Lift Trampoline_ Trampoline
User Manual: Pdf Lift Trampoline_
Open the PDF directly: View PDF ![]() .
.
Page Count: 20
ASSEMBLY MANUAL
SAFETY INFORMATION, INSTALLATION, CARE AND MAINTENANCE INSTRUCTIONS.
READ PRIOR TO ASSEMBLING AND USING THE TRAMPOLINE.
ATTENTION!
Lift

2

Contents
Read and follow all instructions in this manual before
using your trampoline, and do not use the trampoline in
any way that is not described in this manual.
Responsibility rests with the owner and supervisors of
the trampoline to make sure that all users are aware of
the practices specified in this manual.
1.0. Disclaimer
2.0. Care and Maintenance
2.1. General care
2.2. Rust and corrosion
2.3. Textile deterioration
2.4. Weather care
2.5. Relocation
2.6. Inspection checklist
3.0. Usage and Behaviour
3.1. Safe use information
3.2. Safe use instructions
3.3. Basic trampolining instructions
4.0. HexVex™ Games
5.0. Installation
5.1. Location planning
5.2. Parts checklist
5.3. Assembly instructions
6.0. Product registration
7.0. Half-price replacement parts
8.0. Warranty
8.1. Warranty periods
8.2. Inclusions
8.3. Exclusions
8.4. Warranty Claims
8.5. Australian Consumer Law
9.0. Missing parts
4
5
5
5
5
5
5
6
6
6
7
7
8
9
9
9
10
16
15
16
16
16
17
17
18
18

4
The following Conditions of Sale will apply to, and bind the
purchaser of, any Vuly Trampolines Pty. Ltd. ABN: 91 160 793
706 product.
NOTICE TO USER:
Please read this agreement carefully before purchase or
assembly. By purchasing, opening and assembling this
product you acknowledge that you have read this agreement,
understand it and agree to be bound by its conditions. If you
are making a purchase on behalf of another person, you
agree that you are making the purchase as their agent.
LEGAL RIGHTS – PLEASE READ:
EXCLUSION OF LIABILITY – WAIVER OF RIGHT TO SUE –
YOUR ASSUMPTION OF RISK – THESE CONDITIONS AFFECT
YOUR LEGAL RIGHTS.
Vuly Trampolines Pty. Ltd. ABN: 91 160 793 706 (“Vuly”), as
supplier of trampolines and accessories (“Products”), sells
all Products subject to the following conditions:
1. To the maximum extent permitted by the law, Vuly, its
employees, directors and agents will not be liable to
the customer, their dependents or legal representatives
for damage to property, personal injury or death
suffered by the customer because the Product was not
manufactured or supplied with due care and skill, the
Product is not reasonably fit for its purpose or because
of negligence, breach of contract, breach of statute or
breach of statutory duty by Vuly.
2. Vuly, its employees, directors and agents are not liable to
the customer, their dependents or legal representatives
for personal injury or death suffered by the customer
because the Product was not:
a. installed in accordance with the Vuly instruction
manual. It is the customer’s responsibility to check all
boxes to confirm that all components are included
and in the correct condition before assembly.
b. installed with due care and skill, by a the customer
or a third party assembly service; and
c. in the same condition as when the Product was
supplied, due to wear and tear – including, but not
limited to, weather damage, deterioration of the net,
spring stretch, UV deterioration or rust.
3. The customer acknowledges that using the Product can
be dangerous, with inherent risks and hazards. As a
consequence, personal injury or death may occur. The
customer assumes and accepts all such risks, and hereby
– to the full extent permitted by law – waives the right of
action against, and fully releases Vuly for, loss, damages,
personal injury or death in any way caused by, or
relating to, the customer’s participation in such activities.
This includes – without limitation – liability for any
negligent or tortuous acts or omission, breach of duty,
breach of contract or breach of statutory duty on the
part of Vuly, its office bearers, directors, employees or
agents.
1.0. Disclaimer
RISK WARNING:
The use of the Product involves a significant risk of participants suffering personal injury including the possibility of serious
injuries, permanent disability or death. All participants who engage in activities with the Product do so at their own risk.

5
2.1. General care
• Inspect before and after each use. It is essential that you
replace any worn, defective or missing parts immediately
and only through Vuly.
- See the ‘Inspection checklist’.
• Ensure that the Safety Net (and Safety Pad, if applicable)
is always correctly attached and in good condition.
- Replace the Safety Net every 1 year.
• Keep away objects that could damage textile components.
• Ensure that moving metal components remain well
lubricated.
• Use only Vuly-made accessories.
• Use only parts that are recommended by the manufacturer.
2.2. Rust and corrosion
• Be aware of areas that are particularly prone to rusting:
- Places where water is easily trapped.
- Hollow sections of steel (which can appear in good
condition on the outside, while hiding rust on the
inside).
- Sections where different metal components join
together.
• Inspect the inside of all Frame Tubes and Net Poles every
6 months – as well as after rain – and remove any water
from the inside surfaces.
• Check Frame Tube and Net Pole connection areas for
rust.
• Use general-purpose grease on steel connection areas.
• Avoid cleaning steel components excessively; it may
reduce the effectiveness of our protective coatings.
2.3. Textile deterioration
• Clean your Jump Mat with a soft sponge only to avoid
prematurely wearing the textiles.
• Avoid using powerful soaps or detergents; they can
damage the textiles.
• Wipe dry with an absorbent cloth any water left after rain,
cleaning or use of the Vuly Mister accessory. The mat may
discolour or form spots, if left to dry in the sun.
• Inspect the inside of your Safety Pad (if applicable) regularly,
and remove any water through the drainage holes.
Improper maintenance or lack of care can lead to your
trampoline deteriorating earlier than expected. Please
follow these care instructions to ensure that your trampoline
lasts for as long as possible.
2.0. Care and Maintenance
Record your date of purchase here:
/ /
• Remove textile parts, and store them – in their original
packaging – in a cool, dry and dark place when the
trampoline will be unused for over 1 month. Prolonged
exposure to UV sunlight can shorten the lifespan of the
safety net.
2.4. Weather care
Components of this trampoline are susceptible to
deterioration from use and environmental conditions – such
as sunlight, rain, salt and heat, to varying degrees.
If your trampoline will be unused for any extended period,
disassemble it, return it to its original packaging and store it
in a dry place.
RAIN: Remove any fallen debris on your trampoline
after rain. Wipe off residual water with a dry cloth;
moisture left on the trampoline may contribute to the
corrosion of steel components and weaken textiles.
WIND: Disconnect the Safety Net from the Net Poles,
and cover the Safety Net and Jump Mat with a storm
cover.
COLD: Disassemble your trampoline.
HEAT: Move your trampoline to where it will receive
the most shade during the brightest times of the day.
Cover when not in use to minimise UV damage.
2.5. Relocation
• Move the trampoline with a minimum of 8 adults, to ensure
that the lift is within heavy lifting regulations.
• Move the trampoline short distances using Vuly’s official
Wheels accessory, if your trampoline model supports it.
• Do not drag the trampoline. Joiner Poles and Frame Tubes
may bend or warp if insufficiently lifted.
• Avoid tilting the trampoline or resting it on its side; the
frame may bend under its own weight.
• Disassemble the trampoline, and return it to its original
packaging, to transport it over long distances.
COMPONENTS WILL DETERIORATE OVER TIME.

6
Improper use of, or behaviour on, your trampoline can lead
to serious injury. Please follow these usage and behaviour
instructions to ensure safe play.
3.1. Safe use information
Trampolines are great fun, encourage the development of
gross motor skills; provide opportunities for physical activity
and present users with manageable challenges to find
and test their limits. However, like many physical activities,
trampoline use involves potential risk of injury, particularly if
the equipment is used improperly.
Injury surveillance and hospital admissions data show
that trampolines feature frequently in injury presentations
and admissions. Children under 14 years of age account
for about 90% of all trampoline-related injuries. 28% of the
trampoline-related injuries were sustained by children under
five years of age and more than a third of the injuries related
to multi-users. (Victorian Injury Surveillance Unit—Hazard 75,
Autumn 2013, pg. 3.)
The following points are important to note:
• Injury data indicates that people can be severely injured if
they land on an unprotected trampoline frame or springs
or if they fall from the trampoline. Impact attenuation
systems, such as pads, are intended to minimise the risk
of injury and enclosures are intended to stop people
falling off the trampoline.
• Ensure that your enclosure is attached to the trampoline
before use.
• The risk of injury increases when more than one person
at a time bounces on a trampoline. Smaller children are
at increased risk when jumping with adults and/or larger
children, for example, a ‘double bounce’ dramatically
increases the energy transferred to the smaller body
and children’s legs have been broken and severe spinal
injuries have occurred as a result.
• Ensure that only one person at a time bounces on the
trampoline
• Children are often unable to identify hazards and do not
have a well-developed ability to assess risk and may, if
left unsupervised, be at more risk of injury.
• Always supervise children while they are using the
trampoline
• Overconfidence can lead to injury.
• Learn fundamental bounces first before trying more
complex manoeuvres.
• Inappropriate clothing can cause injury.
3.0. Usage and Behaviour
Frame
Bending, cracking, twisting or breakage of the Frame Tubes
Rust spots
Sharp protrusions
Safety Padding
Missing, improperly positioned or insecurely attached
Safety Padding
Punctures, frays, tears or holes in the Safety Padding
Deterioration of the stitching or fabric of the Safety
Padding and / or its securing system
Damaged or degraded Safety Padding
Springs
Missing, broken or damaged springs
Jump mat
Punctures, frays, tears or holes in the bed or the edge system
Deterioration in the stitching or fabric of the bed or
edge system
Sagging fabric
Sharp protrusions in the suspension system elements
Broken mat connector plastics
Rusting, damaged or bent mat connector steel
Safety net
Missing, improperly positioned or insecurely attached
enclosure barrier
Punctures, frays, tears or holes in the enclosure barrier or
connectors
Deterioration in the stitching or fabric of the enclosure
barrier or connectors
Sagging of the enclosure barrier
Broken or damaged enclosure entry system
Net poles
Missing, improperly positioned or insecurely attached:
A. Net Pole supports B. Net Pole caps
Bending, cracking, twisting or breakage of the Net Pole supports
Rust spots on the Net Pole supports
Sharp protrusions from the Net Pole supports
2.6. Inspection checklist
Use this checklist to inspect your trampoline before each
use. Replace any worn, defective, or missing parts to avoid
potential hazards.
If you discover any safety issues, do not use the trampoline.
Contact Vuly to order and replace any parts.

7
to always climb on and off the trampoline, and never
jump or bounce off. It is dangerous practice to jump or
bounce from the trampoline when dismounting. Never
use springs or suspension elements as ‘hand grips’
when getting on and off the trampoline.
• Learn fundamental bounces and body positions
thoroughly before trying more advanced manoeuvres.
A variety of trampoline activities can be carried out by
performing the basic fundamentals in various series and
combinations, or performing one fundamental bounce
after the other, with or without bounces between them.
• For further information or additional instructional
material, contact Vuly or an authorised retailer. To learn
more advanced trampolining skills, contact a suitable
gymnastics / trampoline club.
3.3. Basic trampolining instructions
This trampoline is a domestic trampoline, not a gymnastics
trampoline. You will get the safest and best use from it by
following these basic principles:
• Do not attempt or allow somersaults on the trampoline.
Landing on your head or neck while doing somersaults
can cause serious injury, paralysis or even death.
• Do not use the trampoline when wet. The mat will be
slippery and make landing less secure.
• Enclosure systems are designed to prevent users falling
off the trampoline. Do not allow users to intentionally
bounce towards or off the barrier, as this can unbalance
the trampoline and continual impact may damage the
enclosure.
• Do not use a trampoline while under the influence of
alcohol or drugs. Balance, perception and assessment of
risk will be affected and may lead to injury.
• Do not use the trampoline as a springboard to other
objects. Use the trampoline only for trampoline-style
bouncing.
• Focus your eyes on the edge of the trampoline. This will
help control your bounce.
• Stop your bounce by flexing your knees as your feet come
in contact with the trampoline bed. Learn this skill before
you attempt any others.
• Avoid bouncing too high. Stay low until you can control
your bounce and repeatedly land in the centre of the
trampoline.
• Do not bounce immediately after a meal.
• Clothing should allow plenty of body movement without
flapping loosely and becoming a distraction to the jumper.
• Wear clothing free of drawstrings, hooks, loops or anything
that could get caught while using the trampoline and
result in entanglement or strangulation. Buckles, jewellery
and belts should not be worn, as these may damage
the trampoline mat or cause injury to the jumper if they
become caught in the fabric of the trampoline.
• Should should be removed as they may damage the bed
and increase the risk of injury.
Better design, good construction and improved safety
features go a long way towards minimising the hazards
associated with trampoline use; however, trampolines need
to be used, cared for and maintained appropriately to
ensure the benefits of these features continue throughout the
lift of the product.
3.2. Safe use instructions
• To reduce the risk of injury while using the trampoline,
develop household rules – such as the following:
• Do not allow children under 6 on the trampoline.
• Allow only one person on the trampoline at any one
time.
• Active, competent supervision is essential – always
supervise children while they are using the trampoline.
• Ensure that any pads (where they are required) covering
the frame / suspension system are securely attached at
all times.
• Ensure that the enclosure is securely attached and in
good condition at all times.
• Check the trampoline before use and ensure that it is in
good condition. Replace any worn or broken parts. Use
only parts that are produced by Vuly.
• Make sure that the area around, underneath and above
the trampoline is clear of objects that could interfere
with the person jumping. Do not allow children, pets,
toys or other play equipment to be present under the
trampoline.
• Adults should model safe use of trampolines when
children are present.
• Wear comfortable clothing that won’t become
entangled in the trampoline’s components and become
a strangulation hazard. Do not wear jewellery or
drawstrings / cords that can catch on the trampoline
and create a strangulation hazard. Remove shoes, as
they may damage the bed and increase the risk of injury.
• Children should be educated by responsible adults

8
Match-up
The first player starts in the middle of the Jump Mat, and
begins the game by picking an icon and jumping onto it.
They then jump to the other, matching icon. That player
continues this process, choosing and matching up all nine
icons to complete one round. A miss-matched jump ends
their turn in the game.
The winner is the first person to complete three consecutive
rounds of matched icons!
Players: 2
Players: 2 or more (in pairs) Players: 4 - 5 S or M sizes | 6 – L or XL sizes
Players: 2-3
Story Hop
The first player starts in the middle of the Jump Mat, and
begins the game by jumping on any icon, and shouting a
part of a story that relates to that icon. That player then
continues the story by jumping on the remaining icons to tell
a complete story. The other players then take their turns by
doing the same.
The winner is the player who achieves the most laughs with
their story from all the other players!
Musical Icons
by Donna and Hayley Shaw, winners of Create-a-HexVex™ Game.
Each player hops into the trampoline and puts on a blindfold.
The supervising parent then plays some music, and each
player crawls around on the HexVex™ Game Mat, wiggling
and dancing until the referee stops the music. When they
do, each player must sit up on their knees and lift up their
blindfold to see if both of their knees are on a HexVex™ icon.
If they’re not, that player is out.
The winner is the last player left wiggling!
Mimic Me!
The first player starts in the middle of the Jump Mat, with
their partner standing outside the trampoline. The partner
writes down the names of all the HexVex™ icons (in an order
of their choosing). They begin the game by calling out each
icon name, and the bouncer must jump onto them.
Once the partner has called all of the icons, the bouncer
must try to do the sequence again from memory. If they get
it wrong, they end their turn and trade places.
The winner is the first player to fully mimic a sequence from
memory!
HexVex™ players
A trampoline should be used by one person at a time. Some
HexVex™ require more than 1 person to play.
For each of these games that requires bouncing, a player
should climb off the trampoline to allow the next player to
have their turn. For those games that do not require standing
or bouncing, exercise caution while playing.
HexVex™ is a unique, interactive game printed right on your
Jump Mat! Originally based on ‘Add-ons’ – a training tool
used by elite trampolinists to improve their coordination and
reaction time – HexVex™ helps jumpers to improve their
balance and enhance their memory and learn sequence.
Invent new games with HexVex™, and tell Vuly to have them
published for everyone to enjoy!
4.0. HexVex™ Games
9
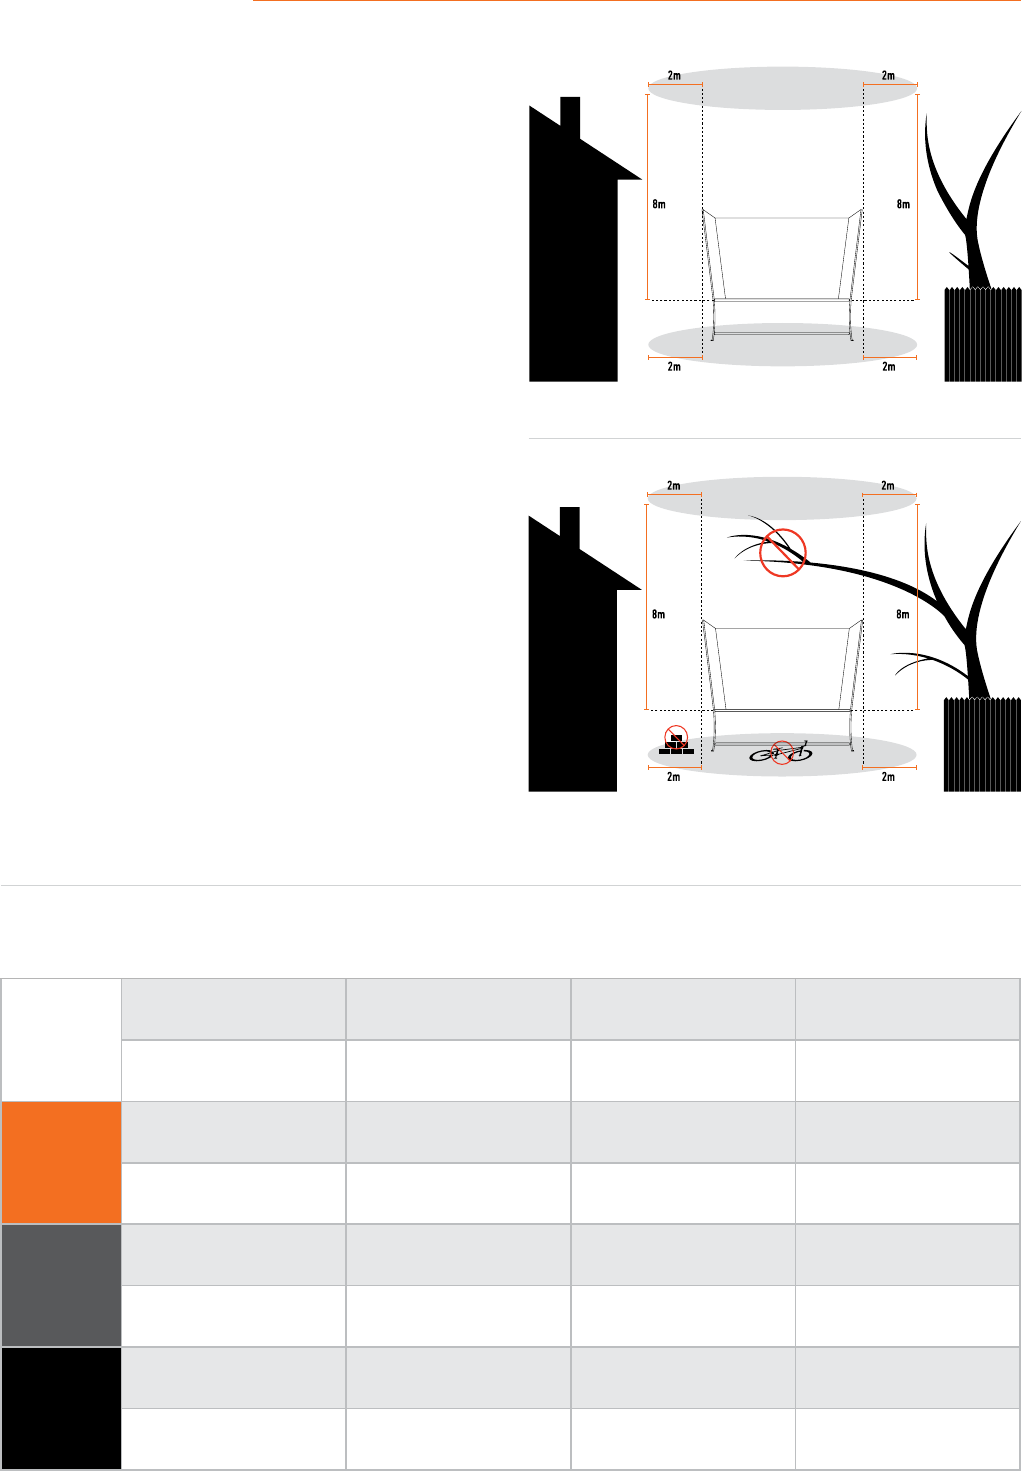
5.0. Installation
5.1. Location planning
• Place the trampoline on a flat, level surface with impact attenuating
properties – such as grass.
• Ensure that the trampoline is sufficiently stable, to prevent the
trampoline from tipping over or blowing away. Sandbags or pegs
may be suitable anchorage devices.
• Keep a minimum of 8 m overhead clearance, when measured
from the bed height, to prevent users from inadvertently contacting
overhead hazards – such as electric wires, tree limbs and clotheslines.
• Maintain a minimum clearance of 2 m on all sides of the trampoline.
This area should not include concrete, bitumen, brick or other hard
surfaces, as these can cause serious injuries if users fall off the
trampoline.
• Do not locate the trampoline on top of other objects or store anything
underneath the trampoline bed.
• Keep the area around and underneath the trampoline clear. Place
the trampoline away from walls, structures, fences and other play
areas.
• Place the trampoline in a well-lit area.
Correct Installation
Incorrect Installation
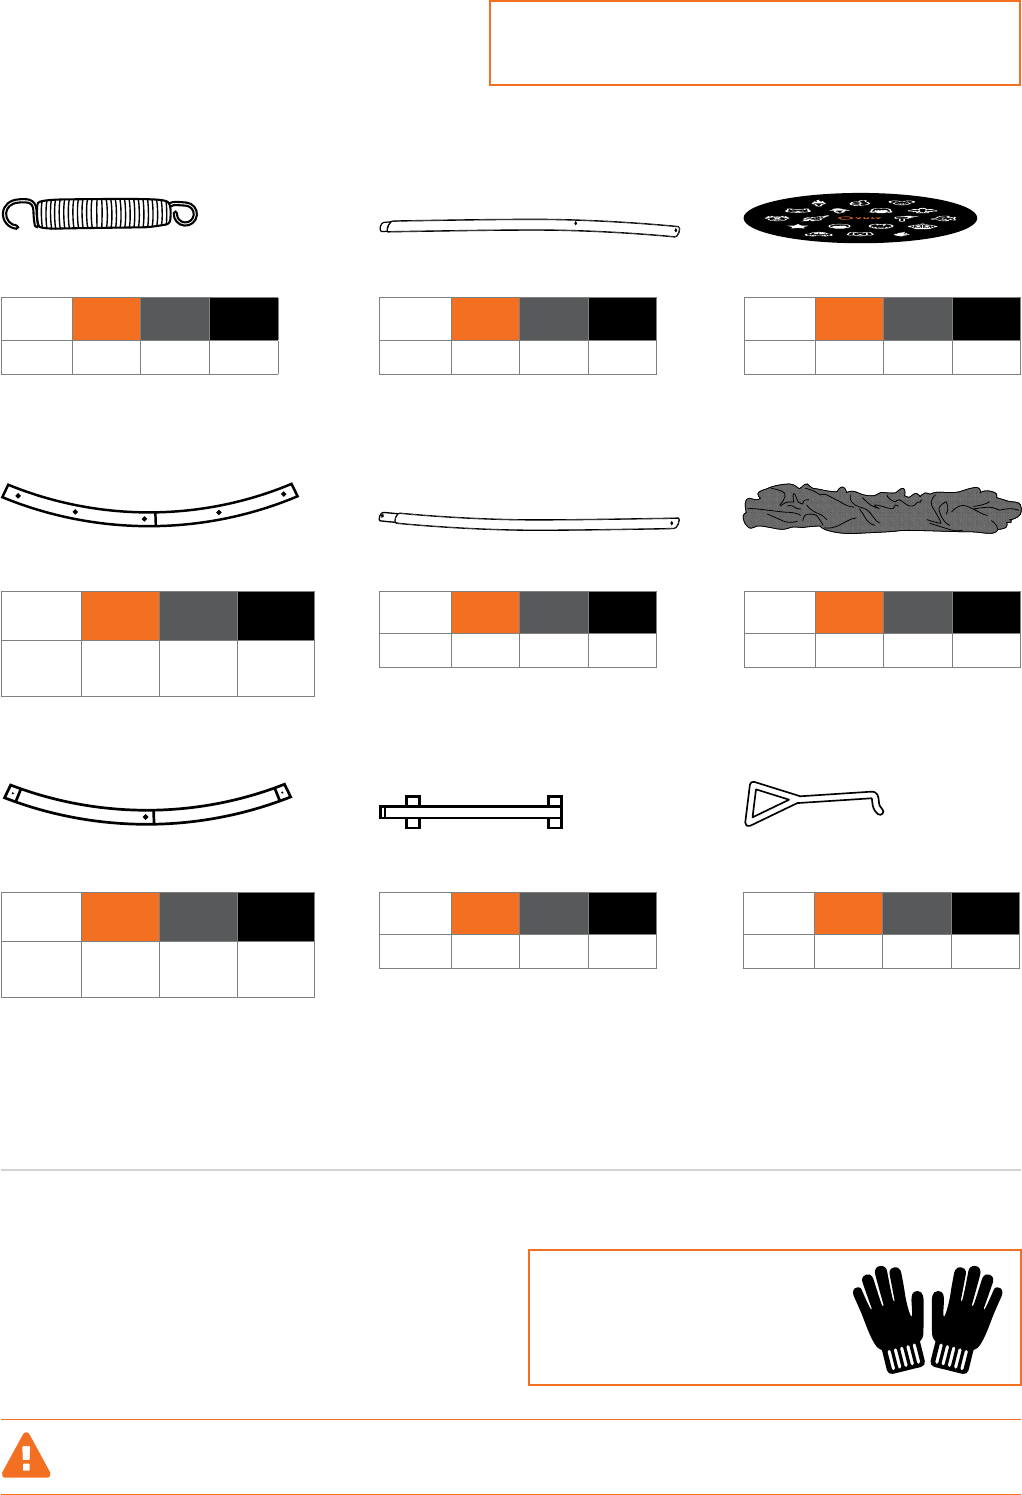
5.2. Parts checklist
S
1x BOX A
(L) 1200mm (W) 470mm (H) 245mm
1x BOX B
(L) 1140mm (W) 385mm (H) 215mm
Frame tubes, Springs, Safety
pad, Jump mat
Net poles, Joiner poles,
Safety net
M
1x BOX A
(L) 760mm (W) 390mm (H) 460mm
1x BOX B
(L) 1000mm (W) 470mm (H) 165mm
1x BOX C
(L) 1140mm (W) 280mm (H) 240mm
Frame tubes,
Safety pad Joiner poles, Springs Net poles, Safety net,
Jump mat
L
1x BOX A
(L) 800mm (W) 425mm (H) 180mm
1x BOX B
(L) 1000mm (W) 415mm (H) 225mm
1x BOX C
(L) 1140mm (W) 300mm (H) 200mm
1x BOX D
(L) 760mm (W) 360mm (H) 400mm
Frame tubes Joiner poles, Jump mat Net poles, Safety net Safety pad, Springs
XL
1x BOX A
(L) 870mm (W) 460mm (H) 410mm
1x BOX B
(L) 800mm (W) 330mm (H) 220mm
1x BOX C
(L) 1140mm (W) 310mm (H) 205mm
1x BOX D
(L) 1000mm (W) 500mm (H) 215mm
Upper frame tubes,
Safety pad Lower frame tubes, Springs Net poles, Safety net Joiner poles,
Jump mat
10
SM L XL
6 7 8 9
SM L XL
48 63 72 90
SM L XL
1 1 1 1
SM L XL
1 1 1 1
SM L XL
1 1 1 1
SM L XL
6 7 8 9
SM L XL
6 7 8 9
SM L XL
614
(7xA, 7xB)
16
(8xA, 8xB)
18
(9xA, 9xB)
SM L XL
614
(7xA, 7xB)
16
(8xA, 8xB)
18
(9xA, 9xB)
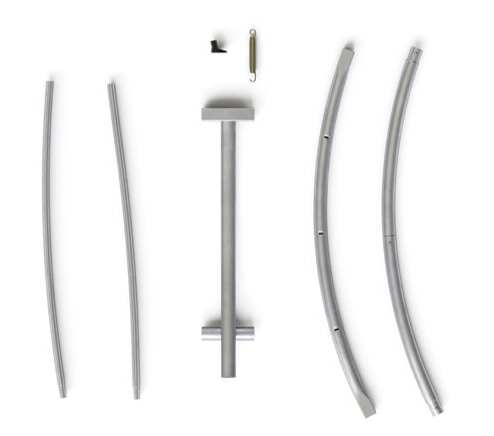
Joiner poles
Springs Jump mat
Safety net
Spring tool
Upper net poles
Lower net poles
Upper frame tubes
Lower frame tubes
VULY LIFT
Check that your trampoline bundle
contains the all of following parts:
TIME REQUIRED FOR ASSEMBLY: 1 HOUR (APPROX).
NUMBER OF PEOPLE REQUIRED FOR ASSEMBLY: 2
5.3. Assembly instructions – Vuly Lift
PRE-ASSEMBLY
• Find level ground, and make sure that there are no
obstructions nearby.
• Check that you have all the parts required for assembly.
Keep the Leaf Spring sleeves on during assembly and over the life of your trampoline. These sleeves provide
crucial protection in the unlikely event of a Leaf Spring breaking.
REMEMBER: WEAR THE VULY
GLOVES AT ALL TIMES WHEN
INSTALLING YOUR TRAMPOLINE.
11
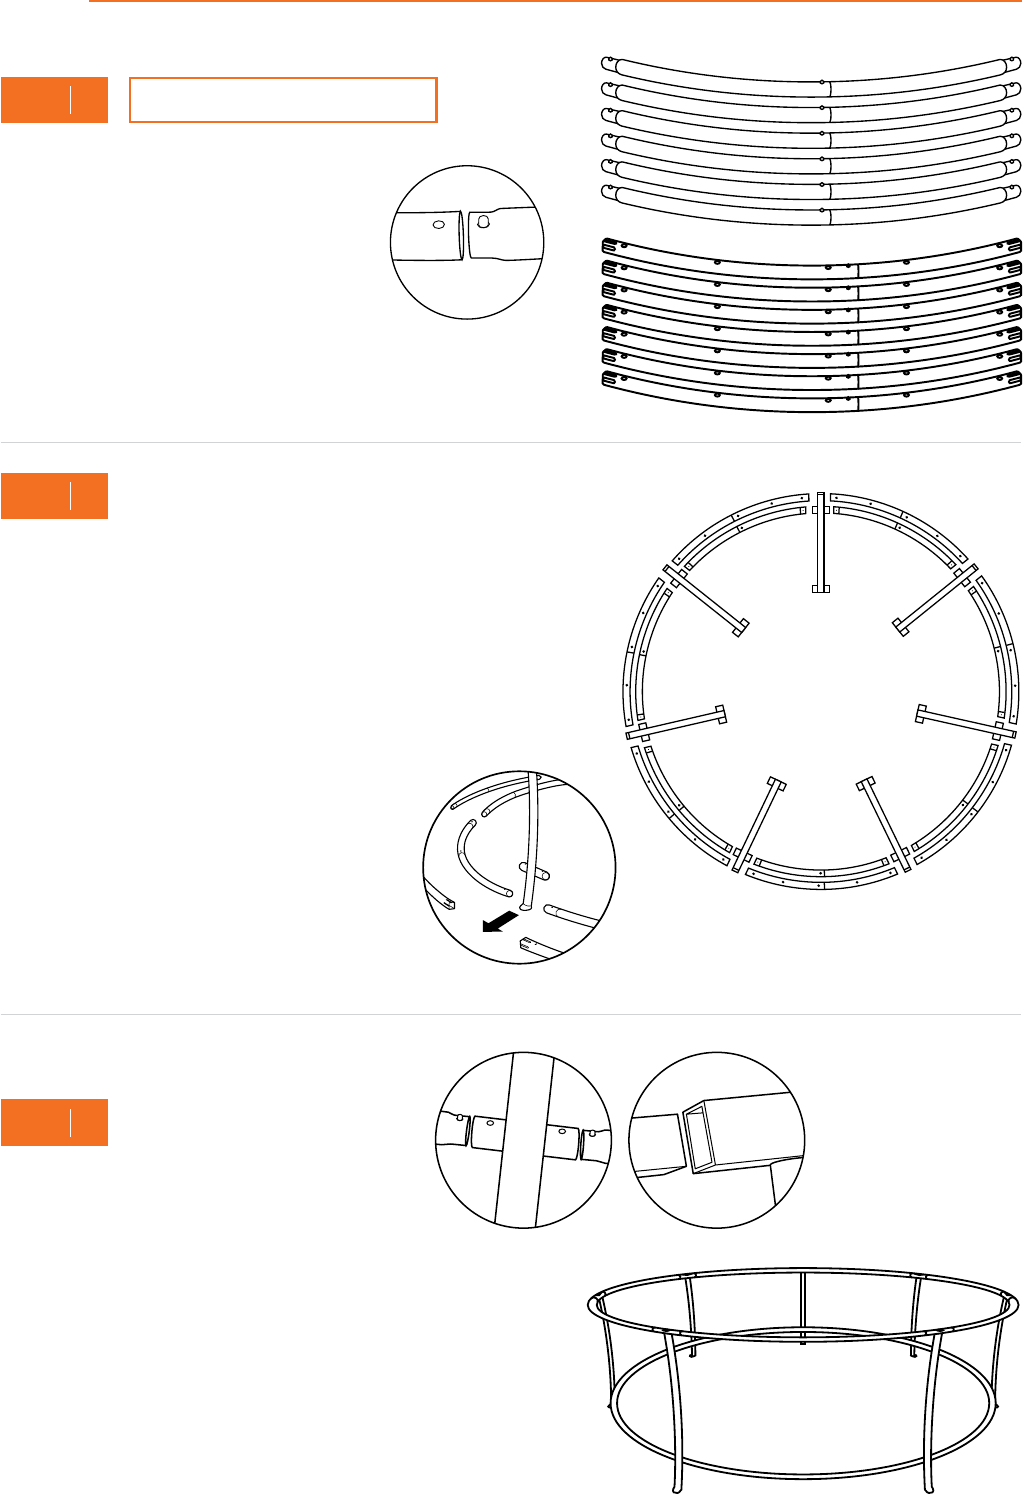
Frame
A. Connect each Lower Frame Tube A to
a Lower Frame Tube B. Lower Frame
Tubes are those without spring holes
or square ends.
B. Connect each Upper Frame Tube A
to an Upper Frame Tube B. Ensure
that the push buttons lock these
components together.
2
STEP
1
STEP
3
STEP
A. Lay out each Lower Frame Tube in a circle. Place the Upper
Frame Tubes around them. Ensure that all push buttons are
on the left-hand side of their middle connection and that all
ends face the same direction.
Note: If all push buttons are not on the left half of the
connected Upper Frame Tubes and the ends of the Lower
Frame Tubes do not face the same direction, the Frame and
Springs will not attach correctly.
B. Position each Joiner Pole in the gaps around
the Frame Tubes.
Note: The feet of the Joiner Poles must face
outwards and the joiner connector inwards.
A. Choose a Joiner Pole. Slide Lower Frame
Tubes into both sides of it and an Upper
Frame Tube on the left side only.
B. Go around your trampoline, connecting the Upper and
Lower Frame Tubes to each Joiner Pole until you complete
the frame. Ensure that all push buttons properly lock.
C. See that your completed frame matches the image.
M, L AND XL MODELS ONLY
A
A
B
B
C
12
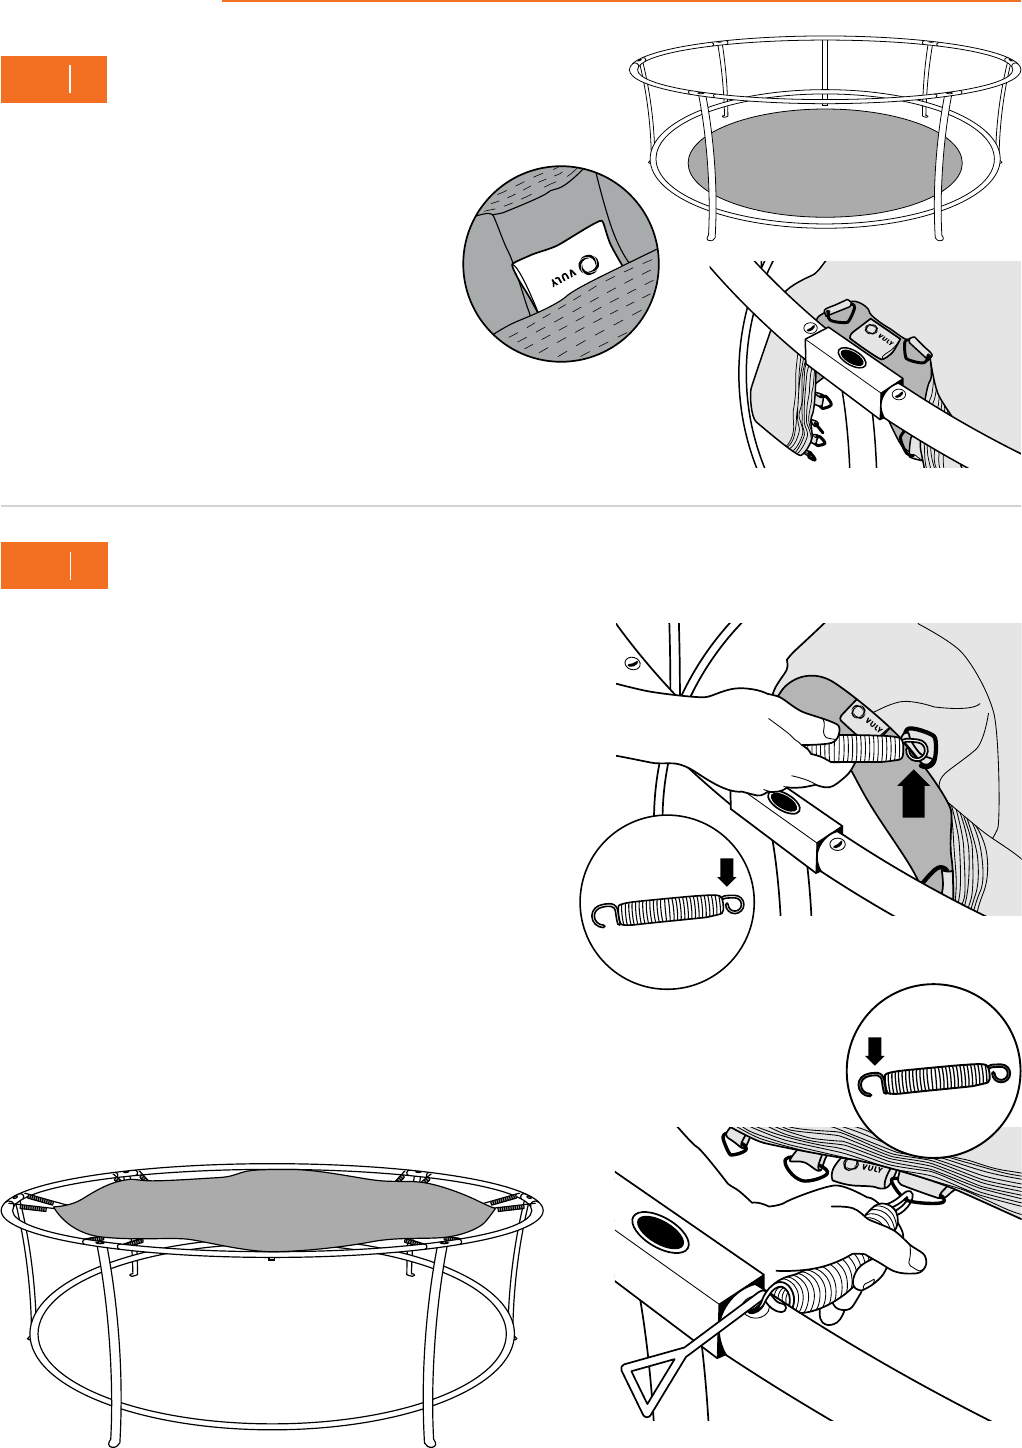
Mat and springs
A. Unravel and lay your trampoline Mat inside
the frame, ensuring that it is flat, with the print
facing upwards.
B. Find the Vuly Batch Tag on the Mat, and rotate
the Mat so that the Batch Tag lines up with a
Joiner Pole.
Note: The net entrance will be between the two Joiner Poles to the right of the Batch Tag.
Rotate your Mat to the desired position, but always ensure that the Batch Tag lines up
with a Joiner Pole. The Vuly logo should be centred between two Joiner Poles.
5
STEP
A. Attach a Spring into the D-shackle that is on the right of the Batch Tag,
and connect it to the Spring hole directly on the right of a Joiner Pole.
Note: You must hook the short ends of the Spring hooks into the
D-shackles on the Mat, and hook the long ends into the Frame.
B. Go to the opposite side of the frame – counting Springs against
D-shackles as you go – and connect a Spring to the right of the
opposite Joiner Pole to its corresponding D-shackle.
Tip: Hooking the Spring to the Mat and pulling back to the Frame
is the easiest connection method. Alternatively, use the Spring tool
to pull and connect the Springs from the Mat to the Frame.
C. Repeat for each Spring and D-shackle to the right of every Joiner
Pole. Then, repeat for each Spring to the left of each Joiner Pole.
B
C
A
4
STEP
13
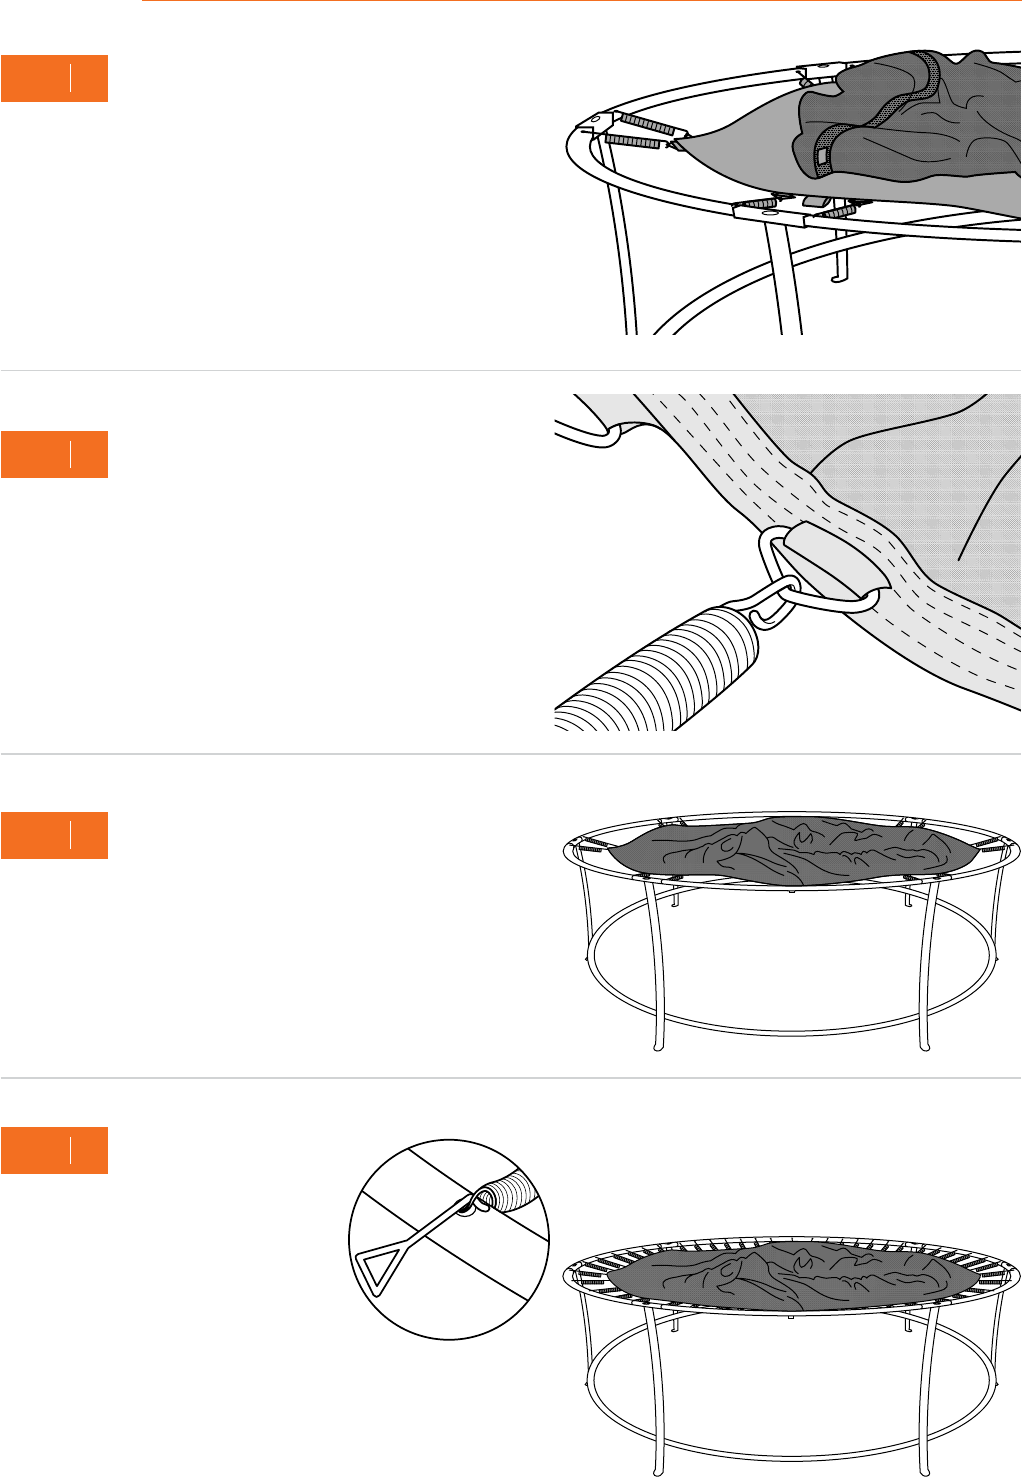
Safety Net
A. Unravel your Safety Net and lay it atop your trampoline mat.
B. Find the the Vuly Batch Tag on the Safety Net, and rotate the
Net so that this Batch Tag lines it up with the one on the Mat.
Ensure that the PP belts on the Safety Net are on the outside
and that they also line up with the Joiner Poles.
7
STEP
A. Unhook the D-shackle to the right of the Batch Tag. Slip it
through the net connector hole to the right of the PP belt,
before re-attaching it to the Net and Frame. Do the same for
the D-shackle to the left of the Batch Tag.
B. Repeat for each Spring and D-shackle to either side of
every Joiner Pole.
Make your way around the Frame, slipping all D-shackles
through their corresponding net connector holes.
Go around your trampoline, attaching
one Spring per Frame section to the
Mat and pulling it into the Spring
holes on the Frame. Ensure that the
D-Shackles remain slipped through the
net connector holes as you do so.
Remember: Spring holes alternate
between atop and beneath the Upper
Frame.
6
STEP
8
STEP
9
STEP
14
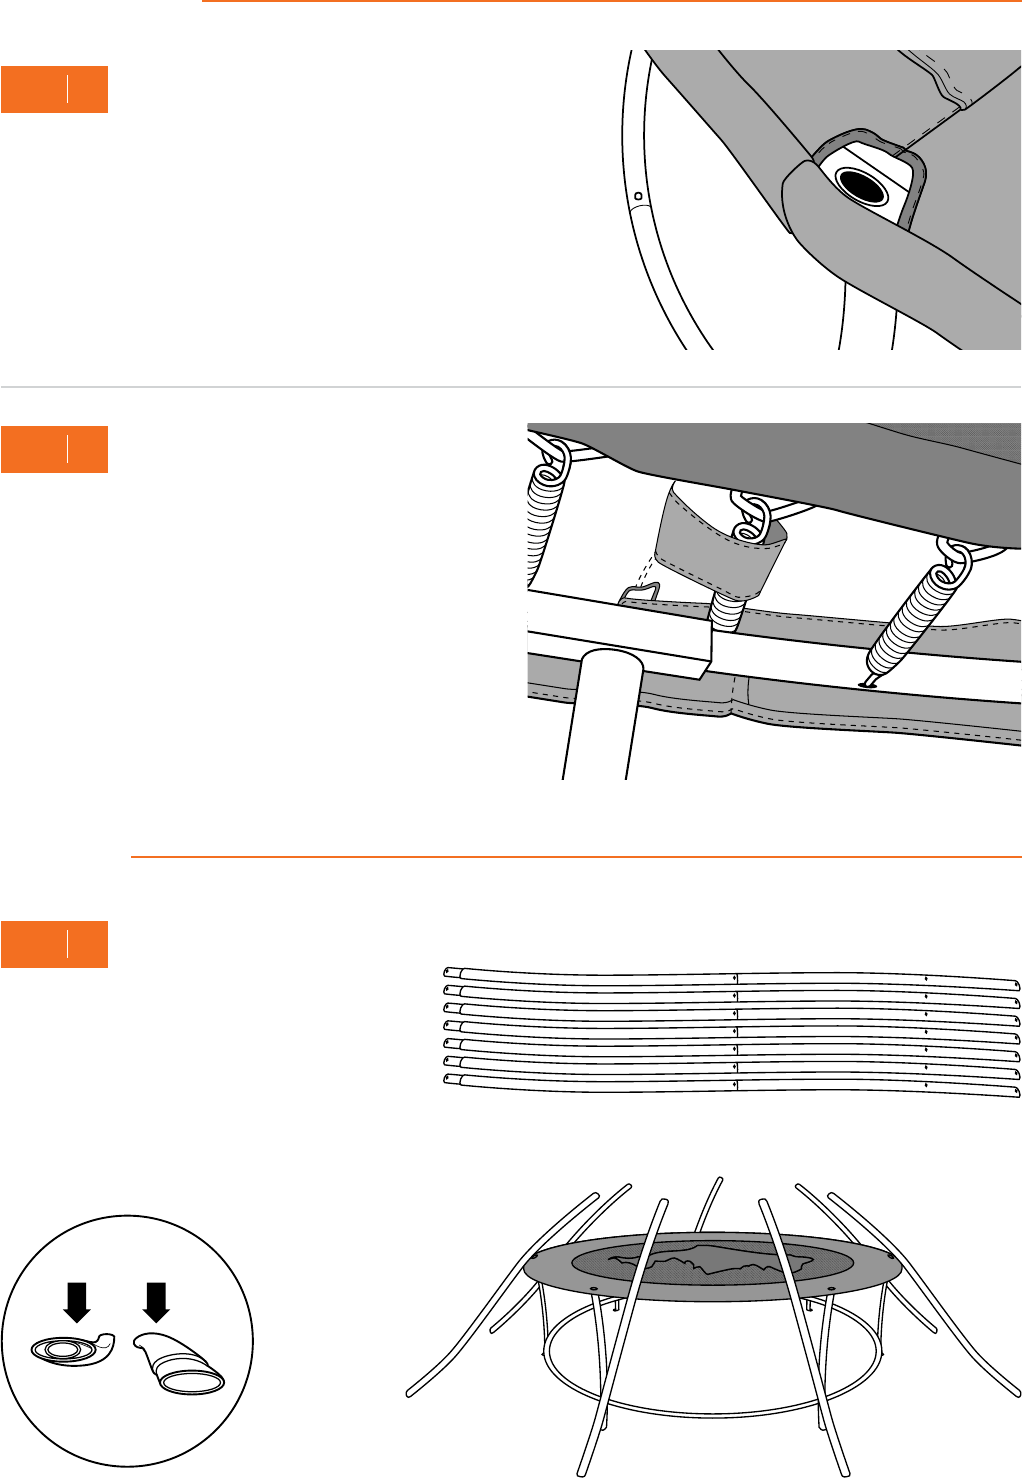
A. Lift up the Safety Padding, and completely remove the
Spring to the left of a Joiner Pole. Feed the Spring through
the loop on the Safety Padding, before re-hooking it to the
Mat and Frame.
B. Repeat for each Spring and loop in the Safety Padding to
the left of every Joiner Pole.
Remember: Ensure that the Safety Padding is correctly attached
and secured. Properly installed Safety Padding is crucial to
protect against injuries.
A. Insert each Upper Net Pole into each
Lower Net Pole. The Lower Net Pole is
reinforced at the bottom.
B. Rest the completed Net Poles against
the frame at each Joiner Pole.
Safety Padding
Net poles
Place the Safety Padding onto the Mat and Safety Net. Unfold
and position it to cover the Springs. Ensure that all openings in
the Safety Padding are over the Net Pole holes in the Joiner
Poles and that the Vuly logo lines up with the entrance.
11
STEP
12
STEP
10
STEP
A
B

15
A. Insert each Net Pole Plug into
every Upper Net Pole. Ensure
that the materials are not
twisted and that the Upper Net
Pole is facing outwards.
A. Lift the Net Pole, raising the net at the same time.
Insert it into the Joiner Pole through the holes in the
Padding.
B. Repeat for each Net Pole until you have completely
erected the Safety Net.
Remember: Ensure that the Safety Net is correctly
assembled. A properly installed Safety Net is crucial to
protect against injuries.
13
STEP
14
STEP
AB
You have finished assembling your Lift trampoline.
CONGRATULATIONS!
WARNING: Make sure that all push buttons are locked and secured before using your trampoline.
Bouncing on a trampoline with push buttons that are not locked will cause damage and injury.
16
To access the Half-Price Parts for Life programme or to lodge
a Warranty Claim, customers must ensure that their Vuly
product is registered with Vuly.
Whether the customer purchased their Vuly product through
Vuly’s website, at the Brisbane showroom, over the phone
or through an authorised resellers, they must register their
product by visitng www.vulyplay.com/support and completing
the form with a proof of purchase.
All Vuly products are sold with a manufacturing warranty,
which assure that the item is free of defects in workmanship
and materials (“warranty”).
Vuly offers the longest and most extensive warranties in
the market on all our trampoline models. We provide
comprehensive after-sales service, which we believe
encourages the customer to purchase a Vuly trampoline
instead of those of our competitors.
8.1. Warranty periods
Warranty periods do not reset for any reason, unless
the customer purchases a new product. In this case, that
particular item will be covered by its own warranty period. It
does not affect – nor will it increase – warranty periods for
other purchased items.
Warranty periods always commence from the date of item
delivery.
This warranty is for use under normal conditions, and it
applies for:
Trampolines
• 120 months [10 years] to the Frame Tubes and Joiner
Poles.
• 60 months [5 years] to the Springs (excluding Leaf
Springs), and Jump Mat (excluding the print).
• 12 months [1 year] to all other parts of a purchased
trampoline – e.g. Safety Pad, Safety Net, Net Poles and
Leaf Springs.
Accessories
• 12 months [1 year] to purchased accessories – e.g.
Mister, Deck – not received during a promotional period.
• 3 months to any items received at no cost as part of a
promotion – e.g. ‘Free Shade Cover’.
The customer may extend the standard 12-month [1 year]
warranty to 36 months [3 years], if they purchase an extended
warranty within 7 days of their delivery date.
8.2. Inclusions
This warranty covers manufacturing faults and defects only.
If a product is damaged or rendered unsafe as a result of
a departure from its design specifications during production,
this constitutes a manufacturing fault or defect.
This may occur if – for example – use of incorrect textiles
during manufacturing causes a Safety Net to disintegrate, or
if improper welding produces an unstable Frame.
Vuly offers half-price replacement parts to all customers for
the lifetime of their trampoline purchase through the Half-
Price Parts for Life programme.
This programme is subject to change at any time, and it
is only available to customers who have purchased either
through an authorised reseller or directly through Vuly.
Half-Price Parts for Life is only available to customers who
wish to replace parts that are core components of their
trampoline. These parts include:
• Springs,
• Leaf Springs,
• Jump Mat,
• Joiner Poles
• Safety Net (and components thereof),
• Net Poles,
• Frame Tubes.
The programme does not extend to accessories or to Tent
components.
6.0. Product registration 8.0. Warranty
7.0. Half-price Replacement Parts
17
8.3. Exclusions
8.3.1. Damage through wear and tear
This warranty does not extend to normal wear and tear of
the product. This may include, but is not limited to:
• Rusting of steel components,
• UV deterioration of textile components,
• Stretching of springs.
As outdoor products that are actively used, trampolines and
their accessories will experience wear and tear over time.
8.3.2. Damage through weather conditions
Damage to the product that results from weather events –
such as rain or wind – are not covered under the warranty.
Vuly suggests that you contact your home and contents
insurer if your trampoline is damaged by such events.
8.3.3. Damage through improper installation
This warranty does not extend to any failure of the product
caused by installation not in accordance with the Vuly Manual.
Customers must assemble their Vuly product by following
carefully the Installation section of their Vuly Manual.
Furthermore, the warranty does not cover installation
provided by a third-party assembly service. It is the
customer’s responsibility to check all boxes and confirm that
all components are included in the correct condition before
installing.
8.3.4. Damage through insufficient care or maintenance
This warranty does not extend to accelerated decay of the
product caused by poor care or maintenance. It is essential
that customers regularly check, and follow the advice of,
the Care and Maintenance sections of their Vuly Manual to
ensure that their product lasts as long as possible.
8.3.5. Damage through inappropriate use
This warranty will be void if the product is used for any other
activity besides those for which it was intended. Vuly products
constitute recreational trampolines and accessories for such
trampolines. They are not intended for use as professional,
gymnastics trampolines, springboards, etc.
Any evidence that inappropriate actions that have led to
product failure will not be covered by the warranty. Similarly,
replacement parts or repairs needed to mend such damage
will not be covered under the warranty.
8.3.6. Personal Injury
The warranty does not cover personal injury or losses due
to any of the above: wear and tear, weather conditions,
inappropriate installation, insufficient care or maintenance
or inappropriate use, nor does it cover damage due to
negligence or accidents.
8.4. Warranty Claims
If a customer believes that a Vuly product is faulty or defective,
they must discontinue use and submit a Warranty Claim.
A customer must not attempt to use a product if any part is
faulty or defective, as it may be dangerous. Any damage
that the user causes as a result of using faulty or defective
products will lead to voiding of the warranty.
8.4.1. Making a Warranty Claim
To fulfil a warranty claim, a customer must submit an online
Warranty Claim at www.vulyplay.com/support.
Submitting the online Warranty Claim form requires the
customer to provide:
• Details of their purchase – including date,
• Batch number,
• Clear photographic evidence of the manufacturing fault
or defect.
If the customer does not provide all details that the form
requires, their Warranty Claim will not be assessed.
Vuly may take up to 7 days to process Warranty Claims upon
a completed submission. It may take a further 7 days for
replacement parts to reach the customer.
8.4.2. Successful Warranty Claims
If Vuly accepts a customer’s Warranty Claim, Vuly will replace
the faulty or defective parts, not offer refunds.
Successful Warranty Claims lodged within 7 days of the
delivery date
Vuly will replace the damaged parts free of charge. Vuly
will also cover any costs associated with shipping the
replacement part.
Successful Warranty Claims lodged after 7 days of the
delivery date
Vuly will replace the damaged parts free of charge. The
customer must cover any costs associated with shipping the
replacement part.
8.4.3. Refunds
In all instances of successful warranty claims, Vuly offers
replacements parts only. Vuly provides refunds only at their
discretion.
18
8.4.4 Claiming on non-Vuly products
Products sold alongside Vuly that are not Vuly-branded
are subject to the warranties provided by the companies
that supply them. The customer must contact these external
companies to make a warranty claim; Vuly itself will not
assess claims made against non-Vuly products.
8.5. Australian Consumer Law
Our Goods come with guarantees that cannot be excluded
under the Australian Consumer Law. You are entitled
to a replacement or refund for a major failure and for
compensation for any other reasonably foreseeable loss or
damage. You are also entitled to have the Goods repaired
or replaced if the Goods fail to be of acceptable quality and
the failure does not amount to a major failure.
If a customer believes that a Vuly product does not include
all necessary parts, they must immediately lodge a Missing
Parts Claim at www.vulyplay.com/support.
A customer must not attempt to use a product if any part is
incomplete, as it may be dangerous. Any damage that the
user causes as a result of using incomplete products will
lead to voiding of the warranty.
Vuly trampolines are delivered to Vuly HQ prepackaged; we
are unable to check the boxes prior to delivery to ensure that
they contain all the required parts. While the missing part
rate during packing is very low, some parts may also fall
out in transit due to small, unintentional tears in their boxes.
9.0. Missing parts
19

See vulyplay.com/terms for the most recent Vuly
warranty policies, terms and conditions.
