The Accidental Administrator: Linux Server Step By Configuration Guide
User Manual: Pdf
Open the PDF directly: View PDF ![]() .
.
Page Count: 254 [warning: Documents this large are best viewed by clicking the View PDF Link!]

The Accidental
Administrator®

The Accidental Administrator®:
Linux Server
Step-by-Step
Configuration Guide
Edition 2.0
by Don R. Crawley, Linux+
Seattle, Washington
www.soundtraining.net
Reasonable attempts have been made to ensure the accuracy of the
information contained in this publication as of the date on which it was
written. This publication is distributed in the hope that it will be helpful,
but with no guarantees. There are no guarantees made as to the accuracy,
reliability, or applicability of this information for any task or purpose
whatsoever.
The author recommends that these procedures be used only as a guide to
configuration of computers and/or devices in a test environment prior to
usage in a production environment. Under no circumstances should these
procedures be used in a live, production environment without first being
tested in a laboratory environment to determine their suitability, their
accuracy, and any security implications.
ISBN: 978-1453689929
Copyright 2014, Don R. Crawley.
All rights reserved.
This is a copyrighted work in which all rights are retained by the author.
You may not copy this work in any form, nor change this work, nor store
this document in a retrieval system, nor distribute or otherwise transmit this
work in any form by any means, electronic, mechanical, photocopying,
recording, or otherwise, without the written prior permission of the
copyright holder. The preceding restrictions apply to this document in
whole or in part.
Trademarks, Registered Trademarks, and Service Marks: This book
identifies and uses product names and services known to be trademarks,
registered trademarks, or service marks of their respective holders. Such
marks are used throughout this book in an editorial fashion only.
Additionally, terms suspected of being trademarks, registered trademarks,
or service marks have been appropriately capitalized, although
soundtraining.net cannot attest to the accuracy of such information. Use of a
term in this book should not be regarded as affecting the validity of any
trademark, registered trademark, or service mark. Neither the author nor

soundtraining.net are associated with any vendor or product mentioned in
this book.
Please do not make illegal copies of this book, either in its entirety or
any portion thereof.
PO Box 48094
Seattle, Washington 98148-0094
United States of America
On the web: www.soundtraining.net
On the phone: (206) 988-5858
Email: info@soundtraining.net
To Janet
“Technology, like art, is a soaring exercise of the human imagination.”
—Daniel Bell
The Winding Passage

Contents
PRELUDE
The Base Config for the Systems in the Book ……… 2
The Revisions in this Edition ……… 3
CHAPTER 1:
Introduction to Linux
Chapter Introduction ……… 7
Chapter Objectives ……… 8
Red Hat and CentOS ……… 9
Installing CentOS Linux Server ……… 9
Minimum Hardware Requirements ……… 9
Which Version of the Operating System Should You Download? ……… 10
Performing the Installation ……… 10
Adding VMWare Tools ……… 20
CHAPTER 2:
Understanding Linux Commands
Introduction ……… 23
Chapter Objectives ……… 23
Some Basic Rules About Linux Commands ……… 24
The Shell ……… 24
Some Commonly Used Linux Commands ……… 26
CHAPTER 3:
Linux User Accounts
Introduction ……… 37
Objectives ……… 37
Understanding /etc/passwd ……… 38
Creating a New User ……… 39
Passwords ……… 39
Default Values ……… 40
Adding Groups ……… 41
Deleting Users ……… 41
Changing Ownership for a File or Directory ……… 41

Adding a User to a Group ……… 42
Viewing Information About the Current User ……… 43
Additional User Management Commands ……… 46
CHAPTER 4:
File and Directory Management
Introduction ……… 47
Objectives ……… 47
Working with File Systems and Mount Points ……… 48
Linux File Types ……… 49
Mounting a Device ……… 51
Understanding /etc/fstab ……… 52
Understanding Mount Points ……… 53
Octal (Numeric) Permissions ……… 56
Setting Default Permissions ……… 59
Disk Configuration Tools ……… 59
CHAPTER 5:
Linux Administration
Introduction ……… 61
Objectives ……… 62
GUI vs. CLI ……… 63
Linux Directories ……… 64
Linux Profiles ……… 65
Administration Tools and Techniques ……… 66
Editing Configuration Files ……… 74
Other Commonly Used Text Editors ……… 75
vim Cheat Sheet ……… 77
Using grep ……… 78
Using the alias Command ……… 80
Making Aliases Persistent ……… 81
Starting and Stopping Services (The Daemons) ……… 83
Linux Compression and Archiving Tools ……… 84
Understanding the Linux Boot Process ……… 86
Run Levels ……… 88

Controlling the Boot Process ……… 89
System Shutdowns and Reboots ……… 92
How to Shut Down the System ……… 92
X Windows ……… 93
Getting Help ……… 93
CHAPTER 6:
Red Hat/CentOS Linux Package Management
Introduction ……… 99
Objectives ……… 99
Using yum to Update Your System ……… 100
Additional Repositories ……… 107
RPM: The RedHat Package Manager ……… 110
CHAPTER 7:
Networking with Red Hat/CentOS Linux
Introduction ……… 115
Objectives ……… 116
Network Administration ……… 117
Installing Networking Tools ……… 118
RHEL/Fedora/CentOS Network Configuration ……… 119
Using ifconfig ……… 123
/etc/resolv.conf ……… 123
DHCP (Dynamic Host Configuration Protocol) ……… 126
CHAPTER 8:
DNS: The Domain Name System
Introduction ……… 131
Objectives ……… 131
Installing BIND DNS ……… 132
Understanding the Fundamentals of DNS ……… 133
Primary, Secondary, and Caching Zones ……… 134
Building Name Servers ……… 134
A Primary DNS Server ……… 136
Creating the Primary Master Zone Database File ……… 137
DNS Resource Records ……… 138

Creating the Secondary Master ……… 142
DNS Tools ……… 143
DNS Resources ……… 145
CHAPTER 9:
Using SSH (Secure Shell)
Introduction ……… 147
Objectives ……… 147
What is SSH? ……… 148
When is SSH Used? ……… 148
How Do I Configure SSH? ……… 148
Transferring Files with scp ……… 149
Transferring Files with SFTP ……… 150
CHAPTER 10:
Linux Security
Introduction ……… 151
Objectives ……… 152
Physical Security ……… 153
Keep the Software Up to Date ……… 153
Employ the Principle of Least Privilege ……… 153
Use Encryption ……… 154
Avoid Non-Secure Protocols ……… 154
Clean Up Your Systems ……… 154
Minimize the Number of Services per System ……… 154
Enforce a Good Password Policy ……… 155
Disable Root Login ……… 155
Disable Unneeded Services ……… 155
Delete X Windows ……… 155
Implement a Firewall ……… 155
Implementing NAT (Network Address Translation) ……… 160
Separate Partitions ……… 161
Block SSH Attacks ……… 161
Perform Security Scans and Audits ……… 162
Using sudo ……… 162

Bypassing sudo ……… 165
Using lastlog ……… 165
Using last ……… 166
Port Scanning ……… 167
Password Recovery (Resetting) ……… 168
Additional Security Tools ……… 170
Develop and Maintain a Good Backup Strategy ……… 171
Summary ……… 172
CHAPTER 11:
Automating Administration Tasks with cron
Introduction ……… 173
Objectives ……… 173
Using cron ……… 174
CHAPTER 12:
Monitoring Your Red Hat/CentOS Linux Server
Introduction ……… 177
Objectives ……… 177
Log Files ……… 178
Viewing Log Files ……… 179
Other Linux Monitoring Tools ……… 180
The sysstat Package of Utilities ……… 185
Network Monitoring Tools ……… 187
CHAPTER 13:
How to Build and Configure a Basic File Server for Windows and Other
Clients
Introduction ……… 189
Objectives ……… 190
Using NFS to Share Files ……… 194
Using rsync to Synchronize Files Between Servers ……… 197
CHAPTER 14:
How to Build and Configure a Basic Web Server
Introduction ……… 201

Objectives ……… 202
Apache Web Server ……… 203
Understanding Apache ……… 204
Creating Content for the Web Site ……… 208
Installing and Configuring an FTP Server ……… 212
CHAPTER 15:
How to Build and Configure a Basic Database Server
and Add a Scripting Language (PHP)
Introduction ……… 215
Objectives ……… 215
Adding a Database Server ……… 216
Adding a Scripting Language ……… 218
PHPMyAdmin ……… 219
CHAPTER 16:
How to Build and Configure a Basic Email Server
Introduction ……… 221
Objectives ……… 221
Some Email Terminology ……… 222
CHAPTER 17:
Remote Administration with Webmin
Introduction ……… 225
Objectives ……… 225
Installing Webmin ……… 226
POSTLUDE
APPENDICES
Appendix A: How to Create a New Virtual Machine in VMWare ………
232
Appendix B: Don’s Online Resources ……… 240
Appendix C: Other Helpful Websites ……… 241
INDEX

Prelude
Writing any book is a huge undertaking. One of the biggest challenges in
writing a technical book such as this lies in deciding what to include. Even
more difficult is the challenge of deciding what to exclude. As you read
through this book, you could well find yourself thinking I should have
included a particular technology or that something I did include is
extraneous. If you do feel that way, please let me know. Post something on
one of my social media channels or send me an email. I love getting
feedback.
I write books and create training workshops based on how I like to learn.
My preference is to learn how to build a simple, working configuration and
then use other resources to learn how to finesse the configuration. In other
words, show me how to build a simple Apache web server and later I can
learn how to add virtual hosts, SSL, or other more advanced configs. That’s
exactly what this book attempts to do. I try to focus on building
configurations and include only enough theory as required to make sense of
the config. I hope this approach works for you. If you want more theory and
more advanced configs, there are plenty of 1000 – 1200 page books
available that do an excellent job of providing that. Oh, and there’s always
Google.
What about support? As an Accidental Administrator®, you might feel a bit
overwhelmed by all the new terminology and strange names in the IT
world. I remember well my first few months in IT. I felt like I was on a
different planet. That was in the days before a ubiquitous Internet, so
support options were limited to books and BBSs. Today, there are many
great forums that provide outstanding support for all flavors of Linux,
including Red Hat and CentOS. I do not provide one-on-one support. I
simply don’t have enough time to do that and still write books, produce
videos, play music, and hang out with my family, so please don’t ask. If you
do, I’ll politely refer you to resources such as linuxquestions.org,
wiki.centos.org/HowTos, or any of the many other excellent Linux support

forums on the Web. There is a fairly lengthy list of Linux support websites
in the appendix at the end of this book. If you feel like you really need one-
on-one support, consider purchasing a copy of Red Hat Enterprise Linux
which comes with varying levels of support, depending on the package you
purchase. (www.redhat.com/apps/store/server/)
The Base Config for the Systems in the Book
I built the configs in this book using CentOS Linux 6.5 running in virtual
machines in VMWare Workstation 10.0.1.
Download the installation ISO image from
http://wiki.centos.org/Download. The instructions and exercises in this
book are based on CentOS Linux version 6.5. Any version whose number
starts with a 6 should be compatible with this book.
I created two VMs: LinuxServer01 and LinuxServer02. In general,
LinuxServer01 has an IP address of 192.168.0.1/24 and LinuxServer02 has
an IP address of 192.168.0.2. When required, I use the domain
soundtraining.local, since my company’s name is soundtraining.net. Feel
free to replace that with whatever you choose. Frankly, as you work through
this book, it will probably be simpler for you to just use the same names as
I have.
LinuxServer01
e0: (Static) 192.168.0.1/24
e1: (DHCP) 192.168.146.132/24
Gateway: (DHCP) 192.168.146.2/24
LinuxServer02
e0: (Static) 192.168.0.2/24
Gateway: 192.168.0.1
Domain: soundtraining.local

DNS servers: (Google Public DNS Servers) 8.8.8.8 and 8.8.4.4
This is a basic network and system configuration for the book. Certain
chapters may require modifications to these configs or even additional
systems, such as a Windows system for testing the Samba config.
Check out the following diagram to see the configuration.
Figure 1: The base network configuration for the book
It will be necessary for you to have Internet connectivity to complete many
of the procedures in this book such as installing and upgrading software.
One of the great things about Linux, whether CentOS or any of the myriad
other flavors, is its flexibility. As long as you’re willing to get under the
hood, do some research, and experiment, there’s almost nothing you can’t
do. So, get ready to do a lot of typing in the command line and have a lot of
fun on your Linux Server journey!
The Revisions in this Edition
This book is a major revision over the previous edition. I’ve learned much
about writing and publishing since it was released and, hopefully, this
edition reflects much of what I’ve learned. I’ve included many more
graphics and step-by-step exercises, I’ve expanded the content considerably
based on feedback from students in my classes and reviewers on Amazon.
(Admittedly, some of the feedback and reviews were, err, more educational
than I might have preferred!) You’ll find much greater coverage of LAMP
servers and a greatly expanded troubleshooting section, among many other
additions, expansions, and improvements.
Oh, and if you find this book helpful, please leave a review, even a short
one, on Amazon. As an independent author and publisher, Amazon reviews
are the main way I can compete with the big publishers.
Acknowledgements
Thanks, as always, to Janet, my wife for her never-ending patience,
understanding, and support. Thanks to Jason Sprenger for making my
books readable and attractive. Ultimately, however, this book is all about
you, the reader. Thank you for purchasing and reading this book.
Special thanks to the following staff members at Group Health Cooperative
in Seattle for their cooperation, patience, and invaluable feedback in sorting
through the exercises in this book: Leslie Aal, John Cook, Shain Hart,
Maurice Jamerson, Steven Lowrimore, Justen Manatt, Stephanie Matthews,
Bobby McKinney, Karen Mercurio, Kim O’Grady, James Rivera, and
Jessica Roberson. Also, thanks to John Sims and Dave Ditzler at Group
Health Cooperative.

CHAPTER 1:
Introduction to Linux
Videos are available for many of the procedures in this chapter at www.soundtraining.net/videos
Chapter Introduction
Technically speaking, Linux is not an operating system, but the kernel of an
operating system. The Linux kernel was developed by Linus Torvalds while
he was a student at the University of Helsinki in Finland. Linux is inspired
by UNIX and bears much similarity to it in terms of commands and
directory structure.
Various organizations package the Linux kernel and offer it to the public as
a distribution, or distro for short. Some of the more common distros include
Red Hat and its variants Fedora and CentOS, SuSE, Gentoo, Ubuntu, Mint,
Debian, and Slackware, just to name a few. You can learn about the many
Linux distros at www.distrowatch.com.
There are many excellent sources of background information on Linux,
including the Linux Foundation at www.linuxfoundation.org. Performing a
Web search on the keyword “Linux” will return millions of results. Since
the purpose of this book is to help you configure a Linux server, I’ll let
others supply the background information, but I encourage you to get
familiar with the fascinating and important stories of Linux, the GNU
project, and the people who were and are involved in open source software.
Chapter Objectives
Complete a CentOS Linux minimal installation
Login to a newly installed server
Enable the network interface
Add VMWare tools
Red Hat and CentOS

Red Hat Enterprise Linux (RHEL) is a popular Linux distribution, available
only through a paid subscription model. RHEL, however, is comprised
largely of software packages distributed under the free software licenses.
The source code for the packages is made available by Red Hat.
CentOS (Community Enterprise Operating System) developers use the
source code from Red Hat to create CentOS, a product very similar to
RHEL. Red Hat’s proprietary branding and logos have been removed, but
otherwise the CentOS product will behave much the same as RHEL.
In January of 2014, Red Hat and the CentOS Project joined forces, which
should further enhance the compatibility of the two operating systems.
This book is based on CentOS. The things you learn in this book and in
other documentation should apply equally to either RHEL or CentOS. Of
course, it’s possible that there may be differences, but I’m not aware of any
substantial differences in configuration between the two.
Installing CentOS Linux Server
The examples in this book are written based on installing CentOS Linux
Server 6.5 in a virtualized environment. I used VMWare Workstation 10
(www.vmware.com). The procedures I’m going to show you should work
in other virtualization environments or in a physical environment. I say
“should” because there’s no way for me to anticipate every possible
environment or configuration.
If you prefer, you can certainly use other virtualization environments such
as VMWare Player, VirtualBox (www.virtualbox.org) or Hyper-V, which is
included with Windows 8 and 8.1 (http://windows.microsoft.com/en-
us/windows-8/hyper-v-run-virtual-machines).
Minimum Hardware Requirements
It’s nearly impossible to give minimum hardware requirements for Linux
installations, because Linux operating systems can be installed on a
tremendous variety of systems. The minimum requirements depend on the
intended use of the system. As with most things related to computers, more

is usually better. Having said that, and knowing that you might be thinking,
“Oh come on, Don. Just give me some minimums!”, here are some very
general guidelines:
RAM: 256 MB
Hard drive: 1 GB
CentOS version 6.x, like many other current versions of Linux, requires a
CPU that supports PAE (Physical Address Extension), a feature that allows
x86 processors to access a physical address space larger than four
gigabytes. If you’re trying to install CentOS on an older system, you may
have to use CentOS 5 instead. Many of the commands and examples will
still work perfectly well with version 5. If your CPU doesn’t support PAE,
the installation process will throw off an error.
I configured my VM for the examples in the book with 1 GB of RAM and a
20 GB hard drive, which should be sufficient for most learning exercises
you’ll perform, either from this book or on your own. Again, it depends on
what you ultimately want to do with your system.
A production system, of course, will usually require much more in terms of
memory and hard disk resources.
Which Version of the Operating System Should You Download?
Visit http://www.centos.org/download/. You can click on the big button to
download the latest X86 64-bit DVD version, but there are lots of other
options. There are a variety of ISOs available to download. Click on the
alternative downloads link and you’ll see what I mean. Once you click
through to a mirror, you’ll see LiveCDs, LiveDVDs, full DVD .iso
downloads (it takes two), minimal .iso downloads, and netinstall .iso
downloads. The live versions are fun because they allow you to boot nearly
any computer from a CD, DVD, or USB thumb drive and play around with
Linux without actually installing it on your computer’s hard drive. I usually
download the minimal version, simply because it’s smaller and faster to

download and I always install software packages and updates from the
Internet. If you have limited Internet connectivity, you might want to go
somewhere with a good Internet connection and download the two full-
version DVDs. The exercises in this book are based on using the minimal
version.
Performing the Installation
I’m going to assume you’ve already downloaded the CentOS 6.5 ISO from
http://wiki.centos.org/Download, that you’ve chosen the appropriate version
(32-bit or 64-bit) for your system architecture, and that you’ve configured
your environment, virtual or physical, for the installation. After all, this is a
server installation for Pete’s sake. Frankly, if you don’t understand how to
do those sorts of things, this book will probably be too advanced for you.
Soundthinking Point:
Which Processor Are You Using?
In the examples, I use a machine with a 64-bit processor. For that reason, you’ll
often see “x86_64” in many of the filenames. If you’re using a system with a 32-
bit processor, you can simply replace x86_64 with i386.
If you’re not sure, use the 32-bit version of the operating system. After you finish
the installation, use the command uname -p to identify your processor.
If you’re new to VMWare Workstation, I’ve included a step-by-step guide
to creating a new virtual machine in Appendix A at the end of this book.
Hands-On Exercise 1.1:
Installing CentOS Linux Server 6.5
Warning: This exercise will completely erase all the files on your
computer’s hard disk. You will not be able to recover any files that are
currently on your computer after you complete this exercise. Do NOT
perform this exercise on a computer whose files you wish to preserve.
1. Configure the VM to boot from the ISO you downloaded. (Alternatively,
you could place the installation media such as a DVD in your host
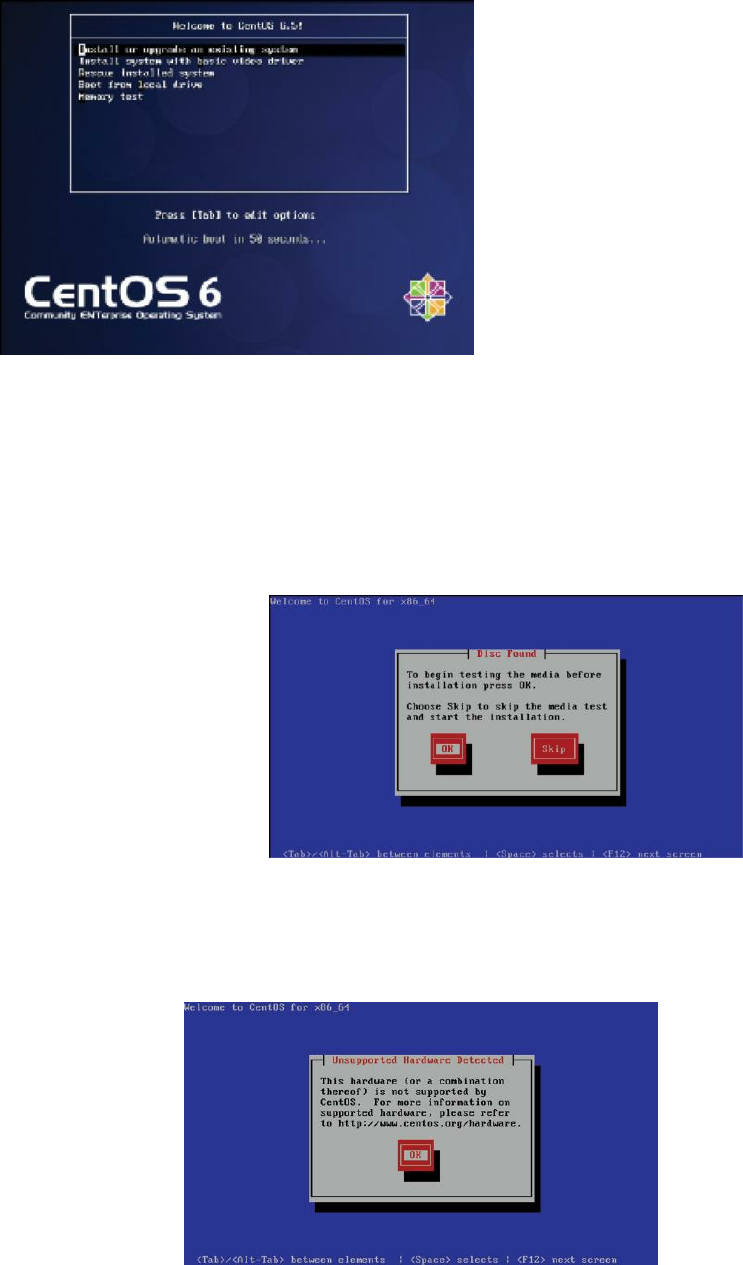
computer’s optical drive and configure your VM to boot from it.) Power
on your system. The welcome screen will appear. Press the Enter key to
accept the default.
Figure 2: The CentOS 6 welcome screen
2. In the next screen, you are presented with the option to test the
installation media before installation. In the real world, this is a good
idea that can save you some frustration in case of a bad DVD. It takes a
while, so for our purposes, I’m going to skip it. Use your arrow key to
select Skip and press the Enter key.
Figure 3: The media check
3. You may encounter an error about non-specific, unsupported hardware. I
have not found this to prevent installation, so press the Enter key and
continue with the installation.
Figure 4: Unsupported hardware warning
4. A CentOS splash screen appears requiring you to click Next. Click Next.
(Don’t you just love screens like this that do nothing, but still require you
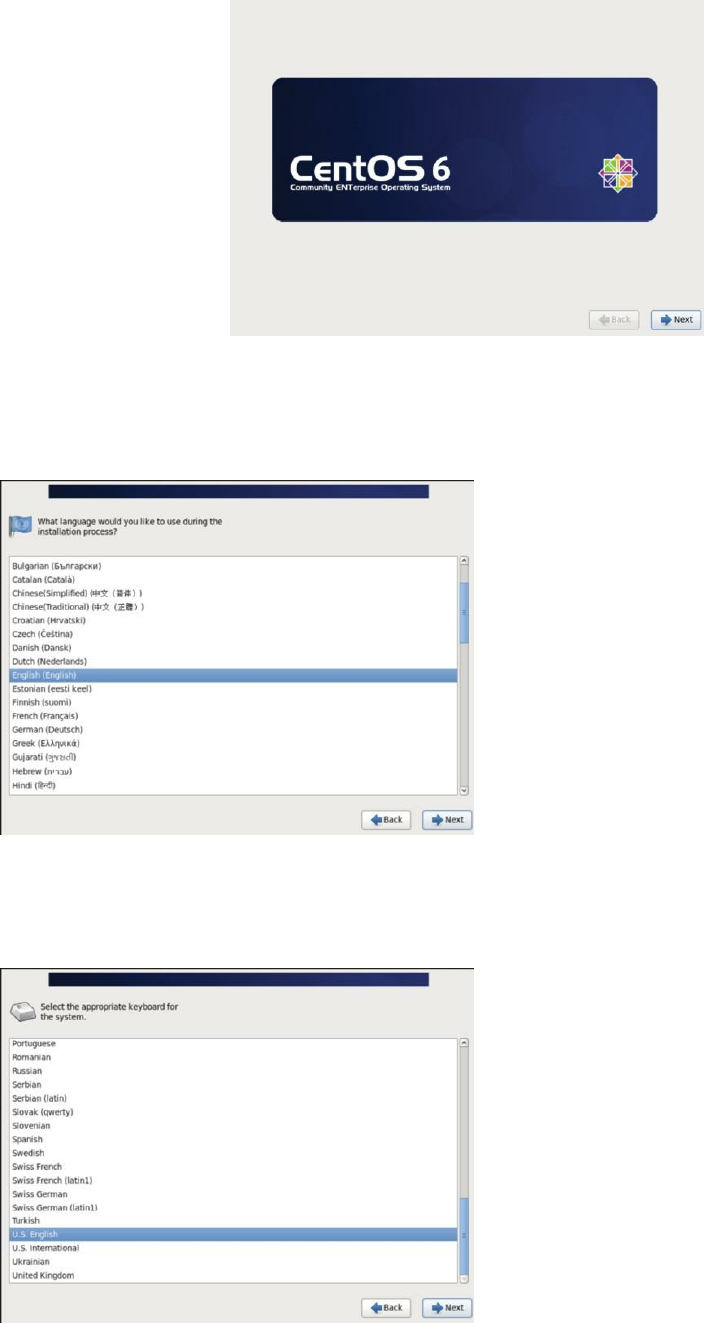
to click Next?)
Figure 5: A splash screen
5. Next, you must select the language to be used for the installation. The
default is English. Press the Enter key to select the default.
Figure 6: Choosing the installation language
6. Now, you must choose the appropriate keyboard for the system. We’ll
use a U.S. English keyboard, the default. Press the Enter key.
Figure 7: Choosing your preferred keyboard layout
7. In this screen, you must choose your storage devices. Basic Storage
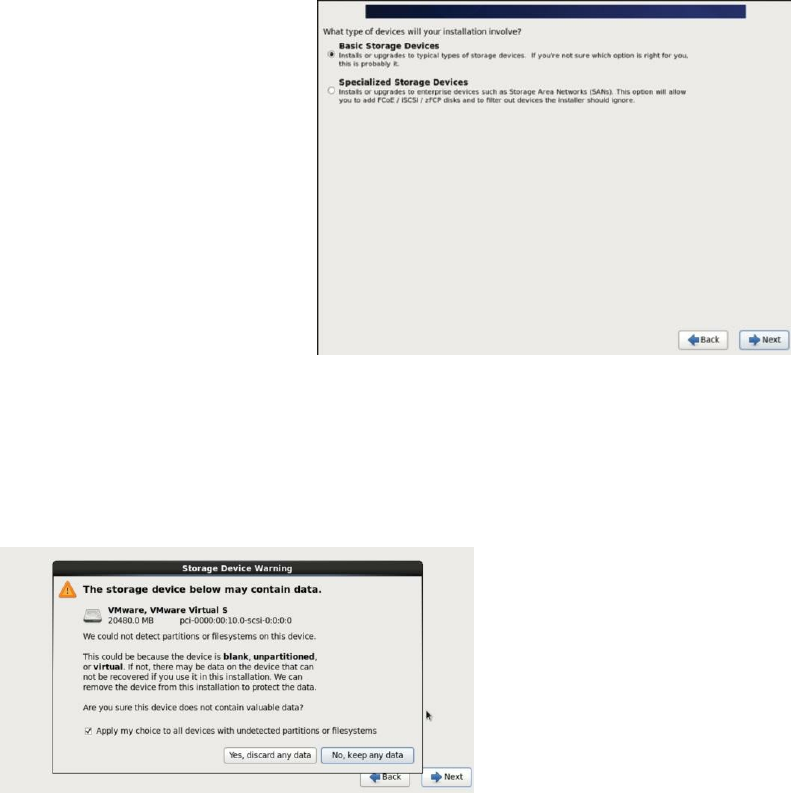
Devices is the default. Press the Enter key.
Figure 8: Installation storage options
8. Uh oh, here’s a warning. If you’ll recall earlier, I warned that we’re
going to blow away all the data on this system. Now, CentOS is
concerned about the same thing. Click the button labeled
Yes, discard any data.
Figure 9: Storage device warning
9. Now, the installation process wants to know its name. Choose your name
wisely. You can change it later, but it’s kind of a minor hassle. I recently
switched from coffee to herbal tea, so I’m not quite as edgy as I used to
be. Maybe that’s the reason I chose something fairly bland like
LinuxServer01.soundtraining.local, as you can see in the screen capture.
(I’ll mention this again later, but you need to know that everything in
Linux is case sensitive.) If you’re on your third can of RedBull, I’m sure
you’ll come up with something much more interesting. Not to squelch
your creativity, but If you’re building your system purely for learning
purposes, I recommend you just use the same names I do for simplicity.
Enter your server’s name and press the Enter key.
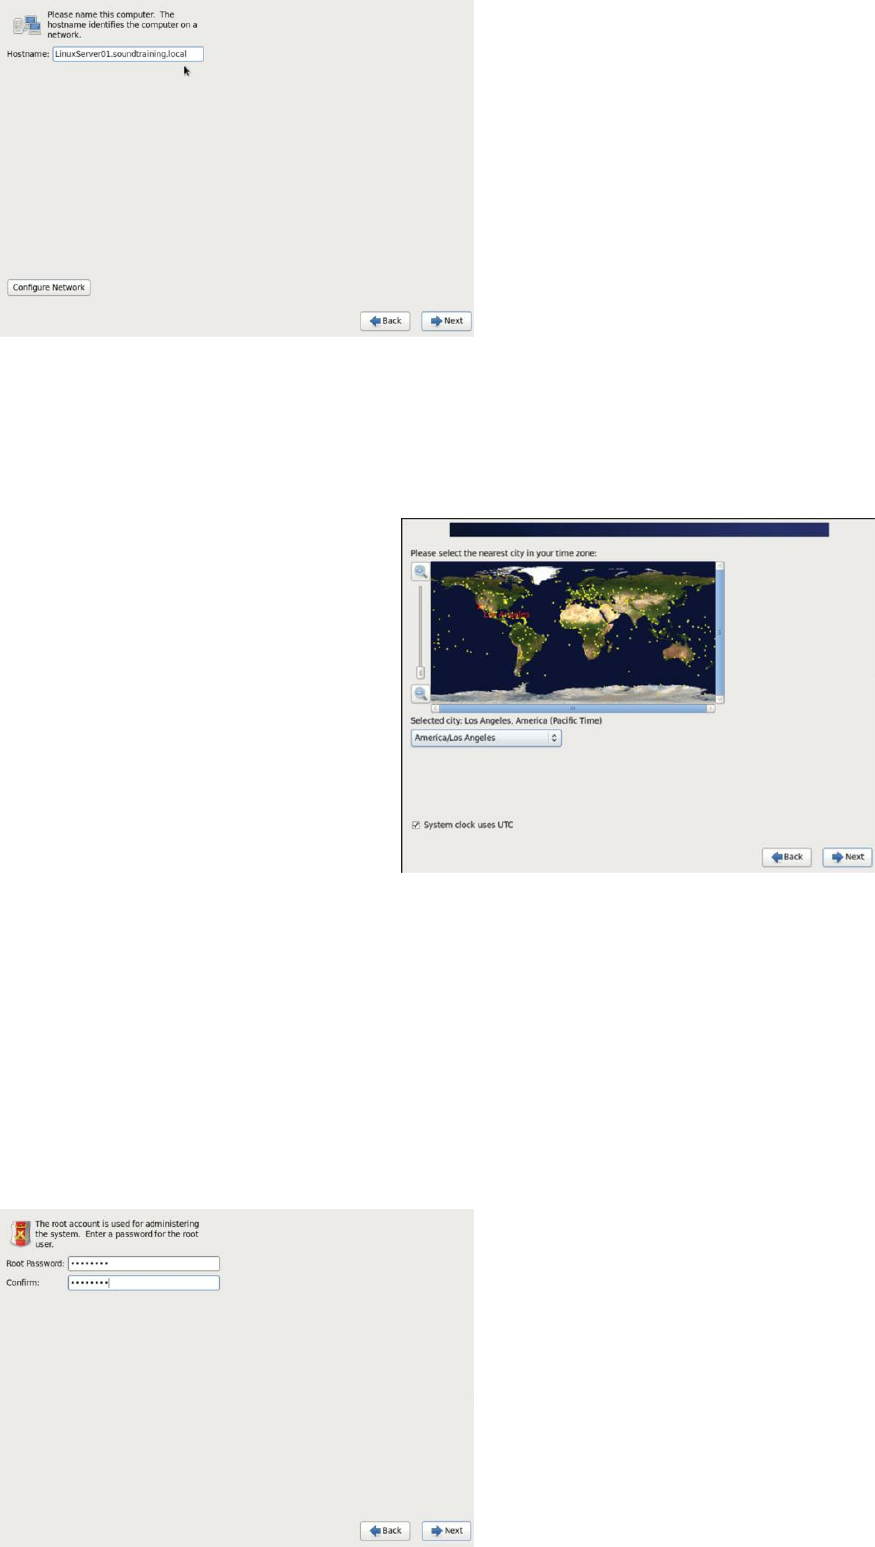
Figure 10: Naming your system
10. Once you’ve named your server, it’s time to tell it what time zone it’s in.
I’m in Seattle on the U.S. West Coast, so I chose America/Vancouver,
which is just up I-5 from Seattle and in the same time zone. Choose your
time zone and click Next.
Figure 11: Choosing a time zone
11. Now, you get to choose the root password. The user root is the
administrator on Linux systems. root is all knowing, all seeing, and all
powerful, kind of like the great and powerful Oz in The Wizard of Oz. In
the real world, make this a very difficult to guess password. For our
purposes in this book, we’ll always use p@ss5678 for the root password.
Enter p@ss5678 and confirm it, press Enter to continue.
Figure 12: Creating the root (admin) password
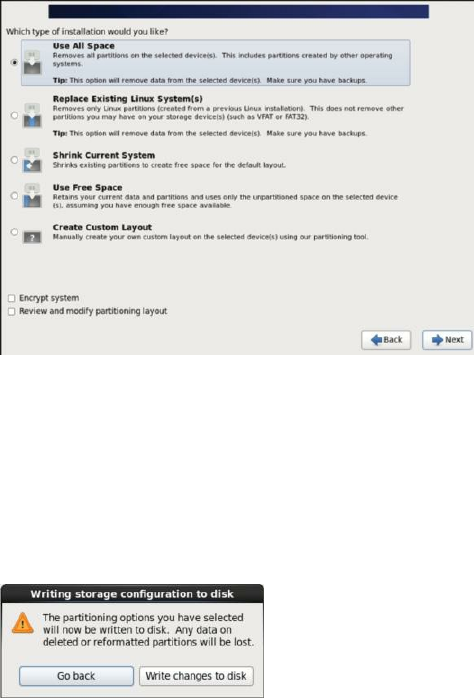
12. Now, you must choose the type of installation you’d like. For our
purposes in this book, we’ll remove all existing partitions (there aren’t
any) and start from scratch. Choose Use All Space and click Next.
Figure 13: Choosing the type of installation for the disk(s)
13. You’ll get another warning that you’re going to lose any data on the new
partitions. If you choose to write the changes to the disk, you’ll lose any
data. Assuming that you’re aware of that and that there’s no data you
care about on the disk, click the button labeled Write changes to the disk.
Figure 14: Another storage warning
14. If you downloaded the CentOS minimal version for your installation, you
can ignore this step and go to the next one. If, on the other hand, you
decided to use the full version DVD for your installation, you get to
choose what type of system you want. As the screen says, the default
installation of CentOS is a minimum install. In the real world, you might
want to choose one of the other options, but since this book is all about
learning how to build a system, we’ll choose Minimal and click the
button labeled Next. (As we’ve discussed previously, when you
download CentOS, there is an option to download a minimal version. If
you choose that version, you won’t be presented with the following

options.)
Figure 15: Choosing the type of installation for package installation
15. The package installation process starts up. Now is a good time to refill
that cup of coffee or get another Red Bull. You’ll see a screen like this,
but you don’t have to do anything unless you just want to watch the blue
progress bar.
Figure 16: Installing the packages
16. When package installation is complete, you’ll see a splash screen. Click
the button labeled Reboot.
Figure 17: Complete installation and reboot
17. After your system reboots, you’ll be presented with your first logon
prompt. Enter the username root and the password p@ss5678.
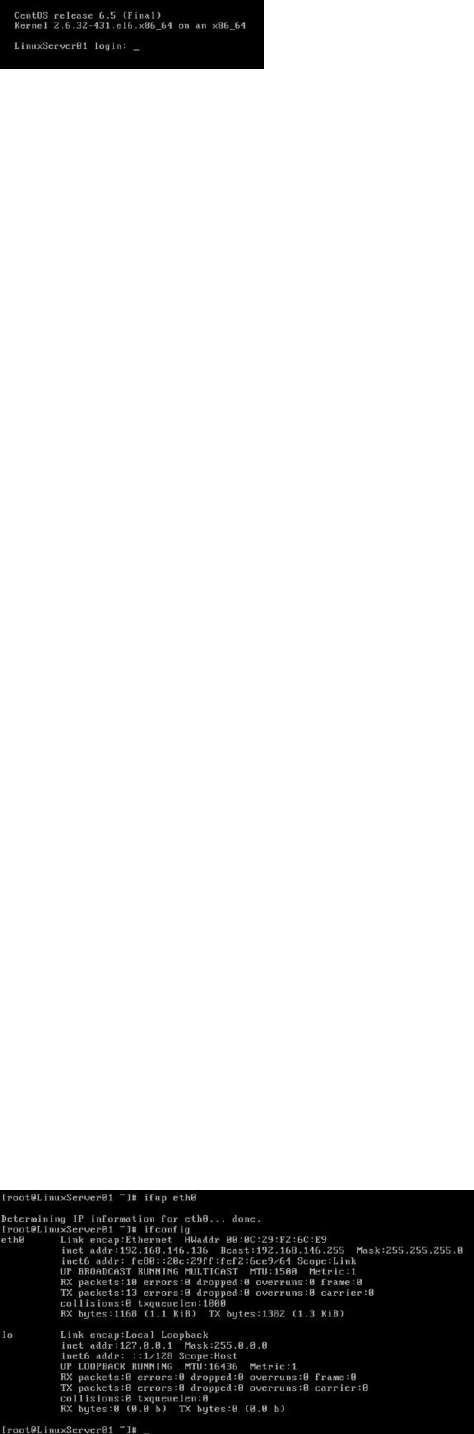
Figure 18: First time login
Congratulations! You’ve just completed your first CentOS Linux
installation. Good job.
Now, it’s time to start having some fun with your new Linux server.
One of the cool things about a minimal CentOS install is that, even though
it’s minimal, it still includes some basic necessities such as SSH (Secure
Shell). It doesn’t, however, turn on the network interface by default, so let’s
get that done before we do anything else.
Hands-On Exercise 1.2:
Enabling the Network Interface
In this exercise, you’ll enable the network interface named eth0 and view
the IP address configuration on the interface eth0 and the loopback
interface.
1. While logged on to the system as root, execute the following command to
bring up the interface eth0:
ifup eth0
2. The system will pause for a moment while it determines the IP address
for interface eth0, then it will return a prompt. At the prompt, use the
command ifconfig to view the configuration on interface eth0 and the
loopback interface. Enter the following command:
ifconfig
Figure 19: Output from the command ifconfig
3. Make a note of the IP address for eth0 on your system. You’ll use it
frequently as the book progresses. (On my system, it’s currently
192.168.146.136, but that could change since it’s dynamically assigned
via DHCP.)
Congratulations! You’ve just performed your first sys admin task. Way to
go.
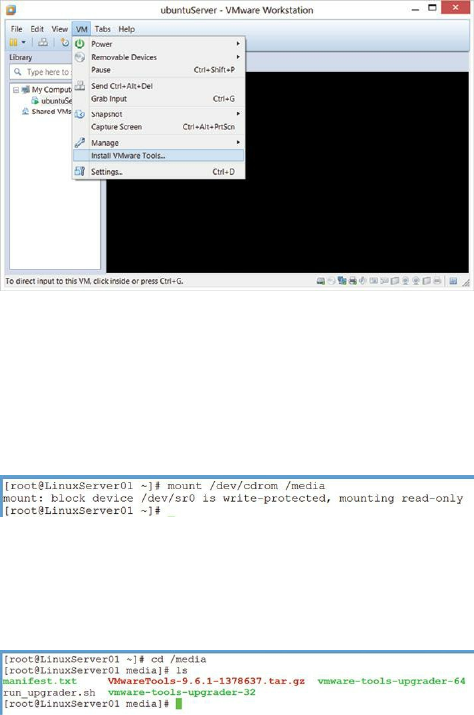
Adding VMWare Tools
VMWare tools is an add-on to your VMWare installation that adds
considerable functionality, especially when working in a graphical user
environment. It is especially helpful in easing movement between the host
and guest computers. Installing VMWare tools is not required, but I always
install it. It’s pretty simple and it’s also a really good exercise in performing
some basic Linux administration tasks. Here’s how to do it.
1. Install VMWare tools in VMWare Workstation by clicking on VM in the
menu bar and choosing Install VMWare Tools …
Figure 20: Installing VMWare tools
2. Now, in the VMWare guest, while logged on as root, mount the virtual
CD drive with the following command:
mount /dev/cdrom /media
Figure 21: How to mount the CD-ROM drive
3. Navigate to the /media directory with the command cd /media and view
the contents of the directory with the command ls:
Figure 22: Showing the contents of the mounted drive in /media
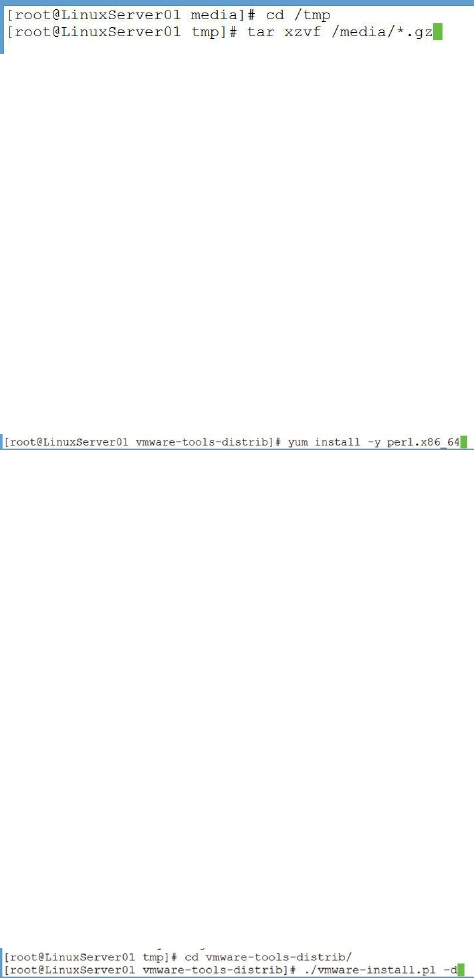
4. Navigate to the /tmp directory with the command cd /tmp and extract the
tar file (it’s often called a tarball) with the command tar xzvf
/media/*.gz: (I’ll explain tar in chapter five.)
Figure 23: Navigating to /tmp and extracting the tar file for VMWare tools
5. You’ll see a lot of activity fly through the screen as the system extracts all
the files from the tarball. After several seconds, the extraction will be
complete and your system will display a prompt.
6. In order to complete the installation of VMWare tools, you must also
install perl on your system. To do that, use the yum utility, which I’ll
explain later in chapter six. Use the following command to install perl:
yum install -y perl.x86_64
Figure 24: Installing perl
If you’re installing on a 32-bit system, modify the command, replacing
x86_64 with i386.
7. When perl is installed, navigate to the vmware-tools-distrib directory
with the command
cd vmware-tools-distrib and execute the following command:
./vmware-install.pl -d
(Notice the leading period. The -d switch answers the default to all
installation questions. If you want to customize the installation, just omit
it.)
Figure 25: Installing VMWare tools with the Perl script
8. Again, you’ll see a lot of text flying down the screen. After about a
minute, the installation will be complete.
This probably won’t be necessary, but in the event your system doesn’t
automatically unmount the VMWare Tools installation CD, use the
following command:
umount /media
CHAPTER 2:
Understanding Linux Commands
Videos are available for many of the procedures in this chapter at www.soundtraining.net/videos
Introduction
Working in Linux, especially on a Linux server, means working in the
command-line interface or the CLI. If you’re a Windows or a Mac kind of
person, this may seem unfamiliar, old-school, and daunting. Please don’t
worry. It’s just another way of managing a system and, once you get
familiar with the basic commands and some shortcuts, you’ll probably find
it pretty easy. You might even decide you like it better than clicking through
a series of menus, checkboxes, and radio buttons. Seriously. That’s how I
feel.
Chapter Objectives
Learn basic rules for Linux commands
Get comfortable working in the Linux shell (command line environment)
Learn basic Linux commands
Perform a system upgrade
Some Basic Rules About Linux Commands
1. Everything is case sensitive, so ls is something completely different from
LS.
2. You can complete a partially-typed command or filename by pressing the
Tab key.
3. Similarly, you can type of string of letters that might be part of a
command or filename, then press the Tab key twice to see the files and
commands whose names start with that string.
4. Linux separates directory branches with a forward slash (/) instead of a
backslash like Windows.
5. Linux doesn’t use drive letters the same way Windows does. Linux
mounts filesystems to mount points which are named identically to
directories. For example, your system may have a separate partition for
the boot partition, but it will be identified only as /boot.
6. Letters are assigned to device names in the /dev directory. For example,
/dev/sda is the first SCSI drive and /dev/sdb is the second SCSI drive.
sda1 indicates the first partition on the first SCSI drive. Although IDE
drives are not used as much as in the past, if they exist they are
designated as /dev/hda and so on.
7. “root” is the name of the administrator in Linux. It’s also the name of the
base of the filesystem (/), and there’s a separate home directory for root
called /root.
The Shell
The shell is the interface between the user and the operating system. It acts
as a keyboard interpreter, taking the keyboard input from the user and
delivering it to the operating system. You can think of the shell as being the
part of the operating system that allows you to interact with the kernel. The
shell is the program that executes Linux commands.
There are several shells available for use in Linux and UNIX. The one most
commonly used in Linux is the BASH shell (Bourne Again Shell). Other
shells include sh (Bourne Shell), csh (CShell), tcsh, and ksh (Korn Shell).
If additional shells are installed, you can change the shell by typing the
shell’s name at a command prompt.
For the purpose of this document, we’ll focus on the BASH shell.
Linux, like all multi-user operating systems, has an administrator account
which is used for system configurations and operations. In Linux/UNIX, the
administrator account is called “root” (equivalent to “admin”,
“administrator”, or “supervisor” in other operating systems). “root” is often
referred to as the “superuser” because of the account’s unrestricted access to

every area of the system and every aspect of the system’s configuration.
When logged on as root using the BASH shell, the prompt is a pound sign
(#). When logged on as a regular user using the BASH shell, the prompt is
a dollar sign ($).
Shell commands in the Linux/UNIX world are usually case sensitive. You
can see your default shell with this command:
echo $SHELL
It’s possible to install different shells using yum install (yum is a tool for
managing packages. I’ll go over it in more detail in chapter six.). As I
mentioned previously, BASH is the most commonly used shell and unless
you know a reason to switch, you’re probably better off staying with BASH.
Shell Scripting
In the same way that advanced Windows users will often create simple
batch scripts or Powershell scripts to automate certain processes in
Windows, Linux users can do similar things with shell scripts. Shell
scripting is a very powerful tool, even when used with simple shell scripts,
and I encourage you to explore shell scripting. Entire books have been
written on shell scripting, so I’m not going to attempt to teach it as part of
this book. I have included, however, some online resources that will help
you learn shell scripting.
Shell Scripting Resources
http://www.ibm.com/developerworks/library/l-bash/
http://www.math.utk.edu/~vasili/shell-scripts/
http://www.tldp.org/LDP/Bash-Beginners-Guide/html/
http://tldp.org/HOWTO/Bash-Prog-Intro-HOWTO.html
http://www.howtogeek.com/67469/the-beginners-guide-to-shell-
scripting-the-basics/
Some Commonly Used Linux Commands

The following are some of the more commonly used commands in the
wonderful world of Linux. Some of them won’t work until they’re installed,
which we’ll do later, so take a few minutes and peruse this list. Try some of
the commands, but know that some of them won’t work until later. The real
value of this list will come later, after you’ve gotten more familiar with
Linux and you’re trying to remember a particular command.
Working with Directories and Files
cat <filename>
Concatenates (combines) files. Frequently used to display the contents of the specified file
cd
Change directory. When used by itself, with no options, moves to the current user’s home directory
cd ..
Change to the parent directory
cd </path/directory_name>
Change to the specified directory
cp <filename> </path/directory_name>
Copy specified file into specified directory
cp <filename1> <filename2>
</path/directory_name>
Copy specified files into specified directory
cp -r <directory_name>/
<path>/
<directory_name2>
Copy the entire specified directory into /path/directory_name2
head <filename>
Display the first 10 lines in the specified file
head -15 <filename>
Display the first 15 lines in the specified file
ls
Display the contents of the current directory
ls -a
Display the contents of the current directory, including hidden files and directories
ls -l
Display a long listing of the contents of the current directory, including filenames, permissions, owners,
size, links, and date information
mkdir <directory_name>
Create a new directory with the specified name
more <filename>
Display the specified file’s contents one page at a time. Use the spacebar to display the next page.
mv <filename> /<path>/
<directory_name>/
Move filename into /<path>/<directory_name>
mv <filename1> <filename2>
Rename filename1 to filename2
pwd
Print working directory to stdout, which means display the name of the current directory, including the
path
rm <name>
Remove the specified file or directory
rm -r <name>
Remove an entire directory recursively (r) as well as its included files and subdirectories
rmdir <directory_name>
Delete the specified directory
tail <filename>
Display the last 10 lines of the specified file

tail -15 <filename>
Display the last 15 lines of the specified file
Finding Files and Text Strings Within Files
find / -name <filename>
Starting from the root directory, search for the file with the specified name
grep <string>
/<path>/<directory_name>
Starting from the specified path, search for all files containing the specified string
locate <filename>
Find file specified file by searching in the database
updatedb
Update or create a database of all files under the root directory. This command updates the database which is
used by the locate command
whereis <application_name>
Search $PATH (your default path), man pages and source files for the specified application
which <application_name>
Search $PATH for the specified application
Note: You can display your user profile’s default path with the command
echo $PATH
Working with Archived and Compressed Files
Archive
tar -cvf filenames >
<filename>.tar
Combine specified files into a single archive file called <filename>.tar. The use of “>” directs the output of
the tar command into the specified file.
tar -xvf <filename>.tar
Extracts files from specified archive file
tar -czfj <filenames> >
<filename>.tar.bz2
Combines specified files into a single, bzip2-compressed archive called <filename>.tar.bz2
tar -czf <filenames> >
<filename>.tar.gz
Combines specified files into a single, gzip-compressed archive called <filename>.tar.gz
Compress
bzip2 -c <filename> > <filename>.bz2
Compress specified file to <filename>.bz2
gzip -c filename > filename.gz
Compress /path/directory_name to <filename>.gz
Decompress
bunzip2 <filename>
Uncompress specified file
gunzip <filename>
Uncompress specified file
tar -xjf <filename.tar.bz2>
Uncompress specified file
tar -xzf <filename.tar.gz>
Uncompress specified file
tar -xzf <filename.tgz>
Uncompress specified file

Red Hat/CentOS Package Management
yum install <package
name>
Downloads and installs specified package
yum remove <package name>
Removes specified package, but leaves configuration files intact
yum search <text string>
Looks for packages whose names match the text string
yum update <package name>
Updates the specified package
yum update
Updates all packages
yum info <package name>
Display information about the specified package
yum list installed
List the packages installed on the system
yum grouplist
yum groups allow you to install several related packages with a single command. The yum grouplist command show
available groups.
yum groupinstall <group
name>
Installs a software group
yum groupupdate <group
name>
Upgrades a software group to the latest version
yum groupremove <group
name>
Removes an installed software group
yum repolist
Displays enabled software repositories
The above yum commands are covered in more detail with screen captures
and step-by-step guides in chapter six.
Starting and Stopping the System
halt
Shutdown the system now
reboot
Reboots the system
shutdown -h now
Shutdown the system now
shutdown -r +15
Reboot in 15 minutes
shutdown -r now
Reboot now
Mounting Filesystems
mount -t iso9660 /dev/cdrom
/mnt/cdrom
Mounts cdrom to the /mnt/cdrom directory
mount -t vfat /dev/sda1
/mnt/c_drive
Mounts the first partition (1) of the first hard disk drive (a) which is in fat32 vfat format to the
/mnt/c_drive directory
umount /mnt/hda1
Unmounts /mnt/hda1

mount /dev/cdrom /media/cdrom
Mounts the cdrom to /media/cdrom
User Administration
adduser <username>
Create a new user
exit
Exit from the login session
groupadd <group name>
Create a new group with the specified name
groups
Display the group membership of the currently logged on user
passwd <username>
Set or change a user’s password
su
Switch user to root from the current login
su -
Switch user to root from current login and load root’s profile
useradd <username>
Create a new user
usermod <username>
Change properties of the specified user account
users
Display users currently logged in
w
List logged-in users with information about their session
who
List logged-in users
whoami
Display current user
Process
<command>
Execute command in the foreground
<command>&
Execute command in the background
ctrl+c
Interrupt a program
ctrl+z
Suspend a program
kill <pid>
Kill the specified process
kill -9 <pid>
Forcefully kill the specified process
ps
List all processes
top
Monitor processes in real time
Networking
hostname
List the system’s hostname
ifconfig
Set/Display network information
ip address
Displays IP address information for each interface
ip route
Displays local routing table
ifup <interface name>
Brings an interface up
ifdown <interface name>
Brings an interface down
service network status
Display currently active interfaces
service network stop
Disable networking
service network start
Enable networking
service network restart
Restart networking
System Information
cp <filename> /<path>/.
Copy filename into specified location
df -T -h
List filesystem disk space usage
fdisk -l
List partition tables
free -m
Display RAM+Swap usage
uname -a
General system information
Hands-On Exercise 2.1:
Upgrading Your CentOS Linux Server Installation
In this exercise, you will use some of the commands listed above to ensure
your CentOS Linux server installation is patched to current levels.
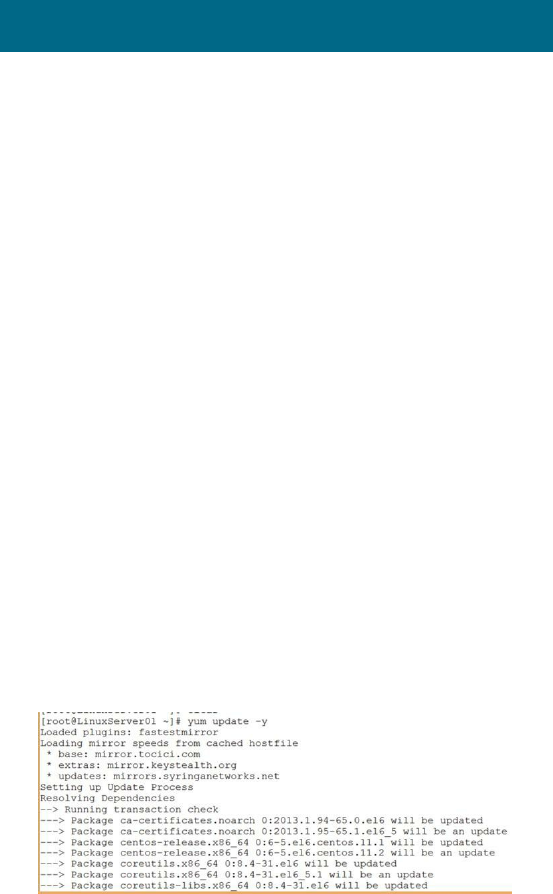
1. Use the yum utility to update all packages with the following command:
yum -y update
(The -y option simply answers yes to confirmation requests.)
Figure 26: Using yum to update all packages on the system
2. It will take several minutes the first time you run yum update. When it’s
finished, as before, it will return a shell prompt.
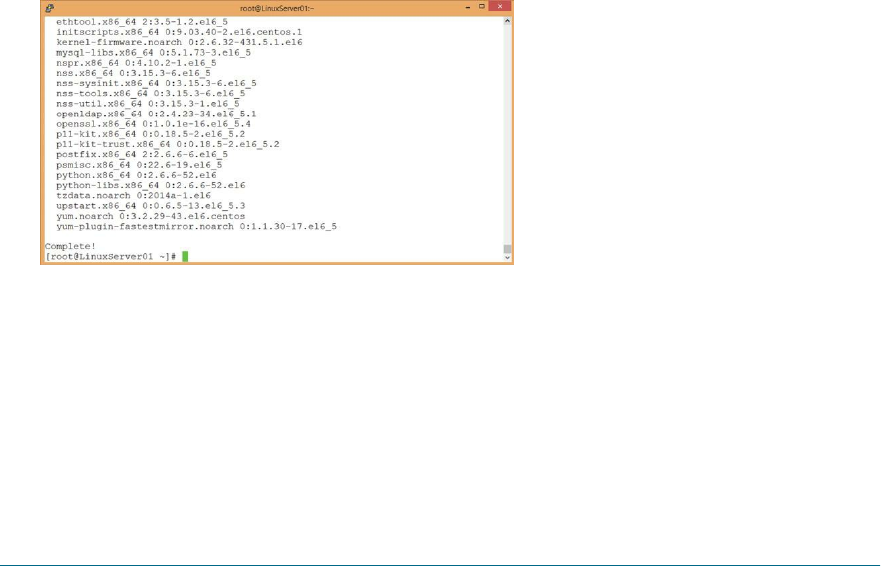
Figure 27: A completed system packages upgrade
Congratulations! Your system is now upgraded to current patch levels.
This is an important process to repeat as packages are updated from time-
to-time. This is, of course, especially important with security patches. You
can subscribe to a maillist to learn about CentOS security patches at
http://lists.centos.org/mailman/listinfo/centos-announce.
You might also want to consider writing a simple shell script and using the
scheduler service known as cron to automatically apply patches. The risk in
doing so, of course, is that you can’t test patches before they’re applied and
it’s possible that a patch might break some or all of your system. I’ll
discuss cron later in this book in chapter 11.

CHAPTER 3:
Linux User Accounts
Videos are available for many of the procedures in this chapter at www.soundtraining.net/videos
Introduction
Even if you think your server needs only one or two user accounts, there are
many others which are added as you add services (daemons). As with most
things in Linux, at first the user account files may seem intimidating, but as
you work with them they’ll make more sense.
In this chapter, I’ll go over the user account files, user profiles, and group
accounts. For the sample usernames, I’ve used some of my favorite
composers and names of several former colleagues. See if you can spot ‘em!
Objectives
Learn how Linux user accounts are organized
Configure default values for user profiles
Add and modify user accounts
Add and modify group accounts
Understanding /etc/passwd
The user list is in /etc/passwd. /etc/passwd is a simple text file
containing entries such as
this: don:x:1000:1000:Don R. Crawley,,,:/home/don:/bin/bash
In the above example, there are seven fields, each separated by colons.
Field Number
Example Value
Description
1
don
Username
2
X
Password (“x” indicates that shadow passwords are in use)
3
1000
UID (User ID)
4
1000
GID (Group ID)
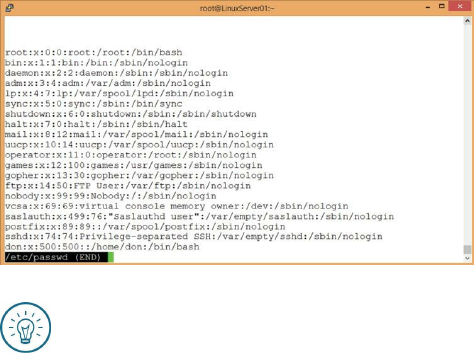
5
Don R. Crawley
Comment (usually the user’s full name)
6
/home/don
User’s home directory
7
/bin/bash
User’s default shell
You can view the contents of /etc/passwd with the command less
/etc/passwd:
Figure 28: Viewing the contents of /etc/passwd
Soundthinking Point:
What If There’s No Password?
You may be wondering what happens if you create a user, but don’t create a
password for that user. The answer is simple: He or she cannot log on without a
password.
Notice that there are many system accounts created by default. The only
account I’ve created on this system so far is my own user account. Notice,
also, that the comment field includes several commas. As mentioned
previously, the comment field normally contains the user’s full name. It can
also contain other text-based information such as phone numbers, building
names, or other unique identifiers for the user. If you choose to include
additional information fields about the user, separate each field with a
comma.
It is possible to add and delete users by modifying this file, but is much
easier to do it with command line tools like useradd or userdel.
Creating a New User
Using the “useradd” command in the CLI: useradd mcostello will create
the user account “mcostello”, a group called “mcostello”, and a “home
directory” for the new user.
Passwords
Password Commands
Using the “passwd” command in the CLI:
passwd dlawrence will prompt for a new password for user dlawrence
passwd –l <username> will lock the user account
passwd –u <username> will unlock the user account
Require passwords to be changed at regular intervals with this command:
chage –M <# of days> <username>
Shadow Passwords
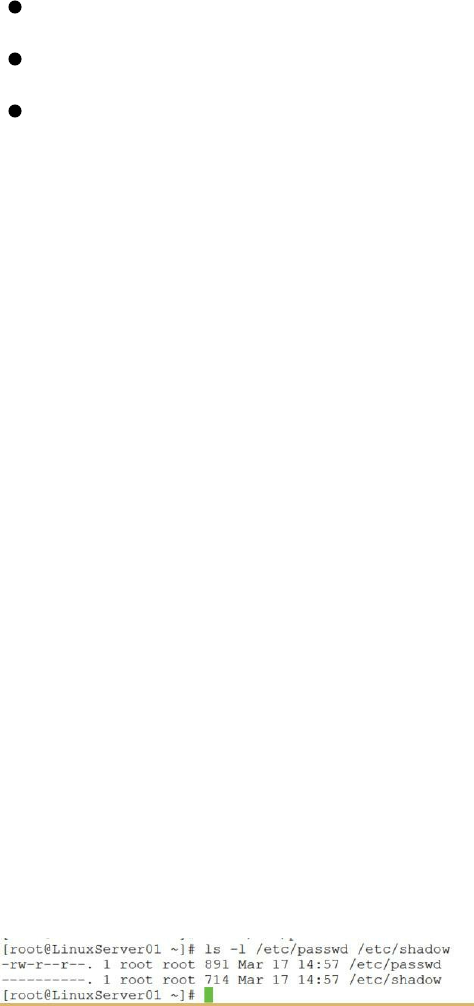
You need to be aware that the file /etc/passwd is world-readable which
means that literally everyone can read it, whether you’re an administrator or
not. (I’ll discuss permissions in more detail in a moment and in much
greater detail in chapter four.) Therefore, shadow passwords are normally
enabled which replaces the password in /etc/passwd with an “x” and
moves the encrypted passwords to the /etc/shadow file, which is not
readable by anyone other than root and members of the shadow group.
Notice, in the following screen capture, in the far left column which shows
permissions, that the user has read/write (rw) permissions, the group as
read (r) permissions, and the world (the third permission) also has read (r)
permission on the file /etc/passwd, but no one has read permission on
/etc/shadow.
Figure 29: Viewing the permissions on /etc/passwd and /etc/shadow
Default Values
Default values for useradd are found in /etc/default/useradd.
Traditionally, such values were stored in /etc/login.defs which is still
maintained, even if it’s not used. By modifying the values found in

/etc/default/useradd, you can set default values for all new users created
with “useradd”. Values found in /etc/default/useradd include minimum
and maximum password age, the location of user mailboxes, starting and
ending UIDs and GIDs, and whether or not to create home directories for
new users.
You’ll also find hidden files that control user profile behavior in /etc/skel.
Figure 30: Displaying the hidden files that control user profile behavior
Notice that each of the three files in the /etc/skel directory has a name
that begins with a period. That makes them hidden files, which is why it
was necessary for me to use the -a option with the ls command in order to
see them.
Soundthinking Point:
Hidden Files in Linux
There are many hidden files in Linux, especially in user profiles. Files can be
hidden in Linux by making the first character of the filename a period. For
example, one of the hidden files in a user profile is .bashrc. You can list the hidden
files in a directory with the command ls -a.
Adding Groups
Using the groupadd command in the CLI: groupadd sales will add the
group “sales” to your system
Using “useradd” with options (options are also frequently referred to as
switches)
useradd –c “Johann S. Bach” –g musicians –G baroque,
organists, jbach adds the user “jbach” with the comment “Johann S.
Bach”, making him a member of the primary group “musicians”, plus
additional group membership in “baroque” and “organists”
useradd wloman -g sales -e 2021-06-18 creates a new user named
wloman, in the sales group, and sets the account to expire on June 18,
2021.
useradd dmilhaud -g composers -p p@ss1234 will create a new user
named dmilhaud, put him in the composers group, and create the
password p@ss1234 for his account.
Deleting Users
Using the “userdel” command in the CLI:
userdel –r jbach deletes the user account. The “-r” deletes the user’s
home directory and its contents.
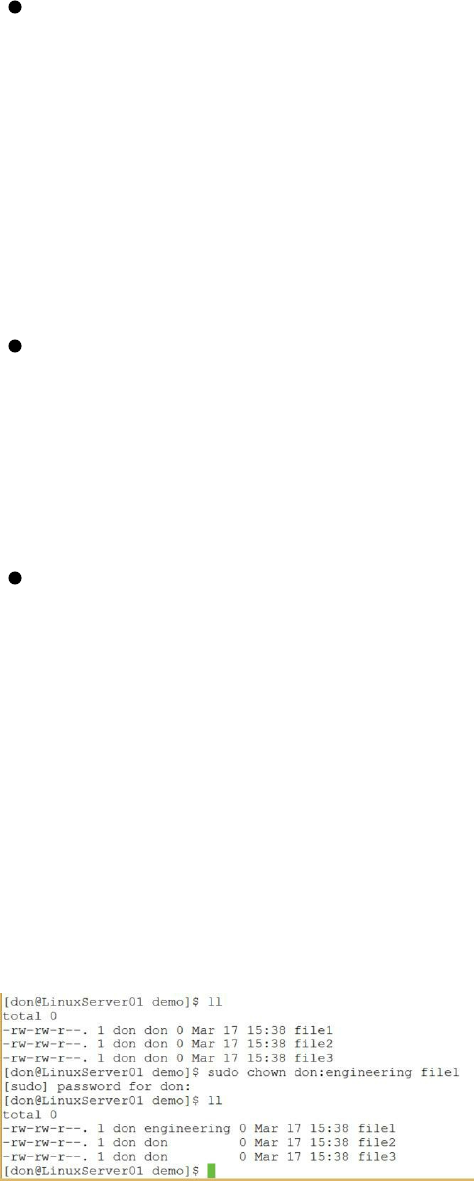
Changing Ownership for a File or Directory
chown <user|:group> <filename|dir> changes group and user
ownership for a file or directory. For example, if I wanted to change the
ownership of the file file1 to the user Nathan and the group sales, I
would use the following command:
chown Nathan:sales file1
In the screen capture below, I used the chown command to change the
group ownership of the file file1 to engineering, while leaving the user
ownership unchanged.
Figure 31: Using the chown command to change file ownership
Notice in the preceding screen capture how I used the ll (long listing)
command to display the three files in the directory, along with their owner
(the first name) and their group (the second name). Then, I used the sudo
chown command to change the group for file1 to engineering. When is used
the ll command again, the group for file1 had changed to engineering.

Soundthinking Point:
Using Sudo
The sudo command allows you to run root commands as a regular user. In the
previous screen capture, I was logged on as regular user don. Regular users don’t
have permission to change file ownership, so I had to precede the chown
command with sudo and enter my password in order to execute the chown
command. The user don also had to be in the sudoers list. I’ll cover sudo in more
detail in chapter 10.
Adding a User to a Group
usermod –G <group name> <username> adds a user to a supplementary
group
usermod -g <group name> <username> will change a user’s initial
group.
Additionally, the usermod command can be used after a user account is
created to add comments to the user account, change the user’s home
directory, add an expiration date to the account, and modify various other
account parameters. Group accounts are stored in the /etc/group file,
which, like /etc/passwd, is readable by everyone.
To view a user’s group membership, type this command: groups
<username>
Viewing Information About the Current User
The “id” command allows you to see information about the currently logged
on user, including username, UID, group memberships, and GIDs.
Hands-On Exercise 3.1:
User and Group Administration
Adding Users and Groups Using the Command Line Interface
In this exercise, you will practice adding users and groups in a terminal
window. If the command doesn’t work, make sure that you’re logged in as
the root user.
1. Use the switch user command to change to root:
su -
Password:p@ss5678
(Remember that your password is not shown as you enter it.)
2. Enter the following command to add the user user01:
useradd user01
3. Assign a password to the user account “user01” with the following
command:
passwd user01
Changing password for user01.
New password: password (the password will not be displayed as you
enter it)
BAD PASSWORD: it is based on a dictionary word
Retype new password: password (the password will not be displayed
as you enter it)
passwd: all authentication tokens updated successfully.
4. Use the switch user command to change to user01:
su – user01
Note the user of the hyphen following the su command, which tells the
system to load the new user’s profile in addition to switching to the new
user account.
5. As user01, you will now attempt to change the password to a simple,
non-secure password. Notice that, as a regular user, the system will not
allow you to use a simple, non-secure password, but will, however,
permit a secure password.
passwd
Changing password for user user01.
Changing password for user01
(current) UNIX password:password
New UNIX password:mypassword
BAD PASSWORD: it is based on a dictionary word
New UNIX password:p@ss1234
Retype new UNIX password:p@ss1234
passwd: all authentication tokens updated successfully.
6. Enter the following command to add the user user02 with additional
information:
useradd –c “User Two” –e 2017-06-18 user02
This command adds a user with a comment of User Two (Comments are
often used to identify the user’s full name. Quotation marks are required
around a comment when it consists of more than a single word.), an
account expiration date of June 18, 2017, and a user name of user02.
7. Assign a password to the user account “user02” with the following
command:
passwd user02
Changing password for user02.
New password:p@ss1234 (The password will not be displayed as you
enter it.)
Retype new password: p@ss1234 (As before, the password will not be
displayed as you enter it.)
passwd: all authentication tokens updated successfully.
8. Enter the following command to see other options available for use with
useradd:
useradd --help
9. Create a new group called “sales” by entering the following command:
groupadd sales
10. Repeat step eight for the groups research, management, and
engineering.
11. You can view the new user accounts you created with the following
command:
less /etc/passwd
(As discussed earlier, /etc/passwd is the file that contains all user
accounts and related information.) Touch the End key to navigate to the
bottom of the file and observe a line similar to this:
user01:x:500:500:User One:/home/user01:/bin/bash
In this line, each field is separated by a colon. The first field is the user’s
logon name, the “x” indicates that shadow passwords are enabled, the
first 500 is the UID (User ID), the second 500 is the GID (Group ID) for
the user’s primary group, the next field is the comment field, followed by
the user’s home directory, and finally the user’s default shell.
12. You can view the new groups you created with the following command:
less /etc/group
As with /etc/passwd, touch End to navigate to the bottom of the file
where you’ll see each of the groups you created. Note how the GIDs in
this file correspond to the GIDs in /etc/passwd.
13. Touch the “q” key to exit “less”.
14. Add user01 to the sales group (as the user’s secondary group) with the
following command:
usermod -c “User One” -G sales user01
15. View the groups again with the following command:
less /etc/group
Touch End to navigate to the bottom of the file and observe that user01 is
now a member of the sales group.
Additional User Management Commands
To delete the user:
userdel <username>
To delete the user and his/her home directory:
userdel –r <username>
To display the username, UID, group memberships, and GIDs for the
presently logged on user:
id
To view a user’s group membership:
groups <username>
CHAPTER 4:
File and Directory Management
Videos are available for many of the procedures in this chapter at www.soundtraining.net/videos
Introduction
CentOS/Red Hat 6 uses the ext4 file system by default. Older Linux distros
use the ext3 file system by default. ext4 is a journaling file system which
offers greater stability and reliability than predecessor file systems. Among
the benefits of ext4 are larger volume sizes, larger file sizes, and slightly
longer filenames than its predecessor.
Objectives
Learn about Linux filesystems and file types
Learn about links, both hard links and symbolic links
Understand how to mount a device
Gain familiarity with /etc/fstab
Manage file and directory permissions
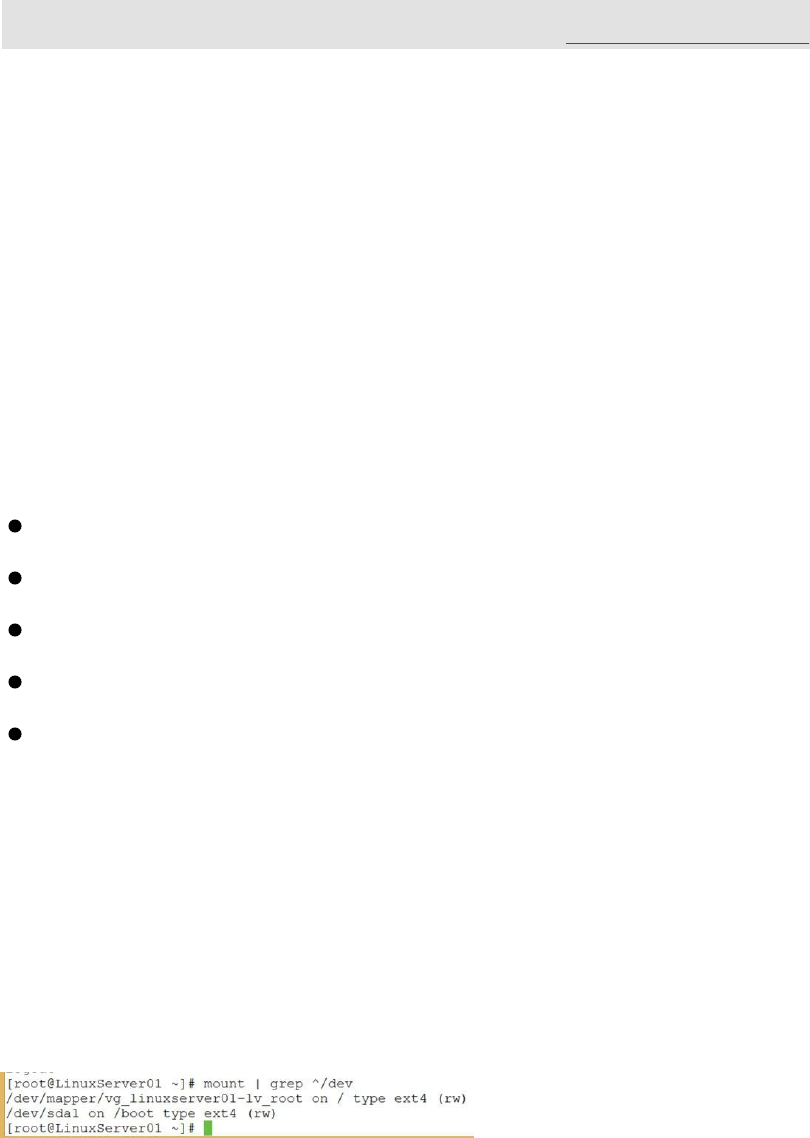
Working with File Systems and Mount Points
There are several methods you can use to identify the file systems in use on
your computer. An easy method is to use the mount command:
mount | grep ^/dev
On my system, it produces the following output:
Figure 32: A method for viewing the file systems in use
In the output, you can see that the root partition (/) is using ext4 and the
boot partition (/boot) is also using ext4.
In case you’re wondering about the syntax, here’s the explanation:
mount Mounts a file system, which makes it accessible to the user
|
The pipe symbol redirects output. In this case the output of mount is redirected into a grep filter.
grep
The grep utility will become one of your best friends. It allows you to filter output to see only output that matches a particular string. (Oh, and in
case you’re wondering, grep is an acronym that stands for global regular expression print.)
^
The caret is a shell wildcard used in regular expressions that says, “Look for lines that begin with whatever follows.”
/dev
This is the filter being used with the caret and grep. This says, “Look for lines that begin with /dev and ignore everything else.”
Linux can also read and/or write to many other file systems including ext2,
ext3, FAT, FAT32, NTFS, HPFS, and others. Partitions are mounted onto
existing directories called “mount-points”.
Linux uses a tree model to organize directories and files. Directories are the
basic unit of storage in the Linux file system. Directories can contain files
or other directories. In the same way that a tree cannot exist without its
roots, the Linux file system starts at root. Root is designated by “/”. (Recall
from chapter two that the term “root” is used in three different ways in
Linux: “Root” is the name of the superuser, it is also used to identify the
superuser’s home directory </root>, and to indicate the root of the file
system </>. It can be difficult to know which “root” someone is talking
about. It helps to be clear about what is meant when referring to “root”.)
Linux File Types
When you issue the “ls -l” command, Linux will display a listing of files
along with information about the files. The far left hand column of the
listing indicates the type of file. Three common file types are regular files,
links, and directories.
Figure 33: Some of the common file types in Linux
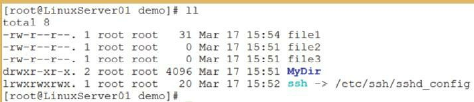
In the screen capture, notice along the far left side, the file ssh is identified
with the letter l, indicating that it is a link. The file file1 is identified with a
hyphen (-), indicating that it is a regular file, and the file MyDir is identified
with a d, indicating that it is a directory.
Regular files
Regular files are the most common file type on Linux or UNIX systems.
They can be used to store various types of data including text that you can
read or binary data that can be executed by the system. It is often helpful to
identify more information about the file than just whether it is a regular file
or not. For example, you might want to know whether the file is an ASCII
text file or a shell script. You can use the “file” command to identify the file
type.
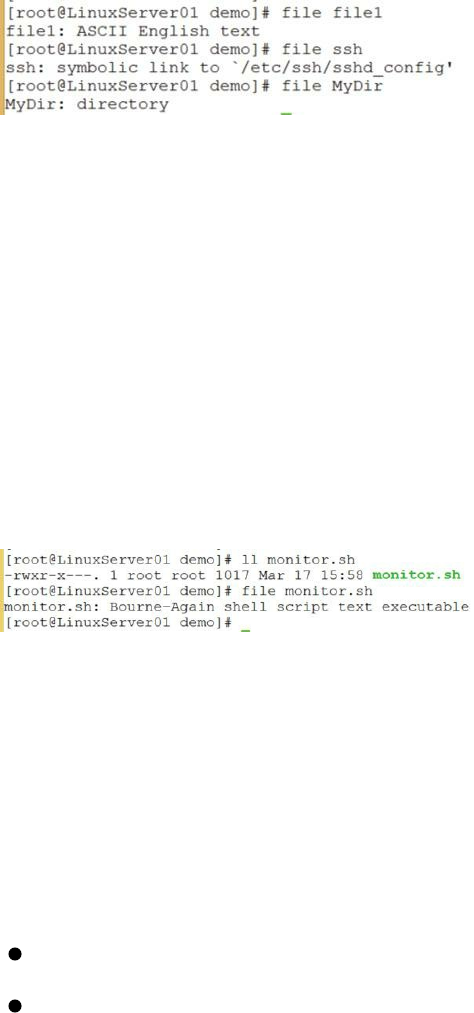
file <filename>
Figure 34: Using the file command to see information about files
In the following screen capture, I used the file command to display
information about a shell script. Notice in the output of the ll command that
the file is considered to be a regular file. Notice, also, that the permission
for the owner includes the executable permission (I’ll explain more about
permissions is a moment. For now, just know that the “x” in the far left
column indicates executable.). When I used the file command to display the
file type, however, the system told me that the file monitor.sh is a shell
script.
Figure 35: Displaying information about a script file
Links
Links are files that point to other files on the system. There are two types of
links: Hard links and symbolic links.
Hard links are a special type of directory entry that have certain limitations:
Hard links can only point to a file; they cannot point to a directory.
They cannot be distinguished from the file to which they are pointing.
Hard links are created with the “ln” command:

ln <source> <target>
Symbolic links are special files that store a pathname to another file.
Symbolic links are created with the “ln” command, combined with the “-s”
option:
ln -s <source pathname> <target>
You can think of symbolic links as being similar to shortcuts in Microsoft
Windows.
Figure 36: Creating and viewing a symbolic link
In the preceding screen capture, I created a symbolic link titled ssh in the
current directory, which links (or points) to the file /etc/ssh/ssh_config. I
also used the command ll ssh to show the newly created link.
Directories
Directories are containers that hold various types of files or other
directories. Directories are used for organizing the file system.
Mounting a Device
In order to make a device such as a DVD-ROM or USB drive available to
the file system, it must be “mounted” to an existing mount point within the
file system. Before using the “mount” command, ensure that the desired
mount point already exists within the file system. A common place to locate
mount points is within the /mnt directory (but they can be placed
anywhere). To mount a device to the mount-point:
mount /dev/cdrom /mnt/dvdrom
You can navigate to the newly mounted device with the “cd” command: cd
/mnt/dvdrom
Before ejecting DVDs or other types of storage, you must unmount them
from the file system. To unmount a mount-point:
umount /mnt/dvdrom
Note that, before a mountpoint can be unmounted, you must cd out of the
directory which you wish to unmount.

Partitions can be mounted automatically on boot through the fstab file,
which is located at /etc/fstab.
Figure 3:7 Viewing /etc/fstab
Understanding /etc/fstab
The file /etc/fstab contains descriptive information about the various file
systems. The fstab file is read at boot. Here is a brief explanation of
/etc/fstab.
Pound signs (#) indicate comments and are ignored by the system.
The first column indicates the device file which points to the device with
the file system which will be mounted.
The second column is the mount point.
The third column indicates the file system type in use on the file system
being mounted.
The fourth column is used for mount options.
The fifth column is for the dump utility to decide whether or not to back
up the file.
The sixth column determines the order in which fsck checks the file
system at boot time. A zero means the filesystem will not be checked.
Take a look at the last line in the screen capture, which I added to simplify
the explanation of the part of /etc/fstab. Here is an explanation of each of
the columns in that line:
/dev/fd0 is the device file for a floppy drive. (Yeah, it’s weird to see a
floppy drive, but it is what it is. I don’t know, maybe I’m just feeling
nostalgic for limited and unreliable storage media for some strange
reason.)
/media/floppy0 is the directory which will be mounted to give us access

to that whopping 1.544MB of data.
The entry auto in the third column means the system will attempt to
identify the filesystem type. (Notice that the entry for
/dev/mapper/LinuxServer01--vg-root specifies ext4 as the filesystem
type.)
In the fourth column, rw means the filesystem will be mounted as
read/write, user means that any user can mount the filesystem, but only
root or the user who mounted it can unmount it, noauto means it will not
be automatically mounted at boot time, exec allows the execution of
binaries that are on the partition, and the last entry adds support for utf8.
The zero in the next column disables the dump option.
The zero in the sixth column means that the filesystem will not be
checked by fsck at boot time.
The fstab file holds information about how to mount partitions and storage
devices. If you’re having trouble mounting, say, a DVD drive, it may be a
missing entry in /etc/fstab.
Understanding Mount Points
You can think of mount points as a way of accessing a partition. Recall that
in Linux, everything is oriented around the file system. Drives are identified
with letters, so the first SCSI drive on a computer might be known as
/dev/sda, the second as /dev/sdb, and so on. The first IDE drive would be
known as /dev/hda. Partitions are numbered, so the first partition on the
first SCSI drive would be /dev/sda1, the second partition would be
/dev/sda2, and so on.
You cannot, however, access partitions through /dev files; you must create
mount points which, as you’ll recall from earlier, are simply a means of
gaining access to a partition through the computer’s file system.
A basic partitioning scheme will usually have three partitions: /, /boot,
and a swap partition. Server administrators will frequently create separate
partitions for other purposes as shown below:

Mount Point
Purpose
/boot
Contains boot loader, kernel and related files
/
Root of the file system
/usr
UNIX system resources (usr) is where you find program and related files
/home
Users’ home directories and profiles
/var
Variable size files including logs and print spools. Also home to WWW and FTP files.
/tmp
Temporary files
It’s especially common to put /tmp on a separate partition to avoid
problems related to a corrupt process or application going crazy writing
temporary files. I once had a process do that. I had not created a separate
partition for /tmp (it was just a directory under root) and, when the
corrupted process went crazy writing temporary files, it filled up the entire
root partition which made the system unusable. If I had put /tmp in its own
partition, I would have avoided the system becoming unusable.
Managing File and Directory Permissions
Linux uses three types of file/directory permissions. For files:
Read means that you can view a file’s contents.
Write means that you change or delete the file.
Execute means that you can run the file as a program.
For directories:
Read means you can list the contents of the directory.
Write means you can add and remove files in the directory.
Execute means you can list information about the files in the directory.
Permissions are assigned to both users and groups
Read permission: Whether the file can be read or the directory contents

can be listed
Write permission: Whether the file can be modified or written to or
whether changes can be made to the contents of a directory. For example,
without write permission, you cannot create, delete, nor rename a file
Execute permission: For files, whether the file can be executed. For
directories, this is the permission to enter, search through the directory, or
execute a program from the directory
You can list file or directory permissions by using the “ls” command with
the “-l” option, for example: ls –l. On many systems, including Red
Hat/CentOS server, you can also use the alias “ll”. When you list files and
folders using the “–l” option, you’ll see a display like this:
d-rw-rw--- 1 jbach jbach 150 March 10 08:08 file1.txt
The first column (drw-rw----) is actually ten columns which can be divided
into four groups:
The first group is a single column used to identify the type of entry. As
mentioned previously, the options are:
“-“ is a regular file
“d” which indicates a directory
“l” is a symbolic link to another program or file elsewhere on the system
The three options above are the options you’ll deal with most of the time.
There are other file types which you will encounter from time-to-time,
which are listed below.
“b” is a block file
“c” is a character device file
“p” is a named pipe file or a pipe file

“s” is a socket file
The second group is three columns used to identify the permissions of the
owner
The third group is three columns used to identify the permissions of the
owner group
The fourth group of three columns identifies the permissions of the world
(everyone).
The three permissions columns are, in order: read (r), write (w), and execute
(x). If the permissions are expressed as “-rw-rw----“, then the entry is a file
(“-“) whose owner user and owner group has read+write permissions, but
not execute and the rest of the world is denied access.
Changing Permissions
Use the chmod command to change permissions. You can set permissions
for the user (u), group (g), and others (o). Permissions can also be set for all
(a).
Permissions are set using +, -, and =.
+ adds the permission, - removes the permission, and = sets the permission
as specified and can be used to copy permissions.
For example:
chmod u+x file1 adds the execute permission for the user owner on
file1.
chmod g-w file2 removes the write permission for the group owner on
file1.
chmod a+r file3 adds the read permission for everyone on file3.
chmod o=u file4 copies the user permissions for file4 to the world.

Octal (Numeric) Permissions
Octal permissions are simply a form of shorthand for assigning access to
files and folders.
Read = 4
Write = 2
Execute = 1
No access = 0
Use chmod to assign permissions using the numeric system. For example:
chmod 644 file1 would assign owner read+write (6=2+4), the owner’s
group and everyone would have read permission (4).
Special Permissions
Sticky bit: Can be used on “world writable directories” to prevent users
from deleting other users’ files
Assigning Special Permissions
chmod 1766 <directory> (1 makes it sticky)
Hands-On Exercise 4.1:
Viewing File and Directory Permissions
In this exercise, you will use various commands to view file and directory
permissions.
1. If you are currently logged on as root, skip to step number two. If you’re
not already logged on as root, change to the superuser (root) account with
the switch user command:
su -
Password:p@ss5678
2. Navigate to the root (“/”) directory and use the ls –l command to verify
the existence of /demo. If it is not present, use the mkdir command to
create a new directory called demo:
mkdir demo
3. Now, use the cd command to navigate to /demo, then use the ls -l
command to verify the existence of file1, file2, and file3. If they are not
present, use the touch command to create three files:
cd demo
touch file1 file2 file3
4. Use the following command to view the permissions for the three files
you just created:
ls –l
5. What are the permissions on each of the files for the user? Each of the
files should have “rw” permission for the user.
6. What are the permissions on each of the files for the group? Each of the
files should have “r” permission for the group.
7. What are the permissions on each of the files for the world? Each of the
files should have “r” permission for the world (other).
Hands-On Exercise 4.2:
Changing Permissions Using Alphabetic Expressions
In this exercise, you will use alphabetic and octal syntax to modify file
permissions using the chmod command.
1. While still in /demo, execute the following command to display the
permissions for the files:
ls –l file1
2. Notice that only information about file1 is displayed because you
modified the “ls –l” command by appending “file1” to the end of the
command. What are the permissions for the user on file1?
Again, it should be “rw” for the user on file1.
3. Now, use the following command:
chmod u+x file1
4. Now, execute the following command to display the permissions for the
file:
ls –l file1
5. What are the permissions now for the user on file1? The permissions
should now be “rwx” for the user.
6. Execute the following command:
chmod g+w file2
7. Now, what are the permissions for the group on file2? The permissions
should be “rw-“ for file2.
8. Execute the following command:
chmod a+x file*
9. What happened to the permissions on all files in the directory? All files
should now have “x” permission in addition to any pre-existing
permissions.
10. Execute the following command:
chmod o=u file3
11. Use the ls –l command to view the new permissions. What happened to
the permissions for the world on file3? Are they the same as for the user?
The permission for the world (other) should now match the permissions
for the user.
Hands-On Exercise 4.3:
Octal (Numeric) Permissions
In this exercise, you will practice managing permissions using octal settings
instead of alphabetic expressions.
1. Execute the following command:
chmod 644 file*
2. Using the ls –l command, display the changed permissions. What are
the new permissions for the files? The new permissions should be “rw”
for the user and “r” for the group and the world (other).
3. Execute the following command:
chmod 777 file1
4. Again, use the ls –l command to display the permissions. What

happened? The permissions for file1 are now “rwx” for user, group, and
world.
Setting Default Permissions
The umask command is the user file-creation mask command which allows
you set default permissions.
The umask command uses an octal value that is the inverse of the values
used with the chmod command. In other words, if you wish to set
permissions for a directory to full for the owner, read for the group, and
nothing for the world, you would use chmod as follows:
chmod 740
To set the default permissions for all future files and directories created to
full for the owner, read for the group, and nothing for the world, use the
umask command with a value that is the inverse of the value used with
chmod:
umask 037
Note that this is a universal command and cannot be applied to a single
directory.
Disk Configuration Tools
fdisk /dev/hda starts the disk configuration utility “fdisk” (“hda”
represents the first IDE drive, “sda” would represent the first SCSI drive on
the system.)
Using fdisk returns a different prompt than the customary Linux command
prompt:
Command (m for help):p displays your disk partitions.
Command (m for help):d schedules partitions for deletion (if you make a
mistake and don’t want to delete a partition, you can simply type q to quit
without saving)
Command (m for help):l lists known partition types

Command (m for help):m lists available commands
Related Commands
fdisk –l displays information about partitions on a hard drive
fdisk –t sets the file system for a partition
mkfs will format a partition
fsck will repair a corrupted file system
fsck /mbr will repair a corrupted Master Boot Record
Soundthinking Point:
Partition Management Tool
The open source tool gparted is a great tool for managing disks and partitions.
CHAPTER 5:
Linux Administration
Videos are available for many of the procedures in this chapter at www.soundtraining.net/videos
Introduction
This is a long chapter and one of the most important chapters in this book.
In this chapter, I’ll talk about default Linux directories and how to generally
find your way around in Linux. You’ll learn about the grep tool, which will
become one of your best friends. Additionally, we’ll discuss Linux
compression and archiving tools, plus I’ll show you four different ways to
get help (in addition, of course, to Google).
Objectives
Gain familiarity with default Linux directories
Learn about Linux profiles, both system-wide and user-specific
Practice commonly-used shell commands
Practice switching user accounts without logging off
Move, copy, and rename files
Use the find command to locate files on the system
Practice editing configuration files with the vi text editor
Use the grep tool to filter output (conditional searching)
Create aliases to simplify commands
Learn how to start and stop services (daemons)
Learn how to use Linux compression and archiving tools
Gain familiarity with the Linux boot process, including run levels
Learn the proper way to shut down your system, including shutdown
options
How to get help in Linux
GUI vs. CLI

Since the first graphical user interface (GUI) was created in the Xerox Palo
Alto Research Center in the early 1970s, those of us who work in IT have
debated its benefits and drawbacks. The real issue is not whether to use a
GUI or a command-line interface (CLI); it is about choosing a tool that
works for you and helps you work most effectively. For most of us, that
means that sometimes we’ll use a GUI and sometimes we’ll use a CLI.
I once had a student in a Linux workshop who said his nickname was “No
GUI Louie”. While I remember Louie as a very knowledgeable and capable
IT pro, I have also had knowledgeable and capable students who avoid the
CLI because of its complexity without considering the power it affords an
administrator. I think we limit ourselves when we arbitrarily limit the tools
at our disposal by eliminating GUI or CLI tools. In my own work, I find
that I use both the CLI and GUI, depending on the task at hand and my
personal familiarity with the tools in question. (Okay, I use the command-
line most often, but I’m very grateful for a GUI when performing unfamiliar
tasks!)
Pros to Using a GUI
Faster (sometimes)
Fewer typing errors
Less minutia
Safer (harder to make mistakes)
Can help teach you CLI commands
Cons to Using a GUI
Father away from the “road”
Less control
Java and other issues might make GUI unavailable
Some of the names and labels it creates are strange
Some people are more familiar with the CLI

The minimal and basic server installations of Red Hat/CentOS server do not
include a GUI, although you certainly can install one if you feel the need.
My experience, however, is that most sys admins do not use a graphical
interface with Linux servers and that’s how this book is designed and
written.
One final comment on the subject of GUIs in general: In the past, they were
often buggy and unreliable. Today, graphical interfaces are much improved
over those in the past. If your experience with GUIs in the past was less
than stellar, you might want to consider giving the newer graphical
interfaces a try. Still, the bulk of this book is based on the command line
interface.
Linux Directories
As mentioned previously, everything in Linux/UNIX is based on the file
system. The file system is comprised of various directories (Windows calls
them “folders”.) The root directory (“/”) is at the base of the file system.
Some directories may be on different partitions or drives, but they are still a
part of the file system. Some directories may even be on completely
different computers, perhaps running a completely different operating
system, but they are still part of the file system. What follows is a list of
some of the more commonly found directories in the Linux file system (not
all directories are included on every system):
/ is the root directory
/bin/ and /usr/bin/ store user commands. For example, cp, a user
command is found in /bin.
/boot/ contains files used for system startup including the kernel.
/dev/ contains device files
/etc/ is where configuration files and directories are located.
/home/ is the default location for users’ home directories.
/initrd/ is used to load required device modules and mount the
initrd.img image file during system startup.

/lib/ and /usr/lib/ hold library files used by programs in /bin/ and
/sbin/.
/lost+found/ holds orphaned files (files without names) found by fsck
/mnt/ holds the mount points for file systems that were mounted after
boot.
/opt/ is used primarily for installation and uninstallation of third-party
software. Holds optional files and programs.
/proc/ is a virtual directory (not actually stored on the disk) which holds
system information required by certain programs.
/root/ is the home directory of the superuser “root”
/sbin/ and /usr/sbin/ store system commands. For example, ifconfig,
a system command is found in /sbin.
/tmp/ is the system temporary directory. All users have read+write
access to /tmp/.
/usr/ contains files related to users such as application files and related
library files (“usr” is an acronym that stands for UNIX system
resources).
/var/ (as in “variable”) holds files and directories that are constantly
changing such as printer spools and log files.
The preceding page is a brief overview of Linux/UNIX directories. For a
more complete discussion of Linux/UNIX directory structures, search on
“Filesystem Hierarchy Standard” at www.wikipedia.com.
Linux Profiles
There are two types of Linux profiles: system-wide and user-specific.
System-wide configurations affect all users, while user-specific
configurations affect only a single user. Normally, you must be root to
change system-wide configurations.
User-Specific Profiles
User-specific profile settings are found in the user’s home directory
(/home/don), but they’re hidden by prepending a “.” to the filename.

Examples of profile files include:
.bashrc
.bash_profile
.bash_history
There are many others. You can view the hidden files in any directory by
using “ls -a”.
As mentioned previously, the default settings for user profiles are in
/etc/skel.
System-Wide Configurations
System-wide configuration settings are found almost entirely in /etc. This
is where you find files for configuring Apache, BIND DNS, SSH, and
nearly any other aspect of Linux. For example, in Debian Linux, if you want
to modify settings of your Apache web server, you would probably modify
/etc/apache2/apache2.conf. If you are working with a Red Hat product,
the file most likely is /etc/httpd/conf/httpd.conf. (The reason for using
tentative language is because everything is configurable in Linux and the
person who built your Linux system might have chosen to place the
configuration files elsewhere.) My point here, however, is that regardless of
which distro you’re using, you’re most likely going to find configuration
files in /etc.
Administration Tools and Techniques
Working in Terminal
Most Linux systems configured as servers are managed in a command-line
interface (CLI) and many Linux power-users prefer to manage even their
desktop system in the CLI. (Watch out for anyone who says that either vi or
emacs is their favorite word processor!) Although the graphical user
interface (GUI) tools available for use in many Linux distros have improved
considerably over past versions, as discussed previously the CLI continues
to provide the greatest power and flexibility for configuring and managing a
Linux system. The other benefit to working in a CLI is that each Linux
distro is much more similar in the CLI than in the GUI. For the purpose of
this book, you will do most (actually, nearly all) of your configurations in
the CLI, thus allowing you to make smoother and simpler transitions from
Red Hat/CentOS other distros such as SuSE, Ubuntu, Debian, Slackware,
or even traditional UNIX systems.
Hands-On Exercise 5.1:
Commonly-Used Shell Commands
When you first logon to a Linux system, you may be in a GUI or in a
command-line shell. If you are in a GUI, you can open a terminal window
(a command-line shell) by clicking on Applications in the menu at the top
of your desktop, then mouse over Accessories, and click on Terminal. Once
you are in a command-line shell, you are placed in your home directory
(/home/<username>). You can navigate to other directories by using the
“cd” command, followed by the path to the desired destination.
1. If you are already logged on as root, skip to step two. If you are not
already using the root account, use the su (switch user) command with
the “-“ switch to change to the root account and profile:
su -
Password: p@ss5678
2. cd changes the working directory. Enter the following command:
cd /home
Notice that the prompt changes to display the current directory (home).
3. To return to your own home directory, type the following command:
cd ~
You can also type cd by itself to return to your home directory, but you
should know that the tilde (~) represents your home directory. The tilde is
often used in path statements to represent your home directory.
4. Now, enter the pwd command to print your working directory to your
screen (output directed to the screen is known as standard output or

stdout):
pwd
5. You can go up one level in the directory hierarchy by using the
command:
cd ..
The “..” indicates the parent directory. All directories except for the root
(/) directory have a parent.
6. Once again, enter the pwd command to print your working directory:
pwd
7. Once again, return to your own home directory. This time, simply enter
cd with no tilde:
cd
8. Now issue an ls command to see the contents of the current directory.
Recall from earlier that ls lists the contents of a directory.
There are a variety of switches or options available for use with ls. Some
commonly used ls options:
ls –a: Lists all files including hidden files
ls –l: Long listing, includes permissions, owners, groups, etc.
ls –R: Lists sub-directories recursively
ls –sh: Shows file size (s) in human-readable format (h)
ls -1 (the number “1”): Displays one file per line
ls –d: Tells “ls” to list directory names, but not their contents
Soundthinking Point:
How to Get Out of a Long File Display
You can usually use the command CTRL+c to cancel an operation in Linux. For
example, if you use the ls command to display the contents of a directory with
hundreds of files, you may decide you don’t want to wait for your computer to
display all of them. You can just enter CTRL+c to return to a shell prompt.
You can also use common shell metacharacters with ls:

* is the string wildcard
? is the character wildcard
[] encloses a character set
[-] is a character range
{} is a string set
When you issue the cd command with no parameters, you will be returned
to your home directory.
The mkdir command creates directories.
Hands-On Exercise 5.2:
Working with Directories
In this exercise, you will create a working directory which you will use for
upcoming exercises. You will work with several commands to become
familiar with some of the important tools related to directory and file
management.
1. Log on to your system as the regular user you created during the
installation process.
2. In the terminal window, enter the following commands:
su –
Password: p@ss5678
mkdir /demo
You have just created a directory called demo which is a subdirectory
under the root directory (/). Note: You can create multiple directories at
the same time simply by separating their names with a space.
3. Display the contents of your working directory with the following
command:
ls
Notice that /demo is not displayed. The reason is that /demo is a
subdirectory of the root directory. You are presently in a different
directory.
4. Print your working directory to stdout (your screen) with the following
command:
pwd
Notice that you’re in the super user root’s home directory which is not
where you created /demo.
5. Display the contents of the root directory with the following command:
ls /
Notice that you now see the demo directory, along with several other
directories which are all child directories under the parent /.
Enter the following command to change your working directory to /demo:
cd /demo
6. Now, use the pwd command to print your working directory to stdout (the
screen):
pwd
You should now see that /demo is your working directory.
7. Enter the following commands:
mkdir demo1 demo2 demo3
You have just created three sub-directories in /demo called demo1,
demo2, and demo3.
8. Now, list the contents of /demo with the following command:
ls
You should now see the three subdirectories you just created. To remove
a directory, use the command rmdir.
9. While still in /demo, remove the three directories you just created with
the following command:
rmdir demo1 demo2 demo3
10. Use the ls command again to confirm that the three directories are
removed:
ls

The /demo directory should be empty.
11. You can also use wildcards to simplify file and directory management.
Touch the up arrow on your keyboard several times. Notice that it repeats
the last several commands. Stop when you see the command mkdir
demo1 demo2 demo3. With mkdir demo1 demo2 demo3 visible, press the
Enter key to recreate the three directories.
12. Use the ls command to verify that the three directories have been re-
created.
ls
13. Now, use the “*” wildcard to simplify the rmdir process:
rmdir demo*
14. Use the ls command to verify that the three directories have been
deleted.
ls
Hands-On Exercise 5.3:
Working with Files
Moving, Copying, and Deleting Files
The “mv”, “cp”, and “rm” commands are commonly used commands for
basic file management.
mv <filename> <destination and filename> moves a file to a new
location. This is also used when you want to rename a file.
mv <current filename> <new filename> renames a file.
cp <filename> <destination> copies a file to a new location.
rm <filename> deletes a file.
You can use the -f option to force a move, copy, or deletion without being
asked for confirmation (Be careful when doing this.). You can use the -r
option to move, copy, or delete recursively through directories. (Be
especially careful when using the -r option with the -f option.)
The rm command is absolute and, once invoked, cannot be undone. Best
practice is to always use the -i (interactive) option with rm which prompts
you to confirm that you really do want to delete the file.
The touch command is used to change file timestamps, but it is also a
handy way to create empty files While still in /demo, use the touch
command to create three new, empty files:
touch file1 file2 file3
1. Now, issue the ls command to see the contents of the current directory.
2. The mv command (move) is used when you want to move or rename a
file. While still in /demo, issue the following command to rename file1:
mv file1 file4
3. Use the ls command to view the contents of the directory. The former
file1 should now appear as file4.
The cp command (copy) copies files from one location to another. While
still in /demo, issue the following command to copy file4 from /demo to
/:
cp file4 ../.
(The ../. tells the system to copy file4 to the parent directory (..) and use
the same name on the copy as the original (/.).
4. Use the ls command to view the contents of /demo and notice that file4
is still in /demo. Then, use the ls / command to view the contents of the
root directory and you should see the copy of file4.
5. The rm command (remove) deletes files. Use the following command to
remove file4 from the root directory:
rm /file4
(Notice that you are prompted to confirm the deletion.)
6. Use the ls command with a wildcard to check the root (/) directory for
any files whose names start with fil:
ls /fil*
You should see a message stating “No such file or directory”.
7. Now, use wildcards and options to remove multiple files without being
prompted. While in /demo, issue the following command to remove all
files whose names start with fil:
rm -f fil*
8. Use the ls command with a wildcard to check /demo for any files whose
names start with fil:
ls fil*
As with the previous step, you should see a message stating “No such
file or directory”.
Other Helpful Commands
su – <username> is the switch user command. The hyphen switches the
profile to the new user’s profile. When used with no parameters, the su
command switches to “root”.
pwd, an acronym for print working directory, displays the current working
directory’s full path
ls lists the directory contents
cat <filename1 filename2> concatenates files and prints on the standard
output (usually the display screen)
less <filename> (from the man page) less is a program similar to more,
but which allows backward movement in the file as well as forward
movement. Also, less does not have to read the entire input file before
starting.
more <filename> is a program that filters text to allow paging through a
file one page at a time
whereis is a helpful command for finding configuration files and
executable programs. It does not search through user directories.
Try this: whereis ifconfig
find is another helpful command that will search based on various criteria

including file name, file size, modification date, and permissions. The find
command can only be issued by a user who has permission to view the
target files and directories.
Try this: find <filename within the current directory>
There are many options available for use with find:
find / -type d -name conf will find all the directories named “conf”
find / -user donc will find all files owned by “donc”
find / -name donc will find all files with the same name as “donc”
find -name ‘index.html’ would search for any file named index.html
in the current directory and any subdirectory.
find / -name ‘index.html’ would search for any file named
index.html in the root directory and all subdirectories from root
find -name ‘sshd*’ would search for any file beginning with the text
string “sshd” in the current directory and any subdirectory.
find -name ‘*’ -size +500k would search for any file larger then 500k.
locate is also a command that is useful for finding files on a Linux system.
It uses a database when searching for files, so it’s faster than find.
You can use locate like this: locate <filename>
Files that have been created recently, however, may not be in the database.
You can force an update of the database with the following command:
updatedb
If, for some reason, updatedb is not installed, use the command yum -y
install mlocate to install it.
du is a way of estimating disk usage. When used with no arguments, du
reports the disk space for the current directory. By default, disk space is
printed in units of one kilobyte (1024 bytes). For example, to find out which
directories are largest, use this command:
du -S | sort -n
The upper-case “S” option tells it to report the size of each directory
separately, not including subdirectories. The pipe (|) redirects the output of
“du” to the “sort” utility. The “-n” switch sorts numerically.)
dmesg is a program that helps users print out bootup messages:
dmesg | less
This command will pipe to “less”
An alternative is to redirect the dmesg output to a file. Try this:
dmesg > boot.messages
You will find the boot.messages file in the present working directory. Try
using cat, more, and less to view the contents of the file.
The who command displays currently logged on users:
who displays currently logged on users, their terminal, and their login times.
who -u adds idle time.
whoami displays the name of the user initiating the command.
The simple, one-letter command w also displays currently logged on users,
along with information about the user’s logon session.
Viewing the Contents of a File
Command
Syntax
What it does
cat
cat
<filename>
“cat” is for “concatenate”, cat displays the contents of file(s) named in the command
file
file
<filename>
“file” identifies the type of file as directory, text, or binary.
head
head
<filename>
“head” shows the top ten lines of the named file. You can change the number of lines shown by using the -n option (where “n”
is the number of lines you wish to display).
tail
tail
<filename>
“tail” shows the bottom ten lines of the named file. As with “head”, you can change the number of lines shown by using the -n
option (where “n” is the number of lines you wish to display).
more
more
<filename>
“more” shows the contents of a file, one page at a time. You can see additional pages by pressing the space bar or view
additional lines, one at a time, by pressing the enter key.
less
less
<filename>
“less” is similar to “more” in that it shows the contents of a file, one page at a time, but “less” allows you to move forward
and backward through the file using the arrow keys. Frankly, “less” is much more than “more” and “more” is much less than
“less”. Think about that!
wc
wc
<filename>
When used with no options, “wc” displays the number of lines, words, and characters in the named file. Options are available
which allow you to specify bytes, characters, lines, and words.

Editing Configuration Files
In addition to managing a Linux system by executing various commands in
the CLI or using tools in graphical interface, you will also need to
frequently modify various configuration files.
There are several text editors which are commonly used to edit the Linux
configuration files. In this book, we will be using “vim”, a programmers’
text editor. “vim” is an enhanced version of “vi”. Most people use “vim”,
but refer to it as “vi” (pronounced “VEE-eye”). The upcoming exercise will
help you
become more comfortable with “vi”, a traditional text editor found on most
Linux and UNIX systems. Although many people consider “vi” to be
somewhat awkward to learn, its wide availability makes a fundamental
understanding of its basic commands well worthwhile. Additionally, once
you learn it, vim is incredibly powerful and fast.
The traditional “vi” text editor has been replaced on most systems with
“vim” (“vi” improved). The command set is substantially the same for both
“vi” and “vim”. On most systems, the “vi” command has been aliased to
“vim”.
To open a file with vim, type the following command:
vim <filename>
Operation within vim is done with a variety of commands, some of which
are listed here:
:set nu displays line numbers along the left margin
:set nu! turns off the display of line numbers
:q! quits without saving
:wq writes and quits (saves and quits)
Arrow keys can be used to move the cursor or letter keys can be used:

h to go left
j to go down
k to go up
l to go right
G goes to the end of the file
nG (where “n” is a line number) goes to the specified line in the file
Vim has many more commands and options available. Help is available by
typing :help.
Other Commonly Used Text Editors
Emacs
Emacs is a class of text editors, known for their extensibility. Emacs has
more than 1000 editing commands. It also supports the use of macros to
automate work by combining commands. The name is based on Editor
MACrosS.
Development of emacs began in the mid-70s and continues actively as of
this writing (mid 2014).
Gedit
Gedit is the default text editor for the Gnome desktop environment. It
supports syntax highlighting and is designed to be a very clean, easy-to-use
editor. Gedit is available for both the Linux/Unix and the Windows
platforms.
Notepad ++
Notepad ++ is a text editor for Windows. It is often used as a replacement
for the built-in Notepad text editor. It offers several advantages over
Notepad including tabbed windows, line numbering, and syntax
highlighting.
Hands-On Exercise 5.3:
Working with vim: Using the vim Tutorial
1. An excellent tutorial is available for vi. Although vi is included in the
minimal installation, the tutorial must be installed prior to use. In a
terminal window, enter the following command to install the vi tutorial:
yum install -y vim-enhanced
2. When the installation is complete, start the vim tutorial:
vimtutor
3. Work at least through lesson four.
The following page is a VIM cheat sheet. Feel free to copy it and tape it to
the side of your monitor.
vim Cheat Sheet
Some common vim commands
Press the <ESC> (escape) key to ensure you’re in normal mode, then:
:q!
Quits without saving
:wq
Saves and quits (write quit)
x
Deletes individual characters
i
Inserts text
dw
Deletes to the end of a word (d2w deletes two words, d3w deletes three words, etc.)
d$
Deletes to the end of a line
dd
Deletes an entire line (2dd deletes two lines, 23dd deletes 23 lines, etc.)
u
Undoes the last command
U
Fixes an entire line
<CTRL>R
Redoes the command
p
Puts the last deletion after the cursor
r
Replaces the character under the cursor
cw
Is the “change word” command, that deletes the word (from the cursor to the right) and places you in “insert” mode
c$
Is the “change line” command, that deletes the line (from the cursor to the right) and places you in “insert” mode
<CTRL>g
Shows your location in a file
<SHIFT>G
Moves to the end of the file, <number><SHIFT>G moves to the line number specified in the command, for example
1<SHIFT>G moves to line #1.

/<search term> Searches forward through a file for the search term. For example, “ /apache” will search for the next instance of the word
“apache” in the file
?<search term>
Searches backwards through a file for the search term. For example, “ ?apache” will search for the last instance before the
cursor of the word “apache” in the file
:s/<old>/<new>
Will replace the next instance of “old” with “new”. For example, :s/blue/red will replace the next instance of “blue” with
“red”.
:s/<old>/<new>/g
Will replace the every instance of “old” on the current line with “new”. For example, :s/blue/red will replace the every
instance of “blue” with “red”.
:#,#s/<old>/<new>/g
Will replace every instance of “old” with “new” in the range of lines specified
with the # sign.
:!
Allows you to execute external commands
:set nu
Turns on line numbering
:nohlsearch
Turns off highlighting of search terms
Using grep
grep (global regular expression print) is a filtering utility used in the ‘nix
world to aid in searches. grep is one of the most useful tools in IT. (There’s
even a version available for Windows.)
Some examples:
grep red blue will display lines of text from the blue file that contain
the word “red”
rpm –qa | grep smb will display all installed RPMs with “smb” in their
name
Here is a handy way to use grep. Suppose you need to find a file (or files)
containing a particular text string. Use grep with the –r and –H options to
find all files containing that particular string (remember that everything in
Linux is case sensitive). By default, grep only prints the text string. If
you’re looking for files containing the text string, you must tell grep to print
the filename, too. The –H command does that.
In the following statement, -H prints the filename, –r searches recursively
from the starting point (/etc), and -n displays the line number(s) in the
found files for the text string PASS_MAX_DAYS:
grep -Hrn PASS_MAX_DAYS /etc
This is the output from the previous command:
Figure 38: Using grep to search through the content of files
In the screen capture, you can see where the text string
“PASS_MAX_DAYS” was found in /etc/login.defs on line 20 and
again, in the same file, on line 25.
Hands-On Exercise 5.4:
Conditional Searching
In this exercise, you will search for a unique text string within a file buried
deep within a directory tree.
1. As root, create a deep directory tree with the following command in a
terminal window:
mkdir –p /demo/demo1/demo2/demo3
(The “p” switch creates parent directories when they do not already
exist.)
2. Using “vi”, create a file called “deepfile” in the demo3 directory:
vi /demo/demo1/demo2/demo3/deepfile
3. Enter five lines of text in the file as shown in the screen capture.
Figure 39: Creating a file for use with the grep exercise
4. When you’re finished, use the key combination of ESC, then :wq to save
the file and close vi.
5. While still in a terminal window, enter the following command to find
the text string “I grok Linux” (the n option displays the line number in
the file where the text string is locatedn):
grep –Hrn “I grok Linux” /demo
6. The command should return to stout (standard output) the following
response:
/demo/demo1/demo2/demo3/deepfile:5:I grok Linux

(In the above output, the path is displayed, followed by the line number
in the file where the text string appears, followed by the text string.)
If your results differ, check spelling, remembering that text in a Linux
terminal window is case-sensitive.
Using the alias Command
The alias command is a shell function that allows you to substitute one
command for another. Aliases are also handy for assigning default
arguments to commands, such as ensuring that the “-i” (interactive) option
is always used with the commands cp and mv. The syntax for the alias
command is:
alias <new command>=”<command with arguments>”
alias cps=”cp -s” would create the new alias “cps” which would always
invoke the cp command with the symbolic link argument.
You can see existing aliases by issuing the alias command with no options
at a command prompt.
Aliases can be removed with the unalias command:
unalias cps will remove the “cps” alias.
Soundthinking Point:
Simplify Upgrades with an Alias
A great example of a way to use an alias is to simplify the CentOS Linux upgrade
process by creating this alias:
alias yu=”yum -y update”
With this alias enabled, you can simply type yu to upgrade all existing packages.
Use the steps in the following section to make the alias persistent across
boots.
Hands-On Exercise 5.5:
Creating a Temporary Alias
In this exercise, you will create an alias to shorten the command for
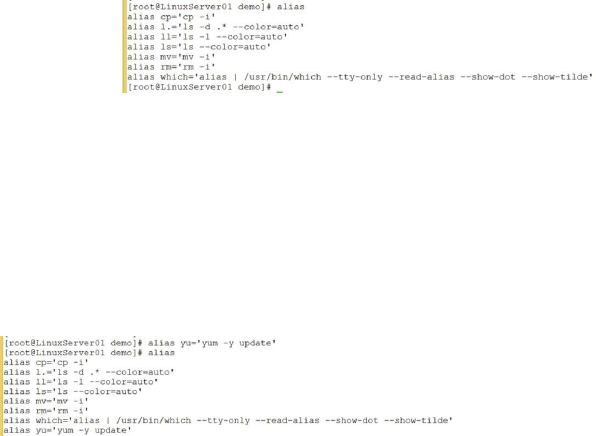
upgrading packages on the system. You will create the alias yu to shorten
the following command: yum -y update
1. Use the command alias to view existing aliases and to ensure that no
alias exists using yu.
Figure 40: Viewing existing aliases
2. Assuming no other alias exists using yu, use the following command to
create the new alias:
alias yu=’yum -y update’
3. Use the alias command again with no parameters to view your newly
created alias.
Figure 41: Viewing the new alias
4. If you have Internet connectivity, try your alias by entering yu at the
prompt. If you set up the alias correctly, your system should upgrade all
packages. Even if you don’t have Internet connectivity, you can still try
the alias. The upgrade will fail, but you’ll still be able to see the alias do
its thing.
Making Aliases Persistent
If you simply use the alias command to create an alias, the aliases are in
effect only for your current session. To make them persistent across logons,
add them to your profile by modifying ~/.bashrc. In the following screen
capture, you can see how three aliases were added to the file, making them
persistent across logons and system boots. Note the leading period in the
filename (.bashrc) which makes it a hidden file in Linux.
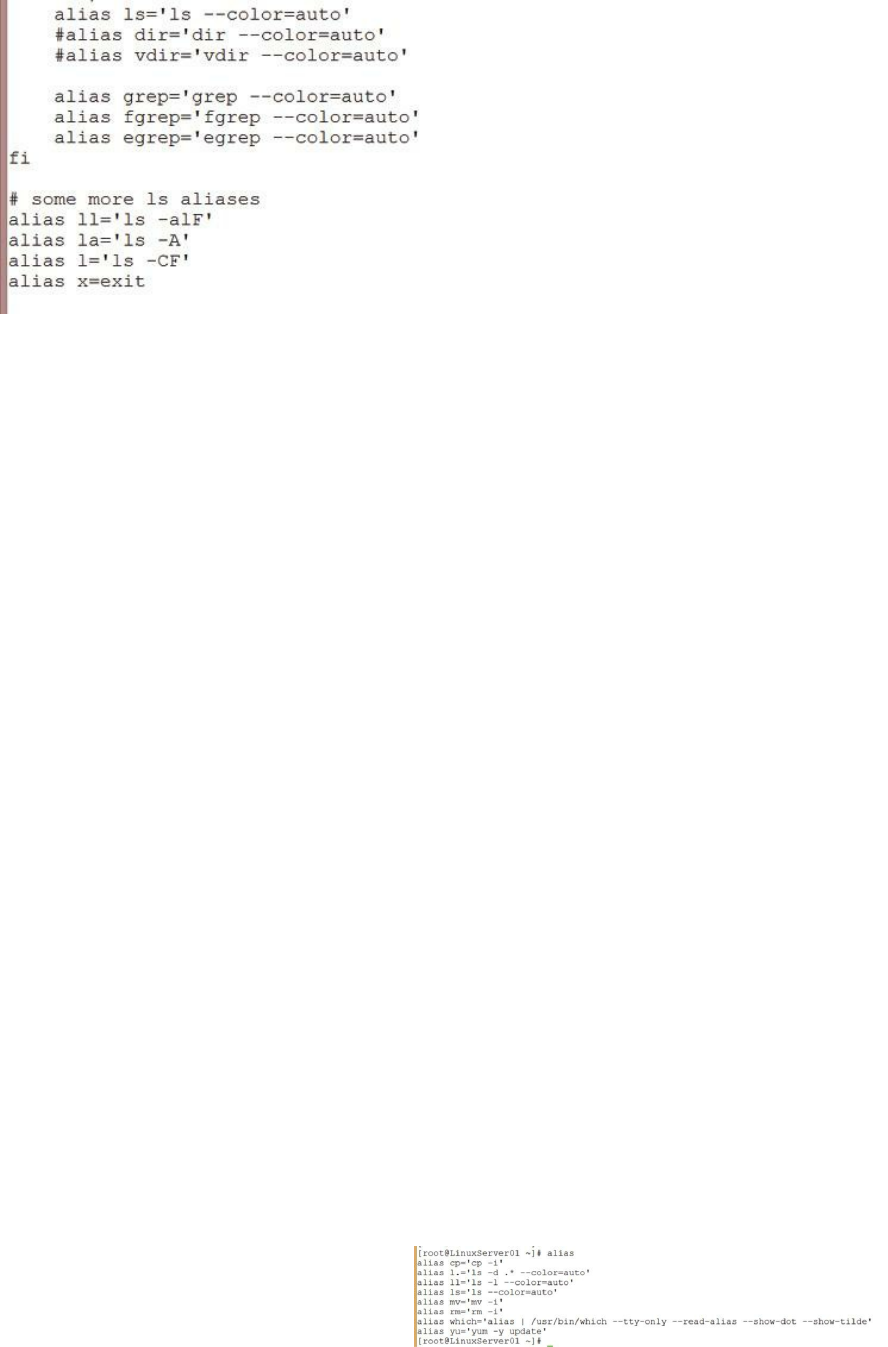
Figure 42: Creating persistent aliases
Hands-On Exercise 5.6:
Creating a Persistent Alias
In this exercise, you will add the yu alias to your profile, so it will be
persistent across logons.
1. Change directory to your home directory with the following command:
cd
2. Make a backup of your .bashrc file with the following command:
cp .bashrc .bashrc.bak
3. Using the vim text editor open your .bashrc file for editing:
vi .bashrc
4. In the section “User specific aliases and functions”, use your arrow keys
to go to the last alias under that header. On my system, it’s “alias
mv=’mv -i’”.
5. Insert a new line and enter the following text:
alias yu=’yum -y update’
6. Touch the ESC key, then type :wq to save and exit the editor.
7. Check your work by using the command less .bashrc. It should look
like this screen capture:
Figure 43: Viewing the newly created persistent alias
Note that you must use straight apostrophes around the command or it
will not work.
8. Now, log off and when you log back on, the alias should work because
it’s part of your profile.
Starting and Stopping Services (The Daemons)
In Linux, the various services that together make up the entire operating
system are called daemons (pronounced DEE-muns). There are daemons for
the DNS name server (named), the Web server (httpd), DHCP (dhcpd), and
so on. Different distros sometimes give the daemons different names. For
example, Ubuntu uses the name apache2 when referring to the Web server
daemon, but Red Hat calls it httpd. When you see odd names ending with
the letter “d”, you’re most likely looking at a daemon name. Most of the
daemons can be controlled through scripts located at /etc/init.d/. For
example, to start the SSH server from a terminal window, you would
execute the command /etc/init.d/sshd start. To stop it, you would
execute the command /etc/init.d/sshd stop.
Different Linux distros might place the scripts in slightly different locations.
Later in the book, you’ll learn how to use the find command to locate such
scripts as well as other files and directories.
As I mentioned earlier, many daemons (services) are started from shell
scripts located in the /etc/rc.d/init.d directory. You can view the
various services by navigating to the directory and issuing the ls -l
command. You’ll notice that the files within the directory are all scripts
(you can tell by the execute permission on each file).
In order to execute scripts from within your working directory, you must
precede the script name with ./, meaning this directory. For example, if
your current directory is /etc/rc.d/init.d and you wish to execute the
script sshd, you would use the command ./sshd Otherwise, you can specify
the entire path to the script, as in the following examples:
Start a service:
/etc/init.d/sshd start
Stop a service
/etc/init.d/sshd stop

Restart a service
/etc/init.d/sshd restart
Soundthinking Point:
The “Service” Tool
Many modern Linux distros, including Red Hat and CentOS, include a script
called service which runs other scripts located in /sbin. The service script will do
essentially the same thing as the above commands, but in a simpler form:
service sshd start
service sshd stop
service sshd status
service sshd restart
Note: When you compile applications from source, you will not be able to use tools
such as those listed without creating customized scripts for each compiled
application. That is one of the benefits of using applications compiled by the distro
vendor instead of compiling them yourself.
To start applications you compiled yourself, you must find the script or
binary that starts the application. Usually, there is a README file included
with the source code that will tell you the default installation paths.
Alternatively, you can use the “find” utility to search the filesystem for files
by name.
Linux Compression and Archiving Tools
Archiving is the process of storing multiple files in a single file to simplify
backup, moving, and transfer. Compression, on the other hand, uses various
algorithms to store files and directories in a way that consumes less space
on the disk or tape. A common practice is to create an archive file and then
compress it.
The tar utility (tape archive) is a commonly-used archiving utility. It
combines many files together in a single archive for tape or disk and allows

the restoration of individual files from that archive.
Soundthinking Point:
The Acronym “tar”
The acronym “tar” comes from the phrase “tape archive”.
Tar usage:
tar <option> <file>
tar -cf demofile.tar file1.txt file2.txt file3.txt will create the
archive demofile.tar including the files file1.txt, file2.txt, and file3.txt. The
options c and f tell tar to create (c) a tar file (f).
tar -tvf demofile.tar will list all files in the archive demofile.tar
verbosely. The options t, v, and f tell tar to list (t), verbosely (v), the
contents of the file (f) demofile.tar.
tar -xf demofile.tar will extract all files from archive “demofile.tar”.
The options x and f tell tar to extract (x) the contents of the file (f)
demofile.tar.
Common compression tools in CentOS and RedHat Linux include gzip
(.gz), bzip2 (.bz2), and zip (.zip). The compression tools used with each
type of file are gzip, bzip2, and zip. The uncompression tools used with
each type of compression are gunzip, bunzip2, and unzip.
Compression usage:
gzip <filename>
gunzip <filename>
bzip2 <filename>
bunzip2 <filename>
zip <filename>
unzip <filename>
bzip2 is recommended due to its high compression rate and availability on
most UNIX/Linux systems. bzip2 can also create a single compressed file
from multiple files.
zip and unzip are compatible with the Windows file compression utility
PKZIP versions 2.04 and later.
Hands-On Exercise 5.7:
Archiving and Compressing with tar and gzip
In the following exercise, you will learn how to create a “tarball” and
compress it using common archiving and compression tools.
1. Enter the following commands to switch user to root and change
directory to /demo:
su -
Password: p@ss5678
cd /demo
2. Once again, use the touch command to create three files in /demo:
touch file1 file2 file3
3. Enter the ls command to confirm the presence of file1, file2, and file3.
4. Create a tarball (tape archive) of the three files called files.tar with the
following command:
tar cvf files.tar file*
5. View the contents of the tarball with the following command:
tar tvf files.tar
6. View the size of the tarball with the following command:
ls –l
7. What is the size of files.tar? It should be about 10,240 bytes.
8. Compress the tarball with the following command:
gzip files.tar
9. Touch the up arrow twice to cycle back to the ls –l command and press
Enter.
10. Notice that files.tar has been renamed to files.tar.gz, indicating that it’s a
gzip compressed file. What is the size of files.tar.gz? It should now be
between 140 and 150 bytes.
11. Now, uncompress files.tar.gz with the following command:
gunzip files.tar.gz
12. Touch the up arrow twice to cycle back to the ls –l command and press
Enter.
13. Notice that the .gz extension has been removed and files.tar is back to its
original size.
14. Remove the tarball with the following command:
rm -rf files.tar
Hands-On Exercise 5.8:
Archiving and Compressing with tar and bzip2
You can perform similar operations with bzip2 using the commands bzip2
and bunzip2. The tar utility also allows you create a tarball and compress it
in a single operation using the “z” switch for gzip or the “j” switch for
bzip2:
1. While in /demo, execute the following command:
tar cvfj files.tar.bz2 file*
2. Use the ll command to display the contents of /demo.
3. Notice that files.tar.bz2 is now compressed. What is its size? It should be
about 140 bytes. What was the size of files.tar.gz? Recall that it was 147
bytes.
In this case, the tarball compressed with bzip2 should be slightly smaller
than the tarball compressed with gzip.
4. Use the following command to view the contents of files.tar.bz2:
tar jtvf files.tar.bz2
5. Notice that, even though compression has been applied to the tarball, you
can still view the contents using the “t” and “j” option with tar.
6. You’re finished with the compression and archiving exercises, so you can
delete the tarball:
rm –f files.tar.bz2
Understanding the Linux Boot Process

The boot process for RHEL/CentOS 6 goes through several stages.
Different systems follow different stage one procedures. In this discussion,
I’ll cover the procedures used by BIOS-based x86 systems. If you’re
running a UEFI-based x86 system, a Power Systems, or an IBM System z,
stage one will be different. Red Hat has documentation available for each of
those systems at http://www.redhat.com.
Here are the basic stages of the boot process on a BIOS-based x86 system:
1. The system loads and runs a first-stage boot loader from the Master Boot
Record located in the first sector on the primary hard disk, which then
loads GRUB (Grand Unified Boot Loader).
2. GRUB loads its configuration file (/boot/grub/grub.conf for BIOS
systems or, for UEFI systems, /boot/efi/EFI/redhat/grub.conf) and
the kernel into system memory. As you’re probably aware, the kernel is
the core of an operating system which provides access to services and
hardware. The kernel(s) are found in /boot and use the following naming
convention: /boot/vmlinuz-<kernel-version>. For example, the kernel
file used in most of the examples in this book is /boot/vmlinuz-2.6.32-
431.el6.x86_64.
3. The boot loader then loads one or multiple initramfs images into system
memory. The kernel uses initramfs to load drivers and needed modules
for booting the system.
4. After the kernel and initramfs image(s) are loaded, control of the boot
process goes to the kernel. The kernel now initializes and configures
memory and connected hardware and executes /sbin/init. See below
for more information about /sbin/init.
5. Control of the boot process is then transferred by the kernel to
/sbin/init. During this process, the system locates the root partition
and filesystem. Both are checked and mounted, then the system starts the
init process, which runs the initialization scripts invoking different
scripts in the /etc rc directories, such as /etc/rc2.d or /etc/rc3.d,

plus Upstart events, ultimately giving you a fully functioning computer
with a logon prompt
6. A login screen is presented to the user.
The /sbin/init Program
The init process
The sysinit is the first script that runs on a Linux system. Sysinit is
responsible for executing initialization and teardown routines.
Sysinit controls the most basic Linux services such as mounting the file
systems specified in /etc/fstab, enabling the swap partition, setting
system-wide environment variables, setting the system time, and other
important operating system tasks.
After sysinit is run, the system is started in the default-run-level specified
in /etc/inittab. Run levels are discussed below.
Any services defined in the default-run-level are started. The services are
controlled by scripts within the rcX.d directory (where “X” is the chosen
run level).
In case you’re curious, rc derives from RUNCOM and stands for run
command.
Run Levels
The number of run levels varies from distro to distro, as do the default
settings in each run level. Here is the default configuration for run levels in
a system running Red Hat/CentOS Linux:
runlevel0
Shut down the system
Do not set the default value to runlevel0

runlevel1
Single-user mode
runlevel2
Multi-user mode, but no NFS support
runlevel3 (the most commonly used run level and usually the best choice
for servers)
Multi-user mode without “X”
runlevel4
Not used
runlevel5 (good for end-user workstations, but not recommended for

servers)
X11
runlevel6
Reboot
Do not set the inittab value to runlevel6
Soundthinking Point:
Run Levels in Other Distros
As a point of comparison, a Debian-based system such as Debian or Ubuntu also
has seven run-levels. Run levels 0, 1, and 6 are the same as in a Red Hat-based
system. Run levels two through five are identical, but can be configured in
whatever way you desire. The default configuration boots the system into run level
2 which is configured as full multi-user mode with graphics (X windows).
You can view the current run level with this command:
runlevel
The display will indicate the current and previous run level(s), separated by
a space.
You can change the current run level with this command:
init <desired run level> or telinit <desired run level>
You can modify the default run level by editing /etc/inittab. Modify the
last line, changing the number 3 to your desired run level.
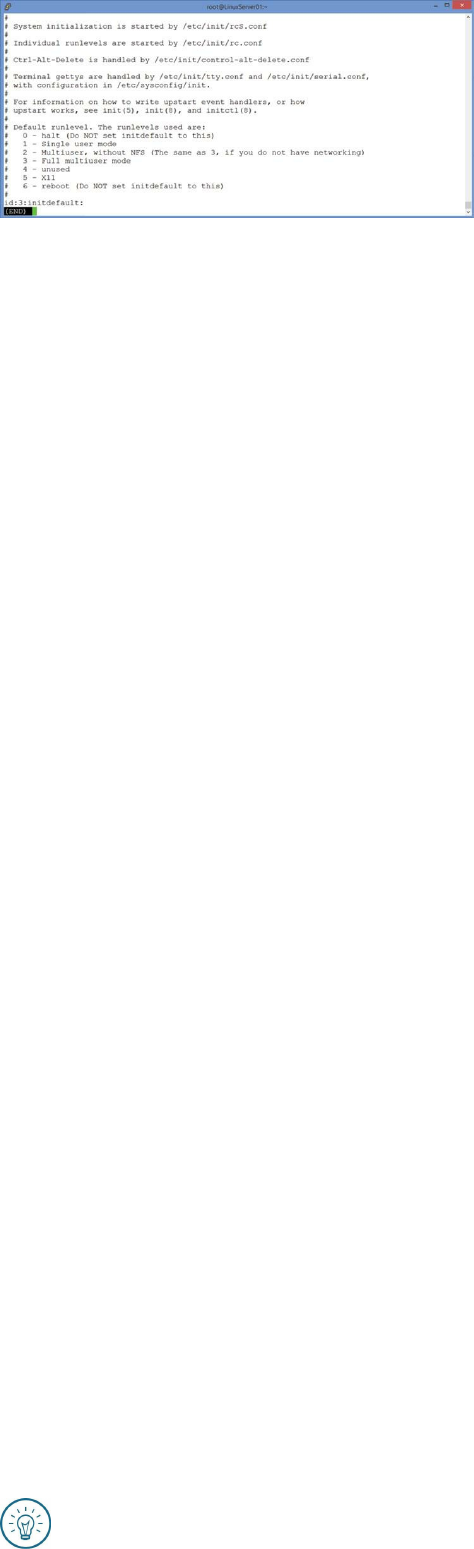
Figure 44: Viewing run levels in /etc/inittab
Controlling the Boot Process
Change the default run level by modifying /etc/inittab, as shown above .
It is possible to more finely control the boot process by modifying scripts
within “rc” directories.
In Red Hat/CentOS Linux, they’re in /etc and identified with names such
as /etc/rc0.d or /etc/rc2.d.
There is an “rc” directory that corresponds to each run level. For example,
rc3.d corresponds to run level 3. Look for the corresponding directory to the
run level you wish to modify. Within that directory, you’ll find scripts for
each of the services on the system. Each script name includes an “S” or a
“K”. Scripts which start with “S” start indicated daemons with the
directory’s run level. Scripts which start with “K” kill daemons within the
directory’s run level. (Scripts in an rc directory are executed in alphabetical,
then numerical order.)
The init command first stops all scripts which start with a K, then starts all
scripts which start with an S. You’ll notice that the scripts are also
numbered, which dictates execution order. Lower numbered scripts are
executed first. In the event of two scripts having the same number, they are
executed alphabetically.
After init has finished its work, Upstart initiates a process for each virtual
console which produces a login prompt. Virtual consoles are started based
on the runlevel configuration in /etc/event.d. Six virtual consoles are
allocated to each of runlevels two through five. Runlevel one has a single
virtual console and runlevels zero and six have none.
Soundthinking Point:
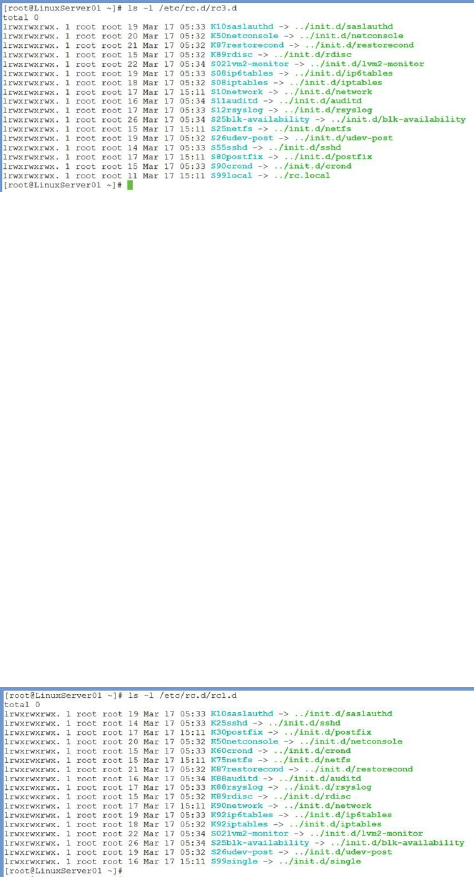
Upstart
Upstart is an event-based replacement for init. Like init, it is the method through
which RHEL/CentOS and other Unix-like operating systems perform tasks related
to system startup.
Figure 45: Viewing the scripts associated with run level 3
Notice in the screen capture that there a number of scripts starting with the
letter “S”. These are the scripts that are started when this run level is
chosen. Note that the “S” is followed by a number, which indicates the
order in which the scripts run. If certain processes were to be killed (such as
rdisc), they would be listed with their name preceded by a “K”.
In fact, in the following screen capture of the directory listing for
/etc/rc1.d, the script that shuts down the system, you can see some of the
script links preceded with the letter K, which tells the system to kill that
script.
Figure 46: Viewing the scripts associated with run level 1
You’ll also notice scripts in /etc/rc.d called rc, rc.local, and rc.sysinit.
The rc script is responsible for starting and stopping services when
runlevels change, rc.sysinit runs once at boot time before all other rc scripts,
and rc.local runs after all the other init scripts. You can put your own
initialization stuff in rc.local instead of working through the System V
runlevels.
Using chkconfig to Manage Startup Daemons (Services)
The chkconfig utility is a convenient way to manage and monitor startup
daemons. It updates and queries runlevel information for system services.
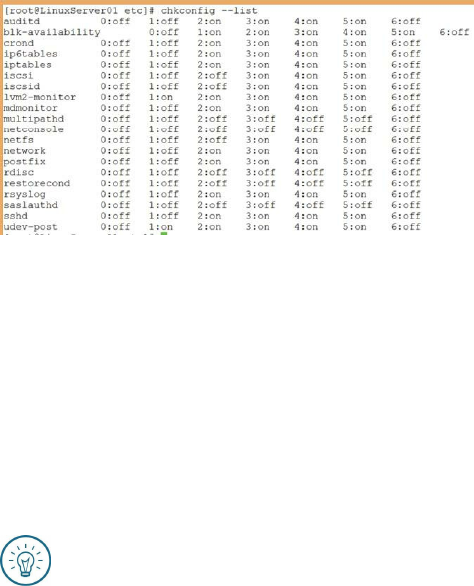
There are several switches available with chkconfig, however, commonly
used switches include:
chkconfig --list which lists all of the services which chkconfig knows
about, and whether they are stopped or started in each of the runlevels.
Figure 47: Using chkconfig to view the services that start at various run levels
chkconfig --level <levels> <service name> <on|off> which starts or
stops the specified service at the specified runlevel(s). For example, the
following command would configure the system to automatically start the
Web server (httpd) at runlevels 3 and 5 upon system boot:
chkconfig --level 35 httpd on
Soundthinking Point:
Change Terminals
As a true multi-user operating system, Linux allows you to change terminals and
even log on as a different user. When in the CLI, simply use the key combination
of Alt-F<#> to change to a different terminal. Type tty to display which terminal is
active.
System Shutdowns and Reboots
As with any operating system, it is very important to shut Linux down
properly. During the shutdown process, services and daemons are stopped
and file systems are unmounted in an orderly fashion. An improper
shutdown can cause corrupted file systems and other problems that may
actually prevent the system from booting successfully.
The use of the “sync” command is recommended to flush the filesystem
buffers, thus synchronizing them with the hard disk.
How to Shut Down the System

Although it is possible to shut down the system by typing “init 0” or reboot
by typing “init 6”, it is recommended to use the shutdown command to
perform an orderly shutdown. There are several switches that can be used
with the shutdown command:
shutdown -r reboots the system
shutdown -h halts the system
shutdown -h 10 shuts down and halts the system in 10 minutes
shutdown -r 23:00 forces a reboot at 11:00 p.m.
shutdown -c cancels a scheduled shutdown
shutdown -c “Ignore the last shutdown message” cancels a
scheduled shutdown and broadcasts the message “Ignore the last
shutdown message”.
shutdown -k 10 doesn’t shut the system down, but broadcasts the
message that the system will go into maintenance mode in 10 minutes.
Many distros also support the use of the “halt” command and the “reboot”
command instead of requiring you to type the entire shutdown command
with switches.
Soundthinking Point:
Working in Terminal (No X)
When working in full multi-user mode, but with no X Windows, you can scroll up
and down through the screen output by using the key combination of Shift-
PageUp or Shift-PageDown.
X Windows
X Windows is the underlying technology used in the Linux/UNIX world to
support graphics. There are several versions of X, but the one most
commonly used with Linux is XFree86.
Think of X as the foundation for the Graphical User Interface (GUI). On top
of the foundation (X) is the user environment. As with X, there are several
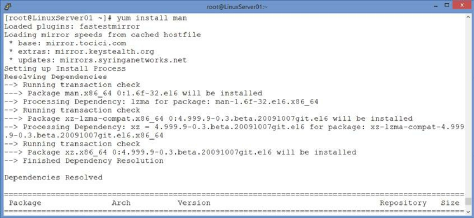
different user environments available, but the two most common are KDE
and GNOME. The user environments provide such things as icons, buttons,
desktop backgrounds, and user applications.
Most implementations of Red Hat/CentOS server (or other server software,
for that matter) will not use a graphical interface, especially at the server
console. For that reason, we’ll limit our discussion of X at this time.
There are several Web-based management tools which provide a graphical
management interface. Those will be discussed later in the book.
Getting Help
Linux includes ample, built-in help including “man” pages, “info”, “help”,
and “apropos”.
man
man formats and displays the online manual pages. There are manual pages
for nearly every command imaginable. Unfortunately, many of the man
pages assume a fairly extensive background in UNIX, therefore they often
require research beyond the initial man page.
The man pages are not installed by default in a Red Hat/CentOS minimal
install, but they can be quickly installed with the command yum install
man.
Figure 48: Installing the man pages
The man pages are divided into sections. Many man entries appear in only
one section, but some appear in multiple sections such as when a command
and a library function have the same name. The sections that are most likely
to be of interest to system and network administrators are sections 1, 5, and
8.

Section 1: user commands (introduction)
Section 2: system calls (introduction)
Section 3: library functions (introduction)
Section 4: special files (introduction)
Section 5: file formats (introduction)
Section 6: games (introduction)
Section 7: conventions and miscellany (introduction)
Section 8: administration and privileged commands (introduction)
Section L: math library functions
Section N: tcl fuctions (Tool command language, a dynamic
programming language)
You can view a man page as follows:
man chown
You can specify a particular section as follows:
man 1 chmod
The above command would display only section 1 (the user commands
section) of the manual for the chmod command. chmod is also a system
call, so if you wanted to see the man page for the system call “chmod”, you
would need to enter the following command:
man 2 chmod
Hands-On Exercise 5.9:
Getting Help with man
1. In a terminal window, install the man pages with the following
command:
yum -y install man
2. After the installation completes, enter the following command:
man ls
3. Press Enter. What happens? The screen output should display the next
line in the man page.
4. Now press the space bar. What happens? The screen output should
display the next page in the man page.
5. Use the arrow keys to move up and down through the page. When you’re
finished, touch “q” to quit. (You can also use the pageup and pagedown
keys to move through the page.)
6. Enter the following command:
man 5 init
7. What do you see in the upper left-hand corner of the screen? You should
see init(5) indicating that you are in the man section 1, the user
commands section.
8. Touch “q” to quit.
9. Enter the following command:
man 8 init
10. Now, what do you see in the upper left-hand corner of the screen? You
should see init(8) indicating that you are in the man section 2, the system
calls section. Notice, also, that the subjects of the two pages are different.
11. Touch “q” to quit the man page.
info
info is an on-line manual reader used by the GNU Project to document
utilities. It is similar to man (and often produces identical documents), but
offers a standardized set of commands for viewing the documentation. The
info utility does not assume as great a depth of UNIX knowledge as man.
info pages are included in a Red Hat/CentOS minimal install.
Basic usage is the same as man:
info chown
The above command will display the info page for the chown command.
Info divides its help into nodes instead of sections. A node, like a section in
man, describes a specific topic at a specific level of detail. In a moment, you
will work through the first few steps of a tutorial on using info.
Hands-On Exercise 5.11:
Getting Help with info
Next, you’ll use the info utility to view help for commands and learn how to
navigate info pages by working through the first part of an info tutorial.
1. Enter the following command to see the info page for chmod:
info chmod
2. The info page for chmod opens.
3. Touch the H key to start a brief tutorial for info.
4. Work through lesson 1.4 of the tutorial. The tutorial continues through
lesson 1.9. Feel free, of course, to work through more screens, but at least
work through screen 1.4.
5. Touch the q key when you’re finished.
help
The --help option is included with most GNU utilities. It displays command
options and other information about the utility:
ls --help
The above command shows options and other information about the ls
command.
Hands-On Exercise 5.12:
Getting Help with --help
This exercise will show you how to use --help with GNU utilities:
1. Enter the following command:
chmod --help
2. Notice that the help screen, albeit abbreviated, shows you the proper
syntax for using the chmod command.
3. Enter the following command:
ls --help
4. Notice that the help screen fills more than one screen. Use the key
combination of Shift-PageUp and Shift-PageDown to move up and down
through the Terminal window.
apropos
apropos looks in the description sections of man pages for text strings.
In order to use apropos, you must first create the whatis database with the
following command:
/usr/sbin/makewhatis
When executed, apropos will return every man page with whose description
contains the specified text string:
apropos edit
Figure 49: Using apropos
The above command displays a list of every man page with a description
which contains the text string “edit”.
apropos is helpful when you know what you want to do, but you are not
certain of the appropriate utility or command to accomplish it.
Hands-On Exercise 5.10:
Getting Help with apropos
Now, you will use the apropos utility to search for man pages pertaining to
a particular topic.
1. Use the following command to view the man page for sudo:
man sudo
2. Notice that the description contains the word sudo.
3. Create the whatis database with the following command:
/usr/sbin/makewhatis
4. Now, enter the following command:
apropos sudo
5. Notice in the output that sudo is listed, along with every other command
whose description includes the word sudo.
6. Also, notice that sudo is listed, not only by itself, but as part of other
commands. In addition to the obvious difference that there are different
commands, notice that each command is followed by a number. The
number indicates which section of man pages contains that particular
documentation.

CHAPTER 6:
Red Hat/CentOS Linux Package Management
Videos are available for many of the procedures in this chapter at www.soundtraining.net/videos
Introduction
Linux applications are called packages. In this chapter, you’ll learn about
downloading packages from repositories using yum. It’s a lot like installing
apps from the App Store or Google Play, except that we’ll do it from the
command line by typing commands instead of by clicking and swiping.
You’ll also learn how to use RPM (Red Hat Package Management) to
install, remove, and manage packages.
Objectives
Learn how to use yum to update your system
Practice installing software with yum
Learn how to add additional software repositories
Gain familiarity with RPM (The Red Hat Package Management System)
Using yum to Update Your System
The yum (Yellowdog Updater Modified) utility is included with
RHEL/Fedora/CentOS for the management of software. It is an interactive,
automated system for maintaining systems using RPM. It allows you to
install, update, and remove software on your computer running the
RHEL/Fedora/CentOS operating system. yum is a command-line utility.
When you use the yum utility, you connect to various repositories for
software installation and/or updates. A repository is a prepared directory or
web site containing software packages and index files.
A common practice after completing the initial installation of a system is to
run yum update to connect to various repositories and update all of the
packages on your system.
Here are some ways you can use yum:
yum –y install <package name> will install the specified package on
your system. yum resolves all dependencies during the installation process.
The option “-y” prevents yum from asking for confirmation before installing
the specified package.
yum -y remove <package name> does what the name implies.
yum list <search term> will list packages whose name matches the
specified search term. You can list installed or available packages using
appropriate options, for example to list installed options use the command
yum list installed and to list available packages, use the command yum
list available <package name>.
yum –y update will update all packages on your system. The –y option will
answer “yes” to all prompts such as confirmation that you want to install or
update a particular package. (Use with care!)
yum –y update [package name] will update only the specified package on
your system. yum resolves all dependencies during the update process. The
option “-y” prevents yum from asking for confirmation before updating the
specified package.
yum check-update does what the name implies; it checks your machine to
see if any updates need to be applied.
yum search [text string] will search for any packages matching the
string in the description, summary, packager, and package name fields in
the rpm.
yum deplist <package name> displays a list of all dependencies and the
packages that provide those dependencies.
As you can imagine, there are many other options available with yum. See
the yum man page for details.
Hands-On Exercise 6.1:
Installing Software with yum
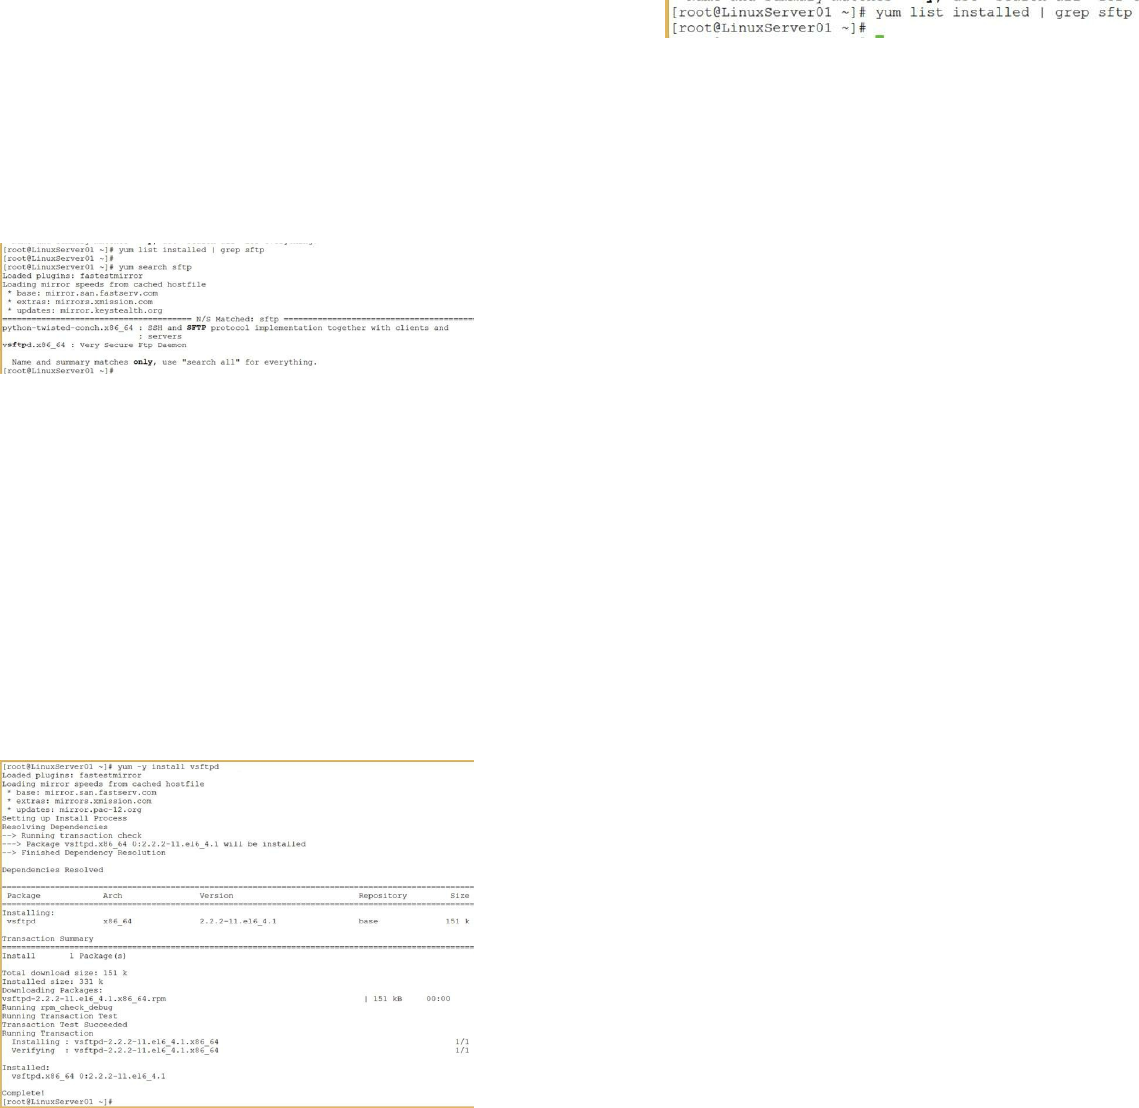
In this exercise, you will install the vsftp (Very Secure FTP) package using
the several yum commands, including yum install. You will use several
other yum and rpm tools to learn more about the package. You will then
remove it using the command yum remove.
1. Ensure you’re logged in as root.
2. Use the command yum list installed | grep sftp to check if vsftp
is already installed. Since it most likely is not installed, your system
should simply return a command prompt.
Figure 50: Using yum list to confirm an installed package
Use the command yum search sftp to check the repos for the vsftp
package. Notice that I only include sftp, but the search results found
vsftpd.
Figure 51: Using yum search to find a package in the repositories
In this case, it’s easy to see the package since there are only two results
and only a single relevant result. Other times, you might see dozens of
items in the results. Often, the package you’re looking for has a name
which includes the processor architecture. In this screen capture, it’s
x86_64, because I’m working with a 64-bit system. If you’re working
with a 32-bit system, the results will probably say i386.
3. Use the command yum -y install vsftpd to install the package.
Figure 52: Using yum to install a package

When the installation is complete, the system will return a command
prompt.
4. Repeat the earlier command yum list installed | grep vsftp to see
the newly installed package.
Figure 53: Using grep to verify that yum installed a particular package)
You could also use the command yum list installed vsftpd (without
grep).
5. Now, use the command yum info vsftpd.x86_64 to view information
about the newly installed package.
Figure 54: Getting information about a package with yum list
6. Now, remove the package with the command yum remove
vsftpd.x86_64. Again, use the command yum list installed | grep
vsftpd to confirm the package was removed.
Figure 55: Using yum remove to remove a package
As you can see, the yum utility offers simplified package installation,
information, and removal.
In addition to installing individual packages, yum can also install and
manage groups of packages through its groupinstall feature, a part of yum
groups. By using yum groups, it’s not necessary for you to manually install
related packages individually. For example, the yum group “Web Server”
not only installs httpd, it also installs crypto-utils, httpd-manual, mod_perl,
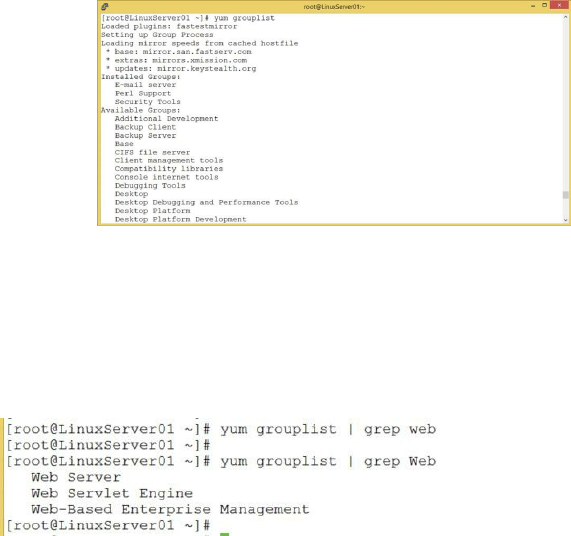
mod_ssl, mod_wsgi, and webalizer, plus all their dependencies.
Hands-On Exercise 6.2:
Package Management Through Groups
In this exercise, you will list available groups, install a group, and remove a
group.
1. Use the command yum grouplist to see a list of all the available
package groups.
Figure 56: Listing available package groups with yum grouplist
2. Now, add a grep filter to look for groups related to “Web” by using the
command
yum grouplist | grep Web (Remember, everything in Linux is case-
sensitive.)
Figure 57: Using grep with yum grouplist to find a specific package
3. Use yum groups to install the Web Server group with the following
command:
yum groupinstall “Web Server”
(Notice the use of quotation marks around the package name since it
consists of two words. Also, notice that the two words are capitalized.)
Stand up and stretch while this installation takes place. It has to
download and install 34 packages which takes about a minute,
depending on your connection speed and your computer’s speed. Do
some shoulder rolls and neck rolls while this takes place. Seriously.

(060901_yum groupinstall.png)
4. When it’s finished, as usual, it will return a command prompt. In the
following screen capture, you can see all the packages it installed.
Obviously, even with automatic dependency installation, this is still a lot
less work than installing the packages manually.
Figure 59: Completing a yum groupinstall
5. Now, remove the group with the command yum groupremove “Web
Server”
Figure 60: Removing packages with yum groupremove
As with yum groupinstall, the process of uninstalling packages is much
easier with yum groupremove.
Additional Repositories
Many Linux users add various repositories to add additional functionality to
their system. Some repositories are maintained to support a single vendor’s
application(s). Others are maintained to support a variety of third-party
packages. One of the most commonly added repositories is RepoForge.
RepoForge is maintained by Dag Wieers, a Linux and open source
consultant based in Belgium. It is generally regarded as stable and reliable.
It is not, however, maintained or supported by CentOS or RedHat and,
therefore, should be used with some caution.
How to Use Additional Repositories
To configure your system to use additional repositories, you can often use
downloads available at the repo’s site. The download will automatically
configure your system to connect to the desired repo for updates. Other
repos will require manual configuration. An example of manual
configuration is included in the Webmin section of this document.
Hands-On Exercise 6.3:
Installing Additional Repositories
In this exercise, you will add the RepoForge (formerly RPMForge)
repository for additional package installation and updates. Suppose you
want to install a popular database management tool called phpMyAdmin. If
you use the command yum search phpmyadmin to check the repos for it,
you’ll come up empty. That’s because phpMyAdmin is not available
through the default CentOS 6 repositories (repos). In order to install it, we
need to add the RepoForge (formerly RPMforge) repo (not a bad idea
anyway). This exercise requires Internet connectivity.
1. Start by checking your version of CentOS with the following command:
cat /etc/redhat-release
These steps are based on CentOS 6.5. If you’re running any version of
CentOS 6.x or RedHat 6.x, these procedures should apply to you. It has
not been tested on other versions, but may work.
2. Next, check your system’s architecture with the following command:
uname -r
Your system should be running either 32-bit (i686) or 64-bit (x86_64)
architecture. If it’s anything else, this guide probably doesn’t apply to
you, but you might be able to perform similar steps on your system and
get it to work.
3. Use the rpm utility to download and install the appropriate package for
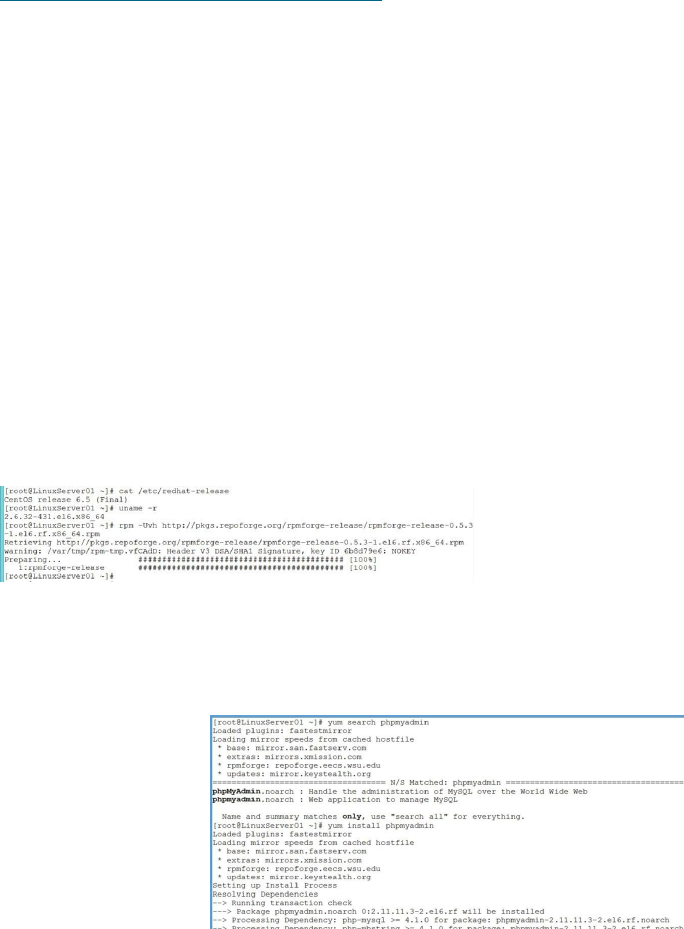
your architecture and RedHat/CentOS version from
http://repoforge.org/use/. (The rpm utility is discussed below, following
this exercise.) I find it easiest to visit the RepoForge website in a browser
to get the appropriate link for downloading their software. Then, I enter
the following command on x86_64 systems (all on a single line). If your
system is based on 32-bit architecture, your package file will include
i686 instead of x86_64. Make sure you choose the correct package for
your architecture.:
rpm -Uvh http://pkgs.repoforge.org/rpmforge-release/rpmforge-
release-0.5.3-1.
el6.rf.x86_64.rpm
(or whatever the most current link is).
Figure 61: Installing a different repository
4. Now, check the availability of phpMyAdmin with the command yum
search phpmyadmin and install it with the command yum -y install
phpmyadmin.
Figure 62: Searching for a package after adding a new repository
The installation worked because your system now has access to a much
greater variety of software packages available through RepoForge. In
chapter fifteen, you’ll learn how to work with phpMyAdmin.
Prioritizing Repositories
When using third-party repositories, it is possible that the third-party repo
might update a package installed by the base repo. Although that might
seem desirable under some circumstances, a more conservative approach
might be desirable on, for example, mission-critical systems.
You can enable priorities to limit which repo can upgrade packages

installed by another repo. For more information about implementing
priorities, visit http://wiki.centos.org/PackageManagement/Yum/Priorities.
Hands-On Exercise 6.4:
Using yum to add the System-Config Utilities
There are several utilities included with Red Hat/CentOS that add
considerable functionality to your system and greatly simplify
administration. They are the system-config packages. While we’re still in
the package management chapter, let’s go ahead and add some of them
now.
We’re going to add the following two packages that are normally installed
as part of a Basic Server installation:
system-config-firewall-tui
system-config-network-tui
These two packages aid in network and firewall configuration. Since we
chose the minimal installation in chapter one, they were not installed, but
we’ll install them now.
1. Use the following command (all on a single line) to install them, using
yum:
yum install -y system-config-firewall-tui system-config-
network-tui
Figure 63: Installing the system-config utilities
2. Notice that you were able to install both packages as part of a single

command. When you need to install multiple packages, the ability to
string multiple packages together in a single command will make your
life a little simpler.
3. You can confirm the installation by typing the following command:
rpm -qa | grep system-config
You’ll use both the network and the firewall package later in this book.
RPM: The RedHat Package Manager
RPM is the RedHat Package Manager. It is designed to simplify the
installation, maintenance, and removal of software in the Linux
environment. It allows ease of updating existing packages and verification
of packages. Verification of packages is useful when parts of packages may
have been inadvertently deleted.
In the previous exercises, you’ve already used the rpm command to install
and verify packages. Now, I’ll give you some detail about how it works.
RPM packages can only be installed by the root user.
RPM usage:
rpm –ivh [package name].rpm (where “i” represents “install”, “v”
represents “verbose”, and “h” represents “hash” [displaying the
installation progress])
rpm –qa | grep [package name] (where “q” represents “query” and
“a” represents “all”)
rpm –Uvh [package name] is used to upgrade packages and can be used
to install some types of packages. Frankly, this command is often used
when doing a fresh installation, too.
rpm –e [package name] is used to remove packages.
rpm –Va will verify all RPM packages.
You can get information about an RPM package with this command:
rpm –qi [package name]
Find the location where the files were copied with this command:
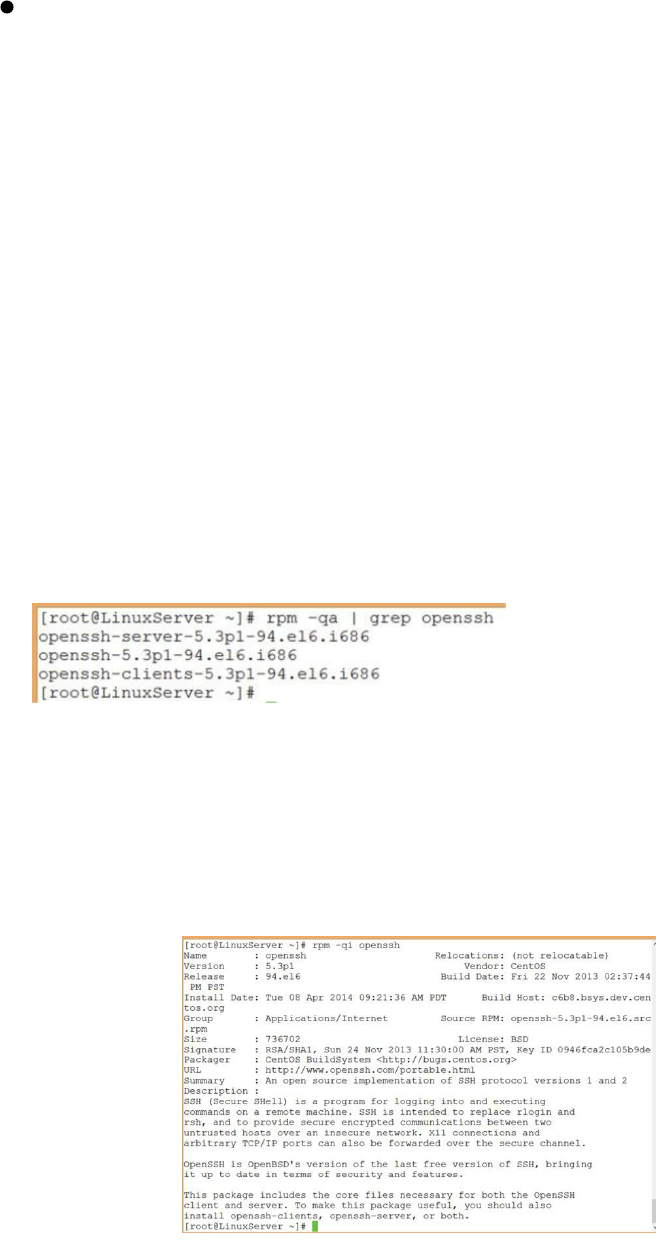
rpm –ql [package name]
Determine what rpm a file came from with this command:
rpm –qf /path/filename
Hands-On Exercise 6.5:
Using RPM
In this exercise, we’ll use the rpm utility to determine whether a particular
package is installed on our system and, if it is, to learn more information
about it.
1. Use the command rpm -qa to display a list of all packages installed on
your system.
2. Notice that the output is very long and overwhelming. Now, use the
command rpm -qa | grep openssh to see if that package is installed.
Figure 64: Querying for packages using rpm and grep
3. In this particular output, we can see three openssh packages that are
installed. Let’s say we’re interested in learning more about the general
openssh package.
4. Next, use the command rpm -qi openssh to learn information about the
package.
Figure 65: Using rpm to query for information about a particular package
5. Finally, use the command rpm -ql openssh to see the locations where
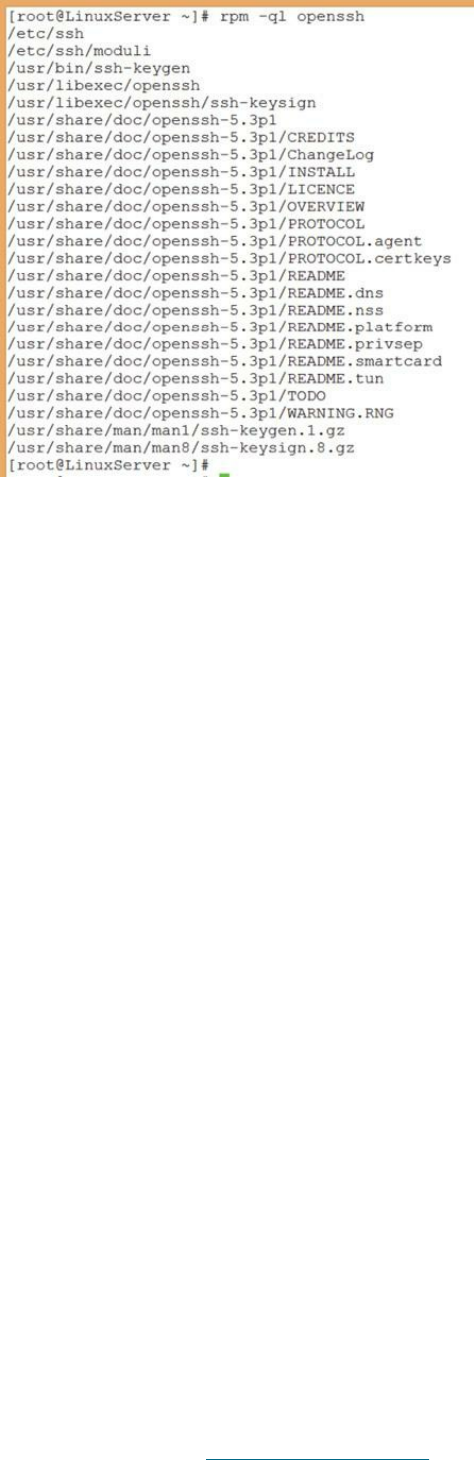
files from the package were copied.
Figure 66: Using rpm to find the location of files in a particular package
In this exercise, you’ve seen some of the more common uses of the rpm
command. In the past, rpm was frequently used to install software from
DVDs or CDs. With the advent of constant Internet connectivity, yum is
probably the more frequently used installation tool, but rpm, as you’ve seen
in the two preceding exercises, offers considerable power for package
management. The rpm utility is used when you need to install software
from either a CD or DVD instead of installing it from the Internet.
Managing the RPM Database
Occasionally, the RPM database will become corrupted. This can occur
when an RPM process is forcibly stopped using the “kill -9” command.
Symptoms of a corrupted database are known and installed RPMs not being
displayed when an RPM query is initiated. To repair a corrupted RPM
database, begin by deleting the existing database:
rm -f /var/lib/rpm/__db*
(That’s two underscores before db*.)
Next, rebuild the database:
rpm -vv --rebuilddb
For more information about RPM: man rpm or visit www.rpm.org.
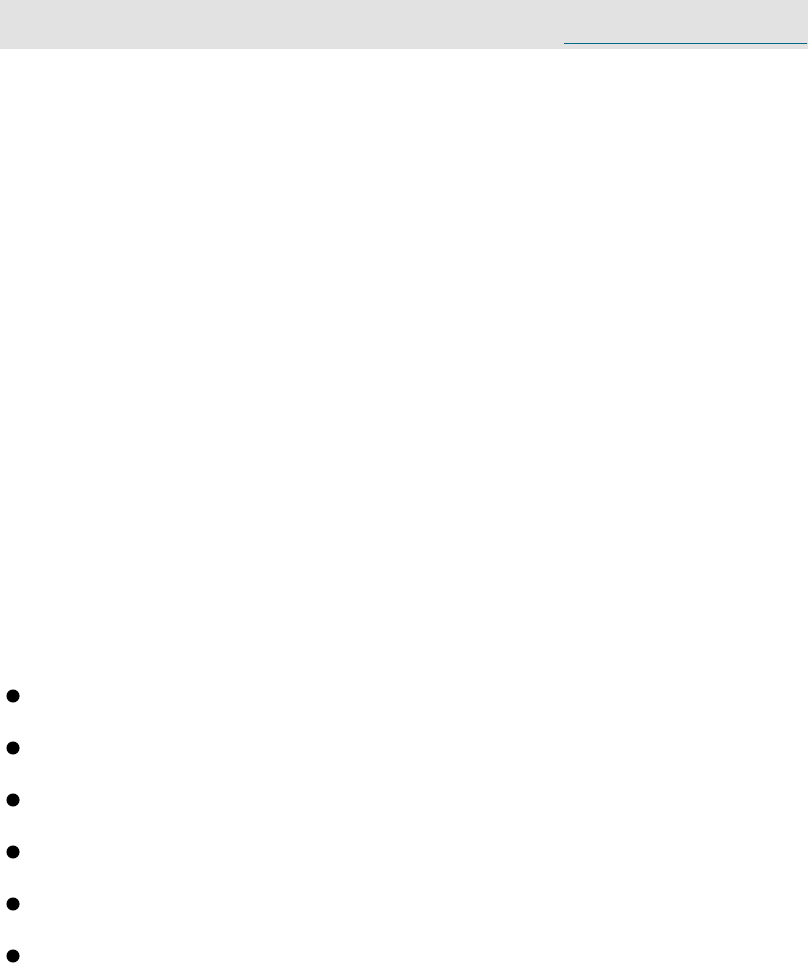
CHAPTER 7:
Networking with Red Hat/CentOS Linux
Videos are available for many of the procedures in this chapter at www.soundtraining.net/videos
Introduction
Scott McNealy, the former CEO of the legendary Sun Microsystems, used
as his company’s motto, “The network is the computer.” There’s a lot of
truth to that statement. Although there are certainly many standalone
computers, most of the time our systems are connected to each other and to
the global Internet.
In this chapter, we’ll not only connect computers to each other and the
Internet, we’ll also cover networking tools such as DNS and DHCP.
Get ready to feel a sense of connection!
Objectives
Find and view the network configuration files
Configure network interfaces
Install and use networking tools
Practice using ifconfig
Work with /etc/resolv.conf to configure the DNS client
Install and configure the DHCP server component
Network Administration
Network Configuration Files
The /etc/sysconfig/network file contains non-interface specific
parameters such as enabling networking, the persistent hostname, and the
default gateway.
Network Card Configuration
Check the /etc/sysconfig/network-scripts/ifcfg-eth[x] file (where
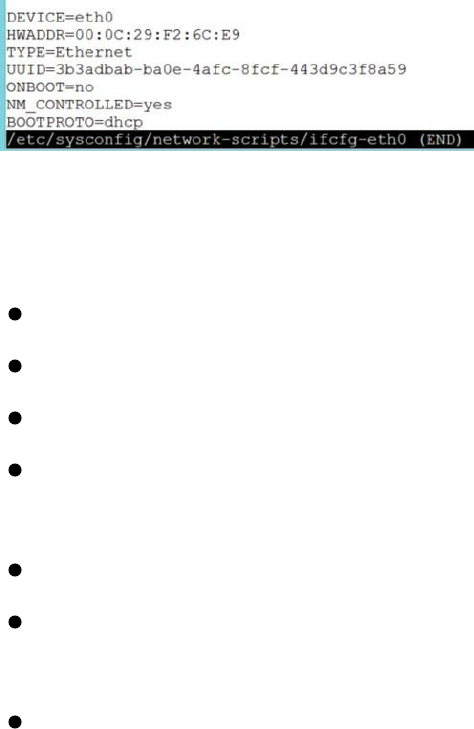
“x” is the number of the interface to be configured. For example, if your
system has only a single interface, its configuration file is
/etc/sysconfig/network-scripts/ifcfg-eth0. The initial configuration
of eth0 looks like this:
Figure 67: The default network card configuration
Here’s an explanation of the lines in the above configuration:
DEVICE=eth0: The name of the interface.
HWADDR=00:0C:29:F2:6C:E9: The interface’s MAC address.
TYPE=Ethernet: The interface type.
UUID=3b3adbab-ba0e-4afc-8fcf-443d9c3f8a59: The universally unique
identifier for the network interface.
ONBOOT=no: Whether the interface is activated on boot.
NM_CONTROLLED=yes: This is whether the network interface device is
controlled by a network management daemon.
BOOTPROTO=dhcp: This is how the interface obtains its IP address.
Mainly, you’ll either configure it as dhcp or static, although other options
are available.
From the above configuration, we can see why it was necessary earlier to
activate the network interface, since its configuration file has it in a down
state on boot.
There are many settings which can be controlled through the interface
configuration file. A sample interface configuration file might look like this:
DEVICE=eth0
BOOTPROTO=static
ONBOOT=yes
USERCTL=no
TYPE=Ethernet
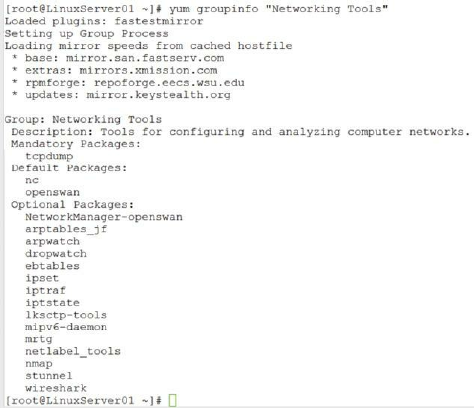
IPADDR=10.16.0.100
NETMASK=255.240.0.0
GATEWAY=10.16.0.1
NETWORK=10.16.0.0
BROADCAST=10.31.255.255
This file can be modified to meet your particular needs. Changes take effect
upon a restart (service network restart).
Hands-On Exercise 7.1:
Configuring the Network Interface
In this exercise, you will modify the network interface to always start on
boot.
1. Use the vim text editor to modify /etc/sysconfig/network-
scripts/ifcfg-eth0 with the following command:
vi /etc/sysconfig/network-scripts/ifcfg-eth0
2. Use your arrow keys to navigate to the line that says ONBOOT=no
3. Modify it to say ONBOOT=yes
4. Save the file with the key combination of :wq (remember, you must press
ESC to leave the editing mode before you can enter vim commands).
Installing Networking Tools
There is a yum group which includes many helpful networking tools, as you
can see in the screen capture on the next page.
Figure 68: Using yum groupinfo to view the packages included with networking tools

Install it with the command yum groupinstall “Networking Tools”.
Figure 69: Using yum groupinstall to install networking tools
RHEL/Fedora/CentOS Network Configuration
As an alternative to manually editing the text configuration file,
RHEL/Fedora/CentOS provides a text-based tool that can be used to
configure the network card. You can access it by typing system-config-
network at a command prompt.
Hands-On Exercise 7.3:
Adding a New Network Interface
In this exercise, you will add an additional network interface to your virtual
machine in VMWare Workstation, then you will configure it manually
using the text-based configuration tool. (If you’re working with a physical
machine, open the box and add a network card.)
1. In VMWare Workstation, click on VM, then click on Settings.
2. At the bottom of the Settings window, click on Add…
3. Select Network Adapter and click the button labelled Next >.
Figure 70: Adding an additional network adapter in VMWare Workstation
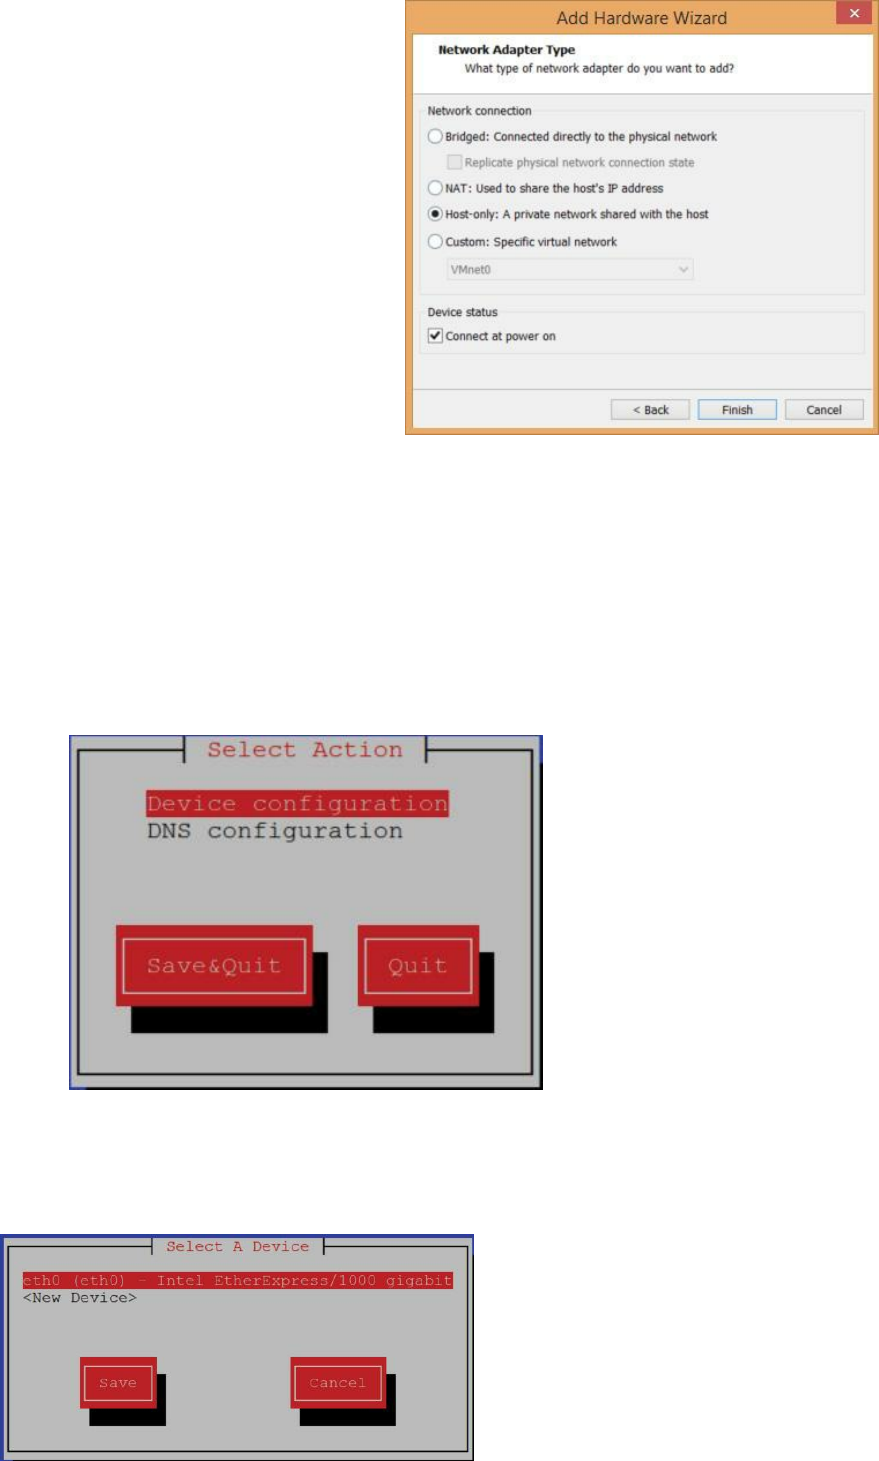
4. In the Add Hardware Wizard window, push the radio button for Host-
only and click the button labelled Finish.
Figure 71: Choosing the type of connection for the new network adapter
5. Click the button labelled OK.
6. Restart the virtual machine.
7. After the system finishes restarting, while logged on as root, from within
the CLI, type system-config-network to open it.
8. When the tool opens, you can choose from either Device configuration or
DNS configuration.
Figure 72: Starting to configure the new network adapter
9. Choose Device configuration by pressing the Enter key (remember that
you’re still operating in a command-line interface, so you mouse will
have no effect).
Figure 73: Choosing the device to configure
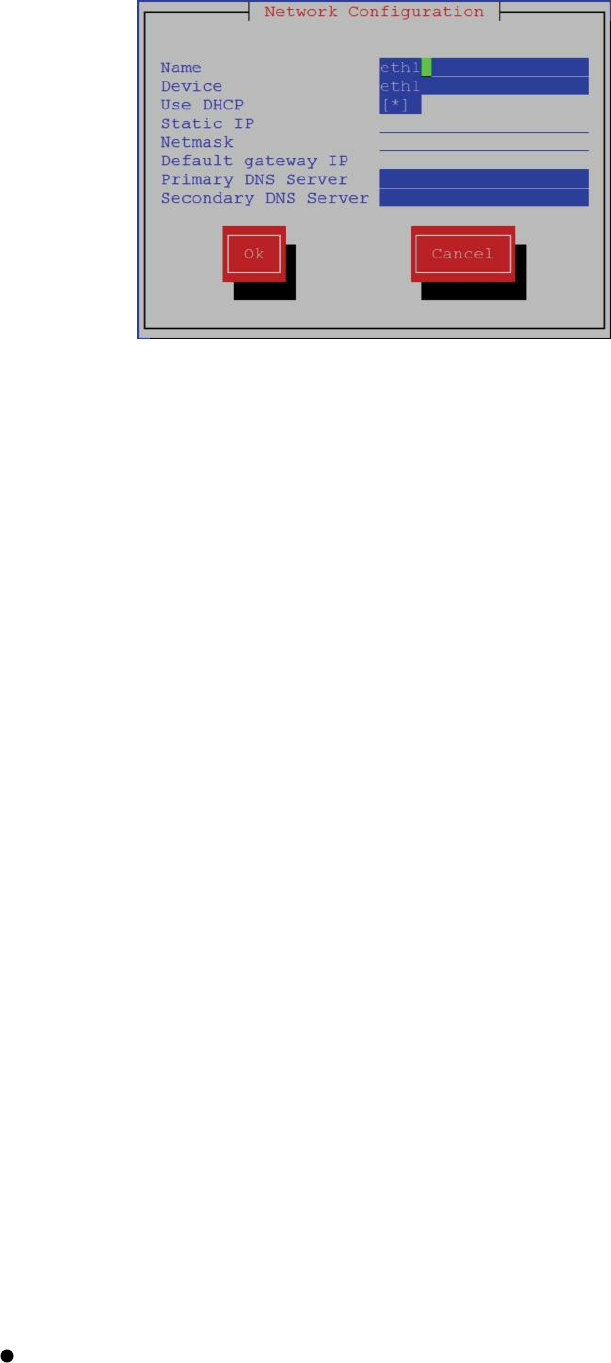
10. Use the arrow key to move the highlighter down to <New Device> and
press the Enter key.
11. In the next window, choose Ethernet as the device type to add and press
Enter.
Figure 74: Setting the configuration for the new network adapter
12. In the Network Configuration window, enter eth1 for both the Name and
the Device. Use the arrow key to move to the use DHCP field and press
the space bar to place an asterisk in the DHCP field.
13. Use your tab key to highlight Ok and press the Enter key.
14. In the Select A Device window, ensure that Save is highlighted and press
the Enter key.
15. In the Select Action window, use your arrow key to move the highlighter
to Save&Quit and press the Enter key.
16. Use the command service network restart to restart network
services.
17. Now, in a command window, enter the command ifconfig. You should
see the new interface. If not, enter the command ifup-eth1 to enable it,
then repeat the command ifconfig to see the new interface.
As you probably noticed during the exercise, you could have configured a
static IP address on the interface instead of having it get its IP address from
a DHCP server. We’ll do that in a moment.
Using ifconfig
ifconfig, typed by itself, will show you if the network card is working

and display a variety of information about its configuration including its
IP address.
ifconfig eth0 10.20.30.1 netmask 255.0.0.0 will assign the IP
address 10.20.30.1 to the first NIC (Addresses assigned in this manner
are not persistent. In other words, the address will revert back to the
original address upon restart.)
ifconfig eth0:0 10.20.30.1 netmask 255.0.0.0 will assign a
second IP address of 10.20.30.1 to the first NIC. This process is known
as IP aliasing.
ifconfig eth1 10.20.30.1 netmask 255.0.0.0 will assign the IP
address 10.20.30.1 to a second NIC.
ifdown eth[x] disables the network card specified
ifup eth[x] enables the network card specified
/etc/resolv.conf
Although it is perhaps more closely related to DNS, the file /etc/resolv.conf
also warrants examination. /etc/resolv.conf contains several different
configuration directives including nameserver, domain, and search. There
are others, but we’ll focus on these three.
The following screen capture shows the contents of /etc/resolv.conf on the
author’s demonstration computer.
Figure 75: Viewing /etc/resolv.conf
The nameserver directive is the IP address in dotted decimal notation of the
name server(s) that should be queried. You can specify up to three name
servers.
The domain directive is the local domain name. If none is specified, as in
the screen capture, this value is determined from the local host name, using
everything after the first “.”. If there is no domain part in the local host
name, the root domain is assumed.
The search directive specifies the search list for host name lookup. The
search list is normally determined from the local domain name. By default,
it contains only the local domain name. According to the man page for
resolv.conf, “you can change the default behavior by listing the desired
domain search path following the search keyword, with spaces or tabs
separating the names. Most resolver queries will be attempted using each
component of the search path in turn until a match is found. This process
may be slow and will generate a lot of network traffic if the servers for the
listed domains are not local. Queries will time out if no server is available
for one of the domains. The search list is currently limited to six domains
and a total of 256 characters.” Note in the screen capture how the
resolv.conf file was configured automatically by /sbin/dhclient-script
with values provided by the DHCP server in the author’s office network.
Hands-On Exercise 7.3:
Configuring Your IP Address
Assumptions: This exercise assumes you’re connected to a private network
with a network address of 192.168.0.0/24, a DNS domain name of
soundtraining.local, and a DNS server located at 192.168.0.1. If your
settings are different, you’ll need to adjust the settings in this exercise
accordingly.
In this exercise, you will configure interface eth1 to connect to your local
network and leave interface eth0 as your connection to the Internet.
The following steps will be performed on LinuxServer01.
1. If you’re already logged on as root, skip to step two. If you’re not already
logged on as root, do so now.
2. Navigate to /etc/sysconfig/networking/devices:
cd /etc/sysconfig/networking/devices
3. Edit the network configuration file to add a static IP address for your
system:
vi ifcfg-eth1
4. Make the following changes and additions (it is not necessary to delete
any lines such as HWADDR or TYPE):
DEVICE=eth1
BOOTPROTO=static
ONBOOT=yes
IPADDR=192.168.0.1
NETMASK=255.255.255.0
PEERDNS=no
When you’re finished, touch the ESC key, then :wq to save the file and
exit vi.
5. You must also modify interface eth0 so that it doesn’t modify the DNS
client with DNS settings obtained from a DHCP server. Use the vim text
editor to modify /etc/sysconfig/networking/devices/ifcfg-eth0
with the following command:
vi /etc/systconfig/networking/devices/ifcfg-eth0
6. Add the line PEERDNS=no to the bottom of the file.
7. Save the file and close vim with the command :wq.
Hands-On Exercise 7.4:
Manually Configuring the Hosts File
1. The Linux hosts file is located at /etc/hosts. It must be modified to map
the computer’s new host name to its IP address:
vi /etc/hosts
2. Add the following line (leaving the existing line in place):
192.168.0.1<tab>LinuxServer01.soundtraining.local<tab>LinuxServer01
3. When you’re finished, touch the ESC key, then enter :wq to quit vi
4. Restart the network card:
service network restart
5. Review the changes:
ifconfig
Hands-On Exercise 7.5:
Configuring the DNS Client
In this exercise, you will configure the DNS client to use the Google public
DNS servers and LinuxServer01 as the DNS servers.
1. Set the host name of the system:
vi /etc/resolv.conf (this is the correct spelling, notice the absence of
the trailing “e” on resolv)
2. Add the following lines to /etc/resolv.conf:
search localdomain soundtraining.local
nameserver 8.8.8.8
nameserver 8.8.4.4
nameserver 192.168.0.1
When you’re finished, touch the ESC key, then :wq to exit vi. Then,
reboot your system.
DHCP (Dynamic Host Configuration Protocol)
Configuring DHCP
DHCP is not installed by default when you choose network servers in the
initial installation. If it is necessary to install it later, you can install it with
the command yum install dhcp.
Once installed, DHCP uses the /etc/dhcpd.conf file to retrieve its
configuration information.
As of this writing, DHCP uses two Dynamic DNS update schemes: The ad-
hoc DNS update mode and the interim DHCP-DNS interaction draft update
mode. The recommended mode is DHCP-DNS interaction draft update
mode, but if you’re not using Dynamic DNS, just place none at the end of
the ddns-update-sytle line:
ddns-update-style none;
Within the dhcpd.conf file are two types of statements: Parameters and
declarations:
Parameters state whether a task is to be performed and how tasks are to be
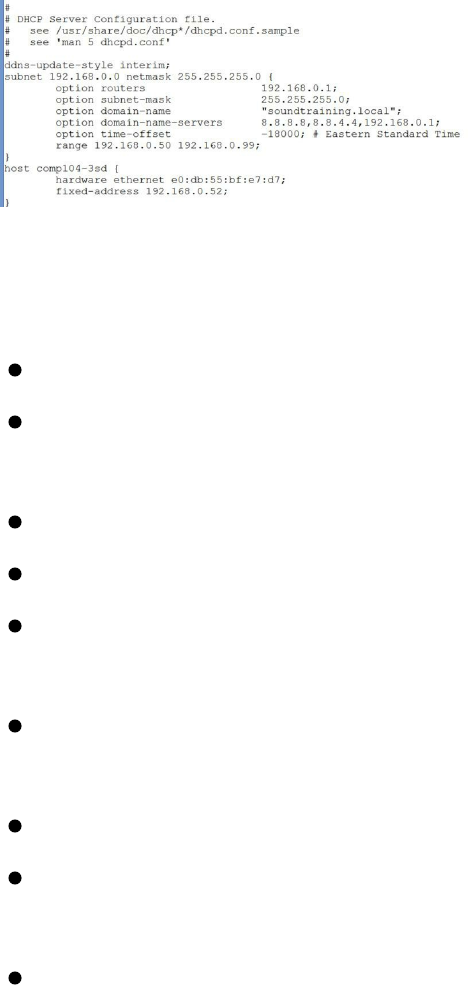
performed, and what network configuration options are to be sent to the
client.
Any parameters declared before braces ({}) are global parameters and apply
to all following sections.
Declarations describe the network topology and the clients. Declarations
also provide client addresses and apply groups of parameters to groups of
declarations.
A subnet declaration must be included for each subnet in your network. The
DHCP server will fail to start if this step is omitted. What follows is a
sample dhcpd.conf file:
Figure 76: An example of a DHCP configuration file
In the example configuration:
The dynamic DNS update style is “interim”.
The parameters will be assigned to DHCP clients on the 192.168.0.0
subnet.
The default gateway is at 192.168.0.1.
The subnet mask is 255.255.255.0 (/24).
The domain name is soundtraining.local (note the use of quotation marks
surrounding the domain name).
The name server is at 192.168.0.1. You can add multiple name servers if
you separate them with commas.
The time offset is -18000 seconds from GMT.
The DHCP pool of available IP addresses for assignment to clients is
192.168.0.50 through 192.168.0.99.
When host comp104-3sd with a MAC address of e0:db:55:bf:e7:d7
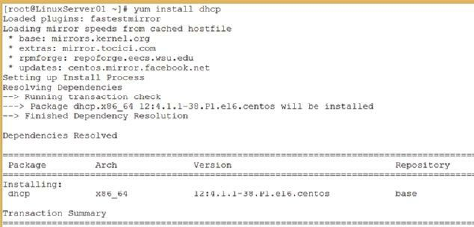
comes online and sends a DHCPREQUEST packet, it will be assigned
the IP address of 192.168.0.52.
Viewing DHCP Leases
DHCP lease information is stored in /var/lib/dhcp/dhcpd.leases. A
separate file called /var/lib/dhcp/dhcpd.leases~ is created at regular
intervals as a backup to dhcpd.leases.
Hands-On Exercise 7.6:
Installing and Configuring the DHCP Server
In this exercise, you will install and configure a basic DHCP server. This
exercise requires both a server and a client, so you will also create a second
virtual machine to act as the DHCP client. (The second machine will also
be used in future chapters.)
Build the Second Virtual Machine
Refer to Appendix A at the end of this book for instructions on how to build
a new virtual machine in VMWare Workstation.
Refer to Hands-On Exercise 1.1 at the beginning of this book for a step-by-
step guide to installing CentOS 6.5 in a new virtual machine. The only
thing to do differently from the steps in exercise 1.1 is to name the new VM
LinuxServer02.
Perform the following steps on LinuxServer01.
1. Install the DHCP server with the following command:
yum install dhcp
Figure 77: Using yum to install a DHCP server
2. Once the DHCP server is installed, configuration is done in
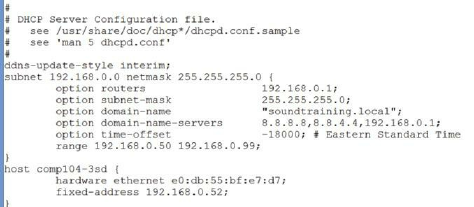
/etc/dhcp/dhcpd.conf. Use the following commands to change to
/etc/dhcp and then backup and edit the original dhcpd.conf:
cd /etc/dhcp
cp dhcpd.conf dhcpd.conf.orig
vi dhcpd.conf
3. You’ll notice that the file is nearly blank. There is a sample configuration
file at /usr/share/doc/ dhcp-common-4.1.1/dhcpd.conf.sample. (If
you’re running a different version number of DHCP, of course your path
will be slightly different.) For our purposes in this book, we’re going to
make a very simple configuration, similar to the example shown earlier.
Enter the following parameters in the dhcpd.conf:
ddns-update-style none;
subnet 192.168.0.0 netmask 255.255.255.0 {
option routers 192.168.0.1;
option subnet-mask 255.255.255.0;
option domain-name “soundtraining.local”;
option domain-name-servers 8.8.8.8,8.8.4.4,192.168.0.1;
option time-offset -25200; # Pacific Daylight Time
range 192.168.0.50 192.168.0.99;
}
Note: You must straight quotes in the domain name in order for the
server to successfully read the file. If you use slanted quotes, it will fail
and throw off an error..
In the following screen capture, you can see a similarly configured DHCP
server which also includes a statement for configuring Dynamic DNS
(ddns-update-style) and a section that configures a static address for a
computer named comp104-3sd.
Figure 78: An example of a DHCP configuration file with a DHCP reservation
In case you’re wondering about the domain-name-servers, 8.8.8.8 and
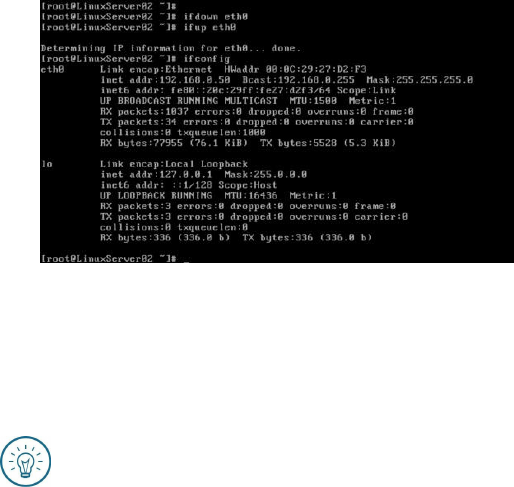
8.8.4.4 are the Google public DNS servers.
4. Start the DHCP server with the following command:
service dhcpd start
5. If you get a failure or other error, check the log for an explanation. Use
the following command to view aspects of the log related to DHCP:
less /var/log/messages | grep dhcp
6. Now, on LinuxServer02, take the Ethernet interface down and bring it
back up with the following commands:
ifdown eth0
ifup eth0
7. Check the IP address of eth0 with the following command:
ifconfig
It should be within the range specified in the configuration.
Figure 79: Viewing the IP address configuration with the command ifconfig after enabling the interface
8. If you see an address in the 192.168.228.0/24 subnet, see the following
soundthinking point to learn how to fix it.
Soundthinking Point:
Disabling VMWares’s DHCP Server
When you configure host-only networking in VMWare, VMWare has a DHCP
server that supplies IP addresses for the host-only network. It defaults to the
192.168.228.0/24 network. You can disable it to avoid potential conflicts with
your Linux-based DHCP server. To disable it, in the menu bar in VMWare
Workstation, click on Edit, then select Virtual Network Editor. In the Virtual
Network window at the top of the screen, select VMnet1 (Host-only). At the
bottom of the screen, clear the checkbox labeled Use local DHCP service to
distribute IP address to VMs. Make a note to yourself to re-enable it when you’re
finished with the hands-on exercises in this book.

CHAPTER 8:
DNS: The Domain Name System
Videos are available for many of the procedures in this chapter at www.soundtraining.net/videos
Introduction
DNS resolves host names to IP addresses. Think of DNS as being similar to
the white pages of an old-school telephone book. The white pages map
names to telephone numbers such as Pat Smith— (206) 555-1234. DNS
maps hostnames to IP addresses such as www.redhat.com—66.187.232.56.
In Linux, DNS runs as the “named” daemon. It is most often implemented
with the BIND (Berkley Internet Name Domain) software.
Objectives
Gain an understanding of DNS fundamentals
Build a caching name server
Learn how to build a primary and secondary name server
Work with DNS tools to verify proper configuration
Installing BIND DNS
BIND is usually included with the various Linux distributions, including
Red Hat/CentOS, through the package management systems. Most people
use the package management systems to install BIND for simplicity,
compatibility, and ease of updates. If you prefer to do everything manually,
you can download the source code for the most current version from ISC
(Internet Systems Consortium) at www.isc.org. If you choose to do the
installation manually, you will have to compile BIND from source code and
configure it manually. In this chapter, we’ll use the yum package
management system to install BIND DNS.
Hands-On Exercise 8.1:
Installing BIND DNS

1. Install BIND9 and a set of BIND utilities by using the following
command:
yum -y install bind bind-utils
Figure 80: Installing BIND DNS and related utilities
2. Confirm successful installation with the following command:
rpm -qa | grep bind
You should see three packages related to BIND.
Figure 81: Confirming installation of BIND DNS and utilities
Understanding the Fundamentals of DNS
In order to work with DNS, you must understand some basic concepts.
The Resolver (Client)
The client requesting name resolution is called the resolver. Resolvers send
queries to the name server which answers the queries that come from the
resolver. The resolver can be configured from the /etc/resolv.conf file.
The /etc/resolv.conf file contains the IP address of the nameserver for
the domain.
DNS Configuration Files
The main configuration file for BIND in Red Hat/CentOS is
/etc/named.conf. In addition to the configuration parameters contained
within the file itself, it also uses includes statements to read other files that
define the basic parameters and point to the sources of domain database
information.
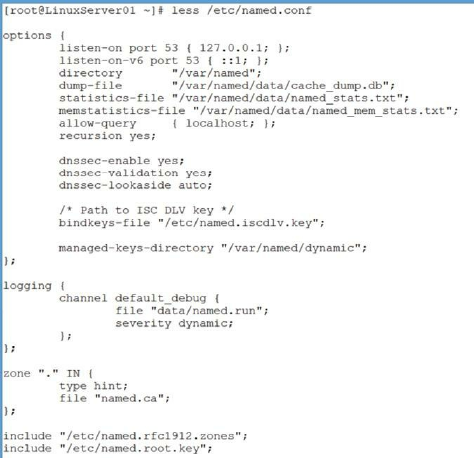
Figure 82: Viewing a named.conf configuration file
Primary, Secondary, and Caching Zones
DNS primary zones get their zone information from the zone files in
/var/named. DNS configuration changes are made on the server hosting the
primary zone.
DNS secondary zones get their zone information by performing a zone
transfer from the server hosting the primary zone.
A DNS caching zone does no lookups, but holds information from other
lookups to speed query response times.
Building Name Servers
A Caching Name Server
The easiest name server to build is a caching name server. It requires only
two modifications to /etc/named.conf. In the screen capture in the
exercise, I modified it to point to Google’s public DNS servers.
Hands-On Exercise 8.1:
Building a Caching Name Server
In this exercise, you will install and configure a simple caching name
server.
1. Make a backup copy of /etc/named.conf with the following command:
cp /etc/named.conf /etc/named.conf.orig
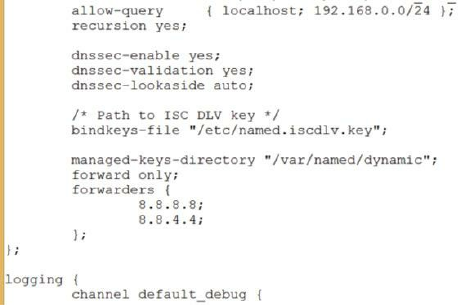
2. Use the vim editor to open the file /etc/named.conf:
vi /etc/named.conf
3. Edit the line allow-query to include your local subnet, so that it looks like
this:
allow-query {localhost; 192.168.0.0/24;};
4. Add the following lines to the options section, just below the line that
says managed- keys-directory (be very careful of syntax, especially semi-
colons):
forward only;
forwarders {
8.8.8.8;
8.8.4.4;
};
When you’re done, the portion of /etc/named.conf you’ve been working
on should look like this:
Figure 83: A configuration file for a caching DNS server
5. Save /etc/named.conf (ESC, then :wq) and assign 644 permissions
with the following command:
chmod 644 /etc/named.conf
6. Check the syntax with the following command:
named-checkconf /etc/named.conf
(If you simply get a return to the prompt, the configuration is fine.)
7. Configure the local resolver to point to itself for name resolution. Make
the following change to /etc/resolv.conf:
nameserver 127.0.0.1
8. You performed this step in chapter seven, but in case you skipped

chapter seven for some reason, you need to know this. The DHCP client
software will overwrite /etc/resolv.conf with nameserver information
from the DHCP server. You can prevent this by making the following
change to your network card configuration script(s)
/etc/sysconfig/network-scripts/ifcfg-eth0 (replace eth0 with your
network interface if different): PEERDNS=no
9. Start the nameserver as root and configure to start in runlevels 3 and 5:
su -
Password:p@ss5678
service named start
chkconfig named on 35
10. Test your nameserver using the dig utility to query soundtraining.local:
dig soundtraining.local
;; Query time: 10 msec
;; SERVER: 127.0.0.1#53(127.0.0.1)
11. From the preceding dig query, you can see it took 10 msec to receive the
name queries. Now test the caching ability of your nameserver by
running dig again on the soundtraining.local domain:
dig soundtraining.local
;; Query time: 1 msec
;; SERVER: 127.0.0.1#53(127.0.0.1)
If you really want to have fun with this, try using a dig query against servers
on the other side of the world from where you are. For example, since I’m in
Seattle, I could do a dig query on the Australian telephone company at
www.telstra.com. If you’re in, say Africa or India, try doing a dig query on
my server at www.soundtraining.net, which is hosted in the USA.
You’re certainly not limited to the Google public DNS servers. Another pair
of public DNS servers you might try are the OpenDNS servers located at
208.67.222.222 and 208.67.220.220. There are actually quite a few public
DNS servers which you can try. You can see a list at
http://pcsupport.about.com/od/tipstricks/a/free-public-dns-servers.htm
After you make the modification, restart the name server with the following
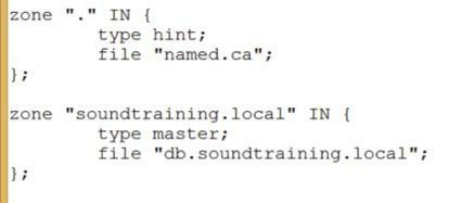
command:
service named restart
A Primary DNS Server
A primary DNS server stores the master data file for a zone and replicates
its information to secondary DNS servers.
The first step is to add a new zone to /etc/named.conf. In the following
screen capture, I created a forward lookup zone for soundtraining.local and
added it to /etc/named.conf (in the screen capture, I added the new zone
right below the root hints zone):
Figure 84: Adding a new zone to named.conf
DNS files are very sensitive about syntax. Double-check your work to
ensure you’ve included all the curly braces, semicolons, and quotation
marks in the appropriate places.
Creating the Primary Master Zone Database File
The Forward Lookup Zone
Next, you’ll create the zone database file. You’ll start by creating the
forward lookup zone file. A forward lookup zone maps host names to IP
addresses. The easiest way to build a zone database file is to copy an
existing one and then modify it for the zone in question. Use the following
command:
cp /var/named/named.empty /var/named/db.soundtraining.local
(Of course, you can use a different zone name if you choose. I’m just using
soundtraining because that’s the name of my company and I’m using local
to identify this as a local zone.)
Open the new file /var/named/db.soundtraining.local with vi:
vi /var/named/db.soundtraining.local
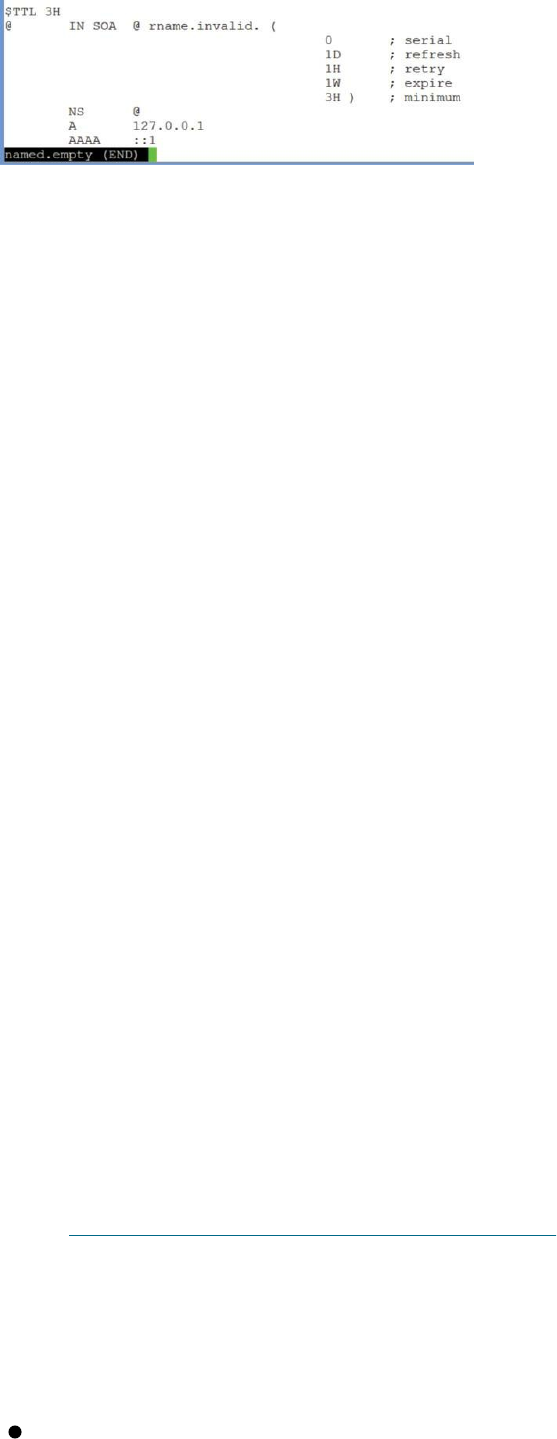
The unaltered file looks like the following screen capture:
Figure 85: A default DNS zone file
before configuration
The first few lines contain default values for the zone, along with contact
information. Here’s an explanation of each of the lines:
$TTL—this is the default time-to-live for the zone. This is the time-to-live
for all records in the zone that don’t have an explicit TTL. The default value
is three hours. We can leave that value in place.
@—this defines the current origin, which is the zone name defined in
named.conf. If you have a line in the zone database file that starts with
$ORIGIN, that is another way of identifying the origin. An easy way to
understand origin is that it’s added to any unqualified name (names which
do not end in a dot).
IN—indicates that this is the Internet class of data. This is the only class of
data currently in general use, although other types exist. Still, it’s required.
DNS Resource Records
SOA Record—this stands for Start of Authority and its presence means
that this server is authoritative for the zone. The first name following SOA
is the name of the zone’s primary name server, in this case rname.invalid.,
but we’ll change it shortly. That is usually followed by the email address of
the zone administrator, but it’s missing in this particular file. When it’s
included, it doesn’t look like an email address. You might see something
like hostmaster.soundtraining.local. The opening parentheses at the end of
the line allows the configuration to span multiple lines.
Next, are several numbers. Here are the explanations:
The first number is the serial number. This is used by the secondary
master to tell if its zone file is up to date or not. When it queries the

primary, if the primary’s serial number is greater than the secondary’s,
the secondary knows that its zone file is out-of-date and initiates a zone
transfer. DNS admins sometimes use a format of year-month-date-and
update number for the serial number, so a serial number of 2014021503
would indicate that this was the third update on February 15, 2014.
The next four fields specify time intervals, by default in seconds:
Refresh: This tells the secondary how often to check that the zone information
is up to date.
Retry: If the secondary is unable to reach the primary for whatever reason, this
value tells the secondary how many seconds to wait before retrying.
Expire: This value tells the secondary to stop responding to queries if the
primary is down for this amount of time. This value must always be
significantly greater than the refresh and retry values.
Negative caching: This value sets the time-to-live for all negative responses
from the name servers who are authoritative for the zone
The next records are not included in named.empty, but will be added to
create a complete zonefile.
NS Records: These are the name servers for the zone. There are usually
two of them. The format is zone name, class, record type, and server
hostname. For the soundtraining.local zone, the records will look like this:
soundtraining.local. IN NS LinuxServer01.soundtraining.local.
soundtraining.local. IN NS LinuxServer02.soundtraining.local.
NS records cannot map to CNAME records. They must map to A records.
Note the trailing period after the zone names and the name server names.
Without it, the zone name would be appended to each of the names creating
a name like LinuxServer.soundtraining.local.soundtraining.local.
Obviously, that’s not what we want!
A Records: These are the address records that contain name-to-address
mappings for hosts within the zone. The format is hostname, class, record
type, and IP address.
LinuxServer01.soundtraining.local. IN A 192.168.0.1
LinuxServer02.soundtraining.local. IN A 192.168.0.2
computer01.soundtraining.local. IN A 192.168.0.110
computer02.soundtraining.local. IN A 192.168.0.120
computer03.soundtraining.local. IN A 192.168.0.130
computer04.soundtraining.local. IN A 192.168.0.140
CNAME Records: These are alias records which map an alias to its
canonical (CNAME) name . (its real name). We’ll use CNAME records for
our web servers and mail server.
www.soundtraining.local. IN CNAME
LinuxServer01.soundtraining.local.
mail.soundtraining.local. IN CNAME
LinuxServer01.soundtraining.local.
www1.soundtraining.local. IN CNAME
computer01.soundtraining.local.
www2.soundtraining.local. IN CNAME
computer02.soundtraining.local.
www3.soundtraining.local. IN CNAME
computer03.soundtraining.local.
www4.soundtraining.local. IN CNAME
computer04.soundtraining.local.
MX Records: MX records are mail exchanger records. They point to mail
servers, hosts that will either process or forward mail for the domain. MX
records include an additional value called a preference value, a 16-bit
number between 0 and 65,535. The preference value determines which mail
exchanger should be used first. Mail exchangers with a lower preference
value are preferred over those with a higher preference value.
soundtraining.local. IN MX 50
LinuxServer01.soundtraining.local.
soundtraining.local. IN MX 100
LinuxServer02.soundtraining.local.
There are many other types of records, but these are the types you’re most
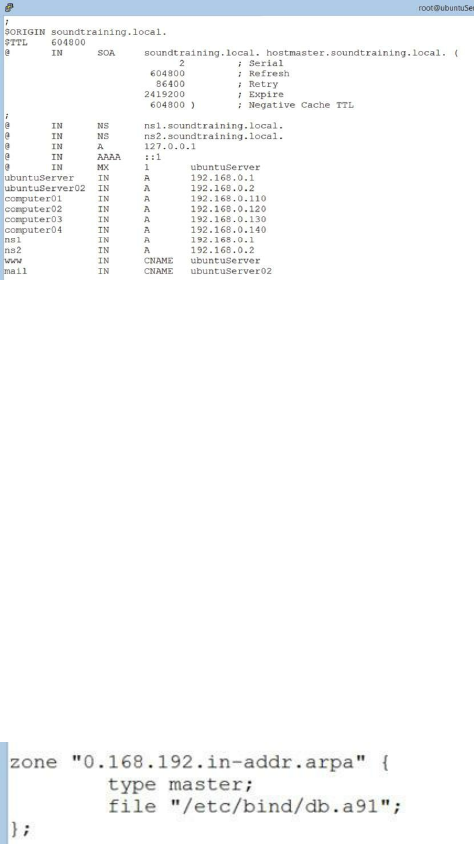
likely to see. There is one other type of commonly used record. The PTR
record is used for reverse lookups and we’ll cover that in a moment.
One more comment before we move on. You can use shorthand to simplify
the configuration of zone files. For example, you can eliminate the zone
name from most records, since it’s the origin for the zone. For example, in
the above CNAME records, I could simply enter the first one like this:
www IN CNAME LinuxServer01
The reason it works is two-fold. First, we’ve established the origin of the
zone (soundtraining.local) in the configuration file and, secondly, we’ve
eliminated the trailing dot after each of the names, which tells the server to
append the zone name to the end.
A Sample Forward Lookup Zone File
Here’s the forward lookup zone file I created for a demonstration zone:
Figure 86: A DNS forward lookup zone file
Note that the AAAA record is not necessary unless you’re implementing
IPv6.
The Reverse Lookup Zone
A reverse lookup zone maps known IP addresses to host names. Reverse
zones always use a naming convention of the reverse network octets from
the IP address, followed by “in-addr.arpa”, as you can see in the screen
capture.
First, edit /etc/named.conf and add the following lines:
Figure 87: Creating a DNS reverse lookup zone
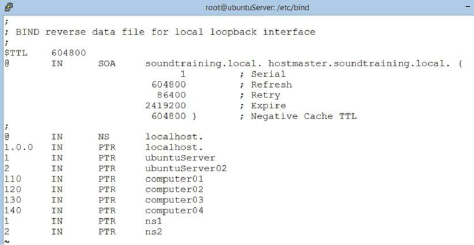
Next, you must create the zone file. As with the forward lookup zone, the
easiest way to do this is by copying an existing lookup zone file and
modifying it:
sudo cp /var/named/named.empty /var/named/db.192
After you copy the zone file, make the same changes to the SOA record as
you did to the previous zone file. Then create PTR records for each host
with an A record in the forward lookup file. The format is as follows:
Last Octet of IP Address IN PTR Hostname, for example, if I were to
create a PTR (Pointer) record for the host named LinuxServer01 with an IP
address of 192.168.0.1, it would look like this: 1 IN PTR LinuxServer01
Here’s the screen capture of my completed reverse zone file:
Figure 88: A DNS reverse lookup zone file
Creating the Secondary Master
The secondary master serves as a backup for the zone. It receives its zone
information by performing a zone transfer from the primary master.
A configuration change must be made on the primary to permit zone
transfers to the secondary and a configuration change must also be made on
the secondary so that it knows its role and where to find the primary. The
syntax uses the unfortunate terminology of slave and master to identify the
secondary and primary roles.
On the primary master, add an allow-transfer with the IP address of the
secondary to both the forward and reverse lookup zones by editing
/etc/named.conf:

Figure 89: Allowing zone transfers on a primary DNS server
Restart BIND on the primary for the changes to take effect:
service named restart
On the secondary master, use the same procedures as on the primary to
install BIND9, then edit /etc/ named.conf to create the forward and
reverse zones and configure the server as the secondary:
Figure 90: Configuring the DNS secondary to perform zone transfers from the primary
Restart BIND on the secondary for the changes to take effect:
service named restart
You can verify the zone transfers by looking for the zone files in
/var/cache/bind. Also, check the log /var/log/messages.
Forcing the Primary to Notify the Secondary
You can add an also-notify statement to the primary’s named.conf file in
each of the zone sections to force the primary to send a notification to the
secondary whenever there are zone file changes. In the following screen
capture, I configured the primary to notify the secondary at 192.168.0.2
whenever the zone file is updated.
Figure 91: Configuring the DNS primary to notify the DNS secondary server
DNS Tools
Checking Configuration Files
You can check your configuration files with this command:
named-checkzone <zone name> <zone file name>. For example, to check
the zone database file for the soundtraining.local zone, you would use the
following syntax (all on a single line):
named-checkzone soundtraining.local
/var/named/db.soundtraining.local
You can use named-checkconf to check the BIND9 configuration file.
Using host
host is a simple utility for performing DNS lookups.
Usage:
host <name>
host -l <domain name> lists all hosts in a domain
Using dig
dig is the domain information groper. It is used to query DNS servers for
information concerning hostnames and servers. You may be familiar with
“nslookup”, an older utility that does much the same thing. “dig” uses a
clearer, easier to understand command structure and is generally more
stable than “nslookup”, so it is the recommended tool for querying name
servers.
Using “dig”
dig <server to query> <name to be looked up> <type of query> (if
not specified, dig will perform a lookup for an A RR)
Using nslookup
nslookup emulates a resolver in making queries. It queries only one name
server at a time. It does zone transfers just like a name server.
Use noninteractive when looking up just one record. Use interactive when
looking up multiple records.
nslookup, when used with no parameters starts interactive mode.
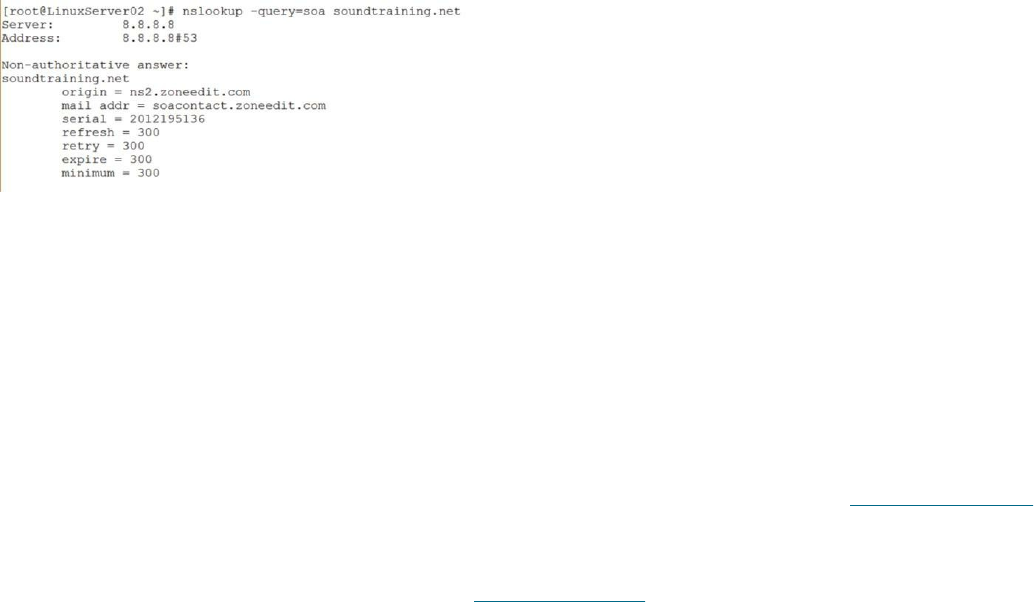
nslookup, when used with a domain name, starts non-interactive mode.
Non-Interactive mode
nslookup soundtraining.net will return the A record information for
soundtraining.net, using the default name servers.
nslookup -query=soa soundtraining.net will return the SOA record
information for soundtraining.net, again using the default name servers, as
shown in the following screen capture:
Figure 92: Using nslookup in non-interactive mode
For more options, naturally, check the man or info pages for nslookup.
Interactive mode:
nslookup
>set type=<type of record to look up>
><domain name>
For example, if I wanted to check the SOA record for zombo.com, I would
issue the following commands, as shown in the screen capture. I was able
to also do an SOA lookup for yahoo.com by simply entering yahoo.com at
the nslookup interactive prompt.
Type “exit” or “ctrl+c” to exit.
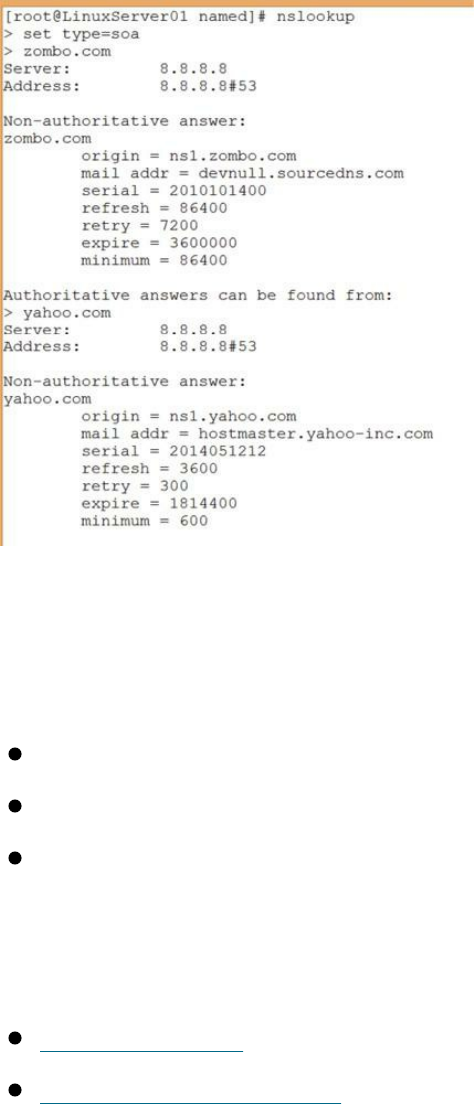
Figure 93: Using nslookup in interactive mode
DNS Resources
DNS RFCs
RFC 1034 covers domain name facilities and concepts
RFC 1035 explains the technical workings of DNS
RFC 1591 provides a general description of DNS
DNS Websites
www.isc.org
www.dnsstuff.com
CHAPTER 9:
Using SSH (Secure Shell)
Videos are available for many of the procedures in this chapter at www.soundtraining.net/videos
Introduction
In Red Hat/CentOS 6, an SSH server and client are installed by default to
assist in remote management. In this chapter, I’ll go into detail about how
SSH works and how to configure it.
I’ll also show you some of SSH’s additional capabilities in the form of
secure copy and secure FTP.
Objectives
Work with SSH (Secure Shell) to encrypt communication
Configure SSH
Transfer files with SCP (Secure Copy)
Transfer files with SFTP (Secure File Transfer Protocol)
What is SSH?
SSH stands for Secure Shell. It is a cryptographic protocol that provides
secure communication services across non-secure networks such as the
public Internet. Among the services provided by SSH are remote command-
line login, remote command execution, file transfer, and other network
services.
SSH is the replacement for the old Telnet protocol, which although widely
supported, should not be used anymore. In a Telnet session, all
communication is in clear text and visible to anyone who intercepts the
communication. SSH, on the other, encrypts the entire session to prevent
eavesdropping by unintended third parties.
SSH operates over port 22, unless you configure it otherwise. (See my
comment on that later in this chapter.)

Soundthinking Point:
Why Not Use Telnet on a Trusted or Private Network?
Well, you certainly can use Telnet in such a setting, but it seems to me that we
generally want to avoid using non-secure protocols, if for no other reason than
making a habit out of best practices. SSH is easy to use and configure, so why not
use it all the time and not even install Telnet? Don’t let your attack surface get any
broader than absolutely necessary. When it comes to network and system security,
a healthy dose of paranoia is entirely appropriate.
When is SSH Used?
Most servers are located in data centers or equipment racks some distance
away from the person who manages them. The same is true of routers,
switches, firewalls, and other network devices. It’s impractical to physically
visit the console of each server and device we manage, so instead we install
SSH clients such as PuTTY or TeraTerm on Windows computers or
OpenSSH on Macs and ‘nix computers. We then use such software to log in
across the network to the remote servers and network devices and manage
them from the command line as though we were actually sitting at the
physical console.
How Do I Configure SSH?
Once you’ve installed SSH, configuration is done in the file
/etc/ssh/sshd_config. Within this file, you can modify things such as the
listening IP address(es), TCP port number (the default is 22), logging
options, and authentication options.
As always, start by making a copy of the file you’re going to modify so
you’ll have a fallback on in case you mess something up. Use the command
sudo cp /etc/ssh/sshd_config /etc/ssh/sshd_config.orig. Now,
you’re ready to customize!
Hands-On Exercise 9.1:
Securing SSH
From a security standpoint, here are two easy things to do to make SSH
more secure:
1. Open /etc/ssh/sshd_config with the vi text editor:
vi /etc/ssh/sshd_config
2. Change the default port. The default port is 22, but it’s easy to change it
to something else up in the dynamic port range of 49,153-65,535. Sure,
someone running a wide port scan will discover it, but someone trying
the default of 22 will see that the port is closed. Maybe you’ll get lucky
and they’ll go on to someone else. Change the line that says Port 22 to
something else in the private port range of 49152 to 65535, say 50000.
3. Disable root login. If you examine your logs on an Internet-connected
server, you’ll notice a ton of login attempts using the username root.
That’s the low-hanging fruit to a bad guy trying to break into your
system. Everyone knows that the Linux admin username is root so why
not try to login with that username and see if you can guess the
password. Change the line that says PermitRootLogin yes to
PermitRootLogin no. This means you must log in via SSH as a regular
user and then use either sudo or su to execute root commands.
Transferring Files with scp
SCP (Secure Copy) is part of the SSH suite. It allows you to transfer a file
securely from one computer to another.
In the following screen capture, I performed a basic transfer of a file called
donslog.txt from my local computer to a remote computer at
192.168.146.131. In order to complete the file transfer, I had to know the
destination path on the remote computer and I also had to have a user
account on the remote computer. The syntax is very simple (as usual, it goes
on a single line):
scp <filename> <username>@<remote computer name or address>:
<destination path>

Figure 94: First time using SCP to copy a file
Notice that, since this was the first time I had connected to this server, my
SSH (SCP) client wanted me to validate the key.
One limitation that you need to know regarding SCP is that one of the two
computers in the operation must be a local computer.
Transferring Files with SFTP
SFTP (SSH FTP) is installed as part of the SSH suite. It allows the secure
transfer of files as well as secure authentication. Like SSH, SFTP operates
on port 22. Clients such as Filezilla allow you to specify either the protocol
(sftp) or the port number to connect securely, as shown in the screen
capture.
Figure 95: Using Filezilla to connect from a Windows computer to a Linux FTP server with SFTP
You can also connect from the command line by using the command sftp,
followed by the username and hostname or IP address in the following
format:
sftp <username>@<hostname or IP address>
Figure 96: Using SFTP from a command-line environment
Exit from the session with the command bye.

CHAPTER 10:
Linux Security
Videos are available for many of the procedures in this chapter at www.soundtraining.net/videos
Introduction
Linux server security bears great similarity to securing other systems. Here
are some things you can do to make your systems more secure, but realize
that there is no such thing as a 100% secure system. For that reason, part of
your security plan must include a system of regular backups and auditing.
As you consider your system’s security, think about how you can narrow
the attack surface. If your system is connected to some sort of public
network such as the global Internet, it’s providing some service, perhaps as
a Web server. All services can be exploited by the bad guys. Obviously, the
closest thing to a 100% secure system would be one in which no services or
programs are running. It would be very secure, but non-functional. With
each service we start or program we run, we open our system up to
exploitation. The idea behind security is to minimize the degree to which
we open our systems, in other words we want to minimize our attack
surface as much as possible. System security is lot of auditing, patching, re-
auditing, and repeating. It’s also been compared to the carnival game of
Whack-a-Mole, where the little moles keep popping up in different places
and you have to try to hit them before they hide again. As soon as you hit
one, however, another one pops up. In the same way, as soon as we patch
one vulnerability, another one pops up.
Objectives
Understand physical security
Learn the principle of least privilege
Learn how to implement a firewall
Configure NAT (Network Address Translation)

Perform security scans and audits
Learn how to use sudo
Gain an overview of Linux security tools
Perform a password reset
Learn best practices for system and data backups
Physical Security
If someone can gain physical access to your server, they can break into it
and own it. Keep your servers in a data center, in a locked equipment rack,
or in a locked closet. Oh, and those locks don’t do any good unless you use
them. Remember that you’re not only securing your systems against bad
guys, but also against curiosity seekers who like to click on buttons to see
what they do. It’s always amazing to me to watch people who don’t know
anything about IT systems click on on-screen items with no sense of
danger. Keep those servers and network devices locked up!
Keep the Software Up to Date
Well, this just seems obvious, but long-known vulnerabilities often remain
unpatched and are still widely exploited, so maybe it’s not so obvious. Use
this command to update your Red Hat/CentOS system in one fell swoop:
yum -y update. How often should you perform an update? As often as
software updates are available. Subscribe to security bulletins from Red Hat
or CentOS so you’ll know when patches are available. Consider creating a
cron job to check for updates automatically every day. (If you do that, make
sure you also have a system of creating regular backups, just in case a patch
causes problems.)
Here is a link to the Red Hat notifications and advisories page where you
can subscribe to advisories:
https://access.redhat.com/site/security/updates/advisory/.
Here is a link to the CentOS announcements subscription page for both
security and geneal announcements:
http://lists.centos.org/mailman/listinfo/centos-announce.
Employ the Principle of Least Privilege
The principle of least privilege is one of the bedrocks of system security.
The idea behind it is both very simple and, at the same time, very powerful.
Here is the principle of least privilege: Users and processes should only
have access to the least amount of information and functions required to
do their job.
In other words, as you configure file and directory access rights or
administrative permissions, ask yourself, “What is the minimum level of
rights and permissions that this user, group, or process requires in order to
successfully perform the required business function?” Be skeptical with a
healthy dose of paranoia in making such decisions.
Be especially skeptical about granting 777 permission to any file or
directory. (Recall from earlier that 777 gives read, write, and execute
permission to everyone in the world.) If a particular piece of software
requires such a setting, start with something less, perhaps 774, and see if it
works. I’ve dealt with software vendors whose tier-1 tech support staff
made such recommendations without understanding the ramifications of
such a setting. If you encounter such a recommendation, carefully think
through potential scenarios before implementing it in production. Consider
asking to speak with a supervisor who, hopefully, is more knowledgeable
about Linux permissions.
Use Encryption
Encrypt data communication using tools such as SSH, SFTP, SCP, and
rsync. After the revelations of Edward Snowden and the unending stream of
news reports about commercial data theft, it really seems foolhardy to use
unencrypted communication on the public Internet. Frankly, it just seems
foolhardy to use unencrypted communication on any network where
sensitive information such as credit card numbers or other private or
personal information is used and stored. Similarly, all sensitive information
such as that just mentioned should always be encrypted when stored in a
database or any other type of storage. A Google search on Linux encryption
tools turns up a variety of recommendations.
Avoid Non-Secure Protocols
FTP, Telnet, rsh, and rlogin are protocols left over from a more innocent
time when security was less of a concern than it is today. Those types of
protocols make all communication using them available to anyone using a
protocol analyzer such as Wireshark. It’s really pretty simple: Don’t use
them! Not only should you not use them, but you should remove them from
your systems using yum remove.
Clean Up Your Systems
Remove any unused software. Go through your systems and audit them for
installed software. Use the command rpm -qa >
~/installedpackages.txt to create a text file in your home directory
showing all of your installed packages, then go through the file line-by-line
and do research on packages you’re not familiar with. Yes, it’s tedious, but
you’ll gain great insight into your system and possibly prevent something
bad from happening down the road.
Minimize the Number of Services per System
Today, thanks to virtualization, it’s much easier to isolate services from
each other. Doing so can minimize the likelihood of a bad guy breaking into
one system and exploiting multiple services. Consider using tools like
VirtualBox, VMWare, or XEN to create virtualized servers, then put
Apache on one system, MySQL on another, PostFix on still another, and so
on.
Enforce a Good Password Policy
Enforcing a good password policy also seems obvious until you read the
lists of most common passwords that occasionally surface on the Internet.
The idea is that you don’t want bad guys to be able to easily guess
passwords. Sure, your users will whine about it, but that’s so much better
than you having to explain your lax password policy after a breach. Require
a minimum of an eight character password with a mix of letters, numbers,
special characters, and upper/lower case. Consider teaching your users
about passphrases to replace passwords. Also, use the chage command to
enforce a maximum number of days between password changes. You can
also modify password parameters
in /etc/login.defs.
Disable Root Login
Use sudo instead of logging in as root. Also, as mentioned in the previous
section on SSH configuration, modify /etc/ssh/sshd_config to disallow root
logins. If you must log in as root, make certain to log off when you get up
from your computer, even for a moment.
Disable Unneeded Services
Use the command chkconfig --list to view the services that start with
the system. You can narrow the output to just view the services that start in
run level 3 by using the command chkconfig --list | grep 3:on.
Delete X Windows
You’re not running X Windows on your server. Most serious server admins
would never do that, so if it’s installed on your server, uninstall it! (I say
“most” because there are always exceptions, but generally speaking you
don’t want X Windows on your server.) Depending on how it was installed,
you can try this command (after you perform a full system backup, of
course):
yum groupremove “X Window System”
Implement a Firewall
The iptables set of tools is used to implement a firewall in Linux. Although
it’s very powerful, it can be difficult to configure and manage. An
alternative to manually configuring iptables is to use the built-in firewall
management tool system-config-firewall.
The system-config-firewall tool is not installed by default in a minimal
installation. Install it with the command yum install system-config-
firewall. Once installed, it is simple to use, yet also allows for fairly

complex configurations.
Be aware that enabling the firewall in its default state might break
connections such as SSH. (Here’s a tech support call for you: “I
implemented the firewall and now I can’t connect to my server!” No
fooling!)To work with the firewall, enter the command system-config-
firewall, which opens a text-based firewall configuration tool.
Hands-On Exercise 10.1:
Installing and Configuring the Firewall
In this exercise, you will install the firewall, view its configuration and
confirm that SSH traffic is permitted.
1. While logged on as root, execute the following command:
yum install -y system-config-firewall
Figure 97: Installing the firewall configuration tool
2. After installation is complete, open the firewall configuration tool with
the following command:
system-config-firewall
3. In the firewall configuration window, notice that the firewall is enabled
by default upon installation. Using the arrow keys on your computer,
select the button labeled Customize and press the Enter key.
Figure 98: Using the firewall configuration tool
4. In the Trusted Services window, scroll through the various options.
Notice that SSH is enabled by default. What would happen if SSH were

not enabled? Your SSH session would be disconnected and you would
have to execute commands from the server console. When you’ve looked
through all the options, use your arrow keys (you can also use your Tab
key) to select the button labeled Forward and press the Enter key.
Figure 99: Identifying trusted services in the Linux firewall configuration tool
5. The Other Ports window opens where you can specify additional
TCP/UDP ports by number. For example, suppose you want to permit
RDP traffic operating on TCP port 3389 through your firewall. To do
that, use your arrow keys to select the option <Add> and press the Enter
key.
Figure 100: Indentifying trusted ports or port raunges in the Linux firewall configuration tool
6. In the Port and Protocol window, enter 3389 in the Port/Port Range field
and tcp (it is case sensitive) in the Protocol field. Then, using your arrow
keys, select the button labeled OK and press Enter.
Figure 101: Configuring the Linux firewall to pass RDP traffic
Notice that the newly configured exception is now listed as permitted.
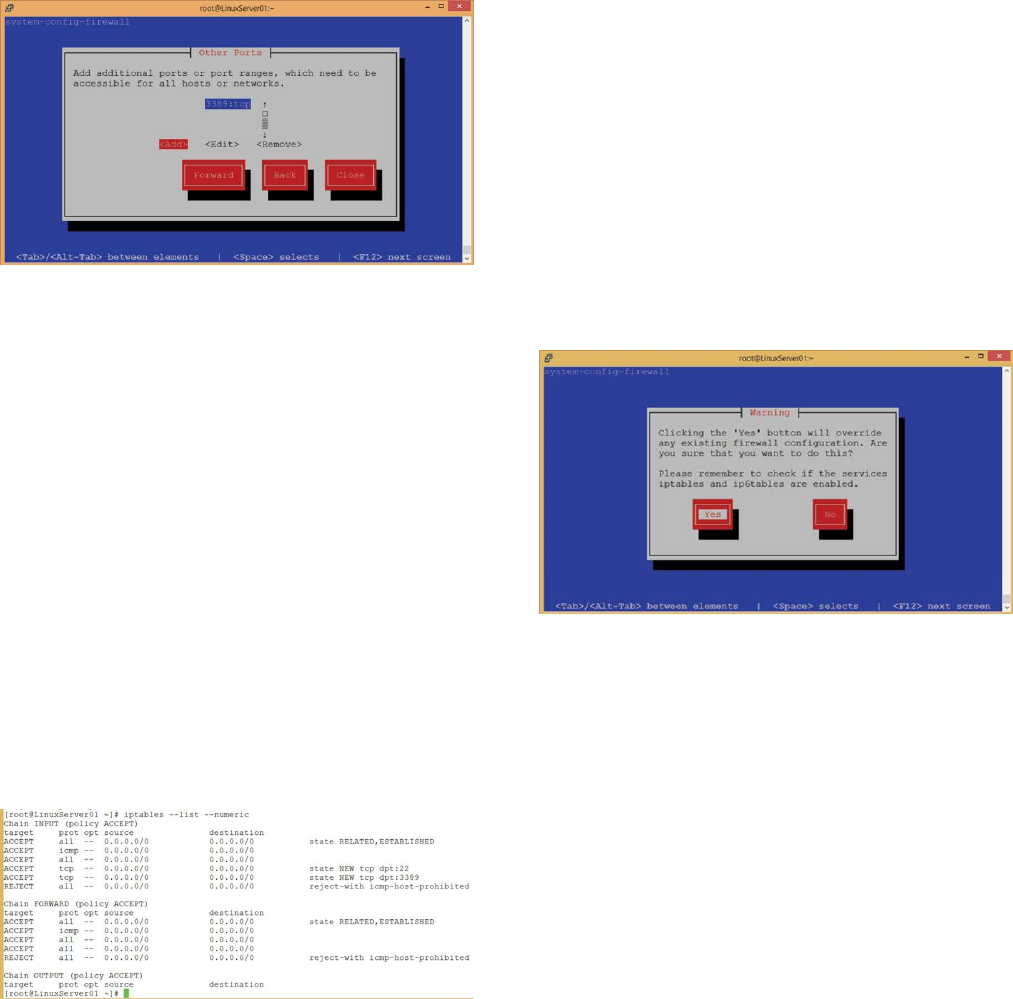
Use your arrow or Tab keys to select the button labeled Close and press
the Enter key.
7. In the Firewall Configuration window, use your arrow or Tab keys to
select the button labeled OK and press the Enter key.
Figure 102: Viewing the firewall configuration permitting RDP traffic
8. In the Warning window, ensure that Yes is selected and press the Enter
key to put the changes into effect.
Figure 103: Saving new firewall settings
9. You can use an iptables command to see the permitted ports. Enter the
following command:
iptables --list --numeric
Figure 104: Viewing firewall settings in the command line
Implementing NAT (Network Address Translation)
In the Linux world, NAT is known as IP masquerading which is the
process of using one set of addresses, probably RFC 1918 addresses, on the
inside network and sharing a single registered public IP address on the
outside network.
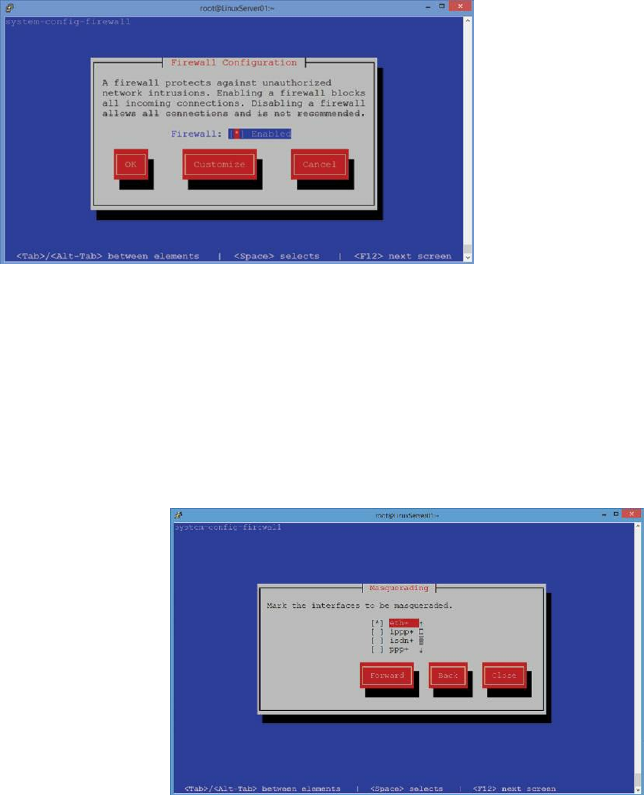
In the past, IP masquerading required manual configuration using iptables
commands. Now, in version 6, Red Hat and CentOS have updated the
system-config-firewall tool to make IP masquerading ridiculously simple.
Hands-On Exercise 10.2:
Enabling NAT (IP Masquerading)
In this exercise, you will use the system-config-firewall tool to enable IP
masquerading, or NAT. This exercise will make use of both LinuxServer01
and LinuxServer02.
1. On LinuxServer01, while logged on as root, enter the following
command to open the firewall configuration tool:
system-config-firewall
2. Using your arrow keys, select the button labeled Customize and press the
Enter key.
Figure 105: Preparing to configure IP masquerading in the Linux firewall
3. Using your arrow keys and the Enter key, move through all the screens
until you come to the screen labeled Masquerading.
4. In the Masquerading window, use your arrow keys to move the
highlighter to the interface eth+ and press the space bar to place as
asterisk next to eth+.
Figure 106: Choosing the interface to be masqueraded
5. Using your arrow keys, move the highlighter to the button labeled Close

and press the Enter key.
6. In the Firewall Configuration window, use your arrow or Tab keys to
move the highlighter to the button labeled OK and press the Enter key.
7. On LinuxServer02, attempt to ping an external website such as
www.soundtraining.net. The ping should be successful. If the ping by
name is unsuccessful, trying pinging by IP address. For example, trying
ping 8.8.8.8. If the ping by IP address is successful, NAT is working, but
there is a problem with name resolution.
You may also have to enable certain types of traffic through the firewall,
such as DNS (port 53) in order for NAT translations to actually work.
Separate Partitions
A default Red Hat/CentOS server installation does not create separate
partitions. Most administrators consider it best practice to create separate
partitions for /home, /tmp, and /var, in addition to /, and /boot, plus, of
course the swap partition. Such a scheme makes it easier to implement disk
quotas, to prevent errant processes from filling up a disk, and simplifies
moving users home directories.
Block SSH Attacks
The denyhosts utility is an additional way to thwart SSH attacks. Denyhosts
periodically scans /var/log/auth.log for repeated failed SSH logon
attempts. The IP addresses associated with such attempts are added to
/etc/hosts.deny. If you change your default SSH port, this may not be as
much of an issue as it would be if your system were listening on port 22.
Still, it doesn’t hurt to have it. Installation is easy. Use yum install
denyhosts.
Perform Security Scans and Audits
Tools such as the port scanner nmap (www.insecure.org) and the Nessus
vulnerability scanner (www.tenablecom/products/nessus) can provide eye-
opening reports of potential vulnerabilities on your systems. Both tools can
be installed using yum. Nessus is a fairly sophisticated tool whose use is

beyond the scope of this book. Still, it’s very powerful and well worth
learning. The nmap tool, however, is also very powerful and fairly easy to
use. Port scanning and some examples of how to use nmap are covered later
in this chapter.
Using sudo
As in all operating systems, best practice is to have two user accounts for
the administrator. One account is used for daily use and the “root”
administrator account is used only when needed for administrative
purposes. You can use the switch user command to work as root, but doing
so means that you have probably opened a terminal window and are
executing all commands as root, whether needed or not. It can also be easy
to forget to exit back to your regular user account, thus exposing your
system to potential security issues.
Sudo is similar to runas in Windows. It allows you to execute specific
commands under root context without leaving your regular user profile or
context. To use sudo, you preface the root command you wish to run with
the word sudo. For example, if you want to run the command ifconfig, you
would enter it as sudo ifconfig. If your account is allowed to run that
command, it would then execute. Otherwise, you would receive an error.
Figure 107: How does sudo work? (Courtesy of xkcd.com)
The use of sudo requires modifying /etc/sudoers, but you can’t just open
the file in an editor as you would normally. In order to modify
/etc/sudoers, you must use the command visudo as root. When you

execute visudo, an editor window appears similar to this:
Figure 108: Configuring sudo with visudo
Notice the line: root ALL=(ALL) ALL. That statement gives root permission
to run from any terminal (the first ALL), acting as any user (the second
ALL), and execute any command (the third ALL). Notice, also, that I gave
myself the same permissions as root.
Suppose you wanted to give a user the ability to run ifconfig, you would add
the following line to /etc/sudoers (using visudo, of course):
donc ALL=/sbin/ifconfig
That gives user donc the ability to run ifconfig from any terminal, but in
order to do so, he would enter the command as follows:
sudo ifconfig
You might want to give your personal user account the ability to run any
command (similar to an Ubuntu system) by entering the following
statement in /etc/sudoers:
donc ALL=ALL
There are many other options available, including the ability to use aliases
to group users. For more information, see man sudoers.
When using sudo, passwords are cached for 15 minutes by default. If you
want to clear the cache, use this command: sudo -K
Hands-On Exercise 10.3:
Configuring sudo and Preventing root Login
It’s easy to prevent the root account from logging in, while still allowing the
use of sudo to execute root commands. In this exercise, you will enable your
account for root access via sudo and disable the root account.
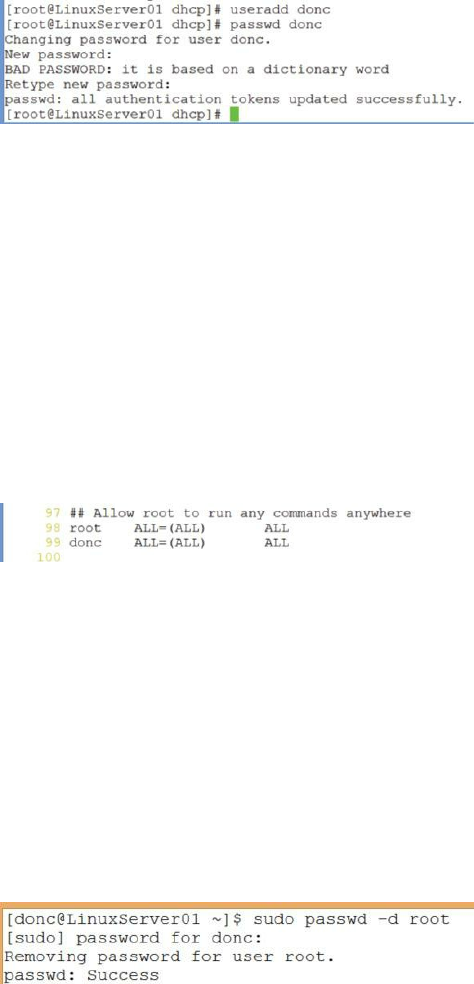
1. Create a regular user account for yourself with the following command:
useradd <Your first name and last initial>
2. Set a password for your user account with the following command:
passwd <your username, as configured in the previous step>
Enter your desired password (I recommend p@ss1234 for the exercises
in this book) and confirm it. Don’t worry about the complaint that it’s a
dictionary word. In the real world, of course, you should use complex,
hard-to-guess passwords, but for the purpose of this book, I like to keep
them simple.)
Figure 109: Changing a user’s password
3. Use the visudo command to enable /etc/sudoers for editing:
visudo
4. When the editor opens, add the following statement at line 99. If you’re
working with a different version than CentOS 6.5, you may need to edit a
different line number. Just add it right after the line that says “root ALL=
(ALL) ALL”:
<your username> ALL=(ALL) ALL
Figure 110: Modifying /etc/sudoers with visudo
5. Use the key combination of ESC, :wq to save the configuration.
6. Log off your system with the command exit.
7. Log back on as your new user.
8. 8. Attempt to disable the root account by removing root’s password with
the following command, incorporating the use of sudo:
sudo passwd -d root
Figure 111: Using sudo to disable the root account
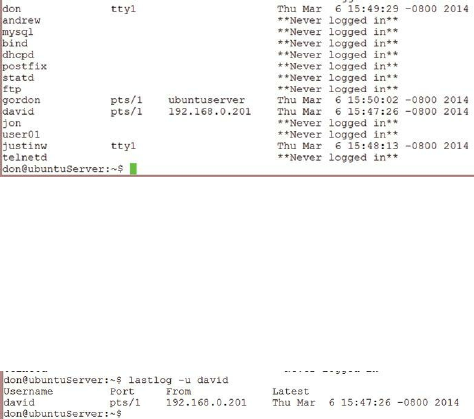
9. Now, you will not be able to log on as root. Go ahead. Try it. In order to
operate as root, you must either use sudo or first log on as your regular
user, then use the su - command to switch user to root (see the next
paragraph).
Bypassing sudo
If you’re adamant about bypassing sudo and working as root, you can use
the command sudo su -, which stands for switch user. (The “-“ loads the
new user’s profile.) If you don’t specify a user, su assumes you wish to
work as root. If you choose to do this, be careful. Remember to log off when
you’re done by typing exit. Remember the sage wisdom of Voltaire, “With
great power comes great responsibility.” (Okay, if you’re thinking it was
Uncle Ben Parker in Spiderman, you’re right. He did say it, but Voltaire
said it first.)
Using lastlog
The lastlog tool reports the most recent login of all users or you can use it
with the “u” switch to specify a particular user. To use lastlog, enter the
command lastlog. You’ll see output similar to that shown in the screen
capture below.
Figure 112: Viewing the output of lastlog
You can limit the output to the last login time for a particular user by
adding the “u” switch with the username, as shown in the following screen
capture.
Figure 113: Viewing the output of lastlog for a single user
Using last
The last tool shows a listing of the last logged in users. When used by itself
with no options, last shows all users logged in since the file /var/log/wtmp
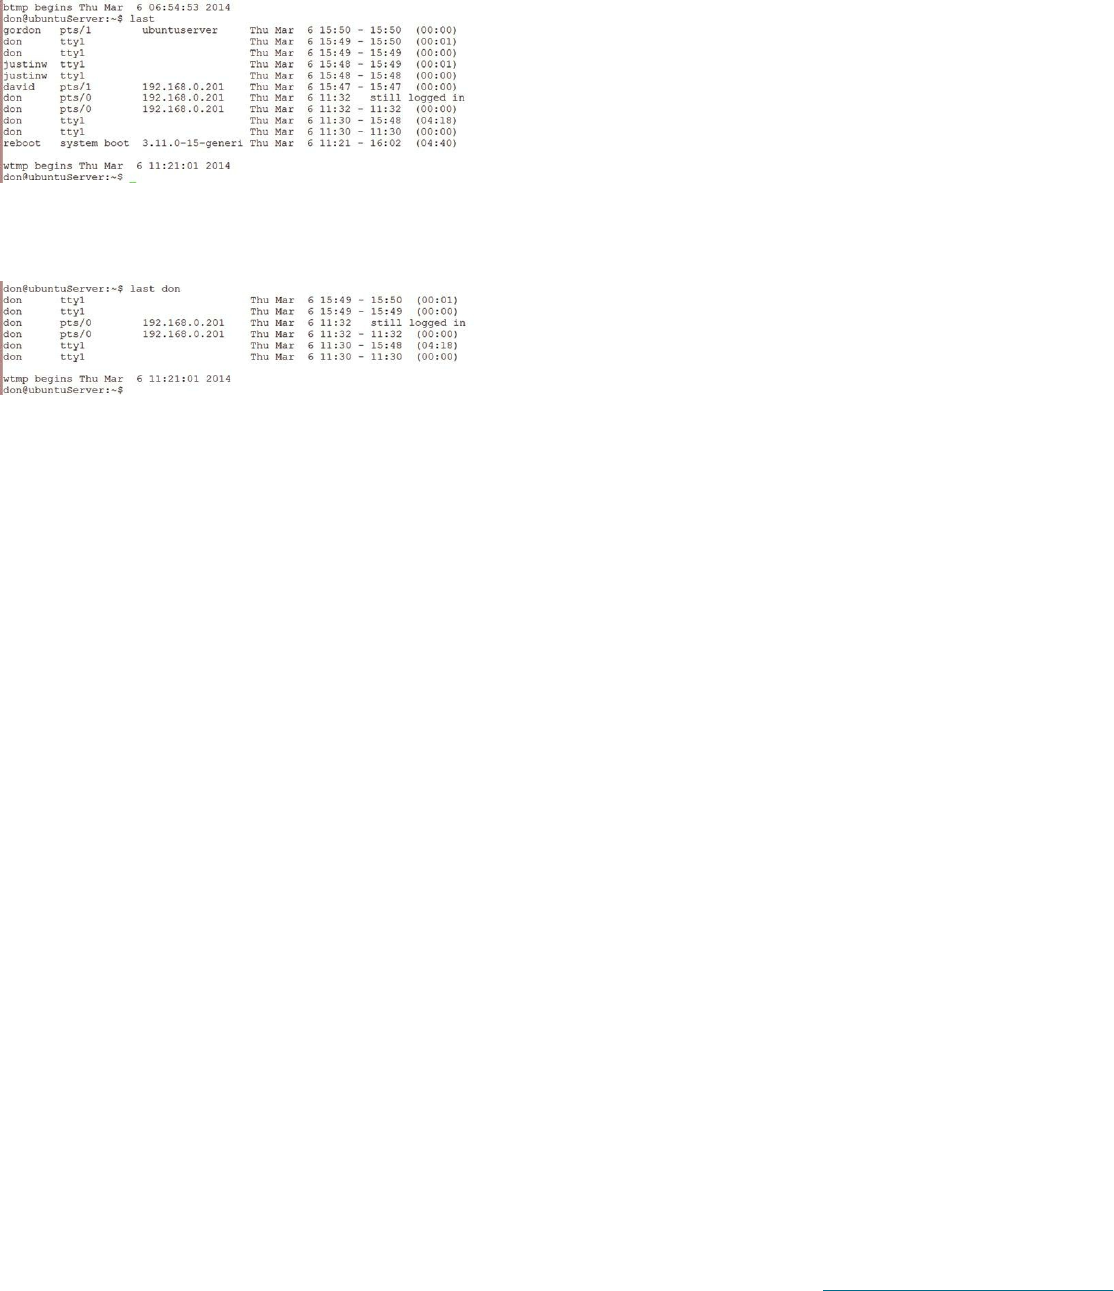
was created (usually since the last boot or reboot). As with lastlog you can
use options with last to show the information for a particular user.
In the first screen capture, you can see the use of last for a general view of
all recently logged in users.
Figure 114: Viewing the output of last
In the next screen capture, you see the output filtered for a single user.
Figure 115: Viewing the output of last for a single user
As with most tools in Linux, there are many more options. Use man last to
see them all.
Port Scanning
Port scanning is the process of probing a host to determine which ports are
open and waiting for connections. For example, if you port scan a host and
notice that ports 80 and 443 are open, then you can be reasonably certain
that the computer being scanned is running a web server. Port scanning is a
valuable security tool for auditing systems. Of course, as with most such
tools, in the wrong hands, it can be used by bad guys to conduct
reconnaissance scans for illicit purposes.
Warning: Do not conduct port scanning on systems at work or systems
managed by other people without getting explicit, written permission
from your boss. Port scanning may be noticed by security monitoring
software and could result in disciplinary action or other undesirable
outcomes for you.
The port scanner nmap (Network Mapper) is the most popular and best-
known port scanner. You can learn more about it at www.insecure.org.
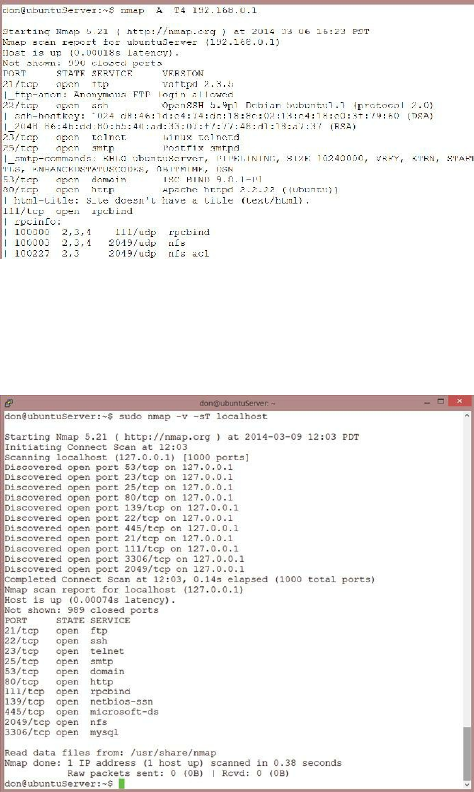
Hands-On Exercise 10.4:
Installing and Using nmap
1. Use yum to install it with the command yum -y install nmap
After nmap is installed, you can run it with a variety of switches,
depending on the type of scan you wish to perform. Use the following
command to perform a fairly commonly used scan to detect the operating
system and version, script scanning, and traceroute. I also used the “T4”
switch, which enables faster execution.
nmap -A -T4 192.168.0.1
Figure 116: Using nmap to detect the operating system and version, script scanning, and traceroute, along with other information
2. Now, try a quick scan for open ports with the following command:
nmap -v -sT localhost
Figure 117: Using nmap for a simple port scan
For more understanding of the switches available and types of port scans
possible, look at the man page for nmap.
Password Recovery (Resetting)
If you ever forget your root password, you can use the process of password

recovery to reset your root password to a known value. Some people object
to the use of the word recovery, since you can’t actually recover the
password. Instead, you change it to a new password. Performing password
recovery requires physical access to the server console. It cannot be
performed across a network.
Hands-On Exercise 10.5:
Password Recovery (Resetting)
When you are locked out of the system because you don’t know your
password, the following steps will allow you to log in as root and reset the
password.
1. Reboot the system. This will probably require you to force a hard reboot
(ouch), since you don’t know the password required to use advanced
privilege commands such as shutdown.
2. When the system comes back up, you will have about 5 seconds to
interrupt the boot process by pressing any key.
Figure 118: Interrupting the boot process to perform a password recovery
3. Press any key to enter the GRUB menu.
Figure 119: Entering the GRUB menu
4. Press the e key to edit the first line of the GRUB menu.
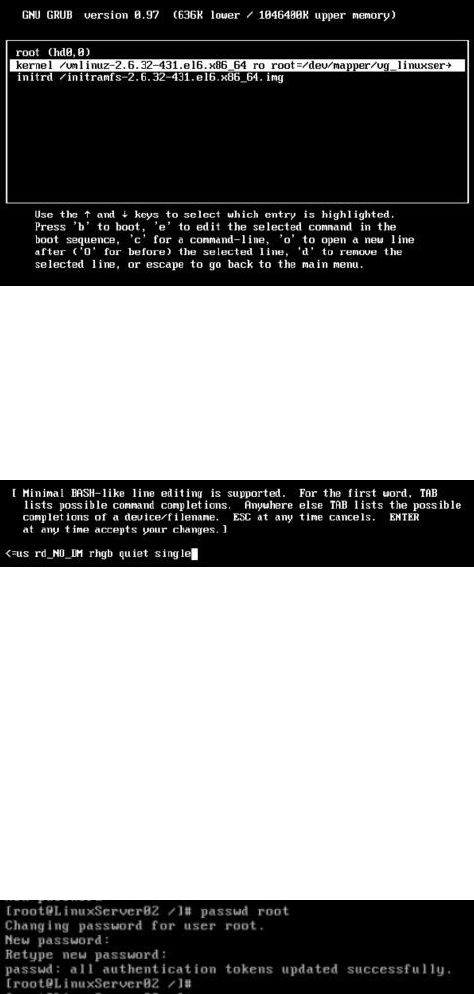
Figure 120: Editing the GRUB menu
Use the arrow keys to position the curser at the end of the line that starts
with kernel /vmlinuz and add the word single at the end of the line.
Press the Enter key.
Figure 121: Modifying the GRUB boot process for single user mode
5. Use the b key to continue booting your computer.
6. When the boot process is complete, your computer will be operating in
run level 1, also known as single user mode. You will automatically be
logged on as root, but no password will be required.
7. You can now use the shell command passwd to change the password to a
known value. You’ll have to enter and confirm the password.
Figure 122: Using the shell command passwd to reset the root password
8. After you’ve changed the password, use the command shutdown -r now
to reboot the computer. When it finishes booting and prompts you for a
logon, you can use the username and password you just reset.
9. Note: This procedure requires physical access to the computer. It cannot
be done across a network.
Additional Security Tools
Here are some additional tools that you can use, both to better test and
implement security in your network and also to better understand your
systems and networks.

Nessus is a very popular and very powerful vulnerability scanner.
(http://www.tenable.com/products/nessus)
Wireshark is a packet capture utility that allows you to examine each of
the packets traversing your network. (http://www.wireshark.org)
Snort is a network intrusion detection and prevention system.
(http://www.snort.org/)
Aircrack is a suite of tools for 802.11a/b/g WEP and WPA cracking.
(http://www.aircrack-ng.org/)
John the Ripper is a fast password cracker.
(http://www.openwall.com/john/)
One of the best listings of security tools on the web is at
http://sectools.org/.
Develop and Maintain a Good Backup Strategy
Bear in mind that there are both full system backups in addition to regular
data backups. Data backups allow you to restore your data in the event of
accidental deletion or other relatively minor issues. Full system backups
allow you to quickly restore your entire system in the event of catastrophes
such as server room fires, floods and other natural disasters, or massive
attacks.
Use tools such as tar and rsync to perform regular data backups. Consider
maintaining duplicate systems in separate locations and writing scripts to
use rsync to synchronize data files from the primary to the secondary
location. Include directories such as /home and /var in the synchronization.
There may be other directories to include such as subdirectories of /etc to
synchronize configuration files.
Performing full system backups allows you to quickly restore an entire
system in the event of a major catastrophe. For my small business, I
maintain duplicate systems in two separate data centers in different parts of
the country. If one fails, the other one is instantly available. You might
prefer to create and test full system backups to tape (or other media), which

gives you local control over your backups. If you choose to maintain
backups on tape, be sure to keep copies of the tape(s) offsite in case of fire
or other catastrophic event.
Backup Tools
A wide variety of commercial and open-source tools are available. Some of
the open-source tools include Bacula (www.bacula.org), rsnapshot
(www.rsnapshot.org), DRBD (www.drbd.org), or Amanda
(www.amanda.org).
Some administrators simply use tar and rsync to perform their backups, but
tools such as those mentioned above, while requiring a learning process,
can ultimately simplify and automate the backup process.
Regardless of your choice of tools, follow the advice of the Tao of Backup
(www.taobackup.com):
1. Backup all your data
2. Backup frequently
3. Take some backups offsite
4. Keep some old backups
5. Test your backups
6. Secure your backups
7. Test your backups for integrity
Remember, your success is not judged based on data backup; it’s based on
successful (and fast) data and system restoration.
Summary
The thing to understand about system security is that your system will never
be totally secure and your job in attempting to secure it is never done. To
ensure the security of your systems, you must be constantly monitoring,
auditing, patching, and fine-tuning. Additionally, you must subscribe to
security bulletins from each of the vendors whose products you use and
constantly read trade publications and blogs to ensure you’re fully informed
about the latest security threats and the latest thinking from security experts.
Assume your system will be compromised. It will. Use encryption
whenever possible, keep backups current and test them regularly, and keep
your disaster recovery plan up-to-date.
CHAPTER 11:
Automating Administration
Tasks with cron
Videos are available for many of the procedures in this chapter at www.soundtraining.net/videos
Introduction
One of the great things about computers is how well-suited they are for
performing routine or repetitive tasks. In this chapter, you’ll learn about the
cron utility. Cron is similar to the Windows task scheduler. You can use it
for scheduling backups, system cleanups, mirroring, or any other task
imaginable.
Objectives
Learn how to use the cron tool
Practice creating a cron job
Learn how to edit a cron job
Using cron
cron is a UNIX tool that allows scheduling of automated tasks. Cron
commands are stored in a file named for the user who created them in
/var/spool/cron/.
The crontab command is used to create new cron files:
crontab -l lists the contents of your personal cron file
crontab -r removes all crontab entries
crontab -e opens your default text editor for cron job creation
Wildcards can be used. For example, replacing the month parameter with
“*” would activate the cron entry on the day/date/time specified in every
month.

Some sample cron entries:
10 8 12 mar,sep * rm /tmp/* would delete all files in the /tmp
directory at 8:10 a.m. on the 12th of March and September.
30 19 * * mon rm /tmp/* would delete all files in the /tmp directory at
7:30 p.m. every Monday.
45 22 1,15 * * rm /tmp/* would delete all files in the /tmp directory
at 10:45 p.m. every 1st and 15th of every month.
The command syntax is minute, hour, date, month, day, command.
Soundthinking Point:
Use crontab to Edit cron Jobs
Do not edit cron files directly. In order for cron to work, you must use the crontab
utility to edit cron files.
Hands-On Exercise 11.1:
Using cron
In this exercise, you will create a cron job to empty a directory at a specified
point in the future. In the real world, you can use cron to schedule any task
you can imagine such as running a backup or compressing a database. In
the next chapter, you’ll learn how to create a cron job to email a log monitor
report.
1. While logged on as root, create a directory called /crondemo and navigate
to it:
mkdir /crondemo
cd /crondemo
2. Create three files in the directory: touch file1 file2 file3
3. Ensure that they are in the correct directory:
ls /crondemo
You should see the three files listed. If not, check to make certain that
you are working in the /crondemo directory and try again until you have
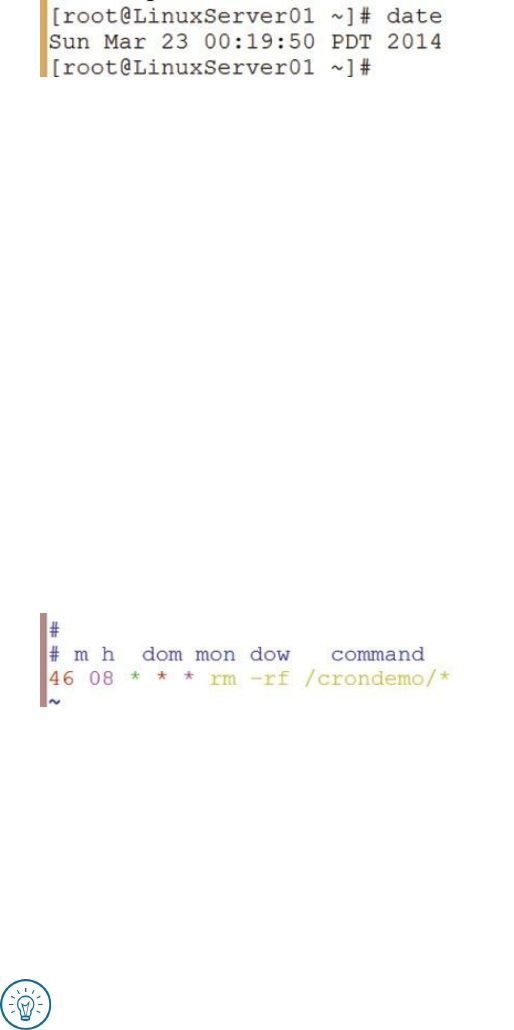
successfully created the files.
4. Display your current system time and make a note of it:
date
Figure 123: Checking the date and time with the date command
5. Use the crontab command to open your default editor and create a cron
job:
crontab –e
6. Create a cron job to delete the three files in a few minutes from the
current time by entering the following line at the top of the editor:
46 08 * * * rm –rf /crondemo/*
(Where 46 is the minute and 08 is the hour at which the job will run. For
this exercise, select a time four or five minutes beyond your system’s
current time. The three asterisks represent, in order, date, month, and day
of week.)
Figure 124: Configuring a new cron job
7. Use the ls utility to confirm that the cronjob ran and the three files were
actually deleted:
ls /crondemo
If you have configured cron correctly, the three files will be gone.
Soundthinking Point:
Configuring cron Intervals
Sometimes you might want to configure a task to run at regular intervals, say every
15 minutes, instead of at specific times on the clock. The cron utility allows you to
do that by entering */15 in the first field in the cron file. Obviously, if you want the
job to run every 30 minutes, you would enter */30 instead of */15.

CHAPTER 12:
Monitoring Your Red Hat/CentOS Linux Server
Videos are available for many of the procedures in this chapter at www.soundtraining.net/videos
Introduction
Effective monitoring starts with an understanding of system logs and
expands to the use of tools such as Cacti, Nagios, or commercial tools such
as WhatsUp Gold, Solar Winds Orion, and similar tools.
In this chapter, we’ll start with a look at log files, then we’ll check out some
of the built-in monitoring tools, and we’ll end with a discussion of some of
the powerful network monitoring software.
Objectives
Learn how to locate and view log files
Use other Linux monitoring tools
Install and use the sysstat package of utilities
Learn about network monitoring tools
Log Files
Linux log files are found in /var/log. If you look inside that directory,
you’ll see a large number of logfiles and subdirectories which contain even
more log files.
Figure 125: Viewing the contents of the /var/log directory
Here is an explanation of most of the logs:
/var/log/anaconda.log—Messages related to the installation of Linux.
/var/log/boot.log—Information logged during the system boot process
/var/log/btmp—Information about failed login attempts. Use the
command last to view its contents. For example, “sudo last -f
/var/log/btmp | less” (The -f option tells last to use the specified file.)
/var/log/cron—Whenever the cron daemon (or anacron) starts a cron job,
it logs the information about the job in this log
/var/log/dmesg—Kernel ring buffer information. As the system boots, it
prints a number of messages to the screen containing information about the
hardware devices detected by the kernel during the boot process. The
command dmesg will display the contents of this file.
/var/log/httpd—A log for the Apache Web server, if installed
/var/log/lastlog—Recent login information for all users. This is a binary
file which can be viewed using the lastlog command.
/var/log/maillog or /var/log/mail.log—The mail server logs.
/var/log/messages—Global system messages, including messages logged
during system startup. Among the logs in /var/log/messages are mail, cron,
daemon, kern, and auth.
/var/log/secure—Information related to authentication and authorization
privileges.
/var/log/wtmp or /var/log/wtmp—Login records. Using wtmp you can
find out who is logged into the system. The who command uses this file.
You’ll likely see other logs such as MySQL or VSFTPD, depending on
what packages you’ve installed on your system.
Viewing Log Files
With many log files, you can simply view them the same way you view any
text file. You can use less or cat. The problem is that many log files are
quite lengthy and probably contain a lot of information that’s not interesting
to you at this particular time.
Linux includes several tools to help you filter out extraneous data so you’ll
only see that which is relevant for you.
Perhaps the most obvious and widely used such tool is grep. Using grep,
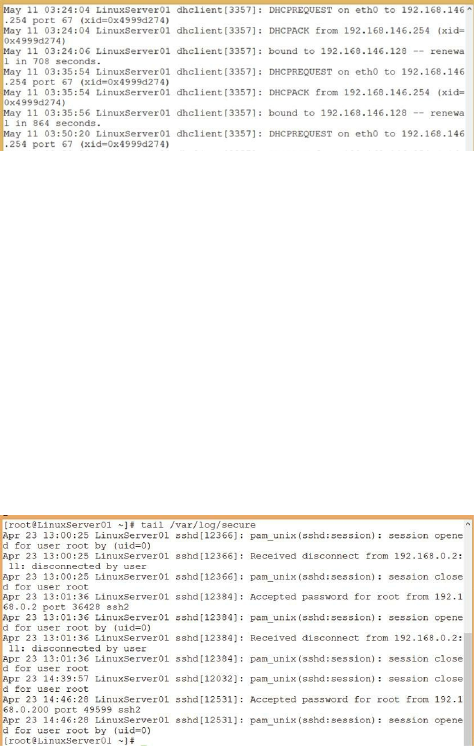
you can filter on text strings, dates, times, and nearly any other value you
wish.
Regardless of which tool you use, viewing log files requires root
permission, so you must either be logged on as root or use sudo when
performing these operations.
Here’s an example of how to use grep on a log file:
To view DHCP events in the messages log, use the following command:
grep -i dhc /var/log/messages
(the -i option tells grep to ignore case). Notice, also, that I grepped on dhc
instead of DHCP. That allows me to see messages concerning dhclient as
well as those concerning DHCP. Here’s what it will produce:
Figure 126: Using grep to filter messages in /var/log/messages
Notice that the only lines shown are those including the text string dhc (in
either upper or lower case). That’s why we’re able to see lines containing
the strings DHCPREQUEST, DHCPACK, and dhclient.
You could also use grep to view only lines containing a particular username
or any other text string.
You can also use the tail command to view the last 10 lines of a file:
Figure 127: Using tail to view the last 10 lines of a file
You can use the option -n to modify the number of lines displayed when
you use tail. Another option which can helpful with tail is -f. The -f option
allows you to watch entries as they’re added to the file in real time.
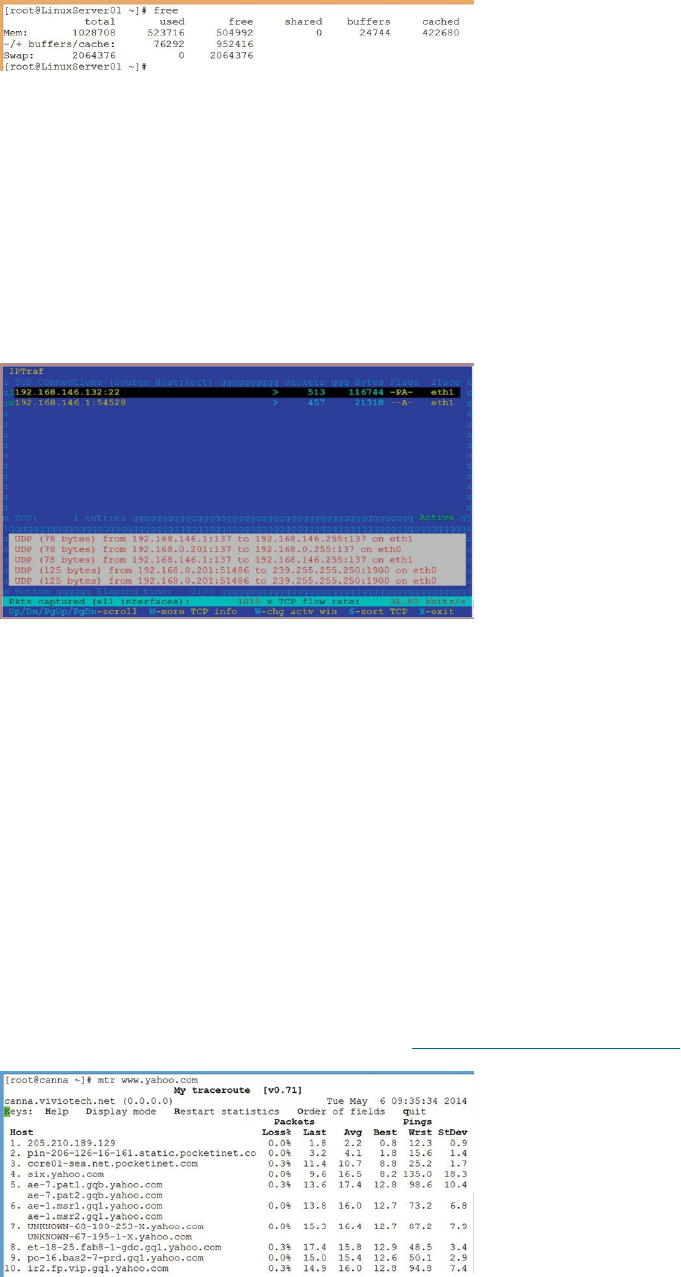
Other Linux Monitoring Tools
free
The free utility displays the amount of free and used memory on the system.
Figure 128: Using the free command to display the amount of free and used memory on your system
iptraf
iptraf provides a colorful view of LAN performance, based on interfaces. It
is not installed by default. Use the command yum install iptraf to
install it. It must be run by root, so, unless you’re already logged on as root,
start it with the command sudo iptraf.
Figure 129: Checking LAN performance with iptraf
mtr
The mtr tool combines ping and traceroute to aid in network
troubleshooting. Use the command mtr <IP address or host name> to
start it. The mtr tool is not installed by default, but can be installed using
yum:
yum -y install mtr
In the following screen capture, I used the mtr tool to examine statistics
from one of my servers to www.yahoo.com.
Figure 130: Using mtr to display connectivity statistics to a remote host
netstat
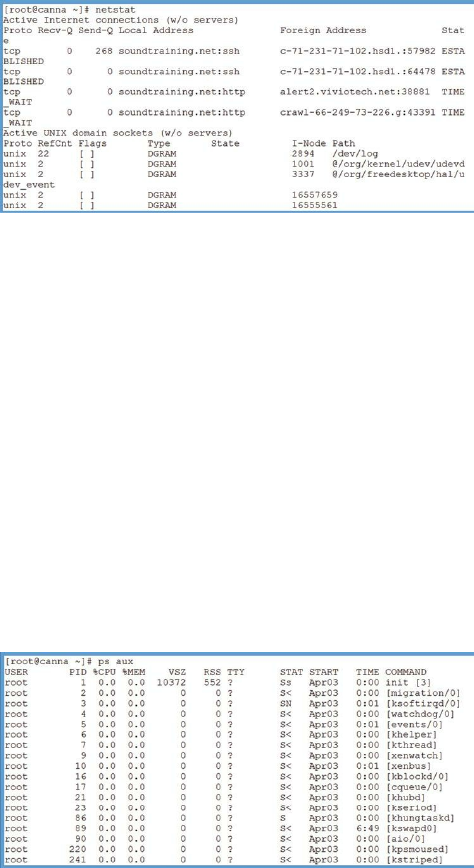
The familiar netstat utility prints network connections, routing tables,
interface statistics, masquerade connections, and multicast memberships.
Figure 131: Using netstat to display network connections, routes, and other information
ps
The ps command shows all running processes on a system. I usually use it
with the aux switches to see all running processes (ax) and the user (u) who
started them. Be careful not to precede the options with a hyphen (-). That
means something completely different from ps aux. Usually, when I want to
see all running processes (ax) and the user (u) who started them, I use the
following command:
ps aux
Figure 132: Using the ps command to view information about running processes
Sometimes, when I’m looking for a particular process, I’ll add a grep filter
to it, for example:
ps aux | grep named
pmap
pmap reports a memory map of a process or processes. Use the ps command
to display all running processes, then use pmap to see the memory map of a
particular process, like this:
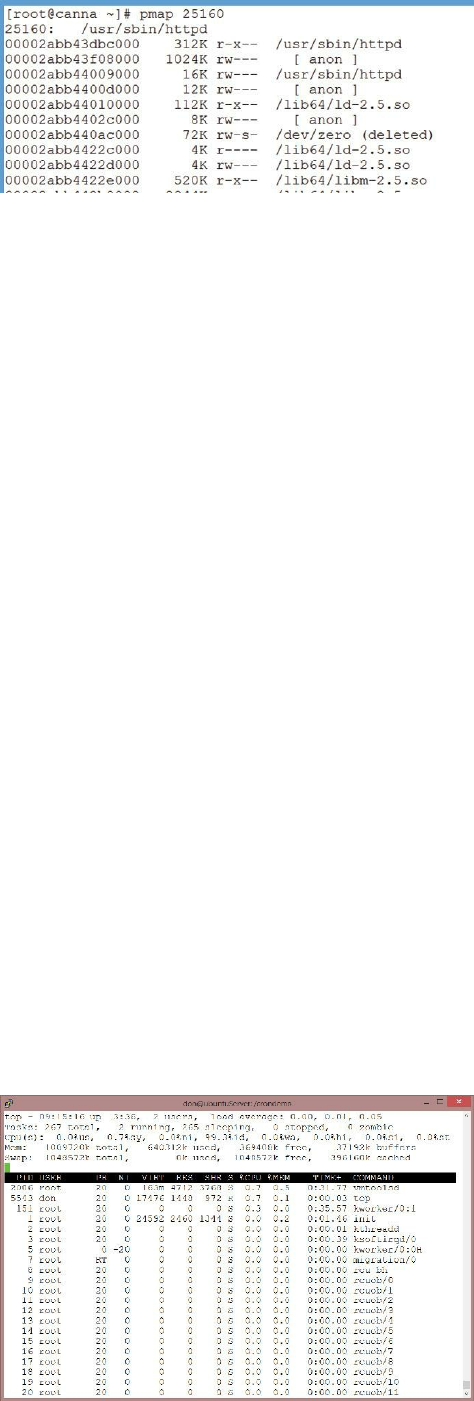
Figure 133: Using pmap to view a memory map of the processes associated with the http daemon
kill
If there’s a process that, for whatever reason, won’t shut down, you can use
the kill command to stop it. Use ps to find the PID (process ID) of the
errant process, then use kill to bring it to a halt:
kill 3740
The kill command doesn’t actually kill processes, it sends signals to them.
You can specify the signal by adding it to the command. If no signal is
specified, the kill command sends SIGTERM (signal 15) by default.
Sometimes, that’s not enough and you have to get out the virtual
sledgehammer to do the trick. Adding the option SIGKILL or signal 9 is
how you do it, but save this option for when you really need it. Here’s the
syntax:
kill -9 3740
top
The top utility displays a real-time, continuously updating view of the
running processes on the system. Its default setting displays the most CPU-
intensive processes and updates the list every five seconds.
Figure 134: Using the top command to display a real-time view of running processes
traceroute
The traceroute program is a traditional utility for following the path of a

packet from source to destination. It probes each router along the path and
reports the results of the probe. Although it’s usually installed by default, I
had to install it in this version of Linux with the command yum install
traceroute.
Use the following command to try traceroute: traceroute
www.telstra.com. (As OI mentioned in chapter eight, Telstra is the
Australian telephone company.)
uptime
The uptime utility displays a one line display of the following information.
The current time, how long the system has been running, how many users
are currently logged on, and the system load averages for the past 1, 5, and
15 minutes.
Figure 135: Using uptime to display information about system uptime and currently logged on users
vmstat
vmstat reports information about processes, memory, paging, block IO,
traps, disks, and CPU activity. Run it with the command vmstat:
Figure 136: Using vmstat to see information about processes, memory, CPU activity, and similar information
w
The w command shows who is logged on and what they are doing. Use it
by simply running the command w:
Figure 137: Using the simple w command to see who is logged on and what they’re doing
The sysstat Package of Utilities
sysstat is a package of tools available for installation through yum. sysstat
includes mpstat, iostat, and sar. Install the sysstat package with the
command yum install sysstat.
Once installed, sysstat should start automatically. If not, you can start it
with the command service sysstat start. It also should be configured to
start automatically at boot. If not, you can use chkconfig to configure it to

start automatically with the following command: chkconfig sysstat on
iostat
iostat reports CPU statistics and input/output statics for devices and
partitions. Run by itself with no options, iostat provides general information
about the system, CPU load, and device (drive) loads.
Figure 138: Using iostat to see CPU statistics and i/o informaiton for devices and partitions
As you probably expect, there are many options available for use with
iostat. As usual, see the man page for details.
mpstat
mpstat displays activities for each available processor, starting from 0. The
screen capture is from a machine with a single processor, so the information
displayed isn’t as extensive as it would be on, say, a quad processor
machine. Still, you get the idea. Use the command mpstat to start it:
Figure 139: Using mpstat to display activities for each available processor
sar
The sar tool collects, reports, and saves system activity information.
After you enable and configure sysstat, sar will collect system statistics
every ten minutes and store them in the binary file /var/log/sa/sa27.
You can view the stats by issuing the command sar. If you don’t specify
any options, sar will show the current day’s CPU stats.
Figure 140: Using sar to view system activity information
There are many options available with sar. Use the man page for specifics.
Network Monitoring Tools

There are many network monitoring tools available, some commercial and
others open-source. I want to mention two in particular that you may find
helpful. Entire books could be written about both (and perhaps I’ll do that
in the future), so I’m just going to make you aware of them, give a brief
description, and tell you where to get them.
Nagios
Nagios is a network monitoring system that can provide early alerts on
system problems, overall infrastructure monitoring including system
metrics, applications, services, network protocols, and servers.
Alerts can be configured to trigger when components fail and recover. They
can be delivered via email, SMS, or customized scripts.
Nagios is available in both commercial and non-commercial versions at
www.nagios.org.
Cacti
From Wikipedia: “Cacti is an open-source, web-based network monitoring
and graphing tool designed as a front-end application for the open-source,
industry-standard data logging tool RRDtool. Cacti allows a user to poll
services at predetermined intervals and graph the resulting data. It is
generally used to graph time-series data of metrics such as CPU load and
network bandwidth utilization. A common usage is to monitor network
traffic by polling a network switch or router interface via simple network
management protocol (SNMP).”
Cacti is available at www.cacti.net.

CHAPTER 13:
How to Build and Configure a Basic File Server for Windows and
Other Clients
Videos are available for many of the procedures in this chapter at www.soundtraining.net/videos
Introduction
This chapter is primarily about building a file server to share files and
printers with clients running the Windows operating system. I’ll use
Windows 7 Professional for the screen captures, but what I’m going to
show you should work with any Windows client. (Should, of course, is the
operative word!)
The traditional Windows file sharing protocol is SMB (Server Message
Block). The SAMBA package was developed to allow Windows computers
and users to connect to file and printer shares on a computer running the
Linux operating system. In fact, when properly configured, Windows users
automatically have their own home directory on the SAMBA system.
In later years, SMB was updated to CIFS (Common Internet File System),
but you can think of CIFS as just a new version of SMB. In fact, Microsoft
introduced SMB version 2 with Windows Vista in 2006, improved on it in
Windows 7, and developed major revisions of 2.1 and 3.0 as of 2012.
Samba runs on the Linux (or UNIX) server. It’s not necessary to modify the
Windows client computers to connect to the Samba server, except that the
Windows client must have a user with the same username and password as
the Linux system in order to take advantage of home directories.
Objectives
Install and configure Samba to share files and printers with Windows
systems
Install and configure NFS (Network File System)
Install and configure rsync to synchronize files

Hands-On Exercise 13.1:
Installing and Configuring Samba
Installing Samba
1. Use yum to install the Samba package:
yum -y install samba
Creating Samba Test Directory and Files
For this part of the procedure, you’ll use the su - (switch user) command
to work as root. Although, as we’ve discussed, it’s not best practice to do
this regularly, there are times where it’s much more practical to work
directly as root instead of trying to use sudo to do everything. This is one
of those times. You’re going to create a new directory containing three
empty files which you’ll share using Samba.
2. While logged on as root, create the new directory /smbdemo with the
following command:
mkdir /smbdemo
3. Change the permissions on the new directory to 770 with the following
command:
chmod 770 /smbdemo
4. Navigate to the new directory with the following command:
cd /smbdemo
5. Add three empty files to the directory with the following command:
touch file1 file2 file3
Figure 141: Using touch to create files for the Samba exercise
Adding the Samba User
You must add users to the Samba database in order for them to have
access to their home directory and other Samba shares.
6. Use the following command to add a new Samba user:
smbpasswd -a <username>

For example, to add the user don, use the command smbpasswd -a don.
Creating the Samba Group
7. Perform the following steps to create an smbusers group, change
ownership of the /smbdemo directory, and add a user to the smbusers
group:
groupadd smbusers
chown :smbusers /smbdemo
usermod -G smbusers don
Figure 142: Adding the smbusers group, changing ownership on /smbdemo, and adding a user to the smbusers group
Configuring Samba
Note: In several of the steps in this exercise, I mention specific line
numbers. The line numbers I mention are based on CentOS version 6.5.
If you’re running any other version, your line numbers may be different.
In that case, just search for the relevant text string.
Samba configuration is done in the file /etc/samba/smb.conf. There are
two parts to /etc/samba/smb.conf:
Global Settings: This is where you configure the server. You’ll find
things like authentication method, listening ports, interfaces, workgroup
names, server names, log file settings, and similar parameters.
Share Definitions: This is where you configure each of the shares for the
users. By default, there’s a printer share already configured.
Configuring smb.conf
In the Global Settings section, at line 74, change the workgroup name to
your workgroup name. I’m going to use soundtraining as a means of
shamelessly promoting my company during your quest for knowledge. I’m
sure you understand.
Soundthinking Point:
Enable Line Numbering in vim
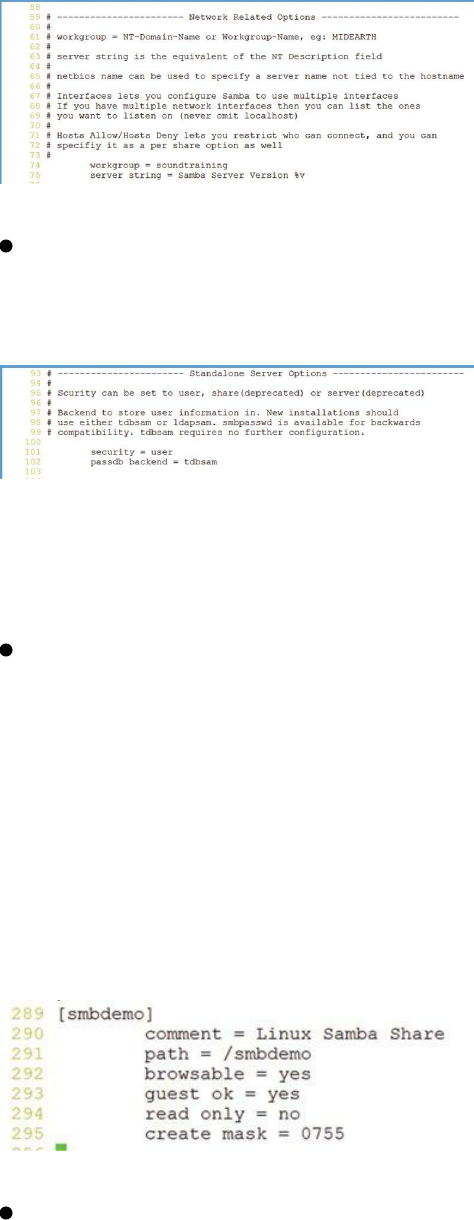
You can enable line numbering in vim with the command :set nu. If you want to turn
it off, use :set nu!.
Figure 143: Chaning the workgroup in the Samba configuration file)
Now, confirm that the authentication type is set to user by going to the
authentication section, still in Global Settings, and line 101. Make sure
there is no hash mark at the beginning of the line to enable user security.
Figure 144: Confirming user authentication in the Samba configuration file
This change allows users on your Red Hat/CentOS server to log in to shares
on the Samba server.
Next, add a section for /smbdemo, which you created earlier. You can just
add it to the very bottom of /etc/samba/smb.conf with the following lines:
[smbdemo]
comment = Linux Samba Share
path = /smbdemo
browsable = yes
guest ok = yes
read only = no
create mask = 0755
Figure 145: Configuring Samba share definitions
Be sure to save your changes with a :wq.
You can use the command testparm to test the configuration. In order for
the server to re-read the configuration file and make the changes, you must
restart the Samba service with the commands service smb restart and
service nmb restart.
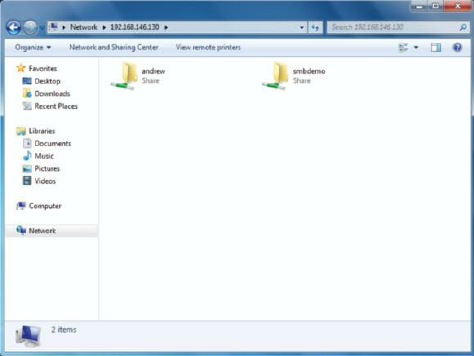
When properly configured, you should be able to connect from a computer
running the Windows operating system and see both the general share and
the user’s home directory:
Figure 146: Viewing Samba shares from a Windows computer
You can test it by opening the user’s home directory in Windows, adding a
file, and then viewing that file on the Linux server.
Using NFS to Share Files
NFS (Network File System) is another way of sharing files across a
network. It is used primarily in Linux and UNIX systems, although there
are NFS clients for Windows.
Hands-On Exercse 13.2:
Installing and Configuring NFS
Installing NFS
1. Use the following command to install NFS:
yum -y install nfs-utils nfs-utils-lib
Configuring NFS
Configuration of NFS is pretty simple. You add the directories you wish
to export to the file /etc/exports.
2. Create a directory called /public with the following command:
mkdir /public
3. Populate it with three empty files:
touch /public/nfs1 /public/nfs2 /public/nfs3

4. Next, edit the file /etc/exports:
vi /etc/exports
5. Add the following line to /etc/exports:
/public *(ro,sync)
Here’s an explanation of the fields in the command:
/public—The directory to be shared
*—The clients allowed to access the share. You can restrict it by IP
address. For example, you could, instead of the asterisk, put
192.168.0.0/24 to restrict it to clients on the 192.168.0.0/24 network.
ro—Read only access
sync—Reply to requests only after any changes have been committed to
stable storage. This is a slower, but more stable option than alternatives.
In the following screen capture, you can see how I configured
/etc/exports to share /public:
Figure 147: Configuring an NFS shared directory in /etc/exports
6. NFS requires the rpcbind service to be running. Start it with the
following command:
service rpcbind start
7. Then, start the nfs server:
/etc/init.d/nfs start
(You could also use service nfs start.)
8. If you want NFS to start at boot, use the following command:
chkconfig nfs on
9. Enable the export immediately with the command exportfs -v. You can
view the export with the command showmount -e.
If you are using a firewall, you must explicitly allow traffic from your
local subnet to access the server. For more information, see chapter 10 on
Linux security.
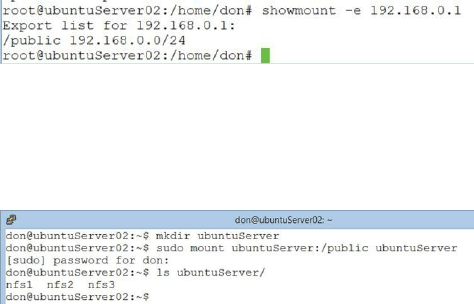
Configuring the NFS Client
You must install the nfs package on the client with this command:
yum -y install nfs-utils nfs-utils-lib
Once the package is installed, you can use the showmount command to view
exports on an NFS server:
Figure 148: Viewing NFS shares with the showmount command
You can also create a new directory on your client and mount the NFS
export to the directory, thus giving you access to the files in the directory:
Figure 149: Creating and viewing a mount point for the NFS share
In the above example, I mounted the export from ubuntuServer (/public) to
a directory on my local client machine, called ubuntuServer02. As you can
see, after it was mounted, I was able to view the contents of the exported
directory locally.
Using rsync to Synchronize Files Between Servers
When administering file servers, you may want to configure replication to
help minimize the chance of data loss in the event of a server crash. One
way to do that is with the rsync utility, which allows you to seamlessly
move one or more files from one server to another. Unlike a simple file
copy, however, rsync can perform differential file transfers, transferring only
the data that has changed. A benefit of rsync is that mirroring occurs with
only a single transmission in each direction.
Installing rsync
Use yum to install rsync with the command: yum install -y rsync. The
rsync utility must be installed on both computers participating in the
mirroring.
Basic rsync syntax
rsync <options> <source> <destination>

Some common rsync options
-a—archive mode, which allows copying files recursively, plus it
preservers symbolic links, user and group ownership, file permissions,
and timestamps
-e—specifies the remote shell to use. This option allows you to use SSH
for the transfer
-h—human-readable which causes the system to output numbers in a
human-readable format
-r—copy data recursively without preserving timestamps and
permissions
-v—verbose
-z—compress data
Use security with rsync
By itself, rsync transfers data in the clear. You can enable rsync over ssh
with the e option, as you’ll see in the upcoming exercise.
Hands-On Exercise 13.3:
Using rsync to Synchronize Files from the Local Computer to a Remote
Computer
In this exercise, you will install rsync on two connected servers and use it to
synchronize files from one server to the other.
Requirements
Two computers are required (LinuxServer01 and LinuxServer02), both
connected to the public Internet and each other. For the purpose of this
exercise, LinuxServer01 is configured with an IP address of 192.168.0.1/24
and LinuxServer02 is configured with an IP address of 192.168.0.2/24. If
your IP addresses are different, modify the following steps accordingly.
The Steps
1. While logged on as root, install rsync by executing the following
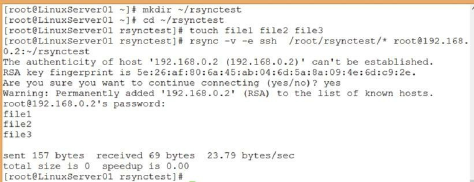
command on both LinuxServer01 and LinuxServer02:
yum -y install rsync
2. On LinuxServer01, create a test directory with the following command:
mkdir ~/rsynctest
(The use of the tilde (~) represents the current user’s home directory.
Since you’re logged on as root, the command will create the following
directory: /root/rsynctest.)
3. Repeat step two on LinuxServer02.
4. On LinuxServer01, navigate to the new directory with the following
command:
cd ~/rsynctest
5. Within the new directory, create three empty files for testing purposes:
touch file1 file2 file3
6. Now, use the rsync command to synchronize the three files with the
remote server:
rsync -v -e ssh ~/rsynctest/* root@192.168.0.2:~/rsynctest
Notice that the first time you connect via SSH, you’ll be prompted to
accept the remote server’s SSH key. Obviously, in the real world, you
should confirm that you’re actually connecting to the correct server before
replying yes.
You’ll also have to enter the remote user’s password in order to complete
the transfer.
Figure 150: Configuring and using rsync between two computers
7. Check that the file transfer actually occurred by using the ls command in
~/rsynctest on LinuxServer02. You should see the three files.
Hands-On Exercise 13.4:
Using rsync to Synchronize Files from a Remote Computer to the Local
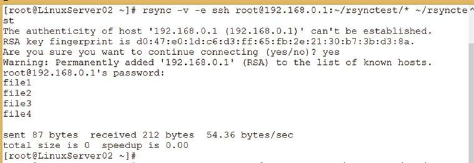
Computer
In this exercise, you do the opposite of what you did in the previous
exercise.
1. On LinuxServer01, create a new file in ~/rsynctest with the following
command:
touch ~/rsynctest/file4
2. Change to LinuxServer02 and execute the following command:
rsync -v -e ssh root@192.168.0.1:~/rsynctest/* ~/rsynctest
3. Confirm the transfer by using the ls command to view the contents of
~/rsynctest on the local machine:
ls ~/rsynctest
4. You should see the three original files, plus file4.
Figure 151: Using rsync to synchronize files from a remote computer to the local computer
You might want to consider creating a daily cron job to automatically
synchronize files between computers (or even more frequently, depending
on the nature of the systems). There are many uses for rsync. Others include
synchronizing or mirroring directories. As usual, for more information,
check the man page. I also found many examples of ways to use rsync by
searching the Internet on “rsync examples”.

CHAPTER 14:
How to Build and Configure a Basic Web Server
Videos are available for many of the procedures in this chapter at www.soundtraining.net/videos
Introduction
In this chapter, I’ll show you how to install and build a basic Web server.
In subsequent chapters, we’ll make it dynamic by adding a database and
scripting language.
The Apache Web server is the most widely used HTTP server in the world.
According to W3Techs, it is used by 62% of known Web servers. Because
of Apache’s ease of use, stability, security, and popularity, we’ll use it to
build our Web server.
You’ll hear people talking about a LAMP server, which is an acronym for
Linux, Apache, MySQL, and PHP. LAMP servers are frequently the choice
for admins wanting to support dynamic websites using content
management systems such as Wordpress, Joomla, or Drupal.
As you can see from the acronym, Linux is the first part and the Apache
web server is the second part of a LAMP server. Over the next two
chapters, we’ll actually build a functioning LAMP server, starting with
Apache.
Objectives
Install and configure the Apache Web server
Learn the parts of httpd.conf
Create a simple Web server
Create a Web server with multiple sites (name-based virtual hosting)
Install and configure an FTP server
Apache Web Server
The Apache Web server can run on a variety of platforms including UNIX,
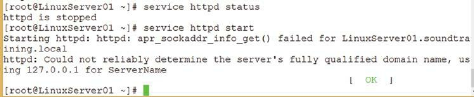
Linux,and Windows. It is generally regarded as being extremely flexible,
secure, and stable. There is an online manual at
/var/www/manual/index.html.en.
Hands-On Exercise 14.1:
Installing the Apache Web Server
In this exercise, you will install the Apache Web server and a package of
related tools.
1. Check to see if Apache is already installed with the following command:
rpm -qa | grep httpd
2. If it’s not installed, use the following command to install the server and
tools:
yum -y install httpd httpd-tools
3. Confirm successful installation by repeating the command from step one
in this exercise:
rpm -qa | grep httpd
4. Use the following commands to check the status of the http server and
start it running:
service httpd status
service httpd start
5. You’ll notice in the following screen capture that, although it’s running,
it threw off an error, which we’ll fix during the configuration exercise in
a few minutes.
Figure 152: Managing the httpd service with the service command
6. You’ll probably want the Apache Web server to start automatically
whenever you boot your server. To make that happen, enter the following
command:
chkconfig httpd on
Congratulations, you’ve just successfully installed the Apache Web server
and configured it to start automatically on boot.

Understanding Apache
Three primary parts of Apache
Httpd daemons
Respond to incoming requests to the server’s network interfaces
The requests are processed according to parameters specified in the
configuration files
The Apache configuration files
httpd.conf: The primary configuration file
Magic: Helps Apache identify different media types
Web site’s content
In Red Hat Linux, web content is located in /var/www/html (the Apache
configuration file identifies the location of the document pages for each
distro)
The Apache Configuration Directives
The Apache configuration parameters are contained within directives in the
httpd.conf file. The httpd.conf file is divided into containers (also called
“blocks”) which provide the structure used by Apache to combine one or
more directives into a single entity. Each container includes a beginning
and an end tag to bind the directives together. Within each container, a
directive is used to assign a variable or option value.
The Three Parts of httpd.conf
The httpd.conf file can be broken into three parts: Global Environment,
Main Server, and Virtual Hosts. Global Environment defines the behavior
of the httpd daemons. The directives in the Global Environment section deal
with the overall operation of your Web server. Main Server sets the Web
server’s default behavior, and Virtual Hosts defines the parameters for the
virtual Web servers.

Developing a Virtual Web Site
Using Virtual Hosts makes a single Apache Web server appear as many.
There are several uses for virtual web sites including the conservation of IP
addresses, greater utilization of server hardware, and allowing employees
and customers to have their own web sites. There are two types of virtual
hosts:
IP-based Virtual Hosts
Requires an IP address for each site (in other words, each hostname on
the server is given its own IP address)
Generally, the only time IP-based virtual-hosting is desirable is when an
SSL certificate is used to provide security, since such certificates are
associated with an IP address
Name-based Virtual Hosts
Associates a name with each site and does not require an individual IP
address
Allows multiple hostnames (websites) to share a single IP address
Is generally considered a best practice unless an SSL certificate is in use
Enabling Name-Based Virtual Hosting
To enable named based virtual hosting uncomment the directive at line 990
in /etc/httpd/conf/httpd.conf:
NameVirtualHost *:80
Understanding the httpd.conf File
The Apache Web server is configured in the file
/etc/httpd/conf/httpd.conf. After you install Apache, open httpd.conf
to view its contents. Here is an explanation of the essential parts of the
Apache configuration file:
The container opening directive (<VirtualHost *:80>) tells the server

the port and IP address on which to listen. If no IP address is specified,
the server will listen on all IP addresses configured on the hosting
computer.
The ServerAdmin directive does what the name suggests, it supplies the
email address of the server’s administrator. In certain error messages, the
ServerAdmin email address will be displayed for reporting server
problems.
The DocumentRoot directive specifies the location on the server of the
content files for the website, in this case /var/www/html.
Next, are the directory options. The first container is for the root
directory, which should be very restrictive in most settings. The root
directory container <Directory /> contains the directive options which
controls which server features are available in the specified directory.
There are a variety of options, but the default is FollowSymLinks, which
is what you see in this container. The FollowSymLinks option allows the
server to follow symlinks in this directory. The AllowOverride None
setting specifies that .htaccess files in the system will be ignored. We’ll
discuss .htaccess files later. We’ll look at two other options in the next
directory container.
The next container is for the website’s document root directory, which
should be less restrictive than the computer’s root directory. In fact, if we
look at the options for <Directory /var/www/>, we see Indexes,
FollowSymLinks, and Multiviews. The FollowSymLinks option is
explained above. The Indexes option tells the server to display a
formatted listing of directories when URLs for a directory are requested,
but no default document exists in that directory. The Multiviews option is
used frequently when a document exists within a directory in multiple
languages. By enabling Multiviews, it’s possible to let the server choose
the best document based on the client’s requirements. Following the
options is the order deny,allow statement which determines the order in
which the access directives are applied. In the case of this directory,
access is allowed from all, so the Order statement says, “First allow all,

then if someone is denied, block them.”
Next, is the error log directive. In this case, the website will write to the
error.log file located in the log directory specified in the global
configuration files. It will write a logging level of warn, which is a fairly
low level of logging.
The access log entries will be written to the file access.log, also in the log
directory specified in the global configuration files. The statement
combined is commonly used to combine the access, agent, and referrer
logs into a single logfile.
Checking the httpd.conf file
Use the command httpd -t to check the file for syntax errors.
Hands-On Exercise 14.2:
Creating a Simple Web Server
In this exercise, you will modify the Apache configuration file to create a
basic Web server hosting a single site.
Note: In several of the steps in this exercise, I mention specific line
numbers. As usual, the line numbers I mention are based on CentOS
version 6.5. If you’re running any other version, your line numbers
may be different. In that case, just search for the relevant text string.
Configuring Your Windows hosts File
In order to test your Web server configurations, it is necessary for you to
modify the hosts file on your VMWare host computer. Assuming your
VMWare host computer is running the Windows operating system, you’ll
find the host file tucked away in a remote part of your filesystem at
c:\windows\system32\drivers\etc. On modern Windows operating
systems such as Windows 7, 8, or 8.1, you must edit it as administrator.
Here’s how to do it:
1. Find Notepad and right-click on it.
2. Choose Run as administrator.
3. When Notepad opens, click on File>>Open and choose
c:\windows\system32\drivers\etc\hosts
4. When the host file opens, add the following two lines:
192.168.0.1 LinuxServer01.soundtraining.local
192.168.0.1 www.soundtraining.local
5. Save the file.
Configuring the Apache Web Server
6. Log on to your Linux VM as root.
7. Create a backup of the httpd configuration file:
cd /etc/httpd/conf
cp httpd.conf httpd.conf.bak
vi httpd.conf
8. Use the key combination of 262+G (the number 262 plus upper-case “G”)
to go to line 262. Replace “root@localhost” with
“webmaster@soundtraining.local”
9. Navigate to line 276. Uncomment the line by deleting the leading pound
sign (#). Replace
www.example.com:80 with “LinuxServer01.soundtraining.local:80”.
10. Save the configuration file by using the key combination of :wq.
11. Test syntax with the following command:
httpd –t
12. If you have any syntax errors, you’ll see an error message pinpointing
where the error(s) occurred. If necessary, make any corrections.
13. Restart the Apache Web Server with the following command:
service httpd start
14. Using a browser on your virtual machine host, test your Web server by
attempting to connect to your server at
http://LinuxServer01.soundtraining.local. If your server is
operating properly, you will see the Apach2 test page. If you do not see
the test page, review your settings for misconfigurations.
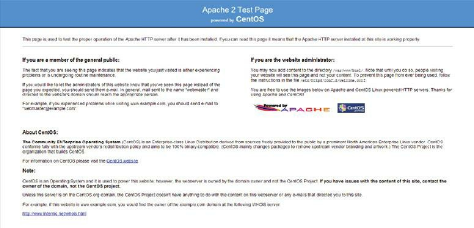
Figure 153: The Apache default page
Creating Content for the Web Site
In Red Hat systems, the default location for website content is
/var/www/html. The httpd.conf file will specify the location on other
systems.
15. Navigate to /var/www/html with the following command:
cd /var/www/html
16. You can create simple content with the following command (Feel free to
get more elaborate if you wish, ensuring that your content clearly
identifies your computer.):
echo “This is LinuxServer01” > index.html
(where [xx] is your computer number)
17. Restart the server
service httpd restart
18. Again, using a browser on your host computer, test your Web server by
attempting to connect to your server at
http://LinuxServer01.soundtraining.local. If your server is
operating properly, you’ll see the content you just created. If you don’t
see the content, review the previous steps to ensure your configuration is
correct.
Hands-On Exercise 14.3:
Creating Name-Based Virtual Hosts
You can host multiple websites on the same server using the same IP
address through the use of a name-based virtual host configuration. Use the
following steps:
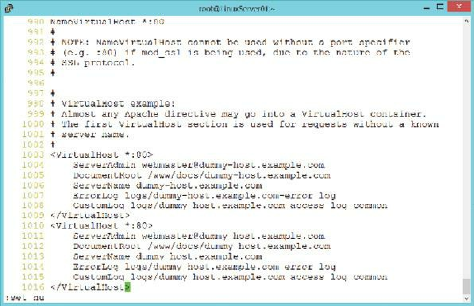
1. While still logged on as root, change directory to /etc/httpd/conf and
open /etc/httpd/conf/httpd.conf with vi:
cd /etc/httpd/conf
vi httpd.conf
2. Navigate to line 990 near the bottom of the file by using the key
combination of 990+G. (Again, the number 990 plus upper-case “G”).
3. Enable Name-Based Virtual hosting by uncommenting the
NameVirtualHost directive.
4. Uncomment lines 1003 through 1009. (This is the sample virtual host
container, starting with the line reading “<VirtualHost *:80>” and
ending with the line reading “</VirtualHost>”.
5. Using your arrow keys, position the cursor at the beginning of line 1003.
Use the key combination of 7+Y to copy lines 1003 through 1009 into a
buffer.
6. Press the key combination of SHIFT+G to move the cursor to the end of
the file.
7. Press the upper-case P key to paste the seven lines you copied previously
to the end of the file. When you’re done, the bottom of the file should
look like the screen capture on the following page:
Figure 154: The default virtual host section of httpd.conf
8. In the first container, change the email address for the ServerAdmin
directive to webmaster@soundtraining.local. Do the same thing for the
ServerAdmin directive in the second container.
9. In the first container, change the DocumentRoot directive to
/var/www/html and in the second container, change the DocumentRoot
directive to /var/www/virtual.
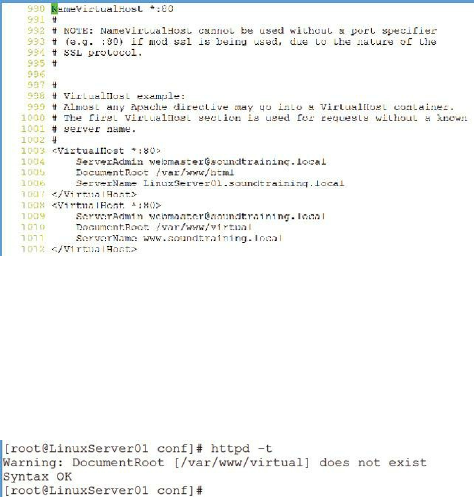
10. In the first container, change the ServerName directive to
LinuxServer01.soundtraining.local and in the second container,
change the ServerName directive to www.soundtraining.local.
11. In both containers, remove the ErrorLog and CustomLog directives and
save the file with the vi command :wq. (Remember, if you’re in edit
mode, to touch the ESC key to return to command mode.) When you are
finished, the configuration should look like the screen capture:
Figure 155: The virtual host section of httpd.conf after modification
12. Test the configuration with the following command:
httpd –t
13. Notice that you receive a warning that /var/www/virtual doesn’t exist.
Figure 156: Using httpd -t to check your Apache Web server configuration
You must create the additional document root with the following
command:
mkdir /var/www/virtual
14. You must also create content with the following commands:
cd /var/www/virtual
echo “This is your virtual site” > index.html
15. Test the configuration again with the following command:
httpd –t
This time, you should not receive any warnings. If you do, use the
information in the warning to troubleshoot the configuration.
16. Restart the server
service httpd restart
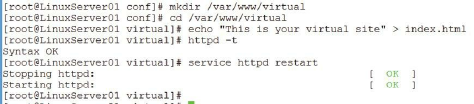
Figure 157: Adding content to the new virtual site
17. Again, using a browser, test your Web server by attempting to connect to
your server at http://LinuxServer01.soundtraining.local. If your
server is operating properly, you’ll see the original content you created.
Now, test the virtual site by attempting to connect to
http://www.soundtraining.local. You should see the content from
your virtual site.
Once you’re finished testing your Apache Web server, be sure to delete the
two lines you added previously to
c:\windows\system32\drivers\etc\hosts on your Windows host
computer.
Note, in order for virtual hosting to work, your DNS server must be
configured with A or CNAME records for the virtual hosts. For testing
purposes, you can also add the necessary entries to your browser computer’s
host file, as we did previously. In the real world, however, you must have
DNS entries for each name you intend to use on a Web site.
Installing and Configuring an FTP Server
FTP (File Transfer Protocol) allows the uploading and downloading of files
from a remote server. FTP operates over ports 20 and 21. It is one of the
original Internet protocols, left over from the days when the Internet’s
predecessor Arpanet was a network for academic and military institutions.
The original specification for FTP was published as RFC 116 in 1971. The
current version of FTP was published as RFC 959 in 1985. (To learn more
about FTP, search on the term “RFC 959”.) FTP is widely used, but is
totally non-secure. The entire session including authentication and file
transfers is done in the clear with no encryption. For this reason, FTP is best
used as a means of permitting non-sensitive downloads. When security is a
concern, SFTP can be used which incorporates FTP with SSH over port 22
or FTPS can be used which incorporates FTP with SSL over port 990.
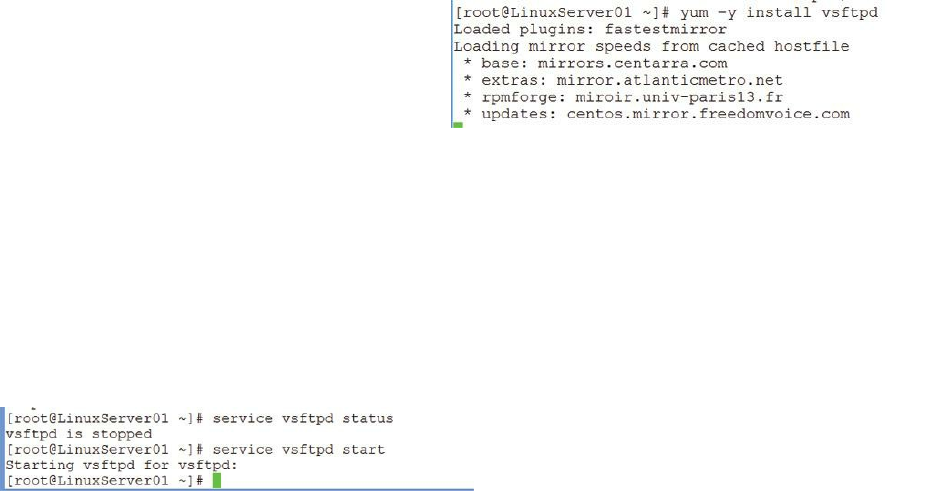
Installing the FTP Server
There are many versions of FTP. In my experience, the version most
commonly used is VSFTP (Very Secure FTP). It strikes me as a little odd
that FTP, a totally non-secure protocol, would have a version titled Very
Secure FTP. It’s not, but in the old days it was considered to be a more
secure version of FTP than other versions.
Hands-On Exercise 14.4:
Installing and Customizing the VSFTPD Server
In this exercise, you will install the VSFTPD server and customize its
configuration file to allow anonymous login.
1. Install VSFTP using the command yum -y install vsftpd, as shown
in the screen capture below.
Figure 158: Using yum to install the vsftpd server
2. After you install it, confirm that it’s running with the command:
service vsftpd status.
It should be running by default. If not, start it with the command:
service vsftpd start.
Figure 159: Starting the vsftpd server
Allowing Anonymous FTP Access
By default, when a user connects to the FTP server, they have access to their
home directory. Configuration of VSFTP is done in
/etc/vsftpd/vsftpd.conf. Depending on the purpose of your FTP server,
you may want to enable anonymous logins, in which the user connects
using the username anonymous and their email address as a password.
Hands-On Exercise 14.5:
Permitting Anonymous Access to the FTP Server
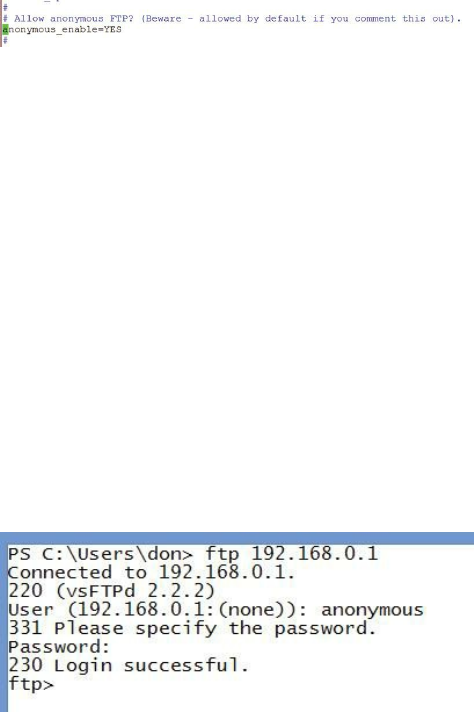
In this exercise, you will allow anonymous access to the FTP server.
1. Confirm that anonymous access is permitted by looking at line 12 in
/etc/vsftpd/vsftpd.conf. It should look like the screen capture.
Figure 160: Allowing anonymos FTP access
2. Test your server by attempting to connect from another computer. For
example, if you’re doing the exercises in a virtual machine, attempt to
connect from your host computer using PowerShell or a command
prompt. Enter the following command:
ftp 192.168.0.1
When the system prompts you for a username, enter anonymous and use
anything for the password. (Traditionally, anonymous FTP users use their
email address as the password but, although it’s considered a courtesy to
the FTP server administrator, it’s certainly not required.)
Figure 161: Accessing the FTP server from a command line environment
3. If you’re not able to connect, check your server’s firewall and, if
necessary, allow FTP connections through it. (Remember, use the
command system-config-firewall to open the firewall configuration
tool.)
4. Since you’ll probably want the server to start at boot time, enable that
with the following command:
chkconfig vsftpd on
Using SFTP
As mentioned previously, SFTP is part of the SSH suite, along with SSH
and SCP. For information about using SFTP, see chapter nine.

CHAPTER 15:
How to Build and Configure a Basic Database Server and Add a
Scripting Language (PHP)
Videos are available for many of the procedures in this chapter at www.soundtraining.net/videos
Introduction
The third part of building a LAMP server is adding the database server.
There are many different database managers available for use with Linux
distros. The most widely used product is MySQL, a project now owned by
Oracle Corporation. The version of MySQL installed with Red Hat/CentOS
server is 5.1. Other versions are available if, for some reason, you need an
earlier version.
Objectives
Install and configure a database server
Add a scripting language
Work with phpMyAdmin to administer the database server
Adding a Database Server
To install MySQL, use the command yum install mysql-server.
After running the install command, you need to run an included script to
secure the MySQL server. During the execution of the script, you’ll be
prompted to create a MySQL root password. Use whatever you want, but be
sure to remember it. During the learning process, I recommend using
p@ss5678 for all admin passwords. Obviously, when you move into a
production environment, you’ll change it to something more secure.
Hands-On Exercise 15.1:
Installing and Securing a MySQL Server
In this exercise, you will install a MySQL server and client, then you’ll
execute the mysql_secure_installation script to configure passwords and
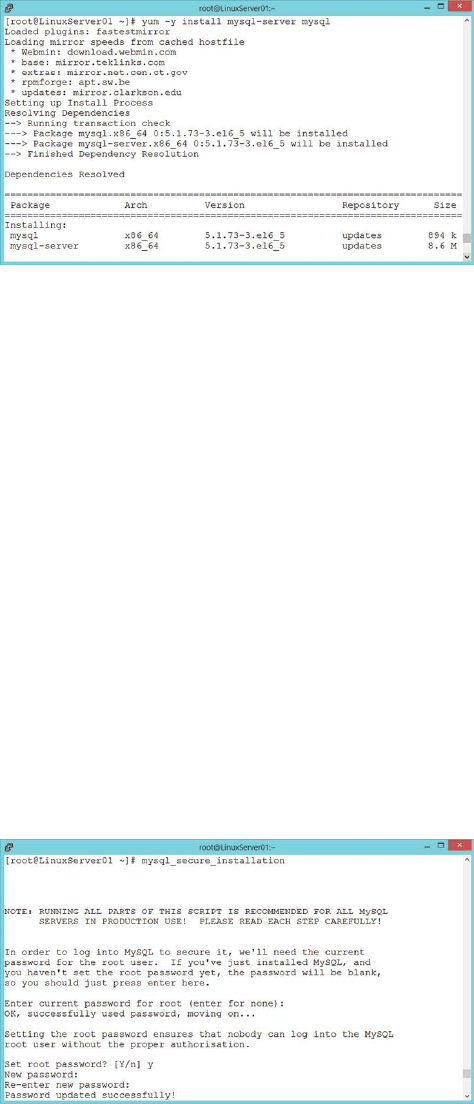
implement other aspects of database security.
1. Install MySQL server and client with the following command:
yum -y install mysql-server mysql
Figure 162: Using yum to install the MySQL server and client
2. When installation is complete, check the status of the server and then
start it with the following commands:
service mysqld status
service mysqld start
3. Run the following command to start the included script which secures
the MySQL server installation:
mysql_secure_installation
You’ll be asked to set the root password. Answer y. Then, enter and
confirm the root password. The password I use during the learning
process is p@ss5678. Obviously, you should choose a different one for a
production server.
Figure 163: Running the mysql_secure_installation script
4. After the root password is set, the script will run some cleanup activities.
Answer y to each of these, as you can see in the screen capture.
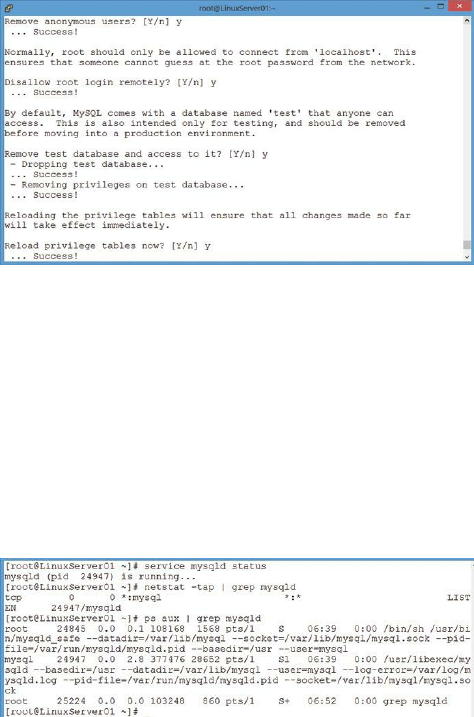
Figure 164: Finishing the mysql_secure_installation script
5. Oh, and you’ll probably want the MySQL server to start at boot time, so
enable that with the following command:
chkconfig mysqld on
After installation, the MySQL server should be running. You can confirm
it several ways, as shown in the screen capture:
Figure 165: How to confirm that the MySQL server is running
Adding a Scripting Language
A scripting language is the final part of the LAMP acronym and the
language used with LAMP is PHP. PHP is an acronym standing for PHP:
Hypertext Preprocessor. It originally stood for Personal Home Page, but
was later changed to the current recursive backronym. (I often think there
must be sleep deprivation involved in the creation of some of the names we
use in our industry.)
From Wikipedia: “PHP is a server-side scripting language designed for web
development but also used as a general-purpose programming language.
PHP is now installed on more than 244 million websites and 2.1 million
web servers. Originally created by Rasmus Lerdorf in 1995, the reference
implementation of PHP is now produced by The PHP Group.”
Hands-On Exercise 15.2:
Installing PHP
In this exercise, you will install PHP, create a PHP test page, and integrate

PHP with MySQL.
1. Install PHP with the following command:
yum -y install php
2. When the installation is complete, create a new file in the root of the Web
server with the following command:
vi /var/www/html/info.php
3. Place the following text in the newly created file:
<?php phpinfo();?>
Figure 166: Creating the phpinfo page for testing your PHP installation
4. Restart the Web server with the following command:
service httpd restart
5. Use a browser to go to the following URL:
http://192.168.0.1/info.php
6. You should see a page similar to the screen capture:
Figure 167: Viewing the PHP Info page
7. You must also install packages to integrate PHP with MySQL. Use the
following command:
yum -y groupinstall “PHP Support”
As you become more familiar with PHP and the Websites you manage, you
may want to install individual packages manually instead of taking a
“kitchen sink” approach.
PHPMyAdmin
PHPMyAdmin is a web-based graphical interface for managing MySQL
databases. I consider a “must-have” tool for the dynamic websites I manage
and have used it for years. It was installed back in chapter six, so it should
still be installed. Confirm with the following command:
rpm -qa | grep phpmyadmin
If it’s not installed, go back to chapter six and install it before continuing.
Testing the Installation
To test the installation, use a browser and, in the browser’s address bar,
type the IP address of the Red Hat/CentOS server. (You can find your IP
address by using the command ifconfig in the server console.) You should
see the web server’s default page.
To test the PHPMyAdmin installation, type the IP address of the Red
Hat/CentOS server, followed by /phpmyadmin. In my case, the server is at
192.168.146.130, so I typed the following:
http://192.168.146.130/phpmyadmin
Obviously, you’ll need to change the IP address to that for your server.
If you receive an error complaining about needing a blowfish_secret, open
the file /usr/share/phpmyadmin/config.inc.php and add a password (it
doesn’t matter what password you use) to the following line:
$cfg[‘blowfish_secret’] = ‘’; /* YOU MUST FILL IN THIS FOR
COOKIE AUTH! */
For example, I created and added the password MyPasswordHere, as you
can see:
$cfg[‘blowfish_secret’] = ‘MyPasswordHere’;
You’ll be prompted for logon credentials. Use the username root and the
password you configured earlier. In my case, it’s p@ss5678. You’ll then
see the PHPMyAdmin dashboard:
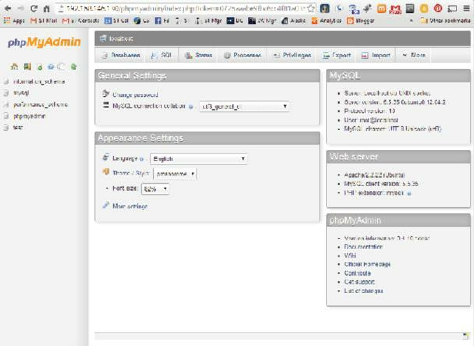
Figure 168: The phpMyAdmin dashboard
In the PHPMyAdmin dashboard, you can add, modify, and delete databases
and much more. For some great tips about working with PHPMyAdmin,
visit
http://www.phpbuilder.com/columns/phpmyadmin/Jason_Gilmore02082011.php3
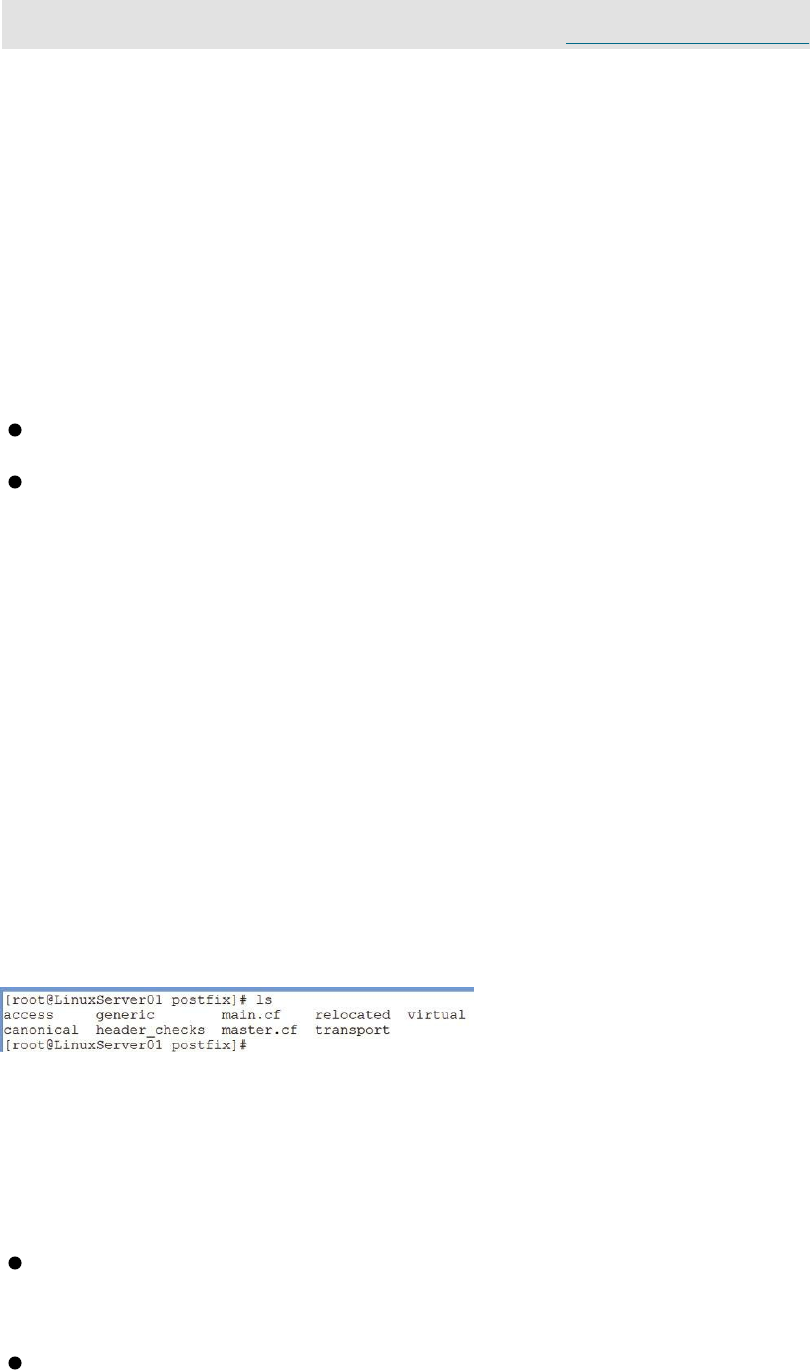
CHAPTER 16:
How to Build and Configure a Basic Email Server
Videos are available for many of the procedures in this chapter at www.soundtraining.net/videos
Introduction
Although many organizations use cloud-based email services, you may
want to install, configure, and operate your own email server, perhaps
internally. In this chapter, I’ll show you how to set up a Postfix server.
Objectives
Install and configure the Postfix email server
Use telnet to test the email server configuration
Some Email Terminology
Mail User Agent (MUA): The email client used to send the message.
Mail Transfer Agent (MTA): Messages are sent through MTAs. The last
MTA delivers the message to an MDA.
Mail Delivery Agent (MDA): The MDA is responsible for delivering the
message to the recipient’s mailbox, where it will be retrieved by an email
client, usually through a POP3 or IMAP server.
Postfix’ configuration files are located in /etc/postfix.
Figure 169: Viewing the files in the postfix directory
The most important files to understand are access, main.cf, master.cf, and
transport.
access: This file is used for access control and specifies the hosts that
are allowed to connect to Postfix.
main.cf: This is the global Postfix configuration file. This is where
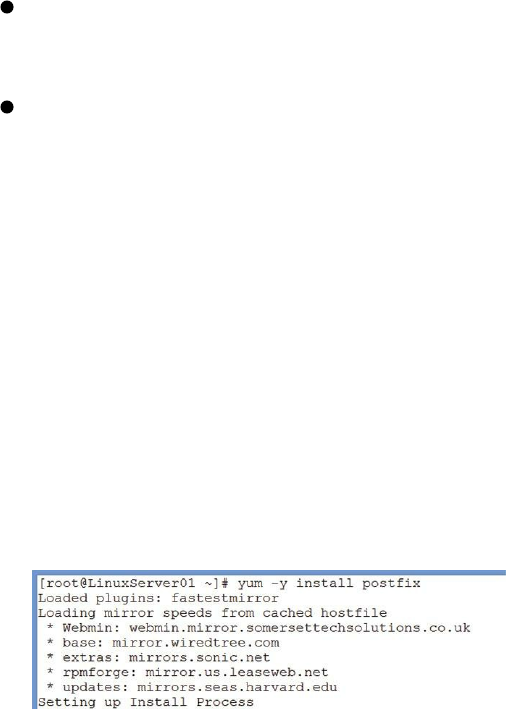
you’ll do most of the Postfix configuration.
master.cf: This file specifies the manner in which Postfix interacts with
various processes to get the mail delivered.
transport: This file maps email addresses to relay hosts.
There’s one additional file you need to know. /etc/aliases describes user
ID aliases and is required by the mail protocol.
Hands-On Exercise 16.1:
Installing and Configuring Postfix
1. The default MTA in Red Hat/CentOS is Postfix. Install Postfix with the
following command:
yum -y install postfix
Figure 170: Using yum to install Postfix
2. Backup /etc/postfix/main.cf with the following command:
cp /etc/postfix/main.cf /etc/postfix/main.cf.orig
3. Using the vi editor, make the following changes in
/etc/postfix/main.cf (remember, you can search for text strings in vi
with the command /<search string>):
a. Find the line that starts with mydomain. Uncomment it by removing the
pound sign and change domain.tld to soundtraining.local
b. Find and uncomment the line myorigin = $mydomain
c. Find the myhostname = host.domain.tld line. Uncomment it and
replace host.domain.tld with LinuxServer01.soundtraining.local
d. Find and uncomment the mydestination = $myhostname,
localhost.$mydomain line. (It may already be uncommented.)
e. Find and uncomment the mynetworks = 168.100.189.0/28, 127.0.0.0/8
line. Also, change the address 168.100.189.0/28 to 192.168.0.0/24. (This
change allows hosts on the 192.168.0.0/24 network to connect to the mail
server.)

f. Find and uncomment the line inet_interfaces = all.
g. Find and uncomment the line inet_interfaces = localhost. (It, also, may
be uncommented already.)
h. Go back and audit your changes to ensure everything is correct, the
save the file with the command ESC, :wq.
4. Restart the postfix server with the following command:
service postfix restart
5. Use the command system-config-firewall to check if your firewall
permits SMTP traffic. If necessary, allow SMTP traffic through your
firewall.
You can learn a lot more about the Postfix configuration file by reading
the many comments in /etc/postfix/main.cf.
Hands-On Exercise16.2:
Testing the Postfix Configuration
You can use Telnet to test the configuration by connecting to port 25
(SMTP) on your mail server.
1. Install telnet with the following command:
yum -y install telnet
2. Use the following command to connect to your server:
telnet 127.0.0.1 25
3. Once the connection is successful, use the following command to operate
the server:
ehlo mail.soundtraining.local
4. You should see output similar to this:
Figure 171: Using telnet to test your mail server installation
5. We could, of course, configure an email client like Thunderbird or
Outlook to connect to the server to send mail, but this simple test tells us
that the server is working as we expect.
6. Type quit to exit the Telnet session.

CHAPTER 17:
Remote Administration with Webmin
Videos are available for many of the procedures in this chapter at www.soundtraining.net/videos
Introduction
Webmin is a browser-based tool for administering Linux and UNIX
systems. Webmin allows you to use a graphical interface to add and
manage user accounts, Web services, DNS, file shares, mail services, and
more. For someone migrating from a graphical environment, Webmin is a
reasonable way to manage your system without having to manually edit the
various configuration files in /etc. Even for experienced Linux admins,
Webmin can be helpful in managing less familiar services.
Objectives
Add the Webmin repository
Install and configure Webmin
Installing Webmin
In order to install Webmin, there are several steps:
1. Add the Webmin repository
2. Download and install the Webmin developer’s GPG key to verify the
package
3. Use yum to install Webmin
4. Permit Webmin through your firewall
Hands-On Exercise 17.1:
Installing Webmin
In this exercise, you will add the Webmin repository and install the
Webmin browser-based Linux administration package.
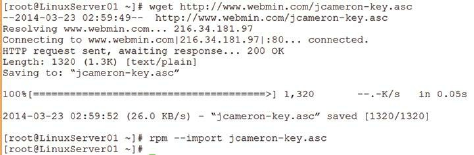
Add the Webmin Respository
1. Create the new file /etc/yum.repos.d/webmin.repo with the following
command:
vi /etc/yum.repos.d/webmin.repo
2. Place the following text in the file (remember to use the i key when you
want to insert text in the vi editor):
[Webmin]
name=Webmin Distribution Neutral
#baseurl=http://download.webmin.com/download/yum
mirrorlist=http://download.webmin.com/download/yum/mirrorlist
enabled=1
3. Use the key sequence ESC, then :wq to save the file.
4. Use the following two commands to download and install the
developer’s GPG key:
wget http://www.webmin.com/jcameron-key.asc
rpm --import jcameron-key.asc
Figure 172: Using wget to install the developer’s public key to support the Webmin installation
Installing Webmin
1. Use the following command to install Webmin:
yum -y install webmin
2. When the installation is complete, confirm that it’s running with the
following command:
service webmin status
3. Test it by connecting to your server through a browser pointed to the
address https://<server IP address>:10000. If the connection
doesn’t work, check your firewall to ensure you’ve allowed tcp port
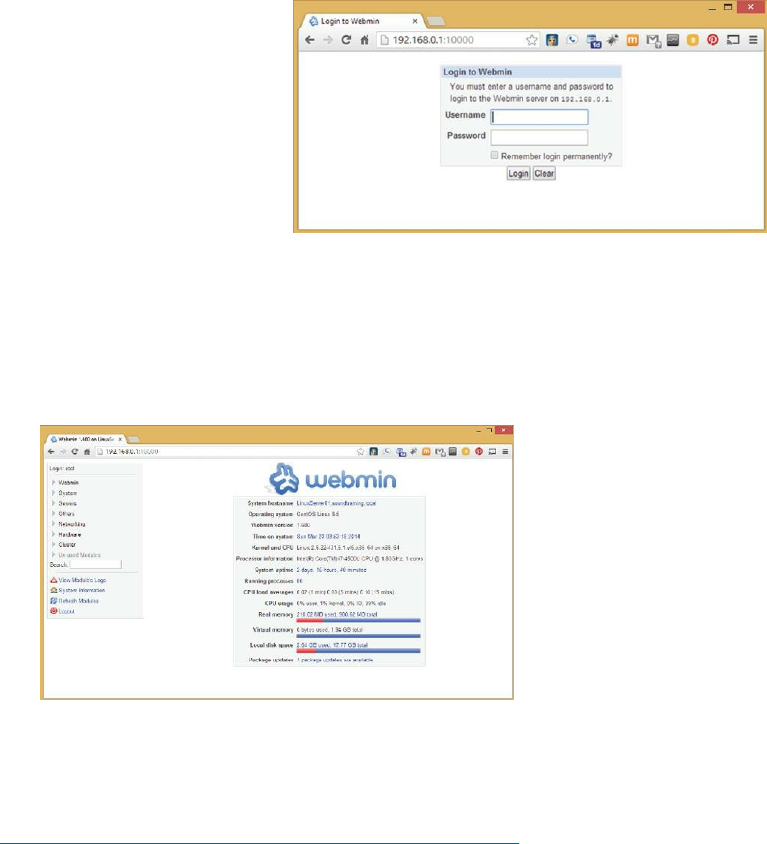
10000 through.
Figure 173: Connecting to Webmin through a browser
4. Once you’ve logged on, the Webmin dashboard appears with a summary
of server statistics on the right-hand side and various menu options on
the left-hand side.
Figure 174: The Webmin dashboard
You can stay up-to-date on Webmin security alerts at
www.webmin.com/security.html.

Postlude
At the end of nearly every seminar or workshop I lead, I realize that I’ve
become quite fond of most of the attendees. I realize how much I love
working with technology and how much I like and respect the people like
you who are actually out in the field working with this stuff every day.
Unfortunately, a book is really a one-way street where you get to know me a
little, but I don’t get to know you at all. It’s always a thrill and an honor to
meet someone who has purchased and read one of my books, but as a
percentage of the books sold, the number of readers I get to meet is pretty
small. Still, I appreciate you.
One of the joys of working in technology is the joy of solving puzzles.
Don’t you love it when you get something working or find a way to produce
a customized solution for a user (or even for yourself)? I love it when I learn
a new way to do something with a server, a desktop system, a router, a
switch, a firewall, or some other piece of gear. I even get excited when I
find some new way to explain something. I hope I never lose my fascination
with technology nor my sense of wonder at the amazing things it can do.
Frankly, I hope to always maintain a sense of awe and wonder as I think
about my world in general.
Have fun with Red Hat/CentOS Linux. Find ways to make it do things that
no one else has done. Experiment, explore, try new things (but not on
production servers without testing first), learn from your failures, and share
what you’ve learned. Join a users group. In Seattle, SASAG (The Seattle
Area System Administrators Guild) is a group of very talented, thoughtful,
and kind individuals dedicated to self-improvement and the sharing of
knowledge. (www.sasag.org) They’re a part of LOPSA (The League of
Professional System Administrators). There’s probably a branch of LOPSA
in your city or a nearby city. (https://lopsa.org) Get involved and share what
you’ve learned and learn from others in our field.
Most of all, remember the words of Stewart Brand in the Whole Earth
Catalog, repeated by Steve Jobs in his commencement address at Stanford,
“Stay hungry. Stay foolish.” As I did in my book The Compassionate Geek,
I’m going to add stay awesome.
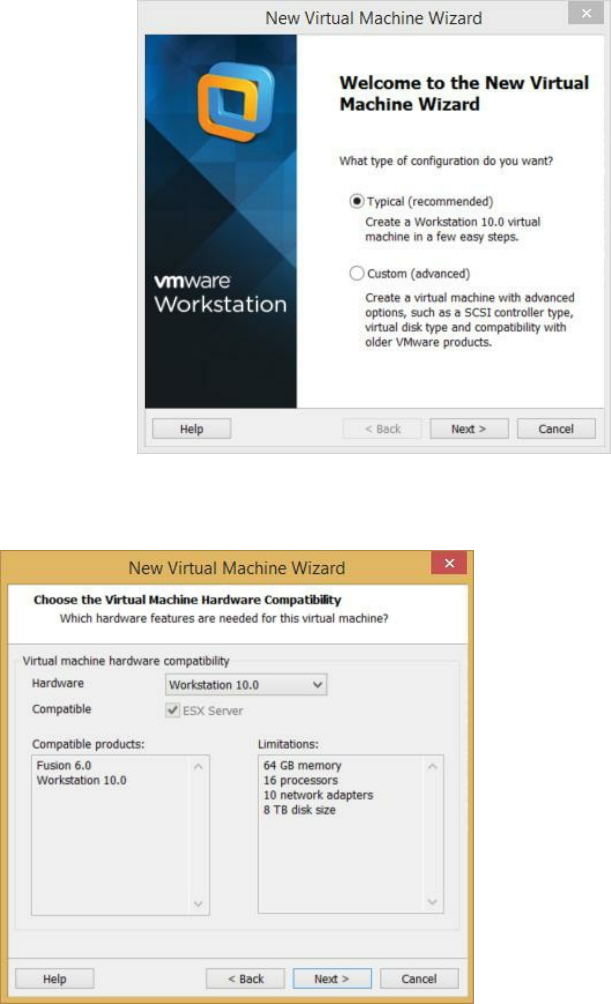
APPENDICES
Appendix A:
How to Create a New Virtual Machine in VMWare
1. In VMWare Workstation, click File>>New Virtual Machine. In the New
Virtual Machine Wizard, accept the default of Typical installation by
clicking the button labeled Next.
Figure 175: Starting the new virtual machine wizard in VMWare Workstation
2. Accept the default hardware compatibility in the next window and click
the button labeled Next.
Figure 176: Choosing the new VM hardware compatibility
3. In the Guest Operating System Installation window, choose the option to
install the operating system later and click Next.

Figure 177: New VM operating system installation options
4. In the Guest Operating System window, choose Linux and CentOS 64-
bit, then click Next.
Figure 178: Choosing the operating system for the new virtual machine
5. In the Name the Virtual Machine window, name your first server
LinuxServer01 and name your second server LinuxServer02 and click the
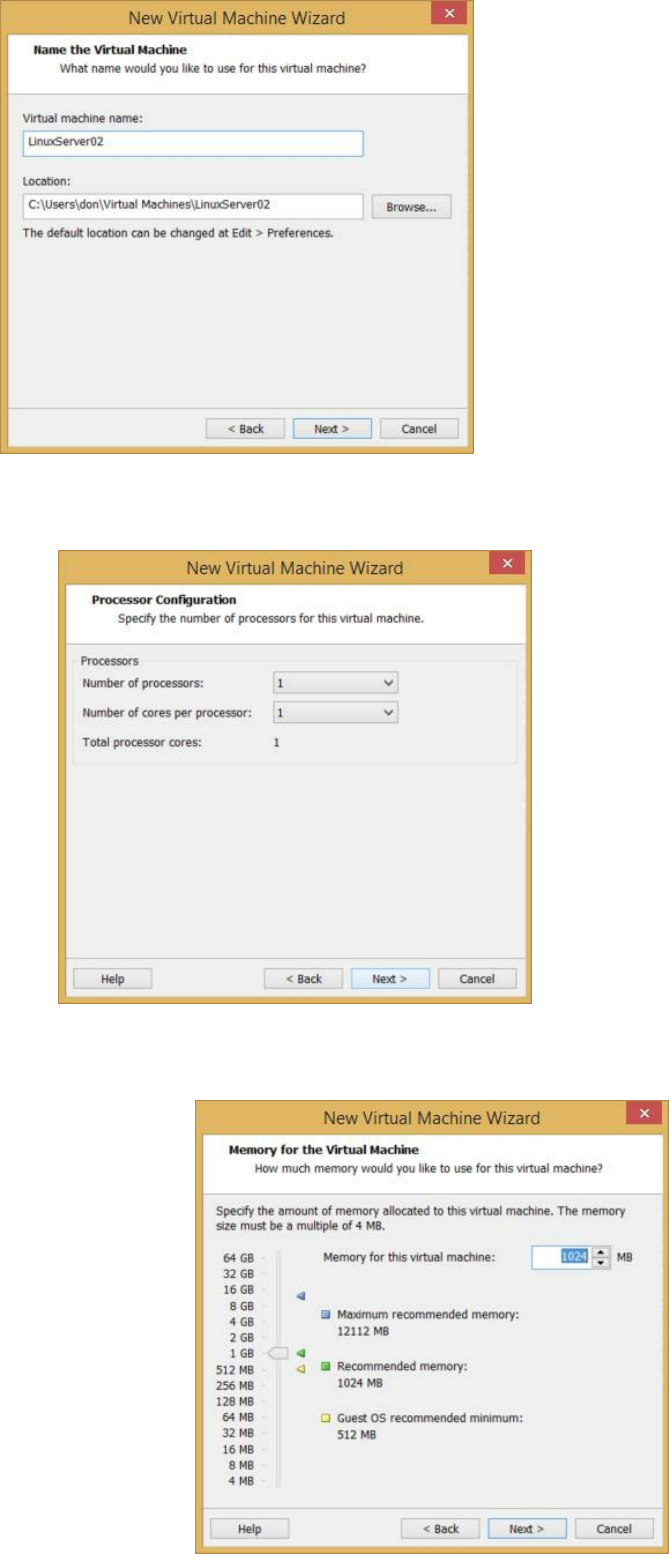
button labeled Next.
Figure 179: Naming the new VM
6. In the Processor Configuration window, accept the defaults by clicking
the button labeled Next.
Figure 180: Specifying the number of processors assigned to the VM
7. In the Memory for the Virtual Machine window, accept the defaults by
clicking the button labeled Next.

Figure 181: Assigning the amount of memory for the new virtual machine
8. In the Network Type window, accept the default to use Network address
translation (NAT). We’ll change it later. Click the button labeled Next.
Figure 182: Choosing the new VM’s network type
9. In the Select I/O Controller Types window, again accept the defaults by
clicking the button labeled Next.
Figure 183: Selecting the I/O controller type for the new VM
10. In the Select a Disk Type window, select the default by clicking the
button labeled Next>.
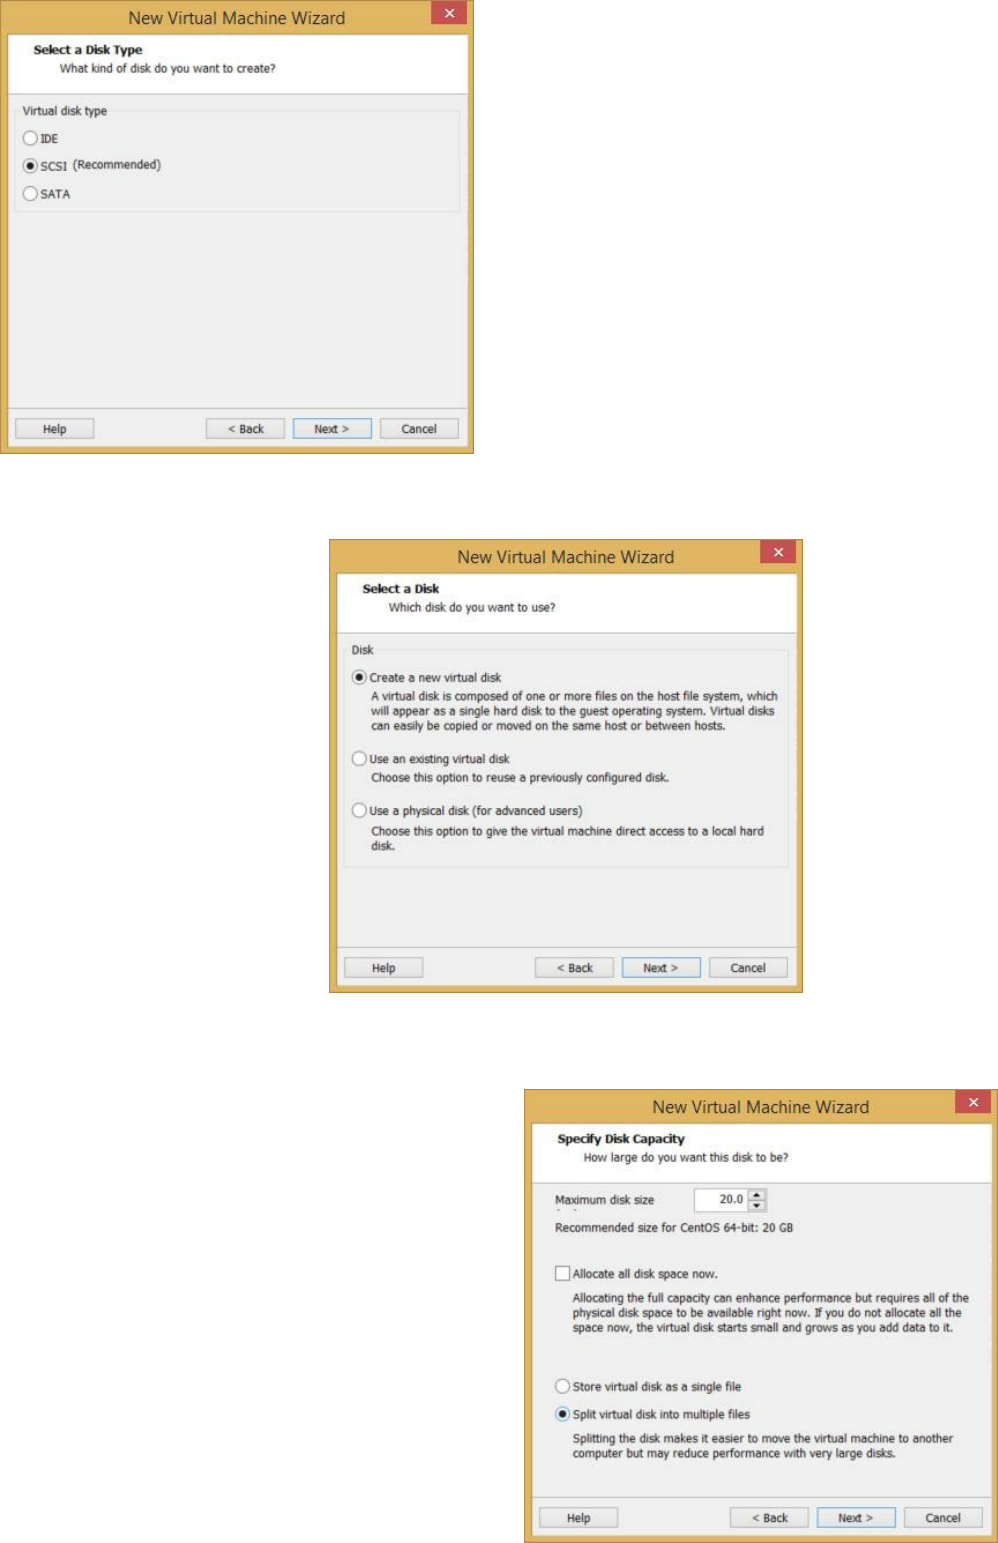
Figure 184: Choosing the new VM’s disk type
11. In the Select a Disk window, as before, accept the default by clicking the
button labeled Next.
Figure 185: Choosing the type of disk to use for the new VM
12. In the Specify Disk Capacity window, again go with the defaults by
clicking the button labeled Next.
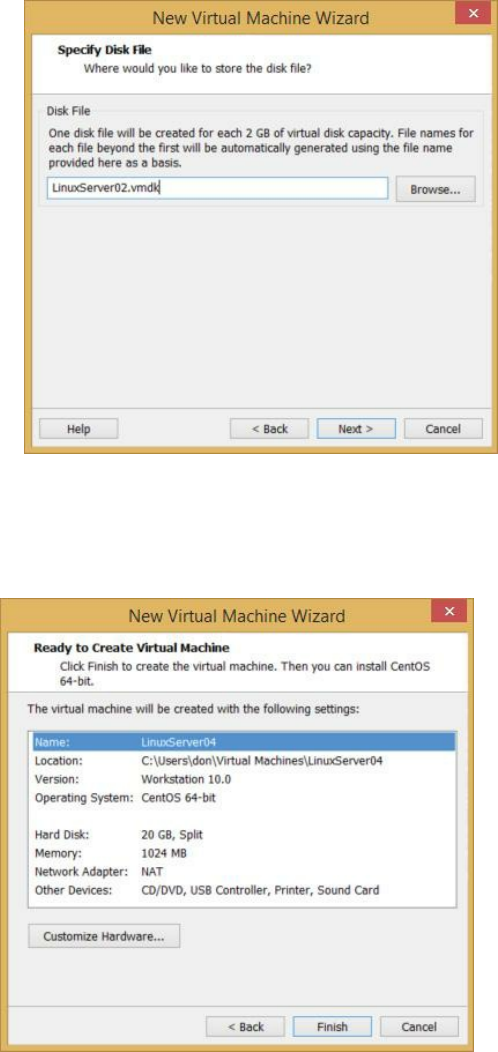
Figure 186: Configuring disk capacity for the new VM
13. In the Specify Disk File window, continue going with the default by
clicking the button labeled Next.
Figure 187: Configuring the disk file for the new VM
14. The Ready to Create Virtual Machine window displays a summary of the
configuration you’re about to build. Assuming that it’s what you expect,
click the button labeled Finish.
Figure 188: Confirming the settings for the new virtual machine)
15. Now, you’re ready to install the operating system.
16. For the purpose of this exercise, we’ll prepare the VM to use a
downloaded .iso image for the 64-bit minimal version of CentOS.
17. In the upper right corner of the virtual machine window, under the virtual
machine name (in this case LinuxServer01), click the link Edit virtual
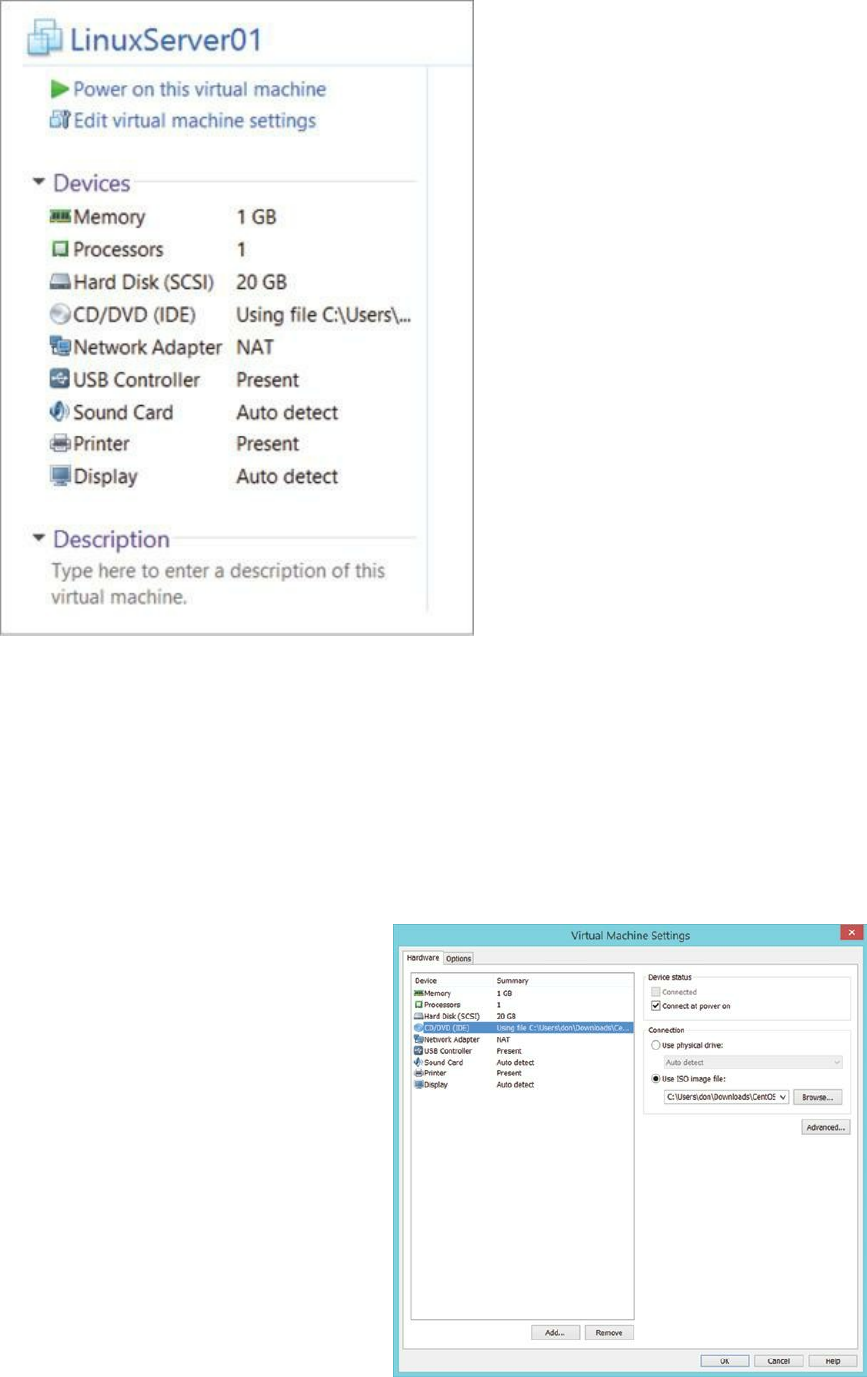
machine settings.
Figure 189: Editing the new VM’s settings
18. In the Virtual Machine Settings window, under Hardware, use your
mouse to select CD/DVD. On the right-hand side, under Connection,
select the radio button labeled Use ISO image file: and browse to the
location of the .iso image you downloaded from CentOS. org (probably
either CentOS-6.5-x86_64-minimal.iso or CentOS-6.5-i386-minimal.iso,
depending on your processor architecture).
Figure 190: Configuring the source for the CD/DVD
19. Click OK at the bottom of the window.
20. You are now ready to begin a fresh installation of CentOS Linux, using
the procedures in chapter one of this book.

Appendix B:
Don’s Online Resources
IT Customer Service and Human Relations Resources
www.doncrawley.com
Blog: www.compassionategeek.com
Video channel: www.doncrawley.com/videos
Facebook: www.doncrawley.com/fb
Twitter: www.doncrawley.com/twitter
Bookstore: www.doncrawley.com/bookstore
Technical Learning Resources
www.soundtraining.net
Blog: www.accidentaladministrator.com
Video channel: www.soundtraining.net/videos
Facebook: www.soundtraining.net/fb
Twitter: www.soundtraining.net/twitter
Bookstore: www.soundtraining.net/bookstore

Appendix C:
Other Helpful Websites
The following list is a miniscule representation of the millions of Web
resources devoted to Linux. It’s current as of late winter 2014. Of course, as
with many aspects of the Internet, things change quickly. Still, I think you’ll
find this list helpful.
Support Websites
www.apache.org
www.freecode.com
www.gnome.org
www.howtoforge.com
www.ietf.org
www.kde.org
www.kernel.org
www.li.org
www.linux.org
www.linuxbase.org
www.linuxcommand.org
www.linuxquestions.org
www.linuxtoday.com
www.lopsa.org
www.maconlinux.org
www.netfilter.org
www.openldap.org
www.openoffice.org
www.postfix.org
www.putty.org
www.realvnc.com
www.rfc-editor.org

www.rpmfind.net
www.samba.org
www.sasag.org
www.sendmail.org
www.shelldorado.com
www.tldp.org
www.zoneedit.com
Problems with sound cards, try this:
www.alsa-project.org
For Linux printer drivers:
www.linuxprinting.org
www.linuxprinting.org/foomatic.html
http://gimp-print.sourceforge.net/
Linux Distributions
(A very short list)
www.centos.org
www.debian.org
www.gentoo.org
www.knoppix.net
www.redhat.com
www.slackware.com
www.suse.com
www.ubuntu.com
www.yellowdoglinux.com

BOOKS
For IT Professionals
from author Don R. Crawley, Linux+, IPv6 Silver Engineer
Ubuntu Linux Server:
An Accidental Administrator® Step-by-Step Configuration Guide
Packed with more than 30 easy-to-follow interactive exercises, loads of
screen captures and lots of step-by-step examples to help you build a
working router from scratch, Ubuntu Linux Server: An Accidental
Administrator Step-by-Step Configuration Guide is easily the most
straight-forward approach to learning how to configure a build an Ubuntu
Linux server. You’ll learn the nitty-gritty on user and group management,
the Linux help system, monitoring, search and scheduling tools, BIND
DNS, remote administration, and more.
ISBN: 978-0-9836607-4-3
Available in paperback and Kindle editions
through Amazon and other channels.

Tweeting Linux: 140 Linux Configuration Commands Explained in
140 Characters or Less
In it’s first edition, this guidebook is a straight-forward approach to
learning Linux commands. Each command is explained in 140 characters or
less, then examples of usage are shown in screen captures, and details are
given when necessary to explain command usage. You’ll see the most
commonly-used commands plus a few gems you might not know about!
ISBN: 978-0-98366-071-2
Available in paperback and Kindle editions
through Amazon and other channels.
The Accidental Administrator®:
Cisco ASA Step-by-Step Configuration Guide
Packed with 56 easy-to-follow hands-on exercises to help you build a
working firewall configuration from scratch, it’s the most straight-forward
approach to learning how to configure the Cisco ASA Security Appliance.
The chapters cover the essentials on installing, backups and restores,
remote administration, VPNs, DMZs, usernames, transparent mode, static
NAT, port address translation, access lists, DHCP, password recovery,
logon banners, AAA (authentication, authorization, and accounting),
filtering content, and more.
ISBN: 978-1-449596620
The Accidental Administrator®:
Cisco Router Step-by-Step Configuration Guide
Packed with more than 30 easy-to-follow interactive exercises, loads of
screen captures and lots of step-by-step examples to help you build a
working router from scratch. Easily the most straight-forward approach to
learning how to configure a Cisco router, this book is filled with practical
tips and secrets learned from years of teaching and consulting on Cisco
network devices. As a bonus, you won’t waste your time on boring theory.
All the essentials are covered in chapters on installing, backups and
restores, and TCP/IP. You’ll learn the nitty-gritty on subnetting, remote
administration, routing protocols, static routing, access-control lists, site-to-

site VPNs, network address translation (NAT), DHCP, password recovery
and security. There’s even an entire chapter on the new Internet Protocol
version 6 (IPv6)!
ISBN: 978-0983660729
Available in paperback and Kindle editions
through Amazon and other channels.
THE COMPASSIONATE GEEK:
How Engineers, IT Pros, and Other Tech Specialists Can Master
Human Relations Skills to Deliver Outstanding Customer Service
Now in its third edition, The Compassionate Geek is the definitive guide
for delivering amazing customer service to customers and end-users. Filled
with practical tips, best practices and real-world techniques, The
Compassionate Geek is a quick read with equally fast results. Each chapter
contains a reflection and discussion section to help improve customer
service skills. Inside are lots of personal stories and examples of mistakes
made and lessons learned in addition to an entire chapter on overcoming
personal and professional obstacles. All of the information is presented in a
straightforward style that can be understood and used right away. There’s
nothing foo-foo, just down-to-earth tips and technical support best practices
learned from years of working with technical staff and demanding
customers and end-users.

Available in both paperback and Kindle editions!
BOOK DETAILS
Author:
Don R. Crawley
Categories:
Business & Economics/Customer Service
Distribution:
CreateSpace
Publisher:
soundtraining.net
Box 48094
Seattle, WA 98148
(206) 988-5858
Official release date:
November 1, 2013
Number of pages: 224
Book size: 6 x 9
ISBN: 978-0983660736
Index
32-bit …… 10, 21, 101, 107-108
64-bit …… 10, 101, 107, 233, 239
A
Acknowledgements …… 5
adduser …… 31
Aircrack …… 170
alias …… 54, 80-82, 139
AllowOverride …… 205
anonymous access …… 213
Apache …… 1, 65, 77, 154, 178, 201-208, 210-211, 241
apache2.conf …… 65
Apache Web server …… 1, 65, 178, 201-205, 207, 211
Appendices …… 231
apropos …… 93, 97-98
archiving …… 61-62, 84-86
A record …… 141, 144
B
bash_history …… 65
bash_profile …… 65
bashrc …… 41, 65, 81-82
BASH shell …… 24-25
bin …… 38, 45, 64
BIND …… 65, 131-133, 142, 204, 242
BIND DNS …… 65, 132, 242
bind-utils …… 132
block file …… 55
boot …… 10-11, 24, 48, 51-53, 59, 62, 64, 73, 86-87, 89, 91-92, 117-118,
161, 166, 169-170, 178, 185, 196, 203, 214, 218
Bourne Shell …… 24
bzip2 …… 29, 84, 86
C
caching name server …… 131, 134
Cacti …… 177, 187
case sensitive …… 15, 24-25, 78, 158
cat …… 26, 71, 73-74, 107, 179
cd …… 10, 20-22, 26, 51, 57, 66-68, 82, 85, 112, 124, 128, 174, 191, 198,
207-209, 211, 239
CentOS …… 1-3, 7-12, 14, 17, 19, 30, 34-35, 47, 54, 63, 66, 80, 83-84, 86,
88-90, 93, 96, 99-100, 107-109, 115, 119, 128, 132-133, 147, 153, 160-
161, 164, 177, 192-193, 206, 215, 220, 223, 229, 233, 239, 241
CentOS announcements …… 153
chage …… 39, 155
character device file …… 55
chkconfig …… 91-92, 136, 155, 185, 196, 203, 214, 218
chmod …… 55-59, 95-97, 135, 191
chown …… 41-42, 94, 96, 192
CIFS …… 190
compression …… 61-62, 84-86
configuration files …… 30, 62, 64-65, 71, 74, 116-117, 133, 143, 171, 204,
206, 222, 225
cp …… 26, 33, 64, 70, 80, 82, 128, 134, 137, 141, 148, 207, 223
CPU …… 10, 185-187
cron …… 35, 153, 173-175, 178, 199
crontab …… 174-175
CShell …… 24
D
database …… 28, 72, 97-98, 107, 113, 133, 137-138, 143, 154, 174, 191,
201, 215-216
ddns-update-style …… 126, 129
Debian …… 7, 65-66, 88, 241
default permissions …… 59
dev …… 20, 24, 31, 48, 51-53, 59, 64
df …… 33
DHCP …… 2, 20, 83, 115-117, 122, 124-130, 135, 179, 243
DHCP client …… 128, 135
dhcpd …… 83, 126-129
DHCP server …… 116, 122, 124-125, 127-130, 135
dig …… 136, 143
directories …… 24, 26, 40, 48-49, 51, 53-54, 56, 59, 61-62, 64-72, 79, 83-
84, 87, 89, 161, 171, 190, 195, 199, 206
Disk Configuration …… 59
distros …… 7, 47, 66, 83, 88, 93, 215
dmesg …… 73, 178
DNS …… 2, 65, 83, 115-116, 121, 123-127, 129, 131-138, 140-143, 145,
161, 211, 225, 242
download …… 2, 10, 17, 105, 107-108, 132, 226
drive letters …… 24
du …… 72
E
echo …… 25, 28, 208, 211
Emacs …… 66, 75
email …… 1, 138, 174, 187, 205, 210, 213, 221-222, 224, 253-254
encryption …… 154, 172, 212
etc …… 38, 40-41, 43, 45, 47, 51-52, 64-65, 67, 77-78, 83, 87, 89-91, 107,
116-118, 123-126, 128, 133-136, 141-142, 148-149, 155, 161, 163-164,
171, 192-193, 195-196, 205-207, 209, 211, 213, 222-226
etc/samba …… 192-193
etc/ssh …… 51, 148-149, 155
etc/sysconfig …… 117-118, 124-125, 135
etc/sysconfig/networking …… 124-125
etc/vsftpd …… 213
eth0 …… 19-20, 117-118, 123-125, 130, 135
eth1 …… 122-125
exportfs …… 196
F
fdisk …… 33, 59
file and directory permissions …… 47, 54, 56
files …… 11, 21, 24, 26-30, 37, 40-42, 49-51, 53-54, 56-59, 62, 64-65, 67,
70-72, 74, 78, 83-86, 94, 100, 111-112, 116-117, 133-134, 137, 140, 142-
143, 147, 149-150, 171, 174-175, 177-179, 189-191, 194-199, 204-206,
212, 222, 225
File Server …… 189
filesystem …… 24, 33, 52, 65, 83, 87, 92, 206
Filesystem Hierarchy Standard …… 65
find …… 1, 3, 23, 28, 40, 53, 61-63, 65, 72-73, 78-79, 83, 89, 101, 105,
108, 111-112, 116, 142, 178, 183, 187, 192, 206, 220, 223, 229, 241
firewall …… 109-110, 152, 155-161, 196, 214, 224, 226-227, 229, 243
FollowSymLinks …… 205-206
forward lookup zone …… 136-137, 140-141
free …… 2, 9, 33, 76, 96, 180, 208
FTP …… 53, 101, 147, 150, 154, 202, 212-214
G
Gedit …… 76
GID …… 38, 45
gnome …… 76, 93, 241
Google public DNS servers …… 2, 126, 129, 136
Grand Unified Boot Loader …… 87
grep …… 28, 48, 61-62, 78-79, 101-105, 110-111, 130, 132, 155, 179,
183, 203, 219
groupadd …… 31, 41, 45, 192
groupinstall …… 30, 104-106, 119, 219
grouplist …… 30, 104-105
groupremove …… 30, 106, 155
groups …… 30-31, 41, 43, 45-46, 54, 67, 104-105, 126
groupupdate …… 30
GRUB …… 87, 169-170
gzip …… 29, 84-86
H
halt …… 31, 93, 183
hard drive …… 9-10, 59
Hard links …… 47, 50
hardware …… 9, 12, 87, 120, 178, 204, 232, 239
head …… 26, 74
help …… 8, 25, 59, 61-63, 74-75, 93, 95-98, 179, 197, 242-244
Helpful Websites …… 241
hidden files …… 26, 40-41, 65, 67
home …… 24, 26, 38-41, 43, 45-46, 49, 53, 64-68, 82, 154, 161, 171, 189-
191, 194, 198, 213, 218
host …… 11, 20, 123-127, 131, 137, 141, 143, 167, 181, 206-211, 213,
223
hostname …… 33, 117, 139, 141, 150, 205
How to Create a New Virtual Machine …… 232
.htaccess …… 205
httpd …… 65, 83, 92, 104, 178, 202-211, 219
httpd.conf …… 65, 202, 204-210
Hyper-V …… 9
I
ifcfg-eth0 …… 117-118, 125, 135
ifcfg-eth1 …… 124
ifconfig …… 19, 33, 64, 71, 116, 122-123, 125, 130, 162-163, 220
ifup …… 19, 33, 123, 130
info …… 30, 93, 96, 103, 144, 218-219
init …… 83, 87, 89-92, 95, 196
initrd …… 64
inittab …… 87-89
installation ISO …… 2
Installing …… 3, 9-11, 18, 20-22, 94, 99-101, 104-105, 107-108, 110, 112,
118, 128, 132, 156, 167, 191, 195, 197, 203, 212, 216, 218, 223, 226-227,
243
Internet connectivity …… 3, 10, 81, 107, 112
IP address …… 2, 19-20, 33, 117, 122-125, 127, 130, 133, 139, 141-142,
148, 150, 160-161, 181, 195, 197, 205, 209, 220, 227
IP masquerading …… 160
ip route …… 33
iptables …… 155, 159-160
iptraf …… 180-181
iso downloads …… 10
J
John the Ripper …… 170
K
kde …… 93, 241
kernel …… 7, 24, 53, 64, 87, 170, 178, 241
keyboard …… 13, 24, 69
Korn Shell …… 24
L
LAMP …… 3, 201, 215, 218
language …… 13, 65, 94, 201, 215, 218
last …… 27, 52, 69, 77, 82, 89, 92, 141, 164, 166, 178, 180, 222
lastlog …… 165-166, 178
lib …… 64, 113, 127
links …… 27, 47, 49-51, 91, 197
Linux Commands …… 23-24, 26, 242
linuxfoundation.org …… 8
LiveCDs …… 10
LiveDVDs …… 10
locate …… 28, 51, 62, 72, 83, 177
log files …… 64, 177-179
logs …… 53, 149, 177-178, 206
LOPSA (The League of Professional System Administrators) …… 229
lost+found …… 64
ls …… 21, 24, 26-27, 41, 49, 54, 56-58, 65, 67-71, 83, 85-86, 95-97, 175,
198-199
M
Mail Delivery Agent …… 222
maillist …… 35
Mail Transfer Agent …… 222
Mail User Agent …… 222
man …… 28, 71, 93-98, 100, 113, 124, 144, 163, 166, 168, 186, 199
masquerading …… 160-161
media …… 1, 11, 20-22, 31, 52, 171, 204
minimal installation …… 8, 76, 109, 155
Minimum Hardware Requirements …… 9
mkdir …… 27, 56, 67-69, 79, 174, 191, 195, 198, 210
mlocate …… 72
mnt …… 31, 51, 64
monitoring …… 167, 172, 177, 180, 187, 242
more …… 1, 3, 7, 9-10, 15, 25-27, 30, 37, 40, 42, 44, 49-50, 63-66, 71, 73-
75, 87, 89, 96-97, 101, 109, 111-113, 123, 140, 143-144, 149, 151, 154,
163, 166-168, 178, 191, 195-197, 199, 204, 208, 212, 216, 218-220, 224-
225, 242-243
Mounting …… 31, 51-52, 87
mount points …… 24, 48, 51, 53, 64
mpstat …… 185-186
mtr …… 181
mv …… 27, 70, 80, 82
MySQL …… 154, 178, 201, 215-219
N
Nagios …… 177, 187
Name-Based Virtual Hosts …… 205, 209
named …… 15, 19, 24, 41, 55, 72, 74, 83, 129, 131, 133-138, 141-143,
174, 183, 205
named-checkconf …… 135, 143
named-checkzone …… 143
named pipe file …… 55
nameserver …… 123, 126, 133, 135-136
NAT (Network Address Translation) …… 152, 160
Nessus …… 162, 170
netinstall …… 10
netstat …… 182
Network File System …… 190, 194
networking …… 33, 115-119, 124-125, 130
NFS …… 88, 190, 194-196
nfs-utils …… 195-196
nmap …… 162, 167-168
nslookup …… 143-144
O
Octal (Numeric) Permissions …… 56, 58
Online Resources …… 25, 240
opt …… 64
P
Package Management …… 30, 99, 104, 109, 112, 132
Partition Management …… 59
PASS_MAX_DAYS …… 78
password policy …… 155
password recovery …… 168-169, 243
passwords …… 38-40, 45, 155, 163-164, 216
patches …… 35, 153
permissions …… 27, 40, 47, 50, 54-59, 67, 72, 135, 153-154, 163, 191,
197
PermitRootLogin …… 149
PHP …… 201, 215, 218-220
phpmyadmin …… 107-109, 215, 219-220
Physical Security …… 152-153
pmap …… 183
Port scanning …… 162, 167
Postfix …… 154, 221-224, 241
primary master …… 137, 142
principle of least privilege …… 152-153
proc …… 64
processes …… 25, 32, 90, 153, 161, 182-185, 222
processor …… 10, 66, 101, 186, 234, 239
profiles …… 37, 41, 53, 62, 65
prompt …… 18-19, 21, 24-25, 34, 39, 59, 66-67, 80-81, 87, 90, 101-102,
105, 119, 135, 144, 213
ps …… 32, 182-183
PTR record …… 140
pwd …… 27, 67-68, 71
R
RAM …… 9-10, 33
rc.d …… 83, 91
reboot …… 18, 31, 88, 92-93, 126, 166, 169-170
Red Hat …… 1-2, 7, 9, 30, 47, 54, 63, 65-66, 83, 86, 88-89, 93, 96, 99,
109, 115, 132-133, 147, 153, 160-161, 177, 193, 204, 208, 215, 220, 223,
229
Red Hat Enterprise Linux …… 2, 9
Red Hat notifications and advisories …… 153
regular file …… 49-50, 54
repolist …… 30
repositories …… 30, 99-101, 107, 109
Resource Records …… 138
reverse lookup zone …… 141
RFC …… 145, 160, 212
RHEL …… 9, 86, 90, 100, 119
rm …… 27, 70-71, 86, 113, 174-175
rmdir …… 27, 69
root …… 16, 18-20, 24-25, 28, 31-32, 40, 42-43, 48-49, 52-53, 56, 64-68,
71-72, 79, 85, 87, 101, 110, 121, 123-124, 136, 149, 155-156, 160, 162-
165, 168-170, 174, 179-180, 191, 198-199, 205-207, 209-210, 216-218,
220
Root Login …… 149, 155, 164
route …… 33
rpcbind …… 196
rpm …… 78, 99-101, 108, 110-113, 132, 154, 203, 219, 226
rsync …… 154, 171, 190, 197-199
runlevel …… 89-92
run levels …… 62, 87-89, 91
S
Samba …… 2, 189-194, 241
sar …… 185-186
SASAG (The Seattle Area System Administrators Guild) …… 229
sbin …… 64, 83, 87, 97-98, 124, 163
SCP …… 147, 149-150, 154, 214
scripting …… 25, 201, 215, 218
searching …… 28, 62, 72, 79, 108, 199
secondary master …… 138, 142
sectools.org …… 170
security …… 35, 148-149, 151-154, 162, 167, 170, 172, 193, 196-197,
201, 205, 212, 216, 228, 243
services …… 37, 62, 83, 87, 89, 91-92, 122, 148, 151, 154-155, 157, 187,
221, 225
SFTP …… 101, 147, 150, 154, 212, 214
shell …… 19, 23-25, 34-35, 38, 45, 48-50, 62, 66-67, 80, 83, 147-148, 170,
197
shell scripting …… 25
showmount …… 196
shutdown …… 31, 62, 92-93, 169-170
Single-user mode …… 88
smb …… 78, 189-190, 192-194
smbpasswd …… 191
SMTP …… 224
SOA record …… 138, 141, 144
socket file …… 55
SSH …… 19, 49, 51, 65, 83, 147-150, 154-157, 161, 197-199, 212, 214
sshd …… 72, 83, 148-149, 155
su …… 31-32, 43-44, 56, 66, 68, 71, 85, 136, 149, 165, 191
sudo …… 42, 98, 141, 148-149, 152, 155, 162-165, 178-180, 191
superuser …… 24, 49, 56, 64
symbolic links …… 47, 50, 197
system-config …… 109-110
system-config-firewall …… 155-156, 160, 214, 224
system-config-network …… 119, 121
system information …… 33, 64
T
Tab …… 24, 122, 125, 157-158, 161
tail …… 27, 74, 180
tar …… 21, 29, 84-86, 171
tarball …… 21, 85-86
tcsh …… 24
Telnet …… 148, 154, 221, 224
testparm …… 194
tmp …… 21, 53, 64, 161, 174
touch …… 45, 57, 69-70, 82, 85-86, 95-96, 125-126, 174, 191, 195, 198-
199, 210
traceroute …… 167, 181, 184
U
Ubuntu …… 7, 66, 83, 88, 163, 241-242
UID …… 38, 43, 45-46
umask …… 59
umount …… 22, 31, 51
unalias …… 80
uname …… 10, 33, 107
updatedb …… 28, 72
upgrading …… 3, 34, 80
Upstart …… 87, 90
uptime …… 184
USB thumb drive …… 10
user …… 16, 20, 24-26, 28, 31-32, 37-46, 48, 52, 55-59, 62-66, 68, 71-73,
82, 85, 87, 92-95, 110, 149, 153, 162-166, 170, 174, 182, 187, 190-194,
197-198, 213, 222, 225, 229, 242
useradd …… 32, 39-41, 43-44, 164
userdel …… 39, 41, 46
usermod …… 32, 42-43, 45, 192
users …… 25, 32, 39-43, 53-54, 56, 64-65, 73, 107, 153, 155, 161, 163,
165-166, 178, 184, 189, 191-193, 213, 229
usr …… 53, 64, 97-98, 129, 220
V
var …… 53, 64, 113, 127, 130, 134, 137, 141-143, 161, 166, 171, 174,
178-179, 186, 203-206, 208, 210-211, 218
var/lib/dhcp …… 127
var/log …… 130, 142, 161, 166, 178-179, 186
versions …… 10, 66, 84, 93, 107, 187, 212, 215
vi …… 62, 66, 74-76, 79, 82, 118, 124-126, 128, 134, 137, 149, 195, 207,
209-210, 218, 223, 226
vim …… 74-77, 82, 118, 125, 134, 192
VirtualBox …… 9, 154
virtual hosting …… 202, 205, 209, 211
Virtual Web Site …… 204
visudo …… 163-164
vmlinuz …… 170
vmstat …… 185
VMWare …… 2, 8-10, 20-22, 120, 128, 130, 154, 206, 232
VMWare Player …… 9
VMWare tools …… 8, 20-22
VMWare Workstation …… 2, 9-10, 20, 120, 128, 130, 232
vsftpd …… 101-103, 178, 212-214
W
w …… 32, 55, 58, 73, 185
wc …… 74
Webmin …… 107, 225-228
Web server …… 1, 65, 83, 92, 104-106, 151, 167, 178, 201-208, 211, 218-
220
whereis …… 28, 71
which …… 2, 9-10, 15, 21, 24, 26-28, 31, 37, 40-41, 43-44, 47-55, 59, 61,
64-65, 68, 70-72, 74-75, 80-81, 83, 87-93, 97-98, 101, 105, 109, 118, 129,
133, 136, 138-140, 148, 151, 156, 160, 165, 167, 171, 175, 178-180, 191,
193, 197, 201, 203-206, 212-213, 217, 222
who …… 8, 32, 52, 63, 65-66, 72-73, 138, 148, 153-154, 174, 178, 182,
185, 229
whoami …… 32, 73
Wireshark …… 154, 170
X
X Windows …… 88, 93, 155
Y
Yellowdog Updater Modified …… 100
yum …… 21, 25, 30, 34, 72, 76, 80-82, 93, 95, 99-109, 112, 118-119, 126,
128, 132, 153-156, 161-162, 167, 180-181, 184-185, 191, 195-198, 203,
212, 216, 218-219, 223-224, 226-227
Z
zip …… 84


Table of Contents
The Accidental Administrator: Linux Server Step-by-Step Configuration
Guide
Cover
Table of Contents
Introduction
Chapter 1
Chapter 2
Chapter 3
Chapter 4
Chapter 5
Chapter 6
Chapter 7
Chapter 8
Chapter 9
Chapter 10
Chapter 11
Chapter 12
Chapter 13
Chapter 14
Chapter 15
Chapter 16
Chapter 17
Postlude
Appendix
Index
