MANUAL
MANUAL
MANUAL
MANUAL
MANUAL
User Manual: Pdf
Open the PDF directly: View PDF ![]() .
.
Page Count: 28
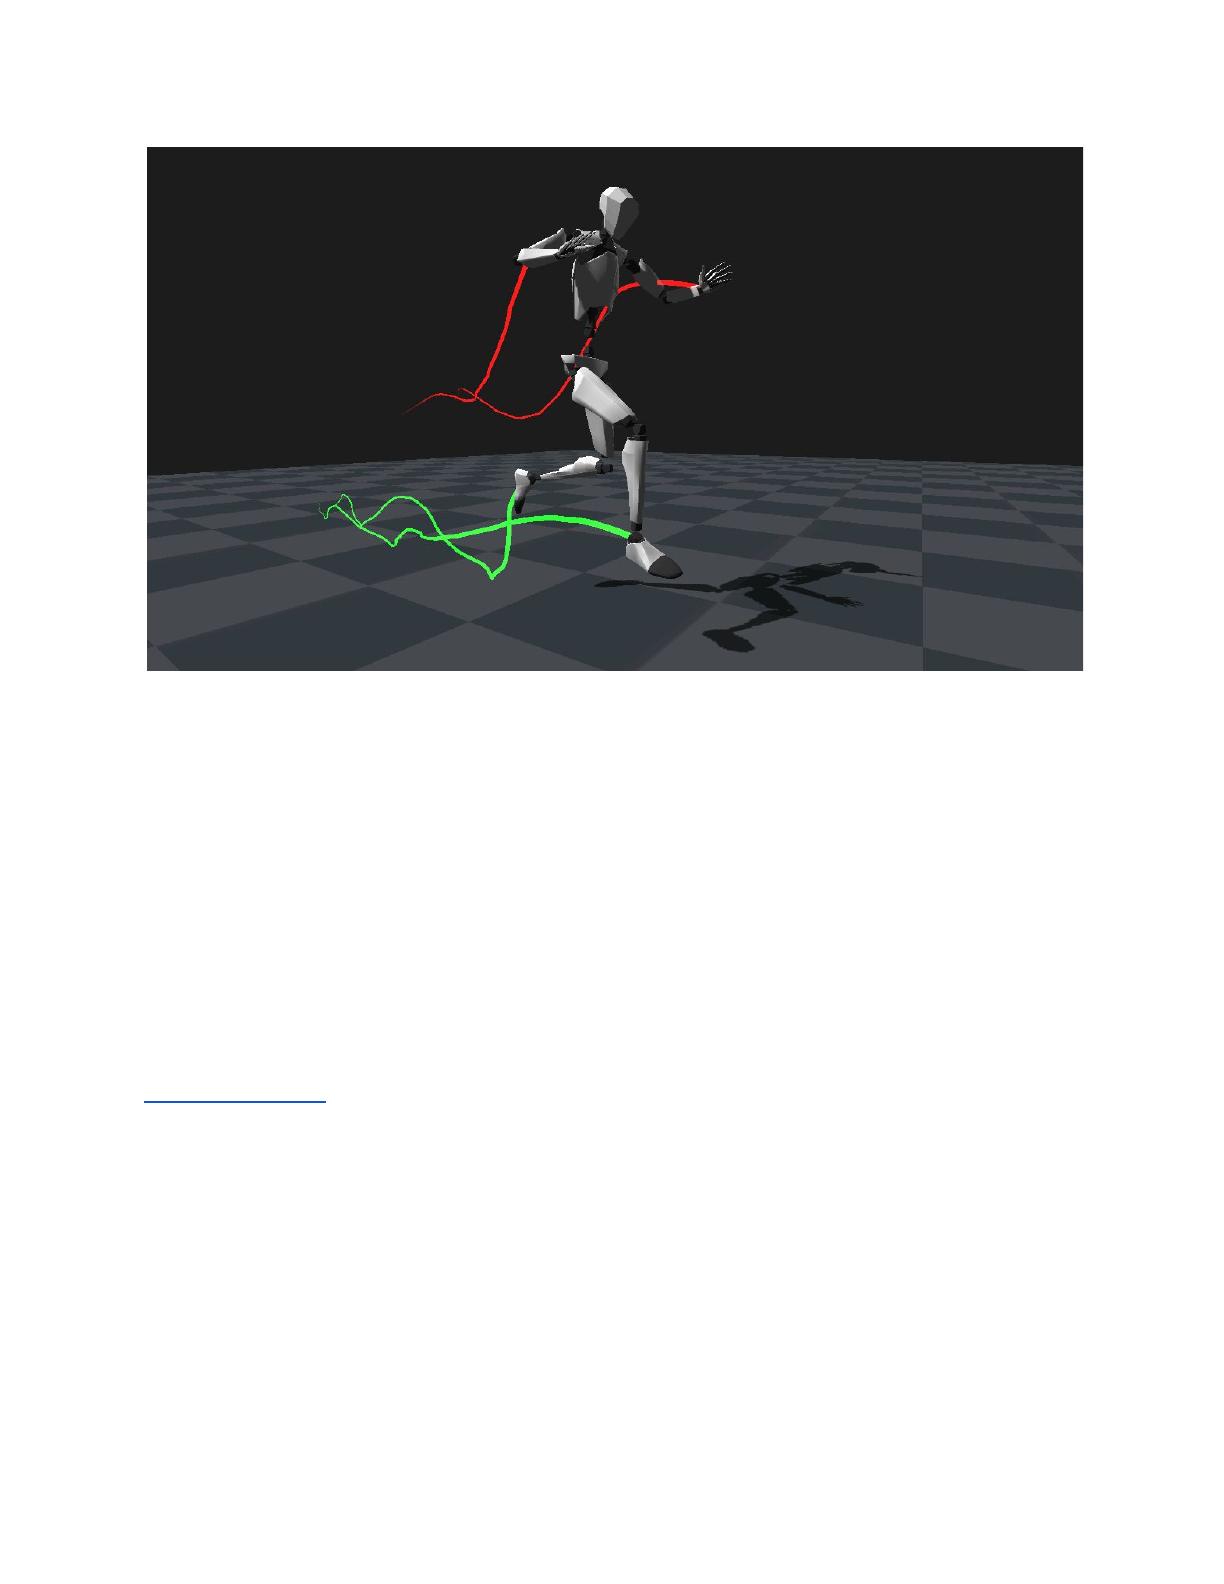
TABLE OF CONTENTS
INTRODUCTION
OVERVIEW
INSTALLING AXIS NEURON
HOW TO GET THE INTEGRATION INTO UNITY
STRUCTURE OVERVIEW
CORE SCRIPTS OVERVIEW
USAGE EXAMPLE
A WORD ABOUT PHYSICS
NEURON SKELETON TOOLS
HOW TO CONFIGURE A NEW SKELETON
SHUTTER KEY MAPPINGS
NEURON DEBUG VIEWER
HMD INTEGRATION
KNOWN BUGS
REFERENCES:
APPENDIX A: NEURON SKELETON MAPPING
APPENDIX B: SKELETON BONES
APPENDIX C: DATA STREAM HEADER
APPENDIX D: BINARY DATA SEQUENCE
2

INTRODUCTION
This document should help you get familiar with real-time motion capture data reading inside
the game engine Unity 3D. It explains how to install the motion capture streaming software
Axis Neuron as well as how to load and use the real-time BVH data in Unity.
Keep in mind that this the first release and a few things may be a little rough around the
edges. We’ll keep improving and adding features to the integration.
If you find bugs or need help, the official forums at https://neuronmocap.com/forum are a
good starting point.
3

OVERVIEW
This chapter is intended to give you an overview of how Perception Neuron works and how
we get the motion data into the game engine.
Perception Neuron is an inertial sensor based motion-capture system. That means each
sensor, called Neuron, measures its own orientation and acceleration using a gyroscope, a
magnetometer and an accelerometer. On top of this each Neuron also does its own drift
correction. The measured data is then sent to the hub which gathers all the data from every
connected Neuron. The hub then sends that data either over USB or Wi-Fi connection to a
computer that is running the Axis Neuron software and that has established a connection
with the hub. Axis Neuron in return does a few complex algorithms, data optimization and
drift correction to reconstruct a human skeleton with 59 bones from the sensor data received
by the Neurons. This skeleton data is then being broadcast over local network in binary float
values. After this point is where the Unity integration comes into play as it will connect to the
broadcast and turn the binary values into usable numbers for the game engine. This is
basically how all the magic is happening.
Here’s some more interesting information:
➔The data stream to the game engine is identical regardless if you use recorded or live
motion data. This allows you to record certain actions and use them to test before
putting on the full system and doing a live test.
➔You can have multiple actors at the same time inside Axis Neuron and have them all
streamed into Unity.
➔The data stream is based on the BVH structure including header information and
body dimension data is available from Axis Neuron via a command interface.
➔Because motion-data is streamed over network the computer running Axis Neuron
doesn’t necessarily have to be the same computer running Unity.
The following chapters will help you getting started with using Perception Neuron in Unity.
4
INSTALLING AXIS NEURON
1. Start the installer of Axis Neuron for either x86 or x64 depending on your system.
2. After completing the installation start Axis Neuron.
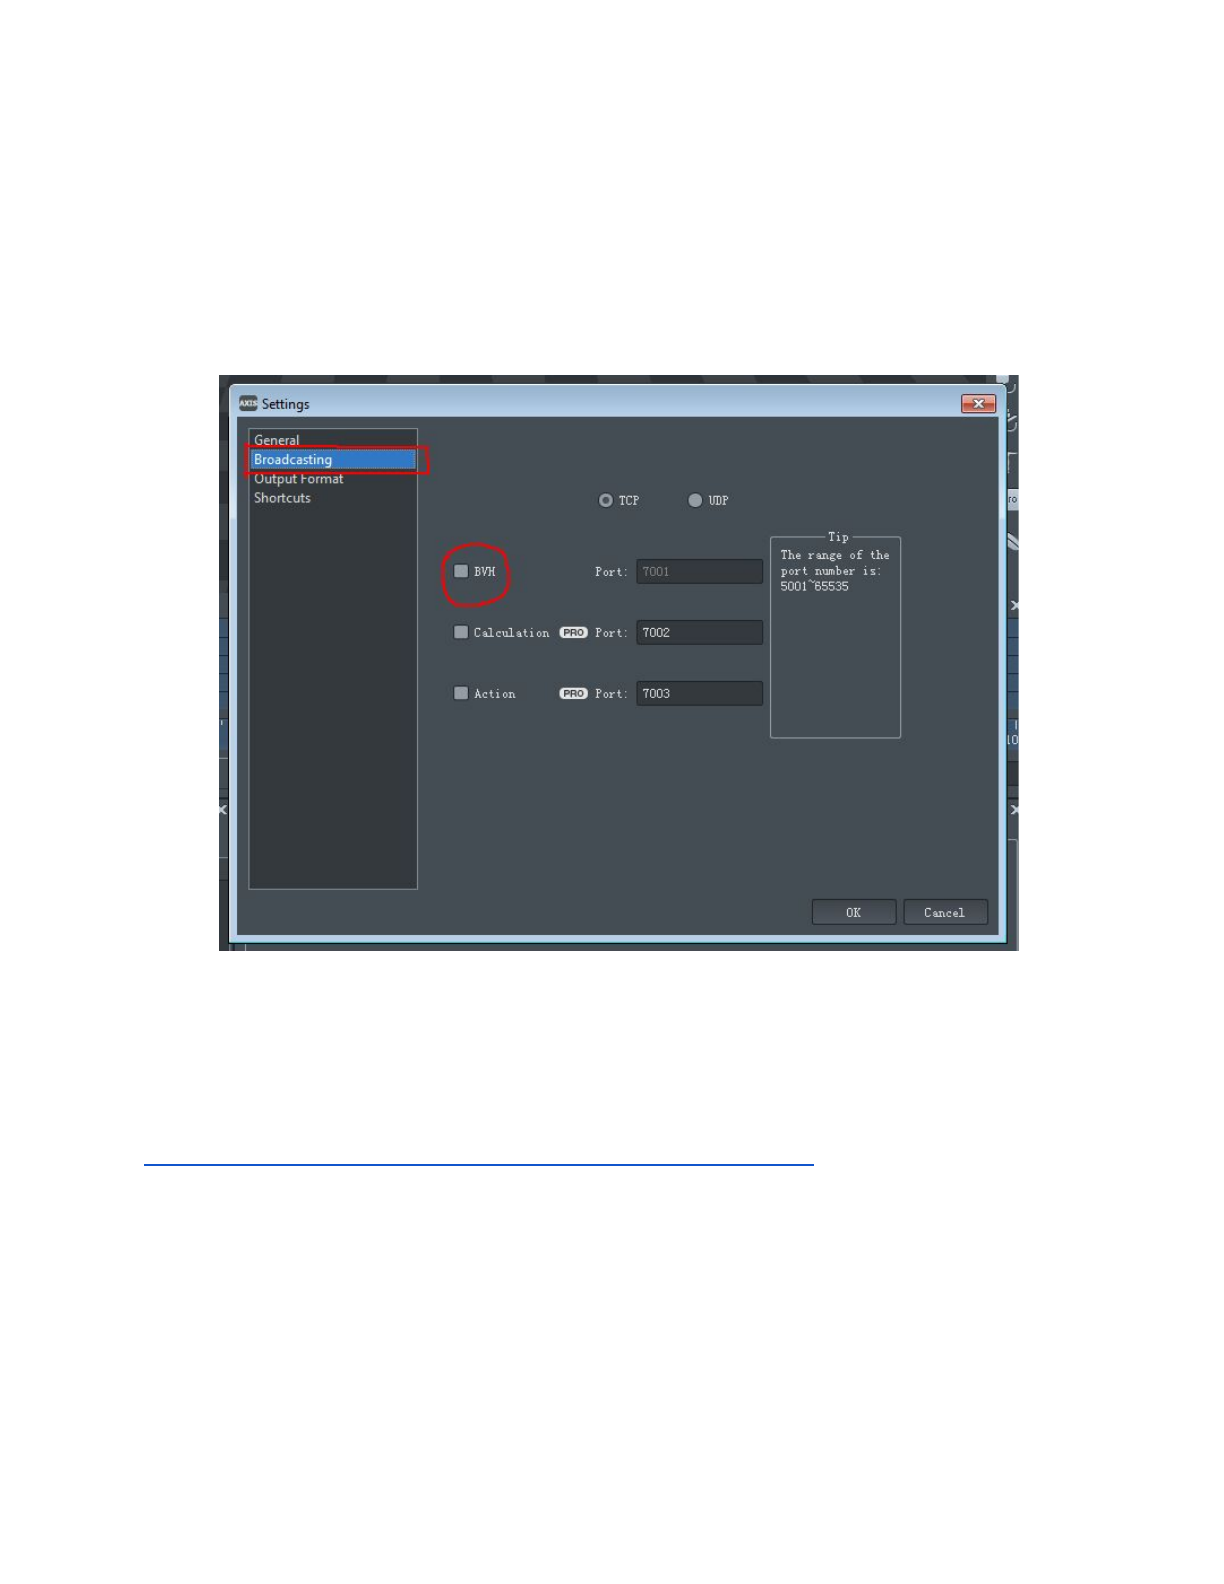
3. Next we need to turn on the BVH data streaming. Go to the menu File and click on
Settings. Then Click on the Broadcasting tab.
4. Click on BVH to turn on the BVH data streaming service.
5. Thats it! Axis Neuron is set up to stream recorded or real-time motion data to Unity.
Note: If you get the error: “The program can’t start because MSVCP110.dll is missing from
your computer” when trying to start Axis Neuron, then download and install the Visual C++
Redistributable by Microsoft:
http://www.microsoft.com/en-us/download/details.aspx?id=30679
5
HOW TO GET THE INTEGRATION INTO UNITY
1. Start Unity and load your project in which you want to use Perception Neuron.
2. Load the file: “PerceptionNeuron_UnityIntegration.unitypackage” by double clicking it
or going to the menu Assets -> Import Package and then click on “Custom
Package...”.
3. Click on Import.
4. You now have the integration in Unity.
The next step is to set up the layers and collision matrix. You can do this by either copying
the included ProjectSettings folder into your Unity project folder and replacing your existing
project settings (make sure to make a backup copy of them first!). Or you can edit the layers
yourself by following these steps:
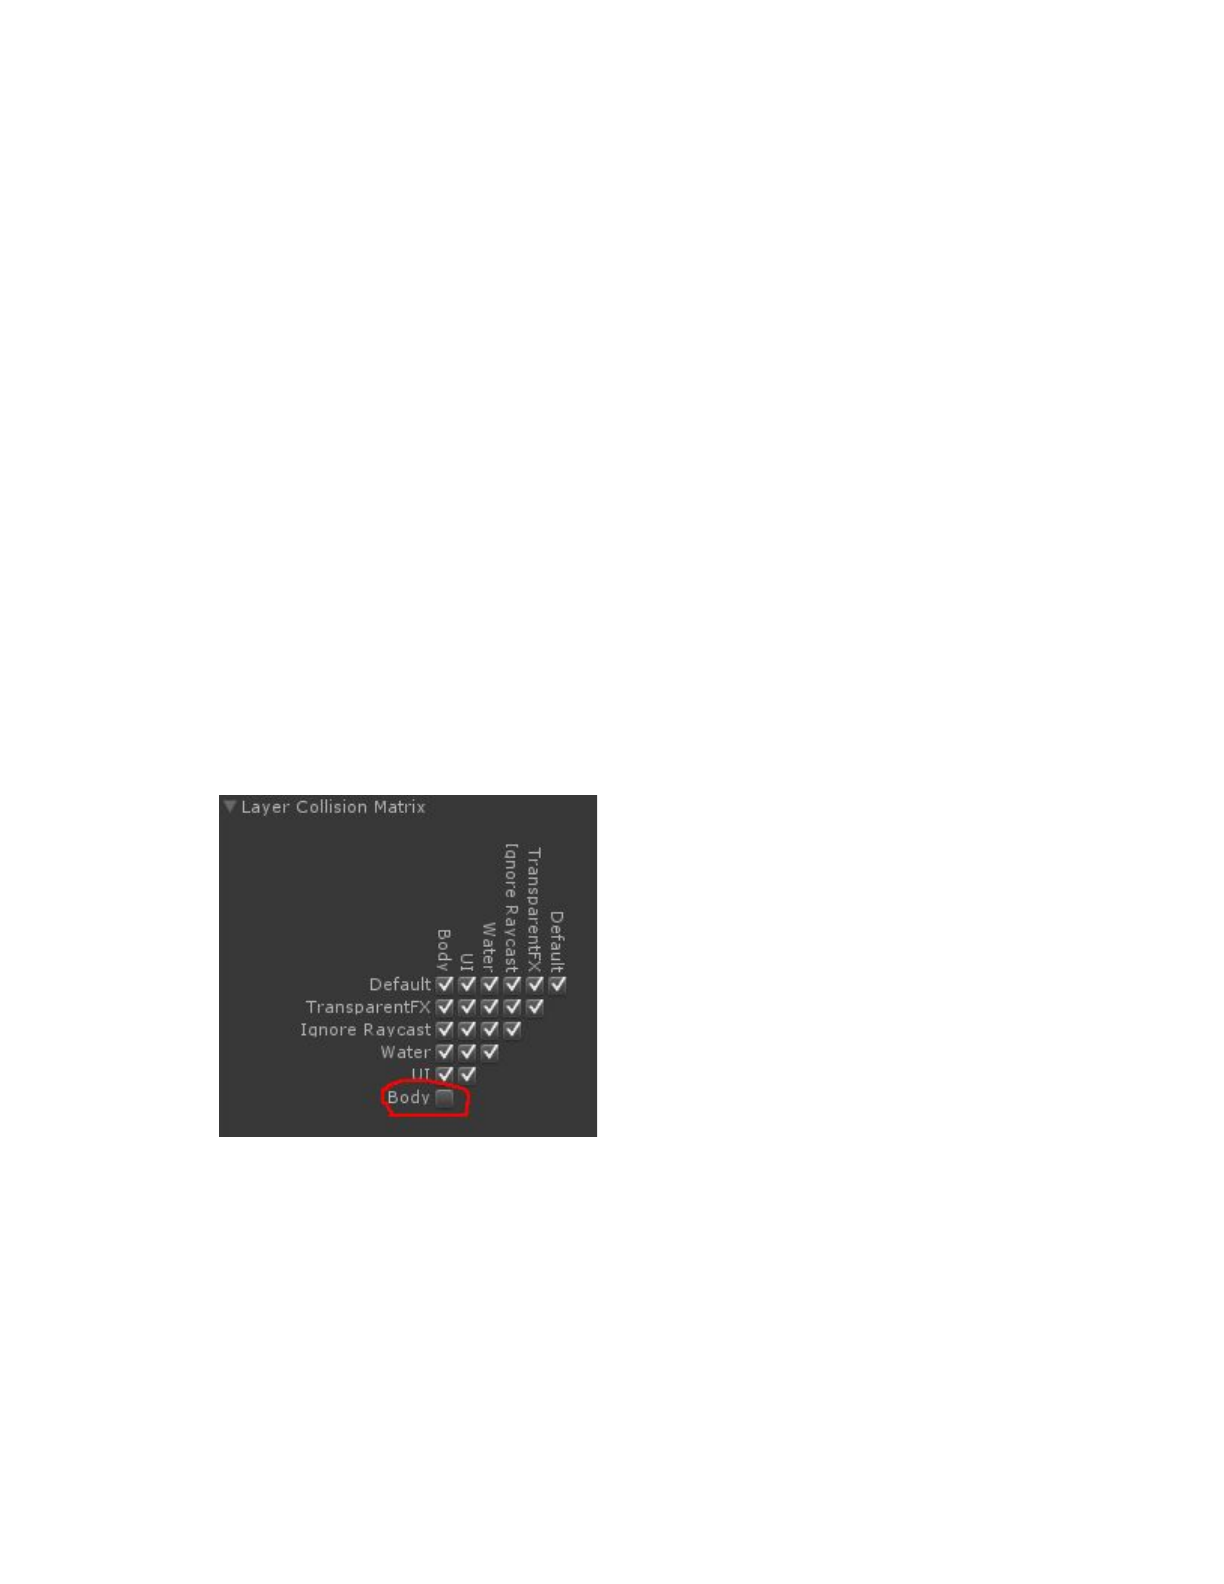
1. In Unity go to the menu Edit -> Project Settings -> Tags and Layers
2. Add a User Layer by typing the name “Body” into any of the empty slots below the
Layers category. Note: you can also use any other name you like for this.
3. Go to menu Edit -> Project Settings -> Physics
4. Below the Layer Collisions Matrix tab toggle off the collisions between the layer you
just created and itself. In our example this is Body/Body = no collisions:
The main reason for doing this is to prevent the colliders of the body from colliding with each
other. This is explained in greater detail on chapter “A word about physics”.
6
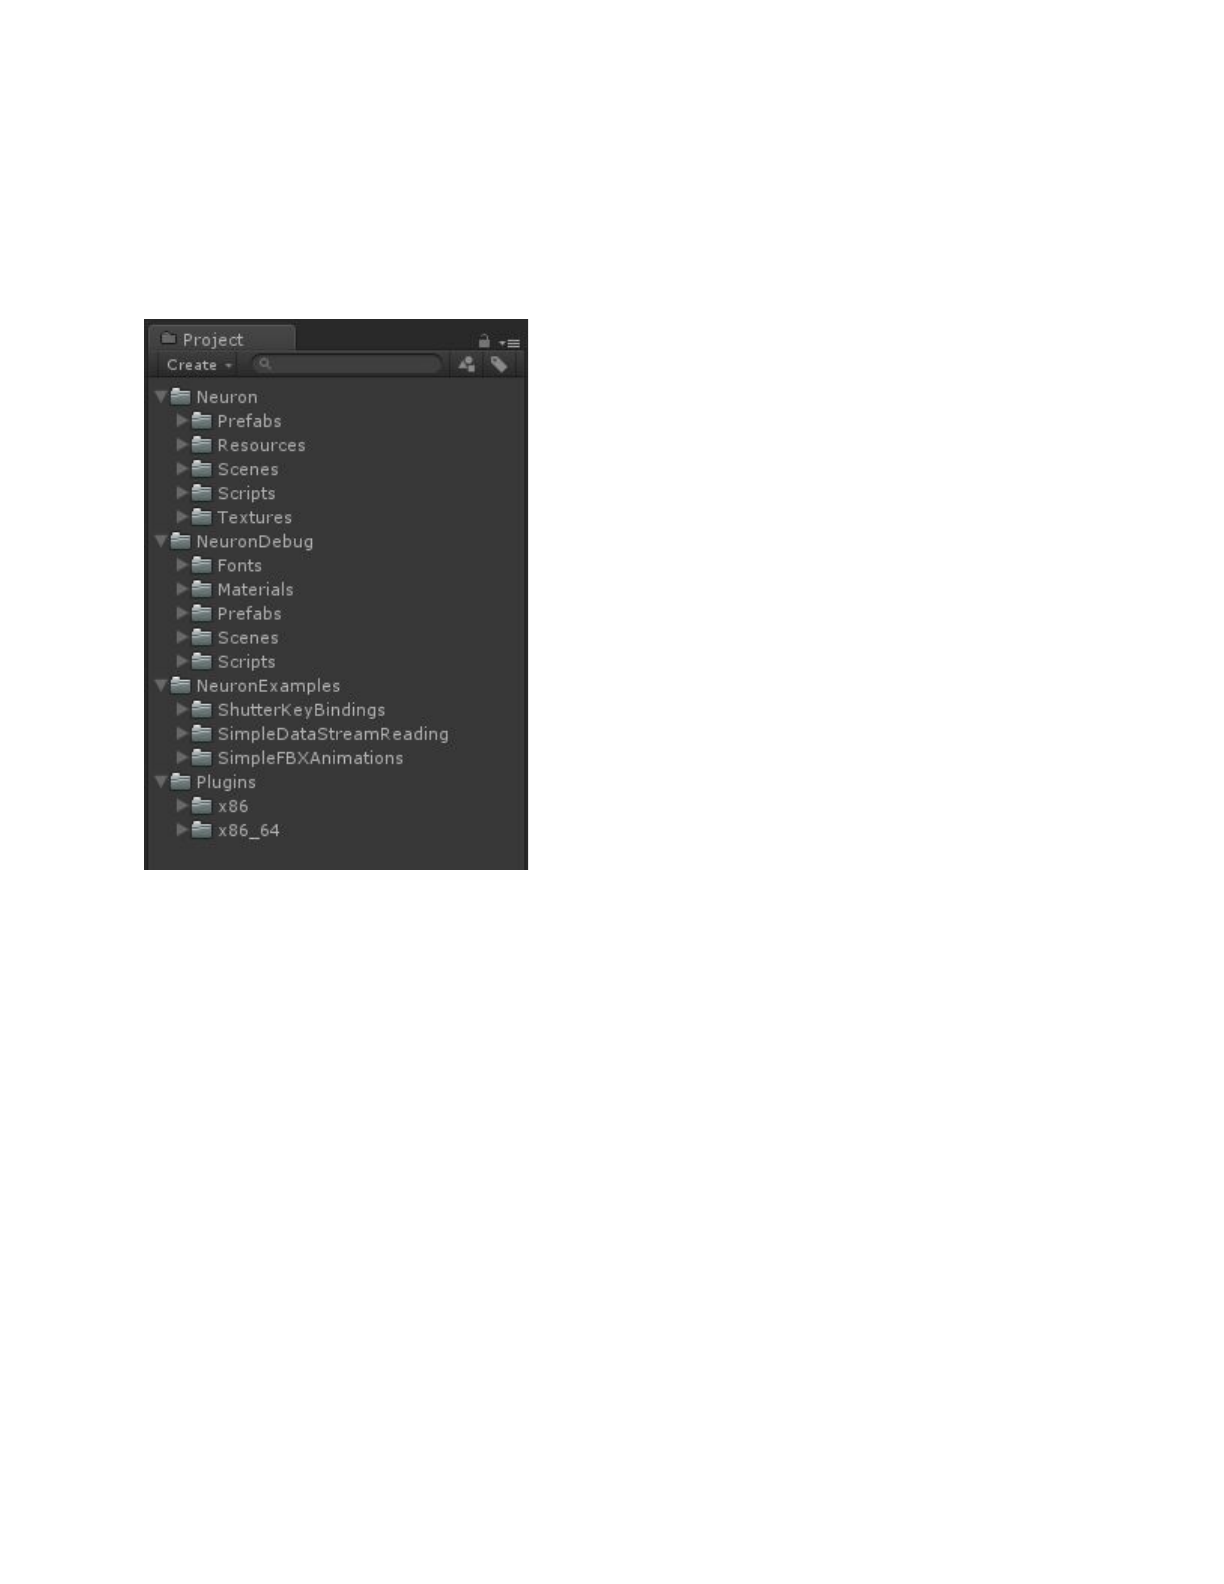
STRUCTURE OVERVIEW
The SDK package is divided into the following structure:
Neuron
The core scripts and components of the Perception
Neuron Unity integration.
NeuronDebug
The source files for the Perception Neuron Debug
Viewer.
NeuronExamples
ShutterKeyBindings - An example of which
Keycodes are mapped to which button of the
Shutter.
SimpleDataStreamReading - A very simple code
example for how to use the data stream together
with a humanoid skeleton.
SimpleFBXAnimations - A simple example of how
to use exported animations from Axis Neuron
directly inside Unity.
Plugins
The library files of the Perception Neuron data
reader for both 32 and 64 bit architecture.
7

CORE SCRIPTS OVERVIEW
Assets/Neuron/Scripts/Mocap/BVHDataReader.cs
C# wrapper class for the BVHDataReader plugin. Includes a basic interface to connect or
disconnect from Axis Neuron and callbacks when receiving motion data and mocap
information ( frequency, combination mode, etc. ).
Assets/Neuron/Scripts/Mocap/NeuronConnection.cs
NeuronConnection manages connections with Axis Neuron using BVHDataReader.cs. You
can connect to multiple instances of Axis Neuron and each connection will be mapped to a
NeuronSource instance.
Assets/Neuron/Scripts/Mocap/NeuronSource.cs
NeuronSource manages instances of NeuronActor with two dictionaries called activeActors
and suspendedActors. NeuronSource monitors the lastest timestamp update inside
NeuronActor in the OnUpdate method and use a threshold to judge if any actor is lost
(number of actors in Axis Neuron has changed or the connection was lost completely). When
this happens NeuronSource will add or remove actors between the two dictionaries and
notify NeuronActor.
Assets/Neuron/Scripts/Mocap/NeuronActor.cs
Data class to store only the most recent motion data frame, also provides methods to parse
the received motion data which is received as float values from the network. NeuronActor
also saves mocap info and provides methods to register callbacks when it was resumed or
suspended by NeuronSource.
Assets/Neuron/Scripts/Mocap/NeuronInstance.cs
Base class for all kinds of instances for receiving motion data. Inherits from
UnityEngine.MonoBehaviour. NeuronInstance provides callbacks for state changes and the
receiving of mocap info from a NeuronActor instance which was bound to this instance by
connect or other methods. This class is not intended to be used directly, but can be inherited
to provide custom methods to apply motion data, handle states change and mocap info.
Assets/Neuron/Scripts/Mocap/NeuronAnimatorInstance.cs
Inherited from NeuronInstance. Provides custom methods to apply Neuron motion data to
the transform components of the bones bound in the Unity animator component. Needs a
humanoid skeleton setup to work properly.
8

Assets/Neuron/Scripts/Mocap/NeuronAnimatorPhysicalReference.cs
Data class for initialization and cleanup of a reference skeleton used for motions based upon
Unity’s rigidbody component. Used by NeuronAnimatorInstance if physics toggle is enabled.
Assets/Neuron/Scripts/Mocap/NeuronTransformsInstance.cs
Inherited from NeuronInstance. Provides custom methods to apply Neuron motion data
directly to transform components. Use this for non-humanoid skeletons or skeletons with
more bones then the default setup used in Unity.
Assets/Neuron/Scripts/Mocap/NeuronTransformsPhysicalReference.cs
Data class for initialization and cleanup of a reference skeleton used for motions based upon
Unity’s rigidbody component. Used by NeuronTransformsInstance if physics toggle is
enabled.
Assets/Neuron/Scripts/Mocap/NeuronHelper.cs
Contains definitions for Neuron bones and several helper functions.
Assets/Neuron/Scripts/Mocap/NeuronInstancesManager.cs
For each NeuronActor, NeuronInstancesManager keep exactly one NeuronAnimatorInstance.
Used in NeuronDebugViewer.
Assets/Neuron/Scripts/Mocap/BoneColliders.cs
Utility class for Neuron editor to add or remove colliders.
Assets/Neuron/Scripts/Mocap/BoneLine.cs
Utility class using a line renderer to draw bone lines.
Assets/Neuron/Scripts/Mocap/BoneLines.cs
Utility class for Neuron editor to add or remove BoneLines.
Assets/Neuron/Scripts/Mocap/BoneRigidbodies.cs
Utility class for Neuron editor to add or remove Rigidbodies.
Assets/Neuron/Scripts/Mocap/FPSCounter.cs
Utility class to calculate the FPS (Frames-Per-Second).
Assets/Neuron/Scripts/Mocap/CustomAnimatorDriver.cs
A sample script explaining how to drive a model with Neuron motion data with just a few
lines of code.
9
USAGE EXAMPLE
The motion data from Perception Neuron works best when paired with an animator
component. You will need a humanoid skeleton and you need to make sure your rig is
defined as humanoid in the import settings of the model. Also make sure your avatar
mapping is correct. Hint: if you rigged your model with our skeleton example, there is a bone
mapping template you can use to get the correct mapping. It can be found in:
Neuron/Resources/NeuronSkeletonMapping.ht
The next step is to attach the NeuronAnimatorInstance.cs script on the model. You can use
your own code and functions for this. The NeuronAnimatorInstance just serves as a good
example. If you want to use the complete bone structure you should use
NeuronTransformInstance.cs instead. The reason there are two different scripts is explained
in greater detail in the next chapter.
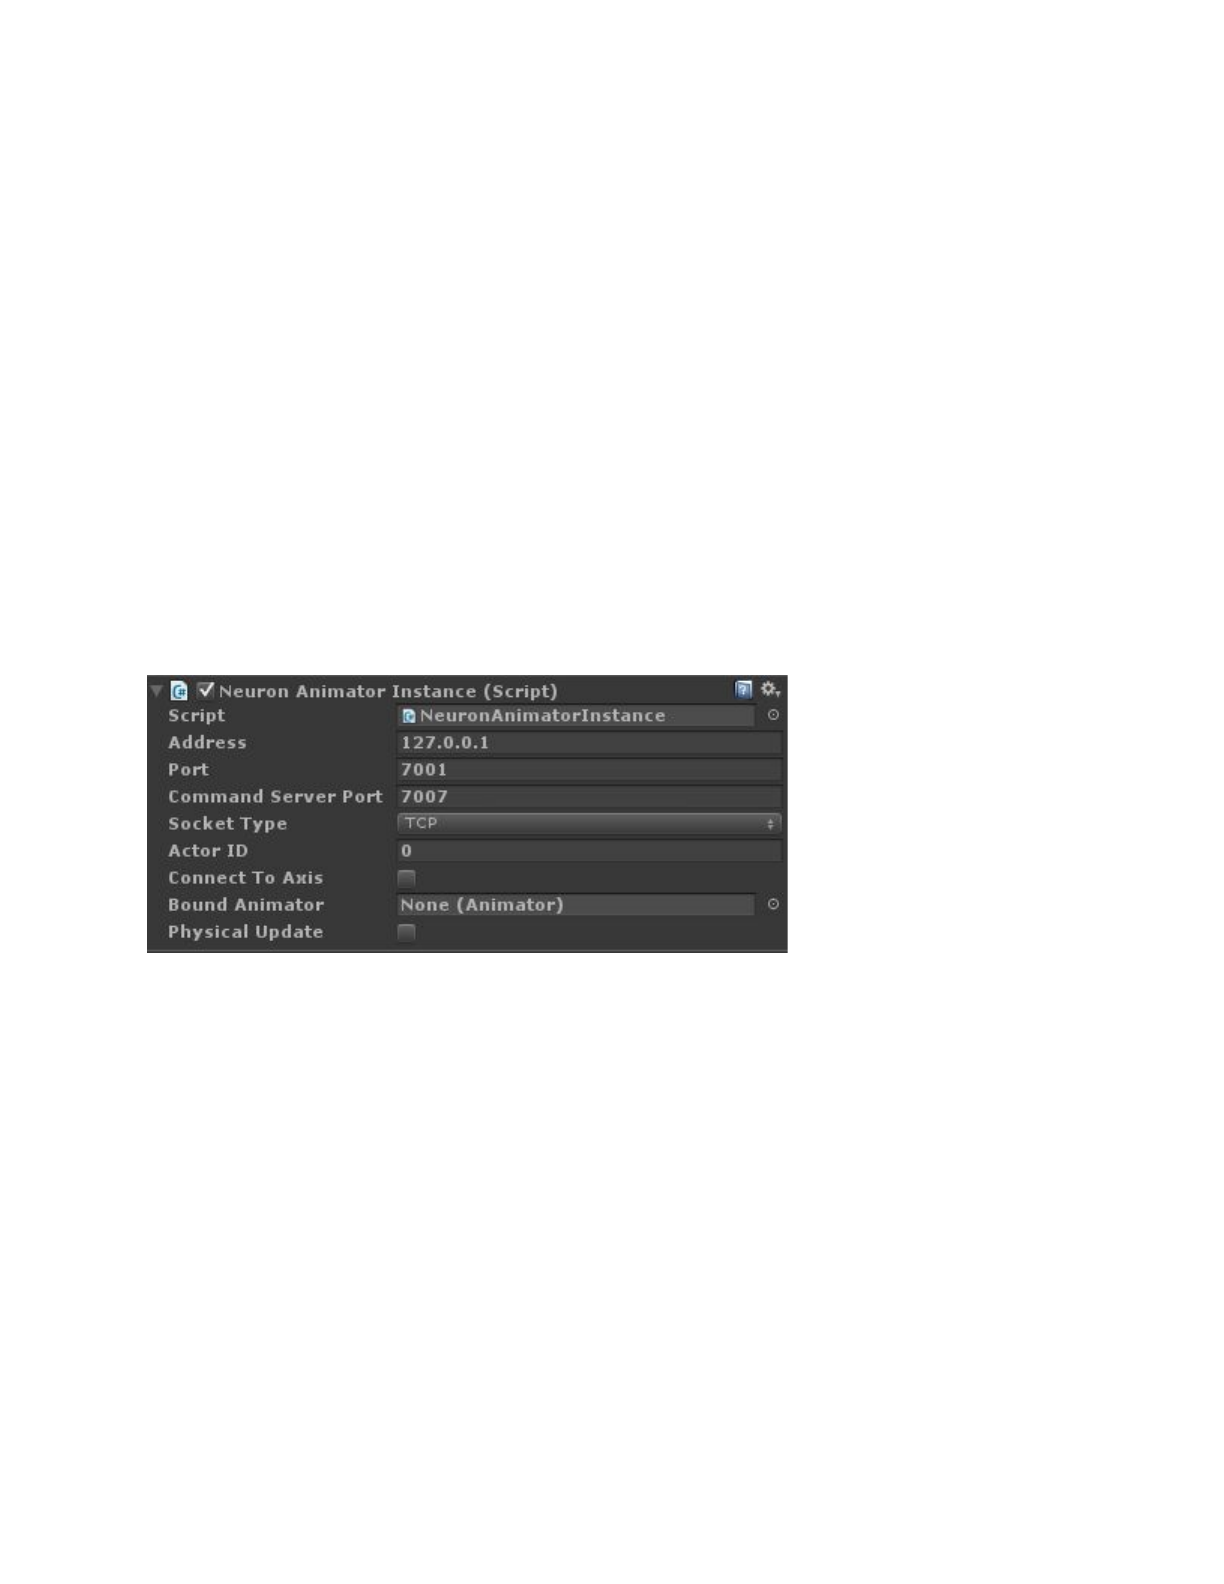
Here are the public variables of the NeuronAnimatorInstance script explained:
Address is the IP address of the machine running Axis Neuron. If its the same computer the
address should be 127.0.0.1. You can use this stream motion data from any other computer
in the same network. In this case change the address accordingly.
Port is the port number associated with the BVH data stream output setting in Axis Neuron.
No need to change this if you didn’t change it inside Axis Neuron.
Command Server Port is the port number to listen for commands. This is used to request
bone size settings from Axis Neuron. Note that this feature is not yet fully implemented in this
version of the Unity integration.
Socket Type is the socket type to be used for that data stream. This should be identical to
your setting in Axis Neuron.
Actor ID is the id number for the actor you want to use. If you have more than one actor
connected in Axis Neuron this id number will increase. Default is 0 which is the first actor.
Connect To Axis means the script will connect to Axis Neuron and apply the motion data.
You can use this toggle to starts/stop the data stream.
10

Bound Animator the Animator component this instance should use for the received motion
data. You can use this if you don’t want to keep the script on the same GameObject as the
animator component.
Physical Update tells the instance if it should use rigidbody functions provided by Unity to
move and rotate each bone. The default method is to apply the received float values directly
to the transform components of each bone.
For the NeuronTransformInstance its basically the same script with two differences. Since
we can’t use the Humanbodybones references provided by Unity’s humanoid skeleton
system to get the transform components we have to traverse and find them ourselves. For
this we use the Root and Prefix variables. Root is the parent transform component of the hip
bone. Prefix is the starting naming convention for each bone. In our skeleton setup the prefix
is “Robot_” because all our bone names start with “Robot_”. The script will then search for
Robot_Hips, Robot_RightUpLeg, Robot_LeftUpLeg and so on.
Regardless of whether you use the transform or animator instance method the motion data
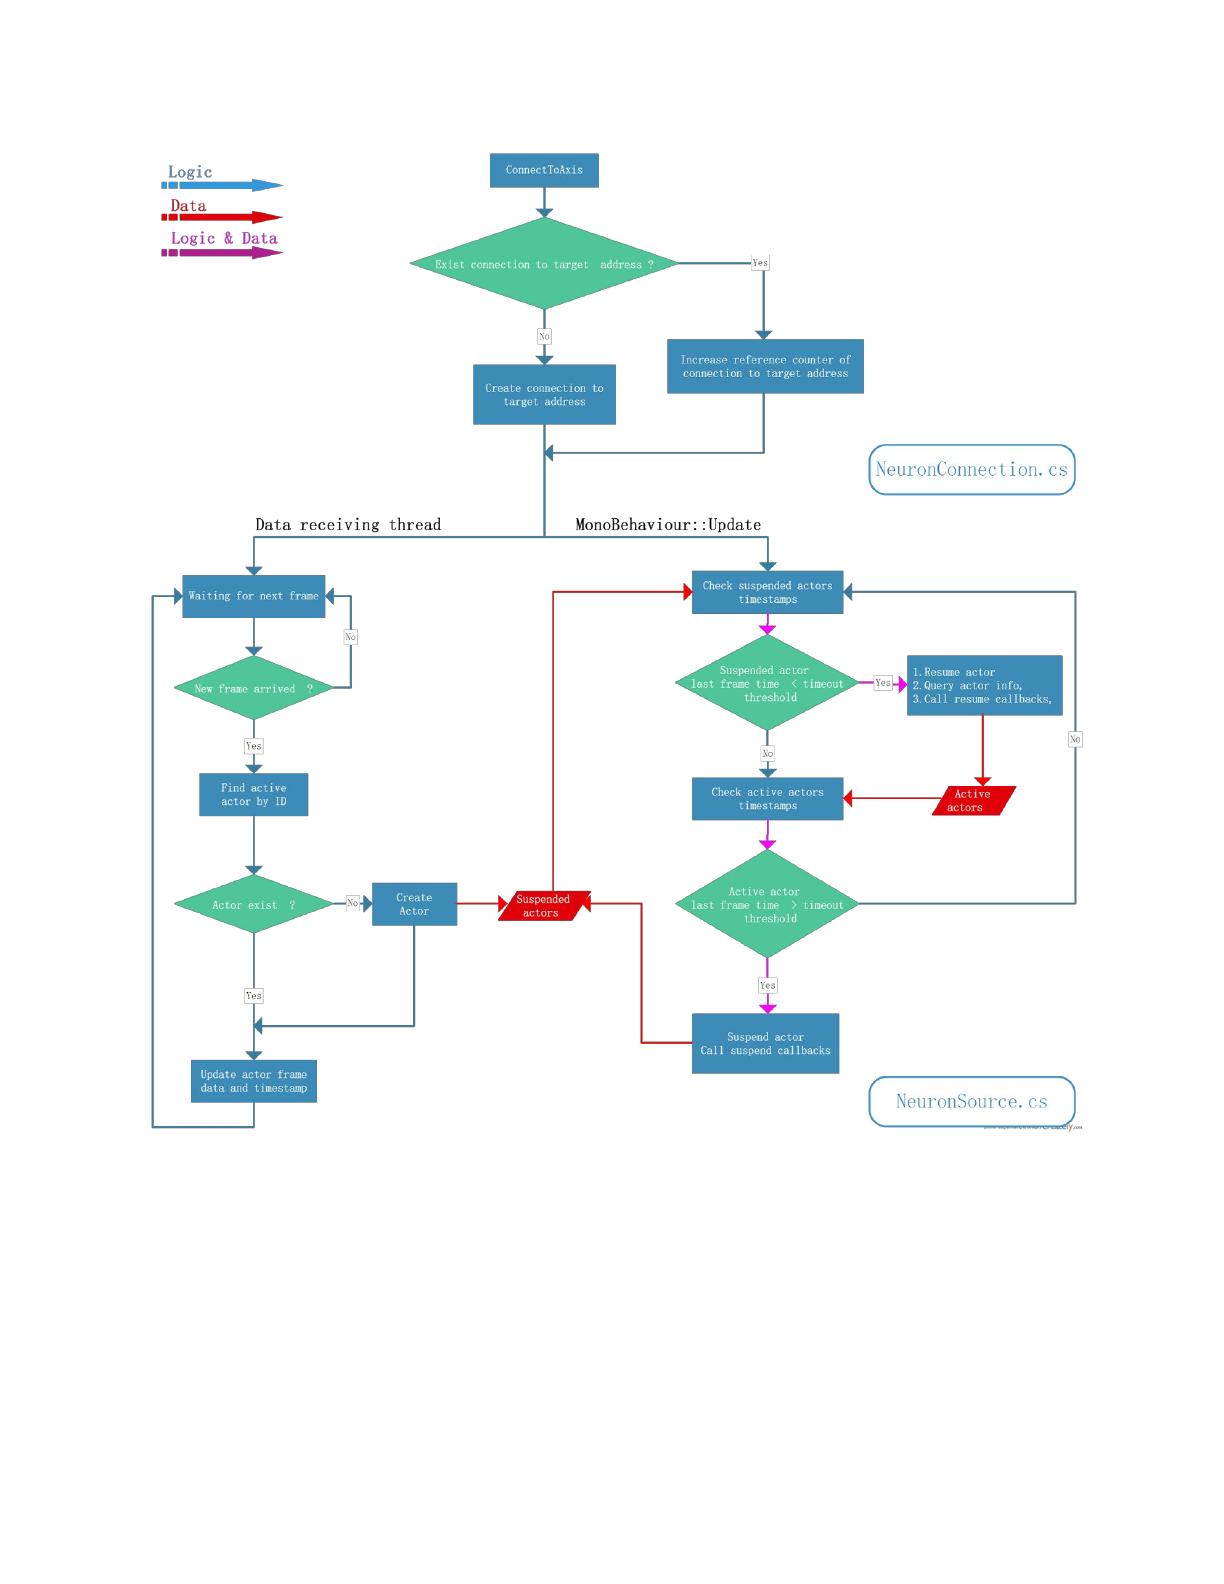
pipeline always works the same way:
1. Axis Neuron will broadcast the motion data when BVH output is turned on in the
settings. In this case it doesn’t matter if its a recorded raw file or real-time. We
recommend you to do recordings of your intended real-time interactions and play
them back as this will help greatly with development.
2. Once Unity is running and we’ve established a successful connection to the data
stream, with the address and port specified, the integration will always make the most
recent motion values available.
3. If we’re not using physics to move the bones we’ll update each bone on every new
frame being rendered with the currently available data.
4. If we’re using physics update the bone updates will happen inside Unity’s
FixedUpdate loop to stay consistent with Unity’s physics system.
See the following flow-chart for a more detailed overview:
11
12

A WORD ABOUT PHYSICS
There are two methods to use the received motion data in Unity. The first method is to use
the received values as and apply them directly to the corresponding transform component of
each bone. This is similar to stop-motion or movie frames where every new received frame is
another position/rotation of each bone. This is happening so fast that you can’t see the steps
in between. Similar as how movies are perceived as motion even though they’re just a series
of images.
While this method works well it does not give you accurate physical interactions. As we jump
from one position/rotation to the next between updates (frames) Unity has trouble figuring
out what to do if there is a collision. Usually Unity’s physics engine will simply try to prevent
any penetrations from happening and will move colliders away from each other if the
penetration is above a certain threshold. The result of this is that, lets say you want to kick a
ball, that the ball will simply move itself out of the collider of the feet between each update.
So it will not really get kicked away as you would expect from real life.
This leads us to the second method you can use the motion data: Unity’s physics engine
provides us with two functions to solve exactly these problems. They’re called
Rigidbody.MovePosition() and Rigidbody.MoveRotation(). By using these functions Unity will
calculate the steps between every update and will have any collision react accordingly. So
between each FixedUpdate cycle Unity will interpolate from the current position/rotation to
the next one instead of jumping directly to it. This method gives you more accurate physical
interactions.
To prevent the colliders of our own body from interacting with each other we need to make
sure the collision matrix and layers are configured correctly. See the chapter “How to get the
integration into Unity” for how to do this. Additionally you need to aware of the following
conditions:
1. The rigidbody components of all the bones you are moving have to be set to
kinematic. Otherwise the physics movement function by Unity will not work as
intended.
2. You can only use global position and rotation values to move the bones. We
instantiate a shadow skeleton that is used as a target reference for this.
3. Unity’s rigidbody functions will not work properly with childrens. Thats why we need
to kill the hierarchy of the bones.
13
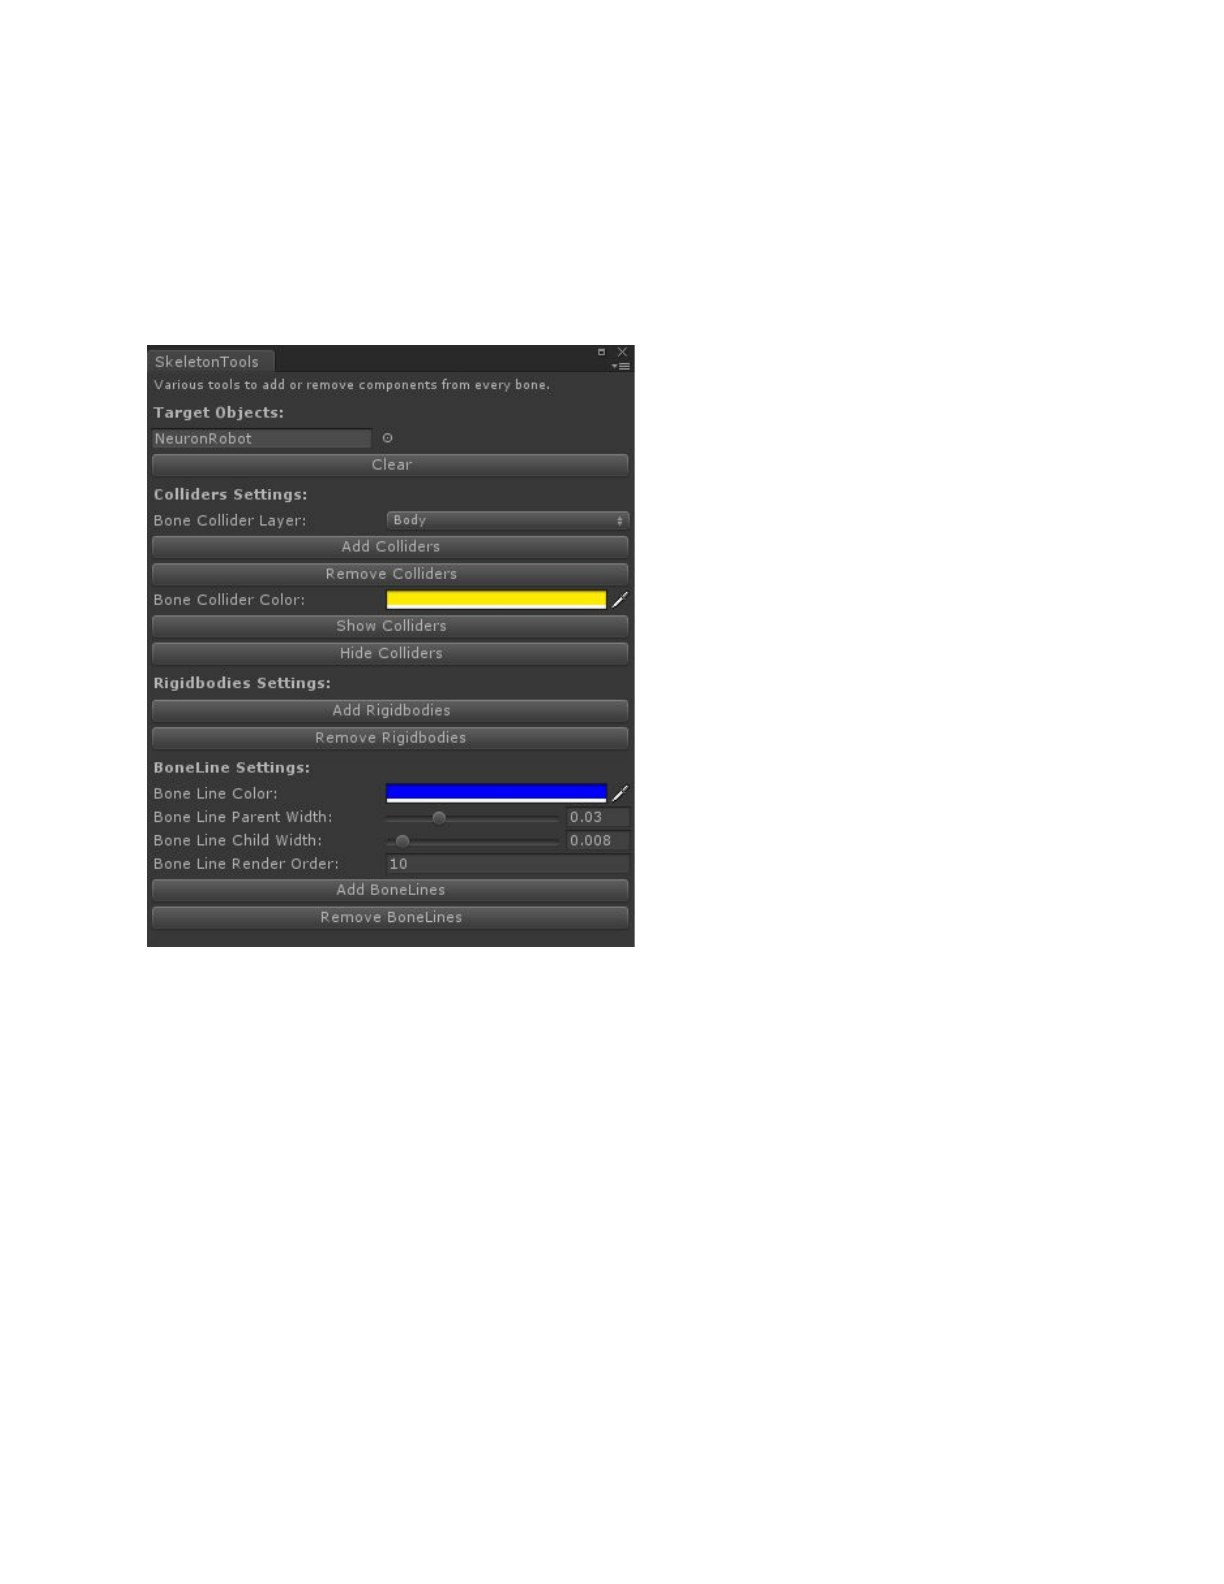
NEURON SKELETON TOOLS
We programmed a nifty tool to help you with configuring and making changes to your avatar.
Its called Skeleton Tools and can be found in the menu Neuron -> Skeleton Tools.
First thing to make sure is that you select your GameObject that either has a
NeuronAnimatorInstance or NeuronTransformInstance script attached to it. This will provide
the tools script with the right interface to work with.
The following settings allow you to various things such as:
➔Adding/removing a default collider setup to the skeleton.
➔Showing/hiding the colliders for debugging/adjustments,
➔Adding/removing of rigidbody components.
➔Adding/removing of bone lines. (Bone lines are a great tool for debugging and can
also be added to instantiated reference skeleton, when using physics update, during
runtime). The render order setting defines which line to render ontop of eachother if
you have multiple bone lines.
14

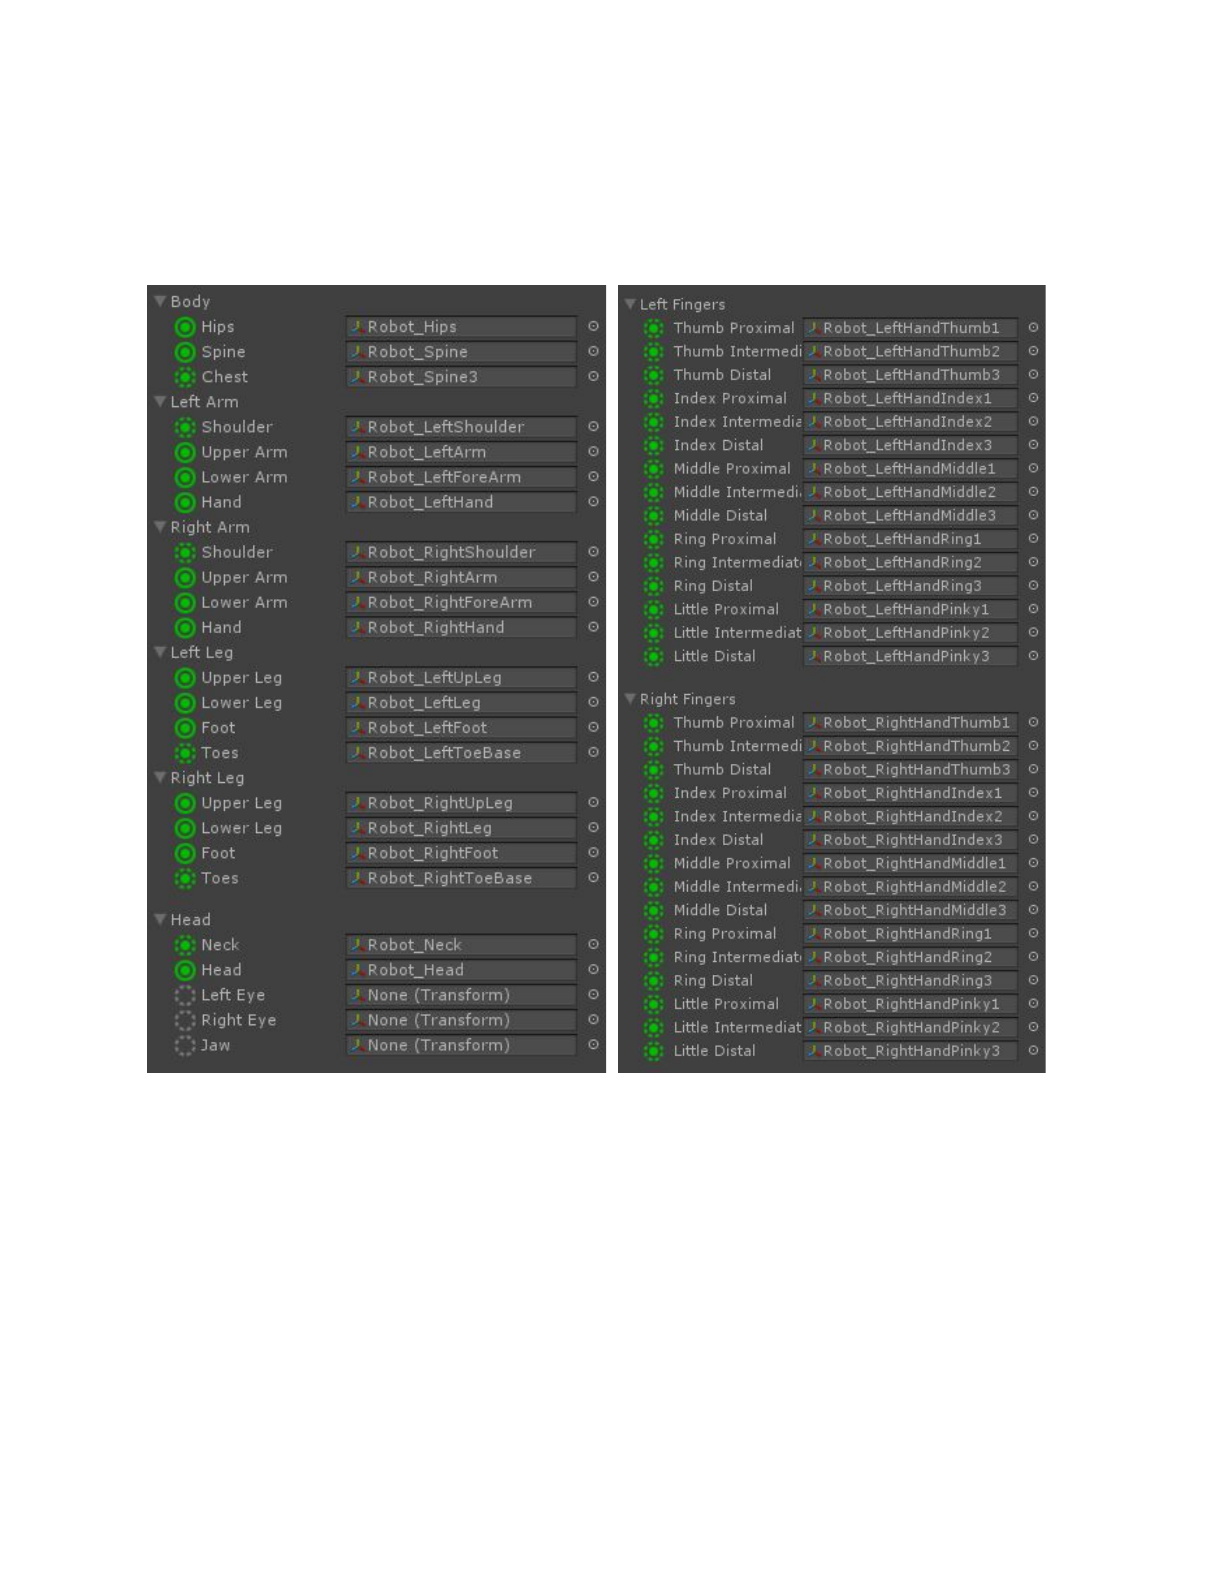
HOW TO CONFIGURE A NEW SKELETON
The following is a guide for how to configure a new character model to receive real-time
motion data by Perception Neuron. Before we start you need to be aware of a few things:
1. Your model needs to be rigged on a humanoid skeleton.
2. The bones of your rig can not have any existing rotations in them and their axis
orientation needs to be identical with Unity’s axis system.
3. Your model needs to be rigged in a T-Pose.
4. If you’re model is not rigged with our skeleton setup you can only use real-time
motion data without displacement for now.
If you don’t consider the points mentioned above the applied motion from the integration will
look wrong. Please make sure to correct those issues. Worst case suggestion is to rig your
model on the included skeleton template found at: Neuron/Resources/Models/Template
Bone Structure.fbx
1. Import your model into Unity.
2. In the Project tab in Unity click on your model and then click on the Rig tab in the
inspector windows.
3. Set your Animation Type to Humanoid, then click on Apply.
4. Next click on Configure to check the bone mapping. Usually Unity will find the right
bone references for almost all the humanoid skeleton so its good check them.
5. If your model is using our skeleton setup go to step 6, otherwise go to step 7.
6. Click on Mapping and then click on Load to load our template file that fixes the
mapping for you.
a. In the new window navigate to Neuron/Resources and load the file
NeuronSkeletonMapping.ht.
(Hint: see the appendix for an example of the correct configuration.)
7. Make sure you have all the right bones mapped to the correct body segments inside
each of the tabs for Body, Head, Left and Right Hand.
8. Click on Apply and then on Done.
9. Load the scene you want to use your model in.
10. Click and drag your model into the Hierarchy tab to load it into the scene.
11. Select your model in the Hierarchy tab and click on Add Component in the inspector
window.
12. In the search field type “Neuron Anim” and select the script “Neuron Animator
Instance”.
15

13. Adjust the settings of the Neuron Animator Script according to your own setup. To
make the script to automatically connect to Neuron Axis when you hit Play then
enable the toggle “Connect To Axis”.
14. Make sure you have Neuron Axis running and playing a recorded animation in loop or
a live actor connected to it. Also make sure you turned on BVH data streaming in the
Neuron Axis settings.
15. Click on Play in Unity to see the motion being applied to your new model.
16
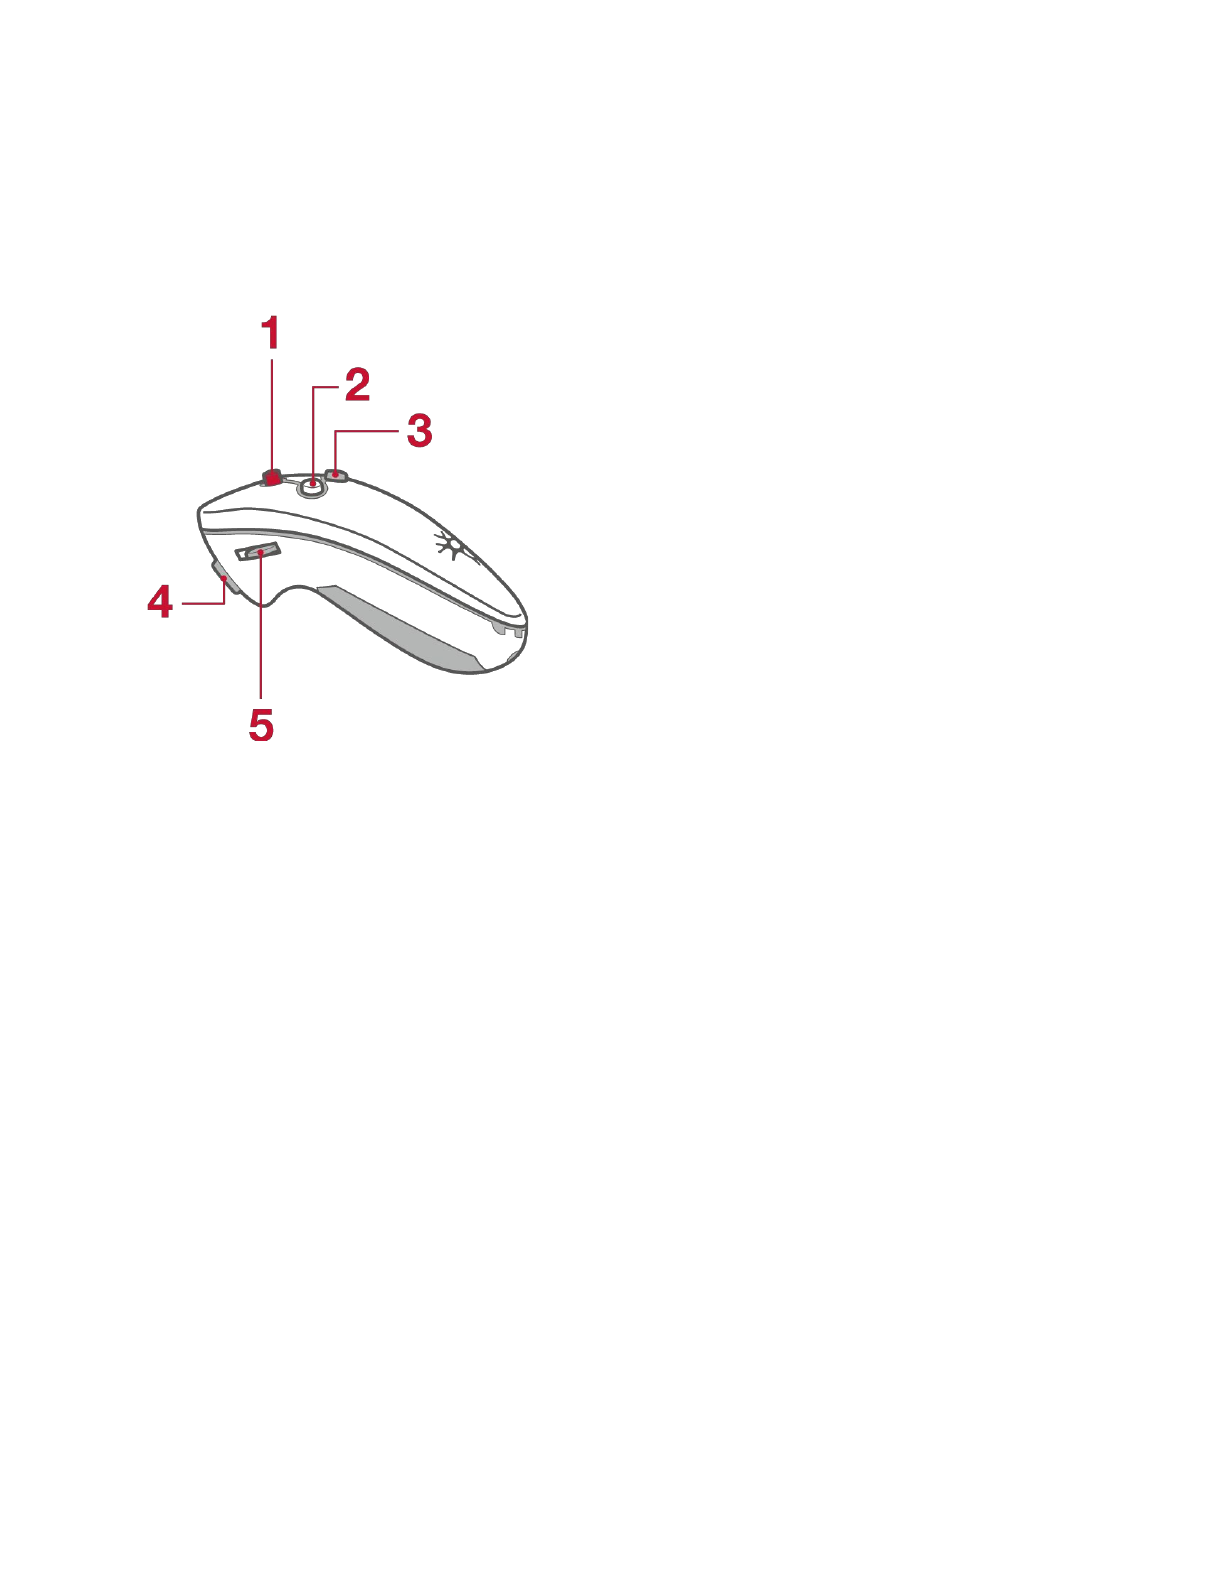
SHUTTER KEY MAPPINGS
The shutter buttons function just like a keyboard. Here are the key bindings for each button:
1. The Red Button
Press upwards = Alternating between ESC and SHIFT+CTRL+S
Press downwards = B
Press to the left = RETURN
Press to the right = TAB
Hold to the right = Alt-Tab
2. The Laser Button
No key mapped. Will turn the laser pointer on when held down.
3. The R Button
UpArrow Key
4. The L Button
DownArrow Key
5. The Scrollwheel
Not mapped to any keys.
17
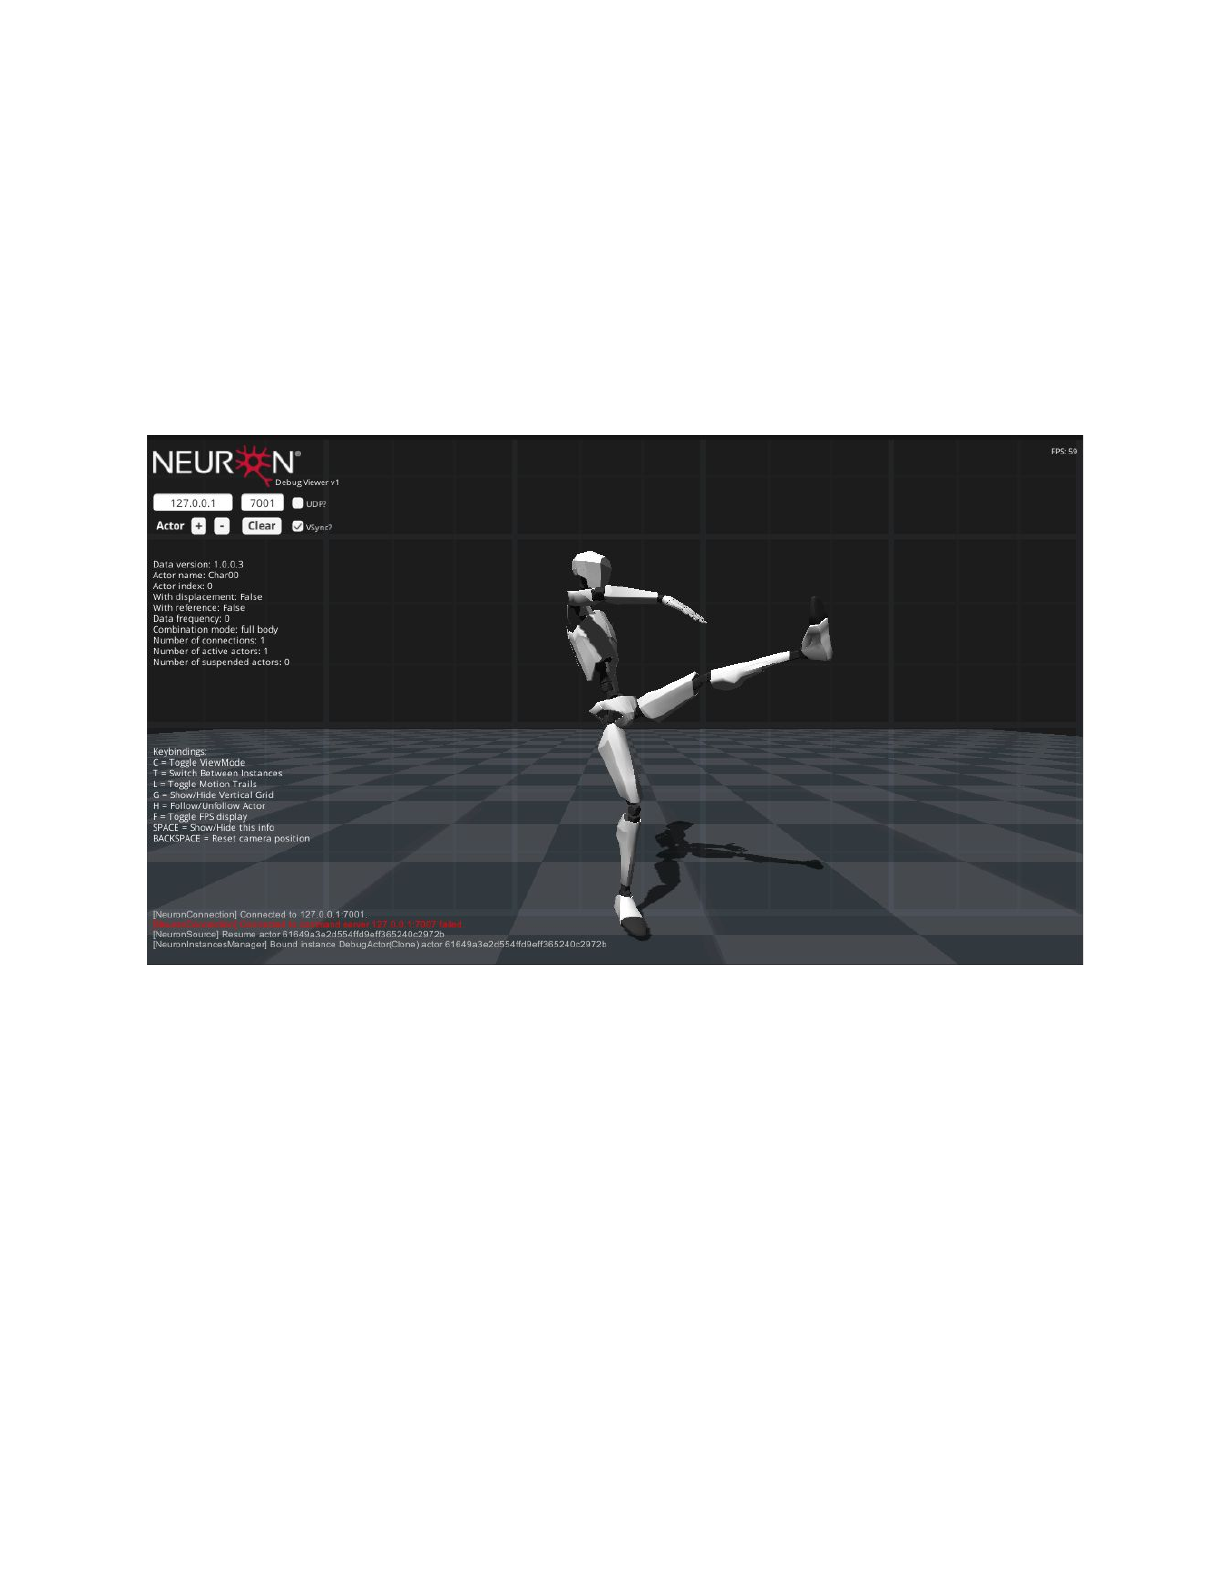
NEURON DEBUG VIEWER
The Neuron Debug Viewer serves both as a tool to test the data stream inside Unity and as
an example how to use the integration. Its a great tool to measure the connection to Axis
Neuron on local as well as over Wi-Fi/Lan connections. The following section explains its
functions and how to use them.
●The first input field is the IP address followed by the field for the port number. Adjust
these for whatever settings you use inside Axis Neuron or which ever IP you want to
connect to. (Hint: 127.0.0.1 is the local IP address.)
●The next checkbox is used to determine whether to use UDP or TCP (default) socket
method.
●Actor [+] will create a new actor who will try to connect to the IP address and port
specified above. You can use this to connect to multiple computers running Axis
Neuron. If there are more than one actors connected within Axis Neuron, these actors
will also be created inside Unity.
●Actor [-] button will remove the last connected actor.
●[Clear] button will remove all connections and actors.
●VSync toggle will turn enable/disable VSync.
18

The text below the buttons will display some information about the received data.
Top left corner will display the current frame rate.
The text at the bottom left will show the last 10 console messages from Unity.
Camera controls:
●Left-Click will move the camera relative to the current rotation.
●Right-Click will rotate the camera around the current center.
●Mouse-Wheel will zoom in or out.
The keybindings are as follows:
●C = Toggle ViewMode
There are two view modes: One camera or split-screen with two additional cameras
fixed to each hand. This is useful to debug finger movements.
●T = Switch Between Instances
If there are more than one actor in the scene you can switch the camera target using
this key.
●L = Toggle Motion Trails
Motion Trials are used to visualize the movement of the limbs. These are very helpful
to see jitter and lag in the received data. There are three modes:
1. No trails are shown.
2. Trails for hand and feet are shown.
3. Trails for all the fingers are shown.
●G = Show/Hide Vertical Grid
This will show hide the vertical Grid.
●H = Follow/Unfollow Actor
This will make the camera follow or stop following the current actor.
●F = Toggle FPS display
●SPACE = Show/Hide this info
Show or hide the whole UI.
●BACKSPACE = Reset camera position
This will reset the camera position and rotation.
19

HMD INTEGRATION
Getting any HMD synced up with the Perception Neuron integration can be a bit tricky. Here
is how we got it done and what we found out to be working the best. There are three core
rules worth mentioning:
1. The rotation tracker of the HMD should always have priority. Don’t overwrite its
rotation values with something else and don’t use the head rotation values from the
Perception Neuron system.
2. Don’t use the positional tracking of the HMD.
3. Never parent the HMD cameras or GameObjects to the skeleton setup.
Inside the examples folder there is an example called: OVRExample. It contains a simple
script and a scene showing you how to combine our system with the Oculus Rift HMD. The
example script works in the following ways:
●On every new frame we position the OVR Camera Rig to the same position as the
head target object.
●This target object is an empty GameObject inside the Head skeleton hierarchy. We
use the target object to provide an easy way to define an offset and to set the correct
position on the head.
●Since we never change the rotation of the OVR Rig you need to reset its tracker once
you have the HMD on your head. This way the rig will be aligned correctly with your
virtual body. Make sure you’re facing forward when resetting the Oculus tracker.
(Note: you need to code the reference to the OVRManager yourself in order to reset
the OVR pose).
Before using the OVR example make sure you turn on VR support in your Unity player
settings or import the OVR integration if you’re using Unity 4.x.
20

KNOWN BUGS
If you use a bone setup where the rotation of each bone pivot is not zeroed out the motion
from Perception Axis will be incorrect. You have to use a rigged model with all bone pivots
pointing in the same direction and without any rotation values on the bones. If this isn’t the
case with the model you want to use the best and simplest solution is to reskin your model
on the bone setup provided in the FBX file: Robot Bone Structure.fbx
For some unknown reason the position of one upper leg bone can get corrupted when using
imported FBX files to drive another model via the Animation Controller. If this happens
configure the avatar of the model you’re using and click on Reset below the Pose editing
menu.
You can not change the names of the bones inside Unity if you’re using the Animator
component to drive the skeleton. If you want to change the names of the bones you have to
do it in you modelling software and export the model again.
If you find any other bugs or problems please report them to me at: tobias@noitom.com
Thank you!
21
APPENDIX A: NEURON SKELETON MAPPING
22

APPENDIX B: SKELETON BONES
The skeleton setup we use consist of the following 59 bones:
1. Hips
2. RightUpLeg
3. RightLeg
4. RightFoot
5. LeftUpLeg
6. LeftLeg
7. LeftFoot
8. Spine
9. Spine1
10. Spine2
11. Spine3
12. Neck
13. Head
14. RightShoulder
15. RightArm
16. RightForeArm
17. RightHand
18. RightHandThumb1
19. RightHandThumb2
20. RightHandThumb3
21. RightInHandIndex
22. RightHandIndex1
23. RightHandIndex2
24. RightHandIndex3
25. RightInHandMiddle
26. RightHandMiddle1
27. RightHandMiddle2
28. RightHandMiddle3
29. RightInHandRing
30. RightHandRing1
31. RightHandRing2
32. RightHandRing3
33. RightInHandPinky
34. RightHandPinky1
35. RightHandPinky2
36. RightHandPinky3
37. LeftShoulder
38. LeftArm
39. LeftForeArm
40. LeftHand
41. LeftHandThumb1
42. LeftHandThumb2
43. LeftHandThumb3
44. LeftInHandIndex
45. LeftHandIndex1
46. LeftHandIndex2
47. LeftHandIndex3
48. LeftInHandMiddle
49. LeftHandMiddle1
50. LeftHandMiddle2
51. LeftHandMiddle3
52. LeftInHandRing
53. LeftHandRing1
54. LeftHandRing2
55. LeftHandRing3
56. LeftInHandPinky
57. LeftHandPinky1
58. LeftHandPinky2
59. LeftHandPinky3
This is the complete structure of our skeleton model. If we use the humanoid skeleton in
Unity we skip some of them resulting in 51 bones remaining. However we need to include
the data of the bones we skip in the following bones for the correct values. We skip all the
InHand bones and two of the spine bones.
23
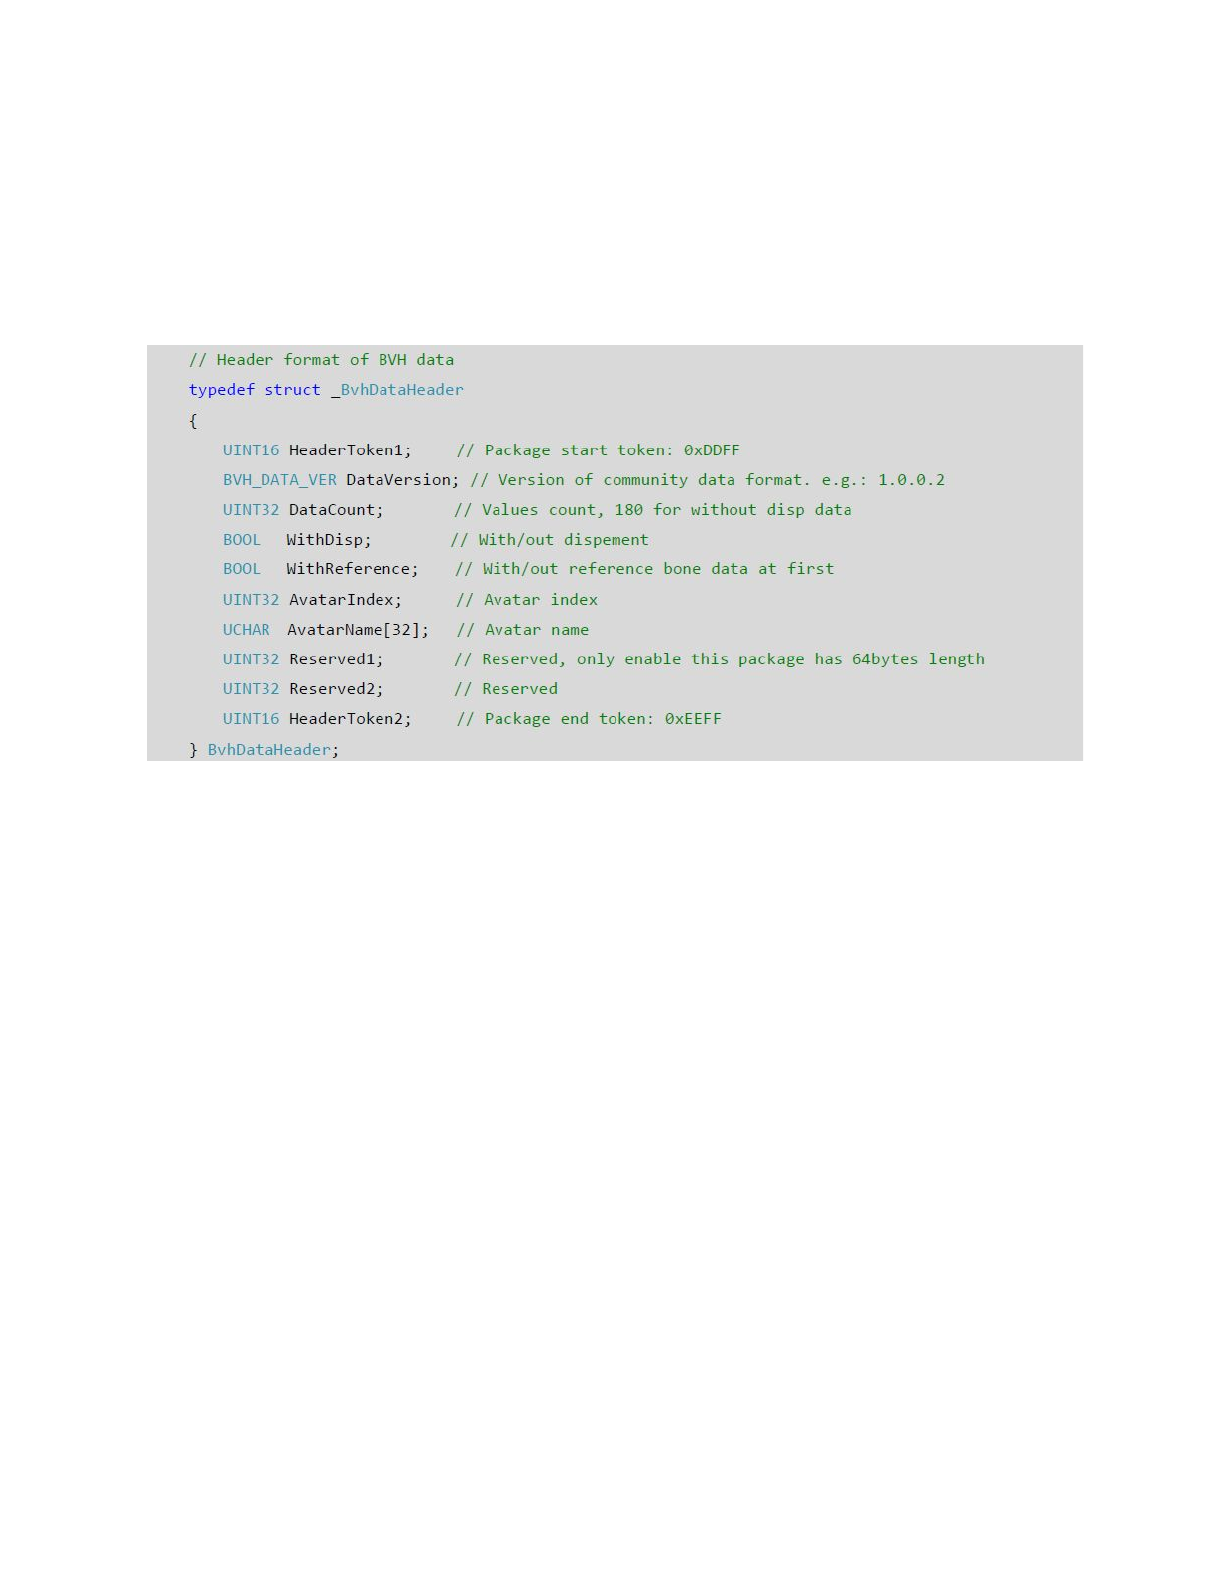
APPENDIX C: DATA STREAM HEADER
Each frame package of the data stream is accompanied by a header package containing the
following data:
The integration takes care of most of these things for you. Use this as a reference if you want
to do things yourself or want to learn more about the structure.
24

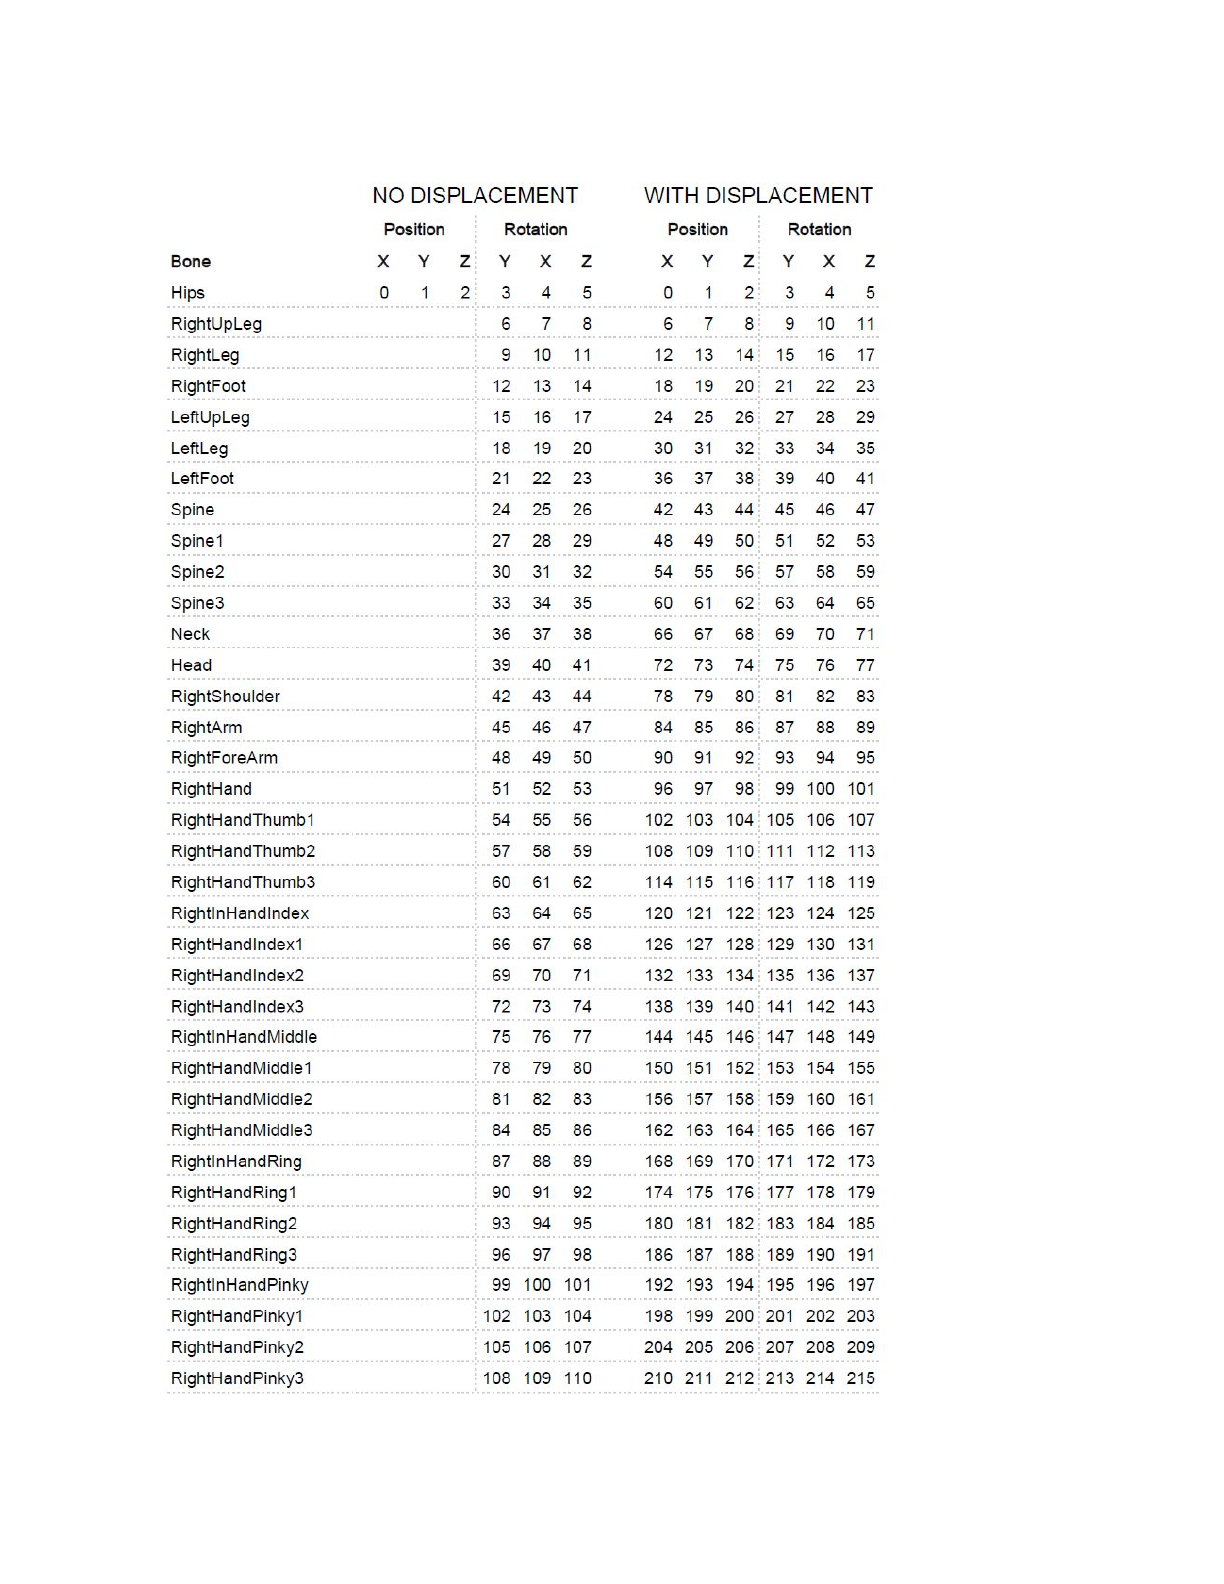
APPENDIX D: BINARY DATA SEQUENCE
On the next two pages you’ll find a complete graph of the whole sequence of the binary data
received from Axis Neuron. It is a one-dimensional float array with different ordering and
length depending on whether you’re using displacement data or not.
25
26

27

28
