MAST2 Mobile Application User Manual Phase 2 Version
User Manual: Pdf
Open the PDF directly: View PDF ![]() .
.
Page Count: 71

MOBILE APPLICATION TO
SECURE TENURE PILOT
PROJECT (MAST)
User Manual for the Mobile Application (v.2.2)
APRIL 2016
This document was produced for review by the United States Agency for International Development. It
was initially prepared by Cloudburst Consulting Group, Inc. for the Evaluation, Research, and
Communication (ERC) Task Order under the Strengthening Tenure and Resource Rights (STARR)
IQC.
Prepared for the United States Agency for International Development, USAID Contract Number AID-
OAA-TO-13-00019, Evaluation, Research and Communication (ERC) Task Order under Strengthening
Tenure and Resource Rights (STARR) IQC No. AID-OAA-I-12-00030.
Implemented by:
Cloudburst Consulting Group, Inc.
8400 Corporate Drive, Suite 550
Landover, MD 20785-2238
Mobile Application to Secure
Tenure Pilot Project (MAST)
User Manual for the Mobile Application
Version 2.2
APRIL 2016
DISCLAIMER
The authors' views expressed in this publication do not necessarily reflect the views of the United States
Agency for International Development or the United States Government.
Mobile Application to Social Tenure Pilot Project (MAST)
User Manual for the Mobile Application v.2.2
1
TABLE OF CONTENTS
1. DOCUMENT OVERVIEW 3
2. ABOUT THE MAST APPLICATION 3
3. INSTALLATION STEPS 4
4. LOGIN 4
5. MAP VIEWER 6
5.1 LAYER MANAGER 7
5.2 GPS 8
5.3 GET LOCATION CO-ORDINATES 9
5.4 MEASURE 10
5.4.1 CALCULATE DISTANCE 11
5.4.2 CALCULATE AREA 12
5.4.3 MEASURE POLYGON AREA 13
5.4.4 MEASURE LINE LENGTH 13
5.5 PARCEL INFO TOOL 14
5.6 ADD/VIEW BOOKMARK 15
5.6.1 ADD BOOKMARK 15
5.6.2 VIEW BOOKMARK 16
6. DOWNLOAD DATA 17
7. DOWNLOAD CONFIG 18
8. VERIFY DATA 19
8.1 PENDING 19
8.1.1 VIEW MAP 20
8.1.2 VIEW ATTRIBUTES 21
8.1.3 MARK AS VERIFIED 22
8.2 VERIFIED 23
8.3 FINAL 23
9. CAPTURE DATA 24
9.1 LAYER MANAGER 25
9.2 ZOOM TO CURRENT LOCATION 26
9.3 ADD BOOKMARK 27
9.4 VIEW BOOKMARK 27
Mobile Application to Social Tenure Pilot Project (MAST)
User Manual for the Mobile Application v.2.2
2
9.5 ADD FEATURE 28
9.5.1 DRAW POLYGON 28
9.5.2 CAPTURE POLYGON BY GPS 29
9.5.3 SNAPPING 29
9.6 CAPTURE ATTRIBUTES 31
9.6.1 New Claim 32
9.6.2 Existing Right 51
9.6.3 Unclaimed 53
9.6.4 Disputed Claim 55
8.7 EDIT SPATIAL 58
8.8 DELETE FEATURE 60
9. REVIEW DATA 62
9.1 DRAFT LIST 63
9.1.1 EDIT SPATIAL 64
9.1.2 EDIT ATTRIBUTE 65
9.1.3 DELETE ENTRY 66
9.1.4 MARK AS COMPLETE 67
10. UPLOAD DATA 69
11. USER PREFERENCES 70
11.1 CHANGE LANGUAGE 71
11.2 CONFIGURE AUTO SYNC 72
11.3 CONFIGURE MAP SETTINGS 73
11.3.1 SNAPPING 73
11.3.2. LABELING AND VERTICES 74
12. LOGOUT 75
Mobile Application to Social Tenure Pilot Project (MAST)
User Manual for the Mobile Application v.2.2
3
1. DOCUMENT OVERVIEW
This document intends provides guidelines for MAST mobile application users (Trusted Intermediaries
and Adjudicators), for usage of MAST mobile data capture application.
This mobile data capture application has been designed to work on Android based hand-held devices
only and enables the field users to capture data of parcels (spatial units) in the field along with parcel
attributes and multimedia information.
Pre-requisite:
1. Android application (apk) file should be installed on the device.
2. Internet connectivity should be available to download the data before initiation of data capturing
work.
2. ABOUT THE MAST APPLICATION
The key objective of MAST is to provide a framework for capturing land rights information using a
participatory approach. This framework provides a suite of applications to support the collection and
management of land rights information with following key components:
Mobile Data Capture Application – The mobile data capture application is an Android-based mobile
application to capture land rights information (spatial, alphanumeric and multimedia) on mobile devices
in field.
The mobile application is able to conduct data collection work without being connected to a central
cloud-based server in offline mode. Data will be collected and stored on users’ handheld devices and
once the user is within the influence region of the internet, where data could be synced, the information
will be packaged and sent back to the server.
Land Rights Data Management Infrastructure Application – Data collected on mobile devices
will be transferred to a cloud-based land rights Data Management Infrastructure application which will
provide tools to ingest, manage and store data of land rights information. It will also provide reporting
components so that required land rights reports can be generated.
This document provides details of the mobile component of the MAST application.

Mobile Application to Social Tenure Pilot Project (MAST)
User Manual for the Mobile Application v.2.2
4
3. INSTALLATION STEPS
Steps to install Application in Mobile and configuration of Spatial Data:
1. Copy mast.apk in the device
2. Tap on the app to install the application
3. Login into the application to create necessary folders/db
4. Copy the test_vector.mbtiles file into \MTP\spatialdata folder
4. LOGIN
This functionality allows authorized users to login into the application.
Steps:
1. User provides valid User Name and Password
2. Enter URL of the server
3. Click on ‘Login’ button
Mobile Application to Social Tenure Pilot Project (MAST)
User Manual for the Mobile Application v.2.2
5
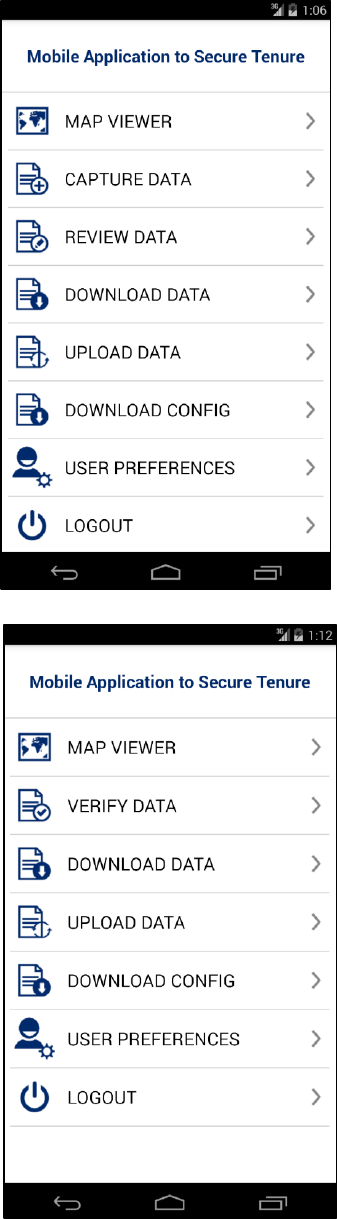
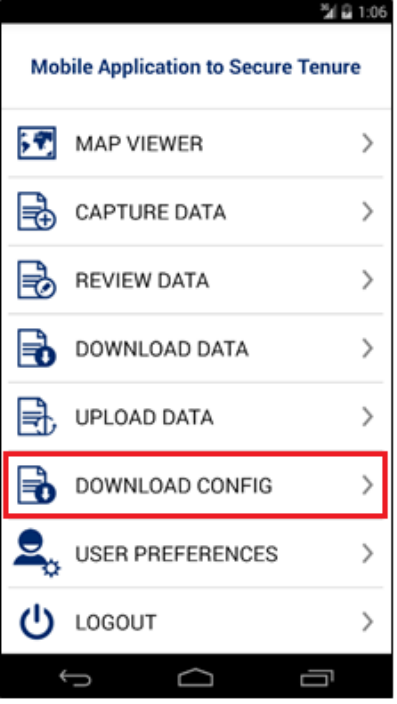
4. Application will open up homepage of application
5. Following functionalities are visible:
• Map Viewer
• Capture Data
• Review Data
• Download Data
• Upload Data
• Download Config
• User Preferences
• Logout
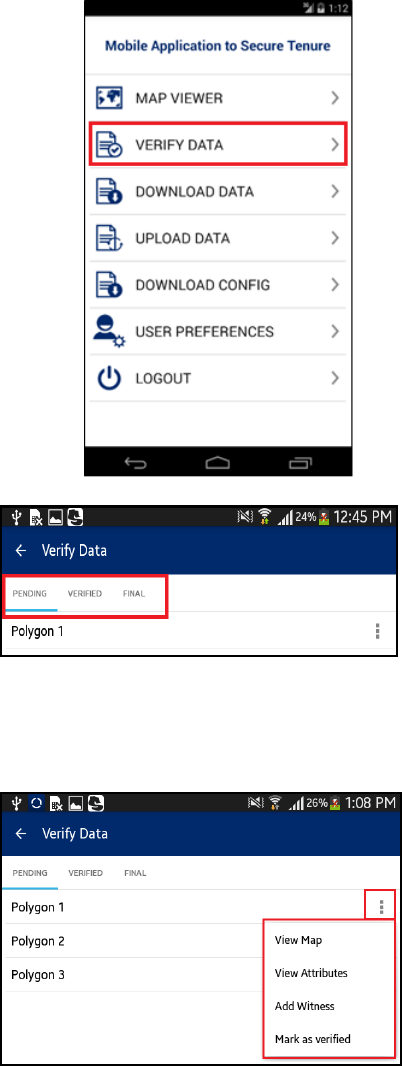
Note – If ‘Adjudicator’ user logs in into MAST,
the following functionalities are visible:
• Map Viewer
• Verify Data
• Download Data
• Upload Data
• Download Config
• User Preferences
• Logout
Mobile Application to Social Tenure Pilot Project (MAST)
User Manual for the Mobile Application v.2.2
6
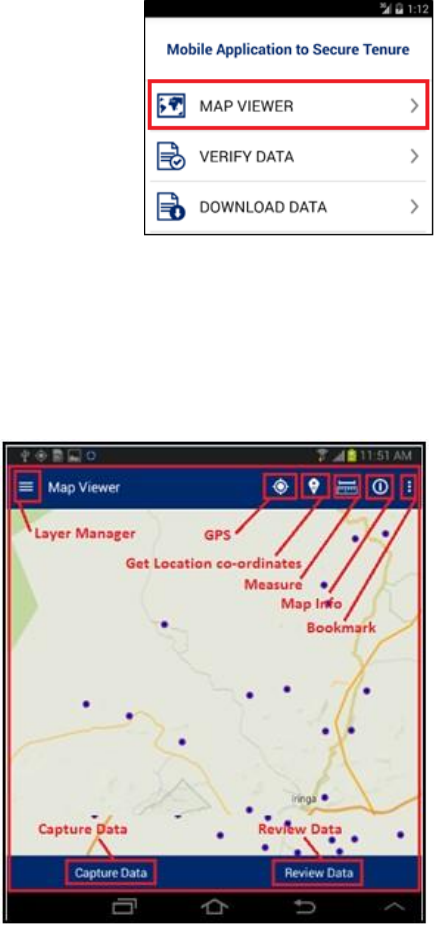
5. MAP VIEWER
This functionality allows authorized user/s to view spatial data of parcels and download the base map.
Overall, map viewer will display following data layers:
• Base map (Satellite data downloaded from server)
• Google base map
• Collected parcel data (if collected by the user)
This functionality provides following facilities:
• View Base Data on map
• Capture Spatial Data
• Review Captured Data
• Navigation Tools
• Mapping Tools
– Zoom to location
– Enter X and Y coordinates
– Measure
– Info
Steps:
1. Click on ‘Map Viewer’ option available on home page
2. Application will open up Map Viewer. Following tools are available with map viewer:
• Layer Manager
• GPS
• Get Location co-ordinates
• Measure
• Parcel Info (Map Info)
• Bookmark
• Capture Data
• Review Data
Mobile Application to Social Tenure Pilot Project (MAST)
User Manual for the Mobile Application v.2.2
7
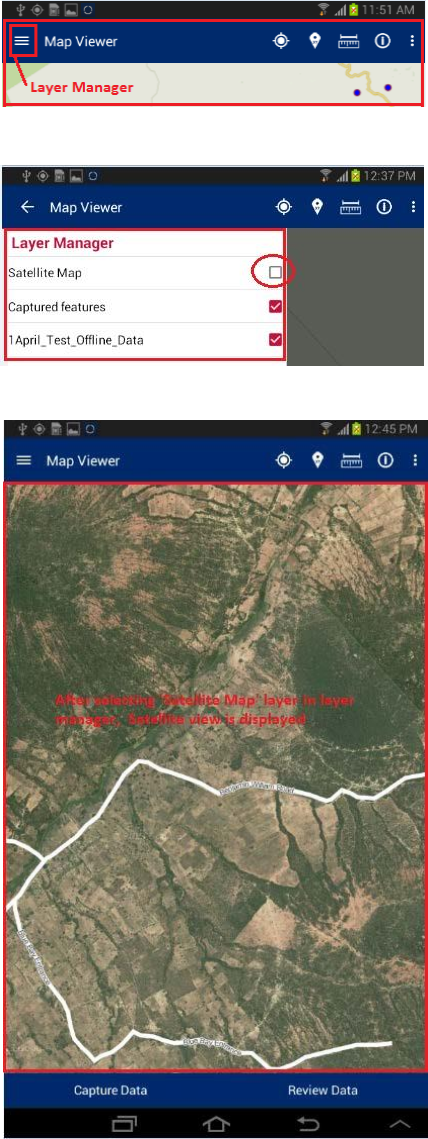
5.1 LAYER MANAGER
This functionality provides the listing of layers configured for the selected project. The user selects
On/Off to display a particular layer from the Layer Manager to view on the map.
Steps:
1. Click on Layer Manager option available on
top left
2. List of layers configured for the selected
project will be displayed along with a check
box. Check/Uncheck the checkboxes on Layer
Manager to show/hide a particular layer on the
map
3. Selected layer will become available on map
Mobile Application to Social Tenure Pilot Project (MAST)
User Manual for the Mobile Application v.2.2
8
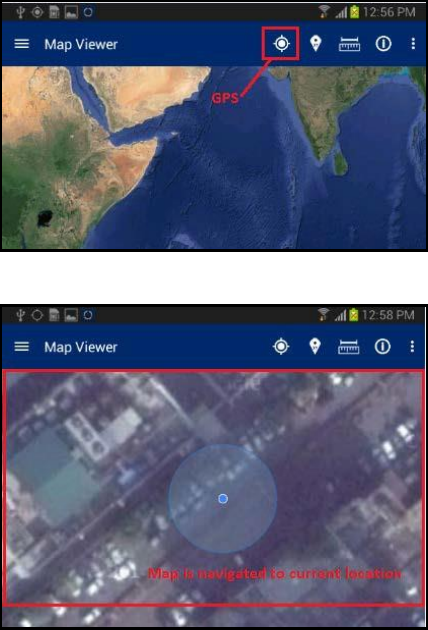
5.2 GPS
This functionality allows the user to navigate on the map to the current location.
Steps:
1. Tap on ‘GPS’ option available on top right
2. Map will navigate to the current location
Mobile Application to Social Tenure Pilot Project (MAST)
User Manual for the Mobile Application v.2.2
9
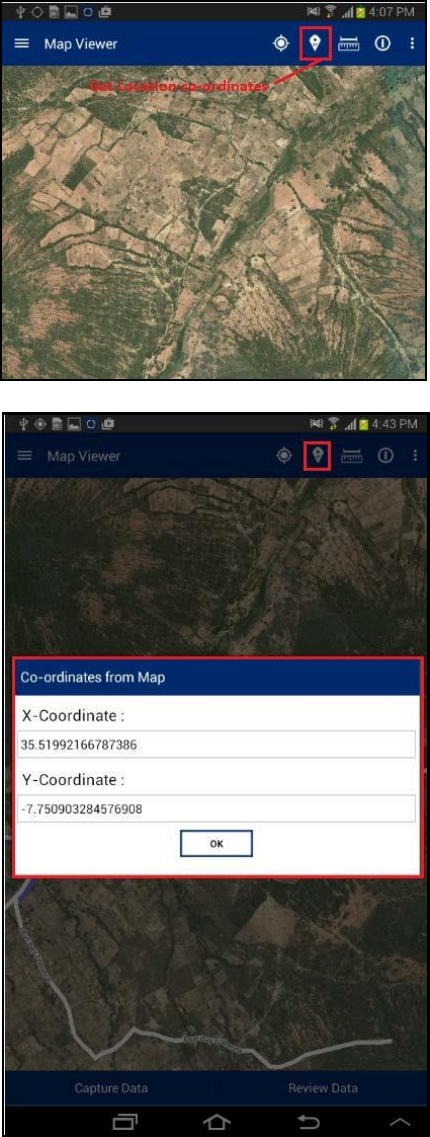
5.3 GET LOCATION CO-ORDINATES
This functionality allows the user to get coordinate values of specified location of map.
Steps:
1. Tap on ‘Get location Co-ordinates’ option
available on top right
2. Click on map
3. ‘Co-ordinates from Map’ dialogue box will be
displayed with coordinates of location
specified by click on map
Mobile Application to Social Tenure Pilot Project (MAST)
User Manual for the Mobile Application v.2.2
10
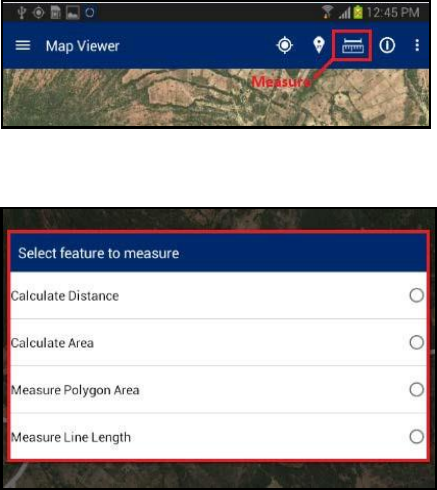
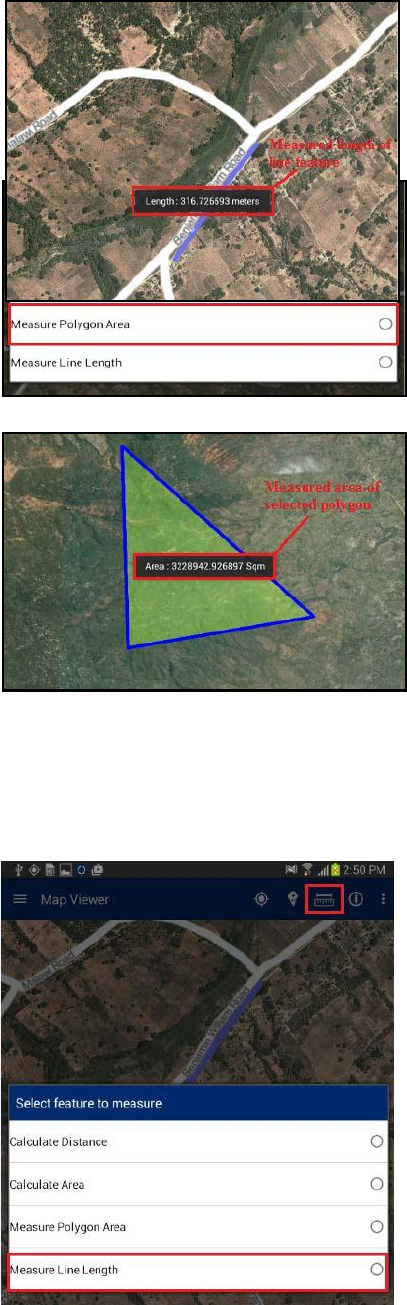
5.4 MEASURE
This functionality allows the user to measure the area of any polygon, length of any line or the distance
between two points on the map.
Steps:
1.
2.
Tap on ‘Measure’ option available on top
right
‘Select feature to measure’ dialogue will be
displayed with following options –
• Calculate Distance
• Calculate Area
• Measure Polygon Area
• Measure Line Length
Mobile Application to Social Tenure Pilot Project (MAST)
User Manual for the Mobile Application v.2.2
11
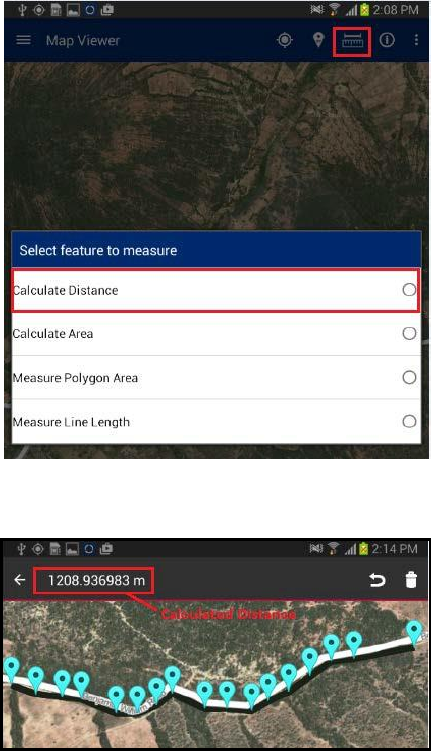
5.4.1 CALCULATE DISTANCE
This functionality allows the user to calculate the distance between two or more subsequent points on
map.
Steps:
1.
2.
3.
4.
Tap on ‘Measure’ option available on top right
Select ‘Calculate distance’ option
Click on map to specify at least two points
Application will calculate distance and display
it on top right of application
Mobile Application to Social Tenure Pilot Project (MAST)
User Manual for the Mobile Application v.2.2
12
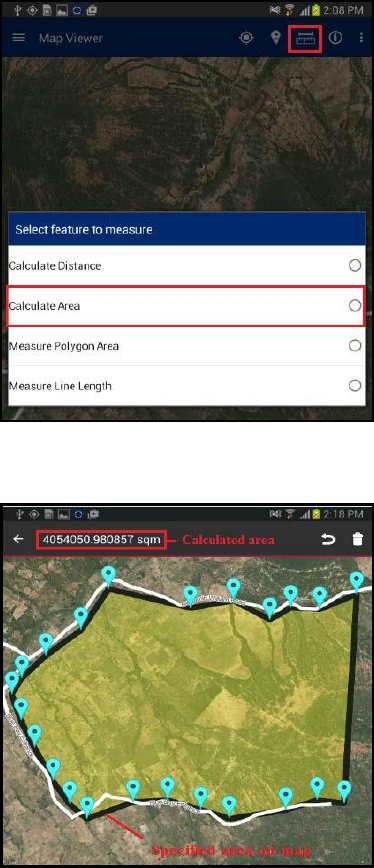
5.4.2 CALCULATE AREA
This functionality allows the user to calculate the area of a polygon by specifying it on map.
Steps:
1.
2.
3.
4.
Tap on ‘Measure’ option available on top right
Select ‘Calculate Area’ option
Click on map to specify at least three points
Application will calculate area and display it on top
right of application
Mobile Application to Social Tenure Pilot Project (MAST)
User Manual for the Mobile Application v.2.2
13
5.4.3 MEASURE POLYGON AREA
This functionality allows the user to calculate the area of
the existing polygon feature by specifying it on the map.
Steps:
1. Tap on ‘Measure’ option available on top right
2. Select ‘Measure Polygon Area’ option
3. Click on existing polygon feature map
4. Application will calculate area and display it on
the map only
5.4.4 MEASURE LINE LENGTH
This functionality allows the user to calculate the length of an existing line feature by specifying it on the
map.
Steps:
1. Tap on ‘Measure’ option available on top right
2. Select ‘Measure Line Length’ option
3. Click on existing line feature map
4. Application will calculate length and display it on
map only
Mobile Application to Social Tenure Pilot Project (MAST)
User Manual for the Mobile Application v.2.2
14
5.5 PARCEL INFO TOOL
This functionality allows the user to view the attribute details of any spatial feature which is already
created on map.
Steps:
1. Navigate to existing feature on map;
2. tap on ‘Parcel Info’ option available on
top
3. Right Click on feature on map
4. Attribute details of specified feature will
be displayed

Mobile Application to Social Tenure Pilot Project (MAST)
User Manual for the Mobile Application v.2.2
15
5.6 ADD/VIEW BOOKMARK
This functionality allows the user to save a particular area of interest of on the map canvas for future
reference. It also facilitates user to navigate a selected bookmark.
Steps:
1. Tap on ‘Add/View Bookmark’ option
available on top right
2. Application will display two options:
• Add Bookmark
• View Bookmark
5.6.1 ADD BOOKMARK
This functionality allows the user to save a particular area of interest on the map canvas and save for
future reference.
Steps:
1. Click on ‘Add Bookmark' option
2. Enter Bookmark dialogue box will be
displayed
3. Enter desired name in input box
4. Click on ‘Save’ button
5. Bookmark will be saved with entered name
and will become available in ‘Select
Bookmark' dialogue
Mobile Application to Social Tenure Pilot Project (MAST)
User Manual for the Mobile Application v.2.2
16
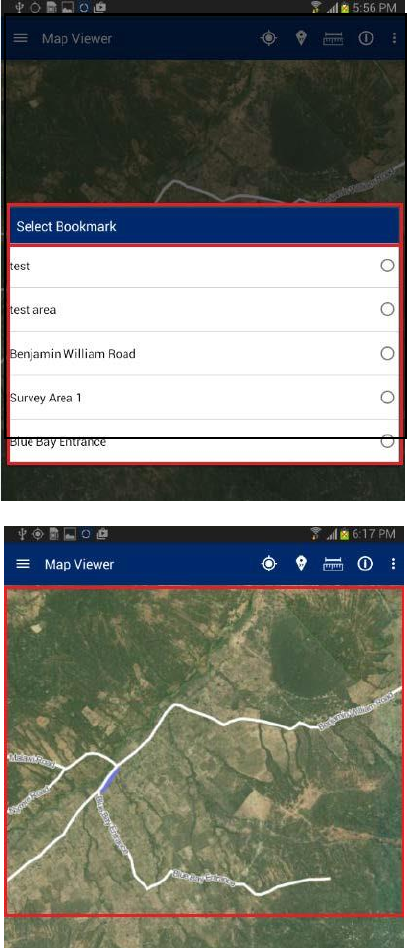
5.6.2 VIEW BOOKMARK
This functionality allows the user to navigate a selected bookmark.
Steps:
1. Click on ‘View Bookmark' option
2. ‘Select Bookmark' dialogue box will be
displayed with list of all bookmarks
available
3. Select required bookmark
4. Map will navigate to the location saved
with selected bookmark
Mobile Application to Social Tenure Pilot Project (MAST)
User Manual for the Mobile Application v.2.2
17
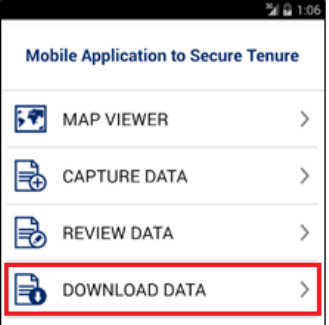
6. DOWNLOAD DATA
This functionality allows the user to download all claims, collected and loaded on the server by para-
surveyors. These claims can be further used for viewing and snapping when creating new claims. If you
open map viewer or start data capturing, all downloaded claims (parcels) will be displayed.
To download data, the mobile device should be in connected mode, i.e. internet should be available in
device.
Steps:
1.
2.
3.
Click on ‘Download Data’ option available in homepage
Application will connect to the remote server and download required data
Once Data Download is completed, an acknowledgement message will be displayed, indicating
its success.
Mobile Application to Social Tenure Pilot Project (MAST)
User Manual for the Mobile Application v.2.2
18
7. DOWNLOAD CONFIG
This functionality allows the user to download configuration information and base data (satellite imagery
and vector data which will be used as reference for the data collection process) on the device. To
download configuration, the mobile device should be in connected mode, i.e. internet should be
available in device.
Steps:
1.
2.
3. Once configuration downloading is finished,
you will get appropriate message.
Click on ‘Download Config’ option available
in homepage.
Application will connect to the remote server
and download required configuration.
Mobile Application to Social Tenure Pilot Project (MAST)
User Manual for the Mobile Application v.2.2
19
8. VERIFY DATA
This functionality allows an Adjudicator user to verify and approve the parcel as completed and synced
by Trusted Intermediaries in the field.
Steps:
1. ‘Adjudicator’ user logs into the application
2. Application will open up homepage of application.
3. Following functionalities are visible:
• Map Viewer
• Verify Data
• Download Data
• Upload Data
• Download Config
• User Preferences
• Logout
4. Click on ‘Verify Data’ option available in Home
page
5. Verify Data form will be displayed with following
lists:
• Pending
• Verified
• Final
8.1 PENDING
The ‘Pending’ list displays all the parcels that are pending verification by the user. The following actions
can be performed on a parcel which is in the pending list:
Steps:
• View Map
• View Attributes
• Mark as Verified
1. Click on ‘Action’ option available with parcel
record in ‘Pending’ list
2. List of available possible actions will be displayed
• View Map
• View Attributes
• Mark as Verified
Mobile Application to Social Tenure Pilot Project (MAST)
User Manual for the Mobile Application v.2.2
20
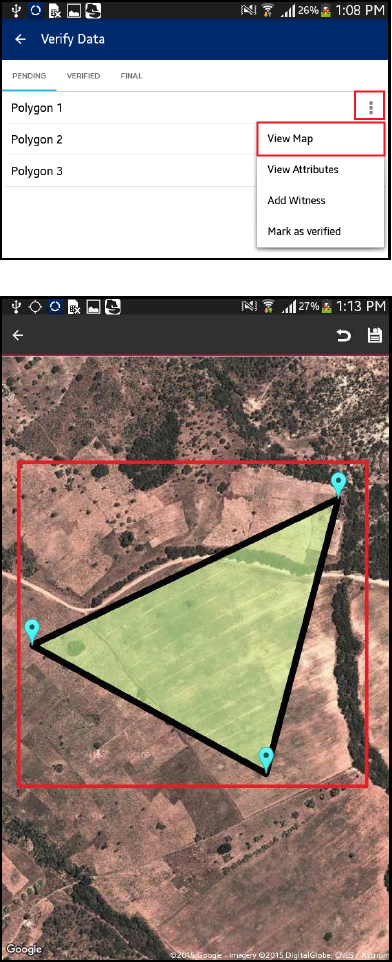
8.1.1 VIEW MAP
This functionality allows the user to edit spatial data.
Steps:
1.
2.
3.
4.
5.
Click on ‘View Map’ option
User will navigate to the map and corresponding
feature will be available in edit mode
Select node/vertices by long pressing the
node/vertices and edit the same
Click on ‘Save’ option
Application will save updated spatial feature
Mobile Application to Social Tenure Pilot Project (MAST)
User Manual for the Mobile Application v.2.2
21
Note: In case feature is not visible, click on back arrow button on left hand top of screen.
Click on Capture Spatial data icon. Application will open up Layer Manager. Switch on
Captured Features layer.
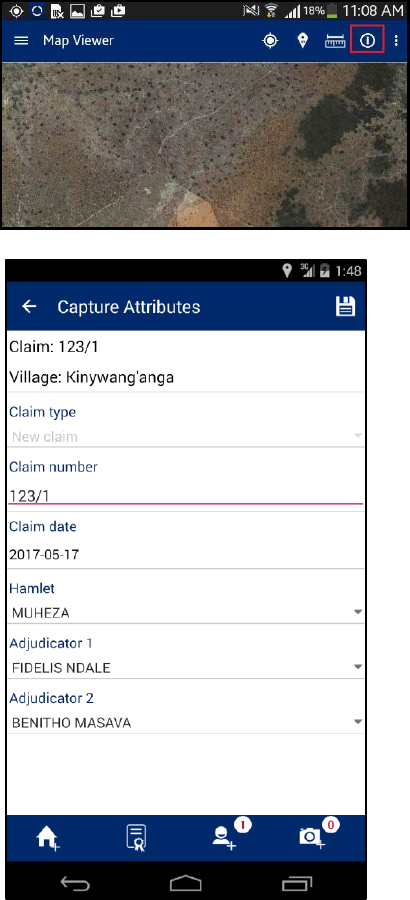
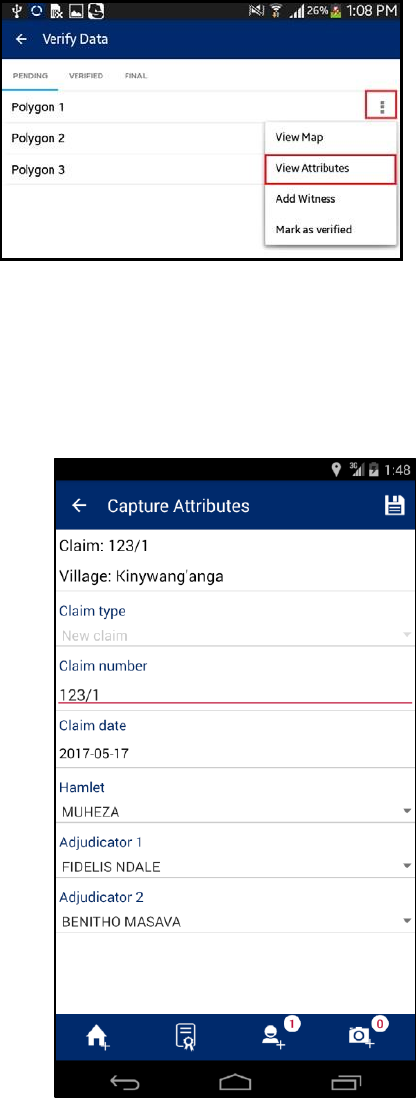
8.1.2 VIEW ATTRIBUTES
This functionality allows the user to view attribute data
of a spatial unit.
Steps:
1. Click on ‘View Attributes’ option
2. The user will navigate to the ‘Capture
Attributes' form and attributes of corresponding
feature will be available in read-only mode
Mobile Application to Social Tenure Pilot Project (MAST)
User Manual for the Mobile Application v.2.2
22
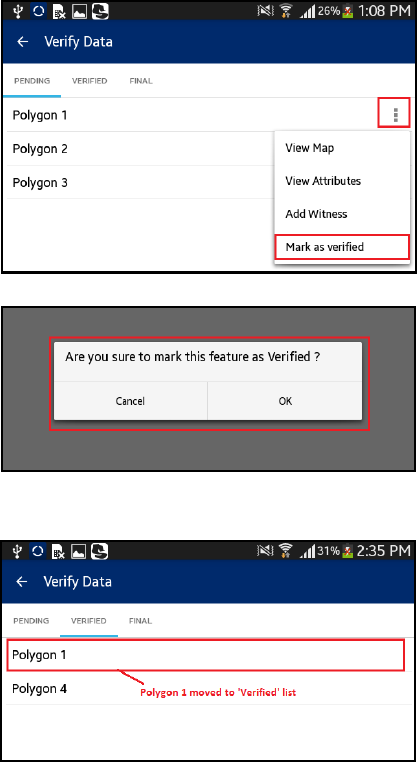
8.1.3 MARK AS VERIFIED
This functionality allows the user to mark a parcel as
`Verified.”
Steps:
1. Click on ‘Mark as Verified’ option
2. Application will display a confirmation message
along with ‘Cancel’ and ‘OK’ button
3. Click on OK button
4. Parcel will be verified. It will be removed from
the ‘Pending’ List and will become available in
the ‘Verified’ List
Mobile Application to Social Tenure Pilot Project (MAST)
User Manual for the Mobile Application v.2.2
23
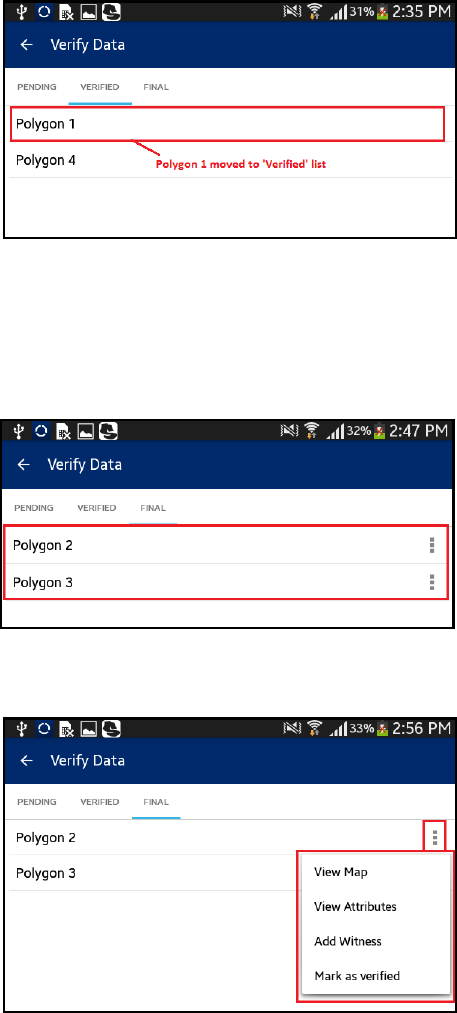
8.2 VERIFIED
‘Verified’ list displays all the parcels that have been marked as verified by the user.
Steps:
1. ‘Adjudicator’ user logs into the application
2. Application will open up homepage of
application
3. User clicks on ‘Verify Data’ option available
in homepage
4. Tap the device
5. 'Verified list' will be displayed
8.3 FINAL
‘Final’ list displays all the parcels that have been marked as final in web application.
Steps:
1. ‘Adjudicator’ user logs into the application
2. Application will open up homepage of
application
3. User clicks on ‘Verify Data’ option available
in homepage
4. Tap the device
5. 'Final list' will be displayed
6. Click on ‘Action’ option available with
parcel record in ‘Final’ list
7. List of available possible actions will be
displayed:
• View Map
• View Attributes
• Mark as Verified
Mobile Application to Social Tenure Pilot Project (MAST)
User Manual for the Mobile Application v.2.2
24
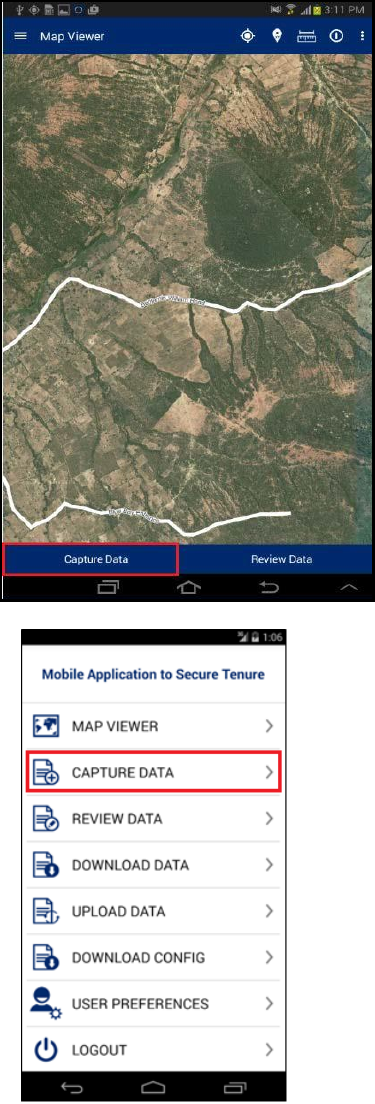
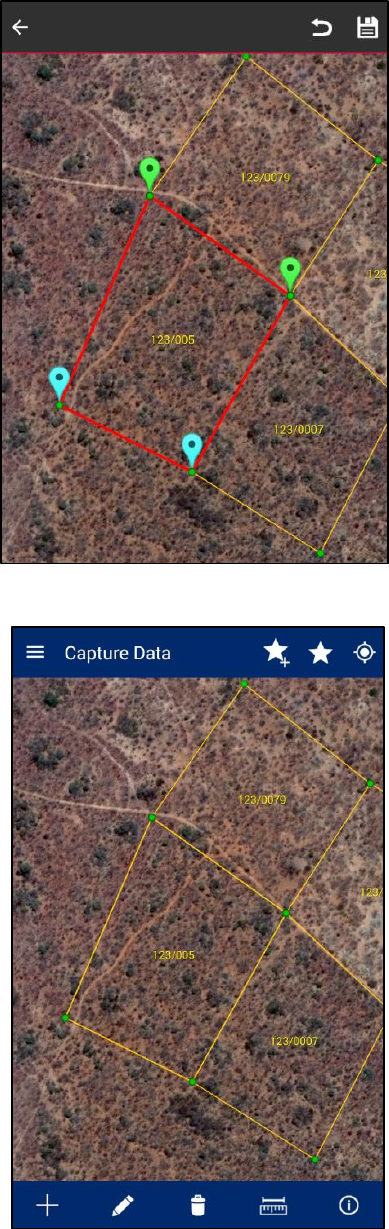
9. CAPTURE DATA
This functionality allows authorized user/s to capture spatial data of parcels on map. This functionality
allows users to: Capture new claims, edit claims, delete claims, measure and view info of selected
feature.
Steps:
1. Click on ‘Capture Data’ button available in Map
Viewer
Note: User can navigate directly to ‘Capture Data’
functionality by clicking on ‘Capture Data’
option available in homepage.
Mobile Application to Social Tenure Pilot Project (MAST)
User Manual for the Mobile Application v.2.2
25
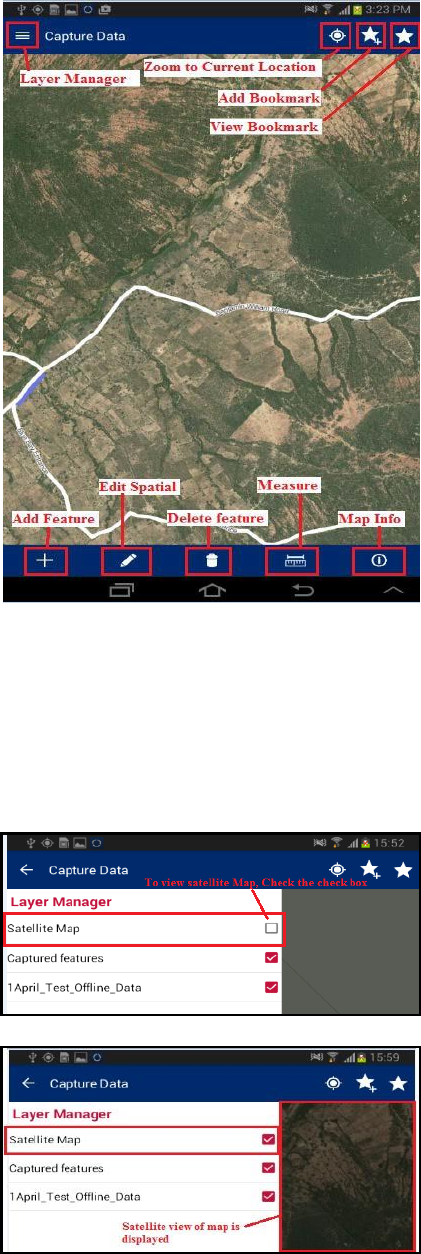
2. Application will open ‘Capture Data’ window.
The following tools are available with the
‘Capture Data’ window:
Layer Manager
Zoom to Current Location
Add Bookmark
View Bookmark
Add Feature
Edit Spatial
Delete Feature
Measure Tool
Map Info
9.1 LAYER MANAGER
This functionality provides the listing of layers configured for the selected project. User can select
On/Off display of a particular layer from the Layer Manager to view on the map.
Steps:
1. Click on `Layer Manager’ option available on
top left
2. Check the ‘Checkbox’ associated with layer
3. Selected layer will become visible on map

Mobile Application to Social Tenure Pilot Project (MAST)
User Manual for the Mobile Application v.2.2
26
9.2 ZOOM TO CURRENT LOCATION
This functionality allows the user to navigate on the map to the current location.
Steps:
1.
2.
Tap on ‘Zoom to current location' option
available on top right
Map will navigate to the current location
Mobile Application to Social Tenure Pilot Project (MAST)
User Manual for the Mobile Application v.2.2
27
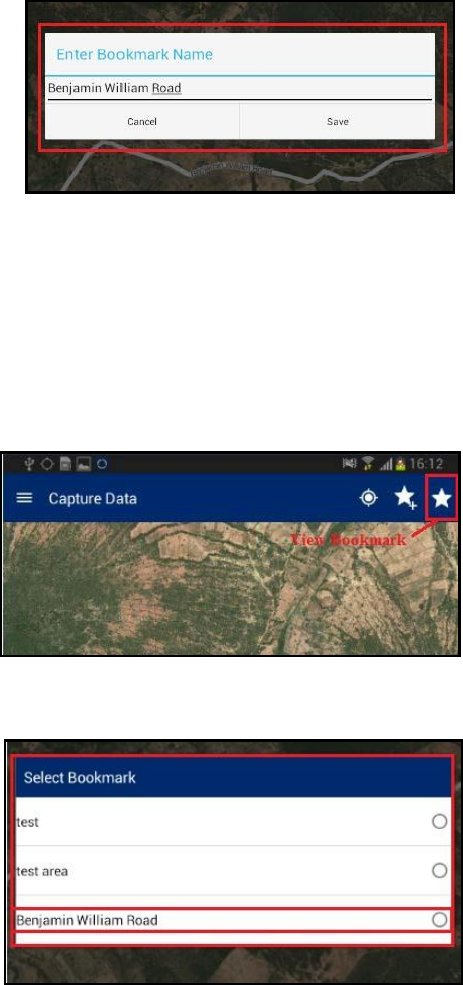
9.3 ADD BOOKMARK
This functionality allows the user to save a particular area of interest of the map canvas for future
reference.
Steps:
1. Tap on ‘Add Bookmark’ option available on
top right
2. ‘Enter Bookmark Name’ dialogue box will be
displayed
3. Enter desired name in input box and click on
‘Save’ button
4. Bookmark will be saved with entered name
and will become available in ‘Select
Bookmark’ dialogue
9.4 VIEW BOOKMARK
This functionality allows the user to navigate to a selected bookmark.
Steps:
1. Tap on ‘View Bookmarks’ option available
on top right
2. ‘Select Bookmark’ dialogue box will be
displayed with list of all bookmarks
available.
3. Select required bookmark
4. Map will navigate to the location saved
with selected bookmark
Mobile Application to Social Tenure Pilot Project (MAST)
User Manual for the Mobile Application v.2.2
28
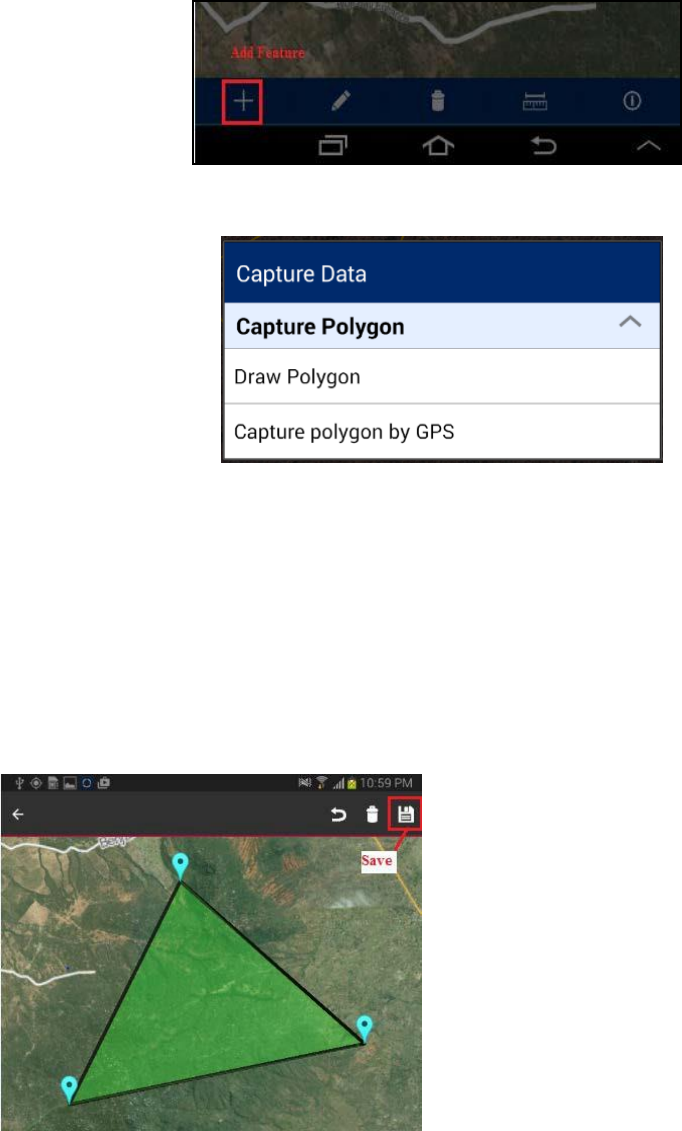
9.5 ADD FEATURE
This functionality provides multiple tools to capture spatial data on the map. These tools are point, line,
and polygon. These features can be created via ‘manual drawing’ or via GPS.
Steps:
1. Tap on ‘Add Feature’ option
available on bottom tool box
2. ‘Capture Data’ dialogue box will
be displayed with following
options:
• Draw Polygon
• Capture polygon by GPS
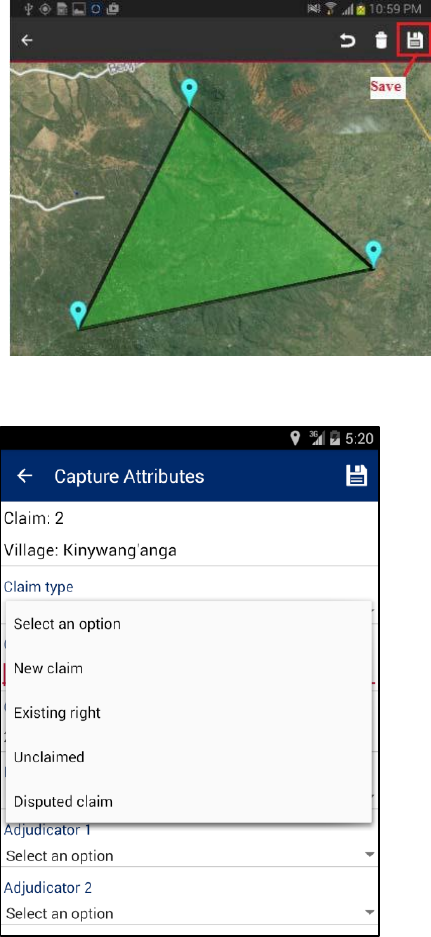
9.5.1 DRAW POLYGON
This functionality allows the user to draw a polygon on the map manually by clicking on desired locations
on the map.
1. Select the option ‘Draw Polygon’
2. Click on map. On first click, first vertex of the polygon will be created
3. Next, click on second, third or more locations on map to create polygon
4. Markers will be placed on clicked locations and polygon will be created
5. Click on ‘Save’ option available on top right
6. Polygon placed on map will be saved and ‘Capture Attribute’ form will be displayed
Mobile Application to Social Tenure Pilot Project (MAST)
User Manual for the Mobile Application v.2.2
29
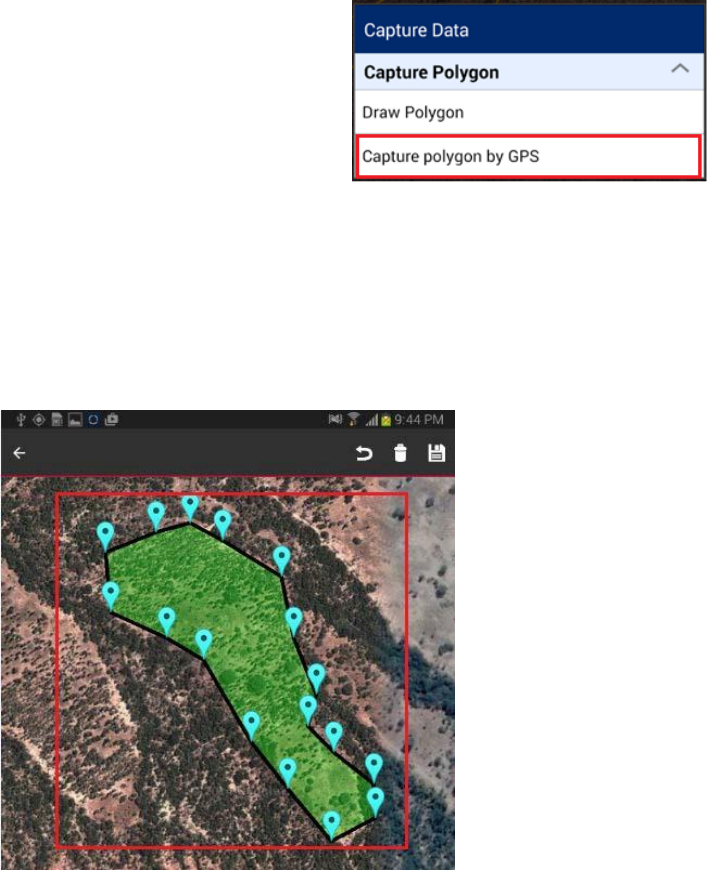
9.5.2 CAPTURE POLYGON BY GPS
This functionality allows the user to draw a polygon covering selected locations using GPS.
1.
2.
3.
4.
5.
6.
7.
8.
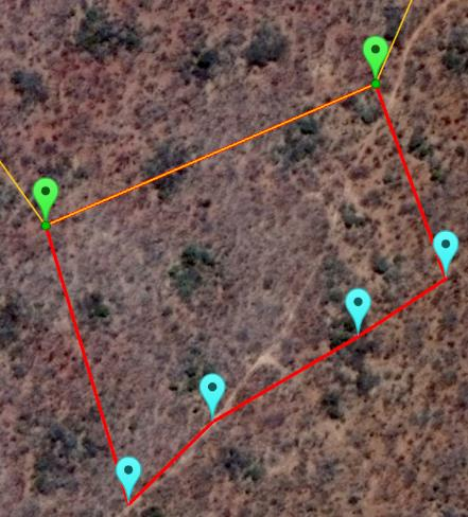
9.5.3 SNAPPING
When drawing new polygon either by using GPS or clicking on the map, snap feature can be used to improve
quality of collected data. By default snapping feature is enabled and parcel vertices will be displayed, helping
with snapping. Snapping settings and labeling can be customized in the User Preferences menu, available on the
homepage screen. In order to snap to the neighbor parcel, follow these steps:
1. Long press on the marker of the captured polygon
2. Drag the marker to the neighbor parcel vertex or line
3. The marker will become green, indicating that it is snapped
Select the option ‘Capture Polygon by GPS’
Click on ‘Plot point by GPS’ option available on top
left
Marker will be placed on current location using GPS
Move the device to second location and click on
‘Plot point by GPS’
Marker on second location will be placed on current
location using GPS
Move the device to third or more locations and
click on ‘Plot point by GPS’
Marker will be placed on current location using GPS
and a polygon will be created
Click on `Save’ option available on top right
Polygon placed on map will be saved and ‘Capture
Attribute’ form will be displayed
Mobile Application to Social Tenure Pilot Project (MAST)
User Manual for the Mobile Application v.2.2
30
Note: If you want to see neighbor parcel vertices (green points), you have to zoom in closer.
Vertices will appear automatically, after certain zoom level. Vertices labeling have to be enabled
as well (Map Settings of User Preferences).
Mobile Application to Social Tenure Pilot Project (MAST)
User Manual for the Mobile Application v.2.2
31
9.6 CAPTURE ATTRIBUTES
Once spatial data is captured on the map, the user will be able to capture attributes and multimedia data for
the spatial unit. Attributes that will be captured are configurable by the mobile configuration tool of the web
application.
After creating the spatial data, a user clicks on the ‘Save’ option available on top left of screen.
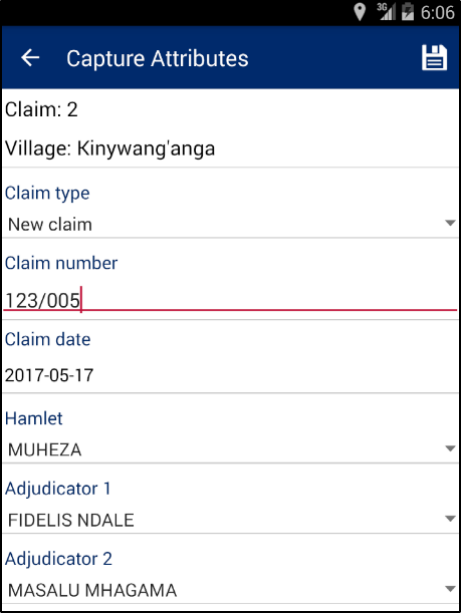
After saving spatial data, Capture Attributes scree will appear, where user have to select the type of claim
he/she wants to capture and provide other attributes.
The application allows capturing the following types of claim:
1 New claim – Most common type of claim, where new CCRO right will be registered.
2 Existing right – Any existing ownership right, discovered in the field. This type of claim will be
further checked and verified by DLO. If information is correct, it will be included into the database
as a digital record.
Mobile Application to Social Tenure Pilot Project (MAST)
User Manual for the Mobile Application v.2.2
32
3 Unclaimed – Parcels, where no ownership rights were found, but the parcel can be clearly
identified. Later this parcel can be claimed, but for the time being stays as unclaimed on the map.
4 Disputed claim – If any dispute discovered, it can be captured during field work.
Depending on the select type of claim, first screen and the following screens will look differently.
9.6.1 New Claim
1. After selecting ‘New claim’ on the first screen, the following fields have to be filled in/selected:
a. Claim number – Manually assigned claim number. This number is written on the paper receipt,
issued to the claimant for further reference to the claim. This number must be unique.
b. Claim date – The date when claim was captured.
c. Hamlet – Hamlet name, where claim is captured.
d. Adjudicator 1 – Name of first adjudicator.
e. Adjudicator 2 – Name of second adjudicator.
After finishing click on ‘Save’ option to proceed to Add Property Info screen.
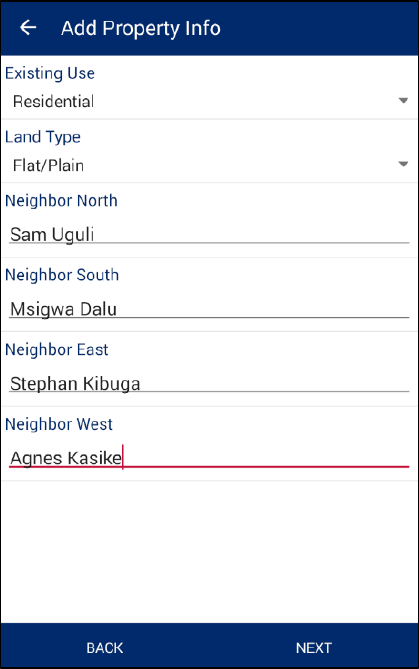
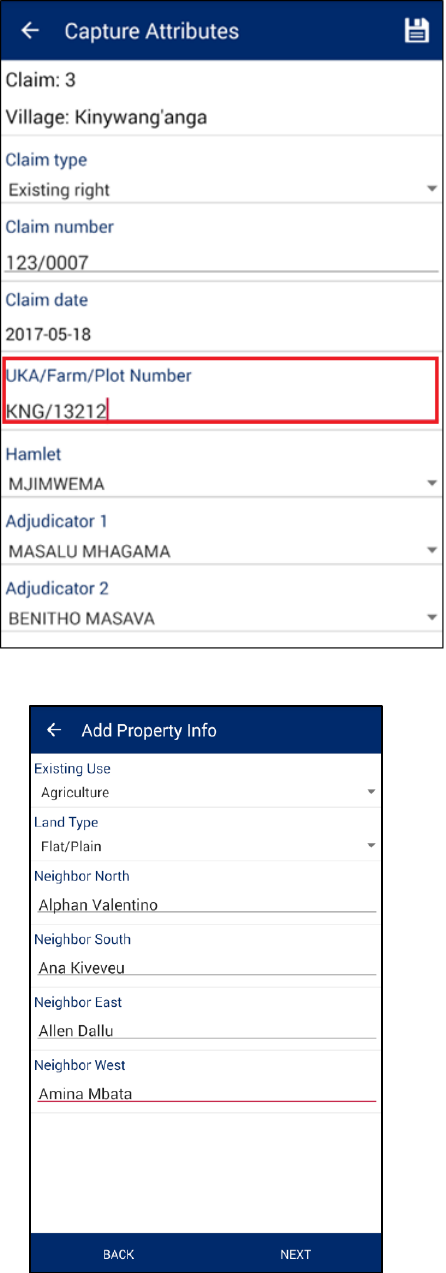
2. On the ‘Add Property Info’ screen, you have to provide the
following information:
a. Existing Use – Existing land use
b. Land Type – Type of land
c. Neighbor North – Name of neighbor from north side
d. Neighbor South – Name of neighbor from south side
Mobile Application to Social Tenure Pilot Project (MAST)
User Manual for the Mobile Application v.2.2
33
e. Neighbor East – Name of neighbor from east side
f. Neighbor West – Name of neighbor from west side
Once the data is entered, the user will then click on the ‘Next’ button. The application will save the
property information and the ‘Add Social Tenure’ screen will be shown.
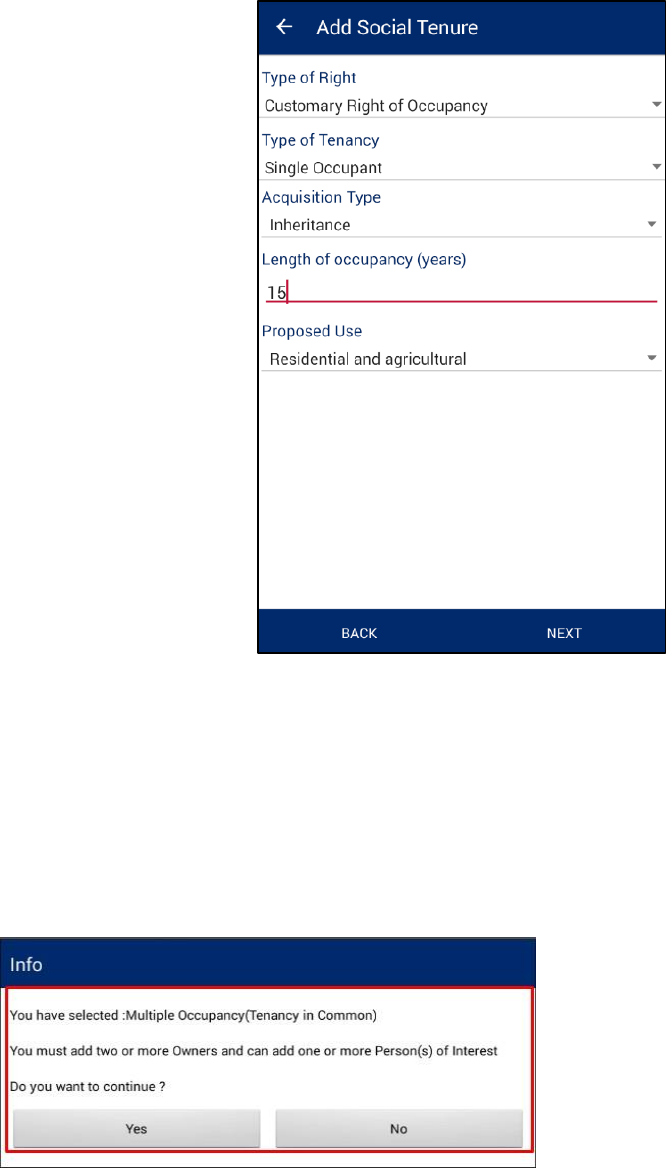
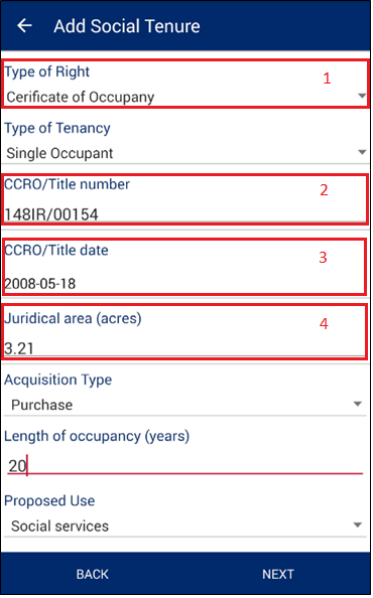
3. On the ‘Add Social Tenure’ screen, the following details have to be provided:
a. Type of Right – Captured type of right. For new Claims only ‘Customary Right of Occupancy’ is
available. For Existing rights, ‘Certificate of Occupancy’ is available as well.
b. Type of Tenancy – Sometimes called as share type and defines ownership structure (single,
multiple, etc).
c. Acquisition Type – The way an owner got this land.
d. Length of Occupancy – Number of year an owner occupies/owns this land.
e. Proposed Use – Proposed land use type.
Mobile Application to Social Tenure Pilot Project (MAST)
User Manual for the Mobile Application v.2.2
34
After providing all required information, user have to click ‘Next’ button to proceed to the next
screen for capturing owner(s) details. Depending on the selected Type of Tenancy, different screen will
be opened for capturing owners as well as different rules applied. There are 6 main types available for
selection:
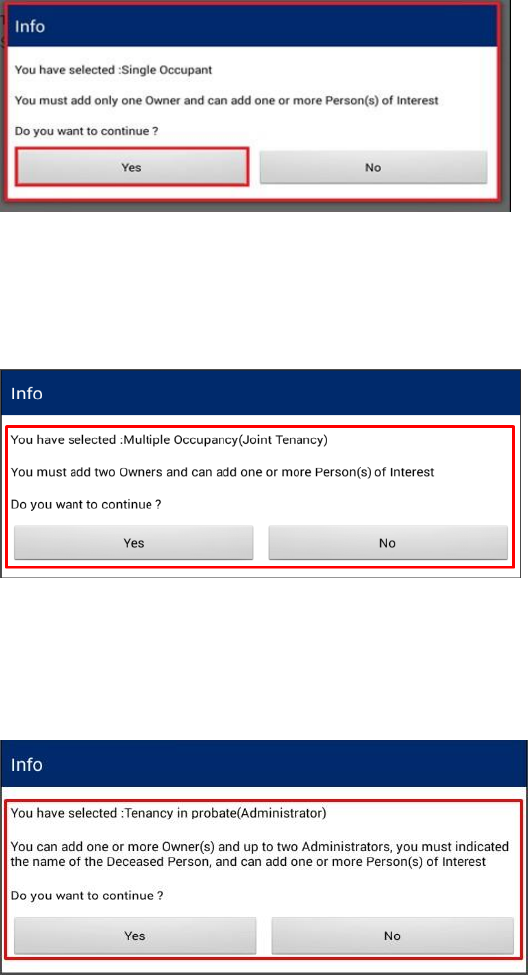
- Multiple Occupancy (Tenancy in Common): If the user selects this tenure type and saves the
form, then the user will be prompted to add users in the Add Person form. The user will be required
to add two or more “Owners” and there can add one or more “Person(s) of Interest”.
Mobile Application to Social Tenure Pilot Project (MAST)
User Manual for the Mobile Application
44
- Single Occupant: If the user selects this type of tenure, and saves the form, then the user will be
prompted to add users in the Add Person form. In this case, the user will be required to add only
one “Owner” and will have the possibility to add one or more “Person(s) of Interest”.
- Multiple Occupancy (Joint Tenancy): If the user selects this tenure type, then the user will be
prompted to add users in the Add Person form. In the Add Person form, the user will be required
to add two “Owners” and may add one or more “Person(s) of Interest.”
- Tenancy in Probate (Administrator): If the user selects this tenure type, then in the Add
Person form the user will be required to add one or more “Owner(s)”. Based on the tenure
selection, the user may and up to two “Administrators” and will also need to indicate the name of
the “Deceased Person”. The user can also add one or more “Person(s) of Interest.”
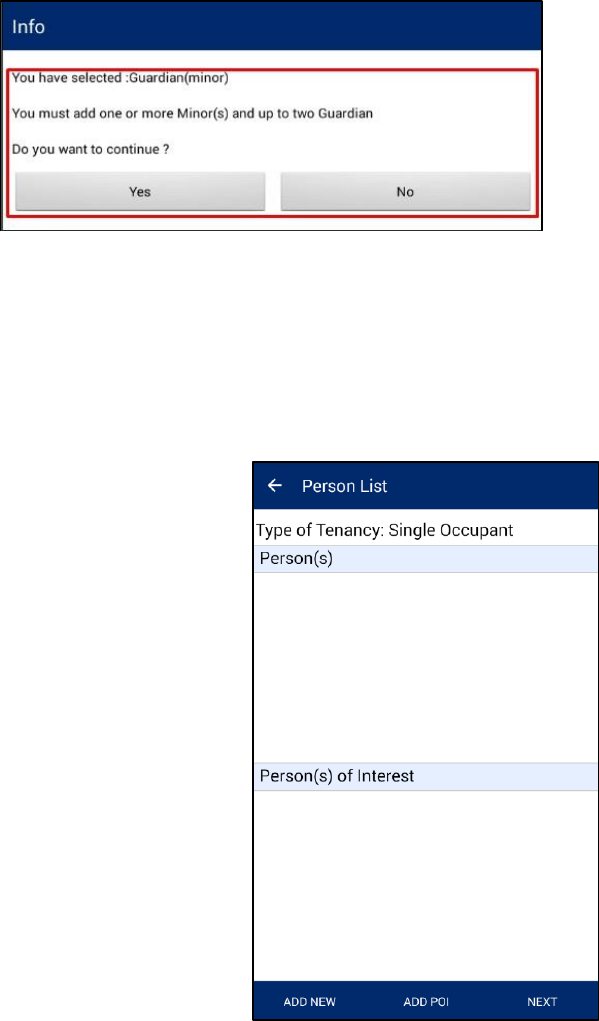
- Guardian (Minor): If the user selects this tenure type, then the user will be prompted to add
users in the Add Person form. The user will be required to add one or more “Minor” and up to two
“Guardian”.
Mobile Application to Social Tenure Pilot Project (MAST)
User Manual for the Mobile Application
45
- Non-Natural/Institution: If the user selects this tenure type, no info messages will be displayed
and next screen will guide/control you about what information have to be provided.
Note: It is mandatory to add photo for Owner, Administrator and Guardian.
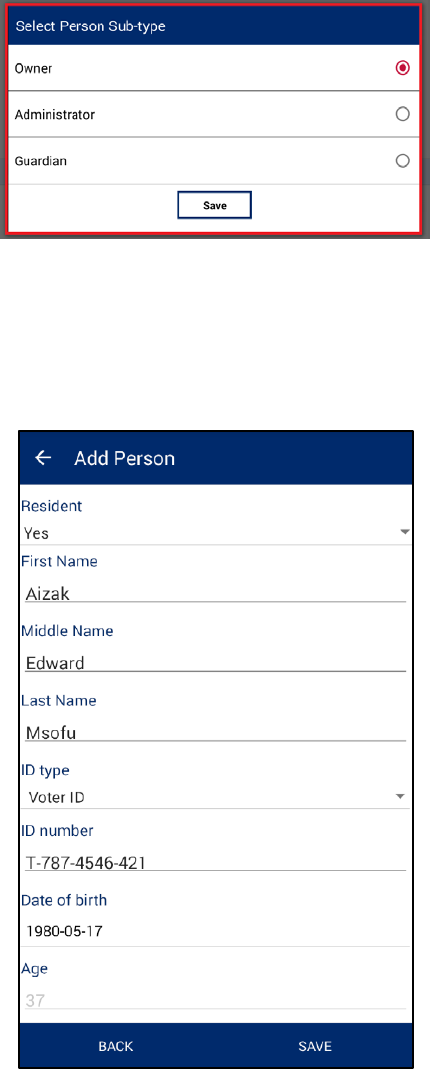
Based on tenancy type the user has selected, the user will be required to provide inputs available in
‘Person List’ form.
Follow the steps below to add persons and person of interest:
1. Click ’Add New’ button to add person.
2. Select person type and click ‘Save’
Mobile Application to Social Tenure Pilot Project (MAST)
User Manual for the Mobile Application
46
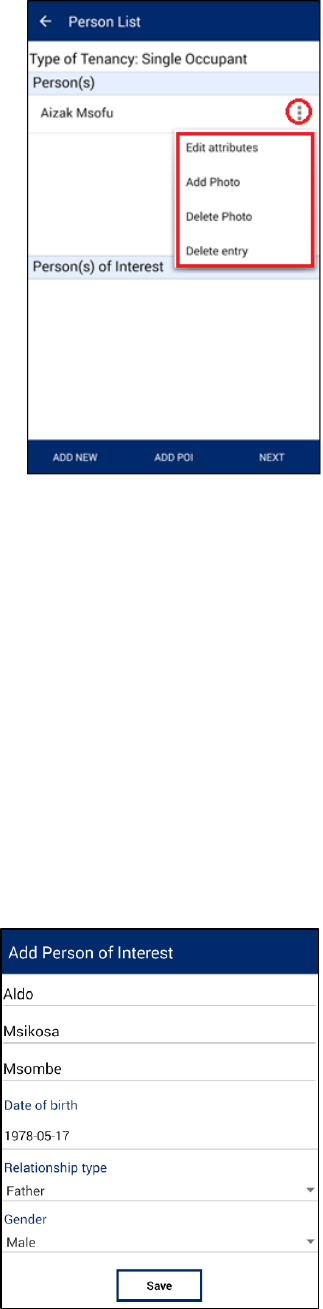
3. Click on ‘Add New’ button, ‘Person Sub-type’ dialogue will be displayed. Select the required option
and click on ‘Save’ button.
4. ‘Add Person’ form will be displayed. User will enter the desired attributes and click on ‘Save’
button.
5. Personal details will be saved and details will become available in corresponding section.
Mobile Application to Social Tenure Pilot Project (MAST)
User Manual for the Mobile Application
47
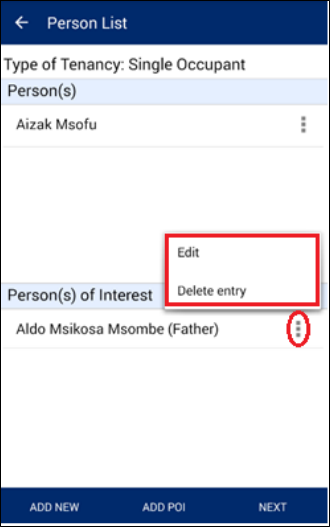
6. Click on option associated with record available in Person(s) section. The following options will be
available:
a. Edit Attribute
b. Add Photo
c. Delete Photo
d. Delete entry
Note:
- Edit Attribute: ‘Edit Attribute’ option will enable user to edit the current details of person.
- Add Photo: ‘Add Photo’ will enable user to take a photo of the person and associate it with
details.
- Delete Photo: ‘Delete Photo’ will enable the user to delete an existing photo.
- Delete entry: ‘Delete Entry’ will enable user to delete the person’s details.
7. Click on ‘Add POI’ button. ‘Add Person of Interest’ dialogue will be displayed. Provide the
required details and click on ‘Save’ button.
Mobile Application to Social Tenure Pilot Project (MAST)
User Manual for the Mobile Application
48
Note: Only first, last and middle name are required. Date of birth, relationship type and gender fields
can be omitted.
8. Details of ‘Person of Interest’ will be saved and details will become available in corresponding
section.
9. Click on option associated with record available in ‘Person(s) of Interest’ section, following options
will be available:
- Edit. ‘Edit’ option will enable user to edit the current details of the person of interest.
- Delete Entry. ‘Delete Entry’ will enable user to delete the person’s details.
10. Once you’ve finished with adding persons and persons of interest, click ‘Next’ button to proceed to
the ‘Multimedia List’ screen.
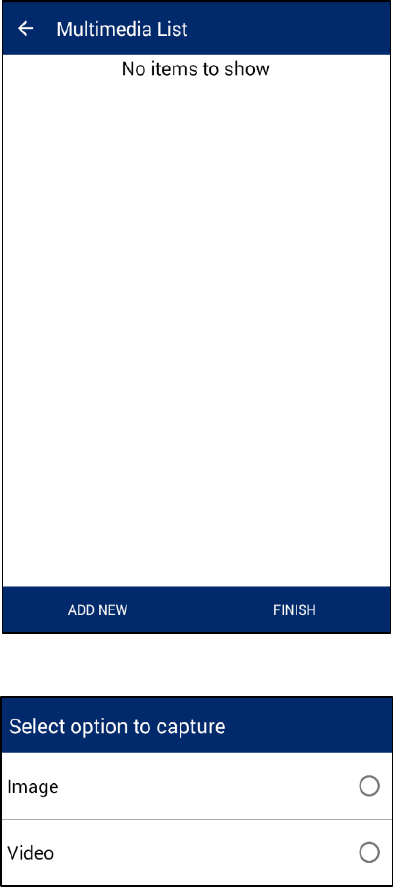
11. On the ‘Multimedia List’ screen you can add different types of documents, supporting this claim.
Documents are added by taking their photo and providing additional information. The most
common case is to take picture of the claimant’s ID. Nevertheless, multimedia list is an optional and
can be skipped.
Mobile Application to Social Tenure Pilot Project (MAST)
User Manual for the Mobile Application
49
12. For adding new document, click ‘Add New’ button and select ‘Image’ option.
13. You camera will be automatically activated for taking snapshots. Take a picture of a document and
click accept button (V).
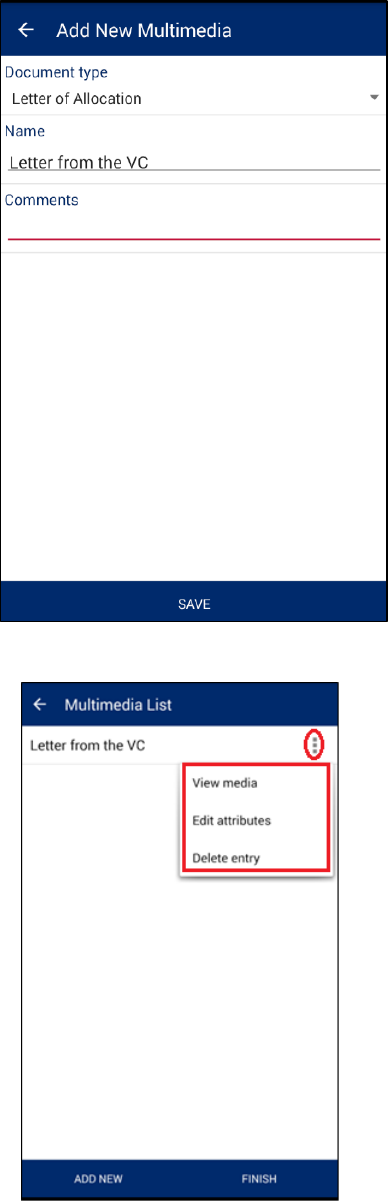
14. New screen will appear to provide document description. You can provide the following
information:
a. Document type
b. Name
c. Comments.
You are required to select at least document type.
Mobile Application to Social Tenure Pilot Project (MAST)
User Manual for the Mobile Application
50
15. After you’ve entered document description, click ‘Save’ button to save it into multimedia list.
16. By clicking on the options button (…) you can review document, edit its attributes or delete it.
17. In order to finalize capturing new claim, click ‘Finish’ button.
Mobile Application to Social Tenure Pilot Project (MAST)
User Manual for the Mobile Application
51
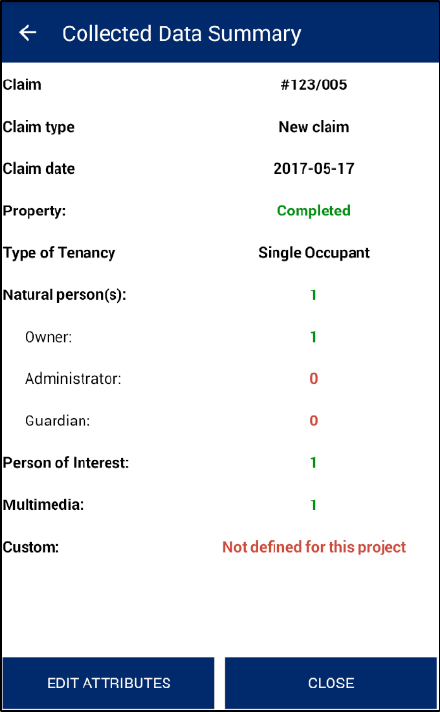
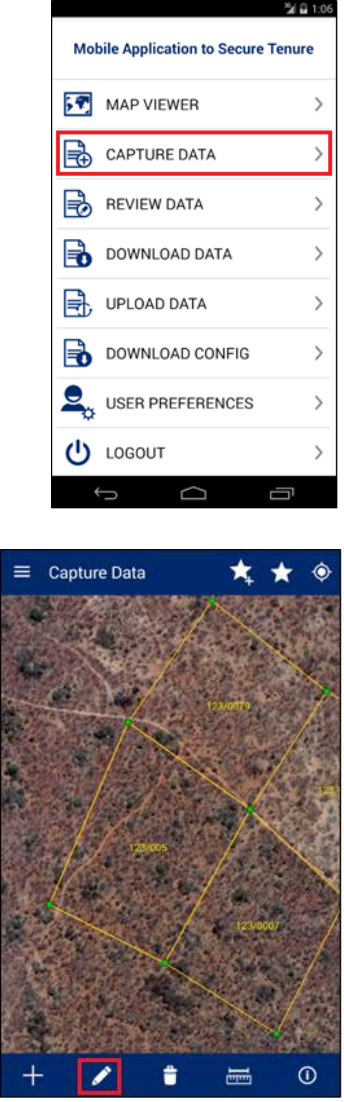
18. If custom attributes were defined for specific project, next screen will show the list of additional
attributes, which have to be provided, otherwise you will get on the summary screen. On the final
screen you can review summary information and either close it by clicking ‘Close’ button or come
back to editing attributes by clicking ‘Edit Attributes’ button.
9.6.2 Existing Right
Capturing existing right claims is very similar to the capturing new claims. Few extra fields will be needed
for existing rights. Follow the steps bellow to complete existing rights capturing:
1. Start data capturing as described in 9.5
2. Upon saving demarcated parcel, ‘Capture Attributes’ screen will popup.
3. Select ‘Existing Right’ option from the dropdown list of claim types.
4. Apart from the fields, you fill in for new claims, there will be one more field, you have to provide -
‘UKA/Farm/Plot Number’. Depending on the type of existing right, it can be UKA number, Farm
number of Plot Number.
Mobile Application to Social Tenure Pilot Project (MAST)
User Manual for the Mobile Application
52
5. Click ‘Save’ icon to proceed to ‘Add Property Info’ screen, which has no difference to the new
claim capturing. Refer to the section 9.6.1 for more details.
6. Click ‘Next’ button to go to ‘Add Social Tenure’ screen. On this screen, compared to the new
Mobile Application to Social Tenure Pilot Project (MAST)
User Manual for the Mobile Application
53
claim capturing, you can select different type of right and you have to provide the following extra
details:
a) CCRO/Title number – Registered CCRO or title number of existing right.
b) CCRO/Title date – Date when CCRO or title was registered.
c) Juridical area – Juridical area of the parcel, written in the CCRO or title.
7. After providing all required data, click ‘Next’ button to capture person details.
8. Refer to the section 9.6.1 for more details on ‘Persons List’ screen and the following ‘Multimedia
List’.
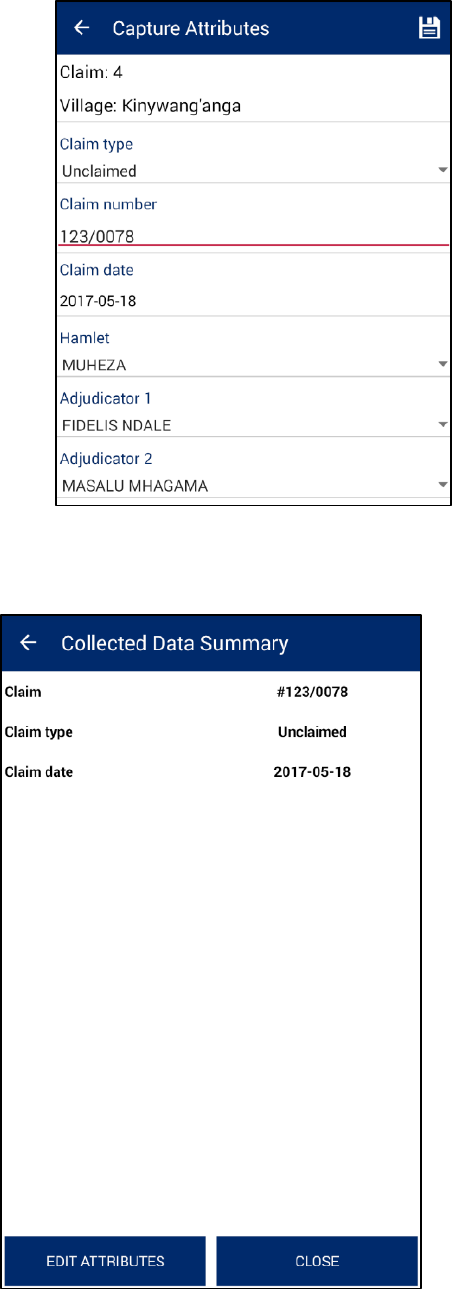
9.6.3 Unclaimed
Unclaimed parcel is the simplest type of claim and doesn’t require providing most of the fields. Follow the
steps bellow to capture Unclaimed:
1. Start data capturing as described in 9.5
2. Upon saving demarcated parcel, ‘Capture Attributes’ screen will popup.
3. Select ‘Unclaimed’ in the ‘Claim type’ field and fill in/select other fields.
Mobile Application to Social Tenure Pilot Project (MAST)
User Manual for the Mobile Application
54
4. Click ‘Save’ icon to finalize claim. No other details are needed and you will get on the summary
screen.
Mobile Application to Social Tenure Pilot Project (MAST)
User Manual for the Mobile Application
55
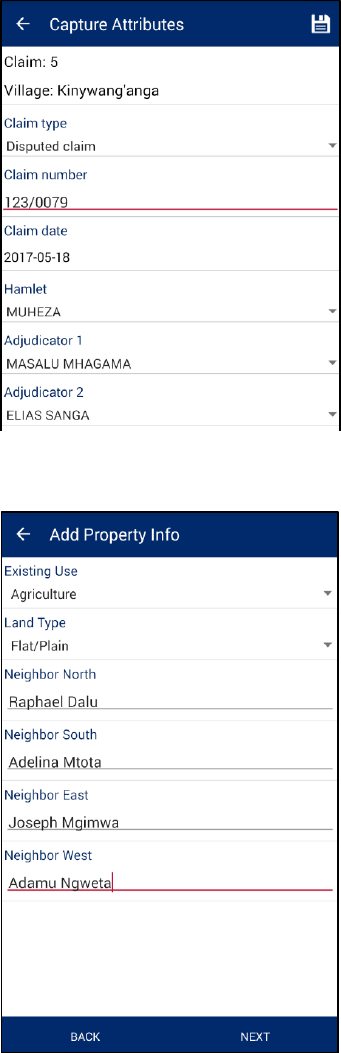
9.6.4 Disputed Claim
Disputed claim type allows you to register different types of disputes, found during the field work.
Complete the following steps to register new dispute:
1. Start data capturing as described in 9.5
2. Upon saving demarcated parcel, ‘Capture Attributes’ screen will popup.
3. Select ‘Disputed claim’ in the ‘Claim type’ field and fill in/select other fields.
9. Click ‘Save’ icon to proceed to ‘Add Property Info’ screen, which has no difference to the new
claim capturing. Refer to the section 9.6.1 for more details.
Mobile Application to Social Tenure Pilot Project (MAST)
User Manual for the Mobile Application
56
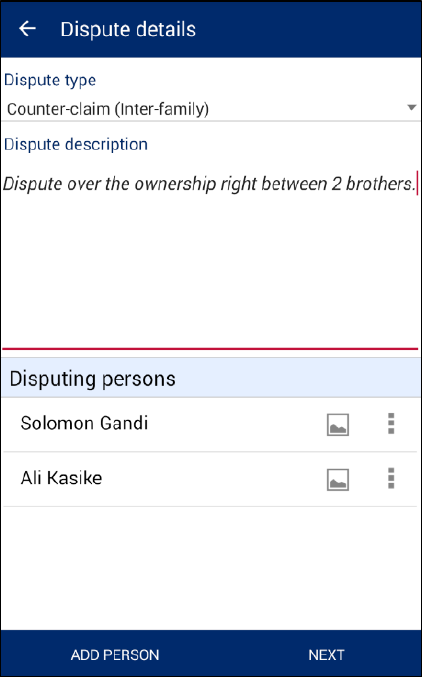
4. Once property information is provided, click ‘Next’ button to go to the ‘Dispute Details’ screen.
5. On the ‘Dispute Details’ screen you have to provide the following information:
a) Dispute type
b) Dispute description
c) Disputants (at least 2)
6. Use ‘Add Person’ button to add disputants. Comparing to the other ‘Add Person’ screens, you will
have to provide one more extra field - ‘Acquisition Type’.
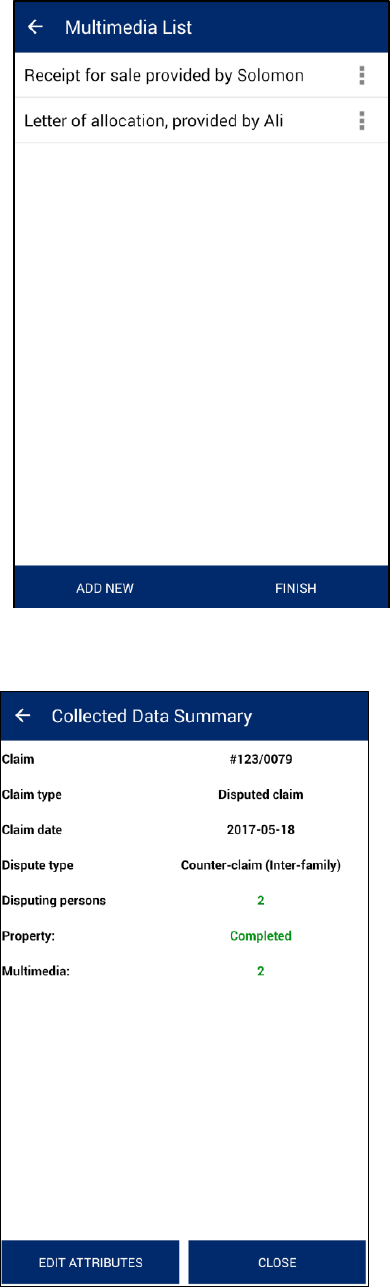
7. After you have provided dispute details, click ‘Next’ button to go to the ‘Multimedia List’ screen.
8. On the ‘Multimedia List’ screen you can add any optional evidences (documents), confirming
disputants’ rights. Refer to the section 9.6.1 for more details on adding documents.
Mobile Application to Social Tenure Pilot Project (MAST)
User Manual for the Mobile Application
57
9. Click ‘Finish’ button to finalize capturing the dispute.
Mobile Application to Social Tenure Pilot Project (MAST)
User Manual for the Mobile Application
58
8.7 EDIT SPATIAL
This functionality allows the user to edit spatial data which
has already been captured by the user.
Steps:
1. Click on ‘Capture Data’ option available on home
page
2. Navigate to parcel which is being edited
3. Click on ‘Edit Spatial’ data icon
4. Click on feature to be edited
Mobile Application to Social Tenure Pilot Project (MAST)
User Manual for the Mobile Application
59
5. Application will show nodes/vertices in editable
format
6. Select node/vertices by long pressing the
node/vertices and move these
7. You can use snapping feature to snap to
the neighbor parcel vertices and lines.
When edited vertex get snapped, it will
be displayed in green color.
8. Click on ‘Save’ on right top
9. Application will save updated spatial features and an
acknowledgement message will display
Note: In case feature is not visible, click on back arrow
button on left hand top of screen. Click on
‘Capture Spatial’ data icon. Application will open up
Layer Manager. Switch on the Captured Features layer.
Mobile Application to Social Tenure Pilot Project (MAST)
User Manual for the Mobile Application
60
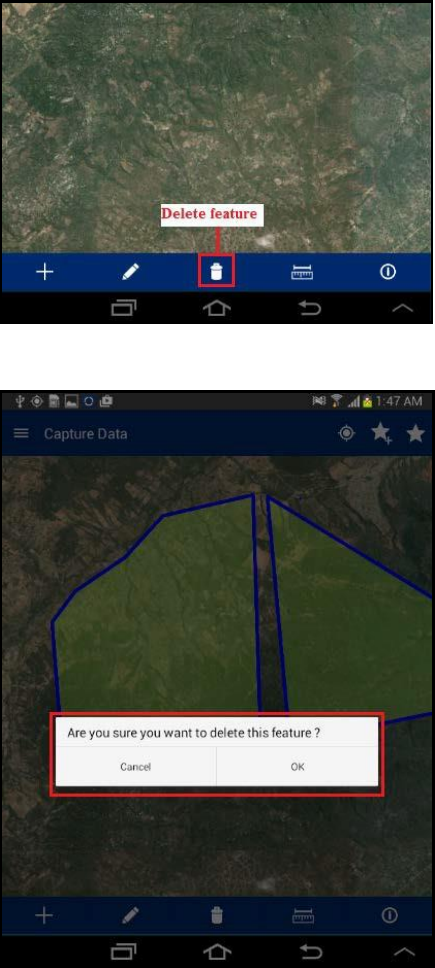
8.8 DELETE FEATURE
This functionality allows the user to delete spatial data.
Steps:
1.
2.
3.
4.
Click on Delete icon
Click on the created spatial feature
The application will display a confirmation
message to the user: “Are you sure you want
to delete this feature?” with ‘Ok’ and ‘Cancel’
option
Click on ‘Ok’ button
Mobile Application to Social Tenure Pilot Project (MAST)
User Manual for the Mobile Application
61
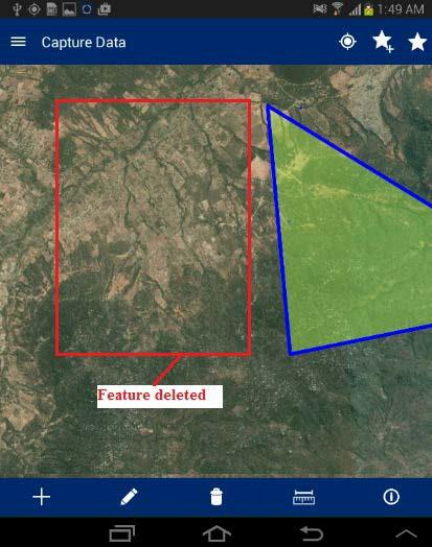
5.
Application will delete the selected feature and
same will not be visible in the map
Mobile Application to Social Tenure Pilot Project (MAST)
User Manual for the Mobile Application
62
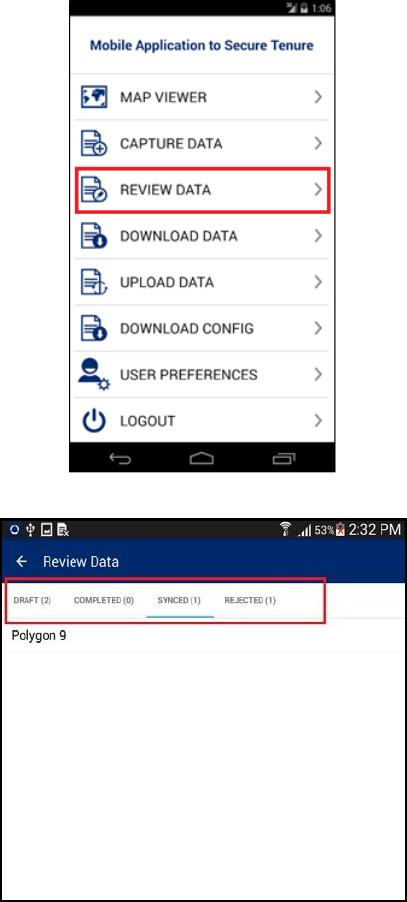
9. REVIEW DATA
This functionality allows the user to view the data
collected in the field for review and finalization. This also
allows the user to Edit Special, Edit Attribute, Delete
Entry or mark a parcel as Complete.
Steps:
1. Click on ‘Review Data‘ option available on
Home page
2. ‘Review Data’ form will be displayed with
following lists
• Draft – Parcels that are not marked as
complete will be listed in ‘Draft’ list
• Completed – Parcels that are marked as
complete will be listed in ‘Completed’ list
• Synced – Parcels that have been synced will
be listed in ‘Synced’ list
• Rejected – Parcels that are rejected from
the back-end web application, will be listed
in the ‘Rejected’ list
Mobile Application to Social Tenure Pilot Project (MAST)
User Manual for the Mobile Application
63
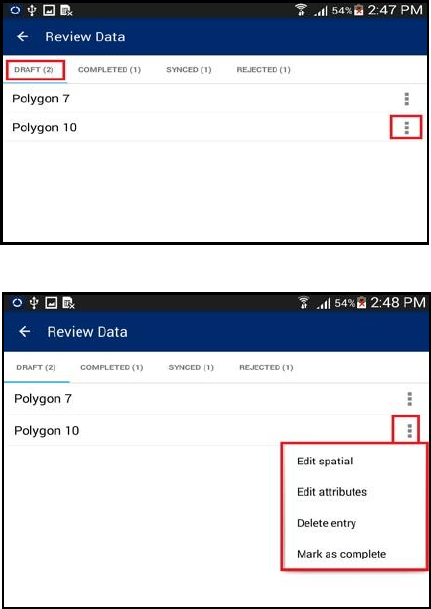
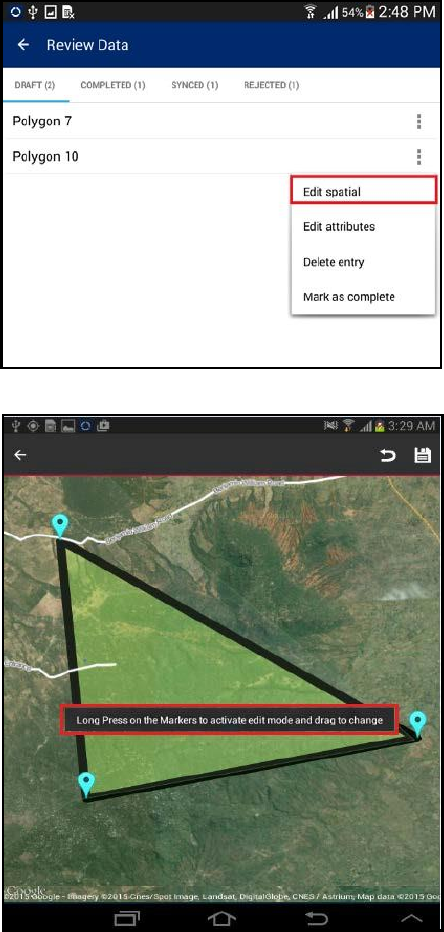
9.1 DRAFT LIST
A parcel that is not marked as completed will be listed in ‘Draft’ list. The user can perform the following
actions on parcels available in Draft List:
• Edit Spatial
• Edit Attribute
• Delete Entry
• Mark as Complete
Steps:
1.
2.
Click on the ‘Action’ option available with the
parcel record in the ‘Draft List’
A list of available possible actions will be
displayed
Mobile Application to Social Tenure Pilot Project (MAST)
User Manual for the Mobile Application
64
9.1.1 EDIT SPATIAL
This functionality allows the user to perform editing on spatial data.
Steps:
1.
2.
3.
4.
5.
Note: In case feature is not visible, click on back arrow button on left hand top of screen. Click on
Capture Spatial data icon. Application will open up Layer Manager. Switch on Captured Features layer.
Select the ‘Edit Spatial’ option
User will navigate to map and the
corresponding feature will be available in
edit mode.
Select node/vertices by long pressing the
node/vertices and move the same.
Click on ‘Save’ option
Application will save updated spatial feature.
Mobile Application to Social Tenure Pilot Project (MAST)
User Manual for the Mobile Application
65
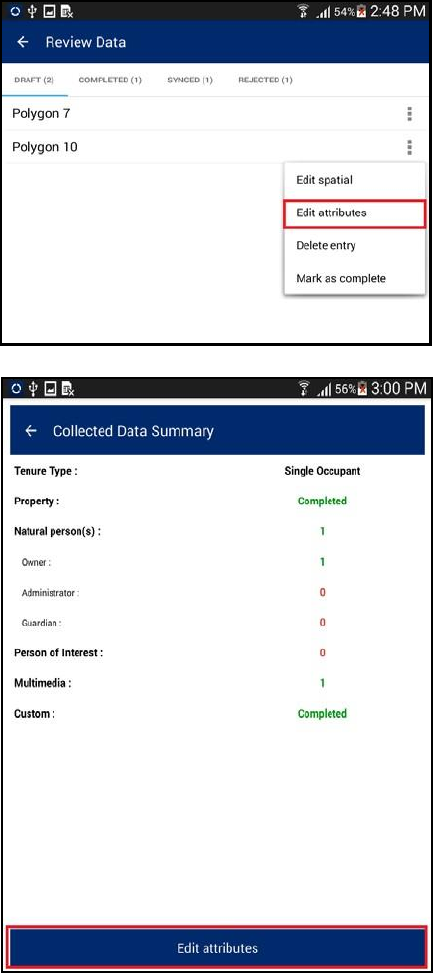
9.1.2 EDIT ATTRIBUTE
This functionality allows the user to edit attribute data for the spatial unit.
Steps:
1.
2.
Click on ‘Edit Attribute’ option
User will navigate to ‘Collected Data
Summary’ form. This will display the
summarized details of the survey. There will
be a button ‘Edit Attribute’
Mobile Application to Social Tenure Pilot Project (MAST)
User Manual for the Mobile Application
66
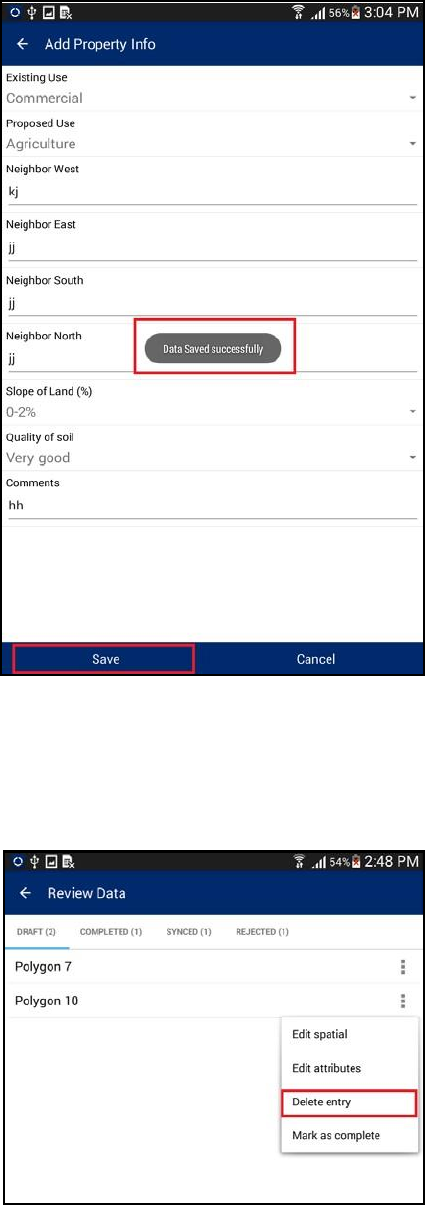
3. Click on ‘Edit Attribute’ button
4. User will navigate to ‘Capture Attribute’ form
and attributes of corresponding feature will be
available in edit mode
5. Edit required attributes
6. Click on ‘Save’ option
7. Application will save updated attribute details
and an acknowledge message will be displayed
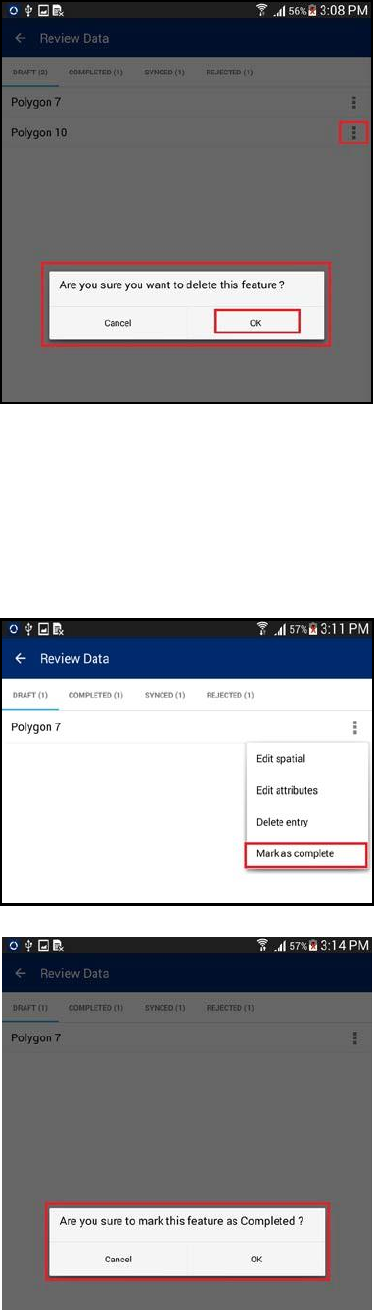
9.1.3 DELETE ENTRY
This functionality allows the user to delete a spatial unit along with all of its attribute data.
Steps:
1. Click on ‘Delete Entry’ option
2. Application will display a confirmation message along with ‘Cancel’ and ‘OK’ button
Mobile Application to Social Tenure Pilot Project (MAST)
User Manual for the Mobile Application
67
3. Click on ‘OK’ button
4. Corresponding feature along with its attribute
details will be deleted
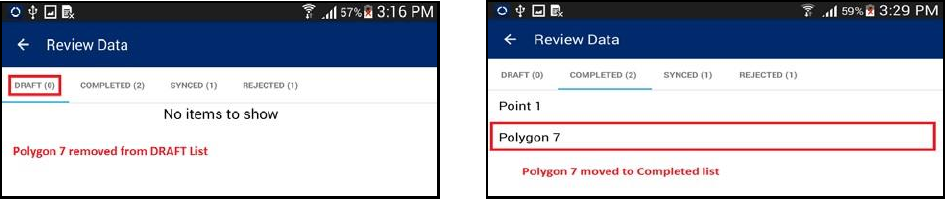
9.1.4 MARK AS COMPLETE
This functionality allows the user to mark a parcel complete. Once a parcel is completed it can be
synchronized.
Steps:
1. Click on ‘Mark as Complete’ option
2. Application will display a confirmation message along
with ‘Cancel’ and ‘OK’ button
3. Click on OK button
Mobile Application to Social Tenure Pilot Project (MAST)
User Manual for the Mobile Application
68
4. Parcel will be completed. It will be removed from ‘Draft’ List and will become available in the
‘Completed’ List
Mobile Application to Social Tenure Pilot Project (MAST)
User Manual for the Mobile Application
69
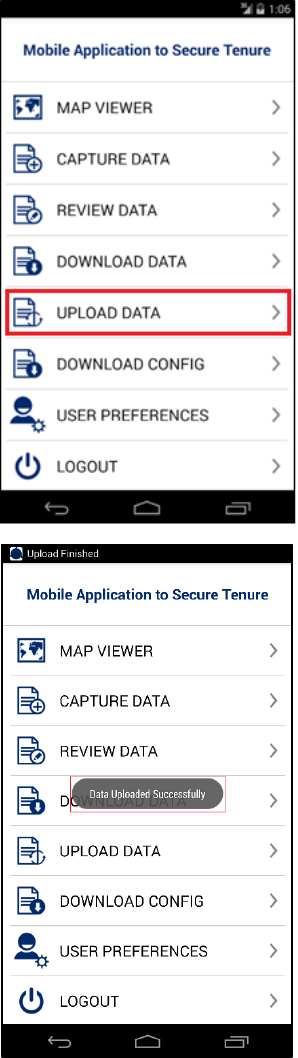
10. UPLOAD DATA
This functionality allows the user to submit completed and verified data to the back-end cloud server.
Steps:
1. Click on the ‘Upload Data’ option available on
the Home page
2. Application will connect to the remote server to
upload data
3. Once Data uploading is completed, an
acknowledgement message will be displayed
Mobile Application to Social Tenure Pilot Project (MAST)
User Manual for the Mobile Application
70
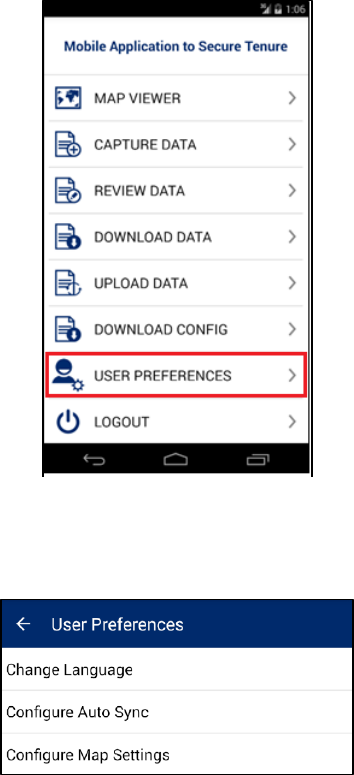
11. USER PREFERENCES
This functionality allows the user to change settings for the MAST mobile application. This functionality
also allows the user to change default language, configure data collection tools, configure sync up and
map display.
Steps:
1. Click on ‘User Preferences' option available on the Home page.
2. User Preferences for will be displayed with following options:
• Change Language
• Configure Auto Sync
• Configure Map Settings

Mobile Application to Social Tenure Pilot Project (MAST)
User Manual for the Mobile Application
71
11.1 CHANGE LANGUAGE
This functionality allows the user to change to a preferred language for the mobile application.
Steps:
1. Click on ‘Change Language’ option
2. Application will display ‘Change Language’ dialogue
3. Select desired language
4. Click on OK button, language of the MAST application will be changed
Forms has been changed to Swahili:
Mobile Application to Social Tenure Pilot Project (MAST)
User Manual for the Mobile Application
72
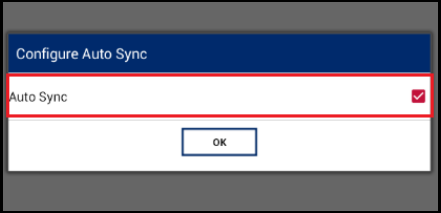
11.2 CONFIGURE AUTO SYNC
This functionality allows the user to configure the sync up settings on the device. Users can configure
sync up to be 'Auto Sync'. Auto Sync means that the data will be synced automatically to the back-end
server whenever internet connectivity is available.
Steps:
1. Click on ‘Configure Auto Sync’ option
2. ‘Configure Auto Sync’ dialogue box will be
displayed
3. Check ‘Auto Sync’ option, if user wishes to
enable auto sync up
4. Click on OK button
Mobile Application to Social Tenure Pilot Project (MAST)
User Manual for the Mobile Application
73
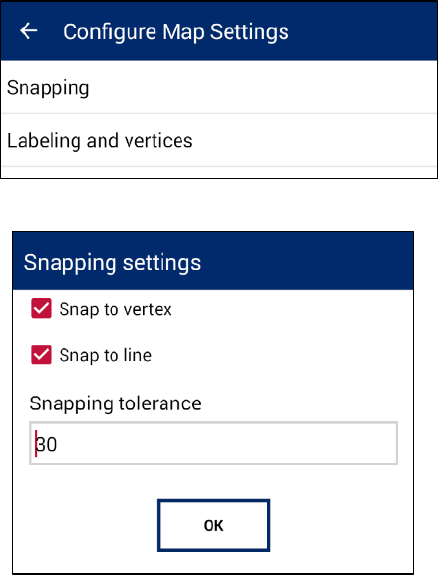
11.3 CONFIGURE MAP SETTINGS
This functionality allows the user to configure snapping settings and displaying of labels, when viewing
the map or capturing data.
Steps:
1. Click on ‘Configure Map Settings option
2. ‘Configure Map Settings’ form will
be displayed with the following
options:
• Snapping
• Labeling and Vertices
11.3.1 SNAPPING
This functionality of snapping objects and
snapping tolerance. The following settings can be
configured:
1. Snap to vertex – Enables snapping to the
parcel vertices
2. Snap to line – Enables snapping to the parcel
sides (lines)
3. Snapping tolerance – Distance in screen
pixels, when automatic snapping should occur
to the snapping objects (vertex, line).
Mobile Application to Social Tenure Pilot Project (MAST)
User Manual for the Mobile Application
74
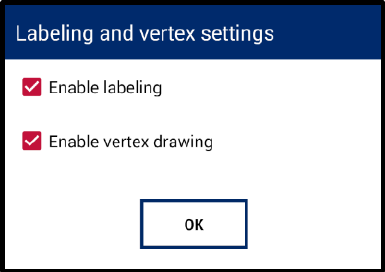
11.3.2. LABELING AND VERTICES
These settings allow configuration of displaying vertices and labels when viewing and editing map. The
following options are available:
1. Enable labeling – Enables displaying of parcel labels. If claim number is provided, it will be used
as a label, otherwise word “Polygon” + sequential number will be used (e.g. Ploygon 20).
2. Enable vertex drawing – Enables drawing/showing vertices of parcels, when in the editing or
data capture mode.
Note: Labels and vertices will be displayed after certain zoom level. This is done to improve the
performance of the map component. If labels and/or vertices enabled for displaying, but you don’t
see them, try to zoom in closer.
Mobile Application to Social Tenure Pilot Project (MAST)
User Manual for the Mobile Application
75
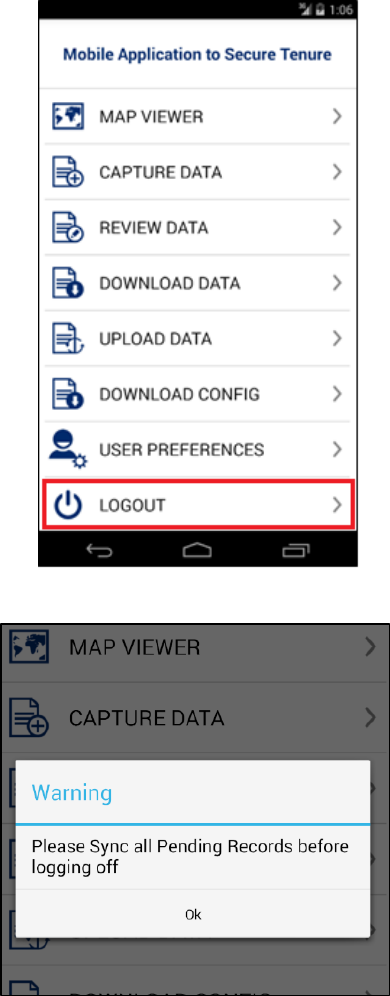
12. LOGOUT
This functionality allows the user to logout from the application. When the user clicks on the logout
option, if any of the completed parcel is pending for sync up, the application displays a notification
message.
Steps:
1.
2.
Click on ‘Logout’ option available on Home
page
If any of the completed parcel is pending for
uploading, the application displays a
Warning message
Mobile Application to Social Tenure Pilot Project (MAST)
User Manual for the Mobile Application
76
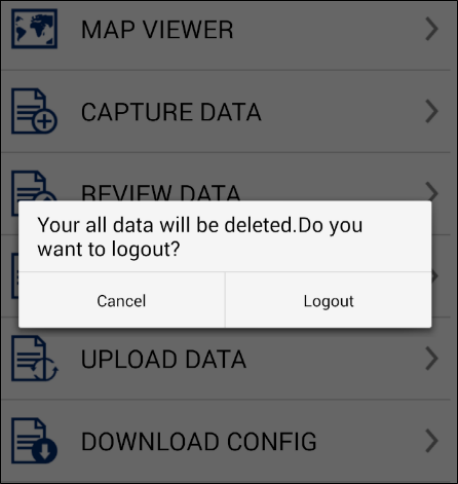
3.
4.
If there is no pending parcel for uploading,
the application displays a Warning message
Click on Logout button. The user will be logged out from the application.