MDK User Guide
User Manual: Pdf
Open the PDF directly: View PDF ![]() .
.
Page Count: 24
- MDK User's Guide
- 1 Initialization
- 1.1 Linking to MMS
- 2 Functions
- 2.1 Logging in to MMS
- 2.2 MMS Menu
- 2.3 MMS Syncing
- 2.3.1 Coordinated Syncing
- 2.3.2 Manual Syncing
- 2.3.3 Resolving Conflicts and Errors
- 2.3.4 Branch Syncing
- 2.4 MDK Specific Features
- 2.4.1 Documents and Views
- 2.4.1.1 Open in View Editor
- 2.4.2 Viewpoints and Viewpoint Methods
- 2.4.3 _MMSSync_ Package
- 2.4.4 Holding Bin Package
- 2.5 Selected Modeling Tutorials
- 2.5.1 Create and Generate Documents
- 2.5.1.1 Create A Document With A View
- 2.5.1.1.1 Generate Views and Sync with MMS
- 2.5.1.1.1.1 MDK 2.4 Tutorial Updates
- 2.5.1.1.1.2 Generate Views and Commit to MMS
- 2.5.1.1.1.3 Manually Generate Views and Validate with MMS
- 2.5.1.2 Insert Diagram as Image
- 2.5.1.3 Create and Generate a Rapid Table
- 2.5.1.4 Generate Views Locally
- 2.5.2 Create a Group of Documents
- 2.5.3 Create Enumerated Values
- 2.5.4 Create Togglable Boolean Values
- 2.5.5 Create a Reusable Cover Page
- 3 Developer Resources
- 3.1 API
- 3.2 MDK Environment Options
MDK User's Guide
Model Development Kit (MDK) is a MagicDraw plugin that syncs models to the MMS, enabling interoperability between MagicDraw
and other tools integrated with MMS, like View Editor. This guide is designed to introduce users to the various features of MDK.
Table of Contents
1 Initialization ......................................................................................................................................................................................................................6
1.1 Linking to MMS...........................................................................................................................................................................................6
2 Functions...........................................................................................................................................................................................................................8
2.1 Logging in to MMS......................................................................................................................................................................................8
2.2 MMS Menu..................................................................................................................................................................................................8
2.3 MMS Syncing ..............................................................................................................................................................................................8
2.3.1 Coordinated Syncing ...............................................................................................................................................................8
2.3.2 Manual Syncing.......................................................................................................................................................................9
2.3.3 Resolving Conflicts and Errors ...............................................................................................................................................9
2.3.4 Branch Syncing .......................................................................................................................................................................9
2.4 MDK Specific Features..............................................................................................................................................................................10
2.4.1 Documents and Views...........................................................................................................................................................10
2.4.1.1 Open in View Editor.........................................................................................................................................10
2.4.2 Viewpoints and Viewpoint Methods.....................................................................................................................................11
2.4.3 _MMSSync_ Package ...........................................................................................................................................................12
2.4.4 Holding Bin Package.............................................................................................................................................................12
2.5 Selected Modeling Tutorials ......................................................................................................................................................................12
2.5.1 Create and Generate Documents ...........................................................................................................................................12
2.5.1.1 Create A Document With A View....................................................................................................................12
2.5.1.1.1 Generate Views and Sync with MMS..........................................................................................13
2.5.1.1.1.1 MDK 2.4 Tutorial Updates .....................................................................................13
2.5.1.1.1.2 Generate Views and Commit to MMS....................................................................13
2.5.1.1.1.3 Manually Generate Views and Validate with MMS...............................................14
2.5.1.2 Insert Diagram as Image...................................................................................................................................14
2.5.1.3 Create and Generate a Rapid Table ..................................................................................................................15
2.5.1.4 Generate Views Locally ...................................................................................................................................16
2.5.2 Create a Group of Documents...............................................................................................................................................16
2.5.3 Create Enumerated Values ....................................................................................................................................................16
2.5.4 Create Togglable Boolean Values.........................................................................................................................................17
2.5.5 Create a Reusable Cover Page...............................................................................................................................................17
3 Developer Resources ......................................................................................................................................................................................................24
3.1 API .............................................................................................................................................................................................................24
3.2 MDK Environment Options.......................................................................................................................................................................24
2
List of Figures
1. Open In View Editor......................................................................................................................................................................................................11
2. Concise Demo Cover Page ............................................................................................................................................................................................20
3
List of Equations
4
List of Tables
5

1 Initialization
The following views are designed to guide a user through initializing and configuring a project to enable the full functionality of
MDK.
1.1 Linking to MMS
In the following clips, the user sets up a brand new MagicDraw project to be MDK-enabled. A MDK-enabled project means that the
entire project model will be able to sync with MMS.
Create New Project - Tutorial
Annotations
1. File > New Project
2. Select “SysML Project”
3. Name the Project
4. Choose project save location
5. OK
6. See message about System Engineering perspective - choose either (more information in description)
Import MDK Module to project - Tutorial
Annotations
1. Go to Options>>Project Usages
2. Use Project
3. Select “SysML Extensions.mdxml”
4. Finish
5. See message about showing Auxilary Resources - choose either (more information in description)
6. Click OK
Add Model Management System stereotype - Tutorial
Annotations
1. Select “Model”, Right Click,Select Stereotype
2. If greyed out, means that Model needs to be locked for teamwork before editing
3. Search for “MMS”
4. Select “Model Management System” stereotype
5. Apply
Assign Project to MMS server - Tutorial
Annotations
1. Open “Model” specification (double click or use right click menu)
2. Scroll down to MMS section
3. Enter MMS URL (e.g. https://mms.hostname.com)
4. Close
Initialize Project - Tutorial
Annotations
1. Login to MMS
2. Right click “Model”>>MMS>> Validate Models
3. Wait for validation window to see initialization error
4. Right Click error in Validation window>>Commit Project and Model
6
5. Select Org or create new one.
7

2 Functions
The following views are designed to guide the user through using all aspects of the MDK.
2.1 Logging in to MMS
Because many MDK features expect that you are logged in to the MMS, you may be prompted to login to the MMS when a MDK-
enabled project is loaded. This login prompt occurs near the end of the load cycle, but will not block MagicDraw from completing the
model load. If the login fails or is cancelled, MDK will revert to offline mode. Any changes will be persisted in the model, and you
will be unable to receive changes from or send changes to MMS until you successfully log in. Other offline features of MDK are
unaffected. You may login at any time by selecting "Login" from the "MMS" menu and submitting your credentials through the dialog
box.
If you commit a MDK-enabled project to Teamwork Cloud (TWC) but are not logged in to MMS, you will be prompted to log in the
MMS. This prompt occurs immediately after you submit the commit message, and will block MagicDraw from completing the
commit to TWC until it is submitted or cancelled. If this login fails or is cancelled, you will continue to not have access to the online
functionality as described above.
2.2 MMS Menu
The following provides an overview of the different operations that are offered through the top MMS menu. For information about the
MMS menu that appears when selecting an element, such as a document, refer to Manually Generate Views and Validate with MMS .
• Login - Trigger a prompt for credentials to be used to log in to the MMS. When logged in, the options that require MMS
interaction will be enabled.
• Logout - Clear your MMS authentication. It will also disable any options that require a connection to the MMS.
• Generate All Views - Generates all Views in the project. It is functionally equivalent to finding all Views, right clicking, and
selecting "MMS" > "Generate View Contents".
• Validate - Validate elements or project attributes in bulk, such as Views and branches.
2.3 MMS Syncing
Syncing with MMS is an automated process that is typically transparent to the user. These views explain how this occurs, cases where
manual intervention is required i.e. conflicts, and how to recover from a loss of parity.
2.3.1 Coordinated Syncing
Coordinated Sync ties the MMS synchronization functionality to MagicDraw's Teamwork Cloud (TWC) commit action. When a TWC
commit is initiated in MagicDraw, coordinated sync triggers a similar commit to the MMS. This minimizes the user interactions
required to keep the model up to date on the MMS and ensures that parity is maintained between the TWC model and the MMS
model. This also vastly reduces the need for alternative sync methods such as Manual Syncing .
Description:
While you are editing the model, element changes are collected in memory to be processed on your next save / commit. This includes
direct changes to your model, such as new elements or updated documentation, as well as reference changes that can arise from
changes to mounted projects. MMS changes by other users, in MagicDraw or View Editor, are also stored in memory to be processed
during the sync operation (these changes are not stored in memory if you are not logged in to the MMS).
When a TWC commit is initiated and a coordinated sync occurs, these two change lists are processed. MMS element changes are
updated into the MagicDraw model as possible. After this model update, MagicDraw model changes are committed to the MMS in the
background of the TWC commit. Finally, the model save/commit occurs.
Any conflicts caused by changes to elements in both MagicDraw and MMS introduced by any user on either end will be stored in the
model for any user to resolve as desired. They will also be presented to the user in the validation window upon save/commit.
These conflicts will be presented to the user on every save/commit until resolved. The presence of conflicts does not
8

prevent completion of the TWC commit operation.
Usage:
• On Model Open
◦ Coordinated Sync will prompt the user to log in to MMS. Logging in allows it to listen to messages track changes
in real time, and be ready to gather and apply them at the appropriate time.
▪ Cancelling this login, or submitting invalid credentials, will not prevent you from working on the model.
It will only prevent you from receiving messages about elements changed in the MMS and prevent you
from committing to the MMS until after you log in manually. Changes made to the model will be
persisted locally for later commit.
• On Model Save / TWC Commit
◦ Coordinated Sync will automatically perform model synchronization with MMS, committing MagicDraw
elements to MMS or deleting elements no longer present in MagicDraw.
◦ Coordinated Sync will update elements in MagicDraw based on MMS changes if the element can be edited and
there is no version conflict between the MagicDraw and MMS versions of the elements.
▪ Elements with pending updates will be presented to the user as a validation violation so that the user can
plan to lock them before next commit, if desired. These will be stored in a list in the model for future
checking.
◦ Coordinated Sync will not update elements in MagicDraw of MMS that have pending changes on both the
MagicDraw and MMS side, as it cannot determine which version of the element is correct.
▪ Elements with these conflicts will be presented to the user as a validation violation for manual
resolution. These will be stored in a list in the model for future checking.
◦ Coordinated Sync will also validate all elements in its list of elements whose updates failed due to locks or
conflicts, according to the above rules. If an update can be performed, the element will be updated in MagicDraw
and removed from the list. Similarly, if the element is equivalent between MagicDraw and MMS, the element will
be removed from the list. Any elements that remain out of sync with MMS will be again displayed as a validation
violation.
2.3.2 Manual Syncing
Manual validation is deprecated in MDK 2.3.0 and above. It is retained for use in re-establishing parity in case automated sync
fails, but models should generally be synced using Coordinated Syncing . If you have to manually validate, it is best to follow the
CRUD rules about order of operations: 1) create 2) update 3) delete.
Manual validation options can be found by right clicking any element and selecting the "MMS" category. The three options are as
follows:
• Validated Models: Run validation on the element(s) selected and all those contained by them.
• Validated Models (specified depth): Run validation on the element(s) selected and elements that are contained by them to
the specified depth.
• Validate Element: Run validation on the element(s) selected.
2.3.3 Resolving Conflicts and Errors
During any of the MMS synchronization operations, the MDK checks for conflicts between the MMS and the MagicDraw model.
These conflicts may indicate a difference between what is in the current project model and an edit in View Editor, or they may be
caused by data being updated on the MMS by a different application.
Conflicts will appear either in a Validation window, and each one may be interacted with via the context (right-click) menu in order to
commit the MagicDraw version or updated from the MMS version. Additional information about the conflict may be available in the
context menu as well. Error messages will appear on the Notification window, and may not be interacted with.
2.3.4 Branch Syncing
Note: This applies to Teamwork Cloud (TWC) projects, but not local projects as the latter do not have branching.
Both TWC and MMS support branching as a part of their version control functionality. MDK syncs branches created in TWC by
9
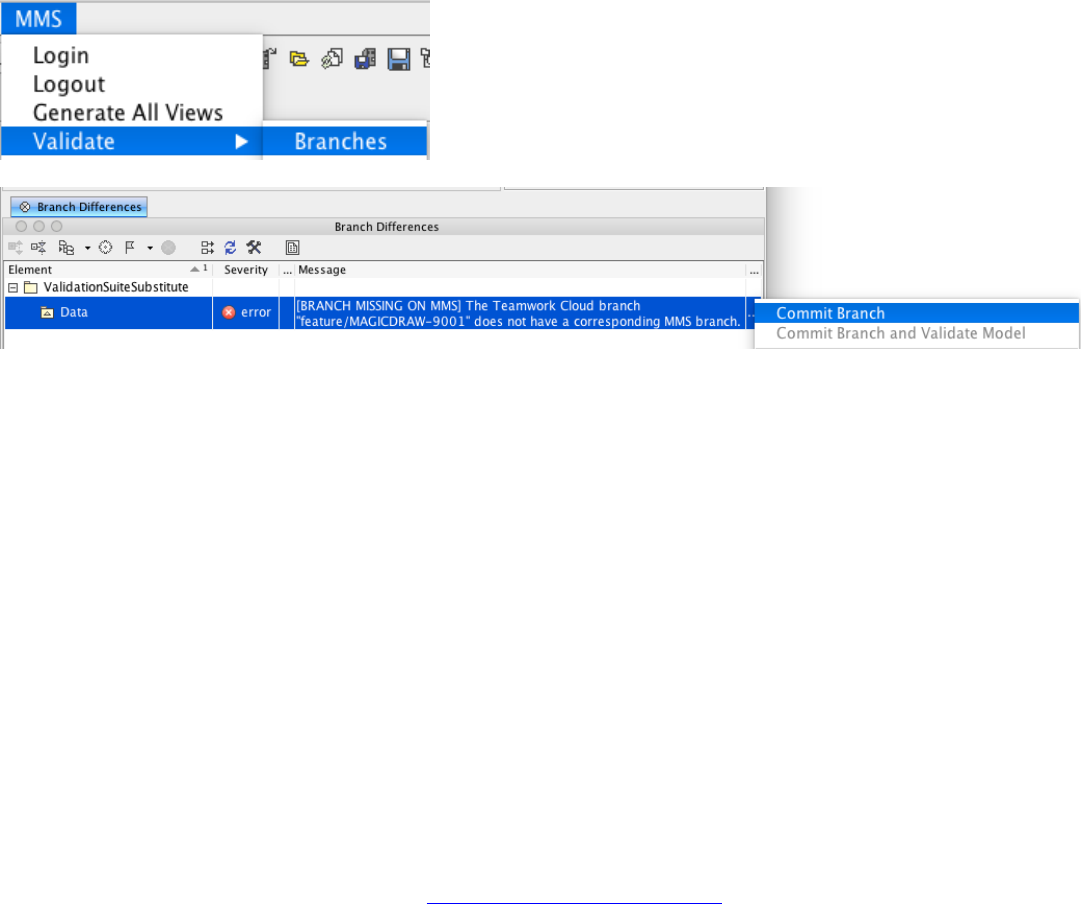
committing them to MMS. To validate the branches on both sides, select "MMS" from the main menu > "Validate" > "Branches".
Validation rule violations will be presented if they are not in sync, and resolutions can be selected by right clicking each violation.
2.4 MDK Specific Features
The following views are designed to provide users with information about key MDK features, including explanations of their use and
how they affect a modeler on a daily basis.
2.4.1 Documents and Views
Documents and Views can be created and modeled in MagicDraw and generated to View Editor.
Documents are a key part of systems engineering; through the practice of Model Based System Engineering (MBSE), documents have
also been adapted so that they are able to be generated and produced from a model. Documents consist of Views, which are sections of
a document. Both Documents and Views are based on Classes in UML and therefore are treated as elements in the model, with their
own associated attributes and formatting metadata.
Implications:
A SysML model is not required to produce a document; however, the main interface between MagicDraw and View Editor, the web
application, is primarily done through the interactive capabilities of documents and views. They are used to provide access to
modeling data outside of the model itself.
Documents and views are built and configured using Viewpoints and Viewpoint Methods . More information can be found in the next
view.
2.4.1.1 Open in View Editor
You may wish to inspect a view after generating it with the MDK, to confirm that it matches your expectations. The "Open in View
Editor" feature allows you to easily open a Document of View on View Editor from its element representation in MagicDraw.
To use this feature, right-click the element in a diagram, containment, or similar view and select "Open in View Editor" from the
context menu. This feature will build a full web link to the selected View by navigating up the view hierarchy to find the Document
that contains the View, and then simply open the web link in your default browser.
If a Document or View is a child of multiple Documents, the feature will instead build a link for each Document and open a new
window with a button for each Document. Clicking on one of the Documents listed will open the appropriate web link.
If a View is not a child of any Documents, the feature will display a message in the Notification Window of MagicDraw and open the
View in View Editor without a Document context.
Use of this feature does not require you to be logged in to MMS, but does require that your model have a MMS server specified in its
ModelManagementSystem stereotype.
10
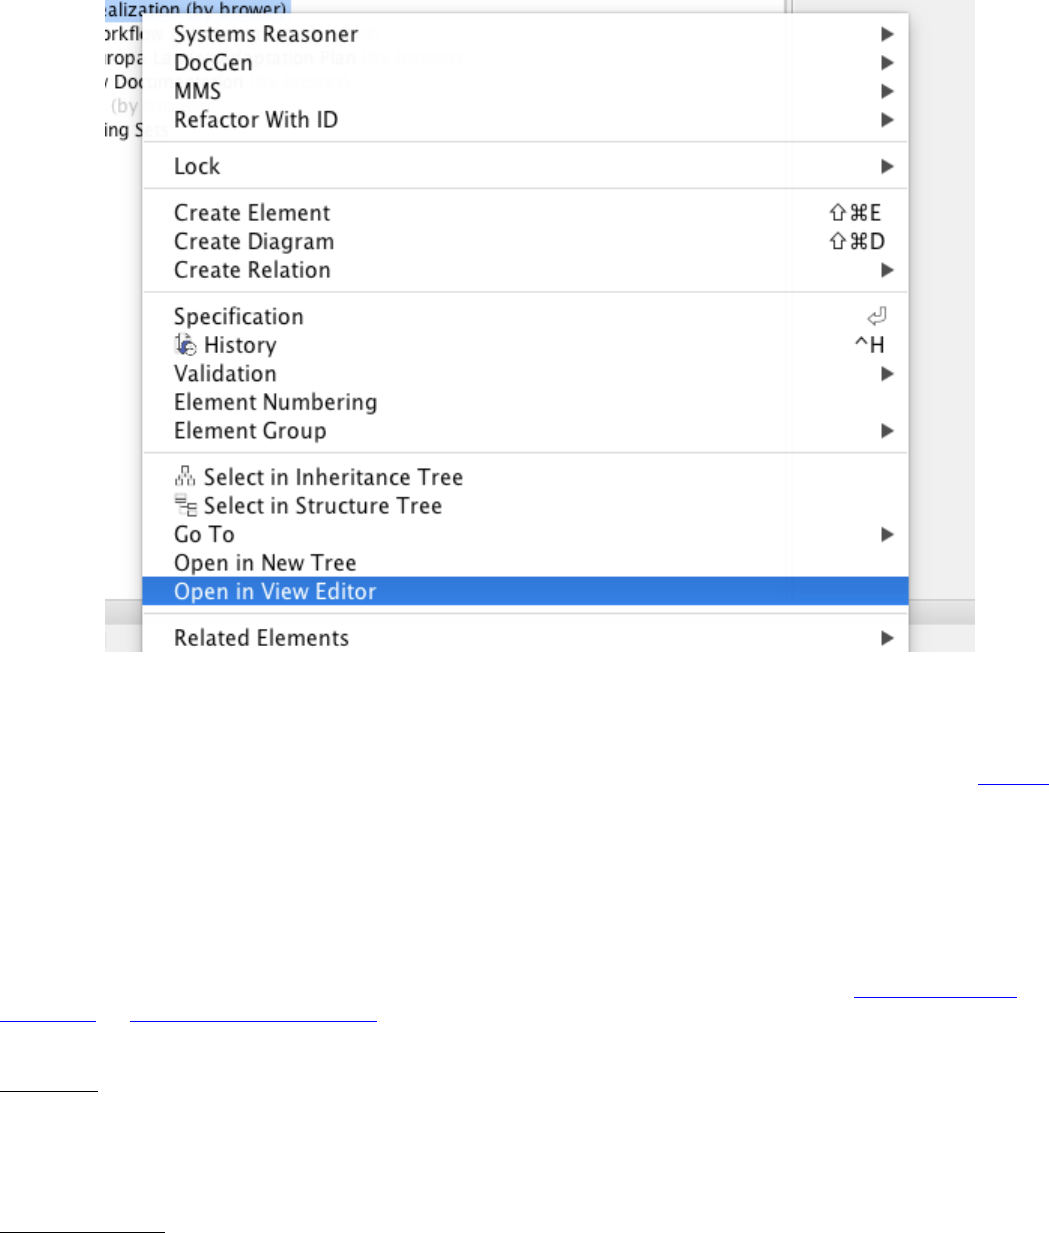
Note: In the event that Java fails in its attempt to open a link in your default browser, a message will appear in the Notification
Window of MagicDraw that includes the web address. This can by copied into your web browser to open the page manually.
Figure 1. Open In View Editor
2.4.2 Viewpoints and Viewpoint Methods
One of the defining moments for widespread adoption of SysML at JPL was when the community created "DocGen" (see DocGen ), a
precursor of the MDK plug-in, which gives MBSE practitioners the ability to produce documents from their models. In order to create
these documents, the view and viewpoint method was introduced.
A pattern is a set of rules governing model construction that provide standardization and consistency across models. The method for
document creation is one such pattern adopted by the Object Management Group (OMG, the standards body behind SysML) and was
incorporated
into SysML 1.4.
Viewpoints and Viewpoint Methods can be created in MagicDraw and will result in View Editor. Refer to Create and Generate
Documents and Create a Reusable Cover Page for examples of using Documents, Views, Viewpoints, Viewpoint Methods, and
Exposing elements.
Viewpoints:
• Can be thought of as the "compiler" for a view.
• Dictate what will actually be displayed in a view.
• Uses the viewpoint methods and the exposed elements to produce a view.
Viewpoint Methods:
• Are a set of rules that govern model construction to give standardization and consistency across models.
• Can be thought of as the "constructor".
• Consist of activity flows that are specialized to be in charge of building what the view will be.
• The most common viewpoint method are those that make Rapid Tables - they take the exposed elements and iteratively go
11

through them to produce the desired table. More information on how to build such a table can be found here: Create and
Generate a Rapid Table .
Implications:
Using the model, a user will consistently utilize Viewpoints and Viewpoint Methods to construct documents and views. These
documents and views may contain any number of important modeling information, based on what the user desires. The user will then
generate these formatted and configured documents and views so that users on View Editor can have access to the model information
and data.
2.4.3 _MMSSync_ Package
The _MMSSync_ package is part of a number of sync solutions for the MMS and View Editor. Its purpose is to allow continual
collaboration while a project is consistently being updated by multiple users. It does this by capturing changes between the model and
the MMS server and persisting them in the model. The idea is that when an element is updated from the server, whoever is using the
syncing options will capture the changes and the MDK will try to update the model itself. However, if there is some non-editable
content or errors of any sort that would prevent the MDK from automatically updating, these changes will be saved in the
_MMSSync_ package. Once stored, the changes will be tried to be resolved/updated the next time it is run.
Although the _MMSSync_ package looks like an ordinary Package, users must NOT edit the content. A user may try to unlock the
elements in Teamwork Cloud projects, but should not edit the elements themselves. If the user manually modifies this Package or its
contents, parity and/or data could be lost.
Usage:
• Every project that is connected to MMS will have an _MMSSync_ package.
• References to all changed (categorized as created, updated, and deleted) elements on both MagicDraw and MMS will be
persisted in elements in this package.
• These changed elements will be analyzed during sync operations to generate the necessary operations to sync the model.
• Each element in this package will be categorized and timestamped.
• Each element in this package is automatically managed and deleted by the MDK. No user intervention is required or
recommended. See version specific implications for more information.
• In the case that elements in this package cannot be deleted due to insufficient locks, a second element is created that
signifies to sync operations that the first one can be safely ignored as its contents have already been processed.
2.4.4 Holding Bin Package
The "Holding Bin" Package is created for every project. Its purpose is to provide a default place to put elements that were created
without an owner specified. This is often the case for Documents and Views that originated in View Editor. Elements in the Holding
Bin can be moved to other locations in the project just like other model elements.
2.5 Selected Modeling Tutorials
The following views are dedicated to guiding users through some of the most commonly used workflows that involve MDK.
2.5.1 Create and Generate Documents
The following views focus on foundational training to get any user to be able to interact with the MMS and subsequently View Editor.
The goal at the end of these views is for the MDK user to be able to Create A Document With A View ,Generate Views and Commit
to MMS , and Manually Generate Views and Validate with MMS .
2.5.1.1 Create A Document With A View
In this clip, the user creates a new (blank) document in MagicDraw using MDK's tools for Documents and Views. Committing these
new elements is required for proceeding to the next step, Generate Views and Sync with MMS , where the user will generate the
document so it appears on View Editor.
12

NOTE: This tutorial was put together for MDK 2.3. MDK 2.4 uses a more streamlined synchronization workflow. The below tutorial
can be used, but all references to "Update and Commit", "Commit to MMS" should be replaced with a save (local model) or commit to
teamwork (teamwork model) to trigger a coordinated sync. References to "Generate and Commit to MMS" should be replaced with a
save (local model) or commit to teamwork (teamwork model) to trigger a coordinated sync followed by a "Generate Views" on the
appropriate target. References to "Validate View Hierarchy" may simply be skipped.
Setup: Model has been synced to it's own Alfresco site (See Linking to MMS for more information on this process) A new package is
created for the purpose of simple organization. Each modeler should follow the modeling practices of his/her project.
<src="https://jpltube.jpl.nasa.gov/NetworkFileStore/8662/media_720.mp4">Your browser does not support embedded videos.
Link to video: https://jpltube.jpl.nasa.gov/NetworkFileStore/8662/media_720.mp4
Video Instructions:
1. Create a new View Diagram
1. Name new diagram
2. Create new Document
1. Name Document
3. Create new View
1. Name new view
4. Create a "Directed Composition" relation from the new Document to the new View
2.5.1.1.1 Generate Views and Sync with MMS
There are two ways to generate views and interact with the MMS in general - using "Generate Views and Commit to MMS" or
manually generating views/validating . CAE highly encourages the use of the "Generate Views and Commit to MMS". It is designed
to be a "one-click" interaction where MDK takes care of validations and "order of validations" for the user. However, for the
convenience of the user and to illustrate all the steps that "Generate Views and Commit to MMS" does, a second screencast has been
provided for manually generating and validating a document/view.
2.5.1.1.1.1 MDK 2.4 Tutorial Updates
NOTE: The below tutorials were put together for MDK 2.3. MDK 2.4+ uses a more streamlined synchronization workflow, and the
procedure for the above is similar but different in some respects. These tutorials can be used with the following updates:
• All references to "Update and Commit", "Commit to MMS" should be replaced with a save (local model) or commit to
teamwork (teamwork model) to trigger a coordinated sync.
• All references to "Generate and Commit to MMS" should be replaced with a save (local model) or commit to teamwork
(teamwork model) to trigger a coordinated sync followed by a "Generate Views" on the appropriate target.
• All references to "Validate View Hierarchy" may simply be skipped.
Additionally, some attempts to generate views may return a "View does not exist on MMS. Generation skipped." error message in
your notification window. This message indicates that the view has not been synced to MMS, and as a result the elements necessary to
display the view on MMS may not be entirely present. To resolve this error you will need to sync the missing elements with MMS and
then re-attempt the view generation (see MMS Syncing for additional information).
2.5.1.1.1.2 Generate Views and Commit to MMS
IMPORTANT: It is highly suggested, though not absolutely required, that a MagicDraw project be fully synced before using
these options for the first time.
In this clip, the user is working on a teamwork hosted project and has already created a document and view ( Create A Document With
A View ). The user now demonstrates how to use "Generate Views and Commit to MMS" from the document's View Diagram. The
user then shows the newly generated document on View Editor.
<src="https://jpltube.jpl.nasa.gov/NetworkFileStore/8664/media_720.mp4">Your browser does not support embedded videos.
13

Link to video: https://jpltube.jpl.nasa.gov/NetworkFileStore/8664/media_720.mp4
Note to any user who is working on a project on a teamwork server: There will be a pop up window regarding updating the project
before interacting with MMS. Please refer to Teamwork and MMS for more information, including what is the best option to choose.
Video Annotations:
1. Generate Views and Commit to MMS
1. "Generate Views and Commit to MMS" on the document level
2. When message pops up about updating from teamwork, click "Cancel, I will update from teamwork first"
3. Go to "Collaborate" drop down menu and click "Update Project"
4. Upon completion, "Generate Views and Commit to MMS" again
5. This time, when message comes up, click "Continue with MMS"
2. *Watch it all go
3. If there are conflicts
1. Resolve conflicts by accepting from the web or committing the model
2. Re-run "Generate Views and Commit to MMS"
4. Validate the hierarchy via the Validation Hierarchy window
5. *Navigate to document on view editor
6. Show that the view is there
7. Go back to MD, go to "Collaborate" dropdown, "Commit to server", Comment "Created and generated(Document name) "
2.5.1.1.1.3 Manually Generate Views and Validate with MMS
In this clip, the user is working on a teamwork hosted project and has already created a document and view ( Create A Document With
A View ). The user now manually generates views, validates the document/views, validates hierarchy, validates instances/constraints,
and confirms the document appears on View Editor.
<src="https://jpltube.jpl.nasa.gov/NetworkFileStore/8666/media_720.mp4">Your browser does not support embedded videos.
Link to video: https://jpltube.jpl.nasa.gov/NetworkFileStore/8666/media_720.mp4
Video Annotations:
1. Manually Generate Views and Validate Models with MMS
1. From the Document Diagram or Containment Tree, “Generate Views” from the Document level
2. See new View Instances package
2. More info on View Instances can be found in the description
1. In the containment tree, “Validate Models” on the parent element most appropriate
2. (For this clip) Validate Models on the package that contains the documents/views and View Instances
3. Note: 404 (aka “element not found”) message will appear because the Instances do not exist on MMS…yet
4. Order errors in validation window by “Message” column
1. Follow normal CRUD order of operations rule: Add, Update, Delete
2. Commit “[EXIST] This doesn’t exist on MMS”
3. (Explanation of Export on MagicDraw vs Export on Server can be found in the description)
4. (For this clip) Export on MagicDraw
5. Accept from Web or Commit from Model for other conflicts
6. Commit View Constraints
7. Create MagicDraw element or Delete from MMS - not applicable here
5. Validate View Hierarchy
1. Commit Hierarchy
6. (View Editor) Navigate to document
1. See View
7. If teamwork project - return to MagicDraw, “Commit to server” with comment
2.5.1.2 Insert Diagram as Image
NOTE: This tutorial was put together for MDK 2.3. MDK 2.4 uses a more streamlined synchronization workflow. The below tutorial
can be used, but all references to "Update and Commit", "Commit to MMS" should be replaced with a save (local model) or commit to
14

teamwork (teamwork model) to trigger a coordinated sync. References to "Generate and Commit to MMS" should be replaced with a
save (local model) or commit to teamwork (teamwork model) to trigger a coordinated sync followed by a "Generate Views" on the
appropriate target. References to "Validate View Hierarchy" may simply be skipped.
In this clip, the user demonstrates one of the most basic ways of using viewpoints and viewpoint methods to construct what will be in
a view. For more information about what viewpoints and viewpoint method are, refer to Viewpoints and Viewpoint Methods . More
detailed information about creating specific viewpoints and methods can be found in the DocGen .
<src="https://jpltube.jpl.nasa.gov/NetworkFileStore/6607/media_720.mp4">Your browser does not support embedded videos.
Link to video: https://jpltube.jpl.nasa.gov/NetworkFileStore/6607/media_720.mp4
Video Annotations:
1. Create a new View
2. Create new View Point
1. Name new View Point
3. Create a "Conforms" relation from the new View to the new View Point
4. Select a diagram from the containment tree (to insert as an image) and drag it into the view diagram of the chosen document
5. Create an "Expose" relation from the chosen view to the diagram
6. Select the Viewpoint in the containment tree and create a new Viewpoint Method Diagram
7. Navigate to the new Viewpoint Method Diagram
8. Create a View Point activity
1. Insert "Initial Node"
2. Insert ”Image Template"
3. Insert “Activity Final"
4. Connect activity flow (use the stamp feature to speed connections)
9. From the View Diagram, on the document level, “Generate Views and Commit to MMS"
1. *If teamwork popup, refer to Teamwork and MMS for more information, including which option to choose and
when.
2. Address conflicts/issues by going through the validation windows that appeared during the update/generate/
commit process - including committing view hierarchy and outdated image.
3. Once conflicts are resolved, re-run update/generate/commit
2.5.1.3 Create and Generate a Rapid Table
NOTE: This tutorial was put together for MDK 2.3. MDK 2.4 uses a more streamlined synchronization workflow. The below tutorial
can be used, but all references to "Update and Commit", "Commit to MMS" should be replaced with a save (local model) or commit to
teamwork (teamwork model) to trigger a coordinated sync. References to "Generate and Commit to MMS" should be replaced with a
save (local model) or commit to teamwork (teamwork model) to trigger a coordinated sync followed by a "Generate Views" on the
appropriate target. References to "Validate View Hierarchy" may simply be skipped.
In this screencast, the user creates a table in MagicDraw (also called "rapid table") using viewpoints and viewpoint methods. The table
is then pushed to a view and shown in View Editor. For more detailed information, about using Viewpoints and Viewpoint Methods
refer to the DocGen .
<src="https://jpltube.jpl.nasa.gov/NetworkFileStore/6604/media_720.mp4">Your browser does not support embedded videos.
Link to video: https://jpltube.jpl.nasa.gov/NetworkFileStore/6604/media_720
Video Annotations:
1. Create a new View in the Document for the table
2. Create new Viewpoint
1. Name new Viewpoint
2. Connect Viewpoint to new View via "Conforms"
3. Drag existing package of blocks onto diagram
1. Connect package via "Expose"
4. Create View Point Method Diagram
15

1. Right click the view point in the containment tree->Create Diagram->MDK->View Point Method Diagram
5. Start building the activity - the end result will create a table that has the name of the blocks. Columns for two of their
properties will be added in advanced screencasts
1. Create “Initial Node”
2. Create “CollectOwnedElements”
3. Create “FilterByStereotypes”
1. Double click the new block, or right click and go to specification
2. Find “Stereotypes” -> search for "Block" and select Block[Class] Sysml::Blocks
4. Create “Table Structure”
1. Name the table. This name will display in the view
2. Create “Initial Node” inside the table.
3. Create “TableAttributeColumn” inside the table.
1. Name the column. This name will display in the view
2. Double click the new block
3. Find “Desired Attribute” -> select desired attribute from options
4. Create “Activity Final” inside the table.
5. Create “Activity Final” outside the table, in the activity.
6. Connect all control flows
6. From the View Diagram, on the document level, “Generate Views and Commit to MMS”. If working on a Teamwork
server, remember to update first.
1. Address conflicts/issues by going through the validation windows that appeared during the update/generate/
commit process - including committing view hierarchy and outdated image.
2. Once conflicts are resolved, re-run update/generate/commit
2.5.1.4 Generate Views Locally
A user can generate Views locally as DocBook XML by right clicking a View > "DocGen" > "Generate Document". The DocBook
XML can then be converted to other file formats, such as PDF, Word document, etc., with third-party tools. An example of such a tool
is Oxygen XML Editor.
2.5.2 Create a Group of Documents
Groups offer users the ability to better organize projects by allowing Packages to be designated as containers of Documents. Tools that
visualize Documents, such as View Editor, would display these Groups in navigation. Documents that are owned by the Group
(recursively) would show up under that Group. This is for organizational purposes and applies no semantics.
Instructions:
1. Right click a Package.
2. Click "Stereotype" in the context menu.
3. Add "Group" stereotype in the popup menu and click "Apply".
4. Sync.
2.5.3 Create Enumerated Values
NOTE: This tutorial was put together for MDK 2.3. MDK 2.4 uses a more streamlined synchronization workflow. The below tutorial
can be used, but all references to "Update and Commit", "Commit to MMS" should be replaced with a save (local model) or commit to
teamwork (teamwork model) to trigger a coordinated sync. References to "Generate and Commit to MMS" should be replaced with a
save (local model) or commit to teamwork (teamwork model) to trigger a coordinated sync followed by a "Generate Views" on the
appropriate target. References to "Validate View Hierarchy" may simply be skipped.
One of the more sophisticated features of View Editor is the option to have values be enumerated values. This means that a user will
only be allowed to set an element's value to a specific set of choices. In View Editor, this is shown as a drop down list. This can be
extremely useful for elements that are similar in makeup but have different properties and different values.
In this clip, the user demonstrates how to create enumerated values so that they may be seen as drop down lists on View Editor. The
user adds a column to an existing rapid table (see Create and Generate a Rapid Table ) to show one of the many options that a user can
choose to reveal different model elements.
16

Note: Unfortunately this clip does not currently provide written "Real time" instructions nor a voice over. However, the functionality
is correct so it is still being provided for the user. A new video with comprehensive in-video instructions and edited user friendly
footage is on its way.
Link to video: https://jpltube.jpl.nasa.gov/NetworkFileStore/8730/media_720.mp4
2.5.4 Create Togglable Boolean Values
NOTE: This tutorial was put together for MDK 2.3. MDK 2.4 uses a more streamlined synchronization workflow. The below tutorial
can be used, but all references to "Update and Commit", "Commit to MMS" should be replaced with a save (local model) or commit to
teamwork (teamwork model) to trigger a coordinated sync. References to "Generate and Commit to MMS" should be replaced with a
save (local model) or commit to teamwork (teamwork model) to trigger a coordinated sync followed by a "Generate Views" on the
appropriate target. References to "Validate View Hierarchy" may simply be skipped.
Another relevant feature of View Editor is the option to have an element's value be Boolean. In View Editor, this is shown as a
toggable check box indicating if a value is "√True" or "False". This can be extremely useful for all elements that require a quick
Boolean answer.
In this clip, the user demonstrates how to create toggable Boolean values so that they may be seen check boxes on View Editor. The
user adds a column to an existing rapid table (see Create and Generate a Rapid Table for the first column and Create Enumerated
Values for the second column) to show one of the many options that a user can choose to reveal different model elements.
Note: Unfortunately this clip does not currently provide written "Real time" instructions nor a voice over. However, the functionality
is correct so it is still being provided for the user. A new video with comprehensive in-video instructions and edited user friendly
footage is on its way.
Link to Video: https://jpltube.jpl.nasa.gov/NetworkFileStore/6578/media_720.mp4
2.5.5 Create a Reusable Cover Page
A user can create a reusable cover page by constructing a ViewPoint with a ViewPoint method. Once the method is made, a user can
apply it to any View, and specifically to the Cover Page of a document. See Viewpoints and Viewpoint Methods for more information
about using them in general and see DocGen for more detailed information.
This model based cover page will be reflected when generating PDFs as well. See Save As for more information on saving a
document (with said cover page) in different forms, including generating a PDF.
The following instructions is an overview about how to create a simple, reusable Cover Page for a document that already exists:
1. Find a Document that already exists ( Concise Demo Document )
2. Open the document's View Diagram by double clicking
1. If it has/belongs to a View Diagram, double click the Diagram and view in main window
1. To find the View Diagram, Right Click the Document>>Go To>> Usage in Diagrams ....select the
appropriate View Diagram
2. If it does not have a View Diagram,
1. Right click the containing package>>Create Diagram>>MDK>>View Diagram
2. Name the View Diagram
3. New Diagram should be shown in main window
4. Drag the Document onto the View Diagram
17
3.
3. Set Up Document Cover Page relationships
1. Note: Although these instructions are specifically in regards to generating a Document Cover Page, the ViewPoint
can be applied to any View and would appear the same.
2.
3. Create a new Viewpoint
1. While on the View Diagram, drag and drop the "Viewpoint" icon from the tools pane onto the Diagram
2. Name the new Viewpoint ("Concise Demo Cover Page")
3. Connect the Document to the new Viewpoint via a "Conforms" relationship
4. Drag wanted elements that will be used for constructing the Cover Page
1. Connect Document to said elements via "Expose" relationship
4. Create View Point Method Diagram
1. Right click the View Point in the Containment Tree->Create Diagram->MDK->View Point Method Diagram
2.
5. Create ViewPoint Method Activity
1. The following activity will create a Cover Page with several presentation elements including: a title, an image, a
18

table of contributors, several paragraphs, and signature lines with badge numbers/names of the "owners", along
with some stylistic. Note: in this example, the owners and contributors are the Person blocks exposed to the
Document; the viewpoint method would change depending on the context of the model i.e. a user could navigate
through the model to find real owners, roles, work packages, etc. if that is what is required.
2. To keep this User Guide succinct, the activity will only be briefly described below. More information about the
used functions can be found in DocGen and later there will be specific documentation about different reusable
activities.
19
20

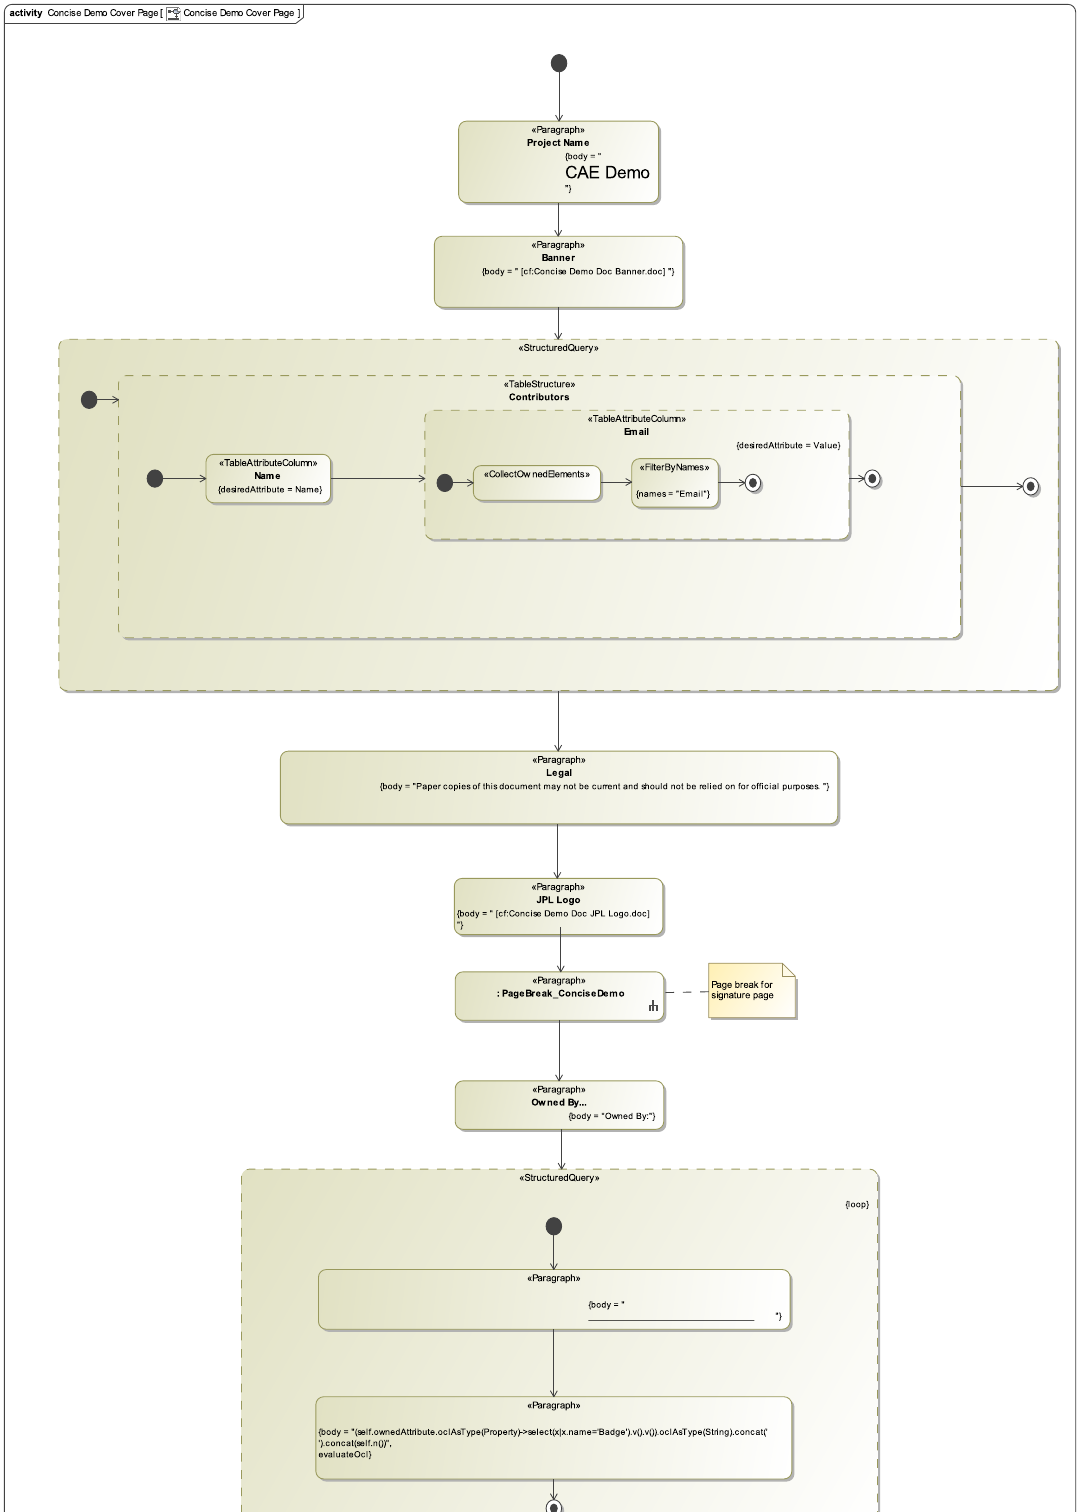
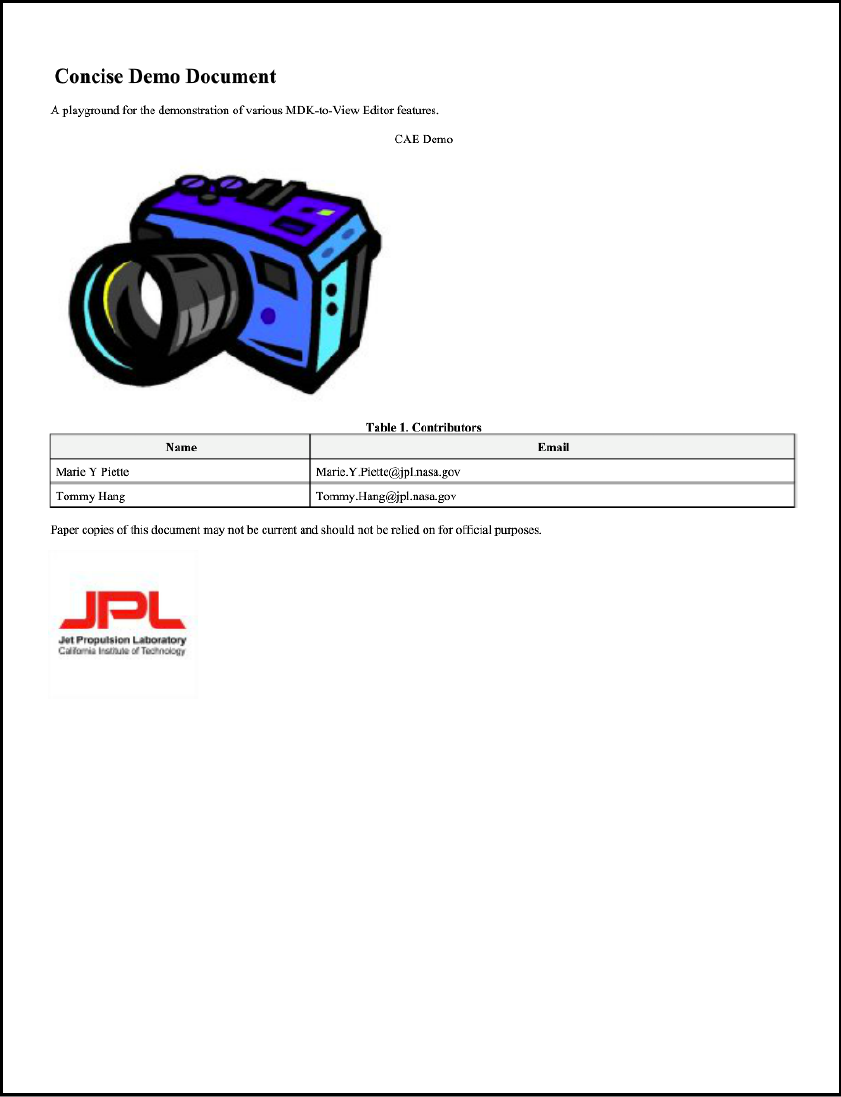
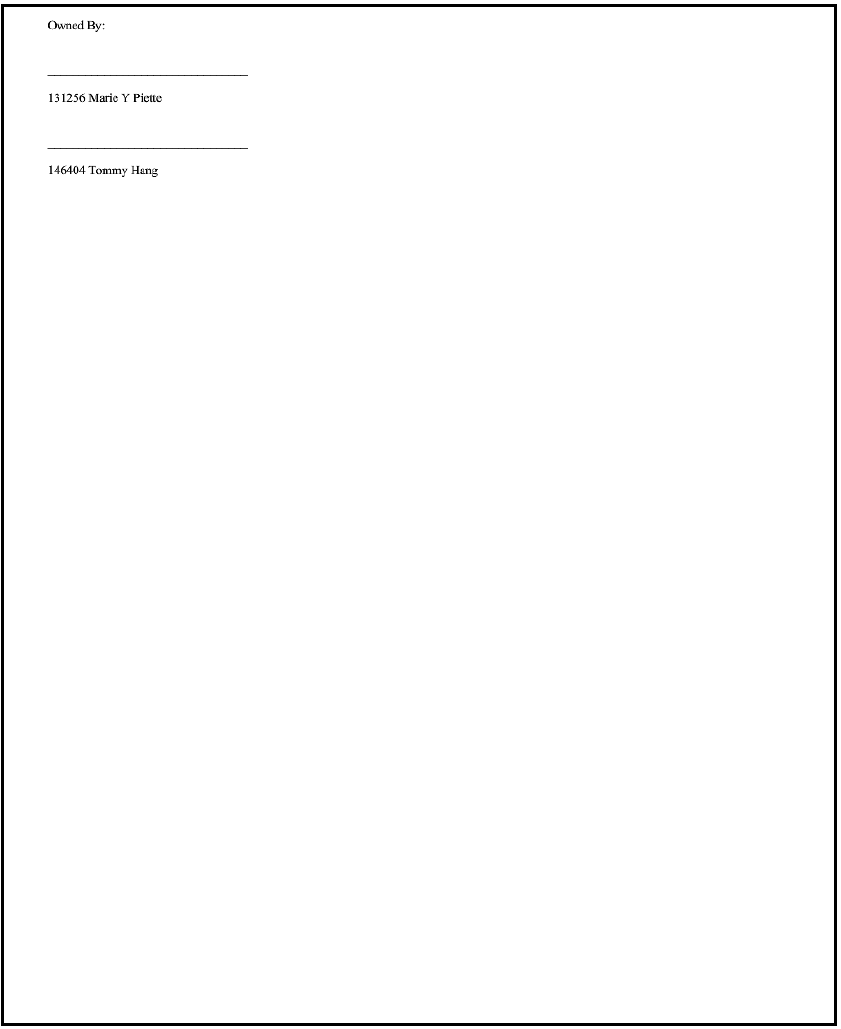
Figure 2. Concise Demo Cover Page
The Concise Demo Cover Page is an example of a reusable cover page. It creates a cover page that includes the following:
1. A title - "CAE Demo" is displayed at the top of the page and centered, according to the Paragraph function and its internal
html
2. An image - This Paragraph function includes a cross reference to a model element, whose documentation is an image.
3. A table of contributors - This Rapid Table uses the Exposed blocks (in this case, Personnel blocks) to create a table of their
Name and Email attributes.
4. A "legal" paragraph - Similar to the title, this paragraph function creates and formats the written texts.
5. A logo - See #2, an image
6. A page break - this is an example of using an embedded reusable activity. In this case, there is an activity that creates a html
page break and it is used here instead of creating a new one. This allows for multiple pages to be created as part of the
"Cover Page"
7. A identification paragraph - "Owned by_", see #1 and #4,
8. Signature lines with badge numbers/names of the "owners" - this structured query has several aspects:
1. It's in a separate structured query, not only for clean separation of functions, but also so that it can "loop", meaning
that it will repeat the internal functions for as many times as intended. In this case, there are 2 "owners" that are
exposed to the VP so it repeats twice.
2. The first paragraph is simply the html for a line and provides a place for a signature
3. The second paragraph is constructed of OCL that finds the Owner's badge number and name and concatenates
them. This specific combination may not be what is most used for most formal documents, but it demonstrates
how someone could use OCL to navigate through the model and get the desired attributes.
1. Commit to TW
1. Collaborate>>Commit Changes to Server
2. Generate the Cover Page
1. In the View Diagram or in the Containment Tree, Right Click Document>>MMS>>Generate View
3. See Cover Page on VE
4. To see how the Cover Page will be appear as a PDF, Generate PDF of View (note: other PDF generation options are in the
provided view)
1. Below is how the Cover Page of the Concise Demo Document appears according to the Concise Demo Cover
Page above:
21
1.
22
2.
23

3 Developer Resources
3.1 API
The Javadoc for MDK is included in the plugin and can be found in the MagicDraw plugins folder after installation. Note that only the
classes found in gov.nasa.jpl.mbee.mdk.api are intended to be used by other plugins/tools and that the rest of the code can
change without any notification.
3.2 MDK Environment Options
Options for advanced users to customize certain behaviors or enable MDK functionality are available in MagicDraw's Environment
Options.
• LOG_JSON: Enables logging of MMS request and response information, including sent and received JSON, to the
MagicDraw log.
To access these settings, navigate to the "Options Menu" -> "Environment" dialog, and select the "MDK" section.
Several [DEVELOPER] options are also available, but are generally hidden from users. They are included here for completeness - we
strongly recommend they not be modified unless for development purposes as they will likely result in data loss.
• PERSIST_CHANGELOG: [DEVELOPER] Enables persisting of the changelog in the _MMSSync_ package for uneditable
model elements. Disabling this option will cause these changelogs to be lost after CSync and may cause loss of model
parity.
• ENABLE_CHANGE_LISTENER: [DEVELOPER] Enables listeners for model changes in MagicDraw and MMS.
Disabling this option will cause changes to not be tracked and may cause loss of model parity.
• ENABLE_COORDINATED_SYNC: [DEVELOPER] Enables Coordinated Sync on Teamwork Cloud project commit.
Disabling this option will cause CSync to be skipped on Teamwork Cloud commit and may cause loss of model parity.
24
