APDevFundamentals3.9_studentManual MUFundamentals3.9 Student Manual Mod04
MUFundamentals3.9_studentManual_mod04
MUFundamentals3.9_studentManual_mod04
MUFundamentals3.9_studentManual_mod04
MUFundamentals3.9_studentManual_mod04
MUFundamentals3.9_studentManual_mod04
User Manual: Pdf
Open the PDF directly: View PDF ![]() .
.
Page Count: 43
102
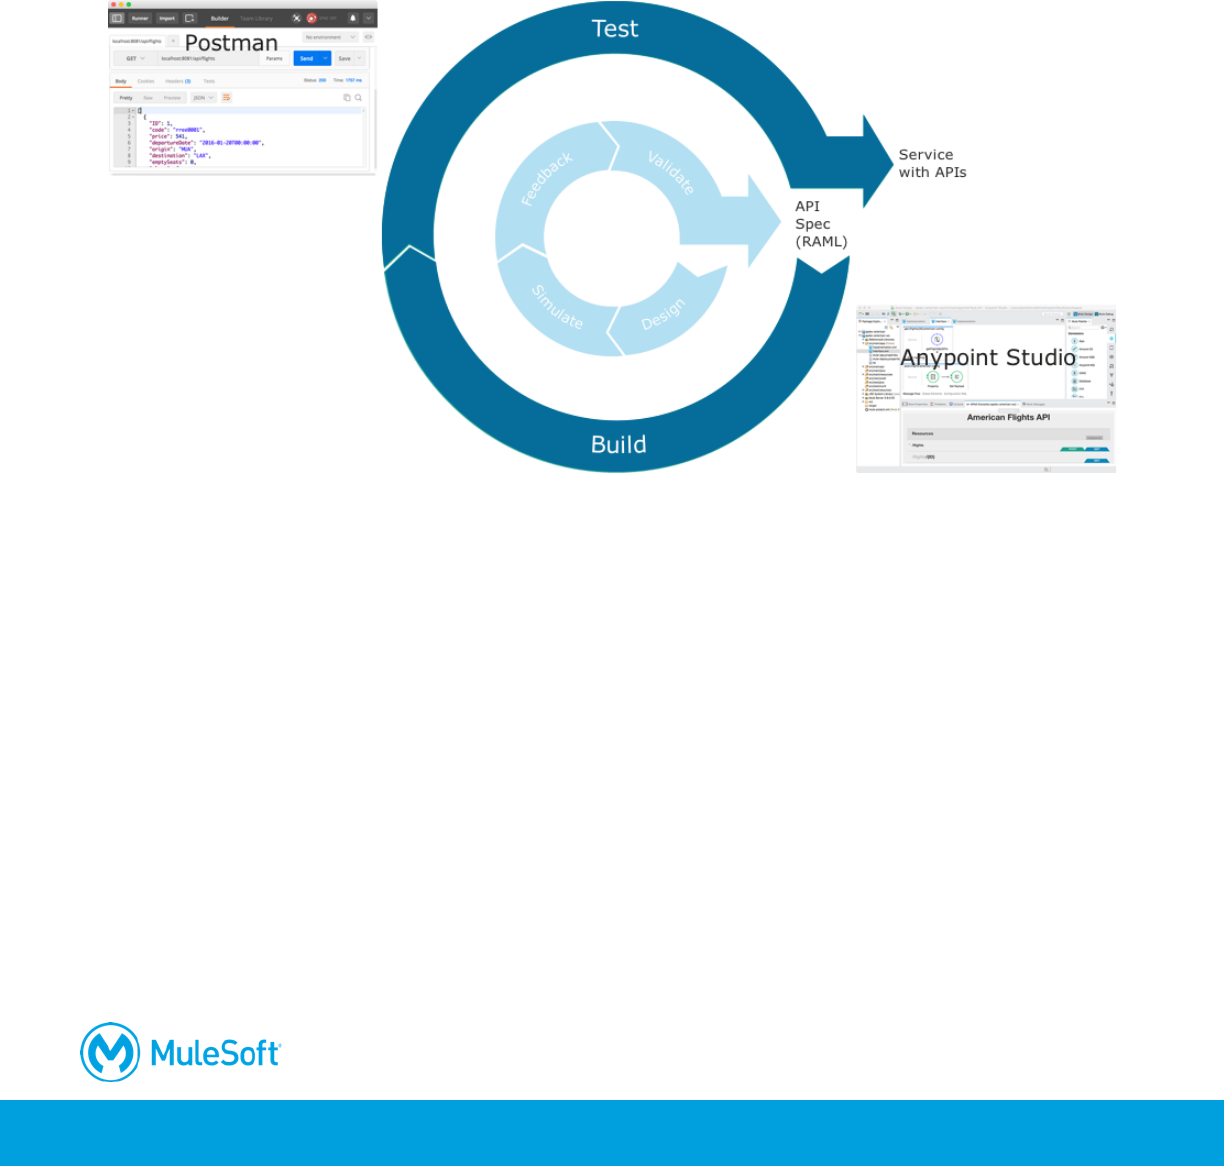
Module 4: Building APIs
At the end of this module, you should be able to:
• Use Anypoint Studio to build, run, and test Mule applications.
• Use a connector to connect to databases.
• Use the graphical DataWeave editor to transform data.
• Create RESTful interfaces for applications from RAML files.
• Connect API interfaces to API implementations.
103
Walkthrough 4-1: Create a Mule application with Anypoint Studio
In this walkthrough, you build a Mule application. You will:
• Create a new Mule project with Anypoint Studio.
• Add a connector to receive requests at an endpoint.
• Set the message payload.
• Run a Mule application using the embedded Mule runtime.
• Make an HTTP request to the endpoint using Postman.
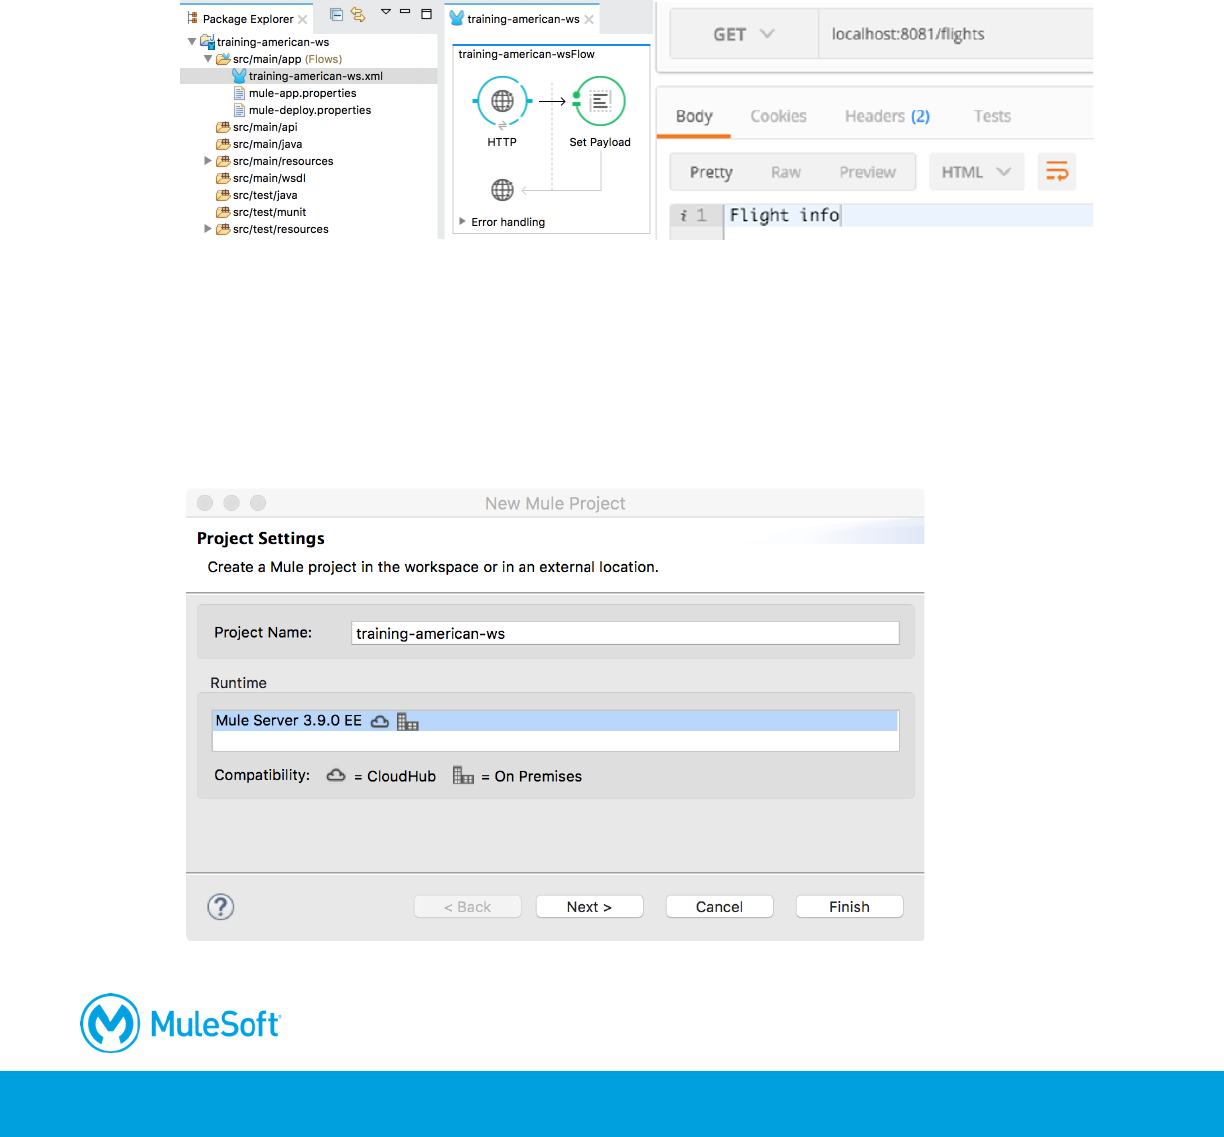
Create a Mule project
1. Open Anypoint Studio.
2. Select File > New > Mule Project.
3. In the New Mule Project dialog box, set the Project Name to training-american-ws.
4. Ensure the Runtime is set to the latest version of Mule.
5. Click Finish.
104
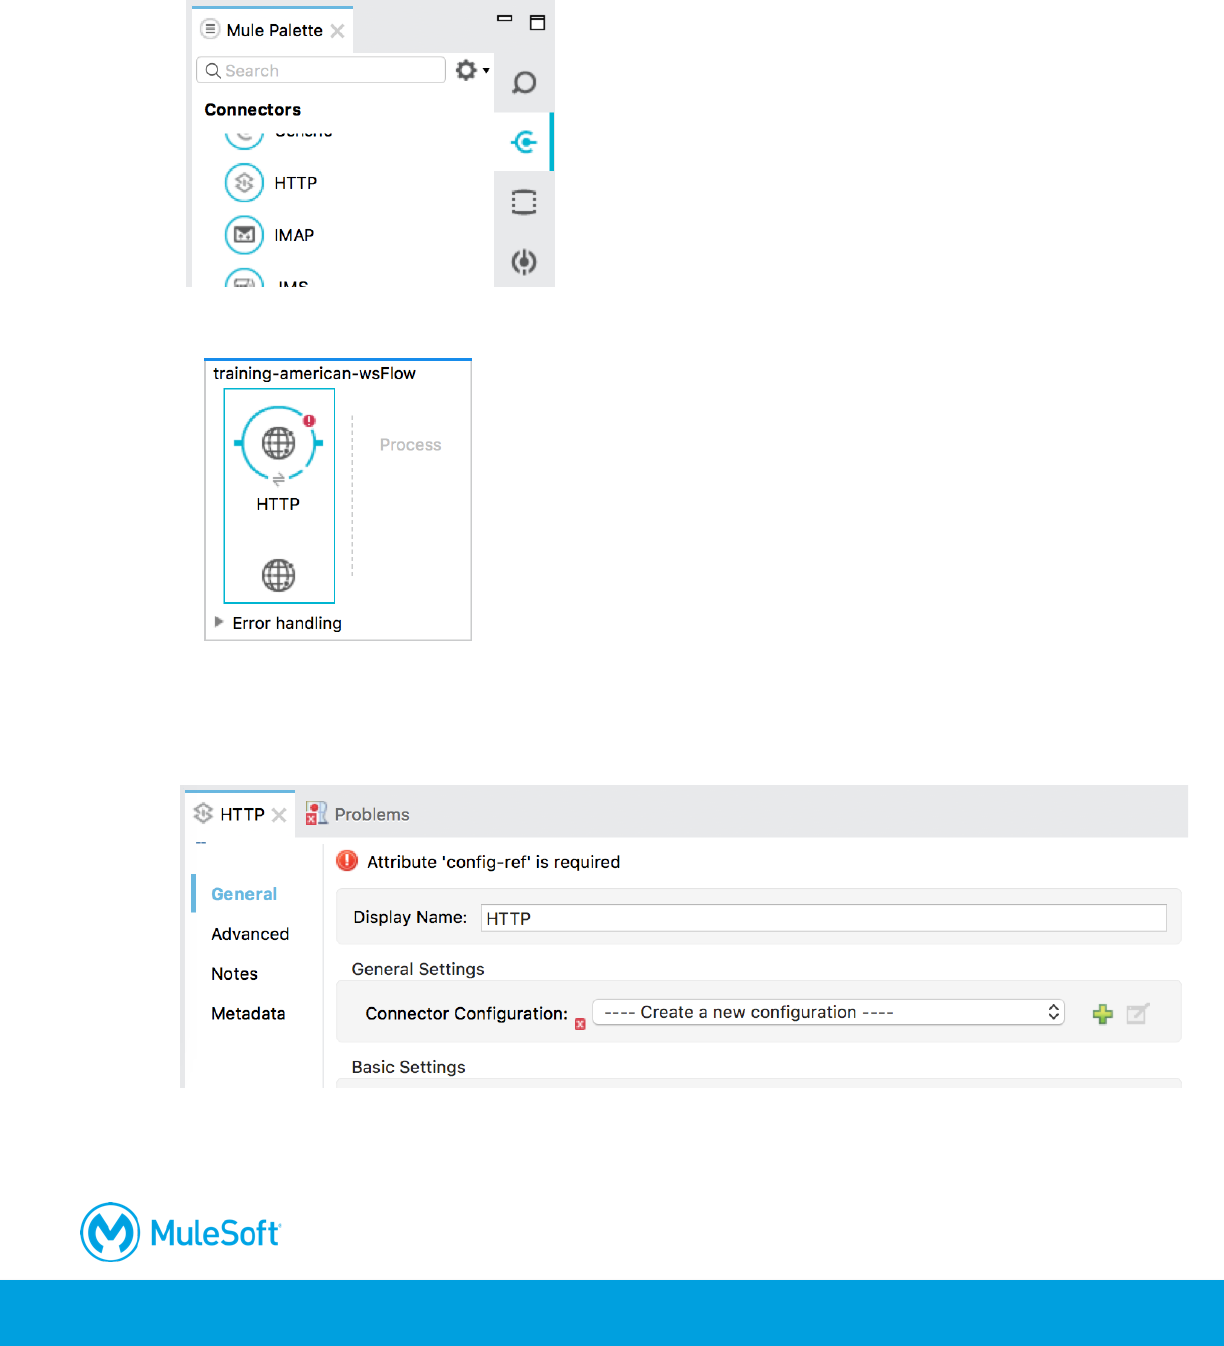
Create an HTTP connector endpoint to receive requests
6. In the Mule Palette, select the Connectors tab.
7. Drag an HTTP connector from the Mule Palette to the canvas.
8. Double-click the HTTP endpoint.
9. In the HTTP Properties view that opens at the bottom of the window, click the Add button next to
connector configuration.
105
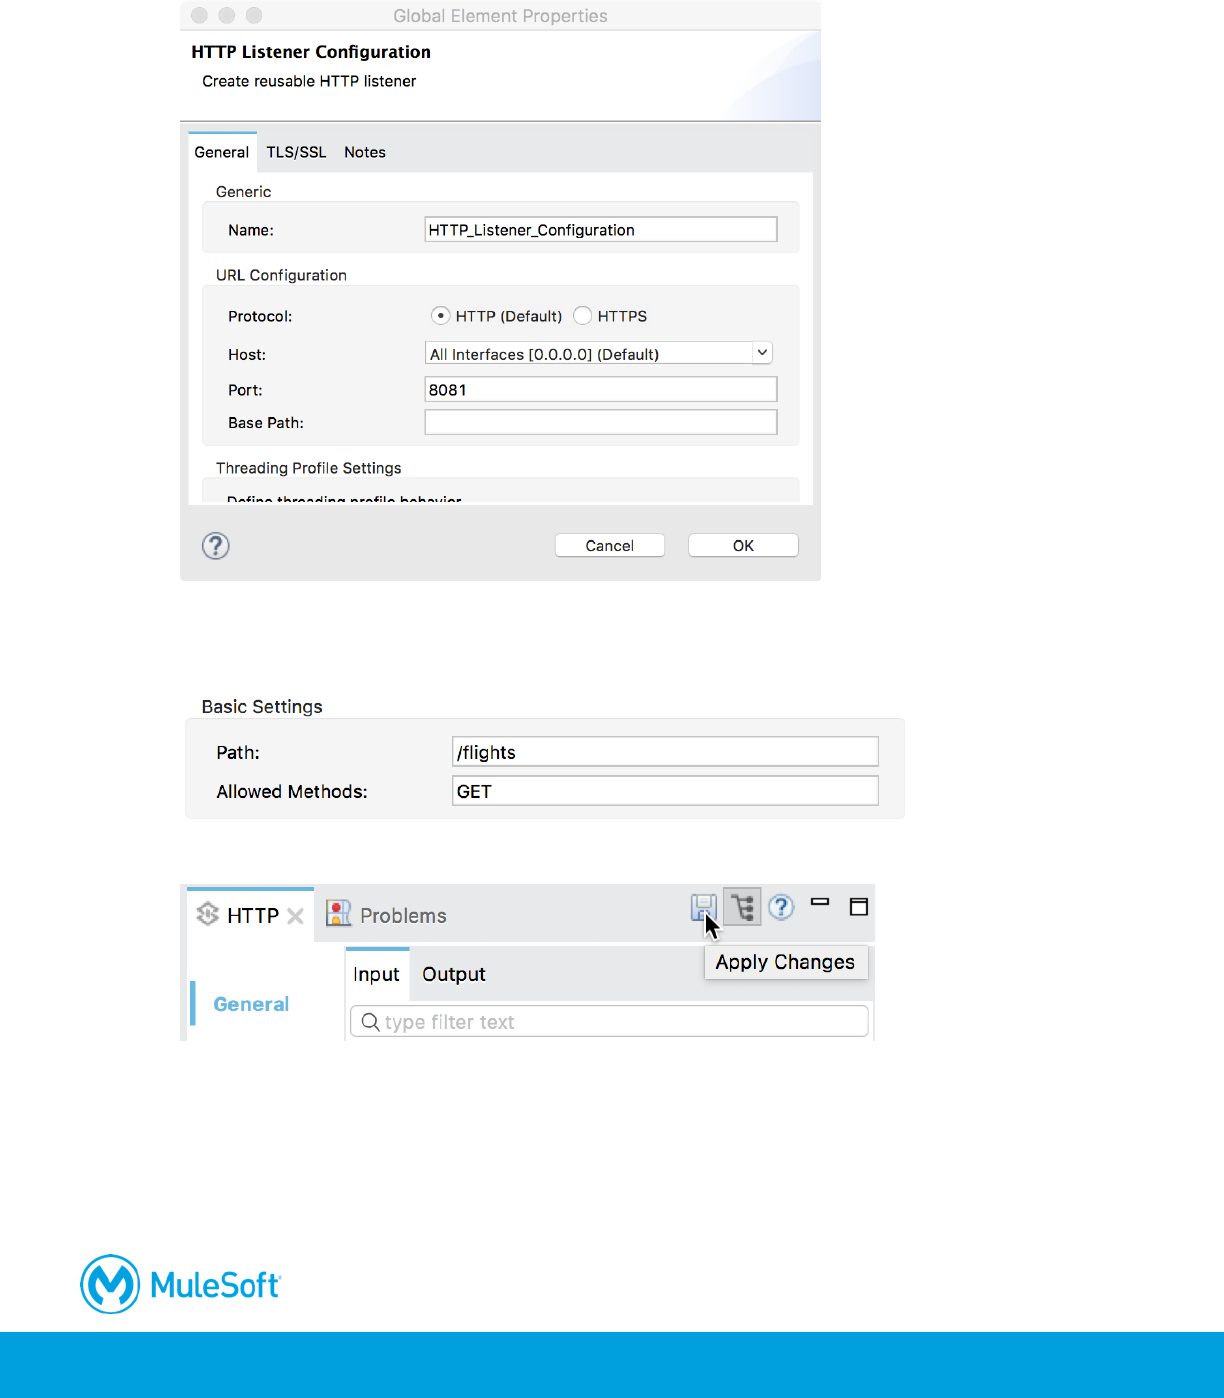
10. In the Global Element Properties dialog box, look at the default values and click OK.
11. In the HTTP properties view, set the path to /flights.
12. Set the allowed methods to GET.
13. Click the Apply Changes button; the errors in the Problems view should disappear.
106
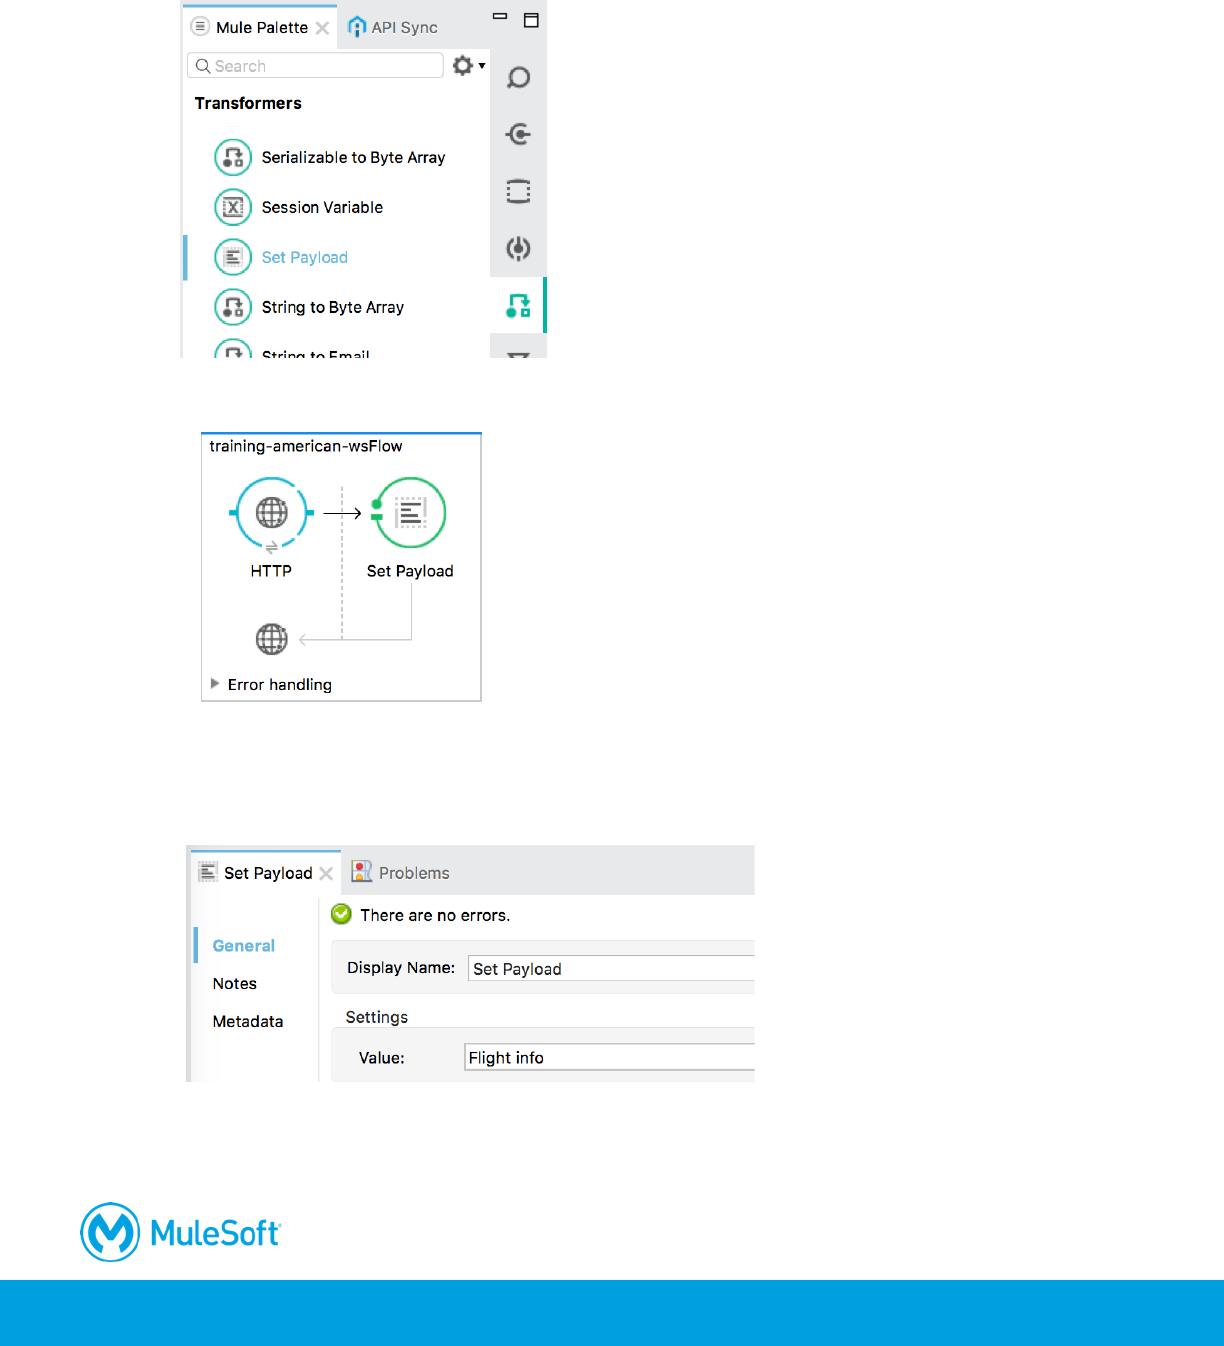
Display data
14. In the Mule Palette, select the Transformers tab.
15. Drag a Set Payload transformer from the Mule Palette into the process section of the flow.
Configure the Set Payload transformer
16. In the Set Payload properties view, set the value field to Flight info.
107
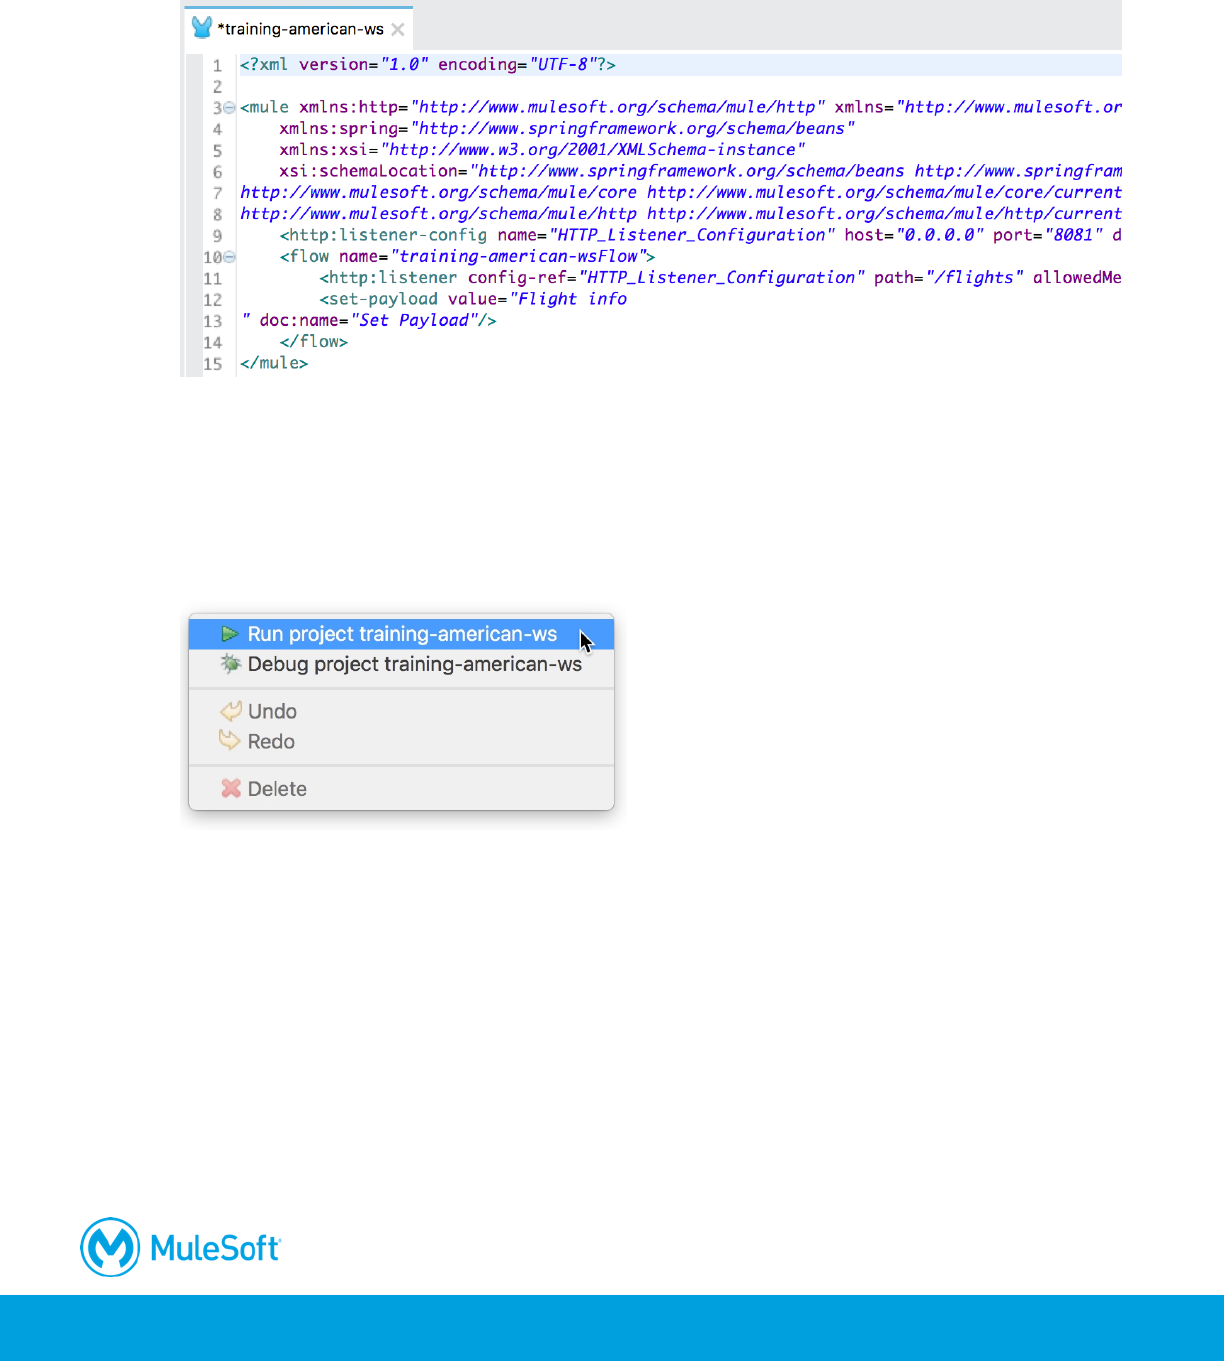
17. Click the Configuration XML link at the bottom of the canvas and examine the corresponding
XML.
18. Click the Message Flow link to return to the canvas.
19. Click the Save button or press Cmd+S or Ctrl+S.
Run the application
20. Right-click in the canvas and select Run project training-american-ws.
108
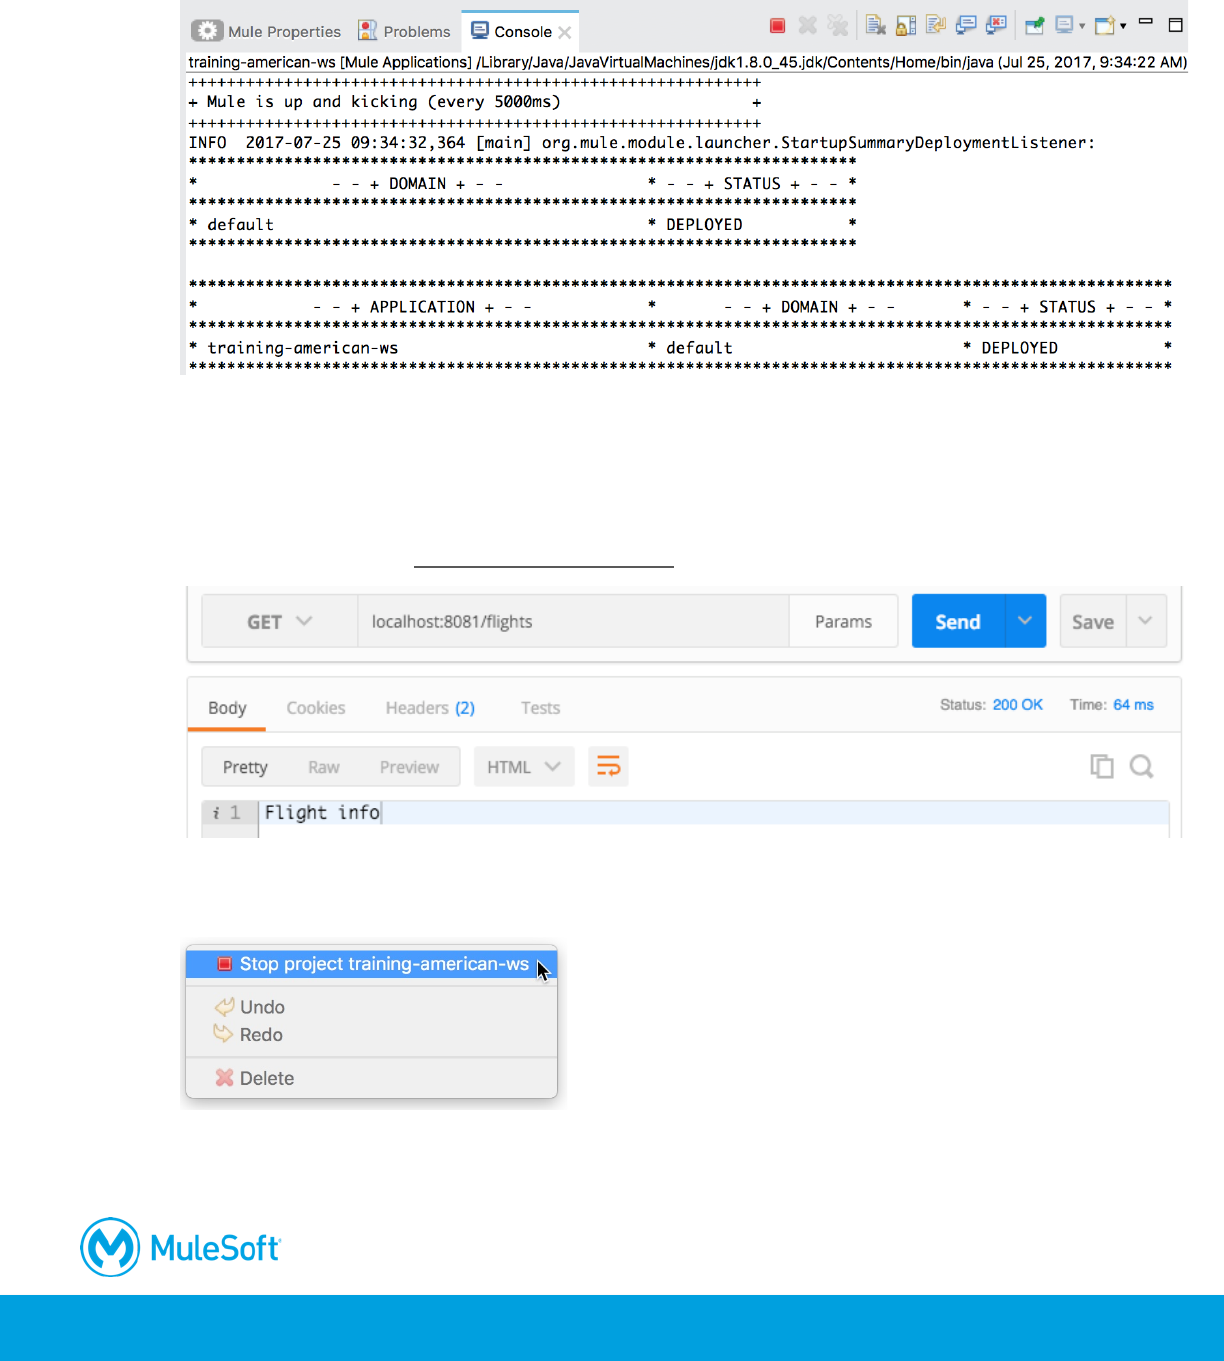
21. Watch the Console view; it should display information letting you know that both the Mule
runtime and the training-american-ws application started.
Test the application
22. Return to Postman.
23. Make sure the method is set to GET and that no headers or body are set for the request.
24. Make a GET request to http://localhost:8081/flights; you should see Flight info displayed.
25. Return to Anypoint Studio.
26. Right-click in the canvas and select Stop project training-american-ws.
109
Walkthrough 4-2: Connect to data (MySQL database)
In this walkthrough, you connect to a database and retrieve data from a table that contains flight
information. You will:
• Add a Database connector endpoint.
• Configure a Database connector that connects to a MySQL database (or optionally an in-
memory Derby database if you do not have access to port 3306).
• Configure the Database endpoint to use that Database connector.
• Write a query to select data from a table in the database.
Locate database information
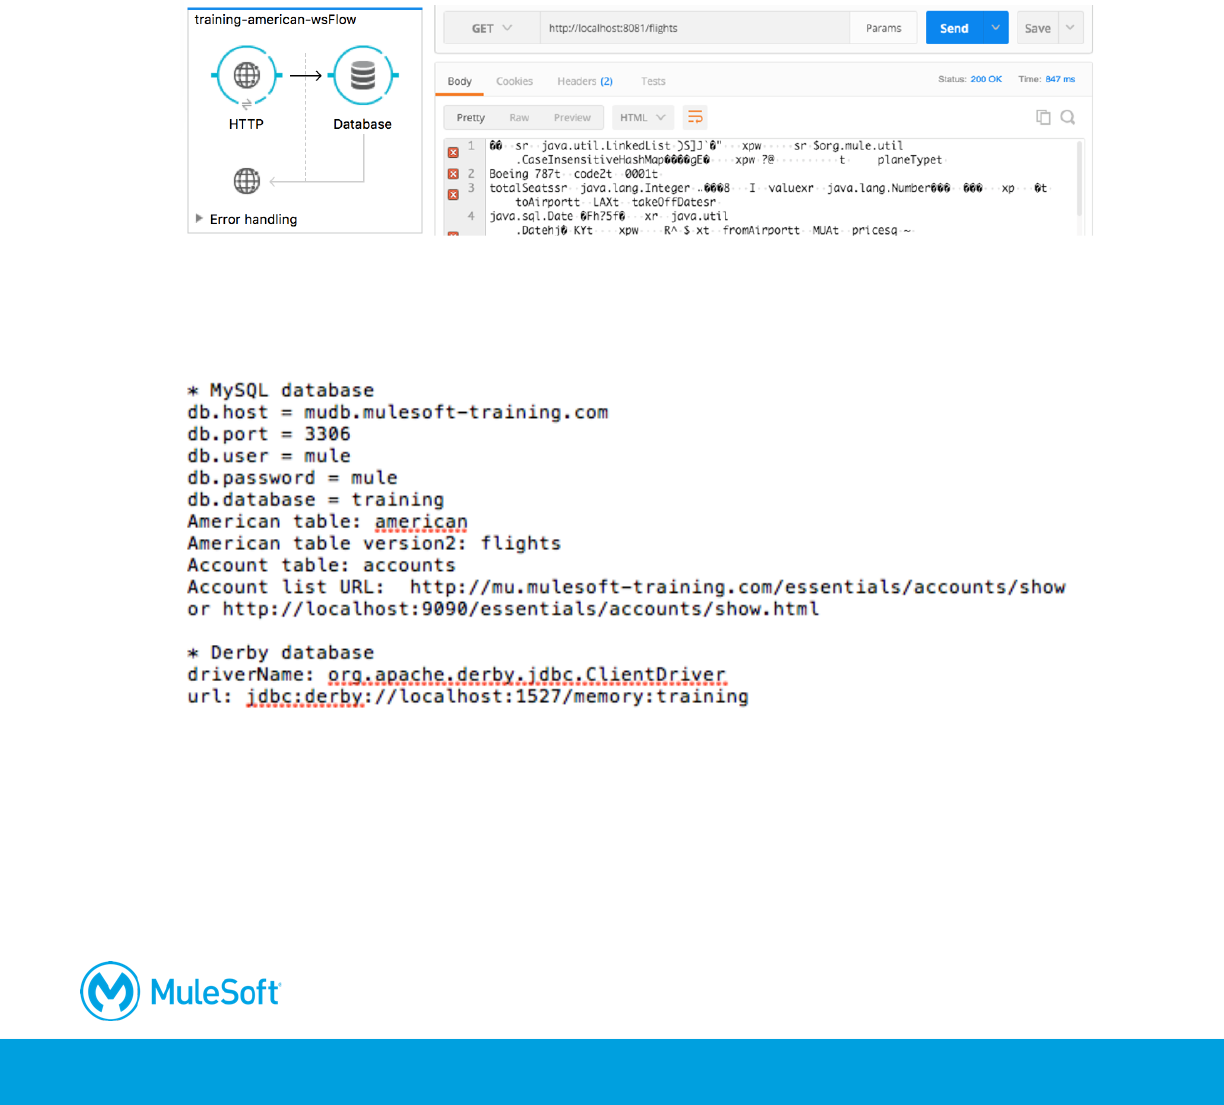
1. Return to the course snippets.txt file and locate the MySQL and Derby database information.
Note: The database information you see may be different than what is shown here; the values in
the snippets file differ for instructor-led and self-study training classes.
Add a Database connector endpoint
2. Return to Anypoint Studio.
3. Right-click the Set Payload message processor and select Delete.
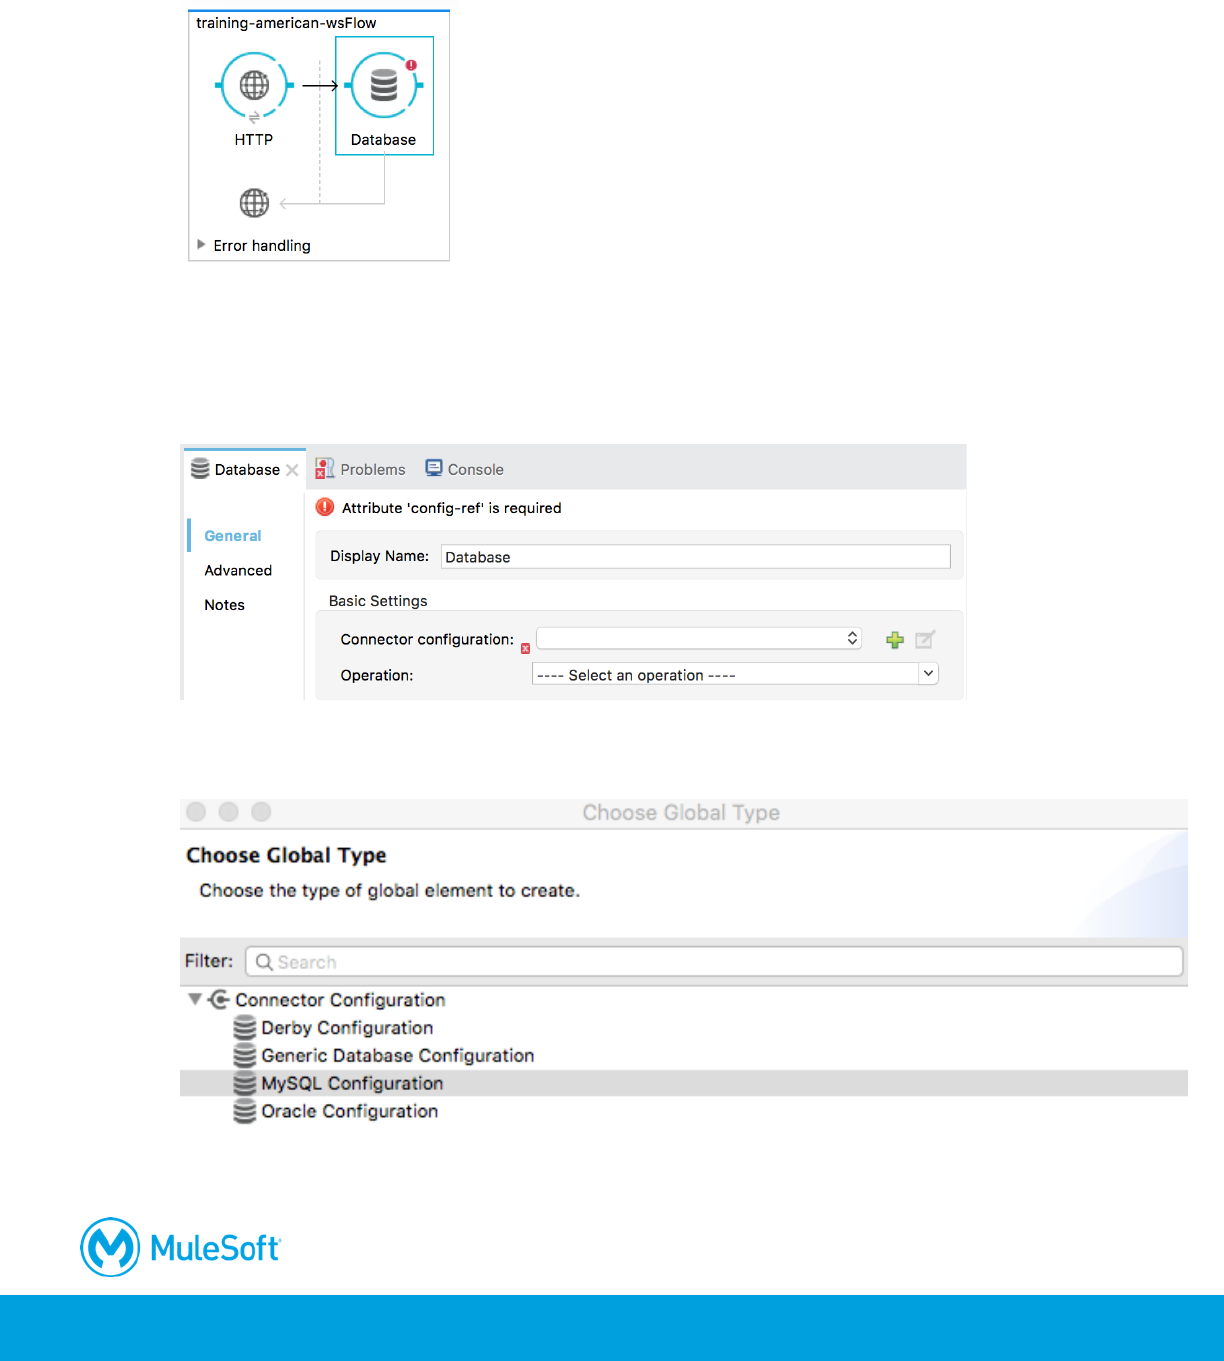
110
4. In the Mule Palette, select the Connectors tab.
5. Drag a Database connector to the process section of the flow.
Option 1: Configure a MySQL Database connector (if you have access to port 3306)
6. Double-click the Database endpoint.
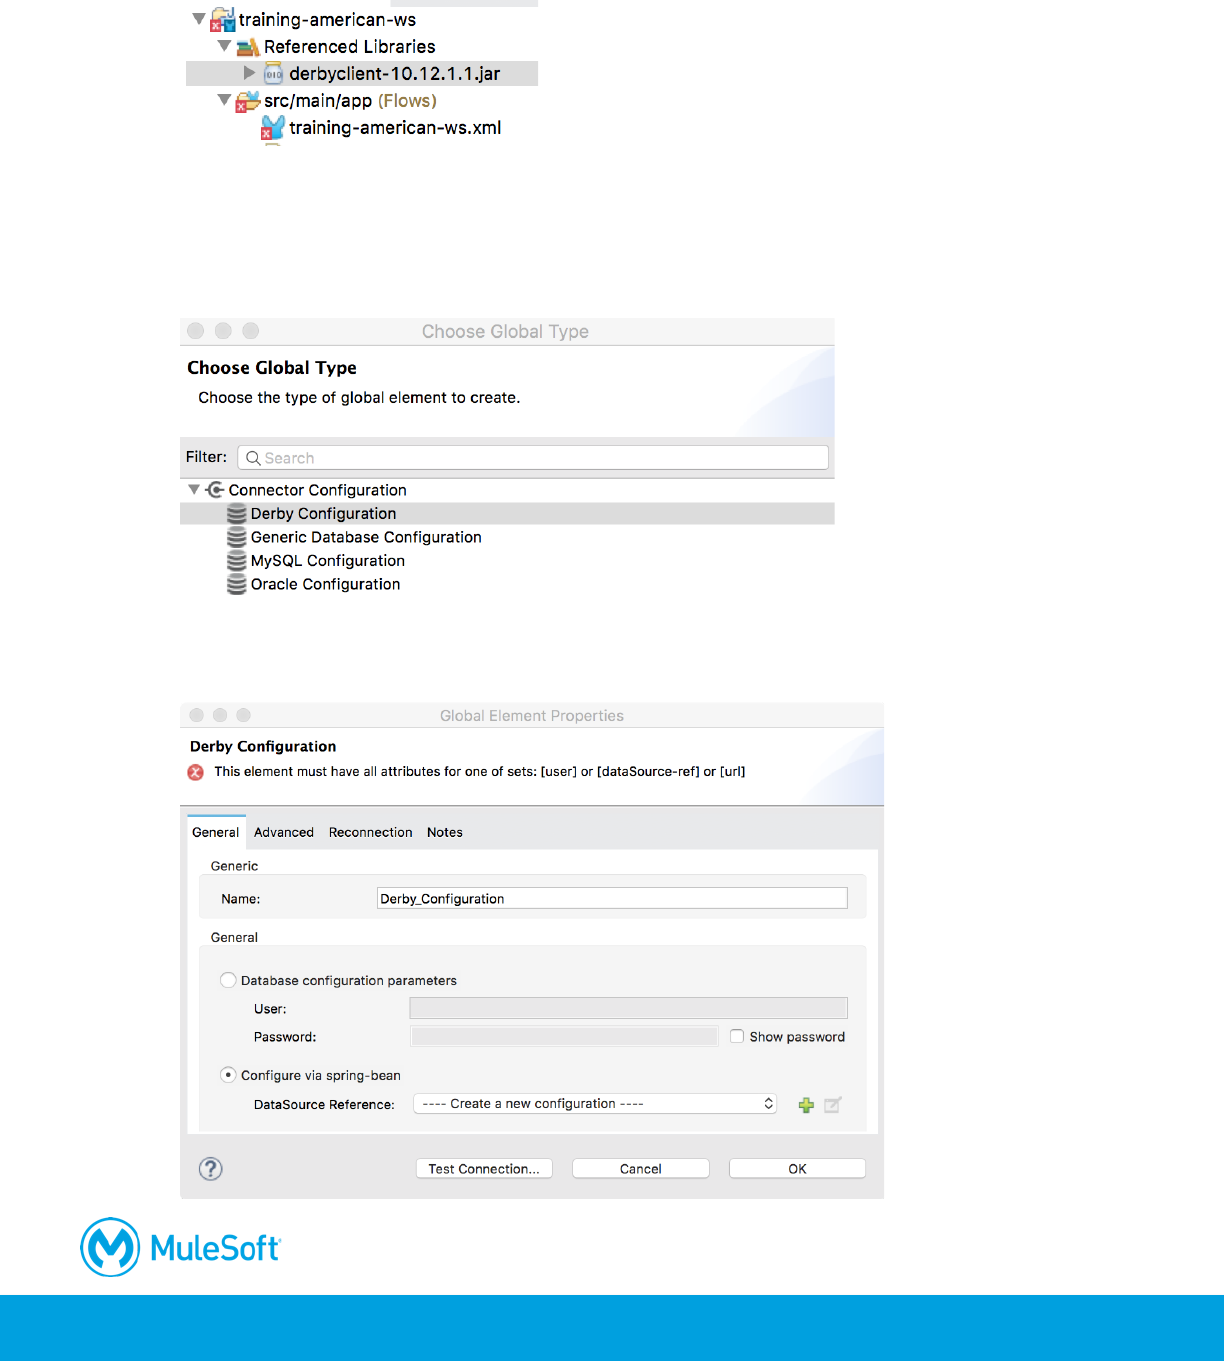
7. In the Database properties view, click the Add button next to connector configuration.
8. In the Choose Global Type dialog box, select Connector Configuration > MySQL Configuration
and click OK.
111
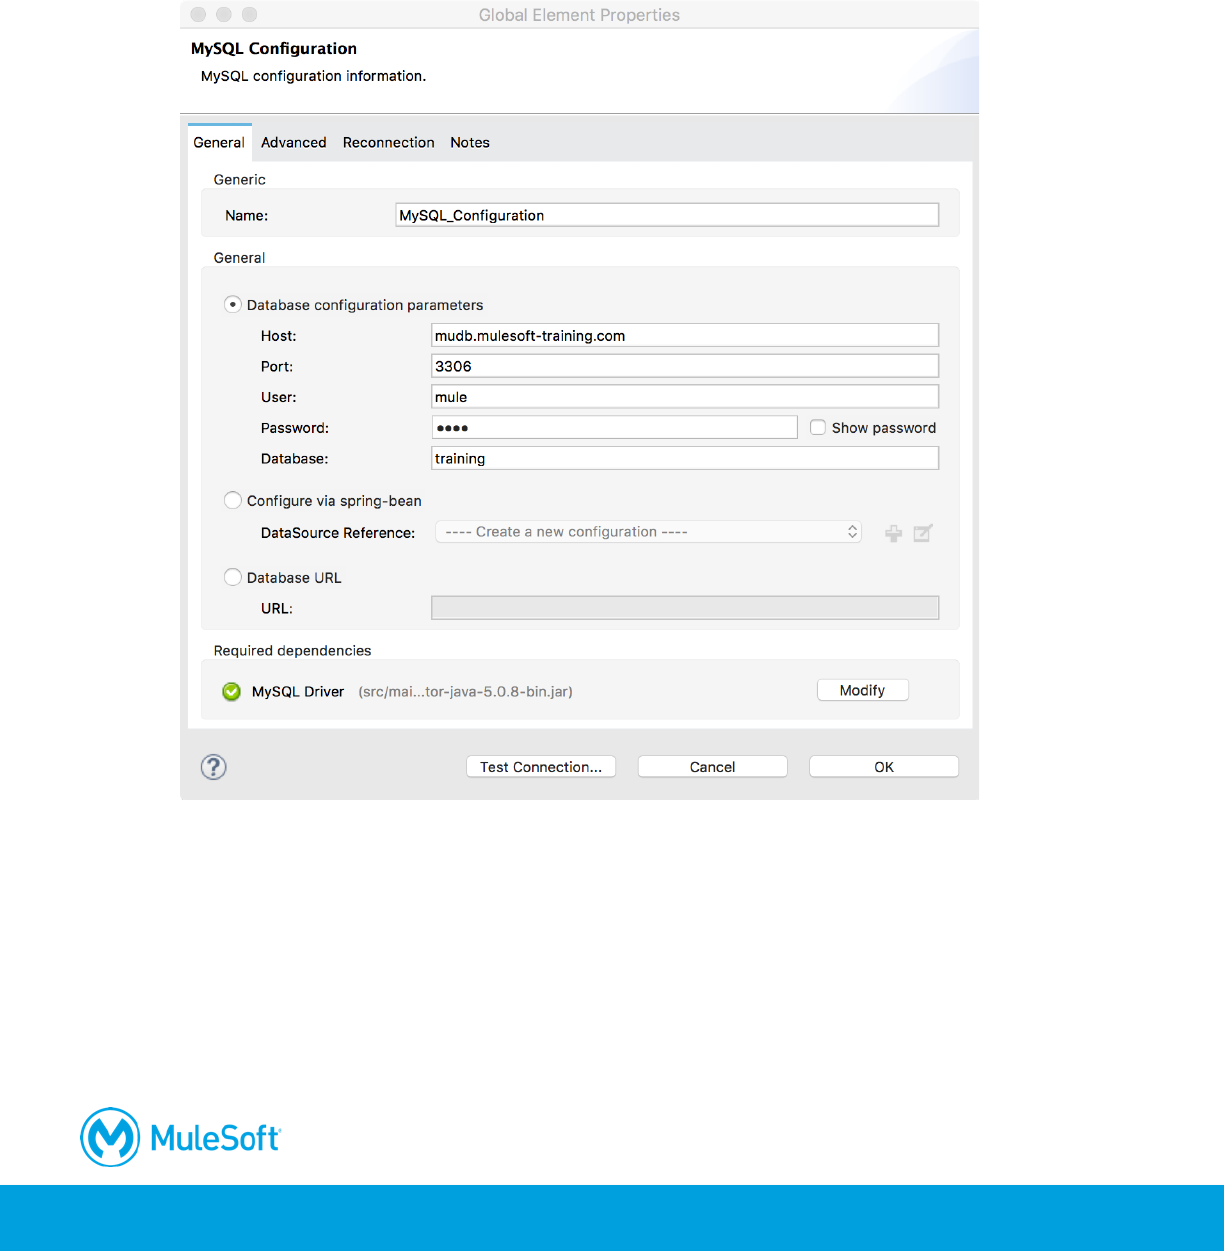
9. In the Global Element Properties dialog box, set the server, port, user, password, and database
values to the values listed in the course snippets.txt file.
10. Under Required dependencies, click the Add File button next to MySQL Driver.
11. Navigate to the student files folder, select the MySQL JAR file located in the jars folder, and
click Open.
112
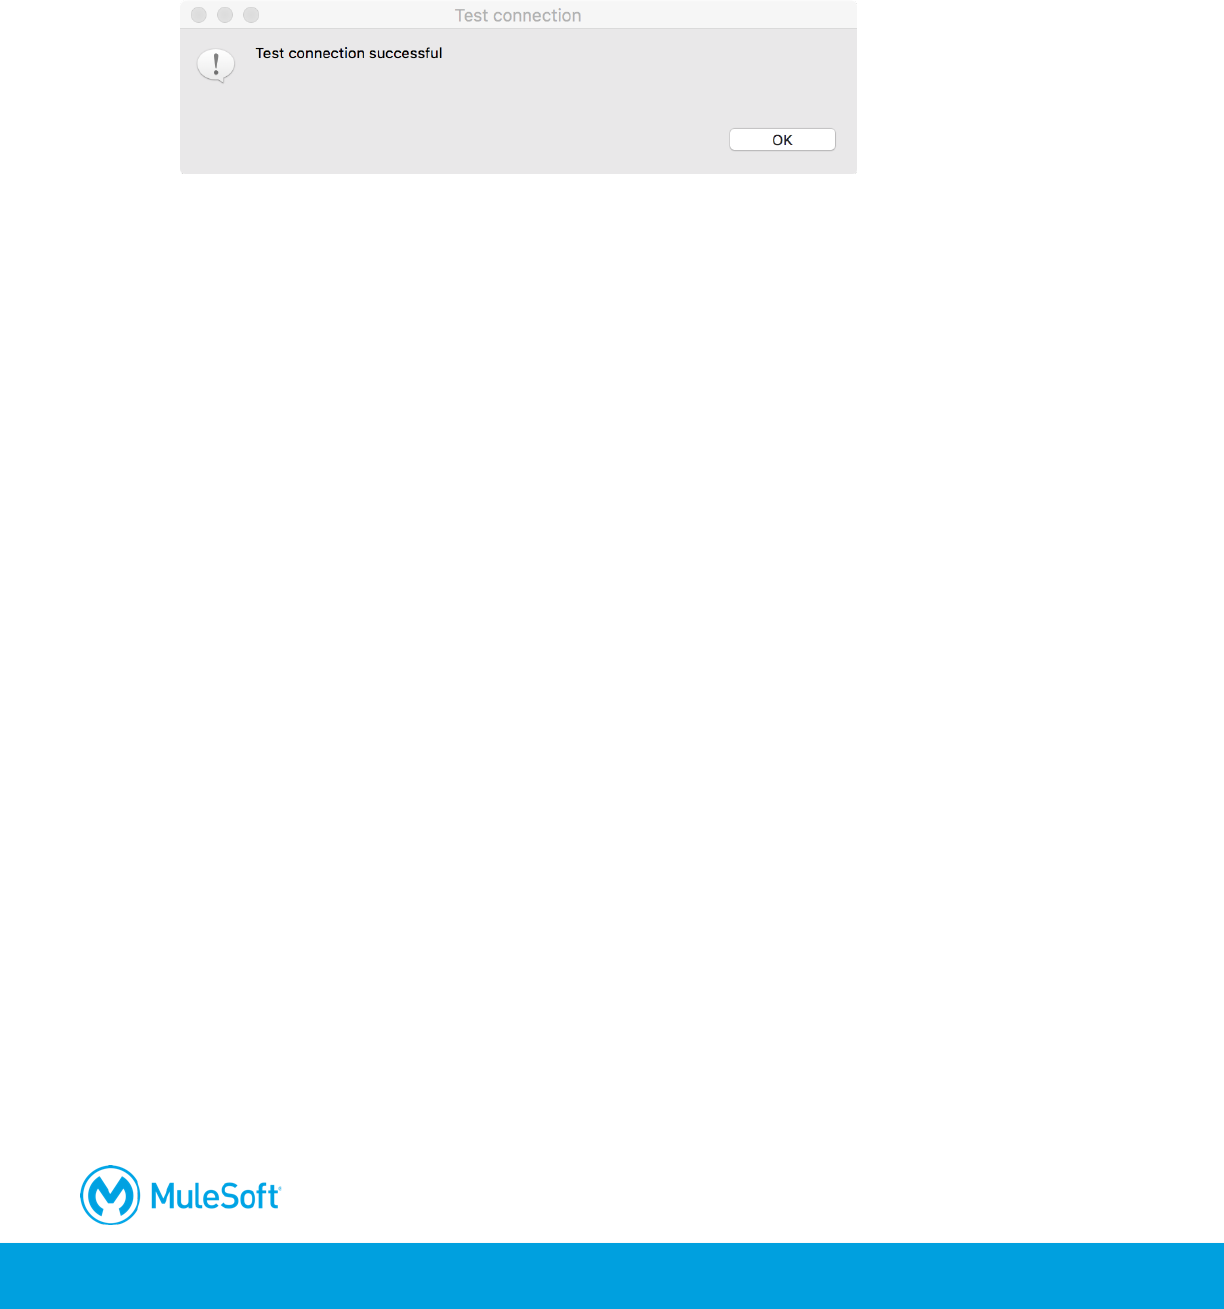
12. Back in the Global Element Properties dialog box, click the Test Connection button; you should
get a successful test dialog box.
Note: Make sure the connection succeeds before proceeding.
Note: If the connectivity test fails, make sure you are not behind a firewall restricting access to
port 3306. If you cannot access port 3306, use the instructions in the next section for option 2.
13. Click OK to close the dialog box.
14. Click OK to close the Global Element Properties dialog box.
Option 2: Configure a Derby Database connector (if no access to port 3306)
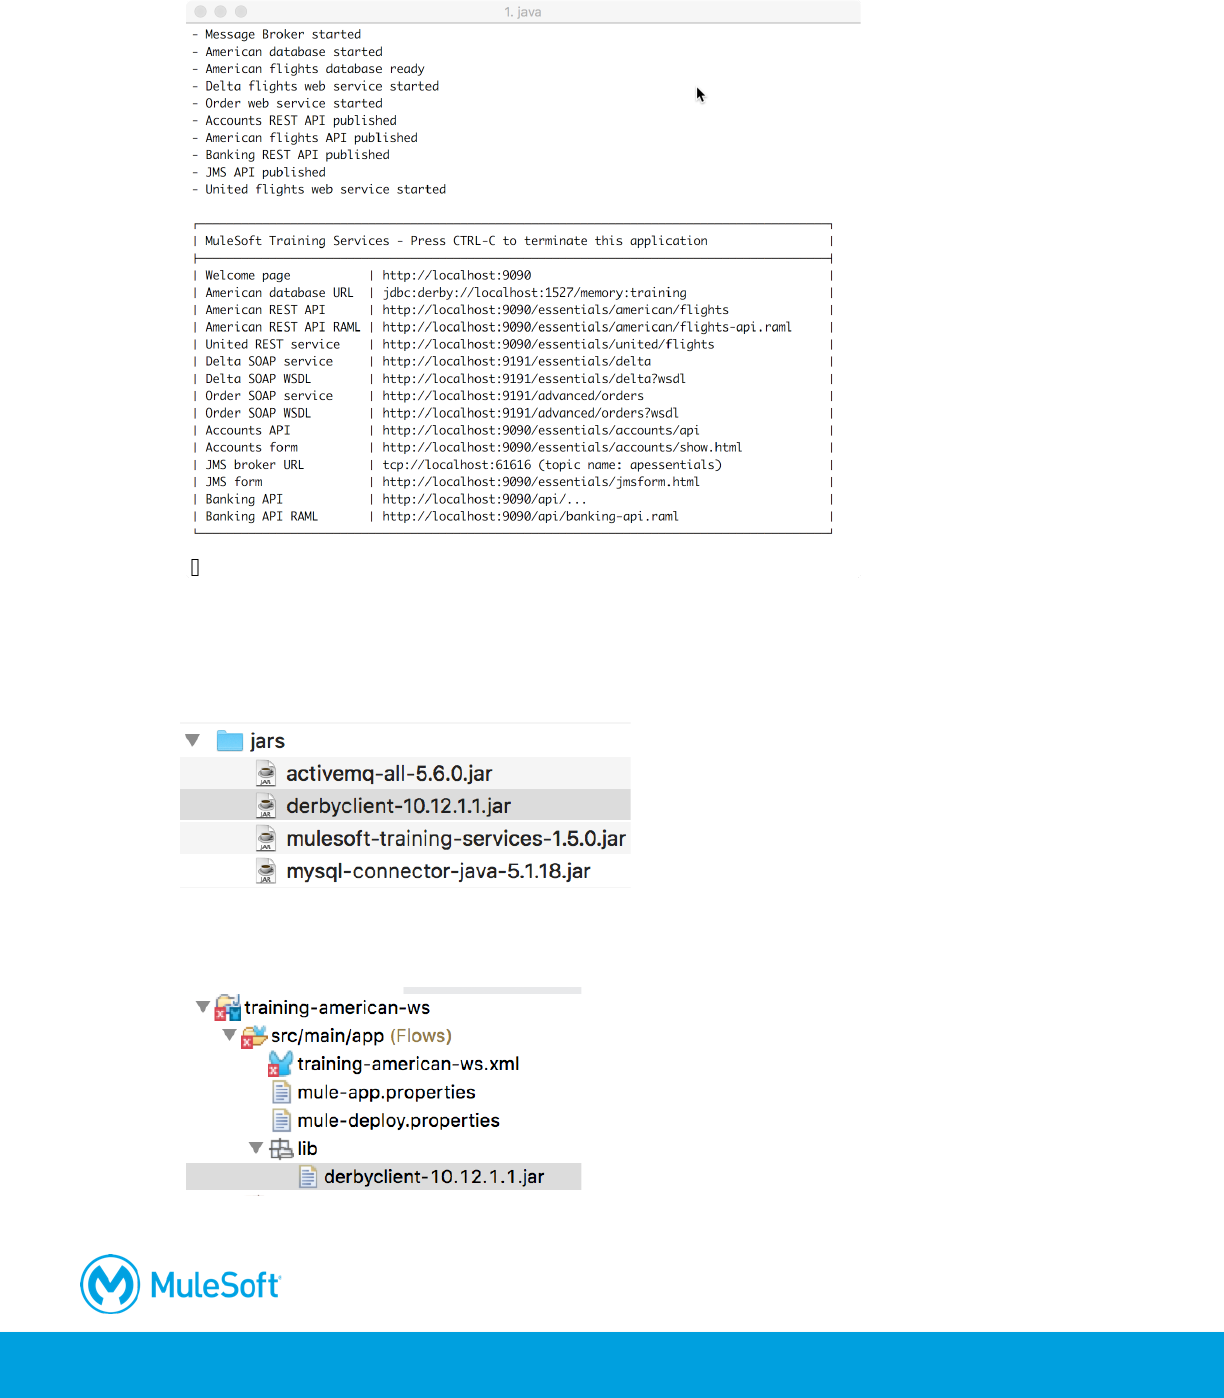
15. In a command-line interface, use the cd command to navigate to the folder containing the jars
folder of the student files.
16. Run the mulesoft-training-services.jar file.
java –jar mulesoft-training-services-X.X.X.jar
Note: Replace X.X.X with the version of the JAR file, for example 1.5.0.
Note: The application uses ports 1527, 9090, 9091, and 61616. If any of these ports are already
in use, you can change them when you start the application as shown in the following code.
java -jar mulesoft-training-services-X.X.X.jar --database.port=1530 --
ws.port=9092 --spring.activemq.broker-url=tcp://localhost:61617 --
server.port=9193
113
17. Look at the output and make sure all the services started.
Note: When you want to stop the application, return to this window and press Ctrl+C.
18. In the computer's file explorer, return to the student files folder and locate the derbyclient.jar file
in the jars folder.
19. Copy and paste or drag this JAR file into the src/main/app/lib folder of the project in Anypoint
Studio.
114
20. Right-click the JAR file and select Build Path > Add to Build Path; you should now see the JAR
file in the project's Referenced Libraries.
21. Double-click the Database endpoint in the canvas.
22. In the Database properties view, click the Add button next to connector configuration.
23. In the Choose Global Type dialog box, select Connector Configuration > Derby Configuration
and click OK.
24. In the Global Element Properties dialog box, select Configure via spring-bean.
25. Click the Add button next to DataSource Reference.
115
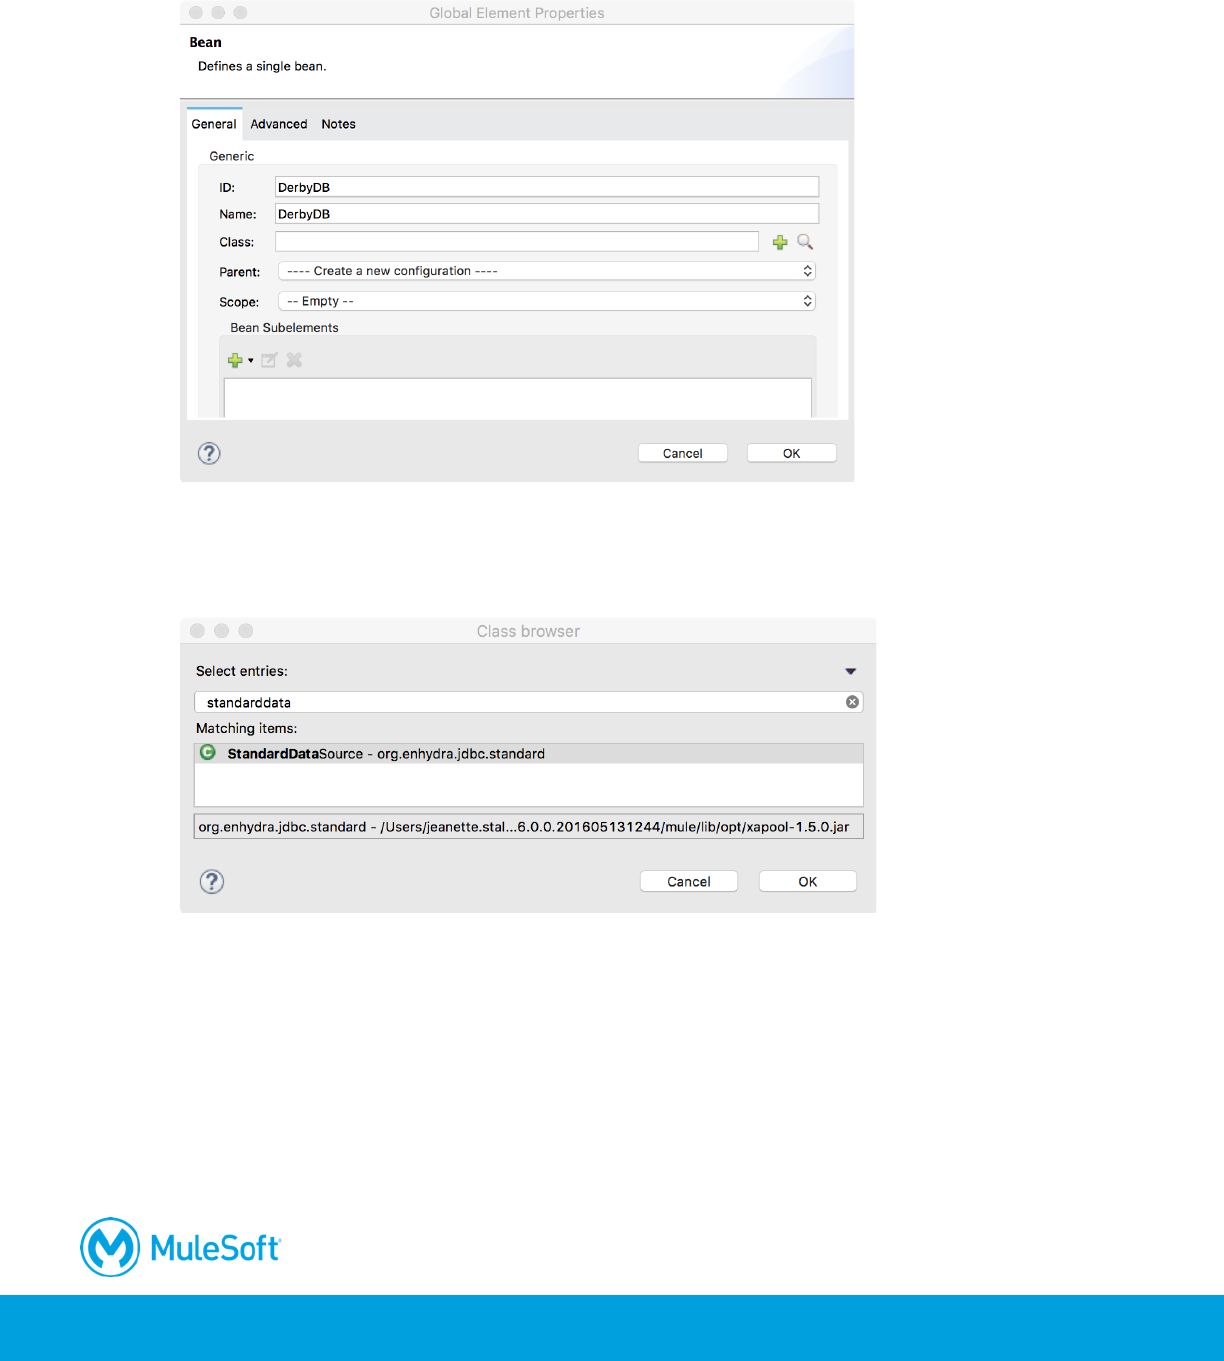
26. On the Bean page of the Global Element Properties dialog box, set the ID and name to
DerbyDB.
27. Click the Browse for Java class button next to class.
28. In the Class browser dialog box, start typing StandardDataSource and select the matching item
for StandardDataSource – org.enhydra.jdbc.standard.
29. Click OK.
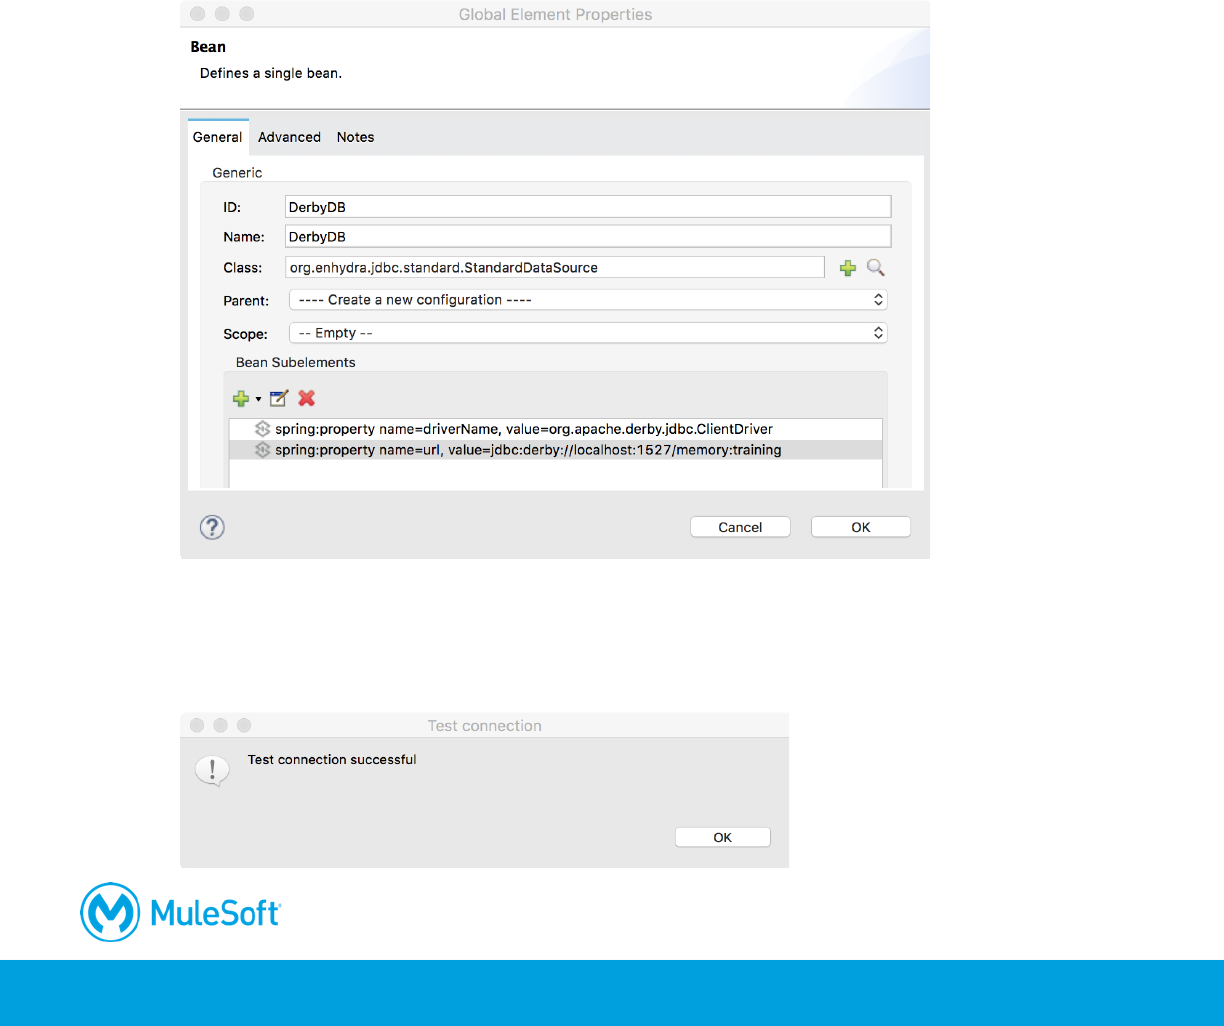
30. On the Bean page of the Global Element Properties dialog box, click the Add button under Bean
Subelements and select Add Property.
31. In the Property dialog box, set the following values:
• Name: driverName
• Value: org.apache.derby.jdbc.ClientDriver
Note: You can copy this value from the course snippets.txt file.
116
32. Click Finish.
33. Click the Add button under Bean Subelements again and select Add Property.
34. In the Property dialog box, set the following values:
• Name: url
• Value: jdbc:derby://localhost:1527/memory:training
Note: You can copy this value from the course snippets.txt file.
Note: If you changed the database port when you started the mulesoft-training-services
application, be sure to use the new value here.
35. Click Finish.
36. On the Bean page of the Global Element Properties dialog box, click OK.
37. On the Derby Configuration page of the Global Element Properties dialog box, click Test
Connection; you should get a successful test dialog box.
Note: Make sure the connection succeeds before proceeding.

117
38. Click OK to close the dialog box.
39. Click OK to close the Global Element Properties dialog box.
Write a query to return all flights
40. In the Database properties view, set the operation to Select.
41. Add a query to select all records from the american table.
SELECT *
FROM american
Test the application
42. Run the project.
43. In the Save and launch dialog box, select Always save resources before launching and click
OK.
118
44. Watch the console, and wait for the application to start.
45. Once it has started, return to Postman.
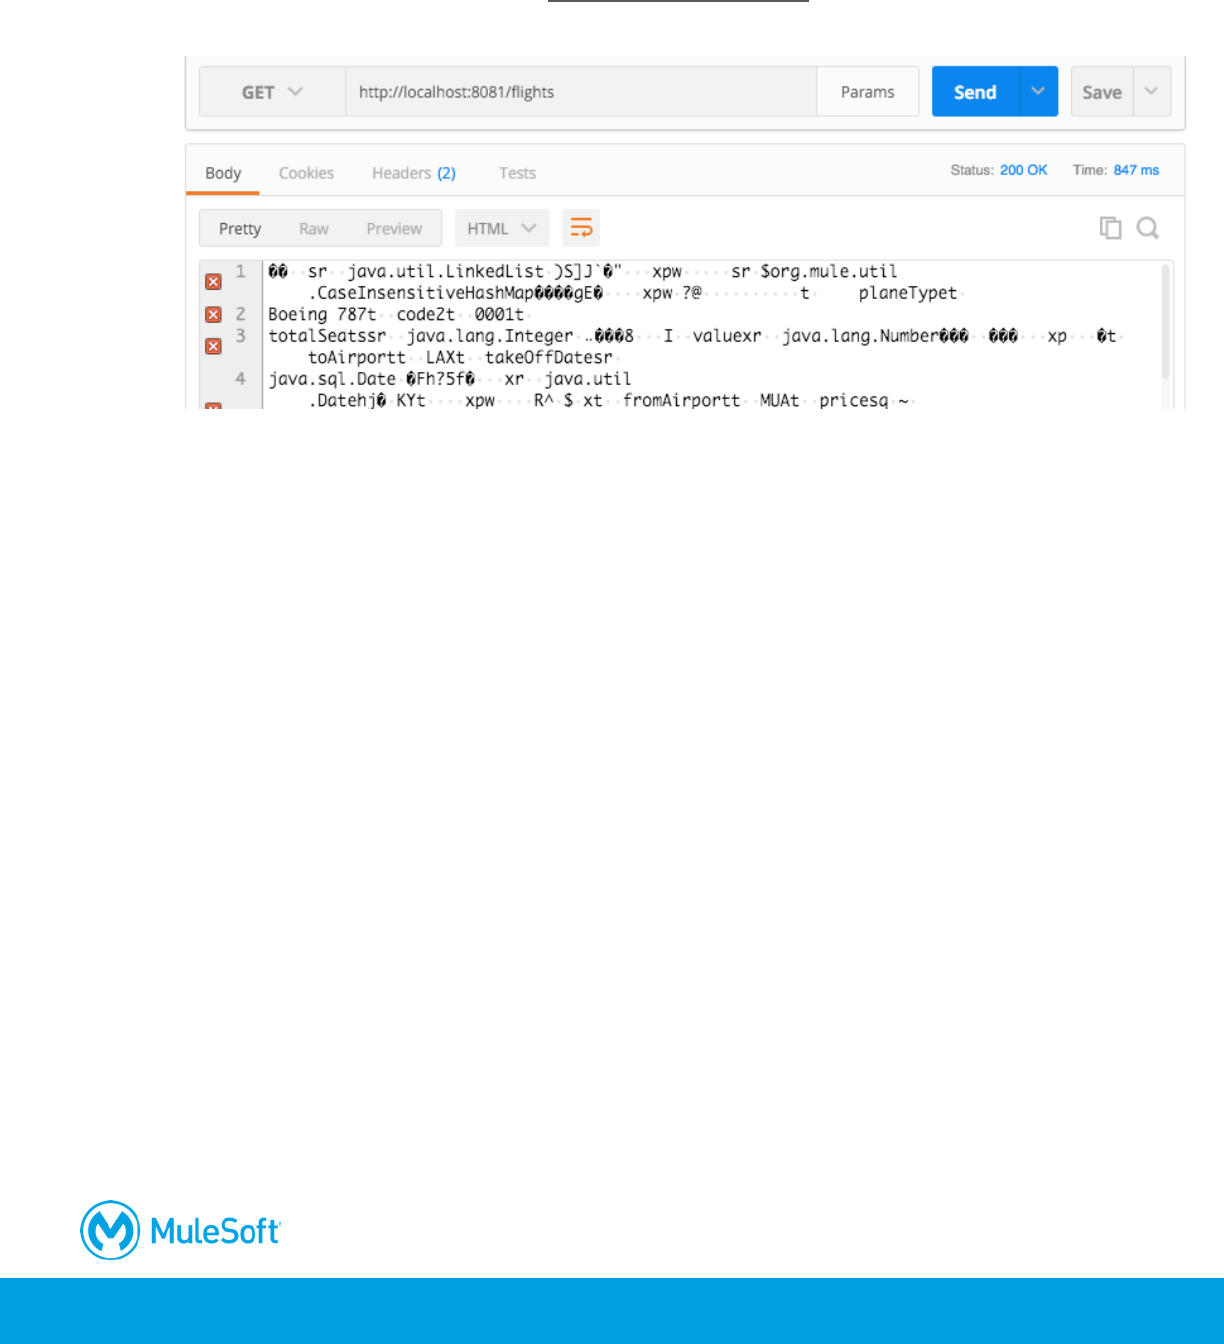
46. In Postman, make another request to http://localhost:8081/flights; you should get some garbled
plain text displayed – the tool's best representation of Java objects.
47. Return to Anypoint Studio.
48. Stop the project.
119
Walkthrough 4-3: Transform data
In this walkthrough, you transform and display the account data into JSON. You will:
• Use the Object to JSON transformer.
• Replace it with a Transform Message component.
• Use the DataWeave visual mapper to change the response to a different JSON structure.
Add an Object to JSON transformer
1. In the Mule Palette, select the Transformers tab.
2. Drag an Object to JSON transformer from the Mule Palette and drop it after the Database
endpoint.
Test the application
3. Run the project.
120
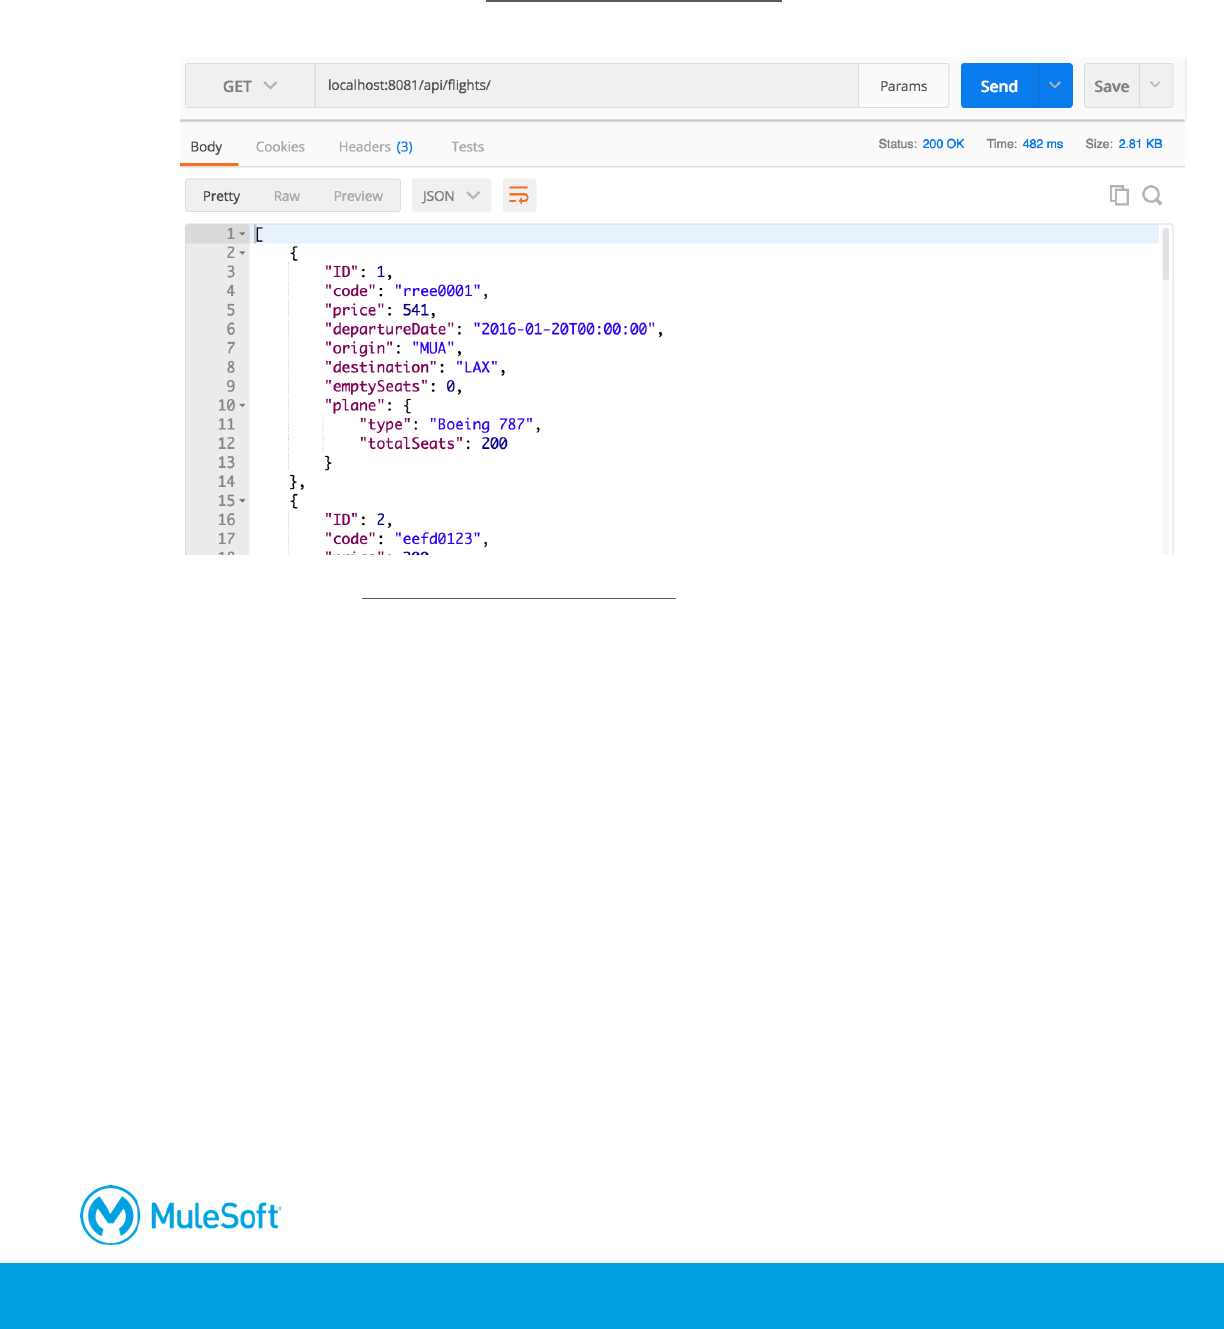
4. In Postman, send the same request; you should see the American flight data represented as
JSON.
Note: If you are using the local Derby database, the properties will be uppercase instead.
Review the data structure to be returned by the American flights API
5. Return to your American Flights API in Exchange.
6. Look at the example data returned for the /flights GET method.
7. Notice that the structure of the JSON being returned by the Mule application does not match this
JSON.

121
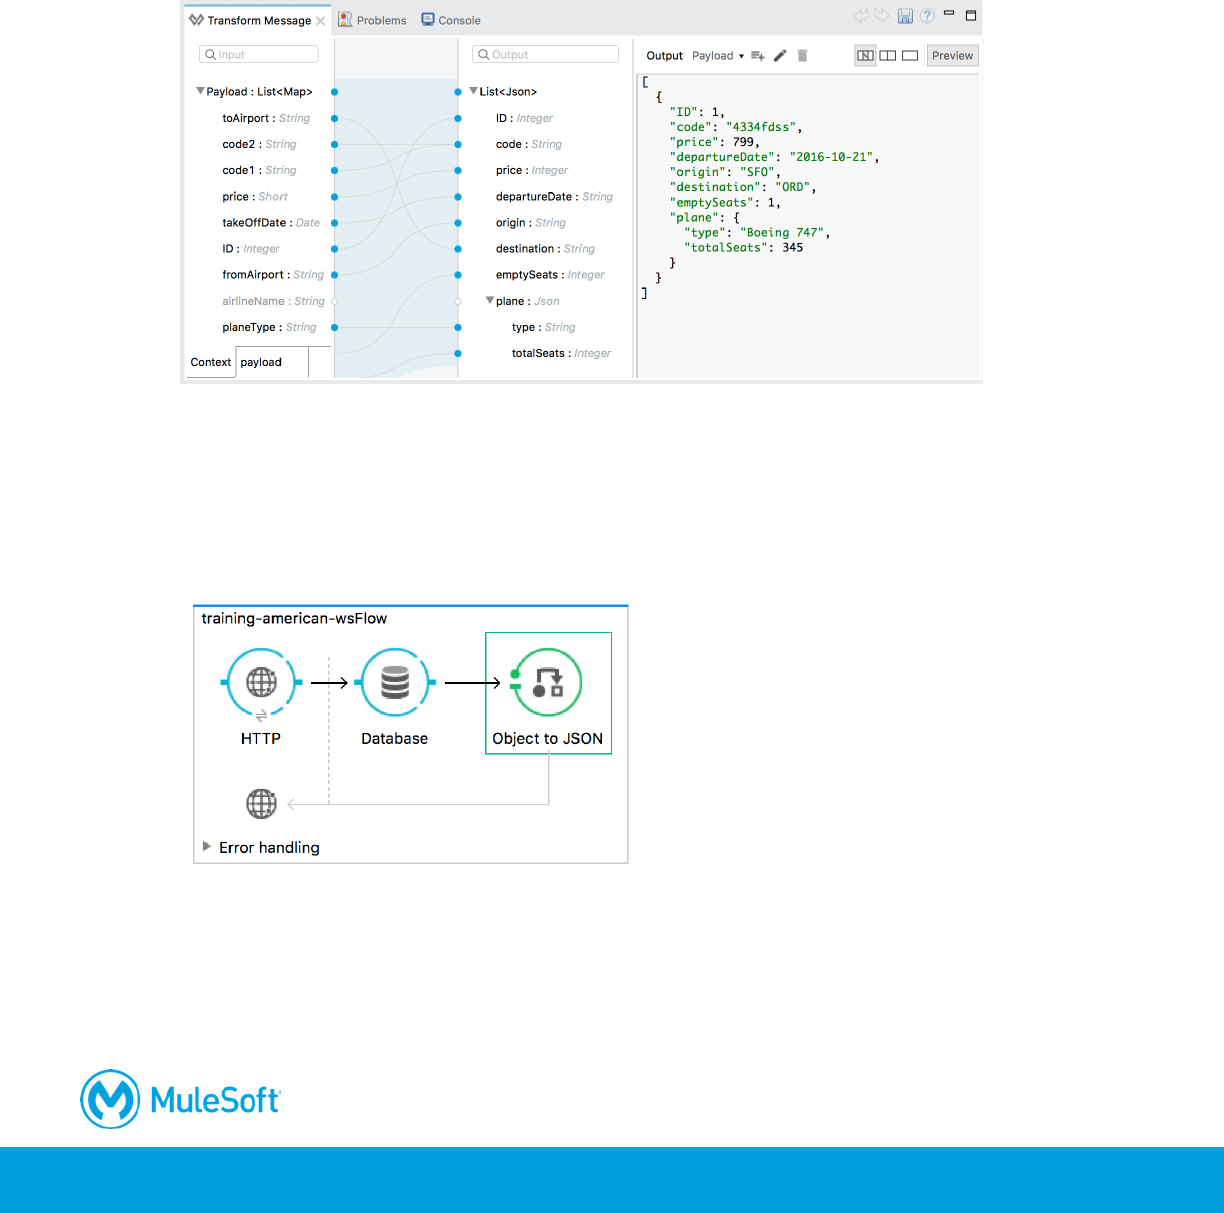
Add a Transform Message component
8. Return to Anypoint Studio and stop the project.
9. Right-click the Object to JSON transformer and select Delete.
10. In the Mule Palette, select the Components tab.
11. Drag a Transform Message component from the Mule Palette and drop it after the Database
endpoint.
Review metadata for the transformation input
12. Double-click the Transform Message component in the canvas.
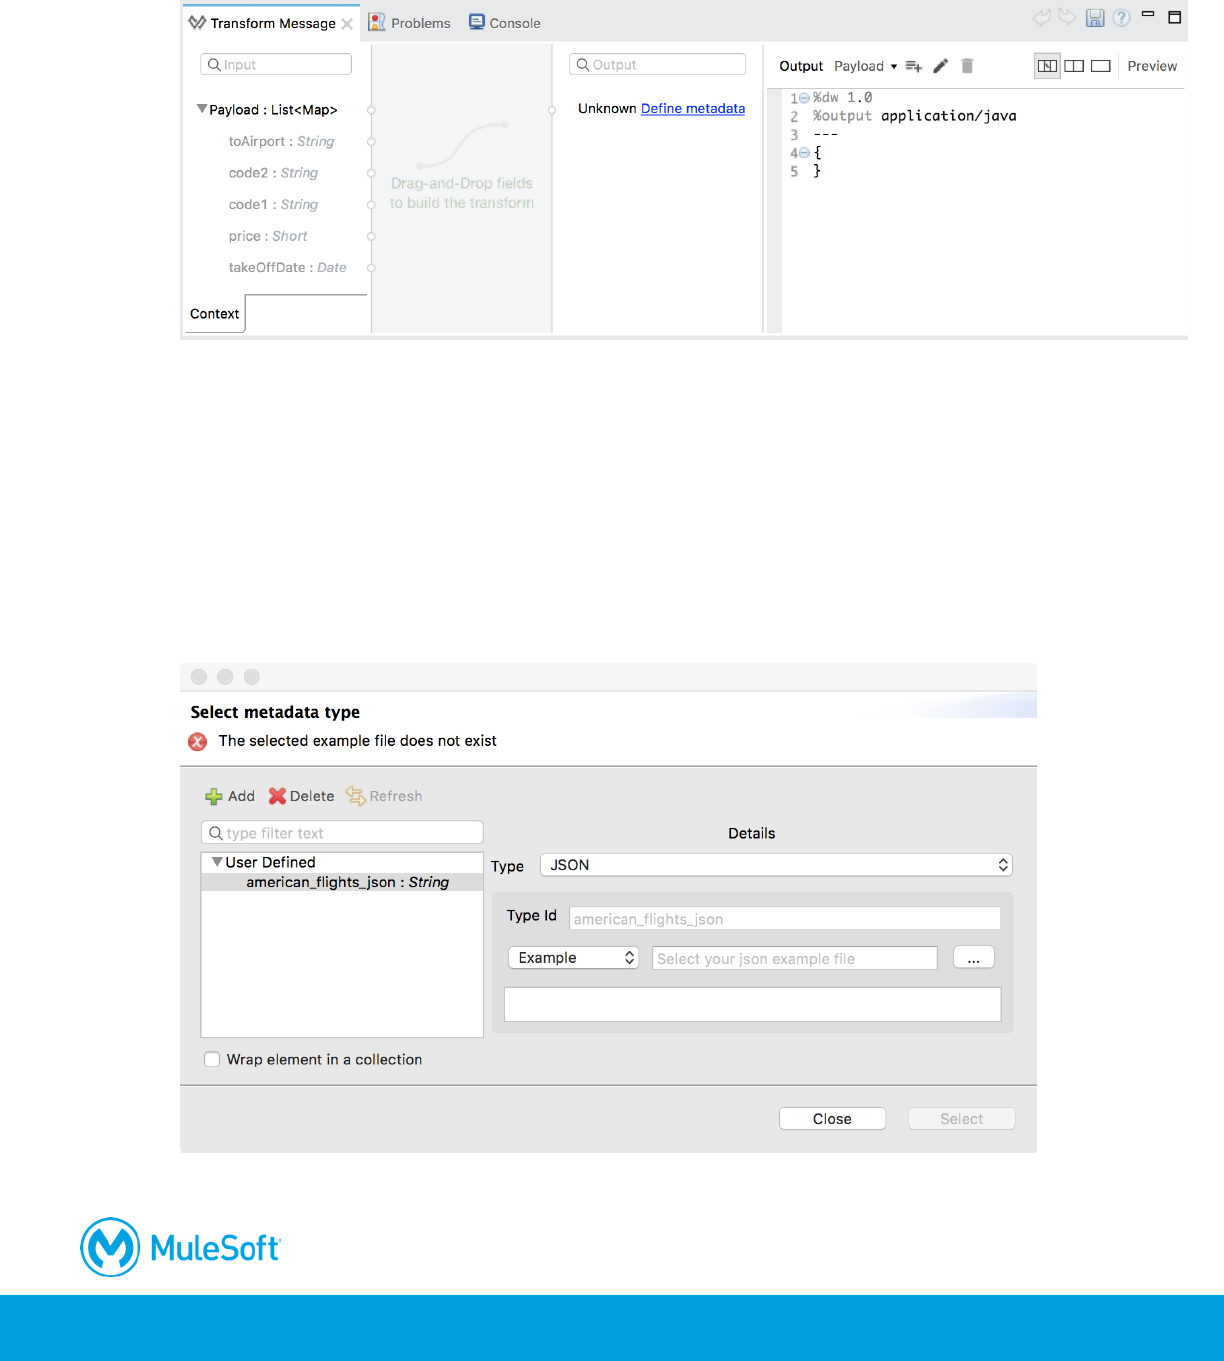
122
13. In the Transform Message properties view, look at the input section and review the payload
metadata; it should match the data returned by the Database endpoint.
Add metadata for the transformation output
14. Click the Define metadata link in the output section.
15. In the Select metadata type dialog box, click the Add button.
16. In the Create new type dialog box, set the type id to american_flights_json.
17. Click Create type.
18. Back in the Set metadata type dialog box, set the type to JSON.
19. Change the Schema selection to Example.
20. Click the browse button and navigate to the course student files.
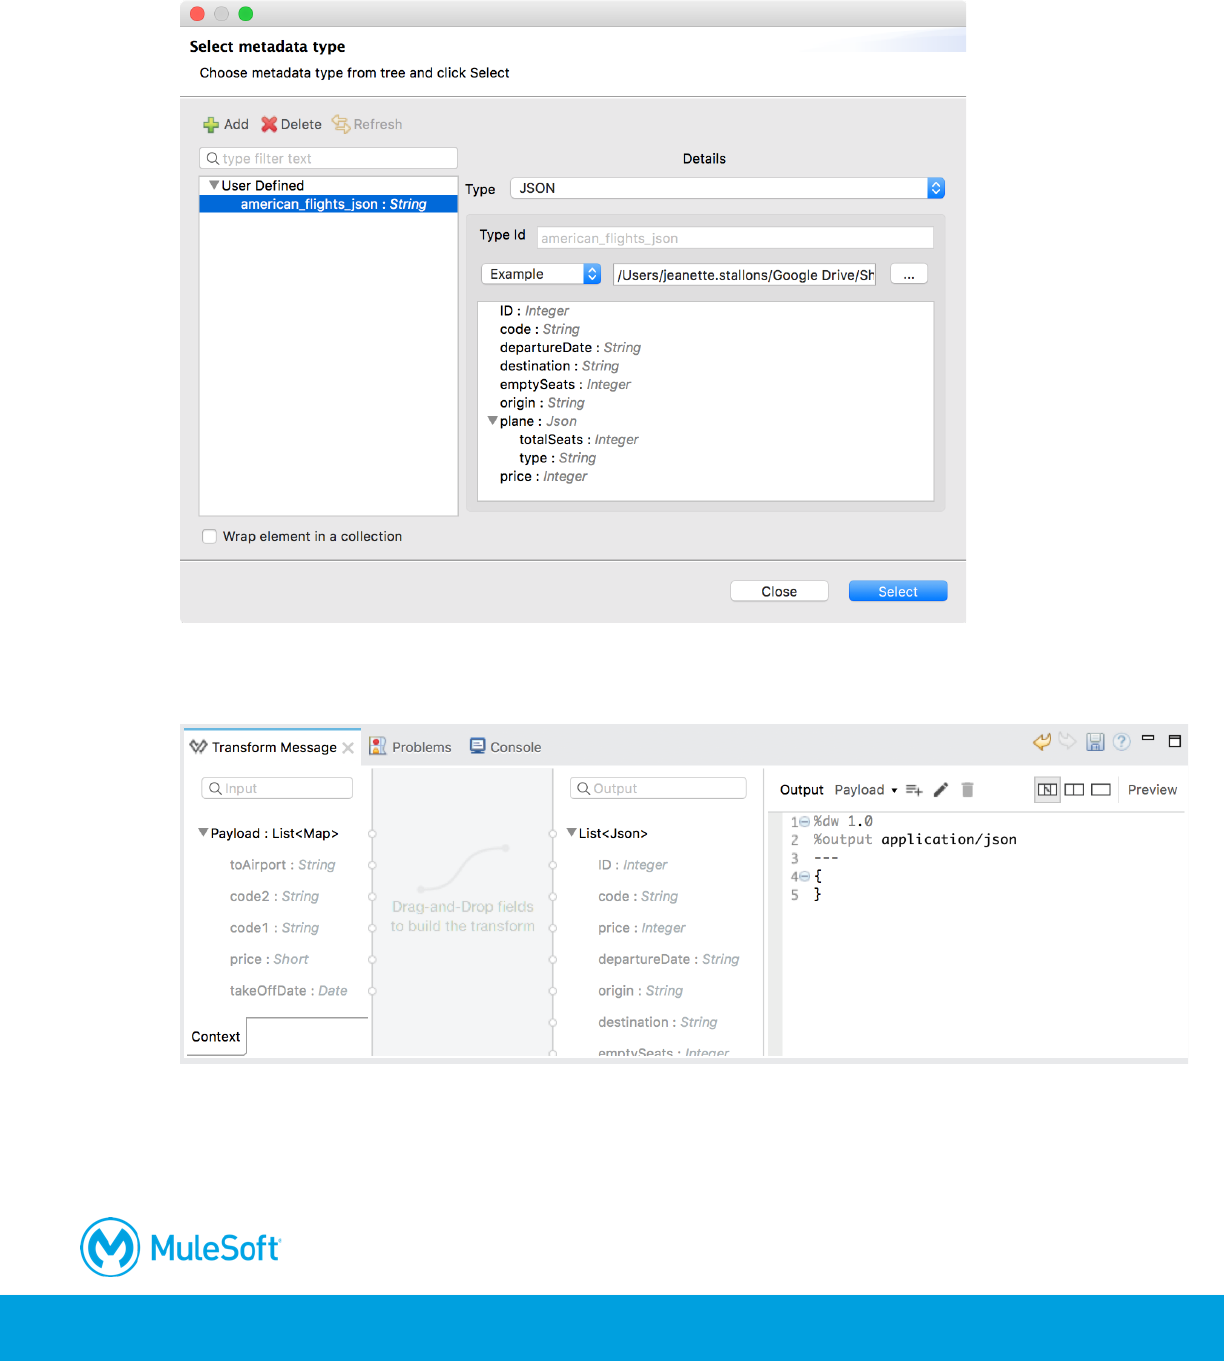
123
21. Select american-flights-example.json in the examples folder and click Open; you should see the
example data for the metadata type.
22. Click Select; you should now see output metadata in the output section of the Transform
Message properties view.
124
Create the transformation
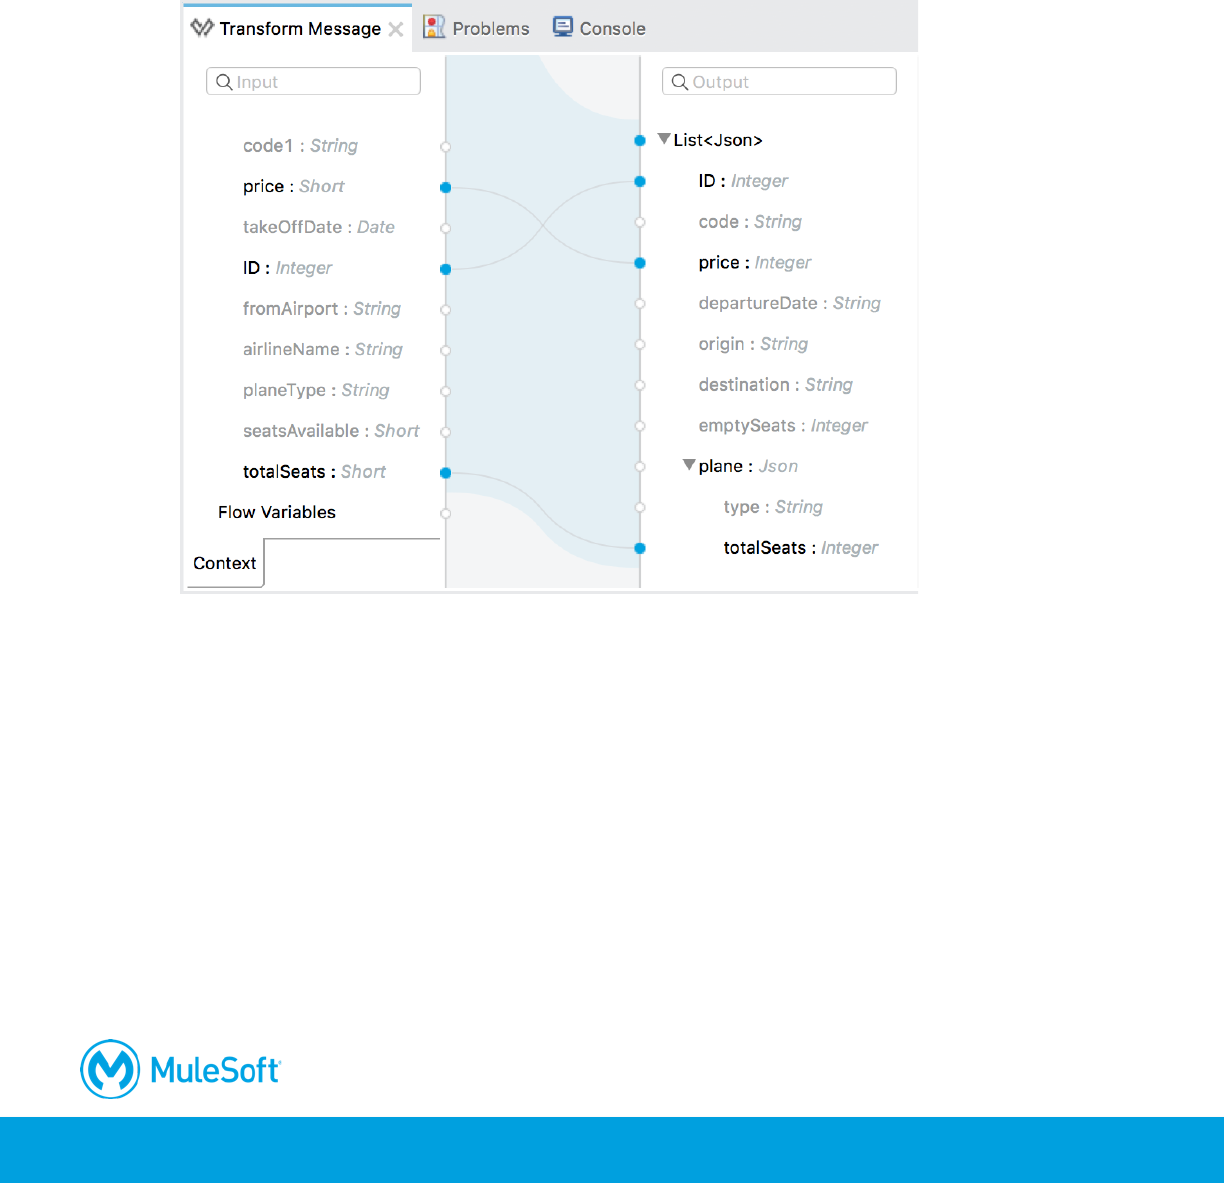
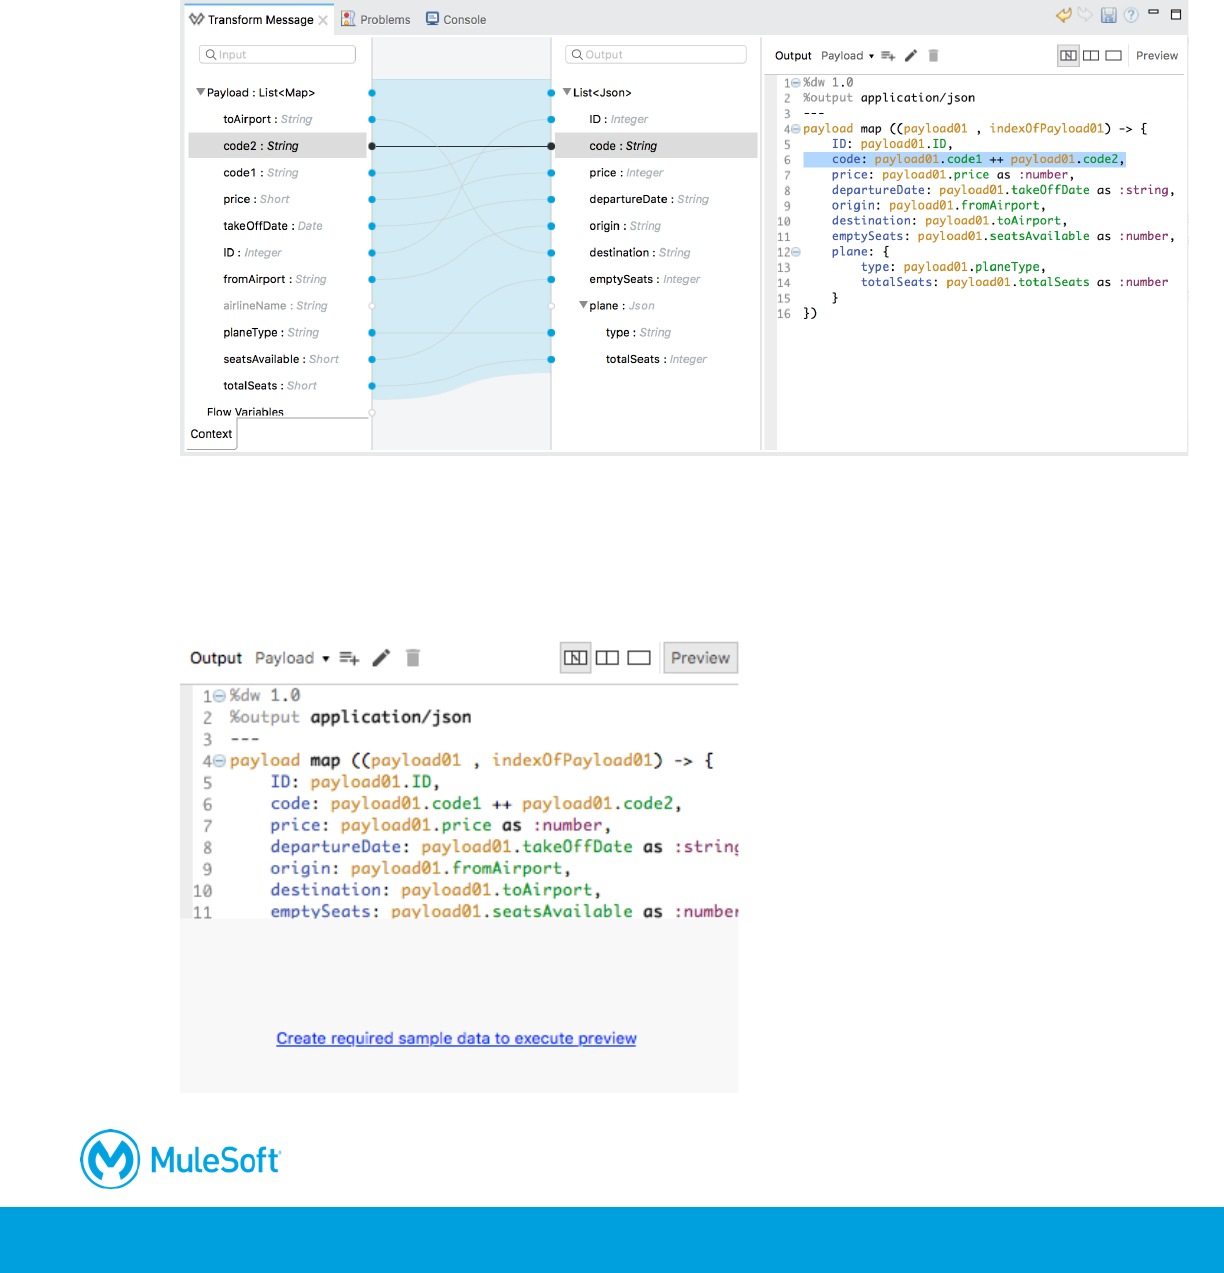
23. Map fields with the same names by dragging them from the input section and dropping them on
the corresponding field in the output section.
• ID to ID
• price to price
• totalSeats to plane > totalSeats
24. Map fields with different names by dragging them from the input section and dropping them on
the corresponding field in the output section.
• toAirport to destination
• takeOffDate to departureDate
• fromAirport to origin
• seatsAvailable to emptySeats
• planeType to plane > type
125
25. Concatenate two fields by dragging them from the input section and dropping them on the same
field in the output section.
• code1 to code
• code2 to code
Add sample data
26. Click the Preview button in the output section.
27. In the preview section, click the Create required sample data to execute preview link.
126
28. Look at the input section, you should see a new tab called payload with sample data generated
from the input metadata.
29. Look at the output section, you should see a sample response for the transformation.
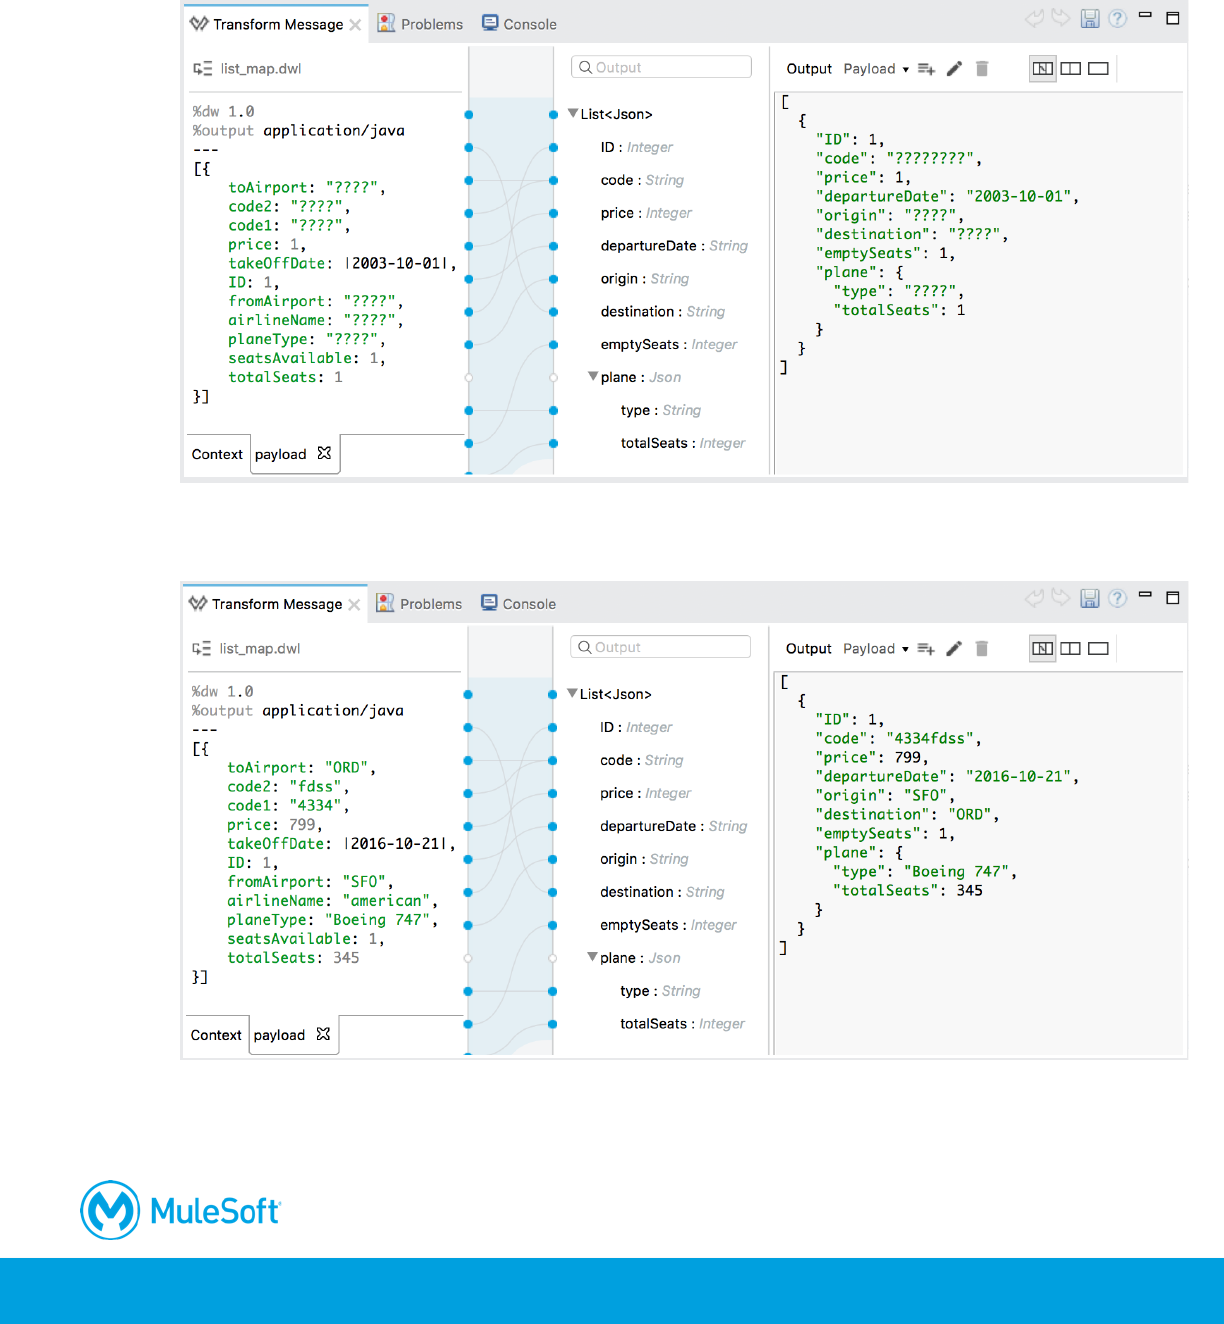
30. In the input section, replace all the ???? with sample values.
31. Look at the output section, you should see the sample values in the transformed data.

127
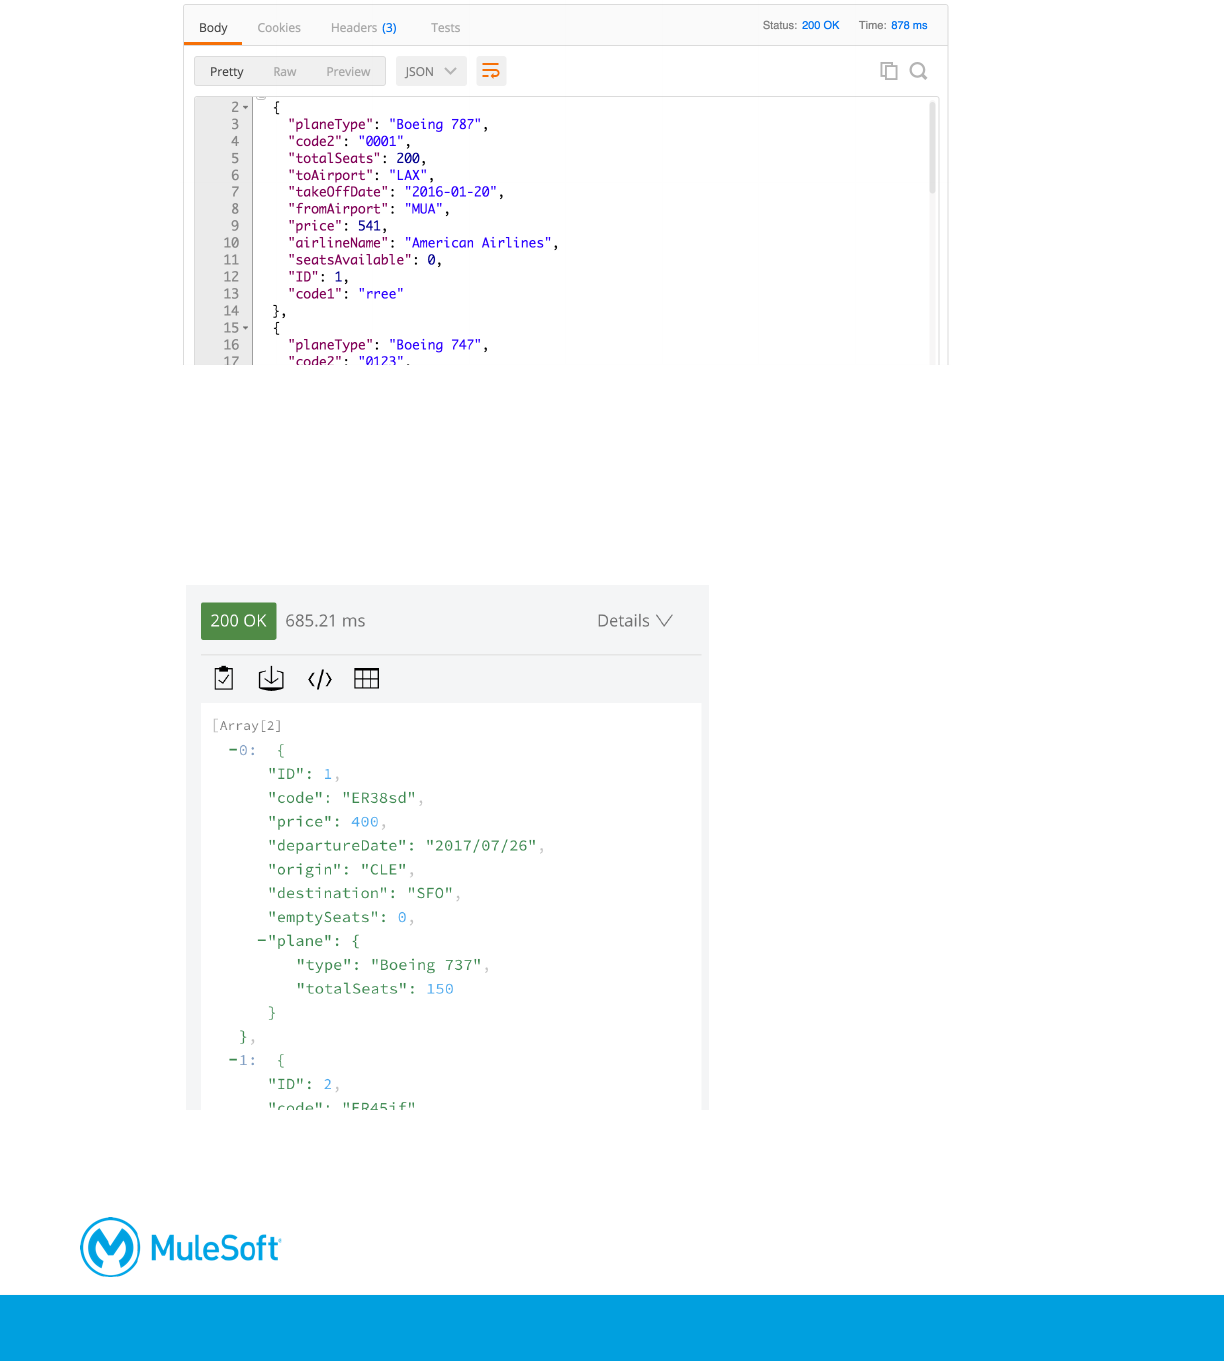
Test the application
32. Run the project.
33. In Postman, make another request to http://localhost:8081/flights; you should see all the flight
data as JSON again but now with a different structure.
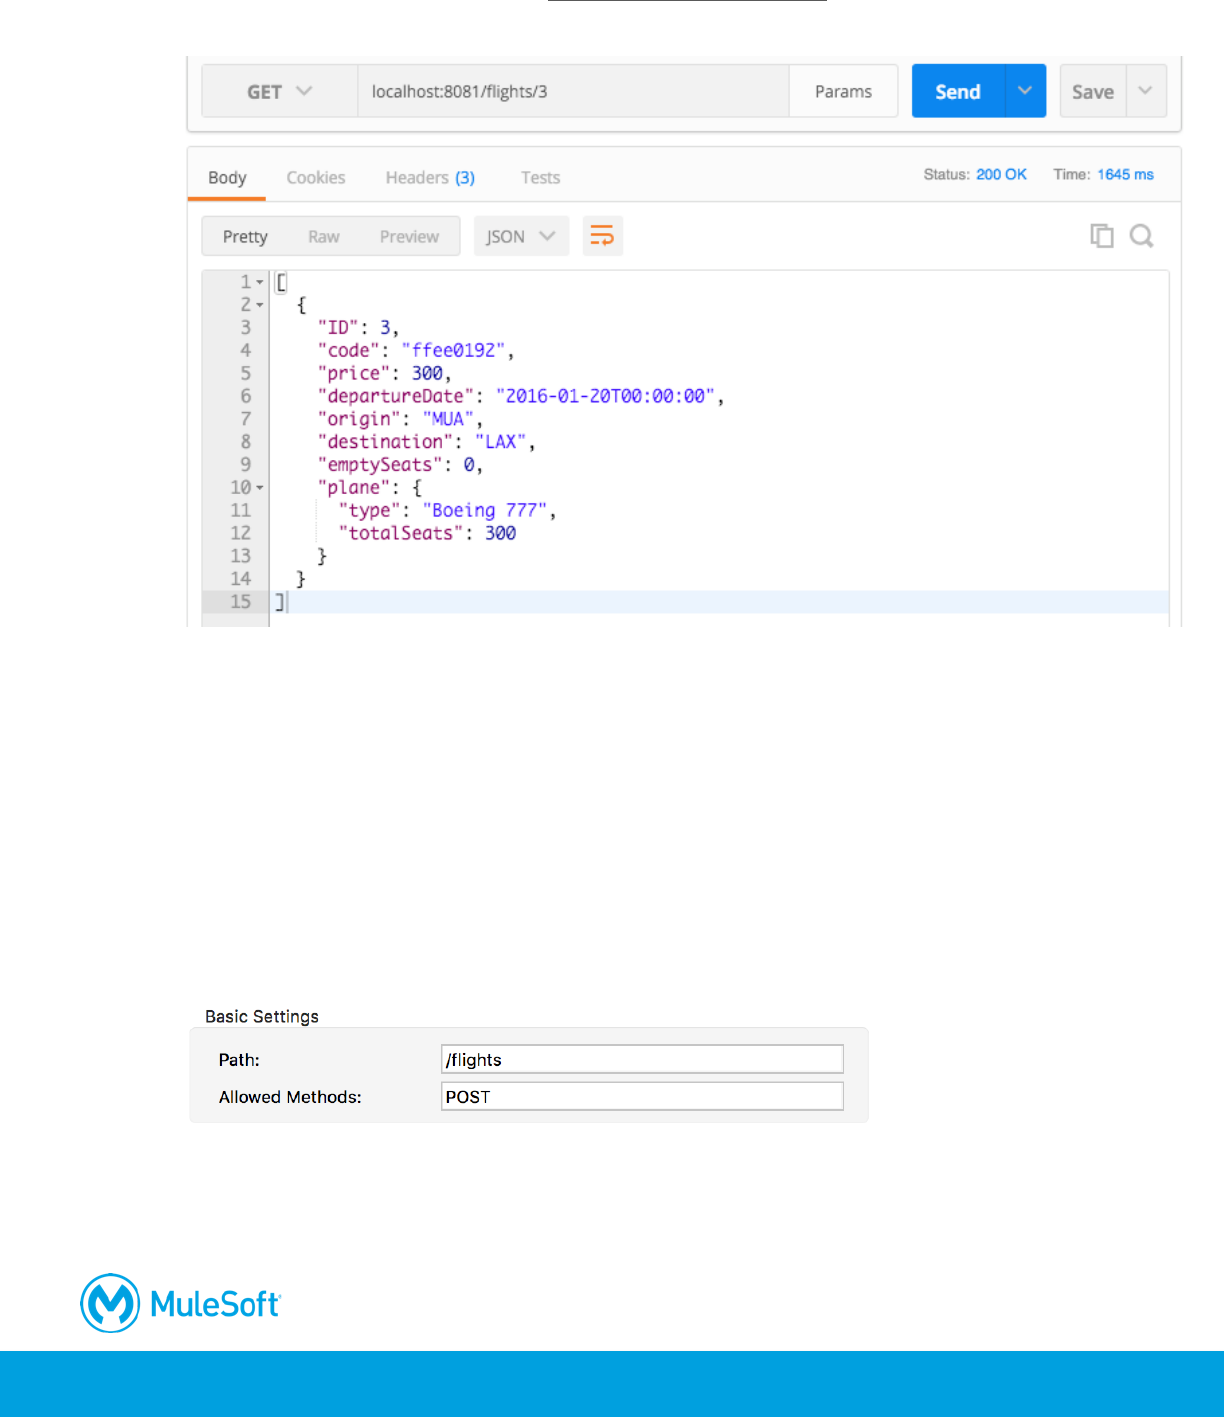
Try to retrieve information about a specific flight
34. Add a URI parameter to the URL to make a request to http://localhost:8081/flights/3; you should
get a 404 response with a no listener or resource not found message.
35. Return to Anypoint Studio.
36. Look at the console; you should get a no listener found for request (GET)/flights/3.
37. Stop the project.
128
Walkthrough 4-4: Create a RESTful interface for a Mule
application
In this walkthrough, you continue to create a RESTful interface for the application. You will:
• Route based on path.
• Add a URI parameter to a new HTTP Listener endpoint path.
• Route based on HTTP method.
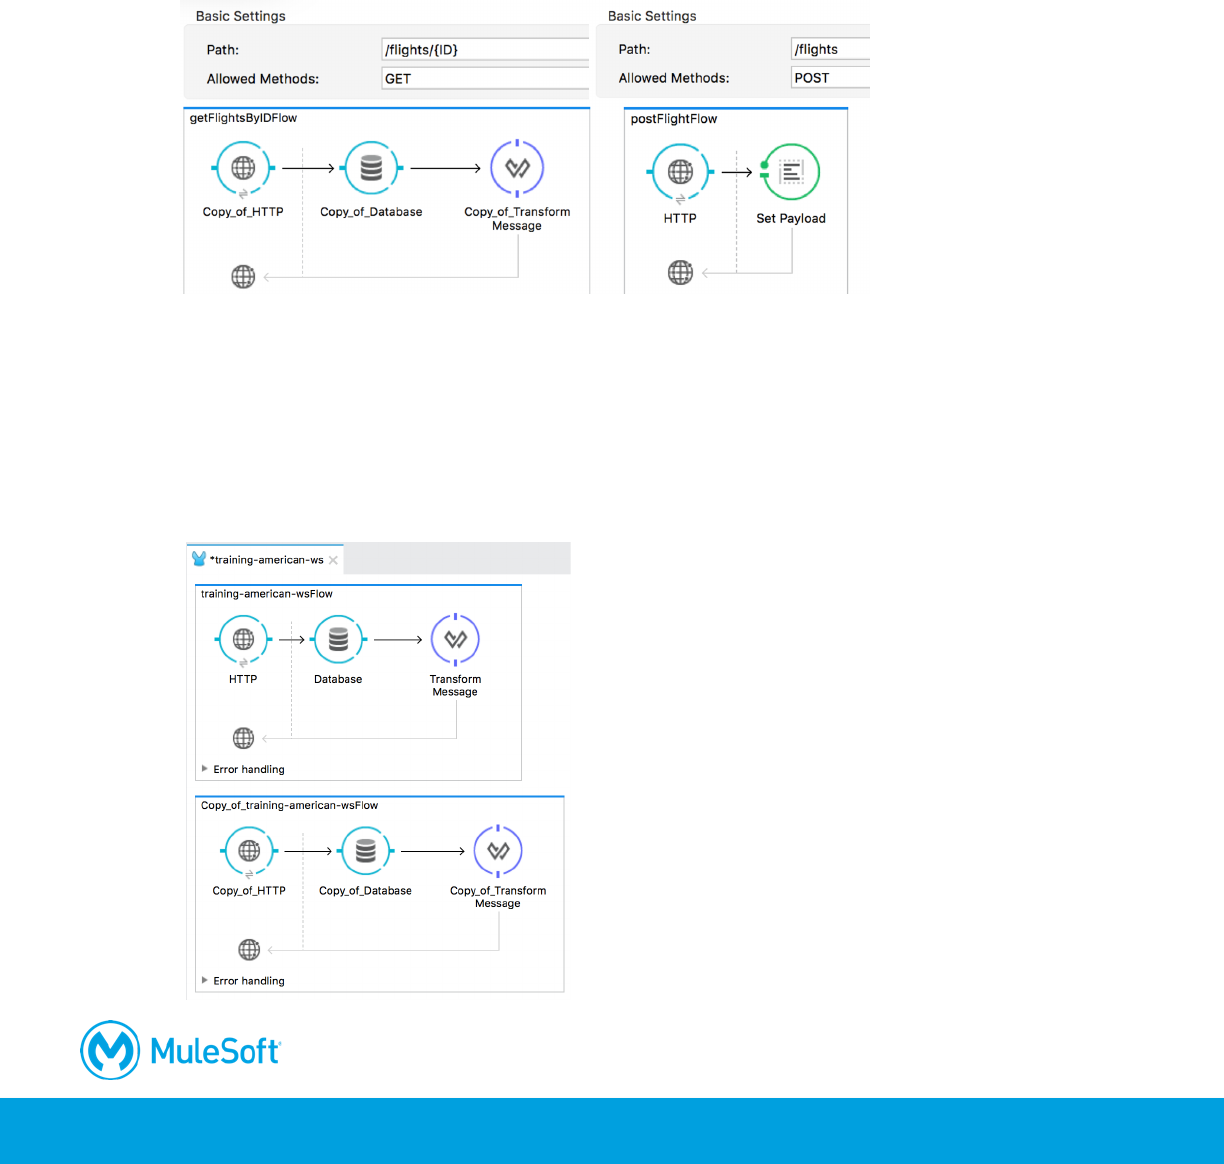
Make a copy of the existing flow
1. Return to training-american-ws.xml.
2. Click the flow in the canvas to select it.
3. From the main menu bar, select Edit > Copy.
4. Click in the canvas beneath the flow and select Edit > Paste.
129
Rename the flows
5. Double-click the name of the first flow.
6. In the Properties view, change its name to getFlightsFlow.
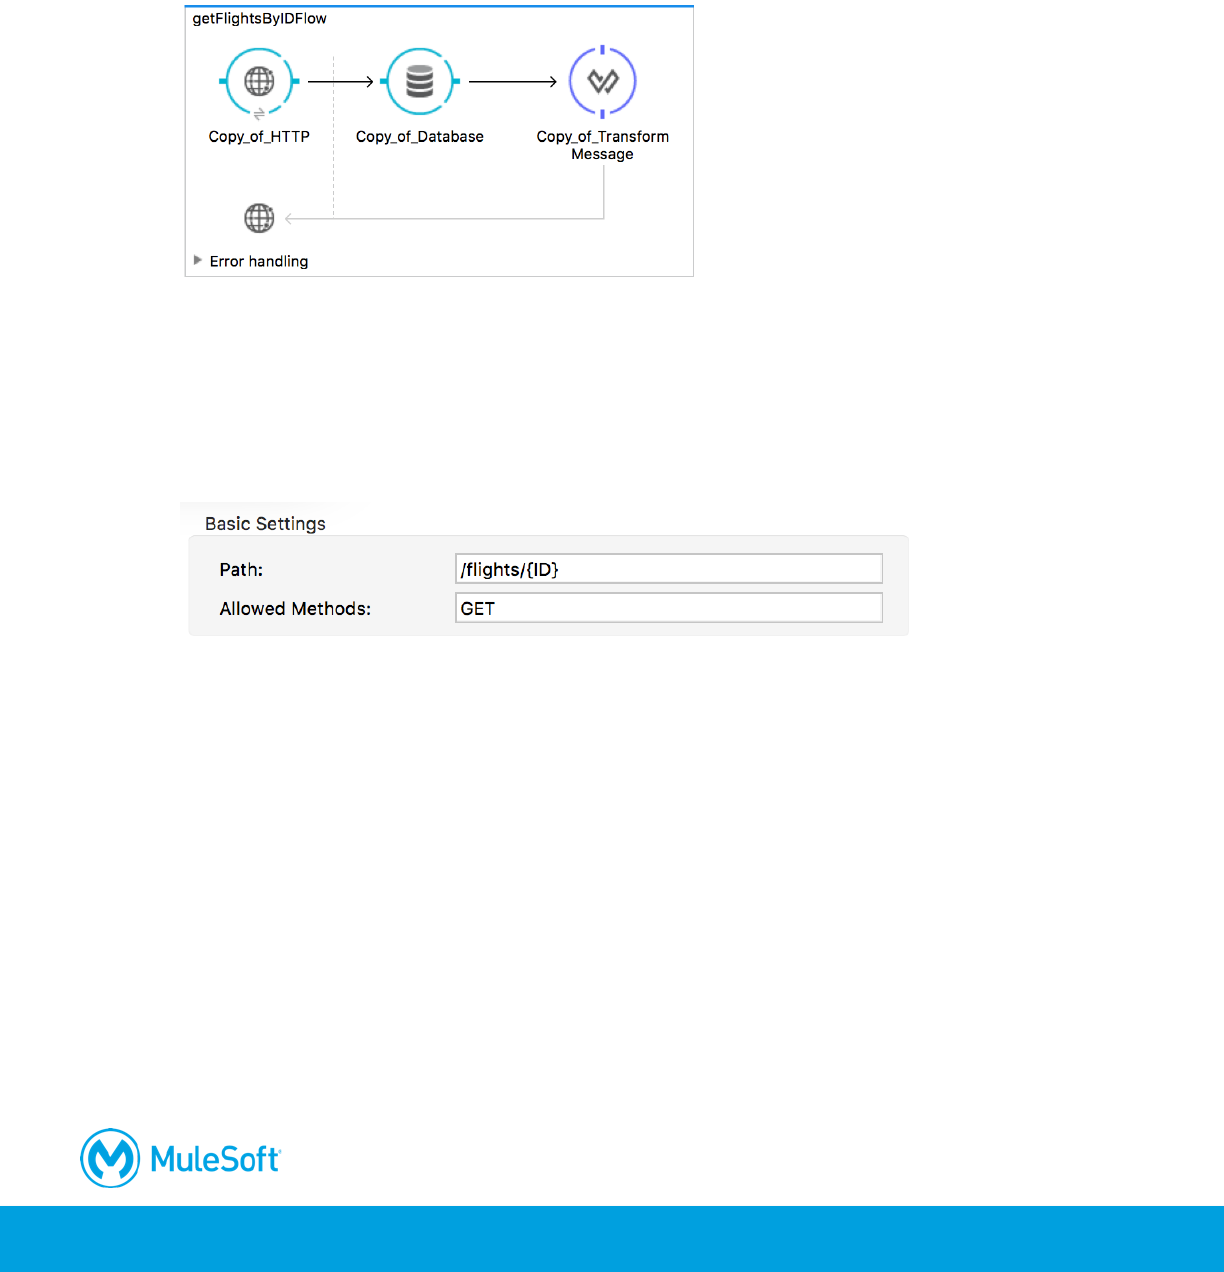
7. Change the name of the second flow to getFlightsByIDFlow.
Note: If you want, change the name of the message source and message processors.
Specify a URI parameter for the new HTTP Listener endpoint
8. Double-click the HTTP Listener endpoint in getFlightsByIDFlow.
9. Change the path to have a URI parameter called ID.
Modify the Database endpoint
10. Double-click the Database endpoint in getFlightsByIDFlow.
11. Modify the query WHERE clause, to select flights with the ID equal to 1.
SELECT *
FROM american
WHERE ID = 1
Test the application
12. Run the project.
130
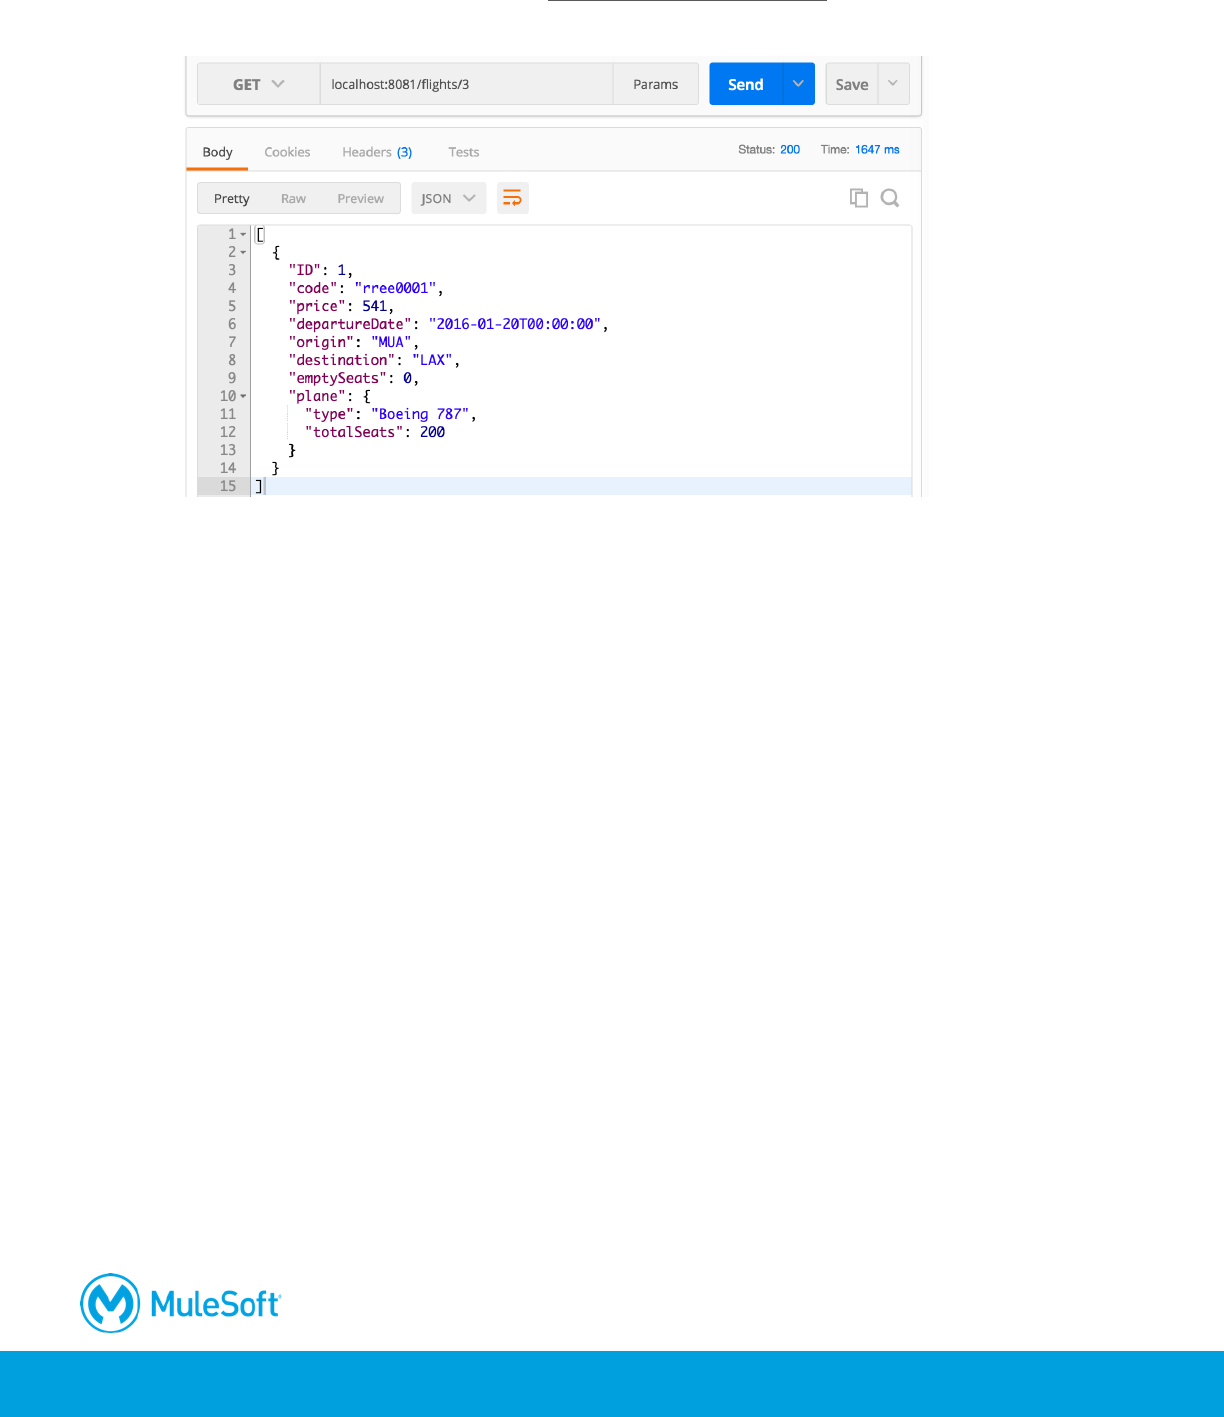
13. In Postman, make another request to http://localhost:8081/flights/3; you should see details for
the flight with an ID of 1.
Modify the database query to use the URI parameter
14. Return to the course snippets.txt file and copy the SQL expression for American Flights API.
15. Return to Anypoint Studio and stop the project.
16. In the Database properties view, replace the existing WHERE clause with the value you copied.
SELECT *
FROM american
WHERE ID = #[message.inboundProperties.'http.uri.params'.ID]
Note: You learn about reading and writing properties and variables in a later module in the
Development Fundamentals course.
Test the application
17. Run the project.
131
18. In Postman, make another request to http://localhost:8081/flights/3; you should now see the info
for the flight with an ID of 3.
19. Return to Anypoint Studio and stop the project.
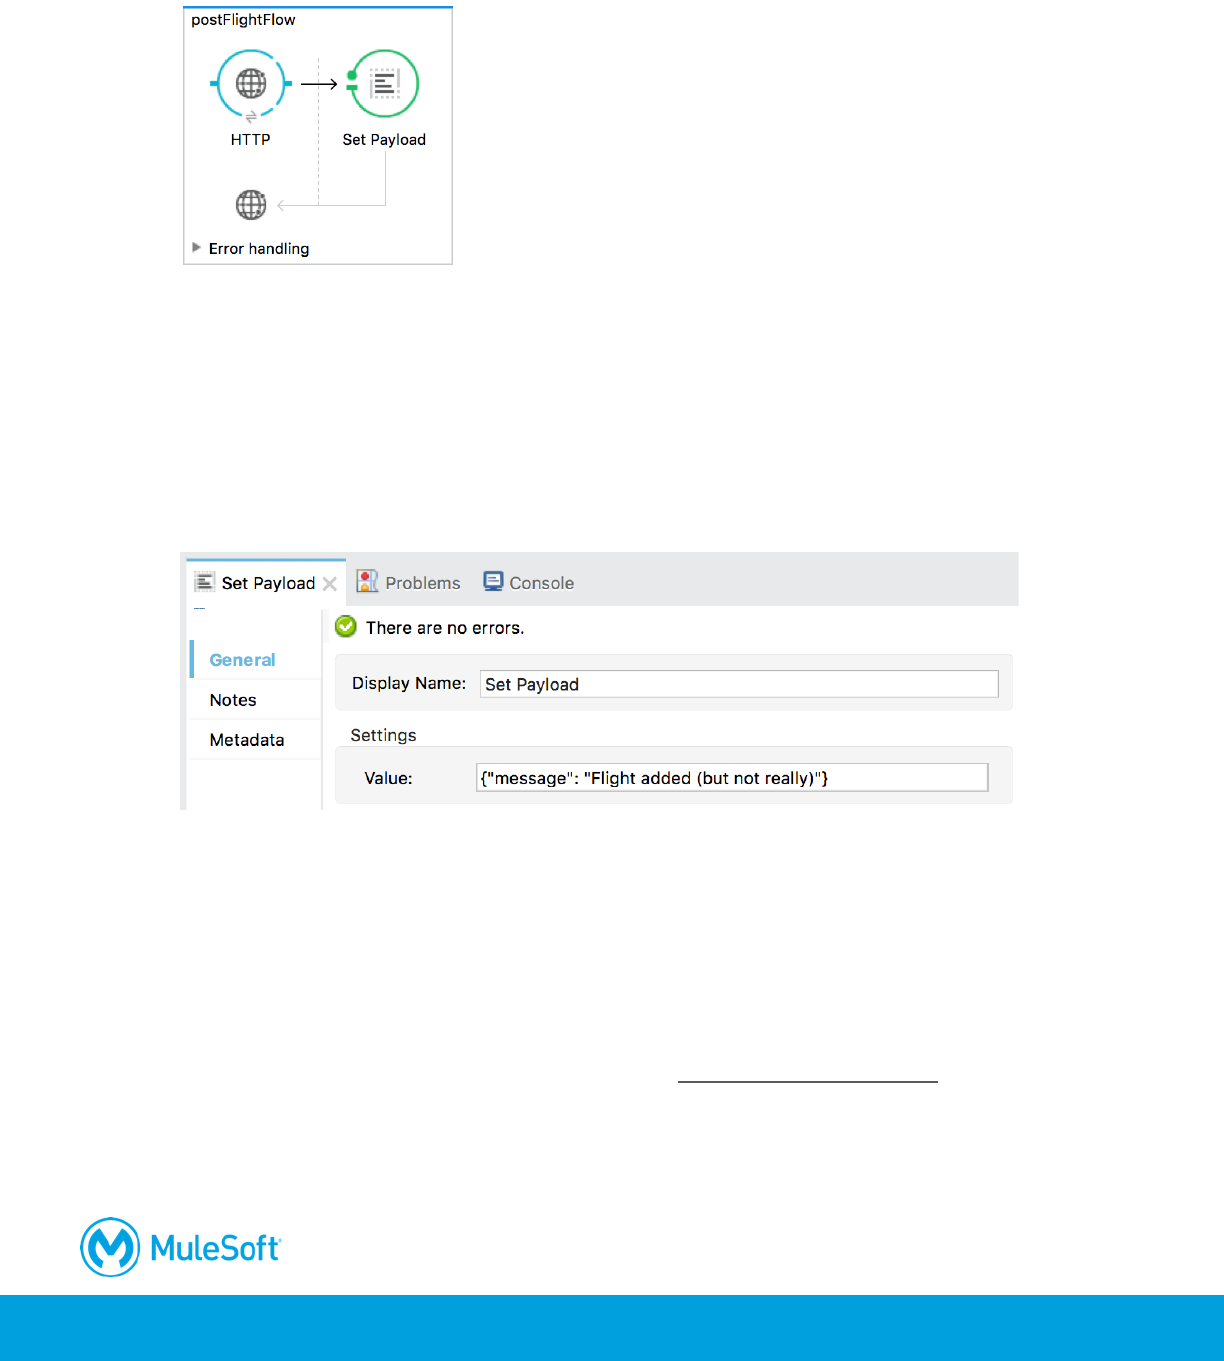
Make a new flow to handle post requests
20. In the Mule Palette, select the Connectors tab.
21. Drag out an HTTP connector from the Mule Palette and drop it in the canvas below the two
existing flows.
22. Change the name of the flow to postFlightFlow.
23. Double-click the HTTP Listener endpoint.
24. In the HTTP properties view, set the path to /flights and the allowed methods to POST.
25. In the Mule Palette, select the Transformers tab.
132
26. Drag out a Set Payload transformer from the Mule Palette and drop it in the process section of
the flow.
27. Double-click the Set Payload processor.
28. Return to the course snippets.txt file and copy the American Flights API - /flights POST
response example.
{"message": "Flight added (but not really)"}
29. Return to Anypoint Studio and in the Set Payload properties view, set value to the value you
copied.
Note: This flow is just a stub. For it to really work and add data to the database, you would need
to add logic to insert the request data to the database.
Test the application
30. Run the project.
31. In Postman, change the request type from GET to POST.
32. Remove the URI parameter from the request URL: http://localhost:8081/flights.
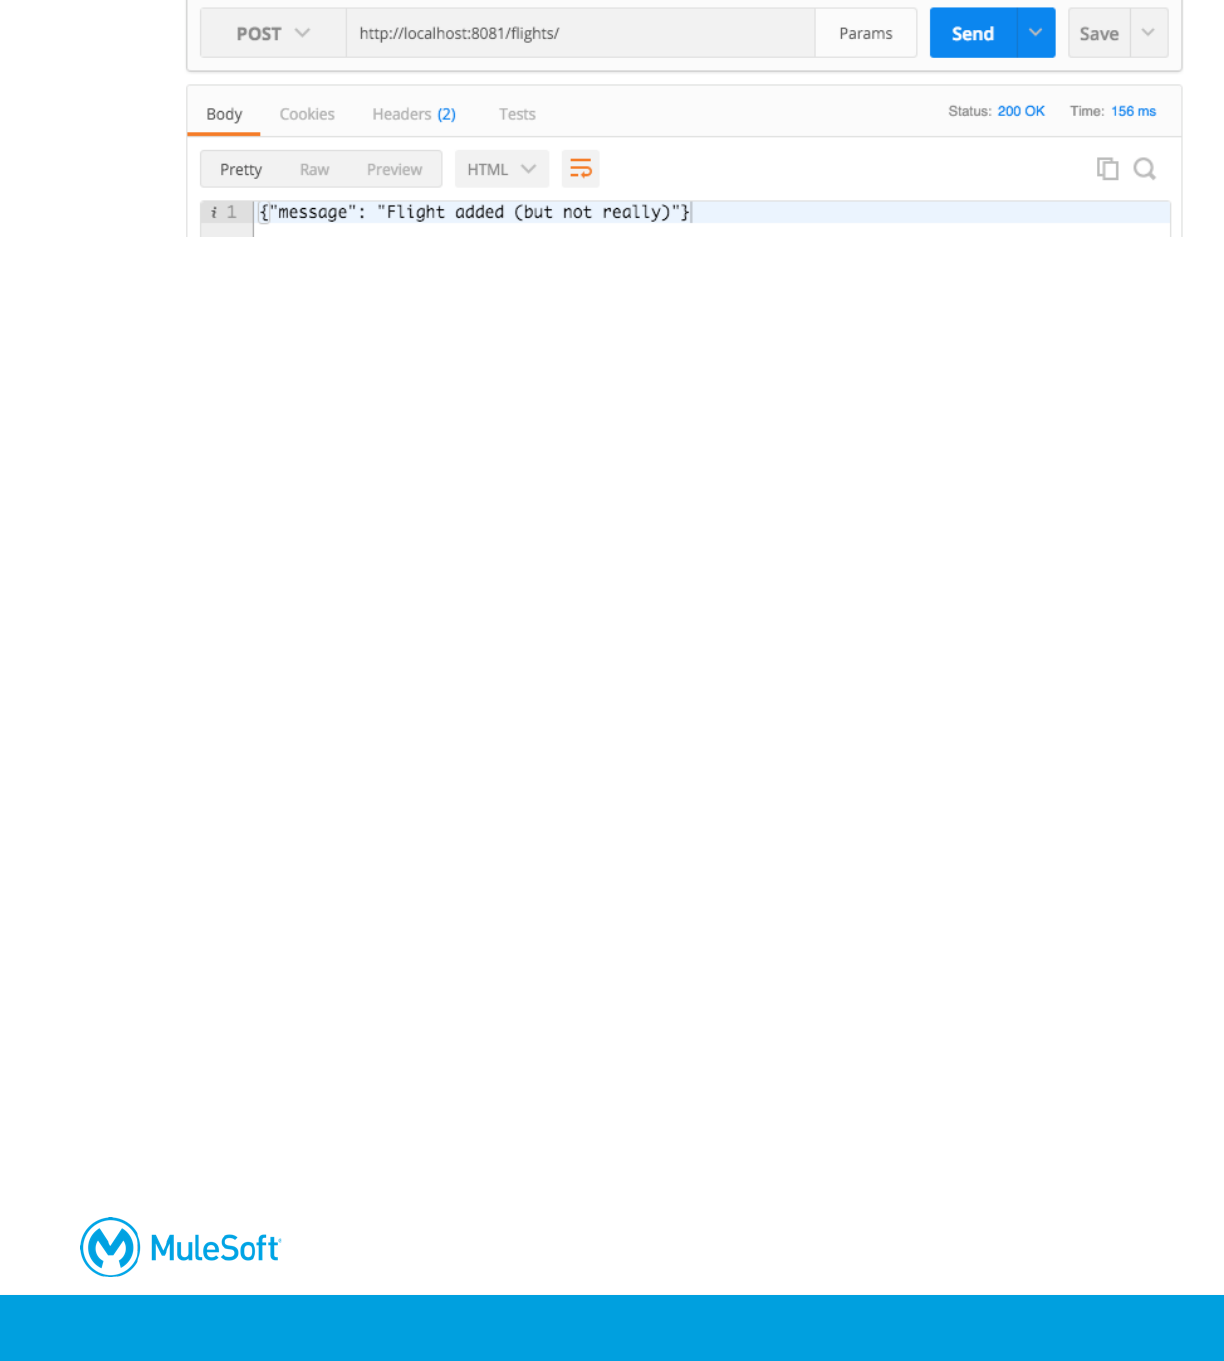
133
33. Send the request; you should now see the message the flight was added – even though you did
not send any flight data to add.
34. Return to Anypoint Studio and stop the project.
134
Walkthrough 4-5: Use Anypoint Studio to create a RESTful API
interface from a RAML file
In this walkthrough, you generate a RESTful interface from the RAML file. You will:
• Add Anypoint Platform credentials to Anypoint Studio.
• Import an API from Design Center into an Anypoint Studio project.
• Use APIkit to generate a RESTful web service interface from an API.
• Test a web service using Postman.
Add Anypoint Platform credentials to Anypoint Studio
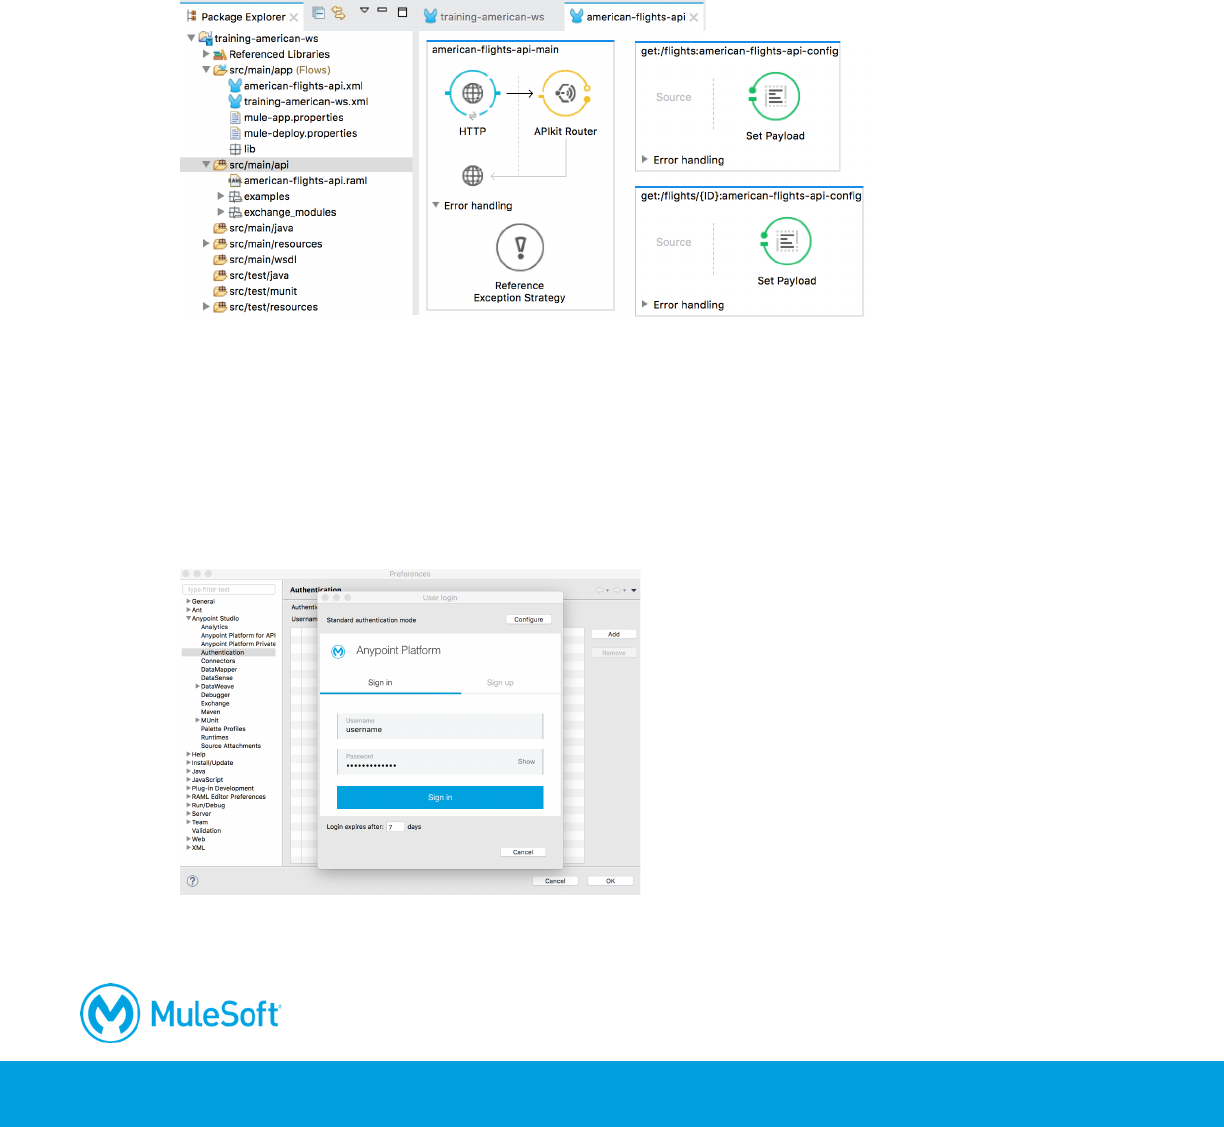
1. In Anypoint Studio, right-click training-american-ws and select Anypoint Platform > Configure
Credentials.
2. In the Authentication page of the Preferences dialog box, click the Add button.
3. In the Anypoint Platform Sign In dialog box, enter your username & password and click Sign In.
4. On the Authentication page, make sure your username is listed and selected.
5. Click OK.
135
Add an API from Design Center to the Anypoint Studio project
6. In the Package Explorer, locate the src/main/api folder; it should not contain any files.
7. Right-click the folder (or anywhere in the project in the Package Explorer) and select Anypoint
Platform > Import from Design Center.
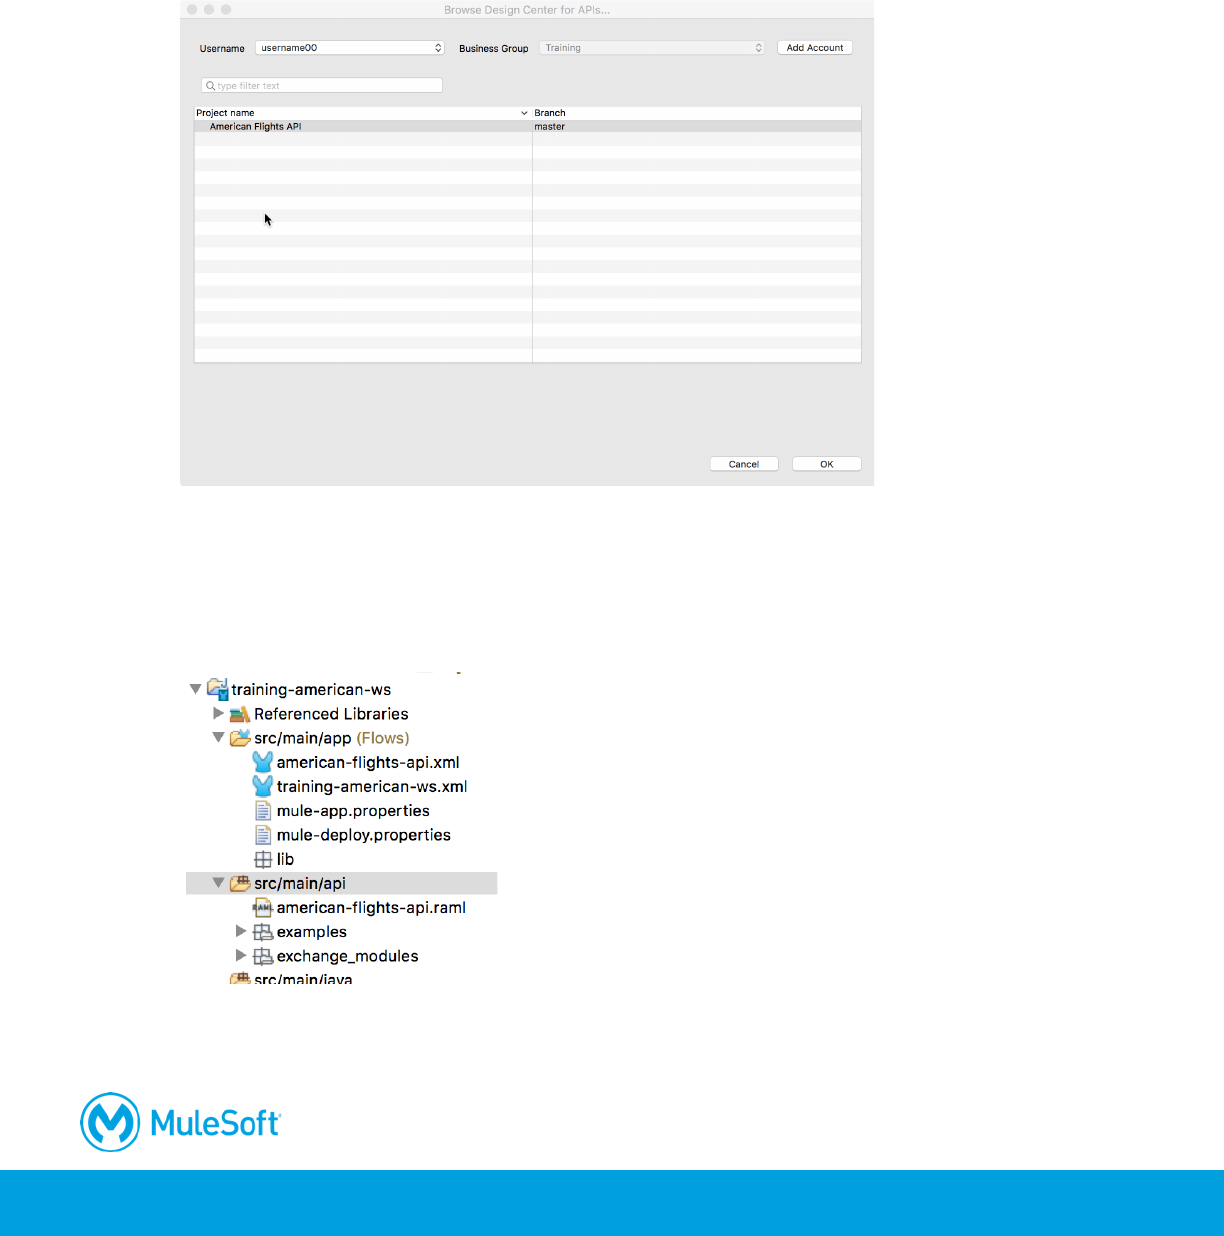
8. In the Browse Design Center for APIs dialog box, select the American Flights API and click OK.
9. In the Override files dialog box, click Yes.
Locate the API files added to the project
10. In the Package Explorer, locate and expand the src/main/api folder; it should now contain files.

136
Examine the XML file created
11. Examine the generated american-flghts-api.xml file and locate the following five flows:
• get:/flights
• get:/flights/{ID}
• post:/flights
• delete:/flights/{ID}
• put:/flights/{ID}
137
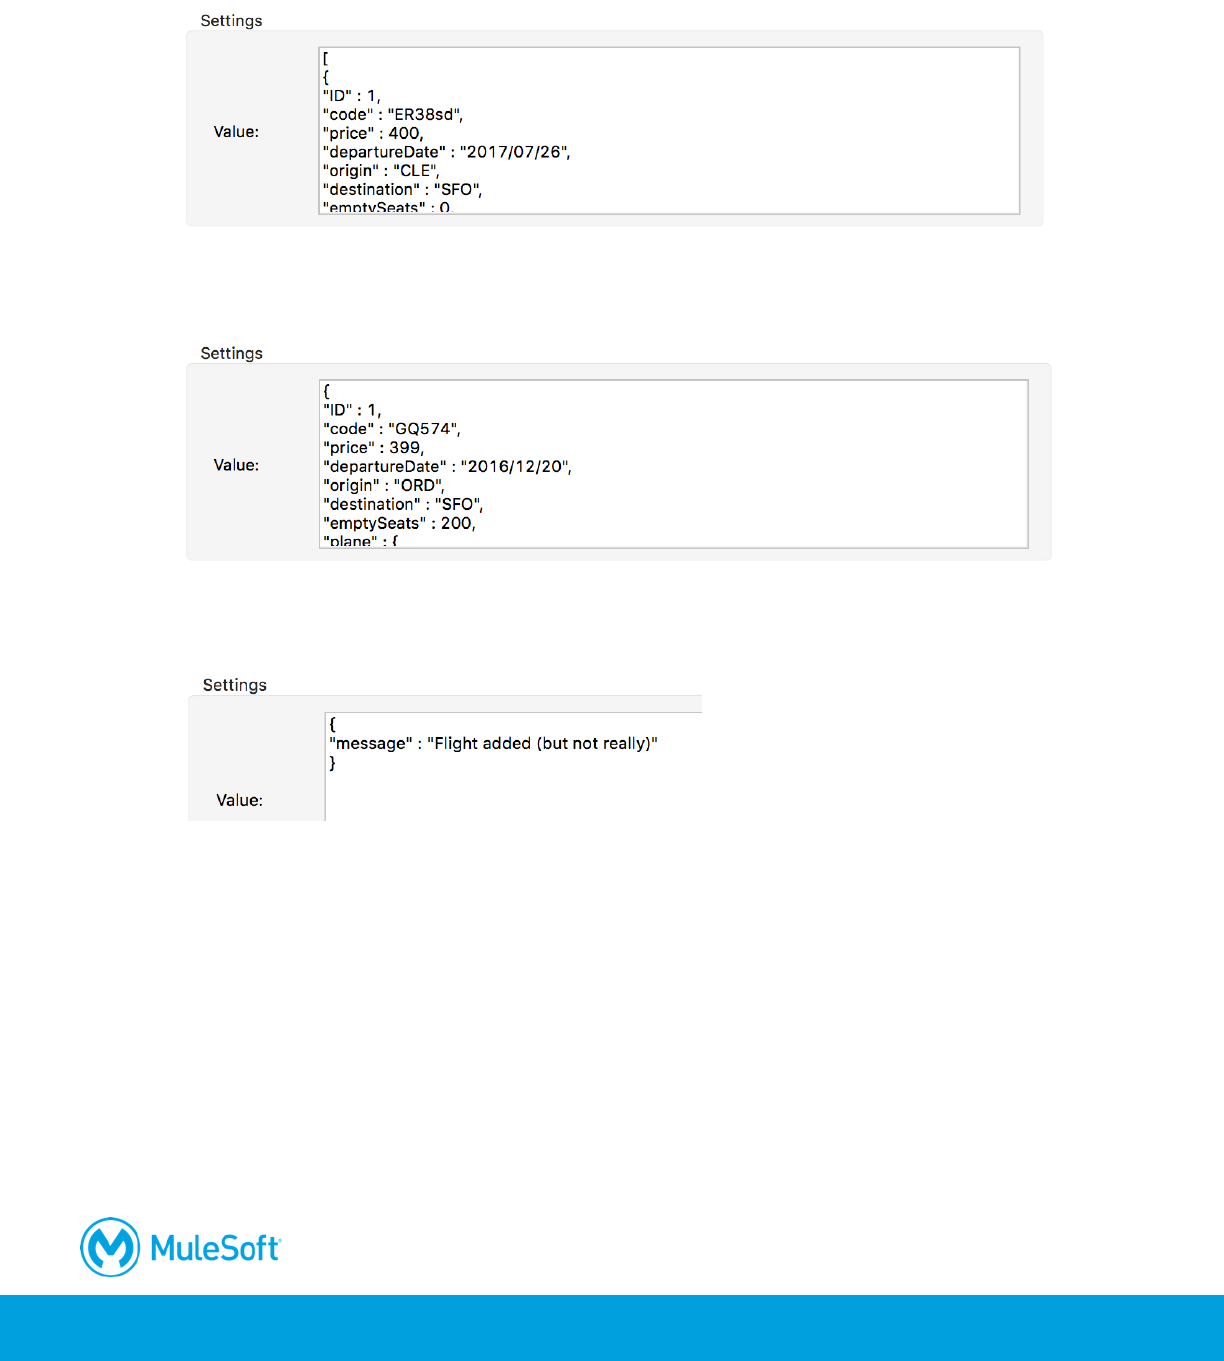
12. In the get:/flights flow, double-click the Set Payload transformer and look at the value in the Set
Payload properties view.
13. In the get:/flights/{ID} flow, double-click the Set Payload transformer and look at the value in the
Set Payload properties view.
14. In the post:/flights flow, double-click the Set Payload transformer and look at the value in the Set
Payload properties view.
Examine the main flow and the new HTTP Listener endpoint
15. Locate the american-flights-api-main flow.
16. Double-click its HTTP Listener endpoint.
138
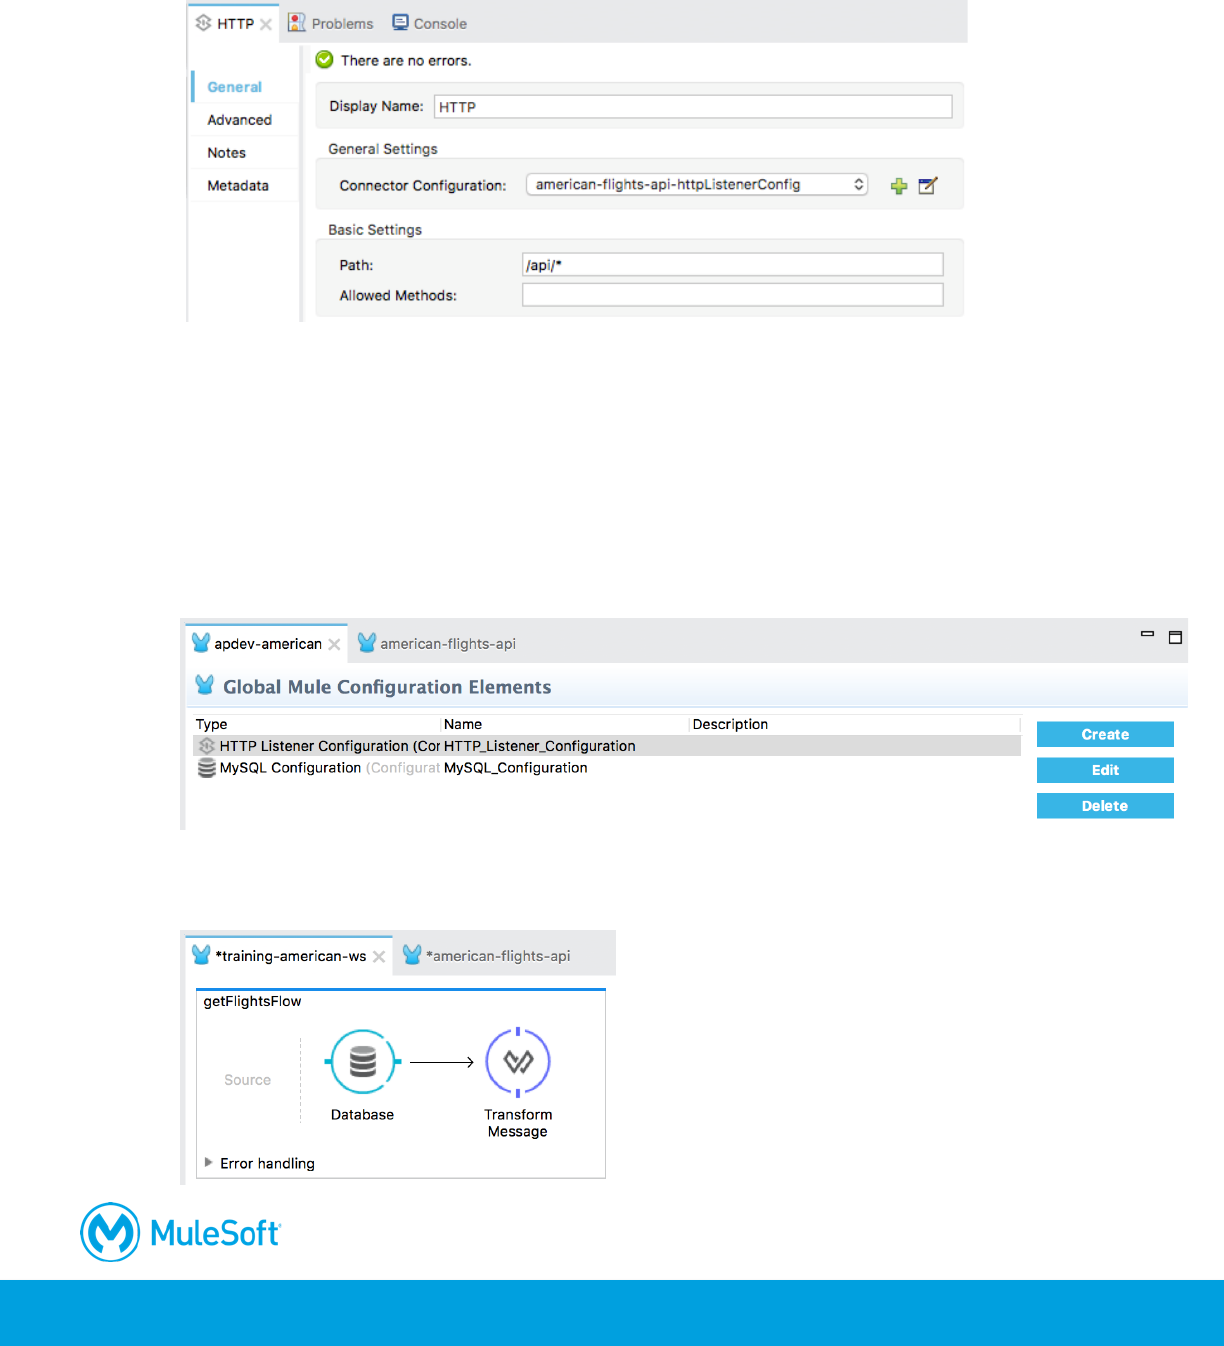
17. In the HTTP properties view, notice that the path is set to /api/*.
Note: The * is a wildcard allowing any characters to be entered after /api/.
18. Click the Edit button for the connector configuration; you should see that the same port 8081 is
used as the HTTP listener you created previously.
19. Click OK.
Remove the other HTTP configuration and listeners
20. Return to training-american-ws.xml.
21. In the Global Elements view, select the HTTP Listener and click Delete.
22. Return to the Message Flow view.
23. Right-click the HTTP Listener endpoint in getFlightsFlow and select Delete.
139
24. Delete the other two HTTP Listener endpoints.
Disable the APIkit Consoles view
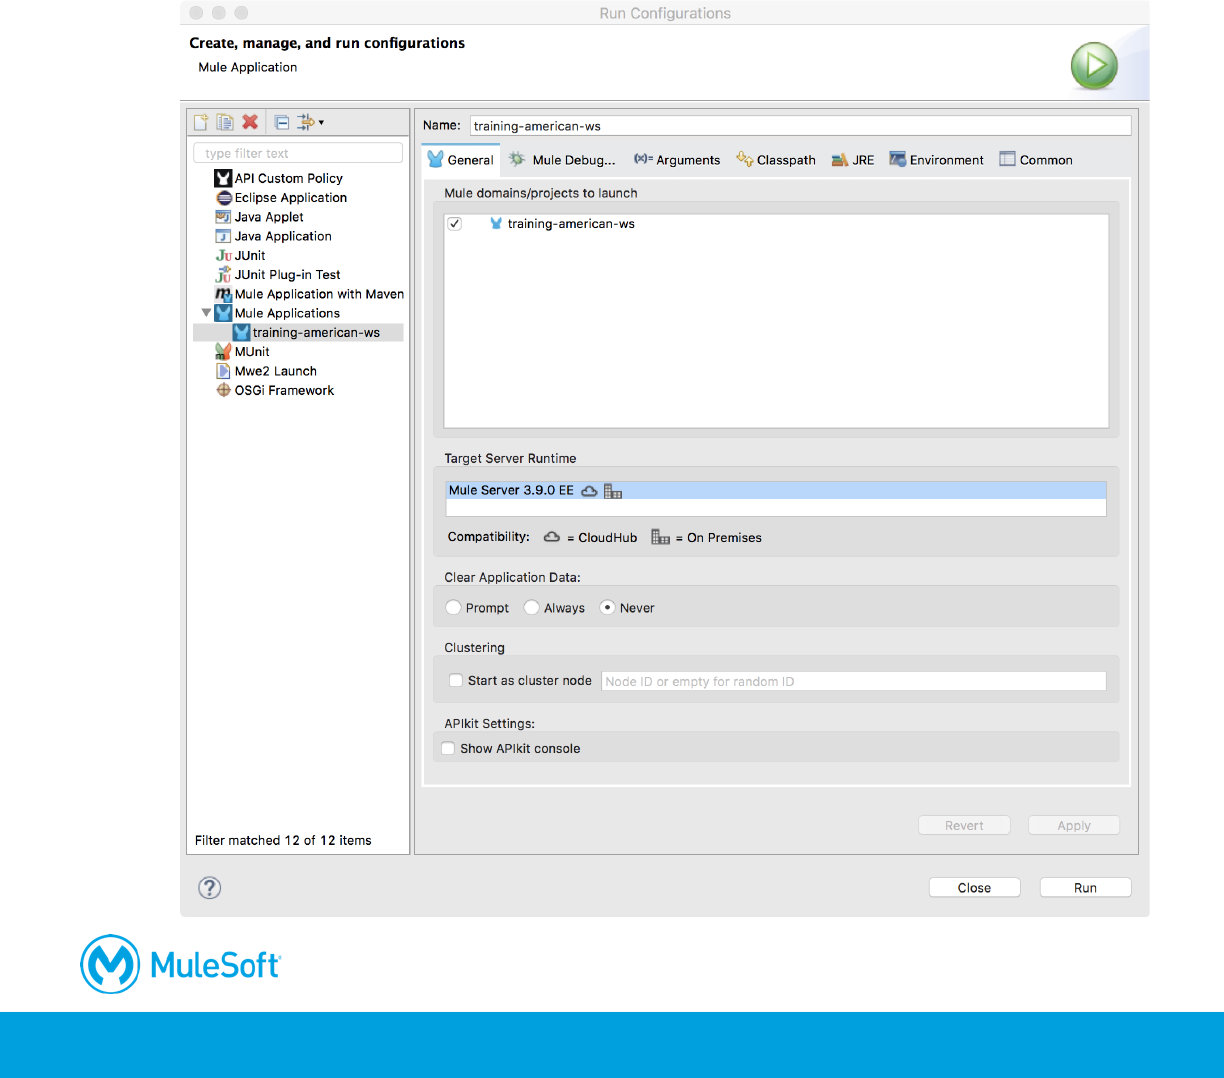
25. In the main menu, select Run > Run Configurations.
26. In the Run Configurations dialog box for training-american-ws, uncheck the Show APIkit console
option located at the bottom of the General tab settings.
27. Click Run.
Note: If you want to use the APIkit Consoles view, you need to add a baseUri to the RAML file in
order for the Try-it functionality of the API console to work.

140
Test the web service using Postman
28. In Postman, make a GET request to http://localhost:8081/flights; you should get a 404 response
with a message that the resource was not found because there is no longer a listener for that
endpoint.
29. Change the URL to http://localhost:8081/api/flights and send the request; you should see the
example data returned.
30. Make a request to http://localhost:8081/api/flights/3; you should see the example data returned.
31. Return to Anypoint Studio and stop the project.
141
Walkthrough 4-6: Implement a RESTful web service
In this walkthrough, you wire the RESTful web service interface up to your back-end logic. You will:
• Pass a message from one flow to another.
• Call the backend flows.
• Create new logic for the nested resource call.
• Test the web service using Postman.
Rename the configuration files
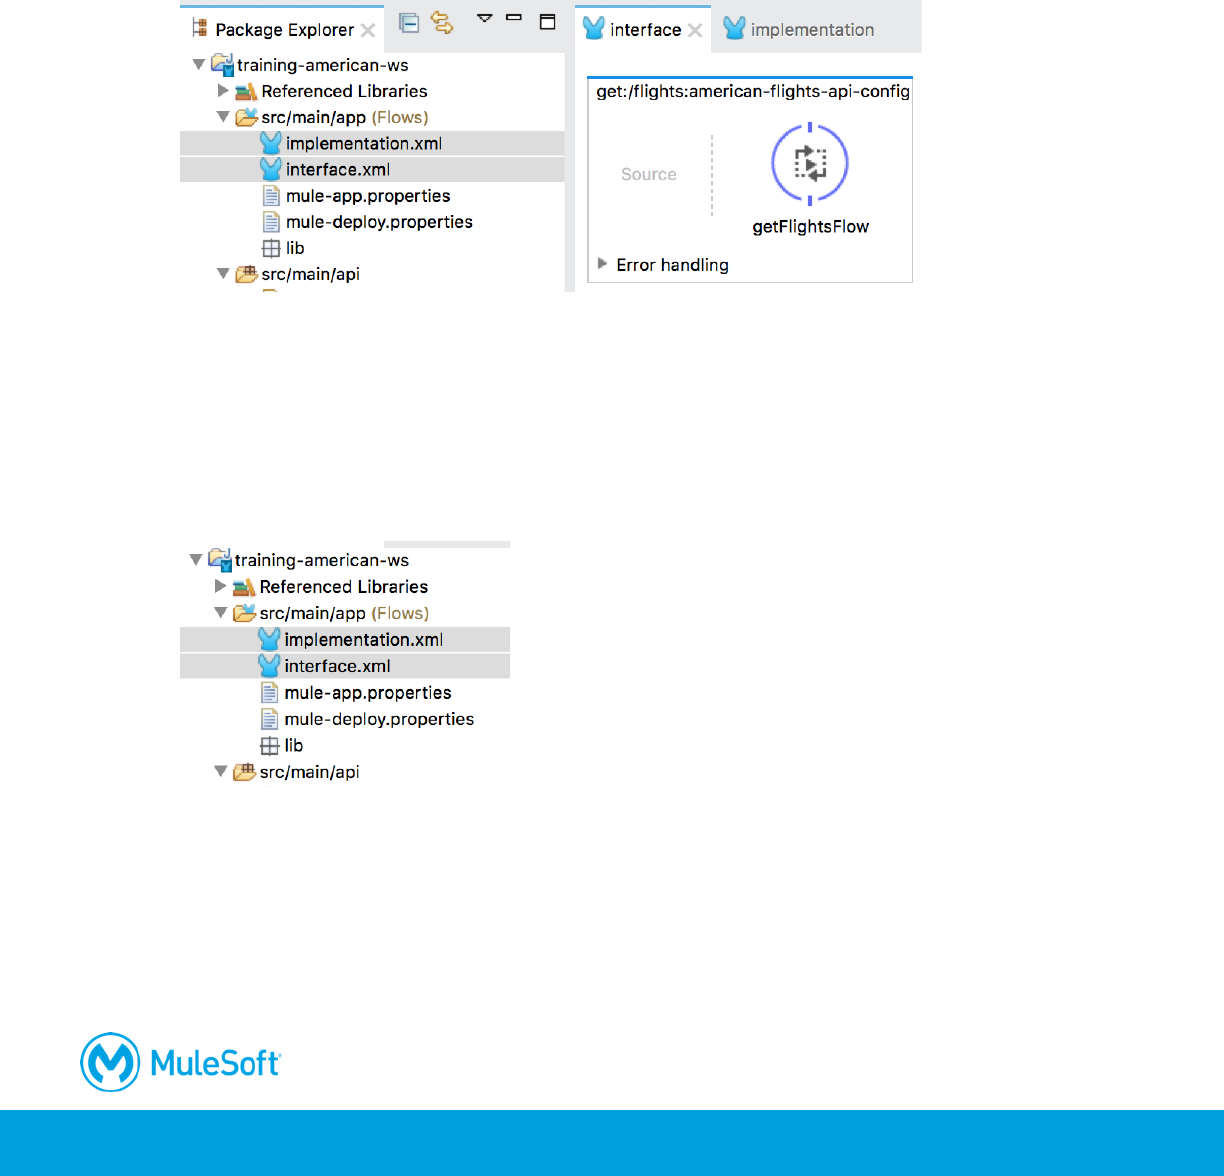
1. Right-click american-flights-api.xml in the Package Explorer and select Refactor > Rename.
2. In the Rename Resource dialog box, set the new name to interface.xml and click OK.
3. Right-click training-american-ws.xml and select Refactor > Rename.
4. In the Rename Resource dialog box, set the new name to implementation.xml and click OK.
Set logic for the /flights resource
5. Return to interface.xml.
6. Delete the Set Payload transformer in the get:/flights flow.
142
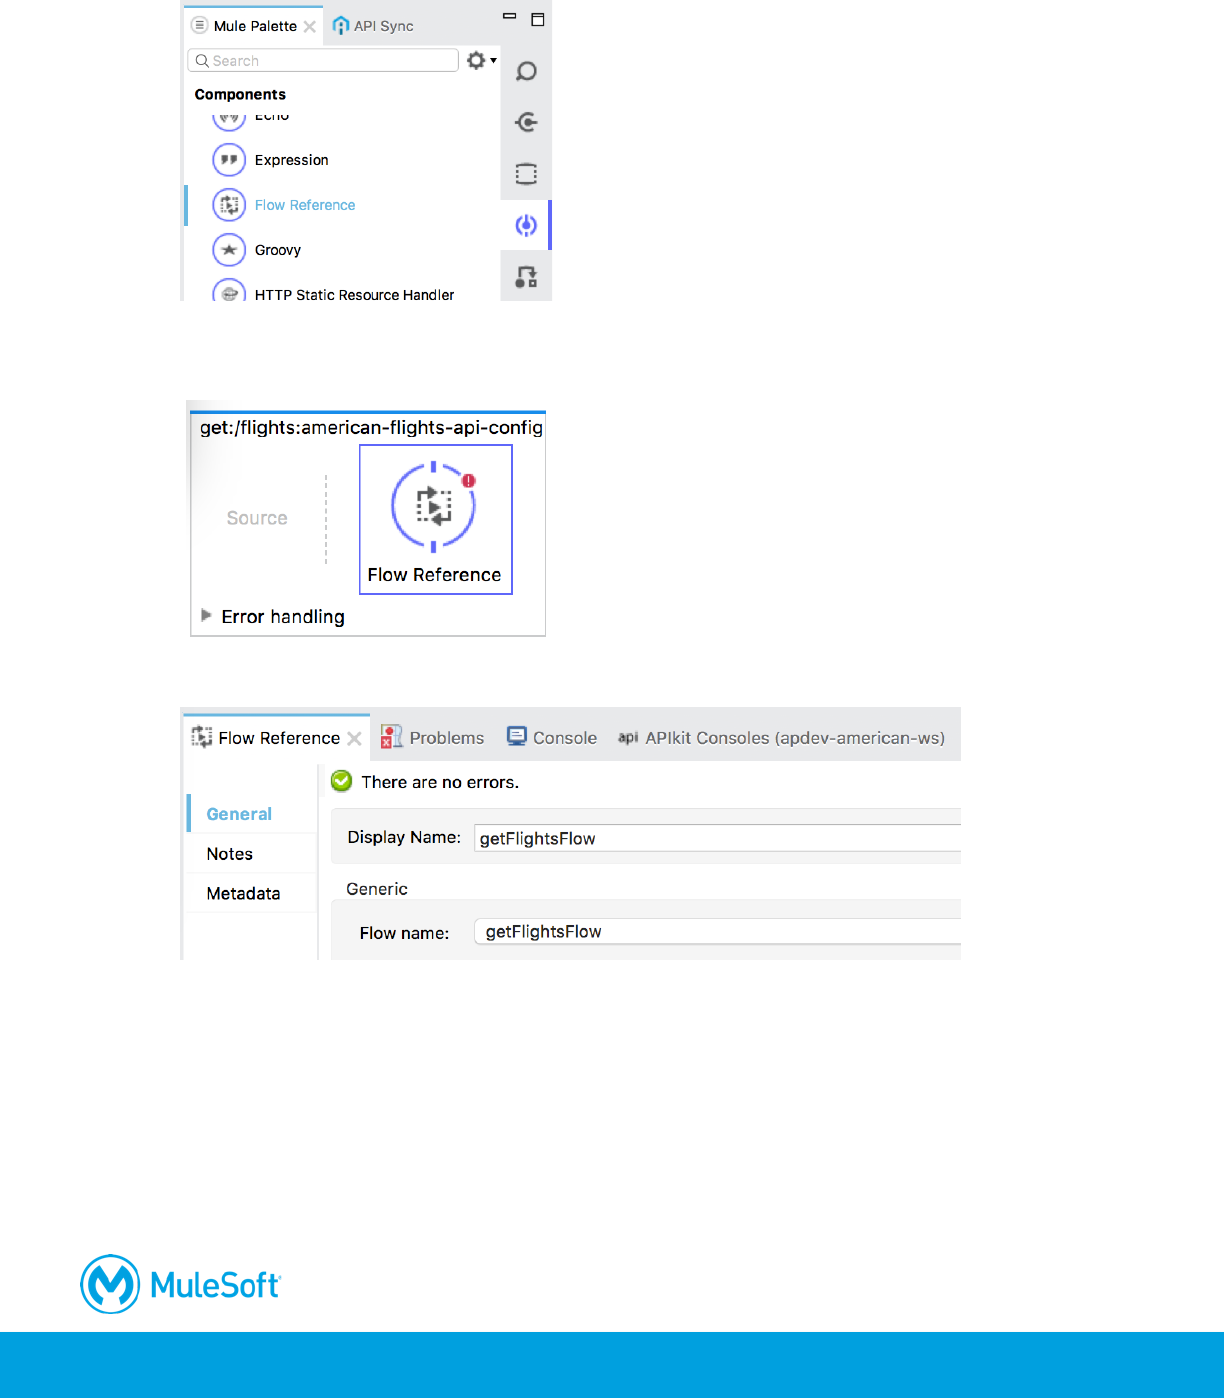
7. In the Mule Palette, select the Components tab.
8. Drag a Flow Reference component from the Mule Palette and drop it into the process section of
the flow.
9. In the Flow Reference properties view, select getFlightsFlow for the flow name.
Set logic for the /flights/{ID} resource
10. Delete the Set Payload transformer in the get:/flights/{ID} flow.
11. Drag a Flow Reference component from the Mule Palette and drop it into the flow.

143
12. In the Flow Reference properties view, select getFlightsByIDFlow for the flow name.
13. Return to implementation.xml.
14. Double-click the Database endpoint in getFlightsByIDFlow.
15. Change the query to use a variable instead of a query parameter.
WHERE ID = #[flowVars.ID]
Note: You learn about the different types of variables in later modules in the Development
Fundamentals course.
144
Test the web service using Postman
16. Run the project.
17. In Postman, make a request to http://localhost:8081/api/flights; you should now get the data for
all the flights from the database instead of the sample data.
18. Make a request to http://localhost:8081/api/flights/3; you should now get the data that flight from
the database instead of the sample data.
19. Return to Anypoint Studio and stop the project.
