APDevFundamentals3.9_studentManual MUFundamentals3.9 Student Manual Mod12
MUFundamentals3.9_studentManual_mod12
MUFundamentals3.9_studentManual_mod12
MUFundamentals3.9_studentManual_mod12
MUFundamentals3.9_studentManual_mod12
MUFundamentals3.9_studentManual_mod12
User Manual: Pdf
Open the PDF directly: View PDF ![]() .
.
Page Count: 42
389
Module 12: Connecting to
Additional Resources
At the end of this module, you should be able to:
• Connect to SaaS applications.
• Connect to files.
• Poll resources.
• Connect to JMS queues.
• Discover and install connectors not bundled with Anypoint Studio.
390
Walkthrough 12-1: Connect to a SaaS application (Salesforce)
In this walkthrough, you retrieve account records from Salesforce. You will:
• Browse Salesforce data on http://salesforce.com.
• Add and configure a Salesforce connector.
• Add a Salesforce endpoint to retrieve accounts for a specific postal code.
• Use the Query Builder to write a query.
Note: To complete this walkthrough, you need a Salesforce Developer account. Instructions for
creating a Salesforce developer account and getting an API access token are included in the
first walkthrough at the beginning of this student manual.
Look at existing Salesforce account data
1. In a web browser, navigate to http://login.salesforce.com/ and log in with your Salesforce
Developer account.
2. Click the Accounts link in the main menu bar.
3. In the view drop-down menu, select All Accounts and click the Go button.
391
4. Look at the existing account data; a Salesforce Developer account is populated with some
sample data.
5. Notice that countries and postal codes are not displayed by default.
6. Click the Create New View link next to the drop-down menu displaying All Accounts.
7. Set the view name to All Accounts with Postal Code.
8. Locate the Select Fields to Display section.
9. Select Billing Zip/Postal Code as the available field and click the Add button.
10. Add the Billing Country field.
11. Use the Up and Down buttons to order the fields as you prefer.
12. Click the Save button; you should now see all the accounts with postal codes and countries.
392
Review the starting flow in the examples project
13. Return to Anypoint Studio.
14. Open the apdev-examples project.
15. Open accounts.xml and review the HTTP Listener endpoint.
Add a Salesforce endpoint
16. Drag out a Salesforce connector and drop it before the Logger.
17. In the Package Explorer, locate the new Salesforce library that was added.
Configure the Salesforce connector
18. Open mule-app.properties in src/main/app.
19. Set an environment variable called env equal to DEV.
20. In the Package Explorer, right-click src/main/resources and select New > File.
393
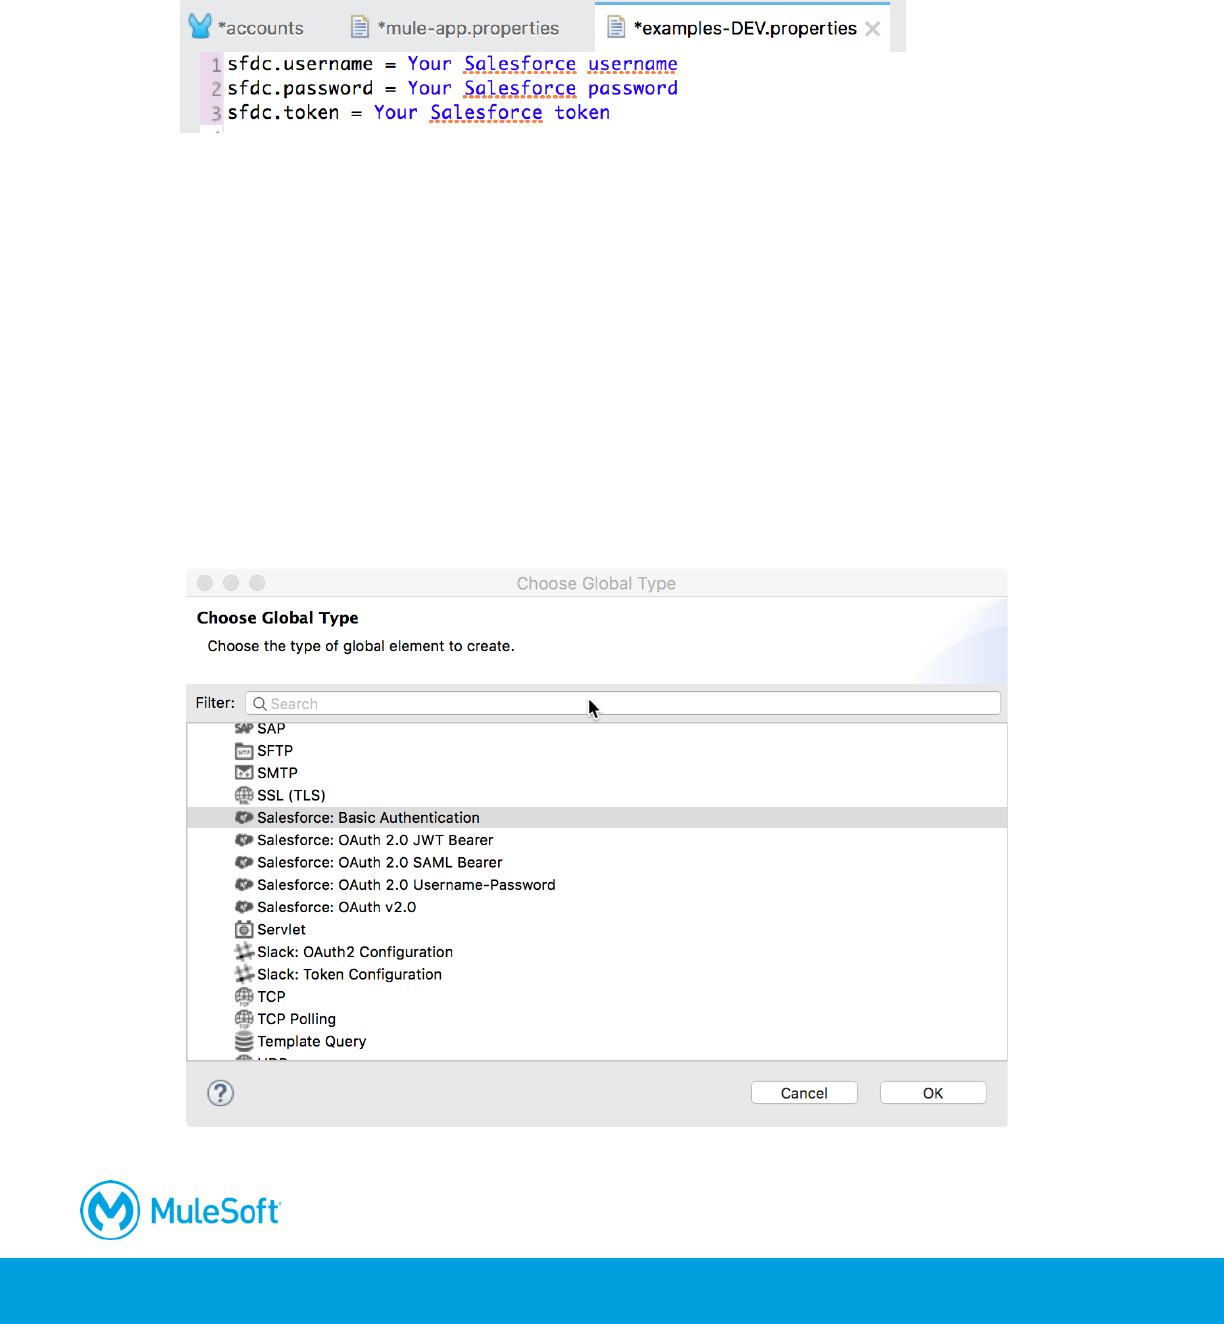
21. In the new File dialog box, set the file name to examples-DEV.properties and click Finish.
22. In examples-DEV.properties, create properties for your Salesforce username, password, and
security token.
Note: Instructions for creating a Salesforce Developer account and getting a security token are
included in the first walkthrough at the beginning of this student manual.
23. Save all the files.
24. Return to the Global Elements view of global.xml.
25. Click Create.
26. In the Choose Global Type dialog box, select Component configurations > Property Placeholder
and click OK.
27. Set the location to examples-${env}.properties and click OK.
28. Click Create.
29. In the Choose Global Type dialog box, select Connector Configuration > Salesforce: Basic
Authentication and click OK.
394
30. In the Global Element Properties dialog box, set the following values and click OK.
• Username: ${sfdc.username}
• Password: ${sfdc.password}
• Security Token: ${sfdc.token}
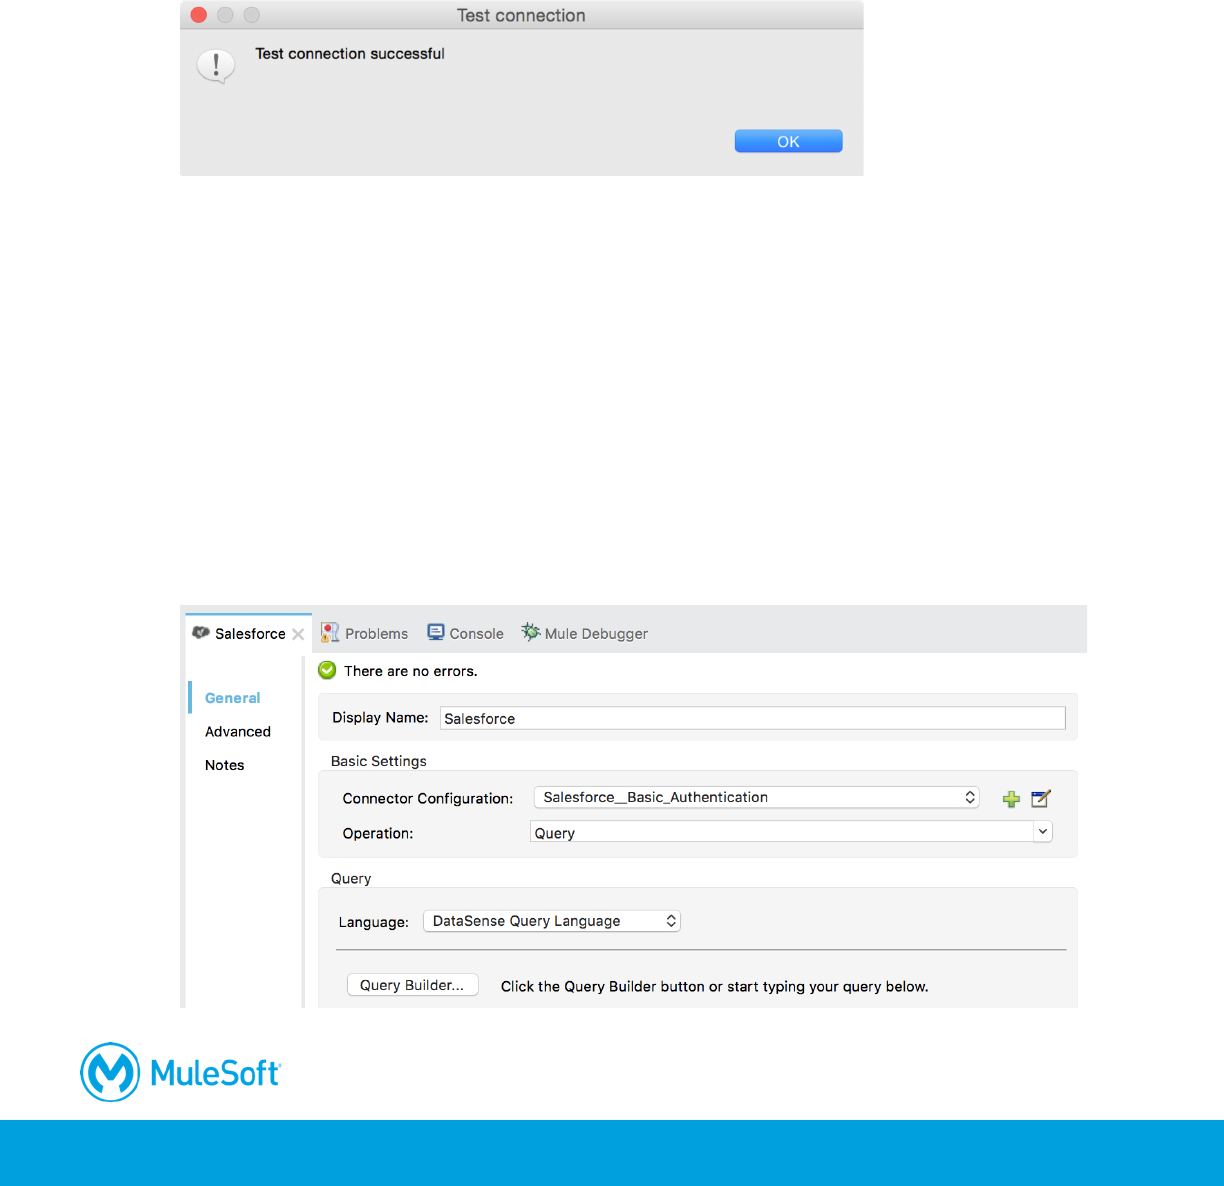
31. Click the Validate configuration button; you will get a Test Connection dialog box letting you
know if the connection succeeds or fails.
32. Click OK to close the Test connection dialog box.
33. If your test connection failed, fix it; do not proceed until it is working.
Note: If it failed, check to see if you have any extra whitespace in your entries.
34. Click OK to close the Global Elements Properties dialog box.
Configure the Salesforce endpoint
35. Return to accounts.xml.
36. In the Salesforce properties view, set the connector configuration to the existing
Salesforce__Basic_Authentication.
37. Set the operation to Query.
395
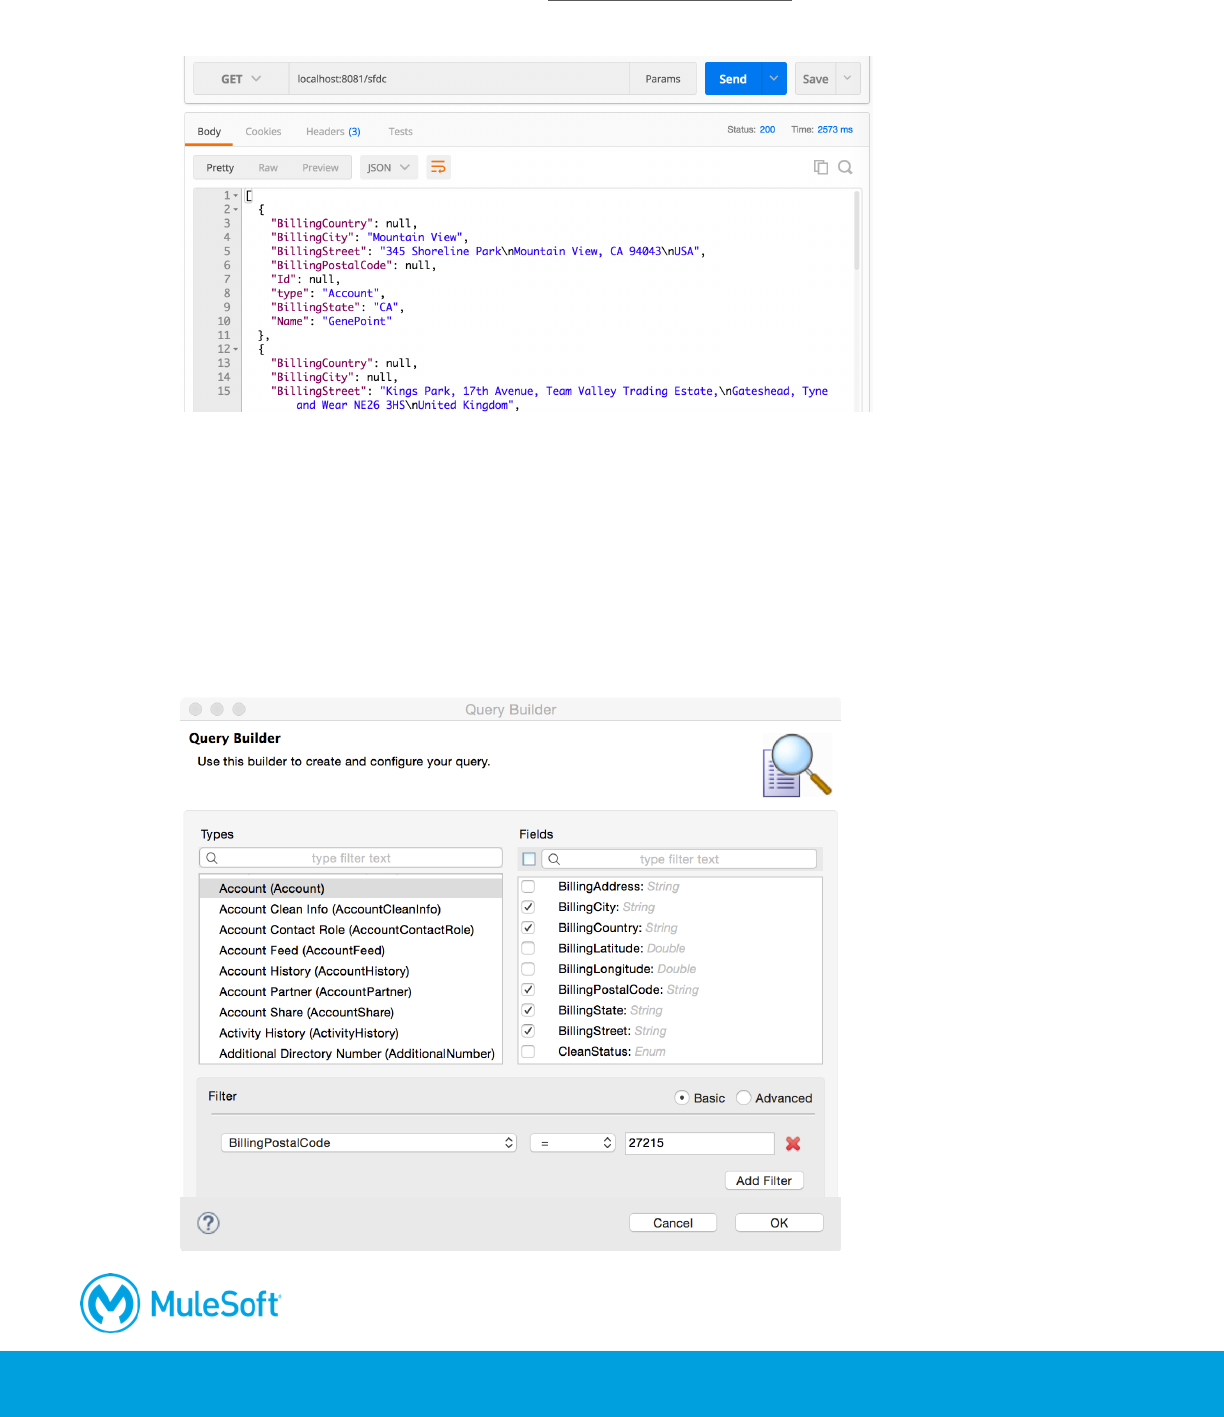
Write the query
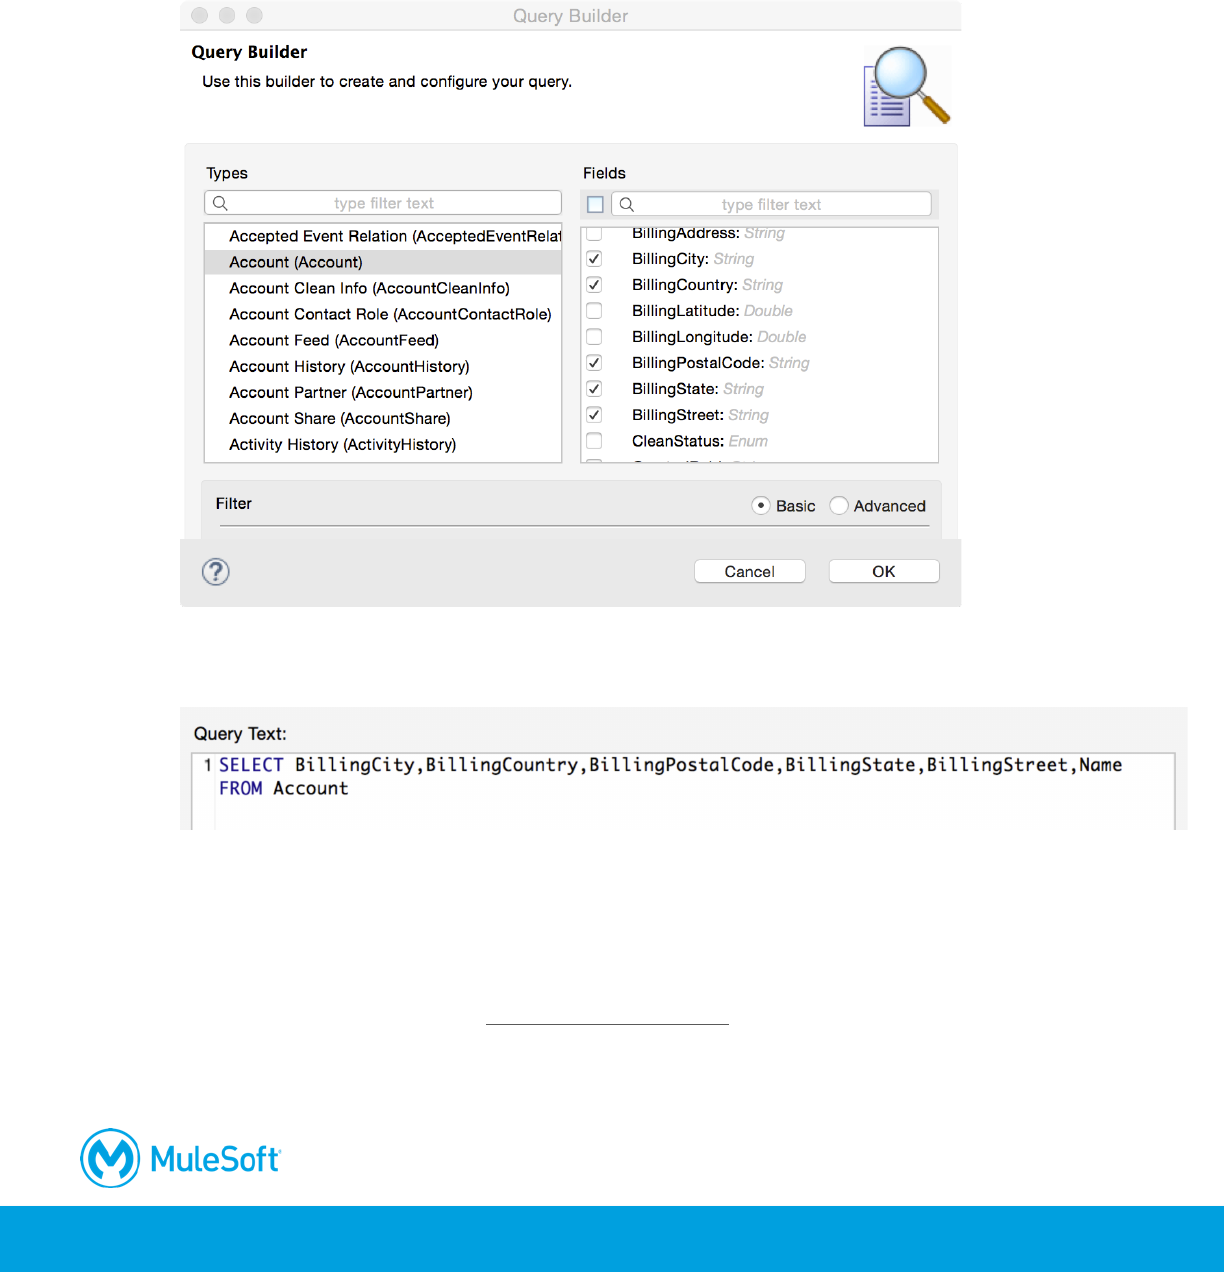
38. Click the Query Builder button.
39. In the Query Builder dialog box, select a type of Account (Account).
40. Select fields BillingCity, BillingCountry, BillingPostalCode, BillingState, BillingStreet, and Name.
41. Click OK.
42. In the Salesforce properties view, examine the generated query.
Debug the application
43. Add a breakpoint to the Logger.
44. Debug the project.
45. In Postman, make a request to http://localhost:8081/sfdc.
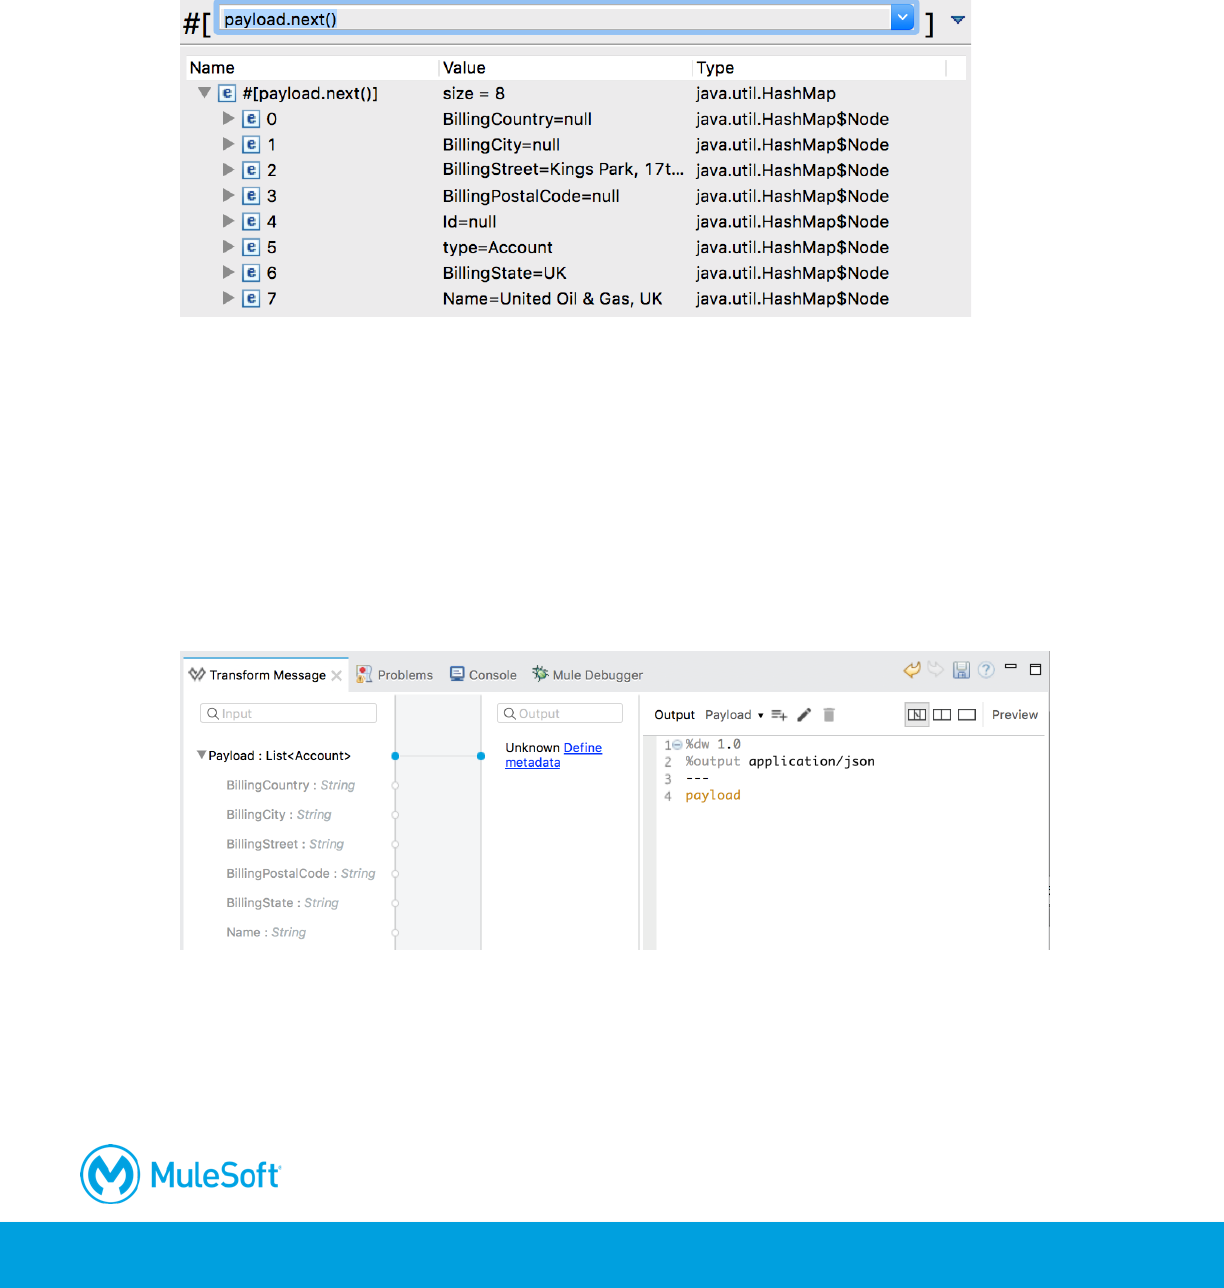
46. In the Mule Debugger, drill-down into the payload variable.
47. Click the Evaluate Mule Expression button.
396
48. Enter the following expression and press the Enter key.
#[payload.next()]
49. Expand the results; you should see the account data for the first account.
50. Click anywhere outside the expression window to close it.
51. Stop the project and switch perspectives.
Display the return data
52. Add a Transform Message component before the Logger component.
53. In the Transform Message properties view, look at the input metadata.
54. In the output expression section, change the output type to application/json.
55. Set the DataWeave expression to payload.
Test the application
56. Run the project.
397
57. In Postman, make another request to http://localhost:8081/sfdc; you should see the Salesforce
accounts displayed.
Modify the query
58. Return to accounts.xml.
59. In the Salesforce Properties view, click the Query Builder button.
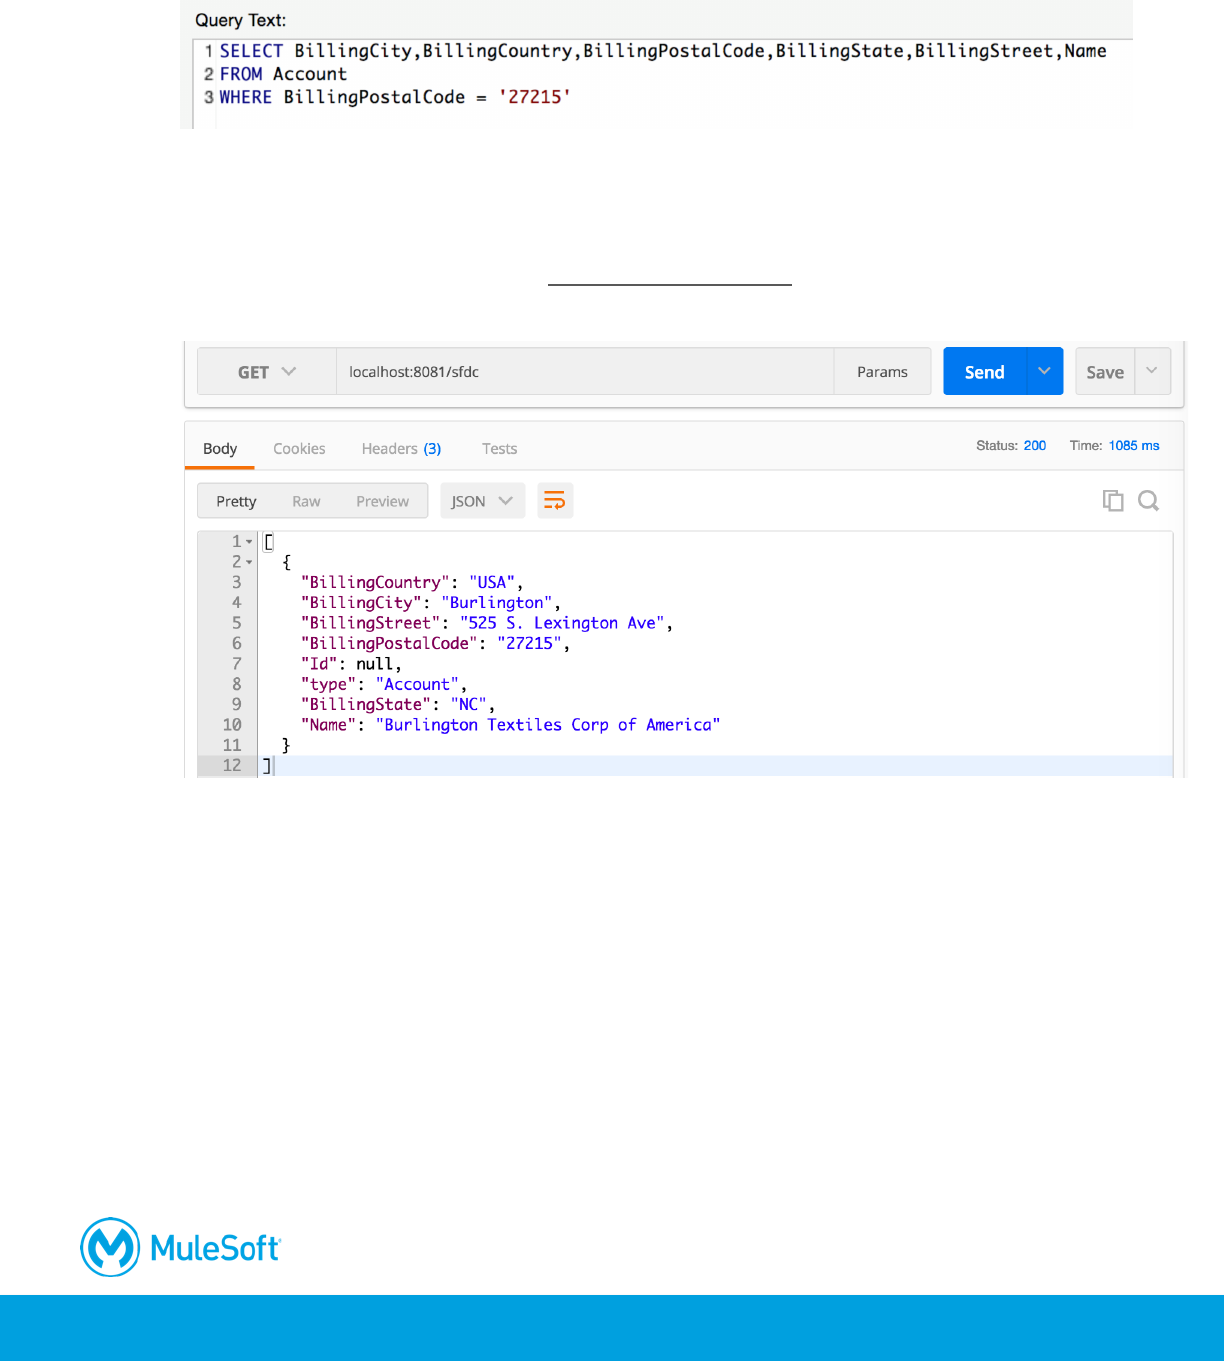
60. In the Query Builder dialog box, click the Add Filter button.
61. Create a filter for BillingPostalCode equal to one of the postal codes (like 27215) in your
Salesforce account data.
398
62. Click OK.
63. Examine the generated query.
Test the application
64. Save the file to redeploy the application.
65. In Postman, make another request to http://localhost:8081/sfdc; you should see only the
accounts with the specified postal code displayed.
66. Return to Anypoint Studio and stop the project.
399
Walkthrough 12-2: Connect to a file (CSV)
In this walkthrough, you load data from a local CSV file. You will:
• Add and configure a File endpoint to watch an input directory, read the contents of any added
files, and then rename and move the files.
• Use DataWeave to convert a CSV file to a string.
• Add a CSV file to the input directory and watch it renamed and moved.
• Restrict the type of file read.
• Add metadata to a file endpoint.
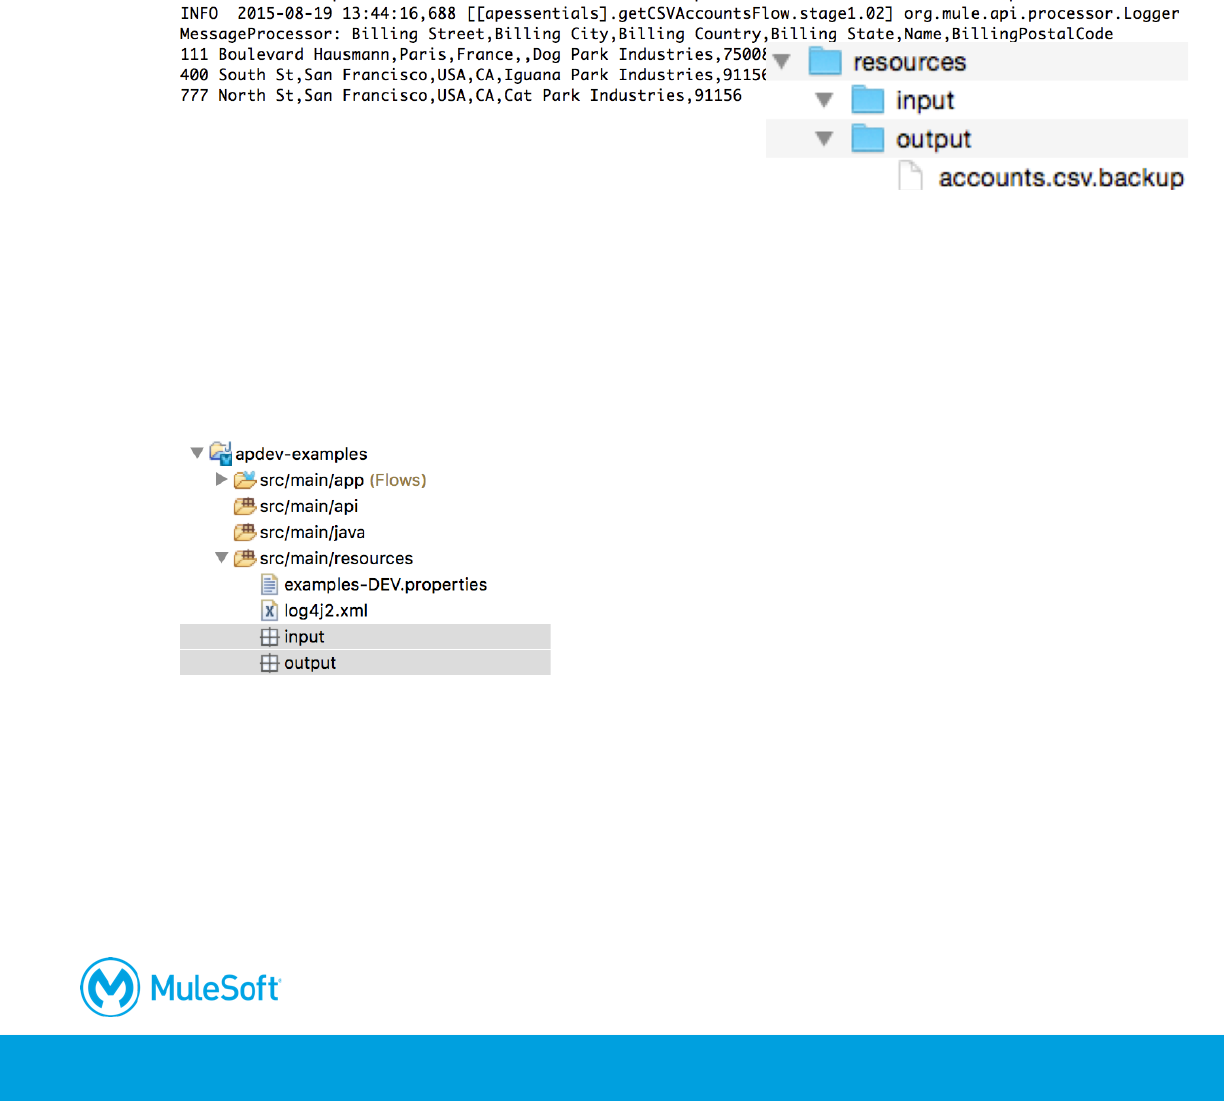
Create new directories
1. Return to the apdev-examples project.
2. Right-click the src/main/resources folder in the Package Explorer and select New > Folder.
3. Set the folder name to input and click Finish.
4. Create a second folder called output.
Add and configure a File endpoint
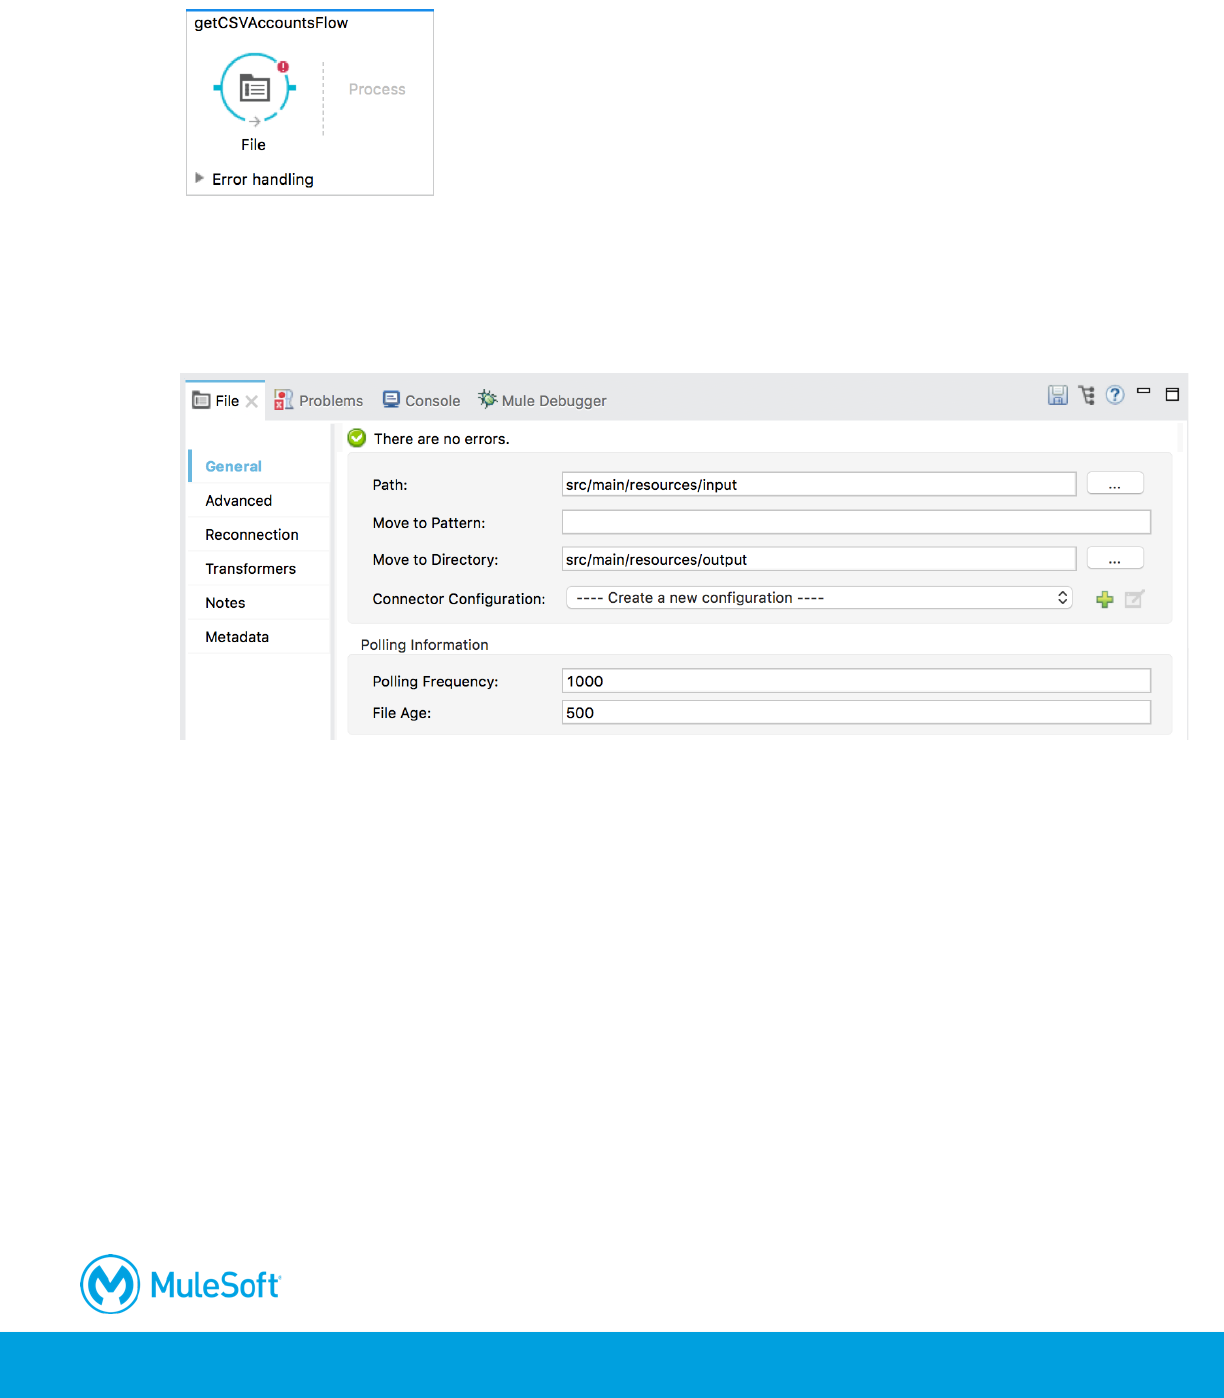
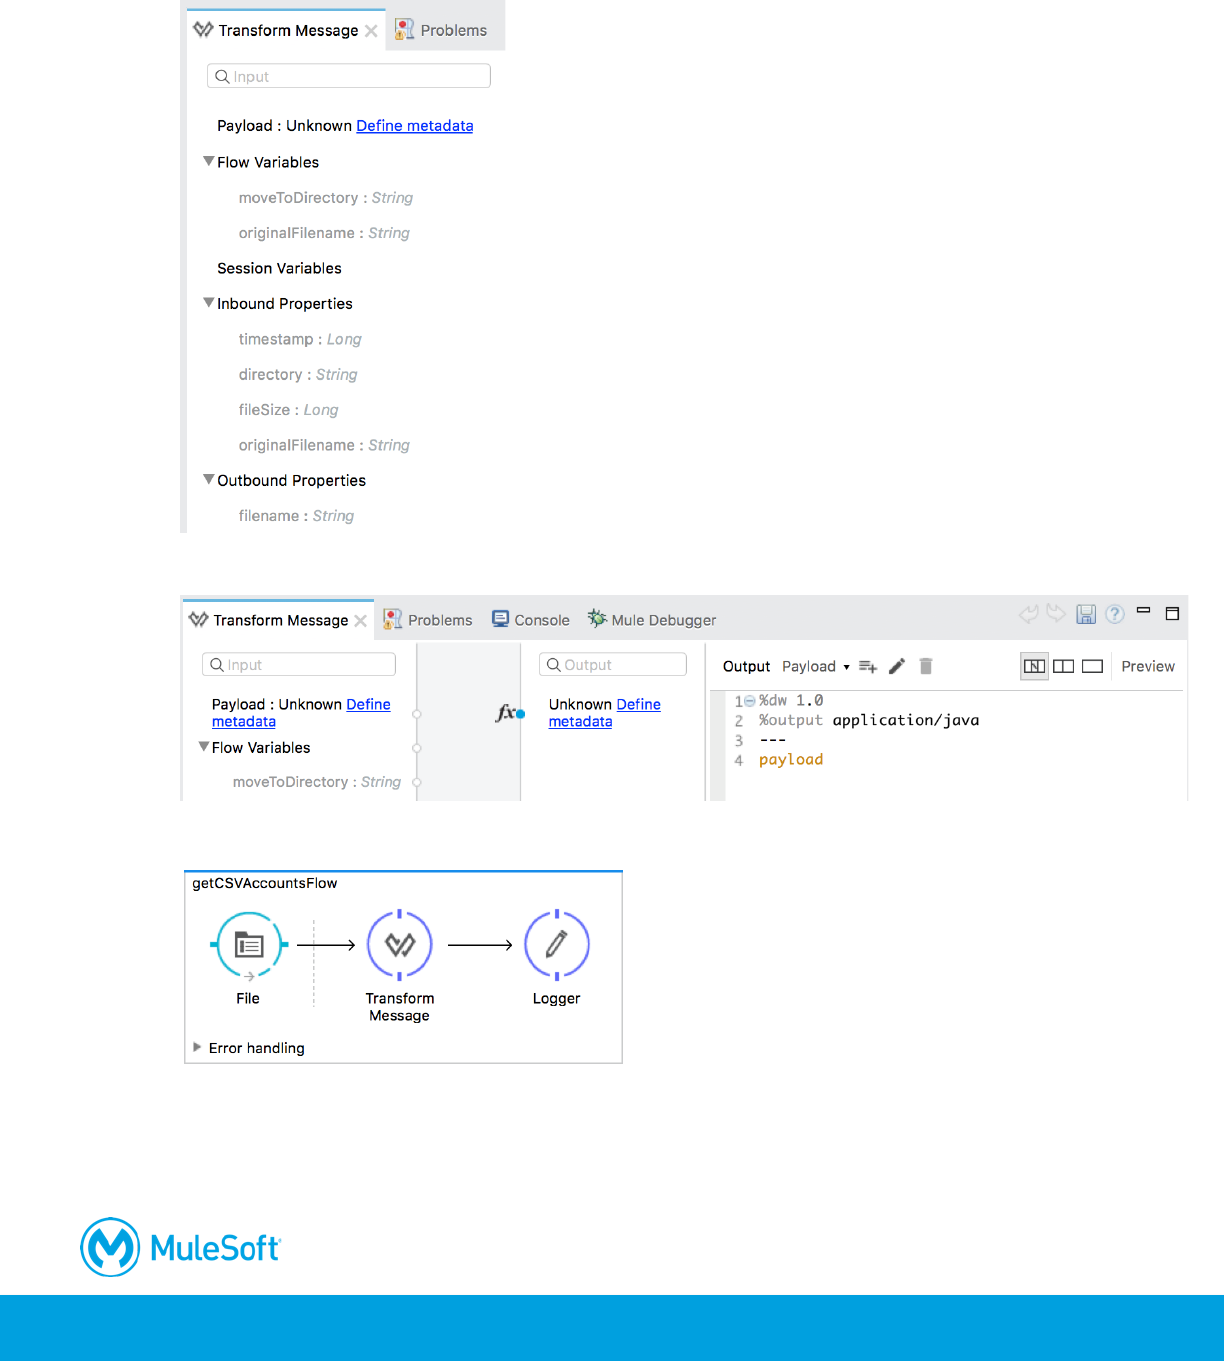
5. Return to accounts.xml.
6. Drag a File connector from the Mule Palette and drop it in the canvas to create a new flow.
400
7. Rename the flow to getCSVAccountsFlow.
8. In the File properties view, set the path to src/main/resources/input.
9. Set the move to directory to src/main/resources/output.
10. Look at the default polling information; the endpoint checks for incoming messages every 1000
milliseconds and sets a minimum of 500 milliseconds a file must wait before it is processed.
Display the file contents
11. Add a Transform Message component to the process section of the flow.
401
12. In the Transform Message properties view, look at the metadata for the input; there should be
no metadata for the payload but there should be metadata for variables and properties.
13. Set the transformation expression to payload.
14. Add a Logger after the component.
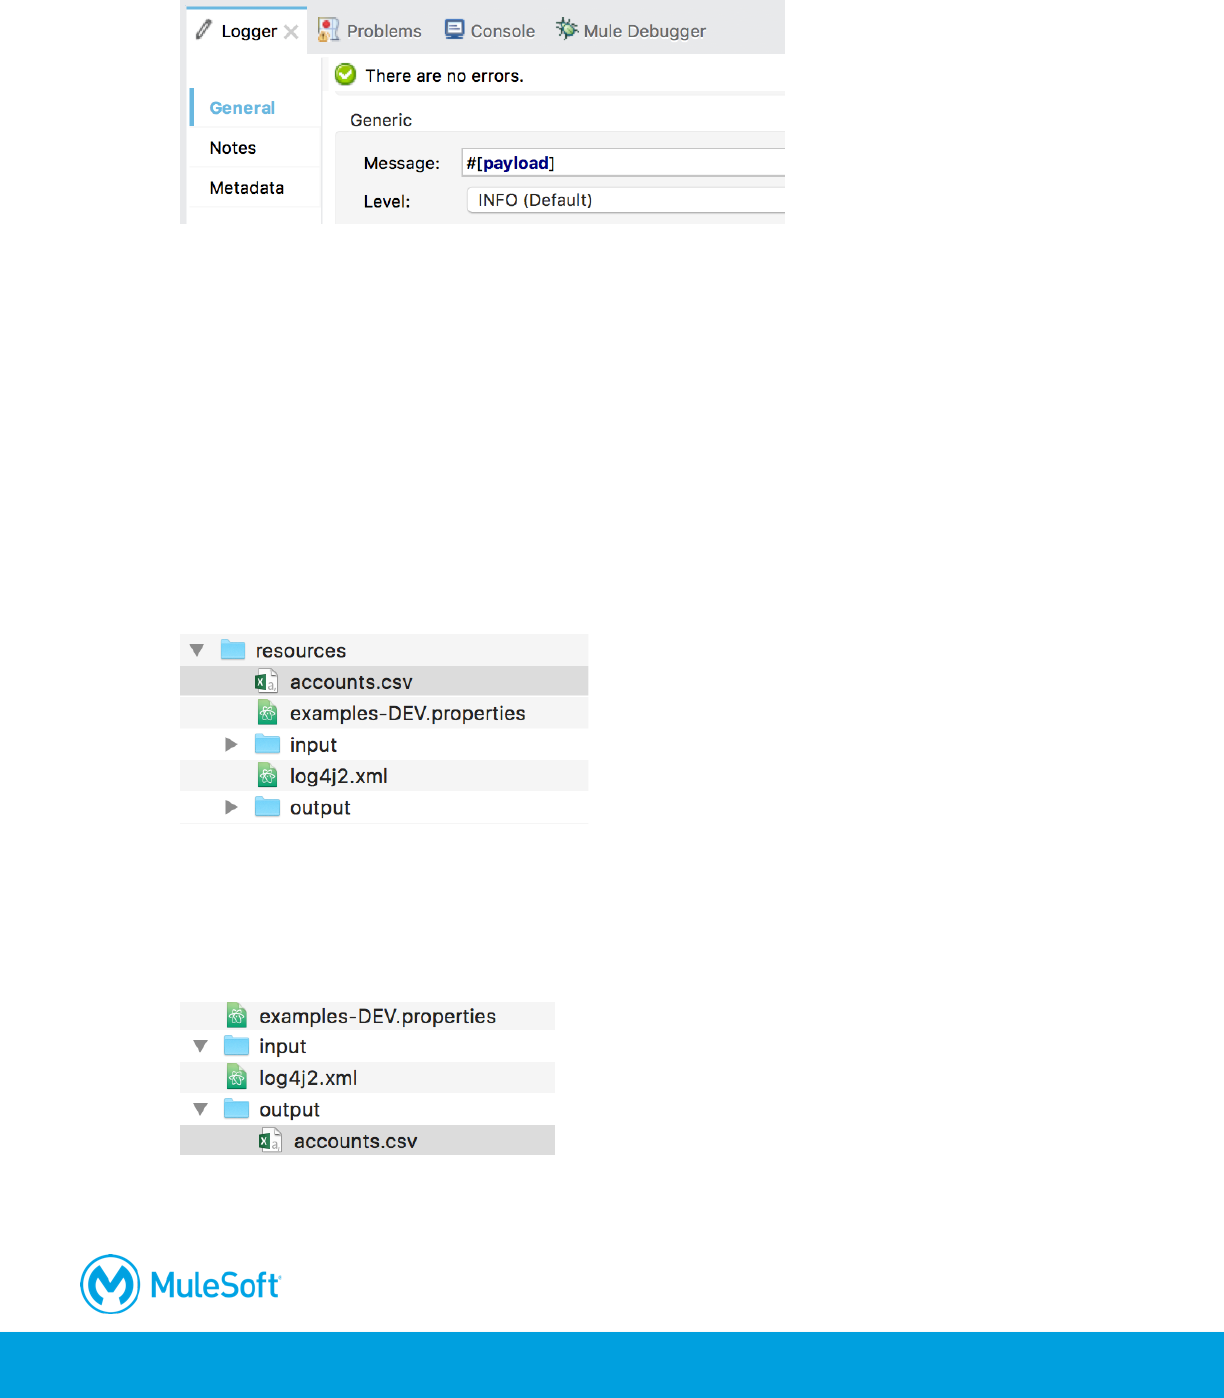
402
15. In the Logger properties view, set the message to display the payload.
Run the application
16. Run the project.
Add a CSV file to the input directory
17. Right-click src/main/resources in the Package Explorer and select Show In > System Explorer.
18. Open the resources folder.
19. In another file browser window, navigate to the student files for the course.
20. Locate the resources/accounts.csv file.
21. Copy this file and then paste it in the src/main/resources folder of the apdev-examples project.
Test the application
22. Drag the accounts.csv file into the input folder; you should see it almost immediately moved to
the output folder.
23. Drag it back into the input folder; it will be read again and then moved to the output folder.
24. Leave this folder open.
403
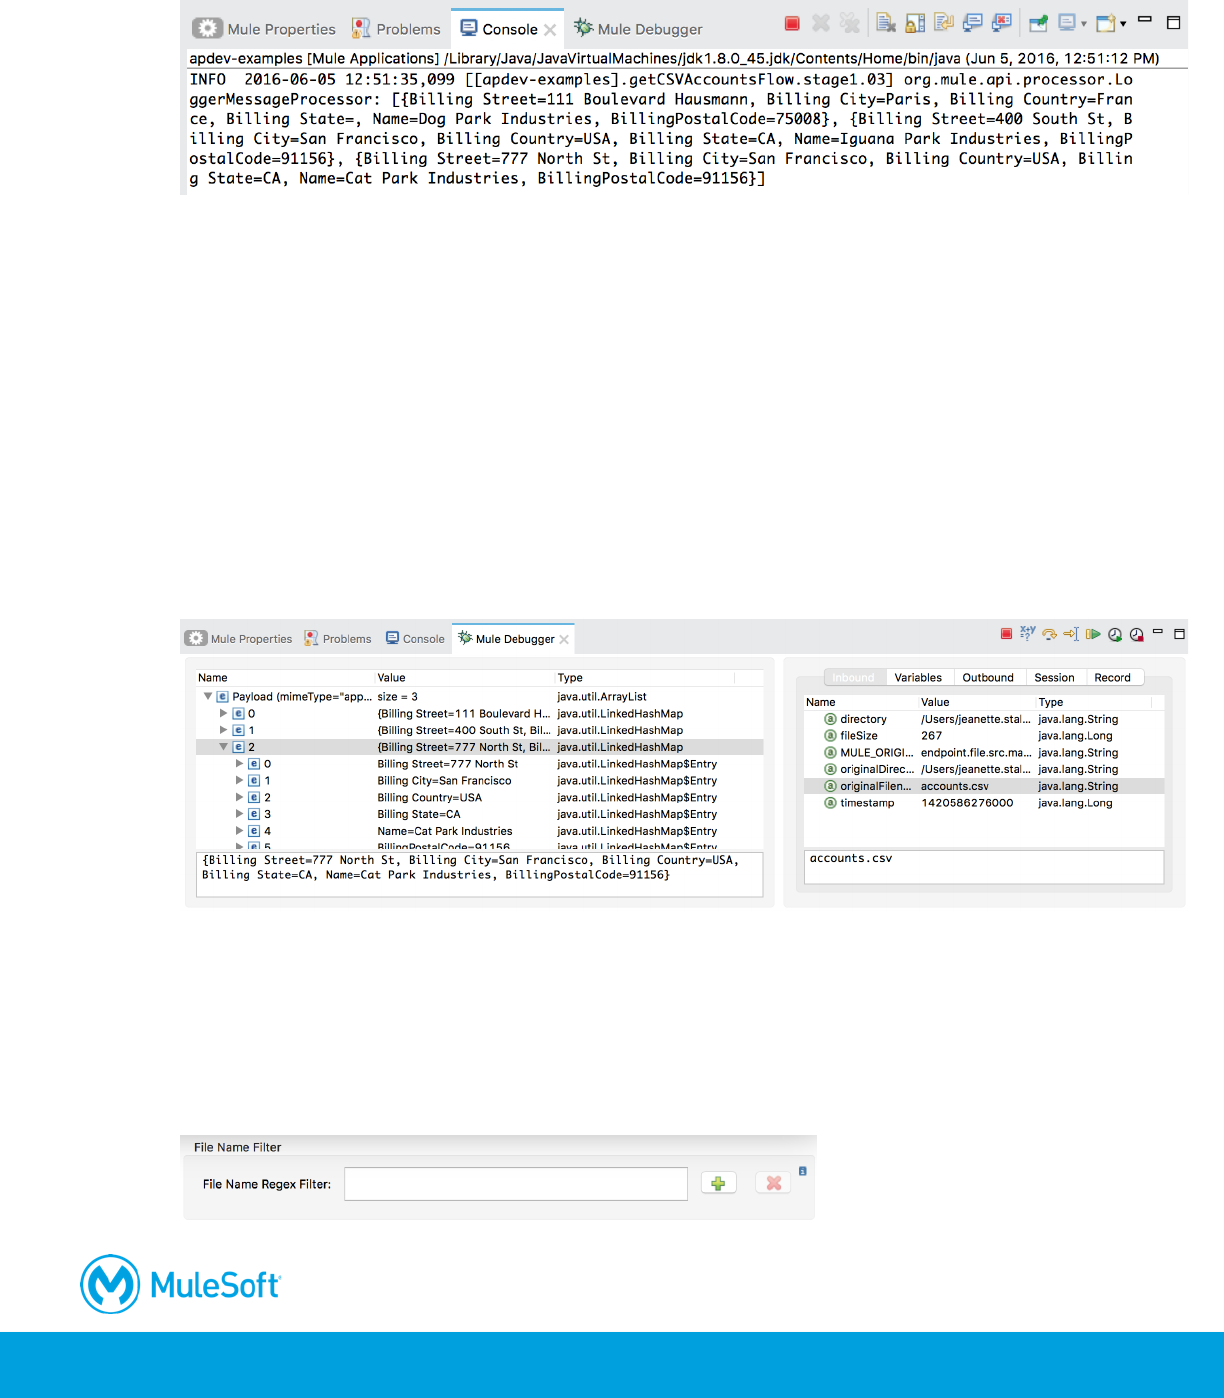
25. Return to Anypoint Studio and look at the console; you should see the file contents displayed.
26. Stop the project.
Debug the application
27. In getCSVAccountsFlow, add a breakpoint to the Logger.
28. Debug the project.
29. Move the accounts.csv file from the output folder back to the input folder.
Note: You can do this in your computer's file browser or in Anypoint Studio. If you use Anypoint
Studio, you will need to right-click the project and select Refresh to see the file.
30. In the Mule Debugger, drill-down and look at the payload.
31. Look at the inbound message properties and locate the original filename.
32. Click the Resume button.
33. Stop the project and switch perspectives.
Restrict the type of file read
34. In the File Properties view, click the Add button next to file name regex filter.

404
35. In the File Name Regex Filter dialog box, set the pattern to .*csv (not *.csv) and uncheck case
sensitive.
36. Click Finish.
Rename the file
37. Set the move to pattern to append .backup to the original filename.
#[message.inboundProperties.originalFilename].backup
Test the application
38. Run the project.
39. Move the accounts.csv file from the output folder back to the input folder; you should see it
appear in the output folder with its new name.
40. Move the accounts.csv.backup file from the output folder back to the input folder; it should not
be processed and moved to the output folder.
405
41. Return to Anypoint Studio and stop the project.
Modify the File endpoint to not rename the files
Note: In the last part of the walkthrough, you add metadata for the File endpoint. Although not
needed here, this metadata will be used when the data is synchronized to Salesforce in the next
module.
42. In the Package Explorer, right-click the src/main/resources/input folder and select Refresh.
43. Expand the src/main/resources/input folder.
44. Right-click accounts.csv.backup and select Refactor > Rename.
45. In the Rename Resource dialog box, set the new name to accounts.csv and click OK.
46. In the File Properties view, delete the move to pattern.
Note: This will make it easier to test the application because you won’t have to keep renaming
the file as you move it back to the input directory.
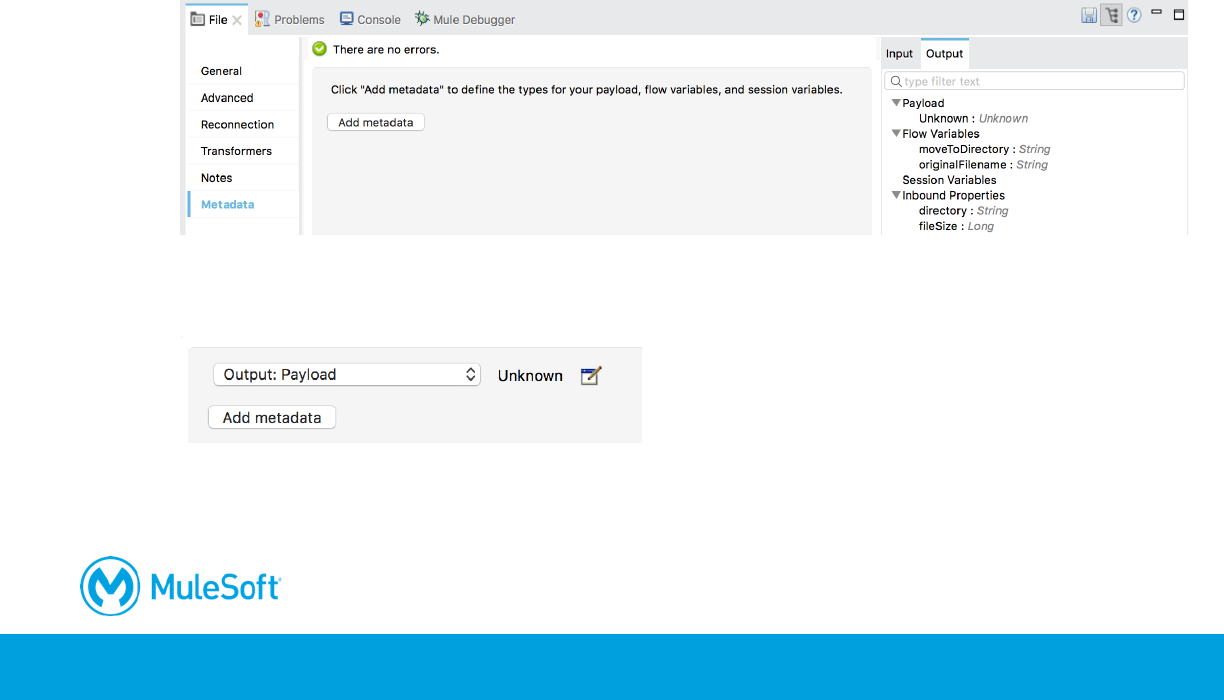
Add file endpoint metadata
47. In the File Properties view, click the output tab in the metadata explorer and review the
metadata.
48. Click Metadata in the left-side navigation.
49. Click the Add metadata button.
50. In the drop-down menu that appears, make sure Output: Payload is selected.
51. Click the Edit button next to the drop-down menu.
52. In the Select metadata type dialog box, click the Add button.
53. In the Create new type dialog box, set the name to accounts_csv and click Create type.

406
54. In the Select metadata dialog box, change the type to CSV.
55. Make sure CSV includes header row is checked.
56. Click the Load from example button (the folder icon).
57. In the Load CSV fields from file dialog box, click the Browse button next to Example.
58. Browse to the project’s src/main/resources/input folder, select accounts.csv and click Open.
59. In the Load CSV fields from file dialog box, click OK.
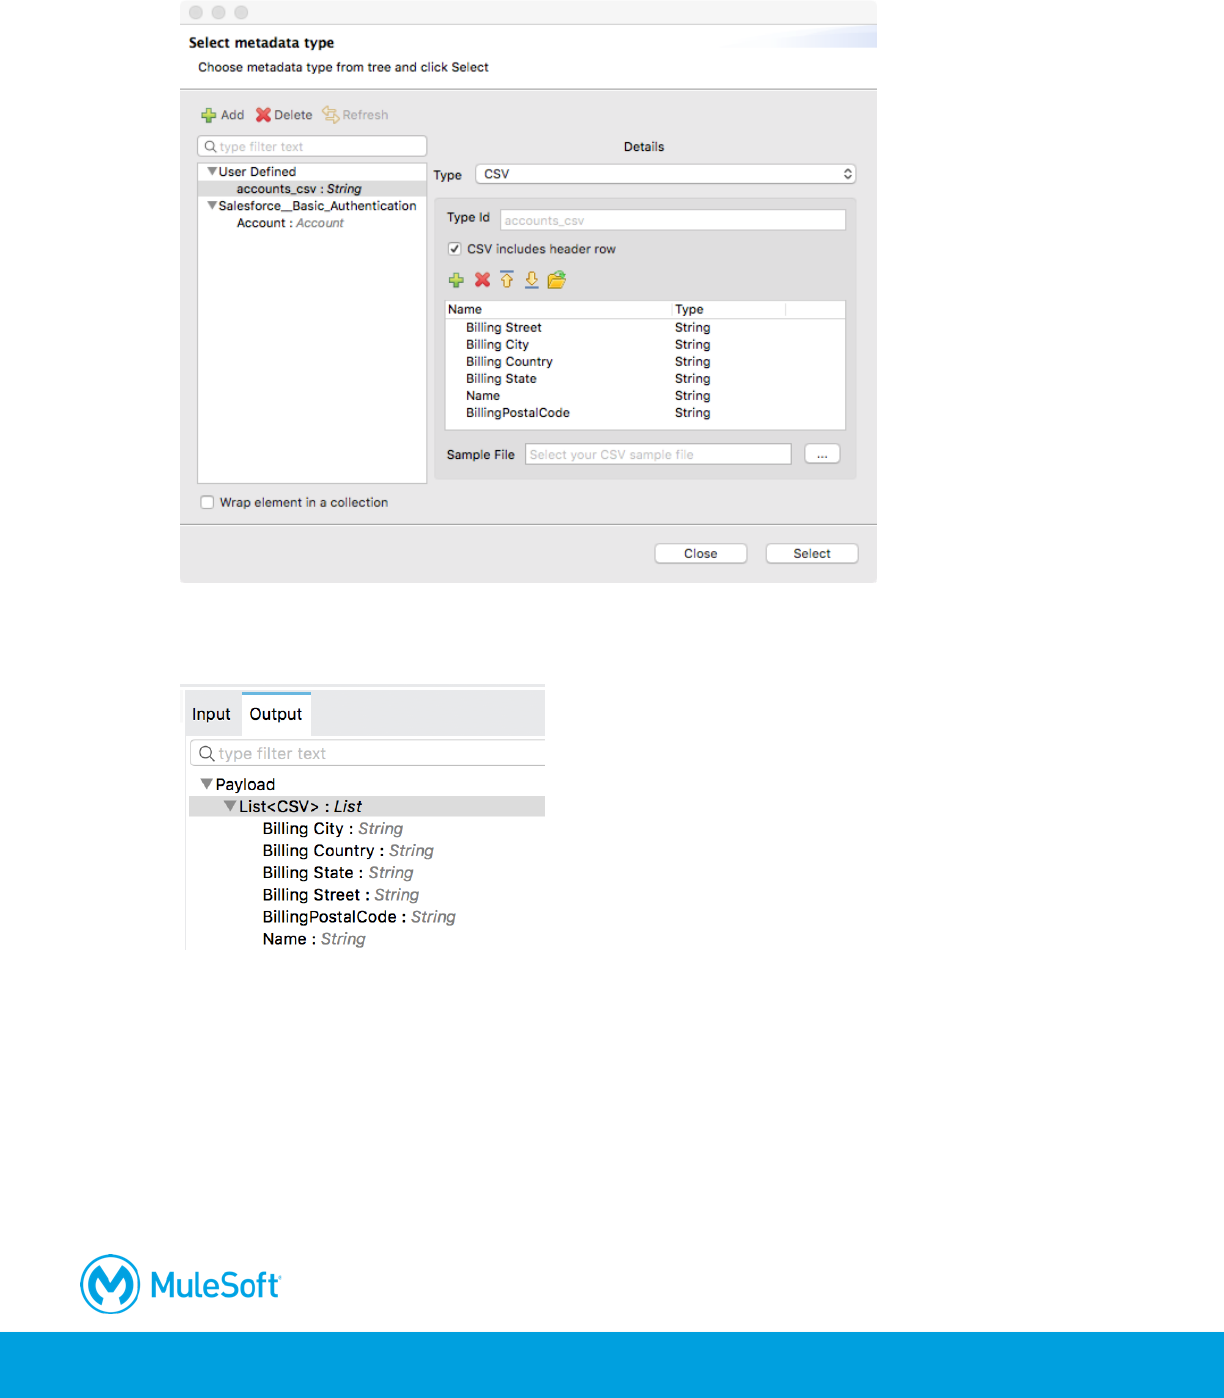
407
60. In the Select metadata type dialog box, click Select.
61. In the File Properties view, click the Output tab of the metadata explorer again; the payload
should now have associated metadata and be shown to be a List <CSV>.
62. In the Transform Message Properties view, look at the payload metadata in the input section;
the payload should now have associated metadata.
63. Save the file.
408
Walkthrough 12-3: Poll a resource
In this walkthrough, you poll a database. You will:
• Use a form to add accounts for a specific postal code to an accounts table in a database.
• Create a flow with a Poll scope as the message source.
• Poll a database every 5 seconds for records with a specific postal code.
• Use a poll watermark to track the ID of the latest record retrieved.
• Use the watermark to only retrieve new records with that postal code from the database.
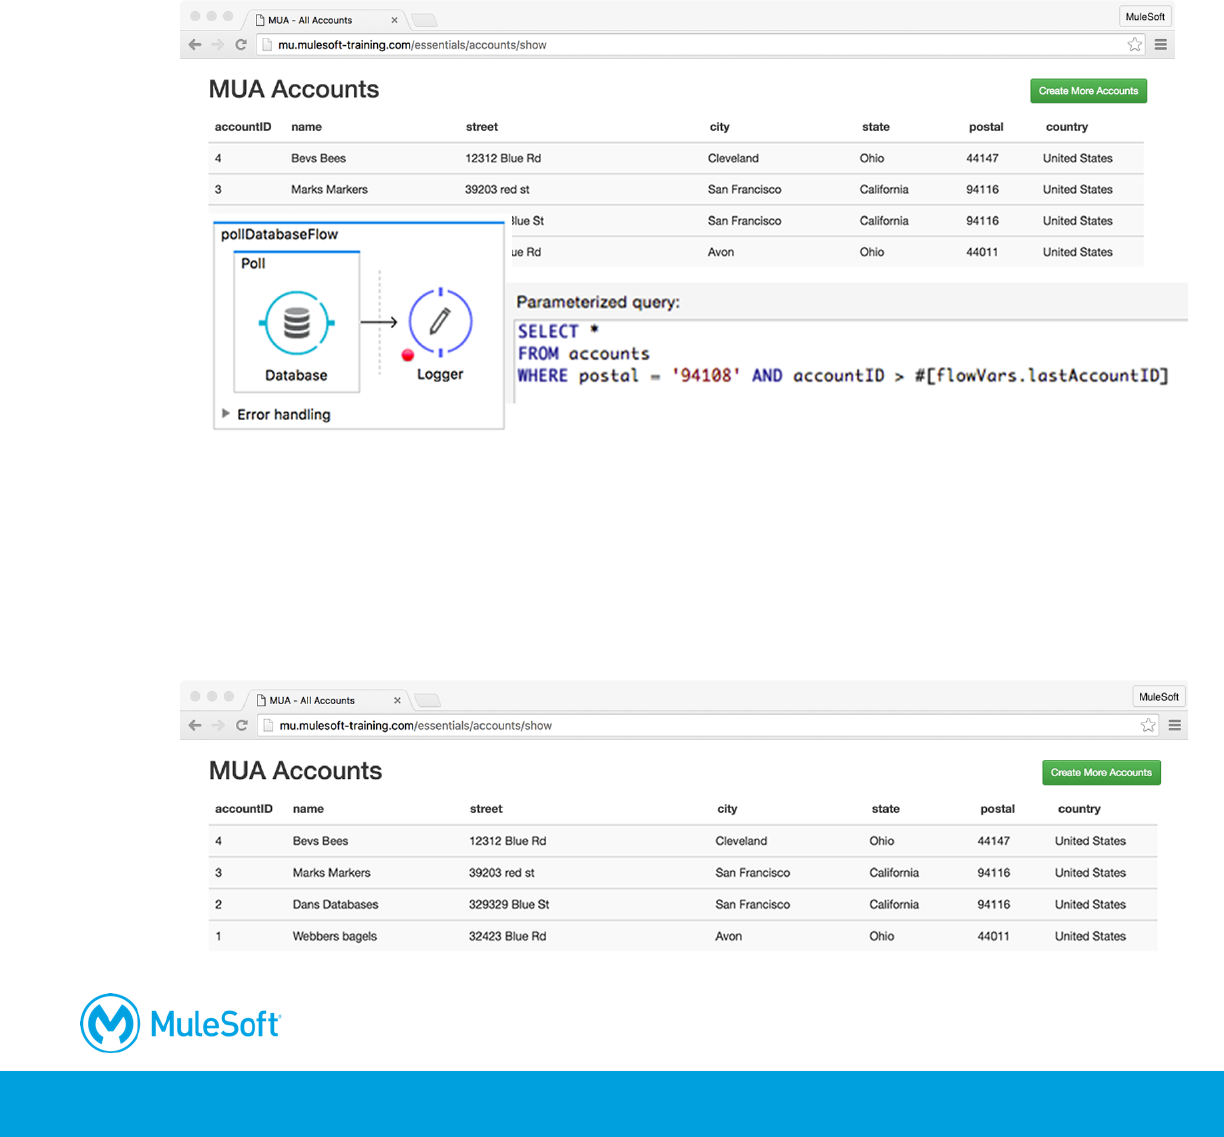
Get familiar with the data in the database
1. Return to the course snippets.txt file and copy the Account list URL for the MySQL database.
2. In a web browser, navigate to the URL you copied.
3. Look at the existing data and the name of the columns (which match the names of the database
fields) and the postal values.
409
4. Click the Create More Accounts button.
5. Add a new record with a specific postal code; you will retrieve this record in this walkthrough
and insert it into your Salesforce account in the next module.
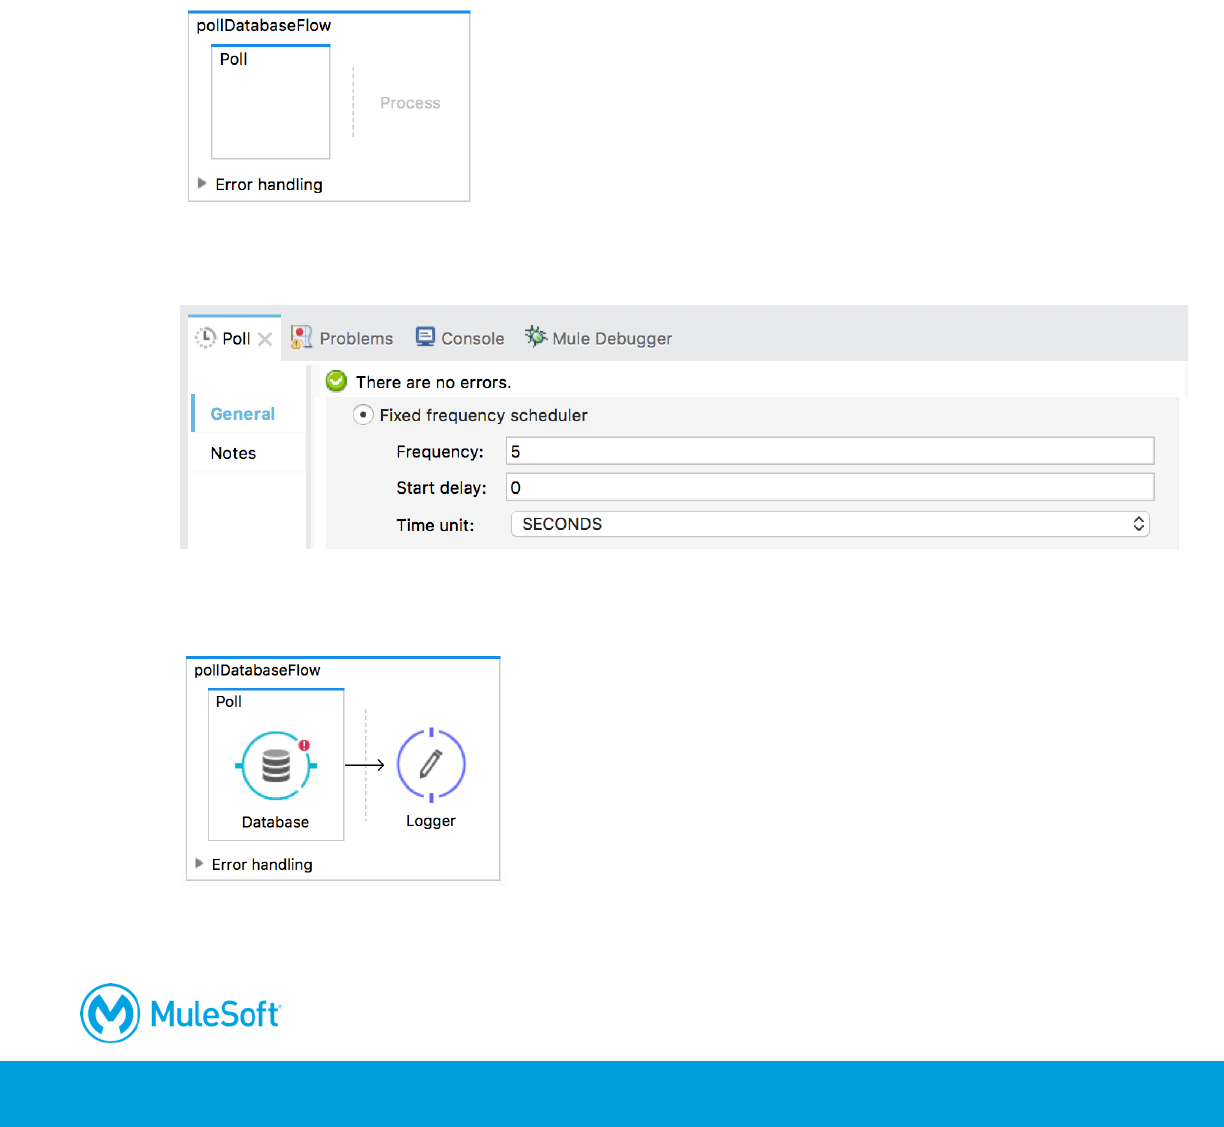
Create a flow that polls a database
6. Return to accounts.xml in Anypoint Studio.
7. Drag a Poll scope from the Mule Palette and drop it at the top of the canvas.
8. Change the name of the flow to pollDatabaseFlow.
9. In the Poll Properties view, select the fixed frequency scheduler.
10. Set the frequency to 5 and the time unit to seconds.
11. Drag a Database connector from the Mule Palette to the poll scope.
12. Add a Logger to the process section of the flow.
410
13. In the Logger properties view, set the message to display the payload.
Note: Instead of polling the database directly, you could use the poll scope to make periodic
requests to an API that governs access to the database.
Configure the Database connector
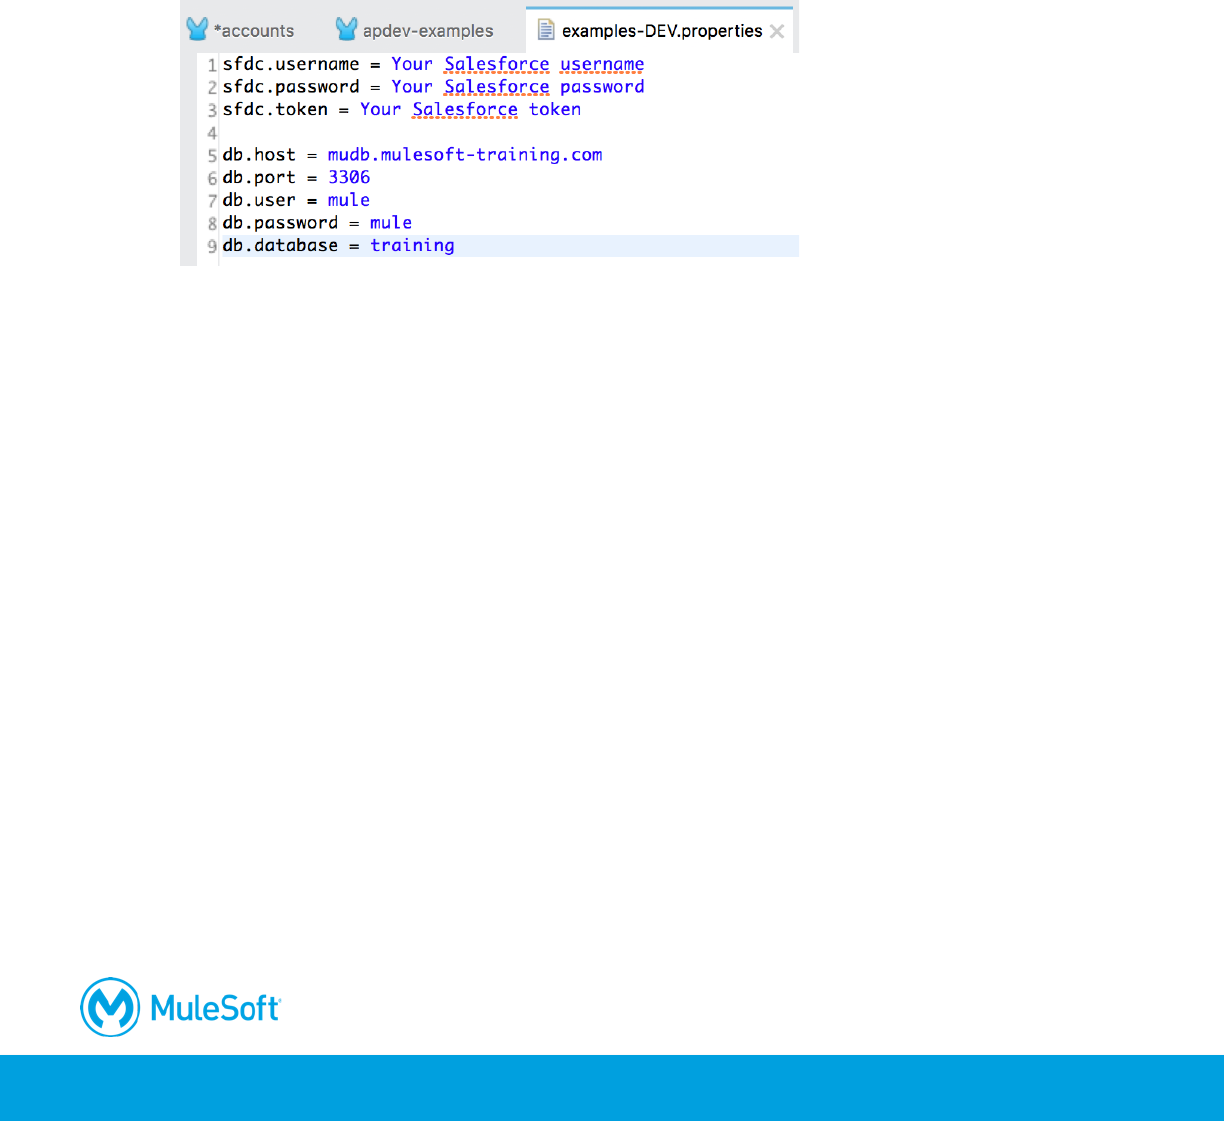
14. Return to the course snippets.txt file and copy the database parameters (the five starting with
db).
15. Return to examples-DEV.properties and paste the values.
16. Save the file.
17. Return to the Global Elements view of global.xml.
18. Click Create.
19. In the Choose Global Type dialog box, select Connector Configuration > MySQL Configuration
and click OK.
20. In the Global Element Properties dialog box, set the following values and click OK.
• Host: ${db.host}
• Port: ${db.port}
• User: ${db.user}
• Password: ${db.password}
• Database: ${db.database}
21. Under Required dependencies, click the Add File button next to MySQL Driver.
22. Navigate to the student files folder, select the MySQL JAR file located in the resources folder,
and click Open.
23. Back in the Global Element Properties dialog box, click the Test Connection button; you should
get a successful test dialog box.
Note: Make sure the connection succeeds before proceeding.

411
24. Click OK to close the dialog box.
25. Click OK to close the Global Element Properties dialog box.
Configure the Database endpoint
26. Return to accounts.xml.
27. In the Database properties view, set the connector configuration to the existing
MySQL_Configuration.
28. Set the operation to Select.
29. Add a query to select the data for the postal code of the record you added to the accounts table.
SELECT *
FROM accounts
WHERE postal = '94108'
Test the application
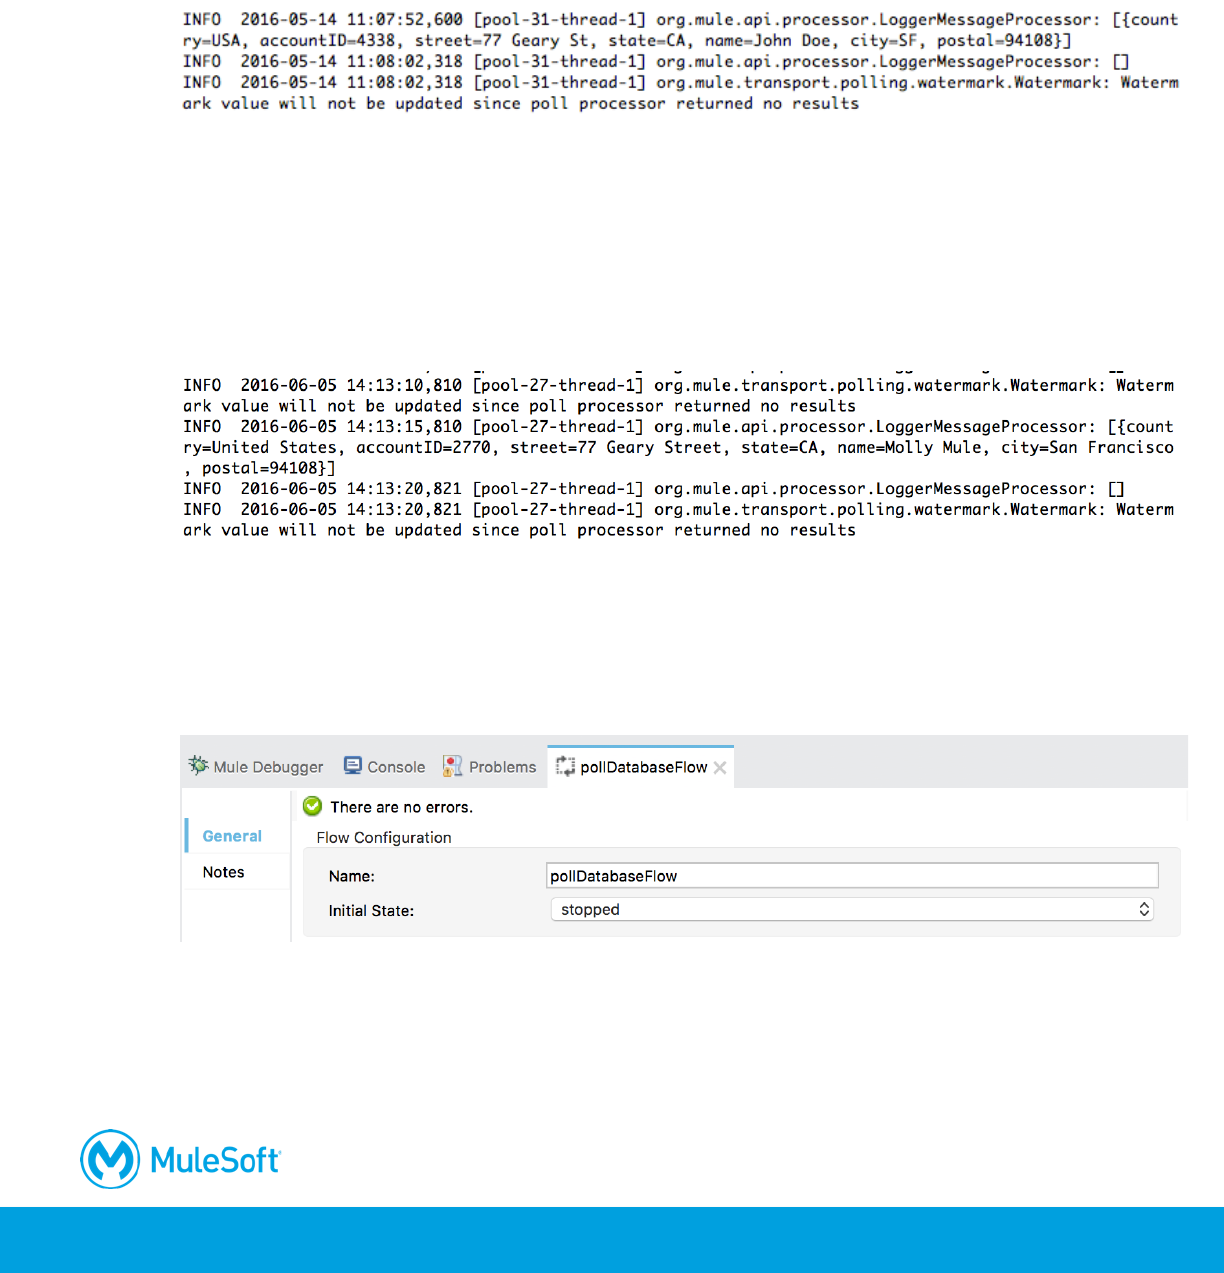
30. Run the project.
31. Watch the console; you should see records displayed every 5 seconds.
Note: Right now, all records with matching postal code are retrieved – over and over again.
Next, you will modify this so only new records with the matching postal code are retrieved.
32. Stop the project.
Use a watermark to keep track of the last record retrieved
33. In the Poll properties view, select Enable watermark.
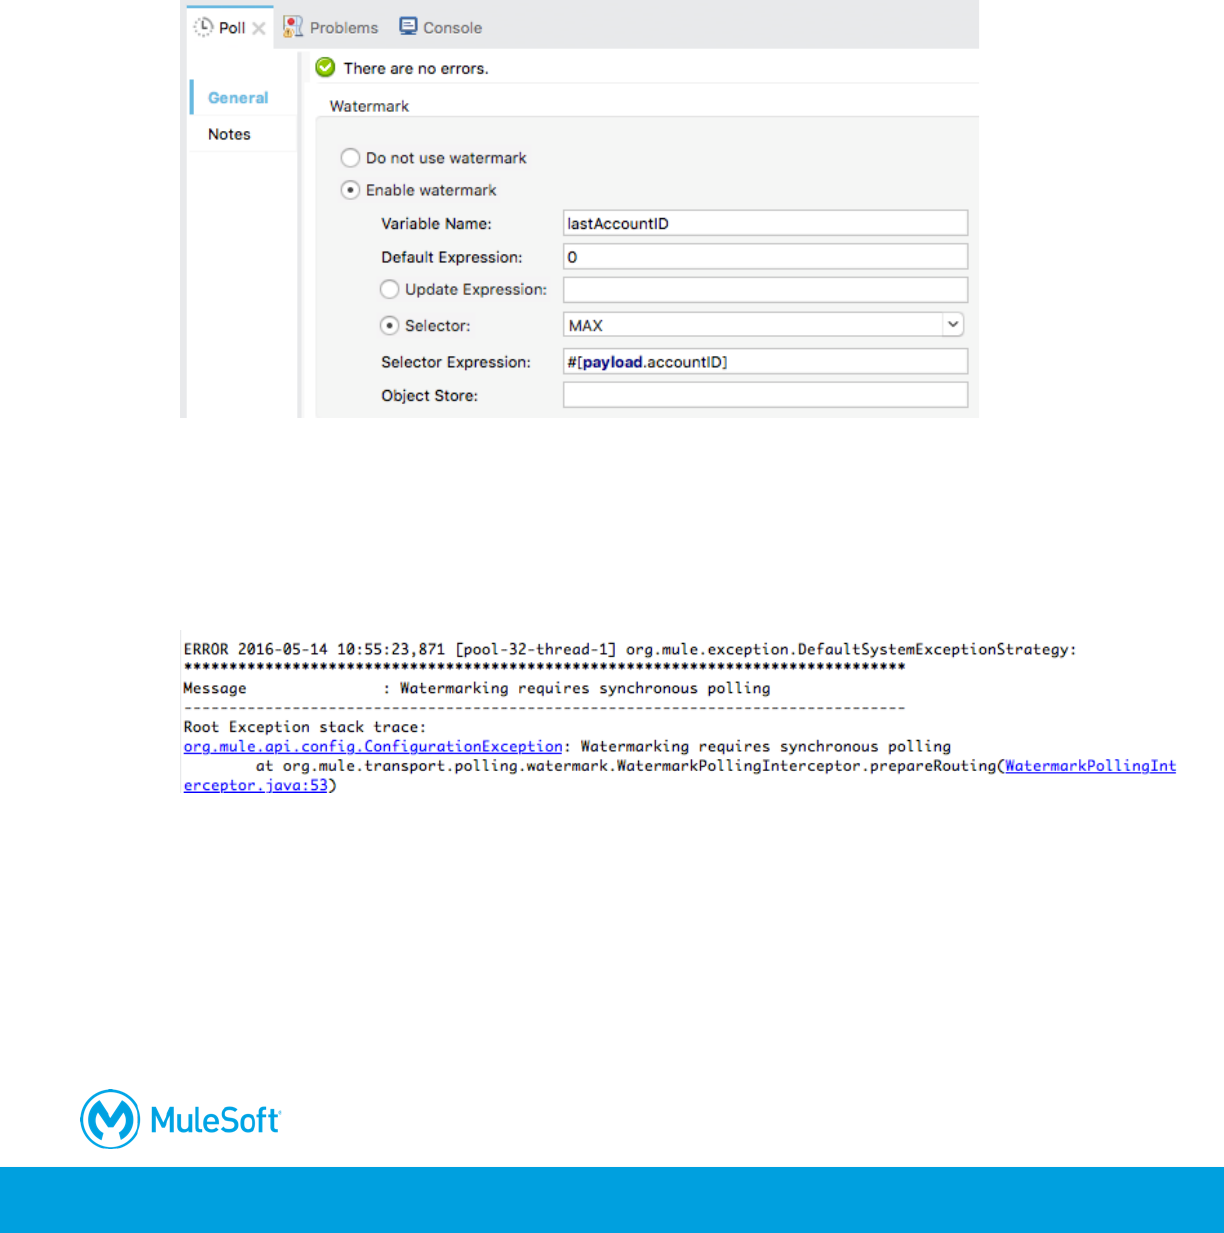
412
34. Set the watermark to store the max accountID returned by setting the following values.
• Variable name: lastAccountID
• Default expression: 0
• Selector: MAX
• Selector Expression: #[payload.accountID]
Run the application
35. Run the project; the application should deploy but then throw an exception.
36. Locate the exception in the console; you should see a message that watermarking requires
synchronous polling.
37. Stop the project.
Make the flow synchronous
38. In the Properties view for pollDatabaseFlow, select processing strategy.
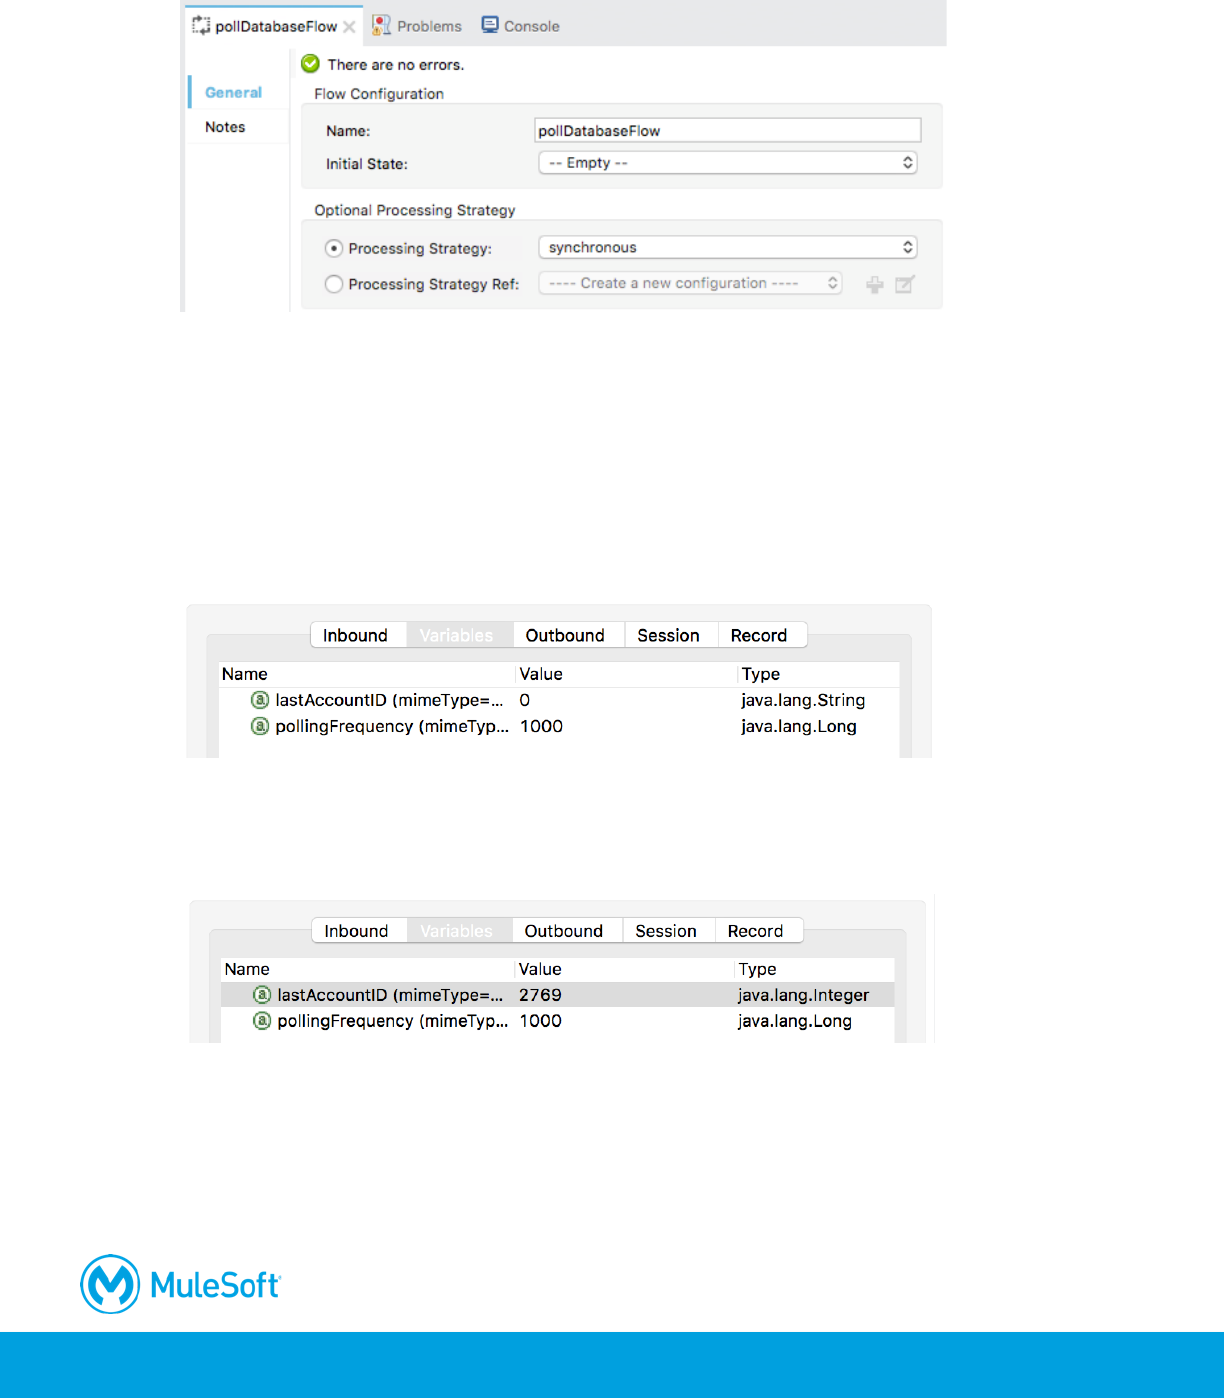
413
39. In the processing strategy drop-down menu, select synchronous.
Debug the application and examine the watermark value
40. Place a breakpoint on the Logger.
41. Debug the project.
42. Wait until the breakpoint is hit.
43. Locate your watermark variable in the Variables section of the Mule Debugger view; initially, you
should see a default value of zero.
44. Click the Resume button.
45. Look at the value of the watermark variable again; it should now be equal to the max accountID
for training accounts records with the postal code you are using.
46. Resume the application multiple times; the same records should still be selected over and over
again.
47. Stop the project and switch perspectives.
414
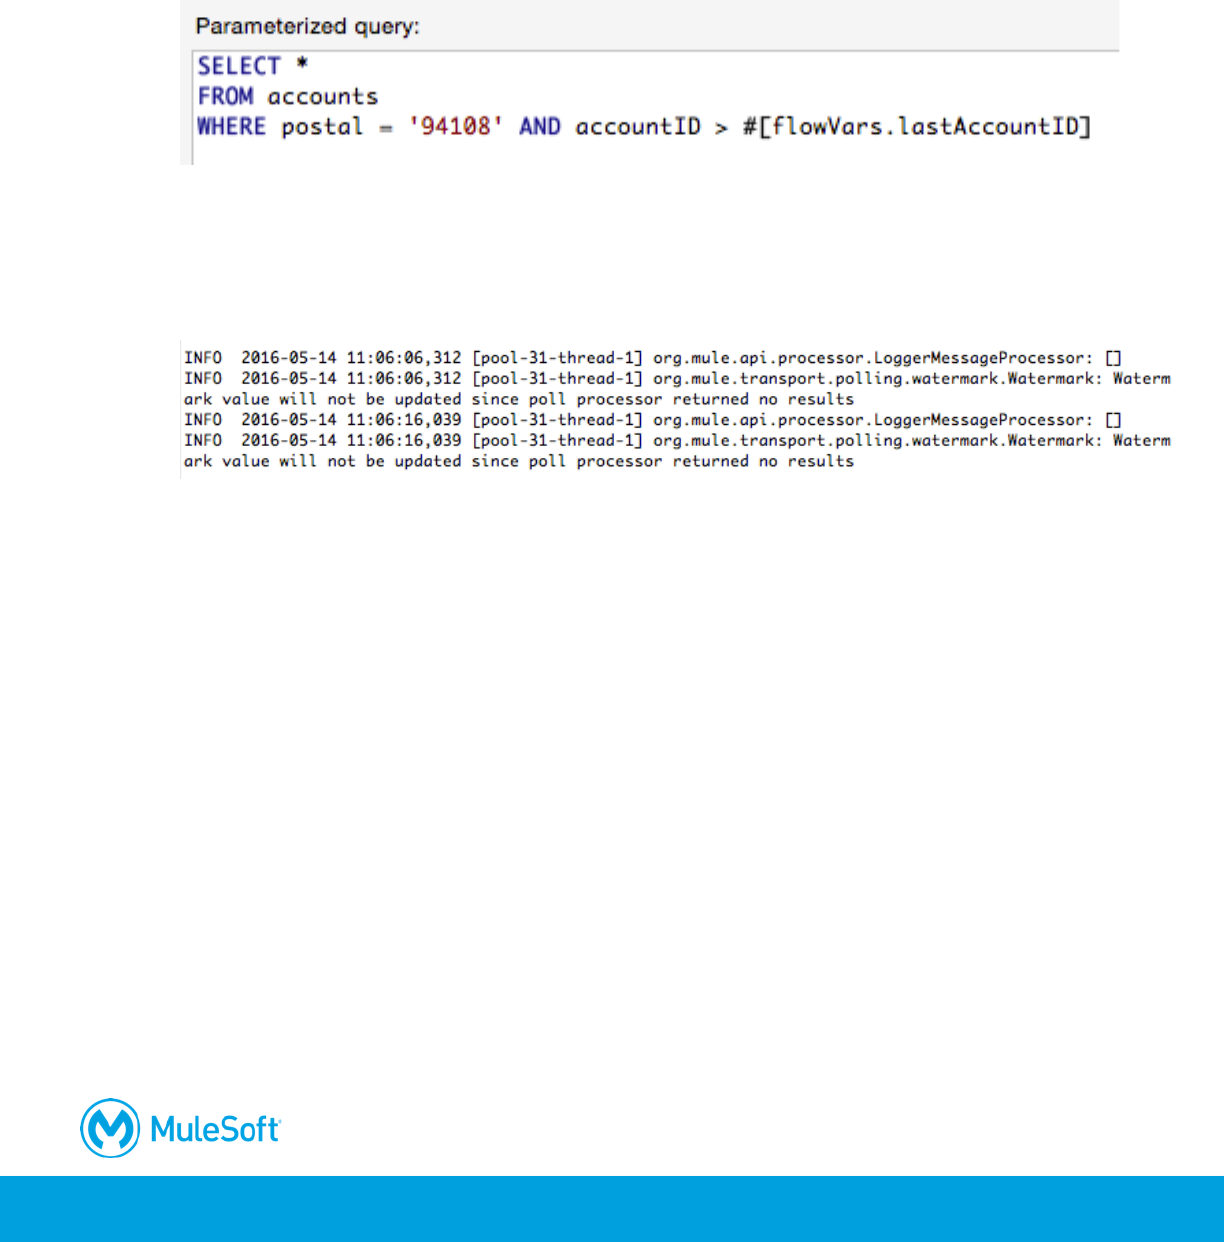
Modify the database query to use the watermark
48. In the Database properties view, modify the query so it only returns records for your postal code
and with accountID values greater than the watermark lastAccountID value.
WHERE postal = '94108' AND accountID > #[flowVars.lastAccountID]
Test the application
49. Run the project.
50. Look at the console; you should see that no records are retrieved at all this time.
Note: By default, the watermark is stored in a persistent object store so its value is retained
between different executions of the application.
51. Stop the project.
Clear application data
52. Select Run > Run Configurations.
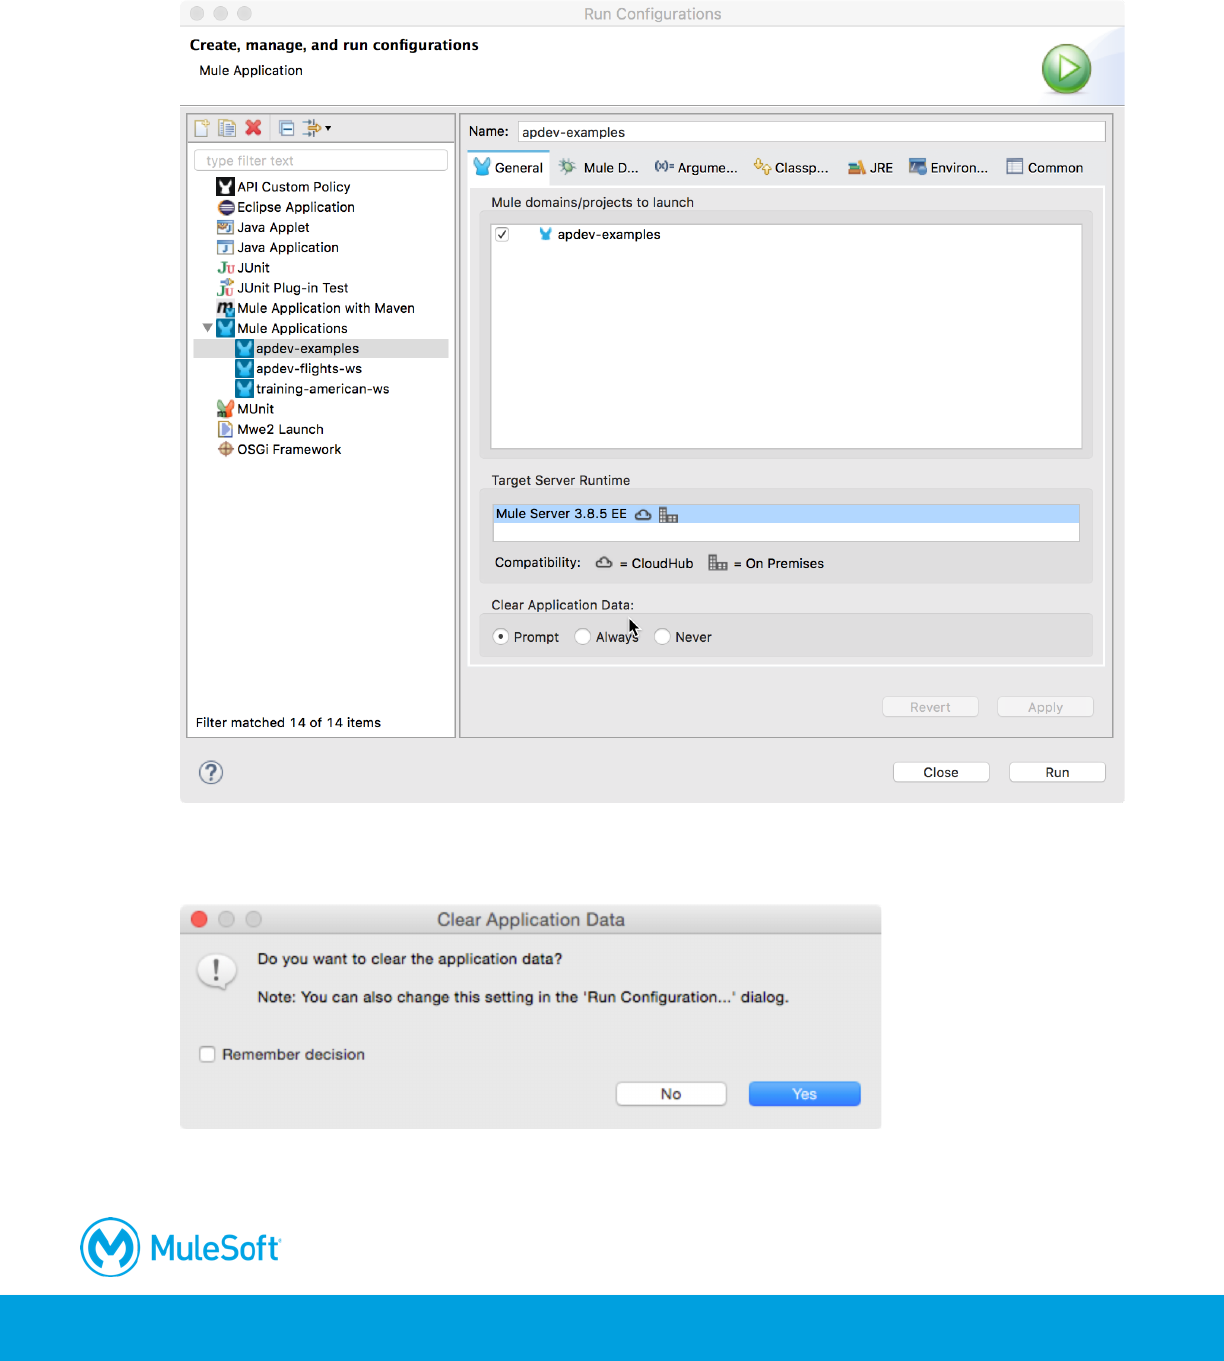
415
53. Make sure your apdev-examples project is selected and then on the General tab, scroll down
and change Clear Application Data from Never to Prompt.
54. Click Run; you should be prompted to clear the application data.
55. In the Clear Application Data dialog box, click Yes.
416
Test the application
56. Look at the console; you should see the latest matching records retrieved from the database
again – but this time, only once.
57. Watch the console and see that all subsequent polling events retrieve no records.
Add a new account with the same postal code
58. Return to the web browser displaying the account data.
59. Add another record with the same postal code.
60. Return to the console in Anypoint Studio.
61. Watch the console until you see your new record displayed on the next polling event.
62. Stop the project.
Stop the flow
63. In the Properties view for pollDatabaseFlow, set initial state to stopped.
64. Save the file.
417
Walkthrough 12-4: Connect to a JMS queue (ActiveMQ)
In this walkthrough, you read and write messages from a JMS topic. You will:
• Create a flow accessible at http://localhost:8081/jms.
• Add and configure an ActiveMQ connector.
• Use a JMS endpoint to retrieve messages from a JMS topic.
• Add messages to the topic using a web form.
• Use a JMS endpoint to send messages to a JMS topic.
Create a JMS inbound endpoint
1. Return to the apdev-examples project.
2. Create a new Mule configuration file called jms.xml.
3. Drag out a JMS connector from the Mule Palette and drop it in the canvas to create a new flow.
4. Give the flow a new name of getTopicMessagesFlow.
5. In the JMS properties view, leave the exchange pattern set to one-way.
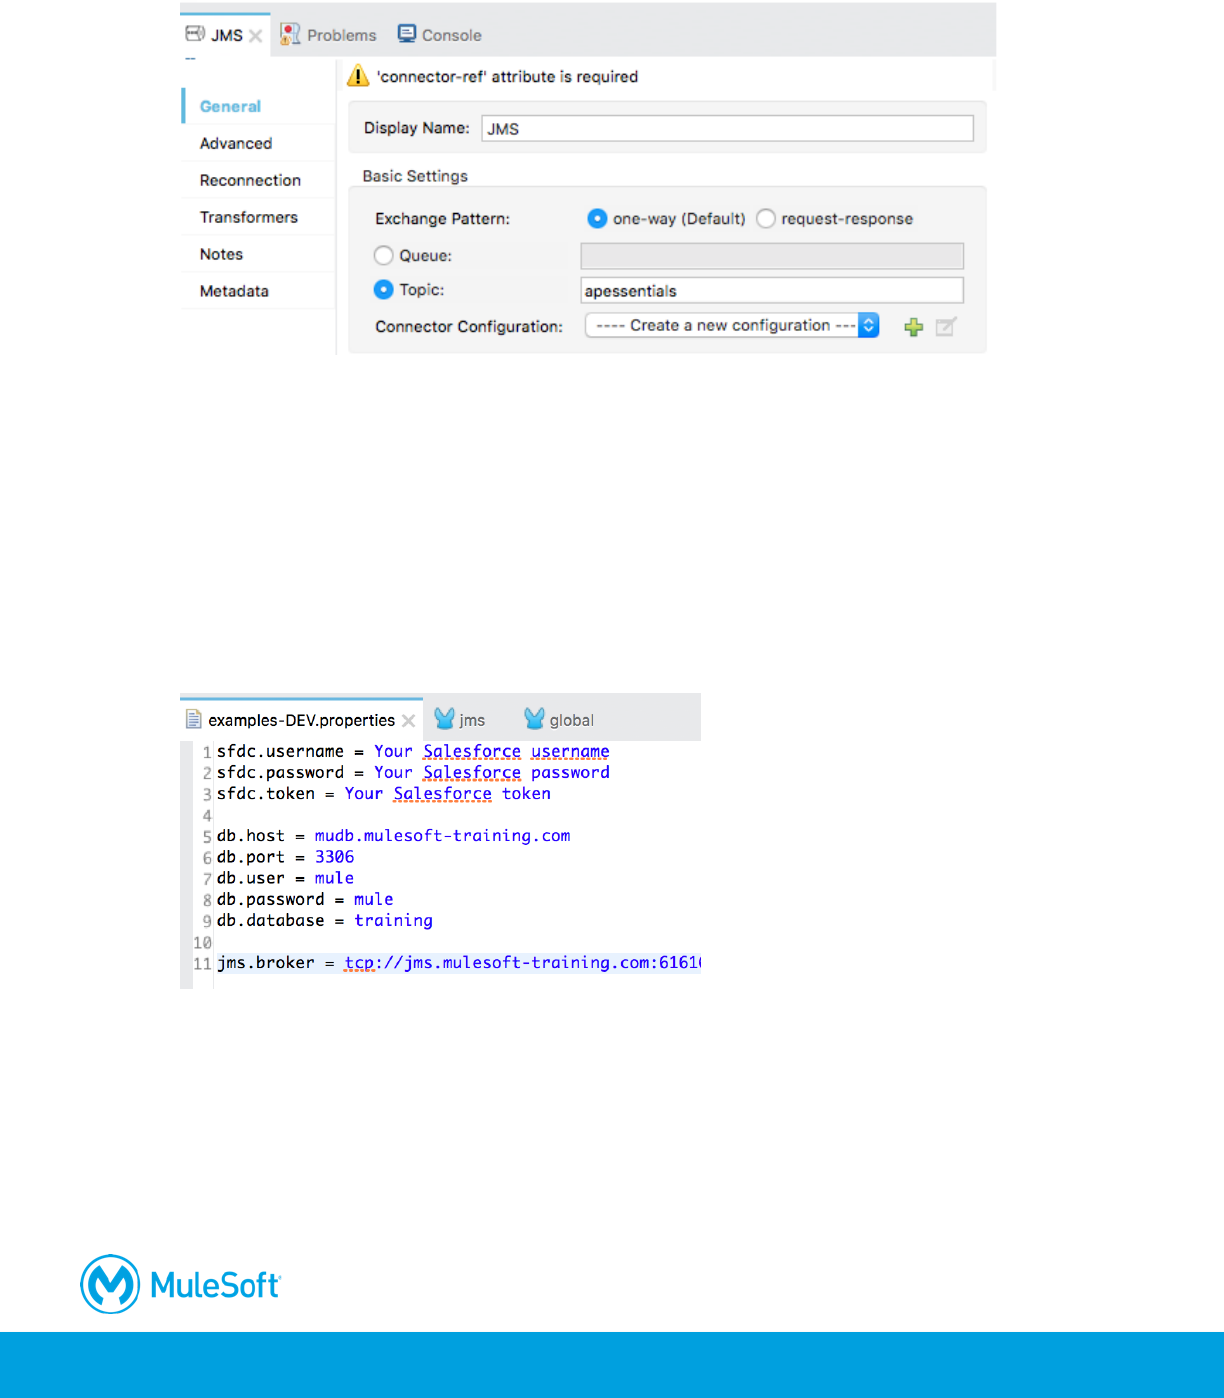
418
6. Select topic and set it to apessentials.
Configure the JMS connector
7. Return to the course snippets.txt file and copy the value for the ActiveMQ Broker URL.
8. Return to Anypoint Studio.
9. Return to examples-DEV.properties.
10. Create a new property called jms.broker and set it equal to the value you copied from the
course snippets.txt file.
Note: If you do not have access to port 61616, set jms.broker equal to vm://localhost instead.
11. Save the file.
12. Return to the Global Elements view in global.xml.
13. Click Create.
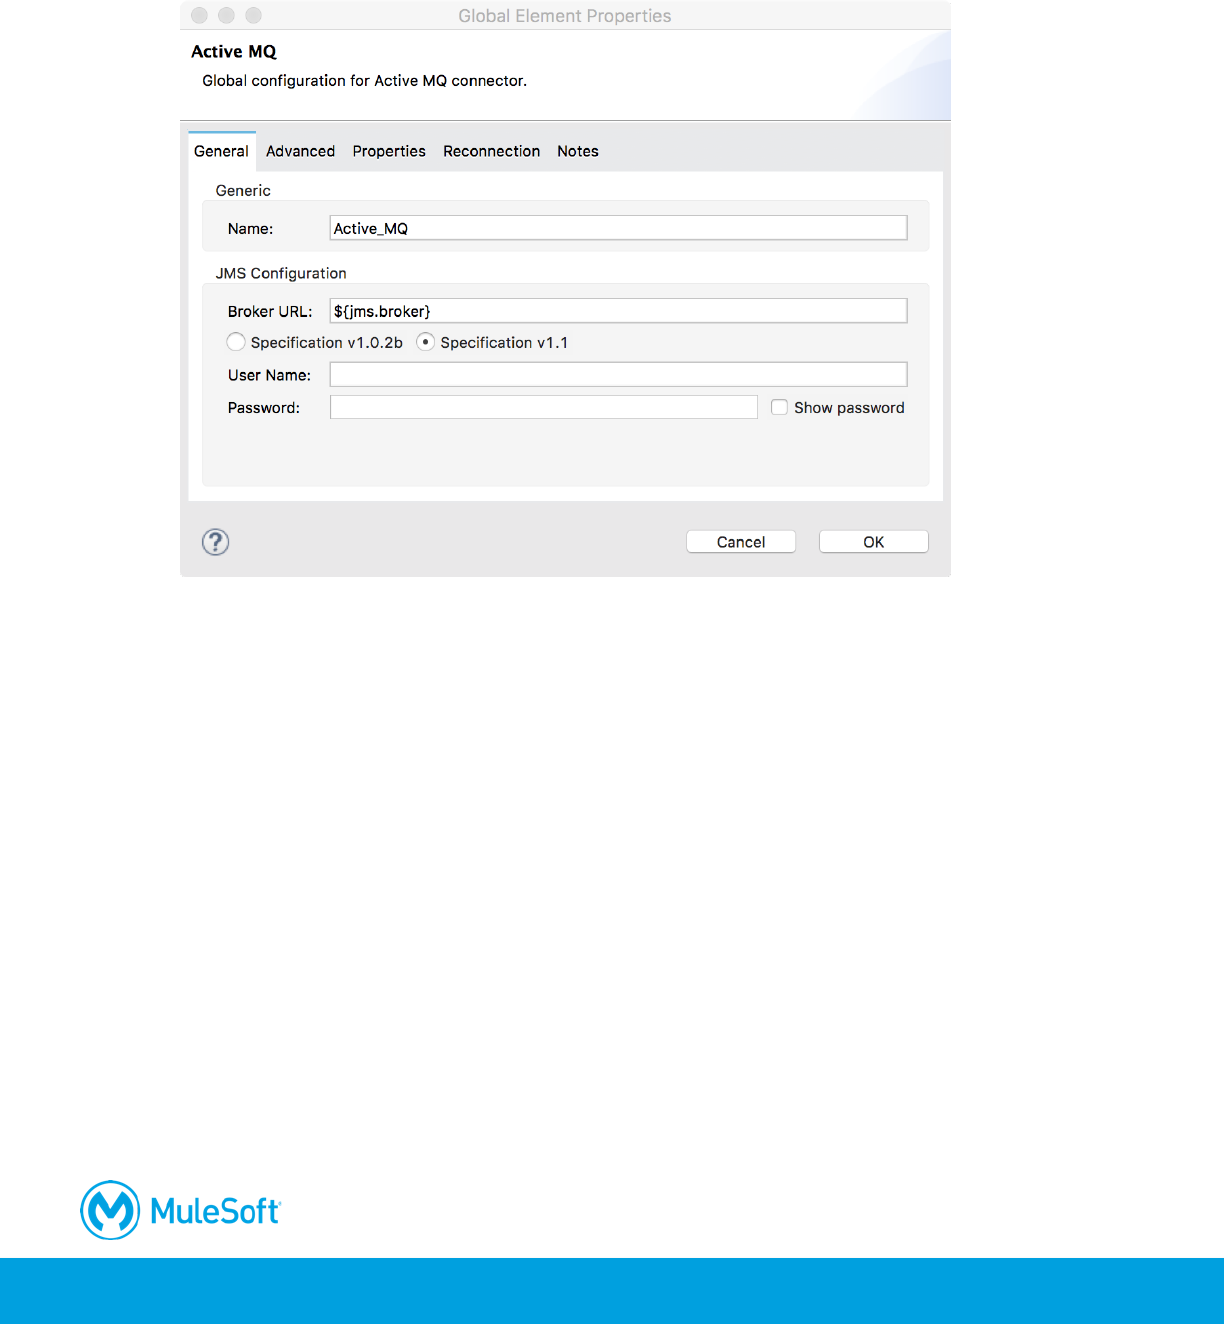
14. In the Choose Global Type dialog box, select Connector Configuration > JMS > Active MQ and
click OK.
419
15. In the Global Element Properties dialog box, change the broker URL to the property
${jms.broker}.
16. Set the Specification to v1.1.
17. Click OK.
18. Return to jms.xml.
19. In the JMS properties view, set the connector configuration to the existing Active_MQ
configuration.
Add the ActiveMQ library
20. In the Package Explorer, right-click apdev-examples and select New > Folder.
21. In the New Folder dialog box, set the folder name to lib and click Finish.
22. In your computer's file browser, locate the activemq-all.jar file located in the jars folder in the
student files.
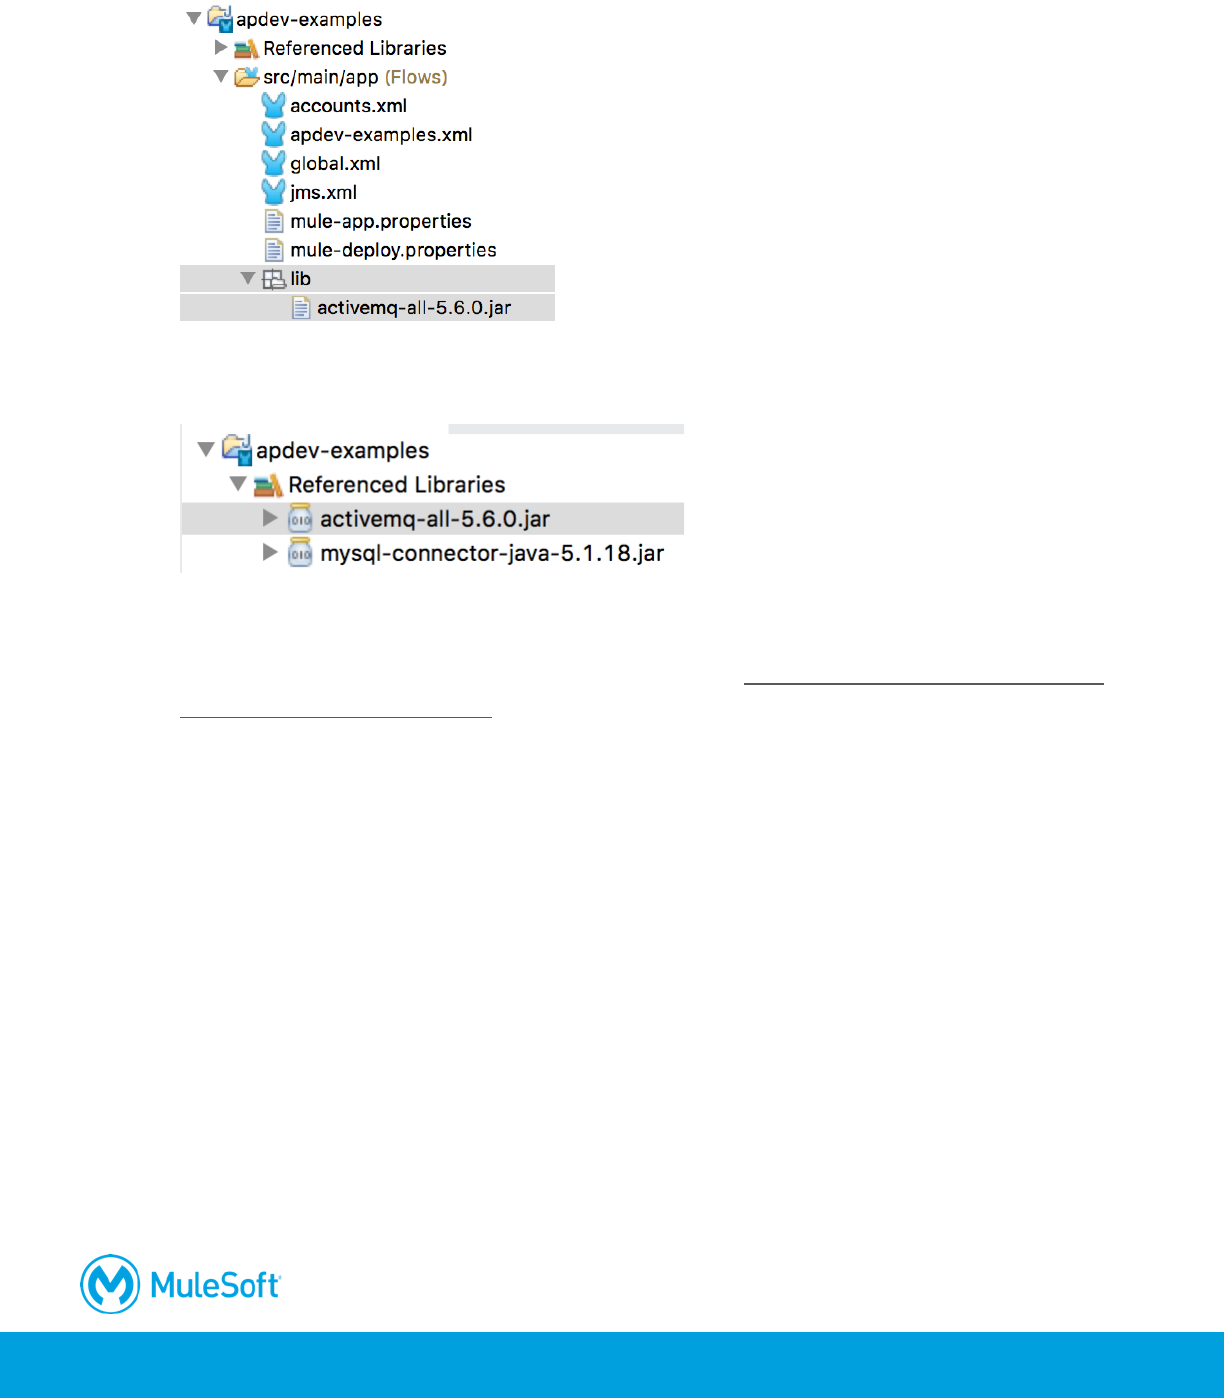
420
23. Copy and paste or drag the JAR file into the lib folder.
24. Right-click the JAR file in the Package Explorer and select Build Path > Add to Build Path; you
should now see it under Referenced Libraries.
Note: Adding activemq-all.jar can create conflicts with other dependencies in projects, so it is
recommended that you only add only the JAR files you need in relation to what you need
ActiveMQ for. For more details, see the documentation at https://docs.mulesoft.com/mule-user-
guide/v/3.8/activemq-integration.
Test the application and receive messages
25. Return to jms.xml.
26. Add a Logger to the flow and set its message to #[payload].
27. Run the project.
28. In the Clear Application Data dialog box, select Remember decision and click No.
29. Return to the course snippets.txt file and copy the value for the JMS Form URL.
30. In a web browser, navigate to the URL you copied.
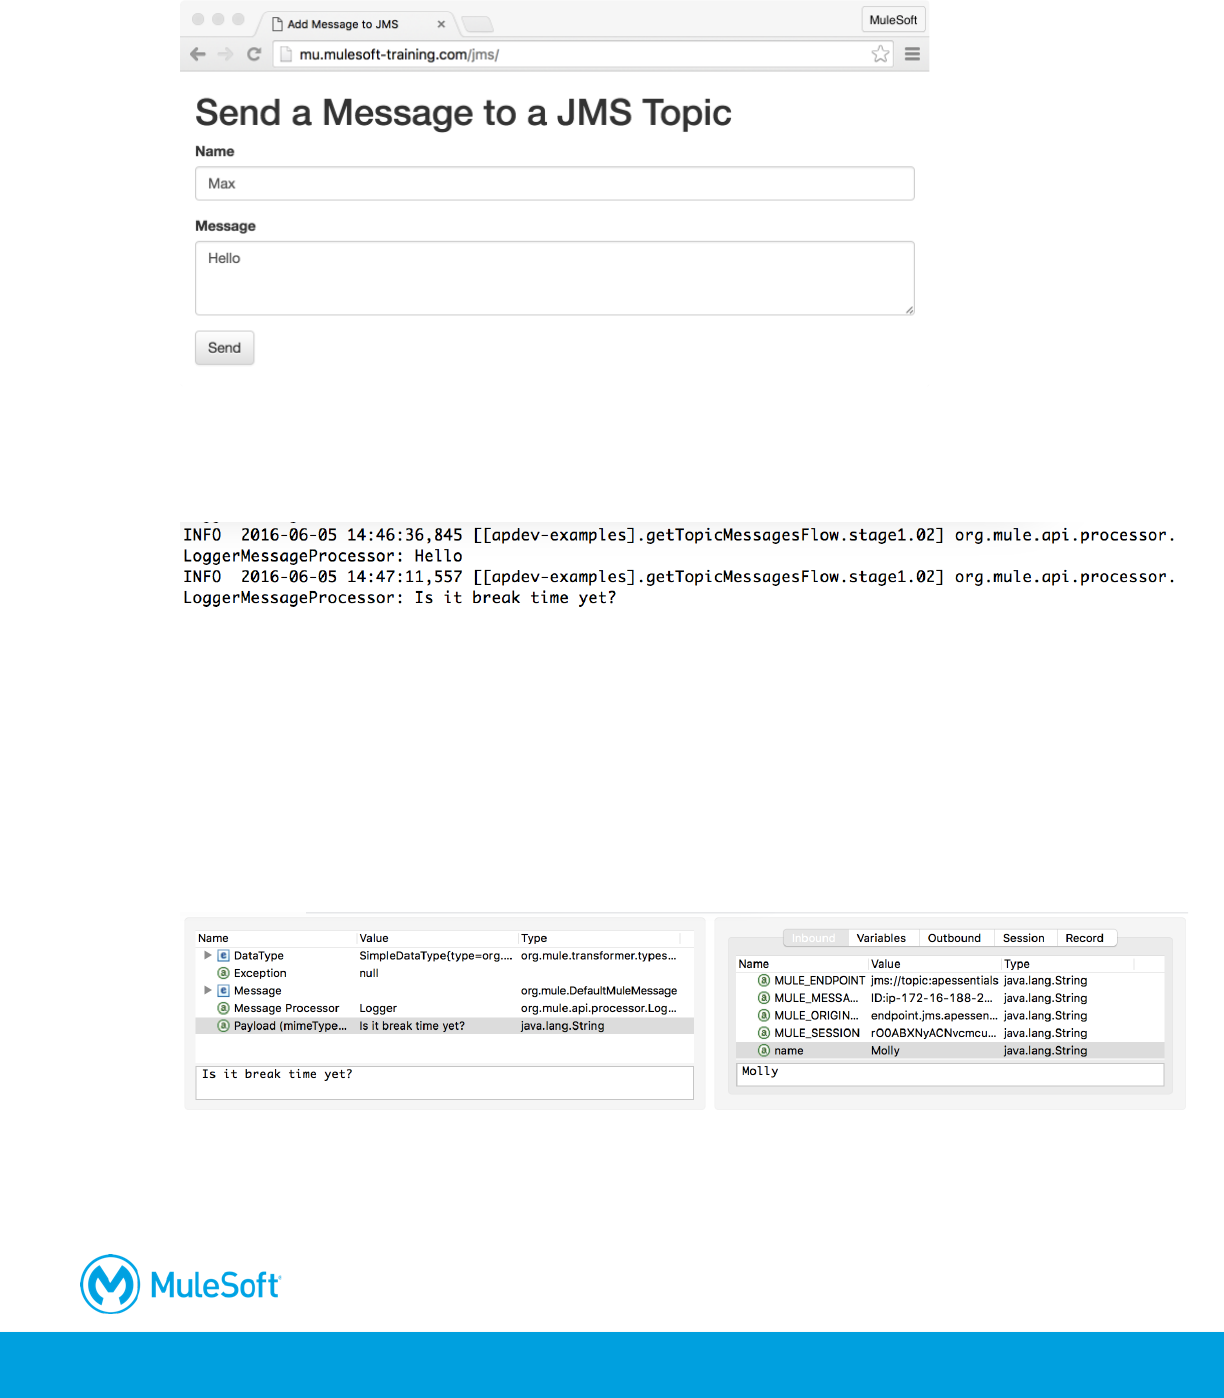
421
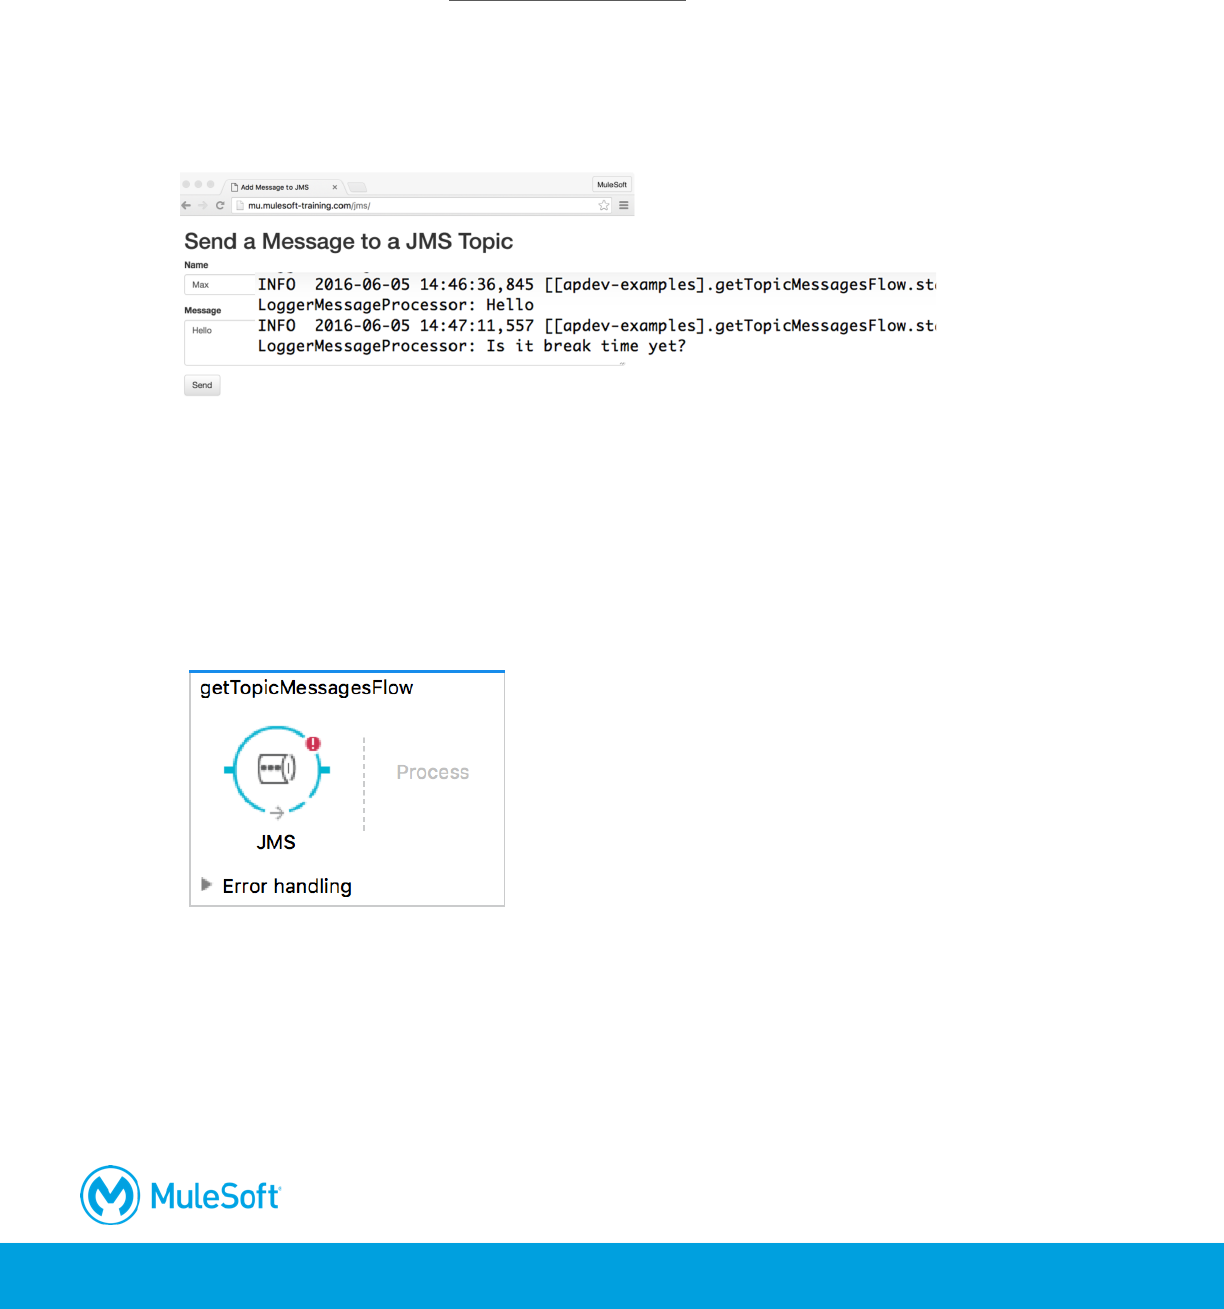
31. In the form, enter your name and a message and click Send.
32. In the popup window with the response, click OK.
33. Return to the console in Anypoint Studio; you should see your message along with those from
your classmates – but you don’t see the names of the people who sent the messages.
34. Stop the project.
Debug the application
35. Add a breakpoint to the Logger.
36. Debug the project.
37. Make another request to the JMS form URL and submit another message.
38. In the Mule Debugger view, look at the payload and inbound message properties.
39. Step through the rest of the application.
40. Stop the project and switch perspectives.
422
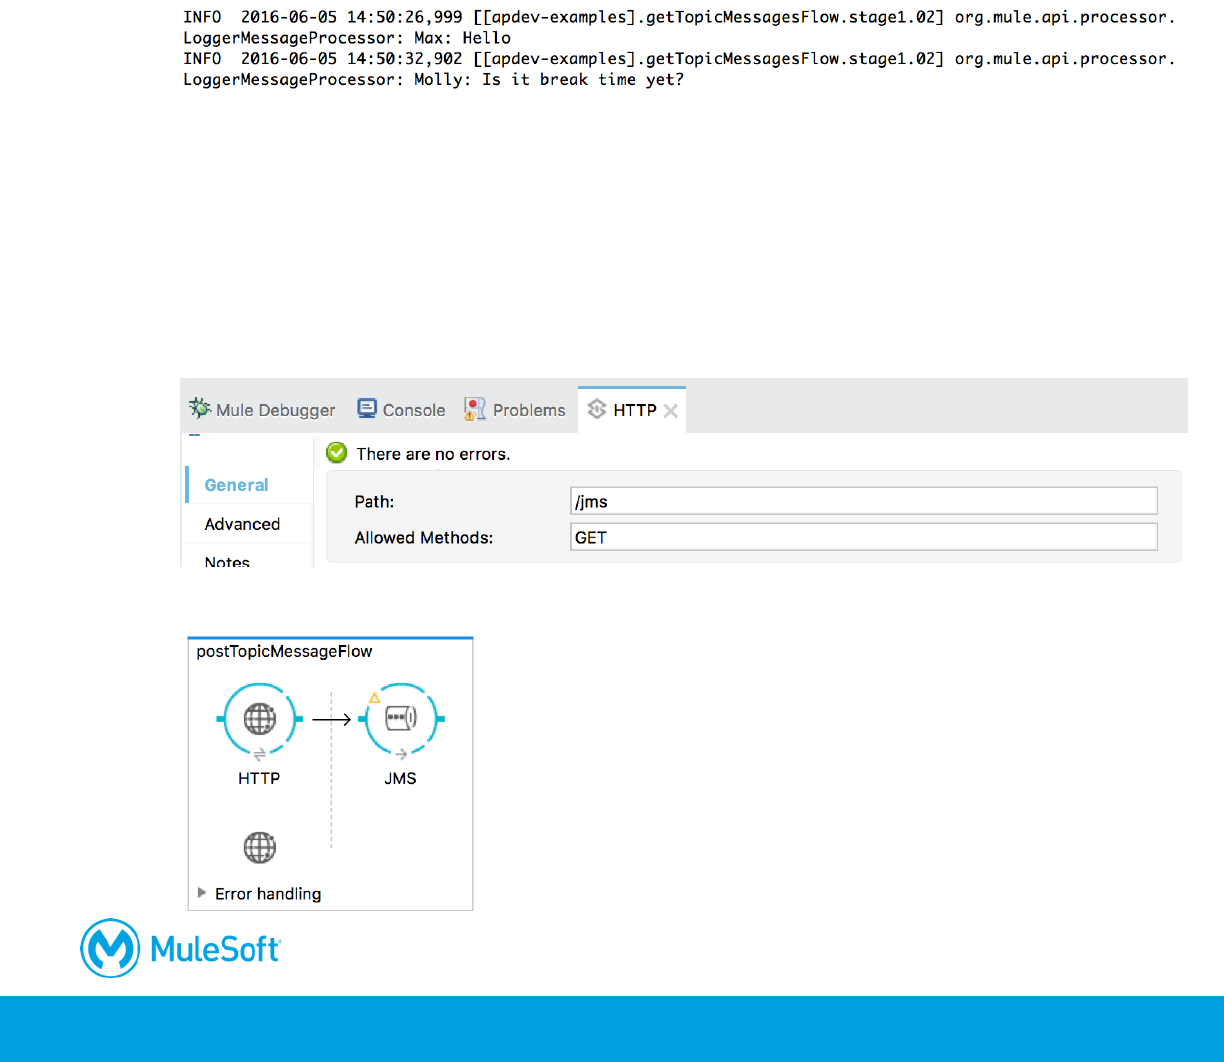
Display names with the messages
41. In the Logger properties view, change the message to use an expression to display the name
and message.
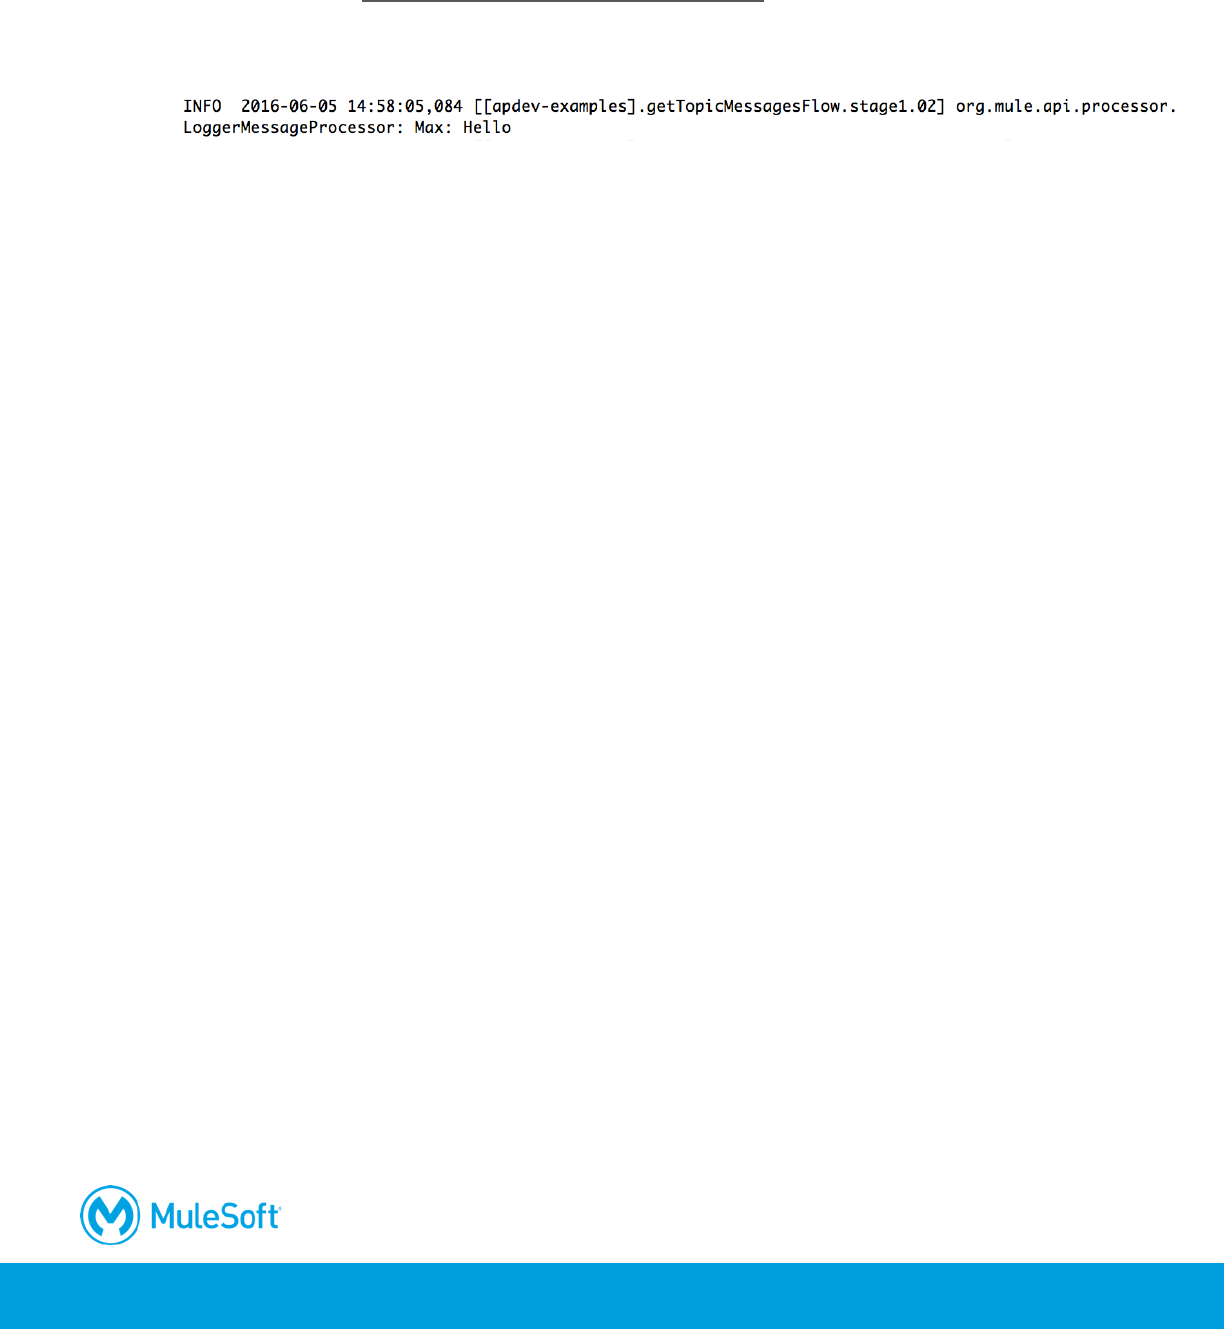
#[message.inboundProperties.name + ": " + payload]
Test the application
42. Run the project.
43. Return to the message form and submit a new message.
44. Look at the console; you should now see names along with messages.
Create a JMS outbound-endpoint
45. Drag out an HTTP connector from the Mule Palette and drop it in the canvas.
46. Give the flow a new name of postTopicMessageFlow.
47. In the HTTP properties view, set the connector configuration to the existing
HTTP_Listener_Configuration.
48. Set the path to /jms and the allowed methods to GET.
49. Drag out a JMS connector from the Mule Palette and drop it into the process section of the flow.
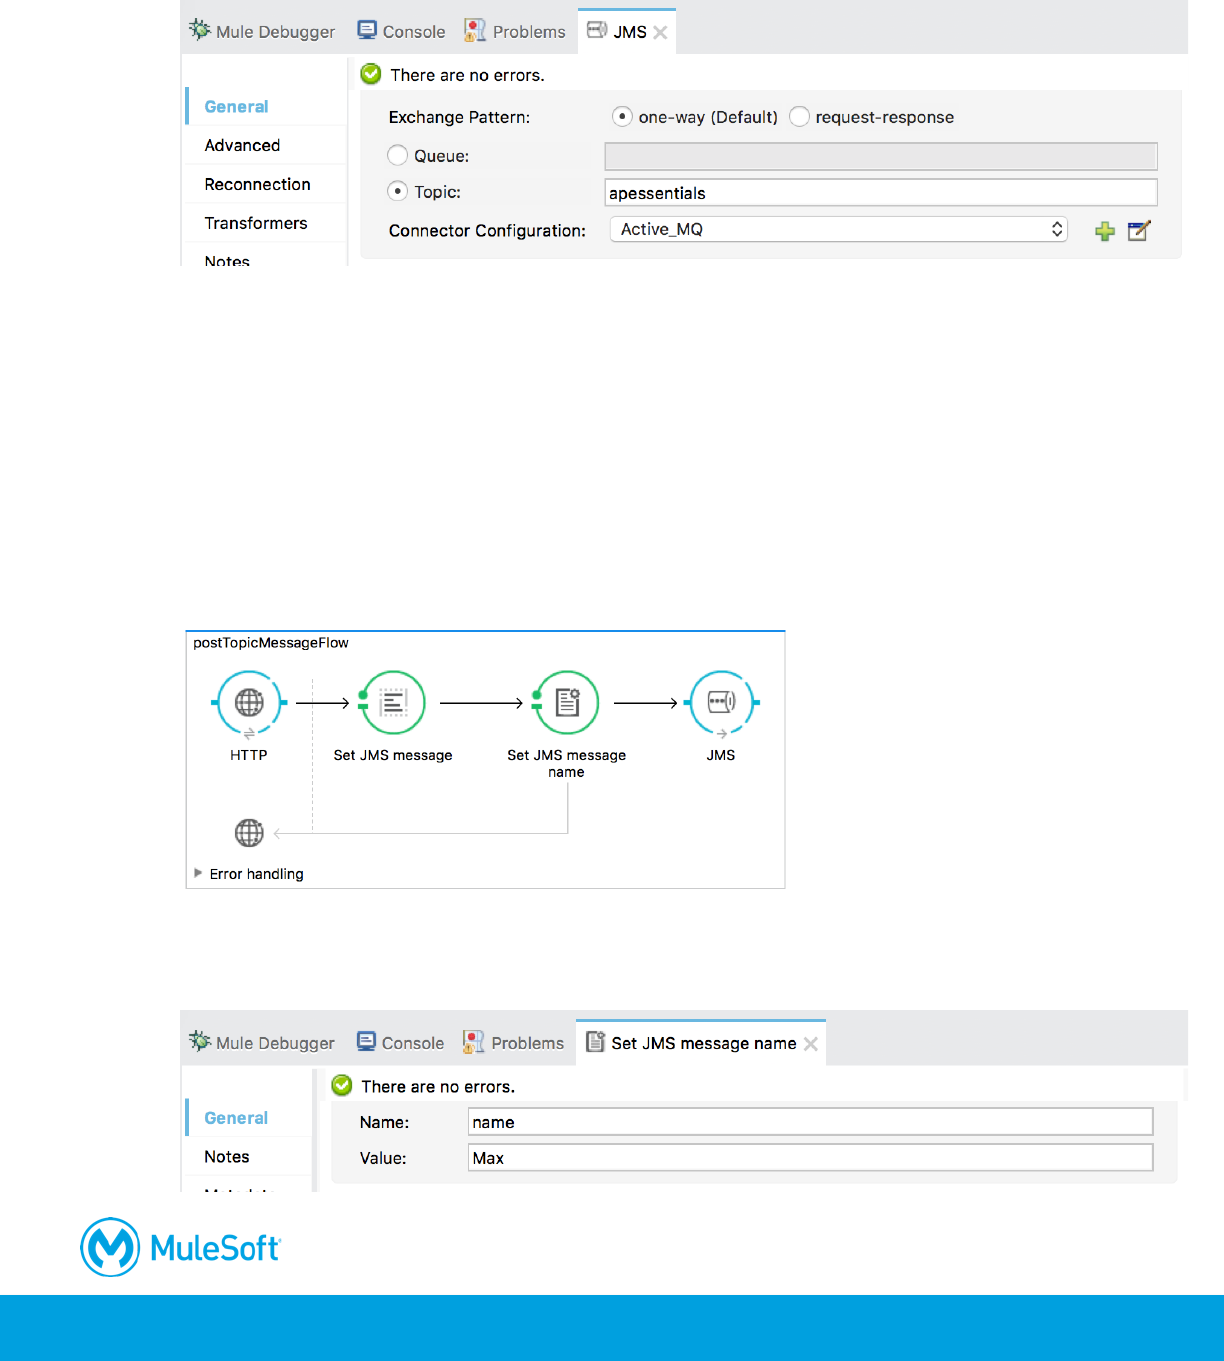
423
50. In the JMS Properties view, select topic and set it to apessentials.
51. Set the connector configuration to the existing Active_MQ.
Set a message
52. Add a Set Payload transformer between the HTTP and JMS connector endpoints.
53. In the Set Payload Properties view, change the display name to Set JMS message.
54. Set the value to a message query parameter.
#[message.inboundProperties.'http.query.params'.message]
55. Add a Property transformer after the Set Payload transformer.
56. In the Properties view, change the display name to Set JMS message name.
57. Select Set Property and set the name to name and the value to your name.
Note: You can set this to a query parameter instead if you prefer.
424
Test the application and post messages
58. Save the file to redeploy the project.
59. Make a request to http://localhost:8081/jms?message=Hello.
60. Look at the console; you should see your name and message displayed – along with those of
your classmates.
61. Stop the project.
425
Walkthrough 12-5: Find and install not-in-the-box connectors
In this walkthrough, you learn how to add a new connector to Anypoint Studio. You will:
• Browse Anypoint Exchange from Anypoint Studio.
• Install a connector from Exchange into Anypoint Studio.
• Locate the new connector in Anypoint Studio.
• Manage installed software.
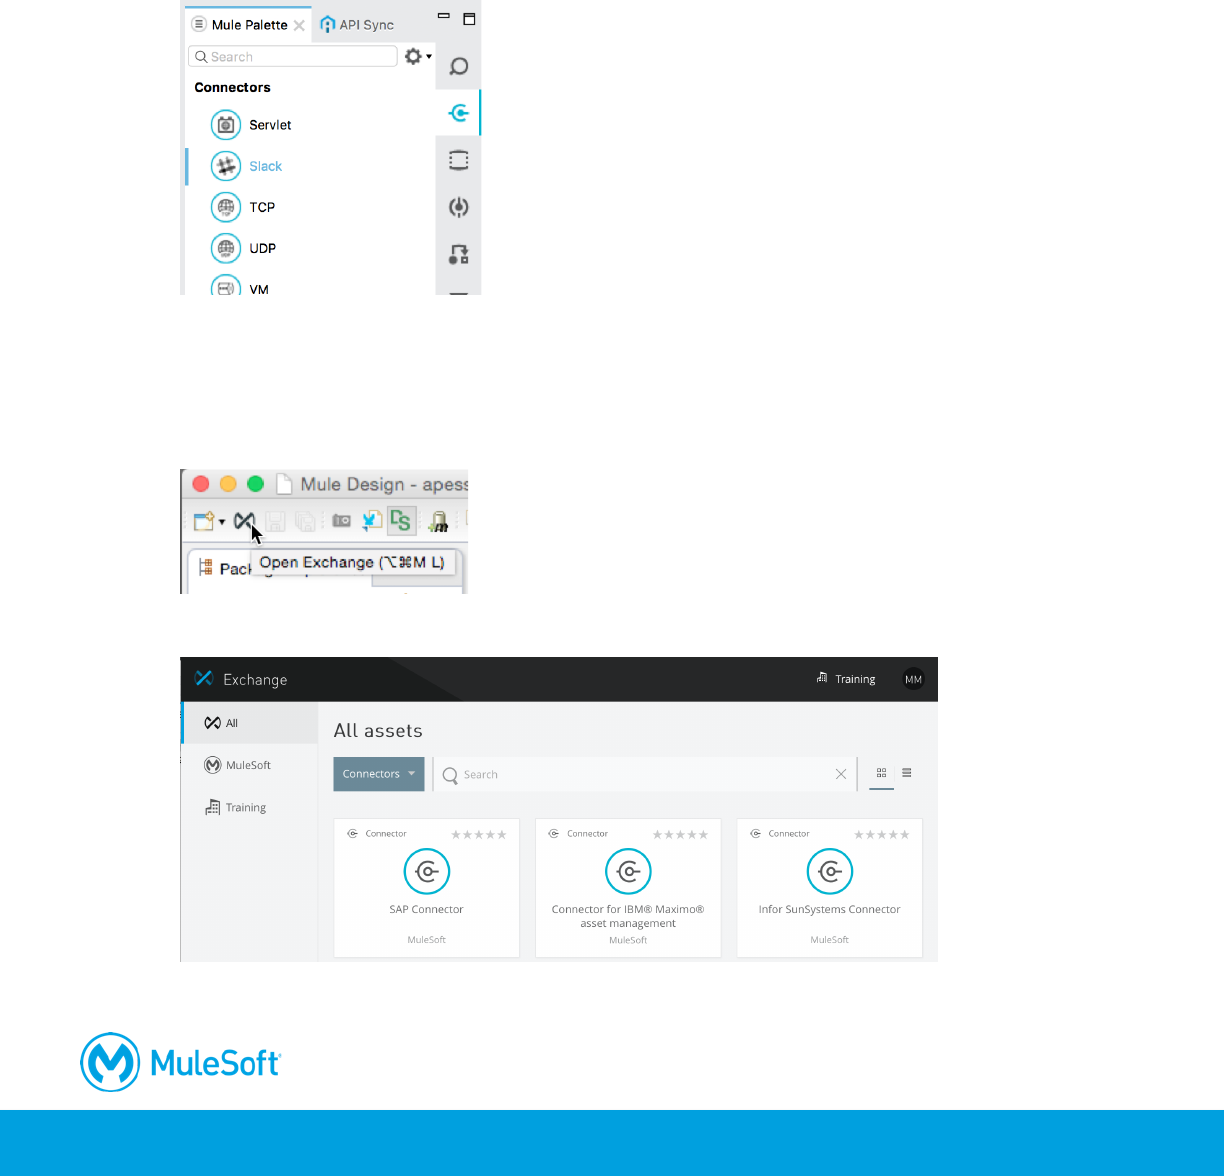
Browse connectors in Anypoint Exchange from Anypoint Studio
1. In Anypoint Studio, click the Open Exchange button; the Anypoint Exchange should open in a
new window.
2. In Exchange, select Connectors in the types drop-down menu.
3. Browse the connectors.

426
Review the Salesforce connector details
4. Search for just the select connectors.
5. Browse the connectors.
6. Search for the Salesforce connector.
7. Select the Salesforce Connector.
8. In the page that opens, browse the connector’s documentation.
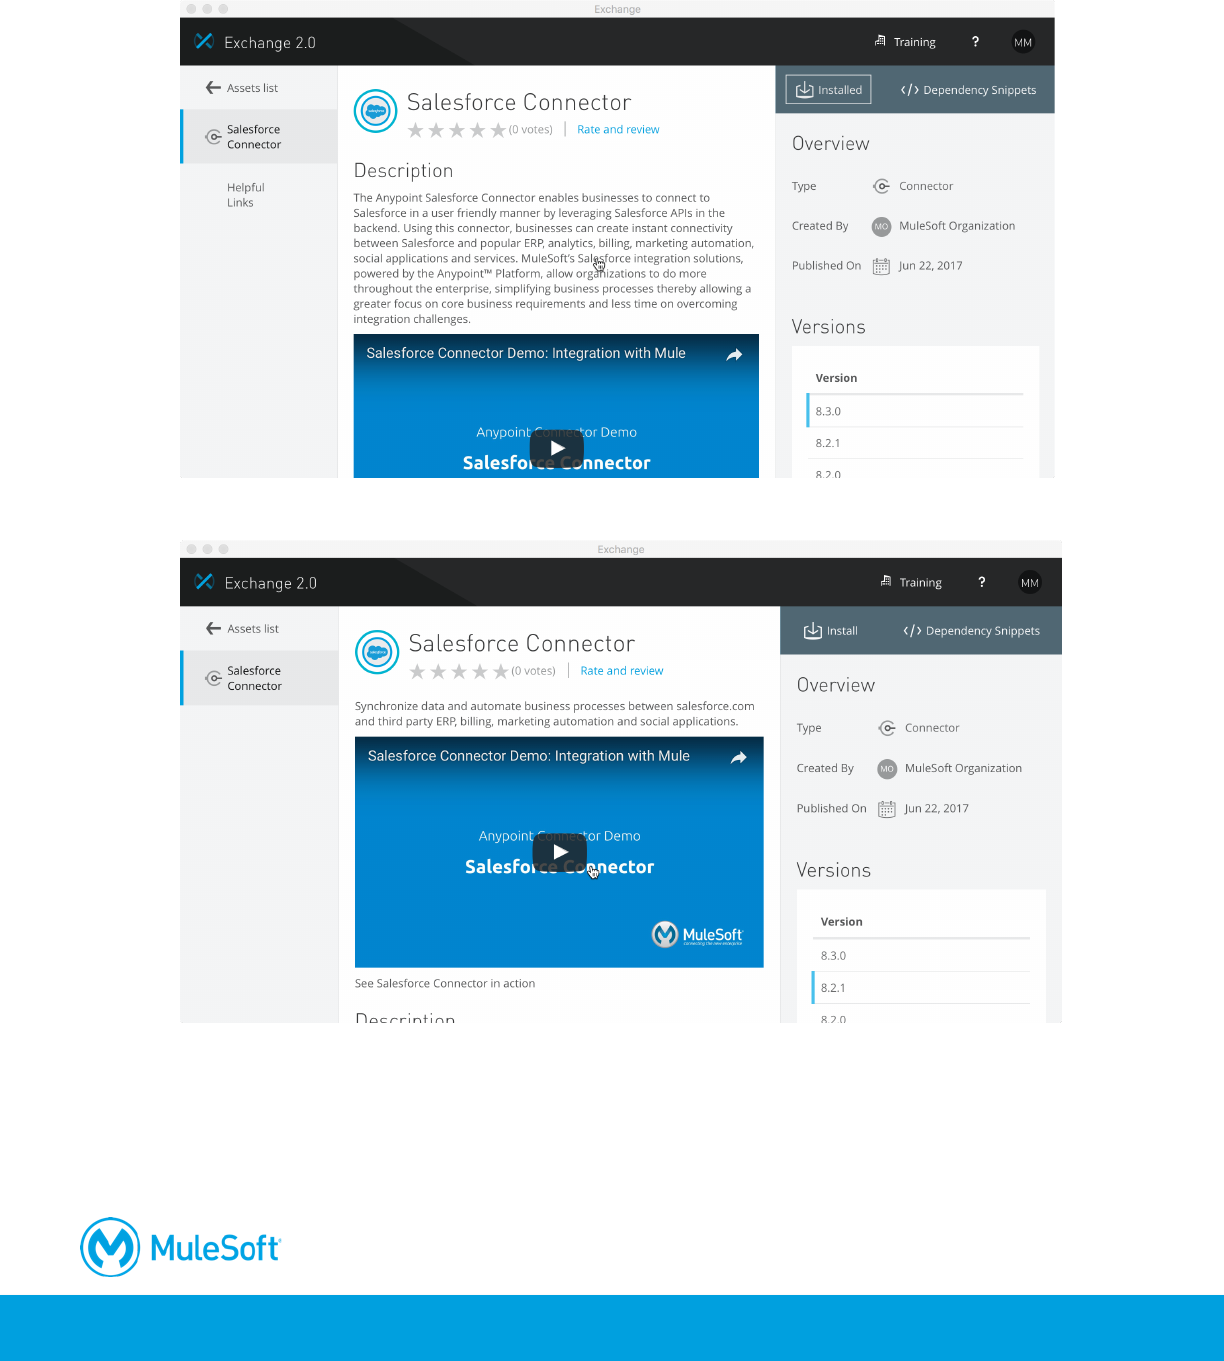
427
9. Review the versions and see if the latest version is installed or not; you should see Installed or
Install above the versions at the top of the window.
10. Select an older version in the versions list; you should now see a clickable Install button.
11. To return to the assets list, click the Assets list link on the left side of the page.
Review the Slack connector
12. Browse the connectors again.
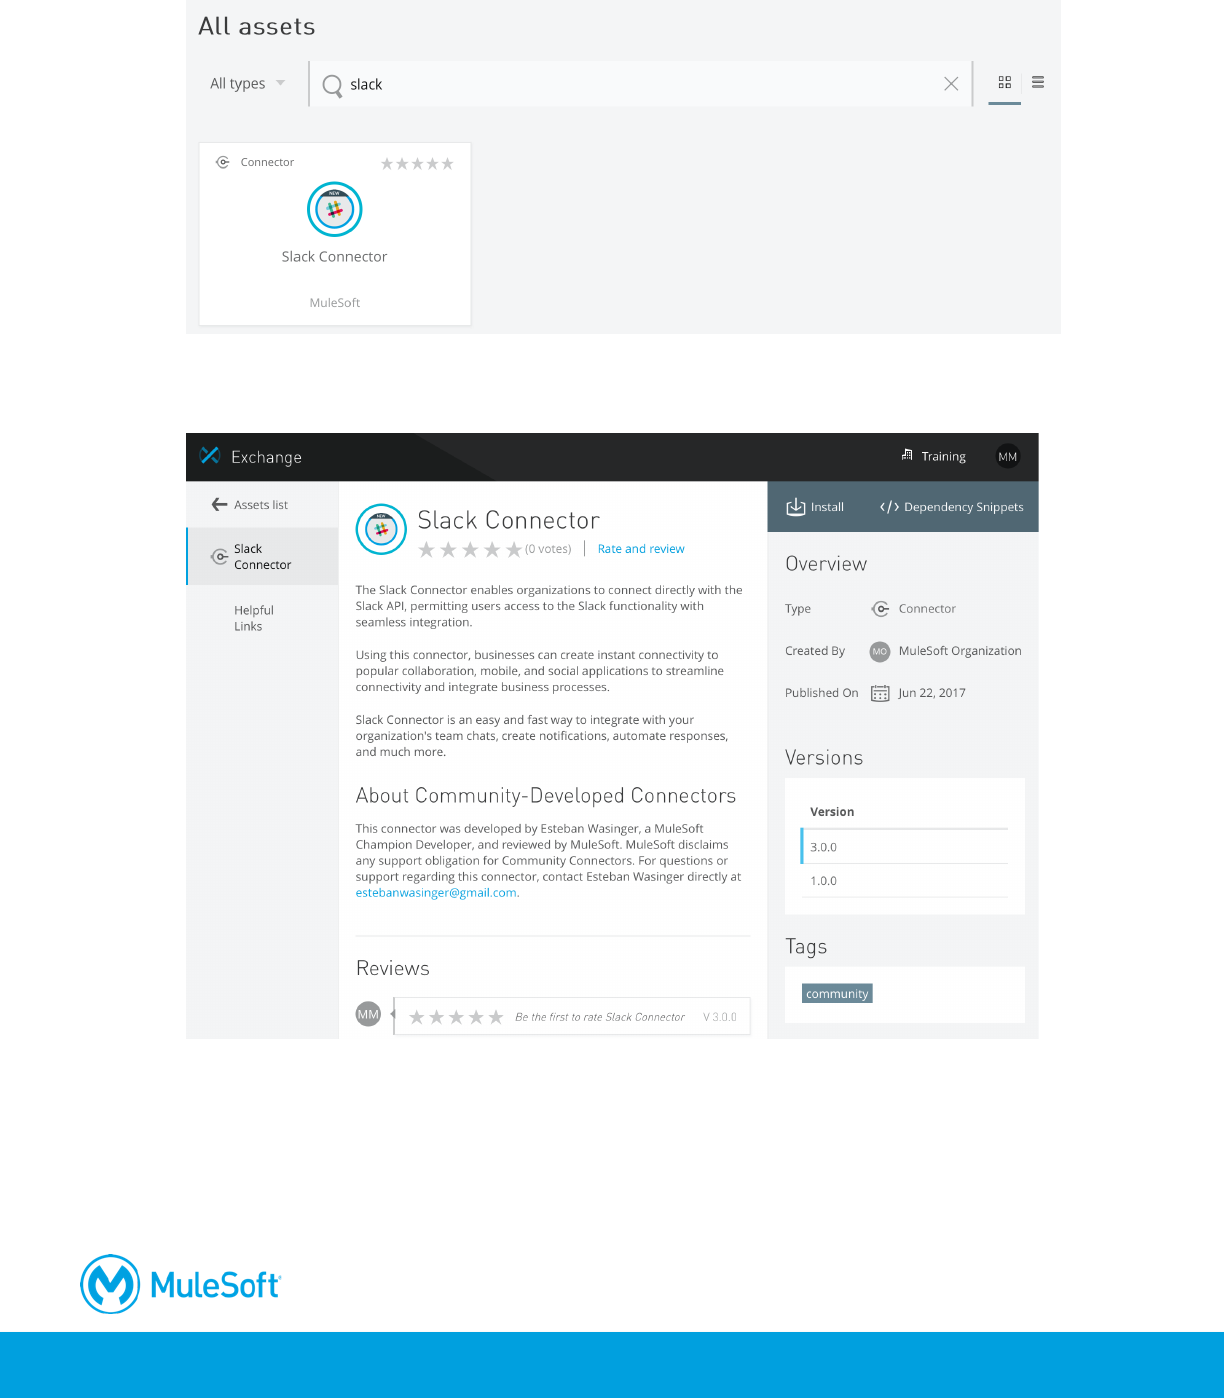
428
13. Search for and select the Slack Connector (or any other connector you're interested in).
14. Select it and review its documentation; you should see this is a community connector and not
supported by MuleSoft.
Install the connector
15. Click the Install button.
429
16. Wait until an Install dialog box appears in Anypoint Studio.
Note: You can also install connector’s directly from Anypoint Studio. From the main menu bar,
select Help > Install New Software. In the Install dialog box, click the Work with drop-down
button and select Anypoint Connectors Update Site. Drill-down into Community and select the
Slack Connector (or some other connector).
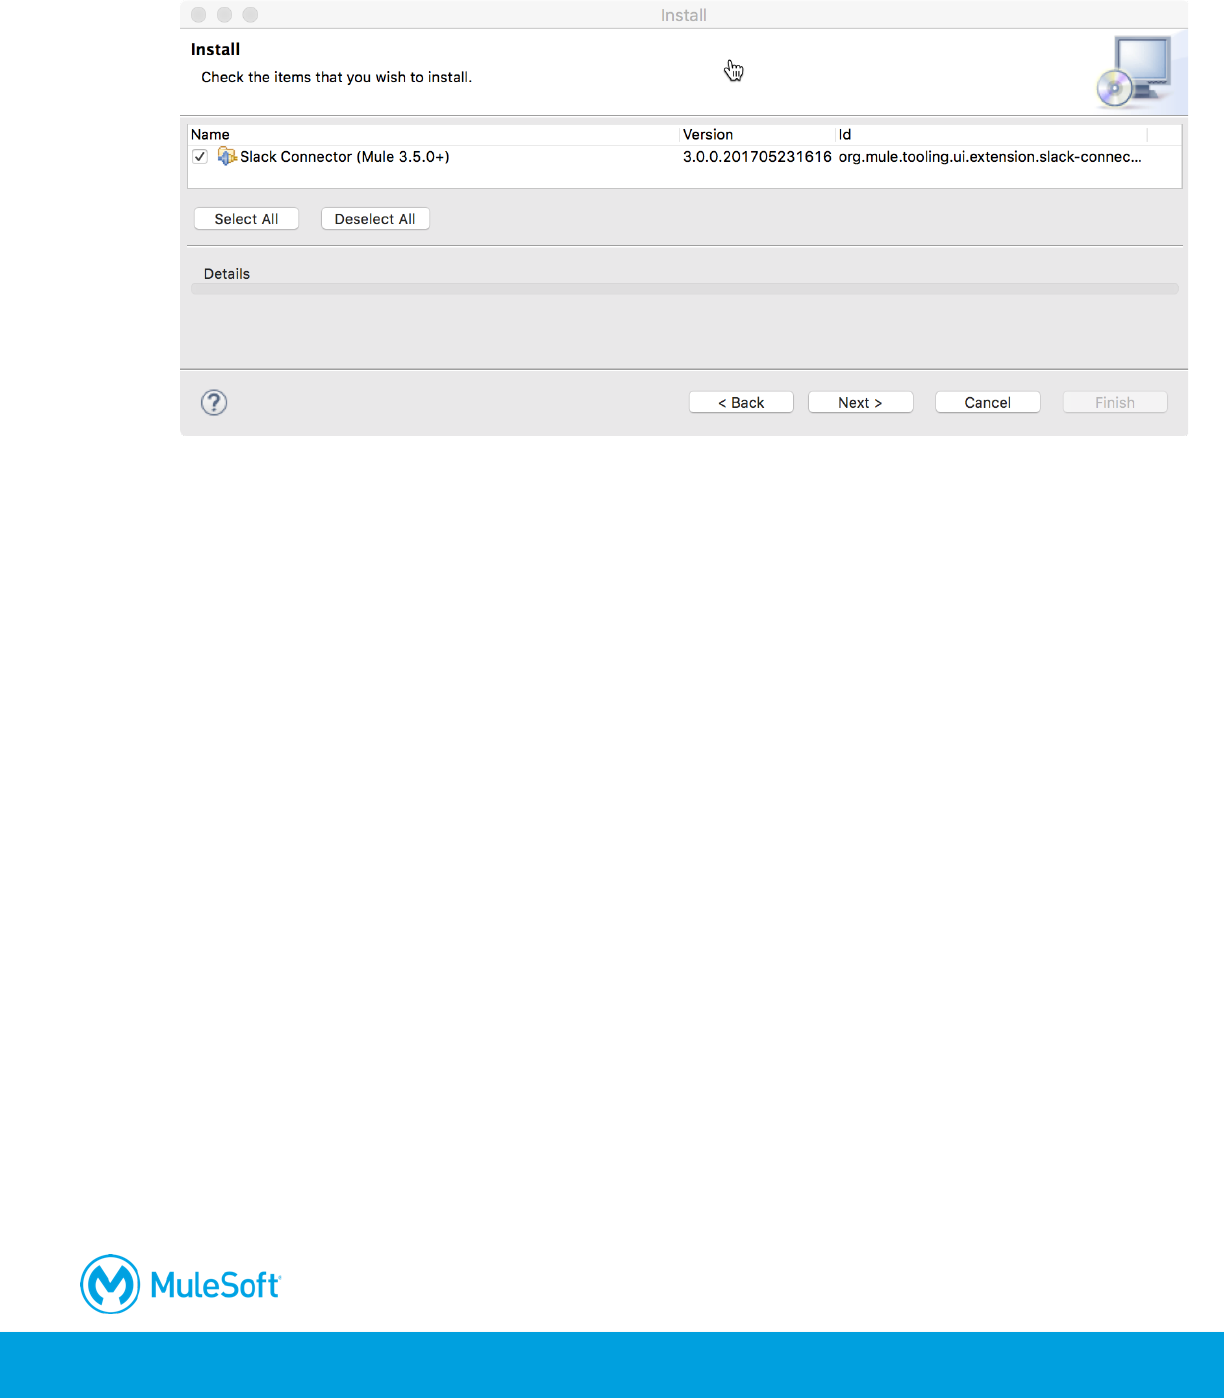
17. Click Next.
18. On the Install Details page, click Next.
19. On the Review Licenses page, select the I accept the terms of the license agreement radio
button.
20. Click Finish; the software will be installed and then you should get a message to restart
Anypoint Studio.
21. In the Software Updates dialog box, click Yes to restart Anypoint Studio.
430
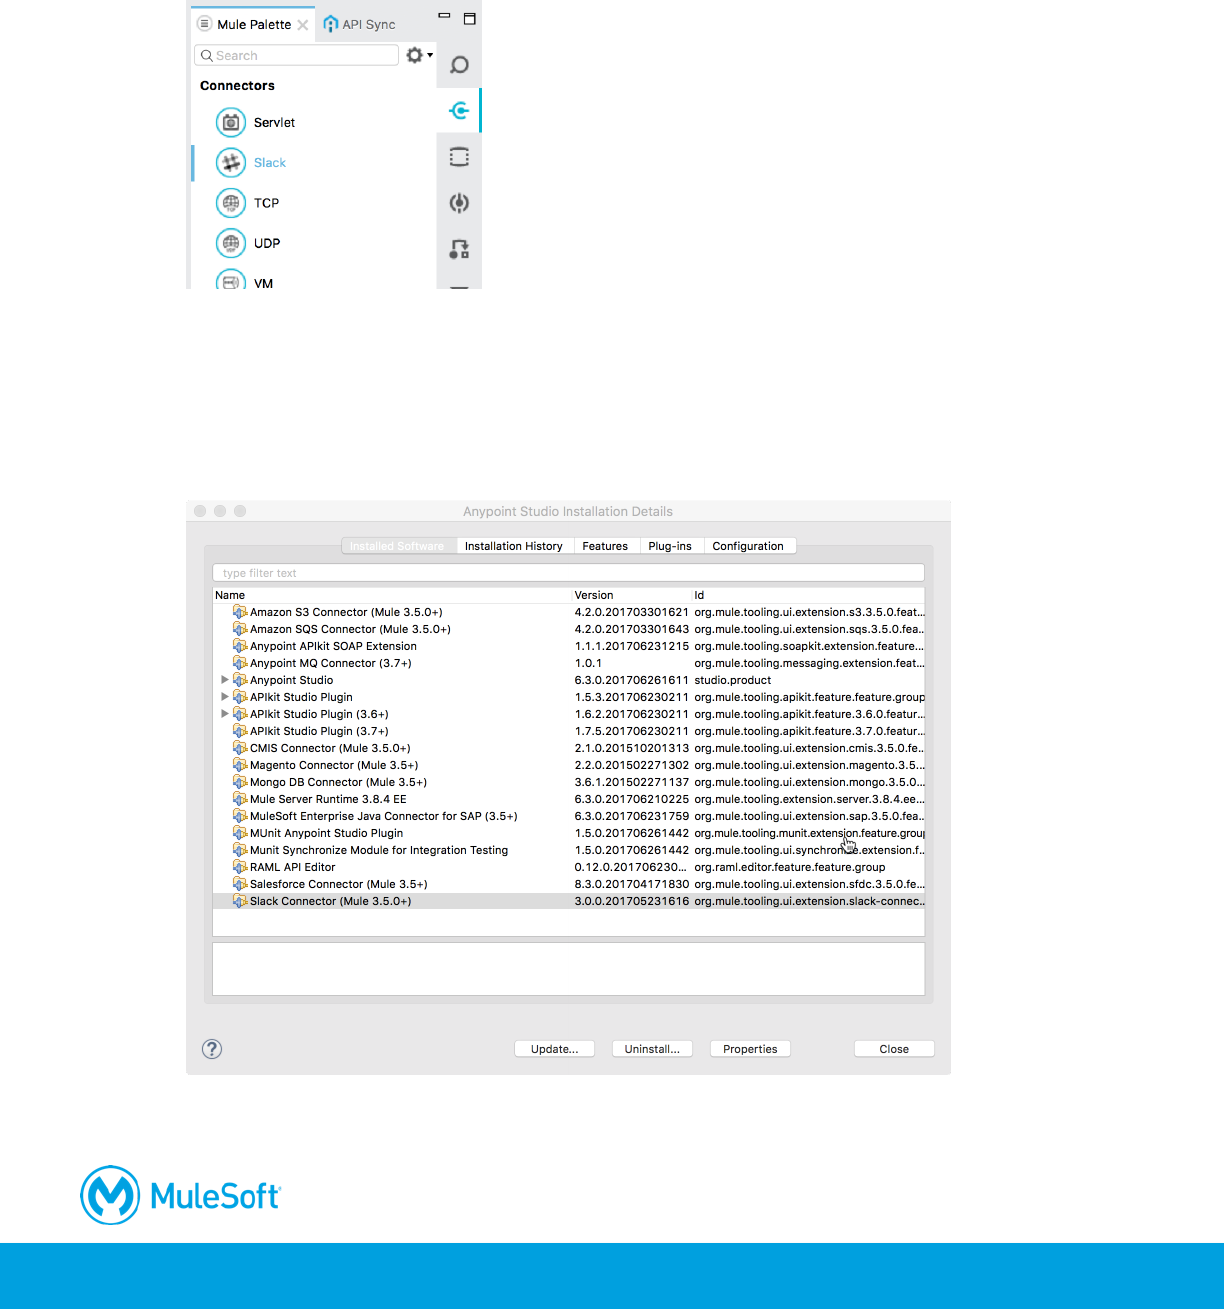
Locate the new connector in Anypoint Studio
22. After Anypoint Studio restarts, locate the new connector in the Connectors section of the Mule
Palette.
Manage installed software
23. In the main menu, select Help > Installation Details.
24. Select the Slack Connector; you should see Update, Uninstall, and Properties buttons for the
connector.
25. Click Close.
