MacRuby: The Definitive Guide Mac Ruby Matt Aimonetti
User Manual: Pdf
Open the PDF directly: View PDF ![]() .
.
Page Count: 244 [warning: Documents this large are best viewed by clicking the View PDF Link!]
- Table of Contents
- Preface
- Part I. MacRuby Overview
- Chapter 1. Introduction
- Chapter 2. Fundamentals
- Chapter 3. The Cocoa Environment
- Chapter 4. Foundation
- Chapter 5. Application Kit
- Chapter 6. Xcode
- Chapter 7. Core Data
- Chapter 8. One Step Deeper
- Part II. MacRuby in Practice
- Index

MacRuby: The Definitive Guide
Matt Aimonetti
Beijing
•
Cambridge
•
Farnham
•
Köln
•
Sebastopol
•
Tokyo
MacRuby: The Definitive Guide
by Matt Aimonetti
Copyright © 2012 Matt Aimonetti. All rights reserved.
Printed in the United States of America.
Published by O’Reilly Media, Inc., 1005 Gravenstein Highway North, Sebastopol, CA 95472.
O’Reilly books may be purchased for educational, business, or sales promotional use. Online editions
are also available for most titles (http://my.safaribooksonline.com). For more information, contact our
corporate/institutional sales department: (800) 998-9938 or corporate@oreilly.com.
Editors: Mike Loukides and Andy Oram
Production Editor: Adam Zaremba
Copyeditor: Amy Thomson
Proofreader: Teresa Horton
Indexer: Jay Marchand
Cover Designer: Karen Montgomery
Interior Designer: David Futato
Illustrator: Robert Romano
October 2011: First Edition.
Revision History for the First Edition:
2011-10-12 First release
See http://oreilly.com/catalog/errata.csp?isbn=9781449380373 for release details.
Nutshell Handbook, the Nutshell Handbook logo, and the O’Reilly logo are registered trademarks of
O’Reilly Media, Inc. MacRuby: The Definitive Guide, the image of a northern cardinal, and related trade
dress are trademarks of O’Reilly Media, Inc.
Many of the designations used by manufacturers and sellers to distinguish their products are claimed as
trademarks. Where those designations appear in this book, and O’Reilly Media, Inc. was aware of a
trademark claim, the designations have been printed in caps or initial caps.
While every precaution has been taken in the preparation of this book, the publisher and author assume
no responsibility for errors or omissions, or for damages resulting from the use of the information con-
tained herein.
ISBN: 978-1-449-38037-3
[LSI]
1318518022
Pour ma fille, Giana,
Et pour ma femme, Heidi: merci pour ton soutien,
tes encouragements, et ta compréhension. Sans
toi, ce livre n’aurait jamais vu le jour.

Table of Contents
Preface ..................................................................... xi
Part I. MacRuby Overview
1. Introduction ........................................................... 3
Introducing MacRuby 3
Why MacRuby? 4
Installation 6
Mac OS X 6
Xcode 6
MacRuby 6
Code Example 7
Loading a Framework 11
Using Classes 11
Defining a Class and Its Methods 11
Ruby Class Instantiation 12
Methods 13
Documentation 15
The Interactive Ruby Shell 16
Syntactic Sugar 18
2. Fundamentals ......................................................... 21
Run Loops 22
Callbacks/Delegation 22
User Inputs 23
Outlets 24
Display 25
Example 25
v

3. The Cocoa Environment ................................................. 29
History 29
Main Frameworks in the Cocoa API 30
Foundation Framework 31
AppKit Framework 31
CoreData Framework 32
Reference Library 32
Central Panel 34
Sidebar 34
Mutability 35
4. Foundation ........................................................... 37
Compatibility Table 37
Strings and Attributed Strings 38
Arrays 39
Hashes/Dictionaries 41
Sets 42
Enumerators 42
Date, Time, and Calendars 43
NSDate 43
NSCalendar 44
Data 45
Locales 46
Time Zones 46
Exceptions 47
I/O 47
URLs/Requests/Connections 48
Cache Policy and Cache Access 50
Asynchronous Versus Synchronous 51
Pipes 53
File Handles 53
Bundles 53
Scheduling 54
Run Loops 54
Timers 55
Tasks/Subprocesses 58
Threads 59
Operations/Operation Queues 61
Notifications 62
Notification Centers 63
Notification Queues 63
Archiving and Serialization 65
Miscellaneous Classes 69
vi | Table of Contents

XML Parsing 69
Filtering/Logical Conditions 72
Undo/Redo 73
User’s Preferences 74
5. Application Kit ........................................................ 77
Cocoa Key Principles 77
Model-View-Controller Design Pattern 77
Protocols 78
Key-Value Coding 78
Bindings 80
Delegation 84
User Interface 84
Windows, Views, and Cells 84
Positioning 85
Events and the Responder Chain 89
Drawing 92
Graphics Context 93
Images 99
6. Xcode ............................................................... 103
Xcode IDE 103
Template 103
Navigator Area 106
Editor Area 108
Debug Area 109
Utility Area 110
7. Core Data ............................................................ 113
Data Model 113
The Data Model and the Entity 114
Adding Attributes 116
Relationships 117
Setting Up Controllers 117
User Interface 121
Movies 121
Art Cover 125
Actors 129
Search 131
Persistence 132
Managed Object Model 132
Managed Object Context 133
Persistent Store Coordinator 133
Table of Contents | vii

Workflow 134
8. One Step Deeper ...................................................... 135
Selectors 135
Blocks 137
Concurrency 140
Grand Central Dispatch 140
Sandboxing 148
Using Objective-C or C Code 149
Scriptable Applications 150
Method Missing 153
Pointers 158
Void Pointers 159
Unsigned Pointer 160
Compilation 162
Compilation Within Xcode 163
Part II. MacRuby in Practice
9. Address Book Example ................................................. 167
User Interface 167
Address Book 170
Web API Call 172
Cleaning Up: Better Management of Widgets 175
The Extra Mile: Displaying More Information Through Notifications 176
10. Geolocation .......................................................... 179
User Interface 179
Table View 182
Core Location 185
Web API 187
11. MacRuby in Objective-C Projects . . . . . . . . . . . . . . . . . . . . . . . . . . . . . . . . . . . . . . . . . 191
API 191
Usage 192
Example in an Xcode Project 195
User Interface 196
Using the MacRuby Method 197
12. Objective-C Code in MacRuby Apps . . . . . . . . . . . . . . . . . . . . . . . . . . . . . . . . . . . . . . . 203
Dynamic Library 203
Framework 208
viii | Table of Contents


Preface
MacRuby is Apple’s implementation of the Ruby programming language on top of the
Objective-C technology stack. It allows developers to write native applications for the
Cocoa environment using the popular Ruby syntax as well as the well-known and ro-
bust Objective-C and C libraries.
This book provides a guide to OS X development for MacRuby developers. Key con-
cepts of MacRuby and Cocoa, as well the popular Cocoa APIs, are covered in this book.
The book should help you leverage your existing programming knowledge to make you
an efficient and productive MacRuby developer.
I became interested in MacRuby after many years working on/with/around Ruby web
frameworks. I started using MacRuby after meeting Laurent Sansonetti (MacRuby lead
developer at Apple). Laurent showed me that MacRuby had some interesting things to
offer: a programming language that I liked as well as some great APIs and tools that
allowed me to develop desktop applications easily and access some cool hardware
resources.
This book was written using a version of MacRuby just prior 1.0. All the Xcode screen-
shots were created using Xcode 4.x. Most, if not all, of the content should be valid for
MacRuby 1.x. and later versions.
The Purpose of This Book
The purpose of this book is to:
• Teach MacRuby fundamentals.
• Provide a guide to develop Cocoa applications using the MacRuby language.
• Show concrete examples leveraging the Cocoa technology using MacRuby.
My personal goal is to provide you with a solid foundation, allowing you to understand
how MacRuby is meant to be used and why things are designed the way they are. While
this book is neither a Ruby book nor a Cocoa book, it should provide you with enough
information to understand the MacRuby environment and create rich applications for
the OS X platform.
xi

Prerequisites
To get the most out of this book, you should have some programming experience and
be familiar with the basics of object-oriented programming. I also assume some very
basic knowledge of Ruby, because there are so many places to pick up that knowledge
and the language is pretty simple. If you aren’t familiar with Ruby yet, go to the Ruby
language website and read up. You’ll get more out of this book if you do that first. If
you are already familiar with Ruby but would like to learn more, I recommend the
excellent book, The Ruby Programming Language, by David Flanagan and Ruby’s cre-
ator, Yukihiro Matsumoto.
Also, even though we are going to cover some of the basics, understanding some fun-
damental Cocoa concepts will help. You can learn more about Cocoa as you go along,
but should you find something confusing in this book, here are places to look for more
information:
•Apple’s dev center
• Your local CocoaHeads group
• One of the many available books, such as:
— Aaron Hillegass’s books (Aaron wrote a Cocoa programming book [http://
bignerdranch.com/book/cocoa%C2%AE_programming_for_mac%C2%AE_os
_x_3rd_edition] and an advanced Mac OS X programming [http://bignerdranch
.com/book/advanced_mac_os_x_programming_nd_edition_] book.)
—Cocoa Programming: A Quick-Start Guide for Developers
Conventions Used in This Book
The following typographical conventions are used in this book:
Italic
Indicates new terms, URLs, email addresses, filenames, and file extensions.
Constant width
Used for program listings, as well as within paragraphs to refer to program elements
such as variable or function names, databases, data types, environment variables,
statements, and keywords.
Constant width bold
Shows commands or other text that should be typed literally by the user.
Constant width italic
Shows text that should be replaced with user-supplied values or by values deter-
mined by context.
xii | Preface
This icon signifies a tip, suggestion, or general note.
This icon indicates a warning or caution.
Using Code Examples
This book is here to help you get your job done. In general, you may use the code in
this book in your programs and documentation. You do not need to contact us for
permission unless you’re reproducing a significant portion of the code. For example,
writing a program that uses several chunks of code from this book does not require
permission. Selling or distributing a CD-ROM of examples from O’Reilly books does
require permission. Answering a question by citing this book and quoting example
code does not require permission. Incorporating a significant amount of example code
from this book into your product’s documentation does require permission.
We appreciate, but do not require, attribution. An attribution usually includes the title,
author, publisher, and ISBN. For example: “MacRuby: The Definitive Guide by Matt
Aimonetti (O’Reilly). Copyright 2012 Matt Aimonetti, 978-1-449-38037-3.”
If you feel your use of code examples falls outside fair use or the permission given above,
feel free to contact us at permissions@oreilly.com.
Safari® Books Online
Safari Books Online is an on-demand digital library that lets you easily
search over 7,500 technology and creative reference books and videos to
find the answers you need quickly.
With a subscription, you can read any page and watch any video from our library online.
Read books on your cell phone and mobile devices. Access new titles before they are
available for print, and get exclusive access to manuscripts in development and post
feedback for the authors. Copy and paste code samples, organize your favorites, down-
load chapters, bookmark key sections, create notes, print out pages, and benefit from
tons of other time-saving features.
O’Reilly Media has uploaded this book to the Safari Books Online service. To have full
digital access to this book and others on similar topics from O’Reilly and other pub-
lishers, sign up for free at http://my.safaribooksonline.com.
Preface | xiii

How to Contact Us
Please address comments and questions concerning this book to the publisher:
O’Reilly Media, Inc.
1005 Gravenstein Highway North
Sebastopol, CA 95472
800-998-9938 (in the United States or Canada)
707-829-0515 (international or local)
707-829-0104 (fax)
We have a web page for this book, where we list errata, examples, and any additional
information. You can access this page at:
http://shop.oreilly.com/product/0636920000723.do
To comment or ask technical questions about this book, send email to:
bookquestions@oreilly.com
For more information about our books, courses, conferences, and news, see our website
at http://www.oreilly.com.
Find us on Facebook: http://facebook.com/oreilly
Follow us on Twitter: http://twitter.com/oreillymedia
Watch us on YouTube: http://www.youtube.com/oreillymedia
Acknowledgments
I would like to start out by thanking the two people without whom MacRuby would
have never existed:
• Yukihiro Matsumoto (Matz), for designing Ruby, such an elegant language.
• Laurent Sansonetti, for writing the MacRuby implementation and leading the
project.
I’m grateful to Apple for initiating and supporting the MacRuby project (with special
thanks to Jordan Hubbard), and to Steve Jobs, who through his life proved that pas-
sionate people casting a vision of simplicity, efficiency, and interaction can design
products that change the world. In addition, I’d like to thank my MacRuby teammates:
Laurent Sansonetti, Vincent Isambart, Eloy Duran, Thibault Martin-Lagardette, Sa-
toshi Nakagawa, Joshua Ballanco, Watson, Takao Kouji, Rich Kilmer, Patrick Thom-
son, and all the many contributors to the project over the years.
xiv | Preface

I would also like to thank J. Chris Anderson and Jan Lehnardt, who inspired me to
release my work under the Creative Commons Attribution license, with a special “thank
you” to Jan for introducing me to Mike Loukides. Speaking of Mike, I’d like to thank
him and Andy Oram from O’Reilly for assisting and encouraging me as I wrote this
book. Next, I’d like to thank the dozens of reviewers who gave me insightful comments
and suggestions. You are too many to be listed, but know that I really appreciate you
taking the time to help me make this book better.
Finally, I’d like to thank my friends and family for their continuous support and
encouragement.
Preface | xv

PART I
MacRuby Overview
Part I introduces MacRuby. What is it? How do you install it? How does it work? What
can you do with it? How does it relate to what you already know? These are the sorts
of questions answered here.

CHAPTER 1
Introduction
If you are interested in developing applications for Apple’s Mac OS X platform, you
probably know that it’s intimately tied in with the Objective-C language. Objective-C
extends the standard ANSI C language by adding full object-oriented programming
capabilities. It sees little use outside Apple environments.
Objective-C presents quite a contrast to Ruby, a scripting language that became very
popular, thanks in part to the Ruby on Rails web framework. Both languages are very
dynamic (although Objective-C is fully compiled) and object-oriented. They both have
comparable levels of introspection, support metaprogramming, and have their own
garbage collector. But Objective-C is a verbose language with rather tiresome require-
ments for specifying data and methods, and it might not fit all developers. Ruby, in
contrast, is sleek and encourages quick programming techniques such as prototyping.
According to its creator, Yukihiro Matsumoto, Ruby is designed for humans, not ma-
chines because “We are the masters. They are the slaves.” Both languages have their
pros and cons. To find out more about Matsumoto, see the Wikipedia entry for Yuki-
hiro Matsumoto.
Mac OS X ships with a version of Ruby you can access from the command line, but
MacRuby is a completely separate project that has one key advantage: it provides access
to all the features available to Objective-C programmers.
Introducing MacRuby
MacRuby is Apple’s implementation of the Ruby programming language. More pre-
cisely, it is a Ruby implementation that invokes methods from the well-known and
proven Objective-C runtime to give you direct native access to all the OS X libraries.
The end result is a first-class, compilable scripting language designed to develop ap-
plications for the OS X platform.
3
MacRuby brings you the best of both worlds:
• The power and flexibility of Ruby
• The rock-solidness of the Objective-C runtime with the richness of the Cocoa
environment
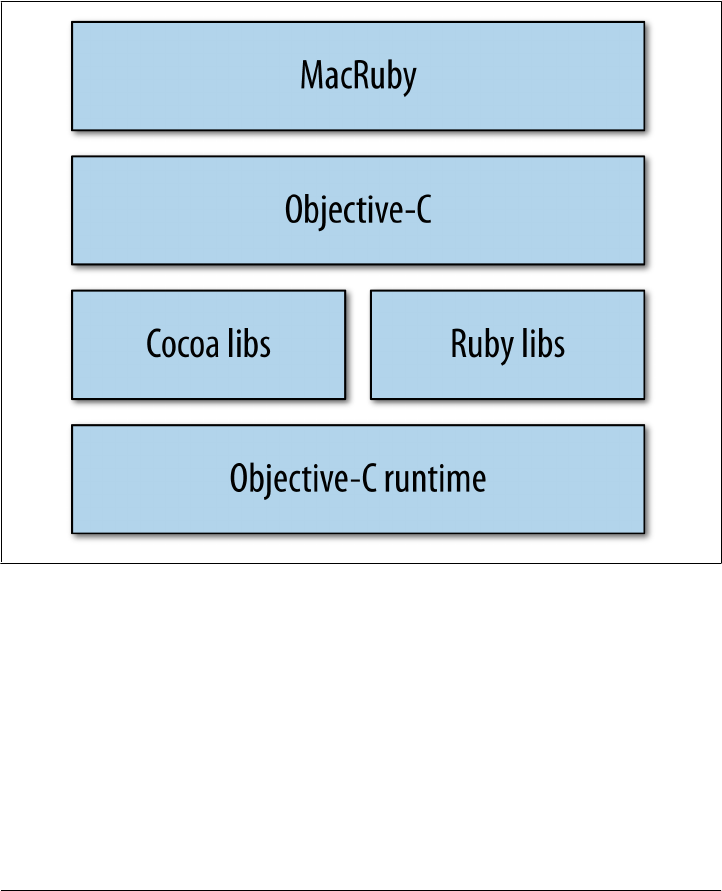
As you can see in Figure 1-1, MacRuby runs natively in the Objective-C runtime and
offers Ruby as an alternative native runtime language with support for its well-known
ecosystem of libraries and tools.
Figure 1-1. The MacRuby stack
Why MacRuby?
MacRuby has some obvious and not so obvious advantages. It is Apple’s first alternate
language for accessing the Objective-C runtime. What’s even more interesting is that
Apple managed to do this without reinventing the wheel. Instead, MacRuby is really
the result of the blend of great existing technologies.
For most beginners, MacRuby’s learning curve is not as steep as if you start directly
with Objective-C and Cocoa. Certainly, MacRuby developers also have to learn Co-
coa’s APIs. However, beginners have an easier time thanks to simple things such as not
4 | Chapter 1: Introduction

having to worry about header files and implementation files, the use of a succinct and
natural syntax, and the availability of an interactive shell.
A lot of documentation is available for MacRuby, although you have to learn how to
interpret it because much of it assumes an Objective-C environment. In addition to
MacRuby-specific documentation, such as this book, you can find a lot of documen-
tation regarding Ruby and Cocoa. Tools used by both communities are available to
MacRuby developers and you can rely on the communities to help you with domain-
specific challenges.
MacRuby’s open source status might not be an obvious advantage at first, but it offers
direct access to the core of the implementation. The quality of the code can be easily
evaluated, patches can be submitted, and overall it is a sign that Apple wants greater
involvement from the developers targeting its platform, as well as offering some trans-
parency into its technology.
MacRuby is for you if:
• You prefer to avoid C-like syntax and low-level coding.
• You are interested in learning or already know Objective-C, Ruby, Python, Perl,
or Smalltalk.
• You are interested in targeting the OS X platform.
MacRuby is also for you if you are already a Cocoa developer but would like to improve
your productivity, interact a bit more with the world outside of Cocoa, or maybe just
improve your test coverage.
Objective-C is a great language, but it is also very verbose. The problem is not the
amount of time you spend writing code (most integrated development environments
[IDEs] will generate code for you anyway). The real problem is the amount of time
developers spend reading and understanding the code previously written. Most of the
time spent fixing a bug is not really spent “fixing” anything, but finding the source of
the bug. By offering a syntax that is less verbose and easier to grasp, MacRuby instantly
improves your short-term and long-term productivity.
Cocoa developers can leverage their acquired knowledge and existing code and maxi-
mize their efficiency by using MacRuby. Because Ruby, Objective-C, and C code can
be used in the same project, your legacy code is 100% reusable. Available libraries for
Cocoa, Ruby, and even C can help enrich your projects and save you precious time.
MacRuby has full native support for regular expressions, which might be enough to
convince you to try it.
Finally, Apple’s backing is recognition that a higher-level language, designed to be easy
to read and enjoyable to work with while still being fully natively Cocoa compliant, is
valuable to developers targeting the Apple platform.
Introducing MacRuby | 5

Installation
No doubt you are impatient to start writing applications. But before we can start writing
any code, we need to make sure we have all the required tools set up properly. Getting
started is really simple and doesn’t require compiling anything.
Mac OS X
First, make sure you are running Snow Leopard, Lion, or a more recent version of
MacOS X. MacRuby runs on Leopard, but for the purpose of this book, I’ll assume you
are using a more recent version of the OS.
Xcode
Xcode is Apple’s development environment for OS X. Installing Xcode will provide you
with the tools and libraries required to develop Cocoa applications.
You can either install Xcode from the OS X DVD that shipped with your Mac or down-
load it from Apple’s developer center.
Apple regularly updates Xcode, which means that the online version is
likely more recent than the one you have on your OS X installation DVD.
At the time of this writing, Apple still provides Xcode 3 for free, but
Xcode 4 is sold for five American dollars at the App Store, or free if you
have an iOS or Mac developer license. This book will refer to Xcode 4,
but the same concepts apply to Xcode 3.
MacRuby
As of the writing of this chapter, MacRuby is not shipping with OS X or Xcode. Lion
ships with MacRuby as a private framework because the OS relies on it, but because
Apple didn’t make the framework public, you are not allowed to link against it. So, you
need to install MacRuby manually.
Installing MacRuby is easy:
1. Go to the MacRuby website.
2. Download the package installer.
3. Launch it to install MacRuby on your machine.
MacRuby won’t conflict with the Ruby version you already have installed.
6 | Chapter 1: Introduction
If you already have Xcode 3 installed and upgrade to Xcode 4, you will
need to reinstall MacRuby so the updated version of Xcode can make
proper use of the MacRuby tools.
MacRuby does not come with an uninstaller. If you want to remove MacRuby from
your computer, delete the MacRuby binary files, which use the mac prefix and are
located in /usr/local/bin/. Then remove MacRuby itself: /Library/Frameworks/Ma-
cRuby.framework.
MacRuby is a library/framework and end users don’t need to have it
installed on their machines to use your program. You can package
MacRuby within your app during the building process.
Code Example
Instead of making you wade through MacRuby’s history, the technical aspects of the
implementations, and their pros and cons, let’s dive into a code example to get a feel
for MacRuby.
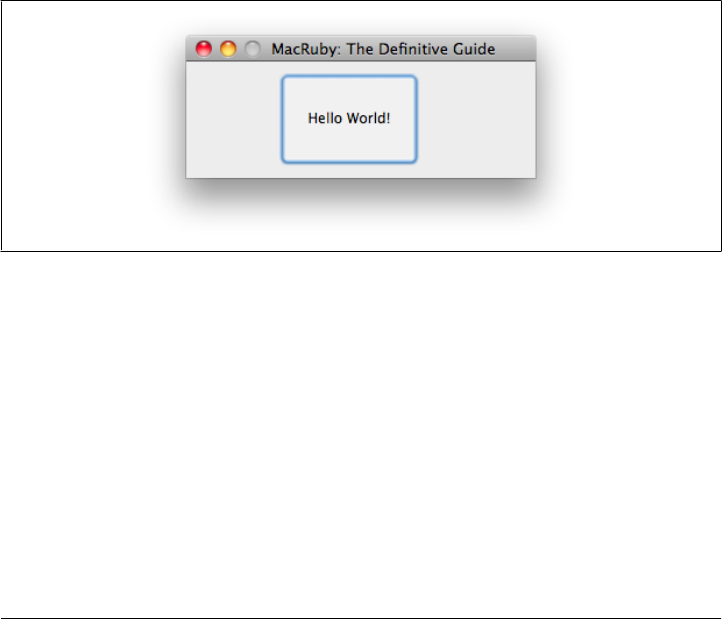
We’ll build a traditional “Hello World!” example. To keep things simple, we’ll just
write a script and won’t use any IDEs or GUI tools. Let’s make it pretty and create a
window with a button. When the button is clicked, the computer will greet the world
through its speakers:
framework 'AppKit'
class AppDelegate
def applicationDidFinishLaunching(notification)
voice_type = "com.apple.speech.synthesis.voice.GoodNews"
@voice = NSSpeechSynthesizer.alloc.initWithVoice(voice_type)
end
def windowWillClose(notification)
puts "Bye!"
exit
end
def say_hello(sender)
@voice.startSpeakingString("Hello World!")
puts "Hello World!"
end
end
app = NSApplication.sharedApplication
app.delegate = AppDelegate.new
window = NSWindow.alloc.initWithContentRect([200, 300, 300, 100],
styleMask:NSTitledWindowMask|NSClosableWindowMask|NSMiniaturizableWindowMask,
backing:NSBackingStoreBuffered,
Code Example | 7
defer:false)
window.title = 'MacRuby: The Definitive Guide'
window.level = NSModalPanelWindowLevel
window.delegate = app.delegate
button = NSButton.alloc.initWithFrame([80, 10, 120, 80])
button.bezelStyle = 4
button.title = 'Hello World!'
button.target = app.delegate
button.action = 'say_hello:'
window.contentView.addSubview(button)
window.display
window.orderFrontRegardless
app.run
Type in the code (don’t worry about matching my spacing) or download it from http:
//bit.ly/macruby_hello_world, then save it in a file named hello_world.rb and run it in a
terminal:
$ macruby hello_world.rb
The application, shown in Figure 1-2, will open.
Figure 1-2. “Hello World!” example run from the command line
Congratulations, we just wrote a graphical user interface (GUI) application in 35 lines
of code! And don’t forget to click the button to hear your computer’s nice voice.
Let’s do a first walk through the code so you have a general understanding of what we
just wrote.
We start by loading the AppKit framework, which gives us access to classes to build a
GUI app. Then we create a class called AppDelegate, which implements methods to
handle the actions our application triggers. This new class has three different methods:
one to be called when the application is loaded (applicationDidFinishLaunching), one
when the window is closed (windowWillClose), and one to say, “Hello world!”
(say_hello).
8 | Chapter 1: Introduction

After the application is launched, we create an instance of the NSSpeechSynthesizer
class that we keep in an instance variable called @voice. The instance variable makes
the features available to every method in the AppDelegate class. When the button is
clicked, we trigger the say_hello method, which will use the voice object to greet the
world. The say_hello method also outputs a string to our terminal. Finally, when the
window is closed, our code says, “Bye!” and exits.
The class AppDelegate is used to create a delegate that is attached to another object to
handle events sent to that object. Delegates have to be set for each object you want to
handle events for.
To keep things simple, our delegate instance is used by all the objects in the user in-
terface: the application, the window, and the button. So, our next step is to get a pointer
to our application and link it to a new instance of our delegate class:
app = NSApplication.sharedApplication
app.delegate = AppDelegate.new
That’s pretty easy, but we are not done yet. We also need to build a window with a
button inside. Furthermore, assigning an application delegate to our application does
not make the other objects within the application use the delegate. Each object has to
be attached explicitly. Interface Builder offers a really nice interface that allows you to
graphically define targets, making the delegate concept much easier to work with.
A window is created by passing a frame reference and a style. You can see a slight
increase in the code’s complexity, because we have to tell the Objective-C runtime a
bunch of information.
The frame refers to the coordinate space (in points) of the window. Objective-C de-
velopers usually pass an NSRect instance. MacRuby developers can simply pass an
Array with the frame references in the following order: x, y, width, height. These work
like just about every other windowing system: x and y specify the position of the top
left corner of the window from the top left corner of the screen, while width and height
specify the window’s size. The coordinates and positioning are discussed in Chapter 5:
window = NSWindow.alloc.initWithContentRect([200, 300, 300, 100],
styleMask:NSTitledWindowMask|NSClosableWindowMask|NSMiniaturizableWindowMask,
backing:NSBackingStoreBuffered,
defer:false)
We also give a title to our window, set its level and style, and connect it to the delegate
we previously created. The level determines how the window will stack in relation to
other windows/applications. If you don’t explicitly set the window level in your script,
the new window will display behind the command line, which is in focus. That’s why
we need to set it as a modal window level—so it shows above the running application.
Now it’s time to create a button, the same way we created a window. We create our
button by passing a frame reference:
button = NSButton.alloc.initWithFrame([80, 10, 120, 80])
Code Example | 9
The button is styled to make it look better, give it a title, and connect it to our delegate:
button.target = app.delegate
But before moving on, we need to tell the button what to do when it’s clicked, which
we do by defining its action:
button.action = 'say_hello:'
Remember the say_hello method we created in our delegate? Now, when the button
is clicked, the method is triggered.
Did you notice the colon at the end of the string? It’s present because
we are referring to the method we want to invoke. Technically, this is
called a selector and our selector takes an argument (the sender), so it is
represented with a colon. We will discuss selectors a bit more later in
this chapter, but in this case we just need to append a colon to the name
of the method to make it a selector.
Once the button is created and set up, we can add it to the window:
window.contentView.addSubview(button)
Our GUI is now ready. We just need to display the window, put it on foreground, and
run our application:
window.display
window.orderFrontRegardless
app.run
That was not too hard, was it?
Now start your application from the terminal:
$ macruby hello_world.rb
You’ll see the application window shown in Figure 1-2.
When executing a script via the terminal, your application won’t prop-
erly get focus and you might notice some issues with text fields, for
instance. To force the focus, you can use the following code:
NSApplication.sharedApplication.activationPolicy =
NSApplicationActivationPolicyRegular
NSApplication.sharedApplication.activateIgnoringOtherApps(true)
Here is more good news: using Xcode and Interface Builder, we will be able to do the
same thing with even less code. But before playing with the GUI tools, let’s learn more
about MacRuby and Cocoa by going through the code in detail.
10 | Chapter 1: Introduction

Loading a Framework
Our example starts with a framework:
framework 'AppKit'
A framework is a library (usually a dynamically linked library) packaged with the sup-
porting files that make it easier for a developer to use that library. Mac OS X ships with
many frameworks, and a lot of third-party frameworks are also available. In Chap-
ter 2, you’ll learn more about the Cocoa environment and some of the most commonly
used frameworks.
But for now, what’s important to understand is that we are loading an Objective-C
framework called AppKit, also known as the Cocoa Application Framework. The App
Kit framework provides the functionality to build OS X GUI applications. We are going
to explore this framework at length in Chapter 5, so let’s just focus on the rest of the
code for now.
Using Classes
MacRuby is a true object-oriented language, in which everything is an object, and ob-
jects are defined by classes.
Defining a Class and Its Methods
Defining a class in MacRuby is straightforward. Use the class keyword, followed by
the capitalized name of the class. To close the class definition, use the end keyword.
Unlike Objective-C, no headers are required; just define your class once and you are
ready to go.
Here is our AppDelegate class. As you can see, each method begins with def and ends
(like the class definition) with end. I’ve used indentation to show how the end statements
line up with the beginnings of the definitions:
class AppDelegate
def applicationDidFinishLaunching(notification)
voice_type = "com.apple.speech.synthesis.voice.GoodNews"
@voice = NSSpeechSynthesizer.alloc.initWithVoice(voice_type)
end
def windowWillClose(notification)
puts "Bye!"
exit
end
Using Classes | 11

def say_hello(sender)
@voice.startSpeakingString("Hello World!")
puts "Hello World!"
end
end
Ruby objects are initialized using the new class method. This is exactly what we did in
our “Hello World!” example when we created an instance of our AppDelegate class:
AppDelegate.new
And if you look further, we have another object instantiation, this time using different
methods:
button = NSButton.alloc.initWithFrame([80, 10, 120, 80])
The combination of alloc and an init method is used because NSButton is an Objective-
C class and has its own constructor. To keep it simple, when dealing with classes you
created or other Ruby classes, use the new constructor method. Otherwise, use
alloc.init or any other constructors mentioned in the documentation (in this case,
alloc.initWithFrame).
Although you can use new to instantiate an Objective-C class, I strongly
recommend you use alloc.init or related constructors defined by the
class. Apple’s Objective-C classes are usually easy to identify, because
their names start by NS. The reason for this advice is that the class was
written and tested to be used the Objective-C way and it’s therefore safer
to initialize it that way.
Ruby Class Instantiation
You can customize instantiation by defining the initialize method. Unlike Objective-
C, Ruby doesn’t have a public explicit object allocation method, but both languages
initialize instances of objects immediately after they are created. Ruby has an internal
allocate method but is called automatically. Ruby implicitly calls the initialize
method, while Objective-C makes initialization explicit with a call to some method
whose name usually begins with init.
The following example causes an instance variable in the Book class to be initialized
whenever an object of that class is created with new:
class Book
def initialize
@created_at = Time.now
end
end
To modify the construction of any new instances, we just reopen the class and define
initialize.
12 | Chapter 1: Introduction
By reopening the class, I mean that we define a class that was previously
defined. All we do here is overwrite the initialize method. Classes are
never closed. Both MacRuby and Objective-C classes can be reopened
at any time, so it’s incredibly easy to add new methods to existing classes
at runtime.
Right after a new Book instance is created, a new instance variable called @created_at
will be defined and will hold the creation time. This @created_at instance variable is
then stored inside our newly created object.
Let’s look next at how MacRuby handles methods.
Methods
Objects respond to methods. In Objective-C terminology, the invocation of a method
is also called sending the object a message. Like variables, methods can be class meth-
ods, which are called on the name of the class, or instance methods, which are called
on objects after they are created with new. A simple example of a class method is:
class Contact
def self.first
# Let's pretend we have an array of contacts
# held in the @contacts class instance variable.
@contacts.first
end
end
Contact.first # => #<Contact:0x20029fe20>
A simple instance method is:
class Contact
def full_name
"#{first_name} #{last_name}"
end
end
Contact.first.full_name # => "Laurent Sansonetti"
Ruby methods don’t need to explicitly return a value. If a method
doesn’t explicitly issue a return statement, the last value evaluated in
the body of the method will be returned.
There can also be singleton methods. These are methods defined on an individual in-
stance of an object, as in the following example:
laurent = Contact.first
def laurent.country_of_origin
"Belgium"
Methods | 13

end
laurent.country_of_origin # => "Belgium"
In this example, only the object named laurent can invoke the country_of_origin
method. Singleton methods are very useful in MacRuby, because they allow you to
overwrite or define a method on an instance instead of having to create a subclass.
MacRuby methods can also be defined in many other ways, described
in the Ruby language reference.
Looking at the AppDelegate class we created, we can see the three defined methods:
def applicationDidFinishLaunching(notification)
...
end
def windowWillClose(notification)
...
end
def say_hello(sender)
...
end
If you look closely at the names of the methods, you will notice that the first two are
CamelCased , while the last one uses an underscore. By convention, Rubyists usually
underscore their method names. But in this case, the two first methods are callbacks
sent by the application. These callbacks are defined in Objective-C, so their names use
the CamelCase syntax convention that’s ubiquitous in Objective-C. The last method
is the method we trigger when the button is pressed. We have full control over this
method and we could have defined the button’s action method sayHello to stay con-
sistent. But instead, by using the Ruby convention, we can quickly see which methods
come from Cocoa libraries and which ones we wrote. Another way to explain the same
thing is that the windowWillClose and applicationDidFinishLaunching methods are pre-
defined and can be included in our class to provide certain functionality even though
we are not calling them explicitly. In comparison, say_hello is our own method that
we call explicitly in our code and thus we can name it anything we want.
If defined on an application delegate, the applicationDidFinishLaunching method is
triggered when the application is launched. We are using this callback to create an
instance of NSSpeechSynthesizer that we will hold in the @voice instance variable:
def applicationDidFinishLaunching(notification)
voice_type = "com.apple.speech.synthesis.voice.GoodNews"
@voice = NSSpeechSynthesizer.alloc.initWithVoice(voice_type)
end
14 | Chapter 1: Introduction

To find out which constructor to use to create a speech synthesizer and which voices
are available, read the documentation. Apple documentation follows its own set of
conventions, which I’ll introduce you to next.
Documentation
When you load a framework, you get access to its APIs, which include classes, methods,
constants, functions, enumerations, and so on. As I explained earlier, many frameworks
are written in Objective-C. Their conventions reflect Objective-C practices, and that
comes out in the documentation, which is fairly easy for Objective-C programmers to
read, but could use some interpretation for other readers.
To learn more about each framework and see its possibilities, open the developer doc-
umentation and look for the framework, or search for a specific class. The documen-
tation is available via Xcode or on Apple’s developer website, and it looks the same in
both places.
Let’s open the NSSpeechSynthesizer class documentation so we can see the available
methods. Search for NSSpeechSynthesizer in the documentation and you should find
the NSSpeechSynthesizer class reference. Under the “tasks” section, there is an entry
titled “Creating Speech Synthesizers” with its first documented method called init
WithVoice:
*initWithVoice:
Initializes the receiver with a voice.
- (id)initWithVoice:(NSString *)voiceIdentifier
Parameters
voiceIdentifier
Identifier of the voice to set as the current voice. When nil, the default voice is used.
Passing in a specific voice means the initial speaking rate is determined by the synthe-
sizer’s default speaking rate; passing nil means the speaking rate is automatically set to
the rate the user specifies in Speech preferences.
Return Value
Initialized speech synthesizer or nil when the voice identified by voiceIdentifier is not
available or when there’s an allocation error.
• Available in Mac OS X v10.3 and later.
See Also
+ availableVoices
Declared In
NSSpeechSynthesizer.h
Methods | 15

Method prototypes
The Objective-C method signature might seem a bit cryptic at first, so let me explain
what it means:
- (id)initWithVoice:(NSString *)voiceIdentifier
Notice first that the signature starts with a - symbol, which means that we are dealing
with an instance method. A class method signature would start with a + symbol.
The instance method is called initWithVoice and returns an object of type id. In
Objective-C, the id keyword means that the returned object can be of any type. In this
case, the documentation explains that the returned value can be either a speech syn-
thesizer instance or nil. Finally, the method takes an argument representing the
voiceIdentifier to use. The argument should be a String. However, the documenta-
tion indicates that nil can also be passed.
Constant names
The documentation might refer to some constants that are relevant to the class. In
Cocoa, constants are namespaced and start with a k followed by a two-letter code. For
instance, AB stands for AddressBook, and its documentation mentions the
kABFirstNameProperty constant. However, even though a constant can start with a low-
ercase character in Objective-C, in MacRuby, constants always have to start with an
uppercase character. In this example, Objective-C’s kABFirstNameProperty constant is
available as KABFirstNameProperty in MacRuby.
The Interactive Ruby Shell
A great advantage of using MacRuby is that we can use the interactive shell to inspect
our code. Let’s experiment with the NSSpeechSynthesizer class and learn more about
it by interacting directly with it.
The NSSpeechSynthesizer documentation sample we looked at earlier mentions a class
method named + availableVoices. Let’s play with it.
Open a terminal shell and launch macirb (macirb is MacRuby’s interactive shell and it
is installed when you install MacRuby):
$ macirb --simple-prompt
>> framework 'AppKit'
=> true
>> NSSpeechSynthesizer.availableVoices
=> ["com.apple.speech.synthesis.voice.Agnes",
"com.apple.speech.synthesis.voice.Albert",
"com.apple.speech.synthesis.voice.Alex",
"com.apple.speech.synthesis.voice.BadNews",
"com.apple.speech.synthesis.voice.Bahh",
"com.apple.speech.synthesis.voice.Bells",
"com.apple.speech.synthesis.voice.Boing",
"com.apple.speech.synthesis.voice.Bruce",
16 | Chapter 1: Introduction

"com.apple.speech.synthesis.voice.Bubbles",
"com.apple.speech.synthesis.voice.Cellos",
"com.apple.speech.synthesis.voice.Deranged",
"com.apple.speech.synthesis.voice.Fred",
"com.apple.speech.synthesis.voice.GoodNews",
"com.apple.speech.synthesis.voice.Hysterical",
"com.apple.speech.synthesis.voice.Junior",
"com.apple.speech.synthesis.voice.Kathy",
"com.apple.speech.synthesis.voice.Organ",
"com.apple.speech.synthesis.voice.Princess",
"com.apple.speech.synthesis.voice.Ralph",
"com.apple.speech.synthesis.voice.Trinoids",
"com.apple.speech.synthesis.voice.Vicki",
"com.apple.speech.synthesis.voice.Victoria",
"com.apple.speech.synthesis.voice.Whisper",
"com.apple.speech.synthesis.voice.Zarvox"]
In irb mode, the chevrons (>>) represent the irb prompt, the fat arrow
(⇒) represents output, and anything after a hash (#) is a comment I
added.
We started macirb with the --simple-prompt argument to avoid dis-
playing the line numbers. Check on the various options by passing the
--help argument.
Let’s create an instance of the speech synthesizer, passing nil to use the default voice,
and let’s see what methods are available:
>> voice = NSSpeechSynthesizer.alloc.initWithVoice(nil)
=> #<NSSpeechSynthesizer:0x2004c7c20>
>> voice.methods returns the available Ruby methods
The list is too long for this book but give it a try on your machine.
>> voice.methods(true, true) returns the available Objective-C methods
=> the list is too long for this book
>> voice.methods(true, true).grep(/speak/i)
returns all methods containing 'speak' in their name.
Limited selection for the purpose of this book.
=> [:continueSpeaking, :stopSpeaking, :isSpeaking, :startSpeakingString]
We created a speech synthesizer instance, inspected the Ruby and Objective-C meth-
ods, and even filtered them to find the methods used to speak.
We can invoke another method to see the status of the object, then define a string and
feed it to the synthesizer to read out loud:
>> voice.isSpeaking
=> false
# MacRuby offers an alias to Objective-C methods starting by is
>> voice.speaking?
=> false
>> voice.respond_to?(:sing)
=> false
>> jelly_time = "Do the peanut butter jelly, peanut butter jelly,
Peanut butter jelly with a baseball bat"
Methods | 17

=> "Do the peanut butter jelly, peanut butter jelly,
\nPeanut butter jelly with a baseball bat"
>> voice.startSpeakingString(jelly_time)
=> true
Now let’s play with some of the other available voices we listed earlier when we called
the availableVoices class method:
>> voice_name = "com.apple.speech.synthesis.voice.BadNews"
=> "com.apple.speech.synthesis.voice.BadNews"
>> voice = NSSpeechSynthesizer.alloc.initWithVoice(voice_name)
=> #<NSSpeechSynthesizer:0x200855380>
>> voice.startSpeakingString(jelly_time)
=> true
let's try with a different voice
>> voice_name = "com.apple.speech.synthesis.voice.GoodNews"
=> "com.apple.speech.synthesis.voice.GoodNews"
>> voice = NSSpeechSynthesizer.alloc.initWithVoice(voice_name)
=> #<NSSpeechSynthesizer:0x200873100>
>> voice.startSpeakingString(jelly_time)
=> true
Have fun trying different voices with different sentences and get a feel for macirb.
Syntactic Sugar
MacRuby offers a couple of method aliases to keep your code more Ruby-like. Feel free
to use whichever version you prefer:
Objective-C/Ruby accessor syntax:
object.setFoo(bar)
object.foo = bar
Objective-C/Ruby boolean response syntax:
object.isFoo
object.foo?
Objective-C/Ruby key accessor syntax:
keyed_object.objectForKey('foo')
keyed_object['foo']
Objective-C/Ruby key setter:
keyed_object.setObject('bar', :forKey => 'foo')
keyed_object['foo'] = bar
The Ruby syntax is usually shorter than the Objective-C syntax, but it is good to know
both for times when you go back and forth between Objective-C and Ruby code.
18 | Chapter 1: Introduction

Some extra helpers added by MacRuby include:
Convert a String instance into an NSData:
"this is a test".to_data
Convert an NSData instance into a String:
data = "this is a test".to_data
# => #<NSCFData:0x200245d40>
data.to_str
# => "this is a test"
Convert an object into a property list:
[1, "two", {'three' => 3}, true, false].to_plist
Load and convert a property list:
plist = {one: 1, two: 2, three: 3}.to_plist
load_plist(plist)
Methods | 19

CHAPTER 2
Fundamentals
This chapter focuses on the fundamentals of GUI application development. It covers
the concepts of run loops, callbacks and delegation, user inputs, outlets, and display.
Finally, these basic concepts are illustrated in an example application.
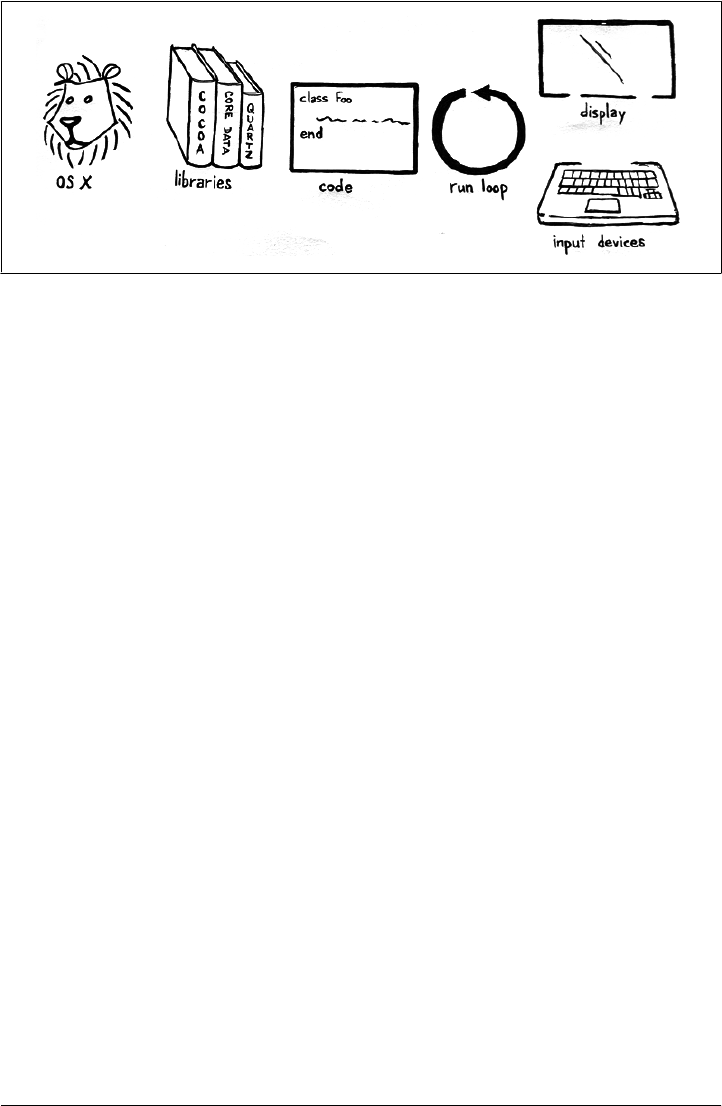
Figure 2-1 shows the simplified view that most users have when it comes to
applications.
Figure 2-1. The way my mom sees herself using one of my applications
If we give it a closer look, we will notice some key elements my mom takes for granted.
My mom has a good perspective that we don’t need to disagree with. From her per-
spective, she is simply having an interaction with her computer. She opens the appli-
cation, clicks, types, and sees a result right away. However, what’s going on under the
covers is a bit more complex, as shown in Figure 2-2.
21
Run Loops
The first challenge is that we don’t want our code to execute and exit. We need our
code to keep running to intercept my mom’s actions and react to them. We can’t pause
or ask our code to sleep, because doing so might make us miss some events. Instead,
we use what is called a run loop. Run loops are like threads that schedule work and
coordinate the receipt of incoming events. By default, Cocoa applications have a main
run loop that handles the events and keeps the application running. However, devel-
opers must be careful not to block this main loop, because that would prevent the user
from interacting with the application and will cause the infamous spinning “pizza of
death,” aka “beach ball of death,” to be displayed. To avoid that, you can use multiple
run loops or, more simply, use asynchronous APIs.
Callbacks/Delegation
A callback is a function that you define but that is called by some other part of the
system. Callbacks are the center of event-driven applications, which certainly include
the ones you’ll write for the Mac (and which also includes Ruby on Rails applications,
with which you may be familiar). The runtime loop calls one of your functions when
an event takes place you need to handle (Figure 2-3).
Asynchronous APIs also use callbacks. After you launch an asynchronous operation,
your application continues while the operation takes place in the background. For
instance, you may launch an operation that downloads a large file over the network
while you allow the program to continue and handle other requests. This means that
whatever code you want to execute at the successful completion of the operation—for
instance, storing the file on the disk after it has been downloaded—has to be encap-
sulated in a callback, which the runtime invokes. Asynchronous operations also let you
specify functions to be called in case of error and for other reasons. All these functions
are called delegate callbacks.
Figure 2-2. The details of a GUI app
22 | Chapter 2: Fundamentals
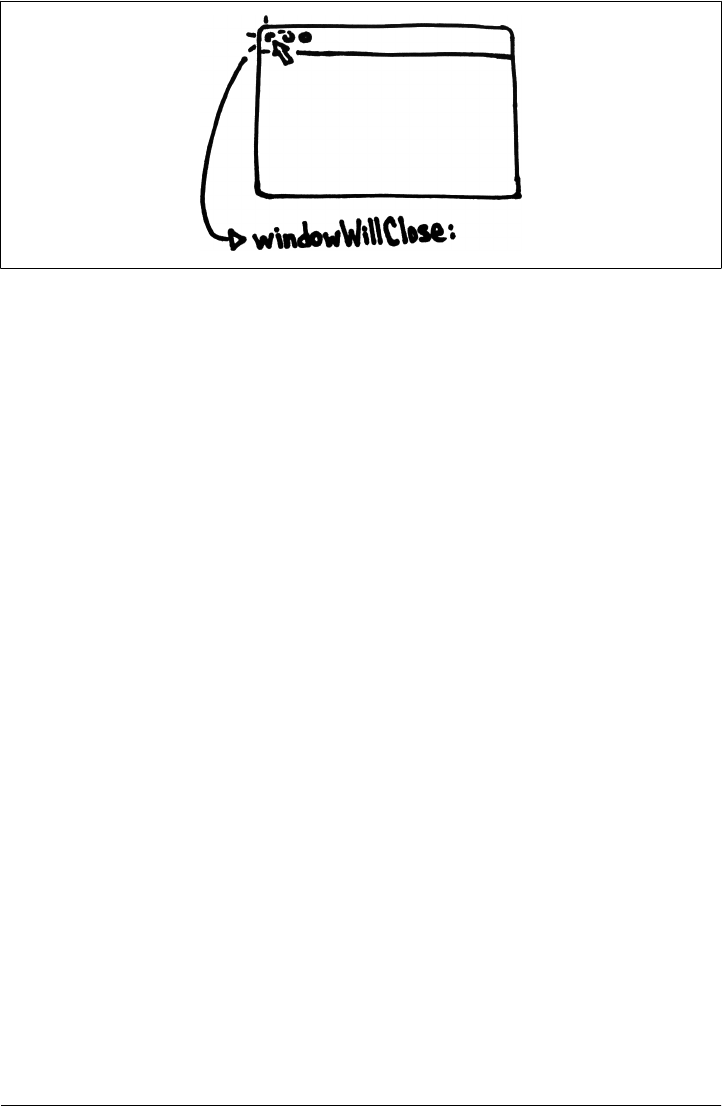
Figure 2-3 shows a callback triggered when the user clicks on the Close button of a
window. The callback is called only if you previously attached it to this instance of the
window. You might have noticed that the callback selector ends with a colon, which
means that it takes an argument (in this case a notification). We will discuss the call-
back/notification concepts a bit further in Chapter 5.
User Inputs
User inputs, such as keyboard or mouse events, need to be wired to actions so that you,
the developer, can decide what happens when an event is triggered. When developing
Cocoa applications, this is usually done in Xcode’s Interface Builder. The developer
links an action received on a UI item to a controller’s action.
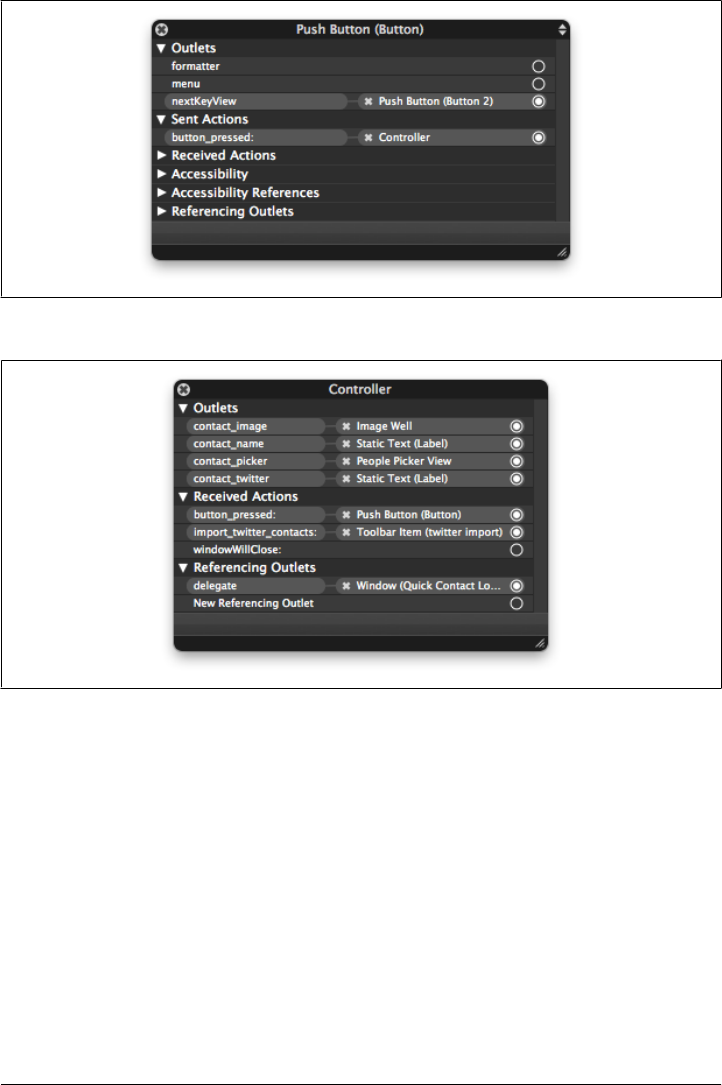
Figure 2-4 shows the connections between a button and a controller. As you can see,
the button’s sent action (the action triggered when the button is clicked) is associated
with the controller object. What that means is that when the button is pressed, the
method calls button_pressed on the Controller class.
Figure 2-5 shows how the controller handles the connection from a button to an action.
In the Received Actions list, notice that the button object’s push button action is wired
to the button_pressed action on the controller.
As a quick preview of what we will discuss later on, here is the only code required to
implement a button action:
class Controller
def button_pressed(sender)
puts "The button was pressed"
end
end
Figure 2-3. A callback is triggered when a window closes
User Inputs | 23
The wiring itself is done graphically in Interface Builder: you create a controller object
that you connect to the Controller class, drag a button from the library, visually link
its action to your controller object, and choose the action to trigger. But I am getting
ahead of myself—you will see that in a later chapter.
The point is that connecting user inputs to code is trivial with MacRuby.
Outlets
You might have noticed in the previous connection screenshots that some outlets were
mentioned. Outlets keep track of UI elements such as windows and widgets in your
code. In Figure 2-5, for instance, the controller defines four outlets to keep track of four
UI elements used to display contact information.
Figure 2-4. Button connections in Xcode
Figure 2-5. Controller connections in Xcode
24 | Chapter 2: Fundamentals

Most of the time, you want to keep track of the application’s state programmatically
and make some modifications to UI objects. To do that you need a way to reference
events, and that’s what outlets are for. Creating an outlet in a class is very simple—just
create an attribute accessor (technically a getter/setter to an instance variable):
class Controller
attr_accessor :main_button
end
Once you have defined the outlet, Interface Builder automatically adds it to the list of
available outlets, and you can connect a UI element to an outlet via Xcode’s Interface
Builder.
Again, you will see much more about the use of outlets later on. What is important to
remember is that keeping track of UI elements from controllers is straightforward.
When an event is triggered, your callback receives the notification and can modify the
state of any UI element.
Display
So far, you have seen that the code runs continuously in a run loop, and waits for events.
You saw that events can trigger actions and that action code has access to UI elements.
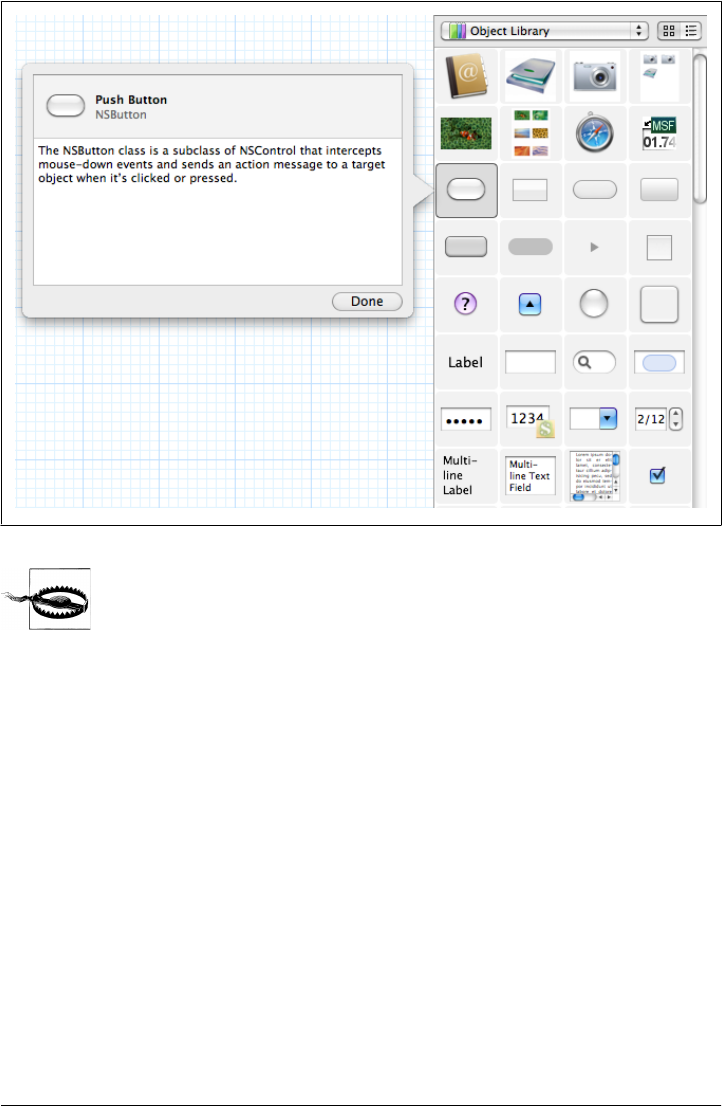
The last missing piece is the rendering or display of data on the screen. Cocoa UIs are
usually designed using Xcode, which comes with a library of UI elements ready to be
used.
Figure 2-6 shows a sample of the various UI objects available to OS X developers.
To build your application UI, you can drag and drop the elements and connect them
visually to the icons representing your code. Most elements know how to redraw them-
selves, so you don’t need to do anything more. However, if you start doing anything
advanced, such as developing video games or drawing on the screen, you might need
to mark your elements as needing to be redrawn, or actually define how to redraw the
elements. But we will keep that for later.
Example
If you have not used Cocoa previously, some of the concepts we’ve discussed might be
a bit hard to grasp. Maybe the best way to bridge the gap is to jump ahead and take
some time to just play with an application and look at how it works. We are going to
write some example apps later on, but to get a feel for the meaning of everything we
just discussed, download the demo application for this chapter. Open it with Xcode
(double-click demo.xcodeproj) and press Command-R (or click the Run button). Fig-
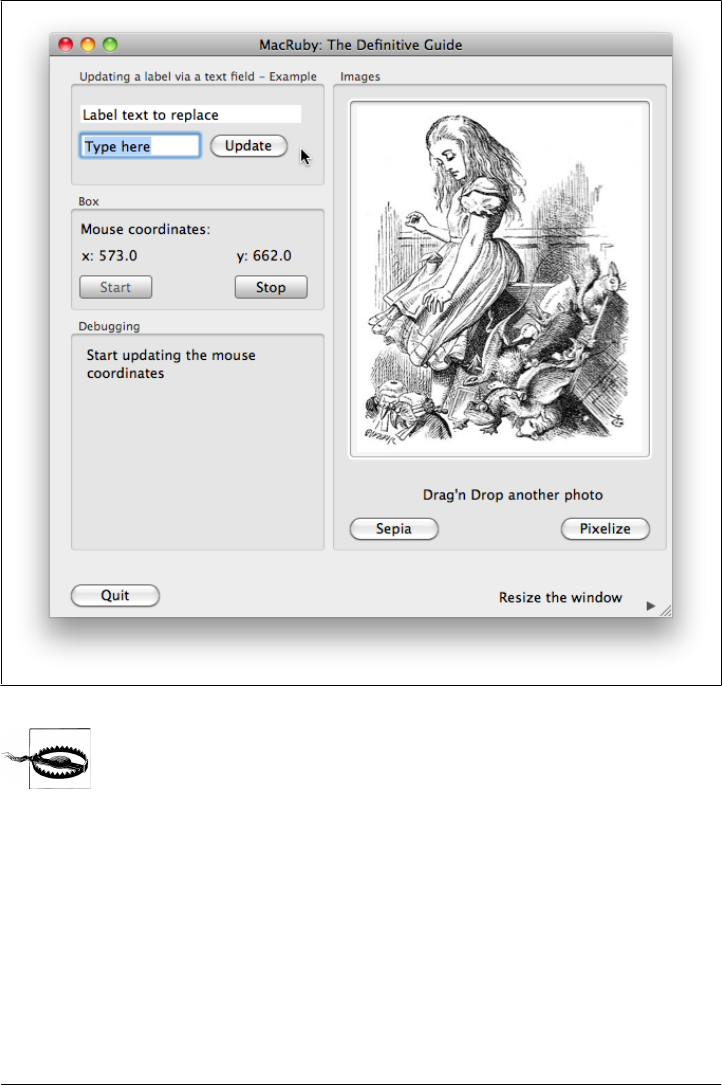
ure 2-7 shows how the running demo app should look.
Example | 25
Make sure the “Demo” scheme is selected.
Take some time to play with the app: change the label text, turn on the mouse coor-
dinate logger, apply some image filters, drag and drop another image, resize the win-
dow, and close the window or click the quit button. You might also want to look up
the documentation for some of the APIs we are using, such as NSWindow.
Not all the concepts discussed here are shown in the demo app. My goal is to give you
a quick idea of what you can do, how much code is needed, and how things connect
to each other.
For a better understanding of how things work, focus on these two files:
•controller.rb
•MainMenu.xib
MainMenu.xib is the “view” file that defines all the UI elements and wires them to our
code, which lives in the controller.rb file. At this point, I am not going to explain the
code in detail, but the code can give you a feel for how things fit together.
Figure 2-6. Xcode object library
26 | Chapter 2: Fundamentals
This is just an example app, and it does not necessarily enforce best
practices.
Start by opening the MainMenu.xib file. Now right-click the Window icon. You should
see the window’s delegate pointing to the controller object. Right-click the controller
object and you will see all the outlets and actions.
Next, start inspecting some of these objects by opening the Utilities bar (View → Utilities
→ Attributes Inspector) and selecting some items. In parallel, open controller.rb. Look
at how the outlets map to the attribute accessors (lines starting by attr_accessor)
and at how the actions map to the methods taking an argument, such as
Figure 2-7. MacRuby demo app
Example | 27

update_text_field. Delegate methods include windowShouldClose and
windowDidResize. A timer runs without blocking the main loop.
Take some time to get familiar with the code. Try adding a new button and connecting
it to a new action. Test the effect of blocking the main loop by adding a sleep call to an
action, for instance, to the sepia action:
def sepia(sender)
sleep(15) # block the main loop for 15 seconds
# rest of the code
end
If you feel like playing and have some experience with Xcode, add more UI elements
and figure out how to make them behave properly when the window is resized. Don’t
worry if you are not fully getting it yet. The next few chapters focus on how things are
designed, which tools to use, and how to map your existing knowledge to MacRuby
and Cocoa. After that, we will go back to concrete examples and examine how to
accomplish specific tasks. Feel free to jump ahead and then come back to the more
technical explanations if that works best for you.
28 | Chapter 2: Fundamentals

CHAPTER 3
The Cocoa Environment
Programmers who have written Mac OS X or iOS applications using Objective-C are
already familiar with Cocoa and should recognize its APIs in the examples in Chap-
ter 1, albeit with some odd syntax changes noted in that chapter. Ruby programmers
who want an introduction to Cocoa can find it in this chapter. MacRuby lets you mix
Ruby and Cocoa APIs seamlessly. But as you start developing Cocoa applications, you
will start having to use Cocoa-specific APIs to solve Cocoa-specific challenges.
History
In the early 1980s, two engineers from the company StepStone, named Brad J. Cox and
Tom Love, designed a C-based language inspired by SmallTalk-80. Their goal was to
implement an object-oriented extension to the C language. The result was called
Objective-C.
In 1985, Steve Jobs founded NeXT, a computer platform development company spe-
cializing in the higher education and business markets.
In 1988, NeXT licensed Objective-C from StepStone and wrote libraries and a compiler
to build NeXTSTEP’s user interface and interface builder. NeXTSTEP, NeXT’s Unix-
based operating system was particularly notable because of its focus on object-oriented
programming and its many powerful toolkits.
Writing applications for NeXTSTEP was known to be far easier than on many com-
peting systems. The UI was consistent and refined. Tim Berners-Lee, credited as the
inventor of the World Wide Web, wrote the very first web browser, called WorldWi-
deWeb, in 1990 on NeXT (Figure 3-1), and even claimed that he could not have done
what he did as easily if he had to use other technologies.
“I could do in a couple of months what would take more like a year on other platforms,
because on the NeXT, a lot of it was done for me already.”
—Tim Berners-Lee, World Wide Web inventor
29
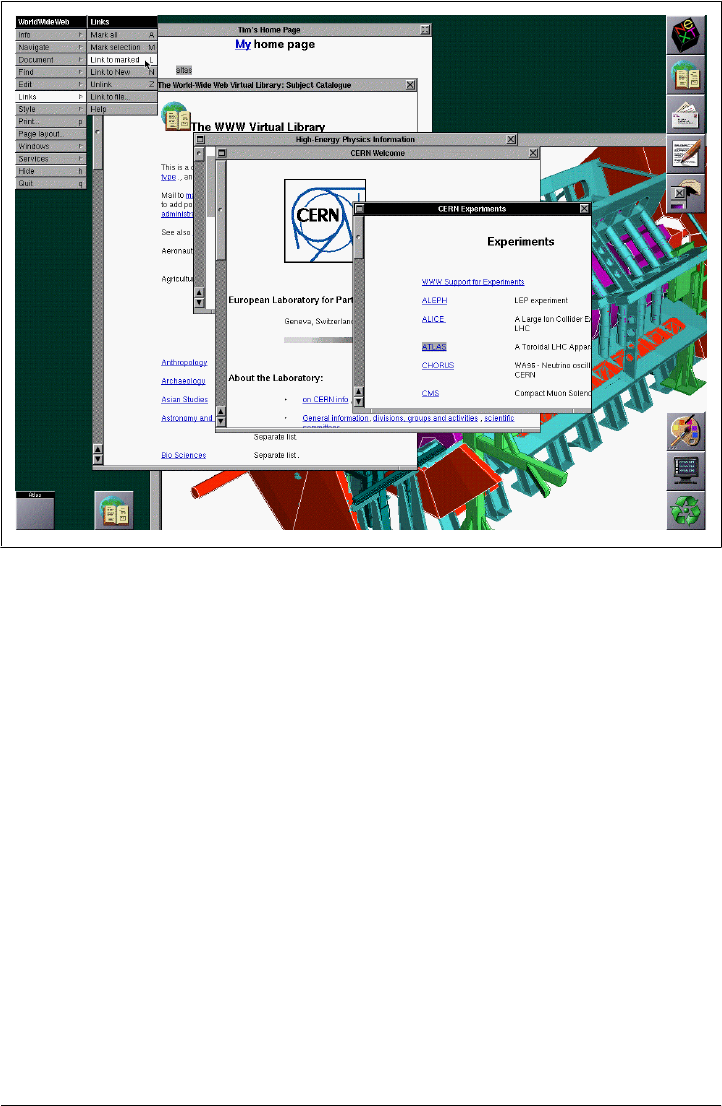
WorldWideWeb was not the only ground-breaking application developed on NeXT-
STEP. Apple’s Interface Builder, the initial implementations of Doom, Macromedia
FreeHand, and Lotus Improv were also built on that platform.
In 1996, NeXT was acquired by Apple, which used parts from NeXTSTEP and from
the open source Berkeley Software Distribution systems to build its new operating sys-
tem: Mac OS X. The new OS included Objective-C as well as NeXT’s developer and
interface tools/frameworks, which became the base of the Cocoa API.
Main Frameworks in the Cocoa API
What’s known as the Cocoa API is really a collection of several frameworks. More
precisely, it is what is known as an “umbrella framework,” a framework built up from
other frameworks.
In this context, when we talk about frameworks, we are referring to application frame-
works, which are usually a collection of advanced object-oriented APIs allowing soft-
ware developers to work in a specific development environment.
Figure 3-1. Screenshot of WorldWideWeb, the very first web browser
30 | Chapter 3: The Cocoa Environment
Developers writing applications usually spend a lot of time coding the same features
over and over: creating and managing a window, creating a menu and menu items,
handling undos and redos, and so on.
Apple, and NeXTSTEP before them, saw the need to streamline the application devel-
opment process. To do that, the two companies decided to provide developers with all
the common features required to build Mac OS X applications. OS X developers can
rely on these building blocks to focus on the unique values of their applications instead
of constantly reinventing the wheel.
Cocoa takes advantage of common object-oriented design patterns and best practices
identified and implemented by NeXTSTEP, resulting in a dynamic, mature, consistent,
and extensive set of libraries.
The Cocoa API minimum set is an umbrella framework called Cocoa.framework. When
loading this framework, you really load three Objective-C frameworks: Foundation,
AppKit, and CoreData.
But more than a collection of APIs, the Cocoa framework enforces conventions when
it comes to the UI. By using the APIs, you buy into Apple’s view of how the user should
see and interact with the device. These conventions also allow for tools such as Xcode
to exist and to leverage APIs, while enforcing a consistent user experience.
To use a class from one of these frameworks, you need to make sure to
load the framework first. This is also true when using macirb. Each
framework can be loaded individually without having to load the entire
Cocoa framework. This can be interesting if you are developing an ap-
plication that doesn’t have a UI, such as a shared library or a script.
Foundation Framework
This is also known as the Foundation Kit. Foundation defines primitive object classes
and data types such as strings, arrays, collection classes, dates, XML parser, notifica-
tions, IOs, iterators, and run loops. It is the base layer of the Objective-C classes (http:
//developer.apple.com/mac/library/documentation/cocoa/Reference/Foundation/ObjC
_classic/Intro/IntroFoundation.html).
The Foundation framework defines NSObject (the base Object class), as well as sub-
classes and constants prefixed by “NS” (standing variously for NextStep or NeXT/Sun).
Later in this chapter, you will read about the essential classes defined by this framework.
AppKit Framework
This is also known as Application Kit. AppKit is a direct descendant of the original
NeXTSTEP Application Kit. It contains all the objects needed to implement graphical,
Main Frameworks in the Cocoa API | 31

event-driven UI objects, such as windows, panels, buttons, menus, scrollers, and text
fields. The framework also handles screen drawing and refresh.
Basically, every time you write a GUI, you will use AppKit.
If you are writing an OS X application that doesn’t require a GUI or a
data model based on CoreData, you don’t have to load these Cocoa
frameworks.
CoreData Framework
CoreData contains interfaces to manage your application’s data model (http://developer
.apple.com/mac/library/referencelibrary/GettingStarted/GettingStartedWithCoreData).
Basically, it allows developers to deal easily with objects’ life cycles and graph man-
agement. That includes validation, database object change tracking (undo, redo) and
propagation, persistence, filtering, fetching, and Cocoa bindings.
In a nutshell, CoreData encapsulates the model in the MVC (model-view-controller)
design pattern.
CoreData can be seen as an object-relational mapper (ORM) on steroids. Developers
can choose one of the multiple data stores supported: XML, atomic (binary or custom),
SQLite, and in-memory.
However, don’t think that CoreData is restricted to database-oriented applications.
Reference Library
Apple’s Reference Library will soon become your best friend. It describes all the
Objective-C methods, C functions, and constants made available by the Cocoa API and
other various related frameworks. Thanks to MacRuby, they are all accessible to you.
You can access this reference API offline by using Xcode, or online at http://developer
.apple.com.
The offline documentation is stored in the /Developer/Documentation/
DocSets folder. Using the /Developer/usr/bin/docsetutil utility command
line, you can query the documentation. Writing a small application
around the docsets can be a great way to get familiar with MacRuby and
Cocoa.
After you connect to the Apple Developer Connection website, choose the Mac Dev
Center. At this point, if you haven’t created an account, you might want to sign up.
Signing up is free and will give you access to the latest version of the Xcode package,
as well as some development videos.
32 | Chapter 3: The Cocoa Environment
In the Development Resources section of the page, you will find some sample code and
training videos, but more important, the Mac Reference Library.
The library is maintained and kept up to date by Apple. You will notice that the docu-
ments are organized by types, topics, and frameworks. If you find a document that you
are interested in, you can download it as a PDF to consult it later offline.
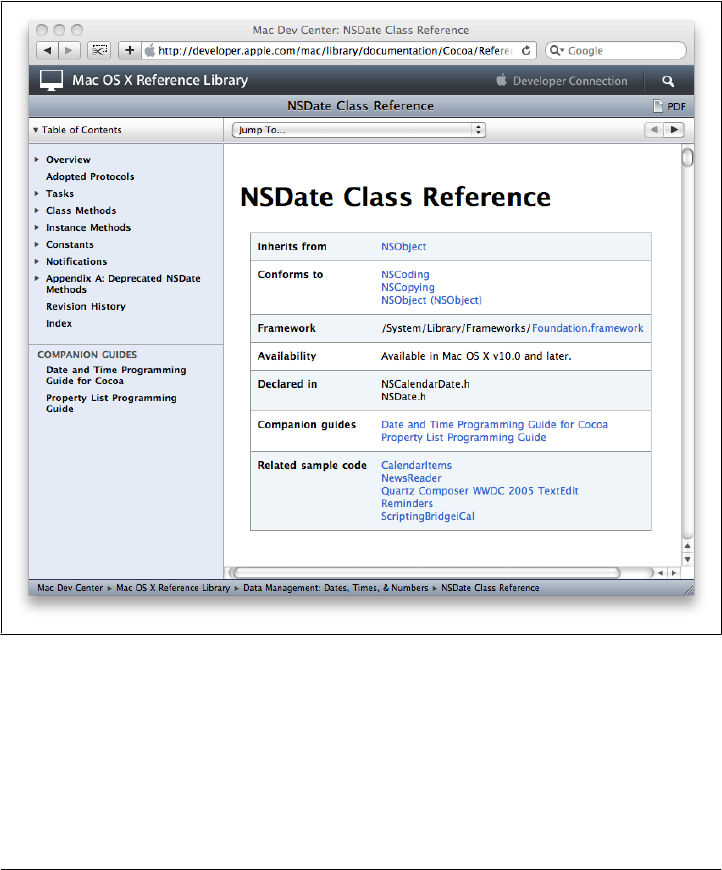
Let’s do a search on NSDate and open the NSDate Class Reference page (Figure 3-2).
API reference documents appear basically the same whether you view them online or
via Xcode.
Figure 3-2. NSDate class reference
Reference Library | 33

It’s important to understand how the documentation is structured, so you can effi-
ciently find the information you need when you need it.
Central Panel
Inherits from
The inheritance tree of the class we are looking at. In this case, NSDate is a direct
subclass of NSObject. Each class can inherit from only one parent, but the inheri-
tance tree can go far back. If you look at NSView, for instance, you will notice
that the inheritance tree is a bit longer: NSResponder : NSObject. This means that
NSView is a subclass of NSResponder, which in turn is a subclass of NSObject. That
means all methods, delegates, notifications, and constants of NSResponder and
NSObject are available in NSView. Don’t forget to browse superclasses when learning
new classes.
Conforms to
A list of protocols our class conforms to. It’s basically a list of conventions and
methods implemented by various other classes.
Framework
The name of the framework defining the class.
Availability
The OS versions supporting the class.
Declared in
The header files defining the class. Not really useful for MacRuby developers, since
we don’t need to include any header files.
Companion guides
A list of guides related to the class.
Related sample code
A list of examples using the class in question. Most of these examples are in
Objective-C, but since the API usage is the same, you should not have a problem
reading them.
Sidebar
The sidebar lists links that cover all the aspects of the class.
In addition to the topics mentioned in the previous section, you will find a new listing.
While some sections might be really obvious, some might be a bit more cryptic.
Tasks
Lists class and instance methods by topic. This is particularly useful when you are
reading the documentation of a class you don’t know yet. Instead of trying to guess
the name of the method, start with this section.
34 | Chapter 3: The Cocoa Environment

Notifications
The delegate methods triggered on class instances that implement these notifica-
tion methods.
Mutability
Before looking a bit at some key Cocoa classes, we need to talk about mutability. By
definition, an immutable object is an object whose state cannot be modified after being
created. In contrast, a mutable object can be modified after creation.
Some Cocoa classes even come in two separate versions, mutable and immutable. Mu-
table classes descend from their nonmutable counterparts and therefore share the same
methods. The main reason for having both classes is that immutable classes are opti-
mized to be more efficient, based on the expectation that their contents are fixed:
framework 'foundation'
mutable_array = [] # => []
mutable_array << 'foo' # => ["foo"]
immutable_array = NSArray.alloc.initWithArray(['foo', 'bar']) # => ["foo", "bar"]
immutable_array << 'foo' # RuntimeError: can't modify frozen/immutable array
Something else to keep in mind when choosing a Cocoa class: Cocoa
doesn’t let you query whether you are dealing with a mutable or an
immutable object. That may come as a surprise, but it’s intended. Make
sure to always pay attention to documentation for the APIs returning
strings, arrays, hashes/dictionaries, and sets (NSArray, NSString,
NSDictionary, and NSSet).
Ruby classes are usually mutable, but the state of a Ruby object can be frozen. In other
words, in Ruby, you can make a mutable object immutable by freezing it. Cocoa ac-
complishes this by having two versions of a class, a mutable version and an immutable
version:
my_string = "Understanding Ruby"
my_string.freeze
my_string.upcase! # => RuntimeError: can't modify frozen string
array = Array.new # => []
array << 'foo' # => ["foo"]
array.freeze
array << 'bar' # RuntimeError: can't modify frozen/immutable array
Now it’s time to get a quick tour of some of the classes you are going to encounter
frequently.
Mutability | 35
CHAPTER 4
Foundation
As stated in Chapter 3, Foundation defines the primitive object classes and data types
used by all the other classes in Cocoa. It’s therefore the first stop in our examination
of frameworks for Cocoa and MacRuby.
Compatibility Table
When it comes to primitive types, MacRuby developers often have a choice between
Cocoa Foundation classes and native Ruby classes. Before going through the list of key
classes, their purposes, and how to use them, it is important to understand the differ-
ences and relationships between Ruby primitives and Foundation primitives.
Table 4-1 shows classes that are implemented in such a way that the Ruby classes are
compatible with their Foundation and Core Foundation counterparts.
Table 4-1. Ruby/Foundation/Core Foundation compatibility table
Ruby class Compatible Foundation class Compatible Core Foundation type
String NSString/NSMutableString CFString/CFMutableString
Array NSArray/NSMutableArray CFArray/CFMutableArray
Hash NSDictionary/
NSMutableDictionary
CFDictionary/
CFMutableDictionary
Integer (Fixnum, Bignum)NSNumber CFNumber
Float NSNumber CFNumber
Time NSDate CFDate
Even though the Exception and NSException classes are not compatible
per se, Ruby’s syntax can rescue NSException instances, meaning that
the developer can define a behavior in case a defined exception is caught.
37

This compatibility map is important because it means that even though a certain API
might expect to receive an instance of NSArray, if you send it an instance of Array,
everything will work as expected. Also, if an API returns an NSMutableDictionary in-
stance, for example, the Hash instance methods can be used on the returned object. You
can use any of the Hash or NSDictionary/NSMutableDictionary instance methods on the
returned object.
However, some Ruby classes are not compatible with their Foundation equivalents and
when using them in conjunction with other Cocoa libraries, one needs to be careful to
use the appropriate class. Table 4-2 shows Ruby and Foundation classes that play similar
roles but are not compatible.
Table 4-2. Incompatible types in Ruby and Cocoa frameworks
MacRuby class Foundation counterparts
Set NSSet, NSMutableSet, NSCountedSet, NSHashTable
Enumerator NSEnumerator, NSFastEnumerationEnumerator
Date NSDate, NSCalendar
This means if an API expects an object of a certain type, you can’t provide it with a
counterpart from the other column. For instance, if a Cocoa API expects an instance
of NSDate, you can’t pass it a Ruby date object. What you might want to do in such a
case is convert an object as shown in “Date, Time, and Calendars” on page 43.
Now that we have this reference frame, let’s look at the key classes defined by
Foundation.
Strings and Attributed Strings
Cocoa’s Foundation string class is NSString. MacRuby’s String class is fully compatible
with NSString/NSMutableString because NSString is “toll-free bridged” with its Core
Foundation counterpart: CFString. In other words, whenever a method is expecting a
String, NSString, or CFStringRef, you are free to use whichever class instance you want.
NSString and String have different APIs, but offer more or less the same features. Here
are a few NSString methods that are not available in the traditional Ruby API but are
quite useful nonetheless:
pathComponents
Returns each path component of a path represented as a string:
>> framework 'Foundation'
=> true
>> "/Developer/Examples/Ruby/MacRuby".pathComponents
=> ["/", "Developer", "Examples", "Ruby", "MacRuby"]
38 | Chapter 4: Foundation
pathExtension
Returns the extension of a path represented as a string:
>> framework 'Foundation'
=> true
file_path = "~/Music/born_to_be_alive.m4a"
file_path.pathExtension
# => "m4a"
# similar to Ruby's
File.extname(path)
# => ".m4a"
Attributed string objects, represented in Cocoa by NSAttributedString, manage sets of
text attributes, such as font and kerning, that are associated with strings.
NSAttributedString is not a subclass of NSString, but it does contain an NSString object
to which it applies attributes. NSAttributedString supports HTML, Rich Text Format
(including file attachments and graphics), drawing in NSView objects, and word and line
calculation.
The NSAttributedString instance attributes are set/retrieved via a Hash:
>> framework 'Foundation'
=> true
font = NSFont.fontWithName("Helvetica", size:14.0)
content = "So Long, and Thanks for All the Fish"
attributes = {NSFontAttributeName => font}
attr_string = NSAttributedString.alloc.initWithString(content, attributes: attributes)
attr_string.string
# => "So Long, and Thanks for All the Fish"
total_range = NSMakeRange(0,attr_string.string.size)
attr_string.attributesAtIndex(0, effectiveRange: total_range)
=> {"NSFont"=>#<NSFont:0x20027d7c0>}
The AppKit framework also uses NSParagraphStyle/NSMutableParagraphStyle to en-
capsulate the paragraph or ruler attributes used by the NSAttributedString classes.
String instances are usually mutable (see “Mutability” on page 35 for
details about mutability), but might be modified to become immutable.
Arrays
MacRuby’s Array implementation is fully compatible with the mutable version of
NSArray. That means that anywhere you need to use or pass a NSMutableArray, you can
use an instance of Array, and vice versa.
Array instances are usually mutable (see “Mutability” on page 35 for
details about mutability), but some APIs might modify a passed array
to become immutable. Make sure you know which type you have.
Arrays | 39

Ruby’s API is often easier to use and less verbose. For instance, here is how you create
a new array instance using Cocoa’s NSMutableArray:
>> framework 'Foundation'
# don't forget nil as the last element
>> NSArray.arrayWithObjects('so', 'say', 'we', 'all', nil)
=> ["so", "say", "we", "all"]
Here’s the same thing using Ruby’s syntax:
>> ["so", "say", "we", "all"]
=> ["so", "say", "we", "all"]
You can read more about Ruby’s Array on Ruby’s document website.
The Ruby syntax creates mutable array versions by default, so if you receive an im-
mutable version of an array and want a mutable version, you can use the mutableCopy
method:
>> framework 'Foundation'
=> true
# create an immutable array
>> a = NSArray.arrayWithObjects('terrans', 'zerg', 'protoss', nil)
=> ["terrans", "zerg", "protoss"]
>> b = a.mutableCopy
=> ["terrans", "zerg", "protoss"]
>> b << "Xel'Naga"
=> ["terrans", "zerg", "protoss", "Xel'Naga"]
Conversely, if you want a copy of an mutable array to be immutable, use the #copy
method available from NSObject:
>> array = ['M', 'V', 'C']
=> ["M", "V", "C"]
>> copy = array.copy
=> ["M", "V", "C"]
>> copy.class
=> Array
Another way to achieve the same result is to use Ruby’s dup instance method.
Read the NSCopying and NSMutableCopying Protocol References for more information.
These protocols are implemented by a majority of the Cocoa classes.
A few Foundation methods that have no counterparts in the traditional Ruby API can
be very useful, including the following:
firstObjectCommonWithArray
Returns the first object contained in the receiver that’s equal to an object in another
given array. For instance:
>> [1,2,3].firstObjectCommonWithArray([3,4,5])
=> 3
is the same as:
40 | Chapter 4: Foundation

>> ([1,2,3] & [3,4,5]).first
=> 3
writeToFile:atomically
Writes the contents of the receiver to a file at a given path:
>> order = ['double double', ['pickles', 'onions'], {:animal_style => true}]
=> ["double double", ["pickles", "onions"], {:animal_style=>true}]
>> order.writeToFile("/tmp/in-n-out", atomically: true)
=> true
The array is serialized to disk using a property list, producing the following file:
<?xml version="1.0" encoding="UTF-8"?>
<!DOCTYPE plist PUBLIC "-//Apple//DTD PLIST 1.0//EN"
"http://www.apple.com/DTDs/PropertyList-1.0.dtd">
<plist version="1.0">
<array>
<string>double double</string>
<array>
<string>pickles</string>
<string>onions</string>
</array>
<dict>
<key>animal_style</key>
<true/>
</dict>
</array>
</plist>
It can then be deserialized using the arrayWithContentsOfFile class method:
>> NSMutableArray.arrayWithContentsOfFile("/tmp/in-n-out")
=> ["double double", ["pickles", "onions"], {"animal_style"=>true}]
This serialization process is fast and easy, but works with only a few
basic types. For more general use, try other built-in serialization solu-
tions such as YAML, JSON, marshaling, and a lower-level serialization
provided by NSData.
Hashes/Dictionaries
MacRuby’s Hash implementation is fully compatible with NSMutableDictionary, allow-
ing you to use Ruby and Objective-C’s methods on the same objects. Also, because
NSDictionary is “toll-free bridged” with its Core Foundation counterpart, CFDictionary,
the Core Foundation type is interchangeable in function or method calls with the
bridged Foundation object. In other words, you can use MacRuby, Foundation, or Core
Foundation hash/dictionaries interchangeably. If you are calling a C function that re-
quires an instance of one of these dictionary classes, you can pass it a Hash instance,
and it will work just fine.
Hashes/Dictionaries | 41

Since NSDictionary object creation is different from its Ruby counterpart, let’s compare
both approaches:
Cocoa:
keys = ['Matt', 'Laurent', 'Vincent']
objects = ['double-double', '3x3', 'cheeseburger']
NSMutableDictionary.dictionaryWithObjects(objects, forKeys:keys)
# => {"Matt"=>"double-double", "Laurent"=>"3x3", "Vincent"=>"cheeseburger"}
or:
NSMutableDictionary.dictionaryWithObjectsAndKeys(
'double-double', 'Matt',
'3x3', 'Laurent',
'cheeseburger', 'Vincent', nil)
# => {"Matt"=>"double-double", "Laurent"=>"3x3", "Vincent"=>"cheeseburger"}
Ruby:
{"Matt"=>"double-double", "Laurent"=>"3x3", "Vincent"=>"cheeseburger"}
# => {"Matt"=>"double-double", "Laurent"=>"3x3", "Vincent"=>"cheeseburger"}
You can read more about Ruby’s Hash on Ruby’s document website.
Just as with NSArray, Ruby’s API is often easier to use. NSDictionary also implements
serialization via writeToURL:atomically: and NSDictionary.dictionaryWithContentsOf
File.
Sets
Ruby’s Set, like Cocoa’s NSSet, NSMutableSet, NSCountedSet, and NSHashTable classes,
implements unordered collections of distinct elements. It might seem convenient to
build MacRuby’s Set on top of one of the Cocoa set classes, but it is actually imple-
mented entirely from scratch. The main reason is that NSSet and its variants behave
significantly differently from Ruby’s Set. So look at the Cocoa and Ruby implementa-
tions and choose whichever one makes more sense for your case.
The name NSHashTable might lead you to believe the class is somehow related to Ruby’s
Hash class, but they are quite different, NSHashTable is a variant of NSSet. The big dif-
ference between NSHashTable and the other Set implementations is that NSHashTable
supports weak references in a garbage-collected environment. Unless you have a very
specific need for weak references, stick to Ruby or Cocoa’s Set implementations.
Enumerators
NSEnumerator and NSFastEnumerationEnumerator are conceptually the same as Ruby
Enumerator, except that the Ruby version is much more powerful.
The aim of these classes is to allow collections of objects, such as arrays, sets, and
dictionaries/hashes, to be processed one at a time.
42 | Chapter 4: Foundation

When using the Ruby API, just pass a block (an anonymous method) to one of the
many collection methods that return an enumerator:
["Eloy", "Matthias", "Joshua", "Thibault"].each do |name|
puts "#{name} is a great developer!"
end
# => Eloy is a great developer!
# => Matthias is a great developer!
# => Joshua is a great developer!
# => Thibault is a great developer!
["Eloy", "Matthias", "Joshua", "Thibault"]
The array is being enumerated and each item is sent to the block.
You can also get an Enumerator instance and store it in a variable to call methods on it
later on:
object_enumerator = {'nl' => "Eloy",
'ch' => "Matthias",
'us' => "Joshua",
'fr' => "Thibault"}.each_value
object_enumerator.each_slice(2) do |name_1, name_2|
puts "#{name_1} and #{name_2}"
end
# outputs
Thibault and Matthias
Eloy and Joshua
Date, Time, and Calendars
Cocoa and MacRuby provide much more sophisticated time options than simple time-
stamps or even date/time formatting routines.
NSDate
NSDate is the class that implements dates and times in Cocoa. It is used to create date
objects and perform date-based calculations. NSDate objects are invariant points in time
and therefore immutable:
now = NSDate.date
now.description
# => "2009-12-30 23:09:16 -0500"
seconds_per_day = 24 * 60 * 60
tomorrow = NSDate.alloc.initWithTimeIntervalSinceNow(seconds_per_day)
tomorrow.description
# => "2009-12-31 23:09:27 -0500"
NSDate.date
# => 2009-12-30 23:10:02 -0500
NSDate.dateWithTimeIntervalSinceNow(10.0)
# => 2009-12-30 23:10:12 -0500
Date, Time, and Calendars | 43

NSDate also has more flexible ways to create dates, for instance:
framework 'Foundation'
NSDate.dateWithNaturalLanguageString('next Tuesday dinner').description
# =>"2010-01-12 19:00:00 -0800"
NSDate.dateWithString("2010-01-10 23:51:05 -0800").description
=> "2010-01-10 23:51:05 -0800"
date_string = "3pm June 30, 2010"
NSDate.dateWithNaturalLanguageString(date_string).description
# => "2010-06-30 15:00:00 -0700"
NSDate.dateWithNaturalLanguageString("06/30/2010").description
# => "2010-06-30 12:00:00 -0700"
Here is the Ruby API to create Time instances:
>> Time.now
# => 2009-12-30 23:19:00 -0500
>> Time.now + (24 * 60 * 60)
# => 2009-12-31 23:19:00 -0500
Ruby’s date and time APIs are usually more flexible than their Cocoa counterparts.
However, some Cocoa APIs expect NSDate instances and, in some cases, Ruby’s API
lacks some features. Being familiar with Cocoa’s date and time management is therefore
important.
If you want to convert an instance of Time and to an NSDate instance, use NSDate.date
WithString and pass it the string representation of your time object. For example:
NSDate.dateWithString(Time.now.to_s)
NSCalendar
The NSCalendar class represents calendar objects and covers the most used calendars—
Buddhist, Gregorian, Hebrew, Islamic, and Japanese:
current_calendar = NSCalendar.currentCalendar
Calendars are used in conjunction with NSDateComponents and NSDate:
today = NSDate.date
calendar = NSCalendar.currentCalendar
units = (NSDayCalendarUnit | NSWeekdayCalendarUnit)
components = calendar.components(units, fromDate: today)
components.day # => 30
components.weekday # => 4
Consult the reference documentation about the available NSCalendarUnit constants to
set the different units you might need. If you are using the Gregorian calendar, you can
more easily access most of the date information using the strftime method of Ruby’s
Time class. However, the Cocoa API is great for getting localized date management and
access data unavailable in Ruby’s API, such as era and quarter.
44 | Chapter 4: Foundation
Data
The NSData and NSMutableData classes are typically used for data storage. NSData is “toll-
free bridged” with its Core Foundation counterpart: CFData. This means the Core
Foundation type is interchangeable with the bridged Foundation object in function or
method calls. If a function expects a CFDataRef parameter, you can send it an NSData
instance, and vice versa.
If you have a string and you want to access its data representation, use the
dataUsingEncoding method:
string = "Some classes gets initiated using data, (i.e NSXMLDocument)"
data = string.dataUsingEncoding(NSUTF8StringEncoding)
# => #<NSConcreteMutableData:0x200295cc0>
Conversely, if you have some data and want to access a string representation, use the
following:
NSString.alloc.initWithData(data, encoding:NSUTF8StringEncoding)
# => "Some classes gets initiated using data, (i.e NSXMLDocument)"
Quite often, when I have to deal with a lot of string/data conversions, I reopen the
String and Data classes and add some conversion methods:
class String
def to_utf8_data
self.dataUsingEncoding(NSUTF8StringEncoding)
end
end
class NSData
def to_utf8_string
NSString.alloc.initWithData(self, encoding:NSUTF8StringEncoding)
end
end
"Can't wait until Taco Tuesday!".to_utf8_data
# => #<NSConcreteMutableData:0x2002ac400>
data.to_utf8_string
=> "Can't wait until Taco Tuesday!"
In “Syntactic Sugar” on page 18 you saw that String instances respond
to #to_data and NSData instances respond to #to_str. However, these
methods encode the data using ASCII 8-bit instead of UTF-8, and some-
times you need the wider range of characters provided by UTF-8.
Data | 45

Locales
NSLocale, as its name implies, helps developers deal with different languages and lin-
guistic, cultural, and technological conventions and standards. Using NSLocale, you
can retrieve the system and/or user locale and load any of the available locales.
In addition to providing you with the user country and language codes, locales are very
useful for displaying all sorts of localized data (time, date, monetary amounts, dimen-
sions, etc.). Locales store information such as symbols used for the decimal separator
in numbers, the way dates are formatted, and more:
framework 'Foundation'
locale = NSLocale.currentLocale
locale.objectForKey(NSLocaleLanguageCode)
# => "en"
# We could also use the MacRuby alias
locale[NSLocaleLanguageCode]
# => "en"
locale[NSLocaleCurrencyCode]
# => "USD"
locale[NSLocaleCurrencySymbol]
# => "$"
locale[NSLocaleUsesMetricSystem]
=> false
locale[NSLocaleCalendar].calendarIdentifier
=> "gregorian"
french_locale = NSLocale.alloc.initWithLocaleIdentifier("fr_FR")
french_locale.displayNameForKey(NSLocaleIdentifier, value: "en_US")
# => "anglais (États-Unis)"
MacRuby adds some shortcuts/aliases to improve some of Cocoa’s
APIs. For instance, if an object responds to objectForKey: and
setObject:forKey: you can use [] and []= instead. This is exactly what
we did in the previous example. Writing locale[NSLocaleLanguage
Code] has exactly the same effect as writing locale.objectForKey(NSLo
caleLanguageCode).
Time Zones
NSTimeZone will provide you with all the information you need to handle timezones:
time_zone = NSTimeZone.localTimeZone
time_zone.name
# => "America/Los_Angeles"
46 | Chapter 4: Foundation

time_zone.abbreviation
# => "PST"
time_zone.secondsFromGMT
=> -28800
time_zone.daylightSavingTime?
# same as calling time_zone.isDaylightSavingTime
=> false
french_locale = NSLocale.alloc.initWithLocaleIdentifier("fr_FR")
time_zone.localizedName(NSTimeZoneNameStyleStandard, locale: french_locale)
# => "heure normale du Pacifique"
Exceptions
Cocoa’s NSException works the same as Ruby’s Exception. As the following example
shows, raised NSException instances can be caught by the standard Ruby syntax:
exception = NSException.exceptionWithName('MacRuby Book',
reason: 'documentation purposes',
userInfo: nil)
begin
exception.raise
rescue Exception => e
puts e.message
end
# => MacRuby Book: documentation purposes
I/O
As with most of the tasks discussed in this chapter, input and output (I/O) operations
can be performed using either the Ruby or the Cocoa API. However, Cocoa will more
than likely make your applications more robust and efficient, mainly because a lot of
its APIs are asynchronous. Asynchronous APIs are important when writing desktop/
mobile applications, because you don’t want to block the main application process
while waiting for your I/O operation to finish.
Let’s imagine that you have a Twitter client and want to fetch the latest updates. If you
don’t use an asynchronous API, when the user clicks the refresh button, the application
will freeze and the “beach volleyball/pizza of death” will spin until the API response is
received from Twitter. To ensure a better user experience, it is recommended that you
use an asynchronous API and provide some sort of indication of progress.
I/O | 47
URLs/Requests/Connections
The NSURL, NSURLRequest, and NSURLConnection classes provide developers with ways to
manipulate and load URLs and the resources they reference.
An NSURL object can refer to a local or remote resource. It’s the recommended way to
refer to files. Various protocols are supported:
• File Transfer Protocol (ftp://)
• Hypertext Transfer Protocol (http://)
• Secure 128-bit Hypertext Transfer Protocol (https://)
• Local file URLs (file://)
NSURL also transparently supports both proxy servers and SOCKS gateways using the
user’s system preferences.
Since NSURL is a class you will more than likely use often, let’s start by covering some
of the frequently used methods:
NSURL.fileURLWithPath
Initializes and returns a newly created NSURL object as a file URL with a specified
path:
framework 'Foundation'
url = NSURL.fileURLWithPath("/usr/local/bin/macruby")
url.description
# => "file://localhost/usr/local/bin/macruby"
isFileReferenceURL or fileReferenceURL?
Returns True if the NSURL object refers to a file, false otherwise:
framework 'Foundation'
macruby = NSURL.fileURLWithPath("/usr/local/bin/macruby")
website = NSURL.URLWithString("http://macruby.org")
macruby.fileReferenceURL?
# => true
website.fileReferenceURL?
# => false
MacRuby adds some syntactic sugar. Objective-C methods with
an is prefix are aliased in MacRuby by adding a question mark at
the end of the method name. For instance, an Objective-C method
called isOpaque is also available in MacRuby using the opaque?
method alias.
48 | Chapter 4: Foundation

NSURL.URLWithString
Creates and returns an NSURL object initialized with the string provided. Here is an
example with some of the available accessors. Refer to the API documentation for
more details:
framework 'Foundation'
url = NSURL.URLWithString("http://macruby.org/downloads.html#beta")
# => #<NSURL:0x200262ba0>
url.absoluteString
# => "http://macruby.org/downloads.html#beta"
url.fragment
# => "beta"
url.host
# => "macruby.org"
url.path
# => "/downloads.html"
url = NSURL.URLWithString
("http://macruby.org/downloads.html?sorted=true&nightly=false")
url.query
# => "sorted=true&nightly=false"
url = NSURL.URLWithString("http://mattetti:apple@macruby.org:8888/admin")
url.port
# => 8888
url.user
# => "mattetti"
url.password
# => "apple"
The following list explains the methods used in the example. The different parts of a
URL are defined by RFC 1808:
absoluteString
Returns a string representation of the URL.
fragment
Returns the fragment of the URL following a pound or hash sign.
host
Returns the URL’s host.
path
Returns the URL’s path.
query
Returns the query from the URL, the part following a question mark.
port
Returns the port from the URL.
user
Returns the user from the URL.
password
Returns the password from the URL.
URLs/Requests/Connections | 49

NSURLRequest and NSMutableURLRequest objects represent URL load requests. These ob-
jects contain two different aspects of a load request: the URL to load and the cache
policy to use. Once a URL request is defined, it can be loaded and processed using
NSURLConnection or NSURLDownload.
The concepts in the following subsections apply to both NSURLRequest and
NSMutableURLRequest, but for the sake of simplicity I’ll refer just to NSURLRequest.
Cache Policy and Cache Access
Caching allows better performance and optimized resource usage. Of the standard
protocols, NSURLConnection caches only HTTP and HTTPS requests, but custom pro-
tocols can also provide caching. NSURLRequest relies on a composite on-disk and in-
memory cache, which is enabled by default.
Here is an example where we are sending a request to the MacRuby website ignoring
any cached data:
framework 'Foundation'
url = NSURL.URLWithString('http://macruby.org')
request = NSMutableURLRequest.requestWithURL(url,
cachePolicy:NSURLRequestReloadIgnoringCacheData,
timeoutInterval:30.0)
NSURLConnection.connectionWithRequest(request, delegate:self)
puts "Connecting to http://macruby.org"
# response callback
def connection(connection, didReceiveResponse:response)
puts "response received with status code: #{response.statusCode}"
exit
end
# Keep the main loop running
NSRunLoop.currentRunLoop.runUntilDate(NSDate.distantFuture)
Unless specified otherwise, HTTP requests use the default HTTP cache protocol, which
will cache them and use their ETag and Last-Modified headers to determine whether
subsequent requests are stale. Using the headers, the cache is evaluated for each request.
Read more about HTTP caching in RFC 2616 to see how to take advantage of this
feature.
NSURLConnection allows you to alter default caching behavior. Four types of caching are
available and can be passed as an argument:
Default cache policy (NSURLRequestUseProtocolCachePolicy)
The default policy is specific to the protocol used and is the best conforming policy
for the protocol.
Disabled cache policy (NSURLRequestReloadIgnoringCacheData)
This ignores the cache, disabling it.
50 | Chapter 4: Foundation
Use cached data, fallback on loading the resource (NSURLRequestReturnCacheDataElse
Load)
Use of the cache can be forced, ignoring cache data age and expiration date. The
request is loaded from its source only if no cache data is available. The data is also
cached after it is loaded.
Offline mode (NSURLRequestReturnCacheDataDontLoad)
This caching policy simulates an offline mode and loads data only from the cache.
NSURLDownload does not cache responses.
Defining a request using NSURLRequest.requestWithURL uses the default
cache policy and a default timeout of 30 seconds. But, of course, you
can specify your own settings using NSRequest.requestWithURL:cachePo
licy:timeoutInterval:.
Asynchronous Versus Synchronous
We have already touched briefly on the topic of asynchronous versus synchronous APIs.
Ruby I/O APIs are synchronous, meaning that when an operation is performed, the
process is blocked, waiting for the operation to be done. Blocking a process may not
always be a problem. Separate threads can also be started to handle blocking I/Os.
When writing a web application, your application reacts to an action triggered by a
user. If there is no traffic on your website, your code is idle. However, when writing a
desktop or mobile application, your code is constantly running without requiring user
interaction. To keep running, the application has a main run loop that keeps the code
running. Within the run loops, you can use asynchronous APIs. Basically, you initiate
an operation, return to other activities (or wait for further user input), and receive
notification when the operation is done. To get the notification, you implement dele-
gate methods and point to them when initiating the asynchronous operation.
If you are satisfied using synchronous APIs, stick to the Ruby standard libraries such
as net/http or the methods available on NSString or NSData, as shown here:
framework 'Foundation'
url = NSURL.URLWithString 'http://macruby.org'
content = NSMutableString.alloc.initWithContentsOfURL(url,
encoding:NSUTF8StringEncoding,
error:nil)
or:
require 'net/http'
content = Net::HTTP.get('www.macruby.org', '/')
However, you will probably be more interested in using the asynchronous APIs provi-
ded by Cocoa. As an example, I’ll discuss the NSURLDownload call mentioned in the
previous section, which downloads remote content to file.
URLs/Requests/Connections | 51

NSURLDownload downloads requests asynchronously. The request’s body is saved into a
file. When initiating the download, you specify the destination path and the delegator
object containing the callbacks you want to use during the download. Within the dele-
gator object, you can define a rich set of optional methods to check on redirection,
download status, authentication challenges, and completion. These run automatically
as the Cocoa runtime detects events. You can also cancel the load if needed.
Here is a sample download script. It starts by defining a class arbitrarily named
DownloadDelegator. I’ve chosen to define four methods, including two variants of
download. After defining the class, the script initiates a download by creating an object
of type NSURLDownload. The runtime takes care of the rest, calling downloadDidBegin and
downloadDidFinish at the appropriate moments.
The two download methods are defined on the DownloadDelegator class. They follow
the delegate method signature defined by the NSURLDownload API. When we create our
NSURLDownload instance, we also create an instance of DownloadDelegator, which we
assign as a delegate object. This way the NSURLDownload instance will automatically try
to dispatch the delegate methods if they are available on the delegate object. The
download methods are then called automatically:
framework 'Cocoa'
class DownloadDelegator
def downloadDidBegin(dl_process)
puts "downloading..."
end
def download(dl_process, decideDestinationWithSuggestedFilename:filename)
home = NSHomeDirectory()
path = home.stringByAppendingPathComponent('Desktop')
path = path.stringByAppendingPathComponent(filename)
dl_process.setDestination(path, allowOverwrite:true)
end
def download(dl_process, didFailWithError:error)
error_description = error.localizedDescription
more_details = error.userInfo[NSErrorFailingURLStringKey]
puts "Download failed. #{error_description} - #{more_details}"
exit
end
def downloadDidFinish(dl_process)
puts "Download finished!"
exit
end
end
url_string = 'http://www.macruby.org/files/nightlies/macruby_nightly-latest.pkg'
url = NSURL.URLWithString(url_string)
req = NSURLRequest.requestWithURL(url)
52 | Chapter 4: Foundation

file_download = NSURLDownload.alloc.initWithRequest(req,
delegate: DownloadDelegator.new)
# keep the run loop running
NSRunLoop.currentRunLoop.runUntilDate(NSDate.distantFuture)
Pipes
In Unix-like computer operating systems, pipes allow you to chain processes. The out-
put of a process (stdout) feeds directly the input (stdin) of another one.
The NSPipe class provides an interface for accessing pipes. An NSPipe class instance
represents both ends of a pipe and enables communication through the pipe.
File handles are used in the NSTask example a bit later in this chapter. Look at the
example’s code to learn how to create and monitor pipes.
File Handles
The NSFileHandle class provides a wrapper for accessing open files or communications
channels. File handles can be retrieved for a URL, a path, standard input, standard
output, standard error, or a null device. Some objects, such as pipes, also expose a file
handle. Using a file handle, one can read or write the data source it references
asynchronously.
File handles are used in the NSTask example a bit later in this chapter. Look at the
example’s code to learn how to use file handles.
Bundles
A bundle is a collection of code and resources used by an application, generally created
outside the application. Bundles are usually built with Xcode using the Application or
Framework project types, or using plug-ins. In most cases, your application bundle will
contain .nib/.xib files, media assets (images/sounds), dynamic libraries, and frame-
works. The NSBundle class creates objects that represent bundles.
Useful methods include:
NSBundle.mainBundle
A class method returning the NSBundle object that usually corresponds to the ap-
plication file package or application wrapper (the .app folder holding your code).
localizations
Returns a list of all the localizations available in the bundle:
framework 'Foundation'
NSBundle.mainBundle.localizations
# => ['English', 'French']
Bundles | 53

localizedStringForKey:value:table:
Returns the localized version of a string from the Localizable.strings file.
pathForResource:ofType:
Returns the full pathname for the resource identified by the specified name and file
extension.
The following example registers a custom font (akaDylan.ttf) that was added to the
resources folder. We can use it in our UI without having to install it on the user’s
machine:
framework 'Foundation'
font_location = NSBundle.mainBundle.pathForResource('akaDylan', ofType: 'ttf')
font_url = NSURL.fileURLWithPath(font_location)
# using this Core Text Font Manager function to register the embedded font.
CTFontManagerRegisterFontsForURL(font_url, KCTFontManagerScopeProcess, nil)
Scheduling
The OS X runtime offers both low-level threads and a collection of convenient ways to
schedule activities such as timers and operation queues. We’ll look at the various op-
tions in this section.
Run Loops
Run loops process input from the mouse, keyboard events from the window system,
NSPort objects, NSConnection objects, NSTimer events, and other sources. Run loops are
essential to keeping your application running and handling inputs. In Cocoa, the NSRun
Loop class implements the run loop concept.
You don’t need to create or manage NSRunLoop instances. Every NSThread object you
create is already attached to its own NSRunLoop instance.
We’ve already used NSRunLoop in many of the examples in this chapter. What we did
was retrieve the current thread’s run loop and force it to run until a distant date:
framework 'Foundation'
future = NSDate.distantFuture
NSRunLoop.currentRunLoop.runUntilDate(future)
The most interesting methods provided by NSRunLoop are:
NSRunLoop.currentRunLoop
As already shown, this returns the NSRunLoop object for the current thread. If a run
loop does not yet exist, one is created and returned.
NSRunLoop.mainRunLoop
Returns the run loop of the main thread.
54 | Chapter 4: Foundation

currentMode
Run loops can run in different modes, each of which defines its own set of objects
to monitor. This method returns the run loop’s input mode.
runUntilDate
Runs the run loop for a delimited amount of time. More exactly, it sets the run
loop to run until a specific date.
Timers
Sometimes you might want to trigger a method to run at a regular interval. For instance,
you might want to redraw a video game screen 30 times a second or call an API every
2 minutes to check the status of a service. To do that, you can use a timer object defined
by the NSTimer class.
Timers can be repeated or run once. If it’s a repeating timer, it sends a specified method
to a target object again and again based on the defined time interval.
Here is an example of a game loop implementation based on NSTimer:
framework 'Foundation'
class GameLoop
def start
@timer = NSTimer.scheduledTimerWithTimeInterval 0.06,
target: self,
selector: 'refresh_screen:',
userInfo: nil,
repeats: true
end
def refresh_screen(timer)
puts "refresh"
end
def stop_refreshing
@timer.invalidate && @timer = nil if @timer
end
end
GameLoop.new.start
NSRunLoop.currentRunLoop.runUntilDate(NSDate.distantFuture)
NSTimer instances can fire only when the run loop they live in is running. Also, you need
to keep in mind that the effective resolution of a timer is approximately 50 to 100
milliseconds. This should be fine for UI-driven interactive applications that don’t de-
pend on finer-grained execution times.
There are three ways to schedule a timer. The first is to use the following:
NSTimer.scheduledTimerWithTimeInterval:invocation:repeats:
Scheduling | 55
or:
NSTimer.scheduledTimerWithTimeInterval:target:selector:userInfo:repeats:
This method creates the timer and schedules it on the current run loop in the default
mode.
This method relies on the additional NSInvocation class, so to keep things simpler, let’s
look at an example using a second approach:
framework 'Foundation'
def do_something(timer)
puts 'Do something'
end
NSTimer.scheduledTimerWithTimeInterval 0.06,
target: self,
selector: 'do_something:',
userInfo: nil,
repeats: true
NSRunLoop.currentRunLoop.runUntilDate(NSDate.distantFuture)
The first argument is the time interval, so in this case, the timer is going to fire 15 times
a second (every 0.06 seconds). When the timer is triggered, it will send the
do_something: selector to self (target:) and will pass a nil argument (specified by
userInfo:). The timer will be repeated indefinitely.
Selectors represent methods. A selector is just a string consisting of the
method name followed by a colon.
You can pass any object to the method triggered by the timer. To do so, just pass your
object via the userInfo argument. If you have multiple items of data to pass, combine
them in an array or object. To retrieve the passed data, call #userInfo on the timer
object passed to the callback.
The following is an example of a timer that fires just once:
framework 'Foundation'
def do_something(timer)
puts "#{timer.userInfo} says: do something!"
exit
end
NSTimer.scheduledTimerWithTimeInterval 0.5,
target: self,
selector: 'do_something:',
userInfo: 'Simon',
repeats: false
56 | Chapter 4: Foundation

NSRunLoop.currentRunLoop.runUntilDate(NSDate.distantFuture)
# outputs:
# => 'Simon says: do something!'
Notice that the userInfo object is evaluated only the first time it’s called. The following
contrived example should make that clear. No matter when the timer runs, the
do_something prints just the time that was stored in its argument the first time it ran:
framework 'Foundation'
def do_something(timer)
puts timer.userInfo
end
NSTimer.scheduledTimerWithTimeInterval 0.5,
target: self,
selector: 'do_something:',
userInfo: Time.now,
repeats: true
NSRunLoop.currentRunLoop.runUntilDate(NSDate.distantFuture)
# outputs:
# => 2010-01-10 23:05:45 -0800
# => 2010-01-10 23:05:45 -0800
# => 2010-01-10 23:05:45 -0800
# => 2010-01-10 23:05:45 -0800
# => 2010-01-10 23:05:45 -0800
# [...]
Another option is to create a timer and not schedule it to a run loop right away. Do this
using one of the following calls:
NSTimer.timerWithTimeInterval:invocation:repeats:a
NSTimer.timerWithTimeInterval:target:selector:userInfo:repeats:
After the timer is created, you must add it to a run loop using the NSRunLoop’s add
Timer:forMode: method. For example:
framework 'Foundation'
def do_something(timer)
puts 'do something'
end
timer = NSTimer.timerWithTimeInterval 0.5,
target: self,
selector: 'do_something:',
userInfo: nil,
repeats: true
# the timer isn't scheduled yet
# let's schedule it:
Scheduling | 57

NSRunLoop.currentRunLoop.addTimer(timer, forMode: NSDefaultRunLoopMode)
NSRunLoop.currentRunLoop.runUntilDate(NSDate.distantFuture)
Finally, you can create a timer with a defined fire date and then attach it to a run loop:
framework 'Foundation'
def do_something(timer)
puts 'do something'
exit
end
in_2_seconds = Time.now + 2
timer = NSTimer.alloc.initWithFireDate NSDate.dateWithString(in_2_seconds.to_s),
interval: 0.5,
target: self,
selector: 'do_something:',
userInfo: nil,
repeats: false
NSRunLoop.currentRunLoop.addTimer(timer, forMode: NSDefaultRunLoopMode)
NSRunLoop.currentRunLoop.runUntilDate(NSDate.distantFuture)
Tasks/Subprocesses
You might want to run another program as a subprocess and monitor its execution.
An easy way to do that is to use Ruby’s API to shell out and call a program:
puts `/bin/ls -la /`
The back ticks execute the command, which is then printed. While this is very easy
and nice, it blocks the main loop. So, if we were to start, for instance, an encoding
process, we would have to wait for it to finish before we could continue the execution
of our program. Not always ideal.
This is exactly when Cocoa’s NSTask class shines. NSTask objects create separate exe-
cutable entities. You can monitor the execution of your task using observers.
An NSTask needs to be passed a command to execute, the directory in which to run the
task, and optional standard input/output/error values. An NSTask instance can be run
only once. Subsequent attempts to run the task will raise an exception.
Here is an example showing how to asynchronously start a new process and monitor it:
framework 'Foundation'
class AsyncHandler
def data_ready(notification)
data = notification.userInfo[NSFileHandleNotificationDataItem]
output = NSString.alloc.initWithData(data, encoding: NSUTF8StringEncoding)
puts output
end
def task_terminated(notification)
exit
end
58 | Chapter 4: Foundation

end
notification_handler = AsyncHandler.new
nc = NSNotificationCenter.defaultCenter
task = NSTask.alloc.init
pipe_out = NSPipe.alloc.init
task.arguments = ['-la']
task.currentDirectoryPath = "/"
task.launchPath = "/bin/ls"
task.standardOutput = pipe_out
file_handle = pipe_out.fileHandleForReading
nc.addObserver(notification_handler,
selector: "data_ready:",
name: NSFileHandleReadCompletionNotification,
object: file_handle)
nc.addObserver(notification_handler,
selector: "task_terminated:",
name: NSTaskDidTerminateNotification,
object: task)
file_handle.readInBackgroundAndNotify
task.launch
# keep the run loop running
NSRunLoop.currentRunLoop.runUntilDate(NSDate.distantFuture)
We start by defining an AsyncHandler class that implements some callback methods
(data_ready and task_terminated). We then create our task and a pipe to monitor the
output of the task. Finally, we add an observer on the pipe’s file handle (so we’ll know
when data is being written to it) and another notification (so we’ll know when the task
is done running). These observers invoke the callback methods we defined at the start.
The task is executed and the output is printed as it is pushed by the notification system.
Once the task is done running, the program exits.
Threads
Threads are often used to run code that might take some time to execute, when the
developer doesn’t want to block the execution of the rest of the application.
In the case of a Cocoa application, the main thread handles the UI and the various
inputs (user, network, devices, etc.). Using threads leaves the main thread to run
smoothly while lengthy processing runs separately.
Using multiple threads can also distribute the load to multiple cores and therefore
improve the performance of your code when run on multicore machines.
Scheduling | 59

OS X uses POSIX threads, which are a standard seen on many Unix-type systems. But
Cocoa has enhanced these threads to use a simple locking mechanism, NSLock. You can
create threads using Cocoa’s NSThread class or Ruby’s Thread. Ruby’s Thread class cre-
ates only POSIX threads, while NSThread creates Cocoa’s enhanced threads by default,
with the option of creating POSIX threads.
The only “inconvenience” with using POSIX threads is that unless you start an
NSThread instance, Cocoa frameworks will think you are running in a single-threaded
mode. This was historically important to optimize threaded versus nonthreaded code
path, but nowadays the difference is not very important.
It’s fine to mix Cocoa threads and POSIX threads, but make sure to use
their respective mutex classes to lock them.
An NSThread can be initiated with a target and method to call on it. Here is an example
showing how to start an expensive process without blocking the main thread:
framework 'Foundation'
class ExpensiveCalculation
def start(to_process)
puts "processing on a separate thread"
sleep(2)
puts "processing is over"
end
end
calculation = ExpensiveCalculation.new
thread = NSThread.alloc.initWithTarget( calculation,
selector:'start:',
object:'dummy_obj' )
thread.start
puts "the main thread is not blocked"
NSRunLoop.currentRunLoop.runUntilDate(NSDate.dateWithTimeIntervalSinceNow(3.0))
The output will be something like the following. The order of statements may be dif-
ferent, because the order in which the main thread and subordinate thread run is
unpredictable:
processing on a separate thread
the main thread is not blocked
processing is over
Once you have an NSThread instance, you can also ask for its status:
framework 'Foundation'
thread = NSThread.alloc.init
thread.start
thread.cancelled?
60 | Chapter 4: Foundation
# => false
thread.executing?
# => false
thread.finished?
# => true
MacRuby developers might, however, prefer to use Ruby’s Thread API or Grand Central
Dispatch (GCD).
As mentioned earlier, MacRuby’s Thread class creates POSIX threads. The API is very
simple:
def print_char(char)
1.upto(5_000) do
print char
end
end
Thread.new{print_char('1')}
print_char('0')
The output will look more or less like the following:
# [..]
0000000000001111111111111111111111111111111111111111111111111111111111111111111
1111111111011111111011111111111110011111111111110011111111111111001111111111111
0111111011111111111111001111111111111100000000000000000000000000000000000000000
0000000000000000000000000000000000000000000000000000000000000000000000000000011
1111101111111111111111100111111111111100111111011111111011111111111111000000000
0000000000000000000000000000000000000000000000000000000000000001111111111111111
1111111111111111111111111111111111111111111111111111111111111111111111111111111
# [..]
You can also pass a variable to a thread as follows:
['Joshua', 'Laurent', 'Matt'].each do |dev_name|
Thread.new(dev_name){|name| puts "Hello, #{name}!\n"}
end
Each thread has access to its own local variable called name.
MacRuby has been specifically designed with concurrency in mind. Un-
like the main Ruby interpreter, threads are executed in parallel and
multiple threads can concurrently call into MacRuby without blocking.
Operations/Operation Queues
Dealing with threads can be quite cumbersome and difficult. Thankfully, Cocoa en-
capsulates threads by grouping work that you want to perform asynchronously into
what are called operations. Operations can be used on their own or queued up and
prioritized to run asynchronously.
Scheduling | 61
Operations are discussed more in depth in “Concurrency” on page 140, but let’s look
at how you can create a queue and add operations to it. To do this, we will use the
NSOperationQueue class and NSOperation.
Because the NSOperation class is an abstract class, we will need to create a subclass to
define our custom operation and add it to a queue:
framework 'Foundation'
class MyOperation < NSOperation
attr_reader :name
def initWithName(name)
init
@name = name
self
end
def main
puts "#{name} get to work!"
end
end
operation_matt = MyOperation.alloc.initWithName('Matt')
queue = NSOperationQueue.alloc.init
queue.addOperation(operation_matt)
# run the main loop for 2 seconds
NSRunLoop.currentRunLoop.runUntilDate(NSDate.dateWithTimeIntervalSinceNow(2.0))
To create a valid NSOperation subclass, we need to create a custom initiator (in this case,
we used initWithName) and define a main method that will be executed when the oper-
ation is triggered.
When creating a custom initiator, don’t forget to return self.
Notifications
Most applications trigger a lot of events in the runtime, ranging from a user clicking on
a UI element to an I/O operation. Cocoa’s Foundation supplies a programming archi-
tecture that allows you to send and receive notifications and to subscribe to occurring
events.
The notification architecture is divided into three parts: the notifications themselves,
the notification centers, and the notification observers. When an event happens, a no-
tification is created and sent to a notification center, which then broadcasts the
62 | Chapter 4: Foundation

notification to all the observers that registered for the event. Notifications can also be
held in a notification queue before being broadcast.
NSNotification objects encapsulate information about events. The objects don’t know
much about anything except the event that sends them.
Notification Centers
If you need to manage notifications in just one process, use the NSNotificationCenter
class. Otherwise, you will have to rely on NSDistributedNotificationCenter.
As explained earlier, notification centers receive notifications posted by events and
dispatch them to registered observers. Observers are added to notification centers, and
notifications can be manually posted to a center or automatically triggered by classes
triggering notifications. The default notification center can be accessed using the
NSNotificationCenter.defaultCenter method:
framework 'Foundation'
class NotificationHandler
def tea_time(notification)
puts "it's tea time!"
end
end
center = NSNotificationCenter.defaultCenter
notification_handler = NotificationHandler.new
center.addObserver( notification_handler,
selector: "tea_time:",
name: 'tea_time_reminder',
object: nil )
center.postNotificationName("tea_time_reminder", object:self)
A common problem reported by programmers new to notification cen-
ters is that their notifications are not working. This is often because their
observers are garbage-collected, and, therefore, never get triggered. By
design, observers use weak references instead of strong references, and
registrations are automatically cleaned up when an observer is collected.
You therefore need to ensure that the observers don’t get garbage-
collected for as long as you want the notification registration to remain.
One way to do this is to assign them to instance variables of the class.
Notification Queues
One potential problem with notifications is that they are synchronous. Therefore, if an
observer calls a slow method, the execution of the rest of the code is delayed. Notifi-
cation queues, on the other hand, allow the coalescing of notifications as well as asyn-
chronous posting.
Notifications | 63

As mentioned earlier, every thread has its own default notification center, but what I
did not mention is that every default notification center also has a default notification
queue. You can also create your own notification queue and associate it with a notifi-
cation center.
To retrieve the default notification queue in the current thread, use the defaultQueue
class method on NSNotificationQueue:
framework 'Foundation'
NSNotificationQueue.defaultQueue
# => #<NSNotificationQueue:0x200211100>
Now that you have a queue, you can post notifications to it. You have three options
for doing this:
• Posting as soon as possible, bypassing the queue (but posting only at the end of
current run loop iteration).
• Posting when the queue is idle.
• Posting synchronously but with coalescence. The notification queue coalesces
(combines) messages in two ways: by discarding identical duplicates of a message
that arrive during a given time period and by combining small messages into a
single notification.
These notification styles or priorities are flags that you set when posting the notification.
To dispatch a notification using each of the three priorities, retrieve the default notifi-
cation queue for the current thread and create a notification that is ready to be posted:
framework 'Foundation'
queue = NSNotificationQueue.defaultQueue
notification = NSNotification.notificationWithName('fetch_feed', object:nil)
To post a notification as soon as possible, use the NSPostASAP style:
queue.enqueueNotification(notification, postingStyle: NSPostASAP)
This is often used for posting to an expensive resource, such as the display server, to
avoid having many clients flushing the window buffer after drawing within the same
run loop iteration. You can have all the clients post the same NSPostASAP style notifi-
cation with coalescing on name and object. As a result, only one of those notifications
is dispatched at the end of the run loop and the window buffer is flushed only once.
To post a notification when the run loop is waiting (idle), use the following:
queue.enqueueNotification(notification, postingStyle: NSPostWhenIdle)
Here is a simple example: imagine you are writing a text editor and you want to display
some statistics at the bottom of the page, such as the number of lines, characters, words,
and paragraphs in the buffer. If you were to recalculate this information every time a
key is pressed, it would result in quite a lot of resource usage, especially if the user types
quickly. Instead, you can queue the notifications using the NSPostWhenIdle style and
post the information only when there is a pause in typing. This saves loads of resources.
64 | Chapter 4: Foundation

The notification posting code will look like the following code. Imagine that
text_field returns the main editor window with the text field we want to monitor:
notification = NSNotification.notificationWithName('text_edited', object:text_field)
queue = NSNotificationQueue.defaultQueue
queue.enqueueNotification(notification,
postingStyle: NSPostWhenIdle
coalesceMask: NSNotificationCoalescingOnName
forModes: nil)
The coalesceMask parameter tells the notification queue how to coalesce notifications.
Notifications can be coalesced by name (NSNotificationCoalescingOnName) or by object
(NSNotificationCoalescingOnSender). Alternatively, this parameter can disable coa-
lescing (NSNotificationNoCoalescing). You can also combine the constants using the
bitwise OR operator:
NSNotificationCoalescingOnSender | NSNotificationCoalescingOnName
Finally, to post a notification synchronously but still using the coalescence feature of
the queue, use the following:
queue.enqueueNotification(notification, postingStyle: NSPostNow)
Using the NSPostNow style is the same thing as using postNotification or notification
WithName, but it has the advantage of being able to combine similar notifications using
coalescence. You will often want to use this type of notification when you want a syn-
chronous behavior, basically, whenever you want to ensure that observing objects have
received and processed the notification before doing something else. Using coalescence,
you still ensure dispatched notifications are handled synchronously, but you also guar-
antee the uniqueness of these notifications.
Archiving and Serialization
There are situations where you need to convert some of your objects into a form that
can be saved to a file or transmitted to another process or machine, and then recon-
structed. The native binary format that represents objects in memory while you ma-
nipulate them is not appropriate for storage and may not be readable on another system.
Therefore, Cocoa and Ruby provide standard ways to translate between the binary
formats and a format more suitable for storage, often in a human-readable text format.
Translating the data into such a format is known as serialization or marshaling.
In some cases, you just need to serialize a simple hierarchical relationship like an API
response, whereas in other cases you need to archive complex relationships, as Interface
Builder does when it stores the objects and relationships that make up a UI in a nib file.
In Cocoa, archiving uses the NSCoder abstract class, which can encode and decode
Objective-C objects, scalars, arrays, structures, and strings. To be properly encoded
and decoded, objects have to implement the NSCoding protocol. This defines two meth-
ods: one to encode the object and one to restore it. All of the Foundation primitive
Archiving and Serialization | 65

classes (NSString, NSArray, NSNumber, and so on) and most of the Application Kit UI
objects implement the NSCoding protocol and can be put into an archive.
NSCoder has three types of archives, which differ in the encoding/decoding process they
use:
Sequential archives
Decoding is done in the same sequence in which the encoding took place. Use for
sequential archives when your content needs to be processed linearly.
Keyed archives
Information is encoded and decoded in a random access manner using assigned
name keys. Because the keys can be requested by name, you can decode parts of
the data in any order. This option offers flexibility for making serialized objects
forward and backward compatible.
Distributed objects
Used to implement distributed object architectures. To be used only when imple-
menting distributed object architectures, which means when you want to do in-
terprocess messaging between applications or threads.
Here is a simple keyed archiving process:
framework 'Foundation'
# let's assume we have a collection of Objective-C objects stored in
# a variable called objc_objects
archive_path = NSTemporaryDirectory().stringByAppendingPathComponent("Objs.archive")
result = NSKeyedArchiver.archiveRootObject( objc_objects, toFile: archive_path)
In Ruby, archiving is done using the Marshal class. All Ruby objects can be converted
into a byte stream and then restored:
class CylonCenturion
attr_accessor :battery_life, :ammo
end
class CylonSkinJob
attr_accessor :physical_health, :mental_health
end
squadron = []
10.times{ squadron << CylonCenturion.new }
2.times{ squadron << CylonSkinJob.new }
# encode and save to file
File.open('cylon_squadron', 'w+'){|f| f << Marshal.dump(squadron)}
# reload
loaded_squadron = Marshal.load File.read('cylon_squadron')
leader = loaded_squadron.find{|soldier| soldier.is_a?(CylonSkinJob)}
Often, you don’t need to serialize complex relationships and objects. What you need
is to serialize some basic object types, such as to save some user’s preferences to disk.
To do that, you have a few options:
66 | Chapter 4: Foundation

•writeToURL/writeToFile
•NSPropertyListSerialization
• YAML
• JSON
The writeToURL/writeTofile options were covered when we looked at the primitive
classes added by Foundation. Refer to their documentation to see how to use this API:
For NSPropertyListSerialization, use the following:
framework 'Foundation'
user_info = { :points => 4200,
:level => 3,
:name => 'Matt',
:teams => ['Blue', 'Red'],
:twitter_update => false,
:urls => {:github => 'http://github.com/mattetti',
:twitter => 'http://twitter.com/merbist'}
}
plist_data = NSPropertyListSerialization.dataWithPropertyList(
user_info,
format: NSPropertyListXMLFormat_v1_0,
options: 0,
error: nil)
file_path = NSTemporaryDirectory().stringByAppendingPathComponent("user_info.plist")
plist_data.writeToFile(file_path, atomically:true)
You can also use MacRuby’s syntactical sugar:
user_info = { :points => 4200,
:level => 3,
:name => 'Matt',
:teams => ['Blue', 'Red'],
:twitter_update => false,
:urls => {:github => 'http://github.com/mattetti',
:twitter => 'http://twitter.com/merbist'}
}
plist = user_info.to_plist
Here is what the file content looks like:
<?xml version="1.0" encoding="UTF-8"?>
<!DOCTYPE plist PUBLIC "-//Apple//DTD PLIST 1.0//EN"
"http://www.apple.com/DTDs/PropertyList-1.0.dtd">
<plist version="1.0">
<dict>
<key>level</key>
<integer>3</integer>
<key>name</key>
<string>Matt</string>
<key>points</key>
<integer>4200</integer>
<key>teams</key>
Archiving and Serialization | 67

<array>
<string>Blue</string>
<string>Red</string>
</array>
<key>twitter_update</key>
<false/>
<key>urls</key>
<dict>
<key>github</key>
<string>http://github.com/mattetti</string>
<key>twitter</key>
<string>http://twitter.com/merbist</string>
</dict>
</dict>
</plist>
To load and recover the object, you can reload the object and use the following code:
framework 'Foundation'
file_path = File.expand_path("~/user_info.plist")
plist_data = NSData.alloc.initWithContentsOfFile(file_path)
user_info = NSPropertyListSerialization.propertyListFromData(plist_data,
mutabilityOption:
NSPropertyListMutableContainersAndLeaves,
format:nil,
errorDescription:nil)
p user_info
# => {"points"=>4200, "twitter_update"=>false,
"urls"=>{"github"=>"http://github.com/mattetti",
"twitter"=>"http://twitter.com/merbist"}, "level"=>3,
"teams"=>["Blue", "Red"], "name"=>"Matt"}
Notice that in this example, I chose to use the plist XML format, but I could have chosen
to use the plist binary format instead.
Another way to deserialize a property list file is to use MacRuby’s helper to convert the
content of the plist file:
file_path = File.expand_path("~/user_info.plist")
user_info = load_plist(File.read(file_path))
Because we know the type of object we are expecting from the deserialization (a dic-
tionary), we could have also done the following:
file_path = File.expand_path("~/user_info.plist")
Hash.dictionaryWithContentsOfFile(file_path)
To encode basic types, we can also use YAML or JSON:
require 'yaml'
user_info = {"points"=>4200, "twitter_update"=>false, "urls"=>{"github"=>
"http://github.com/mattetti", "twitter"=>"http://twitter.com/merbist"}, "level"=>3,
"teams"=>["Blue", "Red"], "name"=>"Matt"}
File.open('user_info.yml', 'w+'){|f| f << user_info.to_yaml}
The content of the YAML file looks like the following:
68 | Chapter 4: Foundation

---
points: 4200
twitter_update: false
urls:
github: http://github.com/mattetti
twitter: http://twitter.com/merbist
level: 3
teams:
- Blue
- Red
name: Matt
To deserialize the content of the file, simply do the following:
require 'yaml'
YAML.load_file('user_info.yml')
# => {"points"=>4200, "name"=>"Matt", "twitter_update"=>false,
"urls"=>{"twitter"=>"http://twitter.com/merbist", "github"=>
"http://github.com/mattetti"}, "level"=>3, "teams"=>["Blue", "Red"]}
Finally, you can use the JSON serialization format, as follows:
require 'json'
user_info = {"points"=>4200, "twitter_update"=>false, "urls"=>{"github"=>
"http://github.com/mattetti", "twitter"=>"http://twitter.com/merbist"}, "level"=>3,
"teams"=>["Blue", "Red"], "name"=>"Matt"}
File.open('user_info.json', 'w+'){|f| f << user_info.to_json}
The content of the saved file looks like this:
{"points":4200,"name":"Matt","twitter_update":false,
"urls":{"twitter":"http://twitter.com/merbist",
"github":"http://github.com/mattetti"},"level":3,"teams":["Blue","Red"]}
To deserialize the file, use JSON.load:
require 'json'
JSON.parse File.open('user_info.json').read
# => {"points"=>4200, "teams"=>["Blue", "Red"], "twitter_update"=>false,
"name"=>"Matt", "urls"=>{"twitter"=>"http://twitter.com/merbist",
"github"=>"http://github.com/mattetti"}, "level"=>3}
Miscellaneous Classes
The Foundation framework also comes with other useful miscellaneous classes.
XML Parsing
Foundation offers two approaches to XML parsing: an event-driven parser called
NSXMLParser and a NSXMLNode based solution using XPath.
The NSXMLParser solution is useful for processing a complete XML file, and is based on
delegates. You need to initiate an NSXMLParser object with a URL or data. In the fol-
lowing example, I use NSXMLParser.alloc.initWithContentsOfURL to load XML from a
Miscellaneous Classes | 69

URL. I then specify a delegate that will be called when the parser finds elements. Once
that is done, I call parse on the parser object.
Here is a Really Simple Syndication parser built using NSXMLParser. I won’t go through
the details of this script, but the overall structure gives you an idea of how this kind of
parser works. There is documentation for NSXMLParser delegates at the Apple devel-
oper site:
framework 'Cocoa'
class RSSParser
attr_accessor :parser, :xml_url, :doc
def initialize(xml_url)
@xml_url = xml_url
NSApplication.sharedApplication
url = NSURL.alloc.initWithString(xml_url)
@parser = NSXMLParser.alloc.initWithContentsOfURL(url)
@parser.shouldProcessNamespaces = true
@parser.delegate = self
@items = []
end
# RSSItem is a simple class that holds all of the RSS items.
# Extend this class to display/process the item differently.
class RSSItem
attr_accessor :title, :description, :link, :guid, :pubDate, :enclosure
def initialize
@title, @description, @link, @pubDate, @guid = '', '', '', '', ''
end
end
# Starts the parsing and send each parsed item through its block.
#
# Usage:
# feed.block_while_parsing do |item|
# puts item.link
# end
def parse(&block)
@block = block
puts "Parsing #{xml_url}"
@parser.parse
end
# Starts the parsing but keeps blocking the main run loop
# until the parsing is done.
# Do not use this method in a GUI app. Use #parse instead.
def block_while_parsing(&block)
@parsed = false
parse(&block)
NSRunLoop.currentRunLoop.runUntilDate(NSDate.distantFuture)
end
# Delegate getting called when parsing starts
def parserDidStartDocument(parser)
puts "starting parsing.."
70 | Chapter 4: Foundation

end
# Delegate being called when an element starts being processed
def parser(parser, didStartElement:element, namespaceURI:uri, qualifiedName:name,
attributes:attrs)
if element == 'item'
@current_item = RSSItem.new
elsif element == 'enclosure'
@current_item.enclosure = attrs
end
@current_element = element
end
# as the parser finds characters, this method is being called
def parser(parser, foundCharacters:string)
if @current_item && @current_item.respond_to?(@current_element)
el = @current_item.send(@current_element)
el << string
end
end
# method called when an element is done being parsed
def parser(parser, didEndElement:element, namespaceURI:uri, qualifiedName:name)
if element == 'item'
@items << @current_item
end
end
# delegate getting called when the parsing is done
# If a block was set, it will be called on each parsed item
def parserDidEndDocument(parser)
@parsed = true
puts "done parsing"
if @block
@items.each{|item| @block.call(item)}
end
end
end
twitter = RSSParser.new("http://twitter.com/statuses/user_timeline/16476741.rss")
# because we are running in a script, we need the run loop to keep running
# until we are done with parsing
#
# If we would to use the above code in a GUI app,
# we would use #parse instead of #block_while_parsing
twitter.block_while_parsing do |item|
print item.title
end
The delegate object should implement some methods so it is alerted when the parser
encounters an event. Delegate methods look like the following:
Miscellaneous Classes | 71

def parser(parser, didStartElement:element, namespaceURI:uri, qualifiedName:name,
attributes:attrs)
end
This method, for instance, is called when the parser encounters the beginning of an
element. It’s up to the developer to set up the proper business logic to capture and
process the information that the parser outputs.
In some cases, however, you already know the structure of the XML document you are
going to process and you will want to access just one or a limited set of notes. To do
that, you can rely on NSXMLNode/NSXMLDocument and XPath or XQuery.
Here is a simple example that fetches the MacRuby home page and searches for the
current version using XPath:
framework 'Foundation'
url = NSURL.alloc.initWithString('http://macruby.org')
url_content = NSMutableString.alloc.initWithContentsOfURL(url,
encoding:NSUTF8StringEncoding,
error:nil)
data = url_content.dataUsingEncoding(NSUTF8StringEncoding)
document = NSXMLDocument.alloc.initWithData(data, options:NSXMLDocumentTidyHTML,
error:nil)
root = document.rootElement
version_xpath = '//*[@id="current_version"]'
error = Pointer.new(:object)
nodes = root.nodesForXPath(version_xpath, error:error)
if nodes.empty?
puts error[0].description
else
puts nodes.first.stringValue
end
Filtering/Logical Conditions
Using Ruby’s enumerators and blocks, you can query a collection of objects. The fol-
lowing example illustrates the procedure:
Actor = Struct.new :name, :oscars
actors = []
actors << Actor.new("Marlon Brando", 2)
actors << Actor.new("Sean Penn", 2)
actors << Actor.new("Jack Nicholson", 3)
actors << Actor.new("Adrien Brody", 1)
actors << Actor.new("Neil Patrick Harris", 0)
winners = actors.find_all{|actor| actor.oscars >= 1 }
# => [#<struct Actor name="Marlon Brando", oscars=2>, #<struct Actor name="Sean Penn",
oscars=2>, #<struct Actor name="Jack Nicholson", oscars=3>,
#<struct Actor name="Adrien Brody", oscars=1>]
max_oscars = actors.map{|actor| actor.oscars}.max
super_star = winners.find{|actor| actor.oscars == max_oscars}
# => #<struct Actor name="Marlon Brando", oscars=3>
72 | Chapter 4: Foundation

The code within curly braces resembles what you would put in a do loop. The first
enumerator, for instance, is:
|actor| actor.oscars >= 1
Ruby mixes in the Enumerable module in collection classes to offer various traversal and
searching methods such as max, find, and find_all. Thus, as part of the find_all
method, the previous code extracts each item that is associated with one or more Oscar
awards.
In this example, I did not explicitly create the Actor class and its acces-
sors. Instead, I used the Struct class to generate the Actor class. Read
the Ruby documentation to learn more about this interesting way to
generate simple classes.
In Cocoa, filtering and searching uses the NSPredicate class. As the Cocoa documen-
tation explains quite well, this class is used to define logical conditions that constrain
a search either for a fetch or for in-memory filtering. However, NSPredicate can be used
only on objects that implement the key-value coding (KVC) protocol, which can be
done manually on custom objects.
Here are a few examples using NSPredicate:
framework 'Foundation'
predicate = NSPredicate.predicateWithFormat("SELF IN %@", ['Ninh', 'Hongli'])
predicate.evaluateWithObject "Matt"
# => false
filter = NSPredicate.predicateWithFormat("SELF beginswith[c] 'm'")
['Matt', 'Mike', 'Nate'].filteredArrayUsingPredicate(filter)
# => ["Matt", "Mike"]
Undo/Redo
Undo and redo are common patterns in applications that revert the state of an object.
Before the user changes the state of an object, the object registers the initial state as
well as the method called on the object. This way, the change can be undone and
redone.
The NSUndoManager class is implemented in the Foundation framework because execut-
ables other than applications might want to revert changes to their states.
Application Kit also implements undo and redo in its NSTextView class, making it avail-
able to all its subclasses.
Here is an example implementing undo/redo on a player class:
framework 'Foundation'
class Player
Miscellaneous Classes | 73

attr_accessor :x, :y
def initialize
@x = @y = 0
end
def undo_manager
@manager ||= NSUndoManager.alloc.init
end
def left
undo_manager.prepareWithInvocationTarget(self).right
@x -= 1
end
def right
undo_manager.prepareWithInvocationTarget(self).left
@x += 1
end
end
And now if we used the code, here is what it would look like:
>> lara = Player.new
=> <Player:0x200267c80 @y=0 @x=0>
>> lara.undo_manager.canUndo
=> false # normal since we did not do anything yet
>> lara.left
=> -1
>> lara.x # -1
=> -1
>> lara.undo_manager.canUndo
=> true # now we can undo, so let's try
>> lara.undo_manager.undo # undo back to initial position
=> #<NSUndoManager:0x200257560>
>> lara.x
=> 0
>> lara.undo_manager.canUndo
=> false # we can't do any more undoing
>> lara.undo_manager.canRedo
=> true # however we can redo what was just undone
>> lara.undo_manager.redo # redo to before we called undo
=> #<NSUndoManager:0x200257560>
>> lara.x
=> -1
User’s Preferences
Foundation offers a convenient way to store a user’s preferences via the NSUserDe
faults class. Preferences are saved in a shared database where developers can save and
load keyed settings using some primitive objects. Here is a quick example that saves a
token in the user’s preferences. Keep on reading after the example to see how to save
other object types, such as arrays and hashes, and search for a preference key:
74 | Chapter 4: Foundation

framework 'Foundation'
def set_api_token(token)
NSUserDefaults.standardUserDefaults['oreilly.api_token'] = token
NSUserDefaults.standardUserDefaults.synchronize # force sync
api_token
end
def api_token
NSUserDefaults.standardUserDefaults["oreilly.api_token"]
end
if api_token.nil?
puts "The API token has not been set yet, please enter it now:"
cli_token = gets
set_api_token(cli_token.strip)
puts "API token set, thank you!"
else
puts "Currently stored API token: #{api_token}"
end
After saving this code in a file called api_pref.rb, run it from the command line. The
output will look like the following:
$ macruby api_pref.rb
The API token has not been set yet, please enter it now:
# typed my token: 42sosayweall42
API token set, thank you!
Running it a second time will skip the token prompt:
$ macruby api_pref.rb
Currently stored API token: 42sosayweall42
Let’s jump to macirb and play with the preferences:
$ macirb --simple-prompt
>> require 'api_pref.rb'
Currently stored API token: 42sosayweall42
=> true
>> NSUserDefaults.standardUserDefaults.removeObjectForKey('oreilly.api_token')
=> #<NSUserDefaults:0x2002362a0>
>> api_token
=> nil
>> set_api_token 'macruby is awesome'
=> "macruby is awesome"
>> api_token
=> "macruby is awesome"
>> NSUserDefaults.standardUserDefaults.dictionaryRepresentation.keys.grep /oreilly/
=> ["oreilly.api_token"]
>> NSUserDefaults.standardUserDefaults['oreilly.owned_books'] =
[{'topic' => 'macruby',
'isbn' => '9781449380373'}]
>> NSUserDefaults.standardUserDefaults['oreilly.owned_books'].first['isbn']
=> "9781449380373"
Miscellaneous Classes | 75
As shown here, we can delete preferences using NSUserDefaults.stand
ardUserDefaults.removeObjectForKey, as well as access all the preferen-
ces using NSUserDefaults.standardUserDefaults.dictionaryRepresenta
tion, which returns a Hash.
Finally, we set a more complex preference: an array containing a hash. However, the
storage is limited to objects supported by the property lists, that is, objects of the fol-
lowing class families: NSData, NSString, NSNumber, NSDate, NSArray, and NSDictionary.
76 | Chapter 4: Foundation
CHAPTER 5
Application Kit
The Application Kit, also known as the AppKit framework, contains all the classes nee-
ded to build OS X GUI applications. This is the framework we used in our “Hello
World!” example in “Code Example” on page 7.
AppKit is a very large framework and this book will not cover all the classes provided.
I’ll introduce the concepts you need to get started and illustrate a few of the classes that
every programmer uses for graphical interfaces.
Cocoa Key Principles
You need to understand a few key concepts before digging further into Cocoa. So far,
we have looked closely only at the Foundation classes, which map fairly intuitively to
concepts and library calls in other programming languages and programming environ-
ments. With Cocoa, we jump into unique concepts that are less intuitive.
Cocoa is a well-thought-out, well-designed, and very consistent API. To assure this
consistency, a few key concepts underlie most of the API classes. By following the
designed conventions, you will avoid spending a lot of time rewriting your code over
and over.
These Cocoa concepts and conventions are unfortunately not enforced
in all the available frameworks. Some C-based frameworks were incor-
porated into Cocoa simply by adding an Objective-C wrapper, and these
usually don’t follow the conventions as nicely as frameworks written
directly in Objective-C.
Model-View-Controller Design Pattern
Ruby developers who have done any web development should be quite familiar with
the model-view-controller (MVC) design pattern. It’s one of the key conventions en-
forced by the Ruby on Rails framework, and it goes back to the early 1980s when the
77
Smalltalk community defined it, so it can also be found in plenty of other environments:
GTK, Tcl Tk, Qt, Swing, WPF, and many others, including Cocoa. Basically, your code
ends up divided in three parts: the model, which represents the data upon which the
application operates, the view, which renders the model and potentially makes it in-
teractive, and finally the controller, which is the glue between the model and the view
and runs what many people call the “business logic” unique to your application.
When developing a Cocoa app, you will usually define your views in Interface
Builder, Cocoa’s UI tool, while your models and controllers will be written in your
editor/IDE (usually Xcode). We will go through these tools later in this chapter.
Protocols
As you have probably guessed, a Cocoa protocol has nothing to do with the interna-
tional agreement aimed at ending child labor in the production of cocoa, known as the
Cocoa Protocol and signed in September 2001.
Protocols are well-defined APIs that any class may choose to implement. In other words,
protocols are a way to declare a convention via an API. Two classes implementing the
same protocol can easily communicate with each other without having to be subclasses
of the same superclass.
Protocols are basically just a set of well-defined methods adopted by different classes.
Some APIs expect to receive certain objects to implement certain protocols. So if you
are developing your own class, you will need to make sure to implement the expected
API. Once you do, we say that your class conforms to the protocol.
Key-Value Coding
Often abbreviated KVC, the NSKeyValueCoding protocol defines the mechanism to set and
retrieve an object’s attributes/properties by name instead of by invoking a method. This
is a fundamental value concept in Cocoa programming, and it essentially allows you
to access instances as if they were hash tables/dictionaries. There are many advantages
of such an approach. The most obvious are that you don’t need to explicitly write getters
and setters and that you can implement UI bindings and serialization much more easily,
since knowing the name of a property is enough to get and set it.
KVC is often mentioned with KVO (key value observing), which is a
notification system using the observer pattern and based on KVC.
Here is a simple example in which we will pretend that Player is a KVC-compliant class:
78 | Chapter 5: Application Kit

matt = Player.new
matt.setPoints(42)
matt.valueForKey('points') # => 42
matt.setValue(442, forKey: 'points')
matt.valueForKey('points') # => 442
The Player class doesn’t have to implement a setPoints accessor method. Because the
class implements the NSKeyValueCoding protocol, it intercepts your invocation of set
Points and sets the points instance variable in your instance to the value you supply.
The other three methods shown here are also interpreted according to the protocol.
The code you can write using this protocol is quite similar to Ruby’s accessor syntax:
matt = Player.new
matt.points = 42
matt.points # => 42
matt.points = 442
matt.points # => 442
You can simply implement it like this:
class Player
attr_accessor :points
end
It turns out that MacRuby generates the KVC code for you when you add a Ruby
accessor. This way, your classes can easily conform to the KVC protocol:
framework 'foundation'
class Player
attr_accessor :points
end
matt = Player.new
matt.points = 100 # Ruby syntax
matt.valueForKey('points') # => 100 (KVC protocol)
matt.setPoints(42) # KVC protocol
matt.points # => 42
matt.setValue(442, forKey: 'points') # KVC protocol
matt.points # => 442
Here is another example using a class that’s KVC-compliant by default: Hash and a KVC
method named valueForKeyPath that we haven’t seen yet:
framework "Cocoa"
class Me < Hash
def initialize
super
self["siblings"] = {"brothers" => ["Arnaud"], "sister" => ["Marjorie"]}
end
end
moi = Me.new
p moi.valueForKey('siblings')
Cocoa Key Principles | 79

# => {"brothers"=>["Arnaud"], "sister"=>["Marjorie"]}
p moi.valueForKeyPath("siblings.brothers")
# => ["Arnaud"]
In this example, we create a new class called Me that inherits from Hash and therefore is
KVC-compliant by default. We define the initialize method to set some default value.
The method starts by calling super so the code defined by the Hash constructor can be
triggered, then sets the default values. Once my code is written, we create an instance
of Me called moi and use the previously discussed valueForKey method, which works as
expected. Then we invoke another KVC protocol method, called valueForKeyPath,
which takes a path to the object we are interested in. Notice that valueForKeyPath
requires a scalar as its argument; we can’t pass it an array index. For instance, passing
siblings.brothers[0] will result in a nil value.
Bindings
When developing a Cocoa application, you can bind an attribute of one object to a
property of another. For instance, imagine we are developing a music player. On the
one hand, we have a player object defining a volume attribute, and on the other, we
have a slider UI controller to allow the user to control the output volume. We also want
to display the setting of the volume. To implement all this, we are going to load our
player instance in the controller and bind its volume attribute to our slider and text
field values.
Let’s start by defining our model. Create a new Xcode MacRuby project (see the intro
to Xcode to learn more about Xcode) and add a new Ruby file called player.rb. Our
model code is very simple—just a KVC conform class with a volume attribute, as shown
here:
class Player
attr_accessor :volume
end
Our AppDelegate class is not much more complicated, we just need to add a new ac-
cessor for the player and initialize an instance of the object when the class instance is
initialized:
class AppDelegate
attr_accessor :window
attr_accessor :player
def applicationDidFinishLaunching(a_notification)
# Insert code here to initialize your application
end
def initialize
@player = Player.new
end
end
80 | Chapter 5: Application Kit

Now edit your view file (MainMenu.xib) by clicking on it in Xcode.
The template already has an NSObject instance called App Delegate, which represents
an instance of the AppDelegate class (Figure 5-1). Look at it via the Identity Inspector
and notice that the AppDelegate class is set as the object’s class.
Figure 5-1. Details of the controller object viewed in the Inspector
Now open the Object Library, look for the vertical slider, drop it on the UI inside the
window’s view (Figure 5-2), then look for the text field icon and drop it inside the view,
as shown in Figure 5-3.
Cocoa Key Principles | 81
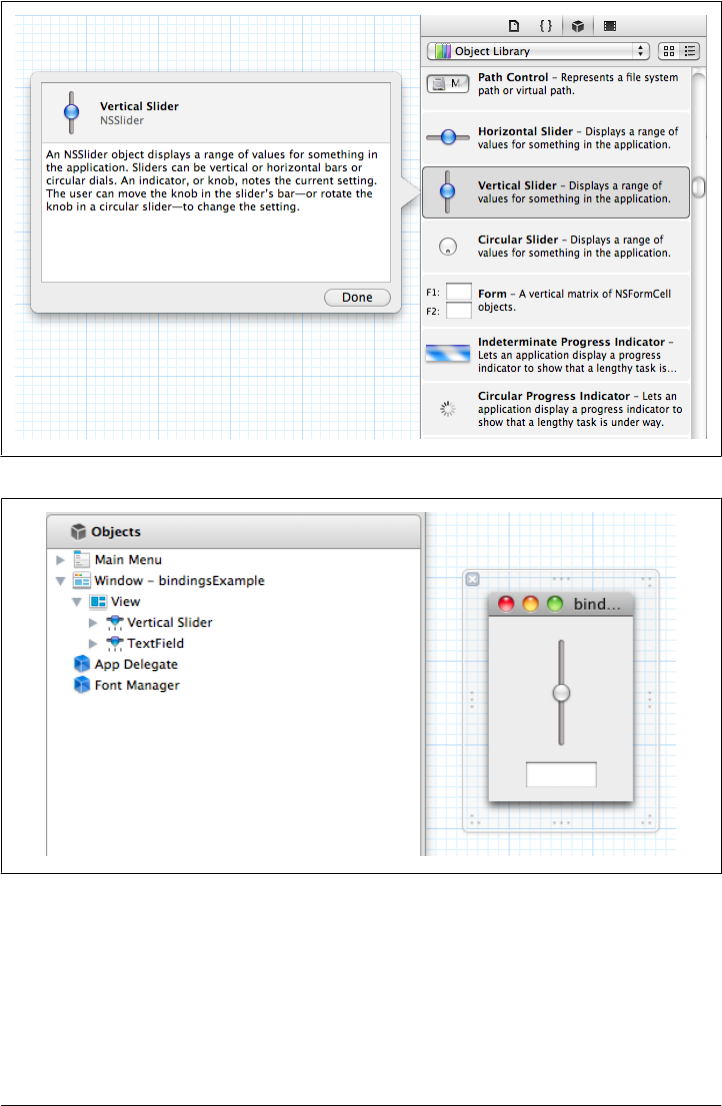
Figure 5-3. Object hierarchy and UI
Once the UI objects are in place, you need to set the bindings for the slider. To do so,
select the slider and open it in the Inspector. Then select the bindings tab in the Utility
area and set the bindings settings as shown in Figure 5-4.
Set the bind to App Delegate and set the model key path to player.volume. Do the same
for the text field. The slider will set the value while the text field will read the value.
Figure 5-2. Vertical slider viewed from the Object Library
82 | Chapter 5: Application Kit
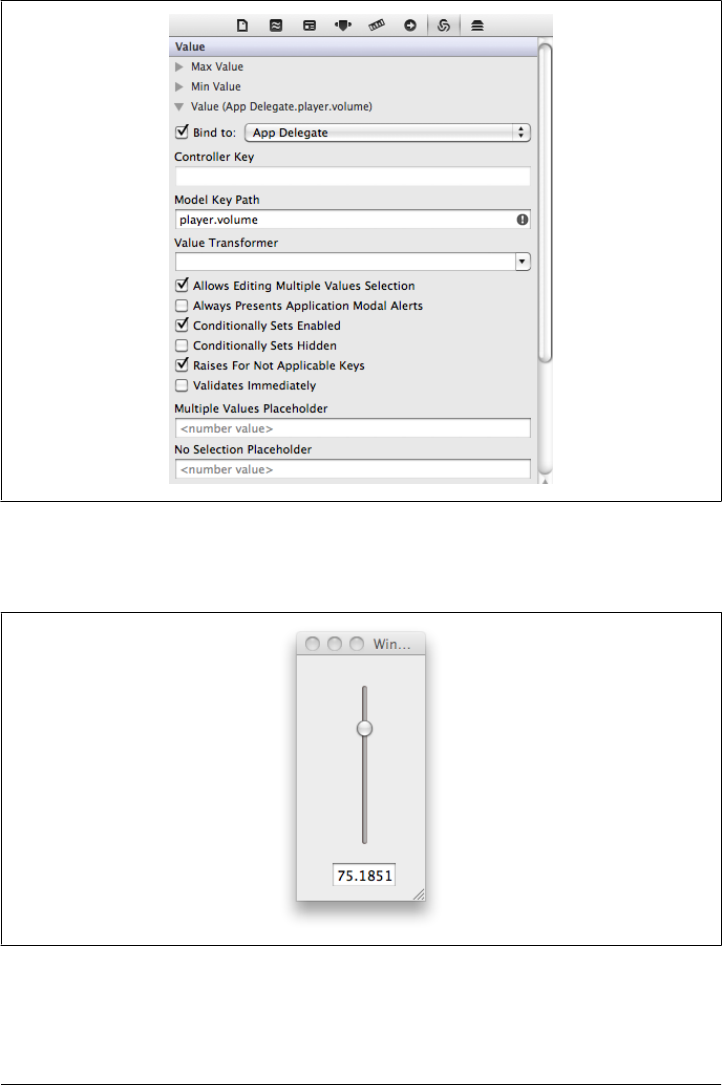

When you move the slider, the text value changes, and vice versa. But, what’s even
more interesting is that the model’s attribute value also changes at the same time. As
you can see, bindings can save you a lot of development time.
Delegation
We used and discussed delegation when we worked on our “Hello World!” example
in Chapter 1. In the delegate class we created, we implemented two delegate methods.
One was an NSApplication delegate named applicationDidFinishLaunching and the
other was an NSWindow delegate named windowWillClose.
Delegation is a common pattern in Cocoa. It often offers an elegant way to hook into
events. For instance, when an application is started, two delegates are triggered if they
are available. The applicationWillFinishLaunching delegate is called as soon as the run
loop is ready, but before the application is started. applicationDidFinishLaunching is
called after the application is launched.
An NSWindow instance has a lot of delegates available for implementation (see http://
developer.apple.com/mac/library/documentation/cocoa/reference/NSWindowDelegate
_Protocol/Reference/Reference.html). A few of the simpler delegates include:
•windowShouldClose
•windowWillClose
•windowWillMove
•windowDidMove
Look at the documentation to learn more about the delegates available for the classes
you are using.
User Interface
Most of the Ul-related classes are provided by the Cocoa framework. Instead of going
down the long list of UI classes, let’s talk about the main concepts and elements critical
to MacRuby developers.
Windows, Views, and Cells
Windows, views, and cells are the visible units the user deals with. For instance, a
button is usually a view, as is a text entry box.
Windows and panels
Windows are conceptually easy to understand and don’t need much explanation.
Technically, a Cocoa window is an instance of the NSWindow class in which a view
84 | Chapter 5: Application Kit

(NSView instance) displays its content. To group windows, an application can use panels
via the NSPanel class, which is itself a subclass of NSWindow.
Views
Per Cocoa’s definition, “A view instance is responsible for drawing and responding to
user actions in a rectangular region of a window.” In other words, views render some
of the app content and handle user-initiated events.
Whenever you need to display content in a window, you will need a view. The view
also handles keyboard and mouse events. Views often act as containers and contain
one or more nested views.
The primary view class is called NSView, which inherits directly from NSResponder. This
lets you easily implement keyboard/mouse event handling by overriding NSView meth-
ods. This class implements the fundamental view behavior, making it a perfect candi-
date for creating a custom view.
Application Kit offers a set of great NSView subclasses to help with common tasks. Here
are a few examples:
• Controls such as buttons via NSButton
• Text fields and display via NSTextField and NSTextView
• PDF display via PDFView
• Movie display via QTMovieView
• Image display via NSImageView
• Open GL contexts via NSOpenGLView
Cells
For reasons of performance and reusability, most views delegate drawing to another
class called the cell (generally an NSCell subclass). For instance, buttons are instances
of the NSButton class (itself a subclass of NSControl), but use different NSButtonCell
instances for drawing.
Positioning
The position of an object is called its coordinates, and this refers to the x and y pixel
positions of its bottom, leftmost corner. When using Cocoa views, it’s important to
keep in mind that the coordinates of each object are always relative to the immediately
enclosing view. Thus, each of the views you create will define and maintain its own
coordinate systems. All the objects in each view will be relative to the view’s coordinate
system.
By default, as shown in Figure 5-6, the origin is at (0.0, 0.0), which is located in the
lower left corner of the parent object.
User Interface | 85
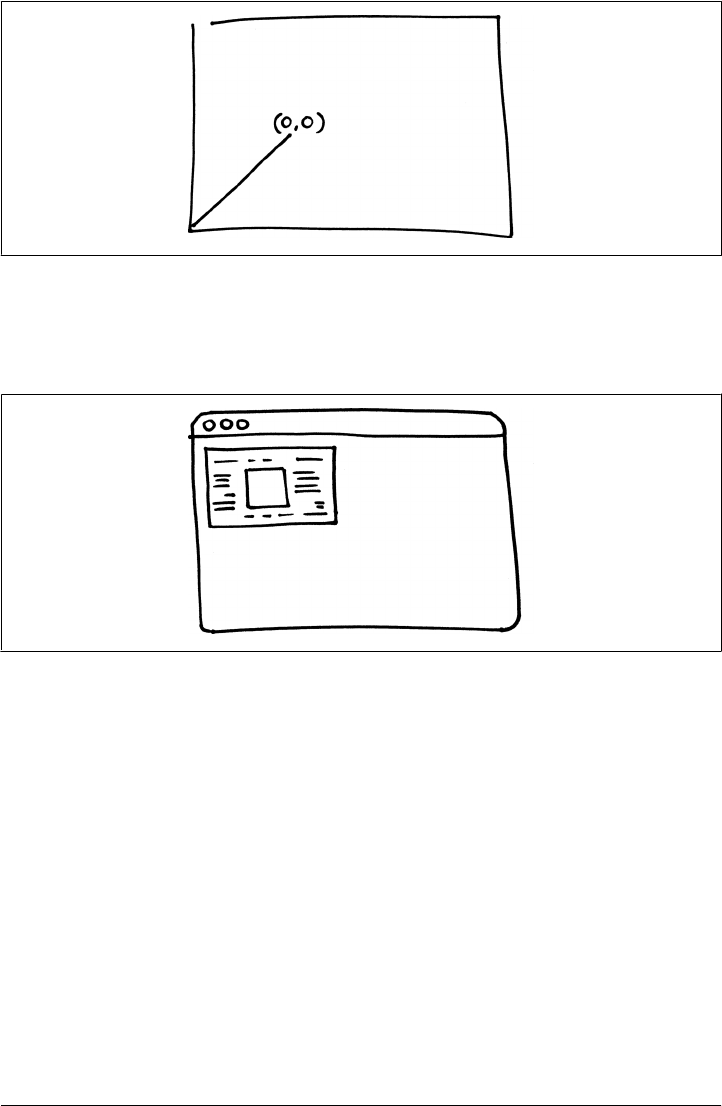
Let’s take an example. Imagine that we want to display a web page in a window. The
web page’s view should take up only a quarter of the window and we want it to be at
the top left corner (Figure 5-7).
Figure 5-7. Window with a web preview on top left corner
You could just use Interface Builder to create such a simple UI, but for the sake of
explaining how views work, I will show how to programmatically create a window and
content view, and to place a web page view on the top left corner of the window. Here
is the code:
framework 'Cocoa'
framework 'WebKit'
application = NSApplication.sharedApplication
# create the window
width = 800.0
height = 600.0
frame = [0.0, 0.0, width, height]
mask = NSTitledWindowMask | NSClosableWindowMask | NSMiniaturizableWindowMask
window = NSWindow.alloc.initWithContentRect(frame,
styleMask:mask,
backing:NSBackingStoreBuffered,
Figure 5-6. Representation of the drawing origin
86 | Chapter 5: Application Kit

defer:false)
# assign a content view instance
content_view = NSView.alloc.initWithFrame(frame)
window.contentView = content_view
# create a web view positioned in the top left quarter of the super view
web_view_frame = [0.0, height/2, width/2, height/2]
web_view = WebView.alloc.initWithFrame(web_view_frame, frameName: "Web Frame",
groupName: nil)
request = NSURLRequest.requestWithURL(NSURL.URLWithString("http://macruby.org"))
web_view.mainFrame.loadRequest(request)
content_view.addSubview(web_view)
# center the window
window.center
# show the window
window.display
window.makeKeyAndOrderFront(nil)
window.orderFrontRegardless
application.run
You can copy this code to a file and run it with the MacRuby executable. I will skip the
part about requiring the frameworks and creating an application.
We start the code by creating a frame for our window:
width = 800.0
height = 600.0
frame = [0.0, 0.0, width, height]
Technically, a frame is just an array with four floating-point values representing the x-
axis coordinate, y-axis coordinate, width, and height. An Objective-C code example
would have the following syntax:
NSRect frame = NSMakeRect(0.0, 0.0, 800.0, 600.0);
Both code snippets just shown are equivalent, except that one is written in Ruby and
the other in Objective-C.
A frame defines the size of its content and its position inside the containing views. A
frame in Cocoa can be considered like a picture frame in real life: you position it on the
wall and the frame dimensions define the maximum area available for the canvas inside.
Our example starts by creating a window that will hold our UI. We define two variables,
width and height, that we use for the frame. We will reuse these variables later on to
position our web page view relative to the window.
We also need to create a content view that will hold our UI items. Remember that we
want our web page view to take only one-fourth of the space. For that to happen, we
need a placeholder. That’s what our NSView instance offers:
User Interface | 87
content_view = NSView.alloc.initWithFrame(frame)
window.contentView = content_view
If you start a new Interface Builder Application project, a window and
its content view instance will already be created for you.
Now we need to create a frame for our web view. This frame is positioned relative to
the content view, which in turn is positioned relative to our window. Since we stored
the window’s width and height, we can easily define our web view frame to be displayed
only at the top left corner of our GUI:
web_view_frame = [0.0, height/2, width/2, height/2]
Our frame defines the web view x-axis position as 0.0, which is the graphics environ-
ment axis origin and located all the way to the left. Then we do some math to define
the y-axis position, width, and height. We take the superview (content_view) height
and divide it in two to find the middle point to position our web view. Because we want
our web view to only take a fourth of the UI, we set the width and the height to be half
the corresponding width and the height of the containing view.
Remember that we are starting to draw from the bottom left and not
from the top, as you do when designing a web page.
We then create the WebView instance, set the URL to load, and finally add it to the
content view subviews:
content_view.addSubview(web_view)
At this point, we are finished placing our content. However, why not center our window
on the user’s screen while we are at it?
window.center
Calling the center instance method on a window places it exactly in the center hori-
zontally and somewhat above center vertically. Another way to center the window is
to manually locate its frame:
screen_frame = NSScreen.mainScreen.frame
window.frameOrigin = [(screen_frame.size.width - width)/2.0,
((screen_frame.size.height - height)/2.0)]
This code starts by retrieving the screen frame. Then we position our window right in
the middle of the screen by taking the width and height of the screen, subtracting our
UI width and height, and dividing the sum by 2.
88 | Chapter 5: Application Kit
On my laptop, my resolution is set to 1280x800. So, to find the x coordinate, our code
takes the screen width (1280), subtracts our content view’s width (800), and divides
the result by 2, locating the x coordinate at 240.0. We do the same with the height and
get a y coordinate of 100.0.
Once we have the coordinates figured out, we move the window frame origin and
display the window.
Great, our content displays properly—but what if we want to track keyboard and/or
mouse events?
Events and the Responder Chain
When an event message is dispatched, the message is sent down the window. The
window itself has a responder chain, which is a linked series of responder objects. If
the first object in the chain doesn’t handle the message, the message is passed to the
next responder in the chain and so forth, until a responder handles the message or the
responder chain has been entirely traversed (in which case the window’s responder
noResponderFor method is dispatched).
If you have multiple windows, only the window in which the associated
user event occurred will forward the event message to its responder
chain.
The default responder chain is constructed by the Application Kit framework, but can
be modified by developers. The default responder chain for a key event begins with the
first responder in the window where the focus is when the key is pressed. In contrast,
the default responder chain for a mouse event begins with the view on which the event
occurred. If not handled, the mouse event message is sent to the window’s first res-
ponder, which is usually the selected view object. The next responder in the chain is
the UI object’s containing view (superview) and so on up to the NSWindow object.
You can insert responders in the responder chain by using the setNextResponder method
or the nextResponder= alias on the view object.
Let’s experiment with the responder chain. Open Xcode and create a new project using
the MacRuby application template. Now create a new Ruby file and call it
event_view.rb. Our new class will be a View subclass that will handle our events:
class EventView < NSView
def acceptsFirstResponder
true
end
def keyDown(event)
puts "key down"
User Interface | 89
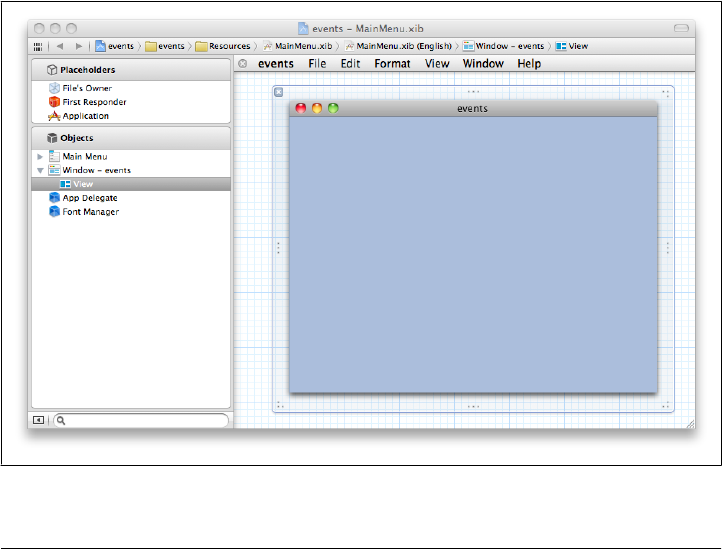
characters = event.characters
if characters.length == 1 && !event.isARepeat
character = characters.characterAtIndex(0)
case character
when NSLeftArrowFunctionKey
puts "you pressed the left arrow"
when NSRightArrowFunctionKey
puts "you pressed the right arrow"
end
end
end
end
The subclass implements a keyDown method that takes an event argument. This method
is part of the responder chain. You can see from the example that we can get the char-
acters pressed by calling characters on the event. We inspect the characters pressed to
log an appropriate message. We then check that the event isn’t a repeated event, in the
sense that if the user leaves his or her finger on a key, we want to get only one event.
We extract the characters (NSString instance) from the event (NSEvent). We then take
only the first character using characterAtindex and try to match it to some keyboard
constants.
Now click on the MainMenu.xib file. The contents will be displayed in a format like
that shown in Figure 5-8.
Figure 5-8. MainMenu.xib with the window expanded
90 | Chapter 5: Application Kit
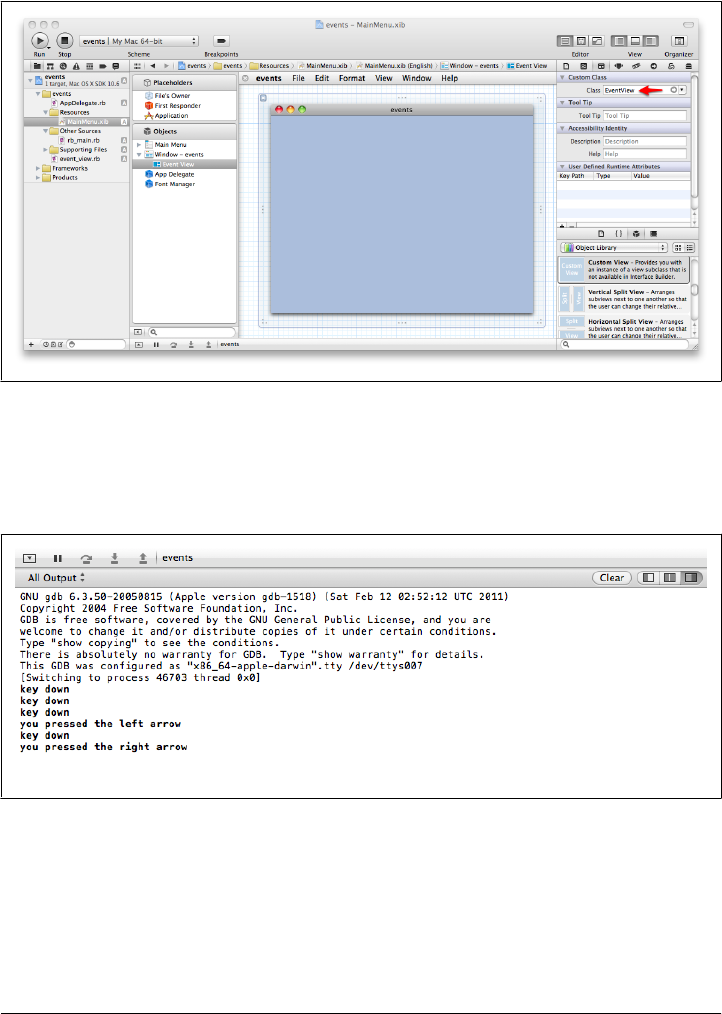
Select the View in the Identity Inspector and, in the Custom Class section, change the
class value to EventView (see Figure 5-9). Xcode automatically detects the new class we
created.
Figure 5-9. View with a custom class handling keystrokes
Save the project and click Run. When the application is running, type on your keyboard
and see the output in the Debug area (shown in Figure 5-10). Try pressing the left or
right arrow keys and notice the different output.
Figure 5-10. Output shown in the Debug area
To see which key events are available, read the NSResponder class documentation (http:
//developer.apple.com/mac/library/documentation/cocoa/Reference/ApplicationKit/
Classes/NSResponder_Class/Reference/Reference.html). What we did was to set our
custom view as first responder and check the key pressed to see whether it matched
one of the NSResponder’s constants.
User Interface | 91

Drawing
Cocoa’s drawing environment is available via the Application Kit framework, which is
itself based on Quartz, the Macintosh’s basic 2D graphics rendering software. The
environment automatically takes advantage of graphics hardware wherever it can,
making the drawing process as fast as possible.
If you come from a browser-oriented background, you might not think about how UI
elements are rendered. After all, when using HTML, you just use UI tags and let the
browser deal with rendering. In Cocoa, however, understanding how UI elements are
drawn and how to interact with the drawing processing can be very beneficial. If you
use only standard system controls, all the drawing is automatically handled by Cocoa.
But as soon as you start using custom views and controls, managing the customized
appearance of your elements become your responsibility. Also, you might want to use
the drawing features to display images, PDFs, vector-based drawings, or videos, to
render openGL code, or to custom print.
But before getting too deep into custom drawing, let’s talk more about how a normal
control element is drawn.
A control element such as a button is usually an instance of a custom NSView class.
NSView instances are responsible for their own drawing, but in most views the drawing
is delegated to another class called the cell (generally a subclass of NSCell).
In the case of NSButton, the drawing is delegated to an NSButtonCell instance. To cus-
tomize the drawing of a button, you can subclass the cell and override some of its
properties or methods. The advantage of having the drawing done in the cell instead
of the view is that one cell instance can be shared by multiple controls of the same kind.
Also, a cell can be given to a more specialized view to customize only a part of it. A
good example of this is customizing a table view column using a different cell.
If you look at the Interface Builder library and search for NSButton, you will find a lot
of different buttons (Figure 5-11). That’s because each button uses a different
NSButtonCell under the covers to implement its own UI. The NSButtonCell associated
with the button will set the background color, style, images, states, sounds, and events.
It will also take care of the button’s content drawing.
92 | Chapter 5: Application Kit
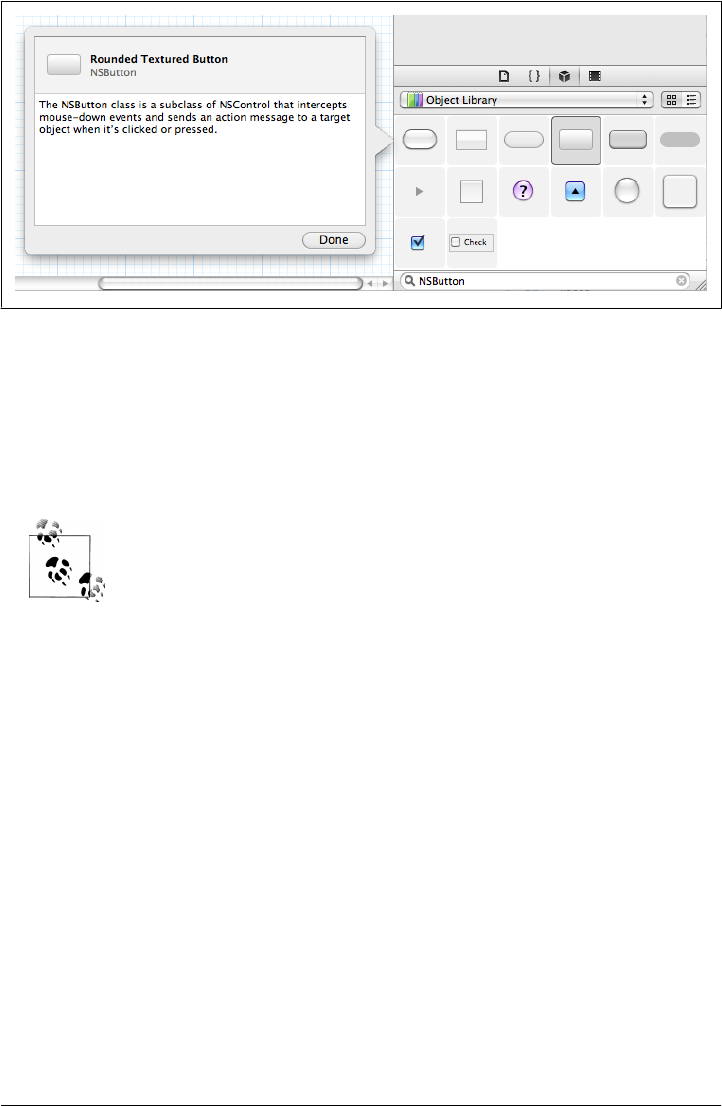
Figure 5-11. Choice of NSButton types offered by the Object Library
When the button is loaded, Cocoa draws it in its initial state. When a mouse event
occurs on the button or a triggering key is pressed, the NSButtonCell state is changed
and the object is marked as needing to be redrawn. You can also force the redrawing
of an element by calling setNeedsDisplay or setNeedsDisplayInRect on it. When the run
loop restarts its cycle, all the elements that need redrawing are redrawn.
For more information about buttons, refer to Apple’s documentation,
"Introduction to Buttons" at http://developer.apple.com/mac/library/doc
umentation/cocoa/Conceptual/Button/Button.html.
You can also totally customize the drawing of your views by reimplementing the
drawRect method on your NSView class. drawRect is called on a view when something
about your view has changed or can be called manually.
Let’s cover some other important Cocoa drawing concepts.
Graphics Context
In Cocoa, as in many GUIs, you don’t apply visual traits directly to objects; that is, you
don’t say, “Draw this rectangle with a blue border” or “Write this text in italic.” Instead,
you define the traits in general for the whole window, using an abstraction called the
graphics context. A typical sequence is:
User Interface | 93

1. Set the color in the graphics context to red.
2. Draw the background.
3. Set the color in the graphics context to black.
4. Draw a rectangle.
5. Etc..
The procedure may seem awkward, but it makes the best use of the hardware capabil-
ities. A graphics context is thus a representation of the area onto which you’re drawing.
The context has a huge range of attributes, each of which takes on one value at a time,
such as red or black. Its job is to set and hold all the information needed so a view can
be drawn properly. It even saves its state before rendering so changes can be undone.
Most of the time, the graphics context you will interact with represents one of your
application’s windows, but the drawing destination can also refer to an image, an out-
put device (i.e., a printer), a file, or an OpenGL surface. Cocoa maintains a separate
graphics context per window and per thread. So, an application can have multiple
contexts.
In a Cocoa application, graphics contexts for most types of canvas are represented by
the NSGraphicsContext class. To access the current thread’s graphics context, you can
simply call NSGraphicsContext.currentContext. This is usually something you do when
you implement your own drawRect method. The problem is that if you modify the
current context, all other items drawn in the same thread will be affected by this change.
For instance, if you are changing the fill color to red, all objects redrawn after the change
will be redrawn with a red fill color. Here is an illustration of the problem:
framework 'Cocoa'
class CustomView < NSView
def drawRect(rect)
# draw a red background
NSColor.redColor.set
NSBezierPath.fillRect(rect)
# draw a rectangle
path = NSBezierPath.bezierPath
path.lineWidth = 2
# starting point
path.moveToPoint [100, 50]
# draw a rectangle
path.lineToPoint [100, 100]
path.lineToPoint [200, 100]
path.lineToPoint [200, 50]
# close the rectangle automatically
path.closePath
path.stroke
end
end
94 | Chapter 5: Application Kit
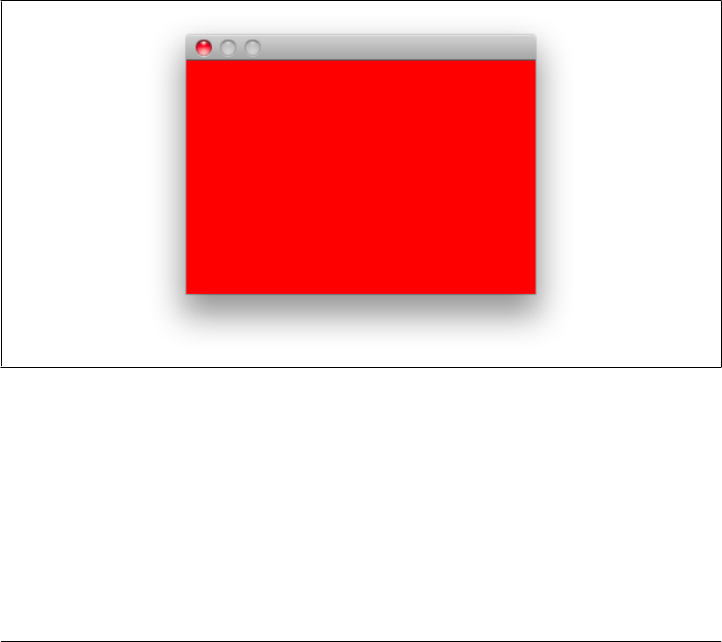
application = NSApplication.sharedApplication
# create the window
frame = [0.0, 0.0, 300, 200]
mask = NSTitledWindowMask | NSClosableWindowMask
window = NSWindow.alloc.initWithContentRect(frame,
styleMask:mask,
backing:NSBackingStoreBuffered,
defer:false)
# assign a content view instance
content_view = CustomView.alloc.initWithFrame(frame)
window.contentView = content_view
# show the window
window.display
window.makeKeyAndOrderFront(nil)
window.orderFrontRegardless
application.run
The result is shown in Figure 5-12. The problem is that the rectangle we drew isn’t
visible.
Figure 5-12. Display with improperly drawn rectangle
The source of the problem is quite easy to spot: we have switched the context color
from black to red by using NSColor.redColor.set, but when we then draw the rectangle,
the stroke is still red and we can’t distinguish the rectangle.
An easy fix would obviously be to reset the color to black before drawing the stroke.
While that would work for this simple example, imagine if you were changing more
than two context attributes and you were drawing several items in the view. Having to
manually reset the context every time would become quite challenging. A more robust
User Interface | 95

approach is to save the current context, set a new context, draw what you want using
the new context, and restore the old context. This is why Cocoa offers methods to save
the context and then restore it:
framework 'Cocoa'
class CustomView < NSView
def drawRect(rect)
context = NSGraphicsContext.currentContext
context.saveGraphicsState
# draw a red background
NSColor.redColor.set
NSBezierPath.fillRect(rect)
context.restoreGraphicsState
# draw a rectangle
path = NSBezierPath.bezierPath
path.lineWidth = 2
# starting point
path.moveToPoint [100, 50]
# draw a rectangle
path.lineToPoint [100, 100]
path.lineToPoint [200, 100]
path.lineToPoint [200, 50]
# close the rectangle automatically
path.closePath
path.stroke
end
end
application = NSApplication.sharedApplication
# create the window
frame = [0.0, 0.0, 300, 200]
mask = NSTitledWindowMask | NSClosableWindowMask
window = NSWindow.alloc.initWithContentRect(frame,
styleMask:mask,
backing:NSBackingStoreBuffered,
defer:false)
# assign a content view instance
content_view = CustomView.alloc.initWithFrame(frame)
window.contentView = content_view
# show the window
window.display
window.makeKeyAndOrderFront(nil)
window.orderFrontRegardless
application.run
The result is shown in Figure 5-13. This time, the rectangle is visible.
96 | Chapter 5: Application Kit
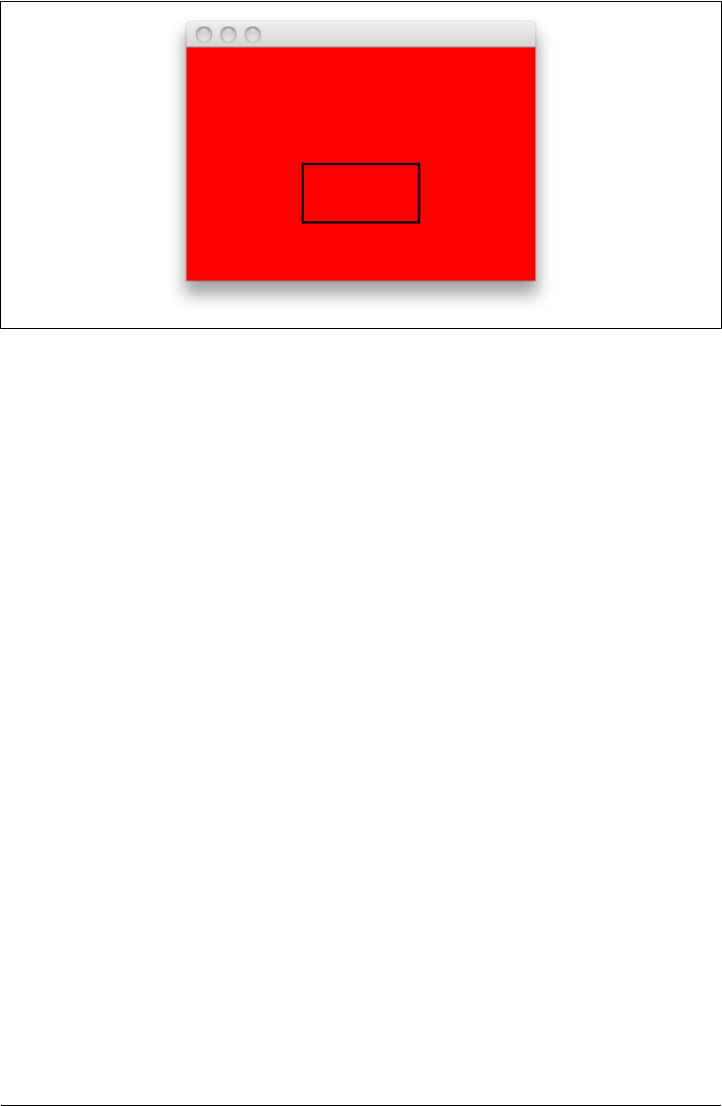
Figure 5-13. Display with all objects visible
And here is a more complete example, where we extract the graphics context switch
into a method that can then be invoked for each object we draw:
framework 'Cocoa'
class CustomView < NSView
# Using a method yielding a block, we can keep
# our code cleaner
def temp_context(&block)
context = NSGraphicsContext.currentContext
context.saveGraphicsState
yield
context.restoreGraphicsState
end
def drawRect(rect)
# draw a red background
temp_context do
NSColor.redColor.set
NSBezierPath.fillRect(rect)
end
path = NSBezierPath.bezierPath
path.lineWidth = 2
# starting point
path.moveToPoint [100, 50]
# draw a rectangle
path.lineToPoint [100, 100]
path.lineToPoint [200, 100]
path.lineToPoint [200, 50]
# close the path automatically
path.closePath
# fill the content of the path in transparent white
temp_context do
User Interface | 97

NSColor.colorWithCalibratedWhite(0.9, alpha: 0.5).set
NSBezierPath.fillRect([100, 50, 100, 50])
end
# draw the rectangle stroke after the content was filled
path.stroke
# draw some text, because we are changing the context shadow
# we are doing that in a temp context
temp_context do
shadow = NSShadow.alloc.init
shadow.shadowOffset = [4, -4]
shadow.set
font = NSFont.fontWithName("Helvetica", size:24)
attributes = {NSFontAttributeName => font,
NSForegroundColorAttributeName => NSColor.whiteColor}
"MacRuby Rocks".drawAtPoint([60, 120], withAttributes: attributes)
end
end
end
application = NSApplication.sharedApplication
# create the window
frame = [0.0, 0.0, 300, 200]
mask = NSTitledWindowMask | NSClosableWindowMask | NSMiniaturizableWindowMask
window = NSWindow.alloc.initWithContentRect(frame,
styleMask:mask,
backing:NSBackingStoreBuffered,
defer:false)
# assign a content view instance
content_view = CustomView.alloc.initWithFrame(frame)
window.contentView = content_view
# show the window
window.display
window.makeKeyAndOrderFront(nil)
window.orderFrontRegardless
application.run
The result is shown in Figure 5-14.
98 | Chapter 5: Application Kit
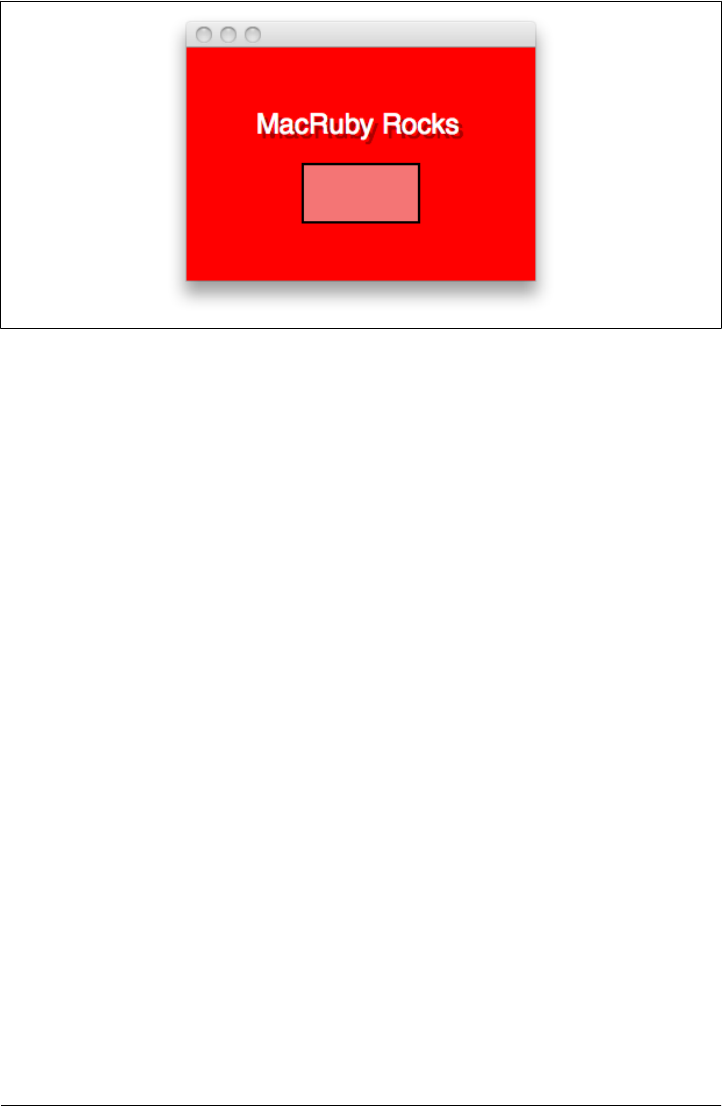
Figure 5-14. Result of the sample using an extracted context switch
The temp_context method takes, as its argument, a block of code that is executed after
the current context is saved and before it is reset. The end result allows for a more
expressive syntax and the code ends up being easier to maintain.
As a side note, as shown in the previous example, drawing text in a view is very simple.
Probably the simplest way is to use drawAtPoint, as follows:
position = [60, 120]
"MacRuby Rocks".drawAtPoint(position, withAttributes: nil)
Other ways to draw text are to use NSAttributedString or NSTextView. I leave it up to
you to explore further.
Images
To manipulate images, the Application Kit offers the NSImage class. With this class, you
can load existing images from disk, draw image data into your views, create new images,
scale and resize images, or convert images to any of several different formats.
A typical method that draws a simple image follows:
def drawRect(rect)
NSColor.whiteColor.set
NSBezierPath.fillRect(rect)
img_url = NSURL.URLWithString('http://bit.ly/apple_logo_png')
img = NSImage.alloc.initWithContentsOfURL(img_url)
img.drawAtPoint([0,0],
fromRect: NSZeroRect,
operation: NSCompositeSourceOver,
fraction: 1)
end
User Interface | 99

We start by setting the color to white and filling the background, then we specify the
URL of the image to load. With the instance of NSURL ready, we just need to pass it to
our NSImage constructor and we get an instance representing our image. Finally, we use
an API similar to the one that drew text in the previous section.
In the call to drawAtPoint, the first parameter is the coordinate where we want to start
drawing the picture (bottom left). Then we pass an empty rectangle represented by the
NSZeroRect constant (passing [0,0,0,0] would have done the same thing). The
operation parameter refers to the composing operation: in other words, the way the
image should be composed. A list of operation constants is available in the NSImage
class reference (http://developer.apple.com/mac/library/documentation/cocoa/Refer
ence/ApplicationKit/Classes/NSImage_Class/Reference/Reference.html#//apple_ref/c/
tdef/NSCompositingOperation). Finally, the last parameter refers to the opacity. This
ranges from 0 (totally transparent) to 1, totally opaque.
The code just shown appears near the top of the following example, which is a complete
application using the image:
framework 'Cocoa'
class CustomView < NSView
def drawRect(rect)
NSColor.whiteColor.set
NSBezierPath.fillRect(rect)
img_url = NSURL.URLWithString('http://bit.ly/apple_logo_png')
img = NSImage.alloc.initWithContentsOfURL(img_url)
img.drawAtPoint([0,0], fromRect: NSZeroRect, operation: NSCompositeSourceOver,
fraction: 1)
end
end
application = NSApplication.sharedApplication
# create the window
frame = [100, 100, 152, 186]
mask = NSTitledWindowMask | NSClosableWindowMask
window = NSWindow.alloc.initWithContentRect(frame,
styleMask:mask,
backing:NSBackingStoreBuffered,
defer:false)
# assign a content view instance
content_view = CustomView.alloc.initWithFrame(frame)
window.contentView = content_view
# show the window
window.display
window.makeKeyAndOrderFront(nil)
window.orderFrontRegardless
application.run
100 | Chapter 5: Application Kit
Another way to display images is to use Interface Builder. Start by adding an image to
your Xcode project. Then open your .xib file in Interface Builder and drag an instance
of NSImageView (referred to as Image Well) from the Library to your UI. Select the new
UI element and open the Inspector. In the Image View Attributes, use the scroll-down
menu to pick your image. Voilà, you’re done!
NSImageView also optionally allows users to drag an image to your UI
and display it.
User Interface | 101

CHAPTER 6
Xcode
Apple likes to refer to Xcode as “the hub of your development experience.” Technically,
Xcode is a suite of developer tools designed to help developers write Cocoa applica-
tions. Most Cocoa developers spend their time in the Xcode IDE.
Xcode IDE
You don’t need to use an IDE to write Cocoa apps. But you will more than likely want
to use the tools in place to streamline development and avoid doing a lot of things
manually. As of the writing of this chapter, Xcode doesn’t support MacRuby as well as
it supports Objective-C, but the key features are supported: MacRuby templates,
schemes, and the integration with the Interface Builder suite.
To get acquainted with Xcode, you have the choice of starting a new project or opening
an existing one. At this point, I will assume you have never used Xcode and you want
to start a new MacRuby project.
Template
Start Xcode, click on Create a new Xcode project, select Application under Mac OS X,
choose MacRuby Application (Figure 6-1), and click the Next button.
You will then be offered a few options, as shown in Figure 6-2:
Product Name
The unique name of your application.
Company Identifier
Your company ID using the reverse domain notation. This starts with the top-level
domain, followed by a company or creator name, and then other subdomains, if
any. For instance, a department called iosdev.example.com would put com.exam
ple.iosdev here.
103
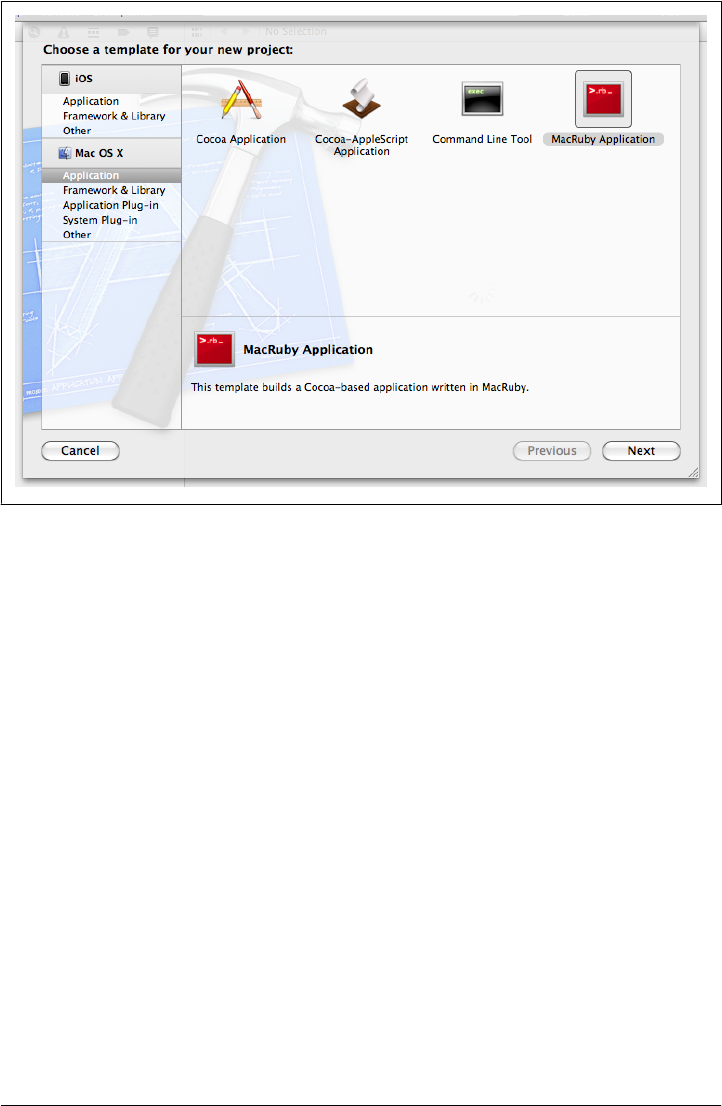
App Store Category
Optional category you want your application to appear under in the App Store.
Create Document-Based Application
A document-based application is an application (see http://developer.apple.com/
library/mac/#documentation/cocoa/conceptual/Documents/Documents.html) re-
volving around a document workflow. Think about a word processor or spread-
sheet application. The user can create, edit, save, and print specific versions of a
document. If your application requires this kind of workflow, you will want to
enable this option. You will find a lot of information about document-based ap-
plications online or in any decent Cocoa book. If enabled, you will be asked to
provide a document class name and a document extension. The document class
name will be used to create a class representing your document. The document
extension is used for reference.
Use Core Data
Core Data is covered more in depth in Chapter 7. Enabling the core data option
will set up your application with a delegate class that takes care of persistent stor-
age. If you need to store data for your user, you might want to consider enabling
this option.
Figure 6-1. Xcode 4 template chooser
104 | Chapter 6: Xcode
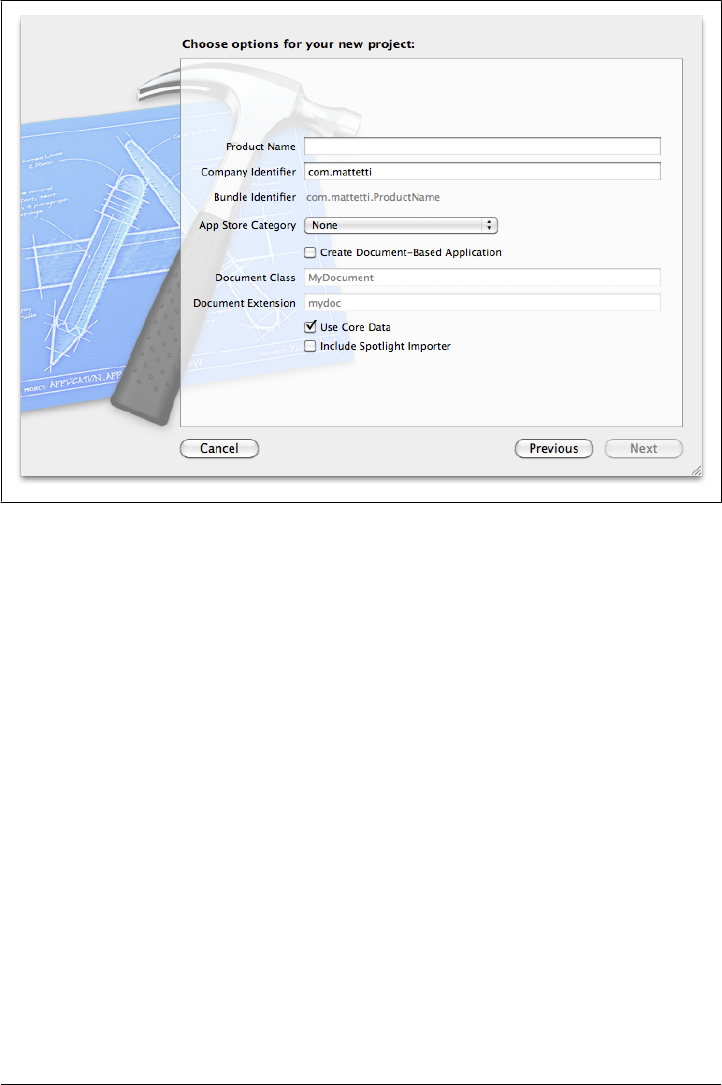
Include a Spotlight Importer
A Spotlight importer should be provided by all applications that support custom
document formats. The Spotlight importer parses your document format for rele-
vant information and assigns that information to the appropriate metadata keys,
making your files’ info available via Spotlight.
Choose a product name for your application and, after choosing the appropriate op-
tions, click Next. To keep things simple, I am going to assume you didn’t enable Docu-
ment-Based Application or Use Core Data. At this point, you will choose where to save
your project and Xcode will automatically create a local git repository for it. Git is a
distributed Source Control System that you can use to keep track of your changes,
experiment in code branches, and share code with coworkers. You can also use a third-
party service such as GitHub to safely save and share your code online.
The Xcode interface is a bit overwhelming at first. You might not know where to start
and what to do. Let’s take a few minutes to visit the interface so you can understand
the workflow.
Figure 6-2. Xcode MacRuby application template option chooser
Xcode IDE | 105
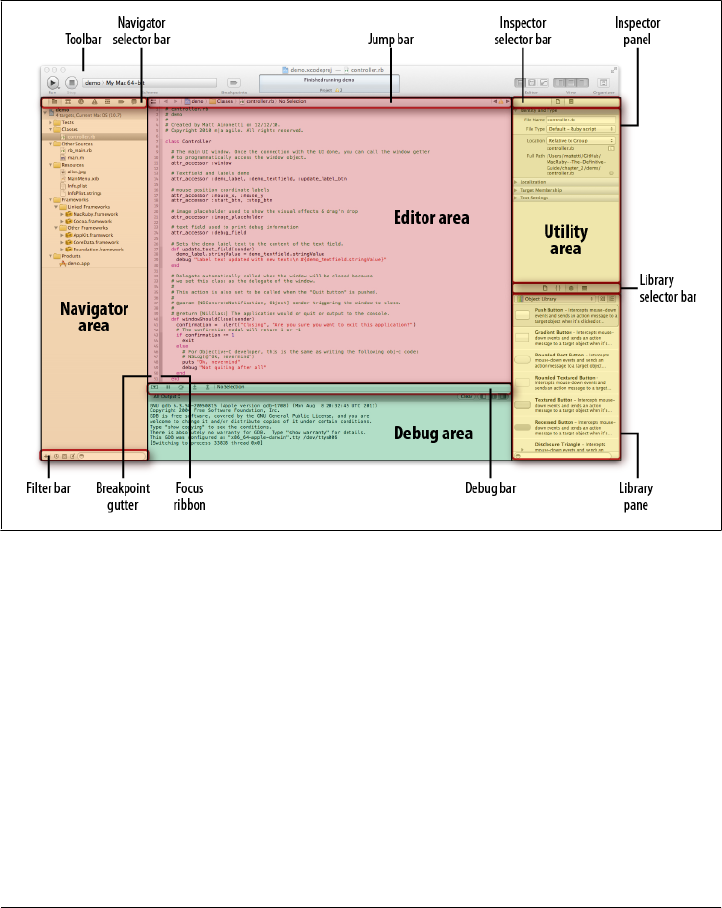
The interface, called Workspace window, is broken down into four main areas (Fig-
ure 6-3):
• Navigator area
• Editor area
• Debug area
• Utility area
Figure 6-3. Xcode Workspace window
Navigator Area
The left part of the UI is called the Navigator area. It contains icons that allow you to
switch from one navigator to the other. Seven navigators are available in Xcode 4:
Project navigator
Shows you the files used in your application.
Symbol navigator
Allows you to browse your Objective-C classes and methods (MacRuby isn’t sup-
ported yet).
106 | Chapter 6: Xcode
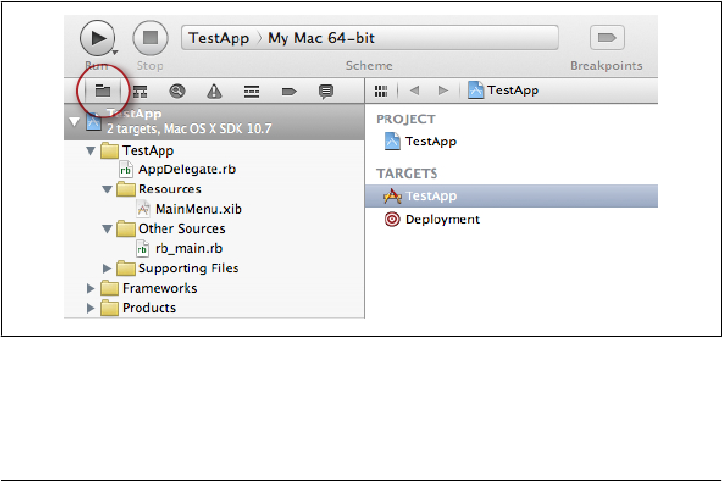
Search navigator
Allows you to search your code or the frameworks you use.
Issue navigator
Logs warning and errors during the build phases.
Debug navigator
Allows you to navigate a debugging session in an Objective-C project (MacRuby
isn’t supported yet).
Breakpoint navigator
Keeps track of your breakpoints (breakpoints in MacRuby aren’t currently sup-
ported in Xcode).
Log navigator
Allows you to navigate through previously generated logs.
If you look at the project navigator for a brand-new project, you will notice a few files,
as shown in Figure 6-4. Here is a list of the files you will find in a new project:
app-name -Info.plist
The application manifest file
MainMenu.xib
The application UI file
rb_main.rb
The application MacRuby main file (loaded by main.m)
AppDelegate.rb
The delegate class that handles the default view’s actions
Figure 6-4. Xcode project navigator
The rb_main.rb file loads the Cocoa framework and all the Ruby files available in your
build/scheme and starts the application.
Xcode IDE | 107
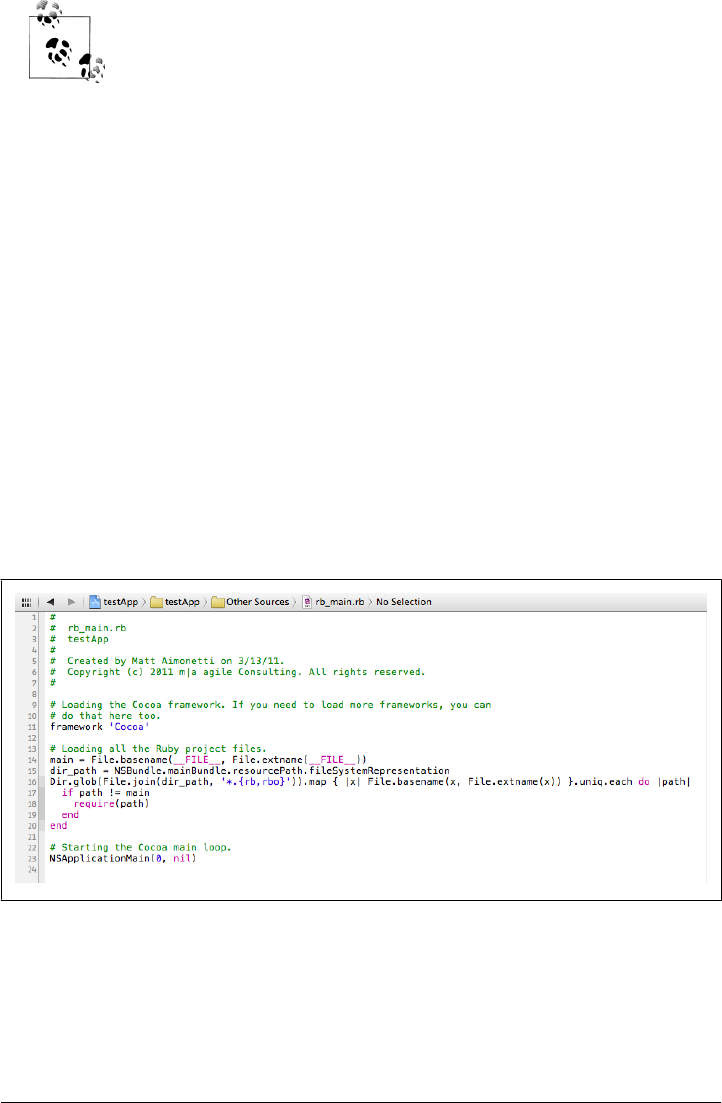
The MacRuby main file globs the resource folder for MacRuby files
(compiled or not) and loads them in the order they are found. If you
have dependencies within your files, you might want to manually re-
quire some specific files in the rb_main.rb file or declare the dependen-
cies at the top of each file (recommended). When the application is built,
all the files are moved to the resources folder of the app. That is why the
main file uses the NSBundle.mainBundle.resourcePath.fileSystemRepre
sentation Cocoa API method to look for the MacRuby files there.
The Navigator pane is easy to figure out, so let’s move on to an even more straightfor-
ward section: the editor.
Editor Area
The Editor (Figure 6-5) is the place where you edit your code. You can choose from
three editor modes, denoted by icons (Figure 6-6):
Standard editor
Normal code editing pane
Assistant editor
Additional editing panes
Version editor
Diff tool used to see the different versions/changes of a given file
Figure 6-5. Xcode Editor
108 | Chapter 6: Xcode
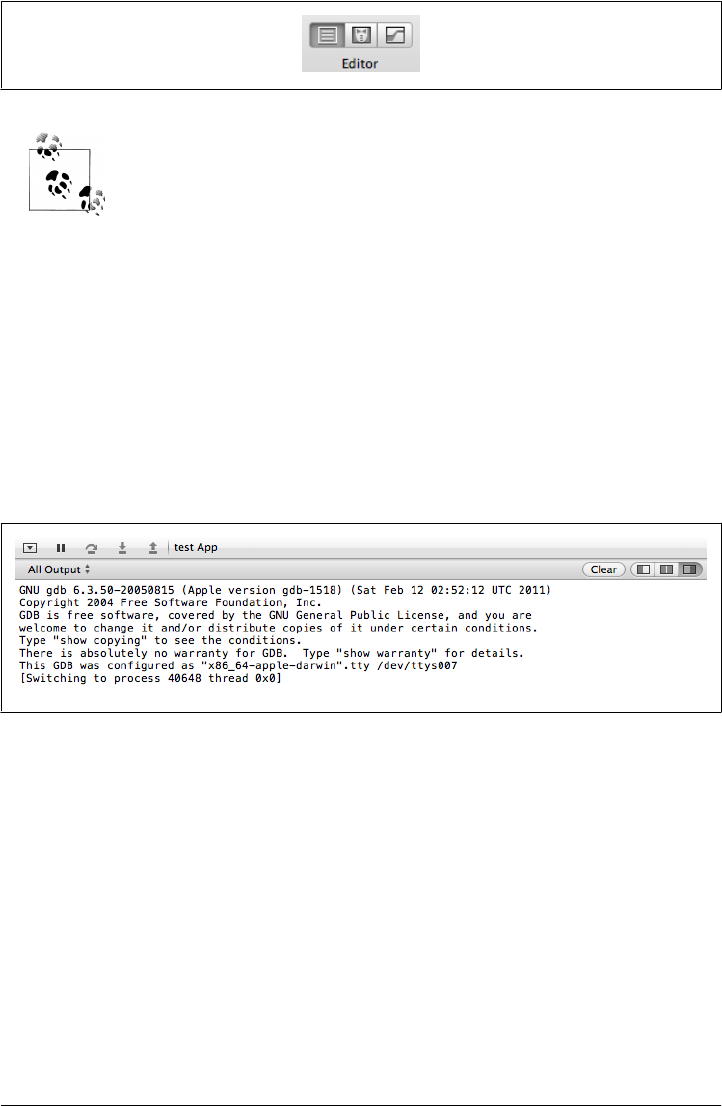
Because Xcode’s Ruby support isn’t great, I personally use MacVim to
edit Ruby code, and I set up the “Open with External Editor” feature to
use MacVim from within Xcode.
By default, the line numbers aren’t displayed. If you want to display them, open the
Xcode preferences, choose the Text Editing tab, and select “Show Line numbers.”
If you wish to create custom snippets, you will need to go into the Code Snippet Library
and create your own. (The Code Snippet Library is available from the Utility area.)
Debug Area
Located at the bottom of the screen, the Debug area displays debug information and
the data printed out by the application (Figure 6-7).
Figure 6-7. Xcode Debug area
You can print data to the Debug area by using Ruby’s puts or Cocoa’s NSLog:
puts "It is #{Time.now}"
NSLog "It is week number: %s" % Time.now.strftime("%W")
The output is as follows:
It is 2011-03-20 21:04:03 -0700
2011-03-20 21:04:03.774 test App[40827:903] It is week number: 11
As you can see, the NSLog call is timestamped, and the app name is printed along with
a reference ID before the string you request? This area of the workspace is really
straightforward and shouldn’t cause you any trouble.
Figure 6-6. Xcode Editor modes
Xcode IDE | 109
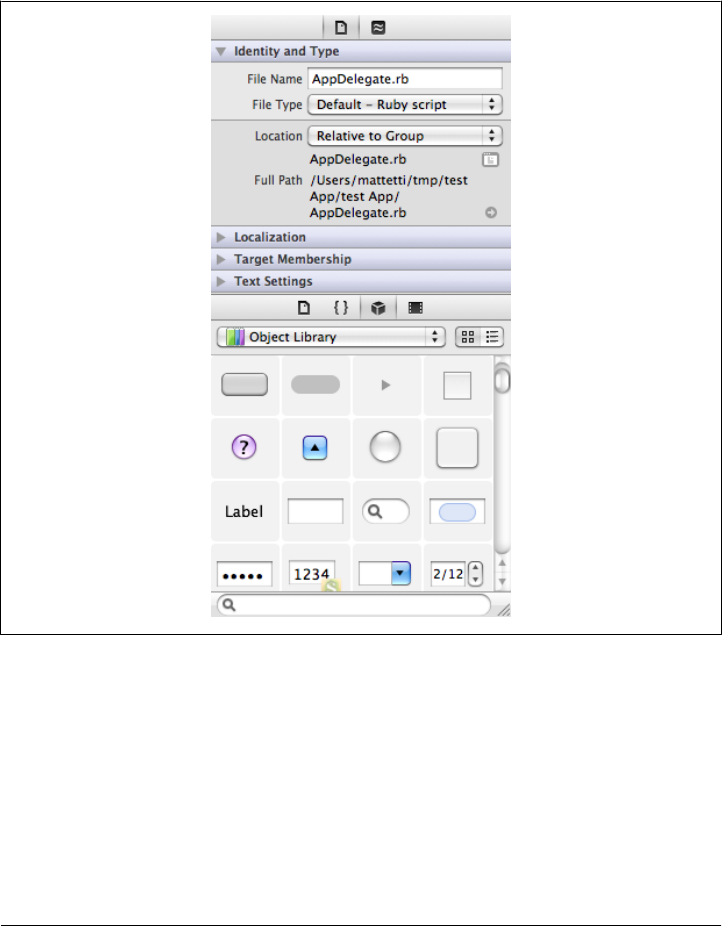
Utility Area
The Utility area, located on the right side of the screen, can seem complex at times.
The reason is that this area is contextual: in other words, the options will change de-
pending on what you are editing. As you can see in Figure 6-8, the Inspector selector
bar has only two top tabs, the one we are on (File Inspector) and the Quick Help tab.
Figure 6-8. Xcode Utility area when editing a Ruby file
The bottom part of the Utility area, called the Library pane, on the other hand, has four
tabs. The icons in this pane, shown in Figure 6-8, from left to right, refer to:
• File Template Library (list of file templates)
• Code Snippet Library (list of code snippets)
• Object Library (list of UI-related objects)
• Media Library (list of media to use in your app)
110 | Chapter 6: Xcode

Now, if we were to edit a UI file such as an .xib file, the top menu (Inspector pane)
would look quite different (Figure 6-9).
Figure 6-9. Xcode Utility area when editing an .xib file
This time, in addition to File inspect and Quick Help, we have six more tabs at the very
top:
• Identity Inspector (overall settings of a given UI element)
• Attributes Inspector (attribute details of a given UI element)
• Size Inspector (lets you define the size and resizing behaviors of a given UI element)
• Connections Inspector (relationships with other objects)
• Bindings Inspector (binding details, discussed in “Bindings” on page 80)
• View Effects Inspector (appearance settings for a given item)
Xcode IDE | 111
As you can see, the Utility area is useful mainly when editing a UI. As a matter of fact,
I hide this area most of the time and display it only when editing my UI. There are two
ways to show and hide areas via the View menu and via the workspace buttons (Fig-
ure 6-10).
Figure 6-10. Xcode view selector
112 | Chapter 6: Xcode

CHAPTER 7
Core Data
Core Data is Cocoa’s model and framework for manipulating and storing data. In a
nutshell, Core Data provides a nice way to handle relational object persistence without
having to worry about the underlying storage.
What do you get from it?
• Key-value coding and key-value observing
• Validation
• Undo/redo support
• Relationship maintenance
• Querying, filtering, and grouping
• Version tracking and optimistic locking
• Schema migration
• A memory-optimized solution
• Integration with Apple’s tool chain (XCode, Interface Builder, and Instruments)
But remember that Core Data is not a database replacement. Even though you can set
Core Data to use SQLite as a data store, Core Data doesn’t support sophisticated da-
tabase operations such as joins. All it supports is the basic CRUD operations. See the
Wikipedia entry for CRUD interface. If you are interested in using a database such as
SQLite, look at the various Ruby ORMs such as Sequel.
Data Model
At the heart of Core Data is a rich data modeling solution based on simple tools and
configuration. The modeling is pretty close to a database design and if you have any
experience with databases, you should be able to adapt really quickly.
113
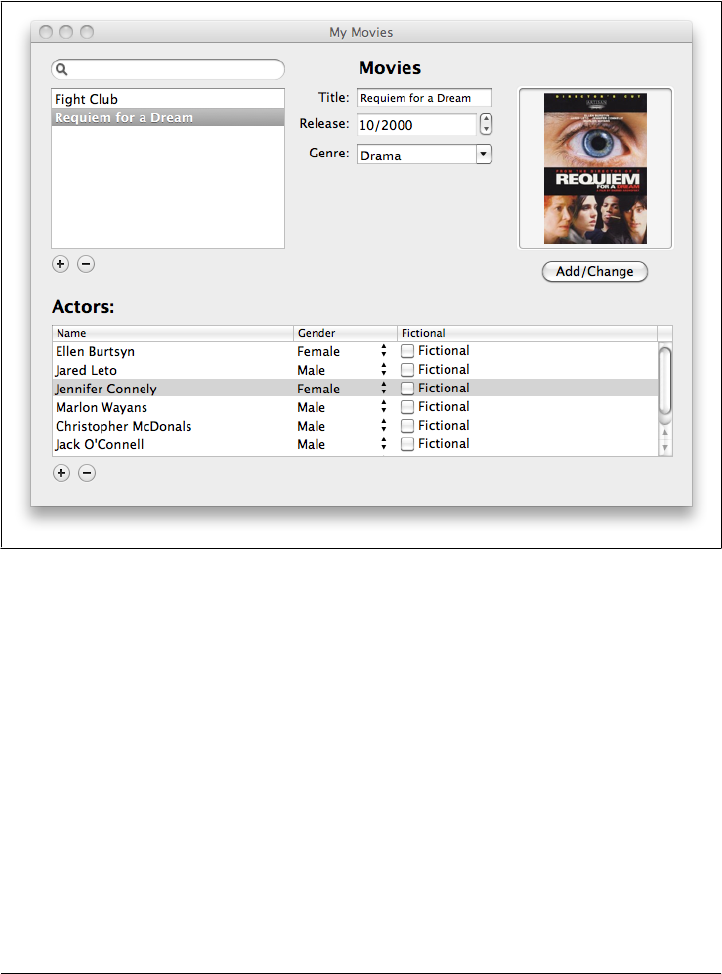
The best way to understand how Core Data works is to create a simple data model.
Let’s build a simple example application: a movie library. At the end of this chapter,
we will have built a persisting (saved to disk) movie library that looks like the one shown
in Figure 7-1.
Figure 7-1. Movie library using Core Data
To get there, we are going to use Xcode. It will dramatically reduce the amount of code
we have to write. As a matter of fact, we are probably going to write less than 50 lines
of code in total! Start Xcode and create a new MacRuby application called
CoreDataExample, and don’t forget to enable the Use Core Data option. This template
handles persistence through a file with the extension .xcdatamodel and an application
delegate class.
The Data Model and the Entity
An entity in Core Data is a bit like a container that structures the objects it holds. It
can be loosely compared to a database table, but it differs in some major ways. For
instance, entities may be arranged in an inheritance hierarchy and are directly tied to
a class.
114 | Chapter 7: Core Data
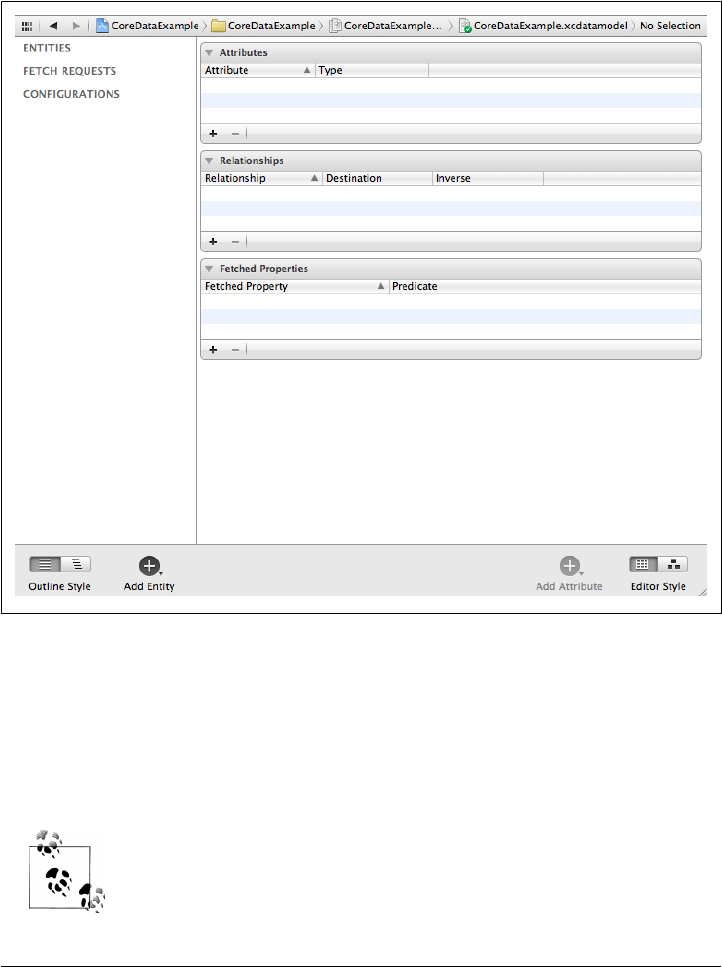
Let’s create an entity for our movies. Browse the model folder; you should see a file
called CoreDataExample.xcdatamodeld. Select this file. You should see something sim-
ilar to Figure 7-2. As we build our entity, this file will hold the data structure that Core
Data will use.
Figure 7-2. View of a blank xcdatamodel file in Xcode 4
Click Add Entity and name the new entity Movie.
We don’t need to change the defaults. The entity is represented by the
NSManagedObject class and doesn’t inherit from any other entities (see the details in the
Data Model Inspector).
The Data Model Inspector is available in the Utilities area. If you can’t
see it, you can display it via the top menu: View → Utilities → Data Model
Inspector.
Data Model | 115
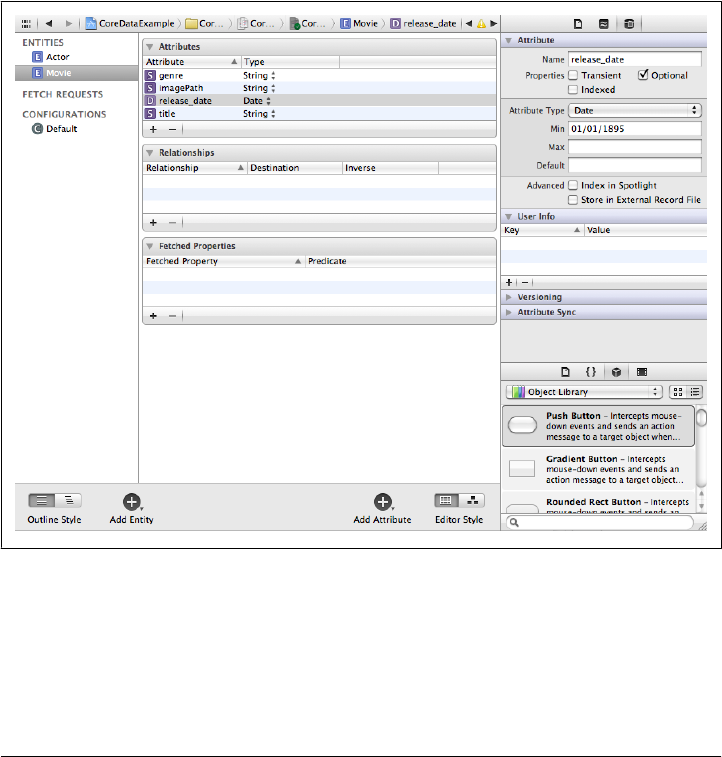
Adding Attributes
An attribute is something describing data, such as a movie’s title. Attributes are to an
entity as columns are to a table: until we add attributes, an entity is useless. Attributes
can be added different ways and are edited using the Data Model Inspector. After se-
lecting the entity, click the big Add Attribute button at the bottom of the screen. Add
the following attributes with the appropriate settings:
•title (string, required)
•genre (string, optional)
•imagePath (string, optional)
•release_date (date, optional, minimum value: 01/011/1895)
At this point, your model should look like Figure 7-3 in Xcode 4.
Figure 7-3. Movies’ attributes in Xcode 4
116 | Chapter 7: Core Data
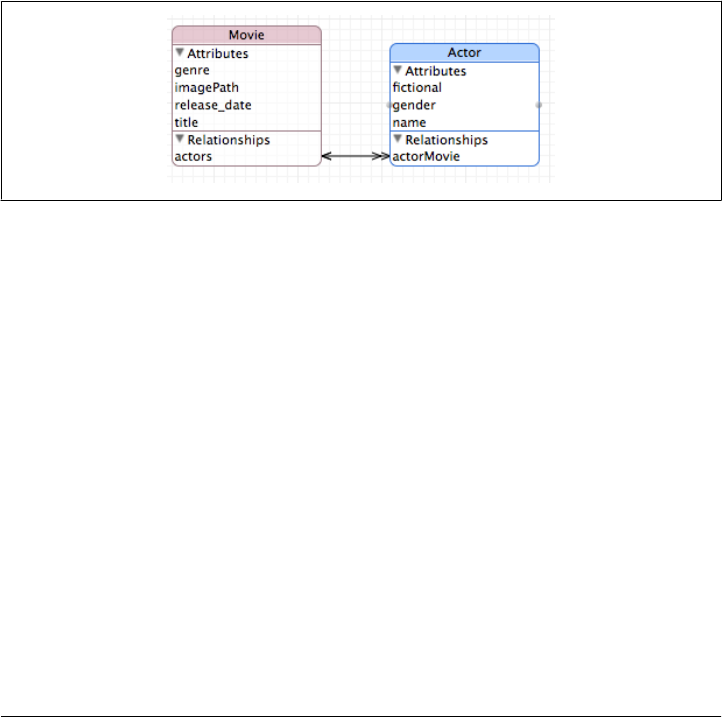
Relationships
Relationships between entities are another very important aspect of model design, just
as foreign keys provide relationships between database tables. An example of a rela-
tionship in our case is between a movie and actors. A movie can have many actors. So
we’ll model this as a one-to-many relationship between a movie and an actor. (In real
life, you’d have to do something more complicated, because an actor can also be in
many movies, but we’ll stick to one-to-many for now.)
First, we’ll create a second entity, an Actor with the following attributes:
•name (string)
•gender (string, default value: Female)
•fictional (Boolean, default value: NO)
We will now create a relationship between Movie and Actor, as illustrated in Figure 7-4.
Figure 7-4. Relationships between our entities
Select Movie and add a new relationship called actors. Set the destination to Actor—
don’t worry about the inverse relationship for now—and set the relationship to be
optional and plural (To-Many Relationship).
Now select Actor and create a new relationship. The new relationship should be named
actorMovie with Movie as a destination and actors as the inverse relationship. Make
sure the Optional checkbox is enabled and the Plural checkbox is not enabled. You can
then see the final relationship in Xcode as Figure 7-5. Notice that the Movie’s inverse
relationship has been set automatically.
Setting Up Controllers
We’ll spend most of the rest of this chapter in what used to be called Interface Builder,
the UI editor for Xcode. Since Xcode 4, Interface Builder is built into Xcode. Depending
on the version you are using, click or double-click the .xib file shown in the Xcode
navigator. What we want to do is create a UI that will let us create and edit existing
movies and their related data.
Data Model | 117
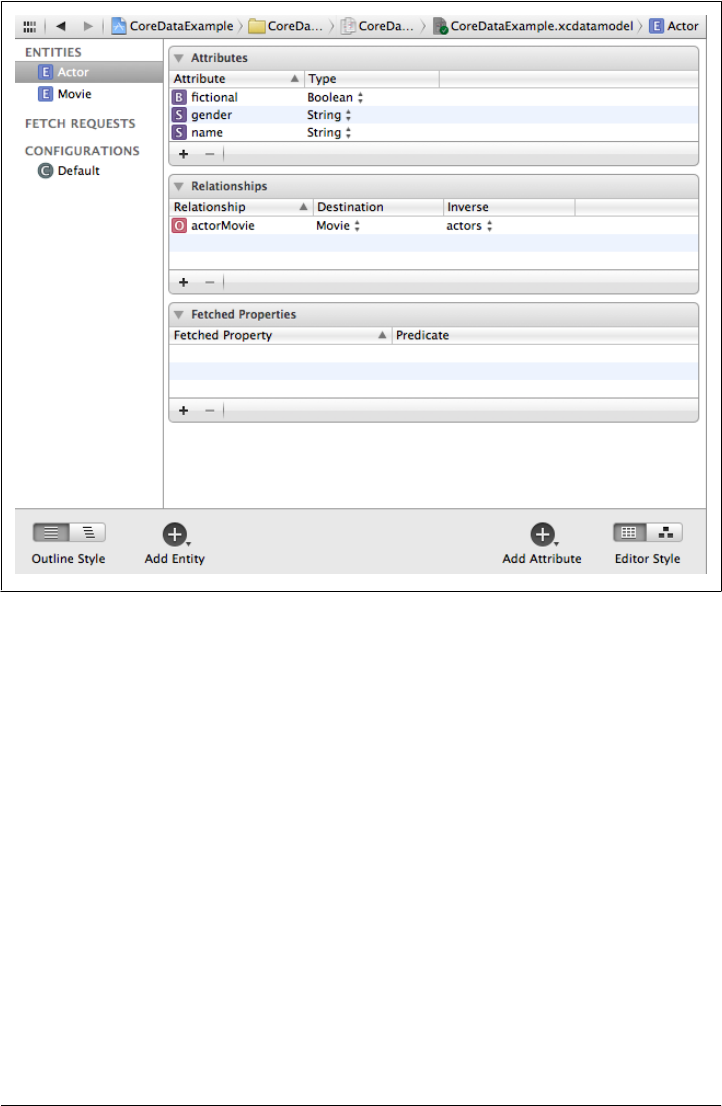
The first step is to create a UI object that will retrieve and store all our movies. The best
object to use for that is NSArrayController. This class, which is compatible with Cocoa
bindings (it conforms to a protocol allowing you to automatically bind UI elements to
objects), manages a collection of objects and provides selection management and
sorting capabilities. We will need two array controllers—one for our movies and one
for their actors:
1. Drag and drop an NSArrayController instance to the Object list, in the editor.
2. Edit the controller’s attributes to look like Figure 7-6, by doing the following:
• Change the mode from Class to Entity.
• Name the entity Movie.
• Make sure the Prepare Content flag is on.
3. Change the Array Controller’s label to “movies” (use the identity label field in
Identity Inspector)
4. Finally, edit the movies array controller binding’s parameters to bind the Managed
Object Context to the AppDelegate class. The Model Key Path should be automat-
ically set to managedObjectContext, as shown in Figure 7-7.
Figure 7-5. The Movie/Actor relationship viewed from the Movie entity
118 | Chapter 7: Core Data
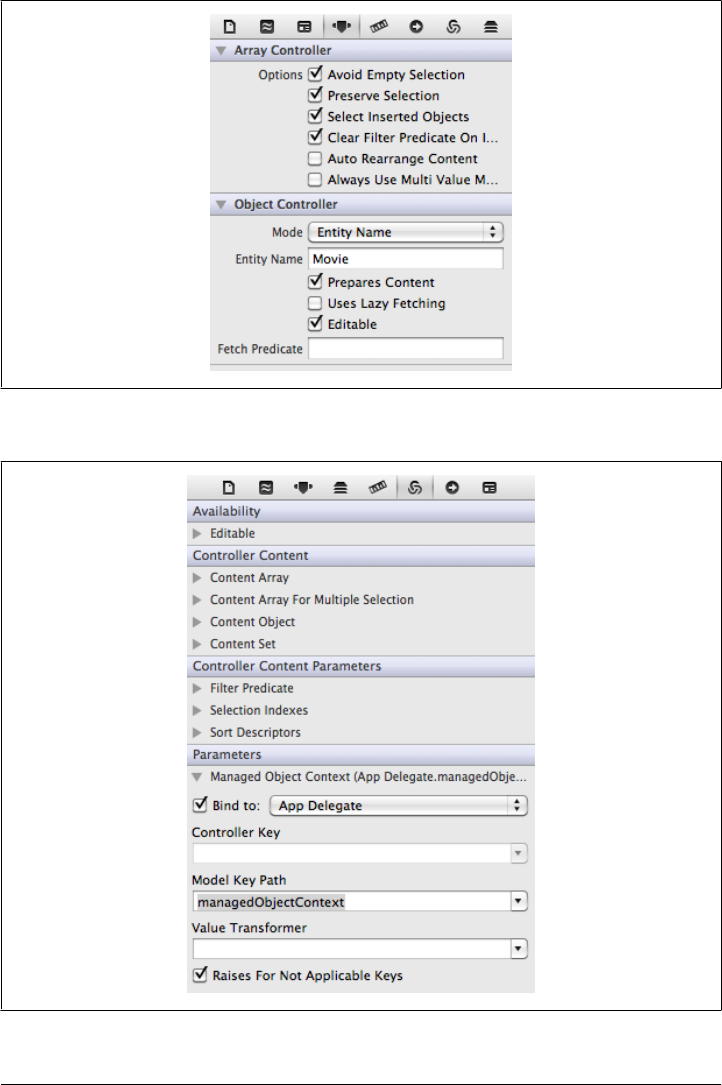
Figure 7-7. Array controller bindings property set
Figure 7-6. Array controller attributes property set
Data Model | 119
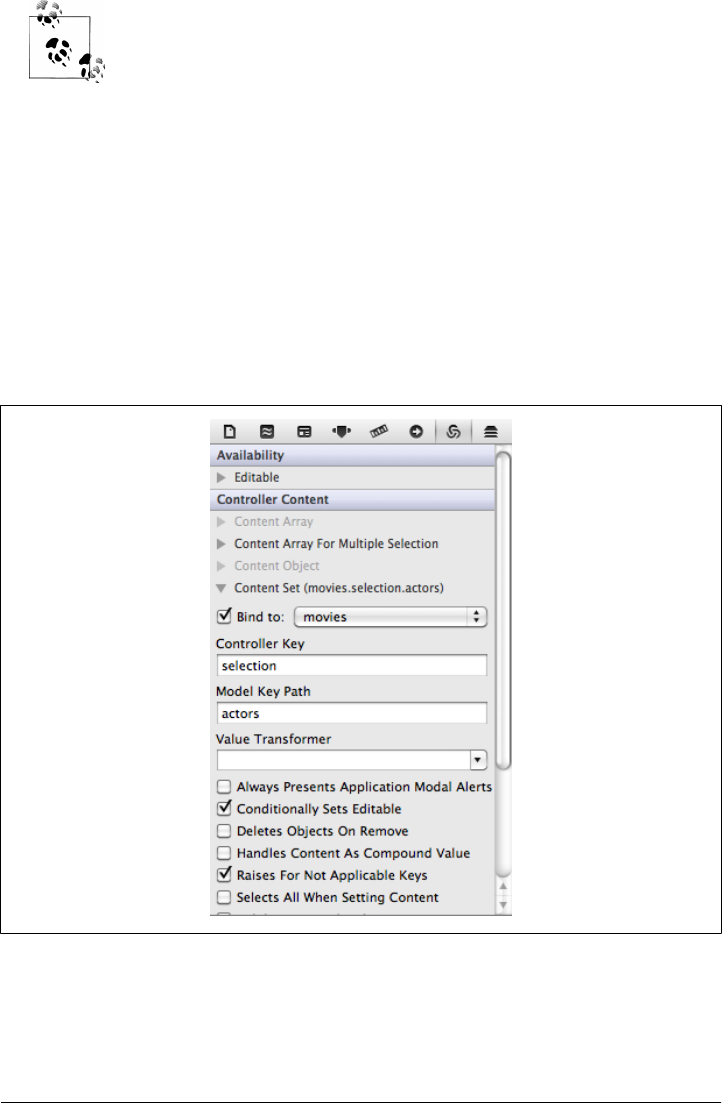
The Object Library, where you will find NSArrayController, is inside the
Utility area. You can display it via the top menu: View → Utilities →
Object Library. If you want a better view of the objects and placeholders,
click the small arrow at the bottom of the long column of icons to the
left of the UI preview.
We’ve finished with the Movie entity. Now go through a similar process for Actor.
Create an NSArrayController called actors with its mode set to the Actor entity name
and the Prepare Content flag checked. However, this time the bindings will be slightly
different. We want to bind the actor’s controller to the movie’s actors so we don’t
display all the actors in memory, but only the ones related to the current edited movie.
To do that, bind the Content Set value to movies. Set the Controller Key to selection
and the Model Key Path to actors, as shown in Figure 7-8. Don’t forget to also bind
the Managed Object Context in the parameters subsection to the AppDelegate class and
the Model Key Path to managedObjectContext.
Figure 7-8. Actors’ content set bindings
120 | Chapter 7: Core Data
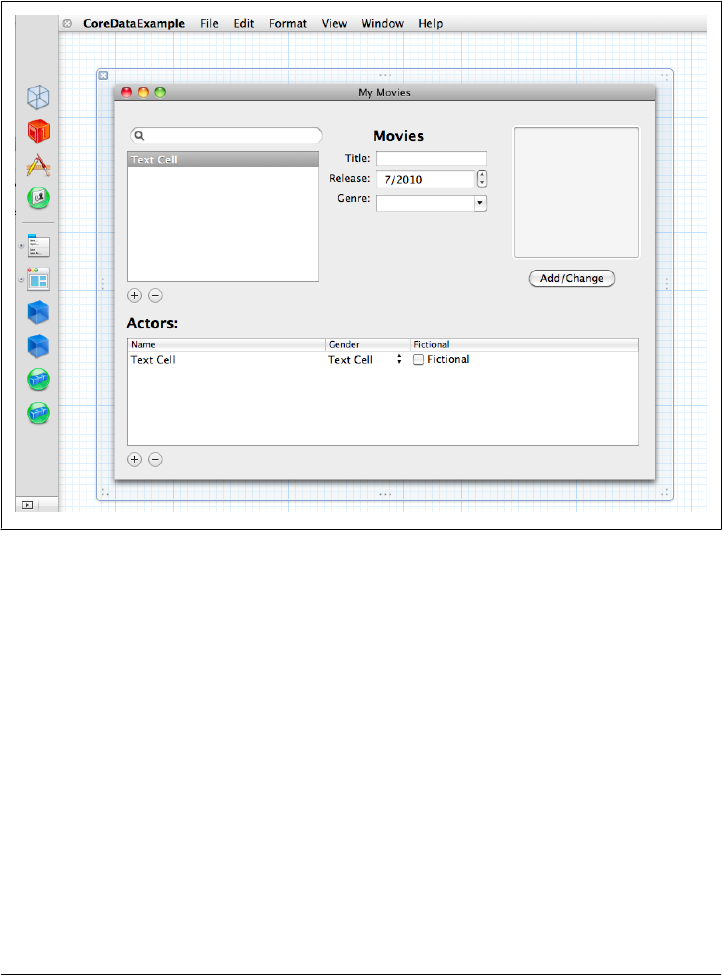
User Interface
So far, we’ve designed our model and created two array containers to hold our data.
It’s now time to add some UI elements. The end result should look like Figure 7-9.
Figure 7-9. The finished UI
Movies
We’ll start with the Table View, which will list all the movies. The goal here is to allow
sorting and selection of movies:
1. Drag and drop a Table View into your main window.
2. Expand the Scroll View - Table View tab to access its Table View.
3. Change the attributes (no headers, 1 column, source list highlight) to match Fig-
ure 7-10.
4. Expand the Table View to access its Table Column
5. Bind the table view’s value to movies.arrangedObjects.title, as shown in Fig-
ure 7-11.
6. Change the attributes to have a sort key and a selector, as shown in Figure 7-12.
User Interface | 121
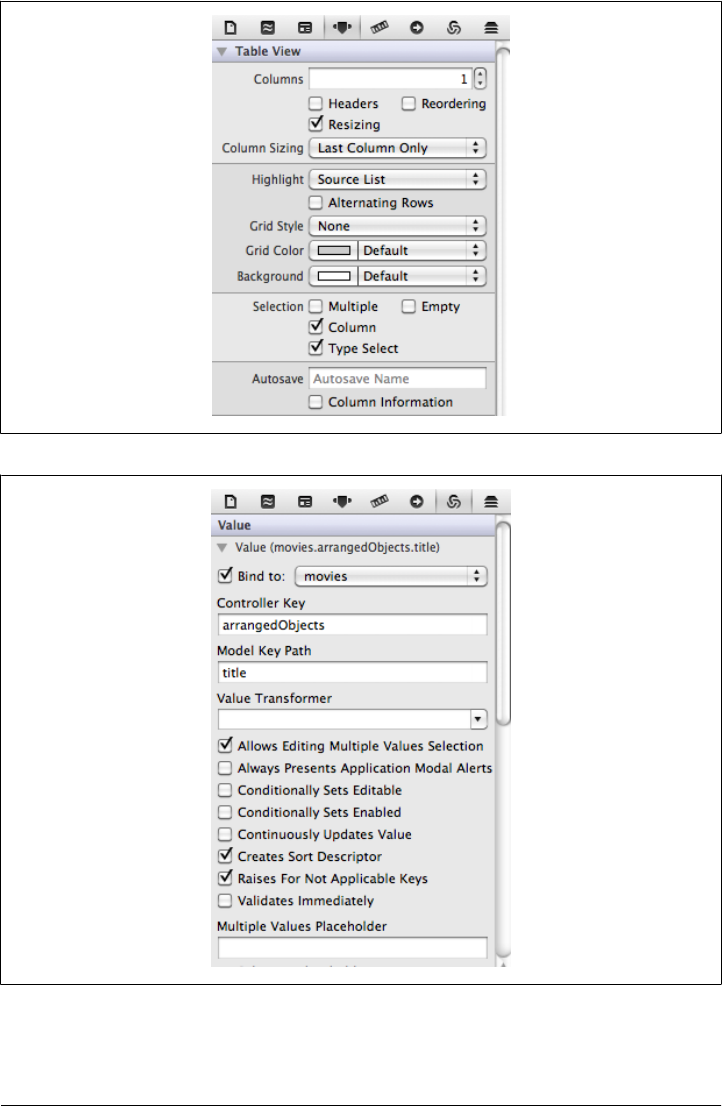
Figure 7-11. Table Column’s bindings
Figure 7-10. Table View attributes for Movies
122 | Chapter 7: Core Data
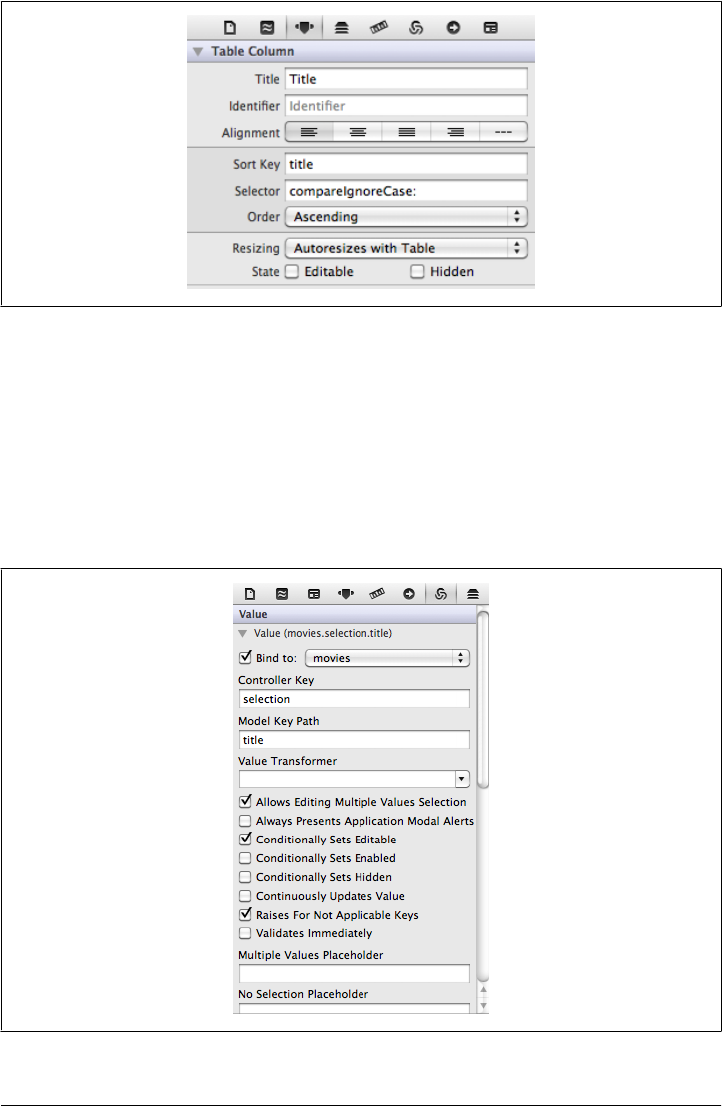
Figure 7-12. Table Column’s attributes
Now that we have a way to display our movie titles, we need a way to display more
information and to edit this information. We are going to add three fields: one for the
title, one for the release date, and one for the genre. Assign a label to identify each field
and use a Text Field data type for the title, a Date Picker for the release date, and a
Combo Box for the genre.
Each field’s value needs to be bound to the related array controller selection’s attribute.
For instance, the title’s text field is shown in Figure 7-13.
Figure 7-13. Title’s text field binding
User Interface | 123
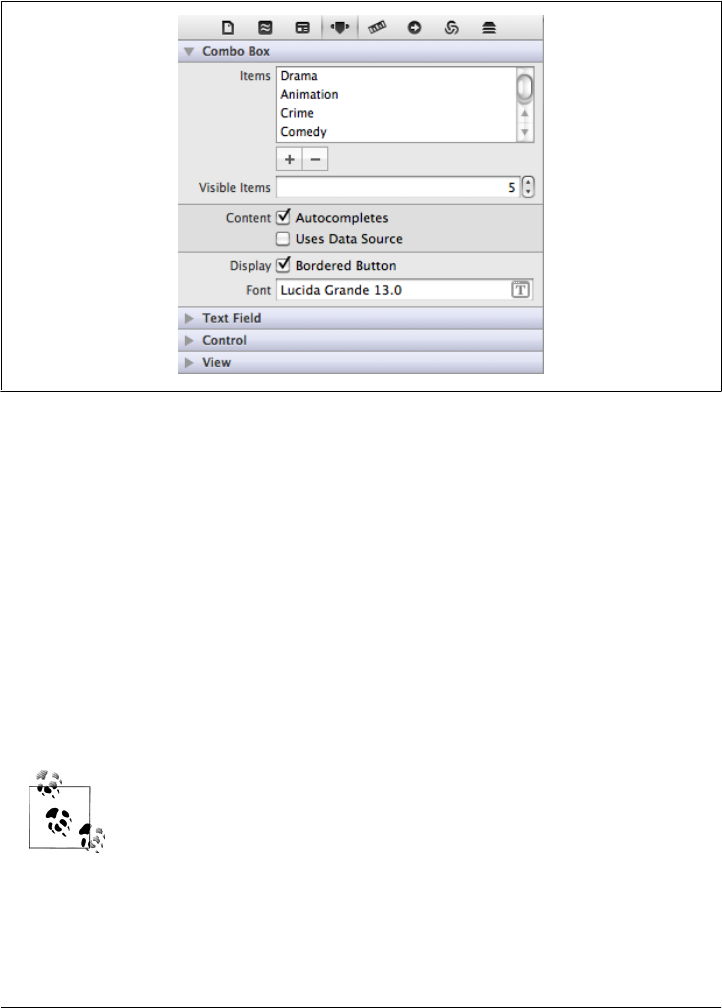
The Combo Box is slightly different, since we need to define the available values. This
can be done in the Model, but to keep it simple, we are going to hardcode the values,
as shown in Figure 7-14 (don’t forget to bind the box to movies.selection.genre).
Figure 7-14. Hardcoded Combo Box items
We also need two buttons, one to add a new movie and one to remove an existing
movie. The buttons’ actions must be bound to the movies array controller:
1. Add two buttons to the UI (the style doesn’t matter).
2. Edit the first button’s attributes to use the NSAddTemplate image and a “Round Rect”
bezel.
3. Edit the second button’s attributes to use the NSRemoveTemplate image and a Round
Rect bezel.
4. Select both buttons. Click Editor → Size to Fit.
5. Set the + button’s selector to the movies array controller add: action.
6. Set the - button’s selector to the movies array controller remove: action.
To set the buttons’ selector, right-click a button, expand the Sent Ac-
tions section, click the round icon on the same line as the selector, drag
the cursor to the array of your choice, and then choose the appropriate
action.
Build and run the application to make sure it works fine. You should be able to add a
new movie by clicking the + button, then select the new row and edit the attributes.
Try it a few times to make sure everything works as expected.
124 | Chapter 7: Core Data

Art Cover
What would a movie library be without art covers? We are going to write some code
to handle the movie covers. We need to let our users choose a cover and we need to
display it when the movie is selected. That will actually be the only code manually
written in this chapter.
To give the user the option to add/change/display movie covers, we need to start writing
our action and wire it to our views. The wiring is done through an outlet (IBOutlet)
defined in our AppDelegate class and keeping a reference to our movies NSArrayControl
ler. MacRuby makes that really easy: just define an attribute writer or attribute acces-
sor, and Xcode will see it as an outlet. By default, the MacRuby Core Data Application
template defines an attribute accessor for the main window. This creates a getter and
a setter for the window, allowing us to call it from within our code as window. We now
need to add an accessor/outlet for movies, the array controller we have created in the
view:
class AppDelegate
attr_accessor :window
attr_accessor :movies
Don’t forget to wire the AppDelegate movies outlet to the movies controller (right-click
AppDelegate in the UI editor and connect the two objects). We can now write the action
code as follows:
def add_image(sender)
movie = movies.selectedObjects.lastObject
return unless movie
panel = NSOpenPanel.openPanel
panel.canChooseDirectories = false
panel.canCreateDirectories = false
panel.allowsMultipleSelection = false
panel.beginSheetModalForWindow window, completionHandler: Proc.new{|result|
return if (result == NSCancelButton)
path = panel.filename
# use a GUID to avoid conflicts
guid = NSProcessInfo.processInfo.globallyUniqueString
# set the destination path in the support folder
dest_path = applicationFilesDirectory.URLByAppendingPathComponent(guid)
dest_path = dest_path.relativePath
error = Pointer.new(:id)
NSFileManager.defaultManager.copyItemAtPath(path, toPath:dest_path, error:error)
NSApplication.sharedApplication.presentError(error[0]) if error[0]
movie.setValue(dest_path, forKey:"imagePath")
}
end
Let’s break it down to make sure everything is clear:
movie = movies.selectedObjects.lastObject
return unless movie
User Interface | 125

We start by fetching the selected movie from the movies NSArrayController. If nothing
is selected, we just exit the action.
Then we open a panel (see http://developer.apple.com/library/mac/#documentation/Co
coa/Reference/ApplicationKit/Classes/NSOpenPanel_Class/Reference/Reference.html)
and set its settings:
panel = NSOpenPanel.openPanel
panel.canChooseDirectories = false
panel.canCreateDirectories = false
panel.allowsMultipleSelection = false
Finally, we call the beginSheetModalForWindow API, which takes a C block as its last
argument. If you need to refresh your memory concerning C blocks, refer to
“Blocks” on page 137.
Here is the API call:
panel.beginSheetModalForWindow window, completionHandler: Proc.new{|result|
return if (result == NSCancelButton)
path = panel.filename
# use a GUID to avoid conflicts
guid = NSProcessInfo.processInfo.globallyUniqueString
# set the destination path in the support folder
dest_path = applicationFilesDirectory.URLByAppendingPathComponent(guid)
dest_path = dest_path.relativePath
error = Pointer.new(:id)
NSFileManager.defaultManager.copyItemAtPath(path, toPath:dest_path, error:error)
NSApplication.sharedApplication.presentError(error[0]) if error[0]
movie.setValue(dest_path, forKey:"imagePath")
}
We are calling beginSheetModalForWindow on panel and passing two arguments: the
Outlet pointing to our window and a proc that is called when the modal is closed. The
proc takes an argument that reflects the button pressed by the user. The Objective-C
method signature of this API looks like this:
- (void)beginSheetModalForWindow:(NSWindow *)window
completionHandler:(void (^)(NSInteger result))handler
If the handler is passed a result matching the constant value NSCancelButton, the user
has changed his mind and we should exit the action. Otherwise, we collect the selected
filename from the panel. We also create a destination path by appending a global unique
ID to the applicationFilesDirectory path. applicationFilesDirectory, defined in the
application template, specifies where all the application’s files are saved. In this case,
the value of applicationFilesDirectory is ~/Library/Application Support/CoreDataEx-
ample/.
Once we know where we want to save the file, we can copy it using NSFileManager. We
then check that the error pointer doesn’t contain any errors. If it does, we present them
to the user via the NSApp.presentError call. Finally, we set the imagePath of our movie.
Now it’s time to wire our brand new action in the UI.
126 | Chapter 7: Core Data
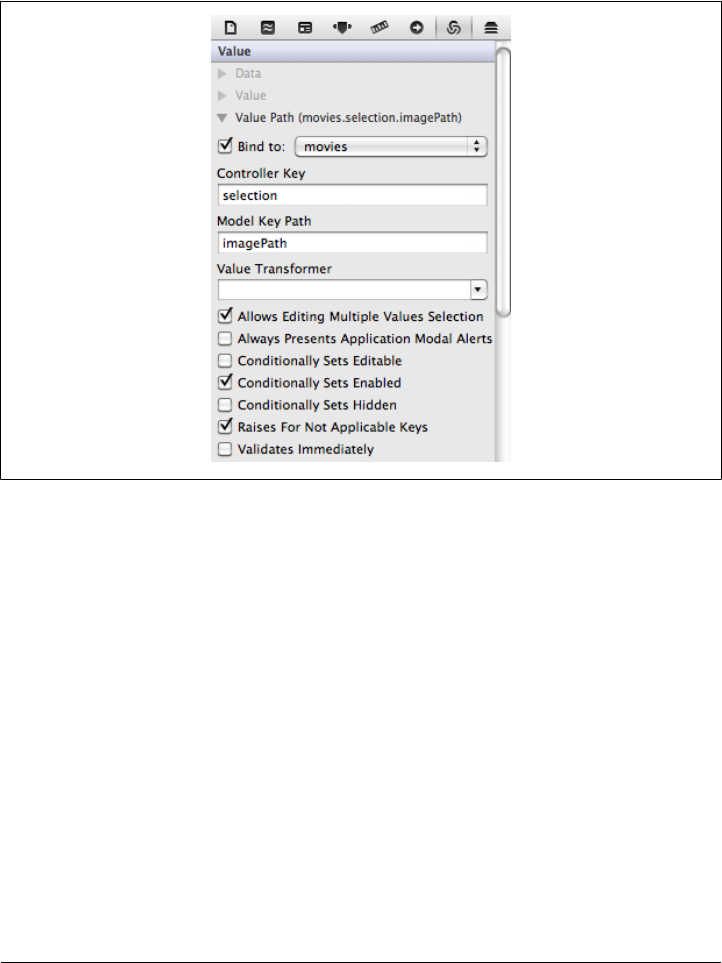
Start by dragging an Image Well (instance of NSImageView) from the Object Library to
the main window. This will display the art cover once the user chooses it. Bind its Value
Path to movies.selection.imagePath. In other words, bind the Image Well’s Value Path
to movies, and set the Controller Key to “selection” and the Model Key Path to image-
Path, as shown in Figure 7-15.
Figure 7-15. Image View bindings
Now that the bindings are set, the UI will display the image from our data store. But
we still need to define a way for the user to use the code we just wrote and let him add
or change a movie’s cover. If you’ve followed along carefully, you should be able to
implement the next step on your own. But just in case, here it is:
1. Add a new button
2. Wire the button action to our add_image: method as shown Figure 7-16.
Your UI should look similar to what’s shown in Figure 7-17. We’ve built the table view,
the various buttons, and the image preview, but we are missing the search box (we’ll
work on that last) and the bottom part.
User Interface | 127
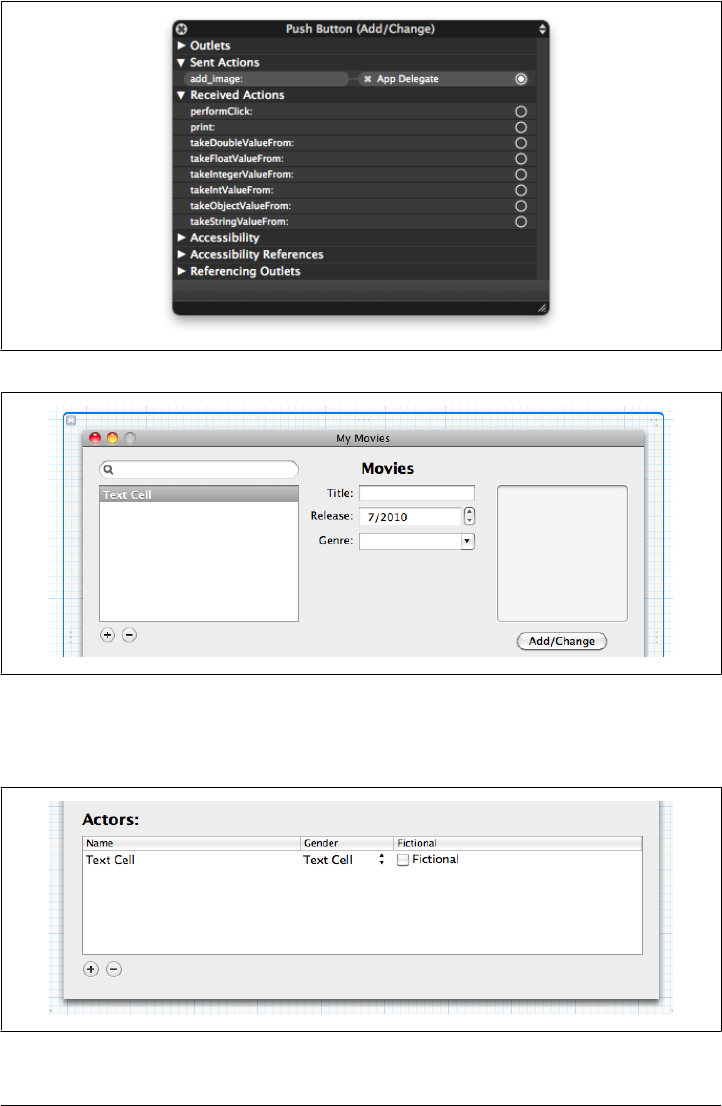
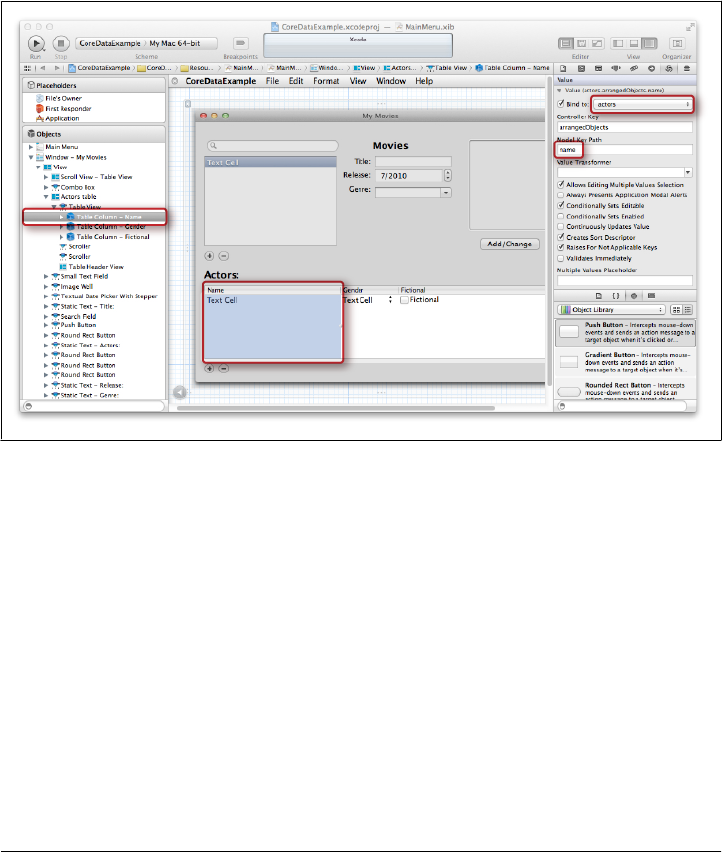
Actors
The lower part of the UI shows the actors for a selected movie. We are going to set a
new Table View exactly the same way as the movies’ table view, but instead of binding
its elements to the movies array controller, we are going to bind them to the actors array
controller.
Because we just went through these steps, we won’t go into the binding details. You
can look at the example source code if you can’t set the bindings properly.
Figure 7-19 shows a screenshot of the actor’s name column.
Figure 7-19. Bindings for the Actor’s name column
Something you might not know how to do yet is to use a different type of column cell.
As you can see in the example, the actors’ table uses three different cell types: Text
Field Cell, Combo Box Cell, and Button Cell.
For that, you first need to add a new column, select the actors’ table view, and open
the inspector. Once there, set the total amount of columns you want (Figure 7-20).
User Interface | 129
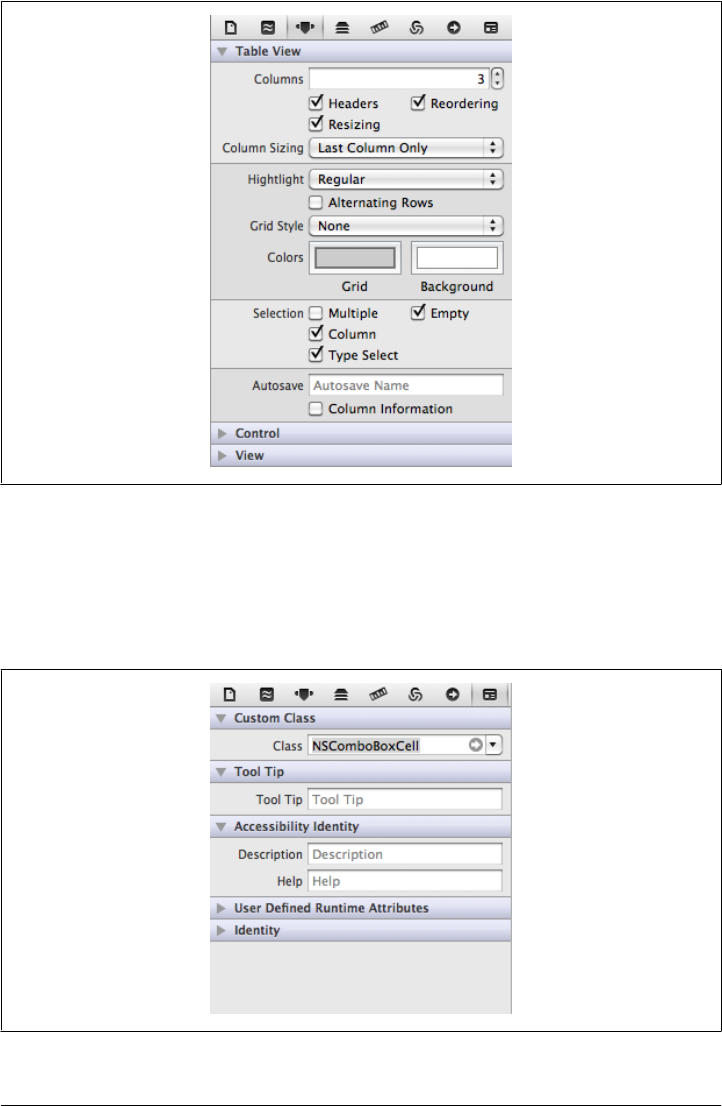
Figure 7-20. Table View columns settings
Then extend the newly added column, choose the cell, and open the identity tab. In
the Custom Class field pick another cell class such as NSButtonCell, NSComboBoxCell,
NSSliderCell, or NSImageCell (Figure 7-21).
Figure 7-21. Changing the class of a cell
130 | Chapter 7: Core Data
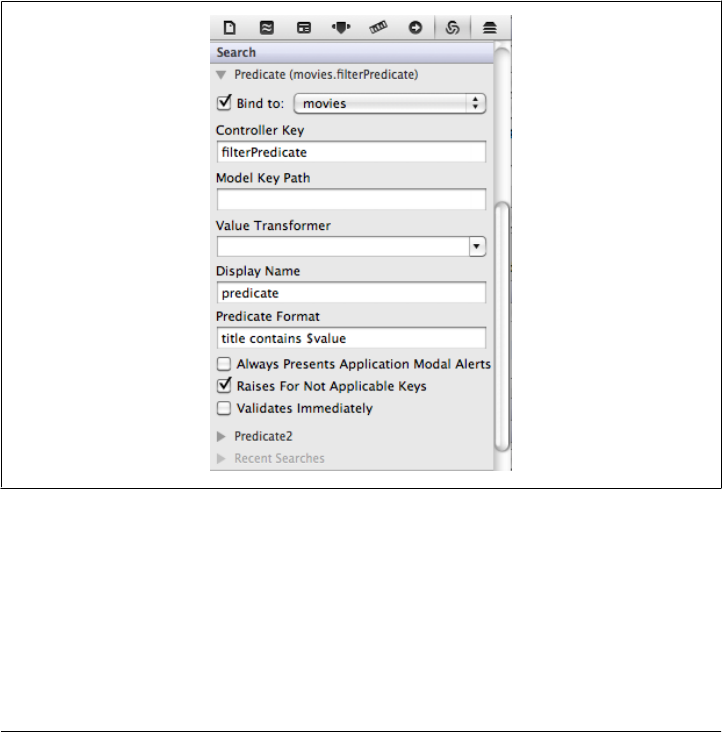
You also need to bind the combo box’s value to actors.selection.gender and the but-
ton cell’s value to actors.selection.fictional.
Search
The last missing part is the search field at the top right of our UI. The search field allows
us to search for movies by name. Drag and drop the Search Field icon (representing the
NSSearchField class) from the Object Library to the UI. Once the field is positioned,
we need to set some bindings so the text entered in the text field is used to search the
movies by title.
As shown in Figure 7-22, we need to bind the search predicate value to the Movies array
controller. Apple has a lot of documentation about using predicates (see http://developer
.apple.com/library/mac/#documentation/Cocoa/Conceptual/Predicates/predicates.html)
In this example, we’ll just scratch the surface.
Figure 7-22. Search field bindings
As you can see in Figure 7-22, when binding the search to the Movies array, we also set
the Controller Key value to filterPredicate (this is called a predicate binding). This
means we are going to set a predicate for an array controller to filter the content array
(in our case Movies). This process is also well documented by Apple (see http://developer
.apple.com/library/mac/#documentation/Cocoa/Reference/CocoaBindingsRef/Cocoa
BindingsRef.html). The last missing piece is the predicate format, which is a bit like the
User Interface | 131
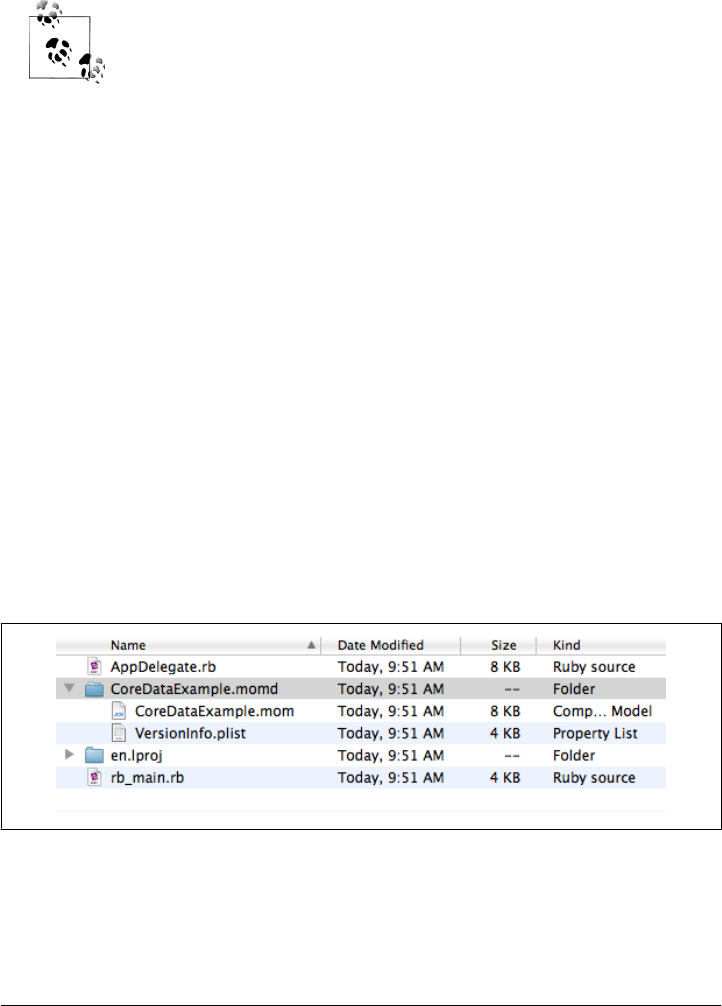
query string. In our case, because we want to find any movies containing the string
entered in the search field, the predicate format looks like title contains $value, where
$value is replaced by the value of the text field.
You can set multiple predicates, and the user can use the arrow in the
search field to choose the desired predicate. If you want to do that, you
need to make sure to set a Display Name value so the user knows how
he is filtering the data.
Persistence
Data persistence is handled for you by the template provided by MacRuby. Let’s look
at the different parts involved in providing data persistence.
Managed Object Model
Before even talking about persisting the user data, we need to talk about the Managed
Object Model, also known as “mom.” When we worked on the Core Data app, we
designed our model by editing an .xcdatamodeld file: CoreDataExample.xcdatamo-
deld. In the background, Xcode actually uses a source directory where all the info is
stored. When we compile our app, each file in the source directory is compiled into a
mom file and stored into a folder with the .momd extension (as in “mom deployment”
directory). This is how the application knows about the data structures and relation-
ships to use.
If you look at your compiled application (the .app file), right-click it, choose Show
Package Contents, and drill down to Contents/Resources, you will see the momd folder
and its mom file (Figure 7-23).
Figure 7-23. Contents of the Resources directory
The template has a method that finds the momd deployment directory and exposes it
to the rest of the code.
132 | Chapter 7: Core Data

The mom compiler is also available outside of Xcode, via the command
line: /Developer/usr/bin/momc
Managed Object Context
The Managed Object Context is at the heart of the Core Data stack. The main job of
the context is to manage a collection of objects. It is used under the covers to create
and fetch managed objects, and to manage undo and redo operations.
All the data is stored in memory and is then flushed to the persistent store when the
context is saved. The Managed Object Context is basically what you interact with when
editing Core Data values. It is a very powerful layer that works great and that you don’t
have to worry about when writing Core Data application using the MacRuby template.
That’s because the template takes care of setting the context and making it available
for you.
To summarize, the Managed Object Context handles the interactions with Core Data
managed objects in a very transparent way and delegates the persistence to a persistent
store via its coordinator.
Persistent Store Coordinator
The persistent store coordinator is an API on top of different types of persistent stores
such as XML, SQLite, binary, or in-memory. The coordinator acts as a broker between
one or many Managed Object Contexts and one or many persistent stores. In other
words, they associate Managed Object Models to persistent stores via the use of the
models’ contexts.
You can run multiple coordinators connecting to one or many stores, depending on
what you want to do. By default, the MacRuby Core Data template sets only one co-
ordinator, which uses an XML store. If you look at the AppDelegate.rb file that is gen-
erated with your Core Data app, you will notice the persistentStoreCoordinator
method. Here is how the store is set:
url = directory.URLByAppendingPathComponent("CoreDataExample.storedata")
@persistentStoreCoordinator = NSPersistentStoreCoordinator.alloc. \
initWithManagedObjectModel(mom)
@persistentStoreCoordinator.addPersistentStoreWithType(NSXMLStoreType,
configuration:nil,
URL:url,
options:nil,
error:error)
You can easily change that default if you decide to use another store.
Persistence | 133

Workflow
Now that we have examined all the different moving pieces, let’s see how they come
together. In our interface, we bound our movies’ and actors’ array controllers to the
AppDelegate’s Managed Object Context (see Figure 7-7) and we mapped these con-
trollers to entities in our Managed Object Model. By wiring these few things, we gained
access to our model and its context. The Xcode template defines a few other hooks
such as the delegation of the window undo manager to the Model Object Context,
giving us “free” undo and redo via the context. The template also defines the
saveAction that commits the context changes to the persistent store and a hook into
the app termination process that triggers the saving of the managed context to the
persistent store (see the applicationShouldTerminate method in the AppDelegate.rb
file).
The good news is that the wiring needed at the developer level is very simple and, unless
you have custom needs, the defaults work fine. If you want to know the difference
between the various persistent stores and why and how to run many persistent store
coordinators, or if you want to dig further into Core Data, I strongly encourage you to
look at the documentation provided by Apple on the topic.
134 | Chapter 7: Core Data

CHAPTER 8
One Step Deeper
In Chapter 7, we looked at the basics of MacRuby. You are now ready to get started
with developing complex apps. Depending on the way you approach learning, you
might want to first jump to hacking or you might want to first learn more advanced
techniques. This chapter will focus on some advanced aspects of MacRuby that will
help you go deeper in your MacRuby knowledge. Feel free to skip this chapter and
come back to it later on if that makes more sense to you.
Selectors
In Objective-C, methods are identified by selectors. A selector is composed of the name
of the method and keywords specifying the arguments to the method. If you have two
methods that are the same except for the number and/or kind of arguments they accept,
Objective-C treats them as separate methods. In Ruby, a method is specified by its name
alone. The sort of arguments passed to a method have no bearing on which Ruby
method is called. Therefore, to support the Objective-C method calling style, MacRuby
extends Ruby to create Objective-C selectors from the arguments passed to a function.
The examples in this chapter are meant to explain MacRuby’s method overloading,
(see the Wikipedia entry for method overloading at http://en.wikipedia.org/wiki/Method
_overloading), which is not something Ruby programmers normally deal with. Look
carefully at the examples. The method names are always the same, and only the ex-
pected parameters are different.
Let’s imagine that we have a Player class and that it defines a method called
add_contact that takes two parameters: a name and a hash with a tags key. This method
adds a new contact to the player contact list, tagging the new contact with the passed
tags. We can also define another method called add_contact that takes two different
parameters: a name and a hash with the location key:
class Player
def add_contact(name, tags:contact_tags)
@name = name
@tags = contact_tags
135
"new contact #{name} was added and tagged."
end
def add_contact(name, location:contact_location)
@name = name
@contact_location = contact_location
"new contact #{name} was added and located."
end
end
There are four different ways to call the add_contact method:
player = Player.new
player.add_contact('Matt', tags: ['Ruby', 'Cocoa'])
# => new contact Matt was added and tagged.
player.add_contact('Matt', location: 'San Diego')
# => new contact Matt was added and located.
player.add_contact('Matt')
# => NoMethodError: undefined method 'add_contact'
player.add_contact('Matt', tags: ['Ruby'], location: 'San Diego') # => NoMethodError:
As you can see, the method signature/selector used will determine which method to
dispatch. If we want to define a method for the last two examples, we can use the
following:
class Player
def add_contact(name, options={})
# do something with the options passed
end
end
This is important to understand, because you will often need to use selectors in
MacRuby when your code relies on Cocoa frameworks.
To help you interpret existing Cocoa documentation for use with Ruby methods, here
is an extract of the NSMutableString documentation:
insertString:atIndex:
Inserts into the receiver the characters of a given string at a given location.
- (void)insertString:(NSString *)aString atIndex:(NSUInteger)anIndex
Parameters
aString
The string to insert into the receiver. aString must not be nil.
anIndex
The location at which aString is inserted. The location must not exceed the bounds of
the receiver.
136 | Chapter 8: One Step Deeper

This is how you call this method using an Objective-C selector (in this case, atIndex):
"Ruby".insertString("Mac", atIndex:0) # => "MacRuby"
You can get the same results by calling an entirely different method. The
Ruby insert method produces the same result if used as follows:
"Ruby".insert(0, "Mac")
Hopefully this example helps you understand how to use the Cocoa documentation to
port and implement Objective-C selectors, especially in the case of delegates.
If you remember the “Hello, World!” example we wrote at the beginning of this chapter,
you might remember that we passed a selector to the button action. The selector was
a string with the method name, followed by a colon (the colon was needed because the
method had arguments). You might wonder why we called it a selector, whereas in this
section, selectors seem different.
The source of confusion is that in Objective-C, selector has two meanings. It can refer
to a method signature or the unique identifier associated with a method. By the first
definition, methods that take different arguments have different selectors, whereas, by
the second, all methods with the same name have the same selector.
Blocks
Another important part of the Ruby syntax is the concept of blocks. MacRuby has
blocks as well as procs and lambdas. They are all commonly referred as closures. Let’s
look at some example code to understand this powerful concept:
days = ['Sunday', 'Monday', 'Tuesday', 'Wednesday', 'Thursday', 'Friday', 'Saturday']
days.each_with_index do |day, index|
puts "day #{index + 1} of the week is #{day}"
end
Running the code above will result in the following output:
day 1 of the week is Sunday
day 2 of the week is Monday
day 3 of the week is Tuesday
day 4 of the week is Wednesday
day 5 of the week is Thursday
day 6 of the week is Friday
day 7 of the week is Saturday
days is an array on which we are calling the each_with_index method and passing it a
block. A block is like the body of an anonymous method that is being passed to a defined
method as a parameter. The block is invoked as the defined method executes.
In this case, the block is delimited by the do/end keywords, but you can also define
blocks using curly brackets, as shown here:
Blocks | 137

days = ['Sunday', 'Monday', 'Tuesday', 'Wednesday', 'Thursday', 'Friday', 'Saturday']
days.each_with_index{ |day, index| puts "day #{index + 1} => #{day}" }
This code will generate the following output:
day 1 => Sunday
day 2 => Monday
day 3 => Tuesday
day 4 => Wednesday
day 5 => Thursday
day 6 => Friday
day 7 => Saturday
each and each_with_index are iterators—methods that invoke a block of code for each
of its contained items. In the case of each_with_index, two arguments are passed to the
block on each iteration: an array item’s value and its index. The block called in the
previous example prints out a string, interpolating the two passed values.
There are a few different ways to use closures in MacRuby, but the ex-
amples shown in this section are the most common usage you will
encounter.
When using blocks, you need to be careful about the scope you are operating on. When
called, a block has access to the context it’s being called on and will operate on it. Here
is a simple example:
macruby_genius = 'Laurent'
developers = ['laurent', 'josh', 'matt', 'jordan']
developers = developers.map do |dev|
macruby_genius = dev
end
macruby_genius # => "jordan"
As you can see, each iteration of the array redefines the macruby_genius variable defined
earlier. So the value assigned last remains as part of the surrounding context after the
do loop ends. A block is different from a method, which implicitly creates its own local
context, as shown in the following example:
macruby_genius = 'Laurent'
developers = ['laurent', 'josh', 'matt', 'jordan']
def developer_names(devs)
devs.map do |dev|
macruby_genius = dev
end
end
developer_names(developers)
macruby_genius # => "Laurent"
In this case, the macruby_genius variable exists in two different contexts. Therefore,
even though it is being redefined in each iteration within the developer_names method,
the variable set outside of the method is not affected.
138 | Chapter 8: One Step Deeper

Blocks can make your code easier to read and maintain. Let’s say you want to create
five new Contact instances and add them to an array.
In a different language, you might do something like this:
Contact = function(){};
contacts = [];
for (i = 0; i < 5; i++) {
var contact = new Contact;
contacts[i] = contact;
}
However, with MacRuby, you can just write:
# Dummy objects referenced in the example
class Contact; end
# same code as the javascript example above:
contacts = []
5.times do
contacts << Contact.new
end
# Or you can use this shortened syntax
contacts = Array.new(5){ Contact.new }
both of which, at least in my mind, read much better than the version without blocks.
Since MacRuby 0.7.1, Objective-C APIs using C blocks are supported. Here is a simple
example using Array#enumerateObjectsUsingBlock (see http://developer.apple.com/li
brary/ios/documentation/Cocoa/Reference/Foundation/Classes/NSArray_Class/NSAr
ray.html#//apple_ref/doc/uid/20000137-SW19):
framework 'Foundation'
array = [1, 2, 3, 4, 5]
proc = Proc.new do |obj, index, stop|
p obj
stop.assign(true) if index == 2
end
array.enumerateObjectsUsingBlock(proc)
Here is the output:
1
2
3
=> [1, 2, 3, 4, 5]
You might be surprised that we changed the value of stop by using #assign. The reason
we cannot just use the = operator is that the Objective-C API defines stop as a pointer
to a boolean value, so we have to reassign the pointer’s value to make the loop stop.
Read “Pointers” on page 158 for more information about using pointers with
MacRuby.
Blocks | 139

Concurrency
CPU clock speeds aren’t increasing as quickly as they used to. Instead, to scale programs
and improve performance, chipset designers have to add more cores to the processors.
At the same time, users expect programs to do more complicated things and to do them
faster than before.
The obvious solution for a long time was to use threads. The problem with threads is
that they require a lot of development attention, and if not handled properly, they can
seriously affect the system performance and embed difficult-to-find bugs in programs.
Threads are available, and are discussed further in this book. However, since the Snow
Leopard release, Apple offers a very interesting API called Grand Central Dispatch
(GCD). GCD is an API on top of the libdispatch library, which Apple open sourced.
Grand Central Dispatch
MacRuby developers have full access to GCD. Unless you have developed in Objective-
C in the past, you probably are not familiar with this library. This section gives you a
quick overview of the key APIs. For more information about GCD, refer to Apple’s
documentation (http://developer.apple.com/library/ios/#documentation/Performance/
Reference/GCD_libdispatch_Ref/Reference/reference.html).
Queues
GCD provides and manages dispatch queues, which allow developers to execute blocks
of code on a pool of threads fully managed by the system (the pool grows and shrinks
dynamically and distributes its threads evenly among available processors). You can
think of a queue as a pool of workers ready to take orders. You don’t have to worry
about how they will share the workload among themselves. You pick a queue based
on a few key criteria—such as whether they tackle tasks serially or concurrently—and
then send the queue instructions about executing your task.
Queues in MacRuby are handled by the Dispatch::Queue class. GCD has three types of
queues:
Main queue
Tasks are executed serially on your application’s main thread. The main queue is
automatically created by the system.
Concurrent queue
Tasks start executing in the order in which you queue them, but can run concur-
rently. Use these queues when you want to execute large numbers of tasks con-
currently. Three concurrent queues are automatically created for your application:
one that runs at a high priority, one that runs at a low priority, and the default
queue, which lies between them in priority.
140 | Chapter 8: One Step Deeper

Serial queue
Tasks execute one at a time in first in, first out (FIFO) order. Use this queue type
when you want to ensure that tasks are executed in a predictable order. Serial
queues have to be created by the programmer.
Queues are interesting for a few reasons, mainly because they are lighter (smaller mem-
ory footprint, faster allocation) than threads and because developers can rely on the
system to manage them. In practice, this means that instead of worrying about the
amount of threads to start and manage, you can start as many queues and tasks as you
want and not worry about the nitty-gritty details.
To create a new queue, create an instance of Dispatch::Queue and give it a name:
queue = Dispatch::Queue.new('com.oreilly.guide')
The default dispatch queues are serial queues. You can create as many
serial queues as you want, and they will run in parallel with each other.
But if you want to execute many tasks at the same time, it is more effi-
cient to use a concurrent queue.
Once you have a queue instance, you can dispatch tasks to it using Ruby blocks (see
the section “Blocks” on page 137 as a reminder). Tasks can be dispatched synchro-
nously or asynchronously, as shown here:
queue = Dispatch::Queue.new('com.oreilly.guide')
queue.sync do
puts 'Blocking operation...'
sleep(3)
puts 'done waiting!'
end
puts 'Synchronous dispatching evaluated'
queue.async do
puts "Async call..."
sleep(3)
puts 'Async block done'
end
puts 'Asynchronous dispatching evaluated'
If you run this code, you will notice that the first call using #sync is a blocking call and
the rest of the code won’t be executed until after the block is done running. The other
call, using #async, isn’t blocking and will be executed concurrently because it is being
processed in the background.
Using the synchronous approach ensures the data is accessed by only one task at a time,
making the use of a mutex redundant while keeping the code simple. Here is an im-
plementation example showing how a missing launcher class can ensure its instances
fire in the proper order, one after the other, respecting the chronological order:
Concurrency | 141

class MissileLauncher
def initialize
@queue = Dispatch::Queue.new('org.macruby.synchronizer')
end
def launch!
# Because serial queues execute their tasks in FIFO order, we can be sure
# that only one thread will be running the passed block at any given time.
@queue.sync do
# critical section: here we arm the missiles and fire them.
puts "BOOM!"
end
end
end
If you don’t need to run your tasks in a given order, you can use the concurrent queues:
Dispatch::Queue.concurrent(:default).async do
# expensive calculation run concurrently
end
# which is the same as
Dispatch::Queue.concurrent.async do
# expensive calculation run concurrently
end
# Other concurrent queues can be used calling them using
# their priority level:
Dispatch::Queue.concurrent(:low)
Dispatch::Queue.concurrent(:high)
The main queue isn’t covered in detail here, since it’s not useful for
concurrency. However, it should never be used for long-running tasks,
because it keeps the UI from interacting with the user.
Groups
GCD groups are designed to make task synchronization trivial. In some cases, you need
to ensure a queue has executed all of its tasks before doing something else. After you
create a group, you can assign tasks to it as you dispatch them and make your code
wait for all the group’s tasks to be executed. Alternatively, you can register a block to
be triggered when the group’s tasks have all executed.
Here is the MacRuby implementation of the concept of Futures, found in the Io lan-
guage. Basically, the concept is simple: create a proxy object performing expensive
computations in the background and then collect the results:
class Future
def initialize(&block)
# Each thread gets its own FIFO queue upon which we will dispatch
# the delayed computation passed in the &block variable.
Thread.current[:futures] ||=
Dispatch::Queue.new("org.macruby.futures-#{Thread.current.object_id}")
@group = Dispatch::Group.new
# Asynchronously dispatch the future to the thread-local queue.
142 | Chapter 8: One Step Deeper

Thread.current[:futures].async(@group) { @value = block.call }
end
def value
# Wait for the computation to finish (if not already done)
@group.wait
# then just return the value in question.
@value
end
end
Use the following to create a future and fetch the result of the calculation:
result = Future.new do
p 'Engaging delayed computation!'
sleep 2.5
42 # Your result would go here.
end
# Then to fetch the calculation result:
result.value # => 42
The important aspect of this implementation is that we are defining a queue and a
group. We are then dispatching blocks to the group. Before checking the value, we are
first verifying that all the tasks have executed. It’s common practice to group concurrent
tasks inside a serial queue to process groups of tasks in a sequential order.
The following example shows how to speed up Array#map by spreading out the total
work across the system’s available processors:
class Array
def parallel_map(&block)
result = []
# Creating a group to synchronize block execution.
group = Dispatch::Group.new
# We will access the `result` array from within this serial queue,
# as without a GIL (Global Interpreter Lock) we cannot assume array access
# to be thread-safe.
result_queue = Dispatch::Queue.new('access-queue.#{result.object_id}')
0.upto(self.size) do |idx|
# Dispatch a task to the default concurrent queue.
Dispatch::Queue.concurrent.async(group) do
temp = block[self[idx]]
result_queue.async(group) { result[idx] = temp }
end
end
# Wait for all the blocks to finish.
group.wait
result
end
end
Concurrency | 143
MacRuby doesn’t use a Global Interpreter Lock (a lock preventing mul-
tiple threads to access the same data at the same time), which means
that it is truly concurrent. You can read more about Ruby and concur-
rency in an article from my blog at http://merbist.com/2011/02/22/con
currency-in-ruby-explained.
GCD also offers other features, such as interthread communication and resource man-
agement, as well as a low-level foundation for event-based programming. But these
features fall outside of the scope of this section.
GCD dispatch gem
While MacRuby has native full access to the GCD APIs, in some cases, developers might
wish to use more abstraction and get some extra features. This is what the GCD dis-
patch gem offers.
Like all Ruby gems, the dispatch gem is hosted on Rubygems.org.
To install the gem, enter the following:
$ macgem install dispatch
MacRuby lets you bundle gems with your apps when you compile it.
Here is a quick tour of what is available to you:
require 'dispatch'
job = Dispatch::Job.new { slow_operation }
job.value # => “wait for the result”
As you can see, the API looks very similar to the Thread API. The difference is that the
"Dispatch::Job" is in reality a wrapper around GCD’s default concurrent queue. When
you add a new block to the queue, the main thread doesn’t stall.
To retrieve the result of the passed block, you have two options. The one shown above,
calling #value on a job, will block the current thread until the job is processed. The
other option is to use the asynchronous API, as follows:
require 'dispatch'
job = Dispatch::Job.new { slow_operation }
job.value do |v|
"operation result: #{v} - asynchronous dispatched!"
end
In this case, the result of the job processing will be triggered asynchronously and the
result will be passed to the block.
144 | Chapter 8: One Step Deeper

But that’s not all. You can send a bunch of operations to a job and let GCD decide how
many threads should be used underneath—all of that is totally transparent to you:
require 'dispatch'
job = Dispatch::Job.new
job.add { slow_operation(a) }
job.add { slow_operation(b) }
job.add { slow_operation(c) }
job.join
job.values # =>[result_a, result_b, result_c]
Calling values in this case returns all the returned operation results. However, this is
not a blocking call, so to make sure all the operations are done processing, the caller
calls #join.
The only challenge with this approach is that because in MacRuby each thread runs in
its own nonlocking, reentrant VM, there is a risk of destroying data integrity. Two
operations might try to access the same data at the same time, corrupting the data.
Luckily, MacRuby comes with another wrapper around GCD’s serial queues, providing
lock-free synchronization. Simply speaking, the developer defines a proxy object that
has a private access queue, making sure it keeps its data integrity:
require 'dispatch'
job = Dispatch::Job.new
@scores = job.synchronize Hash.new
[user1, user2, user3].each do |user|
job.add{ @scores[user.name] = calculate(user) }
end
job.join
@scores[user1.name] # => 1042
@scores[user2.name] # => 673
@scores[user3.name] # => 845
MacRuby’s wrapper even goes further and provides a concurrent alternative version of
most of the Ruby enumerable methods. What I mean by that is that by using the parallel
version of an enumerable method, we let GCD run each iteration concurrently. Con-
sider the following code:
start = Time.now
25.times do
sleep(1)
end
puts "Took #{Time.now - start} seconds"
# => Took 25.011652 seconds
As expected, the code took a bit more than 25 seconds, since we asked it to sleep 25
times for 1 second.
Now, let’s use the concurrent version provided by GCD:
require 'dispatch'
start = Time.now
25.p_times do
sleep(1)
Concurrency | 145

end
puts "Took #{Time.now - start} seconds"
# => Took 13.028822 seconds
Instead of calling #times, we called #p_times, which is the parallel/concurrent version
of #times. In the background, GCD figures out the optimal number of threads to use
and runs the iterations in parallel.
This example should let you imagine how you can optimize the performance of your
code by running your iterations in parallel:
require 'dispatch'
locations = ["San Diego", "Chicago", "New Orleans", "Paris", "Singapore"]
locations.p_each do |location|
# expensive calculation
location.update_stats
end
The concurrent enumerable methods are synchronous, meaning they
won’t return until all the iterations have completed. This way, the APIs
stay close to their nonconcurrent counterparts.
To see the available concurrent enumerable methods you can use this trick:
$ macruby -rdispatch -e "puts [].methods.grep(/^p_/)"
# => p_each
# => p_each_with_index
# => p_map
# => p_mapreduce
# => p_find_all
# => p_find
To get the list, I just asked MacRuby to evaluate a string after requiring the dispatch
library. Call the macruby binary with the --help flag to see the various options. Because
we checked on the enumerable methods, p_times wasn’t displayed, because it is defined
on the Integer class.
The last GCD wrapper feature that I would like to introduce is the MapReduce imple-
mentation (see the Wikipedia entry for MapReduce at http://en.wikipedia.org/wiki/
MapReduce). MapReduce allows you to process large amounts of data in parallel and
compute the results. Let’s look at some examples to understand better the usefulness
of this concept:
require 'dispatch'
map_reduce = (0..1_000_000).p_mapreduce(0){|n| Math.sqrt(n)}
map_reduce # => 666667166.393145
This example iterates through all numbers from 0 to one million, calculates the square
root of each, and ends up by adding all the results together. The addition is implicit
and you can specify another operator if you wish to do so.
146 | Chapter 8: One Step Deeper

Ruby developers might see a similarity with the #inject method, except that in p_map
reduce, you have to define a starting value (0 in this example):
require 'dispatch'
map_reduce = (0..10_000).p_mapreduce([], :<<) do |n|
Math.sqrt(n)
end
This code is the same as the following, except that the following runs iterations con-
secutively instead of concurrently:
map_reduce = (0..10_000).inject([]) do |sum, n|
sum << Math.sqrt(n)
end
Code parallelization is difficult, and merely running iterations concurrently doesn’t
necessarily mean you will see better results. One of the rules of parallelization is to
parallelize only costly code. As a matter of fact, based on that recommendation, the
square root examples shown earlier don’t make a lot of sense. Let’s write a real example
and see what kind of performance improvement GCD has to offer on my two-core
machine:
require 'benchmark'
# Monte Carlo method to find an estimated version of Pi
# For more info, read: http://en.wikipedia.org/wiki/Monte_Carlo_method
def estimated_pi(repetitions)
inside = 0
repetitions.times do
inside += 1 if (Math.sqrt(rand**2+rand**2) < 1)
end
((4*inside))/repetitions.to_f
end
n = 50_000
Benchmark.bm(7) do |x|
x.report("times:") { n.times do estimated_pi(200) end }
x.report("p_times:") { n.p_times do estimated_pi(200) end }
end
This code generates the following output:
user system total real
times: 6.030000 0.010000 6.040000 ( 6.149780)
p_times: 6.300000 0.020000 6.320000 ( 3.576102)
Technically, the code takes the same amount of time to execute when you use #times
and when you use #p_times. The user, system, and total times are therefore pretty
similar, and in fact, the system time for the parallel version is worse (probably because
of the overhead of task management). However, the real time reported is half the du-
ration when using the concurrent method. Because the iterations run in parallel on the
two cores, the same amount of code can be processed much faster.
Concurrency | 147

GCD offers many more low-level features, such as custom queues, semaphores, and
asynchronous events based on sources (timers, signals, and file descriptors, which can
be files or sockets). More information is available in the wrapper’s readme file.
Sandboxing
OS X ships with a security facility called sandbox. Sandbox restricts a process’s access
to resources. For instance, you can sandbox your application so it doesn’t access the
Internet or the local network, or can’t read or write to disk. The sandboxing applies to
your entire application, including C extensions or Cocoa APIs you might be using. By
using the sandbox facility in your application, you limit potential damage that can
happen if a vulnerability in your application is exploited.
MacRuby exposes the Sandbox class to make easy use of the facility. The class comes
with five sandboxing profiles:
Sandbox.pure_computation
All operating system services are prohibited.
Sandbox.no_internet
TCP/IP networking is prohibited.
Sandbox.no_network
All socket-based networking is prohibited.
Sandbox.temporary_writes
File system writes are restricted to temporary folders.
Sandbox.no_writes
File system writes are prohibited.
You can also define your own profiles and load them. Check the API for more
information.
To apply a sandbox profile, you just need to call #apply! on the profile. Here is an
example:
require 'open-uri'
begin
Sandbox.no_internet.apply!
open('http://www.macruby.org')
rescue SystemCallError => exception
puts exception
end
If you execute the preceding code, you will get the following output: Operation not
permitted - connect(2).
148 | Chapter 8: One Step Deeper

If you acquire resources before initiating the sandbox, these resources
won’t be controlled by the sandbox.
Using Objective-C or C Code
Because MacRuby runs inside the Objective-C runtime, you can directly call Objective-
C and C code using the Ruby syntax. However, some API symbols of frameworks or
libraries cannot be introspected at runtime, usually because they are ANSI C symbols
denoting nonobject-oriented items such as constants, enumerations, structures, and
functions. Apple has provided Objective-C bridges and languages with a way to access
these symbols nonetheless. This tool is called the Objective-C Bridges Metadata Gen-
erator, or BridgeSupport for short. Apple started shipping BridgeSupport in Mac OS
10.5 Leopard. The project is open source and you can download the latest version or
the source code directly from macosforge.org.
BridgeSupport comes with pregenerated files for all system frameworks.
However, the version shipped before Mac OS 10.7 Lion had some bugs.
It’s recommended that you use the latest version of BridgeSupport and
embed newly generated files with your project.
BridgeSupport comes with XML files describing the C symbols for the system frame-
works. But what if you want to use your own Objective-C/C code or a third-party
framework or library? It’s actually very simple. BridgeSupport ships with a command-
line tool that allows you to create XML files for your symbols.
Let’s pretend I would like to use a framework called FooBar and that this framework
uses constants, so I can’t access them from MacRuby directly. The easiest way to make
the framework compatible is to generate a BridgeSupport file and to add it to the
framework as follows:
$ gen_bridge_metadata --64-bit -f ~/Desktop/FooBar.framework/
-o ~/Desktop/FooBar.framework/Resources/BridgeSupport/FooBar.bridgesupport
You can see all the options by entering the following:
$ gen_bridge_metadata --help
In this example, we use the --64-bit flag to generate 64-bit annotations and the -f
(framework) flag to specify that we are generating a support file for a framework. Fi-
nally, we use the -o (output) flag to save the file directly in the framework.
The BridgeSupport folder might not exist inside your framework. No big deal—just
make sure to create it before generating the support file:
$ mkdir -p ~/Desktop/FooBar.framework/Resources/BridgeSupport
A BridgeSupport can be installed in one of the following locations:
Using Objective-C or C Code | 149
•/Library/Frameworks/MyFramework/Resources/BridgeSupport
•/Library/BridgeSupport
•~/Library/BridgeSupport
•/System/Library/BridgeSupport
For more information about BridgeSupport, check out the manual page by entering the
following:
$ man gen_bridge_metadata
Ruby methods starting with an uppercase letter must be called with
explicit parentheses so they don’t get confused with a constant. C func-
tions usually start with an uppercase letter, and therefore you need to
make sure to use parentheses even if no arguments are needed.
Scriptable Applications
Mac OS X version 10.5 and later ship with a framework called Scripting Bridge. This
framework allows developers to communicate with scriptable applications directly
from within their code. Before Mac OS X version 10.5, developers had to use Apple-
Script scripts to send and handle Apple events. Using this new framework, MacRuby
developers can interact directly with applications such as iChat, iTunes, iPhoto, iCal,
Keynote, and so on.
A OS X application is said to be scriptable when it exposes a dictionary of Apple events.
These events are hooks into the application. The easiest way to see which applications
are scriptable and what APIs they expose is to use the AppleScript Editor application.
Open AppleScript Editor and click File → Open Dictionary. Choose iTunes and browse
the API (Figure 8-1).
OS X also has a series of command-line tools to inspect scriptable applications and
show the available methods. The primary tool is called sdef (scripting definition ex-
tractor), which extracts the scripting definition of an application. You can give it a try
in your terminal by entering the following:
$ /usr/bin/sdef /Applications/iTunes.app
The result is a long XML file describing an Apple event dictionary. The challenge is
that some of these definitions use nonobject-oriented items such as constants and enu-
merations. So what you need to do next is create a BridgeSupport file (“Using Objective-
C or C Code” on page 149) to make sure you can use the full API from MacRuby.
These steps are not necessary if the API doesn’t use nonobject-oriented
items, but to be safe, we are still going through the entire process.
150 | Chapter 8: One Step Deeper
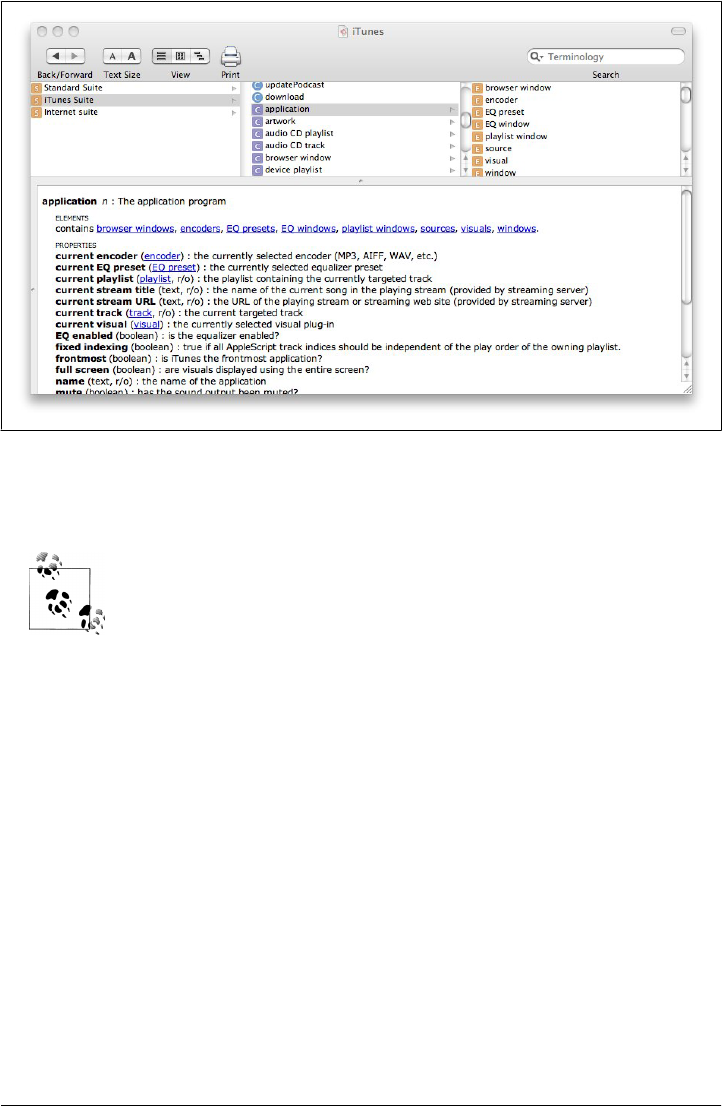
To create a BridgeSupport file, use the sdp command. sdp is an sdef processor:
$ sdef /Applications/iTunes.app | sdp -fh --basename iTunes
sdef, sdp, gen_bridge_metadata, and other tools are located in /usr/bin,
which should be in your path.
The previous command generates a scripting definition for iTunes and pipes it to the
scripting processor. The processor generates a Scripting Bridge Objective-C header and
sets the base name of the generated header file to iTunes. The result is a file called
iTunes.h that we can convert into a BridgeSupport file using gen_bridge_metadata:
$ gen_bridge_metadata -c '-I.' iTunes.h > iTunes.bridgesupport
Now we have a BridgeSupport file and are ready to start playing with the Scripting
Bridge framework to control iTunes. Turn off iTunes, write the following code in a file,
and execute it from the command line:
framework 'Foundation'
framework 'ScriptingBridge'
itunes = SBApplication.applicationWithBundleIdentifier("com.apple.itunes")
load_bridge_support_file 'iTunes.bridgesupport'
itunes.run
itunes.playpause
If everything goes well, iTunes is initialized and starts playing.
Figure 8-1. The AppleScript Editor
Scriptable Applications | 151

At home, I have a MacMini in my living room. In my bedroom, I set up a pair of speakers
connected via an AirPort Express. What’s nice with this setup is that I can stream music
from my MacMini to my speakers and even control what music is played via my iPhone.
Using MacRuby, I decided to write a small script that would start iTunes and play a
special playlist every morning to wake me up slowly. Here is the script in question:
#!/usr/local/bin/macruby
framework 'Foundation'
framework 'ScriptingBridge'
itunes = SBApplication.applicationWithBundleIdentifier("com.apple.itunes")
load_bridge_support_file 'iTunes.bridgesupport'
itunes.run
itunes.stop
library = itunes.sources.find{|source| source.name == 'Library'}
playlist = library.userPlaylists.find do |playlist|
playlist.name == 'morning'
end
playlist.playOnce(false) if playlist
The script is pretty straightforward. After starting iTunes (if it is not already started)
and stopping any item already playing, the script finds the music library and then finds
the playlist named morning. If the playlist is found, it is then played.
The AppleScript Editor doesn’t always show all the different available methods, and
the documentation might not reflect the options you need. The best way to introspect
the available classes is to read the header file or use the interactive command:
$ macirb --simple-prompt
>> framework 'Foundation'
=> true
>> framework 'ScriptingBridge'
=> true
>> itunes = SBApplication.applicationWithBundleIdentifier("com.apple.itunes")
=> #<ITunesApplication:0x200c5bce0>
> (itunes.methods(true, true) - Object.new.methods(true, true)).sort
=> [:EQEnabled, :EQPresets, :EQWindows, :activate, :"add:to:", :backTrack,
:browserWindows, :"childWithClass:code:keyForm:keyData:",
:"childWithClass:code:keyForm:keyData:length:type:",
:"childWithClass:code:keyForm:keyData:type:",
:"childWithClass:code:keyForm:keyDesc:",
:classForScriptingClass, :classNamesForCodes, :classesForScriptingNames,
:codesForPropertyNames, :context, :convert, :currentEQPreset,
:currentEncoder, :currentPlaylist, :currentStreamTitle, :currentStreamURL,
:currentTrack, :currentVisual, :delegate, :descriptionForSpecifier,
:eject, :elementArrayWithCode, :"elementWithCode:ID:",
:"elementWithCode:atIndex:", :"elementWithCode:named:", :encodeWithCoder,
:encoders, :fastForward, :fixedIndexing, :frontmost, :fullScreen, :get,
:"initWithApplication:specifier:", :initWithBundleIdentifier,
:"initWithClass:properties:data:", :initWithCoder, :initWithContext,
:"initWithContext:specifier:", :initWithData,
:"initWithElementCode:properties:data:", :initWithProcessIdentifier,
:initWithProperties, :initWithURL, :isRangeSpecifier, :isRunning,
:lastError, :launchFlags, :mute, :name, :nextTrack, :openLocation, :pause,
152 | Chapter 8: One Step Deeper

:"play:once:", :playerPosition, :playerState, :playlistWindows,
:playpause, :positionAfter, :positionBefore, :previousTrack,
:"print:printDialog:withProperties:kind:theme:", :properties,
:"propertyWithClass:code:", :propertyWithCode, :qualifiedSpecifier,
:qualify, :quit, :resume, :rewind, :run, :selection,
:"sendEvent:id:format:", :"sendEvent:id:parameters:", :sendMode,
:setCurrentEQPreset, :setCurrentEncoder, :setCurrentVisual, :setDelegate,
:setEQEnabled, :setFixedIndexing, :setFrontmost, :setFullScreen,
:setLastError, :setLaunchFlags, :setMute, :setPlayerPosition,
:setSendMode, :setSoundVolume, :setTimeout, :setTo, :setVisualSize,
:setVisualsEnabled, :shouldCreateClasses, :soundVolume, :sources,
:specifier, :specifierDescription, :stop, :subscribe, :timeout, :update,
:updateAllPodcasts, :updatePodcast, :version, :visualSize, :visuals,
:visualsEnabled, :windows]
>> itunes.methods(true, true).grep(/play/)
=> [:playpause, :"play:once:", :playerState, :playerPosition, :playlistWindows]
Method Missing
Method missing is a generic Ruby approach to catching undefined method calls and
executing some code based on the undefined method name.
This is a very handy solution to wrap cumbersome Cocoa APIs. It allows you to pick
out Cocoa classes you use often and create a more Ruby-like API for them. Let’s take,
for example, the AddressBook framework. (see http://developer.apple.com/mac/library/
documentation/UserExperience/Conceptual/AddressBook/AddressBook.html). This is an
old framework that might not seem very natural at first. Here is a simple example:
framework 'AddressBook'
first_contact = ABAddressBook.sharedAddressBook.people.first
puts first_contact.valueForProperty(KABOrganizationProperty)
=> "Apple Inc."
The code above is pretty straightforward: it loads the AddressBook framework and uses
the ABAddressBook class method called sharedAddressBook to fetch an address book. It
then calls the people method on the book, taking only the first person from the array
that is returned (#first in Ruby is equivalent to [0]). Of course, before calling this code,
I had to dig around in the documentation.
The odd API part is how you access a contact’s property. The Framework expects you
to call #valueForProperty on your contact and to pass it a constant that defines the
property type. By introspecting first_contact, we find that it’s an instance of the
ABPerson class.
The ABPerson C Reference documentation lists all the properties available and the as-
sociated constants:
CFStringRef kABFirstNameProperty;
CFStringRef kABLastNameProperty;
CFStringRef kABFirstNamePhoneticProperty;
CFStringRef kABLastNamePhoneticProperty;
CFStringRef kABBirthdayProperty;
Method Missing | 153
CFStringRef kABOrganizationProperty;
CFStringRef kABJobTitleProperty;
CFStringRef kABHomePageProperty;
CFStringRef kABURLsProperty;
CFStringRef kABCalendarURIsProperty;
CFStringRef kABEmailProperty;
CFStringRef kABAddressProperty;
CFStringRef kABPhoneProperty;
CFStringRef kABAIMInstantProperty;
CFStringRef kABJabberInstantProperty;
CFStringRef kABMSNInstantProperty;
CFStringRef kABYahooInstantProperty;
CFStringRef kABICQInstantProperty;
CFStringRef kABNoteProperty;
CFStringRef kABMiddleNameProperty;
CFStringRef kABMiddleNamePhoneticProperty;
CFStringRef kABTitleProperty;
CFStringRef kABSuffixProperty;
CFStringRef kABNicknameProperty;
CFStringRef kABMaidenNameProperty;
CFStringRef kABOtherDatesProperty;
CFStringRef kABRelatedNamesProperty;
CFStringRef kABDepartmentProperty;
CFStringRef kABPersonFlags;
In Objective-C, a constant can start with a lowercase character, but in
MacRuby, constants always have to start with an uppercase character.
So, for instance, if you want to use the kABFirstNameProperty constant,
you have to use the KABFirstNameProperty constant in MacRuby.
Method missing allows us to define a different, potentially nicer API without having to
define a method for each constant. Here is what the API will look like:
first_contact.organization # Acme Inc.
first_contact.first_name # Giana
first_contact.last_name # Aimonetti
And here is the implementation:
class ABPerson
def method_missing(m, *args, &block)
segments = m.to_s.split('_')
missing_meth = segments.map{|part| part.capitalize}.join
constant_name = "KAB#{missing_meth}Property"
if Object.const_defined?(constant_name)
self.valueForProperty Object.const_get(constant_name)
else
super
end
end
end
154 | Chapter 8: One Step Deeper

This might seem quite cryptic if you are new to Ruby and metaprogramming. Basically,
we are reopening the ABPerson class and defining a method_missing method to catch our
new calls. method_missing takes three arguments: the name of the method (m) as a sym-
bol, an array of arguments (*args), and a block. In our case, our implementation con-
verts the method passed (FirstNameProperty, for instance) to the format expected for
a constant (KABFirstNameProperty). If the constant exists, the method dispatches the
call using #valueForProperty and passing the constant. Otherwise, we let MacRuby
raise an exception.
In this section, we will examine how to implement method missing and how it works
so you can also wrap some unneeded complexity in a nice and clean API.
The following method_missing method is defined for Cocoa’s NSSpeechSynthesizer API:
framework 'AppKit'
class Greeter
attr_reader :user
def initialize(commands = {})
voice_type = "com.apple.speech.synthesis.voice.Vicki"
@voice = NSSpeechSynthesizer.alloc.initWithVoice(voice_type)
@user = NSUserName()
@commands = {:hello => "Hello there #{user}, how are you today?",
:bye => "Adios #{user}, come back soon!"}.merge(commands)
end
def method_missing(meth_symbol, *args, &block)
command = @commands[meth_symbol]
if command
message = command.respond_to?(:call) ? command.call(self) : command
@voice.startSpeakingString(message)
end
end
end
Open a new macirb session and copy/paste the previous code, or save it in a file and
require it from macirb. You can then run a speech synthesizer session as follows:
$ macirb --simple-prompt
>> require 'method_missing_example'
=> true
>> vicki = Greeter.new
>> vicki.respond_to?(:hello)
=> false
>> vicki.hello
=> true
# greetings message is played
As you can see, we were able to call a method that doesn’t exist (hello), thanks to
method_missing.
For those not used to reading Ruby code, attr_reader :user is the equivalent of a getter
for the instance variable @user, making it available via the user instance method. Our
initializer takes an optional argument called commands, which defaults to an empty
Method Missing | 155

Hash if not passed. The commands local variable is then merged with a list of default
commands. This way, we can pass additional commands when creating our Greeter
instance.
Finally, in the method_missing method body, we are checking whether the command
object responds to the call method. If it does, we send the call method to it and save
the result in the local variable message. Otherwise, we just use the command value (we do
that so a command can be defined as an anonymous method). The message is then read
by our @voice object.
Let’s see whether passing a new command when creating a new greeter does what we
expect:
>> vicki2 = Greeter.new(:howdy => "Howdy cowboy?")
>> vicki2.howdy
# sound of the new greeting defined on the fly.
Now let’s do something a bit more tricky and pass an anonymous method that needs
to be executed every single time it’s called:
>> time_cmd = Proc.new{"It's #{Time.new.hour}, #{Time.new.min} and
>> #{Time.now.sec} seconds"}
>> vicki3 = Greeter.new(:time => time_cmd)
>> vicki3.time
# check that the seconds changed
>> vicki3.time
# time changed
Finally, let’s look at a way of optimizing the performance of our code by using some
more metaprogramming. This time, we are going to define methods dynamically at
runtime. Instead of always looking up the command and dynamically telling the voice
what to say, once a missing method is called, we can add a new method into the class
so that we never call the same missing method twice:
framework 'AppKit'
class Greeter
attr_reader :user
def initialize(commands = {})
voice_type = "com.apple.speech.synthesis.voice.Vicki"
@voice = NSSpeechSynthesizer.alloc.initWithVoice(voice_type)
@user = NSUserName()
@commands = {:hello => "Hello there #{user}, how are you today?",
:bye => "Adios #{user}, come back soon!"}.merge(commands)
end
def method_missing(meth_symbol, *args, &block)
command = @commands[meth_symbol]
if command
self.class.send(:define_method, meth_symbol.to_s) do
message = command.respond_to?(:call) ? command.call(self) : command
@voice.startSpeakingString(message)
end
# call the newly defined method
156 | Chapter 8: One Step Deeper

send(meth_symbol)
end
end
end
$ macirb --simple-prompt
>> require 'method_missing_example'
>> vicki = Greeter.new
>> vicki.respond_to?(:bye)
=> false
>> vicki.bye
>> vicki.respond_to?(:bye)
=> true
To optimize this code, we use some Ruby tricks you might not be aware of. The “magic”
happens inside the method_missing method implementation. We already talked about
method_missing, but we haven’t talked about send and define_method. To illustrate the
power of these methods, I’ll explain quickly what the code example does:
def method_missing(meth_symbol, *args, &block)
command = @commands[meth_symbol]
if command
self.class.send(:define_method, meth_symbol.to_s) do
message = command.respond_to?(:call) ? command.call(self) : command
@voice.startSpeakingString(message)
end
# call the newly defined method
send(meth_symbol)
end
end
The first thing we do is check that the missing method matches a defined command.
If it does, we define the method on the fly. For that, we define the missing method on
the class itself. We can’t call the define_method directly on the class, because
define_method is a private method and you can’t call a private method from outside of
the object. So, instead, we use the send method. The send method is a way to dynam-
ically dispatch a method by using its name as a string or a symbol. Using send, we can
call define_method on the class and pass the missing method name as an argument. The
block passed to define_method will become the new method’s body. Once the method
is defined, we call it using send again and pass it the method name as a symbol. There
is a lot going on in just a few lines of code—take some time to experiment on your own.
As you can see, after calling the bye method a first time, the method becomes defined
and the Greeter instance knows that it can respond to it.
Method missing is a very powerful tool and, like most metaprogramming tricks, needs
to be used with care. Read more on Ruby metaprogramming to see all the interesting
possibilities that are available to you.
Method Missing | 157
Pointers
In the block example earlier in this chapter, we discussed that when using Objective-
C or C APIs we might have to deal with pointers. MacRuby exposes a Pointer object
that allows you to allocate memory of a given type to a given number of elements. To
create a pointer to a float value, for instance, you can choose one of the two constructor
options:
pointer = Pointer.new(:float)
# or
pointer = Pointer.new_with_type(:f)
Table 8-1 shows available data types. The list can also be found on Apple’s website
(see http://developer.apple.com/library/mac/#documentation/Cocoa/Conceptual/Ob
jCRuntimeGuide/Introduction/Introduction.html).
Table 8-1. Available data types
Pointer code Pointer type Constructor example
c char Pointer.new(:char)
* char string Pointer.new(:string)
i int Pointer.new(:integer)
s short Pointer.new(:short)
l long Pointer.new(:long)
C unsigned char Pointer.new(:uchar)
I unsigned integer Pointer.new(:uint)
S unsigned short Pointer.new(:ushort)
L unsigned long Pointer.new(:ulong)
f float Pointer.new(:float)
@ object Pointer.new(:object) or
Pointer.new(:id)
B Boolean Pointer.new(:boolean)
# class Pointer.new(:class)
: selector Pointer.new(:selector)
You can create pointers by passing the symbol name as shown above,
and also by passing the pointer type code as a string.
You can dereference the pointer the same way you access an array in Ruby.
You can also have a pointer to multiple values. Here is how you create a pointer with
bounds:
158 | Chapter 8: One Step Deeper

pointer = Pointer.new(:float, 4)
pointer[0] = 1.0
pointer[1] = 2.0
pointer[2] = 3.0
pointer[3] = 4.0
pointer[0] # => 1.0
pointer[1] # => 2.0
pointer[2] # => 3.0
pointer[3] # => 4.0
To assign a value to the pointer, you can use one of these two methods:
pointer.assign(3.2)
# or
pointer[0]= 3.2
When you use [] and []=, you must be careful not to try to access or set a value out of
bounds. Unfortunately, there is no way to find out a pointer’s bounds.
Dereferencing pointers is pretty straightforward and was shown earlier:
pointer = Pointer.new(:integer)
pointer.assign(42)
pointer[0] # => 42
You can also offset pointers using the + and the - methods:
pointer = Pointer.new(:long, 10)
10.times{|i| pointer[i] = i }
pointer2 = pointer + 2
pointer2[0] # => 2
pointer2[1] # => 3
pointer2[2] # => 4
One situation that requires offsetting is when you are using a read method that accepts
a pointer of bytes and returns the number of bytes actually read. You can set a pointer,
pass it to the method, offset it, and pass it again. Here is a dummy example of such an
API:
ptr = dataOut;
fakeAPI(dataIn, dataInLength, ptr, dataOutAvailable
&dataOutMoved);
ptr += dataOutMoved;
dataOutAvailable -= dataOutMoved;
otherAPI(ptr, dataOutAvailable, &dataOutMoved);
Two types of Objective-C pointers are not directly supported by MacRuby: void point-
ers and unknown type pointers (also called unsigned pointers). Let’s look at how to
work with these types.
Void Pointers
Most methods in APIs based on CoreFoundation use pointers to CFTypeRefs, which
technically are pointers to void (also known as void *). If a method expects a void
pointer argument, you can pass a pointer of any type.
Pointers | 159

Let’s look at an example from the Accessibility API:
extern AXError AXUIElementCopyAttributeValue (
AXUIElementRef element,
CFStringRef attribute,
CFTypeRef *value);
As you can see, this is a C function that takes a pointer as its last argument. The reason
for using a pointer is that it will hold the function result after it’s called and the caller
can retrieve the result from the pointer. The notable issue with this function is that, as
mentioned, it returns the retrieved data in the final parameter (value), and therefore
requires a pointer as that parameter. To use the method in MacRuby, create a variable
(here named titlePtr) and assign it to an object pointer. Pass the pointer value to the
function and read the retrieved value just by dereferencing it, as shown here:
framework 'ApplicationServices'
pid = 433
safari = AXUIElementCreateApplication(pid)
titlePtr = Pointer.new(:id)
err = AXUIElementCopyAttributeValue(safari, "AXTitle", titlePtr)
p titlePtr[0] # => "Safari"
Unsigned Pointer
Some methods take unsigned pointers, that is, pointers that don’t have a defined type.
Take the FSevents API (see http://developer.apple.com/library/mac/#documentation/
Darwin/Conceptual/FSEvents_ProgGuide/UsingtheFSEventsFramework/UsingtheFSE
ventsFramework.html), for instance.
Here is a MacRuby script that implements this method to watch a specific folder:
callback = Proc.new do |stream, client_callback_info, number_of_events,
paths_pointer, event_flags, event_ids|
puts paths_pointer[0] # => 0
end
paths = [File.expand_path('~/tmp')]
stream = FSEventStreamCreate(KCFAllocatorDefault, callback, nil, paths,
KFSEventStreamEventIdSinceNow, 0.0, 0)
FSEventStreamScheduleWithRunLoop(stream, CFRunLoopGetCurrent(), KCFRunLoopDefaultMode)
FSEventStreamStart(stream)
NSRunLoop.currentRunLoop.runUntilDate(NSDate.distantFuture)
If you run this code and modify or create a file in ~/tmp, the callback will be triggered,
but the output will be 0. You can see why by looking at the callback function’s signature
(see http://developer.apple.com/library/mac/documentation/Darwin/Reference/FSE
vents_Ref/FSEvents_h/index.html//apple_ref/c/tdef/FSEventStreamCallback):
void mycallback(
ConstFSEventStreamRef streamRef,
void *clientCallBackInfo,
size_t numEvents,
160 | Chapter 8: One Step Deeper

void *eventPaths,
const FSEventStreamEventFlags eventFlags[],
const FSEventStreamEventId eventIds[])
{ }
eventPaths is a void pointer and therefore can’t be properly cast by MacRuby. In a case
like this, you need to tell MacRuby how to cast the pointer using the #cast! method:
callback = Proc.new do |stream, client_callback_info, number_of_events,
paths_pointer, event_flags, event_ids|
paths_pointer.cast!("*") # cast as a string pointer
puts paths_pointer[0] # => /Users/mattetti/tmp/
end
paths = [File.expand_path('~/tmp')]
stream = FSEventStreamCreate(KCFAllocatorDefault, callback, nil, paths,
KFSEventStreamEventIdSinceNow, 0.0, 0)
FSEventStreamScheduleWithRunLoop(stream, CFRunLoopGetCurrent(), KCFRunLoopDefaultMode)
FSEventStreamStart(stream)
NSRunLoop.currentRunLoop.runUntilDate(NSDate.distantFuture)
Some methods optionally take integers in void * parameters. An example is OpenGL’s
glVertexPointer function, which, when overloaded, takes an integer passed as the last
void * pointer. To do that in MacRuby, you need to create a special pointer type using
the Pointer#magic_cookie method, and pass it the integer to use.
This is how you call the function in C:
glVertexPointer(3, GL_FLOAT, 3, (void *) 12)
Using MacRuby you call it this way:
glVertexPointer(3, GL_FLOAT, 3, Pointer.magic_cookie(13))
Finally, the last edge case with void pointers is when an API returns a direct reference
to an object. You can’t therefore cast the MacRuby pointer instance value, but should
cast the pointer instance itself. Do this via the Pointer’s instance method called
to_object.
Here is an example using the C-based Text Input Source Services from the HIToolbox
framework. Use the TISGetInputSourceProperty function to get the value of a specified
input source (see http://developer.apple.com/library/mac/#documentation/TextFonts/
Reference/TextInputSourcesReference/Reference/reference.html).
Here is the function signature:
void* TISGetInputSourceProperty (
TISInputSourceRef inputSource,
CFStringRef propertyKey
);
This is how to use it to get the localized name of the current keyboard:
Pointers | 161

framework 'Cocoa'
keyboard = TISCopyCurrentKeyboardInputSource()
keyboard_name = TISGetInputSourceProperty(keyboard, KTISPropertyLocalizedName)
The problem is that the void pointer returned by the function is a direct reference to
an object and, therefore, casting it won't work. In this case, because the documentation
is clear about the fact that the void pointer is a direct-typed reference, we need to use
#to_object on the pointer instead of casting and dereferencing it:
framework 'Cocoa'
keyboard = TISCopyCurrentKeyboardInputSource()
keyboard_name = TISGetInputSourceProperty(keyboard, KTISPropertyLocalizedName)
keyboard_name.to_object #=> "U.S."
Compilation
A book about MacRuby cannot be complete without mentioning compilation.
MacRuby offers two types of compilation: JIT and AOT compilation.
Just In Time compilation (JIT)
This is the default mode. At runtime, prior to being executed, the source code is
optimized and compiled into machine code that can run natively on the machine.
Even though this process includes a slight delay at startup time, compiled code
usually runs faster than the interpreted code, because MacRuby doesn’t have to
reevaluate each line of source code each time it is met. This process is totally trans-
parent, since the compilation is done on the fly when a user launches a MacRuby
application.
Ahead Of Time compilation (AOT)
Before execution, source code can be compiled directly into machine code (see the
Wikipedia entry for Mach-O file at http://en.wikipedia.org/wiki/Mach-O). AOT
compilation has two major advantages: it improves startup time and it obfuscates
the application source code.
Here is the simplest AOT example—save the following line of code in a file called
hello_world.rb:
p ARGV.join(' ').upcase
Or, using the command line, create the file and its content:
$ echo "p ARGV.join(' ').upcase" > hello_world.rb
The code takes all the passed arguments, joins them together separated by a space, and
makes the result string uppercase.
Our “program” source code is now ready, so let’s compile it using the MacRuby com-
piler command line tool, called macrubyc:
$ macrubyc hello_world.rb -o macruby_says
162 | Chapter 8: One Step Deeper

The -o option defines the output file. We can now execute our newly compiled
program:
$ ./macruby_says hello world
# => "HELLO WORLD"
Looking at the macrubyc help, we can see that many other options are available:
$ macrubyc --help
Usage: macrubyc [options] file...
-c Compile and assemble, but do not link
-o <file> Place the output into <file>
--static Create a standalone static executable
--framework <name> Link standalone static executable with given
framework
--sdk <path> Use SDK when compiling standalone static
executable
--dylib Create a dynamic library
--compatibility_version <VERSION>
Compatibility Version for linking
--current_version <VERSION> Current Version for linking
--install_name <NAME> Install Name for linking
-C Compile, assemble, and link a loadable object
file
-a, --arch <ARCH> Compile for specified CPU architecture
-v, --version Display the version
-V, --verbose Print every command line executed
-h, --help Display this information
If you look at the contents of a compiled MacRuby application package, you might
notice some .rbo files. These files are compiled and loadable object files generated using
the equivalent of the following command:
$ macrubyc -C -o file.rbo file.rb
MacRuby can then load the file directly without having to reevaluate it.
Compilation Within Xcode
In most cases, you will use Xcode to develop your application, and the Xcode templates
come with a target that does all the work for you. It turns out that there isn’t much to
do to compile an app. If you open an existing MacRuby project in Xcode and look at
the project’s target information, you will see that the only thing the target does is to
call macruby_deploy as such:
$ /usr/local/bin/macruby_deploy --compile --embed
Because no arguments are passed to define the application-bundle path,
macruby_deploy relies on two environment variables set by Xcode to define the location
of the bundle: TARGET_BUILD_DIR and PROJECT_NAME.
Compilation Within Xcode | 163

When called with the --compile option, macruby_deploy compiles all the Ruby files
available in the resources folder. Xcode copies the source files to this folder automati-
cally for you when you build your project, before calling the external script. These files
are compiled as .rbo files that are loaded by the rb_main.rb file.
When the --embed option is set, the MacRuby framework is copied to the application
bundle, freeing the application from the need to have MacRuby installed on the user’s
system. As part of this process, the linkage is also modified so the compiled code doesn’t
break when it’s run on a different machine.
Another useful option that you might need to use when compiling an application from
Xcode using macruby_deploy is --no-stdlib. It allows you to make your application
smaller by not embedding Ruby’s standard library when embedding MacRuby. If you
don’t rely on any libraries from the standard library, it’s recommended that you use
this option. If, however, you do rely on a library from the Ruby standard library, you
can tell macruby_deploy to embed only specific libraries using the --stdlib option. It
takes the names of one or more libraries. You can also embed Ruby gems libraries, as
explained in Chapter 13.
Finally, if you generate some BridgeSupport files or want to force the use of your ver-
sions, you can use the --bs option to embed them.
The way compilation currently works in Xcode is that you need to run the second target
after building your project. In other words, you will usually develop without compiling.
When you are ready, change the target to use the provided Deployment scheme, which
calls macruby_deploy, which itself might call the MacRuby compiler if needed. You can
see the available macruby_deploy flags by calling its help in the command line, as
follows:
$ macruby_deploy --help
Usage: macruby_deploy [options] application-bundle
--compile Compile the bundle source code
--embed Embed MacRuby inside the bundle
--no-stdlib Do not embed the standard library
--stdlib [LIB] Embed only LIB from the standard library
--gem [GEM] Embed GEM and its dependencies
--bs Embed the system BridgeSupport files
--verbose Log all commands to standard out
-v, --version Display the version
After you run the Deployment scheme, you can start your application manually or go
back to your original scheme and build your app again. If the deployment doesn’t work
as expected, you can look in Xcode’s Log navigator to see exactly what happened. You
can also set the --verbose flag in the target information to see even more information
about what macruby_deploy does. You can also run macruby_deploy manually in the
command line, passing it the path to the application bundle file.
Finally, if things don’t seem to work properly and you can’t figure out what is going
on, don’t hesitate to clean (Shift + Command + K) the project and build it again.
164 | Chapter 8: One Step Deeper

PART II
MacRuby in Practice
This part covers concrete examples of applications you might want to develop in
MacRuby. While the first part focuses on the theory, this part focuses on actual im-
plementations of given features.

CHAPTER 9
Address Book Example
The first full example in this book shows how to write an application around Twitter
and the Address Book. The goal here is to import our Twitter contacts into our address
book and learn new tricks as we go along.
Let’s begin by creating a MacRuby application using Xcode. For that, start Xcode and
choose the MacRuby template. In the template settings, set the Product Name to Twit-
terContactImporter and use “clear” or “deselect” or “disable” the Document-Based
and Core Data options.
User Interface
I personally find it easier to start by working on the UI, and then adding the required
code. Click on the .xib file to edit the interface, then select the Window object, as shown
in Figure 9-1.
We are going to add a button that will automatically import our Twitter contacts. Once
the contacts are imported, we will display the list of our contacts and let the user search
for a specific contact.
To start, we need to use an image to put on our button. Head to the Twitter logos and
icons site and download the logo of your choice. Save the image as twitter_logo.png
somewhere on your hard drive. Once the image is saved, drag and drop it in Xcode into
the Resources folder. An option screen like the one shown in Figure 9-2 will open.
167

Figure 9-2. Import image option screen
Figure 9-1. Initial UI
168 | Chapter 9: Address Book Example
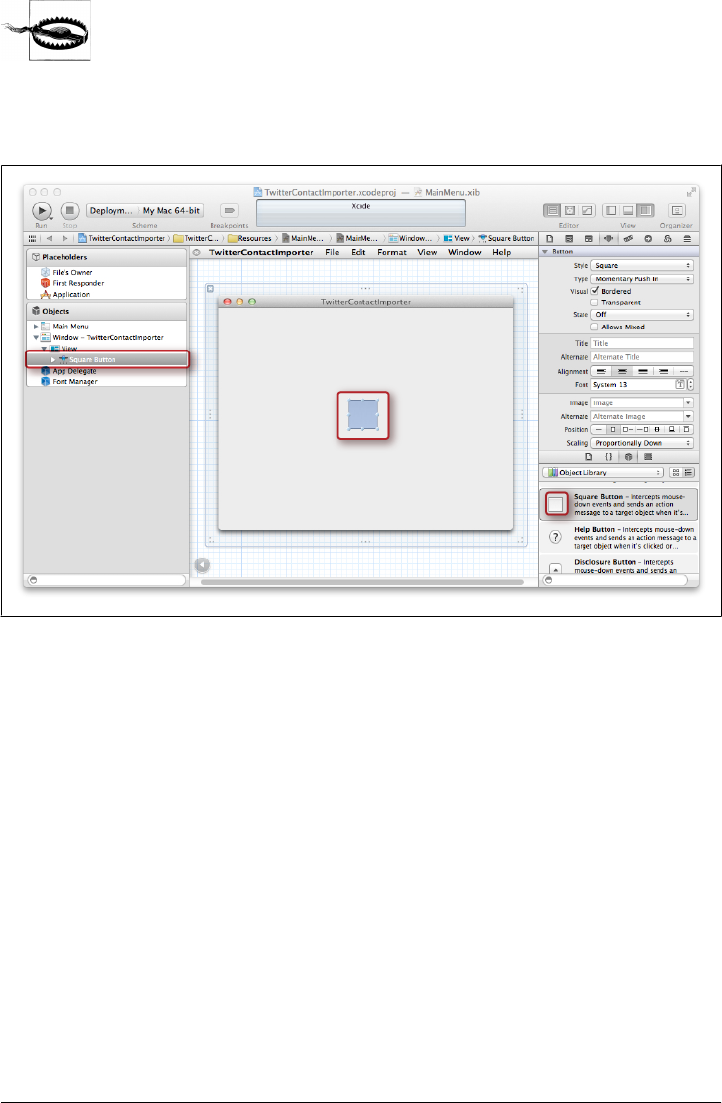
Make sure to select the destination box.
Now, drag a Square Button from the Object Library to the window view, as shown in
Figure 9-3.
Figure 9-3. Addition of a square button
Let’s add our Twitter logo to our button. To do that, select the button and select the
Attributes inspector. Open the drop-down menu for the Image attribute and choose
twitter_logo. Now resize the button to make it bigger. Resizing the button is easy: just
use the handles on the sides of the button. Once you are satisfied, make sure the Twit-
terContactImporter scheme is selected and click Run to compile your application and
preview your UI (Figure 9-4). We can also use the document simulator (in the Editor
menu), but since the MacRuby source code doesn’t have to be compiled, I think it’s
just as easy and more reliable to run the real app.
If you try to close the window, you will notice that the application is still in the dock.
Let’s add a line of code to exit the application once the main window is closed. Open
AppDelegate.rb and add the following code at the bottom of the AppDelegate class (i.e.,
before the last “end”):
def windowWillClose(sender); exit; end
Before testing this code, we need to do one more thing. We need to tell our window to
use our AppDelegate so our callback will work as expected. Edit the .xib file, right-click
User Interface | 169
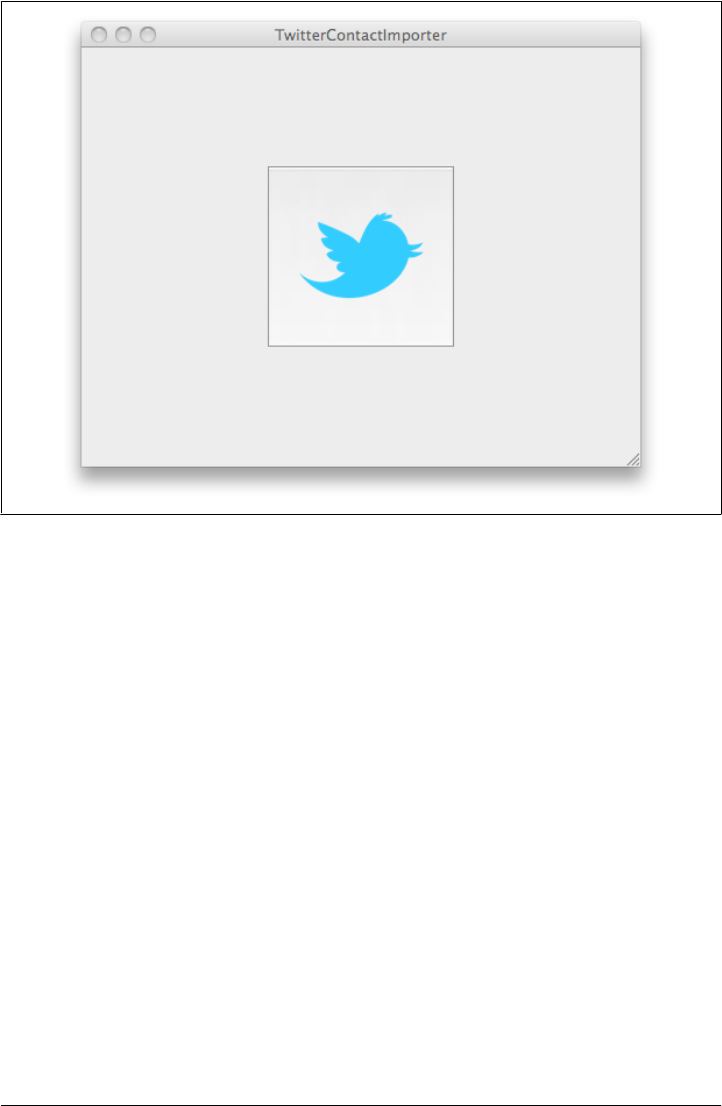
on the Window instance, and drag the window delegate outlet to the App Delegate
object. At this point, the window will delegate everything to our AppDelegate instance,
which is what we want, since that’s where we defined the windowWillClose delegate
method. Depending on the application you write, you might want to write a window-
specific delegate.
Run the application one more time, and notice that this time, when closing the window,
the application exits.
Address Book
To use the AddressBook framework, we need first to load it. Edit rb_main.rb and on
the line loading the Cocoa framework, add the following code:
framework 'AddressBook'
Earlier, in “Method Missing” on page 153, we examined how to wrap the Address
Book Cocoa API to make it easier to work with. I wrote a bunch of basic wrappers for
the AddressBook API. Let’s add them to our project.
Right-click the TwitterContactImporter folder in the Project navigator and choose New
Group. Name the folder Wrappers. Download the wrapper files for this chapter from
the book repository and drag them in the Wrappers folder (the wrapper files are named
Figure 9-4. Final view of the running application
170 | Chapter 9: Address Book Example

ab*_ and you will also see a file adding some helper methods to Ruby). When the option
screen displays, choose to copy the items into the destination group. The files reopen
some AddressBook classes and add some convenient methods. The files will be auto-
matically loaded by the rb_main.rb file.
Next, we need to load the user’s address book and make sure the user marked a record
as her own. Let’s start by creating an accessor for the user’s address book. We want to
do that when the application finishes launching. Edit AppDelegte.rb, add a new attrib-
ute reader called address_reader, and set its value inside the applicationDidFinish-
Launching method as follows:
class AppDelegate
attr_accessor :window
attr_reader :address_book
def applicationDidFinishLaunching(a_notification)
@address_book = ABAddressBook.sharedAddressBook
end
def windowWillClose(sender); exit; end
end
Let’s also add a method to alert the user if something goes wrong, such as, for instance,
if she didn’t set a contact as her own:
def alert(title='Alert', message='Something went wrong: ')
NSAlert.alertWithMessageText(title,
defaultButton: 'OK',
alternateButton: nil,
otherButton: nil,
informativeTextWithFormat: message).runModal
end
And now let’s verify that the user marked an account as hers. If not, let’s display a
warning:
def check_me
unless address_book.me
alert "Address Book Problem",
"You need to open the Address Book and mark a contact as yours. Choose a contact,
click on Card, and select 'Make this my card'."
end
end
And call our newly created method from inside applicationDidFinishLaunching:
def applicationDidFinishLaunching(a_notification)
@address_book = ABAddressBook.sharedAddressBook
check_me
end
This is a good first step, but we also need to check that we set our Twitter nickname
in the address book. Without this nickname representing the user’s Twitter account,
we can’t find her contacts. Notice that only public Twitter accounts are supported.
Address Book | 171

Add the following code at the bottom of the check_me method:
if address_book.me.nickname.nil? || address_book.me.nickname == ''
alert "Address Book Problem",
"You need to set your Twitter account as your nickname in your contact card."
end
Great, so now we have now created a warning that will inform the user if her contact
card doesn’t contain the information we need. But we also need to create a new contact
group to store all the Twitter contacts and keep them somewhat isolated:
def create_twitter_group
twitter_group = address_book.groups.find{|g| g.name == 'Twitter'}
if twitter_group
twitter_group
else
group = ABGroup.alloc.init
group.name = 'Twitter'
puts "adding Twitter group"
address_book << group
address_book.save
twitter_group
end
end
We are going to use this method in a minute, when we call the web API.
Web API Call
Now that the Twitter information is ready, we can write the code that will be called to
fetch the Twitter contacts when the user clicks our Twitter button.
In Cocoa terms, such a method is called an action. We will connect our button’s
performClick event to a new method, passing as its argument the instance that calls the
method. Here is the action code:
def import_twitter_contacts(sender)
me = address_book.me
twitter_group = create_twitter_group
puts "Importing from Twitter"
Thread.new{
fetch_paginated_friends(me.nickname) do |friends|
puts "Importing a batch of friends"
add_twitter_friends(friends, twitter_group)
end
address_book.save
puts "Import done"
}
end
This code calls a method that we haven’t implemented yet, named fetch_
paginated_friends. And for each batch of retrieved friends, we add them to the newly
172 | Chapter 9: Address Book Example

created group, using a new method called add_twitter_friends. Finally, when all the
friends have been imported, the address book is saved.
The reason the code is wrapped in a new thread is so we don’t block the main loop.
Because our application is very simple, using the main thread wouldn’t have been a big
deal. Indeed, a user can’t do anything else in the application while we’re loading con-
tacts, so making him wait until the import is done wouldn’t be too bad. However, this
is a bad practice and, as you can see, running the code in a separate thread is really
straightforward.
Let’s connect our button to this action. To do that, select the MainMenu.xib file, right-
click on the App Delegate icon, and drag the circle attached to import_twitter_contacts
(in the Received Action submenu) to the big button we added.
Now let’s implement the paginated fetching, using the Twitter API:
def fetch_paginated_friends(account, &block)
cursor = '-1'
until cursor == 0
url_string =
"http://twitter.com/statuses/friends/#{account}.json?cursor=#{cursor}"
url = NSURL.alloc.initWithString(url_string)
json_friends = NSMutableString.alloc.initWithContentsOfURL(url,
encoding:NSUTF8StringEncoding,
error:nil)
friend_results = JSON.parse(json_friends)
block.call(friend_results['users'])
cursor = friend_results['next_cursor']
end
end
The code isn’t complicated, but it mixes some Cocoa API calls with some advanced
Ruby idioms. The first thing you might notice is that the second method argument
starts with an ampersand and looks funny. It’s Ruby’s way of saying that this method
expects to be called with a block. The method can’t be called without passing a block.
The Twitter API uses the principle of a cursor to paginate through the results. The first
page starts at cursor –1 and each result set contains information about the previous or
next cursor. When there aren’t any pages to iterate through, the cursor is set to 0.
Because of this, we can write our code so it will keep calling the Twitter API until a
response defines the next cursor as 0. The data coming back from the API is a string in
the JSON format. To parse this data, we first need to require the JSON library at the
top of the file, as follows:
require 'json'
That’s the library used to parse the body of the API response. We then extract a subset
of this data and send it to our block, like this:
block.call(friend_results['users'])
Web API Call | 173

This calls the passed block and passes it our data subset as a parameter. Look at how
we called this method and used the block. See that the block’s parameter is called
friends? Our implementation executes the passed block and replaces “friends” with
the data subset so that it can be manipulated from within the block:
fetch_paginated_friends(me.nickname) do |friends|
# do something with a subset of the friends
end
For our code to work, we also need to implement the add_twitter_friends method that
is called from within the block:
def add_twitter_friends(friends, group)
friends.each do |friend|
# avoid duplicates
if friend['screen_name']
query = ABPerson.searchElementForProperty(KABNicknameProperty,
label:nil, key:nil, value:friend['screen_name'],
comparison:KABEqual)
results = address_book.recordsMatchingSearchElement(query)
contact = results.first || ABPerson.alloc.initWithAddressBook(address_book)
else
contact = ABPerson.alloc.initWithAddressBook(address_book)
end
first_name, last_name = friend['name'].split(' ')
contact.firstName = first_name if first_name
contact.lastName = last_name if last_name
contact.nickname = friend['screen_name']
urls = {'Twitter' => "http://twitter.com/#{friend['screen_name']}"}
urls[KABHomePageLabel] = friend['url'] unless friend['url'].blank?
contact.URLs = urls.to_ab_multivalue
contact.imageData = NSData.dataWithContentsOfURL(friend['profile_image_url'].\
to_nsurl)
notes = []
notes << friend['description'] unless friend['description'].blank?
notes << "Location: #{friend['location']}" unless friend['location'].blank?
contact.note = notes.join("\n")
group << contact
end
end
Even though this method is a bit long, what it does is very simple. For each friend in
the passed array, it checks whether a matching record already exists in the address
book. If so, the method updates the record based on the information returned by Twit-
ter, or creates a new record. We even download the profile image and assign it as the
contact’s image. Once the method is done parsing the data, the updated/created contact
is added to the group. Voilà!
174 | Chapter 9: Address Book Example

Cleaning Up: Better Management of Widgets
The application we’ve thrown together is great, but we have a few issues to fix and
features to add. First, a user might click multiple times on the button, and that would
run our fetching code in multiple parallel threads. We obviously don’t want that. The
other thing is that the user isn’t notified that the contacts are being fetched. Let’s fix
that!
The first thing to do is give our code access to our big Twitter button. By now, you
should know what we need to do:
1. Add a button attribute accessor in our class so Xcode sees it as an outlet.
2. In the Interface Builder, right-click the App Delegate icon and assign the button
outlet to the big Twitter button.
In this section, instead of using the Interface Builder tool provided by Xcode, we are
going to set the rest of the UI programmatically. This is mostly meant as an exercise
and to show you that it is not that hard after all.
Now that we have access to our button, we want to hide the button after it was clicked
and show a progress indicator. To do that, let’s create a method and dispatch it from
the button action:
def make_user_wait
button.hidden = true
if @spinner
@spinner.hidden = false
else
x = window.frame.size.width/2 - 32/2
y = window.frame.size.height/2 - 32/2
@spinner = NSProgressIndicator.alloc.initWithFrame([x,y,32,32])
@spinner.style = NSProgressIndicatorSpinningStyle
window.contentView.addSubview(@spinner)
end
@spinner.startAnimation(nil)
end
This code is a bit more complicated than it should be, but it shows how to display a
view item in relation to another one. The first thing we do is hide the Twitter button
Then, if the spinner already exists, we show it, otherwise we create an instance that we
locate exactly at the middle of the window. To do that, we calculate the x and y positions
by inspecting the window frame size and locating the indicator in the center, based on
its size in pixels (32×32). We also need to start the spinning animation.
The only problem is that we tell the users to wait, but then don’t show them anything.
Thankfully, Cocoa has a widget that lets you integrate a contact browser in your app.
Let’s add it to our sample and display the contact browser once all the contacts are
imported. Our import_twitter_contacts method will look like this:
Cleaning Up: Better Management of Widgets | 175

def import_twitter_contacts(sender)
make_user_wait
me = address_book.me
twitter_group = create_twitter_group
puts "Importing from Twitter"
Thread.new{
fetch_paginated_friends(me.nickname) do |friends|
puts "Importing a batch of friends"
add_twitter_friends(friends, twitter_group)
end
address_book.save
puts "Import done"
display_contacts
}
end
And display_contacts looks like this:
def display_contacts
@spinner.stopAnimation(nil)
@spinner.hidden = true
frame = [0,0, window.frame.size.width, window.frame.size.height - 120]
@picker = ABPeoplePickerView.alloc.initWithFrame(frame)
window.contentView.addSubview(@picker)
end
Again, the code is straightforward. We stop the spinner and hide it. We then create an
instance of ABPeoplePickerView that will be slightly shorter than the window’s height.
Once the instance is created, we add it to our window’s content view.
The Extra Mile: Displaying More Information
Through Notifications
What we have done already is really cool, but it would be even nicer to display some
of the contact’s details while browsing them. We can do this by adding more UI ele-
ments and by observing the interaction with the ABPeoplePickerView.
This time, instead of creating UI elements and placing them programmatically on the
window, let’s set our elements but hide them until we need them. Before we do that,
let’s add some outlets for all of the UI elements and, while we are at it, add an attribute
reader for the picker:
176 | Chapter 9: Address Book Example

class AppDelegate
attr_accessor :window, :button
attr_reader :address_book, :picker
attr_accessor :contact_name, :contact_image, :contact_twitter
#...
end
Next, add an ImageWell instance of 100x100 on the top left of your UI. Edit the Image
view’s settings and change the drop-down to make the view scale proportionally up or
down. Then, to the right of the image, add two labels. Before you hide them all, right-
click the app delegate icon and connect your three outlets to your new UI items. Now,
go to each of them and set their drawing attributes to hidden.
Now we just need to write the code displaying the hidden UI items, setting up the
notification center and its callback method:
def display_contacts
@spinner.stopAnimation(nil)
@spinner.hidden = true
frame = [0,0, window.frame.size.width, window.frame.size.height - 120]
@picker = ABPeoplePickerView.alloc.initWithFrame(frame)
center = NSNotificationCenter.defaultCenter
center.addObserver(self,
selector: "record_changed:",
name: ABPeoplePickerNameSelectionDidChangeNotification,
object:picker)
picker.allowsMultipleSelection = false
picker.addProperty KABNicknameProperty
contact_image.hidden = false
contact_name.hidden = false
contact_twitter.hidden = false
window.contentView.addSubview(picker)
end
In “Notification Centers” on page 63, we covered the notification center and observers.
The principle is simple: when the user changes the selected contact, the callback se-
lector is called. The following code implements the callback method, which simply
finds the selected record and sets the UI elements with the record’s data:
def record_changed(notification)
selected = picker.selectedRecords || []
if selected.empty?
contact_image.image = nil
contact_name.stringValue = ""
contact_twitter.stringValue = ""
else
person = selected.first
contact_image.image = NSImage.alloc.initWithData(person.imageData)
contact_name.stringValue = "#{person.firstName} #{person.lastName}"
contact_twitter.stringValue = person.nickname || ''
end
end
The Extra Mile: Displaying More Information Through Notifications | 177
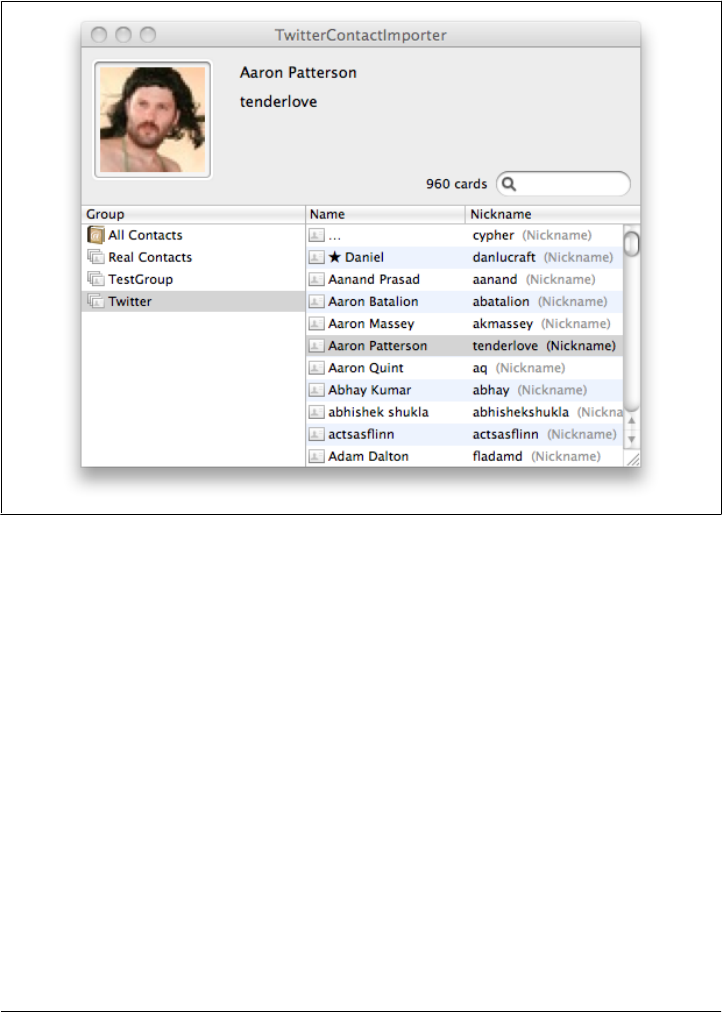
Our app is now finished. After running the app and playing a bit with it, you can open
your AddressBook.app and see all your Twitter contacts being imported and their details
becoming available, as shown in Figure 9-5.
Figure 9-5. My Twitter contacts imported and previewed
178 | Chapter 9: Address Book Example

CHAPTER 10
Geolocation
The example in this chapter shows how to write an application that uses the user’s
geographical location and a location web service. To do that, we are going to use the
CoreLocation framework, the gowalla.com web API (offering location information
based on coordinates), and a TableView instance.
As before, we start by creating a MacRuby application using Xcode. Start Xcode and
choose the MacRuby template. In the template settings, set the Product Name to
“AroundMe” and disable the Document-Based and Core Data options.
User Interface
In this example, the UI will be very simple. We are going to work with just an NSTable
View instance and a bunch of columns (NSTableColumn).
Edit your .xib file and resize the main window to be 640 pixels by 440 pixels (use the
Size Inspector in the Utilities panel). Now drag and drop a Table View from the Object
Library inside the Window’s view. Using the grid guides, scale the table to use most of
the window’s real estate.
At this point, make sure the AroundMe scheme is selected and click Run. The app
should look like Figure 10-1.
We are going to use the Gowalla API to find the locations (called spots in Gowalla’s
jargon) around our users. You can see the type of information the API provides us by
going to the following page: http://gowalla.com/api/explorer#/spots?lat=30.2697&lng
=-97.7494&radius=50.
We can’t easily display all the spot’s information. Instead, we are going to filter the
data and display only the following:
• The spot’s category
• The spot’s name
• The spot’s description
179
• The spot’s distance
• The number of items in the spot
• The number of users who visited this spot
• The number of checkins in the spot
Let’s add some columns to our table. The easiest way to do that is to copy/paste an
existing table column. The end result should look like Figure 10-2.
Now, let’s name each column’s header by setting the header cell title via the Attributes
Inspector (Figure 10-3).
Our first column will display an image, so we need to change the type of cell it uses.
Drag and drop an Image Cell inside the first column so the Text Field cell gets replaced
by its Image counterpart (Figure 10-4).
Finally, one by one, edit the table columns and use the Attributes Inspector to make
sure the columns are not editable.
Figure 10-1. Blank Table View
180 | Chapter 10: Geolocation
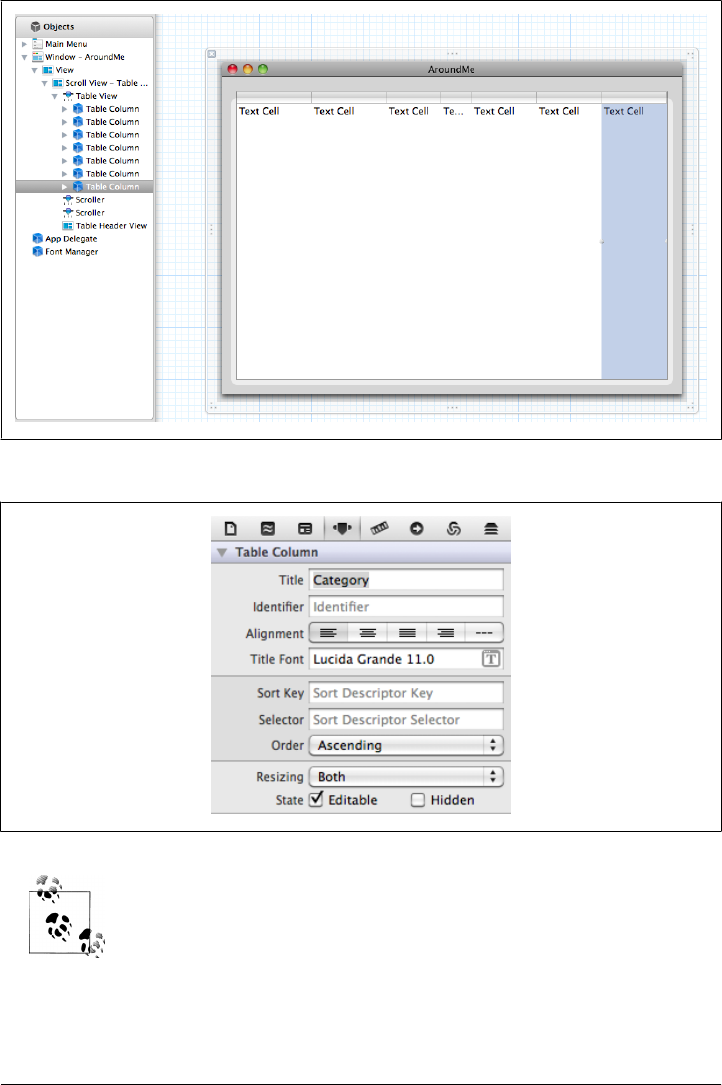
You can select all the columns at once and set the flag the way you want
it.
That’s enough for the UI for now. Let’s move on to writing some code.
Figure 10-2. Seven table columns added
Figure 10-3. Setting the column’s header title
User Interface | 181
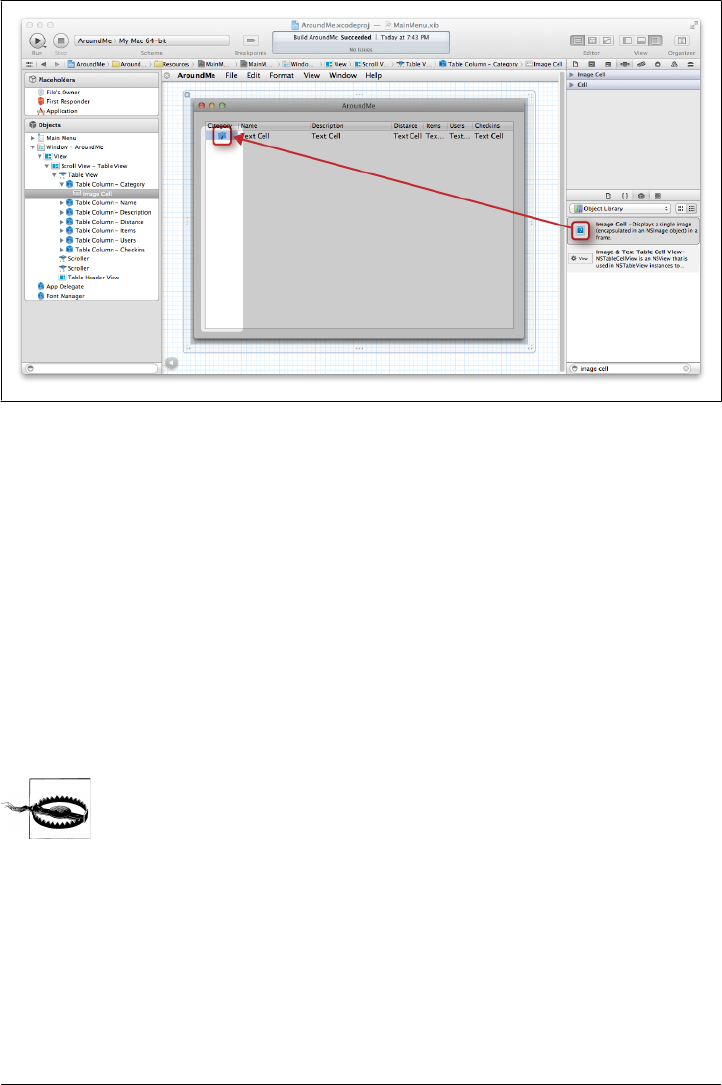
Table View
Before we get to call the web API and fetch the information, we need to wire the table
view. We are going to call our table spot_table and create an outlet for it in our App-
Delegate.rb file:
class AppDelegate
attr_accessor :window
attr_accessor :spot_table
...
end
Going back to the UI editor, right-click the App Delegate object, choose the
spot_table outlet, and connect it to the table view.
Connect the outlet to the table view, not the scroll view. The table view
is inside the scroll view.
We can now initialize the table view delegation as follows:
def applicationDidFinishLaunching(a_notification)
spot_table.dataSource = self
spot_table.doubleAction = "preview:"
end
Figure 10-4. Image Cell being used in the first column
182 | Chapter 10: Geolocation

Setting the TableView instance’s dataSource to self means that we are expected to im-
plement the table’s methods in our AppDelegate class (which is what self refers to in
this context). We are also setting the doubleAction selector, representing the action to
dispatch when a row is double-clicked. Of course, that means that we will need to
implement this action in a minute.
For the table to work properly, we need to implement a few methods. But before we
get there, we need to define an object that will hold the references to spots. Our table
will use this object to fetch and sort its content. Let’s call this object @spots, make an
attribute accessor for it, and initialize it as an empty array when the application finishes
loading. We are going to use this object as the table data source. For more information
about how to use a table data source, please read the Apple developer page, About
Table Views in Mac OS X Applications.
This is how our AppDelegate class should look:
class AppDelegate
attr_accessor :window
attr_accessor :spots, :spot_table
def applicationDidFinishLaunching(a_notification)
@spots = []
spot_table.dataSource = self
spot_table.doubleAction = "preview:"
end
def windowWillClose(sender); exit; end
end
I skipped the windowWillClose delegate explanation here because I cov-
ered it many times previously. Remember that you need to set the win-
dow’s delegate to the AppDelegate class.
Now that we defined our data source object, we can define some table delegate methods
based on this reference object. One of these methods indicates to the table view the
number of records in the source:
def numberOfRowsInTableView(view)
spots.size
end
We also need to implement some sort of overloaded method. In Objective-C, a single
method name can be defined with different method signatures. MacRuby supports the
same approach when a hash is used in the method signature. We are going to implement
the following methods:
Table View | 183

def tableView(view, objectValueForTableColumn:column, row:index)
end
def tableView(view, sortDescriptorsDidChange:descriptors)
end
These are two alternative signatures defined by the TableView API. The first method
retrieves the value for a given column, whereas the second defines sorting in the table.
In both, the second argument is a hash object (Ruby 1.9 style), but the keys are different
between the two method signatures.
When the first method is dispatched, it is passed the column object and row index to
retrieve the data to display. Now we have two issues: we don’t have any data to look
at yet, and we don’t have a way to look up a record’s value with a column instance as
a key. To make things easier, we are going to edit our columns and set their editors
with the matching JSON key we are getting from the web API call. Once we implement
the web API fetching, we will wrap each spot in an object that will respond to the key
names. We can also directly look up the values in the JSON object, but that won’t allow
us to customize and massage the data easily, since the JSON data structure is somewhat
limited.
In the UI editor, select each column and set the identifier as follows:
• Category → image
• Name → name
• Description → description
• Distance → radius_meters
• Items → items_count
• Users → users
• Checkins → checkins
The implementation of the first method is as follows:
def tableView(view, objectValueForTableColumn:column, row:index)
spot = spots[index]
id = column.identifier
if id == 'image'
# NSImageCell instance, we need to feed it an NSImage
@cell_images ||= {}
@cell_images[spot.image] ||= NSImage.alloc.initWithData(
NSURL.URLWithString(spot.image).resourceDataUsingCache(true)
)
else
spot.send(id.to_sym)
end
end
The first thing we are doing in this method is fetching the spot based on its index in
the data source. We then extract the column identifier and check whether it matches
the image string. If it does, we allocate a new NSImage instance based on the image URL
184 | Chapter 10: Geolocation

that was fetched from the web API. To improve performance, we are memoizing all the
NSImage instances we create and making sure to use the built-in cache. Finally, for all
other columns, we are dispatching the identifier’s method using Ruby’s #send method,
which takes, as its argument, the method’s name as a symbol (#to_sym converts a string
into a symbol).
We’ll keep the second method very simple for now. Instead of doing anything here, we
will just reload the data for the moment:
def tableView(view, sortDescriptorsDidChange:descriptors)
spot_table.reloadData
end
Core Location
Before we can call Gowalla’s API, we still need to get the user’s location. For that, we
are going to use CoreLocation, a framework available in OS X that allows the user to
share his geographical location with a given program.
The CLLocationManager class, available from CoreLocation (see http://developer.apple
.com/library/mac/#documentation/CoreLocation/Reference/CoreLocation_Framework/
_index.html) framework, does all the work, but it’s a bit clumsy. So let’s write a thin
wrapper to keep our delegate class simpler. Add a new Ruby file called location_man
ager.rb and paste the following code in the file:
framework 'CoreLocation'
# CLLocationManager wrapper
class LocationManager
def initialize(&block)
@loc = CLLocationManager.alloc.init
@loc.delegate = self
@callback = block
end
def start
@loc.startUpdatingLocation
end
def stop
@loc.stopUpdatingLocation
end
# Dispatch the CLLocationManager callback to the Ruby callback
def locationManager(manager, didUpdateToLocation: new_location,
fromLocation: old_location)
@callback.call(new_location, self)
end
end
Core Location | 185
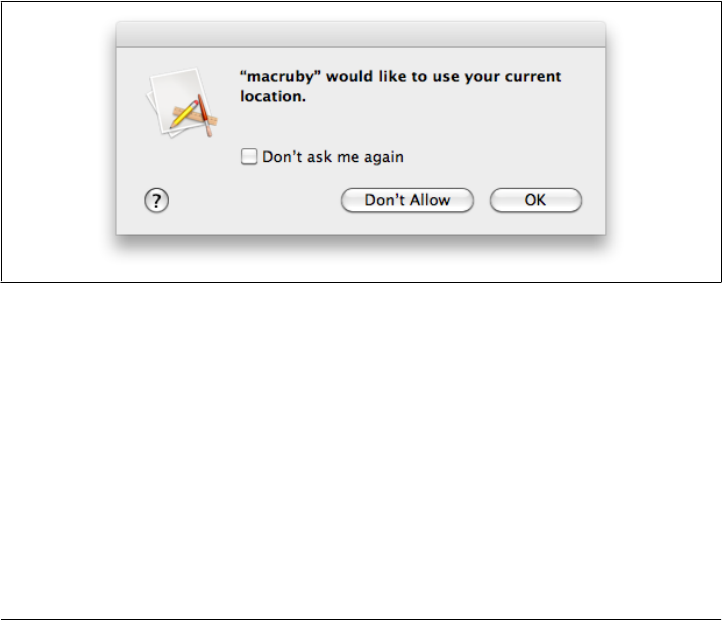
This wrapper doesn’t do much, but it will make our code cleaner. We basically define
a new class called LocationManager, which expects a block at initiation. The block is
kept in memory and is called when new location information is retrieved. I also added
two simple instance methods, #start and #stop, which delegate to the underlying
CLLocationManager instance. There is documentation for CoreLocation at the Apple
developer site.
This nice wrapper allows us to print a location like this:
location_manager = LocationManager.new do |new_location, manager|
puts "location: #{new_location.description}"
manager.stop
end
location_manager.start
As a matter of fact, you can put the wrapper and the previous code in a file and get your
location that way. You will need to add the following line at the bottom of the file to
keep the run loop running:
NSRunLoop.currentRunLoop.runUntilDate(NSDate.distantFuture)
Execute the file using MacRuby, and you should be presented with a dialog box like
the one shown in Figure 10-5.
Figure 10-5. The location-sharing security dialog box
And something like this should be printed out on your terminal:
location: <+32.67000000, 117.24000000> +/- 181.00m
(speed -1.00 mps / course -1.00) @ 2011-05-15 22:46:24 -0700
Back to our app. Let’s use our wrapper in our applicationDidFinishLaunching callback
method:
def applicationDidFinishLaunching(notification)
@spots = []
location_manager = LocationManager.new do |new_location, manager|
puts "location: #{new_location.description}"
gowalla = gowalla_req(new_location)
186 | Chapter 10: Geolocation

@spots = gowalla['spots'].map{|spot| GowallaSpot.new(spot)}
@spots.sort!{|a,b| a.radius_meters <=> b.radius_meters}
spot_table.reloadData
manager.stop
end
spot_table.dataSource = self
spot_table.doubleAction = "preview:"
location_manager.start
end
Within the block, we are making a Gowalla call, iterating through the spots, and storing
them in an array of GowallaSpot instances. The spots are then sorted based on their
distances. The table view reloads its data and the location manager is stopped.
The location manager obviously cannot be started from within the callback block, so
we need to start it once everything is set up. That’s what we do before closing the
method definition.
Web API
Right now, this code won’t work. We still need to implement the GowallaSpot class and
the #gowalla_req method. I personally like to write high-level code before I implement
the underlying methods; I feel it helps me design my APIs better.
The GowallaSpot class is very straightforward. Create a new file with the following code:
class GowallaSpot
attr_reader :name
attr_reader :url
attr_reader :description
attr_reader :highlights_url
attr_reader :lat, :lgn
attr_reader :image
attr_reader :items_count
attr_reader :radius_meters
attr_reader :users, :checkins
def initialize(spot_hash)
@name = spot_hash['name']
@url = NSURL.URLWithString(
"http://gowalla.com#{spot_hash['url']}")
@description = spot_hash['description']
@highlights_url = 'http://gowalla.com' \
+ spot_hash['highlights_url']
@lat = spot_hash['lat']
@lgn = spot_hash['lgn']
@image = spot_hash['_image_url_50']
@items_count = spot_hash['items_count']
@radius_meters = spot_hash['radius_meters']
@users = spot_hash['users_count']
@checkins = spot_hash['checkins_count']
Web API | 187

end
end
The #gowalla_req method is defined inside the AppDelegate class like this:
def gowalla_req(location)
http = Net::HTTP.start('api.gowalla.com')
req = Net::HTTP::Get.new("/spots?lat=#{location.coordinate.latitude}&" + \
"lng=#{location.coordinate.longitude}&radius=500")
req.add_field("Accept", "application/json")
req.add_field("X-Gowalla-API-Key", GOWALLA_API_KEY)
response = http.request(req)
JSON.parse(response.body)
end
This method uses Ruby’s net/http library to make a call to the Gowalla web API and
the built-in JSON library. To use these libraries, we need to require them at the top of
our file using require "net/http" and require "json". You need to get your own API
key from Gowalla and store it in the GOWALLA_API_KEY constant.
If you run the app, everything should load properly and you will see the various spots
around you. It’s nice, but we are missing one last thing: the preview action. Remember
that earlier we set a selector to trigger when a user double-clicks a row. Let’s implement
this preview action:
def preview(sender)
if spot_table.selectedRow >= 0
url = spots[spot_table.selectedRow].url
NSWorkspace.sharedWorkspace.openURL(url)
end
end
NSWorkspace.sharedWorkspace.openURL (see http://developer.apple.com/library/mac/
#documentation/Cocoa/Reference/ApplicationKit/Classes/NSWorkspace_Class/Refer
ence/Reference.html) opens a given URL in the user’s default browser. We made sure
that when this method is called, the table has a valid selected row and we retrieve the
URL by accessing the spots data source using the row index.
If you run the application now, you should be able to view all the Gowalla spots around
you and visit their web pages by double-clicking a row (Figure 10-6).
188 | Chapter 10: Geolocation
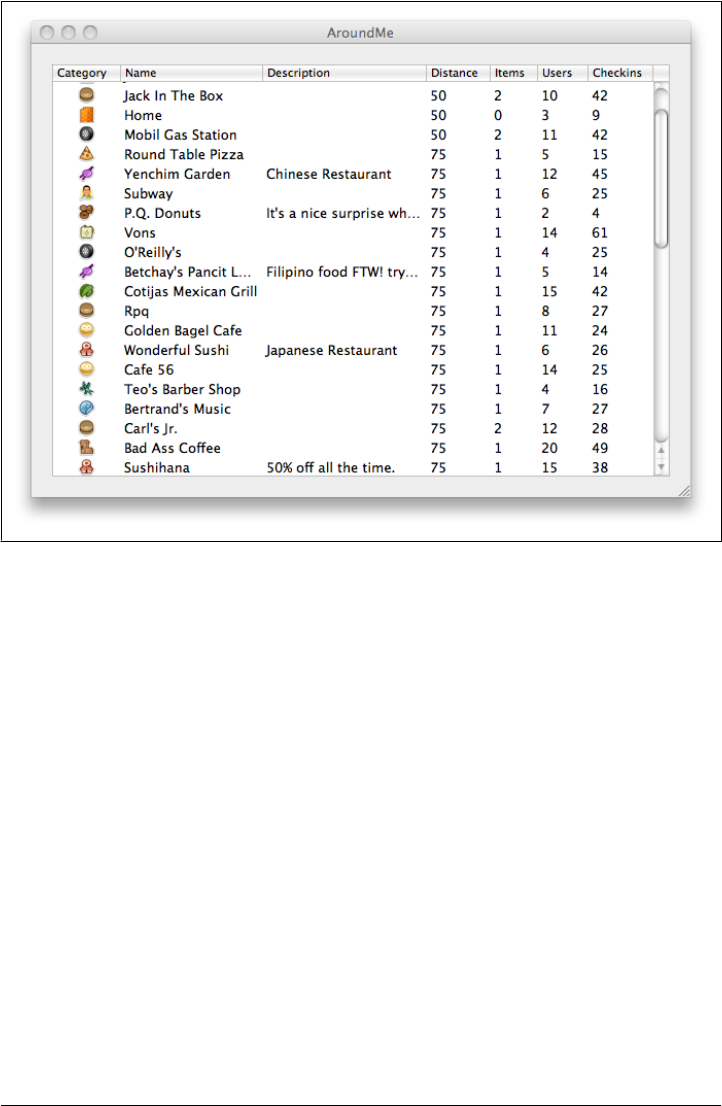
Figure 10-6. The end result
Web API | 189

CHAPTER 11
MacRuby in Objective-C Projects
MacRuby is great, but you might already have a Cocoa application written in Objective-
C. Rewriting all of it in MacRuby would probably be fun, but maybe not really wise.
You might also want to experiment with MacRuby without fully committing to it yet.
Another reason to mix the two languages is if you want to better test your Objective-
C code, but are not pleased by the existing Objective-C tools. Whatever reason you
have, MacRuby is really easy to use within your existing app.
API
MacRuby is a framework, so to use it in your Objective-C project, you just need to add
it to your project and import the headers:
#import <MacRuby/MacRuby.h>
Once you have added the framework and imported the headers, you can call out to
files or snippets of MacRuby from Objective-C. Let’s take a minute to look at the API
provided by the MacRuby framework:
#import <Foundation/Foundation.h>
@interface MacRuby : NSObject
/* Get a singleton reference to the MacRuby runtime, initializing it before if
* needed. The same instance is re-used after.
*/
+ (MacRuby *)sharedRuntime;
/* Evaluate a Ruby expression in the given file and return a reference to the
* result.
*/
- (id)evaluateFileAtPath:(NSString *)path;
/* Evaluate a Ruby expression in the given URL and return a reference to the
* result. Currently only file:// URLs are supported.
*/
- (id)evaluateFileAtURL:(NSURL *)URL;
191

/* Evaluate a Ruby expression in the given string and return a reference to the
* result.
*/
- (id)evaluateString:(NSString *)expression;
/* Load the BridgeSupport file (<<bridgesupport-intro>>) at the given path.
*/
- (void)loadBridgeSupportFileAtPath:(NSString *)path;
/* Load the BridgeSupport file at the given URL.
*/
- (void)loadBridgeSupportFileAtURL:(NSURL *)URL;
@end
@interface NSObject (MacRubyAdditions)
/* Perform the given selector and return a reference to the result. */
- (id)performRubySelector:(SEL)sel;
/* Perform the given selector, passing the given arguments and return a
* reference to the result. The argv argument should be a C array whose size
* is the value of the argc argument.
*/
- (id)performRubySelector:(SEL)sel withArguments:(id *)argv count:(int)argc;
/* Perform the given selector, passing the given arguments and return a
* reference to the result. The arguments should be a NULL-terminated list.
*/
- (id)performRubySelector:(SEL)sel withArguments:(id)firstArgument, ...;
@end
Usage
The MacRuby module you imported is the key channel for turning MacRuby code into
something the Objective-C code can use. In the following code, the module’s
evaluateString method transforms MacRuby code into a generic object that the
Objective-C code refers to:
#import <MacRuby/MacRuby.h>
int main(void) {
NSString *source = @"module Greetings def self.hello; NSLog('Hello World!');\
end; end; Greetings";
id greetings = [[MacRuby sharedRuntime] evaluateString:source];
[greetings performRubySelector:@selector(hello)];
return 0;
}
Save the file as hello_from_macruby.m and run the following command:
192 | Chapter 11: MacRuby in Objective-C Projects

$ gcc hello_from_macruby.m -o hello -framework Foundation -framework MacRuby -fobjc-gc
Now execute the output file as follows:
$ ./hello
2011-05-23 22:39:19.342 hello[90424:903] Hello World!
The code doesn’t do much. It defines a string called source, which contains some Ruby
code. The Ruby code defines a module called Greetings with a hello method, printing
the famous “Hello World!” string. The MacRuby string’s final statement returns a ref-
erence to the Greetings module.
We then evaluate this string using evaluateString, as mentioned, and assign the value
returned (the last value returned by the evaluated MacRuby source) to a variable called
greetings of type id. Using the id type in Objective-C is a way of casting variables as
a generic object type. In other words, it’s a way to use dynamic typing in Objective-C.
Once we assign our MacRuby module to an Objective-C variable, the Objective-C class
has access to the methods within the MacRuby module. So we can dispatch the
hello method by calling performRubySelector: and passing the method as a selector.
We can simplify this example by doing the following:
#import <MacRuby/MacRuby.h>
int main(void) {
NSString *source = [NSString stringWithFormat:@""
"module Greetings;"
" def self.hello;"
" NSLog('Hello World!');"
" end;"
"end;"
"Greetings.hello"];
[[MacRuby sharedRuntime] evaluateString:source];
return 0;
}
It’s the same Ruby code, but instead of calling the hello method from Objective-C, we
call it directly in our Ruby source code.
However, you probably don’t want to keep Ruby code as strings in your Objective-C
code. The easiest way to deal with Ruby source code is to save it in its own file and
require it using another API. So let’s rewrite our example to save the Ruby code in its
own file called greetings.rb:
module Greetings
def self.hello
NSLog('Hello World!')
end
end
Greetings.hello
Now change the implementation file to just “require” our Ruby file:
Usage | 193

#import <MacRuby/MacRuby.h>
int main(void) {
[[MacRuby sharedRuntime] evaluateFileAtPath:@"./greetings.rb"];
return 0;
}
Compile the file as shown earlier, and you will notice that the output is the same.
It’s important to understand that the code is evaluated but stays in memory. So the
following code will work fine and print two “Hello World!” strings:
#import <MacRuby/MacRuby.h>
int main(void) {
[[MacRuby sharedRuntime] evaluateFileAtPath:@"./greetings.rb"];
[[MacRuby sharedRuntime] evaluateString:@"Greetings.hello"];
return 0;
}
However, each evaluation uses its own local scope, so if you wish to evaluate a Ruby
object in two separate calls, you need to make sure the object is available the second
time it’s called. Consider the following example:
#import <MacRuby/MacRuby.h>
int main(void) {
[[MacRuby sharedRuntime] evaluateString:@"@msg = 'Hello!'"];
[[MacRuby sharedRuntime] evaluateString:@"puts @msg"];
return 0;
}
In this case, the first evaluation uses a Ruby instance variable (ivars start with @ in Ruby)
to store a string. The second evaluation prints this string. The code as shown works
fine. But if we were to remove the @ sign in front of the msg and thus convert the instance
variable into a local variable, the second evaluation would fail, because the local variable
was defined in a different scope.
Earlier, we looked at how to assign a Ruby object to an Objective-C variable. MacRuby
can already access all the Objective-C code, but sometimes you want to pass a specific
object to your Ruby code. To do that, pass it as a parameter, as follows:
#import <MacRuby/MacRuby.h>
int main(void) {
NSString *source = @"module Helper; def self.swapcase(str); str.swapcase;
end; end";
[[MacRuby sharedRuntime] evaluateString:source];
id helper = [[MacRuby sharedRuntime] evaluateString:@"Helper"];
NSString *result = [helper performRubySelector:@selector(swapcase:)
withArguments:@"MacRuby", nil];
NSLog(@"%@\n", result);
return 0;
}
194 | Chapter 11: MacRuby in Objective-C Projects
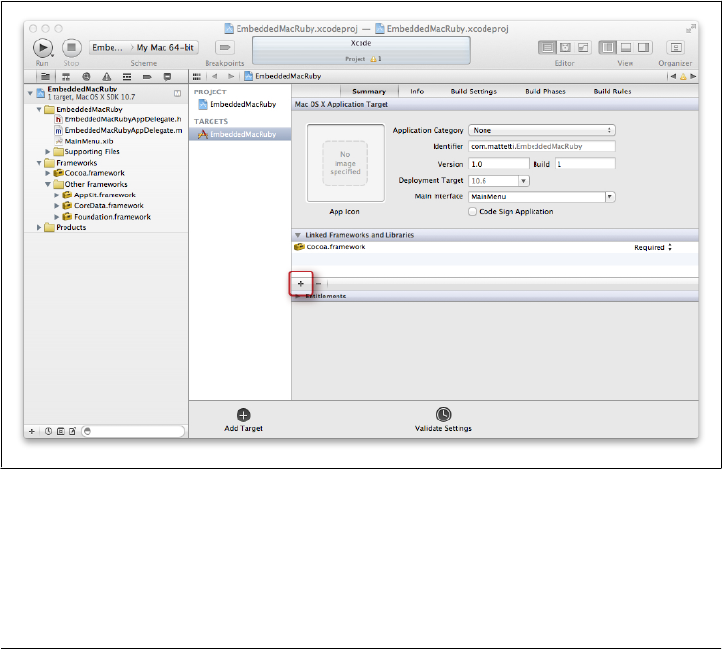
Per the API description, we are passing a NULL-terminated list with our argument
being an Objective-C variable.
Here is the compilation and execution:
$ gcc example.m -o example -framework Foundation -framework MacRuby -fobjc-gc
$ ./example
2011-05-23 23:03:12.142 example[92128:903] mACrUBY
Example in an Xcode Project
Until now, we have been using a simple implementation file to explore how to use Ruby
code from an Objective-C file. Let’s build a full Cocoa project in Objective-C and use
MacRuby within the app.
Open Xcode and create a new project using the Cocoa Application template. Call this
project EmbeddedMacRuby and don’t enable any of the options.
Once the project is created, look at the project’s target summary. We need to link the
MacRuby framework. Click on the + button, as shown in Figure 11-1.
Figure 11-1. Linking the MacRuby framework
Choose the MacRuby framework from the menu and click the Add button. At that
point, the framework should appear in the project navigator and you might want to
drag it to the framework’s subfolder.
Example in an Xcode Project | 195

While you are editing the settings, you also need to make sure your project uses the
Objective-C garbage collector (GC), because MacRuby requires it. Click the Build Set-
tings tab and scroll down until you find the Objective-C Garbage Collection field.
Toggle the value and select Required [-fobjc-gc-only] as shown in Figure 11-2.
Figure 11-2. Making sure the GC support is marked as required
Now that you have added the framework and set the GC settings, you can import the
headers, and your project will build properly.
Edit EmbeddedMacRubyAppDelegate.m and add the following import statement:
#import <MacRuby/MacRuby.h>
To make sure everything is set correctly, run your new project. Everything should build
and an empty window should display.
Now that you know that MacRuby is available in our Objective-C project and you know
that this project builds correctly, let’s build a Ruby interpreter inside your UI. The idea
is to write and execute/evaluate Ruby code from within the app as it is running. While
this is a demo exercise, I’m sure you can imagine how useful it might be to debug an
existing Objective-C app.
User Interface
As usual, we will set the UI first. Start by editing MainMenu.xib and expand the
Window and View objects. Drag and drop a Horizontal Split View from the Object Library
(Utilities Panel), as shown in Figure 11-3.
196 | Chapter 11: MacRuby in Objective-C Projects
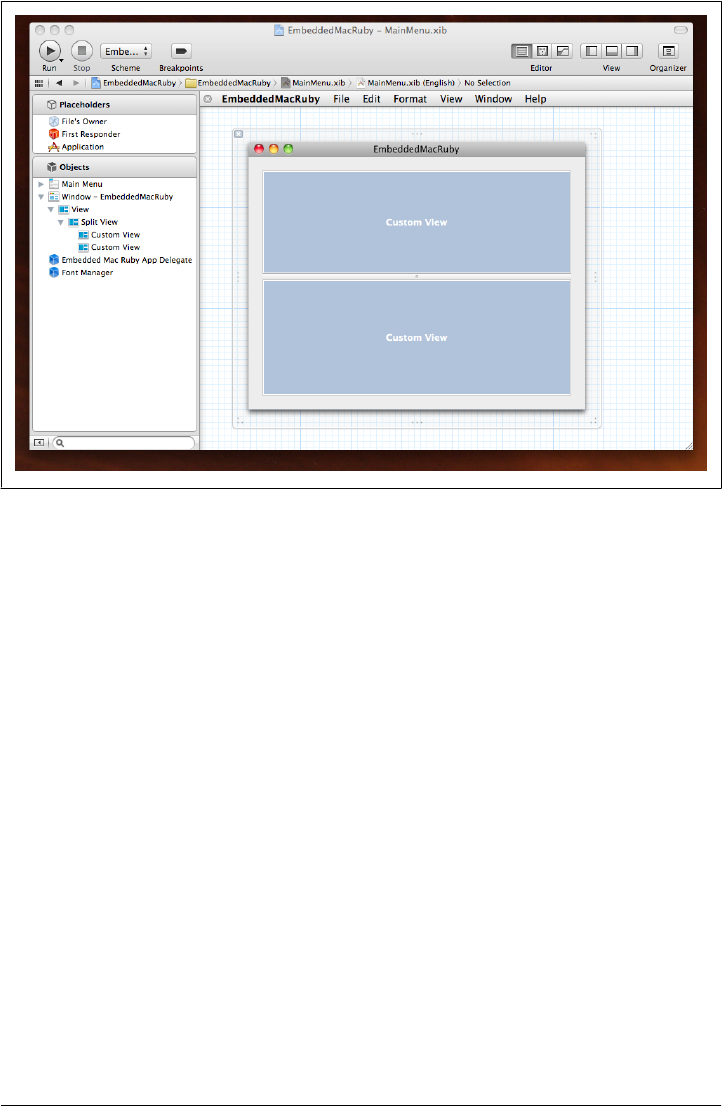
We are going to use the upper part of the split view to type in Ruby code and the lower
part to show the result. Go back to the Object Library and drag a Text View in the top
Custom View into the Split View. Also drag in a label, change the text to read “Ruby
Code,” and organize the UI to look like Figure 11-4.
Do the same for the lower part, and add a button to trigger evaluation of the code. The
end result should look like Figure 11-5.
You will also want to tweak the Split View and the Text views to autoresize (Fig-
ure 11-6).
Using the MacRuby Method
Now that the UI looks good, let’s write some code. Edit EmbeddedMacRubyAppDele-
gate.h and add two outlets, one for each text view. Also add an action for our button.
Your header file should look like this:
#import <Cocoa/Cocoa.h>
@interface EmbeddedMacRubyAppDelegate : NSObject <NSApplicationDelegate> {
IBOutlet NSTextView *rubySourceTextView;
IBOutlet NSTextView *resultTextView;
@private
NSWindow *window;
Figure 11-3. Setting up a horizontal split view
Example in an Xcode Project | 197
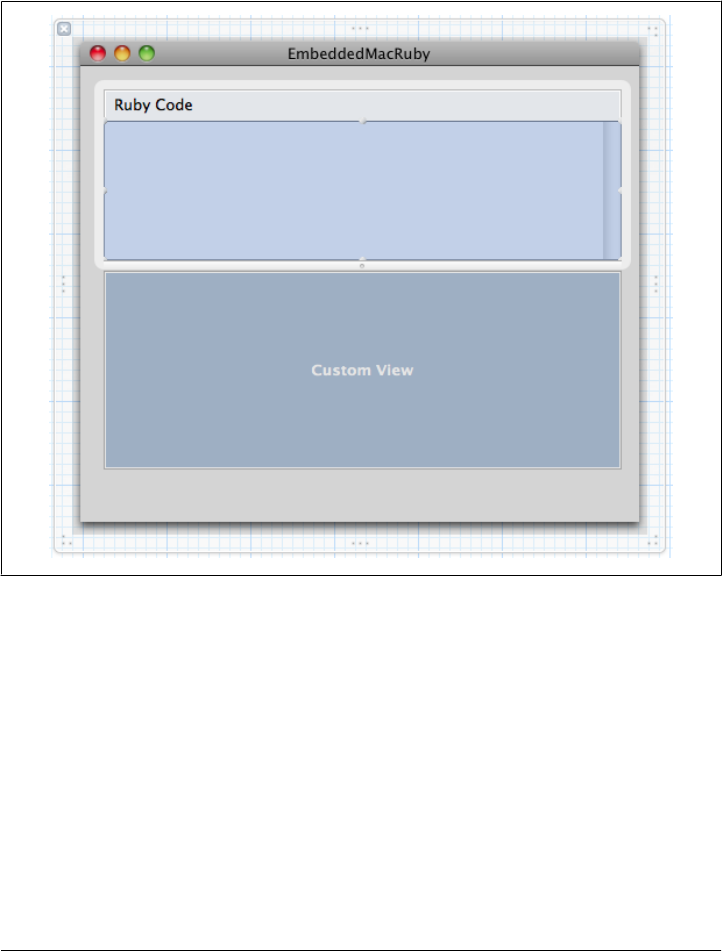
}
- (IBAction)evaluate:(id)sender;
@property (assign) IBOutlet NSWindow *window;
@end
Figure 11-4. Text field to input some Ruby code
Go back to the Interface Builder and right-click Embedded Mac Ruby App Delegate.
Drag the rubySourceTextView outlet to the upper scroll view, the resultTextView to
the lower scroll view, and the evaluate: action to the push button. Your UI is now wired
to your delegate class.
198 | Chapter 11: MacRuby in Objective-C Projects
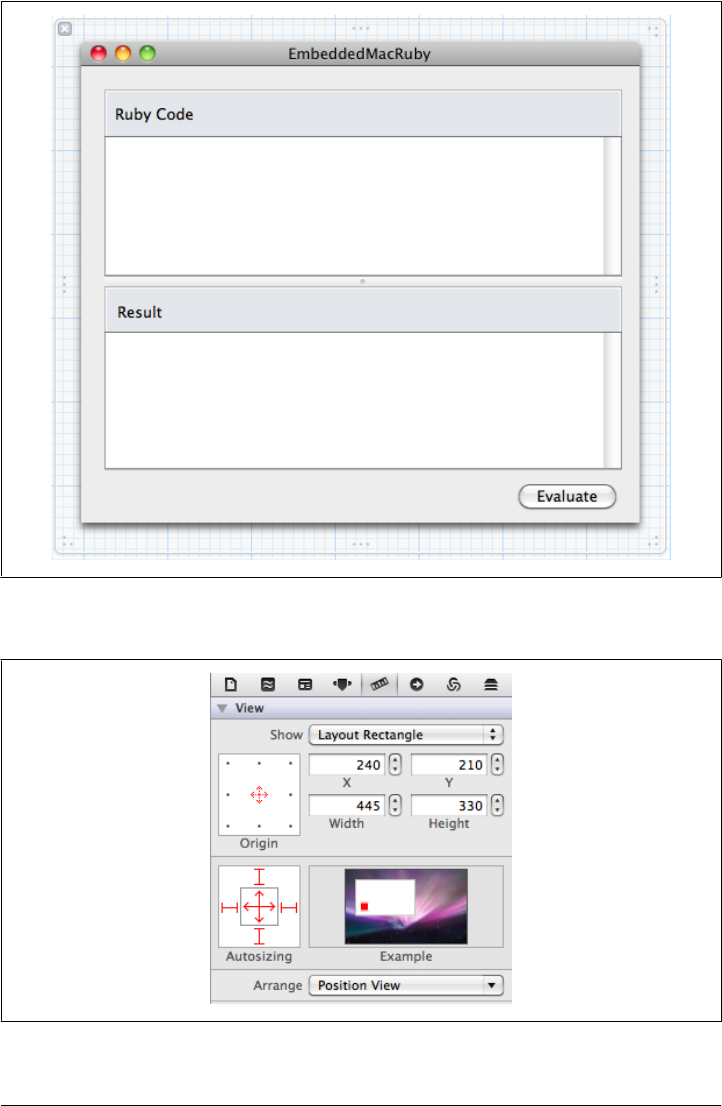
Figure 11-5. End result
Figure 11-6. Setting the views to autoresize
Example in an Xcode Project | 199

Edit the EmbeddedMacRubyAppDelegate.m implementation file and add an awakeFrom
Nib method:
- (void)awakeFromNib
{
NSFont *niceFont;
niceFont = [NSFont fontWithName:@"Monaco" size:12.0];
[rubySourceTextView setFont:niceFont];
[resultTextView setFont:niceFont];
NSString *demoSource = [NSString stringWithFormat: @""
"@window = NSWindow.alloc.initWithContentRect(\n"
" [200,100,200,200],\n"
" styleMask:NSTitledWindowMask,\n"
" backing:NSBackingStoreBuffered,\n"
" defer:false)\n"
"@window.BackgroundColor = NSColor.blueColor\n"
"@window.orderFront(NSApp)"];
[rubySourceTextView setString:demoSource];
}
Even if you are not familiar with Objective-C, this code should be understandable. We
start by setting the same font for the views of our Ruby source and our result text. Then
we insert some demo text in the source view.
This method is called when the UI finishes loading. At that point, everything is set for
the user and he needs only to press the button to create a new window.
You can now run the app. It should build fine and the UI will display properly with the
sample text in the source text view. But a warning should let you know that the
evaluate action implementation is missing. Let’s add it:
- (IBAction)evaluate:(id)sender
{
@try {
id object;
object = [[MacRuby sharedRuntime] evaluateString:[rubySourceTextView string]];
[resultTextView setString:[object description]];
}
@catch (NSException *exception) {
NSString *string = [NSString stringWithFormat:@"%@: %@\n%@",
[exception name], [exception reason],
[[[exception userInfo] objectForKey:@"backtrace"] description]];
[resultTextView setString:string];
}
}
The evaluate action isn’t complicated, now that we know the MacRuby framework
API. We start by declaring the variable that will hold the returned object from the Ruby
code evaluation. This object is cast as id, since we know only that it will be an Objective-
C object, not its exact type. We then evaluate the content of the Ruby source text view
and store the result into the object variable. The description of the object is then set as
200 | Chapter 11: MacRuby in Objective-C Projects
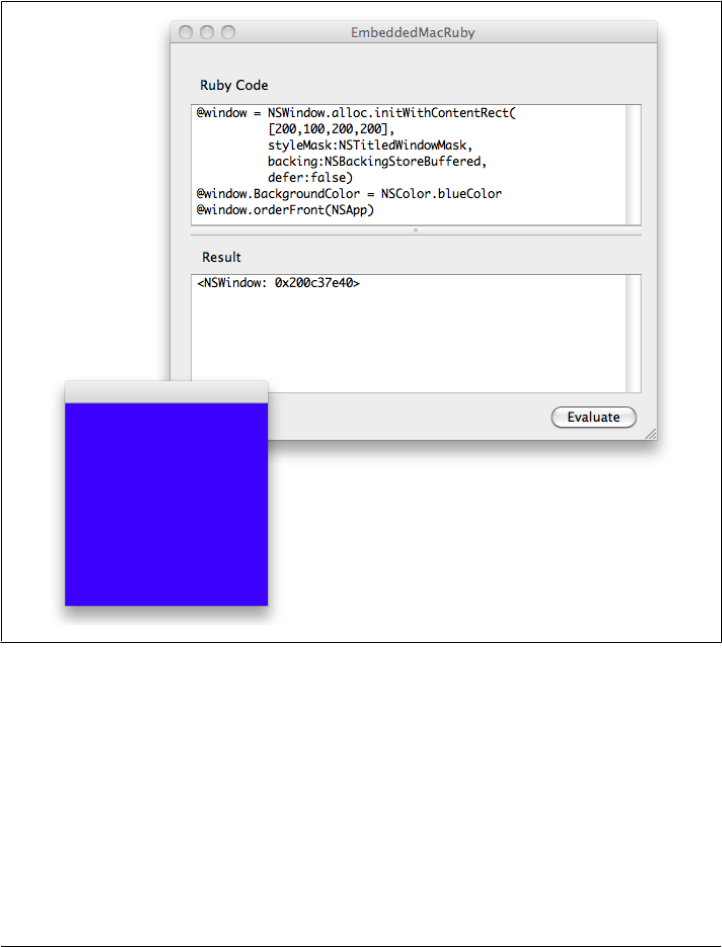
the text displayed in the result text view. In case something goes bad with our Ruby
code, the method is wrapped so it can catch any exception thrown and display it in the
result text view.
Fire the app and click the Evaluate button. You should see something similar to Fig-
ure 11-7.
Figure 11-7. Ruby interpreter in action
Creating new objects and modifying them on the fly is really nice, but what about
modifying the UI we already created? Well, we are missing a reference to our main
window, which we can’t access from our evaluated script. To fix that, change the
awakeFromNib method as shown here:
- (void)awakeFromNib
{
NSFont *niceFont;
niceFont = [NSFont fontWithName:@"Monaco" size:12.0];
Example in an Xcode Project | 201

[rubySourceTextView setFont:niceFont];
[resultTextView setFont:niceFont];
id appHelper = [[MacRuby sharedRuntime] evaluateString:@"module App;\
def self.setWindow(val); @window=val; end;\
def self.window; @window; end; end; App"];
[appHelper performRubySelector:@selector(setWindow:)
withArguments:window, nil];
[rubySourceTextView setString:@"App.window.title = 'W00t!'"];
}
This time, when the app loads, we evaluate an App module helper that we assign to an
Objective-C reference. Then we pass the Objective-C window reference to our module
so we can access it from our Ruby code. To prove that it works, we add a demo state-
ment that changes the title of the window.
Have fun inspecting your live views and subviews, as well as tweaking them in real time
from within your Objective-C app. If you want to find the available methods on the
class, evaluate App.window.methods(true, true).sort or read the NSWindow Class
Reference.
You might have noticed that the Ruby setter in our App module is called setWindow, not
a very Ruby-like setter name. Usually, you will want to use window=. However, if we
had used that method name, we wouldn’t be able to perform our selector. This is
because the Objective-C compiler won’t accept a selector name containing an equals
sign. As a matter of fact, the compiler will reject all selector names containing non-
standard characters: =, <, >, ?, [], |, +, -, *, /, `, and more. However, these characters
are common in Ruby methods. Thankfully, there is a workaround. You can build the
selectors yourself using the Objective-C runtime API, which does not suffer from this
limitation.
Here is the awakeFromNib method, reimplemented using the sel_registerName method:
- (void)awakeFromNib
{
NSFont *niceFont;
niceFont = [NSFont fontWithName:@"Monaco" size:12.0];
[rubySourceTextView setFont:niceFont];
[resultTextView setFont:niceFont];
id appHelper = [[MacRuby sharedRuntime] evaluateString:@"module App;\
def self.window=(val); @window=val; end;\
def self.window; @window; end; end; App"];
[appHelper performRubySelector:sel_registerName("window=:")
withArguments:window, nil];
[rubySourceTextView setString:@"App.window.title = 'W00t'"];
}
We can now perform a selector containing the equals sign.
202 | Chapter 11: MacRuby in Objective-C Projects

CHAPTER 12
Objective-C Code in MacRuby Apps
In the previous chapter, you saw how to embed MacRuby into an Objective-C project.
While MacRuby works great for building Cocoa apps, there are some cases where
performance and low-level programming is important. In other cases, you may already
have a library written in Objective-C and you would like to use it in your MacRuby
project.
Dynamic Library
If the Objective-C code you would like to use isn’t in a framework, the easiest way to
package it to make use of it in MacRuby is to create a Dynamic Library.
Let’s pretend we already wrote some awesome Objective-C code that we rely on heavily,
and we want to share this code between our projects. Following is the code we are going
to try to reuse.
Header file—Spelling.h:
#import <Foundation/Foundation.h>
@interface Spelling : NSObject{
NSDictionary *table;
}
- (Spelling*) initWithBuiltinTable;
- (NSString*) britishize:(NSString*)string;
@end
Implementation file—Spelling.m:
#import "Spelling.h"
@implementation Spelling
- (Spelling*) initWithBuiltinTable {
self = [super init];
if ( self ){
table = [NSDictionary dictionaryWithObjectsAndKeys:
203

@"flat", @"apartment",
@"row", @"argument",
@"pram", @"baby carriage",
@"plaster", @"band-aid",
@"loo", @"bathroom",
@"tin", @"can",
@"mince", @"chopped beef",
@"biscuit", @"cookie",
@"maize", @"corn",
@"nappy", @"diaper",
@"lift", @"elevator",
@"rubber", @"eraser",
@"torch", @"flashlight",
@"chips", @"fries",
@"petrol", @"gas",
@"bloke", @"guy",
@"motorway", @"highway",
@"bonnet", @"hood",
@"jelly", @"jello",
@"jam", @"jelly",
@"paraffin", @"kerosene",
@"solicitor", @"lawyer",
@"number plate", @"license plate",
@"queue", @"line",
@"post", @"mail",
@"caravan", @"motor home",
@"cinema", @"movie theater",
@"silencer", @"muffler",
@"serviette", @"napkin",
@"nought", @"nothing",
@"flyover", @"overpass",
@"dummy", @"pacifier",
@"trousers", @"pants",
@"car park", @"parking lot",
@"full stop", @"period",
@"chemist", @"pharmacist",
@"crisps", @"potato chips",
@"hire", @"rent",
@"banger", @"sausage",
@"pavement", @"sidewalk",
@"football", @"soccer",
@"jumper", @"sweater",
@"bin", @"trash can",
@"lorry", @"truck",
@"boot", @"trunk",
@"holiday", @"vacation",
@"waistcoat", @"vest",
@"windscreen", @"windshield",
nil ];
}
return self;
}
- (NSString*)britishize:(NSString*)string{
NSString* conversion = [table objectForKey:string];
204 | Chapter 12: Objective-C Code in MacRuby Apps

if( conversion ){
return conversion;
}else{
return string;
};
}
@end
This code implements a class called Spelling with an instance method called britishize
that takes a string and, if a translation is found, returns the British equivalent of the
string. Otherwise, the passed string is returned.
This is how we can use our code in an Objective-C project:
Spelling* converter = [[Spelling alloc] initWithBuiltinTable];
NSString* result = [converter britishize:@"truck"];
NSLog(@"%@\n", result);
# => 2011-05-30 14:44:09.293 example[73135:903] lorry
Obviously, this is just a trivial example to illustrate this concept. For those who don’t
know Objective-C but are familiar with Ruby, the equivalent code written in Ruby
looks more or less like this:
module Spelling
@table = Hash["apartment", "flat",
"argument", "row",
"baby carriage", "pram",
"band-aid", "plaster",
"bathroom", "loo",
"can", "tin",
"chopped beef", "mince",
"cookie", "biscuit",
"corn", "maize",
"diaper", "nappy",
"elevator", "lift",
"eraser", "rubber",
"flashlight", "torch",
"fries", "chips",
"gas", "petrol",
"guy", "bloke, chap",
"highway", "motorway",
"hood", "bonnet",
"jello", "jelly",
"jelly", "jam",
"kerosene", "paraffin",
"lawyer", "solicitor",
"license plate", "number plate",
"line", "queue",
"mail", "post",
"motor home", "caravan",
"movie theater", "cinema",
"muffler", "silencer",
"napkin", "serviette",
"nothing", "nought",
Dynamic Library | 205
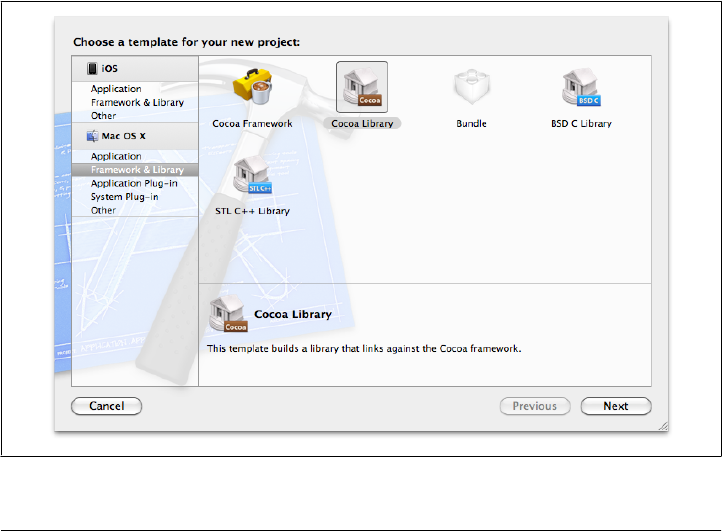
"overpass", "flyover",
"pacifier", "dummy",
"pants", "trousers",
"parking lot", "car park",
"period", "full stop",
"pharmacist", "chemist",
"potato chips", "crisps",
"rent", "hire",
"sausage", "banger",
"sidewalk", "pavement",
"soccer", "football",
"sweater", "jumper",
"trash can", "bin",
"truck", "lorry",
"trunk", "boot",
"vacation", "holiday",
"vest", "waistcoat",
"windshield", "windscreen"]
def self.britishize(str)
@table[str] || str
end
end
To share our Objective-C code, we need to create a Dynamic Library. Create a new
Xcode project and choose the Cocoa Library template in the Framework & Library
category (Figure 12-1).
Figure 12-1. Cocoa Library template selection
206 | Chapter 12: Objective-C Code in MacRuby Apps
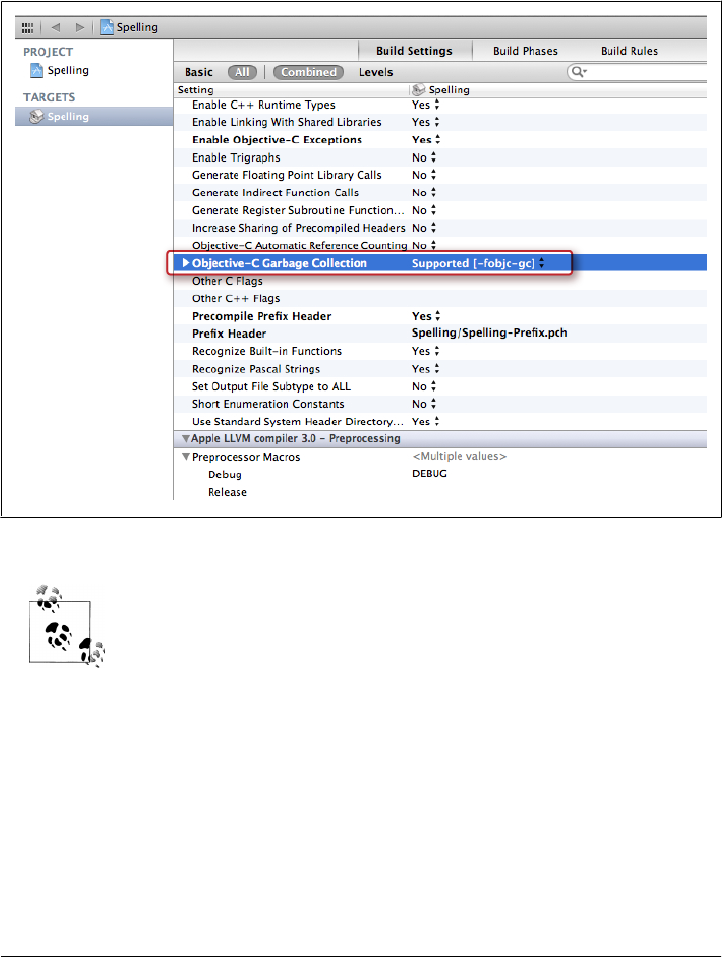
Call the project Spelling and make sure the type value is set to Dynamic. Once the
project has generated, we need to make some build settings changes to our main target.
The first change is to the compiler settings so garbage collection is supported (Fig-
ure 12-2).
Figure 12-2. Setting the GC options
I noticed a weird bug in some versions of Xcode, where some compiler
settings appear only after I tried to build a project. If you don’t see the
Code Generation settings, try to build your current project and go back
to the Build Settings.
Then we need to change a Packaging setting so the Executable Extension is bundle
instead of dylib (Figure 12-3).
Now that our build is ready, we can add the two Objective-C files shown earlier. You
can type them or copy them from the book’s GitHub repository.
Once you have added the files to the project, we need to do one more thing: add an
empty function to Spelling.m. Put the following code before the class implementation:
void Init_Spelling(void) { }
Dynamic Library | 207
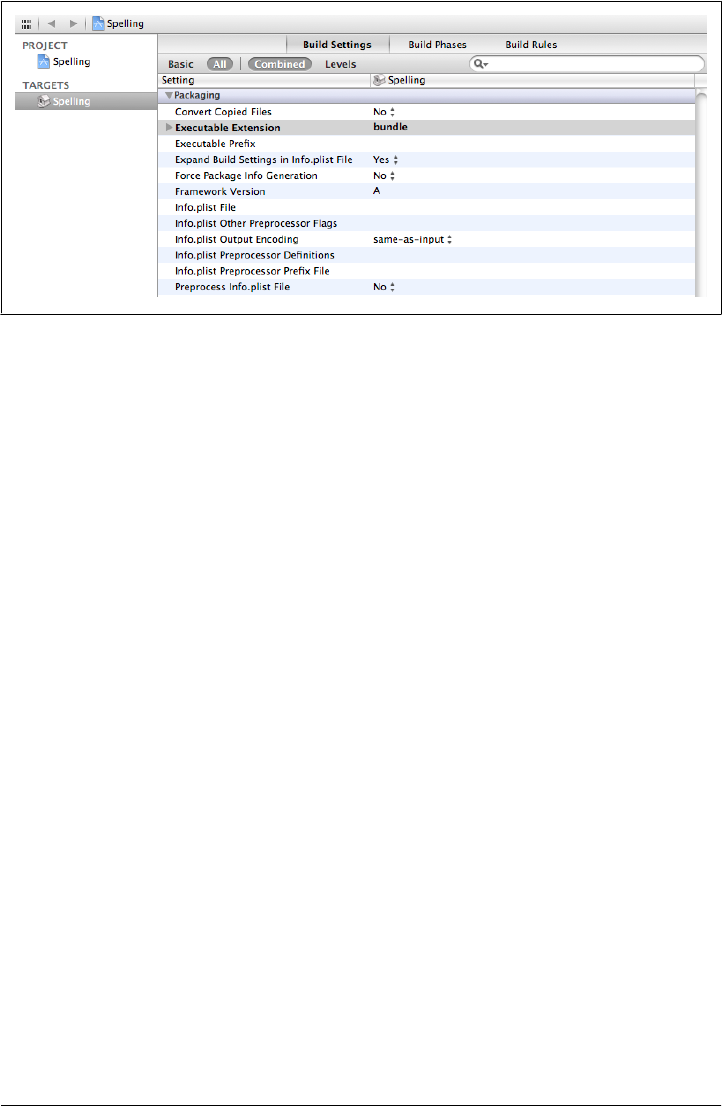
We defined a function with a name such as Init_xxx, where xxx is the name of our
Dynamic Library. When requiring our Dynamic Library, MacRuby will automatically
call this method. If it doesn’t exist, MacRuby will throw an exception. This might be
weird, but it’s actually related to the way C extensions work in Ruby.
Copy the output file to a new location and try the following from the command line:
$ macirb --simple-prompt
>> require 'Spelling'
=> true
>> converter = Spelling.alloc.initWithBuiltinTable
=> #<Spelling:0x2000f8d00>
>> converter.britishize("truck")
=> "lorry"
As you can see, the Dynamic Library acts as if it was a Ruby file, and you can use it
directly. It’s a very convenient way to use Objective-C code in your MacRuby projects.
There are two caveats with using Dynamic Libraries. One is due to MacRuby relying
on the GC. All your code needs to be GC-compatible and must be compiled with the
appropriate GC flags. The other is that this approach doesn’t support BridgeSupport
files, so if you use nonobject-oriented items, this approach won’t work.
Framework
If you are trying to use a third-party Cocoa library, it will probably be packaged as
Cocoa frameworks. Cocoa frameworks are the most common format to share Objec-
tive-C code. MacRuby users also should consider using this format if they need to use
BridgeSupport (see “Using Objective-C or C Code” on page 149) files. In this section,
you’ll see what is needed for a framework to be used by MacRuby and how to ship an
application with third-party frameworks.
Figure 12-3. Changing the file extension name
208 | Chapter 12: Objective-C Code in MacRuby Apps

One of the most popular third-party frameworks is called Sparkle, and it is available
on GitHub. Sparkle is a software update framework. It’s a nice tool that allows you to
add built-in update notifications and downloads from within your app. Unfortunately,
the App Store policy currently doesn’t allow developers to use this framework, because
all updates have to go through the App Store. Nonetheless, we are going to use it as an
example for this section.
Clone or download the source code and open Sparkle.xcodeproj in Xcode. If you look
at the Objective-C Garbage Collection section in the build settings, you will see that
the GC is marked as supported, so we don’t need to change anything. Build the frame-
work and make sure the process goes through properly. At the time of this writing, the
current code links against the OS X 10.5 SDK, so you might have to change the base
SDK setting.
You can also download the precompiled framework from the Sparkle
website.
Once the framework is built, we need to add it to our project. However, we want the
application to dynamically link against the framework at runtime. Otherwise, Xcode
will link against a hardcoded path when the app is compiled and our application will
work only on our own machines or on the machines of users who have the framework
in exactly the same path. To do the dynamic linking, we will add the framework to the
source files and edit the target to copy it to the Frameworks folder inside the .app.
Now we’re ready to build a small MacRuby sample app using Sparkle.
Start Xcode and create a new MacRuby app called MyApp (leave all the template op-
tions off). Now drag and drop the Sparkle framework we built earlier into the sup-
porting files folder (Figure 12-4). When asked, make sure you choose not to add the
file to any targets, but select the option to copy the file. The only point of this step is
to give Xcode a reference to the framework.
Now, add a target’s build phases by selecting the project name in the Project Navigator,
clicking the Build Phases tab, and clicking the Add Build Phase button (Figure 12-5).
Select the Add Copy Files option. A new entry should appear above. Expand the menu,
and change the destination to Frameworks. Finally, drag and drop the Sparkle.frame-
work file to the area labeled Add files here (Figure 12-6).
To test your setup, you can build the app and look at the .app produced. The easiest
way to do that is to expand the Products section in the Project Navigator, right-click
MyApp.app, and select show in Finder. To inspect our application structure, in Finder,
right-click the file and select Show Package Contents. Expand the Contents folder and
you should see a Frameworks folder containing the Sparkle framework.
Framework | 209
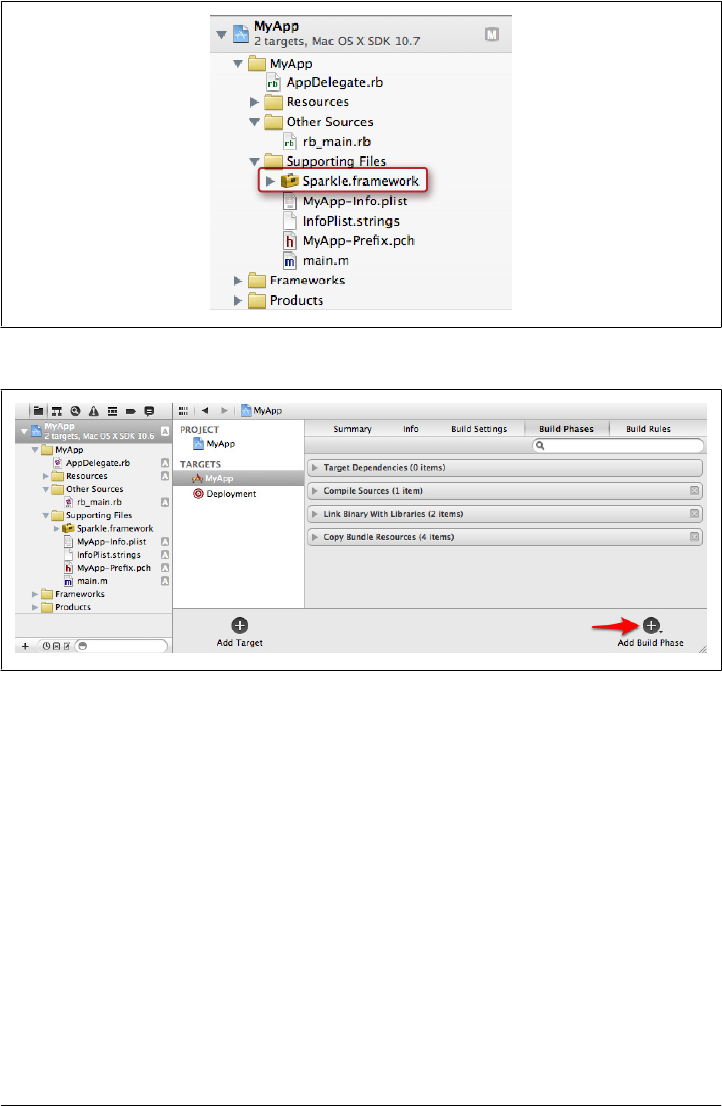
The last thing we need to do is load the framework when our code loads. Going back
to Xcode, edit the rb_main.rb file and add the following line after the Cocoa framework
loading line:
framework 'Sparkle'
The framework is now available in your code and you can make good use of it. You
will find a lot of documentation on the author’s website, showing how to set your
application to use Sparkle.
BridgeSupport
There are some cases where the framework you want to use relies on nonobject-oriented
items such as constants, enumerations, structures, and functions. This is the case for
the PS3SixAxis framework, available at the PS3SixAxis GitHub site.
Figure 12-4. The Sparkle framework added to our project
Figure 12-5. Adding a new build phase
210 | Chapter 12: Objective-C Code in MacRuby Apps
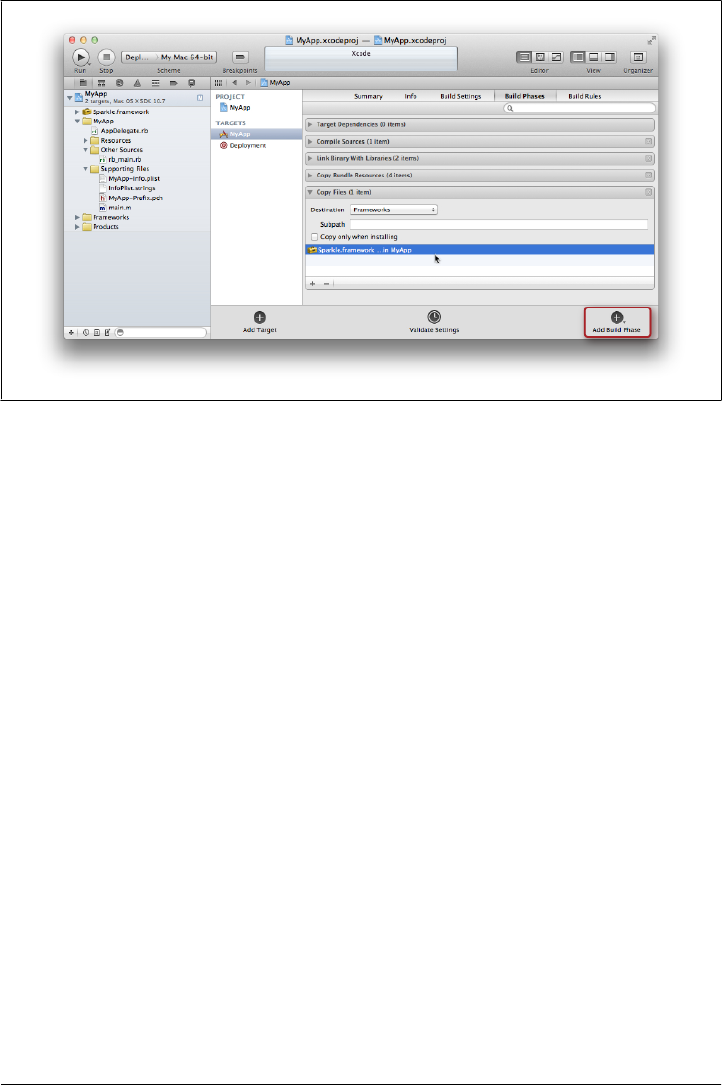
This framework lets you connect a PS3 controller and interact with it via USB or Blue-
tooth. Part of the framework is written in C and, because of that, MacRuby can’t in-
trospect all the code at runtime. To work around this problem, you or the framework
author needs to generate BridgeSupport files and add them to the framework itself.
Generating BridgeSupport is covered in “Using Objective-C or C Code” on page 149,
but let’s take this framework example to generate new BridgeSupport files.
Start by cloning or downloading the PS3SixAxis repository. I will put the files in ~/
tmp, but feel free to put them anywhere you want:
$ mkdir -p ~/tmp
$ cd ~/tmp
$ git clone git@github.com:mattetti/PS3SixAxis.git
Cloning into PS3SixAxis...
remote: Counting objects: 85, done.
remote: Compressing objects: 100% (54/54), done.
remote: Total 85 (delta 26), reused 85 (delta 26)
Receiving objects: 100% (85/85), 251.83 KiB | 279 KiB/s, done.
Resolving deltas: 100% (26/26), done.
$ cd PS3SixAxis
$ open PS3_SixAxis.xcodeproj
Build the framework and, to make things easy, copy the framework file to ~/tmp:
$ mkdir ~/tmp/PS3Controller.framework/Resources/BridgeSupport/
$ gen_bridge_metadata --64-bit -f ~/tmp/PS3Controller.framework/
-o ~/tmp/PS3Controller.framework/Resources/BridgeSupport/PS3Controller
.bridgesupport
Figure 12-6. Sparkle added to the private frameworks in the copy phase
Framework | 211

The framework is now ready to be consumed by a MacRuby app. As you can see, to
generate the BridgeSupport files, we first created a BridgeSupport folder inside the
Resources folder and used the gen_bridge_metadata command with the 64-bit and
framework flags and stored the output in the newly created folder.
212 | Chapter 12: Objective-C Code in MacRuby Apps

CHAPTER 13
Using Ruby Third-Party Libraries
In Chapter 12, you saw how to write or include Objective-C libraries in MacRuby apps
using frameworks or dynamic libraries. This is very useful for existing Cocoa code or
low-level Objective-C wrappers. However, the amount of free open source Ruby libra-
ries is quite impressive. As a matter of fact, there are currently more published Ruby
libraries than Perl libraries! This chapter explains how to access these Ruby resources.
RubyGems
Ruby libraries are usually packaged as gems, which are library packages used by the
RubyGems standard library. A gem includes its own library files, defining a version
number and dependencies on other libraries, if any. You can look for gems at the
RubyGems site. In C Ruby, the default Ruby implementation, use the gem command-
line tool to install gems on your system. In MacRuby, the gem command line is prefixed
to avoid conflicting with the C Ruby command. Very much like irb is available as
macirb, gem for MacRuby is available as macgem.
You can use the macgem command-line tool the same way you use gem. In this case, I
am going to locally install the dispatch gem, a MacRuby-specific gem that adds an
abstraction layer on top of the GCD API:
$ sudo macgem install dispatch
Notice that I’m installing the gem as a superuser (by prefixing the command with
sudo), because the gems will be installed in the /Library/Frameworks/MacRuby.frame-
work folder, which is owned by the root account.
While this is very useful, you can’t really expect your app users to install MacRuby so
they can get access to the macgem command line to manually install your app’s de-
pendencies. So what we need to do is to embed all the third-party dependencies with
our app so nothing is required on the end user’s side and all the versions are locked.
There are many different ways to do that, but we will start with the method that is
simplest and probably best in most cases.
213

MacRuby Deploy
MacRuby ships with a command-line tool called macruby_deploy, which you can use
to prep an application to be deployed to the users. This tool is used in the Xcode
MacRuby template targets to compile Ruby source code and embed MacRuby inside
an app. But the tool can do much more than that. A quick call to the command shows
what it is capable of:
$ macruby_deploy --help
Usage: macruby_deploy [options] application-bundle
--compile Compile the bundle source code
--embed Embed MacRuby inside the bundle
--no-stdlib Do not embed the standard library
--stdlib [LIB] Embed only LIB from the standard library
--gem [GEM] Embed GEM and its dependencies
--bs Embed the system BridgeSupport files
--verbose Log all commands to standard out
-v, --version Display the version
Because you’ll be working in Xcode, you’ll normally just modify the Xcode target to
change the options passed to the macruby_deploy command line.
To illustrate how to embed a gem in a MacRuby app written in Xcode, we’ll use a very
simple Cocoa app written in Xcode using the Nokogiri gem. This gem is a C extension
(a Ruby gem using a C wrapper), giving a nice Ruby API around libxml. Our app won’t
do much, but it should be enough for you to understand how to embed a gem.
Start a new Xcode app or download the sample from the book git repository. The only
thing this app will do is to parse an XML string and find content inside it. Once the
content is found, we will print it to the console. Here is the content of my AppDele-
gate.rb file:
require 'rubygems'
require 'nokogiri'
class AppDelegate
attr_accessor :window
def applicationDidFinishLaunching(a_notification)
nokogiri_example
end
def nokogiri_example
xml = "
<root>
<shows>
<show>
<name>Battlestar Galactica - 2004</name>
<characters>
<character species='human'>William Adama</character>
<character species='human'>Laura Roslin</character>
<character species='human'>Kara 'Starbuck' Thrace</character>
<character species='human'>Lee 'Apollo' Adama</character>
<character species='human'>Dr. Gaius Baltar</character>
214 | Chapter 13: Using Ruby Third-Party Libraries

<character species='cylon'>Number Six</character>
<character species='cylon'>Number Eight</character>
</characters>
</show>
</shows>
</root>"
# Parse the XML string
xml_obj = Nokogiri::XML(xml)
# find all characters using xpath and extract the node contents in an array
all_characters = xml_obj.xpath("//characters/character").map(&:content)
puts "BSG main characters: #{all_characters}"
# => BSG characters: ["William Adama", "Laura Roslin", "Kara 'Starbuck' Thrace",
# "Lee 'Apollo' Adama", "Dr. Gaius Baltar", "Number Six", "Number Eight"]
# Now do the same but filter the cylons using the species attribute.
cylons = xml_obj.xpath("//characters/character[@species='cylon']").map(&:content)
puts "Cylons: #{cylons}"
# => Cylons: ["Number Six", "Number Eight"]
end
end
The code is quite simple, particularly if you have used XPath as part of a jQuery ap-
plication or elsewhere. Look inside the nokogiri_example method. I start by defining a
string containing an XML document with some information about the Battlestar Ga-
lactica TV show. I then feed that XML document to Nokogiri and assign the returned
object to a variable. I use an XPath query, embedding this variable, to find all the char-
acter nodes. The xpath method call returns an array that I pass directly to a Ruby map
method call, looping through each node and calling the content method. All the char-
acter names are now stored in the all_characters variable, which I print to the console.
I then use another xpath query to filter the characters based on their XML node attrib-
utes. Nokogiri offers a really nice CSS3 selector API, in case you are not familiar with
XPath.
To work properly, my code obviously needs Nokogiri, and that’s why I require Ruby-
Gems and Nokogiri at the top of the file.
Unlike Ruby version 1.9, the current version of MacRuby doesn’t au-
tomatically load RubyGems for performance reasons. You need to re-
quire it manually.
However, unless you installed the Nokogiri gem before, your code won’t work. So let’s
go ahead and install Nokogiri:
$ sudo macgem install nokogiri
Now you can compile your project. Make sure the normal schedule (not Deployment)
is selected and build the project. If everything goes well, you should see the two print
statements in the debug window.
MacRuby Deploy | 215
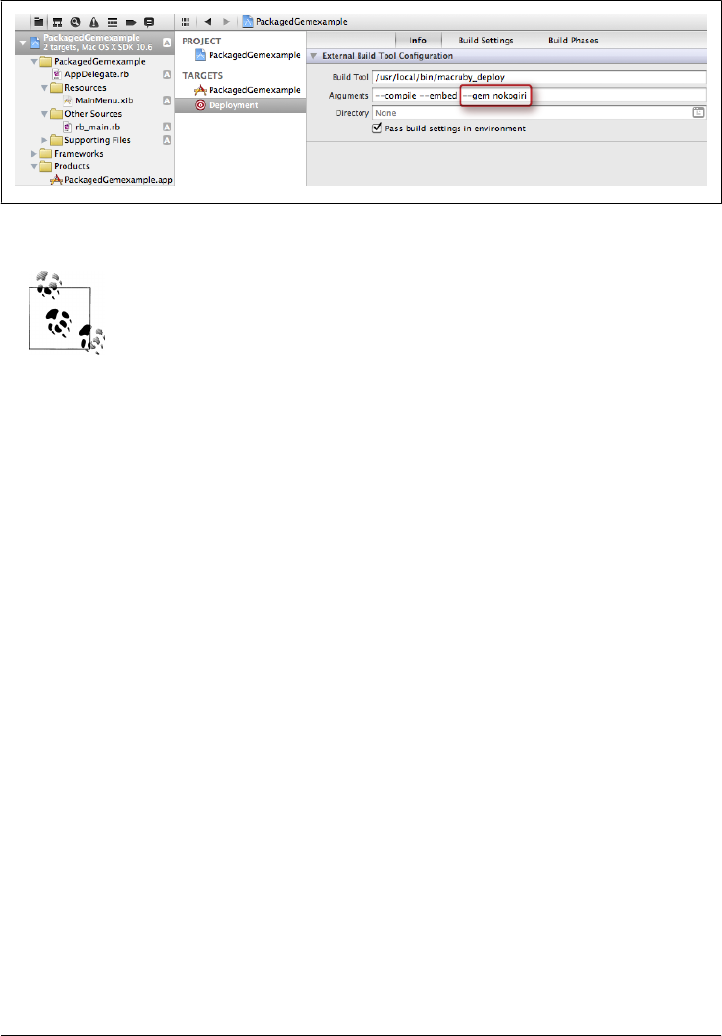
Now, click the project name in the Project Navigator and edit the Deployment target
to add the extra parameters (Figure 13-1).
Figure 13-1. macruby_deploy arguments change in the target
You always have to use the --embed option in conjunction with the
--gem option, otherwise the gem embedding won’t work.
Now that the target is properly set, change the scheme to Deployment and build your
project. If you look at the package contents (right-click the .app file and choose Package
Contents) and dig into PackagedGemexample.app/Contents/Frameworks/Ma-
cRuby.framework/Versions/macruby version/usr/lib/ruby/site_ruby/1.9.2, you will no-
tice a folder called nokogiri.
What’s also nice with this approach is that you can remove the require statement for
rubygems from your code, making your app’s booting time slightly faster.
Finally, if you need to embed multiple gems, you can use the --gem option multiple
times. Here is an example using the command line:
$ macruby_deploy --compile --embed --gem nokogiri --gem dispatch MyApp.app
216 | Chapter 13: Using Ruby Third-Party Libraries
Index
Symbols
# (hash) comment, 17
& (ampersand) passing a block, 173
(GUI), 21–28
+ class method signature, 16
- instance method signature, 16, 126
: (colon) method selector, 10, 56
>> (chevrons) irb prompt, 17
@ instance variables, 194
[], []= MacRuby shortcuts, 46
` (back tick) shell execution, 58
⇒ (fat arrow) irb mode output, 17
A
ABPerson, 153
absoluteString, 49
Accessibility, 160
action, 10, 172
actors, 129
address book example, 167–178
add_contact, 135
add_twitter_friends example, 173, 174
Ahead of Time (AOT) compilation, 162
alloc.init constructor, 12
ampersand (&) passing a block, 173
anonymous methods, 43
API, 191
AppDelegate, 80
Apple Reference Library, 32–35
Application/AppKit Framework, 11, 31, 77
applicationDidFinishLaunching, 8, 14, 84, 171,
186
applicationShouldTerminate, 134
applicationWillFinishLaunching, 84
archiving, 65–69
arrays, 39–41
arrayWithContentsOfFile, 41
art cover, 125–128
assistant editor, 108
asynchronous APIs, 51
attributed strings, 38
attributes, Xcode, 116
availableVoices, 16, 18
awakeFromNib, 200, 201
B
back tick (`) shell execution, 58
beginSheetModalForWindow, 126
Berners-Lee, Tim, 29
bindings, 80, 118–120, 127–132
blocks, 137–139
blocks (anonymous methods), 43
breakpoint navigator, 107
BridgeSupport, 149–152, 210
britishize, 205
bundle, 53
buttons, 9, 23, 124
C
caching, 50
calendars, 44
call, 156
callbacks, 22, 59
CamelCase syntax, 14
cells, 85
center, 88
central panel, reference library, 34
CFDictionary, 41
We’d like to hear your suggestions for improving our indexes. Send email to index@oreilly.com.
217

CFString, 38
chevrons (>>) irb prompt, 17
class instantiation, Ruby, 12
class methods, 13
class, defining a, 11
CLLocationManager class, 185
closures, 137
coalesceMask, 65
coalescence, 63
Cocoa
actions, 172
and Xcode, 25
API, 30
Application template, 195
asynchronous APIs, 51
case conventions, 14
compatible and incompatible types, 37
constant naming conventions, 16
Core Data model, 113–120
date, time, and calendars, 43
demo app, 25–28
drawing, 92–93
frameworks, 30–32
graphics context, 93–99
history, 29
I/O operations, 47
key principles, 77–84
key-value coding, 78–80
Library template, 206
main run loop, 22
method missing, 153
mutable and immutable classes, 35
positioning, 85–89
protocols, 78
run loops, 54
sets, 42
strings and attributed strings, 38
third-party libraries, 208
threads, 59–61
views, 85
Cocoa Application Framework, 11
Code Generation settings, 207
code parallelization, 147
Code Snippet Library, 109
colon (:) method selector, 10, 56
compatible types, Ruby and Cocoa, 37
compilation, 162–164
concurrency, 61, 140–148
concurrent enumerable methods, 146
concurrent queue, 140
content, 215
controllers, 23, 117
coordinates, 85
Core Data, 113
data model, 113–120
template, 133
user interface, 121
Using, 104
core location, 185
CoreData Framework, 32
Cox, Brad J., 29
CPU clock speeds, 140
CRUD operations, 113
currentMode, 55
currentRunLoop, 54
cursors, 173
D
Data Model Inspector, 115
data persistence, 132–134
data storage, 45
data, displaying, 25
dataUsingEncoding, 45
data_ready, 59
dates, 43
Debug area (Xcode), 109
debug navigator, 107
default dispatch queues, 141
default responder, 89
defaultCenter, 63
defaultQueue, 64
delegates, 9, 51, 71
delegation, 22, 84
Deploy, MacRuby, 214
developer_names, 138
dispatch queues, 140
display of data, 25
distributed objects, 66
documentation, 15
download methods, 52
DownloadDelegator, 52
drawAtPoint, 99
drawing, 92
drawRect, 93
dup, 40
Dynamic Library example, 203–212
218 | Index

E
each methods, 138
each_with_index, 137
editor, XCode, 108
entity in Core Data, 114
enumerable methods, 146
enumerators, 42
evaluateString, 192
events, 89
Exception, 47
exceptions, 37, 47
F
fat arrow (⇒) irb mode output, 17
fetch_paginated_friends, 173
file handles, 53
File Transfer Protocol, 48
fileURLWithPath, 48
fill color, 94
filtering, 72
find, 73
find_all, 73
firstObjectCommonWithArray, 40
Flanagan, David, xii
Foundation, 31, 37–44
fragment, 49
frame, window, 87
framework, 11, 15, 208–210
frozen objects, 35
G
GCD (Grand Central Dispatch), 140–148
GCD dispatch gem, 144–148
GCD groups, 142
gems, 144, 213
geolocation, 179–188
git repository, 105
Global Interpreter Lock, 144
Gowalla web API, 179, 187
Grand Central Dispatch (GCD), 140–148
graphical user interface (GUI), 8
graphics context, 93–99
GUI (graphical user interface) application, 8,
21–28
H
Hash methods, 38
hash/dictionaries, 41
hello, 193
“Hello World!” examples, 7–12, 137, 162, 192–
195
Horizontal Split View, 196
host, 49
HTTP/HTTPS caching, 50
Hypertext Transfer Protocol, 48
I
I/O operations, 47
id keyword (Objective-C), 16
IDE (Integrated Development Environment),
103–112
image string, 184
images, 99
immutability, 35
import_twitter_contacts, 175
initialize, 12, 80
initWithVoice, 15, 16
input and output (I/O) operations, 47
insertString, 136
installing MacRuby, 6
instance methods, 13
instantiation, customizing, 12
interactive Ruby shell, 16
Interface Builder, 9, 23–25, 65, 78, 88, 92, 101,
117
Io language, 142
issue navigator, 107
iTunes, 151
J
Jobs, Steve, 29
JSON, 41, 67, 68, 173, 184, 188
Just In Time (JIT) compilation, 162
K
kABFirstNameProperty, 154
key-value coding (KVC), 78
keyboard, 161
keyDown, 90
keyed archives, 66
L
legacy code, 5
line numbers, 109
Index | 219

Lion OS, 6
locales, 46
localizations, 53
localizedStringForKey, 54
log navigator, 107
logical conditions, 72
loops, run, 22, 54
Love, Tom, 29
M
Mac Dev Center, 32
Mac OS X, 6, 30
macgem, 144, 213
macirb interactive shell, 16–18, 31, 75, 155,
208
MacRuby
case conventions, 154
documentation, 5
installation, 6
Matsumoto, Yukihiro, 3
overview, 3–5
stack, 4
macrubyc, 162
MacVim, 109
main queue, 140–142
mainBundle, 53
mainRunLoop, 54
make_user_wait, 175
managed object context, 133
managed object model, 132
MapReduce, 146
Marshal class, 66
marshaling, 65
Matsumoto, Yukihiro, xii, 3
max, 73
memoizing, 185
method missing, 153–157
methods
aliases, 18, 48
anonymous, 137, 156
case conventions, 14, 150
enumerable, 145
finding in documentation, 15, 32
helper, 171
how MacRuby handles, 13–19
iterators, 138
KVC, 79
overloading, 135
protocols, 78
prototypes, 16
selectors in, 56, 135, 202
undefined, 153
method_missing, 155
model-view-controller (MVC) design pattern,
32, 77
.momd extension, 132
movies, 121–124
multiple windows, 89
mutability, 35, 39
mutableCopy, 40
MVC design pattern, 32, 77
N
Navigator area (Xcode), 106
new, 12
NeXT, NeXTSTEP, 29
Nokogiri gem, 214
noResponderFor, 89
notification centers, 63
notification queues, 63
notifications, 62, 176
notificationWithName, 65
NSAddTemplate, 124
NSApp, 126
NSApplication, 84
NSArray, 35, 38, 39, 66, 76
NSArrayController, 118–120, 125
NSAttributedString, 39, 99
NSBundle, 53, 108
NSButton, 12, 85, 92
NSButtonCell, 85, 92, 130
NSCalendar, 44
NSCalendarUnit, 44
NSCancelButton, 126
NSCell, 85, 92
NSCoder, 65
NSCoding, 65
NSColor, 95
NSComboBoxCell, 130
NSConnection, 54
NSControl, 85
NSCopying, 40
NSCountedSet, 42
NSData, 19, 41, 45, 51, 76
NSDate, 33, 44, 76
NSDateComponents, 44
NSDictionary, 35, 38, 42, 76
NSDistributedNotificationCenter, 63
220 | Index

NSEnumerator, 42
NSEvent, 90
NSException, 37, 47
NSFastEnumerationEnumerator, 42
NSFileHandle, 53
NSFileManager, 126
NSGraphicsContext, 94–99
NSHashTable, 42
NSImage, 99, 185
NSImageCell, 130
NSImageView, 85, 101, 127
NSInvocation, 56
NSKeyValueCoding, 78
NSLocale, 46
NSLock, 60
NSLog, 109
NSManagedObject, 115
NSMutableArray, 39
NSMutableCopying, 40
NSMutableData, 45
NSMutableDictionary, 38, 41
NSMutableParagraphStyle, 39
NSMutableSet, 42
NSMutableString, 38, 136
NSMutableURLRequest, 50
NSNotification, 63
NSNotificationCenter, 63
NSNotificationCoalescingOnName, 65
NSNotificationCoalescingOnSender, 65
NSNotificationNoCoalescing, 65
NSNotificationQueue, 64
NSNumber, 66, 76
NSObject, 31, 40, 81
NSOpenGLView, 85
NSOperation, 62
NSOperationQueue, 62
NSPanel, 85
NSParagraphStyle, 39
NSPipe, 53
NSPort, 54
NSPostASAP, 64
NSPostNow, 65
NSPostWhenIdle, 64
NSPredicate, 73
NSPropertyListSerialization, 67
NSRect, 9
NSRemoveTemplate, 124
NSResponder, 85, 91
NSRunLoop, 54, 57
NSScreen, 88
NSSearchField, 131
NSSet, 35, 42
NSSliderCell, 130
NSSpeechSynthesizer, 9, 14, 15, 155
NSString, 35, 38, 51, 66, 76, 90
NSTableColumn, 179
NSTableView, 179
NSTask, 53, 58
NSTextField, 85
NSTextView, 73, 85, 99
NSThread, 54, 60
NSTimer, 54, 55
NSTimeZone, 46
NSUndoManager, 73
NSURL, 48, 100
NSURLConnection, 48, 50
NSURLDownload, 50, 51
NSURLRequest, 48, 50
NSURLRequestReloadIgnoringCacheData, 50
NSURLRequestReturnCacheDataDontLoad,
51
NSURLRequestReturnCacheDataElseLoad,
51
NSURLRequestUseProtocolCachePolicy, 50
NSUserDefaults, 74, 76
NSView, 34, 85, 87, 92
NSWindow, 26, 84, 89, 202
NSWorkspace, 188
NSXMLDocument, 72
NSXMLNode, 69, 72
NSXMLParser, 69
NSZeroRect, 100
O
Object Library, 81, 92, 120
object-relational mapper (ORM), 32
Objective-C
APIs, 139, 158
case conventions, 14
classes, 12
frameworks, 11, 15, 31
hash implementation, 41
history, 29
MacRuby in, 191–202
method signature, 16
methods, 135
pointers, 159
runtime, 3, 9, 149, 158, 202
Index | 221

sending a message, 13
syntax, 18, 48, 87, 135, 154, 202
using in MacRuby, 149, 203–212
open-source access, 5
operation queues, 61
ORM (object-relational mapper), 113
outlets, 24
P
password, 49
path, 49
pathComponents, 38
pathExtension, 39
pathForResource, 54
PDFView, 85
people, 153
persistence, data, 132–134
persistentStoreCoordinator, 133
pipes, 53
Pointer#magic_cookie, 161
pointers, 158–162
port, 49
positioning, 85–89
POSIX threads, 60
postNotification, 65
predicate binding, 131
preferences, 74
project navigator, Xcode, 106
protocols, 78
prototypes, method, 16
PS3SixAxis repository, 210
Q
QTMovieView, 85
Quartz, 92
query, 49
queues, 140
R
redo, 73
reference Library, Apple, 32–35
regular expressions, 5
relationships between entities, 117
rendering of data, 25
responder chain, 89
returning a value, 13
Ruby
archiving, 66
blocks, 137
case conventions in, 150
class instantiation, 12
and Cocoa compatible types, 37
compared to MacRuby, 3
and concurrency, 144
enumerators, 42
freezing objects in, 35
hash implementation, 41
initializing objects in, 12
input/output in, 47, 51
and KVC protocol, 79
MacVim editor, 109
method missing, 153, 157
methods, 135
mutable arrays in, 40
returning a value in, 13
sets, 42
syntax, 18, 87, 149
third-party libraries, 213
Ruby Programming Language (Flanagan &
Matsumoto), xii
RubyGems, 144, 213, 215
run loops, 22, 54
runUntilDate, 55
S
sandboxing, 148
Sansonetti, Laurent, xi
say_hello, 8
scheduling, 54–62
scriptable applications, 150–153
Scripting Bridge, 150
search field, 131
search navigator, 107
searching methods, 73
selectors, 10, 56, 124, 135–137, 202
sel_registerName, 202
sequential archives, 66
serial queue, 141
serialization, 65–69
setNeedsDisplay, 93
setNeedsDisplayInRect, 93
setNextResponder, 89
sets, 42
sharedAddressBook, 153
sidebar, reference library, 34
singleton methods, 13
SmallTalk-80, 29
222 | Index

snippets, custom, 109
Snow Leopard OS, 6
Sparkle, 209–210
Spotlight importer, 105
spots, 179
SQLite, 113
standard editor, 108
StepStone, 29
strftime, 44
strings, 38
stroke color, 95
subprocesses, 58
symbol navigator, 106
synchronous APIs, 51
synchronous notification/posting, 63
syntactic sugar, 18, 45, 48
T
table view, 121, 182–185
tasks, 58
task_terminated, 59
template, MacRuby, 103–106
temp_context, 99
terminal, executing a script from, 10
third-party libraries
Cocoa, 208
Ruby, 213–216
threads, 59
time, 43
time zone, 46
timers, 55
to_object, 161
traversal methods, 73
Twitter example, 167–178
U
undo, 73
uninstalling MacRuby, 7
unsigned pointers, 160
URLs, requests, and connections, 48
URLWithString, 49
user, 49
user inputs, 23
user interface, 84–89
address book example, 167–170
embedded MacRuby, 196
geolocation example, 179–181
movie library example, 121–132
userInfo, 56
user’s preferences, 74
Utility Area, Xcode, 110–112
V
value, returning a, 13
valueForKey, 80
valueForKeyPath, 79
version editor, 108
views, 85
void pointers, 159
W
web API, 172, 187
widgets, 175–176
windowDidMove, 84
windowDidResize, 28
windows, 9, 84
windowShouldClose, 28, 84
windowWillClose, 8, 14, 84, 170
windowWillMove, 84
workflow, 134
Workspace window, Xcode, 106
World Wide Web, 29
writeToFile class, 67
writeToURL class, 67
X
Xcode, 6, 10, 23–25, 103–112, 163, 195–202
Xcode 4, 6, 106, 116, 117
XML parsing, 69–72
XPath, 72, 215
Y
YAML, 41, 67, 68
Index | 223

About the Author
Matt Aimonetti, based in San Diego, California, is a senior research and development
engineer at LivingSocial. Prior to joining LivingSocial, Matt worked on video game
development at Sony PlayStation; and before that he worked with startups, Fortune
100 companies, and traditional companies. There, he had the opportunity to be in-
volved with captivating projects in different domain spaces from biotech to comics,
advertising, social networks, e-learning, and more. Matt joined the MacRuby team in
2008 and was active in the Ruby community for many years prior to that. He developed
or contributed to a lot of OSS libraries and frameworks (Merb, Rails, and many more)
and spoke at user groups and conferences in the United States and abroad. Matt blogs
at http://merbist.com.
Colophon
The animal on the cover of MacRuby: The Definitive Guide is a northern cardinal
(Cardinalis cardinalis), a frequent visitor to backyard bird feeders throughout the Uni-
ted States. Although the male of the species—with its vivid, red plumage—is perhaps
more easily recognized, the brown coloration of females is also accented in the char-
acteristic red. Ranging from southeastern Canada and the eastern United States to
Mexico and northern parts of Central America, the birds favor dense, shrubby areas,
such as those found in forests, gardens, and swamps.
Northern cardinals have prominent crests, thick, cone-shaped beaks, and distinctive
facial masks, which are colored black in males and grayish-black in females. The birds
reach a length of 8 to 9 inches and usually weigh no more than 2 ounces. Their diet
consists of weed and sunflower seeds, grains, fruits, and insects, and the birds feed their
young insects almost exclusively. While there is a preference for seeds that are easily
husked, this nonmigratory species is less selective during the winter months when food
is scarce.
Mated pairs often sing together, sometimes as part of a mating ritual in which the female
sings and the male brings food in response. If the mating is successful, this behavior
may continue throughout the incubation period, with the female singing from the nest.
Fiercely territorial, the male seeks out the highest perch from which he can closely
monitor for other males or predators. Particularly in the spring and summer, it is not
uncommon to see the male attempting to attack mirrored surfaces, mistaking his re-
flection for a rival.
The cover image is from J. G. Wood’s Animate Creation. The cover font is Adobe ITC
Garamond. The text font is Linotype Birka; the heading font is Adobe Myriad Con-
densed; and the code font is LucasFont’s TheSansMonoCondensed.
