OnGuard Manual
User Manual: Pdf
Open the PDF directly: View PDF ![]() .
.
Page Count: 125 [warning: Documents this large are best viewed by clicking the View PDF Link!]
- OnGuard
- Chapter 1: Introduction
- OnGuard is a library of components, classes, and routines that allow you to protect your applicat...
- By embedding a key in your application and making a few well placed calls to some of the routines...
- Through the use of a release code, you can do things such as unlock a demo version of your applic...
- A release code is a 16 hexadecimal character code that you provide to the end user. The user then...
- Some release codes contain additional information (such as the date that the release expires), wh...
- The OnGuard release codes provide many different protection methods:
- Start/end date check
- Number of days used
- Network metering
- Simple registration
- Serial number registration
- Special registration
- Usage count limit
- The application can be run only a limited number of times.
- You can combine most of OnGuard’s protection methods to achieve a greater level of protection. Fo...
- OnGuard also provides a component that allows you to detect changes to your EXE file. It does thi...
- OnGuard makes it easy for you to control use of your application by making it a single instance a...
- OnGuard is based on code written by Robert Salesas of Eschalon Development, Inc. and now licensed...
- Using OnGuard
- OnGuard provides an assortment of components that allow you to protect the applications you write...
- Since there are an almost infinite number of ways to incorporate OnGuard into your application, d...
- Codes, keys, and modifiers
- An OnGuard code is nothing more than a record consisting of two long integers (8 bytes). The firs...
- An OnGuard key is used to encode (or mask) the contents of the code. A key is much like a passwor...
- The key is what gives all of the OnGuard components the ability to decode the code to see if it i...
- Modifiers can be considered as part of a key. They are used to change a key based on some reprodu...
- Other modifiers can “tie” a code to a user name, a product serial number, or even a specific date...
- Anatomy of a “code” component
- A “code” component is any of the OnGuard components that requires a release (or unlocking) code. ...
- 1. The OnGetKey event is fired to obtain the key that was used to encode the release code. The ke...
- 2. The OnGetCode event is fired to obtain the release code. The release code is normally stored o...
- 3. The OnGetModifier event is fired to obtain the key modifier. A modifier should almost always b...
- 4. The modifier is applied to the key to generate the key that was used to encode the release code.
- 5. The release code is inspected to insure that it is a valid release code.
- 6. The component-specific portion of the code is tested. The specific test depends on the type of...
- 7. The OnChecked event is fired to report the results of the previous two steps.
- Release code components
- Other components and features
- Protection Strategies
- OnGuard provides many different protection methods so that you can select those necessary to crea...
- Demo version application with single machine authorization
- This protection strategy combines the advantages of the “Demo version application” and the “Singl...
- To prevent unauthorized copies of your application, design it so that it is initially a demo vers...
- Using this approach means that even fully functional “released” applications revert to their demo...
- Single machine authorization
- Single instance applications
- Demo version application
- System Requirements
- Installation
- Organization of this Manual
- Each chapter starts with an overview of the classes and components discussed in that chapter. The...
- Overview
- Hierarchy
- Properties
- Methods
- Events
- Reference Section
- Details the properties, methods, and events of the class or component. These descriptions are in ...
- Declaration of the property, method, or event.
- Default value for properties, if appropriate.
- A short, one-sentence purpose. The ƒsymbol is used to mark the purpose to make it easy to skim th...
- Description of the property, method, or event. Parameters are also described here.
- Examples are provided in many cases.
- The “See also” section lists other properties, methods, or events that are pertinent to this item.
- Throughout the manual, the Msymbol is used to mark a warning or caution. Please pay special atten...
- Details the properties, methods, and events of the class or component. These descriptions are in ...
- Naming Conventions
- On-Line Help
- Technical Support
- The best way to get an answer to your technical support question is to post it in the OnGuard new...
- To get the most from the newsgroups, we recommend you use dedicated newsreader software.
- Newsgroups are public, so please do not post your product serial number, product unlocking code, ...
- TurboPower’s KnowledgeBase is another excellent support option. It has hundreds of articles about...
- In addition to the newsgroups, TurboPower Software Company offers a variety of technical support ...
- Chapter 2: Tutorials
- This tutorial section provides three simple, step-by-step examples that illustrate some of the mo...
- Example 1: Adding a Program Expiration Date
- In this example, we limit the range of dates for program execution. Although this protection stra...
- 1. Create a new project.
- 2. From the OnGuard tab, add a TOgDateCode component to the project’s main form.
- 3. Click the right mouse button on the TOgDateCode component to invoke the local menu and then se...
- 4. Click the Add button to display the Description and Key dialog box as shown in Figure 2.2.
- 5. Enter the name of your application in the “Description” edit control. For this example, enter ...
- 6. Be sure that “Random” is selected as the key type and click “Generate Key”. Two hexadecimal re...
- 7. Select your application (MyTest) in the “Applications” list box and the generated key is displ...
- 8. Add the following to the implementation section of the unit:
- const
- CKey : TKey =
- ($18,$C1,$99,$64,$3F,$FC,$DA,$6C,$38,$BC,$DF,$CB,$B8,$BE,$DF,$21);
- (The underlined portion of this statement was copied from the clipboard)
- Caution: Don’t store the key in the registry or an INI file. Doing so drastically reduces the sec...
- 9. With the TOgDateCode component selected, double-click the OnGetKey event in the Events tab of ...
- 10. With the TOgDateCode component selected, double-click the Code property in the Properties tab...
- Figure 2.5: The Code Generation dialog box.
- Be sure that the Date tab is selected. The “Start date” is automatically set to today's date. Ent...
- For this example, the release code will be stored with the application, so set the Store Code pro...
- This completes the portion of this example that concerns the TOgDateCode directly. However, there...
- 11. With the TOgDateCode component selected, double-click the OnChecked event in the Events tab o...
- procedure TForm1.OgDateCode1Checked( Sender: TObject; Status:TCodeStatus);
- begin
- case Status of
- ogValidCode : ShowMessage('Valid code');
- ogPastEndDate : ShowMessage('Date has expired');
- ogInvalidCode : ShowMessage('Invalid release code');
- if Status <> ogValidCode then
- Application.Terminate;
- Example 2: Limiting Simultaneous Network Users
- In this example, we build a network application that limits the number of concurrent users to two...
- 1. Create a new project.
- 2. From the OnGuard tab, add a TOgNetCode component to the projects main form.
- 3. Right click on the TOgNetCode component and select “Generate Key” to display the Key Maintenan...
- 4. Click the Add button to display the Description and Key dialog box. In the Description field, ...
- 5. Click on the far right speed button (with the picture of a key) to generate the key for this a...
- 6. Be sure “Random” is selected in the “Key Type” and press the Generate Key button. Two hexadeci...
- 7. In the “Applications” list box, select NetPrj1. The generated key, in both forms, is displayed...
- 8. Click the Copy button immediately to the right of the lower of the two edit controls. This cop...
- 9. Click once on the TOgNetCode component. On the Events tab of the Object Inspector, double clic...
- procedure TForm1.OgNetCode1GetKey(
- Sender: TObject; var Key: TKey)
- const
- CKey : TKey = ($44,$OE,$E2,$DO,$O8,$F6,$5C,$F7,$92,$2B,$DC,$6C,$AC,$5B,$39,$4E);
- begin
- Key := CKey;
- end;
- The underlined code was pasted from the clipboard into the editor and is the string that was copi...
- 10. With the TOgNetCode component selected, double-click the Code property in the Properties tab ...
- 11. Click on the Net tab of the notebook. Note that the key for the program has been automaticall...
- 12. Click the Generate button. This creates a unique code based on the number of slots and, if an...
- 13. Click the OK button on the dialog box. The generated code is seen in the Code property of the...
- 14. Click on the StoreCode property. Click once on the down arrow and select True. This stores th...
- 15. Click on the FileName property. Enter “NETPRJ1.NAF”. This provides the name of the Network Ac...
- 16. Click on the Events tab of the Object Inspector. Double click on the OnChecked event. In the ...
- procedure TForm1.OgNetCode1Checked(
- Sender: TObject; Status: TCodeStatus);
- begin
- case Status of
- ogInvalidCode :
- begin
- ShowMessage('Invalid Code');
- Application.Terminate;
- end;
- ogNetCountUsed :
- begin
- ShowMessage('No more users allowed');
- Application.Terminate;
- end;
- end;
- end;
- 17. Select File|Save File As from the main menu. Enter “NETPRJ1U” in the File Save dialog box and...
- 18. Compile and run the application, and leave it running.
- 19. From either a DOS box or using Start|Run from the task bar, start another copy of the applica...
- 20. Try to run a third instance of the application. You should see the “No more users allowed” me...
- Example 3: Limiting Program Executions
- In this example, we show how to use OnGuard to limit the number of times a program can be run. As...
- 1. Create a New Project.
- 2. From the OnGuard tab, add a TOgUsageCode component to the form.
- 3. Right click the TOgUsageCode component. and select “Generate Key” to display the Key Maintenan...
- 4. Click the Add button to display the Description and Key dialog box as shown in Figure 2.12.
- 5. In the Description field, enter “UsgPrj1” as shown in Figure 2.12. Click on the far right spee...
- 6. Be sure “Random” is selected in the “Key Type” edit control and press the Generate Key button....
- 7. In the “Applications” list box, select UsgPrj1. The generated key, in both forms, is displayed...
- 8. Click the Copy button immediately to the right of the lower of the two edit controls. This cop...
- 9. Click once on the TOgUsageCode component. On the Events tab of the Object Inspector, double cl...
- procedure TForm1.OgUsageCode1GetKey(
- Sender: TObject; var Key: TKey);
- const
- CKey : TKey = ($BD,$42,$EF,$13,$E7,$40,$6E,$13,$77,$08,$B1,$6E,$21,$B5,$C7,$FE); begin
- Key := CKey;
- end;
- The OnGetKey event automatically retrieves the key every time the program starts. Without this ev...
- 10. Right click on the TOgUsageCode component and select “Generate Code” from the context menu. T...
- 11. Click on the Usage tab of the notebook. Note that the key for the program has been automatica...
- 12. In the Usage Count edit control, enter the number 1 to limit the program to only one run as s...
- 13. Click on the Expires edit control and enter an expiration date in the format you’ve set up fo...
- 14. The TOgUsageCode component provides a second level of protection by allowing you to enter an ...
- 15. Click the Generate button. This creates a unique code based on the number of allowed uses and...
- 16. Write down this code. You will need it later. Click the OK button on the dialog box.
- 17. Add OgUtil and IniFiles to the uses clause of the unit. OgUtil contains routines used to conv...
- unit unit1;
- interface
- uses
- WinTypes, WinProcs, Messages, SysUtils, Classes, Graphics, Controls, Forms, Dialogs, OnGuard, Ini...
- Note that the uses clause was generated by Delphi 1, i.e., it has WinTypes and WinProcs. Had the ...
- 18. Click once on the TOgUsageCode component. Double click the OnGetCode event on the Events tab ...
- procedure TForm1.OgUsageCode1GetCode(
- Sender: TObject; var Code: TCode);
- var
- IniFile : TIniFile;
- S : string;
- begin
- IniFile := TIniFile.Create('usgprj1.ini');
- try
- S := IniFile.ReadString('Codes', 'UsageCode', '');
- HexToBuffer(S, Code, SizeOf(Code));
- finally
- IniFile.Free;
- end;
- procedure TForm1.OgUsageCode1Checked(
- Sender: TObject; Status: TCodeStatus);
- var
- Code : TCode;
- IniFile : TIniFile;
- S : string;
- begin
- case Status of
- ogInvalidCode :
- begin
- if InputQuery('Useage Test Program', 'Code', S) then begin
- if (HexToBuffer(S, Code, SizeOf(Code))) then begin
- IniFile.WriteString('Codes', 'UsageCode', S);
- OgUsageCode1.CheckCode(True);
- Exit;
- end;
- end;
- end;
- ogCodeExpired : ShowMessage('Code Expired');
- ogRunCountUsed : ShowMessage('Run Count exceeded');
- end;
- if Status <> ogValidCode then
- Application.Terminate;
- end;
- The OnChecked event of the TOgUsageCode component is fired as a result of the release code being ...
- If the code is invalid, the cutoff date has been exceeded, or the number of permitted uses has be...
- 20. Double click the OnChangeCode event in the Object Inspector. In the source editor, change the...
- procedure TForm1.OgUsageCode1ChangeCode(
- Sender: TObject; Code: TCode);
- var
- IniFile : TIniFile;
- S : string;
- begin
- IniFile := TIniFile.Create('usgprj1.ini');
- try
- S := BufferToHex(Code, SizeOf(Code));
- IniFile.WriteString('Codes', 'UsageCode', S);
- finally
- IniFile.Free;
- end;
- end;
- The OnChangeCode event is fired when the OgUsageCode component needs to update the information in...
- 21. Select File|Save File As from the main menu. Enter “USGPRJ1U” in the File Save dialog box and...
- 22. Compile and run the application. When the InputQuery box appears, enter the code you wrote do...
- 23. Close the application and try to run the program again. The “Run Count Exceeded” message appe...
- Chapter 3: Low-Level Routines
- If you need more control over how and when release codes are handled, you can move one level lowe...
- The ONGUARD.PAS unit not only implements all of the “Code” components, it provides access to the ...
- For example, the following four routines are used to create and manage usage codes.
- procedure InitUsageCode(const Key : TKey; Count : LongInt; Expires : TDateTime; var Code : TCode);
- function IsUsageCodeValid(const Key : TKey; const Code : TCode) :Boolean;
- procedure DecUsageCode(const Key : TKey; var Code : TCode);
- function GetUsageCodeValue(const Key : TKey; const Code : TCode) : LongInt;
- function IsUsageCodeExpired(const Key : TKey; const Code: TCode) : Boolean;
- The first parameter for each of these routines is the key. The key is used to encode and decode t...
- InitUsageCode takes an already initialized key value, a usage count, an expiration date (Expire),...
- The date, days, registration, serial number, and special codes all have similar, low-level, routi...
- Procedures/Functions
- Refernce Section
- ApplyModifierToKeyPrim procedure
- ApplyModifierToKeyPrim XOR’s the Modifier value with the Key returning the modified key as the Ke...
- BufferToHex function
- BufferToHex converts one or more bytes to a hexidecimal string.
- BufferToHexBytes function
- BufferToHexBytes performs the same operation as the BufferToHex function except that the function...
- CheckNetAccessFile function
- CheckNetAccessFile verifies that the net access file referenced by NetAccess has at least one slo...
- CreateMachineID function
- CreateMachineID produces a key modifier based on specific hardware information.
- CreateNetAccessFile function
- CreateNetAccessFile creates a net access for Count users file using FileName as the name of the f...
- CreateNetAccessFileEx function
- CreateNetAccessFileEx creates a net access file using the access count value from a previously en...
- DecDaysCode procedure
- DecDaysCode reduces the internal days count value by one and returns the modified code as the Cod...
- DecodeNAFCountCode function
- DecodeNAFCountCode uses Key to decode Code and returns the number of authorized users as the func...
- DecUsageCode procedure
- DecUsageCode reduces the internal usage count value by one and returns the modified code as the C...
- EncodeNAFCountCode procedure
- EncodeNAFCountCode uses Key to create and encode the usage Count value creating a network code.
- ExpandDate function
- ExpandDate translates an OnGuard date offset to an actual date.
- GenerateDateModifierPrim function
- GenerateDateModifierPrim produces a key modifier based on the date D.
- GenerateMachineModifierPrim function
- GenerateMachineModifierPrim produces a key modifier based on default hardware information.
- GenerateMD5KeyPrim procedure
- GenerateMD5KeyPrim produces a Key by applying the MD5 hash to the string passed as Str
- GenerateRandomKeyPrim procedure
- GenerateRandomKeyPrim produces a Key using a random numbers.
- GenerateStringModifierPrim function
- GenerateStringModifierPrim produces a key modifier by applying a hash algorithm to the string pas...
- GenerateTMDKeyPrim procedure
- GenerateTMDKeyPrim produces key by applying a hash algorithm to the string passed in Str.
- GenerateUniqueModifierPrim function
- GenerateUniqueModifierPrim produces a key modifier using random numbers.
- GetCodeType function
- GetCodeType returns the type of code passed as the Code parameter.
- GetDateCodeValue function
- GetDateCodeValue returns the expiration date stored in the Code.
- GetDaysCodeValue function
- GetDaysCodeValue returns the expiration date stored in the Code.
- GetExpirationDate function
- GetExpirationDate returns the date that the code passed as the Code parameter expires.
- GetNetAccessFileInfo function
- etNetAccessFileInfo obtains information about the specified network access file.
- GetSerialNumberCodeValue function
- GetSerialNumberCodeValue returns the serial number that was used to create the Code.
- GetSpecialCodeValue function
- GetSpecialCodeValue returns the value that was used to create the Code.
- GetUsageCodeValue function
- GetUsageCodeValue returns the current usage count value store in the Code.
- HexStringIsZero function
- HexStringIsZero returns True only if the hexadecimal string passed as Hex consists entirely of ze...
- HexToBuffer function
- HexToBuffer converts the hexadecimal string in Hex to bytes that are stored in Buf.
- InitDateCode procedure
- InitDateCode creates and initializes a date code using Key, StartDate, and EndDate.
- InitDaysCode procedure
- InitDaysCode creates and initializes a days code using Key, Days, and Expires.
- InitRegCode procedure
- InitRegCode creates and initializes a registration code using Key, RegStr, and Expires.
- InitSerialNumberCode procedure
- InitSerialNumberCode creates and initializes a serial number code using Key, Serial, and Expires.
- InitSpecialCode procedure
- InitSpecialCode creates and initializes a special code using Key, Value, and Expires.
- InitUsageCode procedure
- InitUsageCode creates and initializes a usage code using Key, Count, and Expires.
- IsAppOnNetwork function
- IsAppOnNetwork returns True if the drive specified in ExePath is a remote drive, otherwise False.
- IsDateCodeExpired function
- IsDateCodeExpired returns True if the Code has expired, otherwise False.
- IsDateCodeValid function
- IsDateCodeValid returns True if Code is a valid date code, otherwise False.
- IsDaysCodeExpired function
- IsDaysCodeExpired returns True if the Code has expired, otherwise False.
- IsDaysCodeValid function
- IsDaysCodeValid returns True if Code is a valid days code, otherwise False.
- IsRegCodeExpired function
- IsRegCodeExpired returns True if the Code has expired, otherwise False.
- IsRegCodeValid function
- IsRegCodeValid returns True if Code is a valid registration code, otherwise False.
- IsSerialNumberCodeExpired function
- IsSerialNumberCodeExpired returns True if the Code has expired, otherwise False.
- IsSerialNumberCodeValid function
- IsSerialNumberCodeValid returns True if Code is a valid serial number code, otherwise False.
- IsSpecialCodeExpired function
- IsSpecialCodeExpired returns True if the Code has expired, otherwise False.
- IsSpecialCodeValid function
- IsSpecialCodeValid returns True if Code is a valid special code, otherwise False.
- IsUsageCodeExpired function
- IsUsageCodeExpired returns True if the Code has expired, otherwise False.
- IsUsageCodeValid function
- IsUsageCodeValid returns True if Code is a valid usage code, otherwise False.
- LockNetAccessFile function
- LockNetAccessFile locks an access slot in the network access file specified by FileName and retur...
- ResetNetAccessFile function
- ResetNetAccessFile resets invalid access slots by clearing each slot’s “in-use” status.
- ShrinkDate function
- ShrinkDate translates a date to an OnGuard date offset.
- StringHashElf function
- StringHashElf produces a hash value based on the text passed in Str.
- UnlockNetAccessFile function
- UnlockNetAccessFile unlocks an access slot in the network access file specified by FileName and r...
- Chapter 4: Keys and Release Codes
- OnGuard provides two components that automate the tasks of making keys and generating release codes.
- The TOgMakeKeys component is used to create keys. Keys are used to encode and decode release code...
- To make the key more secure, a modifier can be applied to it to make it unique to the current dat...
- The TOgMakeCodes component is used to generate release codes. The release code is an 8 byte value...
- Release codes can be unique to a particular user name, machine specific ID, or almost any static ...
- TOgMakeKeys Component
- TOgMakeKeys provides methods and properties to create and maintain keys. Keys are used to encode ...
- Keys are normally embedded into your application as constants and then supplied to the OnGuard ro...
- TOgMakeKeys allows you to make three different types of keys: Random, Standard Text, and Case-Sen...
- Creating and Maintaining Keys
- TOgMakeKeys provides a series of dialogs with built-in methods for managing keys and their relate...
- “File name” is the name of the INI file where the key information is stored. Use the speed button...
- “Applications” contains a list of the applications for which keys are currently stored in the fil...
- The Add button displays the Description and Key dialog box (described below). The Edit button dis...
- The “Key” group contains two edit fields with hexadecimal representations of the key. The second ...
- The OK button closes the dialog box and makes the selected key information available via the appr...
- If you choose to add or edit an item in the “Applications” list, the Description and Key dialog b...
- “Description” is the name of (or some text describing) the application.
- If a key was already generated for this application, “Key” displays the hexadecimal representatio...
- The OK button closes the dialog box, saving any changes that were made. The Cancel button closes ...
- If you click on the speed button to generate a key, the Key Generation dialog box is displayed as...
- The “Key Type” combo box allows you to select the method used for key generation. The possible ch...
- The Generate key button creates the key based on the “Key Type” and the “Key Phrase”.
- The “Key Phrase” memo field allows you to enter a text phrase that is used to generate the key if...
- The “Key” group contains two edit fields with hexadecimal representations of the key. The second ...
- The OK button closes the dialog box and makes the selected key information available via the appr...
- Hierarchy
- Properties
- Methods
- Reference Section
- About property
- Shows the current version of OnGuard.
- ApplyModifierToKey method
- ApplyModifierToKey alters the specified key.
- Execute method
- Execute displays the Key Maintenance dialog box.
- GenerateDateModifier method
- GenerateDateModifier creates a key modifier based on the current date.
- GenerateMachineModifier method
- GenerateMachineModifier creates a key modifier based on the hardware information for the current ...
- GenerateMachineModifier uses hard disk volume sizes, volume serial numbers, registration name and...
- Use this modifier to sign the key used to encode and decode release codes if you want the release...
- Caution: If hardware is changed on the machine, the modifier changes, rendering the release code,...
- This routine is also available as a function (GenerateMachineModifierPrim) for use in application...
- GenerateMDKey method
- GenerateMDKey produces a key based on a supplied text string.
- GenerateRandomKey method
- GenerateRandomKey produces a key based on the VCL’s internal random number generator.
- GenerateStringModifier method
- GenerateStringModifier creates a key modifier based on the supplied string.
- GenerateUniqueModifier method
- GenerateUniqueModifier creates a unique key modifier.
- GetKey method
- GetKey returns the key generated when Execute was called.
- KeyFileName property
- KeyFileName is the name of the INI file used to store application names and their associated keys.
- KeyType property
- Default: ktMessageDigest
- KeyType determines the type of key to generate.
- ShowHints property
- Default: False
- ShowHints determines whether hints are shown for the TOgMakeKeys dialog boxes.
- TOgMakeCodes Component
- Generating Release Codes
- The Execute method displays the Code Generation dialog box as shown in Figure 4.4.
- The first item in the Code Generation dialog box is a notebook with a page for each possible type...
- Use the Date notebook page to generate a Start/End Date release code as shown in Figure 4.4. An a...
- See the “TOgDateCode Component” on page 88 for information about Start/End Date release codes.
- Use the Days notebook page to generate a Number of Days Used release code as shown in Figure 4.5....
- Enter the number of days in the “Day count” edit field. A value of 0 is interpreted as an expired...
- See the “TOgDaysCode Component” on page 90 for more information about Number of Days Used release...
- Use the Reg notebook page to generate a Simple Registration release code as shown in Figure 4.6. ...
- You should store the text in a file or in the registry. It can be displayed at run time as a dete...
- The Random Number button generates a random string of hexadecimal digits and puts them in the “St...
- Use the “Expires” edit field to specify a date that the release code will expire. The default val...
- See the “TOgRegistrationCode Component” on page 98 for more information about Simple Registration...
- Use the S/N notebook page to generate a Serial Number release code. The number entered in “Serial...
- You should store the serial number in a file or in the registry so that it can be read and displa...
- Use the “Expires” edit field to specify a date that the release code will expire. The default val...
- The Random Number button generates a random number to be used as the product serial number.
- See the “TOgSerialNumberCode Component” on page 101 for more information about Serial Number rele...
- Use the Usage notebook page to generate a Usage Count release code as shown in Figure 4.8. This r...
- Enter the number of uses in the “Usage count” edit field. Use the “Expires” edit field to specify...
- See the “TOgUsageCode Component” on page 105 for more information about Usage Count release codes.
- Use the Network notebook page to generate a Network Metering release code as shown in Figure 4.9....
- Enter the maximum number of network users in the “Access Slots” edit field.
- See the “TOgNetCode Component” on page 94 for more information about Network Metering release codes.
- Use the Special notebook page to generate a Special release code as shown in Figure 4.10. A Speci...
- Enter any value in the “Special data” edit field. Use the “Expires” edit field to specify a date ...
- See the “TOgSpecialCode Component” on page 103 for more information about Special release codes.
- The “Key used to encode” group in the Code Generation dialog box contains information about the k...
- The modifier check boxes, shown in Figure 4.11, determine whether a modifier is used to sign the ...
- If the “Machine modifier” box is checked, a modifier is created using machine-specific informatio...
- If the “Date modifier” box is checked, a modifier is created using a date. Use this type of modif...
- If the “Unique modifier” box is checked, a modifier is randomly generated. Use this type of modif...
- If the “String modifier” box is checked, a modifier is created using the text contained in the “S...
- If none of the boxes are checked, an arbitrary 32-bit value can be entered in the “Modifier” edit...
- The third group in the Code Generation dialog box contains the Generate button. After you have su...
- The OK button closes the dialog box and indicates that the entered data and the generated code ar...
- Hierarchy
- Properties
- Methods
- Reference Section
- About property
- Shows the current version of OnGuard.
- CodeType property
- Default: ctDate
- CodeType is the type of release code.
- Execute method
- Execute displays the Code Generation dialog box.
- GetCode method
- procedure GetCode(var Value : TCode);
- TCode = packed record
- CheckValue : Word; {magic value}
- Expiration : Word; {expiration date or 0, if none}
- case Byte of
- 0 : (FirstDate : Word; {for date code}
- EndDate : Word);
- 1 : (Days : Word; {for days code}
- LastAccess : Word);
- 2 : (RegString : LongInt); {for reg code}
- 3 : (SerialNumber : LongInt); {for serial number code}
- 4 : (UsageCount : Word; {for usage count code}
- LastChange : Word);
- 5 : (Value : LongInt); {for specail codes}
- 6 : (NetIndex : LongInt); {for net codes}
- end;
- GetCode returns the release code generated by the Execute method.
- KeyFileName property
- KeyFileName is the name of the INI file used to store application names and their associated keys.
- ShowHints property
- Default: False
- ShowHints determines whether hints are shown for the TOgMakeCodes dialog boxes.
- Chapter 5: Release Code Components
- This chapter discusses the components that implement the different types of release codes. OnGuar...
- Start and End Date
- Number of Days Used
- Network Metering
- Simple Registration
- Serial Number Registration
- Special Registration
- Usage Count
- TOgCodeBase Class
- The TOgCodeBase class is the ancestor class for the other components described in this chapter. I...
- Hierarchy
- Properties
- Methods
- Events
- Reference Section
- About property
- Shows the current version of OnGuard.
- AutoCheck property
- Default: True
- AutoCheck determines whether CheckCode is called automatically.
- CheckCode virtual abstract method
- CheckCode checks for a valid release code.
- CheckCode is defined as virtual and abstract, which means that each descendant component override...
- CheckCode requires several pieces of information, which it obtains by triggering event handlers t...
- 1. Trigger the OnGetKey event to get the key used to encode and decode the release code. The key ...
- 2. Trigger the OnGetCode event to get the release code. The release code is normally stored in th...
- 3. Trigger the OnGetModifier event to get the key modifier. The modifier can be stored as a const...
- 4. Apply the modifier to the key.
- 5. Test the release code to see if it is valid.
- 6. Test the release code to see if it has expired. The details of this test depend on the type of...
- Code property
- Code is the release code.
- IsCodeValid method
- IsCodeValid tests to see if the release code is valid.
- Modifier property
- Modifier is used to sign the key.
- OnChecked event
- OnChecked defines an event handler that is called after the release code is checked.
- OnGetCode event
- OnGetCode defines an event handler that is called to get the release code.
- OnGetKey event
- OnChecked defines an event handler that is called to get the key.
- OnGetModifier event
- OnGetModifier defines an event handler that is called to get the modifier.
- StoreCode property
- Default: False
- StoreCode determines whether the release code is stored in the resource file.
- StoreModifier property
- Default: False
- StoreModifier determines whether the modifier is stored in the resource file.
- TOgDateCode Component
- TOgDateCode implements a Start/End Date release code. Use this release code when you need to limi...
- OnGuard implements a date as the number of days past a base-line date (stored internally as a sma...
- The EXDTREG project is an example that uses the TOgDateCode component. The example project repres...
- A separate program, CODEGEN, is provided to generate the release code for this and other example ...
- Hierarchy
- Properties
- Methods
- Events
- Reference Section
- TOgDaysCode Component
- TOgDaysCode implements a Number of Days Used release code. This release code limits the number of...
- The days do not need to be consecutive. For example, if an application is limited to 2 days, it c...
- A Number of Days Used release code must be stored in a file or the registry because it must be up...
- TOgDaysCode allows you to specify an expiration date in addition to the number of days. If the re...
- See the EXDYREG project for an example application that uses a Number of Days Used release code. ...
- Hierarchy
- Properties
- Methods
- Events
- Reference Section
- AutoDecrease property
- Default: True
- AutoDecrease determines whether the day count value is automatically decreased each day the appli...
- Decrease method
- Decrease reduces the day count value stored in the release code.
- Performing this action requires several vital pieces of information, which are normally obtained ...
- 1. Trigger the OnGetKey event to get the key used to encode and decode the release code. The key ...
- 2. Trigger the OnGetCode event to get the release code. The release code is normally stored in th...
- 3. Trigger the OnGetModifier event to get the key modifier. The modifier can be stored as a const...
- 4. Apply the modifier to the key.
- 5. Test the code to see if it is valid.
- 6. Decrease the day count by one if it has not already been decreased today.
- 7. Trigger the OnChangeCode event to store the changed release code.
- GetValue method
- GetValue returns the day count embedded in the release code.
- OnChangeCode event
- OnChangeCode defines an event handler that is called when a release code changes.
- TOgNetCode Component
- TOgNetCode implements a Network Metering release code. This release code limits the number of con...
- The Network Access File contains access slots for each authorized use of the application. Each ac...
- When you call the CheckCode method, the Network Access File is checked to ensure that there is ro...
- Your application can create or recreate the Network Access File automatically or require that it ...
- See the EXNET project for an example that uses a Network Metering release code. A separate progra...
- Hierarchy
- Properties
- Methods
- Events
- Reference Section
- ActiveUsers read-only property
- ActiveUsers is the current number of users running the application.
- FileName property
- FileName is the name of the Network Access File.
- InvalidUsers read-only property
- InvalidUsers is the number of invalid user access slots in the Network Access File.
- IsRemoteDrive method
- IsRemoteDrive determines whether ExePath resides on a remote disk drive.
- MaxUsers read-only property
- MaxUsers is the maximum number of concurrent users of the application.
- ResetAccessFile method
- ResetAccessFile resets the invalid slots in the Network Access File.
- TOgRegistrationCode Component
- TOgRegistrationCode implements a Simple Registration release code. This release code ties the use...
- TOgRegistrationCode doesn’t perform any special tests like most of the other release code compone...
- The textual data and the registration code can be stored in the registry or an INI file so that t...
- TOgRegistrationCode allows you to specify an expiration date in addition to the registration valu...
- See the EXRGREG project for an example application that uses a Simple Registration release code. ...
- Hierarchy
- Properties
- Methods
- Events
- Reference Section
- OnGetRegString event
- OnGetRegString defines an event handler that is called to get the registration string.
- RegString property
- RegString is the registration string used to create the release code.
- StoreRegString property
- Default: True
- StoreRegString determines whether the registration string value is stored as a resource at design...
- TOgSerialNumberCode Component
- TOgSerialNumberCode implements a Serial Number Registration release code. This release code ties ...
- TOgSerialNumberCode doesn’t perform any special tests like most of the other release code compone...
- TOgSerialNumberCode allows you to specify an expiration date in addition to the serial number. If...
- See the EXSNREG project for an example application that uses a Serial Number Registration release...
- Hierarchy
- Properties
- Methods
- Events
- Reference Section
- TOgSpecialCode Component
- TOgSpecialCode implements a Special Registration release code. This release code is based on a sp...
- TOgSpecialCode doesn’t perform any special tests like most of the other release code components. ...
- TOgSpecialCode allows you to specify an expiration date in addition to the special information. I...
- See the EXSPREG project for an example application that uses a Special Registration release code....
- Hierarchy
- Properties
- Methods
- Events
- Reference Section
- TOgUsageCode Component
- TOgUsageCode implements a Usage Count release code. This release code limits the number of times ...
- A Usage Count release code must be stored in the INI file or the registry because it must be upda...
- Unfortunately, it is easy for a user to reset a usage counter by simply reinstalling the applicat...
- TOgUsageCode allows you to specify an expiration date in addition to the usage count. If the rele...
- See the EXUSREG for an example application that uses a Usage Count release code. A separate progr...
- Hierarchy
- Properties
- Methods
- Events
- Reference Section
- AutoDecrease property
- Default: True
- AutoDecrease determines whether the usage count value is automatically decreased each time the ap...
- Decrease method
- Decrease reduces the usage count value stored in the release code.
- Performing this action requires several vital pieces of information, which are normally obtained ...
- 1. Trigger the OnGetKey event to get the key used to encode and decode the release code. The key ...
- 2. Trigger the OnGetCode event to get the release code. The code is normally stored in the regist...
- 3. Trigger the OnGetModifier event to get the key modifier. The key modifier can be stored as a c...
- 4. Apply the modifier to the key.
- 5. Test the release code to see if it is valid.
- 6. Decrease the usage count by one.
- 7. Trigger the OnChangeCode event to store the changed release code.
- GetValue method
- GetValue returns the usage count embedded in the release code.
- OnChangeCode event
- OnChangeCode defines an event handler that is called when a release code changes.
- Chapter 6: Detecting Changes to an EXE
- Misuse of your application can occur not only when an unauthorized user attempts to run it, but a...
- The program file integrity envelope is a mechanism that allows your application to detect changes...
- TOgProtectExe Component
- The TOgProtectExe component allows you to detect changes to your EXE file. The size of the EXE fi...
- See the EXPROT and STAMPEXE projects for examples that use this technique.
- Hierarchy
- Properties
- Methods
- Events
- Reference Section
- About property
- Shows the current version of OnGuard.
- AutoCheck property
- Default: False
- AutoCheck determines whether CheckExe is called automatically.
- CheckExe method
- CheckExe tests to see if the executable file was altered.
- CheckSize property
- Default: True
- CheckSize determines whether the size of the executable is tested.
- OnChecked event
- OnChecked defines an event handler that is called after the executable is checked.
- StampExe method
- StampExe marks the executable program with its size and a CRC value.
- UnStampExe method
- UnStampExe reverses the effect of a call to StampExe.
- Chapter 7: Single Instance Applications
- A single instance application is one that refuses to allow a second or subsequent instance of its...
- OgFirst Unit
- The OgFirst unit provides routines that allow you to detect when a second instance of an applicat...
- IsFirstInstance determines if the application is being run the first time. If a previous instance...
- Use IsFirstInstance in the main body of the project file (prior to doing anything else), to detec...
- Here is an example from the EXINST project:
- begin
- if IsFirstInstance then begin
- Application.CreateForm(TMyForm, MyForm);
- Application.CreateForm(TForm2, Form2);
- Application.Run;
- end else begin
- {$IFDEF Win32}
- ActivateFirstInstance;
- {$ELSE}
- ActivateFirstInstance('Test', 'TMyForm');
- {$ENDIF}
- end;
- Procedures
- Reference Section
- Subject index
OnGuard
TurboPower Software Company
Colorado Springs, CO
www.turbopower.com
© 1997-2001 TurboPower Software Company. All rights reserved.
™
License Agreement
This software and its documentation are protected by United States copyright law and also by International Treaty provisions. Any
use of this software in violation of copyright law or the terms of this agreement will be prosecuted to the best of our ability.
© 1997-2001 by TurboPower Software Company. All rights reserved.
TurboPower Software Company authorizes you to make archival copies of this software for the sole purpose of back-up and
protecting your investment from loss. Under no circumstances may you copy this software or documentation for the purposes of
distribution to others. Under no conditions may you remove the copyright notices made part of the software or documentation.
You may distribute, without run-time fees or further licenses, your own compiled programs based on any of the source code of
OnGuard. You may not distribute any of the OnGuard source code, compiled units, or compiled example programs without written
permission from TurboPower Software Company. You may not use OnGuard to create components or controls to be used by other
developers without written approval from TurboPower Software Company.
Note that the previous restrictions do not prohibit you from distributing your own source code or units that depend upon
OnGuard. However, others who receive your source code or units need to purchase their own copies of OnGuard in order to
compile the source code or to write programs that use your units.
The supplied software may be used by one person on as many computer systems as that person uses. Group programming projects
making use of this software must purchase a copy of the software and documentation for each member of the group. Contact
TurboPower Software Company for volume discounts and site licensing agreements.
This software and accompanying documentation is deemed to be “commercial software” and “commercial computer software
documentation,” respectively, pursuant to DFAR Section 227.7202 and FAR 12.212, as applicable. Any use, modification,
reproduction, release, performance, display or disclosure of the Software by the US Government or any of its agencies shall be
governed solely by the terms of this agreement and shall be prohibited except to the extent expressly permitted by the terms of this
agreement. TurboPower Software Company, Colorado Springs, CO.
With respect to the physical media and documentation provided with OnGuard, TurboPower Software Company warrants the same
to be free of defects in materials and workmanship for a period of 60 days from the date of receipt. If you notify us of such a defect
within the warranty period, TurboPower Software Company will replace the defective media or documentation at no cost to you.
TurboPower Software Company warrants that the software will function as described in this documentation for a period of 60 days
from receipt. If you encounter a bug or deficiency, we will require a problem report detailed enough to allow us to find and fix the
problem. If you properly notify us of such a software problem within the warranty period, TurboPower Software Company will
update the defective software at no cost to you.
TurboPower Software Company further warrants that the purchaser will remain fully satisfied with the product for a period of 60
days from receipt. If you are dissatisfied for any reason, and TurboPower Software Company cannot correct the problem, contact the
party from whom the software was purchased for a return authorization. If you purchased the product directly from TurboPower
Software Company, we will refund the full purchase price of the software (not including shipping costs) upon receipt of the original
program diskette(s) and documentation in undamaged condition. TurboPower Software Company honors returns from authorized
dealers, but cannot offer refunds directly to anyone who did not purchase a product directly from us.
TURBOPOWER SOFTWARE COMPANY DOES NOT ASSUME ANY LIABILITY FOR THE USE OF OnGuard BEYOND THE
ORIGINAL PURCHASE PRICE OF THE SOFTWARE. IN NO EVENT WILL TURBOPOWER SOFTWARE COMPANY BE
LIABLE TO YOU FOR ADDITIONAL DAMAGES, INCLUDING ANY LOST PROFITS, LOST SAVINGS, OR OTHER
INCIDENTAL OR CONSEQUENTIAL DAMAGES ARISING OUT OF THE USE OF OR INABILITY TO USE THESE
PROGRAMS, EVEN IF TURBOPOWER SOFTWARE COMPANY HAS BEEN ADVISED OF THE POSSIBILITY OF SUCH
DAMAGES.
By using this software, you agree to the terms of this section and to any additional licensing terms contained in the DEPLOY.HLP
file. If you do not agree, you should immediately return the entire OnGuard package for a refund.
All TurboPower product names are trademarks or registered trademarks of TurboPower Software Company. Other brand and
product names are trademarks or registered trademarks of their respective holders.

13
11
10
12
1
9
3
2
8
4
5
7
6
1
1
15
14
17
16
Table of Contents
Chapter 1: Introduction . . . . . . . . . . . . . . . . . . . . . . . . . . . . . . . . . . . . . . . . . .1
Using OnGuard . . . . . . . . . . . . . . . . . . . . . . . . . . . . . . . . . . . . . . . . . . . . . . . . . . . . . . . . . . . . . . .3
Protection Strategies . . . . . . . . . . . . . . . . . . . . . . . . . . . . . . . . . . . . . . . . . . . . . . . . . . . . . . . . . . .8
System Requirements . . . . . . . . . . . . . . . . . . . . . . . . . . . . . . . . . . . . . . . . . . . . . . . . . . . . . . . . .10
Installation . . . . . . . . . . . . . . . . . . . . . . . . . . . . . . . . . . . . . . . . . . . . . . . . . . . . . . . . . . . . . . . . . .11
Organization of this Manual . . . . . . . . . . . . . . . . . . . . . . . . . . . . . . . . . . . . . . . . . . . . . . . . . . .13
Technical Support . . . . . . . . . . . . . . . . . . . . . . . . . . . . . . . . . . . . . . . . . . . . . . . . . . . . . . . . . . . .15
Chapter 2: Tutorials . . . . . . . . . . . . . . . . . . . . . . . . . . . . . . . . . . . . . . . . . . . . .17
Example 1: Adding a Program Expiration Date . . . . . . . . . . . . . . . . . . . . . . . . . . . . . . . . . . .18
Example 2: Limiting Simultaneous Network Users . . . . . . . . . . . . . . . . . . . . . . . . . . . . . . . .24
Example 3: Limiting Program Executions . . . . . . . . . . . . . . . . . . . . . . . . . . . . . . . . . . . . . . . .30
Chapter 3: Low-Level Routines . . . . . . . . . . . . . . . . . . . . . . . . . . . . . . . . . . .39
Chapter 4: Keys and Release Codes . . . . . . . . . . . . . . . . . . . . . . . . . . . . . . . .57
TOgMakeKeys Component . . . . . . . . . . . . . . . . . . . . . . . . . . . . . . . . . . . . . . . . . . . . . . . . . . . .58
TOgMakeCodes Component . . . . . . . . . . . . . . . . . . . . . . . . . . . . . . . . . . . . . . . . . . . . . . . . . .67
Generating Release Codes . . . . . . . . . . . . . . . . . . . . . . . . . . . . . . . . . . . . . . . . . . . . . . . . . . . . .68
Chapter 5: Release Code Components . . . . . . . . . . . . . . . . . . . . . . . . . . . .81
TOgCodeBase Class . . . . . . . . . . . . . . . . . . . . . . . . . . . . . . . . . . . . . . . . . . . . . . . . . . . . . . . . . .82
TOgDateCode Component . . . . . . . . . . . . . . . . . . . . . . . . . . . . . . . . . . . . . . . . . . . . . . . . . . . .88
TOgDaysCode Component . . . . . . . . . . . . . . . . . . . . . . . . . . . . . . . . . . . . . . . . . . . . . . . . . . . .90
TOgNetCode Component . . . . . . . . . . . . . . . . . . . . . . . . . . . . . . . . . . . . . . . . . . . . . . . . . . . . .94
TOgRegistrationCode Component . . . . . . . . . . . . . . . . . . . . . . . . . . . . . . . . . . . . . . . . . . . . .98
TOgSerialNumberCode Component . . . . . . . . . . . . . . . . . . . . . . . . . . . . . . . . . . . . . . . . . . 101
TOgSpecialCode Component . . . . . . . . . . . . . . . . . . . . . . . . . . . . . . . . . . . . . . . . . . . . . . . . 103
TOgUsageCode Component . . . . . . . . . . . . . . . . . . . . . . . . . . . . . . . . . . . . . . . . . . . . . . . . . 105
Chapter 6: Detecting Changes to an EXE . . . . . . . . . . . . . . . . . . . . . . . . 109
TOgProtectExe Component . . . . . . . . . . . . . . . . . . . . . . . . . . . . . . . . . . . . . . . . . . . . . . . . . 110
Chapter 7: Single Instance Applications . . . . . . . . . . . . . . . . . . . . . . . . . 115
OgFirst Unit . . . . . . . . . . . . . . . . . . . . . . . . . . . . . . . . . . . . . . . . . . . . . . . . . . . . . . . . . . . . . . . 116
Subject index . . . . . . . . . . . . . . . . . . . . . . . . . . . . . . . . . . . . . . . . . . . . . . . . . . . . i

13
11
10
12
1
9
3
2
8
4
5
7
6
1
1
15
14
17
16

1
13
11
10
12
1
9
3
2
8
4
5
7
6
1
1
15
14
17
16
Chapter 1: Introduction
OnGuard is a library of components, classes, and routines that allow you to protect your
applications after they are released to the public. Using OnGuard, you could release an
application that is partially functional so that users can try it. When a user is ready to
purchase the fully functional application, you supply a release code to unlock all of the
features (or the subset that the user is purchasing). You can make your application readily
available to a large number of potential users, but still protect your investment. Application
protection is accomplished through the use of keys to lock or restrict one or more features of
an application and several types of release codes (or access codes) to enable them.
By embedding a key in your application and making a few well placed calls to some of the
routines provided by OnGuard, you can provide just about any level of protection that your
application could need.
Through the use of a release code, you can do things such as unlock a demo version of your
application, extend the trial usage time or run count, set the number of authorized network
users, enable (or even disable) specific features or options, register the application, and
much more.
A release code is a 16 hexadecimal character code that you provide to the end user. The user
then enters the release code in a dialog that you provide in your application. The release
code is verified and stored in the registry or an INI file for use each time the application is
run. The executable file is not modified.
Some release codes contain additional information (such as the date that the release
expires), which can be extracted and used by your application. A special release code allows
you to decide what that additional information is. For example, it could contain a mask
representing specific features that can be enabled or a number indicating a special
configuration.
The OnGuard release codes provide many different protection methods:
Start/end date check
The application can’t be run prior to the start date or after the end date.
Number of days used
The application can only be used for a specific number of days (the days need not be
contiguous).
Network metering
The application can be used by only a limited number of simultaneous users on a network.

2 Chapter 1: Introduction
13
11
10
12
1
9
3
2
8
4
5
7
6
1
1
15
14
17
16
Simple registration
The application is registered using a text string (for example, the user’s name or company
name).
Serial number registration
The application is registered using a product serial number.
Special registration
The application is registered using special data that you define.
Usage count limit
The application can be run only a limited number of times.
You c an combine most of O nGua rd’s protection methods to achieve a greater level of
protection. For example, if an application is designed as a trial version (it stops working or
provides only limited functionality after a specific number of days or uses), simply copying
it to another computer or restoring the registry (or INI file) will allow its continued use. To
protect this type of application further, you can embed a test for an expiration date. The
expiration date would occur sometime after the standard trial period. The use of an
expiration date does not preclude continued use of the application because the user could
simply change their system date. However, this causes other problems for the user and most
are not inclined to change their system date for the purpose of defeating an application
protection mechanism.
OnGuard also provides a component that allows you to detect changes to your EXE file. It
does this by storing information in the EXE and checking that information every time the
application is run.
OnGuard makes it easy for you to control use of your application by making it a single
instance application. A single instance application is one that refuses to allow a second
instance of itself to be run.
OnGuard is based on code written by Robert Salesas of Eschalon Development, Inc. and
now licensed exclusively by TurboPower Software Company.

Using OnGuard 3
13
11
10
12
1
9
3
2
8
4
7
6
1
1
15
14
17
16
Using OnGuard
OnGuard provides an assortment of components that allow you to protect the applications
you write. Applications can be run-limited, time-limited, releasable demos, or even network
applications. The OnGuard components that support these types of protection all operate in
basically the same way: The component is added to the application and the application uses
the status of the component to enable or disable some feature or function.
Since there are an almost infinite number of ways to incorporate OnGuard into your
application, designing and implementing a protection scheme may seem very complicated.
The following sections explain some terms and core concepts behind the OnGuard
components in order to provide a basis of understanding.
Codes, keys, and modifiers
An OnGuard code is nothing more than a record consisting of two long integers (8 bytes).
The first two bytes of the code identify the type of code. The remaining portion of the code
differs depending on the type of code being used. In most cases the second two bytes
contain a number representing an expiration date (when that date arrives, the code becomes
invalid). The last four bytes are used differently for each of the OnGuard components. One
component will store the number of times an application can be run. Another will store the
serial number of the application. See the description of the particular component for
additional information concerning what data the code contains. To prevent someone from
altering the code, OnGuard requires that all codes are encoded using a key.
An OnGuard key is used to encode (or mask) the contents of the code. A key is much like a
password used to permit access to sensitive information or one used to “lock” your
computer ’s screen saver. In fact, OnGuard can create a key from a password (use the
GenerateMDKey method or the GenerateTMDKeyPrim procedure). OnGuard Keys are 16
bytes long and are used to encode the public codes that are used by applications and users.
The key is what gives all of the OnGuard components the ability to decode the code to see if
it is valid and to make use of the information that is contained within the code. The code
cannot be successfully altered outside of the application without using the key that was used
to encode it. Therefore, it is important to keep the key private. The key should always be
embedded into the application as a constant and supplied to the code component on
demand.
Modifiers can be considered as part of a key. They are used to change a key based on some
reproducible piece of information. For example, to make a code that is valid only for a
particular machine, OnGuard can use a machine modifier. A machine modifier uses a
number specific to a particular PC to alter the key used to create the code. (This number is
created using the GenerateMachineModifier method or the GenerateMachineModifierPrim

4 Chapter 1: Introduction
13
11
10
12
1
9
3
2
8
4
5
7
6
1
1
15
14
17
16
procedure.) To use that code, the OnGuard component must be given the same key and
modifier that was used when creating it. If that modifier is created on-the-fly (rather than
being read from a file) the code will only be valid if it is decoded (or unmasked) while the
application is running on that very same machine.
Other modifiers can “tie” a code to a user name, a product serial number, or even a specific
date. The most secure is the machine modifier, since it locks a release code to a particular
computer and hardware configuration.
Anatomy of a “code” component
A “code” component is any of the OnGuard components that requires a release (or
unlocking) code. Different code components offer different types of protection, but all of
the OnGuard code components have one thing in common, the CheckCode method. This
method is called either automatically by the component (when the AutoCheck property is
True) or directly from your application. When the CheckCode method is called, each
OnGuard component reports its status using the following steps:
1. The OnGetKey event is fired to obtain the key that was used to encode the release code.
The key should always be embedded into the application as a constant. The key value
can be returned in an OnGetKey event handler using a simple assignment to the key
constant. You must provide an event handler for this event
2. The OnGetCode event is fired to obtain the release code. The release code is normally
stored outside of the application, but some situations may require the code to be stored
as part of the application’s resources. The StoreCode property determines if the code is
stored with the application. If the code is not stored in the application, you must
provide a handler for this event.
3. The OnGetModifier event is fired to obtain the key modifier. A modifier should almost
always be generated dynamically, rather than reading it from a file, the registry, or
storing it with the application’s resources (the StoreModifier property). If you don ’t
use a modifier, no event handler is required.
4. The modifier is applied to the key to generate the key that was used to encode the
release code.
5. The release code is inspected to insure that it is a valid release code.
6. The component-specific portion of the code is tested. The specific test depends on the
type of component being used. For example, a date code would check to see if the
current date (as reported by the system clock) was greater than the expiration date
stored in the code. A run-count code would test to see if there were any more “runs”
available, etc.
7. The OnChecked event is fired to report the results of the previous two steps.

Using OnGuard 5
13
11
10
12
1
9
3
2
8
4
7
6
1
1
15
14
17
16
Two of the code components (the usage-count and days-count components) must have the
ability to store a revised code value. These components read the number of uses or days
remaining, reduce the value by one, and then store the revised code. Since the component
does not store that information internally, it depends on you to store the revised code
through an OnCodeChanged event handler that you supply. You could store the code in an
INI file, the registry, or anywhere else you like.
You may have noticed that the OnGuard components depend on you to do the work of
providing and sometimes storing the key, code, modifier, and other data. This should
normally be done through implementation of OnGuard’s event handlers. The reason
OnGuard does it this way rather than directly storing these values as it would property
settings has to do with security. If OnGuard were to store the key in the stream along with
the rest of a form’s property values, it would be very easy for someone to find it and
compromise the application’s security.
Release code components
The OnGuard code components provide differing levels of protection., from a simple
registration check to locking the application to a particular machine. The particular
component you use depends on the desired level of protection. In some situations, two or
more components could be used to increase the level of protection.
There are ways to circumvent any protection scheme and OnGuard ’s are no exception.
Where appropriate, the weaknesses of the particular code component are described so that
you can be aware of what a user would have to do to bypass that protection method.
TOgDateCode
The date code component provides support for a code that is valid within a specific date
range. The start and ending date are stored as part of the release code along with
information that identifies the code as a date code. The release code is invalid if used on a
date outside the date range.
The protection offered by this component can be circumvented by changing the system date
so that it returns a date that lies within the valid date range stored in the code. Storing the
code in an obscure location in the system registry, storing multiple (fake) copies, or
embedding it within one of the application’s data files would make this type of attack much
more difficult.
TOgDaysCode
The days code component implements a code that acts as a day counter. Each day that the
code is used, its internal value is reduced by one. Several uses of the code during the same
day will result in only one reduction of the internal value. In addition to the internal “days”
value, the code also stores the date it was last changed so attempts to restore an earlier
version of the code can be detected.

6 Chapter 1: Introduction
13
11
10
12
1
9
3
2
8
4
5
7
6
1
1
15
14
17
16
To bypass this protection technique, a user would need to be able to save and restore the
state of the code and change the system date. Storing the code in an obscure location in the
system registry, storing multiple (fake) copies, or embedding it within one of the
application’s data files would make this type of attack much more difficult.
TOgUsageCode
The usage code component is very similar to the days code component, except that it limits
the actual number of times an application can be run rather than the number of days. Each
time the application is run, the “run count” value stored in the code is decremented. In
addition to the internal “count” value. The code also stores the date it was last changed so
attempts to restore an earlier version of the code can be detected.
TOgRegistrationCode
The registration code component allows you to use a string (a user name or company name,
for example) to create a release code. The registration code component does not store the
string as part of the code, only a number (a hash value) created using the string. To increase
the amount of protection provided, you could display the registration string in some
prominent location on your main form.
Both the code and the registration string are usually stored external to the code component
and the application. The code component tests the code to see if it has been altered but does
not test the registration string. You could perform a test to see if the registration text has
been changed by creating a temporary code using the stored registration string and then
compare it to the stored code. If they don ’t match exactly, the registration text has been
altered.
TOgSerialNumberCode
Like the registration code component, the serial number component provides minimal
protection against someone trying to misuse your application. It allows you to use a product
serial number to create a release code. Since the serial number is stored within the code, the
code can be decoded, the serial number extracted, and then tested against another serial
number to see if the code (or the serial number) has been changed.
TOgSpecialCode
The special code component stores a long integer value as part of the code, but places no
meaning on the value. It is essentially the same as the serial number component except for
the references to the stored value.
TOgNetCode
Although not a release code component in the same sense as the components just described,
TOgNetCode does use a release code to store a long integer value that represents the the
maximum number of simultaneous users of the application. At run time, it uses a Network

Using OnGuard 7
13
11
10
12
1
9
3
2
8
4
7
6
1
1
15
14
17
16
Access File (NAF) to keep track of current users. For each possible user, there is one access
slot in the file. When a new user starts the application, one additional access slot is used.
When all the slots are filled, no more users can run the application.
Other components and features
Besides release code components, OnGuard also provides several other components, as well
as a variety of useful procedures and functions found in various units.
TOgProtectExe
This component allows you to detect changes to your EXE file, to protect it against
unauthorized patching as well as viruses. It stores both the size of your EXE and a 32-bit
CRC value for it at compile time, then recomputes these values at run time to check for
changes
This component is intended primaritly to be used in conjunction with the release code
components, to guard against attempts to patch the executable to defeat the primary
detection scheme.
TOgMakeKeys
This non-visual component provides methods and propertiesfor creating and maintaining
keys. It is also used internally by the other components to display the Key Maintenance and
Key Generation dialogs. See “TOgMakeKeys Component” on page 58 for a detailed
description of this component.
TOgMakeCodes
This non-visual component displays the Code Generation dialog when its Execute method
is called. Thie dialog is used to generate the release codes interactively. See “TOgMakeCodes
Component” on page67 for a detailed description of this component.
OgFirstUnit
This unit provides a pair of routines that allow you to detect when a second instance of your
applicationis being run on the same machine, and to force the first instance to become the
active application.
You might want to use these routines in conjunction with the TOgUsageCode component,
for example, to prevent the user from accidentally wasting one of their application uses
when the application is already running.
OgUtil, OnGuard, OgNetWrk
These three units interface a variety of potentially useful low-level routines. For descriptions
of them, see “Chapter 3: Low-Level Routines” on page 39.

8 Chapter 1: Introduction
13
11
10
12
1
9
3
2
8
4
5
7
6
1
1
15
14
17
16
Protection Strategies
OnGuard provides many different protection methods so that you can select those
necessary to create the protection strategy that is most appropriate for your application. The
rest of this section describes protection strategies that are appropriate for some common
situations.
Demo version application with single machine authorization
This protection strategy combines the advantages of the “Demo version application” and
the “Single machine authorization,” both discussed later in this section. This combination
gives one of the best protection levels and is applicable to a wide range of applications, so it is
strongly recommended.
To prevent unauthorized copies of your application, design it so that it is initially a demo
version. This demo version might display a registration dialog during startup(a nag screen),
reduce the number of options available, or lack some other useful features until an
authorized release code is entered. After entry of the release code, all features and options
are available. A single machine authorization can be used to generate the release code to
ensure that the registry or INI file entries cannot be copied to another computer in order to
allow running the application there. The EXMSELECT example project demonstrates this
approach.
Using this approach means that even fully functional “released” applications revert to their
demo state if they are copied to another computer. It allows you to encourage the spread of
your application without being concerned about piracy. A copied program runs only as a
demo until an authorized release code is entered.
Single machine authorization
You can use the single machine authorization strategy with any type of release code to limit
use of the program to a particular machine.
The release code is encoded and decoded using a key derived from machine-specific
information. The machine-specific information used by OnGuard includes information
such as the number of disk drives, hardware serial numbers, and the user name stored by
Windows. This restricts the program so that it can only be run on a specific computer. If you
use this technique, any change to the hardware will most likely result in the program not
being able to run.
The EXMSELECT project demonstrates this approach.

Protection Strategies 9
13
11
10
12
1
9
3
2
8
4
7
6
1
1
15
14
17
16
Single instance applications
A single instance application is one that refuses to allow a second or subsequent instance of
itself to be run. This can be done by simply ignoring the request, but is normally followed by
making the first instance of the application the active application. Two routines provided by
the OgFirst unit provide these capabilities for both 16-bit and 32-bit applications.
See “Chapter 7: Single Instance Applications” on page 115 for more information.
Demo version application
Another approach for protecting your application is to design it so that it is fully functional
and then limit its use using an expiration date or a limit on the number of times it can be
executed. This is supported by several of OnGuard’s components, but you should only
implement this approach with the knowledge that it is easy to defeat. In most cases, simply
reinstalling the application is sufficient. You should use this approach only for true demo
versions of the application.

10 Chapter 1: Introduction
13
11
10
12
1
9
3
2
8
4
5
7
6
1
1
15
14
17
16
System Requirements
To use OnGuard, you must have the following hardware and software:
1. A computer capable of running Windows 3.1, 9x, NT, 2000, or ME.
2. Delphi or C++Builder.
3. A hard disk with at least 10MB of free space is strongly recommended. To install all
OnGuard files and compile the example programs requires about 5MB of disk space.
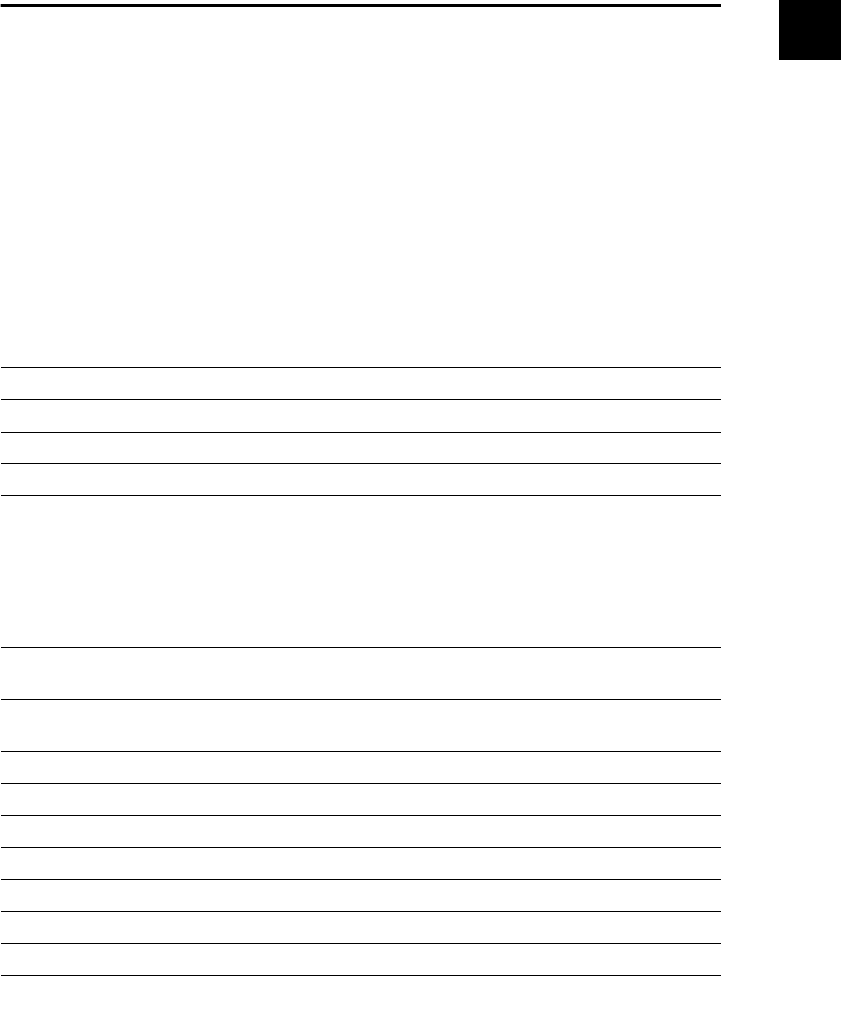
Installation 11
13
11
10
12
1
9
3
2
8
4
7
6
1
1
15
14
17
16
Installation
Install OnGuard directly from the TurboPower Product Suite CD. Insert the CD into your
CD-ROM drive, select OnGuard from the list of products, click “Install”, and follow the
instructions. If the TurboPower introductory splash screen does not appear automatically
upon insertion of the CD, run X:\CDROM.EXE where X is the letter of your CD-ROM
drive.
Demonstration and Example Programs
The following demonstration and example programs are installed in the Examples folder:
Table 1.1: Demonstrtation and example programs
Program Activity
EXDTREG Uses a Start/End Date release code.
EXDYREG Uses a Number of Days Used release code.
EXNET Uses a Network Metering release code.
EXRGREG Uses a Simple Registration release code.
EXSELECT This example uses the TOgUsageCOde and the TOgSpecialCode
components to implement a use “demo” application that
allows only the required features. The program can be run
three times before a special code must be obtained to
register the program and to enable various features. A
machne modifier is used to prevent the application from
being copied and run on another machine.
EXSELAPI This example is identical to EXSELECT except that OnGuard
low-level routines are used instead of OnGuard components.
EXSLCODE This example generates release codes for the companion
examples EXSELECT and EXSELAPI.
EXSNREG Uses a Serial Number Registration release code.
EXSPREG Uses a Special Registration release code.
EXUSREG Uses a Usage Count release code.
EXPROT Shows how to detect changes to your EXE file.
STAMPEXE Marks an EXE file with CRC and size.
EXINST Shows how to implement a single instance application.
CODEGEN Generates release codes for the other example programs.

12 Chapter 1: Introduction
13
11
10
12
1
9
3
2
8
4
5
7
6
1
1
15
14
17
16
The example programs are provided so you can see how to use the various OnGuard
components. Each program is documented in a memo component on the main form and in
the source file.

Organization of this Manual 13
13
11
10
12
1
9
3
2
8
4
7
6
1
1
15
14
17
16
Organization of this Manual
Each chapter starts with an overview of the classes and components discussed in that
chapter. The overview also includes a hierarchy for those classes and components. Each class
and component is then documented individually, in the following format:
Overview
A description of the class or component.
Hierarchy
Shows the ancestors of the class being described, generally stopping at a VCL class. The
hierarchy also lists the unit in which each class is declared and the number of the first page of
the documentation of each ancestor. Some classes in the hierarchy are identified with a
number in a bullet: !. This indicates that some of the properties, methods, or events listed
for the class being described are inherited from this ancestor and documented in the
ancestor class.
Properties
Lists all the properties in the class. Some properties may be identified with a number in a
bullet: !. These properties are documented in the ancestor class from which they are
inherited.
Methods
Lists all the methods in the class. Some methods may be identified with a number in a bullet:
!. These methods are documented in the ancestor class from which they are inherited.
Events
Lists all the events in the unit. Some events may be identified with a number in a bullet: !.
These events are documented in the ancestor class from which they are inherited.
Reference Section
Details the properties, methods, and events of the class or component. These descriptions
are in alphabetical order. They have the following format:
•Declaration of the property, method, or event.
•Default value for properties, if appropriate.
•A short, one-sentence purpose. The !symbol is used to mark the purpose to make it
easy to skim through these descriptions.
•Description of the property, method, or event. Parameters are also described here.

14 Chapter 1: Introduction
13
11
10
12
1
9
3
2
8
4
5
7
6
1
1
15
14
17
16
•Examples are provided in many cases.
•The “See also” section lists other properties, methods, or events that are pertinent to
this item.
Throughout the manual, the "symbol is used to mark a warning or caution. Please pay
special attention to these items.
Naming Conventions
To avoid class name conflicts with VCL components and classes or from other third party
suppliers, all OnGuard class names begin with ‘TOg’. The ‘Og’ stands for OnGuard.
On-Line Help
Although this manual provides a complete discussion of each component, keep in mind that
there is an alternative source of information available. Once properly installed, help is
available from within the IDE when you press <F1> with the caret on an OnGuard class,
property, or method name in the editor or when an OnGuard property or event is selected in
the Object Inspector.

Technical Support 15
13
11
10
12
1
9
3
2
8
4
7
6
1
1
15
14
17
16
Technical Support
The best way to get an answer to your technical support question is to post it in the OnGuard
newsgroup on our news server (news.turbopower.com). Many of our customers find the
newsgroups a valuable resource where they can learn from others’ experiences and share
ideas in addition to getting quick answers to questions.
To get the most from the newsgroups, we recommend you use dedicated newsreader
software.
Newsgroups are public, so please do not post your product serial number, product
unlocking code, or any other private numbers (such as credit card numbers) in your
messages.
TurboPower’s KnowledgeBase is another excellent support option. It has hundreds of
articles about TurboPower products accessible through an easy-to-use search engine
(www.turbopower.com/search). The KnowledgeBase is open 24 hours a day, 7 days a week
so you’ll have another way to find answers to your questions even when we’re not available.
In addition to the newsgroups, TurboPower Software Company offers a variety of technical
support options. For details, please see the “Product Support News” enclosed in the original
package or go to www.turbopower.com/support.

16 Chapter 1: Introduction
13
11
10
12
1
9
3
2
8
4
5
7
6
1
1
15
14
17
16

17
13
11
10
12
1
9
3
2
8
4
5
7
6
1
1
15
14
17
16
Chapter 2: Tutorials
This tutorial section provides three simple, step-by-step examples that illustrate some of the
most common uses of the OnGuard components. Example 1 shows how to create a program
that expires after a given period of time. Example 2 shows how to create a program that can
be run only by a limited number of users on a network at any one time. Example 3 shows
how to create a program that can be run only a fixed number of times. Although you can
simply read through these examples, the greatest benefit lies in following the instructions
while using Delphi or C++Builder.

18 Chapter 2: Tutorials
13
11
10
12
1
9
3
2
8
4
5
7
6
1
1
15
14
17
16
Example 1: Adding a Program Expiration Date
In this example, we limit the range of dates for program execution. Although this protection
strategy is easy for a user to bypass, it is sufficient for some applications and it is certainly
useful as a demonstration of the steps involved in using OnGuard to protect your
application.
1. Create a new project.
2. From the OnGuard tab, add a TOgDateCode component to the project’s main form.
3. Click the right mouse button on the TOgDateCode component to invoke the local
menu and then select the Generate Key option to invoke the Key Maintenance dialog
box. The Key Maintenance dialog box is displayed as shown in Figure 2.1.
The “File name” field is used to specify the INI file that holds the generated keys for all your
protected projects. By default, OnGuard creates ONGUARD.INI in the Windows directory
during installation. You can choose to store your keys in this file or any other INI file. See the
Figure 2.1: The Key Maintenance dialog box.
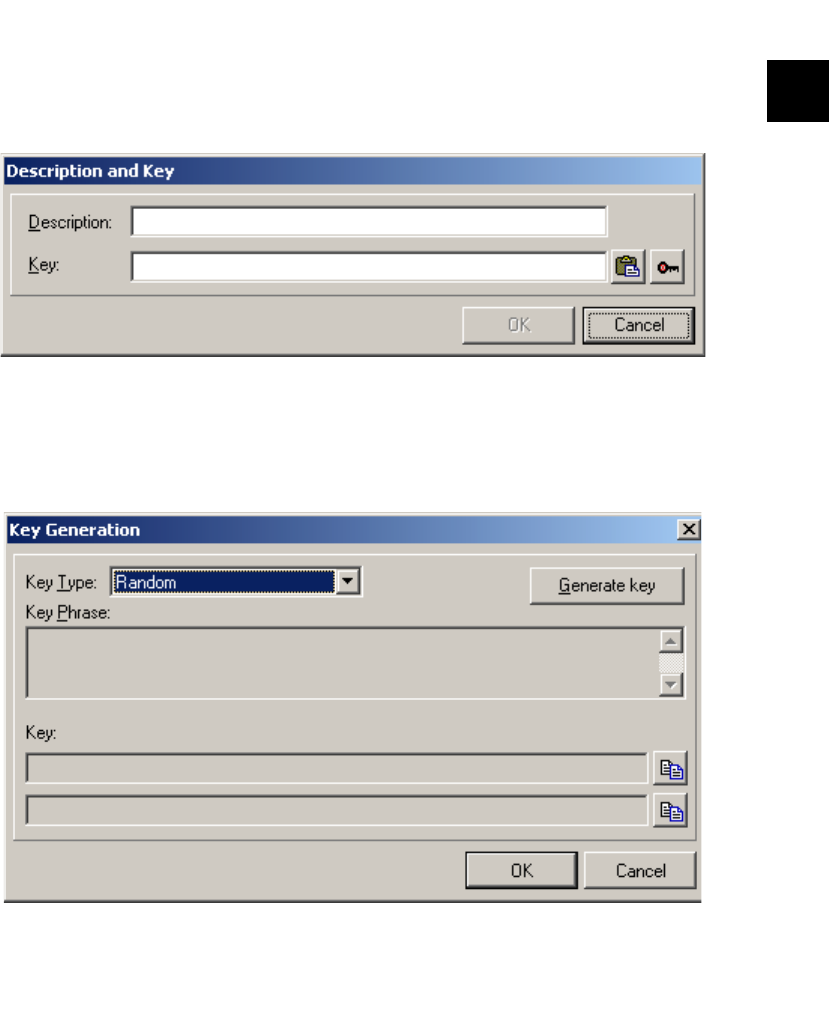
Example 1: Adding a Program Expiration Date 19
13
11
10
12
1
9
3
2
8
4
7
6
1
1
15
14
17
16
manual for more details on creating and using other INI files to store project keys. Do not
distribute this file with any application. You’ll be giving away the keys to this and other
projects if you do. This example uses the default INI file but adds a new project.
4. Click the Add button to display the Description and Key dialog box as shown in Figure
2.2.
5. Enter the name of your application in the “Description” edit control. For this example,
enter “MyTest”. Click on the button to the far right (with the picture of a key) to
generate a key for your application. The Key Generation dialog box is displayed as
shown in Figure 2.3.
Figure 2.2: The Description and Key dialog box.
Figure 2.3: The Key Generation dialog box.
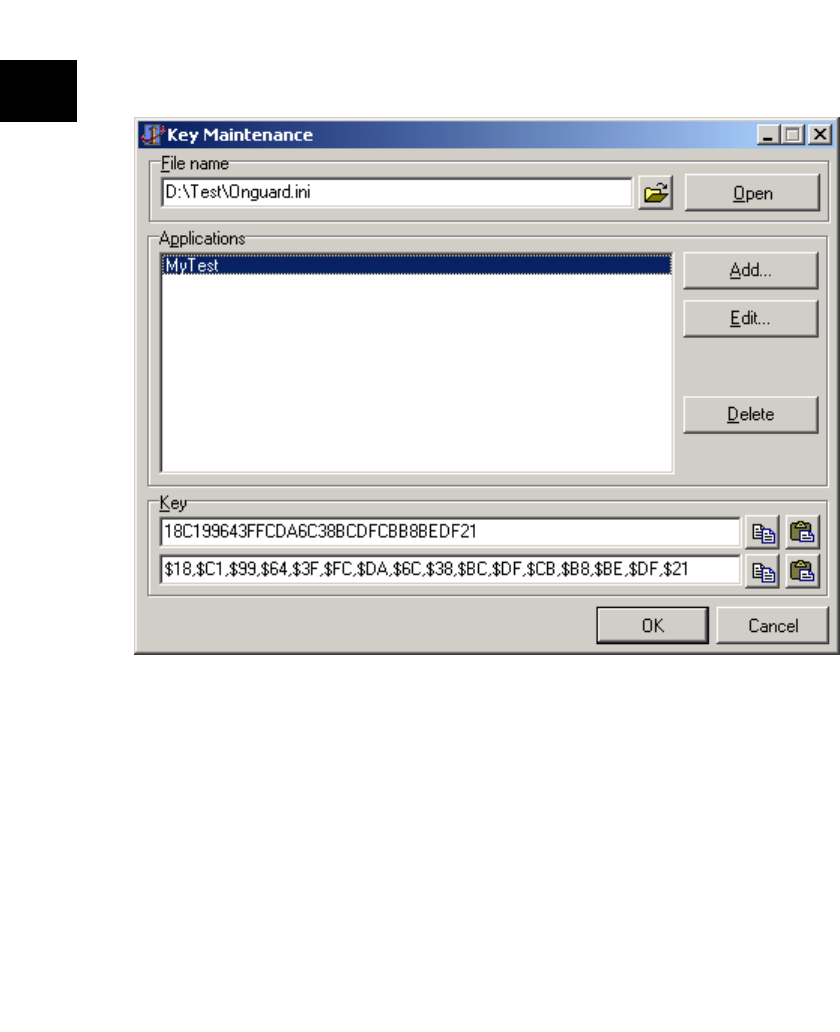
20 Chapter 2: Tutorials
13
11
10
12
1
9
3
2
8
4
5
7
6
1
1
15
14
17
16
6. Be sure that “Random” is selected as the key type and click “Generate Key”. Two
hexadecimal representation of the key will be displayed in the edit controls. Click OK
to return to the Description and Key dialog box. Click OK to return to the Key
Maintenance dialog box as shown in Figure 2.4
7. Select your application (MyTest) in the “Applications” list box and the generated key is
displayed in the “Key’ edit controls. Click on the Copy button (the first speed button to
the right of the bottom edit control) to copy the key to the clipboard. Use the Copy
button on the bottom edit control because it is the hexadecimal representation of the
key that is appropriate for pasting directly into a constant expression in an application.
Click OK to exit the dialog box.
Figure 2.4: The Key Maintenance dialog box with keys generated.

Example 1: Adding a Program Expiration Date 21
13
11
10
12
1
9
3
2
8
4
7
6
1
1
15
14
17
16
8. Add the following to the implementation section of the unit:
const
CKey : TKey =
($18,$C1,$99,$64,$3F,$FC,$DA,$6C,$38,$BC,$DF,$CB,$B8,$BE,$DF,$21);
(The underlined portion of this statement was copied from the clipboard)
Caution: Don’t store the key in the registry or an INI file. Doing so drastically reduces the
security of your application.
9. With the TOgDateCode component selected, double-click the OnGetKey event in the
Events tab of the Object Inspector to create the shell for the event handler. Enter the
following statement:
Key := CKey;
This event is fired by the TOgDateCode component to get the key to encode or decode the
release code.
10. With the TOgDateCode component selected, double-click the Code property in the
Properties tab of the Object Inspector to invoke the Code Generation dialog box. The
Code Generation dialog box is displayed and the Key Maintenance dialog box is
automaticallydisplayed on top of it so that you can select the key to use.
"

22 Chapter 2: Tutorials
13
11
10
12
1
9
3
2
8
4
5
7
6
1
1
15
14
17
16
Enter ONGUARD.INI in the file name edit field, press the Open button, select
“MyTest” in the “Application” list and click OK. The Code Generation dialog box
should look like the one shown in Figure 2.5
Be sure that the Date tab is selected. The “Start date” is automatically set to today's date.
Enter a date in the “End date” edit field. Press the Generate button to create and encode the
release code. The release code is displayed in the edit control to the right of the Generate
button. Click OK to accept the generated release code.
For this example, the release code will be stored with the application, so set the Store Code
property to True and then save the project.
This completes the portion of this example that concerns the TOgDateCode directly.
However, there is one more very important thing that must be done. You need to take some
type of action based of the status of the code. This is done in an OnChecked event handler.
Figure 2.5: The Code Generation dialog box.

Example 1: Adding a Program Expiration Date 23
13
11
10
12
1
9
3
2
8
4
7
6
1
1
15
14
17
16
11. With the TOgDateCode component selected, double-click the OnChecked event in
the Events tab of the Object Inspector to create the shell for the event handler. Enter
the code so that the event handler looks like this:
procedure TForm1.OgDateCode1Checked(
Sender: TObject; Status:TCodeStatus);
begin
case Status of
ogValidCode : ShowMessage('Valid code');
ogPastEndDate : ShowMessage('Date has expired');
ogInvalidCode : ShowMessage('Invalid release code');
end;
if Status <> ogValidCode then
Application.Terminate;
end;
12. Compile and run the application You should see the “Valid code” message. If you run
the application on a day after the end date, the “Date has expired” message is
displayed and the application terminates. You can test this without waiting for the end
date by performing the steps to generate the release code and using a date in the past.

24 Chapter 2: Tutorials
13
11
10
12
1
9
3
2
8
4
5
7
6
1
1
15
14
17
16
Example 2: Limiting Simultaneous Network Users
In this example, we build a network application that limits the number of concurrent users
to two. To keep to its most basic form, this example stores the release code in the program
rather than allowing the user to enter it. This would be the approach to use if distributing a
program that would always allow a fixed number of maximum users.
1. Create a new project.
2. From the OnGuard tab, add a TOgNetCode component to the projects main form.
3. Right click on the TOgNetCode component and select “Generate Key” to display the
Key Maintenance dialog box as shown in Figure 2.6. You’ll use this dialog box to
generate the key used to encode and decode the release code for the program.
The “File name” field is used to specify the INI file that holds the generated keys for all your
protected projects. By default, OnGuard creates ONGUARD.INI in the Windows directory
during installation.We'll use the default INI file but add a new project.
Figure 2.6: The Key Maintenance dialog box.
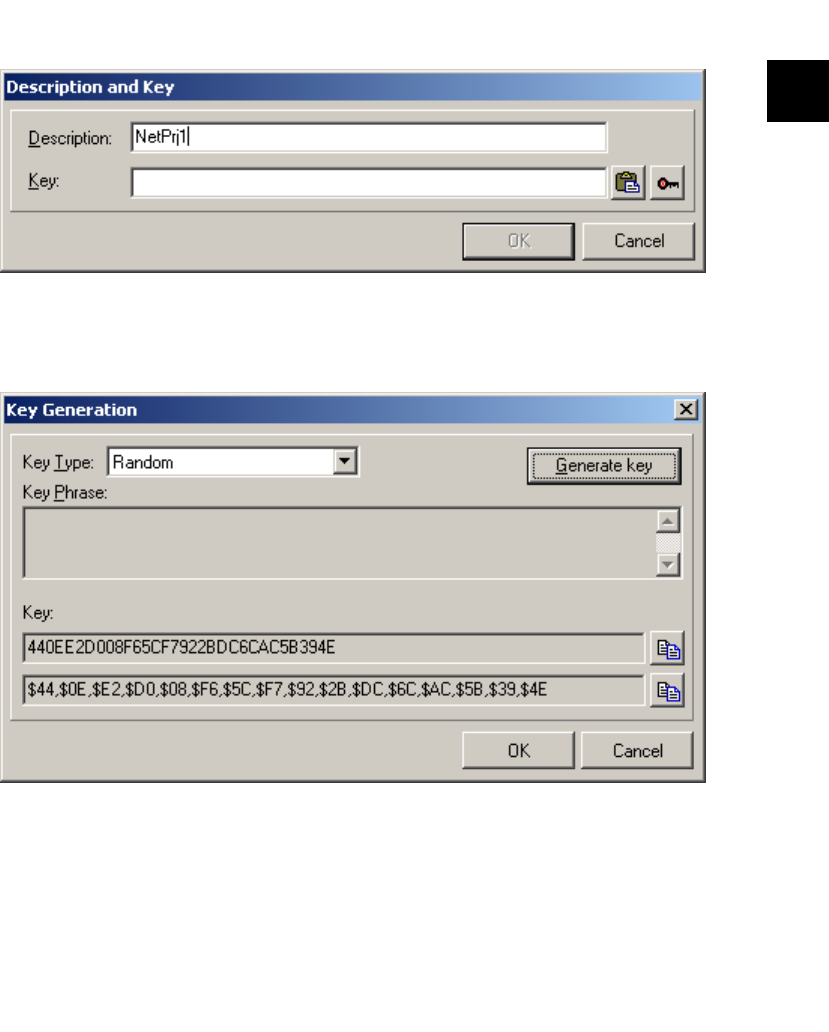
Example 2: Limiting Simultaneous Network Users 25
13
11
10
12
1
9
3
2
8
4
7
6
1
1
15
14
17
16
4. Click the Add button to display the Description and Key dialog box. In the Description
field, enter “NetPrj1”. The result of these actions appears in Figure 2.7.
5. Click on the far right speed button (with the picture of a key) to generate the key for
this application. The Key Generation dialog box is displayed as shown in Figure 2.8.
6. Be sure “Random” is selected in the “Key Type” and press the Generate Key button.
Two hexadecimal representations of the generated key are displayed in the two edit
controls at the bottom of the dialog box. Click OK to return to the Description and Key
dialog box. Click OK to return to the Key Maintenance dialog box.
Figure 2.7: The Description and Key dialog box with the Description field filled in.
Figure 2.8: The Key Generation dialog box.
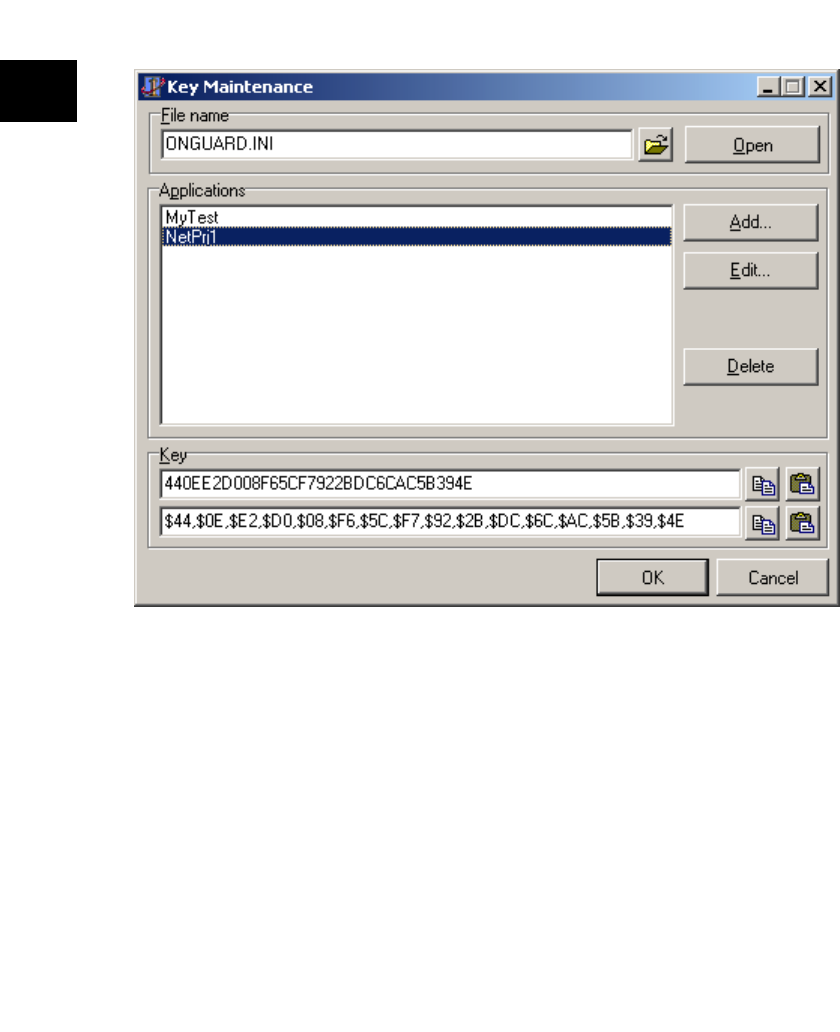
26 Chapter 2: Tutorials
13
11
10
12
1
9
3
2
8
4
5
7
6
1
1
15
14
17
16
7. In the “Applications” list box, select NetPrj1. The generated key, in both forms, is
displayed in the edit controls at the bottom of the dialog box.
8. Click the Copy button immediately to the right of the lower of the two edit controls.
This copies this string into the clipboard so you won’t have to type it into the program.
You use the lower of the two because this representation is appropriate for pasting
directly into a constant expression in an application. Click OK to exit the dialog box.
Caution: Do not store the key in an INI file or the Registry. Doing so makes it available to
users and drastically reduces program security.
Figure 2.9: The Key Maintenance dialog box.
"

Example 2: Limiting Simultaneous Network Users 27
13
11
10
12
1
9
3
2
8
4
7
6
1
1
15
14
17
16
9. Click once on the TOgNetCode component. On the Events tab of the Object Inspector,
double click the OnGetKey event. In the source code editor, modify the generated
event code as follows:
procedure TForm1.OgNetCode1GetKey(
Sender: TObject; var Key: TKey)
const
CKey : TKey =
($44,$OE,$E2,$DO,$O8,$F6,$5C,$F7,$92,$2B,$DC,$6C,$AC,$5B,$39,$4E);
begin
Key := CKey;
end;
The underlined code was pasted from the clipboard into the editor and is the string that was
copied at the end of step 3. This procedure automatically retrieves the key every time the
program starts up. Without this event, an exception would be generated and you would not
be able to run the program. The key is like a password that the program needs to encode and
decode the release code.
10. With the TOgNetCode component selected, double-click the Code property in the
Properties tab of the Object Inspector to invoke the Code Generation dialog box. The
Code Generation dialog box is displayed and the Key Maintenance dialog box is
automatically displayed on top of it so that you can select the key to use.
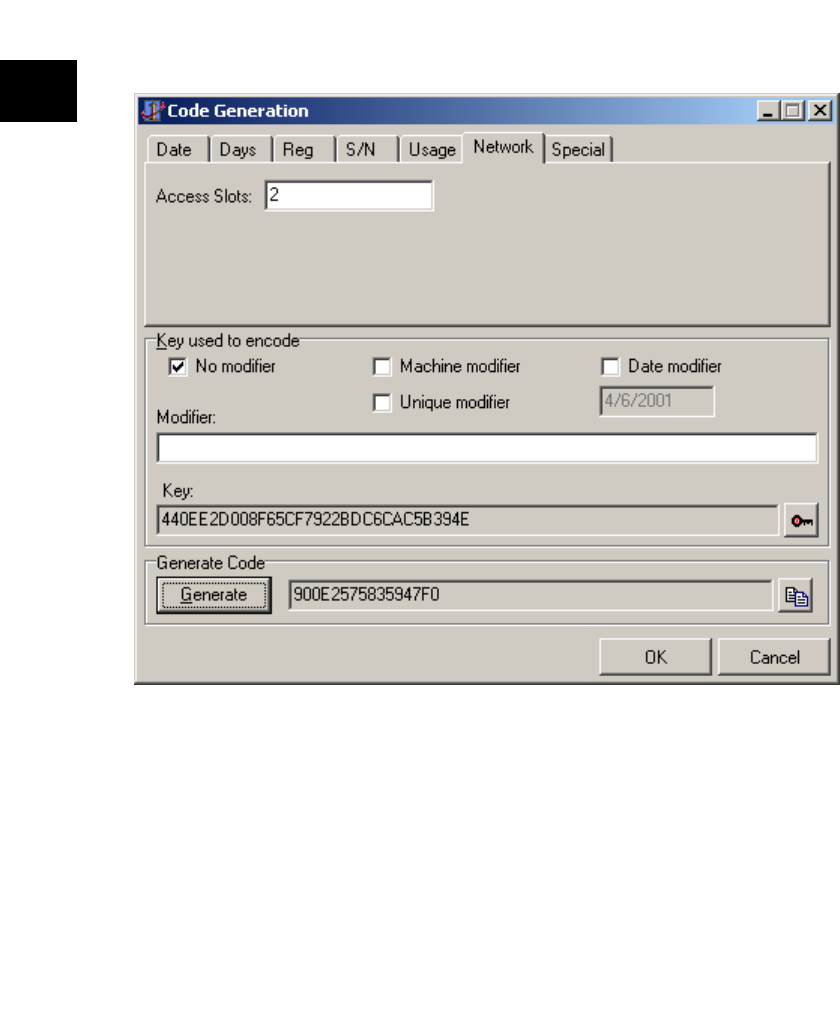
28 Chapter 2: Tutorials
13
11
10
12
1
9
3
2
8
4
5
7
6
1
1
15
14
17
16
Enter ONGUARD.INI in the file name edit field, press the Open button, select
“NetPrj1” in the “Application” list and click OK. The Code Generation dialog box
looks like the one shown in Figure 2.10.
11. Click on the Net tab of the notebook. Note that the key for the program has been
automatically entered in the edit control near the bottom of the dialog box. In the
“Access Slots” edit control, enter the number 2 (2 is the minimum number). To keep
the program simple, don’t check any of the check boxes in the “Key used to encode”
group. These allow a “second-level” of protection by altering the key used to encode
the code that will be generated. For example, the machine’s information might be
included so that the code would only be valid for that specific machine.
12. Click the Generate button. This creates a unique code based on the number of slots
and, if any are checked, modifiers.
Figure 2.10: The Code Generation dialog box with the Access Slots field filled.

Example 2: Limiting Simultaneous Network Users 29
13
11
10
12
1
9
3
2
8
4
7
6
1
1
15
14
17
16
13. Click the OK button on the dialog box. The generated code is seen in the Code
property of the ObjectInspector.
14. Click on the StoreCode property. Click once on the down arrow and select True. This
stores the release code as part of the application, meaning the user does not have to
enter it nor will it be stored in an external file such as the Registry or an INI file.
15. Click on the FileName property. Enter “NETPRJ1.NAF”. This provides the name of
the Network Access File generated by the component that is used by all instances of
the project to compare the number of users against the maximum number allowed.
16. Click on the Events tab of the Object Inspector. Double click on the OnChecked
event. In the source code editor, modify the generated procedure as follows:
procedure TForm1.OgNetCode1Checked(
Sender: TObject; Status: TCodeStatus);
begin
case Status of
ogInvalidCode :
begin
ShowMessage('Invalid Code');
Application.Terminate;
end;
ogNetCountUsed :
begin
ShowMessage('No more users allowed');
Application.Terminate;
end;
end;
end;
17. Select File|Save File As from the main menu. Enter “NETPRJ1U” in the File Save
dialog box and click OK. Select File|Save Project As from the main menu. Enter
“NETPRJ1” in the File Save dialog box and click OK.
18. Compile and run the application, and leave it running.
19. From either a DOS box or using Start|Run from the task bar, start another copy of the
application. A second form should appear. It will be on top of the first form so move it
a little to one side. Lave this instance running as well.
20. Try to run a third instance of the application. You shou ld see the “No more users
allowed” message. Click the OK button to quit the attempt to run the third instance.
Close the other two instances of the application.
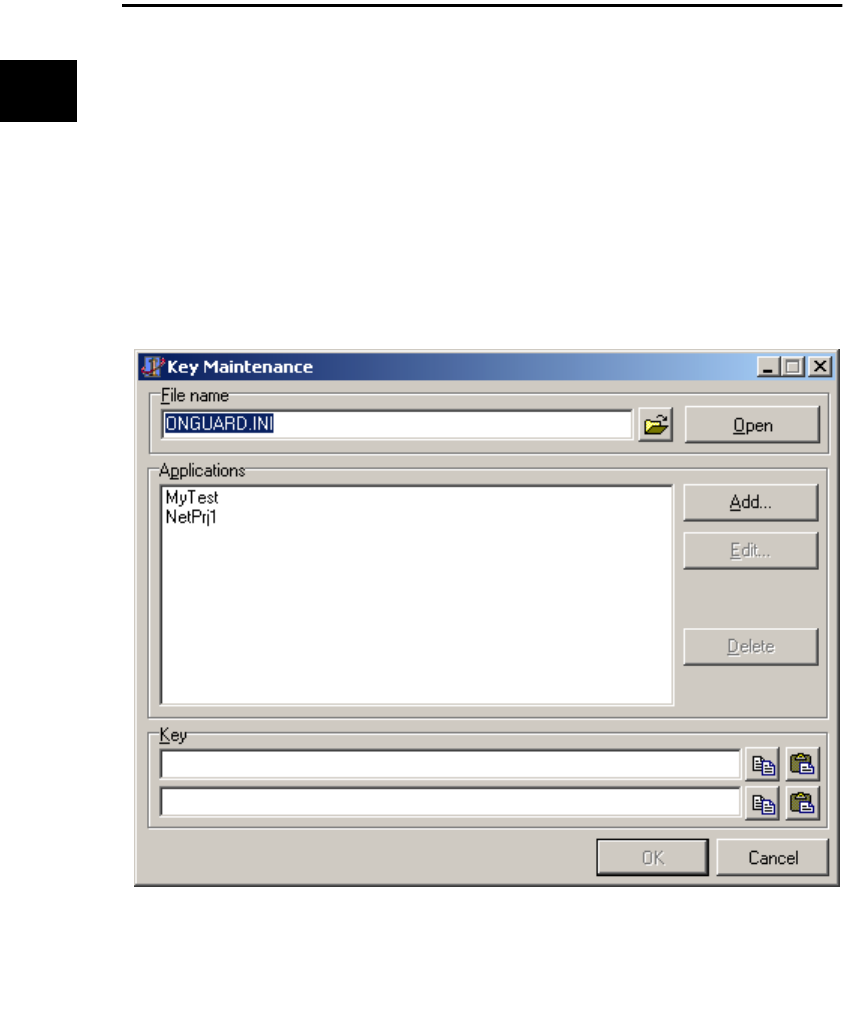
30 Chapter 2: Tutorials
13
11
10
12
1
9
3
2
8
4
5
7
6
1
1
15
14
17
16
Example 3: Limiting Program Executions
In this example, we show how to use OnGuard to limit the number of times a program can
be run. As always, the key is stored in the application. However, the release code must be
stored elsewhere (an INI file or the Registry) since it must be altered to record the remaining
run counts.
1. Create a New Project.
2. From the OnGuard tab, add a TOgUsageCode component to the form.
3. Right click the TOgUsageCode component. and select “Generate Key” to display the
Key Maintenance dialog box as shown in Figure 2.11. You’ll use this dialog box to
generate the key used to encode and decode the release code for the program.
Figure 2.11: The Key Maintenance dialog box.
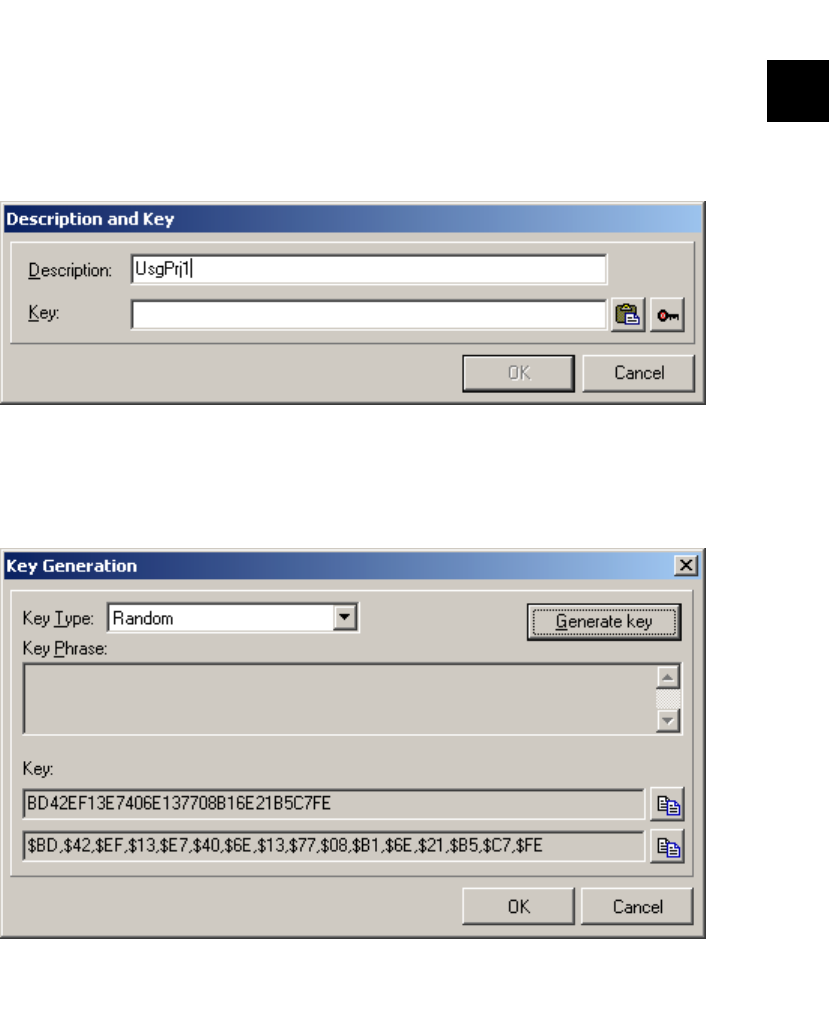
Example 3: Limiting Program Executions 31
13
11
10
12
1
9
3
2
8
4
7
6
1
1
15
14
17
16
The “File name” field is used to specify the INI file that holds the generated keys for all your
protected projects. By default, OnGuard creates ONGUARD.INI in the Windows directory
during installation. You can choose to store your keys in this file or any other INI file. See the
manual for more details on creating and using other INI files to store project keys. Do not
distribute this file with any application. We'll use the default INI file but add a new project.
4. Click the Add button to display the Description and Key dialog box as shown in Figure
2.12.
5. In the Description field, enter “UsgPrj1” as shown in Figure 2.12. Click on the far right
speed button (with the picture of a key) to generate the key for this application. The
Key Generation dialog box is displayed as shown in Figure 2.13.
Figure 2.12: The Description and Key dialog box with the Description field filled.
Figure 2.13: The Key Generation dilog showing genreated keys.
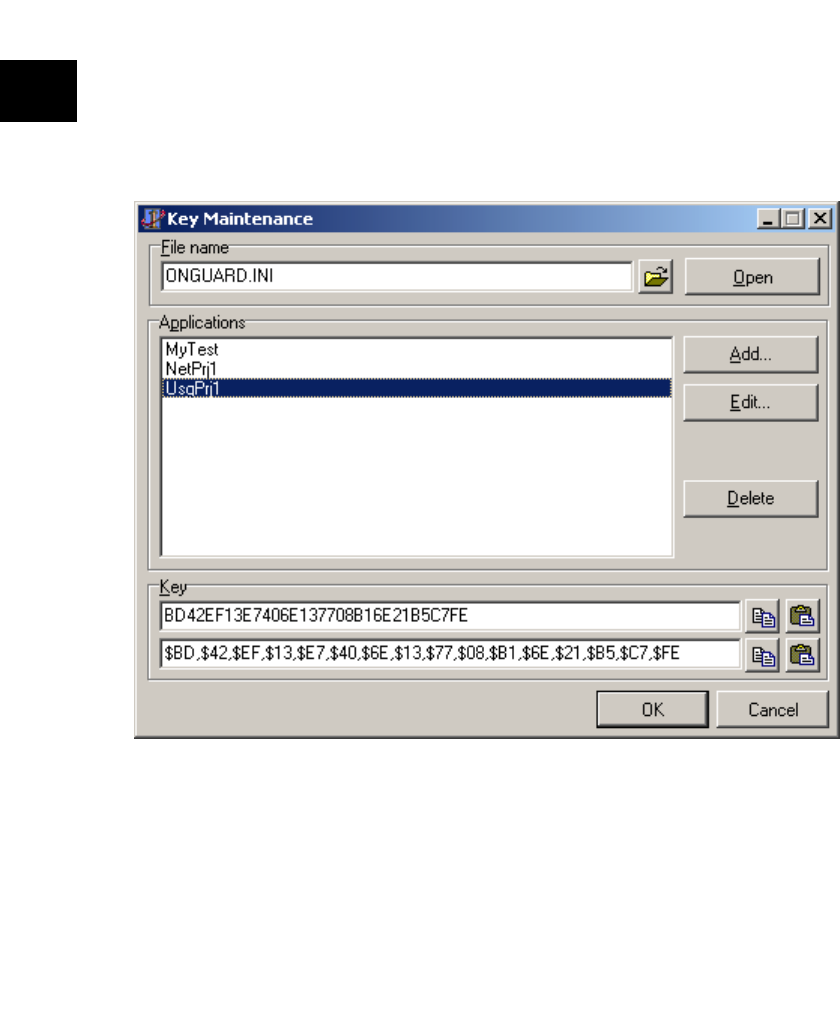
32 Chapter 2: Tutorials
13
11
10
12
1
9
3
2
8
4
5
7
6
1
1
15
14
17
16
6. Be sure “Random” is selected in the “Key Type” edit control and press the Generate
Key button. Two hexadecimal representations of the generated key are displayed in the
two edit controls at the bottom of the dialog box as shown in Figure 2.13. Click OK to
return to the Description and Key dialog box. Click OK to return to the Key
Maintenance dialog box.
7. In the “Applications” list box, select UsgPrj1. The generated key, in both forms, is
displayed in the edit controls at the bottom of the dialog box as shown in Figure 2.14.
8. Click the Copy button immediately to the right of the lower of the two edit controls.
This copies this string into the clipboard so you won’t have to type it into the program.
You use the lower of the two because this representation is appropriate for pasting
directly into a constant expression in an application. Click OK to exit the dialog box.
Caution: Do not store the key in an INI file or the Registry. Doing so makes it available to
users and drastically reduces program security.
Figure 2.14: The Key Maintenance dialog box with the keys displayed.
"

Example 3: Limiting Program Executions 33
13
11
10
12
1
9
3
2
8
4
7
6
1
1
15
14
17
16
9. Click once on the TOgUsageCode component. On the Events tab of the Object
Inspector, double click the OnGetKey event. In the source code editor, modify the
generated event code to the following:
procedure TForm1.OgUsageCode1GetKey(
Sender: TObject; var Key: TKey);
const
CKey : TKey =
($BD,$42,$EF,$13,$E7,$40,$6E,$13,$77,$08,$B1,$6E,$21,$B5,$C7,$FE);
begin
Key := CKey;
end;
The OnGetKey event automatically retrieves the key every time the program starts. Without
this event, an exception would be raised and you would not be able to run the application.
The key is like a password that the program needs to encode and decode the release code.
10. Right click on the TOgUsageCode component and select “Generate Code” from the
context menu. This again displays the Key Maintenance dialog box. Click on
“UsgPrj1” in the “Applications” list box. Click OK. This displays the Code Generation
dialog box box.
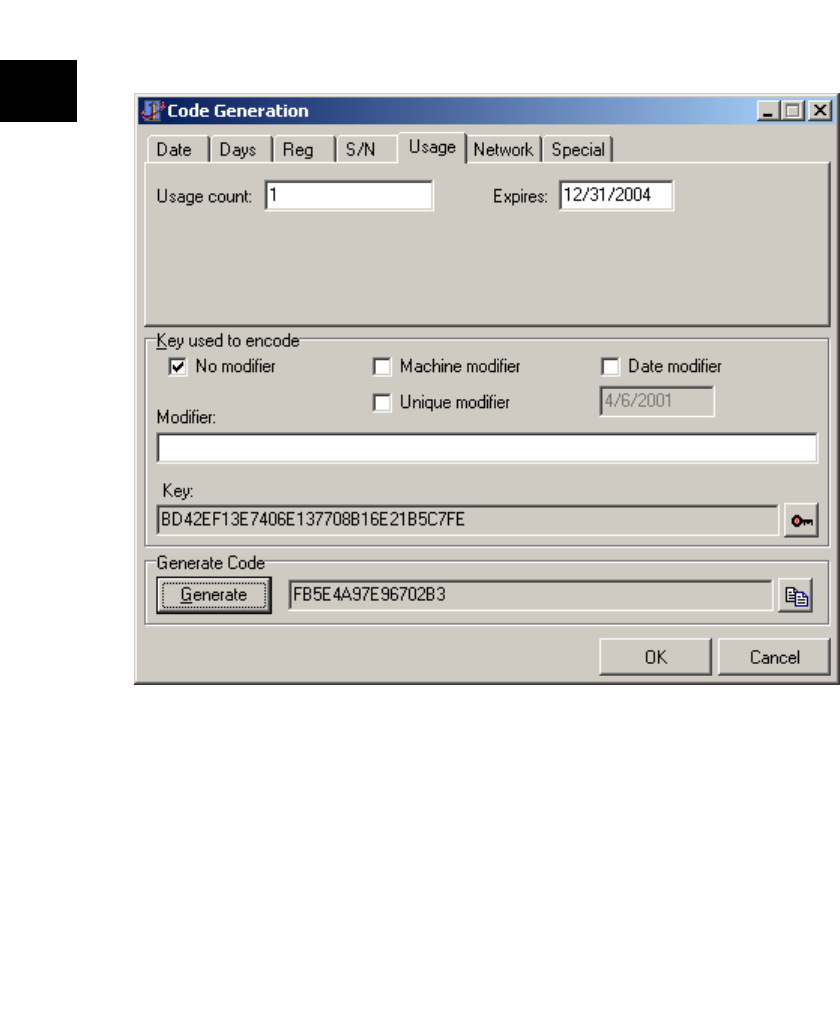
34 Chapter 2: Tutorials
13
11
10
12
1
9
3
2
8
4
5
7
6
1
1
15
14
17
16
11. Click on the Usage tab of the notebook. Note that the key for the program has been
automatically entered in the edit control towards the bottom of the dialog box as
shown in Figure 2.15.
12. In the Usage Count edit control, enter the number 1 to limit the program to only one
run as shown in Figure 2.15.
13. Click on the Expires edit control and enter an expiration date in the format you’ve set
up for Windows. A typical U.S. entry would be 12/31/2004 as shown in Figure 2.15.
14. The TOgUsageCode component provides a second level of protection by allowing
you to enter an absolute expiration date. The program will cease to run after this date
regardless of the number of times the program has been used. Since the release code
(with its embedded usage count) is stored in the Registry or an INI file, an
industrious user would simply reinstall the application and/or restore the INI file or
Registry. The expiration date entered in this field becomes part of the release code
Figure 2.15: The Code Generation dialog box with the Usage count and Expires fields filled.

Example 3: Limiting Program Executions 35
13
11
10
12
1
9
3
2
8
4
7
6
1
1
15
14
17
16
and so helps prevent the application from being used forever. If the program is run
after the date indicated in this field, no matter how many times it’s been run, the code
is reported as invalid. The default date is December 31, 9999, meaning the program
never expires
15. Click the Generate button. This creates a unique code based on the number of
allowed uses and the Expires date.
16. Write down this code. You will need it later. Click the OK button on the dialog box.
17. Add OgUtil and IniFiles to the uses clause of the unit. OgUtil contains routines used
to convert a string to and from a TCode data type while IniFiles is the VCL unit that
allows simple access to an INI file. The top of your unit should look something like
the following example:
unit unit1;
interface
uses
WinTypes, WinProcs, Messages, SysUtils, Classes, Graphics,
Controls, Forms, Dialogs, OnGuard, IniFiles, OgUtil;
Note that the uses clause was generated by Delphi 1, i.e., it has WinTypes and WinProcs.
Had the clause been generated in Delphi 2, the two units would have been replaced with the
single unit, Windows.
18. Click once on the TOgUsageCode component. Double click the OnGetCode event on
the Events tab of the Object Inspector. In the source editor, modify the generated code
to look like the following:
procedure TForm1.OgUsageCode1GetCode(
Sender: TObject; var Code: TCode);
var
IniFile : TIniFile;
S : string;
begin
IniFile := TIniFile.Create('usgprj1.ini');
try
S := IniFile.ReadString('Codes', 'UsageCode', '');
HexToBuffer(S, Code, SizeOf(Code));
finally
IniFile.Free;
end;
end;
The OnGetCode event is responsible for retrieving the release code when the program runs.

36 Chapter 2: Tutorials
13
11
10
12
1
9
3
2
8
4
5
7
6
1
1
15
14
17
16
19. Double click the OnChecked event in the Object Inspector. In the source editor,
modify the generated code as in the following example:
procedure TForm1.OgUsageCode1Checked(
Sender: TObject; Status: TCodeStatus);
var
Code : TCode;
IniFile : TIniFile;
S : string;
begin
case Status of
ogInvalidCode :
begin
if InputQuery('Useage Test Program', 'Code', S) then
begin
if (HexToBuffer(S, Code, SizeOf(Code))) then begin
IniFile.WriteString('Codes', 'UsageCode', S);
OgUsageCode1.CheckCode(True);
Exit;
end;
end;
end;
ogCodeExpired : ShowMessage('Code Expired');
ogRunCountUsed : ShowMessage('Run Count exceeded');
end;
if Status <> ogValidCode then
Application.Terminate;
end;
The OnChecked event of the TOgUsageCode component is fired as a result of the release
code being checked by the program, either automatically at startup (when the AutoCheck
property is True) or when you call the CheckCode method (as shown in the previous step).
If the code is invalid, the cutoff date has been exceeded, or the number of permitted uses has
been exceeded, this event handler displays a message via Delphi's ShowMessage procedure.
The application is terminated if the usage count has been used or if the entered code is
invalid.
20. Double click the OnChangeCode event in the Object Inspector. In the source editor,
change the generated event as in the following example:

Example 3: Limiting Program Executions 37
13
11
10
12
1
9
3
2
8
4
7
6
1
1
15
14
17
16
procedure TForm1.OgUsageCode1ChangeCode(
Sender: TObject; Code: TCode);
var
IniFile : TIniFile;
S : string;
begin
IniFile := TIniFile.Create('usgprj1.ini');
try
S := BufferToHex(Code, SizeOf(Code));
IniFile.WriteString('Codes', 'UsageCode', S);
finally
IniFile.Free;
end;
end;
The OnChangeCode event is fired when the OgUsageCode component needs to update the
information in the INI file. In this case, it will be to decrement the usage counter and replace
the existing encoded entry with a new one.
21. Select File|Save File As from the main menu. Enter “USGPRJ1U” in the File Save
dialog box and click OK. Select File|Save Project As from the main menu. Enter
“USGPRJ1” in the File Save dialog box and click OK.
22. Compile and run the application. When the InputQuery box appears, enter the code
you wrote down back in step 8 then Click OK. The application’s form appears.
Experiment by deleting the INI file and entering a code you know is not valid.
23. Close the application and try to run the program again. The “Run Count Exceeded”
message appears and, after you click OK, the program terminates.

38 Chapter 2: Tutorials
13
11
10
12
1
9
3
2
8
4
5
7
6
1
1
15
14
17
16

39
13
11
10
12
1
9
3
2
8
4
5
7
6
1
1
15
14
17
16
Chapter 3: Low-Level Routines
If you need more control over how and when release codes are handled, you can move one
level lower (beneath the component layer) and use the procedural approach to code creation
and maintenance. In doing so, you take on all responsibility for creating, storing, testing,
and updating of the code (things that the code components handle for you).
The ONGUARD.PAS unit not only implements all of the “Code” components, it provides
access to the low-level procedures and functions that do most of the work of creating,
checking and managing release codes.
For example, the following four routines are used to create and manage usage codes.
procedure InitUsageCode(const Key : TKey; Count : LongInt;
Expires : TDateTime; var Code : TCode);
function IsUsageCodeValid(const Key : TKey;
const Code : TCode) :Boolean;
procedure DecUsageCode(const Key : TKey; var Code : TCode);
function GetUsageCodeValue(const Key : TKey;
const Code : TCode) : LongInt;
function IsUsageCodeExpired(const Key : TKey;
const Code: TCode) : Boolean;
The first parameter for each of these routines is the key. The key is used to encode and
decode the values stored in the TCode structure. The same key used when initializing (or
creating) a code must be used when calling the other, related, routines.
InitUsageCode takes an already initialized key value, a usage count, an expiration date
(Expire), and returns a properly structured and initialized code value. The
IsUsageCodeValid function tests the code value and returns True if it is a valid usage code.
DecUsageCode is called to reduce the stored usage count value by one. GetUsageCodeValue
returns the number of uses remaining in the code. IsUsageCodeExpired tests the Expiration
date stored in the code and returns True if the current date is past the expiration date.
The date, days, registration, serial number, and special codes all have similar, low-level,
routines that are implemented in the ONGUARD.PAS unit. The low-level network code
routines are defined in the OGNETWRK.PAS unit. The actual unit that implements these
and the other low-level routines is stated in the description of that routine.

40 Chapter 3: Low-Level Routines
13
11
10
12
1
9
3
2
8
4
5
7
6
1
1
15
14
17
16
Procedures/Functions
ApplyModifierToKeyPrim
BufferToHex
BufferToHexBytes
CreateMachineID
CheckNetAccessFile
CreateNetAccessFile
CreateNetAccessFileEx
DecDaysCode
DecodeNAFCountCode
DecUsageCode
EncodeNAFCountCode
ExpandDate
GenerateDateModifierPrim
GenerateMachineModifierPr...
GenerateMD5KeyPrim
GenerateRandomKeyPrim
GenerateStringModifierPrim
GenerateTMDKeyPrim
GenerateUniqueModifierPrim
GetCodeType
GetDateCodeValue
GetDaysCodeValue
GetExpirationDate
GetNetAccessFileInfo
GetSerialNumberCodeValue
GetSpecialCodeValue
GetUsageCodeValue
HexStringIsZero
HexToBuffer
InitDateCode
InitDaysCode
InitRegCode
InitSerialNumberCode
InitSpecialCode
InitUsageCode
IsAppOnNetwork
IsDateCodeExpired
IsDateCodeValid
IsDaysCodeExpired
IsDaysCodeValid
IsRegCodeExpired
IsRegCodeValid
IsSerialNumberCodeExpired
IsSerialNumberCodeValid
IsSpecialCodeExpired
IsSpecialCodeValid
IsUsageCodeExpired
IsUsageCodeValid
LockNetAccessFile
ResetNetAccessFile
ShrinkDate
StringHashElf
UnlockNetAccessFile
Refernce Section
ApplyModifierToKeyPrim procedure
procedure ApplyModifierToKeyPrim(
Modifier : LongInt; var Key; KeySize : Cardinal);
ApplyModifierToKeyPrim XOR’s the Modifier value with the Key returning the modified
key as the Key parameter.
Use this routine to sign a key.
KeySize if the size of the key in bytes
This routine is defined in the OnGuard unit.
!

Chapter 3: Low-Level Routines 41
13
11
10
12
1
9
3
2
8
4
7
6
1
1
15
14
17
16
BufferToHex function
function BufferToHex(const Buf; BufSize : Cardinal) : string;
BufferToHex converts one or more bytes to a hexidecimal string.
Buf contains one or more bytes and BufSize if the number of bytes in Buf. The hexadecimal
version of Buf is returned as the function result.
This routine is defined in the OgUtil unit.
BufferToHexBytes function
function BufferToHexBytes(const Buf; BufSize : Cardinal) : string;
BufferToHexBytes performs the same operation as the BufferToHex function except that the
function result is formatted to represent an array of hexadecimal bytes separated by
commas.
Example result: “$02, $67, $FF”
This routine is defined in the OgUtil unit.
CheckNetAccessFile function
function CheckNetAccessFile(
const NetAccess : TNetAccess) : Boolean;
TNetAccess = packed record
Fh : Integer;
Key : TKey;
CheckValue : Word;
Index : Word;
end;
CheckNetAccessFile verifies that the net access file referenced by NetAccess has at least one
slot that is not in use.
If there is at least one open slot in the net access file, CheckNetAccessFile returns True,
otherwise False.
This routine is defined in the OgNetWrk unit.
!
!
!
42 Chapter 3: Low-Level Routines
13
11
10
12
1
9
3
2
8
4
5
7
6
1
1
15
14
17
16
CreateMachineID function
function CreateMachineID (
MachineInfo : TEsMachineInfoSet) : LongInt;
TEsMachineInfoSet = set of(
midUser, midSystem, midNetwork, midDrives);
CreateMachineID produces a key modifier based on specific hardware information.
This function allows you to choose which factors to use when creating the machine
identifier. midUser includes the use of the user and company name (if available—not
available under Win16). midSystem includes the use of system specific informationobtained
by using the GetSystemInfo API. midNetwork includes the network card ID (if available).
midNetwork should only be used while attached to a network since some versions of
Window’s produce different network ID’s after each boot. midDrives includes the capacities
and serial numbers of each of the local drives.
CreateNetAccessFile function
function CreateNetAccessFile(const FileName : string;
const Key : TKey;Count : Word) : Boolean;
CreateNetAccessFile creates a net access for Count users file using FileName as the name of
the file and Key to encode the file.
If a file with FileName as its name exists, it is overwritten without warning.
This routine is defined in the OgNetWrk unit.
CreateNetAccessFileEx function
function CreateNetAccessFileEx(const FileName : string;
const Key : TKey; const Code : TCode) : Boolean;
CreateNetAccessFileEx creates a net access file using the access count value from a
previously encoded net access Code.
Key must be the same key that was used to create the code or the code is considered invalid.
This routine is defined in the OgNetWrk unit.
!
!
!
Chapter 3: Low-Level Routines 43
13
11
10
12
1
9
3
2
8
4
7
6
1
1
15
14
17
16
DecDaysCode procedure
procedure DecDaysCode(const Key : TKey; var Code : TCode);
DecDaysCode reduces the internal days count value by one and returns the modified code
as the Code parameter.
Key must be the same key that was used to create the code or the code is considered invalid.
This routine is defined in the OnGuard unit.
DecodeNAFCountCode function
function DecodeNAFCountCode(
const Key : TKey; const Code : TCode) : LongInt;
DecodeNAFCountCode uses Key to decode Code and returns the number of authorized
users as the function result.
Key must be the same key that was used to create the code or the code is considered invalid.
If the code is invalid, 0 is returned.
This routine is defined in the OgNetWrk unit.
DecUsageCode procedure
procedure DecUsageCode(const Key : TKey; var Code : TCode);
DecUsageCode reduces the internal usage count value by one and returns the modified code
as the Code parameter.
Key must be the same key that was used to create the code or the code is considered invalid.
This routine is defined in the OnGuard unit.
EncodeNAFCountCode procedure
procedure EncodeNAFCountCode(
const Key : TKey; Count : Cardinal; var Code : TCode);
EncodeNAFCountCode uses Key to create and encode the usage Count value creating a
network code.
The resulting code is returned as the Code parameter.
This routine is defined in the OgNetWrk unit.
!
!
!
!

44 Chapter 3: Low-Level Routines
13
11
10
12
1
9
3
2
8
4
5
7
6
1
1
15
14
17
16
ExpandDate function
function ExpandDate(D : Word) : TDateTime;
ExpandDate translates an OnGuard date offset to an actual date.
OnGuard uses a date offset to reduce the amount of space necessary to store a date.
OnGuard creates a date offset by subtracting the TDateTime value for 1 January 1996 from
the actual date.
Exceptions to the conversion rules are that a value of 0 expands to 1 January 9999 and date
offsets larger than 65535 are represented as 0.
This routine is defined in the OnGuard unit.
GenerateDateModifierPrim function
function GenerateDateModifierPrim(D : TDateTime) : LongInt;
GenerateDateModifierPrim produces a key modifier based on the date D.
This routine is defined in the OnGuard unit.
GenerateMachineModifierPrim function
function GenerateMachineModifierPrim: LongInt;
GenerateMachineModifierPrim produces a key modifier based on default hardware
information.
Information about hard disk capacity, network card serial number, and other items specific
to a particular computer are used to create this value.
This routine is defined in the OnGuard unit.
GenerateMD5KeyPrim procedure
procedure GenerateMD5KeyPrim(var Key: TKey; const Str : string);
GenerateMD5KeyPrim produces a Key by applying the MD5 hash to the string passed as Str
The routine is case sensitive.
This routine is defined in the OnGuard unit.
!
!
!
!

Chapter 3: Low-Level Routines 45
13
11
10
12
1
9
3
2
8
4
7
6
1
1
15
14
17
16
GenerateRandomKeyPrim procedure
procedure GenerateRandomKeyPrim(var Key; KeySize : Cardinal);
GenerateRandomKeyPrim produces a Key using a random numbers.
This routine is defined in the OnGuard unit.
GenerateStringModifierPrim function
function GenerateStringModifierPrim(const S : string) : LongInt;
GenerateStringModifierPrim produces a key modifier by applying a hash algorithm to the
string passed in S.
This routine is case sensitive.
This routine is defined in the OnGuard unit.
GenerateTMDKeyPrim procedure
procedure GenerateTMDKeyPrim(
var Key; KeySize : Cardinal; const Str : string);
GenerateTMDKeyPrim produces key by applying a hash algorithm to the string passed in
Str.
This routine is defined in the OnGuard unit.
GenerateUniqueModifierPrim function
function GenerateUniqueModifierPrim: LongInt;
GenerateUniqueModifierPrim produces a key modifier using random numbers.
This routine is defined in the OnGuard unit.
!
!
!
!
46 Chapter 3: Low-Level Routines
13
11
10
12
1
9
3
2
8
4
5
7
6
1
1
15
14
17
16
GetCodeType function
function GetCodeType(
const Key : TKey; const Code : TCode) : TCodeType;
TCodeType =(ctDate, ctDays, ctRegistration, ctSerialNumber,
ctUsage, ctNetwork, ctSpecial, ctUnknown);
GetCodeType returns the type of code passed as the Code parameter.
Key must be the same key that was used when the code was created or ctUnknown is
returned.
This routine is defined in the OnGuard unit.
GetDateCodeValue function
function GetDateCodeValue(
const Key : TKey; const Code : TCode) : TDateTime;
GetDateCodeValue returns the expiration date stored in the Code.
Key must be the same key that was used to create the code or the code is considered invalid.
If the code is invalid, 1 January 9999 is returned.
This routine is defined in the OnGuard unit.
GetDaysCodeValue function
function GetDaysCodeValue(
const Key : TKey; const Code : TCode) : LongInt;
GetDaysCodeValue returns the expiration date stored in the Code.
Key must be the same key that was used to create the code or the code is considered invalid.
If the code is invalid, 0 is returned.
This routine is defined in the OnGuard unit.
GetExpirationDate function
function GetExpirationDate(
const Key : TKey; const Code : TCode) : TDateTime;
GetExpirationDate returns the date that the code passed as the Code parameter expires.
If the code has no expiration date or is invalid, 1 January 9999 is returned.Key must be the
same key that was used to create the code or the code is considered invalid.
This routine is defined in the OnGuard unit.
!
!
!
!
Chapter 3: Low-Level Routines 47
13
11
10
12
1
9
3
2
8
4
7
6
1
1
15
14
17
16
GetNetAccessFileInfo function
function GetNetAccessFileInfo(const FileName : string;
const Key : TKey; var NetAccessInfo : TNetAccessInfo) : Boolean;
TNetAccessInfo = packed record
Total : Cardinal;
Locked : Cardinal;
Invalid : Cardinal;
end;
etNetAccessFileInfo obtains information about the specified network access file.
FileName is the name of an existing network access file and Key is the key that was used to
create it. The network access file information is returned as the NetAccessInfo parameter
and consists of the total number of access slots, the number of locked slots, and the number
of invalid access slots. (An access slot becomes invalid when the application using it is
terminated in a non-standard way.)
GetNetAccessFileInfo returns False if there was an error, otherwise True.
This routine is defined in the OgNetWrk unit.
GetSerialNumberCodeValue function
function GetSerialNumberCodeValue(
const Key : TKey; const Code : TCode) : LongInt;
GetSerialNumberCodeValue returns the serial number that was used to create the Code.
Key must be the same key that was used to create the code or the code is considered invalid.
If the code is invalid, 0 is returned.
This routine is defined in the OnGuard unit.
GetSpecialCodeValue function
function GetSpecialCodeValue(
const Key : TKey; const Code : TCode) : LongInt;
GetSpecialCodeValue returns the value that was used to create the Code.
Key must be the same key that was used to create the code or the code is considered invalid.
If the code is invalid, 0 is returned.
This routine is defined in the OnGuard unit.
!
!
!
48 Chapter 3: Low-Level Routines
13
11
10
12
1
9
3
2
8
4
5
7
6
1
1
15
14
17
16
GetUsageCodeValue function
function GetUsageCodeValue(
const Key : TKey; const Code : TCode) : LongInt;
GetUsageCodeValue returns the current usage count value store in the Code.
Key must be the same key that was used to create the code or the code is considered invalid.
If the code is invalid, 0 is returned.
This routine is defined in the OnGuard unit.
HexStringIsZero function
function HexStringIsZero(const Hex : string) : Boolean;
HexStringIsZero returns True only if the hexadecimal string passed as Hex consists entirely
of zeros.
This routine is defined in the OgUtil unit.
HexToBuffer function
function HexToBuffer(
const Hex : string; var Buf; BufSize : Cardinal) : Boolean;
HexToBuffer converts the hexadecimal string in Hex to bytes that are stored in Buf.
Punctuation ($, spaces, commas, parentheses, etc.) is ignored.
BufSize is the number of bytes to store in Buf and must be the number of hexadecimal bytes
in Hex. False is returned if an error occurs. Otherwise, True is returned.
This routine is defined in the OgUtil unit.
InitDateCode procedure
procedure InitDateCode(const Key : TKey;
StartDate, EndDate : TDateTime; var Code : TCode);
InitDateCode creates and initializes a date code using Key, StartDate, and EndDate.
The resulting code is valid for dates between StartDate and EndDate inclusive.
This routine is defined in the OnGuard unit.
!
!
!
!
Chapter 3: Low-Level Routines 49
13
11
10
12
1
9
3
2
8
4
7
6
1
1
15
14
17
16
InitDaysCode procedure
procedure InitDaysCode(const Key : TKey;
Days : Word; Expires : TDateTime; var Code : TCode);
InitDaysCode creates and initializes a days code using Key, Days, and Expires.
Days is stored as part of the Code.
The resulting code is valid for the number of days of use specified in the Days parameter and
until the date stored in Expires is reached.
This routine is defined in the OnGuard unit.
InitRegCode procedure
procedure InitRegCode(const Key : TKey;
const RegStr : string; Expires : TDateTime; var Code : TCode);
InitRegCode creates and initializes a registration code using Key, RegStr, and Expires.
The code stores a hash value that was derived from RegStr. RegStr cannot be extracted from
the code.
The resulting code is valid until the date stored in Expires is reached.
This routine is defined in the OnGuard unit.
InitSerialNumberCode procedure
procedure InitSerialNumberCode(const Key : TKey;
Serial : LongInt; Expires : TDateTime; var Code : TCode);
InitSerialNumberCode creates and initializes a serial number code using Key, Serial, and
Expires.
Serial is stored as part of the Code.
The resulting code is valid until the date stored in Expires is reached.
This routine is defined in the OnGuard unit.
!
!
!
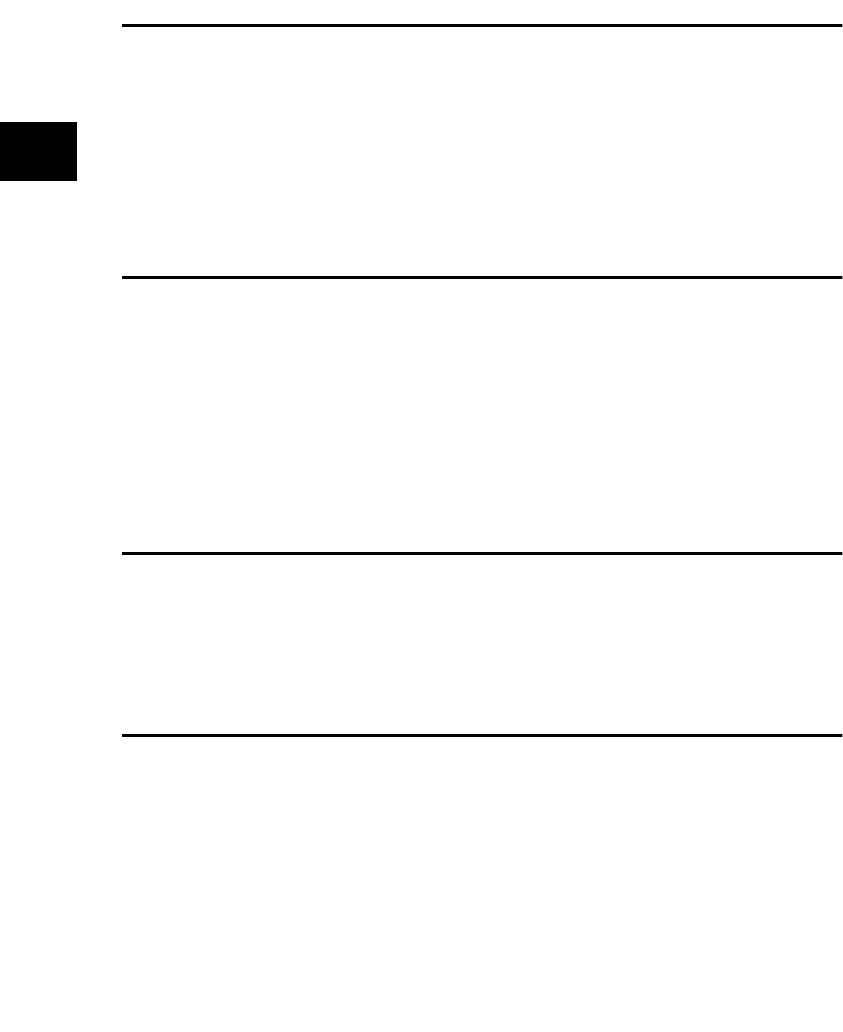
50 Chapter 3: Low-Level Routines
13
11
10
12
1
9
3
2
8
4
5
7
6
1
1
15
14
17
16
InitSpecialCode procedure
procedure InitSpecialCode(const Key : TKey;
Value : LongInt; Expires : TDateTime; var Code : TCode);
InitSpecialCode creates and initializes a special code using Key, Value, and Expires.
Value is stored as part of the Code.
The resulting code is valid until the date stored in Expires is reached.
This routine is defined in the OnGuard unit.
InitUsageCode procedure
procedure InitUsageCode(const Key : TKey;
Count : Word; Expires : TDateTime; var Code : TCode);
InitUsageCode creates and initializes a usage code using Key, Count, and Expires.
Count is stored as part of the Code.
The resulting code is valid until the internal Count is 0 or the date stored in Expires is
reached.
This routine is defined in the OnGuard unit.
IsAppOnNetwork function
function IsAppOnNetwork(const ExePath : string) : Boolean;
IsAppOnNetwork returns True if the drive specified in ExePath is a remote drive, otherwise
False.
This routine is defined in the OgNetWrk unit.
IsDateCodeExpired function
function IsDateCodeExpired(
const Key : TKey; const Code : TCode) : Boolean;
IsDateCodeExpired returns True if the Code has expired, otherwise False.
Key must be the same key that was used to create the code or the code is considered invalid.
If the code is invalid, this function returns True.
This routine is defined in the OnGuard unit.
!
!
!
!

Chapter 3: Low-Level Routines 51
13
11
10
12
1
9
3
2
8
4
7
6
1
1
15
14
17
16
IsDateCodeValid function
function IsDateCodeValid(
const Key : TKey; const Code : TCode) : Boolean;
IsDateCodeValid returns True if Code is a valid date code, otherwise False.
Key must be the same key that was used to create the code or the code is considered invalid.
This routine is defined in the OnGuard unit.
IsDaysCodeExpired function
function IsDaysCodeExpired(
const Key : TKey; const Code : TCode) : Boolean;
IsDaysCodeExpired returns True if the Code has expired, otherwise False.
Key must be the same key that was used to create the code or the code is considered invalid.
If the code is invalid, this function returns True.
This routine is defined in the OnGuard unit.
IsDaysCodeValid function
function IsDaysCodeValid(
const Key : TKey; const Code : TCode) : Boolean;
IsDaysCodeValid returns True if Code is a valid days code, otherwise False.
Key must be the same key that was used to create the code or the code is considered invalid.
This routine is defined in the OnGuard unit.
IsRegCodeExpired function
function IsRegCodeExpired(
const Key : TKey; const Code : TCode) : Boolean;
IsRegCodeExpired returns True if the Code has expired, otherwise False.
Key must be the same key that was used to create the code or the code is considered invalid.
If the code is invalid, this function returns True.
This routine is defined in the OnGuard unit.
!
!
!
!

52 Chapter 3: Low-Level Routines
13
11
10
12
1
9
3
2
8
4
5
7
6
1
1
15
14
17
16
IsRegCodeValid function
function IsRegCodeValid(
const Key : TKey; const Code : TCode) : Boolean;
IsRegCodeValid returns True if Code is a valid registration code, otherwise False.
Key must be the same key that was used to create the code or the code is considered invalid.
This routine is defined in the OnGuard unit.
IsSerialNumberCodeExpired function
function IsSerialNumberCodeExpired(
const Key : TKey; const Code : TCode) : Boolean;
IsSerialNumberCodeExpired returns True if the Code has expired, otherwise False.
Key must be the same key that was used to create the code or the code is considered invalid.
If the code is invalid, this function returns True.
This routine is defined in the OnGuard unit.
IsSerialNumberCodeValid function
function IsSerialNumberCodeValid(
const Key : TKey; const Code : TCode) : Boolean;
IsSerialNumberCodeValid returns True if Code is a valid serial number code, otherwise
False.
Key must be the same key that was used to create the code or the code is considered invalid.
This routine is defined in the OnGuard unit.
IsSpecialCodeExpired function
function IsSpecialCodeExpired(
const Key : TKey; const Code : TCode) : Boolean;
IsSpecialCodeExpired returns True if the Code has expired, otherwise False.
Key must be the same key that was used to create the code or the code is considered invalid.
If the code is invalid, this function returns True.
This routine is defined in the OnGuard unit.
!
!
!
!

Chapter 3: Low-Level Routines 53
13
11
10
12
1
9
3
2
8
4
7
6
1
1
15
14
17
16
IsSpecialCodeValid function
function IsSpecialCodeValid(
const Key : TKey; const Code : TCode) : Boolean;
IsSpecialCodeValid returns True if Code is a valid special code, otherwise False.
Key must be the same key that was used to create the code or the code is considered invalid.
This routine is defined in the OnGuard unit.
IsUsageCodeExpired function
function IsUsageCodeExpired(
const Key : TKey; const Code: TCode) : Boolean;
IsUsageCodeExpired returns True if the Code has expired, otherwise False.
Key must be the same key that was used to create the code or the code is considered invalid.
If the code is invalid, this function returns True.
This routine is defined in the OnGuard unit.
IsUsageCodeValid function
function IsUsageCodeValid(
const Key : TKey; const Code : TCode) : Boolean;
IsUsageCodeValid returns True if Code is a valid usage code, otherwise False.
Key must be the same key that was used to create the code or the code is considered invalid.
This routine is defined in the OnGuard unit.
LockNetAccessFile function
function LockNetAccessFile(const FileName : string;
const Key : TKey; var NetAccess : TNetAccess) : Boolean;
TNetAccess = packed record
Fh : Integer;
Key : TKey;
CheckValue : Word;
Index : Word;
end;
LockNetAccessFile locks an access slot in the network access file specified by FileName and
returns False if an error occurs.
This routine is defined in the OgNetWrk unit.
!
!
!
!

54 Chapter 3: Low-Level Routines
13
11
10
12
1
9
3
2
8
4
5
7
6
1
1
15
14
17
16
ResetNetAccessFile function
function ResetNetAccessFile(
const FileName : string; const Key : TKey) : Boolean;
ResetNetAccessFile resets invalid access slots by clearing each slot’s “in-use” status.
Access slots that are currently in use are skipped.
This routine is defined in the OgNetWrk unit.
ShrinkDate function
function ShrinkDate(D : TDateTime) : Word;
ShrinkDate translates a date to an OnGuard date offset.
OnGuard uses a date offset to reduce the amount of space necessary to store a date.
OnGuard creates a date offset by subtracting the TDateTime value for 1 January 1996 from
the actual date.
Exceptions to the conversion rules are that a value of 0 expands to 1 January 9999 and date
offsets larger than 65535 are represented as 0.
This routine is defined in the OnGuard unit.
StringHashElf function
function StringHashElf(const Str : string) : LongInt;
StringHashElf produces a hash value based on the text passed in Str.
This routine is defined in the OnGuard unit.
UnlockNetAccessFile function
function UnlockNetAccessFile(
var NetAccess : TNetAccess) : Boolean;
TNetAccess = packed record
Fh : Integer;
Key : TKey;
CheckValue : Word;
Index : Word;
end;
UnlockNetAccessFile unlocks an access slot in the network access file specified by FileName
and returns False if an error occurs.
This routine is defined in the OgNetWrk unit.
!
!
!
!

Chapter 3: Low-Level Routines 55
13
11
10
12
1
9
3
2
8
4
7
6
1
1
15
14
17
16

56 Chapter 3: Low-Level Routines
13
11
10
12
1
9
3
2
8
4
5
7
6
1
1
15
14
17
16

57
13
11
10
12
1
9
3
2
8
4
5
7
6
1
1
15
14
17
16
Chapter 4: Keys and Release Codes
OnGuard provides two components that automate the tasks of making keys and generating
release codes.
The TOgMakeKeys component is used to create keys. Keys are used to encode and decode
release codes. A key is 16 bytes long and is often embedded in the application for use when
the release code must be decoded.
To make the key more secure, a modifier can be applied to it to make it unique to the current
date, a specific machine, or a string that you specify (this is called signing the key). If you
cannot protect your key from unauthorized use, use a modifier to sign it because an
unsigned key can easily be used to decode the release code.
The TOgMakeCodes component is used to generate release codes. The release code is an 8
byte value that is encoded using a key and is only decoded internally as needed. This allows
you to store the release code in the system registry or an INI file and not worry about its
security. Later, when you test to see if the application has been released, you can read the
release code from the registry or INI file and use the key in the application to decode the
release code and determine if it is valid. Once the release code is validated, it can be used for
additional tests. The type of test depends on what type release code it is.
Release codes can be unique to a particular user name, machine specific ID, or almost any
static information (this is called signing the release code). By using release codes that have
signatures embedded in them, you can restrict their widespread use.

58 Chapter 4: Keys and Release Codes
13
11
10
12
1
9
3
2
8
4
5
7
6
1
1
15
14
17
16
TOgMakeKeys Component
TOgMakeKeys provides methods and properties to create and maintain keys. Keys are used
to encode and decode the release codes that the other OnGuard components use.
Keys are normally embedded into your application as constants and then supplied to the
OnGuard routines on demand. Keys should not be stored so they could appear in the
form”s resource file because that drastically reduces the security of the key.
TOgMakeKeys allows you to make three different types of keys: Random, Standard Text, and
Case-Sensitive Text. The Standard Text and Case-Sensitive Text methods create a key based
on text that you supply. This means someone else could reproduce that same key if they
know the text used to create it. Unless you need to regenerate a key later, you should use a
Random key. Randomly generated keys are less likely to be reproduced and therefore offer
better protection.
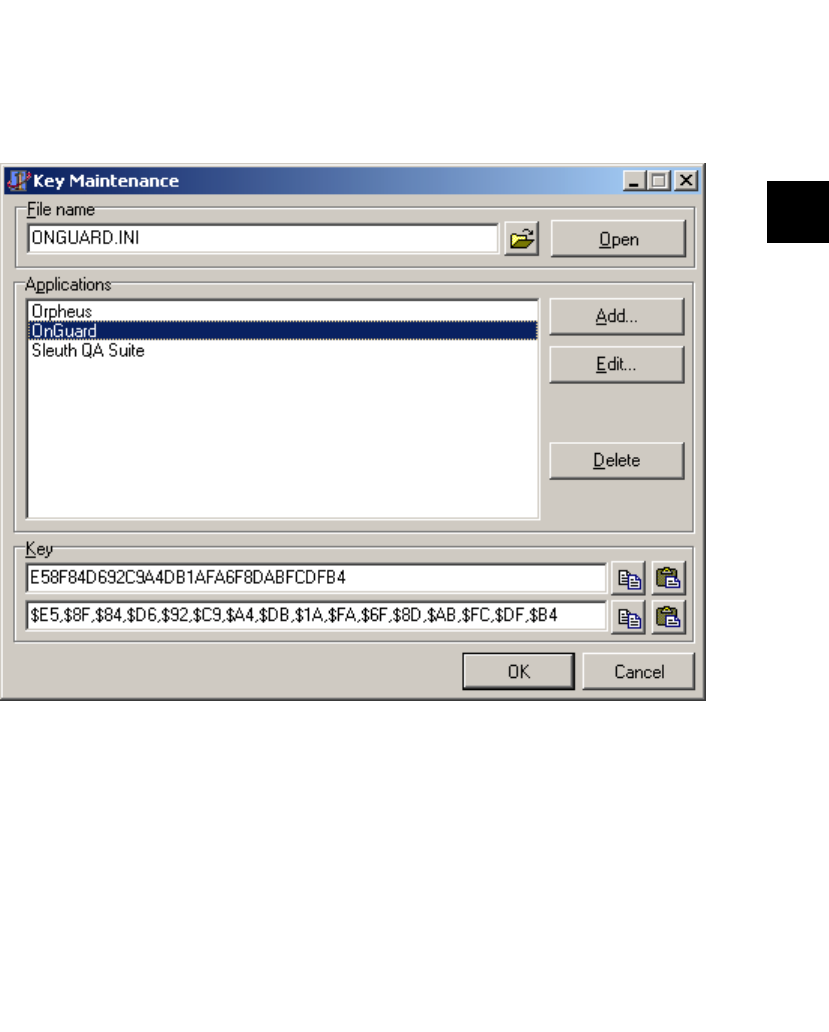
TOgMakeKeys Component 59
13
11
10
12
1
9
3
2
8
4
7
6
1
1
15
14
17
16
Creating and Maintaining Keys
TOgMakeKeys provides a series of dialogs with built-in methods for managing keys and
their related applications. The Key Maintenance dialog box, shown in Figure 4.1, allows you
to create a key, associate it with an application, and store that information in a file for later
access.
“File name” is the name of the INI file where the key information is stored. Use the speed
button to the right of the edit field to display the Select Key Maintenance File dialog box,
which allows you to search for the file. When the file is open, items already within the file are
displayed in the “Applications” list box.
“Applications” contains a list of the applications for which keys are currently stored in the
file specified in “File name”. If no file name is specified, or the specified file does not exist, or
the specified file does not contain any keys, the list is empty.
Figure 4.1: The Key Maintenance dialog box.
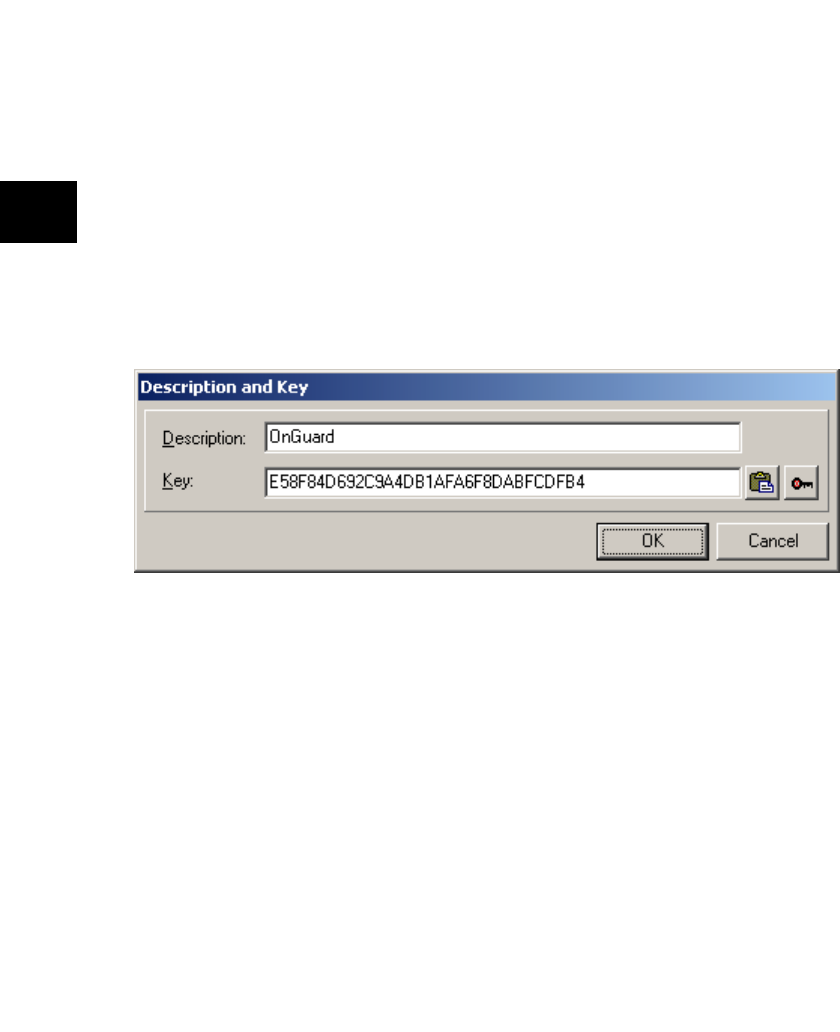
60 Chapter 4: Keys and Release Codes
13
11
10
12
1
9
3
2
8
4
5
7
6
1
1
15
14
17
16
The Add button displays the Description and Key dialog box (described below). The Edit
button displays the Description and Key dialog box for the item currently selected in the
“Applications” list box. The Delete button deletes the item currently selected in the
“Applications” list box.
The “Key” group contains two edit fields with hexadecimal representations of the key. The
second is in a form suitable for copying to the clipboard and pasting directly into a constant
expression in your application. The two speed buttons directly to the right of each edit field
provide clipboard copy and paste functions for the corresponding field.
The OK button closes the dialog box and makes the selected key information available via
the appropriate component properties. The Cancel button closes the dialog box, however,
changes made to the file are not reversed.
If you choose to add or edit an item in the “Applications” list, the Description and Key dialog
box is displayed as shown in Figure 4.2.
“Description” is the name of (or some text describing) the application.
If a key was already generated for this application, “Key” displays the hexadecimal
representation of the key. The first speed button to the right of the “Key” edit field can be
used to paste a key string into the edit field. The second speed button is used to generate a
key.
The OK button closes the dialog box, saving any changes that were made. The Cancel button
closes the dialog box, discarding all changes.
Figure 4.2: The Description and Key dialog box.
TOgMakeKeys Component 61
13
11
10
12
1
9
3
2
8
4
7
6
1
1
15
14
17
16
If you click on the speed button to generate a key, the Key Generation dialog box is displayed
as shown in Figure 4.3.
The “Key Type” combo box allows you to select the method used for key generation. The
possible choices are Random, Standard Text, or Case-Sensitive Text. The Random method
produces a key using the VCL”s random number generator. The two text methods create a
key based on the text supplied in the “Key Phrase” edit control.
The Generate key button creates the key based on the “Key Type” and the “Key Phrase”.
The “Key Phrase” memo field allows you to enter a text phrase that is used to generate the
key if “Key Type” is Standard Text or Case-Sensitive Text. If “Key Type” is Random, this field
is disabled.
The “Key” group contains two edit fields with hexadecimal representations of the key. The
second is in a form suitable for copying to the clipboard and pasting directly into a constant
expression in your application. The speed buttons directly to the right of each edit field
provide clipboard copy functions for the corresponding field.
The OK button closes the dialog box and makes the selected key information available via
the appropriate component properties. The Cancel button closes the dialog box and
discards the generated key.
Figure 4.3: The Key Generation dialog box

62 Chapter 4: Keys and Release Codes
13
11
10
12
1
9
3
2
8
4
5
7
6
1
1
15
14
17
16
Hierarchy
TComponent (VCL)
TOgMakeKeys (OnGuard)
Properties
About
KeyFileName KeyType
ShowHints
Methods
ApplyModifierToKey
Execute
GenerateDateModifier
GenerateMachineModifier
GenerateMDKey
GenerateRandomKey
GenerateStringModifier
GenerateUniqueModifier
GetKey
TOgMakeKeys Component 63
13
11
10
12
1
9
3
2
8
4
7
6
1
1
15
14
17
16
Reference Section
About property
property About : string
Shows the current version of OnGuard.
About is provided in order that the version of OnGuard can easily be identified should
technical support be needed. In the Object Inspector, display the OnGuard about box by
double-clicking this property or selecting the dialog box button to the right of the property
value.
ApplyModifierToKey method
procedure ApplyModifierToKey (
Modifier : LongInt; var Key; KeySize : Cardinal);
ApplyModifierToKey alters the specified key.
If Modifier is not zero, this routine alters (signs) the key specified by Key. KeySize is the size,
in bytes, of Key.
This routine is used automatically by the components that generate a release code when a
non-zero value is specified for the Modifier property.
See also: GenerateDateModifier, GenerateMachineModifier, GenerateStringModifier,
GenerateUniqueModifier, Key
Execute method
function Execute: Boolean;
Execute displays the Key Maintenance dialog box.
Use this method to display the Key Maintenance dialog box so that a key can be generated.
The dialog box is described in “Creating and Maintaining Keys” on page 59.
If Execute returns True, the KeyFileName and KeyType properties contain valid values, and
the key can be obtained via the GetKey method. Otherwise, the contents of these properties
is unknown.
See also: Key, KeyFileName, KeyType
!
!
!

64 Chapter 4: Keys and Release Codes
13
11
10
12
1
9
3
2
8
4
5
7
6
1
1
15
14
17
16
GenerateDateModifier method
function GenerateDateModifier: LongInt;
GenerateDateModifier creates a key modifier based on the current date.
This routine is also available as a function (GenerateDateModifierPrim) for use in
applications that need to generate modifiers dynamically.
See also: ApplyModifierToKey, GenerateMachineModifier, GenerateStringModifier,
GenerateUniqueModifier
GenerateMachineModifier method
function GenerateMachineModifier: LongInt;
GenerateMachineModifier creates a key modifier based on the hardware information for the
current machine.
GenerateMachineModifier uses hard disk volume sizes, volume serial numbers, registration
name and company as reported by Windows, and the network card ID (if available) to
produce a modifier specific to a single machine.
Use this modifier to sign the key used to encode and decode release codes if you want the
release code to restrict usage to a single machine.
Caution: If hardware is changed on the machine, the modifier changes, rendering the release
code, and consequently the application, unusable.
This routine is also available as a function (GenerateMachineModifierPrim) for use in
applications that need to generate modifiers dynamically.
See also: ApplyModifierToKey, GenerateDateModifier, GenerateStringModifier,
GenerateUniqueModifier
GenerateMDKey method
procedure GenerateMDKey (
var Key; KeySize : Cardinal; const Str : string);
GenerateMDKey produces a key based on a supplied text string.
To produce keys that are not case dependent, convert the text to upper case prior to calling
GenerateMDKey.
See also: ApplyModifierToKey, GenerateRandomKey, GetKey
!
!
"
!
TOgMakeKeys Component 65
13
11
10
12
1
9
3
2
8
4
7
6
1
1
15
14
17
16
GenerateRandomKey method
procedure GenerateRandomKey(var Key; KeySize : Cardinal);
GenerateRandomKey produces a key based on the VCL’s internal random number
generator.
See also: ApplyModifierToKey, GenerateKey
GenerateStringModifier method
function GenerateStringModifier (const S : string) : LongInt;
GenerateStringModifier creates a key modifier based on the supplied string.
This routine is also available as a function (GenerateStringModifierPrim) for use in
applications that need to generate modifiers dynamically.
See also: ApplyModifierToKey, GenerateDateModifier, GenerateMachineModifier,
GenerateUniqueModifier
GenerateUniqueModifier method
function GenerateUniqueModifier: LongInt;
GenerateUniqueModifier creates a unique key modifier.
This routine is also available as a function (GenerateUniqueModifierPrim) for use in
applications that need to generate modifiers dynamically.
See also: ApplyModifierToKey, GenerateDateModifier, GenerateMachineModifier,
GenerateStringModifier
GetKey method
procedure GetKey (var Value : TKey);
TKey = array[0..15] of Byte;
GetKey returns the key generated when Execute was called.
Aftera successful call to Execute, use GetKey to return the selected key value.
The key used to encode release codes should be protected from unauthorized use because a
release code that was encoded without a modifiercan easily be decoded using the key. The
key should be embedded into the application rather than stored in a file or resource.
See also: Execute
!
!
!
!

66 Chapter 4: Keys and Release Codes
13
11
10
12
1
9
3
2
8
4
5
7
6
1
1
15
14
17
16
KeyFileName property
property KeyFileName : string
KeyFileName is the name of the INI file used to store application names and their associated
keys.
If a valid file name is assigned to this property, its contents are displayed when the Key
Maintenance dialog box is displayed.
KeyType property
property KeyType : TKeyType
TKeyType = (ktRandom, ktMessageDigest, ktMessageDigestCS);
Default: ktMessageDigest
KeyType determines the type of key to generate.
After a successful call to Execute, KeyType contains one of these key types:
If a value is assigned to this property, it is used to determine the type of key to generate when
the Key Maintenance dialog box is displayed.
See also: Execute
ShowHints property
property ShowHints : Boolean
Default: False
ShowHints determines whether hints are shown for the TOgMakeKeys dialog boxes.
Type Description
ktRandom The key is generated using the
VCL’s random number generator.
ktMessageDigest (Standard Text) The key is generated by using the
supplied text. Text case is
ignored.
ktMessageDigestCS (Case-Sensitive
Text)
The key is generated by using the
supplied text. Text case is
considered.
!
!
!

TOgMakeCodes Component 67
13
11
10
12
1
9
3
2
8
4
7
6
1
1
15
14
17
16
TOgMakeCodes Component
TOgMakeCodes is a non-visual component that displays a dialog box when its Execute
method is called. The dialog box allows you to create several types of release codes. Each
release code consists of 8 bytes and is viewed and entered as 16 hexadecimal digits.
Release codes are encoded using a key to prevent unauthorized access and tampering. If the
Key property is not initialized to a valid value prior to calling Execute, the Key Maintenance
dialog box (see page Creating and Maintaining Keys) is displayed so that one can be selected
or created. Release codes cannot be created without a key to encode them.
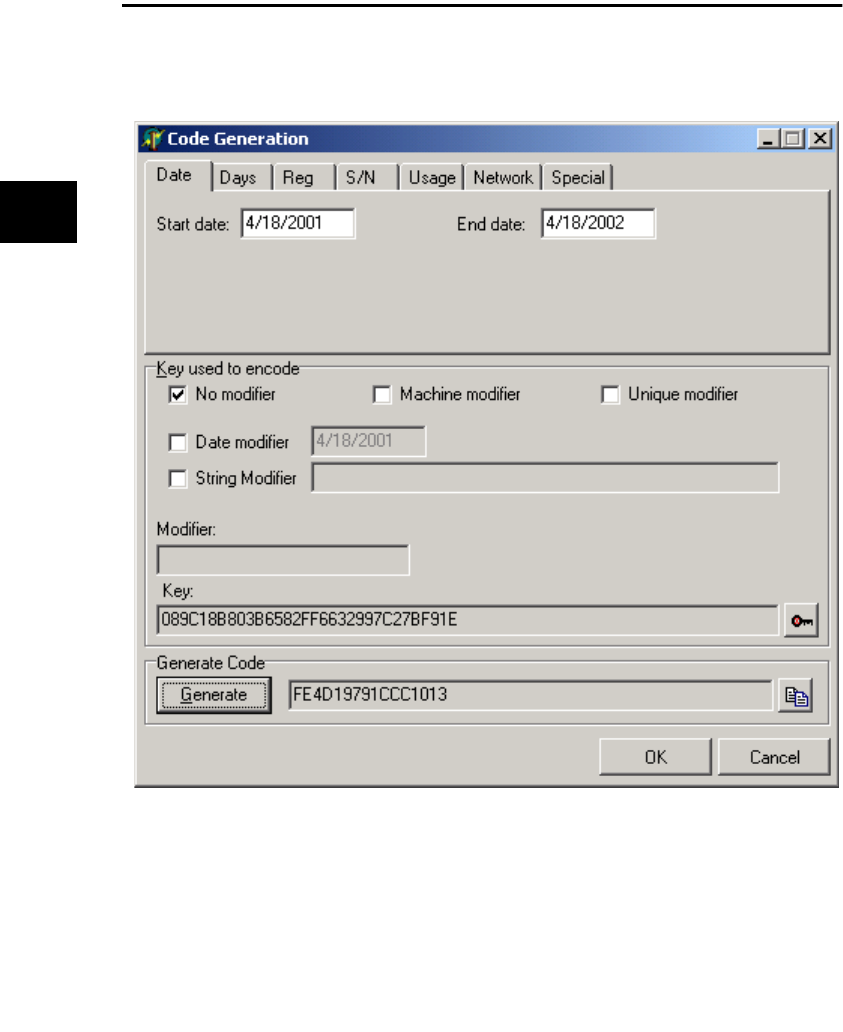
68 Chapter 4: Keys and Release Codes
13
11
10
12
1
9
3
2
8
4
5
7
6
1
1
15
14
17
16
Generating Release Codes
The Execute method displays the Code Generation dialog box as shown in Figure 4.4.
The first item in the Code Generation dialog box is a notebook with a page for each possible
type of release code. Select the page for the type of release code you want to generate.
Use the Date notebook page to generate a Start/End Date release code as shown in Figure
4.4. An attempt to use a release code with a date prior to the start date or after the end date
results in an invalid code error.
Figure 4.4: The Code Generation dialog box generating a Star Date or End Date release code.
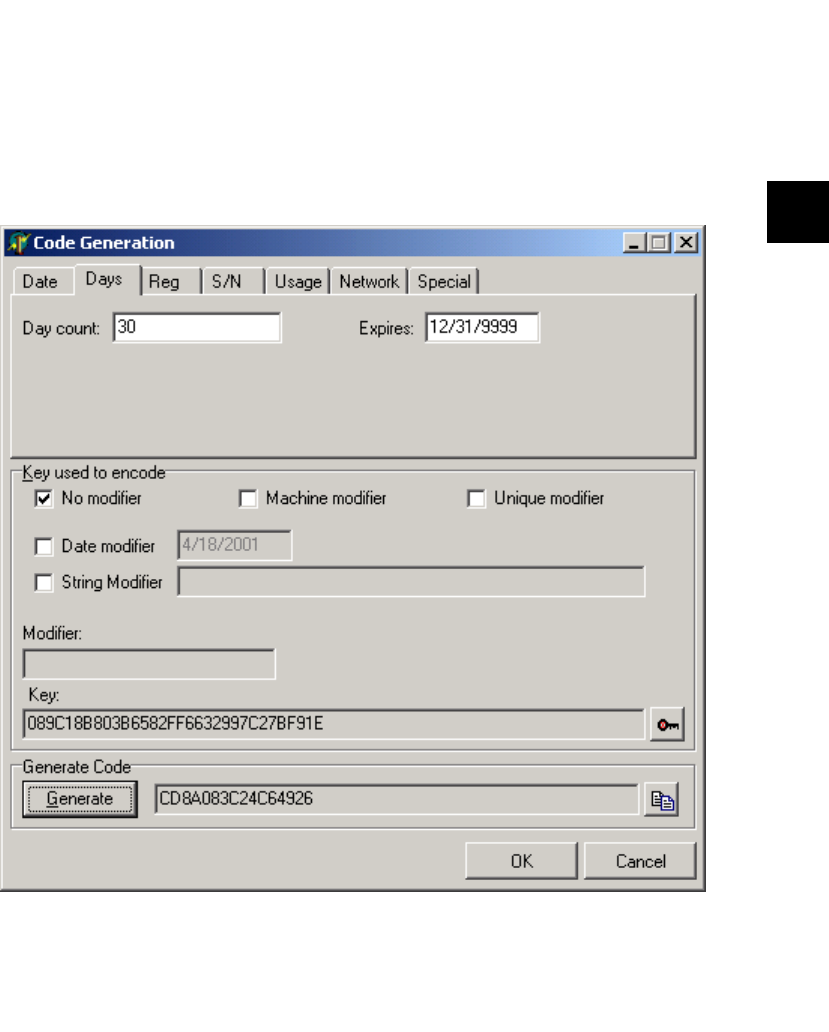
Generating Release Codes 69
13
11
10
12
1
9
3
2
8
4
7
6
1
1
15
14
17
16
See the “TOgDateCode Component” on page 88 for information about Start/End Date
release codes.
Use the Days notebook page to generate a Number of Days Used release code as shown in
Figure 4.5. This release code limits the number of days an application can be run, not the
number of times. For example, if the day count is 3, the application can be run on Monday of
one week, then Tuesday and Wednesday of the next. On each of these days, the application
can be run as many times as desired. An attempt to run the application on a fourth day will
result in an invalid release code error.
Figure 4.5: The Code Generation dialog box enerating a Number of Days Used release code.
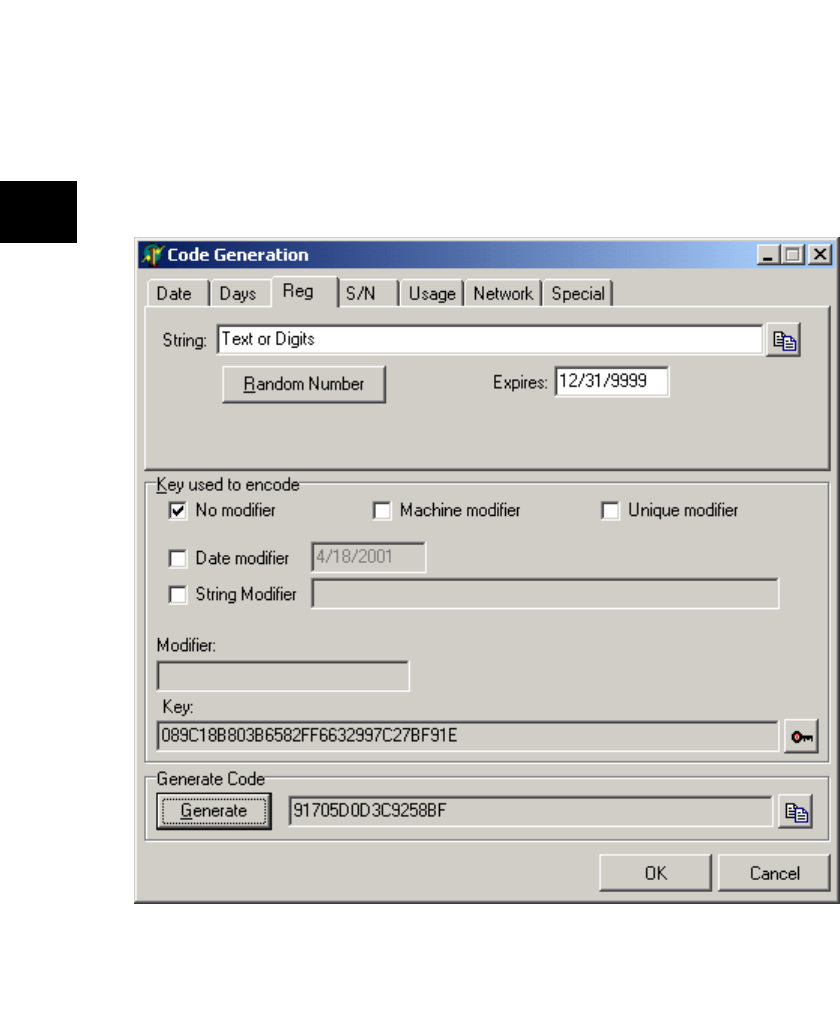
70 Chapter 4: Keys and Release Codes
13
11
10
12
1
9
3
2
8
4
5
7
6
1
1
15
14
17
16
Enter the number of days in the “Day count” edit field. A value of 0 is interpreted as an
expired release code. Use the “Expires” edit field to specify a date that the release code will
expire. The default value is 31 December 9999.
See the “TOgDaysCode Component” on page 90 for more information about Number of
Days Used release codes.
Use the Reg notebook page to generate a Simple Registration release code as shown in
Figure 4.6. The text entered in “String” is used to create the release code. The button at the
right of the field can be used to paste the contents of the clipboard into the field.
Figure 4.6: The Code Generation dialog box generating a Simple Registration release code.

Generating Release Codes 71
13
11
10
12
1
9
3
2
8
4
7
6
1
1
15
14
17
16
You should store the text in a file or in the registry. It can be displayed at run time as a
deterrent to unauthorized users of the application. A Simple Registration release code can be
verified by creating a temporary code using the stored text and expiration date. If the
temporary code and the stored code do not match, chances are that either the code was
altered or the stored text was altered.
The Random Number button generates a random string of hexadecimal digits and puts
them in the “String” field.
Use the “Expires” edit field to specify a date that the release code will expire. The default
value is 31 December 9999.
See the “TOgRegistrationCode Component” on page 98 for more information about Simple
Registration release codes.
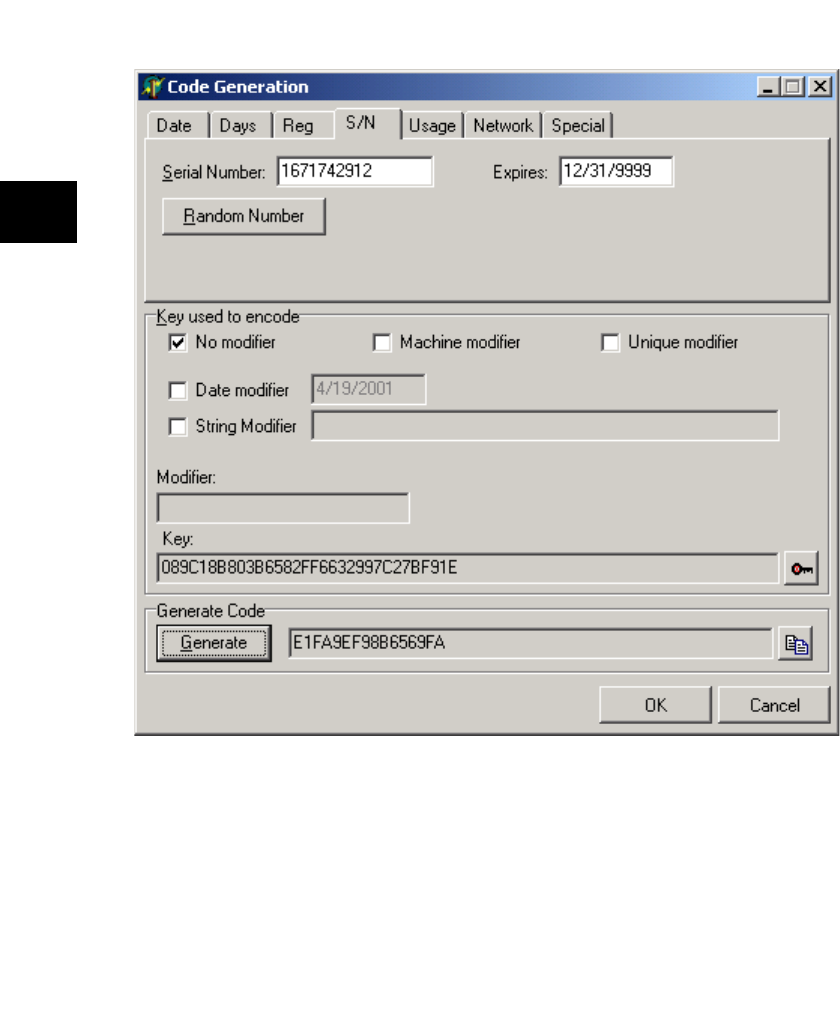
72 Chapter 4: Keys and Release Codes
13
11
10
12
1
9
3
2
8
4
5
7
6
1
1
15
14
17
16
Use the S/N notebook page to generate a Serial Number release code. The number entered
in “Serial Number” is used to create the release code as shown in Figure 4.7.
You should store the serial number in a file or in the registry so that it can be read and
displayed if desired. A Serial Number release code can be verified by creating a temporary
code using the stored serial number and expiration date. If the temporary code and the
stored code do not match, chances are that either the code was altered or the stored text was
altered.
Use the “Expires” edit field to specify a date that the release code will expire. The default
value is 31 December 9999.
Figure 4.7: The Code Generation dialog box generating a Serial Number release code.

Generating Release Codes 73
13
11
10
12
1
9
3
2
8
4
7
6
1
1
15
14
17
16
The Random Number button generates a random number to be used as the product serial
number.
See the “TOgSerialNumberCode Component” on page 101 for more information about
Serial Number release codes.
Use the Usage notebook page to generate a Usage Count release code as shown in Figure 4.8.
This release code limits the number of times an application can be run. Each time the
application is run, the embedded count value is decremented. When the count reaches zero,
the code is expired.
Enter the number of uses in the “Usage count” edit field. Use the “Expires” edit field to
specify a date that the release code will expire. The default value is 31 December 9999.
Figure 4.8: The Code Generation dialog box generating a Usage Count release code.

74 Chapter 4: Keys and Release Codes
13
11
10
12
1
9
3
2
8
4
5
7
6
1
1
15
14
17
16
See the “TOgUsageCode Component” on page 105 for more information about Usage
Count release codes.
Use the Network notebook page to generate a Network Metering release code as shown in
Figure 4.9. This release code, along with methods of the TOgNetCode component, are used
to create and maintain a Network Access File. The Network Access File is used to limit the
number of users that can run the application concurrently.
Enter the maximum number of network users in the “Access Slots” edit field.
See the “TOgNetCode Component” on page 94 for more information about Network
Metering release codes.
Figure 4.9: The Code Generation dialog box generating a Network Metering release code.
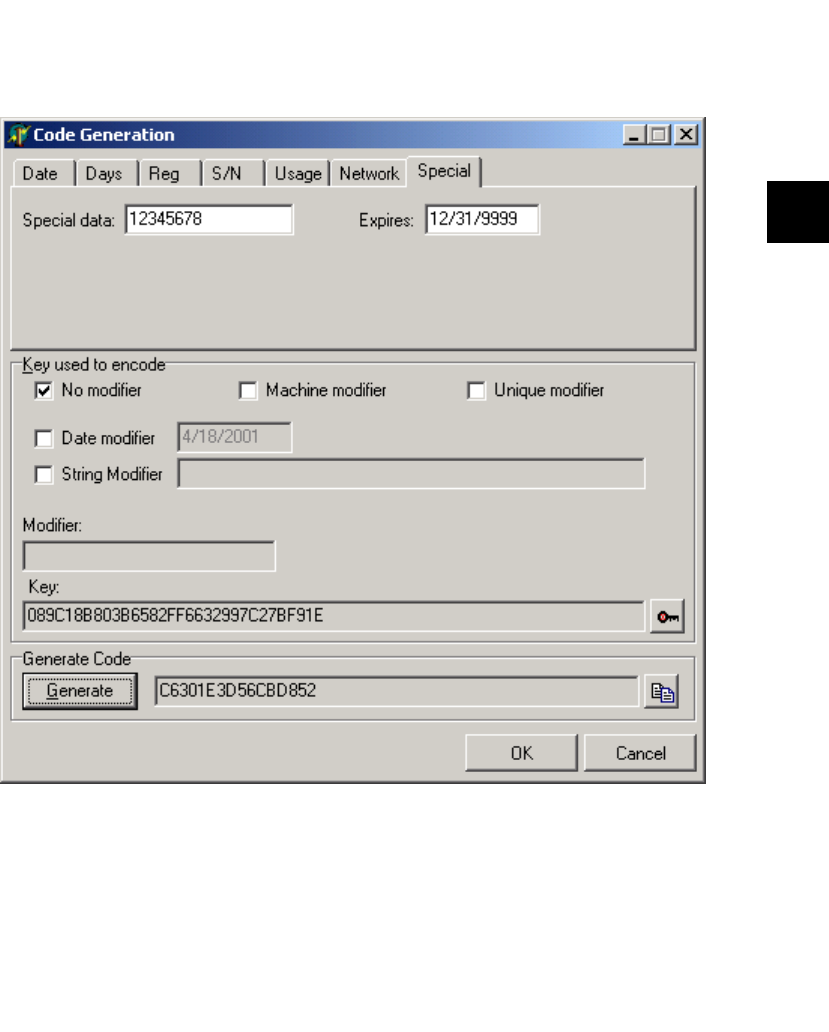
Generating Release Codes 75
13
11
10
12
1
9
3
2
8
4
7
6
1
1
15
14
17
16
Use the Special notebook page to generate a Special release code as shown in Figure 4.10. A
Special release code is very similar to a Serial Number release code, except that you
determine the meaning of the special data. OnGuard does nothing with the embedded
value.
Enter any value in the “Special data” edit field. Use the “Expires” edit field to specify a date
that the release code will expire. The default value is 31 December 9999.
See the “TOgSpecialCode Component” on page 103 for more information about Special
release codes.
Figure 4.10: The Code Generation dialog box generating a Special release code.
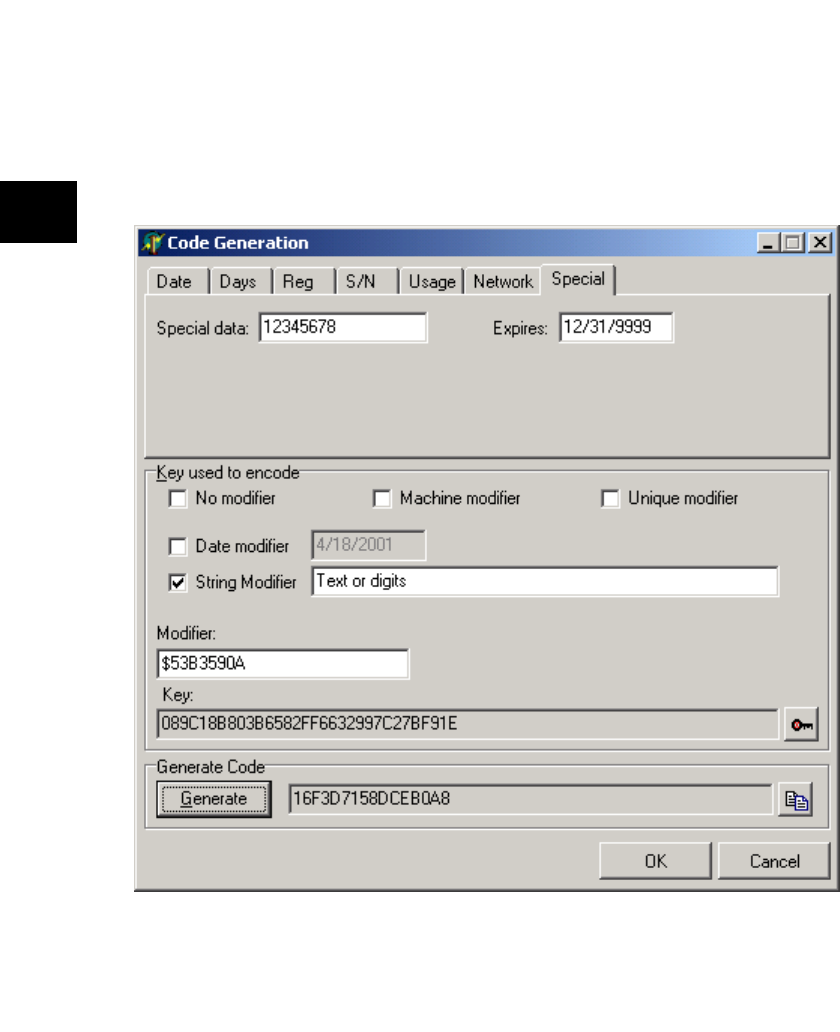
76 Chapter 4: Keys and Release Codes
13
11
10
12
1
9
3
2
8
4
5
7
6
1
1
15
14
17
16
The “Key used to encode” group in the Code Generation dialog box contains information
about the key used to encode the release code. The “Key” edit field contains the key that will
be used to encode the release code. If you need to change the key, use the button to the right
of the edit field to display the Key Maintenance dialog box.
The modifier check boxes, shown in Figure 4.11, determine whether a modifier is used to
sign the key used to encode the release code. A modifier is used to make the key unique.
This can increase security, depending on the type of modifier used. Use of a modifier is not
required. If a modifier is used, the “Modifier” edit field is filled with the generated modifier.
Figure 4.11: The Code Generation dialog box displaying the modifier check boxes.

Generating Release Codes 77
13
11
10
12
1
9
3
2
8
4
7
6
1
1
15
14
17
16
If the “Machine modifier” box is checked, a modifier is created using machine-specific
information. Using this type of modifier restricts use of the application to a specific
computer.
If the “Date modifier” box is checked, a modifier is created using a date. Use this type of
modifier if you require the entry of the date before decoding the release code. You could read
the date from a file, the registry, or require the end-user to enter it. The date used to sign the
key used to decode the release code must be the same one used to sign the key used to
encode the release code.
If the “Unique modifier” box is checked, a modifier is randomly generated. Use this type of
modifier to create a unique key. The modifier should be stored in a file or the registry
because it is not possible to generate the same modifier again.
If the “String modifier” box is checked, a modifier is created using the text contained in the
“String modifier” edit field. Use this type of modifier if you require the entry of text before
decoding the release code.
If none of the boxes are checked, an arbitrary 32-bit value can be entered in the “Modifier”
edit field.
The third group in the Code Generation dialog box contains the Generate button. After you
have supplied all the necessary information (the information you entered in the notebook
page for the appropriate type of release code, the key, and the modifier, if applicable), use the
Generate button to generate the release code. The read-only edit field to the right of the
Generate button is filled with the generated release code. The button to the right of the edit
field can be used to copy the contents of the edit field to the clipboard.
The OK button closes the dialog box and indicates that the entered data and the generated
code are valid. The Cancel button closes the dialog box and indicates that the entered data
and generated code should not be used.
Hierarchy
TComponent (VCL)
TOgMakeCodes (OnGuard)
Properties
About
CodeType KeyFileName
ShowHints
Methods
Execute GetCode GetKey
78 Chapter 4: Keys and Release Codes
13
11
10
12
1
9
3
2
8
4
5
7
6
1
1
15
14
17
16
Reference Section
About property
property About : string
Shows the current version of OnGuard.
About is provided in order that the version of OnGuard can easily be identified should
technical support be needed. In the Object Inspector, display the OnGuard about box by
double-clicking this property or selecting the dialog box button to the right of the property
value.
CodeType property
property CodeType : TCodeType
TCodeType = (ctDate, ctDays, ctRegistration, ctSerialNumber,
ctUsage, ctNetwork, ctSpecial, ctUnknown);
Default: ctDate
CodeType is the type of release code.
If you assign a value to CodeType prior to calling Execute, the corresponding notebook page
is displayed in the Code Generation dialog box (see page Generating Release Codes). After a
successful call to Execute, CodeType contains the type of code that was generated. The
ctUnknown code type is only used internally.
See also: Execute
Execute method
function Execute : Boolean;
Execute displays the Code Generation dialog box.
Use this method to display the Code Generation dialog box so that a release code can be
generated. The dialog box is described on page Generating Release Codes.
If Execute returns True, the Code and CodeType properties contain valid values. Otherwise,
the contents of these properties is unknown.
See also: Code, CodeType
!
!
!

Generating Release Codes 79
13
11
10
12
1
9
3
2
8
4
7
6
1
1
15
14
17
16
GetCode method
procedure GetCode(var Value : TCode);
TCode = packed record
CheckValue : Word; {magic value}
Expiration : Word; {expiration date or 0, if none}
case Byte of
0 : (FirstDate : Word; {for date code}
EndDate : Word);
1 : (Days : Word; {for days code}
LastAccess : Word);
2 : (RegString : LongInt); {for reg code}
3 : (SerialNumber : LongInt); {for serial number code}
4 : (UsageCount : Word; {for usage count code}
LastChange : Word);
5 : (Value : LongInt); {for specail codes}
6 : (NetIndex : LongInt); {for net codes}
end;
GetCode returns the release code generated by the Execute method.
After a successful call to Execute, use GetCode to return to return the selected release code
value.
The code can represent any one of several release code types. Use the CodeType property to
determine which code type was generated.
See also: CodeType, Execute
KeyFileName property
property KeyFileName : string
KeyFileName is the name of the INI file used to store application names and their associated
keys.
If a valid file name is assigned to this property, its contents are displayed when the Key
Maintenance dialog box is displayed.
ShowHints property
property ShowHints : Boolean
Default: False
ShowHints determines whether hints are shown for the TOgMakeCodes dialog boxes.
!
!
!

80 Chapter 4: Keys and Release Codes
13
11
10
12
1
9
3
2
8
4
5
7
6
1
1
15
14
17
16

81
13
11
10
12
1
9
3
2
8
4
5
7
6
1
1
15
14
17
16
Chapter 5: Release Code Components
This chapter discusses the components that implement the different types of release codes.
OnGuard provides the following types of release codes:
• Start and End Date
• Number of Days Used
• Network Metering
• Simple Registration
• Serial Number Registration
• Special Registration
• Usage Count

82 Chapter 5: Release Code Components
13
11
10
12
1
9
3
2
8
4
5
7
6
1
1
15
14
17
16
TOgCodeBase Class
The TOgCodeBase class is the ancestor class for the other components described in this
chapter. It implements several properties and methods that are common for all of its
descendants.
Hierarchy
TComponent (VCL)
TOgCodeBase (OnGuard)
Properties
About
AutoCheck Code
Modifier StoreCode
StoreModifier
Methods
CheckCode IsCodeValid
Events
OnChecked
OnGetKey OnGetCode
OnGetModifier
TOgCodeBase Class 83
13
11
10
12
1
9
3
2
8
4
5
7
6
1
1
15
14
17
16
Reference Section
About property
property About : string
Shows the current version of OnGuard.
About is provided in order that the version of OnGuard can easily be identified should
technical support be needed. In the Object Inspector, display the OnGuard about box by
double-clicking this property or selecting the dialog button to the right of the property
value.
AutoCheck property
property AutoCheck : Boolean
Default: True
AutoCheck determines whether CheckCode is called automatically.
If AutoCheck is True, CheckCode is automatically called after the form containing this
component is loaded. If AutoCheck is False, you are responsible for calling CheckCode to
determine the component status.
See also: CheckCode
CheckCode virtual abstract method
function CheckCode(
Report : Boolean) : TCodeStatus; virtual; abstract;
TCodeStatus = (ogValidCode, ogInvalidCode, ogPastEndDate,
ogDayCountUsed, ogRunCountUsed, ogNetCountUsed, ogCodeExpired);
CheckCode checks for a valid release code.
CheckCode is defined as virtual and abstract, which means that each descendant
component overrides it to provide the necessary code to validate and test the release code
obtained through the Code property. If Report is True, the result of the test is reported by
triggering the OnChecked event. If Report is False, you must check the function result.
!
!
!

84 Chapter 5: Release Code Components
13
11
10
12
1
9
3
2
8
4
5
7
6
1
1
15
14
17
16
CheckCode requires several pieces of information, which it obtains by triggering event
handlers that you define. The normal sequence of events performed by CheckCode is as
follows:
1. Trigger the OnGetKey event to get the key used to encode and decode the release code.
The key should always be embedded in the application as a constant.
2. Trigger the OnGetCode event to get the release code. The release code is normally
stored in the registry or an INI file.
3. Trigger the OnGetModifier event to get the key modifier. The modifier can be stored as
a constant in the application, stored in the registry or INI file, or generated when it is
needed.
4. Apply the modifier to the key.
5. Test the release code to see if it is valid.
6. Test the release code to see if it has expired. The details of this test depend on the type
of release code.
The result of calling CheckCode is one of the following values:
See also: AutoCheck, OnChecked, OnGetCode, OnGetKey, OnGetModifier
Value Description
ogValidCode The release code is valid.
ogInvalidCode The release code is invalid (the internal
integrity check failed).
ogPastEndDate The ending date has past.
ogDayCountUsed The authorized days have been used.
ogRunCountUsed The authorized runs have been used.
ogNetCountUsed The number of authorized users has been
exceeded.
ogCodeExpired The expiration date has been reached.

TOgCodeBase Class 85
13
11
10
12
1
9
3
2
8
4
5
7
6
1
1
15
14
17
16
Code property
property Code : string
Code is the release code.
Code is normally generated by another program, encoded using the application’s key, and
given to the user to enter into the application where it is decoded and validated. The
behavior of the application when a code is entered is entirely up to you, the designer, and is
also determined to some extent by the type of code being used.
Code is published as needed by descendent components.
See also: OnGetCode, StoreCode
IsCodeValid method
function IsCodeValid : Boolean;
IsCodeValid tests to see if the release code is valid.
IsCodeValid calls the CheckCode method and tests its result to see if the release code is
valid. It returns True if the code is valid and False if the code is not valid. Descendent
components decode the release code and test to see if the signature value (the magic value as
defined in the TCode record) is still valid.
You might need to perform additional tests to ensure that the data used to create the release
code was not altered. For example, you could test whether the text string used to create a
Simple Registration release code was altered. Since the string is not part of the release code
(only a number derived from the string is embedded into the code), you cannot compare it
to what is stored in the release code. You must create a temporary release code using the text
string and the same expiration date and then compare the temporary release code to the
stored one. If they don’t match, someone has altered the text string.
See also: CheckCode
Modifier property
property Modifier : LongInt
Modifier is used to sign the key.
If Modifier is equal to 0, the key is not altered. If Modifier is not equal to 0, it is used to sign
the key. Modifier is normally generated as needed, but can be stored on the stream with the
form if the StoreModifier property is True.
See also: OnGetModifier, StoreModifier
!
!
!
86 Chapter 5: Release Code Components
13
11
10
12
1
9
3
2
8
4
5
7
6
1
1
15
14
17
16
OnChecked event
property OnChecked : TCheckedCodeEvent
TCheckedCodeEvent = procedure(
Sender : TObject; Status : TCodeStatus) of object;
OnChecked defines an event handler that is called after the release code is checked.
Sender is the instance of the release code component. Status is the value returned by a call to
CheckCode.
See also: CheckCode
OnGetCode event
property OnGetCode : TGetCodeEvent
TGetCodeEvent = procedure(
Sender : TObject; var Code : TCode) of object;
OnGetCode defines an event handler that is called to get the release code.
Sender is the instance of the release code component. Code is the TCode value associated
with this component. Release codes are normally stored in a file or the registry. In some
cases, the release code can be stored in the resource. To do this, set the StoreCode property
to True.
An example of when you might want to have the code generated and stored with the
application prior to deployment is for an evaluation version of your application that should
operate only for a short period of time. In such a case, you could use an Start/End Date
release code.
See also: Code, StoreCode
OnGetKey event
property OnGetKey : TGetKeyEvent
TGetKeyEvent = procedure(
Sender : TObject; var Key : TKey) of object;
OnChecked defines an event handler that is called to get the key.
Sender is the instance of the release code component.
The key should always be stored as a constant in the application and never stored in the
form, a file, or the registry. Putting the key anywhere except in the application increases the
chances that someone will find and be able to use it to decode the release code.
!
!
!
TOgCodeBase Class 87
13
11
10
12
1
9
3
2
8
4
5
7
6
1
1
15
14
17
16
OnGetModifier event
property OnGetModifier : TGetModifierEvent
TGetModifierEvent = procedure(
Sender : TObject; var Value : LongInt) of object;
OnGetModifier defines an event handler that is called to get the modifier.
Sender is the instance of the release code component. Value is the modifier that is used to
sign the key. Modifier is normally generated as needed, but can be stored on the stream with
the form if the StoreModifier property is True.
See also: Modifier, StoreModifier
StoreCode property
property StoreCode : Boolean
Default: False
StoreCode determines whether the release code is stored in the resource file.
StoreCode is published as needed by descendants.
See also: Code, OnGetCode
StoreModifier property
property StoreModifier : Boolean
Default: False
StoreModifier determines whether the modifier is stored in the resource file.
See also: Modifier, OnGetModifier
!
!
!

88 Chapter 5: Release Code Components
13
11
10
12
1
9
3
2
8
4
5
7
6
1
1
15
14
17
16
TOgDateCode Component
TOgDateCode implements a Start/End Date release code. Use this release code when you
need to limit the amount of time that an application (or specific features of an application)
can be used. Both a start date and an end date are encoded into this release code. This allows
you to detect a change to the computer’s clock that results in a date outside of the date range
or an attempt to alter the registry or INI file entry. If this release code is tested on a date that
is within the range, it is considered valid. Otherwise it is expired.
OnGuard implements a date as the number of days past a base-line date (stored internally as
a small integer). End dates must be after January 1, 1997 because that is the default base-line
date.
The EXDTREG project is an example that uses the TOgDateCode component. The example
project represents a demo form of an application that can be used during a specific period of
time only. A new Start/End Date release code can be entered by using the Enter Code
button. The capability to enter a new end date need not be provided if you do not want to be
able to extend the usable time dynamically. If this is the case, the code can be stored in the
application’s resource rather than in a file or the registry.
A separate program, CODEGEN, is provided to generate the release code for this and other
example projects.
Hierarchy
TComponent (VCL)
!TOgCodeBase (OnGuard). . . . . . . . . . . . . . . . . . . . . . . . . . . . . . . . . . . . . . . . . . . . . . . . . . . . . . . 82
TOgDateCode (OnGuard)
Properties
!About
!AutoCheck
!Code
!Modifier
!StoreCode
!StoreModifier
Methods
!CheckCode GetValue !IsCodeValid
Events
!OnChecked
!OnGetKey
!OnGetCode
!OnGetModifier

TOgDateCode Component 89
13
11
10
12
1
9
3
2
8
4
5
7
6
1
1
15
14
17
16
Reference Section
GetValue method
function GetValue : TDateTime;
GetValue returns the end date embedded in the release code.
The returned value is a VCL TDateTime value.
!

90 Chapter 5: Release Code Components
13
11
10
12
1
9
3
2
8
4
5
7
6
1
1
15
14
17
16
TOgDaysCode Component
TOgDaysCode implements a Number of Days Used release code. This release code limits the
number of days that an application (or specific features in an application) can be used. The
application can be run an unlimited number of times each day.
The days do not need to be consecutive. For example, if an application is limited to 2 days, it
can be run as many times as required on a given day, not used again for a month, and then
run several more times on another day. If the user attempts to run the application on a third
day, the release code is reported as invalid. Your application can then refuse to run, or take
any other appropriate action.
A Number of Days Used release code must be stored in a file or the registry because it must
be updated each day the application is run. See the Decrease method (on page 107) and the
AutoDecrease property (on page 92) for a description of the process used to update the
release code.
TOgDaysCode allows you to specify an expiration date in addition to the number of days. If
the release code is tested after the expiration date, it is reported as invalid. The default value
for the expiration date is 31 December 9999, which essentially means that the code will
never expire.
See the EXDYREG project for an example application that uses a Number of Days Used
release code. A separate program, CODEGEN, is provided to generate the release code for
this and other example projects.

TOgDaysCode Component 91
13
11
10
12
1
9
3
2
8
4
5
7
6
1
1
15
14
17
16
Hierarchy
TComponent (VCL)
!TOgCodeBase (OnGuard) . . . . . . . . . . . . . . . . . . . . . . . . . . . . . . . . . . . . . . . . . . . . . . . . . . . . 82
TOgDaysCode (OnGuard)
Properties
!About
!AutoCheck
AutoDecrease
!Code
!Modifier
!StoreCode
!StoreModifier
Methods
!CheckCode
Decrease GetValue
!IsCodeValid
Events
OnChangeCode
!OnChecked
!OnGetKey
!OnGetCode
!OnGetModifier

92 Chapter 5: Release Code Components
13
11
10
12
1
9
3
2
8
4
5
7
6
1
1
15
14
17
16
Reference Section
AutoDecrease property
property AutoDecrease : Boolean
Default: True
AutoDecrease determines whether the day count value is automatically decreased each day
the application is run.
If AutoDecrease is True, the day count embedded in the release code is automatically
decreased by one each day the application is run. This is accomplished by calling the
Decrease method. If AutoDecrease is False, you must call the Decrease method manually
whenever necessary.
See also: Decrease
Decrease method
procedure Decrease;
Decrease reduces the day count value stored in the release code.
Performing this action requires several vital pieces of information, which are normally
obtained by triggering several event handlers that you define. The normal sequence of
events performed by Decrease is as follows:
1. Trigger the OnGetKey event to get the key used to encode and decode the release code.
The key should always be embedded in the application as a constant.
2. Trigger the OnGetCode event to get the release code. The release code is normally
stored in the registry or an INI file.
3. Trigger the OnGetModifier event to get the key modifier. The modifier can be stored as
a constant in the application, stored in the registry or INI file, or generated when it is
needed.
4. Apply the modifier to the key.
5. Test the code to see if it is valid.
6. Decrease the day count by one if it has not already been decreased today.
7. Trigger the OnChangeCode event to store the changed release code.
See also: OnChangeCode, OnGetCode, OnGetKey, OnGetModifier
!
!

TOgDaysCode Component 93
13
11
10
12
1
9
3
2
8
4
5
7
6
1
1
15
14
17
16
GetValue method
function GetValue : LongInt;
GetValue returns the day count embedded in the release code.
The value returned is the number of days remaining.
OnChangeCode event
property OnChangeCode : TChangeCodeEvent
TChangeCodeEvent = procedure(
Sender : TObject; Code : TCode) of object;
OnChangeCode defines an event handler that is called when a release code changes.
This event is fired after the release code is changed via a call to Decrease, either directly or
automatically (if the AutoDecrease property is True).
Sender is the instance of the release code component. Code is the new release code value.
The release code should be saved in a file or the registry.
See also: AutoDecrease, Decrease
!
!

94 Chapter 5: Release Code Components
13
11
10
12
1
9
3
2
8
4
5
7
6
1
1
15
14
17
16
TOgNetCode Component
TOgNetCode implements a Network Metering release code. This release code limits the
number of concurrent instances of an application that are allowed to run on a network. It
does this through the use of a network release code and a Network Access File. The use of a
network release code is no different than other release codes, but there are additional
maintenance issues related to the network file that your application must handle.
The Network Access File contains access slots for each authorized use of the application.
Each access slot (much like the network release code itself) contains encoded information
that makes it virtually impossible to alter successfully.
When you call the CheckCode method, the Network Access File is checked to ensure that
there is room for an additional user. If there is an available slot, a special code (encoded
using the same key that was used to encode the code) is written to the access file for that
access slot and then that record is locked. Utility routines are provided to correct or recreate
the network access file in case it becomes damaged.
Your application can create or recreate the Network Access File automatically or require that
it be managed using an external maintenance program. Since some users will turn off or
reboot their computers before exiting a program, access slots can become invalid and
require correction. OnGuard provides routines to detect and correct this, as well as routines
to detect the number of active users, the number of authorized access slots, and the number
of invalid access slots.
See the EXNET project for an example that uses a Network Metering release code. A
separate program, CODEGEN, is provided to generate the release code for this and other
example projects.

TOgNetCode Component 95
13
11
10
12
1
9
3
2
8
4
5
7
6
1
1
15
14
17
16
Hierarchy
TComponent (VCL)
!TOgCodeBase (OnGuard) . . . . . . . . . . . . . . . . . . . . . . . . . . . . . . . . . . . . . . . . . . . . . . . . . . . . 82
TOgNetCode (OgNetWrk)
Properties
!About
ActiveUsers
!AutoCheck
!Code
FileName
InvalidUsers
MaxUsers
!Modifier
!StoreCode
!StoreModifier
Methods
!CheckCode
IsRemoteDrive
!IsCodeValid
ResetAccessFile
Events
!OnChecked
!OnGetKey
!OnGetCode
!OnGetModifier

96 Chapter 5: Release Code Components
13
11
10
12
1
9
3
2
8
4
5
7
6
1
1
15
14
17
16
Reference Section
ActiveUsers read-only property
property ActiveUsers : LongInt
ActiveUsers is the current number of users running the application.
FileName property
property FileName : string
FileName is the name of the Network Access File.
The Network Access File is used to determine if another instance of the application is
authorized. If the file specified in FileName does not exist, it is created and initialized during
the call to CheckCode.
InvalidUsers read-only property
property InvalidUsers : LongInt
InvalidUsers is the number of invalid user access slots in the Network Access File.
Invalid slots are created when the user does not exit the application normally. Use
ResetAccessFile to fix these invalid slots.
See also: ResetAccessFile
IsRemoteDrive method
function IsRemoteDrive(const ExePath : string) : Boolean;
IsRemoteDrive determines whether ExePath resides on a remote disk drive.
You can use IsRemoteDrive to determine if your application is being run from a remote disk
drive. Only the drive information passed in ExePath is used.
!
!
!
!

TOgNetCode Component 97
13
11
10
12
1
9
3
2
8
4
5
7
6
1
1
15
14
17
16
MaxUsers read-only property
property MaxUsers : LongInt
MaxUsers is the maximum number of concurrent users of the application.
ResetAccessFile method
function ResetAccessFile : Boolean;
ResetAccessFile resets the invalid slots in the Network Access File.
If the operation is successful, the return value is True. If the file could not be opened for
write access, the return value is False.
Calling ResetAccessFile does not effect active users. Since their access slots are in use, they
are assumed to be valid and are not reset.
!
!

98 Chapter 5: Release Code Components
13
11
10
12
1
9
3
2
8
4
5
7
6
1
1
15
14
17
16
TOgRegistrationCode Component
TOgRegistrationCode implements a Simple Registration release code. This release code ties
the user’s name, company name, or some other textual data to the registration code. A
scenario for using a Simple Registration release code would be one where the user contacts
you to register their copy of the application and supplies their name. You could provide a
registration dialog that prompts the user for their name and then displays a special number
that the user reads to you. You use that number to sign the key used to encode the release
code and then give the release code to the user. The user enters the release code into the
dialog to complete the process.
TOgRegistrationCode doesn’t perform any special tests like most of the other release code
components. It is used primarily to indicate that the application has been registered.
The textual data and the registration code can be stored in the registry or an INI file so that
they can be verified each time that the program is started. Displaying the registration
information in some prominent location in the application is sometimes sufficient to deter
unauthorized users.
TOgRegistrationCode allows you to specify an expiration date in addition to the registration
value. If the release code is tested after the expiration date, it is reported as invalid. The
default value for the expiration date is 31 December 9999, which essentially means that the
code will never expire.
See the EXRGREG project for an example application that uses a Simple Registration release
code. A separate program, CODEGEN, is provided to generate the release code for this and
other example projects.

TOgRegistrationCode Component 99
13
11
10
12
1
9
3
2
8
4
5
7
6
1
1
15
14
17
16
Hierarchy
TComponent (VCL)
!TOgCodeBase (OnGuard) . . . . . . . . . . . . . . . . . . . . . . . . . . . . . . . . . . . . . . . . . . . . . . . . . . . . 82
TOgRegistrationCode (OnGuard)
Properties
!About
!AutoCheck
!Code
!Modifier
RegString
!StoreCode
!StoreModifier
StoreRegString
Methods
!CheckCode !IsCodeValid
Events
!OnChecked
!OnGetKey
!OnGetCode
!OnGetModifier OnGetRegString
100 Chapter 5: Release Code Components
13
11
10
12
1
9
3
2
8
4
5
7
6
1
1
15
14
17
16
Reference Section
OnGetRegString event
property OnGetRegString : TGetRegStringEvent
TGetRegStringEvent = procedure(
Sender : TObject; var Value : string) of object;
OnGetRegString defines an event handler that is called to get the registration string.
Sender is the instance of the release code component. Value is the registration string used to
create the release code.
RegString property
property RegString : string
RegString is the registration string used to create the release code.
See also: OnGetRegString
StoreRegString property
property StoreRegString : Boolean
Default: True
StoreRegString determines whether the registration string value is stored as a resource at
design time.
If StoreRegString is True, the value of RegString is stored in the resource file along with the
form. If StoreRegString is False, RegString is not stored and you must supply an
OnGetRegString event handler so that the registration string can be retrieved when
required.
See also: OnGetRegString, RegString
!
!
!

TOgSerialNumberCode Component 101
13
11
10
12
1
9
3
2
8
4
5
7
6
1
1
15
14
17
16
TOgSerialNumberCode Component
TOgSerialNumberCode implements a Serial Number Registration release code. This release
code ties a serial number to the release code. This release code is very similar to the Simple
Registration release code. The only difference is in the data that is used as part of the code
generation process. The Serial Number Registration release code uses a number instead of a
text string.
TOgSerialNumberCode doesn’t perform any special tests like most of the other release code
components. It is used primarily to indicate that the application has been registered.
TOgSerialNumberCode allows you to specify an expiration date in addition to the serial
number. If the release code is tested after the expiration date, it is reported as invalid. The
default value for the expiration date is 31 December 9999, which essentially means that the
code will never expire.
See the EXSNREG project for an example application that uses a Serial Number Registration
release code. A separate program, CODEGEN, is provided to generate the release code for
this and other example projects.
Hierarchy
TComponent (VCL)
!TOgCodeBase (OnGuard) . . . . . . . . . . . . . . . . . . . . . . . . . . . . . . . . . . . . . . . . . . . . . . . . . . . . 82
TOgSerialNumberCode (OnGuard)
Properties
!About
!AutoCheck
!Code
!Modifier
!StoreCode
!StoreModifier
Methods
!CheckCode GetValue !IsCodeValid
Events
!OnChecked
!OnGetKey
!OnGetCode
!OnGetModifier

102 Chapter 5: Release Code Components
13
11
10
12
1
9
3
2
8
4
5
7
6
1
1
15
14
17
16
Reference Section
GetValue method
function GetValue : LongInt;
GetValue returns the serial number embedded in the release code.
The value returned is the serial number that was used when the release code was created.
!

TOgSpecialCode Component 103
13
11
10
12
1
9
3
2
8
4
5
7
6
1
1
15
14
17
16
TOgSpecialCode Component
TOgSpecialCode implements a Special Registration release code. This release code is based
on a special value (a long integer) that can be used to indicate anything you like. One
possible use is to treat the LongInt value as a bit mask, each bit representing one feature in
the application. If a bit is set, that feature is enabled; otherwise it is disabled.
TOgSpecialCode doesn’t perform any special tests like most of the other release code
components. Its use is entirely determined by you.
TOgSpecialCode allows you to specify an expiration date in addition to the special
information. If the release code is tested after the expiration date, it is reported as invalid.
The default value for the expiration date is 31 December 9999, which essentially means that
the code will never expire.
See the EXSPREG project for an example application that uses a Special Registration release
code. A separate program, CODEGEN, is provided to generate the release code for this and
other example projects.
Hierarchy
TComponent (VCL)
!TOgCodeBase (OnGuard) . . . . . . . . . . . . . . . . . . . . . . . . . . . . . . . . . . . . . . . . . . . . . . . . . . . . 82
TOgSpecialCode (OnGuard)
Properties
!About
!AutoCheck
!Code
!Modifier
!StoreCode
!StoreModifier
Methods
!CheckCode GetValue !IsCodeValid
Events
!OnChecked
!OnGetKey
!OnGetCode
!OnGetModifier

104 Chapter 5: Release Code Components
13
11
10
12
1
9
3
2
8
4
5
7
6
1
1
15
14
17
16
Reference Section
GetValue method
function GetValue : LongInt;
GetValue returns the special information embedded in the release code.
The returned value is a LongInt. The interpretation of the returned value is determined
entirely by you.
!

TOgUsageCode Component 105
13
11
10
12
1
9
3
2
8
4
5
7
6
1
1
15
14
17
16
TOgUsageCode Component
TOgUsageCode implements a Usage Count release code. This release code limits the
number of times an application can be executed.
A Usage Count release code must be stored in the INI file or the registry because it must be
updated each time the application is run. Your application is responsible for storing the
changed value. See the Decrease method (see page 107) and the AutoDecrease property (on
page 92) for a description of the process used to update the release code.
Unfortunately, it is easy for a user to reset a usage counter by simply reinstalling the
application or restoring the registry or INI file. It is recommended to use an expiration date
in conjunction with a usage count to increase the security of your application. You can foil
attempts to reset the usage counter by selecting an expiration date that allows sufficient time
to use all of the available runs. For example, if the usage count is set to 30 and you expect at
least one use per day, use an internal expiration date code that expires 45 or 60 days after the
application is built. This prevents the user from repeatedly reinstalling to reset the usage
counter.
TOgUsageCode allows you to specify an expiration date in addition to the usage count. If the
release code is tested after the expiration date, it is reported as invalid. The default value for
the expiration date is 31 December 9999, which essentially means that the code will never
expire.
See the EXUSREG for an example application that uses a Usage Count release code. A
separate program, CODEGEN, is provided to generate the release code for this and other
example projects.

106 Chapter 5: Release Code Components
13
11
10
12
1
9
3
2
8
4
5
7
6
1
1
15
14
17
16
Hierarchy
TComponent (VCL)
!TOgCodeBase (OnGuard). . . . . . . . . . . . . . . . . . . . . . . . . . . . . . . . . . . . . . . . . . . . . . . . . . . . . . . 82
TOgUsageCode (OnGuard)
Properties
!About
!AutoCheck
AutoDecrease
!Code
!Modifier
!StoreCode
!StoreModifier
Methods
!CheckCode
Decrease GetValue
!IsCodeValid
Events
OnChangeCode
!OnChecked
!OnGetKey
!OnGetCode
!OnGetModifier

TOgUsageCode Component 107
13
11
10
12
1
9
3
2
8
4
5
7
6
1
1
15
14
17
16
Reference Section
AutoDecrease property
property AutoDecrease : Boolean
Default: True
AutoDecrease determines whether the usage count value is automatically decreased each
time the application is run.
If AutoDecrease is True, the usage count value embedded in the release code is automatically
decreased by one each time the application is run. When the usage count is reduced to zero,
the release code is expired. If AutoDecrease is False, you must call the Decrease method
manually whenever necessary.
See also: Decrease
Decrease method
procedure Decrease;
Decrease reduces the usage count value stored in the release code.
Performing this action requires several vital pieces of information, which are normally
obtained by triggering several event handlers that you define. The normal sequence of
events performed by Decrease is:
1. Trigger the OnGetKey event to get the key used to encode and decode the release code.
The key should always be embedded in the application as a constant.
2. Trigger the OnGetCode event to get the release code. The code is normally stored in
the registry or an INI file.
3. Trigger the OnGetModifier event to get the key modifier. The key modifier can be
stored as a constant in the application, stored in the registry or INI file, or generated
when it is needed.
4. Apply the modifier to the key.
5. Test the release code to see if it is valid.
6. Decrease the usage count by one.
7. Trigger the OnChangeCode event to store the changed release code.
See also: OnChangeCode, OnGetCode, OnGetKey, OnGetModifier,
!
!

108 Chapter 5: Release Code Components
13
11
10
12
1
9
3
2
8
4
5
7
6
1
1
15
14
17
16
GetValue method
function GetValue : LongInt;
GetValue returns the usage count embedded in the release code.
The value returned is the number of runs remaining.
OnChangeCode event
property OnChangeCode : TChangeCodeEvent
TChangeCodeEvent = procedure(
Sender : TObject; Code : TCode) of object;
OnChangeCode defines an event handler that is called when a release code changes.
This event is fired after the release code is changed via a call to Decrease, either directly or
automatically (if the AutoDecrease property is True).
Sender is the instance of the release code component. Code is the new release code value.
The release code should be saved in the INI file or the registry.
See also: AutoDecrease, Decrease
!
!

109
13
11
10
12
1
9
3
2
8
4
5
7
6
1
1
15
14
17
16
Chapter 6: Detecting Changes to an EXE
Misuse of your application can occur not only when an unauthorized user attempts to run
it, but also when someone attempts to change your application. This could be an attempt to
change the title of a form, the label on a button, or even changes made by some type of virus.
OnGuard provides the capability for you to protect your application against these types of
piracy.
The program file integrity envelope is a mechanism that allows your application to detect
changes to the EXE file. This mechanism is implemented in the TOgProtectExe component.
It does this by storing the size of and a special CRC value for the executable file within the
executable file itself. Each time the application is run, these values are recomputed and
compared to the stored values. A mismatch indicates that the EXE file has been altered.

110 Chapter 6: Detecting Changes to an EXE
13
11
10
12
1
9
3
2
8
4
5
7
6
1
1
15
14
17
16
TOgProtectExe Component
The TOgProtectExe component allows you to detect changes to your EXE file. The size of
the EXE file and a 32-bit CRC (Cyclical Redundancy Check) value are recorded in the EXE
file and checked each time the application is run.
See the EXPROT and STAMPEXE projects for examples that use this technique.
Hierarchy
TComponent (VCL)
TOgProtectExe (OgProExe)
Properties
About AutoCheck CheckSize
Methods
CheckExe StampExe UnStampExe
Events
OnChecked
TOgProtectExe Component 111
13
11
10
12
1
9
3
2
8
4
7
6
1
1
15
14
17
16
Reference Section
About property
property About : string
Shows the current version of OnGuard.
About is provided in order that the version of OnGuard can easily be identified should
technical support be needed. In the Object Inspector, display the ONGuard about box by
double-clicking this property or selecting the dialog button to the right of the property
value.
AutoCheck property
property AutoCheck : Boolean
Default: False
AutoCheck determines whether CheckExe is called automatically.
If AutoCheck is True, CheckExe is called after the form containing this component is loaded.
If AutoCheck is False, you are responsible for calling CheckExe to determine the status of the
executable file.
See also: CheckExe
!
!

112 Chapter 6: Detecting Changes to an EXE
13
11
10
12
1
9
3
2
8
4
5
7
6
1
1
15
14
17
16
CheckExe method
function CheckExe(Report : Boolean) : TExeStatus;
TExeStatus = (
exeSuccess, exeSizeError, exeIntegrityError, exeNotStamped);
CheckExe tests to see if the executable file was altered.
If Report is True, the result of the test is reported by triggering the OnChecked event. If
Report is False, you must check the function result.
The result of calling CheckExe is one of the following values:
See also: OnChecked
CheckSize property
property CheckSize : Boolean
Default: True
CheckSize determines whether the size of the executable is tested.
If CheckSize is True, the size and the CRC of the executable file are tested. If CheckSize is
False, only the CRC of the executable file is tested.
OnChecked event
property OnChecked : TCheckedExeEvent
TCheckedExeEvent = procedure(
Sender : TObject; Status : TExeStatus) of object;
OnChecked defines an event handler that is called after the executable is checked.
Sender is the instance of the release code component. Status is the value returned by a call to
CheckExe.
See also: CheckExe
Value Description
exeSuccess The executable file has not changed.
exeSizeError The size of the executable file changed.
exeIntegrityError One or more bytes in the executable changed.
exeNotStamped The executable is not stamped with the CRC and size
information.
!
!
!

TOgProtectExe Component 113
13
11
10
12
1
9
3
2
8
4
7
6
1
1
15
14
17
16
StampExe method
function StampExe (
const FileName : string ; EraseMarker : Boolean) : Boolean;
StampExe marks the executable program with its size and a CRC value.
StampExe searches for a special marker that is used to mark the record where the size and
CRC value are stored, calculates the executable’s size and CRC, and writes that information
back to the record. If EraseMarker is True, the special marker used to locate the record is
erased.
This method is not used by the TOgProtectExe component. It is provided so that you can
use it to stamp the application you want to protect. You can write a simple application that
uses StampExe to stamp the application you want to protect. Or you can use the STAMPEXE
example project (which uses the StampExe method) to stamp the application you want to
protect.
See also: UnStampExe
UnStampExe method
function UnStampExe (const FileName : string) : Boolean;
UnStampExe reverses the effect of a call to StampExe.
UnStampExe can only be used if the special marker used to locate the CRC record was not
erased by StampExe.
This method is not used by the TOgProtectExe component. It is provided so that you can
use it unstamp an application.
See also: StampExe
!
!

114 Chapter 6: Detecting Changes to an EXE
13
11
10
12
1
9
3
2
8
4
5
7
6
1
1
15
14
17
16

115
13
11
10
12
1
9
3
2
8
4
5
7
6
1
1
15
14
17
16
Chapter 7: Single Instance Applications
A single instance application is one that refuses to allow a second or subsequent instance of
itself to be run. This can be done by simply ignoring the request, but is normally followed by
making the first instance of the application the active application. The two routines in the
OgFirst unit provide these capabilities for both 16-bit and 32-bit applications.

116 Chapter 7: Single Instance Applications
13
11
10
12
1
9
3
2
8
4
5
7
6
1
1
15
14
17
16
OgFirst Unit
The OgFirst unit provides routines that allow you to detect when a second instance of an
application is being executed and to force the previous instance of the application to become
the active application.
IsFirstInstance determines if the application is being run the first time. If a previous instance
of the application exists, IsFirstInstance returns False. Then you can use
ActivateFirstInstance to locate the application’s main window and make it the active
window.
Use IsFirstInstance in the main body of the project file (prior to doing anything else), to
detect a previous instance of the application. If there is a previous instance, you can switch
to it by using ActivateFirstInstance.
Here is an example from the EXINST project:
begin
if IsFirstInstance then begin
Application.CreateForm(TMyForm, MyForm);
Application.CreateForm(TForm2, Form2);
Application.Run;
end else begin
{$IFDEF Win32}
ActivateFirstInstance;
{$ELSE}
ActivateFirstInstance('Test', 'TMyForm');
{$ENDIF}
end;
end.
After calling ActivateFirstInstance, the application should exit. Do not create any forms or
call Application.Run.
See the EXINST project for an example that implements a single instance application.
Procedures
ActivateFirstInstance IsFirstInstance

OgFirst Unit 117
13
11
10
12
1
9
3
2
8
4
7
6
1
1
15
14
17
16
Reference Section
ActivateFirstInstance procedure
procedure ActivateFirstInstance; {32-bit version}
procedure ActivateFirstInstance(const MainWindowCaption,
MainWindowClass : string); {16-bit version}
ActivateFirstInstance locates an application’s main window and then makes it the active
window.
ActivateFirstInstance forces the window with the specified caption and class to the top of the
Z-order and gives it the focus. This method is normally called after detecting that a second
instance of the application was executed and subsequently halted. Calling
ActivateFirstInstance gives the appearance that running the application a second time
succeeded.
The 32-bit version of ActivateFirstInstance does not take any parameters and automatically
locates the application’s main window. The 16-bit version of this routine requires that the
class name and caption of the main form be passed as arguments.
IsFirstInstance function
function IsFirstInstance : Boolean;
IsFirstInstance determines whether this is the first instance of a program.
This method should be called prior to creating any forms so that the application can be
terminated if necessary. IsFirstInstance returns True if this is the first instance of the
application.
If IsFirstInstance returns False, you can call ActivateFirstInstance to activate the prior
instance of the application.
!
!

118 Chapter 7: Single Instance Applications
13
11
10
12
1
9
3
2
8
4
5
7
6
1
1
15
14
17
16

i
13
11
10
12
Identifier Index
9
1
1
15
14
17
16
Subject Index Subject Index
Subject index
A
ActivateFirstInstance 117
ActiveUsers 96
ApplyModifierToKey 63
AutoCheck (TOgCodeBase) 83
AutoCheck (TOgProtectExe) 111
AutoDecrease (TOgDaysCode) 92
AutoDecrease (TOgUsageCode) 107
C
Case-sensitive text key 58
CheckCode 83
CheckExe 112
CheckSize 112
Code (TOgCodeBase) 85
CodeType 78
CRC 110
D
Decrease (TOgDaysCode) 92
Decrease (TOgUsageCode) 107
Demonstration programs 11
E
End date release code 88
Event handlers
check executable 112
get key 86
get modifier 87
get registration string 100
get release code 86
release code change 93, 108
release code checked 86
Example programs 11
Execute (TOgMakeCodes) 78
Execute (TOgMakeKeys) 63
F
FileName 96
G
GenerateDateModifier 64
GenerateKey 64
GenerateMachineModifier 64
GenerateRandomKey 65
GenerateStringModifier 65
GenerateUniqueModifier 65
GetValue (TOgDateCode) 89
GetValue (TOgDaysCode) 93
GetValue (TOgSerialNumberCode) 102
GetValue (TOgSpecialCode) 104
GetValue (TOgUsageCode) 108
H
Hardware requirements 10
Help
on-line 14
Hints for dialogs 66, 79
I
InvalidUsers 96
IsCodeValid 85
IsFirstInstance 117
IsRemoteDrive 96

13
11
10
12
Identifier Index
1
1
15
17
16
Subject IndexSubject Index
ii Subject index
K
Key
apply modifier 63
creating 63, 64
date modifier 64
definition of 57
file name 66, 79
hints for dialogs 66
machine modifier 64
random 65
string modifier 65
type 58, 66
unique modifier 65
KeyFileName (TOgMakeCodes) 79
KeyFileName (TOgMakeKeys) 66
KeyType (TOgMakeKeys) 66
M
MaxUsers 97
Modifier
definition of 57
property 85
store 87
Modifier (TOgCodeBase) 85
N
Nag screen 8
Naming conventions 14
Network Access File 94
Network Metering release code
active users 96
definition of 94
invalid users 96
maximum users 97
Network Access File name 96
remote disk drive 96
reset Network Access File 97
Number of Days Used release code
automatically decrease 92
day count 93
decrease 92
Number of Days used release code
definition of 90
O
OgFirst 116
OnChangeCode (TOgDaysCode) 93
OnChangeCode (TOgUsageCode) 108
OnChecked (TOgCodeBase) 86
OnChecked (TOgProtectExe) 112
OnGetCode 86
OnGetKey 86
OnGetModifier 87
OnGetRegString 100
P
Program file integrity envelope 109
Protect executable
automatically check 111
check for changes 112
check size 112
definition of 109
stamp executable 113
unstamp executable 113
Protection strategies 8
R
Random keys 58
RegString 100
Release code
automatic checking 83
checking 83
definition of 57, 67
end date 88

13
11
10
12
Identifier Index
9
1
1
15
14
17
16
Subject Index Subject Index
Subject index iii
Release code (continued)
generating 78
hints for dialogs 79
network metering 94
number of days used 90
property 85
serial number registration 101
simple registration 98
special registration 103
start/end date 88
store 87
type 78
usage count 105
validity 85
Requirements, hardware and software 10
ResetAccessFile 97
S
Serial number registration release code 101
ShowHints (TOgMakeCodes) 79
ShowHints (TOgMakeKeys) 66
Signing the key 57
Signing the release code 57
Simple Registration release code
definition of 98
registration string 100
store registration string 100
Single instance application
activate first instance 117
check for first instance 117
definition of 9, 115
Single machine authorization 8
Software requirements 10
Special registration release code 103
StampExe 113
Standard text key 58
Start/End date release code 88
StoreCode 87
StoreModifier 87
StoreRegString 100
T
TChangeCodeEvent (TOgDaysCode) 93
TChangeCodeEvent (TOgUsageCode) 108
TCheckedCodeEvent 86
TCheckedExeEvent 112
TCodeStatus 83
TCodeType 78
TExeStatus 112
TGetCodeEvent 86
TGetKeyEvent 86
TGetModifierEvent 87
TGetRegStringEvent 100
TKeyType (TOgMakeKeys) 66
TOgCodeBase 82
TOgDateCode 88
TOgDaysCode 90
TOgMakeCodes 67
TOgMakeKeys 58
TOgNetCode 94
TOgProtectExe 110
TOgRegistrationCode 98
TOgSerialNumberCode 101
TOgSpecialCode 103
TOgUsageCode 105
U
UnStampExe 113
Usage Count release code
automatically decrease 107
decrease 107
definition of 105
