Manual Monitor
User Manual: Pdf
Open the PDF directly: View PDF ![]() .
.
Page Count: 117 [warning: Documents this large are best viewed by clicking the View PDF Link!]

USHAHIDI PLATFORM V3.4 MANUAL
About Ushahidi
About this Manual
Overview of Ushahidi Platform v3.0
What does Ushahidi Do?
Who is Ushahidi For?
What's New in Version 3?
Technical Specifications
1. Installing Ushahidi
1.1 Installing on Heroku
1.2 Installing with Vagrant + a NodeJS Dev server
1.2.1 Installing the API
Getting the API Code
Prerequisites
Preparing the Server
1.2.2 Installing the client
Getting the client code
Client Dependencies
Install, Build and run a local dev server
1.2.3 Logging in the first time
1.3 Installing on Linux
1.3.1 Installing the API
Getting the API code
System Requirements
Set up the database
Set up URL Rewrites
Enable writing to the logs, cache, and upload
directories 1.3.2 Installing dependencies
1.3.3 Extra: Customizing configuration
1.3.4 Installing the client
Getting the client code
Client dependencies
Building the client
1.3.5 Configure nginx or apache
1.3.6 Logging in the first time
1.4 Upgrading Ushahidi
1.4.1 Updating the client
1.4.2 Updating the API
2. Setting up a deployment
2.1 Upgrading/Downgrading your deployment plan
3. Configuring your deployment
1

3.1 Accessing your deployment
3.1.1 Log in
3.1.2 Create an account
3.1.2.1 Your Account details
3.1.2.2 Notifications
3.1.3 Logging out
3.2 General Settings
3.3 Surveys
3.3.1 Adding Surveys
3.3.1.1 Adding Tasks
3.3.1.1.1 Adding fields
3.3.1.1.2 Editing fields
3.3.1.1.3 Deleting fields
3.3.1.2 Editing Tasks
3.3.1.3 Deleting Tasks
3.3.2 Editing surveys
3.3.3 Deleting surveys
3.4 Data Sources
3.4.1 Email
3.4.2 FrontlineSMS {PENDING}
3.4.3 Nexmo
3.4.4 SMSSync
3.4.5 Twilio
3.4.6 Twitter
3.5 Categories
3.5.1 Adding Categories
3.5.2 Editing Categories
3.5.3 Deleting Categories
3.6 Actors
3.6.1 Adding Categories
3.6.2 Editing Categories
3.6.3 Deleting Categories
3.7 Sources
3.7.1 Adding Categories
3.7.2 Editing Categories
3.7.3 Deleting Categories
4. Managing People on your
deployment
4.1 Roles
4.1.1 Add Role
4.1.2 Edit Role
4.1.3 Delete Role
4.2 Users
4.2.1 Adding new users
4.2.2 Editing users
2
4.2.3 Changing User roles
4.2.4 Deleting users
5. Managing Data in your
deployment
5.1 Viewing Posts
5.2 Adding Posts
5.3 Editing Posts
5.4 Publishing Posts
5.5 Deleting Posts
5.6 Importing Data
5.7 Exporting Data
6. Modes for visualizing and managing data on your
deployment
6.1 Map Mode
6.2 Timeline Mode
6.3 Activity Mode
7. Analysing Data on your deployment
7.1 Filters
7.2 Saved Searches
7.2.1 Creating a saved search
7.2.2 Updating a saved search
7.2.3 Adding a notification to a saved search
7.2.4 Editing a saved search
7.2.5 Deleting a saved search
7.3 Collections
7.3.1 Creating new collections
7.3.2 Adding Posts to collections
7.3.3 Adding notifications to collections
7.3.4 Editing Collections
7.3.5 Deleting Collections
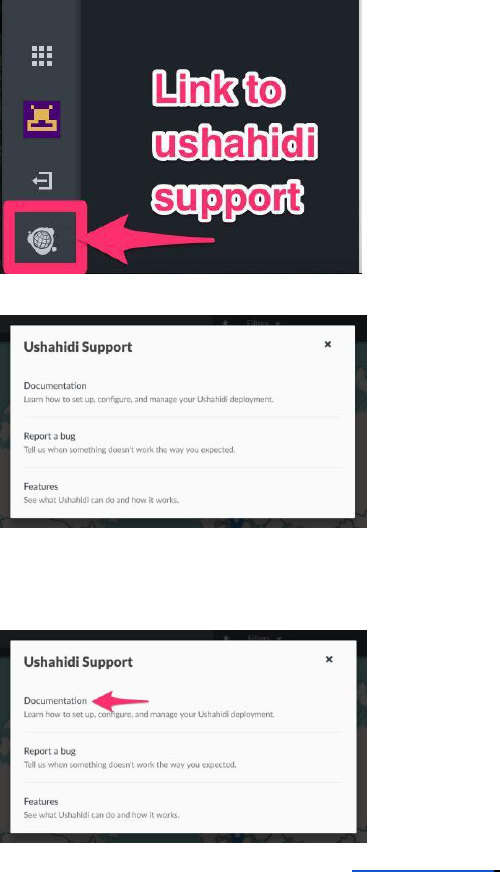
8. Additional Links
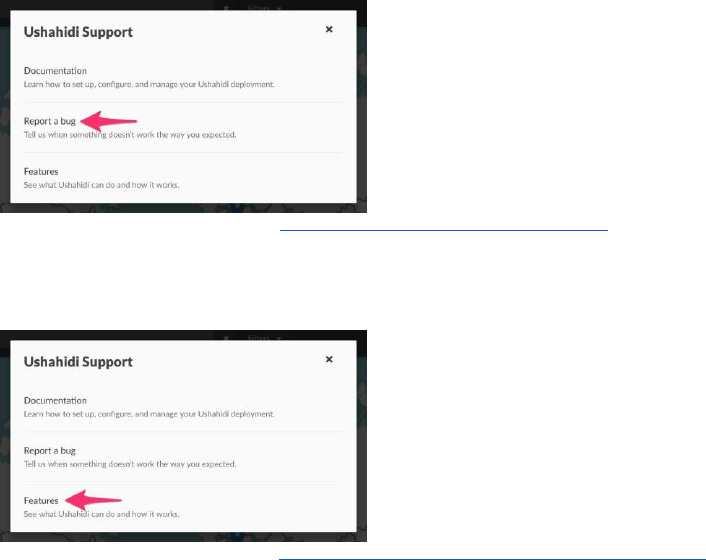
8.1 Documentation
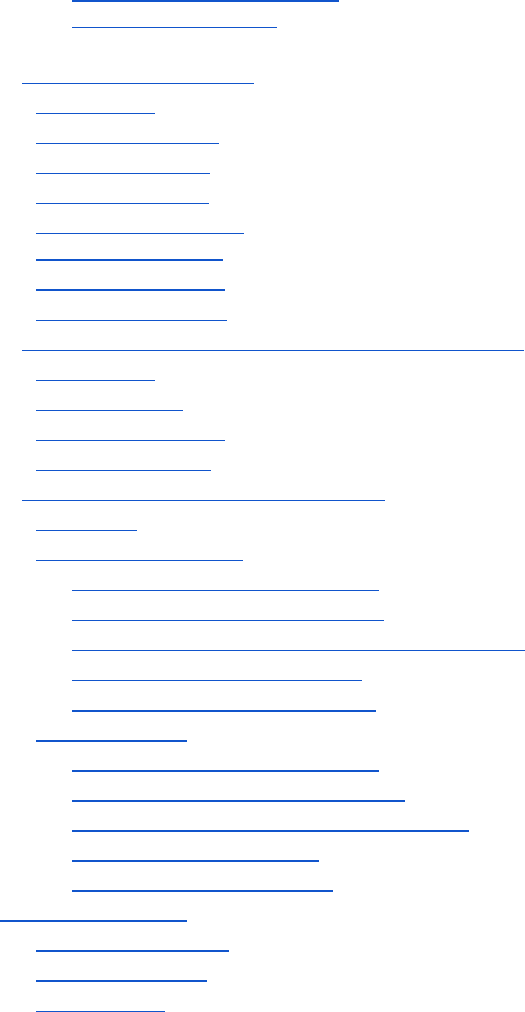
8.2 Report a bug
8.3 Features
3

About Ushahidi
Ushahidiis a non-profit technology company whose mission is to change the way information flows in
the world. Founded in Nairobi, Kenya during the 2008 election violence and human rights abuses,
Ushahidi means "testimony" in Swahili. The company builds digital tools and run programs to give
marginalized people a voice. Since 2008, the Ushahidi Platform has grown to be the world-class open-
source tool for human rights activism, crisis response, and transparency.
Global Mission
Over the past seven years, the Ushahidi Platform has been deployed more than 100,000 times in more
than 159 countries, in 45 local languages, with 7 million testimonies, reaching nearly 20 million people.
The platform has become a replicable solution for people worldwide, from Syrians reporting on human
rights abuses at Syriatracker.crowdmap.comto tracking human rights abuses in Nepal at
Nepalmonitor.org.
People around the world need a way to share their voice during a critical situation, to ask for
and generate support, and to bring transparency to their issues. At the same time, organizations
and governments lack understanding of what is happening on the ground; they need a way to
make sense of how to respond effectively and quickly. These are just a handful of the
thousands of impactful uses of the Ushahidi platform to amplify people’s voices.
Innovation is born here, ecosystems created.
Ushahidi has built six open-source software products: the Ushahidi Platform, SMSsync,
Crowdmap, SwiftRiver, CrisisNet, and RollCall. Ushahidi has run numerous large on-the-
ground programs that utilize its software and expertise, including the Haiti earthquake
response, the Uchaguzi election program, the Resilience Network Initiative, and Making All
Voices Count - a grand challenge for development.
In addition, Ushahidi has successfully catalyzed six organizations that work across its collective
vision to create technologies that provide access, change the way information flows in the
world, and improve decision-making. Together these organizations form the Ushahidi
Ecosystem, an association, that works together to focus on how technology can and should be
used for doing good in the world to solve global problems like humanitarian response &
democracy (Ushahidi), technology-enabled humanitarian volunteering (Standby Task Force),
open data as a global resource (Popily), making things to create jobs and economic growth
(Gearbox), women in tech, job creation and empowerment (AkiraChix), technology built by and
for the developing world (iHub), and access to information (BRCK).
4

About this Manual
This manual gives you a step by step overview of how to set up an Ushahidi version 3.0
deployment, and how to make full use of the features the platform offers.You can:-
● Download the software at no cost and host it on your own servers
from https://github.com/ushahidi/platform.
● sign up for a deployment on http://ushahidi.com. There are currently three different
plans available for you to choose from, which you can review on our plans page here.
For groups running social impact projects unable to afford the current pricing model, you
can apply for a free responder plan here.
This manual will show you how to install the Ushahidi platform, or sign up for an ushahidi
account, customise it to meet the needs of your project, manage people and incoming data, as
well as visualise and analyse your data. It is meant to be a comprehensive learning guide for
brand new users of the platform, as well as a reference point for those who may have some
prior experience using the platform.
If you have any problems and need some guidance or help, reach out to us via:-
● Our chat feature on http://ushahidi.com
● Live Developer chat rooms on IRC/Gitter/Hipchat(posting on any one of these channels
will post on all of them simultaneously)
● Ushahidi forums
Bumped into a bug on the platform or have a feature you would like to request? Share your
feedback with us via our github issues page.
Looking to contribute to the Ushahidi platform? Visit our contribute pagefor directions on how
to get started.
This guide has been updated based on content created on the initial support documentation by Sophie
Shepherd, and new content on previously undocumented features by members of the Ushahidi team.
Feedback is welcome and will be incorporated into the guide.
5
Overview of Ushahidi Platform v3.0
What does Ushahidi Do?
● Ushahidi is a tool for collecting, managing, and visualizing data.
● Data can be collected from anyone, anytime, anywhere by SMS, email, web, Twitter, and RSS.
● Posts can be managed and triaged with filters and workflows.
● Data can be managed in different modes : on a map, in a timeline, or as a visualization.
Who is Ushahidi For?
Anyone can use Ushahidi, but traditionally it has been a tool used by Crisis Responders,
Human Rights Reporters, and Citizens & Governments (such as election monitoring or
corruption reporters). We also serve environmental mappers, asset monitoring, citizen
journalism, international development, and many others.
What's New in Version 3?
The biggest change in v3 is the unification of the administrative interface with Modes of
action. There is now a single interface. volunteers can now work directly on the data in
modes, with permissions on what any particular person can see being set by role-based
Permissions. While the guide will go into a full description of each part of the interface, this
introduction gives a sample of what is to come:
● Reports are now posts: The name change from reports to posts is a recognition
that data collected might not just be a traditional ‘report’ of an event.
● Surveys: Posts are no longer a fixed form with built in fields. You can customize them by
creating many surveys, with different stages and custom fields to collect the data you need.
● Posts now have tasks:Each post is now made up of a number of tasks. These can be made
required (or not) before the post is published. This lets you build the workflow you need.
● One interface for all posts: We no longer have separate views from managing
posts and viewing posts.
● Messages directly as ‘posts’: The old ‘messages ’ views are gone. New SMS or twitter
messages now come in directly as ‘unknown’ posts, meaning they don’t yet belong to a
survey, that are ready to be structured, completed, and published quickly and easily.
● Collections:Aggregate and save a group of posts, share them via a URL link share
● Saved Searches:You can create any search you want, save it, it continues to aggregate
information, and the check again later for updates. Saved Searches are available from your
deployment’s main menu. Sign up for notifications on your saved search to stay up to date as
the posts that are most important to you are submitted to the deployment.
6
● Visualization:Every data set can be viewed as a map, list, bar chart or timeline. Just
select the time frame and variables you want to compare at any time.
● Customize:Add a description, create a new survey, configure how data flows through
your deployment, and more - all from your deployment’s settings.
● Security and Permissions:Controlling who has access to system functions and data is a critical
aspect of every crowdsourcing platform. Ushahidi v3 is arranged around a role-based security
model that conveys permissions to each class of user. These permissions can be customized.
The code is also written in a way that allows for clients to more easily extend certain software
classes to meet their needs. You can also make your deployment completely password
protected, visible only to users with login credentials.
● History of Posts and Messages
○ In the process of turning an initial report from the field into a verified, published
report, many people may touch the data. Someone may translate it, another
may geolocate it, and a third may verify it against other data. Sometimes,
additional information needs to get associated with the report, such as an
image, document, or other set of messages.
○ To facilitate the aggregation and review of this network of data around the data,
we built a history for every Post and Message. Your team can now add its
commentary, ancillary documents to each Post and Message.
● Workflows
○ The management of reports through its lifecycle requires management of the
state of the report, especially when multiple teams are involved in moving reports
from unverified, untranslated states to verified, geolocated reports. Workflows
support this management.
○ More than 90% of the work in an Ushahidi deployments happens behind the
scenes. Unsurprisingly, most of our development efforts went to supporting this
(often invisible) process.
Technical Specifications
Better development stack
Ushahidi 3.x is built on a modern PHP stack: dependencies are managed with composer, we’re
using Kohana 3 but phasing that out, and we’ve isolated the core logic of the platform
standalone Entity and Usecase classes.
The user interface of Ushahidi 3.x is now a separate app (the client) built purely in JS, HTML
+ CSS using AngularJS and a collection of other libraries. Again this uses a modern stack,
with a build pipeline using gulp and browserify.
What’s new (and improved)?
● Dependencies are properly managed and easier to update or replace needed.
● We’re using our own API to build the app, it gets first class support.
7

● You can work on just the UI without delving into the API code
● Modern libraries mean they’re still being supported, we don’t have the burden of
supporting legacy libraries ourselves.
Code is easier to customize
● It’s more structured making it easier to find what you want
● It doesn’t repeat itself so a change can be made in one place, not need to be
copied everywhere else
● UI is isolated to the client, allowing work on just the UI without having to delve into the
API code
The stack
● Back-end: Linux,PHP,Apache/Nginx,MySQLor PostgreSQL
● Front-end: AngularJS,Javascript,Html,CSS.Built with NodeJSand Browserify.Using Leaflet for
mapping, and a collection of other frontend libraries
8
1. Installing Ushahidi
Ushahidi can be installed on several operating systems. We have different instructions
depending on what type of user you are.
Please note that we currently DO NOT RECOMMEND INSTALLATION ON WINDOWS OR
MAC! Just trying it out
● Installing on Heroku
● Install with Vagrant + a NodeJS Development Server
Installing in Production
● Installing on Linux
Getting set up for development
● Install with Vagrant + a NodeJS Development Server
1.1 Installing on Heroku
Deploying onHerokuisgood way to test out the platform quickly. Its also a viable option for running a
production deployment (though this could be expensive depending on your traffic needs).
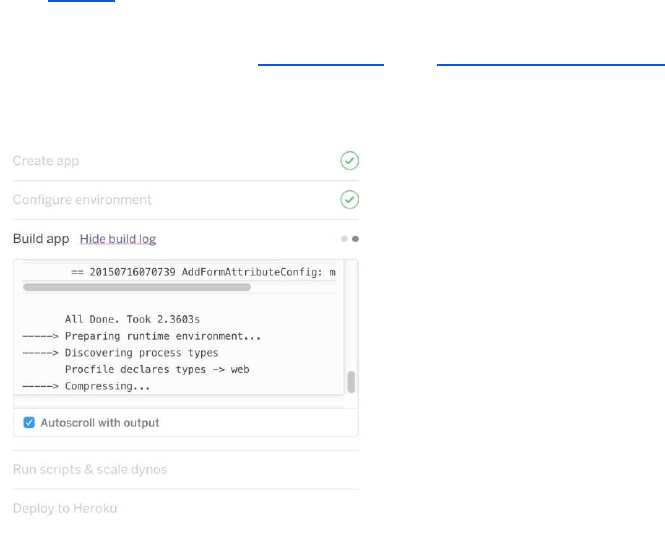
● First deploy the API with thelatest releaseor thelatest development code.Ifyou haven't used
heroku before, you'll be asked to sign up. Pick an App name for your deployment (or let heroku
pick one for you), then hit Deploy for free. You will need to wait while it deploys.
Confirm your deployment went ok by clicking "View". You should see a block of
JSON something like:
9
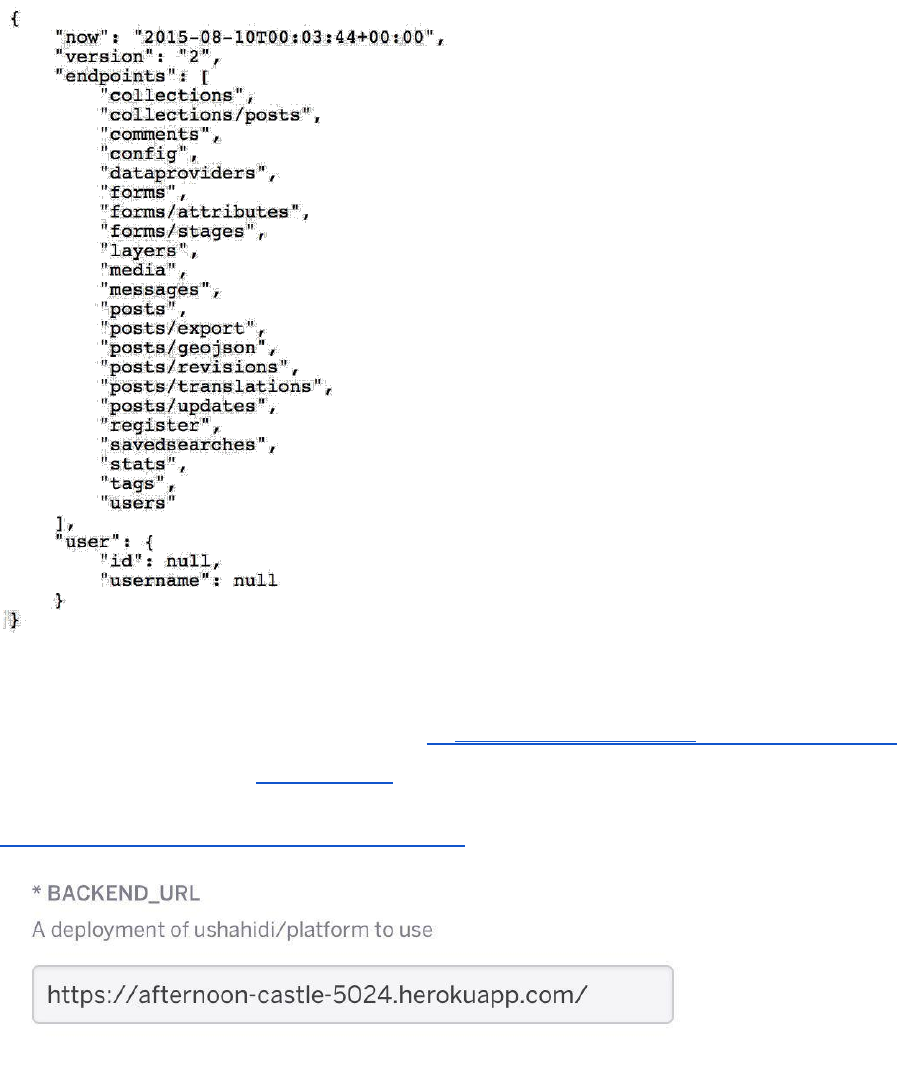
Take note of the URL of the created app (ie: https://afternoon-castle-5024.herokuapp.com/)
● Deploy the client with thelatest releaseor the latest development code.Make sure you
use the same version as you did for the API. Again, Pick an App namefor your
deployment. Set Backend URLto the URL of the API app you just created (ie:
https://afternoon-castle-5024.herokuapp.com/)
***Important: make sure you don't include the trailing slash
Leave other config as-is, and hit Deploy for free. You may need to wait (the client takes much
longer to deploy). When it's finished, click View and check out your new deployment.
10

● Log in to your new deployment. By default there is a single user, username: admin &
password: admin
1.2 Installing with Vagrant + a NodeJS Dev server
1.2.1 Installing the API
Getting the API Code
First, you will need a copy of the source code, which lives in our Github repository:
git clonehttps://github.com/ushahidi/platform.git
Note: if you're getting set up for development, you might want tofork the repositoryfirst.
Once you have the code, the next step is to prepare a web server.
Prerequisites
● Vagrant
● Ruby
If you already use Vagrant, check the settings in theVagrantfileand make sure the IP addresswon't
conflict with your existing VMs.
Preparing the Server
Before we run vagrant we need to get some puppet modules. We do this with librarian puppet:
gem install puppet librarian-puppet
librarian-puppet install
You'll need toget a github tokenthen replace XXXX below with that token
Then you can bring up the vagrant server and provision it:
export github_token = "XXXX"
vagrant up && vagrant provision
Note: If you encounter an error related to Puppet during the vagrant provision, you can run
the following steps:
vagrant destroy -f
vagrant box update
vagrant up && vagrant provision
11

This should set up a server, and install all the dependencies too.
Go to192.168.33.110to check the API is up and running. You should see some JSON with
an API version, endpoints and user info.
The vagrant set up uses a 64 bit VM so you may need to enable 64 bit virtualization on your host machine.
1.2.2 Installing the client
Getting the client code
First, you will need a copy of the source code, which lives in our Github repository:
git clonehttps://github.com/ushahidi/platform-client.git
README. If you have any trouble check those instructions first.
Client Dependencies
First you'll need nodejs or io.js installed, npm takes care of the rest of our dependencies.
● nodejs v0.10 or v0.12 or io.js v1.2
Install, Build and run a local dev server
● Clone therepo
git clonehttps://github.com/ushahidi/platform-client.git
Note: if you're getting set up for development, you might want tofork the repositoryfirst.
● Navigate to project root
cd platform-client
● Install Build Requirements
npm install -g gulp
● Install Packages
npm install
This will install both NPM and Bower dependencies! No separatebower install command
is required.
● Set up build options. Create a .envfile, you'll need to point BACKEND_URLat an instance of the
platform api(Ifyou followed the vagrant instructions above that'll be: http://192.168.33.110)
NODE_SERVER=true
BACKEND_URL=http://192.168.33.110
● Run gulp
gulp
● You should now have a local development server running onhttp://localhost:8080
12

1.2.3 Logging in the first time
The default install creates a user admin with password admin. Once logged in this user can
create further user accounts or give others admin permissions too.
1.3 Installing on Linux
1.3.1 Installing the API
Getting the API code
First, you will need a copy of the source code, which lives in our Github repository:
git clonehttps://github.com/ushahidi/platform.git
Once you have the code, the next step is to prepare a web server.
System Requirements
To install the platform on your computer/server, the target system must meet the
following requirements:
● PHPversion 5.4.0 or greater
○ The following php extensions enabled: curl, gd, imap, json, mcrypt, mysqlnd (optional)
● Composer
● MySQLdatabase version 5.5 or greater (PostgreSQL support planned)
● Apache2.2+ or nginx
Set up the database
To create a database
● First login to MySQL as root.
mysql -u root -p
Using the `-p`is only required when your MySQL configuration requires it.
You may need to use the `-h` option to specify `localhost`or `127.0.0.1`if you are
unable to connect.
● Next, create a new user and database for Ushahidi. The username and database can be
anything; we will use `ushahidi`for both in this example:
CREATE DATABASE ushahidi_db;
GRANT ALL ON ushahidi_db.* to ushahidi_user@localhost IDENTIFIED BY 'ushahidi-
db-password'; quit;
● Now create a .envconfig file in the base of repository. Make sure that the
database, username, and password match the database you just created.
13

DB_HOST=localhost
DB_NAME=ushahidi_db
DB_TYPE=MySQLi
DB_USER=ushahidi_user
DB_PASS=ushahidi-db-password
Set up URL Rewrites
Rename `httpdocs/template.htaccess` to `httpdocs/.htaccess` (for Apache) to enable rewriting
of all non-existent files to `index.php`.
If you are unable to enable rewriting, then you'll need to customize the init settings.
● Copy the `application/config/init.php` file into `application/config/environments/development/`
(create this directory if it doesn't exist).
● Edit init.php and set `index_file` to `"index.php"` to include index.php in your URLs
A NOTE ON URLS, DOCROOTS AND BASE_URL
Typically, Ushahidi is run under a separate virtual host / domain name. Be sure to make
`platform/httpdocs/` the `DocumentRoot` (for Apache) or `root` (for nginx) setting in your
virtual host. If you are running Ushahidi via http://localhost/ then the `base_url` will be
http://localhost/platform/httpdocs/
Enable writing to the logs, cache, and upload directories
The webserver will need write access to logs, cache and upload directories. To do this run:
% chmod 0777 application/logs application/cache application/media/uploads
OR
% chown www-data 0777 application/logs application/cache application/media/uploads
It's generally better to use `chown` to set the owner of the directories to the user the web
server runs as, rather than making them globally writable.
1.3.2 Installing dependencies
We use Composerto manage server side dependencies. Once you have installed composer,
you can run the update script with:
bin/update
Whenever the repository is updated using git pull,run the update script to ensure that
your installation stays updated!
14

If you are updating a production deployment, you will want to avoid installing
developer dependencies (testing tools, etc) by using the "deploy" option:
bin/update --production
1.3.3 Extra: Customizing configuration
Base config files are in application/config/.
You can add per-environment config overrides in `application/config/environments/`.
The environment is switched based on the `KOHANA_ENV` environment variable.
1.3.4 Installing the client
Getting the client code
First, you will need a copy of the source code, which lives in our Github repository:
% git clonehttps://github.com/ushahidi/platform-client.git
Client dependencies
First you'll need nodejs or io.js installed, npm takes care of the rest of our dependencies.
● nodejs v0.10 or v0.12 or io.js v1.2
○ We recommend using NodeJS builds fromNodeSourceor usingNVM
● Build tools for building native addons from npm:
○ Debian users install the `build-essential` package
○ Fedora users install `gcc-c++` and `make`
● nginx or apache2
Building the client
● Clone the repo
git clonehttps://github.com/ushahidi/platform-client.git
Note: if you're getting set up for development, you might want to fork the repositoryfirst.
● Navigate to project root
cd platform-client
● Install Build Requirements
npm install -g gulp
● Install Packages
npm install
15

This will install both NPM and Bower dependencies! No separate `bower
install` command is required.
● Set up build options. Create a `.env` file, you'll need to point BACKEND_URLat an
instance of theplatform api
BACKEND_URL=http://myapi.server/
● Run gulp
gulp build
You should now have a client build in server/www.
1.3.5 Configure nginx or apache
● Nginx:
○ Copy the virtual host config from server/nginx-site.conf into your nginx conf
dir (/etc/nginx or /etc/nginx/sites-enabled)
○ Edit the config:
■ Set server_nameto whatever domain you plan to use
■ Replace root /var/wwwwith the path to server/www
ie. platform-client/server/www
○ Include the config in your nginx.conf (usually located in /etc/nginx.conf) by adding
the following include /etc/nginx/ushahidi-site.conf
○ Restart nginx
○ Load the new vhost in a browser
● Apache2:
○ Copy server/rewrite.htaccess to server/www/.htaccess
○ Create a new apache vhost and point the docroot atserver/www
○ Restart apache
○ Load the new vhost in a browser
1.3.6 Logging in the first time
The default install creates a user admin with password admin. Once logged in this user can
create further user accounts or give others admin permissions too.
16
1.4 Upgrading Ushahidi
1.4.1 Updating the client
From your local repository fetch the latest code and run `npm install` to update your modules:
git pull
npm install
1.4.2 Updating the API
From your local repository fetch the latest code and run `bin/update` or `bin/update --
production` if you are running on a production environment:
git pull
bin/update
OR
bin/update --production
17
2. Setting up a deployment
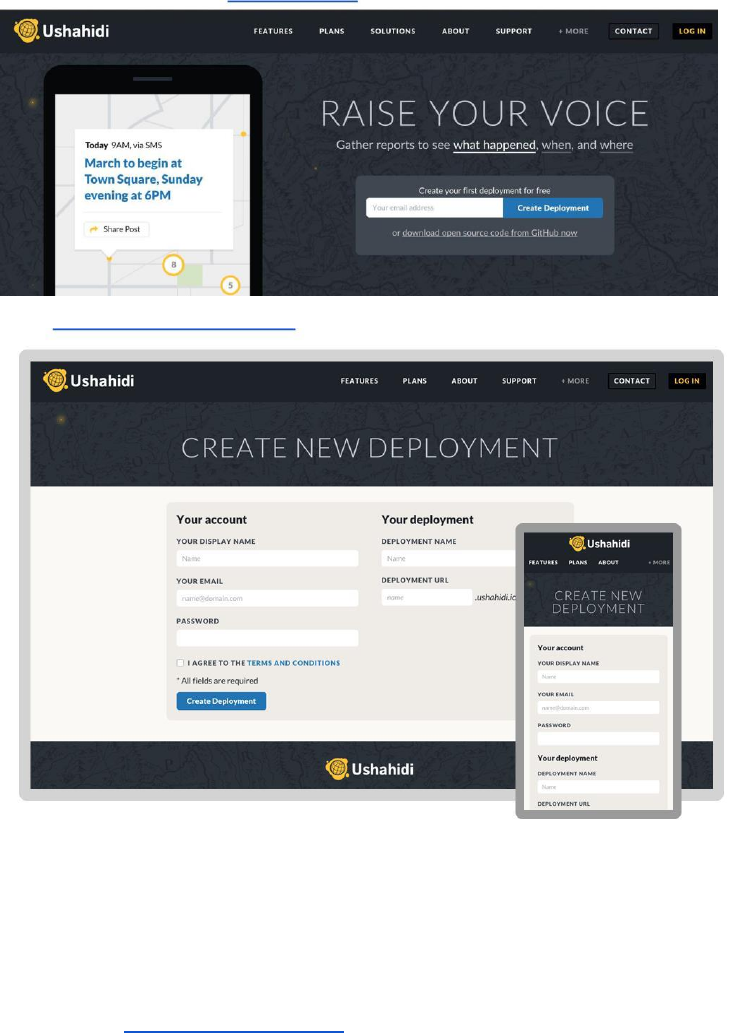
You can create a new deployment in two ways:-
● From the homepage on ushahidi.com
● Or at http://ushahidi.io/create
● Fill out your account details:Enter your Name, email address and set a secure
password that will be used to access this deployment.
● Fill out your deployment details:-
○ Deployment Name:You can give your deployment any name
○ Deployment URL:Each deployment will have a unique web address. No two
deployments can have the same web address. Once created, this CANNOT
be changed, so be sure to countercheck the web address set is one you’re
okay having permanently.
● Agree to our Terms and Conditions
● Once you’re done, click on “Create Deployment”
18
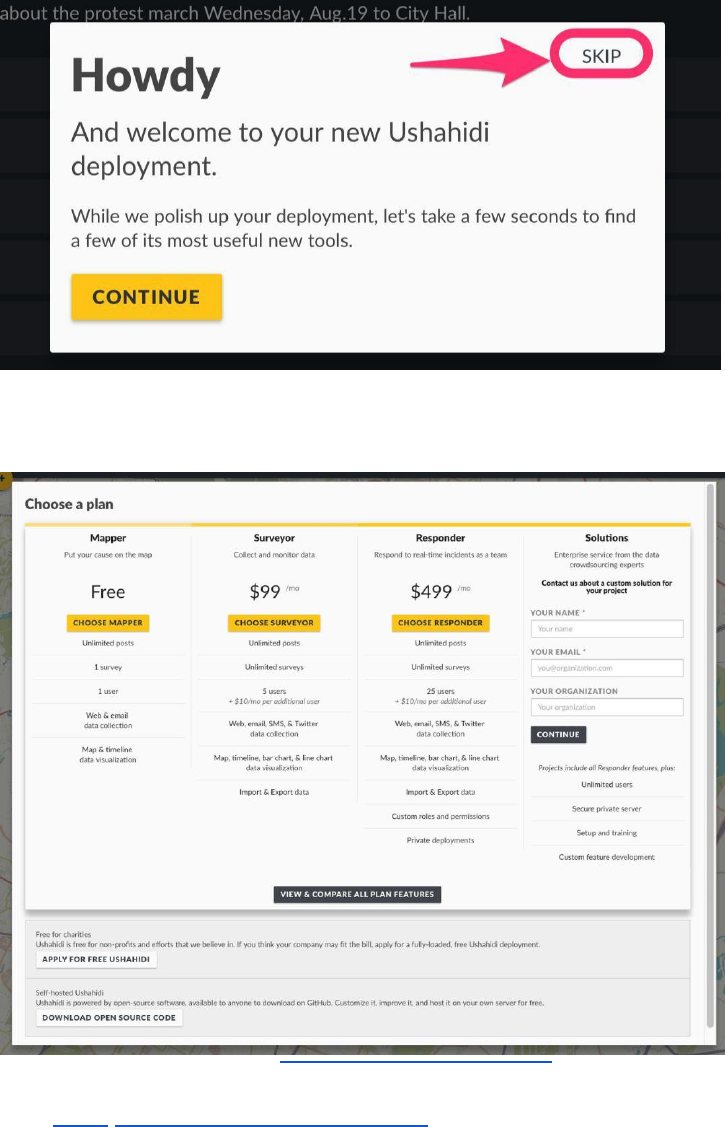
● You will be taken on a brief tour of the user interface and main features of Ushahidi. If
you’d like to skip this tour, click on “Skip” at any time.
● After the tour, you will be prompted to choose a plan from a list. Select one of the
options provided for you.
You can dive deeper into the full list of plan features hereto help you choose a plan that
will meet your needs. If you work for a grassroots organization that can’t afford a paid
plan, apply for a free Responder plan here.
● If you select the free Mapper plan, your deployment will build within a couple of minutes,
and you’ll see your deployment name at the top.
19
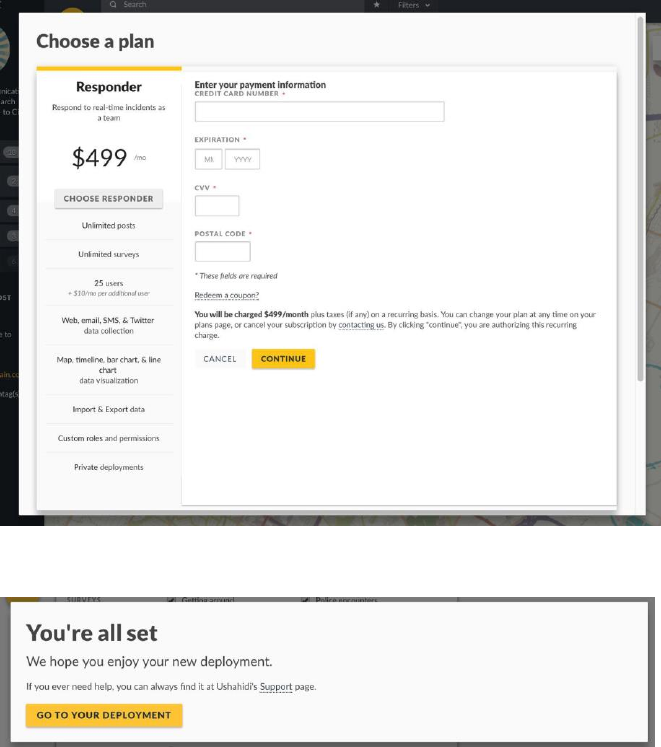
● If you select a paid plan, e.g Surveyor or Responder, you’ll need to do the following:-
● Enter your credit card details and click on continue
● After validation and successful payment, your deployment will be set up and
available for you to use in a couple of minutes.
20

2.1 Upgrading/Downgrading your deployment plan
If you’re subscribed to one of our plans on ushahidi and would like to upgrade to another
available plan:-
● Log into your deployment
● Click on Settings
● Click on Plan.
● On the list of all available plans, click on the one you would like to upgrade to e.g Choose
Surveyor,or Choose Responder
21
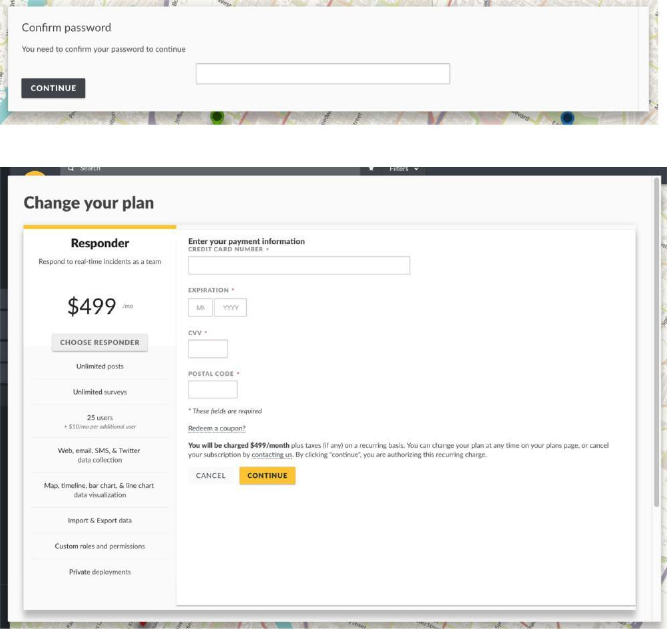
● On selection of the plan you’d like to upgrade to, you’ll have to confirm your password
before proceeding and click on continue.
● Enter your credit card details and click on continue
● After validation and successful payment, your deployment will be upgraded to your new
plan in a couple of minutes!
NB:You can downgrade your deployment at any time by following the same process described above.
22
3. Configuring your deployment
One of the first things you should do as the admin of your new deployment, is customize certain
settings based on the project you’re working on. This section describes how to change your general
and map settings, as well as how to configure data sources, manage surveys and categories.
3.1 Accessing your deployment
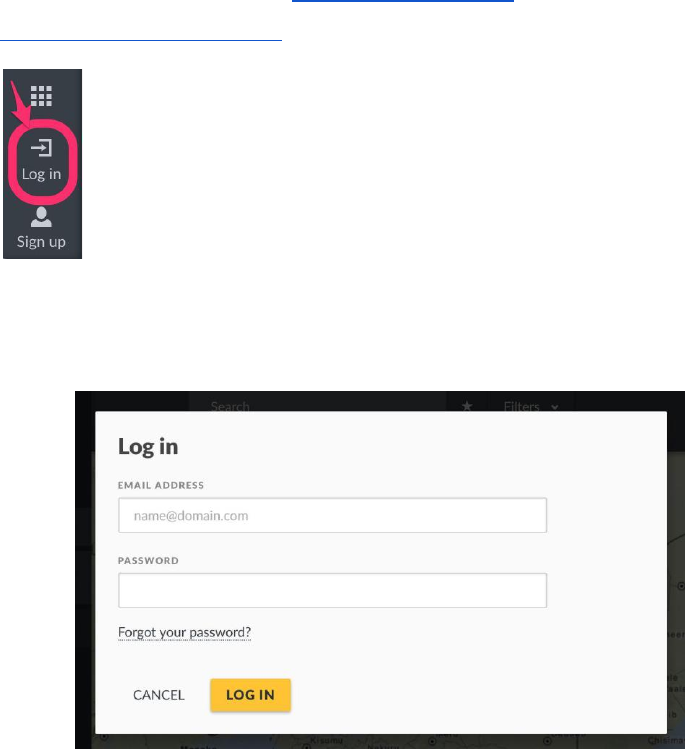
3.1.1 Log in
If your deployment website is www.yourdomain.com,you should be able to login via
http://yourdomain.com/login,or by clicking on the Log inlink on the bottom left hand corner of
your deployment as illustrated below.
● For Open Source deployments, the default install will create a user admin, with
password admin. Be sure to edit this user’s password once you’re logged in.
● For ushahidi.io deployments, enter the email address and password you used to register
your deployment, and the password
NB: You can use EITHER an email address OR username with a corresponding
password to log into your deployment.
23
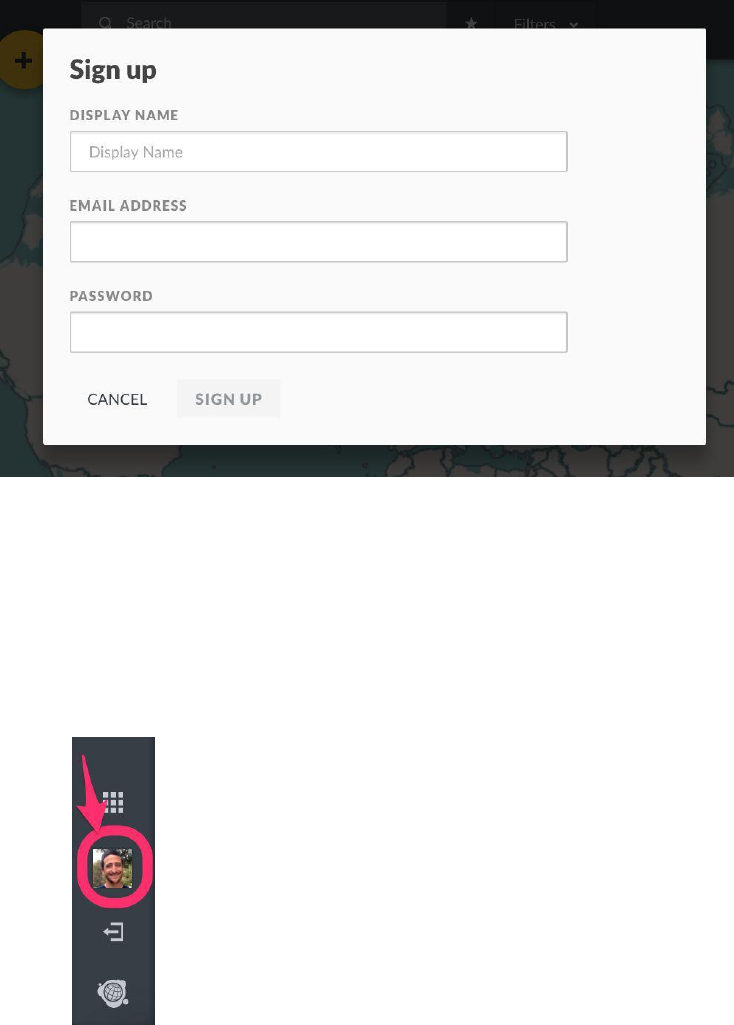
3.1.2 Create an account
If you don’t have an account already, you can create one by clicking on Sign Upand filling
in the required details.
You’ll will be able to log in and perform basic actions on the platform, but won’t have much
privilege within the platform until an administrator upgrades your access level.
3.1.2.1 Your Account details
Once you’re logged in, you can access and change your account details at any time. To do so
● Click on your account favicon at the bottom left hand corner of your deployment
as illustrated below.
● A pop up will appear on your screen. Make changes to your profile as desired, then click on
Save & Close
24
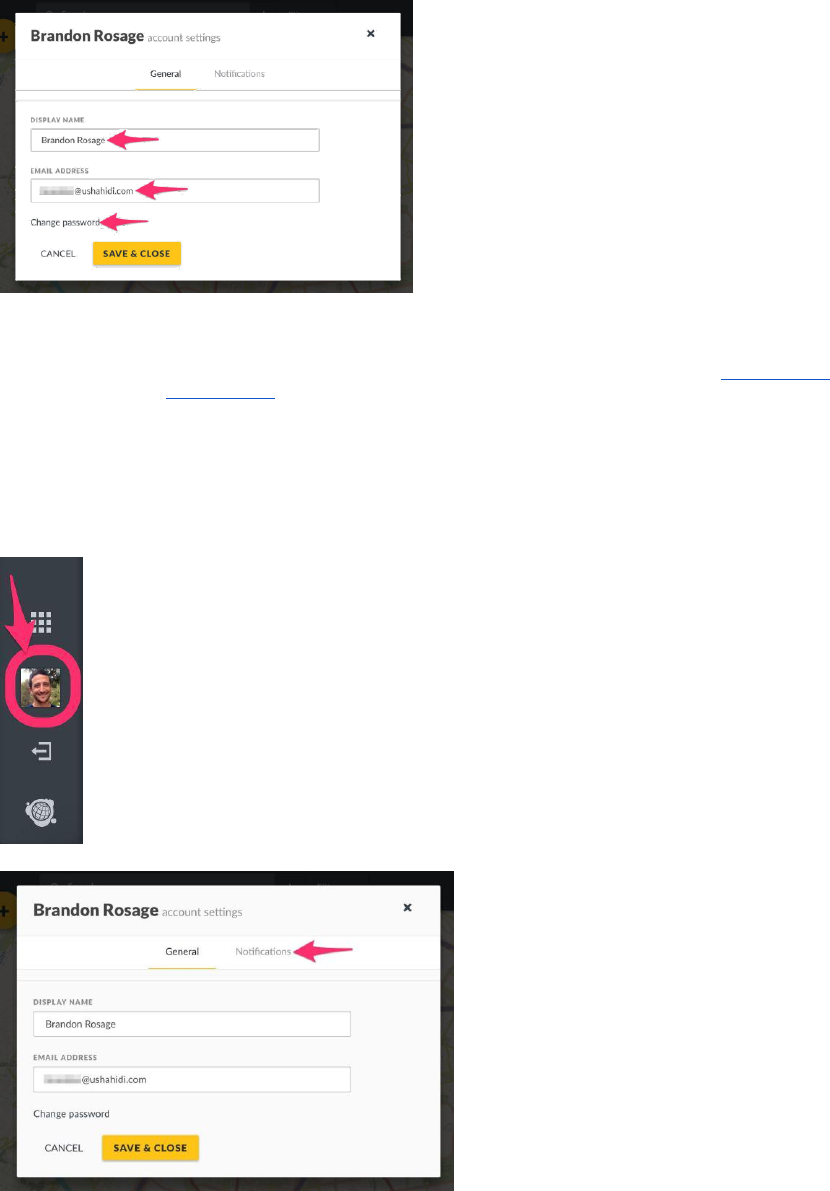
3.1.2.2 Notifications
As a registered and logged in user, you can set up notifications on Saved Searches(Section 7.2of this
manual) and Collections(Section 7.3of this manual). This means that any time a post is
added to a saved search/collection, you will receive an email or phone notification.
You can manage(turn these notification on or off) by
● Clicking on your account favicon at the bottom left hand corner of your
deployment as illustrated below.
● Clicking on Notifications
25
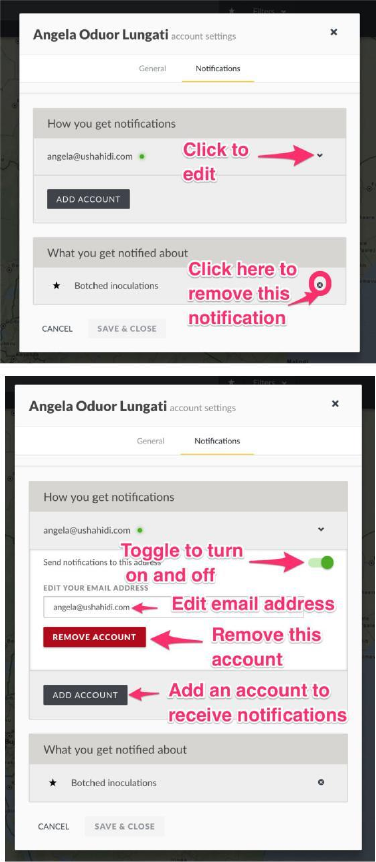
● A list of all notifications you’ve signed up for will appear, with the option of turning them on and
off. You’ll also be able to determine the email address or phone number through which you
would like to receive notifications. You must have SMS configured to enable.
26
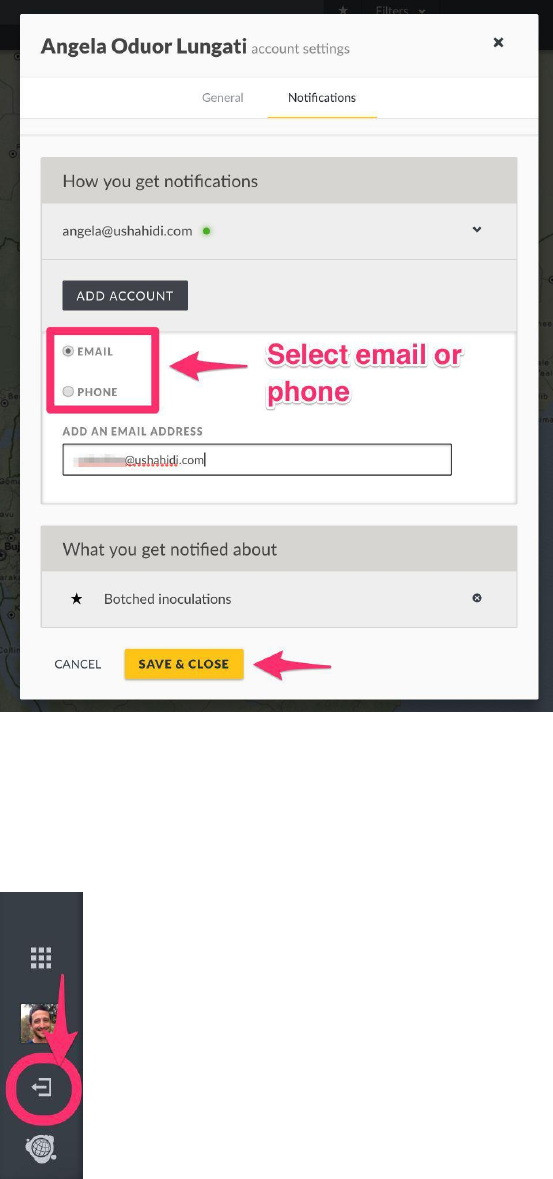
● You can also add additional contacts to receive notifications via email/phone.
3.1.3 Logging out
To log out of your deployment,
● Click on the log out icon at the bottom left hand corner of your deployment as
illustrated below.
● You should be successfully logged out of your deployment, and redirected to the homepage.
27
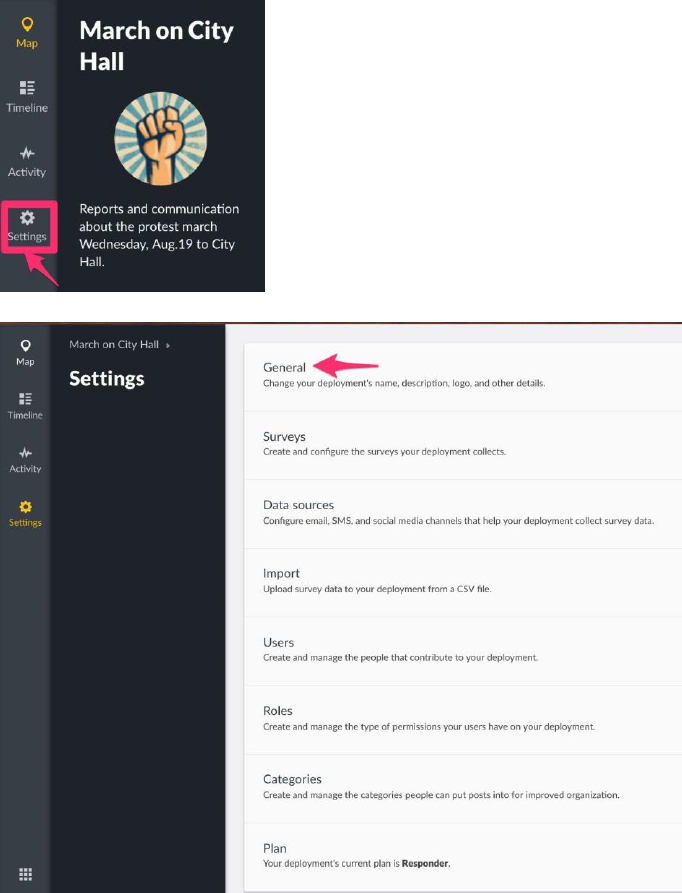
3.2 General Settings
This page allows you to set the basic appearance of your deployment. To access General Settings:-
● On the left hand menu bar, click on Settings
● Then, click on General Settings.
28
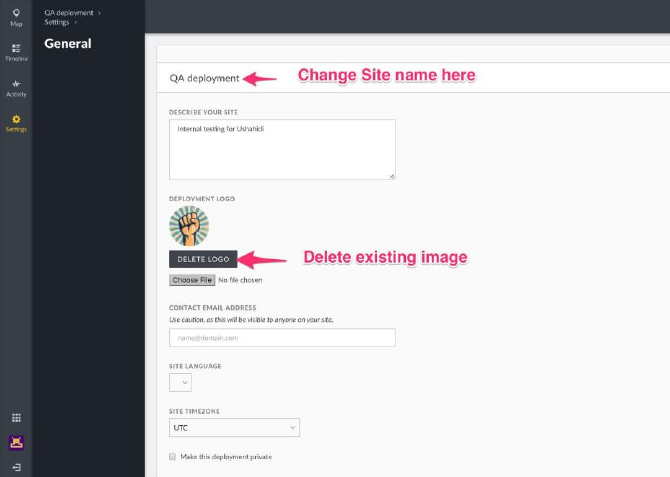
● Add the following details
○ Site Name: This changes the main title of your deployment, and is typically the
title of your project. You can change this at any time.
○ Site Description: This tagline appears below your deployment name, and
should be a one or two sentence overview of what your deployment is about.
○ Deployment logo: Your deployment logo will appear on the right hand sidebar on your
homepage, under your deployment name and above your deployment description. If
you’d like to remove it once it has been added, just hit the Delete Logobutton
○ Contact Email Address: This optional contact email will be displayed publicly to
visitors of your deployment.
○ Site Timezone: This option allows you to set the default time zone your
deployment spans, and will reflect on report time entries. The default timezone
is UTC, but you can specify the timezone for your deployment.
○ Site Language: You can update the default language of your deployment. This will
update the labels within your user interface, and will update the layout of the
deployment if you select a language that reads from the right to the left. You should
○ Private deployment:Ticking this checkbox makes your deployment and it’s
data only accessible to registered users(with the correct privileges) on your
deployment, who must sign in for access.
● You’ll also need to configure your map settings from this page. Your map settings allow you to
select the type of base map you want for your project( the style your map will display as.
29
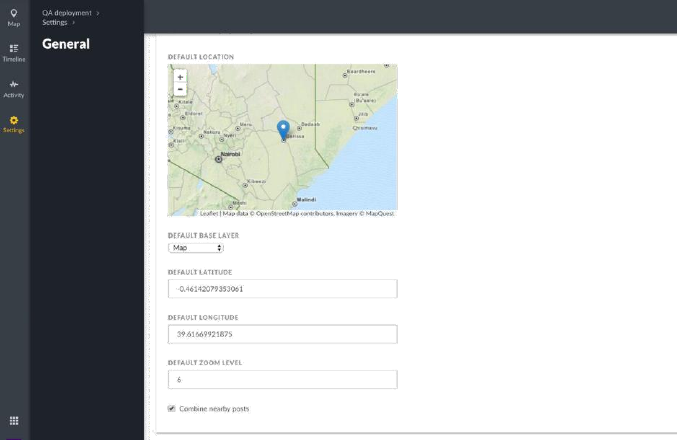
○ Default base layer:Currently, the platform only offers Openstreetmap as a
map provider. Plans are being made to add additional map providers.
You can choose between the map,satelliteand humanitarianviews. This will
determine the style your map will display as on your homepage.
○ Default latitude and Default longitude:Dragging and dropping the blue pointer
on the map automatically fills in these two fields. In the event that you have
lat/lon values, you can also type them in and the pointer on the map will
automatically update to match the points entered.
○ Default zoom level:Zooming in and out of the map using the small menu bar on
the left top hand side of the map will automatically set a value in this field. You
may also optionally set the zoom level by manually adding a figure in this field
and your map will update to match.
○ Combine nearby posts:This checkbox is checked by default, meaning that
posts near each other will be bundled together and denoted as a single point
on the map with a number to show how many posts they are. If you uncheck
this option, each post will appear as a single point on the map.
● Click on Saveand refresh the page to ensure that your settings update.
30
3.3 Surveys
If you’re someone who uses Ushahidi v2, Surveys (previously referred to as post types)in v3
are what we used to refer to as custom forms. A survey defines critical aspects of a post’s
structure and permissions. For example, a post’s “survey” defines which fields are available for
contributors to complete, and who can see it when it’s published.
This section will show you how to create and manage surveys on your deployment.
NB: If you’re a user on ushahidi.com, there are limits to the the number of surveys you can create,
based on the Ushahidi plan you are subscribed to. You may review these from our plans page.For
open source/self hosted deployments, you can create as many surveys as desired.
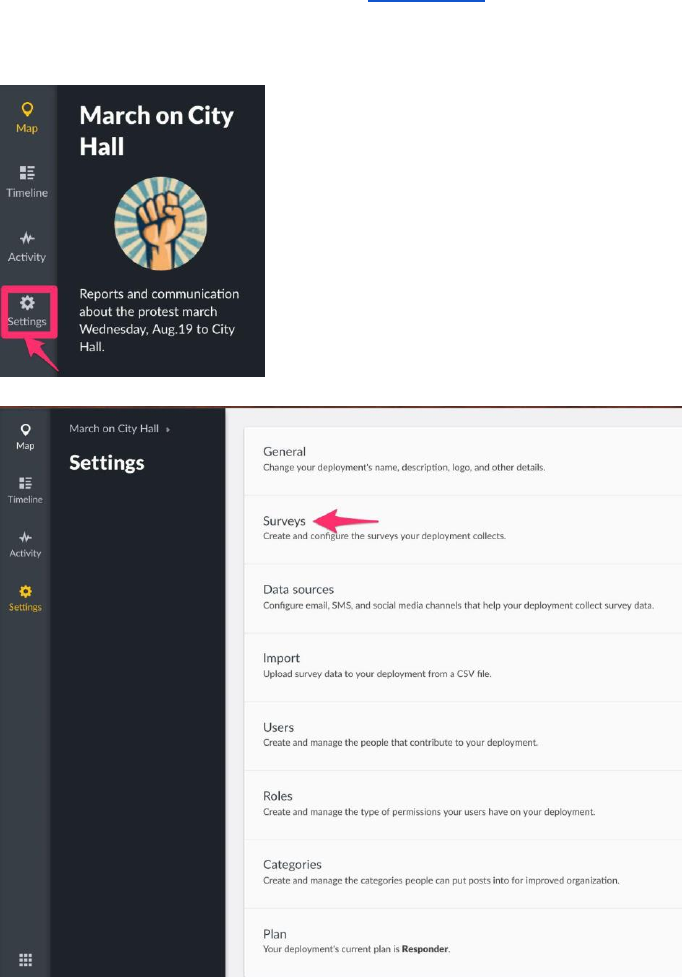
To access the Surveys configuration page,
● On the left hand menu bar, click on Settings
● Then, click on Surveys.
31
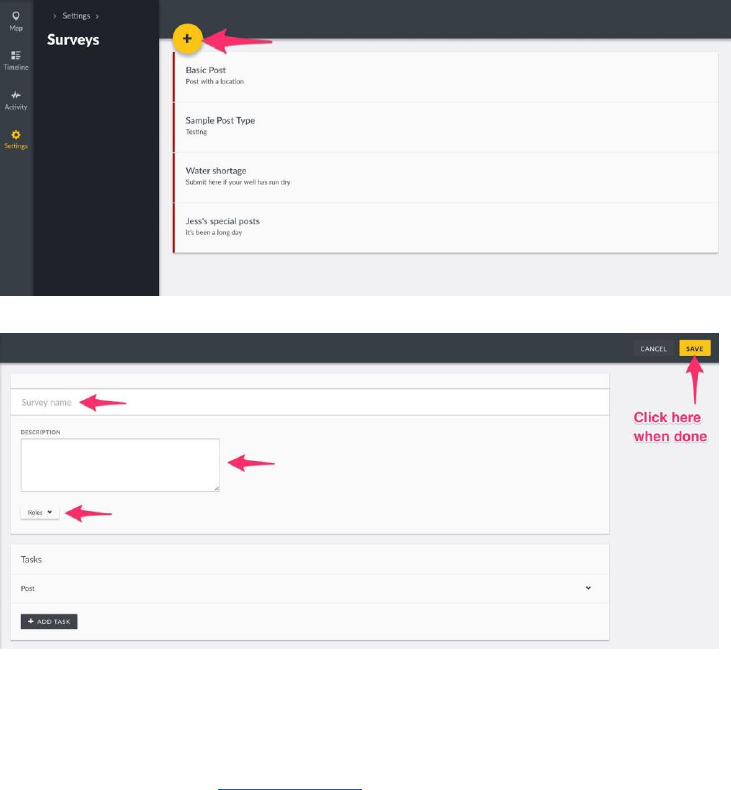
3.3.1 Adding Surveys
By default, each deployment has a Basic Post survey, which can be deleted or modified as
needed. To create a new survey,
● Click on the yellow iconas shown below
● Fill in the required details.
○ Survey Name: Try being as specific as possible when creating your survey name
so that users will understand what they are selecting when creating new posts
○ Description: Provide a brief description of what kind of data you’ll be collecting
with this survey
○ Roles: You can limit access to this survey to specific roles defined on your deployment
○ Tasks:This section allows you to break out your survey into specific tasks with fields,
as described in Section 3.3.1.1below.
● Click on Save when done.
3.3.1.1 Adding Tasks
You can organize your survey into “Tasks”, allowing a deployment to separate fields related to actions
that need to be taken, like translation or verification. These groups of tasks are visible to specified users
and can be marked as ‘complete.’ For example, if a particular survey requires verification upon
submission, you can design a task to ensure your team knows the post needs to be verified before
publishing. The task could include fields like whether the information was verified or
32
not, who verified the information, how they verified it, and when they verified it. After
verification, the task can be marked as complete and the post can either be moved to the next
task if necessary, or published.
By default, each new survey has a “Post” task created on creation, which can be edited.
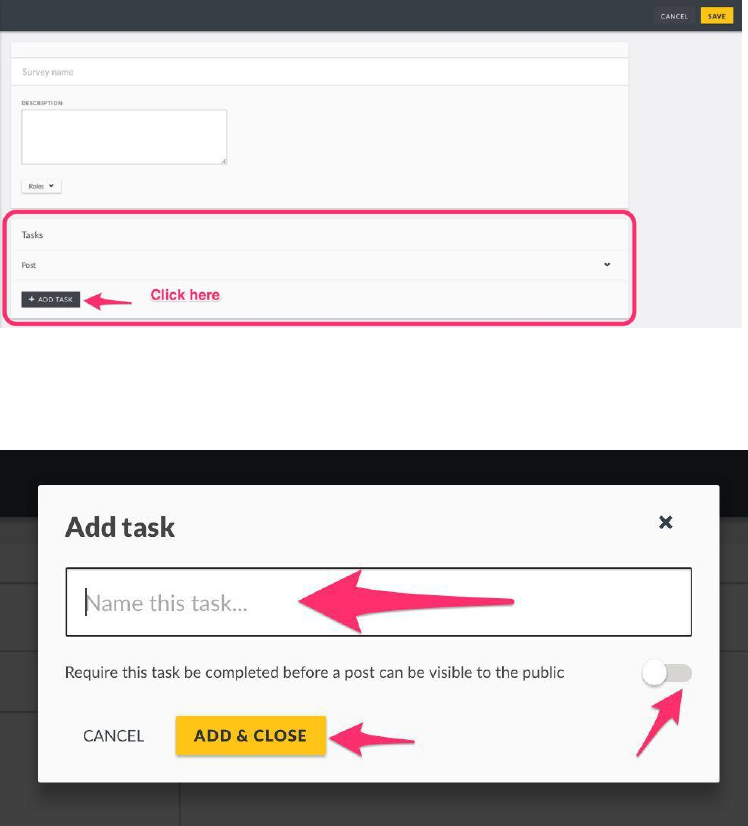
To add a new task,
● Click on Add Task on your survey creation/edit page
● A small pop up box will appear, prompting you to give your task a name
● If you’d like to make this task required before post submission, toggle the Require this task be
completed before a post can be visible to the public button. This means that, a
post will not be published until this task is marked as complete
● Click on Add & Close
33
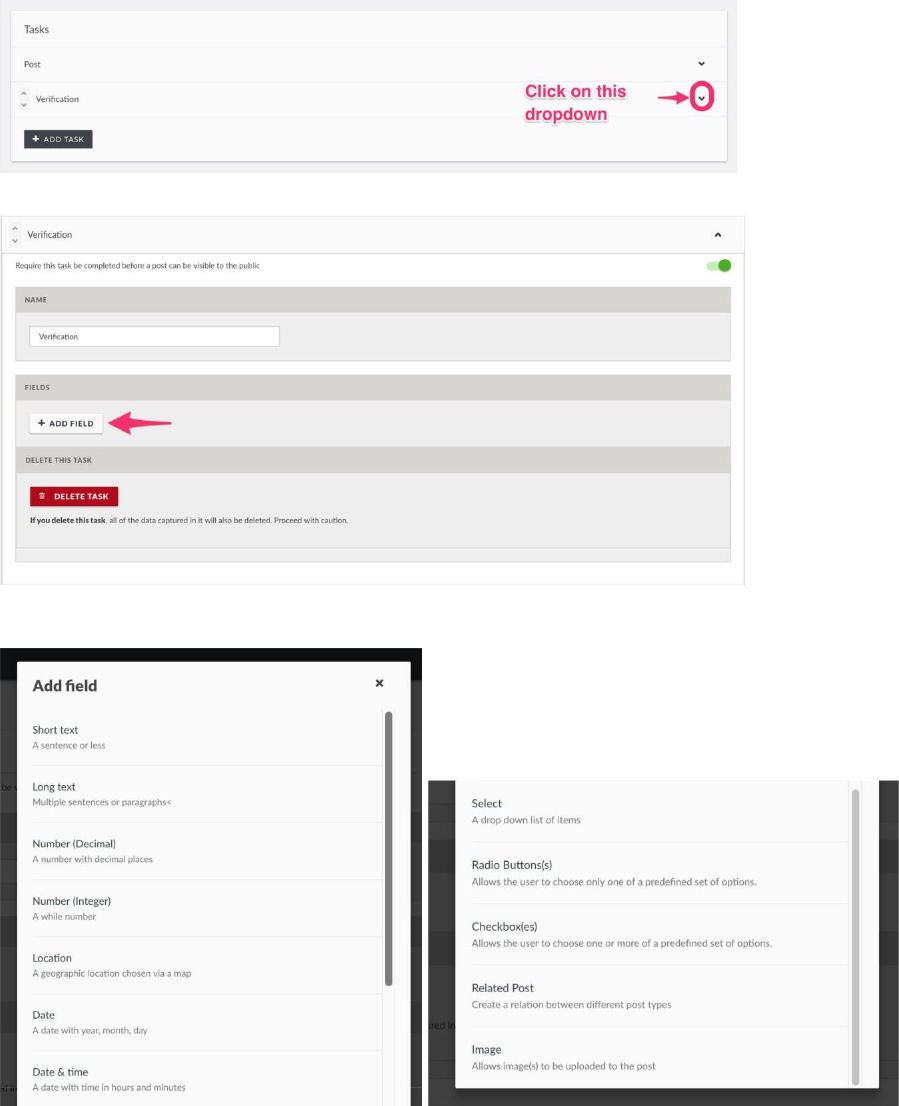
3.3.1.1.1 Adding fields
Each task can have custom fields within it. To add a new field,
● Click on the task to which you’d like to add fields to as shown below.
● Click on Add Field
● A pop up box with a list of different field types will appear on your screen. Choose
whichever one will work best for the type of data you are trying to capture.
34
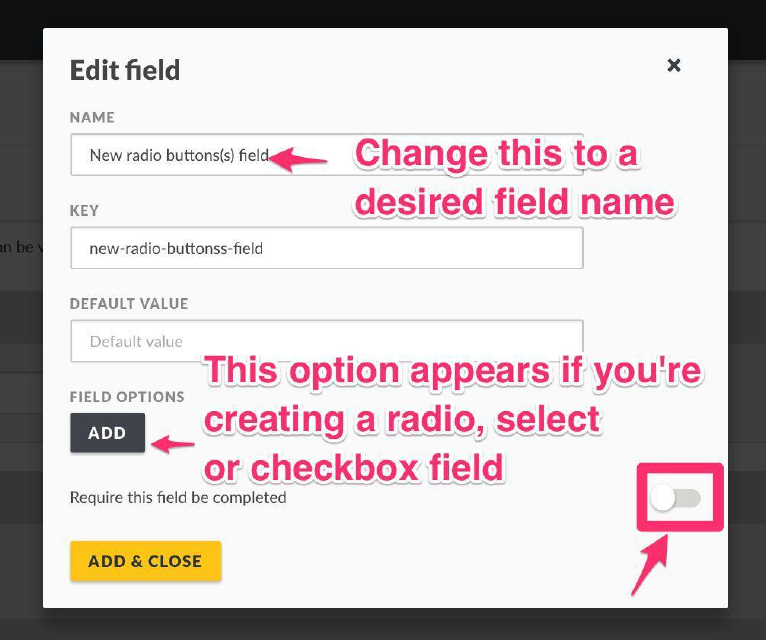
● Add the following details
○ Name:This is what is displayed as a label for your newly created field
○ Key:This field determines how this field is labelled for collection of data within
your database. As your field name is filled out, it gets automatically filled out.
You can change the field key if you desire. It cannot include spaces, and must
be unique from every other field key to ensure proper data storage and retrieval
○ Default Value:You can set a default value displayed every time someone is
creating a new post
○ Field Options:This appears in cases where you’re creating a checkbox, select
or radio button field. You can add as many options as you would like
○ Require this field be completed:If set to yes by toggling the button, the task in
which this field belongs to will not be able to be marked as complete until this
field has been filled out.
● Once you’re done, click on Add&Close.
35
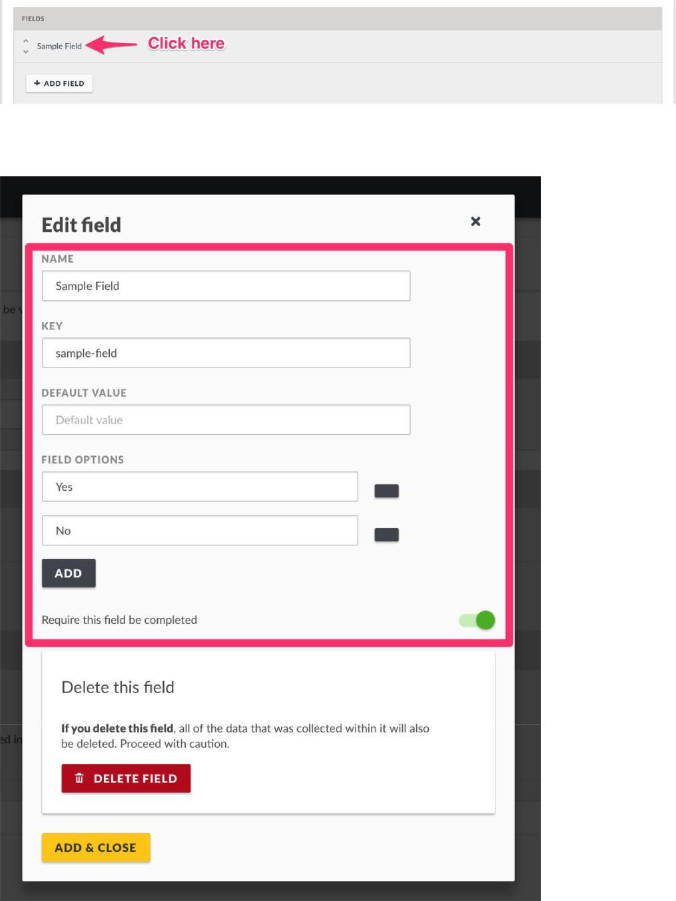
3.3.1.1.2 Editing fields
To edit an existing field,
● Select the desired custom field by clicking on it
● Edit the fields(as described in the section above on Adding fields) as desired.
● Click on Add&close when done.
36

3.3.1.1.3 Deleting fields
To delete an existing field
● Click on the field you would like to delete(as you would when selecting a field to edit),
then click on Delete Field
● A black pop up box will appear on the top of the page, prompting you to confirm whether
you would like to delete the field
○ Click on Deleteto delete the field
○ If you’d like to cancel the field deletion process, click on Cancel
3.3.1.2 Editing Tasks
To edit an existing task,
● Select the desired task
37

● Make changes as desired, e.g changing the task name/making a task required or not
● When done, click on Save on the top of the page
3.3.1.3 Deleting Tasks
To delete an existing task
● Select the desired task
● Click on Delete Task
● A black pop up box will appear on the top of the page, prompting you to confirm whether
you would like to delete the task
○ Click on OKto delete the task
○ If you’d like to cancel the task deletion process, click on Cancel
38
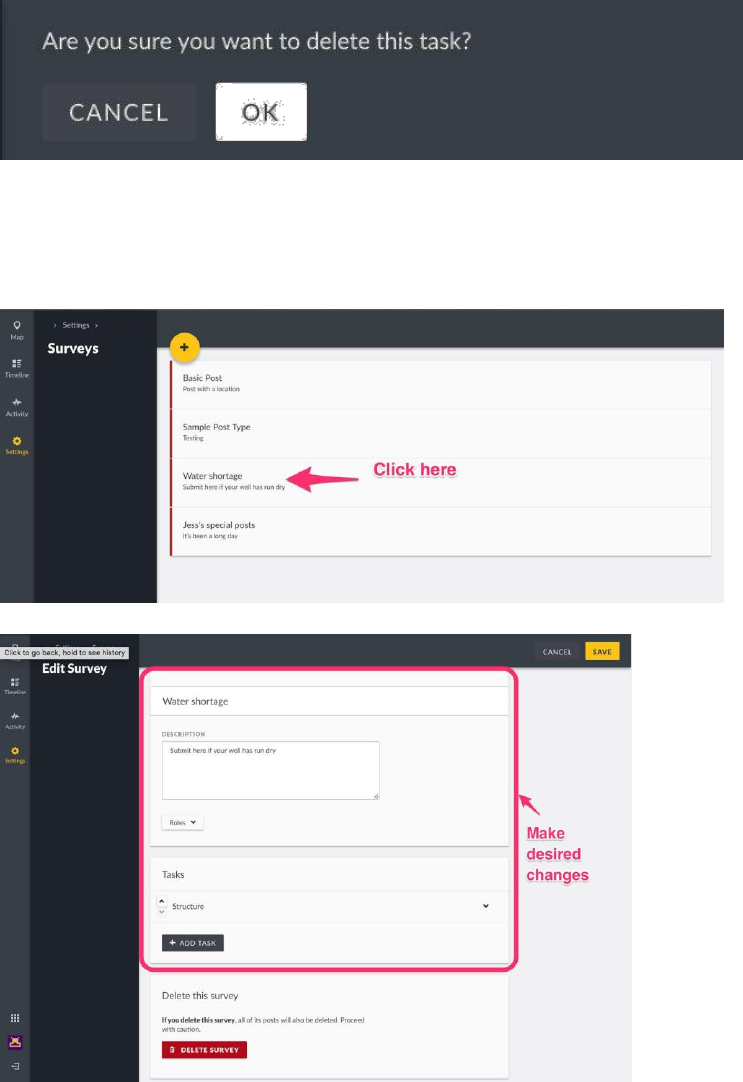
3.3.2 Editing surveys
To edit a survey
● Click on a survey from the list of surveys on your page
● From here, change your survey details as desired then click on Save
3.3.3 Deleting surveys
To delete a survey,
● Select the desired survey from the surveys list page
39
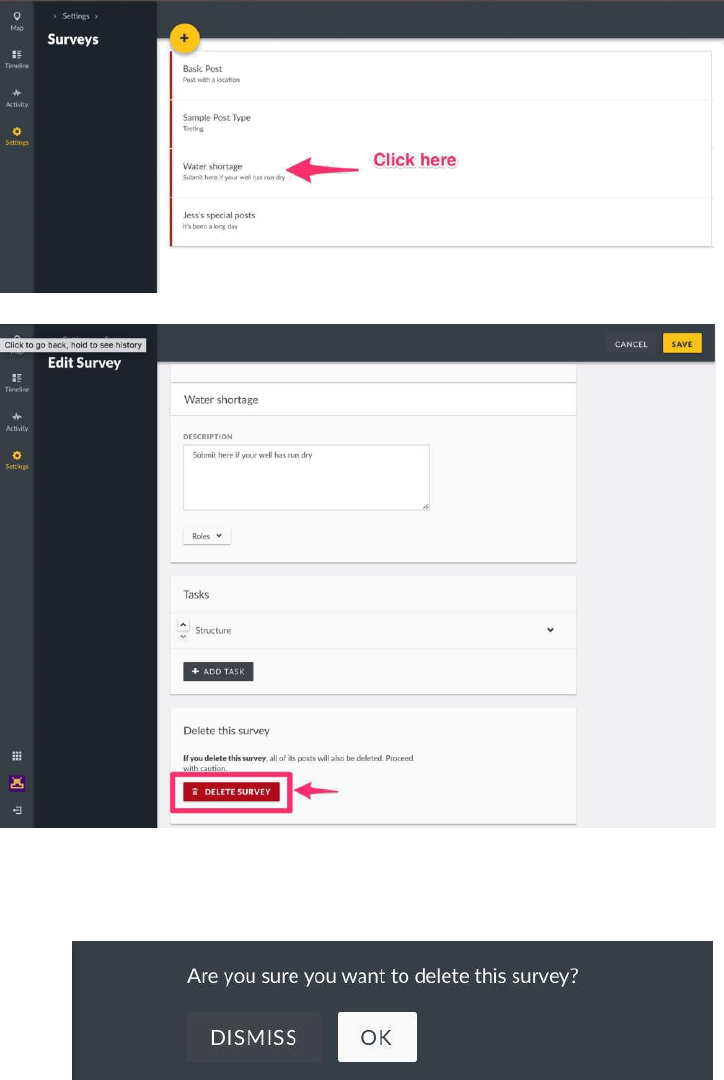
● Click on Delete Survey
● A black pop up box will appear on the top of the page, prompting you to confirm whether
you would like to delete the survey
○ Click on OKto delete the survey
○ If you’d like to cancel the survey deletion process, click on Dismiss
40
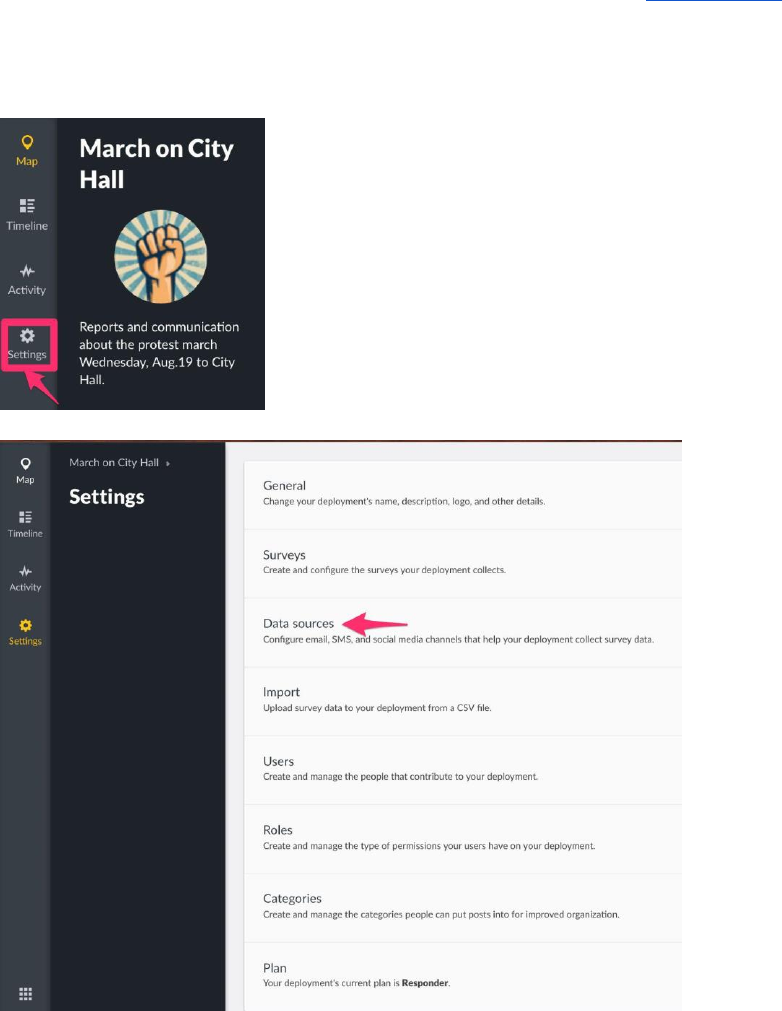
3.4 Data Sources
There are many ways to enter posts into your Ushahidi deployment other than from the
deployment itself. This section shows you how to configure all the possible data source types.
NB: If you’re a user on ushahidi.com, the number of data source types available to you may be
limited, based on the Ushahidi plan you are subscribed to. You may review these from our plans
page.For open source/self hosted deployments, all data source types are available to you
To access the data sources configuration page,
● On the left hand menu bar, click on Settings
● Then, click on Data Sources.
41
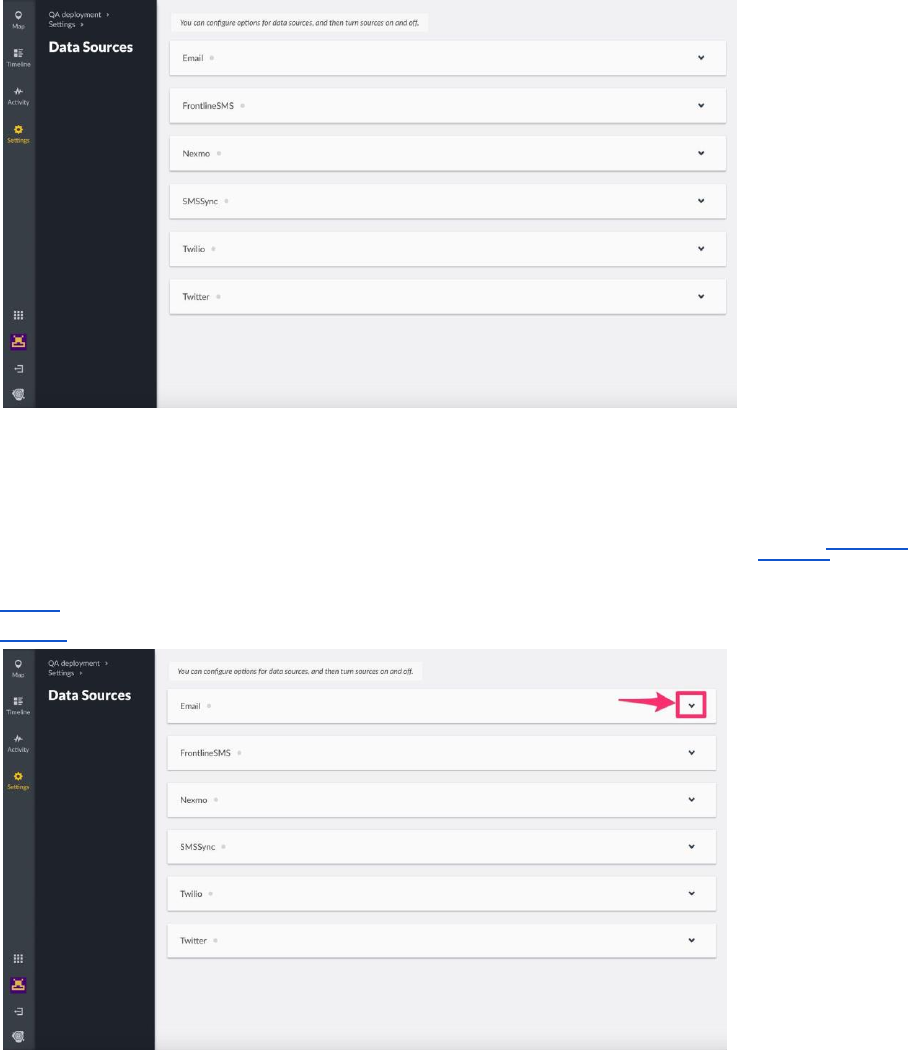
● You should get a full list of data sources as shown below
3.4.1 Email
This section allows you to set up the platform to receive emails from user. Before getting started, make
sure that you have an email account set up on Gmail, Yahoo or any other service provider. Make sure
that you have IMAP/POP enabled (For more information on these two protocols, visit this website.
Instructions on how to enable the IMAP/POP settings in your email can be found here
● Gmail
● Yahoo
To get started with email set up,
● Click on the drop down icon on the right as shown
● Input the following email account settings:-
42

○ Incoming server type:You have two options to select from, POPand IMAP.We
recommend using IMAP if possible because it’s the best way to make sure you
can see all your mail at any time on all of your devices
○ Incoming server:Enter the address of the server where your email services are hosted.
E.g mail.yourwebsite.com,imap.gmail.comor pop.gmail.com
○ Incoming server port:Enter the port that your email account uses for incoming emails. This
is also provided by your service provider and depends on the use of SSL(Secure
Sockets Layer)/Transport Layer Security(TLS)or not. As a standard rule;
■ IMAP uses port 143 , but SSL/TLS encrypted IMAP uses port 993 .
■ POP uses port 110 , but SSL/TLS encrypted POP uses port 995
○ Incoming server security:You have 3 options to choose from to enhance
secure connection to your email mailbox, depending on which is supported
by your email service provider.
■ None
■ TLS - Read more on Transport Layer Security
■ SSL - Read more on Secure Sockets Layer
○ Incoming user name:Enter the email address you want to use to receive
emails e.g sample@youremail.com.We recommend setting up a separate
email address for this purpose, preferably one that has lot of available space to
avoid the account getting full in a short time, especially if the platform will be
receiving a lot of submission via email.
○ Incoming password:Enter the password of the email account inserted above.
○ Outgoing server type:Select one of the three options presented to you:-
■ SMTP: Simple Mail Transfer Protocol (SMTP) is recommended for use
with the ushahidi platform.
■ Sendmail
■ Native
○ Outgoing server:Enter the address of the server from which emails are sent out.
This is also provided by the email service provider
○ Outgoing server port:Enter the port your email service provider uses for
outgoing emails. The default port tends to be 25, but SMTP with SSL support
uses port 465 or 587
○ Outgoing server security:Select one of the three options provided to you
■ None
■ SSL
■ TLS, which is recommended by the service provider for outgoing
server security.
○ Outgoing user name:Enter the email address you want to use to send
emails. E.g sample@youremail.com
○ Outgoing password:Enter the password of the email account inserted above.
43
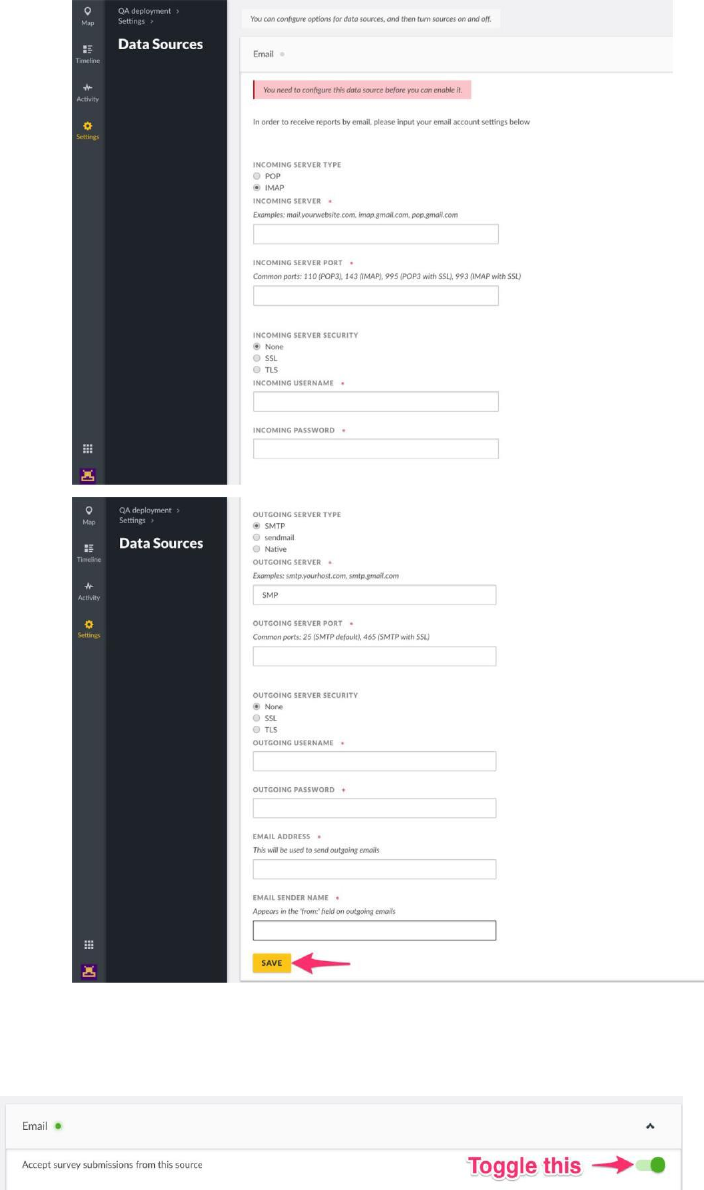
○ Email sender name:This is what appears in the “from” field in outgoing emails.
● Click on Save and this data source’s settings will be saved. Unstructured posts from
email will now be pulled into the platform.
● To enable/disable the email data source, simply click on the green toggle.
44
● If you’d like to edit your email configuration, simply click on the drop down icon on the
right while on the data sources list pageand make your changes.
3.4.2 FrontlineSMS {PENDING}
3.4.3 Nexmo
Nexmo is a cloud-based SMS API that lets you send and receive a high volume of messages to
mobile phones in any country at wholesale rates.
NB: You need a nexmo account to be able to configure this as a data source.
To sign up, go to https://dashboard.nexmo.com/sign-up
To get started with Nexmo set up,
● Log into your Nexmo Dashboard https://dashboard.nexmo.com
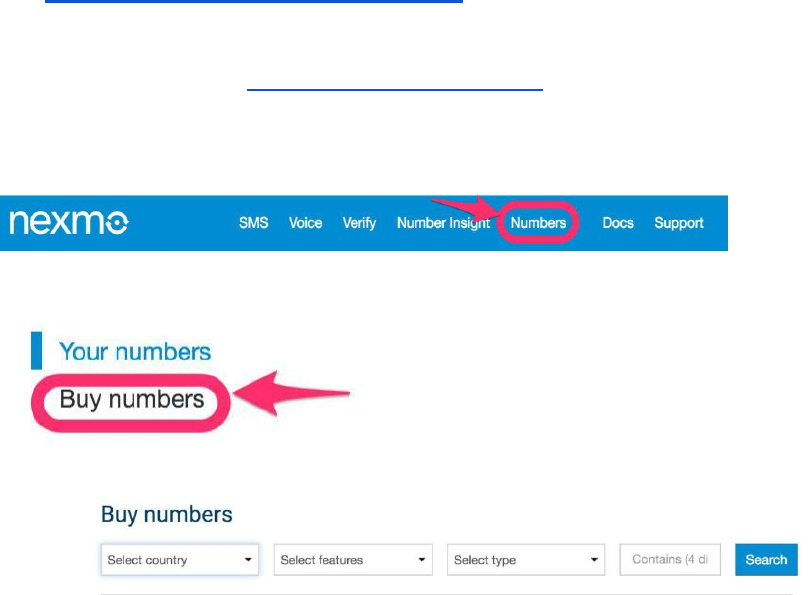
● If you haven’t already, you’ll need buy a number that you will use to receive SMS
messages from.
○ Click on Numbers on the top menu bar on your nexmo dashboard
○ Click on Buy Numbers
○ Set the desired criteria of the phone number you’re looking to use
■ Select the country in which the SMS Number will likely be operating in
■ Select the features of this phone number(SMS only, Voice only or
SMS & Voice)
■ Select the type of phone number it will be (Mobile, Landline, Toll free)
45
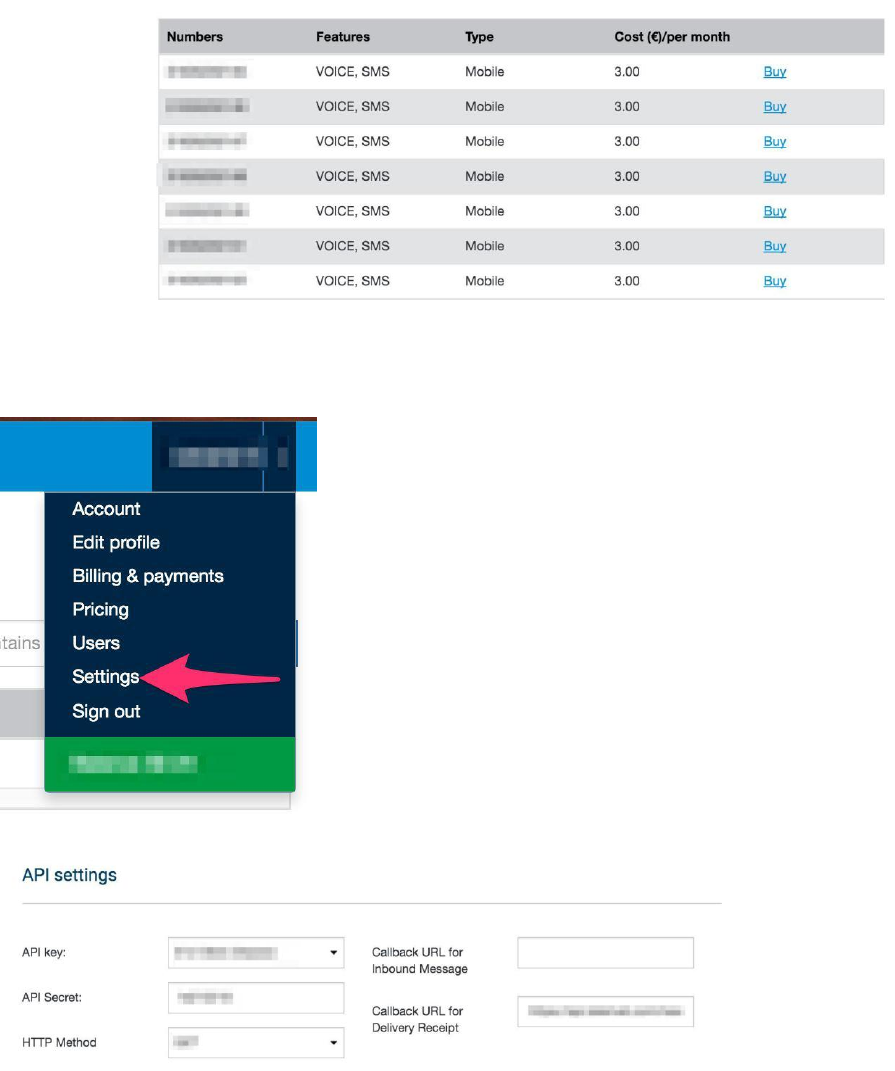
○ Click onSearch.A list of available numbers based on the criteria set above will appear.
○ Click Buyon the number you’d like to use.
● Once you have a phone number, note it down as you’ll need it to configure your data
source later on.
● You’ll need to grab your API credentials from your nexmo settings page.
● Pick your API KEYand API SECRETfrom the API Settingssection.
● Go back to your Data source settings page on your deployment
● Click on the drop down icon on the right to get to your Nexmo configuration page
46
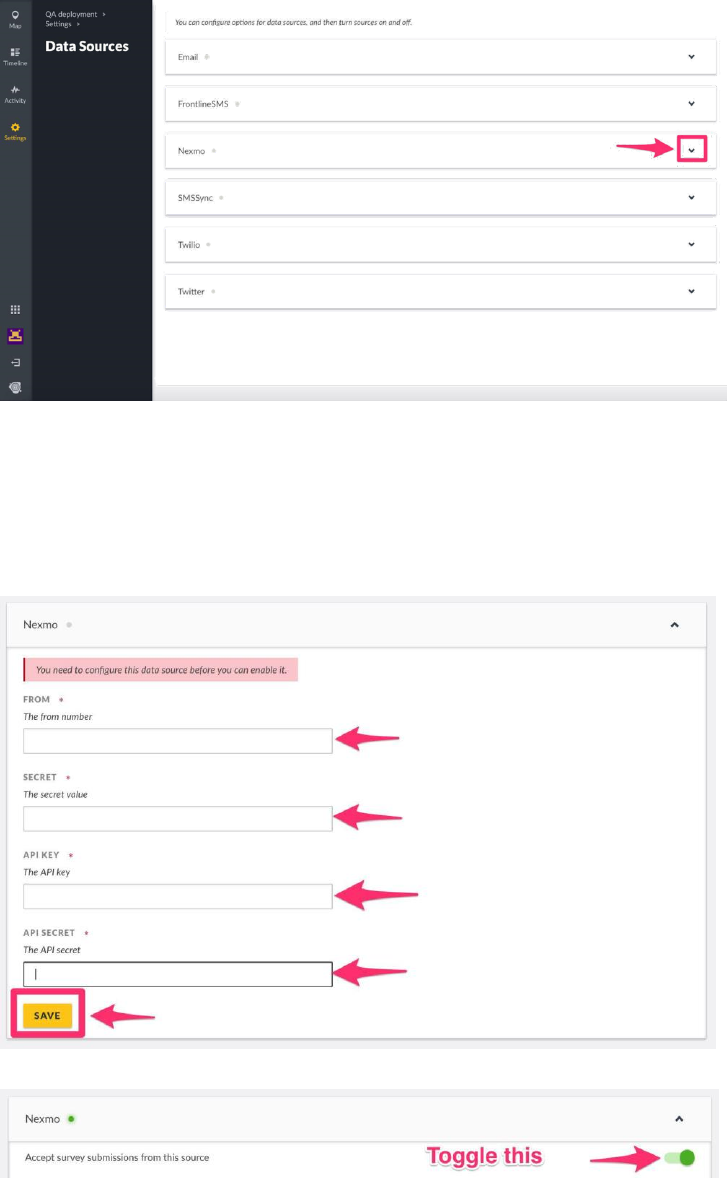
● Enter the following details, which you got earlier from your Nexmo Dashboard
○ From:Enter the phone number you will use to receive SMS messages from
your nexmo account
○ Secret:Enter a secret value for security purposes.
○ API KEY:Enter the API key retrieved from your nexmo settings page.
○ API SECRET:Enter the API secret retrieved from your nexmo settings page.
● Click on Save and this data source’s settings will be saved. Unstructured posts from
SMS will now be pulled into the platform from Nexmo.
● To enable/disable the nexmo data source, simply click on the green toggle.
47
● If you’d like to edit your nexmo configuration, simply click on the drop down icon on the
right while on the data sources list pageand make your changes.
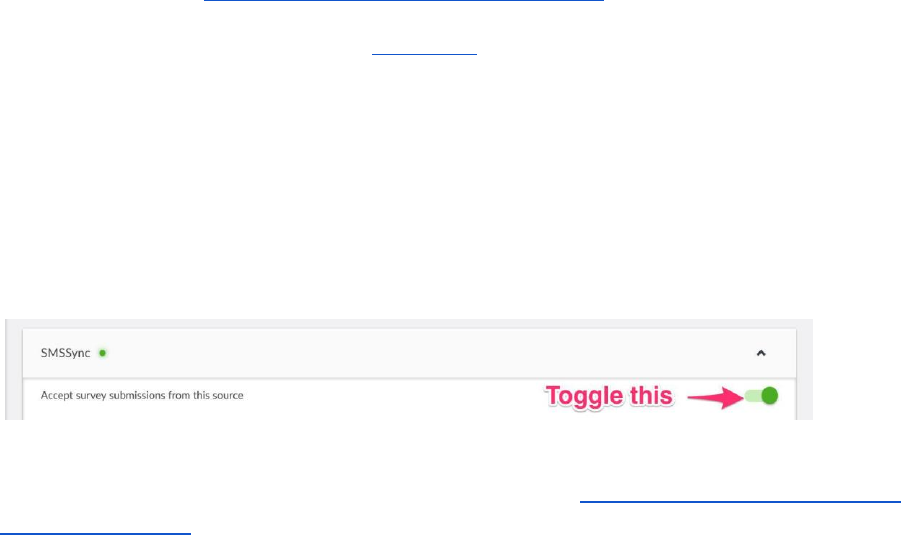
3.4.4 SMSSync
SMSsync is a simple, yet powerful SMS to HTTP sync utility that turns any Android phone into a
local SMS gateway by sending incoming messages (SMS) to a configured URL (web service).
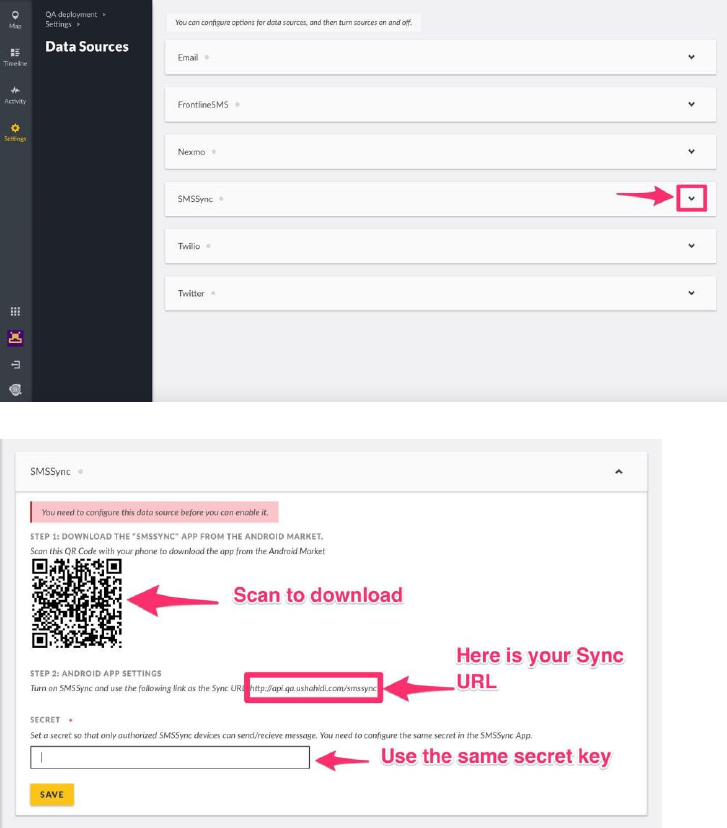
To get started with SMSSync set up,
● Click on the drop down icon on the right as shown
● Follow the instructions given to you below.
○ Download the application from the Android Market by scanning the QR Code
presented to you on the settings page or simply search for it in the android
market. Please note that SMSsync works on any SMS-enabled device running
Android 2.1 and above.
48
○ Retrieve the Sync URL,which you’ll need to configure SMSSync with under Step 2:
ANDROID APP SETTINGS
○ You can also set an SMSSync secret key for security purposes
○ Click on Save
● Open up the SMSSync Application on your android device. You’ll note that you can
manage multiple Sync URLs on the app.
● To add a new Sync URL
○ Tap on the Sync URL from the navigation drawer.
○ Tap on the Add icon icon on the actionbar. An input dialog should open.
○ Enter a title for the Sync URL.
○ Enter a secret key(If you set one above). Make sure you enter the exact key here.
○ The secret key should be presented as string of any characters without spaces.
○ Enter a comma separated value for the keyword(s). These keywords will be
used by SMSsync to filter incoming SMS and pending messages to the Sync
URL you are adding. As of v2.0.2. You can now add Regular Expression code
for filtering. This means, it can either be CSV or RegExp. It cannot be both.
○ Enter the URL for your web service. Don't forget to start with the HTTP or HTTPS
protocol. e.g. https://example.com/api-v1/add-record/
○ Tap OK to save the new entry.
Note: Version 2.5 or higher supportsbasic authcredentials in the URL, e.g.
https://username:pass@example.com/api-v1/add-record/.
● You will now need to start the SMSSync Service to start forwarding messages
to the platform. To start the SMSSync service
○ Make sure that you have added and enabled(checked) the Sync URL you added above.
○ On the SYNC URL screen, tap on the Start SMSsync service to start the
service. You only do this if the service is disabled.
● You should be all set to work with SMSSync and Ushahidi now. Unstructured posts via
SMS will now be pulled into the platform.
● To enable/disable the SMSSync data source, simply click on the green toggle.
● If you’d like to edit your SMSSync configuration, simply click on the drop down icon
on the right while on the data sources list pageand make your changes.
For more details on how to manage messages within SMSSync, see configuration instructions
on the SMSSync Website
49
3.4.5 Twilio
Twilio allows you to programmatically make and receive phone calls and send and
receive text messages using its web service APIs.
NB: You need a Twilio account to be able to configure this as a data source.
To sign up, go to https://www.twilio.com/try-twilio
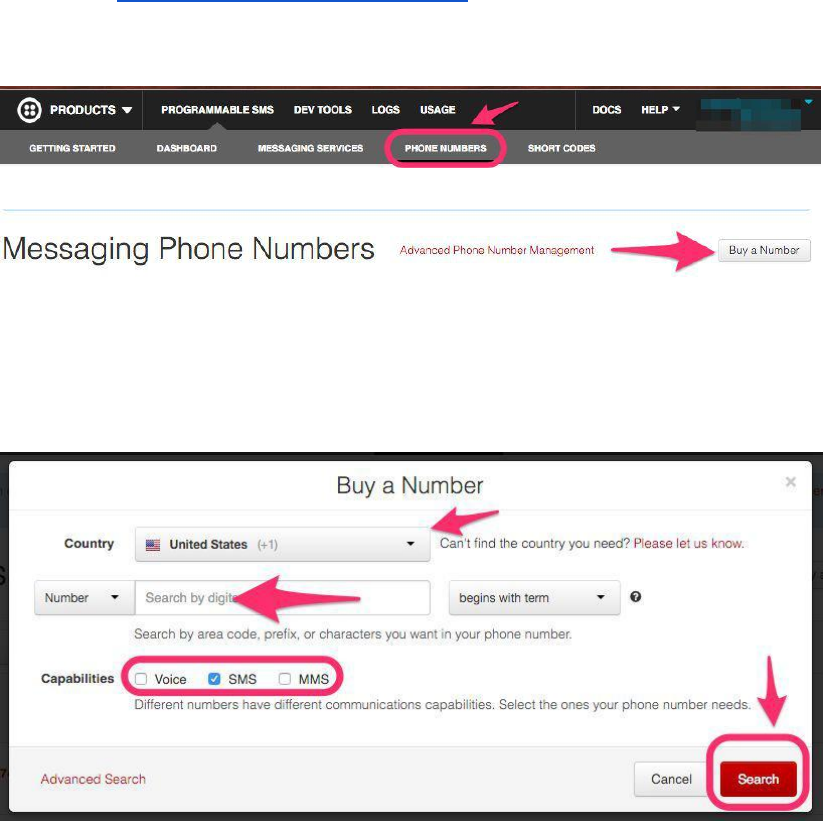
To get started with Twilio set up,
● Log into your twilio account.
● You’ll need to buy a number to use. Click on PHONE NUMBERS.
● Click on Buy a number
● Select the desired criteria for your phone number
○ Country
○ Location/Number
○ Capabilities (Voice, SMS, MMS)
● Click onSearch.A list of available numbers based on the criteria set above will appear.
● Click Buy
on the number you’d like to use.
50
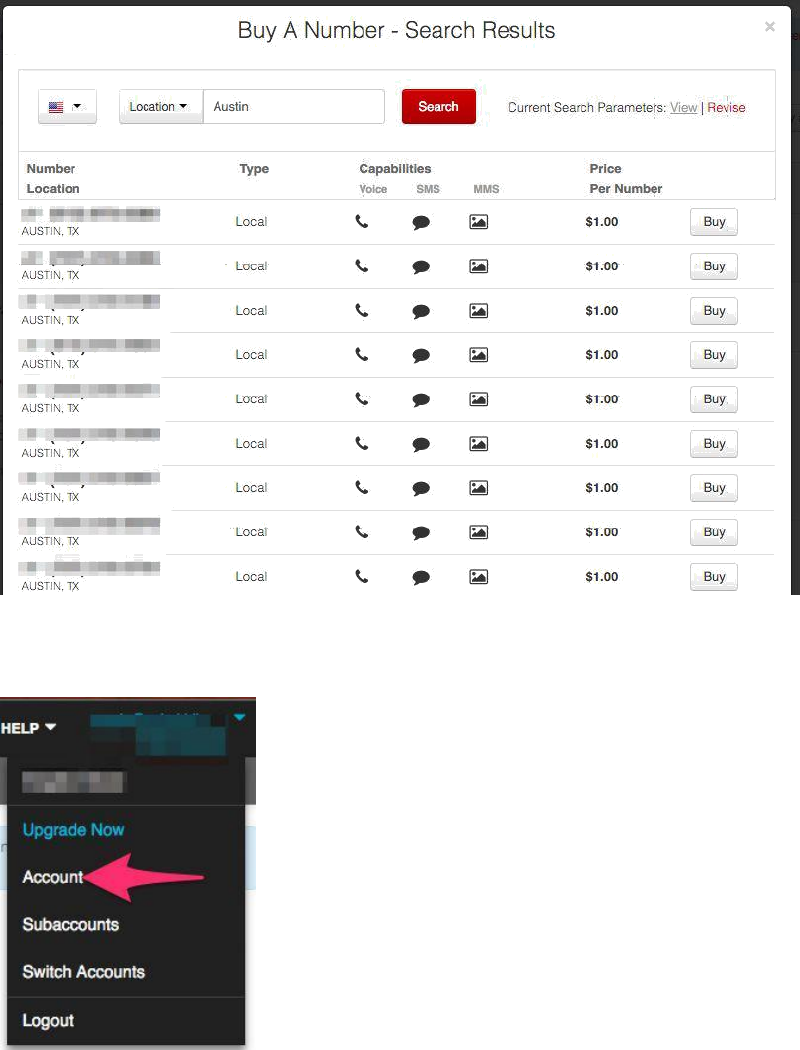
● Once you have a phone number, note it down as you’ll need it to configure your data
source later on.
● You’ll need to grab your API credentials from your Twilio Account settings page.
● Pick your ACCOUNT SIDand AUTH TOKENfrom the API Credentialssection.
51
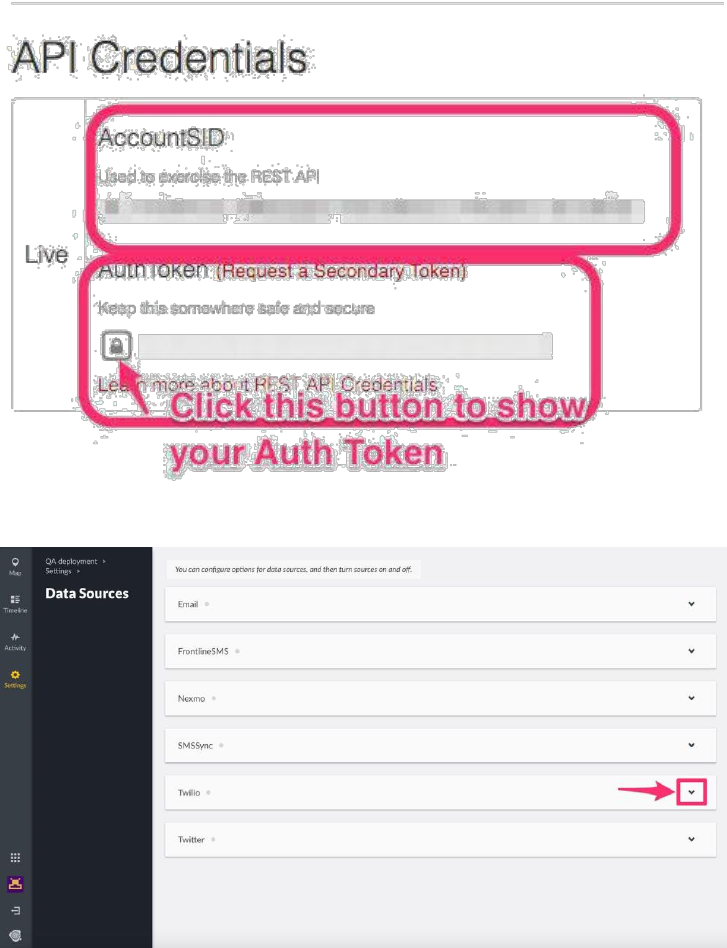
● Go back to your Data source settings page on your deployment
● Click on the drop down icon on the right as shown
● Enter the following details, which you got earlier from your Twilio Account
○ From:Enter the phone number you will use to receive SMS messages from your
twilio account
○ ACCOUNT SID:Enter the unique ID of your twilio account
○ AUTH TOKEN:Enter the Auth Token retrieved from your twilio settings page.
○ SMS Auto Response:This will likely be the message sent back to users who
send you SMS Messages.
● Click on Save and this data source’s settings will be saved. Unstructured posts from
SMS will now be pulled into the platform from Twilio.
52
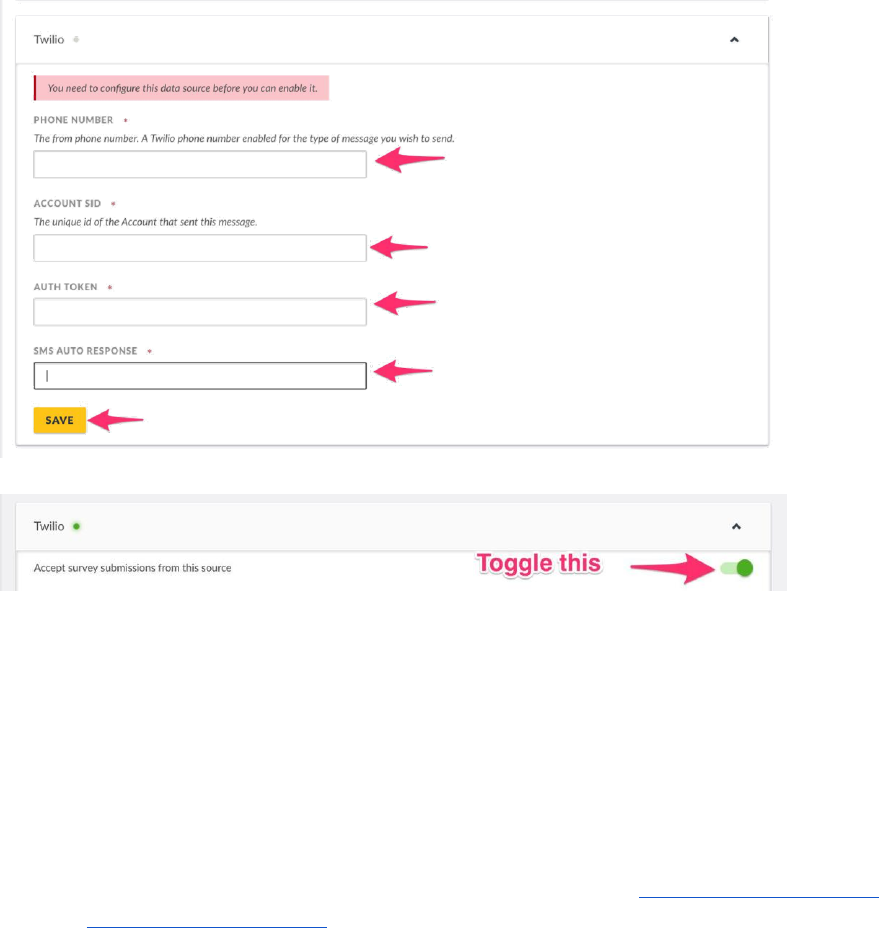
● To enable/disable the Twilio data source, simply click on the green toggle.
● If you’d like to edit your Twilio configuration, simply click on the drop down icon on the
right while on the data sources list pageand make your changes.
3.4.6 Twitter
This section allows you to configure twitter as a data source, and subsequently pull
unstructured posts from specific twitter hashtags.
For you to be able to pull tweets based on hashtags, you will need to set up your
ushahidi deployment as an application on twitter. To get started,
● Click on the drop down icon on the right as shown
● Click on Create a new twitter application. This will redirect you to https://apps.twitter.com
● Sign into https://apps.twitter.comusing your twitter username and password
● Click on “Create New App”
53
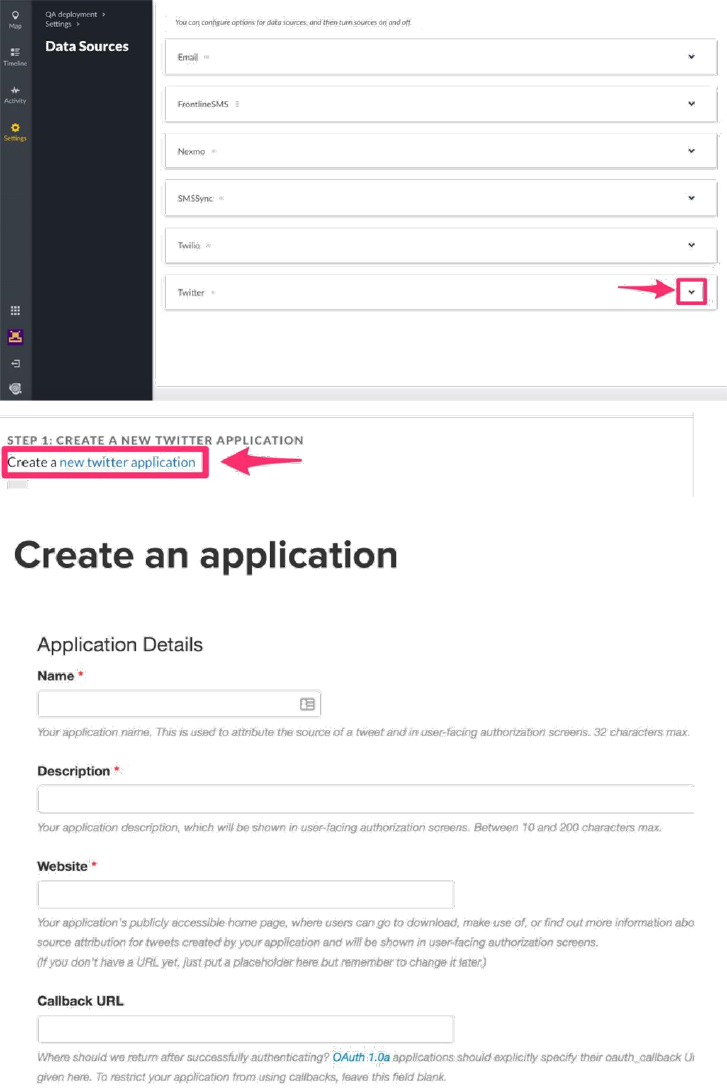
● Fill in the application details
○ Name – this can be your deployment/site name e.g Uchaguzi
○ Description – this is your deployment/site description – what your deployment does
○ Website – this is your deployment url/link i.e http://yourdeployment
○ Callback url – Leave this blank.
○ Agree to the terms and conditions then click on Create your twitter application
54
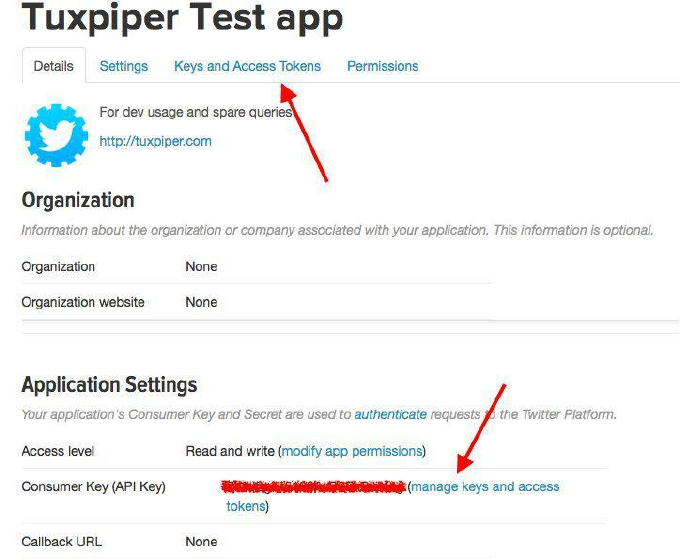
● Once your application has been successfully created, you should now be able to access your
access keys and tokens. To do so, click on Keys and Access Tokensor Manage Keys and Access
● You’ll get redirected to a page where you can grab details needed to configure your Ushahidi
deployment i.e CONSUMER KEY,CONSUMER SECRET,ACCESS TOKEN,ACCESS
TOKEN SECRET.
● You’ll have to generate an ACCESS TOKENand ACCESS TOKEN SECRETby
clicking on Generate my access token and token secret. This may take a couple of
minutes, and your page will refresh with all the details you require.
● Go back to your twitter configuration page on your deployment and fill in all the details
from your twitter app management page.
● Add the hashtags you want to pull tweets from in the “Twitter Search Terms” section. You
can choose more than one hashtag, separated by a comma. It is recommended that
short and clear hashtags be chosen.
● Click on Save and this data source’s settings will be saved. Unstructured posts from
twitter will now get pulled into the platform.
55
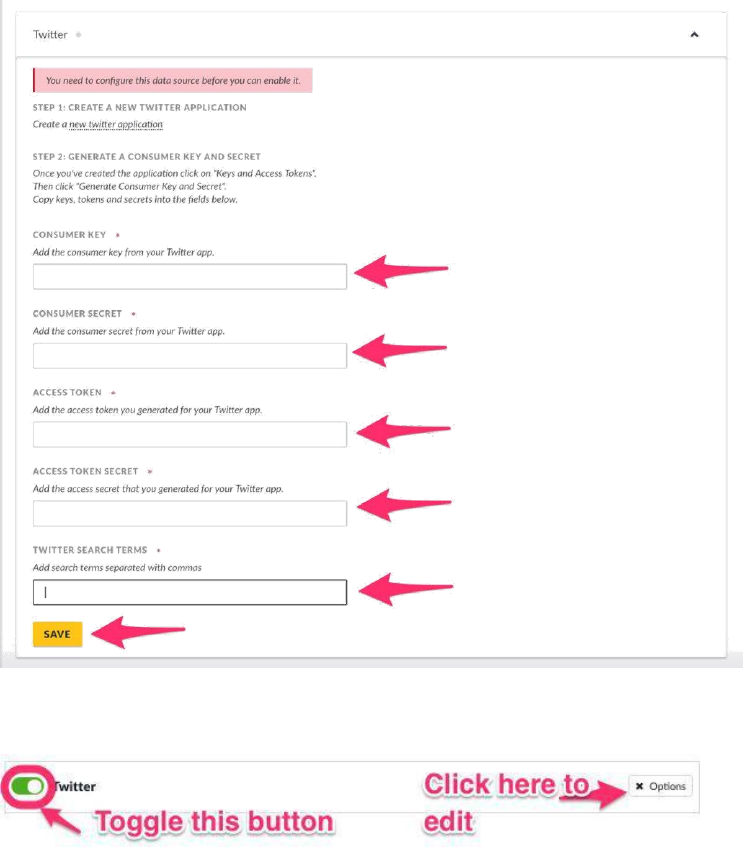
● To enable/disable the twitter data source, simply click on the green toggle.
● If you’d like to edit your twitter configuration, simply click on the drop down icon on the
right while on the data sources list pageand make your changes.
56
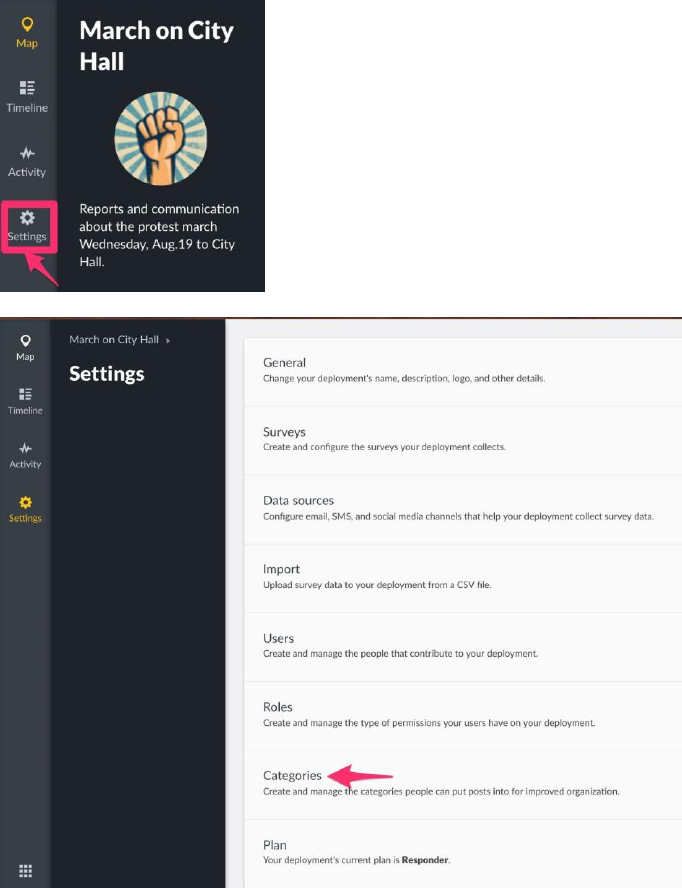
3.5 Categories
Categories are a way of grouping your posts based on their content across many different surveys.
To access the Categories configuration page,
● On the left hand menu bar, click on Settings
● Then, click on Categories.
● You’ll be redirected to a page where you can manage categories on your deployment
3.5.1 Adding Categories
Your deployment come with pre installed/set-up categories. If yoy need to create additional
categories, follow the next steps.
57
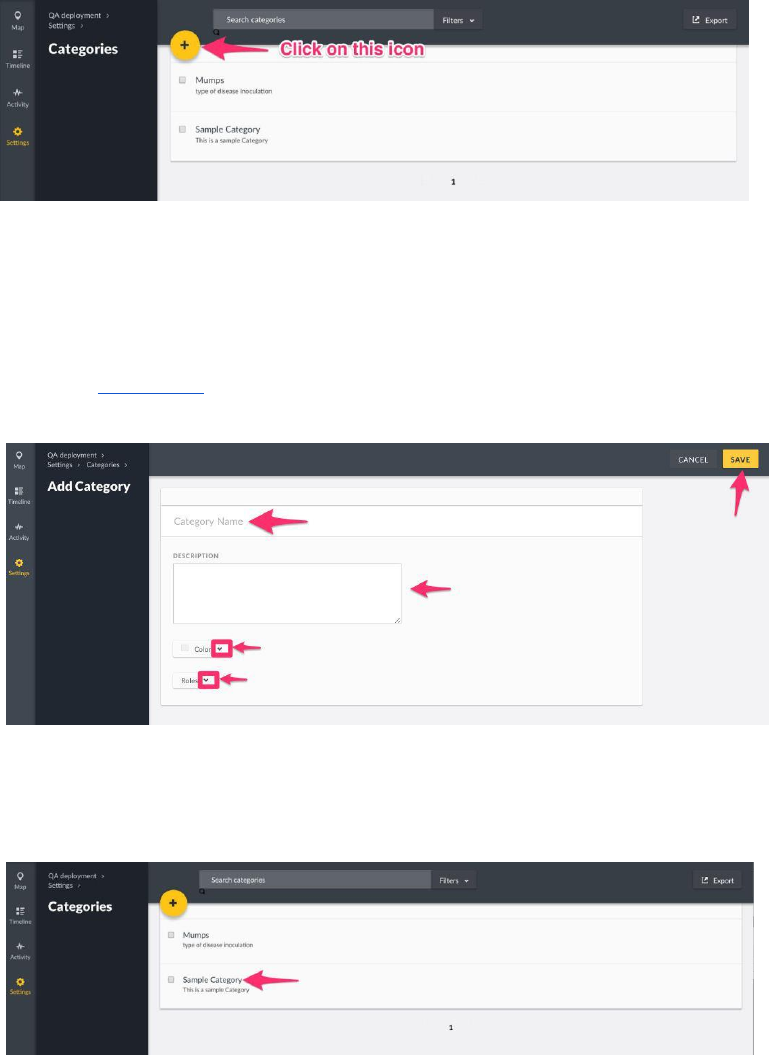
To create a new category,
● Click on the Add Category icon as shown below
● Add the following details
○ Category Name: Give your category a name that will appear on your
homepage and when users are creating new posts.
○ Description: You can provide a brief description of what kind of information
you will fall under this category
○ Color:You can select a color to help visually separate categories from each other.
○ Roles:You can opt to set your category as visible to specific user roles on your
deployment here. This list is populated based on custom roles created. More on Roles
in section 4.1of this manual
● Click on Saveto create one.
3.5.2 Editing Categories
To edit a category,
● Click on the desired category from the category list page
58
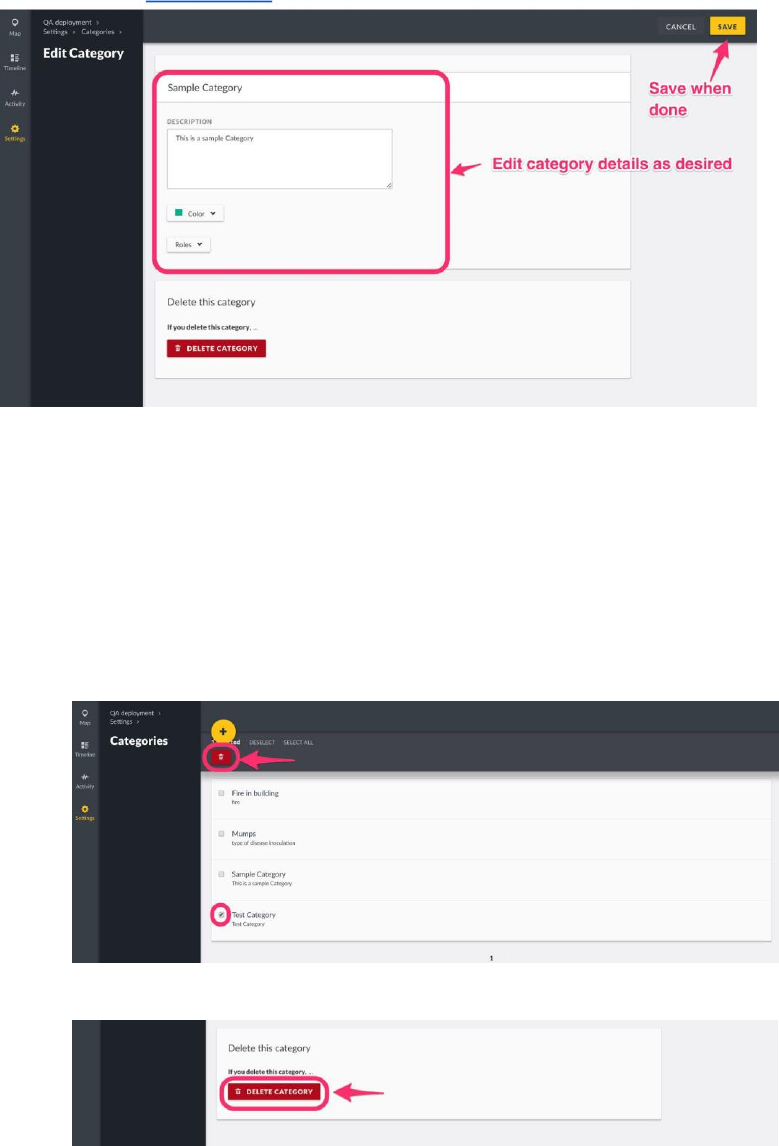
● You’ll get redirected to the Edit Categorypage, where you should be able to add/edit details
as described in section 3.5.1above.
● When done, click on Save,and your changes will reflect shortly.
3.5.3 Deleting Categories
You can delete one or multiple categories at a time.
To delete a category,
● From the category list page,
○ Tick the checkbox on the left, adjacent to the category/categories you would
like to delete from the category list page
○ This action will activate the previously inactive Deletebutton on top left hand
corner of the page. Click on this button to initiate deletion.
● From the category edit page,
○ Click on the Delete Categorybutton
59
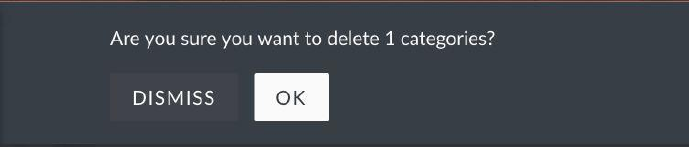
● A black pop up box will appear on the top of the page, prompting you to confirm whether
you would like to delete the category/categories
○ Click on OKto delete your category/categories
○ If you’d like to cancel the category deletion process, click on Dismiss
60
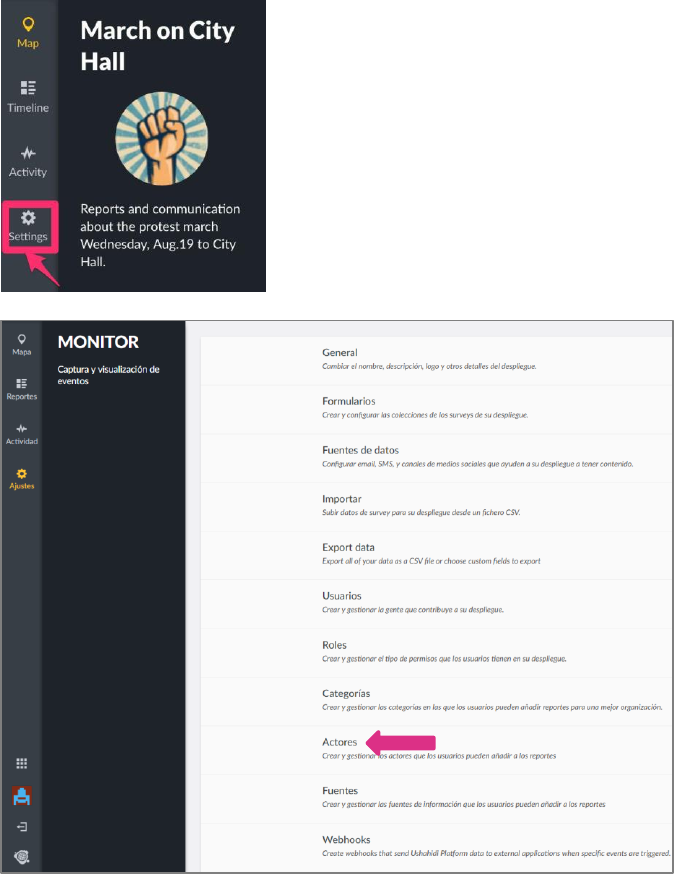
3.6 Actors
Actors are an entity in your posts, givind additional information in the report, inside the survey depends
on the categories selected.
To access the Actors configuration page,
● On the left hand menu bar, click on Settings
● Then, click on Actores.
● You’ll be redirected to a page where you can manage Actors on your deployment
3.6.1 Adding Actors
Your deployment come with pre installed/set-up Actors. If you need to create additional
Actors follow the next steps.
61

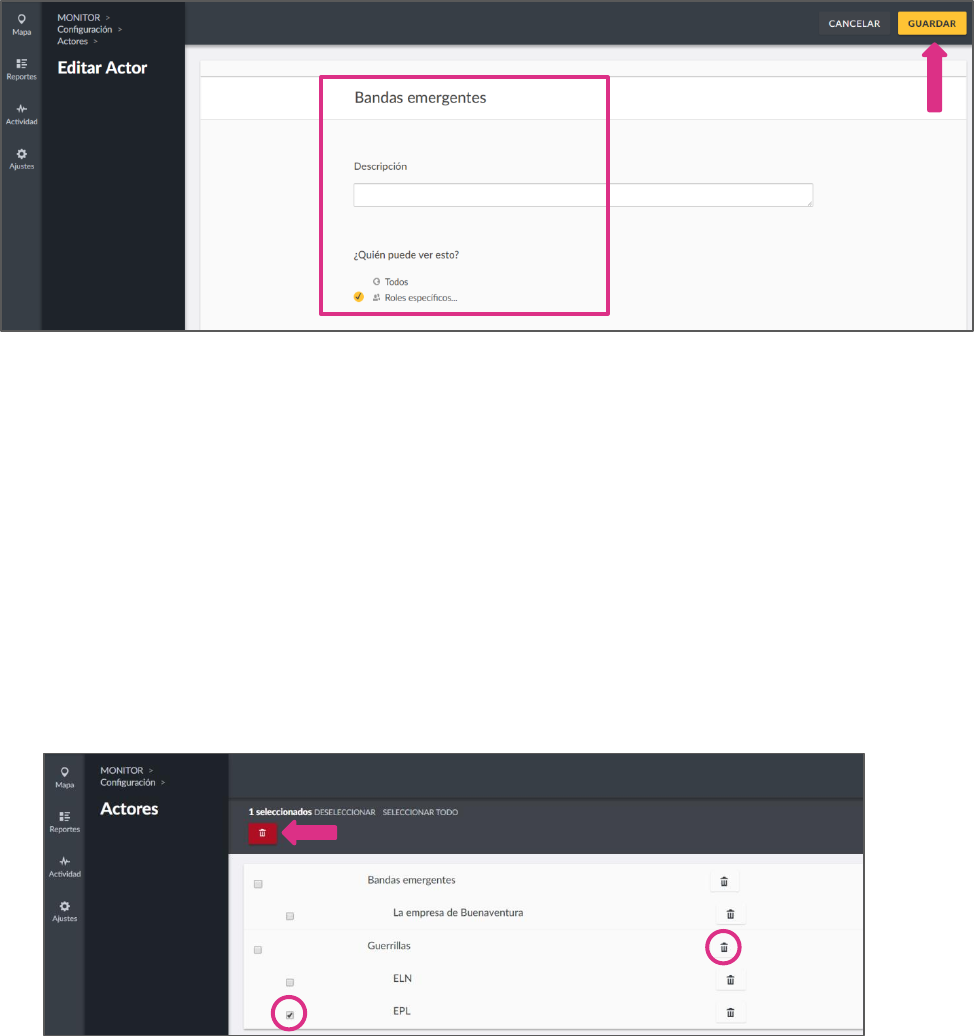
To create a new actor,
● Click on the Add Actor icon as shown below
● Add the following details
○ Actor Name: Give your actor a name that will appear when users are creating
new posts.
○ Description: You can provide a brief description of what kind of information
you will fall under this actor
○ Parent: You can choose from a list of actors already created, if the actual actor
is a child of one of them.
○ Roles:You can opt to set your actor as visible to specific user roles on your deployment
here. This list is populated based on custom roles created. More on Roles
in section 4.1of this manual
● Click on GUARDAR
to create one.
3.6.2 Editing Actors
To edit an Actor,
● Click on the desired actor from the actor list page
62
● You’ll get redirected to the Edit Actor page, where you should be able to add/edit details
as described in section 3.6.1above.
`
● When done, click on Save,and your changes will reflect shortly.
3.6.3 Deleting Actors
To delete an actor,
● From the actor list page,
○ Tick the checkbox on the left, adjacent to the actor/actors you would like to
delete from the actor list page
○ This action will activate the previously inactive Delete button on top left hand
corner of the page. Click on this button to initiate deletion.
○ Click on trash button on the right of each actor listed to delete the actor.
63
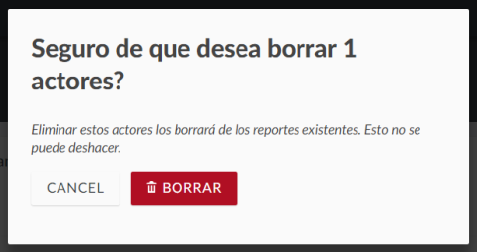
● A black pop up box will appear on the top of the page, prompting you to confirm whether
you would like to delete the actor/actors
○ Click on BORRAR
to delete your actor/actors
○ If you’d like to cancel the actor deletion process, click on CANCEL
64
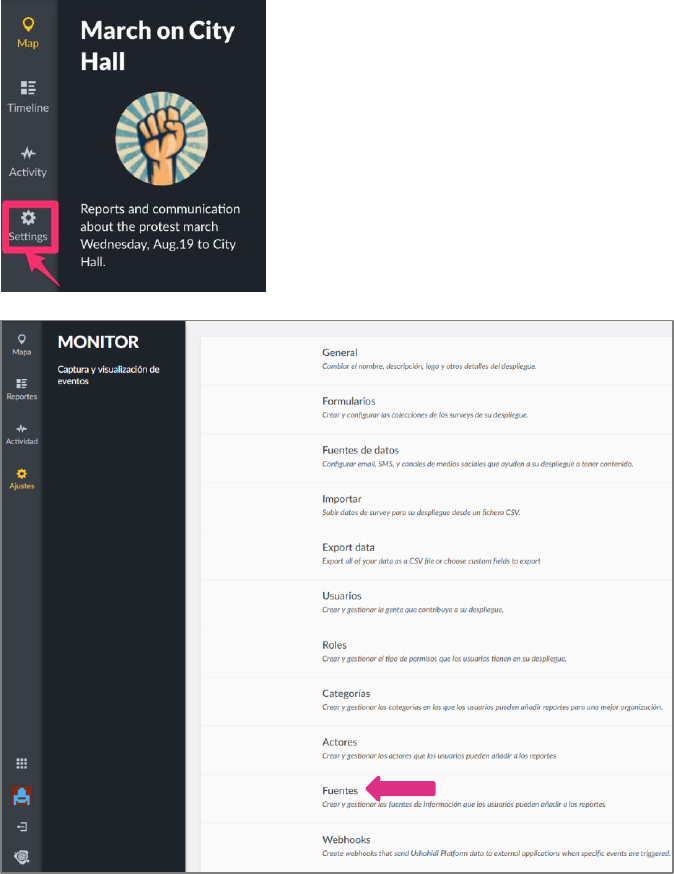
3.7 Sources(Fuentes)
Sources are an entity in your posts, you can select in their respective fields to give additional information
to the report.
To access the Sources configuration page,
● On the left hand menu bar, click on Settings
● Then, click on Fuentes.
● You’ll be redirected to a page where you can manage Sources on your deployment
3.7.1 Adding Sources
Your deployment come with pre installed/set-up Sources. If you need to create additional
Sources follow the next steps.
65
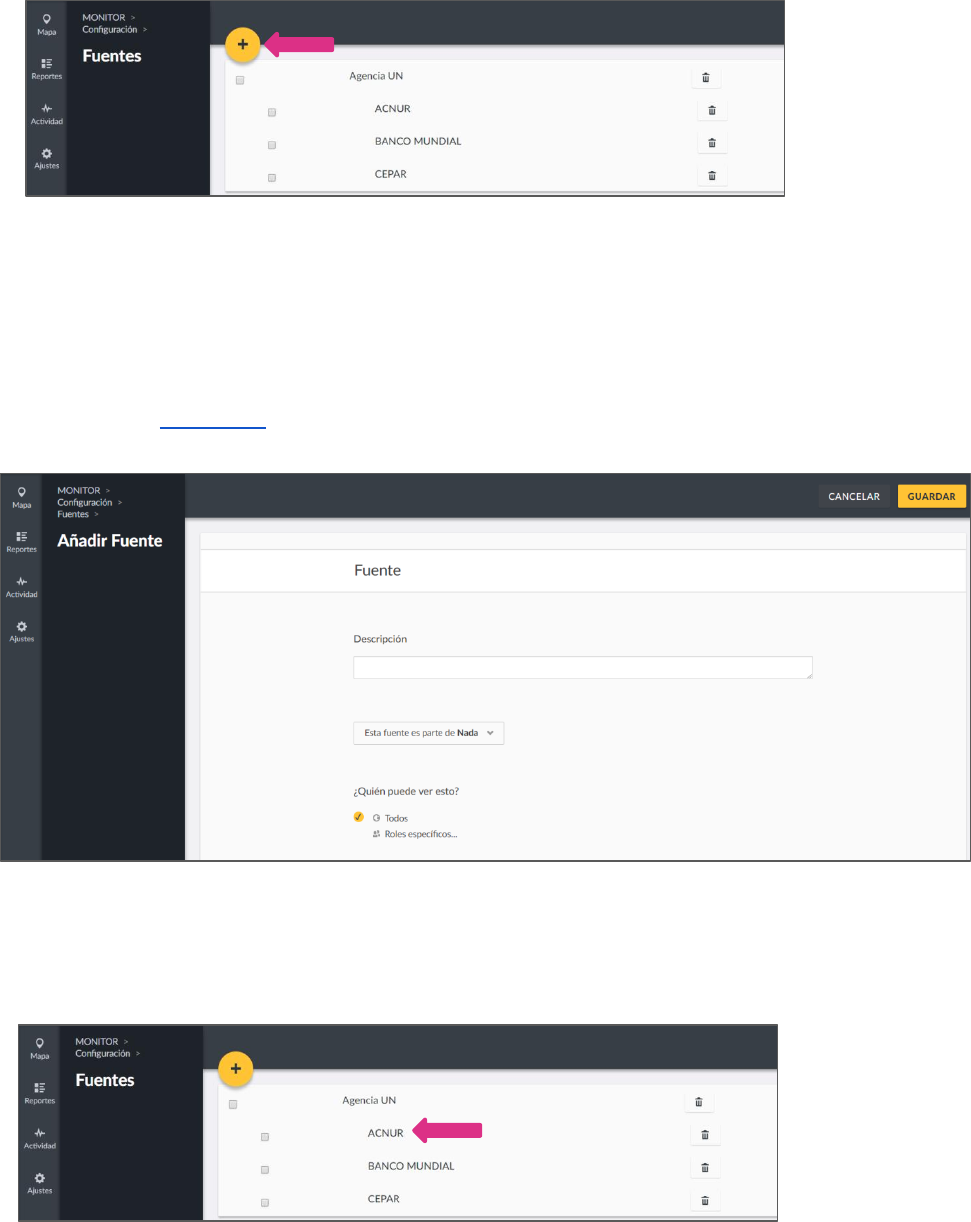
To create a new actor,
● Click on the Add Source icon as shown below
● Add the following details
○ Source Name: Give your source a name that will appear in the respective list
when users are creating new posts.
○ Description: You can provide a brief description of what kind of information
you will fall under this source
○ Parent: You can choose from a list of sources already created, if the actual
source is a child of one of them.
○ Roles:You can opt to set your source as visible to specific user roles on your deployment
here. This list is populated based on custom roles created. More on Roles
in section 4.1of this manual
● Click on GUARDAR
to create one.
3.7.2 Editing Sources
To edit a source,
● Click on the desired source from the source list page
66
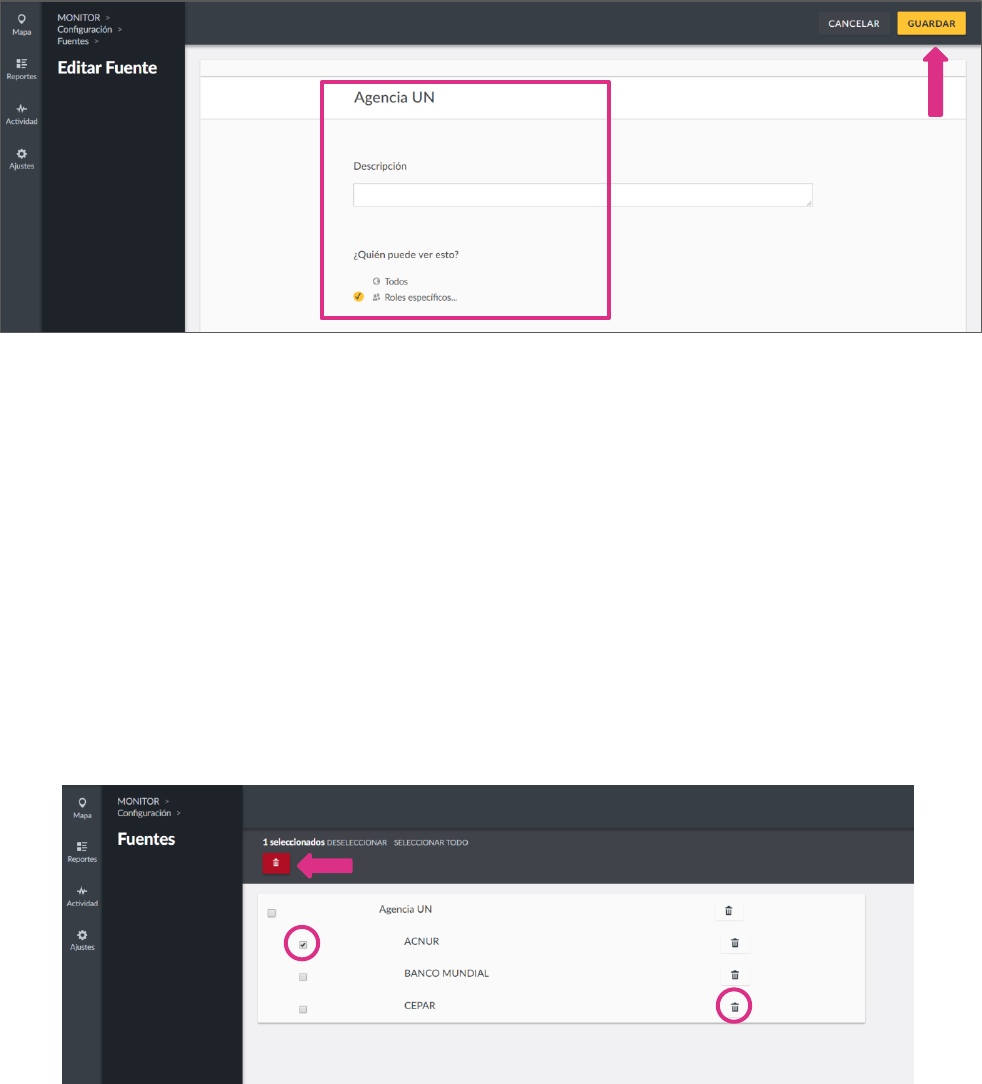
● You’ll get redirected to the Edit Source page, where you should be able to add/edit details
as described in section 3.7.1above.
`
● When done, click on Save,and your changes will reflect shortly.
3.7.3 Deleting Sources
To delete a source,
● From the source list page,
○ Tick the checkbox on the left, adjacent to the source/sources you would like to
delete from the source list page
○ This action will activate the previously inactive Delete button on top left hand
corner of the page. Click on this button to initiate deletion.
○ Or, click on the trash button at the right of each source listed to delete the
source.
67
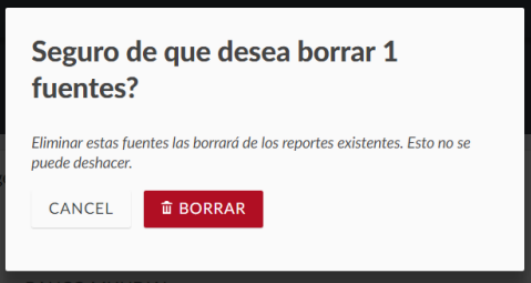
● A black pop up box will appear on the top of the page, prompting you to confirm whether
you would like to delete the source/sources
○ Click on BORRAR
to delete your source/sources
○ If you’d like to cancel the source deletion process, click on CANCEL
68
4. Managing People on your deployment
In some cases, we’ve seen large groups of people teaming up to work on managing data on
Ushahidi deployments. This section describes how to create and manage custom roles and
users on your deployment.
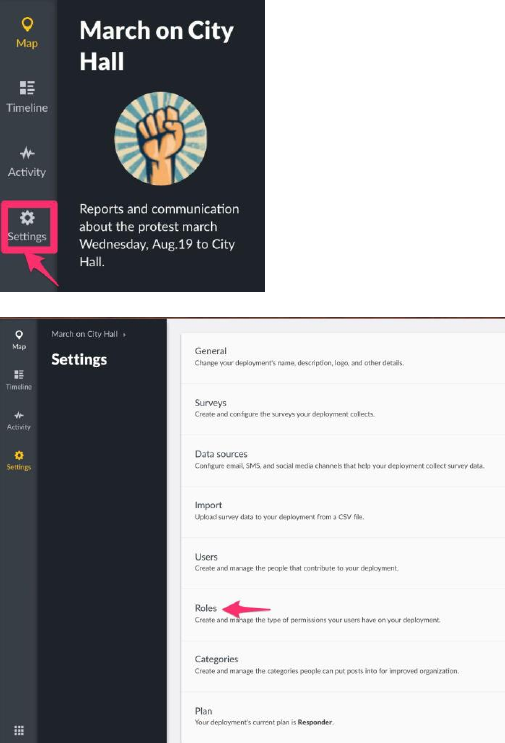
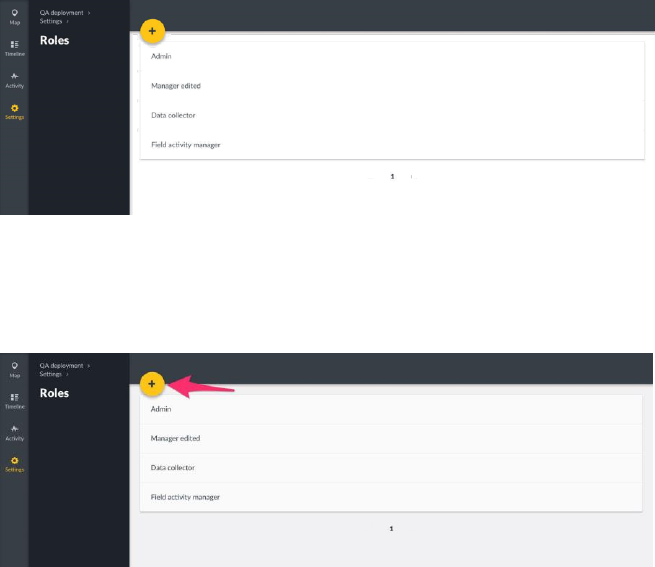
4.1 Roles
This feature allows you to set up and manage default and custom roles and permissions for different user
groups on your deployment. Each deployment has a default “Admin” role,which cannot be deleted,
but can be edited. This default “Admin” role allows for full control over ALL functionality on
your deployment.
To access the roles management page,
● On the left hand menu bar, click on Settings
● Then, click on Roles
● You’ll be redirected to a page with a list of all existing roles - default & custom roles
(created by admins if any exist).
69
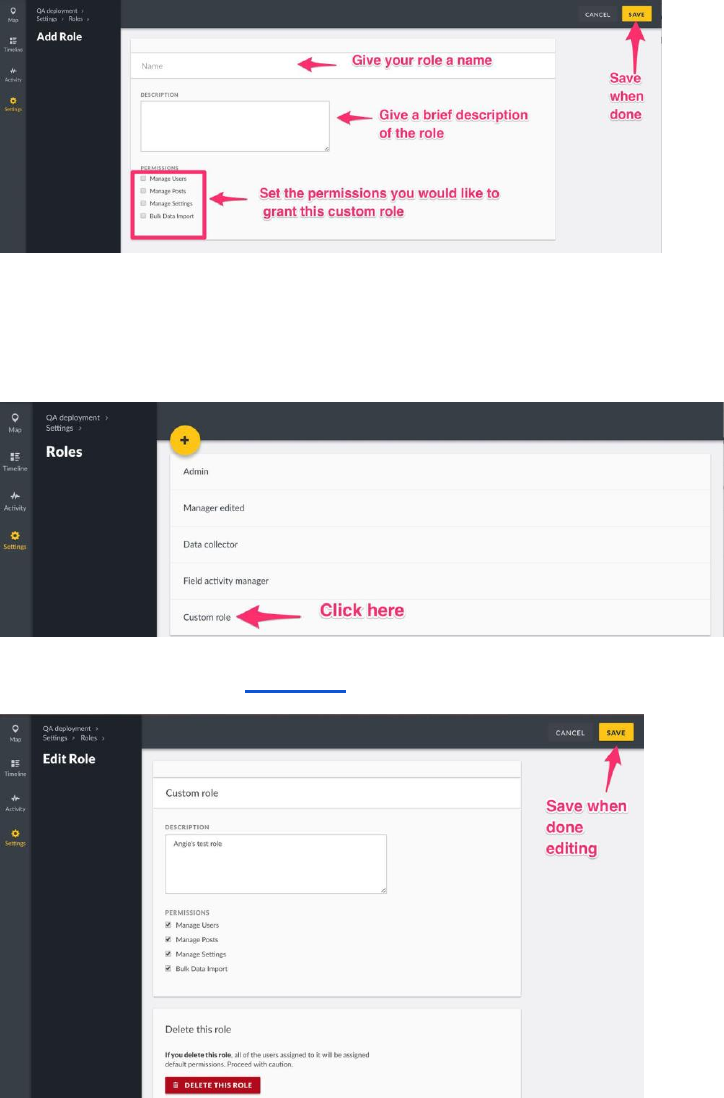
4.1.1 Add Role
To add a custom user role,
● Click on the yellow Add icon
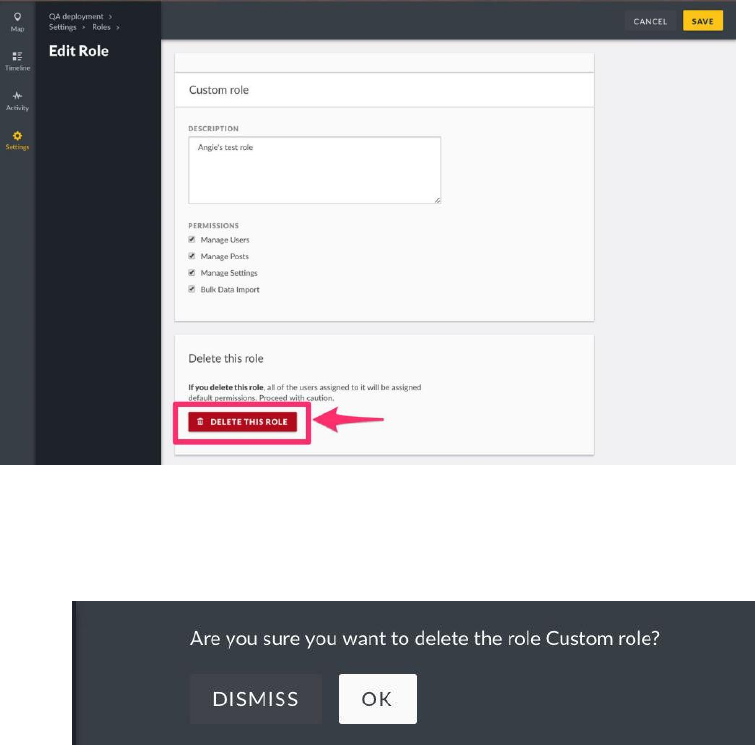
● Add the following details
○ Name:Provide a name for this new custom role
○ Description:Provide a brief description of what/who this custom role has
been created for
○ Set your permissions.Below is a brief breakdown of what permissions get
granted to users on selecting the options provided.
■ Manage Users:Allows for
● Viewing Users
● Adding, Editing, Deleting Users
● and Changing roles for Users
■ Manage Posts:Allows for
● Viewing posts
● Editing and Deleting Posts
● Publishing posts (Setting specific audiences to view )
● Adding posts to collections
● Creating new collections
■ Manage Settings:Allows for managing
● General Settings
● Map Settings
● Data Sources
● Surveys
● Categories
■ Bulk Data import:Allows for upload of data via CSV files
70
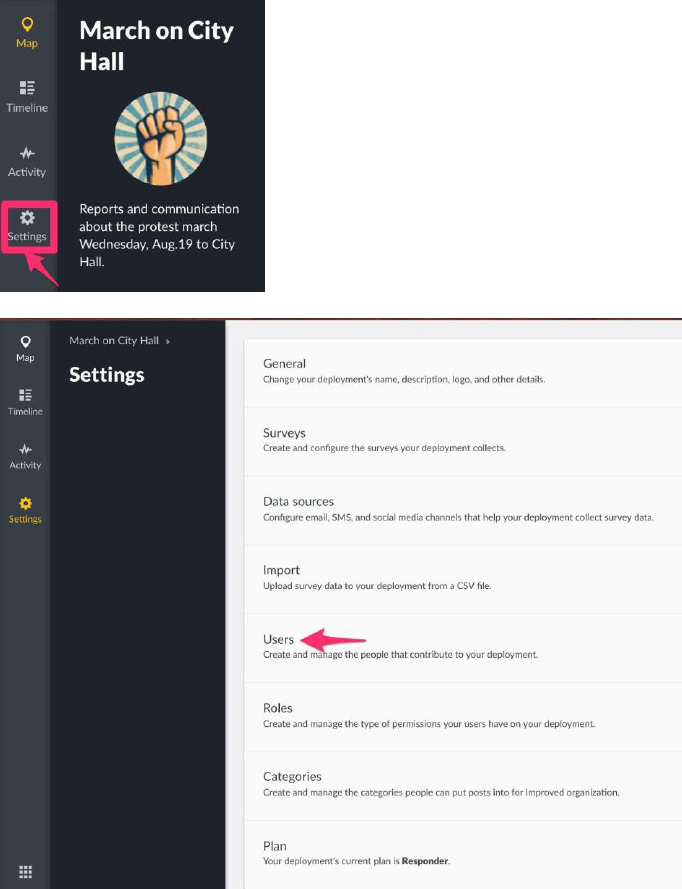
4.1.3 Delete Role
To delete a role
● Click on a role from the Roles management list page
● Then, click on the Delete This Rolebutton at the bottom of the page
● A black pop up box will appear on the top of the page, prompting you to confirm whether
you would like to delete the custom role. If
○ You would like to proceed with deletion, click on OK.
○ You would not like to proceed with deletion, click on Dismiss
72
4.2 Users
To access the User management page,
● On the left hand menu bar, click on Settings
● Then, click on Users.
● You’ll be redirected to a page with a list of all existing users on your deployment
● If you are an ushahidi.io user, you should see the the user you created on set up listed on this
page. If you are an ushahidi open source user, every installation comes with a
default username: adminand password: admin
73
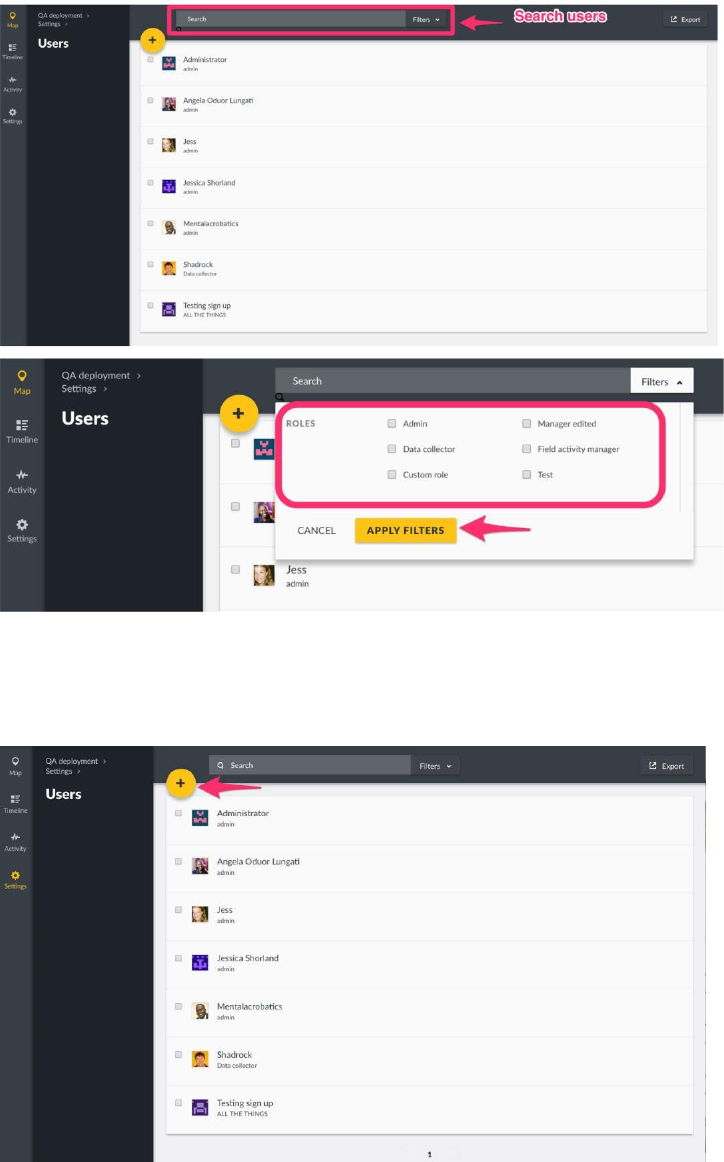
● From here, you can search for users either by name or by custom role
4.2.1 Adding new users
To add a new user,
● Click on the yellow icon as shown below
● Fill out the details below
74
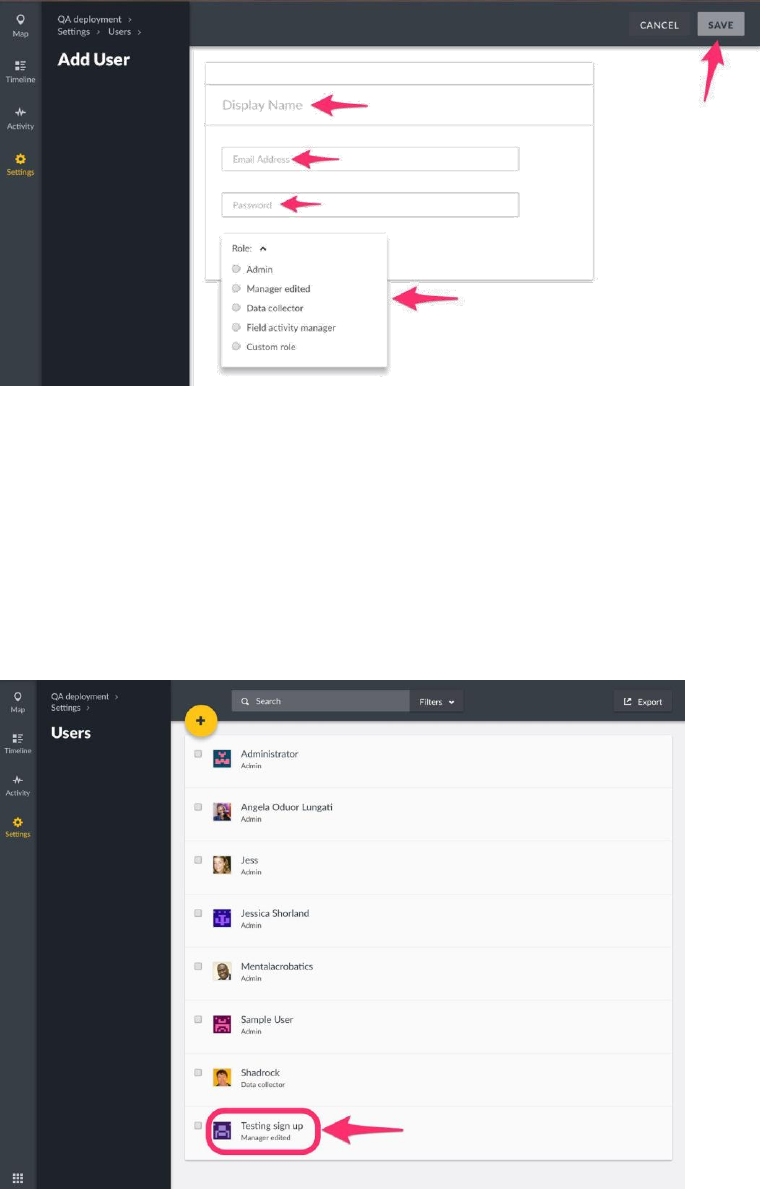
○ Display Name:This is the name that will be displayed
○ Email address: This is the email address that will be tied to this new user’s
account, and will be used to log in.
○ Password: Set a strong and secure password for your new user. Each
password must have at least 7 characters
○ Role: Choose the level of administration access you would like this user to have
● Click on Save to create one.
4.2.2 Editing users
To edit a user,
● Click on the user you intend to edit from the user list page
75
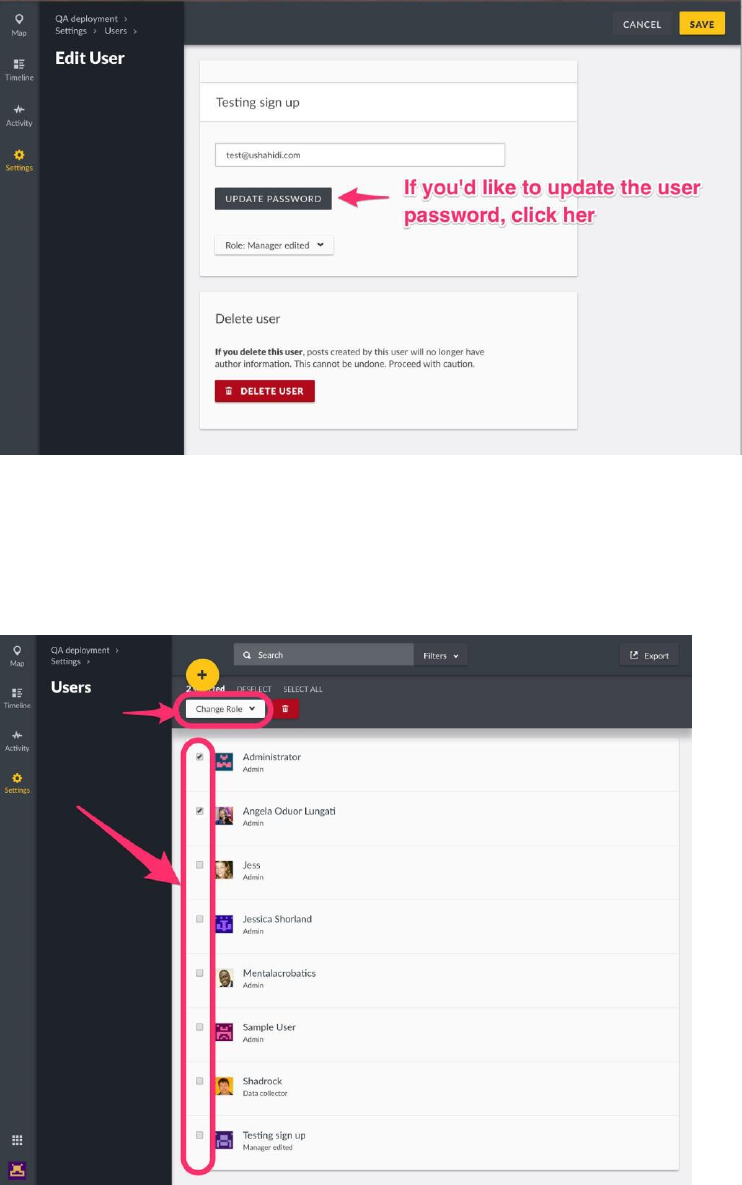
● You should be able to edit the user’s display name, email address, password and
user role from this page.
● Click on save when done.
4.2.3 Changing User roles
You can change multiple users’ roles at once from the user management page.
● Tick the checkbox on the left, adjacent to the user(s) whose role you would like to
change from the user list page
76
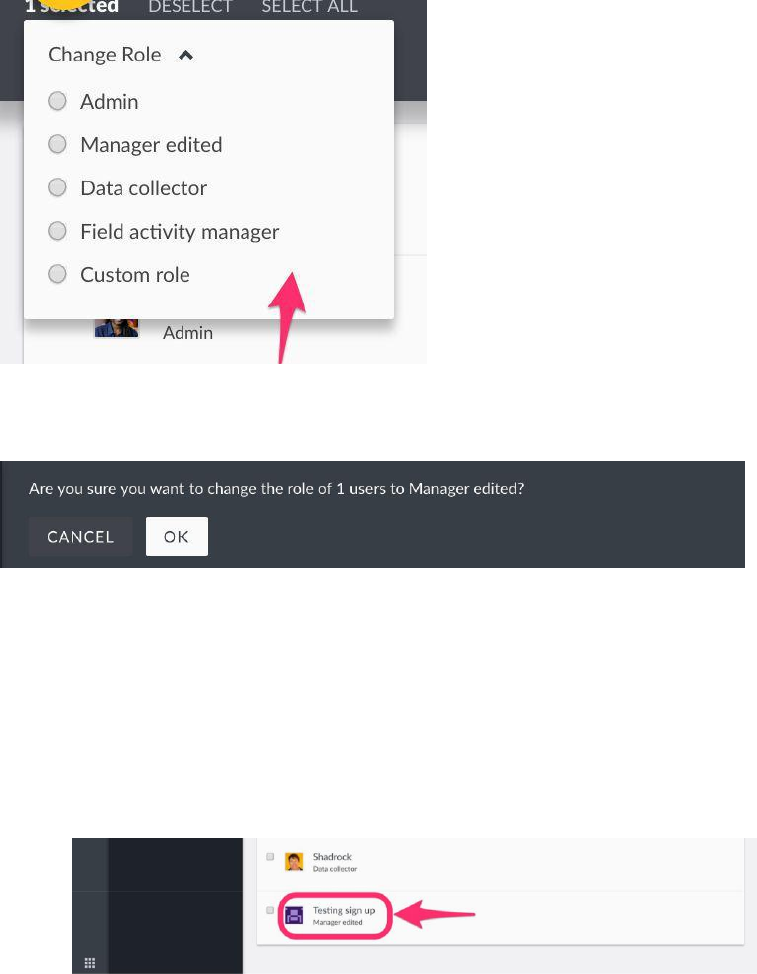
● This action will activate the previously inactive Change Role dropdown button on
the top menu bar.
● Click on this dropdown and select the role you would like to assign your users to.
● A pop up box will appear, prompting you to confirm whether you would like to change
the roles of your user(s)
○ Click on OKto change your user(s) role
○ If you’d like to cancel the role change process, click on Cancel
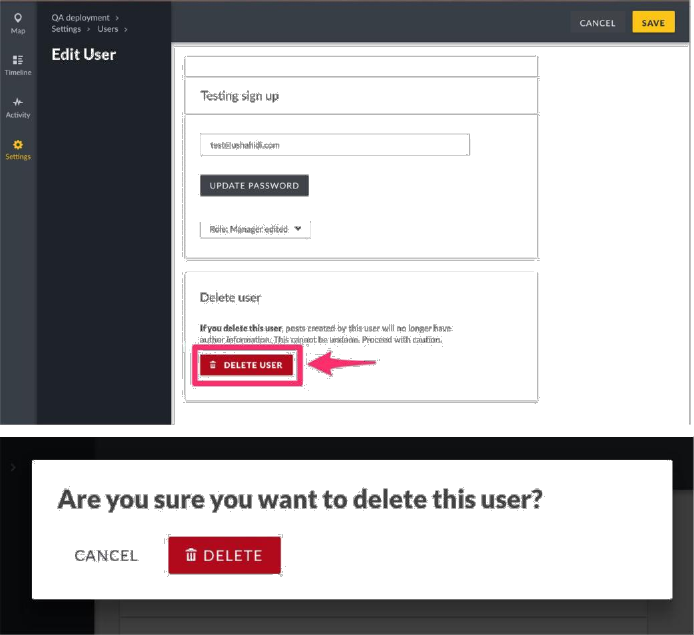
4.2.4 Deleting users
Similarly, you can delete multiple users at once from the user management page, or from the
individual user edit page.
To delete a user
● From the individual user edit page
○ Click on the user you intend to edit from the user list page
○ Click on Delete User
○ A black pop up box will appear on the top of the page, prompting you to
confirm whether you would like to delete your user
■ Click on OKto delete your user(s)
■ If you’d like to cancel the user deletion process, click on Dismiss
77
● From the User management page
○ Tick the checkbox on the left, adjacent to the user(s) you would like to delete from
the user list page
78
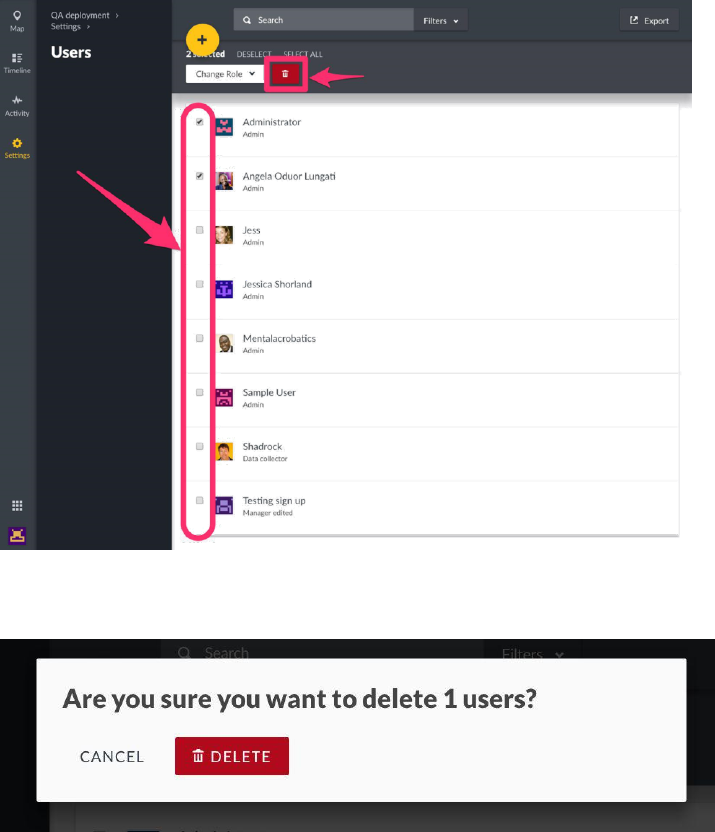
○ This action will activate the previously inactive Deletebutton on the top menu
bar. Click on it to initiate the deletion process
○ A pop up box will appear, prompting you to confirm whether you would like to
delete your user(s)
■ Click on DELETEto delete your user(s)
■ If you’d like to cancel the user deletion process, click on Cancel
79

5. Managing Data in your deployment
A post is a report of a single instance of something in the deployment. It can be made up of
many fields, such as Title, Description, Date, Links, and/or location. Ushahidi allows for
collection of posts via
● SMS:These can be configured to come in via SMSSync, FrontlineSMS, Nexmo and Twilio.
● Twitter:You can pull our tweets based on specific hashtags, search terms, and/or
directly from specific accounts.
● Email:You can configure your deployment to receive post from an email address
NB: You can configure SMS, Twitter and Email as data sources as described in Section 3.4of this manual
● Web(your deployment page online):Since Ushahidi is responsive, you can add a post from
the web app from any device that can access the internet (a computer, tablet, or mobile phone).
● Smartphone apps:Our native applications on Android and iOS are still a work in
progress at the moment.
This chapter will describe how to manage data coming in from these different sources
5.1 Viewing Posts
Posts on your deployment can be categorised into two:-
● Structured:Incoming posts from the web platform and smartphone applications are
classified as structured posts, since they adhere to the structure of surveys created on
your deployment.
● Unknown:Incoming messages from SMS, Twitter and Email are classified as unknown
posts, since they do not adhere to the structure of surveys created on your deployment.
This means that these messages come in their raw form, and have to be manually
structured by admins/anyone with permissions to edit posts, to fit into the structure of
your survey. E.g an SMS message “Hello, my name is Angela” will need to be broken
down into a title, a description, properly categorised etc.
By default, every deployment has a set of four featured Saved Searches(read more in section 7.2of
this manual) from which you can view posts on your deployment, on the top menu bar.
These include:-
● All posts:Lists all posts(structured and unstructured) that have come into your deployment
● Published Posts:Lists all posts that have been made public on your deployment(i.e
can be viewed by registered/non registered users on your deployment.
● Unknown Posts:Lists all messages received from SMS, Email and Twitter
80
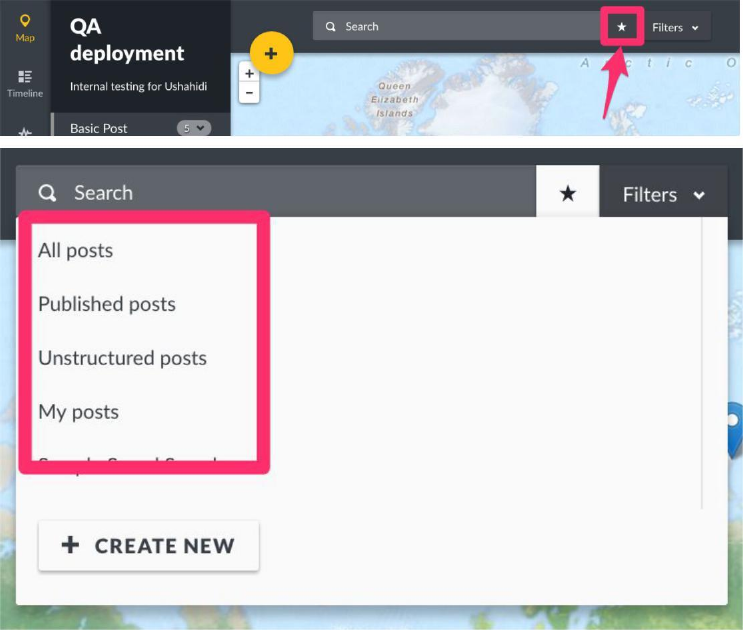
● My posts:Lists all posts created by you as a user
81
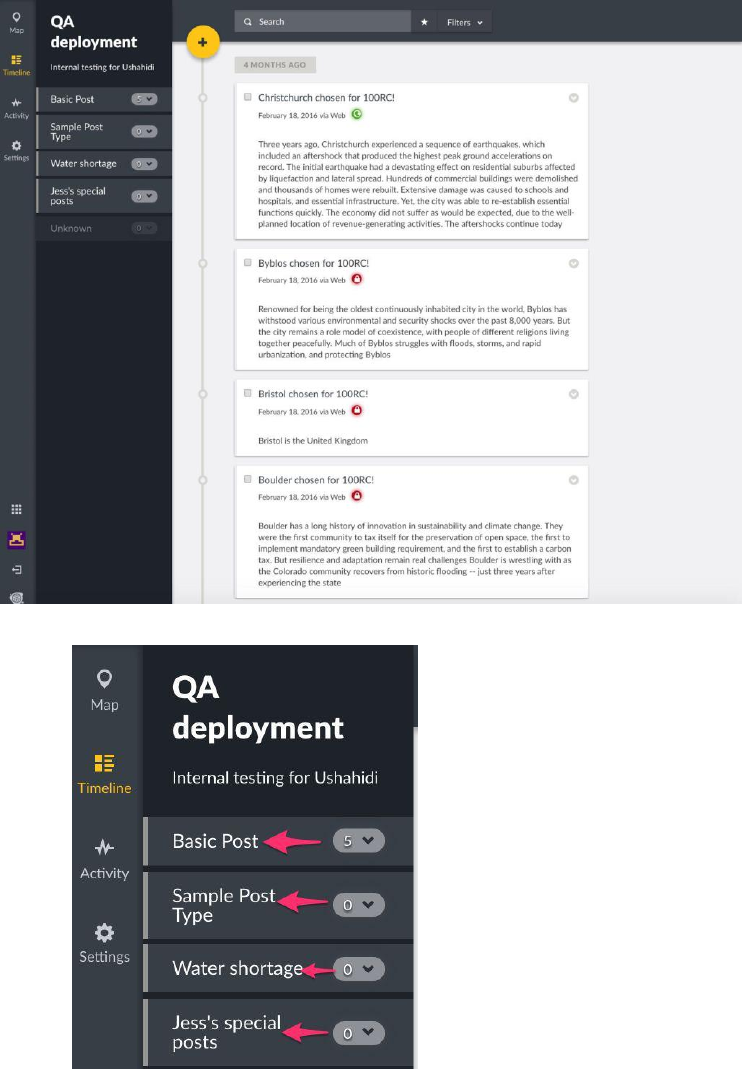
From this post list page, you should be able to see the following:-
● A menu bar on the left with different survey types to filter the list from.
● Post visibility Status: You can tell if a post is public or only visible to a specific audience
82
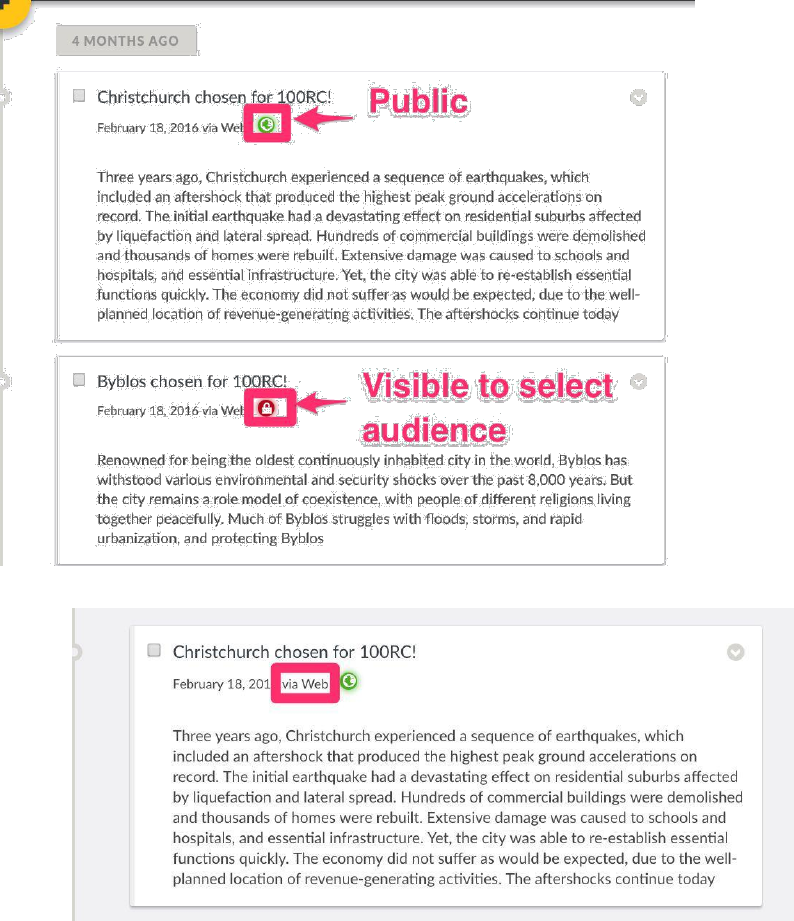
● Post source (is it from the Web, SMS, Email or Twitter?).
○ Structured postsvia web/smartphones will have their respective source label on them.
○ Unstructured postswill have a label denoting their source, as seen below
with this sample SMS message
83
● Date and timethe post was submitted
● Post description
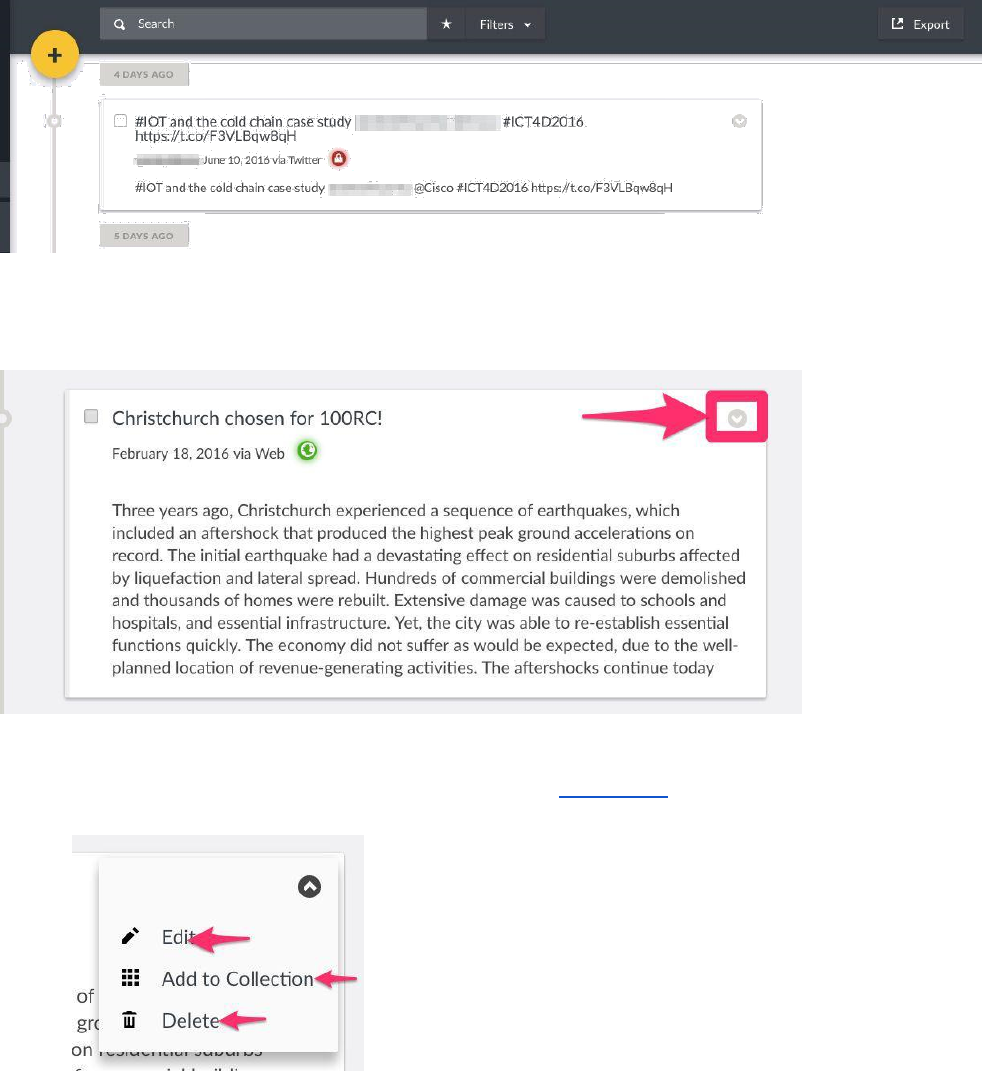
● If you’re an admin/your user role permits, you’ll should also see a small dropdown icon
on the right hand corner of every post.
Clicking on it presents you with options to:-
○ Edit your post
○ Add your post to a collection(more on collections in Section 7.3of this manual)
○ Delete your post
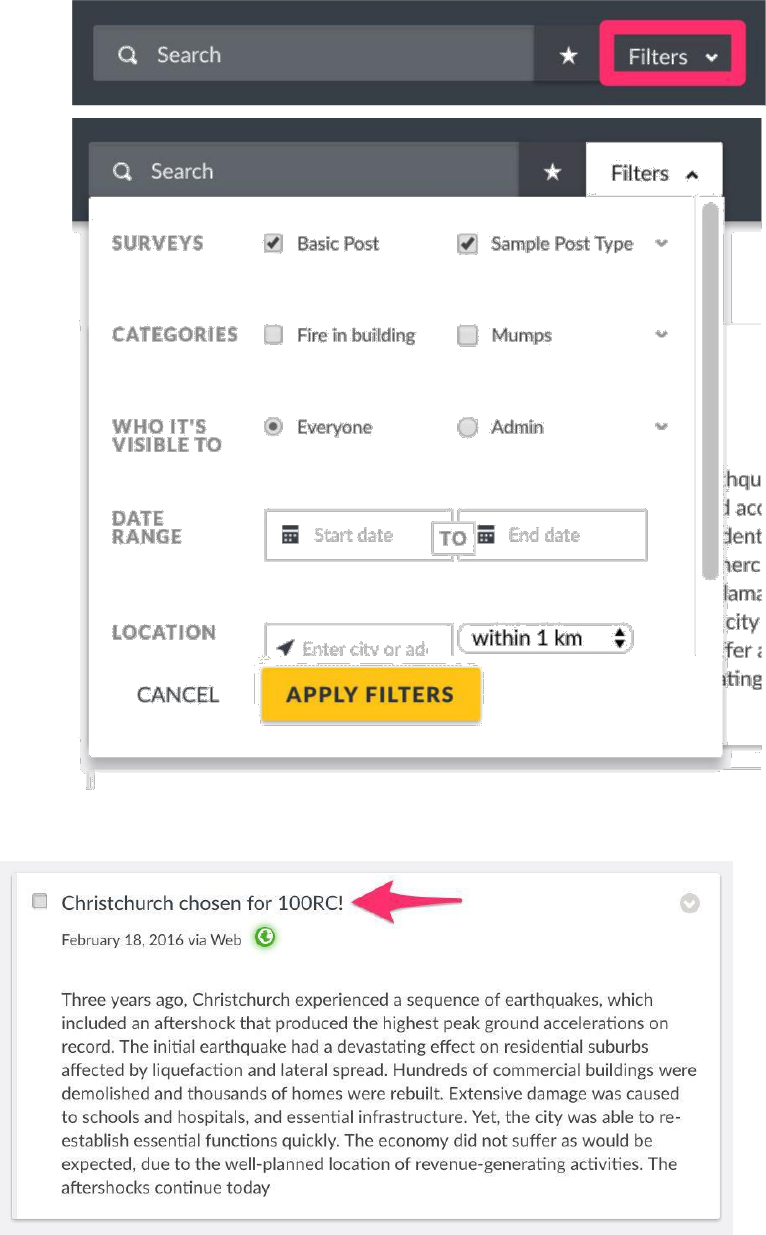
● A search filter that allows you to filter reports by surveys, categories, who posts are
visible to, date range, location, or user determined parameters
84
You can view individual report details by clicking on the Post Title link, which will redirect you
to a page with additional details on categories, tasks completed/not completed for this post.
You can also opt to do the following from the individual report page.
85
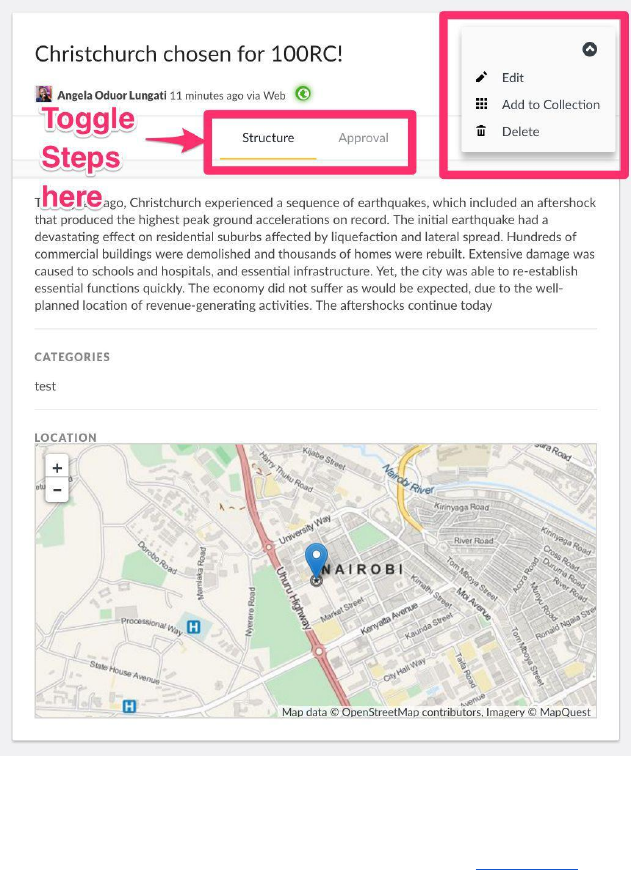
● Edit the post
● Add the post to a collection
● Delete the post
Please note that information displayed to users on each of these pages is dependent on permissions granted
to registered/non registered users by the deployment administrator e.gPublished posts,Unstructured posts
and My posts, and menu bars allowing for editing and deletionare only visible to logged in users with
necessary granted permissions( See more on Roles in Section 4.1of this manual)
5.2 Adding Posts
Registered/non registered users can create posts using the same process described
below. For descriptive purposes, the post below has three tasks. To create a post,
● Click on the yellow add icon as shown below on your homepage.Ifyou’re viewing any
other page on this deployment, this ison will appear on the top left hand corner, just as
on the homepage.
86
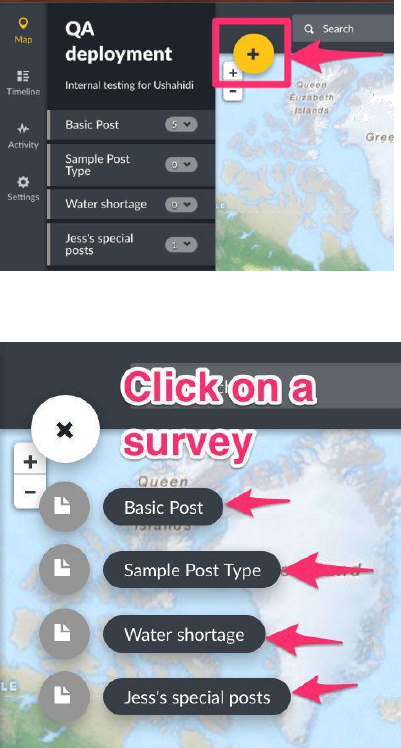
● In the event that you have multiple surveys on your deployment, you’ll have to
choose the survey from a list of all surveys available on your deployment.
● The survey chosen determines which fields will be filled out in each task(if multiple
tasks exist). Make sure to fill out all fields with a red asterisk beside them in each task.
You will not be able to save or publish your post before these fields are filled out.
87
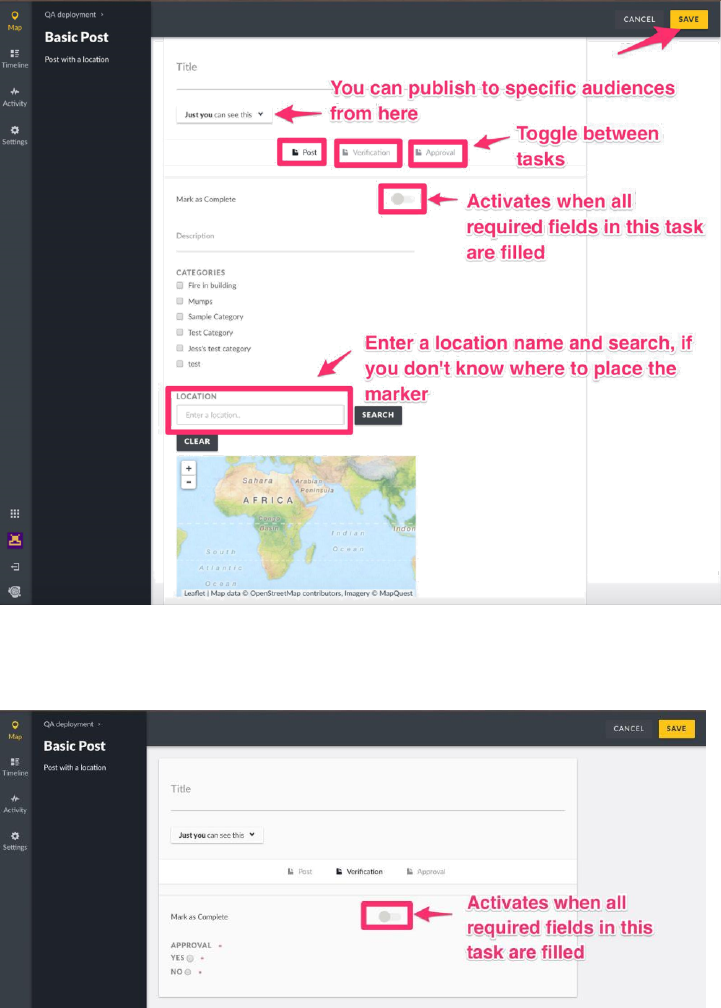
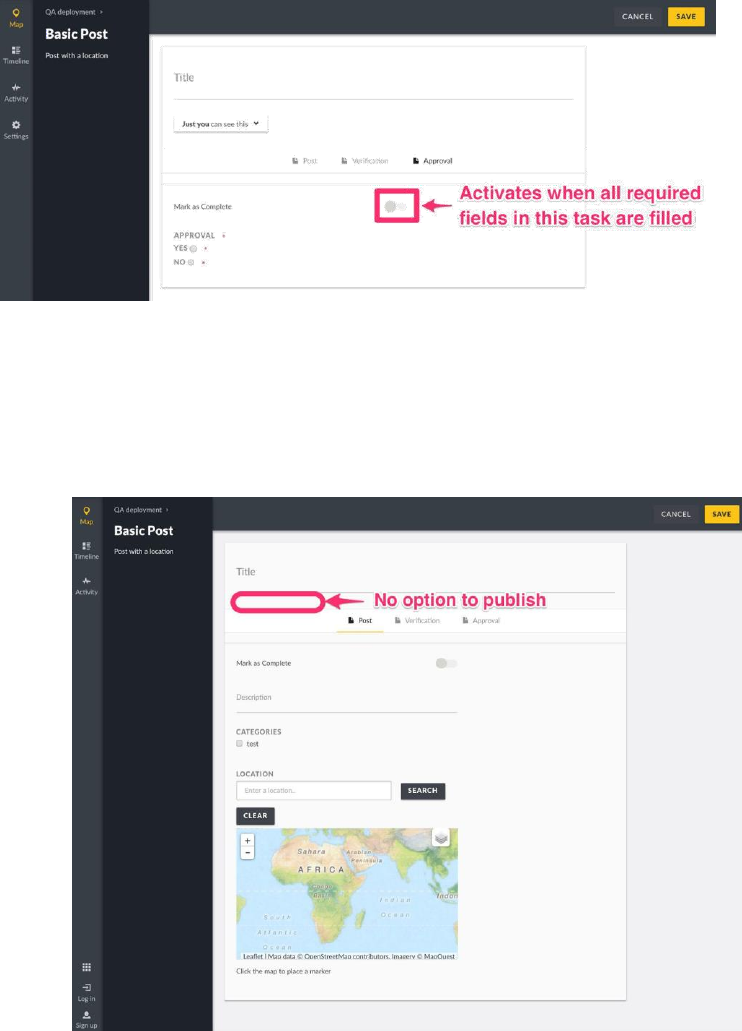
● Once you’re done filling all required fields in a task, make sure to Mark as complete.
You’ll notice that this option is disabled until all required fields in the task are complete.
You should also note that you won’t be able to save the post if there are required tasks
that have not been marked as complete.
88
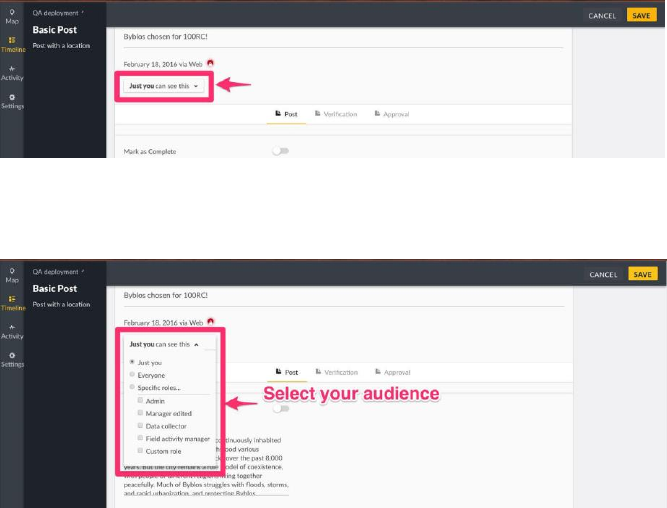
● If you’re an admin, you should be able to set permissions on who will be able to view this post.
The Just you can see this dropdown has a list of all custom roles created on your
deployment to choose from, as well as the option to leave the post viewable by just
you. Setting this option to “Everyone” will publish your post.
● When you’re done adding content and completing tasks that are required, click on Save.
○ If you’re a non registered user or a user without publish permissions, your post
will be submitted to the deployment’s admin for review before publishing.
5.3 Editing Posts
The post editing function is only available to admins or registered users with adequate permissions.
This means that non registered users cannot edit posts.
This feature is particularly useful when creating posts out of unstructured posts (messages
from SMS, Email, Twitter)
89
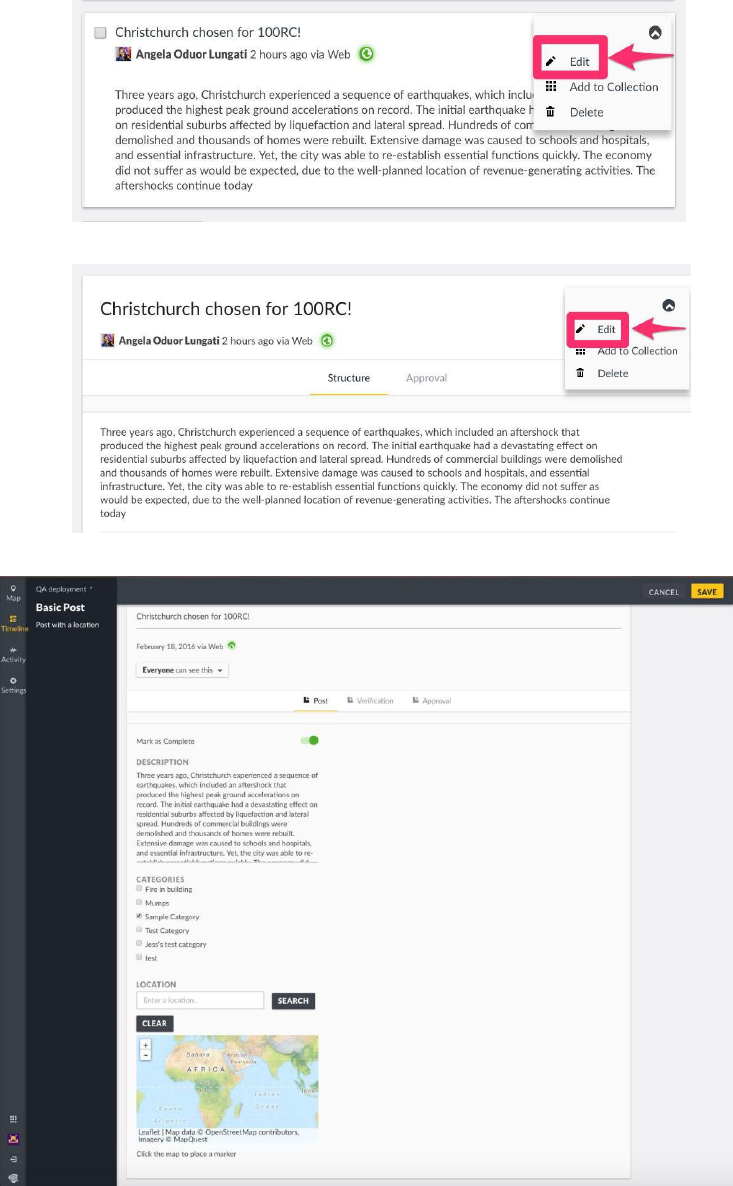
To edit a post,
● Click on Editfrom:-
○ The Posts List page
○ An individual post’s view page
● This will take you to the post creation page, where you’ll be able to edit any of the content.
90
● When done making changes, click on Save.
5.4 Publishing Posts
The ability to publish posts is only available to admins or registered users with adequate
permissions. This means that non registered users cannot publish posts. Posts submitted by
non registered users have to be moderated.
To publish a post,
● Click on the Just you can see thisdropdown from the post edit page
● Select the audience you would like to publish this post to. You can choose to leave it
viewable by just you, or to custom roles as defined on your deployment. Selecting
Everyone sets this post as viewable to the entire public.
● Then, click on Save.
91
5.5 Deleting Posts
The ability to delete posts is only available to admins or registered users with adequate permissions.
This means that non registered users cannot delete posts.
You can select multiple posts to delete at a time from the post list page, or delete individual posts
from the list page, or individual post view page .
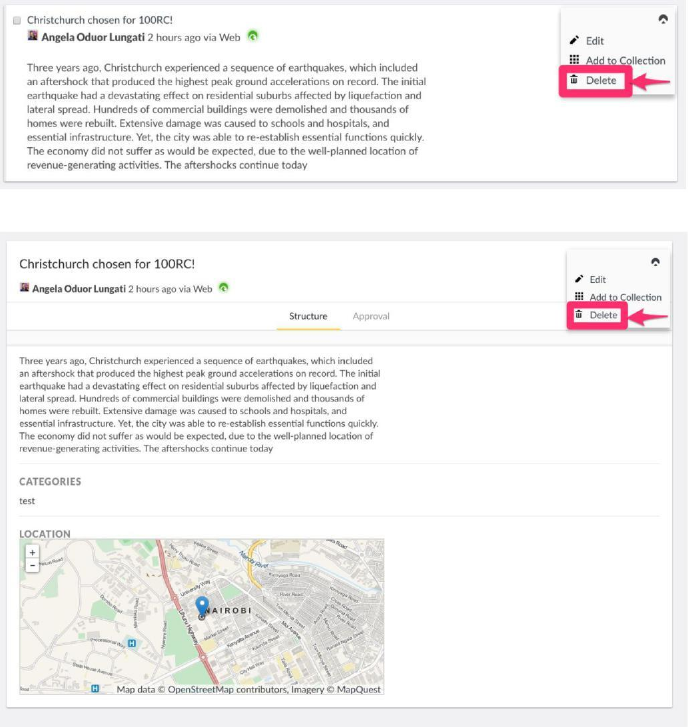
To delete
● An individual post from
○ The Post list page, click on the dropdown as shown below. Then, click on Delete
○ The Post edit page, click on the dropdown as shown below, Then, click on Delete
A pop up box will appear on the top of the page, prompting you to confirm whether you
would like to delete your post(s)
○ Click on Deleteto delete your post(s)
○ If you’d like to cancel the post deletion process, click on Cancel
92

● Multiple posts from the post lists page
○ Tick the checkbox on the left, adjacent to the post(s) you would like to delete from the
posts list page. You can also click on Select Allto grab all posts listed on that page
○ This action will activate the previously inactive Deletebutton on the grey menu
bar. Click on it to initiate the deletion process
○ A black pop up box will appear on the top of the page, prompting you to
confirm whether you would like to delete your post(s)
■ Click on Deleteto delete your post(s)
■ If you’d like to cancel the post deletion process, click on Cancel
93
5.6 Importing Data
The Data Importfeature allows you to import posts into the platform. It is particularly useful in
cases where:-
● You need to upload posts in bulk
● You need to upload posts that people can’t send to you via email/phone but have the
data available in CSV format
● (In future) You are transferring data from one platform to another
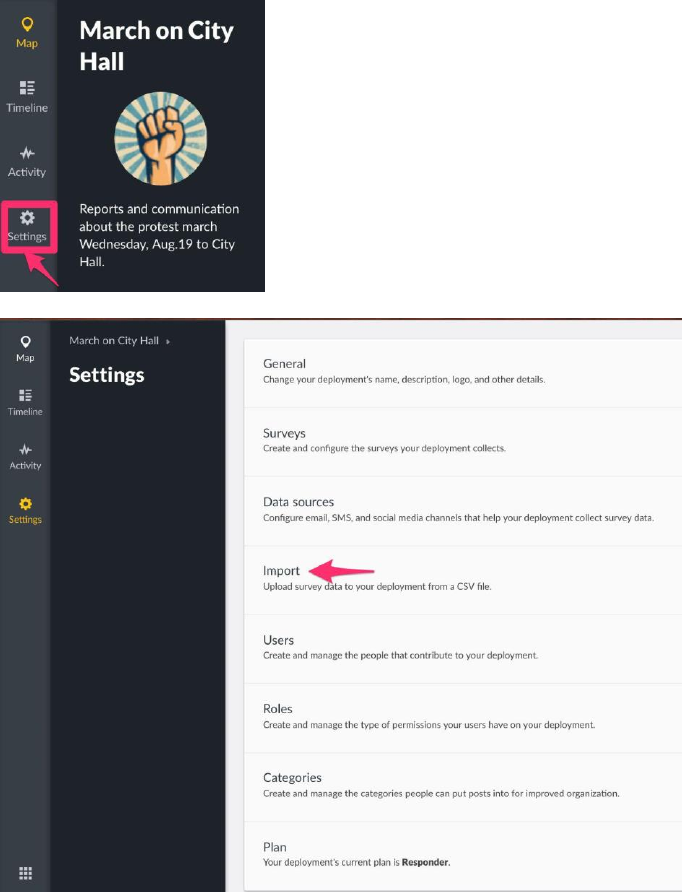
To import a CSV File,
● On the left hand menu bar, click on Settings
● Then, click on Data Import
94
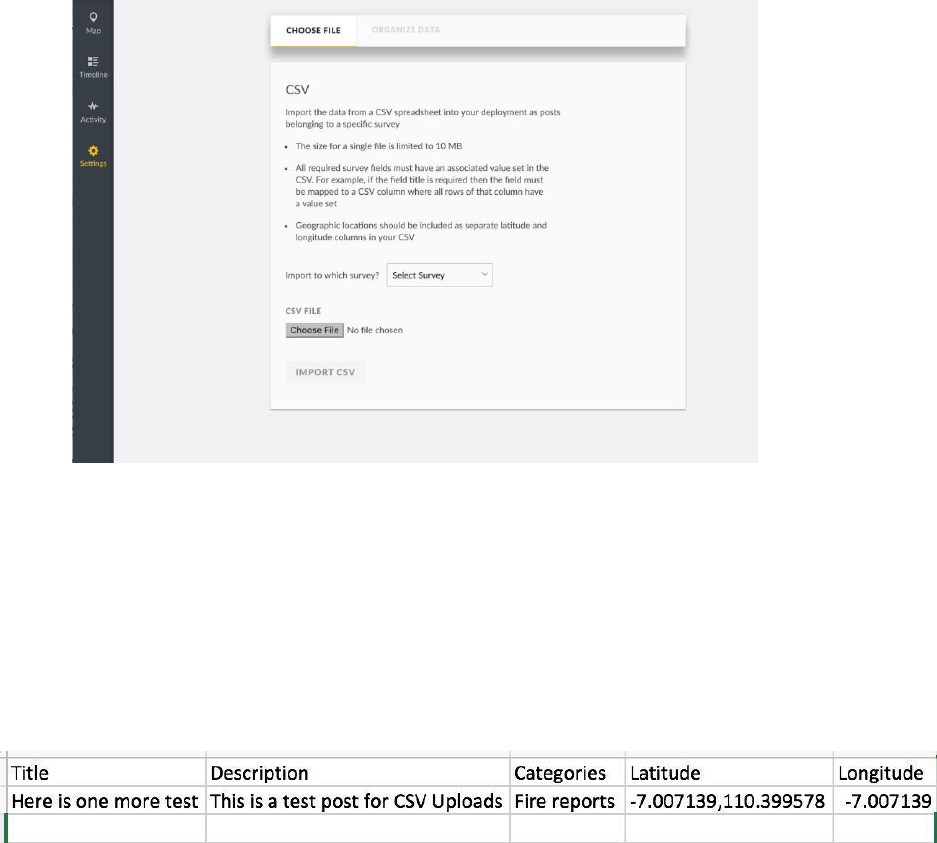
● You’ll get redirected to the import page, as shown below.
● Select a survey you’d like to match the data you’re uploading to. This field is populated
with a list of all existing surveys on your deployment.
● Choose the CSV file you would like to upload. Make sure that
○ You are uploading a file in CSV format. Any other file formats are not accepted
○ Your CSV file size does not exceed 2MB
○ Your CSV file has Column headers( these will be useful when mapping your
CSV column to the survey fields)
○ Geographic location information is separated into two columns; one for Latitude,
and the other for Longitude.
See below for a sample CSV file
● Click on Import CSV.
95
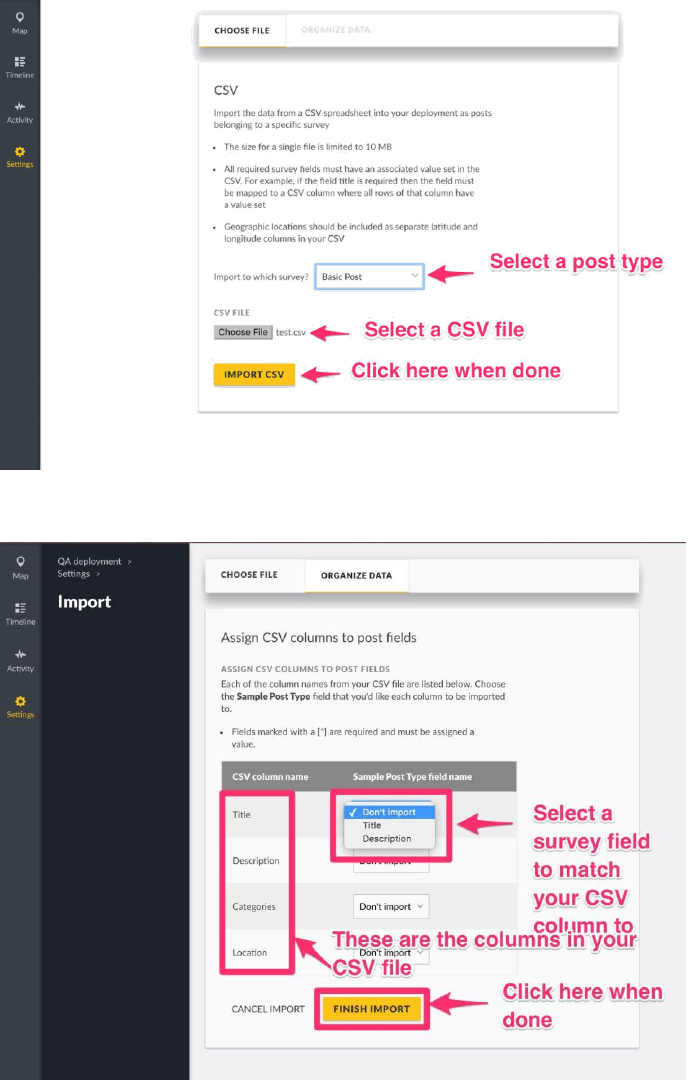
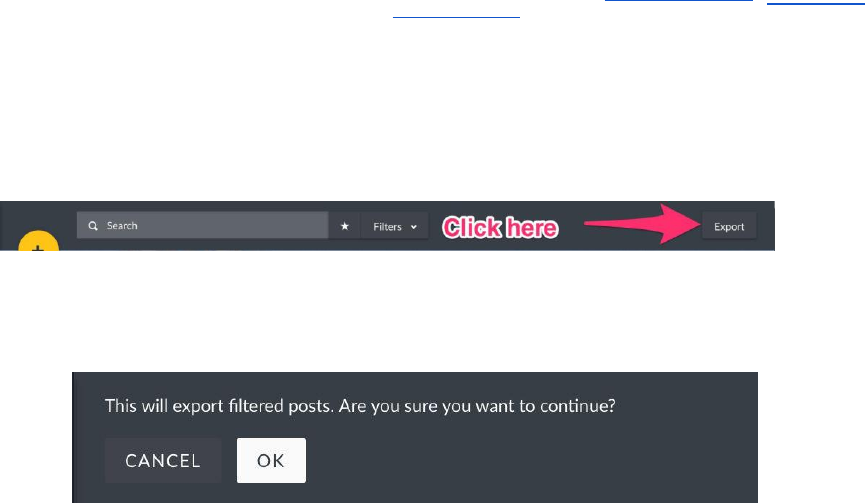
● On successful file upload, you’ll need to assign your CSV Columns to post fields, as
illustrated below.
● Click on Finish Import.
● If successfully uploaded, You’ll be redirected to the All postspage, with your newly
uploaded posts added to the list of previously existing posts.
● To publish your newly imported posts, make sure to mark the any tasks that are
required complete on each individual post as listed.
96
5.7 Exporting Data
The platform now allows for data export, enabling you to download posts from the platform in CSV
format. You can download posts from your map mode, timeline mode, saved searchesand collections
you have access to, or based on custom criteria( search filtersset by you as a user).
To export a CSV file,
● Click on saved search/collection you’d like to export data from.
○ You can also use the Search section on your header to filter posts you would
like to export based on specific criteria
● Once done, click on the Export button on the right hand of your header menu
● A small confirmation box will appear seeking confirmation on whether you would
like to proceed with exporting your data.
○ Click on OKto export your CSV file
○ Click on Cancelif you would like to terminate the export process
● You should get a CSV file named after your deployment name in your downloads folder
97
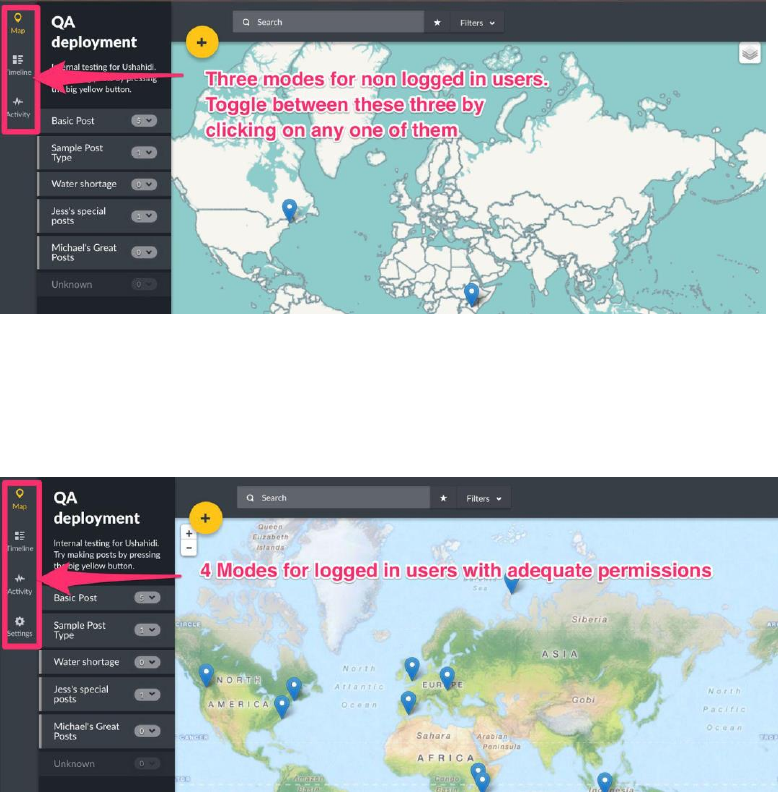
6. Modes for visualizing and managing data on
your deployment
The Ushahidi platform provides you to with modesto not only visualiseyour data in different ways,
but to also manage it.
We designed “modes” for the discrete and specific actions users need to take within the
platform, in a bid to make the platform to be more intuitive and action-oriented for different user
types on a deployment.
Ordinary viewers of a deployment can access three different modes as shown below:-
● Map
● Timeline
● Activity
Signed in users(with the necessary permissions) can access four different modes as shown below:-
● Map
● Timeline
● Activity
● Settings
98
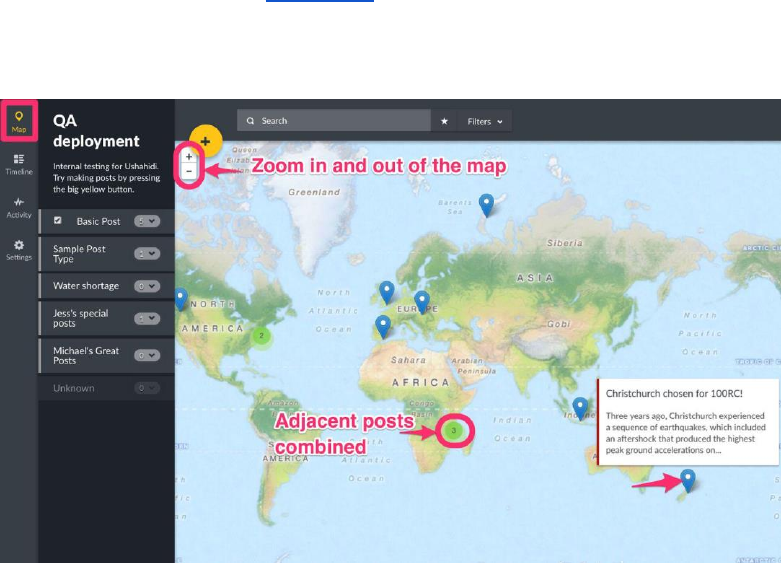
Your ushahidi deployment defaults to the map mode for anyone who visits your homepage(as
illustrated above). To change your current mode, select any of the options provided to you
from the menu on your left.
6.1 Map Mode
This mode displays all published posts on a map.
● Each post appears as an icon on the map. In the event that you opted to combine nearby posts
on your Map settings page (Section 3.3of this manual), posts adjacent to each other on the
map will cluster together, displaying a number denoting number of posts combined.
● Clicking on each individual post displays a small pop up box with the post titleand description.
● You should also be able to zoom in and out of the map as desired.
6.2 Timeline Mode
This mode allows you to view posts coming into your deployment as a chronological list of
events over time.
To access this mode,
● Click on Timeline
● From here, you should be able to:-
○ Edit posts
○ Add posts to collections
○ Delete posts
○ Navigate to view individual posts
99
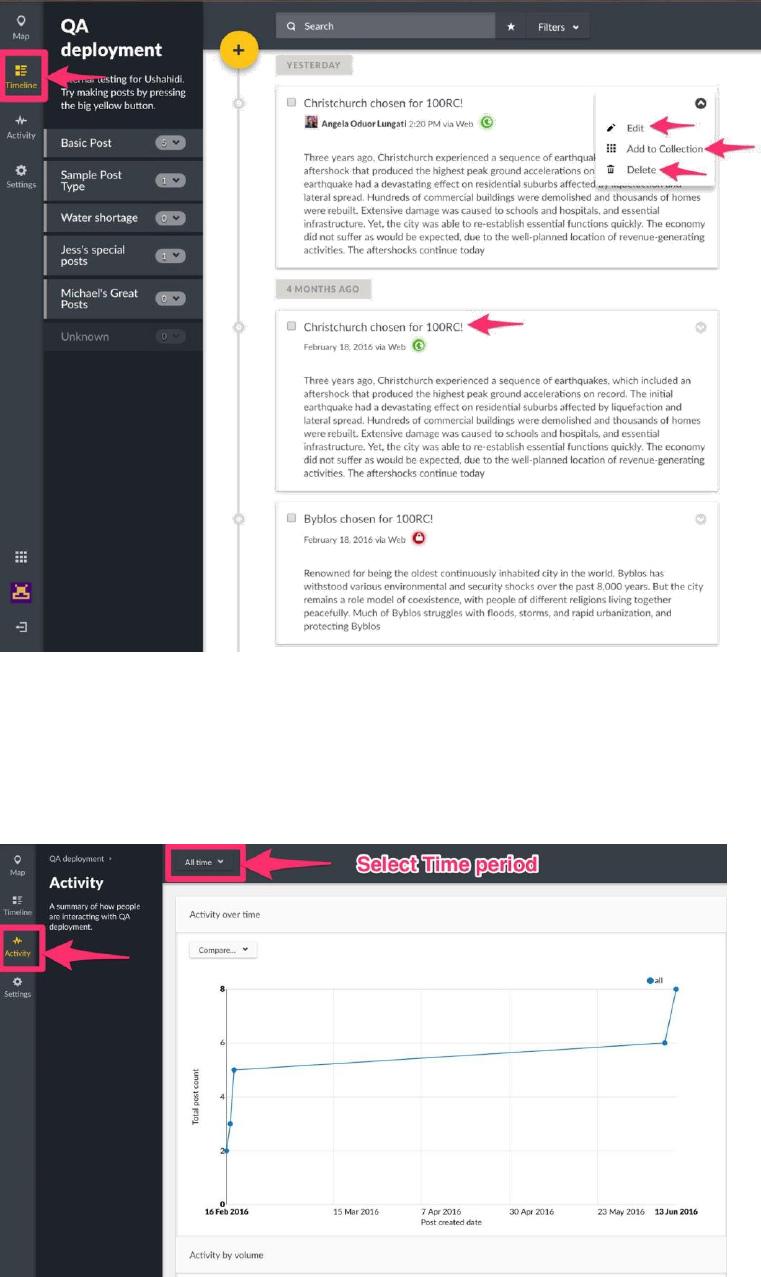
NB: Data displayed on this page is dependent on permissions granted to the user viewing this page
6.3 Activity Mode
This mode gives you a summary of how people are interacting with your deployment over time.
100
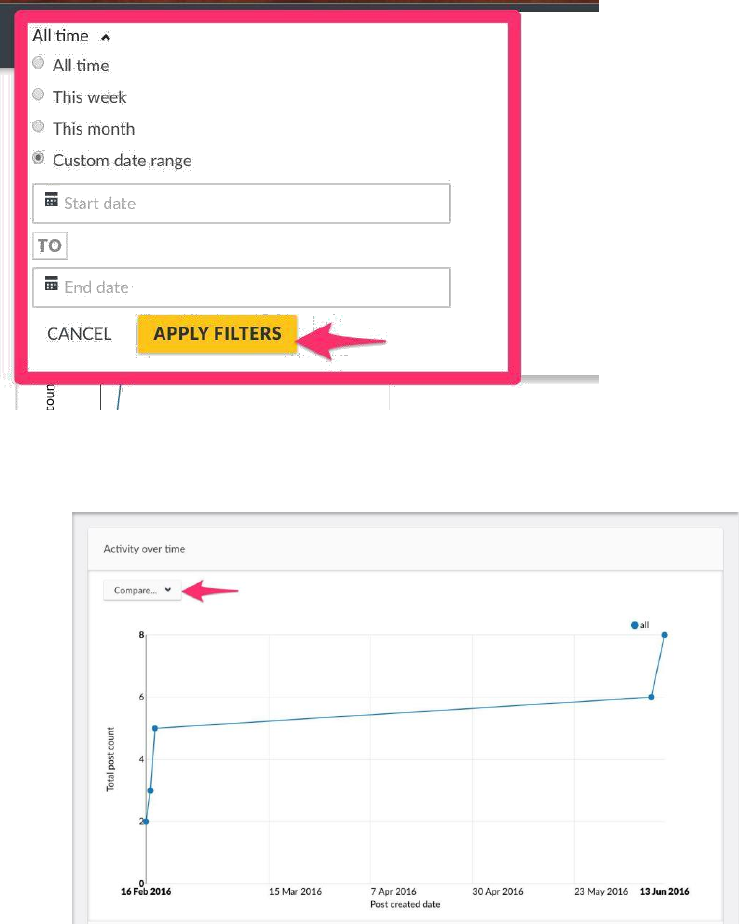
You can compare
● Activity over time
You can filter post count in a line chart over time by:-
○ All posts
○ Categoriesthat the posts belong to
○ Surveysthat the posts were submitted to
○ Statusi.e whether they’re published or not
You can opt to view your post counts on the graph as cumulative totals.
101
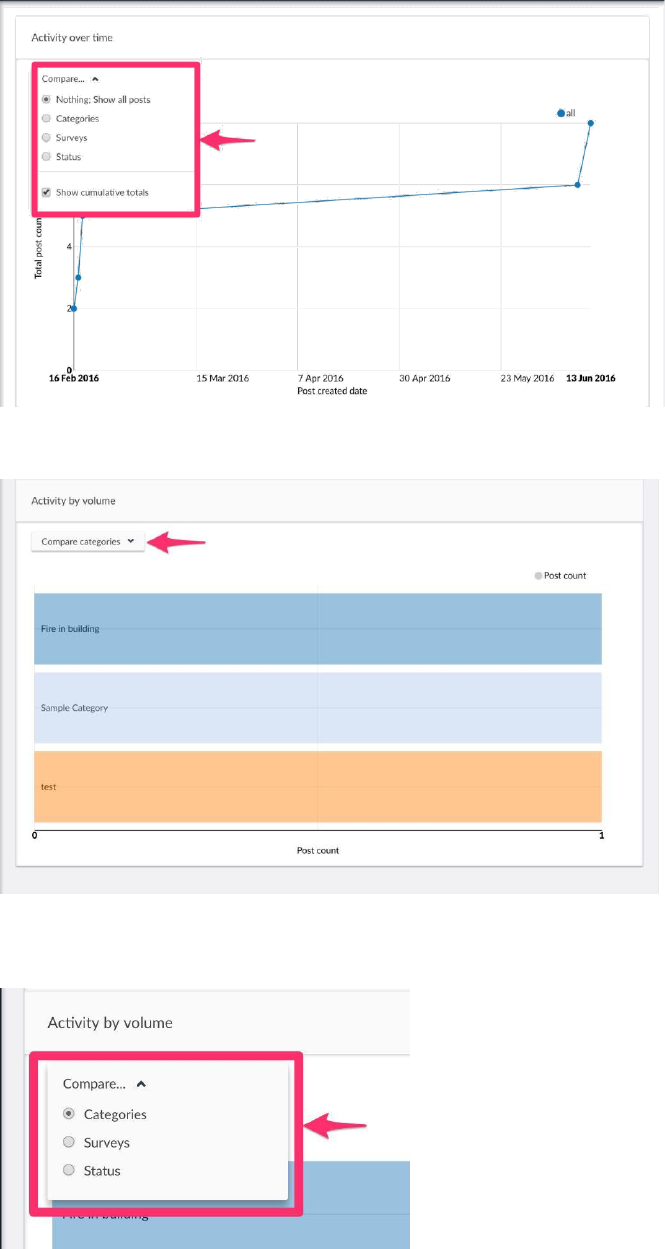
● Activity by Volume
You can filter post count in a bar chart over time by:-
○ Categoriesthat the posts belong to
○ Surveysthat the posts were submitted to
○ Statusi.e whether they’re published or not
102
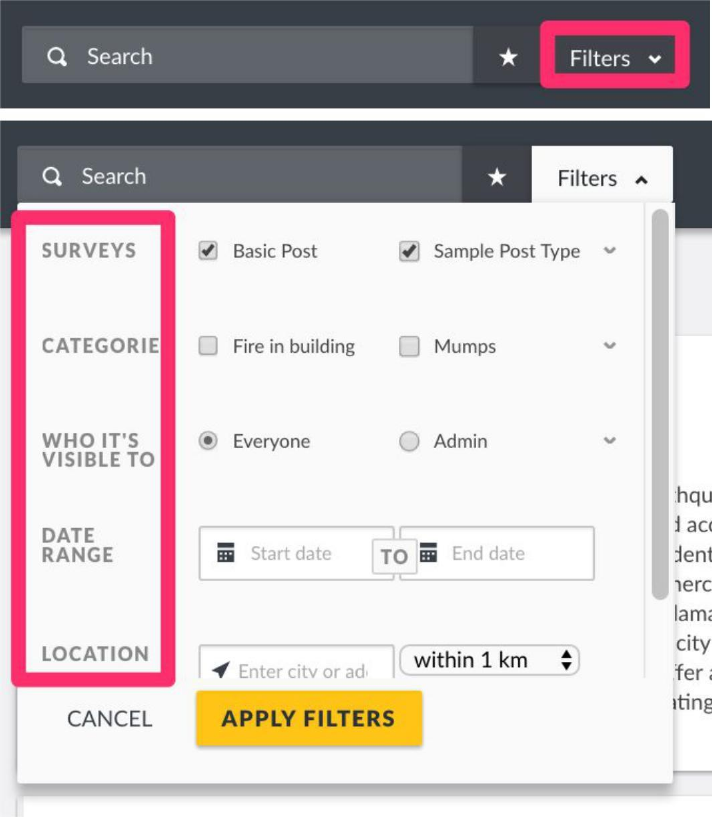
7. Analysing Data on your deployment
7.1 Filters
Filters can be applied to narrow down a large amount of data. You can filter posts by many types of
parameters, for example: Surveys, Categories, Who posts are visible to, Date Ranges, and Location.
Filters are additive, so you can apply as many as you would like. This search filter is
available on all pages.
103
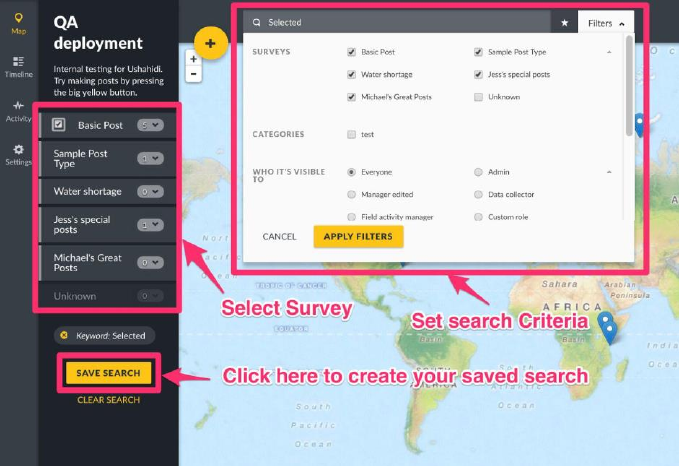
7.2 Saved Searches
Saved searches are dynamic groupings of posts that match parameters chosen in filters.
Saved searches are dynamic because as new posts are added that fit the search criteria,
they will show in the saved search.
Please note that only registered users can create Saved searches. Non registered
users can only view public searches
7.2.1 Creating a saved search
You can create a saved search from your homepage by:-
● Adding your search/filter parameters on the search bar as shown below.
○ A Save Searchbutton will appear on the menu bar on the left of your screen.
● A small pop up box will appear, asking you to fill in the following details:-
104
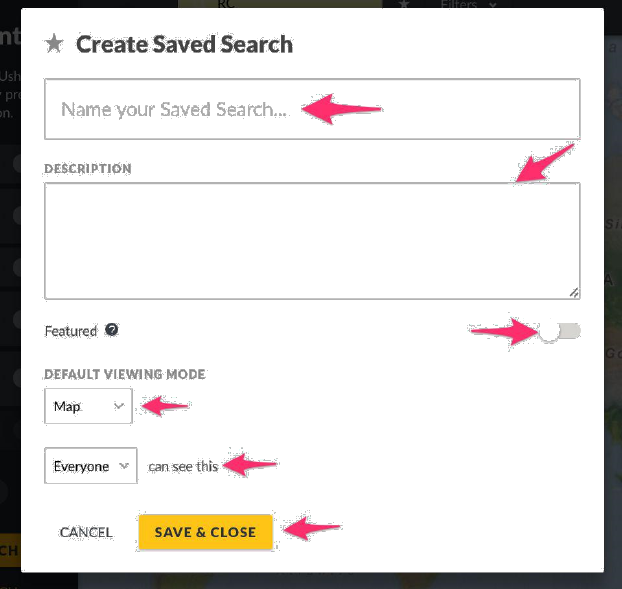
○ Assign a saved search name
○ Provide a description
○ Set the audienceallowed to see this saved search
○ Set the default viewing modefor this saved search(choosing between Map,
Timeline or Activity). This is the view that a user will see when they first arrive at
this saved search
○ Determine if this saved search is featuredor not. Setting this saved search as
featured displays to all users on the saved search menu
● Click on Save&Closewhen done.
● Your saved search should now appear on the Saved Searches menu bar on your search bar.
7.2.2 Updating a saved search
You can update a saved search at any time by adding/editing your filters/keywords, or
turning off existing filters/keywords.
● Set your parameters on the search bar by either typing or selecting options from the search
● An Update Searchbutton will appear on the menu bar on the left of your screen. Click on it.
105
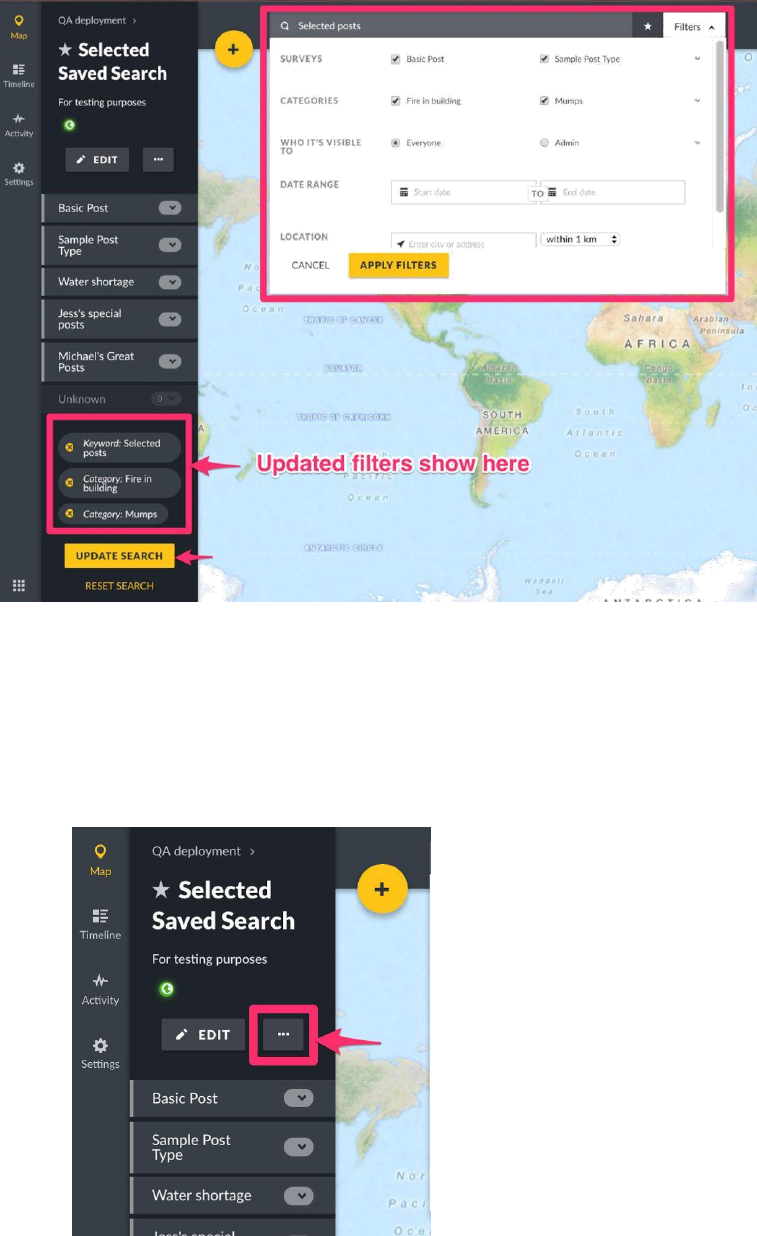
7.2.3 Adding a notification to a saved search
As a registered and logged in user, you can set up notifications on Saved Searches. This
means that any time a post is added to a saved search, you will receive an email or phone
notification. To add a notification,
● Click on the saved search you’d like to receive notifications for
● Click on the three dots button, right next to the Editbutton.
● Click on Get Notifications
106

● You can turn off notifications for this saved search using the same process described above.
7.2.4 Editing a saved search
To edit a saved search,
● Click on the saved search you would like to edit
● Click on Edit as shown below
● Edit your saved search details, then click onSave&Close
107
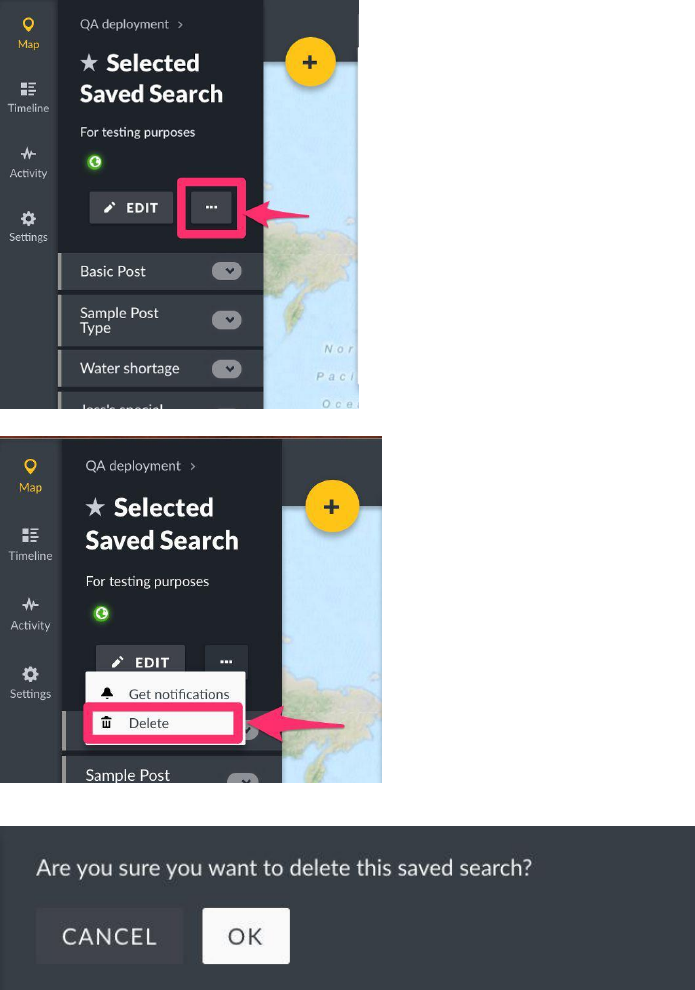
7.2.5 Deleting a saved search
To delete a saved search,
● Click on the saved search you would like to delete
● Click on the three dots button, right next to the Editbutton.
● Click onDelete.
● A black pop up box will appear on the top of the page, prompting you to confirm whether
you would like to delete your saved search
○ Click on OKto delete your saved search
○ If you’d like to cancel the saved search deletion process, click on Cancel
108
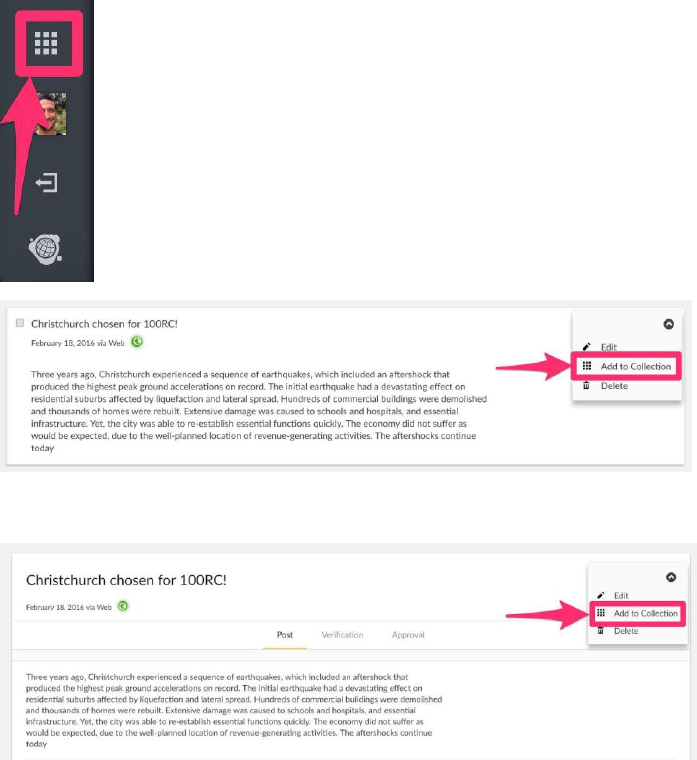
7.3 Collections
A “Collection” is a manually-curated grouping of posts. It is not dynamic, meaning the posts
within it do not change unless a you manually update them.
Please note that only registered users can create Collections. Non registered users can only
view featured public collections
7.3.1 Creating new collections
To create a new collection,
● Click on by clicking on:-
○ Collections icon on the bottom left hand corner of your deployment as
illustrated below
○ The Posts List page on the menu adjacent to each post on the right( note that
this will assign this post to the new collection created)
○ The individual Post view page( note that this will assign this post to the new
collection created)
109
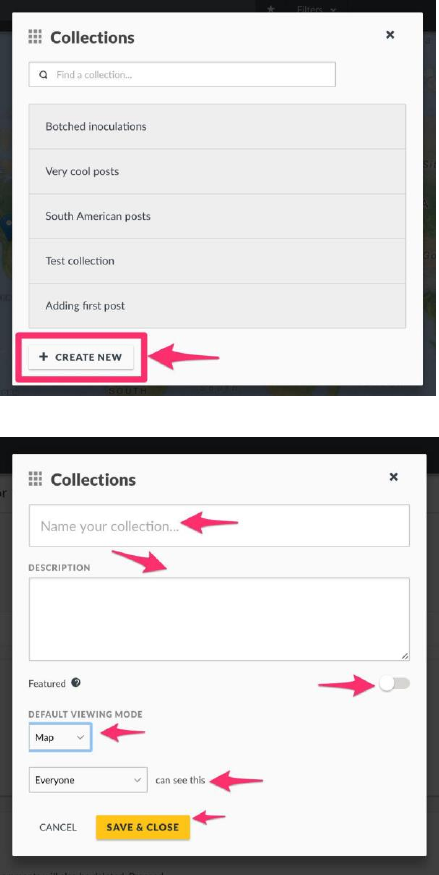
● A pop up box will appear, with a list of all existing collections, and a Create collectionbutton.
Click on it.
● Then, fill in the following details:-
○ Assign a Collection name
○ Provide a description
○ Set the audienceallowed to see this collection
○ Set the default viewing modefor this collection (choosing between Map, Activity, or
Timeline). This is the view that a user will see when they first arrive at this collection
○ Determine if this collection is featuredor not. Setting this collection as
featured displays to all users on the collections menu
● Click on Save&Close when done.
● Your collection should now appear on the left menu bar under Collections
110
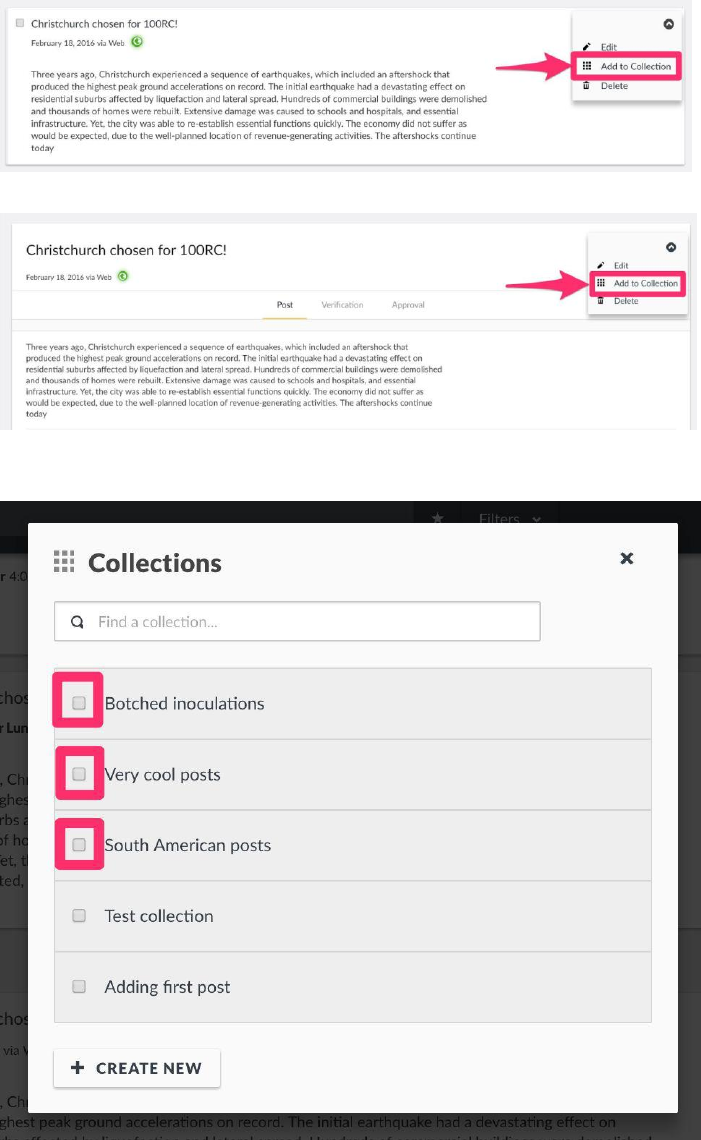
7.3.2 Adding Posts to collections
You can add a post to a collection from:-
● The Posts List page on the menu adjacent to each post on the right
● The individual Post view page
● A pop up box will appear, with a list of all existing collections. Select the collection(s)
you’d like to add the post to.
111
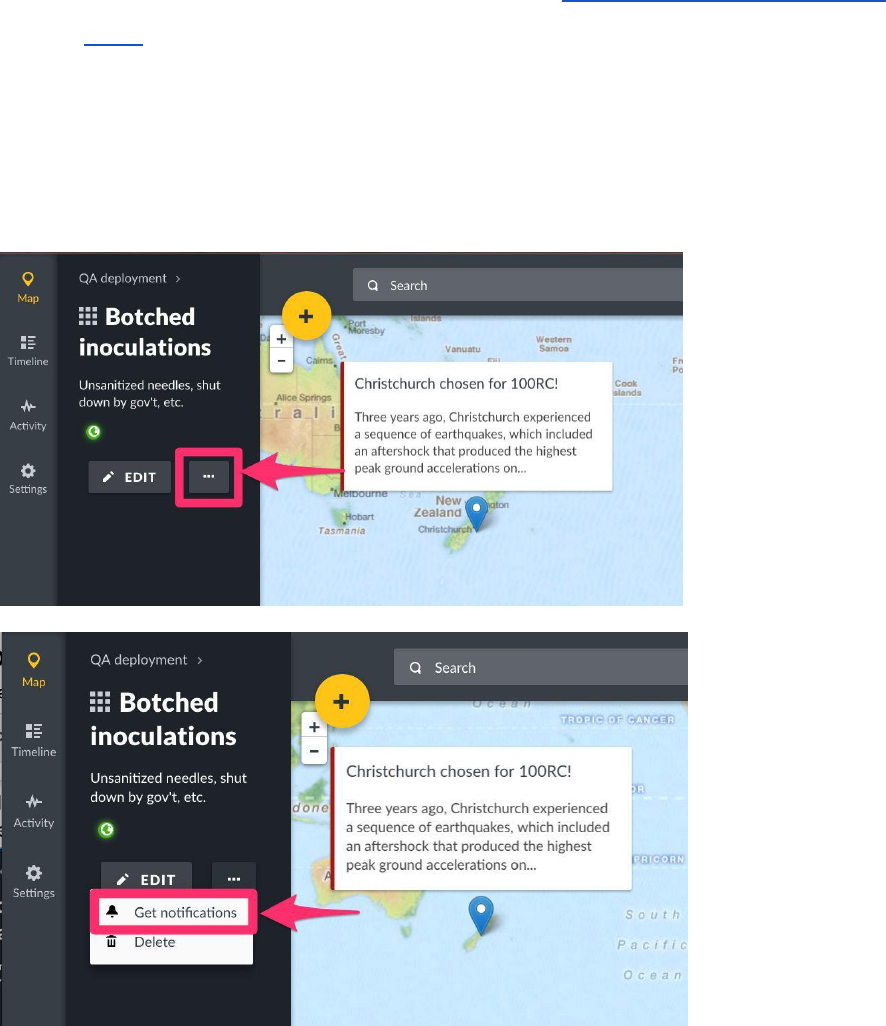
● You can add a post to multiple collection, so tick all checkboxes that apply.
● You can also create a new collection to add the post to from these two pages. Simply click on
Create New from within this dropdown as described in the Creating new collections
(section 7.3.1)of this manual
7.3.3 Adding notifications to collections
As a registered and logged in user, you can set up notifications on Collections. This means
that any time a post is added to a collection, you will receive an email or phone notification.
To add a notification,
● Click on the collection you’d like to receive notifications from.
● Click on the three dots button, right next to the Editbutton.
● Click on Get Notifications
● You can turn off notifications for this collection using the same process described above.
112
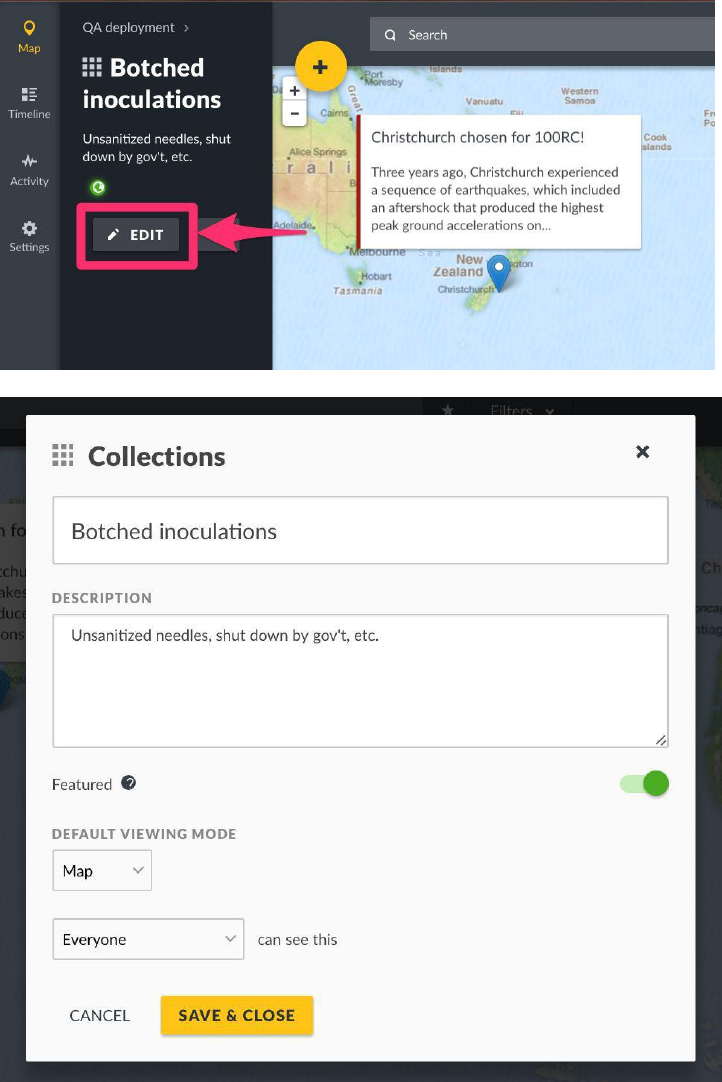
7.3.4 Editing Collections
To edit a Collection,
● Click on the collection you would like to edit
● Click on Edit as shown below
● Edit your Collection details, then click onSave&Close
113
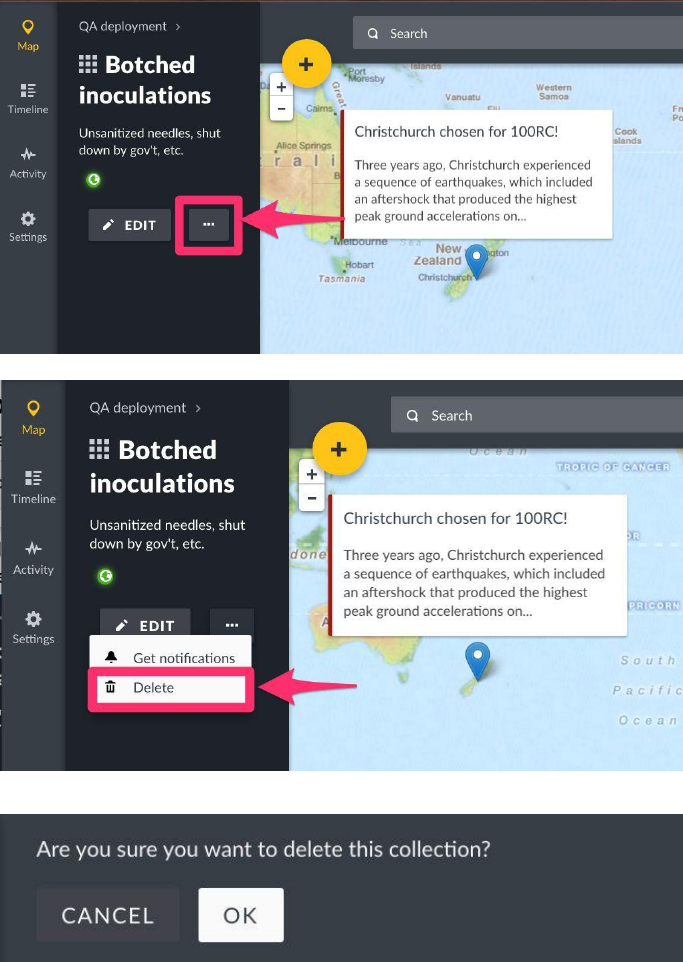
7.3.5 Deleting Collections
To delete a collection,
● Click on the collection you would like to delete
● Click on the three dots button, right next to the Editbutton.
● Click on Delete
● A black pop up box will appear on the top of the page, prompting you to confirm whether
you would like to delete your collection
○ Click on OKto delete your collection
○ If you’d like to cancel the collection deletion process, click on Cancel
114