Manual Script Communicator
User Manual: Pdf
Open the PDF directly: View PDF ![]() .
.
Page Count: 173 [warning: Documents this large are best viewed by clicking the View PDF Link!]
- ScriptCommunicator History
- GUI documentation
- Configuration files
- Command-line arguments
- Self extracting zip (exe) files (only on windows)
- Internal architecture
- Script interface
- Worker scripts
- void stopScript(void)
- The scriptThread object/class
- Main interface
- Separate interfaces
- Standard dialogs
- String showFileDialog (bool isSaveDialog, String caption, String dir, String filter, QWidget* parent=0)
- Array<String> showOpenFileNamesDialogSlot(String caption, String dir, String filter QWidget* parent)
- String showDirectoryDialog(String caption, String dir, QWidget* parent=0)
- String showTextInputDialog(String title, String label, String displayedText="", QWidget* parent=0)
- String showMultiLineTextInputDialog(String title, String label, String displayedText="", QWidget* parent=0)
- String showGetItemDialog(String title, String label, Array<String> displayedItems, Number currentItemIndex=0, bool editable=false, QWidget* parent=0)
- Array<Number> showGetIntDialog(String title, String label, Number intialValue, Number min, Number max, Number step, QWidget* parent=0)
- Array<Number> showGetDoubleDialog(String title, String label, Number intialValue, Number min, Number max, Number decimals, QWidget* parent=0)
- void messageBox(String icon, String title, String text, QWidget* parent=0)
- bool showYesNoDialog(String icon, String title, String text, QWidget* parent=0)
- Array<Number> showColorDialog(Number initialRed=255, Number initialGreen=255, Number initialBlue=255, Number initialAlpha=255, bool alphaIsEnabled=false, QWidget* parent=0)
- Filesystem
- bool checkFileExists(String path, bool isRelativePath=true)
- String createAbsolutePath(String fileName)
- String getScriptFolder(void)
- Number getFileSize(String path, bool isRelativePath=true)
- String readFile (String path, bool isRelativePath=true, Number startPosition=0, Number numberOfBytes=-1)
- Array<Number> readBinaryFile (String path, bool isRelativePath=true, Number startPosition=0, Number numberOfBytes=-1)
- bool writeFile(String path, bool isRelativePath, String content, bool replaceFile, Number startPosition=-1)
- bool writeBinaryFile(String path, bool isRelativePath, Array<Number> content, bool replaceFile, Number startPosition=-1))
- bool deleteFile(String path, bool isRelativePath=true)
- bool renameFile(String path, String newName)
- Array<String> readDirectory(String directory, bool isRelativePath=true, bool recursive=true, bool returnFiles=true, bool returnDirectories=true)
- bool checkDirectoryExists(String path, bool isRelativePath=true)
- bool deleteDirectory(String directory, bool isRelativePath=true)
- bool deleteDirectoryRecursively(String directory, bool isRelativePath=true)
- bool createDirectory(String path, bool isRelativePath=true)
- bool renameDirectory(String path, String newName)
- bool zipDirectory(String fileName, String sourceDirName, String comment="")
- bool zipFiles(String fileName, Array<String> fileList, String comment="")
- bool extractZipFile(String fileName, String destinationDirectory)
- SQL support
- XML support
- ScriptXmlReader* createXmlReader(void)
- ScriptXmlWriter* createXmlWriter(void)
- ScriptXmlReader
- ScriptXmlElement
- ScriptXmlAttribute
- ScriptXmlWriter
- bool writeBufferToFile(String fileName, bool isRelativePath=true)
- String getInternalBuffer(void)
- String clearInternalBuffer(void)
- void setCodec(String codecName)
- void setAutoFormatting(bool autoFormatting)
- bool autoFormatting(void)
- void setAutoFormattingIndent(Number spacesOrTabs)
- Number autoFormattingIndent(void)
- void writeStartDocument(String version="1.0")
- void writeStartDocument(bool standalone, String version="1.0")
- void writeEndDocument(void)
- void writeNamespace(String namespaceUri, String prefix = "")
- void writeDefaultNamespace(String namespaceUri)
- void writeStartElement(String name, String namespaceUri="")
- void writeEmptyElement(String name, String namespaceUri="")
- void writeTextElement(String name, String text, String namespaceUri="")
- void writeEndElement(void)
- void writeAttribute(String name, String value,String namespaceUri="")
- void writeCDATA(String text)
- void writeCharacters(String text)
- void writeComment(String text)
- void writeDTD(String dtd)
- void writeEntityReference(String name)
- void writeProcessingInstruction(String target, String data = "")
- CRC functions
- Inter-WorkerScript communication
- void setGlobalString(String name, String string)
- String getGlobalString(String name, bool removeValue=false)
- void globalStringChangedSignal(String name, String string)
- void setGlobalDataArray(String name, Array<Number> data)
- Array<Number> getGlobalDataArray(String name, bool removeValue=false)
- void globalDataArrayChangedSignal(String name, Array<Number> data)
- void setGlobalUnsignedNumber(String name, Number number)
- Array<Number> getGlobalUnsignedNumber(String name, bool removeValue=false)
- void globalUnsignedChangedSignal(String name, Number number)
- void setGlobalSignedNumber(String name, Number number)
- Array<Number> getGlobalSignedNumber(String name, bool removeValue=false)
- void globalUnsignedChangedSignal(String name, Number number)
- void setGlobalRealNumber(String name, Number number)
- Array<Number> getGlobalRealNumber(String name, bool removeValue=false)
- void globalRealChangedSignal(String name, Number number)
- Process
- bool createProcessDetached(String program, Array<String> arguments, String workingDirectory)
- Number createProcess (String program, Array<String> arguments)
- ScriptProcess createProcessAsynchronous(String program, Array<String> arguments, Number startWaitTime=30000, String workingDirectory="")
- bool waitForFinishedProcess(ScriptProcess process, Number waitTime=30000)
- Number getProcessExitCode(ScriptProcess process)
- void killProcess(ScriptProcess process)
- void terminateProcess(ScriptProcess process)
- bool writeToProcessStdin(ScriptProcess process, Array<Number> data, Number waitTime=30000)
- bool processIsRunning(ScriptProcess process)
- Array<Number> readAllStandardOutputFromProcess(ScriptProcess process, bool isBlocking=false, Number blockByte='n', Number blockTime=30000)
- Array<Number> readAllStandardErrorFromProcess(ScriptProcess process, bool isBlocking=false, Number blockByte='n', Number blockTime=30000)
- Miscellaneous
- Converter functions
- bool checkScriptCommunicatorVersion(String minVersion)
- Array<String> availableSerialPorts(void)
- bool setScriptState(Number state, String scriptTableEntryName)
- String getScriptTableName(void)
- void appendTextToConsole(String text, bool newLine=true, bool bringToForeground=false)
- void sleepFromScript (Number timeMs)
- bool scriptShallExit(void)
- QTimer createTimer (void)
- ScriptPlotWindow createPlotWindow (void)
- bool loadScript(String scriptPath, bool isRelativePath=true)
- bool loadLibrary(String path, bool isRelativePath=true)
- bool loadUserInterfaceFile(String path, bool isRelativePath=true, bool showAfterLoading = true)
- void stopScript(void)
- Array<String> getLocalIpAdress(void)
- bool showReceivedDataInConsoles(bool show)
- bool showTransmitDataInConsoles(bool show)
- void addMessageToLogAndConsoles(String text, bool forceTimeStamp=false)
- bool setScriptThreadPriority(String priority)
- String getCurrentVersion
- String exitScriptCommunicator
- void setBlockTime(Number blockTime)
- String currentCpuArchitecture(void)
- String productType(void)
- String productVersion(void)
- Array<String> getScriptArguments(void)
- String getScriptCommunicatorFolder(void)
- String getUserDocumentsFolder(void)
- bool addTabsToMainWindow(ScriptTabWidget* tabWidget)
- bool addToolBoxPagesToMainWindow(ScriptToolBox* scriptToolBox)
- Array<String> getAllObjectPropertiesAndFunctions(QScriptValue object, bool printInScriptWindowConsole=false)
- void mainWindowClearConsoleClickedSignal(void)
- void mainWindowLockScrollingClickedSignal(bool isChecked)
- String getMainWindowTitle(void)
- void setMainWindowTitle(String newTitle)
- String getTimestamp(void)
- ConsoleSettings getConsoleSettings(void)
- void setMainWindowAndTaskBarIcon(String iconFile, bool isRelativePath)
- The scriptInf object/class
- Main interface
- bool sendDataArray(Array<Number> data, Number repetitionCount=0, Number pause=0, bool addToMainWindowSendHistory=false)
- bool sendString(String string, Number repetitionCount=0, Number pause=0, bool addToMainWindowSendHistory=false)
- bool sendCanMessage(Number type, Number canId, Array<Number> data, Number repetitionCount=0, Number pause=0, bool addToMainWindowSendHistory=false)
- bool isConnectedWithCan(void)
- bool isConnectedWithI2c(void)
- bool isConnected(void)
- void disconnect(void)
- bool connectPcan(Number channel, Number baudrate, Number connectTimeout = 2000, bool busOffAutoReset = true, bool powerSupply = false, bool filterExtended = true, Number filterFrom = 0, Number filterTo = 0x1fffffff)
- bool connectSocket(bool isTcp, bool isServer, String ip, Number destinationPort, Number ownPort, Number connectTimeout = 5000)
- bool connectSerialPort(String name, Number baudRate = 115200, Number connectTimeout= 1000, Number dataBits = 8, String parity = "None", String stopBits = "1", String flowControl = "None")
- void setSerialPortPins(bool setRTS, bool setDTR)
- Number getSerialPortSignals(void)
- void sendReceivedDataToMainInterface(Array<Number> data)
- SerialPortSettings getMainInterfaceSerialPortSettings(void)
- SocketSettings getMainInterfaceSocketSettings(void)
- String aardvarkI2cSpiDetectDevices(void)
- bool aardvarkI2cSpiConnect(AardvarkI2cSpiSettings aardvarkI2cSpiSettings, Number connectTimeout = 5000)
- AardvarkI2cSpiSettings
- AardvarkI2cSpiGpioConfig
- Array<bool> aardvarkI2cSpiReadAllInputs(void)
- AardvarkI2cSpiSettings aardvarkI2cSpiGetMainInterfaceSettings(void)
- bool aardvarkI2cSpiChangePinConfiguration(Number pinIndex, bool isInput, bool withPullups=false)
- bool aardvarkI2cSpiSetOutput(Number pinIndex, bool high, bool updateSettingsDialog=false)
- bool i2cMasterReadWrite(Number flags, Number slaveAddress, Number numberOfBytesToRead, Array<Number> dataToSend = Array<Number>(), Number repetitionCount=0, Number pause=0, bool addToMainWindowSendHistory=false)
- void i2cMasterFreeBus(void)
- void dataReceivedSignal(Array<Number> data)
- void canMessagesReceivedSignal(Array<Number> types, Array<Number> messageIds, Array<Number> timestamps, Array<Array<Number>> data)
- void i2cMasterDataReceivedSignal(Number flags, Number address, Array<Number> data)
- void aardvarkI2cSpiInputStatesChangedSignal(Array<bool> states)
- void sendDataFromMainInterfaceSignal(Array<Number> data)
- void slaveDataSentSignal(Array<Number> data)
- Main interface serial port example
- Main interface UDP socket example
- Main interface TCP/IP client example
- Main interface TCP/IP server example
- Main interface I2C master example
- Main interface I2C slave example
- Main interface SPI master example
- Main interface SPI slave example
- Separate interfaces
- Main interface
- Script UDP socket class
- bool bind(Number port)
- bool isOpen(void)
- void close(void)
- bool hasPendingDatagrams(void)
- Array<Number> readDatagram(void)
- Array<Number> readAll(void)
- Number write(Array<Number> data, String hostAdress, Number hostPort)
- Number writeString(String string, String hostAdress, Number hostPort)
- void enableMainInterfaceRouting(String routingHostAddress, Number routingHostPort)
- void disableMainInterfaceRouting(void)
- bool canReadLine(void)
- String readLine(bool removeNewLine=true, bool removeCarriageReturn=true)
- Array<String> readAllLines(bool removeNewLine=true, bool removeCarriageReturn=true)
- void readyReadSignal(void)
- UDP socket example
- Script TCP client class
- void connectToHost(String hostAdress, Number port)
- bool isOpen(void)
- void close(void)
- bool isReadable(void)
- Number bytesAvailable(void)
- Array<Number> readAll(void)
- Number write(Array<Number> data)
- Number writeString(String string)
- String getErrorString(void)
- void enableMainInterfaceRouting(void)
- void disableMainInterfaceRouting(void)
- void setProxy(String proxyType = "NO_PROXY", String proxyUserName= "", String proxyPassword = "", String proxyIpAddress = "", Number proxyPort = 0)
- bool canReadLine(void)
- String readLine(bool removeNewLine=true, bool removeCarriageReturn=true)
- Array<String> readAllLines(bool removeNewLine=true, bool removeCarriageReturn=true)
- void connectedSignal (void)
- void disconnectedSignal (void)
- void readyReadSignal(void)
- void errorSignal(Number error)
- TCP client example
- Script TCP server class
- Script serial port class
- void setPortName(String name)
- String portName(void)
- bool setBaudRate(Number baudRate)
- Number baudRate(void)
- bool setDataBits(Number dataBits)
- Number dataBits(void)
- bool setParity(String parityString)
- String parity(void)
- bool setStopBits(String stopBitsString)
- String stopBits (void)
- bool setFlowControl(String flowString)
- String flowControl (void)
- String errorString(void)
- bool open(void)
- void close(void)
- void setDTR(bool set)
- void setRTS(bool set)
- bool isOpen(void)
- Number bytesAvailable(void)
- Array<Number> readAll(void)
- Number write(Array<Number> data)
- Number writeString(String string)
- Number bytesToWrite(void)
- bool waitForBytesWritten(Number msecs)
- void enableMainInterfaceRouting(void)
- void disableMainInterfaceRouting(void)
- bool canReadLine(void)
- String readLine(bool removeNewLine=true, bool removeCarriageReturn=true)
- Array<String> readAllLines(bool removeNewLine=true, bool removeCarriageReturn=true)
- void readyReadSignal(void)
- Number getSerialPortSignals(void)
- Script serial port example
- Script PCAN class
- bool open(Number channel, Number baudrate, bool busOffAutoReset, bool powerSupply)
- void close(void)
- bool setFilter(bool filterExtended, Number filterFrom, Number filterTo)
- bool sendCanMessage(Number type, Number canId, Array<Number> data)
- bool isConnected(void)
- String getStatusString(void)
- Number getCurrentStatus(void)
- Array<Number> getCanParameter(Number parameter)
- bool setCanParameter(Number parameter, Number data)
- void canMessagesReceivedSignal(Array<Number> types, Array<Number> messageIds, Array<Number> timestamps, Array<Array<Number>> data)
- Script PCAN example
- Script Aardvark I2C/SPI class
- AardvarkI2cSpiSettings getInterfaceSettings(void)
- void i2cMasterFreeBus(void)
- String detectDevices(void)
- bool connectToDevice(AardvarkI2cSpiSettings aardvarkI2cSpiSettings)
- void disconnect(void)
- bool i2cMasterReadWrite(Number flags, Number slaveAddress, Number numberOfBytesToRead, Array<Number> dataToSend = Array<Number>(), Number)
- Array<Number> i2cMasterReadLastReceivedData(void)
- bool spiMasterSendReceiveData(Array<Number> dataToSend)
- Array<Number> spiMasterReadLastReceivedData(void)
- bool setOutput(Number pinIndex, bool high)
- bool changePinConfiguration(Number pinIndex, bool isInput, bool withPullups=false)
- Array<bool> readAllInputs(void)
- bool isConnected(void)
- bool slaveSetResponse(Array<Number> response)
- void aardvarkI2cSpiInputStatesChangedSignal(Array<bool> states)
- void slaveDataSentSignal(Array<Number> data)
- void slaveDataReceivedSignal(Array<Number> data)
- I2C master example
- I2C slave example
- SPI master example
- SPI slave example
- Script timer class
- Script plot window class
- Number addGraph(String color, String penStyle, String name)
- void setInitialAxisRanges(Number xRange, Number yMinValue, Number yMaxValue, bool addSpaceAfterBiggestValues = true)
- bool addDataToGraph(Number graphIndex, Number x, Number y, bool force = false)
- void setAxisLabels(String xAxisLabel, String yAxisLabel)
- void showLegend(bool show)
- void clearGraphs(void)
- void removeAllGraphs(void)
- void setMaxDataPointsPerGraph(Number maxDataPointsPerGraph)
- void showHelperElements(bool showXRange, bool showYRange, bool showUpdate, bool showSave, bool showLoad, bool showClear, bool showGraphVisibility, Number graphVisibilityMaxSize=80, bool showLegend=true)
- void setUpdateInterval(Number updateInterval)
- void setScatterStyle(Number graphIndex, String style, Number size)
- void setLineStyle(Number graphIndex, String style)
- void removeDataRangeFromGraph(Number graphIndex, Number xFrom, Number xTo, bool force = false)
- void setCurrentAxisRanges(Number xMinValue, Number xMaxValue, Number yMinValue, Number yMaxValue)
- void setAutoUpdateEnabled(bool enabled)
- bool isAutoUpdateEnabled(void)
- void updatePlot(void)
- void setLineWidth(Number graphIndex, Number width)
- Array<ScriptPlotDataPoint> getDataFromGraph(Number graphIndex, Number xStart, Number count)
- void plotMousePressSignal(Number xValue, Number yValue, Number mouseButton)
- void clearButtonPressedSignal (void)
- void closedSignal (void)
- void xRangeChangedSignal(Number newValue)
- Loading and saving graphs
- Plot window example
- User interface classes
- Script dialog
- Script main window
- Script tab widget
- Script tool box
- Script group box
- Script label
- Script action (menu entry)
- Script button
- Script tool button
- Script check box
- Script radio button
- Script combo box and font combo box
- void addItem(String text)
- void insertItem(Number index, String text)
- void removeItem(Number index)
- void setEditable(bool editable)
- bool isEditable(void)
- Number currentIndex(void)
- String currentText(void)
- String itemText(Number index)
- void setItemText(Number index, String text)
- void setCurrentText(String text)
- void setCurrentIndex(Number index)
- Number count(void)
- void clear(void)
- void currentTextChangedSignal(String newText)
- void currentIndexChangedSignal(Number currentSelectedIndex)
- Script combo box example
- Script line edit
- void setText(String text)
- void clear(void)
- String text(void)
- bool isReadOnly(void)
- void setReadOnly(bool readOnly)
- void addIntValidator(Number bottom, Number top)
- void addDoubleValidator(Number bottom, Number top, Number decimals)
- void addRexpExValidator(String pattern, bool caseSensitiv)
- void textChangedSignal(String currentText)
- Script line edit example
- Script table widget
- String getText(Number row, Number column)
- void setText(Number row, Number column, String text)
- void setVerticalHeaderLabel(Number row, String text)
- void setHorizontalHeaderLabel(Number column, String text)
- void setCellEditable(Number row, Number column, bool editable)
- void setRowCount(Number rows)
- void rowCount (void)
- void setColumnCount(Number columns)
- Number columnCount(void)
- void insertRow(Number row)
- void insertRowWithContent(Number row, Array<String> texts, Array<String> backgroundColors, Array<String> foregroundColors)
- void insertColumn(Number column)
- void removeRow(Number row)
- void removeColumn(Number column)
- void clear(void)
- void setCellBackgroundColor(String color, Number row, Number column)
- void setCellForegroundColor(String color, Number row, Number column)
- void sortItems(Number column, bool ascendingOrder=true)
- void resizeColumnToContents(Number column)
- void resizeRowToContents(Number row)
- void setRowHeight(Number row, Number height)
- Number rowHeight(Number row)
- void setColumnWidth(Number column, Number width)
- Number columnWidth(Number column)
- Number frameWidth(void)
- Number verticalHeaderWidth(void)
- Number verticalScrollBarWidth(void)
- bool isVerticalScrollBarVisible(void)
- bool insertWidget(Number row, Number column, String type)
- ScriptWidget* getWidget(Number row, Number column)
- void setCellIcon(Number row, Number column, String iconFileName)
- void rowsCanBeMovedByUser(bool canBeMoved)
- Array<ScriptTableCellPosition> getAllSelectedCells(void)
- void cellChangedSignal (void)
- void cellPressedSignal(Number row, Number column)
- void cellClickedSignal (Number row, Number column)
- void cellDoubleClickedSignal (Number row, Number column)
- void cellChangedSignal (Number row, Number column)
- void horizontalHeaderSectionResizedSignal(Number logicalIndex, Number oldSize, Number newSize)
- Script table widget example
- Adjusting the width of the columns so that all columns fit in the complete table
- Script list widget
- void insertNewItem (Number row, String itemText, String iconFileName)
- Number rowCount(void)
- void removeItem(Number row)
- Number currentSelectedRow(void)
- void setCurrentRow(Number row)
- void clear(void)
- void setItemBackgroundColor(Number row, String color)
- void setItemForegroundColor(Number row, String color)
- String getItemText(Number row)
- void setItemText(Number row, String text)
- void setItemIcon(Number row, String iconFileName)
- void sortItems(bool ascendingOrder=true)
- void currentRowChangedSignal(Number currentRow)
- void itemClickedSignal(Number row)
- void itemDoubleClickedSignal(Number row)
- Script list widget example
- Script tree widget
- ScriptTreeWidgetItem* createScriptTreeWidgetItem(void)
- void setHeaderLabels (Array<String> labels)
- void setColumnWidth(Number column, Number size)
- Number getColumnWidth(Number column)
- void addTopLevelItem (ScriptTreeWidgetItem* item)
- void insertTopLevelItem (Number index, ScriptTreeWidgetItem* item)
- Number topLevelItemCount(void)
- ScriptTreeWidgetItem* invisibleRootItem(void)
- ScriptTreeWidgetItem* itemAbove(ScriptTreeWidgetItem* item)
- ScriptTreeWidgetItem* itemBelow(ScriptTreeWidgetItem* item)
- ScriptTreeWidgetItem* takeTopLevelItem(Number index)
- ScriptTreeWidgetItem* topLevelItem(Number index)
- void resizeColumnToContents(Number column)
- Number columnCount(void)
- void setColumnCount(Number columns)
- void expandItem(ScriptTreeWidgetItem* item)
- void expandAll(void)
- void setCurrentItem (ScriptTreeWidgetItem* item)
- ScriptTreeWidgetItem* currentItem(void)
- void sortItems(Number column, bool ascendingOrder=true)
- void itemClickedSignal(ScriptTreeWidgetItem *item, Number column)
- void itemDoubleClickedSignal(ScriptTreeWidgetItem *item, Number column)
- void currentItemChangedSignal(ScriptTreeWidgetItem *current, ScriptTreeWidgetItem *previous)
- Script tree widget example
- Script tree widget item
- void setText(Number column, String text)
- String text(Number column)
- void setItemIcon(Number column, String iconFileName)
- void addChild(ScriptTreeWidgetItem* child)
- Number childCount(void)
- void insertChild (Number index, ScriptTreeWidgetItem* child)
- ScriptTreeWidgetItem* takeChild (Number index)
- void deleteItem(void)
- Number indexOfChild(ScriptTreeWidgetItem* child)
- void sortChildren(Number column, bool ascendingOrder)
- ScriptTreeWidgetItem* parent (void)
- Number columnCount(void)
- void setBackgroundColor(Number column, String color)
- void setForegroundColor(Number column, String color)
- bool isExpanded(void)
- void setExpanded(bool expand)
- void setData (Number column, Number role, String value)
- String data(Number column, Number role)
- void setDisabled(bool disabled)
- bool isDisabled(void)
- Script tree widget item example
- Script text edit
- Number verticalScrollBarValue(void)
- void verticalScrollBarSetValue(Number value)
- String toPlainText(void)
- String toHtml(void)
- void setMaxChars(Number maxChars)
- String replaceNonHtmlChars(String text, bool replaceNewLine=true)
- void moveTextPositionToEnd(void)
- void setFontPointSize(Number fontSize)
- void setFontFamily (Number fontFamily)
- void clear(void)
- void insertPlainText(String text, bool atTheEnd=true)
- void insertHtml(String htmlString, bool atTheEnd=true)
- void append(String text)
- void setPlainText(String text)
- void setText(String text)
- void lockScrolling(bool lock)
- void setUpdateRate(Number updateRate)
- void textChangedSignal (void)
- Script progress bar
- Script slider
- Script spin box
- Script double spin box
- Script time edit
- Script date edit
- Script date time edit
- Script calendar widget
- Script splitter
- Script dial
- Script plot widget
- Number addGraph(String color, String penStyle, String name)
- void setInitialAxisRanges(Number xRange, Number yMinValue, Number yMaxValue, bool addSpaceAfterBiggestValues = true)
- bool addDataToGraph(Number graphIndex, Number x, Number y, bool force = false)
- void setAxisLabels(String xAxisLabel, String yAxisLabel)
- void showLegend(bool show)
- void clearGraphs(void)
- void removeAllGraphs(void)
- void showHelperElements(bool showXRange, bool showYRange, bool showUpdate, bool showSave, bool showLoad, bool showClear, bool showGraphVisibility, Number graphVisibilityMaxSize=80, bool showLegend=true)
- void setMaxDataPointsPerGraph(Number maxDataPointsPerGraph)
- void setUpdateInterval(Number updateInterval)
- void setScatterStyle(Number graphIndex, String style, Number size)
- void setLineStyle(Number graphIndex, String style)
- void removeDataRangeFromGraph(Number graphIndex, Number xFrom, Number xTo, bool force = false)
- void setCurrentAxisRanges(Number xMinValue, Number xMaxValue, Number yMinValue, Number yMaxValue)
- void setAutoUpdateEnabled(bool enabled)
- bool isAutoUpdateEnabled(void)
- void updatePlot(void)
- void setLineWidth(Number graphIndex, Number width)
- Array<ScriptPlotDataPoint> getDataFromGraph(Number graphIndex, Number xStart, Number count)
- void clearButtonPressedSignal (void)
- void plotMousePressSignal(Number xValue, Number yValue, Number mouseButton)
- void xRangeChangedSignal(Number newValue)
- Loading and saving graphs
- Script plot widget example
- Script Canvas2D
- Number globalAlpha
- String globalCompositeOperation
- QVariant strokeStyle
- QVariant fillStyle
- Number lineWidth
- String lineCap
- String lineJoin
- Number miterLimit
- Number shadowOffsetX
- Number shadowOffsetY
- Number shadowBlur
- String shadowColor
- String width
- String height
- String textAlign
- void setFont(String family, Number pixelSize, int weight, bool italic)
- void fillText(Number x, Number y, Number w, Number h, String text)
- void save()
- void restore()
- void scale(Number x, Number y)
- void rotate(Number angle)
- void translate(Number x, Number y)
- void setTransform(Number m11, Number m12, Number m21, Number m22, Number dx, Number dy)
- void transform(Number m11, Number m12, Number m21, Number m22, Number dx, Number dy)
- CanvasGradient createLinearGradient(Number x0, Number y0, Number x1, Number y1)
- CanvasGradient createRadialGradient(Number x0, Number y0, Number r0, Number x1, Number y1, Number r1)
- void clearRect(Number x, Number y, Number w, Number h)
- void fillRect(Number x, Number y, Number w, Number h)
- void strokeRect(Number x, Number y, Number w, Number h)
- void beginPath()
- void closePath()
- void moveTo(Number x, Number y)
- void lineTo(Number x, Number y)
- void quadraticCurveTo(Number cpx, Number cpy, Number x, Number y)
- void bezierCurveTo(Number cp1x, Number cp1y, Number cp2x, Number cp2y, Number x, Number y)
- void arcTo(Number x1, Number y1, Number x2, Number y2, Number radius)
- void rect(Number x, Number y, Number w, Number h)
- void arc(Number x, Number y, Number radius, Number startAngle, Number endAngle, bool anticlockwise)
- void fill()
- void stroke()
- void clip()
- bool isPointInPath(Number x, Number y)
- void clear()
- void reset()
- bool saveToFile(String fileName, String imageType="")
- void print(String printDialogTitle="")
- Script Canvas2D Example
- ScriptWidget class
- void setEnabled(bool isEnabled)
- void update(void)
- void repaint (void)
- void show (void)
- void close (void)
- void hide (void)
- void setWindowTitle(String title)
- String windowPositionAndSize(void)
- void setWindowPositionAndSize(String positionAndSize)
- void setBackgroundColor(String color)
- void setWindowTextColor(String color)
- void setTextColor(String color)
- void setPaletteColor(String palette, String color)
- void setPaletteColorRgb(Number red, Number green, Number blue, String palette)
- void setToolTip(String text, Number duration)
- void raise(void)
- void lower(void)
- void setWindowFlags(Number flags)
- Number windowFlags(void)
- void clearWindowFlags(Number flags)
- void setFocus(void)
- void width(void)
- void height(void)
- QWidget* getWidgetPointer(void)
- void setAdditionalData(Number key, String data)
- String getAdditionalData(Number key)
- String getClassName(void)
- bool blockSignals(bool block)
- String getObjectName(Number key)
- void setAutoFillBackground(bool enabled)
- void setObjectName(String name)
- void setWindowIcon(String iconFile, bool isRelativePath=true)
- void createShortCut(QString keys, QScriptValue scriptFunction)
- Custom script widget
- Dynamic link libraries
- Sequence script
- Array<Number> data sendData(Array<Number> data)
- String showTextInputDialog(String title, String label, String displayedText="")
- String showMultiLineTextInputDialog(String title, String label, String displayedText="")
- String showGetItemDialog(String title, String label, Array<String> displayedItems, Number currentItemIndex=0, bool editable=false, QWidget* parent=0)
- Array<Number> showGetIntDialog(String title, String label, Number intialValue, Number min, Number max, Number step, QWidget* parent=0)
- Array<Number> showGetDoubleDialog(String title, String label, Number intialValue, Number min, Number max, Number decimals, QWidget* parent)
- void messageBox(String icon, String title, String text, QWidget* parent=0)
- bool showYesNoDialog(String icon, String title, String text, QWidget* parent=0)
- Array<Number> showColorDialog(Number initialRed=255, Number initialGreen=255, Number initialBlue=255, Number initialAlpha=255, bool alphaIsEnabled=false)
- Number calculateCrc8(Array<Number> data)
- Number calculateCrc8WithPolynomial(Array<Number> data, Number polynomial, Number startValue=0)
- Number calculateCrc16(Array<Number> data)
- Number calculateCrc32(Array<Number> data)
- Number calculateCrc64(Array<Number> data)
- String getCurrentVersion
- void setBlockTime(Number blockTime)
- Array<String> getAllObjectPropertiesAndFunctions(QScriptValue object)
- void appendTextToConsole(String text, bool newLine=true, bool bringToForeground=false)
- Converter functions
- Inter-SequenceScript communication
- void setGlobalString(String name, String string)
- String getGlobalString(String name, bool removeValue=false)
- void setGlobalDataArray(String name, Array<Number> data)
- Array<Number> getGlobalDataArray(String name, bool removeValue=false)
- void setGlobalUnsignedNumber(String name, Number number)
- Array<Number> getGlobalUnsignedNumber(String name,bool removeValue=false)
- void setGlobalSignedNumber(String name, Number number)
- Array<Number> getGlobalSignedNumber(String name,bool removeValue=false)
- Script converter object/class
- String byteArrayToString (Array<Number> data)
- String byteArrayToUtf8String (Array<Number> data)
- String byteArrayToHexString (Array<Number> data)
- Array<Number> stringToArray(String str)
- Number byteArrayToUint16(Array<Number> data, bool littleEndian)
- Number byteArrayToUint32(Array<Number> data, bool littleEndian)
- Number byteArrayToUint64(Array<Number> data, bool littleEndian)
- Number unsignedCharToSignedChar(Number number)
- Number byteArrayToInt16(Array<Number> data, bool littleEndian)
- Number byteArrayToInt32(Array<Number> data, bool littleEndian)
- Number byteArrayToInt64(Array<Number> data, bool littleEndian)
- Number byteArrayToFloat32(Array<Number> data, bool littleEndian)
- Number byteArrayToFloat64(Array<Number> data, bool littleEndian)
- Array<Number> addStringToArray(Array<Number> array, String str)
- Array<Number> addUint16ToArray(Array<Number> array, Number value, bool littleEndian)
- Array<Number> addUint32ToArray(Array<Number> array, Number value, bool littleEndian)
- Array<Number> addUint64ToArray(Array<Number> array, Number value, bool littleEndian)
- Array<Number> addInt16ToArray(Array<Number> array, Number value, bool littleEndian)
- Array<Number> addInt32ToArray(Array<Number> array, Number value, bool littleEndian)
- Array<Number> addInt64ToArray(Array<Number> array, Number value, bool littleEndian)
- Array<Number> addFloat32ToArray(Array<Number> array, Number value, bool littleEndian)
- Array<Number> addFloat64ToArray(Array<Number> array, Number value, bool littleEndian)
- Example scripts

ScriptCommunicator
Manual

Table of contents
ScriptCommunicator History..................................................................................................................8
GUI documentation..............................................................................................................................17
Main window.......................................................................................................................................17
Settings dialog.....................................................................................................................................18
Send dialog..........................................................................................................................................19
Single sequence table...................................................................................................................19
Cyclic sequence area.....................................................................................................................19
Scripts dialog.......................................................................................................................................20
Create sce file dialog............................................................................................................................22
Add message dialog.............................................................................................................................24
Sending and receiving a file.................................................................................................................24
Configuration files................................................................................................................................24
Main configuration file........................................................................................................................25
Sequence configuration file.................................................................................................................25
Script configuration file.......................................................................................................................25
SCE configuration file...........................................................................................................................25
Command-line arguments....................................................................................................................25
Command-line mode...........................................................................................................................26
SCE files........................................................................................................................................26
SCEZ files.......................................................................................................................................27
Self extracting zip (exe) files (only on windows)...................................................................................27
Internal architecture.............................................................................................................................28
Script interface.....................................................................................................................................28
Script debugging..................................................................................................................................28
Worker scripts......................................................................................................................................29
void stopScript(void)............................................................................................................................29
The scriptThread object/class..............................................................................................................30
Main interface..............................................................................................................................30
Separate interfaces.......................................................................................................................30
Standard dialogs...........................................................................................................................30
Filesystem.....................................................................................................................................36
SQL support..................................................................................................................................41
XML support.................................................................................................................................42
CRC functions................................................................................................................................47

Inter-WorkerScript communication..............................................................................................50
Process..........................................................................................................................................53
Miscellaneous...............................................................................................................................56
The scriptInf object/class.....................................................................................................................64
Main interface..............................................................................................................................65
Separate interfaces.......................................................................................................................78
Script UDP socket class........................................................................................................................79
Script TCP client class..........................................................................................................................81
Script TCP server class.........................................................................................................................86
Script serial port class..........................................................................................................................87
Script PCAN class.................................................................................................................................92
Script Aardvark I2C/SPI class...............................................................................................................94
Script timer class................................................................................................................................100
Script plot window class....................................................................................................................101
User interface classes........................................................................................................................106
Script dialog................................................................................................................................107
Script main window....................................................................................................................107
Script tab widget.........................................................................................................................108
Script tool box.............................................................................................................................109
Script group box..........................................................................................................................110
Script label..................................................................................................................................110
Script action (menu entry)..........................................................................................................111
Script button...............................................................................................................................111
Script tool button........................................................................................................................113
Script check box..........................................................................................................................114
Script radio button......................................................................................................................114
Script combo box and font combo box.......................................................................................115
Script line edit.............................................................................................................................117
Script table widget......................................................................................................................118
Script list widget.........................................................................................................................125
Script tree widget.......................................................................................................................127
Script tree widget item...............................................................................................................129
Script text edit............................................................................................................................131
Script progress bar......................................................................................................................133
Script slider.................................................................................................................................134

Script spin box............................................................................................................................135
Script double spin box................................................................................................................136
Script time edit...........................................................................................................................137
Script date edit...........................................................................................................................138
Script date time edit...................................................................................................................140
Script calendar widget................................................................................................................141
Script splitter..............................................................................................................................142
Script dial....................................................................................................................................143
Script plot widget........................................................................................................................144
Script Canvas2D..........................................................................................................................149
ScriptWidget class.......................................................................................................................155
Custom script widget..................................................................................................................160
Dynamic link libraries........................................................................................................................161
Sequence script..................................................................................................................................162
Script converter object/class..............................................................................................................170
Example scripts...................................................................................................................................173
ScriptCommunicator (https://sourceforge.net/projects/scriptcommunicator/,
https://github.com/szieke/ScriptCommunicator_serial-terminal) is a scriptable cross-platform data
terminal which supports following interfaces:
Serial port (RS232, USB to serial)
UDP
TCP client/server (network proxy support for TCP clients)
SPI (Aardvark I2C/SPI)
I2C (Aardvark I2C/SPI)
CAN (PCAN-USB, only on windows)
All sent and received data can be shown in a console and can be logged in an html and a text log.
In addition to the simple sending and receiving of data the ScriptCommunicator has a script interface
(QtScript). QtScript is based on the ECMAScript scripting language, as defined in standard ECMA- 262.
Microsoft's JScript, and Netscape's JavaScript are also based on the ECMAScript standard. For an
overview of ECMAScript, see the ECMAScript reference.
This script interface has following features:
Scripts can send and receive data with the main interface.
In addition to the main interface scripts can create and use own interfaces (serial port
(RS232, USB to serial), UDP, TCP client/server, SPI (Aardvark I2C/SPI) and I2C (Aardvark
I2C/SPI)).
Scripts can be connected to GUI files which have been created with the QtDesigner or
QtCreator. All elements in the GUI (files) can be accessed from the script.
Multiple plot windows and plot widgets can be created by scripts (QCustomPlot from
Emanuel Eichhammer is used).

Dynamic link libraries with a special interface (see chapter Dynamic link libraries) can be
loaded by script. Script function can be called by the library and vice versa.
A video which demonstrates the basic features of ScriptCommunicator can be found here:
https://www.youtube.com/playlist?list=PLniMuy2Q_xGuFB_kl1nte2mDxfeeOu8ce

ScriptCommunicator History
Revision Date Changes
02.00 2014-12-31 •PCAN interface added (only on windows)
•command-line mode added
•worker script, changed behavior:
◦loadUserInterfaceFile
◦renameDirectory
◦renameFile
•worker script functions added:
◦isConnectedWithCan, canMessageReceivedSignal,
createPcanInterface, sendCanMessage
◦showMultiLineTextInputDialog, showGetItemDialog,showGetIntDialog,
showGetDoubleDialog
◦disconnect, connectPcan, connectSocket, connectSerialPort,
connectCheetahSpi
◦showReceivedDataInConsoles, showTransmitDataInConsoles
◦addMessageToLogAndConsoles
•ScriptWidget functions added:
◦setAdditionalData
◦getAdditionalData
•ScriptTableWidget function added:
◦insertWidget
•worker script, default parameter added:
◦readFile, readBinaryFile, readDirectory, checkFileExists,
checkDirectoryExists, deleteFile, deleteDirectory,
deleteDirectoryRecursively, createDirectory, loadLibrary,loadScript,
sendDataArray, sendString
2.01 2015-01-05 •bug fixes:
◦received CAN ids have been displayed not correctly
2.02 2015-01-18 •command-line mode: The script window is now invisible per default (it can
be made visible by the command line argument -withScriptWindow)
•send window: remove script menu added
•ScriptWidget function added:
◦blockSignals
•ScriptSplitter added
2.03 2015-01-30 •bug fixes:
◦writeFile and writeBinaryFile: calling this functions with the argument
replaceFile=true did not replace an existing file
•the number of sent bytes are now displayed in the main window
•the console-colors are adjustable now
2.04 2015-02-05 •ScriptSpinBox functions added:
◦value, setSingleStep, singleStep
•ScriptTabWidget signal added:
◦currentTabChangedSignal
•ScriptTableWidget functions added:
◦verticalScrollBarWidth, isVerticalScrollBarVisible
•script widgets added:
◦ScriptDoubleSpinBox, ScriptToolBox, ScriptDial, ScriptCalendarWidget,
ScriptDateTimeEdit
2.05 2015-02-07 •internal improvements
•ScriptSlider function added:
◦value
•ScriptDial function added:
◦value
2.06 2015-02-13 •internal improvements
•text console's wrapping mode changed
•new console/log options:

◦new line after x sent/received bytes
◦new line after x milliseconds without sending or receiving data
•the sequence table is now disabled during sending of data with the send
window
•the RTS and the DTR pin (serial port) can manually be set/cleared now
(check boxes in the main window)
•worker script function added:
◦setSerialPortPins
•ScriptSerialPort function added:
◦setDTR, setRTS
2.07 2015-02-28 •Bug fix: no time stamps after running ScriptCommunicator longer then a
day
•all local IPv6 and IPv4 addresses are displayed in the socket tab (settings
dialog) now
2.08 2015-03-02 •Console send mode: if the send input check box in the main window is
checked all text entered in a console will be sent
•ScriptTableWidget function added:
◦setCellIcon
•Bug fix: error while changing the format of a sequence in the send window
2.09 2015-03-05 •sequence script functions added:
◦calculateCrc8, calculateCrc16, calculateCrc32, calculateCrc64
•new console/log option:
◦new line at byte (CR, LF, none and custom)
•when the serial port combo box is clicked (settings dialog) a serial port scan
is performed now
2.10 2015-03-13 •Bug fixes:
◦error while parsing a sequence or script config file with no entries
◦moving a window while a script shows/opens a dialog caused a
complete freeze of ScriptCommunicator
2.11 2015-03-27 •improved console speed
•new line at byte (CR, LF, none and custom) can be adjusted for the log and
the console separately now
2.12 2015-04-10 •socket address input filter removed (no IPv6 addresses could be entered)
•bug fix: sporadically crash after receiving a 'new line' character
2.13 2015-05-01 •bug fixes:
◦scriptThread.calculateCrc64 did not work correctly
◦uncaught exceptions in script functions connected to a signal have
been ignored
•ScriptComboBox functions added:
◦count, clear
•ScriptTable function added:
◦rowsCanBeMovedByUser
2.14 2015-05-31 •fixed some issues in the manual
•internal improvements
2.15 2015-06-12 •Script- and sequence-buttons added in the main window
•Copy button added in the send window
•worker and sequence script functions added:
◦setGlobalString, getGlobalString
◦setGlobalDataArray, getGlobalDataArray
◦setGlobalUnsignedNumber, getGlobalUnsignedNumber
◦setGlobalSignedNumber, getGlobalSignedNumber
•renamed the sequence script main object: table->seq
•sent on enter added (settings dialog->console tab)
•the console/log time-stamp format can be adjusted now
•new default argument in scriptThread.appendTextToConsole
2.16 2015-06-14 •bug fix: Crash while ScriptCommunicator is closed and a script is running
3.00 2015-06-19 •custom console and custom log added

•new default argument in scriptThread.addMessageToLogAndConsoles
•new menu in the send window: edit sequence script
3.01 2015-06-24 •new manual chapter added: Internal architecture
•new custom console example
(exampleScripts\CustomLogConsoleScripts\CustomConsole_QRCode)
•new main window menus added:
◦Console/print console, Console/save console
◦Help/report a bug, Help/feature request
3.02 2015-07-02 •bug fix: missing Qt libraries for printing a console
3.03 2015-07-04 •fixed some issues in the manual
•added a custom build of QtDesigner (only the supported widgets/GUI
elements (supported by ScriptCommunicator) are available now)
3.04 2015-07-31 •the log and the console tab (settings dialog) have been redesigned
•internal improvements
•fixed some issues in the manual
3.05 2015-08-02 •the console mixed mode utilize the width of the console better now
•bug fix: save console crashed on Linux if no file ending has been given
3.06 2015-08-08 •main window:
◦find text in console area added
◦the send and the receive data rates are now displayed
•sending data with the main interface is faster now
•new example worker scripts:
◦WorkerScripts\CyclicSendReceive\CyclicReceive.js
◦WorkerScripts\CyclicSendReceive\CyclicSend.js
•worker script function added: setScriptThreadPriority
3.07 2015-08-13 •new script widget:
◦ScriptPlotWidget
•ScriptPlotWindow:
◦functions added: clearGraphs, removeAllGraphs, showHelperElements,
clearButtonPressedSignal
◦function removed: showFromScript (use show instead)
•ScriptGroupBox function added: addPlotWidget
•the CAN tab has been improved
3.08 2015-09-12 •bug fix: possible crash while stopping a script
•TCP client: connection errors are now displayed
•ScriptTcpClient functions/signals added:
◦errorSignal, getErrorString
•new main window menus added:
◦Help/video, Help/get support
3.09 2015-09-12 •worker script functions added:
◦getCurrentVersion
•custom log/console and sequence script function added: getCurrentVersion
•ScriptTcpClient, ScriptUdpClient and ScriptSerialPort functions added:
enableMainInterfaceRouting, disableMainInterfaceRouting
3.10 2015-09-26 •network proxy support implemented (only for TCP clients)
•ScriptTcpClient function added: setProxy
3.11 2015-10-04 •bug fix: exceptions in the script function 'stopScript' are displayed now
•worker script function added:
getFileSize
•new arguments in worker script functions:
◦readFile, readBinaryFile, writeFile, writeBinaryFile
•ScriptPlotWidget and ScriptPlotWindow function added/changed:
◦load button, showHelperElements
3.12 2015-10-15 •console and log time stamp format extended (now date and time can be
created)
•new option 'time stamp after byte' added

3.13 2015-10-18 •command-line option '-notMinimized' added
•worker script function added: exitScriptCommunicator
•the template scripts have been modified
•manual chapter 'Worker scripts' has been modified
3.14 2015-10-24 •changed behavior of the console and log time stamp: if a time stamp byte
followed by no other byte has been received then the time stamp is created
not before the next byte has been received
3.15 2015-11-01 •increased performance at high data rates
•new default arguments in worker script function: showTextInputDialog,
showMultiLineTextInputDialog, showGetItemDialog, showGetIntDialog,
showGetDoubleDialog, showFileDialog,showDirectoryDialog, messageBox,
showYesNoDialog
•sequence script function changed: messageBox
•sequence script function added: showYesNoDialog, showTextInputDialog,
showMultiLineTextInputDialog, showGetItemDialog, showGetIntDialog,
showGetDoubleDialog
3.16 2015-11-06 •SQL support for worker and custom log/console scripts implemented
•worker script function removed: deleteObject
•all created script objects (except ScriptTreeWidgetItem) are automatically
deleted by the garbage collector now
3.17 2015-11-08 •bug fix: The script SQL classes did not handle byte arrays correctly.
3.18 2015-11-14 •sequence and custom console/log scripts are running in their own thread
now
•worker, sequence and custom console/log script function added:
setBlockTime
•blocked worker scripts are terminated now (after the block-time (can be set
with setBlockTime) has elapsed)
•custom console/log script functions changed: readFile, readBinaryFile
•custom console/log script functions added: getFileSize, checkFileExists,
checkDirectoryExists, createDirectory, renameDirectory, renameFile,
deleteFile, deleteDirectory, deleteDirectoryRecursively, readDirectory,
writeFile, writeBinaryFile
3.19 2015-11-18 •new send window menus: create script, add script
•'edit custom console script' button added (console tab)
•'edit custom log script' button added (log tab)
3.20 2015-11-21 •bug fix: possible crash while starting a worker script with a syntax error
3.21 2015-12-02 •new send area in the main window
•new option in the settings dialog: target endianess
•new decimal types for the decimal console and the log (uint8, uint16,
uint32, int8, int16 and int32)
•new data formats in the send window (binary, uint8, uint16, uint32, int8,
int16 and int32)
3.22 2015-12-04 •worker script function added: getScriptFolder
•Mac OS X support
3.23 2015-12-13 •bug fix: sometimes up to 3 extra bytes were written into the log if the 'write
decimal into log' option was disabled and then enabled again
•worker and sequence script function added: showColorDialog
3.24 2015-12-21 •the sizes of the tool box pages in the main window (Sequences, Scripts, …)
are saved now
•send history added in the main window
•main window send area: the data can be sent with 'alt+enter' now
•main config file lock implemented
3.24.1 (Mac
OS X only)
2015-12-23 •bug fix: error while starting the external script editor on Mac OS X
•QtCreator is now used for editing worker script user interfaces on Mac OS X

3.25 2015-12-28 •XML support for worker and custom console/log scripts implemented
•new color dialog for selecting the colors of the consoles (background,
receive data …)
•new manual chapter: 'Configuration files'
3.26 2015-12-30 •bug fix:
◦possible crash while saving the content of a script plot widget/window
◦menu 'Config/create new config' did not work correctly
•settings dialog elements adjusted (especially for Linux and Mac OS X)
3.27 2016-01-04 •send history: create script button added
•ScriptTcpClient, ScriptUdpSocket and ScriptSerialPort functions added:
canReadLine, readLine, readAllLines
•ScriptPlotWidget and ScriptPlotWindow:
◦the x-range, y-min and y-max input fields accept floats now
◦function setMaxDataPointsPerGraph added
◦QCustomPlot has been updated to version 1.3.2
◦show legend check box added
◦showHelperElements has new arguments
◦signal plotMousePressSignal added
•ScriptThread functions and signals added/: setScriptState,
getScriptTableName, globalStringChangedSignal,
globalDataArrayChangedSignal, globalUnsignedChangedSignal,
globalSignedChangedSignal, setGlobalRealNumber, getGlobalRealNumber,
globalRealChangedSignal
3.28 2016-01-10 •a simple default script editor is included now
•the sequences- and worker-scripts in the main window tool box are
organized in a list view now
•ScriptPlotWidget and ScriptPlotWindow:
◦show legend check box added
◦showHelperElements has new arguments
◦signal plotMousePressSignal added
•ScriptThread function added: getScriptTableName
3.29 2016-01-16 •bug fix: crash if the start button (main window scripts tab) has been pressed
with an empty script list
•GUI's of paused worker-scripts are disabled (greyed out) now
•ScriptThread functions added: currentCpuArchitecture, productType,
productVersion
•new sequences and scripts are inserted at the front of their tables now
•new menus in the script and the send window: move up/down
•ScriptPlotWidget and ScriptPlotWindow new function added:
setUpdateInterval
•script editor:
◦the line number is displayed now
◦zoom in/out implemented
4.00 2016-01-30 •new features:
◦script debugger (worker-scripts)
◦custom script widget
•new script widget class: ScriptCanvas2D
•ScriptTableWidget functions changed/added: insertWidget, getWidget,
cellSelectionChangedSignal, getAllSelectedCells,, addCanvas2DWidget
•ScriptWidget functions added: getClassName, height
4.01 2016-02-05 •main window send area: sequence-scripts can be used now
•main window 'Top' button added
•sequence and custom console/log scripts: debug support added
•new custom script widget: ScriptWebView
•ScriptCanvas2D functions added: print, saveToFile
•new command-line argument: -P'plug-in path'
4.02 2016-02-07 •ScriptThread function added: availableSerialPorts
•script editor: multi-document support, 'open all included scripts' button
added
•ScriptSerialPort, ScriptUdpSocket and ScriptTcpClient function added:

writeString
4.03 2016-02-13 •new script editor buttons and menus: new script, edit user interface
•script editor auto completion and call tips for several objects/functions
added:
◦scriptThread object
◦several QtScript functions and objects
•script window and send window menu: 'edit all scripts'
•ScriptThread functions added: createProcessAsynchronous,
waitForFinishedProcess, getProcessExitCode, killProcess, terminateProcess,
writeToProcessStdin, readAllStandardOutputFromProcess,
readAllStandardErrorFromProcess, stringToArray, addStringToArray
•sequence and custom console/log script functions added:
byteArrayToString, byteArrayToHexString, stringToArray, addStringToArray
•new example script: TestProcess
4.04 2016-02-23 •ScriptThread functions added: getScriptCommunicatorFolder,
getScriptArguments, zipDirectory, zipFiles, extractZipFile and
getUserDocumentsFolder
•new default argument in ScriptThread.ceateProcessAsynchronous
•new command-line argument: -minScVersion'version', -A'argument' and
-L'library path'
•new main window menu: check for updates
•new file types: .sce (ScriptCommuncator executable) and .scez
(ScriptCommuncator executable, zipped)
•new dialog: create sce file
4.05 2016-02-27 •bug fix: deleting the scez temporary folder failed in some cases
•drag&drop for several GUI elements implemented
4.06 2016-03-05 •bug fixes: wrong 'send history button' text after sending the history, the
console message color has not been saved
•new log option: 'append time stamp at log file name'
•new main window button: reopen (is only visible if the log option 'append
time stamp at log file name' is selected)
•the default text-log file extension is 'txt' now
4.07 2016-03-12 •new ScriptWidget function: setPaletteColorRgb
•new script widget: ScriptFontComboBox
•new and changed ScriptTextEdit functions: lockScrolling, insertHtml and
insertPlainText
•new and changed ScriptThread functions: sendDataArray, sendString,
sendCanMessage and addTabsToMainWindow
4.08 2016-03-19 •bug fix: 0xd ('\r') was changed to 0xa ('\n') in the data input fields (main and
send window) if the format was changed to 'ascii'
•file paths in configuration files are store relative to the configuration file in
which they occur if they have the same root path (on windows for example
C:\)
4.09 2016-04-02 •Linux: changed the config-file directory to '/$
{USER}/home/.config/ScriptCommunicator'
•send history: repetition count added
•main window: quit button added, merged the connect and disconnect
buttons to one button, Action menu added
•new ScriptThread function: addToolBoxPagesToMainWindow
•mixed console: the background-color for the different data types (ascii, bin,
hex and dec) can be adjusted now
4.10 2016-05-01 •the console font size can be modified with 'Ctrl' + 'mouse scroll up/down'
now
•send history: the max. number of repetitions have been changed from 99 to
999999999
•increased performance at high data rates
4.11 2016-05-06 •scriptThread functions/signals added: sendReceivedDataToMainInterface,
sendDataFromMainInterfaceSignal, checkScriptCommunicatorVersion
•new worker scripts: exampleScripts\WorkerScripts\AdditionalInterface

4.12 2016-05-28 •bug fix: the state of a script which has been started at the start-up of
ScriptCommunicator was not shown correct if the user interface could not
be found
•worker, sequence and custom console/log script function added:
getAllObjectPropertiesAndFunctions
•the arrangement of the main window script-buttons changed
4.13 2016-07-03 •bug fix: the stop bits, the data bits and the parity (main interface serial port)
were not set correctly (except the default settings)
•script exception-handling improved (in some cases more information is
displayed)
•the TCP server (main interface) can handle multiple TCP clients now
•scriptThread functions and signals added:
getMainInterfaceSerialPortSettings, getMainInterfaceSocketSettings,
mainWindowClearConsoleClickedSignal,
mainWindowLockScrollingClickedSignal
•new argument in scriptThread::appendTextToConsole
•sequence and custom console/log script function added:
appendTextToConsole
•main window save console: the background color is saved now
4.14 2016-07-16 •new ScriptTimer functions and signals: setSingleShot, isSingleShot,
setInterval, interval, isActive, remainingTime, timeoutSignal
•ScriptEditor: auto-completion for script GUI elements and for dynamically
created script objects (e.g. ScriptSerialPort) implemented
4.15 2016-07-30 •ScriptEditor:
◦if the enter key is pressed after an unclosed '{' then '\n}' is added
◦improved auto-completion
◦the auto-completion can be manually started with 'CTRL+Shift' now
4.16 2016-10-11 •bug fix:
◦possible crash while running a custom log/console script in the script
debugger
◦possible crash while running a worker script in the script debugger and
receiving data at high data rates
•new worker, and sequence script function: calculateCrc8WithPolynomial
•new worker script function: getMainWindowTitle, setMainWindowTitle
•ScriptEditor: removed the adding of '\n' by the script editor
•main window: worker scripts can be started and stopped by a double click
in the script area
•new worker, custom log/console and sequence script object: conv (script
converter)
4.17 2016-11-01 •bug fix:
◦error in conv.byteArrayToUint32 (big numbers)
◦under some circumstances the order of the received and sent bytes
were wrong
•new script converter (conv object) function: unsignedCharToSignedChar
•new command line option: -C'config file'
•ScriptEditor: auto-completion texts for the script SQL classes added
4.18 2016-12-29 •new shortcuts in ScriptEditor and ScriptCommunicator
•ScriptEditor: the font is adjustable now
•new worker script functions: getSerialPortSignals, getTimestamp
•new ScriptWidget functions: getObjectName, setObjectName
•new ScriptButton and ScriptToolButton functions: setCheckable,
isCheckable, isChecked, setChecked
•new ScriptTableWidget function: insertRowWithContent
4.19 2017-02-23 •ScriptStatusBar class removed (replaced by
ScriptMainWindow::showMessage)
•ScriptEditor:
◦bug fix: ScriptButton::clickedSignal was missing in the auto-completion
list
◦script file locks added (to prevent opening the same file in multiple
instances of ScriptEditor)

•settings dialog: connect button added
•if ScriptCommunicator detects that a script file is opened by an instance of
ScriptEditor and contains unsaved changes then a message box is displayed
•new config file extensions (.config, .scripts and .seq)
•new script converter function: byteArrayToUtf8String
•new scriptThread functions: getConsoleSettings,
setMainWindowAndTaskBarIcon
•new command-line argument -I
•new ScriptWidget function: setWindowIcon
4.20 2017-03-31 •new scriptThread function: processIsRunning
•scriptThread function changed: getTimestamp
•new ScriptWidget function: createShortCut
•bug fix: readAllStandardOutputFromProcess and
readAllStandardErrorFromProcess return now if the process has stopped (if
isBlocking is true)
•SCE files are now created in a separate folder.
•new ScriptLed (CustomWidget) functions: setColorRgb, setFlashRate
•ScriptEditor: UTF-8 support added
•new worker and custom log/console script object: scriptFile
4.21 2017-05-09 •batch files added with which self extracting (sfx) zip (exe) files can be
created (only on window) with winrar (the sfx file contains all necessary
ScriptCommunictor files and a script (and it's resources) which shall be
executed)
•update tab added (settings dialog)
•ScriptEditor:
◦global variables are now displayed in the outline window
◦ui window added
◦reload/close button added
◦goto definition added (Ctrl+DoubleClick)
◦improved source parsing
◦icons in the outline windows added
◦find/replace all added
◦if the mouse is moved to a function with a call tip (API functions like
scriptThread.stopScript()) then this call tip is shown now
4.22 2017-05-27 •option 'None' for 'send on enter key' added
•bug fix: ScriptCommunicator could not open the manual if the installation
folder contains spaces
•ScriptEditor:
◦tabs can be moved now
◦Number.api added
◦bool.api added
◦improved source parsing
5.00 2017-06-16 •all text pasted in the consoles ('Ctrl+V') is sent now (if the 'send input' check
box is checked)
•Cheetah SPI removed
•Aardvark I2C/SPI support added
5.01 2017-06-22 •bug fix: possible crash if ScriptEditor could not find the saved
settings
5.02 2017-06-30 •bug fix: instead of one timestamp several timestamps were added to the
consoles
•several keys are send now if they are added in a console and the 'send
input' checkbox is checked:
- ESC (0x1b), Backspace (0x08), up (0x1b 0x5b 0x41), down (0x1b 0x5b
0x42), left (0x1b 0x5b 0x44), right (0x1b 0x5b 0x43)
•I2C/SPI slave support added
•scriptInf object added (worker scripts)
•the toolbar position (main window) is saved/restored now
5.03 2017-08-02 •consoles: performance optimizations
•the main window 'Scripts tab' accepts Drag&Drop now
•scripts can be started/stopped with 'Enter' from the main window 'Scripts
tab' now

•new ScriptPlotWindow and ScriptPlotWidget functions: setScatterStyle,
setLineStyle, removeDataRangeFromGraph
•new ScriptCanvas2D properties and functions: textAlign, setFont, fillText
•new ScriptWidget function: setAutoFillBackground
•switched from QCustomPlot 1.3.2 to QCustomPlot 2.0
•sequences can be sent with 'Alt+Enter' from all input elements now (main
window send area and send window)
•sequences can be send with 'Enter' from the main window 'Sequences tab'
now
5.04 2017-08-11 •custom console/log script functionality removed (worker scripts are much
more flexible (exampleScripts\WorkerScripts\MainWindowConsole))
•bug fix: print/save console didn't find any console
•consoles: performance optimizations
5.05 2017-09-10 •bug fix: ScriptPlotWidget::plotMousePressSignal and ScriptPlotWindow::
plotMousePressSignal returned wrong mouse positions.
•ScriptPlotWidget and ScriptPlotWindow: new argument in
setInitialAxisRanges, addGraph accepts now the whole subset of svg color
keywords
•ScriptPlotWidget and ScriptPlotWindow new functions and new signal:
xRangeChangedSignal, setCurrentAxisRanges, setAutoUpdateEnabled,
isAutoUpdateEnabled, updatePlot, setLineWidth, getDataFromGraph
•ScriptEditor: improved source parsing
5.06 2017-09-27 •bug fix: if a hex string with no spaces was inserted into a send area then it
was truncated
•bug fix (Aardvark I2C/SPI): reading more then 128 bytes in on script call did
not work
•in some cases more information is shown if an exception occurs
5.07 2017-12-08 •bug fix: on some platforms the lines in ScriptEditor were overlapping each
other
•main window find tab: the line of the found string is displayed now
•ScriptEditor: 'go to line' added
•ScriptPlotWidget and ScriptPlotWindow: new argument in
addDataToGraph and removeDataRangeFromGraph
5.08 •new scriptThread function: showOpenFileNamesDialog
GUI documentation
Main window
The main window contains:
the consoles which shows:
othe sent data
othe received data
otime stamps
omessages added with the add message dialog
Note: The console font size can be modified with 'Ctrl' + 'mouse scroll up/down'.
a multi-line send area
the send input check box: if checked all text entered in a console will be sent
a menu and the following buttons:
oConnect: connects the main interface (the configuration of the main interface is
done in the configure dialog)
oDisconnect: disconnects the main interface
oSettings: shows the settings dialog
oSending: shows the send dialog
oScripts: shows the scripts dialog
oClear button: clears all consoles
oLock scrolling: prevents the automatic scrolling in the consoles (if new data is added
to a console the cursor moves to the end of the console)
oAdd message: shows the add message dialog
oTop: brings all windows to top/foreground
oReopen: reopen all logs (is only visible if the log option 'append time stamp at log file
name' is selected)
if the current connection type is serial port:
oa check box for setting/clearing the DTR (data terminal ready) pin (default=1)
oa check box for setting/clearing the RTS (request to send) pin (default=0)
a sequence area in which the sequences from the send window can be sent
a script area in which the scripts from the script window can be started (normal and in a
script-debugger, stopped and paused)
a find text in console area in which a console text can be searched (in the visible console)
the send history
Note: If the 'check for updates' menu is clicked ScriptCommunicator tries to read
https://github.com/szieke/ScriptCommunicator_serial-terminal. To connect to this address
ScriptCommunicator uses the proxy settings from the update tab in the settings windows.
Settings dialog
In the settings dialog several settings can be accessed:
the main interface settings (serial port tab, sockets tab, aardvark I2c/Spi tab and pcan tab)
the console settings (the console options and the colors tab)
the log settings (the log options tab)
the update proxy settings (the update tab)
the path to the external script editor (for editing a script in the script window)
Note:
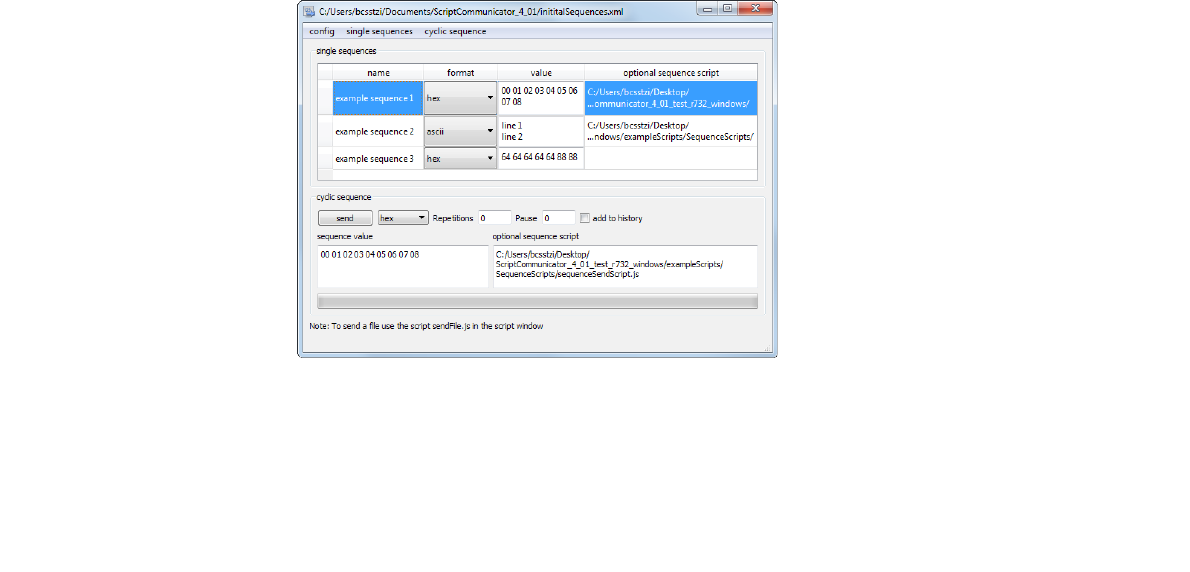
To close this dialog press the close button + press Ctrl+Shift+X.
Send dialog
The send dialog contains the single sequence table and a cyclic sequence area.
Single sequence table
In the sequence table send sequences can be stored. The right mouse button is used to send a
sequence.
Note:
A selected row in the sequence table can be moved up or down while holding the left mouse button
at the row and moving the mouse up and/or down.
Cyclic sequence area
The cyclic send area contains following:
a data input field
a script path filed
a send button which sends the data
a format combo box which sets the format of the data which shall be sent
a Repetition field which sets the number repetitions (if 0 is entered the data is sent only
once, if 1 is entered the data is sent twice)
a pause field which sets the pause in milliseconds between two repetitions
a progress bar which shows the progress while sending data
In addition to the simple sending of a sequence a sequence script can be used (see chapter Sequence
script).
Note:
If ScriptCommunicator is connected to a CAN interface the send bytes are:
Byte 0= message type (0=standard, 1=standard remote-transfer-request, 2=extended, 3=
extended remote-transfer-request)
Byte 1-4 (MSB)= can id

Byte 5-12= the data
If more then 8 data bytes are given, several can messages with the same CAN id will be sent.
If ScriptCommunicator is connected to a I2C master interface the send bytes are:
Byte 0= flags bits (1=10 bit address, 2=combined FMT, 4=no stop condition)
Byte 1-2 (MSB)= I2C address
Byte 3-4 (MSB)= number of bytes to read
Byte 5-n= the data which shall be sent
Change the sequence configuration
Following is implemented:
create a new sequence: Ctrl+N or menu single sequence/new sequence
add a sequence script: Ctrl+A or menu single sequence/add sequence script
create a sequence script: Ctrl+C or menu single sequence/add sequence script
edit a sequence script: Ctrl+E or menu single sequence/edit sequence script
remove a sequence script: menu single sequence/remove sequence script
delete a sequence: select the corresponding sequence and press Ctrl+D or menu single
sequence/delete sequence
move the selected sequence up: select the corresponding sequence and press Ctrl+Up or
menu sequence/move up
move the selected sequence down: select the corresponding sequence and press Ctrl+Down
or menu sequence/move down
edit all sequence scripts: press Ctrl+Shift+A or menu single sequence/edit all sequence
scripts
save the sequence config: Ctrl+S or menu config/save config
save the sequence config under a new name (save as): Menu config/save config as
load another sequence config: Ctrl+L or menu config/load config
unload the current sequence config: menu config/unload config
Note:
To close this dialog press Ctrl+Shift+X.
Scripts dialog
In this window worker scripts (see chapter Worker scripts) can be added and executed.

This dialog contains following functionality:
Change the script configuration (the content of the script table)
Create and edit scripts and ui (user interface) files
Load and save the script configuration (the content of the script table)
Start, debug, pause and stop scripts
Note:
A selected row in the script table can be moved up or down while holding the left mouse button at
the row and moving the mouse up and/or down.
Change the script configuration
Following is implemented:
Add scripts to the script table: Ctrl+A or menu script/addscript
Remove script from the script table: select the corresponding row and press Ctrl+R or menu
script/remove script
Change the path to a script in the script table: double click on the corresponding entry in
path column
Add an ui file to a script: double click on the corresponding empty entry in ui column
Remove an ui file from the script table: select the corresponding row and press Ctrl+Shift+R
or menu script/remove ui
Change the path to an ui file in the script table: double click on the corresponding entry in ui
column
move the selected script up: select the corresponding script and press Ctrl+Up or menu
script/move up
move the selected script down: select the corresponding script and press Ctrl+Down or
menu script/move down
Note:
If a script is added and in the same directory a file with the name “scriptName”.ui exists then it will
be added automatically to the ui column. Example: If the script name is myScript.js then the file
myScript.ui will be added automatically.

Create and edit scripts/ui (user interface) files
Following is implemented:
Edit a script (with an external script editor): select the corresponding row and press Ctrl+E
menu script/edit script
Create new script (from template): Ctrl+N or menu script/new script (after pressing this
menu 2 dialogs appear (first the template file must be chosen and then the name/path of the
new script))
Edit an ui file (with QtDesigner): select the corresponding row and press Ctrl+Shift+E or the
menu script/edit ui
Create new ui file: select the corresponding row and press Ctrl+Shift+N or the menu
script/new ui
Edit all scripts: press Ctrl+Shift+A or menu script/edit all sequence scripts
Load and save the script configuration (the content of the script table)
Following is implemented:
Load a script configuration from a file: Ctrl+L or menu script config/load config
Unload the current script configuration: Ctrl+U or menu script config/unload config
Save the current script configuration: Ctrl+S or menu script config/save config
Save config as (opens a save dialog, where a file name can be chosen): Ctrl+Shift+S or menu
script config/save config as
Start, debug, pause and stop scripts
Following is implemented:
Start a script: select the corresponding row and press the start button or press Ctrl+1
Debug a script: select the corresponding row and press the debug button or press Ctrl+2 (the
script will be executed with an attached script debugger)
Pause a running script: select the corresponding row and press the pause button or press
Ctrl+2
Stop a running or paused script: select the corresponding row and press the stop button or
press Ctrl+3
Note:
If ScriptCommunicator is closed it saves the state (running, paused and not running) of all scripts. If
ScriptCommunicator is started again all script status are restored.
This means if a script is running while ScriptCommunicator is closing then this script will be
automatically started after ScriptCommunicator has been started the next time.
To clear the console press the clear button or press or press Ctrl+Shift+C.
To close this dialog press the close button + press Ctrl+Shift+X.
Create sce file dialog
In this window sce (ScriptCommunicator executable) and scez (ScriptCommunicator executable,
zipped) files can be created (see chapter SCE files and SCEZ files). To open this dialog go to the script
window and click the 'script/create sce file' menu.
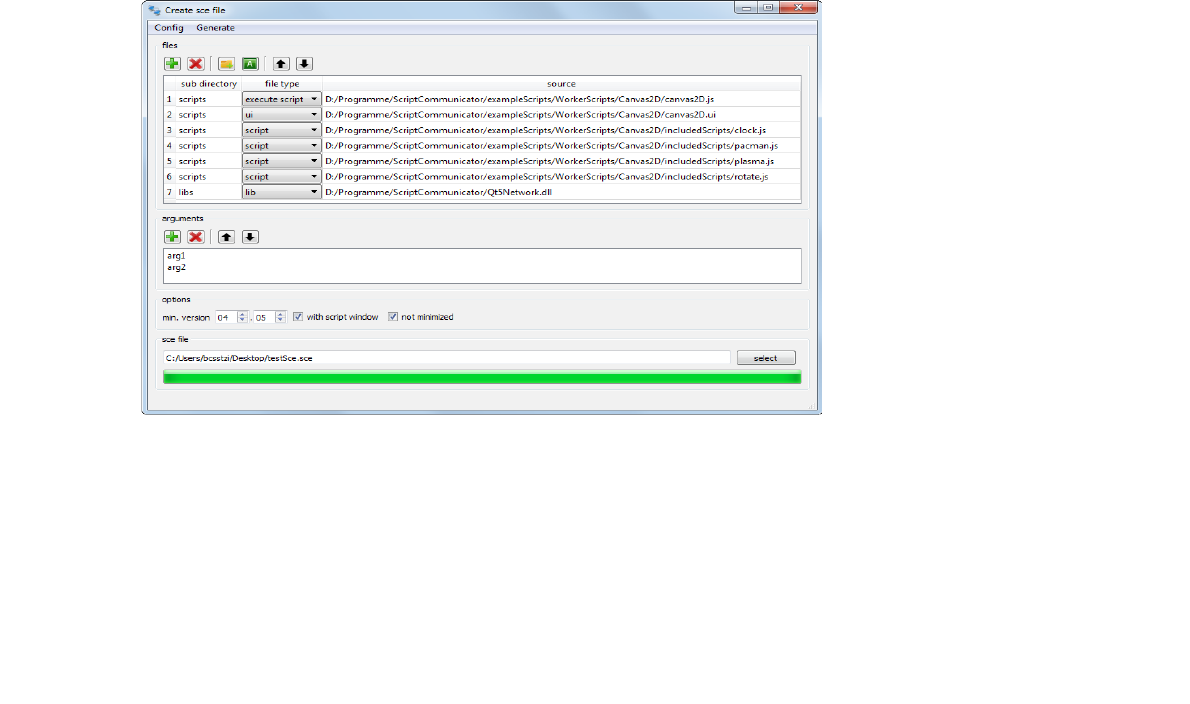
Load and save the sce file configuration (the content of the complete window)
Following is implemented:
Load a configuration from a file: Ctrl+L or menu Config/load config
Unload the current configuration: Ctrl+U or menu Config/unload config
Save the current configuration: Ctrl+S or menu Config/save config
Save config as (opens a save dialog, where a file name can be chosen): Ctrl+Shift+S or menu
Config/save config as
Generate a sce or scez file
To create a sce or a scez file the corresponding entries in the 'Generate' menu must be used.
Note:
•To generate a sce or a scez file at least one 'executable script' must be in the file table (a file
marked with this type is started by ScriptCommunicator as script) and the sce file name must
be set.
•To close this dialog press Ctrl+Shift+X.
•To start/execute a sce or scez file ScriptCommunicator must be started with the
corresponding file as a command-line argument (see chapter Command-line arguments).
•If you have associated the .scez and the .sce file ending with ScriptCommunicator then you
can simply double click on the file to execute it.
File table
The file table contains following columns:
•sub directory: contains the directory of the file entry inside the sce folder
•file type: the type of the file entry
•source: the source of the file entry
The file type is used by ScriptCommunicator to suggest the sub directory (which can be changed
manually).
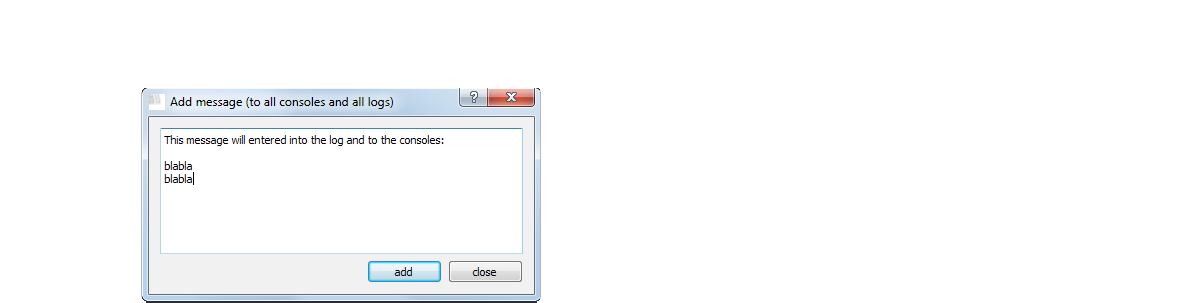
Furthermore following file types have a special meaning:
•executable script: a file marked with this type is started by ScriptCommunicator (during the
sce or scez file execution)the
•lib: the sub directory of this file is added to the ScriptCommunicator library path (if you need
extra libraries (e.g. for a custom widget) then add the libraries with this file type)
•plugin: the sub directory of this file is added to the ScriptCommunicator plug-in path (if you
need extra plug-ins (e.g. for a custom widget) then add the plug-ins with this file type)
Arguments list
All arguments which are added here can be read by the worker scripts with Array<String>
getScriptArguments(void).
Options and sce file area
In this area following options can be set:
•min. version: the minimum version of ScriptCommunicator which is needed to execute the
current scripts
•with script window: the script windows shall be shown (per default minimized)
•not minimized: the script window shall not be minimized
•sce file: the sce file path
Note:
You can find an example sce project in
ScriptCommunicator\exampleScripts\WorkerScripts\PlotWindow (exampleSceFileConfig.xml).
Add message dialog
In this dialog a message can be entered which will be shown in the consoles and be written into the
logs.
Sending and receiving a file
To send a file the script sendFile.js (exampleScripts/WorkerScripts/SendFile) can be used.
To receive a file the script receiveFile.js (exampleScripts/WorkerScripts/ReceiveFile) can be used
Configuration files
ScriptCommunicator has 4 configuration files:
•the main configuration file
•the sequences configuration file

•the scripts configuration file
•the sce configuration file
Note: File paths in configuration files are store relative to the configuration file in which they occur if
they have the same root path (on windows for example C:\).
Main configuration file
The main configuration file contains:
•all settings from the settings dialog
•the sizes and positions of all ScriptCommunicator windows
•the data of the cyclic send area in the send window
•the send history
•the data of the send area in the main window
•the name/path of the used sequence configuration file
•the name/path of the use script configuration file
To create/use a new main configuration file the 'Config' menu in the main window can be used (see
chapter Main window).
Sequence configuration file
The sequence configuration file contains all entries of the sequence table in the send window. To
load, unload or save the sequence configuration file the 'config' menu can be used (see chapter
Change the sequence configuration).
Script configuration file
The script configuration file contains all entries of the script table in the script window. To load,
unload or save the script configuration file the 'script config' menu can be used (see chapter Change
the script configuration).
SCE configuration file
The sce configuration file contains the content of the complete create sce file dialog. To load, unload
or save the sce configuration file the 'Config' menu can be used (see chapter Load and save the sce
file configuration (the content of the complete window)).
Command-line arguments
ScriptCommunicator has several command-line arguments. These arguments are:
•-A: a script command-line argument (these arguments can be read by worker scripts with
the function Array<String> getScriptArguments(void)
•-L: adds an additional library path (e.g. for loading a custom script widget)
•-C: the configuration file to start with
•-P: adds an additional folder to the ScriptCommunicator plug-in (custom script widgets)
search path
•-I: replace the standard icon for the main window (taskbar and window), supported formats:
.ico, .gif, .png, .jpeg, .tiff, .bmp, .icns

•scripts, sce files (see chapter SCE files) or scez files (see chapter SCEZ files) separated by a
space
Example:
ScriptCommunicator.exe -CC:\initialSettingsWin2.config -IC:\myIcon.ico
Command-line mode
ScriptCommunicator has a command-line mode in which scripts can be executed without the
ScriptCommunicator GUI. This command-line mode is entered if a script, a sce or a scez file is found
in the command-line arguments.
Additional command-line arguments for the command-line mode:
•-withScriptWindow: the script windows shall be shown (per default minimized)
•-notMinimized: the script window shall not be minimized
•-minScVersion: the minimum version of ScriptCommunicator which is needed to execute the
current scripts
Example:
ScriptCommunicator.exe -withScriptWindow -notMinimized -minScVersion04.04 -PC:/dir1 -LC:/dir2 -Aarg1 -Aarg2
C:/script1.js C:/script2.js
Command-line mode limitations:
•no ScriptCommunicator window is visible per default (only the script window can be shown
(-withScriptWindow))
Program termination without the argument withScriptWindow:
•if all worker scripts are stopped ScriptCommunicator exits automatically
•a call to scriptThread.exitScriptCommunicator() exits ScriptCommunicator
Program termination with the argument withScriptWindow:
•ScriptCommunicator exits automatically if the script window has been closed
•a call to scriptThread.exitScriptCommunicator() exits ScriptCommunicator
SCE files
The sce file (ScriptCommunicator executable) is a possibility to put all command-line arguments in
one file. This file is a simple XML file and has following structure:
<ExecutableConfig version="04.04"> <!--ScriptCommunicator version with which this file has been created-->
<Scripts>
<Script path="./scripts/scrip1.js"/><!--script which shall be started-->
<Script path="./scripts/scrip2.js"/><!--script which shall be started-->
</Scripts>
<LibraryPaths>
<LibraryPath path="./libs1"/><!--additional library path-->
<LibraryPath path="./libs2"/><!--additional library path-->
</LibraryPaths>
<PluginPaths>
<PluginPath path="./plugins1"/><!--additional plugin path-->
<PluginPath path="./plugins2"/><!--additional plugin path-->
</PluginPaths>
<ScriptArguments>
<ScriptArgument value="arg1"/><!--script argument (getScriptArguments())-->
<ScriptArgument value="arg2"/><!--script argument (getScriptArguments())-->
</ScriptArguments>
<Options withScriptWindow="1" notMinimized="1" minScVersion="4.4"/>
<!--these 3 attributes have the same meaning as the corresponding command-line argument-->
</ExecutableConfig>
For creating a sce file the Create sce file dialog shall be used (but it can be created manually too).

SCEZ files
A scez file (ScriptCommunicator executable, zipped) is a zipped sce file (including all necessary files
and folders). To ensure the data integrity of a scez file a SHA-512 hash is appended.
Note: To create a scez file the Create sce file dialog must be used.
If ScriptCommunicator is started with this kind of file then ScriptCommunicator:
•checks the SHA-512 hash
•unzips the scez file into the temporary folder 'user documents folder'/'time in milliseconds
since epoche'
•starts all executable scripts
•deletes the temporary folder on exit
Self extracting zip (exe) files (only on windows)
With create.bat and sfx.bat in ScriptCommunicator\winRarSfx a self extracting (sfx) zip (exe) file can
be created (only on windows) which:
•contains all necessary ScriptCommunictor files
•a script (and it's resources) which shall be executed
If the created executable is started all files are extracted in a temporary folder und the script is
executed. After the script is finished the temporary is deleted.
To create a sfx file:
•create a sce project (see Create sce file dialog for details) and generate the sce file/folder
•copy the created sce folder to ScriptCommunicator\winRarSfx
•open ScriptCommunicator\winRarSfx\create.bat
•replace the path to winrar (1. argument)
•replace name the sfx file name (2. argument)
•replace the sce folder name (3. argument)
•replace the name of the sce file within the sce folder (4. argument)
•replace or remove (the argument is optional) the name of the icon file (5. argument, this file
must be within the sce folder)
•execute create.bat
Note:
•You can find an example sce project in ScriptCommunicator\winRarSfx\exampleSfx (to build
this sfx example open create.bat, replace the path to winrar and execute create.bat.
•An other tools for creating self extracting zip/exe files which executes a programm after
extraction of the data (and deletes the temporary folder after the programm has exited) is
Iexpress. But to use this you musst execute this programm as admin and you have to create a
batch file which recovers the necessary ScriptCommunictor folder structure (Iexpress
ectracts all files in one temporary folder) and starts ScriptCommunicator with the sce oder
scez file.
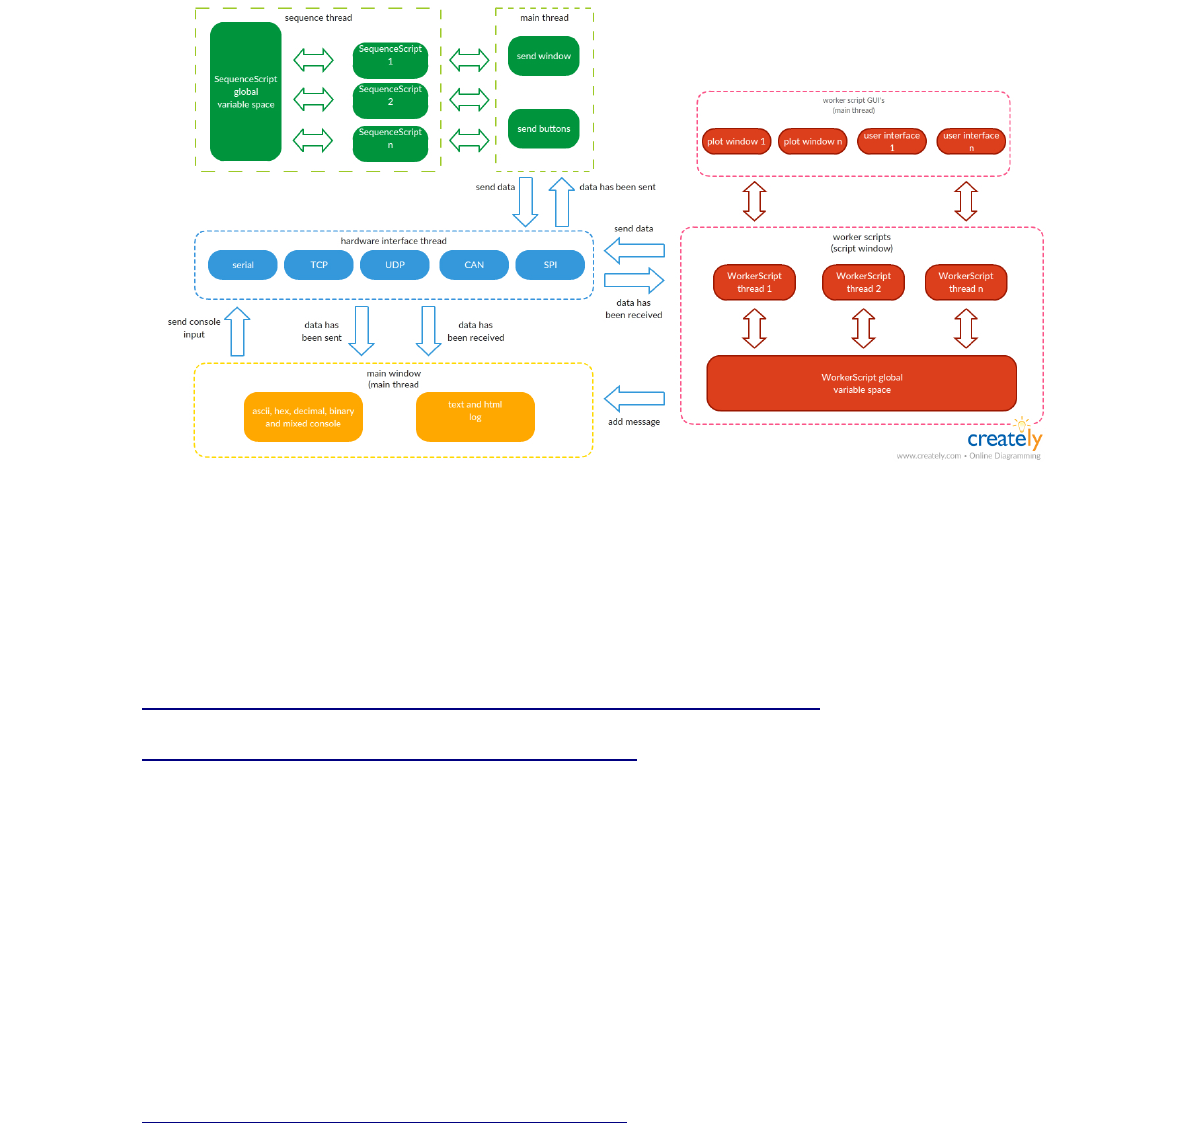
Internal architecture
The following picture illustrates the internal architecture of ScriptCommunicator.
Script interface
The script interface of ScriptCommunicator is able the execute QtScript (similar to JavaScript) files.
This is done with the Qt class QScriptEngine. All standard QtScript functionalities are included. See:
http://qt-project.org/doc/qt-5.0/qtscript/ecmascript.html#value-properties
http://www.trinitydesktop.org/docs/qt4/scripting.html
Since QtScript and JavaScript are base on ECMAScript a good JavaScript book can also be used as
language reference (the core features).
ScriptCommunicator provides 2 different script types/interfaces:
•worker scripts (chapter Worker scripts)
•sequence scripts (chapter Sequence script)
Script debugging
To debug scripts ScriptCommunicator uses the Qt script debugger. For more information see
http://doc.qt.io/qt-4.8/qtscriptdebugger-manual.html.
Note: If a scripts runs in the debugger then it is executed in the main thread (and not in is own
thread).

Worker scripts
Worker scripts can be added in the script window. In this scripts complex functions can be
implemented (sending/receiving data, file operations …).
Every worker script runs in his own thread, therefore ScriptCommunicator can not be blocked by a
worker script directly. The GUI of a worker script runs in the main thread (a call to a script GUI
element normally calls a function in the main thread), therefore to many calls to script GUI elements
can block ScriptCommunicator.
Worker scripts are QtScript scripts (see chapter Script interface). The worker script interface extends
the standard QtScript functionality. These extended functionality is described in the following
chapters.
Note:
A worker script can have a user interface (created with QtDesigner (is included) or QtCreator).
To load a user interface following can be done:
•set the path to the user interface in the script window (the user interface will be loaded
automatically when the script starts)
•or call scriptThread.loadUserInterfaceFile() in the worker script (to load a user interface
manually)
The supported GUI elements and their classes are described in chapter User interface classes
Note:
In the main function (all code outside a function) only the script initialization code should be placed.
The working code should be placed in asynchronous function calls (like timer callbacks or data
receive callbacks). If the main function has been left the script does not stop. To stop a script call
scriptThread.stopScript() or press the stop button (main or script window).
Example:
//Asynchronous data receive callback.
function dataReceived()
{
//Working code.
if(workDone)
{
scriptThread.stopScript();
}
}
//Initialization code.
var workDone = false;
scriptThread.appendTextToConsole('script has started');
scriptThread.dataReceivedSignal.connect(dataReceived);
If the worker code shall be placed in the main function then scriptThread.scriptShallExit() should be
called to check if the script must exit.
Example:
scriptThread.appendTextToConsole('script has started');
while(!scriptThread.scriptShallExit())
{
//Working code.
}
void stopScript(void)
This script function can be added to a worker script. It is called if the script shall be informed that it
will be stopped (for example if the user presses the stop button)
Example:
function stopScript()

{
scriptThread.appendTextToConsole("script has been stopped ");
}
The scriptThread object/class
The scriptThread object is the main interface object for accessing ScriptCommunicator functions from
script. The functions and signals which can be used from script are described in the following
chapters.
Main interface
Worker scripts can send and receive data with the main interface. For more details see The scriptInf
object/class.
Note:
The main interface is the interface which can be adjusted in the settings window .
Separate interfaces
Worker scripts can create separate interfaces (to send and receive data without the main interface).
For more details see The scriptInf object/class.
Standard dialogs
In this chapter all available standard dialog are described.
String showFileDialog (bool isSaveDialog, String caption, String dir, String filter, QWidget*
parent=0)
Shows a file dialog for selecting one file (QFileDialog::getSaveFileName or
QFileDialog::getOpenFileName).
Arguments:
isSaveDialog: True for a QFileDialog::getSaveFileName and false for a
QFileDialog::getOpenFileName dialog
caption: The caption of the dialog
dir: The initial dir for showing the dialog (may be empty)
filter: Filter for the file dialog (for more details see QFileDialog, http://doc.qt.io/qt-
4.8/qfiledialog.html, may be empty)
parent: The parent of this dialog (see chapter QWidget* getWidgetPointer(void) for more
details)
Return: The path of the selected file
Example:
var path = scriptThread.showFileDialog(true, "Save File", "c:/TestDir/","Files (*)")
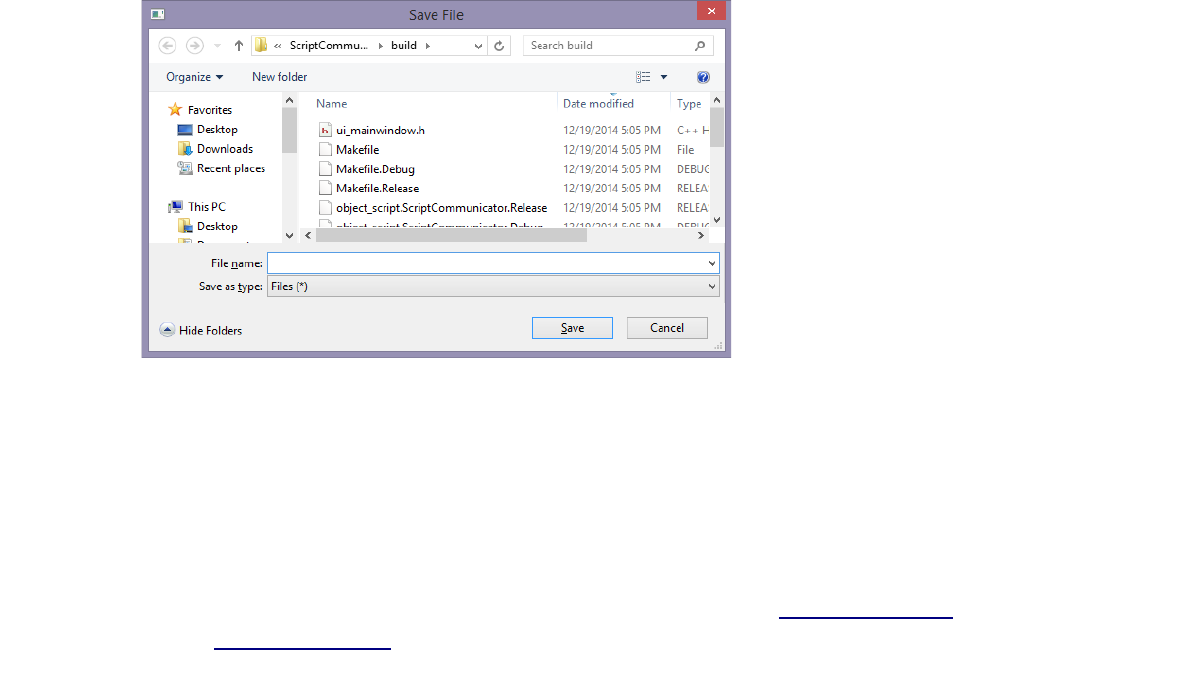
Array<String> showOpenFileNamesDialogSlot(String caption, String dir, String filter
QWidget* parent)
Shows a file dialog for selecting one or more existing files (QFileDialog::getOpenFileNames).
Arguments:
caption: The caption of the dialog
dir: The initial dir for showing the dialog (may be empty)
filter: Filter for the file dialog (for more details see QFileDialog, http://doc.qt.io/qt-
4.8/qfiledialog.html, may be empty)
parent: The parent of this dialog (see chapter QWidget* getWidgetPointer(void) for more
details)
Return: The paths of the selected files
Example:
var input = scriptThread.showOpenFileNamesDialog("select one or more files", "", "");
if(input.length != 0)
{//One ore more files selected.
for(var i = 0; i < input.length; i++)
{
scriptThread.addMessageToLogAndConsoles(input[i]);
}
}
String showDirectoryDialog(String caption, String dir, QWidget* parent=0)
Shows a QFileDialog::getExistingDirectory dialog (is used to select a directory).
Arguments:
caption: The caption of the dialog
dir: The initial dir for showing the dialog
parent: The parent of this dialog (see chapter QWidget* getWidgetPointer(void) for more
details)
Return: The path of the selected directory
Example:
var dir = scriptThread.showDirectoryDialog("Select directory", "c:/TestDir/");
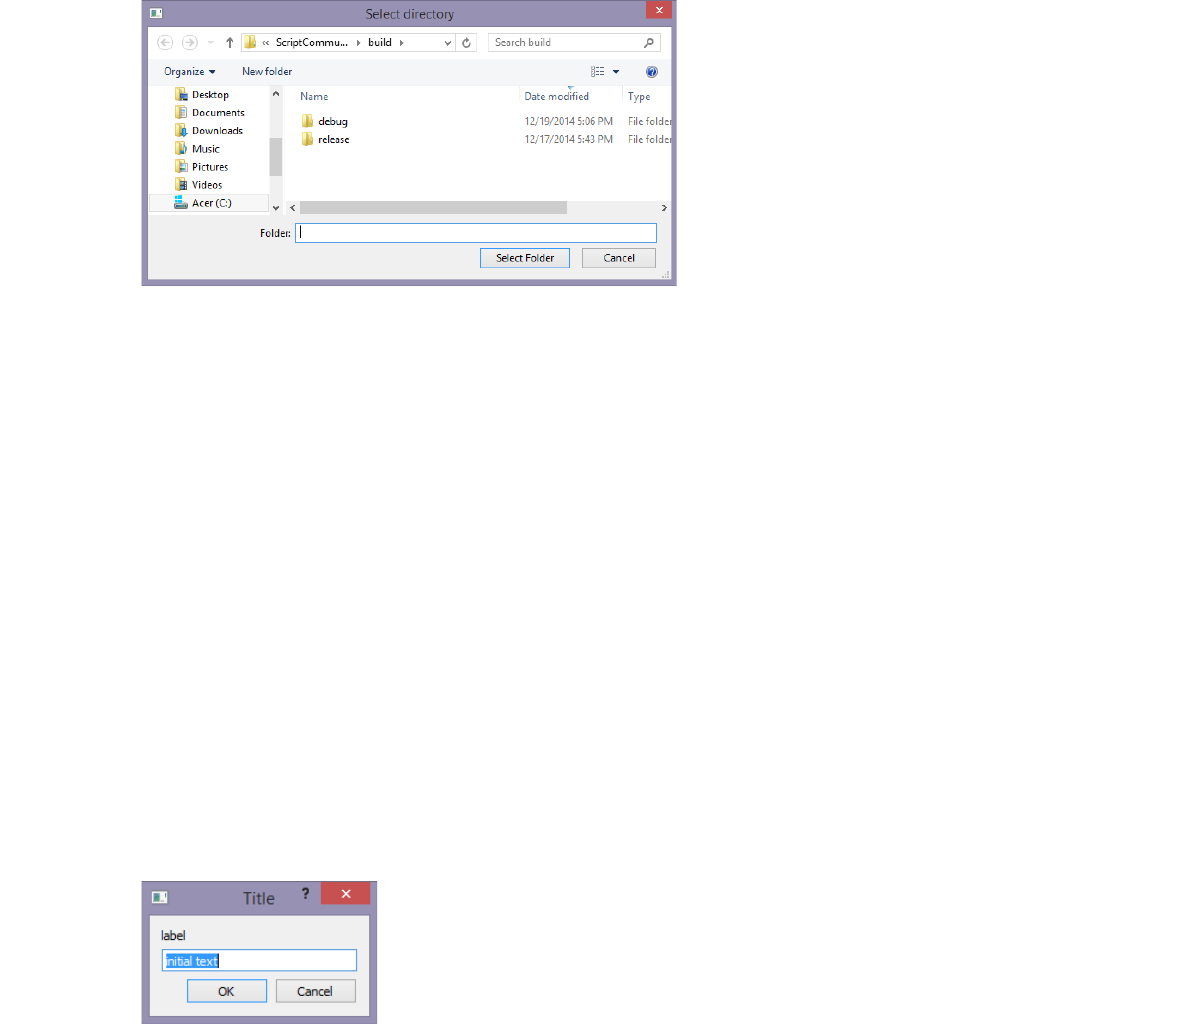
String showTextInputDialog(String title, String label, String displayedText="", QWidget*
parent=0)
Convenience function to get a string from the user. Shows a QInputDialog::getText dialog (line edit).
Arguments:
title: The title of the dialog
label: The label over the input area
displayedText: The initial displayed text in the input area
parent: The parent of this dialog (see chapter QWidget* getWidgetPointer(void) for more
details)
Return: The text in the input section after closing the dialog (empty if the ok button was not
pressed).
Example:
var input = scriptThread.showTextInputDialog("Title", "label", "initial text");
if(input != "")
{
scriptThread.appendTextToConsole("ok button pressed: input=" + input);
}
else
{
scriptThread.appendTextToConsole("ok button not pressed or empty input");
}
String showMultiLineTextInputDialog(String title, String label, String displayedText="",
QWidget* parent=0)
Convenience function to get a multiline string from the user. Shows a QInputDialog::getMultiLineText
dialog (plain text edit).
Arguments:
title: The title of the dialog
label: The label over the input area
displayedText: The initial displayed text in the input area
parent: The parent of this dialog (see chapter QWidget* getWidgetPointer(void) for more
details)
Return: The text in the input section after closing the dialog (empty if the ok button was not
pressed).
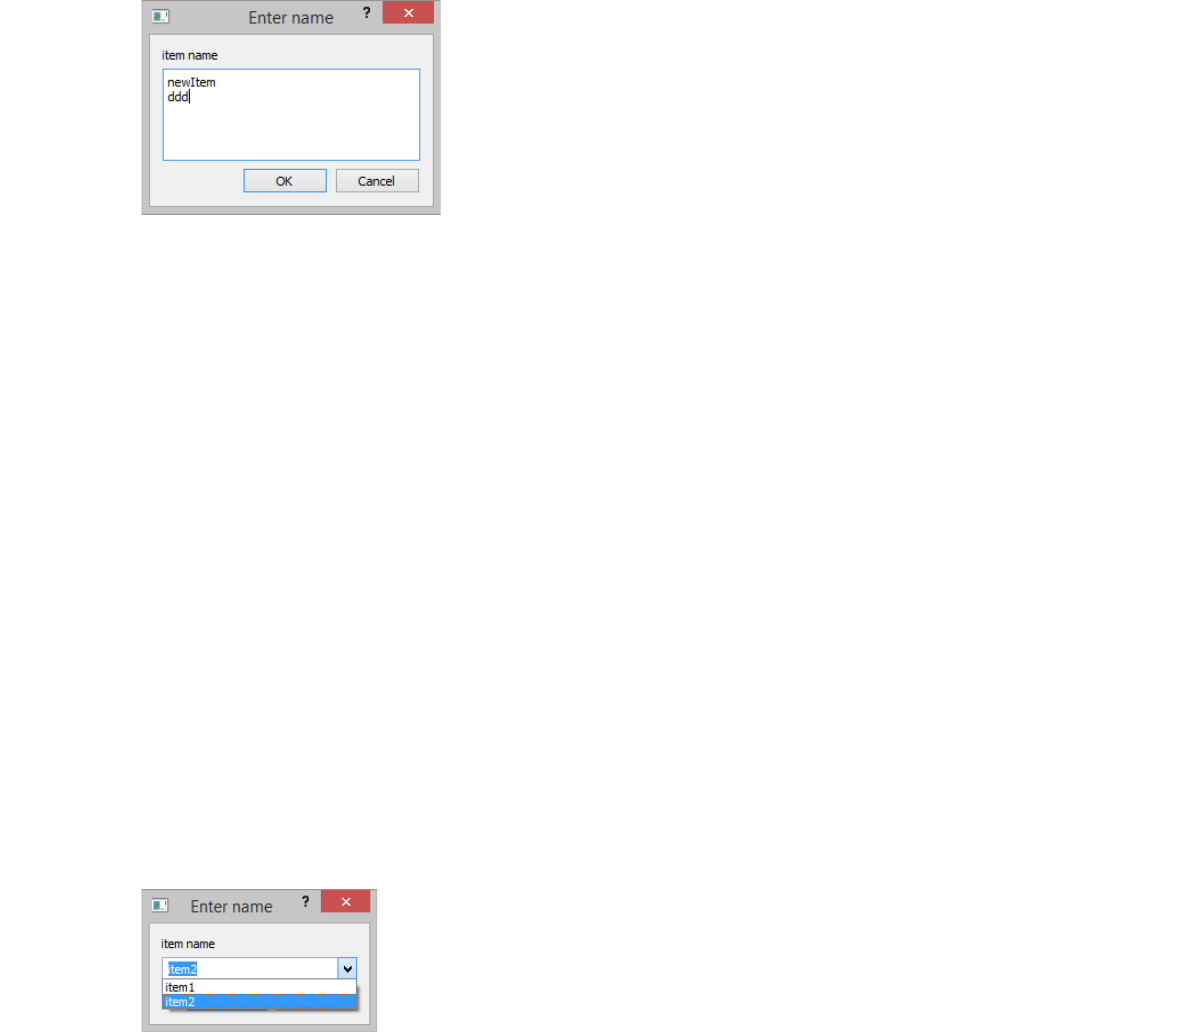
Example:
var input = scriptThread.showMultiLineTextInputDialog("Enter name", "item name", "newItem");
if(input != "")
{
scriptThread.appendTextToConsole("ok button pressed: input=" + input);
}
else
{
scriptThread.appendTextToConsole("ok button not pressed or empty input");
}
String showGetItemDialog(String title, String label, Array<String> displayedItems, Number
currentItemIndex=0, bool editable=false, QWidget* parent=0)
Convenience function to let the user select an item from a string list. Shows a QInputDialog::getItem
dialog (combobox).
Arguments:
title: The title of the dialog
label: The label over the input area
displayedItems: The displayed items
currentItemIndex: The current combobox index
editable: True if the combobox shall be editable
parent: The parent of this dialog (see chapter QWidget* getWidgetPointer(void) for more
details)
Return: The text of the selected item after closing the dialog (empty if the ok button was not
pressed).
Example:
var input = scriptThread.showGetItemDialog("Enter name", "item name", Array("item1", "item2"), 1, true);
if(input != "")
{
scriptThread.appendTextToConsole("ok button pressed: input=" + input);
}
else
{
scriptThread.appendTextToConsole("ok button not pressed or empty input");
}
Array<Number> showGetIntDialog(String title, String label, Number intialValue, Number
min, Number max, Number step, QWidget* parent=0)
Convenience function to get an integer input from the user. Shows a QInputDialog::getInt dialog
(spinbox).

Arguments:
title: The title of the dialog
label: The label over the input area
intialValue: The initial value.
min: The minimum value
max: The maximum value.
step: The amount by which the values change as the user presses the arrow buttons to
increment or decrement the value
parent: The parent of this dialog (see chapter QWidget* getWidgetPointer(void) for more
details)
Return:
array item 0: 1 if the ok button has been pressed, 0 otherwise
array item 1: The value of the spinbox after closing the dialog
Example:
var resultArray = scriptThread.showGetIntDialog("Enter value", "value item name", 10, 0, 20, 2);
if(resultArray[0] == 1)
{
scriptThread.appendTextToConsole("ok button pressed: input=" +
resultArray[1]);
}
else
{
scriptThread.appendTextToConsole("ok button not pressed");
}
Array<Number> showGetDoubleDialog(String title, String label, Number intialValue,
Number min, Number max, Number decimals, QWidget* parent=0)
Convenience function to get a floating point number from the user. Shows a
QInputDialog::getDouble dialog (spinbox).
Arguments:
title: The title of the dialog
label: The label over the input area
intialValue: The initial value.
min: The minimum value
max: The maximum value.
decimals: The maximum number of decimal places the number may have
parent: The parent of this dialog (see chapter QWidget* getWidgetPointer(void) for more
details)
Return:
array item 0: 1.0 if the ok button has been pressed, 0 otherwise
array item 1: The value of the spinbox after closing the dialog
Example:
var resultArray = scriptThread.showGetDoubleDialog("Enter value", "value", 10, 0, 20, 2);
if(resultArray[0] >= 1.0)
{
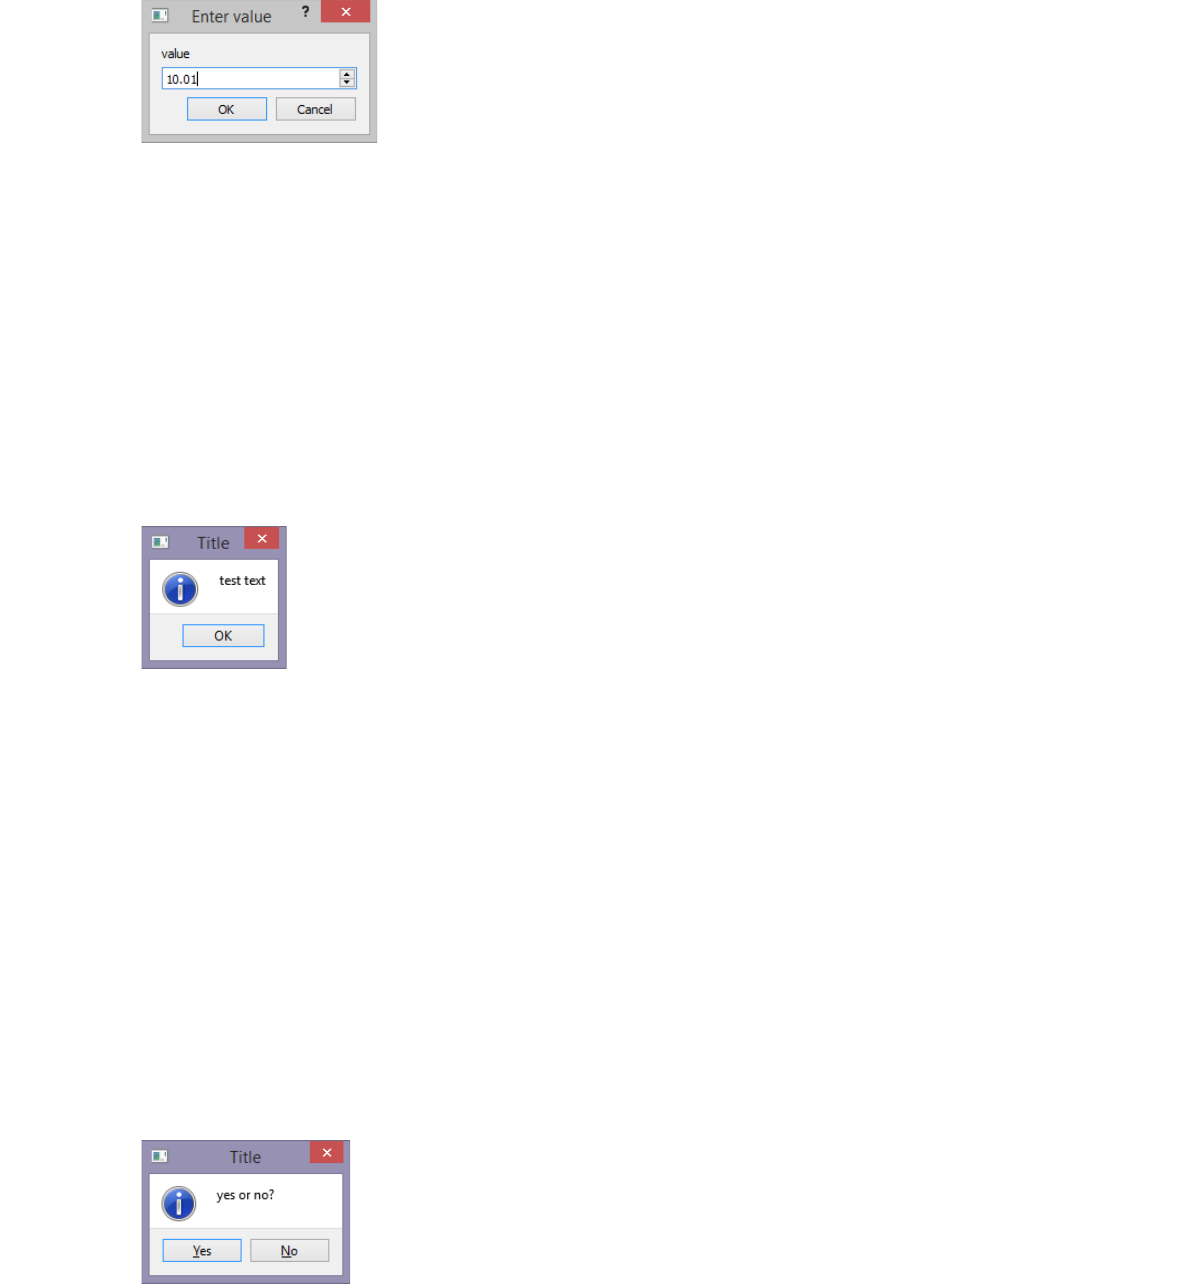
scriptThread.appendTextToConsole("ok button pressed: input=" +
resultArray[1]);
}
else
{
scriptThread.appendTextToConsole("ok button not pressed");
}
void messageBox(String icon, String title, String text, QWidget* parent=0)
This function shows a message box.
Arguments:
icon: The icon of the message box. Possible values are: "Information"," Warning", "Critical"
and "Question"
title: The title of the message box
text: The text of the message box
parent: The parent of this dialog (see chapter QWidget* getWidgetPointer(void) for more
details)
Example:
scriptThread.messageBox("Information", "Title", "test text");
bool showYesNoDialog(String icon, String title, String text, QWidget* parent=0)
This function shows a yes/no dialog.
Arguments:
icon: The icon of the dialog. Possible values are: "Information"," Warning", "Critical" and
"Question"
title: The title of the dialog
text: The text of the dialog
parent: The parent of this dialog (see chapter QWidget* getWidgetPointer(void) for more
details)
Return: True if the user has pressed the yes button
Example:
if(scriptThread.showYesNoDialog("Information", "Title", "yes or no?"))
{//Yes clicked.
//Do something.
}
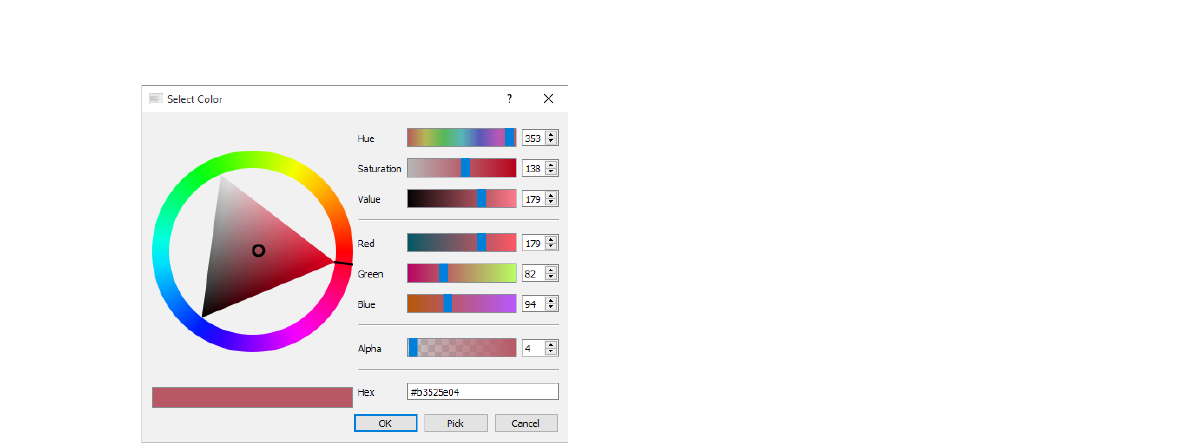
Array<Number> showColorDialog(Number initialRed=255, Number initialGreen=255,
Number initialBlue=255, Number initialAlpha=255, bool alphaIsEnabled=false, QWidget*
parent=0)
Convenience function to get color settings from the user.
Arguments:
initialRed: The initial value for red
initialGreen: The initial value for green
initialBlue: The initial value for blue
initialAlpha: The initial value for alpha
alphaIsEnabled: True if the alpha value should be visible/editable
parent: The parent of this dialog (see chapter QWidget* getWidgetPointer(void) for more
details)
Return: integer list which contains:
element 0: 1 = OK button press, 0 OK button not pressed
element 1: red (0-255)
element 2: green (0-255)
element 3: blue (0-255)
element 4: alpha (0-255)
Example:
var resultArray = scriptThread.showColorDialog(1,2,3,4,true);
var data = Array();
if(resultArray[0])
{//OK clicked.
data.push(resultArray[1]); //Red
data.push(resultArray[2]); //Green
data.push(resultArray[3]); //Blue
data.push(resultArray[4]); //Alpha
}
Filesystem
Worker scripts can access the file system with the scriptFile object. The functions of the scriptFile
object are described in the following chapters.
bool checkFileExists(String path, bool isRelativePath=true)
Checks if a file exists.

Arguments:
path: The file path
isRelativePath: True if the file path is relative to the current script (which executes this
function)
Return: True if the file exists and false if not
Example:
var result = scriptFile.checkFileExists("Testfile.txt");
String createAbsolutePath(String fileName)
Converts a relative path (relative to the current script) into an absolute path.
Arguments:
fileName: The relative path
Return: The created absolute path
Example:
var absolutePath = scriptFile.createAbsolutePath("TestScript.js");
String getScriptFolder(void)
Returns the folder in which the main script resides.
Example:
var result = scriptFile.getScriptFolder();
Number getFileSize(String path, bool isRelativePath=true)
Returns the size of a file.
Arguments:
path: The file path
isRelativePath: True if the file path is relative to the current script (which executes this
function)
Return: The file size if the file exists, -1 if the file doesn't exists
Example:
var size = scriptFile.getFileSize("Testfile.txt");
String readFile (String path, bool isRelativePath=true, Number startPosition=0, Number
numberOfBytes=-1)
Reads a text file and returns the content.
Arguments:
path: The file path
isRelativePath: True if the file path is relative to the current script (which executes this
function)
startPosition: Start position (the file is read from this position)
numberOfBytes: The number of bytes which shall be read. If numberOfBytes is < 0 then all
bytes from startPosition are read
Return: The file as string
Example:
//Read the complete file.
var string = scriptFile.readFile("Testfile.txt");
//Read 20000 bytes from byte 100.
var string2 = scriptFile.readFile("Testfile2.txt", true, 100, 20000);

Array<Number> readBinaryFile (String path, bool isRelativePath=true, Number
startPosition=0, Number numberOfBytes=-1)
Reads a binary file and returns the content (byte array).
Arguments:
path: The file path
isRelativePath: True if the file path is relative to the current script (which executes this
function)
startPosition: Start position (the file is read from this position)
numberOfBytes: The number of bytes which shall be read. If numberOfBytes is < 0 then all
bytes from startPosition are read
Return: The file as byte array
Example:
//Read the complete file.
var array = scriptFile.readFile("Testfile.bin");
//Read 20000 bytes from byte 100.
var array2 = scriptFile.readFile("Testfile2.bin", true, 100, 20000);
bool writeFile(String path, bool isRelativePath, String content, bool replaceFile, Number
startPosition=-1)
Writes a text file.
Arguments:
path: The file path
isRelativePath: True if the file path is relative to the current script (which executes this
function)
content: The content to write
replaceFile: If replaceFile is true, the existing file will be overwritten, else the content is
appended
startPosition: If replaceFile is false then this is the start position at which the data will be
written. For appending the data at the end of the file startPosition must be < 0.
Return: True on success
Example:
//Replace the file.
var result = scriptFile.writeFile("Testfile.txt", true, "new content", true);
//Append text.
result = scriptFile.writeFile("Testfile.txt", true, "new content", false);
//Write from position 3.
result = scriptFile.writeFile("Testfile.txt", true, "new content", false, 3);
bool writeBinaryFile(String path, bool isRelativePath, Array<Number> content, bool
replaceFile, Number startPosition=-1))
Writes a binary file.
Arguments:
path: The file path
isRelativePath: True if the file path is relative to the current script (which executes this
function)
content: The content to write (byte array)
replaceFile: If replaceFile is true, the existing file is overwritten, else the content is appended
startPosition: If replaceFile is false then this is the start position at which the data will be
written. For appending the data at the end of the file startPosition must be < 0.
Return: True on success

Example:
var array = Array(1,2,3,4,5,6);
//Replace the file.
var result = scriptFile.writeBinaryFile("Testfile.bin", true, array, true);
//Append data.
Result = scriptFile.writeBinaryFile("Testfile.bin", true, array, false);
//Write from position 3.
result = scriptFile.writeBinaryFile("Testfile.bin", true, array, false, 3);
bool deleteFile(String path, bool isRelativePath=true)
Deletes a file.
Arguments:
path: The file path.
isRelativePath: True if the file path is relative to the current script (which executes this
function)
Return: True on success
Example:
var result = scriptFile.deleteFile("Testfile.txt");
bool renameFile(String path, String newName)
Renames a file.
Arguments:
path: The file path.
newName: The new name
Return: True on success
Example:
var result = scriptFile.renameFile("C:/Dir1/TestFile.txt", "C:/Dir1/newName.txt");
Array<String> readDirectory(String directory, bool isRelativePath=true, bool
recursive=true, bool returnFiles=true, bool returnDirectories=true)
Reads the content of a directory and his sub directories.
Arguments:
directory: The directory path
isRelativePath: True if the directory path is relative to the current script (which executes this
function)
recursive: If true the result includes the contents of all sub directories (and their sub
directories)
returnFiles: If true the result contains all found files
returnDirectories: If true the result contains all found directories
Return: The found entries
Example:
var array = scriptFile.readDirectory("TestDir");
bool checkDirectoryExists(String path, bool isRelativePath=true)
Checks if a directory exists.
Arguments:
path: The directory path.
isRelativePath: True if the directory path is relative to the current script (which executes this
function)

Return: True if the directory exists and false if not
Example:
var result = scriptFile.checkDirectoryExists("Testdirectory");
bool deleteDirectory(String directory, bool isRelativePath=true)
Deletes a directory (must be empty).
Arguments:
directory: The directory path.
isRelativePath: True if the directory path is relative to the current script (which executes this
function)
Return: True on success
Example:
var result = scriptFile.deletedirectory ("Testdir");
bool deleteDirectoryRecursively(String directory, bool isRelativePath=true)
Removes the directory, including all its contents.
If a file or directory cannot be removed, deleteDirectoryRecursively() keeps going and attempts
to delete as many files and sub-directories as possible, then returns false.
If the directory was already removed, the method returns true (expected result already reached).
Arguments:
directory: The directory path.
isRelativePath: True if the directory path is relative to the current script (which executes this
function)
Return: True on success
Example:
var result = scriptFile.deleteDirectoryRecursively ("Testdir");
bool createDirectory(String path, bool isRelativePath=true)
Creates a directory.
Arguments:
path: The directory path.
isRelativePath: True if the directory path is relative to the current script (which executes this
function)
Return: True on success
Example:
var result = scriptFile.createDirectory("Testdirectory");
bool renameDirectory(String path, String newName)
Renames a directory.
Arguments:
path: The directory path.
newName: The new name (always relative path)
Return: True on success:
Example:
var result = scriptFile.renameDirectory("C:/Dir1/Testdirectory", "C:/Dir1/newName");
bool zipDirectory(String fileName, String sourceDirName, String comment="")
Zips a directory.
Arguments:

fileName: The zip file name.
sourceDirName: The source directory.
comment: The zip file comment.
Return: True on success:
Example:
var result = scriptFile.zipDirectory("C:/Dir1/Test.zip", "C:/Dir1/SourceDir");
bool zipFiles(String fileName, Array<String> fileList, String comment="")
Adds files to a zip file.
Arguments:
fileName: The zip file name.
fileList: Contains all files. An entry consists of a string pair. The first entry of this pair is the
source file name (including the absolute file path) and the second is the file name inside the
zip file (including the relative path) .
comment: The zip file comment.
Return: True on success:
Example:
var fileList = Array();
fileList[0] = Array("C:/file1", "file1");
fileList[1] = Array("C:/file2", "dir1/file2");
fileList[2] = Array("C:/file3", "dir2/dir/file3");
var result = scriptFile.zipFiles("C:/ZipFile.zip", fileList);
bool extractZipFile(String fileName, String destinationDirectory)
Extracts a zip file.
Arguments:
fileName: The zip file name.
destinationDirectory: The destination directory.
Return: True on success:
Example:
var result = scriptFile.extractZipFile("C:/Dir1/Test.zip", "C:/Dir1/DestDir");
SQL support
Worker scripts can access SQL databases. The Qt SQL classes are nearly 1:1 available in
ScriptCommunicator. The documentation of the Qt SQL classes can be found here:
http://doc.qt.io/qt-5.5/qsqldatabase.html. The differences are described below.
Static QSqlDatabase function
All static QSqlDatabase function are available via the scriptSql Object. Example:
var db = scriptSql.addDatabase("QSQLITE");
Creating objects
For creating SQL related Objects the scriptSql Object has following functions:
•QSqlQuery createQuery(QSqlDatabase dataBase, String query = "")
•QSqlField createField()
•QSqlRecord createRecord()
Examples of creating SQL related Objects can be found under:
•exampleScripts\WorkerScripts\TestSql

Not supported functions
Following functions are not supported:
•QSqlDriver* QSqlDatabase::driver()
•void QsqlDatabase::registerSqlDriver(const String &name, QSqlDriverCreatorBase *creator)
•QSqlDatabase QSqlDatabase::addDatabase(QSqlDriver* driver, const String&
connectionName = QLatin1String(defaultConnection))
•QsqlDriver* QSqlQuery::driver()
•QsqlResult* QsqlQuery::result()
Mapping of SQL related enumerations
The enumeration are wrapped in quint32 values. These values can be found at the Qt SQL class
descriptions. Example:
var db = scriptSql.addDatabase("QSQLITE");
//Set the numerical precision policy to QSql::LowPrecisionInt32.
db.setNumericalPrecisionPolicy(0x1);
SQL example scripts
Examples scripts which demonstrates the usage of the SQL script functionalities can be found under:
•exampleScripts\WorkerScripts\TestSql
XML support
Worker scripts can access XML files with the ScriptXmlReader and the ScriptXmlWriter classes. This 2
classes contain a subset of the Qt XML functionality.
Note: Example scripts which demonstrate the usage of the XML script classes class can be found
under exampleScripts/WorkerScripts/TestXml.
To create an object of this classes following functions must be used:
ScriptXmlReader* createXmlReader(void)
Creates an XML reader.
Example:
var reader = cust.createXmlReader();
ScriptXmlWriter* createXmlWriter(void)
Creates an XML writer.
Example:
var writer = cust.createXmlWriter();
ScriptXmlReader
Class for reading a xml file.
Number readFile(String fileName, bool isRelativePath=true)
Reads and parses a xml file. The parsed xml file is stored internally.
Arguments:
fileName: The name of the xml file.

isRelativePath: True if the file path is relative to the main script.
Return:
0: success
1: file could not be opened
2: parse error
Array<ScriptXmlElement*> elementsByTagName(String name)
Returns a list containing all xml elements with the name 'name'.
Note: The xml root element is not included.
Arguments:
name: The name of the xml elements.
Return: A list containing all xml elements.
ScriptXmlElement *getRootElement(void)
Returns the root XML element.
ScriptXmlElement
This class represents an XML element.
String elementName(void)
Returns the name of this element.
Array<ScriptXmlElement*> childElements(void)
Returns all child elements.
Array<String> childTextElements(void)
Returns all child text elements (includes the CDATA elements).
Array<String> childCDataElements(void)
Returns all child CDATA elements.
Array<String> childCommentElements(void)
Returns all child comment elements.
String attributeValue(String attrName)
Returns an attribute value. The attribute is identified by attrName.
Array<ScriptDomAttribute*> attributes(void)
Returns all attributes of this element.
ScriptXmlAttribute
This class represents a xml attributte.
String value(void)
Returns the value of the attribute.
String name(void)
Returns the name of the attribute.

ScriptXmlWriter
This class provides functions for creating/writing XML files.
Note: All function are working on an internal XML buffer.
The function writteBufferToFile must be used to write the content of the internal XML buffer
to a file.
bool writeBufferToFile(String fileName, bool isRelativePath=true)
Writes the internal XML Buffer to a file.
Arguments:
fileName: The name of the xml file.
isRelativePath: True if the file path is relative to the main script.
Return: True on success.
String getInternalBuffer(void)
Returns the content of the internal buffer.
String clearInternalBuffer(void)
Clears the internal buffer.
void setCodec(String codecName)
Sets the codec for the XML writer to codec. The codec is used for encoding any data that is written.
By default, ScriptXmlWriter uses UTF-8. The encoding information is stored in the initial XML tag
which gets written when you call writeStartDocument(). Call this function before calling
writeStartDocument().
Note: Common values for codecName are "ISO 8859-1", "UTF-8", and "UTF-16". If the encoding
isn't recognized, nothing happens.
Arguments:
codecName: The name of the codec.
void setAutoFormatting(bool autoFormatting)
Sets the autoFormatting property. This property controls whether or not the stream writer
automatically formats the generated XML data. If enabled, the writer automatically adds line-breaks
and indentation to empty sections between elements (ignorable whitespace). The main purpose of
auto-formatting is to split the data into several lines, and to increase readability for a human reader.
The indentation depth can be controlled through the autoFormattingIndent property.
Arguments:
autoFormatting: The new value.
bool autoFormatting(void)
Returns the value of the autoFormating property.
void setAutoFormattingIndent(Number spacesOrTabs)
Set the autoFormatingIndent property. This property holds the number of spaces or tabs used for
indentation when auto-formatting is enabled. Positive numbers indicate spaces, negative numbers
tabs.
Arguments:
spacesOrTabs: The new value.

Number autoFormattingIndent(void)
Returns the autoFormatingIndent property.
void writeStartDocument(String version="1.0")
Writes a document start with the attribute version.
Arguments:
version: The XML version.
void writeStartDocument(bool standalone, String version="1.0")
Writes a document start with the attributes version and standalone.
Arguments:
standalone: True if the standalone attributes shall be written.
version: The XML version.
void writeEndDocument(void)
Closes all remaining open start elements and writes a newline.
void writeNamespace(String namespaceUri, String prefix = "")
Writes a namespace declaration for namespaceUri with prefix. If prefix is empty, ScriptXmlWriter
assigns a unique prefix consisting of the letter 'n' followed by a number. If writeStartElement() or
writeEmptyElement() was called, the declaration applies to the current element; otherwise it applies
to the next child element.
Note that the prefix xml is both predefined and reserved for
http://www.w3.org/XML/1998/namespace, which in turn cannot be bound to any other prefix. The
prefix xmlns and its URI http://www.w3.org/2000/xmlns/ are used for the namespace mechanism
itself and thus completely forbidden in declarations.
Arguments:
namespaceUri: The namespace URI.
prefix: The prefix.
void writeDefaultNamespace(String namespaceUri)
Writes a default namespace declaration for namespaceUri. If writeStartElement() or
writeEmptyElement() was called, the declaration applies to the current element; otherwise it applies
to the next child element.
Note that the namespaces http://www.w3.org/XML/1998/namespace (bound to xmlns) and
http://www.w3.org/2000/xmlns/ (bound to xml) by definition cannot be declared as default.
Arguments:
namespaceUri: The namespace URI.
void writeStartElement(String name, String namespaceUri="")
Writes a start element with name, prefixed for the specified namespaceUri. If the namespace has not
been declared yet, ScriptXmlWriter will generate a namespace declaration for it. Subsequent calls to
writeAttribute() will add attributes to this element.
Arguments:
name: The name of the element.
namespaceUri: The namespace URI.

void writeEmptyElement(String name, String namespaceUri="")
Writes an empty element with name, prefixed for the specified namespaceUri. If the namespace has
not been declared, ScriptXmlWriter will generate a namespace declaration for it. Subsequent calls to
writeAttribute() will add attributes to this element.
Arguments:
name: The name of the element.
namespaceUri: The namespace URI.
void writeTextElement(String name, String text, String namespaceUri="")
Writes a text element with name, prefixed for the specified namespaceUri, and text. If the
namespace has not been declared, ScriptXmlWriter will generate a namespace declaration for it.
This is a convenience function equivalent to:
writeStartElement(name, namespaceUri);
writeCharacters(text);
writeEndElement();
Arguments:
name: The name of the element.
text: The text.
namespaceUri: The namespace URI.
void writeEndElement(void)
Closes the previous start element.
void writeAttribute(String name, String value,String namespaceUri="")
Writes an attribute with name and value, prefixed for the specified namespaceUri. If the namespace
has not been declared yet, ScriptXmlWriter will generate a namespace declaration for it. This
function can only be called after writeStartElement() or writeEmptyElement() have been called.
Arguments:
name: The name of the attribute.
value: The value of the attribute.
namespaceUri: The namespace URI.
void writeCDATA(String text)
Writes text as CDATA section. If text contains the forbidden character sequence "]]>", it is split into
different CDATA sections.This function mainly exists for completeness. Normally you should not need
use it, because writeCharacters() automatically escapes all non-content characters.
void writeCharacters(String text)
Writes text. The characters "<", "&", and """ are escaped as entity references "<", "&, and
""". To avoid the forbidden sequence "]]>", ">" is also escaped as ">".
void writeComment(String text)
Writes text as XML comment, where text must not contain the forbidden sequence "--" or end with
"-". Note that XML does not provide any way to escape "-" in a comment.
void writeDTD(String dtd)
Writes a DTD section. The dtd represents the entire doctypedecl production from the XML 1.0
specification.

void writeEntityReference(String name)
Writes the entity reference name to the internal buffer, as "name;".
void writeProcessingInstruction(String target, String data = "")
Writes an XML processing instruction with target and data, where data must not contain the
sequence "?>".
Arguments:
target: The target
data: The data.
CRC functions
The following functions can be used to create various CRC's.
Number calculateCrc8(Array<Number> data)
Calculates a CRC8.
Arguments:
data: The data for calculating the CRC
Return: The CRC
Example:
var dataArray = Array(0, 1, 2, 3, 4, 5, 6, 7)
var crc = scriptThread.calculateCrc8(dataArray);
Following code is used to calculate the CRC8:
quint8 ScriptThread::calculateCrc8(Array<unsigned char> data)
{
static const quint8 crc8Table[] = {
0x00, 0x3e, 0x7c, 0x42, 0xf8, 0xc6, 0x84, 0xba, 0x95, 0xab, 0xe9, 0xd7,
0x6d, 0x53, 0x11, 0x2f, 0x4f, 0x71, 0x33, 0x0d, 0xb7, 0x89, 0xcb, 0xf5,
0xda, 0xe4, 0xa6, 0x98, 0x22, 0x1c, 0x5e, 0x60, 0x9e, 0xa0, 0xe2, 0xdc,
0x66, 0x58, 0x1a, 0x24, 0x0b, 0x35, 0x77, 0x49, 0xf3, 0xcd, 0x8f, 0xb1,
0xd1, 0xef, 0xad, 0x93, 0x29, 0x17, 0x55, 0x6b, 0x44, 0x7a, 0x38, 0x06,
0xbc, 0x82, 0xc0, 0xfe, 0x59, 0x67, 0x25, 0x1b, 0xa1, 0x9f, 0xdd, 0xe3,
0xcc, 0xf2, 0xb0, 0x8e, 0x34, 0x0a, 0x48, 0x76, 0x16, 0x28, 0x6a, 0x54,
0xee, 0xd0, 0x92, 0xac, 0x83, 0xbd, 0xff, 0xc1, 0x7b, 0x45, 0x07, 0x39,
0xc7, 0xf9, 0xbb, 0x85, 0x3f, 0x01, 0x43, 0x7d, 0x52, 0x6c, 0x2e, 0x10,
0xaa, 0x94, 0xd6, 0xe8, 0x88, 0xb6, 0xf4, 0xca, 0x70, 0x4e, 0x0c, 0x32,
0x1d, 0x23, 0x61, 0x5f, 0xe5, 0xdb, 0x99, 0xa7, 0xb2, 0x8c, 0xce, 0xf0,
0x4a, 0x74, 0x36, 0x08, 0x27, 0x19, 0x5b, 0x65, 0xdf, 0xe1, 0xa3, 0x9d,
0xfd, 0xc3, 0x81, 0xbf, 0x05, 0x3b, 0x79, 0x47, 0x68, 0x56, 0x14, 0x2a,
0x90, 0xae, 0xec, 0xd2, 0x2c, 0x12, 0x50, 0x6e, 0xd4, 0xea, 0xa8, 0x96,
0xb9, 0x87, 0xc5, 0xfb, 0x41, 0x7f, 0x3d, 0x03, 0x63, 0x5d, 0x1f, 0x21,
0x9b, 0xa5, 0xe7, 0xd9, 0xf6, 0xc8, 0x8a, 0xb4, 0x0e, 0x30, 0x72, 0x4c,
0xeb, 0xd5, 0x97, 0xa9, 0x13, 0x2d, 0x6f, 0x51, 0x7e, 0x40, 0x02, 0x3c,
0x86, 0xb8, 0xfa, 0xc4, 0xa4, 0x9a, 0xd8, 0xe6, 0x5c, 0x62, 0x20, 0x1e,
0x31, 0x0f, 0x4d, 0x73, 0xc9, 0xf7, 0xb5, 0x8b, 0x75, 0x4b, 0x09, 0x37,
0x8d, 0xb3, 0xf1, 0xcf, 0xe0, 0xde, 0x9c, 0xa2, 0x18, 0x26, 0x64, 0x5a,
0x3a, 0x04, 0x46, 0x78, 0xc2, 0xfc, 0xbe, 0x80, 0xaf, 0x91, 0xd3, 0xed,
0x57, 0x69, 0x2b, 0x15};
quint8 crc = 0xff;
for (auto val : data)
{
crc = crc8Table[(crc ^ val) & 0xff];
}
crc = ~crc;
return crc;
}

Number calculateCrc8WithPolynomial(Array<Number> data, Number polynomial, Number
startValue=0)
Calculates a crc8 with a given polynomial.
Arguments:
data: The data (byte array) for calculating the CRC
polynomial: The used polynomial
startValue: The CRC start value
Return: The CRC
Example:
var dataArray = Array(0, 1, 2, 3, 4, 5, 6, 7)
var crc = scriptThread.calculateCrc8WithPolynomial(dataArray);
Following code is used to calculate the CRC8:
quint8 CRC::calculateCrc8(const QVector<unsigned char> data,
const unsigned char polynomial, const unsigned char startValue=0)
{
quint8 crc = startValue;
const qint32 BITS_PER_BYTE = 8;
for( auto val: data )
{
crc = crc ^ val;
for( qint32 i = 0; i < BITS_PER_BYTE; ++i )
{
if( (crc & 0x80) != 0 )
{
crc = ((crc << 1)) ^ polynomial;
}
else
{
crc = (crc << 1);
}
}
}
return crc;
}
Number calculateCrc16(Array<Number> data)
Calculates a CRC16.
Arguments:
data: The data (byte array) for calculating the CRC
Return: The CRC
Example:
var dataArray = Array(0, 1, 2, 3, 4, 5, 6, 7)
var crc = scriptThread.calculateCrc16(dataArray);
Following code is used to calculate the CRC16:
quint16 ScriptThread::calculateCrc16(Array<unsigned char> data)
{
static const quint16 crc16Table[256] =
{
0x0000, 0xC0C1, 0xC181, 0x0140, 0xC301, 0x03C0, 0x0280, 0xC241,
0xC601, 0x06C0, 0x0780, 0xC741, 0x0500, 0xC5C1, 0xC481, 0x0440,
0xCC01, 0x0CC0, 0x0D80, 0xCD41, 0x0F00, 0xCFC1, 0xCE81, 0x0E40,
0x0A00, 0xCAC1, 0xCB81, 0x0B40, 0xC901, 0x09C0, 0x0880, 0xC841,
0xD801, 0x18C0, 0x1980, 0xD941, 0x1B00, 0xDBC1, 0xDA81, 0x1A40,
0x1E00, 0xDEC1, 0xDF81, 0x1F40, 0xDD01, 0x1DC0, 0x1C80, 0xDC41,
0x1400, 0xD4C1, 0xD581, 0x1540, 0xD701, 0x17C0, 0x1680, 0xD641,
0xD201, 0x12C0, 0x1380, 0xD341, 0x1100, 0xD1C1, 0xD081, 0x1040,
0xF001, 0x30C0, 0x3180, 0xF141, 0x3300, 0xF3C1, 0xF281, 0x3240,

0x3600, 0xF6C1, 0xF781, 0x3740, 0xF501, 0x35C0, 0x3480, 0xF441,
0x3C00, 0xFCC1, 0xFD81, 0x3D40, 0xFF01, 0x3FC0, 0x3E80, 0xFE41,
0xFA01, 0x3AC0, 0x3B80, 0xFB41, 0x3900, 0xF9C1, 0xF881, 0x3840,
0x2800, 0xE8C1, 0xE981, 0x2940, 0xEB01, 0x2BC0, 0x2A80, 0xEA41,
0xEE01, 0x2EC0, 0x2F80, 0xEF41, 0x2D00, 0xEDC1, 0xEC81, 0x2C40,
0xE401, 0x24C0, 0x2580, 0xE541, 0x2700, 0xE7C1, 0xE681, 0x2640,
0x2200, 0xE2C1, 0xE381, 0x2340, 0xE101, 0x21C0, 0x2080, 0xE041,
0xA001, 0x60C0, 0x6180, 0xA141, 0x6300, 0xA3C1, 0xA281, 0x6240,
0x6600, 0xA6C1, 0xA781, 0x6740, 0xA501, 0x65C0, 0x6480, 0xA441,
0x6C00, 0xACC1, 0xAD81, 0x6D40, 0xAF01, 0x6FC0, 0x6E80, 0xAE41,
0xAA01, 0x6AC0, 0x6B80, 0xAB41, 0x6900, 0xA9C1, 0xA881, 0x6840,
0x7800, 0xB8C1, 0xB981, 0x7940, 0xBB01, 0x7BC0, 0x7A80, 0xBA41,
0xBE01, 0x7EC0, 0x7F80, 0xBF41, 0x7D00, 0xBDC1, 0xBC81, 0x7C40,
0xB401, 0x74C0, 0x7580, 0xB541, 0x7700, 0xB7C1, 0xB681, 0x7640,
0x7200, 0xB2C1, 0xB381, 0x7340, 0xB101, 0x71C0, 0x7080, 0xB041,
0x5000, 0x90C1, 0x9181, 0x5140, 0x9301, 0x53C0, 0x5280, 0x9241,
0x9601, 0x56C0, 0x5780, 0x9741, 0x5500, 0x95C1, 0x9481, 0x5440,
0x9C01, 0x5CC0, 0x5D80, 0x9D41, 0x5F00, 0x9FC1, 0x9E81, 0x5E40,
0x5A00, 0x9AC1, 0x9B81, 0x5B40, 0x9901, 0x59C0, 0x5880, 0x9841,
0x8801, 0x48C0, 0x4980, 0x8941, 0x4B00, 0x8BC1, 0x8A81, 0x4A40,
0x4E00, 0x8EC1, 0x8F81, 0x4F40, 0x8D01, 0x4DC0, 0x4C80, 0x8C41,
0x4400, 0x84C1, 0x8581, 0x4540, 0x8701, 0x47C0, 0x4680, 0x8641,
0x8201, 0x42C0, 0x4380, 0x8341, 0x4100, 0x81C1, 0x8081, 0x4040 };
quint16 crc = 0xFFFF;
for (auto val : data)
{
crc = (crc >> 8) ^ crc16Table[(crc ^ val) & 0xff];
}
crc = ~crc;
return crc;
}
Number calculateCrc32(Array<Number> data)
Calculates a CRC32.
Arguments:
data: The data (byte array) for calculating the CRC
Return: The CRC
Example:
var dataArray = Array(0, 1, 2, 3, 4, 5, 6, 7)
var crc = scriptThread.calculateCrc32(dataArray);
Following code is used to calculate the CRC32:
quint32 ScriptThread::calculateCrc32(Array<unsigned char> data)
{
static bool crc32TableCreated = false;
static quint32 crc32Table[256];
if(!crc32TableCreated)
{
const quint32 CRCPOLY = 0xEDB88320;
quint32 value;
for (quint32 i = 0; i < 256; i++)
{
value = i;
for (int j = 8; j > 0; j--)
{
if (value & 1)
{
value = (value >> 1) ^ CRCPOLY;
}
else
{
value >>= 1;
}
}
crc32Table[i] = value;
}

crc32TableCreated = true;
}
quint32 crc = 0xFFFFFFFF;
for (auto val : data)
{
crc = crc32Table[(crc ^ val) & 0xFF] ^ (crc >> 8);
}
crc = ~crc;
return crc;
}
Number calculateCrc64(Array<Number> data)
Calculates a CRC64.
Arguments:
data: The data (byte array) for calculating the CRC
Return: The CRC
Example:
var dataArray = Array(0, 1, 2, 3, 4, 5, 6, 7)
var crc = scriptThread.calculateCrc64(dataArray);
Following code is used to calculate the CRC64:
quint64 ScriptThread::calculateCrc64(Array<unsigned char> data)
{
static bool crc64TableCreated = false;
static quint64 crc64Table[256];
if(!crc64TableCreated)
{
const quint64 CRCPOLY = 0x42F0E1EBA9EA3693;
quint64 value;
for (quint32 i = 0; i < 256; i++)
{
value = i;
for (int j = 8; j > 0; j--)
{
if (value & 1)
{
value = (value >> 1) ^ CRCPOLY;
}
else
{
value >>= 1;
}
}
crc64Table[i] = value;
}
crc64TableCreated = true;
}
quint64 crc = 0;
for (auto val : data)
{
crc = crc64Table[(crc ^ val) & 0xFF] ^ (crc >> 8);
}
crc = ~crc;
return crc;
}
Inter-WorkerScript communication
The following functions can be used to share variables between single worker scripts (these variable
are stored in ScriptCommunicator global worker script maps).

Under exampleScripts\WorkerScripts\InterWorkerScriptDataExchange an example of Inter-
WorkerScript communication can be found.
void setGlobalString(String name, String string)
Sets a string in the global string map.
Arguments:
name: Name of the string variable
string: The string
String getGlobalString(String name, bool removeValue=false)
Returns a string from the global string map.
Arguments:
name: Name of the variable
removeValue: True if the variable shall be removed from the string map
Return: The read string. Returns an empty string if name is not in the string map.
void globalStringChangedSignal(String name, String string)
This signal is emitted if a string in the global string map has been changed.
Arguments:
name: Name of the variable
string: The content of the string
void setGlobalDataArray(String name, Array<Number> data)
Sets a data (byte) array in the global data array map.
Arguments:
name: Name of the variable
data: The data (byte) array
Array<Number> getGlobalDataArray(String name, bool removeValue=false)
Returns a data (byte) array from the global data array map.
Arguments:
name: Name of the variable
removeValue: True if the variable shall be removed from the data array map
Return: The read data (byte) array. Returns an empty data array if name is not in the data array map.
void globalDataArrayChangedSignal(String name, Array<Number> data)
This signal is emitted if a data vector in the global string data vector has been changed.
Arguments:
name: Name of the variable
data: The content of data (byte) array
void setGlobalUnsignedNumber(String name, Number number)
Sets an unsigned number in the global unsigned number map.
Arguments:
name: Name of the variable
number: The number

Array<Number> getGlobalUnsignedNumber(String name, bool removeValue=false)
Returns an unsigned number from the global unsigned number map.
Arguments:
name: Name of the variable
removeValue: True if the variable shall be removed from the unsigned number map
Return: The first element in the result list is the result status (1=name found, 0=name not found). The
second element is the read value.
Example:
//Read the stored value
var resultArray = scriptThread.getGlobalUnsignedNumber("U_Number");
if(resultArray[0] == 1)
{
scriptThread.appendTextToConsole("unumber: " + resultArray[1]);
}
void globalUnsignedChangedSignal(String name, Number number)
This signal is emitted if an unsigned number in the global unsigned number map has been changed.
Arguments:
name: Name of the variable
number: The value of the variable
void setGlobalSignedNumber(String name, Number number)
Sets an unsigned number in the global signed number map.
Arguments:
name: Name of the variable
number: The number
Array<Number> getGlobalSignedNumber(String name, bool removeValue=false)
Returns an unsigned number from the global signed number map.
Arguments:
name: Name of the variable
removeValue: True if the variable shall be removed from the signed number map
Return: The first element in the result list is the result status (1=name found, 0=name not found). The
second element is the read value.
Example:
//Read the stored value
var resultArray = scriptThread.getGlobalSignedNumber("S_Number");
if(resultArray[0] == 1)
{
scriptThread.appendTextToConsole("snumber: " + resultArray[1]);
}
void globalUnsignedChangedSignal(String name, Number number)
This signal is emitted if a signed number in the global signed number map has been changed.
Arguments:
name: Name of the variable
number: The value of the variable
void setGlobalRealNumber(String name, Number number)
Sets a real number in the global real number map.

Arguments:
name: Name of the variable
number: The number
Array<Number> getGlobalRealNumber(String name, bool removeValue=false)
Returns a real number from the global real number map.
Arguments:
name: Name of the variable
removeValue: True if the variable shall be removed from the real number map
Return: The first element in the result list is the result status (1.0=name found, 0.0=name not found).
The second element is the read value.
Example:
//Read the stored value
var resultArray = scriptThread.getGlobalRealNumber("R_Number");
if(resultArray[0] == 1.0)
{
scriptThread.appendTextToConsole("rnumber: " + resultArray[1]);
}
void globalRealChangedSignal(String name, Number number)
This signal is emitted if a real number in the global real number map has been changed.
Arguments:
name: Name of the variable
number: The value of the variable
Process
This chapter contains process related functions.
bool createProcessDetached(String program, Array<String> arguments, String
workingDirectory)
Starts a program with the given arguments in a new process, and detaches from it. Returns true on
success, otherwise returns false. If the calling process exits, the detached process will continue to run
unaffected. The process will be started in the directory workingDirectory. If workingDirectory is
empty, the working directory is inherited from the calling process.
Arguments:
program: The program to start
arguments: The arguments
workingDirectory: The working directory.
Return: True on success
Example:
var arguments = Array("D:/stylers.xml","D:/session.xml");
scriptThread.createProcessDetached("D:/notepad.exe", arguments,"");
Number createProcess (String program, Array<String> arguments)
Starts a program with the given arguments in a new process, waits for it to finish, and then returns
the exit code of the process. The environment and working directory are inherited from the calling
process.
Arguments:
program: The program to start

arguments: The arguments
Return: True on success
Example:
var arguments = Array("D:/stylers.xml","D:/session.xml");
var result = scriptThread.createProcess("D:/notepad.exe", arguments);
ScriptProcess createProcessAsynchronous(String program, Array<String> arguments,
Number startWaitTime=30000, String workingDirectory="")
Starts the program program with the arguments arguments in a new process. Any data the new
process writes to the console is forwarded to the return process object. The environment and
working directory are inherited from the calling process.
Note: Blocks until the process has been created or until startWaitTime milliseconds have passed (-
1=infinite).
Arguments:
program: The program to start
arguments: The arguments
startWaitTime: The max. wait time.
workingDirectory: The working directory. If empty then the working directory of the process
is set the ScriptCommunicator directory.
Return: The created process on success. An invalid object on failure.
Example:
var arguments = Array("D:/stylers.xml","D:/session.xml");
var process = scriptThread.createProcessAsynchronous("D:/notepad.exe", arguments);
if(typeof process == 'undefined')
{
scriptThread.appendTextToConsole("could not start: D:/notepad.exe");
}
else
{
scriptThread.waitForFinishedProcess(process);
}
bool waitForFinishedProcess(ScriptProcess process, Number waitTime=30000)
Blocks until the process has finished or until msecs milliseconds have passed (-1=infinite).
Arguments:
process: The process
waitTime: The max. wait time.
Return: True if the process is finished.
Number getProcessExitCode(ScriptProcess process)
Returns the exit code of process.
Arguments:
process: The process
Return: The process exit code.
void killProcess(ScriptProcess process)
Kills the current process, causing it to exit immediately.
Arguments:
process: The process

void terminateProcess(ScriptProcess process)
Attempts to terminate the process. The process may not exit as a result of calling this function (it is
given the chance to prompt the user for any unsaved files, etc).
Arguments:
process: The process
bool writeToProcessStdin(ScriptProcess process, Array<Number> data, Number
waitTime=30000)
Writes data (byte array) to the standard input of process. Returns true on success.
Note: Blocks until the writing is finished or until msecs milliseconds have passed (-1=infinite).
Arguments:
program: The program to start
data: The data (byte array)
waitTime: The max. wait time.
Return: True on success.
Example:
var arguments = Array("D:/stylers.xml","D:/session.xml");
var process = scriptThread.createProcessAsynchronous("D:/notepad.exe", arguments);
if(typeof process == 'undefined')
{
scriptThread.appendTextToConsole("could not start: D:/notepad.exe");
}
else
{
var data = scriptThread.stringToArray("test standard in\n");
scriptThread.writeToProcessStdin(process, data);
}
bool processIsRunning(ScriptProcess process)
Returns true if the process is running.
Arguments:
program: The program to start
Array<Number> readAllStandardOutputFromProcess(ScriptProcess process, bool
isBlocking=false, Number blockByte='\n', Number blockTime=30000)
This function returns all data (byte array) available from the standard output of process (can be
called after the process is finished).
Note: If isBlocking is true then this function blocks until the blockByte has been received, blockTime
has elapsed (-1=infinite) or the process has stopped.
Arguments:
program: The program to start
isBlocking: True if this function is blocking.
BlockByte: The block byte.
blockTime: The max. block time.
Return: The read data (byte array).
Example:
var arguments = Array("D:/stylers.xml","D:/session.xml");
var process = scriptThread.createProcessAsynchronous("D:/notepad.exe", arguments);
if(typeof process == 'undefined')
{
scriptThread.appendTextToConsole("could not start: D:/notepad.exe");
}
else
{

if(scriptThread.waitForFinishedProcess(process, 120000))
{
var res = scriptThread.readAllStandardOutputFromProcess(process);
res = conv.byteArrayToString(res).replace("\n", "")
scriptThread.appendTextToConsole("stdout data: " + res);
}
else
{
scriptThread.appendTextToConsole("the process is blocked");
}
}
Array<Number> readAllStandardErrorFromProcess(ScriptProcess process, bool
isBlocking=false, Number blockByte='\n', Number blockTime=30000)
This function returns all data (byte array) available from the standard error of process (can be called
after the process is finished).
Note: If isBlocking is true then this function blocks until the blockByte has been received, blockTime
has elapsed (-1=infinite) or the process has stopped.
Arguments:
program: The program to start.
isBlocking: True if this function is blocking.
BlockByte: The block byte.
blockTime: The max. block time.
Return: The read data (byte array).
Example:
var arguments = Array("D:/stylers.xml","D:/session.xml");
var process = scriptThread.createProcessAsynchronous("D:/notepad.exe", arguments);
if(typeof process == 'undefined')
{
scriptThread.appendTextToConsole("could not start: D:/notepad.exe");
}
else
{
if(scriptThread.waitForFinishedProcess(process, 120000))
{
var res = scriptThread.readAllStandardErrorFromProcess(process);
res = conv.byteArrayToString(res).replace("\n", "")
scriptThread.appendTextToConsole("stderr data: " + res);
}
else
{
scriptThread.appendTextToConsole("the process is blocked");
}
}
Miscellaneous
This chapter contains general functions.
Converter functions
The script converter class provides several converter functions. These functions can be accessed with
the conv object (see chapter Script converter object/class).
bool checkScriptCommunicatorVersion(String minVersion)
Checks if the version of ScriptCommunicator is equal/greater then the version in minVersion.
The format of minVersion is: 'major'.'minor' (e.g. 04.11).
Arguments:
minVersion: The minimum version

Array<String> availableSerialPorts(void)
Returns a list with the name of all available serial ports.
Example:
var availablePorts = scriptThread.availableSerialPorts();
for(var i = 0; i < availablePorts.length; i++)
{
UI_serialPortInfoListBox.addItem(availablePorts[i]);
}
bool setScriptState(Number state, String scriptTableEntryName)
Sets the state of a script (running, paused or stopped).
Note: The script must be in the script table (script window) and a script can not set it's own state.
Arguments:
state: The state in which the script shall be switched. Possible value are:
o0: running
o1: paused
o2: stopped
scriptTableEntryName: The name of the script in the script-table (script window).
Return: True if scriptTableEntryName has been found in the script-table and the state has a valid
value.
Example:
scriptThread.setScriptState(0, "send input");//Start the script.
scriptThread.sleepFromScript(3000);
scriptThread.setScriptState(1, "send input");//Pause the script.
scriptThread.sleepFromScript(3000);
scriptThread.setScriptState(2, "send input");//Stop the script.
String getScriptTableName(void)
Returns the script-table (script window) name of the calling script.
void appendTextToConsole(String text, bool newLine=true, bool bringToForeground=false)
This function can be used to append a text to the script window console.
Arguments:
text: The text which has to be appended to the console
newLine: If true then the text will be appended in a new line
bringToForeground: True if the script window shall be on top of all windows
Example:
scriptThread.appendTextToConsole("exception in dataReceivedSlot: " + e);
void sleepFromScript (Number timeMs)
Forces the script thread to sleep for ms milliseconds.
Arguments:
timeMs: The time to sleep in milliseconds
Example:
scriptThread.sleepFromScript(10);
bool scriptShallExit(void)
Returns true if the script shall exit. This can occur if:
•the user has pressed the stop button (main or script window)
•the script has called scriptThread.stopScript()
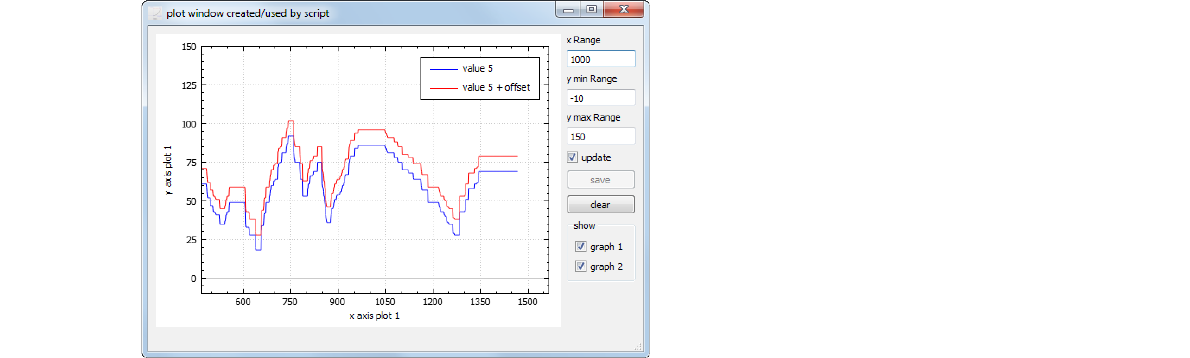
•an uncaught exception has been occurred
QTimer createTimer (void)
Creates a timer object (for more details about the script timer see chapter Script timer class).
Return: The created timer object
Example:
var timer = scriptThread.createTimer();
ScriptPlotWindow createPlotWindow (void)
Creates a plot window object (for more details about the script plot window see chapter Script plot
window class).
Return: The created plot window object
Example:
var plotWindow = scriptThread.createPlotWindow();
bool loadScript(String scriptPath, bool isRelativePath=true)
Loads/includes one script (QtScript has no built-in include mechanism).
Arguments:
scriptPath: The file path
isRelativePath: True if the path of script is relative to current script (which executes this
function)
Return: True on success
Example:
var result = scriptThread.loadScript("Testscript.js");
bool loadLibrary(String path, bool isRelativePath=true)
Loads a dynamic link library and calls the init function (void init(QScriptEngine* engine)).
With this function scripts can extend their functionality. For further information see chapter Dynamic
link libraries.
Arguments:
path: The library file path
isRelativePath: True if the library path is relative to the current script (which executes this
function)
Return: True on success

Example:
var result = scriptThread.loadLibrary("testDll.dll");
bool loadUserInterfaceFile(String path, bool isRelativePath=true, bool showAfterLoading =
true)
Loads a user interface file and shows the GUI.
Arguments:
path: The user interface file path.
isRelativePath: True if the file path is relative to the current script (which executes this
function)
showAfterLoading: True if the first element of the user interface file (normally a window)
shall be shown
Return: True on success
Example:
if(!uiFileLoaded)
{
scriptThread.appendTextToConsole("no ui file in script window, loading file:
guiExample.ui");
uiFileLoaded = scriptThread.loadUserInterfaceFile("guiExample.ui");
}
void stopScript(void)
This function stops the current script.
Example:
if(error)
{
scriptThread.stopScript(scriptThread);
}
Array<String> getLocalIpAdress(void)
Returns all IP addresses (IPv4 and IPv6) found on the host machine (array with strings).
Example:
var ipList = scriptThread.getLocalIpAdress();
for(var i = 0; i < ipList.length; i++)
{
scriptThread.appendTextToConsole(ipList[i])
}
bool showReceivedDataInConsoles(bool show)
Scripts can switch on/off the adding of received data in the main window consoles (for fast data
transfers).
Arguments:
show: True=show received data
Return: The old value (on/off)
bool showTransmitDataInConsoles(bool show)
Scripts can switch on/off the adding of transmitted data in the main window consoles (for fast data
transfers).
Arguments:
show: True=show transmitted data
Return: The old value (on/off)

void addMessageToLogAndConsoles(String text, bool forceTimeStamp=false)
Adds a message into the logs and the main window consoles (if they are active).
Arguments:
text: The message text
forceTimeStamp: True if a time stamp shall be generated (independently from the time
stamp settings)
bool setScriptThreadPriority(String priority)
Sets the priority of the script thread (which executes the current script).
Note: Per default script threads have 'LowestPriority'.
Arguments:
priority: The new priority. Possible values are:
oLowestPriority
oLowPriority
oNormalPriority
oHighPriority
oHighestPriority
Return: True on success.
Example:
scriptThread.setScriptThreadPriority("NormalPriority");
String getCurrentVersion
Returns the current version of ScriptCommunicator (string) .
Version format: major.minor (eg. 3.09)
String exitScriptCommunicator
This function exits ScriptCommunicator.
void setBlockTime(Number blockTime)
Sets the script block time (ms).
Note: If the user presses the stop button the script must be exited after this time. If not then the
script is regarded as blocked and will be terminated. The default is 5000.
String currentCpuArchitecture(void)
Returns the architecture of the CPU that the application is running on, in text format.
Note that this function depends on what the OS will report and may not detect the actual CPU
architecture if the OS hides that information or is unable to provide it. For example, a 32-bit OS
running on a 64-bit CPU is usually unable to determine the CPU is actually capable of running 64-bit
programs.
Values returned by this function are mostly stable: an attempt will be made to ensure that they stay
constant over time and match the values returned by QSysInfo::builldCpuArchitecture(). However,
due to the nature of the operating system functions being used, there may be discrepancies.
Typical returned values are (note: list not exhaustive):
•"arm"
•"arm64"

•"i386"
•"ia64"
•"mips"
•"mips64"
•"power"
•"power64"
•"sparc"
•"sparcv9"
•"x86_64
String productType(void)
Returns the product name of the operating system this application is running in. If the application is
running on some sort of emulation or virtualization layer (such as WINE on a Unix system), this
function will inspect the emulation / virtualization layer.
Values returned by this function are stable and will not change over time, so applications can rely on
the returned value as an identifier, except that new OS types may be added over time.
Linux and Android note: this function returns "android" for Linux systems running Android
userspace, notably when using the Bionic library. For all other Linux systems, regardless of C library
being used, it tries to determine the distribution name and returns that. If determining the
distribution name failed, it returns "unknown".
BlackBerry note: this function returns "blackberry" for QNX systems running the BlackBerry
userspace, but "qnx" for all other QNX-based systems.
Darwin, OS X and iOS note: this function returns "osx" for OS X systems, "ios" for iOS systems and
"darwin" in case the system could not be determined.
FreeBSD note: this function returns "debian" for Debian/kFreeBSD and "unknown" otherwise.
Windows note: this function returns "winphone" for builds for Windows Phone, "winrt" for WinRT
builds, "wince" for Windows CE and Embedded Compact builds, and "windows" for normal desktop
builds.
For other Unix-type systems, this function usually returns "unknown".
String productVersion(void)
Returns the product version of the operating system in string form. If the version could not be
determined, this function returns "unknown".
It will return the Android, BlackBerry, iOS, OS X, Windows full-product versions on those systems. In
particular, on OS X, iOS and Windows, the returned string is similar to the macVersion() or
windowsVersion() enums.
On Linux systems, it will try to determine the distribution version and will return that. This is also
done on Debian/kFreeBSD, so this function will return Debian version in that case.
In all other Unix-type systems, this function always returns "unknown".
Note: The version string returned from this function is only guaranteed to be orderable on Android,
BlackBerry, OS X and iOS. On Windows, some Windows versions are text ("XP" and "Vista", for
example). On Linux, the version of the distribution may jump unexpectedly, please refer to the
distribution's documentation for versioning practices.

Array<String> getScriptArguments(void)
Returns the script arguments (command-line argument -A).
Example:
var args = scriptThread.getScriptArguments();
for(var i = 0; i < args.length; i++)
{
scriptThread.appendTextToConsole(args[i])
}
String getScriptCommunicatorFolder(void)
Returns the ScriptCommunicator program folder.
String getUserDocumentsFolder(void)
Returns the directory containing user document files.
bool addTabsToMainWindow(ScriptTabWidget* tabWidget)
Adds script tabs to the main window (all tabs are removed from tabWidget).
Note: This function fails in command-line mode.
Arguments:
tabWidget: The ScriptTabWidget which contains the tabs which shall be added to the main
window
Return: True on success
Example:
scriptThread.loadUserInterfaceFile("tabs.ui", true, false);
//Remove the tab from the dialog and add it to the main window.
if(!scriptThread.addTabsToMainWindow(UI_TabWidget))
{
scriptThread.messageBox("Critical", "Error", "addTabsToMainWindow failed");
scriptThread.stopScript();
}
An example can be found under exampleScripts\WorkerScripts\TestAddTabsToMainWindow.
bool addToolBoxPagesToMainWindow(ScriptToolBox* scriptToolBox)
Adds script toolbox pages to the main window (all pages are removed from scriptToolBox).
Note: This function fails in command-line mode.
Arguments:
scriptToolBox: The ScriptToolBox which contains the pages which shall be added to the main
window
Return: True on success
Example:
scriptThread.loadUserInterfaceFile("pages.ui", true, false);
//Remove the pages from the dialog and add it to the main window.
if(!scriptThread.addToolBoxPagesToMainWindow(UI_ToolBox))
{
scriptThread.messageBox("Critical", "Error", "addToolBoxPagesToMainWindow
failed");
scriptThread.stopScript();
}
An example can be found under
exampleScripts\WorkerScripts\TestAddToolBoxPageToMainWindow.

Array<String> getAllObjectPropertiesAndFunctions(QScriptValue object, bool
printInScriptWindowConsole=false)
Returns and prints (if printInScriptWindowConsole is true) all functions, signals and properties of an
object in the script window console.
Note: Only ScriptCommunicator classes are supported. Calling this function with a QtScript built-in
class (e.g. Array) will result in an empty list.
Arguments:
object: The object
printInScriptWindowConsole: True if the result shall be printed in the script window console.
Return: All functions and properties of the object.
void mainWindowClearConsoleClickedSignal(void)
Is emitted if the clear console button in the main window is pressed.
Example:
function mainWindowClearConsoleClicked()
{
UI_TextEdit1.clear();
}
scriptThread.mainWindowClearConsoleClickedSignal.connect(mainWindowClearConsoleClicked);
void mainWindowLockScrollingClickedSignal(bool isChecked)
Is emitted if the lock scrolling button in the main window is pressed.
Arguments:
isChecked: True if the main interface lock scrolling button is checked.
Example:
function mainWindowLockScrollingClicked(isChecked)
{
UI_TextEdit1.lockScrolling(isChecked);
}
scriptThread.mainWindowLockScrollingClickedSignal.connect(mainWindowLockScrollingClicked);
String getMainWindowTitle(void)
Returns the title of the main window.
void setMainWindowTitle(String newTitle)
Sets the title of the main window.
Arguments:
newTitle: The new title.
String getTimestamp(void)
Returns the current time stamp in a specific format (see QDateTime.toString for more details).
If the format string is empty then the format from the settings dialog (console options tab) is used.
Example:
scriptThread.appendTextToConsole(scriptThread.getTimestamp("yyyy-MM-dd hh:mm:ss.zzz"));
ConsoleSettings getConsoleSettings(void)
Returns the console settings (settings dialog).
Return:
ConsoleSettings: The console settings. ConsoleSettings contains following properties:

obool showReceivedData: True if the received data (main interface) shall be shown in
the console.
obool showSendData: True if the send data (main interface) shall be shown in the
console.
oNumber maxChars: Max. numbers of chars in the consoles.
obool lockScrolling: If true then the consoles do not scroll to the end after adding new
data.
oString font: The consoles font.
oString fontSize: The consoles font size.
oNumber updateInterval: The consoles update interval.
oString receiveColor: The color (hex) of receive data.
oString sendColor: The color (hex) of send data.
oString backgroundColor: The background color (hex) of the consoles.
oString timestampColor: The color (hex) of timestamps.
oNumber newLineAfterBytes: New line after ... number of sent/received bytes
(0=off).
oNumber newLineAfterPause: New line after ... ms send/receive pause (0=off).
obool createNewLineAtByte: True if a new line shall be created at a specific byte.
(newLineAtByte).
oNumber newLineAtByte: These bytes will be replaced by a new line.
obool ceateTimestampAtByte: True if a timestamp shall be created at a specific byte
(timestampAtByte)
oNumber timestampAtByte: New timestamp at byte.
obool generateCyclicTimeStamps: True if cyclic timestamps shall be created in the.
consoles (timeStampInterval).
oNumber timeStampInterval: The console timestamp interval.
oString imestampFormat: The timestamp format.
Example:
var settings = scriptThread.getConsoleSettings();
scriptThread.appendTextToConsole(settings.backgroundColor);
scriptThread.appendTextToConsole(settings.font);
void setMainWindowAndTaskBarIcon(String iconFile, bool isRelativePath)
Sets the main window and the ScriptCommunicator task bar icon. Supported formats: .ico, .gif,
.png, .jpeg, .tiff, .bmp, .icns.
Arguments:
iconFile: The file name of the icon
isRelativePath: True if the file path is relative to the current script (which executes this
function)
Note: An example can be found under: exampleScripts\WorkerScripts\SendUserInput
The scriptInf object/class
The scriptInf object is the main interface object for accessing ScriptCommunicator interface functions
from script. The functions and signals which can be used from script are described in the following
chapters.

Main interface
The following functions can be used to send and receive data with the main interface.
Note:
•The main interface is the interface which can be adjusted in the settings window (worker
scripts can create/use own interfaces too (see chapter Separate interfaces)).
•Examples of all interface types can be found at the end of this chapter.
bool sendDataArray(Array<Number> data, Number repetitionCount=0, Number pause=0,
bool addToMainWindowSendHistory=false)
Sends a data (byte) array with the main interface.
Arguments:
data: The data array
repetitionCount: The data array is repeated until the number has been reached
pause: The pause (milliseconds) between two repetitions
addToMainWindowSendHistory: True if the data shall be added to the send history in the
main window
Return: True on success
Example:
var array = Array(1,2,3,4);
var result = scriptInf.sendDataArray(array);
Note:
•If ScriptCommunicator is connected to a I2C master interface use i2cMasterReadWrite to
send data.
•If ScriptCommunicator is connected to a CAN interface use sendCanMessage to send data.
•If ScriptCommunicator is connected to a I2C slave or to a SPI slave interface then this
function sets the slave response (the data is only sent if the master request it). If more bytes
are requested in a transaction (from the master), the response will be wrapped as many
times as necessary to complete the transaction. The device buffer space is 64 bytes.
bool sendString(String string, Number repetitionCount=0, Number pause=0, bool
addToMainWindowSendHistory=false)
Sends a string with the main interface.
Arguments:
string: The string
repetitionCount: The data array is repeated until the number has been reached
pause: The pause (ms) between two repetitions
addToMainWindowSendHistory: True if the data shall be added to the send history in the
main window
Return: True on success
Example:
var result = scriptInf.sendString("test string");
Note:
•If ScriptCommunicator is connected to a I2C master interface use i2cMasterReadWrite to
send data.
•If ScriptCommunicator is connected to a CAN interface use sendCanMessage to send data.

•If ScriptCommunicator is connected to a I2C slave or to a SPI slave interface then this
function sets the slave response (the data is only sent if the master request it). If more bytes
are requested in a transaction (from the master), the response will be wrapped as many
times as necessary to complete the transaction. The device buffer space is 64 bytes.
bool sendCanMessage(Number type, Number canId, Array<Number> data, Number
repetitionCount=0, Number pause=0, bool addToMainWindowSendHistory=false)
Sends a can message with the main interface (in MainInterfaceThread). If more then 8 data bytes are
given several can messages with the same can id will be sent.
Arguments:
type: The can message type (0=standard, 1=standard remote-transfer-request, 2=extended,
3= extended remote-transfer-request)
canId: The can id
data: the can data (byte array)
repetitionCount: The data message is repeated until the number has been reached
pause: The pause (ms) between two repetitions
addToMainWindowSendHistory: True if the data shall be added to the send history in the
main window
Return: True on success
Example:
var result = scriptInf.sendCanMessage(2, 0x0f, Array(0,0,0,0));
bool isConnectedWithCan(void)
Returns true if the main interface is a CAN interface (and is connected).
Example:
if(scriptInf.isConnectedWithCan())
{
var result = scriptInf.sendCanMessage(2, 0x0f, Array(0,0,0,0), 0, 0);
}
bool isConnectedWithI2c(void)
Returns true if the main interface is a I2C interface (and is connected).
bool isConnected(void)
Returns true if the main interface is connected.
Example:
if(scriptInf.isConnected())
{
scriptInf.sendString("test string");
}
void disconnect(void)
Disconnects the main interface.
bool connectPcan(Number channel, Number baudrate, Number connectTimeout = 2000,
bool busOffAutoReset = true, bool powerSupply = false, bool filterExtended = true, Number
filterFrom = 0, Number filterTo = 0x1fffffff)
Connects the main interface (PCAN).
Note: A successful call will modify the corresponding settings in the settings dialog.
Arguments:

channel: The PCAN channel
baudrate(kBaud): The baudrate. Possible values are:
1000, 800, 500, 250, 125,100,95,83,50,47,33,20,10,5.
connectTimeout: Connect timeout (ms)
busOffAutoReset: True if the PCAN driver shall reset automatically the CAN controller of a
PCAN Channel if a bus-off state is detected
powerSupply: True if the external 5V on the D-Sub connector shall be switched on
filterExtended: True if the filer message type is extended (29-bit identifier) or false if the
filter message type is standard (11-bit identifier)
filterFrom: The lowest CAN ID to be received
filterTo: The highest CAN ID to be received
Return: True on success
Example:
if(scriptInf.connectPcan(1, 1000))
{
scriptThread.appendTextToConsole ("connectPcan succeeded");
}
bool connectSocket(bool isTcp, bool isServer, String ip, Number destinationPort, Number
ownPort, Number connectTimeout = 5000)
Connects the main interface (UDP or TCP socket).
Note: A successful call will modify the corresponding settings in the settings dialog.
Arguments:
isTcp: True for TCP and false for UDP
isServer: True if the connection type is a (TCP) server
ip: The destination ip address.
destinationPort: The destination port
ownPort: The own port
connectTimeout: Connection timeout (ms)
Return: True on success
Example:
if(scriptInf.connectSocket(false, false, "127.0.0.1", 111, 112))
{
scriptThread.appendTextToConsole ("connectSocket succeeded (UDP socket)");
}
bool connectSerialPort(String name, Number baudRate = 115200, Number
connectTimeout= 1000, Number dataBits = 8, String parity = "None", String stopBits = "1",
String flowControl = "None")
Connects the main interface (serial port).
Note: A successful call will modify the corresponding settings in the settings dialog.
Arguments:
name: True serial port name
baudrate: The baudrate
connectTimeout: Connection timeout (ms)
dataBits: The number of data bits
parity: The parity. Possible values are: "None ", "Even ", "Odd ", "Space" and "Mark"
stopBits: The number of stop bits. Possible values are: "1 ", "1.5" and "2"
flowControl: The flow control. Possible values are: "RTS/CTS", "XON/XOFF" and "None"

Return: True on success
Example:
if(scriptInf.connectSerialPort("COM1"))
{
scriptThread.appendTextToConsole ("connectSerialPort succeeded");
}
void setSerialPortPins(bool setRTS, bool setDTR)
Sets the serial port (main interface) RTS (request to send) and DTR (data terminal ready) pins.
Note: A call to this function changes the value of the RTS (request to send) and the DTR (data
terminal ready) check box in the main window.
Arguments:
setRTS: true=set the pin to 1, false=set the pin to 0
setDTR: true=set the pin to 1, false=set the pin to 0
Number getSerialPortSignals(void)
Returns the state of the serial port signals (pins).The signals are bit coded:
•NoSignal = 0x00
•DataTerminalReadySignal = 0x04
•DataCarrierDetectSignal = 0x08
•DataSetReadySignal = 0x10
•RingIndicatorSignal = 0x20
•RequestToSendSignal = 0x40
• ClearToSendSignal = 0x80
void sendReceivedDataToMainInterface(Array<Number> data)
Sends received data (received with a script internal interface) to the main interface.
This data will be shown as received data in the consoles, the log and will be received by
worker scripts via the dataReceivedSignal.
Arguments:
data: The data (byte array)
SerialPortSettings getMainInterfaceSerialPortSettings(void)
Returns the serial port settings of the main interface.
Return:
SerialPortSettings: The serial port settings. SerialPortSettings contains following properties:
oString name: The name of the serial port.
oNumber baudRate: The baudrate.
oNumber dataBits: The number of data bits.
oString parity: The parity.
oString stopBits: The stop bits.
oString flowControl: The flow control.
obool rts: True if the RTS pin is on.
obool dtr: True if the DTR pin is on.
Example:
var settings = scriptInf.getMainInterfaceSerialPortSettings();
scriptThread.appendTextToConsole(settings.name);
scriptThread.appendTextToConsole(settings.baudRate);

scriptThread.appendTextToConsole(settings.dataBits);
scriptThread.appendTextToConsole(settings.parity);
scriptThread.appendTextToConsole(settings.stopBits);
scriptThread.appendTextToConsole(settings.flowControl);
scriptThread.appendTextToConsole(settings.rts);
scriptThread.appendTextToConsole(settings.dtr);
SocketSettings getMainInterfaceSocketSettings(void)
Returns the socket (UDP, TCP client/server) settings of the main interface.
Return:
SocketSettings: The socket settings. SocketSettings contains following properties:
oNumber destinationPort: The detination port.
oString destinationIpAddress: The destination IP address.
oNumber ownPort: The own port.
oString socketType: The socket type ('TCP client', 'TCP server' or 'UDP socket').
oNumber proxySettings: The proxy settings:
0 = no proxy
1 = use system proxy settings
2 = use custom proxy settings
oString proxyIpAddress: The proxy IP address.
oNumber proxyPort: The proxy port.
oString proxyUserName: The proxy user name.
oString proxyPassword: The proxy password.
Example:
var settings = scriptInf.getMainInterfaceSocketSettings();
scriptThread.appendTextToConsole(settings.destinationPort);
scriptThread.appendTextToConsole(settings.destinationIpAddress);
scriptThread.appendTextToConsole(settings.ownPort);
scriptThread.appendTextToConsole(settings.socketType);
scriptThread.appendTextToConsole(settings.proxySettings);
scriptThread.appendTextToConsole(settings.proxyIpAddress);
scriptThread.appendTextToConsole(settings.proxyPort);
scriptThread.appendTextToConsole(settings.proxyUserName);
scriptThread.appendTextToConsole(settings.proxyPassword);
String aardvarkI2cSpiDetectDevices(void)
Returns a string which contains informations about all detected Aardvark I2C/SPI devices.
bool aardvarkI2cSpiConnect(AardvarkI2cSpiSettings aardvarkI2cSpiSettings, Number
connectTimeout = 5000)
Connects the main interface (Aardvark I2C/SPI).
Note: A successful call will modify the corresponding settings in the settings dialog.
Arguments:
aardvarkI2cSpiSettings: The interface/device settings (AardvarkI2cSpiSettings)
connectTimeout: Connection timeout (ms)
Return: True on success
Example:
/************************Create the AardvarkI2cSpiSettings structure***************/
settings = Array();
settings.devicePort = parseInt(UI_AardvarkI2cSpiPort.text());
settings.deviceMode = UI_AardvarkI2cSpiMode.currentIndex();
settings.device5VIsOn = (UI_AardvarkI2cSpi5V.currentText() == "On") ? true : false
settings.i2cBaudrate = parseInt(UI_AardvarkI2cBaudrate.text());
settings.i2cSlaveAddress = parseInt(UI_AardvarkI2cSlaveAddress.text());
settings.i2cPullupsOn = (UI_AardvarkI2cPullUp.currentText() == "On") ? true : false

settings.spiPolarity = UI_AardvarkSpiPolarity.currentIndex();
settings.spiSSPolarity = UI_AardvarkSpiSSPolarity.currentIndex();
settings.spiBitorder = UI_AardvarkSpiBitorder.currentIndex();
settings.spiPhase = UI_AardvarkSpiPhase.currentIndex();
settings.spiBaudrate = parseInt(UI_AardvarkSpiBaudrate.text());
settings.pinConfigs = Array();
for(var i = 0; i < AARDVARD_I2C_SPI_GPIO_COUNT; i++)
{
settings.pinConfigs[i] = Array();
settings.pinConfigs[i].isInput =
(g_aardvardI2cGpioGuiElements[i].mode.currentText().indexOf("in") != -1) ? true : false;
settings.pinConfigs[i].withPullups =
(g_aardvardI2cGpioGuiElements[i].mode.currentText().indexOf("in pullup") != -1) ? true : false;
settings.pinConfigs[i].outValue = (g_aardvardI2cGpioGuiElements[i].outValue.currentText() == 1) ?
true : false;
}
/**********************************************************************************/
if(!scriptInf.aardvarkI2cSpiConnect(settings))
{
scriptThread.appendTextToConsole("connect error");
}
AardvarkI2cSpiSettings
This object/structure contains the settings for an Aardvark I2C/SPI interface:
•Number devicePort: The device port.
•Number deviceMode: The device mode (0=I2C master and GPIO, 1=I2C slave and GPIO,
2=SPI master and GPIO, 3=SPI slave and GPIO, 4=GPIO)
•bool device5VIsOn: True if the 5V pins shall be on.
•Number i2cBaudrate: The I2C baudrate.
•Number i2cSlaveAddress: The I2C address in slave mode.
•bool i2cPullupsOn: True if the I2C pullups shall be enabled.
•AardvarkSpiPolarity spiPolarity: The SPI Polarity (0=rising/falling, 1=faling/rising).
•AardvarkSpiSSPolarity spiSSPolarity: The SPI slave select polarity (0=active low, 1=active
high).
•AardvarkSpiBitorder spiBitorder: The SPI bitorder (0=MSB, 1=LSB).
•AardvarkSpiPhase spiPhase: The SPI phase (0=sample setup, 1=setup sample).
•Number spiBaudrate: The SPI baudrate.
•AardvarkI2cSpiGpioConfig pinConfigs[6]: The pin configuration (see
AardvarkI2cSpiGpioConfig). Elements of pinConfigs are:0=Pin1/SCL, 1=Pin3/SDA,
2=Pin5/MISO, 3=Pin7/SCK, 4=Pin8/MOSI, 5=Pin9/SS0.
An example how to create this object/structure can be found in bool
aardvarkI2cSpiConnect(AardvarkI2cSpiSettings aardvarkI2cSpiSettings, Number connectTimeout =
5000)).
AardvarkI2cSpiGpioConfig
Contains the pin configuration for an Aardvark I2C/SPI interface:
•bool isInput: True if the pin is an input.
•bool withPullups: True if the pin shall have a pullup (works only with inputs).
•bool outValue: The value of the output.
Array<bool> aardvarkI2cSpiReadAllInputs(void)
Reads all inputs of the Aardvark I2C/SPI device.

The indexes of the result array are:0=Pin1/SCL, 1=Pin3/SDA, 2=Pin5/MISO, 3=Pin7/SCK, 4=Pin8/MOSI,
5=Pin9/SS0.
AardvarkI2cSpiSettings aardvarkI2cSpiGetMainInterfaceSettings(void)
Returns the Aardvark I2C/SPI settings (AardvarkI2cSpiSettings) of the main interface.
Example:
var readSettings = scriptInf.aardvarkI2cSpiGetMainInterfaceSettings();
var consoleString = "connected: <br>" + settingsStructToString(readSettings);
scriptThread.appendTextToConsole(consoleString);
function settingsStructToString(readSettings)
{
var result = "devicePort=" + readSettings.devicePort + " deviceMode=" + readSettings.deviceMode + "
device5VIsOn=" + readSettings.device5VIsOn;
result += " i2cBaudrate=" + readSettings.i2cBaudrate + " i2cSlaveAddress=" +
readSettings.i2cSlaveAddress + " i2cPullupsOn=" + readSettings.i2cPullupsOn + "
spiSSPolarity=" + readSettings.spiSSPolarity;
result += " spiBitorder=" + readSettings.spiBitorder + " spiPhase=" + readSettings.spiPhase + "
spiBaudrate=" + readSettings.spiBaudrate;
for(var i = 0; i < AARDVARD_I2C_SPI_GPIO_COUNT; i++)
{
var mode = "out";
if(readSettings.pinConfigs[i].isInput)
{
if(readSettings.pinConfigs[i].withPullups)
{
mode = "in pullups";
}
else
{
mode = "in";
}
}
result += "<br>"+ g_aardvardI2cGpioGuiElements[i].mode.getAdditionalData(0) + " mode=" +
mode;
result += " "+ g_aardvardI2cGpioGuiElements[i].mode.getAdditionalData(0) + " outValue=" +
readSettings.pinConfigs[i].outValue;
}
return result;
}
bool aardvarkI2cSpiChangePinConfiguration(Number pinIndex, bool isInput, bool
withPullups=false)
Changes the configuration of a pin (Aardvark I2C/SPI device).
Arguments:
pinIndex: 0=Pin1/SCL, 1=Pin3/SDA, 2=Pin5/MISO, 3=Pin7/SCK, 4=Pin8/MOSI, 5=Pin9/SS0.
isInput: True if the pin shall be configured as input.
withPullups: True of the input pin shall have a pullup (not possible with output).
Return: True on success
bool aardvarkI2cSpiSetOutput(Number pinIndex, bool high, bool
updateSettingsDialog=false)
Sets the value of an output pin (Aardvark I2C/SPI device).
Arguments:
pinIndex: 0=Pin1/SCL, 1=Pin3/SDA, 2=Pin5/MISO, 3=Pin7/SCK, 4=Pin8/MOSI, 5=Pin9/SS0
high: True for 1 and false for 0
updateSettingsDialog: True if the new output value should be displayed in the the settings
dialog
Return: True on success

bool i2cMasterReadWrite(Number flags, Number slaveAddress, Number
numberOfBytesToRead, Array<Number> dataToSend = Array<Number>(), Number
repetitionCount=0, Number pause=0, bool addToMainWindowSendHistory=false)
Accesses the I2C bus (write/read).
Note: This functions works only if the main interface is an I2C master. To receive data in master
mode the signal i2cMasterDataReceivedSignal must be used.
Arguments:
flags: The I2C flags: 0x00= no flags, 0x01= 10bit address, 0x02=combined FMT,0x04= no stop
condition (use i2cMasterFreeBus to generate the stop condition later)
slaveAddress: The I2C address
numberOfBytesToRead: The number of bytes wich shall be read.
dataToSend: The bytes which shall be send/written (if this array is empty only a read is
performed)
repetitionCount: The I2C access is repeated until the number has been reached
pause: The pause (milliseconds) between two repetitions
addToMainWindowSendHistory: True if the data shall be added to the send history in the
main window
Return: True on success
Example:
var result = scriptInf.i2cMasterReadWrite(0, 0x01, 4, Array(1,2,3,4));
void i2cMasterFreeBus(void)
Frees the main interface I2C bus (this function can be used if the no stop condition was created
during the last i2cMasterReadWrite call).
void dataReceivedSignal(Array<Number> data)
This signal is emitted if data has been received with the main interface (only if the main interface is
not a CAN or I2C master interface, use canMessagesReceivedSignal if the main interface is a CAN
interface and i2cMasterDataReceivedSignal if the main interface is an I2C master interface).
Arguments:
data: The received data (byte array)
Example:
function dataReceivedSlot(data)
{
scriptThread.appendTextToConsole("data received: " + data);
}
//connect the dataReceivedSlot function with the dataReceivedSignal signal
scriptInf.dataReceivedSignal.connect(dataReceivedSlot);
void canMessagesReceivedSignal(Array<Number> types, Array<Number> messageIds,
Array<Number> timestamps, Array<Array<Number>> data)
This signal is emitted if a can message (or several) has been received with the main interface.
Arguments:
types: The can types of the received can messages (0=standard, 1=standard remote-transfer-
request, 2=extended, 3= extended remote-transfer-request)
messageIds: The can ids of the received can messages

timestamps: Time stamps for the received can messages (milliseconds since the first
message has been received).
data: The data (byte array) of the received can messages
Example:
function canMessagesReceived(types, ids, timeStamps, data)
{
for(var index = 0; index < types.length; index++)
{
scriptThread.appendTextToConsole("message received: " + ids[index]);
}
}
//connect the dataReceivedSlot function with the dataReceivedSignal signal
scriptInf.canMessagesReceivedSignal.connect(canMessagesReceived);
void i2cMasterDataReceivedSignal(Number flags, Number address, Array<Number> data)
This signal is emitted if data has been received with the main interface and the main interface is an
I2C bus.
Arguments:
flags: The I2C flags: 0x00= no flags, 0x01= 10bit address, 0x02=combined FMT,0x04= no stop
condition (use i2cMasterFreeBus to generate the stop condition later)
address: The I2C address
data: The received data.
Example:
scriptInf.i2cMasterDataReceivedSignal.connect(i2cDataReceivedSlot);
function i2cDataReceivedSlot(flags, address, data)
{
scriptThread.appendTextToConsole("I2C data received: flags=0x" + flags.toString(16) + " address=0x"
+ address.toString(16) + " data=" + conv.byteArrayToHexString(data));
}
void aardvarkI2cSpiInputStatesChangedSignal(Array<bool> states)
Is emitted if the input states of the Ardvard I2C/SPI device (main interface) have been changed.
Arguments:
states: The states of the inputs (true=1. false=0). Elements of state are:0=Pin1/SCL,
1=Pin3/SDA, 2=Pin5/MISO, 3=Pin7/SCK, 4=Pin8/MOSI, 5=Pin9/SS0.
void sendDataFromMainInterfaceSignal(Array<Number> data)
Is emitted if the main interface shall send data. Scripts can use this signal to send the main interface
data with an additional interface.
Arguments:
data: The data (byte array)
Example:
function sendDataFromMainInterface(data)
{
scriptThread.appendTextToConsole("send data: " + data);
}
//connect the sendDataFromMainInterface function with the sendDataFromMainInterfaceSignal signal
scriptInf.sendDataFromMainInterfaceSignal.connect(sendDataFromMainInterface);
void slaveDataSentSignal(Array<Number> data)
Is emitted if the main interface is a I2C or SPI slave and has sent data.
Arguments:
data: The sent data (byte array)

Example:
function dataSentSlot(data)
{
scriptThread.appendTextToConsole("slave data sent: " + data);
}
//connect the dataSentSlot function with the slaveDataSentSignal signal
scriptInf.slaveDataSentSignal.connect(dataSentSlot);
Main interface serial port example
This example sends every second a message with the main interface (serial port) and shows the
received data in the script window console.
//Is called if data has been received with the main interface.
function dataReceivedSlot(data)
{
scriptThread.appendTextToConsole("data received: data=" + conv.byteArrayToHexString(data));
}
//Is called if the timer times out.
function timerSlot()
{
if(!scriptInf.sendString("Test message\n"))
{
scriptThread.appendTextToConsole("send failed");
}
}
scriptInf.dataReceivedSignal.connect(dataReceivedSlot);
if(!scriptInf.connectSerialPort("COM1", 9600))
{
scriptThread.appendTextToConsole("connectSerialPort failed");
scriptThread.stopScript();
}
var timer = scriptThread.createTimer();
timer.timeoutSignal.connect(timerSlot);
timer.start(1000);
Main interface UDP socket example
This example sends every second a message with the main interface (UDP socket) and shows the
received data in the script window console.
//Is called if data has been received with the main interface.
function dataReceivedSlot(data)
{
scriptThread.appendTextToConsole("data received: data=" + conv.byteArrayToHexString(data));
}
//Is called if the timer times out.
function timerSlot()
{
if(scriptInf.isConnected())
{
if(!scriptInf.sendString("Test message\n"))
{
scriptThread.appendTextToConsole("send failed");
}
}
}
scriptInf.dataReceivedSignal.connect(dataReceivedSlot);
if(!scriptInf.connectSocket(false, false, "127.0.0.1", 5555, 6666))
{
scriptThread.appendTextToConsole("connectSocket failed");
scriptThread.stopScript();
}
var timer = scriptThread.createTimer();

timer.timeoutSignal.connect(timerSlot);
timer.start(1000);
Main interface TCP/IP client example
This example sends every second a message with the main interface (TCP/IP client) and shows the
received data in the script window console.
//Is called if data has been received with the main interface.
function dataReceivedSlot(data)
{
scriptThread.appendTextToConsole("data received: data=" + conv.byteArrayToHexString(data));
}
//Is called if the timer times out.
function timerSlot()
{
if(scriptInf.isConnected())
{
if(!scriptInf.sendString("Test message\n"))
{
scriptThread.appendTextToConsole("send failed");
}
}
}
scriptInf.dataReceivedSignal.connect(dataReceivedSlot);
if(!scriptInf.connectSocket(true, false, "127.0.0.1", 5555, 0))
{
scriptThread.appendTextToConsole("connectSocket failed");
scriptThread.stopScript();
}
var timer = scriptThread.createTimer();
timer.timeoutSignal.connect(timerSlot);
timer.start(1000);
Main interface TCP/IP server example
This example sends every second a message with the main interface (TCP/IP server) and shows the
received data in the script window console.
//Is called if data has been received with the main interface.
function dataReceivedSlot(data)
{
scriptThread.appendTextToConsole("data received: data=" + conv.byteArrayToHexString(data));
}
//Is called if the timer times out.
function timerSlot()
{
if(scriptInf.isConnected())
{
if(!scriptInf.sendString("Test message\n"))
{
scriptThread.appendTextToConsole("send failed");
}
}
}
scriptInf.dataReceivedSignal.connect(dataReceivedSlot);
if(!scriptInf.connectSocket(true, true, "", 0, 5555))
{
scriptThread.appendTextToConsole("connectSocket failed");
scriptThread.stopScript();
}
var timer = scriptThread.createTimer();
timer.timeoutSignal.connect(timerSlot);
timer.start(1000);

Main interface I2C master example
This example sends and reads every second data with the main interface (I2C master). The received
data is shown in the script window console.
//Is called if data has been received with the main interface and the interface is a I2C master.
function i2cMasterDataReceivedSlot(flags, address, data)
{
scriptThread.appendTextToConsole("I2C master data received: flags=0x" + flags.toString(16) + "
address=0x" + address.toString(16) + " data=" + conv.byteArrayToHexString(data));
}
//Is called if the timer times out.
function timerSlot()
{
if(scriptInf.isConnectedWithI2c())
{
if(!scriptInf.i2cMasterReadWrite(0, 0x2, 4, Array(1, 2, 3, 4, 5)))
{
scriptThread.appendTextToConsole("send failed");
}
}
}
//Get the current Aardvard I2C/SPI settings.
settings = scriptInf.aardvarkI2cSpiGetMainInterfaceSettings();
settings.devicePort = 0;
settings.deviceMode = 0;//I2C master
settings.device5VIsOn = false;
settings.i2cBaudrate = 400;
settings.i2cPullupsOn = true;
//Configure all pins to input without pullups.
for(var i = 0; i < 6; i++)
{
settings.pinConfigs[i] = Array();
settings.pinConfigs[i].isInput = true;
settings.pinConfigs[i].withPullups = false;
settings.pinConfigs[i].outValue = 0;
}
if(!scriptInf.aardvarkI2cSpiConnect(settings))
{
scriptThread.appendTextToConsole("aardvarkI2cSpiConnect failed");
scriptThread.stopScript();
}
scriptInf.i2cMasterDataReceivedSignal.connect(i2cMasterDataReceivedSlot);
var timer = scriptThread.createTimer();
timer.timeoutSignal.connect(timerSlot);
timer.start(1000);
Main interface I2C slave example
This example reads/sends data from/to an I2C master (main interface).
function dataReceivedSlot(data)
{
scriptThread.appendTextToConsole("data received: data=" + conv.byteArrayToHexString(data));
}
function slaveDataSentSlot(data)
{
scriptThread.appendTextToConsole("data sent: data=" + conv.byteArrayToHexString(data));
}
//Get the current Aardvard I2C/SPI settings.
settings = scriptInf.aardvarkI2cSpiGetMainInterfaceSettings();
settings.devicePort = 0;
settings.deviceMode = 1;//I2C slave
settings.device5VIsOn = false;
settings.i2cBaudrate = 400;
settings.i2cPullupsOn = true;

//Configure all pins to input without pullups.
for(var i = 0; i < 6; i++)
{
settings.pinConfigs[i] = Array();
settings.pinConfigs[i].isInput = true;
settings.pinConfigs[i].withPullups = false;
settings.pinConfigs[i].outValue = 0;
}
if(!scriptInf.aardvarkI2cSpiConnect(settings))
{
scriptThread.appendTextToConsole("aardvarkI2cSpiConnect failed");
scriptThread.stopScript();
}
//Set the response (this data is only send if the master requests it).
if(!scriptInf.sendDataArray(Array(0, 1, 2, 3, 4)))
{
UI_Console.append("set slave response failed");
scriptThread.stopScript();
}
scriptInf.dataReceivedSignal.connect(dataReceivedSlot);
scriptInf.slaveDataSentSignal.connect(slaveDataSentSlot);
Main interface SPI master example
This example sends and reads every second data with the main interface (SPI master). The received
data is shown in the script window console.
//Is called if data has been received with the main interface and the interface is a SPI master.
function dataReceivedSlot(data)
{
scriptThread.appendTextToConsole("SPI master data received: data=" +
conv.byteArrayToHexString(data));
}
//Is called if the timer times out.
function timerSlot()
{
if(scriptInf.isConnected())
{
if(!scriptInf.sendDataArray(Array(1, 2, 3, 4, 5)))
{
scriptThread.appendTextToConsole("send failed");
}
}
}
//Get the current Aardvard I2C/SPI settings.
settings = scriptInf.aardvarkI2cSpiGetMainInterfaceSettings();
settings.devicePort = 0;
settings.deviceMode = 2;//SPI master
settings.device5VIsOn = false;
settings.spiPolarity = 0; //rising/falling
settings.spiSSPolarity = 0;//active low
settings.spiBitorder = 0;//MSB
settings.spiPhase = 0;//sample setup
settings.spiBaudrate = 1000;
//Configure all pins to input without pullups.
for(var i = 0; i < 6; i++)
{
settings.pinConfigs[i] = Array();
settings.pinConfigs[i].isInput = true;
settings.pinConfigs[i].withPullups = false;
settings.pinConfigs[i].outValue = 0;
}
if(!scriptInf.aardvarkI2cSpiConnect(settings))
{
scriptThread.appendTextToConsole("aardvarkI2cSpiConnect failed");
scriptThread.stopScript();
}

scriptInf.dataReceivedSignal.connect(dataReceivedSlot);
var timer = scriptThread.createTimer();
timer.timeoutSignal.connect(timerSlot);
timer.start(1000);
Main interface SPI slave example
This example reads/sends data from/to an SPI master (main interface). The sent and received data is
shown in the script window console.
function dataReceivedSlot(data)
{
scriptThread.appendTextToConsole("data received: data=" + conv.byteArrayToHexString(data));
}
function slaveDataSentSlot(data)
{
scriptThread.appendTextToConsole("data sent: data=" + conv.byteArrayToHexString(data));
}
//Get the current Aardvard I2C/SPI settings.
settings = scriptInf.aardvarkI2cSpiGetMainInterfaceSettings();
settings.devicePort = 0;
settings.deviceMode = 3;//SPI slave
settings.device5VIsOn = false;
settings.spiPolarity = 0; //rising/falling
settings.spiSSPolarity = 0;//active low
settings.spiBitorder = 0;//MSB
settings.spiPhase = 0;//sample setup
settings.spiBaudrate = 1000;
//Configure all pins to input without pullups.
for(var i = 0; i < 6; i++)
{
settings.pinConfigs[i] = Array();
settings.pinConfigs[i].isInput = true;
settings.pinConfigs[i].withPullups = false;
settings.pinConfigs[i].outValue = 0;
}
if(!scriptInf.aardvarkI2cSpiConnect(settings))
{
scriptThread.appendTextToConsole("aardvarkI2cSpiConnect failed");
scriptThread.stopScript();
}
//Set the response (this data is only send if the master requests it).
if(!scriptInf.sendDataArray(Array(0, 1, 2, 3, 4)))
{
UI_Console.append("set slave response failed");
scriptThread.stopScript();
}
scriptInf.dataReceivedSignal.connect(dataReceivedSlot);
scriptInf.slaveDataSentSignal.connect(slaveDataSentSlot);
Separate interfaces
The following functions can be used to create separate interfaces (to send and receive data without
the main interface).
ScriptUdpSocket createUdpSocket(void)
Creates an UDP socket object (for more details see chapter Script UDP socket class).
Return: The created UDP socket object
Example:
var udpSocket = scriptInf.createUdpSocket();

ScriptTcpServer createTcpServer (void)
Creates a TCP server object (for more details see chapter Script TCP server class).
Return: The created TCP server object
Example:
var tcpServer = scriptInf.createTcpServer();
ScriptTcpClient createTcpClient (void)
Creates a TCP client object (for more details see chapter Script TCP client class).
Return: The created TCP client object
Example:
var tcpClient = scriptInf.createTcpClient();
ScriptPcan createPcanInterface(void)
Creates a PCAN interface object (for more details see chapter Script PCAN class).
Return: The created PCAN interface object
Example:
var pcan = scriptInf.createPcanInterface();
ScriptSerialPort createSerialPort (void)
Creates a serial port object (for more details see chapter Script serial port class).
Return: The created serial port object
Example:
var serialPort = scriptInf.createSerialPort();
ScriptAardvarkI2cSpi aardvarkI2cSpiCreateInterface(void)
Creates an Aardvark I2c/SPI interface (for more details see Script Aardvark I2C/SPI class).
Example:
var g_interface = scriptInf.aardvarkI2cSpiCreateInterface();
Script UDP socket class
This class is a wrapper class for the Qt class QUdpSocket. With this class the script can send and
receive data (additional to the main interface) with a UDP socket. To create a UDP socket object the
function ScriptUdpSocket createUdpSocket(void) must be used.
The functions and signals which can be used are described in the following chapters.
bool bind(Number port)
Binds the socket to a port.
Arguments:
port: The port
bool isOpen(void)
Returns true if the UDP socket is open/listening.
void close(void)
Closes the socket.

bool hasPendingDatagrams(void)
Returns true if a received datagram can be read from the socket.
Array<Number> readDatagram(void)
Returns the data (byte array) from one received datagram.
Array<Number> readAll(void)
Reads all received datagrams (the data from the single datagrams are inserted in one byte array)
Number write(Array<Number> data, String hostAdress, Number hostPort)
Writes data (byte array) to the socket.
Arguments:
data: The data (byte array)
hostAdress: The host address
hostPort: The port of the host
Return: The number of written bytes
Number writeString(String string, String hostAdress, Number hostPort)
Writes a string to the socket.
Arguments:
string: The string
hostAdress: The host address
hostPort: The port of the host
Return: The number of written bytes
void enableMainInterfaceRouting(String routingHostAddress, Number routingHostPort)
Enables the main interface routing (all data from the main interface is send with this socket and
all received (with this socket) data is sent with the main interface).
Arguments:
routingHostAdress: The host address, to which all data from the main interface is sent
routingHostPort: The port of the host, to which all data from the main interface is sent
void disableMainInterfaceRouting(void)
Disables the main interface routing.
bool canReadLine(void)
This function checks if a data line (ends with EOL ('\n')) is ready to be read.
Return: True if a line is ready to be read.
String readLine(bool removeNewLine=true, bool removeCarriageReturn=true)
This function reads a line (a line ends with a '\n') of ASCII characters.
Arguments:
removeNewLine: If removeNewLine is true then the '\n' will not returned (is removed from
the received line).
removeCarriageReturn: If removeCarriageReturn is true then a '\r' in front of '\n' will also
not returned.

Return: The received line. If no new data line is ready for reading this functions returns an empty
string.
Example:
function readyReadSlot()
{
if(udpSocket.canReadLine())
{
var line = udpSocket.readLine();
scriptThread.appendTextToConsole("line received: " + line);
}
}
Array<String> readAllLines(bool removeNewLine=true, bool removeCarriageReturn=true)
This function reads all available lines (a line ends with a '\n') of ASCII characters.
Arguments:
removeNewLine: If removeNewLine is true then the '\n' will not returned (is removed from
the received lines).
removeCarriageReturn: If removeCarriageReturn is true then a '\r' in front of '\n' will also
not returned.
Return: The received lines. If no new data line is ready for reading this functions returns an empty
list.
Example:
function readyReadSlot()
{
var lines = udpSocket.readAllLines();
for(var index = 0; index < lines.length; index++)
{
scriptThread.appendTextToConsole("line received: " + lines[index]);
}
}
void readyReadSignal(void)
This signal is emitted if data can be read from the socket (if a datagram has been received).
UDP socket example
The following Code shows the typically use of the UDP socket class:
function readyReadSlot()
{
var data = udpSocket.readAll();
udpSocket.write(data, "127.0.0.1", 111);
}
var udpSocket = scriptInf.createUdpSocket();
//connect the readyReadSlot function to the readyReadSignal signal
udpSocket.readyReadSignal.connect(readyReadSlot);
udpSocket.bind(11112);
Script TCP client class
This class is a wrapper class for the Qt class QTcpSocket. With this class the script can send and
receive data (additional to the main interface) with a TCP socket. To create a TCP socket object the
function ScriptTcpClient createTcpClient (void) must be used.
The functions and signals which can be used are described in the following chapters.
void connectToHost(String hostAdress, Number port)
This function connects the socket to a TCP server.

Arguments:
hostAdress: The host address
port: The port of the host
bool isOpen(void)
Returns true if the TCP client is open/connected.
void close(void)
This function closes the socket.
bool isReadable(void)
Returns true if data can be read from the socket.
Number bytesAvailable(void)
Returns the number of bytes which are available for reading.
Array<Number> readAll(void)
This function returns all received bytes (byte array).
Number write(Array<Number> data)
Writes data (byte array) to the socket.
Arguments:
data: The data (byte array)
Return: The number of written bytes
Number writeString(String string)
Writes a string to the socket.
Arguments:
string: The string
Return: The number of written bytes
String getErrorString(void)
Returns a human-readable description of the last error that has been occurred.
void enableMainInterfaceRouting(void)
Enables the main interface routing (all data from the main interface is send with this socket and
all received (with this socket) data is sent with the main interface).
void disableMainInterfaceRouting(void)
Disables the main interface routing.
void setProxy(String proxyType = "NO_PROXY", String proxyUserName= "", String
proxyPassword = "", String proxyIpAddress = "", Number proxyPort = 0)
Sets the network proxy.
Arguments:

proxyType: The proxy type, possible values are:
oNO_PROXY
oSYSTEM_PROXY
oCUSTOM_PROXY
proxyUserName: The proxy user name
proxyPassword: The proxy user password
proxyIpAddress: The proxy ip address
proxyPort: The proxy port
Example:
var tcpClient = scriptInf.createTcpClient();
//No proxy.
tcpClient.setProxy("NO_PROXY");
//Use the system proxy settings.
tcpClient.setProxy("SYSTEM_PROXY", "proxy_user", "proxy_password");
//Use custom proxy settings.
tcpClient.setProxy("CUSTOM_PROXY", "proxy_user", "proxy_password""169.254.224.120", 83);
bool canReadLine(void)
This function checks if a data line (ends with EOL ('\n')) is ready to be read.
Return: True if a line is ready to be read.
String readLine(bool removeNewLine=true, bool removeCarriageReturn=true)
This function reads a line (a line ends with a '\n') of ASCII characters.
Arguments:
removeNewLine: If removeNewLine is true then the '\n' will not returned (is removed from
the received line).
removeCarriageReturn: If removeCarriageReturn is true then a '\r' in front of '\n' will also
not returned.
Return: The received line. If no new data line is ready for reading this functions returns an empty
string.
Example:
function readyReadSlot()
{
if(tcpClient.canReadLine())
{
var line = tcpClient.readLine();
scriptThread.appendTextToConsole("line received: " + line);
}
}
Array<String> readAllLines(bool removeNewLine=true, bool removeCarriageReturn=true)
This function reads all available lines (a line ends with a '\n') of ASCII characters.
Arguments:
removeNewLine: If removeNewLine is true then the '\n' will not returned (is removed from
the received lines).
removeCarriageReturn: If removeCarriageReturn is true then a '\r' in front of '\n' will also
not returned.
Return: The received lines. If no new data line is ready for reading this functions returns an empty
list.
Example:
function readyReadSlot()

{
var lines = tcpClient.readAllLines();
for(var index = 0; index < lines.length; index++)
{
scriptThread.appendTextToConsole("line received: " + lines[index]);
}
}
void connectedSignal (void)
This signal is emitted if the connection has been established.
void disconnectedSignal (void)
This signal is emitted if the connection has been disconnected.
void readyReadSignal(void)
This signal is emitted if data can be read from the socket.
void errorSignal(Number error)
This signal is emitted after an error has been occurred. The error parameter describes the type of
error that has been occurred.
Arguments:
error: The error
Internally error has the type QabstractSocket::SocketError. Therefore error can have the following
values:
QAbstractSocket::ConnectionRe
fusedError
0 The connection was refused by the peer (or timed out).
QAbstractSocket::RemoteHostCl
osedError
1 The remote host closed the connection. Note that the client
socket (i.e., this socket) will be closed after the remote close
notification has been sent.
QAbstractSocket::HostNotFoun
dError
2 The host address was not found.
QAbstractSocket::SocketAccessE
rror
3 The socket operation failed because the application lacked
the required privileges.
QAbstractSocket::SocketResour
ceError
4 The local system ran out of resources (e.g., too many
sockets).
QAbstractSocket::SocketTimeou
tError
5 The socket operation timed out.
QAbstractSocket::DatagramToo
LargeError
6 The datagram was larger than the operating system's limit
(which can be as low as 8192 bytes).
QAbstractSocket::NetworkError 7 An error occurred with the network (e.g., the network cable
was accidentally plugged out).
QAbstractSocket::AddressInUse
Error
8 The address specified to QAbstractSocket::bind() is already
in use and was set to be exclusive.
QAbstractSocket::SocketAddres
sNotAvailableError
9 The address specified to QAbstractSocket::bind() does not
belong to the host.
QAbstractSocket::UnsupportedS 10 The requested socket operation is not supported by the local

ocketOperationError operating system (e.g., lack of IPv6 support).
QAbstractSocket::ProxyAuthenti
cationRequiredError
12 The socket is using a proxy, and the proxy requires
authentication.
QAbstractSocket::SslHandshake
FailedError
13 The SSL/TLS handshake failed, so the connection was closed
(only used in QSslSocket)
QAbstractSocket::UnfinishedSoc
ketOperationError
11 Used by QAbstractSocketEngine only, The last operation
attempted has not finished yet (still in progress in the
background).
QAbstractSocket::ProxyConnecti
onRefusedError
14 Could not contact the proxy server because the connection
to that server was denied
QAbstractSocket::ProxyConnecti
onClosedError
15 The connection to the proxy server was closed unexpectedly
(before the connection to the final peer was established)
QAbstractSocket::ProxyConnecti
onTimeoutError
16 The connection to the proxy server timed out or the proxy
server stopped responding in the authentication phase.
QAbstractSocket::ProxyNotFoun
dError
17 The proxy address set with setProxy() (or the application
proxy) was not found.
QAbstractSocket::ProxyProtocol
Error
18 The connection negotiation with the proxy server failed,
because the response from the proxy server could not be
understood.
QAbstractSocket::OperationErro
r
19 An operation was attempted while the socket was in a state
that did not permit it.
QAbstractSocket::SslInternalErr
or
20 The SSL library being used reported an internal error. This is
probably the result of a bad installation or misconfiguration
of the library.
QAbstractSocket::SslInvalidUser
DataError
21 Invalid data (certificate, key, cypher, etc.) was provided and
its use resulted in an error in the SSL library.
QAbstractSocket::TemporaryErr
or
22 A temporary error occurred (e.g., operation would block and
socket is non-blocking).
QAbstractSocket::UnknownSock
etError
-1 An unidentified error occurred.
TCP client example
The following Code shows the typically use of the TCP client class:
//Connection established.
function connectSlot()
{
var array = Array(1,2,3,4,5,6);
//send data to the host
tcpClient.write(array);
}
//Connection closed.
function disconnectSlot()
{
scriptThread.appendTextToConsole("disconnected ");
tcpClient.close();
}
//Data has been received.
function readyReadSlot ()
{

var array = tcpClient.readAll();
scriptThread.appendTextToConsole("data received: " + array);
//send data to the host
tcpClient.write(array);
}
//An error has been ocurred.
function tcpClientErrorSlot(error)
{
if(error != 1)
{//The error is not QAbstractSocket::RemoteHostClosedError.
disconnectSlot();
}
if(error == 0) //QAbstractSocket::ConnectionRefusedError
{
scriptThread.messageBox("Critical", "TCP error",
"The connection was refused. " +
"Make sure the server is running, " +
"and check that the host name and port " +
"settings are correct.");
}
else if(error == 1) //QAbstractSocket::RemoteHostClosedError
{
//The connection has been closed. Do nothing.
}
else if(error == 2) //QAbstractSocket::HostNotFoundError
{
scriptThread.messageBox("Critical", "TCP error",
"The server was not found. Please check the " +
"host name and port settings.");
}
else
{
scriptThread.messageBox("Critical", "TCP error",
"The following error occurred: " +
tcpClient.getErrorString());
}
}
var tcpClient = scriptInf.createTcpClient();
tcpClient.readyReadSignal.connect(readyReadSlot);
tcpClient.disconnectedSignal.connect(disconnectSlot);
tcpClient.connectedSignal.connect(connectSlot);
tcpClient.errorSignal.connect(tcpClientErrorSlot);
tcpClient.connectToHost("127.0.0.1", 111);
Script TCP server class
This class is a wrapper class for the Qt class QTcpServer. With this class the script can create a TCP
server. To create a TCP server object the function ScriptTcpServer createTcpServer (void) must be
used.
The functions and signals which can be used are described in the following chapters.
bool listen(Number port)
Call this function to start listening for new connections.
Arguments:
port: The port for listening
Return: True on success
bool isListening (void)
Returns true if the socket is listening for new connections.
void setMaxPendingConnections(Number numConnections)
Set the max. pending connections.

Arguments:
numConnections: The max. pending connections
Number maxPendingConnections(void)
Returns the max. pending connections.
void close(void)
This function closes the TCP server.
ScriptTcpClient nextPendingConnection(void)
Return the next pending connection (returns a script TCP client).
void newConnectionSignal (void)
This signal is emitted if a new connection has been established.
TCP server example
The following Code shows the typically use of the TCP server class:
function connectionEstablished()
{
tcpServerClient = tcpServer.nextPendingConnection();
tcpServerClient.disconnectedSignal.connect(disconnectSlot);
tcpServerClient.readyReadSignal.connect(readyReadSlot);
}
function disconnectSlot()
{
scriptThread.appendTextToConsole("disconnected ");
}
function readyReadSlot()
{
var array = tcpServerClient.readAll();
scriptThread.appendTextToConsole("data received: " + array);
//send data to the host
tcpServerClient.write(array);
}
var tcpServer = scriptInf.createTcpServer();
var tcpServerClient = undefined;
tcpServer.newConnectionSignal.connect(connectionEstablished);
tcpServer.listen(112);
Script serial port class
This class is a wrapper class for the Qt class QSerialPort. With this class the script can send and
receive data (additional to the main interface) with a serial port. To create a serial port socket object
the function ScriptSerialPort createSerialPort (void) must be used.
The functions and signals which can be used are described in the following chapters.
Note:
If the script serial port is connected the RTS (request to send) and DTR (data terminal ready) signals
are automatically set to high (and set low at disconnect).
void setPortName(String name)
Sets the serial port name.
Arguments:
name: The name of the serial port

String portName(void)
Returns the serial port name.
bool setBaudRate(Number baudRate)
Sets the baudrate.
Arguments:
baudRate: The new baud rate
Return: True on success
Number baudRate(void)
Returns the baudrate.
bool setDataBits(Number dataBits)
Sets the number of data bits.
Arguments:
dataBits: The new number of data bits
Return: True on success
Number dataBits(void)
Returns the number of data bits.
bool setParity(String parityString)
Sets the parity.
Arguments:
parityString: The new parity. Possible values are: "None ", "Even ", "Odd ", "Space" and
"Mark"
Return: True on success
String parity(void)
Returns the parity. Possible values are: "None ", "Even", "Odd ", "Space" and "Mark".
bool setStopBits(String stopBitsString)
Sets the number of stop bits.
Arguments:
stopBitsString: The new number of stop bits. Possible values are: "1 ", "1.5" and "2"
Return: True on success
String stopBits (void)
Returns the number of stop bits. Possible values are: "1 ", "1.5" and "2".
bool setFlowControl(String flowString)
Sets the flow control.
Arguments:
flowString: The new flow control. Possible values are: "RTS/CTS", "XON/XOFF" and "None"
Return: True on success

String flowControl (void)
Returns the flow control. Possible values are: "RTS/CTS ", " XON/XOFF" and "None".
String errorString(void)
Returns the error string from the serial port (contains additional information in the case of an error).
bool open(void)
Opens the serial port.
Return: True on success
void close(void)
Closes the serial port.
void setDTR(bool set)
Sets the DTR (data terminal ready) pin.
Note: The default for the DTR (data terminal ready) pin is 1 ( if the serial port is completely
configured and open).
Arguments:
set: true=set the pin to 1, false=set the pin to 0
void setRTS(bool set)
Sets the RTS (request to send) pin.
Note: The default for the RTS (request to send) pin is 0. This call has only an effect if the serial port is
completely configured and open.
Arguments:
set: true=set the pin to 1, false=set the pin to 0
bool isOpen(void)
Returns true if the serial port is open.
Number bytesAvailable(void)
Returns the number of bytes which are available for reading.
Array<Number> readAll(void)
This function returns all received bytes (byte array).
Number write(Array<Number> data)
Writes data (byte array) to the serial port.
Arguments:
data: The data (byte array)
Return: The number of written bytes
Number writeString(String string)
Writes a string to the serial port.
Arguments:

string: The string
Return: The number of written bytes
Number bytesToWrite(void)
Returns the number of bytes which are not written yet.
bool waitForBytesWritten(Number msecs)
This function waits until all bytes have been written (sent) or the time in msec has been elapsed.
Arguments:
msecs: The max. time to wait
Return: True if all bytes have been written
void enableMainInterfaceRouting(void)
Enables the main interface routing (all data from the main interface is send with this socket and
all received (with this socket) data is sent with the main interface).
void disableMainInterfaceRouting(void)
Disables the main interface routing.
bool canReadLine(void)
This function checks if a data line (ends with EOL ('\n')) is ready to be read.
Return: True if a line is ready to be read.
String readLine(bool removeNewLine=true, bool removeCarriageReturn=true)
This function reads a line (a line ends with a '\n') of ASCII characters.
Arguments:
removeNewLine: If removeNewLine is true then the '\n' will not returned (is removed from
the received line).
removeCarriageReturn: If removeCarriageReturn is true then a '\r' in front of '\n' will also
not returned.
Return: The received line. If no new data line is ready for reading this functions returns an empty
string.
Example:
function readyReadSlot()
{
if(serialPort.canReadLine())
{
var line = serialPort.readLine();
scriptThread.appendTextToConsole("line received: " + line);
}
}
Array<String> readAllLines(bool removeNewLine=true, bool removeCarriageReturn=true)
This function reads all available lines (a line ends with a '\n') of ASCII characters.
Arguments:
removeNewLine: If removeNewLine is true then the '\n' will not returned (is removed from
the received lines).
removeCarriageReturn: If removeCarriageReturn is true then a '\r' in front of '\n' will also
not returned.

Return: The received lines. If no new data line is ready for reading this functions returns an empty
list.
Example:
function readyReadSlot()
{
var lines = serialPort.readAllLines();
for(var index = 0; index < lines.length; index++)
{
scriptThread.appendTextToConsole("line received: " + lines[index]);
}
}
void readyReadSignal(void)
This signal is emitted if data is available for reading (if data has been received).
Number getSerialPortSignals(void)
Returns the state of the serial port signals (pins).
The signals are bit coded:
•NoSignal = 0x00,
•DataTerminalReadySignal = 0x04
•DataCarrierDetectSignal = 0x08
•DataSetReadySignal = 0x10
•RingIndicatorSignal = 0x20
•RequestToSendSignal = 0x40
•ClearToSendSignal = 0x80
Script serial port example
The following Code shows the typically use of the script serial port class:
function readyReadSlot()
{
var array = serialPort.readAll();
scriptThread.appendTextToConsole("data received: " + array);
//send data to the host
serialPort.write(array);
}
var serialPort = scriptInf.createSerialPort();
serialPort.readyReadSignal.connect(readyReadSlot);
serialPort.setPortName("COM1");
serialPort.setDTR(false);
if (serialPort.open())
{
serialPort.setBaudRate(19200);
serialPort.setDataBits(8);
serialPort.setParity("None");
serialPort.setStopBits("1.5");
serialPort.setFlowControl("None");
serialPort.setDTR(true);
serialPort.setRTS(true);
scriptThread.appendTextToConsole("serial port signals:" +
serialPort.getSerialPortSignals().toString(16) );
}
else
{
scriptThread.messageBox("Critical", 'error', 'could not open serial port');
}

Script PCAN class
With this class the script can create a PCAN interface. To create a PCAN interface object the function
Fehler: Referenz nicht gefunden must be used.
The functions and signals which can be used are described in the following chapters.
bool open(Number channel, Number baudrate, bool busOffAutoReset, bool powerSupply)
Opens a PCAN interface.
Arguments:
channel: The PCAN channel
baudRate: The baudrate (kHz), possible values are: 1000, 800, 500, 250,
125,100,95,83,50,47,33,20,10,5
busOffAutoReset: Automatic reset on BUS-OFF on/off
powerSupply: 5 volt power supply on/off
Return: True on success.
void close(void)
Closes the PCAN interface.
bool setFilter(bool filterExtended, Number filterFrom, Number filterTo)
Configures the reception filter.
Arguments:
filterExtended: True if the filer message type is extended (29-bit identifier) or false if the
filter message type is standard (11-bit identifier)
filterFrom: The lowest CAN ID to be received
filterTo: The highest CAN ID to be received
Return: True on success.
bool sendCanMessage(Number type, Number canId, Array<Number> data)
Sends a can message (byte array). If more then 8 data bytes are given several can messages with the
same can id will be sent.
Arguments:
type: The can message type: 0=standard, 1=standard remote-transfer-request, 2=extended,
3= extended remote-transfer-request
canId: The CAN id
data: The CAN data (byte array).
Return: True on success.
bool isConnected(void)
Returns true if connected to a PCAN interface.
String getStatusString(void)
Returns the current status as string.
Number getCurrentStatus(void)
Returns the current status.

Array<Number> getCanParameter(Number parameter)
Reads a PCAN parameter.
Arguments:
parameter: The PCAN parameter. Possible values are:
o0x01=PCAN_DEVICE_NUMBER
o0x02=PCAN_5VOLTS_POWER
o0x07=PCAN_BUSOFF_AUTORESET
o0x08=PCAN_LISTEN_ONLY
o 0x0F=PCAN_RECEIVE_STATUS
o 0x10=PCAN_CONTROLLER_NUMBER
o 0x15=PCAN_CHANNEL_IDENTIFYING
Return: Byte 0= status(1=success, 0=failure), Byte 1= the parameter value
bool setCanParameter(Number parameter, Number data)
Sets a PCAN parameter.
Arguments:
parameter: The PCAN parameter. Possible values are:
o0x01=PCAN_DEVICE_NUMBER
o0x02=PCAN_5VOLTS_POWER
o0x07=PCAN_BUSOFF_AUTORESET
o0x08=PCAN_LISTEN_ONLY
o 0x0F=PCAN_RECEIVE_STATUS
o 0x15=PCAN_CHANNEL_IDENTIFYING
data: The new parameter value
Return: True on success.
void canMessagesReceivedSignal(Array<Number> types, Array<Number> messageIds,
Array<Number> timestamps, Array<Array<Number>> data)
This signal is emitted if a can message (or several) has been received with the main interface.
Arguments:
types: The can types of the received can messages (0=standard, 1=standard remote-transfer-
request, 2=extended, 3= extended remote-transfer-request)
messageIds: The can ids of the received can messages
timestamps: The time-stamps of the received can messages
data: The data of the received can messages (byte arrays)
Script PCAN example
The following Code shows the typically use of the script PCAN class:
function pcanMessagesReceived(type, id, timeStamp, data)
{
for(var index = 0; index < type.length; index++)
{
pcan.sendCanMessage(type[index], id[index], data[index], 0, 0);
}
}
var pcan = scriptInf.createPcanInterface();
pcan.canMessagesReceivedSignal.connect(pcanMessagesReceived);

if(!pcan.open(2, 1000, true, false))
{
scriptThread.messageBox("Critical", "error", 'could not open pcan');
}
if(!pcan.setFilter(true, 0, 0x1fffffffff))
{
scriptThread.messageBox("Critical", "error", 'setFilter failed');
}
//PCAN_CHANNEL_IDENTIFYING=0x15
var valueAndStatus = pcan.getCanParameter(0x15, value);
var status = valueAndStatus >> 15;
var value = valueAndStatus & 0xff;
if(!status)
{
scriptThread.messageBox("Critical", "error", ' getCanParameter failed')
}
Script Aardvark I2C/SPI class
With this class the script can create an Aardvark I2C/SPI interface. To create an Aardvark I2C/SPI
interface object the function ScriptAardvarkI2cSpi aardvarkI2cSpiCreateInterface(void) must be used.
The functions and signals which can be used are described in the following chapters.
AardvarkI2cSpiSettings getInterfaceSettings(void)
Returns the Aardvark I2C/SPI settings (AardvarkI2cSpiSettings).
Example:
var g_interface = scriptInf.aardvarkI2cSpiCreateInterface();
var readSettings = g_interface.getInterfaceSettings();
var consoleString = "connected: <br>" + settingsStructToString(readSettings);
scriptThread.appendTextToConsole(consoleString);
function settingsStructToString(readSettings)
{
var result = "devicePort=" + readSettings.devicePort + " deviceMode=" + readSettings.deviceMode + "
device5VIsOn=" + readSettings.device5VIsOn;
result += " i2cBaudrate=" + readSettings.i2cBaudrate + " i2cSlaveAddress=" +
readSettings.i2cSlaveAddress + " i2cPullupsOn=" + readSettings.i2cPullupsOn + "
spiSSPolarity=" + readSettings.spiSSPolarity;
result += " spiBitorder=" + readSettings.spiBitorder + " spiPhase=" + readSettings.spiPhase + "
spiBaudrate=" + readSettings.spiBaudrate;
for(var i = 0; i < AARDVARD_I2C_SPI_GPIO_COUNT; i++)
{
var mode = "out";
if(readSettings.pinConfigs[i].isInput)
{
if(readSettings.pinConfigs[i].withPullups)
{
mode = "in pullups";
}
else
{
mode = "in";
}
}
result += "<br>"+ g_aardvardI2cGpioGuiElements[i].mode.getAdditionalData(0) + " mode=" +
mode;
result += " "+ g_aardvardI2cGpioGuiElements[i].mode.getAdditionalData(0) + " outValue=" +
readSettings.pinConfigs[i].outValue;
}
return result;
}
void i2cMasterFreeBus(void)
Frees the main interface I2C bus (this function can be used if the no stop condition was created
during the last i2cMasterReadWrite call).

String detectDevices(void)
Frees the main interface I2C bus (this function can be used if the no stop condition was created
during the last masterI2cSendReceiveData call).
bool connectToDevice(AardvarkI2cSpiSettings aardvarkI2cSpiSettings)
Connects to the Aardvark I2C/SPI device/interface.
Arguments:
aardvarkI2cSpiSettings: The interface/device settings (AardvarkI2cSpiSettings)
Return: True on success
Example:
/************************Create the AardvarkI2cSpiSettings structure***************/
settings = Array();
settings.devicePort = parseInt(UI_AardvarkI2cSpiPort.text());
settings.deviceMode = UI_AardvarkI2cSpiMode.currentIndex();
settings.device5VIsOn = (UI_AardvarkI2cSpi5V.currentText() == "On") ? true : false
settings.i2cBaudrate = parseInt(UI_AardvarkI2cBaudrate.text());
settings.i2cSlaveAddress = parseInt(UI_AardvarkI2cSlaveAddress.text());
settings.i2cPullupsOn = (UI_AardvarkI2cPullUp.currentText() == "On") ? true : false
settings.spiPolarity = UI_AardvarkSpiPolarity.currentIndex();
settings.spiSSPolarity = UI_AardvarkSpiSSPolarity.currentIndex();
settings.spiBitorder = UI_AardvarkSpiBitorder.currentIndex();
settings.spiPhase = UI_AardvarkSpiPhase.currentIndex();
settings.spiBaudrate = parseInt(UI_AardvarkSpiBaudrate.text());
settings.pinConfigs = Array();
for(var i = 0; i < AARDVARD_I2C_SPI_GPIO_COUNT; i++)
{
settings.pinConfigs[i] = Array();
settings.pinConfigs[i].isInput =
(g_aardvardI2cGpioGuiElements[i].mode.currentText().indexOf("in") != -1) ? true : false;
settings.pinConfigs[i].withPullups =
(g_aardvardI2cGpioGuiElements[i].mode.currentText().indexOf("in pullup") != -1) ? true : false;
settings.pinConfigs[i].outValue = (g_aardvardI2cGpioGuiElements[i].outValue.currentText() == 1) ?
true : false;
}
/**********************************************************************************/
var g_interface = scriptInf.aardvarkI2cSpiCreateInterface();
if(!g_interface.connectToDevice(settings))
{
scriptThread.appendTextToConsole("connect error");
}
void disconnect(void)
Disconnects from the interface.
bool i2cMasterReadWrite(Number flags, Number slaveAddress, Number
numberOfBytesToRead, Array<Number> dataToSend = Array<Number>(), Number)
Accesses the I2C bus (write/read). The received data can be read with
i2cMasterReadLastReceivedData.
Arguments:
flags: The I2C flags: 0x00= no flags, 0x01= 10bit address, 0x02=combined FMT,0x04= no stop
condition (use i2cMasterFreeBus to generate the stop condition later)
slaveAddress: The I2C address
numberOfBytesToRead: The number of bytes wich shall be read.
dataToSend: The bytes which shall be send/written (if this array is empty only a read is
performed)

Return: True on success
Example:
var result = g_interface.i2cMasterReadWrite(0, 0x01, 4, Array(1,2,3,4));
Array<Number> i2cMasterReadLastReceivedData(void)
Returns last received data from the I2C interface (master mode).
bool spiMasterSendReceiveData(Array<Number> dataToSend)
Sends and receive data with the SPI interface (master mode). The received data must be read with
spiMasterReadLastReceivedData.
Arguments:
dataToSend: The bytes which shall be send/written (if this array is empty only a read is
performed)
Return: True on success
Example:
var result = g_interface.spiMasterSendReceiveData(Array(1,2,3,4));
Array<Number> spiMasterReadLastReceivedData(void)
Returns last received data from the SPI interface (master mode).
bool setOutput(Number pinIndex, bool high)
Sets the value of an output pin.
Arguments:
pinIndex: 0=Pin1/SCL, 1=Pin3/SDA, 2=Pin5/MISO, 3=Pin7/SCK, 4=Pin8/MOSI, 5=Pin9/SS0
high: True for 1 and false for 0
Return: True on success
bool changePinConfiguration(Number pinIndex, bool isInput, bool withPullups=false)
Changes the configuration of a pin.
Arguments:
pinIndex: 0=Pin1/SCL, 1=Pin3/SDA, 2=Pin5/MISO, 3=Pin7/SCK, 4=Pin8/MOSI, 5=Pin9/SS0.
isInput: True if the pin shall be configured as input.
withPullups: True of the input pin shall have a pullup (not possible with output).
Return: True on success
Array<bool> readAllInputs(void)
Reads all inputs.
The indexes of the result array are:0=Pin1/SCL, 1=Pin3/SDA, 2=Pin5/MISO, 3=Pin7/SCK, 4=Pin8/MOSI,
5=Pin9/SS0.
bool isConnected(void)
Returns true if the interface is connected.
bool slaveSetResponse(Array<Number> response)
Sets the slave (I2C/SPI) response. slaveDataSentSignal can be used to receive the sent data and
slaveDataReceivedSignal can be uses to read the received data.

If more bytes are requested in a transaction (from the master), the response will be wrapped as
many times as necessary to complete the transaction. The device buffer space is 64 bytes.
Arguments:
response: The slave response.
Return: True on success
void aardvarkI2cSpiInputStatesChangedSignal(Array<bool> states)
Is emitted if the input states of the Ardvard I2C/SPI device (main interface) have been changed.
Arguments:
states: The states of the inputs (true=1. false=0). Elements of state are:0=Pin1/SCL,
1=Pin3/SDA, 2=Pin5/MISO, 3=Pin7/SCK, 4=Pin8/MOSI, 5=Pin9/SS0.
void slaveDataSentSignal(Array<Number> data)
Is called if the interface is a I2C or SPI slave and has sent data.
Arguments:
data: The sent data.
void slaveDataReceivedSignal(Array<Number> data)
Is called if the interface is a I2C or SPI slave and has received data.
Arguments:
data: The received data.
I2C master example
This example sends and reads every second data with the Aardvark I2C interface (master mode). The
sent and received data is shown in the script window console.
//Is called if the timer times out.
function timerSlot()
{
if(g_interface.isConnected())
{
var sendData = Array(1, 2, 3, 4, 5);
if(!g_interface.i2cMasterReadWrite(0, 0x2, 4, sendData ))
{
scriptThread.appendTextToConsole("send failed");
}
else
{
scriptThread.appendTextToConsole("I2C data sent: data=" +
conv.byteArrayToHexString(sendData));
var receivedData = g_interface.i2cMasterReadLastReceivedData();
if(receivedData.length != 0)
{
scriptThread.appendTextToConsole("I2C data received: data=" +
conv.byteArrayToHexString(receivedData));
}
}
}
}
var g_interface = scriptInf.aardvarkI2cSpiCreateInterface();
//Get the current Aardvard I2C/SPI settings.
settings = scriptInf.aardvarkI2cSpiGetMainInterfaceSettings();
settings.devicePort = 0;
settings.deviceMode = 0;//I2C master
settings.device5VIsOn = false;
settings.i2cBaudrate = 400;
settings.i2cPullupsOn = true;

//Configure all pins to input without pullups.
for(var i = 0; i < 6; i++)
{
settings.pinConfigs[i] = Array();
settings.pinConfigs[i].isInput = true;
settings.pinConfigs[i].withPullups = false;
settings.pinConfigs[i].outValue = 0;
}
if(!g_interface.connectToDevice(settings))
{
scriptThread.appendTextToConsole("connectToDevice failed: " + result);
scriptThread.stopScript();
}
var timer = scriptThread.createTimer();
timer.timeoutSignal.connect(timerSlot);
timer.start(1000);
I2C slave example
This example reads/sends data from/to an I2C master (Aardvark I2C interface, slave mode). The sent
and received data is shown in the script window console.
function slaveDataSentSlot(data)
{
scriptThread.appendTextToConsole("slave data sent: data=" + conv.byteArrayToHexString(data));
}
function slaveDataReceivedSlot(data)
{
scriptThread.appendTextToConsole("slave data received: data=" + conv.byteArrayToHexString(data));
}
var g_interface = scriptInf.aardvarkI2cSpiCreateInterface();
//Get the current Aardvard I2C/SPI settings.
settings = scriptInf.aardvarkI2cSpiGetMainInterfaceSettings();
settings.devicePort = 0;
settings.deviceMode = 1;//I2C slave
settings.device5VIsOn = false;
settings.i2cBaudrate = 400;
settings.i2cPullupsOn = true;
//Configure all pins to input without pullups.
for(var i = 0; i < 6; i++)
{
settings.pinConfigs[i] = Array();
settings.pinConfigs[i].isInput = true;
settings.pinConfigs[i].withPullups = false;
settings.pinConfigs[i].outValue = 0;
}
if(!g_interface.connectToDevice(settings))
{
scriptThread.appendTextToConsole("connectToDevice failed: " + result);
scriptThread.stopScript();
}
if(!g_interface.slaveSetResponse(Array(1, 2, 3, 4, 5)))
{
scriptThread.appendTextToConsole("slaveSetResponse failed");
scriptThread.stopScript();
}
g_interface.slaveDataSentSignal.connect(slaveDataSentSlot);
g_interface.slaveDataReceivedSignal.connect(slaveDataReceivedSlot);
SPI master example
This example sends and reads every second data with the Aardvark SPI interface (master mode). The
received data is shown in the script window console.
//Is called if the timer times out.
function timerSlot()

{
if(g_interface.isConnected())
{
var sendData = Array(1, 2, 3, 4, 5);
if(!g_interface.spiMasterSendReceiveData(sendData ))
{
scriptThread.appendTextToConsole("send failed");
}
else
{
scriptThread.appendTextToConsole("SPI data sent: data=" +
conv.byteArrayToHexString(sendData));
var receivedData = g_interface.spiMasterReadLastReceivedData();
if(receivedData.length != 0)
{
scriptThread.appendTextToConsole("SPI data received: data=" +
conv.byteArrayToHexString(receivedData));
}
}
}
}
var g_interface = scriptInf.aardvarkI2cSpiCreateInterface();
//Get the current Aardvard I2C/SPI settings.
settings = scriptInf.aardvarkI2cSpiGetMainInterfaceSettings();
settings.devicePort = 0;
settings.deviceMode = 2;//SPI master
settings.device5VIsOn = false;
settings.spiPolarity = 0; //rising/falling
settings.spiSSPolarity = 0;//active low
settings.spiBitorder = 0;//MSB
settings.spiPhase = 0;//sample setup
settings.spiBaudrate = 1000;
//Configure all pins to input without pullups.
for(var i = 0; i < 6; i++)
{
settings.pinConfigs[i] = Array();
settings.pinConfigs[i].isInput = true;
settings.pinConfigs[i].withPullups = false;
settings.pinConfigs[i].outValue = 0;
}
if(!g_interface.connectToDevice(settings))
{
scriptThread.appendTextToConsole("connectToDevice failed: " + result);
scriptThread.stopScript();
}
var timer = scriptThread.createTimer();
timer.timeoutSignal.connect(timerSlot);
timer.start(1000);
SPI slave example
This example reads/sends data from/to an SPI master (Aardvark SPI interface, slave mode). The sent
and received data is shown in the script window console.
function slaveDataSentSlot(data)
{
scriptThread.appendTextToConsole("slave data sent: data=" + conv.byteArrayToHexString(data));
}
function slaveDataReceivedSlot(data)
{
scriptThread.appendTextToConsole("slave data received: data=" + conv.byteArrayToHexString(data));
}
var g_interface = scriptInf.aardvarkI2cSpiCreateInterface();
//Get the current Aardvard I2C/SPI settings.
settings = scriptInf.aardvarkI2cSpiGetMainInterfaceSettings();
settings.devicePort = 0;
settings.deviceMode = 3;//SPI slave
settings.device5VIsOn = false;

settings.spiPolarity = 0; //rising/falling
settings.spiSSPolarity = 0;//active low
settings.spiBitorder = 0;//MSB
settings.spiPhase = 0;//sample setup
settings.spiBaudrate = 1000;
//Configure all pins to input without pullups.
for(var i = 0; i < 6; i++)
{
settings.pinConfigs[i] = Array();
settings.pinConfigs[i].isInput = true;
settings.pinConfigs[i].withPullups = false;
settings.pinConfigs[i].outValue = 0;
}
if(!g_interface.connectToDevice(settings))
{
scriptThread.appendTextToConsole("connectToDevice failed: " + result);
scriptThread.stopScript();
}
if(!g_interface.slaveSetResponse(Array(1, 2, 3, 4, 5)))
{
scriptThread.appendTextToConsole("slaveSetResponse failed");
scriptThread.stopScript();
}
g_interface.slaveDataSentSignal.connect(slaveDataSentSlot);
g_interface.slaveDataReceivedSignal.connect(slaveDataReceivedSlot);
Script timer class
Provides a repetitive timer (QTimer) for generating periodically events. The functions and signals
which can be used from script are described in the following chapters.
void start(Number msec)
Starts or restarts the timer with a timeout interval of msec milliseconds. If the timer is already
running, it will be stopped and restarted. If the timer is a single-shot timer, then the timer will be
activated only once.
Arguments:
msec: The timer interval in milliseconds
void start(void)
Starts or restarts the timer with the timeout interval set in setInterval. If the timer is already running,
it will be stopped and restarted. If the timer is a single-shot timer, then the timer will be activated
only once.
void stop(void)
Stops the timer.
void setSingleShot(bool singleShot)
Sets the timer to single-shot or non-single-shot. A single-shot timer fires only once, non-single-shot
timers fire every interval milliseconds.
Arguments:
singleShot: True if the timer is a single-shot timer.
bool isSingleShot(void)
Returns true if the timer is a single-shot timer.
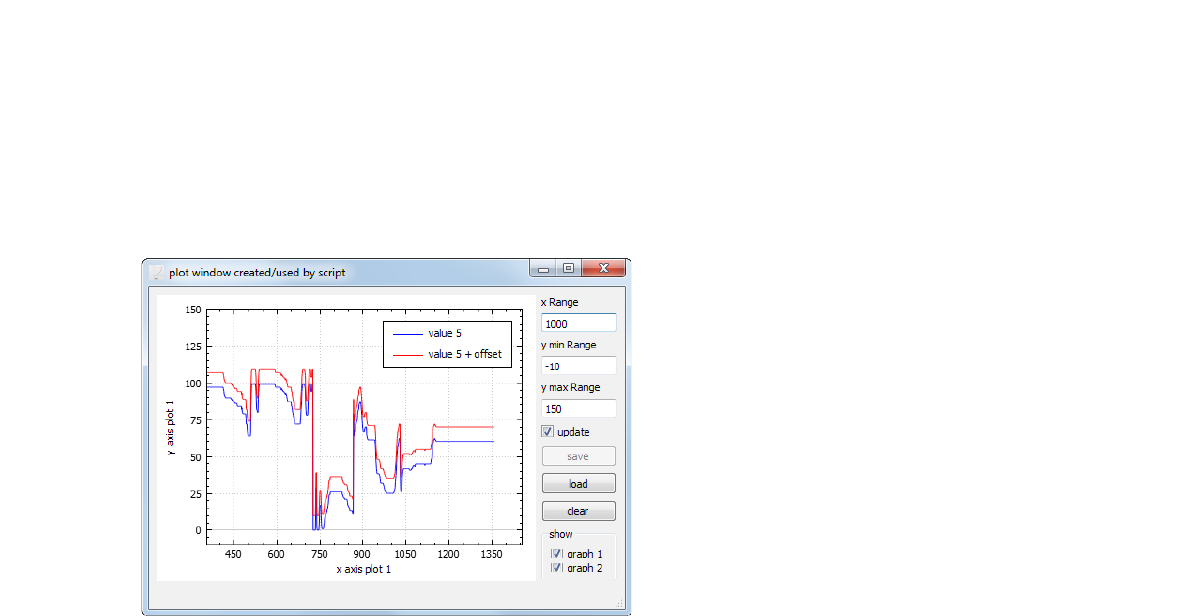
void setInterval(Number msec)
Sets the timer interval.
Arguments:
msec: The timer interval in milliseconds.
Number interval(void)
Returns the timer interval.
bool isActive(void)
Returns true if the timer is running, otherwise false.
Number remainingTime(void)
Returns the timer's remaining value in milliseconds left until the timeout. If the timer is inactive, the
returned value will be -1. If the timer is overdue, the returned value will be 0.
void timeoutSignal (void)
This signal is emitted if the timer interval has been elapsed.
Timer example
The following Code shows the typically use of the timer class:
function updateConsole()
{
scriptThread.appendTextToConsole("updateConsole function called")
}
var consoleTimer = scriptThread.createTimer()
consoleTimer.timeoutSignal.connect(updateConsole);
consoleTimer.start(200);
Script plot window class
This class provides functions to plot data into a plot window.
This class is derived from the script widget class. Therefore all functions from the script widget class
can be used.
The additional functions and signals which can be used from script are described in the following
chapters.

Note: To plot data in an existing script GUI (and not in a separate window) the Script plot widget class
can be used.
Number addGraph(String color, String penStyle, String name)
This function adds a graph to the diagram.
Arguments:
color: The color of the graph (svg color keyword, e.g. "blue", "red", "yellow", "green",
"black", …).
penStyle: The pen style of the graph. Allowed values are: "dash", "dot" and "solid"
name: The name of the graph
Return: The index of the added graph
void setInitialAxisRanges(Number xRange, Number yMinValue, Number yMaxValue, bool
addSpaceAfterBiggestValues = true)
Sets the initial ranges of the diagram.
Arguments:
xRange: The range of the x axis (the x axis starts always with 0)
yMinValue: The min. values of the y axis
yMaxValue: The max. value of the y axis
addSpaceAfterBiggestValues: True if a space shall be added after the biggest value of a graph
bool addDataToGraph(Number graphIndex, Number x, Number y, bool force = false)
Adds one point to a graph.
Arguments:
graphIndex: The graph index
x: The x value of the point
y: The y value of the point
force: If true then the data is added even if auto update is disabled (setAutoUpdateEnabled)
void setAxisLabels(String xAxisLabel, String yAxisLabel)
Sets the axis label.
Arguments:
xAxisLabel: The label of the x axis
yAxisLabel: The label of the y axis
void showLegend(bool show)
This function shows or hides the diagram legend.
Arguments:
show: True=show, false=hide
void clearGraphs(void)
This function clears the data of all graphs.

void removeAllGraphs(void)
This function removes all graphs.
void setMaxDataPointsPerGraph(Number maxDataPointsPerGraph)
Sets the max. number of data points per graph (the default is 10.000.000.).
void showHelperElements(bool showXRange, bool showYRange, bool showUpdate, bool
showSave, bool showLoad, bool showClear, bool showGraphVisibility, Number
graphVisibilityMaxSize=80, bool showLegend=true)
Sets the visibility of several plot window elements.
Arguments:
showXRange: True if the x range input field shall be visible
showYRange: True if the y range input fields shall be visible
showUpdate: True if the x update check box shall be visible
showSave: True if the save button shall be visible
showLoad: True if the load button shall be visible
showClear: True if the clear button shall be visible
showGraphVisibility: True if the show group box
graphVisibilityMaxSize: The max. width of the show group box
showLegend: True if the show legend check box shall be visible
void setUpdateInterval(Number updateInterval)
Sets the update-interval.
Arguments:
updateInterval: The new interval
void setScatterStyle(Number graphIndex, String style, Number size)
Sets the visual appearance of single data points in the plot.
Arguments:
graphIndex: The graph index.
style: The style of the single data points. Possible values:
oNone: No scatter symbols are drawn.
oDot: A single pixel.
oCross: A cross.
oPlus: A plus.
oCircle: A circle.
oDisc: A circle which is filled with the pen's color.
oSquare: A square.
oDiamond: A diamond.
oStar: A star with eight arms, i.e. a combination of cross and plus.
oTriangle: An equilateral triangle, standing on baseline.
oTriangleInverted: An equilateral triangle, standing on corner.
oCrossSquare: A square with a cross inside.
oPlusSquare: A square with a plus inside.
oCrossCircle: A circle with a cross inside.

oPlusCircle: A circle with a plus inside.
oPeace: A circle, with one vertical and two downward diagonal lines.
size: The size of the single data points.
void setLineStyle(Number graphIndex, String style)
Sets the line style of a graph.
Arguments:
graphIndex: The graph index.
style: The style of the single data points. Possible values:
oNone: Data points are not connected with any lines (e.g. data only represented with
symbols according to the scatter style (is set with setScatterStyle)).
oLine: Data points are connected by a straight line.
oStepLeft: Line is drawn as steps where the step height is the value of the left data
point.
oStepRight: Line is drawn as steps where the step height is the value of the right data
point.
oStepCenter: Line is drawn as steps where the step is in between two data points.
oImpulse: Each data point is represented by a line parallel to the value axis, which
reaches from the data point to the zero-value-line.
void removeDataRangeFromGraph(Number graphIndex, Number xFrom, Number xTo, bool
force = false)
Removes all data points with (sort-)keys between xFrom and xTo. If xFrom is greater or equal to xTo,
the function does nothing.
Arguments:
graphIndex: The graph index.
xFrom: The start position.
xTo: The end position.
force: If true then the data is removed even if auto update is disabled
(setAutoUpdateEnabled)
void setCurrentAxisRanges(Number xMinValue, Number xMaxValue, Number yMinValue,
Number yMaxValue)
The function sets the current ranges of the diagram. Automatic update should be disabled (see
setAutoUpdateEnabled).
Arguments:
xMinValue: The min. values of the x axis.
xMaxValue: The max. value of the x axis.
yMinValue: The min. values of the y axis.
YmaxValue: The max. value of the y axis.
void setAutoUpdateEnabled(bool enabled)
Sets the automatic update enabled state.

bool isAutoUpdateEnabled(void)
Returns the automatic update enabled state.
void updatePlot(void)
Repaints the plot widget.
void setLineWidth(Number graphIndex, Number width)
This function sets the line width in pixel of a graph.
Arguments:
graphIndex: The graph index.
width: The line width (pixel).
Array<ScriptPlotDataPoint> getDataFromGraph(Number graphIndex, Number xStart,
Number count)
This function returns several data points from a graph.
Arguments:
graphIndex: The graph index.
xStart: The x coordinate of the first data point.
count: Number of points to grab. If negative then this function grabs backwards.
Return: Array with the data points (ScriptPlotDataPoint).
Note: The properties of ScriptPlotDataPoint are x and y.
void plotMousePressSignal(Number xValue, Number yValue, Number mouseButton)
Is emitted if the user press a mouse button inside the plot.
Arguments:
xValue: The x-position of the click
yValue: The y-position of the click
mouseButton: The used mouse button (enumeration Qt::MouseButton)
void clearButtonPressedSignal (void)
Is emitted if the user clicks the clear button.
void closedSignal (void)
This signal is emitted if the plot window has been closed.
void xRangeChangedSignal(Number newValue)
Is emitted if the user changes the value in the x-range textedit.
Loading and saving graphs
With the save button all visible graphs can be stored into an image or a comma separated value file
(csv). The csv file can be loaded with the load button. The csv file has following format:
'name of the graph','color of the graph (rgb)','graph style (Qt::PenStyle)',x1:y1,x2:y2,...
Note: The single graphs are separated with a \n.
Example:

graph 1,#0000ff,1,0:0,1:0,2:0,3:0,4:0
graph 2,#00ff00,2,0:0,1:0,2:0,3:0,4:0
Plot window example
The following Code shows the typically use of the plot window class:
function plotWindowClosedSlot()
{
scriptThread.stopScript()
}
function clearButtonPressed()
{
plotWindow.clearGraphs();
}
var plotWindow = scriptThread.createPlotWindow();
plotWindow.setWindowTitle("plot window created/used by script");
plotWindow.setAxisLabels("x axis plot 1", "y axis plot 1");
plotWindow.showLegend(true);
plotWindow.setInitialAxisRanges(100, 0, 15);
var plotWindowGraph1Index = plotWindow.addGraph("blue", "solid", "graph 1");
var plotWindowGraph2Index = plotWindow.addGraph("red", "dot", "graph 2");
plotWindow.showHelperElements(true, true, true, true, true, true);
plotWindow.show();
plotWindow.clearButtonPressedSignal.connect(clearButtonPressed)
plotWindow.closedSignal.connect(plotWindowClosedSlot)
var x = 0;
var y = 0;
for(var i = 0; i < 100; i++)
{
x++;
y++;
plotWindow.addDataToGraph(plotWindowGraph1Index, x, y);
plotWindow.addDataToGraph(plotWindowGraph2Index, x + 10, y);
if(y > 10)
{
y = 0;
}
}
User interface classes
This chapter describes all worker script GUI classes.
The names of all GUI objects (in a worker script) have the following style: UI_"object name in
QtDesigner".
Example:
The object name of a button in QtDesigner is MyButton. This button can be accessed by the object
name UI_MyButton.
Following (Qt) GUI elements are supported:
•QDialog
•QMainWindow
•QTabWidget
•QToolBox
•QGroupBox
•QLabel
•QAction
•QStatusBar
•QPushButton
•QToolButton
•QCheckBox
•QRadioButton
•QComboBox

•QFontComboBox
•QLineEdit
•QTableWidget
•QListWidget
•QTreeWidget
•QTreeWidgetItem
•QTextEdit
•QProgressBar
•QSlider
•QSpinBox
•QDoubleSpinBox
•QTimeEdit
•QDateEdit
•QDateTimeEdit
•QCalendarWidget
•QSplitter
•QDial
Note: Only the supported GUI elements can be accessed by worker scripts.
Script dialog
A QDialog in the user interface file is passed to the worker script via a ScriptDialog class object.
This class is derived from the ScriptWidget class. Therefore all functions from the script widget class
can be used.
The additional functions and signals which can be used from script are described in the following
chapters.
void finishedSignal(void)
This signal is emitted if the user closes the dialog.
creating shortcuts
For creating shortcuts (e.g. Ctrl+V) void createShortCut(QString keys, QScriptValue scriptFunction)
can be used.
Script dialog example
The following Code shows the typically use of the ScriptDialog class:
function DialogFinished()
{
UI_testTextEdit.append("DialogFinished");
scriptThread.stopScript()
}
UI_Dialog.setWindowTitle("gui example");
Ui_Dialog.setWindowPositionAndSize("100,100,500,500");
UI_Dialog.finishedSignal.connect(DialogFinished);
Script main window
A QMainWindow in the user interface file is passed to the script via a ScriptMainWindow class object.
This class is derived from the ScriptWidget class. Therefore all functions from the script widget class
can be used.
The additional functions and signals which can be used from script are described in the following
chapters.

creating shortcuts
For creating shortcuts (e.g. Ctrl+V):
•menu items with shortcuts can be created (only main windows can have menus) in
QtDesigner (the menu items can be accessed with Script action (menu entry))
•void createShortCut(QString keys, QScriptValue scriptFunction) can be used
void finishedSignal(void)
This signal is emitted if the user closes the window.
void showMessage(String text, Number duration)
Shows a message in the status bar.
Arguments:
text: The message text
duration: The duration of the message (after this time the status bar will be cleared)
Script main window example
The following Code shows the typically use of the ScriptMainWindow class:
function MainWindowFinished(e)
{
scriptThread.stopScript()
}
UI_MainWindow.finishedSignal.connect(MainWindowFinished);
UI_MainWindow.setWindowTitle("main window example");
UI_MainWindow.setWindowPositionAndSize("100,100,300,300");
UI_MainWindow.showMessage("new message", 1000);
Script tab widget
A QTabWidget in the user interface file is passed to the worker script via a ScriptTab widget class
object. This class is derived from the ScriptWidget class. Therefore all functions from the
ScriptWidget class can be used.
The additional functions and signals which can be used from script are described in the following
chapters.
void setTabText(Number index, String text)
Sets the tab text.
Arguments:
index: The tab index
text: The new text
void String tabText(Number index)
Returns the tab text.
Arguments:
index: The tab index
void setCurrentIndex(Number index)
Sets the current tab index.

Arguments:
index: The new tab index
Number currentIndex(void)
Returns the current tab index.
void currentTabChangedSignal(Number index)
This signal is emitted if the current tab has been changed.
Script tab widget example
The following Code shows the typically use of the ScriptTabWidget class:
//the user has changed the tab index
function CurrentTabChanged(index)
{
UI_testTextEdit.append("CurrentTabChanged: " + index);
}
UI_tabWidget1.setTabText(0, "new text");
UI_tabWidget1.setCurrentIndex(UI_tabWidget1.currentIndex() + 1);
UI_tabWidget1.currentTabChangedSignal.connect(CurrentTabChanged);
Script tool box
A QToolBox in the user interface file is passed to the worker script via a ScriptToolBox class object.
This class is derived from the ScriptWidget class. Therefore all functions from the ScriptWidget class
can be used.
The functions and signals which can be used from script are described in the following chapters.
void setItemText(Number index, String text)
Sets the item text.
Arguments:
index: The item index
text: The new text
void String itemText(Number index)
Returns the item text.
Arguments:
index: The item index
void setCurrentIndex(Number index)
Sets the current item index.
Arguments:
index: The new item index
Number currentIndex(void)
Returns the current item index.
Number currentItemChangedSignal(Number index)
This signal is emitted if the current item has been changed.

Script tool box example
The following Code shows the typically use of the ScriptToolBox class:
//the user has changed the item index
function ToolBoxCurrentItemChanged(index)
{
UI_testTextEdit.append("ToolBoxCurrentItemChanged: " + index);
}
UI_toolBox.setItemText(1, "new text");
UI_toolBox.setCurrentIndex(UI_toolBox.currentIndex() + 1);
UI_toolBox.currentItemChangedSignal.connect(ToolBoxCurrentItemChanged);
Script group box
A QGroupBox in the user interface file is passed to the worker script via a ScriptGroupBox class
object. This class is derived from the ScriptWidget class. Therefore all functions from the
ScriptWidget class can be used.
The additional functions and signals which can be used from script are described in the following
chapters.
void setTitle(String title)
Sets the group box title.
Arguments:
title: The new title
String title(void)
Returns the group box title.
ScriptPlotWidget addPlotWidget(void)
Adds a plot widget to the group box (see chapter Script plot widget for more details).
ScriptCanvas2DWidget addCanvas2DWidget(void)
Adds a ScriptCanvas2DWidget to the group box (see chapter Script Canvas2D for more details).
Script group box example
The following Code shows the typically use of the ScriptGroupBox class:
UI_groupBoxProgressAndSlider.setTitle("new title");
Script label
A QLabel in the user interface file is passed to the worker script via a ScriptLabel class object.
This class is derived from the ScriptWidget class. Therefore all functions from the ScriptWidget class
can be used.
The additional functions and signals which can be used from script are described in the following
chapters.
void setText(String text)
Sets the label text.
Arguments:
text: The new text

Example:
UI_createProcessProgramLabel.setText("program");
String text(void)
Returns the label text.
Example:
var string = UI_createProcessProgramLabel.text();
Script action (menu entry)
A QAction (menu entry) in the user interface file is passed to the worker script via a ScriptAction class
object.
Note: Menus can be created in QtDesigner (only main windows can have menus).
Important: This class is not derived from the ScriptWidget class. Therefore the functions from the
ScriptWidget class can not be used.
The functions and signals which can be used from script are described in the following chapters.
void setText(String text)
Sets the action text.
Arguments:
text: The new text
String text(void)
Returns the action text.
void setChecked(bool checked)
Sets the checked state of the action.
Arguments:
check: True=checked, false=not checked
bool isChecked(void)
Returns true if the action is checked.
void clickedSignal (void)
This signal is emitted if the user presses the action.
Script action example
The following Code shows the typically use of the ScriptAction class:
function myActionClicked()
{
scriptThread.appendTextToConsole("myActionClicked");
}
UI_myAction.setText("new text")
UI_myAction.clickedSignal.connect(myActionClicked);
Note: An example can be found in: exampleScripts\WorkerScripts\TestMainWindow
Script button
A QPushButton in the user interface file is passed to the worker script via a ScriptButton class object.
This class is derived from the ScriptWidget class. Therefore all functions from the ScriptWidget class
can be used.

The additional functions and signals which can be used from script are described in the following
chapters.
void setText(String text)
Sets the button text.
Arguments:
text: The new text
String text(void)
Returns the button text.
void setIcon(String iconFileName)
Sets the icon of the button.
Arguments:
iconFileName: The path to the icon (absolute path)
void setCheckable(bool checkable)
Sets the checkable property of the button.
Arguments:
checkable: The new value of the checkable property
bool isCheckable(void)
Returns true if the button is checkable and false if not.
void setChecked(bool checked)
Checks or unchecks the button.
Arguments:
checked: true=check, false=uncheck
bool isChecked(void)
Returns true if the button is checked and false if not.
void clickedSignal (void)
This signal is emitted if the user presses the button.
Script button example
The following Code shows the typically use of the ScriptButton class:
function myButtonClicked()
{
scriptThread.appendTextToConsole("myButtonClicked");
//disable the button
UI_myButton.setEnabled(false);
}
UI_myButton.setText("new text")
UI_myButton.setIcon(scriptThread.createAbsolutePath("icons/button.gif")
UI_myButton.clickedSignal.connect(myButtonClicked);

Script tool button
A QToolButton in the user interface file is passed to the worker script via a ScriptToolButton class
object. This class is derived from the ScriptWidget class. Therefore all functions from the
ScriptWidget class can be used.
The additional functions and signals which can be used from script are described in the following
chapters.
void setText(String text)
Sets the button text.
Arguments:
text: The new text
String text(void)
Returns the button text.
void setIcon(String iconFileName)
Sets the icon of the button.
Arguments:
iconFileName: The path to the icon (absolute path)
void setCheckable(bool checkable)
Sets the checkable property of the button.
Arguments:
checkable: The new value of the checkable property
bool isCheckable(void)
Returns true if the button is checkable and false if not.
void setChecked(bool checked)
Checks or unchecks the button.
Arguments:
checked: true=check, false=uncheck
bool isChecked(void)
Returns true if the button is checked and false if not.
void clickedSignal (void)
This signal is emitted if the user presses the button.
Script tool button example
The following Code shows the typically use of the ScriptToolButton class:
function myButtonClicked()
{
scriptThread.appendTextToConsole("myButtonClicked");
//disable the button
UI_myButton.setEnabled(false);
}
UI_myButton.setText("new text")
UI_myButton.setIcon(scriptThread.createAbsolutePath("icons/button.gif")

UI_myButton.clickedSignal.connect(myButtonClicked);
Script check box
A QCheckBox in the user interface file is passed to the worker script via a ScriptCheckBox class object.
This class is derived from the ScriptWidget class. Therefore all functions from the ScriptWidget class
can be used.
The additional functions and signals which can be used from script are described in the following
chapters.
void setText(String text)
Sets the check box text.
Arguments:
text: The new text
String text(void)
Returns the check box text.
void setChecked(bool checked)
Sets the checked state of the check box.
Arguments:
check: True=checked, false=not checked
bool isChecked(void)
Returns true if the check box is checked.
void clickedSignal (void)
This signal is emitted if the user presses the check box.
Script check box example
The following Code shows the typically use of the ScriptCheckBox class:
function myCheckBoxClicked()
{
scriptThread.appendTextToConsole("myCheckBoxClicked");
//disable the check box
UI_myCheckBox.setEnabled(false);
}
UI_myCheckBox.setText("new text")
UI_myCheckBox.clickedSignal.connect(myCheckBoxClicked);
Script radio button
A QRadioButton in the user interface file is passed to the worker script via a ScriptRadioButton class
object. This class is derived from the ScriptWidget class. Therefore all functions from the
ScriptWidget class can be used.
The additional functions and signals which can be used from script are described in the following
chapters.
Note: If several radio buttons are in the same area, only one radio button can be checked (all other
are unchecked automatically).

void setText(String text)
Sets the radio button text.
Arguments:
text: The new text
String text(void)
Returns the radio button text.
void setChecked(bool checked)
Sets the checked state of the radio button.
Arguments:
check: True=checked, false=not checked
bool isChecked(void)
Returns true if the radio button is checked.
void clickedSignal (void)
This signal is emitted if the user presses the radio button.
Script radio button example
The following Code shows the typically use of the ScriptRadioButton class:
function myRadioButtonClicked()
{
scriptThread.appendTextToConsole("myRadioButtonClicked");
//disable the check box
UI_myRadioButton.setEnabled(false);
}
UI_myRadioButton.setText("new text")
UI_myRadioButton.clickedSignal.connect(myRadioButtonClicked);
Script combo box and font combo box
A QComboBox and a QFontComboBox in the user interface file is passed to the worker script via a
ScriptComboBox class object. This class is derived from the ScriptWidget class. Therefore all functions
from the ScriptWidget class can be used.
The additional functions and signals which can be used from script are described in the following
chapters.
void addItem(String text)
Adds one item to the combo box.
Arguments:
text: The text of the new item
void insertItem(Number index, String text)
Inserts one item into the combo box.
Arguments:
index: The index of the new item
text: The text of the new item

void removeItem(Number index)
Removes one item from the combo box.
Arguments:
index: The index of the item
void setEditable(bool editable)
Sets the editable property of the combo box. If the editable property is true, then the text of the
selected item can be changed.
Arguments:
editable: True=editable, false=not editable
bool isEditable(void)
Returns true if the combo box is editable. If the editable property is true, then the text of the
selected item can be changed.
Number currentIndex(void)
Returns the index of the current selected item.
String currentText(void)
Returns the text of the current selected item.
String itemText(Number index)
Returns the item (identified by index) text.
Arguments:
index: The index of the item
Return: The item text
void setItemText(Number index, String text)
Sets the item (identified by index) text.
Arguments:
index: The index of the item
text: The new text
void setCurrentText(String text)
Sets the text of the current selected item.
Arguments:
text: The new text
void setCurrentIndex(Number index)
Sets the index of the current selected item.
Arguments:
index: The index of the new selected item
Number count(void)
Returns the number of items in the combo box.

void clear(void)
Clears the combo box and removes all items.
void currentTextChangedSignal(String newText)
This signal is emitted if the text of the current selected item has been changed.
Arguments:
newText: The new text of the changed item
void currentIndexChangedSignal(Number currentSelectedIndex)
This signal is emitted if the current selected index has been changed.
Arguments:
currentSelectedIndex: The index of the changed item
Script combo box example
The following Code shows the typically use of the ScriptComboBox class:
function myComboBoxCurrentTextChanged(text)
{
UI_testTextEdit.append("myComboBoxCurrentTextChanged");
}
UI_myComboBox.setCurrentText("myItem");
UI_myComboBox.currentTextChangedSignal.connect(myComboBoxCurrentTextChanged)
Script line edit
A QLineEdit in the user interface file is passed to the worker script via a ScriptLineEdit class object.
This class is derived from the ScriptWidget class. Therefore all functions from the ScriptWidget class
can be used.
The additional functions and signals which can be used from script are described in the following
chapters.
void setText(String text)
Sets the text of the line edit.
Arguments:
text: The new text
void clear(void)
Clears the line edit.
String text(void)
Returns the text of the line exit.
bool isReadOnly(void)
Returns true of the line edit is editable.
void setReadOnly(bool readOnly)
Sets the editable property of the line edit.
Arguments:
readOnly: True=read only, false=editable

void addIntValidator(Number bottom, Number top)
Adds an int validator to the line edit (this ensures that the line edit contains only integer).
Arguments:
bottom: The min. value
top: The max. value
void addDoubleValidator(Number bottom, Number top, Number decimals)
Adds a double validator to the line edit (this ensures that the line edit contains only double values).
Arguments:
bottom: The min. value
top: The max. value
decimals: the max. number of digits after the decimal point
void addRexpExValidator(String pattern, bool caseSensitiv)
Adds a regular expression validator to the line edit (this ensures that the line edit contains only the
allowed values which are specified in the pattern).
Arguments:
pattern: The pattern (see QRegExp class for more details, http://doc.qt.io/qt-
4.8/QRegExp.html)
caseSensitiv: True if the pattern shall be matched case sensitively
void textChangedSignal(String currentText)
This signal is emitted if the text of the line edit has been changed.
Arguments:
currentText: The current text of the line edit
Script line edit example
The following Code shows the typically use of the ScriptLineEdit class:
function textChangedSlot(text)
{
UI_testTextEdit.append("textChangedSlot: " + text);
}
UI_lineEdit.addIntValidator(0, 2000);
UI_lineEdit.textChangedSignal.connect(textChangedSlot);
var text = UI_lineEdit.text()
Script table widget
A QTableWidget in the user interface file is passed to the worker script via a ScriptTableWidget class
object. This class is derived from the ScriptWidget class. Therefore all functions from the
ScriptWidget class can be used.
The additional functions and signals which can be used from script are described in the following
chapters.
Note:
A selected row in the table can be moved up or down while holding the left mouse button at the row
and moving the mouse up and/or down.

String getText(Number row, Number column)
Returns the text of one cell.
void setText(Number row, Number column, String text)
Sets the text of one cell.
Arguments:
row: The row of the cell
column: The column of the cell
text: The new text
void setVerticalHeaderLabel(Number row, String text)
Sets a vertical header label.
Arguments:
row: The row of the header
text: The new text
void setHorizontalHeaderLabel(Number column, String text)
Sets a horizontal header label.
Arguments:
column: the column of the header
text: The new text
void setCellEditable(Number row, Number column, bool editable)
Makes on cell editable or not editable.
Arguments:
row: The row of the cell
column: The column of the cell
editable: True=editable, false=not editable
void setRowCount(Number rows)
Sets the row count.
Arguments:
rows: The new number of rows
void rowCount (void)
Return the row count.
void setColumnCount(Number columns)
Sets the column count.
Arguments:
columns: The new number of columns
Number columnCount(void)
Return the column count.
void insertRow(Number row)
Inserts one row at row.

void insertRowWithContent(Number row, Array<String> texts, Array<String>
backgroundColors, Array<String> foregroundColors)
This function inserts one row at row and fills the cells with content.
Note: Possible colors are: black, white, gray, red, green, blue, cyan, magenta and yellow.
Arguments:
row: The row
texts: The texts of the cells
backgroundColors: The background colors of the cells
foregroundColors: The foreground colors of the cells
Example:
UI_testSendTableWidget.insertRowWithContent(1, Array("text1", "text2"), Array("red", "green"),
Array("white", "black"));
void insertColumn(Number column)
Inserts one column at column.
void removeRow(Number row)
Removes the row at row.
void removeColumn(Number column)
Removes the column at column.
void clear(void)
Clears the table (removes all cells).
void setCellBackgroundColor(String color, Number row, Number column)
Sets the background color of a single cell.
Arguments:
color: The color, possible values are: black, white, gray, red, green, blue, cyan, magenta and
yellow
row: The row of the cell
column: The column of the cell
Example:
UI_testSetTextLineEdit.setBackgroundColor("red", 0, 0);
void setCellForegroundColor(String color, Number row, Number column)
Sets the foreground color of a single cell.
Arguments:
color: The color, possible values are: black, white, gray, red, green, blue, cyan, magenta and
yellow
row: The row of the cell
column: The column of the cell
Example:
UI_testSetTextLineEdit.setBackgroundColor("red", 0, 0);
void sortItems(Number column, bool ascendingOrder=true)
Sorts the items in the widget in the specified order(true=AscendingOrder, false=DescendingOrder) by
the values in the given column.
Arguments:

column: The column
ascendingOrder: true=AscendingOrder, false=DescendingOrder
void resizeColumnToContents(Number column)
Resizes the column given to the size of its contents.
Arguments:
column: The column
void resizeRowToContents(Number row)
Resizes the row given to the size of its contents.
Arguments:
row: The row
void setRowHeight(Number row, Number height)
Sets the height of the given row to be height.
Arguments:
row: The row
height: The height
Number rowHeight(Number row)
Returns the height of the given row.
void setColumnWidth(Number column, Number width)
Sets the width of the given column to be width.
Arguments:
column: The column
width: The width
Number columnWidth(Number column)
Returns the width of the given column.
Number frameWidth(void)
Returns the width of the frame that is drawn.
Number verticalHeaderWidth(void)
Returns the width of the vertical header.
Number verticalScrollBarWidth(void)
Returns the width of the vertical scroll bar.
bool isVerticalScrollBarVisible(void)
Returns true if the vertical scroll bar is visible.
bool insertWidget(Number row, Number column, String type)
Creates and inserts a script widget into a table cell.

Note: To access the cell widget ScriptWidget* getWidget(Number row, Number column) must be
used.
Arguments:
row: The row of the cell
column: The column of the cell
type: The type of the created widget. Possible type values are:
oLineEdit
oComboBox
oButton
oCheckBox
oSpinBox
oDoubleSpinBox
oVerticalSlider
oHorizontalSlider
oTimeEdit
oDateEdit
oDateTimeEdit
oCalendarWidget
oTextEdit
oDial
Return: True on success
Example:
function TableCheckBoxClicked(checked)
{
UI_testTextEdit.append("TableCheckBoxClicked: " + checked);
}
UI_testSendTableWidget.insertWidget(3, 1, "CheckBox");
var UI_tableCheckBox1 = UI_testSendTableWidget.getWidget(3, 1);
if(typeof UI_tableCheckBox1 != 'undefined')
{
UI_tableComboBox1.addItem("val1");
UI_tableCheckBox1.clickedSignal.connect(TableCheckBoxClicked)
}
ScriptWidget* getWidget(Number row, Number column)
Returns the cell widget. If the cell has no widget then 'invalid' is returned.
Example: see bool insertWidget(Number row, Number column, String type).
Note: To determine the class name of the returned ScriptWidget String getClassName(void) can be
used.
void setCellIcon(Number row, Number column, String iconFileName)
Sets the icon of a single cell.
Arguments:
row: The row of the cell
column: The column of the cell
iconFileName: The path to the item icon

void rowsCanBeMovedByUser(bool canBeMoved)
If set to true the user can move a selected row up or down (while holding the left mouse button at
the row and moving the mouse up and/or down).
Arguments:
canBeMoved: True for moving selected rows
Array<ScriptTableCellPosition> getAllSelectedCells(void)
Returns an array which contains the the rows and columns of the selected cells. The array contains
one ScriptTableCellPosition object for every selected cell.
The ScriptTableCellPosition object has to attributes which can be accessed: row and column.
Example: see void cellChangedSignal (void).
void cellChangedSignal (void)
This signal is emitted if a cell has been changed.
Example:
function ReceiveTableSelectionChanged()
{
var cells = UI_testReceiveTableWidget.getAllSelectedCells();
for(var i = 0; i < cells.length; i++)
{
UI_testTextEdit.append('column: ' + cells[i].column + ' row: '
+ cells[i].row);
}
}
UI_testSendTableWidget.cellSelectionChangedSignal.connect(SendTableSelectionChanged)
void cellPressedSignal(Number row, Number column)
This signal is emitted if the user has pressed a cell.
Arguments:
row: The row of the cell
column: The column of the cell
void cellClickedSignal (Number row, Number column)
This signal is emitted if the user has clicked a cell.
Arguments:
row: The row of the cell
column: The column of the cell
void cellDoubleClickedSignal (Number row, Number column)
This signal is emitted if the user has double clicked a cell.
Arguments:
row: The row of the cell
column: The column of the cell
void cellChangedSignal (Number row, Number column)
This signal is emitted if a cell has been changed.
Arguments:
row: The row of the cell
column: The column of the cell

void horizontalHeaderSectionResizedSignal(Number logicalIndex, Number oldSize, Number
newSize)
This signal is emitted if a horizontal header section is resized.
Arguments:
logicalIndex: The section's logical number
oldSize: The old size
newSize: The new size
Script table widget example
The following Code shows the typically use of the ScriptTableWidget class:
function tableWidgetCellChanged (row, column)
{
UI_testTextEdit.append("tableWidgetCellChanged: " +
UI_tableWidget.getText(row, column));
}
UI_tableWidget.setRowCount(2);
UI_tableWidget.setColumnCount(2);
UI_tableWidget.setVerticalHeaderLabel(0, "ver1");
UI_tableWidget.setVerticalHeaderLabel(1, "ver2");
UI_tableWidget.setHorizontalHeaderLabel(0, "hor1");
UI_tableWidget.setHorizontalHeaderLabel(1, "hor2");
UI_tableWidget.setCellEditable(0,0, false);
UI_tableWidget.setCellEditable(1,0, false);
UI_tableWidget.insertRow(UI_testSendTableWidget.rowCount() )
UI_tableWidget.setHorizontalHeaderLabel(2, "hor3");
UI_tableWidget.setText(0, 0, "test1");
UI_tableWidget.setText(1, 0, "test2");
UI_tableWidget.setText(2, 0, "test3")
UI_tableWidget.cellChangedSignal.connect(UI_tableWidgetCellChanged);
Adjusting the width of the columns so that all columns fit in the complete table
The following code shows an example how to adjust the right column so that all columns fit in the
complete table (the table has 2 columns):
//Adjust the width of the right column, so that all columns fit in the complete table.
function adjustTableColmnWidth()
{
var verticalScrollBarWidth = 0;
if(UI_TableWidget.isVerticalScrollBarVisible())
{
verticalScrollBarWidth = UI_TableWidget.verticalScrollBarWidth();
}
UI_TableWidget.setColumnWidth(1, UI_TableWidget.width() -
(UI_TableWidget.columnWidth(0)
+ 2 * UI_TableWidget.frameWidth()
+ UI_TableWidget.verticalHeaderWidth()
+ verticalScrollBarWidth));
}
//The width of a header has been changed.
function UI_tableHorizontalHeaderSectionResizedSignal(logicalIndex, oldSize, newSize)
{
adjustSendTableColmnWidth();
}
//Start a timer which periodically calls adjustTableColmnWidth(if the dialog/table
//size has been changed the columns have to be adjusted)
var tableAdjustWidthTimer = scriptThread.createTimer()
tableAdjustWidthTimer.timeout.connect(adjustTableColmnWidth)
tableAdjustWidthTimer.start(200);
UI_testSendTableWidget.horizontalHeaderSectionResizedSignal.connect(UI_tableHorizontalHeaderSectionResizedSi
gnal);

Script list widget
A QListWidget in the user interface file is passed to the worker script via a ScriptListWidget class
object. This class is derived from the ScriptWidget class. Therefore all functions from the
ScriptWidget class can be used.
The additional functions and signals which can be used from script are described in the following
chapters.
Note:
A selected row in the table can be moved up or down while holding the left mouse button at the row
and moving the mouse up and/or down.
void insertNewItem (Number row, String itemText, String iconFileName)
Inserts a new list item.
Arguments:
row: The row of the new item
itemText: The text of the new item
iconFileName: The path to the item icon (if empty then no icon will be added)
Number rowCount(void)
Returns the number of rows in the list widget.
void removeItem(Number row)
Removes an item from the list widget.
Arguments:
row: The row of the item
Number currentSelectedRow(void)
Returns the current selected row.
void setCurrentRow(Number row)
Sets the current selected row.
Arguments:
row: The row of the item
void clear(void)
Clears the list widget.
void setItemBackgroundColor(Number row, String color)
Sets the background color of an item.
Arguments:
row: The row of the item
color: The color, possible values are: black, white, gray, red, green, blue, cyan, magenta and
yellow

void setItemForegroundColor(Number row, String color)
Sets the foreground color of an item.
Arguments:
row: The row of the item
color: The color, possible values are: black, white, gray, red, green, blue, cyan, magenta and
yellow
String getItemText(Number row)
Returns the item text.
Arguments:
row: The row of the item
void setItemText(Number row, String text)
Sets the item text.
Arguments:
row: The row of the item
text: The new text
void setItemIcon(Number row, String iconFileName)
Sets the item icon.
Arguments:
row: The row of the item
iconFileName: The path to the item icon
void sortItems(bool ascendingOrder=true)
Sorts the items in the widget in the specified order(true=AscendingOrder, false=DescendingOrder).
void currentRowChangedSignal(Number currentRow)
This signal is emitted if the current row selection has been changed.
Arguments:
currentRow: The index of the current selected item
void itemClickedSignal(Number row)
This signal is emitted if a row has been clicked.
Arguments:
row: The row of the item
void itemDoubleClickedSignal(Number row)
This signal is emitted if a row has been double clicked.
Arguments:
row: The row of the item
Script list widget example
The following Code shows the typically use of the ScriptListWidget class:
function UI_listWidgetCurrentRowChanged(currentRow)
{

UI_testTextEdit.append("UI_listWidgetCurrentRowChanged: " + currentRow);
}
function UI_listWidgetItemClicked(currentRow)
{
UI_testTextEdit.append("UI_listWidgetItemClicked: " + currentRow);
}
function UI_listWidgetItemDoubleClicked(currentRow)
{
UI_testTextEdit.append("UI_listWidgetItemDoubleClicked: " + currentRow);
}
UI_sendListWidget.insertNewItem(UI_sendListWidget.rowCount(), "item0",
scriptThread.createAbsolutePath("icons/folder.gif"));
UI_sendListWidget.seItemBackgroundColor(UI_sendListWidget.rowCount() - 1, "red")
UI_sendListWidget.insertNewItem(UI_sendListWidget.rowCount(), "item1",
scriptThread.createAbsolutePath("icons/browser.ico"));
UI_sendListWidget.setCurrentRow(0);
UI_sendListWidget.currentRowChangedSignal.connect(UI_listWidgetCurrentRowChanged);
UI_sendListWidget.itemClickedSignal.connect(UI_listWidgetItemClick)
UI_sendListWidget.itemDoubleClickedSignal.connect(UI_listWidgetItemDoubleClicked);
Script tree widget
A QTreeWidget in the user interface file is passed to the worker script via a ScriptTreeWidget class
object. This class is derived from the ScriptWidget class. Therefore all functions from the
ScriptWidget class can be used.
The additional functions and signals which can be used from script are described in the following
chapters.
ScriptTreeWidgetItem* createScriptTreeWidgetItem(void)
Creates a script tree widget item (for more details about the script tree widget item see chapter
Script tree widget item)
Note: A created ScriptTreeWidgetItem has to be inserted in a ScriptTreeWidget or has to be deleted
with ScriptTreeWidgetItem::deleteItem() (memory leak).
void setHeaderLabels (Array<String> labels)
Adds a column in the header for each item in the labels list, and sets the label for each column.
Note that setHeaderLabels() won't remove existing columns.
Example:
var headerList = Array("header 1", "header 2");
UI_treeWidget.setHeaderLabels(headerList);
void setColumnWidth(Number column, Number size)
Sets the width of a column.
Number getColumnWidth(Number column)
Returns the width of a column.
void addTopLevelItem (ScriptTreeWidgetItem* item)
Appends the item as a top-level item in the widget.
void insertTopLevelItem (Number index, ScriptTreeWidgetItem* item)
Inserts the item at index in the top level in the view.
If the item has already been inserted somewhere else it won't be inserted.

Number topLevelItemCount(void)
Returns the number of top level items.
ScriptTreeWidgetItem* invisibleRootItem(void)
Returns the tree widget's invisible root item.
The invisible root item provides access to the tree widget's top-level items through
the ScriptTreeWidgetItem API, making it possible to write functions that can treat top-level
items and their children in a uniform way; for example, recursive functions.
ScriptTreeWidgetItem* itemAbove(ScriptTreeWidgetItem* item)
Returns the item above the given item. If to item is above then it returns null.
ScriptTreeWidgetItem* itemBelow(ScriptTreeWidgetItem* item)
Returns the item below the given item. If to item is above then it returns null.
ScriptTreeWidgetItem* takeTopLevelItem(Number index)
Removes the top-level item at the given index in the tree and returns it, otherwise returns null.
Note: A removed ScriptTreeWidgetItem has to be inserted in a ScriptTreeWidget or has to be deleted
with ScriptTreeWidgetItem::deleteItem() (memory leak).
ScriptTreeWidgetItem* topLevelItem(Number index)
Returns the top level item at the given index, or null if the item does not exist.
void resizeColumnToContents(Number column)
Resizes the column given to the size of its contents.
Number columnCount(void)
Returns the number of columns displayed in the tree widget.
void setColumnCount(Number columns)
Sets the number of columns displayed in the tree widget.
void expandItem(ScriptTreeWidgetItem* item)
Expands the item. This causes the tree containing the item's children to be expanded.
void expandAll(void)
Expands all expandable items.
void setCurrentItem (ScriptTreeWidgetItem* item)
Sets the current item in the tree widget.
ScriptTreeWidgetItem* currentItem(void)
Returns current item in the tree widget.

void sortItems(Number column, bool ascendingOrder=true)
Sorts the items in the widget in the specified order(true=AscendingOrder, false=DescendingOrder) by
the values in the given column.
void itemClickedSignal(ScriptTreeWidgetItem *item, Number column)
This signal is emitted if an item has been clicked.
void itemDoubleClickedSignal(ScriptTreeWidgetItem *item, Number column)
This signal is emitted if an item has been double clicked.
void currentItemChangedSignal(ScriptTreeWidgetItem *current, ScriptTreeWidgetItem
*previous)
This signal is emitted if the current item changes. The current item is specified by current, and this
replaces the previous current item.
Script tree widget example
The following Code shows the typically use of the ScriptTreeWidget class:
function UI_treeWidgetItemClicked(item, column)
{
UI_testTextEdit.append("UI_treeWidgetItemClicked: " + item.text(column));
}
function UI_treeWidgetItemDoubleClicked(item, column)
{
UI_testTextEdit.append("UI_treeWidgetItemDoubleClicked: " +
item.text(column));
}
UI_treeWidget.itemClickedSignal.connect(UI_treeWidgetItemClicked);
UI_treeWidget.itemDoubleClickedSignal.connect(UI_treeWidgetItemDoubleClicked);
UI_treeWidget.setColumnWidth(0, 100);
var treeItem1 = UI_treeWidget.createScriptTreeWidgetItem();
treeItem1.setText(0, "value1");
treeItem1.setData(0, 0, "value 1");
treeItem1.setText(0, treeItem1.data(0, 0));
treeItem1.setItemIcon(0, scriptThread.createAbsolutePath("icons/openfolder.gif"));
treeItem1.setText(1, "value2");
treeItem1.setItemIcon(1, scriptThread.createAbsolutePath("icons/folder.gif"));
UI_treeWidget.addTopLevelItem(treeItem1);
var treeItem2 = UI_treeWidget.createScriptTreeWidgetItem();
treeItem2.setText(0, "value3");
treeItem2.setItemIcon(0, scriptThread.createAbsolutePath("icons/browser.ico"));
treeItem2.setText(1, "value4");
treeItem2.setItemIcon(1, scriptThread.createAbsolutePath("icons/browser.ico"));
UI_treeWidget.insertTopLevelItem(UI_treeWidget.topLevelItemCount(), treeItem2)
treeItem2.setBackgroundColor(0, "red");
treeItem2.setForegroundColor(1, "blue");
treeItem1.addChild(treeItem2);
UI_treeWidget.expandItem(treeItem1);
Script tree widget item
A QTreeWidgetItem (one element in a QTreeWidget object) in the user interface file is passed to the
worker script via a ScriptTreeWidgetItem class object.

Important: This class is not derived from the ScriptWidget class. Therefore the functions from the
ScriptWidget class can not be used.
Note: A created ScriptTreeWidgetItem has to be inserted in a ScriptTreeWidget or has to be deleted
with ScriptTreeWidgetItem::deleteItem() (memory leak).
The functions and signals which can be used from script are described in the following chapters.
void setText(Number column, String text)
Sets the text to be displayed in the given column to the given text.
String text(Number column)
Returns the text in the specified column.
void setItemIcon(Number column, String iconFileName)
Sets the item icon.
void addChild(ScriptTreeWidgetItem* child)
Appends the child item to the list of children.
Number childCount(void)
Returns the number of child items.
void insertChild (Number index, ScriptTreeWidgetItem* child)
Inserts the child item at index in the list of children.
If the child has already been inserted somewhere else it won't be inserted again.
ScriptTreeWidgetItem* takeChild (Number index)
Removes the item at index and returns it, otherwise return null.
Note: A temoved ScriptTreeWidgetItem has to be inserted in a ScriptTreeWidget or has to be deleted
with ScriptTreeWidgetItem::deleteItem() (memory leak).
void deleteItem(void)
Deletes the current item.
Number indexOfChild(ScriptTreeWidgetItem* child)
Returns the index of the given child in the item's list of children.
void sortChildren(Number column, bool ascendingOrder)
Sorts the children of the item using the given order(true=AscendingOrder,
false=DescendingOrder) by the values in the given column.
ScriptTreeWidgetItem* parent (void)
Returns the item's parent.

Number columnCount(void)
Returns the number of columns in the item.
void setBackgroundColor(Number column, String color)
Sets the background color of the label in the given column to the specified color.
Possible colors are: black, white, gray, red, green, blue, cyan, magenta and yellow.
void setForegroundColor(Number column, String color)
Sets the foreground color of the label in the given column to the specified color.
Possible colors are: black, white, gray, red, green, blue, cyan, magenta and yellow.
bool isExpanded(void)
Returns true if the item is expanded, otherwise returns false.
void setExpanded(bool expand)
Expands the item if expand is true, otherwise collapses the item.
void setData (Number column, Number role, String value)
Sets the value for the item's column and role to the given value.
The role describes the type of data specified by value.
String data(Number column, Number role)
Returns the value for the item's column and role to the given value.
The role describes the type of data specified by value.
void setDisabled(bool disabled)
Disables the item if disabled is true; otherwise enables the item.
bool isDisabled(void)
Returns true if the item is disabled; otherwise returns false.
Script tree widget item example
The typically use of the ScriptTreeWidgetItem class is shown in chapter Script tree widget example
Script text edit
A QTextEdit in the user interface file is passed to the worker script via a ScriptTextEdit class object.
This class is derived from the ScriptWidget class. Therefore all functions from the ScriptWidget class
can be used.
The additional functions and signals which can be used from script are described in the following
chapters.
Number verticalScrollBarValue(void)
Returns the vertical scroll bar value.
void verticalScrollBarSetValue(Number value)
Sets the vertical scroll bar value.

Arguments:
value: The new value
String toPlainText(void)
Returns the content of the text edit as plain text.
String toHtml(void)
Returns the content of the text edit as html.
void setMaxChars(Number maxChars)
Sets the maximum number of characters in the text edit.
Arguments:
maxChars: The new value for max. characters
String replaceNonHtmlChars(String text, bool replaceNewLine=true)
Replaces the characters '\n',' ', '<' and '>' to their html representation.
Arguments:
text: The old text.
replaceNewLine: True if new line characters ('\n') shall be replaced.
Return: The converted text
void moveTextPositionToEnd(void)
Moves the curser to the end of the text edit.
void setFontPointSize(Number fontSize)
Sets the font size.
Arguments:
fontSize: The new font size
void setFontFamily (Number fontFamily)
Sets the font family.
Arguments:
fontFamily: The new font family
void clear(void)
Clears the text edit.
void insertPlainText(String text, bool atTheEnd=true)
Inserts plain text into the text edit.
Arguments:
text: The text
atTheEnd: If true then the text is inserted at the end if false then the text is inserted at the
cursor position
void insertHtml(String htmlString, bool atTheEnd=true)
Inserts HTML text into the text edit.
Arguments:
htmlString: The HTML string

atTheEnd: If true then the text is inserted at the end if false then the text is inserted at the
cursor position
void append(String text)
Appends text at the end of text edit (includes a new line) and moves the cursor to the end of the
text.
Arguments:
text: The text
void setPlainText(String text)
Sets the text of the text edit (plain text).
Arguments:
text: The text
void setText(String text)
Sets the text of the text edit.
Arguments:
text: The text
void lockScrolling(bool lock)
Locks or unlocks the scrolling of the vertical scroll bar.
Arguments:
lock: true for locking and false for unlocking
void setUpdateRate(Number updateRate)
Sets the update rate of the script text edit.
Arguments:
updateRate: The new update rate
void textChangedSignal (void)
This signal is emitted if the text of the text edit has been changed.
Script progress bar
A QProgressBar in the user interface file is passed to the script via a ScriptProgressBar class object.
This class is derived from the ScriptWidget class. Therefore all functions from the ScriptWidget class
can be used.
The additional functions and signals which can be used from script are described in the following
chapters.
void reset(void)
Resets the progress bar. The progress bar rewinds and shows no progress.
void setRange(Number minimum, Number maximum)
Sets the progress bar's minimum and maximum values to minimum and maximum respectively.
Arguments:
minimum: The minimum
maximum: The maximum

void setMinimum(Number minimum)
Sets the progress bar's minimum value.
Arguments:
minimum: The minimum
void setMaximum(Number maximum)
Sets the progress bar's maximum value.
Arguments:
maximum: The maximum
void setValue(Number value)
Sets the progress bar's current value.
Arguments:
value: The current value
Script progress bar example
The following Code shows the typically use of the ScriptProgressBar class:
UI_progressBar.setMinimum(0);
UI_progressBar.setMaximum(100);
UI_progressBar.setValue(10);
Script slider
A QSlider (horizontal and vertical) in the user interface file is passed to the script via a ScriptSlider
class object. This class is derived from the ScriptWidget class. Therefore all functions from the
ScriptWidget class can be used.
The additional functions and signals which can be used from script are described in the following
chapters.
void setRange(Number min, Number max)
Sets the slider's minimum to min and its maximum to max.
Arguments:
min: The minimum
max: The maximum
void setValue(Number value)
Sets the slider's current value.
Arguments:
value: The current value
Number value(void)
Returns the slider's current value.
void valueChangedSignal(Number value)
This signal is emitted if the value of the slider has been changed.

Script slider example
The following Code shows the typically use of the ScriptSlider class:
function UI_horizontalSliderValueChanged(value)
{
UI_testTextEdit.append("UI_horizontalSliderValueChanged");
}
UI_horizontalSlider.valueChangedSignal.connect(UI_horizontalSliderValueChanged);
UI_horizontalSlider.setRange(0,100);
UI_horizontalSlider.setValue(0);
Script spin box
A QSpinBox in the user interface file is passed to the worker script via a ScriptSpinBox class object.
This class is derived from the ScriptWidget class. Therefore all functions from the ScriptWidget class
can be used.
The additional functions and signals which can be used from script are described in the following
chapters.
void setRange(Number min, Number max)
Sets the spin box's minimum to min and its maximum to max.
Arguments:
min: The minimum
max: The maximum
void setValue(Number value)
Sets the spin box's current value.
Arguments:
value: The current value
Number value(void)
Returns the spin box's current value.
void setSingleStep(Number value)
If the user uses the arrows to change the spin box's value the value will be
incremented/decremented by the amount of the single step. The default value is 1.
Setting a single step value of less than 0 does nothing.
Arguments:
value: The new value
Number singleStep(void)
Returns the single step value.
void valueChangedSignal(Number value)
This signal is emitted if the value of the spin box has been changed.
Script spin box example
The following Code shows the typically use of the ScriptSpinBox class:
function UI_spinBoxValueChanged(value)
{
UI_testTextEdit.append("UI_spinBoxValueChanged: " + value);

}
UI_spinBox.valueChangedSignal.connect(UI_spinBoxValueChanged);
UI_spinBox.setRange(0,100);
UI_spinBox.setValue(0);
Script double spin box
A QDoubleSpinBox in the user interface file is passed to the script via a ScriptDoubleSpinBox class
object. This class is derived from the ScriptWidget class. Therefore all functions from the
ScriptWidget class can be used.
The additional functions and signals which can be used from script are described in the following
chapters.
void setRange(Number min, Number max)
Sets the spin box's minimum to min and its maximum to max.
Arguments:
min: The minimum
max: The maximum
void setValue(Number value)
Sets the spin box's current value.
Arguments:
value: The current value
Number value(void)
Returns the spin box's current value.
void setSingleStep(Number value)
If the user uses the arrows to change the spin box's value the value will be
incremented/decremented by the amount of the single step. The default value is 1.0.
Setting a single step value of less than 0 does nothing.
Arguments:
value: The new value
Number singleStep(void)
Returns the single step value.
void setDecimals(Number value)
Sets the precision of the spin box, in decimals.
Arguments:
value: The new value
Number decimals(void)
Returns the precision of the spin box, in decimals.
void valueChangedSignal(Number value)
This signal is emitted if the value of the spin box has been changed.

Script double spin box example
The following Code shows the typically use of the ScriptDoubleSpinBox class:
function UI_doubleSpinBoxValueChanged(value)
{
UI_testTextEdit.append("UI_doubleSpinBoxValueChanged: " + value);
}
UI_doubleSpinBox.valueChangedSignal.connect(UI_doubleSpinBoxValueChanged);
UI_doubleSpinBox.setRange(0,100);
UI_doubleSpinBox.setDecimals(2);
UI_doubleSpinBox.setValue(0);
Script time edit
A QTimeEdit in the user interface file is passed to the worker script via a ScriptTimeEdit class object.
This class is derived from the ScriptWidget class. Therefore all functions from the ScriptWidget class
can be used.
The additional functions and signals which can be used from script are described in the following
chapters.
void setTime(String time)
Sets the time.
Arguments:
time: The time (must satisfy the display format)
String getTime(void)
Returns the time.
void setDisplayFormat(String format)
Sets the display format.
Arguments:
format: The new display format (see chapter Time format)
String getDisplayFormat(void)
Returns the display format.
void timeChangedSignal(String time)
This signal is emitted if the value of the time edit has been changed.
Time format
Following expressions may be used for the time format:
Expression Output
h the hour without a leading zero (0 to 23 or 1 to 12 if AM/PM display)
hh the hour with a leading zero (00 to 23 or 01 to 12 if AM/PM display)
m the minute without a leading zero (0 to 59)
mm the minute with a leading zero (00 to 59)
s the second without a leading zero (0 to 59)
ss the second with a leading zero (00 to 59)
z the milliseconds without leading zeroes (0 to 999)
zzz the milliseconds with leading zeroes (000 to 999)
AP interpret as an AM/PM time. AP must be either "AM" or "PM".
ap Interpret as an AM/PM time. ap must be either "am" or "pm".
All other input characters will be treated as text. Any sequence of characters that are enclosed in
single quotes will also be treated as text and not be used as an expression.
//time is 12:01.00
UI_timeEdit.setDisplayFormat("m'mm'hcarss");
UI_timeEdit.setTime("1mm12car00");
Expressions that do not expect leading zeroes to be given (h, m, s and z) are greedy.
This means that they will use two digits even if this puts them outside the range of accepted
values and leaves too few digits for other sections.
For example, the following string could have meant 00:07:10, but the m will grab two digits,
resulting in an invalid time:
//invalid
UI_timeEdit.setDisplayFormat("hh:ms");
UI_timeEdit.setTime("00:710");
Any field that is not represented in the format will be set to zero. For example:
//time is 00:01:30.000
UI_timeEdit.setDisplayFormat("m.s");
UI_timeEdit.setTime("1.30");
Script time edit example
The following Code shows the typically use of the ScriptTimeEdit class:
function UI_timeEditTimeChanged(time)
{
UI_testTextEdit.append("UI_timeEditTimeChanged: " + time);
}
UI_timeEdit.setDisplayFormat("hh:mm:ss");
UI_timeEdit.setTime("10:09:08");
UI_timeEdit.timeChangedSignal.connect(UI_timeEditTimeChanged);
Script date edit
A QDateEdit in the user interface file is passed to the worker script via a ScriptDateEdit class object.
This class is derived from the ScriptWidget class. Therefore all functions from the ScriptWidget class
can be used.
The additional functions and signals which can be used from script are described in the following
chapters.
void setDate(String date)
Sets the date.
Arguments:
date: The date (must satisfy the display format)
String getDate(void)
Returns the date.

void setDisplayFormat(String format)
Sets the display format.
Arguments:
format: The new display format (see chapter Date format)
String getDisplayFormat(void)
Returns the display format.
void dateChangedSignal(String date)
This signal is emitted if the value of the date edit has been changed.
Date format
Following expressions may be used for the date format:
Expression Output
d The day as a number without a leading zero (1 to 31)
dd The day as a number with a leading zero (01 to 31)
ddd The abbreviated localized day name (e.g. 'Mon' to 'Sun'). Uses the system locale to localize the
name, i.e. QLocale::system().
dddd The long localized day name (e.g. 'Monday' to 'Sunday'). Uses the system locale to localize the
name, i.e. QLocale::system().
M The month as a number without a leading zero (1 to 12)
MM The month as a number with a leading zero (01 to 12)
MMM The abbreviated localized month name (e.g. 'Jan' to 'Dec'). Uses the system locale to localize
the name, i.e. QLocale::system().
MMMM The long localized month name (e.g. 'January' to 'December'). Uses the system locale to
localize the name, i.e. QLocale::system().
yy The year as two digit number (00 to 99)
yyyy The year as four digit number. If the year is negative, a minus sign is prepended in addition.
All other input characters will be treated as text. Any sequence of characters that are enclosed in
single quotes will also be treated as text and will not be used as an expression. For example:
//date is 1 December 2003
UI_dateEdit.setDisplayFormat("d'MM'MMcaryyyy");
UI_dateEdit.setDate("1MM12car2003");
The expressions that don't expect leading zeroes (d, M) will be greedy. This means that they will use
two digits even if this will put them outside the accepted range of values and leaves too few digits for
other sections. For example, the following format string could have meant January 30 but the M will
grab two digits, resulting in an invalid date:
//invalid
UI_dateEdit.setDisplayFormat("Md");
UI_dateEdit.setDate("130");
For any field that is not represented in the format the following defaults are used:

Field Default value
Year 1900
Month 1
Day 1
The following examples demonstrate the default values:
//January 30 1900
UI_dateEdit.setDisplayFormat("M.d");
UI_dateEdit.setDate("1.30");
//January 10, 2000
UI_dateEdit.setDisplayFormat("yyyyMMdd");
UI_dateEdit.setDate("20000110");
//January 10, 2000
UI_dateEdit.setDisplayFormat("yyyyMd");
UI_dateEdit.setDate("20000110");
Script date edit example
The following Code shows the typically use of the ScriptDateEdit class:
function UI_dateEditDateChanged(date)
{
UI_testTextEdit.append("UI_dateEditDateChanged: " + date);
}
UI_dateEdit.setDisplayFormat("dd.MM.yyyy");
UI_dateEdit.setDate("01.02.2014");
UI_dateEdit.dateChangedSignal.connect(UI_dateEditDateChanged);
Script date time edit
A QDateTimeEdit in the user interface file is passed to the worker script via a ScriptDateTimeEdit
class object. This class is derived from the ScriptWidget class. Therefore all functions from the
ScriptWidget class can be used.
The additional functions and signals which can be used from script are described in the following
chapters.
void setDateTime(String dateTimeString)
Sets the date and the time.
Arguments:
date: The date and time (must satisfy the display format)
String getDateTime(void)
Returns the date and time.
void setDisplayFormat(String format)
Sets the display format.
Arguments:
format: The new display format (see chapter Date format and Time format)
Example:
UI_dateTimeEdit.setDisplayFormat("dd.MM.yyyy hh:mm:ss");
String getDisplayFormat(void)
Returns the display format.

void dateTimeChangedSignal(String date)
This signal is emitted if the value of the date time edit has been changed.
Script date time edit example
The following Code shows the typically use of the ScriptDateTimeEdit class:
//the user has changed the date and/or the time
function UI_dateTimeEditTimeChanged(dateTime)
{
UI_testTextEdit.append("UI_dateTimeEditTimeChanged: " + dateTime);
}
UI_dateTimeEdit.setDisplayFormat("dd.MM.yyyy hh:mm:ss");
UI_dateTimeEdit.setDateTime("01.01.2016 10:09:08");
UI_dateTimeEdit.dateTimeChangedSignal.connect(UI_dateTimeEditTimeChanged);
Script calendar widget
A QCalendarWidget in the user interface file is passed to the worker script via a
ScriptCalendarWidget class object. This class is derived from the ScriptWidget class. Therefore all
functions from the ScriptWidget class can be used.
The additional functions and signals which can be used from script are described in the following
chapters.
void setSelectedDate(String dateString)
Sets the selected date.
Arguments:
date: The date (must satisfy the date format)
String getSelectedDate(void)
Returns the selected date.
void setDateFormat(String format)
Sets the date format.
Arguments:
format: The new date format (see chapter Date format)
String getDateFormat(void)
Returns the date format.
void setDateRange(String min, String max)
Sets the minimum and the maximum date.
Arguments:
•min: the min. date (must satisfy the date format)
•max: the max. date (must satisfy the date format)
void selectionChangedSignal(String date)
This signal is emitted if the selected date has been changed.

Script calendar widget example
The following Code shows the typically use of the ScriptCalendarWidget class:
//the user has changed the date
function UI_calendarSelectionChangedSignal(date)
{
UI_testTextEdit.append("UI_calendarSelectionChangedSignal: " + date);
}
UI_calendar.setDateFormat("dd.MM.yyyy");
UI_calendar.setDateRange("01.01.2014", "01.01.2016");
UI_calendar.setSelectedDate("01.02.2015");
UI_calendar.selectionChangedSignal.connect(UI_calendarSelectionChangedSignal);
Script splitter
A QSplitter in the user interface file is passed to the worker script via a ScriptSplitter class object.
This class is derived from the ScriptWidget class. Therefore all functions from the ScriptWidget class
can be used.
The additional functions and signals which can be used from script are described in the following
chapters.
Array<Number> sizes(void)
Returns a list of the size parameters of all the widgets in this splitter.
If the splitter's orientation is horizontal, the list contains the widgets width in pixels,
from left to right; if the orientation is vertical, the list contains the widgets height in pixels, from top
to bottom.
void setSizes (Array<Number> list)
Sets the child widgets respective sizes to the values given in the list.
If the splitter is horizontal, the values set the widths of each widget in pixels, from left to right.
If the splitter is vertical, the heights of each widget is set, from top to bottom.
Extra values in the list are ignored. If list contains too few values, the result is undefined but the
program will still be well-behaved.
The overall size of the splitter widget is not affected. Instead, any additional/missing space is
distributed amongst the widgets according to the relative weight of the sizes.
If you specify a size of 0, the widget will be invisible. The size policies of the widgets are preserved.
That is, a value smaller then the minimal size hint of the respective widget will be replaced by the
value of the hint.
Script splitter example
The following Code shows the typically use of the script splitter class:
var sizeList = UI_SecondDialogSplitter.sizes();
//Change the sizes.
sizeList[0] -= 50;
sizeList[1] += 50;
UI_SecondDialogSplitter.setSizes(sizeList);
Note: To add a splitter in the designer following must be done:
•select several items
•press the right mouse button
•go to the 'lay out' menu
•select 'lay out vertically in splitter' or 'Lay out horizontally in splitter' (see below)
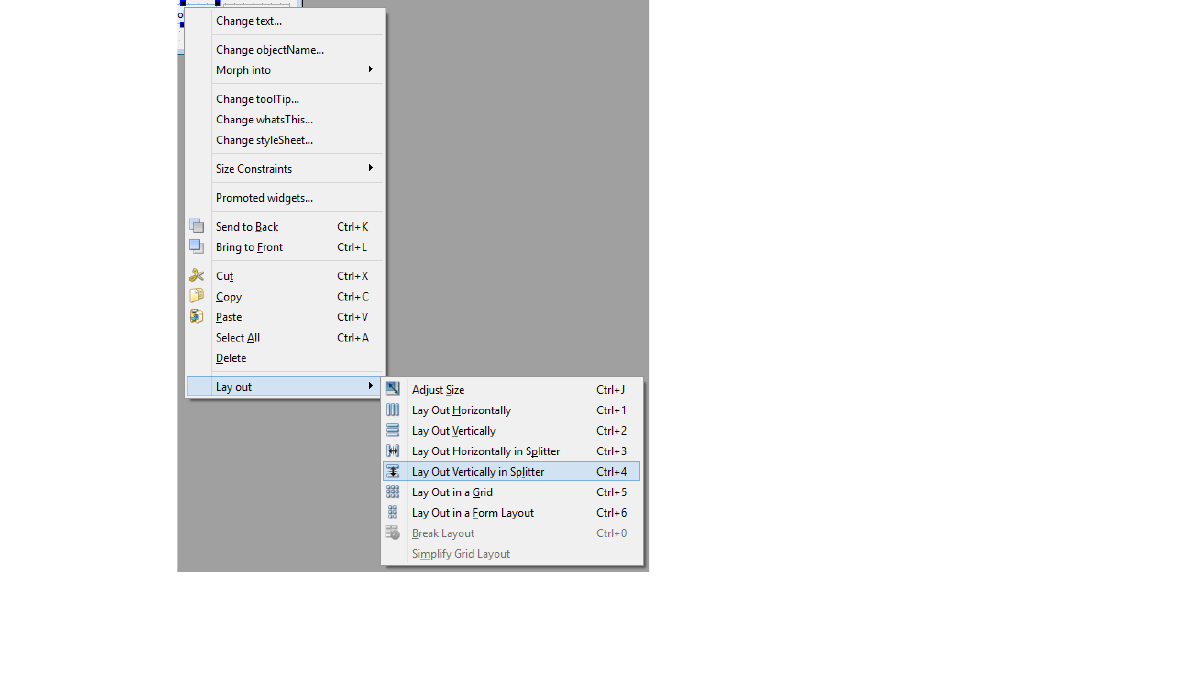
Script dial
A QDial in the user interface file is passed to the worker script via a ScriptDial class object.
This class is derived from the ScriptWidget class. Therefore all functions from the ScriptWidget class
can be used.
The additional functions and signals which can be used from script are described in the following
chapters.
void setRange(Number min, Number max)
Sets the dial's minimum to min and its maximum to max.
Arguments:
min: The minimum
max: The maximum
void setValue(Number value)
Sets the dial's current value.
Arguments:
value: The current value
Number value(void)
Returns the dial's current value.
void valueChangedSignal(Number value)
This signal is emitted if the value of the dial has been changed.
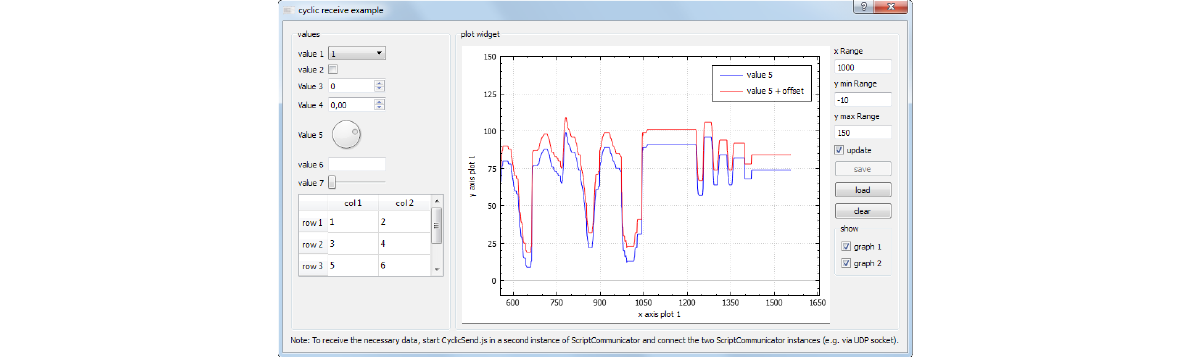
Script dial example
The following Code shows the typically use of the ScriptDial class:
function UI_dialValueChanged(value)
{
UI_testTextEdit.append("UI_dialValueChanged");
}
UI_dial.valueChangedSignal.connect(UI_dialValueChanged);
UI_dial.setRange(0,100);
UI_dial.setValue(0);
Script plot widget
This class provides functions to plot data into a script GUI.
If you want a separate window for plotting data, then use a plot window instead (see chapter Script
plot window class).
To create a ScriptPlotWidget following must be done:
•add a group box to the script GUI (QtDesigner)
•call ScriptGroupBox::addPlotWidget (see chapter ScriptPlotWidget addPlotWidget(void))
Important: This class is not derived from the ScriptWidget class. Therefore the functions from the
ScriptWidget class can not be used.
The functions and signals which can be used from script are described in the following chapters.
Number addGraph(String color, String penStyle, String name)
This function adds a graph to the diagram.
Arguments:
color: The color of the graph (svg color keyword, e.g. "blue", "red", "yellow", "green",
"black", …).
penStyle: The pen style of the graph. Allowed values are: "dash", "dot" and "solid"
name: The name of the graph
Return: The index of the added graph
void setInitialAxisRanges(Number xRange, Number yMinValue, Number yMaxValue, bool
addSpaceAfterBiggestValues = true)
Sets the initial ranges of the diagram.

Arguments:
xRange: The range of the x axis (the x axis starts always with 0)
yMinValue: The min. values of the y axis
yMaxValue: The max. value of the y axis
addSpaceAfterBiggestValues: True if a space shall be added after the biggest value of a graph
bool addDataToGraph(Number graphIndex, Number x, Number y, bool force = false)
Adds one point to a graph.
Arguments:
graphIndex: The graph index
x: The x value of the point
y: The y value of the point
force: If true then the data is added even if auto update is disabled (setAutoUpdateEnabled)
void setAxisLabels(String xAxisLabel, String yAxisLabel)
Sets the axis label.
Arguments:
xAxisLabel: The label of the x axis
yAxisLabel: The label of the y axis
void showLegend(bool show)
This function shows or hides the diagram legend.
Arguments:
show: True=show, false=hide
void clearGraphs(void)
This function clears the data of all graphs.
void removeAllGraphs(void)
This function removes all graphs.
void showHelperElements(bool showXRange, bool showYRange, bool showUpdate, bool
showSave, bool showLoad, bool showClear, bool showGraphVisibility, Number
graphVisibilityMaxSize=80, bool showLegend=true)
Sets the visibility of several plot widget elements.
Arguments:
showXRange: True if the x range input field shall be visible
showYRange: True if the y range input fields shall be visible
showUpdate: True if the x update check box shall be visible
showSave: True if the save button shall be visible
showLoad: True if the load button shall be visible
showClear: True if the clear button shall be visible
showGraphVisibility: True if the show group box
graphVisibilityMaxSize: The max. width of the show group box
showLegend: True if the show legend check box shall be visible

void setMaxDataPointsPerGraph(Number maxDataPointsPerGraph)
Sets the max. number of data points per graph (the default is 10.000.000.).
void setUpdateInterval(Number updateInterval)
Sets the update-interval.
Arguments:
updateInterval: The new interval
void setScatterStyle(Number graphIndex, String style, Number size)
Sets the visual appearance of single data points in the plot.
Arguments:
graphIndex: The graph index.
style: The style of the single data points. Possible values:
oNone: No scatter symbols are drawn.
oDot: A single pixel.
oCross: A cross.
oPlus: A plus.
oCircle: A circle.
oDisc: A circle which is filled with the pen's color.
oSquare: A square.
oDiamond: A diamond.
oStar: A star with eight arms, i.e. a combination of cross and plus.
oTriangle: An equilateral triangle, standing on baseline.
oTriangleInverted: An equilateral triangle, standing on corner.
oCrossSquare: A square with a cross inside.
oPlusSquare: A square with a plus inside.
oCrossCircle: A circle with a cross inside.
oPlusCircle: A circle with a plus inside.
oPeace: A circle, with one vertical and two downward diagonal lines.
size: The size of the single data points.
void setLineStyle(Number graphIndex, String style)
Sets the line style of a graph.
Arguments:
graphIndex: The graph index.
style: The style of the single data points. Possible values:
oNone: Data points are not connected with any lines (e.g. data only represented with
symbols according to the scatter style (is set with setScatterStyle)).
oLine: Data points are connected by a straight line.
oStepLeft: Line is drawn as steps where the step height is the value of the left data
point.
oStepRight: Line is drawn as steps where the step height is the value of the right data
point.
oStepCenter: Line is drawn as steps where the step is in between two data points.

oImpulse: Each data point is represented by a line parallel to the value axis, which
reaches from the data point to the zero-value-line.
void removeDataRangeFromGraph(Number graphIndex, Number xFrom, Number xTo, bool
force = false)
Removes all data points with (sort-)keys between xFrom and xTo. If xFrom is greater or equal to xTo,
the function does nothing.
Arguments:
graphIndex: The graph index.
xFrom: The start position.
xTo: The end position.
force: If true then the data is removed even if auto update is disabled
(setAutoUpdateEnabled)
void setCurrentAxisRanges(Number xMinValue, Number xMaxValue, Number yMinValue,
Number yMaxValue)
The function sets the current ranges of the diagram. Automatic update should be disabled (see
setAutoUpdateEnabled).
Arguments:
xMinValue: The min. values of the x axis.
xMaxValue: The max. value of the x axis.
yMinValue: The min. values of the y axis.
YmaxValue: The max. value of the y axis.
void setAutoUpdateEnabled(bool enabled)
Sets the automatic update enabled state.
bool isAutoUpdateEnabled(void)
Returns the automatic update enabled state.
void updatePlot(void)
Repaints the plot widget.
void setLineWidth(Number graphIndex, Number width)
This function sets the line width in pixel of a graph.
Arguments:
graphIndex: The graph index.
width: The line width (pixel).
Array<ScriptPlotDataPoint> getDataFromGraph(Number graphIndex, Number xStart,
Number count)
This function returns several data points from a graph.
Arguments:
graphIndex: The graph index.
xStart: The x coordinate of the first data point.

count: Number of points to grab. If negative then this function grabs backwards.
Return: Array with the data points (ScriptPlotDataPoint).
Note: The properties of ScriptPlotDataPoint are x and y.
void clearButtonPressedSignal (void)
Is emitted if the user clicks the clear button.
void plotMousePressSignal(Number xValue, Number yValue, Number mouseButton)
Is emitted if the user press a mouse button inside the plot.
Arguments:
xValue: The x-position of the click
yValue: The y-position of the click
mouseButton: The used mouse button (enumeration Qt::MouseButton)
void xRangeChangedSignal(Number newValue)
Is emitted if the user changes the value in the x-range textedit.
Loading and saving graphs
With the save button all visible graphs can be stored into an image or a comma separated value file
(csv). The csv file can be loaded with the load button. For more details see chapter Loading and
saving graphs.
Script plot widget example
The following Code shows the typically use of the ScriptPlotWidget class:
//Is called if the user clicks the button.
function clearButtonPressed()
{
plotXCounter = 0;
plotWindow.clearGraphs();
plotWidget.clearGraphs();
}
var plotWidget = UI_PlotGroupBox.addPlotWidget();
plotWidget.setAxisLabels("x axis plot 1", "y axis plot 1");
plotWidget.showLegend(true);
plotWidget.setInitialAxisRanges(100, 0, 15);
var plotWidgetGraph1Index = plotWidget.addGraph("blue", "solid", "value 5");
var plotWidgetGraph2Index = plotWidget.addGraph("red", "solid", "value 5 + offset");
plotWidget.showHelperElements(true, true, true, true, true, true);
plotWidget.clearButtonPressedSignal.connect(clearButtonPressed);
var x = 0;
var y = 0;
for(var i = 0; i < 100; i++)
{
x++;
y++;
plotWidget.addDataToGraph(plotWidgetGraph1Index, x, y);
plotWidget.addDataToGraph(plotWidgetGraph2Index, x + 10, y);
if(y > 10)
{
y = 0;
}
}

Script Canvas2D
This class provides a subset of the HTML Canvas 2D Context object
(https://www.w3.org/TR/2dcontext.)
To create a ScriptCanvas2DWidget following must be done:
•add a group box to the script GUI (QtDesigner)
•call ScriptGroupBox::addCanvas2DWidget (see chapter ScriptCanvas2DWidget
addCanvas2DWidget(void))
Important: This class is not derived from the ScriptWidget class. Therefore the functions from the
ScriptWidget class can not be used.
The functions and signals which can be used from script are described in the following chapters.
Number globalAlpha
This read/write property holds the current alpha value applied to rendering operations.
The value must be in the range from 0.0 (fully transparent) to 1.0
(fully opaque). The default value is 1.0.
String globalCompositeOperation
This read/write property holds the current the current composition operation.
The default value is source-over. Following values are possible:
•"source-over"
•"destination-over"
•"clear"
•"source"
•"destination"
•"source-in"
•"destination-in"
•"source-out"
•"destination-out"
•"source-atop"
•"destination-atop"
•"xor"
•"plus"
•"multiply"
•"screen"
•"overlay"
•"darken"
•"lighten"
• "color-dodge"
•"color-burn"
•"hard-light"
•"soft-light"
•"difference"
•"exclusion"
Note: See QPainter::CompositionMode for more details.

QVariant strokeStyle
This read/write property holds the current color or style to use for the lines around shapes.
The style can be either a string containing a CSS color, a CanvasGradient or CanvasPattern object.
Invalid values are ignored. The default value is '#000000'.
QVariant fillStyle
This read/write property holds the current style used for filling shapes. The style can be either a
string containing a CSS color, a CanvasGradient or CanvasPattern object- The default value is
'#000000'.
Number lineWidth
This read/write property holds the current line width. Values that are not finite values greater than
zero are ignored. The default value is 1.
String lineCap
This read/write property holds the current line cap style. The possible line cap styles are:
•butt: the end of each line has a flat edge perpendicular to the direction of the line, this is
the default line cap value.
•round: a semi-circle with the diameter equal to the width of the line must then be added
on to the end of the line.
•square: a rectangle with the length of the line width and the width of half the line width,
placed flat against the edge perpendicular to the direction of the line.
String lineJoin
This read/write property holds the current line join style. A join exists at any point in a subpath
shared by two consecutive lines. When a subpath is closed, then a join also exists at its first point
(equivalent to its last point) connecting the first and last lines in the subpath. The possible line join
styles are:
•bevel: this is all that is rendered at joins.
•round: a filled arc connecting the two aforementioned corners of the join, abutting (and
not overlapping) the aforementioned triangle, with the diameter equal to the line width
and the origin at the point of the join, must be rendered at joins.
•miter: a second filled triangle must (if it can given the miter length) be rendered at the join,
this is the default line join style.
Number miterLimit
This read/write property holds the current miter limit ratio. The default miter limit value is 10.0.
Number shadowOffsetX
This read/write property holds the current shadow offset in the positive horizontal distance. The
default value is 0.

Number shadowOffsetY
This read/write property holds the current shadow offset in the positive vertical distance. The default
value is 0.
Number shadowBlur
This read/write property holds the current level of blur applied to shadows. The default value is 0.
String shadowColor
This read/write property holds the current shadow color. The default value is '#000000'.
String width
This read property holds the width of the canvas widget.
String height
This read property holds the height of the canvas widget.
String textAlign
This read/write property holds the current text alignment. The default value is Qt::AlignLeft.
Possible values:
•0x0001 (Qt::AlignLeftAligns): With the left edge.
•0x0002 (Qt::AlignRight): Aligns with the right edge.
•0x0004 (Qt::AlignHCenter): Centers horizontally in the available space.
•0x0008 (Qt::AlignJustify): Justifies the text in the available space.
•0x0020 (Qt::AlignTop): Aligns with the top.
•0x0040 (Qt::AlignBottom): Aligns with the bottom.
•0x0080 (Qt::AlignVCenter): Centers vertically in the available space.
•0x0100 (Qt::AlignBaseline): Aligns with the baseline.
Example:
ctxPlasma.textAlign = 0x0004 //Qt::AlignHCenter
void setFont(String family, Number pixelSize, int weight, bool italic)
Sets the current font.
Arguments
family: The font family.
pixelSize: The font size(pixel).
weight: The weight. Possible values:
oQFont::Thin: 0
oQFont::ExtraLight: 12
oQFont::Light: 25
oQFont::Normal: 50
oQFont::Medium: 57
oQFont::DemiBold: 63
oQFont::Bold: 75
oQFont::ExtraBold: 81
oQFont::Black: 87
italic: True of the font style shall be italic.

void fillText(Number x, Number y, Number w, Number h, String text)
Draws the given text beginning at the given position(x,y) and the given max. dimensions (w,h).
void save()
Pushes the current state onto the state stack.
Before changing any state attributes, you should save the current state for future reference. The
context maintains a stack of drawing states. Each state consists of the current transformation matrix,
clipping region, and values of the following attributes:
•strokeStyle
• fillStyle
• globalAlpha
• lineWidth
• lineCap
• lineJoin
• miterLimit
• shadowOffsetX
• shadowOffsetY
• shadowBlur
• shadowColor
• globalCompositeOperation
void restore()
Pops the top state on the stack, restoring the context to that state.
void scale(Number x, Number y)
Increases or decreases the size of each unit in the canvas grid by multiplying the scale factors to the
current tranform matrix. x is the scale factor in the horizontal direction and y is the scale factor in the
vertical direction.
void rotate(Number angle)
Rotate the canvas around the current origin by angle in radians and clockwise direction.
void translate(Number x, Number y)
Translates the origin of the canvas by a horizontal distance of x, and a vertical distance of y, in
coordinate space units. Translating the origin enables you to draw patterns of different objects on
the canvas without having to measure the coordinates manually for each shape.
void setTransform(Number m11, Number m12, Number m21, Number m22, Number dx,
Number dy)
Changes the transformation matrix to the matrix given by the arguments as described below.
Modifying the transformation matrix directly enables you to perform scaling, rotating, and
translating transformations in a single step. Each point on the canvas is multiplied by the matrix
before anything is drawn. For more details see the HTML Canvas 2D Context specification.

void transform(Number m11, Number m12, Number m21, Number m22, Number dx,
Number dy)
This method is very similar to setTransform(), but instead of replacing the old transform matrix, this
method applies the given tranform matrix to the current matrix by multiplying to it.
CanvasGradient createLinearGradient(Number x0, Number y0, Number x1, Number y1)
Returns a CanvasGradient object that represents a linear gradient that transitions the color along a
line between the start point (x0, y0) and the end point (x1, y1). A gradient is a smooth transition
between colors. There are two types of gradients: linear and radial. Gradients must have two or
more color stops, representing color shifts positioned from 0 to 1 between to the gradient's starting
and end points or circles.
CanvasGradient createRadialGradient(Number x0, Number y0, Number r0, Number x1,
Number y1, Number r1)
Returns a CanvasGradient object that represents a radial gradient that paints along the cone given by
the start circle with origin (x0, y0) and radius r0, and the end circle with origin (x1, y1) and radius r1.
void clearRect(Number x, Number y, Number w, Number h)
Clears all pixels on the canvas in the given rectangle to transparent black.
void fillRect(Number x, Number y, Number w, Number h)
Paint the specified rectangular area using the fillStyle.
void strokeRect(Number x, Number y, Number w, Number h)
Stroke the specified rectangle's path using the strokeStyle, lineWidth, lineJoin, and (if appropriate)
miterLimit attributes.
void beginPath()
Resets the current path to a new path.
void closePath()
Closes the current subpath by drawing a line to the beginning of the subpath, automatically starting a
new path. The current point of the new path is the previous subpath's first point.
void moveTo(Number x, Number y)
Creates a new subpath with the given point.
void lineTo(Number x, Number y)
Draws a line from the current position to the point (x, y).
void quadraticCurveTo(Number cpx, Number cpy, Number x, Number y)
Adds a quadratic bezier curve between the current point and the endpoint (x, y) with the control
point specified by (cpx, cpy).

void bezierCurveTo(Number cp1x, Number cp1y, Number cp2x, Number cp2y, Number x,
Number y)
Adds a cubic bezier curve between the current position and the given endPoint using the control
points specified by (cp1x, cp1y) and (cp2x, cp2y). After the curve is added, the current position is
updated to be at the end point (x, y) of the curve.
void arcTo(Number x1, Number y1, Number x2, Number y2, Number radius)
Adds an arc with the given control points and radius to the current subpath, connected to the
previous point by a straight line.
void rect(Number x, Number y, Number w, Number h)
Adds a rectangle at position (x, y), with the given width w and height h, as a closed subpath.
void arc(Number x, Number y, Number radius, Number startAngle, Number endAngle, bool
anticlockwise)
Adds an arc to the current subpath that lies on the circumference of the circle whose center is at the
point (x, y) and whose radius is radius. Both startAngle and endAngle are measured from the x-axis in
radians. The anticlockwise parameter is true for each arc in the figure above because they are all
drawn in the anticlockwise direction.
void fill()
Fills the subpaths with the current fill style.
void stroke()
Strokes the subpaths with the current stroke style.
void clip()
Creates the clipping region from the current path. Any parts of the shape outside the clipping path
are not displayed.
bool isPointInPath(Number x, Number y)
Returns true if the given point is in the current path.
void clear()
Clears the canvas widget.
void reset()
Resets the canvas widget.
bool saveToFile(String fileName, String imageType="")
Save the canvas widget to an image file. If imageType is empty then the image format will be
detected by inspecting the extension of fileName.
Arguments:
fileName: The file name
imageType: The image type. Following types are supported.

oBMP (Windows Bitmap)
oJPG (Joint Photographic Experts Group)
oPNG (Portable Network Graphics)
oPBM (Portable Bitmap)
oPGM (Portable Graymap)
oPPM (Portable Pixmap)
Return: True on success.
void print(String printDialogTitle="")
Opens a print dialog and prints the canvas widget.
Arguments:
printDialogTitle: The title of the print dialog
Script Canvas2D Example
An example can be found under exampleScripts\WorkerScripts\Canvas2D.
ScriptWidget class
This is the parent class of almost all user interface classes.
The functions and signals which can be used from the worker script are described in the following
chapters.
void setEnabled(bool isEnabled)
Enables or disables the widget.
void update(void)
Updates the widget.
void repaint (void)
Repaints the widget.
void show (void)
Shows the widget.
void close (void)
Closes the widget.
void hide (void)
Hides the widget.
void setWindowTitle(String title)
Sets the window title.
Arguments:
title: The new title

String windowPositionAndSize(void)
Returns the window size and position (Pixel). The return string has following format: "top left x, top
left y, width, height".
void setWindowPositionAndSize(String positionAndSize)
Sets the position and the size of a window (Pixel). String format: "top left x, top left y, width, height".
Arguments:
positionAndSize: The position and size string
Example:
Ui_Dialog.setWindowPositionAndSize("100,100,500,500");
void setBackgroundColor(String color)
Sets the background color of a script gui element.
Arguments:
color: The color, possible values are: black, white, darkGray, gray, lightGray, red, green, blue,
cyan, magenta, darkRed, darkGreen, darkBlue, darkCyan, darkMagenta, darkYellow and
yellow.
Example:
UI_testSetTextLineEdit.setBackgroundColor("red");
Note:
Fore some GUI elements (like the RadioButton) setAutoFillBackground must be called if the
background color shall be changed and for some other GUI elements (like the CheckBox) the
background color cannot be changed.
void setWindowTextColor(String color)
Sets the window text color of a script gui element.
Arguments:
color: The color, possible values are: black, white, darkGray, gray, lightGray, red, green, blue,
cyan, magenta, darkRed, darkGreen, darkBlue, darkCyan, darkMagenta, darkYellow and
yellow.
Example:
UI_testReceiveCheckBox.setWindowTextColor("red");
void setTextColor(String color)
Sets the text color of a script gui element.
Arguments:
color: The color, possible values are: black, white, darkGray, gray, lightGray, red, green, blue,
cyan, magenta, darkRed, darkGreen, darkBlue, darkCyan, darkMagenta, darkYellow and
yellow.
Example:
UI_testReceiveCheckBox.setTextColor("red");
void setPaletteColor(String palette, String color)
Sets a palette color of a script gui element.
Arguments:

palette: The palette element, possible values are: Base, Button, Foreground, Background,
WindowText, Window, Text and ButtonText.
color: The color, possible values are: black, white, darkGray, gray, lightGray, red, green, blue,
cyan, magenta, darkRed, darkGreen, darkBlue, darkCyan, darkMagenta, darkYellow and
yellow.
Example:
UI_testReceiveCheckBox.setPaletteColor("Text", "red");
void setPaletteColorRgb(Number red, Number green, Number blue, String palette)
Sets a palette color of a script gui element.
Arguments:
red: the red value
green: the green value
blue: the blue value
palette: The palette element, possible values are: Base, Foreground, Background,
WindowText, Window, Text and ButtonText.
Example:
UI_testReceiveCheckBox.setPaletteColorRgb(255, 255, 255, "Text");
void setToolTip(String text, Number duration)
Sets the tool tip of the script gui element.
If the duration is -1 (default) the duration is calculated depending on the length of the tool tip.
Arguments:
text: The tool tip text
duration: The tool tip duration
Example:
UI_testGetTextLineEdit.setToolTip("tool tip text", -1);
void raise(void)
Raises this widget to the top of the parent widget's stack.
void lower(void)
Lowers the widget to the bottom of the parent widget's stack.
void setWindowFlags(Number flags)
Sets the window flags.
Window flags are a combination of a type (e.g. Qt::Dialog) and zero or more hints to the window
system (e.g. Qt::FramelessWindowHint).
If the widget had type Qt::Widget or Qt::SubWindow and becomes a window (Qt::Window,
Qt::Dialog, etc.), it is put at position (0, 0) on the desktop. If the widget is a window and becomes a
Qt::Widget or Qt::SubWindow, it is put at position (0, 0) relative to its parent widget.
Note: This function calls setParent() when changing the flags for a window, causing the widget to be
hidden. You must call ScriptWidget::show() to make the widget visible again.
Arguments:
flags: The new additional window flags

The flag argument is a Qt enumeration. It is defined as:
enum WindowType
{
Widget = 0x00000000,
Window = 0x00000001,
Dialog = 0x00000002 | Window,
Sheet = 0x00000004 | Window,
Drawer = Sheet | Dialog,
Popup = 0x00000008 | Window,
Tool = Popup | Dialog,
ToolTip = Popup | Sheet,
SplashScreen = ToolTip | Dialog,
Desktop = 0x00000010 | Window,
SubWindow = 0x00000012,
ForeignWindow = 0x00000020 | Window,
CoverWindow = 0x00000040 | Window,
WindowType_Mask = 0x000000ff,
MSWindowsFixedSizeDialogHint = 0x00000100,
MSWindowsOwnDC = 0x00000200,
BypassWindowManagerHint = 0x00000400,
X11BypassWindowManagerHint = BypassWindowManagerHint,
FramelessWindowHint = 0x00000800,
WindowTitleHint = 0x00001000,
WindowSystemMenuHint = 0x00002000,
WindowMinimizeButtonHint = 0x00004000,
WindowMaximizeButtonHint = 0x00008000,
WindowMinMaxButtonsHint = WindowMinimizeButtonHint |
WindowMaximizeButtonHint,
WindowContextHelpButtonHint = 0x00010000,
WindowShadeButtonHint = 0x00020000,
WindowStaysOnTopHint = 0x00040000,
WindowTransparentForInput = 0x00080000,
WindowOverridesSystemGestures = 0x00100000,
WindowDoesNotAcceptFocus = 0x00200000,
CustomizeWindowHint = 0x02000000,
WindowStaysOnBottomHint = 0x04000000,
WindowCloseButtonHint = 0x08000000,
MacWindowToolBarButtonHint = 0x10000000,
BypassGraphicsProxyWidget = 0x20000000,
WindowOkButtonHint = 0x00080000,
WindowCancelButtonHint = 0x00100000,
NoDropShadowWindowHint = 0x40000000,
WindowFullscreenButtonHint = 0x80000000
};
Example:
UI_ReceiveFileDialog.setWindowFlags(0x00040000);
//show must be called after setWindowFlags
UI_ReceiveFileDialog.show();
Number windowFlags(void)
Returns the window flags.
void clearWindowFlags(Number flags)
Clears the given window flags.
Note: ScriptWidget::show must be called after a clearWindowFlags call.
Arguments:
flags: The window flags which shall be cleared (for more details about window flags see void
setWindowFlags(Number flags)
Example:
UI_ReceiveFileDialog.clearWindowFlags(0x00040000);
//show must be called after setWindowFlags
UI_ReceiveFileDialog.show();

void setFocus(void)
Gives the keyboard input focus to this widget.
void width(void)
Returns the width of the widget excluding any window frame.
void height(void)
Returns the height of the widget excluding any window frame.
QWidget* getWidgetPointer(void)
Returns the widget pointer.
Example:
var input = scriptThread.showTextInputDialog(“Title”, “label”, “initial text”, UI_Dialog.getWidgetPointer())
void setAdditionalData(Number key, String data)
Sets/stores an additional data entry (internally stored in a QMap<int, String> map).
Arguments:
key: The data key
data: The data string
String getAdditionalData(Number key)
Returns an additional data entry (internally stored in a QMap<int, String> map).
Arguments:
key: The data key
String getClassName(void)
Returns the class name of this object.
bool blockSignals(bool block)
If block is true, signals emitted by this object are blocked (i.e., emitting a signal will not invoke
anything connected to it). If block is false, no such blocking will occur.
The return value is the previous value of the blocking state.
String getObjectName(Number key)
Returns the name of this object (UI_'object name in the ui file').
Note: This function returns only a not empty string for GUI elements from ui files (standard GUI
elements). For GUI elements created with ScriptTableWidget::insertWidget the object name must be
set with setObjectName.
Example:
function sendSequence()
{
var sender = this;
if(sender.getObjectName() == "UI_SendButton1")
{
}
else
{//UI_SendButton2
}
}
UI_SendButton1.clickedSignal.connect(UI_SendButton1, sendSequence);
UI_SendButton2.clickedSignal.connect(UI_SendButton2, sendSequence);

void setAutoFillBackground(bool enabled)
This property holds whether the widget background is filled automatically. If enabled, this property
will cause Qt to fill the background of the widget before invoking the paint event.
Note:
Some GUI elements (like the RadioButton) need this property set to true if the background color shall
be changed with setBackgroundColor.
void setObjectName(String name)
Sets the name of the current object (can be retrieved with getObjectName).
void setWindowIcon(String iconFile, bool isRelativePath=true)
Sets the window icon of a dialog or a main window. Supported formats: .ico, .gif, .png, .jpeg, .tiff,
.bmp, .icns.
Arguments:
iconFile: The file name of the icon
isRelativePath: True if the file path is relative to the current script (which executes this
function)
Note: An example can be found under: exampleScripts\WorkerScripts\SendUserInput
void createShortCut(QString keys, QScriptValue scriptFunction)
Creates a shortcut and connects it to a script function.
Arguments:
keys: The shortcut keys (up to four key codes may be entered by separating them with
commas, e.g. "Alt+X,Ctrl+S,Q). See http://doc.qt.io/qt-4.8/qkeysequence.html for more
details).
scriptFunction: The script function which shall be called if the user enters the shortcuts.
Example:
function testShortcut1(){scriptThread.appendTextToConsole("testShortcut1");}
function testShortcut2(){scriptThread.appendTextToConsole("testShortcut2");}
function testShortcut3(){scriptThread.appendTextToConsole("testShortcut3");}
//Test shortcut 1.
UI_Dialog.createShortCut("Alt+V", testShortcut1);
//Test shortcut 2.
UI_Dialog.createShortCut("F1", testShortcut2);
//To activate test shortcut 3:
//- enter Alt+Ctrl+X, release Alt+Ctrl+X
//- enter Ctrl+S, release Ctrl+S
//- enter Q
UI_Dialog.createShortCut("Alt+Ctrl+X,Ctrl+S,Q", testShortcut3);
Note: An example can be found under: exampleScripts\WorkerScripts\SendUserInput
Custom script widget
ScriptCommunicator can be extended with a custom script widget. For this following must be done:
•create a Qt widget (see the Qt documentation)
•create a QtDesigner plug-in (see the Qt documentation)

•export the functions GetScriptCommunicatorWidgetName and
CreateScriptCommunicatorWidget
•create a wrapper class through which worker scripts can access the custom widget (the
custom widget resides (like a GUI elements) in the main thread and worker threads resides in
their own thread)
•put the QtDesigner plug-in library into the plugins\designer folder
Note: All functions and classes must reside in the QtDesigner plug-in library.
extern "C" Q_DECL_EXPORT const char* GetScriptCommunicatorWidgetName(void)
Returns the class name of the custom widget.
extern "C" Q_DECL_EXPORT QObject *CreateScriptCommunicatorWidget(QObject
*scriptThread, QWidget *customWidget, bool scriptRunsInDebugger)
Creates the wrapper class through which a worker-script can access the custom widget.
Arguments:
scriptThread: Pointer to the script thread.
customWidget: The custom widget.
scriptRunsInDebugger: True if the script thread runs in a script debugger.
Important:
A function from a custom widget class must not be called directly from a worker-script (a worker
script runs in his own thread and the custom widget runs like all GUI elements in the main thread).
Instead a slot must be called (by a signal). This signal must be connected with Qt::QueuedConnection
or Qt::BlockingQueuedConnection.
If the worker script runs in a debugger then Qt::DirectConnection instead of
Qt::BlockingQueuedConnection must be used (the debugger and therefore the worker script runs in
the main thread). Qt::BlockingQueuedConnection would cause a dead-lock.
Examples can be found under exampleScripts\WorkerScripts\CustomWidget.
Dynamic link libraries
Worker script can extend their functionality by loading a dynamic link library. This library must export
following function:
extern "C" Q_DECL_EXPORT void init(QScriptEngine* engine);
In this function all objects and functions which are accessible by script must be registered.
C++ Example:
void init(QScriptEngine* engine)
{
qRegisterMetaType<QScriptEngine*>("TestDll*");
engine->globalObject().setProperty("TestDll", engine->newQObject(&testDll));
QScriptValue sendDataArrayFunction = engine->evaluate("sendDataArray");
testDll.setSendDataArrayFunction(sendDataArrayFunction);
testDll.setScriptEngine(engine);
}
To load a library the script must call the function bool loadLibrary(String path, bool
isRelativePath=true)

Example:
scriptThread.loadLibrary("TestDll.dll", true);
Under exampleScripts/WorkerScripts/LoadLibrary a script and a Qt library Project can be found
which demonstrate the usage.
Sequence script
Sequence scripts can be added to a send sequence (send window). If a sequence is send, the script
function sendData is called. In this function the sequence data can be modified (create a frame,
calculate CRC …). The modified data must be returned.
Note: After sending a sequence the corresponding sequence script is unloaded. Therefore no data
can be stored in a sequence script variable (sequence scripts can store data globally in
ScriptCommunicator (e.g. counter) with special functions (are described below)).
Example:
function sendData(data)
{
var counter = 0;
//Read the stored counter value
var resultArray = seq.getGlobalUnsignedNumber("Counter");
if(resultArray[0] == 1)
{
counter = resultArray[1];
}
//Append the counter value.
data.push((counter >> 24) & 0xff);
data.push((counter >> 16) & 0xff);
data.push((counter >> 8) & 0xff);
data.push(counter & 0xff);
//Append a CRC8.
var crc8 = seq.calculateCrc8(data);
data.push(crc8 & 0xff);
counter++;
//Store the new counter value.
seq.setGlobalUnsignedNumber("Counter", counter);
return data;
}
Note:
For complex scripts 'worker scripts' in the script window must be used (see chapter Worker scripts).
Sequence scripts are running in an own thread, therefore ScriptCommunicator can not be blocked by
a sequence script directly. The GUI of a sequence script runs in the main thread (a call to a script GUI
element normally calls a function in the main thread), therefore to many calls to script GUI elements
can block ScriptCommunicator.
Sequence scripts are QtScript scripts (see chapter Script interface). The sequence scripts interface
extents the standard QtScript functionality. These extended functionality is described in the following
chapters.
Array<Number> data sendData(Array<Number> data)
This function is called if a sequence shall be sent (every sequence script must contain this function).
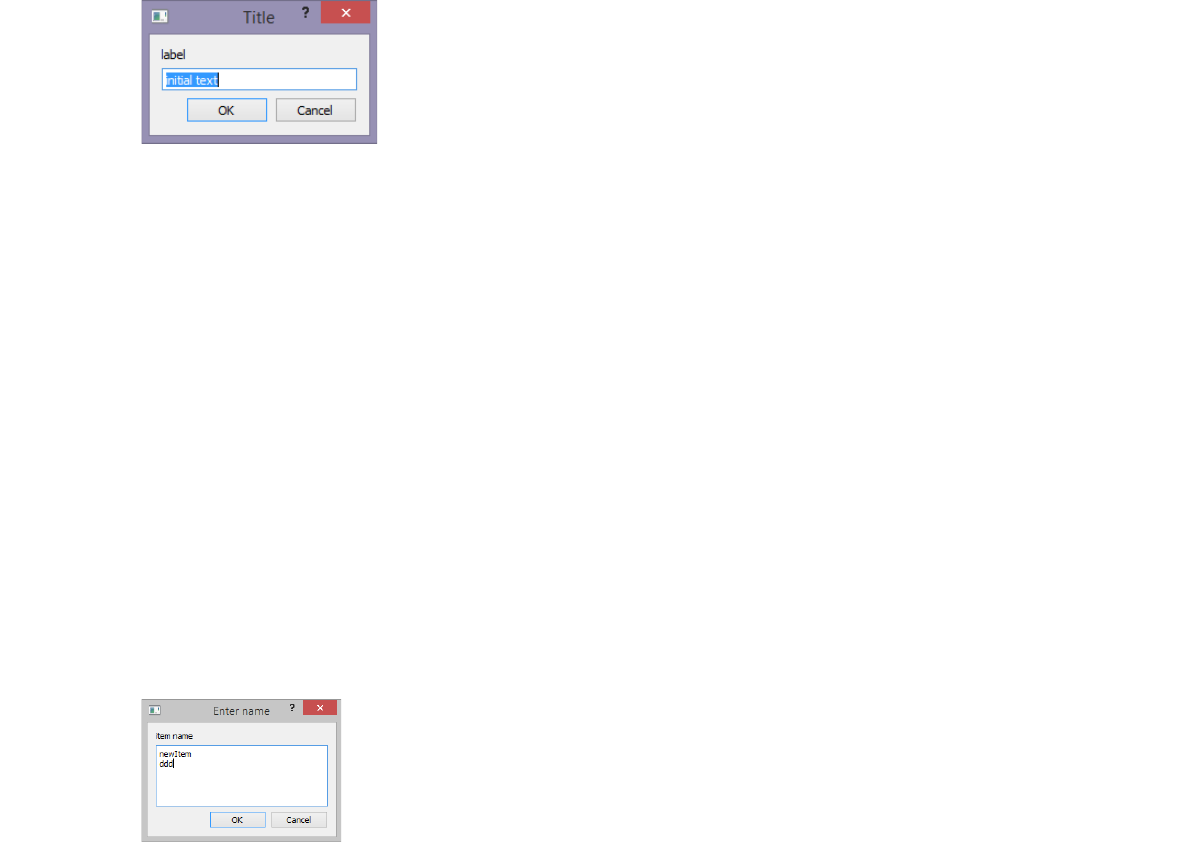
Arguments:
data: The sequence data (byte) array
Return: The modified data array.
Note: The sequence will not be sent if an empty array (Array()) is returned.
String showTextInputDialog(String title, String label, String displayedText="")
Convenience function to get a string from the user. Shows a QInputDialog::getText dialog (line edit).
Arguments:
title: The title of the dialog
label: The label over the input area
displayedText: The initial displayed text in the input area
Return: The text in the input section after closing the dialog (empty if the ok button was not
pressed).
Example:
var input = seq.showTextInputDialog("Title", "label", "initial text");
if(input != "")
{//OK button pressed.
//Process the string in 'input'.
}
else
{//OK button not pressed or empty input.
}
String showMultiLineTextInputDialog(String title, String label, String displayedText="")
Convenience function to get a multiline string from the user. Shows a QInputDialog::getMultiLineText
dialog (plain text edit).
Arguments:
title: The title of the dialog
label: The label over the input area
displayedText: The initial displayed text in the input area
parent: The parent of this dialog (see chapter QWidget* getWidgetPointer(void) for more
details)
Return: The text in the input section after closing the dialog (empty if the ok button was not
pressed).
Example:
var input = seq.showMultiLineTextInputDialog("Enter name", "item name", "newItem");
if(input != "")
{//OK button pressed.
//Process the string in 'input'.
}
else
{//OK button not pressed or empty input.
}

String showGetItemDialog(String title, String label, Array<String> displayedItems, Number
currentItemIndex=0, bool editable=false, QWidget* parent=0)
Convenience function to let the user select an item from a string list. Shows a QInputDialog::getItem
dialog (combobox).
Arguments:
title: The title of the dialog
label: The label over the input area
displayedItems: The displayed items
currentItemIndex: The current combobox index
editable: True if the combobox shall be editable
parent: The parent of this dialog (see chapter QWidget* getWidgetPointer(void) for more
details)
Return: The text of the selected item after closing the dialog (empty if the ok button was not
pressed).
Example:
var input = seq.showGetItemDialog("Enter name", "item name", Array("item1", "item2"), 1, true);
if(input != "")
{//OK button pressed.
//Process the string in 'input'.
}
else
{//OK button not pressed or empty input.
}
Array<Number> showGetIntDialog(String title, String label, Number intialValue, Number
min, Number max, Number step, QWidget* parent=0)
Convenience function to get an integer input from the user. Shows a QInputDialog::getInt dialog
(spinbox).
Arguments:
title: The title of the dialog
label: The label over the input area
intialValue: The initial value.
min: The minimum value
max: The maximum value.
step: The amount by which the values change as the user presses the arrow buttons to
increment or decrement the value
parent: The parent of this dialog (see chapter QWidget* getWidgetPointer(void) for more
details)
Return:
array item 0: 1 if the ok button has been pressed, 0 otherwise
array item 1: The value of the spinbox after closing the dialog
Example:
var resultArray = seq.showGetIntDialog("Enter value", "value item name", 10, 0, 20, 2);
if(resultArray[0] == 1)
{//OK button pressed.
//Process the string in 'input'.
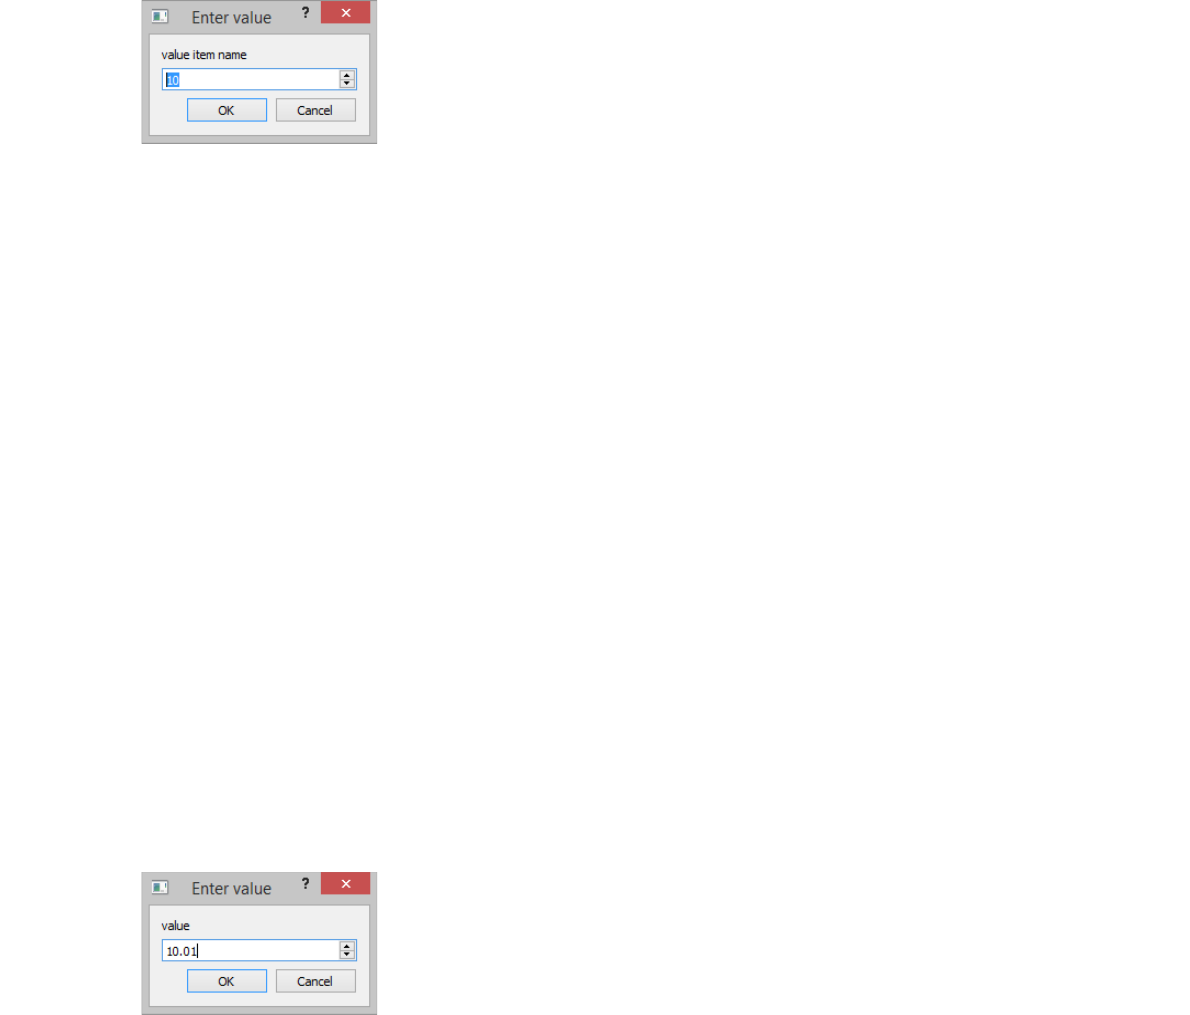
}
else
{//OK button not pressed or empty input.
}
Array<Number> showGetDoubleDialog(String title, String label, Number intialValue,
Number min, Number max, Number decimals, QWidget* parent)
Convenience function to get a floating point number from the user. Shows a
QInputDialog::getDouble dialog (spinbox).
Arguments:
title: The title of the dialog
label: The label over the input area
intialValue: The initial value.
min: The minimum value
max: The maximum value.
decimals: The maximum number of decimal places the number may have
parent: The parent of this dialog (see chapter QWidget* getWidgetPointer(void) for more
details)
Return:
array item 0: 1.0 if the ok button has been pressed, 0 otherwise
array item 1: The value of the spinbox after closing the dialog
Example:
var resultArray = seq.showGetDoubleDialog("Enter value", "value", 10, 0, 20, 2);
if(resultArray[0] >= 1.0)
{//OK button pressed.
//Process the string in 'input'.
}
else
{//OK button not pressed or empty input.
}
void messageBox(String icon, String title, String text, QWidget* parent=0)
This function shows a message box.
Arguments:
icon: The icon of the message box. Possible values are: "Information"," Warning", "Critical"
and "Question"
title: The title of the message box
text: The text of the message box
parent: The parent of this dialog (see chapter QWidget* getWidgetPointer(void) for more
details)
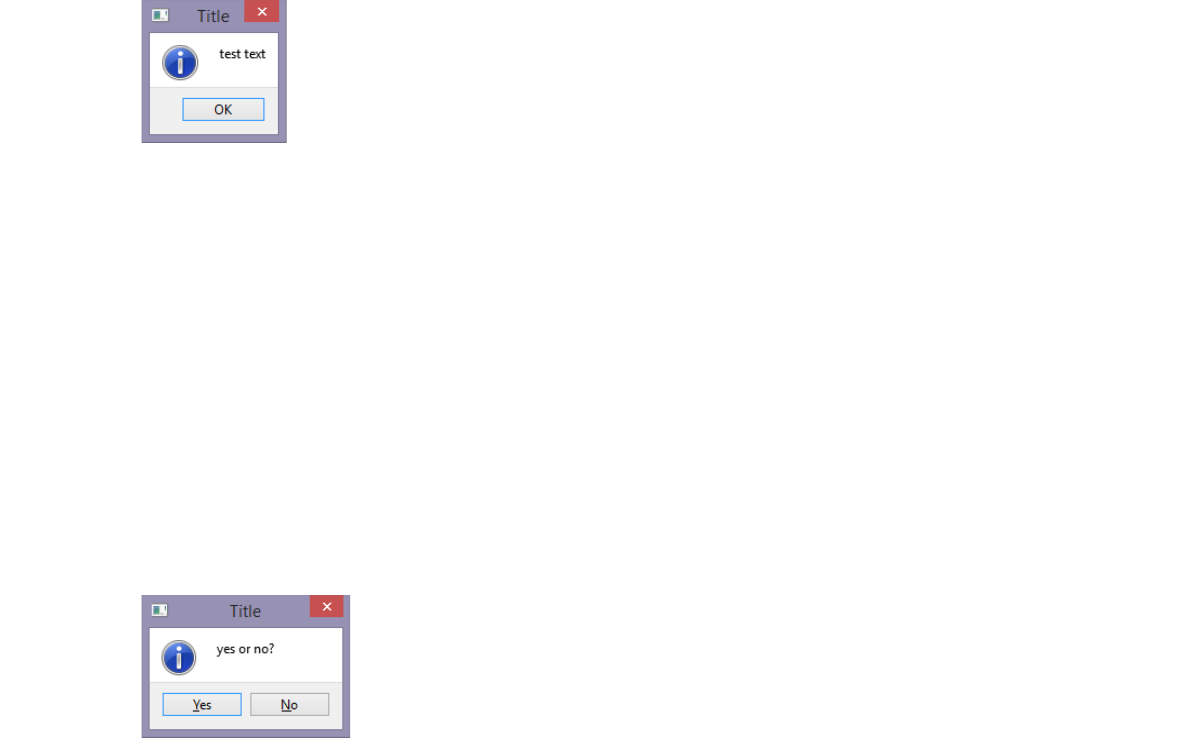
Example:
seq.messageBox("Information", "Title", "test text");
bool showYesNoDialog(String icon, String title, String text, QWidget* parent=0)
This function shows a yes/no dialog.
Arguments:
icon: The icon of the dialog. Possible values are: "Information"," Warning", "Critical" and
"Question"
title: The title of the dialog
text: The text of the dialog
parent: The parent of this dialog (see chapter QWidget* getWidgetPointer(void) for more
details)
Return: True if the user has pressed the yes button
Example:
if(seq.showYesNoDialog("Information", "Title", "yes or no?"))
{//Yes clicked.
//Do something.
}
Array<Number> showColorDialog(Number initialRed=255, Number initialGreen=255,
Number initialBlue=255, Number initialAlpha=255, bool alphaIsEnabled=false)
Convenience function to get color settings from the user.
Arguments:
initialRed: The initial value for red
initialGreen: The initial value for green
initialBlue: The initial value for blue
initialAlpha: The initial value for alpha
alphaIsEnabled: True if the alpha value should be visible/editable
Return: integer list which contains:
element 0: 1 = OK button press, 0 OK button not pressed
element 1: red (0-255)
element 2: green (0-255)
element 3: blue (0-255)
element 4: alpha (0-255)
Example:
var resultArray = seq.showColorDialog(1,2,3,4,true);
var data = Array();
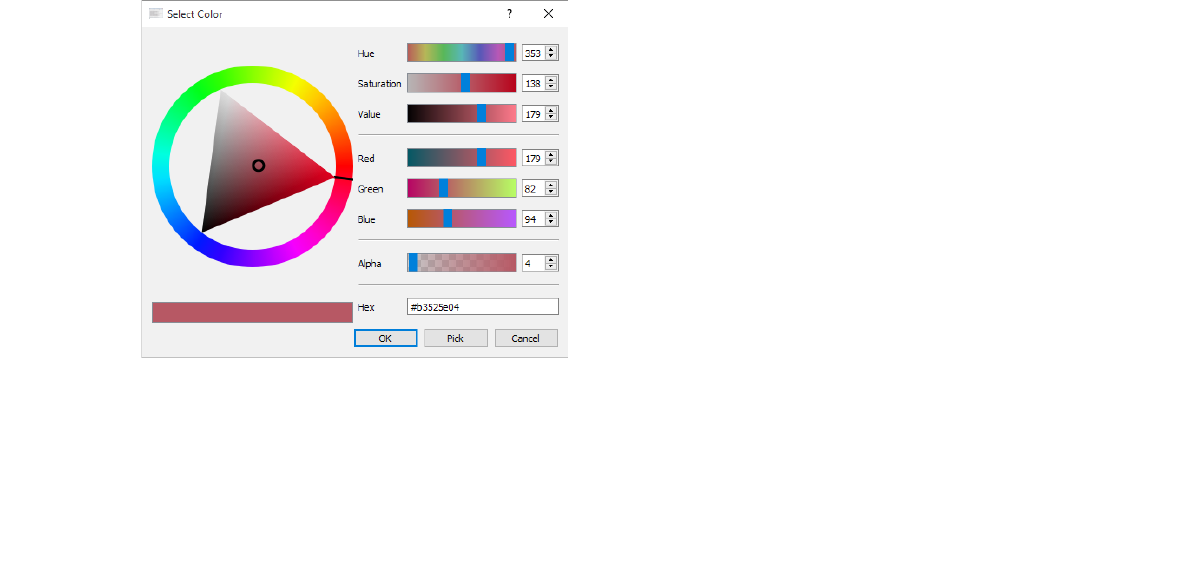
if(resultArray[0])
{//OK clicked.
data.push(resultArray[1]); //Red
data.push(resultArray[2]); //Green
data.push(resultArray[3]); //Blue
data.push(resultArray[4]); //Alpha
}
Number calculateCrc8(Array<Number> data)
Calculates a CRC8.
Arguments:
•data: The data for calculating the CRC
Return: The CRC
Example:
var dataArray = Array(0, 1, 2, 3, 4, 5, 6, 7)
var crc = seq.calculateCrc8(dataArray);
The used code for the CRC calculation is shown on page 47.
Number calculateCrc8WithPolynomial(Array<Number> data, Number polynomial, Number
startValue=0)
Calculates a crc8 with a given polynomial.
Arguments:
data: The data (byte array) for calculating the CRC
polynomial: The used polynomial
startValue: The CRC start value
Return: The CRC
Example:
var dataArray = Array(0, 1, 2, 3, 4, 5, 6, 7)
var crc = seq.calculateCrc8WithPolynomial(dataArray);
The used code for the CRC calculation is shown on page 48.
Number calculateCrc16(Array<Number> data)
Calculates a CRC16.
Arguments:
•data: The data (byte array) for calculating the CRC
Return: The CRC
Example:

var dataArray = Array(0, 1, 2, 3, 4, 5, 6, 7)
var crc = seq.calculateCrc16(dataArray);
The used code for the CRC calculation is shown on page 48.
Number calculateCrc32(Array<Number> data)
Calculates a CRC32.
Arguments:
•data: The data (byte array) for calculating the CRC
Return: The CRC
Example:
var dataArray = Array(0, 1, 2, 3, 4, 5, 6, 7)
var crc = seq.calculateCrc32(dataArray);
The used code for the CRC calculation is shown on page 49.
Number calculateCrc64(Array<Number> data)
Calculates a CRC64.
Arguments:
•data: The data (byte array) for calculating the CRC
Return: The CRC
Example:
var dataArray = Array(0, 1, 2, 3, 4, 5, 6, 7)
var crc = seq.calculateCrc64(dataArray);
The used code for the CRC calculation is shown on page 50.
String getCurrentVersion
Returns the current version of ScriptCommunicator (string) .
Version format: major.minor (eg. 3.09)
void setBlockTime(Number blockTime)
Sets the script block time.
Note: After this execution time (sendData and the script main function (all outside a function))
the script is regarded as blocked and will be stopped. The default is 10000.
Array<String> getAllObjectPropertiesAndFunctions(QScriptValue object)
Returns all functions and properties of an object.
Arguments:
object: The object
Return: All functions and properties of the object.
void appendTextToConsole(String text, bool newLine=true, bool bringToForeground=false)
This function can be used to append a text to the script window console (e.g. to print debug
messages).
Arguments:
text: The text which has to be appended to the console
newLine: If true then the text will be appended in a new line

bringToForeground: True if the script window shall be on top of all windows
Example:
seq.appendTextToConsole("This is a debug message");
Converter functions
The script converter class provides several converter functions. These functions can be accessed with
the conv object (see chapter Script converter object/class).
Inter-SequenceScript communication
The following functions can be used to store data from a sequence script globally. If this sequence
script is started again the data can be read (e.g. for a counter). Global stored sequence script
data\variables can be accessed from every sequence script (these variable are stored in
ScriptCommunicator global sequence script maps).
Under exampleScripts\SequenceSendScript an example of global sequence variables can be found.
void setGlobalString(String name, String string)
Sets a string in the global string map.
Arguments:
name: Name of the string variable
string: The string
String getGlobalString(String name, bool removeValue=false)
Returns a string from the global string map.
Arguments:
name: Name of the variable
removeValue: True if the variable shall be removed from the string map
Return: The read string. Returns an empty string if name is not in the string map.
void setGlobalDataArray(String name, Array<Number> data)
Sets a data (byte) array in the global data array map.
Arguments:
name: Name of the variable
data: The data (byte) array
Array<Number> getGlobalDataArray(String name, bool removeValue=false)
Returns a data (byte) array from the global data array map.
Arguments:
name: Name of the variable
removeValue: True if the variable shall be removed from the data array map
Return: The read data (byte) array. Returns an empty data array if name is not in the data array map.
void setGlobalUnsignedNumber(String name, Number number)
Sets an unsigned number in the global unsigned number map.
Arguments:
name: Name of the variable
number: The number

Array<Number> getGlobalUnsignedNumber(String name,bool removeValue=false)
Returns an unsigned number from the global unsigned number map.
Arguments:
name: Name of the variable
removeValue: True if the variable shall be removed from the unsigned number map
Return: The first element in the result list is the result status (1=name found, 0=name not found). The
second element is the read value.
Example:
var counter = 0;
//Read the stored counter value
var resultArray = seq.getGlobalUnsignedNumber("Counter");
if(resultArray[0] == 1)
{
counter = resultArray[1];
}
void setGlobalSignedNumber(String name, Number number)
Sets a signed number in the global signed number map.
Arguments:
name: Name of the variable
number: The number
Array<Number> getGlobalSignedNumber(String name,bool removeValue=false)
Returns a signed number from the global signed number map.
Arguments:
name: Name of the variable
removeValue: True if the variable shall be removed from the signed number map
Return: The first element in the result list is the result status (1=name found, 0=name not found). The
second element is the read value.
Example:
var counter = 0;
//Read the stored counter value
var resultArray = seq.getGlobalSignedNumber("Counter");
if(resultArray[0] == 1)
{
counter = resultArray[1];
}
Script converter object/class
The script converter class provides several converter functions. These functions can be accessed with
the conv object. Example:
var array = conv.addUint16ToArray(array, 61234, true);
The functions which can be used are described in the following chapters.
String byteArrayToString (Array<Number> data)
Converts a byte array which contains ASCII characters into an ASCII string.
Example:
var array = Array(48, 49, 50);
var string = conv.byteArrayToString(array);

String byteArrayToUtf8String (Array<Number> data)
Converts a byte array which contains utf8 characters into an utf8 string (QString).
Example:
var array = Array(0x61, 0x62, 0xc3, 0xa4);
var string = conv.byteArrayToUtf8String(array);
String byteArrayToHexString (Array<Number> data)
Converts a byte array into a hex string.
Example:
var array = Array(2, 3, 4, 33);
var string = conv.byteArrayToHexString(array);
Array<Number> stringToArray(String str)
Converts an ASCII string into a byte array.
Example:
var array = conv.stringToArray("Test");
Number byteArrayToUint16(Array<Number> data, bool littleEndian)
Converts the first Bytes of a byte array to an uint16.
Arguments:
data: The data array
littleEndian: True if the byte order is little endian (least significant byte first)
Number byteArrayToUint32(Array<Number> data, bool littleEndian)
Converts the first Bytes of a byte array to an uint32.
Arguments:
data: The data array
littleEndian: True if the byte order is little endian (least significant byte first)
Number byteArrayToUint64(Array<Number> data, bool littleEndian)
Converts the first Bytes of a byte array to an uint64.
Arguments:
data: The data array
littleEndian: True if the byte order is little endian (least significant byte first)
Number unsignedCharToSignedChar(Number number)
Converts an unsigned char to a signed char (int8).
Number byteArrayToInt16(Array<Number> data, bool littleEndian)
Converts the first Bytes of a byte array to an int16.
Arguments:
data: The data array
littleEndian: True if the byte order is little endian (least significant byte first)
Number byteArrayToInt32(Array<Number> data, bool littleEndian)
Converts the first Bytes of a byte array to an int32.
Arguments:
data: The data array
littleEndian: True if the byte order is little endian (least significant byte first)

Number byteArrayToInt64(Array<Number> data, bool littleEndian)
Converts the first Bytes of a byte array to an int64.
Arguments:
data: The data array
littleEndian: True if the byte order is little endian (least significant byte first)
Number byteArrayToFloat32(Array<Number> data, bool littleEndian)
Converts the first Bytes of a byte array to a float32.
Arguments:
data: The data array
littleEndian: True if the byte order is little endian (least significant byte first)
Number byteArrayToFloat64(Array<Number> data, bool littleEndian)
Converts the first Bytes of a byte array to a double.
Arguments:
data: The data array
littleEndian: True if the byte order is little endian (least significant byte first)
Array<Number> addStringToArray(Array<Number> array, String str)
Adds an ASCII string to a byte array.
Example:
var array = Array(0,1,2,3,4);
array = conv.addStringToArray(array, "Test");
Array<Number> addUint16ToArray(Array<Number> array, Number value, bool
littleEndian)
Adds an uint16 to a byte array.
Arguments:
array: The data array
value: The value
littleEndian: True if the byte order is little endian (least significant byte first)
Array<Number> addUint32ToArray(Array<Number> array, Number value, bool
littleEndian)
Adds an uint32 to a byte array.
Arguments:
array: The data array
value: The value
littleEndian: True if the byte order is little endian (least significant byte first)
Array<Number> addUint64ToArray(Array<Number> array, Number value, bool
littleEndian)
Adds an uint64 to a byte array.
Arguments:
array: The data array
value: The value

littleEndian: True if the byte order is little endian (least significant byte first)
Array<Number> addInt16ToArray(Array<Number> array, Number value, bool littleEndian)
Adds an int16 to a byte array.
Arguments:
array: The data array
value: The value
littleEndian: True if the byte order is little endian (least significant byte first)
Array<Number> addInt32ToArray(Array<Number> array, Number value, bool littleEndian)
Adds an int32 to a byte array.
Arguments:
array: The data array
value: The value
littleEndian: True if the byte order is little endian (least significant byte first)
Array<Number> addInt64ToArray(Array<Number> array, Number value, bool littleEndian)
Adds an int64 to a byte array.
Arguments:
array: The data array
value: The value
littleEndian: True if the byte order is little endian (least significant byte first)
Array<Number> addFloat32ToArray(Array<Number> array, Number value, bool
littleEndian)
Adds a float32 to a byte array.
Arguments:
array: The data array
value: The value
littleEndian: True if the byte order is little endian (least significant byte first)
Array<Number> addFloat64ToArray(Array<Number> array, Number value, bool
littleEndian)
Adds a float64 to a byte array.
Arguments:
array: The data array
value: The value
littleEndian: True if the byte order is little endian (least significant byte first)
Example scripts
Under the directory exampleScripts several example scripts can be found which demonstrate the
different script interfaces of ScriptCommunicator.
