Maven: The Reference Maven Guide
Maven_the_reference_guide
Maven_the_reference_guide
Maven_the_reference_guide
Maven_the_reference_guide
Maven_the_reference_guide
User Manual: Pdf
Open the PDF directly: View PDF ![]() .
.
Page Count: 339 [warning: Documents this large are best viewed by clicking the View PDF Link!]
- Introducing Apache Maven
- Installing Maven
- The Project Object Model
- The Build Lifecycle
- Build Profiles
- Running Maven
- Maven Command Line Options
- Defining Properties
- Getting Help
- Using Build Profiles
- Displaying Version Information
- Running in Offline Mode
- Using a Custom POM or Custom Settings File
- Encrypting Passwords
- Dealing with Failure
- Controlling Maven's Verbosity
- Running Maven in Batch Mode
- Downloading and Verifying Dependencies
- Non-recursive Builds
- Using Advanced Reactor Options
- Using the Maven Help Plugin
- Maven Command Line Options
- Maven Configuration
- Maven Assemblies
- Introduction
- Assembly Basics
- Overview of the Assembly Descriptor
- The Assembly Descriptor
- Controlling the Contents of an Assembly
- Best Practices
- Summary
- Properties and Resource Filtering
- Site Generation
- Writing Plugins
- Using Maven Archetypes
- Developing with Flexmojos
- Introduction
- Configuring Build Environment for Flexmojos
- Creating a Flex Mojos Project from an Archetype
- The FlexMojos Lifecycle
- FlexMojos Plugin Goals
- FlexMojos Plugin Reports
- Developing and Customizing Flexmojos
- Android Application Development with Maven
- Introduction
- Configuring Build Environment for Android Development
- Getting Started
- Creating New Projects with the Android Maven Archetypes
- Using Add-Ons
- Multi Module Android Projects
- Using external dependencies
- The Custom Lifecycle from the Android Maven Plugin
- Plugin Configuration Parameters
- Device Interaction
- Emulator Interaction
- Other Useful Android Maven Plugin Goals
- Internal Android Maven Plugin Goals
- Testing Android Application Code
- Native Application Builds
- Tips and Tricks
- Appendix: Settings Details
- Appendix: Sun Specification Alternatives
- Creative Commons License

Maven: The Complete Reference i
Maven: The Complete Reference
Ed. 1.0

Maven: The Complete Reference ii
Contents
1 Introducing Apache Maven 1
1.1 Maven. . . What is it? .................................... 1
1.2 Convention Over Configuration ............................... 2
1.3 A Common Interface .................................... 3
1.4 Universal Reuse through Maven Plugins .......................... 3
1.5 Conceptual Model of a "Project" .............................. 4
1.6 Is Maven an alternative to XYZ? .............................. 5
1.7 Comparing Maven with Ant ................................ 6
2 Installing Maven 10
2.1 Verify your Java Installation ................................ 10
2.2 Downloading Maven .................................... 11
2.3 Installing Maven ...................................... 11

Maven: The Complete Reference iii
2.3.1 Installing Maven on Linux, BSD or Mac OSX ................... 12
2.3.2 Installing Maven on Microsoft Windows ...................... 12
2.4 Testing a Maven Installation ................................ 13
2.5 Maven Installation Details ................................. 13
2.5.1 User-specific Configuration and Repository .................... 14
2.5.2 Upgrading a Maven Installation .......................... 15
2.6 Uninstalling Maven ..................................... 15
2.7 Getting Help with Maven .................................. 15
2.8 About the Apache Software License ............................ 16
3 The Project Object Model 18
3.1 Introduction ......................................... 18
3.2 The POM .......................................... 18
3.2.1 The Super POM .................................. 21
3.2.2 The Simplest POM ................................. 25
3.2.3 The Effective POM ................................. 26
3.2.4 Real POMs ..................................... 26
3.3 POM Syntax ......................................... 26
3.3.1 Project Versions .................................. 27

Maven: The Complete Reference iv
3.3.1.1 Version Build Numbers ......................... 27
3.3.1.2 SNAPSHOT Versions .......................... 28
3.3.2 Property References ................................ 28
3.4 Project Dependencies .................................... 30
3.4.1 Dependency Scope ................................. 31
3.4.2 Optional Dependencies ............................... 32
3.4.3 Dependency Version Ranges ............................ 34
3.4.4 Transitive Dependencies .............................. 35
3.4.4.1 Transitive Dependencies and Scope ................... 35
3.4.5 Conflict Resolution ................................. 36
3.5 Project Relationships .................................... 40
3.5.1 More on Coordinates ................................ 40
3.5.2 Project Inheritance ................................. 42
3.6 POM Best Practices ..................................... 44
3.6.1 Grouping Dependencies .............................. 45
3.6.2 Multi-module vs. Inheritance ........................... 47
3.6.2.1 Simple Project .............................. 47
3.6.2.2 Multi-module Enterprise Project .................... 49

Maven: The Complete Reference v
4 The Build Lifecycle 52
4.1 Introduction ......................................... 52
4.1.1 Clean Lifecycle (clean) ............................... 53
4.1.2 Default Lifecycle (default) ............................. 56
4.1.3 Site Lifecycle (site) ................................. 57
4.2 Package-specific Lifecycles ................................. 58
4.2.1 JAR ......................................... 59
4.2.2 POM ........................................ 59
4.2.3 Maven Plugin .................................... 60
4.2.4 EJB ......................................... 60
4.2.5 WAR ........................................ 61
4.2.6 EAR ........................................ 61
4.2.7 Other Packaging Types ............................... 62
4.3 Common Lifecycle Goals .................................. 63
4.3.1 Process Resources ................................. 63
4.3.2 Compile ....................................... 67
4.3.3 Process Test Resources ............................... 68
4.3.4 Test Compile .................................... 68

Maven: The Complete Reference vi
4.3.5 Test ......................................... 69
4.3.6 Install ........................................ 70
4.3.7 Deploy ....................................... 70
5 Build Profiles 71
5.1 What Are They For? .................................... 71
5.1.1 What is Build Portability .............................. 71
5.1.1.1 Non-Portable Builds ........................... 72
5.1.1.2 Environment Portability ......................... 72
5.1.1.3 Organizational (In-House) Portability .................. 72
5.1.1.4 Wide (Universal) Portability ....................... 73
5.1.2 Selecting an Appropriate Level of Portability ................... 73
5.2 Portability through Maven Profiles ............................. 74
5.2.1 Overriding a Project Object Model ......................... 76
5.3 Profile Activation ...................................... 77
5.3.1 Activation Configuration .............................. 79
5.3.2 Activation by the Absence of a Property ...................... 80
5.4 Listing Active Profiles ................................... 81
5.5 Tips and Tricks ....................................... 81

Maven: The Complete Reference vii
5.5.1 Common Environments .............................. 82
5.5.2 Protecting Secrets .................................. 84
5.5.3 Platform Classifiers ................................. 85
5.6 Summary .......................................... 87
6 Running Maven 88
6.1 Maven Command Line Options ............................... 88
6.1.1 Defining Properties ................................. 88
6.1.2 Getting Help .................................... 89
6.1.3 Using Build Profiles ................................ 90
6.1.4 Displaying Version Information .......................... 90
6.1.5 Running in Offline Mode .............................. 91
6.1.6 Using a Custom POM or Custom Settings File .................. 91
6.1.7 Encrypting Passwords ............................... 91
6.1.8 Dealing with Failure ................................ 92
6.1.9 Controlling Maven’s Verbosity ........................... 92
6.1.10 Running Maven in Batch Mode .......................... 93
6.1.11 Downloading and Verifying Dependencies ..................... 93
6.1.12 Non-recursive Builds ................................ 94

Maven: The Complete Reference viii
6.2 Using Advanced Reactor Options .............................. 94
6.2.1 Advanced Reactor Options Example Project .................... 95
6.2.2 Resuming Builds .................................. 97
6.2.3 Specifying a Subset of Projects ........................... 97
6.2.4 Making a Subset of Projects ............................ 98
6.2.5 Making Project Dependents ............................ 98
6.2.6 Resuming a "make" build ............................. 99
6.3 Using the Maven Help Plugin ................................ 99
6.3.1 Describing a Maven Plugin ............................. 100
7 Maven Configuration 103
7.1 Configuring Maven Plugins ................................. 103
7.1.1 Plugin Configuration Parameters .......................... 103
7.1.2 Adding Plugin Dependencies ............................ 107
7.1.3 Setting Global Plugin Parameters ......................... 108
7.1.4 Setting Execution Specific Parameters ....................... 108
7.1.5 Setting Default Command Line Execution Parameters .............. 109
7.1.6 Setting Parameters for Goals Bound to Default Lifecycle ............. 110
8 Maven Assemblies 112

Maven: The Complete Reference ix
8.1 Introduction ......................................... 112
8.2 Assembly Basics ...................................... 113
8.2.1 Predefined Assembly Descriptors ......................... 114
8.2.2 Building an Assembly ............................... 114
8.2.3 Assemblies as Dependencies ............................ 117
8.2.4 Assembling Assemblies via Assembly Dependencies ............... 118
8.3 Overview of the Assembly Descriptor ........................... 122
8.4 The Assembly Descriptor .................................. 123
8.4.1 Property References in Assembly Descriptors ................... 123
8.4.2 Required Assembly Information .......................... 123
8.5 Controlling the Contents of an Assembly .......................... 125
8.5.1 Files Section ................................... 125
8.5.2 FileSets Section ................................ 126
8.5.3 Default Exclusion Patterns for ........................... 128
8.5.4 dependencySets Section ............................ 129
8.5.4.1 Customizing Dependency Output Location ............... 131
8.5.4.2 Interpolation of Properties in Dependency Output ........... 132
8.5.4.3 Including and Excluding Dependencies by Scope ........... 133

Maven: The Complete Reference x
8.5.4.4 Fine Tuning: Dependency Includes and Excludes ........... 135
8.5.4.5 Transitive Dependencies, Project Attachments, and Project . . . . . . 137
8.5.4.6 Advanced Unpacking Options ...................... 138
8.5.4.7 Summarizing Dependency Sets ..................... 140
8.5.5 moduleSets Sections .............................. 140
8.5.5.1 Module Selection ............................ 141
8.5.5.2 Sources Section ............................. 141
8.5.5.3 Interpolation of outputDirectoryMapping in .......... 143
8.5.5.4 Binaries section ............................. 144
8.5.5.5 moduleSets, Parent POMs ...................... 146
8.5.6 Repositories Section ................................ 146
8.5.7 Managing the Assembly’s Root Directory ..................... 147
8.5.8 componentDescriptors and ......................... 148
8.6 Best Practices ........................................ 149
8.6.1 Standard, Reusable Assembly Descriptors ..................... 149
8.6.2 Distribution (Aggregating) Assemblies ...................... 152
8.7 Summary .......................................... 157
9 Properties and Resource Filtering 158

Maven: The Complete Reference xi
9.1 Introduction ......................................... 158
9.2 Maven Properties ...................................... 159
9.2.1 Maven Project Properties .............................. 159
9.2.2 Maven Settings Properties ............................. 161
9.2.3 Environment Variable Properties .......................... 162
9.2.4 Java System Properties ............................... 162
9.2.5 User-defined Properties ............................... 163
9.3 Resource Filtering ...................................... 164
10 Site Generation 168
10.1 Introduction ......................................... 168
10.2 Building a Project Site with Maven ............................. 169
10.3 Customizing the Site Descriptor .............................. 171
10.3.1 Customizing the Header Graphics ......................... 173
10.3.2 Customizing the Navigation Menu ......................... 173
10.4 Site Directory Structure ................................... 175
10.5 Writing Project Documentation ............................... 176
10.5.1 APT Example .................................... 176
10.5.2 FML Example ................................... 177

Maven: The Complete Reference xii
10.6 Deploying Your Project Website .............................. 178
10.6.1 Configuring Server Authentication ......................... 179
10.6.2 Configuring File and Directory Modes ....................... 179
10.7 Customizing Site Appearance ................................ 180
10.7.1 Customizing the Site CSS ............................. 180
10.7.2 Create a Custom Site Template ........................... 181
10.7.3 Reusable Website Skins .............................. 186
10.7.4 Creating a Custom Theme CSS .......................... 187
10.8 Tips and Tricks ....................................... 189
10.8.1 Inject XHTML into HEAD ............................. 189
10.8.2 Add Links under Your Site Logo .......................... 190
10.8.3 Add Breadcrumbs to Your Site ........................... 190
10.8.4 Add the Project Version .............................. 191
10.8.5 Modify the Publication Date Format and Location ................ 192
10.8.6 Using Doxia Macros ................................ 193
11 Writing Plugins 195
11.1 Introduction ......................................... 195
11.2 Programming Maven .................................... 195

Maven: The Complete Reference xiii
11.2.1 What is Inversion of Control? ........................... 196
11.2.2 Introduction to Plexus ............................... 197
11.2.3 Why Plexus? .................................... 198
11.2.4 What is a Plugin? .................................. 198
11.3 Plugin Descriptor ...................................... 199
11.3.1 Top-level Plugin Descriptor Elements ....................... 201
11.3.2 Mojo Configuration ................................. 202
11.3.3 Plugin Dependencies ................................ 204
11.4 Writing a Custom Plugin .................................. 204
11.4.1 Creating a Plugin Project .............................. 205
11.4.2 A Simple Java Mojo ................................ 206
11.4.3 Configuring a Plugin Prefix ............................ 208
11.4.4 Logging from a Plugin ............................... 211
11.4.5 Mojo Class Annotations .............................. 211
11.4.6 When a Mojo Fails ................................. 213
11.5 Mojo Parameters ...................................... 214
11.5.1 Supplying Values for Mojo Parameters ...................... 214
11.5.2 Multi-valued Mojo Parameters ........................... 216

Maven: The Complete Reference xiv
11.5.3 Depending on Plexus Components ......................... 218
11.5.4 Mojo Parameter Annotations ............................ 219
11.6 Plugins and the Maven Lifecycle .............................. 220
11.6.1 Executing a Parallel Lifecycle ........................... 220
11.6.2 Creating a Custom Lifecycle ............................ 221
11.6.3 Overriding the Default Lifecycle .......................... 223
12 Using Maven Archetypes 225
12.1 Introduction to Maven Archetypes ............................. 225
12.2 Using Archetypes ...................................... 225
12.2.1 Using an Archetype from the Command Line ................... 226
12.2.2 Using the Interactive generate Goal ........................ 227
12.2.3 Using an Archetype from m2eclipse ........................ 229
12.3 Available Archetypes .................................... 229
12.3.1 Common Maven Archetypes ............................ 230
12.3.1.1 maven-archetype-quickstart ....................... 230
12.3.1.2 maven-archetype-webapp ........................ 230
12.3.1.3 maven-archetype-mojo ......................... 230
12.3.2 Notable Third-Party Archetypes .......................... 231

Maven: The Complete Reference xv
12.3.2.1 AppFuse ................................. 231
12.3.2.2 Confluence and JIRA plugins ...................... 232
12.3.2.3 Wicket .................................. 233
12.4 Publishing Archetypes ................................... 234
13 Developing with Flexmojos 237
13.1 Introduction ......................................... 237
13.2 Configuring Build Environment for Flexmojos ....................... 237
13.2.1 Referencing a Repository with the Flex Framework ................ 238
13.2.1.1 Referencing Sonatype’s Flexmojos Repository in a POM . . . . . . . 238
13.2.1.2 Proxying Sonatype’s Flexmojos Repository with Nexus ........ 239
13.2.2 Configure a Flexmojos Proxy Repository in Nexus ................ 239
13.2.2.1 Add the Flexmojos Proxy Repository to a Group ............ 242
13.2.2.2 Configure Your Development Environment for Nexus ......... 244
13.2.3 Configuring Environment to Support Flex Unit Tests ............... 245
13.2.4 Adding FlexMojos to Your Maven Settings’ Plugin Groups ............ 246
13.3 Creating a Flex Mojos Project from an Archetype ..................... 247
13.3.1 Creating a Flex Library ............................... 247
13.3.2 Creating a Flex Application ............................ 254

Maven: The Complete Reference xvi
13.3.3 Creating a Multi-module Project: Web Application with a Flex .......... 258
13.4 The FlexMojos Lifecycle .................................. 267
13.4.1 The SWC Lifecycle ................................. 268
13.4.2 The SWF Lifecycle ................................. 269
13.5 FlexMojos Plugin Goals .................................. 271
13.5.1 Generating Actionscript Documentation ...................... 272
13.5.2 Compiling Flex Source ............................... 272
13.5.3 Generating Flex Builder Project Files ....................... 273
13.6 FlexMojos Plugin Reports ................................. 274
13.6.1 Generating Actionscript Documentation Report .................. 274
13.7 Developing and Customizing Flexmojos .......................... 276
13.7.1 Get the Flexmojos Source Code .......................... 276
14 Android Application Development with Maven 278
14.1 Introduction ......................................... 278
14.2 Configuring Build Environment for Android Development ................ 279
14.2.1 Installing the Android SDK ............................ 279
14.2.2 Android artifact install into Maven repository ................... 280
14.2.2.1 Installation to local repository ...................... 280

Maven: The Complete Reference xvii
14.2.2.2 Installation to remote repository ..................... 281
14.2.2.3 Installation of a subset of all platforms ................. 281
14.3 Getting Started ....................................... 282
14.4 Creating New Projects with the Android Maven Archetypes ................ 284
14.5 Using Add-Ons ....................................... 285
14.6 Multi Module Android Projects ............................... 286
14.7 Using external dependencies ................................ 286
14.8 The Custom Lifecycle from the Android Maven Plugin .................. 287
14.9 Plugin Configuration Parameters .............................. 288
14.10Device Interaction ...................................... 289
14.11Emulator Interaction .................................... 290
14.12Other Useful Android Maven Plugin Goals ........................ 291
14.12.1 Manifest-update .................................. 291
14.12.2 Zipalign ....................................... 291
14.12.3 Help ......................................... 291
14.13Internal Android Maven Plugin Goals ........................... 291
14.14Testing Android Application Code ............................. 292
14.14.1 Unit tests ...................................... 293

Maven: The Complete Reference xviii
14.14.2 Instrumentation tests ................................ 293
14.15Native Application Builds ................................. 294
14.16Tips and Tricks ....................................... 294
14.16.1 Other Maven Plugins ................................ 294
14.16.2 Performing a Release Build ............................ 295
14.16.3 Configuring command line usage ......................... 295
15 Appendix: Settings Details 296
15.1 Quick Overview ....................................... 296
15.2 Settings Details ....................................... 297
15.2.1 Simple Values ................................... 297
15.2.2 Servers ....................................... 298
15.2.3 Mirrors ....................................... 299
15.2.4 Proxies ....................................... 300
15.2.5 Profiles ....................................... 301
15.2.6 Activation ...................................... 301
15.2.7 Properties ...................................... 303
15.2.8 Repositories .................................... 304
15.2.9 Plugin Repositories ................................. 305


Maven: The Complete Reference xx
Preface
Maven is a build tool, a project management tool, an abstract container for running build tasks. It is a
tool that has shown itself indispensable for projects that graduate beyond the simple and need to start
finding consistent ways to manage and build large collections of interdependent modules and libraries
which make use of tens or hundreds of third-party components. It is a tool that has removed much of the
burden of 3rd party dependency management from the daily work schedule of millions of engineers, and
it has enabled many organizations to evolve beyond the toil and struggle of build management into a new
phase where the effort required to build and maintain software is no longer a limiting factor in software
design.
This work is the first attempt at a comprehensive title on Maven. It builds upon the combined experience
and work of the authors of all previous Maven titles, and you should view it not as a finished work but
as the first edition in a long line of updates to follow. While Maven has been around for a few years,
the authors of this book believe that it has just begun to deliver on the audacious promises it makes. The
authors, and company behind this book, Sonatype, believe that the publishing of this book marks the
beginning of a new phase of innovation and development surrounding Maven and the software ecosystem
that surrounds it.
Acknowledgements
Sonatype would like to thank the following contributors. The people listed below have provided feedback
which has helped improve the quality of this book. Thanks to Raymond Toal, Steve Daly, Paul Strack, Paul
Reinerfelt, Chad Gorshing, Marcus Biel, Brian Dols, Mangalaganesh Balasubramanian, Marius Kruger,
and Mark Stewart. Special thanks to Joel Costigliola for helping to debug and correct the Spring web
chapter. Stan Guillory was practically a contributing author given the number of corrections he posted to
the book’s Get Satisfaction. Thank you Stan. Special thanks to Richard Coasby of Bamboo for acting as
the provisional grammar consultant.

Maven: The Complete Reference xxi
Thanks to our contributing authors including Eric Redmond.
Thanks to the following contributors who reported errors either in an email or using the Get Satisfaction
site: Paco Soberón, Ray Krueger, Steinar Cook, Henning Saul, Anders Hammar, "george_007", "ksan-
gani", Niko Mahle, Arun Kumar, Harold Shinsato, "mimil", "-thrawn-", Matt Gumbley. If you see your
Get Satisfaction username in this list, and you would like it replaced with your real name, send an email
to book@sonatype.com.
Special thanks to Grant Birchmeier for taking the time to proofread portions of the book and file extremely
detailed feedback via GetSatisfaction.

Maven: The Complete Reference xxii
Copyright
Copyright © 2008-2011 Sonatype, Inc.
Online version published by Sonatype, Inc.
This work is licensed under a Creative Commons Attribution-Noncommercial-No Derivative Works 3.0
United States license. For more information about this license, see creativecommons.org/licenses/by-nc-
nd/3.0/us/.
Nexus™, Nexus Professional™, and all Nexus-related logos are trademarks or registered trademarks of
Sonatype, Inc., in the United States and other countries.
Java™ and all Java-based trademarks and logos are trademarks or registered trademarks of Sun Microsys-
tems, Inc., in the United States and other countries.
IBM® and WebSphere® are trademarks or registered trademarks of International Business Machines,
Inc., in the United States and other countries.
Eclipse™ is a trademark of the Eclipse Foundation, Inc., in the United States and other countries.
Apache and the Apache feather logo are trademarks of The Apache Software Foundation.
Linux® is the registered trademark of Linus Torvalds in the U.S. and other countries.
Many of the designations used by manufacturers and sellers to distinguish their products are claimed as
trademarks. Where those designations appear in this book, and Sonatype, Inc. was aware of a trademark
claim, the designations have been printed in caps or initial caps.

Maven: The Complete Reference xxiii
While every precaution has been taken in the preparation of this book, the publisher and authors assume no
responsibility for errors or omissions, or for damages resulting from the use of the information contained
herein.

Maven: The Complete Reference 1 / 316
Chapter 1
Introducing Apache Maven
Although there are a number of references for Maven online, there is no single, well-written narrative for
introducing Maven that can serve as both an authoritative reference and an introduction. What we’ve tried
to do with this effort is provide such a narrative coupled with useful reference material.
1.1 Maven. . . What is it?
The answer to this question depends on your own perspective. The great majority of Maven users are
going to call Maven a “build tool”: a tool used to build deployable artifacts from source code. Build
engineers and project managers might refer to Maven as something more comprehensive: a project man-
agement tool. What is the difference? A build tool such as Ant is focused solely on preprocessing,
compilation, packaging, testing, and distribution. A project management tool such as Maven provides a
superset of features found in a build tool. In addition to providing build capabilities, Maven can also run
reports, generate a web site, and facilitate communication among members of a working team.
A more formal definition of Apache Maven: Maven is a project management tool which encompasses
a project object model, a set of standards, a project lifecycle, a dependency management system, and
logic for executing plugin goals at defined phases in a lifecycle. When you use Maven, you describe your
project using a well-defined project object model, Maven can then apply cross-cutting logic from a set of
shared (or custom) plugins.
Don’t let the fact that Maven is a "project management" tool scare you away. If you were just looking

Maven: The Complete Reference 2 / 316
for a build tool, Maven will do the job. In fact, the first few chapters of this book will deal with the most
common use case: using Maven to build and distribute your project.
1.2 Convention Over Configuration
Convention over configuration is a simple concept. Systems, libraries, and frameworks should assume
reasonable defaults. Without requiring unnecessary configuration, systems should "just work". Popular
frameworks such as Ruby on Rails and EJB3 have started to adhere to these principles in reaction to
the configuration complexity of frameworks such as the initial EJB 2.1 specifications. An illustration of
convention over configuration is something like EJB3 persistence: all you need to do to make a particular
bean persistent is to annotate that class with @Entity. The framework assumes table and column names
based on the name of the class and the names of the properties. Hooks are provided for you to override
these default, assumed names if the need arises, but, in most cases, you will find that using the framework-
supplied defaults results in a faster project execution.
Maven incorporates this concept by providing sensible default behavior for projects. Without customiza-
tion, source code is assumed to be in ${basedir}/src/main/java and resources are assumed to be in
${basedir}/src/main/resources. Tests are assumed to be in ${basedir}/src/test, and a project is assumed
to produce a JAR file. Maven assumes that you want the compile byte code to ${basedir}/target/classes
and then create a distributable JAR file in ${basedir}/target. While this might seem trivial, consider the
fact that most Ant-based builds have to define the locations of these directories. Ant doesn’t ship with any
built-in idea of where source code or resources might be in a project; you have to supply this informa-
tion. Maven’s adoption of convention over configuration goes farther than just simple directory locations,
Maven’s core plugins apply a common set of conventions for compiling source code, packaging distri-
butions, generating web sites, and many other processes. Maven’s strength comes from the fact that it is
"opinionated", it has a defined life-cycle and a set of common plugins that know how to build and assem-
ble software. If you follow the conventions, Maven will require almost zero effort - just put your source
in the correct directory, and Maven will take care of the rest.
One side-effect of using systems that follow "convention over configuration" is that end-users might feel
that they are forced to use a particular methodology or approach. While it is certainly true that Maven has
some core opinions that shouldn’t be challenged, most of the defaults can be customized. For example,
the location of a project’s source code and resources can be customized, names of JAR files can be
customized, and through the development of custom plugins, almost any behavior can be tailored to your
specific environment’s requirements. If you don’t care to follow convention, Maven will allow you to
customize defaults in order to adapt to your specific requirements.

Maven: The Complete Reference 3 / 316
1.3 A Common Interface
Before Maven provided a common interface for building software, every single project had someone ded-
icated to managing a fully customized build system. Developers had to take time away from developing
software to learn about the idiosyncrasies of each new project they wanted to contribute to. In 2001,
you’d have a completely different approach to building a project like Turbine than you would to building
a project like Tomcat. If a new source code analysis tool came out that would perform static analysis on
source code, or if someone developed a new unit testing framework, everybody would have to drop what
they were doing and figure out how to fit it into each project’s custom build environment. How do you run
unit tests? There were a thousand different answers. This environment was characterized by a thousand
endless arguments about tools and build procedures. The age before Maven was an age of inefficiency,
the age of the "Build Engineer".
Today, most open source developers have used or are currently using Maven to manage new software
projects. This transition is less about developers moving from one build tool to another and more about
developers starting to adopt a common interface for project builds. As software systems have become
more modular, build systems have become more complex, and the number of projects has sky-rocketed.
Before Maven, when you wanted to check out a project like Apache ActiveMQ or Apache ServiceMix
from Subversion and build it from source, you really had to set aside about an hour to figure out the
build system for each particular project. What does the project need to build? What libraries do I need to
download? Where do I put them? What goals can I execute in the build? In the best case, it took a few
minutes to figure out a new project’s build, and in the worst cases (like the old Servlet API implementation
in the Jakarta Project), a project’s build was so difficult it would take multiple hours just to get to the point
where a new contributor could edit source and compile the project. These days, you check it out from
source, and you run mvn install.
While Maven provides an array of benefits including dependency management and reuse of common build
logic through plugins, the core reason why it has succeeded is that it has defined a common interface for
building software. When you see that a project like Apache ActiveMQ uses Maven, you can assume that
you’ll be able to check it out from source and build it with mvn install without much hassle. You
know where the ignition keys goes, you know that the gas pedal is on the right-side, and the brake is on
the left.
1.4 Universal Reuse through Maven Plugins
The core of Maven is pretty dumb, it doesn’t know how to do much beyond parsing a few XML doc-
uments and keeping track of a lifecycle and a few plugins. Maven has been designed to delegate most
responsibility to a set of Maven Plugins which can affect the Maven Lifecycle and offer access to goals.
Most of the action in Maven happens in plugin goals which take care of things like compiling source,

Maven: The Complete Reference 4 / 316
packaging bytecode, publishing sites, and any other task which need to happen in a build. The Maven
you download from Apache doesn’t know much about packaging a WAR file or running JUnit tests; most
of the intelligence of Maven is implemented in the plugins and the plugins are retrieved from the Maven
Repository. In fact, the first time you ran something like mvn install with a brand-new Maven in-
stallation it retrieved most of the core Maven plugins from the Central Maven Repository. This is more
than just a trick to minimize the download size of the Maven distribution, this is behavior which allows
you to upgrade a plugin to add capability to your project’s build. The fact that Maven retrieves both
dependencies and plugins from the remote repository allows for universal reuse of build logic.
The Maven Surefire plugin is the plugin that is responsible for running unit tests. Somewhere between
version 1.0 and the version that is in wide use today someone decided to add support for the TestNG unit
testing framework in addition to the support for JUnit. This upgrade happened in a way that didn’t break
backwards compatibility. If you were using the Surefire plugin to compile and execute JUnit 3 unit tests,
and you upgraded to the most recent version of the Surefire plugin, your tests continued to execute without
fail. But, you gained new functionality, if you want to execute unit tests in TestNG you now have that
ability. You also gained the ability to run annotated JUnit 4 unit tests. You gained all of these capabilities
without having to upgrade your Maven installation or install new software. Most importantly, nothing
about your project had to change aside from a version number for a plugin a single Maven configuration
file called the Project Object Model (POM).
It is this mechanism that affects much more than the Surefire plugin. Maven has plugins for everything
from compiling Java code, to generating reports, to deploying to an application server. Maven has ab-
stracted common build tasks into plugins which are maintained centrally and shared universally. If the
state-of-the-art changes in any area of the build, if some new unit testing framework is released or if some
new tool is made available, you don’t have to be the one to hack your project’s custom build system to
support it. You benefit from the fact that plugins are downloaded from a remote repository and maintained
centrally. This is what is meant by universal reuse through Maven plugins.
1.5 Conceptual Model of a "Project"
Maven maintains a model of a project. You are not just compiling source code into bytecode, you are
developing a description of a software project and assigning a unique set of coordinates to a project. You
are describing the attributes of the project. What is the project’s license? Who develops and contributes
to the project? What other projects does this project depend upon? Maven is more than just a "build tool",
it is more than just an improvement on tools like make and Ant, it is a platform that encompasses a new
semantics related to software projects and software development. This definition of a model for every
project enables such features as:
Dependency Management

Maven: The Complete Reference 5 / 316
Because a project is defined by a unique set of coordinates consisting of a group identifier, an
artifact identifier, and a version, projects can now use these coordinates to declare dependencies.
Remote Repositories
Related to dependency management, we can use the coordinates defined in the Maven Project
Object Model (POM) to create repositories of Maven artifacts.
Universal Reuse of Build Logic
Plugins contain logic that works with the descriptive data and configuration parameters defined
in Project Object Model (POM); they are not designed to operate upon specific files in known
locations.
Tool Portability / Integration
Tools like Eclipse, NetBeans, and IntelliJ now have a common place to find information about a
project. Before the advent of Maven, every IDE had a different way to store what was essentially
a custom Project Object Model (POM). Maven has standardized this description, and while each
IDE continues to maintain custom project files, they can be easily generated from the model.
Easy Searching and Filtering of Project Artifacts
Tools like Nexus allow you to index and search the contents of a repository using the information
stored in the POM.
1.6 Is Maven an alternative to XYZ?
So, sure, Maven is an alternative to Ant, but Apache Ant continues to be a great, widely-used tool. It
has been the reigning champion of Java builds for years, and you can integrate Ant build scripts with
your project’s Maven build very easily. This is a common usage pattern for a Maven project. On the
other hand, as more and more open source projects move to Maven as a project management platform,
working developers are starting to realize that Maven not only simplifies the task of build management, it
is helping to encourage a common interface between developers and software projects. Maven is more of
a platform than a tool, while you could consider Maven an alternative to Ant, you are comparing apples
to oranges. "Maven" includes more than just a build tool.
This is the central point that makes all of the Maven vs. Ant, Maven vs. Buildr, Maven vs. Gradle
arguments irrelevant. Maven isn’t totally defined by the mechanics of your build system. It isn’t about
scripting the various tasks in your build as much as it is about encouraging a set of standards, a common
interface, a life-cycle, a standard repository format, a standard directory layout, etc. It certainly isn’t
about what format the POM happens to be in (XML vs. YAML vs. Ruby). Maven is much larger than
that, and Maven refers to much more than the tool itself. When this book talks of Maven, it is referring to
the constellation of software, systems, and standards that support it. Buildr, Ivy, Gradle, all of these tools
interact with the repository format that Maven helped create, and you could just as easily use a repository
manager like Nexus to support a build written entirely in Ant.

Maven: The Complete Reference 6 / 316
While Maven is an alternative to many of these tools, the community needs to evolve beyond seeing
technology as a zero-sum game between unfriendly competitors in a competition for users and developers.
This might be how large corporations relate to one another, but it has very little relevance to the way that
open source communities work. The headline "Who’s winning? Ant or Maven?" isn’t very constructive.
If you force us to answer this question, we’re definitely going to say that Maven is a superior alternative
to Ant as a foundational technology for a build; at the same time, Maven’s boundaries are constantly
shifting and the Maven community is constantly trying to seek out new ways to become more ecumenical,
more inter-operable, more cooperative. The core tenets of Maven are declarative builds, dependency
management, repository managers, universal reuse through plugins, but the specific incarnation of these
ideas at any given moment is less important than the sense that the open source community is collaborating
to reduce the inefficiency of "enterprise-scale builds".
1.7 Comparing Maven with Ant
The authors of this book have no interest in creating a feud between Apache Ant and Apache Maven,
but we are also cognizant of the fact that most organizations have to make a decision between the two
standard solutions: Apache Ant and Apache Maven. In this section, we compare and contrast the tools.
Ant excels at build process, it is a build system modeled after make with targets and dependencies. Each
target consists of a set of instructions which are coded in XML. There is a copy task and a javac task
as well as a jar task. When you use Ant, you supply Ant with specific instructions for compiling and
packaging your output. Look at the following example of a simple build.xml file:
A Simple Ant build.xml file
<project name="my-project" default="dist" basedir=".">
<description>
simple example build file
</description>
<!-- set global properties for this build -->
<property name="src" location="src/main/java"/>
<property name="build" location="target/classes"/>
<property name="dist" location="target"/>
<target name="init">
<!-- Create the time stamp -->
<tstamp/>
<!-- Create the build directory structure used by compile -->
<mkdir dir="${build}"/>
</target>
<target name="compile" depends="init"

Maven: The Complete Reference 7 / 316
description="compile the source " >
<!-- Compile the java code from ${src} into ${build} -->
<javac srcdir="${src}" destdir="${build}"/>
</target>
<target name="dist" depends="compile"
description="generate the distribution" >
<!-- Create the distribution directory -->
<mkdir dir="${dist}/lib"/>
<!-- Put everything in ${build} into the MyProject-${DSTAMP}.jar ←-
file -->
<jar jarfile="${dist}/lib/MyProject-${DSTAMP}.jar" basedir="${ ←-
build}"/>
</target>
<target name="clean"
description="clean up" >
<!-- Delete the ${build} and ${dist} directory trees -->
<delete dir="${build}"/>
<delete dir="${dist}"/>
</target>
</project>
In this simple Ant example, you can see how you have to tell Ant exactly what to do. There is a com-
pile goal which includes the javac task that compiles the source in the src/main/java directory to the
target/classes directory. You have to tell Ant exactly where your source is, where you want the resulting
bytecode to be stored, and how to package this all into a JAR file. While there are some recent develop-
ments that help make Ant less procedural, a developer’s experience with Ant is in coding a procedural
language written in XML.
Contrast the previous Ant example with a Maven example. In Maven, to create a JAR file from some Java
source, all you need to do is create a simple pom.xml, place your source code in ${basedir}/src/main/java
and then run mvn install from the command line. The example Maven pom.xml that achieves the
same results as the simple Ant file listed in A Simple Ant build.xml file is shown in A Sample Maven
pom.xml.
A Sample Maven pom.xml
<project>
<modelVersion>4.0.0</modelVersion>
<groupId>org.sonatype.mavenbook</groupId>
<artifactId>my-project</artifactId>
<version>1.0</version>
</project>

Maven: The Complete Reference 8 / 316
That’s all you need in your pom.xml. Running mvn install from the command line will process
resources, compile source, execute unit tests, create a JAR, and install the JAR in a local repository for
reuse in other projects. Without modification, you can run mvn site and then find an index.html file in
target/site that contains links to JavaDoc and a few reports about your source code.
Admittedly, this is the simplest possible example project containing nothing more than some source code
and producing a simple JAR. It is a project which closely follows Maven conventions and doesn’t require
any dependencies or customization. If we wanted to start customizing the behavior, our pom.xml is going
to grow in size, and in the largest of projects you can see collections of very complex Maven POMs which
contain a great deal of plugin customization and dependency declarations. But, even when your project’s
POM files become more substantial, they hold an entirely different kind of information from the build file
of a similarly sized project using Ant. Maven POMs contain declarations: "This is a JAR project", and
"The source code is in src/main/java". Ant build files contain explicit instructions: "This is project", "The
source is in src/main/java", "Run javac against this directory", "Put the results in target/classes", "Create
a JAR from the . . . .", etc. Where Ant had to be explicit about the process, there was something "built-in"
to Maven that just knew where the source code was and how it should be processed.
The differences between Ant and Maven in this example are:
• Apache Ant
–Ant doesn’t have formal conventions like a common project directory structure or default behav-
ior. You have to tell Ant exactly where to find the source and where to put the output. Informal
conventions have emerged over time, but they haven’t been codified into the product.
–Ant is procedural. You have to tell Ant exactly what to do and when to do it. You have to tell it to
compile, then copy, then compress.
–Ant doesn’t have a lifecycle. You have to define goals and goal dependencies. You have to attach a
sequence of tasks to each goal manually.
• Apache Maven
–Maven has conventions. It knows where your source code is because you followed the convention.
Maven’s Compiler plugin put the bytecode in target/classes, and it produces a JAR file in target.
–Maven is declarative. All you had to do was create a pom.xml file and put your source in the default
directory. Maven took care of the rest.
–Maven has a lifecycle which was invoked when you executed mvn install. This command told
Maven to execute a series of sequential lifecycle phases until it reached the install lifecycle phase. As
a side-effect of this journey through the lifecycle, Maven executed a number of default plugin goals
which did things like compile and create a JAR.
Maven has built-in intelligence about common project tasks in the form of Maven plugins. If you wanted
to write and execute unit tests, all you would need to do is write the tests, place them in ${basedir}/src/test/java,

Maven: The Complete Reference 9 / 316
add a test-scoped dependency on either TestNG or JUnit, and run mvn test. If you wanted to deploy a
web application and not a JAR, all you would need to do is change your project type to war and put your
docroot in ${basedir}/src/main/webapp. Sure, you can do all of this with Ant, but you will be writing
the instructions from scratch. In Ant, you would first have to figure out where the JUnit JAR file should
be. Then you would have to create a classpath that includes the JUnit JAR file. Then you would tell
Ant where it should look for test source code, write a goal that compiles the test source to bytecode, and
execute the unit tests with JUnit.
Without supporting technologies like antlibs and Ivy (even with these supporting technologies), Ant has
the feeling of a c`ustom procedural build. An efficient set of Maven POMs in a project which adheres
to Maven’s assumed conventions has surprisingly little XML compared to the Ant alternative. Another
benefit of Maven is the reliance on widely-shared Maven plugins. Everyone uses the Maven Surefire
plugin for unit testing, and if someone adds support for a new unit testing framework, you can gain new
capabilities in your own build by just incrementing the version of a particular Maven plugin in your
project’s POM.
The decision to use Maven or Ant isn’t a binary one, and Ant still has a place in a complex build. If
your current build contains some highly customized process, or if you’ve written some Ant scripts to
complete a specific process in a specific way that cannot be adapted to the Maven standards, you can still
use these scripts with Maven. Ant is made available as a core Maven plugin. Custom Maven plugins can
be implemented in Ant, and Maven projects can be configured to execute Ant scripts within the Maven
project lifecycle.

Maven: The Complete Reference 10 / 316
Chapter 2
Installing Maven
This chapter contains very detailed instructions for installing Maven on a number of different platforms.
Instead of assuming a level of familiarity with installing software and setting environment variables, we’ve
opted to be as thorough as possible to minimize any problems that might arise due to a partial installation.
The only thing this chapter assumes is that you’ve already installed a suitable Java Development Kit
(JDK). If you are just interested in installation, you can move on to the rest of the book after reading
through Section 2.2 and Section 2.3. If you are interested in the details of your Maven installation, this
entire chapter will give you an overview of what you’ve installed and the meaning of the Apache Software
License, Version 2.0.
2.1 Verify your Java Installation
The latest version of Maven currently requires the usage of Java 7 or higher. While older Maven versions
can run on older Java versions, this book assumes that you are running at least Java 7. Go with the most
recent stable Java Development Kit (JDK) available for your operating system.
% java -version
java version "1.7.0_71"
Java(TM) SE Runtime Environment (build 1.7.0_71-b14)
Java HotSpot(TM) 64-Bit Server VM (build 24.71-b01, mixed mode)

Maven: The Complete Reference 11 / 316
Tip
More details about Java version required for different Maven versions can be found on theMaven site.
Maven works with all certified JavaTM compatible development kits, and a few non-certified implemen-
tations of Java. The examples in this book were written and tested against the official Java Development
Kit releases downloaded from the Oracle web site.
2.2 Downloading Maven
You can download Maven from the Apache Maven project website at http://maven.apache.org/download.html.
When downloading Maven, you can download the latest available version the latest available version of
Maven 3 in various branches. The latest version of Maven 3 when this book was last updated was Maven
3.3.3. If you are not familiar with the Apache Software License, you should familiarize yourself with the
terms of the license before you start using the product. More information on the Apache Software License
can be found in Section 2.8.
Tip
We recommend to avoid Maven 2 as it is no longer maintained and use the latest version of Maven 3
available and listed as the current stable version.
To download Maven , go to http://maven.apache.org/download.html and select the appropriate binary
archive format for your platform. The contents of the zip or tar.gz are the same.
2.3 Installing Maven
There are wide differences between operating systems such as Mac OS X and Microsoft Windows, and
there are subtle differences between different versions of Windows. Luckily, the process of installing
Maven on all of these operating systems is relatively painless and straightforward. The following sections
outline the recommended best-practice for installing Maven on a variety of operating systems.

Maven: The Complete Reference 12 / 316
2.3.1 Installing Maven on Linux, BSD or Mac OSX
You can download a binary release of Maven from http://maven.apache.org/download.html. Download
the current release of Maven in a format that is convenient for you to work with. Pick an appropriate place
for it to live, and expand the archive there. If you expanded the archive into the directory /opt/apache-
maven-3.2.5, you may want to create a symbolic link to make it easier to work with and to avoid the need
to change any environment configuration when you upgrade to a newer version:
$ cd /opt
$ ln -s apache-maven-3.2.5 maven
$ export PATH=/opt/maven/bin:${PATH}
Once Maven is installed, you need to do a couple of things to make it work correctly. You need to add its
bin directory in the distribution (in this example, /opt/maven/bin) to your command path.
You’ll need to add PATH to a script that will run every time you login. To do this, add the following lines
to .bash_login or .profile
export PATH=/opt/maven/bin:${PATH}
Once you’ve added these lines to your own environment, you will be able to run Maven from the command
line.
Note
These installation instructions assume that you are running bash.
2.3.2 Installing Maven on Microsoft Windows
Installing Maven on Windows is very similar to installing Maven on Mac OSX, the main differences being
the installation location and the setting of an environment variable. This book assumes a Maven instal-
lation directory of c:\Program Files\apache-maven-3.2.5, but it won’t make a difference if
you install Maven in another directory as long as you configure the proper environment variables. Once
you’ve unpacked Maven to the installation directory, you will need to set the PATH environment variable.
You can use the following commands:
C:\Users\tobrien > set PATH=%PATH%;"c:\Program Files\apache-maven-3.2.5\ ←-
bin"

Maven: The Complete Reference 13 / 316
Setting these environment variables on the command-line will allow you to run Maven in your current
session, but unless you add them to the System environment variables through the control panel, you’ll
have to execute these two lines every time you log into your system. You should modify both of these
variables through the Control Panel in Microsoft Windows.
2.4 Testing a Maven Installation
Once Maven is installed, you can check the version by running mvn -v from the command-line. If
Maven has been installed, you should see something resembling the following output.
$ mvn -v
Apache Maven 3.2.5 (12a6b3acb947671f09b81f49094c53f426d8cea1; 2014-12-14 ←-
T09:29:23-08:00)
Maven home: /opt/apache-maven-3.2.5
Java version: 1.7.0_71, vendor: Oracle Corporation
Java home: /Library/Java/JavaVirtualMachines/jdk1.7.0_71.jdk/Contents/Home ←-
/jre
Default locale: en_US, platform encoding: UTF-8
OS name: "mac os x", version: "10.8.5", arch: "x86_64", family: "mac"
If you see this output, you know that Maven is available and ready to be used. If you do not see this
output, and your operating system cannot find the mvn command, make sure that your PATH environment
variable and M2_HOME environment variable have been properly set.
2.5 Maven Installation Details
Maven’s download measures in at roughly 1.5 MiB, it has attained such a slim download size because
the core of Maven has been designed to retrieve plugins and dependencies from a remote repository on-
demand. When you start using Maven, it will start to download plugins to a local repository described in
Section 2.5.1. In case you are curious, let’s take a quick look at what is in Maven’s installation directory.
$ ls /opt/maven -p1
LICENSE.txt
NOTICE.txt
README.txt
bin/
boot/
conf/
lib/

Maven: The Complete Reference 14 / 316
LICENSE.txt contains the software license for Apache Maven. This license is described in some detail
later in the section Section 2.8.NOTICE.txt contains some notices and attributions required by libraries
that Maven depends on. README.txt contains some installation instructions. bin/ contains the mvn script
that executes Maven. boot/ contains a JAR file (classwords-1.1.jar) that is responsible for creating the
Class Loader in which Maven executes. conf/ contains a global settings.xml that can be used to customize
the behavior of your Maven installation. If you need to customize Maven, it is customary to override any
settings in a settings.xml file stored in ~/.m2.lib/ contains a single JAR file (maven-core-3.0.3-uber.jar)
that contains the core of Maven.
Note
Unless you are working in a shared Unix environment, you should avoid customizing the settings.xml in
M2_HOME/conf. Altering the global settings.xml file in the Maven installation itself is usually unneces-
sary and it tends to complicate the upgrade procedure for Maven as you’ll have to remember to copy the
customized settings.xml from the old Maven installation to the new installation. If you need to customize
settings.xml, you should be editing your own settings.xml in ~/.m2/settings.xml.
2.5.1 User-specific Configuration and Repository
Once you start using Maven extensively, you’ll notice that Maven has created some local user-specific
configuration files and a local repository in your home directory. In ~/.m2 there will be:
~/.m2/settings.xml
A file containing user-specific configuration for authentication, repositories, and other information
to customize the behavior of Maven.
~/.m2/repository/
This directory contains your local Maven repository. When you download a dependency from a
remote Maven repository, Maven stores a copy of the dependency in your local repository.
Note
In Unix (and OSX), your home directory will be referred to using a tilde (i.e. ~/bin refers to /home/to-
brien/bin). In Windows, we will also be using ~to refer to your home directory. In Windows XP, your
home directory is C:\Documents and Settings\tobrien, and in Windows Vista, your home directory is
C:\Users\tobrien. From this point forward, you should translate paths such as ~/m2 to your operating
system’s equivalent.

Maven: The Complete Reference 15 / 316
2.5.2 Upgrading a Maven Installation
If you’ve installed Maven on a Mac OSX or Unix machine according to the details in Section 2.3.1, it
should be easy to upgrade to newer versions of Maven when they become available. Simply install the
newer version of Maven (/opt/maven-3.future) next to the existing version of Maven (/opt/maven-3.2.5).
Then switch the symbolic link /opt/maven from /opt/maven-3.2.5 to /opt/maven-3.future. Since, you’ve
already set your M2_HOME variable to point to /opt/maven, you won’t need to change any environment
variables.
If you have installed Maven on a Windows machine, simply unpack Maven to c:\Program Files\maven-
3.future and update your M2_HOME variable.
Note
If you have any customizations to the global settings.xml in M2_HOME/conf, you will need to copy this
settings.xml to the conf directory of the new Maven installation.
2.6 Uninstalling Maven
Most of the installation instructions involve unpacking of the Maven distribution archive in a directory
and setting of various environment variables. If you need to remove Maven from your computer, all you
need to do is delete your Maven installation directory and remove the environment variables. You will
also want to delete the ~/.m2 directory as it contains your local repository.
2.7 Getting Help with Maven
While this book aims to be a comprehensive reference, there are going to be topics we will miss and
special situations and tips which are not covered. While the core of Maven is very simple, the real work
in Maven happens in the plugins, and there are too many plugins available to cover them all in one book.
You are going to encounter problems and features which have not been covered in this book; in these
cases, we suggest searching for answers at the following locations:
maven.apache.org
This will be the first place to look, the Maven web site contains a wealth of information and doc-

Maven: The Complete Reference 16 / 316
umentation. Every plugin has a few pages of documentation and there are a series of "quick start"
documents which will be helpful in addition to the content of this book. While the Maven site
contains a wealth of information, it can also be a frustrating, confusing, and overwhelming. There
is a custom Google search box on the main Maven page that will search known Maven sites for
information. This provides better results than a generic Google search.
Maven User Mailing List
The Maven User mailing list is the place for users to ask questions. Before you ask a question
on the user mailing list, you will want to search for any previous discussion that might relate
to your question. It is bad form to ask a question that has already been asked without first
checking to see if an answer already exists in the archives. There are a number of useful mail-
ing list archive browsers, we’ve found Nabble to the be the most useful. You can browse the
User mailing list archives here: http://www.nabble.com/Maven---Users-f178.html. You can
join the user mailing list by following the instructions available here http://maven.apache.org/-
mail-lists.html.
www.sonatype.com
Sonatype maintains an online copy of this book and other tutorials related to Apache Maven.
2.8 About the Apache Software License
Apache Maven is released under the Apache Software License, Version 2.0. If you want to read this
license, you can read ${M2_HOME}/LICENSE.txt or read this license on the Open Source Initiative’s
web site here: http://www.opensource.org/licenses/apache2.0.php.
There’s a good chance that, if you are reading this book, you are not a lawyer. If you are wondering
what the Apache License, Version 2.0 means, the Apache Software Foundation has assembled a very
helpful Frequently Asked Questions (FAQ) page about the license available here: http://www.apache.org/-
foundation/licence-FAQ.html. Here’s is the answer to the question "I am not a lawyer. What does it all
mean?"
[This license] allows you to:
• freely download and use Apache software, in whole or in part, for personal, company internal, or
commercial purposes;
• use Apache software in packages or distributions that you create.
It forbids you to:

Maven: The Complete Reference 17 / 316
• redistribute any piece of Apache-originated software without proper attribution;
• use any marks owned by The Apache Software Foundation in any way that might state or imply that
the Foundation endorses your distribution;
• use any marks owned by The Apache Software Foundation in any way that might state or imply that
you created the Apache software in question.
It requires you to:
• include a copy of the license in any redistribution you may make that includes Apache software;
• provide clear attribution to The Apache Software Foundation for any distributions that include Apache
software.
It does not require you to:
• include the source of the Apache software itself, or of any modifications you may have made to it, in
any redistribution you may assemble that includes it;
• submit changes that you make to the software back to the Apache Software Foundation (though such
feedback is encouraged).

Maven: The Complete Reference 18 / 316
Chapter 3
The Project Object Model
3.1 Introduction
This chapter covers the central concept of Maven—the Project Object Model. The POM is where a
project’s identity and structure are declared, builds are configured, and projects are related to one another.
The presence of a pom.xml file defines a Maven project.
3.2 The POM
Maven projects, dependencies, builds, artifacts: all of these are objects to be modeled and described.
These objects are described by an XML file called a Project Object Model. The POM tells Maven what
sort of project it is dealing with and how to modify default behavior to generate output from source. In the
same way a Java web application has a web.xml that describes, configures, and customizes the application,
a Maven project is defined by the presence of a pom.xml. It is a descriptive declaration of a project for
Maven; it is the figurative “map” that Maven needs to understand what it is looking at when it builds your
project.
You could also think of the pom.xml as analogous to a Makefile or an Ant build.xml. When you are using
GNU make to build something like MySQL, you’ll usually have a file named Makefile that contains
explicit instructions for building a binary from source. When you are using Apache Ant, you likely have a

Maven: The Complete Reference 19 / 316
file named build.xml that contains explicit instructions for cleaning, compiling, packaging, and deploying
an application. make, Ant, and Maven are similar in that they rely on the presence of a commonly named
file such as Makefile,build.xml, or pom.xml, but that is where the similarities end. If you look at a Maven
pom.xml, the majority of the POM is going to deal with descriptions: Where is the source code? Where are
the resources? What is the packaging? If you look at an Ant build.xml file, you’ll see something entirely
different. You’ll see explicit instructions for tasks such as compiling a set of Java classes. The Maven
POM is declarative, and although you can certainly choose to include some procedural customizations
via the Maven Ant plugin, for the most part you will not need to get into the gritty procedural details of
your project’s build.
The POM is also not specific to building Java projects. While most of the examples in this book are
geared towards Java applications, there is nothing Java-specific in the definition of a Maven Project Object
Model. While Maven’s default plugins are targeted at building JAR artifacts from a set of source, tests, and
resources, there is nothing preventing you from defining a POM for a project that contains C# sources and
produces some proprietary Microsoft binary using Microsoft tools. Similarly, there is nothing stopping
you from defining a POM for a technical book. In fact, the source for this book and this book’s examples
is captured in a multi-module Maven project which uses one of the many Maven Docbook plugins to
apply the standard Docbook XSL to a series of chapter XML files. Others have created Maven plugins to
build Adobe Flex code into SWCs and SWFs, and yet others have used Maven to build projects written
in C.
We’ve established that the POM describes and declares, it is unlike Ant or Make in that it doesn’t provide
explicit instructions, and we’ve noted that POM concepts are not specific to Java. Diving into more
specifics, take a look at Figure 3.1 for a survey of the contents of a POM.

Maven: The Complete Reference 20 / 316
Figure 3.1: The Project Object Model
The POM contains four categories of description and configuration:
General project information
This includes a project’s name, the URL for a project, the sponsoring organization, and a list of
developers and contributors along with the license for a project.
Build settings
In this section, we customize the behavior of the default Maven build. We can change the location
of source and tests, we can add new plugins, we can attach plugin goals to the lifecycle, and we can
customize the site generation parameters.
Build environment
The build environment consists of profiles that can be activated for use in different environments.
For example, during development you may want to deploy to a development server, whereas in
production you want to deploy to a production server. The build environment customizes the build

Maven: The Complete Reference 21 / 316
settings for specific environments and is often supplemented by a custom settings.xml in ~/.m2.
This settings file is discussed in Chapter 5and in the section Section 15.2.
POM relationships
A project rarely stands alone; it depends on other projects, inherits POM settings from parent
projects, defines its own coordinates, and may include submodules.
3.2.1 The Super POM
Before we dive into some examples of POMs, let’s take a quick look at the Super POM. All Maven project
POMs extend the Super POM, which defines a set of defaults shared by all projects. This Super POM is
a part of the Maven installation. Depending on the Maven version it can be found in the maven-x.y.
z-uber.jar or maven-model-builder-xy.z.jar file in ${M2_HOME}/lib. If you look in this
JAR file, you will find a file named pom-4.0.0.xml under the org.apache.maven.model package. It
is also published on the Maven reference site that is available for each version of Maven separately and
e.g. for Maven 3.1.1 it can be found with the Maven Model Builder documentation. A Super POM for
Maven is shown in The Super POM.
Tip
An analogy to how the Super POM is the parent for all Maven POM files, would be how java.lang.
Object is the top of the class hierarchy for all Java classes.
The Super POM
<project>
<modelVersion>4.0.0</modelVersion>
<name>Maven Default Project</name>
<repositories>
<repository>
<id>central</id> v
1
<name>Maven Repository Switchboard</name>
<layout>default</layout>
<url>http://repo1.maven.org/maven2</url>
<snapshots>
<enabled>false</enabled>
</snapshots>
</repository>
</repositories>
<pluginRepositories>

Maven: The Complete Reference 22 / 316
<pluginRepository>
<id>central</id> v
2
<name>Maven Plugin Repository</name>
<url>http://repo1.maven.org/maven2</url>
<layout>default</layout>
<snapshots>
<enabled>false</enabled>
</snapshots>
<releases>
<updatePolicy>never</updatePolicy>
</releases>
</pluginRepository>
</pluginRepositories>
<build> v
3
<directory>${project.basedir}/target</directory>
<outputDirectory>
${project.build.directory}/classes
</outputDirectory>
<finalName>${project.artifactId}-${project.version}</finalName ←-
>
<testOutputDirectory>
${project.build.directory}/test-classes
</testOutputDirectory>
<sourceDirectory>
${project.basedir}/src/main/java
</sourceDirectory>
<scriptSourceDirectory>src/main/scripts</scriptSourceDirectory ←-
>
<testSourceDirectory>
${project.basedir}/src/test/java
</testSourceDirectory>
<resources>
<resource>
<directory>${project.basedir}/src/main/resources</ ←-
directory>
</resource>
</resources>
<testResources>
<testResource>
<directory>${project.basedir}/src/test/resources</ ←-
directory>
</testResource>
</testResources>
<pluginManagement> v
4
<plugins>
<plugin>

Maven: The Complete Reference 23 / 316
<artifactId>maven-antrun-plugin</artifactId>
<version>1.3</version>
</plugin>
<plugin>
<artifactId>maven-assembly-plugin</artifactId>
<version>2.2-beta-2</version>
</plugin>
<plugin>
<artifactId>maven-clean-plugin</artifactId>
<version>2.2</version>
</plugin>
<plugin>
<artifactId>maven-compiler-plugin</artifactId>
<version>2.0.2</version>
</plugin>
<plugin>
<artifactId>maven-dependency-plugin</ ←-
artifactId>
<version>2.0</version>
</plugin>
<plugin>
<artifactId>maven-deploy-plugin</artifactId>
<version>2.4</version>
</plugin>
<plugin>
<artifactId>maven-ear-plugin</artifactId>
<version>2.3.1</version>
</plugin>
<plugin>
<artifactId>maven-ejb-plugin</artifactId>
<version>2.1</version>
</plugin>
<plugin>
<artifactId>maven-install-plugin</artifactId>
<version>2.2</version>
</plugin>
<plugin>
<artifactId>maven-jar-plugin</artifactId>
<version>2.2</version>
</plugin>
<plugin>
<artifactId>maven-javadoc-plugin</artifactId>
<version>2.5</version>
</plugin>
<plugin>
<artifactId>maven-plugin-plugin</artifactId>
<version>2.4.3</version>
</plugin>
<plugin>

Maven: The Complete Reference 24 / 316
<artifactId>maven-rar-plugin</artifactId>
<version>2.2</version>
</plugin>
<plugin>
<artifactId>maven-release-plugin</artifactId>
<version>2.0-beta-8</version>
</plugin>
<plugin>
<artifactId>maven-resources-plugin</artifactId ←-
>
<version>2.3</version>
</plugin>
<plugin>
<artifactId>maven-site-plugin</artifactId>
<version>2.0-beta-7</version>
</plugin>
<plugin>
<artifactId>maven-source-plugin</artifactId>
<version>2.0.4</version>
</plugin>
<plugin>
<artifactId>maven-surefire-plugin</artifactId>
<version>2.4.3</version>
</plugin>
<plugin>
<artifactId>maven-war-plugin</artifactId>
<version>2.1-alpha-2</version>
</plugin>
</plugins>
</pluginManagement>
<reporting>
<outputDirectory>target/site</outputDirectory>
</reporting>
</project>
The Super POM defines some standard configuration variables that are inherited by all projects. Those
values are captured in the annotated sections:
v
1The default Super POM defines a single remote Maven repository with an ID of central. This is
the Central Repository that all Maven clients are configured to read from by default. This setting
can be overridden by a custom settings.xml file. Note that the default Super POM has disabled
snapshot artifacts on the Central Repository. If you need to use a snapshot repository, you will
need to customize repository settings in your pom.xml or in your settings.xml. Settings and profiles
are covered in Chapter 5and in Section 15.2.
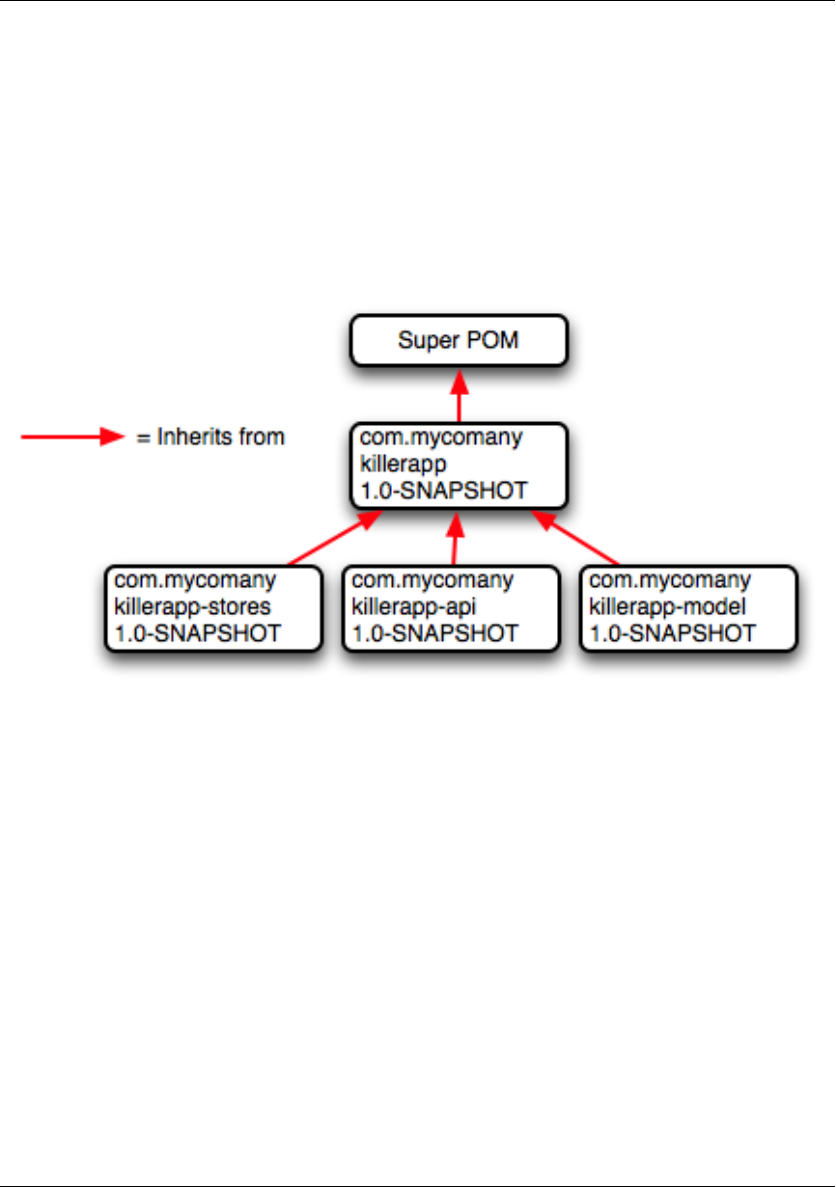
Maven: The Complete Reference 25 / 316
v
2The Central Repository also contains Maven plugins. The default plugin repository is the central
Maven repository. Snapshots are disabled, and the update policy is set to “never,” which means
that Maven will never automatically update a plugin if a new version is released.
v
3The build element sets the default values for directories in the Maven Standard Directory layout.
v
4Starting in Maven 2.0.9, default versions of core plugins have been provided in the Super POM.
This was done to provide some stability for users that are not specifying versions in their POMs.
In newer versions some of this has been migrated out of the file. However you can still see the
versions that will be used in your project using mvn help:effective-pom.
Figure 3.2: The Super POM is always the base Parent
3.2.2 The Simplest POM
All Maven POMs inherit defaults from the Super POM (introduced earlier in the section Section 3.2.1).
If you are just writing a simple project that produces a JAR from some source in src/main/java, want to
run your JUnit tests in src/test/java, and want to build a project site using mvn site, you don’t have to
customize anything. All you would need, in this case, is the simplest possible POM shown in The Simplest
POM. This POM defines a groupId,artifactId, and version: the three required coordinates for
every project.
The Simplest POM

Maven: The Complete Reference 26 / 316
<project>
<modelVersion>4.0.0</modelVersion>
<groupId>org.sonatype.mavenbook.ch08</groupId>
<artifactId>simplest-project</artifactId>
<version>1</version>
</project>
Such a simple POM would be more than adequate for a simple project—e.g., a Java library that produces
a JAR file. It isn’t related to any other projects, it has no dependencies, and it lacks basic information
such as a name and a URL. If you were to create this file and then create the subdirectory src/main/java
with some source code, running mvn package would produce a JAR in target/simple-project-1.jar.
3.2.3 The Effective POM
$ mvn help:effective-pom
Executing the effective-pom goal should print out an XML document capturing the merge between
the Super POM and the POM from The Simplest POM.
3.2.4 Real POMs
Maven is something of a chameleon; you can pick and choose the features you want to take advantage of.
Some open source projects may value the ability to list developers and contributors, generate clean project
documentation, and manage releases automatically using the Maven Release plugin. On the other hand,
someone working in a corporate environment on a small team might not be interested in the distribution
management capabilities of Maven nor the ability to list developers. The remainder of this chapter is
going to discuss features of the POM in isolation. Instead of bombarding you with a 10-page listing of a
set of related POMs, we’re going to focus on creating a good reference for specific sections of the POM.
In this chapter, we discuss relationships between POMs, but we don’t illustrate such a project here.
3.3 POM Syntax
The POM is always in a file named pom.xml in the base directory of a Maven project. This XML document
can start with the XML declaration, or you can choose to omit it. All values in a POM are captured as

Maven: The Complete Reference 27 / 316
XML elements.
3.3.1 Project Versions
A project’s version number is used to group and order releases. Maven versions contain the following
parts: major version, minor version, incremental version, and qualifier. In a version, these parts corre-
spond to the following format:
<major version>.<minor version>.<incremental version>-<qualifier>
For example, the version "1.3.5" has a major version of 1, a minor version of 3, and an incremental version
of 5. The version "5" has a major version of 5 and no minor or incremental version. The qualifier exists
to capture milestone builds: alpha and beta releases, and the qualifier is separated from the major, minor,
and incremental versions by a hyphen. For example, the version "1.3-beta-01" has a major version of 1, a
minor version of 3, no incremental version and a qualifier of "beta-01".
Keeping your version numbers aligned with this standard will become very important when you want to
start using version ranges in your POMs. Version ranges, introduced in Section 3.4.3, allow you to specify
a dependency on a range of versions, and they are only supported because Maven has the ability to sort
versions based on the version release number format introduced in this section.
If your version release number matches the format <major>.<minor>.<incremental>-<quali
fier> then your versions will be compared properly; "1.2.3" will be evaluated as a more recent build than
"1.0.2", and the comparison will be made using the numeric values of the major, minor, and incremental
versions. If your version release number does not fit the standard introduced in this section, then your
versions will be compared as strings; "1.0.1b" will be compared to "1.2.0b" using a String comparison.
3.3.1.1 Version Build Numbers
One gotcha for release version numbers is the ordering of the qualifiers. Take the version release numbers
“1.2.3-alpha-2” and “1.2.3-alpha-10,” where the “alpha-2” build corresponds to the 2nd alpha build, and
the “alpha-10” build corresponds to the 10th alpha build. Even though “alpha-10” should be considered
more recent than “alpha-2,” Maven is going to sort “alpha-10” before “alpha-2” due to a known issue in
the way Maven handles version numbers.
Maven is supposed to treat the number after the qualifier as a build number. In other words, the qualifier
should be "alpha", and the build number should be 2. Even though Maven has been designed to separate

Maven: The Complete Reference 28 / 316
the build number from the qualifier, this parsing is currently broken. As a result, "alpha-2" and "alpha-
10" are compared using a String comparison, and "alpha-10" comes before "alpha-2" alphabetically. To
get around this limitation, you will need to left-pad your qualified build numbers. If you use "alpha-02"
and "alpha-10" this problem will go away, and it will continue to work once Maven properly parses the
version build number.
3.3.1.2 SNAPSHOT Versions
Maven versions can contain a string literal to signify that a project is currently under active development.
If a version contains the string “-SNAPSHOT,” then Maven will expand this token to a date and time
value converted to UTC (Coordinated Universal Time) when you install or release this component. For
example, if your project has a version of “1.0-SNAPSHOT” and you deploy this project’s artifacts to a
Maven repository, Maven would expand this version to “1.0-20080207-230803-1” if you were to deploy
a release at 11:08 PM on February 7th, 2008 UTC. In other words, when you deploy a snapshot, you are
not making a release of a software component; you are releasing a snapshot of a component at a specific
time.
Why would you use this? SNAPSHOT versions are used for projects under active development. If your
project depends on a software component that is under active development, you can depend on a SNAP-
SHOT release, and Maven will periodically attempt to download the latest snapshot from a repository
when you run a build. Similarly, if the next release of your system is going to have a version "1.4", your
project would have a version "1.4-SNAPSHOT" until it was formally released.
As a default setting, Maven will not check for SNAPSHOT releases on remote repositories. To depend
on SNAPSHOT releases, users must explicitly enable the ability to download snapshots using a reposi
tory or pluginRepository element in the POM.
When releasing a project, you should resolve all dependencies on SNAPSHOT versions to dependen-
cies on released versions. If a project depends on a SNAPSHOT, it is not stable as the dependencies may
change over time. Artifacts published to non-snapshot Maven repositories such as http://repo1.maven.org/-
maven2 cannot depend on SNAPSHOT versions, as Maven’s Super POM has snapshot’s disabled from
the Central repository. SNAPSHOT versions are for development only.
3.3.2 Property References
The syntax for using a property in Maven is to surround the property name with two curly braces and
precede it with a dollar symbol. For example, consider the following POM:

Maven: The Complete Reference 29 / 316
<project>
<modelVersion>4.0.0</modelVersion>
<groupId>org.sonatype.mavenbook</groupId>
<artifactId>project-a</artifactId>
<version>1.0-SNAPSHOT</version>
<packaging>jar</packaging>
<build>
<finalName>${project.groupId}-${project.artifactId}</finalName>
</build>
</project>
If you put this XML in a pom.xml and run mvn help:effective-pom, you will see that the output
contains the line:
...
<finalName>org.sonatype.mavenbook-project-a</finalName>
...
When Maven reads a POM, it replaces references to properties when it loads the POM XML. Maven
properties occur frequently in advanced Maven usage, and are similar to properties in other systems such
as Ant or Velocity. They are simply variables delimited by ${...}. Maven provides three implicit variables
which can be used to access environment variables, POM information, and Maven Settings:
env
The env variable exposes environment variables exposed by your operating system or shell. For
example, a reference to ${env.PATH} in a Maven POM would be replaced by the ${PATH} environ-
ment variable (or %PATH% in Windows).
project
The project variable exposes the POM. You can use a dot-notated (.) path to reference the value
of a POM element. For example, in this section we used the groupId and artifactId to set
the finalName element in the build configuration. The syntax for this property reference was:
${project.groupId}-${project.artifactId}.
settings
The settings variable exposes Maven settings information. You can use a dot-notated (.) path
to reference the value of an element in a settings.xml file. For example, ${settings.offline} would
reference the value of the offline element in ~/.m2/settings.xml.
Note
You may see older builds that use ${pom.xxx} or just ${xxx} to reference POM properties. These meth-
ods have been deprecated and only ${project.xxx} should be used.

Maven: The Complete Reference 30 / 316
In addition to the three implicit variables, you can reference system properties and any custom properties
set in the Maven POM or in a build profile:
Java System Properties
All properties accessible via getProperties() on java.lang.System are exposed as
POM properties. Some examples of system properties are: ${user.name},${user.home},${java.home},
and ${os.name}. A full list of system properties can be found in the Javadoc for the System class.
x
Arbitrary properties can be set with a properties element in a pom.xml or settings.xml, or
properties can be loaded from external files. If you set a property named fooBar in your pom.xml,
that same property is referenced with ${fooBar}. Custom properties come in handy when you are
building a system that filters resources and targets different deployment platforms. Here is the
syntax for setting ${foo}=bar in a POM:
<properties>
<foo>bar</foo>
</properties>
For a more comprehensive list of available properties, see Chapter 9.
3.4 Project Dependencies
Maven can manage both internal and external dependencies. An external dependency for a Java project
might be a library such as Plexus, the Spring Framework, or Log4J. An internal dependency is illustrated
by a web application project depending on another project that contains service classes, model objects, or
persistence logic. Project Dependencies shows some examples of project dependencies.
Project Dependencies
<project>
...
<dependencies>
<dependency>
<groupId>org.codehaus.xfire</groupId>
<artifactId>xfire-java5</artifactId>
<version>1.2.5</version>
</dependency>
<dependency>
<groupId>junit</groupId>

Maven: The Complete Reference 31 / 316
<artifactId>junit</artifactId>
<version>3.8.1</version>
<scope>test</scope>
</dependency>
<dependency>
<groupId>javax.servlet</groupId>
<artifactId>servlet-api</artifactId>
<version>2.4</version>
<scope>provided</scope>
</dependency>
</dependencies>
...
</project>
The first dependency is a compile dependency on the XFire SOAP library from Codehaus. You would
use this type of dependency if your project depended on this library for compilation, testing, and during
execution. The second dependency is a test-scoped dependency on JUnit. You would use a test-
scoped dependency when you need to reference this library only during testing. The last dependency in
Project Dependencies is a dependency on the Servlet 2.4 API. The last dependency is scoped as a provided
dependency. You would use a provided scope when the application you are developing needs a library for
compilation and testing, but this library is supplied by a container at runtime.
3.4.1 Dependency Scope
Project Dependencies briefly introduced three of the five dependency scopes: compile,test, and pro
vided. Scope controls which dependencies are available in which classpath, and which dependencies
are included with an application. Let’s explore each scope in detail:
compile
compile is the default scope; all dependencies are compile-scoped if a scope is not supplied.
compile dependencies are available in all classpaths, and they are packaged.
provided
provided dependencies are used when you expect the JDK or a container to provide them. For
example, if you were developing a web application, you would need the Servlet API available on
the compile classpath to compile a servlet, but you wouldn’t want to include the Servlet API in the
packaged WAR; the Servlet API JAR is supplied by your application server or servlet container.
provided dependencies are available on the compilation classpath (not runtime). They are not
transitive, nor are they packaged.
runtime
runtime dependencies are required to execute and test the system, but they are not required for

Maven: The Complete Reference 32 / 316
compilation. For example, you may need a JDBC API JAR at compile time and the JDBC driver
implementation only at runtime.
test
test-scoped dependencies are not required during the normal operation of an application, and
they are available only during test compilation and execution phases.
system
The system scope is similar to provided except that you have to provide an explicit path to the
JAR on the local file system. This is intended to allow compilation against native objects that may
be part of the system libraries. The artifact is assumed to always be available and is not looked up
in a repository. If you declare the scope to be system, you must also provide the systemPath
element. Note that this scope is not recommended (you should always try to reference dependencies
in a public or custom Maven repository).
3.4.2 Optional Dependencies
Assume that you are working on a library that provides caching behavior. Instead of writing a caching
system from scratch, you want to use some of the existing libraries that provide caching on the file
system and distributed caches. Also assume that you want to give the end user an option to cache on
the file system or to use an in-memory distributed cache. To cache on the file system, you’ll want to
use a freely available library called EHCache (http://ehcache.sourceforge.net/), and to cache in a dis-
tributed in-memory cache, you want to use another freely available caching library named SwarmCache (
http://swarmcache.sourceforge.net/ ). You’ll code an interface and create a library that can be configured
to use either EHCache or SwarmCache, but you want to avoid adding a dependency on both caching
libraries to any project that depends on your library.
In other words, you need both libraries to compile this library project, but you don’t want both libraries
to show up as transitive runtime dependencies for the project that uses your library. You can accomplish
this by using optional dependencies as shown in Declaring Optional Dependencies.
Declaring Optional Dependencies
<project>
<modelVersion>4.0.0</modelVersion>
<groupId>org.sonatype.mavenbook</groupId>
<artifactId>my-project</artifactId>
<version>1.0.0</version>
<dependencies>
<dependency>
<groupId>net.sf.ehcache</groupId>
<artifactId>ehcache</artifactId>
<version>1.4.1</version>

Maven: The Complete Reference 33 / 316
<optional>true</optional>
</dependency>
<dependency>
<groupId>swarmcache</groupId>
<artifactId>swarmcache</artifactId>
<version>1.0RC2</version>
<optional>true</optional>
</dependency>
<dependency>
<groupId>log4j</groupId>
<artifactId>log4j</artifactId>
<version>1.2.13</version>
</dependency>
</dependencies>
</project>
Since you’ve declared these dependencies as optional in my-project, if you’ve defined a project that
depends on my-project which needs those dependencies, you’ll have to include them explicitly in the
project that depends on my-project. For example, if you were writing an application which depended
on my-project and wanted to use the EHCache implementation, you would need to add the following
dependency element to your project.
<project>
<modelVersion>4.0.0</modelVersion>
<groupId>org.sonatype.mavenbook</groupId>
<artifactId>my-application</artifactId>
<version>1.0.0</version>
<dependencies>
<dependency>
<groupId>org.sonatype.mavenbook</groupId>
<artifactId>my-project</artifactId>
<version>1.0.0</version>
</dependency>
<dependency>
<groupId>net.sf.ehcache</groupId>
<artifactId>ehcache</artifactId>
<version>1.4.1</version>
</dependency>
</dependencies>
</project>
In an ideal world, you wouldn’t have to use optional dependencies. Instead of having one large project
with a series of optional dependencies, you would separate the EHCache-specific code to a my-proj
ect-ehcache submodule and the SwarmCache-specific code to a my-project-swarmcache sub-
module. This way, instead of requiring projects that reference my-project to specifically add a de-
pendency, projects can just reference a particular implementation project and benefit from the transitive

Maven: The Complete Reference 34 / 316
dependency.
3.4.3 Dependency Version Ranges
Instead of a specific version for each dependency, you can alternatively specify a range of versions that
would satisfy a given dependency. For example, you can specify that your project depends on version 3.8
or greater of JUnit, or anything between versions 4.5 and 4.10 of JUnit. You do this by surrounding one
or more version numbers with the following characters:
(, )
Exclusive quantifiers
[, ]
Inclusive quantifiers
For example, if you wished to access any JUnit version greater than or equal to 3.8 but less than 4.0,
your dependency would be as shown in Specifying a Dependency Range: JUnit 3.8 - JUnit 4.0.
Specifying a Dependency Range: JUnit 3.8 - JUnit 4.0
<dependency>
<groupId>junit</groupId>
<artifactId>junit</artifactId>
<version>[3.8,4.0)</version>
<scope>test</scope>
</dependency>
If you want to depend on any version of JUnit no higher than 3.8.1, you would specify only an upper
inclusive boundary, as shown in Specifying a Dependency Range: JUnit ⇐3.8.1.
Specifying a Dependency Range: JUnit ⇐3.8.1
<dependency>
<groupId>junit</groupId>
<artifactId>junit</artifactId>
<version>[,3.8.1]</version>
<scope>test</scope>
</dependency>

Maven: The Complete Reference 35 / 316
A version before or after the comma is not required, and means +/- infinity. For example, "[4.0,)" means
any version greater than or equal to 4.0. "(,2.0)" is any version less than 2.0. "[1.2]" means only version
1.2, and nothing else.
Note
When declaring a "normal" version such as 3.8.2 for Junit, internally this is represented as "allow any-
thing, but prefer 3.8.2." This means that when a conflict is detected, Maven is allowed to use the conflict
algorithms to choose the best version. If you specify [3.8.2], it means that only 3.8.2 will be used and
nothing else. If somewhere else there is a dependency that specifies [3.8.1], you would get a build
failure telling you of the conflict. We point this out to make you aware of the option, but use it sparingly
and only when really needed. The preferred way to resolve this is via dependencyManagement.
3.4.4 Transitive Dependencies
project-a depends on project-b, which in turn depends on project-c, then project-c is
considered a transitive dependency of project-a. If project-c depended on project-d, then
project-d would also be considered a transitive dependency of project-a. Part of Maven’s appeal
is that it can manage transitive dependencies and shield the developer from having to keep track of all
of the dependencies required to compile and run an application. You can just depend on something like
the Spring Framework and not have to worry about tracking down every last dependency of the Spring
Framework.
Maven accomplishes this by building a graph of dependencies and dealing with any conflicts and overlaps
that might occur. For example, if Maven sees that two projects depend on the same groupId and artif
actId, it will sort out which dependency to use automatically, always favoring the more recent version of
a dependency. Although this sounds convenient, there are some edge cases where transitive dependencies
can cause some configuration issues. For these scenarios, you can use a dependency exclusion.
3.4.4.1 Transitive Dependencies and Scope
Each of the scopes outlined earlier in the section Section 3.4.1 affects not just the scope of the dependency
in the declaring project, but also how it acts as a transitive dependency. The easiest way to convey this
information is through a table, as in Table 3.1. Scopes in the top row represent the scope of a transitive
dependency. Scopes in the leftmost column represent the scope of a direct dependency. The intersection
of the row and column is the scope that is assigned to a transitive dependency. A blank cell in this table
means that the transitive dependency will be omitted.

Maven: The Complete Reference 36 / 316
Table 3.1: How Scope Affects Transitive Dependencies
Direct Scope vs. Transitive Scope
compile provided runtime test
compile compile - runtime -
provided provided - provided -
runtime runtime - runtime -
test test - test -
To illustrate the relationship of transitive dependency scope to direct dependency scope, consider the
following example. If project-a contains a test scoped dependency on project-b which contains a
compile scoped dependency on project-c.project-c would be a test-scoped transitive dependency
of project-a.
You can think of this as a transitive boundary which acts as a filter on dependency scope. Transitive
dependencies which are provided and test scope usually do not affect a project. Transitive dependen-
cies which are compile and runtime scoped usually affect a project regardless of the scope of a direct
dependency. Transitive dependencies which are compile scoped will have the same scope of the direct
dependency . Transitive dependencies which are runtime scoped will generally have the same scope of
the direct dependency except when the direct dependency has a scope of compile. When a transitive de-
pendency is runtime scoped and the direct dependency is compile scoped, the transitive dependency will
have an effective scope of runtime.
3.4.5 Conflict Resolution
There will be times when you need to exclude a transitive dependency, such as when you are depending
on a project that depends on another project, but you would like to either exclude the dependency alto-
gether or replace the transitive dependency with another dependency that provides the same functionality.
Excluding a Transitive Dependency shows an example of a dependency element that adds a dependency
on project-a, but excludes the transitive dependency project-b.
Excluding a Transitive Dependency
<dependency>
<groupId>org.sonatype.mavenbook</groupId>
<artifactId>project-a</artifactId>
<version>1.0</version>

Maven: The Complete Reference 37 / 316
<exclusions>
<exclusion>
<groupId>org.sonatype.mavenbook</groupId>
<artifactId>project-b</artifactId>
</exclusion>
</exclusions>
</dependency>
Often, you will want to replace a transitive dependency with another implementation. For example, if
you are depending on a library that depends on the Sun JTA API, you may want to replace the declared
transitive dependency. Hibernate is one example. Hibernate depends on the Sun JTA API JAR, which is
not available in the central Maven repository because it cannot be freely redistributed. Fortunately, the
Apache Geronimo project has created an independent implementation of this library that can be freely
redistributed. To replace a transitive dependency with another dependency, you would exclude the transi-
tive dependency and declare a dependency on the project you wanted instead. Excluding and Replacing a
Transitive Dependency shows an example of a such replacement.
Excluding and Replacing a Transitive Dependency
<dependencies>
<dependency>
<groupId>org.hibernate</groupId>
<artifactId>hibernate</artifactId>
<version>3.2.5.ga</version>
<exclusions>
<exclusion>
<groupId>javax.transaction</groupId>
<artifactId>jta</artifactId>
</exclusion>
</exclusions>
</dependency>
<dependency>
<groupId>org.apache.geronimo.specs</groupId>
<artifactId>geronimo-jta_1.1_spec</artifactId>
<version>1.1</version>
</dependency>
</dependencies>
In Excluding and Replacing a Transitive Dependency, there is nothing marking the dependency on geronimo-
jta_1.1_spec as a replacement, it just happens to be a library which provides the same API as the original
JTA dependency. Here are some other reasons you might want to exclude or replace transitive dependen-
cies:
1. The groupId or artifactId of the artifact has changed, where the current project requires an

Maven: The Complete Reference 38 / 316
alternately named version from a dependency’s version - resulting in 2 copies of the same project in
the classpath. Normally Maven would capture this conflict and use a single version of the project,
but when groupId or artifactId are different, Maven will consider this to be two different
libraries.
2. An artifact is not used in your project and the transitive dependency has not been marked as an op-
tional dependency. In this case, you might want to exclude a dependency because it isn’t something
your system needs and you are trying to cut down on the number of libraries distributed with an
application.
3. An artifact which is provided by your runtime container thus should not be included with your build.
An example of this is if a dependency depends on something like the Servlet API and you want to
make sure that the dependency is not included in a web application’s WEB-INF/lib directory.
4. To exclude a dependency which might be an API with multiple implementations. This is the sit-
uation illustrated by Excluding and Replacing a Transitive Dependency; there is a Sun API which
requires click-wrap licensing and a time-consuming manual install into a custom repository (Sun’s
JTA JAR) versus a freely distributed version of the same API available in the central Maven repos-
itory (Geronimo’s JTA implementation). ==== Dependency Management
Once you’ve adopted Maven at your super complex enterprise and you have two hundred and twenty
inter-related Maven projects, you are going to start wondering if there is a better way to get a handle on
dependency versions. If every single project that uses a dependency like the MySQL Java connector needs
to independently list the version number of the dependency, you are going to run into problems when you
need to upgrade to a new version. Because the version numbers are distributed throughout your project
tree, you are going to have to manually edit each of the pom.xml files that reference a dependency to make
sure that you are changing the version number everywhere. Even with find,xargs, and awk, you are
still running the risk of missing a single POM.
Luckily, Maven provides a way for you to consolidate dependency version numbers in the dependency
Management element. You’ll usually see the dependencyManagement element in a top-level parent
POM for an organization or project. Using the dependencyManagement element in a pom.xml allows
you to reference a dependency in a child project without having to explicitly list the version. Maven will
walk up the parent-child hierarchy until it finds a project with a dependencyManagement element, it
will then use the version specified in this dependencyManagement element.
For example, if you have a large set of projects which make use of the MySQL Java connector ver-
sion 5.1.2, you could define the following dependencyManagement element in your multi-module
project’s top-level POM.
Defining Dependency Versions in a Top-level POM
<project>
<modelVersion>4.0.0</modelVersion>

Maven: The Complete Reference 39 / 316
<groupId>org.sonatype.mavenbook</groupId>
<artifactId>a-parent</artifactId>
<version>1.0.0</version>
...
<dependencyManagement>
<dependencies>
<dependency>
<groupId>mysql</groupId>
<artifactId>mysql-connector-java</artifactId>
<version>5.1.2</version>
<scope>runtime</scope>
</dependency>
...
<dependencies>
</dependencyManagement>
Then, in a child project, you can add a dependency to the MySQL Java Connector using the following
dependency XML:
<project>
<modelVersion>4.0.0</modelVersion>
<parent>
<groupId>org.sonatype.mavenbook</groupId>
<artifactId>a-parent</artifactId>
<version>1.0.0</version>
</parent>
<artifactId>project-a</artifactId>
...
<dependencies>
<dependency>
<groupId>mysql</groupId>
<artifactId>mysql-connector-java</artifactId>
</dependency>
</dependencies>
</project>
You should notice that the child project did not have to explicitly list the version of the mysql-connec
tor-java dependency. Because this dependency was defined in the top-level POM’s dependencyMan-
agement element, the version number is going to propagate to the child project’s dependency on mysql-
connector-java. Note that if this child project did define a version, it would override the version
listed in the top-level POM’s dependencyManagement section. That is, the dependencyManage
ment version is only used when the child does not declare a version directly.
Dependency management in a top-level POM is different from just defining a dependency on a widely
shared parent POM. For starters, all dependencies are inherited. If mysql-connector-java were

Maven: The Complete Reference 40 / 316
listed as a dependency of the top-level parent project, every single project in the hierarchy would have
a reference to this dependency. Instead of adding in unnecessary dependencies, using dependencyM
anagement allows you to consolidate and centralize the management of dependency versions without
adding dependencies which are inherited by all children. In other words, the dependencyManagem
ent element is equivalent to an environment variable which allows you to declare a dependency anywhere
below a project without specifying a version number.
3.5 Project Relationships
One of the compelling reasons to use Maven is that it makes the process of tracking down dependencies
(and dependencies of dependencies) very easy. When a project depends on an artifact produced by another
project we say that this artifact is a dependency. In the case of a Java project, this can be as simple as a
project depending on an external dependency like Log4J or JUnit. While dependencies can model external
dependencies, they can also manage the dependencies between a set of related projects. If project-
adepends on project-b, Maven is smart enough to know that project-b must be built before
project-a.
Relationships are not only about dependencies and figuring out what one project needs to be able to build
an artifact. Maven can model the relationship of a project to a parent, and the relationship of a project to
submodules. This section gives an overview of the various relationships between projects and how such
relationships are configured.
3.5.1 More on Coordinates
Coordinates define a unique location for a project. Projects are related to one another using Maven
Coordinates. project-a doesn’t just depend on project-b; a project with a groupId,artifac
tId, and version depends on another project with a groupId,artifactId, and version. To
review, a Maven Coordinate is made up of three components:
groupId
AgroupId groups a set of related artifacts. Group identifiers generally resemble a Java package
name. For example, the groupId org.apache.maven is the base groupId for all artifacts pro-
duced by the Apache Maven project. Group identifiers are translated into paths in the Maven Repos-
itory; for example, the org.apache.maven groupId can be found in /maven2/org/apache/maven on
repo1.maven.org.
artifactId
The artifactId is the project’s main identifier. When you generate an artifact, this artifact is

Maven: The Complete Reference 41 / 316
going to be named with the artifactId. When you refer to a project, you are going to refer
to it using the artifactId. The artifactId,groupId combination must be unique. In
other words, you can’t have two separate projects with the same artifactId and groupId;
artifactId s are unique within a particular groupId.
Note
While ’.’s are commonly used in groupId s, you should try to avoid using them in artifactId s.
This can cause issues when trying to parse a fully qualified name down into the subcomponents.
version
When an artifact is released, it is released with a version number. This version number is a numeric
identifier such as "1.0", "1.1.1", or "1.1.2-alpha-01". You can also use what is known as a snapshot
version. A snapshot version is a version for a component which is under development, snapshot ver-
sion numbers always end in SNAPSHOT; for example, "1.0-SNAPSHOT", "1.1.1-SNAPSHOT",
and "1-SNAPSHOT". Section 3.3.1.1 introduces versions and version ranges.
There is a fourth, less-used qualifier:
classifier
You would use a classifier if you were releasing the same code but needed to produce two separate
artifacts for technical reasons. For example, if you wanted to build two separate artifacts of a JAR,
one compiled with the Java 1.4 compiler and another compiled with the Java 6 compiler, you might
use the classifier to produce two separate JAR artifacts under the same groupId:artifactId:version
combination. If your project uses native extensions, you might use the classifier to produce an
artifact for each target platform. Classifiers are commonly used to package up an artifact’s sources,
JavaDocs or binary assemblies.
When we talk of dependencies in this book, we often use the following shorthand notation to describe a
dependency: groupId:artifactId:version. To refer to the 2.5 release of the Spring Framework,
we would refer to it as org.springframework:spring:2.5. When you ask Maven to print out a
list of dependencies with the Maven Dependency plugin, you will also see that Maven tends to print out
log messages with this shorthand dependency notation.

Maven: The Complete Reference 42 / 316
3.5.2 Project Inheritance
There are going to be times when you want a project to inherit values from a parent POM. You might
be building a large system, and you don’t want to have to repeat the same dependency elements over
and over again. You can avoid repeating yourself if your projects make use of inheritance via the parent
element. When a project specifies a parent, it inherits the information in the parent project’s POM. It can
then override and add to the values specified in this parent POM.
All Maven POMs inherit values from a parent POM. If a POM does not specify a direct parent using
the parent element, that POM will inherit values from the Super POM. Project Inheritance shows the
parent element of project-a which inherits the POM defined by the a-parent project.
Project Inheritance
<project>
<parent>
<groupId>com.training.killerapp</groupId>
<artifactId>a-parent</artifactId>
<version>1.0-SNAPSHOT</version>
</parent>
<artifactId>project-a</artifactId>
...
</project>
Running mvn help:effective-pom in project-a would show a POM that is the result of merg-
ing the Super POM with the POM defined by a-parent and the POM defined in project-a. The
implicit and explicit inheritance relationships for project-a are shown in Figure 3.3.
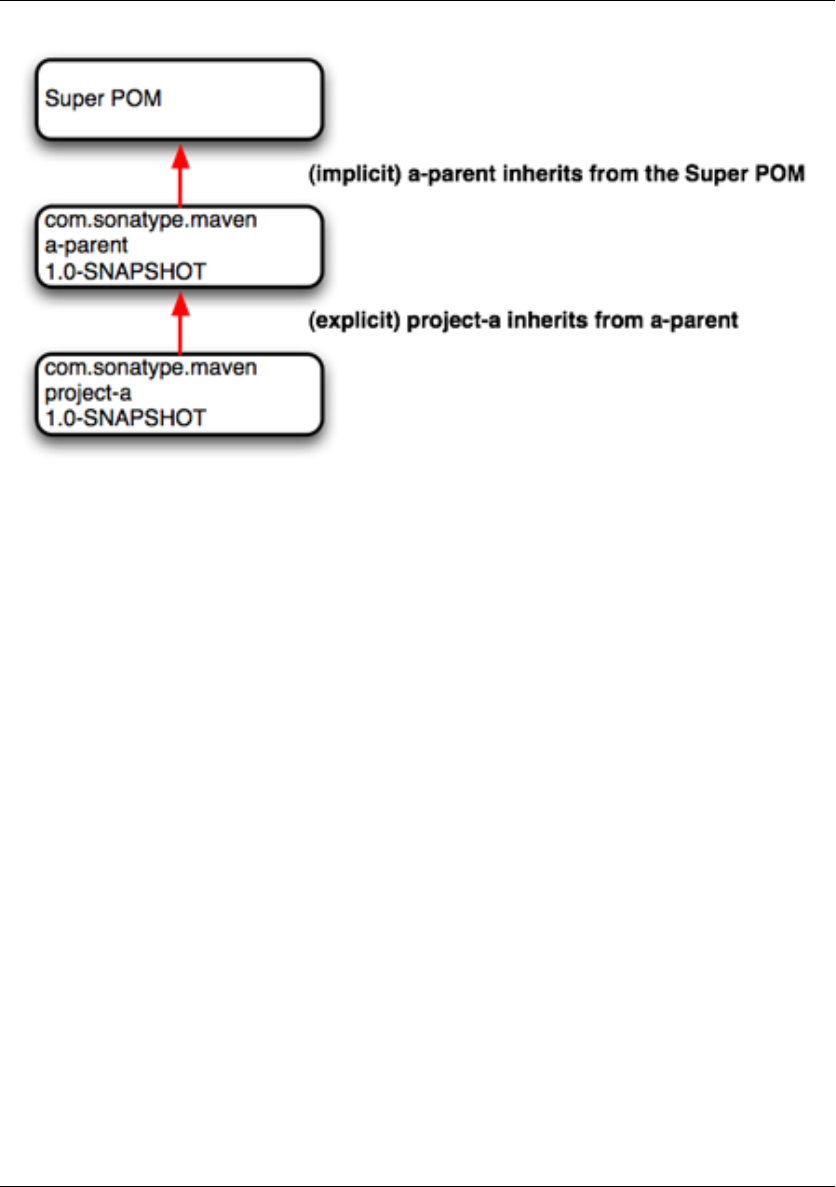
Maven: The Complete Reference 43 / 316
Figure 3.3: Project Inheritance for a-parent and project-a
When a project specifies a parent project, Maven uses that parent POM as a starting point before it reads
the current project’s POM. It inherits everything, including the groupId and version number. You’ll
notice that project-a does not specify either, both groupId and version are inherited from a-
parent. With a parent element, all a POM really needs to define is an artifactId. This isn’t
mandatory, project-a could have a different groupId and version, but by not providing values,
Maven will use the values specified in the parent POM. If you start using Maven to manage and build
large multi-module projects, you will often be creating many projects which share a common groupId
and version.
When you inherit a POM, you can choose to live with the inherited POM information or to selectively
override it. The following is a list of items a Maven POM inherits from its parent POM:
• identifiers (at least one of groupId or artifactId must be overridden.)
• dependencies
• developers and contributors
• plugin lists
• reports lists

Maven: The Complete Reference 44 / 316
• plugin executions (executions with matching ids are merged)
• plugin configuration
When Maven inherits dependencies, it will add dependencies of child projects to the dependencies defined
in parent projects. You can use this feature of Maven to specify widely used dependencies across all
projects which inherit from a top-level POM. For example, if your system makes universal use of the
Log4J logging framework, you can list this dependency in your top-level POM. Any projects which
inherit POM information from this project will automatically have Log4J as a dependency. Similarly, if
you need to make sure that every project is using the same version of a Maven plugin, you can list this
Maven plugin version explicitly in a top-level parent POM’s pluginManagement section.
Maven assumes that the parent POM is available from the local repository, or available in the parent
directory (../pom.xml) of the current project. If neither location is valid this default behavior may be
overridden via the relativePath element. For example, some organizations prefer a flat project
structure where a parent project’s pom.xml isn’t in the parent directory of a child project. It might be in a
sibling directory to the project. If your child project were in a directory ./project-a and the parent project
were in a directory named ./a-parent, you could specify the relative location of parent-a’s POM with
the following configuration:
<project>
<parent>
<groupId>org.sonatype.mavenbook</groupId>
<artifactId>a-parent</artifactId>
<version>1.0-SNAPSHOT</version>
<relativePath>../a-parent/pom.xml</relativePath>
</parent>
<artifactId>project-a</artifactId>
</project>
3.6 POM Best Practices
Maven can be used to manage everything from simple, single-project systems to builds that involve hun-
dreds of inter-related submodules. Part of the learning process with Maven isn’t just figuring out the
syntax for configuring Maven, it is learning the "Maven Way"—the current set of best practices for orga-
nizing and building projects using Maven. This section attempts to distill some of this knowledge to help
you adopt best practices from the start without having to wade through years of discussions on the Maven
mailing lists.

Maven: The Complete Reference 45 / 316
3.6.1 Grouping Dependencies
If you have a set of dependencies which are logically grouped together. You can create a project with
pom packaging that groups dependencies together. For example, let’s assume that your application uses
Hibernate, a popular Object-Relational mapping framework. Every project which uses Hibernate might
also have a dependency on the Spring Framework and a MySQL JDBC driver. Instead of having to include
these dependencies in every project that uses Hibernate, Spring, and MySQL you could create a special
POM that does nothing more than declare a set of common dependencies. You could create a project
called persistence-deps (short for Persistence Dependencies), and have every project that needs to
do persistence depend on this convenience project:
Consolidating Dependencies in a Single POM Project
<project>
<groupId>org.sonatype.mavenbook</groupId>
<artifactId>persistence-deps</artifactId>
<version>1.0</version>
<packaging>pom</packaging>
<dependencies>
<dependency>
<groupId>org.hibernate</groupId>
<artifactId>hibernate</artifactId>
<version>${hibernateVersion}</version>
</dependency>
<dependency>
<groupId>org.hibernate</groupId>
<artifactId>hibernate-annotations</artifactId>
<version>${hibernateAnnotationsVersion}</version>
</dependency>
<dependency>
<groupId>org.springframework</groupId>
<artifactId>spring-hibernate3</artifactId>
<version>${springVersion}</version>
</dependency>
<dependency>
<groupId>mysql</groupId>
<artifactId>mysql-connector-java</artifactId>
<version>${mysqlVersion}</version>
</dependency>
</dependencies>
<properties>
<mysqlVersion>(5.1,)</mysqlVersion>
<springVersion>(2.0.6,)</springVersion>
<hibernateVersion>3.2.5.ga</hibernateVersion>
<hibernateAnnotationsVersion>3.3.0.ga</hibernateAnnotationsVersion ←-
>
</properties>

Maven: The Complete Reference 46 / 316
</project>
If you create this project in a directory named persistence-deps, all you need to do is create this
pom.xml and run mvn install. Since the packaging type is pom, this POM is installed in your local
repository. You can now add this project as a dependency and all of its dependencies will be added as
transitive dependencies to your project. When you declare a dependency on this persistence-deps project,
don’t forget to specify the dependency type as pom.
Declaring a Dependency on a POM
<project>
<description>This is a project requiring JDBC</description>
...
<dependencies>
...
<dependency>
<groupId>org.sonatype.mavenbook</groupId>
<artifactId>persistence-deps</artifactId>
<version>1.0</version>
<type>pom</type>
</dependency>
</dependencies>
</project>
If you later decide to switch to a different JDBC driver (for example, JTDS), just replace the dependencies
in the persistence-deps project to use net.sourceforge.jtds:jtds instead of mysql:
mysql-java-connector and update the version number. All projects depending on persiste
nce-deps will use JTDS if they decide to update to the newer version. Consolidating related depen-
dencies is a good way to cut down on the length of pom.xml files that start having to depend on a large
number of dependencies. If you need to share a large number of dependencies between projects, you
could also just establish parent-child relationships between projects and refactor all common dependen-
cies to the parent project, but the disadvantage of the parent-child approach is that a project can have only
one parent. Sometimes it makes more sense to group similar dependencies together and reference a pom
dependency. This way, your project can reference as many of these consolidated dependency POMs as it
needs.
Note
Maven uses the depth of a dependency in the tree when resolving conflicts using a nearest-
wins approach. Using the dependency grouping technique above pushes those dependencies one
level down in the tree. Keep this in mind when choosing between grouping in a pom or using
dependencyManagement in a parent POM

Maven: The Complete Reference 47 / 316
3.6.2 Multi-module vs. Inheritance
There is a difference between inheriting from a parent project and being managed by a multimodule
project. A parent project is one that passes its values to its children. A multimodule project simply
manages a group of other subprojects or modules. The multimodule relationship is defined from the
topmost level downwards. When setting up a multimodule project, you are simply telling a project that its
build should include the specified modules. Multimodule builds are to be used to group modules together
in a single build. The parent-child relationship is defined from the leaf node upwards. The parent-child
relationship deals more with the definition of a particular project. When you associate a child with its
parent, you are telling Maven that a project’s POM is derived from another.
To illustrate the decision process that goes into choosing a design that uses inheritance vs. multi-module
or both approaches consider the following two examples: the Maven project used to generate this book
and a hypothetical project that contains a number of logically grouped modules.
3.6.2.1 Simple Project
First, let’s take a look at the maven-book project. The inheritance and multi-module relationships are
shown in Figure 3.4.

Maven: The Complete Reference 48 / 316
Figure 3.4: maven-book Multi-module vs. Inheritance
When we build this Maven book you are reading, we run mvn package in a multi-module project
named maven-book. This multi-module project includes two submodules: book-examples and
book-chapters. Neither of these projects share the same parent, they are related only in that they
are modules in the maven-book project. book-examples builds the ZIP and TGZ archives you
downloaded to get this book’s example. When we run the book-examples build from book-examples/
directory with mvn package, it has no knowledge that it is a part of the larger maven-book project.
book-examples doesn’t really care about maven-book, all it knows in life is that its parent is the
top-most sonatype POM and that it creates an archive of examples. In this case, the maven-book
project exists only as a convenience and as an aggregator of modules.
Each of the three projects: maven-book,book-examples, and book-chapters all list a shared
"corporate" parent — sonatype. This is a common practice in organizations which have adopted
Maven, instead of having every project extend the Super POM by default, some organizations define
a top-level corporate POM that serves as the default parent when a project doesn’t have any good reason

Maven: The Complete Reference 49 / 316
to depend on another. In this book example, there is no compelling reason to have book-examples
and book-chapters share the same parent POM, they are entirely different projects which have a dif-
ferent set of dependencies, a different build configuration, and use drastically different plugins to create
the content you are now reading. The sonatype POM gives the organization a chance to customize the
default behavior of Maven and supply some organization-specific information to configure deployment
settings and build profiles.
3.6.2.2 Multi-module Enterprise Project
Let’s take a look at an example that provides a more accurate picture of a real-world project where inher-
itance and multi-module relationships exist side by side. Figure 3.5 shows a collection of projects that
resemble a typical set of projects in an enterprise application. There is a top-level POM for the corpora-
tion with an artifactId of sonatype. There is a multi-module project named big-system which
references sub-modules server-side and client-side.
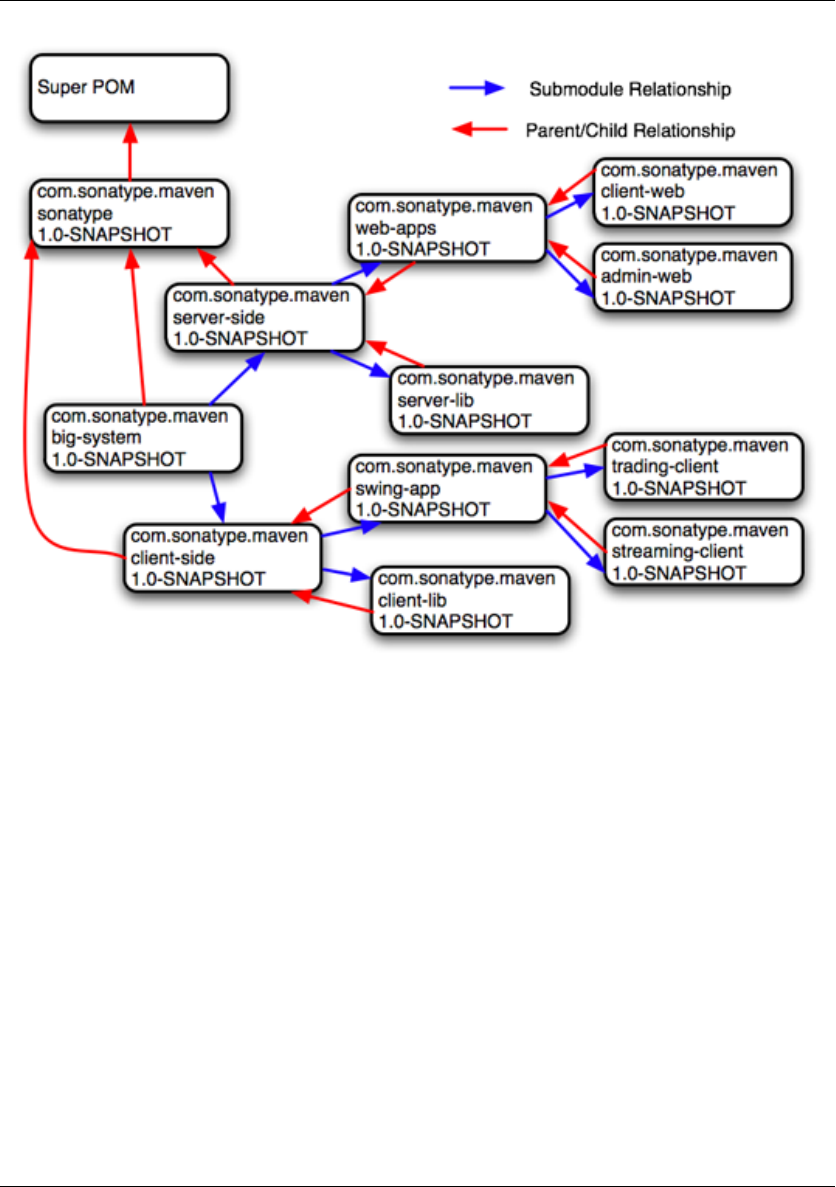
Maven: The Complete Reference 50 / 316
Figure 3.5: Enterprise Multi-module vs. Inheritance
What’s going on here? Let’s try to deconstruct this confusing set of arrows. First, let’s take a look at
big-system. The big-system might be the project that you would run mvn package on to build
and test the entire system. big-system references submodules client-side and server-side.
Each of these projects effectively rolls up all of the code that runs on either the server or on the client.
Let’s focus on the server-side project. Under the server-side project we have a project called
server-lib and a multi-module project named web-apps. Under web-apps we have two Java web
applications: client-web and admin-web.
Let’s start with the parent/child relationships from client-web and admin-web to web-apps. Since
both of the web applications are implemented in the same web application framework (let’s say Wicket),
both projects would share the same set of core dependencies. The dependencies on the Servlet API, the
JSP API, and Wicket would all be captured in the web-apps project. Both client-web and admin-

Maven: The Complete Reference 51 / 316
web also need to depend on server-lib, this dependency would be defined as a dependency between
web-apps and server-lib. Because client-web and admin-web share so much configura-
tion by inheriting from web-apps, both client-web and admin-web will have very small POMs
containing little more than identifiers, a parent declaration, and a final build name.
Next we focus on the parent/child relationship from web-apps and server-lib to server-side.
In this case, let’s just assume that there is a separate working group of developers which work on the
server-side code and another group of developers that work on the client-side code. The list of devel-
opers would be configured in the server-side POM and inherited by all of the child projects under-
neath it: web-apps,server-lib,client-web, and admin-web. We could also imagine that
the server-side project might have different build and deployment settings which are unique to the
development for the server side. The server-side project might define a build profile that only makes
sense for all of the server-side projects. This build profile might contain the database host and cre-
dentials, or the server-side project’s POM might configure a specific version of the Maven Jetty
plugin which should be universal across all projects that inherit the server-side POM.
In this example, the main reason to use parent/child relationships is shared dependencies and common
configuration for a group of projects which are logically related. All of the projects below big-system
are related to one another as submodules, but not all submodules are configured to point back to parent
project that included it as a submodule. Everything is a submodule for reasons of convenience, to build
the entire system just go to the big-system project directory and run mvn package. Look more
closely at the figure and you’ll see that there is no parent/child relationship between server-side and
big-system. Why is this? POM inheritance is very powerful, but it can be overused. When it makes
sense to share dependencies and build configuration, a parent/child relationship should be used. When
it doesn’t make sense is when there are distinct differences between two projects. Take, for example,
the server-side and client-side projects. It is possible to create a system where client-
side and server-side inherited a common POM from big-system, but as soon as a significant
divergence between the two child projects develops, you then have to figure out creative ways to factor
out common build configuration to big-system without affecting all of the children. Even though
client-side and server-side might both depend on Log4J, they also might have distinct plugin
configurations.
There’s a certain point defined more by style and experience where you decide that minimal duplication
of configuration is a small price to pay for allowing projects like client-side and server-side to
remain completely independent. Designing a huge set of thirty plus projects which all inherit five levels
of POM configuration isn’t always the best idea. In such a setup, you might not have to duplicate your
Log4J dependency more than once, but you’ll also end up having to wade through five levels of POM
just figure out how Maven calculated your effective POM. All of this complexity to avoid duplicating
five lines of dependency declaration. In Maven, there is a "Maven Way", but there are also many ways
to accomplish the same thing. It all boils down to preference and style. For the most part, you won’t go
wrong if all of your submodules turn out to define back-references to the same project as a parent, but
your use of Maven may evolve over time.

Maven: The Complete Reference 52 / 316
Chapter 4
The Build Lifecycle
4.1 Introduction
Maven models projects as nouns which are described by a POM. The POM captures the identity of a
project: What does a project contain? What type of packaging a project needs? Does the project have
a parent? What are the dependencies? We’ve explored the idea of describing a project in the previous
chapters, but we haven’t introduced the mechanism that allows Maven to act upon these objects. In Maven
the "verbs" are goals packaged in Maven plugins which are tied to a phases in a build lifecycle. A Maven
lifecycle consists of a sequence of named phases: prepare-resources, compile, package, and install among
other. There is phase that captures compilation and a phase that captures packaging. There are pre- and
post- phases which can be used to register goals which must run prior to compilation, or tasks which must
be run after a particular phase. When you tell Maven to build a project, you are telling Maven to step
through a defined sequence of phases and execute any goals which may have been registered with each
phase.
A build lifecycle is an organized sequence of phases that exist to give order to a set of goals. Those goals
are chosen and bound by the packaging type of the project being acted upon. There are three standard
lifecycles in Maven: clean, default (sometimes called build) and site. In this chapter, you are going to
learn how Maven ties goals to lifecycle phases and how the lifecycle can be customized. You will also
learn about the default lifecycle phases.

Maven: The Complete Reference 53 / 316
4.1.1 Clean Lifecycle (clean)
The first lifecycle you’ll be interested in is the simplest lifecycle in Maven. Running mvn clean invokes
the clean lifecycle which consists of three lifecycle phases:
•pre-clean
•clean
•post-clean
The interesting phase in the clean lifecycle is the clean phase. The Clean plugin’s clean goal (clean:
clean) is bound to the clean phase in the clean lifecycle. The clean:clean goal deletes the
output of a build by deleting the build directory. If you haven’t customized the location of the build
directory it will be the ${basedir}/target directory as defined by the Super POM. When you execute the
clean:clean goal you do not do so by executing the goal directly with mvn clean:clean, you
do so by executing the clean phase of the clean lifecycle. Executing the clean phase gives Maven an
opportunity to execute any other goals which may be bound to the pre-clean phase.
For example, suppose you wanted to trigger an antrun:run goal task to echo a notification on pre-
clean, or to make an archive of a project’s build directory before it is deleted. Simply running the
clean:clean goal will not execute the lifecycle at all, but specifying the clean phase will use the
clean lifecycle and advance through the three lifecycle phases until it reaches the clean phase. Trig-
gering a Goal on pre-clean shows an example of build configuration which binds the antrun:run goal
to the pre-clean phase to echo an alert that the project artifact is about to be deleted. In this example,
the antrun:run goal is being used to execute some arbitrary Ant commands to check for an existing
project artifact. If the project’s artifact is about to be deleted it will print this to the screen
Triggering a Goal on pre-clean
<project>
...
<build>
<plugins>... <plugin>
<artifactId>maven-antrun-plugin</artifactId>
<executions>
<execution>
<id>file-exists</id>
<phase>pre-clean</phase>
<goals>
<goal>run</goal>
</goals>
<configuration>

Maven: The Complete Reference 54 / 316
<tasks>
<!-- adds the ant-contrib tasks (if/then/ ←-
else used below) -->
<taskdef resource="net/sf/antcontrib/ ←-
antcontrib.properties" />
<available
file="${project.build.directory}/${ ←-
project.build.finalName}.${project ←-
.packaging}"
property="file.exists" value="true" ←-
/>
<if>
<not>
<isset property="file.exists" />
</not>
<then>
<echo>No
${project.build.finalName}.${ ←-
project.packaging} to
delete</echo>
</then>
<else>
<echo>Deleting
${project.build.finalName}.${ ←-
project.packaging}</echo>
</else>
</if>
</tasks>
</configuration>
</execution>
</executions>
<dependencies>
<dependency>
<groupId>ant-contrib</groupId>
<artifactId>ant-contrib</artifactId>
<version>1.0b2</version>
</dependency>
</dependencies>
</plugin>
</plugins>
</build>
</project>
Running mvn clean on a project with this build configuration will produce output similar to the fol-
lowing:
[INFO] Scanning for projects...

Maven: The Complete Reference 55 / 316
[INFO] ←-
----------------------------------------------------------------------
[INFO] Building Your Project
[INFO]task-segment: [clean]
[INFO] ←-
----------------------------------------------------------------------
[INFO] [antrun:run {execution: file-exists}]
[INFO] Executing tasks
[echo] Deleting your-project-1.0-SNAPSHOT.jar
[INFO] Executed tasks
[INFO] [clean:clean]
[INFO] Deleting directory ~/corp/your-project/target
[INFO] Deleting directory ~/corp/your-project/target/classes
[INFO] Deleting directory ~/corp/your-project/target/test-classes
[INFO] ←-
------------------------------------------------------------------------ ←-
[INFO] BUILD SUCCESSFUL
[INFO] ←-
------------------------------------------------------------------------ ←-
[INFO] Total time: 1 second
[INFO] Finished at: Wed Nov 08 11:46:26 CST 2006
[INFO] Final Memory: 2M/5M
[INFO] ←-
------------------------------------------------------------------------ ←-
In addition to configuring Maven to run a goal during the pre-clean phase, you can also customize
the Clean plugin to delete files in addition to the build output directory. You can configure the plugin to
remove specific files in a fileSet. The example below configures clean to remove all .class files in a
directory named target-other/ using standard Ant file wildcards: *and \**.
Customizing Behavior of the Clean Plugin
<project>
<modelVersion>4.0.0</modelVersion>
...
<build>
<plugins>
<plugin>
<artifactId>maven-clean-plugin</artifactId>
<configuration>
<filesets>
<fileset>
<directory>target-other</directory>
<includes>

Maven: The Complete Reference 56 / 316
<include>*.class</include>
</includes>
</fileset>
</filesets>
</configuration>
</plugin>
</plugins>
</build>
</project>
4.1.2 Default Lifecycle (default)
Most Maven users will be familiar with the default lifecycle. It is a general model of a build process for
a software application. The first phase is validate and the last phase is deploy. The phases in the
default Maven lifecycle are shown in Table 4.1.
Table 4.1: Maven Lifecycle Phases
Lifecycle Phase Description
validate Validate the project is correct and all necessary
information is available to complete a build
generate-sources Generate any source code for inclusion in
compilation
process-sources Process the source code, for example to filter
any values
generate-resources Generate resources for inclusion in the package
process-resources Copy and process the resources into the
destination directory, ready for packaging
compile Compile the source code of the project
process-classes Post-process the generated files from
compilation, for example to do bytecode
enhancement on Java classes
generate-test-sources Generate any test source code for inclusion in
compilation
process-test-sources Process the test source code, for example to
filter any values
generate-test-resources Create resources for testing
process-test-resources Copy and process the resources into the test
destination directory
test-compile Compile the test source code into the test
destination directory

Maven: The Complete Reference 57 / 316
Table 4.1: (continued)
Lifecycle Phase Description
test Run tests using a suitable unit testing
framework. These tests should not require the
code be packaged or deployed
prepare-package Perform any operations necessary to prepare a
package before the actual packaging. This often
results in an unpacked, processed version of the
package (coming in Maven 2.1+)
package Take the compiled code and package it in its
distributable format, such as a JAR, WAR, or
EAR
pre-integration-test Perform actions required before integration
tests are executed. This may involve things
such as setting up the required environment
integration-test Process and deploy the package if necessary
into an environment where integration tests can
be run
post-integration-test Perform actions required after integration tests
have been executed. This may include cleaning
up the environment
verify Run any checks to verify the package is valid
and meets quality criteria
install Install the package into the local repository, for
use as a dependency in other projects locally
deploy Copies the final package to the remote
repository for sharing with other developers
and projects (usually only relevant during a
formal release)
4.1.3 Site Lifecycle (site)
Maven does more than build software artifacts from project, it can also generate project documentation
and reports about the project, or a collection of projects. Project documentation and site generation have
a dedicated lifecycle which contains four phases:
1. pre-site

Maven: The Complete Reference 58 / 316
2. site
3. post-site
4. site-deploy
The default goals bound to the site lifecycle is:
1. site - site:site
2. site-deploy -site:deploy
The packaging type does not usually alter this lifecycle since packaging types are concerned primarily
with artifact creation, not with the type of site generated. The Site plugin kicks off the execution of Doxia
document generation and other report generation plugins. You can generate a site from a Maven project
by running the following command:
$ mvn site
For more information about Maven Site generation, see Chapter 10.
4.2 Package-specific Lifecycles
The specific goals bound to each phase default to a set of goals specific to a project’s packaging. A project
with packaging jar has a different set of default goals from a project with a packaging of war. The
packaging element affects the steps required to build a project. For an example of how the packaging
affects the build, consider two projects: one with pom packaging and the other with jar packaging.
The project with pom packaging will run the site:attach-descriptor goal during the package
phase, and the project with jar packaging will run the jar:jar goal instead.
The following sections describe the lifecycle for all built-in packaging types in Maven. Use these sections
to find out what default goals are mapped to default lifecycle phases.
Maven: The Complete Reference 59 / 316
4.2.1 JAR
JAR is the default packaging type, the most common, and thus the most commonly encountered lifecycle
configuration. The default goals for the JAR lifecycle are shown in Table 4.2.
Table 4.2: Default Goals for JAR Packaging
Lifecycle Phase Goal
process-resources resources:resources
compile compiler:compile
process-test-resources resources:testResources
test-compile compiler:testCompile
test surefire:test
package jar:jar
install install:install
deploy deploy:deploy
4.2.2 POM
POM is the simplest packaging type. The artifact that it generates is itself only, rather than a JAR, SAR,
or EAR. There is no code to test or compile, and there are no resources the process. The default goals for
projects with POM packaging are shown in Table 4.3.
Table 4.3: Default Goals for POM Packaging
Lifecycle Phase Goal
package site:attach-descriptor
install install:install
deploy deploy:deploy
Maven: The Complete Reference 60 / 316
4.2.3 Maven Plugin
This packaging type is similar to JAR packaging type with three additions: plugin:descriptor,
plugin:addPluginArtifactMetadata, and plugin:updateRegistry. These goals gener-
ate a descriptor file and perform some modifications to the repository data. The default goals for projects
with plugin packaging are shown in Table 4.4.
Table 4.4: Default Goals for Plugin Packaging
Lifecycle Phase Goal
generate-resources plugin:descriptor
process-resources resources:resources
compile compiler:compile
process-test-resources resources:testResources
test-compile compiler:testCompile
test surefire:test
package jar:jar, plugin:addPluginArtifactMetadata
install install:install, plugin:updateRegistry
deploy deploy:deploy
4.2.4 EJB
EJBs, or Enterprise Java Beans, are a common data access mechanism for model-driven development in
Enterprise Java. Maven provides support for EJB 2 and 3. Though you must configure the EJB plugin to
specifically package for EJB3, else the plugin defaults to 2.1 and looks for the presence of certain EJB
configuration files. The default goals for projects with EJB packaging are shown in Table 4.5.
Table 4.5: Default Goals for EJB Packaging
Lifecycle Phase Goal
process-resources resources:resources
compile compiler:compile
process-test-resources resources:testResources
test-compile compiler:testCompile
test surefire:test
package ejb:ejb
install install:install
deploy deploy:deploy
Maven: The Complete Reference 61 / 316
4.2.5 WAR
The WAR packaging type is similar to the JAR and EJB types. The exception being the package goal of
war:war. Note that the war:war goal requires a web.xml configuration in your src/main/webapp/WEB-
INF directory. The default goals for projects with WAR packaging are shown in Table 4.6.
Table 4.6: Default Goals for WAR Packaging
Lifecycle Phase Goal
process-resources resources:resources
compile compiler:compile
process-test-resources resources:testResources
test-compile compiler:testCompile
test surefire:test
package war:war
install install:install
deploy deploy:deploy
4.2.6 EAR
EARs are probably the simplest Java EE constructs, consisting primarily of the deployment descriptor
application.xml file, some resources and some modules. The EAR plugin has a goal named generate-
application-xml which generates the application.xml based upon the configuration in the EAR
project’s POM. The default goals for projects with EAR packaging are shown in Table 4.7.
Table 4.7: Default Goals for EAR Packaging
Lifecycle Phase Goal
generate-resources ear:generate-application-xml
process-resources resources:resources
package ear:ear
install install:install
deploy deploy:deploy

Maven: The Complete Reference 62 / 316
4.2.7 Other Packaging Types
This is not an exhaustive list of every packaging type available for Maven. There are a number of pack-
aging formats available through external projects and plugins: the NAR (native archive) packaging type,
the SWF and SWC packaging types for projects that produce Adobe Flash and Flex content, and many
others. You can also define a custom packaging type and customize the default lifecycle goals to suit your
own project packaging requirements.
To use one of these custom packaging types, you need two things: a plugin which defines the lifecycle
for a custom packaging type and a repository which contains this plugin. Some custom packaging types
are defined in plugins available from the central Maven repository. Here is an example of a project which
references the Israfil Flex plugin and uses a custom packaging type of SWF to produce output from Adobe
Flex source.
Custom Packaging Type for Adobe Flex (SWF)
<project>
...
<packaging>swf</packaging>
...
<build>
<plugins>
<plugin>
<groupId>net.israfil.mojo</groupId>
<artifactId>maven-flex2-plugin</artifactId>
<version>1.4-SNAPSHOT</version>
<extensions>true</extensions>
<configuration>
<debug>true</debug>
<flexHome>${flex.home}</flexHome>
<useNetwork>true</useNetwork>
<main>org/sonatype/mavenbook/Main.mxml</main>
</configuration>
</plugin>
</plugins>
</build>
...
</project>
In Section 11.6, we show you how to create your own packaging type with a customized lifecycle. This

Maven: The Complete Reference 63 / 316
example should give you an idea of what you’ll need to do to reference a custom packaging type. All
you need to do is reference the plugin which supplies the custom packaging type. The Israfil Flex plugin
is a third-party Maven plugin hosted at Google Code, for more information about this plugin and how to
use Maven to compile Adobe Flex go to http://code.google.com/p/israfil-mojo. This plugin supplies the
following lifecycle for the SWF packaging type:
Table 4.8: Default Lifecycle for SWF Packaging
Lifecycle Phase Goal
compile flex2:compile-swc
install install:install
deploy deploy:deploy
4.3 Common Lifecycle Goals
Many of the packaging lifecycles have similar goals. If you look at the goals bound to the WAR and
JAR lifecycles, you’ll see that they differ only in the package phase. The package phase of the WAR
lifecycle calls war:war and the package phase of the JAR lifecycle calls jar:jar. Most of the
lifecycles you will come into contact with share some common lifecycle goals for managing resources,
running tests, and compiling source code. In this section, we’ll explore some of these common lifecycle
goals in detail.
4.3.1 Process Resources
The process-resources phase "processes" resources and copies them to the output directory. If you
haven’t customized the default directory locations defined in the Super POM, this means that Maven will
copy the files from ${basedir}/src/main/resources to ${basedir}/target/classes or the directory defined
in ${project.build.outputDirectory}. In addition to copying the resources to the output directory, Maven
can also apply a filter to the resources that allows you to replace tokens within resource file. Just like
variables are referenced in a POM using ${...} notation, you can reference variables in your project’s
resources using the same syntax. Coupled with build profiles, such a facility can be used to produce build
artifacts which target different deployment platforms. This is something that is common in environments
which need to produce output for development, testing, staging, and production platforms from the same
project. For more information about build profiles, see Chapter 5.

Maven: The Complete Reference 64 / 316
To illustrate resource filtering, assume that you have a project with an XML file in src/main/resources/META-
INF/service.xml. You want to externalize some configuration variables to a properties file. In other words,
you might want to reference a JDBC URL, username, and password for your database, and you don’t
want to put these values directly into the service.xml file. Instead, you would like to use a properties
file to capture all of the configuration points for your program. Doing this will allow you to consoli-
date all configuration into a single properties file and make it easier to change configuration values when
you need to target a new deployment environment. First, take a look at the contents of service.xml in
src/main/resources/META-INF.
Using Properties in Project Resources
<service>
<!-- This URL was set by project version ${project.version} -->
<url>${jdbc.url}</url>
<user>${jdbc.username}</user>
<password>${jdbc.password}</password>
</service>
This XML file uses the same property reference syntax you can use in the POM. In fact, the first variable
referenced is the project variable which is also an implicit variable made available in the POM. The
project variable provides access to POM information. The next three variable references are jdbc.
url,jdbc.username, and jdbc.password. These custom variables are defined in a properties file
src/main/filters/default.properties.
default.properties in src/main/filters
jdbc.url=jdbc:hsqldb:mem:mydb
jdbc.username=sa
jdbc.password=
To configure resource filtering with this default.properties file, we need to specify two things in a project’s
POM: a list of properties files in the filters element of the build configuration, and a flag to Maven
that the resources directory is to be filtered. The default Maven behavior is to skip filtering and just copy
the resources to the output directory; you’ll need to explicitly configure resource filter, or Maven will skip
the step altogether. This default ensures that Maven’s resource filtering feature doesn’t surprise you out
of nowhere and clobbering any ${...} references you didn’t want it to replace.
Filter Resources (Replacing Properties)
<build>
<filters>
<filter>src/main/filters/default.properties</filter>
</filters>
<resources>

Maven: The Complete Reference 65 / 316
<resource>
<directory>src/main/resources</directory>
<filtering>true</filtering>
</resource>
</resources>
</build>
As with all directories in Maven, the resources directory does not need to be in src/main/resources. This is
just the default value defined in the Super POM. You should also note that you don’t need to consolidate all
of your resources into a single directory. You can always separate resources into separate directories under
src/main. Assume that you have a project which contains hundreds of XML documents and hundreds of
images. Instead of mixing the resources in the src/main/resources directory, you might want to create
two directories src/main/xml and src/main/images to hold this content. To add directories to the list of
resource directories, you would add the following resource elements to your build configuration.
Configuring Additional Resource Directories
<build>
...
<resources>
<resource>
<directory>src/main/resources</directory>
</resource>
<resource>
<directory>src/main/xml</directory>
</resource>
<resource>
<directory>src/main/images</directory>
</resource>
</resources>
...
</build>
When you are building a project that produces a console application or a command-line tool, you’ll often
find yourself writing simple shell scripts that need to reference the JAR produced by a build. When you are
using the assembly plugin to produce a distribution for an application as a ZIP or TAR, you might place
all of your scripts in a directory like src/main/command. In the following POM resource configuration,
you’ll see how we can use resource filtering and a reference to the project variable to capture the final
output name of the JAR. For more information about the Maven Assembly plugin, see Chapter 8.
Filtering Script Resources
<build>
<groupId>org.sonatype.mavenbook</groupId>
<artifactId>simple-cmd</artifactId>

Maven: The Complete Reference 66 / 316
<version>2.3.1</version>
...
<resources>
<resource>
<filtering>true</filtering>
<directory>${basedir}/src/main/command</directory>
<includes>
<include>run.bat</include>
<include>run.sh</include>
</includes>
<targetPath>${basedir}</targetPath>
</resource>
<resource>
<directory>${basedir}/src/main/resources</directory>
</resource>
</resources>
...
</build>
If you run mvn process-resources in this project, you will end up with two files, run.sh and run.bat, in
${basedir}. We’ve singled out these two files in a resource element, configuring filtering, and set the
targetPath to be ${basedir}. In a second resource element, we’ve configured the default resources
path to be copied to the default output directory without any filtering. Filtering Script Resources shows
you how to declare two resource directories and supply them with different filtering and target directory
preferences. The project from Filtering Script Resources would contain a run.bat file in src/main/com-
mand with the following content:
@echo off
java -jar ${project.build.finalName}.jar %*
After running mvn process-resources, a file named run.bat would appear in ${basedir} with the
following content:
@echo off
java -jar simple-cmd-2.3.1.jar %*
The ability to customize filtering for specific subsets of resources is another reason why complex projects
with many different kinds of resources often find it advantageous to separate resources into multiple
directories. The alternative to storing different kinds of resources with different filtering requirements in
different directories is to use a more complex set of include and exclude patterns to match all resource
files which match a certain pattern.

Maven: The Complete Reference 67 / 316
4.3.2 Compile
Most lifecycles bind the Compiler plugin’s compile goal to the compile phase. This phase calls out
to compile:compile which is configured to compile all of the source code and copy the bytecode to
the build output directory. If you haven’t customized the values defined in the Super POM, compile:
compile is going to compile everything from src/main/java to target/classes. The Compiler plugin
calls out to javac and uses default source and target settings of 1.3 and 1.1. In other words, the compiler
plugin assumes that your Java source conforms to Java 1.3 and that you are targeting a Java 1.1 JVM.
If you would like to change these settings, you’ll need to supply the target and source configuration to
the Compiler plugin in your project’s POM as shown in Setting the Source and Target Versions for the
Compiler Plugin.
Setting the Source and Target Versions for the Compiler Plugin
<project>
...
<build>
...
<plugins>
<plugin>
<artifactId>maven-compiler-plugin</artifactId>
<configuration>
<source>1.5</source>
<target>1.5</target>
</configuration>
</plugin>
</plugins>
...
</build>
...
</project>
Notice we are configuring the Compiler plugin, and not the specific compile:compile goal. If we
were going to configure the source and target for just the compile:compile goal, we would place the
configuration element below an execution element for the compile:compile goal. We’ve
configured the target and source for the plugin because compile:compile isn’t the only goal we’re
interested in configuring. The Compiler plugin is reused when Maven compiles tests using the comp
ile:testCompile goal, and configuring target and source at the plugin level allows us to define it
once for all goals in a plugin.
If you need to customize the location of the source code, you can do so by changing the build config-
uration. If you wanted to store your project’s source code in src/java instead of src/main/java and if
you wanted build output to go to classes instead of target/classes, you could always override the default
sourceDirectory defined by the Super POM.

Maven: The Complete Reference 68 / 316
Overriding the Default Source Directory
<build>
...
<sourceDirectory>src/java</sourceDirectory>
<outputDirectory>classes</outputDirectory>
...
</build>
Warning
While it might seem necessary to bend Maven to your own idea of project directory structure,
we can’t emphasize enough that you should sacrifice your own ideas of directory structure in
favor of the Maven defaults. This isn’t because we’re trying to brainwash you into accepting the
Maven Way, but it will be easier for people to understand your project if it adheres to the most
basic conventions. Just forget about this. Don’t do it.
4.3.3 Process Test Resources
The process-test-resources phase is almost indistinguishable from the process-resour
ces phase. There are some trivial differences in the POM, but most everything the same. You can filter
test resources just as you filter regular resources. The default location for test resources is defined in the
Super POM as src/test/resources, and the default output directory for test resources is target/test-classes
as defined in ${project.build.testOutputDirectory}.
4.3.4 Test Compile
The test-compile phase is almost identical to the compile phase. The only difference is that
test-compile is going to invoke compile:testCompile to compile source from the test source
directory to the test build output directory. If you haven’t customized the default directories from the
Super POM, compile:testCompile is going to compile the source in src/test/java to the target/test-
classes directory.
As with the source code directory, if you want to customize the location of the test source code and the
output of test compilation, you can do so by overriding the testSourceDirectory and the testOut-
putDirectory. If you wanted to store test source in src-test/ instead of src/test/java and you wanted to save
test bytecode to classes-test/ instead of target/test-classes, you would use the following configuration.

Maven: The Complete Reference 69 / 316
Overriding the Location of Test Source and Output
<build>
...
<testSourceDirectory>src-test</testSourceDirectory>
<testOutputDirectory>classes-test</testOutputDirectory>
...
</build>
4.3.5 Test
Most lifecycles bind the test goal of the Surefire plugin to the test phase. The Surefire plugin is Maven’s
unit testing plugin, the default behavior of Surefire is to look for all classes ending in *Test in the test
source directory and to run them as JUnit tests. The Surefire plugin can also be configured to run TestNG
unit tests.
After running mvn test, you should also notice that the Surefire produces a number of reports in
target/surefire-reports. This reports directory will have two files for each test executed by the Surefire
plugin: an XML document containing execution information for the test, and a text file containing the
output of the unit test. If there is a problem during the test phase and a unit test has failed, you can use
the output of Maven and the contents of this directory to track down the cause of a test failure. This
surefire-reports/ directory is also used during site generation to create an easy to read summary of all the
unit tests in a project.
If you are working on a project that has some failing unit tests, but you want the project to produce output,
you’ll need to configure the Surefire plugin to continue a build even if it encounters a failure. The default
behavior is to stop a build whenever a unit test failure is encountered. To override this behavior, you’ll
need to set the testFailureIgnore configuration property on the Surefire plugin to true.
Configuring Surefire to Ignore Test Failures
<build>
<plugins>
<plugin>
<groupId>org.apache.maven.plugins</groupId>
<artifactId>maven-surefire-plugin</artifactId>
<configuration>
<testFailureIgnore>true</testFailureIgnore>
</configuration>
</plugin>
...
</plugins>

Maven: The Complete Reference 70 / 316
</build>
If you would like to skip tests altogether, you can do so by executing the following command:
$ mvn install -Dmaven.test.skip=true
The maven.test.skip variable controls both the Compiler and the Surefire plugin, if you pass in
maven.test.skip you’ve told Maven to ignore tests altogether.
4.3.6 Install
The install goal of the Install plugin is almost always bound to the install lifecycle phase. This
install:install goal simply installs a project’s main artifact to the local repository. If you have a
project with a groupId of org.sonatype.mavenbook, an artifactId of simple-test, and
aversion of 1.0.2, the install:install goal is going to copy the JAR file from target/simple-
test-1.0.2.jar to ~/.m2/repository/org/sonatype/mavenbook/simple-test/1.0.2/simple-test-1.0.2.jar. If the
project has POM packaging, this goal will copy the POM to the local repository.
4.3.7 Deploy
The deploy goal of the Deploy plugin is usually bound to the deploy lifecycle phase. This phase
is used to deploy an artifact to a remote Maven repository, this is usually required to update a remote
repository when you are performing a release. The deployment procedure can be as simple as copying
a file to another directory or as complex as transferring a file over SCP using a public key. Deployment
settings usually involve credentials to a remote repository, and, as such, deployment settings are usually
not stored in a pom.xml. Instead, deployment settings are more frequently found in an individual user’s
~/.m2/settings.xml. For now, all you need to know is that the deploy:deploy goal is bound to the
deploy phase and it takes care of transporting an artifact to a published repository and updating any
repository information which might be affected by such a deployment.

Maven: The Complete Reference 71 / 316
Chapter 5
Build Profiles
5.1 What Are They For?
Profiles allow for the ability to customize a particular build for a particular environment; profiles enable
portability between different build environments.
What do we mean by different build environments? Two example build environments are production and
development. When you are working in a development environment, your system might be configured to
read from a development database instance running on your local machine while in production, your sys-
tem is configured to read from the production database. Maven allows you to define any number of build
environments (build profiles) which can override any of the settings in the pom.xml. You could configure
your application to read from your local, development instance of a database in your "development" pro-
file, and you can configure it to read from the production database in the "production" profile. Profiles can
also be activated by the environment and platform, you can customize a build to run differently depending
the Operating System or the installed JDK version. Before we talk about using and configuring Maven
profiles, we need to define the concept of Build Portability.
5.1.1 What is Build Portability
A build’s "portability" is a measure of how easy it is to take a particular project and build it in different
environments. A build which works without any custom configuration or customization of properties files

Maven: The Complete Reference 72 / 316
is more portable than a build which requires a great deal of work to build from scratch. The most portable
projects tend to be widely used open source projects like Apache Commons or Apache Velocity which
ship with Maven builds which require little or no customization. Put simply, the most portable project
builds tend to just work, out of the box, and the least portable builds require you to jump through hoops
and configure platform specific paths to locate build tools. Before we show you how to achieve build
portability, let’s survey the different kinds of portability we are talking about.
5.1.1.1 Non-Portable Builds
The lack of portability is exactly what all build tools are made to prevent - however, any tool can be
configured to be non-portable (even Maven). A non-portable project is buildable only under a specific
set of circumstances and criteria (e.g., your local machine). Unless you are working by yourself and you
have no plans on ever deploying your application to another machine, it is best to avoid non-portability
entirely. A non-portable build only runs on a single machine, it is a "one-off". Maven is designed to
discourage non-portable builds by offering the ability to customize builds using profiles.
When a new developer gets the source for a non-portable project, they will not be able to build the project
without rewriting large portions of a build script.
5.1.1.2 Environment Portability
A build exhibits environment portability if it has a mechanism for customizing behavior and configuration
when targeting different environments. A project that contains a reference to a test database in a test
environment, for example, and a production database in a production environment, is environmentally
portable. It is likely that this build has a different set of properties for each environment. When you move
to a different environment, one that is not defined and has no profile created for it, the project will not
work. Hence, it is only portable between defined environments.
When a new developer gets the source for an environmentally portable project, they will have to run the
build within a defined environment or they will have to create a custom environment to successfully build
the project.
5.1.1.3 Organizational (In-House) Portability
The center of this level of portability is a project’s requirement that only a select few may access internal
resources such as source control or an internally-maintained Maven repository. A project at a large corpo-

Maven: The Complete Reference 73 / 316
ration may depend on a database available only to in-house developers, or an open source project might
require a specific level of credentials to publish a web site and deploy the products of a build to a public
repository.
If you attempt to build an in-house project from scratch outside of the in-house network (for example,
outside of a corporate firewall), the build will fail. It may fail because certain required custom plugins
are unavailable, or project dependencies cannot be found because you don’t have the appropriate creden-
tials to retrieve dependencies from a custom remote repository. Such a project is portable only across
environments in a single organization.
5.1.1.4 Wide (Universal) Portability
Anyone may download a widely portable project’s source, compile, and install it without customizing a
build for a specific environment. This is the highest level of portability; anything less requires extra work
for those who wish to build your project. This level of portability is especially important for open source
projects, which depend on the ability for would-be contributors to easily download and build from source.
Any developer could download the source for a widely portable project.
5.1.2 Selecting an Appropriate Level of Portability
Clearly, you’ll want to avoid creating the worst-case scenario: the non-portable build. You may have had
the misfortune to work or study at an organization that had critical applications with non-portable builds.
In such organizations, you cannot deploy an application without the help of a specific individual on a
specific machine. In such an organization, it is also very difficult to introduce new project dependencies
or changes without coordinating the change with the single person who maintains such a non-portable
build. Non-portable builds tend to grow in highly political environments when one individual or group
needs to exert control over how and when a project is built and deployed. "How do we build the system?
Oh, we’ve got to call Jack and ask him to build it for us, no one else deploys to production." That is
a dangerous situation which is more common that you would think. If you work for this organization,
Maven and Maven profiles provide a way out of this mess.
On the opposite end of the portability spectrum are widely portable builds. Widely portable builds are
generally the most difficult build systems to attain. These builds restrict your dependencies to those
projects and tools that may be freely distributed and are publicly available. Many commercial software
packages might be excluded from the most-portable builds because they cannot be downloaded before you
have accepted a certain license. Wide portability also restricts dependencies to those pieces of software
that may be distributed as Maven artifacts. For example, if you depend upon Oracle JDBC drivers, your

Maven: The Complete Reference 74 / 316
users will have to download and install them manually; this is not widely portable as you will have to
distribute a set of environment setup instructions for people interested in building your application. On
the other hand, you could use a JDBC driver which is available from the public Maven repositories like
MySQL or HSQLDB.
As stated previously, open source projects benefit from having the most widely portable build possible.
Widely portable builds reduce the inefficiencies associated with contributing to a project. In an open
source project (such as Maven) there are two distinct groups: end-users and developers. When an end-user
uses a project like Maven and decides to contribute a patch to Maven, they have to make the transition from
using the output of a build to running a build. They have to first become a developer, and if it is difficult
to learn how to build a project, this end-user has a disincentive to take the time to contribute to a project.
In a widely portable project, an end-user doesn’t have to follow a set of arcane build instructions to start
becoming a developer, they can download the source, modify the source, build, and submit a contribution
without asking someone to help them set up a build environment. When the cost of contributing source
back to an open-source project is lower, you’ll see an increase in source code contributions, especially
casual contributions which can make the difference between a project’s success and a project’s failure.
One side-effect of Maven’s adoption across a wide group of open source projects is that it has made it
easier for developers to contribute code to various open source projects.
5.2 Portability through Maven Profiles
A profile in Maven is an alternative set of configuration values which set or override default values. Using
a profile, you can customize a build for different environments. Profiles are configured in the pom.xml
and are given an identifier. Then you can run Maven with a command-line flag that tells Maven to execute
goals in a specific profile. The following pom.xml uses a production profile to override the default
settings of the Compiler plugin.
Using a Maven Profile to Override Production Compiler Settings
<project xmlns="http://maven.apache.org/POM/4.0.0"
xmlns:xsi="http://www.w3.org/2001/XMLSchema-instance"
xsi:schemaLocation="http://maven.apache.org/POM/4.0.0
http://maven.apache.org/maven-v4_0_0.xsd">
<modelVersion>4.0.0</modelVersion>
<groupId>org.sonatype.mavenbook</groupId>
<artifactId>simple</artifactId>
<packaging>jar</packaging>
<version>1.0-SNAPSHOT</version>
<name>simple</name>
<url>http://maven.apache.org</url>
<dependencies>
<dependency>

Maven: The Complete Reference 75 / 316
<groupId>junit</groupId>
<artifactId>junit</artifactId>
<version>3.8.1</version>
<scope>test</scope>
</dependency>
</dependencies>
<profiles> v
1
<profile>
<id>production</id> v
2
<build> v
3
<plugins>
<plugin>
<groupId>org.apache.maven.plugins</ ←-
groupId>
<artifactId>maven-compiler-plugin</ ←-
artifactId>
<configuration>
<debug>false</debug> v
4
<optimize>true</optimize>
</configuration>
</plugin>
</plugins>
</build>
</profile>
</profiles>
</project>
In this example, we’ve added a profile named production that overrides the default configuration of
the Maven Compiler plugin. Let’s examine the syntax of this profile in detail.
v
1The profiles element is in the pom.xml, it contains one or more profile elements. Since
profiles override the default settings in a pom.xml, the profiles element is usually listed as the
last element in a pom.xml.
v
2Each profile has to have an id element. This id element contains the name which is used to invoke
this profile from the command-line. A profile is invoked by passing the -P<profile_id>
command-line argument to Maven.
v
3Aprofile element can contain many of the elements which can appear under the project
element of a POM XML Document. In this example, we’re overriding the behavior of the Compiler
plugin and we have to override the plugin configuration which is normally enclosed in a build
and a plugins element.
v
4We’re overriding the configuration of the Maven Compiler plugin. We’re making sure that the
bytecode produced by the production profile doesn’t contain debug information and that the byte-
code has gone through the compiler’s optimization routines.

Maven: The Complete Reference 76 / 316
To execute mvn install under the production profile, you need to pass the -Pproduction
argument on the command-line. To verify that the production profile overrides the default Compiler
plugin configuration, execute Maven with debug output enabled (-X) as follows:
~/examples/profile $ mvn clean install -Pproduction -X
... (omitting debugging output) ...
[DEBUG] Configuring mojo ’o.a.m.plugins:maven-compiler-plugin:2.0.2: ←-
testCompile’
[DEBUG] (f) basedir = ~\examples\profile
[DEBUG] (f) buildDirectory = ~\examples\profile\target
...
[DEBUG] (f) compilerId = javac
[DEBUG] (f) *debug = false*
[DEBUG] (f) failOnError = true
[DEBUG] (f) fork = false
[DEBUG] (f) *optimize = true*
[DEBUG] (f) outputDirectory = \
~\svnw\sonatype\examples\profile\target\test-classes
[DEBUG] (f) outputFileName = simple-1.0-SNAPSHOT
[DEBUG] (f) showDeprecation = false
[DEBUG] (f) showWarnings = false
[DEBUG] (f) staleMillis = 0
[DEBUG] (f) verbose = false
[DEBUG] -- end configuration --
... (omitting debugging output) ...
This excerpt from the debug output of Maven shows the configuration of the Compiler plugin under the
production profile. As shown in the output, debug is set to false and optimize is set to true.
5.2.1 Overriding a Project Object Model
While the previous example showed you how to override the default configuration properties of a single
Maven plugin, you still don’t know exactly what a Maven profile is allowed to override. The short-answer
to that question is that a Maven profile can override almost everything that you would have in a pom.xml.
The Maven POM contains an element under project called profiles containing a project’s alternate
configurations, and under this element are profile elements which define each profile. Each profile must
have an id, and other than that, it can contain almost any of the elements one would expect to see under
project. The following XML document shows all of the elements, a profile is allowed to override.
Elements Allowed in a Profile
<project>
<profiles>

Maven: The Complete Reference 77 / 316
<profile>
<build>
<defaultGoal>...</defaultGoal>
<finalName>...</finalName>
<resources>...</resources>
<testResources>...</testResources>
<plugins>...</plugins>
</build>
<reporting>...</reporting>
<modules>...</modules>
<dependencies>...</dependencies>
<dependencyManagement>...</dependencyManagement>
<distributionManagement>...</distributionManagement>
<repositories>...</repositories>
<pluginRepositories>...</pluginRepositories>
<properties>...</properties>
</profile>
</profiles>
</project>
A profile can override an element shown with ellipses. A profile can override the final name of a project’s
artifact in a profile, the dependencies, and the behavior of a project’s build via plugin configuration. A
profile can also override the configuration of distribution settings depending on the profile; for example,
if you need to publish an artifact to a staging server in a staging profile, you would create a staging profile
which overrides the distributionManagement element in a profile.
5.3 Profile Activation
In the previous section we showed you how to create a profile that overrides default behavior for a specific
target environment. In the previous build the default build was designed for development and the produc
tion profile exists to provide configuration for a production environment. What happens when you need
to provide customizations based on variables like operating systems or JDK version? Maven provides a
way to "activate" a profile for different environmental parameters, this is called profile activation.
Take the following example, assume that we have a Java library that has a specific feature only available
in the Java 6 release: the Scripting Engine as defined in JSR-223. You’ve separated the portion of the
library that deals with the scripting library into a separate Maven project, and you want people running
Java 5 to be able to build the project without attempting to build the Java 6 specific library extension. You
can do this by using a Maven profile that adds the script extension module to the build only when the
build is running within a Java 6 JDK. First, let’s take a look at our project’s directory layout and how we
want developers to build the system.

Maven: The Complete Reference 78 / 316
When someone runs mvn install with a Java 6 JDK, you want the build to include the simple-
script project’s build, when they are running in Java 5, you would like to skip the simple-script
project build. If you failed to skip the simple-script project build in Java 5, your build would fail
because Java 5 does not have the ScriptEngine on the classpath. Let’s take a look at the library
project’s pom.xml:
Dynamic Inclusion of Submodules Using Profile Activation
<project xmlns="http://maven.apache.org/POM/4.0.0"
xmlns:xsi="http://www.w3.org/2001/XMLSchema-instance"
xsi:schemaLocation="http://maven.apache.org/POM/4.0.0
http://maven.apache.org/maven-v4_0_0.xsd">
<modelVersion>4.0.0</modelVersion>
<groupId>org.sonatype.mavenbook</groupId>
<artifactId>simple</artifactId>
<packaging>jar</packaging>
<version>1.0-SNAPSHOT</version>
<name>simple</name>
<url>http://maven.apache.org</url>
<dependencies>
<dependency>
<groupId>junit</groupId>
<artifactId>junit</artifactId>
<version>3.8.1</version>
<scope>test</scope>
</dependency>
</dependencies>
<profiles>
<profile>
<id>jdk16</id>
<activation> v
1
<jdk>1.6</jdk>
</activation>
<modules> v
2
<module>simple-script</module>
</modules>
</profile>
</profiles>
</project>
If you run mvn install under Java 1.6, you will see Maven descending into the simple-script subdi-
rectory to build the simple-script project. If you are running mvn install in Java 1.5, the build
will not try to build the simple-script submodule. Exploring this activation configuration in more
detail:

Maven: The Complete Reference 79 / 316
v
1The activation element lists the conditions for profile activation. In this example, we’ve
specified that this profile will be activated by Java versions that begin with "1.6". This would
include "1.6.0_03", "1.6.0_02", or any other string that began with "1.6". Activation parameters
are not limited to Java version, for a full list of activation parameters, see Section 5.3.1.
v
2In this profile we are adding the module simple-script. Adding this module will cause Maven
to look in the simple-script/ subdirectory for a pom.xml.
5.3.1 Activation Configuration
Activations can contain one of more selectors including JDK versions, Operating System parameters,
files, and properties. A profile is activated when all activation criteria has been satisfied. For example,
a profile could list an Operating System family of Windows, and a JDK version of 1.4, this profile will
only be activated when the build is executed on a Windows machine running Java 1.4. If the profile is
active then all elements override the corresponding project-level elements as if the profile were included
with the -P command-line argument. The following example, lists a profile which is activated by a very
specific combination of operating system parameters, properties, and a JDK version.
Profile Activation Parameters: JDK Version, OS Parameters, and Properties
<project>
...
<profiles>
<profile>
<id>dev</id>
<activation>
<activeByDefault>false</activeByDefault> v
1
<jdk>1.5</jdk> v
2
<os>
<name>Windows XP</name> v
3
<family>Windows</family>
<arch>x86</arch>
<version>5.1.2600</version>
</os>
<property>
<name>customProperty</name> v
4
<value>BLUE</value>
</property>
<file>
<exists>file2.properties</exists> v
5
<missing>file1.properties</missing>
</file>
</activation>
...
</profile>

Maven: The Complete Reference 80 / 316
</profiles>
</project>
This previous example defines a very narrow set of activation parameters. Let’s examine each activation
criterion in detail:
v
1The activeByDefault element controls whether this profile is considered active by default.
v
2This profile will only be active for JDK versions that begin with "1.5". This includes "1.5.0_01",
"1.5.1".
v
3This profile targets a very specific version of Windows XP, version 5.1.2600 on a 32-bit platform.
If your project uses the native plugin to build a C program, you might find yourself writing projects
for specific platforms.
v
4The property element tells Maven to activate this profile if the property customProperty
is set to the value BLUE.
v
5The file element allows us to activate a profile based on the presence (or absence) of files. The
dev profile will be activated if a file named file2.properties exists in the base directory of the
project. The dev profile will only be activated if there is no file named file1.properties file in the
base directory of the project.
5.3.2 Activation by the Absence of a Property
You can activate a profile based on the value of a property like environment.type. You can ac-
tivate a development profile if environment.type equals dev, or a production profile if
environment.type equals prod. You can also activate a profile in the absence of a property. The
following configuration activates a profile if the property environment.type is not present during
Maven execution.
Activating Profiles in the Absence of a Property
<project>
...
<profiles>
<profile>
<id>development</id>
<activation>
<property>
<name>!environment.type</name>
</property>

Maven: The Complete Reference 81 / 316
</activation>
</profile>
</profiles>
</project>
Note the exclamation point prefixing the property name. The exclamation point is often referred to as the
"bang" character and signifies "not". This profile is activated when no ${environment.type} property is
set.
5.4 Listing Active Profiles
Maven profiles can be defined in either pom.xml,profiles.xml,~/.m2/settings.xml, or ${M2_HOME}/conf/settings.xml.
With these four levels, there’s no good way of keeping track of profiles available to a particular project
without remembering which profiles are defined in these four files. To make it easier to keep track of
which profiles are available, and where they have been defined, the Maven Help plugin defines a goal,
active-profiles, which lists all the active profiles and where they have been defined. You can run
the active-profiles goal, as follows:
$ mvn help:active-profiles
Active Profiles for Project ’My Project’:
The following profiles are active:
- my-settings-profile (source: settings.xml)
- my-external-profile (source: profiles.xml)
- my-internal-profile (source: pom.xml)
5.5 Tips and Tricks
Profiles can encourage build portability. If your build needs subtle customizations to work on different
platforms or if you need your build to produce different results for different target platforms, project
profiles increase build portability. Settings profiles generally decrease build portability by adding extra-
project information that must be communicated from developer to developer. The following sections
provide some guidelines and some ideas for applying Maven profiles to your project.

Maven: The Complete Reference 82 / 316
5.5.1 Common Environments
One of the core motivations for Maven project profiles was to provide for environment-specific configura-
tion settings. In a development environment, you might want to produce bytecode with debug information
and you might want to configure your system to use a development database instance. In a production
environment you might want to produce a signed JAR and configure the system to use a production
database. In this chapter, we defined a number of environments with identifiers like dev and prod. A
simpler way to do this would be to define profiles that are activated by environment properties and to use
these common environment properties across all of your projects.
For example, if every project had a development profile activated by a property named environm
ent.type having a value of dev, and if those same projects had a production profile activated by a
property named environment.type having a value of prod, you could simply pass in the appropriate
property value on the command-line to ensure that your builds target the correct environment. You can
then use this property to activate profiles defined in a project’s pom.xml as follows. Let’s take a look
at how a project’s pom.xml would define a profile activated by environment.type having the value
dev.
Project Profile Activated by setting environment.type to dev
<project>
...
<profiles>
<profile>
<id>development</id>
<activation>
<activeByDefault>true</activeByDefault>
<property>
<name>environment.type</name>
<value>dev</value>
</property>
</activation>
<properties>
<database.driverClassName>com.mysql.jdbc.Driver</database. ←-
driverClassName>
<database.url>
jdbc:mysql://localhost:3306/app_dev
</database.url>
<database.user>development_user</database.user>
<database.password>development_password</database.password ←-
>
</properties>
</profile>
<profile>
<id>production</id>
<activation>

Maven: The Complete Reference 83 / 316
<property>
<name>environment.type</name>
<value>prod</value>
</property>
</activation>
<properties>
<database.driverClassName>com.mysql.jdbc.Driver</database. ←-
driverClassName>
<database.url>jdbc:mysql://master01:3306,slave01:3306/ ←-
app_prod</database.url>
<database.user>prod_user</database.user>
</properties>
</profile>
</profiles>
</project>
This project defines some properties like database.url and database.user which might be used
to configure another Maven plugin configured in the pom.xml. There are plugins available that can manip-
ulate the database, run SQL, and plugins like the Maven Hibernate3 plugin which can generate annotated
model objects for use in persistence frameworks. A few of these plugins, can be configured in a pom.xml
using these properties. These properties could also be used to filter resources. If we needed to target the
development environment, we would just run the following command:
~/examples/profiles $ mvn install
Because the development profile is active by default, and because there are no other profiles activated,
running mvn help:active-profiles will show that the development profile is active. Now, the
activeByDefault option will only work if no other profiles are active. If you wanted to be sure that the
development profile would be active for a given build, you could explicitly pass in the environment.type
variable as follows:
~/examples/profiles $ mvn install -Denvironment.type=dev
Alternatively, if we need to activate the production profile, we could always run Maven with:
~/examples/profiles $ mvn install -Denvironment.type=prod
To test which profiles are active for a given build, use mvn help:active-profiles.

Maven: The Complete Reference 84 / 316
5.5.2 Protecting Secrets
This best practice builds upon the previous section. In Project Profile Activated by setting environ-
ment.type to dev, the production profile does not contain the database.password property. I’ve
done this on purpose to illustrate the concept of putting secrets in you user-specific settings.xml. If you
were developing an application at a large organization which values security, it is likely that the majority
of the development group will not know the password to the production database. In an organization that
draws a bold line between the development group and the operations group, this will be the norm. Devel-
opers may have access to a development and a staging environment, but they might not have (or want to
have) access to the production database. There are a number of reasons why this makes sense, particu-
larly if an organization is dealing with extremely sensitive financial, intelligence, or medical information.
In this scenario, the production environment build may only be carried out by a lead developer or by a
member of the production operations group. When they run this build using the prod environment.
type, they will need to define this variable in their settings.xml as follows:
Storing Secrets in a User-specific Settings Profile
<settings>
<profiles>
<profile>
<activeByDefault>true</activeByDefault>
<properties>
<environment.type>prod</environment.type>
<database.password>m1ss10nimp0ss1bl3</database.password>
</properties>
</profile>
</profiles>
</settings>
This user has defined a default profile which sets the environment.type to prod and which also
sets the production password. When the project is executed, the production profile is activated by the
environment.type property and the database.password property is populated. This way, you
can put all of the production-specific configuration into a project’s pom.xml and leave out only the single
secret necessary to access the production database.
Note
Secrets usually conflict with wide portability, but this makes sense. You wouldn’t want to share your
secrets openly.

Maven: The Complete Reference 85 / 316
5.5.3 Platform Classifiers
Let’s assume that you have a library or a project that produces platform-specific customizations. Even
though Java is platform-neutral, there are times when you might need to write some code that invokes
platform-specific native code. Another possibility is that you’ve written some C code which is compiled
by the Maven Native plugin and you want to produce a qualified artifact depending on the build platform.
You can set a classifier with the Maven Assembly plugin or with the Maven Jar plugin. The following
pom.xml produces a qualified artifact using profiles which are activated by Operating System parameters.
For more information about the Maven Assembly plugin, see Chapter 8.
Qualifying Artifacts with Platform Activated Project Profiles
<project>
...
<profiles>
<profile>
<id>windows</id>
<activation>
<os>
<family>windows</family>
</os>
</activation>
<build>
<plugins>
<plugin>
<artifactId>maven-jar-plugin</artifactId>
<configuration>
<classifier>win</classifier>
</configuration>
</plugin>
</plugins>
</build>
</profile>
<profile>
<id>linux</id>
<activation>
<os>
<family>unix</family>
</os>
</activation>
<build>
<plugins>
<plugin>
<artifactId>maven-jar-plugin</artifactId>
<configuration>
<classifier>linux</classifier>
</configuration>

Maven: The Complete Reference 86 / 316
</plugin>
</plugins>
</build>
</profile>
</profiles>
</project>
If the Operating System is in the Windows family, this pom.xml qualifies the JAR artifact with "-win".
If the Operating System is in the Unix family, the artifact is qualified with "-linux". This pom.xml suc-
cessfully adds the qualifiers to the artifacts, but it is more verbose than it need to be due to the redundant
configuration of the Maven Jar plugin in both profiles. This example could be rewritten to use variable
substitution to minimize redundancy as follows:
Qualifying Artifacts with Platform Activated Project Profiles and Variable Substitution
<project>
...
<build>
<plugins>
<plugin>
<artifactId>maven-jar-plugin</artifactId>
<configuration>
<classifier>${envClassifier}</classifier>
</configuration>
</plugin>
</plugins>
</build>
...
<profiles>
<profile>
<id>windows</id>
<activation>
<os>
<family>windows</family>
</os>
</activation>
<properties>
<envClassifier>win</envClassifier>
</properties>
</profile>
<profile>
<id>linux</id>
<activation>
<os>
<family>unix</family>
</os>
</activation>

Maven: The Complete Reference 87 / 316
<properties>
<envClassifier>linux</envClassifier>
</properties>
</profile>
</profiles>
</project>
In this pom.xml, each profile doesn’t need to include a build element to configure the Jar plugin. Instead,
each profile is activated by the Operating System family and sets the envClassifier property to either
win or linux. This envClassifier is then referenced in the default pom.xml build element to add
a classifier to the project’s JAR artifact. The JAR artifact will be named ${finalName}-${envClassifier}.jar
and included as a dependency using the following dependency syntax:
Depending on a Qualified Artifact
<dependency>
<groupId>com.mycompany</groupId>
<artifactId>my-project</artifactId>
<version>1.0</version>
<classifier>linux</classifier>
</dependency>
5.6 Summary
When used judiciously, profiles can make it very easy to customize a build for different platforms. If
something in your build needs to define a platform-specific path for something like an application server,
you can put these configuration points in a profile which is activated by an operating system parameter.
If you have a project which needs to produce different artifacts for different environments, you can cus-
tomize the build behavior for different environments and platforms via profile-specific plugin behavior.
Using profiles, builds can become portable, there is no need to rewrite your build logic to support a new
environment, just override the configuration that needs to change and share the configuration points which
can be shared.

Maven: The Complete Reference 88 / 316
Chapter 6
Running Maven
This chapter focuses on the various ways in which Maven can be customized at runtime. It also provides
some documentation of special features such as the ability to customize the behavior of the Maven Reactor
and how to use the Maven Help plugin to obtain information about plugins and plugin goals.
6.1 Maven Command Line Options
The following sections detail Maven’s command line options.
6.1.1 Defining Properties
To define a property use the following option on the command line:
-D, --define <arg>
Defines a system property
This is the option most frequently used to customized the behavior of Maven plugins. Some examples of
using the -D command line argument:

Maven: The Complete Reference 89 / 316
$ mvn help:describe -Dcmd=compiler:compile
$ mvn install -Dmaven.test.skip=true
Properties defined on the command line are also available as properties to be used in a Maven POM or
Maven Plugin. Form more information about referencing Maven properties, see Chapter 9.
Properties can also be used to activate build profiles. For more information about Maven build profiles,
see Chapter 5.
6.1.2 Getting Help
To list the available command line parameters, use the following command line option:
-h, --help
Display help information
Executing Maven with this option produces the following output:
$ mvn --help
usage: mvn [options] [<goal(s)>] [<phase(s)>]
Options:
-am,--also-makeIf project list is specified, also
build projects required by the
list
-amd,--also-make-dependentsIf project list is specified, also
build projects that depend on
projects on the list
-B,--batch-modeRun in non-interactive (batch)
mode
...
If you are looking for information about the goals and parameters available from a specific Maven plugin,
see Section 6.3.

Maven: The Complete Reference 90 / 316
6.1.3 Using Build Profiles
To activate one or more build profiles from the command line, use the following option:
-P, --activate-profiles <arg>
Comma-delimited list of profiles to activate
For more information about build profiles, see Chapter 5.
6.1.4 Displaying Version Information
To display Maven version information, use one of the following options on the command line:
-V, --show-version
Display version information WITHOUT stopping build
-v, --version
Display version information
Both of these options produce the same version information output, but the -v option will terminate the
Maven process after printing out the version. You would use the -V option if you wanted to have the
Maven version information present at the beginning of your build’s output. This can come in handy if you
are running Maven in a continuous build environment and you need to know what version of Maven was
used for a particular build.
Maven Version Information
$ mvn -v
Apache Maven 2.2.1 (r801777; 2009-08-06 14:16:01-0500)
Java version: 1.6.0_15
Java home: /System/Library/Frameworks/JavaVM.framework/Versions/1.6.0/Home
Default locale: en_US, platform encoding: MacRoman
OS name: "mac os x" version: "10.6.1" arch: "x86_64" Family: "mac"

Maven: The Complete Reference 91 / 316
6.1.5 Running in Offline Mode
If you ever need to use Maven without having access to a network, you should use the following option
to prevent any attempt to check for updates to plugins or dependencies over a network:
-o, --offline
Work offline
When running with the offline option enabled, Maven will not attempt to connect to a remote repository
to retrieve artifacts.
6.1.6 Using a Custom POM or Custom Settings File
If you don’t like the pom.xml file name, the location of your user-specific Maven settings, or the default
location of your global settings file, you can customize any of these things with the following options:
-f, --file <file>
Forces the use of an alternate POM file
-s,--settings <arg>
Alternate path for the user settings file
-gs, --global-settings <file>
Alternate path for the global settings file
6.1.7 Encrypting Passwords
The following commands allow you to use Maven to encrypt passwords for storage in a Maven settings
file:
-emp, --encrypt-master-password <password>
Encrypt master security password
-ep, --encrypt-password <password>
Encrypt server password

Maven: The Complete Reference 92 / 316
Encrypting passwords is documented in Section 15.2.11.
6.1.8 Dealing with Failure
The following options control how Maven reacts to a build failure in the middle of a multi-module project
build:
-fae, --fail-at-end
Only fail the build afterwards; allow all non-impacted builds to continue
-ff, --fail-fast
Stop at first failure in reactorized builds
-fn, --fail-never
NEVER fail the build, regardless of project result
The -fn and -fae options are useful options for multi-module builds that are running within a continu-
ous integration tool like Hudson. The -ff option is very useful for developers running interactive builds
who want to have rapid feedback during the development cycle.
6.1.9 Controlling Maven’s Verbosity
If you want to control Maven’s logging level, you can use one of the following three command line
options:
-e, --errors
Produce execution error messages
-X, --debug
Produce execution debug output
-q, --quiet
Quiet output - only show errors
The -q option only prints a message to the output if there is an error or a problem.

Maven: The Complete Reference 93 / 316
The -X option will print an overwhelming amount of debugging log messages to the output. This option is
primarily used by Maven developers and by Maven plugin developers to diagnose problems with Maven
code during development. This -X option is also very useful if you are attempting to diagnose a difficult
problem with a dependency or a classpath.
The -e option will come in handy if you are a Maven developer, or if you need to diagnose an error in a
Maven plugin. If you are reporting an unexpected problem with Maven or a Maven plugin, you will want
to pass both the -X and -e options to your Maven process.
6.1.10 Running Maven in Batch Mode
To run Maven in batch mode use the following option:
-B, --batch-mode
Run in non-interactive (batch) mode
Batch mode is essential if you need to run Maven in a non-interactive, continuous integration environment.
When running in non-interactive mode, Maven will never stop to accept input from the user. Instead, it
will use sensible default values when it requires input.
6.1.11 Downloading and Verifying Dependencies
The following command line options affect the way that Maven will interact with remote repositories and
how it verifies downloaded artifacts:
-C, --strict-checksums
Fail the build if checksums don’t match
-c, --lax-checksums
Warn if checksums don’t match
-U, --update-snapshots
Forces a check for updated releases and snapshots on remote repositories
If you are concerned about security, you will want to run Maven with the -C option. Maven repositories
maintain an MD5 and SHA1 checksum for every artifact stored in a repository. Maven is configured to

Maven: The Complete Reference 94 / 316
warn the end-user if an artifact’s checksum doesn’t match the downloaded artifact. Passing in the -C
option will cause Maven to fail the build if it encounters an artifact with a bad checksum.
The -U option is useful if you want to make sure that Maven is checking for the latest versions of all
SNAPSHOT dependencies.
6.1.12 Non-recursive Builds
There will be times when you simply want to run a Maven build without having Maven descend into all
of a project’s submodules. You can do this by using the following command line option:
-N, --non-recursive
Prevents Maven from building submodules. Only builds the project contained in the current direc-
tory.
Running this will only cause Maven to execute a goal or step through the lifecycle for the project in the
current directory. Maven will not attempt to build all of the projects in a multi-module project when you
use the -N command line option.
6.2 Using Advanced Reactor Options
Starting with the Maven 2.1 release, there are new Maven command line options which allow you to
manipulate the way that Maven will build multimodule projects. These new options are:
-rf, --resume-from
Resume reactor from specified project
-pl, --projects
Build specified reactor projects instead of all projects
-am, --also-make
If project list is specified, also build projects required by the list
-amd, --also-make-dependents
If project list is specified, also build projects that depend on projects on the list
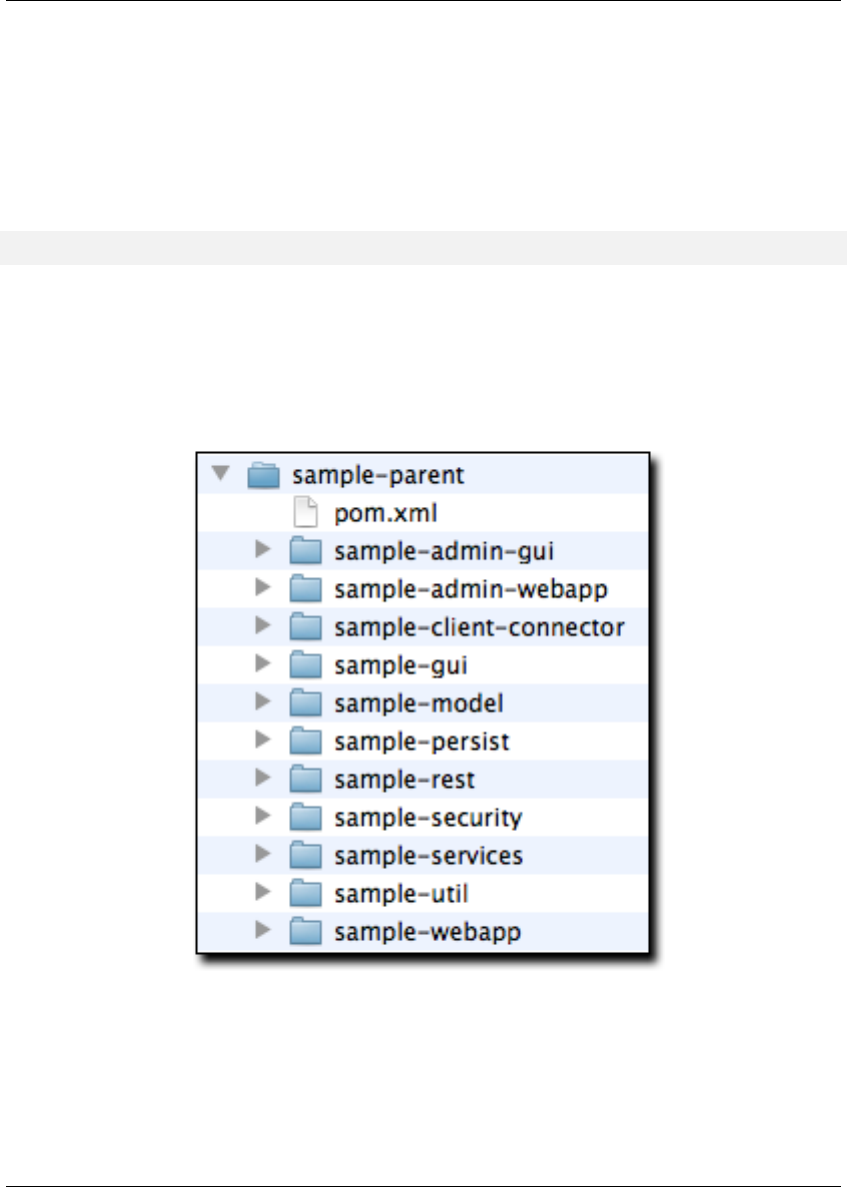
Maven: The Complete Reference 95 / 316
6.2.1 Advanced Reactor Options Example Project
The example in this section is a skeleton of a complex multimodule project that is used to illustrate the
advanced reactor options. While it is possible to read this section without the example code, you might
want to download the example code and follow along, experimenting with the various options as you
learn how to use the advanced reactor options. This section’s example project may be downloaded with
the book’s example code at:
http://www.sonatype.com/books/mvnref-book/mvnref-examples.zip
Unzip this archive in any directory, and then go to the ch-running/ directory. There you will see a direc-
tory named sample-parent/. All of the examples in this section will be executed from the examples/ch-
running/sample-parent/ directory in the examples distribution. The sample-parent/ directory contains the
multimodule project structure shown in Figure 6.1.
Figure 6.1: Directory Structure of Sample Multi-module Project
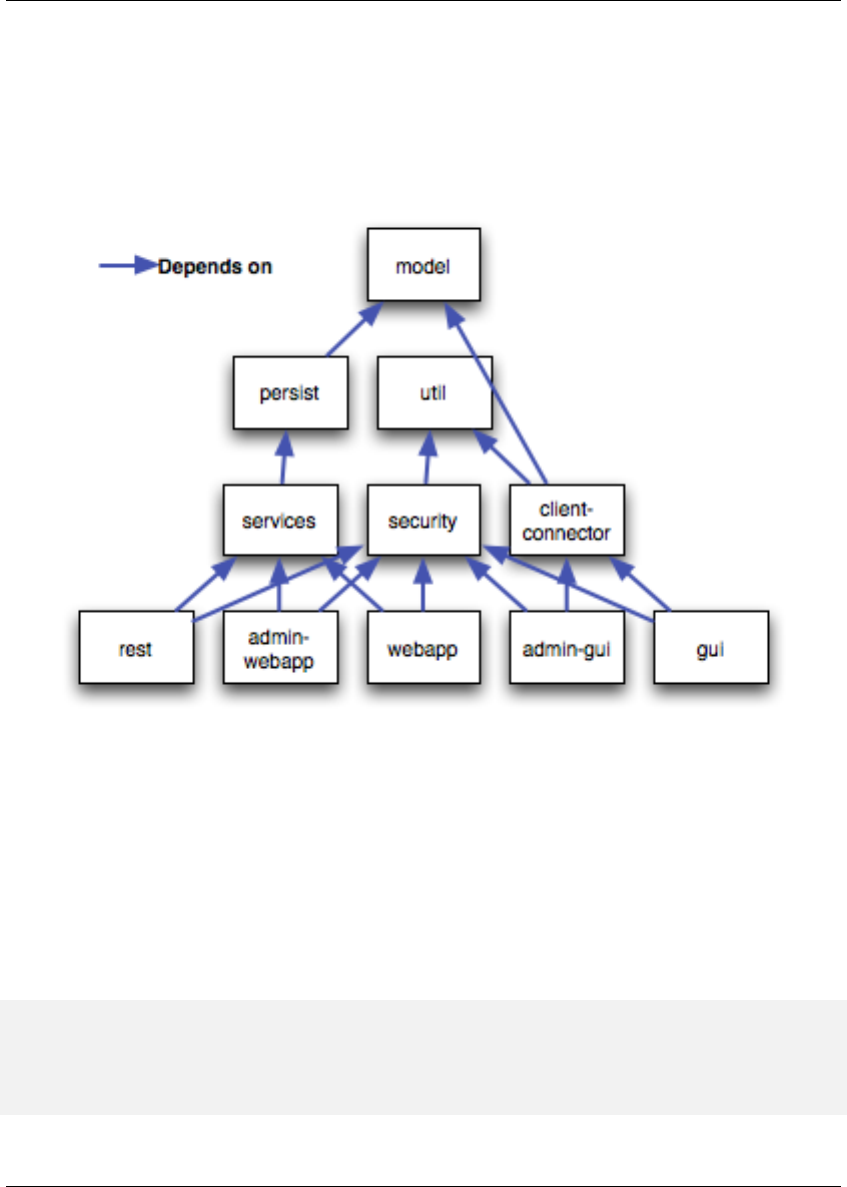
Maven: The Complete Reference 96 / 316
This project approximates the structure of a real-world enterprise project: the sample-model project
contains a set of foundational model objects used throughout the system, the sample-util project
would contain utility code, the sample-persist project would contain logic that deals with persisting
objects to a database, and the other projects would all be combined to produce the various GUI and Web-
based interfaces that comprise a very complex system. Figure 6.2 captures the dependencies between
each of these sample modules.
Figure 6.2: Dependencies within Sample Multi-module Project
If you go into the sample-parent/ project directory and run mvn clean, you will see that the Maven
Reactor reads all of the project dependencies and comes up with the following build order for these
projects as shown in Order of Project Builds in Maven Reactor.
Order of Project Builds in Maven Reactor
[INFO] Reactor build order:
[INFO] sample-parent
[INFO] sample-model
[INFO] sample-persist
[INFO] sample-services

Maven: The Complete Reference 97 / 316
[INFO] sample-util
[INFO] sample-security
[INFO] sample-admin-webapp
[INFO] sample-webapp
[INFO] sample-rest
[INFO] sample-client-connector
[INFO] sample-gui
[INFO] sample-admin-gui
6.2.2 Resuming Builds
The -rf or --resume-from option can come in handy if you want to tell the Maven Reactor to resume
a build from a particular project. This can be useful if you are working with a large multimodule project
and you want to restart a build at a particular project in the Reactor without running through all of the
projects that precede it in the build order.
Assume that you are working on the multi-module project with the build order shown in Order of Project
Builds in Maven Reactor and that your build ran successfully up until Maven encountered a failing unit
test in sample-client-connector. With the -rf option, you can fix the unit test in simple-cli
ent-connector and then run mvn -rf sample-client-connect from the sample-parent/ di-
rectory to resume the build with the final three projects.
$ mvn --resume-from sample-client-connector install
[INFO] Scanning for projects...
[INFO] Reactor build order:
[INFO] sample-client-connector
[INFO] sample-gui
[INFO] sample-admin-gui
...
6.2.3 Specifying a Subset of Projects
The -pl or --projects option allows you to select a list of projects from a multimodule project. This
option can be useful if you are working on a specific set of projects, and you’d rather not wait for a full
build of a multi-module project during a development cycle.
Assume that you are working on the multi-module project with the build order shown in Order of Project
Builds in Maven Reactor and that you are a developer focused on the sample-rest and sample-

Maven: The Complete Reference 98 / 316
client-connector projects. If you only wanted Maven to build the sample-rest and sample-
client-connector project, you would use the following syntax from the sample-parent/ directory:
$ mvn --projects sample-client-connector,sample-rest install
[INFO] Scanning for projects...
[INFO] Reactor build order:
[INFO] sample-rest
[INFO] sample-client-connector
6.2.4 Making a Subset of Projects
If you wanted to run a portion of the larger build, you would use the -pl or --projects option with
the -am or --also-make option. When you specify a project with the -am option, Maven will
build all of the projects that the specified project depends upon (either directly or indirectly). Maven will
examine the list of projects and walk down the dependency tree, finding all of the projects that it needs to
build.
If you are working on the multi-module project with the build order shown in Order of Project Builds in
Maven Reactor and you were only interested in working on the sample-services project, you would
run mvn -pl simple-services -am to build only those projects
$ mvn --projects sample-services --also-make install
[INFO] Scanning for projects...
[INFO] Reactor build order:
[INFO] sample-parent
[INFO] sample-model
[INFO] sample-persist
[INFO] sample-services
6.2.5 Making Project Dependents
While the -am command makes all of the projects required by a particular project in a multi-module
build, the -amd or --also-make-dependents option configures Maven to build a project and any
project that depends on that project. When using --also-make-dependents, Maven will examine
all of the projects in our reactor to find projects that depend on a particular project. It will automatically
build those projects and nothing else.
If you are working on the multi-module project with the build order shown in Order of Project Builds in
Maven Reactor and you wanted to make sure that your changes to sample-services did not introduce

Maven: The Complete Reference 99 / 316
any errors into the projects that directly or indirectly depend on sample-services, you would run
the following command:
$ mvn --projects sample-services --also-make-dependents install
[INFO] Scanning for projects...
[INFO] Reactor build order:
[INFO] sample-services
[INFO] sample-admin-webapp
[INFO] sample-webapp
[INFO] sample-rest
6.2.6 Resuming a "make" build
When using --also-make, Maven will execute a subset of the larger build as shown in Section 6.2.4.
Combining --project,--also-make, and --resume-from provides you with the ability to refine
your build even further. The -rf or --resume-from resumes the build from a specific point in the
Reactor build order.
$ mvn --projects sample-webapp --also-make \
--resume-from sample-services install
[INFO] Scanning for projects...
[INFO] Reactor build order:
[INFO] sample-services
[INFO] sample-util
[INFO] sample-security
[INFO] sample-webapp
In this example, the build is resumed from sample-services which omits the sample-persist
and sample-model projects from the build. If you are focused on individual components and you
need to accelerate your build times, using these advanced reactor options together is a great way to skip
portions of your large multi-module project build. The --resume-from argument also works with --
also-make-dependents.
6.3 Using the Maven Help Plugin
Throughout this book, we introduce Maven plugins, talking about Maven Project Object Model (POM)
files, settings files, and profiles. There are going to be times when you need a tool to help you make sense
of some of the models that Maven is using and what goals are available on a specific plugin. The Maven

Maven: The Complete Reference 100 / 316
Help plugin allows you to list active Maven profiles, display an effective POM, print the effective settings,
or list the attributes of a Maven plugin.
The Maven Help plugin has four goals. The first three goals — active-profiles,effective-
pom, and effective-settings — describe a particular project and must be run in the base directory
of a project. The last goal — describe — is slightly more complex, showing you information about a
plugin or a plugin goal. The following commands provide some general information about the four goals:
help:active-profiles
Lists the profiles (project, user, global) which are active for the build.
help:effective-pom
Displays the effective POM for the current build, with the active profiles factored in.
help:effective-settings
Prints out the calculated settings for the project, given any profile enhancement and the inheritance
of the global settings into the user-level settings.
help:describe
Describes the attributes of a plugin. This need not run under an existing project directory. You must
at least give the groupId and artifactId of the plugin you wish to describe.
6.3.1 Describing a Maven Plugin
Once you start using Maven, you’ll spend most of your time trying to get more information about Maven
Plugins: How do plugins work? What are the configuration parameters? What are the goals? The help:
describe goal is something you’ll be using very frequently to retrieve this information. With the
plugin parameter you can specify a plugin you wish to investigate, passing in either the plugin prefix
(e.g. maven-help-plugin as help) or the groupId:artifact[:version], where version
is optional. For example, the following command uses the Help plugin’s describe goal to print out
information about the Maven Help plugin.
$ mvn help:describe -Dplugin=help
...
Group Id: org.apache.maven.plugins
Artifact Id: maven-help-plugin
Version: 2.0.1
Goal Prefix: help
Description:
The Maven Help plugin provides goals aimed at helping to make sense
out of the build environment. It includes the ability to view the
effective POM and settings files, after inheritance and active

Maven: The Complete Reference 101 / 316
profiles have been applied, as well as a describe a particular plugin
goal to give usage information. ...
Executing the describe goal with the plugin parameter printed out the Maven coordinates for the
plugin, the goal prefix, and a brief description of the plugin. While this information is helpful, you’ll
usually be looking for more detail than this. If you want the Help plugin to print a full list of goals with
parameters, execute the help:describe goal with the parameter full as follows:
$ mvn help:describe -Dplugin=help -Dfull
...
Group Id: org.apache.maven.plugins
Artifact Id: maven-help-plugin
Version: 2.0.1
Goal Prefix: help
Description:
The Maven Help plugin provides goals aimed at helping to make sense
out of the build environment. It includes the ability to view the
effective POM and settings files, after inheritance and active
profiles have been applied, as well as a describe a particular plugin
goal to give usage information.
Mojos:
Goal: ’active-profiles’
Description:
Lists the profiles which are currently active for this build.
Implementation: org.apache.maven.plugins.help.ActiveProfilesMojo
Language: java
Parameters:
[0] Name: output
Type: java.io.File
Required: false
Directly editable: true
Description:
This is an optional parameter for a file destination for the output of
this mojo...the listing of active profiles per project.
[1] Name: projects
Type: java.util.List
Required: true
Directly editable: false

Maven: The Complete Reference 102 / 316
Description:
This is the list of projects currently slated to be built by Maven.
This mojo doesn’t have any component requirements.
... removed the other goals ...
This option is great for discovering all of a plugin’s goals as well as their parameters. But sometimes this
is far more information than necessary. To get information about a single goal, set the mojo parameter as
well as the plugin parameter. The following command lists all of the information about the Compiler
plugin’s compile goal.
$ mvn help:describe -Dplugin=compiler -Dmojo=compile -Dfull

Maven: The Complete Reference 103 / 316
Chapter 7
Maven Configuration
7.1 Configuring Maven Plugins
To customize the behavior of a Maven Plugin, you will need to configure the plugin in a project’s POM.
The following sections outline the various methods available for customizing a Maven plugin’s configu-
ration.
7.1.1 Plugin Configuration Parameters
Maven plugins are configured using properties that are defined by goals within a plugin. If you look at a
goal like the compile goal in the Maven Compiler Plugin you will see a list of configuration parameters
like source,target,compilerArgument,fork,optimize, and many others. If you look at
the testCompile goal you will see a different list of configuration parameters for the testCompile
goal. If you are looking for details on the available plugin goal configuration parameters, you can use the
Maven Help Plugin to describe a particular plugin or a particular plugin goal.
To describe a particular plugin, use the help:describe goal from the command line as follows:
$ mvn help:describe -Dcmd=compiler:compile
[INFO] [help:describe {execution: default-cli}]
[INFO] ’compiler:compile’ is a plugin goal (aka mojo).
Mojo: ’compiler:compile’

Maven: The Complete Reference 104 / 316
compiler:compile
Description: Compiles application sources
Deprecated. No reason given
For more information about the available configuration parameters, run the same command with the -
Ddetail argument:
$ mvn help:describe -Dcmd=compiler:compile -Ddetail
[INFO] [help:describe {execution: default-cli}]
[INFO] ’compiler:compile’ is a plugin goal (aka mojo).
Mojo: ’compiler:compile’
compiler:compile
Description: Compiles application sources
Deprecated. No reason given
Implementation: org.apache.maven.plugin.CompilerMojo
Language: java
Bound to phase: compile
Available parameters:
compilerArgument
Sets the unformatted argument string to be passed to the compiler if fork
is set to true.
This is because the list of valid arguments passed to a Java compiler
varies based on the compiler version.
Deprecated. No reason given
compilerArguments
Sets the arguments to be passed to the compiler (prepending a dash) if
fork is set to true.
This is because the list of valid arguments passed to a Java compiler
varies based on the compiler version.
Deprecated. No reason given
compilerId (Default: javac)
The compiler id of the compiler to use. See this guide for more
information.
Deprecated. No reason given
compilerVersion
Version of the compiler to use, ex. ’1.3’, ’1.5’, if fork is set to true.
Deprecated. No reason given
debug (Default: true)
Set to true to include debugging information in the compiled class files.
Deprecated. No reason given

Maven: The Complete Reference 105 / 316
encoding
The -encoding argument for the Java compiler.
Deprecated. No reason given
excludes
A list of exclusion filters for the compiler.
Deprecated. No reason given
executable
Sets the executable of the compiler to use when fork is true.
Deprecated. No reason given
failOnError (Default: true)
Indicates whether the build will continue even if there are compilation
errors; defaults to true.
Deprecated. No reason given
fork (Default: false)
Allows running the compiler in a separate process. If ’false’ it uses the
built in compiler, while if ’true’ it will use an executable.
Deprecated. No reason given
includes
A list of inclusion filters for the compiler.
Deprecated. No reason given
maxmem
Sets the maximum size, in megabytes, of the memory allocation pool, ex.
’128’, ’128m’ if fork is set to true.
Deprecated. No reason given
meminitial
Initial size, in megabytes, of the memory allocation pool, ex. ’64’,
’64m’ if fork is set to true.
Deprecated. No reason given
optimize (Default: false)
Set to true to optimize the compiled code using the compiler’s
optimization methods.
Deprecated. No reason given
outputFileName
Sets the name of the output file when compiling a set of sources to a
single file.
Deprecated. No reason given
showDeprecation (Default: false)
Sets whether to show source locations where deprecated APIs are used.

Maven: The Complete Reference 106 / 316
Deprecated. No reason given
showWarnings (Default: false)
Set to true to show compilation warnings.
Deprecated. No reason given
source
The -source argument for the Java compiler.
Deprecated. No reason given
staleMillis (Default: 0)
Sets the granularity in milliseconds of the last modification date for
testing whether a source needs recompilation.
Deprecated. No reason given
target
The -target argument for the Java compiler.
Deprecated. No reason given
verbose (Default: false)
Set to true to show messages about what the compiler is doing.
Deprecated. No reason given
If you need to get a list of plugin goals which are contained in a plugin, you can run the help:describe
goal and pass in the plugin parameter. The plugin parameter accepts a plugin prefix or a groupId and
an artifactId for a plugin as shown in the following examples:
$ mvn help:describe -Dplugin=compiler
[INFO] [help:describe {execution: default-cli}]
[INFO] org.apache.maven.plugins:maven-compiler-plugin:2.0.2
Name: Maven Compiler Plugin
Description: Maven Plugins
Group Id: org.apache.maven.plugins
Artifact Id: maven-compiler-plugin
Version: 2.0.2
Goal Prefix: compiler
This plugin has 2 goals:
compiler:compile
Description: Compiles application sources
Deprecated. No reason given
compiler:testCompile
Description: Compiles application test sources
Deprecated. No reason given

Maven: The Complete Reference 107 / 316
You can use the groupId and the artifactId of the plugin and get the same list of plugin goals.
$ mvn help:describe -Dplugin=org.apache.maven.plugins:maven-compiler- ←-
plugin
Passing the -Ddetail argument to the help:describe goal with the plugin parameter will cause
Maven to print out all of the goals and all of the goal parameters for the entire plugin.
7.1.2 Adding Plugin Dependencies
If you need to configure a plugin to use specific versions of dependencies, you can define these depen-
dencies under a dependencies element under plugin. When the plugin executes, it will execute with a
classpath that contains these dependencies. Adding Dependencies to a Plugin is an example of a plugin
configuration that overrides default dependency versions and adds new dependencies to facilitate goal
execution.
Adding Dependencies to a Plugin
<plugin>
<groupId>com.agilejava.docbkx</groupId>
<artifactId>docbkx-maven-plugin</artifactId>
<version>2.0.9</version>
<dependencies>
<dependency>
<groupId>docbook</groupId>
<artifactId>docbook-xml</artifactId>
<version>4.5</version>
</dependency>
<dependency>
<groupId>org.apache.fop</groupId>
<artifactId>fop-pdf-images</artifactId>
<version>1.3</version>
</dependency>
<dependency>
<groupId>org.apache.fop</groupId>
<artifactId>fop-pdf-images-res</artifactId>
<version>1.3</version>
<classifier>res</classifier>
</dependency>
<dependency>
<groupId>pdfbox</groupId>
<artifactId>pdfbox</artifactId>
<version>0.7.4-dev</version>
<classifier>dev</classifier>

Maven: The Complete Reference 108 / 316
</dependency>
</dependencies>
</plugin>
7.1.3 Setting Global Plugin Parameters
To set a value for a plugin configuration parameter in a particular project, use the XML shown in Con-
figuring a Maven Plugin. Unless this configuration is overridden by a more specific plugin parameter
configuration, Maven will use the values defined directly under the plugin element for all goals which
are executed in this plugin.
Configuring a Maven Plugin
<plugin>
<groupId>org.apache.maven.plugins</groupId>
<artifactId>maven-compiler-plugin</artifactId>
<configuration>
<source>1.5</source>
<target>1.5</target>
</configuration>
</plugin>
7.1.4 Setting Execution Specific Parameters
You can configure plugin parameters for specific executions of a plugin goal. Setting Configuration
Parameters in an Execution shows an example of configuration parameters being passed to the execution
of the run goal of the AntRun plugin during the validate phase. This specific execution will inherit the
configuration parameters from the plugin’s configuration element and merge them with the values defined
for this particular execution.
Setting Configuration Parameters in an Execution
<plugin>
<artifactId>maven-antrun-plugin</artifactId>
<executions>
<execution>
<phase>validate</phase>
<goals>
<goal>run</goal>

Maven: The Complete Reference 109 / 316
</goals>
<configuration>
<tasks>
<echo>${PATH}=${env.PATH}</echo>
<echo>User’s Home Directory: ${user.home}</echo>
<echo>Project’s Base Director: ${basedir}</echo>
</tasks>
</configuration>
</execution>
</executions>
</plugin>
7.1.5 Setting Default Command Line Execution Parameters
Starting with Maven 2.2.0, you can now supply configuration parameters for goals which are executed
from the command-line. To do this, use the special execution id value of "default-cli". Configuring Plugin
Parameters for Command Line Execution shows an example that binds the single goal to the package
phase of the lifecycle which produces a binary distribution. This example also configures the default-
cli execution for the assembly plugin to use the jar-with-dependencies assembly descriptor.
The bin.xml descriptor will be used during the lifecycle, and jar-with-dependencies will be used
when you execute mvn assembly:assembly from the command line.
Configuring Plugin Parameters for Command Line Execution
<plugin>
<artifactId>maven-assembly-plugin</artifactId>
<configuration>
<appendAssemblyId>false</appendAssemblyId>
</configuration>
<executions>
<execution>
<id>assemble-binary</id>
<phase>package</phase>
<goals>
<goal>single</goal>
</goals>
<configuration>
<descriptors>
<descriptor>src/main/assembly/bin.xml</descriptor>
</descriptors>
</configuration>
</execution>
<execution>
<id>default-cli</id>

Maven: The Complete Reference 110 / 316
<configuration>
<descriptorRefs>
<descriptorRef>jar-with-dependencies</descriptorRef>
</descriptorRefs>
</configuration>
</execution>
</executions>
</plugin>
7.1.6 Setting Parameters for Goals Bound to Default Lifecycle
Starting with Maven 2.2.0, if you need to customize the behavior of a goal which is already bound to the
default lifecycle, you can use the execution id "default-<goal>". You can customize the behavior of the
Jar plugin’s jar goal which is bound to the package phase in the default lifecycle, and you can customize
the configuration parameters of a separate goal execution if you follow the example shown in Setting a
Parameter for a Default Goal Execution.
Setting a Parameter for a Default Goal Execution
<plugin>
<artifactId>maven-jar-plugin</artifactId>
<executions>
<execution>
<id>default-jar</id>
<configuration>
<excludes>
<exclude>**/somepackage/*</exclude>
</excludes>
</configuration>
</execution>
<execution>
<id>special-jar</id>
<phase>package</phase>
<goals>
<goal>jar</goal>
</goals>
<configuration>
<includes>
<include>**/sompackage/*</include>
</includes>
<classifier>somepackage</classifier>
</configuration>
</execution>
</executions>

Maven: The Complete Reference 111 / 316
</plugin>
In this example, the default jar goal is customized to exclude contents in a specific package. Another jar
goal is bound to the package phase to create a JAR file which contains only the contents of a particular
package in a classified JAR file.
Configuring the default goal execution parameters can also come in handy if you need to configure two
goals bound to the default lifecycle with separate settings for the same configuration parameter. Set-
ting Two Default Goal Plugin Configuration Parameters shows an example that configures the default re-
sources:resources goal to exclude empty directories while configuring the default resources:testResources
goal to include empty directories.
Setting Two Default Goal Plugin Configuration Parameters
<plugin>
<artifactId>maven-resources-plugin</artifactId>
<executions>
<execution>
<id>default-resources</id>
<configuration>
<includeEmptyDirs>false</includeEmptyDirs>
</configuration>
</execution>
<execution>
<id>default-testResources</id>
<configuration>
<includeEmptyDirs>true</includeEmptyDirs>
</configuration>
</execution>
</executions>
</plugin>

Maven: The Complete Reference 112 / 316
Chapter 8
Maven Assemblies
8.1 Introduction
Maven provides plugins that are used to create the most common archive types, most of which are con-
sumable as dependencies of other projects. Some examples include the JAR, WAR, EJB, and EAR plug-
ins. As discussed in Chapter 4these plugins correspond to different project packaging types each with a
slightly different build process. While Maven has plugins and customized lifecycles to support standard
packaging types, there are times when you’ll need to create an archive or directory with a custom layout.
Such custom archives are called Maven Assemblies.
There are any number of reasons why you may want to build custom archives for your project. Perhaps
the most common is the project distribution. The word ‘distribution’ means many different things to
different people (and projects), depending on how the project is meant to be used. Essentially, these
are archives that provide a convenient way for users to install or otherwise make use of the project’s
releases. In some cases, this may mean bundling a web application with an application server like Jetty.
In others, it could mean bundling API documentation alongside source and compiled binaries like jar
files. Assemblies usually come in handy when you are building the final distribution of a product. For
example, products like Nexus introduced in Repository Management with Nexus, are the product of large
multi-module Maven products, and the final archive you download from Sonatype was created using a
Maven Assembly.
In most cases, the Assembly plugin is ideally suited to the process of building project distributions. How-
ever, assemblies don’t have to be distribution archives; assemblies are intended to provide Maven users

Maven: The Complete Reference 113 / 316
with the flexibility they need to produce customized archives of all kinds. Essentially, assemblies are in-
tended to fill the gaps between the standard archive formats provided by project package types. Of course,
you could write an entire Maven plugin simply to generate your own custom archive format, along with
a new lifecycle mapping and artifact-handling configuration to tell Maven how to deploy it. But the As-
sembly plugin makes this unnecessary in most cases by providing generalized support for creating your
own archive recipe without spending so much time writing Maven code.
8.2 Assembly Basics
Before we go any further, it’s best to take a minute and talk about the two main goals in the Assembly
plugin: assembly:assembly, and the single mojo. I list these two goals in different ways because
it reflects the difference in how they’re used. The assembly:assembly goal is designed to be invoked
directly from the command line, and should never be bound to a build lifecycle phase. In contrast, the
single mojo is designed to be a part of your everyday build, and should be bound to a phase in your
project’s build lifecycle.
The main reason for this difference is that the assembly:assembly goal is what Maven terms an
aggregator mojo; that is, a mojo which is designed to run at most once in a build, regardless of how many
projects are being built. It draws its configuration from the root project - usually the top-level POM or
the command line. When bound to a lifecycle, an aggregator mojo can have some nasty side-effects. It
can force the execution of the package lifecycle phase to execute ahead of time, and can result in builds
which end up executing the package phase twice.
Because the assembly:assembly goal is an aggregator mojo, it raises some issues in multi-module
Maven builds, and it should only be called as a stand-alone mojo from the command-line. Never bind an
assembly:assembly execution to a lifecycle phase. assembly:assembly was the original goal
in the Assembly plugin, and was never designed to be part of the standard build process for a project. As
it became clear that assembly archives were a legitimate requirement for projects to produce, the single
mojo was developed. This mojo assumes that it has been bound to the correct part of the build process, so
that it will have access to the project files and artifacts it needs to execute within the lifecycle of a large
multi-module Maven project. In a multi-module environment, it will execute as many times as it is bound
to the different module POMs. Unlike assembly:assembly,single will never force the execution
of another lifecycle phase ahead of itself.
The Assembly plugin provides several other goals in addition to these two. However, discussion of these
other mojos is beyond the scope of this chapter, because they serve exotic or obsolete use cases, and
because they are almost never needed. Whenever possible, you should definitely stick to using assem
bly:assembly for assemblies generated from the command line, and to single for assemblies bound
to lifecycle phases.

Maven: The Complete Reference 114 / 316
8.2.1 Predefined Assembly Descriptors
While many people opt to create their own archive recipes - called assembly descriptors - this isn’t strictly
necessary. The Assembly plugin provides built-in descriptors for several common archive types that you
can use immediately without writing a line of configuration. The following assembly descriptors are
predefined in the Maven Assembly plugin:
bin
The bin descriptor is used to bundle project LICENSE,README, and NOTICE files with the
project’s main artifact, assuming this project builds a jar as its main artifact. Think of this as the
smallest possible binary distribution for completely self-contained projects.
jar-with-dependencies
The jar-with-dependencies descriptor builds a JAR archive with the contents of the main
project jar along with the unpacked contents of all the project’s runtime dependencies. Coupled
with an appropriate Main-Class Manifest entry (discussed in “Plugin Configuration” below),
this descriptor can produce a self-contained, executable jar for your project, even if the project has
dependencies.
project
The project descriptor simply archives the project directory structure as it exists in your file-
system and, most likely, in your version control system. Of course, the target directory is omitted,
as are any version-control metadata files like the CVS and .svn directories we’re all used to seeing.
Basically, the point of this descriptor is to create a project archive that, when unpacked, can be built
using Maven.
src
The src descriptor produces an archive of your project source and pom.xml files, along with any
LICENSE,README, and NOTICE files that are in the project’s root directory. This precursor to the
project descriptor produces an archive that can be built by Maven in most cases. However, because
of its assumption that all source files and resources reside in the standard src directory, it has the
potential to leave out non-standard directories and files that are nonetheless critical to some builds.
8.2.2 Building an Assembly
The Assembly plugin can be executed in two ways: you can invoke it directly from the command line, or
you can configure it as part of your standard build process by binding it to a phase of your project’s build
lifecycle. Direct invocation has its uses, particularly for one-off assemblies that are not considered part of
your project’s core deliverables. In most cases, you’ll probably want to generate the assemblies for your
project as part of its standard build process. Doing this has the effect of including your custom assemblies

Maven: The Complete Reference 115 / 316
whenever the project is installed or deployed into Maven’s repositories, so they are always available to
your users.
As an example of the direct invocation of the Assembly plugin, imagine that you wanted to ship off a
copy of your project which people could build from source. Instead of just deploying the end-product of
the build, you wanted to include the source as well. You won’t need to do this often, so it doesn’t make
sense to add the configuration to your POM. Instead, you can use the following command:
$ mvn -DdescriptorId=project assembly:single
...
[INFO] [assembly:single]
[INFO] Building tar : /Users/~/mvn-examples-1.0/assemblies/direct- ←-
invocation/\
target/direct-invocation-1.0-SNAPSHOT-project.tar.gz
[INFO] Building tar : /Users/~/mvn-examples-1.0/assemblies/direct- ←-
invocation/\
target/direct-invocation-1.0-SNAPSHOT-project.tar.bz2
[INFO] Building zip: /Users/~/mvn-examples-1.0/assemblies/direct- ←-
invocation/\
target/direct-invocation-1.0-SNAPSHOT-project.zip
...
Imagine you want to produce an executable JAR from your project. If your project is totally self-contained
with no dependencies, this can be achieved with the main project artifact using the archive configuration of
the JAR plugin. However, most projects have dependencies, and those dependencies must be incorporated
in any executable JAR. In this case, you want to make sure that every time the main project JAR is installed
or deployed, your executable JAR goes along with it.
Assuming the main class for the project is org.sonatype.mavenbook.App, the following POM
configuration will create an executable JAR:
Assembly Descriptor for Executable JAR
<project xmlns="http://maven.apache.org/POM/4.0.0"
xmlns:xsi="http://www.w3.org/2001/XMLSchema-instance"
xsi:schemaLocation="http://maven.apache.org/POM/4.0.0
http://maven.apache.org/maven-v4_0_0.xsd">
<modelVersion>4.0.0</modelVersion>
<groupId>org.sonatype.mavenbook.assemblies</groupId>
<artifactId>executable-jar</artifactId>
<version>1.0-SNAPSHOT</version>
<packaging>jar</packaging>
<name>Assemblies Executable Jar Example</name>
<url>http://sonatype.com/book</url>
<dependencies>

Maven: The Complete Reference 116 / 316
<dependency>
<groupId>commons-lang</groupId>
<artifactId>commons-lang</artifactId>
<version>2.4</version>
</dependency>
</dependencies>
<build>
<plugins>
<plugin>
<artifactId>maven-assembly-plugin</artifactId>
<version>2.2-beta-2</version>
<executions>
<execution>
<id>create-executable-jar</id>
<phase>package</phase>
<goals>
<goal>single</goal>
</goals>
<configuration>
<descriptorRefs>
<descriptorRef>
jar-with-dependencies
</descriptorRef>
</descriptorRefs>
<archive>
<manifest>
<mainClass>org.sonatype.mavenbook.App ←-
</mainClass>
</manifest>
</archive>
</configuration>
</execution>
</executions>
</plugin>
</plugins>
</build>
</project>
There are two things to notice about the configuration above. First, we’re using the descriptorRefs
configuration section instead of the descriptorId parameter we used last time. This allows multiple
assembly types to be built from the same Assembly plugin execution, while still supporting our use case
with relatively little extra configuration. Second, the archive element under configuration sets
the Main-Class manifest attribute in the generated JAR. This section is commonly available in plugins
that create JAR files, such as the JAR plugin used for the default project package type.
Now, you can produce the executable JAR simply by executing mvn package. Afterward, we’ll also

Maven: The Complete Reference 117 / 316
get a directory listing for the target directory, just to verify that the executable JAR was generated. Finally,
just to prove that we actually do have an executable JAR, we’ll try executing it:
$ mvn package
... (output omitted) ...
[INFO] [jar:jar]
[INFO] Building jar: ~/mvn-examples-1.0/assemblies/executable-jar/target/\
executable-jar-1.0-SNAPSHOT.jar
[INFO] [assembly:single {execution: create-executable-jar}]
[INFO] Processing DependencySet (output=)
[INFO] Building jar: ~/mvn-examples-1.0/assemblies/executable-jar/target/\
executable-jar-1.0-SNAPSHOT-jar-with-dependencies.jar
... (output omitted) ...
$ ls -1 target
... (output omitted) ...
executable-jar-1.0-SNAPSHOT-jar-with-dependencies.jar
executable-jar-1.0-SNAPSHOT.jar
... (output omitted) ...
$ java -jar \
target/executable-jar-1.0-SNAPSHOT-jar-with-dependencies.jar
Hello, World!
From the output shown above, you can see that the normal project build now produces a new artifact in
addition to the main JAR file. The new one has a classifier of jar-with-dependencies. Finally, we
verified that the new JAR actually is executable, and that executing the JAR produced the desired output
of “Hello, World!”
8.2.3 Assemblies as Dependencies
When you generate assemblies as part of your normal build process, those assembly archives will be
attached to your main project’s artifact. This means they will be installed and deployed alongside the main
artifact, and are then resolvable in much the same way. Each assembly artifact is given the same basic
coordinates (groupId,artifactId, and version) as the main project. However, these artifacts
are attachments, which in Maven means they are derivative works based on some aspect of the main
project build. To provide a couple of examples, source assemblies contain the raw inputs for the project
build, and jar-with-dependencies assemblies contain the project’s classes plus its dependencies.
Attached artifacts are allowed to circumvent the Maven requirement of one project, one artifact precisely
because of this derivative quality.
Since assemblies are (normally) attached artifacts, each must have a classifier to distinguish it from the
main artifact, in addition to the normal artifact coordinates. By default, the classifier is the same as the
assembly descriptor’s identifier. When using the built-in assembly descriptors, as above, the assembly

Maven: The Complete Reference 118 / 316
descriptor’s identifier is generally also the same as the identifier used in the descriptorRef for that
type of assembly.
Once you’ve deployed an assembly alongside your main project artifact, how can you use that assembly
as a dependency in another project? The answer is fairly straightforward. Projects depend on other
projects using a combination of four basic elements, referred to as a project’s coordinates: groupId,
artifactId,version, and packaging. In Section 5.5.3, multiple platform-specific variants of a
project’s artifact are available, and the project specifies a classifier element with a value of either
win or linux to select the appropriate dependency artifact for the target platform. Assembly artifacts
can be used as dependencies using the required coordinates of a project plus the classifier under which
the assembly was installed or deployed. If the assembly is not a JAR archive, we also need to declare its
type.
8.2.4 Assembling Assemblies via Assembly Dependencies
Configuring the project assembly in top-level POM
<project>
...
<build>
<pluginManagement>
<plugins>
<plugin>
<artifactId>maven-assembly-plugin</artifactId>
<version>2.2-beta-2</version>
<executions>
<execution>
<id>create-project-bundle</id>
<phase>package</phase>
<goals>
<goal>single</goal>
</goals>
<configuration>
<descriptorRefs>
<descriptorRef>project</descriptorRef>
</descriptorRefs>
</configuration>
</execution>
</executions>
</plugin>
</plugins>
</pluginManagement>
</build>
...

Maven: The Complete Reference 119 / 316
</project>
Each project POM references the managed plugin configuration from Configuring the project assembly in
top-level POM using a minimal plugin declaration in its build section shown in Activating the Assembly
Plugin Configuration in Child Projects.
Activating the Assembly Plugin Configuration in Child Projects
<build>
<plugins>
<plugin>
<artifactId>maven-assembly-plugin</artifactId>
</plugin>
</plugins>
</build>
To produce the set of project assemblies, run mvn install from the top-level directory. You should
see Maven installing artifacts with classifiers in your local repository.
$ mvn install
...
Installing ~/mvn-examples-1.0/assemblies/as-dependencies/project-parent/\
second-project/target/second-project-1.0-SNAPSHOT-project.tar.gz to
~/.m2/repository/org/sonatype/mavenbook/assemblies/second-project/1.0- ←-
SNAPSHOT/\
second-project-1.0-SNAPSHOT-project.tar.gz
...
Installing ~/mvn-examples-1.0/assemblies/as-dependencies/project-parent/\
second-project/target/second-project-1.0-SNAPSHOT-project.tar.bz2 to
~/.m2/repository/org/sonatype/mavenbook/assemblies/second-project/1.0- ←-
SNAPSHOT/\
second-project-1.0-SNAPSHOT-project.tar.bz2
...
Installing ~/mvn-examples-1.0/assemblies/as-dependencies/project-parent/\
second-project/target/second-project-1.0-SNAPSHOT-project.zip to
~/.m2/repository/org/sonatype/mavenbook/assemblies/second-project/1.0- ←-
SNAPSHOT/\\
second-project-1.0-SNAPSHOT-project.zip
...
When you run install, Maven will copy each project’s main artifact and each assembly to your local Maven
repository. All of these artifacts are now available for reference as dependencies in other projects locally.
If your ultimate goal is to create a bundle which includes assemblies from multiple projects, you can do so
by creating another project which will include other project’s assemblies as dependencies. This bundling

Maven: The Complete Reference 120 / 316
project (aptly named project-bundle) is responsible for creating the bundled assembly. The POM for the
bundling project would resemble the XML document listed in POM for the Assembly Bundling Project.
POM for the Assembly Bundling Project
<project xmlns="http://maven.apache.org/POM/4.0.0"
xmlns:xsi="http://www.w3.org/2001/XMLSchema-instance"
xsi:schemaLocation="http://maven.apache.org/POM/4.0.0
http://maven.apache.org/maven-v4_0_0.xsd">
<modelVersion>4.0.0</modelVersion>
<groupId>org.sonatype.mavenbook.assemblies</groupId>
<artifactId>project-bundle</artifactId>
<version>1.0-SNAPSHOT</version>
<packaging>pom</packaging>
<name>Assemblies-as-Dependencies Example Project Bundle</name>
<url>http://sonatype.com/book</url>
<dependencies>
<dependency>
<groupId>org.sonatype.mavenbook.assemblies</groupId>
<artifactId>first-project</artifactId>
<version>1.0-SNAPSHOT</version>
<classifier>project</classifier>
<type>zip</type>
</dependency>
<dependency>
<groupId>org.sonatype.mavenbook.assemblies</groupId>
<artifactId>second-project</artifactId>
<version>1.0-SNAPSHOT</version>
<classifier>project</classifier>
<type>zip</type>
</dependency>
</dependencies>
<build>
<plugins>
<plugin>
<artifactId>maven-assembly-plugin</artifactId>
<version>2.2-beta-2</version>
<executions>
<execution>
<id>bundle-project-sources</id>
<phase>package</phase>
<goals>
<goal>single</goal>
</goals>
<configuration>
<descriptorRefs>
<descriptorRef>
jar-with-dependencies
</descriptorRef>

Maven: The Complete Reference 121 / 316
</descriptorRefs>
</configuration>
</execution>
</executions>
</plugin>
</plugins>
</build>
</project>
This bundling project’s POM references the two assemblies from first-project and second-pro
ject. Instead of referencing the main artifact of each project, the bundling project’s POM specifies a
classifier of project and a type of zip. This tells Maven to resolve the ZIP archive which was created
by the project assembly. Note that the bundling project generates a jar-with-dependencies
assembly. jar-with-dependencies does not create a particularly elegant bundle, it simply creates
a JAR file with the unpacked contents of all of the dependencies. jar-with-dependencies is really
just telling Maven to take all of the dependencies, unpack them, and then create a single archive which
includes the output of the current project. In this project, it has the effect of creating a single JAR file that
puts the two project assemblies from first-project and second-project side-by-side.
This example illustrates how the basic capabilities of the Maven Assembly plugin can be combined with-
out the need for a custom assembly descriptor. It achieves the purpose of creating a single archive
that contains the project directories for multiple projects side-by-side. This time, the jar-with-
dependencies is just a storage format, so we don’t need to specify a Main-Class manifest attribute.
To build the bundle, we just build the project-bundle project normally:
$ mvn package
...
[INFO] [assembly:single {execution: bundle-project-sources}]
[INFO] Processing DependencySet (output=)
[INFO] Building jar: ~/downloads/mvn-examples-1.0/assemblies/as- ←-
dependencies/\
project-bundle/target/project-bundle-1.0-SNAPSHOT-jar-with-dependencies. ←-
jar
To verify that the project-bundle assembly contains the unpacked contents of the assembly dependencies,
run jar tf:
$ jar tf \
target/project-bundle-1.0-SNAPSHOT-jar-with-dependencies.jar
...
first-project-1.0-SNAPSHOT/pom.xml
first-project-1.0-SNAPSHOT/src/main/java/org/sonatype/mavenbook/App.java
first-project-1.0-SNAPSHOT/src/test/java/org/sonatype/mavenbook/AppTest. ←-
java
...

Maven: The Complete Reference 122 / 316
second-project-1.0-SNAPSHOT/pom.xml
second-project-1.0-SNAPSHOT/src/main/java/org/sonatype/mavenbook/App.java
second-project-1.0-SNAPSHOT/src/test/java/org/sonatype/mavenbook/AppTest. ←-
java
After reading this section, the title should make more sense. You’ve assembled assemblies from two
projects into an assembly using a bundling project which has a dependency on each of the assemblies.
8.3 Overview of the Assembly Descriptor
When the standard assembly descriptors introduced in Section 8.2 are not adequate, you will need to
define your own assembly descriptor. The assembly descriptor is an XML document which defines the
structure and contents of an assembly. The assembly descriptor contains five main configuration sections,
plus two additional sections: one for specifying standard assembly-descriptor fragments, called compo-
nent descriptors, and another for specifying custom file processor classes to help manage the assembly-
production process.
Base Configuration
This section contains the information required by all assemblies, plus some additional configuration
options related to the format of the entire archive, such as the base path to use for all archive entries.
For the assembly descriptor to be valid, you must at least specify the assembly id, at least one
format, and at least one of the other sections shown above.
File Information
The configurations in this segment of the assembly descriptor apply to specific files on the file
system within the project’s directory structure. This segment contains two main sections: files
and fileSets. You use files and fileSets to control the permissions of files in an assembly
and to include or exclude files from an assembly.
Dependency Information
Almost all projects of any size depend on other projects. When creating distribution archives,
project dependencies are usually included in the end-product of an assembly. This section manages
the way dependencies are included in the resulting archive. This section allows you to specify
whether dependencies are unpacked, added directly to the lib/ directory, or mapped to new file
names. This section also allows you to control the permissions of dependencies in the assembly,
and which dependencies are included in an assembly.
Repository Information
At times, it’s useful to isolate the sum total of all artifacts necessary to build a project, whether
they’re dependency artifacts, POMs of dependency artifacts, or even a project’s own POM ances-
try (your parent POM, its parent, and so on). This section allows you to include one or more

Maven: The Complete Reference 123 / 316
artifact-repository directory structures inside your assembly, with various configuration options.
The Assembly plugin does not have the ability to include plugin artifacts in these repositories yet.
Module Information
This section of the assembly descriptor allows you to take advantage of these parent-child relation-
ships when assembling your custom archive, to include source files, artifacts, and dependencies
from your project’s modules. This is the most complex section of the assembly descriptor, because
it allows you to work with modules and sub-modules in two ways: as a series of fileSets (via
the sources section) or as a series of dependencySets (via the binaries section).
8.4 The Assembly Descriptor
This section is a tour of the assembly descriptor which contains some guidelines for developing a custom
assembly descriptor. The Assembly plugin is one of the largest plugins in the Maven ensemble, and one
of the most flexible.
8.4.1 Property References in Assembly Descriptors
Any property discussed in Section 9.2 can be referenced in an assembly descriptor. Before any assembly
descriptor is used by Maven, it is interpolated using information from the POM and the current build
environment. All properties supported for interpolation within the POM itself are valid for use in assembly
descriptors, including POM properties, POM element values, system properties, user-defined properties,
and operating-system environment variables.
The only exceptions to this interpolation step are elements in various sections of the descriptor named
outputDirectory,outputDirectoryMapping, or outputFileNameMapping. The reason
these are held back in their raw form is to allow artifact- or module-specific information to be applied
when resolving expressions in these values, on a per-item basis. <!--This last paragraph is not clear.-→
8.4.2 Required Assembly Information
There are two essential pieces of information that are required for every assembly: the id, and the list
of archive formats to produce. In practice, at least one other section of the descriptor is required - since
most archive format components will choke if they don’t have at least one file to include - but without at
least one format and an id, there is no archive to create. The id is used both in the archive’s file name,

Maven: The Complete Reference 124 / 316
and as part of the archive’s artifact classifier in the Maven repository. The format string also controls the
archiver-component instance that will create the final assembly archive. All assembly descriptors must
contain an id and at least one format:
Required Assembly Descriptor Elements
<assembly>
<id>bundle</id>
<formats>
<format>zip</format>
</formats>
...
</assembly>
The assembly id can be any string that does not contain spaces. The standard practice is to use dashes
when you must separate words within the assembly id. If you were creating an assembly to create an
interesting unique package structure, you would give your an id of something like interesting-
unique-package. It also supports multiple formats within a single assembly descriptor, allowing
you to create the familiar .zip,.tar.gz, and .tar.bz2 distribution archive set with ease. If you don’t find
the archive format you need, you can also create a custom format. Custom formats are discussed in
Section 8.5.8. The Assembly plugin supports several archive formats natively, including:
• jar
• zip
• tar
• bzip2
• gzip
• tar.gz
• tar.bz2
• rar
• war
• ear
• sar
• dir

Maven: The Complete Reference 125 / 316
The id and format are essential because they will become a part of the coordinates for the assembled
archive. The example from Required Assembly Descriptor Elements will create an assembly artifact of
type zip with a classifier of bundle.
8.5 Controlling the Contents of an Assembly
In theory, id and format are the only absolute requirements for a valid assembly descriptor; however,
many assembly archivers will fail if they do not have at least one file to include in the output archive.
The task of defining the files to be included in the assembly is handled by the five main sections of the
assembly descriptor: files,fileSets,dependencySets,repositories, and moduleSets.
To explore these sections most effectively, we’ll start by discussing the most elemental section: files.
Then, we’ll move on to the two most commonly used sections, fileSets and dependencySets.
Once you understand the workings of fileSets and dependencySets, it’s easier to understand
repositories and moduleSets.
8.5.1 Files Section
The files section is the simplest part of the assembly descriptor, it is designed for files that have a
definite location relative to your project’s directory. Using this section, you have absolute control over
the exact set of files that are included in your assembly, exactly what they are named, and where they will
reside in the archive.
Including a JAR file in an Assembly using files
<assembly>
...
<files>
<file>
<source>target/my-app-1.0.jar</source>
<outputDirectory>lib</outputDirectory>
<destName>my-app.jar</destName>
<fileMode>0644</fileMode>
</file>
</files>
...
</assembly>

Maven: The Complete Reference 126 / 316
Assuming you were building a project called my-app with a version of 1.0,Including a JAR file in an
Assembly using files would include your project’s JAR in the assembly’s lib/ directory, trimming the
version from the file name in the process so the final file name is simply my-app.jar. It would then make
the JAR readable by everyone and writable by the user that owns it (this is what the mode 0644 means
for files, using Unix four-digit Octal permission notation). For more information about the format of the
value in fileMode, please see the Wikipedia’s explanation of four-digit Octal notation.
You could build a very complex assembly using file entries, if you knew the full list of files to be included.
Even if you didn’t know the full list before the build started, you could probably use a custom Maven
plugin to discover that list and generate the assembly descriptor using references like the one above.
While the files section gives you fine-grained control over the permission, location, and name of each
file in the assembly archive, listing a file element for every file in a large archive would be a tedious
exercise. For the most part, you will be operating on groups of files and dependencies using fileSets.
The remaining four file-inclusion sections are designed to help you include entire sets of files that match
a particular criteria.
8.5.2 FileSets Section
Similar to the files section, fileSets are intended for files that have a definite location relative to
your project’s directory structure. However, unlike the files section, fileSets describe sets of files,
defined by file and path patterns they match (or don’t match), and the general directory structure in which
they are located. The simplest fileSet just specifies the directory where the files are located:
<assembly>
...
<fileSets>
<fileSet>
<directory>src/main/java</directory>
</fileSet>
</fileSets>
...
</assembly>
This file set simply includes the contents of the src/main/java directory from our project. It takes advan-
tage of many default settings in the section, so let’s discuss those briefly.
First, you’ll notice that we haven’t told the file set where within the assembly matching files should
be located. By default, the destination directory (specified with outputDirectory) is the same as
the source directory (in our case, src/main/java). Additionally, we haven’t specified any inclusion or
exclusion file patterns. When these are empty, the file set assumes that all files within the source directory
are included, with some important exceptions. The exceptions to this rule pertain mainly to source-

Maven: The Complete Reference 127 / 316
control metadata files and directories, and are controlled by the useDefaultExcludes flag, which
is defaulted to true. When active, useDefaultExcludes will keep directories like .svn/ and CVS/
from being added to the assembly archive. Section 8.5.3 provides a detailed list of the default exclusion
patterns.
If we want more control over this file set, we can specify it more explicitly. Including Files with fileSet
shows a fileSet element with all of the default elements specified.
Including Files with fileSet
<assembly>
...
<fileSets>
<fileSet>
<directory>src/main/java</directory>
<outputDirectory>src/main/java</outputDirectory>
<includes>
<include>**</include>
</includes>
<useDefaultExcludes>true</useDefaultExcludes>
<fileMode>0644</fileMode>
<directoryMode>0755</directoryMode>
</fileSet>
</fileSets>
...
</assembly>
The includes section uses a list of include elements, which contain path patterns. These patterns
may contain wildcards such as ‘**’ which matches one or more directories or ‘*’ which matches part of a
file name, and ‘?’ which matches a single character in a file name. Including Files with fileSet uses a
fileMode entry to specify that files in this set should be readable by all, but only writable by the owner.
Since the fileSet includes directories, we also have the option of specifying a directoryMode that
works in much the same way as the fileMode. Since a directories’ execute permission is what allows
users to list their contents, we want to make sure directories are executable in addition to being readable.
Like files, only the owner can write to directories in this set.
The fileSet entry offers some other options as well. First, it allows for an excludes section with
a form identical to the includes section. These exclusion patterns allow you to exclude specific file
patterns from a fileSet. Exclude patterns take precedence over include patterns. Additionally, you
can set the filtering flag to true if you want to substitute property values for expressions within
the included files. Expressions can be delimited either by ${ and }(standard Maven expressions like
${project.groupId}) or by @and @(standard Ant expressions like @project.groupId@). You
can adjust the line ending of your files using the lineEnding element; valid values for lineEnding
are:

Maven: The Complete Reference 128 / 316
keep
Preserve line endings from original files. (This is the default value.)
unix
Unix-style line endings
lf
Only a Line Feed Character
dos
MS-DOS-style line endings
crlf
Carriage-return followed by a Line Feed
Finally, if you want to ensure that all file-matching patterns are used, you can use the useStrictFil
tering element with a value of true (the default is false). This can be especially useful if unused
patterns may signal missing files in an intermediary output directory. When useStrictFiltering
is set to true, the Assembly plugin will fail if an include pattern is not satisfied. In other words, if you
have an include pattern which includes a file from a build, and that file is not present, setting useStric
tFiltering to true will cause a failure if Maven cannot find the file to be included.
8.5.3 Default Exclusion Patterns for
When you use the default exclusion patterns, the Maven Assembly plugin is going to be ignoring more
than just SVN and CVS information. By default the exclusion patterns are defined by the DirectoryScan-
ner class in the plexus-utils project hosted at Codehaus. The array of exclude patterns is defined as a
static, final String array named DEFAULTEXCLUDES in DirectoryScanner. The contents of this
variable are shown in Definition of Default Exclusion Patterns from Plexus Utils.
Definition of Default Exclusion Patterns from Plexus Utils
public static final String[] DEFAULTEXCLUDES = {
// Miscellaneous typical temporary files
"**/*~",
"**/#*#",
"**/.#*",
"**/%*%",
"**/._*",
// CVS
"**/CVS",
"**/CVS/**",

Maven: The Complete Reference 129 / 316
"**/.cvsignore",
// SCCS
"**/SCCS",
"**/SCCS/**",
// Visual SourceSafe
"**/vssver.scc",
// Subversion
"**/.svn",
"**/.svn/**",
// Arch
"**/.arch-ids",
"**/.arch-ids/**",
//Bazaar
"**/.bzr",
"**/.bzr/**",
//SurroundSCM
"**/.MySCMServerInfo",
// Mac
"**/.DS_Store"
};
This default array of patterns excludes temporary files from editors like GNU Emacs, and other common
temporary files from Macs and a few common source control systems (although Visual SourceSafe is
more of a curse than a source control system). If you need to override these default exclusion patterns you
set useDefaultExcludes to false and then define a set of exclusion patterns in your own assembly
descriptor.
8.5.4 dependencySets Section
One of the most common requirements for assemblies is the inclusion of a project’s dependencies in an
assembly archive. Where files and fileSets deal with files in your project, dependency files don’t
have a location in your project. The artifacts your project depends on have to be resolved by Maven
during the build. Dependency artifacts are abstract, they lack a definite location, and are resolved using a
symbolic set of Maven coordinates. Since file and fileSet specifications require a concrete source
path, dependencies are included or excluded from an assembly using a combination of Maven coordinates
and dependency scopes.

Maven: The Complete Reference 130 / 316
The simplest dependencySet is an empty element:
<assembly>
...
<dependencySets>
<dependencySet/>
</dependencySets>
...
</assembly>
The dependencySet above will match all runtime dependencies of your project (runtime scope in-
cludes the compile scope implicitly), and it will add these dependencies to the root directory of your as-
sembly archive. It will also copy the current project’s main artifact into the root of the assembly archive,
if it exists.
Note
Wait? I thought dependencySet was about including my project’s dependencies, not my project’s
main archive? This counterintuitive side-effect was a widely-used bug in the 2.1 version of the Assembly
plugin, and, because Maven puts an emphasis on backward compatibility, this counterintuitive and
incorrect behavior needed to be preserved between a 2.1 and 2.2 release. You can control this behavior
by changing the useProjectArtifact flag to false.
While the default dependency set can be quite useful with no configuration whatsoever, this section of the
assembly descriptor also supports a wide array of configuration options, allowing your to tailor its behav-
ior to your specific requirements. For example, the first thing you might do to the dependency set above
is exclude the current project artifact, by setting the useProjectArtifact flag to false (again,
its default value is true for legacy reasons). This will allow you to manage the current project’s build
output separately from its dependency files. Alternatively, you might choose to unpack the dependency
artifacts using by setting the unpack flag to true (this is false by default). When unpack is set to
true, the Assembly plugin will combine the unpacked contents of all matching dependencies inside the
archive’s root directory.
From this point, there are several things you might choose to do with this dependency set. The next
sections discuss how to define the output location for dependency sets and how include and exclude
dependencies by scope. Finally, we’ll expand on the unpacking functionality of the dependency set by
exploring some advanced options for unpacking dependencies.

Maven: The Complete Reference 131 / 316
8.5.4.1 Customizing Dependency Output Location
There are two configuration options that are used in concert to define the location for a dependency file
within the assembly archive: outputDirectory and outputFileNameMapping. You may want
to customize the location of dependencies in your assembly using properties of the dependency artifacts
themselves. Let’s say you want to put all the dependencies in directories that match the dependency
artifact’s groupId. In this case, you would use the outputDirectory element of the dependenc
ySet, and you would supply something like:
<assembly>
...
<dependencySets>
<dependencySet>
<outputDirectory>${artifact.groupId}</outputDirectory>
</dependencySet>
</dependencySets>
...
</assembly>
This would have the effect of placing every single dependency in a subdirectory that matched the name
of each dependency artifact’s groupId.
If you wanted to perform a further customization and remove the version numbers from all dependencies.
You could customize the output file name for each dependency using the outputFileNameMapping
element as follows:
<assembly>
...
<dependencySets>
<dependencySet>
<outputDirectory>${artifact.groupId}</outputDirectory>
<outputFileNameMapping>
${artifact.artifactId}.${artifact.extension}
</outputFileNameMapping>
</dependencySet>
</dependencySets>
...
</assembly>
In the previous example, a dependency on commons:commons-codec version 1.3, would end up in
the file commons/commons-codec.jar.

Maven: The Complete Reference 132 / 316
8.5.4.2 Interpolation of Properties in Dependency Output
As mentioned in the Assembly Interpolation section above, neither of these elements are interpolated
with the rest of the assembly descriptor, because their raw values have to be interpreted using additional,
artifact-specific expression resolvers.
The artifact expressions available for these two elements vary only slightly. In both cases, all of the
${project.*},${pom.**}, and ${*}expressions that are available in the POM and the rest of
the assembly descriptor are also available here. For the outputFileNameMapping element, the
following process is applied to resolve expressions:
1. If the expression matches the pattern ${artifact.\*}:
a. Match against the dependency’s Artifact instance (resolves: groupId,artifactId,
version,baseVersion,scope,classifier, and file.*)
b. Match against the dependency’s ArtifactHandler instance (resolves: expression)
c. Match against the project instance associated with the dependency’s Artifact (resolves: mainly
POM properties)
2. If the expression matches the patterns ${pom.*}or ${project.\*}:
a. Match against the project instance (MavenProject) of the current build.
3. If the expression matches the pattern $and the Artifact instance contains a non-null classifier,
resolve to the classifier preceded by a dash (-classifier). Otherwise, resolve to an empty string.
a. Attempt to resolve the expression against the project instance of the current build.
b. Attempt to resolve the expression against the POM properties of the current build.
c. Attempt to resolve the expression against the available system properties.
d. Attempt to resolve the expression against the available operating-system environment vari-
ables.
The outputDirectory value is interpolated in much the same way, with the difference being that there
is no available ${artifact.*}information, only the ${project.\*}instance for the particular
artifact. Therefore, the expressions listed above associated with those classes (1a, 1b, and 3 in the process
listing above) are unavailable.
How do you know when to use outputDirectory and outputFileNameMapping? When de-
pendencies are unpacked only the outputDirectory is used to calculate the output location. When
dependencies are managed as whole files (not unpacked), both outputDirectory and outputFil
eNameMapping can be used together. When used together, the result is the equivalent of:

Maven: The Complete Reference 133 / 316
<archive-root-dir>/<outputDirectory>/<outputFileNameMapping>
When outputDirectory is missing, it is not used. When outputFileNameMapping is missing,
its default value is: ${artifact.artifactId}-${artifact.version}-$.${artifact.
extension}
8.5.4.3 Including and Excluding Dependencies by Scope
In Section 3.4, it was noted that all project dependencies have one scope or another. Scope determines
when in the build process that dependency normally would be used. For instance, test-scoped dependen-
cies are not included in the classpath during compilation of the main project sources; but they are included
in the classpath when compiling unit test sources. This is because your project’s main source code should
not contain any code specific to testing, since testing is not a function of the project (it’s a function of the
project’s build process). Similarly, provided-scoped dependencies are assumed to be present in the envi-
ronment of any eventual deployment. However, if a project depends on a particular provided dependency,
it is likely to require that dependency in order to compile. Therefore, provided-scoped dependencies
are present in the compilation classpath, but not in the dependency set that should be bundled with the
project’s artifact or assembly.
Also from Section 3.4, recall that some dependency scopes imply others. For instance, the runtime
dependency scope implies the compile scope, since all compile-time dependencies (except for those
in the provided scope) will be required for the code to execute. There are a number of complex
relationships between the various dependency scopes which control how the scope of a direct dependency
affects the scope of a transitive dependency. In a Maven Assembly descriptor, we can use scopes to apply
different settings to different sets of dependencies accordingly.
For instance, if we plan to bundle a web application with Jetty to create a completely self-contained appli-
cation, we’ll need to include all provided-scope dependencies somewhere in the jetty directory structure
we’re including. This ensures those provided dependencies actually are present in the runtime environ-
ment. Non-provided, runtime dependencies will still land in the WEB-INF/lib directory, so these two
dependency sets must be processed separately. These dependency sets might look similar to the following
XML.
Defining Dependency Sets Using Scope
<assembly>
...
<dependencySets>
<dependencySet>
<scope>provided</scope>

Maven: The Complete Reference 134 / 316
<outputDirectory>lib/${project.artifactId}</outputDirectory>
</dependencySet>
<dependencySet>
<scope>runtime</scope>
<outputDirectory>
webapps/${webContextName}/WEB-INF/lib
</outputDirectory>
</dependencySet>
</dependencySets>
...
</assembly>
Provided-scoped dependencies are added to the lib/ directory in the assembly root, which is assumed
to be a libraries directory that will be included in the Jetty global runtime classpath. We’re using a
subdirectory named for the project’s artifactId in order to make it easier to track the origin of a
particular library. Runtime dependencies are included in the WEB-INF/lib path of the web application,
which is located within a subdirectory of the standard Jetty webapps/ directory that is named using a
custom POM property called webContextName. What we’ve done in the previous example is separate
application-specific dependencies from dependencies which will be present in a Servlet contains global
classpath.
However, simply separating according to scope may not be enough, particularly in the case of a web appli-
cation. It’s conceivable that one or more runtime dependencies will actually be bundles of standardized,
non-compiled resources for use in the web application. For example, consider a set of web application
which reuse a common set of Javascript, CSS, SWF, and image resources. To make these resources easy
to standardize, it’s a common practice to bundle them up in an archive and deploy them to the Maven
repository. At that point, they can be referenced as standard Maven dependencies - possibly with a depen-
dency type of zip - that are normally specified with a runtime scope. Remember, these are resources, not
binary dependencies of the application code itself; therefore, it’s not appropriate to blindly include them
in the WEB-INF/lib directory. Instead, these resource archives should be separated from binary runtime
dependencies, and unpacked into the web application document root somewhere. In order to achieve this
kind of separation, we’ll need to use inclusion and exclusion patterns that apply to the coordinates of a
specific dependency.
In other words, say you have three or four web application which reuse the same resources and you want to
create an assembly that puts provided dependencies into lib/, runtime dependencies into webapps/<contextName>/WEB-
INF/lib, and then unpacks a specific runtime dependency into your web application’s document root. You
can do this because the Assembly allows you to define multiple include and exclude patterns for a given
dependencySet element. Read the next section for more development of this idea.

Maven: The Complete Reference 135 / 316
8.5.4.4 Fine Tuning: Dependency Includes and Excludes
A resource dependency might be as simple as a set of resources (CSS, Javascript, and Images) in a project
that has an assembly which creates a ZIP archive. Depending on the particulars of our web application,
we might be able to distinguish resource dependencies from binary dependencies solely according to
type. Most web applications are going to depend on other dependencies of type jar, and it is possible
that we can state with certainty that all dependencies of type zip are resource dependencies. Or, we
might have a situation where resources are stored in jar format, but have a classifier of something like
resources. In either case, we can specify an inclusion pattern to target these resource dependencies
and apply different logic than that used for binary dependencies. We’ll specify these tuning patterns using
the includes and excludes sections of the dependencySet.
Both includes and excludes are list sections, meaning they accept the sub-elements include and exc
lude respectively. Each include or exclude element contains a string value, which can contain
wildcards. Each string value can match dependencies in a few different ways. Generally speaking, three
identity pattern formats are supported:
groupId:artifactId - version-less key
You would use this pattern to match a dependency by only the groupId and the artifactId.
groupId:artifactId:type[:classifier] - conflict id
The pattern allows you to specify a wider set of coordinates to create a more specific include/ex-
clude pattern.
groupId:artifactId:type[:classifier]:version - full artifact identity
If you need to get really specific, you can specify all the coordinates.
All of these pattern formats support the wildcard character ‘*’, which can match any subsection of the
identity and is not limited to matching single identity parts (sections between ‘:’ characters). Also,
note that the classifier section above is optional, in that patterns matching dependencies that don’t have
classifiers do not need to account for the classifier section in the pattern.
In the example given above, where the key distinction is the artifact type zip, and none of the dependencies
have classifiers, the following pattern would match resource dependencies assuming that they were of type
zip:
*:zip
The pattern above makes use of the second dependency identity: the dependency’s conflict id. Now that
we have a pattern that distinguishes resource dependencies from binary dependencies, we can modify our
dependency sets to handle resource archives differently:

Maven: The Complete Reference 136 / 316
Using Dependency Excludes and Includes in dependencySets
<assembly>
...
<dependencySets>
<dependencySet>
<scope>provided</scope>
<outputDirectory>lib/${project.artifactId}</outputDirectory>
</dependencySet>
<dependencySet>
<scope>runtime</scope>
<outputDirectory>
webapps/${webContextName}/WEB-INF/lib
</outputDirectory>
<excludes>
<exclude>*:zip</exclude>
</excludes>
</dependencySet>
<dependencySet>
<scope>runtime</scope>
<outputDirectory>
webapps/${webContextName}/resources
</outputDirectory>
<includes>
<include>*:zip</include>
</includes>
<unpack>true</unpack>
</dependencySet>
</dependencySets>
...
</assembly>
In Using Dependency Excludes and Includes in dependencySets, the runtime-scoped dependency set
from our last example has been updated to exclude resource dependencies. Only binary dependencies
(non-zip dependencies) should be added to the WEB-INF/lib directory of the web application. Resource
dependencies now have their own dependency set, which is configured to include these dependencies in
the resources directory of the web application. The includes section in the last dependencySet
reverses the exclusion from the previous dependencySet, so that resource dependencies are included
using the same identity pattern (i.e. *:zip). The last dependencySet refers to the shared resource
dependency and it is configured to unpack the shared resource dependency in the document root of the
web application.
Using Dependency Excludes and Includes in dependencySets was based upon the assumption that
our shared resources project dependency had a type which differed from all of the other dependencies.
What if the share resource dependency had the same type as all of the other dependencies? How could you
differentiate the dependency? In this case if the shared resource dependency had been bundled as a JAR

Maven: The Complete Reference 137 / 316
with the classifier resources, you would match that dependency with the following identity pattern:
*:jar:resources
Instead of matching on artifacts with a type of zip and no classifier, we’re matching on artifacts with a
classifier of resources and a type of jar.
Just like the fileSets section, dependencySets support the useStrictFiltering flag. When
enabled, any specified patterns that don’t match one or more dependencies will cause the assembly - and
consequently, the build - to fail. This can be particularly useful as a safety valve, to make sure your
project dependencies and assembly descriptors are synchronized and interacting as you expect them to.
By default, this flag is set to false for the purposes of backward compatibility.
8.5.4.5 Transitive Dependencies, Project Attachments, and Project
The dependencySet section supports two more general mechanisms for tuning the subset of matching
artifacts: transitive selection options, and options for working with project artifacts. Both of these features
are a product of the need to support legacy configurations that applied a somewhat more liberal definition
of the word “dependency”. As a prime example, consider the project’s own main artifact. Typically, this
would not be considered a dependency; yet older versions of the Assembly plugin included the project
artifact in calculations of dependency sets. To provide backward compatibility with this “feature”, the 2.2
releases (currently at 2.2-beta-2) of the Assembly plugin support a flag in the dependencySet called
useProjectArtifact, whose default value is true. By default, dependency sets will attempt to
include the project artifact itself in calculations about which dependency artifacts match and which don’t.
If you’d rather deal with the project artifact separately, set this flag to false.
Tip
The authors of this book recommend that you always set useProjectArtifact to false.
As a natural extension to the inclusion of the project artifact, the project’s attached artifacts can also
be managed within a dependencySet using the useProjectAttachments flag (whose default
value is false). Enabling this flag allows patterns that specify classifiers and types to match on artifacts
that are “attached” to the main project artifact; that is, they share the same basic groupId/artifac
tId/version identity, but differ in type and classifier from the main artifact. This could be
useful for including JavaDoc or source jars in an assembly.
Aside from dealing with the project’s own artifacts, it’s also possible to fine-tune the dependency set
using two transitive-resolution flags. The first, called useTransitiveDependencies (and set to
Maven: The Complete Reference 138 / 316
true by default) simply specifies whether the dependency set should consider transitive dependencies
at all when determining the matching artifact set to be included. As an example of how this could be
used, consider what happens when your POM has a dependency on another assembly. That assembly
(most likely) will have a classifier that separates it from the main project artifact, making it an attachment.
However, one quirk of the Maven dependency-resolution process is that the transitive-dependency infor-
mation for the main artifact is still used when resolving the assembly artifact. If the assembly bundles its
project dependencies inside itself, using transitive dependency resolution here would effectively duplicate
those dependencies. To avoid this, we simply set useTransitiveDependencies to false for the
dependency set that handles that assembly dependency.
The other transitive-resolution flag is far more subtle. It’s called useTransitiveFiltering, and has
a default value of false. To understand what this flag does, we first need to understand what information
is available for any given artifact during the resolution process. When an artifact is a dependency of a de-
pendency (that is, removed at least one level from your own POM), it has what Maven calls a "dependency
trail", which is maintained as a list of strings that correspond to the full artifact identities (groupId:
artifactId:type:[classifier:]version) of all dependencies between your POM and the
artifact that owns that dependency trail. If you remember the three types of artifact identities available
for pattern matching in a dependency set, you’ll notice that the entries in the dependency trail - the full
artifact identity - correspond to the third type. When useTransitiveFiltering is set to true, the
entries in an artifact’s dependency trail can cause the artifact to be included or excluded in the same way
its own identity can.
If you’re considering using transitive filtering, be careful! A given artifact can be included from multiple
places in the transitive-dependency graph, but as of Maven 2.0.9, only the first inclusion’s trail will be
tracked for this type of matching. This can lead to subtle problems when collecting the dependencies for
your project.
Warning
Most assemblies don’t really need this level of control over dependency sets; consider carefully
whether yours truly does. Hint: It probably doesn’t.
8.5.4.6 Advanced Unpacking Options
As we discussed previously, some project dependencies may need to be unpacked in order to create a
working assembly archive. In the examples above, the decision to unpack or not was simple. It didn’t
take into account what needed to be unpacked, or more importantly, what should not be unpacked. To gain
more control over the dependency unpacking process, we can configure the unpackOptions element
of the dependencySet. Using this section, we have the ability to choose which file patterns to include

Maven: The Complete Reference 139 / 316
or exclude from the assembly, and whether included files should be filtered to resolve expressions using
current POM information. In fact, the options available for unpacking dependency sets are fairly similar
to those available for including files from the project directory structure, using the file sets descriptor
section.
To continue our web-application example, suppose some of the resource dependencies have been bundled
with a file that details their distribution license. In the case of our web application, we’ll handle third-
party license notices by way of a NOTICES file included in our own bundle, so we don’t want to include
the license file from the resource dependency. To exclude this file, we simply add it to the unpack options
inside the dependency set that handles resource artifacts:
Excluding Files from a Dependency Unpack
<asembly>
...
<dependencySets>
<dependencySet>
<scope>runtime</scope>
<outputDirectory>
webapps/${webContextName}/resources
</outputDirectory>
<includes>
<include>*:zip</include>
</includes>
<unpack>true</unpack>
<unpackOptions>
<excludes>
<exclude>**/LICENSE*</exclude>
</excludes>
</unpackOptions>
</dependencySet>
</dependencySets>
...
</assembly>
Notice that the exclude we’re using looks very similar to those used in fileSet declarations. Here,
we’re blocking any file starting with the word LICENSE in any directory within our resource artifacts. You
can think of the unpack options section as a lightweight fileSet applied to each dependency matched
within that dependency set. In other words, it is a fileSet by way of an unpacked dependency. Just
as we specified an exclusion pattern for files within resource dependencies in order to block certain files,
you can also choose which restricted set of files to include using the includes section. The same code that
processes inclusions and exclusions on fileSets has been reused for processing unpackOptions.
In addition to file inclusion and exclusion, the unpack options on a dependency set also provides a fil
tering flag, whose default value is false. Again, this should be familiar from our discussion of file

Maven: The Complete Reference 140 / 316
sets above. In both cases, expressions using either the Maven syntax supported. Filtering is a particularly
nice feature to have for dependency sets, though, since it effectively allows you to create standardized,
versioned resource templates that are then customized to each assembly as they are included. Once you
start mastering the use of filtered, unpacked dependencies which store shared resources, you will be able
to start abstracting repeated resources into common resource projects.
8.5.4.7 Summarizing Dependency Sets
Finally, it’s worth mentioning that dependency sets support the same fileMode and directoryMode
configuration options that file sets do, though you should remember that the directoryMode setting
will only be used when dependencies are unpacked.
8.5.5 moduleSets Sections
Multi-module builds are generally stitched together using the parent and modules sections of interrelated
POMs. Typically, parent POMs specify their children in a modules section, which under normal cir-
cumstances causes the child POMs to be included in the build process of the parent. Exactly how this
relationship is constructed can have important implications for the ways in which the Assembly plugin
can participate in this process, but we’ll discuss that more later. For now, it’s enough to keep in mind this
parent-module relationship as we discuss the moduleSets section.
Projects are stitched together into multi-module builds because they are part of a larger system. These
projects are designed to be used together, and single module in a larger build has little practical value
on its own. In this way, the structure of the project’s build is related to the way we expect the project
(and its modules) to be used. If consider the project from the user’s perspective, it makes sense that the
ideal end goal of that build would be a single, distributable file that the user can consume directly with
minimum installation hassle. Since Maven multi-module builds typically follow a top-down structure,
where dependency information, plugin configurations, and other information trickles down from parent
to child, it seems natural that the task of rolling all of these modules into a single distribution file should
fall to the topmost project. This is where the moduleSet comes into the picture.
Module sets allow the inclusion of resources that belong to each module in the project structure into the
final assembly archive. Just like you can select a group of files to include in an assembly using a fileSet
and a dependencySet, you can include a set of files and resources using a moduleSet to refer to
modules in a multi-module build. They achieve this by enabling two basic types of module-specific
inclusion: file-based, and artifact-based. Before we get into the specifics and differences between file-
based and artifact-based inclusion of module resources into an assembly, let’s talk a little about selecting
which modules to process.

Maven: The Complete Reference 141 / 316
8.5.5.1 Module Selection
By now, you should be familiar with includes/excludes patterns as they are used throughout the
assembly descriptor to filter files and dependencies. When you are referring to modules in an assembly
descriptor, you will also use the includes/excludes patterns to define rules which apply to different
sets of modules. The difference in moduleSet includes and excludes is that these rules do not
allow for wildcard patterns. (As of the 2.2-beta-2 release, this feature has not really seen much demand,
so it hasn’t been implemented.) Instead, each include or exclude value is simply the groupId and
artifactId for the module, separated by a colon, like this:
groupId:artifactId
In addition to includes and excludes, the moduleSet also supports an additional selection tool:
the includeSubModules flag (whose default value is true). The parent-child relationship in any
multi-module build structure is not strictly limited to two tiers of projects. In fact, you can include any
number of tiers, or layers, in your build. Any project that is a module of a module of the current project is
considered a sub-module. In some cases, you may want to deal with each individual module in the build
separately (including sub-modules). For example, this is often simplest when dealing with artifact-based
contributions from these modules. To do this, you would simply leave the useSubModules flag set to
the default of true.
When you’re trying to include files from each module’s directory structure, you may wish to process
that module’s directory structure only once. If your project directory structure mirrors that of the parent-
module relationships that are included in the POMs, this approach would allow file patterns like **/src/-
main/java to apply not only to that direct module’s project directory, but also to the directories of its own
modules as well. In this case you don’t want to process sub-modules directly (they will be processed as
subdirectories within your own project’s modules instead), you should set the useSubModules flag to
false.
Once we’ve determined how module selection should proceed for the module set in question, we’re ready
to choose what to include from each module. As mentioned above, this can include files or artifacts from
the module project.
8.5.5.2 Sources Section
Suppose you want to include the source of all modules in your project’s assembly, but you would like to
exclude a particular module. Maybe you have a project named secret-sauce which contains secret
and sensitive code that you don’t want to distribute with your project. The simplest way to accomplish
this is to use a moduleSet which includes each project’s directory in ${module.basedir.name}
and which excludes the secret-sauce module from the assembly.

Maven: The Complete Reference 142 / 316
Includes and Excluding Modules with a moduleSet
<assembly>
...
<moduleSets>
<moduleSet>
<includeSubModules>false</includeSubModules>
<excludes>
<exclude>
com.mycompany.application:secret-sauce
</exclude>
</excludes>
<sources>
<outputDirectoryMapping>
${module.basedir.name}
</outputDirectoryMapping>
<excludeSubModuleDirectories>
false
</excludeSubModuleDirectories>
<fileSets>
<fileSet>
<directory>/</directory>
<excludes>
<exclude>**/target</exclude>
</excludes>
</fileSet>
</fileSets>
</sources>
</moduleSet>
</moduleSets>
...
</assembly>
In Includes and Excluding Modules with a moduleSet, since we’re dealing with each module’s sources
it’s simpler to deal only with direct modules of the current project, handling sub-modules using file-path
wildcard patterns in the file set. We set the includeSubModules element to false so we don’t have
to worry about submodules showing up in the root directory of the assembly archive. The exclude
element will take care of excluding the secret-sauce module. We’re not going to include the project
sources for the secret-sauce module; they’re, well, secret.
Normally, module sources are included in the assembly under a subdirectory named after the module’s
artifactId. However, since Maven allows modules that are not in directories named after the mod-
ule project’s artifactId, it’s often better to use the expression ${module.basedir.name} to
preserve the module directory’s actual name (${module.basedir.name} is the same as calling
MavenProject.getBasedir().getName()). It is critical to remember that modules are not re-
quired to be subdirectories of the project that declares them. If your project has a particularly strange

Maven: The Complete Reference 143 / 316
directory structure, you may need to resort to special moduleSet declarations that include specific
project and account for your own project’s idiosyncrasies.
Warning
Try to minimize your own project’s idiosyncrasies, while Maven is flexible, if you find yourself
doing too much configuration there is likely an easier way.
Continuing through Includes and Excluding Modules with a moduleSet, since we’re not processing
sub-modules explicitly in this module set, we need to make sure sub-module directories are not excluded
from the source directories we consider for each direct module. By setting the excludeSubModuleD
irectories flag to false, this allows us to apply the same file pattern to directory structures within a
sub-module of the one we’re processing. Finally in Includes and Excluding Modules with a moduleSet,
we’re not interested in any output of the build process for this module set. We exclude the target/ directory
from all modules.
It’s also worth mentioning that the sources section supports fileSet-like elements directly within
itself, in addition to supporting nested fileSets. These configuration elements are used to provide
backward compatibility to previous versions of the Assembly plugin (versions 2.1 and under) that didn’t
support multiple distinct file sets for the same module without creating a separate module set declaration.
They are deprecated, and should not be used.
8.5.5.3 Interpolation of outputDirectoryMapping in
In Section 8.5.4.1, we used the element outputDirectoryMapping to change the name of the di-
rectory under which each module’s sources would be included. The expressions contained in this element
are resolved in exactly the same way as the outputFileNameMapping, used in dependency sets (see
the explanation of this algorithm in Section 8.5.4).
In Includes and Excluding Modules with a moduleSet, we used the expression ${module.base
dir.name}. You might notice that the root of that expression, module, is not listed in the mapping-
resolution algorithm from the dependency sets section; this object root is specific to configurations within
moduleSets. It works in exactly the same way as the ${artifact.*}references available in the
outputFileNameMapping element, except it is applied to the module’s MavenProject,Artif
act, and ArtifactHandler instances instead of those from a dependency artifact.

Maven: The Complete Reference 144 / 316
8.5.5.4 Binaries section
Just as the sources section is primarily concerned with including a module in its source form, the bin
aries section is primarily concerned with including the module’s build output, or its artifacts. Though
this section functions primarily as a way of specifying dependencySets that apply to each module
in the set, there are a few additional features unique to module artifacts that are worth exploring: atta
chmentClassifier and includeDependencies. In addition, the binaries section contains
options similar to the dependencySet section, that relate to the handling of the module artifact itself.
These are: unpack,outputFileNameMapping,outputDirectory,directoryMode, and
fileMode. Finally, module binaries can contain a dependencySets section, to specify how each
module’s dependencies should be included in the assembly archive. First, let’s take a look at how the
options mentioned here can be used to manage the module’s own artifacts.
Suppose we want to include the javadoc jars for each of our modules inside our assembly. In this case,
we don’t care about including the module dependencies; we just want the javadoc jar. However, since this
particular jar is always going to be present as an attachment to the main project artifact, we need to specify
which classifier to use to retrieve it. For simplicity, we won’t cover unpacking the module javadoc jars,
since this configuration is exactly the same as what we used for dependency sets earlier in this chapter.
The resulting module set might look similar to Including JavaDoc from Modules in an Assembly.
Including JavaDoc from Modules in an Assembly
<assembly>
...
<moduleSets>
<moduleSet>
<binaries>
<attachmentClassifier>javadoc</attachmentClassifier>
<includeDependencies>false</includeDependencies>
<outputDirectory>apidoc-jars</outputDirectory>
</binaries>
</moduleSet>
</moduleSets>
...
</assembly>
In Including JavaDoc from Modules in an Assembly, we don’t explicitly set the includeSubModules
flag, since it’s true by default. However, we definitely want to process all modules - even sub-modules
- using this module set, since we’re not using any sort of file pattern that could match on sub-module
directory structures within. The attachmentClassifier grabs the attached artifact with the javadoc
classifier for each module processed. The includeDependencies element tells the Assembly plugin
that we’re not interested in any of the module’s dependencies, just the javadoc attachment. Finally, the
outputDirectory element tells the Assembly plugin to put all of the javadoc jars into a directory

Maven: The Complete Reference 145 / 316
named apidoc-jars/ off of the assembly root directory.
Although we’re not doing anything too complicated in this example, it’s important to understand that the
same changes to the expression-resolution algorithm discussed for the outputDirectoryMapping
element of the sources section also applies here. That is, whatever was available as ${artifact.*}
inside a dependencySet+’s +outputFileNameMapping configuration is also available here
as ${module.*}. The same applies for outputFileNameMapping when used directly within a
binaries section.
Finally, let’s examine an example where we simply want to process the module’s artifact and its runtime
dependencies. In this case, we want to separate the artifact set for each module into separate directory
structures, according to the module’s artifactId and version. The resulting module set is surpris-
ingly simply, and it looks like the listing in Including Module Artifacts and Dependencies in an Assembly:
Including Module Artifacts and Dependencies in an Assembly
<assembly>
...
<moduleSets>
<moduleSet>
<binaries>
<outputDirectory>
${module.artifactId}-${module.version}
</outputDirectory>
<dependencySets>
<dependencySet/>
</dependencySets>
</binaries>
</moduleSet>
</moduleSets>
...
</assembly>
In Including Module Artifacts and Dependencies in an Assembly, we’re using the empty dependenc
ySet element here, since that should include all runtime dependencies by default, with no configura-
tion. With the outputDirectory specified at the binaries level, all dependencies should be included
alongside the module’s own artifact in the same directory, so we don’t even need to specify that in our
dependency set.
For the most part, module binaries are fairly straightforward. In both parts - the main part, concerned with
handling the module artifact itself, and the dependency sets, concerned with the module’s dependencies
- the configuration options are very similar to those in a dependency set. Of course, the binaries section
also provides options for controlling whether dependencies are included, and which main-project artifact
you want to use.

Maven: The Complete Reference 146 / 316
Like the sources section, the binaries section contains a couple of configuration options that are provided
solely for backward compatibility, and should be considered deprecated. These include the includes and
excludes sub-sections.
8.5.5.5 moduleSets, Parent POMs
Finally, we close the discussion about module handling with a strong warning. There are subtle interac-
tions between Maven’s internal design as it relates to parent-module relationships and the execution of a
module-set’s binaries section. When a POM declares a parent, that parent must be resolved in some way
or other before the POM in question can be built. If the parent is in the Maven repository, there is no
problem. However, as of Maven 2.0.9 this can cause big problems if that parent is a higher-level POM in
the same build, particularly if that parent POM expects to build an assembly using its modules’ binaries.
Maven 2.0.9 sorts projects in a multi-module build according to their dependencies, with a given project’s
dependencies being built ahead of itself. The problem is the parent element is considered a dependency,
which means the parent project’s build must complete before the child project is built. If part of that
parent’s build process includes the creation of an assembly that uses module binaries, those binaries will
not exist yet, and therefore cannot be included, causing the assembly to fail. This is a complex and subtle
issue, which severely limits the usefulness of the module binaries section of the assembly descriptor. In
fact, it has been filed in the bug tracker for the Assembly plugin at: http://jira.codehaus.org/browse/-
MASSEMBLY-97. Hopefully, future versions of Maven will find a way to restore this functionality, since
the parent-first requirement may not be completely necessary.
8.5.6 Repositories Section
The repositories section represents a slightly more exotic feature in the assembly descriptor, since few
applications other than Maven can take full advantage of a Maven-repository directory structure. For
this reason, and because many of its features closely resemble those in the dependencySets section,
we won’t spend too much time on the repositories section of the assembly descriptor. In most cases,
users who understand dependency sets should have no trouble constructing repositories via the Assembly
plugin. We’re not going to motivate the repositories section; we’re not going to go through a the
business of setting up a use case and walking you through the process. We’re just going to bring up a few
caveats for those of you who find the need to use the repositories section.
Having said that, there are a two features particular to the repositories section that deserve some mention.
The first is the includeMetadata flag. When set to true it includes metadata such as the list of real
versions that correspond to -SNAPSHOT virtual versions, and by default it’s set to false. At present,
the only metadata included when this flag is true is the information downloaded from Maven’s central

Maven: The Complete Reference 147 / 316
repository.
The second feature is called groupVersionAlignments. Again, this section is a list of individual
groupVersionAlignment configurations, whose purpose is to normalize all included artifacts for a
particular groupId to use a single version. Each alignment entry consists of two mandatory elements
-id and version - along with an optional section called excludes that supplies a list of artifac
tId string values which are to be excluded from this realignment. Unfortunately, this realignment doesn’t
seem to modify the POMs involved in the repository, neither those related to realigned artifacts nor those
that depend on realigned artifacts, so it’s difficult to imagine what the practical application for this sort of
realignment would be.
In general, it’s simplest to apply the same principles you would use in dependency sets to repositories
when adding them to your assembly descriptor. While the repositories section does support the above
extra options, they are mainly provided for backward compatibility, and will probably be deprecated in
future releases.
8.5.7 Managing the Assembly’s Root Directory
Now that we’ve made it through the main body of the assembly descriptor, we can close the discussion
of content-related descriptor sections with something lighter: root-directory naming and site-directory
handling.
Some may consider it a stylistic concern, but it’s often important to have control over the name of the root
directory for your assembly, or whether the root directory is there at all. Fortunately, two configuration
options in the root of the assembly descriptor make managing the archive root directory simple: includ
eBaseDirectory and baseDirectory. In cases like executable jar files, you probably don’t want
a root directory at all. To skip it, simply set the includeBaseDirectory flag to false (it’s true
by default). This will result in an archive that, when unpacked, may create more than one directory in
the unpack target directory. While this is considered bad form for archives that are meant to be unpacked
before use, it’s not so bad for archives that are consumable as-is.
In other cases, you may want to guarantee the name of the archive root directory regardless of the POM’s
version or other information. By default, the baseDirectory element has a value equal to ${proj
ect.artifactId}-${project.version}. However, we can easily set this element to any value
that consists of literal strings and expressions which can be interpolated from the current POM, such
as ${project.groupId}-${project.artifactId}. This could be very good news for your
documentation team! (We all have those, right?)
Another configuration available is the includeSiteDirectory flag, whose default value is false.

Maven: The Complete Reference 148 / 316
If your project build has also constructed a website document root using the site lifecycle or the Site
plugin goals, that output can be included by setting this flag to true. However, this feature is a bit
limited, since it only includes the outputDirectory from the reporting section of the current POM
(by default, target/site) and doesn’t take into consideration any site directories that may be available in
module projects. Use it if you want, but a good fileSet specification or moduleSet specification
with sources configured could serve equally well, if not better. This is yet another example of legacy
configuration currently supported by the Assembly plugin for the purpose of backward compatibility.
Your mileage may vary. If you really want to include a site that is aggregated from many modules, you’ll
want to consider using a fileSet or moduleSet instead of setting includeSiteDirectory to
true.
8.5.8 componentDescriptors and
To round out our exploration of the assembly descriptor, we should touch briefly on two other sections:
containerDescriptorHandlers and componentDescriptors. The containerDescri
ptorHandlers section refers to custom components that you use to extend the capabilities of the As-
sembly plugin. Specifically, these custom components allow you to define and handle special files which
may need to be merged from the multiple constituents used to create your assembly. A good example
of this might be a custom container-descriptor handler that merged web.xml files from constituent war
or war-fragment files included in your assembly, in order to create the single web-application descriptor
required for you to use the resulting assembly archive as a war file.
The componentDescriptors section allows you to reference external assembly-descriptor frag-
ments and include them in the current descriptor. Component references can be any of the following:
1. Relative file paths: src/main/assembly/component.xml
2. Artifact references: groupId:artifactId:version[:type[:classifier]]
3. Classpath resources: /assemblies/component.xml
4. URLs: http://www.sonatype.com/component.xml
Incidentally, when resolving a component descriptor, the Assembly plugin tries those different strategies
in that exact order. The first one to succeed is used.
Component descriptors can contain many of the same content-oriented sections available in the assembly
descriptor itself, with the exception of moduleSets, which is considered so specific to each project that
it’s not a good candidate for reuse. Also included in a component descriptor is the containerDesc
riptorHandlers section, which we briefly discussed above. Component descriptors cannot contain

Maven: The Complete Reference 149 / 316
formats, assembly id’s, or any configuration related to the base directory of the assembly archive, all
of which are also considered unique to a particular assembly descriptor. While it may make sense to
allow sharing of the formats section, this has not been implemented as of the 2.2-beta-2 Assembly-plugin
release.
8.6 Best Practices
The Assembly plugin provides enough flexibility to solve many problems in a number of different ways.
If you have a unique requirement for your project, there’s a good chance that you can use the methods
documented in this chapter to achieve almost any assembly structure. This section of the chapter details
some common best practices which, if adhered to, will make your experiences with the assembly plugin
more productive and less painful.
8.6.1 Standard, Reusable Assembly Descriptors
Up to now, we’ve been talking mainly about one-off solutions for building a particular type of assembly.
But what do you do if you have dozens of projects that all need a particular type of assembly? In short,
how can we reuse the effort we’ve invested to get our assemblies just the way we like them across more
than one project without copying and pasting our assembly descriptor?
The simplest answer is to create a standardized, versioned artifact out of the assembly descriptor, and
deploy it. Once that’s done, you can specify that the Assembly plugin section of your project’s POM
include the assembly-descriptor artifact as a plugin-level dependency, which will prompt Maven to resolve
and include that artifact in the plugin’s classpath. At that point, you can use the assembly descriptor via
the descriptorRefs configuration section in the Assembly plugin declaration. To illustrate, consider
this example assembly descriptor:
<assembly>
<id>war-fragment</id>
<formats>
<format>zip</format>
</formats>
<includeBaseDirectory>false</includeBaseDirectory>
<dependencySets>
<dependencySet>
<outputDirectory>WEB-INF/lib</outputDirectory>
</dependencySet>
</dependencySets>
<fileSets>

Maven: The Complete Reference 150 / 316
<fileSet>
<directory>src/main/webapp</directory>
<outputDirectory>/</outputDirectory>
<excludes>
<exclude>**/web.xml</exclude>
</excludes>
</fileSet>
</fileSets>
</assembly>
Included in your project, this descriptor would be a useful way to bundle the project contents so that it
could be unpacked directly into an existing web application in order to add to it (for adding an extending
feature, say). However, if your team builds more than one of these web-fragment projects, it will likely
want to reuse this descriptor rather than duplicating it. To deploy this descriptor as its own artifact, we’re
going to put it in its own project, under the src/main/resources/assemblies directory.
The project structure for this assembly-descriptor artifact will look similar to the following:
|-- pom.xml
‘-- src
‘-- main
‘-- resources
‘-- assemblies
‘-- web-fragment.xml
Notice the path of our web-fragment descriptor file. By default, Maven includes the files from the
src/main/resources directory structure in the final jar, which means our assembly descriptor will be in-
cluded with no extra configuration on our part. Also, notice the assemblies/ path prefix, the Assembly
plugin expects this path prefix on all descriptors provided in the plugin classpath. It’s important that we
put our descriptor in the appropriate relative location, so it will be picked up by the Assembly plugin as it
executes.
Remember, this project is separate from your actual web-fragment project now; the assembly descrip-
tor has become its own artifact with its own version and, possibly, its own release cycle. Once you install
this new project using Maven, you’ll be able to reference it in your web-fragment projects. For clarity,
the build process should look something like this:
$ mvn install
(...)
[INFO] [install:install]
[INFO] Installing (...)/web-fragment-descriptor/target/\
web-fragment-descriptor-1.0-SNAPSHOT.jar
to /Users/~/.m2/repository/org/sonatype/mavenbook/assemblies/\
web-fragment-descriptor/1.0-SNAPSHOT/\

Maven: The Complete Reference 151 / 316
web-fragment-descriptor-1.0-SNAPSHOT.jar
[INFO] ---------------------------------------------------------------
[INFO] BUILD SUCCESSFUL
[INFO] ---------------------------------------------------------------
[INFO] Total time: 5 seconds
(...)
Since there are no sources for the web-fragment-descriptor project, the resulting jar artifact will
include nothing but our web-fragment assembly descriptor. Now, let’s use this new descriptor artifact:
<project>
(...)
<artifactId>my-web-fragment</artifactId>
(...)
<build>
<plugins>
<plugin>
<artifactId>maven-assembly-plugin</artifactId>
<version>2.2-beta-2</version>
<dependencies>
<dependency>
<groupId>org.sonatype.mavenbook.assemblies</ ←-
groupId>
<artifactId>web-fragment-descriptor</artifactId>
<version>1.0-SNAPSHOT</version>
</dependency>
</dependencies>
<executions>
<execution>
<id>assemble</id>
<phase>package</phase>
<goals>
<goal>single</goal>
</goals>
<configuration>
<descriptorRefs>
<descriptorRef>web-fragment</descriptorRef ←-
>
</descriptorRefs>
</configuration>
</execution>
</executions>
</plugin>
(...)
</plugins>
</build>
(...)
</project>

Maven: The Complete Reference 152 / 316
Two things are special about this Assembly plugin configuration:
• We have to include a plugin-level dependency declaration on our new web-fragment-descrip
tor artifact in order to have access to the assembly descriptor via the plugin’s classpath.
• Since we’re using a classpath reference instead of a file in the local project directory structure, we must
use the descriptorRefs section instead of the descriptor section. Also, notice that, while
the assembly descriptor is actually in the assemblies/web-fragment.xml location within the plugin’s
classpath, we reference it without the assemblies/ prefix. This is because the Assembly plugin assumes
that built-in assembly descriptors will always reside in the classpath under this path prefix.
Now, you’re free to reuse the POM configuration above in as many projects as you like, with the assurance
that all of their web-fragment assemblies will turn out the same. As you need to make adjustments to the
assembly format - maybe to include other resources, or to fine-tune the dependency and file sets - you can
simply increment the version of the assembly descriptor’s project, and release it again. POMs referencing
the assembly-descriptor artifact can then adopt this new version of the descriptor as they are able.
One final point about assembly-descriptor reuse: you may want to consider sharing the plugin configura-
tion itself as well as publishing the descriptor as an artifact. This is a fairly simple step; you simply add
the configuration listed above to the pluginManagement section of your parent POM, then reference
the managed plugin configuration from your module POM like this:
(...)
<build>
<plugins>
<plugin>
<artifactId>maven-assembly-plugin</artifactId>
</plugin>
(...)
If you’ve added the rest of the plugin’s configuration - listed in the previous example - to the pluginMa
nagement section of the project’s parent POM, then each project inheriting from that parent POM can
add a minimal entry like the one above and take advantage of an advanced assembly format in their own
builds.
8.6.2 Distribution (Aggregating) Assemblies
As mentioned above, the Assembly plugin provides multiple ways of creating many archive formats.
Distribution archives are typically very good examples of this, since they often combine modules from
a multi-module build, along with their dependencies and possibly, other files and artifacts besides these.

Maven: The Complete Reference 153 / 316
The distribution aims to include all these different sources into a single archive that the user can download,
unpack, and run with convenience. However, we also examined some of the potential drawbacks of using
the moduleSets section of the assembly descriptor - namely, that the parent-child relationships between
POMs in a build can prevent the availability of module artifacts in some cases.
Specifically, if module POMs reference as their parent the POM that contains the Assembly-plugin con-
figuration, that parent project will be built ahead of the module projects when the multi-module build
executes. The parent’s assembly expects to find artifacts in place for its modules, but these module
projects are waiting on the parent itself to finish building, a gridlock situation is reached and the parent
build cannot succeed (since it’s unable to find artifacts for its module projects). In other words, the child
project depends on the parent project which in turn depends on the child project.
As an example, consider the assembly descriptor below, designed to be used from the top-level project of
a multi-module hierarchy:
<assembly>
<id>distribution</id>
<formats>
<format>zip</format>
<format>tar.gz</format>
<format>tar.bz2</format>
</formats>
<moduleSets>
<moduleSet>
<includes>
<include>*-web</include>
</includes>
<binaries>
<outputDirectory>/</outputDirectory>
<unpack>true</unpack>
<includeDependencies>true</includeDependencies>
<dependencySets>
<dependencySet>
<outputDirectory>/WEB-INF/lib</outputDirectory>
</dependencySet>
</dependencySets>
</binaries>
</moduleSet>
<moduleSet>
<includes>
<include>*-addons</include>
</includes>
<binaries>
<outputDirectory>/WEB-INF/lib</outputDirectory>
<includeDependencies>true</includeDependencies>
<dependencySets>

Maven: The Complete Reference 154 / 316
<dependencySet/>
</dependencySets>
</binaries>
</moduleSet>
</moduleSets>
</assembly>
Given a parent project - called app-parent - with three modules called app-core,app-web, and app-
addons, notice what happens when we try to execute this multi-module build:
$ mvn package
[INFO] Reactor build order:
[INFO] app-parent <----- PARENT BUILDS FIRST
[INFO] app-core
[INFO] app-web
[INFO] app-addons
[INFO] ---------------------------------------------------------------
[INFO] Building app-parent
[INFO]task-segment: [package]
[INFO] ---------------------------------------------------------------
[INFO] [site:attach-descriptor]
[INFO] [assembly:single {execution: distro}]
[INFO] Reading assembly descriptor: src/main/assembly/distro.xml
[INFO] ---------------------------------------------------------------
[ERROR] BUILD ERROR
[INFO] ---------------------------------------------------------------
[INFO] Failed to create assembly: Artifact:
org.sonatype.mavenbook.assemblies:app-web:jar:1.0-SNAPSHOT (included by ←-
module)
does not have an artifact with a file. Please ensure the package phase is
run before the assembly is generated.
...
The parent project - app-parent - builds first. This is because each of the other projects lists that POM
as its parent, which causes it to be forced to the front of the build order. The app-web module, which
is the first module to be processed in the assembly descriptor, hasn’t been built yet. Therefore, it has no
artifact associated with it, and the assembly cannot succeed.
One workaround for this is to remove the executions section of the Assembly-plugin declaration, that
binds the plugin to the package lifecycle phase in the parent POM, keeping the configuration section
intact. Then, execute Maven with two command-line tasks: the first, package, to build the multi-module
project graph, and a second, assembly:assembly, as a direct invocation of the assembly plugin to
consume the artifacts built on the previous run, and create the distribution assembly. The command line
for such a build might look like this:

Maven: The Complete Reference 155 / 316
$ mvn package assembly:assembly
However, this approach has several drawbacks. First, it makes the distribution-assembly process more
of a manual task that can increase the complexity and potential for error in the overall build process
significantly. Additionally, it could mean that attached artifacts - which are associated in memory as the
project build executes - are not reachable on the second pass without resorting to file-system references.
Instead of using a moduleSet to collect the artifacts from your multi-module build, it often makes more
sense to employ a low-tech approach: using a dedicated distribution project module and inter-project
dependencies. In this approach, you create a new module in your build whose sole purpose is to assemble
the distribution. This module POM contains dependency references to all the other modules in the project
hierarchy, and it configures the Assembly plugin to be bound the package phase of its build lifecycle.
The assembly descriptor itself uses the dependencySets section instead of the moduleSets section
to collect module artifacts and determine where to include them in the resulting assembly archive. This
approach escapes the pitfalls associated with the parent-child relationship discussed above, and has the
additional advantage of using a simpler configuration section within the assembly descriptor itself to do
the job.
To do this, we can create a new project structure that’s very similar to the one used for the module-set
approach above, with the addition of a new distribution project, we might end up with five POMs in total:
app-parent,app-core,app-web,app-addons, and app-distribution. The new app-
distribution POM looks similar to the following:
<project>
<parent>
<artifactId>app-parent</artifactId>
<groupId>org.sonatype.mavenbook.assemblies</groupId>
<version>1.0-SNAPSHOT</version>
</parent>
<modelVersion>4.0.0</modelVersion>
<artifactId>app-distribution</artifactId>
<name>app-distribution</name>
<dependencies>
<dependency>
<artifactId>app-web</artifactId>
<groupId>org.sonatype.mavenbook.assemblies</groupId>
<version>1.0-SNAPSHOT</version>
<type>war</type>
</dependency>
<dependency>
<artifactId>app-addons</artifactId>
<groupId>org.sonatype.mavenbook.assemblies</groupId>
<version>1.0-SNAPSHOT</version>
</dependency>

Maven: The Complete Reference 156 / 316
<!-- Not necessary since it’s brought in via app-web.
<dependency> [2]
<artifactId>app-core</artifactId>
<groupId>org.sonatype.mavenbook.assemblies</groupId>
<version>1.0-SNAPSHOT</version>
</dependency>
-->
</dependencies>
</project>
Notice that we have to include dependencies for the other modules in the project structure, since we don’t
have a modules section to rely on in this POM. Also, notice that we’re not using an explicit dependency on
app-core. Since it’s also a dependency of app-web, we don’t need to process it (or, avoid processing
it) twice.
Next, when we move the distro.xml assembly descriptor into the app-distribution project, we must
also change it to use a dependencySets section, like this:
<assembly>
...
<dependencySets>
<dependencySet>
<includes>
<include>*-web</include>
</includes>
<useTransitiveDependencies>false</useTransitiveDependencies>
<outputDirectory>/</outputDirectory>
<unpack>true</unpack>
</dependencySet>
<dependencySet>
<excludes>
<exclude>*-web</exclude>
</excludes>
<useProjectArtifact>false</useProjectArtifact>
<outputDirectory>/WEB-INF/lib</outputDirectory>
</dependencySet>
</dependencySets>
...
</assembly>
This time, if we run the build from the top-level project directory, we get better news:
$ mvn package
(...)
[INFO] ---------------------------------------------------------------
[INFO] Reactor Summary:

Maven: The Complete Reference 157 / 316
[INFO] ---------------------------------------------------------------
[INFO] module-set-distro-parent ...............SUCCESS [3.070s]
[INFO] app-core .............................. SUCCESS [2.970s]
[INFO] app-web ............................... SUCCESS [1.424s]
[INFO] app-addons ............................ SUCCESS [0.543s]
[INFO] app-distribution ...................... SUCCESS [2.603s]
[INFO] ---------------------------------------------------------------
[INFO] ---------------------------------------------------------------
[INFO] BUILD SUCCESSFUL
[INFO] ---------------------------------------------------------------
[INFO] Total time: 10 seconds
[INFO] Finished at: Thu May 01 18:00:09 EDT 2008
[INFO] Final Memory: 16M/29M
[INFO] ---------------------------------------------------------------
As you can see, the dependency-set approach is much more stable and - at least until Maven’s internal
project-sorting logic catches up with the Assembly plugin’s capabilities, - involves less opportunity to get
things wrong when running a build.
8.7 Summary
As we’ve seen in this chapter, the Maven Assembly plugin offers quite a bit of potential for creating
custom archive formats. While the details of these assembly archives can be complex, they certainly
don’t have to be in all cases - as we saw with built-in assembly descriptors. Even if your aim is to include
your project’s dependencies and selected project files in some unique, archived directory structure, writing
a custom assembly descriptor doesn’t have to be an arduous task.
Assemblies are useful for a wide array of applications, but are most commonly used as application dis-
tributions of various sorts. And, while there are many different ways to use the Assembly plugin, using
standardized assembly-descriptor artifacts and avoiding moduleSets when creating distributions con-
taining binaries are two sure ways to avoid problems.

Maven: The Complete Reference 158 / 316
Chapter 9
Properties and Resource Filtering
9.1 Introduction
Throughout this book, you will notice references to properties which can be used in a POM file. Sibling
dependencies in a multi-project build can be referenced using the ${project.groupId} and ${project.version}
properties and any part of the POM can be referenced by prefixing the variable name with "project.". Envi-
ronment variables and Java System properties can be referenced, as well as values from your ~/.m2/settings.xml
file. What you haven’t seen yet is an enumeration of the possible property values and some discussion
about how they can be used to help you create portable builds. This chapter provides such an enumeration.
If you’ve been using property references in your POM, you should also know that Maven has a feature
called Resource Filtering which allows you to replace property references in any resource files stored
under src/main/resources. By default this feature is disabled to prevent accidental replacement of property
references. This feature can be used to target builds toward a specific platform and to externalize important
build variables to properties files, POMs, or profiles. This chapter introduces the resource filtering feature
and provides a brief discussion of how it can be used to create portable enterprise builds.

Maven: The Complete Reference 159 / 316
9.2 Maven Properties
You can use Maven properties in a pom.xml file or in any resource that is being processed by the Maven
Resource plugin’s filtering features. A property is always surrounded by ${ and }. For example, to
reference the project.version property, one would write:
1.0
There are some implicit properties available in any Maven project, these implicit properties are:
project.*
Maven Project Object Model (POM). You can use the project.*prefix to reference values in a
Maven POM.
settings.*
Maven Settings. You use the settings.*prefix to reference values from your Maven Settings
in ~/.m2/settings.xml.
env.*
Environment variables like PATH and M2_HOME can be referenced using the env.*prefix.
System Properties
Any property which can be retrieved from the System.getProperty() method can be refer-
enced as a Maven property.
In addition to the implicit properties listed above, a Maven POM, Maven Settings, or a Maven Profile
can define a set of arbitrary, user-defined properties. The following sections provide some detail on the
various properties available in a Maven project.
9.2.1 Maven Project Properties
When a Maven Project Property is referenced, the property name is referencing a property of the Maven
Project Object Model (POM). Specifically, you are referencing a property of the org.apache.maven.
model.Model class which is being exposed as the implicit variable project. When you reference
a property using this implicit variable, you are using simple dot notation to reference a bean property
of the Model object. For example, when you reference ${project.version}, you are really invoking the
getVersion() method on the instance of Model that is being exposed as project.

Maven: The Complete Reference 160 / 316
The POM is also represented in the pom.xml document present in all Maven projects. Anything in a
Maven POM can be referenced with a property. A complete reference for the POM structure is available
at http://maven.apache.org/ref/3.0.3/maven-model/maven.html. The following list shows some common
property references from the Maven project.
project.groupId and project.version
Projects in a large, multi-module build often share the same groupId and version identifiers.
When you are declaring interdependencies between two modules which share the same groupId
and version, it is a good idea to use a property reference for both:
<dependencies>
<dependency>
<groupId>${project.groupId}</groupId>
<artifactId>sibling-project</artifactId>
<version>${project.version}</version>
</dependency>
</dependencies>
project.artifactId
A project’s artifactId is often used as the name of a deliverable. For example, in a project with
WAR packaging, you will want to generate a WAR file without the version identifiers. To do this,
you would reference the project.artifactId in your POM file like this:
<build>
<finalName>${project.artifactId}</finalName>
</build>
project.name and project.description
The name and project description can often be useful properties to reference from documentation.
Instead of having to worry that all of your site documents maintain the same short descriptions, you
can just reference these properties.
project.build.*
If you are ever trying to reference output directories in Maven, you should never use a literal value
like target/classes. Instead you should use property references to refer to these directories.
• project.build.sourceDirectory
• project.build.scriptSourceDirectory
• project.build.testSourceDirectory
• project.build.outputDirectory

Maven: The Complete Reference 161 / 316
• project.build.testOutputDirectory
• project.build.directory
sourceDirectory,scriptSourceDirectory, and testSourceDirectory provide access
to the source directories for the project. outputDirectory and testOutputDirectory provide
access to the directories where Maven is going to put bytecode or other build output. directory refers
to the directory which contains all of these output directories.
project.baseUri
If you need a valid URI for your project’s base directory, you can use the ${project.baseUri}
property. If your project is stored in the directory /tmp/simple,${project.baseUri} will
resolve to file:/private/tmp/simple/.
Other Project Property references
There are hundreds of properties to reference in a POM. A complete reference for the POM structure
is available at http://maven.apache.org/ref/3.0.3/maven-model/maven.html.
For a full list of properties available on the Maven Model object, take a look at the JavaDoc for the
maven-model project here http://maven.apache.org/ref/3.0.3/maven-model/apidocs/index.html. Once
you load this JavaDoc, take a look at the Model class. From this Model class JavaDoc, you should
be able to navigate to the POM property you wish to reference. If you needed to reference the output
directory of the build, you can use the Maven Model JavaDoc to see that the output directory is referenced
via model.getBuild().getOutputDirectory(); this method call would be translated to the
Maven property reference ${project.build.outputDirectory}.
For more information about the Maven Model module, the module which defines the structure of the
POM, see the Maven Model project page at http://maven.apache.org/ref/3.0.3/maven-model.
9.2.2 Maven Settings Properties
You can also reference any properties in the Maven Local Settings file which is usually stored in ~/.m2/settings.xml.
This file contains user-specific configuration such as the location of the local repository and any servers,
profiles, and mirrors configured by a specific user.
A full reference for the Local Settings file and corresponding properties is available here http://maven.apache.org/-
ref/3.0.3/maven-settings/settings.html.

Maven: The Complete Reference 162 / 316
9.2.3 Environment Variable Properties
Environment variables can be referenced with the env.* prefix. Some interesting environment variables
are listed in the following list:
env.PATH
Contains the current PATH in which Maven is running. The PATH contains a list of directories used
to locate executable scripts and programs.
env.HOME
(On *nix systems) this variable points to a user’s home directory. Instead of referencing this, you
should use the ${user.home}
env.JAVA_HOME
Contains the Java installation directory. This can point to either a Java Development Kit (JDK)
installation or a Java Runtime Environment (JRE). Instead of using this, you should consider refer-
encing the ${java.home} property.
env.M2_HOME
Contains the Maven 2 installation directory.
While they are available, you should always use the Java System properties if you have the choice. If
you need a user’s home directory use ${user.home} instead of ${env.HOME}. If you do this, you’ll end
up with a more portable build that is more likely to adhere to the Write-Once-Run-Anywhere (WORA)
promise of the Java platform.
9.2.4 Java System Properties
Maven exposes all properties from java.lang.System. Anything you can retrieve from System.
getProperty() you can reference in a Maven property. The following table lists available properties:
Table 9.1: Java System Properties
System Property Description
java.version Java Runtime Environment version
java.vendor Java Runtime Environment vendor
java.vendor.url Java vendor URL
java.home Java installation directory
java.vm.specification.version Java Virtual Machine specification version

Maven: The Complete Reference 163 / 316
Table 9.1: (continued)
java.vm.specification.vendor Java Virtual Machine specification vendor
java.vm.specification.name Java Virtual Machine specification name
java.vm.version Java Virtual Machine implementation version
java.vm.vendor Java Virtual Machine implementation vendor
java.vm.name Java Virtual Machine implementation name
java.specification.version Java Runtime Environment specification
version
java.specification.vendor Java Runtime Environment specification vendor
java.specification.name Java Runtime Environment specification name
java.class.version Java class format version number
java.class.path Java class path
java.ext.dirs Path of extension directory or directories
os.name Operating system name
os.arch Operating system architecture
os.version Operating system version
file.separator File separator ("/" on UNIX, "\" on Windows)
path.separator Path separator (":" on UNIX, ";" on Windows)
line.separator Line separator ("\n" on UNIX and Windows)
user.name User’s account name
user.home User’s home directory
user.dir User’s current working
9.2.5 User-defined Properties
In addition to the implicit properties provided by the POM, Maven Settings, environment variables, and
the Java System properties, you have the ability to define your own arbitrary properties. Properties can be
defined in a POM or in a Profile. The properties set in a POM or in a Maven Profile can be referenced just
like any other property available throughout Maven. User-defined properties can be referenced in a POM,
or they can be used to filter resources via the Maven Resource plugin. Here’s an example of defining
some arbitrary properties in a Maven POM.
User-defined Properties in a POM
<project>
...
<properties>
<arbitrary.property.a>This is some text</arbitrary.property.a>
<hibernate.version>3.3.0.ga</hibernate.version>

Maven: The Complete Reference 164 / 316
</properties>
...
<dependencies>
<dependency>
<groupId>org.hibernate</groupId>
<artifactId>hibernate</artifactId>
<version>${hibernate.version}</version>
</dependency>
</dependencies>
...
</project>
The previous example defines two properties: arbitrary.property.a and hibernate.vers
ion. The hibernate.version is referenced in a dependency declaration. Using the period character
as a separator in property names is a standard practice throughout Maven POMs and Profiles. The next
example shows you how to define a property in a profile from a Maven POM.
User-defined Properties in a Profile in a POM
<project>
...
<profiles>
<profile>
<id>some-profile</id>
<properties>
<arbitrary.property>This is some text</arbitrary.property>
</properties>
</profile>
</profiles>
...
</project>
The previous example demonstrates the process of defining a user-defined property in a profile from a
Maven POM. For more information about user-defined properties and profiles, see Chapter 5.
9.3 Resource Filtering
You can use Maven to perform variable replacement on project resources. When resource filtering is
activated, Maven will scan resources for property references surrounded by ${ and }. When it finds these
references it will replace them with the appropriate value in much the same way the properties defined in

Maven: The Complete Reference 165 / 316
the previous section can be referenced from a POM. This feature is especially helpful when you need to
parameterize a build with different configuration values depending on the target deployment platform.
Often a .properties file or an XML document in src/main/resources will contain a reference to an external
resource such as a database or a network location which needs to be configured differently depending on
the target deployment environment. For example, a system which reads data from a database has an XML
document which contains the JDBC URL along with credentials for the database. If you need to use a
different database in development and a different database in production. You can either use a technology
like JNDI to externalize the configuration from the application in an application server, or you can create
a build which knows how to replace variables with different values depending on the target platform.
Using Maven resource filtering you can reference Maven properties and then use Maven profiles to de-
fine different configuration values for different target deployment environments. To illustrate this feature,
assume that you have a project which uses the Spring Framework to configure a BasicDataSource
from the Commons DBCP project. Your project may contain a file in src/main/resources named applica-
tionContext.xml which contains the XML listed in Referencing Maven Properties from a Resource.
Referencing Maven Properties from a Resource
<beans xmlns="http://www.springframework.org/schema/beans"
xmlns:xsi="http://www.w3.org/2001/XMLSchema-instance"
xsi:schemaLocation="http://www.springframework.org/schema/beans
http://www.springframework.org/schema/beans/ ←-
spring-beans-2.5.xsd">
<bean id="someDao" class="com.example.SomeDao">
<property name="dataSource" ref="dataSource"/>
</bean>
<bean id="dataSource" destroy-method="close"
class="org.apache.commons.dbcp.BasicDataSource">
<property name="driverClassName" value="${jdbc.driverClassName}"/>
<property name="url" value="${jdbc.url}"/>
<property name="username" value="${jdbc.username}"/>
<property name="password" value="${jdbc.password}"/>
</bean>
</beans>
Your program would read this file at runtime, and your build is going to replace the references to prop-
erties like jdbc.url and jdbc.username with the values you defined in your pom.xml. Resource
filtering is disabled by default to prevent any unintentional resource filtering. To turn on resource filtering,
you need to use the resources child element of the build element in a POM. Defining Variables and
Activating Resource Filtering shows a POM which defines the variables referenced in Referencing Maven
Properties from a Resource and which activates resource filtering for every resource under src/main/re-

Maven: The Complete Reference 166 / 316
sources.
Defining Variables and Activating Resource Filtering
<project>
...
<properties>
<jdbc.driverClassName>
com.mysql.jdbc.Driver</jdbc.driverClassName>
<jdbc.url>jdbc:mysql://localhost:3306/development_db</jdbc.url>
<jdbc.username>dev_user</jdbc.username>
<jdbc.password>s3cr3tw0rd</jdbc.password>
</properties>
...
<build>
<resources>
<resource>
<directory>src/main/resources</directory>
<filtering>true</filtering>
</resource>
</resources>
</build>
...
<profiles>
<profile>
<id>production</id>
<properties>
<jdbc.driverClassName>oracle.jdbc.driver.OracleDriver</ ←-
jdbc.driverClassName>
<jdbc.url>jdbc:oracle:thin:@proddb01:1521:PROD</jdbc.url>
<jdbc.username>prod_user</jdbc.username>
<jdbc.password>s00p3rs3cr3t</jdbc.password>
</properties>
</profile>
</profiles>
</project>
The four variables are defined in the properties element, and resource filtering is activated for re-
sources under src/main/resources. Resource filtering is deactivated by default, and to activate it you must
explicitly set filtering to true for the resources stored in your project. Filtering is deactivated by
default to prevent accidental, unintentional filtering during your build. If you build a project with the
resource from Referencing Maven Properties from a Resource and the POM from Defining Variables and
Activating Resource Filtering and if you list the contents of the resource in target/classes, you should see
that it contains the filtered resource:
$ mvn install
...

Maven: The Complete Reference 167 / 316
$ cat target/classes/applicationContext.xml
...
<bean id="dataSource" destroy-method="close"
class="org.apache.commons.dbcp.BasicDataSource">
<property name="driverClassName" value="com.mysql.jdbc.Driver"/>
<property name="url" value="jdbc:mysql://localhost:3306/development_db ←-
"/>
<property name="username" value="dev_user"/>
<property name="password" value="s3cr3tw0rd"/>
</bean>
...
The POM in Defining Variables and Activating Resource Filtering also defines a production profile
under the profiles/profile element which overrides the default properties with values that would
be appropriate for a production environment. In this particular POM, the default values for the database
connection are for a local MySQL database installed on a developer’s machine. When the project is built
with the production profile activated, Maven will configure the system to connect to a production Oracle
database using a different driver class, URL, username, and password. If you build a project with the
resource from Referencing Maven Properties from a Resource and the POM from Defining Variables and
Activating Resource Filtering with the production profile activated and if you list the contents of the
resource in target/classes, you should see that it contains the filtered resource with production values:
$ mvn -Pproduction install
...
$ cat target/classes/applicationContext.xml
...
<bean id="dataSource" destroy-method="close"
class="org.apache.commons.dbcp.BasicDataSource">
<property name="driverClassName"
value="oracle.jdbc.driver.OracleDriver"/>
<property name="url" value="jdbc:oracle:thin:@proddb01:1521:PROD"/>
<property name="username" value="prod_user"/>
<property name="password" value="s00p3rs3cr3t"/>
</bean>
...

Maven: The Complete Reference 168 / 316
Chapter 10
Site Generation
10.1 Introduction
Successful software applications are rarely produced by a team of one. When we’re talking about any
software worth writing, we’re usually dealing with teams of collaborating developers ranging anywhere
in size from a handful of programmers working in a small team to hundreds or thousands of programmers
working in a large distributed environment. Most open source projects (such as Maven) succeed or fail
based on the presence or absence of well written documentation for a widely-distributed, ad-hoc collection
of users and developers. In all environments it is important for projects to have an easy way to publish
and maintain online documentation. Software development is primarily an exercise in collaboration and
communication, and publishing a Maven site is one way to make sure that your project is communicating
with your end-users.
A web site for an open source project is often the foundation for both the end-user and developer com-
munities alike. End-users look to a project’s web site for tutorials, user guides, API documentation, and
mailing list archives, and developers look to a project’s web site for design documents, code reports, issue
tracking, and release plans. Large open-source projects may be integrated with wikis, issue trackers, and
continuous integration systems which help to augment a project’s online documentation with material
that reflects the current status of ongoing development. If a new open source project has an inadequate
web site which fails to convey basic information to prospective users, it often is a sign that the project in
question will fail to be adopted. In other words, for an open source project, the site and the documentation
are as important to the formation of a community as the code itself.

Maven: The Complete Reference 169 / 316
Maven can be used to create a project web site to capture information which is relevant to both the
end-user and the developer audience. Out of the box, Maven can generate reports on everything from
unit test failures to package coupling to reports on code quality. Maven provides you with the ability
to write simple web pages and render those pages against a consistent project template. Maven can
publish site content in multiple formats including XHTML and PDF. Maven can be used to generate API
documentation and can also be used to embed Javadoc and source code in your project’s binary release
archive. Once you’ve used Maven to generate all of your project’s end-user and developer documentation,
you can then use Maven to publish your web site to a remote server.
10.2 Building a Project Site with Maven
To illustrate the process of building a project website, create a sample Maven project with the archetype
plugin:
$ mvn archetype:create -DgroupId=org.sonatype.mavenbook -DartifactId= ←-
sample-project
This creates the simplest possible Maven project with one Java class in src/main/java and a simple POM.
You can then build a Maven site by simply running mvn site. To build the site and preview the result
in a browser, you can run mvn site:run, this will build the site and start an embedded instance of
Jetty.
$ cd sample-project
$ mvn site:run
[INFO] Scanning for projects...
[INFO] Searching repository for plugin with prefix: ’site’.
[INFO] ←-
------------------------------------------------------------------------ ←-
[INFO] Building sample-project
[INFO]task-segment: [site:run] (aggregator-style)
[INFO] ←-
------------------------------------------------------------------------ ←-
[INFO] Setting property: classpath.resource.loader.class =>
’org.codehaus.plexus.velocity.ContextClassLoaderResourceLoader’.
[INFO] Setting property: velocimacro.messages.on => ’false’.
[INFO] Setting property: resource.loader => ’classpath’.
[INFO] Setting property: resource.manager.logwhenfound => ’false’.
[INFO] [site:run]
2008-04-26 11:52:26.981::INFO: Logging to STDERR via org.mortbay.log. ←-
StdErrLog
[INFO] Starting Jetty on http://localhost:8080/
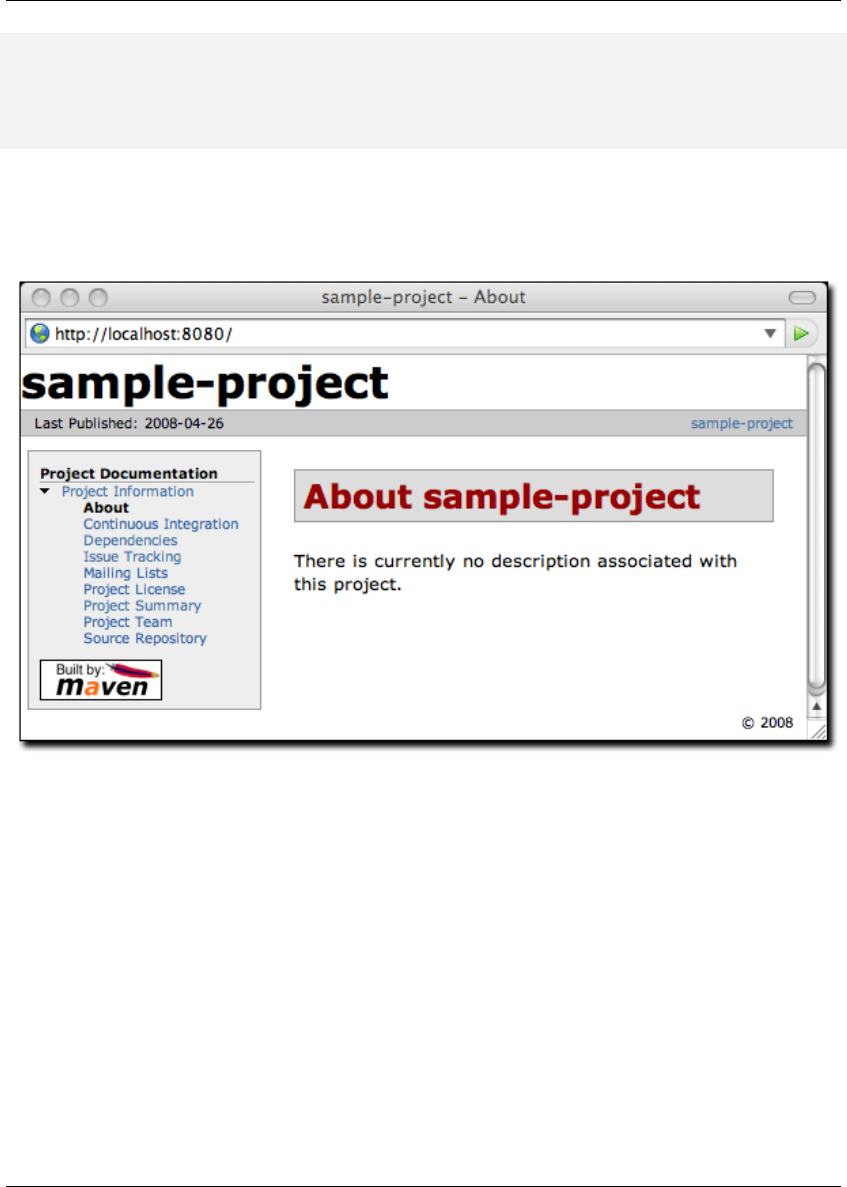
Maven: The Complete Reference 170 / 316
2008-04-26 11:52:26.046::INFO: jetty-6.1.5
2008-04-26 11:52:26.156::INFO: NO JSP Support for /, did not find
org.apache.jasper.servlet.JspServlet
2008-04-26 11:52:26.244::INFO: Started SelectChannelConnector@0 ←-
.0.0.0:8080
Once Jetty starts and is listening to port 8080, you can see the project’s site when you go to http://localhost:8080/-
in a web browser. You can see the results in Figure 10.1.
Figure 10.1: Simple Generated Maven Site
If you click around on this simple site, you’ll see that it isn’t very helpful as a real project site. There’s
just nothing there (and it doesn’t look very good). Since the sample-project hasn’t configured any
developers, mailing lists, issue tracking providers, or source code repositories, all of these pages on the
project site will have no information. Even the index page of the site states, "There is currently no
description associated with this project". To customize the site, you’ll have to start to add content to the
project and to the project’s POM.
If you are going to use the Maven Site plugin to build your project’s site, you’ll want to customize it.
You will want to populate some of the important fields in the POM that tell Maven about the people

Maven: The Complete Reference 171 / 316
participating in the project, and you’ll want to customize the left-hand navigation menu and the links
visible in the header of the page. To customize the contents of the site and affect the contents of the
left-hand navigation menu, you will need to edit the site descriptor.
10.3 Customizing the Site Descriptor
When you add content to the site, you are going to want to modify the left-hand navigation menu that is
generated with your site. The following site descriptor customizes the logo in the upper left-hand corner
of the site. In addition to customizing the header of the site, this descriptor adds a menu section to the
left-hand navigation menu under the heading "Sample Project". This menu contains a single link to an
overview page.
An Initial Site Descriptor
<project name="Sample Project">
<bannerLeft>
<name>Sonatype</name>
<src>images/logo.png</src>
<href>http://www.sonatype.com</href>
</bannerLeft>
<body>
<menu name="Sample Project">
<item name="Overview" href="index.html"/>
</menu>
<menu ref="reports"/>
</body>
</project>
This site descriptor references one image. This logo.png image should be placed in ${basedir}/src/site/resources/images.
In addition to the change to the site descriptor, you’ll want to create a simple index.apt page in ${basedir}/src/site/apt.
Put the following content in index.apt, it will be transformed to the index.html and serve as the first page
a user sees when they come to your project’s Maven-generated web site.
Welcome to the Sample Project, we hope you enjoy your time
on this project site. We’ve tried to assemble some
great user documentation and developer information, and
we’re really excited that you’ve taken the time to visit
this site.
What is Sample Project
Well, it’s easy enough to explain. This sample project is
a sample of a project with a Maven-generated site from
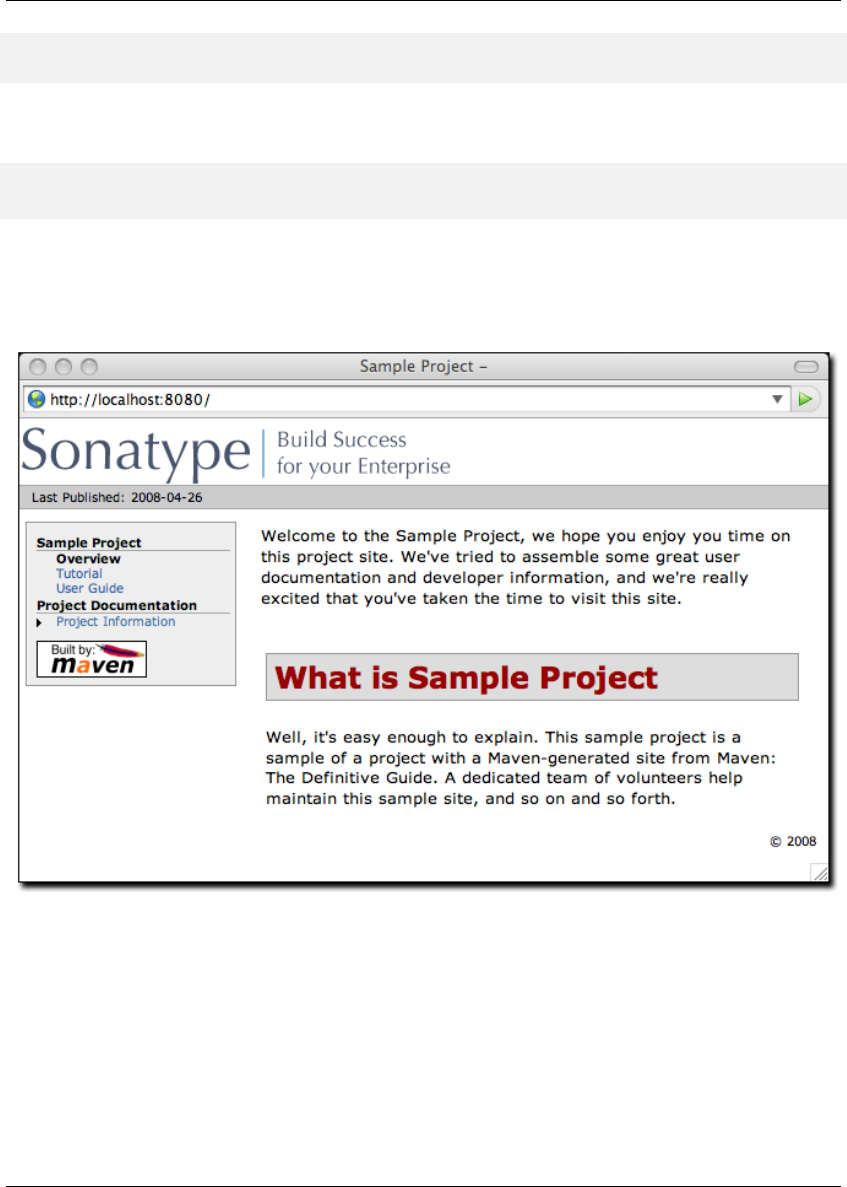
Maven: The Complete Reference 172 / 316
Maven: The Definitive Guide. A dedicated team of volunteers
help maintain this sample site, and so on and so forth.
To preview the site, run mvn clean site followed by mvn site:run:
$ mvn clean site
$ mvn site:run
Once you do this, load the page in a browser by going to http://localhost:8080. You should see something
similar to the screenshot in Figure 10.2.
Figure 10.2: Customized Sample Project Web Site

Maven: The Complete Reference 173 / 316
10.3.1 Customizing the Header Graphics
To customize the graphics which appear in the upper left-hand and right-hand corners of the page, you
can use the bannerLeft and bannerRight elements in a site descriptor.
Adding a Banner Left and Banner Right to Site Descriptor
<project name="Sample Project">
<bannerLeft>
<name>Left Banner</name>
<src>images/banner-left.png</src>
<href>http://www.google.com</href>
</bannerLeft>
<bannerRight>
<name>Right Banner</name>
<src>images/banner-right.png</src>
<href>http://www.yahoo.com</href>
</bannerRight>
...
</project>
Both the bannerLeft and bannerRight elements take name,src, and href child elements. In
the site descriptor shown above, the Maven Site plugin will generate a site with banner-left.png in the
left-hand corner of the page and banner-right in the right-hand corner of the page. Maven is going to look
in ${basedir}/src/site/resources/images for these images.
10.3.2 Customizing the Navigation Menu
To customize the contents of the navigation menu, use the menu element with item child elements. The
menu element adds a section to the left-hand navigation menu. Each item is rendered as a link in that
menu.
Creating Menu Items in a Site Descriptor
<project name="Sample Project">
...
<body>
<menu name="Sample Project">
<item name="Introduction" href="index.html"/>

Maven: The Complete Reference 174 / 316
<item name="News" href="news.html"/>
<item name="Features" href="features.html"/>
<item name="Installation" href="installation.html"/>
<item name="Configuration" href="configuration.html"/>
<item name="FAQ" href="faq.html"/>
</menu>
...
</body>
</project>
Menu items can also be nested. If you nest items, you will be creating a collapsible menu in the left-hand
navigation menu. The following example adds a link "Developer Resources" which links to /developer/in-
dex.html. When a user is looking at the Developer Resources page, the menu items below the Developer
Resources menu item will be expanded.
Adding a Link to the Site Menu
<project name="Sample Project">
...
<body>
...
<menu name="Sample Project">
...
<item name="Developer Resources" href="/developer/index.html"
collapse="true">
<item name="System Architecture" href="/developer/ ←-
architecture.html"/>
<item name="Embedder’s Guide" href="/developer/embedding. ←-
html"/>
</item>
</menu>
...
</body>
</project>
When an item has the collapse attribute set to true, Maven will collapse the item until a user is
viewing that specific page. In the previous example, when the user is not looking at the Developer
Resources page, Maven will not display the System Architecture and Embedder’s Guide links; instead, it
will display an arrow pointing to the Developer Resources link. When the user is viewing the Developer
Resources page it will show these links with an arrow pointing down.

Maven: The Complete Reference 175 / 316
10.4 Site Directory Structure
Maven places all site documents under src/site. Documents of similar format are placed in subdirectories
of src/site. All APT documents should be in src/site/apt, all FML documents should be in src/site/fml,
and XDoc documents should be in src/site/xdoc. The site descriptor should be in src/site/site.xml, and
all resources should be stored under src/site/resources. When the Maven Site plugin builds a web site, it
will copy everything in the resources directory to the root of the site. If you store an image in src/site/re-
sources/images/test.png, you would refer to the image from your site documentation using the relative
path images/test.png.
The following example shows the location of all files in a project which contains APT, FML, HTML,
XHTML, and some XDoc. Note that the XHTML content is simply stored in the resources directory.
The architecture.html file will not be processed by Doxia, it will simply be copied to the output directory.
You can use this approach if you want to include unprocessed HTML content and you don’t want to take
advantage of the templating and formatting capabilities of Doxia and the Maven Site plugin.
sample-project
+- src/
+- site/
+- apt/
| +- index.apt
| +- about.apt
| |
| +- developer/
| +- embedding.apt
|
+- fml/
| +- faq.fml
|
+- resources/
| +- images/
| | +- banner-left.png
| | +- banner-right.png
| |
| +- architecture.html
| +- jira-roadmap-export-2007-03-26.html
|
+- xdoc/
| +- xml-example.xml
|
+- site.xml
Note that the developer documentation is stored in src/site/apt/developer/embedding.apt. This extra di-
rectory below the apt directory will be reflected in the location of the resulting HTML page on the site.

Maven: The Complete Reference 176 / 316
When the Site plugin renders the contents of the src/site/apt directory it will produce HTML output in
directories relative to the site root. If a file is in the apt directory it will be in the root directory of the gen-
erated web site. If a file is in the apt/developer directory it will be generated in the developer/ directory
of the web site.
10.5 Writing Project Documentation
Maven uses a documentation-processing engine called Doxia which reads multiple source formats into
a common document model. Doxia can then manipulate documents and render the result into several
output formats, such as PDF or XHTML. To write document for your project, you will need to write
your content in a format which can be parsed by Doxia. Doxia currently has support for Almost Plain
Text (APT), XDoc (a Maven 1.x documentation format), XHTML, and FML (useful for FAQ documents)
formats.
This chapter has a cursory introduction to the APT format. For a deeper understand of the APT format,
or for an in-depth introduction to XDoc or FML, please see the following resources:
• APT Reference: http://maven.apache.org/doxia/format.html
• XDoc Reference: http://jakarta.apache.org/site/jakarta-site2.html
• FML Reference: http://maven.apache.org/doxia/references/fml-format.html
10.5.1 APT Example
APT Document shows a simple APT document with an introductory paragraph and a simple list. Note
that the list is terminated by the psuedo-element "[]".
APT Document
---
Introduction to Sample Project
---
Brian Fox
---
26-Mar-2008
---

Maven: The Complete Reference 177 / 316
Welcome to Sample Project
This is a sample project, welcome! We’re excited that you’ve decided to
read the index page of this Sample Project. We hope you enjoy the simple
sample project we’ve assembled for you.
Here are some useful links to get you started:
*{{{news.html}News}}
*{{{features.html}Features}}
*{{{faq.html}FAQ}}
If the APT document from APT Document were placed in src/site/apt/index.apt, the Maven Site plugin
will parse the APT using Doxia and produce XHTML content in index.html.
10.5.2 FML Example
Many projects maintain a Frequently Asked Questions (FAQ) page. FAQ Markup Language Document
shows an example of an FML document.
FAQ Markup Language Document
<?xml version="1.0" encoding="UTF-8"?>
<faqs title="Frequently Asked Questions">
<part id="General">
<faq id="sample-project-sucks">
<question>Sample project doesn’t work. Why does sample
project suck?</question>
<answer>
<p>
We resent that question. Sample wasn’t designed to ←-
work, it was
designed to show you how to use Maven. If you really ←-
think
this project sucks, then keep it to yourself. We’re ←-
not
interested in your pestering questions.
</p>
</answer>
</faq>
<faq id="sample-project-source">
<question>I want to put some code in Sample Project,

Maven: The Complete Reference 178 / 316
how do I do this?</question>
<answer>
<p>
If you want to add code to this project, just start ←-
putting
Java source in src/main/java. If you want to put ←-
some source
code in this FAQ, use the source element:
</p>
<source>
for( int i = 0; i < 1234; i++ ) {
// do something brilliant
}
</source>
</answer>
</faq>
</part>
</faqs>
10.6 Deploying Your Project Website
Once your project’s documentation has been written and you’ve creates a site to be proud of, you will
want to deploy it to a server. To deploy your site you’ll use the Maven Site plugin which can take care of
deploying your project’s site to a remote server using a number of methods including FTP, SCP, and DAV.
To deploy the site using DAV, configure the site entry of the distributionManagement section in
the POM, like this:
Configuring Site Deployment
<project>
...
<distributionManagement>
<site>
<id>sample-project.website</id>
<url>dav:https://dav.sample.com/sites/sample-project</url>
</site>
</distributionManagement>
...
</project>
The url in distribution management has a leading indicator dav which tells the Maven Site plugin to
deploy the site to a URL that is able to understand WebDAV. Once you have added the distribution

Maven: The Complete Reference 179 / 316
Management section to our sample-project POM, we can try deploying the site:
$ mvn clean site-deploy
If you have a server configured properly that can understand WebDAV, Maven will deploy your project’s
web site to the remote server. If you are deploying this project to a site and server visible to the public,
you are going to want to configure your web server to access for credentials. If your web server asks for
a username and password (or other credentials, you can configure this values in your ~/.m2/settings.xml).
10.6.1 Configuring Server Authentication
To configure a username/password combination for use during the site deployment, we’ll include the
following in $HOME/.m2/settings.xml:
Storing Server Authentication in User-specific Settings
<settings>
...
<servers>
<server>
<id>sample-project.website</id>
<username>jdcasey</username>
<password>b@dp@ssw0rd</password>
</server>
...
</servers>
...
</settings>
The server authentication section can contain a number of authentication elements. In the event you’re
using SCP for deployment, you may wish to use public-key authentication. To do this, specify the publ
icKey and passphrase elements, instead of the password element. You may still want to configure
the username element, depending on your server’s configuration.
10.6.2 Configuring File and Directory Modes
If you are working in a large group of developers, you’ll want to make sure that your web site’s files
end up with the proper user and group permissions after they are published to the remote server. To

Maven: The Complete Reference 180 / 316
configure specific file and directory modes for use during the site deployment, include the following in
$HOME/.m2/settings.xml:
Configuring File and Directory Modes on Remote Servers
<settings>
...
<servers>
...
<server>
<id>hello-world.website</id>
...
<directoryPermissions>0775</directoryPermissions>
<filePermissions>0664</filePermissions>
</server>
</servers>
...
</settings>
The above settings will make any directories readable and writable by either the owner or members of
the owner’s primary group; the anonymous users will only have access to read and list the directory.
Similarly, the owner or members of the owner’s primary group will have access to read and write any
files, with the rest of the world restricted to read-only access.
10.7 Customizing Site Appearance
The default Maven template leaves much to be desired. If you wish to customize your project’s website
beyond simply adding content, navigational elements, and custom logos. Maven offers several mecha-
nisms for customizing your website that offer successively deeper access to content decoration and web-
site structure. For small, per-project tweaks, providing a custom site.css is often enough. However, if
you want your customizations to be reusable across multiple projects, or if your customizations involve
changing the XHTML that Maven generates, you should consider creating your own Maven website skin.
10.7.1 Customizing the Site CSS
The easiest way to affect the look and feel of your project’s web site is through the project’s site.css. Just
like any images or XHTML content you provide for the website, the site.css file goes in the src/site/re-
sources directory. Maven expects this file to be in the src/site/resources/css subdirectory. With CSS it is

Maven: The Complete Reference 181 / 316
possible to change text styling properties, layout properties, and even add background images and custom
bullet graphics. For example, if we decided that to make the menu heading stand out a little more, we
might try the following style in src/site/resources/css/site.css:
#navcolumn h5 {
font-size: smaller;
border: 1px solid #aaaaaa;
background-color: #bbb;
margin-top: 7px;
margin-bottom: 2px;
padding-top: 2px;
padding-left: 2px;
color: #000;
}
When you regenerate the website, the menu headers should be framed by a gray background and separated
from the rest of the menu by some extra margin space. Using this file, any structure in the Maven-
generated website can be decorated with custom CSS. When you change site.css in a specific Maven
project, the changes will apply to that specific project. If you are interested in making changes that will
apply to more than one Maven project, you can create a custom skin for the Maven Site plugin.
Tip
There is no good reference for the structure of the default Maven site template. If you are attempting to
customize the style of your Maven project, you should use a Firefox extension like Firebug as a tool to
explore the DOM for your project’s pages.
10.7.2 Create a Custom Site Template
If the default Maven Site structure just doesn’t do it for you, you can always customize the Maven site
template. Customizing the Maven Site template gives you complete control over the ultimate output of
the Maven plugin, and it is possible to customize your project’s site template to the point where it hardly
resembles the structure of a default Maven site template.
The Site plugin uses a rendering engine called Doxia, which in turn uses a Velocity template to render
the XHTML for each page. To change the page structure that is rendered by default, we can configure
the site plugin in our POM to use a custom page template. The site template is fairly complex, and
you’ll need to have a good starting point for your customization. Start by copying the default Velocity
template from Doxia’s Subversion repository default-site.vm to src/site/site.vm. This template is written
in a templating language called Velocity. Velocity is a simple templating language which supports simple

Maven: The Complete Reference 182 / 316
macro definition and allows you to access an object’s methods and properties using simple notation. A full
introduction is beyond the scope of this book, for more information about Velocity and a full introduction
please go to the Velocity project site at http://velocity.apache.org.
The default-site.xml template is fairly involved, but the change required to customize the left-hand menu
is relatively straightforward. If you are trying to change the appearance of a menuItem, locate the
menuItem macro. It resides in a section that looks like this:
#macro ( menuItem $item )
...
#end
If you replace the macro definition with the macro definition listed below, you will injects Javascript
references into each menu item which will allow the reader to expand or collapse the menu tree without
suffering through a full page reload:
#macro ( menuItem $item $listCount )
#set ( $collapse = "none" )
#set ( $currentItemHref = $PathTool.calculateLink( $item.href,
$relativePath ) )
#set ( $currentItemHref = $currentItemHref.replaceAll( "\\", "/" ) )
#if ( $item && $item.items && $item.items.size() > 0 )
#if ( $item.collapse == false )
#set ( $collapse = "collapsed" )
#else
## By default collapsed
#set ( $collapse = "collapsed" )
#end
#set ( $display = false )
#displayTree( $display $item )
#if ( $alignedFileName == $currentItemHref || $display )
#set ( $collapse = "expanded" )
#end
#end
<li class="$collapse">
#if ( $item.img )
#if ( ! ( $item.img.toLowerCase().startsWith("http") ||
$item.img.toLowerCase().startsWith("https") ) )
#set ( $src = $PathTool.calculateLink( $item.img, $relativePath ) )
#set ( $src = $item.img.replaceAll( "\\", "/" ) )
<img src="$src"/>
#else

Maven: The Complete Reference 183 / 316
<img src="$item.img" align="absbottom" style="border-width: 0"/>
#end
#end
#if ( $alignedFileName == $currentItemHref )
<strong>$item.name</strong>
#else
#if ( $item && $item.items && $item.items.size() > 0 )
<a onclick="expand(’list$listCount’)"
style="cursor:pointer">$item.name</a>
#else
<a href="$currentItemHref">$item.name</a>
#end
#end
#if ( $item && $item.items && $item.items.size() > 0 )
#if ( $collapse == "expanded" )
<ul id="list$listCount" style="display:block">
#else
<ul id="list$listCount" style="display:none">
#end
#foreach( $subitem in $item.items )
#set ( $listCounter = $listCounter + 1 )
#menuItem( $subitem $listCounter )
#end
</ul>
#end
</li>
#end
This change adds a new parameter to the menuItem macro. For the new functionality to work, you will
need to change references to this macro, or the resulting template may produce unwanted or internally
inconsistent XHTML. To finish changing these references, make a similar replacement in the mainMenu
macro. Find this macro by looking for something similar to the following template snippet:
#macro ( mainMenu $menus )
...
#end
Replace the mainMenu macro with the following implementation:
#macro ( mainMenu $menus )
#set ( $counter = 0 )
#set ( $listCounter = 0 )
#foreach( $menu in $menus )
#if ( $menu.name )
<h5 onclick="expand(’menu$counter’)">$menu.name</h5>
#end
<ul id="menu$counter" style="display:block">

Maven: The Complete Reference 184 / 316
#foreach( $item in $menu.items )
#menuItem( $item $listCounter )
#set ( $listCounter = $listCounter + 1 )
#end
</ul>
#set ( $counter = $counter + 1 )
#end
#end
This new mainMenu macro is compatible with the new menuItem macro above, and also provides
support for a Javascript-enabled top-level menu. Clicking on a top-level menu item with children will
expand the menu and allow users to see the entire tree without waiting for a page to load.
The change to the menuItem macro introduced an expand() Javascript function. This method needs
to be added to the main XHTML template at the bottom of this template file. Find the section that looks
similar to the following:
<head>
...
<meta http-equiv="Content-Type"
content="text/html; charset=${outputEncoding}" />
...
</head>
and replace it with this:
<head>
...
<meta http-equiv="Content-Type"
content="text/html; charset=${outputEncoding}" />
<script type="text/javascript">
function expand( item ) {
var expandIt = document.getElementById( item );
if( expandIt.style.display == "block" ) {
expandIt.style.display = "none";
expandIt.parentNode.className = "collapsed";
} else {
expandIt.style.display = "block";
expandIt.parentNode.className = "expanded";
}
}
</script>
#if ( $decoration.body.head )
#foreach( $item in $decoration.body.head.getChildren() )
#if ( $item.name == "script" )
$item.toUnescapedString()

Maven: The Complete Reference 185 / 316
#else
$item.toString()
#end
#end
#end
</head>
After modifying the default site template, you’ll need to configure your project’s POM to reference this
new site template. To customize the site template, you’ll need to use the templateDirectory and
template configuration properties of the Maven Site plugin.
Customizing the Page Template in a Project’s POM
<project>
...
<build>
<plugins>
<plugin>
<artifactId>maven-site-plugin</artifactId>
<configuration>
<templateDirectory>src/site</templateDirectory>
<template>site.vm</template>
</configuration>
</plugin>
</plugins>
</build>
...
</project>
Now, you should be able to regenerate your project website. When you do so you may notice that the
resources and CSS for the maven site are missing. When a Maven project customizes the site template,
the Site plugin expects the project to supply all of the default images and CSS. To seed your project’s
resources, you may want to copy the resources from the default Doxia site renderer project to your own
project’s resources directory by executing the following commands:
$ svn co \
http://svn.apache.org/repos/asf/maven/doxia/doxia-sitetools/\
trunk/doxia-site-renderer
$ rm \
doxia-site-renderer/src/main/resources/org/apache/maven/\
doxia/siterenderer/resources/css/maven-theme.cs+
$ cp -rf \
doxia-site-renderer/src/main/resources/org/apache/maven/\
doxia/siterenderer/resources/*\
sample-project/src/site/resources

Maven: The Complete Reference 186 / 316
Check out the doxia-site-renderer project, remove the default maven-theme.css file and then
copy all the resources to your project’s src/site/resources directory.
When you regenerate the site, you’ll notice that a few menu items look like regular unstyled text. This is
caused by a quirky interaction between the site’s CSS and our new custom page template. It can be fixed
by modifying our site.css to restore the proper link color for these menus. Simply add this:
li.collapsed, li.expanded, a:link {
color:#36a;
}
After regenerating the site, the menu’s link color should be corrected. If you applied the new site template
to the same sample-project from this chapter, you’ll notice that the menu now consists of a tree. Clicking
on "Developer Resources" no longer takes you to the "Developer Resources" page; in stead, it expands
the sub-menu. Since you’ve turned the Developer Resources menu-item into a dynamically-folding sub-
menu, you have lost the ability to reach the developer/index.apt page. To address this change, you should
add an Overview link to the sub-menu which references the same page:
Adding a Menu Item to a Site Descriptor
<project name="Hello World">
...
<menu name="Main Menu">
...
<item name="Developer Resources" collapse="true">
<item name="Overview" href="/developer/index.html"/>
<item name="System Architecture" href="/developer/architecture ←-
.html"/>
<item name="Embedder’s Guide" href="/developer/embedding.html ←-
"/>
</item>
</menu>
...
</project>
10.7.3 Reusable Website Skins
If your organization is creating many Maven project sites, you will likely want to reuse site template
and CSS customizations throughout an organization. If you want thirty projects to share the same CSS
and site template, you can use Maven’s support for skinning. Maven Site skins allow you to package up
resources and templates which can be reused by other projects in lieu of duplicating your site template
for each project which needs to be customized.

Maven: The Complete Reference 187 / 316
While you can define your own skin, you may want to consider using one of Maven’s alternate skins. You
can choose from several skins. These each provide their own layout for navigation, content, logos, and
templates:
• Maven Classic Skin - org.apache.maven.skins:maven-classic-skin:1.0
• Maven Default Skin - org.apache.maven.skins:maven-default-skin:1.0
• Maven Stylus Skin - org.apache.maven.skins:maven-stylus-skin:1.0.1
You can find an up-to-date and comprehensive listing in the Maven repository: http://repo1.maven.org/-
maven2/org/apache/maven/skins/.
Creating a custom skin is a simple matter of wrapping your customized maven-theme.css in a Maven
project, so that it can be referenced by groupId,artifactId, and version. It can also include
resources such as images, and a replacement website template (written in Velocity) that can generate a
completely different XHTML page structure. In most cases, custom CSS can manage the changes you
desire. To demonstrate, let’s create a designer skin for the sample-project project, starting with a custom
maven-theme.css.
Before we can start writing our custom CSS, we need to create a separate Maven project to allow the
sample-project site descriptor to reference it. First, use Maven’s archetype plugin to create a basic
project. Issue the following command from the directory above the sample-project project’s root
directory:
$ mvn archetype:create -DartifactId=sample-site-skin
-DgroupId=org.sonatype.mavenbook
This will create a project (and a directory) called sample-site-skin. Change directories to the new
sample-site-skin directory, remove all of the source code and tests, and create a directory to store
your skin’s resources:
$ cd sample-site-skin
$ rm -rf src/main/java src/test
$ mkdir src/main/resources
10.7.4 Creating a Custom Theme CSS
Next, write a custom CSS for the custom skin. A custom CSS stylesheet in a Maven site skin should be
placed in src/main/resources/css/maven-theme.css. Unlike the site.css file, which goes in the site-specific

Maven: The Complete Reference 188 / 316
source directory for a project, the maven-theme.css will be bundled in a JAR artifact in your local Maven
repository. In order for the maven-theme.css file to be included in the skin’s JAR file, it must reside in the
main project-resources directory, src/main/resources.
As with the default the default site template, you will want to start customizing your new skin’s CSS
from a good starting point. Copy the CSS file used by the default Maven skin to your project’s maven-
theme.css. To get a copy of this theme file, save the contents of maven-theme.css from the maven-
default-skin project to src/main/resources/css/maven-theme.css in our new skin project.
Now that we have the base theme file in place, customize it using the CSS from our old site.css file.
Replace the #navcolumn h5 CSS block with the following:
#navcolumn h5 {
font-size: smaller;
border: 1px solid #aaaaaa;
background-color: #bbb;
margin-top: 7px;
margin-bottom: 2px;
padding-top: 2px;
padding-left: 2px;
color: #000;
}
Once you’ve customized the maven-theme.css, build and install the sample-site-skin JAR artifact
to your local Maven repository by running:
$ mvn clean install
Once the installation is complete, switch back to the sample-project project directory, if you already
customized the site.css earlier in this chapter, move site.css to site.css.bak so it no longer affects the
output of the Maven Site plugin:
$ mv src/site/resources/css/site.css src/site/resources/css/site.css.bak
To use the sample-site-skin in the sample-project site, you’ll need to add a reference to the
sample-site-skin artifact in the sample-project’s site descriptor. A site references a skin in
the site descriptor using the skin element:
Configuring a Custom Site Skin in Site Descriptor
<project name="Sample Project">
...
<skin>

Maven: The Complete Reference 189 / 316
<groupId>org.sonatype.mavenbook</groupId>
<artifactId>sample-site-skin</artifactId>
</skin>
...
</project>
You can think of a Maven Site skin as a site dependency. Site skins are referenced as artifacts with a
groupId and an artifactId. Using a site skin allows you to consolidate site customizations to a single
project, and makes reusing custom CSS and site templates as easy as reusing build logic through a custom
Maven plugin.
10.8 Tips and Tricks
This section lists some useful tips and tricks you can use when creating a Maven site.
10.8.1 Inject XHTML into HEAD
To inject XHTML into the HEAD element, add a head element to the body element in your project’s Site
descriptor. The following example adds a feed link to every page in the sample-project web site.
Injecting HTML into the HEAD element
<project name="Hello World">
...
<body>
<head>
<link href="http://sample.com/sites/sample-project/feeds/blog"
type="application/atom+xml"
id="auto-discovery"
rel="alternate"
title="Sample Project Blog" />
</head>
...
</body>
</project>

Maven: The Complete Reference 190 / 316
10.8.2 Add Links under Your Site Logo
If you are working on a project which is being developed by an organization, you may want to add links
under your project’s logo. Assume that your project is a part of the Apache Software Foundation, you
might want to add a link to the Apache Software Foundation web site right below your logo, and you might
want to add a link to a parent project as well. To add links below your site logo, just add a links element
to the body element in the Site descriptor. Each item element in the links element will be rendered as a
link in a bar directly below your project’s logo. The following example would add a link to the Apache
Software Foundation followed by a link to the Apache Maven project.
Adding Links Under Your Site Logo
<project name="Hello World">
...
<body>
...
<links>
<item name="Apache" href="http://www.apache.org"/>
<item name="Maven" href="http://maven.apache.org"/>
</links>
...
</body>
</project>
10.8.3 Add Breadcrumbs to Your Site
If your hierarchy exists within a logical hierarchy, you may want to place a series of breadcrumbs to give
the user a sense of context and give them a way to navigate up the tree to projects which might contain the
current project as a subproject. To configure breadcrumbs, add a breadcrumbs element to the body
element in the site descriptor. Each item element will render a link, and the items in the breadcrumbs
element will be rendered in order. The breadcrumb items should be listed from highest level to lowest
level. In the following site descriptor, the Codehaus item would be seen to contain the Mojo item.
Configuring the Site’s Breadcrumbs
<project name="Sample Project">
...
<body>
...
<breadcrumbs>
<item name="Codehaus" href="http://www.codehaus.org"/>
<item name="Mojo" href="http://mojo.codehaus.org"/>

Maven: The Complete Reference 191 / 316
</breadcrumbs>
...
</body>
</project>
10.8.4 Add the Project Version
When you are documenting a project that has multiple versions, it is often very helpful to list the project’s
version number on every page. To display your project’s version on the website, simply add the version
element to your site descriptor:
Positioning the Version Information
<project name="Sample Project">
...
<version position="left"/>
...
</project>
This will position the version (in the case of the sample-project project, it will say "Version: 1.0-SNAPSHOT")
in the upper left-hand corner of the site, right next to the default "Last Published" date. Valid positions
for the project version are:
left
Left side of the bar just below the site logo
right
Right side of the bar just below the site logo
navigation-top
Top of the menu
navigation-bottom
Bottom of the menu
none
Suppress the version entirely

Maven: The Complete Reference 192 / 316
10.8.5 Modify the Publication Date Format and Location
In some cases, you may wish to reformat or reposition the "Last Published" date for your project website.
Just like the project version tip above, you can specify the position of the publication date by using one
of the following:
left
Left side of the bar just below the site logo
right
Right side of the bar just below the site logo
navigation-top
Top of the menu
navigation-bottom
Bottom of the menu
none
Suppress the publication entirely
Positioning the Publish Date
<project name="Sample Project">
...
<publishDate position="navigation-bottom"/>
...
</project>
By default, the publication date will be formatted using the date format string MM/dd/yyyy. You can
change this format by using the standard notation found in the JavaDocs for SimpleDateFormat (see
JavaDoc for SimpleDateFormat for more information). To reformat the date using yyyy-MM-dd, use
the following publishDate element.
Configuring the Publish Date Format
<project name="Sample Project">
...
<publishDate position="navigation-bottom" format="yyyy-MM-dd"/>
...
</project>

Maven: The Complete Reference 193 / 316
10.8.6 Using Doxia Macros
In addition to its advanced document rendering features, Doxia also provides a macro engine that allows
each input format to trigger injection of dynamic content. An excellent example of this is the snippet
macro, which allows a document to pull a code snippet out of a source file that’s available via HTTP.
Using this macro, a small fragment of APT can be rendered into XHTML. The following APT code calls
out to the snippet macro. Please note that this code should be on a single continuous line, the black slash
character is inserted to denote a line break so that this code will fit on the printed page.
%{snippet|id=modello-model|url=http://svn.apache.org/repos/asf/maven/\
archetype/trunk/maven-archetype/maven-archetype-model/src/main/\
mdo/archetype.mdo}
Output of the Snippet Macro in XHTML
<div class="source"><pre>
<model>
<id>archetype</id>
<name>Archetype</name>
<description><![CDATA[Maven’s model for the archetype ←-
descriptor.
]]></description>
<defaults>
<default>
<key>package</key>
<value>org.apache.maven.archetype.model</value>
</default>
</defaults>
<classes>
<class rootElement="true" xml.tagName="archetype">
<name>ArchetypeModel</name>
<description>Describes the assembly layout and ←-
packaging.</description>
<version>1.0.0</version>
<fields>
<field>
<name>id</name>
<version>1.0.0</version>
<required>true</required>
<type>String</type>
</field>
...
</fields>
</class>
</classes>
</model>

Maven: The Complete Reference 194 / 316
</pre></div>
Warning
Doxia macros MUST NOT be indented in APT source documents. Doing so will result in the
APT parser skipping the macro altogether.
For more information about defining snippets in your code for reference by the snippet macro, see the
Guide to the Snippet Macro on the Maven website, at http://maven.apache.org/guides/mini/guide-snippet-
macro.html.

Maven: The Complete Reference 195 / 316
Chapter 11
Writing Plugins
11.1 Introduction
While this chapter covers an advanced topic, don’t let the idea of writing a Maven plugin intimidate you.
For all of the theory and complexity of this tool, the fundamental concepts are easy to understand and
the mechanics of writing a plugin are straightforward. After you read this chapter, you will have a better
grasp of what is involved in creating a Maven plugin.
11.2 Programming Maven
Most of this book has dealt with using Maven, and for a book on Maven, you haven’t seen too many code
examples dealing with Maven customization. In fact, you haven’t yet seen any. This is by design, 99 out
of 100 Maven users will never need to write a custom plugin to customize Maven; there is an abundance of
configurable plugins, and unless your project has particularly unique requirements, you will have to work
to find a reason to write a new plugin. An even smaller percentage of people who end up writing custom
plugins will ever need to crack open the source code for Maven and customize a core Maven component.
If you really need to customize the behavior of Maven, then you would write a plugin. Modifying the
core Maven code is as far out of scope for most developers as modifying the TCP/IP stack on an operating
system, it is that abstract for most Maven users.

Maven: The Complete Reference 196 / 316
On the other hand, if you are going to start writing a custom plugin, you are going to have to learn a bit
about the internals of Maven: How does it manage software components? What is a Plugin? How can I
customize the lifecycle? This section answers some of those questions, and it introduces a few concepts at
the core of Maven’s design. Learning how to write a custom Maven plugin is the gateway to customizing
Maven itself. If you were wondering how to start understanding the code behind Maven, you’ve found
the proper starting line.
11.2.1 What is Inversion of Control?
At the heart of Maven is an Inversion of Control (IoC) container named Plexus. What does it do? It
is a system for managing and relating components. While there is a canonical essay about IoC written
by Martin Fowler, the concept and term have been so heavily overloaded in the past few years it is
tough to find a good definition of the concept that isn’t a self-reference (or just a lazy reference to the
aforementioned essay). Instead of resorting to a Wikipedia quote, we’ll summarize Inversion of Control
and Dependency Injection with an analogy.
Assume that you have a series of components which need to be wired together. When you think about
components, think stereo components not software components. Imagine several stereo components
hooked up to a Playstation 3 and a Tivo that have to interface with both an Apple TV box and a 50-
inch flat panel LCD TV. You bring everything home from the electronics store and you purchase a series
of cables that you are going to use to connect everything to everything else. You unpack all of these
components, put them in the right place, and then get to the job of hooking up fifty thousand coaxial
cables and stereo jacks to fifty thousand digital inputs and network cables. Step back from your home
entertainment center and turn on the TV, you’ve just performed dependency injection, and you’ve just
been an inversion of control container.
So what did that have to do with anything? Your Playstation 3 and a Java Bean both provide an interface.
The Playstation 3 has two inputs: power and network, and one output to the TV. Your JavaBean has three
properties: power,network, and tvOutput. When you open the box of your Playstation 3, it didn’t
provide you with detailed pictures and instructions for how to connect it to every different kind of TV
that might be in every different kind of house. When you look at your Java Bean, it just provides a set of
properties, not an explicit recipe for creating and managing an entire system of components. In an IoC
container like Plexus, you are responsible for declaring the relationships between a set of components
which simply provide an interface of inputs and outputs. You don’t instantiate objects, Plexus does;
your application’s code isn’t responsible for managing the state of components, Plexus is. Even though
it sounds very cheesy, when you start up Maven, it is starting Plexus and managing a system of related
components just like your stereo system.
What are the advantages of using an IoC container? What is the advantage of buying discrete stereo
components? If one component breaks, you can drop in a replacement for your Playstation 3 without
having to spend $20,000 on the entire system. If you are unhappy with your TV, you can swap it out

Maven: The Complete Reference 197 / 316
without affecting your CD player. Most important to you, your stereo components cost less and are more
capable and reliable because manufacturers can build to a set of known inputs and outputs and focus on
building individual components. Inversion of Control containers and Dependency Injection encourage
Disaggregation and the emergence of standards. The software industry likes to imagine itself as the font
of all new ideas, but dependency injection and inversion of control are really just new words for the
concepts of Disaggregation and interchangeable machinery. If you really want to know about DI and IoC,
learn about the Model T, the Cotton Gin, and the emergence of a railroad standard in the late 19th century.
11.2.2 Introduction to Plexus
The most important feature of an IoC container implemented in Java is a mechanism called dependency
injection. The basic idea of IoC is that the control of creating and managing objects is removed from the
code itself and placed into the hands of an IoC framework. Using dependency injection in an application
that has been programmed to interfaces, you can create components which are not bound to specific im-
plementations of these interfaces. Instead, you program to interfaces and then configure Plexus to connect
the appropriate implementation to the appropriate component. While your code deals with interfaces, you
can capture the dependencies between classes and components in an XML file that defines components,
implementation classes, and the relationships between your components. In other words, you can write
isolated components, then you can wire them together using an XML file that defines how the components
are wired together. In the case of Plexus, system components are defined with an XML document that is
found in META-INF/plexus/components.xml.
In a Java IoC container, there are several methods for injecting dependencies values into a component
object: constructor, setter, or field injections. Although Plexus is capable of all three dependency injection
techniques, Maven only uses two types: field and setter injection.
Constructor Injection
Constructor injection is populating an object’s values through its constructor when an instance of
the object is created. For example, if you had an object of type Person which had a constructor
Person(String name, Job job), you could pass in values for both name and the job via
this constructor.
Setter Injection
Setter injection is using the setter method of a property on a Java bean to populate object depen-
dencies. For example, if you were working with a Person object with the properties name and
job, an IoC container which uses setter injection, would create an instance of Person using a
no-arg constructor. Once it had an instance of Person, it would proceed to call the setName()
and setJob() methods.
Field Injection
Both Constructor and Setter injection rely on a call to a public method. Using Field injection,

Maven: The Complete Reference 198 / 316
an IoC container populates a component’s dependencies by setting an object’s fields directly. For
example, if you were working with a Person object that had two fields name and job, your IoC
container would populate these dependencies by setting these fields directly (i.e. person.name
="Thomas";person.job =job;)
11.2.3 Why Plexus?
Spring does happen to be the most popular IoC container at the moment, and there’s a good argument to
be made that it has affected the Java "ecosystem" for the better forcing companies like Sun Microsystems
to yield more control to the open source community and helping to open up standards by providing a
pluggable, component-oriented "bus". But, Spring isn’t the only IoC container in open source. There are
many IoC containers (like PicoContainer).
Years and years ago, when Maven was created, Spring wasn’t a mature option. The initial team of com-
mitters on Maven were more familiar with Plexus because they invented it, so they decided to use it as
an IoC container. While it might not be as popular as the Spring Framework, it is no less capable. And,
the fact that it was created by the same person who created Maven makes it a perfect fit. After reading
this chapter you’ve have an idea of how Plexus works. If you already use an IoC container you’ll notice
similarities and differences between Plexus and the container you currently use.
Note
Just because Maven is based on Plexus doesn’t mean that the Maven community is "anti-Spring" (we’ve
included a whole chapter with a Spring example in this book, portions of the Spring project are moving
to Maven as a build platform). The question, "Why didn’t you use Spring?" comes up often enough it
did make sense to address it here. We know it, Spring is a rock star, we don’t deny it, and it is on our
continuing to-do list to introduce people to (and document) Plexus: choice in the software industry is
always a good thing.
11.2.4 What is a Plugin?
A Maven Plugin is a Maven artifact which contains a plugin descriptor and one or more Mojos. A Mojo
can be thought of as a goal in Maven, and every goal corresponds to a Mojo. The compiler:compile
goal corresponds to the CompilerMojo class in the Maven Compiler Plugin, and the jar:jar goal
corresponds to the JarMojo class in the Maven Jar Plugin. When you write your own plugin, you are

Maven: The Complete Reference 199 / 316
simply grouping together a set of related Mojos (or goals) in a single plugin artifact. 1
Note
Mojo? What is a Mojo? The word mojo is defined as "a magic charm or spell", "an amulet, often in a
small flannel bag containing one or more magic items", and "personal magnetism; charm". Maven uses
the term Mojo because it is a play on the word Pojo (Plain-old Java Object).
A Mojo is much more than just a goal in Maven, it is a component managed by Plexus that can include
references to other Plexus components.
11.3 Plugin Descriptor
A Maven plugin contains a road-map for Maven that tells Maven about the various Mojos and plugin
configuration. This plugin descriptor is present in the plugin JAR file in META-INF/maven/plugin.xml.
When Maven loads a plugin, it reads this XML file, instantiates and configures plugin objects to make the
Mojos contained in a plugin available to Maven.
When you are writing custom Maven plugins, you will almost never need to think about writing a plugin
descriptor. In Chapter 4, the lifecycle goals bound to the maven-plugin packaging type show that the
plugin:descriptor goal is bound to the generate-resources phase. This goal generates a
plugin descriptor off of the annotations present in a plugin’s source code. Later in this chapter, you will
see how Mojos are annotated, and you will also see how the values in these annotations end up in the
META-INF/maven/plugin.xml file.
Plugin Descriptor shows a plugin descriptor for the Maven Zip Plugin. This plugin is a contrived plugin
that simply zips up the output directory and produces an archive. Normally, you wouldn’t need to write a
custom plugin to create an archive from Maven, you could simply use the Maven Assembly Plugin which
is capable of producing a distribution archive in multiple formats. Read through the following plugin
descriptor to get an idea of the content it contains.
Plugin Descriptor
<plugin>
<description></description>
<groupId>com.training.plugins</groupId>
1"mojo." The American Heritage® Dictionary of the English Language, Fourth Edition. Houghton Mifflin Company, 2004.
Answers.com 02 Mar. 2008

Maven: The Complete Reference 200 / 316
<artifactId>maven-zip-plugin</artifactId>
<version>1-SNAPSHOT</version>
<goalPrefix>zip</goalPrefix>
<isolatedRealm>false</isolatedRealm>
<inheritedByDefault>true</inheritedByDefault>
<mojos>
<mojo>
<goal>zip</goal>
<description>Zips up the output directory.</description>
<requiresDirectInvocation>false</requiresDirectInvocation>
<requiresProject>true</requiresProject>
<requiresReports>false</requiresReports>
<aggregator>false</aggregator>
<requiresOnline>false</requiresOnline>
<inheritedByDefault>true</inheritedByDefault>
<phase>package</phase>
<implementation>com.training.plugins.ZipMojo</implementation>
<language>java</language>
<instantiationStrategy>per-lookup</instantiationStrategy>
<executionStrategy>once-per-session</executionStrategy>
<parameters>
<parameter>
<name>baseDirectory</name>
<type>java.io.File</type>
<required>false</required>
<editable>true</editable>
<description>Base directory of the project.</ ←-
description>
</parameter>
<parameter>
<name>buildDirectory</name>
<type>java.io.File</type>
<required>false</required>
<editable>true</editable>
<description>Directory containing the build files.</ ←-
description>
</parameter>
</parameters>
<configuration>
<buildDirectory implementation="java.io.File">
${project.build.directory}</buildDirectory>
<baseDirectory implementation="java.io.File">
${basedir}</baseDirectory>
</configuration>
<requirements>
<requirement>
<role>org.codehaus.plexus.archiver.Archiver</role>
<role-hint>zip</role-hint>
<field-name>zipArchiver</field-name>

Maven: The Complete Reference 201 / 316
</requirement>
</requirements>
</mojo>
</mojos>
<dependencies>
<groupId>org.apache.commons</groupId>
<artifactId>commons-io</artifactId>
<version>1.3.2</version>
</dependencies>
</plugin>
There are three parts to a plugin descriptor: the top-level configuration of the plugin which contains ele-
ments like groupId and artifactId, the declaration of mojos, and the declaration of dependencies.
Let’s examine each of these sections in more detail.
11.3.1 Top-level Plugin Descriptor Elements
The top-level configuration values in the plugin element are:
description
This element contains a short description of the plugin. In the case of the Zip plugin, this description
is empty.
groupId, artifactId, version
As with everything else in Maven, plugins need to have a unique set of coordinates. The groupId,
artifactId, and version are used to locate the plugin artifact in a Maven repository.
goalPrefix
This element controls the prefix used to reference goals in a particular plugin. If you were to look at
the Compiler plugin’s descriptor you would see that goalPrefix has a value of compiler. If
you look at the descriptor for the Jar plugin, it would have a goalPrefix of jar. It is important
that you choose a distinct goal prefix for your custom plugin.
isolatedRealm (deprecated)
This is a legacy property which is no longer used by Maven. It is still present in the system to
provide backwards compatibility with older plugins. Earlier versions of Maven used to provide a
mechanism to load a plugin’s dependencies in an isolated ClassLoader. Maven makes extensive
use of a project called ClassWorlds from the Codehaus community to create hierarchies of Class
Loader objects which are modeled by a ClassRealm object. Feel free to ignore this property
and always set it to false.
inheritedByDefault
If inheritedByDefault is set to true, any mojo in this plugin which is configured in a parent project

Maven: The Complete Reference 202 / 316
will be configured in a child project. If you configure a mojo to execute during a specific phase in a
parent project and the Plugin has inheritedByDefault set to true, this execution will be inherited by
the child project. If inheritedByDefault is not set to true, then an goal execution defined in a parent
project will not be inherited by a child project.
11.3.2 Mojo Configuration
Next is the declaration of each Mojo. The plugin element contains an element named mojos which
contains a mojo element for each mojo present in the Plugin. Each mojo element contains the following
configuration elements:
goal
This is the name of the goal. If you were running the compiler:compile goal, then compiler
is the plugin’s goalPrefix and compile would be the name of the goal.
description
This contains a short description of the goal to display to the user when they use the Help plugin to
generate plugin documentation.
requiresDirectInvocation
If you set this to true, the goal can only be executed if it is explicitly executed from the command-
line by the user. If someone tries to bind this goal to a lifecycle phase in a POM, Maven will print an
error message. The default for this element is false. <!--TODO: Might want some justification.-
→
requiresProject
Specifies that a given goal cannot be executed outside of a project. The goal requires a project with
a POM. The default value for requiresProject is true.
requiresReports
If you were creating a plugin that relies on the presence of reports, you would need to set requi
resReports to true. For example, if you were writing a plugin to aggregate information from
a number of reports, you would set requiresReports to true. The default for this element is
false.
aggregator
A Mojo descriptor with aggregator set to true is supposed to only run once during the exe-
cution of Maven, it was created to give plugin developers the ability to summarize the output of a
series of builds; for example, to create a plugin that summarizes a report across all projects included
in a build. A goal with aggregator set to true should only be run against the top-level project
in a Maven build. The default value of aggregator is false.

Maven: The Complete Reference 203 / 316
requiresOnline
Specifies that a given goal cannot be executed if Maven is running in offline mode (-o command-
line option). If a goal depends on a network resource, you would specify a value of true for this
element and Maven would print an error if the goal was executed in offline mode. The default for
requiresOnline is false.
inheritedByDefault
If inheritedByDefault is set to true, a mojo which is configured in a parent project will
be configured in a child project. If you configure a mojo to execute during a specific phase in a
parent project and the Mojo descriptor has inheritedByDefault set to true, this execution
will be inherited by the child project. If inheritedByDefault is not set to true, then a goal
execution defined in a parent project will not be inherited by a child project.
phase
If you don’t bind this goal to a specific phase, this element defines the default phase for this mojo.
If you do not specify a phase element, Maven will require the user to explicitly specify a phase in a
POM.
implementation
This element tells Maven which class to instantiate for this Mojo. This is a Plexus component
property (defined in Plexus ComponentDescriptor).
language
The default language for a Maven Mojo is Java. This controls the Plexus ComponentFactory
used to create instances of this Mojo component. This chapter focuses on writing Maven plugins in
Java, but you can also write Maven in a number of alternative languages such as Groovy, Beanshell,
and Ruby. If you were writing a plugin in one of these languages you would use a language element
value other than java.
instantiationStrategy
This property is a Plexus component configuration property, it tells Plexus how to create and
manage instances of the component. In Maven, all mojos are going to be configured with an
instantiationStrategy of per-lookup; a new instance of the component (mojo) is cre-
ated every time it is retrieved from Plexus.
executionStrategy
The execution strategy tells Maven when and how to execute a Mojo. The valid values are once-
per-session and always. Note: This particular property doesn’t do a thing, it is a hold over
from an early design of Maven. This property is slated for deprecation in a future release of Maven.
parameters
This element describes all of the parameters for this Mojo. What’s the name of the parameter?
What is the type of parameter? Is it required? Each parameter has the following elements:
name
Is the name of the parameter (i.e. baseDirectory)
type
This is the type (Java class) of the parameters (i.e. java.io.File)

Maven: The Complete Reference 204 / 316
required
Is the parameter required? If true, the parameter must be non-null when the goal is executed.
editable
If a parameter is not editable (if editable is set to false), then the value of the parameter cannot
be set in the POM. For example, if the plugin descriptor defines the value of buildDirectory
to be ${basedir} in the descriptor, a POM cannot override this value to be another value in a POM.
description
A short description to use when generating plugin documentation (using the Help Plugin)
configuration
This element provides default values for all of the Mojo’s parameters using Maven property nota-
tion. This example provides a default value for the baseDir Mojo parameter and the buildD
irectory Mojo parameter. In the parameter element, the implementation specifies the type of
the parameter (in this case java.io.File), the value in the parameter element contains either a
hard-coded default or a Maven property reference.
requirements
This is where the descriptor gets interesting. A Mojo is a component that is managed by Plexus,
and, because of this, it has the opportunity to reference other components managed by Plexus. This
element allows you to define dependencies on other components in Plexus.
While you should know how to read a Plugin Descriptor, you will almost never need to write one of these
descriptor files by hand. Plugin Descriptor files are generated automatically off of a set of annotations in
the source for a Mojo.
11.3.3 Plugin Dependencies
Lastly, the plugin descriptor declares a set of dependencies just like a Maven project. When Maven uses a
plugin, it will download any required dependencies before it attempts to execute a goal from this plugin.
In this example, the plugin depends on Jakarta Commons IO version 1.3.2.
11.4 Writing a Custom Plugin
When you write a custom plugin, you are going to be writing a series of Mojos (goals). Every Mojo
is a single Java class which contains a series of annotations that tell Maven how to generate the Plugin
descriptor described in the previous section. Before you can start writing Mojo classes, you will need to
create Maven project with the appropriate packaging and POM.

Maven: The Complete Reference 205 / 316
11.4.1 Creating a Plugin Project
To create a plugin project, you should use the Maven Archetype plugin. The following command-line will
create a plugin with a groupId of org.sonatype.mavenbook.plugins and the artifactId
of first-maven-plugin:
$ mvn archetype:create \
-DgroupId=org.sonatype.mavenbook.plugins \
-DartifactId=first-maven-plugin \
-DarchetypeGroupId=org.apache.maven.archetypes \
-DarchetypeArtifactId=maven-archetype-mojo
The Archetype plugin is going to create a directory named my-first-plugin which contains the following
POM.
A Plugin Project’s POM
<?xml version="1.0" encoding="UTF-8"?><project>
<modelVersion>4.0.0</modelVersion>
<groupId>org.sonatype.mavenbook.plugins</groupId>
<artifactId>first-maven-plugin</artifactId>
<version>1.0-SNAPSHOT</version>
<packaging>maven-plugin</packaging>
<name>first-maven-plugin Maven Mojo</name>
<url>http://maven.apache.org</url>
<dependencies>
<dependency>
<groupId>org.apache.maven</groupId>
<artifactId>maven-plugin-api</artifactId>
<version>2.0</version>
</dependency>
<dependency>
<groupId>junit</groupId>
<artifactId>junit</artifactId>
<version>3.8.1</version>
<scope>test</scope>
</dependency>
</dependencies>
</project>
The most import element in a plugin project’s POM is the packaging element which has a value of
maven-plugin. This packaging element customizes the Maven lifecycle to include the necessary
goals to create a plugin descriptor. The plugin lifecycle was introduced in Section 4.2.3, it is similar to the
Jar lifecycle with three exceptions: plugin:descriptor is bound to the generate-resources

Maven: The Complete Reference 206 / 316
phase, plugin:addPluginArtifactMetadata is added to the package phase, and plugin:
updateRegistry is added to the install phase.
The other important piece of a plugin project’s POM is the dependency on the Maven Plugin API. This
project depends on version 2.0 of the maven-plugin-api and it also adds in JUnit as a test-scoped
dependency.
11.4.2 A Simple Java Mojo
In this chapter, we’re going to introduce a Maven Mojo written in Java. Each Mojo in your project is going
to implement the org.apache.maven.plugin.Mojo interface, the Mojo implementation shown
in the following example implements the Mojo interface by extending the org.apache.maven.plu
gin.AbstractMojo class. Before we dive into the code for this Mojo, let’s take some time to explore
the methods on the Mojo interface. Mojo provides the following methods:
void setLog( org.apache.maven.monitor.logging.Log log )
Every Mojo implementation has to provide a way for the plugin to communicate the progress of
a particular goal. Did the goal succeed? Or, was there a problem during goal execution? When
Maven loads and executes a Mojo, it is going to call the setLog() method and supply the Mojo
instance with a suitable logging destination to be used in your custom plugin.
protected Log getLog()
Maven is going to call setLog() before your Mojo is executed, and your Mojo can retrieve
the logging object by calling getLog(). Instead of printing out status to Standard Output or the
console, your Mojo is going to invoke methods on the Log object.
void execute() throws org.apache.maven.plugin.MojoExecutionException
This method is called by Maven when it is time to execute your goal.
The Mojo interface is concerned with two things: logging the results of goal execution and executing a
goal. When you are writing a custom plugin, you’ll be extending AbstractMojo.AbstractMojo
takes care of handling the setLog() and getLog() implementations and contains an abstract exec
ute() method. When you extend AbstractMojo, all you need to do is implement the execute()
method. A Simple EchoMojo shows a trivial Mojo implement which simply prints out a message to the
console.
A Simple EchoMojo
package org.sonatype.mavenbook.plugins;

Maven: The Complete Reference 207 / 316
import org.apache.maven.plugin.AbstractMojo;
import org.apache.maven.plugin.MojoExecutionException;
import org.apache.maven.plugin.MojoFailureException;
/**
*Echos an object string to the output screen.
*@goal echo
*@requiresProject false
*/
public class EchoMojo extends AbstractMojo
{
/**
*Any Object to print out.
*@parameter expression="${echo.message}" default-value="Hello World ←-
..."
*/
private Object message;
public void execute()
throws MojoExecutionException, MojoFailureException
{
getLog().info( message.toString() );
}
}
If you create this Mojo in ${basedir} under src/main/java in org/sonatype/mavenbook/mojo/EchoMojo.java
in the project created in the previous section and run mvn install, you should be able to invoke this
goal directly from the command-line with:
$ mvn org.sonatype.mavenbook.plugins:first-maven-plugin:1.0-SNAPSHOT:echo
That large command-line is mvn followed by the groupId:artifactId:version:goal. When
you run this command-line you should see output that contains the output of the echo goal with the default
message: "Hello Maven World. . . ". If you want to customize the message, you can pass the value of the
message parameter with the following command-line:
$ mvn org.sonatype.mavenbook.plugins:first-maven-plugin:1.0-SNAPSHOT:echo ←-
\
-Decho.message="The Eagle has Landed"
The previous command-line is going to execute the EchoMojo and print out the message "The Eagle has
Landed".

Maven: The Complete Reference 208 / 316
11.4.3 Configuring a Plugin Prefix
Specifying the groupId,artifactId,version, and goal on the command-line is cumbersome.
To address this, Maven assigns a plugin a prefix. Instead of typing:
$ mvn org.apache.maven.plugins:maven-jar-plugin:2.2:jar
You can use the plugin prefix jar and turn that command-line into mvn jar:jar. How does Maven re-
solve something like jar:jar to org.apache.mven.plugins:maven-jar:2.3? Maven looks
at a file in the Maven repository to obtain a list of plugins for a specific groupId. By default, Maven is
configured to look for plugins in two groups: org.apache.maven.plugins and org.codehaus.
mojo. When you specify a new plugin prefix like mvn hibernate3:hbm2ddl, Maven is going to
scan the repository metadata for the appropriate plugin prefix. First, Maven is going to scan the org.
apache.maven.plugins group for the plugin prefix hibernate3. If it doesn’t find the plugin
prefix hibernate3 in the org.apache.maven.plugins group it will scan the metadata for the
org.codehaus.mojo group.
When Maven scans the metadata for a particular groupId, it is retrieving an XML file from the Maven
repository which captures metadata about the artifacts contained in a group. This XML file is specific
for each repository referenced, if you are not using a custom Maven repository, you will be able to see
the Maven metadata for the org.apache.maven.plugins group in your local Maven repository
(~/.m2/repository) under org/apache/maven/plugins/maven-metadata-central.xml.Maven Metadata for
the Maven Plugin Group shows a snippet of the maven-metadata-central.xml file from the org.apa
che.maven.plugin group.
Maven Metadata for the Maven Plugin Group
<?xml version="1.0" encoding="UTF-8"?>
<metadata>
<plugins>
<plugin>
<name>Maven Clean Plugin</name>
<prefix>clean</prefix>
<artifactId>maven-clean-plugin</artifactId>
</plugin>
<plugin>
<name>Maven Compiler Plugin</name>
<prefix>compiler</prefix>
<artifactId>maven-compiler-plugin</artifactId>
</plugin>
<plugin>
<name>Maven Surefire Plugin</name>
<prefix>surefire</prefix>
<artifactId>maven-surefire-plugin</artifactId>

Maven: The Complete Reference 209 / 316
</plugin>
...
</plugins>
</metadata>
As you can see in Maven Metadata for the Maven Plugin Group, this maven-metadata-central.xml file
in your local repository is what makes it possible for you to execute mvn surefire:test. Maven
scans org.apache.maven.plugins and org.codehaus.mojo: plugins from org.apache.
maven.plugins are considered core Maven plugins and plugins from org.codehaus.mojo are
considered extra plugins. The Apache Maven project manages the org.apache.maven.plugins
group, and a separate independent open source community manages the Codehaus Mojo project. If you
would like to start publishing plugins to your own groupId, and you would like Maven to automatically
scan your own groupId for plugin prefixes, you can customize the groups that Maven scans for plugins
in your Maven Settings.
If you wanted to be able to run the first-maven-plugins echo goal by running first:echo,
add the org.sonatype.mavenbook.plugins groupId to your ’~/.m2/settings.xml as shown in
Customizing the Plugin Groups in Maven Settings. This will prepend the org.sonatype.mavenb
ook.plugins to the list of groups which Maven scans for Maven plugins.
Customizing the Plugin Groups in Maven Settings
<settings>
...
<pluginGroups>
<pluginGroup>org.sonatype.mavenbook.plugins</pluginGroup>
</pluginGroups>
</settings>
You can now run mvn first:echo from any directory and see that Maven will properly resolve the
goal prefix to the appropriate plugin identifiers. This worked because our project adhered to a naming
convention for Maven plugins. If your plugin project has an artifactId which follows the pattern
maven-first-plugin or first-maven-plugin. Maven will automatically assign a plugin goal
prefix of first to your plugin. In other words, when the Maven Plugin Plugin is generating the Plugin
descriptor for your plugin and you have not explicitly set the goalPrefix in your project, the plu
gin:descriptor goal will extract the prefix from your plugin’s artifactId when it matches the
following patterns:
•${prefix}-maven-plugin, OR
• maven-${prefix}-plugin

Maven: The Complete Reference 210 / 316
If you would like to set an explicit plugin prefix, you’ll need to configure the Maven Plugin Plugin. The
Maven Plugin Plugin is a plugin that is responsible for building the Plugin descriptor and performing
plugin specific tasks during the package and load phases. The Maven Plugin Plugin can be configured
just like any other plugin in the build element. To set the plugin prefix for your plugin, add the following
build element to the first-maven-plugin project’s pom.xml.
Configuring a Plugin Prefix
<?xml version="1.0" encoding="UTF-8"?><project>
<modelVersion>4.0.0</modelVersion>
<groupId>org.sonatype.mavenbook.plugins</groupId>
<artifactId>first-maven-plugin</artifactId>
<version>1.0-SNAPSHOT</version>
<packaging>maven-plugin</packaging>
<name>first-maven-plugin Maven Mojo</name>
<url>http://maven.apache.org</url>
<build>
<plugins>
<plugin>
<artifactId>maven-plugin-plugin</artifactId>
<version>2.3</version>
<configuration>
<goalPrefix>blah</goalPrefix>
</configuration>
</plugin>
</plugins>
</build>
<dependencies>
<dependency>
<groupId>org.apache.maven</groupId>
<artifactId>maven-plugin-api</artifactId>
<version>2.0</version>
</dependency>
<dependency>
<groupId>junit</groupId>
<artifactId>junit</artifactId>
<version>3.8.1</version>
<scope>test</scope>
</dependency>
</dependencies>
</project>
Configuring a Plugin Prefix sets the plugin prefix to blah. If you’ve added the org.sonatype.mav
enbook.plugins to the pluginGroups in your ~/.m2/settings.xml, you should be able to execute
the EchoMojo by running mvn blah:echo from any directory.

Maven: The Complete Reference 211 / 316
11.4.4 Logging from a Plugin
Maven takes care of connecting your Mojo to a logging provider by calling setLog() prior to the
execution of your Mojo. It supplies an implementation of org.apache.maven.monitor.logg
ing.Log. This class exposes methods that you can use to communicate information back to the user.
This Log class provides multiple levels of logging similar to that API provided by Log4J. Those levels
are captured by a series of methods available for each level: debug, info, error and warn. To save trees,
we’ve only listed the methods for a single logging level: debug.
void debug( CharSequence message)
Prints a message to the debug logging level.
void debug( CharSequence message, Throwable t)
Prints a message to the debug logging level which includes the stack trace from the Throwable
(either Exception or Error)
void debug( Throwable t )
Prints out the stack trace of the Throwable (either Exception or Error)
Each of the four levels exposes the same three methods. The four logging levels serve different purposes.
The debug level exists for debugging purposes and for people who want to see a very detailed picture
of the execution of a Mojo. You should use the debug logging level to provide as much detail on the
execution of a Mojo, but you should never assume that a user is going to see the debug level. The info
level is for general informational messages that should be printed as a normal course of operation. If you
were building a plugin that compiled code using a compiler, you might want to print the output of the
compiler to the screen.
The warn logging level is used for messages about unexpected events and errors that your Mojo can cope
with. If you were trying to run a plugin that compiled Ruby source code, and there was no Ruby source
code available, you might want to just print a warning message and move on. Warnings are not fatal, but
errors are usually build-stopping conditions. For the completely unexpected error condition, there is the
error logging level. You would use error if you couldn’t continue executing a Mojo. If you were writing
a Mojo to compile some Java code and the compiler wasn’t available, you’d print a message to the error
level and possibly pass along an Exception that Maven could print out for the user. You should assume
that a user is going to see most of the messages in info and all of the messages in error.
11.4.5 Mojo Class Annotations
In first-maven-plugin, you didn’t write the plugin descriptor yourself, you relied on Maven to
generate the plugin descriptor from your source code. The descriptor was generated using your plugin

Maven: The Complete Reference 212 / 316
project’s POM information and a set of annotations on your EchoMojo class. EchoMojo only specifies
the @goal annotation, here is a list of other annotations you can place on your Mojo implementation.
@goal <goalName>
This is the only required annotation which gives a name to this goal unique to this plugin.
@requiresDependencyResolution <requireScope>
Flags this mojo as requiring the dependencies in the specified scope (or an implied scope) to be
resolved before it can execute. Supports compile, runtime, and test. If this annotation had a value
of test, it would tell Maven that the Mojo cannot be executed until the dependencies in the test
scope had been resolved.
@requiresProject (true|false)
Marks that this goal must be run inside of a project, default is true. This is opposed to plugins
like archetypes, which do not.
@requiresReports (true|false)
If you were creating a plugin that relies on the presence of reports, you would need to set requir
esReports to true. The default value of this annotation is false.
@aggregator (true|false)
A Mojo with aggregator set to true is supposed to only run once during the execution of Maven. It
was created to give plugin developers the ability to summarize the output of a series of builds; for
example, to create a plugin that summarizes a report across all projects included in a build. A goal
with aggregator set to true should only be run against the top-level project in a Maven build.
The default value of aggregator is false.
@requiresOnline (true|false)
When set to true, Maven must not be running in offline mode when this goal is executed. Maven
will throw an error if one attempts to execute this goal offline. Default: false.
@requiresDirectInvocation
When set to true, the goal can only be executed if it is explicitly executed from the command-line
by the user. Maven will throw an error if someone tries to bind this goal to a lifecycle phase. The
default for this annotation is false.
@phase <phaseName>
This annotation specifies the default phase for this goal. If you add an execution for this goal to
apom.xml and do not specify the phase, Maven will bind the goal to the phase specified in this
annotation by default.
@execute [goal=goalName|phase=phaseName [lifecycle=lifecycleId]]
This annotation can be used in a number of ways. If a phase is supplied, Maven will execute a
parallel lifecycle ending in the specified phase. The results of this separate execution will be made
available in the Maven property ${executedProperty}.

Maven: The Complete Reference 213 / 316
The second way of using this annotation is to specify an explicit goal using the prefix:goal notation.
When you specify just a goal, Maven will execute this goal in a parallel environment that will not affect
the current Maven build.
The third way of using this annotation would be to specify a phase in an alternate lifecycle using the
identifier of a lifecycle.
@execute phase="package" lifecycle="zip"
@execute phase="compile"
@execute goal="zip:zip"
If you look at the source for EchoMojo, you’ll notice that Maven is not using the standard annotations
available in Java 5. Instead, it is using Commons Attributes. Commons Attributes provided a way for
Java programmers to use annotations before annotations were a part of the Java language specification.
Why doesn’t Maven use Java 5 annotations? Maven doesn’t use Java 5 annotations because it is designed
to target pre-Java 5 JVMs. Because Maven has to support older versions of Java, it cannot use any of the
newer features available in Java 5.
11.4.6 When a Mojo Fails
The execute() method in Mojo throws two exceptions MojoExecutionException and MojoF
ailureException. The difference between these two exception is both subtle and important, and
it relates to what happens when a goal execution "fails". A MojoExecutionException is a fatal
exception, something unrecoverable happened. You would throw a MojoExecutionException if
something happens that warrants a complete stop in a build; you re trying to write to disk, but there is
no space left, or you were trying to publish to a remote repository, but you can’t connect to it. Throw
aMojoExecutionException if there is no chance of a build continuing; something terrible has
happened and you want the build to stop and the user to see a "BUILD ERROR" message.
AMojoFailureException is something less catastrophic, a goal can fail, but it might not be the
end of the world for your Maven build. A unit test can fail, or a MD5 checksum can fail; both of these
are potential problems, but you don’t want to return an exception that is going to kill the entire build. In
this situation you would throw a MojoFailureException. Maven provides for different "resiliency"
settings when it comes to project failure. Which are described below.
When you run a Maven build, it could involve a series of projects each of which can succeed or fail. You
have the option of running Maven in three failure modes:
mvn -ff

Maven: The Complete Reference 214 / 316
Fail-fast mode: Maven will fail (stop) at the first build failure.
mvn -fae
Fail-at-end: Maven will fail at the end of the build. If a project in the Maven reactor fails, Maven
will continue to build the rest of the builds and report a failure at the end of the build.
mvn -fn
Fail never: Maven won’t stop for a failure and it won’t report a failure.
You might want to ignore failure if you are running a continuous integration build and you want to attempt
a build regardless of the success of failure of an individual project build. As a plugin developer, you’ll
have to make a call as to whether a particular failure condition is a MojoExecutionException or a
MojoFailureExeception.
11.5 Mojo Parameters
Just as important as the execute() method and the Mojo annotations, a Mojo is configured via param-
eters. This section deals with some configuration and topics surrounding Mojo parameters.
11.5.1 Supplying Values for Mojo Parameters
In EchoMojo we declared the message parameter with the following annotations:
/**
*Any Object to print out.
*@parameter
*expression="${echo.message}"
*default-value="Hello Maven World"
*/
private Object message;
The default expression for this parameter is ${echo.message}, this means that Maven will try to use the
value of the echo.message property to set the value for message. If the value of the echo.mess
age property is null, the default-value attribute of the @parameter annotation will be used instead.
Instead of using the echo.message property, we can configure a value for the message parameter of
the EchoMojo directly in a project’s POM.

Maven: The Complete Reference 215 / 316
There are a few ways to populate the message parameter in the EchoMojo. First we can pass in a
value from the command-line like this (assuming that you’ve added org.sonatype.mavenbook.
plugins to your pluginGroups):
$ mvn first:echo -Decho.message="Hello Everybody"
We could also specify the value of this message parameter, by setting a property in our POM or in our
settings.xml.
<project>
...
<properties>
<echo.message>Hello Everybody</echo.message>
</properties>
</project>
This parameter could also be configured directly as a configuration value for the plugin. If we wanted
to customize the message parameter directly, we could use the following build configuration. The fol-
lowing configuration bypasses the echo.message property and populates the Mojo parameter in plugin
configuration.
<project>
...
<build>
<plugins>
<plugin>
<groupId>org.sonatype.mavenbook.plugins</groupId>
<artifactId>first-maven-plugin</artifactId>
<version>1.0-SNAPSHOT</version>
<configuration>
<message>Hello Everybody!</message>
</configuration>
</plugin>
</plugins>
</build>
</project>
If we wanted to run the EchoMojo twice at difference phases in a lifecycle, and we wanted to cus-
tomize the message parameter for each execution separately, we could configure the parameter value at
the execution level in a POM like this:
<build>
<plugins>
<plugin>
<groupId>org.sonatype.mavenbook.plugins</groupId>

Maven: The Complete Reference 216 / 316
<artifactId>first-maven-plugin</artifactId>
<version>1.0-SNAPSHOT</version>
<executions>
<execution>
<id>first-execution</id>
<phase>generate-resources</phase>
<goals>
<goal>echo</goal>
</goals>
<configuration>
<message>The Eagle has Landed!</message>
</configuration>
</execution>
<execution>
<id>second-execution</id>
<phase>validate</phase>
<goals>
<goal>echo</goal>
</goals>
<configuration>
<message>${project.version}</message>
</configuration>
</execution>
</executions>
</plugin>
</plugins>
</build>
While this last configuration example seems very verbose, it illustrates the flexibility of Maven. In the
previous configuration example, you’ve bound the EchoMojo to both the validate and generate-
resources phases in the default Maven lifecycle. The first execution is bound to generate-res
ources, it supplies a string value to the message parameter of "The Eagle has Landed!". The second
execution is bound to the validate phase, it supplies a property reference to 1.0. When you run
mvn install for his project, you’ll see that the first:echo goal executes twice and prints out two
different messages.
11.5.2 Multi-valued Mojo Parameters
Plugins can have parameters which accept more than one value. Take a look at the ZipMojo shown in A
Plugin with Multi-valued Parameters. Both the includes and excludes parameters are multivalued
String arrays which specify the inclusion and exclusion patterns for a component that creates a ZIP
file.

Maven: The Complete Reference 217 / 316
A Plugin with Multi-valued Parameters
package org.sonatype.mavenbook.plugins
/**
*Zips up the output directory.
*@goal zip
*@phase package
*/
public class ZipMojo extends AbstractMojo
{
/**
*The Zip archiver.
*@parameter \
expression="${component.org.codehaus.plexus.archiver.Archiver#zip}"
*/
private ZipArchiver zipArchiver;
/**
*Directory containing the build files.
*@parameter expression="${project.build.directory}"
*/
private File buildDirectory;
/**
*Base directory of the project.
*@parameter expression="${basedir}"
*/
private File baseDirectory;
/**
*A set of file patterns to include in the zip.
*@parameter alias="includes"
*/
private String[] mIncludes;
/**
*A set of file patterns to exclude from the zip.
*@parameter alias="excludes"
*/
private String[] mExcludes;
public void setExcludes( String[] excludes ) { mExcludes = excludes; }
public void setIncludes( String[] includes ) { mIncludes = includes; }
public void execute()
throws MojoExecutionException
{

Maven: The Complete Reference 218 / 316
try {
zipArchiver.addDirectory( buildDirectory, includes, excludes );
zipArchiver.setDestFile( new File( baseDirectory, "output.zip" ) );
zipArchiver.createArchive();
} catch( Exception e ) {
throw new MojoExecutionException( "Could not zip", e );
}
}
}
To configure a multi-valued Mojo parameter, you use a series of elements for each value. If the name
of the multi-valued parameter is includes, you would use an element includes with child elements
include. If the multi-valued parameter is excludes, you would use an element excludes with
child elements exclude. To configure the ZipMojo to ignore all files ending in .txt and all files
ending in a tilde, you would use the following plugin configuration.
<project>
...
<build>
<plugins>
<plugin>
<groupId>org.sonatype.mavenbook.plugins</groupId>
<artifactId>zip-maven-plugin</artifactId>
<configuration>
<excludes>
<exclude>**/*.txt</exclude>
<exclude>**/*~</exclude>
</excludes>
</configuration>
</plugin>
</plugins>
</build>
</project>
11.5.3 Depending on Plexus Components
A Mojo is a component managed by an IoC container called Plexus. A Mojo can depend on other
components managed by Plexus by declaring a Mojo parameter and using the @parameter or the @
component annotation. A Plugin with Multi-valued Parameters shows a ZipMojo which depends on
a Plexus component using the @parameter annotation, this dependency could be declared using the @
component annotation.

Maven: The Complete Reference 219 / 316
Depending on a Plexus Component
/**
*The Zip archiver.
*@component role="org.codehaus.plexus.archiver.Archiver" roleHint="zip"
*/
private ZipArchiver zipArchiver;
When Maven instantiates this Mojo, it will then attempt to retrieve the Plexus component with the speci-
fied role and role hint. In this example, the Mojo will be related to a ZipArchiver component which will
allow the ZipMojo to create a ZIP file.
11.5.4 Mojo Parameter Annotations
Unless you insist on writing your Plugin descriptors by hand, you’ll never have to write that XML. Instead,
the Maven Plugin Plugin has a plugin:descriptor goal bound to the generate-resources phase. This
goal generates the plugin descriptor from annotations on your Mojo. To configure a Mojo parameter, you
should use the following annotations on either the private member variables for each of your Mojo’s
parameters on public setter methods for each property. The most common convention for Maven plugins
is to annotate private member variables directly.
@parameter [alias="someAlias"] [expression="${someExpression}"] [default-value="value"]
Marks a private field (or a setter method) as a parameter. The alias provides the name of the
parameter. If alias is omitted, Maven will use the name of the variable as the parameter name.
The expression is an expression that Maven will evaluate to obtain a value. Usually the expres-
sion is a property reference like ${echo.message}.default-value is the value that this Mojo
will use if no value can be derived from the expression or if a value was not explicitly supplied via
plugin configuration in a POM.
@required
If this annotation is present, a valid value for this parameter is required prior to Mojo execution.
If Maven tries to execute this Mojo and the parameter has a null value, Maven will throw an error
when it tries to execute this goal.
@readonly
If this annotation is present, the user cannot directly configure this parameter in the POM. You
would use this annotation with the expression attribute of the parameter annotation. For example,
if you wanted to make sure that a particular parameter always had the value of the finalName
POM property, you would list an expression of ${build.finalName} and then add the @readOnly
annotation. If this were the case, the user could only change the value of this parameter by changing
the value of finalName in the POM.

Maven: The Complete Reference 220 / 316
@component
Tells Maven to populate a field with a Plexus Component. A valid value for the @component
annotation would be:
@component role="org.codehaus.plexus.archiver.Archiver" roleHint="zip"
This would have the effect of retrieving the ZipArchiver from Plexus. The ZipArchiver is the
Archiver which corresponds to the role hint zip. Instead of component, you could also use the @param-
eter annotation with an expression attribute of:
@parameter expression="’+++${component.org.codehaus.plexus.archiver. ←-
Archiver#zip}+++’"
While the two annotations are effectively the same, the @component annotation is the preferred way to
configure dependencies on Plexus components.
@deprecated
The parameter will be deprecated. Users can continue configuring this parameter, but a warning
message will be displayed.
11.6 Plugins and the Maven Lifecycle
In the Chapter 4chapter, you learned that lifecycles can be customized by packaging types. A plugin can
both introduce a new packaging type and customize the lifecycle. In this section, you are going to learn
how you can customize the lifecycle from a custom Maven plugin. You are going to learn how to execute
a parallel lifecycle.
11.6.1 Executing a Parallel Lifecycle
Let’s assume you write some goal that depends on the output from a previous build. Maybe the ZipMojo
goal can only run if there is output to include in an archive. You can specify something like a prerequisite
goal by using the @execute annotation on a Mojo class. This annotation will cause Maven to spawn a
parallel build and execute a goal or a lifecycle in a parallel instance of Maven that isn’t going to affect the
current build.

Maven: The Complete Reference 221 / 316
@execute goal="<goal>"
This will execute the given goal before execution of this one. The goal name is specified using the
prefix:goal notation.
@execute phase="<phase>"
This will fork an alternate build lifecycle up to the specified phase before continuing to execute the
current one. If no lifecycle is specified, Maven will use the lifecycle of the current build.
@execute lifecycle="<lifecycle>" phase="<phase>"
This will execute the given alternate lifecycle. A custom lifecycle can be defined in META-
INF/maven/lifecycle.xml.
11.6.2 Creating a Custom Lifecycle
A custom lifecycle must be packaged in the plugin under the META-INF/maven/lifecycle.xml file. You
can include a lifecycle under src/main/resources in META-INF/maven/lifecycle.xml. The following life-
cycle.xml declares a lifecycle named zipcycle that contains only the zip goal in a package phase.
Define a Custom Lifecycle in lifecycle.xml
<lifecycles>
<lifecycle>
<id>zipcycle</id>
<phases>
<phase>
<id>package</id>
<executions>
<execution>
<goals>
<goal>zip</goal>
</goals>
</execution>
</executions>
</phase>
</phases>
</lifecycle>
</lifecycles>
If you wanted to execute the zipcycle lifecycle within another build, you could then create a ZipFo
rkMojo which uses the @execute annotation to tell Maven to step through the zipcycle lifecycle
when the ZipForkMojo is executed.
Forking a Custom Lifecycle from a Mojo

Maven: The Complete Reference 222 / 316
/**
*Forks a zip lifecycle.
*@goal zip-fork
*@execute lifecycle="zipcycle" phase="package"
*/
public class ZipForkMojo extends AbstractMojo
{
public void execute()
throws MojoExecutionException
{
getLog().info( "doing nothing here" );
}
}
Running the ZipForkMojo will fork the lifecycle. If you’ve configured your plugin to execute with the
goal prefix zip, running zip-fork should produce something similar to the following output.
$ mvn zip:zip-fork
[INFO] Scanning for projects...
[INFO] Searching repository for plugin with prefix: ’zip’.
[INFO] ←-
----------------------------------------------------------------------
[INFO] Building Maven Zip Forked Lifecycle Test
[INFO]task-segment: [zip:zip-fork]
[INFO] ←-
----------------------------------------------------------------------
[INFO] Preparing zip:zip-fork
[INFO] [site:attach-descriptor]
[INFO] [zip:zip]
[INFO] Building zip: \
~/maven-zip-plugin/src/projects/zip-lifecycle-test/target/output.zip
[INFO] [zip:zip-fork]
[INFO] doing nothing here
[INFO] ←-
---------------------------------------------------------------------
[INFO] BUILD SUCCESSFUL
[INFO] ←-
---------------------------------------------------------------------
[INFO] Total time: 1 second
[INFO] Finished at: Sun Apr 29 16:10:06 CDT 2007
[INFO] Final Memory: 3M/7M
[INFO] ←-
---------------------------------------------------------------------
Calling zip-fork spawned another lifecycle, Maven executed the zipcycle lifecycle then it printed
out the message from ZipFormMojo’s execute method.

Maven: The Complete Reference 223 / 316
11.6.3 Overriding the Default Lifecycle
Once you’ve created your own lifecycle and spawned it from a Mojo. The next question you might have
is how do you override the default lifecycle? How do you create custom lifecycles and attach them to
projects? In Chapter 4, we saw that the packaging of a project defines the lifecycle of a project. There’s
something different about almost every packaging type; each packaging type attaches different goals to
the default lifecycle. When you create a custom lifecycle, you can attach that lifecycle to a packaging
type by supplying some Plexus configuration in your plugin’s archive.
To define a new lifecycle for a new packaging type, you’ll need to configure a LifecycleMapping
component in Plexus. In your plugin project, create a META-INF/plexus/components.xml under src/-
main/resources. In components.xml add the content from Overriding the Default Lifecycle. Set the name
of the packaging type under role-hint, and the set of phases containing the coordinates of the goals
to bind (omit the version). Multiple goals can be associated with a phase using a comma delimited list.
Overriding the Default Lifecycle
<component-set>
<components>
<component>
<role>org.apache.maven.lifecycle.mapping.LifecycleMapping</ ←-
role>
<role-hint>zip</role-hint>
<implementation>
org.apache.maven.lifecycle.mapping.DefaultLifecycleMapping
</implementation>
<configuration>
<phases>
<process-resources>
org.apache.maven.plugins:maven-resources-plugin: ←-
resources
</process-resources>
<compile>
org.apache.maven.plugins:maven-compiler-plugin: ←-
compile
</compile>
<package>org.sonatype.mavenbook.plugins:maven-zip- ←-
plugin:zip</package>
</phases>
</configuration>
</component>
</components>
</component-set>

Maven: The Complete Reference 224 / 316
If you create a plugin which defines a new packaging type and a customized lifecycle, Maven won’t know
anything about it until you add the plugin to your project’s POM and set the extensions element to true.
Once you do this, Maven will scan your plugin for more than just Mojos to execute, it will look for the
components.xml under META-INF/plexus, and it will make the packaging type available to your project.
Configuring a Plugin as an Extension
<project>
...
<build>
...
<plugins>
<plugin>
<groupId>com.training.plugins</groupId>
<artifactId>maven-zip-plugin</artifactId>
<extensions>true</extensions>
</plugin>
</plugins>
</build>
</project>
Once you add the plugin with the extensions element set to true, you can use the custom packaging type
and your project will be able to execute the custom lifecycle associated with that packaging type.

Maven: The Complete Reference 225 / 316
Chapter 12
Using Maven Archetypes
12.1 Introduction to Maven Archetypes
An archetype is a template for a Maven project which is used by the Maven Archetype plugin to create
new projects. Archetypes are useful for open source projects such as Apache Wicket or Apache Cocoon
which want to present end-users with a set of baseline projects that can be used as a foundation for new ap-
plications. Archetypes can also be useful within an organization that wants to encourage standards across
a series of similar and related projects. If you work in an organization with a large team of developers
who all need to create projects which follow a similar structure, you can publish an archetype that can
be used by all other members of the development team. You can create a new project from an archetype
using the Maven Archetype plugin from the command line or by using the project creation wizard in the
m2eclipse plugin introduced in Developing with Eclipse and Maven.
12.2 Using Archetypes
You can use an archetype by invoking the generate goal of the Archetype plugin via the command-line or
with m2eclipse.

Maven: The Complete Reference 226 / 316
12.2.1 Using an Archetype from the Command Line
The following command line can be used to generate a project from the quickstart archetype.
mvn archetype:generate \
-DgroupId=org.sonatype.mavenbook \
-DartifactId=quickstart \
-Dversion=1.0-SNAPSHOT \
-DpackageName=org.sonatype.mavenbook \
-DarchetypeGroupId=org.apache.maven.archetypes \
-DarchetypeArtifactId=maven-archetype-quickstart \
-DarchetypeVersion=1.0 \
-DinteractiveMode=false
The generate goal accepts the following parameters:
groupId
The groupId for the project you are creating.
artifactId
The artifactId for the project you are creating.
version
The version for the project you are creating (defaults to 1.0-SNAPSHOT).
packageName
The default package for the project you are creating (defaults to groupId).
archetypeGroupId
The groupId of the archetype you wish to use for project generation.
archetypeArtifactId
The artifactId of the archetype you wish to use for project generation.
archetypeVersion
The version of the archetype you wish to use for project generation.
interactiveMode
When the generate goal is executed in interactive mode, it will prompt the user for all the
previously listed parameters. When interactiveMode is false, the generate goal will use
the values passed in from the command line.
Once you run the generate goal using the previously listed command line, you will have a directory
named quickstart which contains a new Maven project. The command line you had to suffer through in
this section is difficult to manage. In the next section we generate the same project running the generate
goal in an interactive mode.

Maven: The Complete Reference 227 / 316
12.2.2 Using the Interactive generate Goal
The simplest way to use the Maven Archetype plugin to generate a new Maven project from an archetype
is to run the archetype:generate goal in interactive mode. When interactiveMode is set
to true, the generate goal will present you with a list of archetypes and prompt you to select an
archetype and supply the necessary identifiers. Since the default value of the parameter interactiveM
ode is true, all you have to do to generate a new Maven project is run mvn archetype:generate.
$ mvn archetype:generate
[INFO] ←-
------------------------------------------------------------------------ ←-
[INFO] Building Maven Default Project
[INFO]task-segment: [archetype:generate] (aggregator-style)
[INFO] [archetype:generate]
[INFO] Generating project in Interactive mode
[INFO] No archetype defined. Using maven-archetype-quickstart
Choose archetype:
1: internal -> appfuse-basic-jsf
2: internal -> appfuse-basic-spring
3: internal -> appfuse-basic-struts
4: internal -> appfuse-basic-tapestry
5: internal -> appfuse-core
6: internal -> appfuse-modular-jsf
7: internal -> appfuse-modular-spring
8: internal -> appfuse-modular-struts
9: internal -> appfuse-modular-tapestry
10: internal -> maven-archetype-j2ee-simple
11: internal -> maven-archetype-marmalade-mojo
12: internal -> maven-archetype-mojo
13: internal -> maven-archetype-portlet
14: internal -> maven-archetype-profiles
15: internal -> maven-archetype-quickstart
16: internal -> maven-archetype-site-simple
17: internal -> maven-archetype-site
18: internal -> maven-archetype-webapp
19: internal -> jini-service-archetype
20: internal -> softeu-archetype-seam
21: internal -> softeu-archetype-seam-simple
22: internal -> softeu-archetype-jsf
23: internal -> jpa-maven-archetype
24: internal -> spring-osgi-bundle-archetype
25: internal -> confluence-plugin-archetype
26: internal -> jira-plugin-archetype
27: internal -> maven-archetype-har
28: internal -> maven-archetype-sar
29: internal -> wicket-archetype-quickstart
30: internal -> scala-archetype-simple

Maven: The Complete Reference 228 / 316
31: internal -> lift-archetype-blank
32: internal -> lift-archetype-basic
33: internal -> cocoon-22-archetype-block-plain
34: internal -> cocoon-22-archetype-block
35: internal -> cocoon-22-archetype-webapp
36: internal -> myfaces-archetype-helloworld
37: internal -> myfaces-archetype-helloworld-facelets
38: internal -> myfaces-archetype-trinidad
39: internal -> myfaces-archetype-jsfcomponents
40: internal -> gmaven-archetype-basic
41: internal -> gmaven-archetype-mojo
Choose a number: +15 +
The first thing that the archetype:generate goal does in interactive mode is print out a list of
archetypes that it is aware of. The Maven Archetype plugin ships with an archetype catalog which in-
cludes a reference to all of the standard, simple Maven archetypes (10-18). The plugin’s archetype catalog
also contains a number of references to compelling third-party archetypes such as archetypes which can be
used to create AppFuse projects, Confluence and JIRA plugins, Wicket applications, Scala applications,
and Groovy projects. For a brief overview of these third-party archetypes, see Section 12.3.2.
Once you select an archetype, the Maven Archetype plugin downloads the archetype, and then asks you
to supply the following values for your new project:
• groupId
• artifactId
• version
• package
Define value for groupId: : +org.sonatype.mavenbook+
Define value for artifactId: : +quickstart+
Define value for version: 1.0-SNAPSHOT: : +1.0-SNAPSHOT+
Define value for package: org.sonatype.mavenbook: : +org.sonatype. ←-
mavenbook+
Confirm properties configuration:
groupId: org.sonatype.mavenbook
artifactId: quickstart
version: 1.0-SNAPSHOT
package: org.sonatype.mavenbook
Y: : +Y+
Once this interactive portion of the archetype:generate goal execution is finished, the Maven
Archetype plugin will generate the project in a directory named after the artifactId you supplied.

Maven: The Complete Reference 229 / 316
[INFO] Parameter: groupId, Value: org.sonatype.mavenbook
[INFO] Parameter: packageName, Value: org.sonatype.mavenbook
[INFO] Parameter: basedir, Value: /Users/tobrien/tmp
[INFO] Parameter: package, Value: org.sonatype.mavenbook
[INFO] Parameter: version, Value: 1.0-SNAPSHOT
[INFO] Parameter: artifactId, Value: quickstart
[INFO] ********************* End of debug info from resources from \
generated POM **
[INFO] OldArchetype created in dir: /Users/tobrien/tmp/quickstart
[INFO] ←-
------------------------------------------------------------------------ ←-
[INFO] BUILD SUCCESSFUL
[INFO] ←-
------------------------------------------------------------------------ ←-
[INFO] Total time: 1 minute 57 seconds
[INFO] Finished at: Sun Oct 12 15:39:14 CDT 2008
[INFO] Final Memory: 8M/15M
[INFO] ←-
------------------------------------------------------------------------ ←-
12.2.3 Using an Archetype from m2eclipse
m2eclipse makes creating a new Maven project from a Maven Archetype very easy by providing an
intuitive wizard for searching for, selecting, and configuring a Maven Archetype. For more information
about generating a Maven project from a Maven Archetype using m2eclipse, see Creating a Maven Project
from a Maven Archetype in "Developing with Eclipse and Maven".
12.3 Available Archetypes
As more and more projects adopt Maven, more and more artifacts are being published by projects as a
way to provide users with a quick way of creating projects from existing templates. This section discusses
some of the simple core archetypes from the Apache Maven project as well as providing a survey of some
interesting third-party archetypes.

Maven: The Complete Reference 230 / 316
12.3.1 Common Maven Archetypes
Some of the most straightforward Maven archetypes are contained in the org.apache.maven.archetypes
groupId. Most of the basic archetypes under org.apache.maven.archetypes are very basic templates that
include few options. You’ll use them only to provide the most basic features that distinguish a Maven
project from a non-Maven project. For example, the webapp archetype plugin described in this section
just includes a stub of a web.xml file in ${basedir}/src/main/webapp/WEB-INF, and it doesn’t even go as
far as providing a Servlet for you to customize. In Section 12.3.2 you’ll see a quick survey of some of the
more notable third-party archetypes such as the AppFuse and Cocoon artifacts.
The following archetypes can be found in the groupId org.apache.maven.archetypes:
12.3.1.1 maven-archetype-quickstart
The quickstart archetype is a simple project with JAR packaging and a single dependency on JUnit. After
generating a project with the quickstart archetype, you will have a single class named App in the default
package with a main() method that prints "Hello World!" to standard output. You will also have a single
JUnit test class named AppTest with a testApp() method with a trivial unit test.
12.3.1.2 maven-archetype-webapp
This archetype creates a simple project with WAR packaging and a single dependency on JUnit. ${basedir}/src/main/webapp
contains a simple shell of a web application: an index.jsp page and the simplest possible web.xml file.
Even though the archetype includes a dependency on JUnit, this archetype does not create any unit tests.
If you were looking for a functional web application, this archetype is going to disappoint you. For more
relevant web archetypes, see Section 12.3.2.
12.3.1.3 maven-archetype-mojo
This archetype creates a simple project with maven-plugin packaging and a single mojo class named
MyMojo in the project’s default package. The MyMojo class contains a touch goal which is bound to
the process-resources phase, it creates a file named touch.txt in the target/ directory of the new
project when it is executed. The new project will have a dependency on maven-plugin-api and JUnit.

Maven: The Complete Reference 231 / 316
12.3.2 Notable Third-Party Archetypes
This section is going to give you a brief overview of some of the archetypes available from third-parties
not associated with the Apache Maven project. If you are looking for a more comprehensive list of
available archetypes, take a look at the list of archetypes in m2eclipse. m2eclipse allows you to create
a new Maven project from an ever growing list of approximately 80 archetypes which span an amazing
number of projects and technologies. Creating a Maven Project from a Maven Archetype in "Developing
with Eclipse and Maven" contains a list of archetypes which are immediately available to you when you
use m2eclipse. The archetypes listed in this section are available on the default list of archetypes generated
by the interactive execution of the generate goal.
12.3.2.1 AppFuse
AppFuse is an application framework developed by Matt Raible. You can think of AppFuse as something
of a Rosetta Stone for a few very popular Java technologies like the Spring Framework, Hibernate, and
iBatis. Using AppFuse you can very quickly create an end-to-end multi-tiered application that can plugin
into several front-end web frameworks like Java Server Faces, Struts, and Tapestry. Starting with AppFuse
2.0, Matt Raible has been transitioning the framework to Maven 2 to take advantage of the dependency
management and archetype capabilities. AppFuse 2 provides the following archetypes all in the groupId
org.appfuse.archetypes:
appfuse-basic-jsf and appfuse-modular-jsf
End-to-end application using Java Server Faces in the presentation layer
appfuse-basic-spring and appfuse-modular-spring
End-to-end application using Spring MVC in the presentation layer
appfuse-basic-struts and appfuse-modular-struts
End-to-end application using Struts 2 in the presentation layer
appfuse-basic-tapestry and appfuse-modular-tapestry
End-to-end application using Tapestry in the presentation layer
appfuse-core
Persistence and object model without the presentation layer
Archetypes following the appfuse-basic-*pattern are entire end-to-end applications in a single
Maven project, and archetypes following the appfuse-modular-*pattern are end-to-end applications
in a multimodule Maven project which separates the core model objects and persistence logic from the
web front-end. Here’s an example from generating a project to running a web application for the modular
Spring MVC application:

Maven: The Complete Reference 232 / 316
$ mvn archetype:generate \
-DarchetypeArtifactId=appfuse-modular-spring \
-DarchetypeGroupId=org.appfuse.archetypes \
-DgroupId=org.sonatype.mavenbook \
-DartifactId=mod-spring \
-Dversion=1.0-SNAPSHOT \
-DinteractiveMode=false[INFO] Scanning for projects...
...
[INFO] [archetype:generate]
[INFO] Generating project in Batch mode
[INFO] Archetype [org.appfuse.archetypes:appfuse-modular-spring:RELEASE]
found in catalog
[INFO] Parameter: groupId, Value: org.sonatype.mavenbook
[INFO] Parameter: packageName, Value: org.sonatype.mavenbook
[INFO] Parameter: basedir, Value: /Users/tobrien/tmp
[INFO] Parameter: package, Value: org.sonatype.mavenbook
[INFO] Parameter: version, Value: 1.0-SNAPSHOT
[INFO] Parameter: artifactId, Value: mod-spring
...
[INFO] OldArchetype created in dir: /Users/tobrien/tmp/mod-spring
[INFO] ←-
------------------------------------------------------------------------ ←-
[INFO] BUILD SUCCESSFUL
$ cd mod-spring
$ mvn
... (an overwhelming amount of activity ~5 minutes)
$ cd web
$ mvn jetty:run-war
... (Maven Jetty plugin starts a Servlet Container on port 8080)
From generating a project with the AppFuse archetype to running a web application with a authentication
and user-management system takes all of 5 minutes. This is the real power of using a Maven Archetype as
a foundation for a new application. We oversimplified the AppFuse installation process a bit and left out
the important part where you download and install a MySQL database, but that’s easy enough to figure
out by reading the AppFuse Quickstart Documentation.
12.3.2.2 Confluence and JIRA plugins
Atlassian has created some archetypes for people interested in developing plugins for both Confluence
and JIRA. Confluence and JIRA are, respectively, a Wiki and an issue tracker both of which have
gained a large open source user base through granting free licenses for open source projects. Both
the jira-plugin-archetype and the confluence-maven-archetype artifacts are under the

Maven: The Complete Reference 233 / 316
com.atlassian.maven.archetypes groupId. When you generate a Confluence plugin, the archetype will
generate a pom.xml which contains the necessary references to the Atlassian repositories and a depen-
dency on the confluence artifact. The resulting Confluence plugin project will have a single example
macro class and an atlassian-plugin.xml descriptor. Generating a project from the Jira archetype creates a
project with a single, blank MyPlugin class and an atlassian-plugin.xml descriptor in ${basedir}/src/main/resources.
For more information about developing Confluence plugins with Maven 2, see Developing Confluence
Plugins with Maven 2 on the Confluence project’s Wiki. For more information about developing Jira
plugins with Maven 2, see How to Build and Atlassian Plugin on the Atlassian Developer Network.
12.3.2.3 Wicket
Apache Wicket is a component-oriented web framework which focused on managing the server-side state
of a number of components written in Java and simple HTML. Where a framework like Spring MVC or
Ruby on Rails focuses on merging objects within a request with a series of page templates, Wicket is
very strongly focused on capturing interactions and page structure in a series of POJO Java classes. In
an age where hype-driven tech media outlets are proclaiming the "Death of Java", Wicket is a contrarian
approach to the design and assembly of web applications. To generate a Wicket project with the Maven
Archetype plugin:
$ mvn archetype:generate
... (select the "wicket-archetype-quickstart" artifact from the ←-
interactive \
menu) ...
... (supply a groupId, artifactId, version, package) ...
... (assuming the artifactId is "ex-wicket") ...
$ cd ex-wicket
$ mvn install
... (a lot of Maven activity) ...
$ mvn jetty:run
... (Jetty will start listening on port 8080) ...
Just like the AppFuse archetype, this archetype creates a shell web application which can be immediately
executed with the Maven Jetty plugin. If you hit http://localhost:8080/ex-wicket, you be able to see the
newly created web application in a servlet container.

Maven: The Complete Reference 234 / 316
Note
Think about the power of Maven Archetypes versus the copy and paste approach that has characterized
the last few years of web development. Six years ago, without the benefit of something like the Maven
Archetype plugin, you would have had to slog through a book about AppFuse or a book about Wicket
and followed circuitous pedagogy about the framework before you could actually fire it up in servlet
container. It was either that or just copying an existing project and customizing it for your needs. With
the Maven Archetype plugin, framework developers can now give you a working, customized shell for an
application in a matter of minutes. This is a sea change that has yet to hit the enterprise development
space, and you can expect that this handful of available third-party artifacts will balloon to hundreds
within the next few years.
12.4 Publishing Archetypes
Once you’ve generated a good set of archetypes, you will probably want to share them with the world. To
do this, you’ll need to create something called an Archetype catalog. An Archetype catalog is an XML file
which the Maven Archetype plugin can consult to locate archetypes in a repository. Archetype Catalog for
the Apache Cocoon Project shows the contents of the Archetype catalog for the Apache Cocoon project
which can be found at http://cocoon.apache.org/archetype-catalog.xml.
Archetype Catalog for the Apache Cocoon Project
<archetype-catalog>
<archetypes>
<archetype>
<groupId>org.apache.cocoon</groupId>
<artifactId>cocoon-22-archetype-block-plain</artifactId>
<version>1.0.0</version>
<description>Creates an empty Cocoon block; useful if you want ←-
to add
another block to a Cocoon application</description>
</archetype>
<archetype>
<groupId>org.apache.cocoon</groupId>
<artifactId>cocoon-22-archetype-block</artifactId>
<version>1.0.0</version>
<description>Creates a Cocoon block containing some small
samples</description>
</archetype>
<archetype>
<groupId>org.apache.cocoon</groupId>

Maven: The Complete Reference 235 / 316
<artifactId>cocoon-22-archetype-webapp</artifactId>
<version>1.0.0</version>
<description>Creates a web application configured to host ←-
Cocoon blocks.
Just add the block dependencies</description>
</archetype>
</archetypes>
</archetype-catalog>
To generate such a catalog, you’ll need to crawl a Maven repository and generate this catalog XML file.
The Archetype plugin has a goal named crawl which does just this, and it assumes that it has access
to the file system that hosts a repository. If you run archetype:crawl from the command line with no
arguments, the Archetype plugin will crawl your local repository searching for Archetypes and it will
create an archetype-catalog.xml in ~/.m2/repository.
[tobrien@MACBOOK repository]$ mvn archetype:crawl
[INFO] Scanning for projects...
[INFO] Searching repository for plugin with prefix: ’archetype’.
[INFO] ←-
------------------------------------------------------------------------ ←-
[INFO] Building Maven Default Project
[INFO]task-segment: [archetype:crawl] (aggregator-style)
[INFO] ←-
------------------------------------------------------------------------ ←-
[INFO] [archetype:crawl]
repository /Users/tobrien/.m2/repository
catalogFile null
[INFO] Scanning /Users/tobrien/.m2/repository/ant/ant/1.5/ant-1.5.jar
[INFO] Scanning /Users/tobrien/.m2/repository/ant/ant/1.5.1/ant-1.5.1.jar
[INFO] Scanning /Users/tobrien/.m2/repository/ant/ant/1.6/ant-1.6.jar
[INFO] Scanning /Users/tobrien/.m2/repository/ant/ant/1.6.5/ant-1.6.5.jar
...
[INFO] Scanning /Users/tobrien/.m2/repository/xom/xom/1.0/xom-1.0.jar
[INFO] Scanning /Users/tobrien/.m2/repository/xom/xom/1.0b3/xom-1.0b3.jar
[INFO] ←-
------------------------------------------------------------------------ ←-
[INFO] BUILD SUCCESSFUL
[INFO] ←-
------------------------------------------------------------------------ ←-
[INFO] Total time: 31 seconds
[INFO] Finished at: Sun Oct 12 16:06:07 CDT 2008
[INFO] Final Memory: 6M/12M

Maven: The Complete Reference 236 / 316
[INFO] ←-
------------------------------------------------------------------------ ←-
If you are interested in creating an Archetype catalog it is usually because you are an open source project
or organization which has a set of archetypes to share. These archetypes are likely already available in a
repository, and you need to crawl this repository and generate a catalog in a file system. In other words,
you’ll probably want to scan a directory on an existing Maven repository and generate an Archetype plugin
at the root of the repository. To do this, you’ll need to pass in the catalog and repository parameters to the
archetype:crawl goal.
The following command line assumes that you are trying to generate a catalog file in /var/www/html/archetype-
catalog.xml for a repository hosted in /var/www/html/maven2.
$ mvn archetype:crawl -Dcatalog=/var/www/html/archetype-catalog.xml \
[INFO] Scanning for projects...
[INFO] Searching repository for plugin with prefix: ’archetype’.
[INFO] ←-
------------------------------------------------------------------------ ←-
[INFO] Building Maven Default Project
[INFO]task-segment: [archetype:crawl] (aggregator-style)
[INFO] ←-
------------------------------------------------------------------------ ←-
[INFO] [archetype:crawl]
repository /Users/tobrien/tmp/maven2
catalogFile /Users/tobrien/tmp/blah.xml
-Drepository=/var/www/html/maven2
...

Maven: The Complete Reference 237 / 316
Chapter 13
Developing with Flexmojos
13.1 Introduction
This chapter provides an overview of the Flexmojos project for people interested in using Maven to
develop Flex applications and libraries.
13.2 Configuring Build Environment for Flexmojos
Before you attempt to compile Flex libraries and applications with Maven, you will need to complete two
configuration tasks:
• Configure your Maven settings to reference a repository which contains the Flex framework
• Add the Flash Player to your PATH to support Flex unit testing
• (Optional) Configure your Maven Settings to include the Sonatype plugin group

Maven: The Complete Reference 238 / 316
13.2.1 Referencing a Repository with the Flex Framework
To setup your Maven environment for Flexmojos, you have two options: you can reference the Sonatype
Flexmojos repository directly in a pom.xml, or you can install Nexus and add the Sonatype Flexmojos
repository as a proxy repository in your own repository manager. While the most straightforward option
is to reference the repository directly, downloading and installing Nexus will give you the control and
flexibility you need to cache and manage artifacts generated by your own build. If you are just interested
in getting up and running with Flexmojos, read Section 13.2.1.1 next. If you are interested in a long-term
solution which can be deployed to support a development team, continue to Section 13.2.1.2.
Note
If your organization is already using Sonatype Nexus to proxy remote repositories, you may already
have customized your ~/.m2/settings.xml file to point to a single Nexus group. If this is your situ-
ation, you should add a Proxy repository for the Sonatype Flexmojos repository group at ${flexmo-
jos.repository}[${flexmojos.repository}]. Add this new repository to the Nexus Repository Group that is
referenced by your development team. Adding a proxy repository for this remote group and then adding
this group to your Nexus installation’s public repository group will give clients of your Nexus instance
access to the artifacts from the Sonatype repository.sonatype.org Nexus instance.
13.2.1.1 Referencing Sonatype’s Flexmojos Repository in a POM
Flexmojos depends on a few artifacts which are not currently available from the Central Maven repository.
These artifacts are available from a Repository hosted by Sonatype. To use Flexmojos, you will need to
reference this repository from your project’s pom.xml. To do this, add the repositories element
shown in Adding a Reference to Sonatype’s FlexMojos Repository in a POM to your project’s pom.xml.
Adding a Reference to Sonatype’s FlexMojos Repository in a POM
<project>
<modelVersion>4.0.0</modelVersion>
<groupId>test</groupId>
<artifactId>test</artifactId>
<version>1.0-SNAPSHOT</version>
<packaging>pom</packaging>
<modules>
<module>swc</module>
<module>swf</module>
<module>war</module>
</modules>

Maven: The Complete Reference 239 / 316
*<repositories>
<repository>
<id>flexmojos</id>
<url>${flexmojos.repository}</url>
</repository>
</repositories>*
</project>
The XML shown in Adding a Reference to Sonatype’s FlexMojos Repository in a POM, will add this
repository to the list of repositories Maven will consult when it attempts to download artifacts and plugins.
13.2.1.2 Proxying Sonatype’s Flexmojos Repository with Nexus
Instead of pointing directly at the Sonatype Flexmojos repository, Sonatype recommends that you install
a repository manager and proxy the Sonatype public repository. When you proxy a remote repository
with a repository manager such as Nexus, you gain a level of control and stability not possible when
your build relies directly on external resources. In addition to this control and stability, a repository
manager also provides you with an deployment target for binary artifacts generated by your own builds.
For instructions on downloading, installing, and configuring Nexus, refer to the Installation chapter in
Repository Management with Nexus.
13.2.2 Configure a Flexmojos Proxy Repository in Nexus
Once Nexus is installed and started, complete the following steps to add a proxy repository for the
Sonatype public repository. To add a new proxy repository:
1. Click on the Repositories link under Views/Repositories in the Nexus menu on the left-hand side
of the Nexus user interface.
2. Click on Repositories to load the Repositories panel.
3. In the Repositories panel, click on the Add.. button and select Proxy Repository as shown in
Figure 13.1.
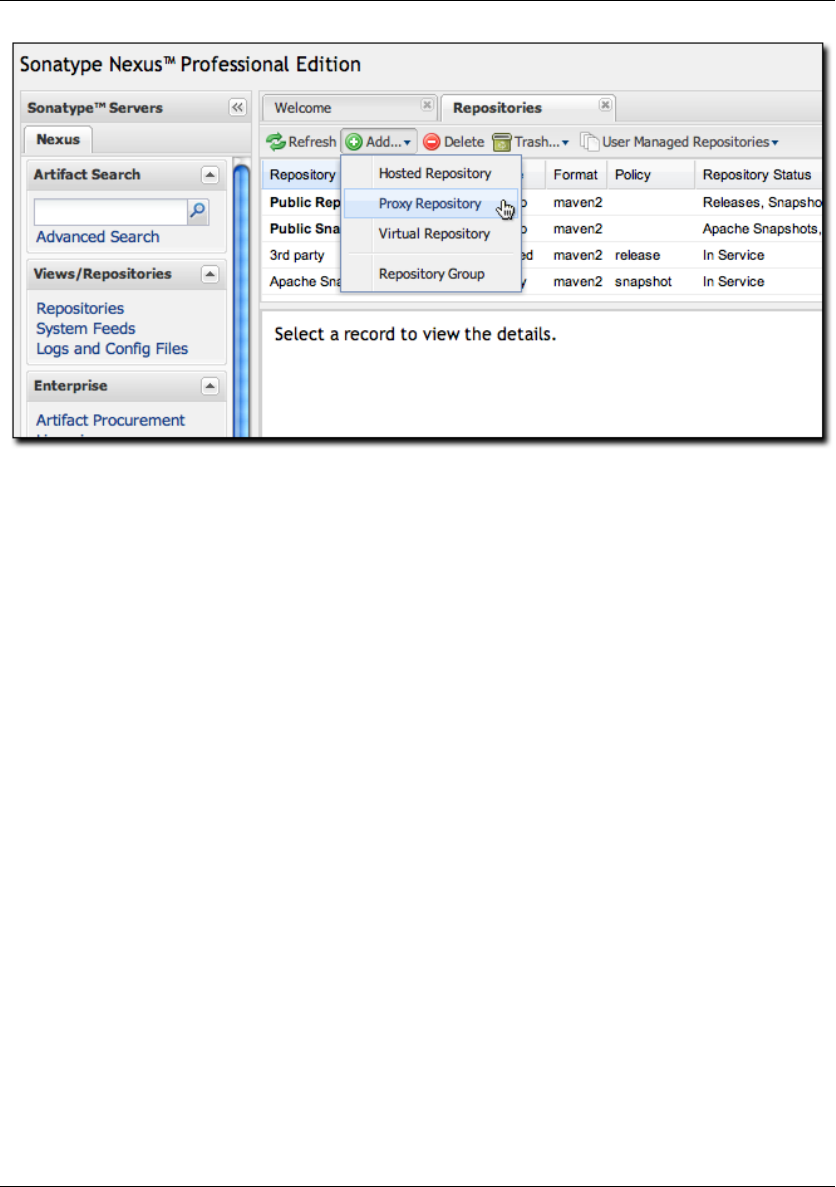
Maven: The Complete Reference 240 / 316
Figure 13.1: Adding a Proxy Repository to Sonatype Nexus
Once you’ve created a new Proxy repository, you will need to configure it to point to the Sonatype Flex-
mojos repository.
1. Select the new repository, and then
2. Select the Configuration tab in the lower half of the window.
3. Populate the following field with the values shown in Figure 13.2.
a. <itemizedlist> Repository ID is "sonatype-flexmojos"
b. Repository Name is "Sonatype Flexmojos Proxy"
c. The Remote Storage Location is ${flexmojos.repository}[${flexmojos.repository}]
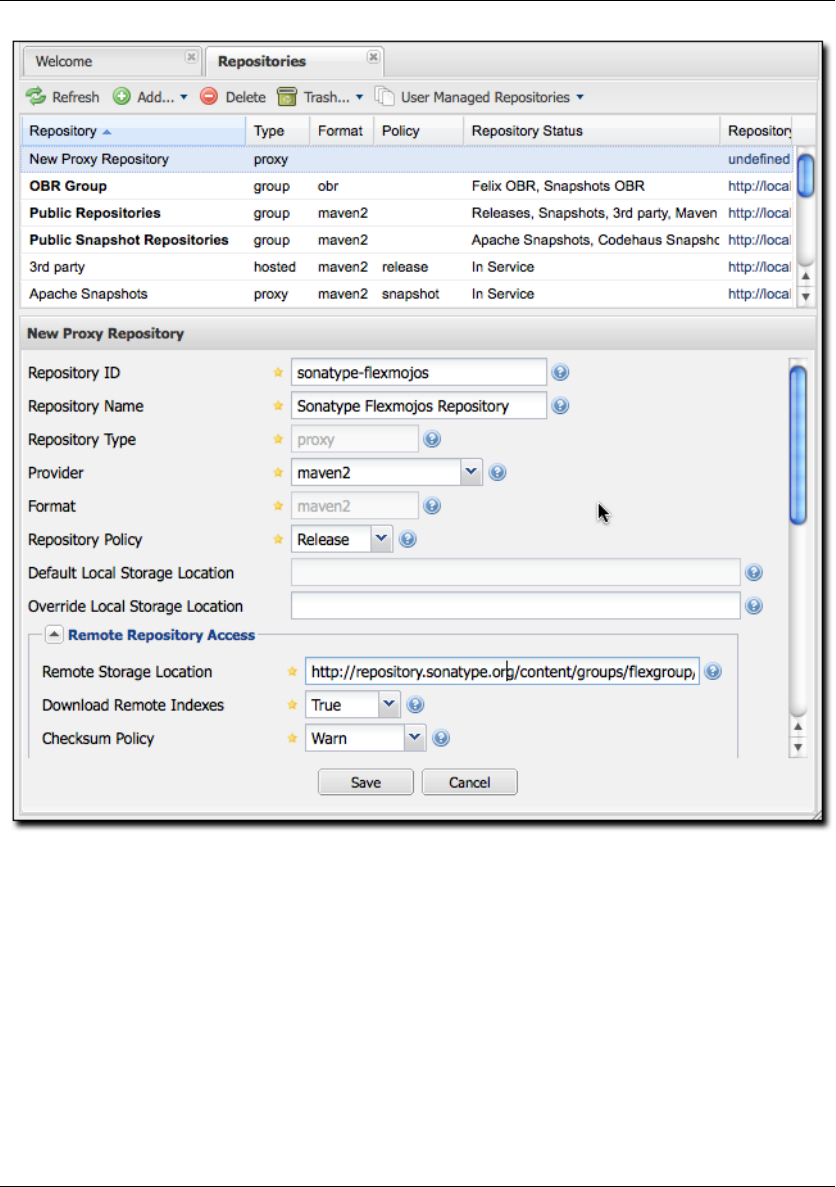

Maven: The Complete Reference 242 / 316
13.2.2.1 Add the Flexmojos Proxy Repository to a Group
Nexus ships with a public repository group, which combines several repositories into a single URL for
Maven clients. Add this new Flexmojos proxy repository to the Nexus public group. To do this:
1. Return to the list of repositories which should now be visible in the upper half of the Repositories
panel as shown in Figure 13.2.
2. Click on the Public Repositories group, and then
3. Click on the Configuration tab in the lower half of the Repository panel. Clicking the Configuration
tab will expose the Group configuration form shown in Figure 13.3.
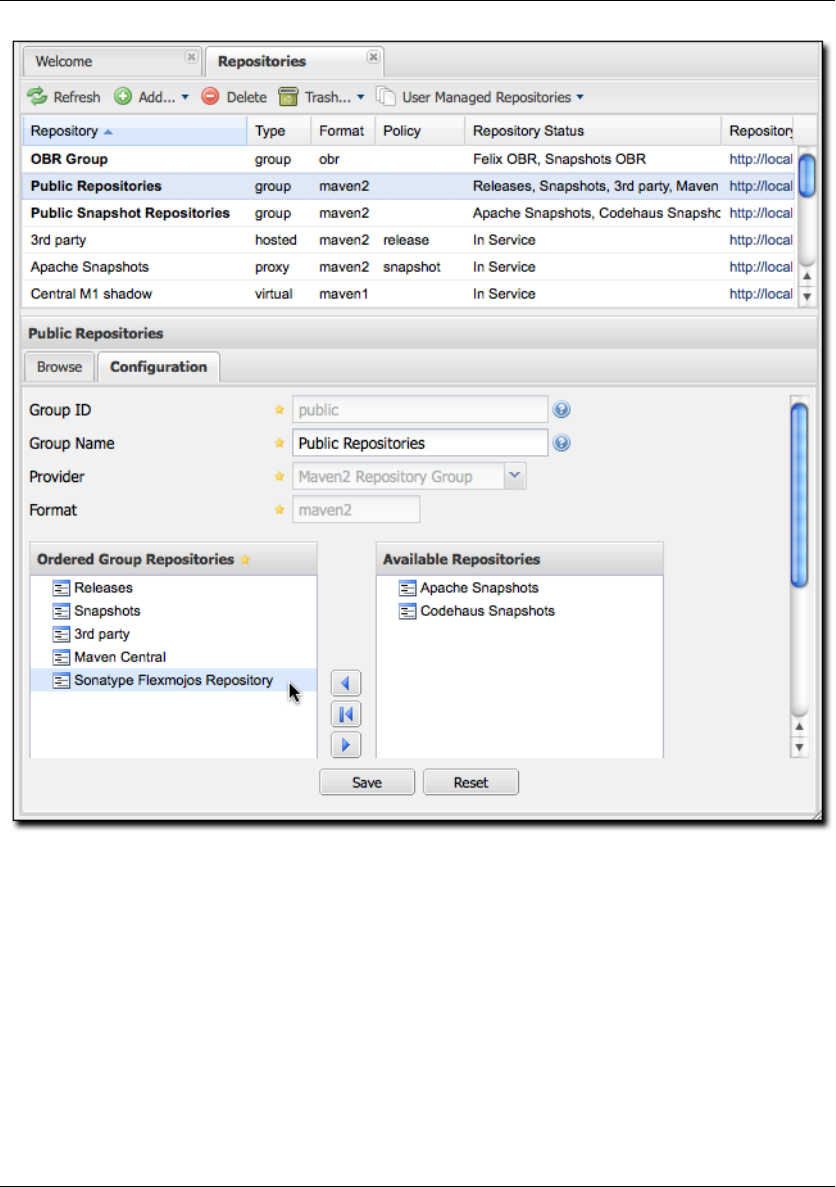
Maven: The Complete Reference 243 / 316
Figure 13.3: Adding the Sonatype Flexmojos Proxy to the Public Repositories Group
1. To add the Sonatype Public Proxy to the Public Repositories group simply drag and drop the
Sonatype Public Proxy repository from the Available Repositories list to the Ordered Group
Repositories list.
2. Click Save, and you have successfully added a proxy of the Sonatype Flexmojos repository to your
Nexus installation.

Maven: The Complete Reference 244 / 316
Whenever a client requests an artifact from this repository group, if Nexus has not already cached a match-
ing artifact, it will query the Sonatype Flexmojos repository at ${flexmojos.repository}[${flexmojos.repository}].
Your Nexus installation will maintain a local cache of all artifacts retrieved from the Sonatype Flexmojos
repository. This local cache gives you more control and contributes to a more stable build environment.
If you are setting up a group of developers to rely upon artifacts from the Sonatype public repository,
you’ll have a completely self-contained build environment that won’t be subject to the availability of the
Sonatype repository once the necessary artifacts have been cached by your Nexus instance.
13.2.2.2 Configure Your Development Environment for Nexus
The final step is connecting your Maven installation to the Nexus instance you just configured. You will
need to update your Maven Settings to use your Nexus repository group as a mirror for all repositories.
To do this, you need to put the following XML in your ~/.m2/settings.xml file.
Settings XML for Local Nexus Instance
<settings>
<mirrors>
<mirror>
<!--This sends everything else to /public -->
<id>nexus</id>
<mirrorOf>*</mirrorOf>
<url>http://localhost:8081/nexus/content/groups/public</url>
</mirror>
</mirrors>
<profiles>
<profile>
<id>nexus</id>
<!--all requests to nexus via the mirror -->
<repositories>
<repository>
<id>central</id>
<url>http://central</url>
<releases><enabled>true</enabled></releases>
<snapshots><enabled>true</enabled></snapshots>
</repository>
</repositories>
<pluginRepositories>
<pluginRepository>
<id>central</id>
<url>http://central</url>
<releases><enabled>true</enabled></releases>
<snapshots><enabled>true</enabled></snapshots>
</pluginRepository>
</pluginRepositories>

Maven: The Complete Reference 245 / 316
</profile>
</profiles>
<activeProfiles>
<activeProfile>nexus</activeProfile>
</activeProfiles>
</settings>
This XML file configures Maven to consult a single public repository group for all configured repositories
and plugin repositories. It is a simple way to guarantee that every request for an artifact is made through
your Nexus installation.
13.2.3 Configuring Environment to Support Flex Unit Tests
Flexmojos expects to be able to launch the stand-alone Flash Player to execute unit tests. In order for this
to work, you will need to add the stand-alone Flash Player to your PATH, or you will need to pass the
location of the Flash Player executable to your build using the -DflashPlayer.command options.
When executing a unit test, Flex Mojos expects to launch the following platform-specific executables for
the stand-alone Flash Player:
Microsoft Windows
FlexMojos will attempt to launch the FlashPlayer.exe binary. To support execution of unit tests, add
the directory containing FlashPlayer.exe to your PATH or pass in the location of the FlashPlayer.exe
binary to Maven using the
Macintosh OSX
FlexMojos will attempt to launch the "Flash Player" application. To support the execution of unit
tests, add the directory containing "Flash Player" to your PATH or pass the path to the executable
to option.
Unix (Linux, Solaris, etc.)
FlexMojos will attempt to launch the flashplayer executable. To support the execution of unit tests,
add the directory containing flashplayer to your PATH or pass the path to the executable to option.
Note
On a Linux machine, you will need to have X virtual framebuffer (Xvfb) installed to run unit tests in a
headless build. For more information about Xvfb, click here.
If you have been developing Flash Applications with Adobe Flash CS4 or Adobe Flex Builder or if you

Maven: The Complete Reference 246 / 316
have been viewing flash content in a browser, you probably have the Flash Player installed somewhere on
your workstation. While it is possible to configure Maven to use one of these players for Flex unit tests,
you’ll want to make sure that you are running the debug version of the Flash Player. To minimize the
potential for incompatibility, you should download one of the Flash Player’s listed below and install it on
your local workstation. To download the standalone Flash Player for you environment:
• Windows: http://download.macromedia.com/pub/flashplayer/updaters/10/flashplayer_10_sa_debug.exe
• Mac OSX: http://download.macromedia.com/pub/flashplayer/updaters/10/flashplayer_10_sa_debug.app.zip
• Linux: http://download.macromedia.com/pub/flashplayer/updaters/10/flash_player_10_linux_dev.tar.gz
To install this player and add it to your PATH on an OSX machine, run the following commands:
$ wget http://download.macromedia.com/pub/flashplayer/updaters/10/\
flashplayer_10_sa_debug.app.zip
$ unzip flashplayer_10_sa_debug.app.zip
$ sudo cp -r Flash\ Player.app /Applications/
$ export PATH=/Applications/Flash\ Player.app/Contents/MacOS:${PATH}
Instead of adding the path for the Flash Player to your PATH on the command-line, you should configure
your environment to automatically configure these variables. If you are using bash, you would add the
last export command to your ~/.bash_profile.
13.2.4 Adding FlexMojos to Your Maven Settings’ Plugin Groups
If you need to run FlexMojos goals from the command-line, it will be more convenient if you add the
Sonatype Plugin groups to your Maven Settings. To do this, open up ~/.m2/settings.xml and add the
following plugin groups:
Adding Sonatype Plugins to Maven Settings
<pluginGroups>
<pluginGroup>com.sonatype.maven.plugins</pluginGroup>
<pluginGroup>org.sonatype.plugins</pluginGroup>
</pluginGroups>
Once you’ve added these plugin groups to your Maven Settings you can invoke a FlexMojos goal using the
plugin prefix flexmojos. Without this configuration, calling the flexbuilder goal would involve
the following command-line:

Maven: The Complete Reference 247 / 316
$ mvn org.sonatype.flexmojos:flexmojos-maven-plugin:${flexmojos.version}: ←-
flexbuilder
With the org.sonatype.plugins group in your Maven settings, the same goal can be invoked with:
$ mvn flexmojos:flexbuilder
13.3 Creating a Flex Mojos Project from an Archetype
Flexmojos has a set of archetypes which can be used to quickly create a new Flex project. The following
archetypes are all in the org.sonatype.flexmojos group with a version of ${flexmojos.ver
sion}:
flexmojos-archetypes-library
Creates a simple Flex Library project which produces a SWC
flexmojos-archetypes-application
Creates a simple Flex Application with produces a SWF
flexmojos-archetypes-modular-webapp
Creates a Multimodule project which consists of a project that produces a SWC which is consumed
by a project which produces a SWF that is ultimately presented in a project that generates a WAR
13.3.1 Creating a Flex Library
To create a Flex Library Project, execute the following command at the command-line:
$ mvn archetype:generate \
-DarchetypeRepository=http://repository.sonatype.org/content/groups/public ←-
\
-DarchetypeGroupId=org.sonatype.flexmojos \
-DarchetypeArtifactId=flexmojos-archetypes-library \
-DarchetypeVersion=${flexmojos.version}
[INFO] Scanning for projects...
[INFO] Searching repository for plugin with prefix: ’archetype’.
[INFO] com.sonatype.maven.plugins: checking for updates from central
...

Maven: The Complete Reference 248 / 316
[INFO] [archetype:generate]
[INFO] Generating project in Interactive mode
[INFO] Archetype defined by properties
...
Define value for groupId: : +org.sonatype.test+
Define value for artifactId: : +sample-library+
Define value for version: 1.0-SNAPSHOT: : +1.0-SNAPSHOT+
Define value for package: org.sonatype.test: : +org.sonatype.test+
Confirm properties configuration:
groupId: org.sonatype.test
artifactId: sample-library
version: 1.0-SNAPSHOT
package: org.sonatype.test
Y: : +Y+[INFO] Parameter: groupId, Value: org.sonatype.test
[INFO] Parameter: packageName, Value: org.sonatype.test
[INFO] Parameter: basedir, Value: /Users/Tim
[INFO] Parameter: package, Value: org.sonatype.test
[INFO] Parameter: version, Value: 1.0-SNAPSHOT
[INFO] Parameter: artifactId, Value: sample-library
[INFO] ←-
------------------------------------------------------------------------ ←-
[INFO] BUILD SUCCESSFUL
If you look in the directory sample-library/ you will see that the project consists of the directory structure
shown in Figure 13.4.

Maven: The Complete Reference 249 / 316
Figure 13.4: Flexmojo Library Archetype File Structure
The product of the simple Flex library archetype only contains three files: a POM, one source, and a unit
test. Let’s examine each of these files. First, the Project Object Model (POM).
Project Object Model for Flex Library Archetype
<project xmlns="http://maven.apache.org/POM/4.0.0"
xmlns:xsi="http://www.w3.org/2001/XMLSchema-instance"
xsi:schemaLocation="http://maven.apache.org/POM/4.0.0
http://maven.apache.org/maven-v4_0_0.xsd">
<modelVersion>4.0.0</modelVersion>
<groupId>org.sonatype.test</groupId>
<artifactId>sample-library</artifactId>
<version>1.0-SNAPSHOT</version>
<packaging>swc</packaging>

Maven: The Complete Reference 250 / 316
<name>sample-library Flex</name>
<build>
<sourceDirectory>src/main/flex</sourceDirectory>
<testSourceDirectory>src/test/flex</testSourceDirectory>
<plugins>
<plugin>
<groupId>org.sonatype.flexmojos</groupId>
<artifactId>flexmojos-maven-plugin</artifactId>
<version>3.5.0</version>
<extensions>true</extensions>
</plugin>
</plugins>
</build>
<dependencies>
<dependency>
<groupId>com.adobe.flex.framework</groupId>
<artifactId>flex-framework</artifactId>
<version>3.2.0.3958</version>
<type>pom</type>
</dependency>
<dependency>
<groupId>com.adobe.flexunit</groupId>
<artifactId>flexunit</artifactId>
<version>0.85</version>
<type>swc</type>
<scope>test</scope>
</dependency>
</dependencies>
<profiles>
<profile>
<id>m2e</id>
<activation>
<property>
<name>m2e.version</name>
</property>
</activation>
<build>
<plugins>
<plugin>
<groupId>org.maven.ide.eclipse</groupId>
<artifactId>lifecycle-mapping</artifactId>
<version>0.9.9-SNAPSHOT</version>
<configuration>
<mappingId>customizable</mappingId>

Maven: The Complete Reference 251 / 316
<configurators>
<configurator
id=’org.maven.ide.eclipse. ←-
configuration.flex.configurator’ ←-
/>
</configurators>
<mojoExecutions>
<mojoExecution>
org.apache.maven.plugins:maven- ←-
resources-plugin::
</mojoExecution>
</mojoExecutions>
</configuration>
</plugin>
</plugins>
<pluginManagement>
<plugins>
<plugin>
<groupId>org.apache.maven.plugins</groupId>
<artifactId>maven-resources-plugin</artifactId ←-
>
<version>2.4</version>
</plugin>
</plugins>
</pluginManagement>
</build>
</profile>
</profiles>
</project>
Project Object Model for Flex Library Archetype is very simple, the key to this POM is the flexmojos-
maven-plugin configuration which sets extensions to true. This configuration customizes the
lifecycle for the swc packaging which is defined in the flexmojos-maven-plugin. The archetype
then includes the flex-framework dependency and the flexmojos-unittest-support test-
scoped dependency. The flex-framework dependency is a POM which contains references to the
SWC libraries and resources required to compile Flex applications.
In Project Object Model for Flex Library Archetype, the packaging is very critical. A POMs packag-
ing type controls the lifecycle it uses to produce build output. The value swc in the packaging ele-
ment is Maven’s cue to look for the Flex-specific lifecycle customizations which are provided by the
flexmojos-maven-plugin. The other important part of this POM is the build element which spec-
ifies the location of the Flex source code and the Flex unit tests. Next, let’s take a quick look at Flex
Library Archetype’s Sample App Class which contains the sample Actionscript which was created by this
archetype.

Maven: The Complete Reference 252 / 316
Flex Library Archetype’s Sample App Class
package org.sonatype.test {
public class App {
public static function greeting(name:String):String {
return "Hello, " + name;
}
}
}
While this code is underwhelming, it does provide you with a quick model and a quick pointer: "Place
More Code Here". While it might seem silly to test code this simple, a sample test named TestApp.as is
provides in the src/test/flex directory. This test is shown in Unit Test for Library Archetype’s App Class.
Unit Test for Library Archetype’s App Class
package org.sonatype.test {
import flexunit.framework.TestCase;
public class TestApp extends TestCase {
/**
*Tests our greeting() method
*/
public function testGreeting():void {
var name:String = "Buck Rogers";
var expectedGreeting:String = "Hello, Buck Rogers";
var result:String = App.greeting(name);
assertEquals("Greeting is incorrect", expectedGreeting, result ←-
);
}
}
}
To run this build, go to the sample-library project directory and run mvn install.
$ mvn install
[INFO] Scanning for projects...
[INFO] ←-
------------------------------------------------------------------------ ←-
[INFO] Building sample-library Flex
[INFO]task-segment: [install]
[INFO] ←-
------------------------------------------------------------------------ ←-

Maven: The Complete Reference 253 / 316
[INFO] [resources:resources]
[INFO] [flexmojos:compile-swc]
[INFO] flexmojos ${flexmojos.version} - GNU GPL License (NO WARRANTY) - \
See COPYRIGHT file
[WARNING] Nothing expecified to include. Assuming source and resources ←-
folders.
[INFO] Flex compiler configurations:
-compiler.headless-server=false
-compiler.keep-all-type-selectors=false
-compiler.keep-generated-actionscript=false
-compiler.library-path ~/.m2/repository/com/adobe/flex/framework/flex/\
3.2.0.3958...
-compiler.namespaces.namespace http://www.adobe.com/2006/mxml
target/classes/configs/mxml-manifest.xml
-compiler.optimize=true
-compiler.source-path src/main/flex
...
[INFO] [resources:testResources]
[WARNING] Using platform encoding (MacRoman actually) to copy filtered \
resources, i.e. build is platform dependent!
[INFO] skip non existing resourceDirectory src/test/resources
[INFO] [flexmojos:test-compile]
[INFO] flexmojos ${flexmojos.version} - GNU GPL License (NO WARRANTY) - \
See COPYRIGHT file
[INFO] Flex compiler configurations:
-compiler.include-libraries ~/.m2/repository/org/sonatype/flexmojos/\
flexmojos-unittest-support...
-compiler.keep-generated-actionscript=false
-compiler.library-path ~/.m2/repository/com/adobe/flex/framework/flex
3.2.0.3958/flex-3.2.0....
-compiler.optimize=true
-compiler.source-path src/main/flex target/test-classes src/test/flex
-compiler.strict=true
-target-player 9.0.0
-use-network=true
-verify-digests=true -load-config=
[INFO] Already trust on target/test-classes/TestRunner.swf
[INFO] [flexmojos:test-run]
[INFO] flexmojos ${flexmojos.version} - GNU GPL License (NO WARRANTY) - \
See COPYRIGHT file
[INFO] flexunit setup args: null
[INFO] ←-
------------------------------------------------------------------------ ←-
[INFO] Tests run: 1, Failures: 0, Errors: 0, Time Elpased: 0 sec
[INFO] [install:install]

Maven: The Complete Reference 254 / 316
Note
To execute Flex unit tests you will need to configure your PATH environment variable to include the Flash
Player. For more information about configuring FlexMojos for unit tests, see Section 13.2.3.
When you ran mvn install on this project, you should notice in the output that Maven and Flexmojos
plugin is take care of managing all of the libraries and the dependencies for the Flex compiler. Much like
Maven excels at helping Java developers manage the contents of a Java classpath, Maven can help Flex
developers manage the complex of compile paths. You also might have been shocked when the Flexmojos
project started a web browser or the Flash Player and used it to execute the TestApp.as class against the
project’s source code.
13.3.2 Creating a Flex Application
To create a Flex application from a Maven archetype, execute the following command:
$ mvn archetype:generate \
-DarchetypeRepository=http://repository.sonatype.org/content/groups/ ←-
public\
-DarchetypeGroupId=org.sonatype.flexmojos \
-DarchetypeArtifactId=flexmojos-archetypes-application \
-DarchetypeVersion=${flexmojos.version}
[INFO] Scanning for projects...
[INFO] Searching repository for plugin with prefix: ’archetype’.
[INFO] com.sonatype.maven.plugins: checking for updates from central
...
[INFO] [archetype:generate]
[INFO] Generating project in Interactive mode
[INFO] Archetype defined by properties
...
Define value for groupId: : +org.sonatype.test+
Define value for artifactId: : +sample-application+
Define value for version: 1.0-SNAPSHOT: : +1.0-SNAPSHOT+
Define value for package: org.sonatype.test: : +org.sonatype.test+
Confirm properties configuration:
groupId: org.sonatype.test
artifactId: sample-library
version: 1.0-SNAPSHOT
package: org.sonatype.test
Y: : +Y+
[INFO] Parameter: groupId, Value: org.sonatype.test
[INFO] Parameter: packageName, Value: org.sonatype.test
[INFO] Parameter: basedir, Value: /Users/Tim/flex-sample
[INFO] Parameter: package, Value: org.sonatype.test
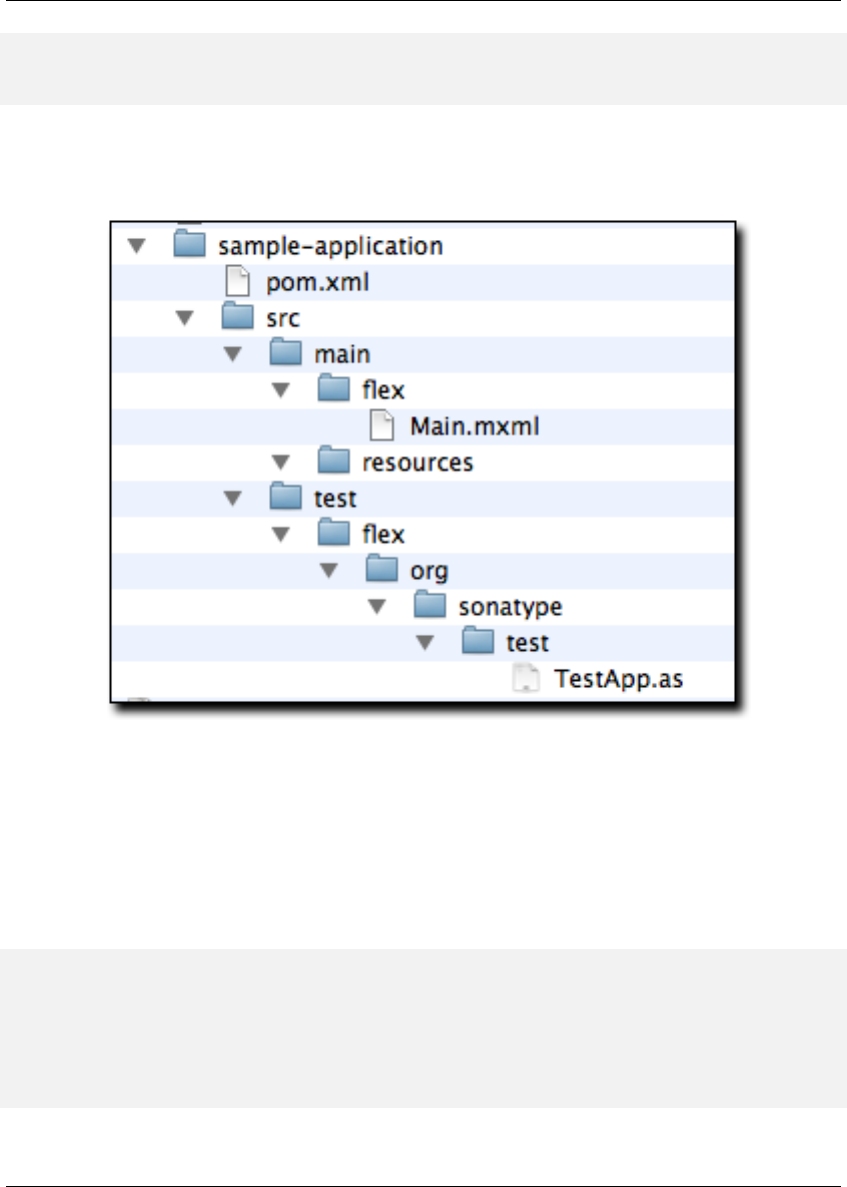
Maven: The Complete Reference 255 / 316
[INFO] Parameter: version, Value: 1.0-SNAPSHOT
[INFO] Parameter: artifactId, Value: sample-application
[INFO] BUILD SUCCESSFUL
If you look in the directory sample-application/ you will see the filesystem shown in Figure 13.5.
Figure 13.5: Directory Structure for Flex Application Archetype
Building an application from the Application archetype produces the following POM.
POM for Flex Application Archetype
<project xmlns="http://maven.apache.org/POM/4.0.0"
xmlns:xsi="http://www.w3.org/2001/XMLSchema-instance"
xsi:schemaLocation="http://maven.apache.org/POM/4.0.0
http://maven.apache.org/maven-v4_0_0.xsd">
<modelVersion>4.0.0</modelVersion>
<groupId>org.sonatype.test</groupId>

Maven: The Complete Reference 256 / 316
<artifactId>sample-application</artifactId>
<version>1.0-SNAPSHOT</version>
<packaging>swf</packaging>
<name>sample-application Flex</name>
<build>
<sourceDirectory>src/main/flex</sourceDirectory>
<testSourceDirectory>src/test/flex</testSourceDirectory>
<plugins>
<plugin>
<groupId>org.sonatype.flexmojos</groupId>
<artifactId>flexmojos-maven-plugin</artifactId>
<version>3.5.0</version>
<extensions>true</extensions>
</plugin>
</plugins>
</build>
<dependencies>
<dependency>
<groupId>com.adobe.flex.framework</groupId>
<artifactId>flex-framework</artifactId>
<version>3.2.0.3958</version>
<type>pom</type>
</dependency>
<dependency>
<groupId>com.adobe.flexunit</groupId>
<artifactId>flexunit</artifactId>
<version>0.85</version>
<type>swc</type>
<scope>test</scope>
</dependency>
</dependencies>
<profiles>
<profile>
<id>m2e</id>
<activation>
<property>
<name>m2e.version</name>
</property>
</activation>
<build>
<plugins>
<plugin>
<groupId>org.maven.ide.eclipse</groupId>
<artifactId>lifecycle-mapping</artifactId>

Maven: The Complete Reference 257 / 316
<version>0.9.9-SNAPSHOT</version>
<configuration>
<mappingId>customizable</mappingId>
<configurators>
<configurator
id=’org.maven.ide.eclipse. ←-
configuration.flex.configurator’ ←-
/>
</configurators>
<mojoExecutions>
<mojoExecution>
org.apache.maven.plugins:maven- ←-
resources-plugin::
</mojoExecution>
</mojoExecutions>
</configuration>
</plugin>
</plugins>
<pluginManagement>
<plugins>
<plugin>
<groupId>org.apache.maven.plugins</groupId>
<artifactId>maven-resources-plugin</artifactId ←-
>
<version>2.4</version>
</plugin>
</plugins>
</pluginManagement>
</build>
</profile>
</profiles>
</project>
The difference between POM for Flex Application Archetype and Project Object Model for Flex Library
Archetype is that the packaging element is swf instead of swc. By setting the packaging to swf,
the project will produce a Flex application in target/sample-application-1.0-SNAPSHOT.swf. The sam-
ple application created by this archetype displays the Text "Hello World". Main.mxml can be found in
src/main/flex.
Sample Application Main.mxml
<mx:Application xmlns:mx="http://www.adobe.com/2006/mxml" layout="absolute ←-
">
<mx:Text text="Hello World!"/>
</mx:Application>

Maven: The Complete Reference 258 / 316
This application also creates a simple FlexUnit test that does nothing more than print out a trace message.
The sample unit test is in src/test/flex/org/sonatype/test.
Unit Test for Main.mxml
package org.sonatype.test
{
import flexunit.framework.TestCase;
import Main;
public class TestApp extends TestCase
{
public function testNothing():void
{
//TODO un implemented
trace("Hello test");
}
}
}
13.3.3 Creating a Multi-module Project: Web Application with a Flex
To create a multi-module project consisting of a Flex Library project referenced by a Flex Application,
referenced by a Web Application.
$ mvn archetype:generate \
-DarchetypeRepository=http://repository.sonatype.org/content/groups/ ←-
public\
-DarchetypeGroupId=org.sonatype.flexmojos \
-DarchetypeArtifactId=flexmojos-archetypes-modular-webapp \
-DarchetypeVersion=${flexmojos.version}
[INFO] Scanning for projects...
[INFO] Searching repository for plugin with prefix: ’archetype’.
[INFO] com.sonatype.maven.plugins: checking for updates from central
...
[INFO] [archetype:generate]
[INFO] Generating project in Interactive mode
[INFO] Archetype defined by properties
...
Define value for groupId: : +org.sonatype.test+
Define value for artifactId: : +sample-multimodule+
Define value for version: 1.0-SNAPSHOT: : +1.0-SNAPSHOT+
Define value for package: org.sonatype.test: : +org.sonatype.test+

Maven: The Complete Reference 259 / 316
Confirm properties configuration:
groupId: org.sonatype.test
artifactId: sample-library
version: 1.0-SNAPSHOT
package: org.sonatype.test
Y: : +Y+
[INFO] Parameter: groupId, Value: org.sonatype.test
[INFO] Parameter: packageName, Value: org.sonatype.test
[INFO] Parameter: basedir, Value: /Users/Tim
[INFO] Parameter: package, Value: org.sonatype.test
[INFO] Parameter: version, Value: 1.0-SNAPSHOT
[INFO] Parameter: artifactId, Value: sample-multimodule
[INFO] ←-
------------------------------------------------------------------------ ←-
[INFO] BUILD SUCCESSFUL
If you look in the sample-multimodule/ directory, you will see a directory structure which contains three
projects swc, swf, and war.
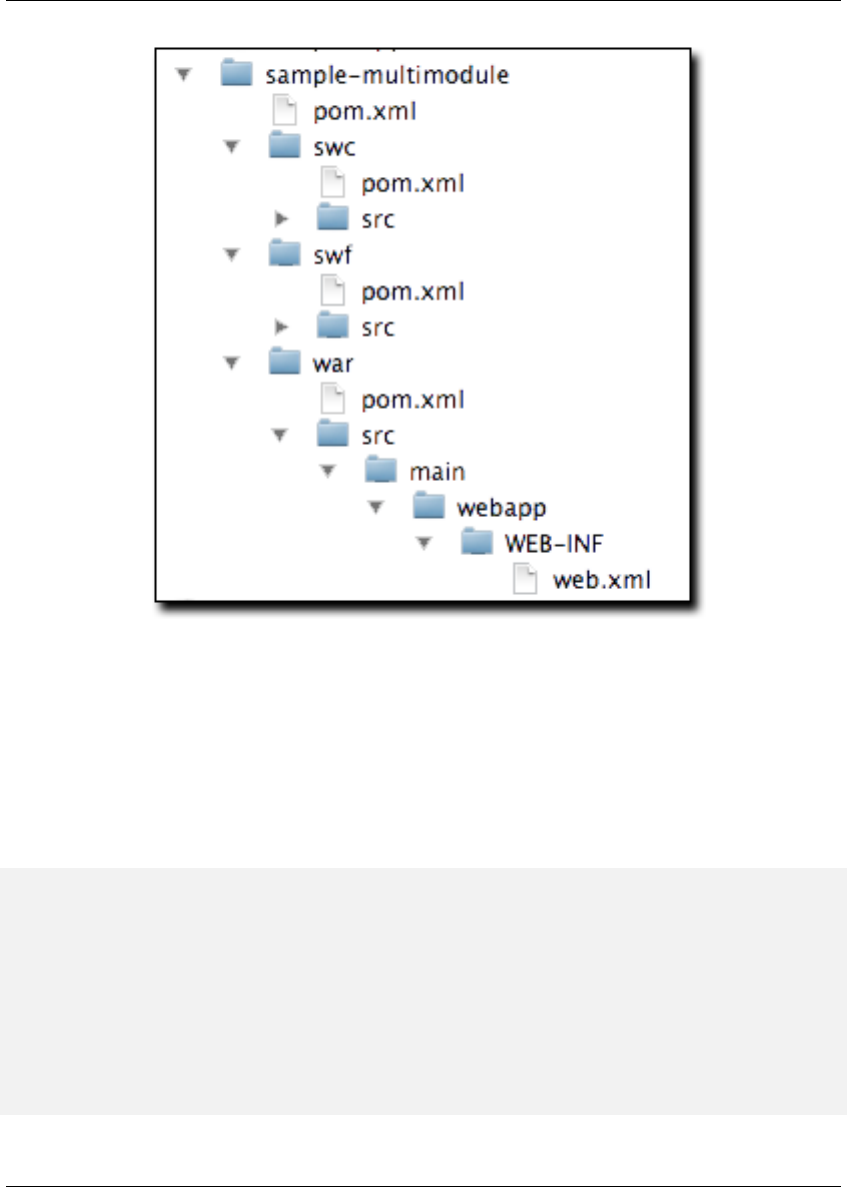
Maven: The Complete Reference 260 / 316
Figure 13.6: Directory Structure for Flex Multimodule Archetype
The simple top-level POM in this multimodule project is shown in . It consists of module references to
the swc, swf, and war modules.
Top-level POM Created by Modular Web Application Archetype
<project xmlns="http://maven.apache.org/POM/4.0.0"
xmlns:xsi="http://www.w3.org/2001/XMLSchema-instance"
xsi:schemaLocation="http://maven.apache.org/POM/4.0.0
http://maven.apache.org/maven-v4_0_0.xsd">
<modelVersion>4.0.0</modelVersion>
<groupId>org.sonatype.test</groupId>
<artifactId>sample-multimodule</artifactId>
<version>1.0-SNAPSHOT</version>
<packaging>pom</packaging>
<modules>

Maven: The Complete Reference 261 / 316
<module>swc</module>
<module>swf</module>
<module>war</module>
</modules>
</project>
The swc project has a simple POM that resembles the POM shown in Project Object Model for Flex Li-
brary Archetype. Note that the artifactId in this POM differs from the name of the module directory
and is swc-swc.
swc Module POM
<project xmlns="http://maven.apache.org/POM/4.0.0"
xmlns:xsi="http://www.w3.org/2001/XMLSchema-instance"
xsi:schemaLocation="http://maven.apache.org/POM/4.0.0
http://maven.apache.org/maven-v4_0_0.xsd">
<modelVersion>4.0.0</modelVersion>
<parent>
<groupId>org.sonatype.test</groupId>
<artifactId>sample-multimodule</artifactId>
<version>1.0-SNAPSHOT</version>
</parent>
<groupId>org.sonatype.test</groupId>
<artifactId>swc</artifactId>
<version>1.0-SNAPSHOT</version>
<packaging>swc</packaging>
<name>swc Library</name>
<build>
<sourceDirectory>src/main/flex</sourceDirectory>
<testSourceDirectory>src/test/flex</testSourceDirectory>
<plugins>
<plugin>
<groupId>org.sonatype.flexmojos</groupId>
<artifactId>flexmojos-maven-plugin</artifactId>
<version>3.5.0</version>
<extensions>true</extensions>
<configuration>
<locales>
<locale>en_US</locale>
</locales>
</configuration>
</plugin>
</plugins>

Maven: The Complete Reference 262 / 316
</build>
<dependencies>
<dependency>
<groupId>com.adobe.flex.framework</groupId>
<artifactId>flex-framework</artifactId>
<version>3.2.0.3958</version>
<type>pom</type>
</dependency>
<dependency>
<groupId>com.adobe.flexunit</groupId>
<artifactId>flexunit</artifactId>
<version>0.85</version>
<type>swc</type>
<scope>test</scope>
</dependency>
</dependencies>
<profiles>
<profile>
<id>m2e</id>
<activation>
<property>
<name>m2e.version</name>
</property>
</activation>
<build>
<plugins>
<plugin>
<groupId>org.maven.ide.eclipse</groupId>
<artifactId>lifecycle-mapping</artifactId>
<version>0.9.9-SNAPSHOT</version>
<configuration>
<mappingId>customizable</mappingId>
<configurators>
<configurator
id="org.maven.ide.eclipse. ←-
configuration.flex.configurator" ←-
/>
</configurators>
<mojoExecutions>
<mojoExecution>
org.apache.maven.plugins:maven- ←-
resources-plugin::
</mojoExecution>
</mojoExecutions>
</configuration>
</plugin>

Maven: The Complete Reference 263 / 316
</plugins>
<pluginManagement>
<plugins>
<plugin>
<groupId>org.apache.maven.plugins</groupId>
<artifactId>maven-resources-plugin</artifactId ←-
>
<version>2.4</version>
</plugin>
</plugins>
</pluginManagement>
</build>
</profile>
</profiles>
</project>
The swf module’s POM resembles the POM in POM for Flex Application Archetype adding a dependency
on the swc-swc artifact. Note that the following POM defines an artifactId that differs from the
directory that stores the module; the artifactId in the following POM is swf-swf.
swf module POM
<project xmlns="http://maven.apache.org/POM/4.0.0"
xmlns:xsi="http://www.w3.org/2001/XMLSchema-instance"
xsi:schemaLocation="http://maven.apache.org/POM/4.0.0
http://maven.apache.org/maven-v4_0_0.xsd">
<modelVersion>4.0.0</modelVersion>
<parent>
<groupId>org.sonatype.test</groupId>
<artifactId>sample-multimodule</artifactId>
<version>1.0-SNAPSHOT</version>
</parent>
<groupId>org.sonatype.test</groupId>
<artifactId>swf</artifactId>
<version>1.0-SNAPSHOT</version>
<packaging>swf</packaging>
<name>swf Application</name>
<build>
<sourceDirectory>src/main/flex</sourceDirectory>
<testSourceDirectory>src/test/flex</testSourceDirectory>
<plugins>
<plugin>

Maven: The Complete Reference 264 / 316
<groupId>org.sonatype.flexmojos</groupId>
<artifactId>flexmojos-maven-plugin</artifactId>
<version>3.5.0</version>
<extensions>true</extensions>
<configuration>
<locales>
<locale>en_US</locale>
</locales>
</configuration>
</plugin>
</plugins>
</build>
<dependencies>
<dependency>
<groupId>com.adobe.flex.framework</groupId>
<artifactId>flex-framework</artifactId>
<version>3.2.0.3958</version>
<type>pom</type>
</dependency>
<dependency>
<groupId>com.adobe.flexunit</groupId>
<artifactId>flexunit</artifactId>
<version>0.85</version>
<type>swc</type>
<scope>test</scope>
</dependency>
<dependency>
<groupId>org.sonatype.test</groupId>
<artifactId>swc</artifactId>
<version>1.0-SNAPSHOT</version>
<type>swc</type>
</dependency>
</dependencies>
<profiles>
<profile>
<id>m2e</id>
<activation>
<property>
<name>m2e.version</name>
</property>
</activation>
<build>
<plugins>
<plugin>
<groupId>org.maven.ide.eclipse</groupId>

Maven: The Complete Reference 265 / 316
<artifactId>lifecycle-mapping</artifactId>
<version>0.9.9-SNAPSHOT</version>
<configuration>
<mappingId>customizable</mappingId>
<configurators>
<configurator
id="org.maven.ide.eclipse. ←-
configuration.flex.configurator" ←-
/>
</configurators>
<mojoExecutions>
<mojoExecution>
org.apache.maven.plugins:maven- ←-
resources-plugin::
</mojoExecution>
</mojoExecutions>
</configuration>
</plugin>
</plugins>
<pluginManagement>
<plugins>
<plugin>
<groupId>org.apache.maven.plugins</groupId>
<artifactId>maven-resources-plugin</artifactId ←-
>
<version>2.4</version>
</plugin>
</plugins>
</pluginManagement>
</build>
</profile>
</profiles>
</project>
When you declare a dependency on a SWC, you’ll need to specify the type of the dependency so that
Maven can locate the appropriate artifact in the remote or local repository. In this case, the swf-swf
project depends upon the SWC that is generated by the swc-swc project. When you add the dependency
to the swf-swf project, the FlexMojos plugin will add the appropriate SWC file to the Flex Compiler’s
library path.
Next, take a look at the simple POM in the war module.
war module POM
<project xmlns="http://maven.apache.org/POM/4.0.0"

Maven: The Complete Reference 266 / 316
xmlns:xsi="http://www.w3.org/2001/XMLSchema-instance"
xsi:schemaLocation="http://maven.apache.org/POM/4.0.0
http://maven.apache.org/maven-v4_0_0.xsd">
<modelVersion>4.0.0</modelVersion>
<parent>
<artifactId>sample-multimodule</artifactId>
<groupId>org.sonatype.test</groupId>
<version>1.0-SNAPSHOT</version>
</parent>
<groupId>org.sonatype.test</groupId>
<artifactId>war</artifactId>
<version>1.0-SNAPSHOT</version>
<packaging>war</packaging>
<build>
<plugins>
<plugin>
<groupId>org.sonatype.flexmojos</groupId>
<artifactId>flexmojos-maven-plugin</artifactId>
<version>3.5.0</version>
<executions>
<execution>
<goals>
<goal>copy-flex-resources</goal>
</goals>
</execution>
</executions>
</plugin>
<plugin>
<groupId>org.mortbay.jetty</groupId>
<artifactId>maven-jetty-plugin</artifactId>
<version>6.1.17</version>
</plugin>
</plugins>
</build>
<dependencies>
<dependency>
<groupId>org.sonatype.test</groupId>
<artifactId>swf</artifactId>
<version>1.0-SNAPSHOT</version>
<type>swf</type>
</dependency>
</dependencies>
</project>

Maven: The Complete Reference 267 / 316
The POM shown in war module POM configures the FlexMojos plugin to execute the copy-flex-
resources goal for this project. The copy-flex-resources goal will copy SWF application
into the web application’s document root. In this project, running a build and creating a WAR will
copy the swf-swf-1.0-SNAPSHOT.swf file to the web application’s root directory in target/war-war-1.0-
SNAPSHOT.
To build the multimodule web application project, run mvn install from the top-level directory. This
should build the swc-swc,swf-swf, and war-war artifacts and product a WAR file in war’/target/war-
war-1.0-SNAPSHOT.war’ which contains the swf-swf-1.0-SNAPSHOT.swf in the document root of the
web application.
Note
To execute Flex unit tests you will need to configure your PATH environment variable to include the Flash
Player. For more information about configuring FlexMojos for unit tests, see Section 13.2.3.
13.4 The FlexMojos Lifecycle
The FlexMojos Maven plugin customizes the lifecycle based on the packaging. If your project has a pac
kaging of type swc or swf, the FlexMojos plugin with execute a customized lifecycle if your plugin
configuration sets the extensions to true. Setting Plugin Extensions to True for Custom Flex Lifecycle
shows the plugin configuration for the flexmojos-maven-plugin with the extensions set to true.
Setting Plugin Extensions to True for Custom Flex Lifecycle
<build>
<sourceDirectory>src/main/flex</sourceDirectory>
<testSourceDirectory>src/test/flex</testSourceDirectory>
<plugins>
<plugin>
<groupId>org.sonatype.flexmojos</groupId>
<artifactId>flexmojos-maven-plugin</artifactId>
<version>${flexmojos.version}</version>
*<extensions>true</extensions>*
<configuration>
<locales>
<locale>en_US</locale>
</locales>
</configuration>
</plugin>
</plugins>
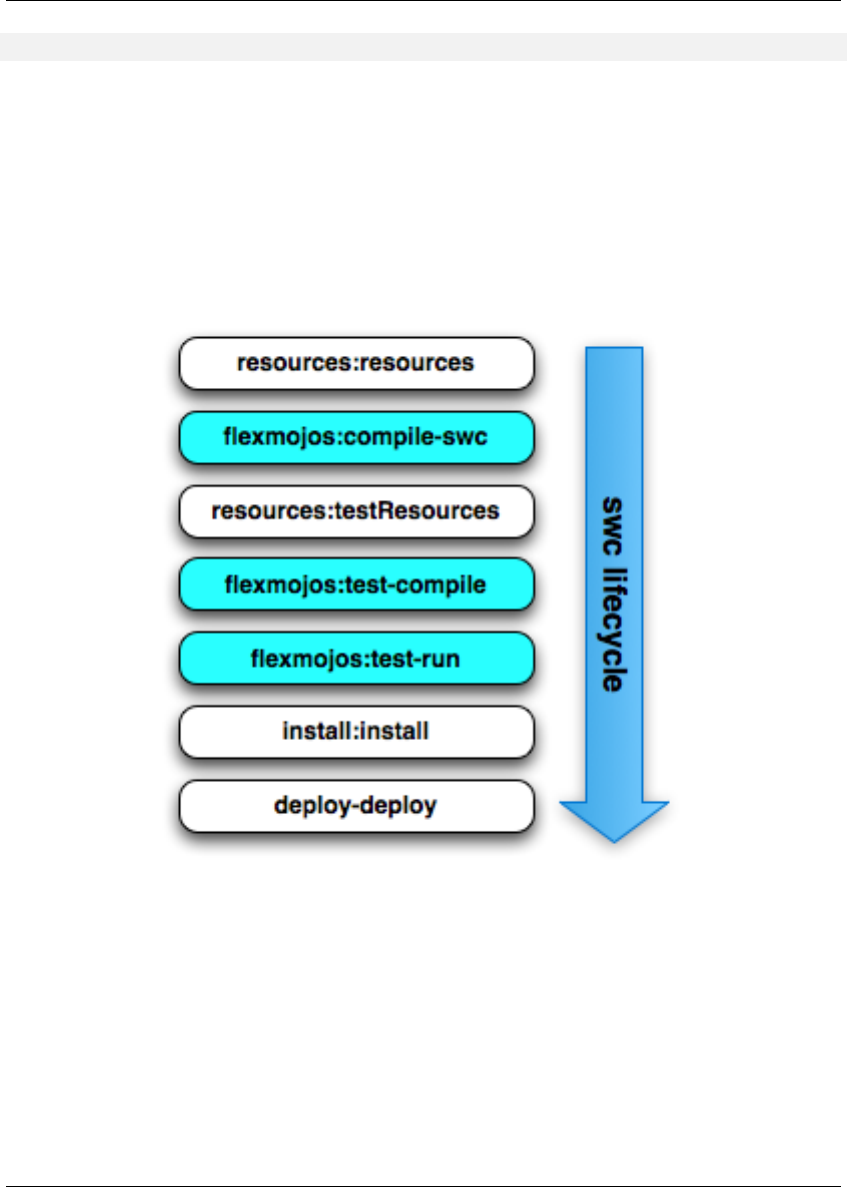
Maven: The Complete Reference 268 / 316
</build>
13.4.1 The SWC Lifecycle
When the packaging is swc, FlexMojos will execute the lifecycle shown in Figure 13.7. The highlighted
goals are goals from the FlexMojos plugin, the goals which are not highlights are standard goals from the
Core Maven plugins.
Figure 13.7: The FlexMojos SWC Lifecycle
The FlexMojos contributed goals are:
flexmojos:compile-swc

Maven: The Complete Reference 269 / 316
This goal compiles all of the Actionscript and MXML files in the sourceDirectory into a
SWC. A SWC is an Adobe library or class file which contains components and resources used in
Flex applications.
flexmojos:test-compile
This goal compiles all of the Actionscript and MXML files in the testSourceDirectory.
flexmojos:test-run
This goal executes unit tests using the Flash Player. This goal can only run if the Flash Player has
been configured as described in Section 13.2.3.
13.4.2 The SWF Lifecycle
When the packaging is swf, FlexMojos will execute the lifecycle shown in Figure 13.8. The highlighted
goals are goals from the FlexMojos plugin, the goals which are not highlights are standard goals from the
Core Maven plugins.
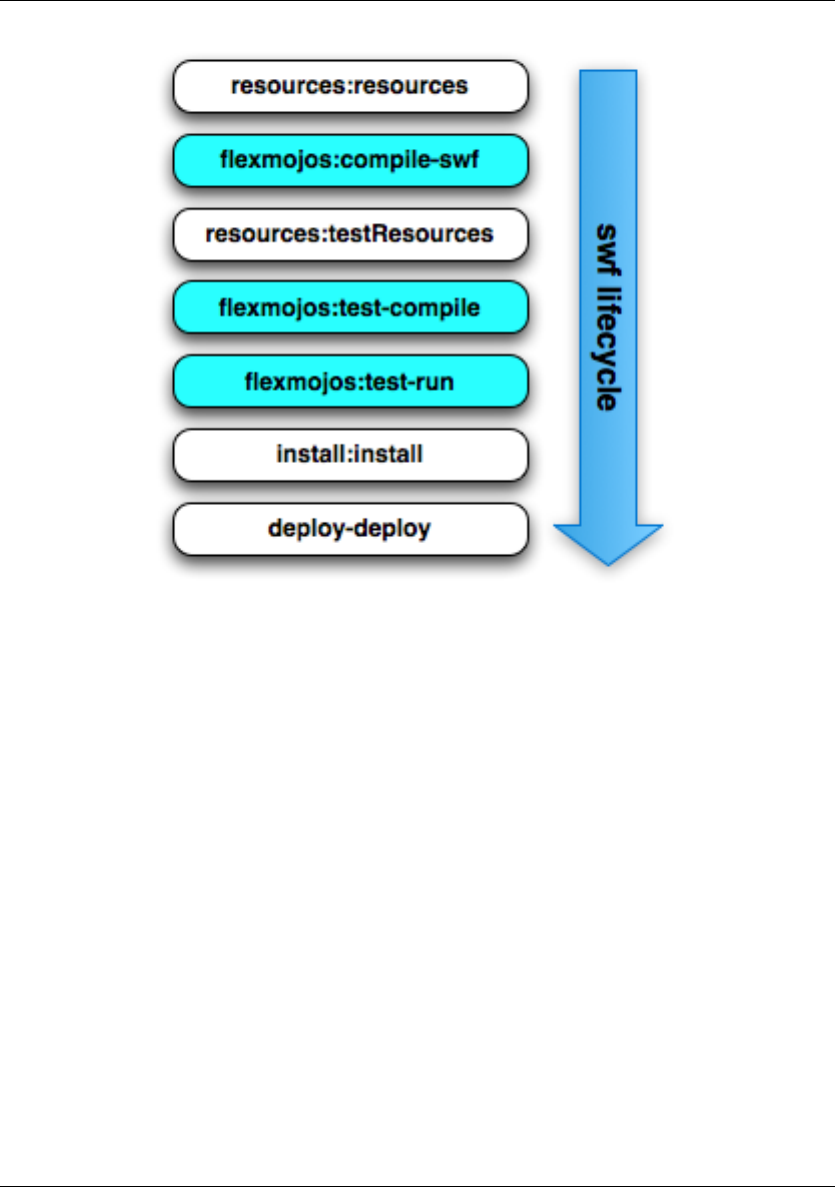
Maven: The Complete Reference 270 / 316
Figure 13.8: The FlexMojos SWF Lifecycle
The FlexMojos contributed goals are:
flexmojos:compile-swf
This goal compiles all of the Actionscript and MXML files in the sourceDirectory into a
SWF. A SWF is a file which contains an application that can be render by the Adobe Flash Player
or Adobe AIR software.
flexmojos:test-compile
This goal compiles all of the Actionscript and MXML files in the testSourceDirectory.
flexmojos:test-run
This goal executes unit tests using the Flash Player. This goal can only run if the Flash Player has
been configured as described in Section 13.2.3.

Maven: The Complete Reference 271 / 316
13.5 FlexMojos Plugin Goals
The FlexMojos Maven Plugin contains the following goals:
flexmojos:asdoc
Generates documentation for Actionscript source files
flexmojos:asdoc-report
Generates documentation for Actionscript sources as a report that can be included in a Maven site
flexmojos:compile-swc
Compiles Flex source (Actionscript and MXML) into a SWC library for use in a Flex or AIR
application
flexmojos:compile-swf
Compiles Flex source (Actionscript and MXML) into a SWF for use in the Adobe Flash Player or
Adobe AIR Runtime
flexmojos:copy-flex-resources
Copies Flex resources into a web application project
flexmojos:flexbuilder
Generates project files for use in Adobe Flex Builder
flexmojos:generate
Generates Actionscript 3 based on Java classes using Granite GAS3
flexmojos:optimize
Goal which run post-link SWF optimization on swc files. This goal is used to produce RSL files.
flexmojos:sources
Create a JAR which contains all the sources for a Flex project
flexmojos:test-compile
Compile all test classes in a Flex project
flexmojos:test-run
Run the tests using the Adobe Flash Player
flexmojos:test-swc
Build a SWC containing the test classes for a specific project
flexmojos:wrapper
Generate an HTML wrapper for a SWF application
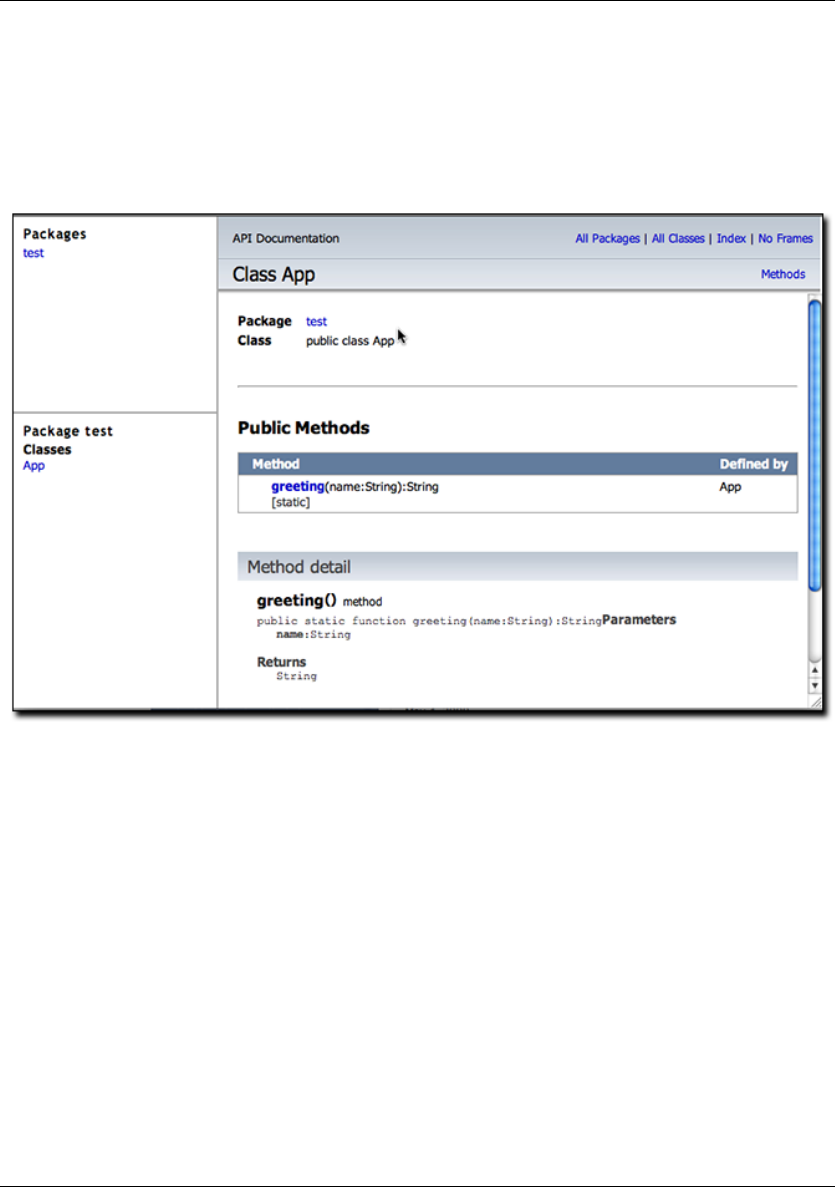
Maven: The Complete Reference 272 / 316
13.5.1 Generating Actionscript Documentation
You can run the asdoc or asdoc-report goals to generate documentation for Actionscript. Once the goals
has completed, the documentation will be saved to ${basedir}/target/asdoc as HTML. Figure 13.9 shows
the result of running the asdoc goal against the Flexmojos application archetype project.
Figure 13.9: Actionscript Documentation Generated by the FlexMojos Plugin
13.5.2 Compiling Flex Source
FlexMojos contains a number of goals which compile Actionscript and MXML into SWCs and SWFs.
The compile-swc and compile-swf goals are used to generate output from a project’s source, and test-
compile is used to compile unit tests. In the simple projects created by the FlexMojos archetypes, the
compile-swc and compile-swf goals are called because the project customizes the lifecycle and binds ei-
ther compile-swc or compile-swf to the compile phase and test-compile to the test-compile phase. If you
need to configure the options for the FlexMojos compiler, you would configure the FlexMojos plugin con-
figuration. For example, if you wanted the application with the POM shown in POM for Flex Application

Maven: The Complete Reference 273 / 316
Archetype to ignore certain code-level warnings on compile and use some customized font settings, you
might use the plugin configuration shown in Customizing the Compiler Plugin.
Customizing the Compiler Plugin
<build>
<sourceDirectory>src/main/flex</sourceDirectory>
<testSourceDirectory>src/test/flex</testSourceDirectory>
<plugins>
<plugin>
<groupId>org.sonatype.flexmojos</groupId>
<artifactId>flexmojos-maven-plugin</artifactId>
<version>${flexmojos.version}</version>
<extensions>true</extensions>
<configuration>
<configurationReport>true</configurationReport>
<warnings>
<arrayTostringChanges>true</arrayTostringChanges>
<duplicateArgumentNames>false</duplicateArgumentNames>
</warnings>
<fonts>
<advancedAntiAliasing>true</advancedAntiAliasing>
<flashType>true</flashType>
<languages>
<englishRange>U+0020-U+007E</englishRange>
</languages>
<localFontsSnapshot>
${basedir}/src/main/resources/fonts.ser
</localFontsSnapshot>
<managers>
<manager>flash.fonts.BatikFontManager</manager>
</managers>
<maxCachedFonts>20</maxCachedFonts>
<maxGlyphsPerFace>1000</maxGlyphsPerFace>
</fonts>
</configuration>
</plugin>
</plugins>
</build>
13.5.3 Generating Flex Builder Project Files
To generate Flex Builder project files for a FlexMojos project, configure the plugin groups as described
in Section 13.2.4, and run the flexbuilder goal:

Maven: The Complete Reference 274 / 316
$ mvn flexmojos:flexbuilder
Running this goal will create a .project,.settings/org.eclipse.core.resources.prefs,.actionScriptProperties,
and .flexLibProperties.
13.6 FlexMojos Plugin Reports
The FlexMojos Maven Plugin contains the following report:
flexmojos:asdoc-report
Generates documentation for Actionscript sources as a report that can be included in a Maven site
13.6.1 Generating Actionscript Documentation Report
To generate the asdoc-report as part of your Maven site build, add the following XML to your POM:
Configuring the Actionscript Documentation Report
<reporting>
<plugins>
<plugin>
<groupId>org.sonatype.flexmojos</groupId>
<artifactId>flexmojos-maven-plugin</artifactId>
<version>${flexmojos.version}</version>
<reportSets>
<reportSet>
<id>flex-reports</id>
<reports>
<report>asdoc-report</report>
</reports>
</reportSet>
</reportSets>
</plugin>
</plugins>
</reporting>
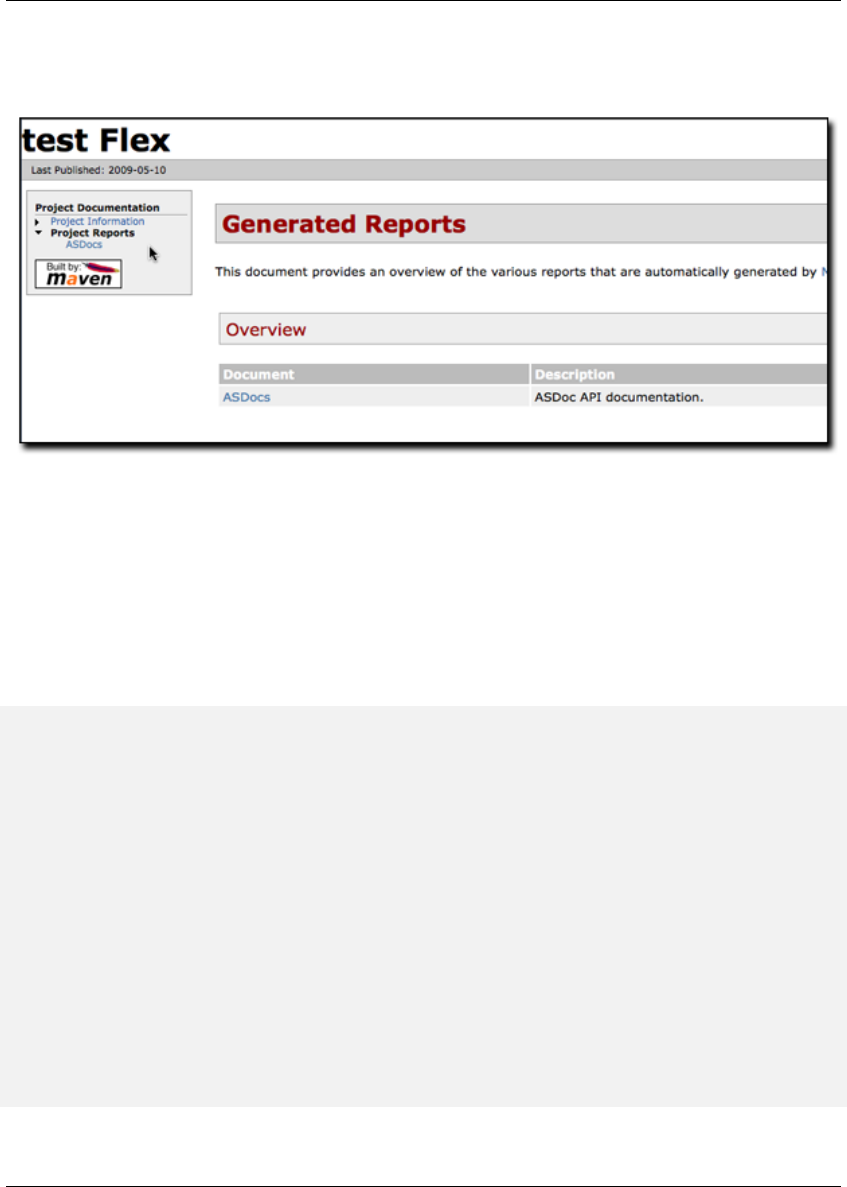
Maven: The Complete Reference 275 / 316
When you run mvn site, Maven will generate this report and place the results under the "Project
Reports" menu as shown in Figure 13.10.
Figure 13.10: Actionscript Documentation Report on Maven Site
If you need to pass in any configuration options to the asdoc-report, you will need add a configuration
element to the reportSets element as shown in Configuring the asdoc-report.
Configuring the asdoc-report
<reporting>
<plugins>
<plugin>
<groupId>org.sonatype.flexmojos</groupId>
<artifactId>flexmojos-maven-plugin</artifactId>
<version>${flexmojos.version}</version>
<reportSets>
<reportSet>
<id>flex-reports</id>
<reports>
<report>asdoc-report</report>
</reports>
<configuration>
<windowTitle>My TEST API Doc</windowTitle>
<footer>Copyright 2010 Sonatype</footer>
</configuration>
</reportSet>
</reportSets>

Maven: The Complete Reference 276 / 316
</plugin>
</plugins>
</reporting>
13.7 Developing and Customizing Flexmojos
The following sections guide you through some of first steps toward customizing or contributing to the
Flexmojos project. Flexmojos is more than just a tool for people who are interested in compiling Action-
script into SWF and SWC artifacts, it is a community of developers. This section isn’t for everyone, but,
if you have an itch to scratch and you wish to participate, come on in.
13.7.1 Get the Flexmojos Source Code
Flexmojos is an open source project hosted on the Sonatype Forge, and the source code for Flexmojos
is stored in the Sonatype Forge Subversion repository. You can browse the contents of the Flexmojos
Subversion repository by opening http://svn.sonatype.org/flexmojos/trunk in a web browser.
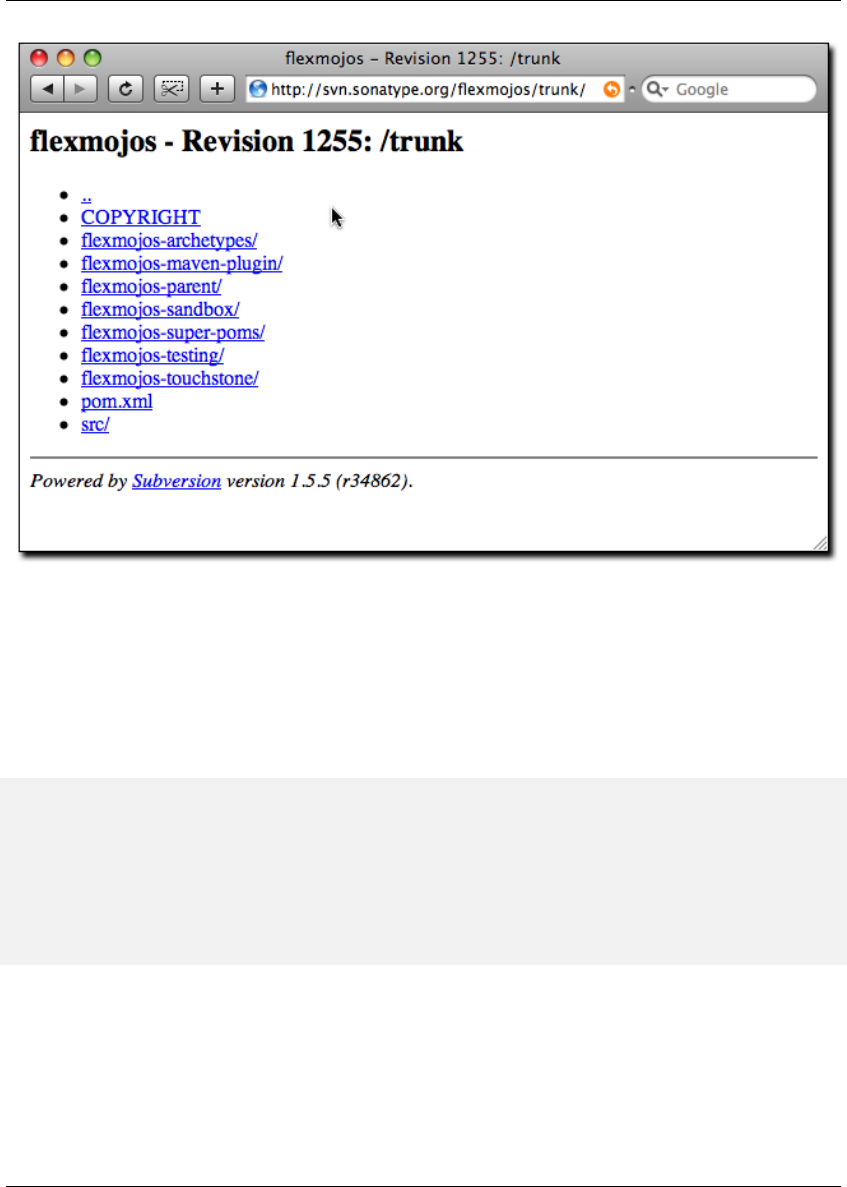
Maven: The Complete Reference 277 / 316
Figure 13.11: Flexmojos Subversion Repository
If you are interested in participating in the Flexmojos project, you will likely want to checkout the current
Flexmojos source code to your local machine. To checkout the Flexmojos source using Subversion,
execute the following command at the command line:
$ svn co http://svn.sonatype.org/flexmojos/trunk flexmojos
A flexmojos
...
$ ls
COPYRIGHT flexmojos-sandbox pom.xml
flexmojos-archetypesflexmojos-super-poms src
flexmojos-maven-plugin flexmojos-testing
flexmojos-parentflexmojos-touchstone

Maven: The Complete Reference 278 / 316
Chapter 14
Android Application Development with
Maven
14.1 Introduction
Android is an open source mobile phone and embedded device operating system developed by the Open
Handset Alliance. It is based on a Linux kernel with a virtual machine environment for managed applica-
tion code using Java bytecode for the runtime code generation. The development environment is based on
the Java language and JVM/JDK based tooling. The generated Java bytecode is transformed into Dalvik
executable code optimized for constrained devices. Once deployed to the device and executed the code
will run on the Dalvik virtual machine. Java is the default programming language and the API’s are all
Java based.
In most cases, development of Android applications is done within the Eclipse based Android Develop-
ment Toolkit ADT. The optionally generated Apache Ant based build can be used to build applications
outside the IDE. The Android Maven Plugin was created to allow development teams to build, deploy and
release Android applications with Apache Maven, taking advantage of all the powerful features available
like dependency management, reporting, code analysis and much more.
Tip
The Android Maven Plugin is rapidly evolving. The documentation below applies to version 3.0.0-alpha-
12 and higher. For up to date information refer to the plugin website.

Maven: The Complete Reference 279 / 316
14.2 Configuring Build Environment for Android Development
Before you attempt to build your Android libraries and applications with Maven, you will need to install
the Android SDK and potentially install the Android API jar files into your local Maven repository or
your repository server.
14.2.1 Installing the Android SDK
The Android Maven Plugin requires the presence of the Android SDK in your development environment.
Install the SDK following the directions on the Android Developer web site.
The ANDROID_HOME environment variable should be configured to point to the installation directory of
the Android SDK. For example if the SDK is installed in /opt/android-sdk-linux this can be achieved with
export ANDROID_HOME=/opt/android-sdk-linux
on a Unix/bash based system or
set ANDROID_HOME=C:\opt\android-sdk-linux
on a Windows system.
In addition to the SDK, the various platform versions you need for development should also be installed
following the instructions. You can install a subset of available platforms or simply install all available
versions.
Optionally, the path ANDROID_HOME/tools and ANDROID_HOME/platform-tools can be added
to the PATH variable to allow easy command line execution of the various tools provided with the SDK.

Maven: The Complete Reference 280 / 316
14.2.2 Android artifact install into Maven repository
When building an Android application with Maven the compile process needs access to the Android
API for the specific platform version the project is configured against. The Android SDK ships this as
android.jar files in the different platform folders. In order for Maven to access these libraries, they need
to be available in the local Maven repository.
Typically artifacts are available in Maven Central, however only the platform versions available in the
Android Open Source Project are published to Maven Central. Newer versions of the platform as well as
the compatibility package and proprietary extensions like the Google Maps support are not available there
and need to be published to your Maven repository, if you want to use them in your Android project.
The artifacts published to Maven central are available as dependencies under the groupId com.google.
android with the artifactId android and android-test.
The Maven Android SDK Deployer has been created to publish artifacts from the Android SDK into your
local repository or repository server when using components that are not available in Central.
Download the tool by clicking on the Download Source button and extract the downloaded zip or
tar archive in a folder of your choice. A folder with a naming pattern of mosabua-maven-android-sdk-
deployer-XXX with XXX being a revision number like df824df will be created.
14.2.2.1 Installation to local repository
In order to install the android jar files from the different platform revisions into your local repository you
run the command in the deployer folder.
cd mosabua-maven-android-sdk-deployer-df824df
mvn clean install
By default this will install all android.jar, maps.jar, usb.jar files and the compatibilty packages into
your local Maven repository. You should find all newly installed files in the android,com.goo
gle.android.maps,com.android.future and android.support group identifiers under
~/.m2/repository.

Maven: The Complete Reference 281 / 316
14.2.2.2 Installation to remote repository
The above deployment works fine for one machine, but if you need to supply a whole team of developers
and a cluster of build machines with the artifacts, you will want to deploy the artifacts once to a remote
repository server that is available to all users. If you are not currently using a repository manager, you
should download Nexus and configure a user with permission to deploy artifacts to a repository. To get
started with Nexus, read the Nexus Installation chapter in the free, online Nexus book.
As a first step you will need to edit the repo.url property in the pom.xml in the top folder of the
Maven Android SDK Deployer tool to point to the repository you want to publish to. Alternatively you
can provide this property in the settings file or with -Drepo.url=theurl on the command line.
Then you need to add a server with the correct access credentials for the server to your Maven Settings
file.
Snippet for settings.xml for the repository server access credentials
<settings>
<servers>
<server>
<id>android.repo</id>
<username>your username</username>
<password>your password</password>
</server>
</servers>
</settings>
Once that configuration is completed, you can deploy the artifacts with the command mvn deploy. As
a result you should find the artifact in the repository of your remote server.
14.2.2.3 Installation of a subset of all platforms
By default the Maven Android SDK Deployer tool will attempt to install or deploy all versions of the
platforms artifacts into a repository. If you decide to only install a subset of the components the tool can
be used with profile options to only install or deploy some artifacts. This can be done by specifying the
platform API versions as a profile name.
mvn install -P 3.2

Maven: The Complete Reference 282 / 316
Further details are available in the Maven Android SDK Deployer documentation.
14.3 Getting Started
The HelloFlashlight example application serves as a starting point to introduce you to the usage of the
Android Maven Plugin. The code for the helloflashlight example application as well as various more
complex examples are available as part of the plugin samples project.
To enable a Maven based build of an Android project a pom.xml has to be added in the root folder of the
project:
The HelloFlashlight pom.xml file
<?xml version="1.0" encoding="UTF-8"?>
<project xmlns="http://maven.apache.org/POM/4.0.0"
xmlns:xsi="http://www.w3.org/2001/XMLSchema-instance"
xsi:schemaLocation="http://maven.apache.org/POM/4.0.0 http:// ←-
maven.apache.org/maven-v4_0_0.xsd">
<modelVersion>4.0.0</modelVersion>
<groupId>com.simpligility.android</groupId>
<artifactId>helloflashlight</artifactId>
<version>1.0.0-SNAPSHOT</version>
<packaging>apk</packaging>
<name>HelloFlashlight</name>
<dependencies>
<dependency>
<groupId>com.google.android</groupId>
<artifactId>android</artifactId>
<version>1.6_r2</version>
<scope>provided</scope>
</dependency>
</dependencies>
<build>
<finalName>${project.artifactId}</finalName>
<sourceDirectory>src</sourceDirectory>
<pluginManagement>
<plugins>
<plugin>
<groupId>com.jayway.maven.plugins.android.generation2 ←-
</groupId>
<artifactId>android-maven-plugin</artifactId>
<version>3.0.0-SNAPSHOT</version>

Maven: The Complete Reference 283 / 316
<extensions>true</extensions>
</plugin>
</plugins>
</pluginManagement>
<plugins>
<plugin>
<groupId>com.jayway.maven.plugins.android.generation2</ ←-
groupId>
<artifactId>android-maven-plugin</artifactId>
<configuration>
<run>
<debug>true</debug>
</run>
<sdk>
<platform>4</platform>
</sdk>
<emulator>
<avd>16</avd>
</emulator>
<undeployBeforeDeploy>true</undeployBeforeDeploy>
</configuration>
</plugin>
</plugins>
</build>
</project>
The highlights of this pom.xml are:
• the packaging type of apk
• the dependency to the Android platform jar
• and the build configuration with the Android Maven Plugin
The Android Package packaging type apk is what activates the Android-specific lifecycle modifica-
tions of the Android Maven Plugin. It takes care of all the specific calls to the Android SDK tools, that
process resources, convert Java bytecode and so on. The Android Maven Plugin needs to be configured
with extensions set to true for this to work as visible in the pluginManagement section.
The declared dependency to the android platform jar is available in Maven Central with various platform
versions. Alternatively you could use an Android jar from the Maven Android SDK Deployer with the
modified groupId and artifactId. The documentation of the deployer shows all valid dependencies.
The scope of provided is important. It signals to Maven that the contents of the jar will not need to be

Maven: The Complete Reference 284 / 316
packaged into the application package, because they are available at runtime on the device as part of the
environment.
In addition the android jar artifacts only contain exception throwing stubs for all methods in order to
define the API for the compiler. They can not be executed on the development machine, but rely on an
emulator or device runtime environment.
The configuration of the Android Maven Plugin is done in the build section. Initially only the sdk platform
parameter is required to be specified. You can use either a platform version number or a API level number
as documented on the Android developer documentation.
Tip
The version of the Android Maven Plugin in the pom file is a development version. Replace it with
the latest released version, when running the example yourself or download the stable branch of the
samples.
To build the application and run it on an already started emulator or attached device you could use
mvn install android:deploy android:run
14.4 Creating New Projects with the Android Maven Archetypes
When starting a fresh project it is easy to use the Maven Archetype Plugin to create a skeleton to start
working with. Fortunately multiple archetypes for Android projects are available.
You can create a new android-quickstart project, which is similar to the helloflashlight example on the
command line with
mvn archetype:generate \
-DarchetypeArtifactId=android-quickstart \
-DarchetypeGroupId=de.akquinet.android.archetypes \
-DarchetypeVersion=1.0.6 \
-DgroupId=your.company \
-DartifactId=my-android-application
Other archetypes available are an Android project including test execution with the archetypeArtifactId

Maven: The Complete Reference 285 / 316
android-with-test-archetype and a project with release process configuration android-rel
ease-archetype.
Note
Many developmemt environments have a visual integration of creating new projects with a Maven
archetype, so you can use that instead of the command line.
14.5 Using Add-Ons
For many applications the normal Android SDK artifact (android.jar) will be sufficient, however some
applications require add-ons. One of the more commonly used add-ons is the Google Maps add-on, which
provides access to the Google Maps API. The Maps add-on is deployed to your Maven repository by the
Maven Android SDK Deployer tool. To use an add on you just have to add the respective dependency to
your pom file.
The dependency to the Google Maps API
<dependency>
<groupId>com.google.android.maps</groupId>
<artifactId>maps</artifactId>
<version>7_r1</version>
<scope>provided</scope>
</dependency>
Another common add-on is the compatibility library. It needs to be included in the produced apk and
there does not have provided scope.
The dependency to the compatibility library for API v4 and up
<dependency>
<groupId>android.support</groupId>
<artifactId>compatibility-v4</artifactId>
<version>r3</version>
</dependency>

Maven: The Complete Reference 286 / 316
14.6 Multi Module Android Projects
The Android Maven Plugin can be used in a multi-module project setup. An example setup would be 3
different modules linked via a parent pom.
Java Library Code
This first module could contain any business logic implemented in Java, or any other JVM based
language actually, in a jar package.
Android Application Code
This second module would depend on the first module and consist of all the interface code for the
Android platform. It would need to use apk packaging and the Maven Android Plugin.
Instrumentation Test
This third module would depend on the second module and implement the integration test of the
application.
Together with the use of other modules to separate items it is possible to set up a multi module build for
an Android application as well as a server side web application sharing e.g. the code for the core objects
and business logic.
A comprehensive example setup like this called morseflash is part of the samples project for the plugin.
14.7 Using external dependencies
When using the Android Maven Plugin there are three types of dependencies that are treated differently.
Regular dependencies to other Java libraries
The Java byte code files (.class) of library dependencies as denoted in the normal Maven way are
transformed to dalvik executable format like any source code of the current project and included in
the Android package. All other files are included as contained in the source library. An example
would look like this
<dependency>
<groupId>com.simpligility</groupId>
<artifactId>model</artifactId>
<version>0.1</version>
</dependency>

Maven: The Complete Reference 287 / 316
Dependencies to other Android projects
Other Maven Android projects with packaging type apk declared as dependencies are deployed to
the emulator prior to running the instrumentation tests in the integration test phase.
<dependency>
<groupId>com.simpligility.android</groupId>
<artifactId>intents</artifactId>
<version>0.1</version>
<type>apk</type>
</dependency>
Dependencies to other Android projects’ sources
Other Android Maven projects with packaging type apk declared as source dependencies are pulled
into the current Android application with assets and resources and used to build an application
combining all artifacts including resources.
<dependency>
<groupId>com.simpligility.android</groupId>
<artifactId>tools</artifactId>
<version>0.1</version>
<type>apklib</type>
</dependency>
Tip
A common use case for using Android libraries is to separate out all application code that is independent
of the application store in which the apk will be made available. Then you can have one apk per store that
depends on the library and add any specific code for e.g. market access or release build requirements.
14.8 The Custom Lifecycle from the Android Maven Plugin
The Android Maven Plugin customizes the lifecycle based on the packaging. If your project has a pack
aging of type apk the customized lifecycle will be used.
The customized lifecycle has the following additional executions in the default lifecycle.

Maven: The Complete Reference 288 / 316
generate-sources Phase
Use the Android Asset Packaging Tool (aapt) of the platform version specified in the pom to
package the Android specific resources like AndroidManifest.xml, assets and resources. Ad-
ditional parameters can be passed to aapt with the parameter aaptExtraArgs.
process-classes Phase
Run the dx tool of the platform version specified in the pom to convert all classes (libraries, re-
sources and project code) into davlik executable format.
package Phase
Run the Android Package tool (apk) of the Android SDK to create and sign the Android package
file (apk) for installation on the emulator or device.
pre-integration-test Phase
Deploy the currently built Android application package (apk) as well as any other dependencies
with packaging type apk to the emulator/device.
integration-test Phase
Run the instrumentation test classes against the deployed application.
14.9 Plugin Configuration Parameters
The Android Maven Plugin supports a large number of configuration parameters. They can typically be
passed into the execution as plugin configuration, as properties defined in the pom or settings file or as
command line parameters.
An example of a plugin configuration
<configuration>
<sdk>
<platform>2.1</platform>
</sdk>
<emulator>
<avd>21</avd>
<options>-no-skin</options>
</emulator>
</configuration>
Configuration as properties in pom.xml
<properties>
<android.emulator.avd>21</android.emulator.avd>
<properties>

Maven: The Complete Reference 289 / 316
Configuration on command line invocation
mvn android:emulator-start -Dandroid.emulator.avd=21
A number of other parameters have defaults that point to the default location as used by the standard
Android/Eclipse project layout, but can be customized if desired.
• androidManifestFile
• assetsDirectory
• resourceDirectory
• sourceDirectories
Some of the other useful parameters are
device
Specify usb,emulator or a specific serial number. Read Section 14.10 for more information.
undeployBeforeDeploy
This parameter will cause the application as well as the test application to be undeployed from the
device before each deployment.
14.10 Device Interaction
The Android Maven Plugin has powerful features for interacting with attached devices and emulators
implemented in a number of goals. They use the android.device parameter to determine a specific
device as specified by the serial number, all connected emulators or all connected devices should be
affected. A value of emulator will trigger execution on all emulators connected via adb and a value of
usb will affect all devices.
The following goals support the device parameter and sequential execution against all devices.
android:deploy
The deploy goal deploys the built apk file, or another specified apk, to the connected device(s).
This goal is automatically performed when running through the integration-test lifecycle

Maven: The Complete Reference 290 / 316
phase on a project with instrumentation tests (e.g. mvn install or mvn integration-
test).
android:undeploy
The undeploy goal removes the apk of the current project, or another specified apk, from the
connected devices and emulators.
android:redeploy
The redeploy goal executes undeploy and deploy consecutively on all specified devices and
emulators.
android:instrument
The instrument goal runs the instrumentation tests after automatically deploying the test appli-
cation and the tests. It honors the standard Maven skip test properties as well as android.test.
skip. It supports a number of further parameters that are explained in more detail in Section 14.14.
android:pull
The pull goal can be used to copy a file or directory from the device. Source and destination file
have to be specified with the android.pull.source and android.pull.destination
configuration parameters.
android:push
The push goal can be used to copy a file or directory to the device. Configuration is done with the
android.push.source and android.push.destination parameters.
android:run
The run goal will start the application on the device. If the run.debug paramter is set to true starting
will wait for a debugger to connect.
14.11 Emulator Interaction
The emulator-start goal can start an existing Android device emulator. The start up can be config-
ured with the parameters emulator.avd specifying the name of the virtual device, emulator.wait
specifying a wait period and emulator.options specifying further command line options passed to
the emulator command.
The emulator-stop and emulator-stop-all goals stop the specified or all attached Android
emulator(s).

Maven: The Complete Reference 291 / 316
14.12 Other Useful Android Maven Plugin Goals
A number of plugin goals are useful for manual execution or custom binding to a lifecycle phase e.g. in a
release profile.
14.12.1 Manifest-update
The manifest-update goal can be used to do in place updates to the AndroidManifest.xml file. It can
update a number of parameters like versionName, versionCode and others and supports the parameters
manifest.versionName,manifest.versionCode,manifest.versionCodeAutoIncr
ement,manifest.versionCodeUpdateFromVersion,manifest.sharedUserId and man
ifest.debuggable.
14.12.2 Zipalign
The zipalign goal can execute the zipalign command as required for creation an apk for upload to the
Android Market. It supports the parameters zipalign.skip,zipalign.verbose,zipalign.
inputApk and zipalign.outputApk.
14.12.3 Help
The help goal provides overall as well as plugin goal specific help on the command line.
14.13 Internal Android Maven Plugin Goals
The Android Maven Plugin supports a number of goals that are part of the default lifecycle and are invoked
automatically. In most cases you will not have to invoke these goals directly, but it can be useful to know
about them and their configuration options.
android:apk

Maven: The Complete Reference 292 / 316
The apk goal creates the android package (apk) file. By default the plugin signs the file with the
debug keystore. The configuration parameter <sign><debug>false<debug><sign> can be
used to disable the signing process.
android:deploy-dependencies
The deploy-dependencies goal deploys all directly declared dependencies of <type>a
pk</type> in this project. This goal is usually used in a project with instrumentation tests, to
deploy the apk to test onto the device before running the deploying and running the instrumentation
tests apk. The goal is automatically performed when running through the integration-test life cy-
cle phase on a project with instrumentation tests (e.g. mvn install or mvn integration-
test).
android:dex
The dex goal converts compiled Java classes to the Android Dalivk Executable (dex) format. The
dex execution can be configured with the parameters dex.jvmArguments,dex.coreLibr
ary,dex.noLocals and dex.optimize.
android:generate-sources
The generate-sources goal generates R.java based on the resources specified by the re-
sources configuration parameter. It generates Java files based on aidl files. If the configuration pa-
rameter deleteConflictingFiles is true (which it is by default), this goal has also deletes
any R.java files found in the source directory, deletes any .java files with the same name as an .aidl
file found in the source directory and deletes any Thumbs.db files found in the resource directory.
android:internal-integration-test
The internal-integration-test goal is called automatically when the lifecycle reaches
the integration-test phase. It determines whether to call the goal instrument in this phase
based on the existence of instrumentation test classes in the current project. The goal is internal to
the plugin lifecycle and should not be used as separate invocation on the command line.
android:internal-pre-integration-test
The internal-pre-integration-test goal is called automatically when the lifecycle
reaches pre-integration-test phase. It determines whether to call the goals android:
deploy-dependencies and android:deploy in this phase and if necessary invokes them.
The goal is internal to the plugin lifecycle and should not be used as separate invocation on the
command line.
14.14 Testing Android Application Code
Testing Android Application code can be done in a unit test fashion with rich junit support as part of the
Android SDK as well as integration type testing called instrumentation testing.

Maven: The Complete Reference 293 / 316
14.14.1 Unit tests
The Android Maven Plugin includes the execution of the Surefire plugin and as such unit tests can be
included in the project like in any other project. The default path for test classes in the Eclipse and
therefore Android Development Toolkit is test and therefore Maven has to be configured to access code
from there with the configuration
Adding the test folder to the build configuration
<build>
<testSourceDirectory>test</testSourceDirectory>
...
Alternatively the Maven conventions can be implemented by moving the source code for the application
and the test source code into src/main/java and src/test/java and reconfiguring the Eclipse
project files.
14.14.2 Instrumentation tests
Instrumentation tests are integration tests bundled into an application that run on the emulator or device
and interact with another deployed application to test the behaviour. The common setup to run instrumen-
tation tests would be two parallel projects, one for the application and one for the instrumentation tests.
These modules are tied together as modules of a parent pom.
The Android Maven Plugin samples contains the morseflash as well as theapidemos-15 examples for a
project set up in this manner. The setup of the instrumentation test application with the Android Maven
Plugin is the same as for a normal application with the added dependency to the application that needs to
be tested. It is important to add the type of apk to the dependency to allow the Android Maven Plugin
to find the Android package of the application.
<dependency>
<groupId>com.simpligility.android</groupId>
<artifactId>intents</artifactId>
<version>0.1</version>
<type>apk</type>
</dependency>
Instrumentation test execution supports a large number of configuration parameters that are displayed in
the plugin configuration layout in Available parameters for instrumentation testing.

Maven: The Complete Reference 294 / 316
Available parameters for instrumentation testing
<test>
<skip>true|false|auto</skip>
<instrumentationPackage>packageName</instrumentationPackage>
<instrumentationRunner>className</instrumentationRunner>
<debug>true|false</debug>
<coverage>true|false</coverage>
<logonly>true|false</logonly> avd
<testsize>small|medium|large</testsize>
<createreport>true|false</createreport>
<classes>
<class>your.package.name.YourTestClass</class>
</classes>
<packages>
<package>your.package.name</package>
</packages>
</test>
Unless createreport is set to false the instrumentation test run will produce junit xml compatible
test output in the build output folder for test results target/surefire-reports for each device or
emulator the tests run on.
14.15 Native Application Builds
The Android Maven Plugin supports building application that include native code as well. Define the
environment variable ANDROID_NDK_HOME to point to the required Android NDK installation and
have a look at the native projects in the samples of the plugin for more details.
14.16 Tips and Tricks
14.16.1 Other Maven Plugins
Apart from the features of the Android Maven Plugin you have access to all the other Maven plugins to
automate things like license header file checks, resource filtering and many more.

Maven: The Complete Reference 295 / 316
14.16.2 Performing a Release Build
A release build for an Android application needs to create an apk file that has been signed and zipaligned.
In addition it is adviseable to run shrinking and obfuscation. All these steps can be done with the Maven
Jarsigner Plugin, the Proguard Maven Plugin and the zipalign goal of the Android Maven Plugin. A
sample configuration of a release build is available in the morseflash example application of the plugin
samples.
14.16.3 Configuring command line usage
In order to use the Android Maven Plugin goals on the command line with the short plugin name andr
oid outside a directory that contains a reference to the plugin, you have to add the following pluginG
roups snippet to your settings.xml file.
Snippet for settings.xml to enable short plugin name usage
<pluginGroups>
<pluginGroup>
com.jayway.maven.plugins.android.generation2
</pluginGroup>
</pluginGroups>

Maven: The Complete Reference 296 / 316
Chapter 15
Appendix: Settings Details
15.1 Quick Overview
The settings element in the settings.xml file contains elements used to define values which configure
Maven execution. Settings in this file are settings which apply to many projects and which should not
be bundled to any specific project, or distributed to an audience. These include values such as the local
repository location, alternate remote repository servers, and authentication information. There are two
locations where a settings.xml file may live:
• Maven Installation Directory: $M2_HOME/conf/settings.xml
• User-specific Settings File: ~/.m2/settings.xml
Here is an overview of the top elements under settings:
Overview of top-level elements in settings.xml
<settings xmlns="http://maven.apache.org/SETTINGS/1.0.0"
xmlns:xsi="http://www.w3.org/2001/XMLSchema-instance"
xsi:schemaLocation="http://maven.apache.org/SETTINGS/1.0.0
http://maven.apache.org/xsd/settings-1.0.0. ←-
xsd">

Maven: The Complete Reference 297 / 316
<localRepository/>
<interactiveMode/>
<usePluginRegistry/>
<offline/>
<pluginGroups/>
<servers/>
<mirrors/>
<proxies/>
<profiles/>
<activeProfiles/>
</settings>
15.2 Settings Details
15.2.1 Simple Values
Half of the top-level settings elements are simple values, representing a range of values which configure
the core behavior of Maven:
Simple top-level elements in settings.xml
<settings xmlns="http://maven.apache.org/SETTINGS/1.0.0"
xmlns:xsi="http://www.w3.org/2001/XMLSchema-instance"
xsi:schemaLocation="http://maven.apache.org/SETTINGS/1.0.0
http://maven.apache.org/xsd/settings-1.0.0. ←-
xsd">
<localRepository>${user.dir}/.m2/repository</localRepository>
<interactiveMode>true</interactiveMode>
<usePluginRegistry>false</usePluginRegistry>
<offline>false</offline>
<pluginGroups>
<pluginGroup>org.codehaus.mojo</pluginGroup>
</pluginGroups>
...
</settings>
The simple top-level elements are:
localRepository

Maven: The Complete Reference 298 / 316
This value is the path of this build system’s local repository. The default value is ${user.dir}/.m2/repository.
interactiveMode
true if Maven should attempt to interact with the user for input, false if not. Defaults to true.
usePluginRegistry
true if Maven should use the ${user.dir}/.m2/plugin-registry.xml file to manage plugin versions,
defaults to false.
offline
true if this build system should operate in offline mode, defaults to false. This element is useful
for build servers which cannot connect to a remote repository, either because of network setup or
security reasons.
pluginGroups
This element contains a list of pluginGroup elements, each contains a groupId. The list is
searched when a plugin is used and the groupId is not provided in the command line. This list
contains org.apache.maven.plugins by default.
15.2.2 Servers
The distributionManagement element of the POM defines the repositories for deployment. How-
ever, certain settings such as security credentials should not be distributed along with the pom.xml. This
type of information should exist on the build server in the settings.xml.
Server configuration in settings.xml
<settings xmlns="http://maven.apache.org/SETTINGS/1.0.0"
xmlns:xsi="http://www.w3.org/2001/XMLSchema-instance"
xsi:schemaLocation="http://maven.apache.org/SETTINGS/1.0.0
http://maven.apache.org/xsd/settings-1.0.0. ←-
xsd">
...
<servers>
<server>
<id>server001</id>
<username>my_login</username>
<password>my_password</password>
<privateKey>${user.home}/.ssh/id_dsa</privateKey>
<passphrase>some_passphrase</passphrase>
<filePermissions>664</filePermissions>
<directoryPermissions>775</directoryPermissions>
<configuration></configuration>
</server>
</servers>

Maven: The Complete Reference 299 / 316
...
</settings>
The elements under server are:
id
This is the id of the server (not of the user to login as) that matches the distributionManag
ement repository element’s id.
username, password
These elements appear as a pair denoting the login and password required to authenticate to this
server.
privateKey, passphrase
Like the previous two elements, this pair specifies a path to a private key (default is ${user.home}/.ssh/id_dsa)
and a passphrase, if required. The passphrase and password elements may be externalized in the
future, but for now they must be set plain-text in the settings.xml file.
filePermissions, directoryPermissions
When a repository file or directory is created on deployment, these are the permissions to use. The
legal values of each is a three digit number corresponding to *nix file permissions, i.e. 664, or 775.
15.2.3 Mirrors
Mirror configuration in settings.xml
<settings xmlns="http://maven.apache.org/SETTINGS/1.0.0"
xmlns:xsi="http://www.w3.org/2001/XMLSchema-instance"
xsi:schemaLocation="http://maven.apache.org/SETTINGS/1.0.0
http://maven.apache.org/xsd/settings-1.0.0. ←-
xsd">
...
<mirrors>
<mirror>
<id>planetmirror.com</id>
<name>PlanetMirror Australia</name>
<url>http://downloads.planetmirror.com/pub/maven2</url>
<mirrorOf>central</mirrorOf>
</mirror>
</mirrors>
...
</settings>

Maven: The Complete Reference 300 / 316
id, name
The unique identifier of this mirror. The id is used to differentiate between mirror elements.
url
The base URL of this mirror. The build system will use prepend this URL to connect to a repository
rather than the default server URL.
mirrorOf
The id of the server that this is a mirror of. For example, to point to a mirror of the Maven central
server (http://repo1.maven.org/maven2), set this element to central. This must not match the mirror
id.
15.2.4 Proxies
Proxy configuration in settings.xml
<settings xmlns="http://maven.apache.org/SETTINGS/1.0.0"
xmlns:xsi="http://www.w3.org/2001/XMLSchema-instance"
xsi:schemaLocation="http://maven.apache.org/SETTINGS/1.0.0
http://maven.apache.org/xsd/settings-1.0.0. ←-
xsd">
...
<proxies>
<proxy>
<id>myproxy</id>
<active>true</active>
<protocol>http</protocol>
<host>proxy.somewhere.com</host>
<port>8080</port>
<username>proxyuser</username>
<password>somepassword</password>
<nonProxyHosts>*.google.com|ibiblio.org</nonProxyHosts>
</proxy>
</proxies>
...
</settings>
id
The unique identifier for this proxy. This is used to differentiate between proxy elements.
active
true if this proxy is active. This is useful for declaring a set of proxies, but only one may be active
at a time.

Maven: The Complete Reference 301 / 316
protocol, host, port
The protocol://host:port of the proxy, separated into discrete elements.
username, password
These elements appear as a pair denoting the login and password required to authenticate to this
proxy server.
nonProxyHosts
This is a list of hosts which should not be proxied. The delimiter of the list is the expected type of
the proxy server; the example above is pipe delimited - comma delimited is also common.
15.2.5 Profiles
The profile element in the settings.xml is a truncated version of the pom.xml profile element. It consists
of the activation,repositories,pluginRepositories and properties elements. The
profile elements only include these four elements because they concern themselves with the build system
as a whole (which is the role of the settings.xml file), not about individual project object model settings.
If a profile is active from settings, its values will override any equivalent profiles which matching identi-
fiers in a POM or profiles.xml file.
15.2.6 Activation
Activations are the key of a profile. Like the POM’s profiles, the power of a profile comes from its
ability to modify some values only under certain circumstances; those circumstances are specified via an
activation element.
Defining Activation Parameters in settings.xml
<settings xmlns="http://maven.apache.org/SETTINGS/1.0.0"
xmlns:xsi="http://www.w3.org/2001/XMLSchema-instance"
xsi:schemaLocation="http://maven.apache.org/SETTINGS/1.0.0
http://maven.apache.org/xsd/settings-1.0.0. ←-
xsd">
...
<profiles>
<profile>
<id>test</id>
<activation>
<activeByDefault>false</activeByDefault>

Maven: The Complete Reference 302 / 316
<jdk>1.5</jdk>
<os>
<name>Windows XP</name>
<family>Windows</family>
<arch>x86</arch>
<version>5.1.2600</version>
</os>
<property>
<name>mavenVersion</name>
<value>2.0.3</value>
</property>
<file>
<exists>${basedir}/file2.properties</exists>
<missing>${basedir}/file1.properties</missing>
</file>
</activation>
...
</profile>
</profiles>
...
</settings>
Activation occurs when all specified criteria have been met, though not all are required at once.
jdk
activation has a built in, Java-centric check in the jdk element. This will activate if the test is run
under a jdk version number that matches the prefix given. In the above example, 1.5.0_06 will
match.
os
The os element can define some operating system specific properties shown above.
property
The profile will activate if Maven detects a property (a value which can be dereferenced within the
POM by ${name}) of the corresponding name=value pair.
file
Finally, a given filename may activate the profile by the existence of a file, or if it is missing.
The activation element is not the only way that a profile may be activated. The settings.xml file’s
activeProfile element may contain the profile’s id. They may also be activated explicitly through
the command line via a comma separated list after the P flag (e.g. -P test).
To see which profile will activate in a certain build, use the maven-help-plugin.

Maven: The Complete Reference 303 / 316
mvn help:active-profiles
15.2.7 Properties
Maven properties are value placeholder, like properties in Ant. Their values are accessible anywhere
within a POM by using the notation ${X}, where X is the property. They come in five different styles, all
accessible from the settings.xml file:
+env.+X
Prefixing a variable with env. will return the shell’s environment variable. For example, ${env.PATH}
contains the $path environment variable. (%PATH% in Windows.)
+project.+x
A dot-notated (.) path in the POM will contain the corresponding elements value.
+settings.+x
A dot-notated (.) path in the settings.xml will contain the corresponding elements value.
Java system properties
All properties accessible via java.lang.System.getProperties() are available as POM
properties, such as ${java.home}.
x
Set within a properties element or an external file, the value may be used as ${someVar}.
Setting the ${user.install} property in settings.xml
<settings xmlns="http://maven.apache.org/SETTINGS/1.0.0"
xmlns:xsi="http://www.w3.org/2001/XMLSchema-instance"
xsi:schemaLocation="http://maven.apache.org/SETTINGS/1.0.0
http://maven.apache.org/xsd/settings-1.0.0. ←-
xsd">
...
<profiles>
<profile>
...
<properties>
<user.install>${user.dir}/our-project</user.install>
</properties>
...
</profile>
</profiles>

Maven: The Complete Reference 304 / 316
...
</settings>
The property ${user.install} is accessible from a POM if this profile is active.
15.2.8 Repositories
Repositories are remote collections of projects from which Maven uses to populate the local repository of
the build system. It is from this local repository that Maven calls it plugins and dependencies. Different
remote repositories may contain different projects, and under the active profile they may be searched for
a matching release or snapshot artifact.
Repository Configuration in settings.xml
<settings xmlns="http://maven.apache.org/SETTINGS/1.0.0"
xmlns:xsi="http://www.w3.org/2001/XMLSchema-instance"
xsi:schemaLocation="http://maven.apache.org/SETTINGS/1.0.0
http://maven.apache.org/xsd/settings-1.0.0. ←-
xsd">
...
<profiles>
<profile>
...
<repositories>
<repository>
<id>codehausSnapshots</id>
<name>Codehaus Snapshots</name>
<releases>
<enabled>false</enabled>
<updatePolicy>always</updatePolicy>
<checksumPolicy>warn</checksumPolicy>
</releases>
<snapshots>
<enabled>true</enabled>
<updatePolicy>never</updatePolicy>
<checksumPolicy>fail</checksumPolicy>
</snapshots>
<url>http://snapshots.maven.codehaus.org/maven2</url>
<layout>default</layout>
</repository>
</repositories>
<pluginRepositories>
...
</pluginRepositories>

Maven: The Complete Reference 305 / 316
...
</profile>
</profiles>
...
</settings>
releases, snapshots
These are the policies for each type of artifact, Release or snapshot. With these two sets, a POM has
the power to alter the policies for each type independent of the other within a single repository. For
example, one may decide to enable only snapshot downloads, possibly for development purposes.
enabled
true or false for whether this repository is enabled for the respective type (releases or snap-
shots).
updatePolicy
This element specifies how often updates should attempt to occur. Maven will compare the lo-
cal POMs timestamp to the remote. The choices are: always,daily (default), interval:X
(where X is an integer in minutes) or never.
checksumPolicy
When Maven deploys files to the repository, it also deploys corresponding checksum files. Your
options are to ignore,fail, or warn on missing or incorrect checksums.
layout
In the above description of repositories, it was mentioned that they all follow a common layout.
This is mostly correct. Maven 2 has a default layout for its repositories; however, Maven 1.x had
a different layout. Use this element to specify which if it is default or legacy. If you are upgrading
from Maven 1 to Maven 2, and you want to use the same repository which was used in your Maven
1 build, list the layout as legacy.
15.2.9 Plugin Repositories
The structure of the pluginRepositories element block is similar to the repositories element.
The pluginRepository elements each specify a remote location of where Maven can find plugins
artifacts.
Plugin Repositories in settings.xml
<settings xmlns="http://maven.apache.org/SETTINGS/1.0.0"
xmlns:xsi="http://www.w3.org/2001/XMLSchema-instance"
xsi:schemaLocation="http://maven.apache.org/SETTINGS/1.0.0

Maven: The Complete Reference 306 / 316
http://maven.apache.org/xsd/settings-1.0.0. ←-
xsd">
...
<profiles>
<profile>
...
<repositories>
...
</repositories>
<pluginRepositories>
<pluginRepository>
<id>codehausSnapshots</id>
<name>Codehaus Snapshots</name>
<releases>
<enabled>false</enabled>
<updatePolicy>always</updatePolicy>
<checksumPolicy>warn</checksumPolicy>
</releases>
<snapshots>
<enabled>true</enabled>
<updatePolicy>never</updatePolicy>
<checksumPolicy>fail</checksumPolicy>
</snapshots>
<url>http://snapshots.maven.codehaus.org/maven2</url>
<layout>default</layout>
</pluginRepository>
</pluginRepositories>
...
</profile>
</profiles>
...
</settings>
15.2.10 Active Profiles
Setting active profiles in settings.xml
<settings xmlns="http://maven.apache.org/SETTINGS/1.0.0"
xmlns:xsi="http://www.w3.org/2001/XMLSchema-instance"
xsi:schemaLocation="http://maven.apache.org/SETTINGS/1.0.0
http://maven.apache.org/xsd/settings-1.0.0. ←-
xsd">
...
<activeProfiles>
<activeProfile>env-test</activeProfile>

Maven: The Complete Reference 307 / 316
</activeProfiles>
</settings>
The final piece of the settings.xml puzzle is the activeProfiles element. This contains a set of
activeProfile elements, which each have a value of a profile id. Any profile id defined as an act
iveProfile will be active, regardless of any environment settings. If no matching profile is found
nothing will happen. For example, if env-test is an activeProfile, a profile in a pom.xml
(or profile.xml with a corresponding id it will be active. If no such profile is found then execution will
continue as normal.
15.2.11 Encrypting Passwords in Maven Settings
Once you start to use Maven to deploy software to remote repositories and to interact with source control
systems directly, you will start to collect a number of passwords in your Maven Settings and without
a mechanism for encrypting these passwords, a developer’s ~/.m2/settings.xml will quickly become a
security risk as it will contain plain-text passwords to source control and repository managers. Maven
2.1 introduced a facility to encrypt passwords in a user’s Maven Settings (~/.m2/settings.xml). To do this,
you must first create a master password and store this master password in a security-settings.xml file in
~/.m2/settings-security.xml. You can then use this master password to encrypt passwords stored in Maven
Settings (~/.m2/settings.xml).
To illustrate this feature, consider the process Maven uses to retrieve an unencrypted server password for
a user’s Maven Settings as shown in Figure 15.1. A user will reference a named server using an identifier
in a project’s POM, Maven looks for a matching server in Maven Settings. When it finds a matching
server element in Maven Settings, Maven will then use the password associated with that server element
and send this password along to the server. The password is stored as plain-text in ~/.m2/settings.xml and
it is readily available to anyone who has read access to this file.
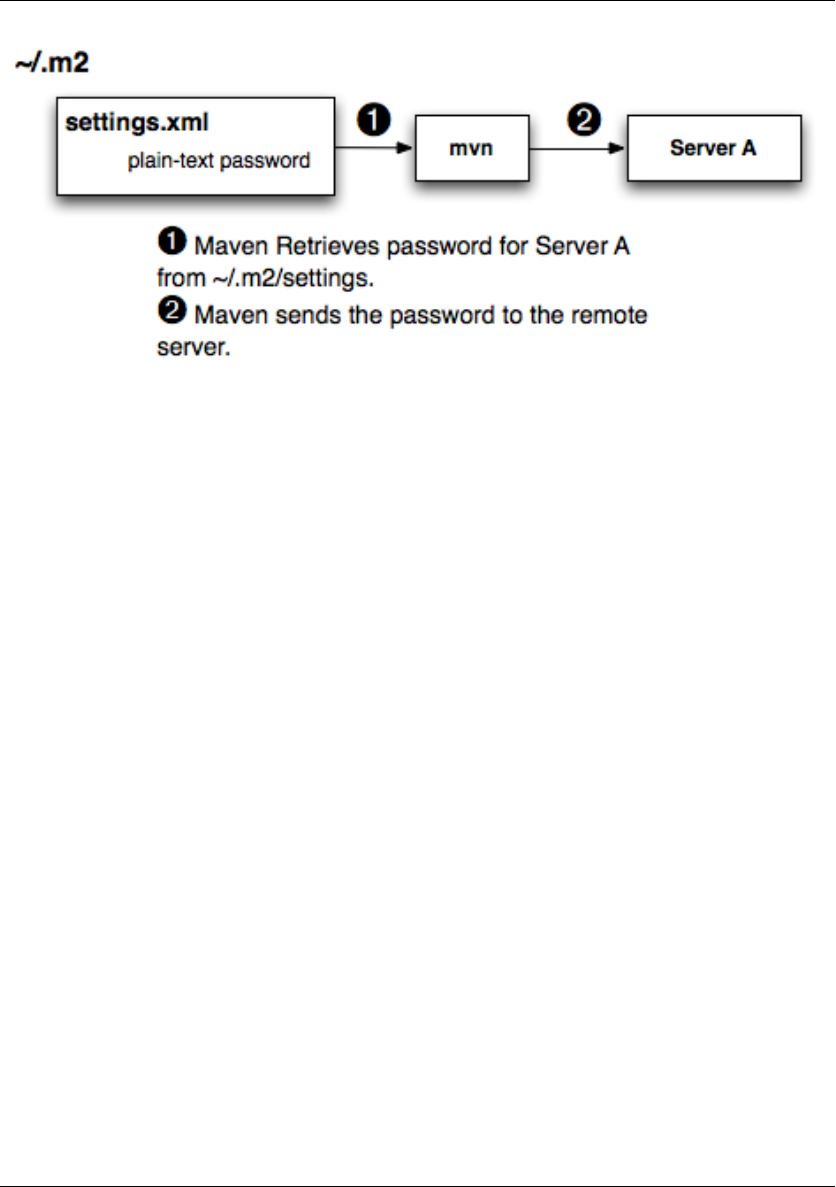
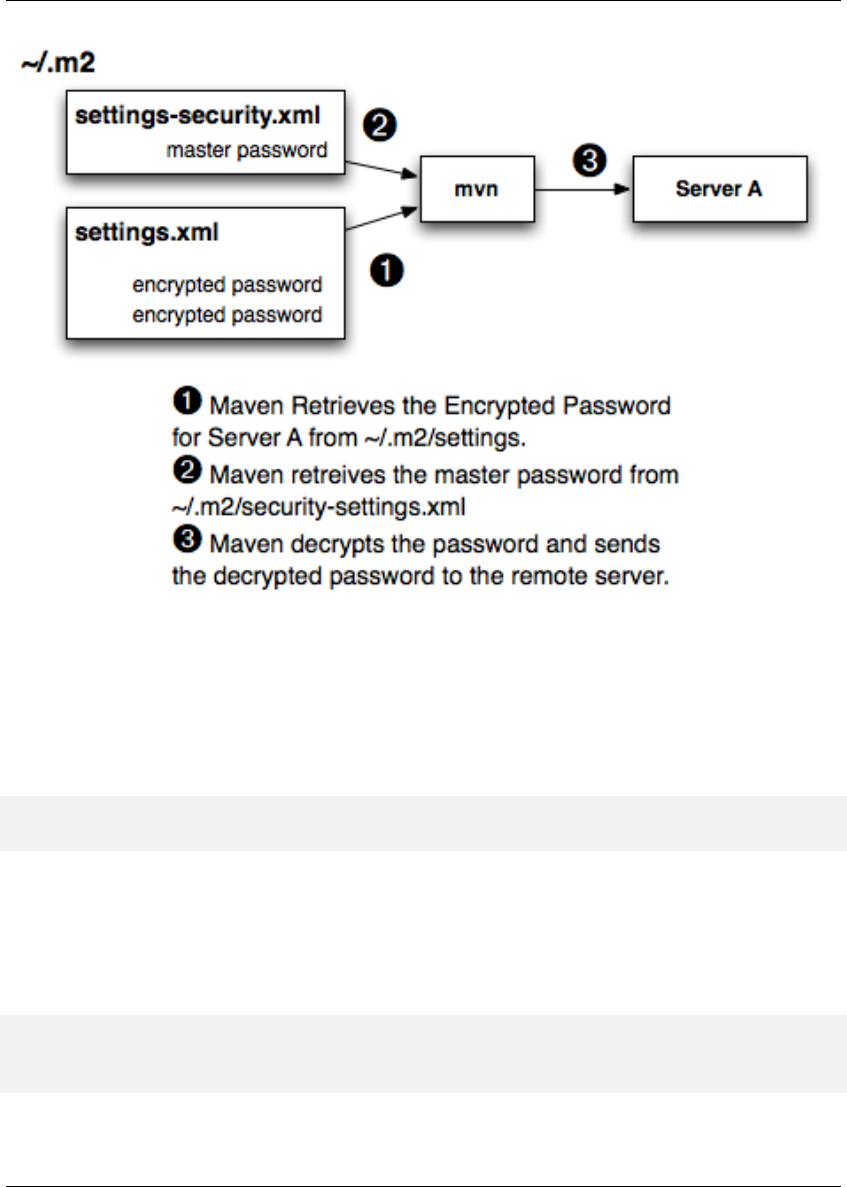
Maven: The Complete Reference 309 / 316
Figure 15.2: Storing Encrypted Passwords in Maven Settings
To configure encrypted passwords, create a master password by running mvn -emp or mvn --encr
ypt-master-password followed by your master password.
$ mvn -emp mypassword
{rsB56BJcqoEHZqEZ0R1VR4TIspmODx1Ln8/PVvsgaGw=}
Maven prints out an encrypted copy of the password to standard out. Copy this encrypted password and
paste it into a ~/.m2/settings-security.xml file as shown in
settings-security.xml with Master Password
<settingsSecurity>
<master>{rsB56BJcqoEHZqEZ0R1VR4TIspmODx1Ln8/PVvsgaGw=}</master>
</settingsSecurity>

Maven: The Complete Reference 310 / 316
After you have created a master password, you can then encrypt passwords for use in your Maven Settings.
To encrypt a password with the master password, run mvn -ep or mvn --encrypt-password.
Assume that you have a repository manager and you need to send a username of "deployment" and a
password of "qualityFIRST". To encrypt this particular password, you would run the following command:
$ mvn -ep qualityFIRST
{uMrbEOEf/VQHnc0W2X49Qab75j9LSTwiM3mg2LCrOzI=}
At this point, copy the encrypted password printed from the output of mvn -ep and paste it into your
Maven Settings.
Storing an Encrypted Password in Maven Settings (~/.m2/settings.xml)
<settings>
<servers>
<server>
<id>nexus</id>
<username>deployment</username>
<password>{uMrbEOEf/VQHnc0W2X49Qab75j9LSTwiM3mg2LCrOzI=}</ ←-
password>
</server>
</servers>
...
</settings>
When you run a Maven build that needs to interact with the repository manager, Maven will retrieve
the Master password from the ~/.m2/settings-security.xml file and use this master password to decrypt
the password stored in your ~/.m2/settings.xml file. Maven will then send the decrypted password to the
server.
What does this buy you? It allows you to avoid storing your passwords in ~/.m2/settings.xml as plain-
text passwords providing you with the peace of mind that your critical passwords are not being stored,
unprotected in a Maven Settings file. Note that this feature does not provide for encryption of the password
while it is being sent to the remote server. An enterprising attacker could still capture the password using
a network analysis tool.
For an extra level of security, you can encourage your developers to store the encrypted master password
on a removable storage device like a USB hard drive. Using this method, a developer would plug a
removable drive into a workstation when she wanted to perform a deployment or interact with a remote
server. To support this, your ~/.m2/settings-security.xml file would contain a reference to the location of
the settings-security.xml file using the relocation element.
Configuring Relocation of the Master Password

Maven: The Complete Reference 311 / 316
<settingsSecurity>
<relocation>/Volumes/usb-key/settings-security.xml</relocation>
</settingsSecurity>
The developer would then store the settings-security.xml file at /Volumes/usb-key/settings-security.xml
which would only be available if the developer were sitting at the workstation.

Maven: The Complete Reference 312 / 316
Chapter 16
Appendix: Sun Specification Alternatives
The Apache Geronimo project maintains implementations of various enterprise Java specifications. Ta-
ble 16.1 lists the artifactId and artifact version for all of the specifications implemented by the Geronimo
project. To use one of these dependencies, use a groupId of org.apache.geronimo.specs, locate
the version of the Specification you want to use and reference the dependency with the Artifact Id and
Artifact Version listed in Table 16.1.
Note
All artifacts in Table 16.1, have a groupId of org.apache.geronimo.specs.
Table 16.1: Alternate Spec Implementations Artifacts
Specification Spec Version Artifact Id Artifact Version
Activation 1.0.2 geronimo-
activation_1.0.2_spec
1.2
Activation 1.1 geronimo-
activation_1.1_spec
1.0.1
Activation 1.0 geronimo-
activation_1.0_spec
1.1
CommonJ 1.1 geronimo-
commonj_1.1_spec
1.0
Corba 2.3 geronimo-
corba_2.3_spec
1.1

Maven: The Complete Reference 313 / 316
Table 16.1: (continued)
Corba 3.0 geronimo-
corba_3.0_spec
1.2
EJB 2.1 geronimo-
ejb_2.1_spec
1.1
EJB 3.0 geronimo-
ejb_3.0_spec
1.0
EL 1.0 geronimo-el_1.0_spec 1.0
Interceptor 3.0 geronimo-
interceptor_3.0_spec
1.0
J2EE Connector 1.5 geronimo-j2ee-
connector_1.5_spec
1.1.1
J2EE Deployment 1.1 geronimo-j2ee-
deployment_1.1_spec
1.1
J2EE JACC 1.0 geronimo-j2ee-
jacc_1.0_spec
1.1.1
J2EE Management 1.0 geronimo-j2ee-
management_1.0_spec
1.1
J2EE Management 1.1 geronimo-j2ee-
management_1.1_spec
1.0
J2EE 1.4 geronimo-
j2ee_1.4_spec
1.1
JACC 1.1 geronimo-
jacc_1.1_spec
1.0
JEE Deployment 1.1MR3 geronimo-javaee-
deployment_1.1MR3_spec
1.0
JavaMail 1.3.1 geronimo-
javamail_1.3.1_spec
1.3
JavaMail 1.4 geronimo-
javamail_1.4_spec
1.2
JAXR 1.0 geronimo-
jaxr_1.0_spec
1.1
JAXRPC 1.1 geronimo-
jaxrpc_1.1_spec
1.1
JMS 1.1 geronimo-
jms_1.1_spec
1.1
JPA 3.0 geronimo-
jpa_3.0_spec
1.1
JSP 2.0 geronimo-
jsp_2.0_spec
1.1
JSP 2.1 geronimo-
jsp_2.1_spec
1.0
JTA 1.0.1B geronimo-
jta_1.0.1B_spec
1.1.1

Maven: The Complete Reference 314 / 316
Table 16.1: (continued)
JTA 1.1 geronimo-
jta_1.1_spec
1.1
QName 1.1 geronimo-
qname_1.1_spec
1.1
SAAJ 1.1 geronimo-
saaj_1.1_spec
1.1
Servlet 2.4 geronimo-
servlet_2.4_spec
1.1.1
Servlet 2.5 geronimo-
servlet_2.5_spec
1.1.1
STaX API 1.0 geronimo-stax-
api_1.0_spec
1.0.1
WS Metadata 2.0 geronimo-ws-
metadata_2.0_spec
1.1.1
Note
The version numbers in the Artifact Version column may be out of date by the time you read this book.
To check on the version number, visit http://repo1.maven.org/maven2/org/apache/geronimo/specs/ in a
web browser, and click on the artifactId you want to add. Choose the highest version of the spec you
want to depend upon.
To illustrate how one would use Table 16.1, if we wanted to write some code in our project which inter-
acted with the JTA 1.0.1B specification, we would need to add the following dependency to our project:
Adding JTA 1.0.1B to a Maven Project
<dependency>
<groupId>org.apache.geronimo.specs</groupId>
<artifactId>geronimo-jta_1.0.1B_spec</artifactId>
<version>1.1.1</version>
</dependency>
Notice how the version of the artifact isn’t going to line up with the version of the specification—the
previous dependency configuration adds version 1.0.1B of the JTA specification using the artifact version
of 1.1.1. Be aware of this when depending on the alternate Geronimo implementations, and always double
check that you are using the latest artifact version number for your specifications.

Maven: The Complete Reference 315 / 316
Chapter 17
Creative Commons License
This work is licensed under a Creative Commons Attribution-Noncommercial-No Derivative Works 3.0
United States license. For more information about this license, see http://creativecommons.org/licenses/-
by-nc-nd/3.0/us/. You are free to share, copy, distribute, display, and perform the work under the following
conditions:
• You must attribute the work to Sonatype, Inc. with a link to http://www.sonatype.com.
• You may not use this work for commercial purposes.
• You may not alter, transform, or build upon this work.
If you redistribute this work on a web page, you must include the following link with the URL in the
about attribute listed on a single line (remove the backslashes and join all URL parameters):
<div xmlns:cc="http://creativecommons.org/ns#"
about="http://creativecommons.org/license/results-one?q_1=2&q_1=1\
&field_commercial=n&field_derivatives=n&field_jurisdiction=us\
&field_format=StillImage&field_worktitle=Repository%3A+\ ←-
Management\
&field_attribute_to_name=Sonatype%2C+Inc.\
&field_attribute_to_url=http%3A%2F%2Fwww.sonatype.com\
&field_sourceurl=http%3A%2F%2Fwww.sonatype.com%2Fbook\
&lang=en_US&language=en_US&n_questions=3">
<a rel="cc:attributionURL" property="cc:attributionName"
href="http://www.sonatype.com">Sonatype, Inc.</a> /

Maven: The Complete Reference 316 / 316
<a rel="license"
href="http://creativecommons.org/licenses/by-nc-nd/3.0/us/">
CC BY-NC-ND 3.0</a>
</div>
When downloaded or distributed in a jurisdiction other than the United States of America, this work
shall be covered by the appropriate ported version of Creative Commons Attribution-Noncommercial-
No Derivative Works 3.0 license for the specific jurisdiction. If the Creative Commons Attribution-
Noncommercial-No Derivative Works version 3.0 license is not available for a specific jurisdiction, this
work shall be covered under the Creative Commons Attribution-Noncommercial-No Derivate Works ver-
sion 2.5 license for the jurisdiction in which the work was downloaded or distributed. A comprehensive
list of jurisdictions for which a Creative Commons license is available can be found on the Creative
Commons International web site at http://creativecommons.org/international.
If no ported version of the Creative Commons license exists for a particular jurisdiction, this work shall be
covered by the generic, unported Creative Commons Attribution-Noncommercial-No Derivative Works
version 3.0 license available from http://creativecommons.org/licenses/by-nc-nd/3.0/.
