Mesa_Coding_Guidelines_Oct1983 Mesa Coding Guidelines Oct1983
User Manual: Pdf Mesa_Coding_Guidelines_Oct1983
Open the PDF directly: View PDF ![]() .
.
Page Count: 43
Mesa Coding Guidelines
by
Neil
R.
Sembower
October
1983
Abstract: The Mesa language
is
very large and complex and provides numerous
opportunities
for
programmers
who
are inexperienced
with
the
language
to
fall
into
undesirable coding habits.
This
document
describes a
number
of
guidelines
for
using
the
language
that
have been
found
to
be useful in
the
development
of
large Mesa systems. Included are hints
that
may
improve
speed
or
readability,
or
decrease
development
and
debugging
times. The guidelines
were
derived
mainly
from
the
programming
experiences
of
members
of
ED
& T /
PDSS
/ Software Tools Area and
do
not
necessarily represent
the
collective Xerox
knowledge
of
good
Mesa
programming
practices.
Filed
as:
[Aztec]
< MesaCourse > MesaCodingGuidelines.lnterpress
CR
Categories:
Key
words
and phrases:
XEROX
Product
Development
&
Software
Systems
ELECTRONICS DIVISION & TECHNOLOGY
1350 Jefferson Road / Rochester /
New
York
14623
XEROX
Internal
Use
Only

Mesa Coding
Guidelines

Mesa
Coding
Guidelines
I
would
like
to
acknowledge
the
efforts
of
Karen Anderson in
maintaining
the
clarity and
grammatical
integrity
of
this paper and
the
Software
Tools Area
for
reviewing
it
for
technical
correctness.

Mesa Coding
Guidelines

Table
of
Contents
1)
Introduction
2)
Sources
of
Information
2.1) Sources and references.
2.2) Cedar Style Sheet
2.3) Sample code.
3)
BEGIN-END
vs.
{}
Mesa Coding
Guidelines
3.1)
Alternate
nested scope's
delimiters
with
BEGIN-END and
{-}.
3.2)
Use
BEGIN-END
to
delimit
procedures.
3.3)
Use
BEGIN-END
on
scopes
that
declare data.
4) SIGNALs
and
ERRORS
4.1) Adherence
to
signalling
guidelines.
4.2) Notes on signalling strategies.
4.3)
Use
signals
only
to
indicate
exceptional conditions.
4.4) The
workings
of
the
signalling
mechanism.
4.5) Placement
of
catch phrases and size
of
scope
of
ENABLE clauses.
4.6) Reducing
the
time
needed
to
signal.
4.7) Declaration
of
signals in interfaces.
4.8) The signal
Error[programmingError].
4.9) The signal Error[caliingError].
4.10) Example
of
a
declaration
of
signals in an interface.
4.11)
Unwind
signals
before
they
reach
the
client.
4.12) Signalling
within
an abstraction's
implementation.
4.13)
Allowing
signals
to
cross abstraction boundaries.
5) PROCEDUREs
5.1) INLINE procedures.
5.2) Parameter passing.
5.3) Nesting procedures.
5.4) Naming procedures.
5.5) Cross-module references
VS.
intra-module
references.
5.6)
Default
values
of
fields in parameters and returns records.
5.7) Positional
notation
vs.
keyword
notation.
6)
Naming
Variables
6.1)
"Handle"
"Object"
relationship.
6.2)
Use
of
Generic Names.
7)
Modules
7.1)
Module
names.
7.2) Change log.
7.3) Interface
module
size.
7.4) Global
frame
size.
7.5) Interface
object
declarations.
7.6) Names
for
related procedures.
1
1
1
1
2
2
2
2
2
3
3
3
3
3
4
4
4
5
5
5
5
6
7
7
7
7
7
8
8
9
9
9
9
9
10
10
11
11
11
11
13

8)
Formatting
8.1)
Order
of
statements.
8.2) Mesa
Formatter.
8.3)
White
space.
9)
Statements
9.1) OPEN
statement
9.2)
SELECT
statement
Mesa Coding
Guidelines
9.3)
SELECT
TRUE
vs.
IF-THEN-ELSE IF-THEN-ELSE
IF
...
9.4)
FOR
statement
9.5) Positional
notation
or
keyword
notation.
9.6)
Dereferencing
pointers.
10)
Storage
Management
10.1)
Initialization
of
objects
allocated
from
zones.
10.2) Storage
management
by abstractions.
10.3) Per instance storage
management.
10.4) One
data
structure
per
zone.
10.5)
Initial
sizes
for
zones
10.6) The system heap.
10.7) Clean
up
after
failures.
lll)
Data
Structures
11
.1) Stri ngs
11.2)
Ownership
of
objects.
11.3) Sequences
vs.
dynamic
arrays.
11.4) File 1/0
Appendix
A:
Recommended Sierra
Interfaces
References
Index
1:1
13
13
13
1:3
13
14
14
1S
1S
16
16
16
16
17
17
17
17
18
18
18
19
19
19
21
2,3
25

1)
Introduction
The Mesa language
has
evolved
to
such a level
of
complexity
that
there
are countless ways in
which
its
power
can be applied, ignored,
or
abused. A
programmer
needs
to
use
some
workable
subset
of
language features
to
create readable,. reliable,
maintainable,
and
efficient
code.
This
document
presents a collection
of
conventions
for
Mesa
programming.
Each
convention
is
a
suggested
way
of
approaching a particular generic
programming
problem. There has been
no
attempt
to
dictate
a single approach. Instead, any reasonable suggestions are
documented
along
with
their
pros and cons. Using this
document
the
programmer
is
able
to
make an
informed
choice
from
among
language features.
Unit
managers and
project
leaders are free
to
establish a
firmer
set
of
guidelines by
identifying
a specific subset
of
the
conventions
to
be
applied
to
projects under
their
charge. The list
of
conventions
MAY
evolve
into
stricter standards
if
experience shows
that
one approach
is
clearly superior
to
all others
or
if
dealing
with
a
proliferation
of
styles
is
more troublesome
to
the
programmers
than
working
with
limited
choices.
It
is
important
to
understand
that
adherence
to
these guidelines
will
not
guarantee
fast code
since
the
algorithms
used
to
implement
a program
normally
determine
the
speed
of
the
program.
The
programmer
would
be wise
to
spend more
time
selecting
the
data
structures and
algorithms
than
tweeking
the
code
for
efficiency.
The comments in this paper
apply
to
the
Mesa 6.0 release and later. Dependencies on specific
releases are
explicitly
noted.
2)
Sources
of
Information
2.1) Sources and references.
Most
of
the
information
contained herein
is
a
product
of
the
design and coding experiences
of
the
people in
the
Software
Tools area,
PARC
CSL,
and
SOD.
Other
sources include
the
distribution
lists MesaUsers i .PA and MesaFolklore i
.PA
and
the
Mesa and Pilot manuals.
Readers are encouraged
to
share any
other
conventions
for
inclusion in
the
document
and
to
provide
feedback
about
those already suggested.
Throughout
the
document
an
attempt
has
been made
to
note
the
source
of
various conventions. References are listed in
the
back
of
the
document,
and numbers are used
as
footnotes
to
emphasize connections
to
the
list.
Most
of
the
section on signalling was abstracted
from
[1] and applied
to
the
Mesa
world.
[1]
describes in
detail
the
rationale
for
the
guidelines and
how
to
use
them
and has been
paraphrased here
where
needed. The signalling mechanism has
not
changed very much since
it
was
first
devised and
so
remains
more
powerful
than
is
needed. The guidelines set
forth
in
the
section
of
SIGNALS and
ERRORS
describe ways
to
use
most
of
the
power
without
rendering
the
code
unreadable
or
unmaintainable.
Therefore,
it
is
expected
that
new
programmers
follow
the
guidelines very closely.
2.2) Cedar Style Sheet
The Cedar Style Sheet was
written
to
give some early standard
for
coding in Cedar and was
found
to
work
so
well
that
it
is
now
considered
the
guide
on
the
format
of
Mesa programs
as
well.
It
presents guidelines on
the
following
issues:
case
in
identifiers

2
Mesa Coding Guidelines
naming
of
program
and
definitions
modules
standard prelude and postlude
for
a
module
employing
user-defined types
use
of
SIGNALS
and
ERRORS
use
of
OPEN
and
qualified
names
use
of
keywords in constructors,
argument
lists, and extractors
use
of
ENDCASE
in
SELECT
statements.
Deviations
from
the
style sheet are
explicitly
noted
in
the
remainder
of
the
document.
2.3) Sample code.
Sample Mesa programs are available in [Aztec]
<MesaCourse>*.mesa.
3)
BEGIN-END
vs.
{}
3.1)
Alternate
nested scope's
delimiters
with
BEGIN-END
and
{-}.
The Mesa language lets
the
programmer
use
either
the
keywords
BEGIN
and
END
or
the
characters
{
and}
to
delimit
scopes. The
compiler
enforces
the
use
of
the
keyword
END
if
the
scope was
opened
with
BEGIN
and
the
character}
if
the
scope was opened
with
{.
This
compiler
feature
may
be used by
the
programmer
to
reduce
the
time
to
find
and correct errors. The
compiler
will
insert
the
correct
delimiter
if
it
is
missing,
or
it
will
replace a
delimiter
with
the
correct one
if
they
are
not
matched
properly
and
report
this action in
the
error
log file. One strategy
for
capitalizing
on this
feature
calls
for
alternating
delimiters
for
nested scopes
with
BEGII\J-END
and
{-
}.
If
the
scopes are
not
nested
properly
or
an end
delimiter
is
missing,
the
compiler
will
respond
by inserting
the
correct
token,
thus
making
it
easier
for
the
programmer
to
determine
which
scope was
not
closed properly. This coding
trick
could result in more
work
for
the
programmer
if
new
scopes are
introduced
which
force a change in
the
delimiter
used
for
scopes nested in
the
new
scope. This problem can be avoided by keeping
the
number
of
nested scopes
down
through
the
use
of
procedures.
32)
Use
BEGIN-ENDto
delimit
procedures.
Although
the
Mesa language
allows
BEGIN-END
and
{-}
to
be interchanged arbitrari Iy,
the
programmer
is
wise
to
use
BEGIN-END
to
delimit
procedures.
In
addition,
it
helps
to
mark
the
end
of
a procedure by
naming
which
procedure
is
ending
after
the
end
delimiter.
If
the
BEGIN-END
pair
is
used,
the
last line
of
the
procedure
will
read
well,
for
example "
END
;
--
of
FumbleProc" (which
reads
better
then
"};
--
of
FumbleProc").
3.3)
Use
BEGIN-END
on scopes
that
declare data.
Occasionally
it
is
necessary
to
write
procedures
that
have a large
number
of
disjoint
sections
of
code
that
may
access
some
data
global
to
the
procedure
as
well
as
some data
that
is
logically
local
to
the
code section. Creating a
new
procedure
for
each
of
these code sections may reduce
the
readability
and speed
of
the
code;
so
these constraints may force
the
programmer
to
make
the
procedures
INLINES
or
open
new
scopes
for
the
data
that
is
local
to
each code se<:tion.
If
the
latter
choice
is
made, using
BEGIN-END
surrounded
with
white
space
to
delimit
thE~
outermost
scopes
will
improve
the
readability
of
the
code.
In
general this practice
will
not
conflict
with
a
desire
to
alternate
scope
delimiters
with
BEGIN-END
and
{-}.
Scopes opened
up
in
the
middle
of
procedures
typically
result
in
a code structure (discussed in paragraph 10.7)
that
makes
it
easy
to
get
the
scopi ng correct.

Mesa
Coding
Guidelines
~ffiGNALsandERRORS
4.1) Adherence
to
signalling guidelines.
The Mesa signalling mechanism
is
very
powerful
and,
if
used
improperly,
may actually
do
more
harm
than
good
in terms
of
code
readability
and speed. Thus
it
is
strongly
recommended
that
the
programmer
strictly adhere
to
these guidelines
or
understand
the
consequences
of
deviation.
4.2) Notes on signalling strategies.
Use
of
signals
is
described in terms
of
client-implementor
interaction
and
implementor-
implementor
interaction.
The
first
set
of
guidelines
(presented in paragraphs 4.3
to
4.12)
were
taken
from
[1] and are useful
when
the
interface
is
being
defined
for
public
use
and
there
is
little
opportunity
for
the
designer
of
the
interface
and
the
programmers
who
write
clients
of
it
to
negotiate
on faster ways
to
handle
the
exceptional conditions
that
do
arise. These guidelines
may
not
be
appropriate
if
speed
is
very
important
since
they
require
more
work
for
the
program
to
report
a failure. The second set
of
guidelines (presented in paragraph 4.13) are documented
in [7] and may be used by small
programming
projects
where
the
programmers are able
to
agree
on coding strategies
that
avoid
handling
errors
at
the
place
they
originate.
4.3)
Use
signals
only
to
indicate exceptional conditions.
Mesa signals should be used
to
indicate an exceptional circumstance-- a
condition
that
is
unusual
in some respect. Signals should never be used
to
indicate
a normal
condition
because
of
the
high
cost associated
with
searching
for
catch phrases. Under normal circumstances control should be
transferred using
straightforward
procedure calls and returns. Signals should also
not
be used
to
pass
data around. This practice
is
much
too
confusing
as
well
as
being
too
slow
and hard
to
maintain.
This
warning
does
not
imply
that
a signal should
not
have
data
associated
with
it,
as
data
is
frequently
necessary
to
patch
up
whatever
went
wrong.
4.4) The
workings
of
the
Sierra signalling mechanism.
The Mesa signalling mechanism
is
relatively
expensive
in
terms
of
time,
so
we
would
like
to
reduce
the
cost
of
including
catch phrases in
(ode
as
well
as
the
cost
of
signalling.
Each
ENABLE
clause
is
translated
into
a range
of
affected
code bytes and a
pointer
to
a code body
to
be
executed
if
the
signal was raised
from
within
the
range.
When
a signal
is
raised, each local
frame's enable item's range
is
checked
from
the
innermost
scope
to
the
outermost
scope
to
see
if
the
current
program
counter
lies
within
that
range,
implying
that
the
signal was raised
from
within
the
scope
of
the
enable clause.
If
it
does,
the
code body
for
that
range
is
executed,
where
the
signal
is
checked
to
see
if
this catch phrase
is
for
the
raised signal.
As
a result,
there
is
a
time
cost associated
with
enclosing a procedure call
within
the
scope
of
an enable clause
when
any
signal
is
raised by
that
procedure.
In
the
following
code
fragment,
if
Foo may raise Ferror
but
not
Mumblerror
and
Mumblerror
may be raised by some
implementor
that
Foo
uses,
the
code
segment
containing
the
Ferror catch phrase code must be swapped
into
memory
and executed
when
Mumblerror
is
raised even
though
there
is
no
chance
that
the
signal
will
be caught
at
the
Ferror Enable clause.
BEGIN
ENABLE
Mumblerror
= > {
...
};
...
code ...
BEGIN
ENABLE Ferror = > {
...
};
...
code ...
Foo[];
4
...
code
...
END;
END;
Mesa Coding
Guidelines
4.5) Placement
of
catch phrases and size
of
scope
of
ENABLE clauses.
It
is
a good practice
to
keep
the
scope
of
the
catch phrase
as
small
as
reasonably possible.
If
only
one procedure call in a block
can
raise some signal,
that
call should have a catch phrase attached
directly
to
it.
If
some signal can
be
raised by
more
than
one procedure call in a blc)ck
but
the
cleanup
for
each failed call
is
different,
each procedure must have its
own
catch phrase.
If
the
cleanup
for
a
number
of
calls
is
the
same
but
size
of
the
scope
is
large (in terms
of
cell
Is
to
other
procedures),
it
is
best
to
attach procedural catch phrases
to
all
the
calls in question and
then
call
some common cleanup procedure
from
within
each
of
the
catch phrases. The rea!;on
for
this
approach was discussed earlier and
has
to
do
with
the
catch phrase
being
swapped
into
memory
and examined, even
if
it
is
not
the
right
one. The previous example corresponds
to
the
last
case
described above and may be fixed
as
follows.
catchProc:
PROCEDURE
RETURNS
[status: {resume, reject,
continue}]
= BEGIN
...
END;
BEGIN
ENABLE
Mumblerror
= >
SELECT
catchProc[] FROM
resume = > RESUME;
reject = >
REJECT;
continue
= > CONTINUE;
ENDCASE;
...
code
...
BEGIN
ENABLE Ferror = > {
...
};
...
code
...
Foo[ !
Mumblerror
= >
SELECT
catchProc[] FROM
resume = > RESUME;
reject::
>
REJECT;
continue
= > CONTINUE;
ENDCASE];
...
code
...
END;
END;
If
signals are reserved
for
truly
exceptional conditions
it
may be
better
to
code
for
readability.
The
equivalent
code
fragment
in 4.4
is
more readable
than
this code
fragment.
4.6) Reducing
the
time
needed
to
signal.
An easy
way
to
reduce
the
time
needed
to
identify
whether
or
not
a catch phrase applies
to
the
raised signal
is
to
reduce
the
number
of
signals
that
may be raised. The
problem
then
reduces
to
deciding
where
to
declare
new
signals and
how
to
use
one signal
to
describe a
number
of
conditions. To this end
the
following
conventions
were
abstracted
for
Mesa
from
[1].
4.7) Declaration
of
signals in interfaces.
Each
abstraction
definition
should declare
at
most one SIGNAL and one
ERROR.
Each
parameter
record
has
at
least one
field
which
is
an enumerated
type
naming
each
of
the
different
failure
modes.
If
there
is
both
an
ERROR
and a SIGNAL,
then
each
of
these should have its
own
€!numerated
type.
It
is
common
to
include
other
fields in
the
parameter record
which
contain
data
that
may
be used
to
correct
or
understand
the
failure. The name
of
the
ERROR
is
"Error"
and
the
name
of
the
SIGNAL
is
either
"Problem"
or
"Malfunction".
The consistent
use
of
the
same name in

Mesa
Coding
Guidelines
interfaces reduces
the
amount
of
time
spent
looking
up
these details,
so
it
is
strongly
recommended
that
such a convention be strictly
followed.
4.8) The signal Error[programmingError].
The signal Error[programmingError] should be raised
when
the
detected
condition
is
"impossible",
resulting
from
an
error
in
the
implementation
of
the
abstraction. This
condition
can be detected
through
validation
of
the
state
of
the
abstraction instance
upon
entry
to
one
of
the
abstraction's public procedures
or
by raising
the
ERROR
on
ENDCASE
of
SELECT'S
or
the
FINISHED
exit
of
loops
which
should
terminate
via an
EXIT
or
a GOTO.
4.9) The signal Error[callingError].
The signal Error[callingError] should be raised
when
the
input
assertions
of
the
interface
have
been violated. These assertions should be validated
as
soon
as
possible
after
some
exported
operation
is
invoked,
preferably
before
the
state
of
the
abstraction
is
altered.
It
is
not
necessary
to
describe
the
condition
further
since
the
condition
is
not
the
result
of
a
programming
error
in
the
failed abstraction
but
is
a
programming
error
in
the
client. The
client
failed
to
use
the
abstraction according
to
it's
interface specification.
If
the
client
knew
enough
about
the
failure
to
correct
it
then
the
client
would
have
known
enough
to
avoid
violating
the
input
assertions.
Situations
such
as
this are usually
the
result
of
confusion on
the
part
of
the
client
or
it's
programmer.
4.10) Example
of
a
declaration
of
signals in an interface.
An
example
of
an
interface
following
these conventions follows.
Sample: DEFINITIONS =
BEGIN
ErrorCode:
TYPE
=
{programmingError,
callingError,
invalidHandle};
ProblemCode:
TYPE
=
{overflow,
underflow,
outOfRange};
Error:
ERROR
[code: ErrorCode];
Problem: SIGNAL [code: ProblemCode];
END.
4.11)
Unwind
signals
before
they
reach
the
client.
All
failures should be
unwound
and cleaned up
before
the
signal
is
handed
over
to
the
client.
This housekeeping
will
ensure
that
the
state
of
the
failed abstraction
is
always consistent
when
the
client
sees
a failure. Restoring
the
abstraction instance
to
a consistent state
is
especially
useful in situations
where
the
client
will
need
to
perform
it's
own
recovery in
the
catch phrase.
If
a signal
is
raised
within
a
monitor,
it
should be
done
so
with
RETURN
WITH SIGNALIERROR since this
will
unlock
the
monitor
before
the
signal
is
raised.
If
one
of
the
objects used by
the
abstraction
fails,
it
should be
caught
at
the
PUBLIC
procedure level and fixed,
if
possible;
otherwise
the
signal
should be
unwound
and a public
ERROR
raised. A code skeleton
for
this approach
follows.
DIRECTORY
Interface USING
[];
Interfacelmpl: PROGRAM
EXPORTS
Interface =
BEGIN
6
Mesa
Coding
Guidelines
x:
PUBLIC
PROCEDURE
[h:
Handle]
= {
failure:
Interface.ErrorCode;
xlnternal:
ENTRY
PROCEDURE
[lock:
LONG
POINTER
TO
MONITORLOCK]
= {
... code ...
IF
<cond
>
THEN
RETURN
WITH
ERROR
Error[
<some
error
code>];
...
more
code
...
};
xlnternal[@h.LOCK !
<
Runtime
error>
= > {
SELECT
code
FROM
<something>
= >
failure
~
<something>;
<something
else>
= >
failure
~
<something
else>;
ENDCASE
= >
REJECT;
GOTO
Failed}];
EXITS
Failed = >
ERROR
Error[failure]};
END.
4.12)
Signalling
within
an
abstraction's
implementation.
Usually
it
is
not
necessary
to
signal
within
an
abstraction's
implementation.
Unusual
conditions
in
implementations
can
normally
be
dealt
with
via
fields
in
RETURNS
records
to
indicatE!
the
success
or
failure
of
an
operation.
When
it
is
necessary
to
signal
in
implementations
and
thE~
size
of
the
scope
of
the
catch phrases
for
these signals can be
limited,
feel
free
to
declare
as
many
signals
as
needed
to
keep
the
number
of
parameters
down
to
one
or
none.
Parameter
records in signals
with
more
than
one
field
take
more
time
to
process.
If
the
scope
of
the
enable
clause
must
be
large,
it
is
better
to
declare
one
signal passing an
argument
describing
the
nature
of
the
problem
since
the
generated
code
for
discriminating
an
enumerated
item
is
faster
than
the
code
to
discriminate
signals.
It
may
not
be possible
to
use
just
one
signal because
the
condition
may
require
other
data
in
order
to
be
repaired.
One
possible
approach
is
to
declare a
variant
record
which
contains
fields
for
the
necessary
data
for
each
of
the
conditions.
If
this
technique
is
used,
one
of
the tag
fields
can
be
used
to
describe
which
of
the
possible
failure
conditions
occurred.
For
example,
in
the
Private
interface
you
may
declare
Problem:
TYPE
=
{someCond,
anotherCond,
yetAnother,
andAFourth};
Error:
ERROR
[description:
FailureHandle];
FailureHandle:
TYPE
=
LONG
POINTER
TO
FailureObject;
FailureObject:
TYPE
=
RECORD
[
SELECT
problem:
Problem
FROM
someCond = > [aField:
CARDINAL,
anotherField:
LONG
POINTER],
anotherCond
= > [aField:
CARDINAL,
me:
Handle],
yetAnother
= > [aField:
INTEGER,
you:
Handle],
andAFourth
= >
[thatField:
LONG
POINTER
TO
someThing],
ENDCASE];
The
enable
clause
for
this
would
look
like
BEGIN
ENABLE
Error = >
WITH
dd:
descri
ption
SELECT
FROM
someCond = > { ...
};
anotherCond = > {
...
};
yetAnother
= > C
..
};
andAFourth
= > {
...
};
ENDCASE;
Mesa
Coding
Guidelines
4.13)
Allowing
signals
to
cross abstraction boundaries.
A second strategy calls
for
ignoring
the
run
time
system errors
at
the
lower
levels and catching
them
at
the
higher
levels,
where
they
are
unwound.
In this
case,
the
low-level code
would
catch
only
those errors
for
which
there
is
a
known
recovery. Problems
with
the
applications code
detected
by
the
code
itself
raise a signal
known
by
the
driver, and some string
is
passed
to
the
driver
to
describe
the
nature
of
the
condition.
This strategy
is
faster because
the
run
time
system does
not
spend
as
much
time
switching
between
searching
for
catch phrases and executing
the
program's code and also because
the
actual
amount
of
code
in
catch phrases
is
smaller. The biggest
problem
with
the
technique
is
that
programmers must
know
how
code
that
is
more
than
one level away expects
to
deal
with
error
conditions, resulting in
greater
opportunity
for
program
bugs because
of
the
i
nterdepe
ndency.
5)
PROCEDURES
5.1) INLINE procedures.
Procedures may be made INLINE
to
improve
the
speed
of
the
code.
It
is
usually a good idea
to
make small procedures INLlNE,
if
they
are
not
called in very many places in a module, since
the
storage overhead
of
a call
is
usually
greater
than
the
overhead
of
duplicating
the
code.
If
a
procedure
is
called
only
once in a
module
(in an
attempt
at
modularization),
it
is
reasonable
to
make
that
procedure INLINE. The
danger
of
indiscriminate
use
of
INLINES
is
that
they
tend
to
increase
the
size
of
the
compiled code. This increased size may increase swapping and
therefore
degrade
performance
to
the
point
where
INLINES cost
rather
than
save.
INLINE procedures should
not
be used
until
the
program
is
very near
completion
because
the
debugger
has
problems
dealing
with
them.
5.2) Parameter passing.
During procedure calls arguments are passed by storing
them
on
the
Mesa processor's
evaluation
stack. This stack
is
of
limited
depth
determined
by
the
implementation
of
the
Mesa processor.
Since
the
language does
not
specify a
limit
on
the
number
of
fields in a parameter record,
the
Mesa processor
implementation
must compensate
for
it's
limitations
by using a
different
scheme
for
passing
arguments
when
the
size
of
the
parameter
record (in words,
not
fields) exceeds
the
size
of
the
evaluation
stack. The
trick
it
uses
is
to
allocate
temporary
storage
of
sufficient
size
(it
actually
uses
the
frame
allocator), store
the
arguments in
the
temporary
storage, and
pass
the
address
of
the
temporary
storage on
the
evaluation
stack. The cost
of
such
a procedure call
is
about
twice
that
of
a call
that
does
not
overflow
the
evaluation
stack. The calls force
the
processor
to
go
to
the
frame
allocator
twice
rather
than
once. The arguments must be loaded
onto
the
stack and
then
stored in
the
temporary
frame
before
the
call,
then
loaded
onto
the
stack
from
the
temporary
frame
and
finally
stored
from
the
stack
into
the
callee's local frame.
This scenario
is
much worse
than
the
best
case,
where
the
arguments are pushed by
the
caller
onto
the
stack and
then
stored
from
the
stack
into
the
local
frame
of
the
callee. The
maximum
size
of
a
parameter
record in Sierra
is
12
words
before
the
temporary
frame
is
used. For
Alto
Mesa 6.0
the
limit
is
5.
Analogous comments apply
to
the
returns record.
See
[3]
for
more
information
on this topic.
8
Mesa Coding
Guidelines
5.3) Nesting procedures.
The Mesa
language
supports lexical nesting
of
procedures
within
procedures. Normal scoping
rules
apply
so
that
a nested procedure may
access
variables
within
the
scope
of
the
containing
procedure. Control
transfer
to
a nested procedure
is
implemented
by
giving
to
xfer
(the
control
transfer
primitive)
the
address
of
the
procedure descriptor
of
the
callee,
which
is
computed
and
stored in
the
caller's local frame. The callee
then
uses
this
pointer
to
compute
the
address
of
the
local
frame
of
the
caller. These actions are
performed
whether
or
not
there
are any cross-scope
references
to
variables.
Each
time
a lexically nested procedure
is
called,
the
address
of
the
lexically
containing
procedure's local
frame
is
stored in
the
callee's local frame.
Anyone
call
need
compute
only
one address
of
a local
frame
even
if
the
procedure
accesses
variables several
levels
up
the
stack,
although
the
callee may need
to
traverse
the
stack
through
several levels
to
find
all
of
the
local frame addresses
it
needs. Such traversals are
performed
once
per
variable
reference; thus, many such references can
get
very expensive.
It
is
not
a
good
idea
to
nest
procedures
arbitrarily.
Nesting
is
justified
at
times
when
you are
making
many
refe'rences, you
wish
to
use
the
same procedure name
for
another
procedure in
the
same
module
(not
a
good
idea anyway), you wish
to
clearly restrict
the
availability
of
the
procedure,
or
the
procedure
is
INLINE.
An
alternative
to
nesting procedures because
of
a need
to
share
data
is
to
declare
the
procedures
at
the
module
level, allocate nodes
(from
a zone)
to
hold
the
shared
data,
and
then
pass
the
address
of
the
nodes.
It
may be useful
to
move all these procedures
to
another
module
since
they
must be related
otherwise
they
would
not
be nested. [3] contains
more
on
this
subject.
5.4) Naming procedures.
All procedures have
the
first
character
of
their
name capitalized
to
clearly
identify
them
as
procedures. This
is
also
true
for
procedure variables since
the
syntax
for
calling
a procedure
variable
is
the
same
as
calling a procedure
with
a constant
declaration.
It
is
common
to
leave
the
name
of
the
object
off
of
the
procedure name since clients
will
need
to
qualify
thE~
procedure
with
the
interface
name (e.g.
use
Foo.lnitialize
rather
than
Foo.lnitializeFoo).
Normally,
an
operation
on
a public
object
is
performed
by an
exported
procedure.
When
the
operation
must
be
performed
within
an
object
monitor,
however, an
internal
procedure
would
actually
be
executed
to
perform
it. Such an
internal
procedure
is
typically
named
the
same
as
the
exported
procedure
with
Internal appended
to
the
name. For example:
prog:
MONITOR
LOCKS
lock
USING
lock: Lock =
BEGIN
Lock:
TYPE
=
LONG
POINTER
TO
MONITORLOCK;
heapLock:
MONITORLOCK;
X:
PUBLIC
PROCEDURE
[h: Handle] =
BEGIN
Xlnternal:
ENTRY
PROCEDURE
[lock: Lock] =
INLINE
BEGIN
...
END;
Xlnternal
[@h.LOCK);
END;
--
of
X
IncrementClientCount:
ENTRY
PROCEDURE
[lock: Lock
+--
@heapLock] =
BEGIN
...
END;
ReduceClientCount:
ENTRY
PROCEDURE
[lock: Lock
+--
@heapLock] =
BEGIN
...
END;
END.
of
prog
5,5)
Cross
module
references
vs.
intra-module
references.
In
the
above example,
the
module
is
actually using
multiple
monitors
to
improve
the
performance
of
the
code. The ClientCount procedures could have been moved
to
another
Mesa
Coding
Guidelines
module,
but
that
would
have slowed
things
down
because cross-module references are
slightly
more
expensive
than
intra-module
references.
If
the
module
was
not
using
multiple
monitors,
then
the
LOCKS
clause could read "LOCKS h USING h:
Handle"
which
would
have
eliminated
the
need
for
the
Internal procedure. [2]
has
more
on
naming
conventions
for
procedures.
5.6)
Default
values
of
fields in parameters and returns records.
Default
values
of
fields in parameters and returns records in interfaces and
program
modules are
usually coded ad hoc. The rule
of
thumb
is
to
give a
parameter
field
a
default
value
if
the
client
need
not
assume complete control over
that
value.
If
there
are
many
fields in
the
parameter
record,
it
is
nice
to
default
most
of
them
so
that
a
programmer
who
is
only
making
light
use
of
the
interface
will
get
some reasonable
performance
without
having
to
dive
into
it
to
understand
what
each
of
the
fields means.
It
is
wrong
to
give a
default
value
to
a
field
if
the
operation
does
not
make
sense
with
that
value. For example,
it
is
usually incorrect
to
default
the
Handle
field
of
an
operation
to
NIL
as
there
is
usually
no
default
instance
of
the
abstraction.
If
a
field
does
not
have any reasonable
default,
you should
disallow
NULL values by
following
the
type
specification
with
a
left
arrow.
For example,
use
"p:
PROCEDURE
[a: CARDINAL
E-
0,
b: CARDINAL
E-]".
Default
values
for
parameter record fields
in
interfaces should
almost
always be identical
to
the
defaults
for
the
same fields in
the
matching
procedure
in
the
implementation.
If
they
are
different,
then
the
semantics
of
a call
to
such a procedure
through
the
interface
will
be
different
from
a call
to
the
procedure
from
within
the
exporting
module.
Such
an
anomaly
is
only
rarely
justified,
as
in
the
case
of
an
implementation
that
needs
to
use
itself
in
a
way
that
is
different
from
a typical client.
Default
values
for
RETURNS
record fields are
normally
not
given
in
the
interface
as
those values are
usually
dependent
on
the
implementation
and
therefore
need
not
be
known
at
the
interface
level.
5.7) Positional
notation
vs.
keyword
notation.
The Mesa language does
not
require
parameter
or
RETURNS
records
to
have named fields. This can
be convenient
when
a procedure
type
must be declared
that
will
be
provided
by a client.
By
not
naming
the
fields in
the
type specification,
the
interface
is
more
accommodating
to
programmers
of
clients because
it
allows
the
programmer
the
freedom
of
naming
the
fields
according
to
their
own
desires. This can be a
problem
if
the
interface
does
not
clearly
indicate
the
meaning
of
each field. Parameter fields in
interface
procedure declarations
(not
interface
procedure types) should be named
if
there
is
more
than
one field.
If
there
are
multiple
unnamed
fields in a record, clients are forced
to
order
the
fields in
their
calls in
the
order
of
the
declaration
(using positional
notation).
This
is
also
true
for
RETURNS
record fields. Positional
notation
is
inconvenient
and can be error-prone, since even strong
type
checking does
not
detect
parameters
out
of
order
if
two
or
more
consecutive ones are
of
the
same type. Therefore,
it
is
expected
that
records
with
more
than
one
field
in procedure declarations have named fields.
6)
Naming
Variables
6.1)
"Handle"
"Object"
relationship.
Pointers usually have
the
suffix"
Handle". Referents
of
pointers usually have
the
suffix
"Object"
or
"Body".
It
is
normal
to
use
just"
Handle"
or
just"
Object"
if
the
types are
the
only
pointer-
object
pair
in an interface
or
if
the
Handle
is
used
to
discriminate
between
instances
of
an
abstraction. [2]
6.2)
Use
of
Generic Names.
Some programmers tend
to
use
the
same variable name
to
mean
the
same
thing
in many
10
Mesa Coding
Guidelines
programs and also keep
the
size
of
these names
as
small
as
possible. Keeping
their
size
down
reduces
the
amount
of
typing,
and using
the
same
identifier
in similar situations reduces
the
number
of
decisions
the
programmer
needs
to
make in choosing names. A
summ(~ry
of
these
naming
conventions
follows
..
The names
"i",
"j",
or
"k"
are used
to
index arrays
or
sequences and are used in
that
order
if
the
previous one
is
already
being
used.
The
identifier
"s"
is
some string
that
was
either
passed in
or
allocated locally.
The name
"ns"
is
read
as
New
String and
is
returned by procedures
that
allocate, copy,
or
manipulate
and
return
strings in some way.
A
pointer
to
some
object
is
called
"p"
and
is
usually constant,
although
the
name can be used
for
the
control variable in some loops.
The
identifier
"h"
names a Handle and
is
the
argument
that
discriminates
between
CI
number
of
abstraction instances.
A Character
is
referred
to
as
"c"
and
is
usually an
argument
to
some procedure.
The
identifier
"name"
is
a string
that
refers
to
some file.
The name
for
the
variant
part
of
a record in
the
WITH
statement
is
constructed by
taking
the
first
letter
of
each
major
word
in
the
name
of
the
variant
object
and
prefixing
the
acronym
with
a d
(for
discriminated). For example,
the
name
"objectDescriptor"
would
be named
"dod".
If
the
expression
part
of
the
Openltem
is
the
variant
record
type
being
accessed
then
the
alternate
name may be
the
same
as
the
record being accessed.
The size
field
in a sequence
is
named
"maxlength".
Records
containing
a sequence contain
another
field,
"length",
that
indicates
the
current
number
of
objects in
the
sequenc1e,
if
there
is
any question.
Variables
or
fields in records in
implementors
are named by concatenating
the
first
character
of
each
word
in
the
type
of
the
object. Examples:
sso:
Swapper.SpaceObject,
dfh:
DarwinFile.Handle, si: Spacelnfo. This convention may sacrifice readability
or
maintainability
to
speed
the
development
of
code, since
the
programmer
spends
less
time
trying
to
come up
with
reasonable names. Once programmers become
informed
of
and accustomed
to
this
(onvention
,
however,
they
may be
more
comfortable
reading
or
maintaining
the
code because
they
will
be
better
able
to
infer
the
type
and
meaning
of
an
object
from
it's
name.
The
programmer
should make an
effort
to
avoid variables
that
differ
only
in
case.
7)
Modules
7.1)
Module
names.
Public interfaces (those
defining
abstractions) are named according
to
the
abstraction being
defined:
e.g., Stack, DarwinFile, Cursor,
Window,
Token, etc. An old custom
suffix€~d
interface
names
with"
Defs"
indicating
that
it
is
a DEFinitions module. This practice was dropped
when
it
was noticed
that
this decreased
the
readability
of
the
code because
the
reader had
to
scan
"Defs".
For example, Stack.Push[] makes more
sense
than
StackDefs.Push[];
the
Def5i
suffix adds
no useful
information.
Interfaces
defining
types used by
multi-module
abstraction
Mesa
Coding
Guidelines
implementations
are named xPrivate
where
x
is
the
name
of
the
interface. Implementors are
named xlmpl
for
single
module
implementations,
or
xlmplA,
xlmplB, xlmplC, etcetera
for
multi-
module
implementations.
Common operations used by an
implementation
are hidden behind
interfaces named xOps. Implementors
of
xOps are named xOpslmpl,
or
xOpslmplA, xOpslmplB,
etc..
Configurations
exporting
abstractions should have "Pack"
in
the
configuration
name (e.g.
MdsStringPack). Interfaces
defining
Cedar objects should be prefixed
with
"Class",
for
example:
ClassABSEFile. [2]
Another
convention
for
naming
implementors
is
to
select a name
which
describes
the
fragment
of
the
implementation
contained in
the
module. For example, instead
of
naming
a SymbolTable
implementor
SymbolTablelmplA
you may name
it
SymbolTablelnsertlmpl
if
that
module
does
the
insertions. The
problem
with
this
naming
scheme
is
that
you need
to
remember
the
exact
name
for
the
module
to
work
on it. For example,
the
module
in question could be named
SymbolTablelnsertlmpl, SymbolTablelnsertionlmpl, SymbolTableUpdatelmpl
or
something else.
The real
benefit
from
using this scheme
is
the
ability
to
identify
what
the
module
does
from
its
name. This could also be described via a
comment
in
the
configuration
file,
which
has
the
added
benefits
of
allowing
the
programmer
more
text
for
description, and also keeps this
information
all in one place. [2], [7]
All
modules should have
the
same name
as
the
containing
file
minus extension, unless
the
programmer
is
doing
tricks
with
multiple
implementations
of
an abstraction
or
is
using
the
generic coding
feature
described in [6].
7.2) Change log.
Each
module
should have a
log
describing
it's
history in terms
of
who
changed
it
when.
At
a
minimum
it
should name
the
person and give
the
time
and
date
it
was last edited. This
information
precedes
the
DIRECTORY statement. There
is
a hack named SourceTime.bcd
which
facilitates this chore by
automatically
updating
this
log
with
time,
day and name
of
person
when
the
file
is
saved
after
an edit.
It
is
also
common
to
maintain
a log
at
the
end
of
the
file
describing
all
significant
changes. [2]
7.3) Interface
module
size.
The
only
real
limitation
to
the
size
of
an
interface
is
the
ability
of
a
programmer
to
grasp
the
concept
of
how
to
use
it.
If
the
programmer
can understand
the
interface despite its size and
the
interface
logically belongs in one place,
then
there
is
no
reason
to
break
it
up. Remember
that
the
possibility
of
multi-module
implementations
removes any fixed
relation
between
the
size
of
the
interface
and
the
size
of
the
implementor(s).
7.4) Global
frame
size.
The size
of
a
global
frame
is
determined
from
the
sum
of
the
sizes
of
the
non-constant global
data
declarations in a
program
module
plus some overhead bytes.
It
is
always a good idea
to
keep
the
size
of
the
global
frames
as
small
as
reasonably possible since
they
are
not
freed unless
the
module
is
unloaded. On
the
Alto,
this
is
especially
important
because
the
machine does
not
have
virtual
memory
and
so
the
global frames
will
permanently
occupy real memory.
An
easy
way
to
reduce
the
global
frame
size
is
to
move string constants
to
the
code segment (which gets
copied
to
the
local
frame
upon
procedure invocation) by placing an 'L
immediately
after
the
string constant. (The
programmer
is
actually
trading
permanent
use
of
global
frame
space
for
longer
procedure call times since string constants stored in
the
code segment must be copied
to
the
local
frame
for
each procedure call.)
Another
way
is
to
include New and Destroy procedures
in
the
interface. The
New
operation
makes a copy
of
the
instance
dependent
data
from
dynamic
storage,
which
will
be recovered
when
the
instance
is
Destroyed. [3]
7.5) Interface
object
declarations.
Interface
object
declarations
allowing
for
multi.ple instances are
normally
declared
as
follows.
1

12
Mesa
Coding
Guidelines
x:
DEFINITIONS =
BEGIN
Handle:
TYPE
= LONG POINTER
TO
Object;
Object: TYPE;
ErrorCode:
TYPE
= {
...
};
Error:
ERROR
[code: ErrorCode, h: Handle];
--
Error
passes
the
Handle
that
was used
when
the
failure
occurred
so
that
the
catch phrase can
use
it
to
clean
up
whatever
went
wrong.
New:
PROCEDURE
[
...
]
RETURNS
[Handle];
Destroy:
PROCEDURE
[LONG POINTER
TO
Handle];
--
Destroy should check
to
see
if
its dereferenced
argument
is
NIL and,
if
so,
return
without
an
error. This reduces
the
amount
of
code needed since
nobody
else need check
to
see
if
the
object
to
be freed actually exists. Destroy should set its
argument's
referent
to
NIL
when
the
object
is
destroyed
to
prevent
the
client
from
trying
to
use
it
again.
Initialize: PROCEDURE;
--
Make
the
implementation
of
this
interface
available
for
use.
This procedure should be called
first
and
only
once.
operation1:
PROCEDURE
[Handle]
RETURNS
[
...
];
operation2:
PROCEDURE
[h: Handle, arg1: ArgType]
RETURNS
[
...
];
END.
If
it
is
necessary
to
provide clients
of
an
interface
with
instance
dependent
data,
allowing
the
client
to
access
parts
of
the
concrete data structure
is
faster and
more
readable
than
providing
many
access
routines in
the
interface. The
danger
with
this
is
that
implementation
dependent
data
is
declared in
the
interface, possibly subjecting clients
to
many
recompilations
if
the
interface changes due
to
implementation
changes.
For abstractions
of
which
only
one instance
is
needed,
the
declaration
is
normally
as
follows.
x: DEFINITIONS =
BEGIN
Handle:
TYPE
=
LONG
POINTER
TO
Object;
Object: TYPE;
ErrorCode:
TYPE
= {
...
};
Error:
ERROR
[code: ErrorCode, h: Handle];
--
Error
passes
the
Handle
that
was used
when
the
failure
occurred
so
that
the
catch phrase can
use
it
to
clean
up
whatever
went
wrong.
Mesa
Coding
Guidelines
Reset: PROCEDURE;
--
Reset destroys
the
old data structures used by
the
abstraction's
implementation
and
sets
them
up
as
though
this
were
the
first
use.
Initialize:
PROCEDURE;
--
Make
the
implementation
of
this
interface
available
for
use.
This procedure should be called
first
and
only
once.
operation1:
PROCEDURE
RETURNS
[
...
];
operation2:
PROCEDURE
[ArgType]
RETURNS
[
...
];
END.
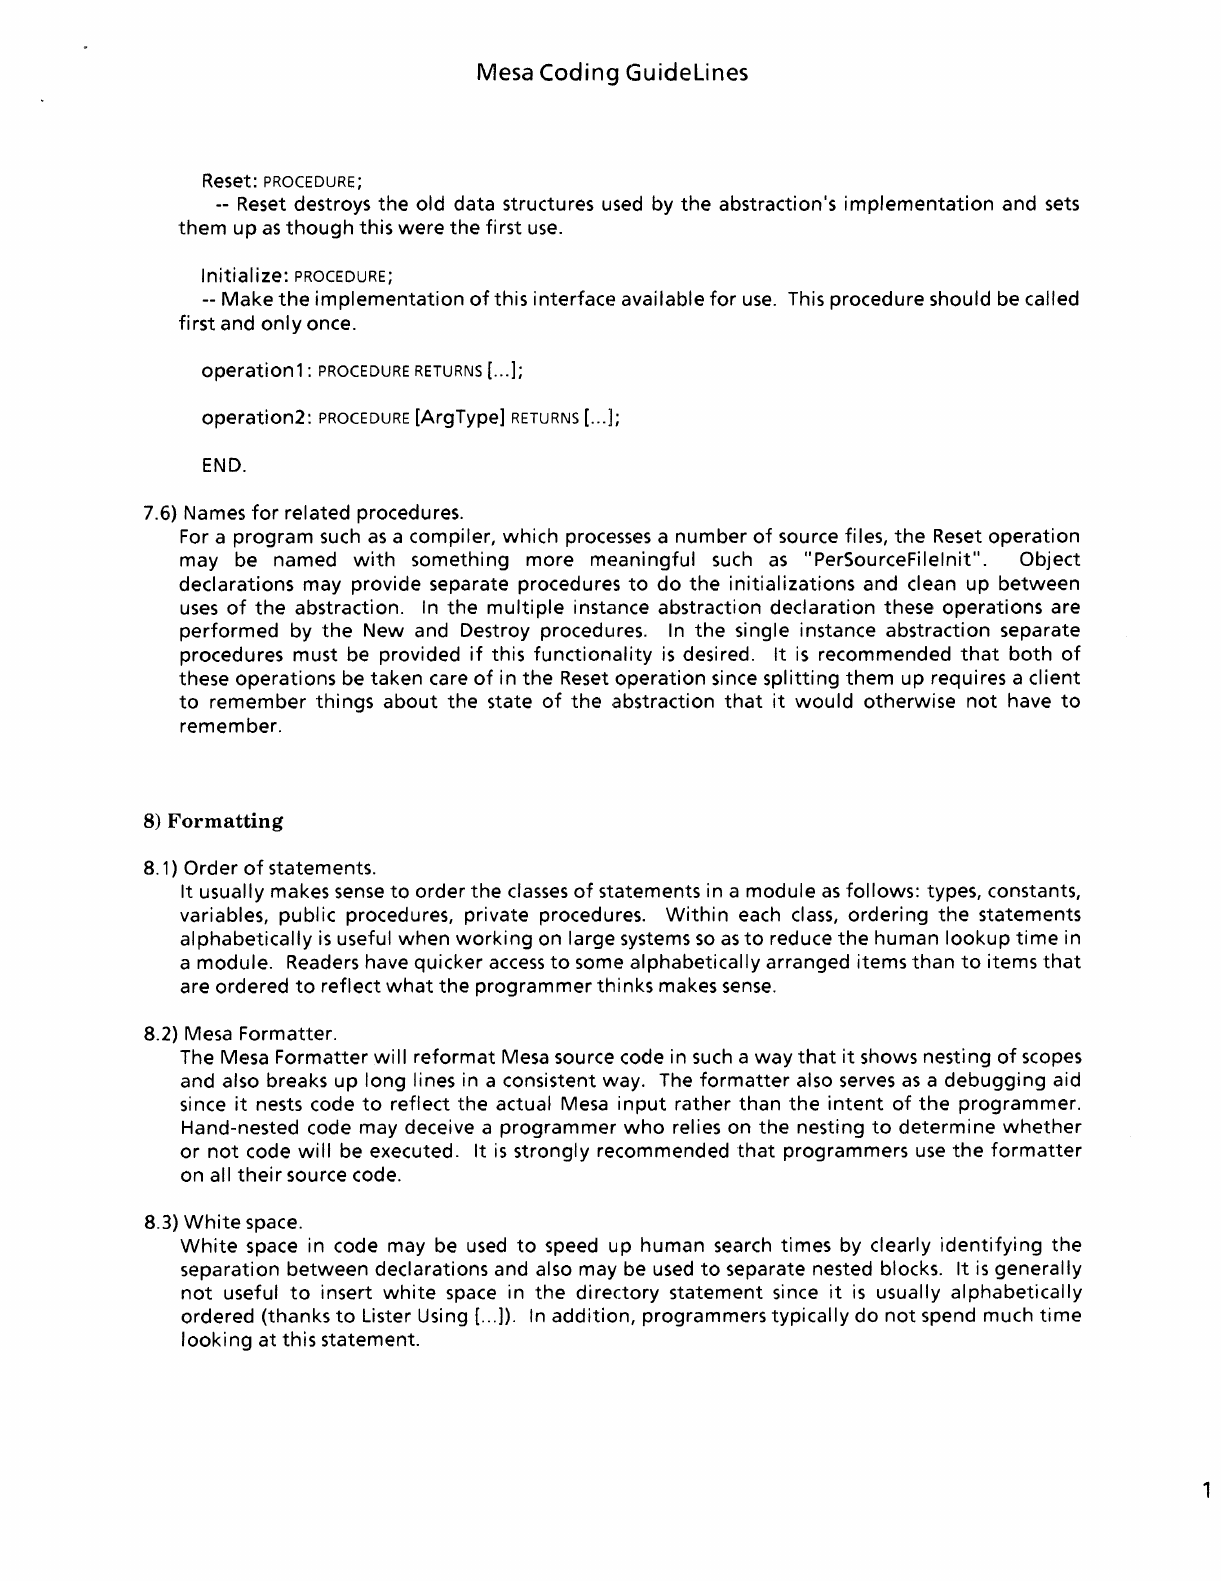
7.6) Names
for
related procedures.
For a
program
such
as
a compiler,
which
processes a
number
of
source files,
the
Reset
operation
may be named
with
something
more
meaningful
such
as
"PerSourceFilelnit". Object
declarations may provide separate procedures
to
do
the
initializations
and clean
up
between
uses
of
the
abstraction. In
the
multiple
instance abstraction declaration these
operations
are
performed
by
the
New and Destroy procedures.
In
the
single instance abstraction separate
procedures must be provided
if
this
functionality
is
desired.
It
is
recommended
that
both
of
these
operations
be taken care
of
in
the
Reset
operation
since
splitting
them
up requires a
client
to
remember
things
about
the
state
of
the
abstraction
that
it
would
otherwise
not
have
to
remember.
8)
Formatting
8.1)
Order
of
statements.
It
usually makes
sense
to
order
the
classes
of
statements in a
module
as
follows:
types, constants,
variables,
public
procedures, private procedures.
Within
each
class,
ordering
the
statements
alphabetically
is
useful
when
working
on large systems
so
as
to
reduce
the
human
lookup
time
in
a
module.
Readers have quicker
access
to
some alphabetically arranged items
than
to
items
that
are ordered
to
reflect
what
the
programmer
thinks
makes
sense.
8.2) Mesa Formatter.
The Mesa
Formatter
will
reformat
Mesa source code in such a
way
that
it
shows nesting
of
scopes
and also breaks
up
long
lines in a consistent way. The
formatter
also serves
as
a
debugging
aid
since
it
nests code
to
reflect
the
actual Mesa
input
rather
than
the
intent
of
the
programmer.
Hand-nested code may deceive a
programmer
who
relies on
the
nesting
to
determine
whether
or
not
code
will
be executed.
It
is
strongly
recommended
that
programmers
use
the
formatter
on all
their
source code.
8.3)
White
space.
White
space in code may be
used
to
speed up
human
search times by clearly
identifying
the
separation
between
declarations and also may be used
to
separate nested blocks.
It
is
generally
not
useful
to
insert
white
space in
the
directory
statement
since
it
is
usually
alphabetically
ordered (thanks
to
Lister Using [
...
]).
In
addition,
programmers
typically
do
not
spend much
time
looking
at
this statement.
1
14
Mesa
Coding
Guidelines
9}
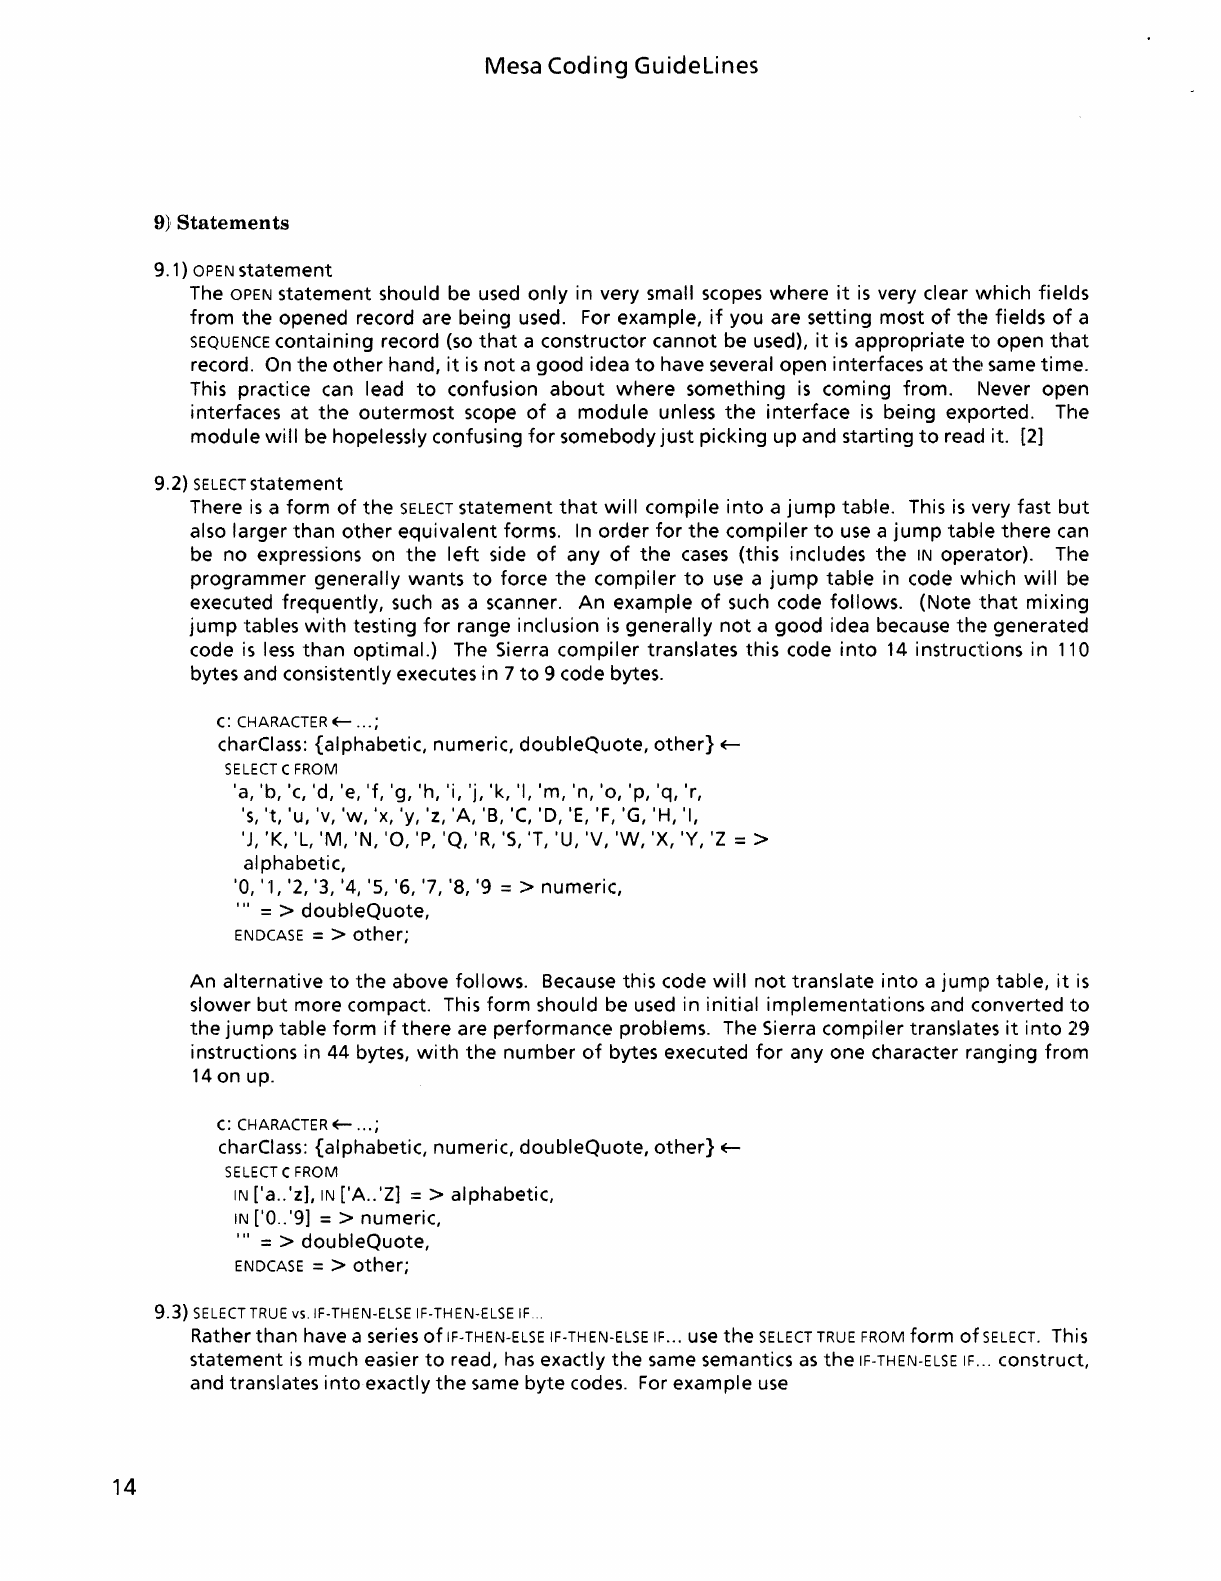
Statements
9.1)
OPEN
statement
The OPEN
statement
should be used
only
in
very small scopes
where
it
is
very clear
which
fields
from
the
opened record are
being
used. For example,
if
you are
setting
most
of
th.~
fields
of
a
SEQUENCE
containing
record (so
that
a
constructor
cannot
be used),
it
is
appropriate
to
open
that
record. On
the
other
hand,
it
is
not
a
good
idea
to
have several
open
interfaces
at
the~
same
time.
This practice can lead
to
confusion
about
where
something
is
coming
from.
l'Jever
open
interfaces
at
the
outermost
scope
of
a
module
unless
the
interface
is
being
exported.
The
module
will
be hopelessly confusing
for
somebody
just
picking
up
and
starting
to
read it.
[2]
9.2)
SELECT
statement
There
is
a
form
of
the
SELECT
statement
that
will
compile
into
a
jump
table.
This
is
very fast
but
also
larger
than
other
equivalent
forms. In
order
for
the
compiler
to
use a
jump
tahle
there
can
be
no
expressions
on
the
left
side
of
any
of
the
cases
(this
includes
the
IN
operator).
The
programmer
generally
wants
to
force
the
compiler
to
use a
jump
table
in code
which
will
be
executed
frequently,
such
as
a scanner.
An
example
of
such code
follows.
(Note
that
mixing
jump
tables
with
testing
for
range inclusion
is
generally
not
a
good
idea because
th.~
generated
code
is
less
than
optimal.)
The Sierra
compiler
translates
this
code
into
14
instructions
in
110
bytes and consistently executes
in
7
to
9 code bytes.
c:
CHARACTER
E-
...
;
charClass:
{alphabetic,
numeric,
doubleQuote,
other}
E-
SELECT
C FROM
'a, 'b, 'c, 'd, 'e, 'f, 'g, 'h, 'i, 'j, 'k, 'I,
'm,
'n,
'0,
'p, 'q, 'r,
's,
't,
'u, 'v,
'w,
'x, 'y, 'z,
'A,
'B,
'C,
'D,
'E,
'F,
'G, 'H, 'I,
'J, 'K, 'L,
'M,
'N,
'0,
'P,
'Q,
'R,
'5, 'T, 'U, 'V,
'W,
'X, 'Y,
'z
= >
alphabetic,
'0, '1, '2, '3, '4, '5, '6, '7, '8, '9 = >
numeric,
'"
= >
doubleQuote,
ENDCASE
= >
other;
An
alternative
to
the
above
follows.
Because this code
will
not
translate
into
a
jump
table,
it
is
slower
but
more
compact. This
form
should be used
in
initial
implementations
and converted
to
the
jump
table
form
if
there
are
performance
problems. The Sierra
compiler
translates
it
into
29
instructions
in
44
bytes,
with
the
number
of
bytes executed
for
anyone
character rZlnging
from
14
on
up.
c:
CHARACTER
E-
...
;
charClass:
{alphabetic,
numeric,
doubleQuote,
other}
E-
SELECT
C FROM
IN
['a . .'z],
IN
['A
. .'Z] = >
alphabetic,
IN
['0
..
'9] = > numeric,
'"
= >
doubleQuote,
ENDCASE
= >
other;
9.3)
SELECT
TRUE
vs.IF-THEN-ELSE IF-THEN-ELSE
IF
...
Rather
than
have a series
of
IF-
THEN-ELSE
IF-TH
EN-ELSE
IF
...
use
the
SELECT
TRUE
FROM
form
of
SELECT.
This
statement
is
much easier
to
read, has exactly
the
same semantics
as
the
IF-THEN-ELSE
IF
...
construct,
and translates
into
exactly
the
same
byte
codes. For
example
use
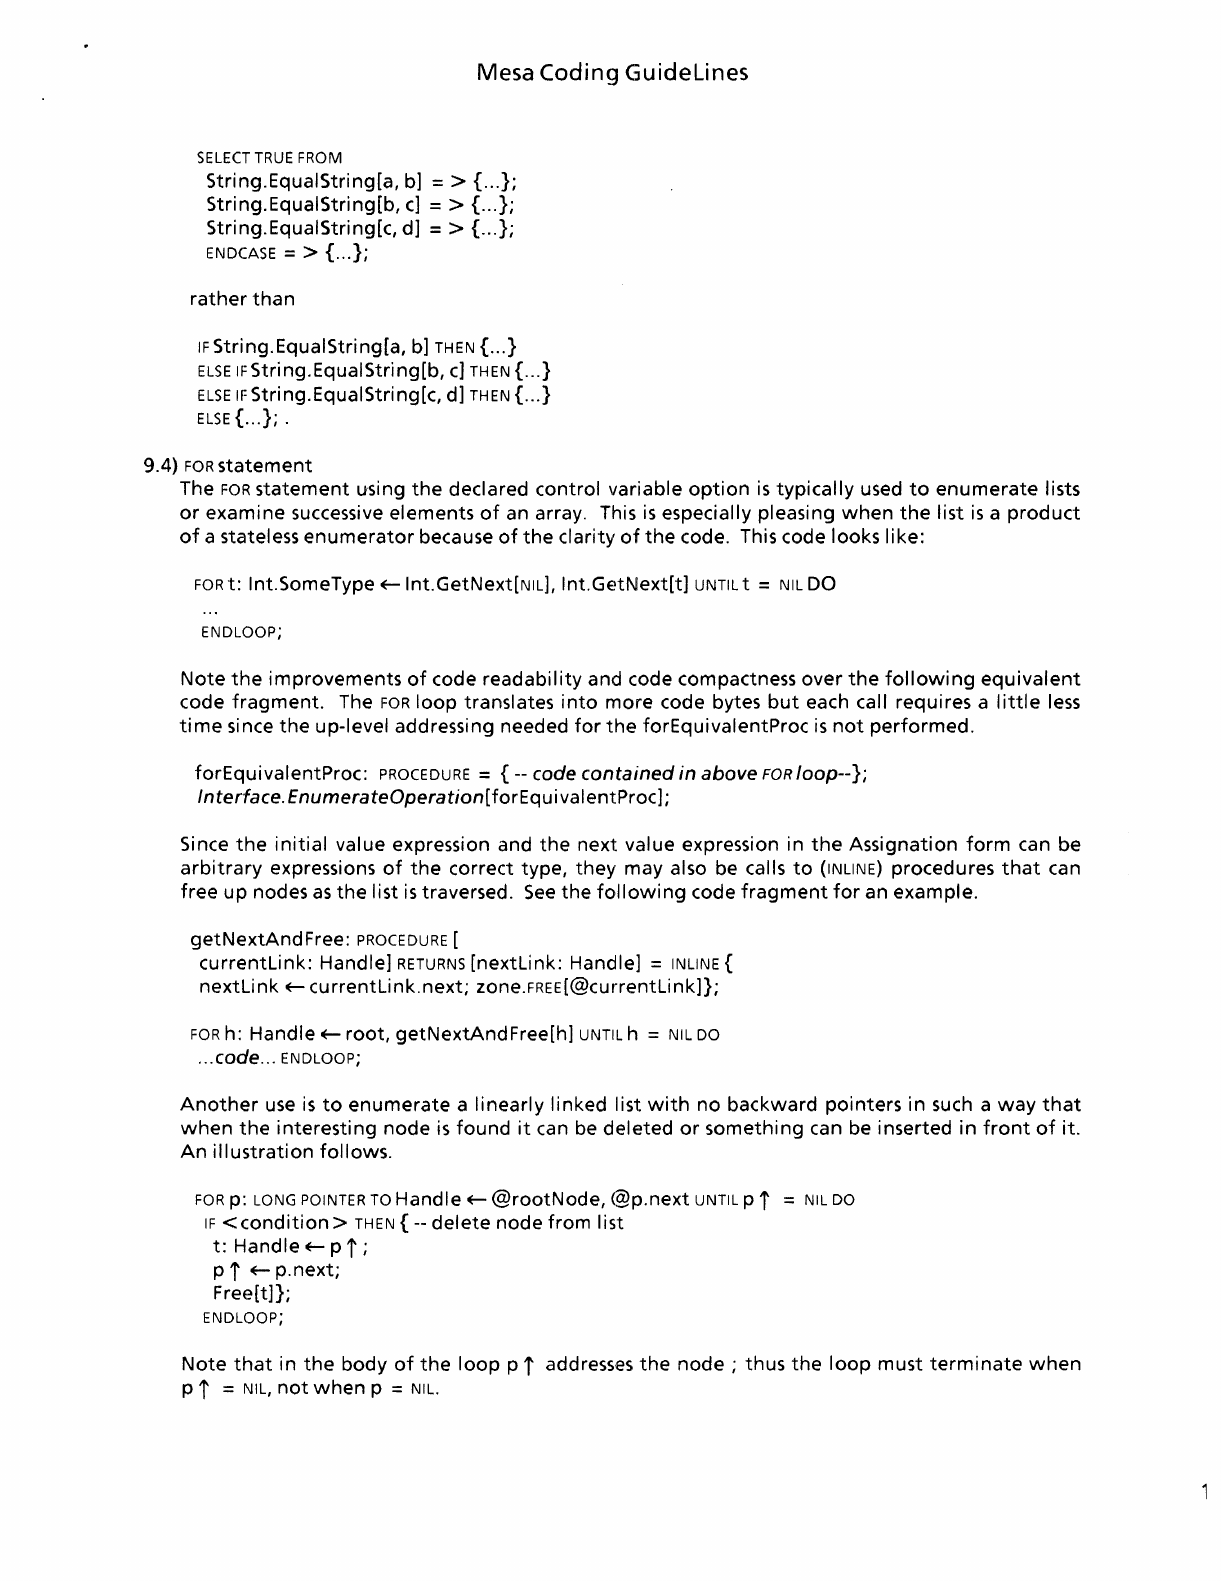
Mesa Coding
Guidelines
SELECT
TRUE
FROM
String.EquaIString[a,
b] = > { ...
};
String.EquaIString[b,
c]
= > { ...
};
String.EquaIString[c,
d]
= > { ...
};
ENDCASE
= > { ...
};
rather
than
IF
String.EquaIString[a,
b]
THEN
{ ... }
ELSE
IFString.EquaIString[b, c]
THEN
{ ... }
ELSE
IF
Stri ng. EqualStri ng[c,
d]
THEN
{ ... }
ELSE
{ ...
};
.
9.4)
FOR
statement
The
FOR
statement
using
the
declared
control
variable
option
is
typically
used
to
enumerate
lists
or
examine
successive
elements
of
an array. This
is
especially
pleasing
when
the
list
is
a
product
of
a stateless
enumerator
because
of
the
clarity
of
the
code. This code
looks
like:
FOR
t:
Int.SomeType oE-lnt.GetNext[NIL],
Int.GetNext[t]
UNTIL
t =
NIL
DO
ENDLOOP;
Note
the
improvements
of
code
readability
and
code compactness
over
the
following
equivalent
code
fragment.
The
FOR
loop
translates
into
more
code bytes
but
each call
requi
res a I
ittle
less
time
since
the
up-level
addressing needed
for
the
forEquivalentProc
is
not
performed.
forEquivalentProc:
PROCEDURE
=
{--
code
contained
in
above
FOR
loop--};
Interface.
EnumerateOperation[forEquivalentProc];
Since
the
initial
value
expression and
the
next
value
expression
in
the
Assignation
form
can
be
arbitrary
expressions
of
the
correct
type,
they
may
also be calls
to
(INLlNE)
procedures
that
can
free
up
nodes
as
the
list
is
traversed.
See
the
following
code
fragment
for
an
example.
getNextAndFree:
PROCEDURE
[
currentLink:
Handle]
RETURNS
[nextLink:
Handle]
=
INLINE
{
nextLink
oE-
currentLink.next;
zone.FREE[@currentLink]};
FOR
h:
Handle
oE-
root,
getNextAndFree[h]
UNTIL
h =
NIL
DO
... code ...
ENDLOOP;
Another
use
is
to
enumerate
a
linearly
linked
list
with
no
backward
pointers
in
such a
way
that
when
the
interesting
node
is
found
it
can be
deleted
or
something
can be
inserted
in
front
of
it.
An
illustration
follows.
FOR
p:
LONG
POINTER
TO
Handle
oE-
@rootNode,
(g}p.next
UNTIL
p i =
NIL
DO
IF
<condition>
THEN
{--
delete
node
from
list
t:
Handle
oE-
pi;
pi
oE-
p.next;
Free[t]};
ENDLOOP;
Note
that
in
the
body
of
the
loop
pi
addresses
the
node;
thus
the
loop
must
terminate
when
pi
=
NIL,
not
when
p =
NIL.
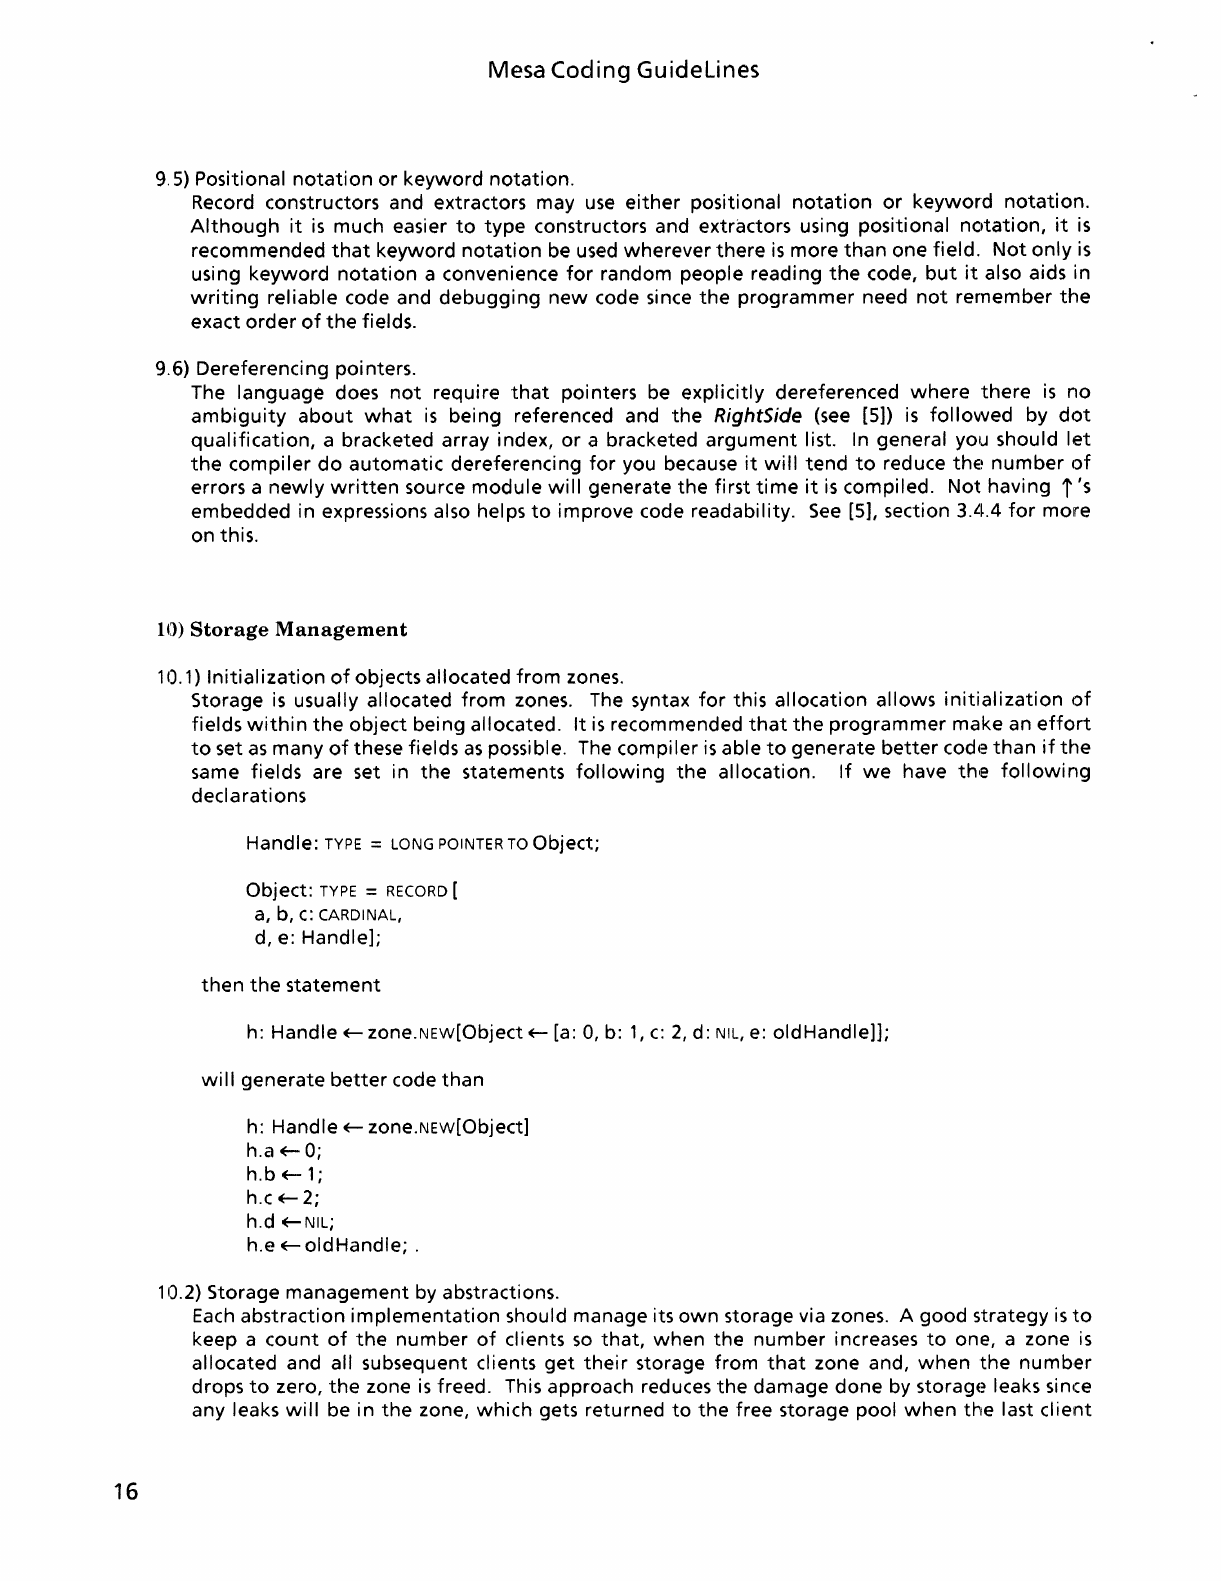
16
Mesa
Coding
Guidelines
9.5) Positional
notation
or
keyword
notation.
Record constructors and extractors may
use
either
positional
notation
or
keyword
notation.
Although
it
is
much easier
to
type
constructors and extractors using positional
notation,
it
is
recommended
that
keyword
notation
be used wherever
there
is
more
than
one
field.
Not
only
is
using
keyword
notation
a convenience
for
random people reading
the
code,
but
it
also aids in
writing
reliable code and
debugging
new
code since
the
programmer
need
not
remember
the
exact
order
of
the
fields.
9.6) Dereferencing pointers.
The language does
not
require
that
pointers be
explicitly
dereferenced
where
there
is
no
ambiguity
about
what
is
being referenced and
the
RightSide
(see
[5])
is
followed
by
dot
qualification,
a bracketed array index,
or
a bracketed
argument
list. In general you should
let
the
compiler
do
automatic
dereferencing
for
you because
it
will
tend
to
reduce
thE~
number
of
errors a
newly
written
source
module
will
generate
the
first
time
it
is
compiled.
Not
having
i's
embedded in expressions also helps
to
improve
code readability.
See
[5], section 3.4.4
for
more
on this.
10)
Storage
Management
10.1)
Initialization
of
objects allocated
from
zones.
Storage
is
usually allocated
from
zones. The syntax
for
this
allocation
allows
initialization
of
fields
within
the
object
being allocated.
It
is
recommended
that
the
programmer
make an
effort
to
set
as
many
of
these fields
as
possible. The compiler
is
able
to
generate
better
codc~
than
if
the
same fields are set in
the
statements
following
the
allocation.
If
we
have thle
following
declarations
Handle:
TYPE
=
LONG
POINTER
TO
Object;
Object:
TYPE
=
RECORD
[
a,
b,
c:
CARDINAL,
d, e: Handle];
then
the
statement
h: Handle
+-
zone.NEw[Object
+-
[a: 0, b:
1,
c:
2,
d:
NIL,
e:
oldHandle]];
wi
II
generate
better
code
than
h: Handle
+-
zone.NEw[Object]
h.a
+-
0;
h.b+-1;
h.c
+-
2;
h.d +-NIL;
h.e
+-
old
Handle; .
10.2) Storage
management
by abstractions.
Each
abstraction
implementation
should manage its
own
storage via zones. A
good
strategy
is
to
keep a
count
of
the
number
of
clients
so
that,
when
the
number
increases
to
one, a zone
is
allocated and all subsequent clients
get
their
storage
from
that
zone and,
when
the
number
drops
to
zero,
the
zone
is
freed. This approach reduces
the
damage
done
by
storagE~
leaks since
any leaks
will
be
in
the
zone,
which
gets returned
to
the
free storage pool
when
the
last
client

Mesa Coding Guidelines
disappears.
It
also helps
to
reduce
the
overhead
of
having
the
package loaded
when
it
is
not
being
used because
the
package
will
automatically
reduce
it's
storage requirements. The
procedures
to
keep
track
of
the
number
of
clients
must
be in a
monitor
because
there
is
no
way
to
guarantee
that
two
clients
will
not
try
to
create
or
destroy an instance simultaneously. Since
most
operations
on
abstractions need
to
be
monitored,
the
model presented in paragraph 5.4
on
Internal procedures demonstrates
how
to
implement
a
multi-monitor
module.
The code
is
reproduced here
for
convenience.
prog:
MONITOR
LOCKS
lock
USING
lock: Lock =
BEGIN
Lock:
TYPE
=
LONG
POINTER
TO
MONITORLOCK;
clientCount:
CARDINAL
+-
0;
heapLock:
MONITORLOCK;
HeapZone:
UNCOUNTED
ZONE
+-
NIL;
IncrementClientCount:
ENTRY
PROCEDURE
[lock: Lock
+-
@heapLock] = {
UNWIND
= >
NULL;
clientCount
+-
clientCount
+
1;
IF
clientCount
= 1
THEN
HeapZone
+-
Heap.Create[initial:
10,
checking:
debugging]};
ReduceClientCount:
ENTRY
PROCEDURE
[lock: Lock
+-
@heapLock] = {
UNWIND
= >
NULL;
IF
clientCount
= 0
THEN
ERROR
Error[programmingError];
clientCount
+-
clientCount
-
1;
IF
clientCount
= 0
THEN
Heap.Delete[HeapZone]};
X:
PUBLIC
PROCEDURE
[h: Handle] = {
Xlnternal:
ENTRY
PROCEDURE
[lock: Lock] =
INLINE
{ ...
};
Xlnternal
[@h.LOCK]};
END.
10.3)
Per
instance storage
management.
Another
strategy
allows
each instance
to
manage
its
own
storage. This approach
is
useful
if
the
amount
of
storage
differs
depending
on
how
a
client
is
using
the
abstraction
or
if
each instance
needs
to
allocate a
lot
of
storage
but
will
not
be
around
for
very
long.
The
latter
case
should
definitely
be handled in this
way
since
the
instance's zone can be destroyed
with
the
instance.
This
is
a
great
improvement
over traversing
the
entire
data structure,
freeing
it
up
on
the
way.
Not
only
will
the
storage
that
the
instance used be
returned
to
the
free
storage pool quickly,
it
will
also reduce
the
probability
of
storage leaks should
the
data
structure change slightly.
10.4) One
data
structure
per
zone.
If
a
data
structure
is
needed
for
a
known
time
and requires much
dynamic
storage
allocation,
a
zone can be allocated
just
for
that
data
structure.
If
all
allocation
for
the
data structure
is
from
that
zone and
no
other
nodes are allocated
from
it,
then
the
zone can be destroyed
when
the
data
structure
is
no
longer
needed. This
method
quickly
recovers space used by
the
structure
since
it
requires
less
work
to
return
pages
to
the
system
than
nodes
to
a zone.
10.5)
Initial
sizes
for
zones
Initial
sizes
for
zones
containing
exactly
one
data
structure should be calculated
from
a projected

18
Mesa Coding
Guidelines
expected size
for
the
data structure
multiplied
by some
fudge
factor.
Initial
sizes
for
other
zones
should be
computed
based on
the
maximum
expected storage needs
for
a single instance
of
an
abstraction and
the
expected
number
of
simultaneous clients. The
increment
for
the
zone
should be computed based on
the
maximum
expected storage needs
for
a single
in~)tance
of
an
abstraction.
10.6) The system heap.
The storage heap (Heap.systemZone) should be used
for
passing objects whose
ownership
must
be transferred. This practice
is
useful since
the
implementor
who
allocated
the
objE~ct
need
not
provide a mechanism
for
freeing
it
up. This implies
that
the
implementor
also need
not
be
concerned
with
hanging
onto
the
zone
from
which
the
object
was allocated
until
the
object
has
been freed.
Allocating
objects
that
must
transfer
ownership
from
the
system zone thus lowers
module
coupling
and reduces
the
potential
for
bugs.
10.7) Clean
up
after
failures.
Storage allocated
from
a
common
storage pool must be freed in
the
event
of
failure's. The most
common
method
for
doing
this
is
outlined
below.
The CleanUpx procedure
is
provided rather
than
a simple call
to
Interface. Destroy since
not
all objects can be destroyed
with
a single call.
Some require special handling.
In
such
cases,
it
is
better
if
CleanUpx
is
not
simply an INLINE.
BEGIN
x:
Interface.Handle
E-lnterface.New[
...
];
CleanUpx: PROCEDURE = INLINE
{lnterface.Destroy[@x]};
BEGIN
ENABLE
UNWIND
= > CleanUpx[];
...
code
that
uses
x ...
END;
CleanUpx[];
END;
11)
Data
Structures
11.
1 ) Stri ngs
Strings are a
great
source
of
trouble
in Mesa.
Many
string operations require changing
the
length
of
a string. Since Mesa does
not
provide
for
automatic
strings,
i.
e.
strings
that
grow
and
shrink
at
will,
the
programmer
must check
for
string
overflows
and
under-utilization.
When
appending a string
to
another
string,
it
is
cheaper
to
check first
for
an
overflow
condition
and
enlarge
the
target
string
if
necessary
than
to
attempt
the
append and raise a signal
if
there
is
not
enough room.
To
enlarge a string
automatically,
a procedure must have a
pointer
to
the
LONG
STRING
and a handle
to
the
zone
that
it
was allocated
from.
Interface String provides most
of
the
necessary facilities.
Mesa supports
the
use
of
string literals by enclosing
the
character sequence comprising
the
string
inside
of
double
quotes. For example: "This
is
a stri ng
literal",
"This
is
another
...
"This one ends
in a carriage
return\n".
String literals are stored in
the
code segment
of
a bcd
until
needed.
Depending on circumstances,
the
literal
will
be copied
into
either
the
global frame
corresponding
to
the
code segment
of
the
module
that
used
the
literal
or
the
local
frame
of
the
procedure
that
used
the
literal.
If
the
literal
is
immediately
followed
by an
L,
as
in "Local
frame"L,
then
the
literal
will
be copied
into
the
local
frame
of
the
procedure
that
declared
it
each
time
the
procedure
is
invoked.
If
the
literal
is
followed
by a G (Mesa 10.0)
or
nothing,
as
~n
"Global
frame"
or
"Global
frame"G,
then
the
literal
will
be copied
into
the
global
frame
of
the
containing
module
once
when
the
module
is
started. There
is
a
time
saving associated
with
Mesa
Coding
Guidelines
putting
the
literal
in
the
global frame, since
it
is
copied
only
once and a space saving associated
with
putting
the
literal
in
the
local frame, since
there
is
only
one copy
of
it
at
any
time
the
containing
procedure has
not
been invoked.
There are several dangers associated
with
using string literals. Since
the
size
of
the
StringBody
containing
the
literal
is
a compile
time
constant,
it
is
not
possible
to
enlarge
the
string
without
making
a copy
of
it
from
some storage pool. Such
use
of
string literals can result in confusion
about
where
a StringBody
is
allocated
when
it
comes
time
to
free
the
string. The easiest and
safest
solution
is
to
use
the
literal
only
to
make a copy
from
the
storage pool. For example:
BEGIN
s:
LONG
STRING
Eo- String.CopyToNewString[s: "This
is
the
literal. "L,
z:
Heap.systemZone];
--
code that uses s
Heap.systemZone.FREE[@S];
END;
String literals used
as
arguments
to
output
procedures can almost
automatically
be made local
since
there
is
no
question
about
whether
the
StringBody
will
need
to
be enlarged.
If
the
procedure may be called recursively, all literals should be in
the
global
frame
since each
literal
would
be copied once
for
each recursive call
if
it
were
in
the
local frame.
String literals
defined
at
the
module
scope can be allocated
from
a storage pool by
following
this
paradigm.
Prog:
PROGRAM
=
BEGIN
stri ng
1,
stri ng2:
LONG
STRING
Eo-
NIL;
zone:
UNCOUNTED
ZONE
Eo-
...
;
Initialize:
PROCEDURE
=
BEGIN
string1 Eo- String.CopyToNewString[s: "String one
literal"L,
z:
zone];
string2 Eo- String.CopyToNewString[s: "String
two
literal"
L,
z:
zone]};
END;
Initialize[];
END.
When
following
this paradigm, care must be exercised
to
free
the
StringBodies should
the
module
be unloaded.
11.2) Ownership
of
objects.
Owning
an
object
is
defined
as
having responsibility
for
maintaining
that
object,
including
deletion
when
it
is
no
longer
needed.
It
is
customary
to
document
the
rules
for
transferring
ownership
between
client
and
implementor
in
the
interface
defining
the
procedure
that
operates on
the
object.
When
strings are
passed
to
procedures
through
an interface,
ownership
is
not
normally
transferred since each
abstract~on
is
responsible
for
its
own
storage.
Ownership
of
strings returned
from
procedures
is
normally
transferred
to
the
caller.
11.3) Sequences
vs.
dynamic arrays.
Sequences
were
intended
to
replace Mesa's
notion
of
dynamic arrays,
which
were
implemented
using descriptors
for
arrays. The difference
between
sequences and dynamic arrays
is
mostly in
the
way
the
object
is
allocated and
what
initialization
is
done
at
allocation
time.
It
is
recommended
that
sequences be used instead
of
descriptors
for
arrays since
the
language
provides
more
conveniences
for
operations on sequences.

20
Mesa Coding
Guidelines
111.4)
File I/O
File I/O
is
a
potential
bottleneck
in any system. The Mesa
runtime
system supports a
number
of
views
of
a
file
including
stream
oriented
and segmented. The most
common
uses
for
files are
to
preserve
text
and
to
store data structures. Byte streams are
the
most useful abstraction
for
accessing
text
files. For data structures,
it
is
generally faster
to
treat
the
file
as
a series
of
fixed
size pages
which
may be swapped in
at
will
by
the
virtual
memory
manager. The idea
is
to
treat
sections
of
the
file
(segments)
as
blocks
of
virtual
memory
and
to
write
the
data
structures
to
that
place in VM
as
though
it
were
memory
and
not
a
file
segment.
When
those addresses are
referenced,
the
corresponding pages
will
be swapped in; and,
when
memory
is
full
()r
the
file
is
closed, those pages
will
be swapped
out
with
the
data
that
was
written
there. The
only
real
problem
is
handling
the
relocation
of
the
data structures
which
use
pointers
when
the
file
is
opened
up
later
since
there
is
no
way
to
guarantee
that
the
structures
will
be swapped
into
memory
at
the
same place. The best solution
is
to
write
at
some
known
place in
the
segment
(usually
the
first
few
words are reserved
for
this) a
directory
that
allows
a
program
to
compute
the
VM
address
of
the
rest
of
the
data structure
when
needed. This tends
to
be faster
than
storing
and
retrieving
data structures via streams since
the
loading
of
the
structure
into
VM
is
done
only
once and
then
accessing
it
is
the
same
as
with
any
other
data structure
that
has always
existed in memory.
Another
possibility
is
to
use
the
relative
pointer
facilities in
the
language
to
compute
the
address
when
needed rather
than
compute
the
real address
just
onC4e
and store
that.
The
trade
off
is
figured
on
how
much
the
data
structure
will
be accessed.
If
it
will
be used a
lot,
then
it
pays
to
compute
the
real address;
otherwise
it
may be cheaper
to
do
the
relative
address
computation
each
time
it
is
needed.

Mesa
Coding
Guidelines
Appendix
A:
Recommended Sierra Interfaces
This list has been compiled
to
help
maximize
the
upward
compatibility
of
software
written
for
the
Sierra release
with
the
next
release
of
Mesa.
The
next
release
of
the
Mesa
Development
Environment (MDE)
is
a maintenance release
that
incorporates
the
new
release
of
Pilot. There are
no
changes
to
MDE interfaces;
so
clients
of
MDE are
guaranteed
upward
compatibility.
There are changes
to
several Pilot interfaces
which
should
not
affect
most clients. The
public
Pilot
interfaces
that
are changed are Environment, DeviceTypes,
Inline, NSConstants, System, Process, Runtime, Supervisor, Stream, PhysicalVolume, Volume,
FileTypes, Scavenger, ScavengerExtras, Heap, Log, LogFile, Floppy, FormatPilotDisk, OthelioOps, and
TemporaryBooting. Mesa 11.0 introduces a
new
interface, ObjAlloc,
to
control
the
allocatedlfree
state
of
a collection
of
objects.
Clients
of
MDE should avoid using
interface
Storage since
the
same
functionality
is
provided in
other
interfaces. This
interface
may disappear in
future
releases
of
MOE. All
other
public MDE interfaces
are acceptable
for
use.

Mesa Coding
Guidelines
22
Mesa Coding
Guidelines
References
[1] Guidelines
for
Signalling in Cedar,
Roy
Levin
[2] Cedar Style Sheet, James
Mitchell
[3] Mesa
Myths
and Methods,
Roy
Levin
[4]
Writing
Mesa programs
for
efficiency, Dick Sweet
[5] Mesa Language
Manual,
James
Mitchell,
William
Maybury,
Richard Sweet
[6] Generic Interfaces, Richard Orgass
[7] Sequel
Compiler-Wide
Conventions, Irene
Allen

Mesa Coding
Guidelines
24

Index
This
index
describes
the
various
uses
of
potentially
interesting
words.
Each
word
in
this
list
may
not
exist
in
the
tense
given,
thus
a
user
of
the
index
must
be
wary
of
spellings
that
change
with
tense.
Each
number
following a word
indicates
which
division
the
word
was
used in.
Abstraction:
4.7,4.8,4.9,4.11,4.12,4.13,5.6,6.1,6.2,7.1,7.5,
7.6,10.2,10.3,10.5
Abstraction
Boundary:
4.13
Algorithm:
1
Allocate,
Storage:
5.2,5.3,6.2,
10, 11.1
Alto:
5.2,7.4
Argument:
2.2,4.12,5.2,6.2,
7.5, 9.6
Array:
6.2,9.4,9.6,11.3
Block:
4.5,8.3
Call
Stack:
5.3
Callee:
5.2,5.3
Caller:
5.2, 5.3
Capitalization,
Procedures:
5.4
Catch
phrase:
4.3,4.4,4.5,4.6,4.11,4.12,4.13,7.5
Client:
4.2,
4.9,4.11,5.4,5.6,5.7,7.5,7.6,10.2,10.3,10.5
Comment:
7.1
Concrete
type: 7.5
Configuration:
7.1
Default
Values: 5.6
Destroing
Object
Instances:
7.4, 7.5,
7.6,10.2,10.3,10.4,10.7
Enable
clause:
4.4,4.5,4.12
Entry
Procedure
Examples:
4.11,5.4,
10.2
Enumerated
Items:
4.7, 4.12
Enumerating
Lists: 9.4
Error:
2.1, 2.2, 3.1, 4,
7.5,10.2
Evaluation
Stack: 5.2
Exceptional
Conditions:
4.2,4.3,4.5,4.8,4.9,4.12,4.13
EXIT: 4.8
Exported
Procedures:
4.9,4.11,5.4,5.6,
7.1,9.1
Extractor:
2.2,9.5
Frame:
4.4,5.2,5.3,7.4,11.1
Free:
4.12,7.4,7.5,9.4,10.2,10.3,10.6,10.7
Global
Frame:
7.4, 11.1
Hack: 7.2
Handle:
4.2,
4.11,4.12,5.4,5.6,6.1,6.2,7.5,9.4,10.1,
10.2, 10.3, 10.7, 11.1
Heap:
10.2,10.6
Implementation:
4.8,4.12,5.2,5.3,5.6,7.1,7.3,7.5,10.2
Indexing
Arrays:
6.2, 9.6
Instance:
4.8,4.11,5.6,6.1,6.2,7.4,7.5,
7.6,10.2,10.3,10.5
Interface:
4.2,4.7,4.9,4.10,4.11,4.12,5.4,5.6,5.7,6.1,7.1,
7.3,
7.4,7.5,9.1,9.4,10.7,11.1
Internal:
5.4, 5.5, 10.2
Jump
table: 9.2
Keyword
Notation:
5.7,9.5
Literal:
11.1
Local
Frame:
4.4, 5.2, 5.3,
7.4,11.1
Lock:
4.11,5.4,5.5,10.2
Log:
3.1,7.2
Memory:
4.4,4.5,7.4
26
Index
Mesa: 8.2,
1,2.1,2.2,2.3,3.1,3.2,4.1,4.3,4.4,4.6,5.2,5.3,5.7,
8.2,11.1
Mesa Byte Codes: 9.2
Module:
2.2,5.1,5.3,5.5,5.6,7,7.1,7.2,7.3,7.4,7.5,8.1,9.1,
9.6,10.2,10.6
Monitor:
4.11,5.4,5.5,
10.2
Nesting
Procedures: 5.3
Nesting
Scopes: 8.2, 8.3
Node:
5.3,9.4,
10.4
Null: 5.6, 10.2
Object: 4.11, 5.4, 6.1,
6.2,7.1,7.5,7.6,10.1,10.6,10.7,11.2
Object Declaration: 4.7, 4.10, 7.4, 7.5,
7.6,8.3,
10.1
OlPen:
2.2, 3.1,
3.3,9.1
Overflow, Stack: 5.2
Overflow,
String:
11.1
Ownership: 10.6, 11.2
Parameter:
4.7, 4.12, 5.2, 5.6, 5.7
Procedure
Call: 4.3, 4.5, 5, 7.4,
9.4,10.7
Programming
Failures:
4,
7.5,10.7
Pointer:
4.4,4.12,5.3,6.1,6.2,9.4,9.6,
11.1
Postlude: 2.2
Prelude: 2.2
Proced ure: 5
Readability:
3.3,4.5,6.2,7.1,7.5,9.4,9.6
Record Field:
4.7,4.12,5.2,5.6,5.7,6.2,9.1,9.5,10.1
Seope:
3.1,3.3,4.4,4.5,4.12,5.3,8.2,9.1
Select
Statement:
9.2,9.3
Signal: 4, 11.1
Space:
3.3,8.3,
10.4
Storage
Leak: 10.2, 10.3
Storage
Pool:
10.2,10.3,10.7
String:
4.13,
6.2,7.4,11.1
Swap:
4.4,4.5,
5.1
Unlocking
Monitors: 4.11
Unwind: 4.11,
10.2,10.7
Variables: 6
Variant
Record: 4.12, 6.2
Zone: 5.3, 10, 11.1
Xerox
Publishing
Illustrator
(XPI)
Step
By
Step
(SBS)
Supplemental
Training
Written
&
published
by
Lee
Thomas
Hedges
Integrated
Systems
Operations
(ISO)
Publishing
Marketing
17
January
1990
San
Diego,
California
USA
Overview:
INTRODUCTION
OVERVIEW
STEP BY STEP
The
Step
By
Step
Supplemental
Training
Series
is
intended
to
be
a
quick
access
and
learning
tool
for
the
Xerox
Publishing
Illustrator
user.
Pr'oblem
Summary:
It
is a
common
critique
by
XPI
users,
both
internal
and
external,
that
there
is
no
classroom
training
offered,
and
the
training
and
reference
documentation
that
is
available
is
unacceptable
as
a
training
tool
for
initial
as
well
as
advanced
learning.
Solutions
Analysis:
Concensus
is
that
there
needs
to
be
additional
training,
either
in
a
classroom
environment
or
as
detailed,
step
by
step
applications
documents.
The
classroom
training
environment
is
not
an
alternative
that
can easily
be
addressed
by
ISO
Publishing
Marketing.
The
d,etailed,
step
by
step
documents
however,
can easily
be
accomplished
with
little
time
and
expense.
Solution
Proposal:
The
Xerox
Publishing
Illustrator
(XPI)
Step
By
Step
Supplemental
Training
Series
is
the
most
beneficial
and
cost
effective
immediate
solution.
Each
Step
By
Step
(SBS)
would
be
a
one-page,
easy
reference
and
learning
document,
with
appropriate
graphics
and
applications
information.
Each
document
will
be
of
a
separate
topic
relating
to
the
features,
functionality,
integration,
or
applications
related
to
the
XPI
& 7650 Pro
Imager
software.
There
would
be
50
(fifty)
documents
in
a
complete
set, issued
monthly
in
subsets
of
5-'10
documents.
This
would
allow
each
user
to
spend
an
appropriate
amont
of
time
with
each
topic,
understanding
the
information,
practicing
each
step,
and
applying
the
knowledge
as
it
might
apply
to
the
specific
job
requirements.
The
benefits
are
extensive,
both
for
internal
and
external
XPI
users.
Customers
could
quickly
learn
the
individual
topics
and
become
advanced
users
in
a
very
short
period
of
time.
Training
would
be
in-house,
and
would
also
be
self-paced
to
allow
for
different
levels
of
sophistication
and
application.
Customers
would
be
more
comfortable
with
the
learning
process,
as
the
training
materials
would
be
fresh,
detailed,
application
specific,
and
written
by
an
expert
user
of
the
software.
Internal
users
would
benefit
from
the
quick
learning
time
required
of
each
topic,
for
the
'realistic'
Xerox
analyst, sales
representative,
and
customer
support
center
personnel
has
little
time
to
'come
up
to
speed'
as
well
as
continue
to
learn
and
apply
the
knowledge
with
deadlines,
interruptions,
and
the
daily
business
of
customer
support.
Internal
users
would
also
benefit
from
the
on-line
Network
access
of
these
documents
(in
IP
format),
as
obtaining
product
documentation
in-
house
is
a
common
problem.
Final
Summary:
Xerox
Publishing
Illustrator
(XPI)
Step
By
Step
Supplemental
Training
Series
would
be
a series
of
50
single-page,
detailed
applications
training
documents,
intended
to
enhance
any
XPI
users
knowledge
and
application
of
the
functionality
available.
Xerox Publishing Illustrator (XPI)
Step
By
Step
(SBS)
Supplemental Training
vVritten &
Compiled
By Lee Thomas
Hedges
Integrated
Systems
Operations
(ISO)
Publishing
Marketing
Table of Contents
STEP
BY
STEP
Al~EA
TOPIC
PAGE
SCANNER
User
Interface:
7650
Pro
Imager
...................................
7
Basic
scanning
................................................
2
Halftone
descreening
filters
Edge
enhancement
filters
Loopback
Preview &
Default
programming
AutoSave &
AutoName
Scanner
set-up
values
Tone
Line
filter
Scan
parameter
recommendations
..................................
6
Line art
scanning
Photograph
scanning
Threshold
1/
clean-up"
scanning
Halftone
Scanning
Application
for
Previously-Screened
Originals
............
5
Photograph
to
line
art
scanning
Photograph
to
line art
creation
(multi-scan)
Application:
Forms scanning &
rebuilding
Application:
Recycled
Artwork
(USAF)
Document
Small
Angle
Rotation
operations
7650
Pro
Imager
Demo
Highlights
RASTER
EDITOR
User
Interface:
Frame
Controls
Menu
User
Interface:
Softkey
Menu
.....................................
4
User
Interface:
Desktop
brushes
Strokes
Effects
Grab Bits vs. Grab
Text
Keybindings
Overlay
.....................................................
1
Stencil
Airbrush
Select Gray
Save &
Delete
Brush
Zoom
Measure
Grid
Symmetry
Space
Shear
Masking
(AutoMask
& Select Mask)
Interactive
Rotation

AREA
TOPIC
PAGE
RASTER
EDITOR
(con't)
Photograph
to
line art creation (overlay)
Application: Gray emphasis
Application:
Annotation
creativity
Application: Symbols creation &
modification
(multinational)
Raster Editor
Demo
Highlights
PUBLIISHING
INTEGRATION
ViewPoint
bitmap
frame
integration
ViewPoint
IMG
frame integration
ViewPoint
bitmap/IMG
shared frame
integration
Printing
RES
&
desktop
brush
(quick-print)
4045
Documenter
image
printing
NS3700 image
printing
Centralized
printer
image
printing
XPS
732 image integration (Printer Subset Filing)
Centralized
printer
image integration (Printer Subset Filing)
MISCIELLANEOUS
Basic
XPI
workstation
configuration
&
dedicated
configuration
6085-2
"Helen"
performance summary
..............................
3
High-performance
600
ppi
image processing
Converter
icon
set-up properties
Notice:
If there
is
no
page listing
for
a specific Topic, the
information
page has
not
yet
been
developed.
Development
and
distribution
of
XPI
Step-By-Step Supplemental Training Topics will be
continuous,
on
the
average
of
10
per
month,
to
give
the
user
time
to
develop
the
necessary skills in each
particular
topic.
If there
is
a request
for
a specific
Topic
not
yet
written
or
if
there
is
an
additional
topic
not
listed, feel free
to
call
or
write
the
author
with
the
request. Requests will be
completed
on
a first-come first-served basis. Users
with
specific applications
involving
XPI
are encouraged
to
share the applications
with
the
author
to
better
serve all users
of
the
software.
Lee
Thomas Hedges
Xerox
Corporation
ISO Publishing
Marketing
Product Manager
10200
Willow
Creek Road,
San
Diego, California 92131 USA
(619) 695-7712
or
Intelnet
*843-7712
Xerox
Publishing
Illustrator
(XPI)
Step
By
Step
(SBS)
Supplemental
Training
'vVritten &
Compiled
By
Lee
Thomas
Hedges
Integrated
Systems
Operations
(ISO)
Publishing
Marketing
C~verview:
Basic
Scanning
STEP BY STEP
The first
encounter
with
the
7650 Pro
Imager
and its user interface
(XPI
Local Scanning
software) can be
overwhelming.
Certainly
it
is
a
lot
of
information
to
comprehend
and a
wealth
of
details
to
memorize,
but
learning
the
basics
of
the
scanner
operations
can
be
as
simple
as
five steps. This
document
will
provide
the
necessary
information
to
get
the
beginner
started and
on
the
way
to
understanding
the
intricasies
of
the
scanner capabilities.
Remember, practice makes
perfect
and mastering
the
scanner
operations
only
comes
about
through
useage.
The five basic scanning steps are Preview,
Crop,
Resolution,
Output,
and Scan.
User
Interface:
It
is
best
to
understand
the
basic features
of
the
scanner
software
before
attempting
to
use it.
Once
the basic
operations
are
understood,
the
illustrator
can
then
proceed
to
learn
by
using,
rather than
fumble
through
without
a base level
of
understanding.
Message
Window: This
is
where
all
messages are displayed. Keep
an
eye
on
this
box
during
your
first
few
trys at
scanning.
Scanning
Control
Buttons: These
buttons
control
the
operation
of
the
scanner. They are
only
selected after
all properties are set-up first.
Crop
Area: This
is
the area in
which
the
image
is
cropped
for
specific
image area.
Image Area: This
section
is
where
the
user specifies the
type
of
image
to
be
scanned and the
resolution
or
quality
required
of
the final image
to
be
printed.
Crop
r~l
lY
Image
~
Output
1131.':~:tl!J
Bilevel
Threshold
[.!J
G
-:
-:
-----,
R.esolution I]) 75 ppi
Five Easy Steps:
Step
One:
Select
the
Preview
button.
This
will
scan a fast,
low
resolution
image
of
whatever
is
on
the
scanner.
Step
Two:
Select
the
Crop
button
(underneath
the
word
Crop).
Move
the
cursor
into
the
Platen area (scan
display area),
point
down
with
the
left
mouse
button
(holding
it
down)
at
the
top
left
corner
of
the
desired image,
drag
it
across
to
the
lower
right
of
the
image area, and
let
up
on
the
mouse
button.
If
the
crop
area needs
to
be
adjusted,
point
on
the
white
adjustment
box
(with
the
right
mouse
button)
and realign
the
crop
area.
Step
Three:
Select
either
the
Bilevel
or
Halftone
Output
(head & shoulders
figures)
by
mousing
on
the
figures,
depending
on
what
you
are scanning
as
the
original. Bilevel
is
for
line art
drawings and
Halftone
is
for
photographs.
For Bilevel,
notice
the
Threshold
area
underneath
it. Set
it
to
128
as
a start.
Adjust
it
up
(for
a
darker scan)
or
down
(for
a
lighter
scan) after
the
first scan
is
completed.
For
Halftone,
notice
the
Screen area
underneath
it. Set
it
for
71
dpi
@ 300
as
a start.
Step Four: Select
the
Resolution
of
the
final image
by
pulling
down
on
the
picklist. This
will
depend
on
what
level
of
quality
is
desired
for
the
image. For
most
applications, 300
ppi
is
the
best. Also make sure that Scale
is
at 100%
or
whatever
final size
is
required.
Step
Five: Select
the
Scan
button.
This
will
take all
of
the
settings and
scan
just
the
area
cropped.
After
the
scan has
completed,
look
at
the
scanned image and make adjustments
if necessary. If
none
are required,
select
the
Save
button
after naming
the
image.
Tips &
Techniques:
1131
:}tlll
Bilevel
Threshold
l!l
~
.;
••
=:J
~~
.....
Resolution
®
300
ppi
®
Proportional
Width
I
3,
73
1 in
I~I
'
100
1
1~1o
Height
I
1,81
in
Enhance
[!.l
lEI
Balance
,l1,utornatic
G I
255
1
0
255
Filter
[:!)
no
filter
When
setting
up
the
Preview program, pull
down
Load
(at
the
top
of
the
menu)
and select
Preview Values
to
show
current
programmed
values
for
Preview. Change any settings
as
desired and
then
pull
down
Save, select Preview Values, and
confirm
in
the
herald. This
will
program
the
new
values
to
scan every
time
Preview
is
selected. The
best
basic values are:
Bilevel, 75 Threshold,
75
ppi, 11.69 x 12
crop
setting, 100% Scale,
Automatic
Balance, and
Low
Edge Enhance Filter.

Xerox
Publishing
Illustrator
(XPI)
Step
By
Step
(SBS)
Supplemental
Training
'Nritten
&
Compiled
By
Lee Thomas
Hedges
Integrated
Systems
Operations
(ISO)
Publishing
Marketing
()verview:
Overlay
STEP BY STEP
Overlay
is
one
of
the
Special
softkey
functions
within
the
XPI
Raster Editor.
It
is
best
used
when
a
graphic
needs
to
be traced
for
an
outline
drawing
or
template
creation, and can be
best
symbolized
as
using tracing paper.
Two
simple
examples
of
Overlay
are tracing a
scanned-in
photograph
to
produce
a line
drawing,
and using
the
scanned-in
photograph
as
a
template
to
make
an
ellipse shape,
as
in
a
picture
frame mat.
Both
applications use
Overlay
as
a tracing
tool,
to
get
a
more
accurate
drawing
reference
for
a
line
drawing.
Overlay
is
best suited
for
the
photograph
to
line art
creation
process. For instance, taking a
real
photograph,
of
a mechanical part
for
instance, scanning
it
in
on
the
7650 Pro Imager
scanner, and saving
it
to
the
desktop
as
an
RES
file. The scanned image
is
then
edited,
selected
as
a brush and
made
into
an
Overlay. The
Overlay
is
then
used like tracing
paper
to
draw
the
required
line art
from
scratch.
There are
two
different
ways
to
create
an
Overlay. The first
is
using Select and
the
other
is
using Place.
Both
methods
will
be
covered
in
detail
in
the
following
section.
User Interface:
It
is
best
to
understand
the
features and
functionality
of
Overlay
before
attempting
to
use it.
Once
the
basic
operations
are
understood,
the
illustrator
can
optimize
these skills
for
increased
efficiency
and
performance.
Select:
selects
an
area
of
the
existing illustration
to
be
the
Overlay.
Place: places a Brush
into
the
illustration
as
the
Overlay.
Overlay
to
Brush:
copies
the
Overlay
into
a Brush.
Delete
Overlay:
eliminates
it
Selecting
an
Overlay:
Put
the
art
(to
be
the
Overlay) in
the
illustration. Select
the
"Overlay"
button
in
the
softkeys
and
then
select
"On"
and "Select".
Notice
that
Overlay
goes
from
ON
to
OFF
(that's
normal).
Hold
down
on
the
left
mouse
while
dragging
it
towards
the
bottom-left
of
the
desired
Overlay
area.
Delete
the
contents
of
the
illustration
(Erase in Frame
Controls).
Notice
that
moving
the
cursor
in
and
out
of
the
illustration
will
make
the
Overlay
disappear and redisplay,
so that
the
drawing
underneath
can be seen
more
accurately.
Placing
an
Overlay:
Of
the
two
ways
to
create an Overlay,
the
most
efficient
way
is
by
using
the
"Place" feature.
To
do
this, select
the
area
required
for
the
Overlay
as
a Brush.
Delete
the
contents
of
the
illustration (Erase in Frame
Controls).
Point
down
on
"Overlay"
in
the
softkeys
(while
the
Brush
is
still
on
the
cursor) and
then
select
"On"
and "Place".
Move
the
Brush back
into
the
illustration and make sure
to
center
it
inside
the
illustration frame
before
pointing
down
(once).
Pointing
down
will
"set
the
Overlay".
The
original
Brush can be
deleted
from
the
cursor.

Using "Overlay
to
Brush":
If
the
illustrator wants a
copy
of
the
Overlay
already in use,
then
the
only
way
to
get
a
copy
as
a Brush
is
to
select
"Overlay
to
Brush". This
will
create a Brush
from
the
Overlay image,
while
keeping
the
original Overlay active and displayed.
Using
"Delete
Overlay":
If
the
illustrator wants
to
delete
the
Overlay
in use, having
completed
the
drawing
operations
for
that
illustration,
then
the
"Delete
Overlay"
button
must
be
selected. This
will
delete
the
original Overlay and
allow
a
new
one
to
be
created.
Closing
the
illustration
will
also cause
the
Overlay
to
be
deleted,
so
before
selecting
the
Close
button,
make sure
to
save
the
Overlay
as
a
Desktop
Brush. '
Overlay
Overlay
& Line Tracing FInal
Shaded
Line Tracing
Tips & Techniques:
When
drawing
based
on
the
Overlay, always
draw
in
the
Unscaled view. This will facilitate
the
drawing process,
allow
the
illustrator
to
connect
lines and
objects
easier and
with
more
confidence,
and
most
importantly,
Unscaled
view
will
always display
the
"real" data
of
the
illustration. Editing in any
other
view
will
always display a representative,
or
distorted
and
'best
guess' view, based
on
the
screen
resolution
of
75
dpi.
When
using Overlay
with
Stencil,
to
create a stenciled area based
upon
the
Overlay image,
Place the Overlay first, create
the
Stencil based
on
the
Overlay, select
the
Stencil image and
Place it in
the
illustration, and
then
use
the
Overlay
to
Brush feature selection
to
bring
the
Overlay image back
into
the
Stenciled area. Using this feature
will
allow
the
user
to
access
the
components
of
the
illustration
much
faster than saving
as
Desktop
Brushes
or
Saved
Brushes.
In
the
current
version
of
XPI
software
(V-2.3),
when
Delete
Overlay
is
selected,
the
image
will
disappear and Overlay
will
turn
OFF,
but
if
you
want
it again, simply select
ON
and
it
will
reappear. This
is
a software
bug
in this version
but
has
no
real user
impact
because
whenever
the
user wants
to
delete
the
Overlay s/he can
either
Close
the
illustration
or
Place
another
Overlay image
into
the
illustration.

Postmark:
From:
Sender:
Subject:
Reply
To:
Attachments:
Si:ze:
N()te
Format:
N()te:
3-April-90
(Tuesday)
10:05:39
PDT
-
(WellsFargo:SD:Xerox)
Hedges:sd:xerox
To:
ISA
Teams:ISO,
ISC
Teams:ISO
Lee Hedges:SD:XEROX Copies:
Step
By
Step
XPI
Training
Series
Hedges:sd
:xerox
MailFolder
692 Disk Pages
XEROX
Format
7650Users:all areas, ISOMo
P:OSBU :RX, Hedges:sd,
NFors:DlosNSC,
Audie
Johnson
:DLOSLV, Peggy
Rahkola:
ISO-ES,
Gary
Robinson
:OSBU:
RX,
Bob
Sampson :STLOUIS,
David
Schmitz:
ES
LBC,
Greg
Stewart:XOS-MAR,
Walton
Gilpin
: Costa Mesa,
Dennis
Checkley: I
nd
ianapol
is,
Ron
Brown
:Sacramento,
Kevin
Heckman:
Nashville,
ISO-SD:sd,
Mayme:sd,
PQ:sd
Take a
look
at
the
"Read
Me
1st"
mailnote.
It's
about
new
XPI
& 7650
Pro
Imager
Training
documents
developed
in an
easy-to-read,
learn,
and
reference
format.
It
is
intended
for"
users"
of
XPI
& 7650 Pro
Imager
(6085 version),
both
internal
and
external.
From
all
draft
reviewers,
it
is
claimed
to
be
the
answer
to
the
XPI/7650
Training
problem!
Give
it
a
try
...
Enclosed
you
will
find
five
(5)
documents.
The
first
is
a
printing
instructions
mailnote
(&
where
to
find
the
other
files).
The
second
is
an
overview
document
(IP)
that
describes
the
training.
The
third
is
a
Table
of
Contents
for
the
Step
By
Step
(SBS)
Training
Series.
The
fourth
and
fifth
are
two
(2)
sample
SBS
documents
that
are
representative
of
the
style,
format,
and
simplicity
of
the
training
serie
s.
There
are
currently
seven (7)
SBS
documents
completed.
You
must
access
the
file
drawer
described in
the
1st
mailnote
to
get
the
current
SBS
documents
#1-7.
There
will
be 10
new
ones each
month.
Now
is
your
chance
to
learn
on
your
own,
at
your
own
pace,
without
having

to
call someone
for
help
at
every
turn.
Take
your
time,
dc.
one
at
a
time,
Step
By
Step,
until
you become a master!
If
you have any questions
or
suggestions, please feel free
to
call
or
write
...
Lee
Thomas Hedges
ISO
Publishing
Marketing
Product
Manager
*843-7712
Hedges:sd
From:
Subject:
NClte
Format:
NClte:
XPI
Wizard
Read
Me
1st
XEROX
Format
To:
For
those
of
you
that
do
not
know
me,
my
name
is
Lee
Thomas
Hedge
s.
I
am
the
ISO
Publishing
Marketing
Product
Manager,
responsible
for
all
the
current
publishing
products,
located
in
San
Diego,
California.
As
most
of
you
know,
there
is
a
great
need
for
customer
training
classes
for
both
the
Xerox
Publishing
Illustrator
(XPI)
and
Xerox
7650
Pro
Imager
products.
Although
there
still are
no
classes
at
this
time,
I
would
like
to
let
all
of
you
know
that
I
have
done
something
to
alleviate
the
problem.
I
have
created a series
of
training
documents
for
XPI
& 7650 Pro
Imager
users,
both
internal
and
external.
The
name
of
this
series is:
Xerox
Publishing
Illustrator
Step
By
Step
(SBS)
Supplemental
Training
As
many
of
you
know,
I
have
been
involved
with
XPI
&
the
7650
for
a
long
time
and
know
a
little
bit
about
these
products,
their
features,
and
users
requirements.
Since
many
of
you
have requested
that
I
present
a
training
class
to
train
both
customers
and
internal
users,
and
I
cannot
possibly
train
everyone,
I have
written
down
(almost)
everything
that
I
know
about
these
two
wonderful
products.
The
format
of
the
training
supplements
is
simple
- a 1
page
document
on
each specific
topic
relating
to
a
feature
or
application.
There are
currently
50
topics
to
be
written,
each
with
precise
and
detailed
information
about
the
topic.
I
will
create 10 a
month,
and
have
them
available
on-line,
via a
network
file
drawer.
As
of
today,
there
are seven (7)
completed
SBS
topics.
1
Overlay
2 Basic Scanning
3 6085-2
"Helen"
Performance
Summary
4 Raster
Editor
User
Interface:
Soft
key
Menu
5
Halftone
Scanning
Application
for
Previously-Screened
Originals
6
Scan
Parameter
Recommendations
7 7650 Pro
Imager
User
Interface

All
that
is
required
of
the
user
is
to
copy
the
Interpress
Master
out
to
a
local
printer.
The steps in
which
to
get
the
IP
Masters
is
as
follows:
1st Copy
the
Table
of
Contents
document
onto
your
workstation
from
the
following
file
server [Pennant:SD:Xerox I
ISO
Field Info/XPI
Demo Directory
ITraining
Documents I Step
By
Step Suppllemental
Training
Series I
SBS
IP
Masters].
2nd Copy
the
Table
of
Contents
from
your
desktop
to
a
networked
printer
that
is
capable
of
printing
large
bitmapped
images (1.5 MB
memory
or
more).
3rd Look
at
the
listing and
see
what
is
currently
available. Copy
the
specific
IP
Master
for
the
specific
SBS
document
to
your
de1sktop.
4th
Once
the
document
has been
printed,
take
the
two
pages and
put
them
on
the
copier
to
make a single
duplex
page. Put these pages
into
a
folder
for
future
reference.
NOTICE:
Be
aware
that
these
documents
are large files,
due
to
the
bitmap
frame
artwork
in each.
It
is
NOT advised
to
copy
the
entire
IP
Master
folder
onto
your
desktop
because
it
may
take
several hours
and kill
the
network.
Keep checking
the
file
drawer
for
additional
listings.
Expf~ct
10
new
SBS
document
topics each
month.
Please
take
a couple
of
minutes
to
copy
out
a
few
of
the
SBS
topics,
read
them
over,
try
some
of
the
suggestions and features,
and
then
let
me
know
what
you
think.
Any
suggestions, comments,
or
additional
topic
subjects
will
be graciously accepted. I
hope
that
all
of
you
take
advantage
of
this series,
both
for
your
own
bene1fit
and
that
of
you r customers.
If
there
are any questions
or
problems, please call
or
write:
Lee
Hedges:SD:Xerox
*843-7712
