Microsemi ZLK38AVS User Guide
Microsemi_ZLK38AVS_User_Guide
Microsemi_ZLK38AVS_User_Guide
User Manual: Pdf
Open the PDF directly: View PDF ![]() .
.
Page Count: 21

ZLK38AVS User Guide
Microsemi AcuEdge™ Development Kit for Amazon
AVS

ZLK38AVS User Guide Revision 3.0 i
Contents
1 Revision History . . . . . . . . . . . . . . . . . . . . . . . . . . . . . . . . . . . . . . . . . . . . . . . . . . . . . 1
1.1 Revision 3.0 . . . . . . . . . . . . . . . . . . . . . . . . . . . . . . . . . . . . . . . . . . . . . . . . . . . . . . . . . . . . . . . . . . . . . . . 1
1.2 Revision 2.0 . . . . . . . . . . . . . . . . . . . . . . . . . . . . . . . . . . . . . . . . . . . . . . . . . . . . . . . . . . . . . . . . . . . . . . . 1
1.3 Revision 1.0 . . . . . . . . . . . . . . . . . . . . . . . . . . . . . . . . . . . . . . . . . . . . . . . . . . . . . . . . . . . . . . . . . . . . . . . 1
2 Overview . . . . . . . . . . . . . . . . . . . . . . . . . . . . . . . . . . . . . . . . . . . . . . . . . . . . . . . . . . 2
2.1 Other References . . . . . . . . . . . . . . . . . . . . . . . . . . . . . . . . . . . . . . . . . . . . . . . . . . . . . . . . . . . . . . . . . . . 2
3 ZLK38AVS Development Kit Contents . . . . . . . . . . . . . . . . . . . . . . . . . . . . . . . . . . . 3
3.1 Hardware Provided . . . . . . . . . . . . . . . . . . . . . . . . . . . . . . . . . . . . . . . . . . . . . . . . . . . . . . . . . . . . . . . . . 3
3.2 Hardware Not Provided . . . . . . . . . . . . . . . . . . . . . . . . . . . . . . . . . . . . . . . . . . . . . . . . . . . . . . . . . . . . . . 3
3.3 Software . . . . . . . . . . . . . . . . . . . . . . . . . . . . . . . . . . . . . . . . . . . . . . . . . . . . . . . . . . . . . . . . . . . . . . . . . . 4
4 Hardware Assembly . . . . . . . . . . . . . . . . . . . . . . . . . . . . . . . . . . . . . . . . . . . . . . . . . 5
4.1 Pillar Assembly . . . . . . . . . . . . . . . . . . . . . . . . . . . . . . . . . . . . . . . . . . . . . . . . . . . . . . . . . . . . . . . . . . . . 5
4.2 Raspberry Pi Connections . . . . . . . . . . . . . . . . . . . . . . . . . . . . . . . . . . . . . . . . . . . . . . . . . . . . . . . . . . . . 6
5 ZLK38AVS Software Installation . . . . . . . . . . . . . . . . . . . . . . . . . . . . . . . . . . . . . . . . 8
5.1 Creating Raspbian Image . . . . . . . . . . . . . . . . . . . . . . . . . . . . . . . . . . . . . . . . . . . . . . . . . . . . . . . . . . . . 8
5.2 Raspberry Pi Software Installation . . . . . . . . . . . . . . . . . . . . . . . . . . . . . . . . . . . . . . . . . . . . . . . . . . . . . . 8
5.2.1 Downloading ZLK38AVS Software . . . . . . . . . . . . . . . . . . . . . . . . . . . . . . . . . . . . . . . . . . . . . . 9
5.2.2 Installing ZLK38AVS Software . . . . . . . . . . . . . . . . . . . . . . . . . . . . . . . . . . . . . . . . . . . . . . . . . 9
6 Amazon Developer Account Creation . . . . . . . . . . . . . . . . . . . . . . . . . . . . . . . . . . . 11
7 Demonstrating the ZLK380AVS (software) . . . . . . . . . . . . . . . . . . . . . . . . . . . . . . . 15
7.1 Starting AVS Software Demo . . . . . . . . . . . . . . . . . . . . . . . . . . . . . . . . . . . . . . . . . . . . . . . . . . . . . . . . . 15
7.2 Installation Troubleshooting . . . . . . . . . . . . . . . . . . . . . . . . . . . . . . . . . . . . . . . . . . . . . . . . . . . . . . . . . . 16
7.2.1 Credential Error . . . . . . . . . . . . . . . . . . . . . . . . . . . . . . . . . . . . . . . . . . . . . . . . . . . . . . . . . . . . 16
7.2.2 Token Error . . . . . . . . . . . . . . . . . . . . . . . . . . . . . . . . . . . . . . . . . . . . . . . . . . . . . . . . . . . . . . . 16
8 Uninstalling the ZLK38AVS Software . . . . . . . . . . . . . . . . . . . . . . . . . . . . . . . . . . . 17
8.1 Reconfiguring the ZLK38AVS Software . . . . . . . . . . . . . . . . . . . . . . . . . . . . . . . . . . . . . . . . . . . . . . . . . 17

ZLK38AVS User Guide Revision 3.0 ii
Figures
Figure 1 ZLK38AVS Development Kit Contents . . . . . . . . . . . . . . . . . . . . . . . . . . . . . . . . . . . . . . . . . . . . . . . 3
Figure 2 Raspberry Pi and ZLE38AVS Evaluation Board . . . . . . . . . . . . . . . . . . . . . . . . . . . . . . . . . . . . . . . . 3
Figure 3 Mounted Raspberry Pi with standoffs attached . . . . . . . . . . . . . . . . . . . . . . . . . . . . . . . . . . . . . . . . . 5
Figure 4 ZLE38AVS board with standoffs attached . . . . . . . . . . . . . . . . . . . . . . . . . . . . . . . . . . . . . . . . . . . . . 5
Figure 5 ZLE38AVS board attached to mounted Raspberry Pi . . . . . . . . . . . . . . . . . . . . . . . . . . . . . . . . . . . . 5
Figure 6 Pillar with speaker attached. . . . . . . . . . . . . . . . . . . . . . . . . . . . . . . . . . . . . . . . . . . . . . . . . . . . . . . . 6
Figure 7 Speaker plugged in to ZLE38AVS board. . . . . . . . . . . . . . . . . . . . . . . . . . . . . . . . . . . . . . . . . . . . . . 6
Figure 8 Raspberry Pi connections . . . . . . . . . . . . . . . . . . . . . . . . . . . . . . . . . . . . . . . . . . . . . . . . . . . . . . . . . 7
Figure 9 Raspbian download page . . . . . . . . . . . . . . . . . . . . . . . . . . . . . . . . . . . . . . . . . . . . . . . . . . . . . . . . . 8
Figure 10 Etcher Disk Imager example . . . . . . . . . . . . . . . . . . . . . . . . . . . . . . . . . . . . . . . . . . . . . . . . . . . . . . . 8
Figure 11 Downloading ZLK38AVS software. . . . . . . . . . . . . . . . . . . . . . . . . . . . . . . . . . . . . . . . . . . . . . . . . . . 9
Figure 12 Sensory License Agreement . . . . . . . . . . . . . . . . . . . . . . . . . . . . . . . . . . . . . . . . . . . . . . . . . . . . . . . 9
Figure 13 Amazon Developer Account . . . . . . . . . . . . . . . . . . . . . . . . . . . . . . . . . . . . . . . . . . . . . . . . . . . . . . . 9
Figure 14 Chromium on Raspberry Pi . . . . . . . . . . . . . . . . . . . . . . . . . . . . . . . . . . . . . . . . . . . . . . . . . . . . . . . 10
Figure 15 Sample App Autoboot Option . . . . . . . . . . . . . . . . . . . . . . . . . . . . . . . . . . . . . . . . . . . . . . . . . . . . . 10
Figure 16 Completed installation . . . . . . . . . . . . . . . . . . . . . . . . . . . . . . . . . . . . . . . . . . . . . . . . . . . . . . . . . . . 10
Figure 17 Alexa Voice Service website . . . . . . . . . . . . . . . . . . . . . . . . . . . . . . . . . . . . . . . . . . . . . . . . . . . . . . 11
Figure 18 Amazon sign-in . . . . . . . . . . . . . . . . . . . . . . . . . . . . . . . . . . . . . . . . . . . . . . . . . . . . . . . . . . . . . . . . 11
Figure 19 Apps distribution agreement . . . . . . . . . . . . . . . . . . . . . . . . . . . . . . . . . . . . . . . . . . . . . . . . . . . . . . 12
Figure 20 Get Started . . . . . . . . . . . . . . . . . . . . . . . . . . . . . . . . . . . . . . . . . . . . . . . . . . . . . . . . . . . . . . . . . . . 12
Figure 21 Alexa Voice Service Selection . . . . . . . . . . . . . . . . . . . . . . . . . . . . . . . . . . . . . . . . . . . . . . . . . . . . . 13
Figure 22 New Profile . . . . . . . . . . . . . . . . . . . . . . . . . . . . . . . . . . . . . . . . . . . . . . . . . . . . . . . . . . . . . . . . . . . 14
Figure 23 Amazon Developer Account URLs . . . . . . . . . . . . . . . . . . . . . . . . . . . . . . . . . . . . . . . . . . . . . . . . . 14
Figure 24 Alexa Start Screen. . . . . . . . . . . . . . . . . . . . . . . . . . . . . . . . . . . . . . . . . . . . . . . . . . . . . . . . . . . . . . 15
Figure 25 Amazon URL Error . . . . . . . . . . . . . . . . . . . . . . . . . . . . . . . . . . . . . . . . . . . . . . . . . . . . . . . . . . . . . 16
Figure 26 Amazon Identifiers Error . . . . . . . . . . . . . . . . . . . . . . . . . . . . . . . . . . . . . . . . . . . . . . . . . . . . . . . . . 16

Revision History
ZLK38AVS User Guide Revision 3.0 1
1 Revision History
The revision history describes the changes that were implemented in the document. The changes are
listed by revision, starting with the most current publication.
1.1 Revision 3.0
Revision 3.0 was published in November 2017. The following is a summary of changes made in this
revision.
• Software installation steps were updated. For more information, see ZLK38AVS Software
Installation, page 8.
• Developer account creation was updated. For more information, see Amazon Developer Account
Creation, page 11.
• A new Alexa app was added. For more information, see Demonstrating the ZLK380AVS (software),
page 15.
• Installation troubleshooting details were added. For more information, see Installation
Troubleshooting, page 16.
• Steps to reconfigure the software were added. For more information, see Reconfiguring the
ZLK38AVS Software, page 17.
1.2 Revision 2.0
Revision 2.0 was published in May 2017. It was the first publication of this document.
1.3 Revision 1.0
Revision 1.0 was published in April 2017. It was a preliminary publication of this document.

Overview
ZLK38AVS User Guide Revision 3.0 2
2 Overview
Microsemi AcuEdge™ Development Kit for Amazon AVS is engineered to help you evaluate voice-
enabled front-end audio systems for your Alexa-enabled products. This kit features Microsemi's ZL38063
voice processor powered by Microsemi's proprietary AcuEdge™ technology for front-end audio clean-up
and Sensory's TrulyHandsFree™ "Alexa" wake-word engine. Two separate microphone configurations
allow you to test applications with 180° or 360°.
This document walks you through all the steps of building an Alexa-powered prototype using Microsemi's
ZLK38AVS development kit and a Raspberry Pi. It takes you from setting up the ZLK38AVS kit,
integrating it with an 'Alexa' wake word engine and connecting to the Alexa Voice Services (AVS) cloud.
Once completed you will have an Alexa-enabled application that will function like an Amazon Echo.
2.1 Other References
The following are documents you may want to refer to when using this guide. These documents can be
found on the Microsemi Audio Processing GitHub for the ZLK38AVS:
• ZLK38AVS Quick Start Guide
• ZLK38AVS Product Brief
• ZLE38AVS Evaluation Board Hardware Guide
• ZL38063 Product Brief
• ZLS38100 Microsemi VProc SDK Documentation
ZLK38AVS Development Kit Contents
ZLK38AVS User Guide Revision 3.0 3
3 ZLK38AVS Development Kit Contents
The ZLK38AVS development kit is shipped with some of the required hardware while other hardware
must be provided by the user. All the software for the ZLK38AVS development kit is provided through
GitHub.
3.1 Hardware Provided
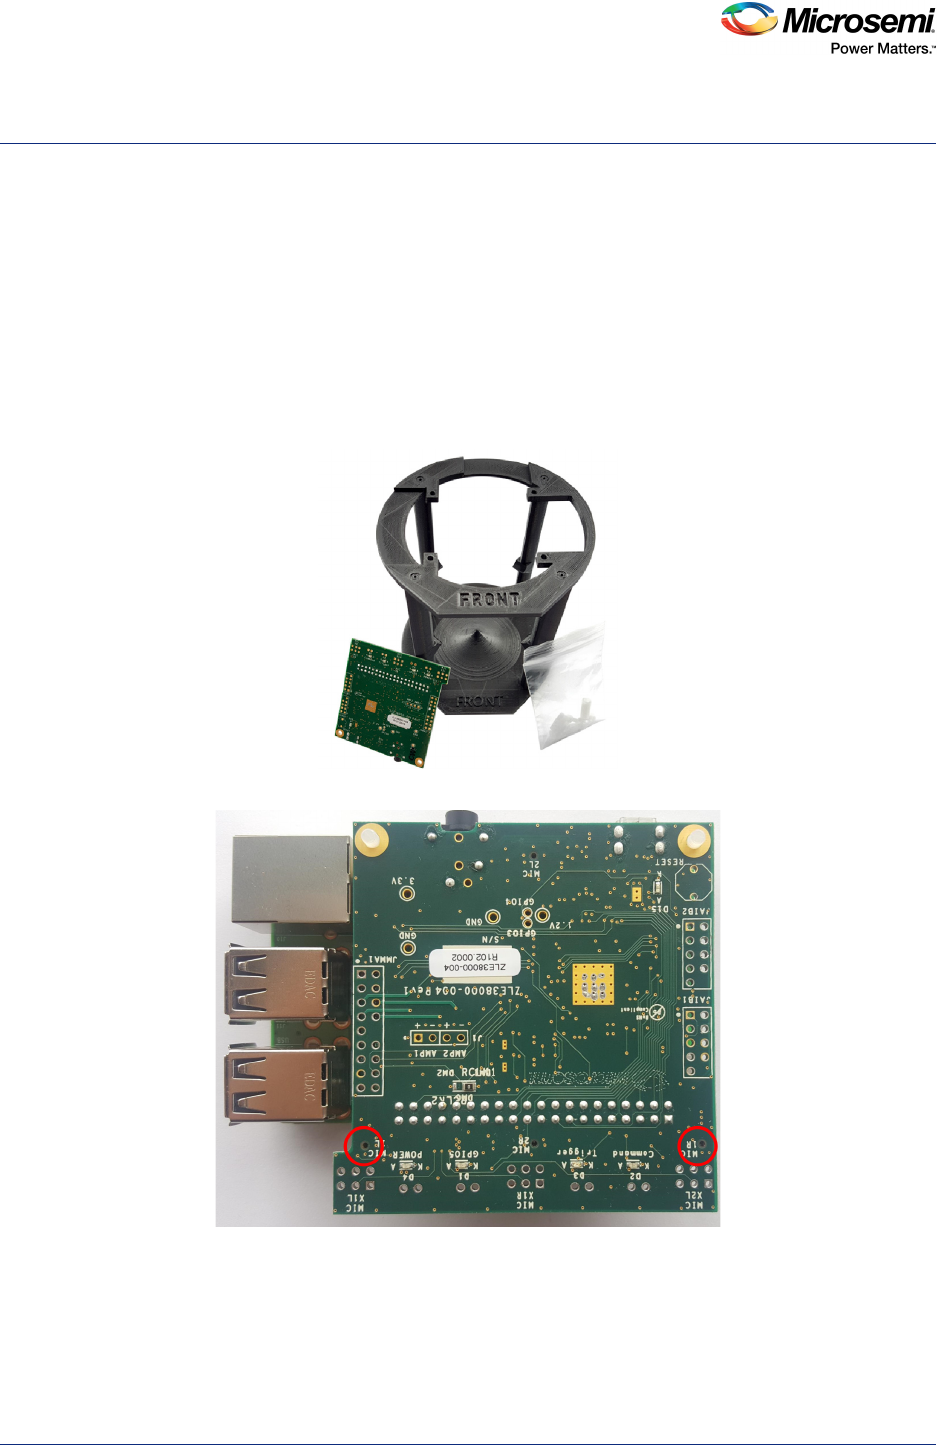
The following hardware is provided in the ZLK38AVS Development Kit:
1. ZLE38AVS evaluation board
2. Pillar (speaker and Raspberry Pi plastic stand)
3. Plastic standoffs and screws
Figure 1 • ZLK38AVS Development Kit Contents
Figure 2 • Raspberry Pi and ZLE38AVS Evaluation Board
3.2 Hardware Not Provided
The following hardware is needed to run the ZLK38AVS demonstration and needs to be provided by the
user of the development kit:

ZLK38AVS Development Kit Contents
ZLK38AVS User Guide Revision 3.0 4
1. Raspberry Pi 3
2. 2 A or greater power supply for the Raspberry Pi 3 (power can be provided through a USB3/Micro-
USB connection from a PC).
3. Micro SD card (8 GB or higher; a card with a 90 MB/s or greater read speed is recommended)
4. External Speaker with a 3.5 mm jack (the example in Figure 6, page 6 is the JBL Clip speaker,
available from Amazon at https://www.amazon.com/gp/product/B00KH636V2/)
5. USB keyboard and mouse
6. HDMI monitor and cable
7. Ethernet Cable (or WiFi) for Internet connection
Note: The monitor, keyboard, and mouse connections are optional if using VNC (or similar) to connect to the
Raspberry Pi.
3.3 Software
The following software for the ZLK38AVS Development Kit is provided through GitHub:
1. A make file which installs all the required software
2. The latest Timberwolf device series Voice Processing Software Development Kit (SDK), which is a
collection of software, tools, code examples, and documents for rapid development with the
Microsemi's Timberwolf device series.
3. A Firmware Loader Application that makes use of the Voice Processing SDK functions to load the
firmware into the ZL38063 device.
Note: During the ZLK38AVS installation, the software will download the “avs-device-sdk” from Amazon and the
“alexa-rpi” model from Sensory.
Hardware Assembly
ZLK38AVS User Guide Revision 3.0 5
4 Hardware Assembly
To assemble the ZLK38AVS kit the following instructions should be followed:
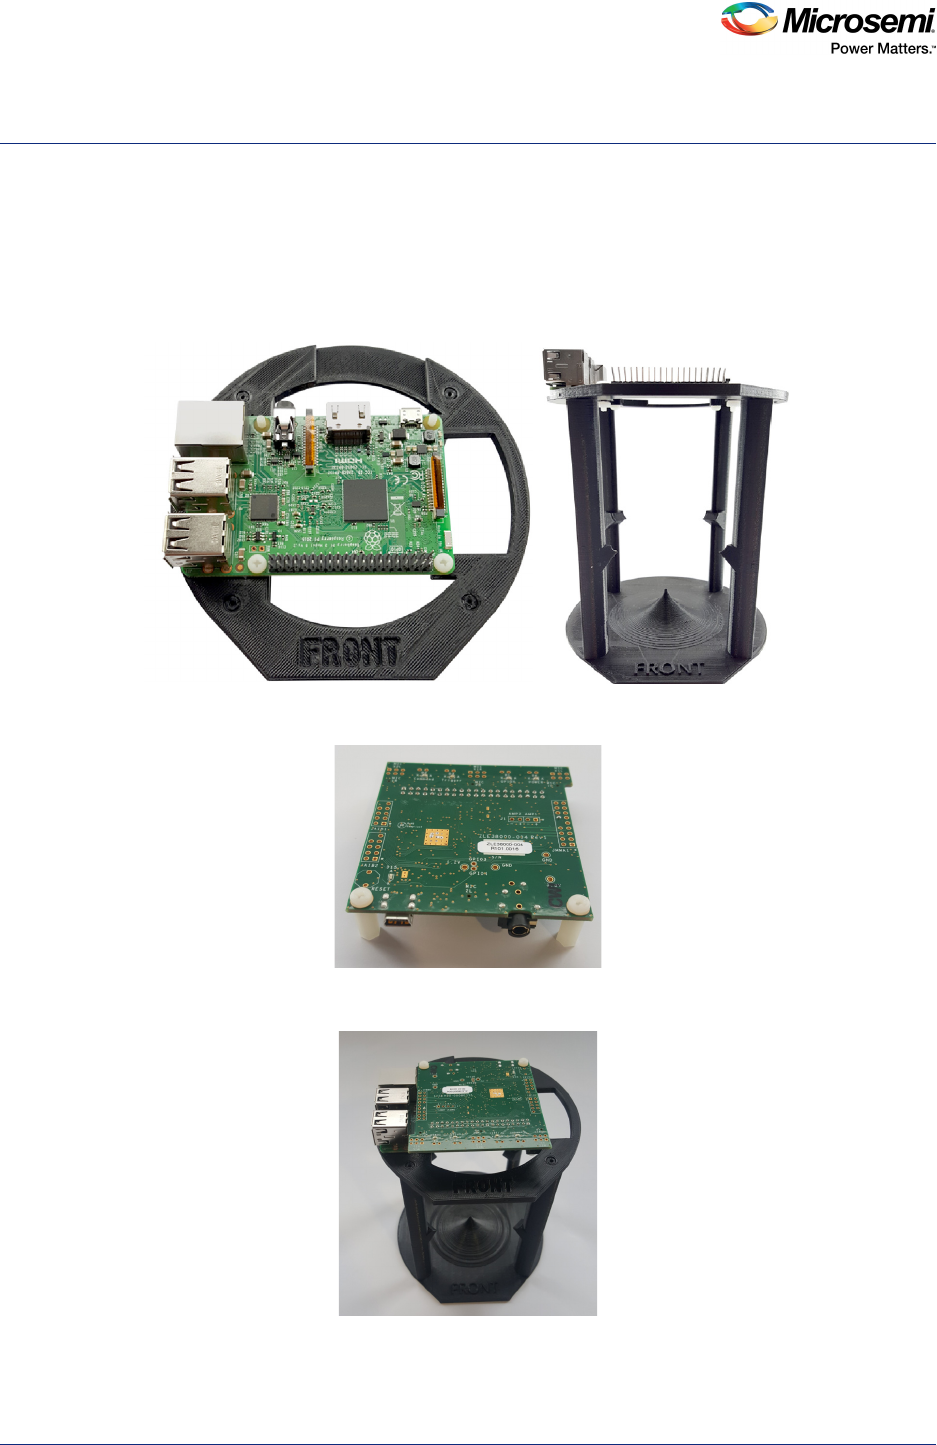
4.1 Pillar Assembly
1. Screw in the Raspberry Pi onto the front side of the Raspberry Pi mounting ring and add the 2nd set
of standoffs
Figure 3 • Mounted Raspberry Pi with standoffs attached
2. Add the standoffs to the ZLE38AVS evaluation board
Figure 4 • ZLE38AVS board with standoffs attached
3. Plug in the ZLE38AVS evaluation board and add the remaining screws
Figure 5 • ZLE38AVS board attached to mounted Raspberry Pi
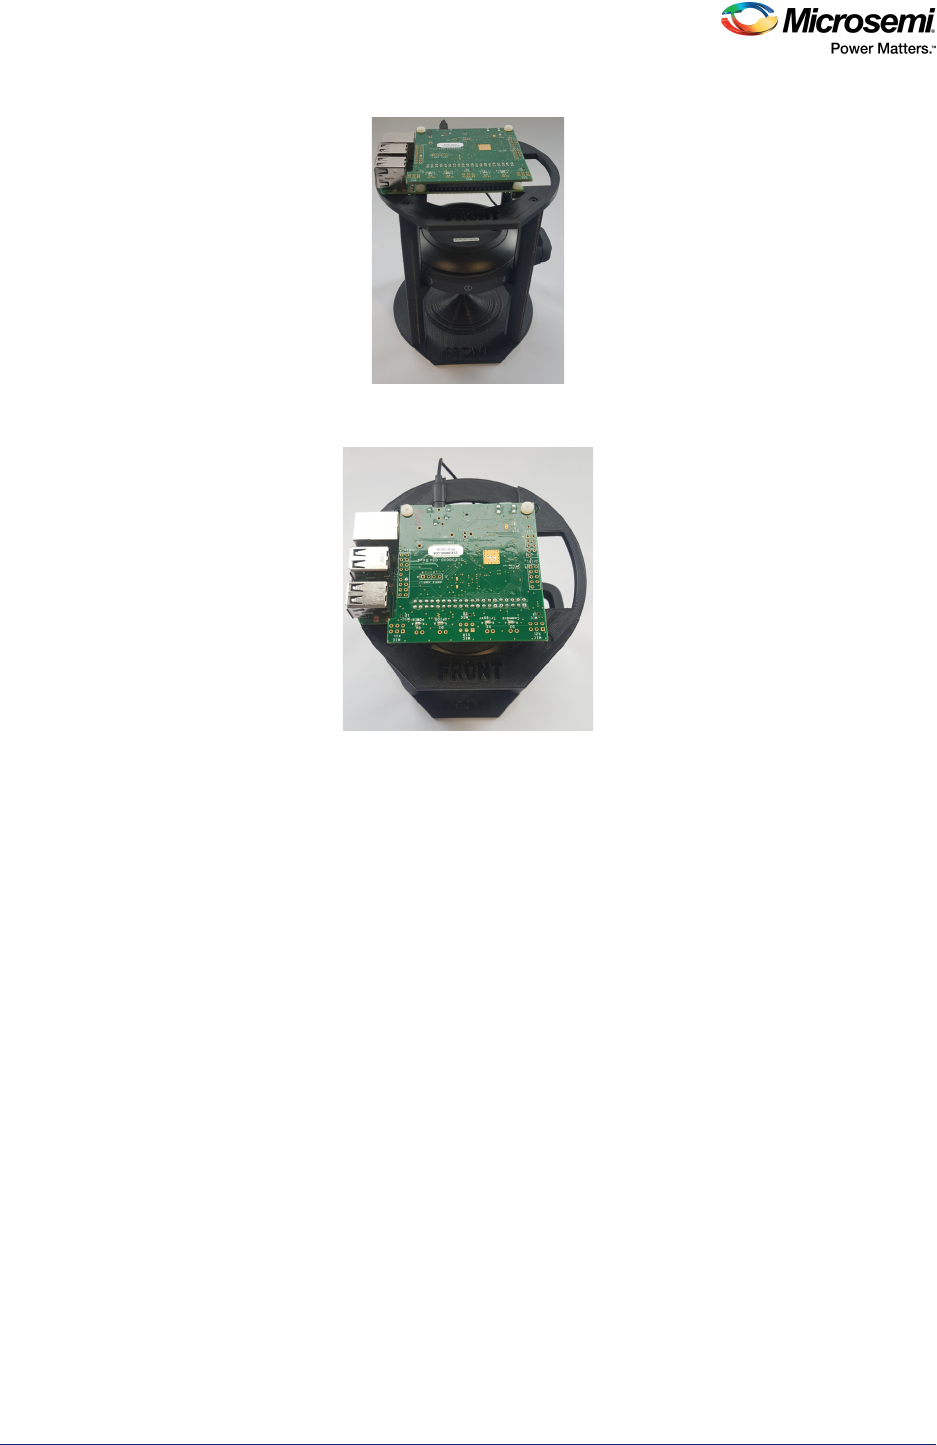
4. Place the speaker facing downwards into the lower plastics
Hardware Assembly
ZLK38AVS User Guide Revision 3.0 6
Figure 6 • Pillar with speaker attached
5. Plug in the speaker to the ZLE38AVS evaluation board
Figure 7 • Speaker plugged in to ZLE38AVS board
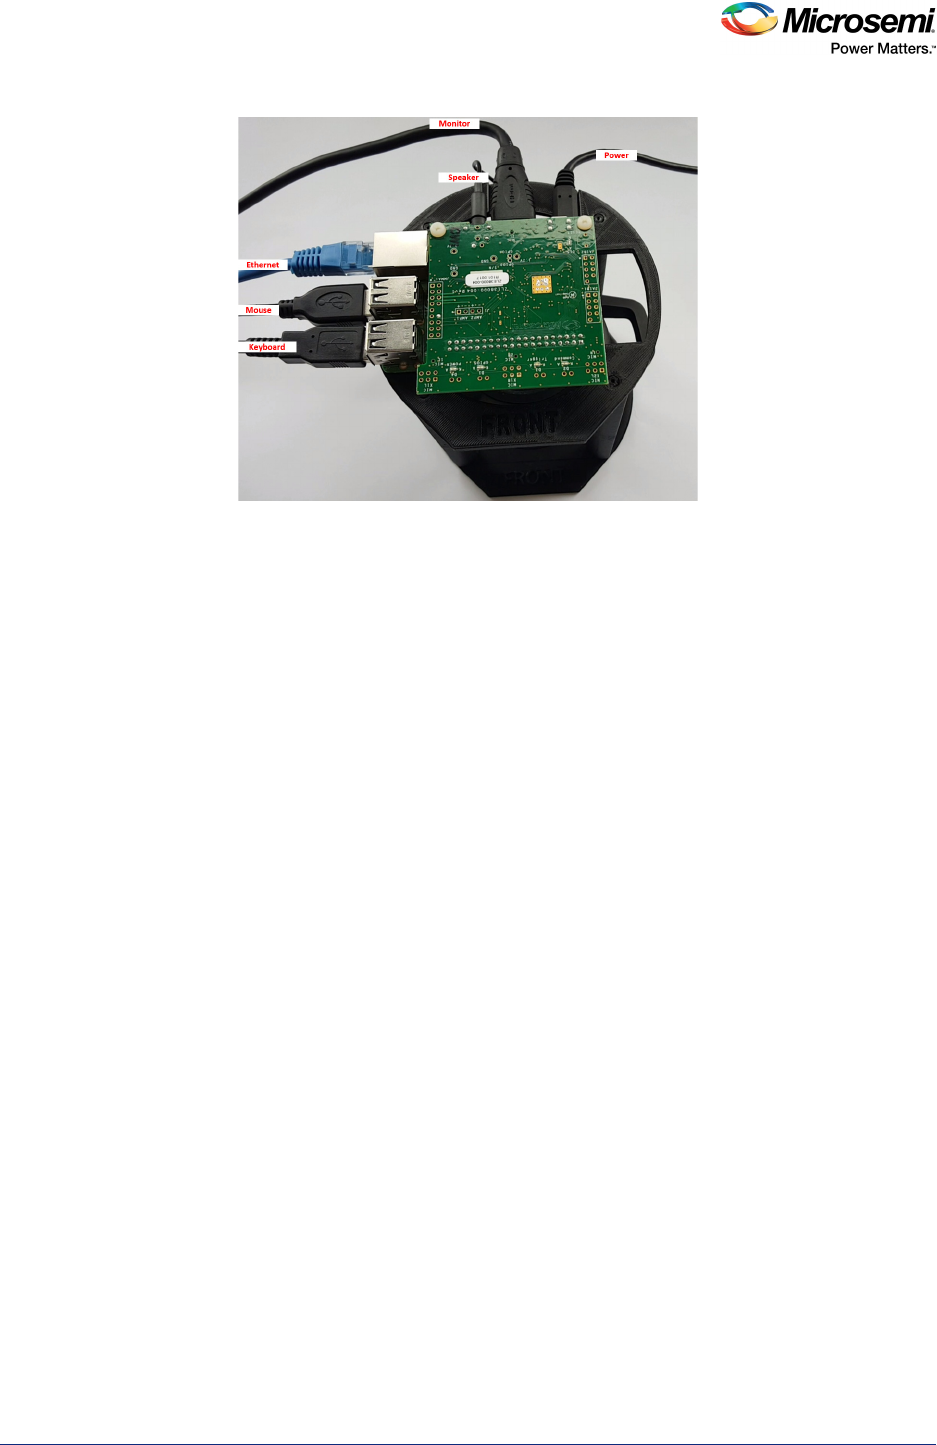
4.2 Raspberry Pi Connections
1. Connect an HDMI monitor to the Raspberry Pi
2. Connect a USB mouse and keyboard to USB ports of the Raspberry Pi
3. Connect the Raspberry Pi to your network with an Ethernet cable or Wi-Fi
4. Flash image onto the SD card using the Wind32Diskimager application (see Creating Raspbian
Image, page 8)
5. Insert the SD card into the SD card slot of the Raspberry Pi
6. Connect a compatible 5V power supply to the Raspberry Pi’s Micro-USB port in order to power up
the Raspberry Pi
Note: The monitor, keyboard, and mouse connections are optional if using VNC (or similar) to connect to the
Raspberry Pi
Hardware Assembly
ZLK38AVS User Guide Revision 3.0 7
Figure 8 • Raspberry Pi connections

ZLK38AVS Software Installation
ZLK38AVS User Guide Revision 3.0 8
5 ZLK38AVS Software Installation
There are two steps to installing the software on the Raspberry Pi:
1. Creating Raspbian image: This step is performed on a separate PC.
2. Raspberry Pi Software Installation: This step downloads the installation scripts and installs the
Microsemi, Amazon, and Sensory software onto the Raspberry Pi. This step requires a monitor,
keyboard, and mouse connected to the Raspberry Pi, or a VNC (or similar) connection to the
Raspberry Pi in order to control and monitor the installation process.
5.1 Creating Raspbian Image
Raspbian Stretch with Pixel is the operating system that will be installed on the SD card. On a separate
PC, follow the steps below:
1. Format the SD card to FAT32 to ensure you are starting with an empty card.
2. Download and install Etcher from https://etcher.io/.
3. Download Raspbian Stretch with Desktop from https://www.raspberrypi.org/downloads/raspbian.
Figure 9 • Raspbian download page
4. Write the image to the SD card using Etcher.
Figure 10 • Etcher Disk Imager example
5. Once the card has been written, exit Etcher and install the SD card into the Raspberry Pi.
5.2 Raspberry Pi Software Installation
Once the Raspberry Pi is up and running, make sure it is connected to the Internet by opening up the
web browser. Open a terminal window and change into your desired working directory, or create one.
ZLK38AVS Software Installation
ZLK38AVS User Guide Revision 3.0 9
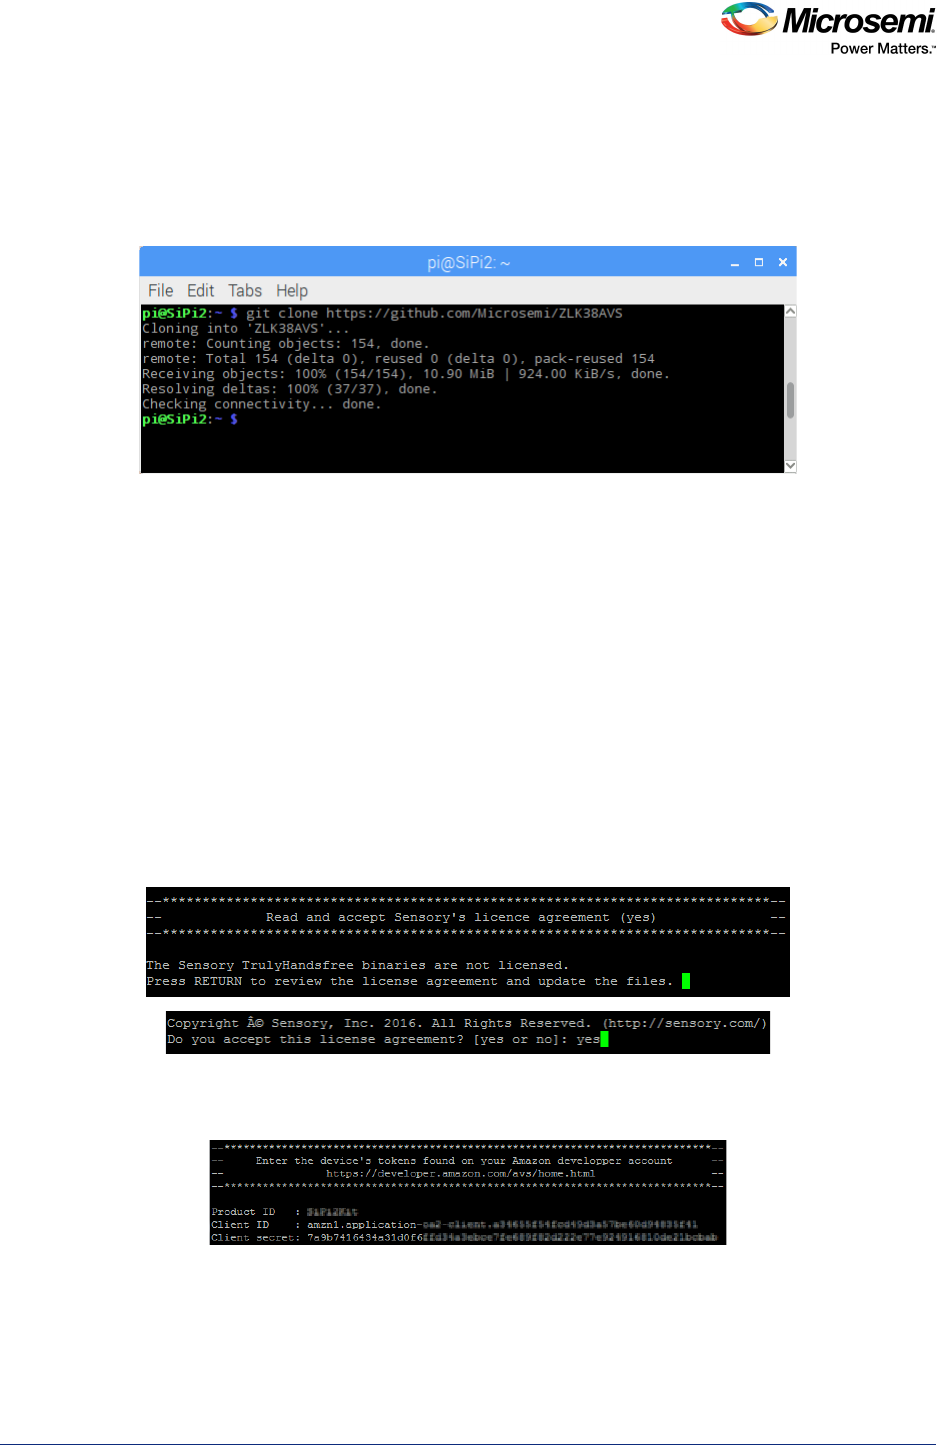
5.2.1 Downloading ZLK38AVS Software
The Microsemi software for the ZLK38AVS kit can be found on the Microsemi Voice Processing GitHub
repository. To download the repository on your Raspberry Pi run the following command:
git clone https://github.com/Microsemi/ZLK38AVS
Figure 11 • Downloading ZLK38AVS software
Note: git is installed by default with the Latest Raspian Stretch, but it can also be installed using the command:
sudo apt-get install git
5.2.2 Installing ZLK38AVS Software
1. cd into the location where the GitHub package was downloaded.
cd ZLK38AVS/
2. Run “make all” command.
Note: During “make all” the makefile will automatically download the all the necessary packages and
dependencies (about 250 MB), expect the total installation to take 20 minutes to 30 minutes with an
average connection.
While this step is running, it may be a good time to create your Amazon account. You will need
information from the creation of your Amazon account later in the software installation (See Amazon
Developer Account Creation, page 11).
3. When prompted, review and accept the Sensory license agreement. Press Enter and Space a few
times until you reach the end of the agreement and then type “yes” and press Enter.
Figure 12 • Sensory License Agreement
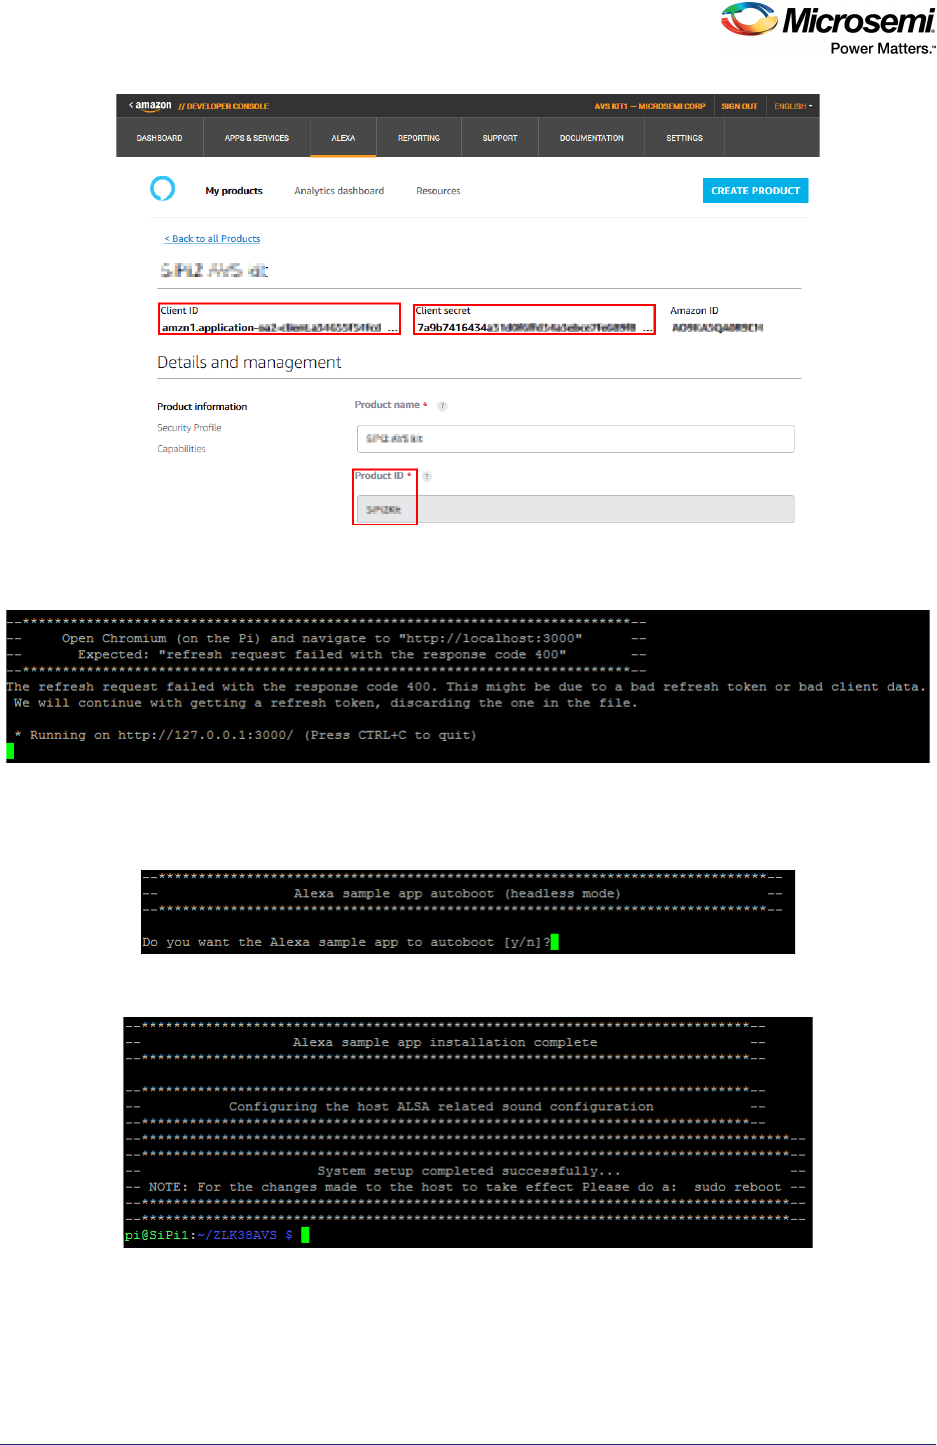
4. When prompted, enter the Product ID, Client ID, and Client Secret from your Amazon Developer
Account (see Amazon Developer Account Creation, page 11).
Figure 13 • Amazon Developer Account
ZLK38AVS Software Installation
ZLK38AVS User Guide Revision 3.0 10
5. After you enter the requested IDs, the makefile will ask you to open Chromium on the Raspberry Pi.
Browse to http://localhost:3000, log in with your Amazon credentials, and follow the instructions.
Figure 14 • Chromium on Raspberry Pi
6. When prompted, you can choose to start the Alexa sample app automatically when the Raspberry Pi
boots up (no need to have a screen connected or VNC). In headless mode, the speaker plays a
short alarm sound to notify the user when Alexa is ready after boot-up.
Figure 15 • Sample App Autoboot Option
7. A successfully completed installation should show the following message.
Figure 16 • Completed installation
8. Upon the completion of the ZLK38AVS kit installation, issue a reboot command to reboot the
Raspberry Pi and complete the installation of the required software for the ZLK38AVS
demonstration.
sudo reboot
Amazon Developer Account Creation
ZLK38AVS User Guide Revision 3.0 11
6 Amazon Developer Account Creation
An Amazon developer account is needed in order to run the ZLK38AVS demonstration kit. The
instructions below describe the steps required to create an account to use with the ZLK38AVS
demonstration kit.
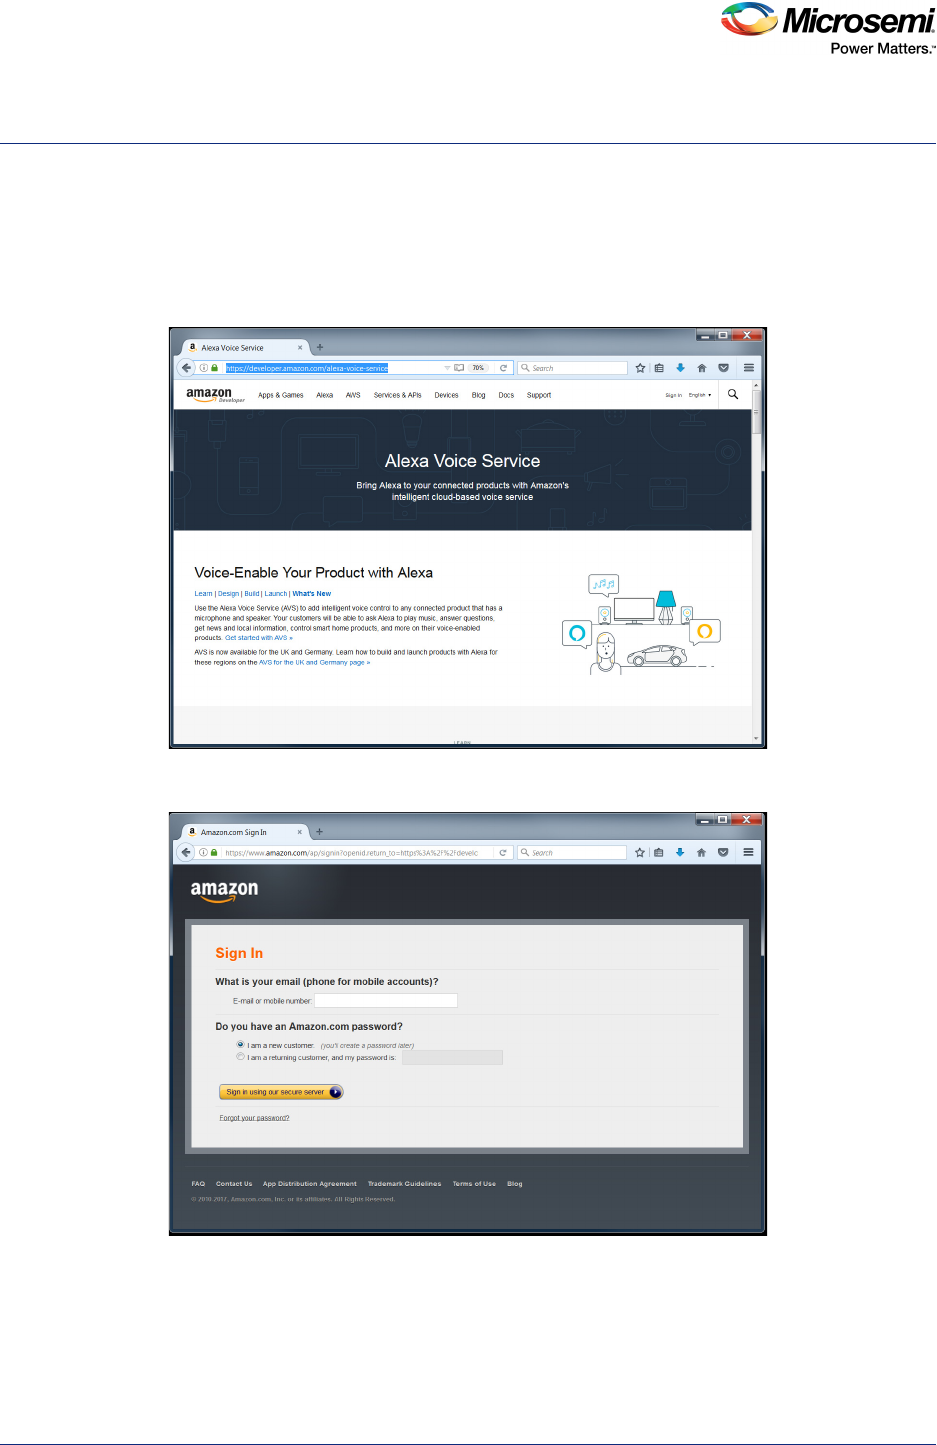
1. Go to https://developer.amazon.com/alexa-voice-service.
Figure 17 • Alexa Voice Service website
2. Click Sign-in on the top right of the screen.
Figure 18 • Amazon sign-in
3. Either sign-in with your account, or create a new account if a new customer. Fill out the registration
forms as requested by Amazon.
Amazon Developer Account Creation
ZLK38AVS User Guide Revision 3.0 12
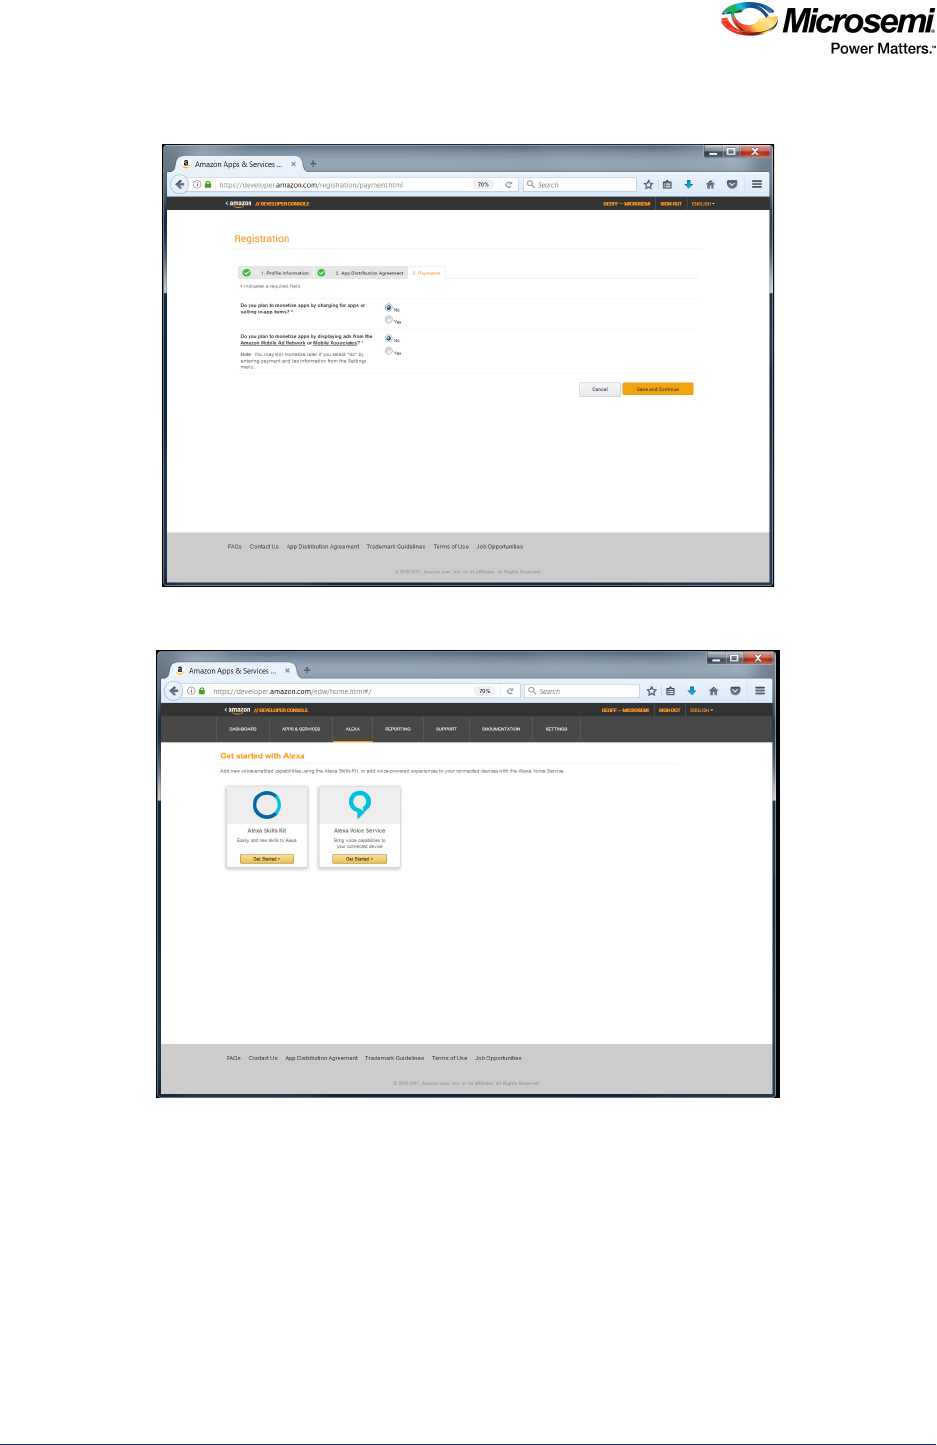
4. When prompted for information on the Apps Distribution Agreement select No for both options:
Figure 19 • Apps distribution agreement
5. Select Alexa on the top navigation bar.
Figure 20 • Get Started
Amazon Developer Account Creation
ZLK38AVS User Guide Revision 3.0 13
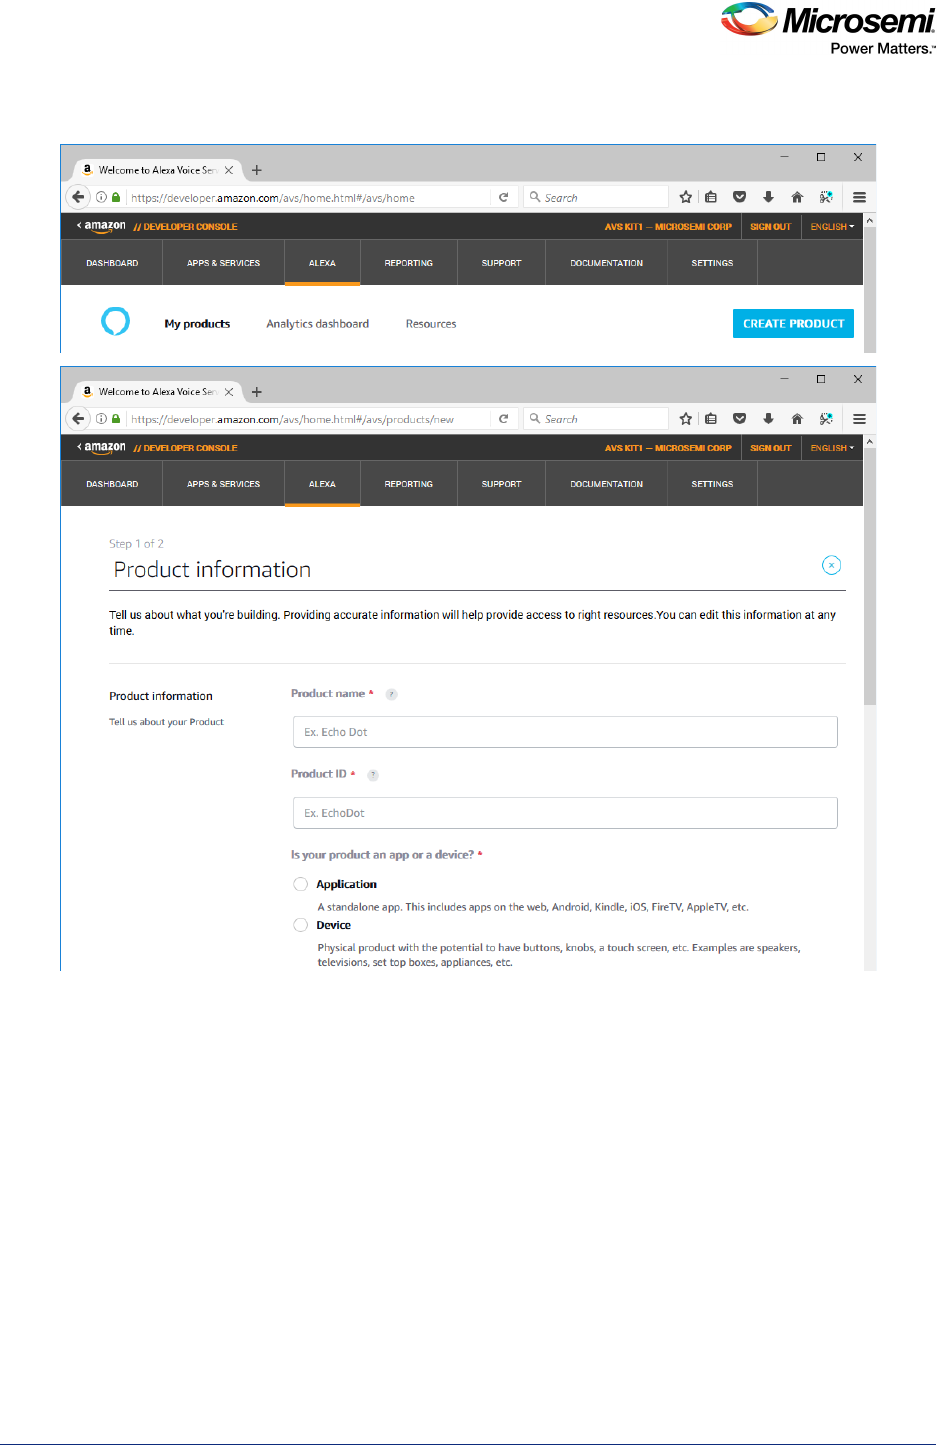
6. Select Alexa Voice service and Create Product using the following entry guidelines.
Figure 21 • Alexa Voice Service Selection
a. Product Name: Name that will appear in your device list to describe it
b. Product ID: This will be the Device ID during installation (no spaces)
c. Is your product an app or a device? Device
d. Will your device use a companion app? No
e. Product category: wireless speakers
f. Brief product description: Enter description
g. How will end users interact with your product? Hands-free
h. Do you intend to distribute this product commercially? No
i. Is this a children’s product or is it otherwise directed to children younger than 13 years old?
No
j. Next
Amazon Developer Account Creation
ZLK38AVS User Guide Revision 3.0 14
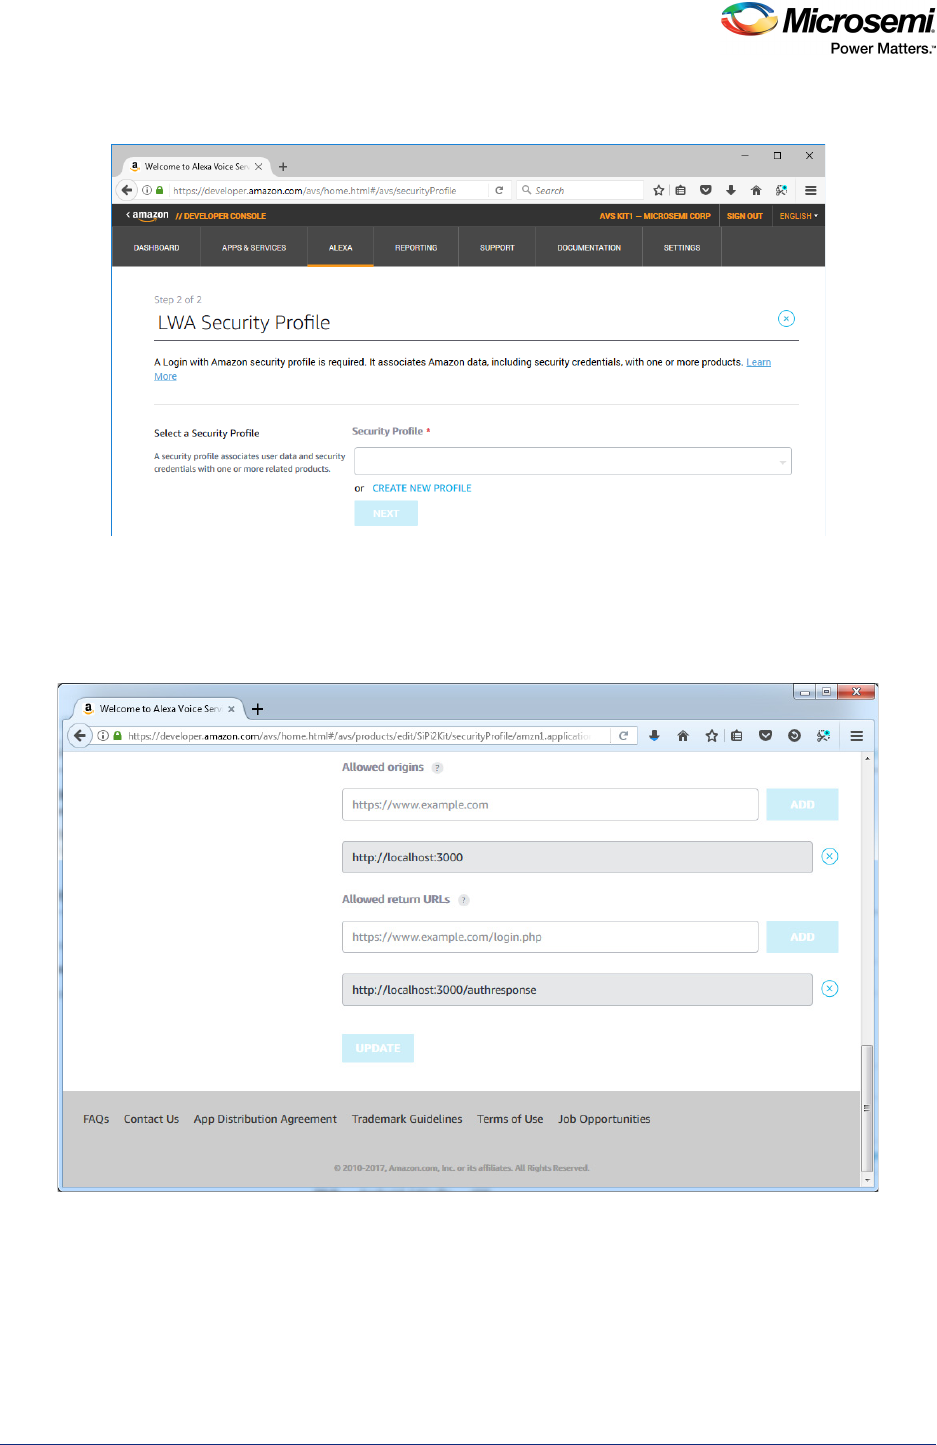
7. Select Create new profile
Figure 22 • New Profile
a. Security Profile Name: Name that refers to the device created
b. Security Profile Description: Enter description
c. Next
8. Update the URLs (don’t forget to click ADD after each entry).
Figure 23 • Amazon Developer Account URLs
a. Allowed origins: http://localhost:3000
b. Allowed return URLs: http://localhost:3000/authresponse
c. I agree...
d. Finish
You have now created the Amazon Developer account and a device.
Demonstrating the ZLK380AVS (software)
ZLK38AVS User Guide Revision 3.0 15
7 Demonstrating the ZLK380AVS (software)
After installing the software (See ZLK38AVS Software Installation, page 8) and rebooting the Raspberry
Pi, you can now demonstrate Alexa Voice Services.
The ZLK38AVS supports two separate microphone configurations: 180° or 360°. The ZLK38AVS default
installation uses the 180° configuration. To change the configuration, see Changing ZL38063
Microphone Mode, page 19.
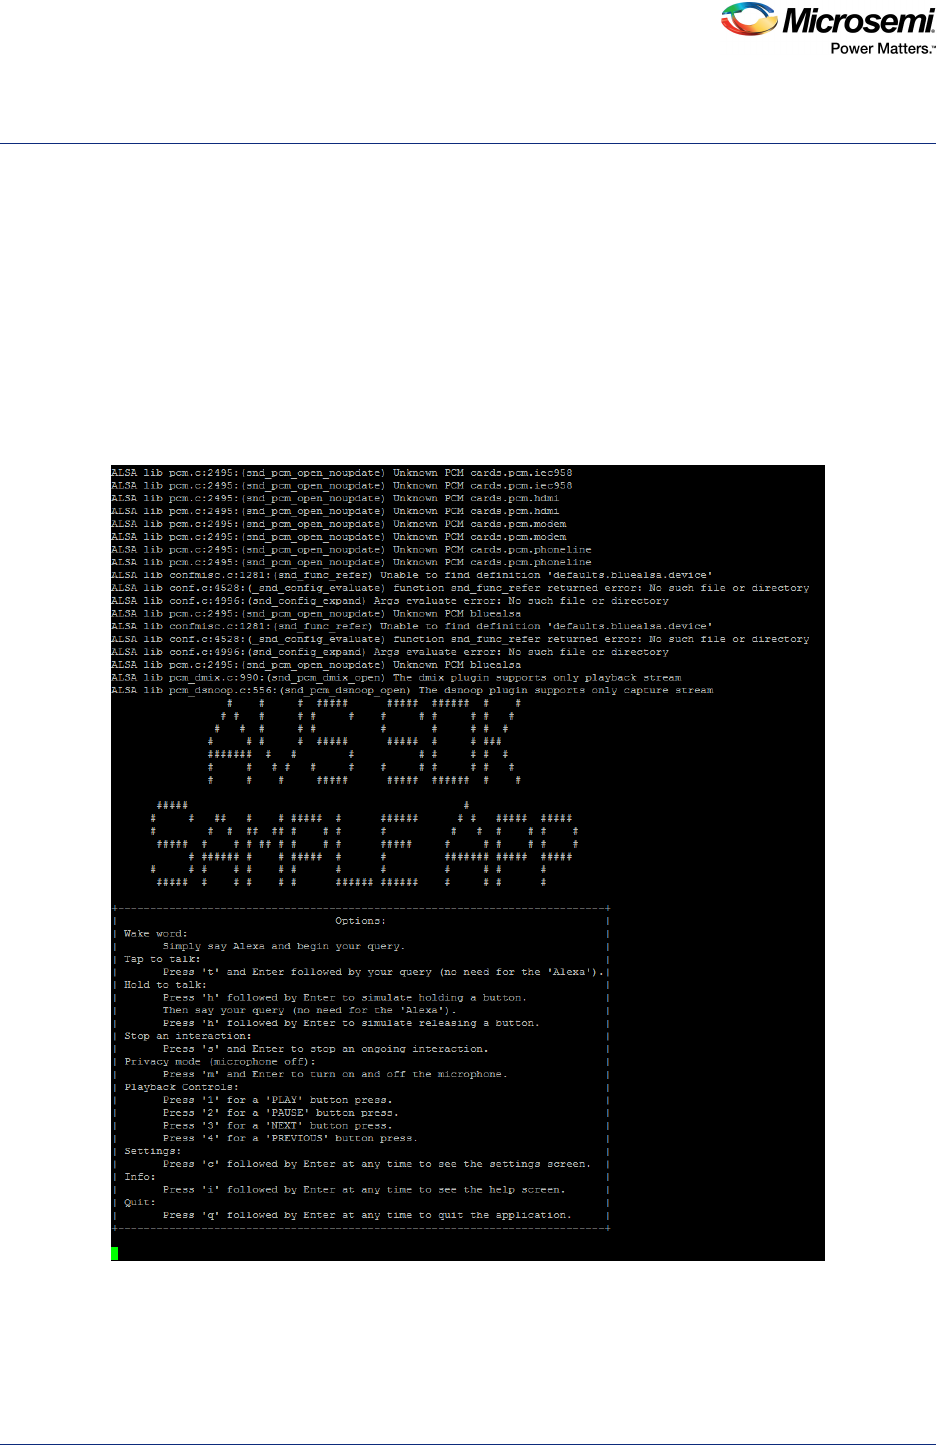
7.1 Starting AVS Software Demo
1. cd into the location where the GitHub package was downloaded. (eg: cd ZLK38AVS/)
2. Issue the following make command to start the AVS software:
make start_alexa
Figure 24 • Alexa Start Screen
3. Turn on the speaker (using power button on the speaker bezel) and set the volume to maximum
using the “+” button on the bezel.
Note: The speaker has an auto-turn-off feature to save battery life, so before testing the unit, make sure to turn
the speaker on, if switched off.
Demonstrating the ZLK380AVS (software)
ZLK38AVS User Guide Revision 3.0 16
4. At this point Alexa is ready to accept commands. Try a few quick commands like “Alexa, what time is
it?” or “Alexa, what is the capital of Peru?” to confirm the software and hardware are activated. A
full list of Alexa Voice commands can be found at https://www.cnet.com/how-to/the-complete-list-of-
alexa-commands/.
Note: Some commands listed on the above website require accounts on the desired services (eg. Pandora
stations).
7.2 Installation Troubleshooting
This section lists the commonly encountered installation errors.
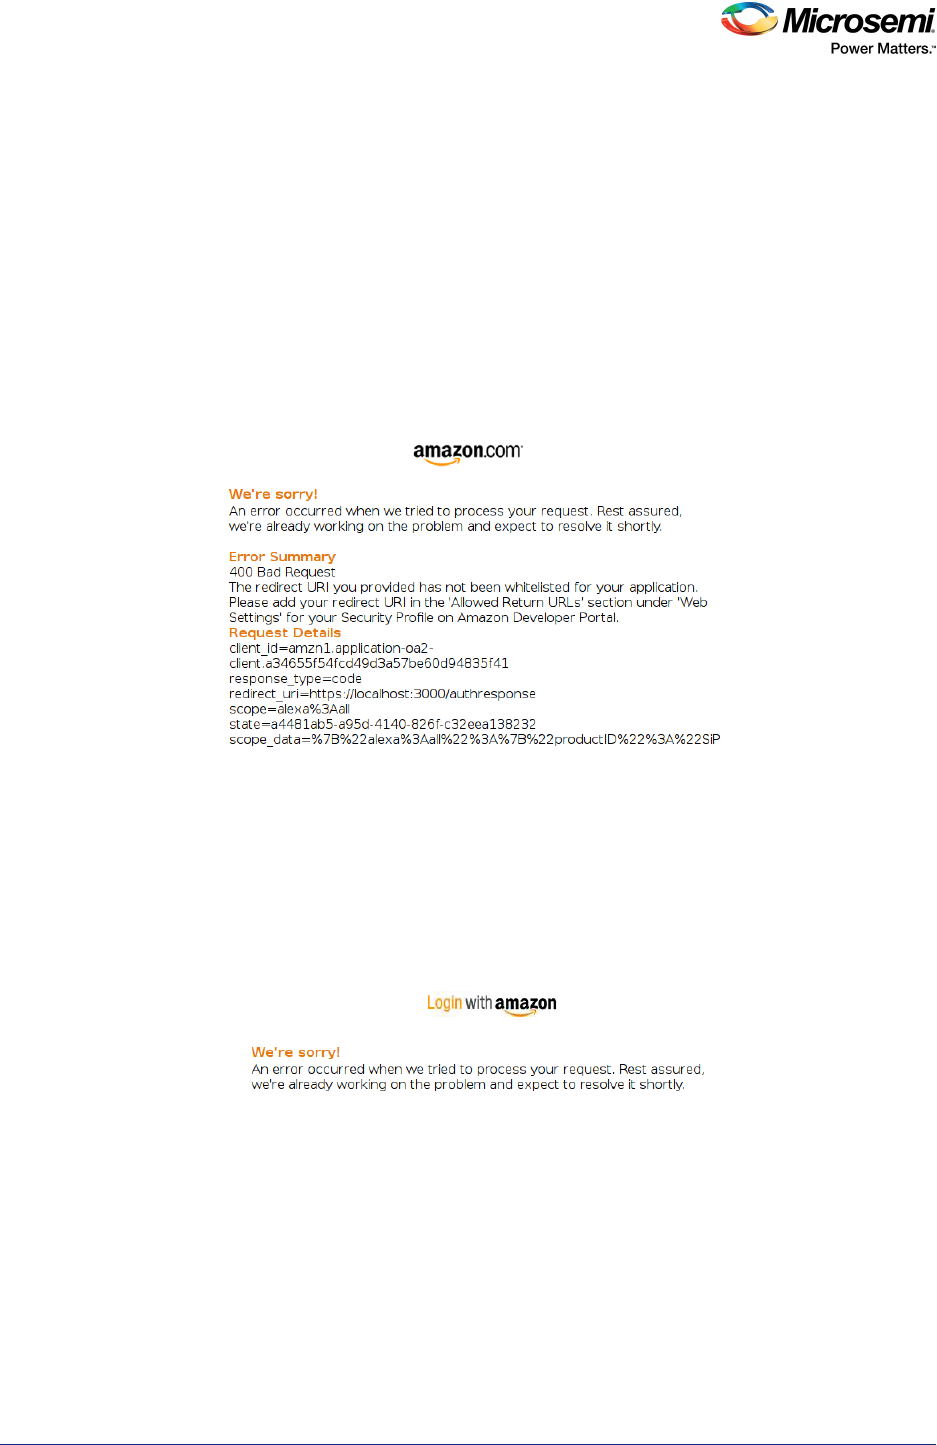
7.2.1 Credential Error
If the web page doesn’t ask for your credentials, as described in step 4 in ZLK38AVS Software
Installation, page 8, and displays the following error message,
Figure 25 • Amazon URL Error
a. Check the URLs. For more information, see step 8 in Amazon Developer Account Creation,
page 11.
b. Enter the proper Allowed origins and Allowed return URLs
c. Restart the Raspberry Pi
d. Start the demo again
7.2.2 Token Error
If the web page displays the following error message after you enter your credentials,
Figure 26 • Amazon Identifiers Error
a. Open the Chromium browser on the Raspberry Pi
b. Log in to your Amazon developer account and navigate to your Amazon device properties as
shown in step 4 in ZLK38AVS Software Installation, page 8.
c. From a Raspberry Pi console in the ZLK38AVS folder update your Amazon tokens
make avs_config
d. Copy/Paste your device identifiers when asked as described in step 4 in ZLK38AVS Software
Installation, page 8.
e. Start the demo again

Uninstalling the ZLK38AVS Software
ZLK38AVS User Guide Revision 3.0 17
8 Uninstalling the ZLK38AVS Software
The Pi can be returned back to its state prior to the installation of the ZLK38AVS SDK install. To do this
run the following command in a terminal window from the installation directory:
make cleanall
Note: This command will undo everything that was done during the make all during the ZLK38AVS Software
Installation (see ZLK38AVS Software Installation, page 8).
To clean the ZLK38AVS installation without removing the Amazon Alexa software, run
make clean
8.1 Reconfiguring the ZLK38AVS Software
To re-make the ZLK38AVS, without re-compiling/re-installing Amazon Alexa, run
make host
To use different Amazon identifiers or account
make avs_config
To enable/disable the headless mode
make avs_config
Note: Even if you just want to enable or disable the headless mode, you have to re-enter your Amazon tokens.

158441. 3.0 11/17
Microsemi Corporate Headquarters
One Enterprise, Aliso Viejo,
CA 92656 USA
Within the USA: +1 (800) 713-4113
Outside the USA: +1 (949) 380-6100
Sales: +1 (949) 380-6136
Fax: +1 (949) 215-4996
E-mail: sales.support@microsemi.com
www.microsemi.com
© 2017 Microsemi Corporation. All
rights reserved. Microsemi and the
Microsemi logo are trademarks of
Microsemi Corporation. All other
trademarks and service marks are the
property of their respective owners.
Microsemi makes no warranty, representation, or guarantee regarding the information contained herein or the suitability of
its products and services for any particular purpose, nor does Microsemi assume any liability whatsoever arising out of the
application or use of any product or circuit. The products sold hereunder and any other products sold by Microsemi have
been subject to limited testing and should not be used in conjunction with mission-critical equipment or applications. Any
performance specifications are believed to be reliable but are not verified, and Buyer must conduct and complete all
performance and other testing of the products, alone and together with, or installed in, any end-products. Buyer shall not
rely on any data and performance specifications or parameters provided by Microsemi. It is the Buyer's responsibility to
independently determine suitability of any products and to test and verify the same. The information provided by Microsemi
hereunder is provided “as is, where is” and with all faults, and the entire risk associated with such information is entirely
with the Buyer. Microsemi does not grant, explicitly or implicitly, to any party any patent rights, licenses, or any other IP
rights, whether with regard to such information itself or anything described by such information. Information provided in this
document is proprietary to Microsemi, and Microsemi reserves the right to make any changes to the information in this
document or to any products and services at any time without notice.
About Microsemi
Microsemi Corporation (Nasdaq: MSCC) offers a comprehensive portfolio of semiconductor and system solutions for
aerospace & defense, communications, data center and industrial markets. Products include high-performance and
radiation-hardened analog mixed-signal integrated circuits, FPGAs, SoCs and ASICs; power management products;
timing and synchronization devices and precise time solutions, setting the world's standard for time; voice processing
devices; RF solutions; discrete components; enterprise storage and communication solutions, security technologies and
scalable anti-tamper products; Ethernet solutions; Power-over-Ethernet ICs and midspans; as well as custom design
capabilities and services. Microsemi is headquartered in Aliso Viejo, Calif., and has approximately 4,800 employees
globally. Learn more at www.microsemi.com.
