VMware AirWatch Mobile Device Management Guide V9 1
User Manual: Pdf
Open the PDF directly: View PDF ![]() .
.
Page Count: 217 [warning: Documents this large are best viewed by clicking the View PDF Link!]
- Chapter 1: Overview
- Chapter 2: Getting Started with AirWatch
- Chapter 3: Environment Setup
- Chapter 4: User and Admin Accounts
- Chapter 5: Role-Based Access
- Chapter 6: Groups
- Chapter 7: Device Enrollment
- Device Enrollment Overview
- Basic vs. Directory Services Enrollment
- Bring Your Own Device (BYOD) Enrollment
- Self-Enrollment vs Device Staging
- Device Registration
- Configure Enrollment Options
- Blacklisting and Whitelisting Device Registration
- Additional Enrollment Restrictions
- AirWatch Autodiscovery Enrollment
- Chapter 8: Shared Devices
- Chapter 9: Device Assignments
- Chapter 10: Profiles & Resources
- Chapter 11: Compliance Policies
- Chapter 12: Device Tags
- Chapter 13: Managing Devices
- Chapter 14: Certificate Management
- Chapter 15: Custom Attributes
- Chapter 16: Self-Service Portal
- Accessing Other Documents

VMware AirWatch Mobile Device
Management Guide
Managing your organization's mobile devices
AirWatch v9.1
Have documentation feedback?Submit a Documentation Feedback support ticket using the Support Wizard on
support.air-watch.com.
Copyright © 2017 VMware, Inc. All rights reserved. This product is protected by copyright and intellectual property laws in the United States and other countries as well as by
international treaties. VMware products are covered by one or more patents listed at http://www.vmware.com/go/patents.
VMware is a registered trademark or trademark of VMware, Inc. in the United States and other jurisdictions. All other marks and names mentioned herein may be trademarks of their
respective companies.
VMware AirWatch Mobile Device Management Guide | v.2017.10 | October 2017
Copyright © 2017 VMware, Inc. All rights reserved.
1

Table of Contents
Chapter 1: Overview 6
What's New 7
Introduction to Mobile Device Management (MDM) 8
Chapter 2: Getting Started with AirWatch 10
AirWatch Console Overview 11
Getting Started Wizard 17
Chapter 3: Environment Setup 19
Environment Setup Overview 20
Log In to the AirWatch Console 20
APNs Certificates 20
Privacy and Data Collection 21
Terms of Use 26
Console Branding 29
Restricted Console Actions 29
Other Enterprise Systems for Integration 32
Chapter 4: User and Admin Accounts 33
User and Admin Accounts Overview 34
User Authentication Types 34
Basic User Accounts 40
Directory-Based User Accounts 42
User Accounts List View Overview 46
Batch Import Feature 47
Admin Accounts 50
Chapter 5: Role-Based Access 53
Role-Based Access Overview 54
Default and Custom Roles 54
User Roles 56
Admin Roles 57
2
VMware AirWatch Mobile Device Management Guide | v.2017.10 | October 2017
Copyright © 2017 VMware, Inc. All rights reserved.

Chapter 6: Groups 64
Assignment Groups Overview 65
Organization Groups Overview 67
Smart Groups Overview 71
User Groups Overview 76
Admin Groups Overview 83
View Assignments 86
Chapter 7: Device Enrollment 88
Device Enrollment Overview 89
Basic vs. Directory Services Enrollment 93
Bring Your Own Device (BYOD) Enrollment 96
Self-Enrollment vs Device Staging 99
Device Registration 103
Configure Enrollment Options 111
Blacklisting and Whitelisting Device Registration 115
Additional Enrollment Restrictions 116
AirWatch Autodiscovery Enrollment 120
Chapter 8: Shared Devices 122
Shared Devices Overview 123
Define the Shared Device Hierarchy 124
Chapter 9: Device Assignments 125
Device Assignments Overview 126
Enable Device Assignments 126
Define Device Assignment Rule or NetworkRange 127
Chapter 10: Profiles &Resources 129
Device Profiles Overview 130
Add General Profile Settings 130
Device Profiles List View 132
Device Profile Editing 136
Resources Overview 137
3
VMware AirWatch Mobile Device Management Guide | v.2017.10 | October 2017
Copyright © 2017 VMware, Inc. All rights reserved.

View Device Assignment 155
Compliance Profiles Overview 156
Geofences 157
Time Schedules 159
Chapter 11: Compliance Policies 161
Compliance Policies Overview 162
Compliance Policies List View 162
Compliance Policy Rules by Platform 165
Add a Compliance Policy 168
Chapter 12: Device Tags 172
Device Tags Overview 173
Filter Devices by Tag 173
Create a New Tag 173
Add Tags 174
Manage Tags 175
Chapter 13: Managing Devices 176
Managing Devices Overview 177
Device Dashboard 177
Device List View 178
Device Details 184
Device Actions by Platform 187
Enrollment Status 192
Wipe Protection 195
AirWatch Hub 197
Reports &Analytics 200
Chapter 14: Certificate Management 201
Certificate Management Overview 202
Digital Certificates List View 202
Certificate Integration Resources 203
Chapter 15: Custom Attributes 205
4
VMware AirWatch Mobile Device Management Guide | v.2017.10 | October 2017
Copyright © 2017 VMware, Inc. All rights reserved.

Custom Attributes Overview 206
Create Custom Attributes 206
Custom Attributes Importing 207
Assign Organization Groups Using Custom Attributes 208
Chapter 16: Self-Service Portal 210
Self-Service Portal Overview 211
Configure the Default Login Page for the SSP 211
My Devices Page of the SSP 211
Remote Actions in the SSP 213
Self-Service Portal Actions Matrix 215
VMware Content Locker Options 216
Accessing Other Documents 217
5
VMware AirWatch Mobile Device Management Guide | v.2017.10 | October 2017
Copyright © 2017 VMware, Inc. All rights reserved.


What's New
The Mobile Device ManagementGuide has been updated with the latest features and functionality from the most recent
releaseAirWatch v9.1. This list includes new features and the sections and pages on which they appear.
lYou can now disable the captcha authentication safeguard mechanism at the login prompt. Be aware that disabling
captcha may weaken the overall security. For more information, see Security PIN on page 11.
lThe Self-Service Portal login page has been redesigned and the ability to customize the background image of the SSP
login page is now possible. For more information, see Self-Service Portal Overview on page 211.
lFour admin console notifications have been added, which help you stay in touch with and react swiftly to changes in
your device fleet. For more information, see AirWatch Console Notifications on page 15 and Configure Notifications
Settings on page 16.
oApp Removal Protection – If apps you've identified as critical keep getting removed from your devices, you can
be notified when the number of these removals exceeds the threshold that you define.
oList View Export – Depending on the number of users and devices in your list, the exportation of the Device List
View and User List View to a comma-separated values file can take time to produce. This notification tells you
when it's complete and ready for examination.
oUser Group Merge Pending – If you have the Auto Merge Changes setting disabled on your User Group, then
you must supply admin approval each time database changes are initiated. This notification lets you know when
AirWatch is ready to begin the merge process.
oVPP App Auto Update – High priority alerts that notify you when an app installed with Apple Volume Purchase
Program has an updated version you can install.
lLicense information has been made more accurate by basing its status on the active/inactive flag instead of
expiration date. The license model is also now accurately reflected which can be user-based or device based. For
more information, see Admin Panel Dashboard on page 199.
Chapter 1: Overview
7
VMware AirWatch Mobile Device Management Guide | v.2017.10 | October 2017
Copyright © 2017 VMware, Inc. All rights reserved.
Introduction to Mobile Device Management (MDM)
Mobile devices are valuable enterprise tools. They allow employees to have immediate access to your internal content
and resources. However, the diversity of mobile platforms, operating systems and versions can make managing a set of
devices difficult. VMware AirWatch® Mobile Device Management™ (MDM) solves this problem by enabling you to
configure, secure, monitor, and manage all types of mobile devices in the enterprise.
Benefits of Mobile Device Management
Mobile device management provides an elegant solution to security concerns and accessibility inherent to enterprise
mobility.
lManage large-scale deployments of mobile devices from a single console.
lEnroll devices in your enterprise environment quickly and easily.
lConfigure and update device settings over the air.
lEnforce security and compliance policies.
lSecure mobile access to corporate resources.
lRemotely lock and wipe managed devices.
You can tailor your MDM environment to gain immediate access to device locations, current users, and content. You can
also automate your MDM deployment to enforce security and compliance settings with rules and warnings that are
unique to each user or organization group. Finally, you can restrict or enable content and features based on the
geographic location of a device.
This guide outlines how to create, configure, and maintain your MDM deployment.
Supported Browsers
The AirWatch Console supports the latest stable builds of the following browsers:
lChrome
lFirefox
lSafari
lInternet Explorer 11
lMicrosoft Edge
Note: If you use IE to access the Console, navigate to Control Panel > Settings > Internet Options > Security and
ensure you have a security level or custom security level that includes the Font Download option being set to
Enabled.
If you are using a browser older than those listed above, upgrade your browser to the latest available version to get the
best performance from the AirWatch console. Comprehensive platform testing has been performed to ensure
functionality using these browsers. The AirWatch Console may experience minor issues if you choose to run it in a non-
certified browser.
Chapter 1: Overview
8
VMware AirWatch Mobile Device Management Guide | v.2017.10 | October 2017
Copyright © 2017 VMware, Inc. All rights reserved.

Supported Platforms
AirWatch supports the following devices and operating systems.
lAndroid 4.0+ lTizen 2.3+
lApple iOS 7.0+ lWindows Desktop (8/8.1/RT/10)
lApple macOS 10.9+ lWindows 7 (Windows 7 or higher)
lChrome OS (latest) lWindows Phone (Windows Phone 8/ 8.1, Windows 10 Mobile)
lQNX 6.5+ lWindows Rugged (Mobile 5/6 and Windows CE 4/5/6)
Limited support may be available for other devices or operating systems. Refer to each platform-specific User Guide,
available on Accessing Other Documents on page 217, or contact AirWatch Support for more information.
Chapter 1: Overview
9
VMware AirWatch Mobile Device Management Guide | v.2017.10 | October 2017
Copyright © 2017 VMware, Inc. All rights reserved.


AirWatch Console Overview
The AirWatch Console allows you to view and manage every aspect of your Mobile Device Management (MDM)
deployment. With this single, web-based resource, you can quickly and easily add new devices and users to your fleet,
manage profiles, and configure system settings.
Acquaint yourself with security settings and interface features such as the Getting Started Wizard, menu icons, and global
search.
Security PIN
Establish security for the AirWatch Console by creating a security PIN. The PIN acts as a safeguard against accidentally
wiping a device or deleting important aspects of your environment, such as users and organization groups. The Security
PIN also works as a second layer of security. It presents an added point of authentication by blocking actions made by
unapproved users.
Establish Your Security PIN
When you first log in to the AirWatch Console, you are prompted to establish a Security PIN.
Enter and confirm your four-digit Security PIN on the Security Settings page and save this PIN for future use. You may not
bypass this page, or proceed to any area within the AirWatch Console, before creating this PIN.
If you enter the wrong password more than the maximum allowed login attempts, you are presented with a "Captcha"
authentication prompt, which you can customize. You can also disable the Captcha login prompt.
Reset Your Security PIN
Reset your security PIN every so often to minimize security risks.
1. Select the Account icon in the top-right corner of the AirWatch Console.
2. Select Manage Account Settings. The Account Settings page displays.
3. Select the Security tab and then reset your PIN by selecting the Reset button.
4. Log out of the console and complete the PIN creation prompt upon logging back in.
Chapter 2: Getting Started with AirWatch
11
VMware AirWatch Mobile Device Management Guide | v.2017.10 | October 2017
Copyright © 2017 VMware, Inc. All rights reserved.
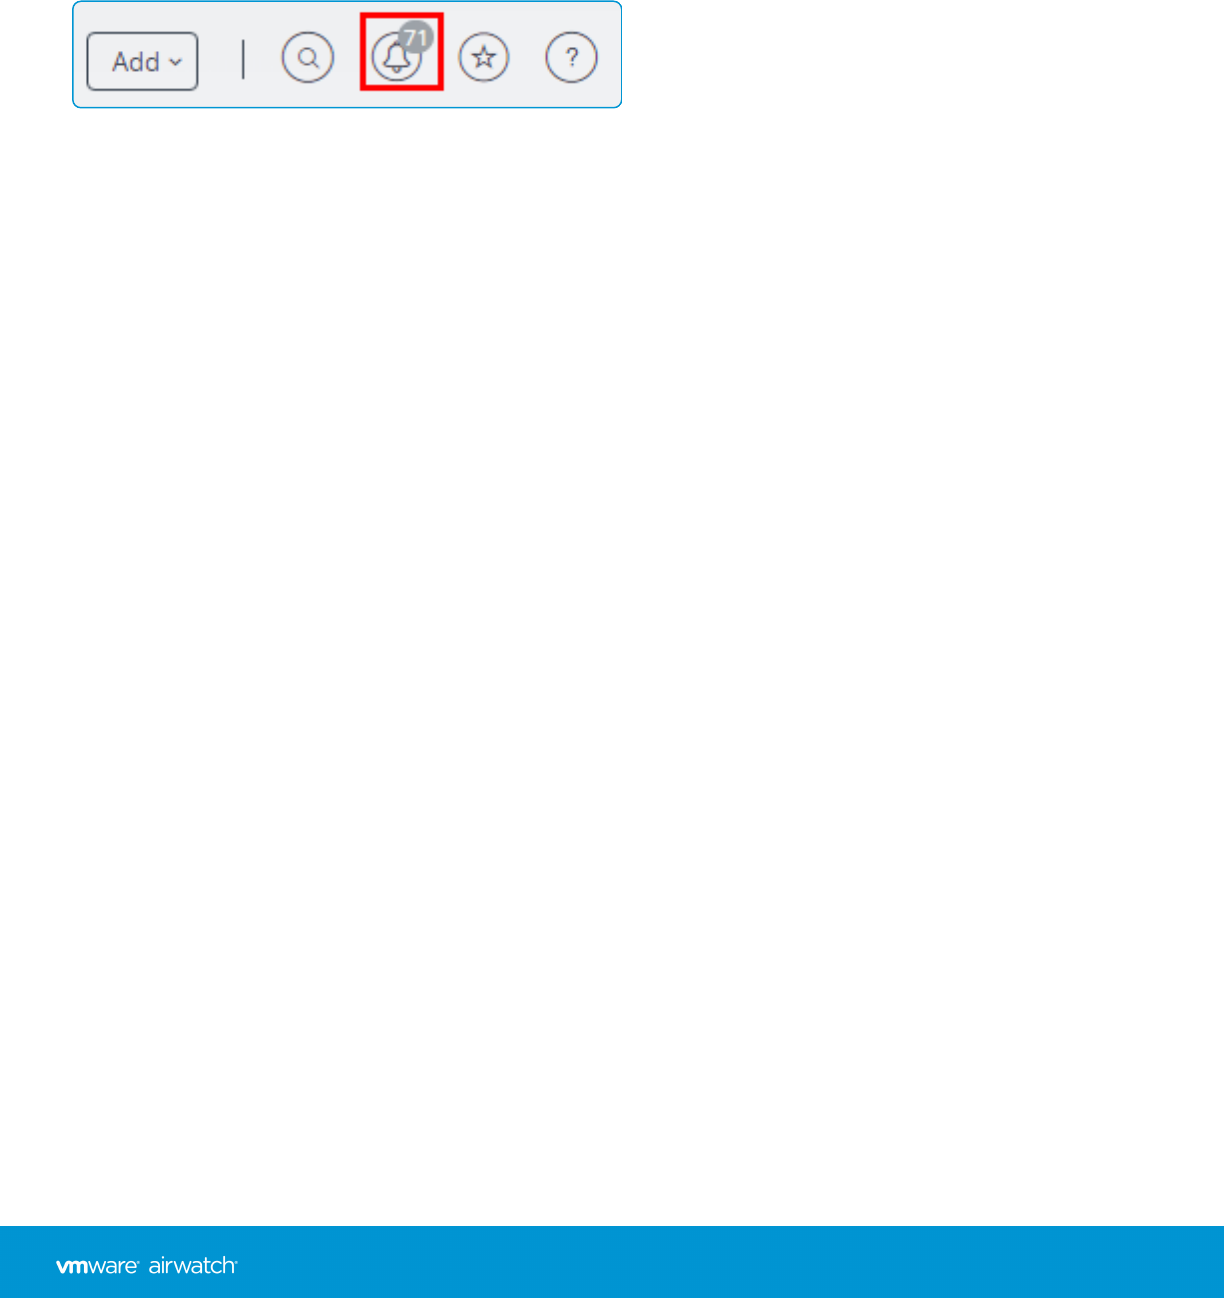
Header Menu
The Header Menu appears at the top of nearly every page of the AirWatch Console, enabling you to access to the
following functions and features.
lOrganization Group – Select the Organization Group (the tab labeled Global) to which you want to apply changes.
lAdd – Quickly create an admin, device, user, policy, content, profile, internal application, or public application.
lGlobal Search – ( ) Search all aspects of your deployment within the AirWatch Console, including devices, users,
content, applications, configuration settings, admins, pages, and more.
lNotifications – ( ) Stay informed about important console events with Notifications. The number badge on the
Notifications bell icon indicates the number of alerts that require your attention.
lSaved – ( ) Access your favorite and most-utilized pages within the AirWatch Console.
lHelp – ( ) Browse or search the available guides and console documentation.
lAccount – View your account information. Change the Account Role that you are assigned to within the current
environment. Customize settings for contact information, language, Notifications, view history of Logins, and
Security settings including PIN reset. You can also Log out of the AirWatch Console and return to the Login screen.
lRefresh – ( ) See updated stats and info without leaving the current view by refreshing the screen.
lAvailable Sections – ( ) Customize the view of the Hub Overview by selecting only the sections you want to see.
Available only on the Hub Overview.
lExport – ( ) Produces a full listing of profiles, apps, books, channels, or policies to a comma-separated values (CSV)
file that you can view and analyze with Excel.
lHome – ( ) Use this icon to assign any screen in the AirWatch Console as your home page. The next time you open
the AirWatch Console, your selected screen displays as your home page.
lSave – ( ) Add the current page to the Saved page list for quick access to your favorite console pages.
For more information, see the following topics.
Organization Groups Overview on page 67.
Role-Based Access Overview on page 54.
AirWatch Console Notifications on page 15.
AirWatch Console Overview on page 11.
AirWatch Hub on page 197.
Chapter 2: Getting Started with AirWatch
12
VMware AirWatch Mobile Device Management Guide | v.2017.10 | October 2017
Copyright © 2017 VMware, Inc. All rights reserved.
Main Menu
The Main Menu allows you to navigate to all the features available to your role and Mobile Device Management (MDM)
deployment.
Ensure that all aspects of a basic successful deployment are established. Getting Started is organized to
reflect only those modules within an AirWatch Console deployment that you are interested in. Getting
Started produces an on-boarding experience that is more tailored to your actual configuration.
View and manage MDM information that drives decisions you must make and access a quick overview of
your device fleet. View information such as the most blacklisted apps that violate compliance. Track module
licenses with the Admin Panel Dashboard and monitor all devices that are currently out of compliance.
Select and run Industry Templates to streamline the onboarding process with industry-specific apps and
policies for your iOS devices.
Access an overview of common aspects of devices in your fleet, including compliance status, ownership
type breakdown, last seen, platform type, and enrollment type. Swap views according to your own
preferences including full Dashboard, list view, and detail view. Access additional tabs, including all current
profiles, enrollment status, Notification, Wipe Protection settings, compliance policies, certificates, product
provisioning, and printer management.
Survey and manage users and administrators involved with your MDM deployment. Access and manage
user groups, roles, batch status, and settings associated with your users. Also, access and manage admin
groups, roles, system activity, and settings associated with your administrators.
Access and manage the app catalog, book catalog, and Volume Purchase Program (VPP) orders. Also view
application analytics and logs with application settings, including app categories, smart groups, app groups,
featured apps, Geofencing, and profiles associated with apps.
Access detailed overview of content use including storage history trends, user and content status,
engagement, and user breakdown. Manage and upload content available to users and devices. Also, access
batch import status, content categories, content repositories, user storage, VMware Content Locker
homescreen configuration, and all other content-specific settings.
Access detailed overview of email information related to your deployment. Such information includes email
management status, managed devices, email policy violations, deployment type, and time last seen.
Access detailed overview of telecom-enabled devices including use history, plan use, and roaming data.
View and manage telecom use and track roaming, including call, Short Message Service (SMS), and content
settings.
Manage structures, types and statuses related to organization groups, smart groups, app groups, user
groups, and Admin Groups. Configure entire system settings or access settings related to all Main Menu
options.
Chapter 2: Getting Started with AirWatch
13
VMware AirWatch Mobile Device Management Guide | v.2017.10 | October 2017
Copyright © 2017 VMware, Inc. All rights reserved.
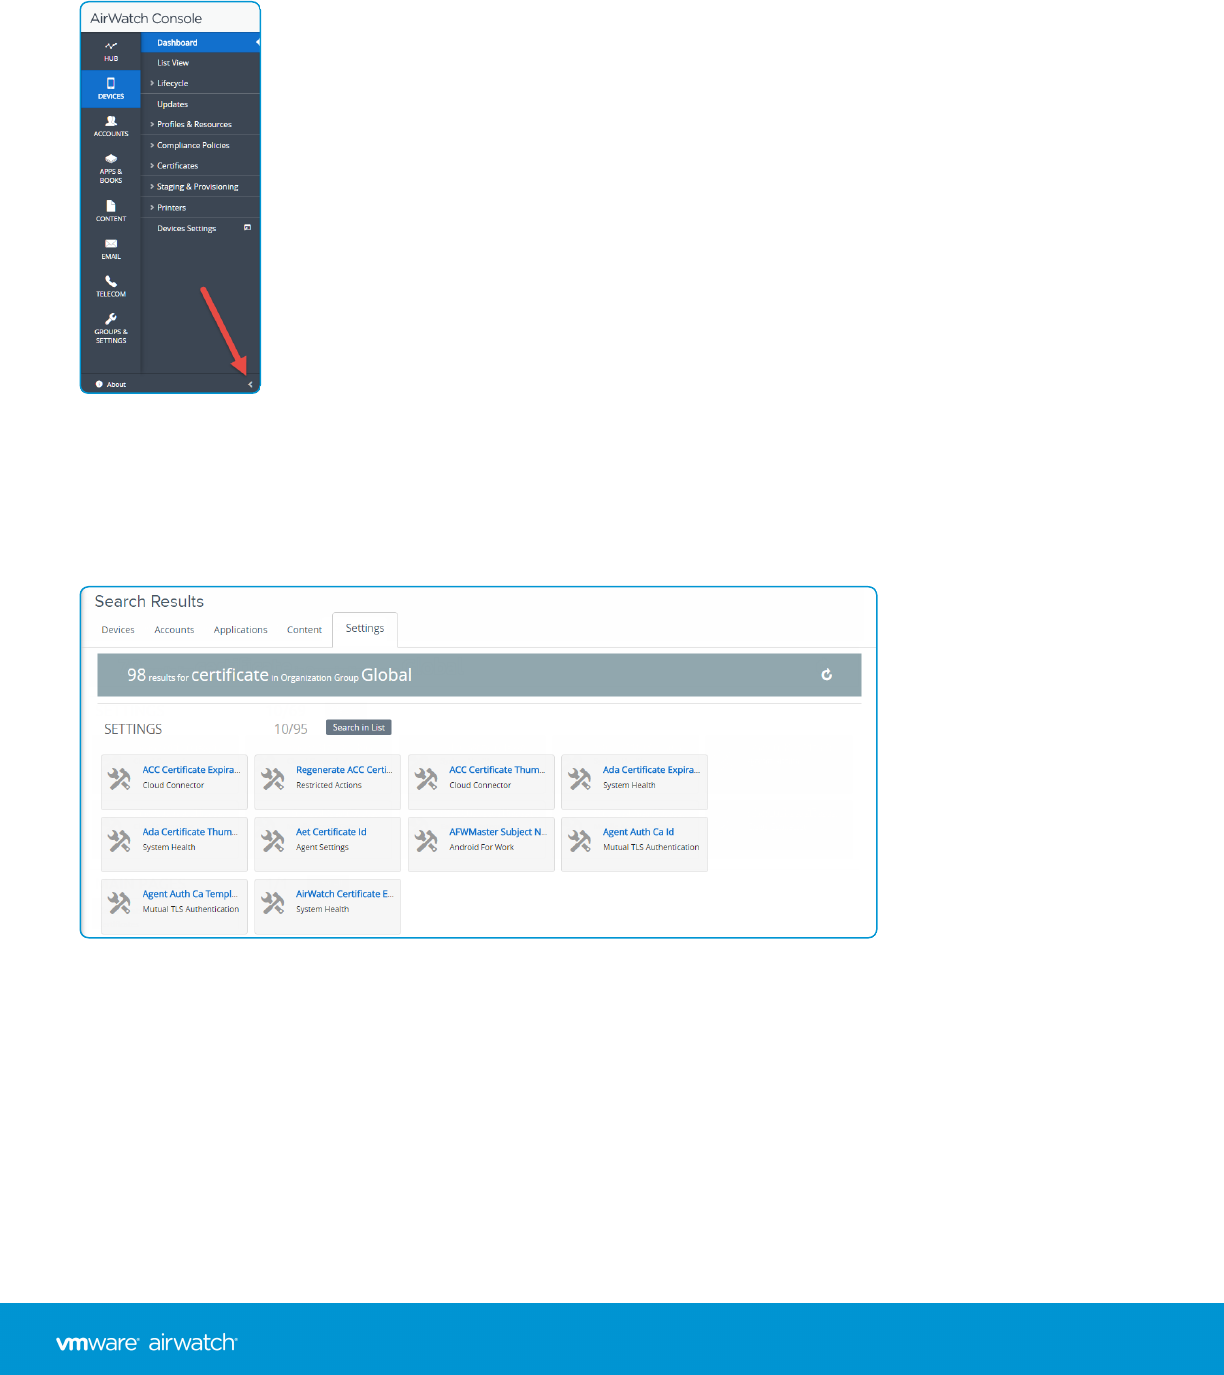
Collapse and Expand the Submenu
You can collapse the submenu by selecting the arrow at the bottom of the console. This action creates more space for
device information. To expand or reopen the submenu, select the modified arrow.
Global Search
Using a modular design with a tabbed interface, Global Search runs searches across your entire deployment. Global
Search applies your search parameter to a single tab at a time, which produces faster results. Apply the same parameters
to another area of the AirWatch Console by selecting another tab.
After running a global search, select the following tabs to view the results.
lDevices – Returns matches to Device friendly name and Device Profile name searches.
lAccounts – Returns matches to user name and administrator name searches.
lApplications – Returns matches to internal, public, purchased, and Web application searches.
lContent – Returns matches to any content that appears on devices.
lSettings – Returns matches to individual field-level settings and console main page searches.
Chapter 2: Getting Started with AirWatch
14
VMware AirWatch Mobile Device Management Guide | v.2017.10 | October 2017
Copyright © 2017 VMware, Inc. All rights reserved.
You can also perform a search for an organization group by selecting the organization group drop-down menu. The
Search bar displays above the list.
AirWatch Console Notifications
Notifications are a communication tool designed to keep you informed about console events that may be impactful to
your operation. The Notifications button is located next to the Global Search button.
There are many different kinds of notifications.
lAPNs Expiration and APNs Expired – You are notified 30 days before APNs for MDM certificates expire, which is a
Critical Priority alert. After the APNs certificate expires, the Critical Priority alert is reduced to a High Priority alert. This
notification helps you avoid the hassles involved with expired certificates and keeps your devices in contact with
AirWatch.
lApp Removal Protection – This High Priority alert displays when the ApplicationRemoval threshold is crossed. You
can act by selecting the Review App Removal link on the Notifications pop-up.
lList View Export – This notification appears when the Device or User list view export you requested has been
completed and is ready for examination. This notification is an Info Priority level.
lUser Group Merge Pending – This notification lets you know that the user group merge process is pending and in
need of admin approval. Such notification happens in two scenarios:
oYou have the Auto Merge Changes setting disabled on your Directory-based User Group, which means all
changes need approval.
oYou have the Auto Merge Changes enabled and the number of changes exceed the Maximum Allowable Changes
threshold. The portion of changes above the threshold need admin approval.
lVPP App Auto Update – High priority alerts that notify you when an app installed with Apple Volume Purchase
Program has an updated version you can install.
For information about Device Lifecycle Notifications, see Configure Lifecycle Notifications on page 113.
Manage Console Notifications
When there are active notifications that require your attention, a numeral badge appears on the alert icon indicating the
number of active alerts. Display the Notifications pop-up by selecting the bell-shaped Notifications icon.
Chapter 2: Getting Started with AirWatch
15
VMware AirWatch Mobile Device Management Guide | v.2017.10 | October 2017
Copyright © 2017 VMware, Inc. All rights reserved.
You can manage the notifications you receive. This management includes viewing the list of active alerts, Renewing your
APNs, Dismissing expired alerts, viewing the list of dismissed alerts, and Configuring Notification Settings.
Each alert displays the organization group under which the APNs for an MDMcertificate is located. The alert also shows
the expiration date of the certificate and a link to Renew your APNs.
lView Active Alerts – The default view displays the list of active alerts.
lRenew your APNs – Displays the Change Organization Group (OG) screen. This screen appears when the OG that
manages the device with the impending license expiration is different than the OG you are currently in. Renew this
APNs license by selecting Yes to change your OG automatically.
Renew the license and keep the device in contact with AirWatch by following the instructions on the APNs For MDM
settings page.
lDismiss Alert – Close the expired alert and send it to the Dismissed alert listing by selecting the Xbutton. You cannot
close critical priority notifications.
lView Dismissed Alerts – View the listing of dismissed alerts by selecting the Dismissed tab at the top of the
Notifications pop-up.
Configure Notifications Settings
Use the Notifications settings page to enable or disable APNs Expiration alerts, choose how to receive alerts, and change
the email to which it sends alerts.
To configure notification settings, take the following steps.
1. Select the Account button, which is accessible from almost every page on the console, then select Manage Account
Settings and select the Notifications tab.
You can also access the notification settings page by selecting the gear icon located in the lower-right corner of the
Notifications pop up screen.
Chapter 2: Getting Started with AirWatch
16
VMware AirWatch Mobile Device Management Guide | v.2017.10 | October 2017
Copyright © 2017 VMware, Inc. All rights reserved.

2. Complete the notification settings.
Setting Description
APNs
Expiration
You can trigger an alert when APNs licenses expire or are in jeopardy of expiring.
Notification Select the notification delivery method. Choose from Console, Email, or Both.
Send email to Enter the email address for when Email or Both is selected in Notification. Separate multiple email
addresses with a comma.
List View
Export
You can trigger an alert when the exportation of a User List View or Device List View is complete.
Notification Select the notification delivery method. Choose from Console, Email, or Both. For List View
Exports, the email used is the address on record in the User tab of Account Settings for the
currently logged in administrator.
User Group
Merge
You can trigger an alert when the Active Directory database changes sync with AirWatch and you
have Auto Merge Changes disabled.
Notification Select the notification delivery method. Choose from Console, Email, or Both.
Send email to Enter the email address for when Email or Both is selected in Notification. Separate multiple email
addresses with a comma.
VPP App
Auto Update
You can trigger an alert when an app installed with Apple Volume Purchase Program has an
updated version you can install.
Notification Select the notification delivery method. Choose from Console, Email, or Both.
Send email to Enter the email address for when Email or Both is selected in Notification. Separate multiple email
addresses with a comma.
3. Save or Cancel your changes.
Getting Started Wizard
The Getting Started Wizard serves as a checklist that walks you through the AirWatch Console settings step by step. It
presents only those modules within your specific deployment which produces an on-boarding experience tailored to
your configuration.
The Getting Started page is split into four sections: Workspace ONE, Mobile Device Management, Mobile Content
Management, and Mobile Application Management. Each section has its own set of steps. Steps that are shared among
all sections are tracked automatically so you never have to complete the same step twice.
lWorkspace ONE – Manage, monitor, and support all desktops, BYOD, and corporate-owned devices in a single,
secure catalog of apps.
lMobile Device Management (MDM) – Establish the level of control you want to have over your devices, add users,
and enroll devices into the AirWatch system.
lMobile Content Management (MCM) – Identify and secure personal content, add users, and configure content
management specifications.
Chapter 2: Getting Started with AirWatch
17
VMware AirWatch Mobile Device Management Guide | v.2017.10 | October 2017
Copyright © 2017 VMware, Inc. All rights reserved.

lMobile Application Management (MAM) – Determine how users install suggested apps and identify and install
public apps to enrolled devices.
Navigate the Getting Started Wizard
The Getting Started Wizard is run in a way that is most convenient to you. It not only tracks how far along you are, it can
be started, paused, restarted later, and rewound to review prior responses.
lSelect Start Wizard to initiate the first step in a module. Here, you answer questions and access the exact pages
within the AirWatch Console to configure settings for each feature. As you answer each question, the percentage
counter progresses and displays how far along you are in completing the module.
lIf you stop a module before completing it, select Continue to return to where you left off.
lYou can opt out of any module by selecting Skip Section, which temporarily disables the Continue button and
inserts a Resume Section link. Enable the Continue button once more by selecting this link.
lYou can review your responses to any module at any time by selecting Review Section from each completed
module.
lAs each substep in the module is completed, a small check mark is placed in the header for that substep. The green
status bar at the top representing the whole module, progresses further.
lSelect the Back button at any time to return to the previous question or screen.
Enable the Getting Started Wizard
For a new AirWatch implementation, access the Getting Started page from the main menu, located above the Hub icon in
the left panel. However, you can manually enable the Getting Started Wizard at any time. Manually enabling the Getting
Started Wizard restarts the walk-through.
To enable the Getting Started Wizard manually
1. Select any Organization Group other than the top-level group.
2. Navigate to Groups &Settings > Groups > Organization Groups > Organization Group Details. Ensure that you are
currently at a customer-level organization group and Save your changes.
3. Navigate to Groups &Settings > All Settings > System > Getting Started.
4. Select Enable for each of the settings on this page:
a. Getting Started Device Status
b. Getting Started Content Status
c. Getting Started Application Status
5. Save changes to the page.
For more information, see Organization Groups Overview on page 67.
Chapter 2: Getting Started with AirWatch
18
VMware AirWatch Mobile Device Management Guide | v.2017.10 | October 2017
Copyright © 2017 VMware, Inc. All rights reserved.

Chapter 3:
Environment Setup
Environment Setup Overview 20
Log In to the AirWatch Console 20
APNs Certificates 20
Privacy and Data Collection 21
Terms of Use 26
Console Branding 29
Restricted Console Actions 29
Other Enterprise Systems for Integration 32
19
VMware AirWatch Mobile Device Management Guide | v.2017.10 | October 2017
Copyright © 2017 VMware, Inc. All rights reserved.
Environment Setup Overview
You can determine the environment URL and login credentials, generate certificates for managing platforms, configure
telecom, privacy settings, customize the console, and more.
Log In to the AirWatch Console
Before you can log in to the AirWatch Console, you must have the Environment URL and log in credentials. How you
obtain this information depends on your type of deployment.
lSaaS Deployment – Your Account Manager provides your Environment URL and user name/password. The URL is
not customizable, and generally follows the format of awmdm.com.
lOn-premises – The on-premises URL is customizable and follows the format awmdm.<MyCompany>.com.
Your Account Manager provides the initial setup credentials for your environment. Administrators who create more
accounts to delegate management responsibility may also create and distribute credentials for their environment. See
Create an Admin Account for details.
Once your browser has successfully loaded the AirWatch Console Environment URL, you can log in using the user name
and Password provided by your AirWatch Administrator.
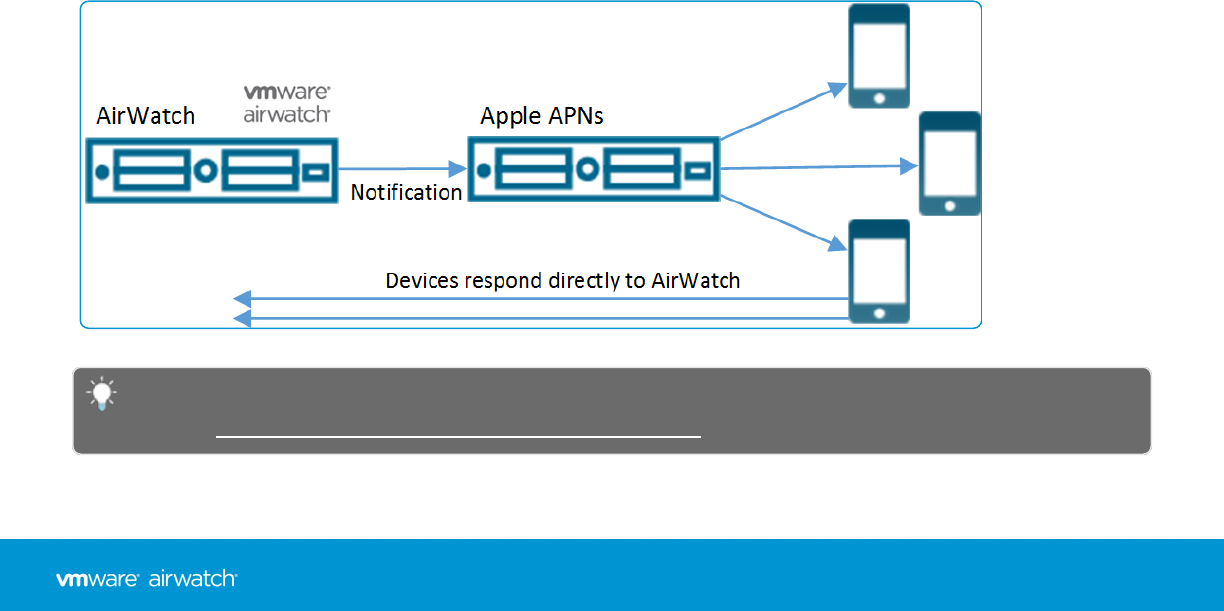
APNs Certificates
To manage iOS devices, you must first obtain an Apple Push Notification Service (APNs) certificate. An APNs certificate
allows AirWatch to communicate securely to Apple devices and report information back to AirWatch.
Per Apple's Enterprise Developer Program, an APNs certificate is valid for one year and then must be renewed.
TheAirWatch Console sends reminders through Notifications as the expiration date nears. Your current certificate is
revoked when you renew from the Apple Development Portal, which prevents device management until you upload the
new one. Plan to upload your certificate immediately after it is renewed. Consider using a different certificate for each
environment if you use separate production and test environments.
For more information, please see the Generating and Renewing an APNs Certificate for AirWatch
KBarticle:https://support.air-watch.com/articles/115001662728.
Chapter 3: Environment Setup
20
VMware AirWatch Mobile Device Management Guide | v.2017.10 | October 2017
Copyright © 2017 VMware, Inc. All rights reserved.

APNs Certificate Expiration
The Notifications button in the header bar of the Console alerts you when your APNs for MDM certificates are close to
expiring. This notice allows you to act.
For more information, see AirWatch Console Notifications on page 15.
Generate an APNs Certificate
You must generate and occasionally renew APNs Certificates to enable and maintain secure communications between
your iOS devices and AirWatch. To generate an APNs certificate, you must choose between two methods.
1. Follow the steps outlined in the Getting Started Wizard on page 17.
OR
2. Generate APNs certificates manually by taking the following steps.
a. Navigate to Groups & Settings > All Settings > Devices & Users > Apple > APNs for MDM.
b. If the Valid To date has passed, select the Renew button and follow the on-screen instructions. There is an
instructions link that shows you how to use the Apple Push Certificates Portal to upload a certificate request.
Provided on this page is a convenient Go To Apple button that opens the Apple Push Certificates Portal in a new
tab of your browser. You need two items to continue.
i. AirWatch Certificate Request, which is a file in the PLIST format that you can save to your device.
ii. The Apple ID that you originally used to create the certificate.
c. Click Next to advance to the next page where you must enter your Apple ID and upload the Apple-issued
AirWatch MDMcertificate (PEM file).
d. Select Save.
Privacy and Data Collection
It is important that you inform your end users about how their data is collected and stored when they enroll into
AirWatch. The AirWatch Console allows you to create a customized privacy notification to inform users about what data
your company collects from enrolled devices.
Work with your legal department to determine what message about the collection of data you communicate to your end
users.
Privacy Notices for BYODEnd Users
A privacy notice informs your end users about what data you collect from their devices based on their device type,
deployment type, and ownership type.
Chapter 3: Environment Setup
21
VMware AirWatch Mobile Device Management Guide | v.2017.10 | October 2017
Copyright © 2017 VMware, Inc. All rights reserved.

Privacy Notice Configuration
Privacy notices are automatically delivered based on the organization group and device ownership of the device
connecting. You may choose to display a privacy notice for each ownership type: Employee Owned,Corporate -
Dedicated,Corporate - Shared, and Unknown.
You must create a privacy notice before you assign ownership types to receive the notice. For more information, See
Create a Privacy Notice in the VMware AirWatch BYOD &Privacy Guide, available through AirWatch Resources.
Privacy Notice Deployment
When you assign an ownership type to receive privacy notices, all users in the selected ownership type receive the
privacy notification immediately as a Web clip. If you inserted the privacy notice lookup value
PrivacyNotificationUrl in your message template, then the message includes a URL where the user can read
the privacy notice.
Users receive the privacy notice automatically if:
lThey enroll a new device and they are of an ownership type for which the privacy notice is enabled.
lThey currently use an enrolled device and their ownership is changed post-enrollment to a type that is assigned the
Web clip.
To learn how to deploy a privacy notice as part of a device activation, see Register an Individual Device.
Create a Privacy Notice for BYODUsers
Inform your users about what data your company collects from their enrolled devices with a customized privacy
notification. Work with your legal department to determine what message about data collection you communicate to
your end users.
1. Navigate to Groups and Settings > All Settings > Devices and Users > General > Message Templates.
2. Select Add to create a template. If you have already created a privacy notification template, select it from the list of
available templates to use or edit it.
3. Complete the Add/Edit Message Template settings.
Setting Description
Name Enter a name for the notification template.
Description Enter a description of the template you are creating.
Category Select Enrollment.
Type Select MDM Device Activation.
Select
Language
Select the default language for your template. Use the Add button to add more default languages for
a multi-language delivery.
Default Select this check box to make this template the default message template.
Message
Type
Select one or more message types: Email,SMS, or Push message.
4. Create the notification content. The message types that you selected in the Message Type selection determine which
Chapter 3: Environment Setup
22
VMware AirWatch Mobile Device Management Guide | v.2017.10 | October 2017
Copyright © 2017 VMware, Inc. All rights reserved.

messages appear for you to configure.
Element Description
Email
Email
Content
Formatting
Choose whether your email notification is delivered as Plain Text or HTML.
Subject Enter the subject line for your email notification.
Message
Body
Compose the email message to send to your users. The editing and formatting tools that appear in
this text box depend on which format you chose in the Email Content Formatting selection.
If you have enabled the Visual Privacy Notice, include the lookup value
PrivacyNotificationUrl in the message body.
SMS
Message
Body
Compose the SMS message to send to your users.
If you have enabled the Visual Privacy Notice, include the lookup value
PrivacyNotificationUrl in your message body.
Push
Message
Body
Compose the Push notification to send to your users.
If you have enabled the Visual Privacy Notice, include the lookup value
PrivacyNotificationUrl in your message body.
5. Select Save.
Privacy Settings
Privacy settings enable you to define how device and user information are handled in the AirWatch Console. This
information is useful in Bring Your Own Device (BYOD) deployments.
lReview and adjust privacy policies according to device ownership, which lets you align with data privacy laws in other
countries or legally defined restrictions.
lEnsure that certain IT checks and balances are in place, preventing overload of servers and systems.
Important: Each jurisdiction has its own regulations governing what data can be collected from end users. Research
these regulations thoroughly before Configure Privacy Settings on page 23.
Configure Privacy Settings
End-user privacy is a major concern for you and your users. AirWatch provides granular control over what data is
collected from users and what collected data is viewable by admins.
Configure the privacy settings to serve both your users and your business needs.
1. Navigate to Devices > Device Settings > Devices & Users > General > Privacy.
2. Select the appropriate setting for GPS,Telecom,Applications,Profiles, and Network data collection.
Chapter 3: Environment Setup
23
VMware AirWatch Mobile Device Management Guide | v.2017.10 | October 2017
Copyright © 2017 VMware, Inc. All rights reserved.

Collect and Display – User data is collected and displayed in the AirWatch Console.
Collect Do Not Display – User data is collected for use in reports but is not displayed it in the AirWatch
Console.
Do Not Collect – User data is not collected and therefore it is not displayed.
3. Select the appropriate setting for the Commands that can be performed on devices.
Allow – The command is made on devices without permission from the user.
Allow With User Permission – The command is made on devices but only with the permission of the user.
Prevent – The command does not run on devices.
Consider disabling all remote commands for employee-owned devices, especially full wipe. This disablement
prevents inadvertent deletion or wiping of an end user's personal content.
Note: If you disable the wipe function for select iOS ownership types, users do not see the "Erase all content and
settings" permission during enrollment.
If you are going to allow remote control, file manager, or registry manager access for Android/Windows Rugged
devices, consider using the Allow With User Permission option. This option requires the end user to consent to
admin access on their device through a message prompt before the action is performed. If you opt to allow use of
any commands, explicitly mention these commands in your terms of use agreement.
4. For User Information, select Display or Do Not Display in the Console for the First Name,Last Name,Phone
Number,Email Accounts, and user name data.
If an option other than user name is set to Do Not Display, that data displays as "Private" wherever it appears in the
AirWatch Console. Options you set to Do Not Display are not searchable in the console. When a user name is set to
Do Not Display, the user name displays as "Private" only on the Device List View and Device Details pages. All other
pages in the AirWatch Console show the user name of the enrolled user.
You can encrypt personally identifiable information, including first name, last name, email address, and telephone
number. Navigate to Groups &Settings > All Settings > System > Security > Data Security from the Global or
Customer-level organization group you want to configure encryption for. Enabling encryption, selecting which user
data to encrypt, and selecting Save encrypts user data. Doing so limits some features in the AirWatch Console, such
as search, sort, and filter.
5. Select whether to Enable or Disable the Do Not Disturb Mode on the device. This setting lets user devices ignore
MDM commands for a specified period. When Enabled, you can select a grace period or activation time in minutes,
hours, or days, after which the Do Not Disturb Mode expires.
For more information about using Do Not Disturb Mode, see the following VMware AirWatch Knowledge
Base article:https://support.air-watch.com/articles/115001662448.
6. Select to Enable or Disable the User-Friendly Privacy Notice on the device.
Chapter 3: Environment Setup
24
VMware AirWatch Mobile Device Management Guide | v.2017.10 | October 2017
Copyright © 2017 VMware, Inc. All rights reserved.
lWhen Enabled, you may choose Yes (display a privacy notice) or No (do not display a privacy notice) for each
ownership level: Employee Owned,Corporate - Dedicated,Corporate - Shared, and Unknown.
7. Click Save. You must enter your PIN to save the changes. Click Save.
For more information about applying a Bring Your Own Device solution, see the VMware AirWatch BYOD and Privacy
Guide, available on Accessing Other Documents on page 217.
Privacy Best Practices
Striking a balance between your business needs and the privacy concerns of your employees can be challenging. There
are a few simple practices that can manage Privacy Settings to strike the best balance.
Important: Every deployment is different. Tailor these settings and policies that fit your organization in the best way
by consulting with your own legal, human resource, and management teams.
User Information for Privacy Best Practices
In general, you display user information such as the first name, last name, phone number, and email address for both
employee-owned and corporate-owned devices.
Application Information for Privacy Best Practices
In general, it is appropriate to set the collection of application information to either do not collect or collect and do not
display for employee-owned devices. This setting is important because public apps installed on a device, if viewed, can be
considered personally identifiable information. For corporate-owned devices, AirWatch records all installed applications
on the device.
If Do Not Collect is selected, only personal application information is not collected. AirWatch collects all managed
applications, whether public, internal, or purchased.
Remote Commands for Privacy Best Practices
Consider disabling all remote commands for employee-owned devices. However, if you allow remote actions or
commands, explicitly mention these remote actions and commands in your terms of use agreement.
GPS Coordinates for Privacy Best Practices
In general, it is not appropriate to collect GPS data for employee-owned devices. The following notes apply to corporate-
owned devices.
lGPS Data – Information collected includes location data and a time-stamp indicating when this information was sent
to AirWatch.
oFor iOS devices, GPS data is reported automatically. GPSdata is reported by opening any AirWatch application or
internal application with an AirWatch Software Development Kit (SDK) set to capture GPS data.
When GPS data is reported, AirWatch defines a 1-kilometer region around this location. It then reports location
information whenever the device moves outside the region or whenever the user opens an AirWatch or internal
application. No new GPS data is reported unless one of these actions occurs.
oLocation Services must be enabled on the iOS device. AirWatch cannot force this setting.
Chapter 3: Environment Setup
25
VMware AirWatch Mobile Device Management Guide | v.2017.10 | October 2017
Copyright © 2017 VMware, Inc. All rights reserved.

lWhile GPS is typically used for lost or stolen devices, it is also used for any situation where knowing the location of a
device is useful.
Telecom Data for Privacy Best Practices
It is only appropriate to collect telecom data for employee-owned devices if they are a part of a stipend where cellphone
expenses are subsidized. In this case, or for corporate-owned devices, consider the following about data you can collect.
lCarrier/Country Code – Carrier and Country Code are recorded and can be used for telecom tracking purposes.
Telecom plans can be set up and devices can be assigned to the appropriate plan based on their carrier and country.
This information can also be used to track devices by home carrier and home country or by current country and
current carrier.
lRoaming Status – This status can be used to track which devices are in a 'Roaming' or 'Not Roaming' state.
Compliance policies can be set up to disable voice and data use while the device is roaming or you can also apply
other compliance actions. Also, if the device is assigned to a telecom plan, AirWatch can track data use while
roaming. Collecting and monitoring roaming status can be helpful in preventing large carrier charges due to roaming.
lCellular Data Use – The data use in terms of total bytes sent and received. This data can be collected for each cellular
device. If the device is assigned to a telecom plan, you can monitor data use based on a percentage of total data
amount per billing cycle. This feature allows you to create compliance policies based on the percentage of data used
and is helpful in preventing large carrier overage charges.
lCell Use – The voice minutes that can be collected for each cellular device. Similar to data, if the device is assigned to
a telecom plan, you can monitor use based on a percentage of minutes per billing cycle. This method allows you to
create compliance policies based on the percentage of minutes used and can be helpful in preventing large carrier
overage charges.
lSMS Use – The short message service (SMS) data that can be collected for each cellular device. Similar to data, if the
device is assigned to a telecom plan, you can monitor SMS use based on a percentage of messages per billing cycle.
This method allows you to create compliance policies based on the percentage of messages used. Monitoring SMS
use is helpful in preventing large carrier overage charges.
Terms of Use
Ensure that all users with managed devices agree to the policy by defining and enforce terms of use (TOU). If necessary,
users must accept the TOU before proceeding with enrollment, installing apps, or accessing the AirWatch Console. The
AirWatch Console allows you to customize fully and assign a unique TOU to each organization group and child
organization group.
The terms of use displays during each device enrollment. Get access the following functions.
lSet version numbers.
lSet platforms to receive the terms of use.
lNotify users by email with the terms of use updates.
lCreate language-specific copies of the terms of use.
lCreate multiple terms of use agreements and assign them to organization groups based on platform or the type of
Chapter 3: Environment Setup
26
VMware AirWatch Mobile Device Management Guide | v.2017.10 | October 2017
Copyright © 2017 VMware, Inc. All rights reserved.

ownership.
lMeet the liability requirements of specific groups by customizing terms of use.
Create Enrollment Terms of Use
You can create an agreement about terms of use (TOU) specific to enrollment purposes. You can also limit devices
allowed for enrollment by device platform, ownership type, and enrollment type.
1. Ensure that your current active organization group is correct for the TOU you are creating.
2. Navigate to Devices > Device Settings > Devices & Users > General > Enrollment and select the Terms of Use tab.
3. Select Add New Enrollment Terms of Use.
4. Enter a unique Name of the new TOU. The Type of TOU is pre-populated as Enrollment.
5. Choose Any for the settings Platforms,Device Ownership, and Enrollment Type if your TOU applies to any kind of
device for that category.
6. If you prefer to specify a device type, you can select one or more of these categories and define the limitations
specific to your TOU.
lIf you select Selected Platform option, then choose your desired platforms from the list that appears. Your TOU
applies to the device platforms you select, excluding all others.
lIf you select Selected Ownership Types option, then you must choose your desired ownership from the list that
appears. Your TOU applies to the ownership types you select, excluding all others.
lIf you select Selected Enrollment Types option, then you must choose your desired enrollment from the list that
appears. Your TOU applies to the types of enrollment you select, excluding all others.
7. Send an email to users whenever the TOU is updated by selecting the Notification check box.
a. Optionally, for localization purposes, you may enter a TOU agreement for each language applicable to your
needs by making a choice in the Select Language drop-down.
8. In the text box provided, enter your customized TOU.
The editor provides a basic text entry tool to create a TOU or paste in an existing TOU. To paste text from an external
source, right-click the text box and choose Paste as plain text to prevent any HTML or formatting errors.
9. Select Save.
You can enforce MDM terms of use acceptance by creating a compliance policy for MDM Terms of Use Acceptance. This
enforcement does not apply to devices using AirWatch Container.
Create Application or Console Terms of Use
You can also create application-based terms of use (TOU) to notify end users when a specific application collects data or
when it imposes restrictions.
When users run these applications from your enterprise app catalog, they must accept the agreement to access the
application. You can set TOU for app versions, make language-specific TOU, and remove apps if the TOU is not accepted.
Console TOU display when an administrator logs in to the AirWatch Console for the first time. For the AirWatch Console,
you can set TOU version numbers and create language-specific copies of the TOU.
Chapter 3: Environment Setup
27
VMware AirWatch Mobile Device Management Guide | v.2017.10 | October 2017
Copyright © 2017 VMware, Inc. All rights reserved.

For Applications, assign the TOU when adding or editing an application using the Terms of Use tab.
1. Navigate to Groups &Settings > All Settings > System > Terms of Use.
2. Select Add Terms of Use.
3. Enter a Name for the terms of use and select the Type, which can be Console or Application.
4. Configure settings such as a Version number and a Grace Period, depending on the Type you selected.
5. Enter your TOU in the text box provided. The editor provides a basic text entry tool to create a TOU or paste in an
existing TOU. If you are pasting text from an external source, right-click the text box and choose Paste as plain text
to prevent any HTML or formatting errors.
6. Select Save.
View Terms of Use Acceptance
While compliance policies can be configured to help enforce terms of use acceptance, you can also see who has and who
has not accepted the agreement. Then, if necessary, you can contact those individuals directly.
1. Navigate to Groups & Settings > All Settings > System > Terms of Use.
2. Use the Type drop-down menu to filter based on the agreement type, for example, Enrollment. The Users / Devices
column displays devices that have accepted/not accepted/been assigned the terms of use.
3. Select the appropriate number in the Devices column for the terms of use row to see device information pertaining
to that agreement. Optionally, access the drop-down menu for the row and select one of the following.
lView Devices or Users – Display a complete list of devices and their acceptance statuses. You can filter by
organization group.
lView Previous Versions – View previous iterations of the agreement.
lView Terms of Use – View the terms of use agreement.
Track Terms of Use Acceptance With Reports
You can track user acceptance for terms of use, enabling you to take possible action.
View details regarding specific organization groups, console acceptances, and device enrollment acceptances. View the
acceptances directly in the AirWatch Console or export the report in either PDF, CSV, or Excel formats.
1. Navigate to Hub > Reports & Analytics > Reports > List View.
2. Search for and generate the Terms of Use Acceptance Detail report by selecting the report title.
3. Select the OrganizationGroups.
4. Select the Terms of Use Type.
5. Select the Report Format.
6. Select Download to save the report in the selected format.
7. You can also Preview as PDF.
Chapter 3: Environment Setup
28
VMware AirWatch Mobile Device Management Guide | v.2017.10 | October 2017
Copyright © 2017 VMware, Inc. All rights reserved.

Important: AirWatch does not provide legally binding sample text and any text examples provided must be reviewed
by your own company or legal team.
Console Branding
The AirWatch Console allows extensive customization options. These options allow you to brand aspects of your
AirWatch tools and resources according to the color scheme, logo, and overall aesthetic of your organization.
Branding can be configured in support of multi-tenancy, so different divisions of your enterprise can have their unique
look and feel at their organization group level.
For more information, see Organization Groups Overview on page 67.
Configure Console Branding
You can align with the color scheme, logo, and overall aesthetic of your organization by customizing the console.
1. Select the organization group you want to brand and then navigate to Groups & Settings > All Settings > System >
Branding.
2. Configure the settings on the Branding tab:
lUpload a Company Logo by uploading a file saved on your computer. The suggested resolution of the uploaded
image is 800x300.
lUpload a background for the login page by uploading a file saved on your computer. The suggested resolution of
the uploaded image is 1024x768.
lUpload a background for the Self-Service Portal login page by uploading a file saved on your computer. The
suggested resolution of the uploaded image is 1024x768.
3. Configure customizations to the Colors section in the Branding tab.
4. Configure the settings on the Custom CSS tab.
lEnter customized CSS code for advanced branding.
5. Select Save.
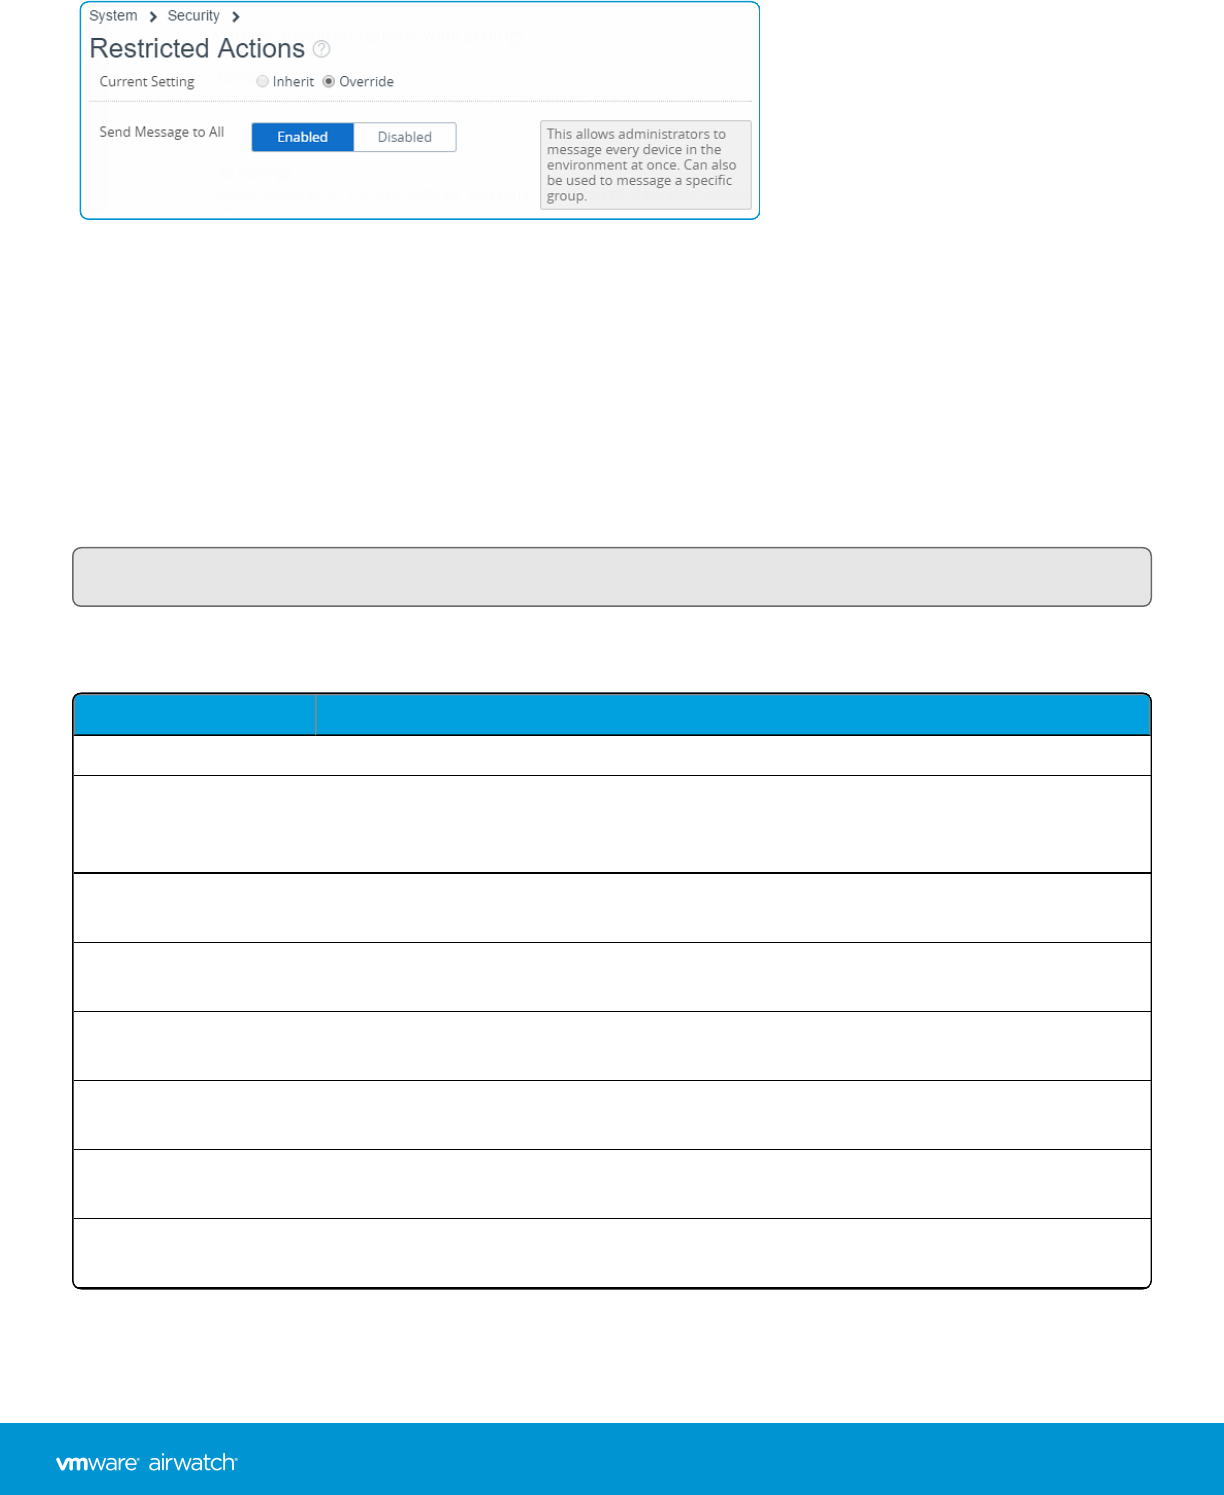
Restricted Console Actions
In a scenario where the AirWatch Console is left unattended, AirWatch provides an extra safeguard against malicious
actions that are potentially destructive. You can place those actions out of reach of unauthorized users. Navigate to
Groups &Settings > AllSettings > System > Security > Restricted Actions.
Enable Send Message to All
Enable this setting to allow a system administrator to send a message to all devices in your deployment from the Device
List View.
Chapter 3: Environment Setup
29
VMware AirWatch Mobile Device Management Guide | v.2017.10 | October 2017
Copyright © 2017 VMware, Inc. All rights reserved.
For more information, see Device List View on page 178.
Select Password Protect Actions
Restricted Console Actions provides an added layer of protection against malicious actions that are potentially
destructive. Configure settings for restricted actions by navigating to Groups & Settings > All Settings > System >
Security > Restricted Actions.
You can require that certain actions require admins to enter a PIN. For each action you choose to protect, select the
appropriate Password Protect Actions button for Enabled or Disabled as appropriate. This provides you with granular
control over which actions you want to make more secure.
Note: Some actions always require a PIN and thus cannot be disabled. Denoted by * below.
You can set the maximum number of failed attempts the system accepts before automatically logging out the session. If
you reach the set number of attempts, you need to re-login into the AirWatch Console and set a new security PIN.
Setting Description
Admin Account Delete Prevents the deletion of an admin user account in Accounts > Administrators > List View.
*Regenerate VMware
Enterprise Systems
ConnectorCertificate
Prevents the regeneration of the VMware Enterprise Systems Connectorcertificate in
Groups &Settings >All Settings >System >Enterprise Integration >VMware Enterprise
Systems Connector.
*APNs Certificate
Change
Prevents the disabling of APNs for MDM in Groups & Settings > All Settings > Devices &
Users > Apple > APNs For MDM.
Application
Delete/Deactivate/Retire
Prevents the deletion, deactivation, or retirement of an application in Apps & Books >
Applications > List View.
Content
Delete/Deactivate
Prevents the deletion or deactivation of a content file in Content > List View.
*Data Encryption Toggle Prevents the Encryption of user information setting in Groups & Settings > All Settings >
System > Security > Data Security.
Device Delete Prevents the deletion of a device in Devices > List View. Admin security PIN is still required
for bulk actions even when this setting is disabled.
*Device Wipe Prevents any attempt to perform a device wipe from the Device List View or Device Details
screens.
Chapter 3: Environment Setup
30
VMware AirWatch Mobile Device Management Guide | v.2017.10 | October 2017
Copyright © 2017 VMware, Inc. All rights reserved.

Setting Description
Enterprise Reset Prevents any attempt to perform an enterprise reset on a device from the Devices Details
page of a Windows Rugged, Rugged Android, or QNX device.
Enterprise Wipe Prevents any attempt to perform an enterprise wipe on a device from the Devices Details
page of a device.
Enterprise Wipe (Based
on User Group
Membership Toggle)
Prevents any attempt to perform an enterprise wipe on a device when it is removed from a
user group. This is an optional setting that you can configure under Groups & Settings > All
Settings > Devices &Users > General > Enrollment on the Restrictions tab. If you Restrict
Enrollment to Configured Groups on this tab, you then have the added option of
performing an enterprise wipe a device when it is removed from a group. For more
information, see the Configure Enrollment Restriction Settings on page 116.
*Organization Group
Delete
Prevents any attempt to delete the current organization group from Groups & Settings >
Groups > Organization Groups > Organization Group Details.
Profile
Delete/Deactivate
Prevents any attempt to delete or deactivate a profile from Devices > Profiles & Resources
> Profiles.
Provisioning Product
Delete
Prevents any attempt to delete a provisioning product from Devices > Staging
&Provisioning > Products List View.
Revoke Certificate Prevents any attempt to revoke a certificate from Devices > Certificates > List View.
*Secure Channel
Certificate Clear
Protects from any attempt to clear an existing secure channel certificate from Groups &
Settings > All Settings > System > Advanced > Secure Channel Certificate.
User Account Delete Prevents any attempt to delete a user account from Accounts > Users > List View.
Delete Telecom Plan Prevents the deletion of a telecom plan in Telecom > PlanList.
Override Job Log Level Prevents attempts to override the currently-selected job log level from Groups &Settings >
Admin > Diagnostics > Logging. Overriding the Job Log Level is useful when a device or
group of devices is having an issue. In this case, the admin can override those device
settings by forcing an elevated log level to Verbose, which logs the maximum level of
console activity, making it ideal for troubleshooting.
*App Scan Vendor
Reset/Toggle
Prevents the resetting (and subsequent wiping) of your app scan integration settings. This
action is performed in Groups &Settings > All Settings > Apps > App Scan.
Maximum invalid PIN
attempts
Defines the maximum number of invalid attempts at entering a PIN before the console locks
down. This setting must be between 1 and 5.
Configure Required Notes for Action
You can also require admins to enter notes using the Require Notes check box and explain their reasoning when
performing these actions. Navigate to Groups &Settings > AllSettings > System > Security > Restricted Actions.
Setting Description
Lock Device Require a note for any attempt to lock a device from the Device List View or Device Details pages.
Chapter 3: Environment Setup
31
VMware AirWatch Mobile Device Management Guide | v.2017.10 | October 2017
Copyright © 2017 VMware, Inc. All rights reserved.

Setting Description
Lock SSO Require a note for any attempt to lock an SSOsession from the Device List View or Device Details
screens.
Device Wipe Require a note for any attempt to perform a device wipe from the Device List View or Device Details
screens.
Enterprise
Reset
Require a note for any attempt to enterprise reset a device from the Devices Details page of a
Windows Rugged or Rugged Android device.
Enterprise Wipe Require a note for any attempt to perform an enterprise wipe from the Devices Details page of a
device.
Override Job
Log Level
Require a note prior to attempts to override the default job log level from Groups &Settings >
Admin > Diagnostics > Logging.
Other Enterprise Systems for Integration
Take advantage of advanced MDM functionality by integrating your AirWatch environment with existing enterprise
infrastructures including email management with SMTP, directory services, and content management repositories.
AirWatch can integrate with the following internal components.
lEmail Relay (SMTP) – Provide security, visibility, and control for mobile email.
lDirectory Services (LDAP/AD) – Take advantage of existing corporate groups to manage users and devices.
lMicrosoft Certificate Services – Use existing Microsoft certificate infrastructure for an AirWatch deployment.
lSimple Certificate Enrollment Protocol (SCEP PKI) – Configure certificates for Wi-Fi, VPN, Microsoft EAS and more.
lEmail Management Exchange 2010 (PowerShell) – Securely connect AirWatch to enforce policies with corporate
email servers.
lBlackBerry Enterprise Server (BES) – Integrate with BES for streamlined BlackBerry management.
lThird-party Certificate Services – Import certificate management systems to be managed within the Console.
lLotus Domino Web Service (HTTPS) – Access Lotus Domino content and features through your AW deployment.
lContent Repositories – Integrate with SharePoint, Google Drive, SkyDrive, file servers, and network shares.
lSyslog (Event log data) – Export event log data to be viewed across all integrated servers and systems.
lCorporate Networks – Configure Wi-Fi and VPN settings, provision device profiles with user credentials for access.
lSystem Information and Event Management (SIEM) – Record and compile device and console data to ensure
security and compliance with regulations and corporate policies.
For more information on how to integrate AirWatch with these infrastructures, seeVMware Enterprise Systems
Connector Guide, available at https://www.vmware.com/support/pubs/workspaceone-pubs.html. See also VMware
Tunnel Admin Guide and the 'Syslog' section of the Reports & Analytics Guide, available on Accessing Other Documents
on page 217.
Chapter 3: Environment Setup
32
VMware AirWatch Mobile Device Management Guide | v.2017.10 | October 2017
Copyright © 2017 VMware, Inc. All rights reserved.

Chapter 4:
User and Admin Accounts
User and Admin Accounts Overview 34
User Authentication Types 34
Basic User Accounts 40
Directory-Based User Accounts 42
User Accounts List View Overview 46
Batch Import Feature 47
Admin Accounts 50
33
VMware AirWatch Mobile Device Management Guide | v.2017.10 | October 2017
Copyright © 2017 VMware, Inc. All rights reserved.
User and Admin Accounts Overview
You must create and integrate user accounts for devices to enroll into AirWatch. Likewise, Administrator accounts must
be created and assigned so Admins can easily manage users and devices.
The AirWatch Console allows you to establish a complete user and admin infrastructure. It provides configuration
options for authentication, enterprise integration, and ongoing maintenance.
User Authentication Types
Before any devices can be enrolled, each device user must have an authentic user account recognized by AirWatch. The
type of user authentication you choose depends upon the needs of your organization.
Basic User Authentication
You can use Basic Authentication to identify users in the AirWatch architecture but this method offers no integration to
existing corporate user accounts.
Pros
lCan be used for any deployment method.
lRequires no technical integration.
lRequires no enterprise infrastructure.
Cons
lCredentials only exist in AirWatch and do not necessarily match existing corporate credentials.
lOffers no federated security or single sign-on.
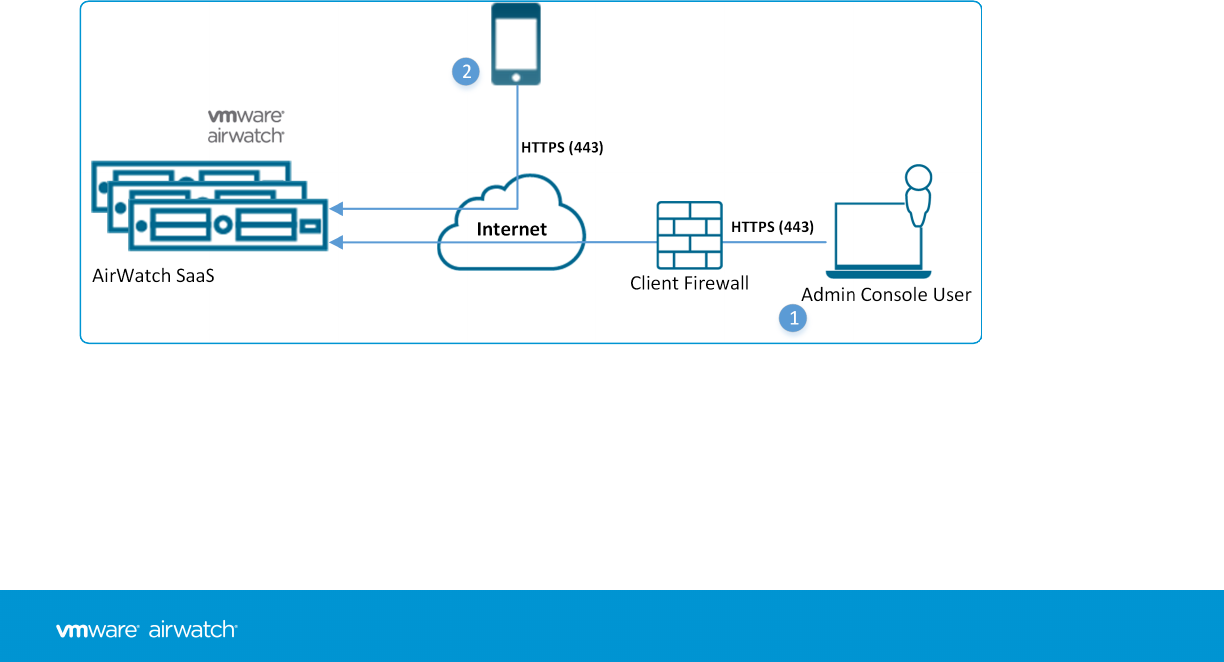
lAirWatch stores all user name and passwords.
1. Console user logs in to AirWatch SaaS using local AirWatch account for authentication (Basic Authentication)
lCredentials are encrypted during transport
l(for example, user name:jdoe@air-watch.com, password: abcd)
Chapter 4: User and Admin Accounts
34
VMware AirWatch Mobile Device Management Guide | v.2017.10 | October 2017
Copyright © 2017 VMware, Inc. All rights reserved.
2. Device user enrolls device using local AirWatch account (Basic Authentication)credentials
lCredentials are encrypted during transport
l(for example, user name:jdoe2, password 2557)
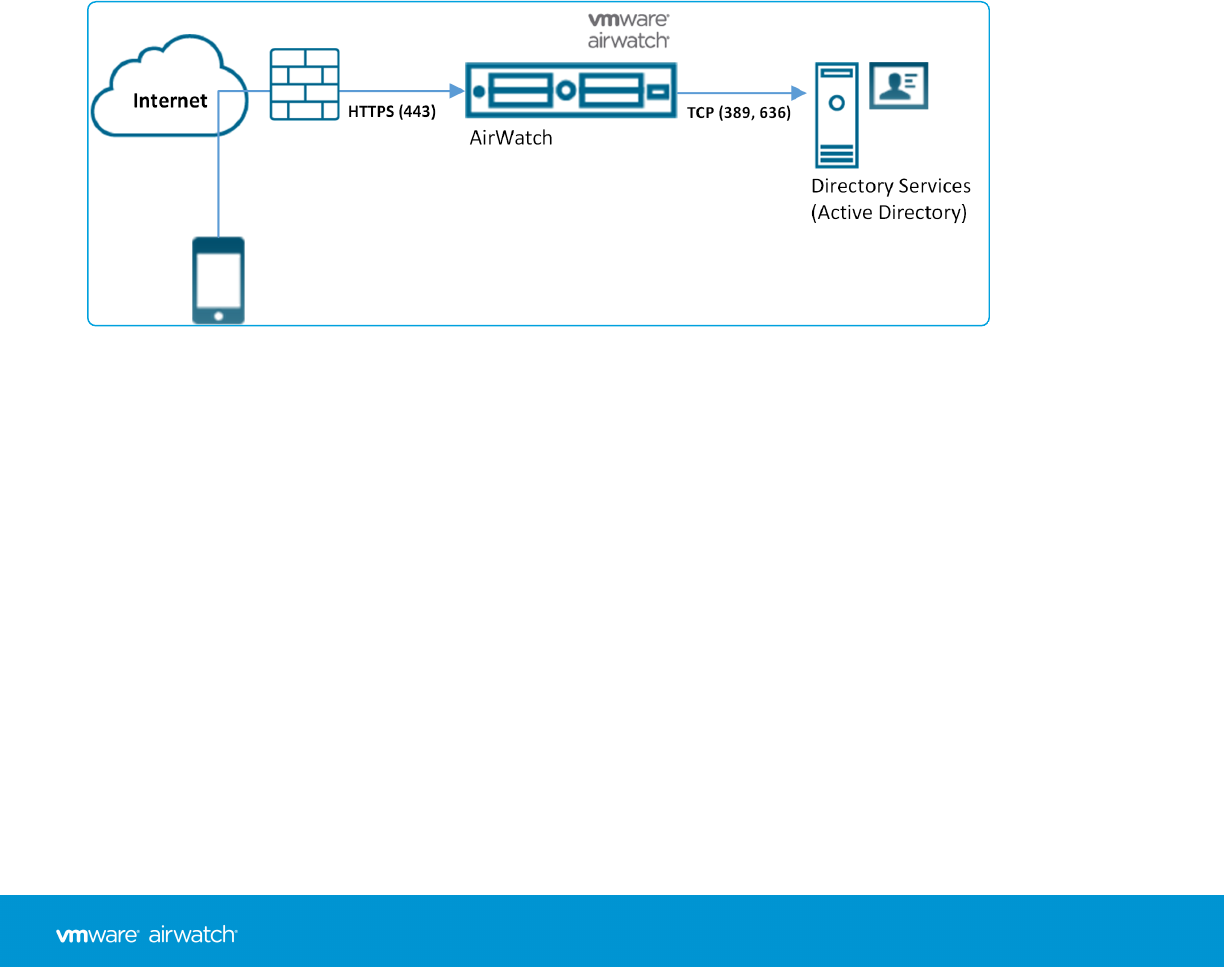
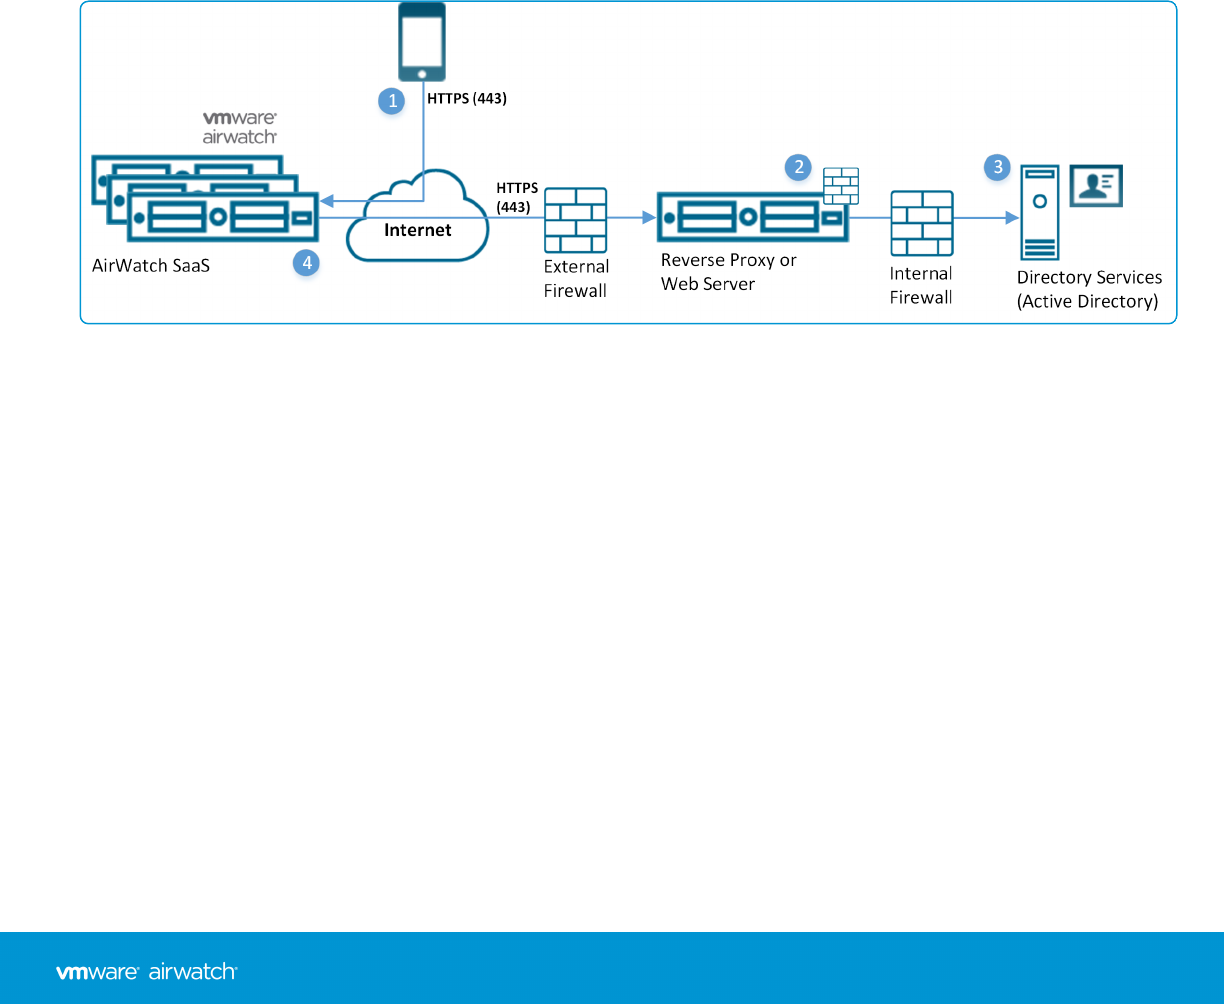
Active Directory / LDAP Authentication
Active Directory (AD)/Lightweight Directory Access Protocol (LDAP) authentication is used to integrate user and admin
accounts of AirWatch with existing corporate accounts.
Pros
lEnd users now authenticate with existing corporate credentials.
lSecure method of integrating with LDAP / AD.
lStandard integration practice.
Cons
lRequires an AD or other LDAP server.
1. Device connects to AirWatch MDMto enroll device. User enters their directory services user name and password.
lUser name and password are encrypted during transport.
lAirWatch does not store the user's directory services password.
2. AirWatch queries the client's directory services through a secureLDAP protocol over the Internet using a service
account for authentication.
3. The user's credentials are validated against the corporate directory service.
4. If the user credentials are valid, the AirWatch server allows the device to complete a device enrollment.
Chapter 4: User and Admin Accounts
35
VMware AirWatch Mobile Device Management Guide | v.2017.10 | October 2017
Copyright © 2017 VMware, Inc. All rights reserved.
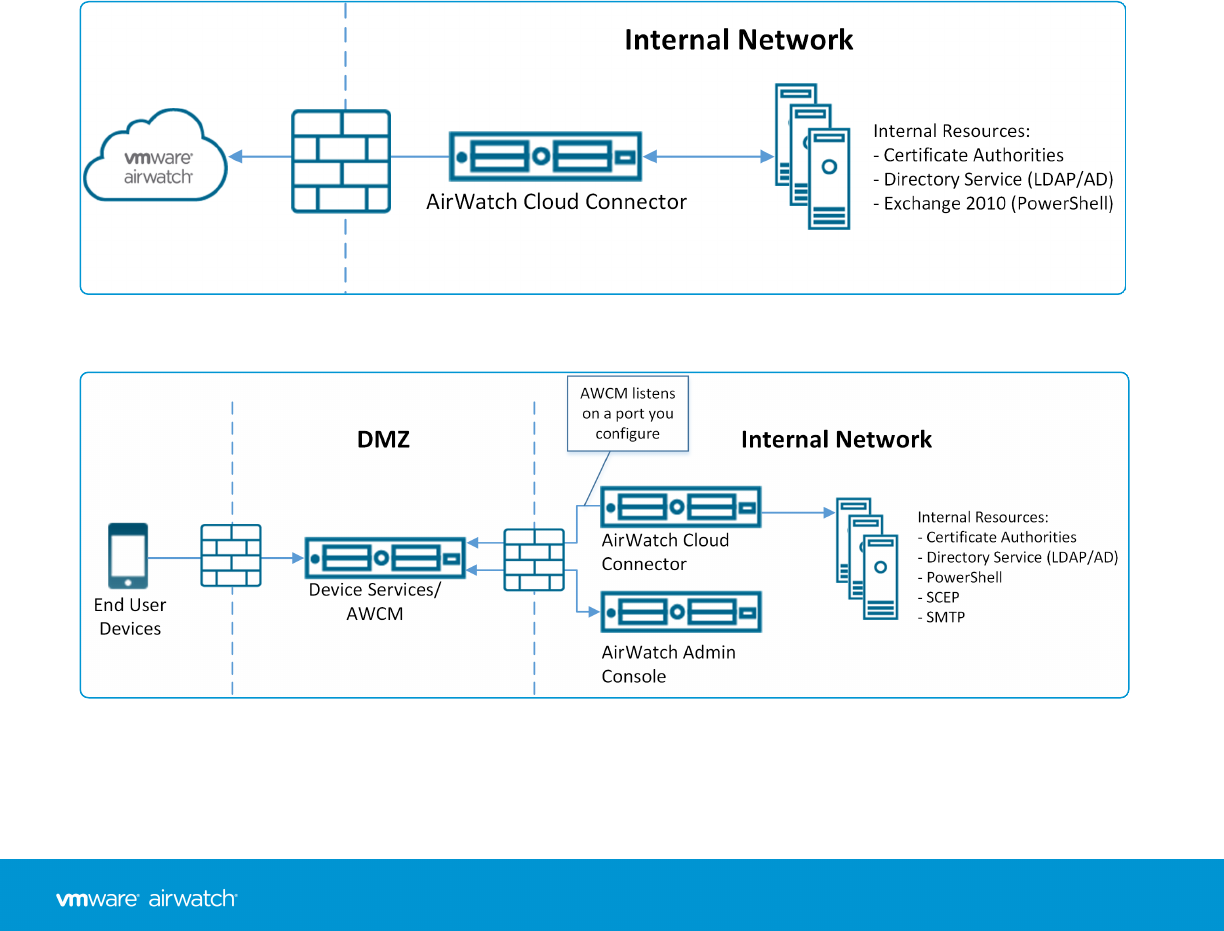
Active Directory / LDAP Authentication with VMware Enterprise Systems Connector
The Active Directory / LDAP authentication with VMware Enterprise Systems Connector provides the same functionality
as traditional AD/LDAP authentication. This model functions across the cloud for Software as a Service (SaaS)
deployments.
Pros
lEnd users authenticate with existing corporate credentials.
lRequires no firewall changes, as communication is initiated from the VMware Enterprise Systems Connector within
your network.
lTransmission of credentials is encrypted and secure.
lOffers secure configuration to other infrastructure such as BES, Microsoft ADCS, SCEP, and SMTP servers.
Cons
lRequires VMware Enterprise Systems Connector to be installed behind the firewall or in a DMZ.
lRequires extra configuration.
SaaS Deployment model
On-premises Deployment model
For information about how to integrate your AirWatch environment with these infrastructures, seeVMware Enterprise
Systems Connector Guide, available at https://www.vmware.com/support/pubs/workspaceone-pubs.html.
Chapter 4: User and Admin Accounts
36
VMware AirWatch Mobile Device Management Guide | v.2017.10 | October 2017
Copyright © 2017 VMware, Inc. All rights reserved.
Authentication Proxy
The authentication proxy delivers directory services integration across the cloud or across hardened internal networks. In
this model, the AirWatch MDM server communicates with a publicly facing Web server or an Exchange ActiveSync Server.
This arrangement authenticates users against the domain controller.
Pros
lOffers a secure method to proxy integration with AD/LDAP across the cloud.
lEnd users can authenticate with existing corporate credentials.
lLightweight module that requires minimal configuration.
Cons
lRequires a public facing Web server or an Exchange ActiveSync server which ties into an AD/LDAP server.
lOnly feasible for specific architecture layouts.
lMuch less robust solution than VMware Enterprise Systems Connector.
1. Device connects to AirWatch to enroll device. User enters their directory services user name and password.
lUser name and password are encrypted during transport.
lAirWatch does not store the user's directory services password.
2. AirWatch relays the user name and password to a configured Authentication Proxy endpoint that requires
authentication (for example, Basic Authentication).
3. The user's credentials are validated against the corporate directory services.
4. If the user credentials are valid, the AirWatch server allows the device to complete a device enrollment.
Chapter 4: User and Admin Accounts
37
VMware AirWatch Mobile Device Management Guide | v.2017.10 | October 2017
Copyright © 2017 VMware, Inc. All rights reserved.
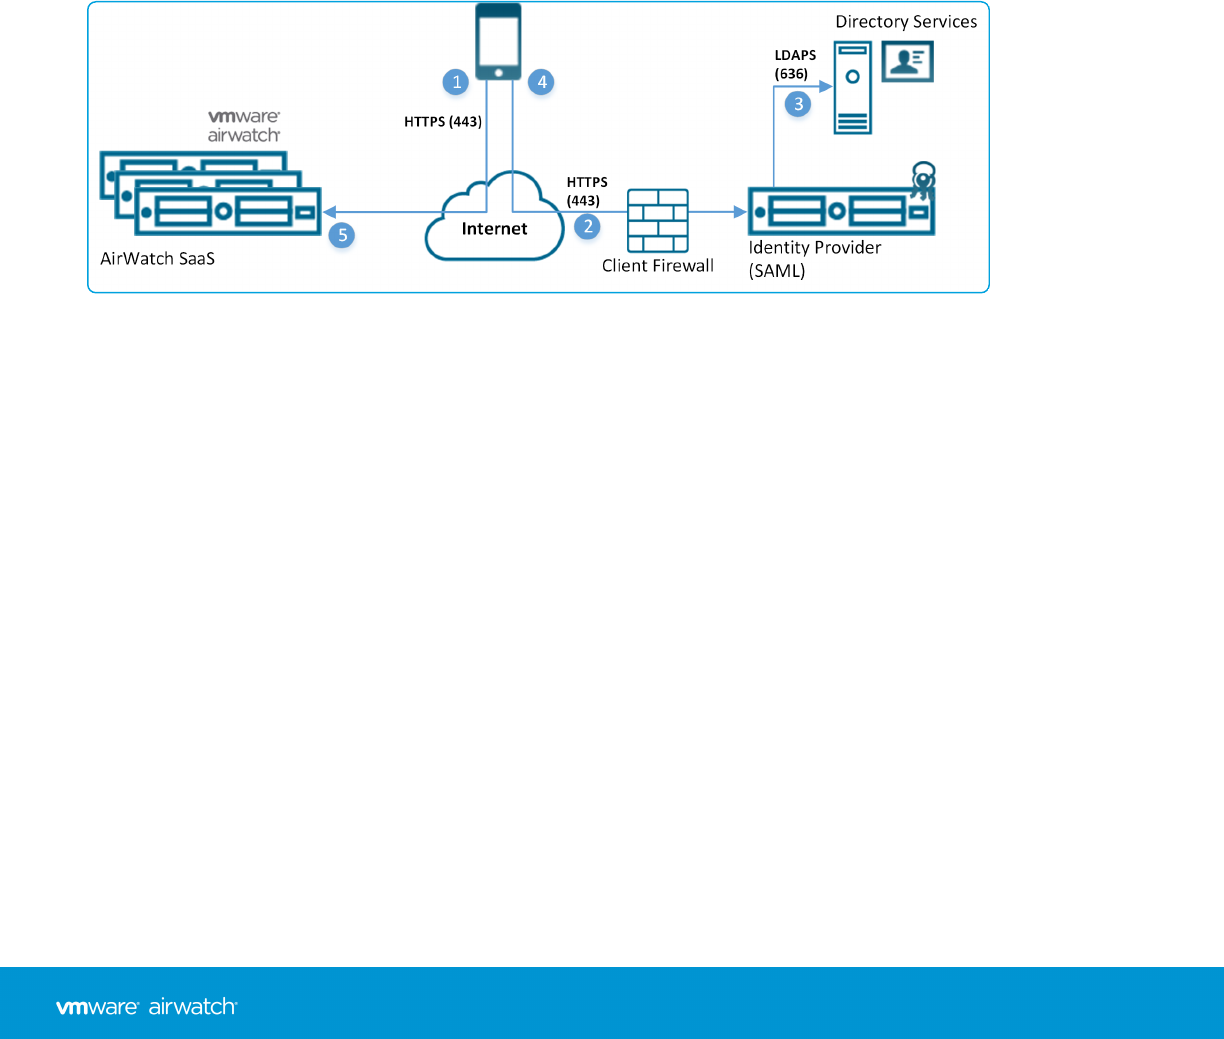
SAML 2.0 Authentication
The Security Assertion Markup Language (SAML) 2.0 Authentication offers single sign-on support and federated
authentication. AirWatch never receives any corporate credentials. If an organization has a SAML Identity Provider
server, use SAML 2.0 integration.
Pros
lOffers single sign-on capabilities.
lAuthentication with existing corporate credentials.
lAirWatch never receives corporate credentials in plain-text.
Cons
lRequires corporate SAML Identity Provider infrastructure.
1. Device connects to AirWatch for enrollment. AirWatch server redirects the device to the client specified identity
provider.
2. Device securely connects through HTTPS to client provided identity provider and user enters credentials.
lCredentials are encrypted during transport directly between the device and SAML endpoint.
3. Credentials are validated against directory services.
4. The identity provider returns a signed SAML response with the authenticated user name.
5. The device responds back to the AirWatch server and presents the signed SAML message. The user is authenticated.
For more information, see the VMware AirWatch SAML Integration Guide, on Accessing Other Documents on page 217.
Chapter 4: User and Admin Accounts
38
VMware AirWatch Mobile Device Management Guide | v.2017.10 | October 2017
Copyright © 2017 VMware, Inc. All rights reserved.
Token-Based Authentication
The Token-based authentication offers the easiest way for a user to enroll their device. With this enrollment setting,
AirWatch generates a token, which is placed within the enrollment URL.
For single-token authentication, the user accesses the link from the device to complete an enrollment and the AirWatch
server references the token provided to the user.
For added security, set an expiration time (in hours) for each token. Setting an expiration minimizes the potential for
another user to gain access to any information and features available to that device.
You may also decide to implement two factor authentication to take end-user identity verification a step further. With
this authentication setting, the user must enter their user name and password upon accessing the enrollment link with
the provided token.
Pros
lMinimal work for an end user to enroll and authenticate their device.
lSecure token use by setting expiration.
lUser does not need credentials for single-token authentication.
Cons
lRequires either Simple Mail Transfer Protocol (SMTP) or Short Message Service (SMS) integration to send tokens to
device.
1. Administrator authorizes user device registration.
2. Single use token generated and sent to user from AirWatch.
3. User receives a token and navigates to enrollment URL. User is prompted for token and optionally two-factor
authentication.
4. Device enrollment process.
5. AirWatch marks token as expired.
Note: SMTP is included with SaaS deployments.
Chapter 4: User and Admin Accounts
39
VMware AirWatch Mobile Device Management Guide | v.2017.10 | October 2017
Copyright © 2017 VMware, Inc. All rights reserved.

Enable Security Types for Enrollment
Once AirWatch is integrated with a selected user security type and before enrollment, enable each authentication mode
you plan to allow.
Navigate to Devices > Device Settings > Devices & Users > General > Enrollment in the Authentication tab and select
the appropriate check boxes for the Authentication Mode setting.
Basic User Accounts
Create basic user accounts in AirWatch for your end users if you are not integrating with a directory service. Basic user
accounts are also useful for testing purposes: they can be created quickly and disposed of afterward. For more
information, see Basic vs. Directory Services Enrollment on page 93.
Pros
lCan be used for any deployment method.
lRequires no technical integration.
lRequires no enterprise infrastructure.
Cons
lCredentials only exist in AirWatch and do not necessarily match existing corporate credentials.
lOffers no federated security.
lSingle sign on not supported.
lAirWatch stores all usernames and passwords.
Create Basic User Accounts
You can create basic user accounts for each user to authenticate and log in to the AirWatch system. You can then send
basic users a notification with instructions on activating their account including a password reset link that expires in 24
hours. For more information, see Create Basic User Accounts on page 40.
Create Basic User Accounts
You can create basic user accounts which each user requires to authenticate and log in to the AirWatch system. This topic
details creating user accounts one at a time.
1. Navigate to Accounts > Users > List View, select Add then Add User. The Add / Edit User page displays.
2. In the General tab, complete the following settings to add a basic user.
Setting Description
Security Type Choose Basic to add a basic user.
User name Enter a user name with which the new user is identified.
Password Enter a password that the user can use to log in.
Chapter 4: User and Admin Accounts
40
VMware AirWatch Mobile Device Management Guide | v.2017.10 | October 2017
Copyright © 2017 VMware, Inc. All rights reserved.
Setting Description
Confirm
Password
Confirm the password.
Full Name Complete the First Name,Middle Name, and Last Name of the user.
Display Name Represent the user in the AirWatch Console by entering a name.
Email Address Enter or edit the user's email address.
Email user name Enter or edit the user's email user name.
Domain Select the email domain from the drop-down setting.
Phone Number Enter the user's phone number including plus sign, country code, and area code. This option is
required if you intend to use SMS to send notifications.
Enrollment
Enrollment
Organization
Group
Choose the organization group the user enrolls in.
Allow the user to
enroll into
additional
Organization
Groups
You can allow the user to enroll into more than one organization group. If you select Enabled,
then complete the Additional Organization Groups drop-down setting.
User Role Select the role for the user you are adding from this drop-down setting.
Notification
Message Type Choose the type of message you may send to the user, Email,SMS, or None. Selecting SMS
requires a valid entry in the Phone Number option.
Message
Template
The basic user activates their account with this notification. For security reasons, this
notification does not include the user's password. Instead, a password reset link is included in
the notification. The basic user selects this link to define another password. This password
reset link expires in 24 hours automatically.
Choose the template for email or SMS messages by selecting one from this drop-down setting.
Optionally, select Message Preview to preview the template and select the Configure Message
Template to create a template.
Chapter 4: User and Admin Accounts
41
VMware AirWatch Mobile Device Management Guide | v.2017.10 | October 2017
Copyright © 2017 VMware, Inc. All rights reserved.
3. You may optionally select the Advanced tab and complete the following settings.
Setting Description
Advanced Info Section
Email
Password
Enter the email password of the user you are adding.
Confirm
Email
Password
Confirm the email password of the user you are adding.
User
Principal
Name
Enter the principal name of the basic user. This setting is optional.
Category Choose the User Category for the user being added.
Department Enter the user's department for administrative purposes.
Employee
ID
Enter the user's employee ID for administrative purposes.
Cost Center Enter the user's cost center for administrative purposes.
Certificates Section
Use
S/MIME
Enable or Disable Secure Multipurpose Internet Mail Extensions (S/MIME).
If enabled, you must have an S/MIME-enabled profile and you must upload an S/MIME certificate by
selecting Upload.
Separate
Encryption
Certificate
Enable or Disable encryption certificate.
If enabled, you must upload an encryption certificate using Upload. Generally, the same S/MIME
certificate is used for signing and encryption, unless a different certificate is expressly being used.
Old
Encryption
Certificate
Enable or disable a legacy version encryption certificate.
If enabled, you must Upload an encryption certificate.
Staging Section
Enable
Device
Staging
Enable or disable the staging of devices.
If enabled, you must choose between Single User Devices and Multi User Devices. If Single User
Devices, you must select between Standard, where users themselves log in and Advanced, where a
device is enrolled on behalf of another user. See Self-Enrollment vs Device Staging on page 99 for
more information.
4. Select Save to save only the new user or select Save and Add Device to save the new user and proceed to the Add
Device page.
Directory-Based User Accounts
Integrating with an existing directory service enables you to pull in users automatically. It eliminates the need of having
to add users manually to the AirWatch Console. For more information, see Basic vs. Directory Services Enrollment on
Chapter 4: User and Admin Accounts
42
VMware AirWatch Mobile Device Management Guide | v.2017.10 | October 2017
Copyright © 2017 VMware, Inc. All rights reserved.
page 93.
Every directory user you want to manage through AirWatch Mobile Device Management (MDM) must have a
corresponding user account in the AirWatch Console.
You can directly add your existing directory services users to AirWatch using one of the following methods.
lBatch upload a file containing all your directory services users. The act of batch importing automatically creates a
user account.
lCreate an AirWatch user accounts one at a time by entering the directory user name and selecting Check User to
auto-populate remaining details.
lDo not import in bulk nor manually create user accounts and instead allow all directory users to self-enroll at
enrollment time.
Pros
lEnd users authenticate with existing corporate credentials.
lCan automatically detect and sync changes from the directory system into AirWatch.
lSecure method of integrating with your existing directory service.
lStandard integration practice.
lSaaS deployments using the VMware Enterprise Systems Connector require no firewall changes and offers a secure
configuration to other infrastructures, such as Microsoft ADCS, SCEP, and SMTP servers.
Cons
lRequires an existing directory service infrastructure.
lSaaS deployments require additional configuration due to the VMware Enterprise Systems Connector being installed
behind the firewall or in a DMZ.
Create a Directory-Based User Account
You must create accounts for each user in the AirWatch system and directory users authenticate using your existing
corporate credentials. For more information, see Create a Directory-Based User Account on page 43.
Create a Directory-Based User Account
You must create accounts for each user in the AirWatch system and directory users authenticate using your existing
corporate credentials. This topic details creating user accounts one at a time.
1. Navigate to Accounts > Users > List View and select Add and then Add User. The Add / Edit User page displays.
2. In the General tab, complete the following settings to add a directory user.
Setting Description
Security Type Add an Active Directory user by choosing Directory as the Security Type.
Directory Name This pre-populated setting identifies the Active Directory name.
Domain Choose the domain name from the drop-down menu.
Chapter 4: User and Admin Accounts
43
VMware AirWatch Mobile Device Management Guide | v.2017.10 | October 2017
Copyright © 2017 VMware, Inc. All rights reserved.
Setting Description
User name Enter the user's directory user name and select Check User. If the system finds a match, the
user's information is automatically populated. The remaining settings in this section are only
available after you have successfully located an active directory user with the Check User
button.
Full Name Use Edit Attributes to allow any option that syncs a blank value from the directory to be
edited. Edit Attributes also enables you to populate matching user's information
automatically.
If a setting syncs an actual value from the directory, then that setting must be edited in the
directory itself. The change takes effect on the next directory sync. Complete any blank
option returned from the directory in Full Name and select Edit Attributes to save the
addition.
Display Name Enter the name that displays in the admin console.
Email Address Enter or edit the user's email address.
Email user name Enter or edit the user's email user name.
Domain (email) Select the email domain from the drop-down menu.
Phone Number Enter the user's phone number including plus sign, country code, and area code. If you
intend to use SMS to send notifications, the phone number is required.
Enrollment
Enrollment
Organization
Group
Select the organization group into which the user enrolls.
Allow the user to
enroll into
additional
Organization
Groups
Choose whether or not to allow the user to enroll into more than one organization group. If
you select Enabled, then complete the Additional Organization Groups.
User Role Select the role for the user you are adding from this drop-down menu.
Notification
Message Type Choose the type of message you may send to the user, Email,SMS, or None. Selecting SMS
requires a valid entry in the Phone Number text box.
Message Template Choose the template for email or SMS messages from this drop-down setting. Optionally,
select the Message Preview to preview the template and select the Configure Message
Templates link to create a template.
3. You may optionally select the Advanced tab and complete the following settings.
Chapter 4: User and Admin Accounts
44
VMware AirWatch Mobile Device Management Guide | v.2017.10 | October 2017
Copyright © 2017 VMware, Inc. All rights reserved.
Setting Description
Advanced Info Section
Email Password Enter the email password of the user you are adding.
Confirm Email
Password
Confirm the email password of the user you are adding.
Distinguished
Name
For directory users recognized by VMware AirWatch, this text box is pre-populated with the
distinguished name of the user. Distinguished Name is a string representing the user name and
all authorization codes associated with an Active Directory user.
Manager
Distinguished
Name
Enter the distinguished name of the user's manager. This text box is optional.
Category Choose the user category for the user being added.
Department Enter the user's department for your company's administrative purposes.
Employee ID Enter the user's employee ID for your company's administrative purposes.
Cost Center Enter the user's cost center for your company's administrative purposes.
Custom
Attribute 1–5
(for Directory
users only)
Enter your previously configured custom attributes, where applicable. You may define these
custom attributes by navigating to Groups &Settings > All Settings > Devices &Users >
Advanced > Custom Attributes.
Note: Custom attributes can be configured only at Customer organization groups.
Certificates Section
Use S/MIME Enable or disable the use of Secure/Multipurpose Internet Mail Extensions (S/MIME). If
enabled, you must have an S/MIME-enabled profile and you must upload an S/MIME certificate
by selecting Upload.
Separate
Encryption
Certificate
Enable or disable the use of a separate encryption certificate. If enabled, you must upload an
encryption certificate using Upload. Generally, the same S/MIME certificate is used for signing
and encryption, unless a different certificate is expressly being used.
Old Encryption
Certificate
Enable or disable a legacy version encryption certificate. If enabled, you must Upload an
encryption certificate.
Staging Section
Enable Device
Staging
Enable or disable the staging of devices.
If enabled, you must choose between Single User Devices and Multi User Devices.
If Single User Devices, you must select between Standard, where users themselves log in and
Advanced, where a device is enrolled on behalf of another user.
4. Select Save to save only the new user or select Save and Add Device to save the new user and proceed to the Add
Device page.
For more information about adding directory users to AirWatch, refer to the VMware AirWatch Directory Services
Guide, available on Accessing Other Documents on page 217.
Chapter 4: User and Admin Accounts
45
VMware AirWatch Mobile Device Management Guide | v.2017.10 | October 2017
Copyright © 2017 VMware, Inc. All rights reserved.

User Accounts List View Overview
The List View page, which you can find by navigating to Accounts > Users > List View, provides useful tools for common
user account maintenance and upkeep.
Customize List View
You can use the User Accounts List View to create customized lists of users immediately. You can also customize the
screen layout based on criteria that is most important to you. You can export this customized list for later analysis and
add new users individually or in bulk.
Action Description
Filters View only the desired users by using the following filters.
lSecurity Type lUser Group
lEnrollment Organization Group lUser Role
lEnrollment Status
Add lAdd User – Perform a one-off addition of a basic user account. Add an employee or a newly promoted
employee that needs access to MDM capabilities. For more information, see Add Users to User Groups on
page 83.
lBatch Import – Add multiple users into AirWatch by importing a comma-separated values (CSV) file. Enter
a unique name and description to group and organize multiple users at a time. For more information, see
Batch Import Users or Devices on page 47.
Layout Enables you to customize the column layout.
lSummary – View the List View with the default columns and view settings.
lCustom – Select only the columns in the List View you want to see. You can also apply selected columns
to all administrators at or below the current organization group.
Chapter 4: User and Admin Accounts
46
VMware AirWatch Mobile Device Management Guide | v.2017.10 | October 2017
Copyright © 2017 VMware, Inc. All rights reserved.

Action Description
Sorting Most columns in the List View (in both Summary and Custom Layout) are sortable including Devices,User
Groups, and Enrollment Organization Group.
Export Save a comma-separated values (CSV) file of the entire List View that can be viewed and analyzed in Excel.
Interact With User Accounts
The list view also features a check box to the left of each user account. View user details by selecting the hypertext user
name in the General Info column. For more information, see Access User Details on page 81.
The Edit icon enables you to make basic changes to the user account. Selecting a single check box causes three action
buttons to appear, Send Message,Add Device, and More Actions.
You can select multiple user accounts using the check box, which, in turn, modifies the available actions.
Action Description
Send
Message
Provide immediate support to a single user or group of users. Send a User Activation (user template)
email to a user notifying them of their enrollment credentials.
Add Device Add a device for the selected user. Only available for single user selections.
More Actions Display the following options.
Add to User
Group
Add selected users to new or existing user group for simplified user management. For more information, see User Groups
List View on page 81 and Edit User Group Permissions on page 80.
Remove from
User Group
Remove selected users from the existing user group.
Change
Organization
Group
Manually move the user to a different organization group. Update the available content, permissions, and restrictions of a
user if they change positions, get a promotion, or change office locations.
Delete If a member of your organization resigns or is fired, you can quickly and completely delete a user account.
Activate Activate the account if a user returns to an organization or must be reinstated in the company.
Deactivate Deactivate a user if a user is missing in action, out-of-compliance, or if their device is lost or stolen.
Batch Import Feature
If you have several dozen or more users to add to AirWatch, you can batch-create users and user groups or batch-import
them from your directory service.
Making a batch import means taking an AirWatch supplied template in a comma-separated values format. Then filling it
out with your own data and uploading the completed template.
Changes in External LDAP/AD User Directories
Once your user and user group batch list is uploaded, changes to your external LDAP/AD user directories are not updated
in AirWatch. These user and user group changes must be updated manually, or uploaded again as a new batch.
Batch Import Users or Devices
To save time, you can batch import multiple Lightweight Directory Access Protocol (LDAP)/Active Directory (AD) users and
devices into the AirWatch Console.
Chapter 4: User and Admin Accounts
47
VMware AirWatch Mobile Device Management Guide | v.2017.10 | October 2017
Copyright © 2017 VMware, Inc. All rights reserved.

1. Navigate to Accounts > Users > Batch Status or Devices > Lifecycle > Enrollment Status > Add and select Batch
Import.
2. Enter the basic information including a Batch Name and Batch Description in the AirWatch Console.
3. Select the applicable batch type from the BatchType drop-down menu.
4. Select and download the template that best matches the kind of batch import you are making.
Blacklisted Devices – Import a list of known, non-compliant devices by IMEI, Serial Number, or UDID. Blacklisted
devices are not allowed to enroll. If a blacklisted device attempts to enroll, it is automatically blocked.
Whitelisted Devices – Import pre-approved devices by IMEI, Serial Number, or UDID. Use this import a list of known,
trusted devices. The ownership and group ID associated to this device is automatically applied to the device during
enrollment.
User / Device – Choose between a Simple and an Advanced CSV template. The simple template features only the
most often-used options and the Advanced template features the full, unabridged compliment of options.
5. Open the CSV file, which consists of a CSV (comma-separated values) file that is populated with a single row
completed with a sample device data. The CSV file features several columns corresponding to the setting that display
on the Add / Edit User page. The GroupIDcolumn corresponds to the Enrollment Organization Group setting on the
Add / Edit User page.
You can confirm whether or not users are part of the enrollment organization group (OG).
a. Navigate to Groups &Settings > All Settings > Devices &Users > General > Enrollment and check the
Grouping tab.
b. If the Group ID Assignment Mode is set to Default, then your users are part of the enrollment OG.
c. For a directory-based enrollment, the Security Type for each user must be Directory.
6. Enter data for your organization's users, including device information (if applicable) and save the file.
7. Return to the Batch Import page and select Choose File to locate and upload the CSV file that you had previously
downloaded and filled out.
8. Select Save.
Batch Import User Groups
To save time, you can import multiple Lightweight Directory Access Protocol (LDAP)/Active Directory (AD) user groups
into the AirWatch Console.
1. Navigate to Accounts > User Groups >List View and select Add.
2. Select Batch Import.
3. Enter the basic information including Batch Name and Batch Description in the AirWatch Console.
4. Under Batch File (.csv), select the Choose File button to locate and upload the completed CSV file, now ready for
importing.
5. Alternately, select the link Download template for this batch type and save the comma-separated values (CSV) file
and use it to prepare a new importation file.
Chapter 4: User and Admin Accounts
48
VMware AirWatch Mobile Device Management Guide | v.2017.10 | October 2017
Copyright © 2017 VMware, Inc. All rights reserved.

lOpen the CSV file, which has several columns corresponding to the settings that display on the Add User Group
page. Columns with an asterisk are required and must be entered with data. Save the file.
lThe last column heading in the CSV file template is labeled "GroupID/Manage(Edit and Delete)/Manage(Users
and Enrollment)/UG assignment/Admin Inheritance." This column heading corresponds to the settings and
abides by the logic of the Permissions tab of the Edit User Group page.
6. Select Import.
7. If the Batch Import does not complete successfully, view and troubleshoot errors by selecting Accounts > Batch
Status. You can view specific batch import errors by clicking the Errors hyperlink.
Editing Basic Users with Batch Import
The Batch Import feature lets you edit and move users in groups rather than one at a time. The users must exist in
AirWatch for such a procedure to work. Edit the following settings in the CSV file and use Batch Import to upload this file.
lPassword (Basic only).
lFirst Name.
lMiddle Name.
lLast Name.
lEmail Address.
lPhone Number.
lMobile Number.
lDepartment.
lEmail user name.
lEmail Password.
lAuthorized organization groups (at and below the given Group ID only).
lEnrollment user category (this category is accessible to the user, otherwise, defaulted to 0).
lEnrollment user role (this role is accessible to the user, otherwise, it assumes the default role of the organization
group).
Such basic user editing applies to Basic User Authentication on page 34 and Authentication Proxy on page 37 only.
Move Users With Batch Import
You may also use the Batch Import feature to move sets of users to a different organization group.
1. From the Batch Import screen, enter the basic information including a Batch Name and a Batch Description in the
AirWatch Console.
2. Choose Change Organization Group from the list of templates and save the CSV file somewhere accessible.
Chapter 4: User and Admin Accounts
49
VMware AirWatch Mobile Device Management Guide | v.2017.10 | October 2017
Copyright © 2017 VMware, Inc. All rights reserved.

3. Enter the applicable Group ID of the user's existing organization group, user name to be moved, and Target Group
ID of the user's new organization group.
4. Return to the Batch Import screen in the AirWatch Console, select Choose File to locate and upload the saved CSV
file and select Open.
5. Select Save.
Admin Accounts
Administrator Accounts enable you to maintain Mobile Device Management (MDM) settings, push, or revoke features
and content, and much more from the centralized AirWatch Console.
Also, a Temporary Admin Account enables a remote assistance feature within the AirWatch Console. These Temporary
Admin Accounts, which have a configurable expiration, can be used to access areas normally reserved for permanent
admin account-holders.
Create an Admin Account
You can add Admin Accounts from the Administrators List View page, providing access to advanced features of the
AirWatch Console. Each admin that maintains and supervises the console must have an individual account.
1. Navigate to Accounts > Administrators > List View, select Add, and then Add Admin. The Add/Edit Admin page
displays.
2. Under the Basic tab, for the User Type setting, select either Basic or Directory.
lIf you select Basic, then fill in all required settings on the Basic tab, including user name, password, FirstName,
and Last Name.
lYou can enable Two-Factor Authentication where you select between Email and SMS as a delivery method and
the token expiration time in minutes.
lYou can also select a Notification option, choosing between None, Email, and SMS. The Admin receives an auto-
generated response.
lIf you select Directory, then enter the Domain and user name of the admin user.
3. Select the Details tab and enter additional information, if necessary.
4. Select the Roles tab and then select the Organization Group followed by the Role you want to assign to the new
admin. Add new roles by using Add Role.
5. Select the APItab and choose the Authentication type.
6. Select the Notes tab and enter additional Notes for the admin user.
7. Select Save to create the adminaccount with the assigned role.
Chapter 4: User and Admin Accounts
50
VMware AirWatch Mobile Device Management Guide | v.2017.10 | October 2017
Copyright © 2017 VMware, Inc. All rights reserved.
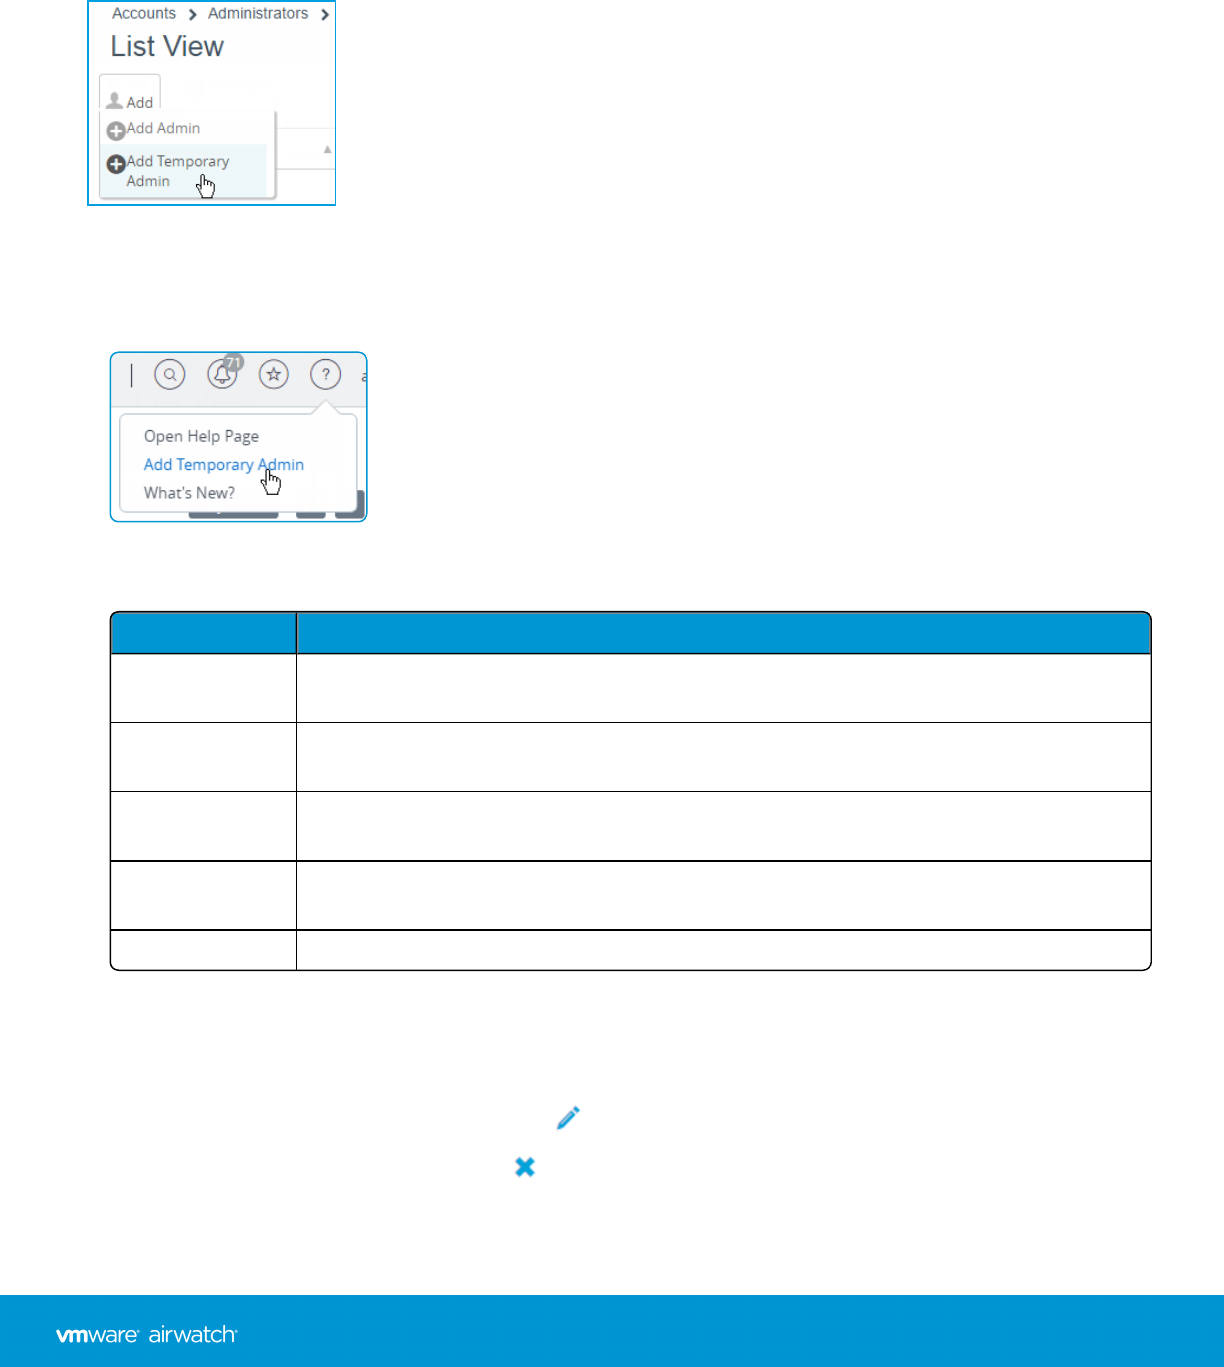
Create a Temporary Admin Account
You may grant temporary administrative access to your environment for support, demonstrations, and other time
limited use cases.
1. Navigate to Accounts > Administrators > List View, select Add. Select the Add Temporary Admin option.
OR
Select the Help button and choose Add Temporary Admin.
2. In the Basic tab, choose to add a temporary admin account based on Email Address or user name and complete the
following settings.
Setting Description
Email Address Enter the email address on which the temporary admin account is based. Available only when
Email Address radio button is selected.
User name Enter the user name on which the temporary admin account is based. Available only when the
user name radio button is selected.
Password /
ConfirmPassword
Enter and confirm the password that is associated with the Email Address or user name.
Expiration Period Select anExpirationPeriod which defaults to 6 hours. You may also set this drop-down menu
to Inactive to create the account now and activate it later.
Ticket Number Optionally, you can add the Ask Ticket Number from ZenDesk as a reference marker.
3. In the Roles tab, you can add and delete roles applicable to the temporary admin account.
a. Add a role by selecting the Add Role button and then select the organization group and role for which the
temporary admin account applies.
b. Edit an existing role by selecting the edit icon ( ) and choose a different organization group and role.
c. Delete a role by selecting the delete icon ( ).
Chapter 4: User and Admin Accounts
51
VMware AirWatch Mobile Device Management Guide | v.2017.10 | October 2017
Copyright © 2017 VMware, Inc. All rights reserved.

4. Select Save.
Managing Admin Accounts
You can implement key management functions for ongoing maintenance and upkeep of admin accounts by navigating to
Accounts > Administrators > List View.
Display the Add/Edit Admin page by selecting the hypertext link in the user name column. This link enables you to
update current roles assigned quickly or change roles within your organization quickly to keep their privileges up-to-date.
You can also alter general admin information and change a password.
You can Filter the list of administrators to include all roles or limit the listing to only a specific role you want to see.
Display the action buttons applicable to that admin by selecting the radio button next to the administrator user name.
lView History – Track when admins log in and out of the AirWatch Console.
lDeactivate – Change the status of an admin account from active to inactive. This feature allows you to suspend the
management functions and privileges temporarily. At the same time, this feature enables you to keep the defined
roles of the admin account for later use.
lActivate – Change the status of an admin account from inactive to active.
lDelete – Ensure that only the right users are accessing the AirWatch Console. Immediately cancel and eliminate a
user account and revoke privileges if someone quits or is fired from their position.
lChange Password – Edit the password belonging to a basic or temporary admin account.
Chapter 4: User and Admin Accounts
52
VMware AirWatch Mobile Device Management Guide | v.2017.10 | October 2017
Copyright © 2017 VMware, Inc. All rights reserved.


Role-Based Access Overview
The AirWatch Console allows you to define access levels for individual users or groups based on the roles you created
during the user enrollment process.
For example, help desk administrators within your enterprise may have limited access within the console, while the IT
Manager has a greater range of permissions.
To enable role-based access control, you must first set up the administrator and user roles within the AirWatch Console.
Specific resources, also known as permissions, define these roles which enable and disable access to various features
within the AirWatch Console. Roles can also be created for end users who need access to the Self-Service Portal.
Default and Custom Roles
There are several default roles already provided by AirWatch from which you may select. These default roles are available
with every AirWatch upgrade and help quickly assign roles to new users. If you require further customization, you may
create custom roles to tailor the user privileges and permissions further. Unlike default roles, custom roles require
manual updates with every AirWatch upgrade.
Each type of role includes inherent advantages and disadvantages. Default Roles save time in configuring a brand new
role from scratch, logically suit various administrative privileges, and automatically update alongside new AirWatch
features and settings. However, Default Roles may not be a precise fit for your organization or MDM deployment, which
is why Custom Roles were created.
Default End-User Roles
Roles are available by default to end users in the AirWatch Console.
lFull Access Role – Provides full permission to perform all the tasks on the Self-Service Portal.
lBasic Access Role – Provides all permissions except MDM commands from the Self-Service Portal.
Custom Roles allow you to customize as many unique roles as you require, and to tweak large or small changes across
different users and administrators. However, Custom Roles must be manually maintained over time and updated with
new features.
Edit a Default End-User Role to Create a Custom User Role
If none of the available default roles provide the proper fit for your organization, consider modifying an existing user role
and creating a custom user role.
1. Ensure that you are currently in the organization group you want the new role to be associated with.
2. Navigate to Accounts > Users > Roles.
3. Determine which role from the list best fits the role you want to create. Then edit that role by selecting the edit
icon ( ) to the far right. The Add/Edit Role page displays.
4. Edit the Name,Description, and Initial Landing Page text boxes as necessary. Review each of the check boxes. These
options represent the various permissions, selecting and deselecting those options as necessary.
5. Select Save to save your changes, overwriting the prior settings of the role in favor of the new settings.
Chapter 5: Role-Based Access
54
VMware AirWatch Mobile Device Management Guide | v.2017.10 | October 2017
Copyright © 2017 VMware, Inc. All rights reserved.

Default Administrator Roles
The following roles are available by default to administrators in the AirWatch Console. Use the Admin Role Compare tool
to compare the specific permissions of two admin roles. For more information, see Compare Admin Roles on page 63.
Role Description
System
Administrator
The System Administrator role provides complete access to an AirWatch environment. This role
includes access to the Password and Security settings, Session Management, and AirWatch Console
audit information. This information is located the Administration tab under System Configuration.
This role is not available for Software as a Service (SaaS) customers.
Device
Manager
The Device Manager role grants users significant access to the AirWatch Console. However, this role is
not designed to configure most System Configurations. These configurations include Active Directory
(AD)/Lightweight Directory Access Protocol (LDAP), Simple Mail Transfer Protocol (SMTP), Agents, and
so on. For these tasks, use a top-tier role like the AirWatch Administrator or System Administrator.
Report
Viewer
The Report Viewer role allows viewing of the data captured through Mobile Device Management
(MDM). This role limits its users to generating, viewing, exporting, and subscribing to reports from the
AirWatch Console.
AirWatch
Administrator
The AirWatch Administrator role allows comprehensive access to the AirWatch environment. However,
this access excludes the Administration tab under System Configuration, because that tab manages
top-level AirWatch Console settings.
Read Only The Read Only role provides access to most of the AirWatch Console, but limits access to read-only
status. Use this role to audit or record the settings in an AirWatch environment. This role is not useful
for system operators or administrators.
Content
Management
The Content Management role only includes access to VMware Content Locker management. Use this
role for specialized administrators responsible for uploading and managing a device content.
Application
Management
The Application Management role allows admins with this access to deploy and manage the device
fleet's internal and public apps. Use this role for an application management administrator.
Help Desk The Help Desk role provides the tools necessary for most Level 1 IT Help Desk functions. The primary
tool available in this role is the ability to see and respond to device info with remote actions. However,
this role also contains report viewing and device searching abilities.
App Catalog
Only
Administrator
The App Catalog Only Admin role has much the same permissions as Application Management. Added
to these permissions are abilities to add and maintain admin and user accounts, admin and user
groups, device details, and tags.
Horizon
Administrator
The Horizon Administrator role is a specially designed set of permissions for complementing an
AirWatch configuration integrated with VMware Horizon View.
NSX
Administrator
The NSX Administrator role is a specially designed set of permissions intended to complement VMware
NSX integrated with AirWatch. This role offers the full complement of system and certificate
management permissions, allowing administrators to bridge endpoint security with data center
security.
Privacy
Officer
The Privacy Officer role provides read access to Hub Overview, Device List View, View system settings,
and full edit permissions for privacy settings.
Chapter 5: Role-Based Access
55
VMware AirWatch Mobile Device Management Guide | v.2017.10 | October 2017
Copyright © 2017 VMware, Inc. All rights reserved.

Edit a Default Admin Role to Create a Custom Admin Role
If the available default roles provide no proper fit for admin resources in your organization, consider modifying an
existing default role into a custom admin role.
1. Ensure that you are currently in the organization group with which you want the new role to be associated.
2. Navigate to Accounts > Administrators > Roles.
3. Determine which role from the list best fits the role you want to create. Select the check box for that role.
4. Select Copy from the actions menu above the listing. The Copy Role page displays.
5. Edit specific settings of the copy in the resulting Copy Role page. Create a unique Name and Description for the
customized role.
6. Select Save.
For more information, see Create Administrator Role on page 58.
User Roles
User roles allow you to enable or disable specific actions that logged-in users can perform. These actions include
controlling access to a device wipe, device query, and managing personal content. You can also customize initial landing
pages and restrict access to the Self-Service portal.
Creating multiple user roles is a time saving measure. You can make comprehensive configurations across different
organization groups or change the user role for a specific user at any time.
Create a New User Role
In addition to the preset Basic Access and Full Access roles, you can create customized roles. Having multiple user roles
available fosters flexibility and can potentially save time when assigning roles to new users.
To create a user role:
1. Navigate to Accounts > Users > Roles and select Add. The Add/Edit Role page displays.
2. Enter a Nameand Description, and select the Initial Landing Page of the SSP for users with this new role.
For existing user roles, the default InitialLanding Page is the My Devices page.
3. Select from a list of options the level of access and control end users of this assigned role have in the SSP.
lClick Select None to clear all check boxes on the page.
lSelect all the check boxes on the page by selecting Select All.
4. Save the changes to the role. The added user role now appears in the list on the Roles page.
From the Roles page, you can view, edit, or delete roles.
Configure a Default Role
A default role is the baseline role from which all user roles are based. Configuring a default role enables you to set the
permissions and privileges users automatically receive upon enrollment.
Chapter 5: Role-Based Access
56
VMware AirWatch Mobile Device Management Guide | v.2017.10 | October 2017
Copyright © 2017 VMware, Inc. All rights reserved.

1. Navigate to Devices > Device Settings > Devices & Users > General > Enrollment and select the Grouping tab.
2. Configure a default level of access for end users in the Self-Service Portal (SSP) by selecting a Default Role. These role
settings are customizable by organization group.
3. Select Save.
Assign or Edit the Role of an Existing User
You can edit the role for a specific user, for example, to grant or restrict access to AirWatch functions.
1. Select the appropriate organization group.
2. Navigate to Accounts > Users > List View
3. Search for the specific user that you want to edit from the list. Once you have identified the user, select the Edit icon
under the check box. The Add/Edit User screen displays.
4. In the General tab, scroll to the Enrollment section and select a User Role from this drop-down menu to change the
role for this specific user.
5. Select Save.
Admin Roles
Admin roles allow you to enable or disable permissions for every available setting and resource in the AirWatch Console.
These settings grant or restrict console abilities for each member of your admin team, enabling you to craft a hierarchy of
administrators specific to your needs.
Creating multiple admin roles is a time saving measure. Making comprehensive configurations across different
organization groups or changing the permissions for a specific administrator at any time.
Administrator Roles List View
The administrator roles list view enables you to add, edit, compare, and maintain your library of roles for your entire
admin base.
Add Role
Make a new admin role from scratch by selecting the Add Role button. For more information, see Create Administrator
Role on page 58.
Import Role
You can import a role exported from another environment. For more information, see the following topics.
lImport Admin Roles on page 60
lExport Admin Roles on page 60,
lVersioning Issues When Importing and Exporting Admin Roles on page 61.
Copy Role
Chapter 5: Role-Based Access
57
VMware AirWatch Mobile Device Management Guide | v.2017.10 | October 2017
Copyright © 2017 VMware, Inc. All rights reserved.

You can save time by making a copy of an existing role. You can also change the permissions of the copy and save it
under a different name.
1. Select the check box next to the role you want to copy.
2. Select the Copy button. The Copy Role page displays.
3. Make your changes to the Categories,Name, and Description.
4. When finished, select Save.
View Users
The View Users button enables you to see the Administrators List View, displaying a listing of all admins. Select a role
name and then select the View Users button.
Delete Role
You can delete an unused role from your library of administrator roles. You cannot delete a role that is assigned to an
admin. Select an unassigned role you want to delete and select the Delete button.
Export Role
You can export a role saved as an XML file to a location on your device, suitable to be imported later. Select the role you
want to export and select the Export button. For more information, see the following topics.
lExport Admin Roles on page 60,
lImport Admin Roles on page 60,
lVersioning Issues When Importing and Exporting Admin Roles on page 61.
Rename a Role
If you are importing an admin role named the same as an existing admin role, you can rename the existing role first. For
more information, see Rename an Admin Role on page 61.
Edit Role
You can edit an existing role's name, description, and specific permissions. Select the hypertext role name from the listing
and the View Role screen displays, enabling you to make changes.
Compare Two Roles
You can also compare the individual permissions settings between two roles. For more information, see Compare Admin
Roles on page 63.
Create Administrator Role
You can create administrator roles which define specific tasks that can be performed in AirWatch. You then assign these
roles to individual admins. To create an administrator role, follow these steps.
Chapter 5: Role-Based Access
58
VMware AirWatch Mobile Device Management Guide | v.2017.10 | October 2017
Copyright © 2017 VMware, Inc. All rights reserved.
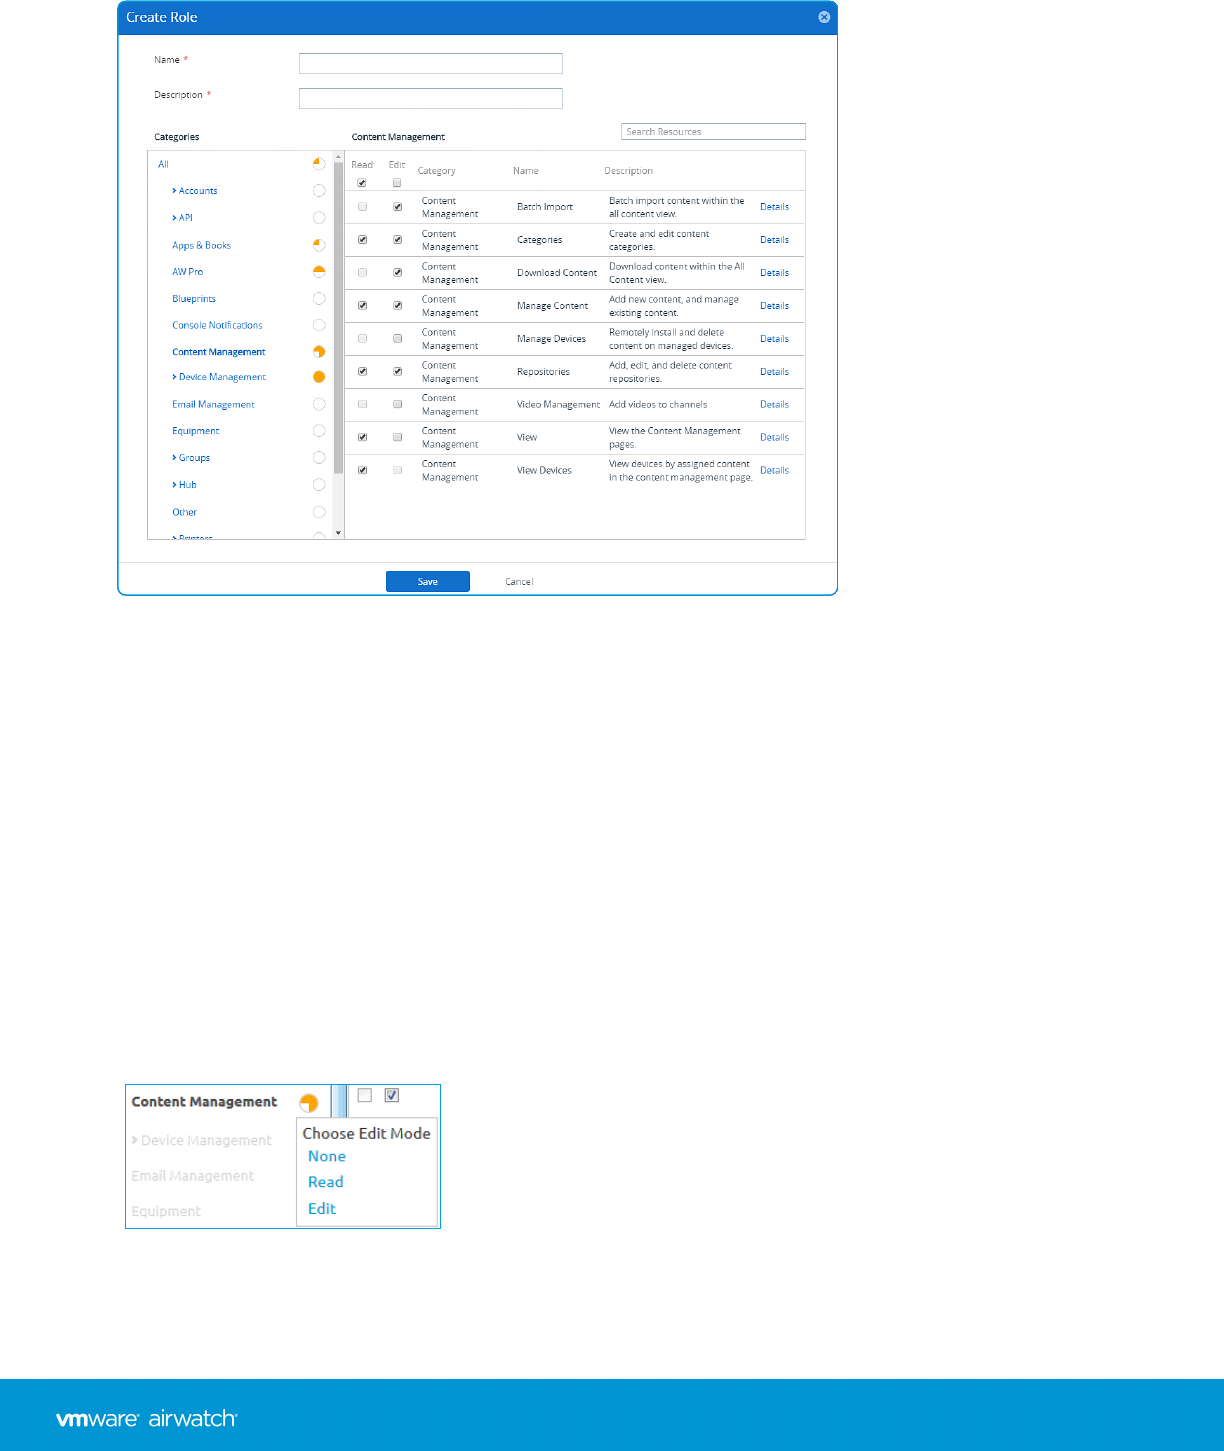
1. Navigate to Accounts > Administrators > Roles and select Add Role in the AirWatch Console.
2. In the Create Role, enter the Name and Description of the role.
3. Make a selection from the list of Categories.
The Categories section organizes top-level categories such as Device Management under which are located
subcategories including Applications,Browser, and Bulk Management among others. This category subdivision
enables an easy and quick role creation process. Each subcategory setting in the right panel has a Read and Edit
check box.
When you make a selection from the Categories section, its subcategorized contents (individual settings) populate in
the right panel. Each individual setting features its own Read and Edit check box and a "select all" style Read and Edit
check box in the column heading. This arrangement allows for a flexible level of control and customization while
creating roles.
4. Select the appropriate Read and Edit check box in the corresponding resource options. You may also choose to clear
any of the selected resources.
Chapter 5: Role-Based Access
59
VMware AirWatch Mobile Device Management Guide | v.2017.10 | October 2017
Copyright © 2017 VMware, Inc. All rights reserved.

5. To make blanket category selections, select None,Read, or Edit directly from the Categories section without ever
populating the right panel. Select the circular icon to the right of the Category label, which is a drop-down menu. Use
this selection method when you are certain you want to select none, read-only, or edit capabilities for the entire
category setting.
6. Select Save to finish creating the Custom Role. You can now view the added role in the list on the Roles page. From
here, you can also edit the role details or delete the role.
You must update the custom role after each AirWatch version update to account for the new permissions in the latest
release.
Import Admin Roles
You can import administrator roles saved from another environment as an XML file, making admin roles a portable
resource, which can save time.
To import a role into a separate AirWatch environment.
1. Navigate to Accounts > Administrators > Roles and select Import Role.
2. In the Import Role page, select Browse and locate the previously saved XML file. Select Upload to upload the admin
role to the Category listing for validation.
3. AirWatch performs a series of validation checks including an XML file check, importing role permission check,
duplicate role name check, and blank name and description check.
4. Check the resource settings and verify their imported role specifications by selecting specific Categories in the left
pane.
5. You may also edit the resources and the Name and Description of the imported role based on your needs. If you
want to keep both the existing role and the imported role, then rename the existing admin role before importing the
new role.
a. If the role you are importing is named the same as an existing role in your environment, then a message
displays. "A role with this name exists in this environment. Would you Like to override the existing role?"
b. If you select No, then the existing role in your environment remains untouched and the role import is canceled.
c. If you select Yes, then you are prompted for the security PIN, which if entered correctly, replaces the existing role
with the imported role.
6. Select Save to apply the imported role to the new environment.
Export Admin Roles
You can export administrator roles as an XML file and import those files into another environment, making admin roles a
portable resource which can save time.
To initiate this process, take the following steps.
Chapter 5: Role-Based Access
60
VMware AirWatch Mobile Device Management Guide | v.2017.10 | October 2017
Copyright © 2017 VMware, Inc. All rights reserved.
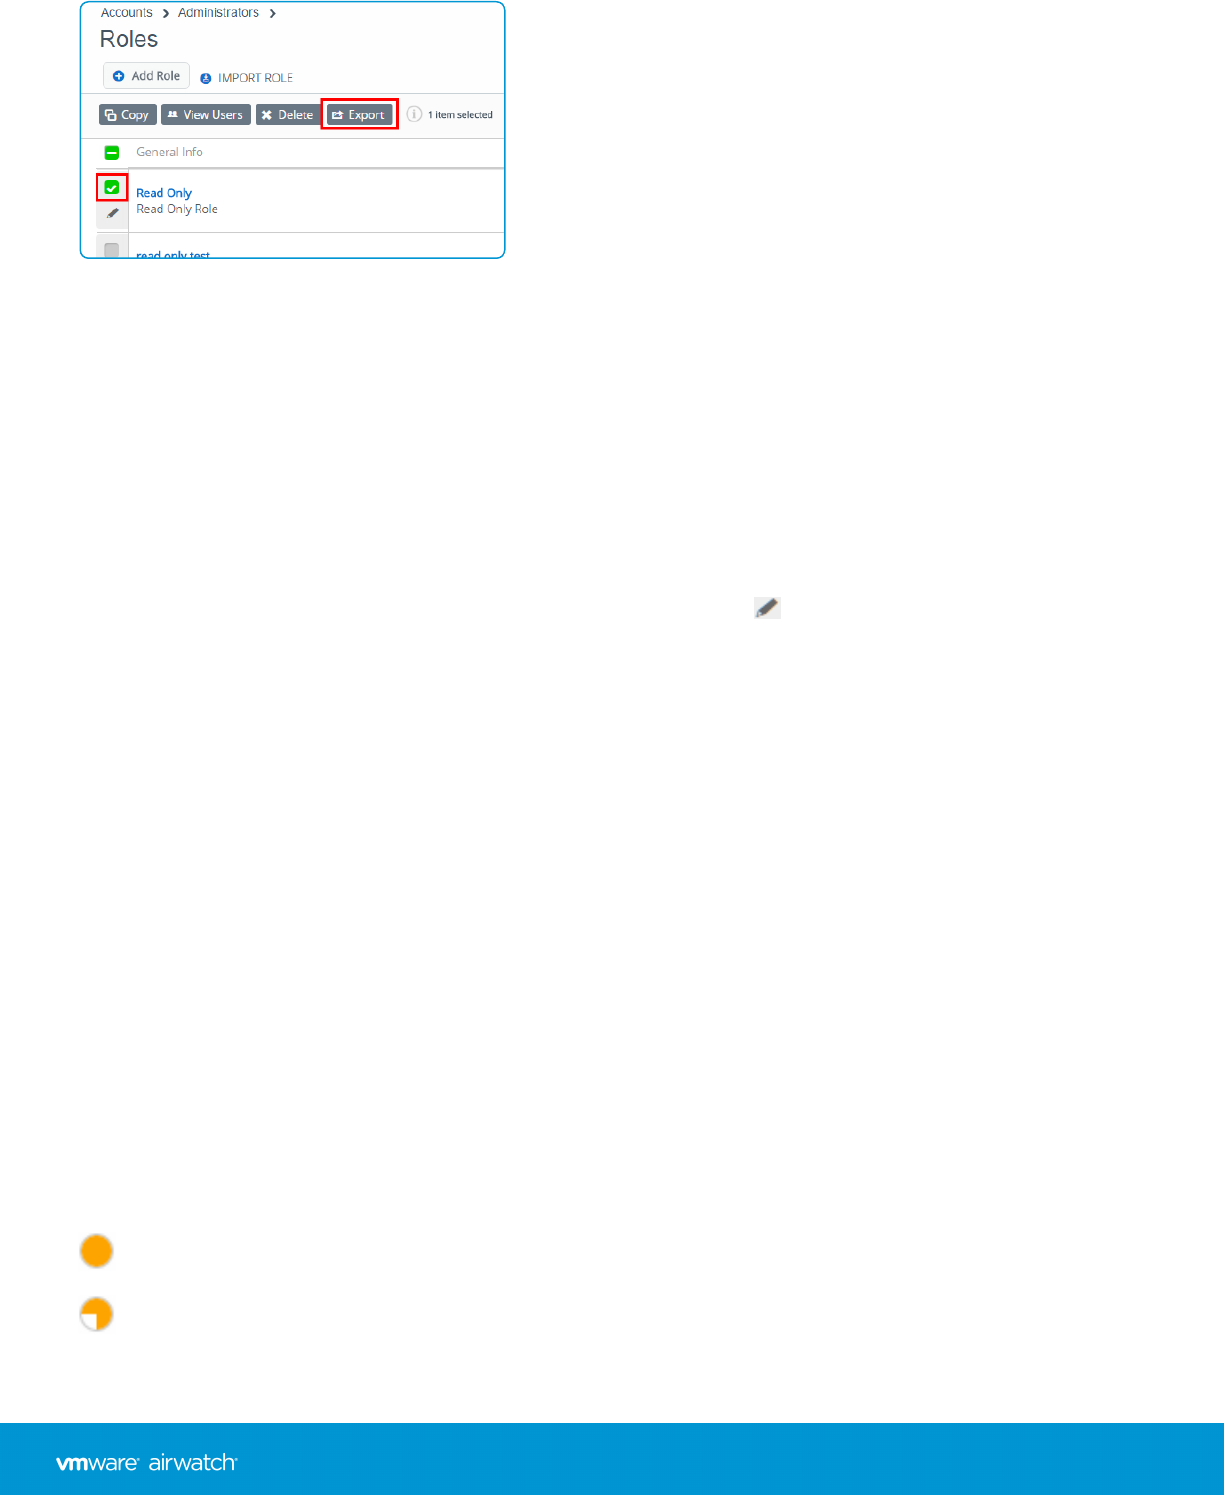
1. Navigate to Accounts > Administrators > Roles.
2. Select the check box next to the administrator role that you want to export. Doing so displays actions buttons above
the role listing.
3. Select Export and save the XML file to a location on your device.
If you select more than one admin role, the Export action is not available.
Rename an Admin Role
If you are importing an admin role named the same as an existing admin role, you may find it useful to rename the
existing role first. Renaming a role allows you to keep both the old and the new role in the same environment.
1. Navigate to Accounts > Administrators > Roles and select the Edit icon ( ) of the role you want to rename. The Edit
Role page displays.
2. Edit the Name of the role and optionally, the Description.
3. Select Save.
Versioning Issues When Importing and Exporting Admin Roles
There may be cases where an exported role is imported into an environment running an earlier version of AirWatch. This
earlier version may not have the same resources and permissions that comprise the imported role.
In these cases, AirWatch notifies you with the following message.
There are some permissions in this environment that are not found in your imported file. Review and correct the highlighted
permissions before saving.
Use the category listing page to deselect the highlighted permissions. This action allows you to save the role to the new
environment.
Read/Edit Indicator in Categories for Admin Roles
There is a visual indicator in the Categories section that reflects the current selection of read-only, edit, or a combination
of each. This indicator reports what the setting is without requiring you to open and examine the individual subcategory
settings.
The indicator features a circular icon located to the right side of the Category listing that reports the following.
All options in this category have the edit capability (which by definition means that they also have read-only
capability).
Most category settings have the edit capability enabled, but edits are disabled for at least one subcategory.
Chapter 5: Role-Based Access
61
VMware AirWatch Mobile Device Management Guide | v.2017.10 | October 2017
Copyright © 2017 VMware, Inc. All rights reserved.
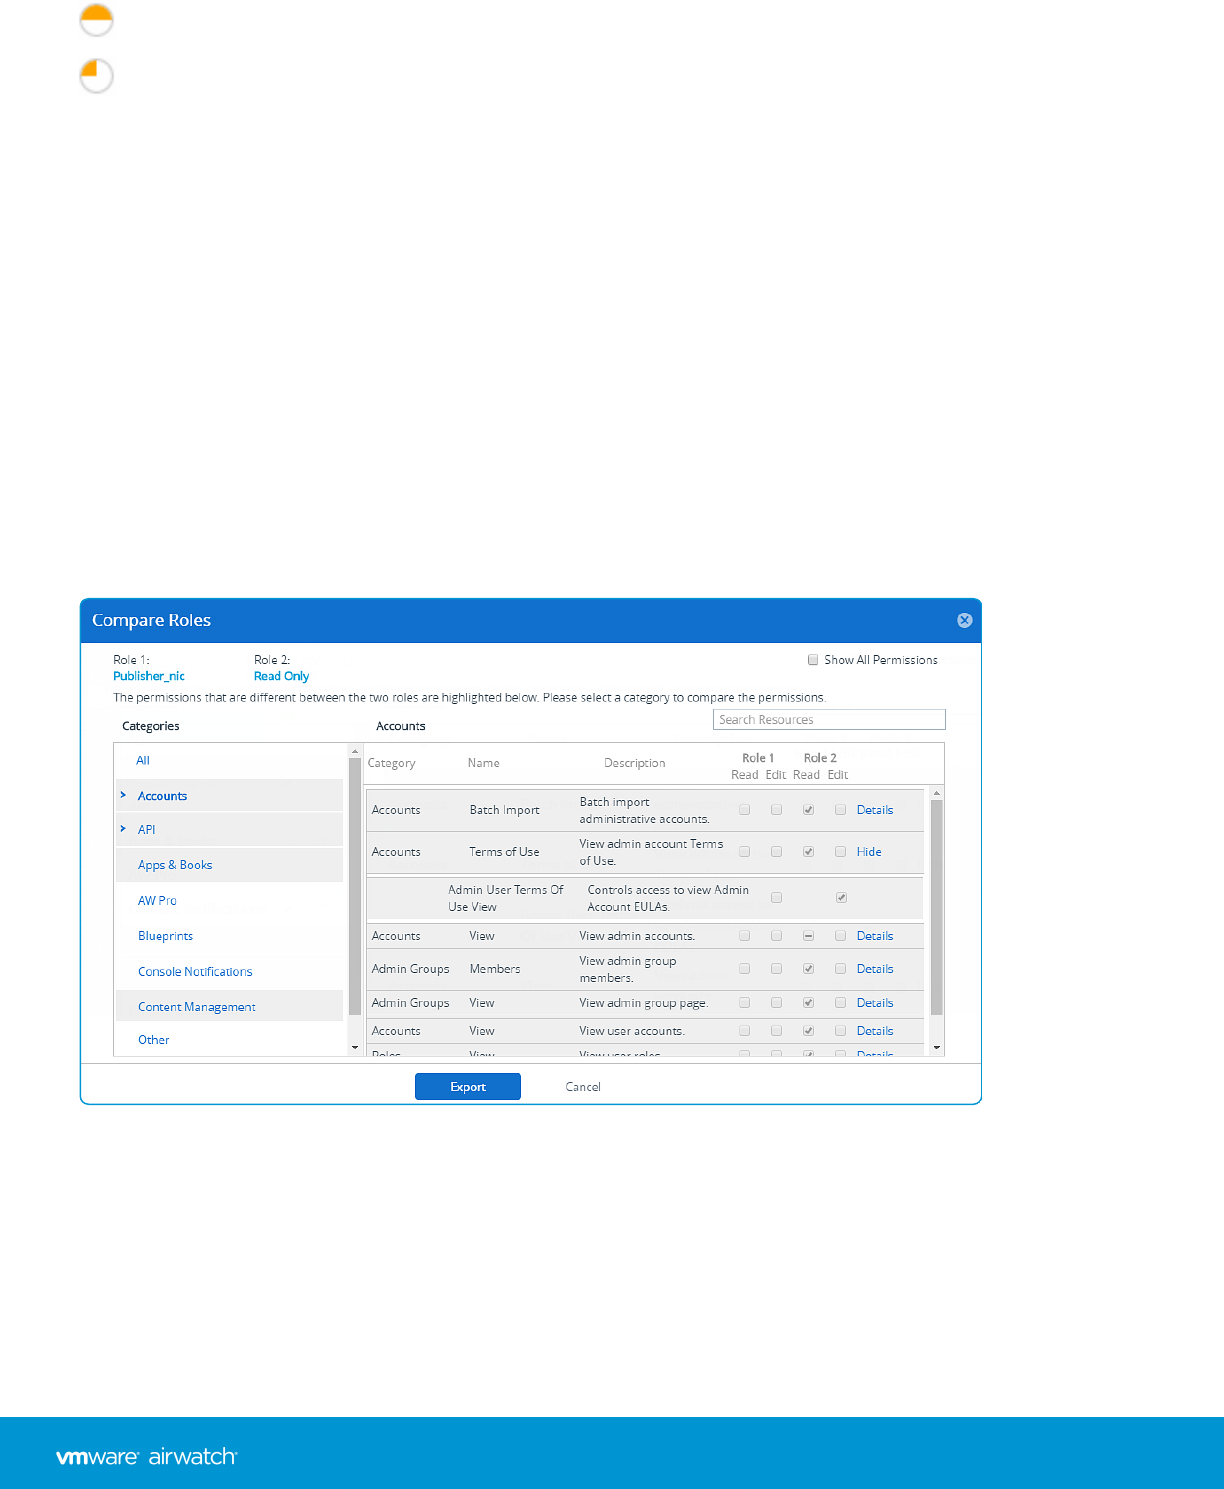
All category settings have read-only enabled (edit disabled).
Most category settings are read-only, but edits are enabled for at least one subcategory.
Assign or Edit the Role of an Admin
You can assign roles to an admin which expand the capabilities of an Admin in the AirWatch console. You can also edit
existing roles, potentially limiting or changing their capabilities.
1. Navigate to Accounts > Administrators > List View, locate the admin account, and select the Edit icon in the Action
button cluster. The Add/Edit Admin page displays.
2. Select the Roles tab. Then select Add Role.
3. Enter the Organization Group and Role details for each role that is added.
4. Select Save.
Admin Roles Compare Tool
When creating an administrator role, it is often easier to modify an existing role than it is to create an admin role from
scratch. The Compare Roles tool makes this process easy.
If you have fewer than two or more than two roles selected, the Compare button does not display.
lBy default, only those categories and subcategories whose settings are different are displayed. You can display all the
permissions including those settings that are identical across the two selected roles by enabling Show All
Permissions.
lIf you choose two roles that have identical permissions across the board, the console displays this message at the
top of the Compare Roles page.
Chapter 5: Role-Based Access
62
VMware AirWatch Mobile Device Management Guide | v.2017.10 | October 2017
Copyright © 2017 VMware, Inc. All rights reserved.

"There are no differences in permissions between the two roles."
lYou may also select Export to create an Excel-viewable CSV file (comma-separated values). This CSV file contains the
complete list of settings for Role 1 and Role 2, enabling you to analyze the differences between them.
Compare Admin Roles
You can compare the permissions settings of any two Administrator roles for the sake of accuracy or to confirm your
deliberate settings differences. Compare two Admin Roles with the Compare Roles tool.
1. Navigate to Accounts > Administrators > Roles.
2. Locate any two listed roles, including roles that appear on different pages, and select those roles.
3. Select Compare. The Compare Roles page displays featuring a list of categories. Selecting a specific category on the
left populates all the details of that category on the right.
lRole subcategories can be viewed in the right panel by selecting the Details link to the far-right side. Collapse the
role subcategory by selecting the Hide link.
lThere is an All category in the left panel that, when selected, displays all the parent categories on the Compare
Roles page. When you enter a search parameter in the Search Resources bar, the right panel only displays
matching category and resources listings.
lThe search function is persistent. This persistence means that if you have a parameter in the SearchResources
bar, selecting the All category displays only the matching categories and resources. The search function is
persistent even after you select specific resources and make Read and Edit selections.
Chapter 5: Role-Based Access
63
VMware AirWatch Mobile Device Management Guide | v.2017.10 | October 2017
Copyright © 2017 VMware, Inc. All rights reserved.

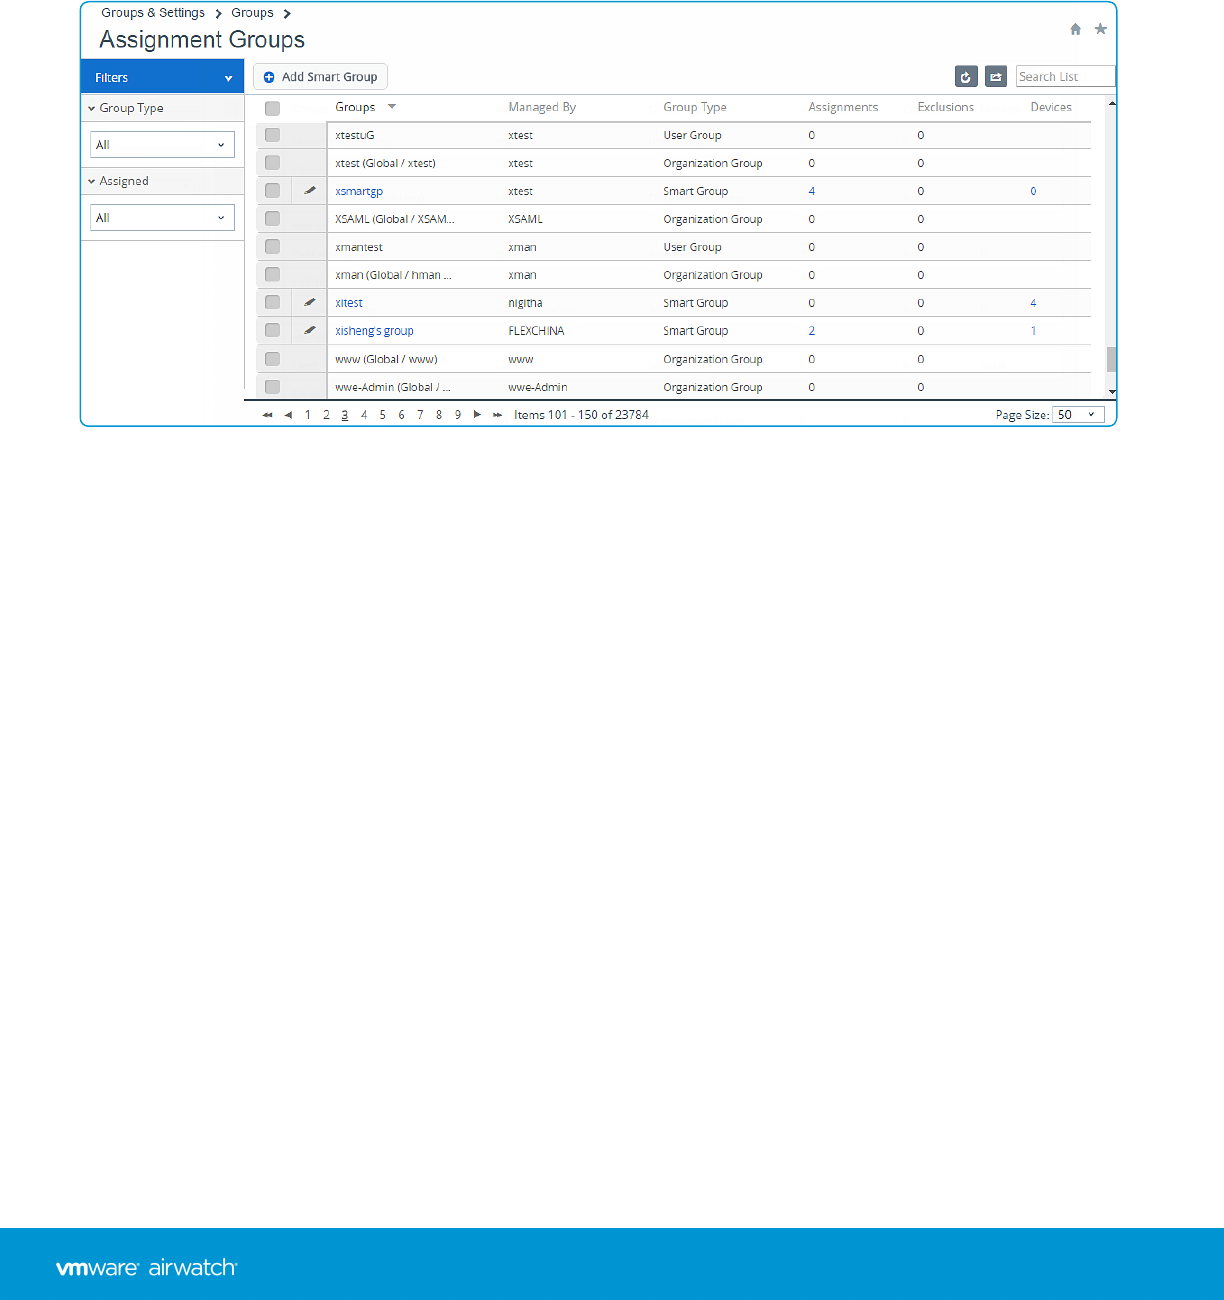
Assignment Groups Overview
Assignment Groups is an umbrella term used to categorize certain management grouping structures within AirWatch.
Organization Groups, Smart Groups, and User Groups each have full feature sets and properties and are distinct from
each other. One element they have in common is the way they can be used to assign content to user devices easily.
Assignment Groups enables an administrator to manage these three grouping structures from a single location.
You can use the list view to assign multiple organization groups, smart groups, and user groups to one or more profiles,
public applications, and policies.
Navigate to Groups &Settings > Groups >Assignment Groups.
Create Custom Assignment Group List
The Assignment Groups List View organizes three kinds of groups that have the function of assigning content to devices:
organization groups, smart groups, and user groups. You can create a listing of only those groups you are interested in
seeing.
Sort by Columns
You can sort the listing of groups by individual columns by selecting the column header.
Filter Groups
You can filter groups by Group Type (Smart Groups, OrganizationGroups, and User Groups). You can also filter by how or
whether they have been Assigned (Assignments, Exclusions, All, and None).
Select Links in the Assignment Groups Listing
Four columns in the Assignment Groups Listing page serve a specific function and require a special mention.
Chapter 6: Groups
65
VMware AirWatch Mobile Device Management Guide | v.2017.10 | October 2017
Copyright © 2017 VMware, Inc. All rights reserved.
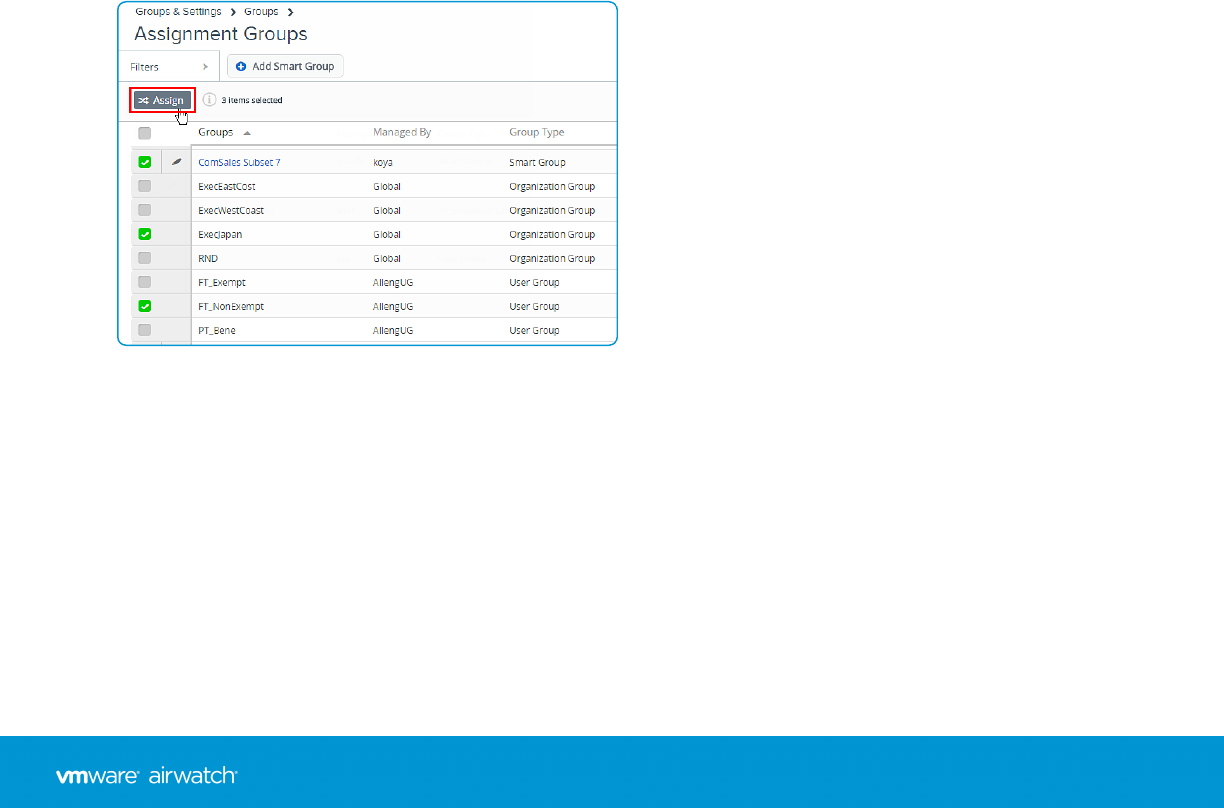
lThe Groups column features a link for each Smart Group. You can select this link to edit the smart group.
lIf you select non-zero values in the Assignments column, the View Assignments page displays, even for assigned
organization groups and user groups. This function allows you to view and confirm assignments to profiles, public
applications, and compliance policies.
lIf you select non-zero values in the Exclusions column, the View Assignments page displays, even for excluded
organization groups and user groups. The View Assignments page allows you to view and confirm exclusions from
profiles, public applications, and compliance policies.
lIf you select the Devices column number, the Devices List View page displays. The Device List View contains the listing
of all devices in the selected organization group, smart group, or user group.
For more information, see the following topics.
View Assignments on page 86
Device List View on page 178
Assign One or More Assignment Groups
You can assign groups to device profiles, public applications, compliance policies. You can also assign multiple groups of
each type (organization, smart, and user) at one time.
1. Navigate to Groups &Settings >Groups > Assignment Groups.
2. Select one or more groups in the listing and select Assign above the column header.
3. The Assign page displays the Organization Groups,Smart Groups, and User Groups you selected.
4. Assign them by initiating a search for a Profile, a Public Application, and Compliance Policy. You may choose up to
10 profiles, up to 10 public applications, and a single compliance policy.
You can only choose multiple entities of a single type per session. For example, you may assign multiple groups to up
to 10 different profiles in a single command. However, you may not, in a single command, assign multiple groups to
10 profiles, 10 apps, and a compliance policy. If you have multiple entities of multiple types, you must undertake
separate assignment sessions for each type (profiles, apps, policies).
Chapter 6: Groups
66
VMware AirWatch Mobile Device Management Guide | v.2017.10 | October 2017
Copyright © 2017 VMware, Inc. All rights reserved.
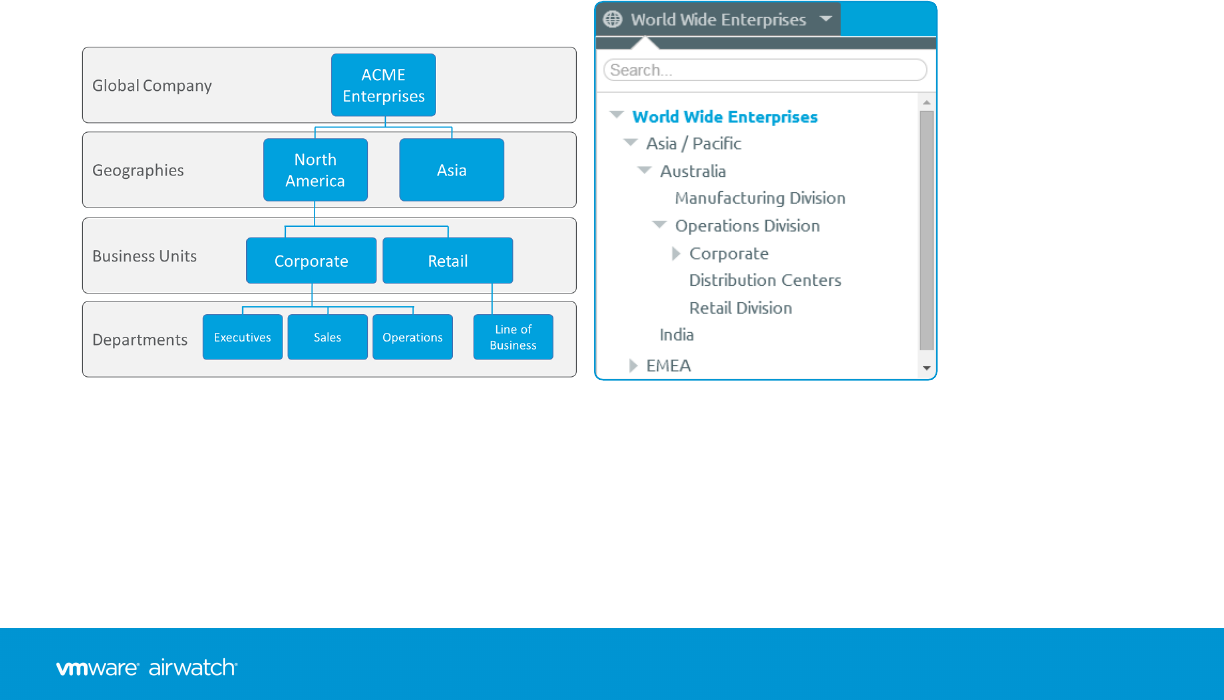
5. Select Next to display the View Device Assignment page which you can use to confirm the groups assignment.
6. Select Save &Publish to finalize the assignment.
Organization Groups Overview
AirWatch identifies users and establishes permissions using organization groups. While any organization method delivers
content to devices, use organization groups (OG) to establish an MDM hierarchy identical to your organizational
hierarchy. You may also establish OGs based on AirWatch features and content.
You can access organization groups by navigating to Groups & Settings > Groups > Organization Groups > List View or
through the organization group drop-down menu.
lBuild groups for entities within your organization.
lCustomize hierarchies with parent and child levels.
lIntegrate with multiple internal infrastructures at the tier level.
lDelegate role-based access and management based on a multi-tenant structure.
Characteristics of Organization Groups
Organization groups can accommodate functional, geographic, and organization entities and enable a multi-tenancy
solution.
lScalability – Flexible support for exponential growth.
lMulti-tenancy – Create groups that function as independent environments.
lInheritance – Streamline the setup process by setting child groups to inherit parent configurations.
Using the example of the organization group drop-down menu, profiles, features, applications, and other MDM
settings can be set at the 'World Wide Enterprises' level.
Settings are inherited down to child organization groups, such as Asia/Pacific and EMEA or even further down to
grand-child Australia > Manufacturing Division or even great grand-child Australia > Operations Division >
Corporate.
Chapter 6: Groups
67
VMware AirWatch Mobile Device Management Guide | v.2017.10 | October 2017
Copyright © 2017 VMware, Inc. All rights reserved.
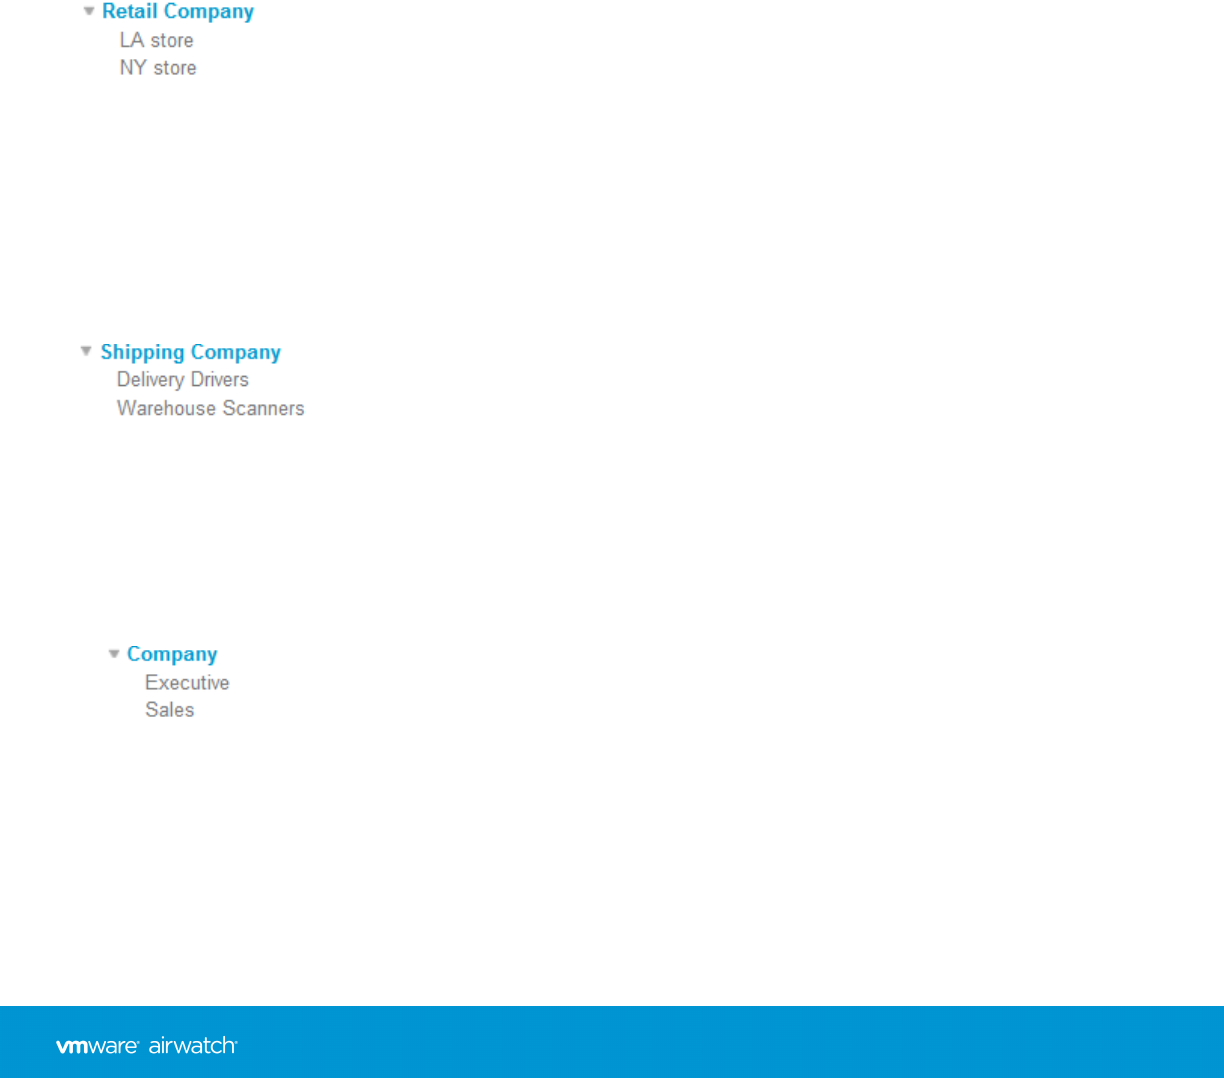
Settings between sibling organization groups such as Asia/Pacific and EMEA take advantage of the multi-tenant
nature of OGs, by keeping these settings separate from one another. However, these two sibling OGs do inherit
settings from their parent OG, World Wide Enterprises.
Alternatively, you may choose to override settings at a lower level and alter only the settings that you want to change
or keep. These settings can be altered or carried down at any level.
Considerations for Setting Up Organization Groups
Before setting up your organization group (OG) hierarchy in the AirWatch Console, first decide on the group structure.
The group structure allows you to make the best use of settings, applications, and resources.
lDelegated Administration – You can delegate administration of subgroups to lower-level administrators by
restricting their visibility to a lower organization group.
lCorporate administrators can access and view everything in the
environment.
lLA manager has access to the LA OG and can manage only those
devices.
lNY manager has access to the NY OG and can manage only those
devices.
lSystem Settings – Settings can be applied at different levels in the organization group tree and inherited down. They
can also be overridden at any level. Settings include device enrollment options, authentication methods, privacy
setting, and branding.
lOverall company establishes an enrollment against the company
Active Directory server.
lDriver devices override the parent authentication and allow a
token-based enrollment.
lWarehouse devices inherit the AD settings from the parent group.
lDevice Use Case – A profile can be assigned to one or several organization groups. Devices in those groups can then
receive that profile. Refer to the Profiles section for more information. Consider configuring devices using profile,
application, and content settings according to attributes such as device make, model, ownership type, or user
groups before creating organization groups.
lExecutive devices cannot install applications and have access to the Wi-Fi
sales network.
lSales devices are allowed to install applications and have VPN access.
Override Versus Inherit Setting for Organization Groups
The hierarchy of your structure determines which organization groups are children and which are parents. However, only
with the addition of repositories and applications can you elect to override this native inheritance.
You can add repositories and applications to child groups that inherit parent group settings. Alternatively, if you choose,
you may override inheritance at each group level.
Chapter 6: Groups
68
VMware AirWatch Mobile Device Management Guide | v.2017.10 | October 2017
Copyright © 2017 VMware, Inc. All rights reserved.
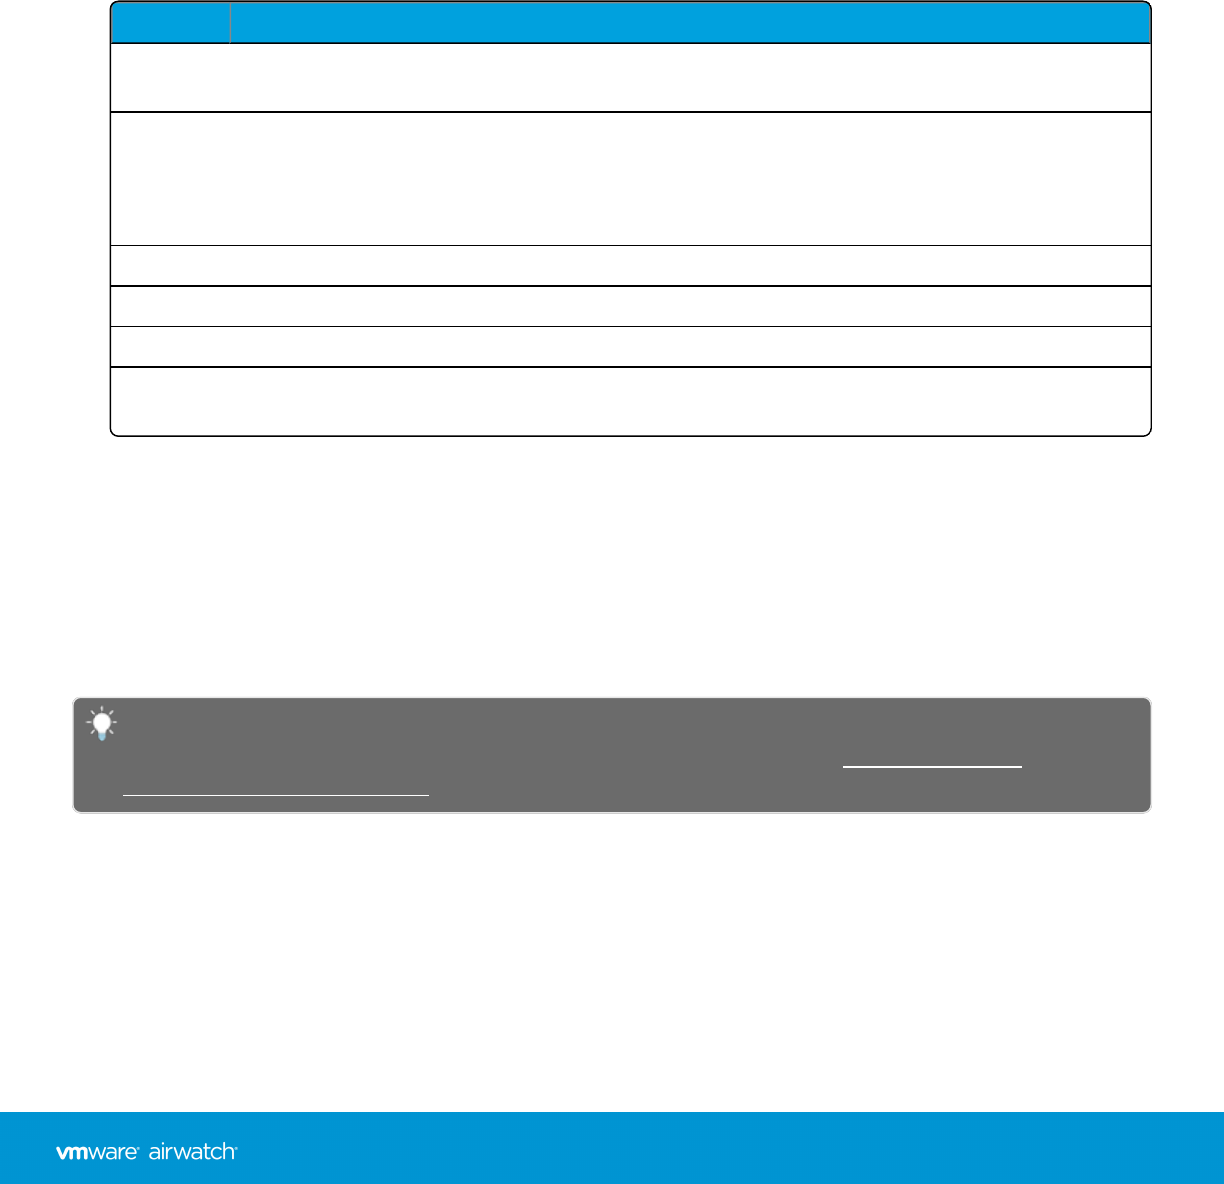
For more information, see the VMware AirWatch Mobile Content Management (MCM) Guide and the VMware
AirWatch Mobile Application Management (MAM) Guide. Each document is available on Accessing Other Documents
on page 217.
Create Organization Groups
You must create an organization group (OG) for each business entity where devices are deployed. Understand that the
OG you are currently in is the parent of the child OG you are about to create.
1. Navigate to Groups & Settings > Groups > Organization Groups > Organization Group Details.
2. Select the Add Child Organization Group tab and complete the following settings.
Setting Description
Name Enter a name for the child organization group (OG) to be displayed. Use alphanumeric characters
only. Do not use odd characters.
Group ID Enter an identifier for the OG for the end users to use during the device login. Group IDs are used
during the enrollment of group devices to the appropriate OG.
Ensure that users sharing devices receive the Group ID as it may be required for the device to log in
depending on your SharedDevice configuration.
Type Select the preconfigured OG type that reflects the category for the child OG.
Country Select the country where the OG is based.
Locale Select the language classification for the selected country.
Customer
Industry
This setting is only available when Type is Customer. Select from the list of Customer Industries.
3. Select Save.
Organization Group Type Functions
The type of an organization group can have an impact on what settings an admin can configure. Certain system settings,
such as Wipe Protection and certain features, such as Personal Content, Telecom, and so on, can only be configured at
Customer level organization groups. In addition, Global is only available for certain deployments. Other than Customer,
Partner, and Global, the types are simply for metadata purposes and do not serve a specific purpose.
For more information about the different types of Organization Groups (e.g. Global, Partner, Customer,
Container, etc.), refer to the following VMware AirWatch Knowledge Base article:https://support.air-
watch.com/articles/115001662908.
Adding Devices at Global
The Global organization group (OG) is designed to house Customer and other types of OGs. Given the way inheritance
works, if you add devices to Global and configure Global with settings intended to affect those devices, you are also
affecting all the Customer OGs underneath. This undermines the benefits of multitenancy and inheritance.
For more information, see Reasons You Should Not Enroll Devices in Global on page 119.
Chapter 6: Groups
69
VMware AirWatch Mobile Device Management Guide | v.2017.10 | October 2017
Copyright © 2017 VMware, Inc. All rights reserved.

Organization Group Restrictions
If you attempt to configure an organization group (OG)-limited setting, the settings pages under Groups &Settings >All
Settings notify you of the limitation.
The following restrictions apply to creating Customer-level organization groups.
lIn a software-as-a-service (SaaS) environment, you cannot create nested customer OGs.
lIn an on-premises environment, you can create nested customer OGs, but only if your administrator role is System
Administrator.
Organization Groups Settings Comparison
As an Administrator, you may find it useful to compare the settings of one organization group (OG) to another. The
following are available when you compare OG settings.
lUpload XML files containing the OG settings from different AirWatch software versions.
lEliminate the possibility of a difference in configuration causing problems during version migration.
lFilter the comparison results, allowing you to display only the settings you are interested in comparing.
lSearch for a single setting by name with the search function.
The Organization Group Compare feature is only available for on-premises customers.
Compare Two Organization Groups
You can compare the settings of one organization group to another to mitigate version migration issues.
For instance, once a User Acceptance Testing (UAT) server has been upgraded, configured, and tested, you can compare
the UAT settings to the production settings directly.
1. Navigate to Groups & Settings > All Settings > Admin > Settings Management > Settings Comparison.
2. Select an OG in your environment from the left drop-down menu (labeled with the numeral 1). Alternatively, upload
the XML settings file by selecting the Upload button and choosing an exported OG setting XML file.
3. Select the comparison OG on the right drop-down menu (labeled with the numeral 2).
4. Display a list of all settings for both selected organization groups by selecting the Update button.
lDifferences between the two sets of OG settings are automatically highlighted.
lYou may optionally enable the Show Differences Only check box. This check box displays only those settings
that apply to one OG but not the other.
lIndividual settings that are empty (or not specified) display in the comparison listing as 'NULL'.
Chapter 6: Groups
70
VMware AirWatch Mobile Device Management Guide | v.2017.10 | October 2017
Copyright © 2017 VMware, Inc. All rights reserved.
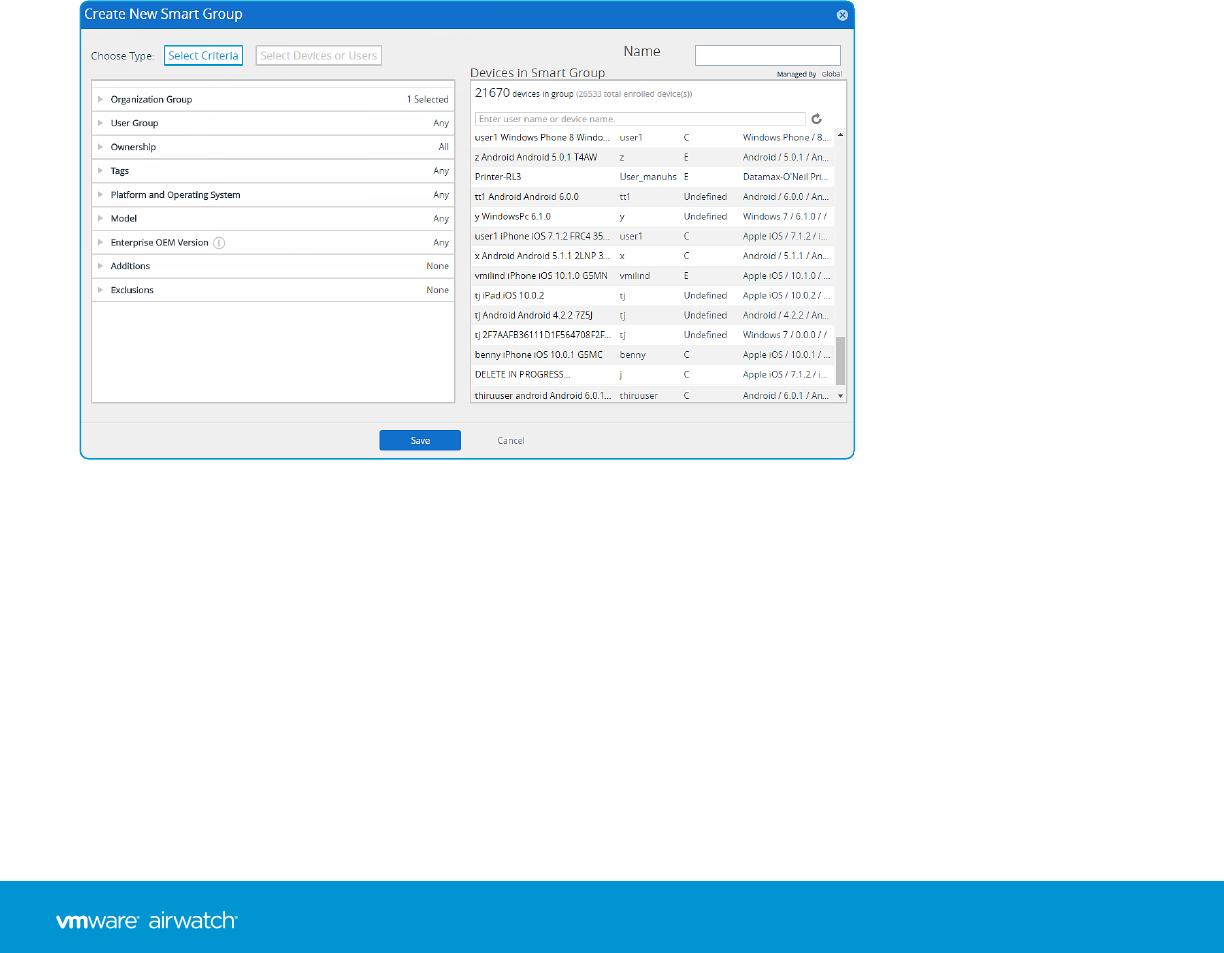
Smart Groups Overview
Smart groups are customizable groups that determine which platforms, devices, and users receive an assigned
application, book, compliance policy, device profile, or provision.
When you create organization groups, you typically base them on the internal corporate structure: geographical
location, business unit, and department. For example, "North Sales," "South HR." Smart groups, however, offer the
flexibility to deliver content and settings by device platform, model, operating system, device tag, or user group. You can
even deliver content to individual users across multiple organization groups.
You can create smart groups when you upload content and define settings. However, their modular nature means you
can also create them at any time, so they are available to be assigned later.
The main benefit of smart groups is their reusability. It may be intuitive to make a new assignment every time you add
content or define a profile or policy. Instead, if you define assignees to smart groups only once, you can simply include
those smart groups in your definition of content.
Create a Smart Group
Before you can assign a smart group to an application, book, compliance policy, device profile, video channel, or product
provision, you must first create one.
1. Choose the applicable Organization Group to which your new smart group applies and from which it can be
managed.
2. Navigate to Groups & Settings > Groups > Assignment Groups and then select Add Smart Group.
3. Enter a Name for the smart group.
4. Configure the smart group type. Choose between Select Criteria and Select Devices or Users.
lThe Select Criteria option works best for groups with large numbers (more than 500 devices) that receive general
updates. This method works best because the inherent details of these groups can reach all endpoints of your
mobile fleet.
Chapter 6: Groups
71
VMware AirWatch Mobile Device Management Guide | v.2017.10 | October 2017
Copyright © 2017 VMware, Inc. All rights reserved.
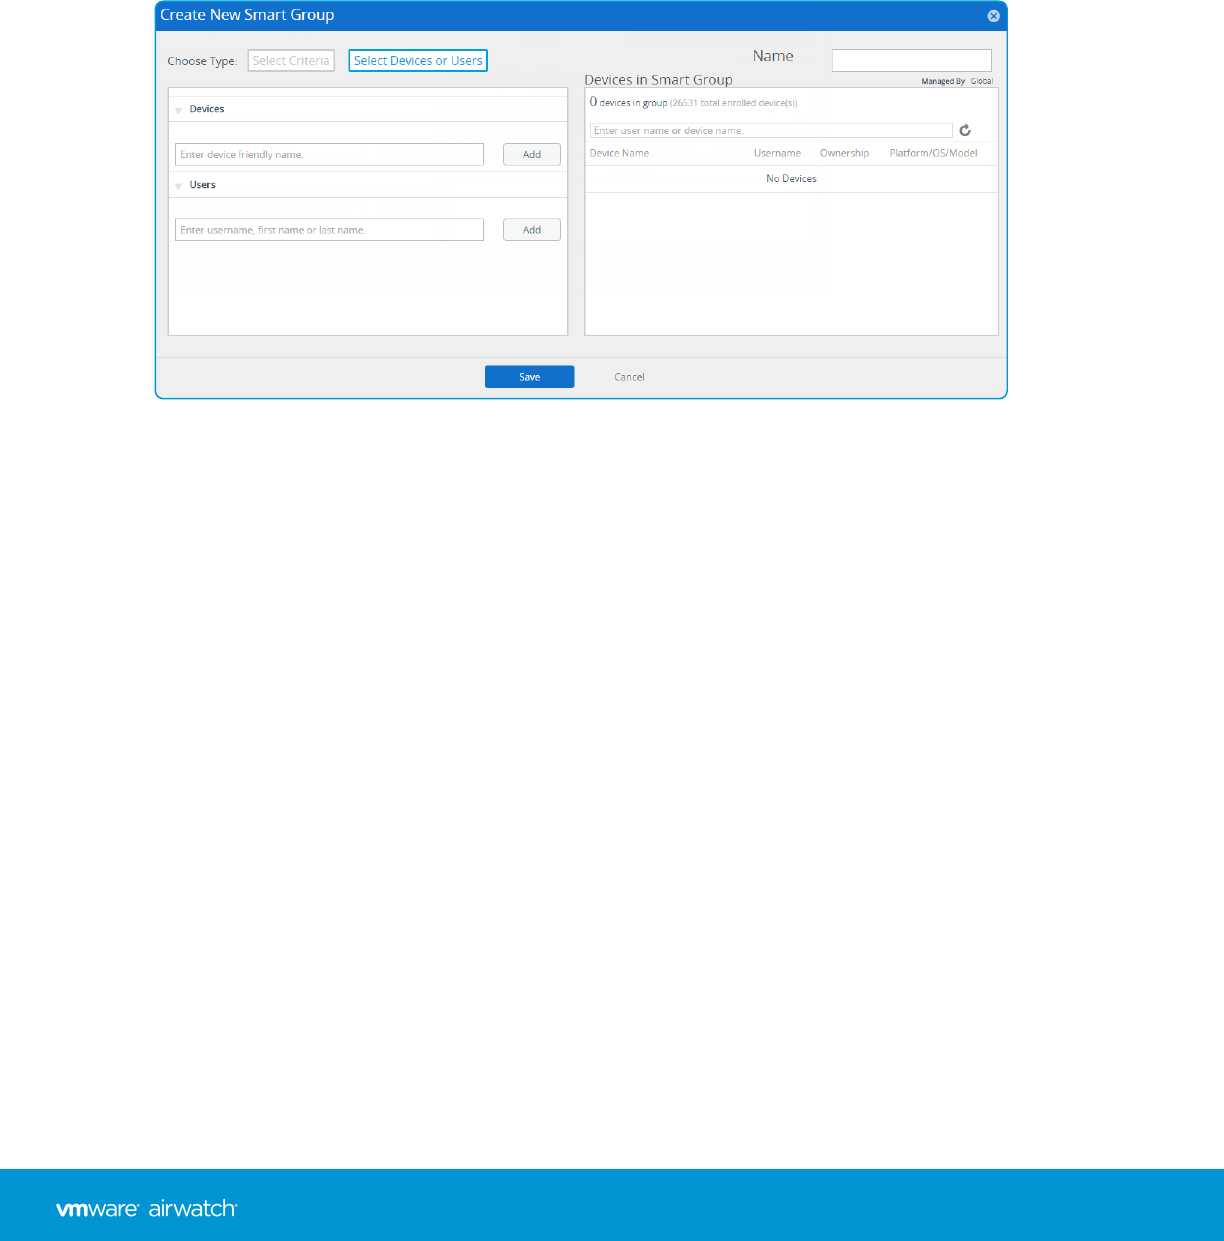
oIn the Select Criteria type, select qualifying parameters to add in the smart group. Parameters include
Organization Group,User Group,Ownership,Tags,Platform and Operating System,Model, and
Enterprise OEM (Original Equipment Manufacturer) Version. You can also add and exclude specific devices
and users in the Additions and Exclusions sections.
While Platform is a criterion within a smart group, the platform configured in the device profile or
compliance policy always takes precedence over the smart group's platform. For instance, if a device profile
is created for the iOS platform, the profile is only assigned to iOS devices even if the smart group includes
Android devices.
lThe Select Devices or Users option works best for groups with smaller numbers (500 or less devices) that receive
sporadic, although important, updates. This method works best because of the granular level at which you can
select group members.
Switching between Select Criteria and Select Devices or Users erases any entries and selections you may have
made.
oUse the Select Devices or Users type to assign content and settings to special cases outside of the general
enterprise mobility criteria. Enter the device friendly name in Devices and user name (first name or last
name) in Users. You must Add at least one device or user or you cannot save the smart group.
There is a limit to the number of rules (500) that a smart group may be programmed with. This 500 rule limit is
unrelated to the 500 device threshold determining whether your smart group is Select Criteria or Select Devices
or Users-based.
5. Select Save when complete.
Assign a Smart Group
Once you have created the smart group and before it can take effect, you must assign it. You can assign it to an
application, book, compliance policy, device profile, video channel, or product provision. There are two methods to
assign a smart group.
Assign Smart Group While Creating Device Product
You can assign a smart group when you add or create an application, book, compliance policy, device profile, video
channel, or product provision.
Chapter 6: Groups
72
VMware AirWatch Mobile Device Management Guide | v.2017.10 | October 2017
Copyright © 2017 VMware, Inc. All rights reserved.

1. Complete the Assigned Groups drop-down menu.
2. Select a smart group from the drop-down menu. Smart groups available are managed only within the organization
group (OG) to which the resource is being added, or to a child OG below it.
3. If no smart group matches the desired assignment criteria, then select the Create a Smart Group option. You can
assign more than one smart group per application, book, compliance policy, device profile, video channel, or
product provision.
4. Select Save to include the assignment.
Assign Smart Group While Managing the Smart Group
You can also assign a smart group during the process of managing the smart group itself.
1. View the entire list of smart groups by navigating to Groups & Settings > Groups > Assignment Groups.
2. Select one or more smart groups you want to assign and select Assign. The Assign page displays.
Select the Groups link at the top of the Assign page to display the Groups page. On this page, the organization
groups that manage the smart groups are displayed. Return to the Assign page by selecting the Close button.
3. On the Assign page, use the search box to view the list of eligible products and assign it to the selected smart groups.
4. Select Next to display the View Device Assignment page and confirm the assignment status.
5. Select Save &Publish.
For more information, see View Device Assignment on page 155.
Exclude Smart Groups in Profiles and Policies
In addition to apps, books, video channels, and products, smart groups apply to device profiles and compliance policies.
This flexibility lets you exclude selected smart groups from profiles and policies.
For example, if you want a compliance policy for all users in the company except executives, then take the following
steps. Make two smart groups, one consisting of all users and another containing executives. Create the Compliance
Policy and assign it to the "all users" smart group then specify the "executives" smart group in the Exclusions option.
1. While adding a device profile or compliance policy, select Yes next to the Exclusions setting to display the
ExcludedGroups option.
2. In the Excluded Groups setting, select those groups that you want to exclude from the assignment of this profile or
policy. You can alternatively make a new group by selecting the Create Assignment Group button.
If you select the same group in both the Assigned Groups and Excluded Groups settings, then the profile or policy
fails to save.
3. Preview the affected devices by selecting View Device Assignment.
Smart Group List View
Manage your smart groups by editing, assigning, unassigning, excluding, and deleting them with the AirWatch Console.
View the entire list of smart groups by navigating to Groups & Settings > Groups > Assignment Groups. Admins can only
see groups which they can manage based on their permissions settings.
Chapter 6: Groups
73
VMware AirWatch Mobile Device Management Guide | v.2017.10 | October 2017
Copyright © 2017 VMware, Inc. All rights reserved.
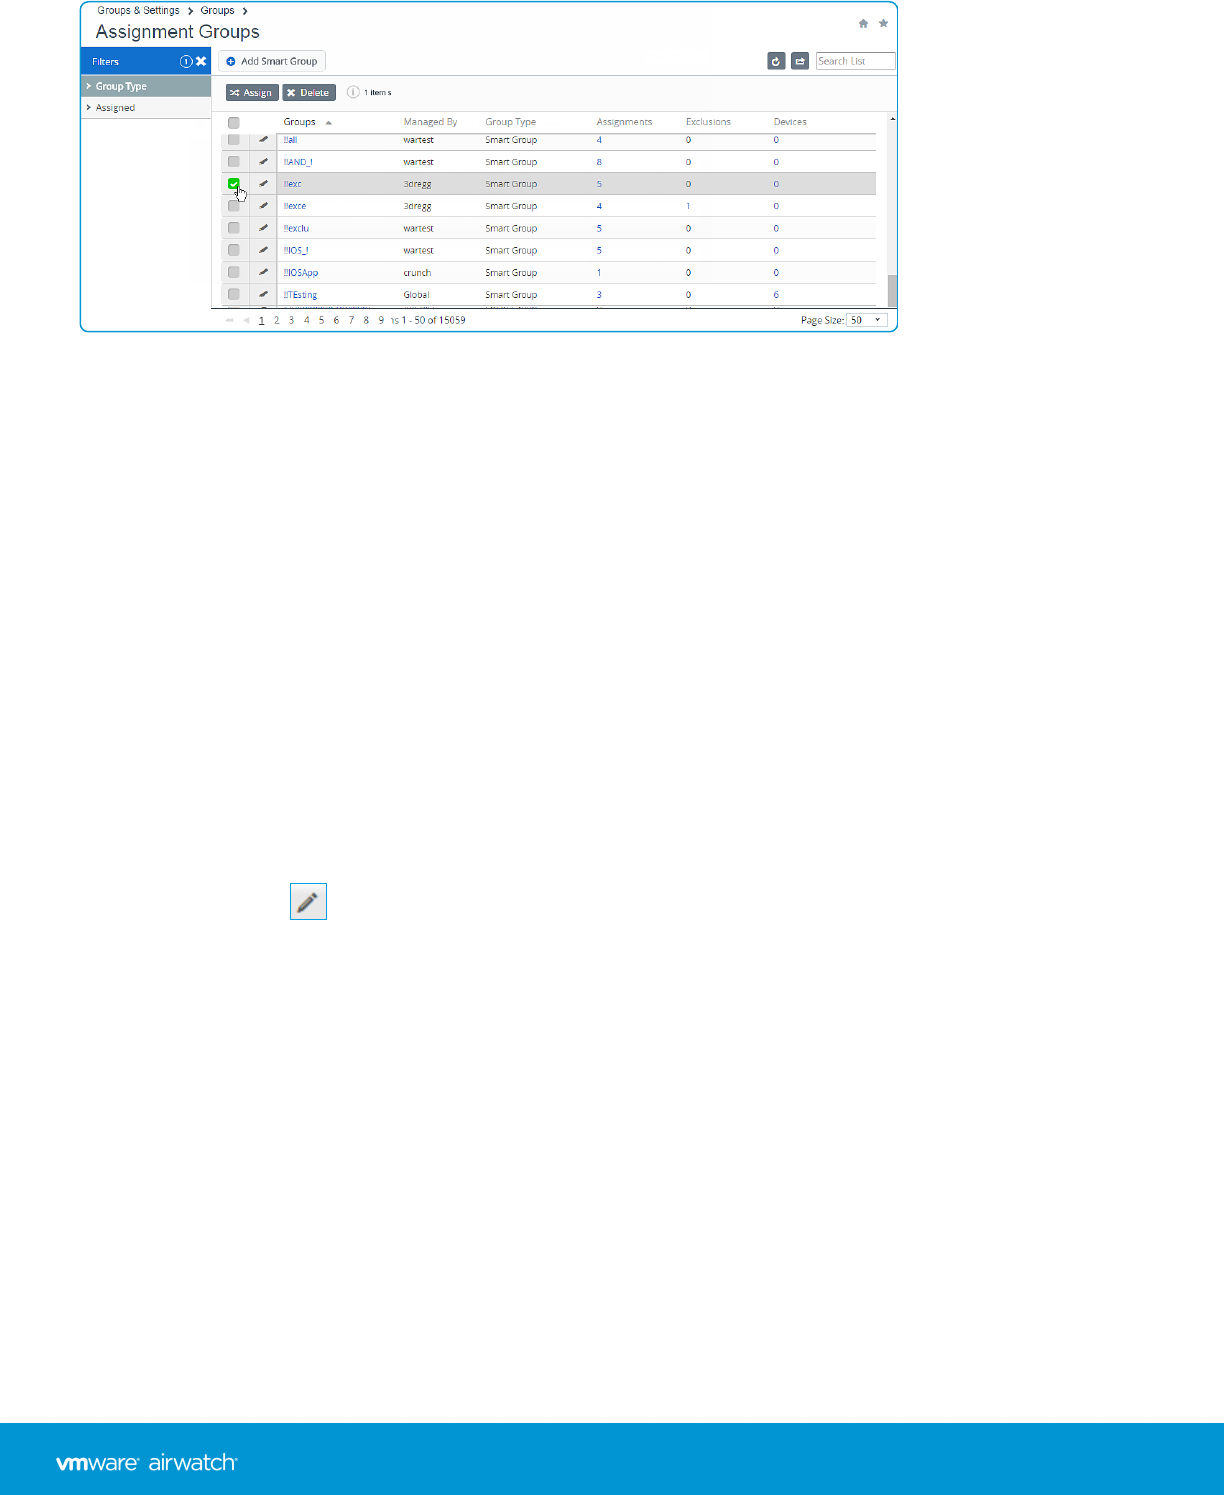
The columns Groups,Assignments,Exclusions, and Devices each feature links which you can select to view detailed
information.
lSelecting links in the Assignments or Exclusions columns display the View Smart Group Assignments screen.
lSelecting a link in the Devices column displays the Devices > List View showing only those devices included in the
smart group.
lYou can Filter your collection of groups by Group Type (Smart, Organization, User, or all) or by Assigned status.
Assigned status shows whether the group is assigned, is excluded, both, or neither.
lYou can Assign a smart group directly from the listing.
Edit, Delete, and Unassign a Smart Group
Any edits that you apply to a smart group affects all policies and profiles to which that smart group is assigned.
For example, a smart group for executives is assigned to a compliance policy, device profile, and two internal apps. If you
want to exclude some of the executives, then simply edit the smart group by specifying Exclusions. This action removes
not only the two internal apps but also the compliance policy and device profile from those excluded devices.
1. Navigate to Groups & Settings > Groups > Assignment Groups.
2. Select the Edit icon ( ) located to the left of the listed smart group that you want to edit. You can also select the
smart group name in the Group column. The Edit Smart Group page displays with its existing settings.
3. In the Edit Smart Group page, alter Criteria or Devices and Users (depending upon which type the smart group was
saved with) and then select Next.
4. In the View Assignments page, you can review which profiles, apps, books, provisions, and policies may be added or
removed from the devices as a result.
5. Select Publish to save your smart group edits. All profiles, apps, books, provisions, and policies tied to this smart
group update their device assignments based on this edit.
The Console Event logger track changes made to smart groups, including the author of changes, devices added, and
devices removed.
Chapter 6: Groups
74
VMware AirWatch Mobile Device Management Guide | v.2017.10 | October 2017
Copyright © 2017 VMware, Inc. All rights reserved.
Delete a Smart Group
When you have no further use for a smart group, you can delete it. You can only delete one smart group at a time.
Selecting more than one smart group causes the Delete button to be unavailable. If a smart group is assigned, you are
not permitted to delete it.
1. Navigate to Groups & Settings > Groups > Assignment Groups and locate the smart group you want to delete from
the listing.
2. Select the check box to the left of the smart group name and select Delete from the actions menu that displays.
Unassign a Smart Group
You can unassign a smart group from an application, book, channel, policy, profile, or product. This action removes the
associated content from all devices in the smart group.
1. Unassign smart groups from applications, books, compliance policies, device profiles, or product provisions. Follow
the navigation paths shown.
lApplications – Navigate to Apps & Books > Applications > List View and select the Public, or Internal tab.
lBooks – Navigate to Apps & Books > Books > List View and select the Public,Internal, or Web tab.
lChannels – Navigate to Content > Video > Channels.
lCompliance Policy – Navigate to Devices > Compliance Policies > List View.
lDevice Profile – Navigate to Devices > Profiles & Resources > Profiles.
lProduct Provision – Navigate to Devices > Staging &Provisioning > Products > List View.
2. Locate the content or setting from the listing and select the Edit icon from the actions menu.
3. Select the Assignment tab or locate the Assigned Smart Groups text box.
4. Select Delete (X) next to the smart group that you want to unassign. This action does not delete the smart group. It
simply removes the smart group assignment from the saved setting.
5. Follow the required steps to Save your changes.
Research Smart Group Events Using Console Event Logger
You can track the changes to smart groups, and when they were made and by whom, by using the Console Event logger.
Such tracking can be useful when troubleshooting devices.
1. Navigate to Hub > Reports &Analytics > Events > Console Events.
2. Select Smart Groups from the Module drop-down filter at the top of the Console Event listing.
3. Apply more filters as you may require including Date Range,Severity, and Category.
4. Where applicable, select the hypertext link in the Event Data column which contains extra detail that may assist your
research efforts.
Chapter 6: Groups
75
VMware AirWatch Mobile Device Management Guide | v.2017.10 | October 2017
Copyright © 2017 VMware, Inc. All rights reserved.

User Groups Overview
You can group sets of users into user groups which, like organization groups, act as filters for assigning profiles and
applications. When configuring your MDM environment, align user groups with security groups and business roles
within your organization.
You can assign profiles, compliance policies, content, and applications to users and devices with user groups. You can
add your existing directory service groups into AirWatch or create user groups from scratch.
As an alternative to user groups, you can also manage content by assigning devices according to a preconfigured range of
network IP address or custom attributes. For more information, see Device Assignments Overview on page 126.
User Groups Without Directory Integration (Custom)
Creating a user group outside of your existing Active Directory structure allows you to create specialized groups of users
at any time. Customize user groups according to your deployment by specifically designing access to features and
content. For instance, you can create a temporary user group for a specific project requiring specialized apps, device
profiles, and compliance policies.
For more information about adding user groups in bulk, see Batch Import User Groups on page 48.
Add User Groups Without Directory Integration (Custom)
You can establish a custom user group outside of your corporate structure, which may be preferred depending upon the
kind of user group you need. Custom user groups can only be added at a customer level organization group.
1. Navigate to Accounts >User Groups >List View and select Add and then Add User Group.
2. Change the user group Type option to Custom.
3. Enter the Group Name and Description used to identify the user group in theAirWatch Console.
4. Confirm the organization group that manages the user group and select Save.
5. You can then add users to this new user group by navigating to Accounts > Users > List View.
Add multiple users by selecting check boxes to the far-left of each listed user name. Next, select the Management
button above the column headings and choose Add to User Group.
User Groups With Directory Integration
An alternative to custom user groups without active directory integration is through user group integration that applies
your existing active directory structure, providing many benefits.
Once you import existing directory service user groups as AirWatch user groups, you can perform the following.
lUser Management – Reference your existing directory service groups (such as security groups or distribution lists)
and align user management in AirWatch with the existing organizational systems.
lProfiles and Policies – Assign profiles, applications, and policies across an AirWatch deployment to groups of users.
lIntegrated Updates – Automatically update user group assignments based on group membership changes.
lManagement Permissions – Set management permissions to allow only approved administrators to change policy
and profile assignments for certain user groups.
lEnrollment – Allow users to enroll with existing credentials and automatically assign an organization group.
Chapter 6: Groups
76
VMware AirWatch Mobile Device Management Guide | v.2017.10 | October 2017
Copyright © 2017 VMware, Inc. All rights reserved.

The administrator must designate an existing organization group as the primary root location from which the
administrator manages devices and users. Directory services must be enabled at this root organization group.
You can add your existing directory service groups into AirWatch. While integration does not immediately create
AirWatch user accounts for each of your directory service accounts, it ensures that AirWatch recognizes them as user
groups. You can use this group to restrict who can enroll.
For more information about adding directory user groups in bulk, see Batch Import User Groups on page 48.
Add User Groups With Directory Integration
Making user groups with directory integration fosters an aligned approach to device management: device enrollment
plus subsequent updates, administrative overview, and user management are each in lockstep with your existing
directory service structure.
Before proceeding, ensure that the user group Type is Directory.
Chapter 6: Groups
77
VMware AirWatch Mobile Device Management Guide | v.2017.10 | October 2017
Copyright © 2017 VMware, Inc. All rights reserved.

1. Navigate to Accounts > User Groups > List View, select Add then Add User Group.
Setting Description
Type Select the type of User Group.
lDirectory – Create a user group that is aligned with your existing active directory structure.
lCustom – Create a user group outside of your organization's existing Active Directory
structure. This user group type grants access to features and content for basic and directory
users to customize user groups according to your deployment. Custom user groups can only
be added at a customer level organization group.
External Type Select the external type of group you are adding.
lGroup – Refers to the group object class on which your user group is based. Customize this
class by navigating to Groups &Settings > All Settings > System > Enterprise Integration >
Directory Services > Group.
lOrganizational Unit – Refers to the organizational unit object class on which your user group
is based. Customize this class by navigating to Groups &Settings > All Settings > System >
Enterprise Integration > Directory Services > Group.
lCustom Query – You can also create a user group containing users you locate by running a
custom query. Selecting this external type replaces the Search Text function but displays the
Custom Query section.
Search Text Identify the name of a user group in your directory by entering the search criteria and selecting
Search to search for it. If a directory group contains your search text, a list of group names
displays.
This option is unavailable when External Type is set to Custom Query.
Directory
Name
Read-only setting displaying the address of your directory services server.
Domain and
Group Base
DN
This information automatically populates based on the directory services server information you
enter on the Directory Services page (Groups &Settings > System >Enterprise Integration >
Directory Services).
Select the Fetch DN plus sign (+) next to the Group Base DN setting, which displays a list of
distinguished name elements from which you can select.
Custom
Object Class
Identifies the object class under which your query runs. The default object class is 'person' but you
can supply a custom object class to identify your users with a greater success and accuracy.
This option is available only when Custom Query is selected as External Type.
Group Name Select a Group Name from your Search Text results list. Selecting a group name automatically
alters the value in the Distinguished Name setting.
This option is available only after you have completed a successful search with the SearchText
setting.
Distinguished
Name
This read-only setting displays the full distinguished name of the group you are creating.
This option is available only when Group or Organizational Unit is selected as External Type.
Chapter 6: Groups
78
VMware AirWatch Mobile Device Management Guide | v.2017.10 | October 2017
Copyright © 2017 VMware, Inc. All rights reserved.
Setting Description
Custom Base
DN
Identifies the base distinguished name which serves as the starting point of your query. The
default base distinguished name is 'AirWatch' and 'sso'. However, if you want to run the query
with a different starting point, you can supply a custom base distinguished name.
This option is available only when Custom Query is selected as External Type.
Organization
Group
Assignment
This optional setting enables you to assign the user group you are creating to a specific
organization group.
This option is available only when Group or Organizational Unit is selected as External Type.
User Group
Settings
Choose between Apply default settings and Use Custom settings for this user group. See the
CustomSettings section for additional setting descriptions. You can configure this option from the
permission settings after the group is created.
This option is available only when Group or Organizational Unit is selected as External Type.
Custom Query
Query This setting displays the currently loaded query that runs when you select the Test Query button
and when you select the Continue button. Changes you make to the Custom Logic setting or the
Custom Object Class setting are reflected here.
Custom Logic Add your custom query logic here, such as user name or admin name. For example, "cn=jsmith".
You can include as much or as little of the distinguished name as you like. The Test Query button
allows you to see if the syntax of your query is correct before selecting the Continue button.
Custom Settings
Management
Permissions
You can allow or disallow all administrators to manage the user group you are creating.
Default Role Choose a default role for the user group from the drop-down menu.
Default
Enrollment
Policy
Choose a default enrollment policy from the drop-down menu.
Auto Sync
with
Directory
This option enables the directory sync, which detects user membership from the directory server
and stores it in a temporary table. Administrators approve changes to the console unless the Auto
Merge option is checked.
If you want to prevent user groups from automatically syncing during a scheduled sync, this
setting must be disabled.
Auto Merge
Changes
Enable this option to apply sync changes automatically from the database without administrative
approval.
Maximum
Allowable
Changes
Use this setting to set a threshold for the number of automatic user group sync changes that are
allowed to occur before approval must be given.
Changes more than the threshold are in need of admin approval and a notification is sent to this
effect.
This option is available only when Auto Merge Changes is enabled.
Chapter 6: Groups
79
VMware AirWatch Mobile Device Management Guide | v.2017.10 | October 2017
Copyright © 2017 VMware, Inc. All rights reserved.
Setting Description
Add Group
Members
Automatically
Enable this setting to add users to the user group automatically.
If you want to prevent user groups from automatically syncing during a scheduled sync, this
setting must be disabled.
Send Email to
User when
Adding
Missing Users
You can send an email to users while adding missing users. Adding missing users means combining
the temporary user group table with the Active Directory table.
Message
Template
Choose a message template to be used for the email notification during the addition of missing
users to the user group.
This option is available only when Send Email to User when Adding Missing Users is enabled.
For more information on Distinguished Name, search for Microsoft's TechNet article entitled "Object Naming"
at https://technet.microsoft.com.
2. Select Save.
Edit User Group Permissions
Fine-tuning user group permissions allows you to reconsider who inside your organization can edit certain groups. For
example, if your organization has a user group for company executives, you may not want lower-level administrators to
have management permissions for that user group.
Use the Permissions page to control who can manage certain user groups and who can assign profiles, compliance
policies, and applications to user groups. Important logic restrictions are highlighted in red.
1. Navigate to Accounts > User Groups >List View.
2. Select the Edit icon of an existing user group row.
3. Select the Permissions tab, then select Add.
4. Select the Organization Group you want to define permissions for.
5. Select the Permissions you want to enable.
lManage Group (Edit/Delete) – Activate the ability to edit and delete user groups.
lManage Users Within Group and Allow Enrollment – Manage users within the user group and to allow a device
enrollment in the organization group.
oThis setting can only be enabled when Manage Group (Edit/Delete) is also enabled.
oIf Manage Group (Edit/Delete) is disabled, then this setting is also disabled.
lUse Group For Assignment – Use the group to assign security policies and enterprise resources to devices.
oThis setting can only be changed if Manage Group (Edit/Delete) is disabled.
oIf Manage Group (Edit/Delete) is enabled, then this setting becomes locked and uneditable.
Chapter 6: Groups
80
VMware AirWatch Mobile Device Management Guide | v.2017.10 | October 2017
Copyright © 2017 VMware, Inc. All rights reserved.

6. Select the Scope of these permissions, that is, which groups of administrators are allowed to manage or use this user
group. Only one of the following options may be active.
lAdministrator Only – The permissions affect only those administrators at the parent organization group.
lAll Administrators at or below this Organization Group – The permissions affect the administrators in the
organization group and all administrators in all child organization groups underneath.
7. Select Save.
Access User Details
Once your users and user groups are in place, you can view all user information regarding user details, associated
devices, and interactions.
Access user information from any location in the AirWatch Console where the user name is displayed, including each of
the following pages in the console.
lUser Group Members (Accounts >User Groups >Details View > More > View Users)
lUsers List View (Accounts > Users >List View)
lAdministrators List View (Accounts >Administrators >List View).
The User Details page is a single-page view.
lAll associated user groups.
lAll Devices associated with the user over time and a link to complete history of enrolled devices.
lAll devices a user has checked-out in a Shared Device Environment and a link to complete check-in/check-out device
history.
lAll device- and user-specific event logs.
lAll assigned, accepted, and declined Terms of Use.
Encrypt Personal Details
You can encrypt personally identifiable information including first name, last name, email address, and phone number.
Navigate to Groups & Settings > All Settings > System > Security > Data Security from the Global or Customer-level
organization group for which you want to configure encryption.
1. Enable the Encrypt User Information setting, then select individual user data settings to activate encryption. Doing
so disables the search, sort, and filter functionality.
2. Click Save to encrypt user data so it is not accessible in the database. Doing so limits some features in the AirWatch
Console, such as search, sort, and filter.
User Groups List View
The User Groups List View page features useful tools for common user group maintenance and upkeep, including
viewing, merging, deleting user groups, and adding missing users. Navigate to Accounts > User Groups > List View.
You can use the User Groups List View to create lists of user groups immediately, based on criteria that is most important
to you. You can also add new user groups individually or in bulk.
Chapter 6: Groups
81
VMware AirWatch Mobile Device Management Guide | v.2017.10 | October 2017
Copyright © 2017 VMware, Inc. All rights reserved.
Action Description
Filters Display only the desired user groups by using the following filters.
lUser Group Type
lSync Status
lMerge Status
Add
Add
User
Group
Perform a one-off addition of either a Directory-Based User Group or a Custom User Group.
Batch
Import
Import new user groups in bulk by using a comma-separated values (CSV) file. You can organize multiple
user groups at a time by entering a unique name and description.
Sorting
and
Resizing
Columns
Columns in the List View that are sortable are Group Name, Last Sync On, Users, and Merge Status. Columns
that can be resized are Group Name and Last Sync On.
Details
View
View basic user group information in the Details View by selecting the link in the Group Name column. This
information includes group name, group type, external type, manager, and number of users. Details View
also includes a link to the group mapping settings in All Settings > Devices &Users > General > Enrollment
in the Grouping tab.
Export (
)
Save a comma-separated values (CSV) file of the entire unfiltered or filtered List View that can be viewed and
analyzed in Excel.
The User Groups List View also features a selection check box and Edit icon to the left of the user. Selecting the Edit icon
( ) enables you to make basic changes to the user group. You can make bulk actions on user groups by selecting one or
more groups which reveals the action buttons for the listing.
You may select more than one user group by selecting as many check boxes as you like. Doing so modifies the available
action buttons and also makes the available actions apply to multiple groups and their respective users.
Action Description
Sync Copy recently added user group users to the temporary table, manually, ahead of the scheduled,
automated Active Directory sync by AirWatch.
View
Users
Displays the User Group Members screen, enabling you to review the user names of all the members in
the selected user group.
More
Actions
View and
Merge
View, Add, and Remove users recently added to the temporary user group table. User group users that appear in this table await
the automated AirWatch user group sync.
Add Missing
Users
Combine the temporary user group table with the Active Directory table, making the addition of these new users in the user
group official.
Delete Delete a user group.
Chapter 6: Groups
82
VMware AirWatch Mobile Device Management Guide | v.2017.10 | October 2017
Copyright © 2017 VMware, Inc. All rights reserved.

Add Users to User Groups
When you have a new user to add to one or more user groups, follow these steps.
1. Navigate to Accounts > Users > List View.
2. Select one or more users in the listing by inserting a check mark in the check box to the left.
3. Select the More Actions button and then select Add To User Group. The Add Selected Users Into Custom User
Group page displays.
4. You may add users to an Existing User Group or create a New User Group.
5. Choose the Group Name.
6. Select Save.
7. Navigate to Accounts > User Groups > List View.
a. The Active Directory (AD) synchronization (which is an automated, scheduled process) copies these pending user
group users to a temporary table. Then these user group users are reviewed, added, or removed.
b. If you do not want to wait for the automated AD sync, you may synchronize manually. Start a manual
synchronization by selecting the user group to which you added users, then select the Sync button.
8. You may optionally select More > View and Merge to perform maintenance tasks such as review, add, and remove
pending user group users.
9. Combine the temporary table of pending user group users with the Active Directory user group users by selecting
More > Add Missing Users.
Admin Groups Overview
Admin groups enable you to assemble subsets of administrator accounts for assigning roles and permissions beyond the
permissions that come from having an admin account.
Admin groups can be used to assign roles and permissions granting access to the console that is specific to a special
project.
You can add your existing directory service administrators into admin groups or create admin groups from scratch using
custom queries.
For example, if you have a new business directive, you may need to assign special admin access to a group of training
facilitators. You might create an admin group, run a custom query for training facilitators, and assign a role that is specific
to the new business effort. For more information, see Admin Accounts on page 50.
Admin Groups List View
The Admin Groups List View page features useful tools for common user group maintenance and upkeep. Such upkeep
includes adding, viewing, merging, and deleting user groups and missing users.
View this page by navigating to Accounts > Administrators >Admin Groups.
Chapter 6: Groups
83
VMware AirWatch Mobile Device Management Guide | v.2017.10 | October 2017
Copyright © 2017 VMware, Inc. All rights reserved.
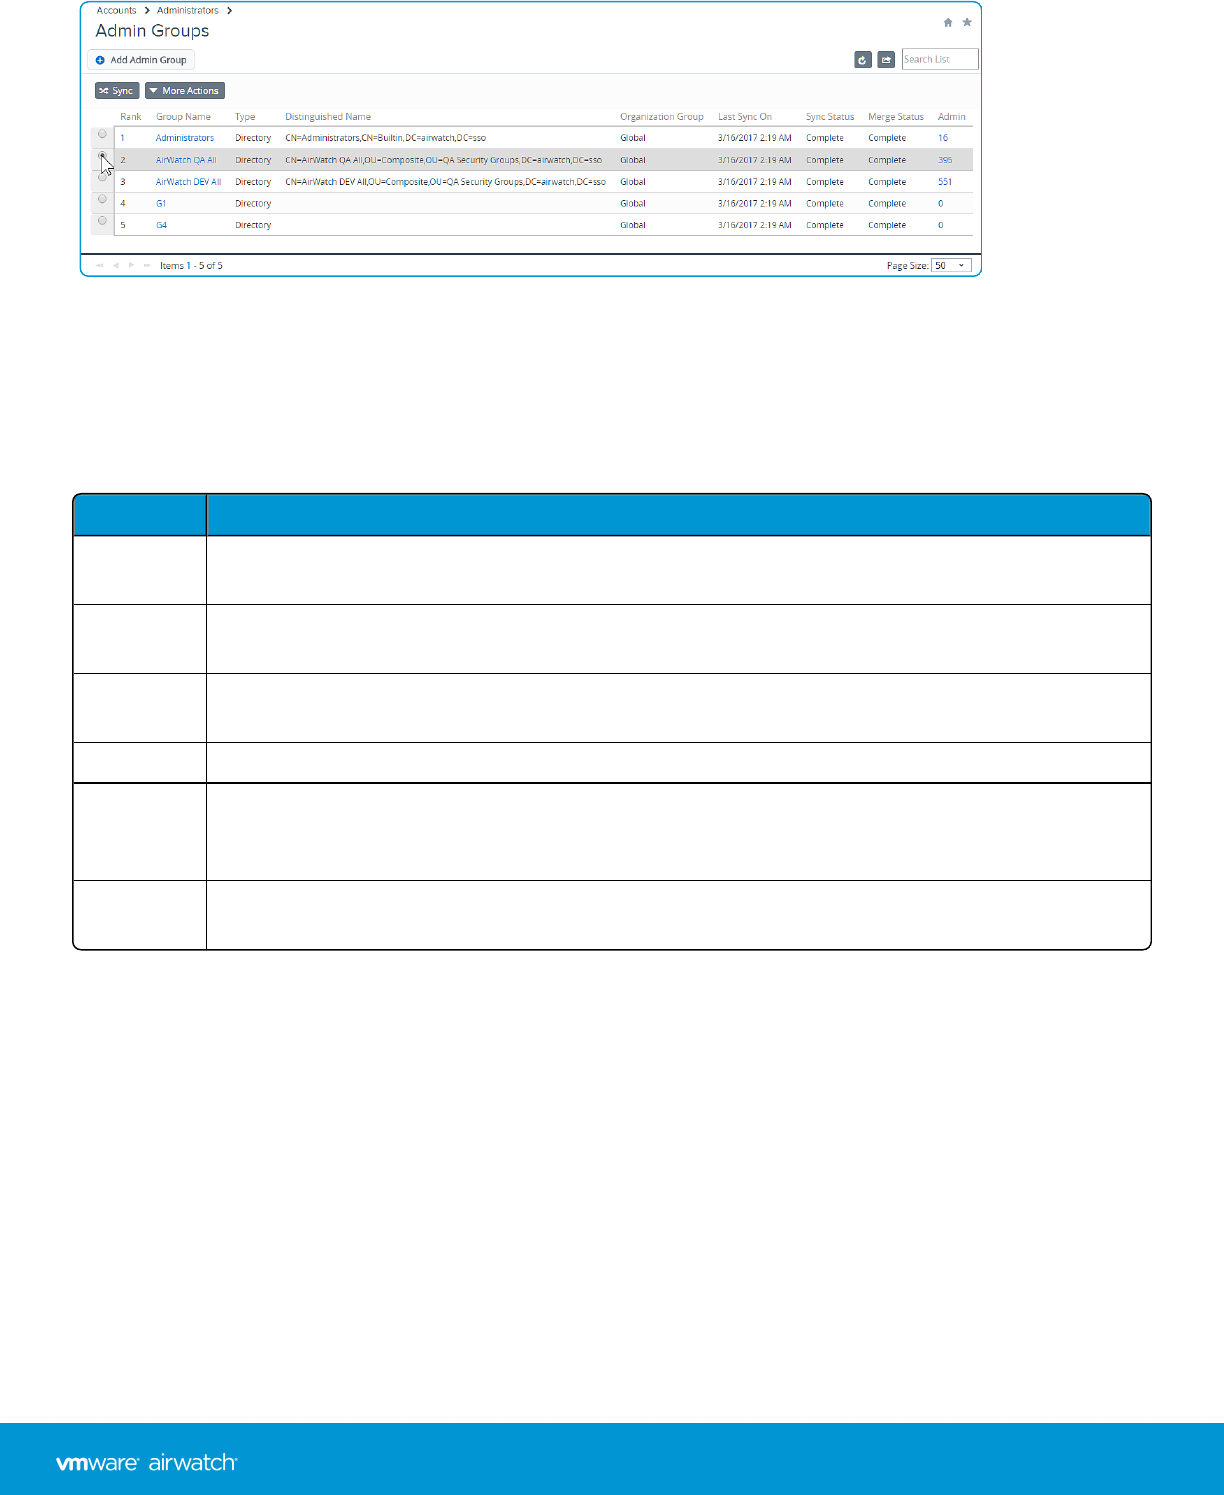
Display the Edit Admin Group page by selecting the hypertext name in the Group Name column of the list view. Use this
page to change the name of the admin group. You can also add and remove roles that are applicable to group members.
For more information, see Admin Roles on page 57.
Display the Admin Group Members listing by selecting the hypertext link number in the Admin column. This listing
shows you the names of all the administrators in the admin group.
Access the following actions and maintenance functions by selecting the radio button next to the group name.
Action Description
Sync Copy recently added admin group users to the temporary table, manually, ahead of the scheduled,
automated Active Directory sync by AirWatch.
More
Actions
View and
Merge
View, Add, and Remove users recently added to the temporary admin group table. Admin group
administrators that appear in this table await the automated AirWatch admin group sync.
Delete Delete an admin group.
Top, Up,
Down,
Bottom
You can edit the ranking of each admin group as it appears in the listing. Moving the groups in this way
is useful for when you have more admin groups than a single page can display.
Add Missing
Users
Combine the temporary admin group table with the Active Directory table, making the addition of these
new admins in the group official.
Add Admin Groups
You can add admin groups to assign additional roles and permissions to your admins for special projects by taking the
following steps.
Chapter 6: Groups
84
VMware AirWatch Mobile Device Management Guide | v.2017.10 | October 2017
Copyright © 2017 VMware, Inc. All rights reserved.

1. Navigate to Accounts > Administrators > AdminGroups and select Add. Complete the applicable settings.
Setting Description
External Type Select the external type of admin group you are adding.
lGroup – Refers to the group object class on which your admin group is based. Customize this
class by navigating to Groups &Settings > All Settings > System > Enterprise Integration >
Directory Services > Group.
lOrganizational Unit – Refers to the organizational unit object class on which your admin
group is based. Customize this by navigating to Groups &Settings > All Settings > System >
Enterprise Integration > Directory Services > Group.
lCustom Query – You can also create an admin group containing administrators you locate by
running a custom query. Selecting this external type replaces the Search Text function but
displays the Custom Query section.
Directory
Name
Read-only setting displaying the address of your directory services server.
Domain and
Group Base
DN
This information automatically populates based on the directory services server information you
enter on the Directory Services page (Accounts > User Groups > Settings > Directory Services).
Select the Fetch DN plus sign (+) next to the Group Base DN setting, which displays a list of Base
Domain Names from which you can select.
Search Text Enter the search criteria to identify the name of an admin group in your directory and select Search
to search for it. If a directory group contains your search text, a list of group names displays.
Also, you can apply default roles to the admin group you are creating. After a successful search is
run, select the Roles tab and then select the Add button to add a new role. Or edit an existing role
by changing the Organization Group and Role selection.
This setting is available only when Group or Organizational Unit is selected as the External Type.
Custom
Object Class
Identifies the object class under which your query runs. The default object class is 'person' but you
can supply a custom object class to identify your admins with greater success and accuracy.
This setting is available only when Custom Query is selected as External Type.
Custom Base
DN
Identifies the base distinguished name which serves as the starting point of your query. The
default is 'airwatch' and 'sso' but you can supply a custom base distinguished name if you want to
run the query from a different starting point.
This setting is available only when Custom Query is selected as External Type.
Group Name Select a Group Name from your Search Text results list. Selecting a group name automatically
alters the value in the Distinguished Name setting.
This setting is available only after you have completed a successful search with the SearchText
setting.
Distinguished
Name
Read-only setting that displays the full distinguished name of the admin group you are creating.
This setting is available only after you have completed a successful search with the SearchText
setting.
Chapter 6: Groups
85
VMware AirWatch Mobile Device Management Guide | v.2017.10 | October 2017
Copyright © 2017 VMware, Inc. All rights reserved.
Setting Description
Rank Read-only setting that displays the rank of the admin group once it is created. You can change an
admin group's rank by navigating to Groups &Settings > Groups > Admin Groups and moving its
relative position using the More action button to the right of the admin group listing.
Auto Sync This option enables the directory sync, which detects user membership from the directory server
and stores it in a temporary table. An administrator approves all changes to the console unless the
Auto Merge option is enabled.
Auto Merge Enable this option to apply sync changes automatically from the database without administrative
approval.
Maximum
Allowable
Changes
Use this setting to set a threshold for the number of automatic admin group sync changes that are
allowed to occur before approval must be given.
This option is available only when Auto Merge is enabled.
Add Group
Members
Automatically
Enable this option to add administrators automatically to the admin group.
Time Zone Enter the time zone associated with the admin group. This required setting impacts when the
scheduled, automated Active Directory sync runs.
Locale Select the localization setting (language) associated with the admin group. This setting is required.
Initial
Landing Page
Enter the initial landing page for administrators in the admin group. The default setting for this
required setting is the Device Dashboard but you can set it to any page of your choosing.
Custom Query
Query This setting displays the currently loaded query that runs when you select the Test Query button
and when you select the Continue button. Changes you make to the Custom Logic option or the
Custom Object Class setting are reflected here.
Custom Logic Add your custom query logic here, such as an admin name. For example, "cn=jsmith". You can
include as much or as little of the distinguished name as you like. The Test Query button allows
you to see if the syntax of your query results in a successful search before selecting the Continue
button.
For more information on Distinguished Name, search for Microsoft's TechNet article entitled "Object Naming"
at https://technet.microsoft.com.
2. Select Save.
View Assignments
As a convenience, you can confirm the profiles, apps, books, channels, and compliance policies that are included in (and
excluded from) the assigned group.
Chapter 6: Groups
86
VMware AirWatch Mobile Device Management Guide | v.2017.10 | October 2017
Copyright © 2017 VMware, Inc. All rights reserved.
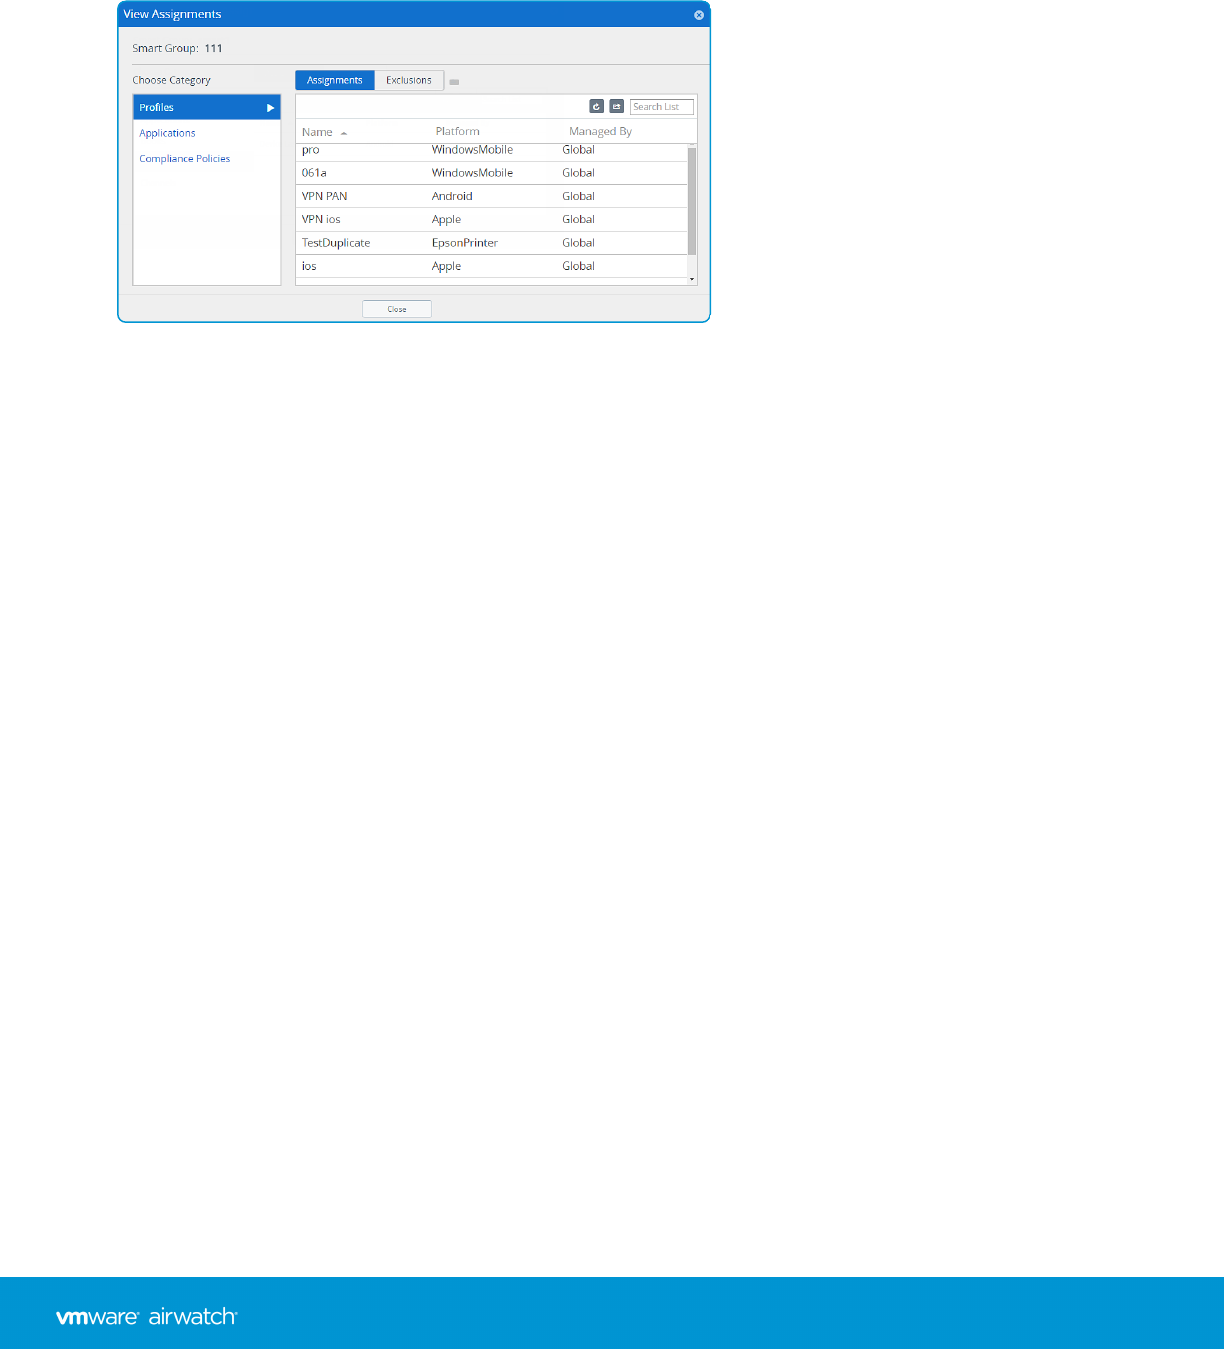
1. Navigate to the group listing in Groups & Settings > Groups > Assignment Groups and locate a group that has been
assigned to at least one entity.
2. In the Assignments column, select the hyperlinked number to open the View Assignments page. This page displays
only those categories that contain Assignments or Exclusions in the group.
Above the header row in the View Assignments screen, are three new tools to help you confirm the specific profile, app,
book, channel, and compliance policy.
Chapter 6: Groups
87
VMware AirWatch Mobile Device Management Guide | v.2017.10 | October 2017
Copyright © 2017 VMware, Inc. All rights reserved.

Chapter 7:
Device Enrollment
Device Enrollment Overview 89
Basic vs. Directory Services Enrollment 93
Bring Your Own Device (BYOD) Enrollment 96
Self-Enrollment vs Device Staging 99
Device Registration 103
Configure Enrollment Options 111
Blacklisting and Whitelisting Device Registration 115
Additional Enrollment Restrictions 116
AirWatch Autodiscovery Enrollment 120
88
VMware AirWatch Mobile Device Management Guide | v.2017.10 | October 2017
Copyright © 2017 VMware, Inc. All rights reserved.

Device Enrollment Overview
AirWatch provides multiple options for enrolling a device which is required before they can be managed.
This non-linear questionnaire outlines some of these combinations and serves as a guide to choosing an appropriate
enrollment path that best suits your organization's needs. It is not intended to be comprehensive or inclusive of every
enrollment option, rather to help you think about which options you may want to consider.
Chapter 7: Device Enrollment
89
VMware AirWatch Mobile Device Management Guide | v.2017.10 | October 2017
Copyright © 2017 VMware, Inc. All rights reserved.


Prerequisites to the Enrollment Process
The enrollment process may differ slightly depending on the device platform. You can find platform-specific instructions
for enrolling each type of a device in the applicable Platform Guides.
To enroll a device, you need the following information.
lEnrollment URL – This enrollment URL is AWAgent.com for all users, organizations, and devices enrolling into
AirWatch.
lUser Credentials – This user name and password confirm the identity of a user to allow log in, authentication, and
enrollment.
oCredentials may be the same as network directory services, for use in a directory-service based enrollment.
OR
oCredentials may be AirWatch-specific, for use in a basic user enrollment.
lGroup ID – The Group ID determines what Mobile Device Management (MDM) resources and features the end user
has access to upon enrollment. If necessary, provide end users with this Group ID.
Enrolling Devices at Global
The Global organization group (OG) is designed to house Customer and other types of OGs. Given the way inheritance
works, if you add devices to Global and configure Global with settings intended to affect those devices, you are also
affecting all the Customer OGs underneath. This undermines the benefits of multitenancy and inheritance.
For more information, see Reasons You Should Not Enroll Devices in Global on page 119.
Enroll a Device With AirWatch Agent
Enrolling a device with the AirWatch Agent is the main option for Android, iOS, and Windows devices.
1. Navigate to AWAgent.com from the native browser on the device that you are enrolling.
AirWatch auto-detects if the AirWatch Agent is already installed and redirects to the appropriate mobile app store to
download the Agent if needed.
Downloading the Agent from public application stores requires either an Apple ID or a Google Account.
2. Run the Agent upon the completion of the download or return to your browser session.
Important: To ensure a successful installation and running of the AirWatch Agent on your Android device, it must
have a minimum of 60 MB of space available. CPU and Run Time Memory are allocated per app on the Android
platform. If an app uses more than allocated, Android devices optimize themselves by killing the app.
3. Enter your email address. AirWatch checks if your address has been previously added to the environment. In which
case, you are already configured as an end user and your organization group is already assigned.
If AirWatch cannot identify you as an end user based on your email address, you are prompted to enter your
Environment URL,Group ID, and Credentials. If your environment URL and Group ID are needed, your AirWatch
Administrator can provide it.
4. Finalize the enrollment by following all remaining prompts.
Chapter 7: Device Enrollment
91
VMware AirWatch Mobile Device Management Guide | v.2017.10 | October 2017
Copyright © 2017 VMware, Inc. All rights reserved.

Additional Enrollment Workflows
In some unique cases, the enrollment process must be adjusted for specific organizations and deployments. For each of
the additional enrollment options, end users need the credentials detailed in the Required Information section of this
guide.
lNotification-Prompt Enrollment – The end user receives a notification (email and SMS) with the Enrollment URL, and
enters their Group ID and login credentials. When the end user accepts the Terms of Use (TOU), the device
automatically enrolls and outfits with all MDM features and content. This acceptance includes selected apps and
features from the AirWatch server.
lSingle-Click Enrollment – In this workflow, which applies to web-based enrollments, an administrator sends an
AirWatch-generated token to the user with an enrollment link URL. The user merely selects the provided link to
authenticate and enroll the device, making it the easiest and fastest enrollment process for the end user. This
method can also be secured by setting expiration times.
oWeb Enrollment – There is an optional welcome screen that an administrator can invoke for Web enrollments by
appending "/enroll/welcome" to the active environment. For example, by supplying the URL
https://<custenvironment>/enroll/welcome to users participating in Web Enrollment, they see a Welcome to
AirWatch screen. This screen includes options to enroll with an Email Address or Group ID. The Web Enrollment
option is applicable for AirWatch version 8.0 and above.
lDual-Factor Authentication – In this workflow, an administrator sends the same enrollment token generated by
AirWatch, but the user must also enter their login credentials. This method is just as easy to run as the Single-Click
Enrollment but adds one additional level of security. The additional security measure is requiring the user to enter
their unique credentials.
lEnd-User Registration – The user logs in to the Self-Service Portal (SSP) and registers their own device. Once
registration is complete, the system sends an email to the end user that includes the enrollment URL and login
credentials. This workflow assumes that administrators have not already performed device registration for a
corporate device fleet. It also assumes that you require corporate devices to be registered so administrators can
track enrollment status. Also, end-user registration means that corporate devices can be used together with user-
purchased devices.
lSingle-User Device Staging – The administrator enrolls devices on behalf of an end user. This method is useful for
administrators who set up multiple devices for an entire team or single members of a team. Such a method saves the
end users the time and effort of enrolling their own devices. The admin can also configure and enroll a device and
mail it directly to a user who is off-site.
lMulti-User Device Staging – The administrator enrolls devices that are used by multiple users. Each device is
enrolled and provisioned with a specific set of features that users access only after they log in with unique
credentials.
For more information, see the following topics.
Enable Registration Tokens and Create a Default Message on page 109.
End-User Device Registration on page 108.
Device Registration on page 103.
Stage a Single-User Device on page 102.
Stage a Multi-User Device on page 103.
Chapter 7: Device Enrollment
92
VMware AirWatch Mobile Device Management Guide | v.2017.10 | October 2017
Copyright © 2017 VMware, Inc. All rights reserved.

Basic vs. Directory Services Enrollment
If you have a directory services infrastructure such as Active Directory (AD), Lotus Domino, and Novell e-Directory, you
can apply existing users and groups in AirWatch.
If you do not have an existing directory services infrastructure or you choose not to integrate with it, you must perform
Basic Enrollment. Basic enrollment means manually creating AirWatch user accounts.
Note: While AirWatch supports a mix of both Basic and Directory-based users, you typically use one or the other for
the initial enrollment of users and devices.
Pros and Cons
Pros Cons
Basic Enrollment lCan be used for any deployment
method.
lRequires no technical integration.
lRequires no enterprise infrastructure.
lCredentials only exist in AirWatch and do not
necessarily match existing corporate
credentials.
lOffers no federated security.
lSingle sign on not supported.
lAirWatch stores all usernames and passwords.
Directory Service
Enrollment
lEnd users authenticate with existing
corporate credentials.
lCan automatically detect and sync
changes from the directory system into
AirWatch.
lSecure method of integrating with your
existing directory service.
lStandard integration practice.
lSaaS deployments using the VMware
Enterprise Systems Connector require
no firewall changes and offers a secure
configuration to other infrastructures,
such as Microsoft ADCS, SCEP, and
SMTP servers.
lRequires an existing directory service
infrastructure.
lSaaS deployments require additional
configuration due to the VMware Enterprise
Systems Connector being installed behind the
firewall or in a DMZ.
Enrollment Considerations, Basic v Directory
When considering end-user enrollment, in addition to the existing pros and cons of Basic vs Directory users, consider also
the following questions.
For the pros & cons of basic users vs directory users, see Basic vs. Directory Services Enrollment on page 93.
Chapter 7: Device Enrollment
93
VMware AirWatch Mobile Device Management Guide | v.2017.10 | October 2017
Copyright © 2017 VMware, Inc. All rights reserved.

Consideration #1: Who Can Enroll?
In answering this question, consider the following.
lIs the intent of your MDM deployment to manage devices for all of your organization's users at or below the base
DN you configured? If so, the easiest way to achieve this arrangement is to allow all users to enroll by ensuring the
Restrict Enrollment check boxes are deselected.
You can allow all users to enroll during the initial deployment rollout and then afterward, restrict the enrollment to
prevent unknown users from enrolling. As your organization adds new employees or members to existing user
groups, these changes are synced and merged.
lAre there certain users or groups who are not to be included in MDM? If so, you must either add users one at a time
or batch import a CSV (comma-separated value) file of only eligible users.
If you want to restrict certain users and groups, see Configure Enrollment Restriction Settings on page 116.
Consideration #2: Where Will Users Be Assigned?
Another consideration to make when integrating your AirWatch environment with directory services is how you assign
directory users to organization groups during an enrollment. In answering this question, consider the following.
lHave you created an organization group structure that logically maps to your directory service groups? You must
complete this task before you can edit user group assignments.
lIf your users are enrolling their own devices, the option to select a Group ID from a list is simple. Human error is a
factor in this simplicity and can lead to incorrect group assignments.
You can automatically select a Group ID based on a user group or allow users to select a Group ID from a list. These
Group ID Assignment Mode options are available by navigating to Devices > Device Settings > Devices & Users >
General > Enrollment and selecting the Grouping tab.
If you want to configure Group ID options, see Configure Enrollment Options on Grouping Tab on page 111.
Enabling Basic Enrollment
Basic Enrollment refers to the process of manually creating user accounts and user groups for each of your organization's
users. If your organization is not integrating AirWatch with a directory service, basic enrollment is how you create user
accounts.
If you have a very small number of basic accounts to create, then create them one at a time by visiting Create Basic User
Accounts on page 40.
For basic enrollments involving larger end-user numbers, you can save time by filling out and uploading CSV (comma-
separated values) template files. These files contain all user information through the batch import feature. For more
information, see Batch Import Users or Devices on page 47.
Would you like to start the device enrollment questionnaire over again? Visit Device Enrollment Overview on page 89.
Enabling Directory Service-Based Enrollment
Directory service enrollment refers to the process of integrating AirWatch with your organization's directory service
infrastructure. Integrating your directory service with AirWatch means you can import users automatically and,
optionally, user groups such as security groups and distribution lists.
When integrating with a directory service such as Active Directory (AD), you have options for how you import users.
Chapter 7: Device Enrollment
94
VMware AirWatch Mobile Device Management Guide | v.2017.10 | October 2017
Copyright © 2017 VMware, Inc. All rights reserved.
lAllow all directory users to enroll – You can allow all your directory service users to enroll. Also, you can set up your
environment to auto discover users based on their email. Then create an AirWatch user account for them when they
perform an enrollment.
lAdd users one by one – After integrating with a directory service, you can add users individually in the same manner
as creating basic AirWatch user accounts. The only difference is you must enter their user name and select Check
User to auto populate remaining information from your directory service.
lBatch upload a CSV file – Using this option, you can import a list of directory services accounts in a CSV (comma-
separated values) template file. This file has specific columns, some of which cannot be left blank.
lIntegrate with user groups (Optional) – With this method, you can use your existing user group memberships to
assign profiles, apps, compliance policies, and so on.
Note: For information about how to integrate your AirWatch environment with your directory service, refer to the
VMware AirWatch Directory Services Guide. If you are considering integrating AirWatch with a SAML provider, refer
to the VMware AirWatch SAML Integration Guide, both available on Accessing Other Documents on page 217.
Chapter 7: Device Enrollment
95
VMware AirWatch Mobile Device Management Guide | v.2017.10 | October 2017
Copyright © 2017 VMware, Inc. All rights reserved.

Bring Your Own Device (BYOD) Enrollment
A major challenge in managing users' personal devices is recognizing and distinguishing between employee-owned and
corporate-owned devices and then limiting enrollment to only approved devices.
AirWatch enables you to configure many options that customize the end-user experience of enrolling a personal device.
Before you begin, you must consider how you plan to identify employee-owned devices in your deployment and
whether to enforce enrollment restrictions for employee-owned devices.
Enrollment Considerations, BYOD
Assuming you are allowing employees to enroll their personal devices in your AirWatch environment, there are many
considerations you must make before you proceed.
Consideration #1: Will BYOD Users Enroll With VMware Workspace ONE, AirWatch Container App, or the AirWatch
Agent?
VMware Workspace ONE is a secure enterprise platform that delivers and manages any app on any device. It begins with
self-service, single-sign on access to cloud, mobile, and Windows apps and includes powerfully integrated email,
calendar, file, and collaboration tools.
With Workspace ONE, users do not need to enroll their personal devices to get access to services. The Workspace ONE
app itself may be downloaded from the Apple App Store, Google Play, or Microsoft Store and installed. A user then logs
in and gains access to applications based on the established policies. The Workspace ONE app configures an MDM
management profile during its installation that enrolls the device automatically.
AirWatch Container enables you to provide specific resources to segments of BYOD users. For example, some users may
only want access to corporate email, while others may only require access to a single enterprise app.
With AirWatch Container, your BYOD users can enroll in AirWatch and securely access business applications and
resources without receiving the same AirWatch profile corporate-owned devices receive.
AirWatch Container addresses privacy concerns users have about MDM by only giving administrators the ability to
control managed enterprise apps instead of the entire device.
Consideration #2: How Will You Specify Ownership Type?
Every device enrolled into AirWatch has an assigned device ownership type: Corporate Dedicated, Corporate Shared, or
Employee Owned. Employees' personal devices are categorized as an Employee Owned type and subject to the specific
privacy settings and restrictions you configure for that type.
In answering the question of specifying an ownership type, consider the following.
lDo you have access to a master list of corporate devices that you can bulk upload into the AirWatch Console? If so,
you may consider uploading this list and setting the default ownership type to Employee Owned.
lHave you considered the legal implications of allowing users to select an ownership type from a list? For example, if a
user enrolls a personal device but incorrectly selects corporate owned as the ownership type. What are the
ramifications when that user violates a policy and has their personal device fully wiped?
For your BYOD program, you can configure AirWatch to apply a default ownership type during enrollment or allow users
to choose the appropriate ownership type themselves.
Consideration #3: Will You Apply Additional Enrollment Restrictions for Employee-Owned Devices?
When answering this question, consider the following.
Chapter 7: Device Enrollment
96
VMware AirWatch Mobile Device Management Guide | v.2017.10 | October 2017
Copyright © 2017 VMware, Inc. All rights reserved.

lDoes your MDM deployment only support certain device platforms? If so, you can specify these platforms and only
allow devices running on them to enroll.
lAre you limiting the number of personal devices an employee is allowed to enroll? If so, you can specify the
maximum number of devices a user is allowed to enroll.
You can set up additional enrollment restrictions to further control who can enroll and which device types are allowed.
For example, you may choose to support only those Android devices that feature built-in enterprise management
functionality. After your organization evaluates and determines which kinds of employee-owned devices they want to
use in your work environment, you can configure these settings.
For more information, see Additional Enrollment Restrictions on page 116.
Identify Corporate Devices and Specify Default Device Ownership
Preparing a list of devices can be useful if you have a mix of corporate-owned devices and employee-owned devices
which employees enroll themselves.
As enrollment commences, devices you identified as Corporate-Owned have their ownership type configured
automatically based on what you selected. Then you can configure all employee-owned devices – which are not in the
list– to enroll with an ownership type as Employee-Owned.
The following procedure explains how to import a list of pre-approved corporate devices. You can apply the Corporate-
Owned ownership type after enrollment automatically, even if you have a restriction that automatically applies the
Employee-Owned ownership type.
Restrictions for an open enrollment, by contrast, explicitly allow or block the enrollment for devices matching parameters
you identify including platform, model, and operating system.
1. Navigate to Devices > Lifecycle > Enrollment Status and select Add, then Batch Import.
You can also select Whitelisted Devices to enter up to 30 whitelisted devices at a time by IMEI, UDID, or Serial
Number. You can also select either Corporate Owned or Corporate Shared as the Ownership Type.
2. Enter a Batch Name and Batch Description, then select Add Whitelisted Device as the Batch Type.
3. Select Choose File to upload a file or select the information icon to download a sample template. If saving a
template, proceed to fill out the necessary information.
4. Select Save.
Now, set the Default Device Ownership type to Employee Owned for all open enrollment.
1. Navigate to Devices > Devices Settings > Devices & Users > General > Enrollment and choose the Grouping tab.
2. Select Employee Owned as the Default Device Ownership.
3. Select the Default Role assigned to the user, which determines the level of access the user has to the Self-Service
Portal (SSP).
4. Select the Default Action for Inactive Users, which determines what to do if the user is marked as inactive.
5. Select Save.
Chapter 7: Device Enrollment
97
VMware AirWatch Mobile Device Management Guide | v.2017.10 | October 2017
Copyright © 2017 VMware, Inc. All rights reserved.

Prompt Users to Identify Ownership Type
If your deployment has organization groups with multiple ownership types, you can prompt users to identify their
ownership type during enrollment.
1. Navigate to Devices > Device Settings > Devices & Users > General > Enrollment and choose the Optional Prompt
tab.
2. Select Prompt for Device Ownership Type. During enrollment, users are prompted to select their ownership type.
3. Select Save.
Risks
While simple, this approach assumes that every user correctly selects the appropriate ownership type applicable to their
device.
If a personal device user chooses the Corporate-Owned type, their device is now subject to policies and profiles that
normally do not apply. This erroneous selection can have serious legal implications regarding user privacy.
While you can always update the ownership type later, it is safer and more secure to make a list of corporate devices.
Then enroll the corporate-owned devices separately and later, set the default ownership type to Employee Owned.
For more information, see VMware AirWatch BYOD Guide, available on Accessing Other Documents on page 217.
Chapter 7: Device Enrollment
98
VMware AirWatch Mobile Device Management Guide | v.2017.10 | October 2017
Copyright © 2017 VMware, Inc. All rights reserved.

Self-Enrollment vs Device Staging
AirWatch supports two methods for enrolling corporate devices. You can let users enroll their own devices or
administrators can enroll devices on users' behalf in a process called device staging.
In device staging, an administrator enrolls devices before assigning them and distributing them to end users. This
method is useful for administrators who must set up devices shared by multiple users across an organization.
Also, device staging works well for newly provisioned devices, since it happens before an employee receives the device. If
your end users already have corporate devices, then allowing them to self-enroll makes the most sense. Letting users
enroll their own devices is also beneficial when the total number of devices makes it impractical for administrators to
perform device staging.
Device staging can be performed for Android, Windows Phone, iOS, and macOS devices.
Note: Windows Phone currently only supports single user device staging.
Enrollment Considerations, Self-Enrollment
If you want to save time by allowing your end users to self enroll, consider the following questions.
Consideration #1: Device Ownership
lDo your end users already have assigned corporate devices? In this case, it may not be practical to collect each
device and have it staged and instead have users enroll themselves.
lAre your end users sharing devices or do they have their own dedicated devices? If end users are not sharing devices,
then you can make it the responsibility of that device's single owner to enroll themself.
Consideration #2: Auto discovery
Are you associating your organization's email domain with your AirWatch environment? This process, known as an auto
discovery, means that end users need only enter email address and credentials. The enrollment URL and Group ID are
automatically entered.
See also Configure Autodiscovery Enrollment From a Child Organization Group on page 121 and Configure Autodiscovery
Enrollment From a Parent Organization Group on page 120.
Self-Enrollment Process
Self-enrollment may require that end users know their appropriate Group ID and login credentials. If you have integrated
with directory services, these credentials are the same as the user's directoryservice credentials.
You can also associate your organization's email domain with your AirWatch environment in a process known as auto
discovery. With auto discovery enabled, devices of supported platforms prompt end users to enter their email address.
These devices automatically complete enrollment if their email domain (the text after @) matches – without the need to
enter a Group ID or enrollment URL.
Note: AirWatch Container users download the AirWatch Container app from the app store.
1. End users navigate to AWAgent.com, which automatically detects whether the AirWatch Agent is installed. If it is not,
the Website redirects to the appropriate mobile app store.
Chapter 7: Device Enrollment
99
VMware AirWatch Mobile Device Management Guide | v.2017.10 | October 2017
Copyright © 2017 VMware, Inc. All rights reserved.

2. After launching the Agent, users enter their credentials – in addition to either an email address or URL/Group ID –
and proceed with enrollment.
Enrollment Considerations, Device Staging
Administrators can enroll devices on behalf of users in a process called device staging. Staging devices serves to
streamline the process of registration and to enroll iOS devices shared by multiple users. You can also stage devices to
provision an entire device fleet quickly with Apple Configurator.
Consideration #1: Use of Device Staging
Unless you are using Apple Configurator, administrators must stage devices one-by-one. For large deployments, consider
the time and staffing this effort requires.
Whereas administrators can stage new devices easily, employees already using corporate-owned devices must ship
devices in or collect them on-site to have devices staged.
If you have thousands of devices to pre-enroll, device staging can take time. Therefore it works best when you have a
new batch of devices being provisioned, since you can gain access to the devices before employees receive them.
Device staging can be performed for Android, Windows Phone, and iOS devices in following ways.
lSingle User (Standard) – Used when you are staging a device which any user can enroll.
lSingle User (Advanced) – Used when you are staging and enrolling a device for a particular user.
lMulti User – Used when you are staging a device to be shared among multiple users.
Note: Windows Phone currently only supports single user device staging.
Consideration #2: Are You Participating in Apple's Device Enrollment Program?
To maximize the benefits of Apple devices enrolled in Mobile Device Management (MDM), Apple has introduced the
Device Enrollment Program (DEP). With DEP, you can perform the following.
lInstall a non-removable MDMprofile on a device, preventing end users from being able to delete it.
lProvision devices in Supervised mode (iOSonly). Devices in Supervised mode can access additional security and
configuration settings.
lEnforce an enrollment for all end users.
lMeet your organization's needs by customizing and streamline the enrollment process.
lPrevent iCloud back up by disabling users from signing in with their Apple ID when generating a DEPprofile.
lForce OS updates for all end users.
Consideration #3: Use of Apple Configurator
Apple Configurator enables IT administrators to deploy and manage Apple iOS devices effectively. Organizations such as
retail stores, classrooms, and hospitals find it especially useful to pre-enroll devices for multiple end users to share.
Using Configurator to enroll pre-registered devices meant for a single user is supported by adding serial number/IMEI
information to a user's registered device in the Console. A major benefit of Apple Configurator is that you can use a USB
hub or iOSdevice cart to provision multiple devices in minutes.
Chapter 7: Device Enrollment
100
VMware AirWatch Mobile Device Management Guide | v.2017.10 | October 2017
Copyright © 2017 VMware, Inc. All rights reserved.

For more information about Apple Configurator, refer to the VMware AirWatch Integration with an Apple Configurator
document, available on Accessing Other Documents on page 217.
Supervised Mode
Administrators have the option of enabling Supervised Mode for devices enrolled through Apple Configurator, which
enables additional enhanced security features. However, this mode does introduce several limitations on the device.
Benefits
Once a device is supervised and enrolled in AirWatch, the administrator has the following enhanced features available for
configuration when compared to normal devices.
lElevated Restrictions over MDM
oPrevent User from Removing Applications. Removing applications can also be restricted locally on the device
using restrictions under System Configuration.
oPrevent AirDrop.
oPrevent users from modifying iCloud and Mail account settings which prevents account modification.
oDisable iMessage.
oSet iBookstore Content rating restrictions.
oDisable Game Center and iBookstore.
lEnhanced Security
oPrevent end users from visiting websites with adult content in Safari.
oRestrict which devices can connect to specified AirPlay destinations, such as Apple TVs.
oPrevent the installation of certificates or unmanaged configuration profiles.
oForce all device network traffic through a global HTTP proxy.
lKiosk Mode
oLock down devices to one app with single app mode and disable the home button.
lCustomize Wallpaper and Text on Device
lEnable or Clear ActivationLock
Limitations
lUSB Access to supervised devices is restricted to the supervising Mac.
lCannot copy data to and from the supervised device using iTunes unless the Apple Configurator supervision identity
certificate is installed on the device.
oMedia such as photos and videos cannot be copied from the device to a PC or Mac. To transfer this type of data,
use the VMware Content Locker to sync the content with the user’s Personal Documents section. Alternatively, a
file sharing application can be used to transfer the data over WLAN/WWAN to a server.
Chapter 7: Device Enrollment
101
VMware AirWatch Mobile Device Management Guide | v.2017.10 | October 2017
Copyright © 2017 VMware, Inc. All rights reserved.

lSupervised mode prevents access to device-side logs using the iPhone Configuration Utility (IPCU).
oThis mode makes it harder to troubleshoot any application or device issues. The reason for this difficulty is the
logs from the device can only be obtained if the device is connected to the supervising Mac. To remediate some
of the challenges, use the AirWatch SDK to send logs and logistics from the applications to the AirWatch Console.
lDevices cannot be reset with factory settings easily.
oOnce a device is factory reset, it must be brought back to the supervising Mac to restore it back to supervised
mode. This procedure may be problematic if the Mac is not near the device.
In deciding whether or not to enable Supervised Mode, consider the following. While it enables additional features that
enhance security on the device, the USB limitations must be considered.
The proximity of the device to the supervising Mac plays an important role in the decisions. Since the USB limitation
prevents access to device-side logs, a device experiencing issues must be shipped back to a depot and restaged to restore
functionality.
Deciding on supervision in advance is important because the process to supervise or “unsupervise” requires the shipping
of the device to an IT location or depot.
Stage a Single-User Device
Single-User Device Staging on the AirWatch Admin Console allows a single administrator to outfit devices for other users
on their behalf, which can be particularly useful for IT administrators provisioning a fleet of devices.
1. Navigate to Accounts > Users > List View and select Edit for the user account for which you want to enable device
staging.
2. In the Add / Edit User page, select the Advanced tab.
a. Scroll down to the Staging section.
b. Select Enable Device Staging.
c. Select the staging settings that will apply to this staging user.
3. Single User Devices stages devices for a single user. Toggle the type of single user device staging mode to either
Standard or Advanced. Standard staging requires an end user to enter login information after staging, while
Advanced means the staging user can enroll the device on behalf of another user.
4. Ensure Multi User Devices is set to Disabled.
5. Enroll the device using one of the two following methods.
lEnroll using the AirWatch Agent by entering a server URLand Group ID.
lOpen the device's Internet browser, navigate to the enrollment URL, and enter the proper Group ID.
6. Enter your staging user's credentials during enrollment. If necessary, specify that you are staging for Single User
Devices. You will only have to do this if multi-user device staging is also enabled for the staging user.
7. Complete enrollment for either Advanced or Standard staging.
lIf you are performing Advanced staging, you are prompted to enter the username of the end-user device owner
who is going to use the device. Proceed with enrollment by installing the Mobile Device Management
Chapter 7: Device Enrollment
102
VMware AirWatch Mobile Device Management Guide | v.2017.10 | October 2017
Copyright © 2017 VMware, Inc. All rights reserved.

(MDM)profile and accepting all prompts and messages.
lIf you are performing Standard staging, then when the end user completes the enrollment, they will be
prompted to enter their own credentials in the login window.
The device is now staged and ready for use by the new user.
Stage a Multi-User Device
Multi-user device/shared device staging allows an ITadministrator to provision devices intended to be used by more
than one user. Multi-User staging allows the device to dynamically change its assigned user as the different network
users log into that device.
1. Navigate to Accounts > Users > List View and select Edit for the user account for which you want to enable device
staging.
2. In the Add / Edit User page, select the Advanced tab.
a. Scroll down to the Staging section.
b. Select Enable Device Staging.
c. Select the staging settings that will apply to this staging user.
3. Single User Devices stages devices for a single user. Toggle the type of single user device staging mode to either
Standard or Advanced. Standard staging requires an end user to enter login information after staging, while
Advanced means the staging user can enroll the device on behalf of another user.
4. Ensure Multi User Devices is set to Enabled.
5. Enroll the device using one of the two following methods.
lEnroll using the AirWatch Agent by entering a server URLand Group ID.
lOpen the device's Internet browser, navigate to the enrollment URL, and enter the proper Group ID.
6. Enter your staging user's credentials during enrollment. If necessary, specify that you are staging for Single User
Devices. You will only have to do this if multi-user device staging is also enabled for the staging user.
7. Complete enrollment for either Advanced or Standard staging.
lIf you are performing Advanced staging, you are prompted to enter the username of the end-user device owner
who is going to use the device. Proceed with enrollment by installing the Mobile Device Management
(MDM)profile and accepting all prompts and messages.
lIf you are performing Standard staging, then when the end user completes the enrollment, they will be
prompted to enter their own credentials in the login window.
The device is now staged and ready for use by the new users.
Device Registration
Registering corporate devices before they are enrolled is optional and the main benefit of this option is to restrict the
enrollment to registered devices only.
Chapter 7: Device Enrollment
103
VMware AirWatch Mobile Device Management Guide | v.2017.10 | October 2017
Copyright © 2017 VMware, Inc. All rights reserved.
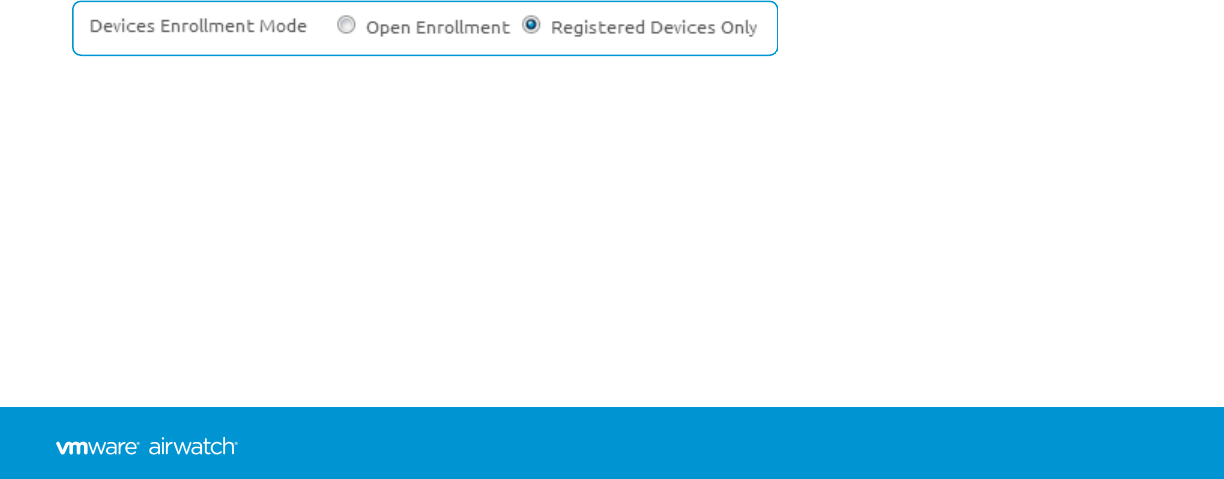
Another benefit is tracking enrollment statuses, which let you know which of your users have enrolled and which have
yet to enroll. You can then notify those users who have not yet enrolled.
AirWatch can successfully register devices even when device identifiers are missing during the data entry phase, by users
or administrators.
Enrollment Considerations, Registration
If you want to proceed with registering devices prior to enrollment, you should consider the following options.
Consideration: Who Will Register Devices?
An important consideration when registering devices is deciding who will perform the actual device registration.
lWhat is the total number of devices in your deployment? In particularly large deployments of thousands of devices,
you may want to add this information to a CSV (comma-separated values) file to be uploaded before devices are
provisioned or pass on the act of device registration onto the end user.
lDo you support a BYOD program where employees can use their personal devices? If you choose to restrict
enrollment to only registered devices, you will need to give employees instructions on how to register their devices.
End-User Device Registration through the SSP
You may choose to have end users register their own devices before enrolling into AirWatch if you are supporting BYOD
in your deployment and yet still require devices to be registered before they can enroll. You can also require users with
corporate owned devices to register their devices if you want to track enrollment or utilize registration tokens. In either
case, you will need to notify your end users of the process they will need to follow.
The following instructions assume the end user has AirWatch credentials, either from their existing directory service
credentials or from a previously-activated AirWatch User Account. If you opted for enrollment with directory services
without manually adding users, you will not have any user accounts already created.
In this case, if you want end users to register devices, you will need to send an email or intranet notification to each user
group outside of AirWatch with the registration instructions.
If you enabled registration tokens for enrollment authentication, they will be sent to the user using the selected message
type at this time.
Restricting Enrollment to Registered Devices Only
At this point, regardless of whether administrators or end users have registered devices, you can restrict enrollment to
only registered devices. To do this, navigate to Devices > Device Settings > Devices & Users > General > Enrollment and
select Registered Devices Only.
Tracking Enrollment Status
Once devices are registered, you can track enrollment statuses by navigating to the Device Dashboard page and selecting
the Enrollment chart, which lets you filter based on enrollment status. You can also access the Hub, which lists devices
recently enrolled.
lRegister Individual Devices – Enter important device and asset information such as friendly name for easy
recognition in the AirWatch Console, model, operating system, serial number, Unique Device Identifier (UDID), and
asset number. This process may also be the final step when adding a single user by selecting Save and Add Device
rather than Save.
Chapter 7: Device Enrollment
104
VMware AirWatch Mobile Device Management Guide | v.2017.10 | October 2017
Copyright © 2017 VMware, Inc. All rights reserved.

lRegister Multiple Devices – Similar to adding users in bulk, this process streamlines the device registration process
when adding multiple devices at a time. It may be included with the Bulk User Account Creation process.
lEnd User Device Registration – You may choose to have end users register their own devices before enrolling into
AirWatch if you are supporting BYOD in your deployment and yet still require devices to be registered before they
can enroll.
For more information, see Enable Registration Tokens and Create a Default Message on page 109.
Register an Individual Device
To register an individual device, which is an option that allows you to restrict and track enrollments, follow one of three
navigation paths. Then proceed to the Add Device page, completing the settings detailed in this topic.
1. Navigate to Accounts > Users > List View and select a single user receiving a newly registered device. Next, select the
Add Device button, which is displayed above the header in the listing.
OR
2. Complete the New User Account Creation process (either Basic or Directory) and select Save and Add Device at the
last step. This step opens the Add Device page.
OR
3. Navigate to Devices > Lifecycle > Enrollment Status and select Add, then select Register Device. The Add Device
page displays with instructions on adding a device.
In the Add Device page, complete the following options according to your needs.
Complete the User tab.
Setting Description
User Section
Search Text Search for a user by entering a search parameter and select the Search User button.
Device Section
Expected Friendly Name Enter the Friendly Name of the device. This text box accepts Lookup Values which you can
insert by selecting the plus sign.
Organization Group Select the Organization Group to which the device belongs.
Ownership Select the ownership level of the device.
Platform Select the platform of the device.
Show advanced device
information options
Display advanced device information settings.
Model Select the device model. This drop-down menu option depends upon the Platform
selection.
OS Select the device operating system. This drop-down menu option depends upon the
Platform selection.
UDID* Enter the device unique device identifier.
Serial Number* § ‡ Enter the serial number of the device.
Chapter 7: Device Enrollment
105
VMware AirWatch Mobile Device Management Guide | v.2017.10 | October 2017
Copyright © 2017 VMware, Inc. All rights reserved.
Setting Description
IMEI* § Enter the device international mobile station equipment identity number.
SIM* Enter the subscriber identity module for the device.
Asset Number* Enter the device asset number
Messaging Section
Message Type The type of notification sent to the user once the device is added. Choose from None,
Email, or SMS.
The Email option requires a valid email address. You must also choose an Email Message
Template.
The SMS option requires a phone number including country code and area code. SMS
charges may apply. You must also choose an SMSMessage Template.
Email Address Required for the Email Message Type.
Email Message Template Required for the EmailMessage Type. Choose a template from the drop-down menu. View
the Email message with the Message Preview button.
Phone Number Required for the SMS Message Type.
SMSMessage Template Required for the SMSMessage Type. Choose a template from the drop-down listing. View
the SMS message with the Message Preview button.
* Among these denoted settings, at least one is required to register a device.
§ To register a Windows Phone device, you must enter either the IMEI or serial number of the device.
‡ To register a Windows Desktop device, you must enter the serial number of the device.
Complete the Custom Attributes tab (optional).
Setting Description
Add Add a custom Attribute and its corresponding Value by selecting this button.
For more information, see the VMware AirWatch Product Provisioning and Staging
Guide, available on Accessing Other Documents on page 217.
Attributes Select the custom attribute from the drop-down menu.
Value Select the value of the custom attribute from the drop-down menu.
Complete the Tags tab (optional).
Setting Description
Add Add a Tag to the device.
Tag Select the Tag from the drop-down menu of existing Tags.
Select Save to complete the device registration process.
Chapter 7: Device Enrollment
106
VMware AirWatch Mobile Device Management Guide | v.2017.10 | October 2017
Copyright © 2017 VMware, Inc. All rights reserved.

Missing Device Identifiers During Registration
If no device identifier is specified during registration (such as UDID, IMEI, and Serial Number), AirWatch uses these
attributes to automatically match an enrolled device to its registration record, in the following ranking. This allows
AirWatch to successfully register devices for which inadequate information has been provided.
1. User to whom the device is registered
2. Platform (if specified)
3. Model (if specified)
4. Ownership type (if specified)
5. Date of the oldest-matching registration record
Register Multiple Devices
Registering devices before they are enrolled is optional and allows you to restrict an enrollment to registered devices
only. Another benefit is tracking enrollment statuses.
You can register multiple devices using a batch import feature which saves time.
To register multiple devices:
1. Navigate to Accounts > Users > List View or Devices > Lifecycle > Enrollment Status.
a. Select Add and then Batch Import to open the Batch Import form.
2. Complete each of the required fields. Batch Name,Batch Description, and Batch Type.
3. Select the information icon ( ) located next to the Batch File (CSV) field to access the User and Device Import help
page featuring .csv templates and a description of each.
4. Select the appropriate Download Template and Example for this Batch Type and save the comma-separated values
(CSV) file to somewhere accessible.
5. Locate the saved CSV file, open it, and enter all the relevant information for each of the devices that you want to
import. The template is pre-populated with three sample entries demonstrating the type of information intended to
be placed in each column.
Important:Enter all data containing only numerical values in double quotation marks (for example,"123456") to
avoid having the values truncated. Truncated data in the CSV file may result in devices being blacklisted by
VMware AirWatch MDM.
lTo register a device, make sure that column X (User Only Registration) is set to No.
lTo register an additional device to the same user account, make sure that all information in columns A through
Wis the same. The remaining columns are used to register each additional device.
lTo store advanced registration info, make sure that column AF (Store Advanced Device Info) is set to Yes.
6. Save the completed template as a CSV file. In the AirWatch Console, select Choose File from the Batch Import form,
Chapter 7: Device Enrollment
107
VMware AirWatch Mobile Device Management Guide | v.2017.10 | October 2017
Copyright © 2017 VMware, Inc. All rights reserved.

navigate to the path where you saved the completed CSV file and select it.
7. Select Save to complete registration for all listed users and corresponding devices.
End-User Device Registration
Directing end users to register their own devices may be preferable if you are unsure of the device details during setup.
Alternately, if you have a bring-your-own-device (BYOD) deployment in effect, such a directive may be prudent.
If you are supporting BYOD in your deployment, then direct end users to register their own devices before enrolling into
AirWatch. You can take this step and still require devices to be registered before users enroll. If you want to track
enrollment or use registration tokens, then require users with corporate owned devices to register. In either case, you
must notify your end users of the process.
The following instructions assume that the end user has AirWatch credentials, either from their existing directory service
credentials or from a previously activated AirWatch User Account. If you opted to enroll with directory services without
manually adding users, you must not have any user accounts already created.
If you want end users to register devices, you must send an email or notification to each user group outside of AirWatch
with registration instructions.
If you enabled registration tokens for enrollment authentication, the token is sent to the user in the selected message.
lSend an email or intranet notification to users outside of AirWatch with the registration instructions. Ensure that
enrollment authentication is enabled for Active Directory or Authentication Proxy by navigating to Devices > Device
Settings > Devices & Users > General > Enrollment > Authentication.
Verify that the setting Deny Unknown Users is deselected by navigating to Devices > Device Settings > Devices
&Users > General > Enrollment > Restrictions.
lCreate user accounts that allow all end users to register their devices, and then send user account activation
messages to each user containing the registration instructions.
Both options require you to provide basic information to end users.
lWhere to Register – End users can register by navigating to the Self-Service Portal URL. This URL follows the structure
of https://<AirWatchEnvironment>/MyDevice where <AirWatchEnvironment> is the enrollment URL. For more
information, see Direct Users to Self-Register on page 108.
lHow to Authenticate into the Self-Service Portal – End users need the Group ID, user name, and password to log in
to the Self-Service Portal (SSP).
Direct Users to Self-Register
Once the end user receives the registration message, they can follow these steps to register their own devices to save
time.
1. Navigate to the Self-Service Portal (SSP) URL: https://<AirWatchEnvironment>/MyDevice, where
<AirWatchEnvironment>is the enrollment URL for your environment.
2. Log in by entering the Group ID and credentials (either an email address or user name and password). These
credentials can match the directory service credentials for directory users.
3. Select Add Device to open the Register Device form.
Chapter 7: Device Enrollment
108
VMware AirWatch Mobile Device Management Guide | v.2017.10 | October 2017
Copyright © 2017 VMware, Inc. All rights reserved.
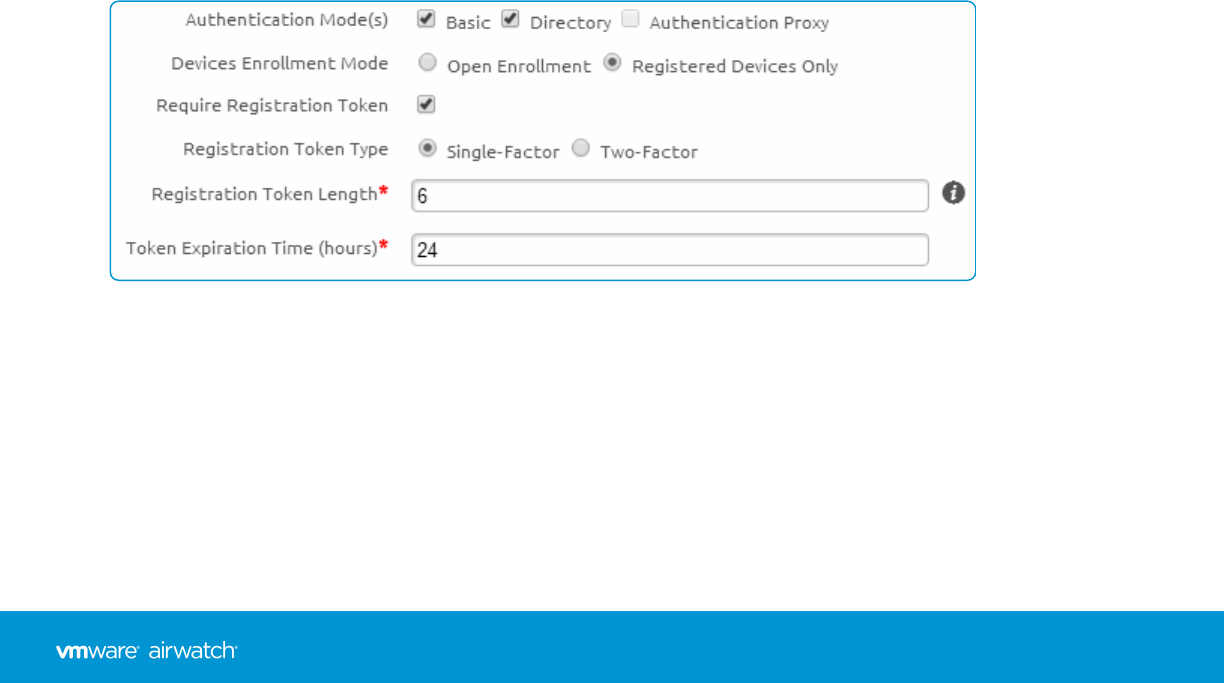
4. Enter the device information by completing the required text boxes in the Register Device form.
5. Select Save to submit and register the device.
Tracking Device Enrollment Status
Occasionally, you may need to troubleshoot device registration, or track the stage of the overall enrollment process. End
users may accidentally delete the message containing registration instructions, or they might not redeem an
authentication within the allotted expiration time.
Manage enrollment status by accessing the Enrollment Status page at Devices > Lifecycle > Enrollment Status. Track the
enrollment status of devices by sorting the Enrollment Status column in the listing or by filtering the list view by
Enrollment Status.
Using the Enrollment Status page, you can produce a list of registered (but unenrolled) devices, select all devices in this
list, and resend the enrollment instructions. If enough time elapses and a device fails to enroll, you may choose to reset
(or even revoke) their registration token.
For more information, see Enrollment Status on page 192.
Enable Registration Tokens and Create a Default Message
If you restrict an enrollment to registered devices only, you also have the option of requiring a registration token. This
option increases security by confirming that a particular user is authorized to enroll. You can send an email or SMS
message with the enrollment token attached to users with AirWatch accounts.
1. Enable a token-based enrollment by selecting the appropriate organization group. Navigate to Devices > Device
Settings > Devices & Users > General > Enrollment and ensure that the Authentication tab is selected.
Scroll down past the Getting Started section and select Registered Devices Only as the Devices Enrollment Mode. A
check box labeled Require Registration Token appears. Enabling this option restricts enrollment to only token-
registered devices.
2. Select a Registration Token Type.
lSingle-Factor – The token is all that is required to enroll.
lTwo-Factor – A token and login with user credentials are required to enroll.
3. Set the Registration Token Length. This required setting denotes how complex the Registration Token is and must
contain a value between 6–20 alphanumeric characters in length.
Chapter 7: Device Enrollment
109
VMware AirWatch Mobile Device Management Guide | v.2017.10 | October 2017
Copyright © 2017 VMware, Inc. All rights reserved.
4. Set the Token Expiration Time (in hours). This required setting is the amount of time an end user has to select a link
and enroll. Once it expires, you must send another link.
Generate a Token with the AirWatch Console
1. Navigate to Accounts > Users > List View and select Edit User for a user. (This process also works with creating
users.) The Add / Edit User page displays.
2. Scroll down and select a Message Type: Email for directory users and SMS for basic user accounts.
3. Select a Message Template. You can use the default template or create a template by selecting the link underneath
that opens the Message Template page in a new tab. Once a Message Template has been chosen, select Save and
Add Device. The Add Device screen displays.
4. Review General information about the device and confirming information about the Message itself. Once finished,
select Save to send the token to the user using the selected message type.
Note: The token is not accessible through the AirWatch Console for security.
Generate a Token with the Self-Service Portal (SSP)
1. Log in to the Self-Service Portal. If you are using single sign-on or smartcards for authentication, you can log in from a
device or a computer. Directory users can log in using their directory service credentials.
2. Select Add Device.
3. Enter the device information (friendly name and platform) and any other details by completing the settings in the
Register Device form. Ensure that the email address and phone number are present and accurate as they may not
automatically populate.
4. Select Save to send the enrollment token to the user using the selected message type.
Note: The token is not shown on this page and only appears in the message that is sent.
Perform Enrollment with a Registration Token
1. Open the SMS or email message on the device and select the link that contains the enrollment token.
If an enrollment page prompts for a Group ID or token, enter the token directly.
2. Enter a user name or password if two-factor authentication is used.
3. Continue with your enrollment as usual. Once complete, the device is associated with the user for which the token
was created.
Once the MDM profile is installed on the device, the token is considered "used" and cannot be used to enroll other
devices. If the enrollment was not completed, the token can still be used on another device. If the token expires based on
the time limit you entered, you must generate another enrollment token.
Chapter 7: Device Enrollment
110
VMware AirWatch Mobile Device Management Guide | v.2017.10 | October 2017
Copyright © 2017 VMware, Inc. All rights reserved.

Configure Enrollment Options
Customize your enrollment workflow by incorporating advanced options available in the AirWatch Console. Access more
enrollment options by navigating to Devices > Device Settings > Devices & Users > General > Enrollment.
In addition to the Authentication and Terms of Use tabs, you may optionally complete the following enrollment tabs.
1. Configure Enrollment Options on Grouping Tab on page 111.
2. Configure Enrollment Restriction Settings on page 116.
3. Configure Enrollment Options on Optional Prompt Tab on page 111.
4. Configure Enrollment Options on Customization Tab on page 114.
Configure Enrollment Options on Grouping Tab
The Grouping tab allows you to view and specify basic information regarding organization groups and Group IDs for end
users. Enable Group ID Assignment Mode to choose how the AirWatch Mobile Device Management (MDM)
environment assigns Group IDs to users.
The Grouping tab can be found by navigating to Devices > Device Settings > Devices & Users > General > Enrollment.
Setting Description
Group
IDAssignment
Mode
lDefault – Select this option if users are provided with Group IDs for enrollment. The Group ID used
determines what organization group the user is assigned to.
lPrompt User to Select Group ID – Enable this option to allow directory service users to select a
Group ID from a list upon enrollment. The Group ID Assignment section lists available
organization groups and their associated Group IDs. This listing does not require you to perform
group assignment mapping, but does mean users have the potential to select an incorrect Group
ID.
lAutomatically Select Based on User Group – This option only applies if you are integrating with
user groups. Enable this option to ensure that users are automatically assigned to organization
groups based on their directory service group assignments. The Group Assignment Settings
section lists all the organization groups for the environment and their associated directory service
user groups. Select Edit Assignment to modify the organization group/user group associations
and set the rank of precedence each group has.
For example, you have three groups, Executive, Sales, and Global, which are ranked in order of job
role. Everyone is a member of Global, so if you were to rank that user group first, it puts all your
users into a single organization group. By ranking Executives first instead, you ensure the few
number of people belonging to that group are placed in their own organization group. By ranking
Sales second, you ensure that all Sales employees are placed in an organization group specific to
sales. Ranking Global third means anyone not already assigned to a group is placed in a separate
organization group.
Configure Enrollment Options on Optional Prompt Tab
On the Optional Prompt tab, you may decide to request extra device information, or present optional messages
regarding enrollment and MDM information to the user.
Chapter 7: Device Enrollment
111
VMware AirWatch Mobile Device Management Guide | v.2017.10 | October 2017
Copyright © 2017 VMware, Inc. All rights reserved.
The Optional Prompt tab can be found by navigating to Devices > Device Settings > Devices & Users > General >
Enrollment.
Setting Description
Prompt for
Device
Ownership Type
You can prompt the end user to select their device ownership type. Otherwise, configure a default
device ownership type for the current organization group.
Display Welcome
Message
You can display a welcome message for your users early in the device enrollment process. You may
configure both the header and the body of this welcome message by navigating to System >
Localization > Localization Editor. Next, select the labels 'EnrollmentWelcomeMessageHeader'
and 'EnrollmentWelcomeMessageBody' respectively.
Display
MDMInstallation
Message
You can display a message for your users during the device enrollment process. You can configure
both the header and the body of this MDMinstallation message by navigating to System >
Localization > Localization Editor. Next, select the labels
'EnrollmentMdmInstallationMessageHeader' and 'EnrollmentMdmInstallationMessageBody'
respectively.
If you choose to customize your own header and body messages using the Localization Editor, you
must opt to 'Override' in the Current Setting option. Doing so ensures that your customizations
are used instead of the default messages.
Enable
Enrollment Email
Prompt
You can prompt the user to enter their email credentials during enrollment.
Note: The Enrollment Email Prompt requests the email address from the end user to populate
that option in the user record automatically. This data is beneficial to organizations deploying
email to devices using the {EmailAddress} lookup value.
Enable Device
Asset Number
Prompt
You can prompt the user to enter the device asset number during enrollment.
Display
Enrollment
Transition
Messages
(Android Only)
You can display or hide enrollment messages on Android devices.
Enable TLS
Mutual Auth for
Windows
You can force Windows Phone and Windows Devices to use endpoints secured by TLS Mutual
Authentication which requires an extra setup and configuration. Contact AirWatch Support for
assistance.
Create a Custom Enrollment Message
You can customize messages related to a device enrollment and any future Mobile Device Management (MDM) prompts
sent to a device.
While strictly optional, customized messages are often preferred over the default messages. It also reduces confusion
among your users because they show a specific organization name in push notifications rather than an environment URL
or simply "AirWatch."
Chapter 7: Device Enrollment
112
VMware AirWatch Mobile Device Management Guide | v.2017.10 | October 2017
Copyright © 2017 VMware, Inc. All rights reserved.

1. Navigate to Devices > Device Settings > General > Enrollment and select the Customization tab.
2. Select Use specific Message Template for each Platform and select a device activation message template from the
drop-down for each platform. See Create Enrollment Message Templates on page 113.
3. For iOS devices, optionally configure the following:
lEnter a post-enrollment landing URL for iOS devices.
lEnter an MDM Profile message for iOS devices, which is the message displayed in the install prompt for the
MDM profile upon enrollment.
4. Select Save.
Create Enrollment Message Templates
You can create your own library of message templates customized by platform to cover the variety of enrollment
scenarios you may encounter.
1. Navigate to Devices > Device Settings > General > Message Templates and select Add.
2. Set the Category drop-down menu to match the category of your template. Options include Administrator,
Application,Compliance,Content,Device Lifecycle,Enrollment, and Terms of Use.
3. Set the Type that best corresponds to the subcategory. The Type drop-down menu's options depend upon the
Category setting.
4. Set the Select Language drop-down menu. You may add languages by selecting the Add button.
5. Select the Default check box if you want the template to be the default template for the chosen Category.
6. Choose the Message Type for the template. The options are Email,SMS, and Push notification.
7. Compose your message by entering text to the Message Body text box.
You have two methods with which to compose the Email message template: Plain Text and HTML.
The Plain Text option features only a monospaced serif font (Courier) with no formatting options.
The HTML option enables a Rich Text editing environment including fonts, formatting, heading levels, bullets,
indentation, paragraph justification, subscript, superscript, image, and hyperlink capability. The HTML environment
supports basic HTML coding using the Show Source button which you can use to toggle between the Rich Text and
source views.
8. Save your template by selecting the Save button.
Configure Lifecycle Notifications
Lifecycle Notifications enable you to deliver customized messages after specific events during the lifecycle of a device,
including enrollment and unenrollment.
This optional setting can be configured by navigating to Devices > Lifecycle > Settings > Notifications and entering the
following fields for the following sections.
lDevice Enrolled Successfully – Send an email notification when a device enrolls successfully.
lDevice Unenrolled – Send an email notification when a device unenrolls.
Chapter 7: Device Enrollment
113
VMware AirWatch Mobile Device Management Guide | v.2017.10 | October 2017
Copyright © 2017 VMware, Inc. All rights reserved.

lDevice Blocked by Enrollment Restriction – Send an email notification if a device is blocked by an enrollment
restriction, which can be configured by navigating to Groups &Settings > All Settings > Devices &Users > General
> Enrollment and choosing the Restrictions tab.
Setting Description
Send
Email
To
lNone – Send no confirmation email upon a successful device block, enrollment, or unenrollment.
lUser – Send a confirmation email to the device user informing them of the successful device block,
enrollment, or unenrollment.
oCC – Send the same confirmation email to a single email address or multiple, comma-separated email
addresses.
oMessage Template – Select the desired message template from the drop-down listing. You have the
option of adding a new message template or editing an existing template by selecting the "Click
here..." hyperlink that takes you to the Devices &Users > General > Message Templates settings
page.
lAdministrator – Send a confirmation email to the AirWatch Administrator informing them of the
successful device block, enrollment, or unenrollment.
oTo – Send the same confirmation email to a single email address or multiple, comma-separated email
addresses.
Configure Enrollment Options on Customization Tab
You can provide an extra level of end-user support, including email and phone number, by configuring the
Customization tab. Such a support level is valuable when users are unable to enroll their device for any reason.
The Customization tab can be found by navigating to Devices > Device Settings > Devices & Users > General >
Enrollment.
Setting Description
Use specific
Message Template
for each Platform
If enabled, you can choose a unique message template for each platform.
The provided link displays the Message Template page, allowing you to begin creating templates
immediately.
Enrollment
Support Email
Enter the support email address.
Enrollment
Support Phone
Enter the support phone number.
Post-Enrollment
Landing URL
(iOSonly)
You can provide a post-enrollment landing URL that the end user is brought to upon a successful
enrollment. This URL may be a company resource, such as a company website or login screen
leading to more resources.
MDMProfile
Message (iOS
only)
For iOSdevices only, this text box is for a message that appears during enrollment. You can
specify a message with a maximum of 255 characters.
Chapter 7: Device Enrollment
114
VMware AirWatch Mobile Device Management Guide | v.2017.10 | October 2017
Copyright © 2017 VMware, Inc. All rights reserved.
Setting Description
Use Custom
MDMApplications
Displays a link which opens the App Groups Listing page. This link is labeled Application Groups.
For information about the App Groups List View, see the VMware AirWatch Mobile Application
Management Guide, available on Accessing Other Documents on page 217.
Blacklisting and Whitelisting Device Registration
A blacklist is an explicit listing of devices or apps that are not allowed. A whitelist is an explicit listing of devices or apps
that are only allowed. This concept can be applied to registration to enable you to control which devices are allowed to
enroll and which devices are not permitted to enroll.
For example, in a deployment of only corporate-owned devices, you can create a whitelist of approved iOS devices. You
can base this list of devices by International Mobile Equipment Identity (IMEI), Serial Number, or Unique Device Identifier
(UDID). This way, enrollment is restricted to only those devices you have identified and enrollment by employee personal
devices can be prohibited.
In addition, if a device is lost or stolen, you can add its IMEI, Serial Number, or UDID information to a list of blacklisted
devices. Blacklisting a device unenrolls the device, removes all MDM profiles, and prevents enrollment until you remove
the blacklist.
Note: You cannot blacklist Windows Phone devices by IMEI or UDID, as this functionality is currently not supported
by Microsoft.
Add a Blacklisted or Whitelisted Device
You can add a blacklisted (device restricted from enrollment) or whitelisted (device cleared for enrollment) based on
various device attributes.
1. Navigate to Devices > Lifecycle > Enrollment Status and select Add.
2. Choose either Blacklisted Devices or Whitelisted Devices from the Add drop-down list and complete the applicable
fields.
Setting Description
Blacklisted/Whitelisted
Devices
Enter the list of whitelisted or blacklisted devices (by the Device Attribute selection),
up to 30 at a time.
Device Attribute Select the corresponding device attribute type. Choose IMEI, Serial Number, or UDID.
OrganizationGroup Confirm to which Organization Group the devices are blacklisted or whitelisted.
Ownership You can allow devices only with the chosen ownership type.
This field is only available while Whitelisting devices.
Additional Information Allows you to choose a platform to apply your whitelist or blacklist.
Platform You can blacklist or whitelist all devices belonging to an entire platform.
This field is only available when the Additional Information checkbox is enabled.
3. Select Save to confirm the settings.
Chapter 7: Device Enrollment
115
VMware AirWatch Mobile Device Management Guide | v.2017.10 | October 2017
Copyright © 2017 VMware, Inc. All rights reserved.

Additional Enrollment Restrictions
Applying additional enrollment restrictions is applicable to any deployment, regardless of directory services integration,
BYOD support, device registration, or other configurations. You can set up additional enrollment restrictions to control
who can enroll and which device types are allowed.
You can also determine the maximum number of enrolled devices per organization group. Once you configure
enrollment restrictions, you can even save those restrictions as a policy.
Enrollment Considerations, Additional Restrictions
Enrollment restrictions let you fine-tune the enrollment parameters you want to apply to your deployment. When
deciding which enrollment restrictions you may use, consider the following.
Consideration #1 – Will You Restrict Specific Platforms, OS Versions, or Maximum Number of Allowed Devices?
lDo you want to support only those devices that feature built-in enterprise management – such as Samsung
SAFE/Knox, HTC Sense, LG Enterprise, and Motorola devices? If so, you can require that Android devices have a
supported enterprise version as an enrollment restriction.
lDo you want to limit the maximum devices that a user is allowed to enroll? If so, you can set this amount, including
distinguishing between corporate owned and employee owned devices.
lAre there certain platforms you do not support in your deployment? If so, you can create a list of blocked device
platforms that prevent them from enrolling.
Your organization must evaluate the number and kinds of devices your employees own. They must also determine which
ones they want to use in your work environment. After this work is complete, you can save these enrollment restrictions
as a policy.
Consideration #2: Will You Restrict Enrollment to a Set List of Corporate Devices?
Additional registration options provide control of the devices that end users are allowed to enroll. Useful to
accommodate BYOD deployments, you can prevent the enrollment of blacklisted devices or restrict the enrollment to
only whitelisted devices. You can whitelist devices by type, platform, or specific device IDs and serial numbers. For more
information, see Add a Blacklisted or Whitelisted Device on page 115.
Consideration #3: Will You Restrict the Number of Enrolled Devices per Organization Group?
You can apply a limit on the number of enrolled devices to an organization group (OG). Imposing such a limit helps you
manage your deployment by preventing you from exceeding the number of valid enrollments.
Configure Enrollment Restriction Settings
When integrating AirWatch with directory services, you can determine which users can enroll devices into your corporate
deployment.
You can restrict enrollment to only known users or to configured groups. Known users are users that already exist in the
AirWatch Console. Configured groups are users associated to directory service groups if you choose to integrate with
user groups. You can also limit the number of devices enrolled per organization group and save restrictions as a reusable
policy.
These options are available by navigating to Groups & Settings > All Settings > Devices & Users > General > Enrollment
and choosing the Restrictions tab. The Restrictions tab allows you to customize enrollment restriction policies by
organization group and user group roles.
Chapter 7: Device Enrollment
116
VMware AirWatch Mobile Device Management Guide | v.2017.10 | October 2017
Copyright © 2017 VMware, Inc. All rights reserved.

lCreate and assign existing enrollment Restrictions policies using the Policy Settings.
lAssign the policy to a user group under the Group Assignment Settings area.
lBlacklist or whitelist devices by platform, operating system, UDID, IMEI, and so on.
For information about integrating your directoryservices groups with AirWatch, refer to the VMware AirWatch
DirectoryServices Guide document, available on AirWatch Resources.
Setting Description
Restrict
Enrollment to
Known Users
Enable to restrict enrollment only to users that already exist in the AirWatch Console. This applies to
directory users you manually added to the AirWatch Console one by one or through batch import. It
can also be used to lock down enrollment after an initial deployment that allowed anyone to enroll.
This enables you to selectively allow users to enroll.
Disable this option to allow all directory users who do not already exist in the Admin Console to enroll
into AirWatch. AirWatch user accounts are automatically created during enrollment.
Restrict
Enrollment to
Configured
Groups
Enable to restrict enrollment and only allow users belonging to All Groups or Selected Groups (if you
have integrated with user groups) to enroll devices. You should not select this option if you have not
integrated with your directory services user groups.
Disable this option to allow all directory users to create new AirWatch user accounts during
enrollment. In addition, you can select the Enterprise Wipe devices of users not belonging to
configured groups option to automatically enterprise wipe any devices not belonging to any user
group (if AllGroups is selected)or a particular user group (if Selected Groups is selected).
One option for integrating with user groups is to create an "MDM Approved" directoryservice group,
import it to AirWatch, then add existing directory service user groups to the "MDM Approved" group
as they become eligible for AirWatch MDM.
Set limit for
maximum
enrolled
devices at this
OG and below
Enable and Enter Device Limit to limit the number of devices allowed to enroll in the current
organization group (OG).
Note: Restrictions do not apply for iOS devices enrolled through Apple's Device Enrollment Program (DEP), because
the required device information is only received after the device has been enrolled.
Enrolled Device Limit Per OrganizationGroup
You can apply a limit on the number of enrolled devices to an organization group (OG). Imposing such a limit helps you
manage your deployment by preventing you from exceeding the number of valid enrollments.
This device limit can be placed on any type of OG (global, customer, partner). Once a limit is set at one OG, you are
unable to set another limit anywhere in the same OG branch. You can set another enrolled device limit but only if you are
setting it in a separate OG branch.
Chapter 7: Device Enrollment
117
VMware AirWatch Mobile Device Management Guide | v.2017.10 | October 2017
Copyright © 2017 VMware, Inc. All rights reserved.
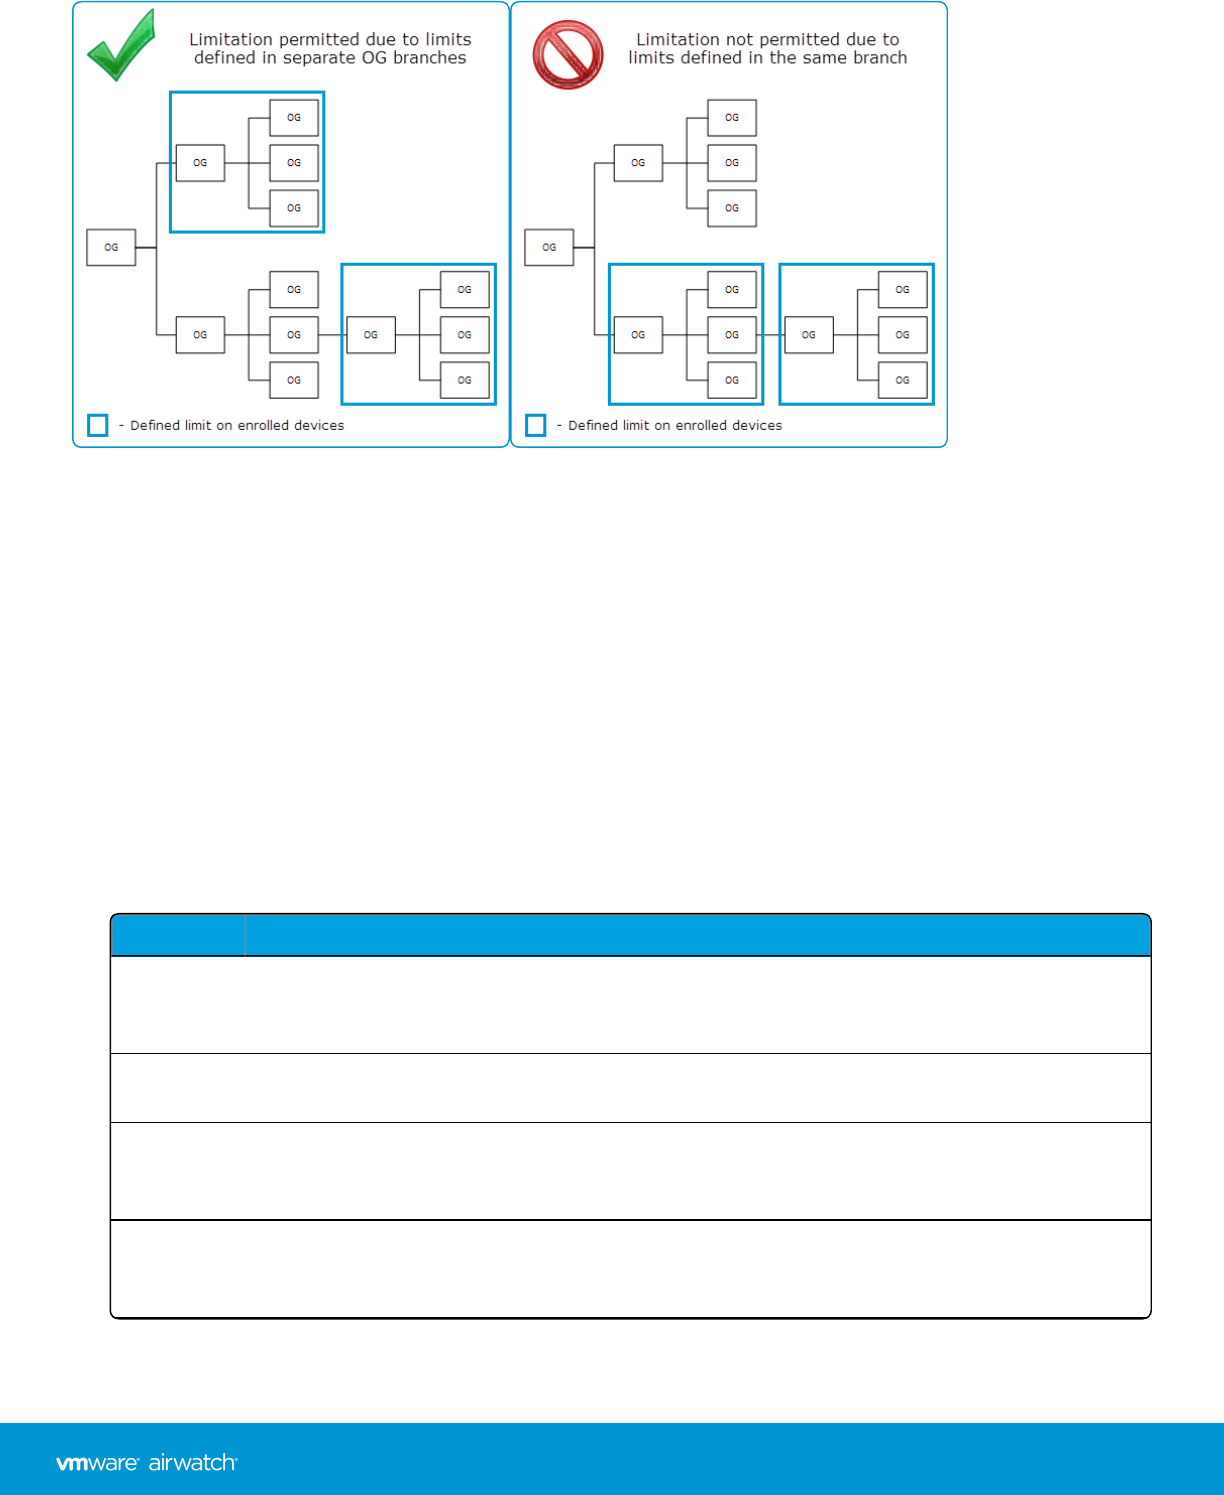
To define an enrolled device limit on your current OG, navigate to Groups & Settings > All Settings > Devices & Users >
General > Enrollment. Next, select the Restrictions tab, and enable the limit under Set a limit for maximum enrolled
devices at this Organization Group and below.
If this option is unavailable, check the parent OG(higher than the current OG) or a child OG (lower than the current OG).
It is likely that an existing limit has already been defined above or below your current OG.
Create an Enrollment Restriction Policy
Your organization must evaluate the number and kinds of devices your employees own. They must also determine which
devices to use in your work environment. After this work is complete, you can save these enrollment restrictions as a
policy.
1. Navigate to Devices > Device Settings > Devices &Users > General > Enrollment.
2. Select the Restrictions tab and then select Add Policy located in the Policy Settings section.
3. In the Add/Edit Enrollment Restriction Policy screen, add an enrollment restriction policy.
Setting Description
Enrollment
Restriction
Policy Name
Enter a name for your enrollment restriction policy.
Organization
Group
Choose an organization group from the drop-down field. This is the OG to which your new
enrollment restriction policy applies.
Policy Type Select the type of enrollment restriction policy, which can be either Organization Group Default to
apply to the selected organization group, or User Group Policy for specific User Groups through
Group Assignment Settings on the Restrictions tab.
Allowed
Ownership
Types
Choose whether to permit or prevent Corporate - Dedicated,Corporate - Shared, and Employee
Owned devices.
Chapter 7: Device Enrollment
118
VMware AirWatch Mobile Device Management Guide | v.2017.10 | October 2017
Copyright © 2017 VMware, Inc. All rights reserved.
Setting Description
Allowed
Enrollment
Types
Choose whether to permit or prevent the enrollment of devices using MDM (AirWatch Agent) and
AirWatch Container (for iOS/Android)apps.
Device Limit
per User
Select Unlimited to allow users to enroll as many devices as they want.
Uncheck this box to enter values for the Device Limit Per User section, to define the maximum
number of devices per ownership type.
lMaximum Devices Per User lShared Max Devices
lCorporate Max Devices lEmployee Owned Max Devices
Allowed
Device
Types
Select the Limit enrollment to specific platforms, models or operating systems checkbox to add
additional device-specific restrictions.
Note: You cannot blacklist Windows Phone devices by IMEI or UDID, as this functionality is
currently not supported by Microsoft.
Device Level
Restrictions
Mode
This field is only available if Limit enrollment to specific platforms, models or operating systems is
selected in the Allowed Device Types field.
Determine the kind of device limitations you should have.
lOnly allow listed device types (Whitelist) – Select this option to explicitly allow only devices
matching the parameters you enter and to block everything else.
lBlock listed device types (Blacklist) – Select this option to explicitly block devices matching the
parameters you enter and to allow everything else.
For either device-level restrictions mode, select Add Device Restriction to choose a Platform,
Model,Manufacturer (specific to Android devices), Operating System, or Enterprise Version. You
may also add a Device Limit per defined device restriction. You may add multiple device
restrictions.
You can also block specific devices based on their IMEI, Serial Number or UDID by navigating to
Devices > Lifecycle > Enrollment Status and selecting Add. This is an effective way to block a single
device and prevent it from re-enrolling without affecting other users' devices. Preventing re-
enrollment is also available as an option when performing an Enterprise Wipe.
4. Select Save to save your changes and navigate back to the Devices &Users / General / Enrollment screen.
Reasons You Should Not Enroll Devices in Global
There are several reasons enrolling devices directly to the top-level organization group (OG), commonly known as Global,
is not a good idea. These reasons are multitenancy, inheritance, and functionality.
Multitenancy
You can make as many child organization groups as you need and you configure each one independently from the
others. Settings you apply to a child OG do not impact other siblings.
Inheritance
Chapter 7: Device Enrollment
119
VMware AirWatch Mobile Device Management Guide | v.2017.10 | October 2017
Copyright © 2017 VMware, Inc. All rights reserved.

Changes made to a parent level OG apply to the children. Conversely, changes made to a child level OG do not apply to
the parent or siblings.
Functionality
There are settings and functionality that are only configurable to Customer type organization groups. These include wipe
protection, telecom, and personal content. Devices added directly to the top-level Global OG are excluded from these
settings and functionality.
The Global organization group (OG) is designed to house Customer and other types of OGs. Given the way inheritance
works, if you add devices to Global and configure Global with settings intended to affect those devices, you are also
affecting all the Customer OGs underneath. This undermines the benefits of multitenancy and inheritance.
AirWatch Autodiscovery Enrollment
AirWatch makes the enrollment process simple, using an autodiscovery system to enroll devices to environments and
organization groups (OG) using user email addresses. Autodiscovery can also be used to allow end users to authenticate
into the Self-Service Portal (SSP) using their email address.
Note: To enable an autodiscovery for on-premises environments, ensure that your environment can communicate
with the AirWatch Autodiscovery servers.
Registration for Autodiscovery Enrollment
The server checks for an email domain uniqueness, only allowing a domain to be registered at one organization group in
one environment. Because of this server check, register your domain at your highest-level organization group.
Autodiscovery is configured automatically for new Software as a Service (SaaS) customers.
Configure Autodiscovery Enrollment From a Parent Organization Group
Autodiscovery Enrollment simplifies the enrollment process enrolling devices to intended environments and organization
groups (OG) using end-user email addresses.
Configure an autodiscovery enrollment from a parent OG by taking the following steps.
1. Navigate to Groups &Settings >All Settings >Admin >Cloud Services and set the Auto Discovery Mode to
AirWatch ID. Enter your Auto Discovery AirWatch Id and select Set Identity.
a. If necessary, select Click here to Register to obtain an Auto Discovery AirWatch Id. Once you have registered
and selected Set Identity, the HMAC Token autopopulates. Click Test Connection to ensure that the connection
is functional.
2. Associate with this domain by selecting the Organization Group, enter a Business Email Domain and Confirmation
Email Address. The coupling of this organization group to end users serves as the starting point for possible Group
ID selection prompts.
3. Navigate to your email and verify your email address by selecting the confirmation link in the confirmation email.
Chapter 7: Device Enrollment
120
VMware AirWatch Mobile Device Management Guide | v.2017.10 | October 2017
Copyright © 2017 VMware, Inc. All rights reserved.

4. Add more Business Email Domains as required, such as "us.example.com" or "eu.example.com."
lMultiple email domains can be added in the same organization group level.
lAdding alternative email domains within other organization groups facilitates multi-tenancy.
5. Select Save to complete an autodiscovery setup.
Instruct end users who enroll themselves to select the email address option for authentication, instead of entering an
environment URL and Group ID. When users enroll devices with an email address, they enroll into the same group listed
in the Enrollment Organization Group of the associated AirWatch user account.
Configure Autodiscovery Enrollment From a Child Organization Group
You can configure Autodiscovery Enrollment from a child organization group below the enrollment organization group.
To enable an autodiscovery enrollment in this way, you must require users to select a Group ID during enrollment.
1. Navigate to Devices > Device Settings > General > Enrollment and select the Grouping tab.
2. Select Prompt User to Select Group ID.
3. Select Save.
Chapter 7: Device Enrollment
121
VMware AirWatch Mobile Device Management Guide | v.2017.10 | October 2017
Copyright © 2017 VMware, Inc. All rights reserved.


Shared Devices Overview
Issuing a device to every employee in certain organizations can be expensive. AirWatch MDM letsyou share a mobile
device among end users in two ways: using a single fixed configuration for all end users, or using a unique configuration
setting for individual end users.
Shared Device/Multi-User Device functionality ensures that security and authentication are in place for every unique end
user. And if applicable, shared devices allow only specific end users to access sensitive information.
When administering shared devices, you must first provision the devices with applicable settings and restrictions before
deploying them to end users. Once deployed, AirWatch uses a simple login/logout process for shared devices in which
end users simply enter their directory services or dedicated credentials to log in.The end-user role determines their level
of access to corporate resources such as content, features, and applications. This role ensures the automatic
configuration of features and resources that are available after the user logs in.
The login/logout functions are self-contained within the AirWatch Agent. Self-containment ensures that the enrollment
status is never affected, and that AirWatch can manage the device whether it is in use or not.
Shared Devices Capabilities
There are basic capabilities surrounding the functionality and security of devices that are shared across multiple users.
These capabilities offer compelling reasons to consider shared devices as a cost-effective solution to making the most of
enterprise mobility.
lFunctionality
oPersonalize each end-user experience without losing corporate settings.
oLogging in a device automatically configures it with corporate access and specific settings, applications, and
content based on the end-user role and organization group (OG).
oAllow for a log in/log out process that is self-contained in the AirWatch Agent.
oAfter the end user logs out of the device, the configuration settings of that session are wiped. The device is then
ready for login by another end user.
lSecurity
oProvision devices with the shared device settings before providing devices to end users.
oLog in and log out devices without affecting an enrollment in AirWatch.
oAuthenticate end users during a login with directory services or dedicated AirWatch credentials.
oManage devices even when a device is not logged in.
Platforms that Support Shared Devices
The following devices support shared device/multi-user device functionality.
lAndroid 2.3+,
liOS devices with AirWatch Agent v4.2+,
lMacOS devices with AirWatch Agent v2.1+.
Chapter 8: Shared Devices
123
VMware AirWatch Mobile Device Management Guide | v.2017.10 | October 2017
Copyright © 2017 VMware, Inc. All rights reserved.
Define the Shared Device Hierarchy
When you first log in to AirWatch, you see a single organization group (OG) that has been created for you using the name
of your organization. This group serves as your top-level OG. Below this top-level group you can create subgroups to
build out your company hierarchical structure.
1. Navigate to Groups & Settings > Groups > Organization Groups > Organization Group Details. Here, you can see an
OG representing your company.
2. Ensure the Organization Group Details displayed are accurate, and then use the available settings to make any
modifications, if necessary. If you make changes, select Save.
3. Select Add Child OrganizationGroup.
4. Enter the following information for the first OG underneath the top-level OG.
Setting Description
Name Enter a name for the child organization group (OG) to be displayed. Use alphanumeric characters
only. Do not use odd characters.
Group ID Enter an identifier for the OG for the end users to use during the device login. Group IDs are used
during the enrollment of group devices to the appropriate OG.
Ensure that users sharing devices receive the Group ID as it may be required for the device to log in
depending on your SharedDevice configuration.
Type Select the preconfigured OG type that reflects the category for the child OG.
Country Select the country where the OG is based.
Locale Select the language classification for the selected country.
Customer
Industry
This setting is only available when Type is Customer. Select from the list of Customer Industries.
5. Select Save.
Chapter 8: Shared Devices
124
VMware AirWatch Mobile Device Management Guide | v.2017.10 | October 2017
Copyright © 2017 VMware, Inc. All rights reserved.

Device Assignments Overview
Device Assignments enable you to move devices across organization groups (OG) and user names based on the network
Internet protocol (IP) address range or custom attributes. It is an alternative to organizing the content (for example,
profiles, apps, policies, and products) by user groups.
Instead of admins manually moving devices between OGs, you can direct the console to move devices automatically
when it connects to Wi-Fi that you define. You can also move devices based on custom attribute rules that you define.
A typical use case for device assignments is a user who regularly changes roles and requires specialized profiles and
applications for each role.
You must choose between implementing User Groups and Device Assignments to move devices since AirWatch does
not support both functions on the same device.
Enable Device Assignments
Before you can move devices across organization groups (OG) and user names based on an Internet protocol (IP) or
custom attribute, you must enable device assignments. Device assignments can only be configured at a child
organization group.
1. Navigate to Groups &Settings > All Settings > Devices &Users >General > Advanced and select Override or
Inherit for the Current Setting according to your needs.
2. Select Enabled in the Device Assignment Rules setting.
3. Choose the management Type.
lOrganization Group By IPRange – Moves the device to a specified OG when the device leaves one Wi-Fi network
range and enters another. This move triggers the automatic push of profiles, apps, policies, and products.
lOrganization Group By CustomAttribute – Moves the device to an organization group based on custom
attributes. Custom attributes enable administrators to extract specific values from a managed device and return
it to the AirWatch Console. You can also assign the attribute value to devices for use in product provisioning or
device lookup values.
Chapter 9: Device Assignments
126
VMware AirWatch Mobile Device Management Guide | v.2017.10 | October 2017
Copyright © 2017 VMware, Inc. All rights reserved.
oWhen Organization Group By Custom Attribute is enabled, a link appears entitled Click Here To Create Custom Attribute Based
Assignment Rule. When selected, this link opens another tab in your browser. This tab displays the Custom Attribute Assignment
Rules page, enabling you to create your own attribute assignment rules. For more information, see Assign Organization Groups
Using Custom Attributes on page 208.
lUser name By IPRange – When a device exits one network and enters another, the device changes user names
instead of moving to another OG. This user name change triggers the same push of profiles, apps, policies, and
products as an OG change does. This option is for customers with a limited ability to create organization groups,
providing an alternate way to take advantage of the device assignment feature.
Important: If you want to change the assignment Type on an existing assignment configuration, you must delete
all existing defined ranges. Remove IP Range assignments by navigating to Groups &Settings > Groups >
OrganizationGroups > Network Ranges. Remove custom attribute assignments by navigating to Devices >
Staging & Provisioning > Custom Attributes > Custom Attribute Assignment Rules.
4. Choose the Device Ownership options. Only devices with the selected ownership types are assigned.
lCorporate – Dedicated
lCorporate – Shared
lEmployee Owned
lUndefined
5. Select Save once all the options are set.
Define Device Assignment Rule or NetworkRange
When your device connects to Wi-Fi, the device authenticates and automatically installs profiles, apps, policies, and
product provisions specific to the OG that you choose.
You can also define rules based on custom attributes. When a device enrolls with an assigned attribute, the rule assigns
the device to the configured organization group. The device can also be assigned in the case where the device receives a
product provision containing a qualifying custom attribute.
Once you have enabled device assignments, you can move a device by custom attribute rule or you may specify a
network range. For more information, see Assign Organization Groups Using Custom Attributes on page 208.
Device assignments can only be configured at a child organization group.
1. Select the link Click here to create a network range or navigate to Groups &Settings >Groups
>OrganizationGroups > Network Ranges.
2. To add a single Internet protocol (IP) address range, select Add Network Range. In the Add/Edit Network Range
page, complete the following settings and then select Save.
lStart IPAddress – Enter the top end of the network range.
lEnd IPAddress – Enter the bottom end of the network range.
Chapter 9: Device Assignments
127
VMware AirWatch Mobile Device Management Guide | v.2017.10 | October 2017
Copyright © 2017 VMware, Inc. All rights reserved.
lOrganizationGroup Name – Enter the OG name to which devices move when the network range is entered. This
setting is only visible if the network assignment Type is 'Organization Group By IPRange.'
lUser name – Enter the user name to whom devices register when the network range is entered. This setting is
only visible if the network assignment Type is 'User name by IPRange.'
lDescription – Optionally, add a helpful description of the network range.
lOverlapping network ranges results in the message, "Save Failed, Network Range exists."
3. If you have several network ranges to add, you can optionally select Batch Import to save time. On the Batch Import
page, select the Download template for this batch type link to view and download the bulk import template.
Complete this template, import it using the Batch Import page, and select Save.
Chapter 9: Device Assignments
128
VMware AirWatch Mobile Device Management Guide | v.2017.10 | October 2017
Copyright © 2017 VMware, Inc. All rights reserved.

Chapter 10:
Profiles &Resources
Device Profiles Overview 130
Add General Profile Settings 130
Device Profiles List View 132
Device Profile Editing 136
Resources Overview 137
View Device Assignment 155
Compliance Profiles Overview 156
Geofences 157
Time Schedules 159
129
VMware AirWatch Mobile Device Management Guide | v.2017.10 | October 2017
Copyright © 2017 VMware, Inc. All rights reserved.
Device Profiles Overview
Device Profiles are the primary means by which you can manage devices. They represent the settings that, when
combined with compliance policies, help you enforce corporate rules and procedures.
Create profiles for each platform type then configure a payload, which consists of the individual settings you configure for
each platform type.
For step-by-step instructions on configuring a specific payload for a particular platform, refer to the applicable Platform
Guide, available on Accessing Other Documents on page 217.
The process for creating a profile consists of first specifying the General settings followed by the Payload settings.
lThe General settings determine how the profile is deployed and who receives it.
lThe Payload for the profile is the actual restriction itself and other settings as applied to the device when the profile is
installed.
Add General Profile Settings
The following profile settings and options apply to most platforms and can be used as a general reference. However,
some platforms may offer different selections. These steps and settings apply to any profile.
1. Navigate to Devices > Profiles &Resources > Profiles > ADD. You can choose from among the following options to
add a profile.
lAdd Profile – Perform a one-off addition of a new device profile.
lUpload Profile – Upload a signed profile on your device.
lBatch Import – Import new device profiles in bulk by using a comma-separated values (.csv) file. Enter a unique
name and description to group and organize multiple profiles at a time.
2. Select Add Profile.
3. Select the appropriate platform for the profile you want to deploy. Depending on the platform, the payload settings
vary.
4. Complete the General tab by completing the following settings.
Setting Description
Name Name of the profile to be displayed in the AirWatch Console.
Version Read-only text box that reports the current version of the profile as determined by the Add Version.
Description A brief description of the profile that indicates its purpose.
Deployment Determines if the profile is automatically removed upon unenrollment (does not apply to Android
for Work profiles).
lManaged – The profile is removed.
lManual – The profile remains installed until removed by the end user.
Chapter 10: Profiles &Resources
130
VMware AirWatch Mobile Device Management Guide | v.2017.10 | October 2017
Copyright © 2017 VMware, Inc. All rights reserved.
Setting Description
Assignment
Type
Determines how the profile is deployed to devices.
lAuto – The profile is deployed to all devices automatically.
lOptional – An end user can optionally install the profile from the Self-Service Portal (SSP), or it
can be deployed to individual devices at the administrator's discretion.
End users can also install profiles representing Web applications, using a Web Clip or a
Bookmark payload. And if you configure the payload to show in the App Catalog, then you can
install it from the App Catalog.
lInteractive –(Does not apply to iOS or Android for Work). This profile is of a unique type that
end users install with the Self Service Portal. When installed, these special types of profiles
interact with external systems to generate data meant to be sent to the device. This option is
only available if enabled in Groups & Settings > All Settings > Devices & Users > Advanced >
Profile Options.
lCompliance – The profile is applied to the device by the Compliance Engine when the user fails
to take corrective action toward making their device compliant. For more information, see
Compliance Profiles Overview on page 156.
Allow
Removal
lAlways – The end user can manually remove the profile at any time.
lWith Authorization – The end user can remove the profile with the authorization of the
administrator. Choosing this option adds an account Password text box.
lNever – The end user cannot remove the profile from the device.
Managed
By
The organization group with administrative access to the profile.
Assigned
Groups
Refers to the group to which you want the device profile added. Includes an option to create a new
smart group which can be configured with specs for minimum OS, device models, ownership
categories, organization groups and more. For more information, see Assignment Groups Overview
on page 65.
While Platform is a criterion within a smart group, the platform configured in the device profile or
compliance policy always takes precedence over the smart group's platform. For instance, if a device
profile is created for the iOS platform, the profile is only assigned to iOS devices even if the smart
group includes Android devices.
Exclusions If Yes is selected, a new text box Excluded Groups displays. This text box enables you to select those
groups you want to exclude from the assignment of the device profile. See Exclude Smart Groups in
Profiles and Policies on page 73 for details.
View Device
Assignment
After you make an Assigned Group selection, you can preview a list of all assigned devices, taking
the smart group assignments and exclusions into account.
Chapter 10: Profiles &Resources
131
VMware AirWatch Mobile Device Management Guide | v.2017.10 | October 2017
Copyright © 2017 VMware, Inc. All rights reserved.

Setting Description
Additional
Assignment
Criteria
These check boxes enable additional restrictions for the profile.
lInstall only on devices inside selected areas. – Enter an address anywhere in the world and a
radius in kilometers or miles to make a 'perimeter of profile installation'. For more information,
see Geofences on page 157.
lEnable Scheduling and install only during selected time periods – Specify a configured time
schedule in which devices receive the profile only within that time-frame. Selecting this option
adds a required text box Assigned Schedules. For more information, please see Time Schedules
on page 159.
Removal
Date
The date when the profile is removed from the device. Must be a future date formatted as
MM/DD/YYYY.
5. Configure a Payload for the device platform.
For step-by-step instructions on configuring a specific Payload for a particular platform, refer to the applicable
Platform Guide, available on Accessing Other Documents on page 217.
6. Select Save & Publish.
Device Profiles List View
After you have created and assigned profiles, you will need a way to manage these settings one at a time and remotely
from a single source. The Devices > Profiles & Resources > Profiles provides a centralized way to organize and target
profiles.
Chapter 10: Profiles &Resources
132
VMware AirWatch Mobile Device Management Guide | v.2017.10 | October 2017
Copyright © 2017 VMware, Inc. All rights reserved.
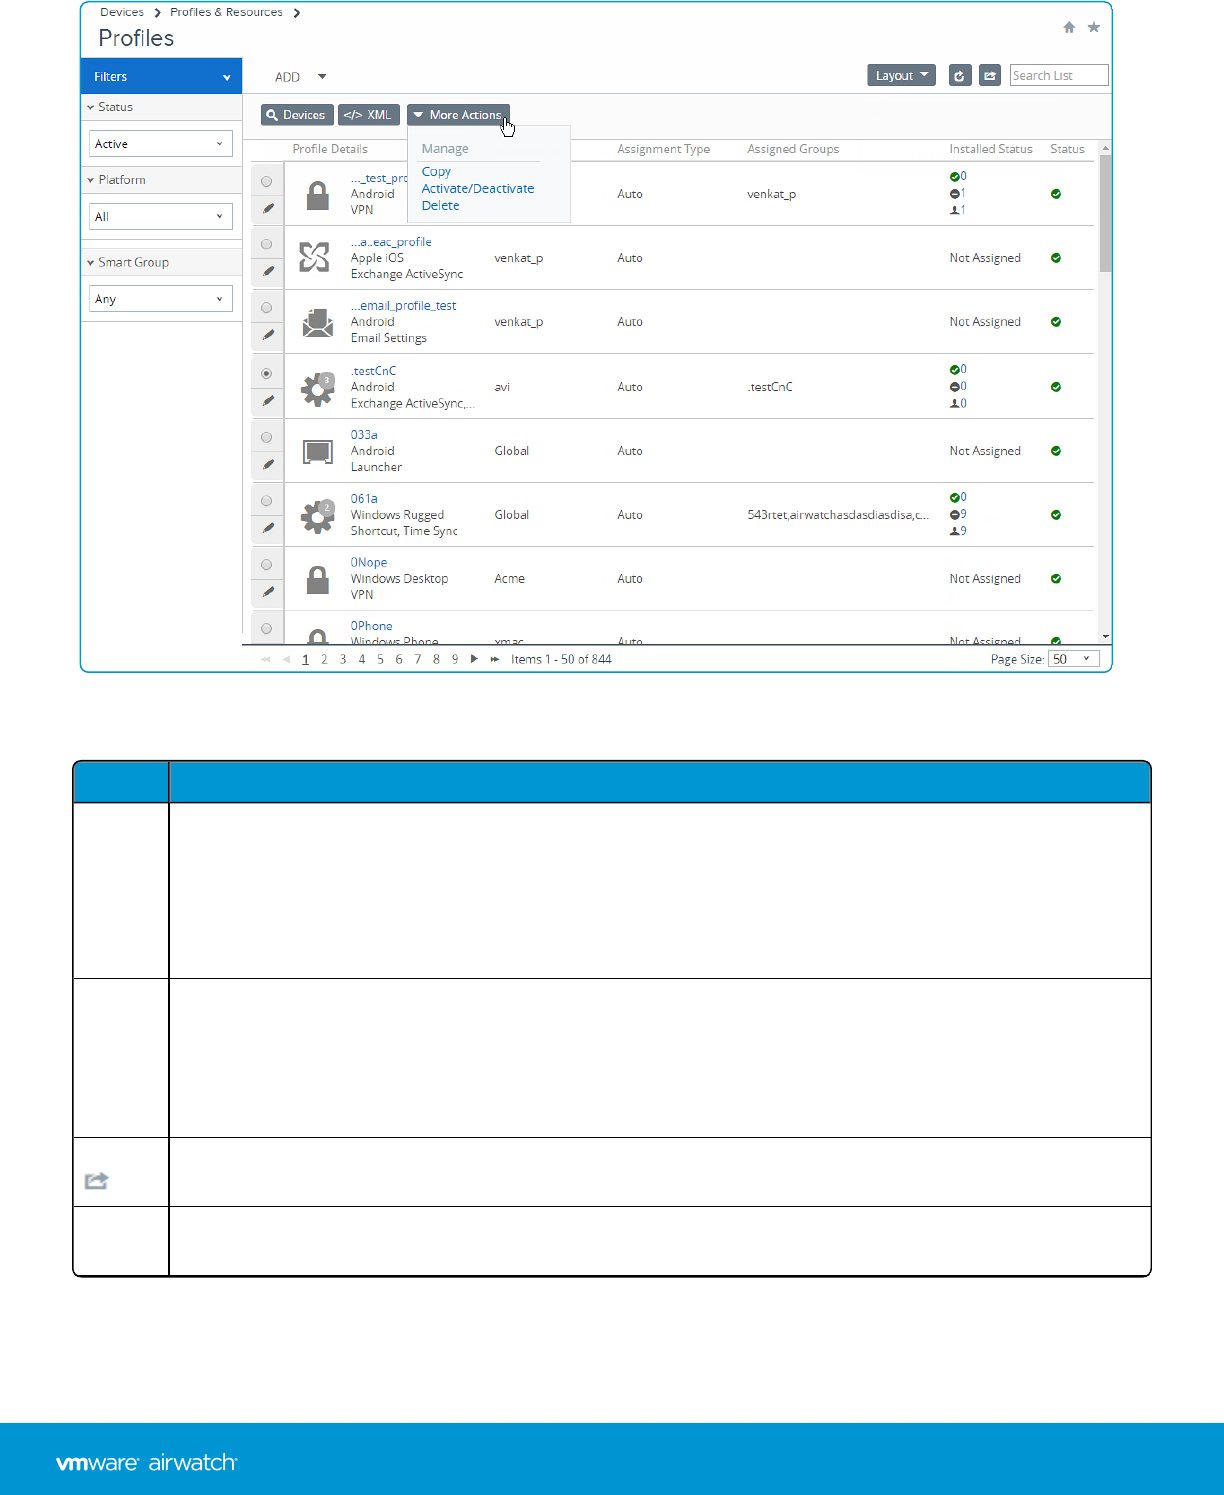
You can create tailor-made lists of device profiles based on the criteria you specify by using Filters,Layout, and Column
Sorting. You can also export these lists to a CSV file suitable for viewing with Excel and see the status of the device profile.
Setting Description
Filters View only the desired profiles by using the following filters.
lStatus – Filter devices to view Active, Inactive, and All devices.
lPlatform – Filter devices by 13 types of platforms or all platforms.
lSmart Group – Filter devices by selecting a smart group from the drop-down menu.
Layout Enables you to customize the column layout of the listing.
lSummary – View the List View with the default columns and view settings.
lCustom – Select only the columns in the List View you want to see. You can also apply selected columns
to all administrators at or below the current organization group.
Export Save a CSV file (comma-separated values) of the entire List View that can be viewed and analyzed in Excel. If
you have a filter applied to the List View, the exported listing reflects the filtered results.
Column
Sorting
Select the column heading to toggle the sorting of the list.
Chapter 10: Profiles &Resources
133
VMware AirWatch Mobile Device Management Guide | v.2017.10 | October 2017
Copyright © 2017 VMware, Inc. All rights reserved.
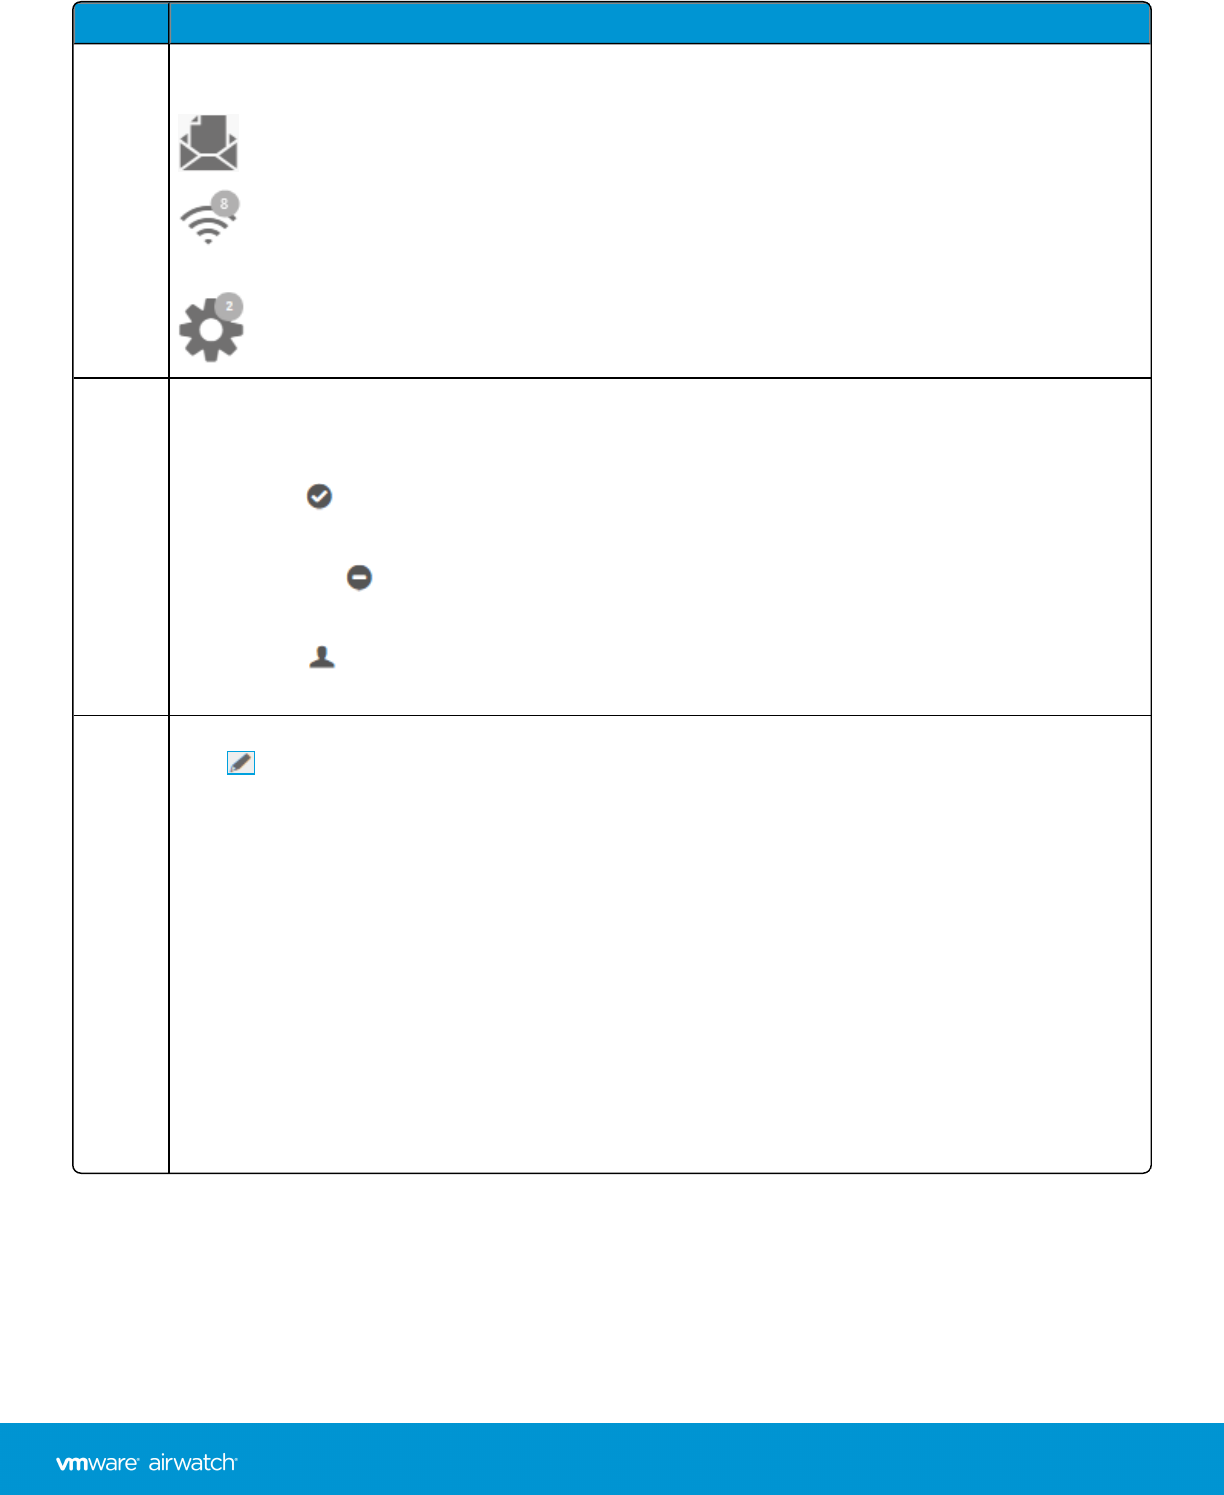
Setting Description
Profile
Details
In both the Summary and Custom views, the Profile Details column, each profile features an icon
representing the payload type.
– Single payload types feature a unique icon for that individual payload type.
– Profiles featuring multiple payloads of the same type feature a number badge in the upper-right
corner of the icon.
– Profiles featuring multiple payloads of differing types feature a generic icon with a number badge.
Installed
Status
This column shows the status of a profile installation by displaying three icon indicators, each with a
hypertext number link. Selecting this link displays the View Devices page, which is a listing of affected
devices in the selected category.
lInstalled ( ) – This indicator displays the number of devices on which the profile is assigned and
successfully installed.
lNot Installed ( ) – This indicator displays the number of devices to which the profile is assigned but
not installed.
lAssigned ( ) – This indicator displays the total number of assigned profiles whether they are installed
or not.
Radio
button
and Edit
Icon
The List View features a selection radio button and Edit icon, each to the left of the profile. Selecting the Edit
icon ( ) enables you to make basic changes to the profile configuration. Selecting a single radio button
causes the Devices button, the XML button, and More Actions button to appear above the listing.
lDevices – View devices that are available for that profile and whether the profile is installed and if not,
see the reason why. Survey which devices are in your fleet and manually push profiles if necessary.
l</> XML – Display the XML code that AirWatch generates after profile creation. View and save the XML
code to reuse or alter outside of the AirWatch Console.
lMore Actions
oCopy – Make a copy of an existing profile and tweak the configuration of the copy to get started
with device profiles.
oActivate/Deactivate – Toggle between making a device profile active and inactive.
oDelete – Maintain your roster of profiles by removing unnecessary profiles.
Device Profile Hover-Over Pop-Up
Each device profile in the Profile Details column features a tool tip icon in the upper-right corner. When this icon is
tapped (mobile touch device) or hovered-over with a mouse pointer (PC or Mac), it displays a hover-over pop-up. This
pop-up contains profile information such as Profile Name, the Platform, and the included payload Type.
Chapter 10: Profiles &Resources
134
VMware AirWatch Mobile Device Management Guide | v.2017.10 | October 2017
Copyright © 2017 VMware, Inc. All rights reserved.
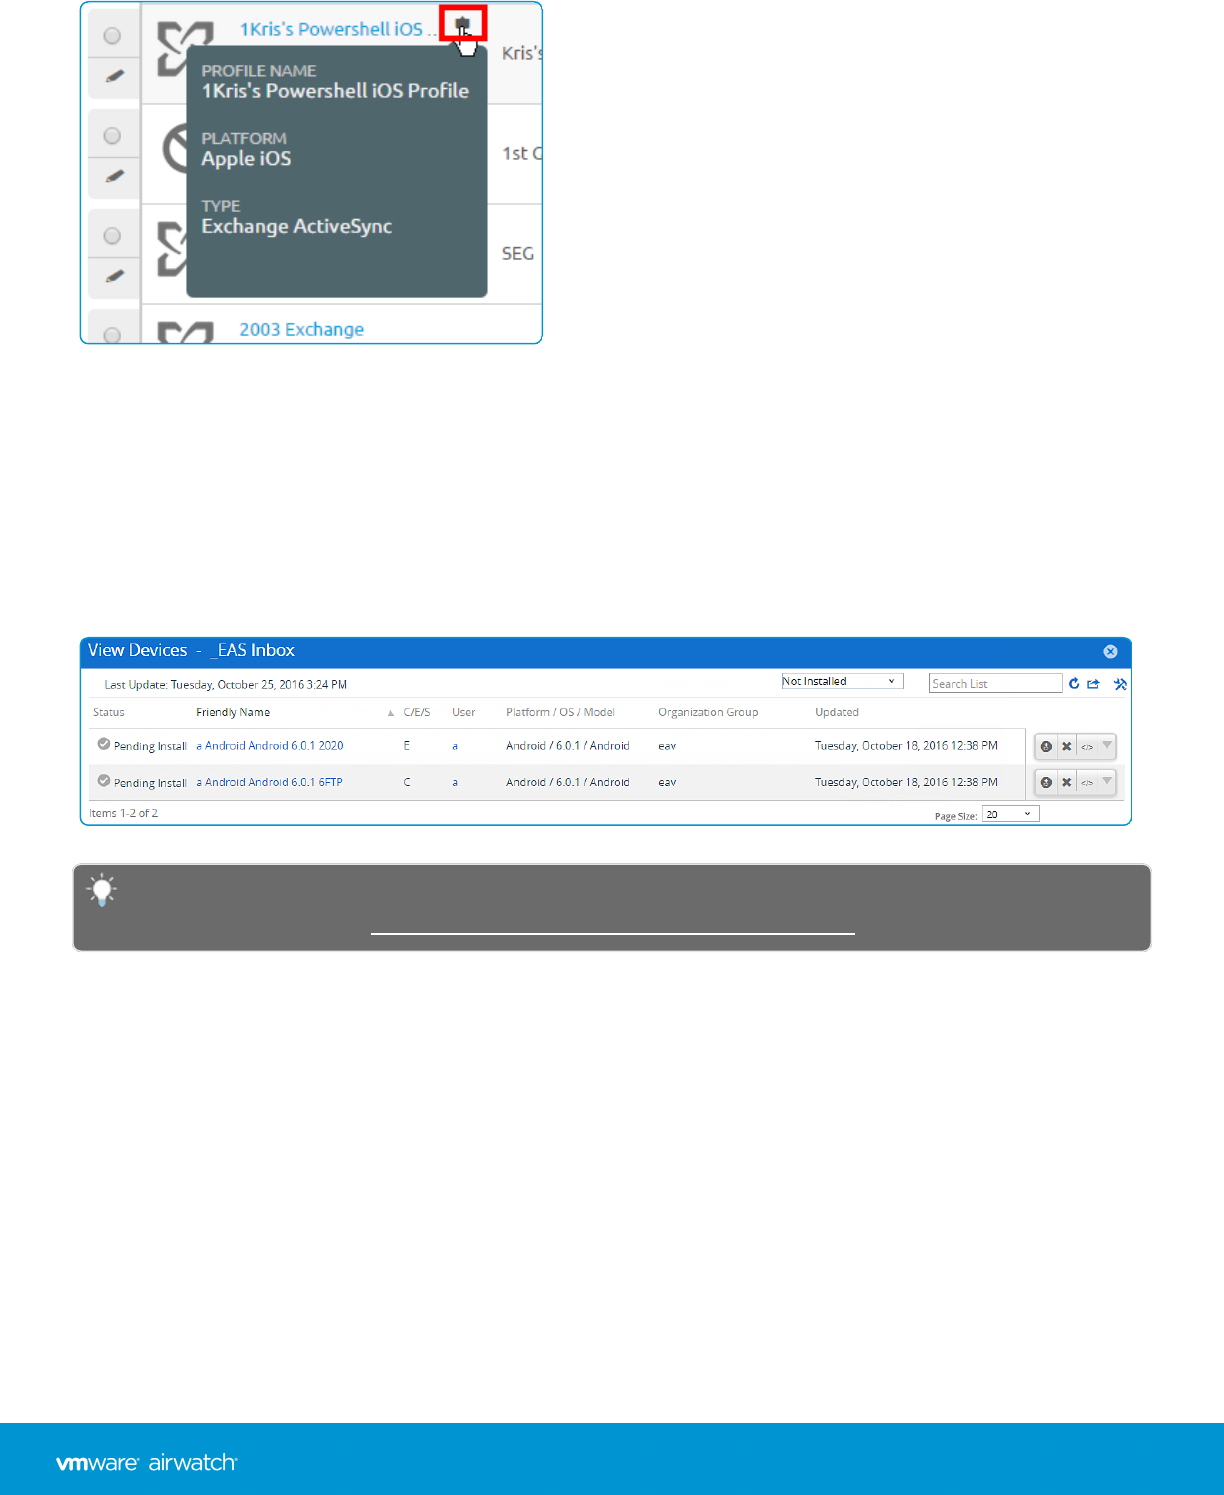
A similar tooltip icon is found in the Assigned Groups column in the Profiles List view, featuring hover-over pop-ups
displaying Assigned Smart Groups and Deployment Type.
Confirm Device Profile Installation
During those infrequent cases in which profiles do not install on targeted devices, the View Devices screen enables you
to see the specific reason why.
Navigate to Devices > Profiles & Resources > Profiles and select the number links to the right of the Installed Status
column to open the View Devices screen.
If your profile is not reaching intended devices, refer to the following VMware AirWatch Knowledge Base article for
some troubleshooting tips:https://support.air-watch.com/articles/115001662268.
View Devices Command Status Column
The Command Status column visible from the View Devices screen includes the following installation statuses as they
relate to the selected device.
lError – Displays as a link that, when selected, shows the specific error code applicable to the device.
lHeld – Displays when the device is included in a certificate batch process that is underway.
lNot Applicable – Displays when the profile assignment does not impact the device but is nonetheless part of the
smart group or deployment. For example, when the profile type is unmanaged.
lNot Now – Displays when the device is locked or otherwise occupied.
Chapter 10: Profiles &Resources
135
VMware AirWatch Mobile Device Management Guide | v.2017.10 | October 2017
Copyright © 2017 VMware, Inc. All rights reserved.
lPending – Displays when the installation is queued and is on schedule to be completed.
lSuccess – Displays when the profile is successfully installed.
Note: The Command Status column is functional only for iOS devices.
You can also produce a comma-separated value (CSV) file of the entire View Devices page by selecting the Export icon (
). Excel can be used to read and analyze the CSV file.
You can also customize which columns in the View Devices page you want to be visible by selecting the Available
Columns icon ( ).
Device Profiles Read-Only View
Device Profiles created in and managed by one organization group (OG) are in a read-only state when accessed by a
logged-in administrator with lower-level privileges. The profile window reflects this read-only state by adding a special
comment, “this profile is being managed at a higher organization group and cannot be edited.”
This read-only limitation applies to smart group assignments as well. When a profile is created at a parent OG and is
assigned to a smart group, a child OG admin may see but not edit it.
Such behavior maintains a hierarchy-based security while fostering communication among admins.
Device Profile Editing
Using the AirWatch Console, you can edit a device profile that has already been installed to devices in your fleet. There
are two types of changes you can make to any device profile.
lGeneral – General profile settings serve to manage the profile distribution: how the profile is assigned, by which
organization group it is managed, to/from which smart group it is assigned/excluded.
lPayload – Payload profile settings affect the device itself: passcode requirement, device restrictions such as camera
use or screen capture, Wi-Fi configs, VPN among others.
Since the operation of the device itself is not impacted, General changes can usually be made without republishing the
profile. Saving such changes results in the profile only being pushed to devices that were not already assigned to the
profile.
Payload changes, however, must always be republished to all devices, new and existing, since the operation of the device
itself is affected.
Edit General Device Profile Settings
General profile settings include changes that manage its distribution only. This distribution includes how the profile is
assigned, by which organization group (OG) it is managed, and to/from which assignment group it is assigned/excluded.
1. Navigate to Devices > Profiles & Resources > Profiles and select the Edit icon ( ) from the actions menu of the
profile you want to edit.
The only profiles that are editable are those profiles that an organization group (or a child organization group
underneath) manages.
Chapter 10: Profiles &Resources
136
VMware AirWatch Mobile Device Management Guide | v.2017.10 | October 2017
Copyright © 2017 VMware, Inc. All rights reserved.

2. Make any changes you like in the General category.
3. After completing General changes, you may select Save & Publish to apply the profile to any new devices you may
have added or removed. Devices already assigned with the profile do receive the republished profile again. The View
Device Assignment screen appears, confirming the list of currently assigned devices.
For more information, see the following topics.
Add General Profile Settings on page 130
View Device Assignment on page 155
Edit Payload Device Profile Settings
Payload profile settings include changes that affect the device itself: passcode requirement, device restrictions such as
camera use or screen capture, Wi-Fi configs, VPN among others.
The Add Version button enables you to create an increment version of the profile where settings in the Payload can be
modified.
1. Enable Payload editing that impacts the operation of the device by selecting the Add Version button.
Selecting the Add Version button and saving your changes means republishing the device profile to all devices to
which it is assigned. This republishing includes devices that already have the profile. For step-by-step instructions on
configuring a specific Payload, refer to the applicable Platform Guide, available on Accessing Other Documents on
page 217.
2. After completing Payload changes, select Save & Publish to apply the profile to all assigned devices. The View
Device Assignment screen appears, enabling you to confirm the list of currently assigned devices.
Resources Overview
Resources simplify the provisioning of Wi-Fi, VPN, and Exchange payloads for AirWatch deployments that support
multiple device platforms, such as iOS, Android, and Windows.
Create a resource for any of these payloads and define the general settings each device platform receives. You can then
optionally configure platform-specific settings that apply only to those devices.
Resources are defined, managed, and deployed separately from device profiles. Deploy resources alongside device
profiles to provide deep and broad device management for all supported platforms in your deployment.
You do not have to use resources to deploy Wi-Fi, VPN, or Exchange settings. If you choose, you can still create separate
device profiles for these payloads for each platform. Consider deploying resources when you expect the Wi-Fi, VPN, or
Exchange settings to be identical or similar across platforms. Then, create additional device profiles as usual to manage
functionality further for each platform.
Chapter 10: Profiles &Resources
137
VMware AirWatch Mobile Device Management Guide | v.2017.10 | October 2017
Copyright © 2017 VMware, Inc. All rights reserved.
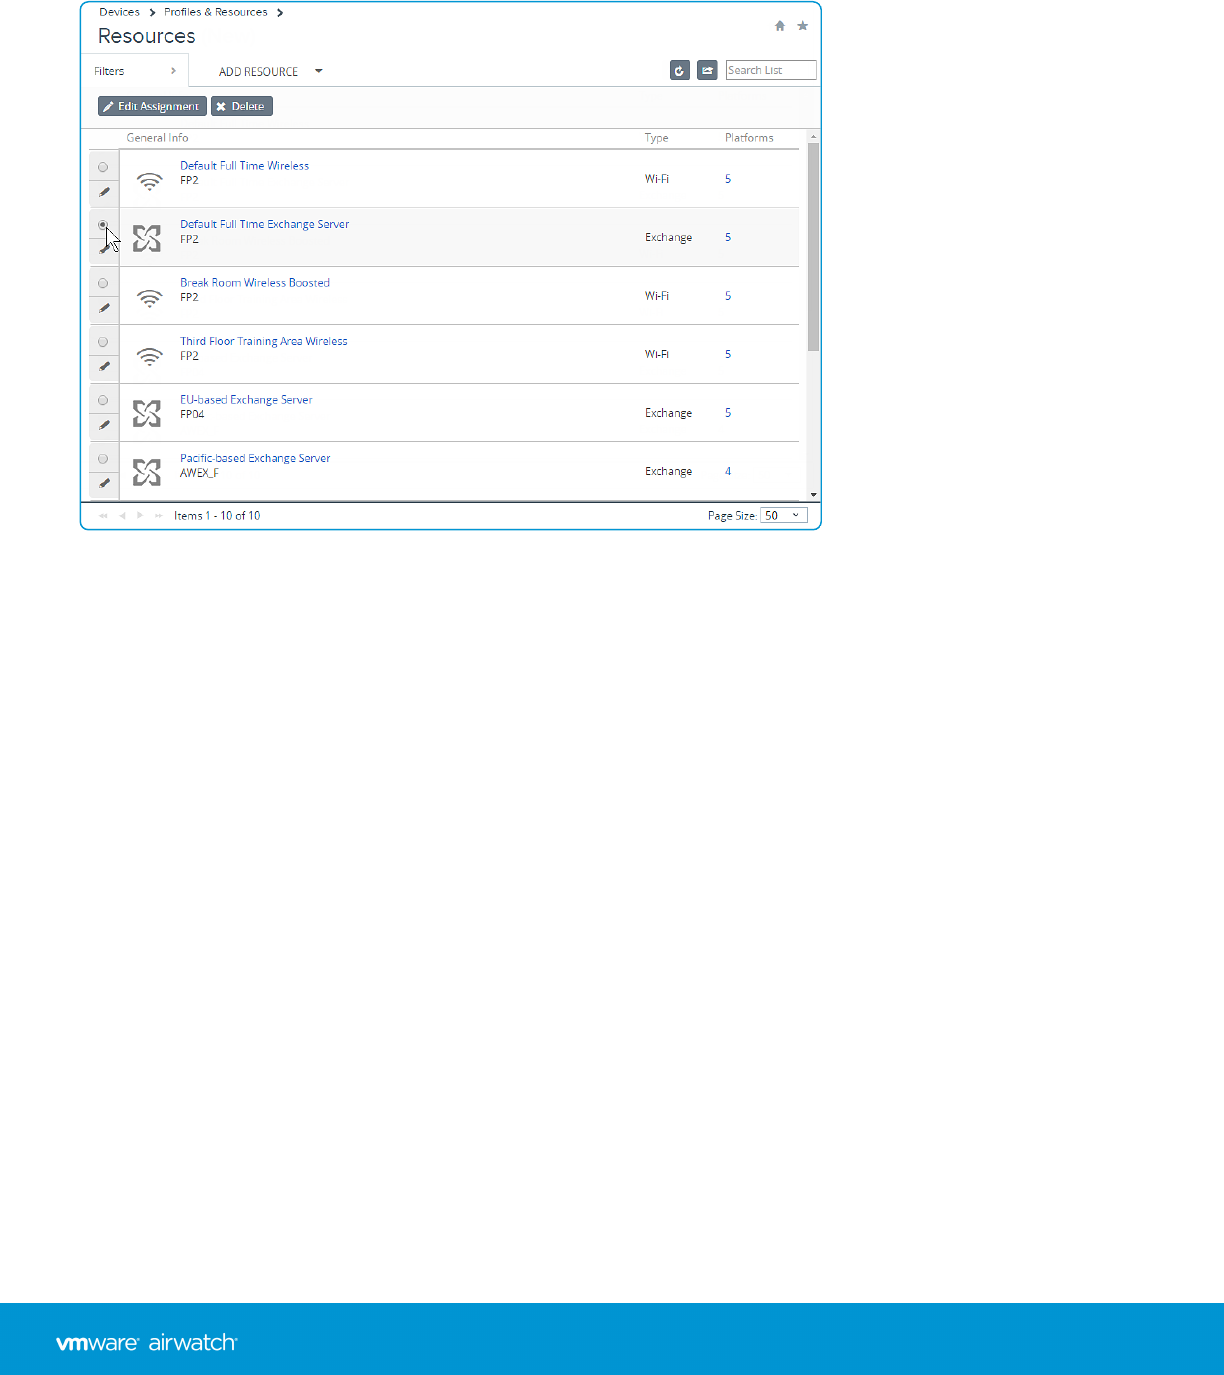
Resources List View
Use the Resources List View to add and manage your collection of device resources which includes viewing, deleting, and
editing individual resource configurations.
Add a Resource
You can add a resource to provision your multi-platform device fleet with the same Exchange, wi-fi, and VPN settings.
Navigate to Devices > Profiles &Resources > Resources and select Add Resource. You must select from the following
options to add a resource.
lExchange – Configure email settings so you can keep in touch with your Exchange email server.
lWi-Fi – Configure Wi-Fi connectivity settings so you can maintain network connectivity.
lVPN – Configure virtual private network settings so you can maintain a secure connection.
Each resource requires three distinct configuration steps. Create a device resource by specifying the Resource Details,
the applicable Platforms, and the Assignment of the resource to devices.
lThe Resource Details contain the resource name, description, server dependencies, and other critical settings that
determine how the resource operates.
lThe Platforms define on which devices the resource runs.
lThe Assignment determines how the resource is deployed, including organization groups, user groups, and smart
groups.
Manage Resources
Once you have amassed a collection of resources, you can manage them by navigating to Devices > Profiles &Resources
> Resources and Filter, View, Edit, and Delete resources.
Chapter 10: Profiles &Resources
138
VMware AirWatch Mobile Device Management Guide | v.2017.10 | October 2017
Copyright © 2017 VMware, Inc. All rights reserved.

lFilter the Resource List View to show Active, Inactive, or All resources.
lView the different platforms which your resource includes by selecting the hyperlink numeral in the Platforms
column.
oOpen Advanced Settings for the resource by selecting the hyperlink platform name.
oOpen the View Devices page by selecting the hyperlink numerals in the Installed/Assigned column of the
Platforms page. This page displays the list of devices assigned to the resource.
oView and Export the XML code and upload a certificate by clicking the View hyperlink in the XML column of the
Platforms page.
lEdit a resource by selecting the name link of the resource which displays the Resource Details section of the Edit
Resource page.
oEdit the resource details by clicking the edit pencil ( ) to the left of the resource listing. You may proceed
making edits to the other sections of the Edit Resource page by selecting the Next button.
lEdit the assignment of the resource by selecting the radio button to the left of the Resource listing and then clicking
the Edit Assignment button.
lDelete a resource by selecting the radio button to the left of the resource listing and clicking the Delete button.
Deleting a resource sets the resource to inactive until it is removed from all devices.
Chapter 10: Profiles &Resources
139
VMware AirWatch Mobile Device Management Guide | v.2017.10 | October 2017
Copyright © 2017 VMware, Inc. All rights reserved.

Add an Exchange Resource
You can add a resource dedicated to providing devices with the means to send and receive secure email
communications.
1. Add an Exchange resource by completing the following settings.
Setting Description
Resource Details
Resource Name Name of the profile to be displayed in the AirWatch Console.
Description A brief description of the profile that indicates its purpose.
Connection Info
Mail Client Select the email client you want to use with the resource.
Exchange Host Enter the Exchange Host for the email account to be included in the resource.
Use SSL Enable a secure socket layer for this mail client.
Advanced
Domain Enter a custom lookup value for the email domain.
User name Enter a custom lookup value for the email user name.
Email Address Enter a custom lookup value for the email address.
Password Enter the password for the email account. Enable the Show Characters check box to
display the unredacted password.
Identity Certificate Upload and attach a certificate authority to the email account by selecting the Add A
Certificate button.
Past Days of Mail to
Sync
Select the length of email history you want to synchronize. Choose from 3 Days,1
Week,2 Weeks,1 Month, and Unlimited.
Sync Calendar Choose to synchronize your device calender with the exchange calendar. This setting is
enabled by default on iOS and macOS devices.
Sync Contacts Choose to synchronize your device contacts with the exchange contacts. This setting is
enabled by default on iOS and macOS devices.
2. Click Next to proceed to the Platforms selection. Choose among the following supported platforms, opting for either
the default settings or Advanced Settings.
lConfigure Advanced Settings for iOS Exchange on page 141.
lConfigure Advanced Settings for macOS Exchange on page 142.
lConfigure Advanced Settings for Android Exchange on page 142.
lConfigure Advanced Settings for Windows Phone Exchange on page 143.
lConfigure Advanced Settings for Windows Desktop Exchange on page 144.
Chapter 10: Profiles &Resources
140
VMware AirWatch Mobile Device Management Guide | v.2017.10 | October 2017
Copyright © 2017 VMware, Inc. All rights reserved.
3. Click Next to proceed to the Assignment section.
4. Assign the resource to devices by completing the following settings.
Setting Description
Assignment Type Determines how the resource is deployed to devices.
lAuto – The resource is deployed to all devices automatically.
lOptional – An end user can optionally install the resource from the Self-Service Portal
(SSP), or it can be deployed to individual devices at the discretion of the administrator.
Managed By The organization group with administrative access to the resource.
Assigned Groups Refers to the group to which you want the device resource added. Includes an option to create
a new smart group which can be configured with specs for minimum OS, device models,
ownership categories, organization groups and more. For more information, see Assignment
Groups Overview on page 65.
Exclusions If Yes is selected, a new text box Excluded Groups displays which enables you to select those
groups you want to exclude from the assignment of this resource. See Exclude Smart Groups in
Profiles and Policies on page 73 for details.
View Device
Assignment
After you have made a selection in the Assigned Group text box, you may select this button to
preview a list of all devices to which this resource is assigned, taking the smart group
assignments and exclusions into account.
Configure Advanced Settings for iOS Exchange
Advanced Exchange settings for iOS consist of S/MIME and Security configuration options, providing user-specific,
certificate-based encryption of email.
Setting Description
Use S/MIME Use Secure Multipurpose Internet Mail Extensions, a public key encryption and
signing standard.
S/MIME Certificate Only available when Use S/MIME is enabled. Add a signing certificate to emails by
selecting Add A Certificate.
S/MIME Encryption Certificate Only available when Use S/MIME is enabled. Add a certificate that encrypts and
digitally signs email by selecting Add A Certificate.
Enable Per-Message Switch Only available when Use S/MIME is enabled. Allow end users to choose which
individual email messages to sign and encrypt using the native iOS mail client (iOS 8+
supervised only).
Settings and Security
Prevent moving messages Prevent moving mail from an Exchange mailbox to another mailbox on the device.
Prevent use in third-party apps Prevent other apps from using the Exchange mailbox to send messages.
Prevent Recent Address
syncing
Prevent suggestions for contacts when sending mail in Exchange.
Prevent Mail Drop Prevent Apple's Mail Drop feature from being used.
Chapter 10: Profiles &Resources
141
VMware AirWatch Mobile Device Management Guide | v.2017.10 | October 2017
Copyright © 2017 VMware, Inc. All rights reserved.
Configure Advanced Settings for macOS Exchange
Enable your macOS devices to retrieve exchange email by configuring advanced settings.
Setting Description
Internal Exchange Host The name of the secure server for EAS use. This option and following appear when
Native Mail Client is selected.
Port Enter the number of the port assigned for communication with the Internal Exchange
Host.
Internal Server Path The location of the secure server for EAS use.
Use SSL For Internal
Exchange Host
Communicate with the Internal Exchange Host by enabling the Secure Socket Layer (SSL).
External Exchange Host The name of the external server for EAS use.
Port Enter the number of the port assigned for communication with the External Exchange
Host.
External Server Path The location of the external server for EAS use.
Use SSL For External
Exchange Host
Communicate with the External Exchange Host by enabling the Secure Socket Layer
(SSL).
Configure Advanced Settings for Android Exchange
Advanced Exchange settings for Android consist of historical syncing, restrictions, sync scheduling, and S/MIME.
Configure these options to deliver email to your Android devices.
Setting Description
Settings
Past Days of Calendar to
Sync
Synchronize a selected number of past days on the device calendar.
Allow Sync Tasks Allow tasks to sync with device.
Maximum Email
Truncation Size (KB)
Specify the size (in kilobytes) beyond which email messages are truncated when they are
synced to the devices.
Email Signature Enter the email signature to be displayed on outgoing emails.
Ignore SSL Errors Allow devices to ignore SSL errors for Agent processes.
Restrictions
Allow Attachments Allow attachments with email.
Maximum Attachment
Size
Specify the maximum attachment size in MB.
Allow Email Forwarding Allow the forwarding of email.
Allow HTML Format Specify whether email synchronized to the device can be in HTML format.
If this setting is disabled, all email is converted to text.
Chapter 10: Profiles &Resources
142
VMware AirWatch Mobile Device Management Guide | v.2017.10 | October 2017
Copyright © 2017 VMware, Inc. All rights reserved.
Setting Description
Disable screenshots Disallow screenshot to be taken on the device.
Sync Interval Enter the number of minutes between syncs.
Peak Days for Sync Schedule
lSchedule the peak weekdays for syncing and the Start Time and End Time on selected
days.
lSet the frequency of Sync Schedule Peak and Sync Schedule Off Peak.
oChoosing Automatic syncs email whenever updates occur.
oChoosing Manual only syncs email when selected.
oChoosing a time value syncs the email on a set schedule.
lEnable Use SSL,Use TLS, and Default Account.
S/MIME Settings
Select Use S/MIME From here you can select an S/MIME certificate you associate as a User
Certificate on the Credentials payload.
lS/MIME Certificate – Select the certificate to be used.
lRequire Encrypted S/MIME Messages – Require encryption of S/MIME messages.
lRequire Signed S/MIME Messages – Require all S/MIME messages be digitally signed.
Provide a Migration Host if you are using S/MIME certificates for encryption.
Configure Advanced Settings for Windows Phone Exchange
Advanced Exchange settings for Windows Phone consist of sync scheduling and data protection settings. Configure these
settings to deliver exchange email to your devices securely.
Settings Descriptions
Settings
Next Sync
Interval (Min)
Enter the number of minutes between syncs.
Diagnostic
Logging
Select the type of diagnostic logging you want to gather.
Content Type
Require Data
Protection
Under Lock
Protect data when a device is pin locked.
When the device is configured to use a pin lock, the protected data is encrypted using a separate
enterprise key. If someone gains access to the device pin lock, your organization's email and data is
protected by a separate key.
Protected
Domains
Available only when Require Data Protection Under Lock is enabled. Enter the lookup values of the
exchange domains that you want to protect.
Chapter 10: Profiles &Resources
143
VMware AirWatch Mobile Device Management Guide | v.2017.10 | October 2017
Copyright © 2017 VMware, Inc. All rights reserved.
Settings Descriptions
Allow Email
Sync
Allow the syncing of email. Disabling this setting removes access to email through Exchange Active
Sync.
Configure Advanced Settings for Windows Desktop Exchange
Advanced Exchange settings for Windows Desktop consist of sync scheduling and data protection settings. Configure
these settings to deliver exchange email to your devices securely.
Settings Descriptions
Settings
Next Sync Interval (Min) Select the frequency, in minutes, that the device syncs with the EAS server.
Diagnostic Logging Log information for troubleshooting purposes.
Content Type
Allow Email Sync Allow the syncing of email messages.
Chapter 10: Profiles &Resources
144
VMware AirWatch Mobile Device Management Guide | v.2017.10 | October 2017
Copyright © 2017 VMware, Inc. All rights reserved.
Add a Wi-Fi Resource
You can add a resource dedicated to providing devices with the means to connect to a wireless network, allowing them
to send and receive data securely.
1. Add a Wi-Fi resource by completing the following settings.
Setting Description
Resource Details
Resource Name Name of the profile to be displayed in the AirWatch Console.
Description A brief description of the profile that indicates its purpose.
Connection Info
Service Set Identifier Enter an identifier that is associated with the name (SSID) of the desired Wi-Fi network.
Hidden Network Enable if the network is not open to broadcast.
Auto-Join Setting that directs the device to join the network automatically.
Encryption Use the drop-down menu to specify if data transmitted using the Wi-Fi connection is
encrypted.
Displays based on the Security Type.
Password Enter the password for the email account. Enable the Show Characters check box to
display the unredacted password.
2. Click Next to proceed to the Platforms selection. Choose among the following supported platforms, opting for either
the default settings or Advanced Settings.
lConfigure Advanced Settings for Wi-Fi Proxy on page 146.
lConfigure Advanced Settings for macOS Wi-Fi on page 146.
lConfigure Advanced Settings for Android Wi-Fi on page 147.
lConfigure Advanced Settings for Windows Wi-Fi on page 148.
3. Click Next to proceed to the Assignment section.
4. Assign the resource to devices by completing the following settings.
Setting Description
Assignment Type Determines how the resource is deployed to devices.
lAuto – The resource is deployed to all devices automatically.
lOptional – An end user can optionally install the resource from the Self-Service Portal
(SSP), or it can be deployed to individual devices at the discretion of the administrator.
Managed By The organization group with administrative access to the resource.
Chapter 10: Profiles &Resources
145
VMware AirWatch Mobile Device Management Guide | v.2017.10 | October 2017
Copyright © 2017 VMware, Inc. All rights reserved.
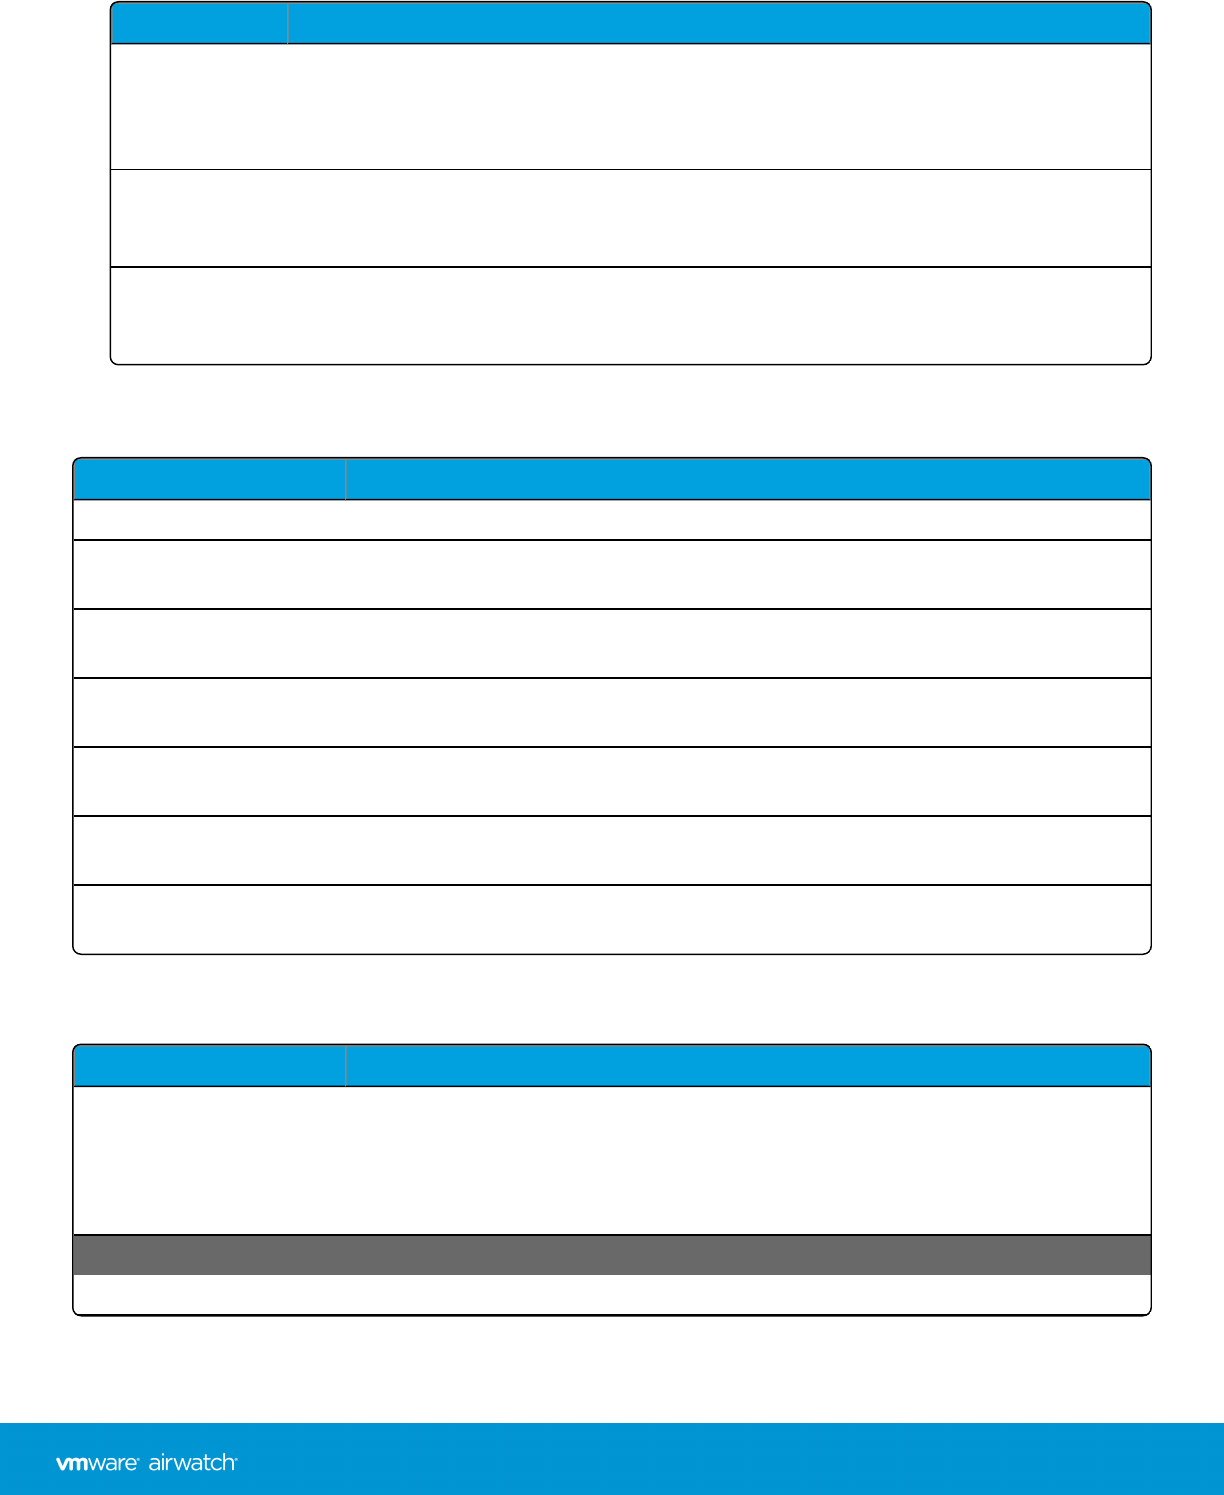
Setting Description
Assigned Groups Refers to the group to which you want the device resource added. Includes an option to create
a new smart group which can be configured with specs for minimum OS, device models,
ownership categories, organization groups and more. For more information, see Assignment
Groups Overview on page 65.
Exclusions If Yes is selected, a new text box Excluded Groups displays which enables you to select those
groups you want to exclude from the assignment of this resource. See Exclude Smart Groups in
Profiles and Policies on page 73 for details.
View Device
Assignment
After you have made a selection in the Assigned Group text box, you may select this button to
preview a list of all devices to which this resource is assigned, taking the smart group
assignments and exclusions into account.
Configure Advanced Settings for Wi-Fi Proxy
Configure advanced Wi-Fi settings to connect devices to AirWatch using a proxy.
Setting Description
Proxy Type Choose between None,Manual, and Auto.
Proxy URL Available only when Proxy Type is Auto. Enter the URL of the Wi-Fi proxy that the device
uses to connect.
Allow a direct connection if
PAC is unreachable
Available only when Proxy Type is Auto. Enable if you want to allow the device to
connect during times when the proxy auto config file is not accessible.
Proxy Server Available only when Proxy Type is Manual. Enter the name of the proxy server to which
your devices connect.
Proxy Server Port Available only when Proxy Type is Manual. Include the port number of the proxy server
through which the device connects to the proxy server.
Proxy user name Available only when Proxy Type is Manual. Enter a user name recognized by the proxy
server.
Proxy Password Available only when Proxy Type is Manual. Enter the password that corresponds to the
user name entered.
Configure Advanced Settings for macOS Wi-Fi
Configure advanced Wi-Fi settings to connect your devices to AirWatch using a proxy.
Setting Description
Profile Choose the target of the proxy settings configuration.
Device – Limit the proxy settings to the specific macOS device
User – Apply the proxy settings to the user of the macOS device.
Apply proxy settings to both targets by inserting a check in both boxes.
Proxy
Proxy Type Choose between None,Manual, and Auto.
Chapter 10: Profiles &Resources
146
VMware AirWatch Mobile Device Management Guide | v.2017.10 | October 2017
Copyright © 2017 VMware, Inc. All rights reserved.
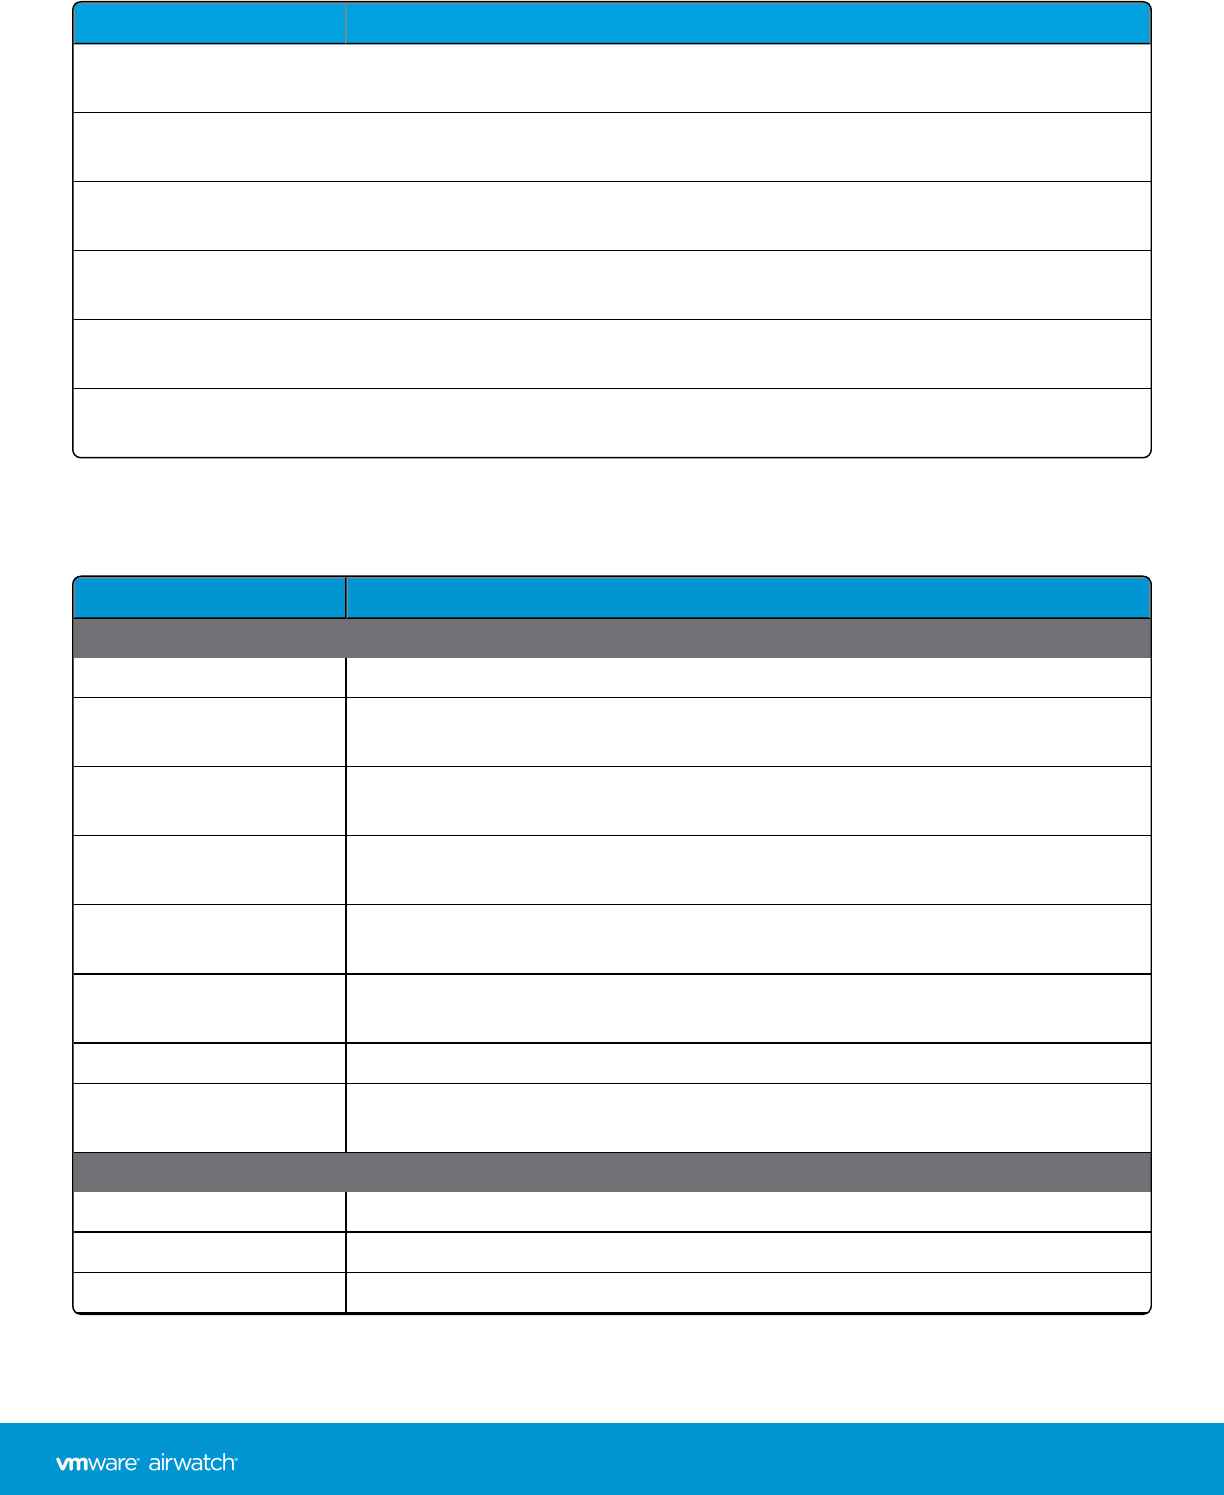
Setting Description
Proxy URL Available only when Proxy Type is Auto. Enter the URL of the Wi-Fi proxy that the device
uses to connect.
Allow a direct connection if
PAC is unreachable
Available only when Proxy Type is Auto. Enable if you want to allow the device to
connect during times when the proxy auto config file is not accessible.
Proxy Server Available only when Proxy Type is Manual. Enter the name of the proxy server to which
your devices connect.
Proxy Server Port Available only when Proxy Type is Manual. Include the port number of the proxy server
through which the device connects to the proxy server.
Proxy user name Available only when Proxy Type is Manual. Enter a user name recognized by the proxy
server.
Proxy Password Available only when Proxy Type is Manual. Enter the password that corresponds to the
user name entered.
Configure Advanced Settings for Android Wi-Fi
Advanced Wi-Fi settings for Android consist of Fusion and Proxy settings. These settings allow you to specify wireless
configurations for radio frequencies, spectral masks, and proxy server settings.
Setting Description
Fusion
Include Fusion Settings Display the main settings for the Fusion feature.
Set Fusion 802.11d /Enable
802.11d
Use an 802.11d wireless specification for operation in additional regulatory domains.
Set Country Code /Country
Code
Set the Country Code for use in the 802.11d specifications.
Set RF Band Display all the Radio Frequency specification options including 2.4 GHz and 5-GHz
channel masking.
Set 2.4 GHz /Enable 2.4
GHz
Use the 2.4-GHz wireless frequency.
2.4 GHz Channel Mask Reduce adjacent channel interference by applying a channel or spectral mask around
the 2.4-GHz frequency.
Set 5 GHz /Enable 5 GHz Use the 5-GHz wireless frequency.
5 GHz Channel Mask Reduce adjacent channel interference by applying a channel or spectral mask around
the 5-GHz frequency.
Proxy
Enable Manual Proxy Display the proxy server settings.
Proxy Server Enter the proxy domain name.
Proxy Server Port Enter the port number to be used by the proxy server.
Chapter 10: Profiles &Resources
147
VMware AirWatch Mobile Device Management Guide | v.2017.10 | October 2017
Copyright © 2017 VMware, Inc. All rights reserved.
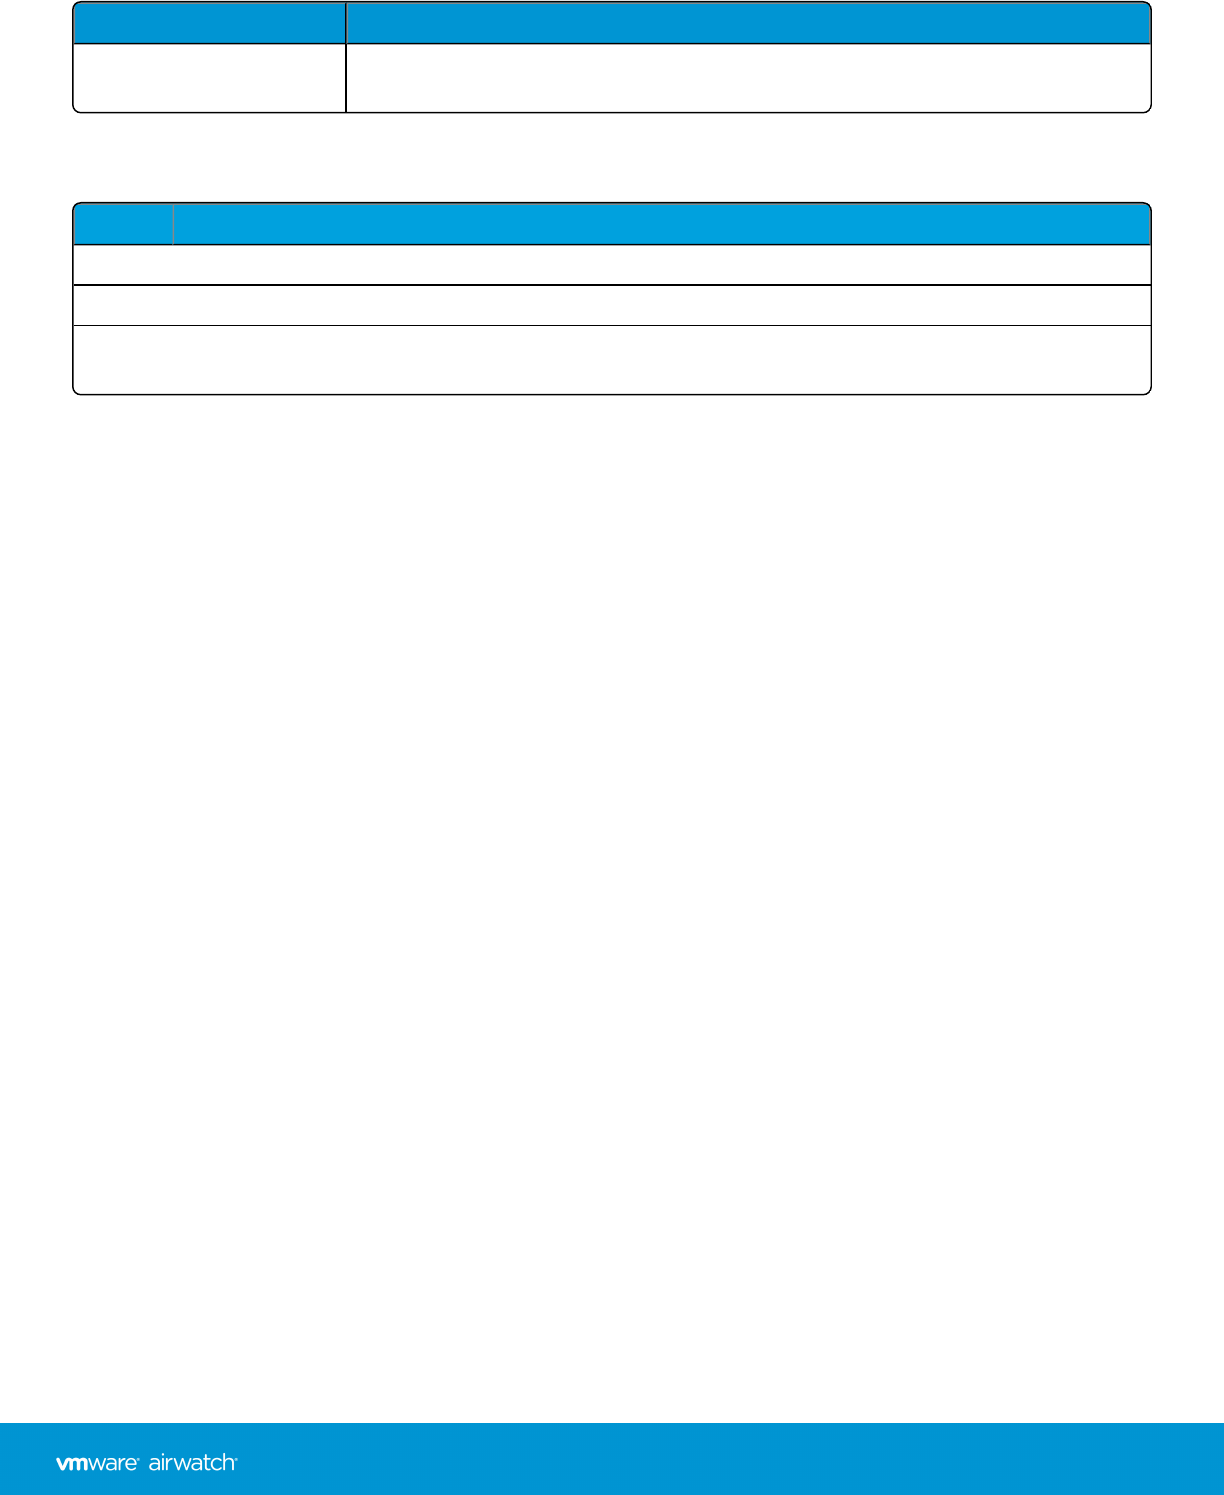
Setting Description
Exclusion List Enter hostnames that are not routed through the proxy. Use an asterisk as a wildcard
for the domain. For example, *.air-watch.com.
Configure Advanced Settings for Windows Wi-Fi
Configure advanced Wi-Fi settings to connect your Windows devices (desktop and phone) to AirWatch using a proxy.
Setting Description
Proxy Enable the use of a proxy to connect your Windows devices to AirWatch.
URL Available only when Proxy is enabled. Enter the URL of the Wi-Fi proxy that the device uses to connect.
Port Available only when Proxy is enabled. Include the port number of the proxy server through which the device
connects to the proxy server.
Chapter 10: Profiles &Resources
148
VMware AirWatch Mobile Device Management Guide | v.2017.10 | October 2017
Copyright © 2017 VMware, Inc. All rights reserved.
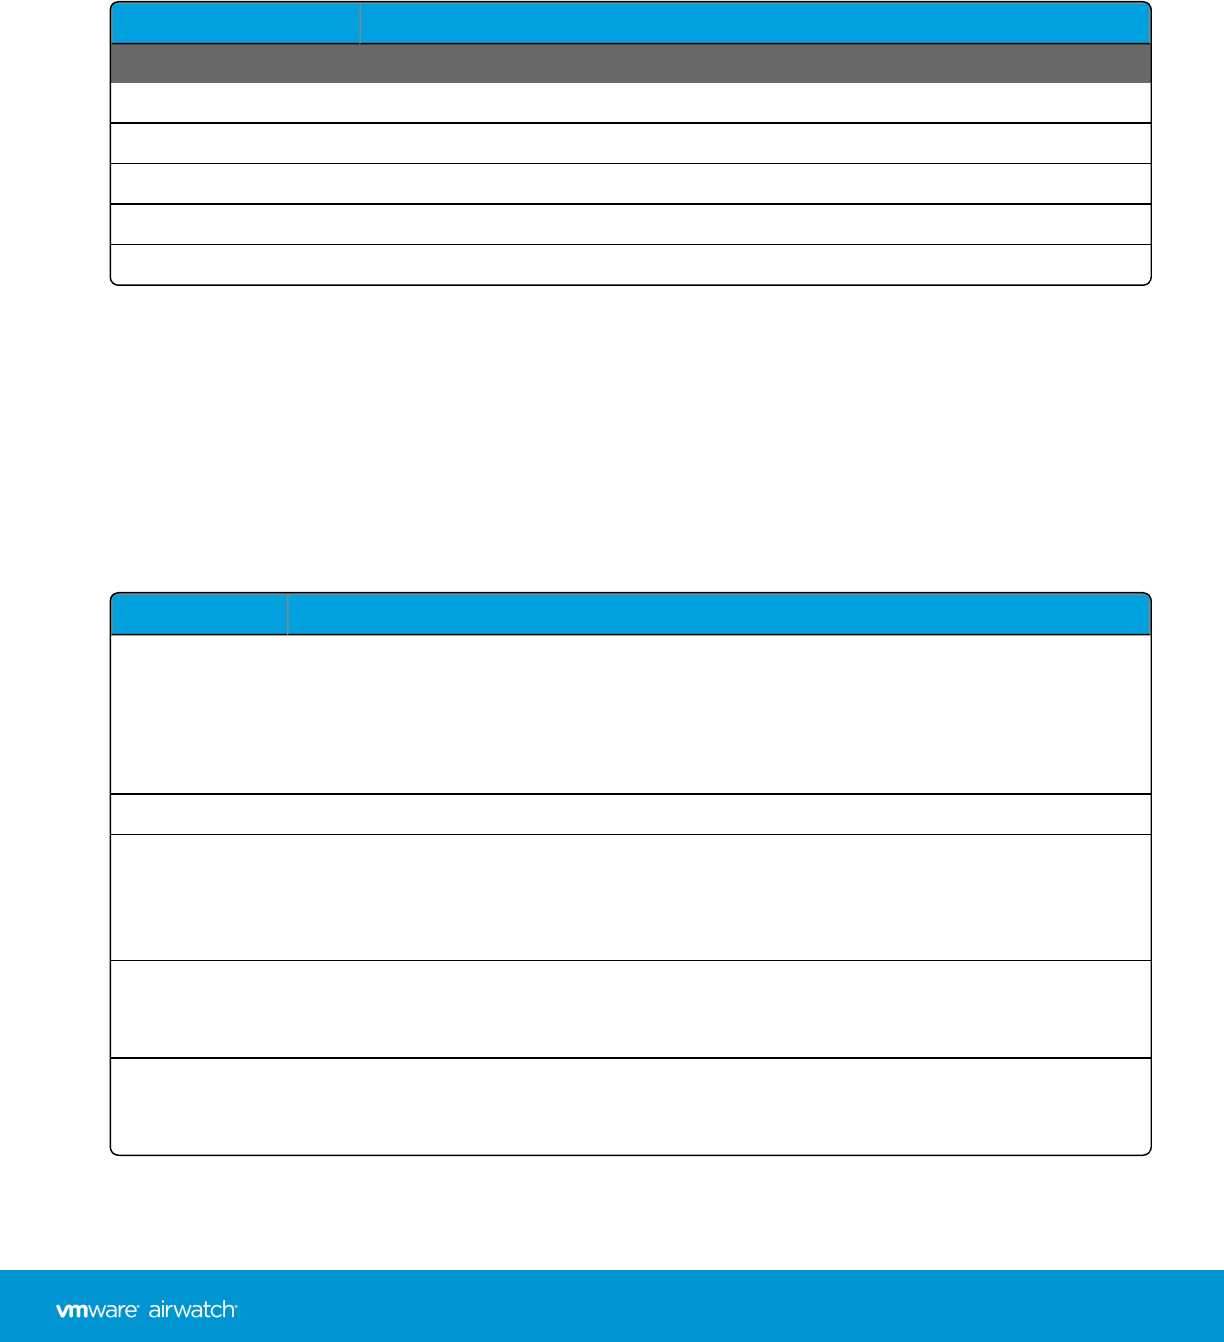
Add a VPN Resource
You can add a resource dedicated to providing a virtual private network (VPN). A VPN enables users to send and receive
data across public networks as though they were connected directly to a private network.
1. Add a VPN resource by completing the following settings.
Setting Description
Resource Details
Resource Name Name of the profile to be displayed in the AirWatch Console.
Description A brief description of the profile that indicates its purpose.
Connection Info
Connection Type Select the type of secure connection from the drop-down listing.
Server Enter the server URL.
2. Click Next to proceed to the Platforms selection. Choose among the following supported platforms, opting for either
the default settings or Advanced Settings.
lConfigure Advanced Settings for iOS VPN on page 150
lConfigure Advanced Settings for Android VPN on page 151
lConfigure Advanced Settings for Windows Phone VPN on page 152
3. Click Next to proceed to the Assignment section.
4. Assign the resource to devices by completing the following settings.
Setting Description
Assignment Type Determines how the resource is deployed to devices.
lAuto – The resource is deployed to all devices automatically.
lOptional – An end user can optionally install the resource from the Self-Service Portal
(SSP), or it can be deployed to individual devices at the discretion of the administrator.
Managed By The organization group with administrative access to the resource.
Assigned Groups Refers to the group to which you want the device resource added. Includes an option to create
a new smart group which can be configured with specs for minimum OS, device models,
ownership categories, organization groups and more. For more information, see Assignment
Groups Overview on page 65.
Exclusions If Yes is selected, a new text box Excluded Groups displays which enables you to select those
groups you want to exclude from the assignment of this resource. See Exclude Smart Groups in
Profiles and Policies on page 73 for details.
View Device
Assignment
After you have made a selection in the Assigned Group text box, you may select this button to
preview a list of all devices to which this resource is assigned, taking the smart group
assignments and exclusions into account.
Chapter 10: Profiles &Resources
149
VMware AirWatch Mobile Device Management Guide | v.2017.10 | October 2017
Copyright © 2017 VMware, Inc. All rights reserved.

Configure Advanced Settings for iOS VPN
Advanced VPN settings for iOS consist of connection and authentication settings, proxy, and vendor configurations.
Enable these settings as necessary to configure VPN for iOS.
Settings Description
Connection Info
Account Enter the name of the VPN account.
Disconnect on
Idle (min)
Allow the VPN to auto-disconnect after a specific amount of time. Support for this value depends on
the VPN provider.
Send All
Traffic
Select to force all traffic through the specified network.
Per App VPN
Rules
Select to enable and configure Per App VPN rules.
Connect
Automatically
Select to allow the VPN to connect automatically to chosen Safari Domains. This option appears when
the Per App VPN Rules check box is selected.
Provider Type Select the type of Per-App VPN provider. Determine how to tunnel traffic, either through an
application layer or IP layer by choosing between AppProxy and PacketTunnel. This option appears
when the Per App VPN Rules check box is selected.
Safari
Domains
Enter each domain to which you want the Per-App VPN to connect automatically. These domains are
internal sites that trigger an automatic VPN connection. This option appears when the Per App VPN
Rules check box is selected.
Authentication
User
Authentication
Authenticate end users by either uploading a Certificate or by requiring a Password for VPN access.
Group Name Enter the AirWatch group name.
Password Available only when User Authentication is set to Password. Enter the password for the AirWatch
Group Name.
Identity
Certificate
This setting is only available when User Authentication is set to Certificate. Select Add A Certificate to
either name and upload a certificate file or choose an existing certificate authority using a certificate
template.
Enable
VPNOn
Demand
This setting is only available when User Authentication is set to Certificate. Enable VPN On Demand to
use certificates to establish VPN connections automatically.
Use new On-
Demand keys
This setting is only available when User Authentication is set to Certificate. Enable the option to
activate a VPN connection when end users access any of the specified domains.
Match Domain
or Host
This setting is only available when User Authentication is set to Certificate. Enter a domain or
hostname that, when accessed by an end user, triggers the activation of a VPN connection.
Chapter 10: Profiles &Resources
150
VMware AirWatch Mobile Device Management Guide | v.2017.10 | October 2017
Copyright © 2017 VMware, Inc. All rights reserved.
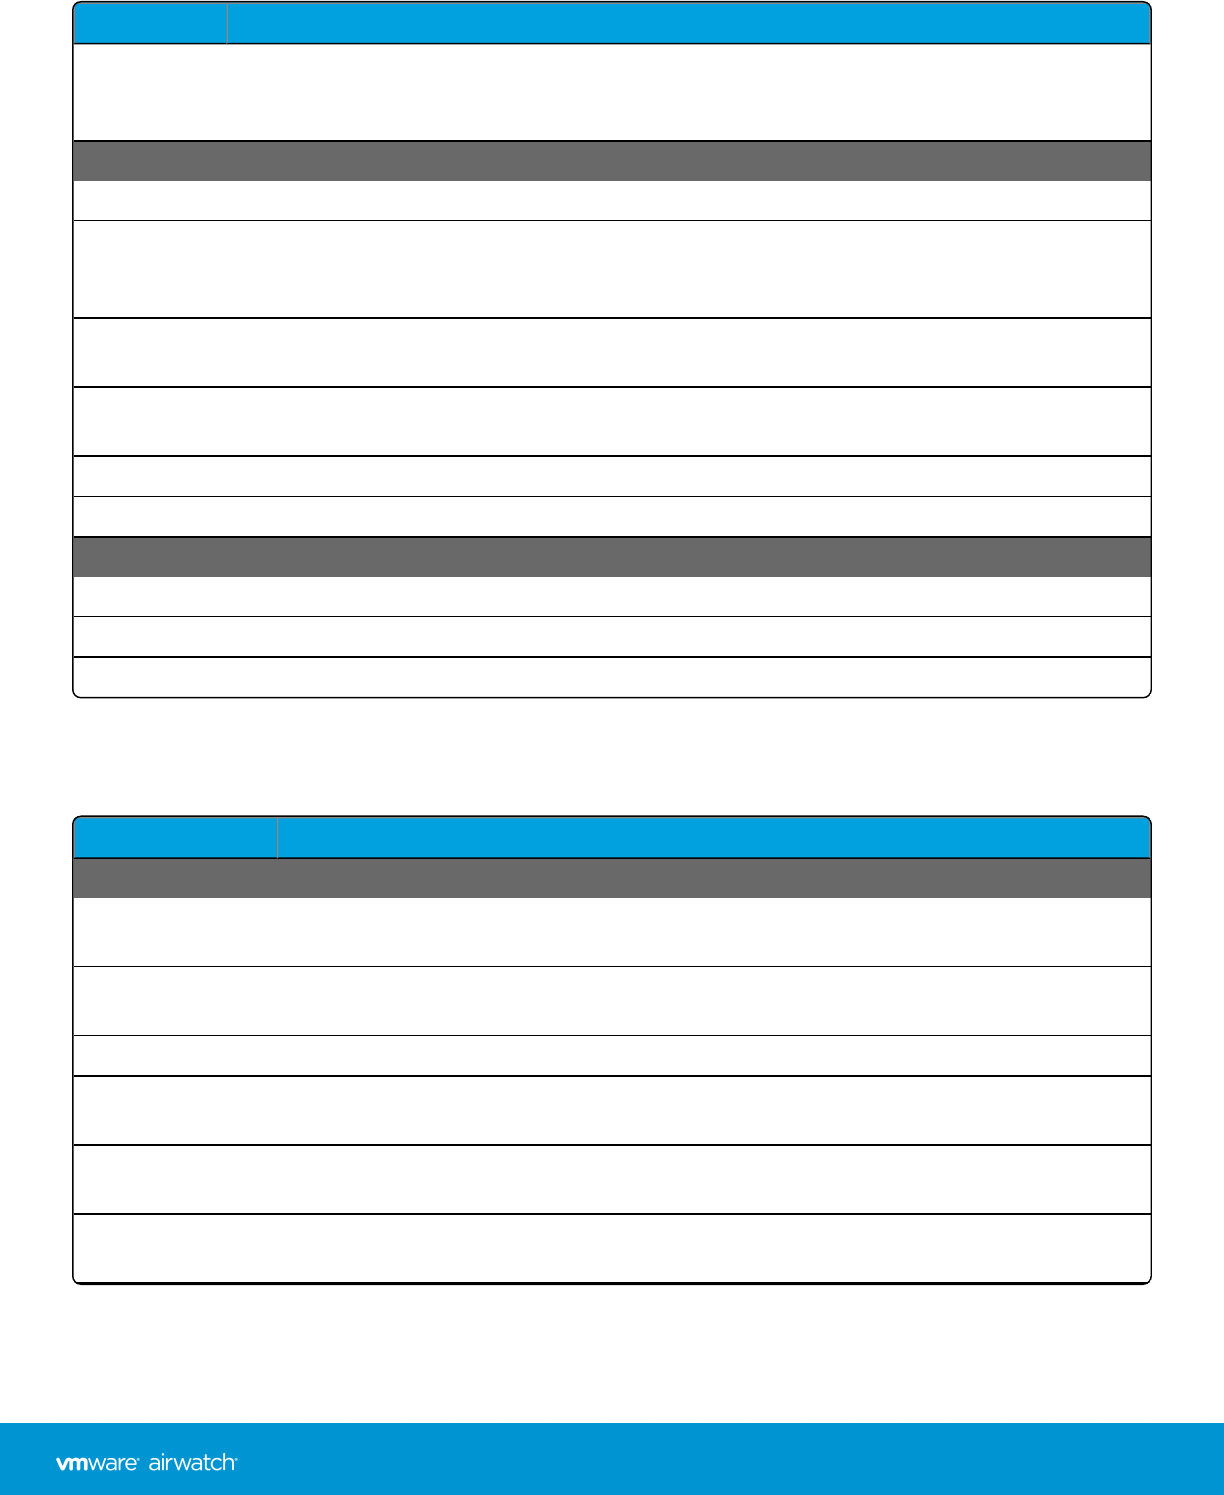
Settings Description
On-Demand
Action
This setting is only available when User Authentication is set to Certificate. Choose the domain-
specific on-demand action that takes place when end users activate a VPN connection. Choose among
Always Establish, Never Establish, and Establish if Needed.
Proxy
Proxy Choose among None,Manual, and Auto.
Proxy Server
Auto Config
URL
Available only when Proxy is Auto. Enter the URL of the Wi-Fi proxy that the device uses to connect.
Server Available only when Proxy is Manual. Enter the name of the proxy server to which your devices
connect.
Port Available only when Proxy is Manual. Include the port number of the proxy server through which the
device connects to the proxy server.
User name Available only when Proxy is Manual. Enter a user name recognized by the proxy server.
Password Available only when Proxy is Manual. Enter the password that corresponds to the user name entered.
Vendor Configurations
Vendor Keys Create custom keys using the vendor config dictionary.
Key Enter the specific key provided by the vendor.
Value Enter the VPN value for each key.
Configure Advanced Settings for Android VPN
Advanced VPN settings for Android consist of authentication and VPN on demand, which you must configure to establish
VPN for Android devices.
Setting Description
Authentication
Identify Certificate Enter the certificate credentials used to authenticate the connection by selecting Add a
Certificate.
Credential Source Select the source of the credentials. Choose between Upload, Defined Certificate Authority, and
User Certificate.
Credential Name Available when Credential Source is set to Upload. Enter the name of the uploaded credential.
Certificate Available when Credential Source is set to Upload. Click Upload to select a certificate file from
your device.
Certificate Authority Available when Credential Source is set to Defined Certificate Authority. Select the certificate
authority from a drop-down listing.
Certificate Template Available when Credential Source is set to Defined Certificate Authority. This setting auto-
populates based on your selection in the Certificate Authority setting.
Chapter 10: Profiles &Resources
151
VMware AirWatch Mobile Device Management Guide | v.2017.10 | October 2017
Copyright © 2017 VMware, Inc. All rights reserved.

Setting Description
S/MIME Available when Credential Source is set to User Certificate. Choose between the user-centric
S/MIME Signing certificate or S/MIME Encryption certificate.
Enable VPNOn Demand
Enable VPNOn
Demand
Enable VPN On Demand to use certificates to establish VPN connections automatically.
Enable VPN by entering the name of the app and selecting the plus sign to the left of the
magnifying glass icon. You may enter more than one application.
Configure Advanced Settings for Windows Phone VPN
Configure device VPN settings to access corporate infrastructure remotely and securely. You can also limit traffic through
the VPN by configuring Per-app VPN connections. Then set the VPN to connect automatically whenever the specified
application is launched.
Settings Descriptions
Connection Info
Advanced
Connection
Settings
Configure advanced routing rules for device VPN connections.
Routing
Addresses
Select Add to enter the IP Addresses and Subnet Prefix Size for the VPN connection. You may add
additional routing addresses as needed.
Available when Advanced Connection Settings is enabled.
DNS Routing
Rules
Select Add to enter the Domain Name on which the VPN server is hosted. Enter the Domain Name,
DNS Servers, and Web Proxy Servers for each specific domain.
Available when Advanced Connection Settings is enabled.
Routing Policy Allow traffic to use the local network connection by selecting Allow Direct Access to External
Resources. Conversely, select Force All Traffic Through VPN to send all traffic through the VPN.
Available when Advanced Connection Settings is enabled.
Proxy Select Auto Detect to detect any proxy servers used by the VPN automatically. Select Manual to
configure the proxy server. Available when Advanced Connection Settings is enabled.
Proxy Auto
Config URL
Enter the URL for the proxy auto config. Available only when Proxy is set to Auto Detect.
Server Enter the URL for the proxy server configuration settings.
Displays when Proxy is set to Manual
Port Enter the port number used to access the proxy server.
Displays when Proxy is set to Manual.
Bypass proxy
for local
Bypass the proxy server when the device detects it is on the local network.
Chapter 10: Profiles &Resources
152
VMware AirWatch Mobile Device Management Guide | v.2017.10 | October 2017
Copyright © 2017 VMware, Inc. All rights reserved.

Settings Descriptions
Authentication
Authentication
Type
Select the authentication protocol for the VPN.
lEAP – Allows for various authentication methods.
lMachine Certificate – Detects a client certificate in the device certificate store to use for
authentication.
Protocols Select the type of EAP authentication.
lEAP-TLS – Smart Card or client certificate authentication.
lEAP-MSCHAPv2 – User name and Password.
Credential
Type
Select Use Certificate to use a client certificate. Select Use Smart Card to use a Smart Card to
authenticate.
Displays when the Protocols option is set to EAP-TLS.
Simple
Certificate
Selection
Simplify the list of certificates from which the user selects. The most recently issued certificate is
presented and the entity for which the certificate was issued groups the certificates.
Displays when the Protocols option is set to EAP-TLS.
Use Windows
login
Credentials
Use the same credentials as the Windows device.
Displays when the Protocols option is set to EAP-MSCHAPv2.
VPN Traffic Rules
App Identifier Specify the App to which the traffic rules apply by entering the application package family name.
lPackage Family Name, for example: AirWatchLLC.AirWatchMDMAgent_htcwkw4rx2gx4
VPN On
Demand
Automatically connect using VPN when the application is launched.
Routing Policy Select the routing policy for the app.
lAllow Direct Access to External Resources allows for both VPN traffic and traffic through the local
network connection.
lForce All Traffic Through VPN forces all traffic through the VPN.
Chapter 10: Profiles &Resources
153
VMware AirWatch Mobile Device Management Guide | v.2017.10 | October 2017
Copyright © 2017 VMware, Inc. All rights reserved.

Settings Descriptions
VPNTraffic
Filters
Add traffic filters for specific Legacy and Modern applications.
Select Add New Filter to add Filter Types and Filter Values for the routing rules. Only traffic from the
specified app that matches these rules can be sent through the VPN.
lIP Protocol – Numeric value 0–255 representing the IP protocol to allow. For example, TCP = 6 and
UDP = 17.
lIP Address – A list of comma-separated values specifying remote IP address ranges to allow.
lPorts – A list of comma-separated values specifying remote port ranges to allow. For example,
100–120, 200, 300–320. Ports are only valid when the protocol is set to TCP or UDP.
lLocalPorts – A list of comma-separated values specifying local port ranges through which traffic is
allowed.
lLocalAddress – A list of comma-separated values specifying local IP addresses through which
traffic is allowed.
Device Wide
VPN Rules
Select Add to add traffic rules for the entire device.
Select Add to add Filter Types and Filter Values for the routing rules. Only traffic that matches these
rules can be sent through the VPN.
Policies
Remember
Credentials
Remember the end user's login credentials.
Always On Force the VPN connection on, which activates the VPN connection when the network connection
disconnects and reconnects.
VPN
Lockdown
Force the VPN on, disable any network access if the VPN is not connected, and prevent a connection
or modification to other VPN profiles.
Trusted
Network
Enter trusted network addresses separated by commas. The VPN does not connect when a trusted
network connection is detected.
Split Tunnel Allow end users to use a split tunnel VPN.
This text box applies to Windows Phone 8.1 devices only.
Bypass for
Local
Bypass the VPN connection for local intranet traffic. For example, you do not use the VPN connection
if you are also connected to your work network connection at the office.
This text box applies to Windows Phone 8.1 devices only.
Trusted
Network
Detection
Use Trusted Network Detection when connecting to the VPN.
This text box applies to Windows Phone 8.1 devices only.
Connection
Type
Select the connection type you want to allow.
Always ON leaves the VPN connection running always.
This text box applies to Windows Phone 8.1 devices only.
Chapter 10: Profiles &Resources
154
VMware AirWatch Mobile Device Management Guide | v.2017.10 | October 2017
Copyright © 2017 VMware, Inc. All rights reserved.

Settings Descriptions
Idle
Disconnection
Time
Set the maximum amount of time that can pass without connectivity requests before automatically
disconnecting the VPN.
This text box applies to Windows Phone 8.1 devices only.
VPN On Demand
Allows Apps Select Add to define apps to have all their traffic secured over the VPN.
You may add as many apps as you like.
Allowed
Networks
Select Add to define networks.
All traffic over configured networks is secured over the VPN.
You may add as many networks as you like.
Excluded Apps Select Add to define excluded apps.
All traffic to these apps is NOT secured over the VPN.
You may add as many excluded apps as you like.
Excluded
Networks
Select Add to define excluded networks.
All traffic over excluded networks is NOT secured over the VPN.
You may add as many excluded networks as you like.
DNS Suffix
Search List
Select Add to define the DNS Suffix Search List.
DNS suffixes are appended to shortened URLs for DNS resolution and connectivity.
You may add as many DNS suffixes as you like.
View Device Assignment
Selecting the Save & Publish button upon configuring a device profile displays the View Device Assignment page and
serves as a preview of affected (or unaffected) devices.
Depending upon which kind of change you make to the device profile, the Assignment Status column reflects various
states.
lAdded – The profile is added and published to the device.
lRemoved – The profile is removed from the device.
Chapter 10: Profiles &Resources
155
VMware AirWatch Mobile Device Management Guide | v.2017.10 | October 2017
Copyright © 2017 VMware, Inc. All rights reserved.

lUnchanged – Indicates that the profile is not scheduled to be republished to the device.
lUpdated – Indicates that the profile is republished to a device that already has the profile assigned.
Select Publish to finalize the changes and, if necessary, republish any required profile.
Compliance Profiles Overview
To understand Compliance Profiles, you must have a full understanding of device profiles and compliance policies. Device
profiles serve as the foundation while compliance policies act as a security gate protecting corporate content.
Device profiles grant you control over a wide range of device settings. These settings include passcode complexity,
Geofencing, time schedules, device hardware functionality, Wi-Fi, VPN, Email, Certificates, and many more.
The compliance engine monitors rules, enforces actions, and applies escalations (all of which you define). Compliance
profiles, however, seek to provide the compliance engine with all the options and settings ordinarily available only to
device profiles. For more information, see Compliance Policies Overview on page 162.
For example, you can make a special device profile that is identical to your normal device profile, only with more
restrictive settings. You can then apply this special device profile in the Actions tab when you define your compliance
policy. With such an arrangement, if the user fails to make their device compliant, you can apply the more restrictive
compliance profile.
Add a Compliance Profile
Compliance profiles are created and saved in the same manner as Auto and Optional device profiles.
1. Navigate to Devices > Profiles & Resources > Profiles, then select Add, then Add Profile, then select a platform.
2. Select a Name for your compliance profile that you can recognize later.
3. In the General profile tab, select 'Compliance' in the Assignment Type drop-down setting.
4. Complete the remaining General and Payload settings.
5. When finished, select Save & Publish.
For step-by-step instructions on completing a device profile, see Add General Profile Settings on page 130
Next, you must select this profile in your compliance policy.
6. Navigate to Devices > Compliance Policies > List View and select Add, then select a platform.
7. Define the Rules and select Next.
8. In the Actions tab, make the following selections.
lSet the first drop-down menu to 'Profile'.
lSet the second drop-down menu to 'Install Compliance Profile'.
lSet the third drop-down menu to the device profile you named in step 2.
9. Select Next and proceed configuring the remaining settings including Assignment and Summary tabs.
10. Save the compliance policy by selecting Finish or Finish and Activate.
Chapter 10: Profiles &Resources
156
VMware AirWatch Mobile Device Management Guide | v.2017.10 | October 2017
Copyright © 2017 VMware, Inc. All rights reserved.
For step-by-step instructions on completing a compliance policy, see Add a Compliance Policy on page 168.
Geofences
AirWatch enables you to define your profile with a Geofence. A geofence limits the use of the device to specific areas
including corporate offices, school buildings, and retail department stores. You can think of a Geofence as a virtual
perimeter for a real-world geographic area.
For example, a Geofence with a 1-mile radius may apply to your office, while a much larger Geofence may apply
approximately to an entire state. Once you have defined a Geofence you can apply it to profiles, SDK applications, and
AirWatch apps such as the VMware Content Locker, and more.
lEnabling a Geofence is a two-step process.
1. Add a Geofencing Area on page 158.
2. Apply a Geofence to a Profile on page 158.
lGeofencing is available for Android and iOS devices.
lRemember that while Geofencing is combined with another payload to enable security profiles based on location,
consider having only one payload per profile.
For more information about how AirWatch tracks GPSlocation, see the following VMware AirWatch Knowledge
Base article:https://support.air-watch.com/articles/115001663108.
Geofencing Support on iOS Devices
Geofencing for apps only works on iOS devices that have Location Services running. In order for location services to
function, the device must be connected to either a cellular network or a Wi-Fi hotspot. Otherwise, the device must have
integrated GPS capabilities.
For Wi-Fi only devices, GPS data is reported when the device is on, unlocked, and the agent is open and being used. For
cellular devices, GPS data is reported when the device changes cell towers. VMware Browser and Content Locker reports
GPS data when the end user opens and uses them.
Devices in an "airplane mode" result in location services (and therefore Geofencing) being deactivated.
Device Wi-Fi Cellular Network Built-In GPS
iPhone ✓ ✓ ✓
iPad Wi-Fi + 3G/4G ✓ ✓ ✓
iPad Wi-Fi ✓
iPod Touch ✓
The following requirements must all be met for the GPS location to be updated.
lThe device must have the AirWatch Agent running.
lPrivacy settings must allow GPS location data to be collected (Groups &Settings > All Settings > Devices & Users >
General > Privacy).
Chapter 10: Profiles &Resources
157
VMware AirWatch Mobile Device Management Guide | v.2017.10 | October 2017
Copyright © 2017 VMware, Inc. All rights reserved.
lThe Apple iOS Agent settings must enable “Collect Location Data” (Groups &Settings > All Settings > Devices &
Users > Apple > Apple iOS > Agent Settings).
Set the Agent SDK settings to either Default SDK settings or any other SDK settings instead of "None."
Add a Geofencing Area
You must define a Geofencing area before you can apply one to a device.
1. Access the Area settings page by navigating to Devices > Profiles & Resources > Profile Settings > Areas. Select
Geofencing Area.
2. Enter an Address and the Radius of the geofence in kilometers or miles. Also, you may double-click any area on the
map to set the central location.
3. Select Click to Search to view on a map roughly where you want to apply the geofence.
Note: Integration with Bing maps requires that "insecure content" is loaded on this page. If a location search
does not load as expected, you may need to allow "Show all Content" for your browser.
4. Enter the Area Name (how it appears in the AirWatch Console) and select Save.
Next, you must Apply a Geofence to a Profile on page 158.
Apply a Geofence to a Profile
Once you have added a Geofencing area, you can apply it to a profile and combine it with other payloads to create more
robust profiles.
For example, you can define geofence areas around each of your offices. Then add a Restrictions payload that disallows
access to the Game Center, multiplayer gaming, YouTube content, and other settings. Once activated, employees of the
organization group to whom the profile is applied no longer have access to these functions while in the office.
1. Navigate to Devices > Profiles & Resources > Profiles > Add then select Add Profile and select a platform.
2. Select the check box Install only on devices inside selected areas on the General tab. An Assigned Geofence Areas
text box displays. If no Geofence Area has been defined, the menu directs you back to the Geofence Area creation
menu.
3. Enter one or multiple Geofencing areas to this profile.
4. Configure a payload such as Passcode, Restrictions, or Wi-Fi that you want to apply only while devices are inside the
selected Geofencing areas.
5. Select Save & Publish.
If a user manually disables location services on their iOS device, AirWatch can no longer collect location updates.
AirWatch considers the device to be in the location where services were disabled.
iBeacons
iBeacon is specific to iOS and is used to manage location awareness. For more information, please see the VMware
AirWatch iOSPlatform Guide, available on Accessing Other Documents on page 217.
Chapter 10: Profiles &Resources
158
VMware AirWatch Mobile Device Management Guide | v.2017.10 | October 2017
Copyright © 2017 VMware, Inc. All rights reserved.
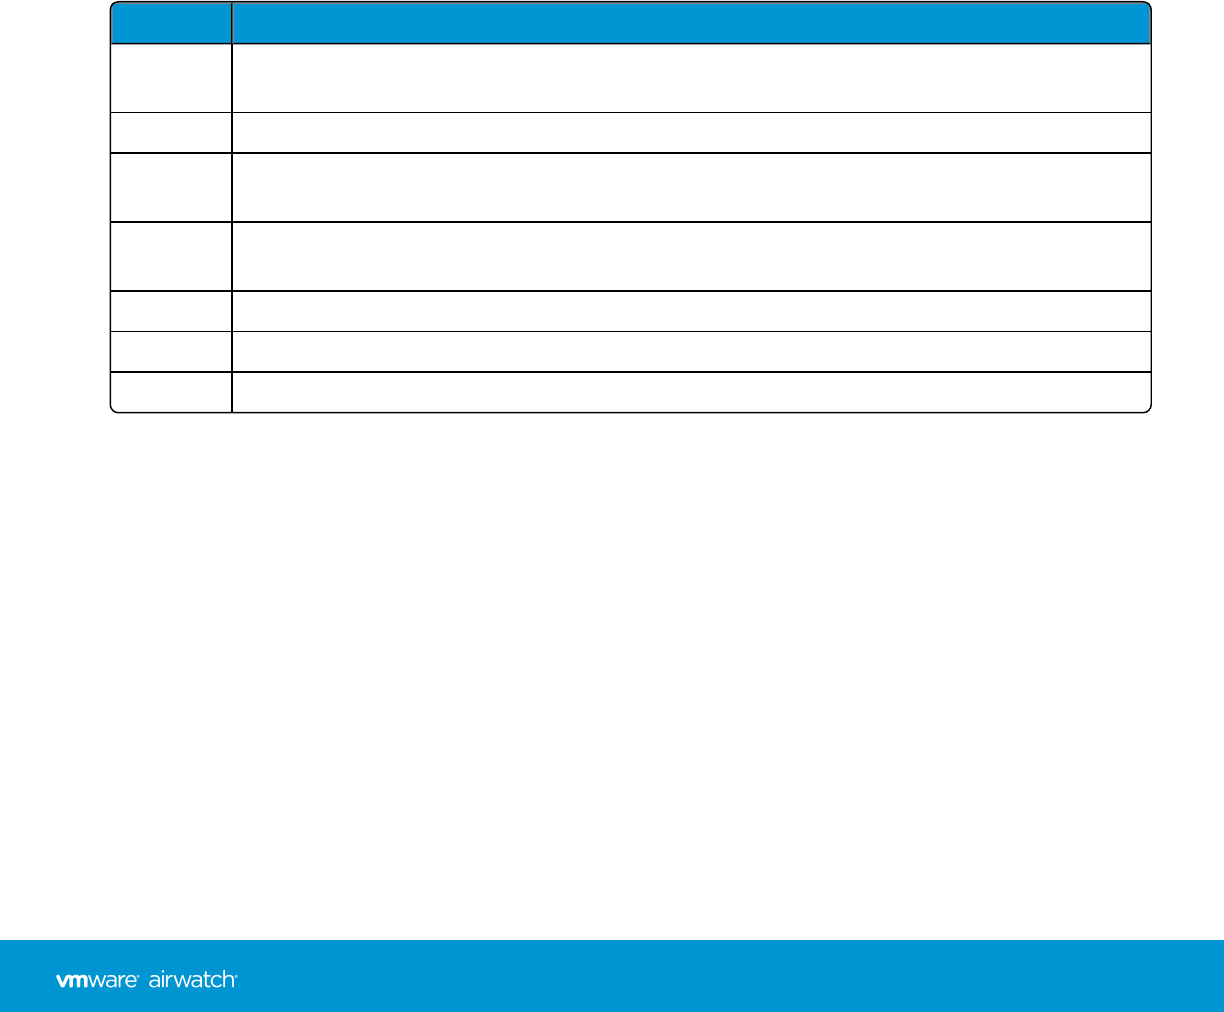
Time Schedules
Time Schedules enable you to control when each device profile is active. The profile dictates how restrictive or permissive
the device usability is. The time schedule simply puts the profile installation on a schedule.
Enabling a Time Schedule is a two-step process.
1. Define a Time Schedule.
2. Apply a Time Schedule to a Profile.
Define a Time Schedule
You must define a time schedule before applying it to a device profile.
1. Navigate to Devices > Profiles & Resources > Profiles Settings > Time Schedules.
2. Select Add Schedule above the Schedule Name column.
3. Select Add Schedule located under the Day of the Week column, then complete the following settings.
Setting Description
Schedule
Name
Enter the name of the time schedule that appears in the listing.
Time Zone Select the time zone of the organization group under which the device is managed.
Day of the
Week
Apply a scheduled profile installation by choosing a day of the week.
AllDay Make the profile install at midnight on the selected Day of the Week. Selecting this check box
removes the Start Time and End Time columns.
Start Time Select the time of day you want the profile to be installed.
End Time Select the time of day you want the profile to be uninstalled.
Actions Remove the day's schedule by clicking the X.
4. Select Save.
Apply a Time Schedule to a New Profile
Once you have defined a time schedule, you can apply it to a new profile and combine it with other payloads to create
more robust profiles. For instance, you can define time schedules for normal work hours and add a Restrictions payload
that denies access to YouTube, multiplayer gaming, and other apps.
Once activated, the organization group users to whom the profile was applied no longer have access to these functions
during the specified times.
1. Navigate to Devices > Profiles & Resources > Profiles > ADD and select your platform.
2. Select Enable Scheduling and install only during selected time periods on the General tab.
3. In the Assigned Schedules box, enter one or more Time Schedules to this profile.
Chapter 10: Profiles &Resources
159
VMware AirWatch Mobile Device Management Guide | v.2017.10 | October 2017
Copyright © 2017 VMware, Inc. All rights reserved.
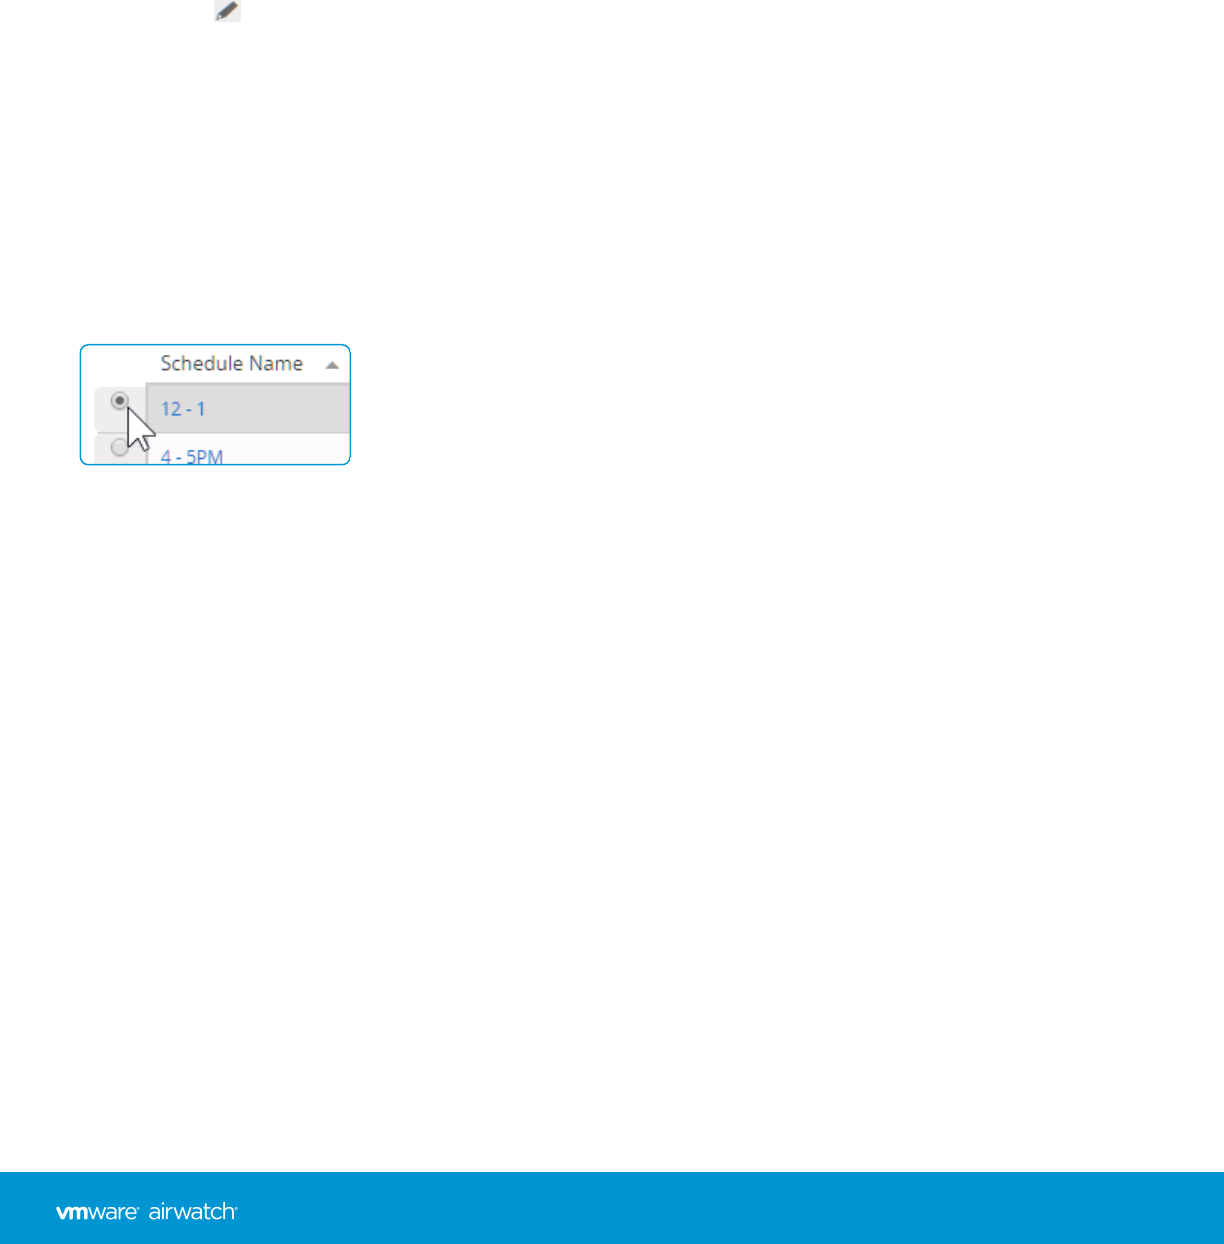
4. Configure a payload, such as Passcode, Restrictions, or Wi-Fi that you want to apply only while devices are inside the
time frames.
5. Select Save & Publish.
Apply a Time Schedule to an Existing Profile
You can apply a previously defined time schedule to an existing profile.
1. Navigate to Devices > Profiles & Resources > Profiles and select the profile from the listing for editing. Select the
pencil icon ( ) or click the profile name.
2. In the General tab of the profile page, enable the setting Enable Scheduling and install only during selected time
periods.
3. In the Assigned Schedule setting that appears, select from the drop-down menu the previously saved time schedule.
4. Select Save & Publish.
Delete a Time Schedule
Keep your collection clear of unused time schedules by deleting them. You cannot delete a time schedule that is assigned
to a profile. Unassign the schedule from the profile before deleting.
1. Select the radio button next to the time schedule you want to delete.
2. Select the Delete button.
Chapter 10: Profiles &Resources
160
VMware AirWatch Mobile Device Management Guide | v.2017.10 | October 2017
Copyright © 2017 VMware, Inc. All rights reserved.


Compliance Policies Overview
The compliance engine is an automated tool by AirWatch that ensures all devices abide by your policies. These policies
may include basic security settings such as requiring a passcode and having a minimum device lock period. For certain
platforms, you may also decide to set and enforce certain precautions. These precautions include setting password
strength, blacklisting certain apps, and requiring device check-in intervals to ensure that devices are safe and in-contact
with AirWatch.
Once devices are determined to be out of compliance, the compliance engine warns users to address compliance errors
to prevent disciplinary action on the device. For example, the compliance engine can trigger a message to notify the user
that their device is out of compliance. If corrections are not made in the amount of time specified, the device loses access
to certain content and functions that you define. The available compliance policies and actions vary by platform.
You can automate escalations when corrections are not made, for example, locking down the device and notifying the
user to contact you to unlock the device. These escalation steps, disciplinary actions, grace periods, and messages are all
customizable with the AirWatch Console.
There are two methods by which compliance is measured.
lReal Time Compliance (RTC) – Unscheduled samples received from the device are used to determine whether or not
the device is compliant. The samples are requested on demand by the admin.
lEngine Compliance – The compliance engine, a software algorithm that receives and measures scheduled samples,
primarily determines the compliance of a device. The time intervals for the running of the scheduler are defined in
the console by the admin.
Enforcing mobile security policies involves a five-step procedure.
lChoosing your platform – Determine on which platform you want to enforce compliance.
lBuilding your policies – Customize your policy to cover everything from an application list, compromised status,
encryption, manufacturer, model and OS version, passcode and roaming.
lDefining escalation – Configure time-based actions in minutes, hours, or days and take a tiered approach to those
actions.
lSpecifying actions – Send SMS, email, or push notifications to the user device or send an email only to an
Administrator. Request device check-in, remove or block specific profiles, install compliance profiles, remove, or
block apps and perform an enterprise wipe.
lConfiguring assignments – Assign your compliance policy by organization group or smart group then confirm the
assignment by device.
Compliance Policies List View
The Compliance Policies List View enables you to see all the active and inactive compliance policies and their
configurations. Devices are placed in a Pending compliance status during an initial enrollment. Creating, saving, and
assigning a policy to an enrolled device causes the device compliance status to either be Compliant or NonCompliant.
Similarly, changes to Smart Group assignments only cause a device compliance policy to be Pending when the device is
new to the smart group. Devices already assigned to the smart group cannot see their compliance status change simply
because the smart group expands (or contracts) its assignment.
View the Compliance Policy List view by navigating to Devices > Compliance Policies > List View.
Chapter 11: Compliance Policies
162
VMware AirWatch Mobile Device Management Guide | v.2017.10 | October 2017
Copyright © 2017 VMware, Inc. All rights reserved.
Setting Description
Status Filter the listing between All,Active and Inactive statuses.
Actions Menu View and edit individual policies, view devices to which the policy has been assigned, and
delete policies you no longer want to keep.
Compliant / NonCompliant
/ Pending / Assigned
The digits in this column feature hypertext links that, when selected, display the View
Devices page for the specific status on the selected compliance policy.
The Assigned status is the sum of Compliant,NonCompliant, and Pending devices.
For more information, see View Devices Page on page 163.
View Devices Page
The View Devices page is used to view compliance details for each device that is assigned to the selected policy. It is
displayed when you select one of the hyperlink text digits in the Compliance Policy List View column titled Compliant /
NonCompliant / Pending / Assigned.
Filter the listing among these four statuses by selecting from the Status drop-down menu. The Assigned status is the
sum of Compliant,Non-Compliant, and Pending statuses.
There are three listed device statuses in the Status column.
Chapter 11: Compliance Policies
163
VMware AirWatch Mobile Device Management Guide | v.2017.10 | October 2017
Copyright © 2017 VMware, Inc. All rights reserved.
lCompliant – The assigned compliance policy has determined that the device is compliant.
lNon-Compliant – The assigned compliance policy has determined that the device is non-compliant.
lPending – The compliance policy is scheduled to be assigned to the newly enrolled device.
You can also confirm the C/E/S (ownership) of the device, the Platform/OS/Model,Organization Group,Last
Compliance Check,Next Compliance Check, and Actions Taken. The Actions Taken column lists the actions that have
been taken to address non-compliant devices.
You may also choose to reevaluate the compliance for a specific device. Engage the compliance engine and re-report
compliance status on the device by selecting Re-Evaluate Compliance ( ).
Chapter 11: Compliance Policies
164
VMware AirWatch Mobile Device Management Guide | v.2017.10 | October 2017
Copyright © 2017 VMware, Inc. All rights reserved.

Compliance Policy Rules by Platform
Not all compliance policy rules apply to all platforms. The Add a Compliance Policy page is platform-based so you see
only the compliance policy rules and actions that apply to your device.
Use the following table to determine which rules are available to deploy to your devices.
Compliance Policy Android Apple iOS Apple macOS Chrome OS QNX Windows
Rugged
Windows
7
Windows
Phone
Windows
Desktop
Application List ✓ ✓ ✓
Antivirus Status ✓
Cell Data Usage ✓ ✓
Cell Message Usage ✓
Cell Voice Usage ✓
Compliance Attribute ✓
Compromised Status ✓ ✓ ✓
Device Last Seen ✓ ✓ ✓ ✓ ✓ ✓ ✓ ✓ ✓
Device Manufacturer ✓
Encryption ✓ ✓ ✓ ✓ ✓ ✓
Firewall Status ✓ ✓
Free Disk Space ✓
iBeacon Area ✓
Interactive Certificate Profile
Expiry
✓ ✓
Last Compromised Scan ✓ ✓
MDMTerms of Use Acceptance ✓ ✓ ✓ ✓ ✓ ✓ ✓
Model ✓ ✓ ✓ ✓
OSVersion ✓ ✓ ✓ ✓ ✓ ✓ ✓
Passcode ✓ ✓ ✓ ✓ ✓
Roaming * ✓ ✓ ✓
Roaming Cell Data Usage * ✓ ✓
Security Patch Version ✓
SIMCard Change * ✓ ✓ ✓
Windows Automatic Update
Status
✓
Windows Copy Genuine
Validation
✓
*Note: Only available for Telecom Advanced Users.
Chapter 11: Compliance Policies
165
VMware AirWatch Mobile Device Management Guide | v.2017.10 | October 2017
Copyright © 2017 VMware, Inc. All rights reserved.
Compliance Policy Rules Descriptions
Compliance policy rules enable you to construct a solid foundation for your policy as the component parts of a policy.
The actions, escalations, and assignments that follow are all built upon these rules.
Setting Description
Application List Detect specific blacklisted apps that are installed on a device, or detect all apps that are not
whitelisted. You can prohibit certain apps (such as social media apps) and vendor-blacklisted
apps, or permit only the apps you specify. You can also specify a minimum version number for
an app.
Antivirus Status Detect whether or not an antivirus app is running. The compliance policy engine checks the
Action Center on the device for an antivirus solution. If your third-party solution does not
display in the action center, it reports as not monitored.
Cell
Data/Message/Voice
Use
Detect when end-user devices exceed a particular threshold of their assigned telecom plan. For
this policy to take effect Telecom must be configured.
Compliance
Attribute***
Compare attribute keys in the device against third-party endpoint security, which returns a
Boolean value representing device compliance.
Compromised
Status
Detect if the device is compromised. Prohibit the use of jailbroken or rooted devices that are
enrolled with AirWatch.
Jailbroken and rooted devices strip away integral security settings and may introduce malware
in your network and provide access to your enterprise resources. Monitoring for compromised
device status is especially important in BYOD environments where employees have various
versions of devices and operating systems.
For more information about compromised device detection using VMware AirWatch,
see the following Knowledge Base articles:https://support.air-
watch.com/articles/115001662748 and https://support.air-
watch.com/articles/115001662508.
Device Last Seen Detect if the device fails to check in within an allotted time window.
Device
Manufacturer
Detect the device manufacturer allowing you to identify certain Android devices. You can
specifically prohibit certain manufacturers or permit only the manufacturers you specify.
Encryption Detect whether or not encryption is enabled on the device.
Firewall Status Detect whether or not a firewall app is running. The compliance policy engine checks the Action
Center on the device for a firewall solution. If your third-party solution does not display in the
action center, it reports as not monitored.
Free Disk Space Detect the available storage space on the device.
iBeacon Area Detect whether your iOS device is within the area of an iBeacon Group. See "Configuring
iBeacon" in the VMware AirWatch Apple iOSPlatform Guide, available in Accessing Other
Documents on page 217.
Chapter 11: Compliance Policies
166
VMware AirWatch Mobile Device Management Guide | v.2017.10 | October 2017
Copyright © 2017 VMware, Inc. All rights reserved.
Setting Description
Interactive
Certificate Profile
Expiry
Detect when an installed profile on the device expires within the specified length of time.
Last Compromised
Scan
Detect if the device has not reported its compromised status within the specified schedule.
MDM Terms of Use
Acceptance
Detect if the end user has not accepted the current MDM Terms of Use within a specified length
of time.
Model Detect the device model. You can specifically prohibit certain models or permit only the models
you specify.
OS Version Detect the device OS version. You can prohibit certain OS versions or permit only the operating
systems and versions you specify.
Passcode Detect whether a passcode is present on the device.
Roaming* Detect if the device is roaming.
Roaming Cell Data
Use*
Detect roaming cell data use against a static amount of data measured in MB or GB.
Security Patch
Version**
Detect the date of the Android device's most recent security patch from Google.
SIM Card Change* Detect if the SIM card has been replaced.
Windows Automatic
Update Status
Detect whether Windows Automatic Update has been activated. The compliance policy engine
checks the Action Center on the device for an Update solution. If your third-party solution does
not display in the action center, it reports as not monitored.
Windows Copy
Genuine Validation
Detect whether the copy of Windows currently running on the device is genuine.
* Only available for Telecom Advanced Users.
** Only available for Android version 6.0 and later.
*** Only available for Windows Desktop devices.
Compliance Policies Actions by Platform
The supported actions by platform, enforced by compliance policies, are as follows.
Compliance Policy Action Android Apple iOS Apple macOS Chrome OS QNX Windows
Rugged
Windows
7
Windows
Phone
Windows
Desktop
Application
Block/Remove Managed
App
✓ ✓ ✓
Block/Remove All Apps ✓ ✓ ✓
Command
Request Device Check-In ✓ ✓ ✓
Chapter 11: Compliance Policies
167
VMware AirWatch Mobile Device Management Guide | v.2017.10 | October 2017
Copyright © 2017 VMware, Inc. All rights reserved.
Compliance Policy Action Android Apple iOS Apple macOS Chrome OS QNX Windows
Rugged
Windows
7
Windows
Phone
Windows
Desktop
Enterprise Wipe ✓ ✓ ✓ ✓ ✓ ✓ ✓
Enterprise Reset ✓ ✓
Change Roaming Settings ✓
(iOS 5+)
OSUpdates ✓
(DEP only)
Email
Block Email ✓ ✓
Notify
Send Email to User ✓ ✓ ✓ ✓ ✓ ✓ ✓ ✓
Send SMS to Device ✓ ✓ ✓ ✓
Send Push Notification to
Device
✓ ✓ ✓ ✓ ✓ ✓ ✓
Send Email to
Administrator
✓ ✓ ✓ ✓ ✓ ✓ ✓ ✓
Profile
Install Compliance Profile ✓ ✓ ✓ ✓
Block/Remove Profile ✓ ✓ ✓ ✓ ✓
Block/Remove Profile
Type
✓ ✓ ✓
Block/Remove All Profiles ✓ ✓ ✓ ✓ ✓
Add a Compliance Policy
Adding a compliance policy is a process comprising four segments: Rules, Actions, Assignment, and Summary. Not all
features and options presented in this guide are available for all platforms. The AirWatch Console bases all available
options on the initial platform choice, so the console never presents an option that your device cannot use.
Note: Windows Rugged compliance is only supported on Motorola devices (Enterprise Reset action enforces
compliance).
Configure the compliance engine with profiles and automated escalations by completing the Compliance Policy tabs.
1. Navigate to Devices > Compliance Policies > List View and select Add.
2. Select a platform from the Add Compliance Policy page on which to base your compliance policy.
3. Detect conditions by configuring the Rules tab by first matching Any or All of the rules.
Chapter 11: Compliance Policies
168
VMware AirWatch Mobile Device Management Guide | v.2017.10 | October 2017
Copyright © 2017 VMware, Inc. All rights reserved.
lAdd Rule – Select to add additional rules and parameters.
lPrevious and Next – Select to go back to the previous step or advance to the next step, Actions, respectively.
4. Define the consequences of noncompliance within of your policy by completing the Actions tab. Available actions are
platform-dependent.
5. Specify Actions and Escalations that occur. An Escalation is simply an automatic action taken when the prior Action
does not cause the device user to take steps to make their device compliant.
Select the options and types of actions to perform.
Setting Description
Actions and Escalations
Mark as
Not
Compliant
check box
Enables you to perform actions on a device without marking it as non-compliant. The compliance
engine accomplishes this task by observing the following rules.
lThe Mark as Not Compliant check box is enabled (checked) by default for each newly added Action.
lIf one action has the Mark as Not Compliant option enabled (checked), then all subsequent actions and
escalations are also marked as not compliant (checked). These subsequent check boxes cannot be edited.
lIf an action has the Mark as Not Compliant option disabled (not checked), then the next action/escalation
has the option enabled by default (checked). This check box can be edited.
lIf an action/escalation has the Mark as Not Compliant option disabled and the device does not pass the
compliance rule, the device is officially 'compliant'. The prescribed action is then run.
lA device's status remains 'compliant' unless it encounters an action/escalation with the Mark as Not
Compliant check box enabled. Only then is the device considered non-compliant.
Application Block or remove a managed application.
You can enforce application compliance by establishing a whitelist, blacklist, or required list of
applications. For more information on establishing a robust Mobile Application Management (MAM)
plan, see the VMware AirWatch MAM Guide, available on Accessing Other Documents on page 217.
Command Initiate a device check-in or run an enterprise wipe.
Email Block the user from email.
If you are using Mobile Email Management together with the Email compliance engine, then the
'Block Email' action applies. Access this option by navigating to Email > Compliance Policies > Email
Policies. This action lets you use Device Compliance policies such as blacklisted apps with any Email
compliance engine policies you configure. With this Action selected, email compliance is triggered
with a single device policy update if the device falls out of compliance.
Notify Send an email, SMS, or push notification to the device or administrator. Multiple emails may be
inserted into the accompanying CC text box provided they are separated by commas.
For email-related Notify actions, there is a drop-down menu enabling you to select an email template.
There is also a link that, when selected, displays the Message Template page in a new window. This
page enables you to customize your own message template. Enable this drop-down menu by
deselecting the check box to the right of the CC: text box.
Chapter 11: Compliance Policies
169
VMware AirWatch Mobile Device Management Guide | v.2017.10 | October 2017
Copyright © 2017 VMware, Inc. All rights reserved.
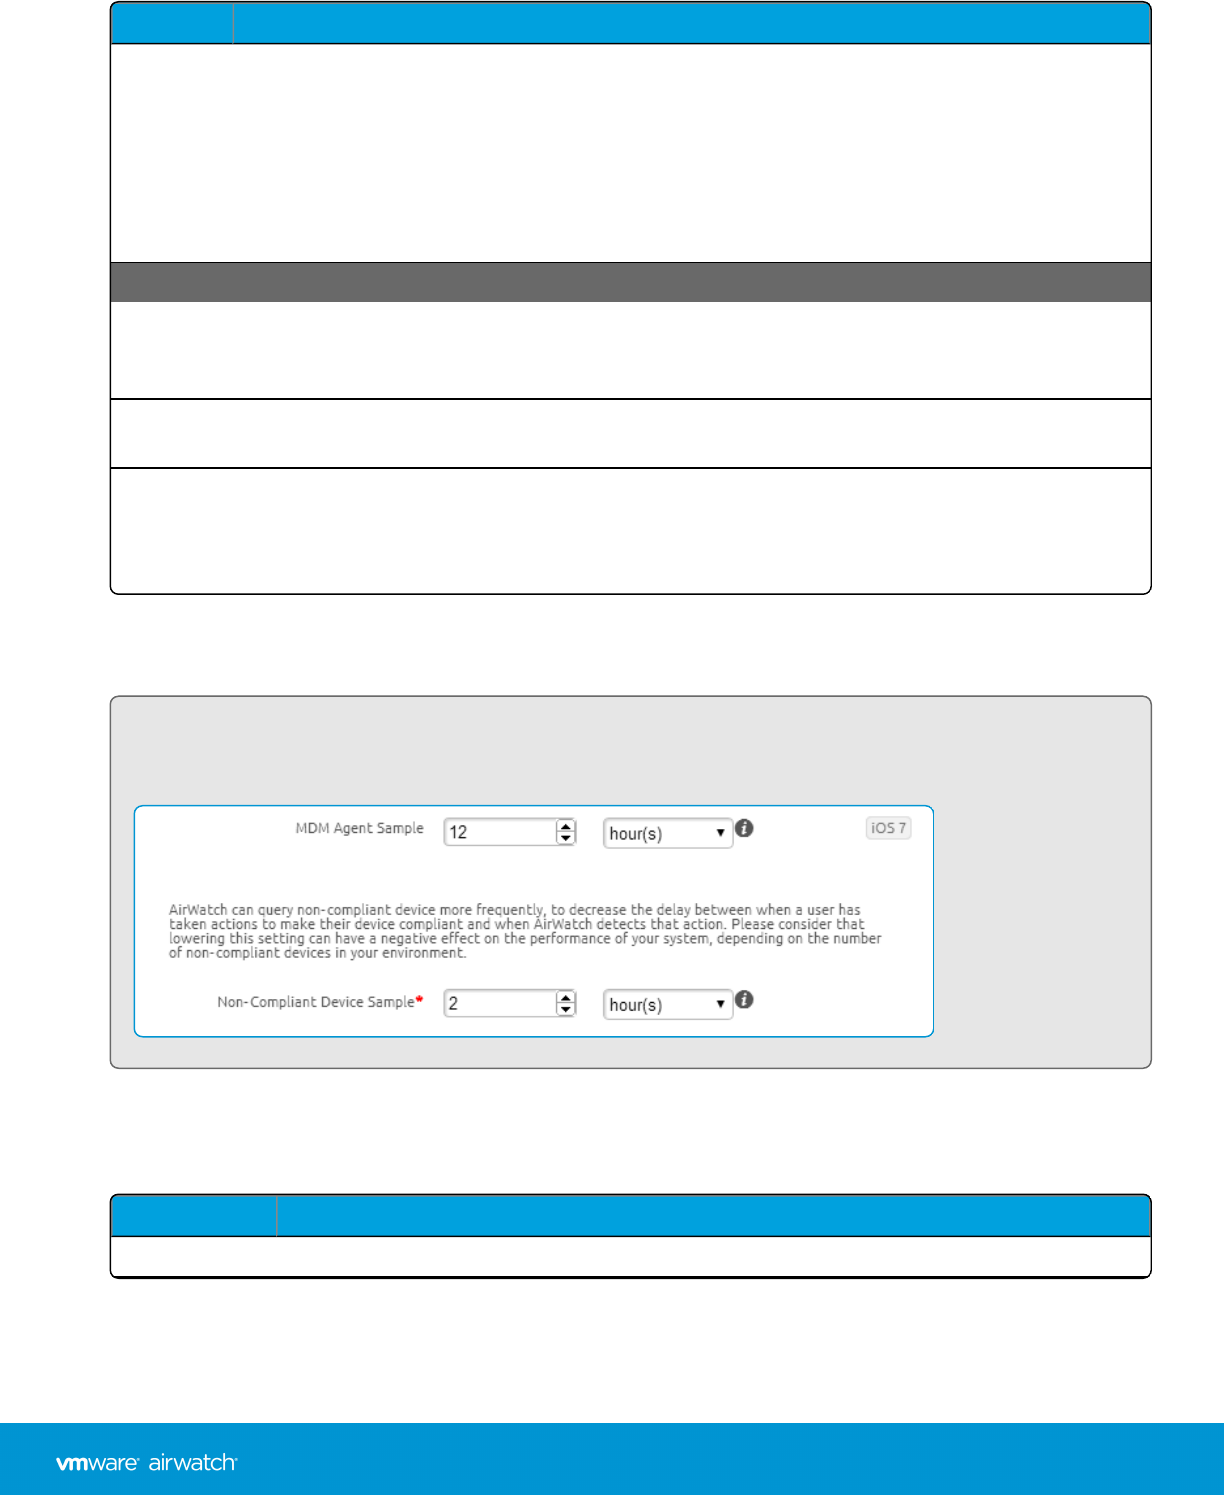
Setting Description
Profile Install, Remove, or Block a specific Device Profile, Device Profile type, or Compliance Profile.
Compliance profiles are created and saved in the same manner as Auto and Optional device profiles.
Navigate to Devices > Profiles & Resources > Profiles, then select Add, then Add Profile. Select a
platform, and in the General profile tab, select 'Compliance' in the Assignment Type drop-down
setting. Compliance profiles are applied in the Actions tab of the Add a Compliance Policy page to
be used when an end user violates a compliance policy. Select Install Compliance Profile from the
drop-down and then select the previously saved compliance profile.
Escalations Only
Add
Escalation
button
Creates an escalation. When adding escalations, it is a best practice to increase the security of actions
with each additional escalation.
After time
Interval...
You may delay the escalation by minutes, hours, or days.
...Perform
the
following
actions
Repeat – Enable this check box to repeat the escalation a selected number of times before the next
scheduled action begins.
For macOS, you can only perform the following actions:
Tip: Query non-compliant iOS 7+ devices to decrease the delay between when a user makes their device
compliant and when AirWatch detects that change. Set this sample by navigating to Groups & Settings >
Settings > Devices & Users > Apple > MDM Sample Schedule and setting the Non-Compliant Device Sample.
6. Determine which devices are subjected to (and excluded from) the compliance policy by completing the Assignment
and Summary tabs of the Add Compliance Policy page.
You can then name, finalize, and activate the policy with the Summary tab.
Setting Description
Managed By Select the organization group by which this compliance policy is managed.
Chapter 11: Compliance Policies
170
VMware AirWatch Mobile Device Management Guide | v.2017.10 | October 2017
Copyright © 2017 VMware, Inc. All rights reserved.
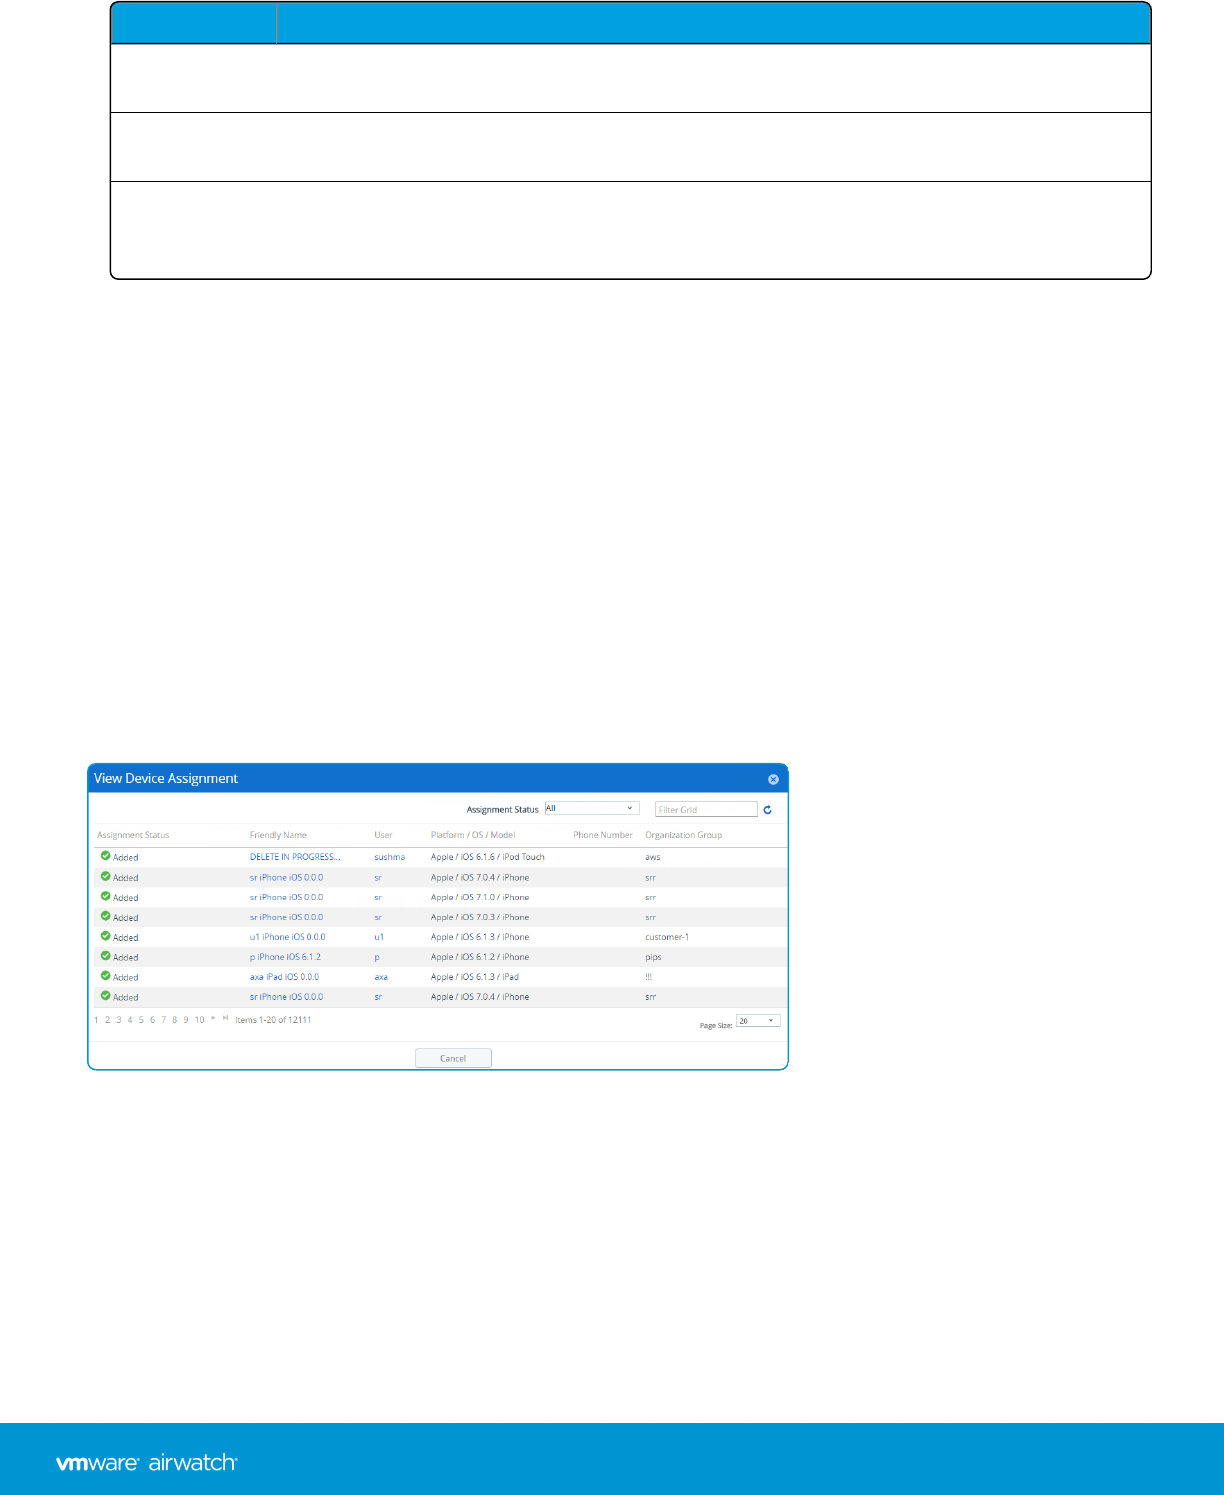
Setting Description
Assigned
Groups
Assign to this policy one or more groups. For more information, see Assignment Groups
Overview on page 65.
Exclusions If you want to exclude groups, select Yes. Next, select from the available listing of groups in the
Excluded Groups text box. See Exclude Smart Groups in Profiles and Policies on page 73.
View Device
Assignment
button
See a listing of devices affected by this compliance policy assignment.
While Platform is a criterion within a smart group, the platform configured in the device profile or compliance policy
always takes precedence over the smart group's platform. For instance, if a device profile is created for the iOS
platform, the profile is only assigned to iOS devices even if the smart group includes Android devices.
7. After you determine the Assignment of this policy, select Next. The Summary tab displays.
lProvide a Name and a useful Description of the compliance policy.
lSelect one of the following:
oFinish – Save your compliance policy without activating it to the assigned devices.
oFinish and Activate – Save and apply the policy to all affected devices.
View Device Assignment
Select View Device Assignment on the Assignment tab while configuring a compliance policy to display the View Device
Assignment page. This page confirms affected (or unaffected) devices.
The Assignment Status column displays the following entries for the devices that appear in the listing.
lAdded – The compliance policy has been added to the listed device.
lRemoved – The compliance policy has been removed from the device.
lUnchanged – The device remains unaffected by the changes made to the compliance policy.
Select Publish to finalize the changes and, if necessary, republish any compliance policy.
Chapter 11: Compliance Policies
171
VMware AirWatch Mobile Device Management Guide | v.2017.10 | October 2017
Copyright © 2017 VMware, Inc. All rights reserved.

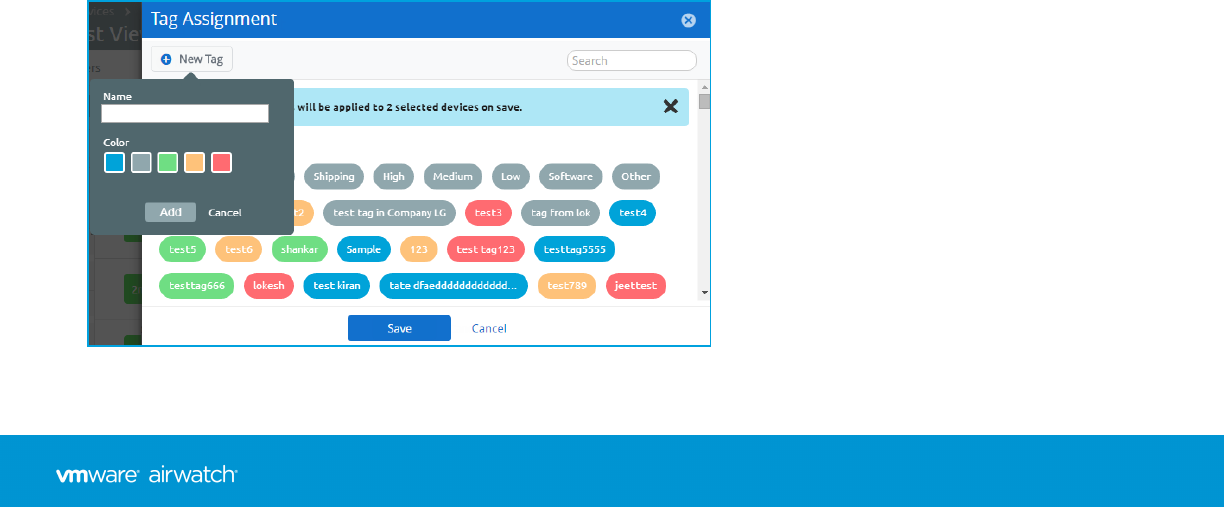
Device Tags Overview
Device tags allow you to identify a specific device without requiring a device profile, smart group, or compliance policy
and without creating a note.
For example, if a device has a defective battery or a broken screen, you can use tags to identify these devices from the
AirWatch Console. Another use is to identify hardware variants in a more visible way rather than relying on the model
number or description to tell devices apart.
For instance, two PCs may have the same model number, but their CPUs may be slightly different, or the amount of
memory may have been customized. Tagging enhanced hardware enables easy identification of these devices.
Tags and Smart Groups
The tag feature is integrated with smart groups, meaning tags can be used to define a smart group.
For instance, if you have tagged all the devices in your fleet with cosmetic damage then you can make a smart group out
of these devices. You can then exclude this smart group from the pool of devices you temporarily assign to site visitors.
Another example is tagging low-performing devices. Creating a smart group of these tagged devices and excluding them
from being used in mission-critical assignments.
Filter Devices by Tag
You can use the filter feature in the Device List View to show only devices with specific tags.
1. Navigate to Devices > List View, select Filters to display the Filters column s to the left of the device list.
2. Select Advanced from the list of Filter Categories and choose Tags.
3. Click anywhere in the Search text box and choose from the list of device tags that display. Devices with deselected
tags are filtered out of the resulting list. The Device List View immediately refreshes itself when the first tag is
selected.
Create a New Tag
You can create tags to help identify a device in a more visible way than by friendly naming, device profiles, smart groups,
or compliance policies. Create a tag in the Device List View.
Chapter 12: Device Tags
173
VMware AirWatch Mobile Device Management Guide | v.2017.10 | October 2017
Copyright © 2017 VMware, Inc. All rights reserved.

1. Navigate to Devices > List View.
2. Select a device using the check box to the left of the device listing.
3. Select More and choose Add Tag from the drop-down menu. The Tag Assignment page appears.
4. Select NEW TAG.
5. Enter the Name of the new tag and select a Color.
6. Select Add to save the tag.
Alternatively, you can create a tag by navigating to Groups &Settings.
1. Navigate to Groups &Settings > All Settings > Devices & Users > Advanced > Tags.
2. Select the Organization Group to which you want the tag to belong and then select Add.
3. In the Add Tag page, enter the Name of the tag.
4. Select the Type of tag you want to add. General or Device.
5. Select Save.
Add Tags
You can add tags to a device to identify it without using notes, profiles, policies, or giving the device a special friendly
name.
Add Tags to a Single Device
For when you have to make a quick one-off adjustment of a device's tags, you can add one or more tags to a single
device easily.
1. Navigate to Devices > List View and select the device you want to tag. You may select a single device in either of the
two ways to display the Send and More Actions buttons.
lDisplay the Details View by selecting the device from the listing.
lSelect the check box next to the device.
2. Select the More Actions button and then select Add Tag. The Tag Assignment screen displays with a listing of tags
available to apply to your selected device.
3. Select each of the tags you want to assign to the device. You may select more than one tag.
4. Select Save to apply one or more tags to the device.
Add Tags to Multiple Devices
You can add a tag (or multiple tags) to one or more devices. Adding multiple tags to multiple devices saves time.
Chapter 12: Device Tags
174
VMware AirWatch Mobile Device Management Guide | v.2017.10 | October 2017
Copyright © 2017 VMware, Inc. All rights reserved.
1. Navigate to Devices > List View.
2. Select the check box of each device you want to tag.
3. Select More Actions and then select Add Tag. The Tag Assignment page displays with a listing of tags available to
apply to your selected devices.
4. Select the tags you want to assign to all the selected devices. You may select more than one tag.
5. Select Save to apply one or more tags to the devices.
Manage Tags
Once you accrue several device tags, you can edit existing tags, remove tags from devices, and delete unused tags.
Edit a Tag
You can edit an existing tag for when you want to rename a tag or change its type and the color of its marker.
1. Navigate to Groups & Settings > All Settings > Devices & Users > Advanced > Tags and select the edit button or
the name of the tag which you want to edit. Only the tags that are part of a child organization group and the
organization group currently selected are editable.
2. Make your changes to the Name and Type settings per your preferences.
3. Select Save.
Remove a Tag
If an assigned tag no longer applies to the device, you can remove a tag from (or untag) a device.
1. Navigate to the device Details View.
2. Select the Summary tab and scroll to the bottom of the Device Info page, where you can find all the tags currently
assigned to the device.
3. Select Xnext to each tag you want to remove.
Important: Removing a tag from a device (or 'untagging' a device) is not the same thing as deleting a tag.
Delete a Tag
If a tag is not assigned to any device and it no longer serves a purpose, you can delete it.
1. Navigate to Groups & Settings > All Settings > Devices & Users > Advanced > Tags.
2. Select Xnext to the tag you want to delete.
Chapter 12: Device Tags
175
VMware AirWatch Mobile Device Management Guide | v.2017.10 | October 2017
Copyright © 2017 VMware, Inc. All rights reserved.

Chapter 13:
Managing Devices
Managing Devices Overview 177
Device Dashboard 177
Device List View 178
Device Details 184
Device Actions by Platform 187
Enrollment Status 192
Wipe Protection 195
AirWatch Hub 197
Reports &Analytics 200
176
VMware AirWatch Mobile Device Management Guide | v.2017.10 | October 2017
Copyright © 2017 VMware, Inc. All rights reserved.
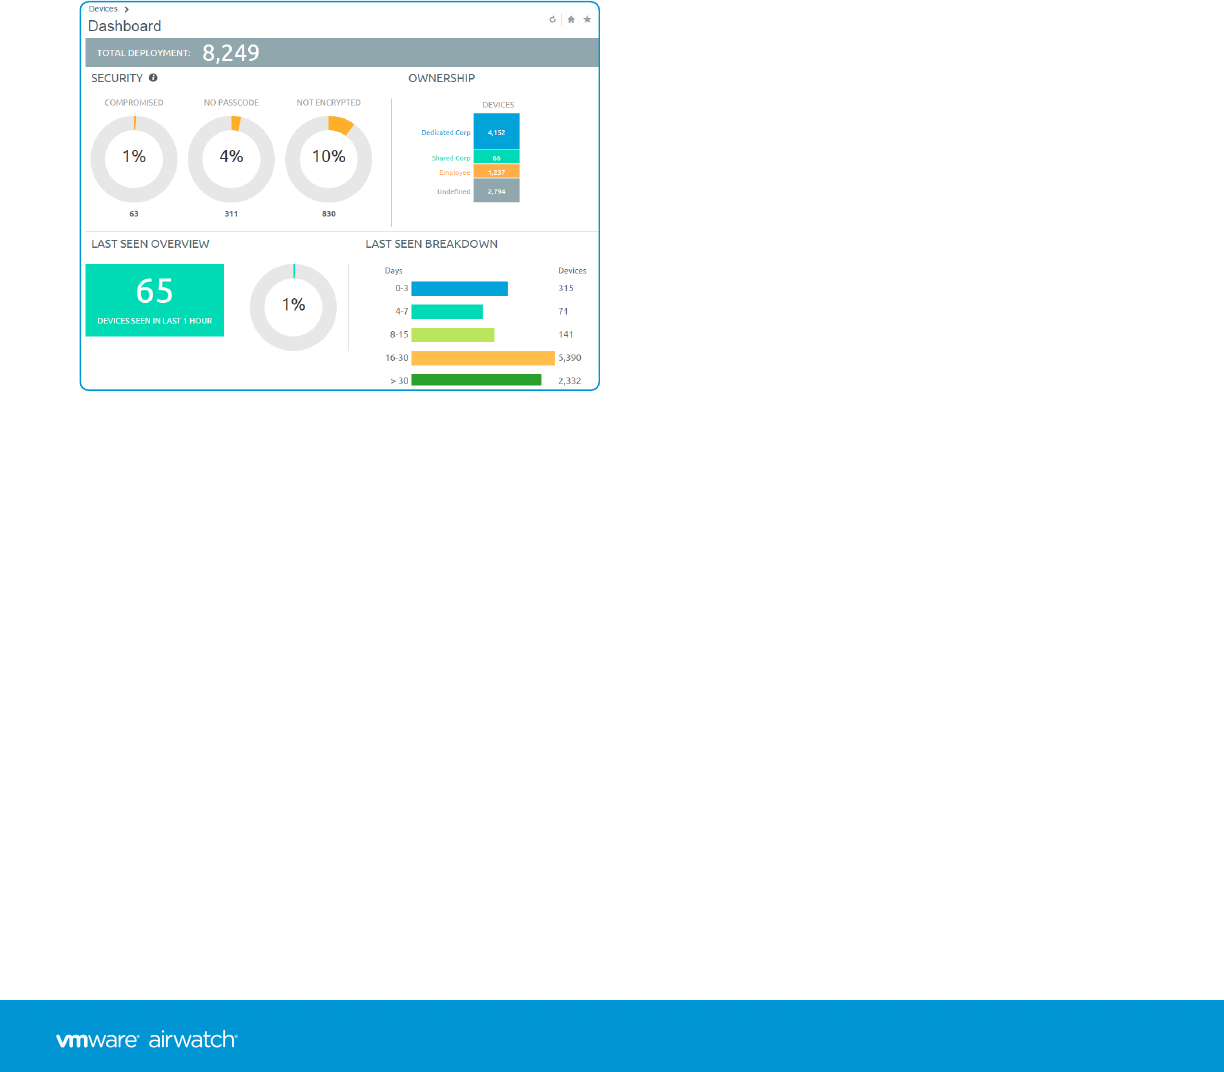
Managing Devices Overview
Manage devices in your fleet and perform functions on a particular set of devices using many different screens in the
AirWatch Admin Console.
You can examine the data flow with the Hub and take a closer look at your fleet with Device Dashboard. You can also
group devices together and create customized lists with the Device List View.
You can also generate Reports and easily identify devices with Tags. You can also set up the Self-Service Portal (SSP) to
enable end users to manage their own devices and reduce the strain on Help Desk personnel.
Device Dashboard
As devices are enrolled, you can manage them from the AirWatch Device Dashboard. The Device Dashboard provides a
high-level view of your entire fleet and allows you to act on individual devices quickly.
You can view graphical representations of relevant device information for your fleet, such as device ownership type,
compliance statistics, and platform and OS breakdowns. You can access each set of devices in the presented categories
by selecting any of the available data views from the Device Dashboard.
From the List View, you can take administrative action: send messages, lock devices, delete devices, and change groups
associated with the device.
lSecurity – View the top causes of security issues in your device fleet. Selecting any of the doughnut charts displays a
filtered Device List view comprised of devices affected by the selected security issue. If supported by the platform,
you can configure a compliance policy to act on these devices.
oCompromised – The number and percentage of compromised devices (jailbroken or rooted) in your
deployment.
oNo Passcode – The number and percentage of devices without a passcode configured for security.
oNo Encryption – The number and percentage of devices that are not encrypted for security. This reported figure
excludes Android SD Card encryption. Only those Android devices lacking disc encryption are reported in the
donut graph.
Chapter 13: Managing Devices
177
VMware AirWatch Mobile Device Management Guide | v.2017.10 | October 2017
Copyright © 2017 VMware, Inc. All rights reserved.

lOwnership – View the total number of devices in each ownership category. Selecting any of the bar graph segments
displays a filtered Device List view comprised of devices affected by the selected ownership type.
lLast Seen Overview/Breakdown – View the number and percentage of devices that have recently communicated
with the AirWatch MDM server. For example, if several devices have not been seen in over 30 days, select the
corresponding bar graph to display only those devices. You can then select all these filtered devices and send them a
message requesting that they check in.
lPlatforms – View the total number of devices in each device platform category. Selecting any of the graphs displays a
filtered Device List view comprised of devices under the selected platform.
lEnrollment – View the total number of devices in each enrollment category. Selecting any of the graphs displays a
filtered Device List view comprised of devices with the selected enrollment status.
lOperating System Breakdown – View devices in your fleet based on operating system. There are separate charts for
Apple iOS,Android, Windows Phone, and Windows Rugged. Selecting any of the graphs displays a filtered Device List
view comprised of devices running the selected OS version.
Device List View
Select Devices > List View to see a full listing of all devices in the currently selected organization group.
The Last Seen column displays an indicator showing the number of minutes elapsed since the device has checked-in. The
indicator is red or green, depending on the number of minutes defined in Device Inactivity Timeout (min). This indicator
can be set by navigating to Groups &Settings > All Settings > Devices & Users > General > Advanced.
Select a device in the General Info column at any time to open the details page for that device.
Sort by columns and configure information filters to review device activity based on specific information. For example,
sort by the Compliance Status column to view only devices that are currently out-of-compliance and target only those
devices. Search all devices for a friendly name or user name to isolate one device or user.
Customize Device List View Layout
Display the full listing of visible columns in the Device List view by selecting the Layout button and choose the Custom
option. This view enables you to display or hide Device List columns per your preferences.
There is also an option to apply your customized column view to all administrators at or below the current organization
group (OG). For instance, you can hide 'Asset Number' from the Device List views of the current OG and of all the OGs
underneath.
Once all your customizations are complete, select the Accept button to save your column preferences and apply this new
column view. You may return to the Layout button settings at any time to tweak your column display preferences.
Search in Device List View
You can search for a single device for quick access to its information and take remote action on the device.
To run a search, navigate to Devices > List View, select the Search List bar and enter a user name, device friendly name,
or other device-identifying element. This action initiates a search across all devices, using your search parameter, within
the current organization group and all child groups.
Chapter 13: Managing Devices
178
VMware AirWatch Mobile Device Management Guide | v.2017.10 | October 2017
Copyright © 2017 VMware, Inc. All rights reserved.
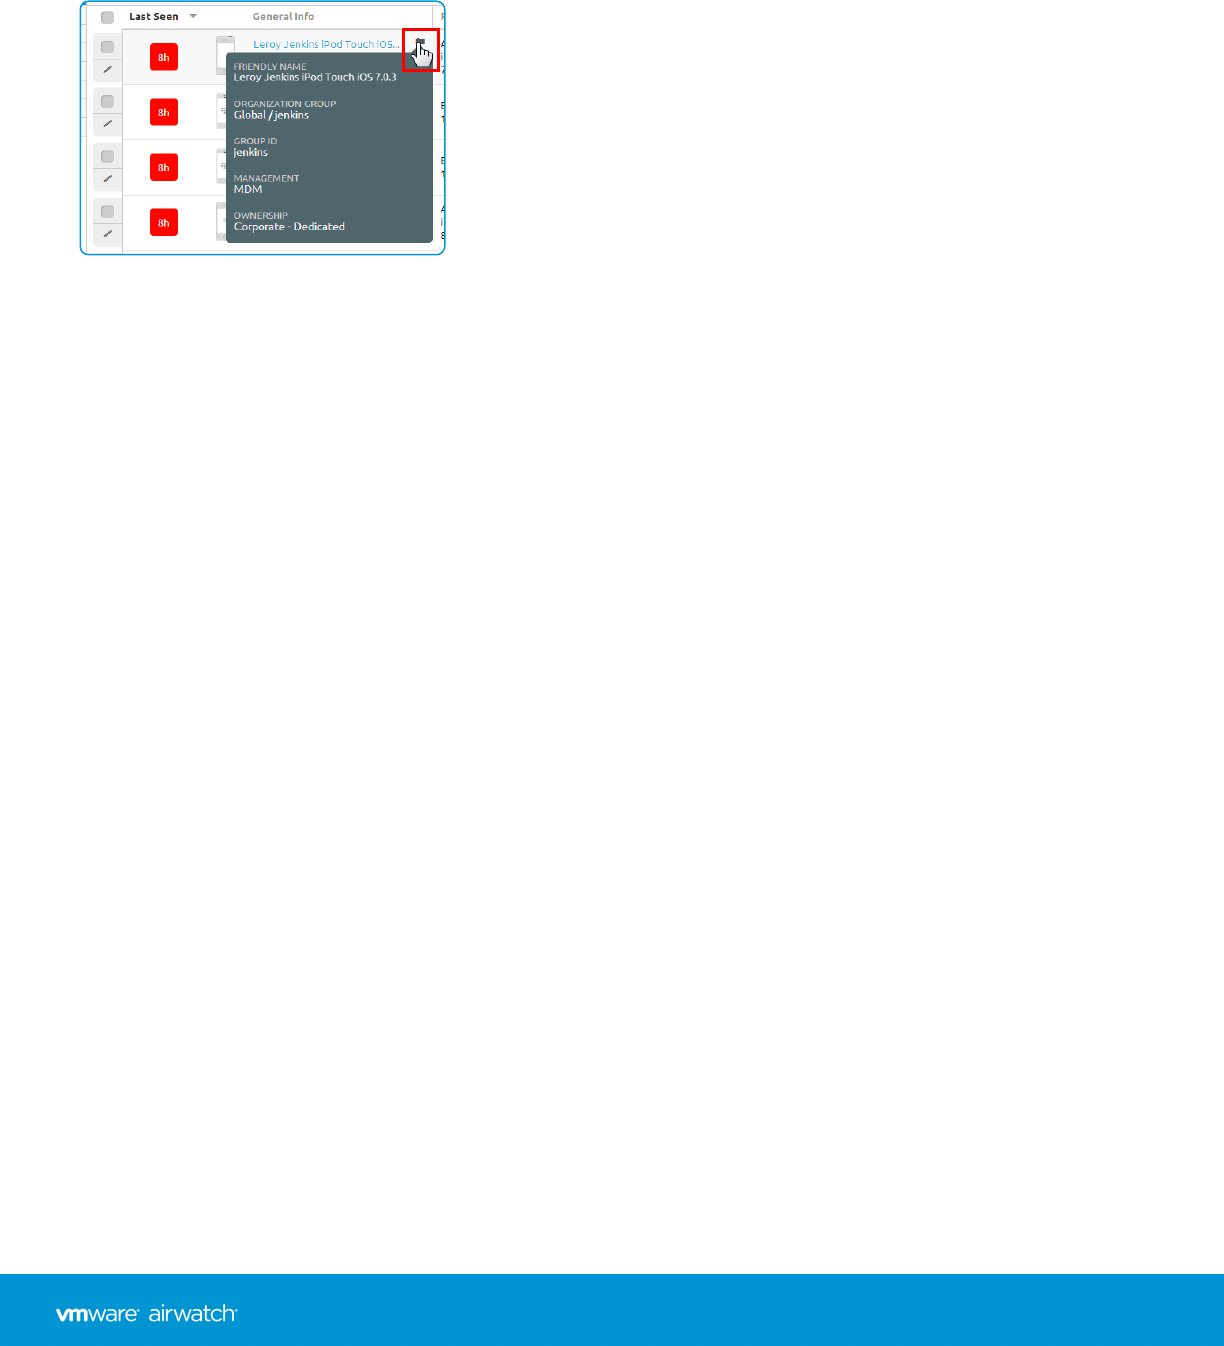
Hover-Over Pop-Up in Device List View
Each device in the General Info column features a tool tip icon in the upper-right corner. When this icon is tapped
(mobile touch device) or hovered-over with a mouse pointer (PC or Mac), it displays a Hover-Over pop-up. This pop-up
screen contains information such as Friendly Name,Organization Group,Group ID,Management, and Ownership.
Similar tool tip icons are found in the Enrollment and Compliance Status columns in the Device List view. These tool tip
icons feature Hover-Over Pop-Ups displaying Enrollment Date and Compliance Violations respectively.
Filtering Devices in List View
You can filter out entire categories of devices by using the available filters. These filters enable you to view only those
devices you are interested in.
lManagement.
lOwnership.
lSmart Groups.
lUser Groups.
lDevice Type (Platform, OS Version which is dependent upon choice of platform).
lSecurity (Compromised, Encryption, Passcode).
lStatus (Enrollment Status, Last Seen, Compliance, Enrollment History).
lAdvanced.
oMACAddress – Filter by the media access control address of a device.
oIPRange – Filter devices by their currently assigned Internet protocol address.
oTags – View devices by their assigned tags which you can search for and select from a drop-down menu.
oTunnel – Choose between showing all devices connected to the tunnel and devices not connected to the tunnel.
oContent Compliance – Choose between showing all devices, showing only those devices missing required docs, and only those devices
lacking the latest version of required content.
oLost Mode – View all devices or only those with Lost Mode enabled. Applicable to iOS devices only.
You can also search for information across all user and devices, allowing you to search for a user (for example "John Doe")
or a device type.
Chapter 13: Managing Devices
179
VMware AirWatch Mobile Device Management Guide | v.2017.10 | October 2017
Copyright © 2017 VMware, Inc. All rights reserved.

Add a Device from List View
You can add or register a device including user assignment, custom attributes, and tagging. To add a device from Devices
>List View or Devices >Lifecycle >Enrollment Status, take the following steps.
Chapter 13: Managing Devices
180
VMware AirWatch Mobile Device Management Guide | v.2017.10 | October 2017
Copyright © 2017 VMware, Inc. All rights reserved.
1. Select the Add Device button. The Add Device page displays. Complete the following in the User tab.
Setting Description
User
Search Text Each device must be assigned to a user. Search for a user with this text box by entering
search parameters and select the Search User button. You can select a user from among the
search results or select the link Create New User.
Create New User
Security Type Choose between Basic and Directory users. For more information, see Basic User
Authentication on page 34 and Active Directory / LDAP Authentication on page 35.
User name Enter the user name by which your user is identified in your AirWatch environment.
Password,Confirm
Password
Enter and confirm the password that corresponds to the user name.
Email Address Enter the email address for the user account.
Enrollment
Organization Group
The organization group (OG) that serves as the enrollment OG for the device enrollment.
Show advanced
user details
Display all the advanced user details, including comprehensive information covering user
name, user phone number, and manager name. Also included are optional identification
settings such as department, employee ID, and cost center.
Select the default User Role for the user you are adding which determines which permissions
the user has while using a connected device. For more information, see User Roles on page
56.
Device
Expected Friendly
Name
Enter the name of the device that appears in the device list view. You can include lookup
values which allow you to inject variables specific to the user, the device, and the
deployment into the friendly name. These variables include an email address, mobile
number, device serial number, organization group, and many others.
OrganizationGroup Select the organization group from the drop-down menu with which the device is to be
associated.
Ownership Select the device ownership from the drop-down menu. Choose between None,Corporate -
Dedicated,Corporate - Shared, and Employee-Owned.
Platform Select the platform of the device from the drop-down menu.
Show advanced
device
information
options
Display all the advanced device information settings.
Advanced Device InformationSettings
Model Select the device model from the drop-down listing. The contents of this drop-down menu
depend upon the selection made in the Platform drop-down menu.
Chapter 13: Managing Devices
181
VMware AirWatch Mobile Device Management Guide | v.2017.10 | October 2017
Copyright © 2017 VMware, Inc. All rights reserved.
Setting Description
OS Select the device's operating system from the drop-down listing. The contents of this drop-
down menu depend upon the selection made in the Platform drop-down menu.
UDID Enter the device's Unique Device Identifier.
Serial Number Enter the device's serial number.
IMEI Enter the device's 15-digit International Mobile Station Equipment Identity.
SIM Enter the device's SIM card specifications.
Asset Number Enter the asset number for the device. This number is created internally from within your
organization and this setting is provided to hold this data point.
Messaging
Message Type Choose the type of message you want to send (None,SMS, or Email) to the device upon a
successful enrollment to the AirWatch environment.
Email Address Enter the email address to which you want the enrollment message sent.
This text box is only available when Email is selected as the Message Type.
Email Message
Template
Select the email template from the drop-down menu. There is a link you can use to open the
Message Template page where you can create an email message template.
Phone Number Enter the phone number to which you want the SMS text message sent.
This text box is only available when SMS is selected as the Message Type.
SMSMessage
Template
Select the SMS template from the drop-down menu. There is a link you can use to open the
Message Template page where you can create an SMS message template.
2. Optionally assign Custom Attributes to the device. Select the Add button and supply an Attribute and its Value.
3. Optionally assign Tags to the device. Select the Add button and select a tag from the drop-down menu for each tag
you want to assign.
4. Select Save.
Bulk Actions in Device List View
Once you filter a subset of devices, you can perform bulk actions to multiple devices by selecting devices and then
selecting from the action button cluster.
For more information, see Selecting Devices in Device List View on page 183.
Bulk actions are only available in the Device List View if they are enabled in the system settings (Groups &Settings > All
Settings > System > Security > Restricted Actions). Password Protect Actions require a PIN to perform.
With devices selected in the List View, the number of devices selected is displayed next to the action buttons. This
number includes filtered devices that are selected as well.
Chapter 13: Managing Devices
182
VMware AirWatch Mobile Device Management Guide | v.2017.10 | October 2017
Copyright © 2017 VMware, Inc. All rights reserved.

Bulk Management Limit in Device List View
You can set a maximum number of devices that can receive a bulk action command to ensure smooth operations when
managing a large device fleet.
Change these limits by navigating to Groups &Settings > All Settings > Devices &Users > Advanced > Bulk
Management.
When a bulk management limit is in place and multiple devices are selected, a link appears next to the 'number of items
selected' message which reads: Some actions disabled due to bulk limits.
Queued Bulk Action Warning in Device List View
Bulk actions take time to process. When you initiate a new bulk action while the AirWatch Console is processing an
existing bulk action, a warning message displays.
Your previous bulk actions requested are still being processed. This request is
run once the previous actions are complete. Do you want to continue with the
current request?
Select Yes to add the new bulk action to the queue. Select No to cancel the new bulk action.
Selecting Devices in Device List View
You can select individual devices on a page by checking individual check boxes to the left of each device. You can also
select a block of devices across multiple pages. You can even select all devices in your entire fleet, which may trigger the
restricted actions warning.
Selecting a Block of Devices
You may select a contiguous block of devices, even across multiple pages, by selecting the device check box at the
beginning of the block. Next, hold down the shift key, then select the device check box at the end of the block. This action
is similar to the block-selection in the Windows and Mac environments and it allows you to apply bulk actions to those
selected devices.
Selecting All Devices
The Global check box, located to the left of the Last Seen column header, can be used to select or deselect all devices in
the listing. If your List View contains a filtered listing of devices, the Global check box can be used to select or deselect all
filtered devices.
When the Global check box features a green minus sign ( ), it means at least one but not all devices are selected. Select
this icon again and it changes to a check mark sign ( ), indicating that all devices in the listing (either filtered or unfiltered)
have been selected. Select it a third time and it changes again to an empty check box ( ), indicating that no devices in the
listing are currently selected.
To watch a video about Selecting Devices and Bulk actions, go to https://support.air-
watch.com/articles/115001664748.
Restricted Action Warning on All Devices Selected
When you initiate an action with all devices in your fleet selected, a warning message is displayed.
Chapter 13: Managing Devices
183
VMware AirWatch Mobile Device Management Guide | v.2017.10 | October 2017
Copyright © 2017 VMware, Inc. All rights reserved.
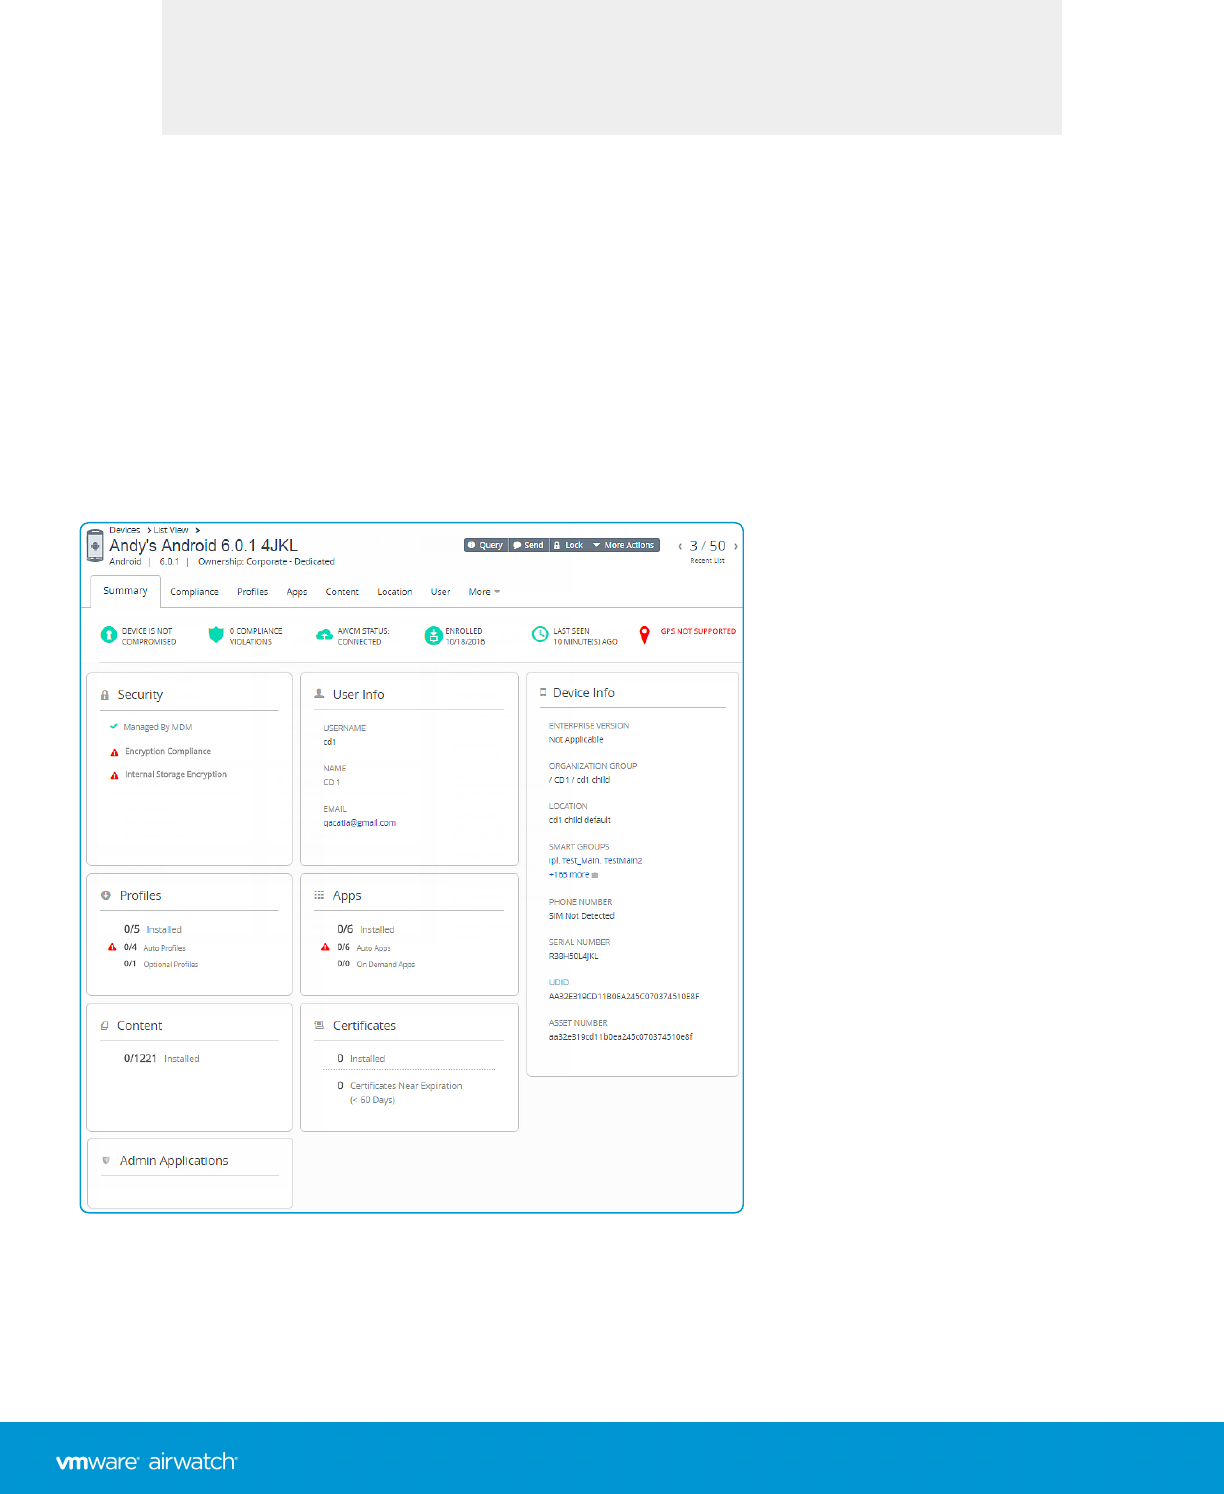
You are attempting to act on [number of selected] devices. This action may not
apply to all devices. Certain limitations of this action include enrollment
status, management type, device platform, model, or OS.
This warning is an acknowledgment of the diverse nature of a large device fleet featuring a multitude of different
manufacturers, operating systems, and capabilities. It is unrelated to the Bulk Management Limit and any warnings it
may generate. If you have a Bulk Management Limit in place, then this Restricted ActionWarning message does not
display.
Device Details
Use the Device Details page to track detailed information for a single device and to access user and device management
actions quickly.
Access Device Details by selecting a device friendly name from one of the available Dashboards, or by using the available
search tools in the AirWatch Console.
The main page features several major sections.
lNotification Badges – Displays the Compromised State, Compliance Violations, Enrollment Date, and time Last Seen
for the selected device.
Chapter 13: Managing Devices
184
VMware AirWatch Mobile Device Management Guide | v.2017.10 | October 2017
Copyright © 2017 VMware, Inc. All rights reserved.
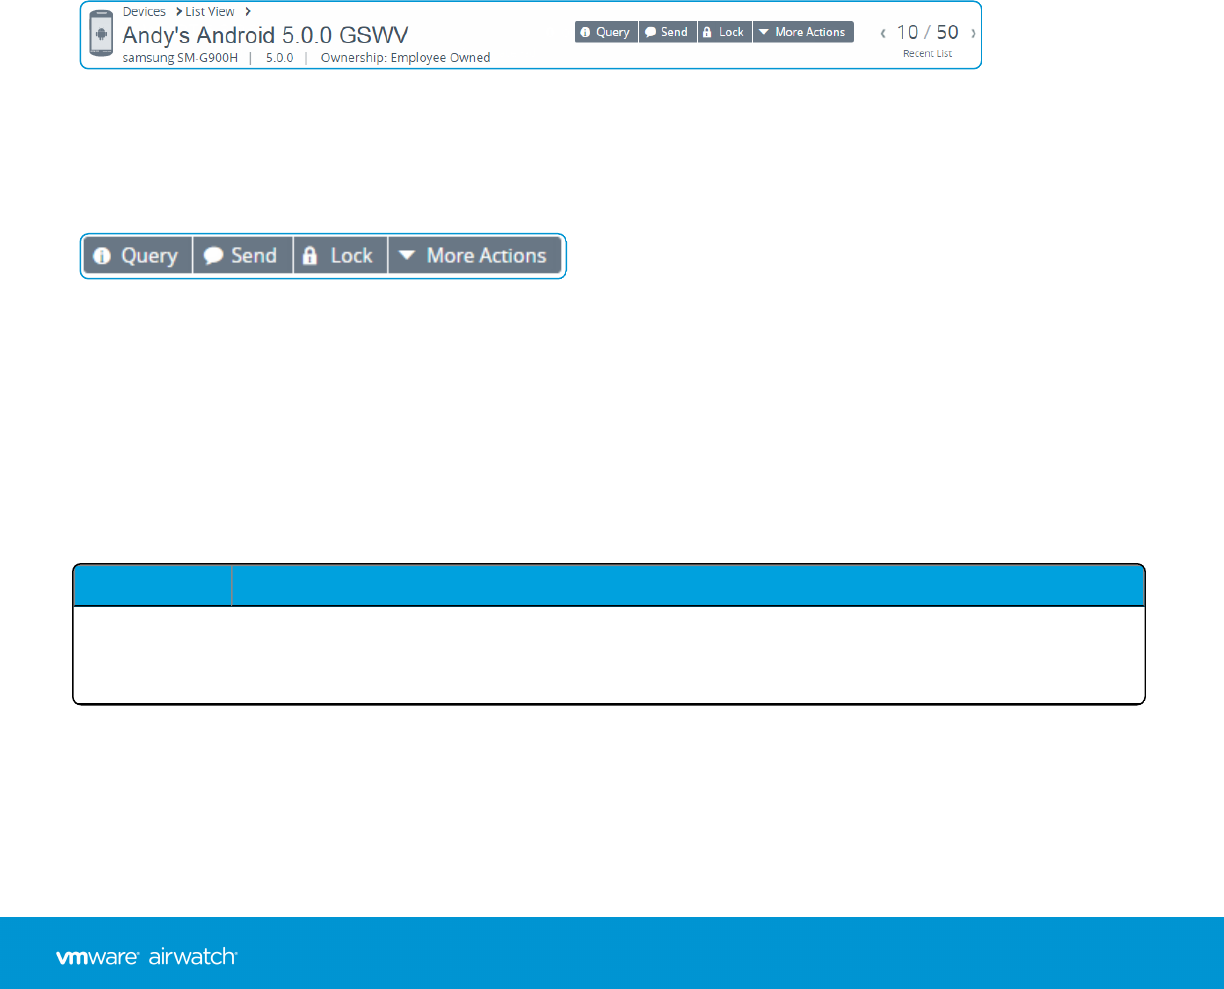
lSecurity – Displays security settings such as which management software is being used, passcode status, and data
protections.
lUser Info – Displays basic user information including full name and email.
lDevice Info – Displays device details such as organization group, location, smart groups, serial number, UDID, asset
number, power status, storage capacity, physical memory, and warranty information.
lProfiles – Displays all profiles such as installed (active), assigned (inactive), and unmanaged (sideloaded).
lApps – Displays all installed apps, both automatic apps and on-demand apps.
lContent – Displays any installed content such as user-added documents.
lCertifications – Displays all installed certificates, including certifications near their expiration date.
Device Details Dashboard
The dashboard displays basic device information such as the device type, device model, OS version number, ownership
type, device action button cluster, and Recent List indicator.
Selecting the arrow buttons in the Recent List indicator changes the selected device based on its position in the filtered
List View.
Device Details Action Button Cluster
Perform common device actions with the action button cluster including Query, Send [Message], Lock, and other actions
accessed through the More Actions button.
Available Device Actions vary by platform, device manufacturer and model, and enrollment status, and the specific
configuration of your AirWatch Console. See Device Actions by Platform on page 187 for a full listing of remote actions an
admin can invoke using the AirWatch Console.
Device Details Menu Tabs
You can use the Menu Tabs to access specific device information, which varies depending on the chosen device platform.
Menu Tab Description
Summary View general statistics such as enrollment status, compliance, last seen, GPS availability,
platform/model/OS, organization group, serial number, power status, storage capacity, physical
memory, and virtual memory.
Chapter 13: Managing Devices
185
VMware AirWatch Mobile Device Management Guide | v.2017.10 | October 2017
Copyright © 2017 VMware, Inc. All rights reserved.

Menu Tab Description
Compliance Display the status, policy name, date of the previous and forthcoming compliance check and the
actions already taken on the device. The Compliance tab includes advanced troubleshooting and
convenience features.
lNon-Compliant devices, and devices in pending compliance status, have troubleshooting
functions available. You may reevaluate compliance on a per-device basis ( ) or get detailed
information about the compliance status on the device ( ).
lUsers with Read-Only privileges can view the specific compliance policy directly from the
Compliance tab while Administrators can make edits to the compliance policy.
Profiles View all profiles currently assigned, installed, and unmanaged on a device.
Apps View all apps currently assigned and installed on the device.
Content View the status, type, name, version, priority, deployment, last update, date, time of views, and
acknowledged content on the device. This tab also provides a toolbar for administrative action
(install or delete).
Location View current location or location history of a device. Choose the Period or length of time you are
looking back in Search of location data points. The Custom Period enables you to choose a range of
dates and times in 5-minute increments.
Enable the collection of location data by navigating to Groups &Settings > All Settings > Devices &
Users and selecting the platform-specific Agent Settings page. For more information about location
data as it relates to privacy, see GPS Coordinates for Privacy Best Practices on page 25.
Edit the number of location data points collected and the minimum distance between locations by
navigating to Groups & Settings > All Settings > Installation > Maps.
User Access details about the user of a device and the status of the other devices enrolled to this user.
More These additional menu tabs vary based on the device platform.
lNetwork – View current network information (Cellular, Wi-Fi, Bluetooth, IMEI) of a device.
lSecurity – View current security status of a device based on security settings.
lTelecom – View amounts of calls, data, and messages sent and received.
lNotes – View and add notes regarding the device. For example, note the shipping status or if the
device is in repair and out of commission.
lCertificates – Identify device certificates by name and issuant. This tab also provides certificate
expiration dates.
lProvisioning – View complete history and status of all packages provisioned to the device and
any provisioning errors.
lTerms of Use – View a list of End-User License Agreements (EULAs) which have been accepted
during enrollment.
Chapter 13: Managing Devices
186
VMware AirWatch Mobile Device Management Guide | v.2017.10 | October 2017
Copyright © 2017 VMware, Inc. All rights reserved.
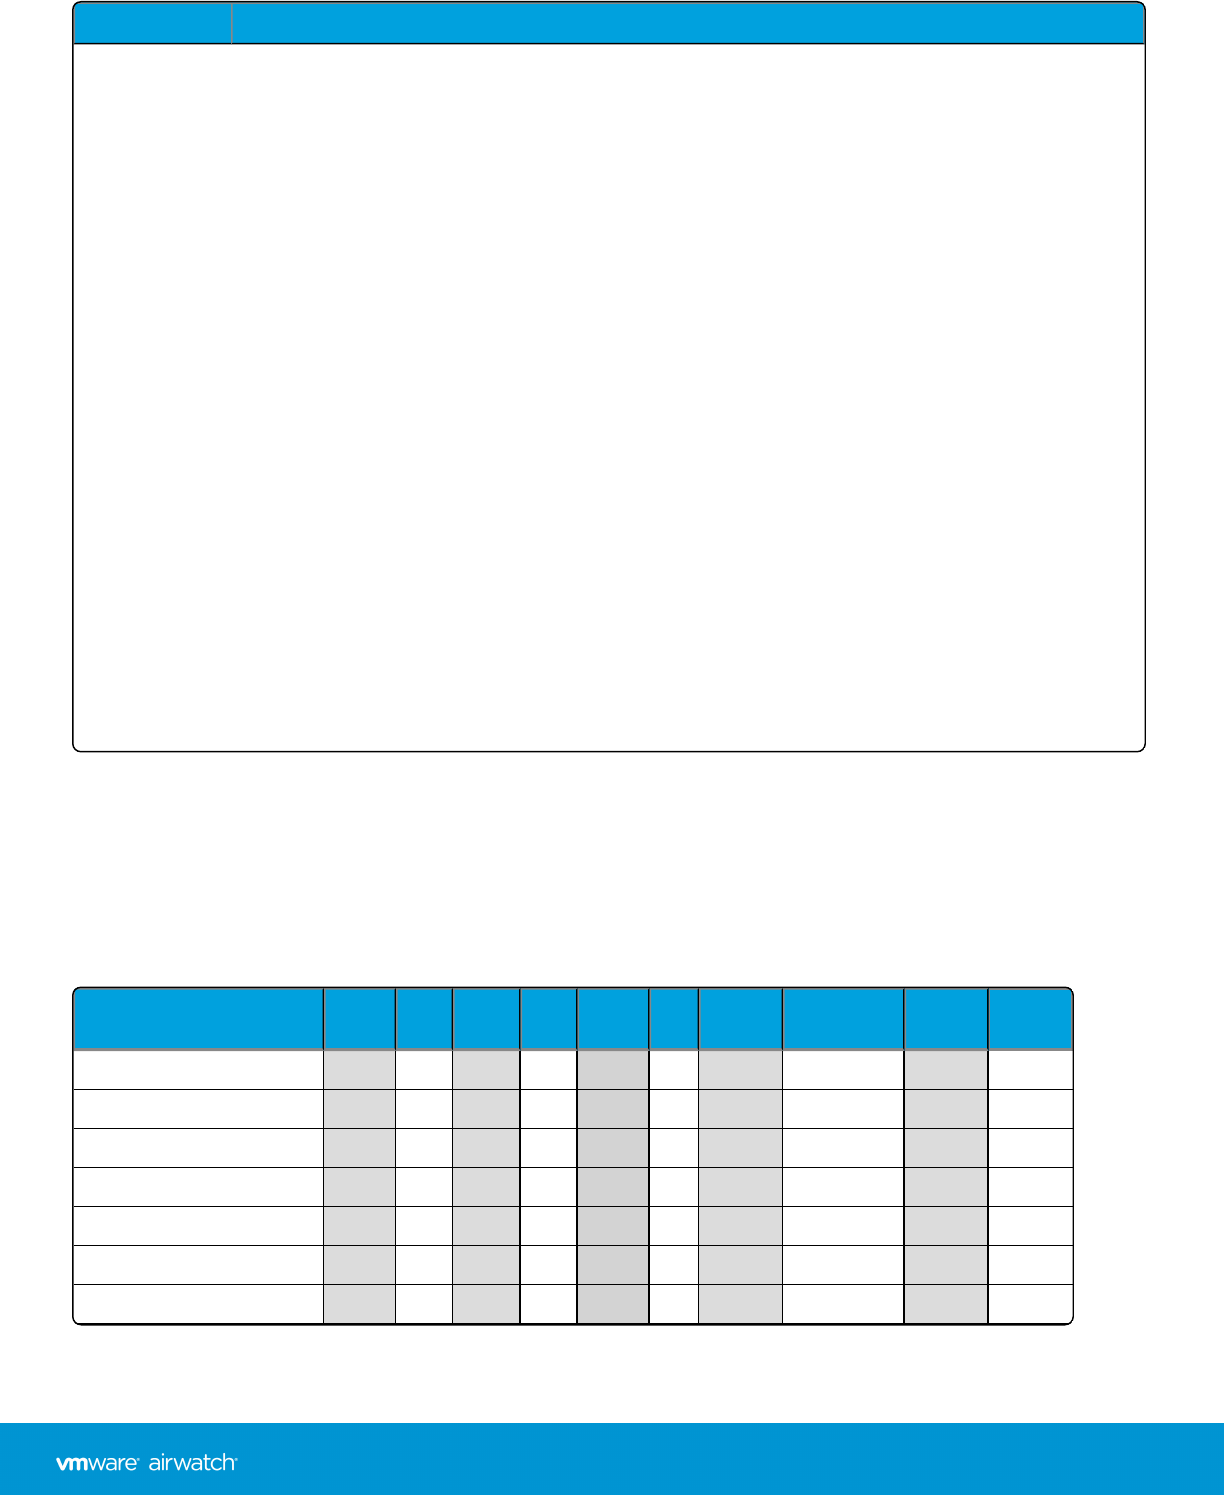
Menu Tab Description
More,
cont.
lAlerts – View all alerts associated with the device.
lShared Device Log – View the history of the shared device including past check-ins and check-
outs and status.
lStatus History – View history of device in relation to enrollment status.
lTargeted Logging – View the logs for the Console, Catalog, Device Services, Device Management,
and Self Service Portal. A link is provided enabling you to configure targeted logging (All Settings
> Admin > Diagnostics > Logging).
lTroubleshooting – View Event Log and Commands logging information. This page features
export and search functions, enabling you to perform targets searches and analysis.
oEvent Log – View detailed debug information and server check-ins, including a Filter by
Event Group Type,Date Range,Severity,Module, and Category.
In the Event Log listing, the Event Data column may display hypertext links that open a
separate screen with even more detail surrounding the specific event. This information
enables you to perform advanced troubleshooting such as determining why a profile fails to
install.
oCommands – View detailed listing of pending, queued, and completed commands sent to
the device. Includes a Filter enabling you to filter commands by Category,Status, and
specific Command.
lAttachments – Use this storage space on the server for screenshots, documents, and links for
troubleshooting and other purposes without taking up space on the device itself.
Device Actions by Platform
As an AirWatch administrator, you can run commands remotely to individual (or bulk) devices in your fleet and different
platforms offer different actions. Each of these platform-specific device actions and definitions represents remote
commands an admin can invoke from the AirWatch Console.
For more information, see Device Action Descriptions on page 189.
Action Android Apple
iOS macOS Apple
TV
Chrome
OS QNX Windows
Rugged Windows 7 Windows
Phone
Windows
Desktop
Add Tag ✓ ✓ ✓ ✓ ✓ ✓ ✓ ✓ ✓ ✓
AirWatch Agent (Query) ✓ ✓ ✓ (*)
App Remote View ✓ ✓ ✓
Apps (Query) ✓ ✓ ✓ ✓ (*) ✓ ✓
Books (Query) ✓
Certificates (Query) ✓ ✓ ✓ ✓ ✓ (*) ✓ ✓
Change Device Passcode ✓ ✓
Chapter 13: Managing Devices
187
VMware AirWatch Mobile Device Management Guide | v.2017.10 | October 2017
Copyright © 2017 VMware, Inc. All rights reserved.

Action Android Apple
iOS macOS Apple
TV
Chrome
OS QNX Windows
Rugged Windows 7 Windows
Phone
Windows
Desktop
Change Organization Group ✓ ✓ ✓ ✓ ✓ ✓ ✓ ✓ ✓ ✓
Change Ownership ✓ ✓ ✓ ✓ ✓ ✓ ✓ ✓ ✓
Clear Activation Lock ✓
Clear Passcode (Device) ✓ ✓ ✓ ✓
Clear Passcode (Container) ✓
Clear Passcode (Restrictions
Setting) ✓
Clear Passcode (SSO) ✓ ✓
Delete Device ✓ ✓ ✓ ✓ ✓ ✓ ✓ ✓ ✓ ✓
Device Information (Query) ✓ ✓ ✓ ✓ ✓ ✓ ✓ (*) ✓ ✓
Device Wipe ✓ ✓ ✓ ✓ ✓ ✓
Edit Device ✓ ✓ ✓ ✓ ✓ ✓ ✓ ✓ ✓ ✓
Enable/Disable Lost Mode ✓
Enroll ✓ ✓ ✓ ✓ ✓ ✓
Enterprise Reset ✓ ✓
Enterprise Wipe ✓ ✓ ✓ ✓ ✓ ✓ ✓ ✓ ✓ ✓
File Manager ✓ ✓ ✓
Find Device ✓ ✓ ✓
iOSUpdate ✓
Location ✓ ✓ ✓ ✓✓ ✓
Lock Device ✓ ✓ ✓ ✓ ✓ ✓
Lock SSO ✓ ✓
Managed Settings ✓
Mark Do Not Disturb ✓ ✓
Override Job Log Level ✓
Profiles (Query) ✓ ✓ ✓ ✓ ✓ (*)
Provision Now ✓ ✓
Query All ✓ ✓ ✓ ✓ ✓ ✓ ✓ ✓ ✓
Reboot Device ✓
Registry Manager ✓
Remote Control ✓ ✓ ✓
Remote Management ✓ ✓ ✓ ✓ ✓ ✓
Remote View ✓
Chapter 13: Managing Devices
188
VMware AirWatch Mobile Device Management Guide | v.2017.10 | October 2017
Copyright © 2017 VMware, Inc. All rights reserved.

Action Android Apple
iOS macOS Apple
TV
Chrome
OS QNX Windows
Rugged Windows 7 Windows
Phone
Windows
Desktop
Rename Device ✓
Request Debug Log ✓
Request Device Check-In ✓ ✓ ✓ ✓
Request Device Location ✓
Restart AirWatch Agent ✓
Security (Query) ✓ ✓ ✓ ✓ (*) ✓ ✓
Send Message ✓ ✓ ✓ ✓ ✓ ✓ ✓ ✓ ✓
Start AirPlay ✓ ✓
Start AWCM ✓ ✓
Stop AWCM ✓ ✓
Sync Device ✓ ✓ ✓
Task Manager ✓
View Manifest ✓
Warm Boot ✓ ✓
(*) This Windows 7 action is satisfied by running a Query All command, which returns all the same information as if each Query command were run separately.
Device Action Descriptions
View a detailed description of each action that can be invoked on a device, remotely from the console.
lAdd Tag – Assign a customizable Tag to a device, which can be used to identify a special device in your fleet.
lAirWatch Agent (Query) – Send a query command to the device's AirWatch Agent to ensure it has been installed and
is functioning normally.
lApp Remote View – Take a series of screenshots of an installed application and send them to the Remote View
screen in the Admin Console. You may choose the number of screenshots and the length of the gap, in seconds,
between the screenshots.
lApps (Query) – Send a query command to the device to return a list of installed apps.
lBooks (Query) – Send a query command to the device to return a list of installed books.
lCertificates (Query) – Send a query command to the device to return a list of installed certificates.
lChange Device Passcode – Replace any existing device passcode used to access the selected device with a new
passcode.
lChange Organization Group – Change the device's home organization group to another pre-existing OG. Includes an
option to select a static or dynamic OG.
lChange Ownership – Change the Ownership setting for a device, where applicable. Choices include Corporate-
Dedicated, Corporate-Shared, Employee Owned and Undefined.
Chapter 13: Managing Devices
189
VMware AirWatch Mobile Device Management Guide | v.2017.10 | October 2017
Copyright © 2017 VMware, Inc. All rights reserved.

lClear Activation Lock – Clear the Activation Lock on an iOS device. With the Activation Lock enabled, the user
requires an Apple ID and password prior to taking the following actions: disabling Find My iPhone, factory wipe, and
reactivate to use the device.
lClear Passcode (Container) – Clear the container-specific passcode. To be used in situations where the user has
forgotten their device's container passcode.
lClear Passcode (Device) – Clear the device passcode. To be used in situations where the user has forgotten their
device's passcode.
lClear Passcode (Restrictions Setting) – Clear the passcode that restricts device features such as app installation,
Safari use, camera use and more.
lClear Passcode (SSO) – Clear the SSO passcode, for situations where the user has forgotten their single sign-on
passcode.
lDelete Device – Delete and unenroll a device from the Admin Console. This action does not remove any data from
the device itself, only its representation in the console.
lDevice Information (Query) – Send a query command to the device to return basic information on the device such
as friendly name, platform, model, organization group, operating system version and ownership status.
lDevice Wipe – Wipe a device clear of all data, including email, profiles and MDM capabilities and the device returns
to a factory default state. This includes all personal user information if applicable. This action cannot be undone.
lEdit Device – Edit device information such as Friendly Name,Asset Number,Device Ownership,Device Group and
Device Category.
lEnable/Disable Lost Mode – Use this to lock a device and send a message, phone number or text to the lock screen.
Lost Mode cannot be disabled by the user. When Lost Mode is disabled by an administrator, the device returns to
normal functionality. Users are sent a message that tells them that the location of the device was shared. (iOS 9.3 +
Supervised)
oRequest Device Location – Query a device when in Lost Mode and then use the Location tab to find the device.
(iOS 9.3 + Supervised)
lEnroll – Send a message to the device user to enroll their device. You may optionally use a message template that
may include enrollment information such as step-by-step instructions and helpful links. This action is only available
on unenrolled devices.
lEnterprise Reset – Enterprise Reset a device to factory settings, keeping only the VMware AirWatch enrollment.
lEnterprise Wipe – Enterprise Wipe a device to unenroll and remove all managed enterprise resources including
applications and profiles. This action cannot be undone and re-enrollment will be required for VMware AirWatch to
manage this device again. Includes options to prevent future re-enrollment and a Note Description field for you to
add any noteworthy details about the action.
oEnterprise Wipe is not supported for cloud domain-joined devices.
lFile Manager – Launch a File Manager within the AirWatch Console that enables you to remotely view a device's
content, add folders, conduct searches and upload files.
lFind Device – Send a text message to the applicable VMware AirWatch application together with an audible sound
(with options to repeat the sound a configurable number of times and the length of the gap, in seconds, between
Chapter 13: Managing Devices
190
VMware AirWatch Mobile Device Management Guide | v.2017.10 | October 2017
Copyright © 2017 VMware, Inc. All rights reserved.

sounds). This audible sound should help the user locate a misplaced device.
liOSUpdate – Push an operating system update to one or more iOSdevices. Applicable only to supervised, DEP-
enrolled devices with iOS version 9 or greater. For details, see the VMware AirWatch iOSPlatform Guide, available
in AirWatch Resources.
lLocation – Reveal a device's location by showing it on a map using its GPS capability.
lLock Device – Lock the screen of a selected device, rendering it unusable until it is unlocked. Includes optional fields
for a custom Message,Phone Number, and Note Description.
lLock SSO – Lock the device user out of VMware AirWatch Container and all participating apps.
lManaged Settings – Enable or disable voice roaming, data roaming, and personal hotspots.
lMark Do Not Disturb – Mark the device not to be disturbed, preventing it from receiving messages, emails, profiles,
and any other type of incoming interaction. Only those devices that are actively Marked Do Not Disturb have the
action Clear Do Not Disturb available, which removes the restrictions.
lOverride Job Log Level – Override the currently-specified level of job event logging on the selected device. This
action sets the logging verbosity of Jobs pushed through Product Provisioning and overrides the current log level
configured in Android Agent Settings. Job Log Level Override can be cleared by selecting the drop-down menu item
Reset to Default on the action screen, or by changing the Job Log Level under the Product Provisioning category in
Android Agent Settings.
lProfiles (Query) – Send a query command to the device to return a list of installed device profiles.
lProvision Now – Provision products to a device. Provisioning is the ability to create an ordered installation of files,
actions, profiles and applications into a single product that can be pushed to devices.
lQuery All – Send a query command to the device to return a list of installed apps (including VMware AirWatch Agent,
where applicable), books, certificates, device information, profiles and security measures.
lReboot Device – Reboot a device remotely, reproducing the effect of powering it off and on again.
lRegistry Manager – Launch a Registry Manager within the AirWatch Console that enables you to remotely view a
device's OS registry, add keys, conduct searches and add properties.
lRemote Control – Take control of a supported device remotely using this action, which launches a console
application that enables you to perform support and troubleshooting on the device.
lRemote Management – Take control of a supported device remotely using this action, which launches a console
application that enables you to perform support and troubleshoot on the device.
lRemote View – Enable an active stream of the device's output to a destination of your choosing (including IP
address, port, audio port, password and scan time), allowing you to see what the user sees as they operate the
device.
lRename Device – Change the device friendly name within the AirWatch Console.
lRequest Debug Log – Request the debug log on the selected device, after which you may view the log by selecting
the More tab and choosing Attachments > Documents. The log is delivered as a text file that can be used to
troubleshoot and provide support.
Chapter 13: Managing Devices
191
VMware AirWatch Mobile Device Management Guide | v.2017.10 | October 2017
Copyright © 2017 VMware, Inc. All rights reserved.

lRequest Device Check-In – Request that the selected device check itself in to the AirWatch Console. This action
updates the Last Seen column status.
lRestart AirWatch Agent – Restart the VMware AirWatchAgent. To be used during troubleshooting for when the
enrollment process or submodule installation process is interrupted.
lSecurity (Query) – Send a query command to the device to return the list of active security measures (device
manager, encryption, passcode, certificates, etc.).
lSend Message – Send a message to the user of the selected device. Choose between Email,Push Notification and
SMS.
lStart AirPlay – Stream audiovisual content from the device to the AirWatch Console using Apple's proprietary
wireless streaming protocol. You must provide the MAC Address (media access control) and Scan Time in seconds.
Requires iOS 4.2 or greater.
lStart/Stop AWCM – Start/Stop the AirWatch Cloud Messaging service for the selected device. VMware AirWatch
Cloud Messaging (AWCM) streamlines the delivery of messages and commands from the Admin Console by
eliminating the need for end users to access the public Internet or utilize consumer accounts, such as Google IDs.
lSync Device – Synchronize the selected device with the AirWatch Console, aligning its Last Seen status.
lTask Manager – Launch a Task Manager within the AirWatch Console that enables you to remotely view a device's
currently-running tasks, including task Name,Process ID and applicable Actions you may take.
lView Manifest – View the device's Package Manifest in XML format from the AirWatch Console. The manifest on
Windows Rugged devices lists metadata for widgets and apps.
lWarm Boot – Initiate a restart of the operating system without performing a power-on self-test (POST).
Enrollment Status
Use the Enrollment Status page to assess enrollment status on a per-device basis, import and register devices in bulk,
whitelist/blacklist devices, and revoke/reset device tokens.
Select Devices > Lifecycle > Enrollment Status to see a full list of all devices by enrollment status in the currently selected
organization group.
Chapter 13: Managing Devices
192
VMware AirWatch Mobile Device Management Guide | v.2017.10 | October 2017
Copyright © 2017 VMware, Inc. All rights reserved.
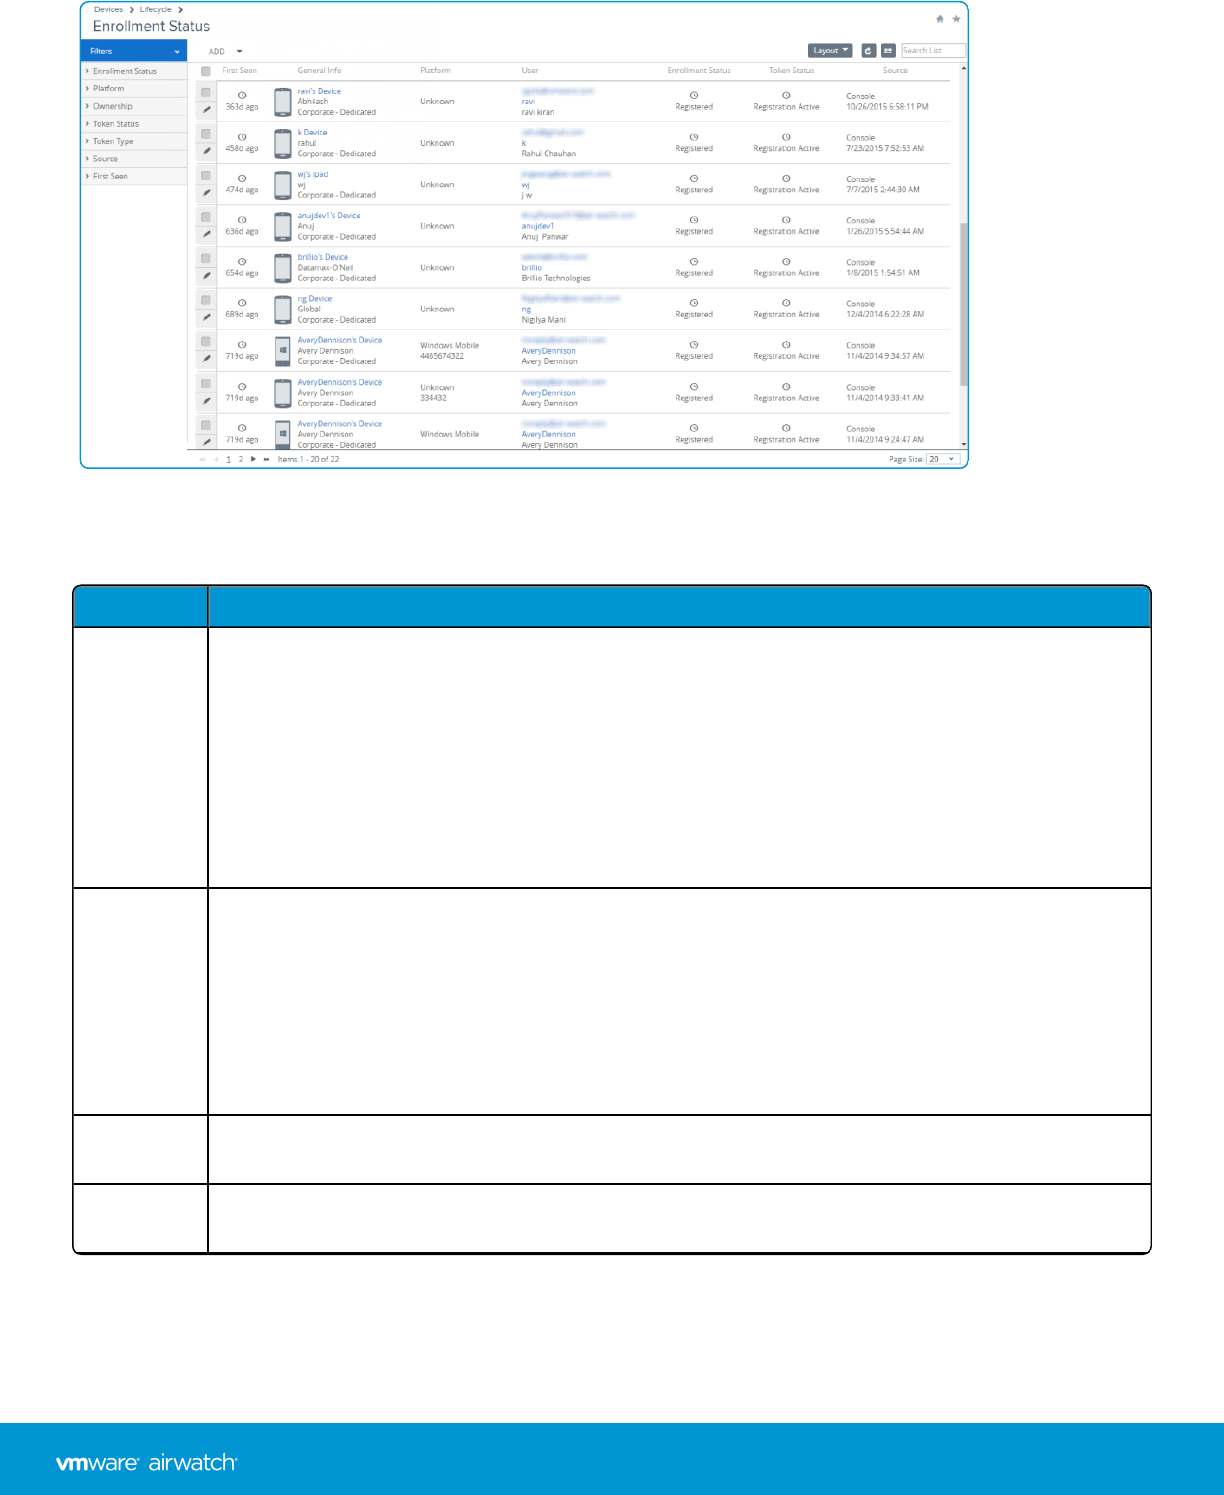
Sort by columns and configure information filters to review device activity based on specific information. For example,
sort by the Token Status column to view only devices whose registration is not applicable and act only on those specific
devices. Search all devices for a friendly name or user name to isolate one device or user.
Setting Description
Filters You may filter out entire device categories by using filters which enable you to see only those devices
that you are interested in.
lEnrollment Status
lPlatform
lOwnership
lTokenStatus
lTokenType
lSource
lFirst Seen
Add lRegister Device – You can register or Add a single device to be enrolled.
lWhitelist or Blacklist Devices – You can allow only those devices to enroll that you have identified
or whitelisted. Alternatively, you can restrict devices from an enrollment by blacklisting devices.
lBatch Import – Import multiple devices or multiple users with the Batch Import screen.
For more information, see Add a Device from List View on page 180,Add a Blacklisted or Whitelisted
Device on page 115, and Batch Import Users or Devices on page 47.
Resend
Message
Resend the original message sent to a user, including Self-Service Portal URL, Group ID, and login
credentials.
More
Actions
Chapter 13: Managing Devices
193
VMware AirWatch Mobile Device Management Guide | v.2017.10 | October 2017
Copyright © 2017 VMware, Inc. All rights reserved.

Setting Description
Change
Organization
Group
Move the selected device to the organization group of your choosing.
Change
Ownership
Change the type of ownership for the selected device.
Delete Permanently delete the registration information for selected devices. This action forces the user to re-
register to enroll. Where applicable, you must first revoke the token before deleting a device
registration.
Reset Token Reset the status of a token if it has been revoked or is expired.
Revoke
Token
Force the registration token status of selected devices to expire, essentially blocking access for
unwanted users or devices.
For the Reset Token and Revoke Token actions, you can choose to disable the Notify Users setting
which prevents the default email notification from being sent.
Selecting
Multiple
Devices
Act on individual devices or multiple devices by selecting the check box next to each device and using
the action buttons.
Once you have applied a filter to show a specific set of devices, you may perform bulk actions to
multiple selected devices. Perform this action by selecting the devices and selecting an action from the
Resend Message and More Actions buttons.
You can select individual check boxes. You may also select the entire set of filtered devices by selecting
the global check box located atop the check box column.
When you select an action for one or more devices, a confirmation screen displays allowing you to Save
or Cancel the action.
Layout Display the full listing of visible columns or choose to display or hide columns per your preferences by
choosing the Custom option.
There is also an option to apply your customized column view to all administrators at or below the
current organization group.
You may return to the Layout button settings at any time to modify your column display preferences.
Enrollment Status Details View
Select a device friendly name in the General Info column at any time to open the Details View for that device.
From the Details View, you can resend the enrollment message by selecting the Resend Message button. You can also
edit a device registration info by selecting the Edit Registration button and completing the Advanced Device
Information section.
The Details View displays a series of tabs, each containing relevant enrollment information about the device.
lSummary – View the registration date, time elapsed since the device was first seen, basic device and user info.
lUser – View detailed user info.
Chapter 13: Managing Devices
194
VMware AirWatch Mobile Device Management Guide | v.2017.10 | October 2017
Copyright © 2017 VMware, Inc. All rights reserved.
lMessage – View the outgoing Device Activation email message including credential information and QR code. There is
a resource available, called "User Registration Message," that allows the AirWatch administrator to hide the Message
tab after the device has successfully enrolled.
lCustom Attributes – View the Custom Attributes associated with the device. For more information, see the VMware
AirWatch Product Provisioning and Staging Guide, on Accessing Other Documents on page 217.
lTags – View the tags currently associated with the device. For more information, see Device Tags Overview on page
173.
lOffline Enrollment – If available, this tab allows you to enroll the device while it is offline. This feature is useful for
when you want to make the most of scheduled time for a device in an unavailable state (for example, while traveling).
Wipe Protection
Remotely wiping a device of privileged corporate content, called an Enterprise Wipe, is a step undertaken when a device
becomes lost or stolen. It is meant as a safeguard against the threat of corporate content coming into contact with
competitors.
However, there are circumstances when scheduled processes such as the Compliance Engine and other automated
directives wipe multiple devices. As an administrator, you may want to be informed when such a directive is scheduled
and be given the chance to intervene.
Configure wipe protection settings by defining a wipe threshold, which is a minimum number of devices wiped within a
certain amount of time. For example, if more than 10 devices are wiped within 20 minutes, you can place future wipes on
hold until after you validate the wipe commands.
You can review wipe logs to see when devices were wiped and for what reason. After reviewing the information, you can
accept or reject the on-hold wipe commands and unlock the system to reset the wipe threshold counter.
Configure Wipe ProtectionSettings for Managed Devices
Set a wipe threshold for managed devices and notify administrators through email when the threshold is met. You can
only configure these settings at the Global or Customer level organization group.
1. Navigate to Devices > Lifecycle > Settings > Managed Device Wipe Protection.
2. Configure the following settings.
Setting Description
Wiped
Devices
Enter the number of Wiped Devices that acts as your threshold for triggering wipe protection.
Within
(minutes)
Enter the value for Within (minutes) which is the amount of time the wipes must occur in order to
trigger wipe protection.
Chapter 13: Managing Devices
195
VMware AirWatch Mobile Device Management Guide | v.2017.10 | October 2017
Copyright © 2017 VMware, Inc. All rights reserved.

Setting Description
Email Select a message template to email to administrators.
Create a message template for wipe protection by navigating to Devices & Users > General > Message
Templates. Then add a new template and select Device Lifecycle as the Category and Wipe Protection
Notification as the Type. You can use the following lookup values as part of your message template.
l{EnterpriseWipeInterval} – The value of Within (minutes) on the settings page.
l{WipeLogConsolePage} – A link to the Wipe Log page.
To Enter the email addresses of administrators who should receive this notification message. You should
only notify administrators who have access to the Wipe Log page.
3. Select Save.
Configure Wipe Protection Settings for Unmanaged Devices
In rare circumstances, automatic enterprise wipe commands can be sent to unmanaged devices. Use the same wipe
threshold settings as managed devices. Once that threshold is reached, the system notifies the email entered and puts a
hold on all future enterprise wipe commands until an administrator specifies otherwise. You can only configure these
settings at the Global or Customer level organization group.
1. Navigate to Groups &Settings > All Settings > Devices &Users >Advanced > Unmanaged Device Wipe
Protection.
2. Configure the following settings.
Setting Description
Wiped
Devices
Enter the number of Wiped Devices that acts as your threshold for triggering wipe protection.
Within
(minutes)
Enter the value for Within (minutes) which is the amount of time the wipes must occur in order to
trigger wipe protection.
Email Select a message template to email to administrators.
Create a message template for wipe protection by navigating to Devices & Users > General > Message
Templates. Then add a new template and select Device Lifecycle as the Category and Wipe Protection
Notification as the Type. You can use the following lookup values as part of your message template.
l{EnterpriseWipeInterval} – The value of Within (minutes) on the settings page.
l{WipeLogConsolePage} – A link to the Wipe Log page.
To Enter the email addresses of administrators who should receive this notification message. You should
only notify administrators who have access to the Wipe Log page.
Allow
Enterprise
Wipes
Enable the enterprise wiping of unmanaged devices. The default setting is enabled.
3. Select Save.
Chapter 13: Managing Devices
196
VMware AirWatch Mobile Device Management Guide | v.2017.10 | October 2017
Copyright © 2017 VMware, Inc. All rights reserved.

View Wipe Logs
You can view the Wipe Log page to see when devices were wiped and for what reason. After reviewing the information,
you can accept or reject any on-hold wipe commands and unlock the system to reset the wipe threshold counter.
If the system is locked, then you see a banner at the top of the page indicating this status.
1. Navigate to Devices > Lifecycle > Wipe Log. The Report Device Wipe Log resource manages access to the Wipe Log
page, and is available by default for system admins, SaaS admins, and AirWatch admins. You can add this resource to
any custom admin role using the Create Admin Role page.
For more information, see Create Administrator Role on page 58.
2. You can Filter the Wipe Log by the following parameters.
lDate Range
lWipe Type
lStatus
lSource
lOwnership
3. View the list of devices and determine whether the presented devices are valid wipes. Device pending actions have a
status of "On Hold." Devices wiped before the threshold limit is reached display as "Processed."
a. If they are valid wipes, then select each device and then select Approve wipes from the command list. The status
changes to Approved.
b. If they are not valid wipes, then select each device and then select Reject wipes from the command list. The
status changes to Rejected.
4. Reset the device threshold counter and allow wipe commands to go through by selecting Unlock System. At this
point, the system allows future automated wipe commands until the threshold limit is exceeded again.
You can only perform this action at a Global or Customer level organization group.
AirWatch Hub
The VMware AirWatch Hub is your central portal for fast access to critical information. You can quickly identify important
issues and act from a single location in the AirWatch Console.
Chapter 13: Managing Devices
197
VMware AirWatch Mobile Device Management Guide | v.2017.10 | October 2017
Copyright © 2017 VMware, Inc. All rights reserved.
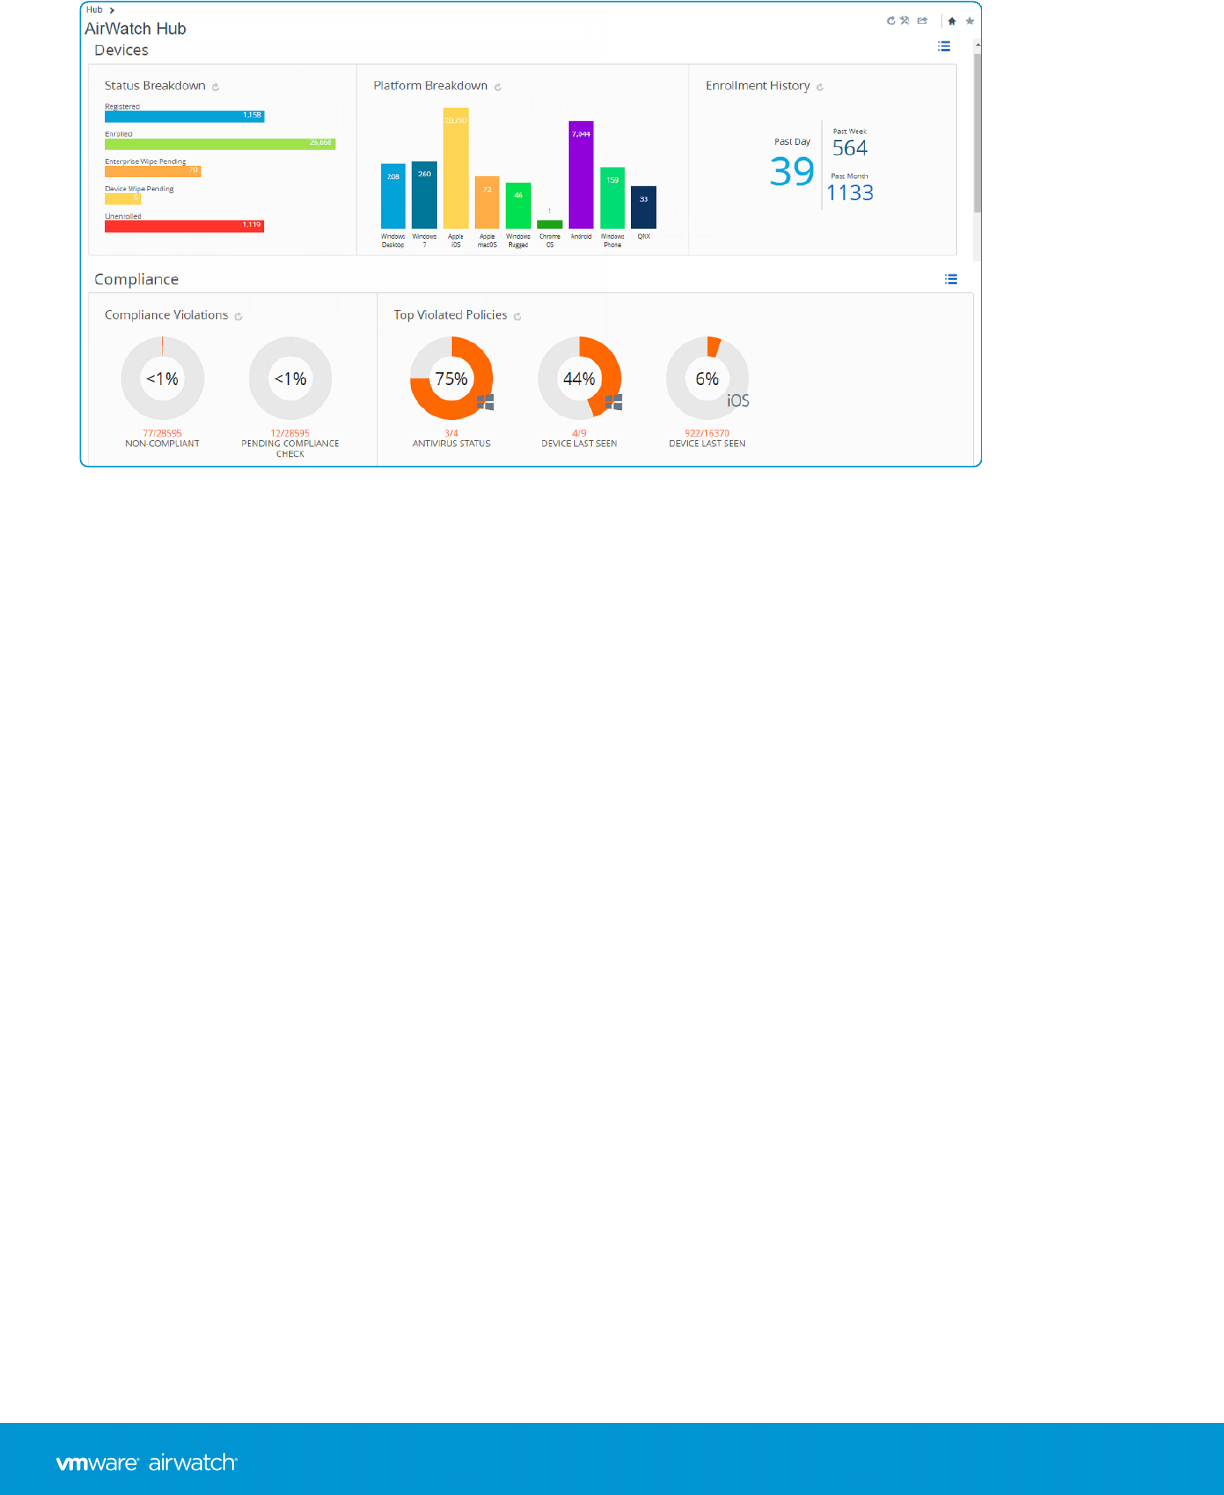
Selecting any bar or donut graph on the page displays the Device List View. This list view contains all the devices specific
to the metric you selected. You can then perform actions such as sending a message to those devices.
For example, select the Antivirus Status donut graph. Within seconds, the Device List View displays with a list of devices
whose lack of antivirus software has triggered a policy violation. Select all the devices in this list by clicking the check box
to the far left of each device. You can also select the "select all" check box below the Add Device button. The action
button cluster displays above the listing. Select the Send button to send a message to the users of the selected devices.
You can choose to send an Email, a push notification, or an SMS text message.
AirWatch Hub Elements
The Hub provides summary graphs and detailed views.
lDevices – View the exact number of devices.
oStatus breakdown of all devices including registered, enrolled, enterprise wipe pending, device wipe pending and
unenrolled.
oPlatform breakdown of devices enrolled in AirWatch.
oEnrollment history over the past day, past week, and past month.
lCompliance – View which devices are violating compliance policies.
oAll compliance policies currently violated by devices, including apps, security settings, geolocation, and more.
oTop violated policies, covering all types of compliance policies established.
oBlacklisted Apps, including all blacklisted apps installed on devices, ranked by order of instances of violation.
oDevices lacking the apps that you want to be installed and ready for your users.
lProfiles – View which profiles are out of date.
oLatest Profile Version, including devices with old versions of each profile.
Chapter 13: Managing Devices
198
VMware AirWatch Mobile Device Management Guide | v.2017.10 | October 2017
Copyright © 2017 VMware, Inc. All rights reserved.
lApps – View which applications are associated with devices.
oLatest Application Version, including devices with old versions of each application.
oMost Installed Apps, ranked by devices that have the application currently installed.
lContent – View devices with content that is out of date.
oLatest Content Version, including each file that is out of date ranked by order of instance.
lEmail – View devices that are currently unable to receive email.
oDevices Blocked from email, including devices blocked by default, blacklisted or unenrolled.
lCertificates – View which certificates are set to expire.
oCertificates expiring within one month, one to three months, three to six months, six to 12 months and greater
than 12 months. Also, view certificates that have already expired.
The set of devices shown varies depending on your current organization group, including all devices in child organization
groups. Switch to lower organization groups and automatically update device results by using the organization group
drop-down menu.
Toggle between views by selecting the List View icon and Chart View icon . Select any metric to open the
Device List View for that specific set of devices. You can then perform actions such as sending a message to those devices.
Customize the Hub by selecting the Available Sections icon . Select or deselect check boxes representing available
sections (Devices, Compliance, Profiles, and so on) and select Save to craft the Hub's Overview.
You can export Hub data in PDF format by selecting the Export icon . Exporting to PDF is useful for providing daily,
weekly, or monthly reports of the current state of your mobile device deployment.
Admin Panel Dashboard
The Admin Panel provides an overview of module license information and deployed AirWatch components. The Admin
Panel contains a summary of AirWatch licenses condensed into two separate sections, Active Products and Deployed
Components.
Access the Admin Panelby navigating to Hub > Admin Panel. The AdminPanel can only be accessed from a Customer
organization group. For more information, see Organization Group Type Functions on page 69.
Active Products in the Admin Panel
The Active Products section confirms the license validity of features included in your deployment such as Browser,
Container, Mobile Device Management, App Catalog, and more. For each feature you can see the total number of
licenses, the license model, and the license type.
Deployed Components in the Admin Panel
The Deployed Components section features a panel for every enabled component at the customer organization group,
each reporting the connectivity status.
lVMware Enterprise Systems Connector
lAirWatch Secure Email Gateway
lVMware Tunnel
Chapter 13: Managing Devices
199
VMware AirWatch Mobile Device Management Guide | v.2017.10 | October 2017
Copyright © 2017 VMware, Inc. All rights reserved.

You can select the refresh button ( ) to refresh the connectivity status of the individual enabled component.
You can also select the settings button ( ) to display the systems setting page that corresponds to the enabled
component.
Industry Templates for iOS
An Industry Template is a collection of mobile apps and device profiles that you can push to your devices, greatly
expediting the deployment process. You can choose templates in support of industries such as healthcare and retail and
you may edit these templates to fit your needs.
For details about Industry Templates, see the VMware AirWatch iOS Platform Guide, available on Accessing Other
Documents on page 217.
Reports &Analytics
AirWatch has extensive reporting and event logging capabilities that provide administrators with actionable, result-driven
statistics about device fleets.
You can use these pre-defined reports or create custom reports based on specific devices, user groups, date ranges, or
file preferences. Reports can be viewed by navigating to the Reports page at Hub > Reports & Analytics > Reports > List
View. Added reports are accessible from the My Reports tab at the top of the Reports page for quick access.
For more information, see the VMware AirWatch Reports & Analytics Guide, on Accessing Other Documents on page
217.
Chapter 13: Managing Devices
200
VMware AirWatch Mobile Device Management Guide | v.2017.10 | October 2017
Copyright © 2017 VMware, Inc. All rights reserved.

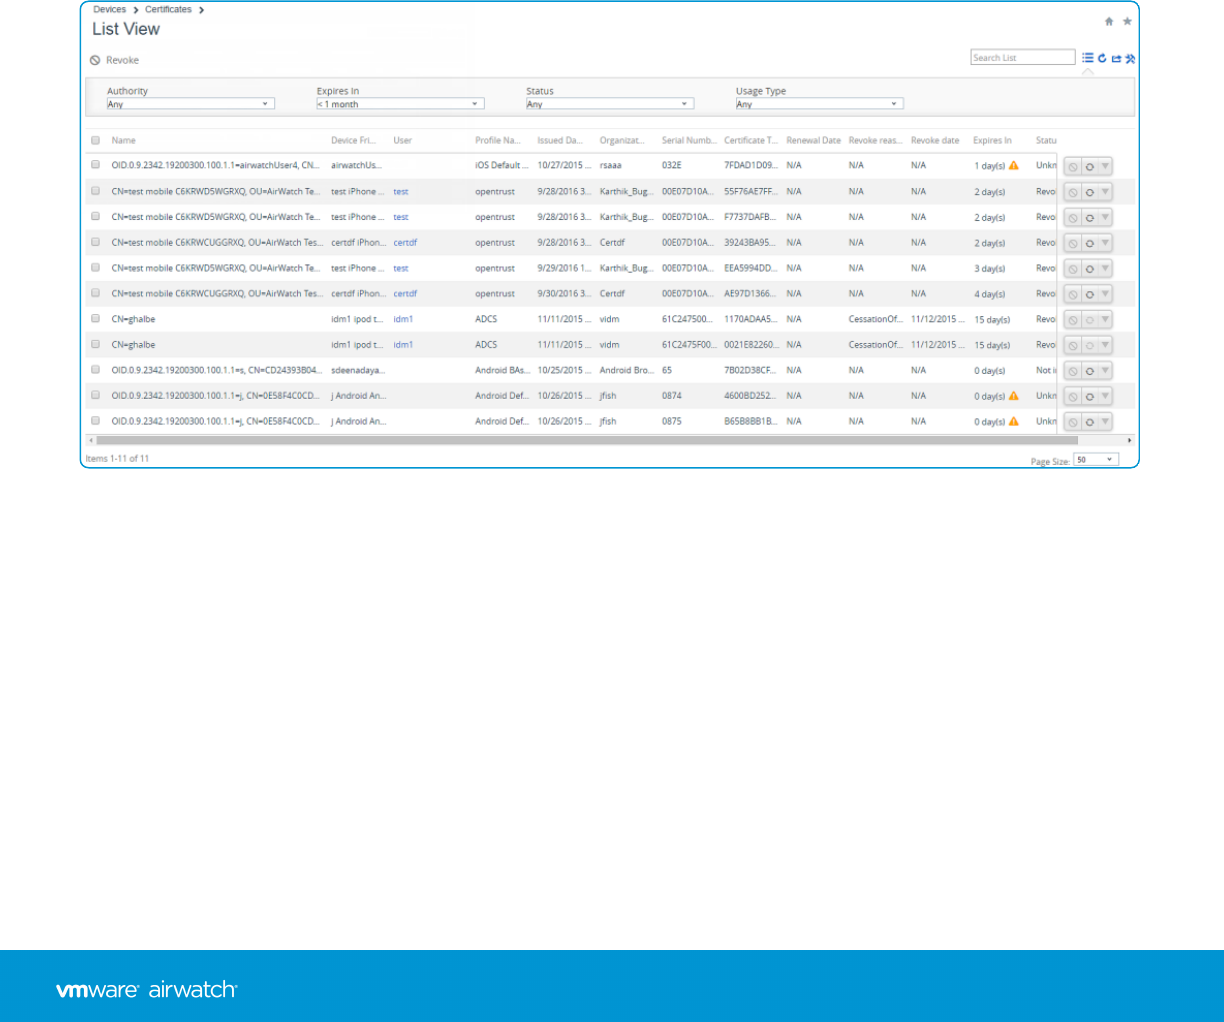
Certificate Management Overview
As the mobility of sensitive corporate content becomes the norm, the probability of unauthorized access and malicious
threats increases. Even if you protect your corporate email, Wi-Fi, and virtual private network (VPN) using strong
passwords, your infrastructure remains vulnerable. Your infrastructure is vulnerable to brute force attacks, dictionary
attacks, and employee error.
For much greater protection, consider implementing digital certificates for securing your corporate assets. Certificates
offer a level of stability, security, and authentication with which passwords cannot compete. Mobile Certificate
Management by VMware AirWatch solves this problem by ensuring security throughout the lifecycle of a device.
Digital Certificates List View
Once issued, AirWatch enables you to manage deployed digital certificates using the Certificate List View in the AirWatch
Console. Administrators can view and sort certificates by device, authority, user, profile, issued date, and so on. Navigate
to Devices >Certificates >List View.
Revoke or Renew a Digital Certificate
The Certificate List View provides a summary of deployed certificates and the ability to renew or revoke certificates
individually or in bulk. Locate and revoke all digital certificates from a deactivated user/device or even renew/rotate all
Wi-Fi authentication certs before a compliance driven expiration date.
Initiate the process by navigating to Devices >Certificates >List View.
1. Identify and select the digital certificates you want to renew or revoke by inserting one or more check marks in the
empty check boxes.
2. Select the action button that you want to invoke: Renew or Revoke, to apply the action to the selected certificates.
Chapter 14: Certificate Management
202
VMware AirWatch Mobile Device Management Guide | v.2017.10 | October 2017
Copyright © 2017 VMware, Inc. All rights reserved.

Certificate Integration Resources
This comprehensive list of certificate management documentation can each be found on Accessing Other Documents on
page 217.
lAirWatch Certificate EOBO with ADCS via DCOM – Set up the Enrollment Agent Signing Certificate for direct integration with
AirWatch using ADCS over the DCOM protocol. This allows AirWatch to take advantage of Microsoft’s Certificate Enroll On Behalf
Of Others function.
lAirWatch Certificate Authentication for Cisco AnyConnect – Set up your Cisco ASA Firewall with AirWatch to automatically
deploy and configure AnyConnect VPN with External CA Authentication.
lAirWatch Certificate Authentication for Cisco IPSec VPN – Set up your Cisco ASA Firewall and AirWatch to automatically deploy
and configure IPSec VPN with External CA Authentication.
lAirWatch Certificate Authentication for EAS with ADCS – Establish trust between your directory services, certificate authority,
and an email server other than CAS.
lAirWatch Certificate Authentication for EAS with NDES-MSCEP – Set up the Microsoft Exchange Client Access Server (CAS) and
AirWatch to allow a device to connect to Microsoft Exchange ActiveSync (EAS) using a certificate for authentication.
lAirWatch Certificate Authentication for EAS with SEG – Set up Kerberos Delegation to enable EAS certificate authentication
with the Secure Email Gateway.
lAirWatch Integration with Entrust IdentityGuard – Integrate with Entrust IdentityGuard service to issue certificates.
lAirWatch Integration with GlobalSign Guide – Integrate with GlobalSign's services to issue certificates.
lAirWatch Integration with JCCH Guide – Integrate with JCCH's services to issue certificates.
lAirWatch Integration with Microsoft ADCS via DCOM – Set up the Microsoft certificate authority for direct CA integration with
AirWatch over the DCOM protocol and take advantage of digital certificates by automating the issuing, renewal, and revocation
process to mobile devices.
lAirWatch Integration with Microsoft NDES via SCEP – Set up the Microsoft certificate authority for direct CA integration with
AirWatch over the NDES/SCEP/MSECP protocol.
lAirWatch Integration with OpenTrust CMS Mobile 2 – Integrate with OpenTrust CMSMobile services to issue certificates.
lAirWatch Integration with RSA PKI Guide – Integrate with RSA PKI to issue certificates for your AirWatch MDM solution.
lAirWatch Integration with SCEP – Use SCEP to leverage certificates as part of your AirWatch deployment.
lAirWatch Integration with SecureAuth PKI Guide – Integrate with SecureAuth PKI services to issue certificates.
lAirWatch Integration withSymantec MPKI Guide – Integrate with Symantec's MPKI services to issue certificates.
lAirWatch Certificate Authentication for EAS with SEG and TMG – Discusses two configurations – TMG to EAS server and TMG
to SEG to EAS server and defines the configurations required in order to setup certificate authentication on a TMG to proxy
requests to backend EAS or SEG servers.
You can also find the following documents on Accessing Other Documents on page 217.
lAirWatch Securing Mobile Devices with Certificates – Provides a business level introduction to the benefits of digital
certificates. Learn more about why, in the mobile landscape, digital certificates do more than act as a security safeguard for
internal content.
Chapter 14: Certificate Management
203
VMware AirWatch Mobile Device Management Guide | v.2017.10 | October 2017
Copyright © 2017 VMware, Inc. All rights reserved.

lAirWatch Selecting Microsoft CA Deployment Models Overview – Provides you with an overview of the different Microsoft CA
Deployment Model and helps you in selecting the right deployment model for your enterprise.
Chapter 14: Certificate Management
204
VMware AirWatch Mobile Device Management Guide | v.2017.10 | October 2017
Copyright © 2017 VMware, Inc. All rights reserved.


Custom Attributes Overview
Custom attributes enable administrators to extract specific values from a managed device and return it to the AirWatch
Console. You can also assign the attribute value to devices for use in product provisioning or device lookup values.
These attributes allow you to take advantage of the rules generator when creating products using Product Provisioning.
Note: Custom attributes (and the rules generator) are only configurable and useable at Customer-level organization
groups.
Custom Attributes Database
Custom attributes are stored either as XML files on the device or in the custom attribute database on the AirWatch
Console server. When using the database, custom attributes are sent as samples to AirWatch periodically for asset
tracking of key/value pairs. If a record in the device database is configured with 'Create Attribute' = TRUE, then the Name
and Value will automatically be retrieved by the AirWatch Agent and sent with the custom attributes sample. The
key/value pair will show in the Device Details page for the device in the Custom Attributes tab.
Create Custom Attributes
Create a custom attribute and values to push to devices. You create the attributes and values associated with them. For
more information, see Create Custom Attributes on page 206.
Importing Custom Attributes
The custom attribute batch import feature allows you to load custom attributes and corresponding values into the
system in bulk. In the templates provided, each column corresponds to one custom attribute and each row corresponds
to different parameters of custom attribute. For more information, see Custom Attributes Importing on page 207.
Platform-Specific Custom Attributes Provisioning
You can push custom attributes to a device using XML provisioning for use with advanced product provisioning
functionality. The method for pushing the XML varies based on the device platform.
Create Custom Attributes
Create a custom attribute and values to push to devices. These attributes and values control how product rules work and
function as lookup values for certain devices.
1. Navigate to Devices > Staging & Provisioning > Custom Attributes > List View.
2. Select Add and then select Add Attribute.
3. Enter an Attribute Name.
4. Enter the optional Description of what the attribute identifies.
5. Enter the name of the Application that will gather the attribute.
Chapter 15: Custom Attributes
206
VMware AirWatch Mobile Device Management Guide | v.2017.10 | October 2017
Copyright © 2017 VMware, Inc. All rights reserved.
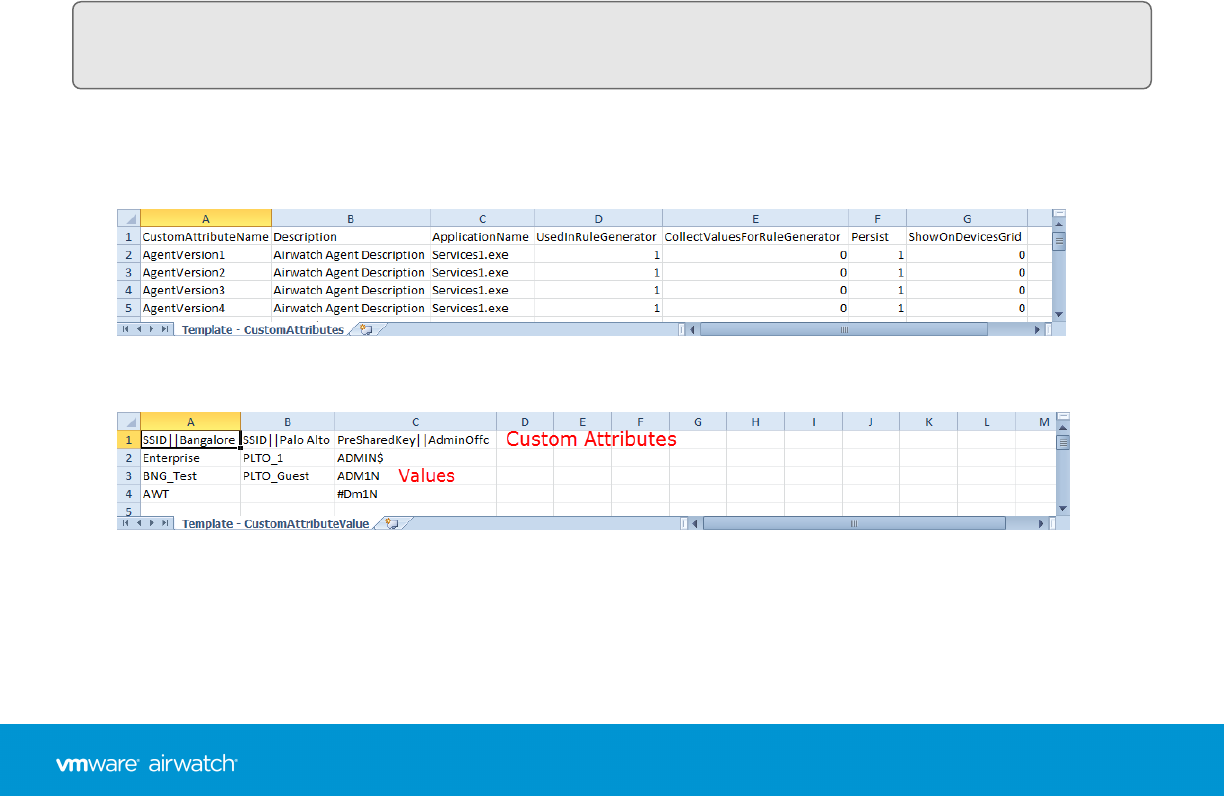
6. Select Collect Value for Rule Generator to make the values of the attribute available in the drop-down menu of the
rule generator.
7. Select Use in Rule Generator if you want to use the attribute in the rule generator.
8. Select Persist to prevent the removal of the custom attribute from the AirWatch Console unless an Admin or an API
call explicitly removes it. Otherwise, the attribute is removed as normal.
If you delete a custom attribute that reported from a device to the AirWatch Console, a persisted custom attribute
still remains in the AirWatch Console.
Custom attribute persistence is only available to Android and Windows Rugged devices.
9. Select Use as Lookup Value to use the custom attribute as a lookup value anywhere in the AirWatch Console.
For example, you could use custom attributes as part of a device friendly name to simplify device naming.
10. Select the Values tab.
11. Select Add Value to add values to the custom attribute and then select Save.
Custom Attributes Importing
The custom attribute batch import feature allows you to load custom attributes and corresponding values into the
system in bulk. In the templates provided, each column corresponds to one custom attribute and each row corresponds
to different parameters of custom attribute.
With the templates, you can import custom attributes in different ways and with different information.
Caution: The syntax of the first column of each template must be replicated exactly. Failure to use proper syntax can
cause database issues and result in loss of data.
Template Types
lCustom Attributes Template – Allows you to define a custom attribute and its settings.
lCustom Attribute Values Template – Allows you to define the values of predefined custom attributes.
lDevice Custom Attribute Values – Allows you to define the values of predefined custom attributes for individual
devices based on the cross reference (Xref) value. The Xref values determine the individual devices receiving the value
Chapter 15: Custom Attributes
207
VMware AirWatch Mobile Device Management Guide | v.2017.10 | October 2017
Copyright © 2017 VMware, Inc. All rights reserved.
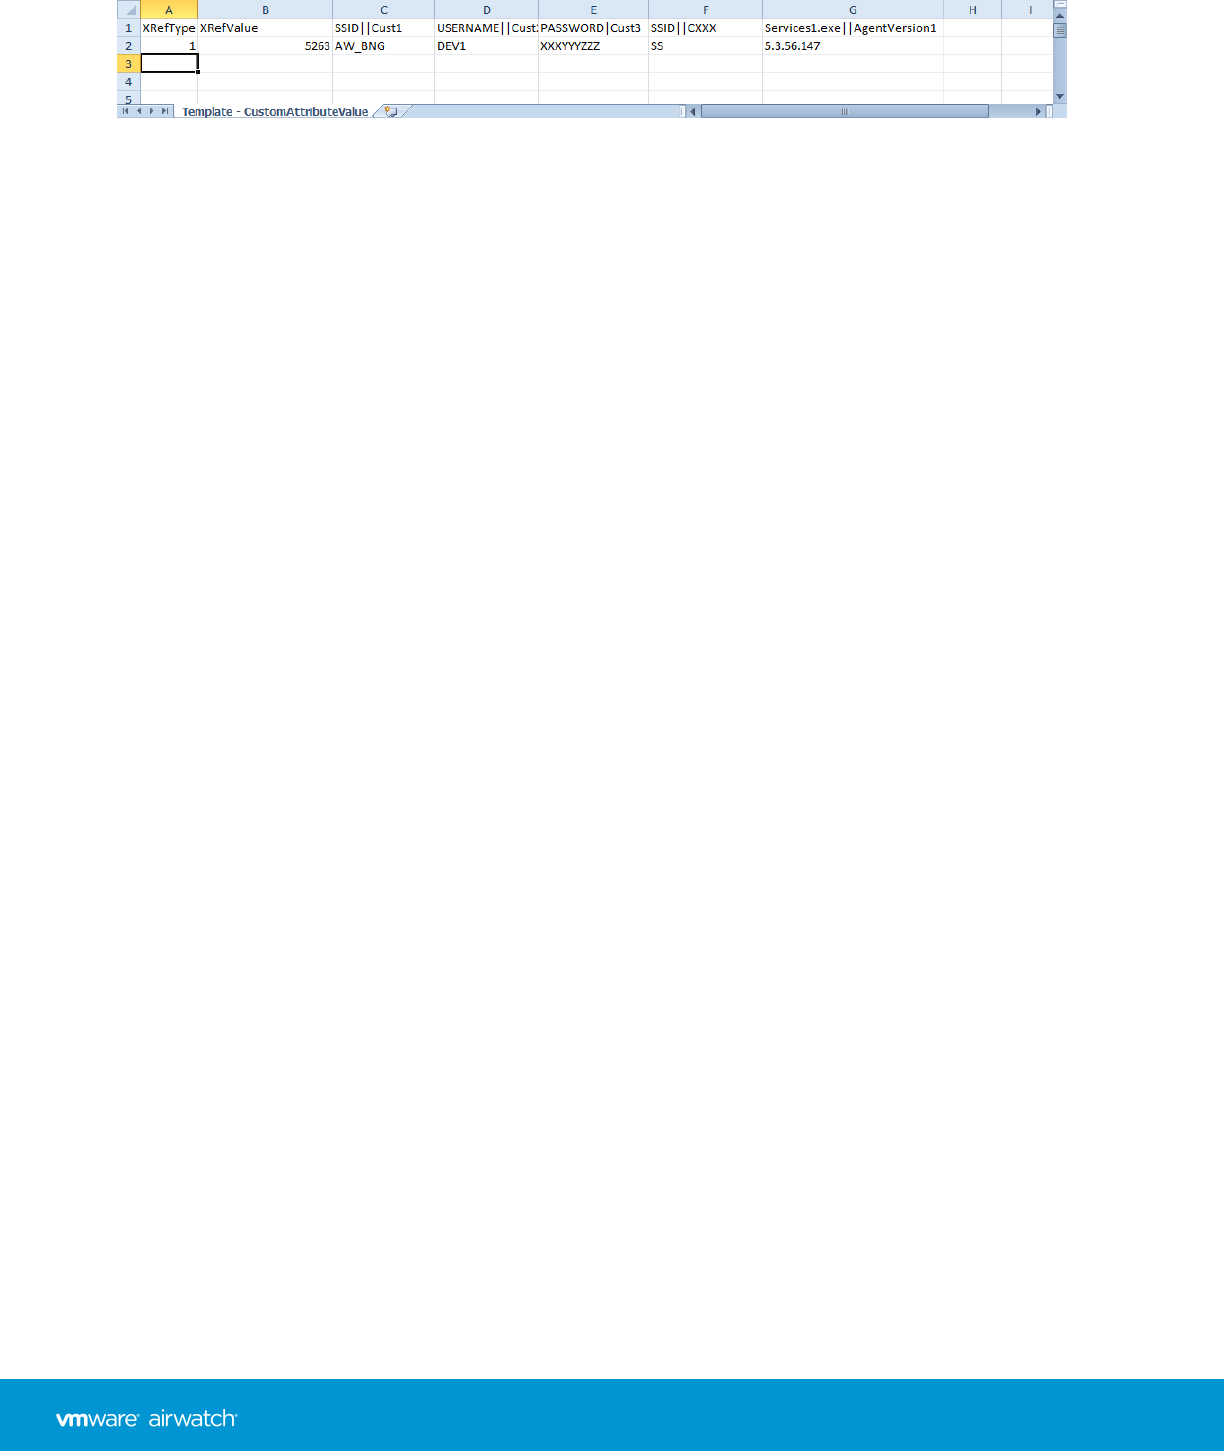
for each custom attribute.
o1 – DeviceID (AirWatch assigned DeviceID when the device enrolls)
o2 – Serial Number
o3 – UDID
o4 – MAC Address
o5 – IMEI Number
Save the file as a .csv before you import it.
Assign Organization Groups Using Custom Attributes
Configure rules that control how devices are assigned to organization groups following enrollment. You can only create
one custom attribute assignment rule for each organization group you run.
To create assignment rules, follow the directions below.
1. Navigate to Groups & Settings > All Settings > Devices & Users > General > Advanced.
2. Set Enable Device Assignment Rules to Enabled.
3. Set the Type to Organization Group by Custom Attribute.
4. Select Save.
5. Navigate to Devices > Staging & Provisioning > Custom Attributes > List View > Add > Add Attribute and create a
custom attribute if you have not already done so. See Create Custom Attributes on page 206 for more information.
6. Navigate to Devices > Staging & Provisioning > Custom Attributes > Custom Attributes Assignment Rules > Add
Rule.
7. Select the Organization Group to which the rule assigns devices.
Chapter 15: Custom Attributes
208
VMware AirWatch Mobile Device Management Guide | v.2017.10 | October 2017
Copyright © 2017 VMware, Inc. All rights reserved.
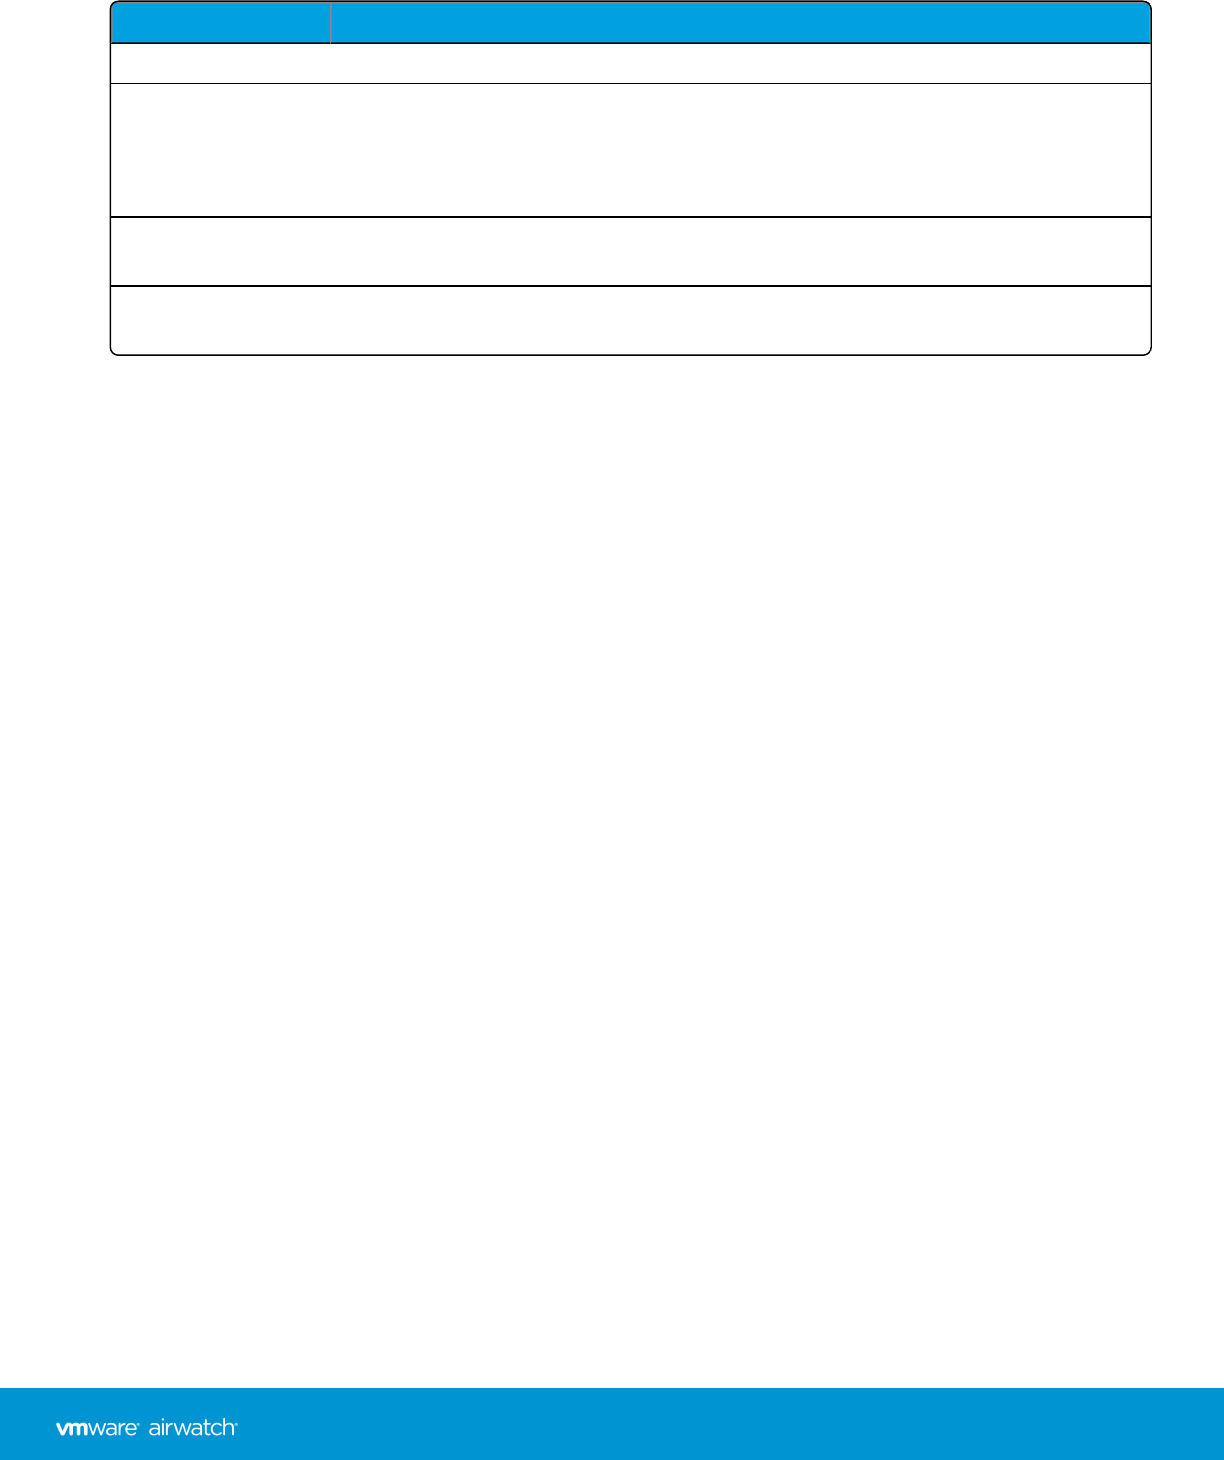
8. Select Add Rule to configure the logic of the rule.
Setting Description
Attribute/Application This is the custom attribute with corresponding values for determining device assignment.
Operator This operator compares the Attribute to the Value to determine if the device qualifies for
the product.
When using more than one Operator in a rule, you must include a Logical Operator
between each Operator.
Value This is the value of the custom attribute. All values from all applicable devices are listed
here for the Attribute selected for the rule.
Add Logical Operator Select to display a drop-down menu of logical operators such as AND, OR, NOT, and
parentheses. Allows for more complex rules.
9. Select Save after configuring the logic of the rule.
When a device with an assigned attribute enrolls, the rule assigns the device to the configured organization group.
Chapter 15: Custom Attributes
209
VMware AirWatch Mobile Device Management Guide | v.2017.10 | October 2017
Copyright © 2017 VMware, Inc. All rights reserved.

Chapter 16:
Self-Service Portal
Self-Service Portal Overview 211
Configure the Default Login Page for the SSP 211
My Devices Page of the SSP 211
Remote Actions in the SSP 213
Self-Service Portal Actions Matrix 215
VMware Content Locker Options 216
210
VMware AirWatch Mobile Device Management Guide | v.2017.10 | October 2017
Copyright © 2017 VMware, Inc. All rights reserved.

Self-Service Portal Overview
The AirWatch Self-Service Portal (SSP) is a useful online tool used to remotely monitor and manage devices. It can help
reduce the hidden costof managing a device fleet. By empowering and educating device users on how to perform basic
device management tasks, investigate issues and fix problems, your organization may be able to reduce the number of
help desk tickets and support issues.
Access the Self Service Portal on Devices
You can access the Self-Service Portal (SSP) from your workstations or devices by navigating to
https://<AirWatchEnvironment>/MyDevice. If you have a device that supports Web Clips or Bookmarks, your
administrator may have supplied these shortcuts enabling you to access the SSP directly.
Self Service Portal (SSP) Customizations
You can alter the default login page background by configuring Branding settings.
Navigate to Groups &Settings > All Settings > System > Branding and select the Upload button in the Self-Service
Portal Login Page Background setting. Select a custom background image with a suggested size of 1024x768 pixels.
Configure the Default Login Page for the SSP
You can set the default authentication method displayed on the Self-Service Portal depending on your organization's and
users' needs.
Note: This setting is only accessible at the Global level for on-premises customers.
Configure this setting by navigating to Groups &Settings > All Settings > Installation > Advanced > Other and set the
SSP Authentication Type to:
lEmail – Prompts users for only their email address if you have set up auto discovery.
lLegacy – Prompts users for their Group ID and credentials (username/password).
lDedicated – Prompts users for only their credentials (username/password). This option defaults a single Group ID for
single-customer environments.
My Devices Page of the SSP
The My Devices page of the Self Service Portal provides access to detailed information about devices and enables users
to perform a wide range of actions.
The viewable tabs and available actions may vary based on device platform. See the applicable VMware AirWatch
Platform Guide, available in AirWatch Resources.
Choose a Language for the SSP
The Self-Service Portal automatically matches the browser default language. However, you can override this default
setting by choosing from the Select Language drop-down on the login screen.
Chapter 16: Self-Service Portal
211
VMware AirWatch Mobile Device Management Guide | v.2017.10 | October 2017
Copyright © 2017 VMware, Inc. All rights reserved.
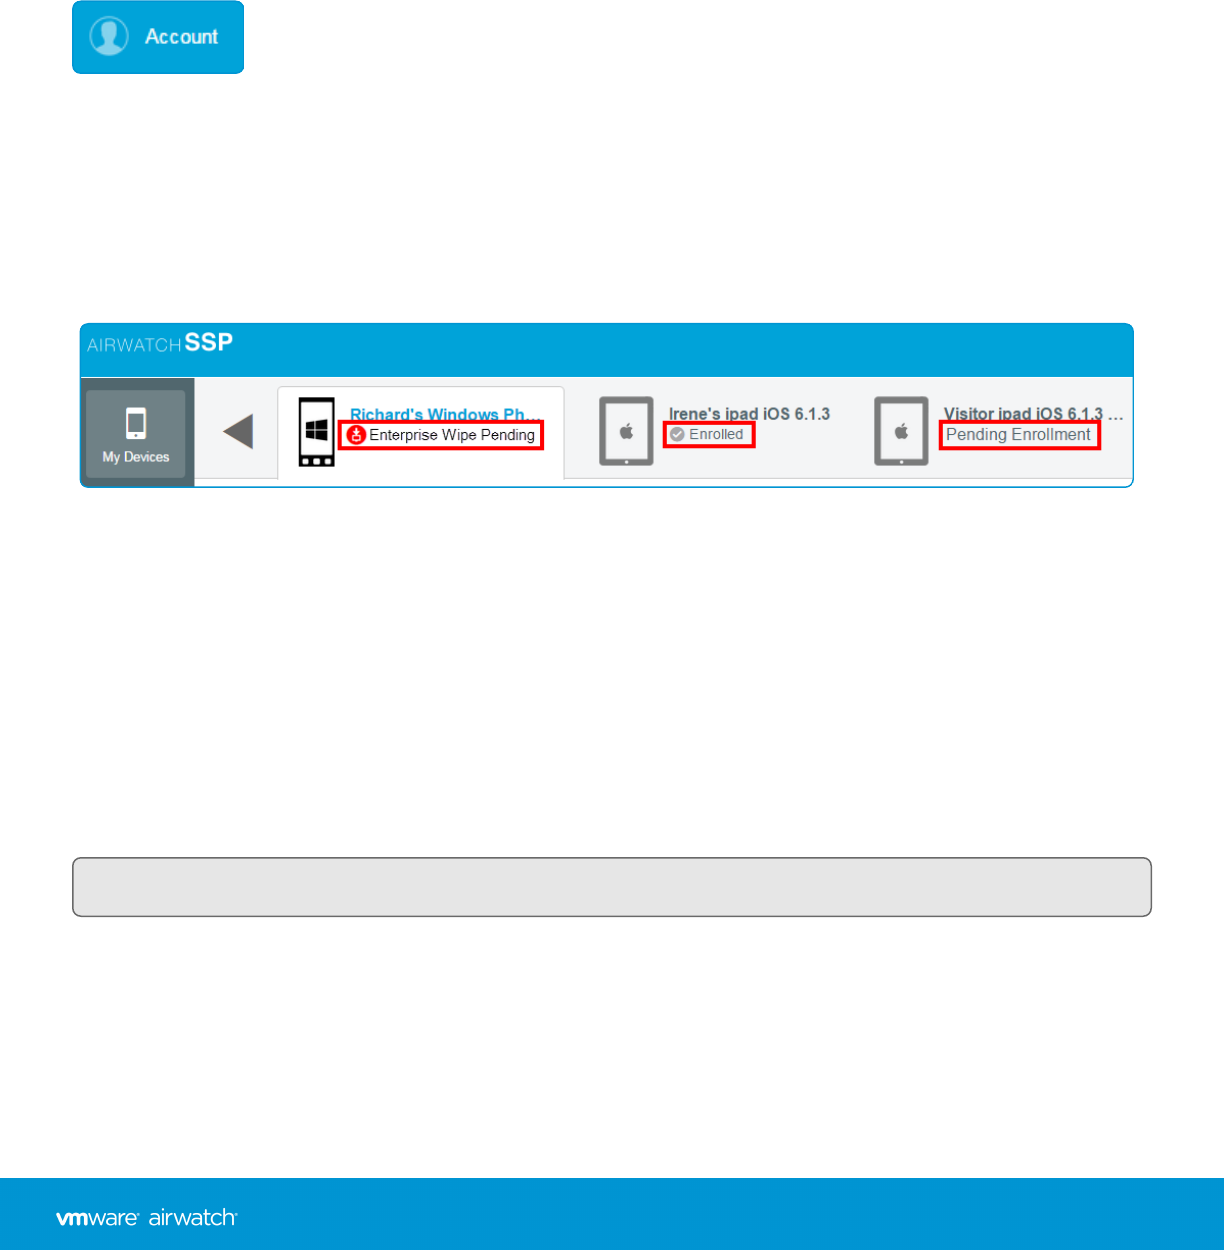
Log Into the SSP
Log in using the same credentials (Group ID,username and password) used to originally enroll in AirWatch. You may be
required to enter a randomly-generated Captcha code.
Change Your Password for the SSP
You may use the Account page to change the password associated with your AirWatch account. This password will be
used for device enrollment and logging into the SSP.
Change your password by selecting the Account button located at the top-right of the Self Service Portal screen. The User
Account page displays allowing you to select the Change button next to the Current Password field.
Select a Device in the SSP
After logging in to the SSP, the My Devices page displays all the devices associated with the account. Each enrolled device
appears in its own tab across the top of the Self Service Portal page. Select the tab representing the device you want to
view and manage.
The device status is listed under the name of the device on the tab. Those statuses include Discovered,Enrolled,Pending
Enrollment,Unenrolled, and Enterprise Wipe Pending.
Add a Device in the SSP
You can add a device directly from the self-service portal.
1. Select Add Device on the My Devices page.
2. Complete the required fields: Friendly Name,Platform,Device Ownership,Message Type and Email Address as
applicable.
3. Select Save to add the new device to the SSP account.
Note: The status of a newly-added device sets to "Pending Enrollment" until it is fully enrolled.
Device Information in the SSP
When a user logs in to the SSP, their primary device appears in the main viewer. The main view page displays basic
information such as Enrollment Date, the Last Seen date, and the device Status.
The Go to Details button displays tabs containing information about the selected device under the selected user
account.
Chapter 16: Self-Service Portal
212
VMware AirWatch Mobile Device Management Guide | v.2017.10 | October 2017
Copyright © 2017 VMware, Inc. All rights reserved.
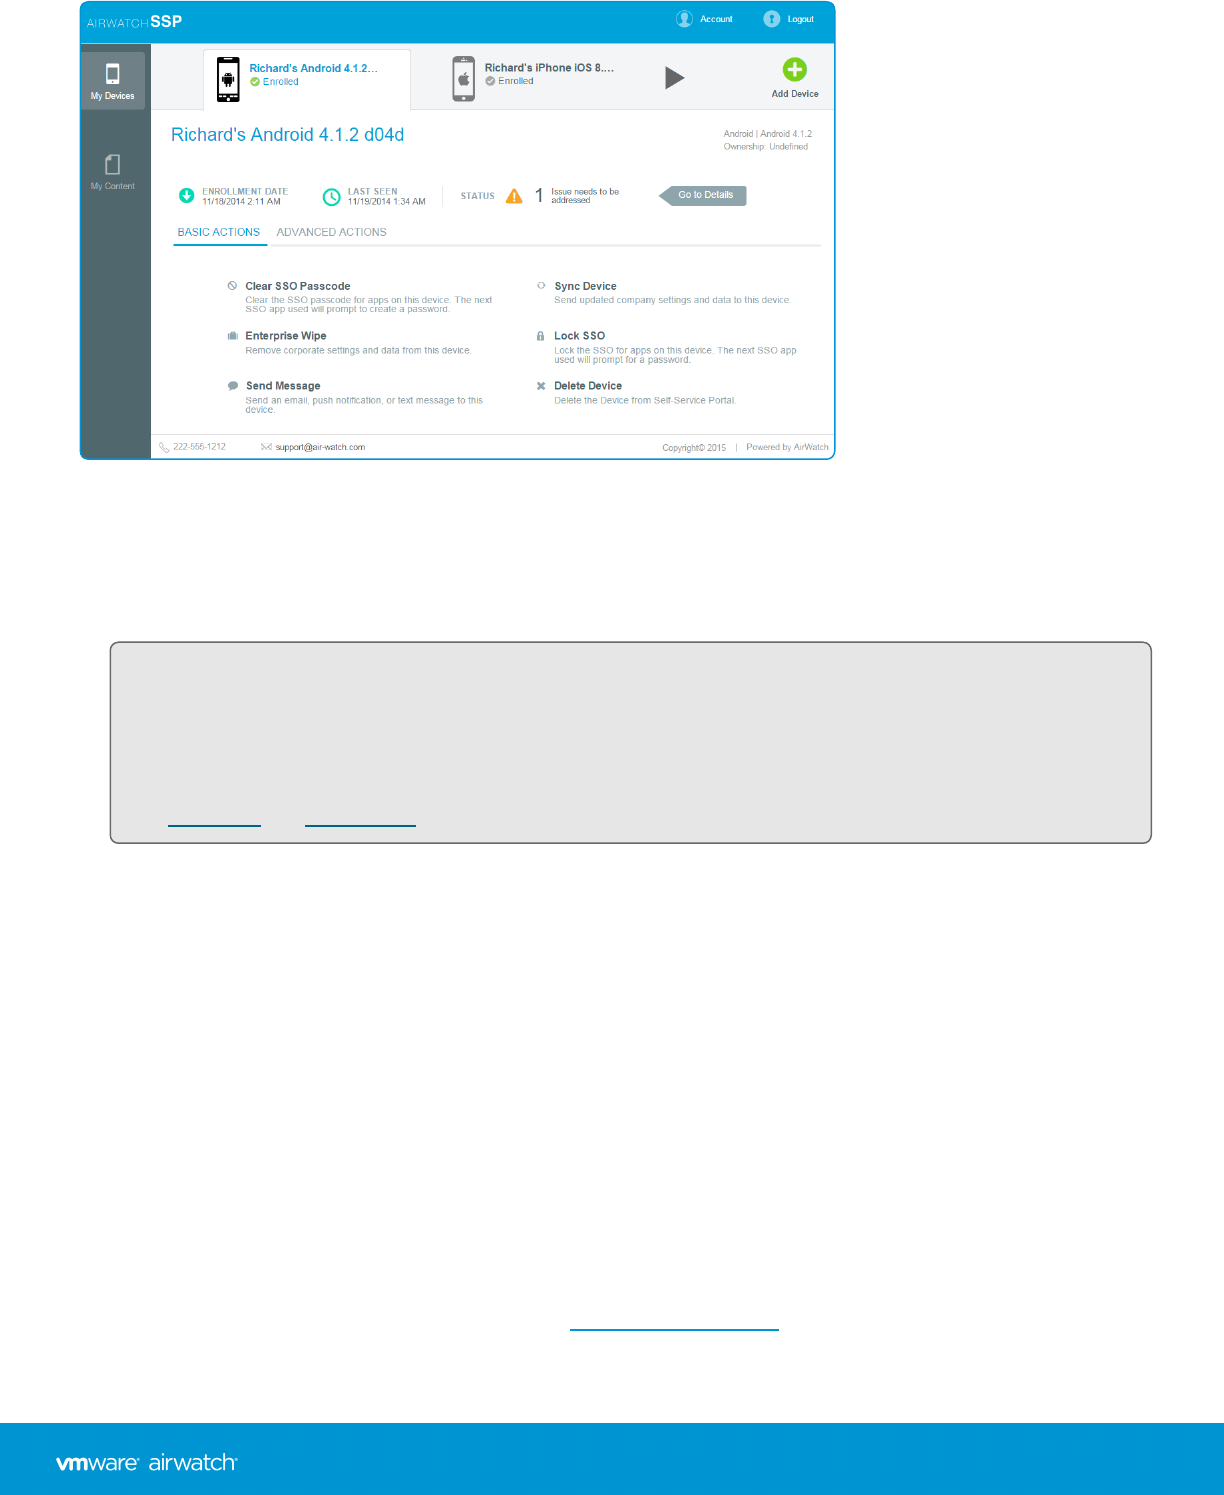
lSummary – Displays summarized information for Compliance, Profiles,Apps, Content, Friendly Name, Asset
Number, UDID number, and Wi-Fi MAC Address.
oA device's friendly name can be edited directly from the Summary tab view by selecting the edit icon to the right
of the Friendly Name field.
Note: The Device Summary User role resource controls the visibility of the Summary tab in the SSP. If specific
pieces of information are restricted from a user role's view by way of a disabled resource such as Device Apps,
Device Compliance, or Device Profiles, then corresponding information normally appearing on the Summary
tab is also hidden.
Visit User Roles and Admin Roles for detailed instructions on limiting resources for user and admin roles.
lCompliance – Shows the compliance status of the device, including the name and level of all compliance policies that
apply to the device.
lProfiles – Shows all of the MDM profiles (including automatic profiles) that have been sent to the devices enrolled
under your user account. This tab also shows the status of each profile.
lApps – Displays all applications installed on the selected device and provides basic app information.
Remote Actions in the SSP
AirWatch gives administrators several remote actions and options for managed devices. However, when devices are
employee-owned, those employees may want to access similar management tools for their own use. The AirWatch SSP
provides a means for employees to utilize some key MDM tools without any IT involvement. If you enable it, end users
can launch the SSP in a web browser and access key MDMsupport tools. You can also enable or disable the displays of
information and the ability to perform remote actions from the SSP.
The selected device's available actions in the SSP, which vary based on platform and action permissions, are determined
by your administrator. Allowed actions are split between Basic Actions and Advanced Actions on the main access page.
Chapter 16: Self-Service Portal
213
VMware AirWatch Mobile Device Management Guide | v.2017.10 | October 2017
Copyright © 2017 VMware, Inc. All rights reserved.

Action permissions are determined by the administrator, therefore device users may not be able to perform all listed
actions. See the applicable VMware AirWatch Platform Guide, available on AirWatch Resources.
Basic Remote Actions in the SSP
Basic remote actions appear on the Basic Actions subtab of the selected device in the self-service portal. The actions
available depend upon enrollment status, device platform, and action permissions.
Action Description
Change
Passcode
Set a new passcode for the selected device.
Clear SSO
Passcode
Clear the single sign on passcode on the selected device and the next SSO app used will prompt for a
new passcode. This is useful if users forget their device passcode and are locked out of their device.
Clear
Passcode
Clear the passcode on the selected device and will prompt for a new passcode. This is useful if users
forget their device passcode and are locked out of their device.
Delete Device Remove the device from the Self Service Portal.
Delete
Registration
Delete any pending enrollment record from the Self Service Portal.
Device Query Request the device to send a comprehensive set of MDM information to the AirWatch Server.
Device Wipe Wipe all data from the selected device, including all data, email, profiles and MDM capabilities and
returns the device to factory default settings.
Download
Agent
Download and install the AirWatch Agent to the device from which you are viewing the SSP.
Enterprise
Wipe
Wipe all corporate data from the selected device and removes the device from AirWatch MDM. All of
the enterprise data contained on the device is removed, including MDM profiles, policies and internal
applications. The device will return to the state it was in prior to the installation of AirWatch MDM.
Locate Device Activate the GPS feature to locate a lost or stolen device. This action is hidden when privacy settings
are restrictive.
Lock
Device/Screen
Locks the selected device so that an unauthorized user cannot access it, which is useful if the device is
lost or stolen. End-users may also want to use the GPS feature to locate the device.
Lock SSO Lock the single sign on passcode for apps on this device. The next SSO app opened will prompt for a
passcode.
Make Noise Rind a device by remotely causing it to ring.
Resend
Enrollment
Message
Send another copy of the initial enrollment email, SMS or QR code to the device intended to register.
Send
Message
Send a message using email, phone notification or SMS to the device.
Set Roaming Set whether roaming is enabled for this device.
Sync Device Outfit devices with the latest company policies, content, and apps.
Chapter 16: Self-Service Portal
214
VMware AirWatch Mobile Device Management Guide | v.2017.10 | October 2017
Copyright © 2017 VMware, Inc. All rights reserved.
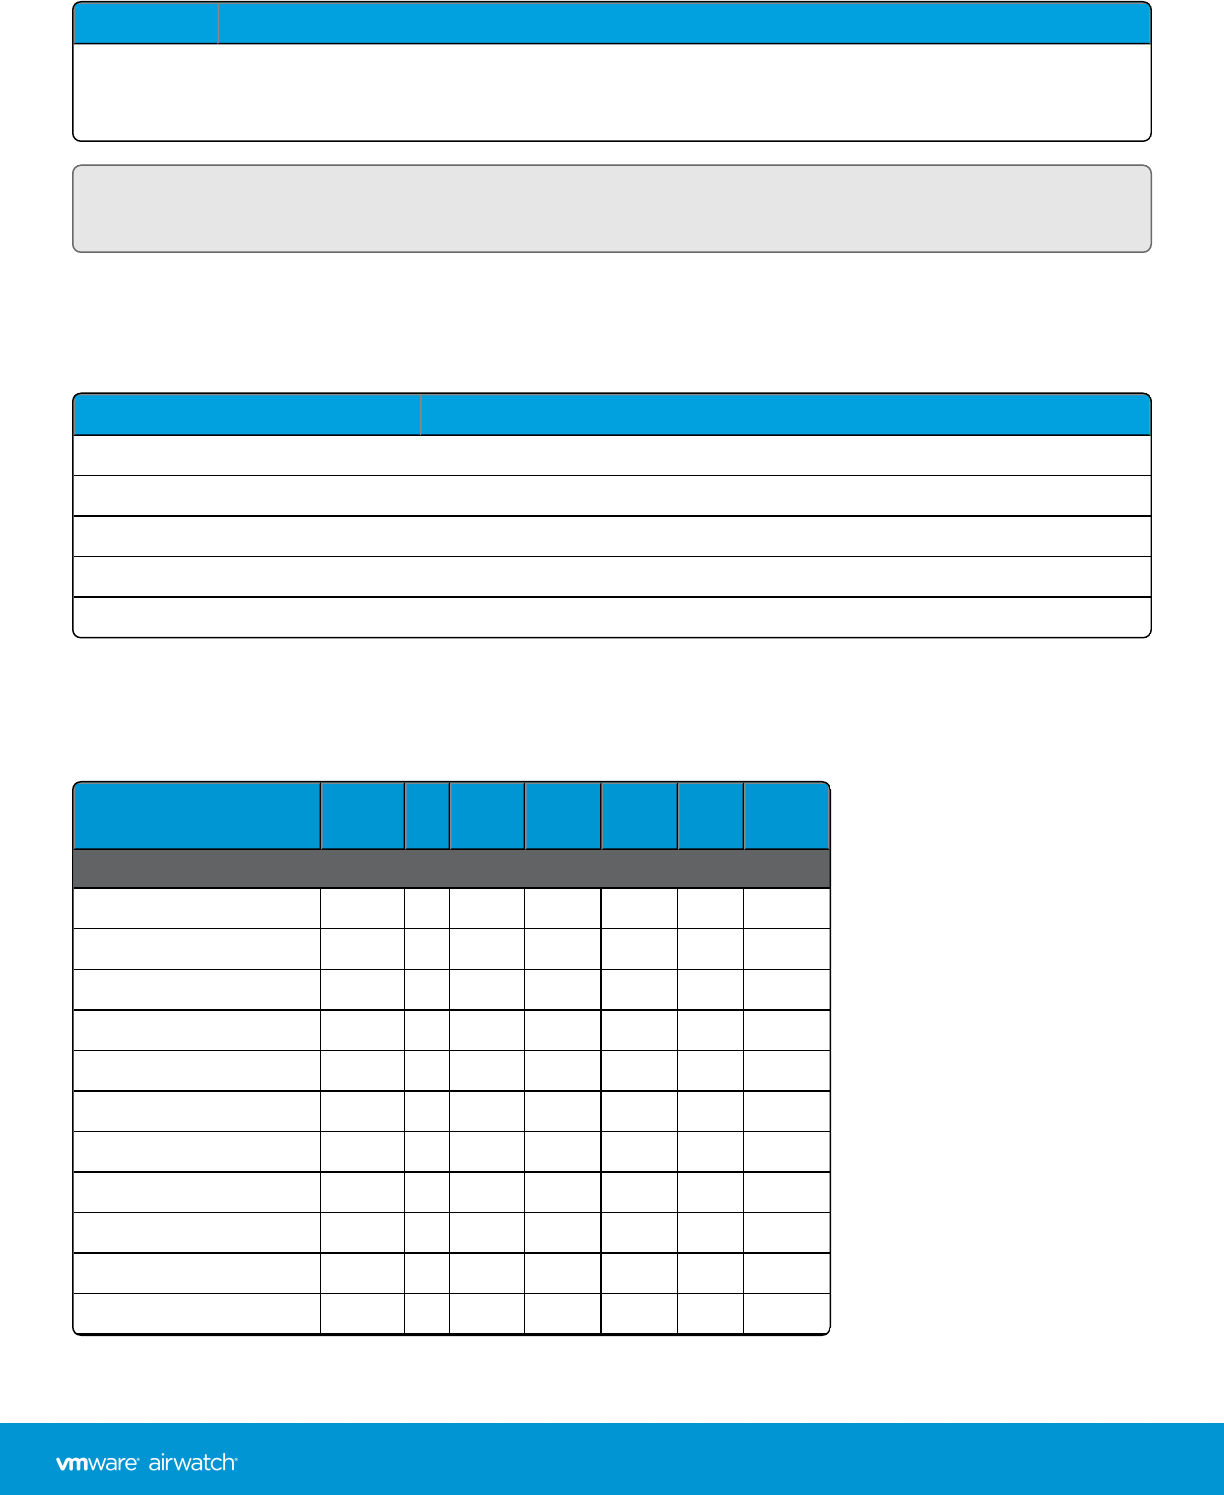
Action Description
View
Enrollment
Message
See the actual email, SMS, or QR code that comprised the initial enrollment message.
Note: Registration and Enrollment actions will only display in the SSP when the enrollment of a selected device is still
pending.
Advanced Remote Actions in the SSP
Advanced remote actions appear on the Advanced Actions subtab of the selected device in the self-service portal. The
actions available depend upon enrollment status, device platform, and action permissions.
Action Description
Generate App Token Generate a token that the device can use to access secure applications.
Manage Email Manage devices connected to an email account.
Review Terms of Use Review past terms of use for this account.
Revoke Token Revokes the token for a selected application.
Upload S/MIME Certificate Upload an S/MIME Certificate for a corporate email account.
Self-Service Portal Actions Matrix
The table below shows the basic and advanced SSP actions that are supported by the various major platforms.
Action Android iOS Win
Phone macOS Win
Mobile Win 7 Win
Desktop
Basic Actions
BES Registration
Change Passcode ✓
Clear (SSO)Passcode ✓ ✓ ✓ ✓
Delete Device ✓ ✓ ✓ ✓ ✓ ✓ ✓
Delete Registration ✓ ✓ ✓ ✓ ✓
Device Query ✓ ✓ ✓ ✓ ✓
Device Wipe ✓ ✓ ✓ ✓ ✓
Download Agent ✓ ✓
Enterprise Wipe ✓ ✓ ✓ ✓ ✓ ✓ ✓
Locate Device ✓ ✓ ✓ ✓
Lock Device/Screen ✓ ✓ ✓ ✓ ✓
Chapter 16: Self-Service Portal
215
VMware AirWatch Mobile Device Management Guide | v.2017.10 | October 2017
Copyright © 2017 VMware, Inc. All rights reserved.
Action Android iOS Win
Phone macOS Win
Mobile Win 7 Win
Desktop
Lock SSO ✓ ✓
Make Noise ✓
Resend Enrollment Message ✓ ✓ ✓ ✓ ✓
Send Message ✓ ✓ ✓ ✓ ✓ ✓ ✓
Set Roaming ✓
Sync Device ✓ ✓
View Enrollment Message ✓ ✓ ✓ ✓ ✓
Advanced Actions
Generate App Token ✓ ✓ ✓ ✓ ✓ ✓ ✓
Manage Email ✓ ✓ ✓
Review Terms of Use ✓ ✓ ✓ ✓ ✓ ✓ ✓
Revoke Token ✓ ✓ ✓ ✓ ✓ ✓ ✓
Upload S/MIME Certificate ✓ ✓ ✓ ✓ ✓ ✓ ✓
VMware Content Locker Options
AirWatch offers three end user facing features that facilitate your organization's content management. In addition to the
robust configurations and management options available within the AirWatch Console for content, you can also
configure the behavior of these user facing features.
lVMware Content Locker – Allows end users to access important content on their devices while simultaneously
safeguarding those files. Any content accessed through the VMware Content Locker opens inside the application,
ensuring that it cannot be copied, saved, or shared without approval.
lContent Locker Sync – Allows end users to add files to a shared folder on their computers that syncs with their
Personal Content repository. This gives them access to those files on their mobile device's VMware Content Locker
application or from the Self-Service Portal.
Note: Downloading, installing, and using these features are user dependent actions. See the VMware Content Locker
End User Guide in the appropriate platform for step by step instructions on downloading and using the VMware
Content Locker as an end user as well as installing and using VMware Content Locker Sync. See also the Content Apps
for Desktop End User Guide located at https://resources.air-watch.com/view/jshgwzqd2fdcby73ryhf/en.
These guides are available in the Resources Portal.
For details about the above features, contact your AirWatch Administrator.
Chapter 16: Self-Service Portal
216
VMware AirWatch Mobile Device Management Guide | v.2017.10 | October 2017
Copyright © 2017 VMware, Inc. All rights reserved.

Accessing Other Documents
While reading this documentation you may encounter references to documents that are not included here.
The quickest and easiest way to find a particular document is to navigate to https://my.air-
watch.com/help/9.1/en/Content/Release_Notes/Doc_List_PDFs.htmand search for the document you need. Each
release-specific document has a link to its PDFcopy on AirWatch Resources.
Alternatively, you can navigate to AirWatch Resources on myAirWatch (resources.air-watch.com)and search. When
searching for documentation on Resources, be sure to select your AirWatch version. You can use the filters to sort by
PDF file type and AirWatch v9.1.
Accessing Other Documents
217
VMware AirWatch Mobile Device Management Guide | v.2017.10 | October 2017
Copyright © 2017 VMware, Inc. All rights reserved.
