Mobile SDK Development Guide Salesforce 6.0(Android Native, I OS React A
User Manual: Pdf
Open the PDF directly: View PDF ![]() .
.
Page Count: 506 [warning: Documents this large are best viewed by clicking the View PDF Link!]
- Introduction to Mobile Development
- Introduction to Salesforce Mobile SDK Development
- What's New in Mobile SDK 6.0
- Getting Started With Mobile SDK 6.0 for Android and iOS
- Updating Mobile SDK Apps (5.0 and Later)
- Welcome to Mobile SDK Labs!
- React Native Development
- Native iOS Development
- iOS Native Quick Start
- Native iOS Requirements
- Creating an iOS Project with Forceios
- Use CocoaPods with Mobile SDK
- Developing a Native iOS App
- Using iOS App Extensions with Mobile SDK
- Tutorial: Creating a Native iOS Warehouse App
- iOS Sample Applications
- Native Android Development
- Android Native Quick Start
- Native Android Requirements
- Creating an Android Project with Forcedroid
- Setting Up Sample Projects in Android Studio
- Developing a Native Android App
- Android Application Structure
- Native API Packages
- Overview of Native Classes
- SalesforceSDKManager Class
- KeyInterface Interface
- PasscodeManager Class
- Encryptor class
- SalesforceActivity, SalesforceListActivity, and SalesforceExpandableListActivity Classes
- UI Classes
- ClientManager Class
- RestClient Class
- RestRequest Class
- FileRequests Class
- OkHttp: The Underlying Network Library
- LoginActivity Class
- Other UI Classes
- UpgradeManager Class
- Utility Classes
- ForcePlugin Class
- Using Passcodes
- Resource Handling
- Using REST APIs
- Unauthenticated REST Requests
- Deferring Login in Native Android Apps
- Android Template App: Deep Dive
- Tutorial: Creating a Native Android Warehouse Application
- Prerequisites
- Create a Native Android App
- Customize the List Screen
- Create the Detail Screen
- Step 1: Create the Detail Screen
- Step 2: Create the DetailActivity Class
- Step 3: Customize the DetailActivity Class
- Step 4: Link the Two Activities, Part 1: Create a Data Class
- Step 5: Link the Two Activities, Part 2: Implement a List Item Click Handler
- Step 6: Implement the Update Button
- Step 7: Try Out the App
- Android Sample Applications
- HTML5 and Hybrid Development
- Getting Started
- HTML5 Development Tools
- Delivering HTML5 Content With Visualforce
- Accessing Salesforce Data: Controllers vs. APIs
- Hybrid Apps Quick Start
- Creating Hybrid Apps
- Debugging Hybrid Apps On a Mobile Device
- Controlling the Status Bar in iOS 7 Hybrid Apps
- JavaScript Files for Hybrid Apps
- Versioning and JavaScript Library Compatibility
- Managing Sessions in Hybrid Apps
- Defer Login
- Offline Management
- Using SmartStore to Securely Store Offline Data
- About SmartStore
- Enabling SmartStore in Hybrid and Native Apps
- Adding SmartStore to Existing Android Apps
- Creating and Accessing User-based Stores
- Using Global SmartStore
- Registering a Soup
- Using Arrays in Index Paths
- Populating a Soup
- Retrieving Data from a Soup
- Smart SQL Queries
- Using Full-Text Search Queries
- Working with Query Results
- Inserting, Updating, and Upserting Data
- Using External Storage for Large Soup Elements
- Removing Soup Elements
- Managing Soups
- Managing Stores
- Testing with the SmartStore Inspector
- Using the Mock SmartStore
- Using SmartSync Data Framework to Access Salesforce Objects
- Using SmartSync Data Framework in Native Apps
- Cache Policies
- Object Representation
- Creating Native Apps with SmartSync Data Framework
- Adding SmartSync Data Framework to Existing Android Apps
- Adding SmartSync Data Framework to Existing iOS Apps
- About Sync Targets
- Syncing Data
- Using Custom Sync Down Targets
- Using Custom Sync Up Targets
- Syncing Related Records
- Storing and Retrieving Cached Data
- Using SmartSync Data Framework in Hybrid and React Native Apps
- Should I Use Smartsync.js or the SmartSync Data Framework Plugin?
- About Backbone Technology
- Models and Model Collections
- Using the SmartSync Data Framework Plugin
- Using SmartSync Data Framework in JavaScript
- Offline Caching
- Conflict Detection
- Accessing Custom API Endpoints
- Tutorial: Creating a Hybrid SmartSync Data Framework Application
- SmartSync Data Framework Sample Apps
- Defining Sync Names and Sync Configuration Files
- Using SmartSync Data Framework in Native Apps
- Using SmartStore to Securely Store Offline Data
- Files and Networking
- Push Notifications and Mobile SDK
- Authentication, Security, and Identity in Mobile Apps
- OAuth Terminology
- OAuth 2.0 Authentication Flow
- Connected Apps
- Portal Authentication Using OAuth 2.0 and Salesforce Sites
- Using MDM with Salesforce Mobile SDK Apps
- Using Advanced Authentication in iOS Apps
- Enabling Browser-Based Authentication in Android Apps
- Customizing the Salesforce Login Page
- Using Mobile SDK Apps as Identity Providers
- Identity Providers: Architecture, Flow, and Connected App Requirements
- Android Architecture and Flow
- Configuring an Android App to Be an Identity Provider
- Configuring an Android App to Be an Identity Provider Client
- Configuring an iOS App to Be An Identity Provider
- Configuring an iOS App to Be An Identity Provider Client
- Using Communities With Mobile SDK Apps
- Communities and Mobile SDK Apps
- Set Up an API-Enabled Profile
- Set Up a Permission Set
- Grant API Access to Users
- Configure the Login Endpoint
- Brand Your Community
- Customize Login, Self-Registration, and Password Management for Your Community
- Use Your Branded Login Page
- Using External Authentication With Communities
- Example: Configure a Community For Mobile SDK App Access
- Example: Configure a Community For Facebook Authentication
- Multi-User Support in Mobile SDK
- Mobile SDK Tools for Developers
- Analytics and Logging
- Migrating from Previous Releases
- Migrate All Apps from 5.3 to 6.0
- Migrating from Earlier Releases
- Migrate All Apps from 5.2 to 5.3
- Migrate Android Apps from 5.1 to 5.2
- Migrate iOS Apps from 5.1 to 5.2
- Migrate Hybrid Apps from 5.1 to 5.2
- Migrate React Native Apps from 5.1 to 5.2
- Migrate Android Apps from 5.0 to 5.1
- Migrate iOS Apps from 5.0 to 5.1
- Migrate Hybrid Apps from 5.0 to 5.1
- Migrate Android Apps from 4.3 to 5.0
- Migrate iOS Apps from 4.3 to 5.0
- Migrate Hybrid Apps from 4.3 to 5.0
- Migrate Android Apps from 4.2 to 4.3
- Migrate iOS Apps from 4.2 to 4.3
- Migrate Hybrid Apps from 4.2 to 4.3
- Migrate Android Apps from 4.1 to 4.2
- Migrate iOS Apps from 4.1 to 4.2
- Migrate Hybrid Apps from 4.1 to 4.2
- Migrate Android Apps from 4.0 to 4.1
- Migrate iOS Apps from 4.0 to 4.1
- Migrate Hybrid Apps from 4.0 to 4.1
- Reference
- Index

© Copyright 2000–2018 salesforce.com, inc. All rights reserved. Salesforce is a registered trademark of salesforce.com, inc.,
as are other names and marks. Other marks appearing herein may be trademarks of their respective owners.

CONTENTS
Chapter 1: Introduction to Mobile Development ..............................1
About Salesforce Mobile Apps .............................................2
Customize the Salesforce App, or Create a Custom App? ...........................2
About This Guide ......................................................4
Version .........................................................4
Sending Feedback .....................................................4
Chapter 2: Introduction to Salesforce Mobile SDK Development ..................5
About Native, HTML5, and Hybrid Development .................................6
Enough Talk; I’m Ready ..................................................8
Chapter 3: What's New in Mobile SDK 6.0 ..................................9
What Was New in Recent Releases .........................................12
Chapter 4: Getting Started With Mobile SDK 6.0 for Android and iOS .............16
Developer Edition or Sandbox Environment? ...................................17
Development Prerequisites for Android and iOS .................................18
Sign Up for Lightning Platform .............................................19
Creating a Connected App ...............................................19
Create a Connected App ............................................19
Installing Mobile SDK ...................................................21
Do This First: Install Node.js, npm, and git .................................21
Mobile SDK npm Packages ...........................................21
iOS Preparation ..................................................22
Android Preparation ...............................................23
Uninstalling Mobile SDK npm Packages ..................................23
Mobile SDK GitHub Repositories .......................................24
Mobile SDK Sample Apps ...............................................25
Installing the Sample Apps ...........................................25
Chapter 5: Updating Mobile SDK Apps (5.0 and Later) ........................27
Using Maven to Update Mobile SDK Libraries in Android Apps ......................29
Chapter 6: Welcome to Mobile SDK Labs! .................................30
Mobile UI Elements with Polymer ..........................................31
force_selector_list .................................................31
force-selector-relatedlist .............................................31
force-sobject ....................................................32
force-sobject-collection .............................................32
force-sobject-layout ...............................................32
force-sobject-relatedlists ............................................32
force-sobject-store ................................................33
force-ui-app ....................................................33
force-ui-detail ...................................................33
force-ui-list .....................................................33
force-ui-relatedlist .................................................34
Chapter 7: React Native Development ....................................35
Creating a React Native Project with Forcereact .................................36
Using Mobile SDK Components in React Native Apps ............................38
Mobile SDK Native Modules for React Native Apps ..............................38
Mobile SDK Sample App Using React Native ..................................42
Defer Login .........................................................44
Upload Binary Content .................................................45
Chapter 8: Native iOS Development .....................................47
iOS Native Quick Start ..................................................48
Native iOS Requirements ................................................48
Creating an iOS Project with Forceios ........................................48
Run the Xcode Project Template App ....................................51
Using a Custom Template to Create Apps .................................51
Use CocoaPods with Mobile SDK ..........................................54
Refreshing Mobile SDK Pods ..........................................57
Developing a Native iOS App .............................................58
About Login and Passcodes ..........................................58
About Memory Management .........................................58
Overview of Application Flow .........................................58
SDK Manager Classes ..............................................59
AppDelegate Class ................................................66
About View Controllers .............................................69
RootViewController Class ............................................70
About Salesforce REST APIs ...........................................71
Handling Authentication Errors ........................................85
Using iOS App Extensions with Mobile SDK ...................................86
Tutorial: Creating a Native iOS Warehouse App .................................93
Create a Native iOS App ............................................94
Customize the List Screen ............................................99
Create the Detail Screen ............................................101
iOS Sample Applications ................................................112
Chapter 9: Native Android Development .................................113
Android Native Quick Start ..............................................114
Native Android Requirements ............................................114
Creating an Android Project with Forcedroid ..................................115
Contents
Using a Custom Template to Create Apps ................................118
Setting Up Sample Projects in Android Studio .................................120
Android Project Files ...............................................121
Developing a Native Android App .........................................122
Android Application Structure ........................................122
Native API Packages ..............................................124
Overview of Native Classes ..........................................124
Using Passcodes .................................................133
Resource Handling ...............................................134
Using REST APIs ..................................................136
Unauthenticated REST Requests .......................................139
Deferring Login in Native Android Apps ..................................139
Android Template App: Deep Dive .....................................141
Tutorial: Creating a Native Android Warehouse Application ........................145
Prerequisites ....................................................145
Create a Native Android App .........................................146
Customize the List Screen ...........................................148
Create the Detail Screen ............................................151
Android Sample Applications ............................................160
Chapter 10: HTML5 and Hybrid Development ..............................161
Getting Started ......................................................162
Using HTML5 and JavaScript .........................................162
HTML5 Development Requirements ....................................162
Multi-Device Strategy ..............................................162
HTML5 Development Tools ..............................................166
Delivering HTML5 Content With Visualforce ...................................166
Accessing Salesforce Data: Controllers vs. APIs ................................166
Hybrid Apps Quick Start ................................................169
Creating Hybrid Apps .................................................170
About Hybrid Development ..........................................171
Building Hybrid Apps With Cordova .....................................171
Developing Hybrid Remote Apps ......................................176
Hybrid Sample Apps ..............................................178
Running the ContactExplorer Hybrid Sample ..............................180
Debugging Hybrid Apps On a Mobile Device .................................192
Debugging a Hybrid App On an Android Device ............................192
Debugging a Hybrid App Running On an iOS Device .........................193
Controlling the Status Bar in iOS 7 Hybrid Apps ................................193
JavaScript Files for Hybrid Apps ...........................................194
Versioning and JavaScript Library Compatibility ................................195
Example: Serving the Appropriate Javascript Libraries ........................197
Managing Sessions in Hybrid Apps ........................................198
Defer Login ........................................................200
Contents
Chapter 11: Offline Management .......................................202
Using SmartStore to Securely Store Offline Data ................................203
About SmartStore ................................................204
Enabling SmartStore in Hybrid and Native Apps ............................207
Adding SmartStore to Existing Android Apps ..............................207
Creating and Accessing User-based Stores ..............................208
Using Global SmartStore ...........................................209
Registering a Soup ................................................211
Using Arrays in Index Paths ..........................................219
Populating a Soup ................................................221
Retrieving Data from a Soup .........................................224
Smart SQL Queries ...............................................232
Using Full-Text Search Queries .......................................234
Working with Query Results .........................................238
Inserting, Updating, and Upserting Data .................................239
Using External Storage for Large Soup Elements ............................242
Removing Soup Elements ...........................................245
Managing Soups ................................................246
Managing Stores ................................................253
Testing with the SmartStore Inspector ...................................254
Using the Mock SmartStore .........................................255
Using SmartSync Data Framework to Access Salesforce Objects ....................256
Using SmartSync Data Framework in Native Apps ..........................256
Using SmartSync Data Framework in Hybrid and React Native Apps ..............296
Defining Sync Names and Sync Configuration Files ..........................345
Chapter 12: Files and Networking ......................................353
Architecture .......................................................354
Downloading Files and Managing Sharing ...................................354
Uploading Files .....................................................354
Encryption and Caching ...............................................355
Using Files in Android Apps .............................................355
Managing the Request Queue .......................................355
Using Files in iOS Native Apps ...........................................356
Managing Requests ..............................................357
Using Files in Hybrid Apps ..............................................358
Chapter 13: Push Notifications and Mobile SDK ............................359
About Push Notifications ...............................................360
Using Push Notifications in Hybrid Apps ....................................360
Code Modifications (Hybrid) .........................................360
Using Push Notifications in Android ........................................361
Configure a Connected App For GCM (Android) ............................362
Code Modifications (Android) ........................................362
Contents
Using Push Notifications in iOS ...........................................363
Configure a Connected App for APNS (iOS) ...............................363
Code Modifications (iOS) ...........................................364
Chapter 14: Authentication, Security, and Identity in Mobile Apps ...............367
OAuth Terminology ..................................................368
OAuth 2.0 Authentication Flow ...........................................368
OAuth 2.0 User-Agent Flow .........................................369
OAuth 2.0 Refresh Token Flow ........................................370
Scope Parameter Values ...........................................370
Using Identity URLs ...............................................372
Setting Custom Login Servers in Android Apps .............................377
Setting Custom Login Servers in iOS Apps ................................378
Hiding the Settings Icon in iOS Apps ....................................379
Revoking OAuth Tokens ............................................380
Refresh Token Revocation in Android Native Apps ...........................381
Connected Apps .....................................................381
About PIN Security ................................................382
Portal Authentication Using OAuth 2.0 and Salesforce Sites ........................382
Using MDM with Salesforce Mobile SDK Apps ................................383
Sample Property List Configuration .....................................385
Using Advanced Authentication in iOS Apps ..................................386
Enabling Browser-Based Authentication in Android Apps .........................388
Chapter 15: Customizing the Salesforce Login Page .........................391
Chapter 16: Using Mobile SDK Apps as Identity Providers ....................392
Identity Providers: Architecture, Flow, and Connected App Requirements ..............393
Android Architecture and Flow ...........................................394
Configuring an Android App to Be an Identity Provider ...........................396
Configuring an Android App to Be an Identity Provider Client .......................397
Configuring an iOS App to Be An Identity Provider ..............................397
Configuring an iOS App to Be An Identity Provider Client ..........................399
Chapter 17: Using Communities With Mobile SDK Apps ......................401
Communities and Mobile SDK Apps .......................................402
Set Up an API-Enabled Profile ............................................402
Set Up a Permission Set ...............................................402
Grant API Access to Users ..............................................404
Configure the Login Endpoint ............................................404
Brand Your Community ................................................405
Customize Login, Self-Registration, and Password Management for Your Community ......406
Use Your Branded Login Page ...........................................406
Using External Authentication With Communities ...............................406
External Authentication Providers ......................................407
Contents
Use the Community URL Parameter ....................................408
Use the Scope Parameter ...........................................409
Configure a Facebook Authentication Provider .............................410
Configure a Salesforce Authentication Provider .............................412
Configure an OpenID Connect Authentication Provider .......................415
Example: Configure a Community For Mobile SDK App Access ......................417
Add Permissions to a Profile .........................................417
Create a Community ..............................................418
Add the API User Profile To Your Community ..............................418
Create a New Contact and User ......................................418
Test Your New Community Login ......................................419
Example: Configure a Community For Facebook Authentication .....................420
Create a Facebook App ............................................420
Define a Salesforce Auth. Provider .....................................421
Configure Your Facebook App ........................................422
Customize the Auth. Provider Apex Class ................................422
Configure Your Salesforce Community ..................................422
Chapter 18: Multi-User Support in Mobile SDK .............................424
About Multi-User Support ..............................................425
Implementing Multi-User Support .........................................425
Android Native APIs ..............................................426
iOS Native APIs ..................................................431
Hybrid APIs ....................................................435
Chapter 19: Mobile SDK Tools for Developers .............................437
In-App Developer Support ..............................................438
Chapter 20: Analytics and Logging .....................................445
Salesforce Mobile SDK Logging Framework ..................................446
Instrumentation and Event Collection .......................................449
Chapter 21: Migrating from Previous Releases .............................451
Migrate All Apps from 5.3 to 6.0 ..........................................452
Migrating from Earlier Releases ..........................................452
Migrate All Apps from 5.2 to 5.3 ......................................452
Migrate Android Apps from 5.1 to 5.2 ...................................453
Migrate iOS Apps from 5.1 to 5.2 ......................................453
Migrate Hybrid Apps from 5.1 to 5.2 ....................................453
Migrate React Native Apps from 5.1 to 5.2 ................................453
Migrate Android Apps from 5.0 to 5.1 ...................................453
Migrate iOS Apps from 5.0 to 5.1 ......................................456
Migrate Hybrid Apps from 5.0 to 5.1 ....................................459
Migrate Android Apps from 4.3 to 5.0 ..................................459
Migrate iOS Apps from 4.3 to 5.0 ......................................459
Contents
Migrate Hybrid Apps from 4.3 to 5.0 ...................................460
Migrate Android Apps from 4.2 to 4.3 ...................................461
Migrate iOS Apps from 4.2 to 4.3 ......................................461
Migrate Hybrid Apps from 4.2 to 4.3 ....................................461
Migrate Android Apps from 4.1 to 4.2 ...................................461
Migrate iOS Apps from 4.1 to 4.2 ......................................462
Migrate Hybrid Apps from 4.1 to 4.2 ....................................462
Migrate Android Apps from 4.0 to 4.1 ...................................462
Migrate iOS Apps from 4.0 to 4.1 ......................................462
Migrate Hybrid Apps from 4.0 to 4.1 ....................................462
Chapter 22: Reference ..............................................463
iOS Architecture .....................................................464
Native REST API Classes for iOS .......................................464
Android Architecture ..................................................466
Android Packages and Classes .......................................466
Android Resources ...............................................466
Files API Reference ...................................................469
FileRequests Methods (Android) ......................................469
SFRestAPI (Files) Category—Request Methods (iOS) ..........................475
Files Methods For Hybrid Apps ........................................481
Tool and Component Supported Versions for Mobile SDK 6.0 ......................486
Index ...........................................................489
Contents

CHAPTER 1 Introduction to Mobile Development
In the twenty-first century, mobile devices have profoundly changed our personal and professional lives.
From impromptu videos to mobile geolocation to online shopping, people everywhere use personal
In this chapter ...
•About Salesforce
Mobile Apps mobile devices to create and consume content. Corporate employees, too, use smart devices to connect
with customers, stay in touch with coworkers, and engage the public on social networks.
•Customize the
Salesforce App, or For enterprise IT departments, the explosion of mobile interaction requires a quick response in software
services. Salesforce provides the Salesforce Platform to address this need. This cloud supports
Create a Custom
App? new-generation mobile operating systems on various form factors—phone, tablet, wearable—with
reliability, availability, and security. Its technologies let you build custom apps, connect to data from any
system, and manage your enterprise from anywhere.
•About This Guide
•Sending Feedback
1

About Salesforce Mobile Apps
The Salesforce Platform offers two ways to build and deploy enterprise-ready mobile applications.
•The Salesforce app, available on Apple AppStore and Google Play Store, delivers the fastest way for Salesforce platform administrators
and developers to build and deliver apps for employees. It offers simple point-and-click tools for administrators and the Lightning
web development platform for advanced developers. This trail doesn’t address Salesforce application development.
•Salesforce Mobile SDK gives developers the tools to build mobile applications with customized user experiences. Mobile SDK lets
you produce stand-alone custom apps that you distribute through the Apple App Store or Google Play Store. These apps can target
employees, customers, or partners. You can choose native or web technologies to build these apps while enjoying the same grade
of reliability and security found in the Salesforce app.
Enterprise Identity & Security
Mobile SDK includes a complete implementation of Salesforce Connected App Policy, so that all users can access their data securely
and easily. It supports SAML and advanced authentication flows so that administrators always have full control over data access.
SmartStore Encrypted Database
Mobile databases are useful for building highly responsive apps that also work in any network condition. SmartStore provides an
easy way to store and retrieve data locally while supporting a flexible data model. It also uses AES-256 encryption to ensure that
your data is always protected.
SmartSync Data Framework
SmartSync Data Framework provides a simple API for synchronizing data between your offline database and the Salesforce cloud.
With SmartSync Data Framework, developers can focus on the UI and business logic of their application while leaving the complex
synchronization logic to Mobile SDK.
Mobile Services
Mobile SDK supports a wide range of platform mobile services, including push notifications, geolocation, analytics, collaboration
tools, and business logic in the cloud. These services can supercharge your mobile application and also reduce development time.
Salesforce Communities
With Salesforce Communities and Mobile SDK, developers can build mobile applications that target their customers and partners.
These applications benefit from the same enterprise features and reliability as employee apps.
Native and Hybrid, iOS and Android
Mobile SDK lets you choose any technology (native, React Native, or Cordova-based hybrid apps) on iOS and Android.
Note: Currently, Lightning components do not support running in Salesforce Mobile SDK apps.
Customize the Salesforce App, or Create a Custom App?
When you’re developing mobile apps for Salesforce org users, you have options. The Salesforce app is the customizable mobile app
developed, built, and distributed by Salesforce. Custom apps are standalone iOS or Android apps built from scratch on Salesforce Mobile
SDK. Although this book deals only with Mobile SDK development, here are some differences between the Salesforce app and custom
apps.
Customizing the Salesforce App
•Has a pre-defined user interface.
•Has full access to Salesforce org data.
•You can create an integrated experience with functionality developed in the Salesforce Platform.
2
About Salesforce Mobile AppsIntroduction to Mobile Development
•The Action Bar gives you a way to include your own apps/functionality.
•You can customize the Salesforce app with either point-and-click or programmatic customizations.
•Functionality can be added programmatically through Visualforce pages or Canvas apps.
•Salesforce mobile customizations or apps adhere to the Salesforce mobile navigation. So, for example, a Visualforce page can be
called from the navigation menu or from the Action Bar.
•You can leverage existing Salesforce development experience, both point-and-click and programmatic.
•Included in all Salesforce editions and supported by Salesforce.
Developing Custom Mobile Apps
Custom apps can be free-standing apps built on Salesforce Mobile SDK, or browser apps using plain HTML5 and JavaScript with Ajax.
With custom apps, you can:
•Define a custom user experience.
•Access data from Salesforce orgs using REST APIs in native and hybrid local apps, or with Visualforce in hybrid apps using JavaScript
Remoting. In HTML5 apps, do the same using JQueryMobile and Ajax.
•Brand your user interface for customer-facing exposure.
•Create standalone mobile apps, either with native APIs using Java for Android or Objective-C for iOS, or through a hybrid container
using JavaScript and HTML5 (Mobile SDK only).
•Distribute apps through mobile industry channels, such as the Apple App Store or Google Play (Mobile SDK only).
•Configure and control complex offline behavior (Mobile SDK only).
•Use push notifications.
•Design a custom security container using your own OAuth module (Mobile SDK only).
•Other important Mobile SDK considerations:
–Open-source SDK, downloadable for free through npm installers as well as from GitHub.
–Requires you to develop and compile your apps in an external development environment (Xcode for iOS, Android Studio for
Android).
–Development costs depend on your app and your platform.
Mobile SDK integrates Lightning Platform cloud architecture into Android and iOS apps by providing:
•Implementation of Salesforce Connected App policy.
•Salesforce org login and OAuth credentials management, including persistence and refresh capabilities.
•Secure offline storage with SmartStore.
•Syncing between the Salesforce cloud and SmartStore through SmartSync Data Framework.
•Support for Salesforce Communities.
•Wrappers for Salesforce REST APIs with implicit networking.
•Fast switching between multiple users.
•Cordova-based containers for hybrid apps.
3
Customize the Salesforce App, or Create a Custom App?Introduction to Mobile Development

About This Guide
This guide introduces you to Salesforce Mobile SDK and teaches you how to design, develop, and manage mobile applications for the
cloud. The topics cover a wide range of development techniques for various skill sets, beginning with HTML5 and JavaScript, continuing
through hybrid apps, and culminating in native development.
We’ve included tutorials for major features. Most of these tutorials take you through the steps of creating a simple master-detail application
that accesses Salesforce through REST APIs. Tutorials include:
•Running the ContactExplorer Hybrid Sample
•Tutorial: Creating a Native Android Warehouse Application
•Tutorial: Creating a Native iOS Warehouse App
•Tutorial: Creating a Hybrid SmartSync Data Framework Application
Shorter, less formal tutorials are scattered throughout the book.
Intended Audience
This guide is primarily for developers who are already familiar with mobile technology, OAuth2, and REST APIs, and who probably have
some Lightning Platform experience. But if that doesn’t exactly describe you, don’t worry. We’ve tried to make this guide usable for a
wider audience. For example, you might be a Salesforce admin who’s developing a new mobile app to support your organization, or
you might be a mobile developer who’s entirely new to Lightning Platform. If either of those descriptions fit you, then you should be
able to follow along just fine.
Mobile SDK and Trailhead
You can learn most of the content of this guide interactively in Trailhead. In the Mobile SDK Beginner’s Trail, you study each development
topic online and then earn points and badges through interactive exercises and quizzes. See trailhead.salesforce.com/trail/mobile_sdk_intro.
Note: An online version of this book is available at developer.salesforce.com/docs.
Version
This book is current with Salesforce Mobile SDK 6.0.
Sending Feedback
Questions or comments about this book? Suggestions for topics you'd like to see covered in future versions? You can:
•Join the SalesforceMobileSDK community at plus.google.com/communities
•Post your thoughts on the Salesforce developer discussion forums at developer.salesforce.com/forums
•Email us directly at developerforce@salesforce.com
•Use the Feedback button at the bottom of each page in the online documentation
(developer.salesforce.com/docs/atlas.en-us.mobile_sdk.meta/mobile_sdk/)
.
4
About This GuideIntroduction to Mobile Development

CHAPTER 2 Introduction to Salesforce Mobile SDK
Development
Salesforce Mobile SDK lets you harness the power of Lightning Platform within stand-alone mobile apps.
In this chapter ...
Lightning Platform provides a straightforward and productive platform for Salesforce cloud computing.
Developers can use Lightning Platform to define Salesforce application components—custom objects
•About Native,
HTML5, and Hybrid
Development and fields, workflow rules, Visualforce pages, Apex classes, and triggers. They can then assemble those
components into awesome, browser-based desktop apps.
•Enough Talk; I’m
Ready Unlike a desktop app, a Mobile SDK app accesses Salesforce data through a mobile device’s native
operating system rather than through a browser. To ensure a satisfying and productive mobile user
experience, you can configure Mobile SDK apps to move seamlessly between online and offline states.
Before you dive into Mobile SDK, take a look at how mobile development works, and learn about essential
Salesforce developer resources.
5

About Native, HTML5, and Hybrid Development
Salesforce Mobile SDK gives you options for developing your app. You can choose the options that fit your development skills, device
and technology requirements, goals, and schedule.
Salesforce Mobile SDK supports several platforms for creating mobile apps:
•Native apps are specific to a given mobile platform (iOS or Android). These apps use the development tools and languages that the
respective platform supports. For example, you develop iOS apps in Xcode using Objective-C or Swift. Native apps look and perform
best but require the most development effort.
•HTML5 apps use standard web technologies—typically HTML5, JavaScript, and CSS—to deliver apps through a mobile web browser.
This “write once, run anywhere” approach to mobile development creates cross-platform mobile applications that work on multiple
devices. While developers can create sophisticated apps with HTML5 and JavaScript alone, some challenges remain. For example,
session management, secure offline storage, and access to native device features can pose problems.
•Hybrid apps combine the ease of HTML5 web app development with the power of the native platform by wrapping a web app
inside the Salesforce container. This combined approach produces an application that accesses the device’s native capabilities and
is delivered through the app store. You can also create hybrid apps using Visualforce pages delivered through the Salesforce hybrid
container.
•React Native apps use the React Native framework from Facebook, Inc., to run JavaScript apps as native code. Rather than following
the hybrid paradigm, React Native lets you assemble the native UI building blocks with JavaScript code. This framework provides
direct access to native resources and lets you test without recompiling. In performance terms, React Native runs a close second to
pure native execution.
Native Apps
Native apps provide the best usability, the best features, and the best overall mobile experience. There are some things you get only
with native apps:
•Fast graphics API—The native platform gives you the fastest graphics. This advantage comes into play, for example, if you’re using
larges quantities of data and require a fast refresh.
•Fluid animation—Related to the fast graphics API is the ability to have fluid animation. This ability is especially important in gaming,
highly interactive reporting, or intensely computational algorithms for transforming photos and sounds.
•Built-in components—The camera, address book, geolocation, and other features native to the device can be seamlessly integrated
into mobile apps. Another important built-in component is encrypted storage, but more about that later.
•Ease of use—The native platform is what people are accustomed to. When you add that familiarity to the native features they
expect, your app becomes that much easier to use.
Native app development requires an integrated development environment (IDE). IDEs provide tools for building, debugging, project
management, version control, and other tools professional developers need. You need these tools because native apps are more difficult
to develop. Likewise, the required level of experience is higher than in other development scenarios. If you’re a professional developer,
however, you don’t have to be sold on the benefits of
•Proven APIs and frameworks
•Painless special effects through established components
•Maintaining all your code in one place
6
About Native, HTML5, and Hybrid DevelopmentIntroduction to Salesforce Mobile SDK Development
HTML5 Apps
An HTML5 mobile app is essentially one or more web pages that are designed to work on a small mobile device screen. As such, HTML5
apps are device agnostic and can be opened with any modern mobile browser. Because your content is on the web, it’s searchable,
which can be a huge benefit for certain types of apps (shopping, for example).
Getting started with HTML5 is easier than with native or hybrid development. Unfortunately, every mobile device seems to have its own
idea of what constitutes usable screen size and resolution. This diversity imposes an extra burden of testing on different devices and
different operating systems.
An important part of the "write once, run anywhere" HTML5 methodology is that distribution and support are much easier than for
native apps. Need to make a bug fix or add features? Done and deployed for all users. Native app, on the other hand, require longer
development and testing cycles. Furthermore, customers typically have to log in to an app store to get new versions.
If HTML5 apps are easier to develop, easier to support, and can reach the widest range of devices, what are the drawbacks?
•No secure offline storage—HTML5 browsers support offline databases and caching, but with no out-of-the-box encryption
support. You get all three features in Mobile SDK native applications.
•Unfriendly security features—Trivial security measures can pose complex implementation challenges in mobile web apps. They
can also be painful for users. For example, a web app with authentication requires users to enter their credentials every time the app
restarts or returns from a background state.
•Limited native features—The camera, address book, and other native features are accessible on few, if any, browser platforms.
•Lack of native look and feel—HTML5 can only emulate the native look, and customers can’t use familiar compound gestures.
Hybrid Apps
Hybrid apps are built using HTML5 and JavaScript wrapped inside a thin container that provides access to native platform features.
Generally, hybrid apps provide the best of both HTML5 and native worlds. They’re almost as easy to develop as HTML5 apps and can
access all the functionality of native. In addition, hybrid apps can use the Mobile SDK SmartSync Data Framework feature to
•Model, query, search, and edit Salesforce data.
•Securely cache Salesforce data for offline use.
•Synchronize locally cached data with the Salesforce server.
You know that native apps are installed on the device, while HTML5 apps reside on a web server. Perhaps you’re wondering whether
hybrid apps store their files on the device or on a server. Great question! The storage location depends on whether your hybrid app is
local or remote.
Local
You can package HTML and JavaScript code inside the mobile application binary, in a structure similar to a native application. You
use REST APIs and Ajax to move data back and forth between the device and the cloud.
Remote
Alternatively, you can implement the full web application from the server (with optional caching for better performance). Your
container app retrieves the full application from the server and displays it in a native web view.
Both types of hybrid development are covered here.
React Native Apps
React Native apps use specialized scripting languages.
•JavaScript is ES2015.
•CSS is JavaScript code that closely resembles CSS syntax and is typically written inline in your JavaScript app.
7
About Native, HTML5, and Hybrid DevelopmentIntroduction to Salesforce Mobile SDK Development

•Markup is actually a special flavor of XML named JSX. Unlike HTML, which embeds JavaScript in markup, you embed JSX markup in
JavaScript.
In addition, React Native bridges provide access to standard Mobile SDK features, such as:
•SmartStore
•SmartSync Data Framework
•Salesforce login and authentication
•Salesforce REST API access.
You can even access your own native objects—in Objective-C, Swift, or Java—directly in React Native code.
Mobile Architecture Comparison
The following table shows how the various development scenarios stack up.
HybridHTML5Native, React Native
HTML, Canvas, SVGHTML, Canvas, SVGNative APIsGraphics
Moderately fastFastFastestPerformance
EmulatedEmulatedNativeLook and feel
App storeWebApp storeDistribution
YesBrowser dependentYesCamera
YesNoYesNotifications
YesNoYesContacts, calendar
Secure file system; shared SQL
(through Cordova plug-ins)
Not secure; shared SQL,
Key-Value stores
Secure file systemOffline storage
YesYesYesGeolocation
YesYesYesSwipe
YesYesYesPinch, spread
Online, offlineMostly onlineOnline, offlineConnectivity
HTML5, CSS, JavaScriptHTML5, CSS, JavaScriptObjective-C, Swift, Java,
Kotlin; JavaScript (React
Native only)
Development skills
Enough Talk; I’m Ready
If you’d rather read about the details later, there are Quick Start topics in this guide for each native development scenario.
•Hybrid Apps Quick Start
•iOS Native Quick Start
•Android Native Quick Start
8
Enough Talk; I’m ReadyIntroduction to Salesforce Mobile SDK Development

CHAPTER 3 What's New in Mobile SDK 6.0
The 6.0 release brings a trove of new features that improve everything from cross-platform efficiency to
login enhancements to debugging.
In this chapter ...
•What Was New in
Recent Releases How to Upgrade Your Apps
For information on any necessary code upgrades to existing Mobile SDK apps, follow the instructions at
Migrating from Previous Releases.
General Updates (Android and iOS Native Platforms)
•A new SDK framework lets you easily turn ordinary Mobile SDK apps into identity providers and their
clients. Identity providers help known users avoid reentering their Salesforce credentials every time
they log in to a Mobile SDK app. See Using Mobile SDK Apps as Identity Providers.
•Mobile SDK provides new native app templates for forcedroid and forceios that create identity
provider apps. You can use these templates with the forcedroid createWithTemplate
and forceios createWithTemplate commands. Look for these templates at
https://github.com/forcedotcom/SalesforceMobileSDK-AuthTemplates.
•Mobile SDK 6.0 adds support for a developer settings screen in debug builds. This screen displays
configuration information that is useful during the development cycle.
What’s New in Mobile SDK 6.0 for Android
Version Updates:
•Target Android SDK: Android Oreo (API 27)
•Minimum Android SDK: Lollipop (API 21)
•Android Studio: 3.0
•Gradle: 4.1
•Cordova: 7.0.0
•React Native: 0.50.4
Login Enhancements:
You can now use Chrome custom tabs for authentication instead of the system web view. See Enabling
Browser-Based Authentication in Android Apps.
Forcedroid Changes:
•The forcedroid utility no longer creates hybrid or React Native apps. Instead, install forcehybrid and
forcereact npm packages for those use cases.
•We’ve provided a new template that creates an identity provider app. Use this template with the
forcedroid createWithTemplate command. You can find these templates at
9

https://github.com/forcedotcom/SalesforceMobi SleSDK-AuthTemplates. See Using a Custom
Template to Create Apps.
What’s New in Mobile SDK 6.0 for iOS
Deprecation:
The SFAuthenticationManager class and its delegates are now deprecated for permanent
removal in Mobile SDK 7.0. In its place, use the SFUserAccountManager class for
authentication-related functionality.
Version Updates:
•iOS SDK: 11
•Minimum iOS SDK supported: 10
•Xcode: 9
•Cordova: 4.5.4
•React Native: 0.50.4
Forceios Changes:
•The forceios utility no longer creates hybrid or React Native apps. Instead, install forcehybrid and
forcereact npm packages for those use cases.
•We’ve provided a new template that creates an identity provider app. Use this template with the
forceios createWithTemplate command. You can find these templates at
https://github.com/forcedotcom/SalesforceMobi SleSDK-AuthTemplates. See Using a Custom
Template to Create Apps.
Miscellaneous Changes:
•The SalesforceSDKManager class welcomes several SDK manager cousins that handle specific
types of apps. This architecture now matches the analogous architecture in Mobile SDK for Android.
See SDK Manager Classes.
•If you’re using the SFLoginViewController class to manage the Settings icon on the login
screen, update your code to use the SFSDKLoginViewControllerConfig class instead.
Import SalesforceSDKCore/SFSDKLoginViewControllerConfig.h and change
this line:
SFLoginViewController *loginViewController =
[SFLoginViewController sharedInstance];
to this one:
SFSDKLoginViewControllerConfig *loginViewConfig =
[[SFSDKLoginViewControllerConfig
alloc] init];
See Hiding the Settings Icon in iOS Apps.
What’s New in Hybrid Apps for Mobile SDK 6.0
Version Updates:
10
What's New in Mobile SDK 6.0

•Android: 7.0.0
•iOS: 4.5.4
Forcehybrid Tool:
Mobile SDK 6.0 introduces a new npm package, forcehybrid, for creating hybrid apps. See Using
Forcehybrid.
iOS Bug Fix:
In iOS hybrid apps on previous releases, oauth.getAuthCredentials() automatically called
authenticate() if the user wasn’t already authenticated. In Mobile SDK 6.0, we’ve changed this
behavior to signal that the user isn’t authenticated rather than directly triggering authentication. This
iOS change matches the existing Android behavior.
What’s New in React Native for Mobile SDK 6.0
Forcereact Tool:
Mobile SDK 6.0 introduces a new npm package, forcereact, for creating React Native apps. See Creating
a React Native Project with Forcereact.
Version Updates:
•React Native: 0.50.4.
What’s New in SmartStore for Mobile SDK 6.0
Mobile SDK 6.0 introduces the ability to define your SmartStore schemas through configuration files
rather than code.
•To define soups for the default global store, provide a file named globalstore.json.
•To define soups for the default user store, provide a file named userstore.json.
See Registering Soups with Configuration Files.
What’s New in SmartSync Data Framework for Mobile
SDK 6.0
Beginning in Mobile SDK 6.0, you can define sync configuration files and assign names to sync
configurations. You can use sync names to run, edit, or delete a saved sync operation.
You can also define “sync down” and “sync up” operations through configuration files rather than code.
•To define sync operations for the default global store, provide a file named globalsyncs.json.
•To define sync operations for the default user store, provide a file named usersyncs.json.
See Defining Sync Names and Sync Configuration Files.
11
What's New in Mobile SDK 6.0

What Was New in Recent Releases
Here’s an archive of What’s New bulletins from recent Mobile SDK releases.
Mobile SDK 5.3
What Was New in Mobile SDK 5.3 for Android
•OS Version Support: Android Oreo (API 26) is now fully supported.
•Library Upgrades: For Android we've updated SQLCipher to version 3.5.7.
•Kotlin Support: We now support Kotlin in native Android apps. Accordingly, forcedroid provides a new app type: native_kotlin.
What Was New in Mobile SDK 5.3 for iOS
•Deprecations:
–CSFNetwork, CSFAction and all related network classes are deprecated for permanent removal in Mobile SDK 6.0. Instead,
use SFRestAPI and SFNetwork.
–SFLogger is deprecated for permanent removal in Mobile SDK 6.0. Instead, use SFSDKLogger.
•OS Version Support: iOS 11.0 is fully supported in Mobile SDK 5.3.
•Library Upgrades: For iOS we've updated SQLCipher to version 3.4.1.
Mobile SDK 5.2
The 5.2 release brings Mobile SDK support for recent REST API enhancements. It also includes updates for SmartSync Data Framework
in native apps. For details on updating your code, see Migrating from Previous Releases.
General Updates (Android and iOS Native Platforms)
Login Enhancements
We’ve added support for branded community login pages by adding methods for configuring the brand parameter. See Use Your
Branded Login Page.
New Logging Framework
We've added a logging framework. See Salesforce Mobile SDK Logging Framework
What Was New in Mobile SDK 5.2 for iOS
•Mobile SDK now uses SFSafariViewController instead of the Safari browser for advanced authentication. This update
provides a better user experience with no app swizzling.
•IMPORTANT! Deprecations:
–CSFNetwork, CSFAction, and all related network classes are now deprecated and will be removed in Mobile SDK 6.0.
Instead, use SFRestAPI and SFNetwork.
–SFLogger is now deprecated and will be removed in Mobile SDK 6.0. Instead, use SFSDKLogger.
What Was New in Hybrid Apps for Mobile SDK 5.2
We’ve updated our Cordova library versions as follows:
•Android: Cordova 6.2.3
•iOS: Cordova 4.4.0
What Was New in SmartSync Data Framework for Mobile SDK 5.2
12
What Was New in Recent ReleasesWhat's New in Mobile SDK 6.0

We've added sync targets for native Android and iOS that let you sync related records up or down in a single call. See Syncing Related
Records.
Mobile SDK 5.1
General Updates (All Platforms)
In the REST API, SOSL search response bodies recently changed. Instead of returning an array of matching records, SOSL search now
returns a dictionary. The array of matching records is in this dictionary under the key “searchRecords”. Mobile SDK 5.1 has amended all
SOSL code in its libraries to handle the new response format.
Important: If your application uses SOSL, be sure to update your code accordingly!
What Was New in Mobile SDK 5.1 for Android
To keep up with recent innovations in the REST API, Mobile SDK adds support for the following features:
•If-Unmodified-Since conditional requests.
•Use of “Id” as the external ID field for upserts, coupled with null for the external ID. This pattern is useful if you’re upserting multiple
records with different external ID fields.
•SObjectTree requests.
•Batch requests.
•Composite requests.
All API changes occur in the RestRequest class. See RestRequest Class.
What Was New in Mobile SDK 5.1 for iOS
•To keep up with recent innovations in the REST API, Mobile SDK adds support for the following features:
–ifUnmodifiedSinceDate conditional requests.
–Use of “Id” as the external ID field for upserts, coupled with null for the external ID. This pattern is useful if you’re upserting
multiple records with different external ID fields.
–SObjectTree requests.
–Batch requests.
–Composite requests.
See Supported Operations for more information.
•Our native network stack now uses NSURLSession directly via the new SFNetwork class. These classes replace the
CSFNetwork and CSFAction classes.
What Was New in Hybrid Apps for Mobile SDK 5.1
We’ve replaced our custom WKWebViewEngine plug-in with Cordova's WKWebViewEngine plug-in.
What Was New in SmartSync Data Framework for Mobile SDK 5.1
•Thanks to API refactoring, custom targets can now control SmartSync Data Framework interaction with SmartStore databases.
•You can now initialize “sync up” targets with separate field lists for create and update operations. This configuration can sometimes
save you from implementing a custom “sync up” target.
What Was New in React Native for Mobile SDK 5.1
•Version Update—Mobile SDK is now built with React Native version 0.50.4.
•SmartSync Data Framework Update—Handling of field lists for “sync up” operations has changed in Mobile SDK 5.1. .
13
What Was New in Recent ReleasesWhat's New in Mobile SDK 6.0

Mobile SDK 5.0
What Was New in Mobile SDK 5.0 for Android
•We've added a library named SalesforceAnalytics. This library collects non-sensitive data that tells us which Mobile SDK
features are being used. The analytics feature is on by default, but you can turn it off if necessary. See Instrumentation and Event
Collection.
•The forcedroid utility now supports rich app templates. See Using a Custom Template to Create Apps.
•Mobile SDK for Android now requires the following versions of third-party tools.
–Java JDK 8
–Gradle 2.14.1
–Target API version: Android Nougat (API 25)
–Android Studio 2.2
–Cordova Android 6.1.0 (hybrid apps)
–Cordova CLI 6.4.0 (hybrid apps)
•We’ve removed dependencies on the guava library.
What Was New in Mobile SDK 5.0 for iOS
•The forceios utility now supports rich app templates. See Using a Custom Template to Create Apps.
•As a result of refactoring libraries, our CocoaPods pod specs have changed. See Migrate iOS Apps from 4.3 to 5.0 for details.
•iOS app extensions are now fully supported. See the SmartSyncExplorer sample app for an example.
•Salesforce servers are now fully ATS-compliant. As a result, we have removed ATS exceptions from Mobile SDK apps.
Mobile SDK for iOS now requires the following versions of third-party tools.
•iOS 9 (minimum), iOS 10 (fully supported)
•Xcode 8
•CocoaPods 1.10 (minimum)
•Cordova iOS 4.3.0 (hybrid apps)
•Cordova CLI 6.4.0 (hybrid apps)
What Was New in Hybrid Apps for Mobile SDK 5.0
•Mobile SDK upgrades its Cordova requirements as follows:
–iOS: Cordova 4.3.0
–Android: Cordova 6.1.0
–Cordova CLI 6.4.0 or later
•The forceios and forceios utilities now support rich app templates. See Using a Custom Template to Create Apps.
•The forcetk.mobilesdk.js library has been replaced with force.js. This new library handles networking natively
through the com.salesforce.plugin.network plug-in. As a result, you no longer have to refresh session tokens in your
own code.
Note: This update results in breaking changes for hybrid apps. See Migrate Hybrid Apps from 4.3 to 5.0 for details.
•A new JavaScript library, force+promise.js, serves as an alternative to force.js and reimplements force.js using
promises instead of callbacks.
•We’ve changed the way you run hybrid tests and sample apps in a browser.
14
What Was New in Recent ReleasesWhat's New in Mobile SDK 6.0

Note: This update results in breaking changes for hybrid apps. See Migrate Hybrid Apps from 4.3 to 5.0 for details.
See the following SmartStore and SmartSync Data Framework sections for more JavaScript updates.
What Was New in SmartStore for Mobile SDK 5.0
•We’ve made it easier for hybrid and React Native apps to use multiple named stores, either global or user-based. Hybrid SmartStore
APIs that previously accepted an optional isGlobalStore first argument now give you an extra option. Instead of a Boolean
value, you can provide a StoreConfig object that specifies an optional store name and indicates whether the store you’re using
is global. See Creating and Accessing User-based Stores.
•A new Cordova plug-in, com.salesforce.plugin.smartstore.client, reimplements SmartStore APIs using promises
instead of callbacks.
•The parameter list for moveCursorToNextPage() and moveCursorToPreviousPage() JavaScript functions has
changed. See Migrate Hybrid Apps from 4.3 to 5.0.
What Was New in SmartSync Data Framework for Mobile SDK 5.0
•SmartSync Data Framework provides a new “refresh” target that is streamlined for easily importing cloud data into cached SmartStore
records.
•SmartSync Data Framework now lets you specify which fields to include in sync down and refresh operations.
•The smartsync.js library has dropped jQuery and implemented native promises. If you use this library on Android 19, see
Migrate Hybrid Apps from 4.3 to 5.0 for an important instruction.
What Was New in React Native for Mobile SDK 5.0
•Version Update—Mobile SDK is now built with React Native version 0.35.
•Many SmartStore and SmartSync Data Framework APIs receive non-breaking changes to their prototypes. See What Was New in
Hybrid Apps for Mobile SDK 5.0 for more information.
15
What Was New in Recent ReleasesWhat's New in Mobile SDK 6.0

CHAPTER 4 Getting Started With Mobile SDK 6.0 for
Android and iOS
Let’s get started creating custom mobile apps! If you haven’t done so already, begin by signing up for
Salesforce and installing Mobile SDK development tools.
In this chapter ...
•Developer Edition or
Sandbox
Environment?
In addition to signing up, you need a connected app definition, regardless of which development options
you choose. To install Mobile SDK for Android or iOS (hybrid and native), you use the Mobile SDK npm
packages.
•Development
Prerequisites for
Android and iOS
•Sign Up for Lightning
Platform
•Creating a
Connected App
•Installing Mobile SDK
•Mobile SDK Sample
Apps
16

Developer Edition or Sandbox Environment?
Salesforce offers a range of environments for developers. The environment that’s best for you depends on many factors, including:
•The type of application you’re building
•Your audience
•Your company’s resources
Development environments are used strictly for developing and testing apps. These environments contain test data that isn’t
business-critical. Development can be done inside your browser or with the Force.com IDE, which is based on the Eclipse development
tool.
Types of Developer Environments
A Developer Edition environment is a free, fully featured copy of the Enterprise Edition environment, with less storage and users. Developer
Edition is a logically separate environment, ideal as your initial development environment. You can sign up for as many Developer Edition
orgs as you need. This allows you to build an application designed for any of the Salesforce production environments.
A Partner Developer Edition is a licensed version of the free Developer Edition that includes more storage, features, and licenses. Partner
Developer Editions are free to enrolled Salesforce partners.
Sandbox is a nearly identical copy of your production environment available to Professional, Enterprise, Performance, and Unlimited
Edition customers. The sandbox copy can include data, configurations, or both. You can create multiple sandboxes in your production
environments for a variety of purposes without compromising the data and applications in your production environment.
Choosing an Environment
In this book, all exercises assume you’re using a Developer Edition org. However, in reality a sandbox environment can also host your
development efforts. Here’s some information that can help you decide which environment is best for you.
•Developer Edition is ideal if you’re a:
–Partner who intends to build a commercially available Salesforce app by creating a managed package for distribution through
AppExchange or Trialforce. Only Developer Edition or Partner Developer Edition environments can create managed packages.
–Salesforce customer with a Group or Personal Edition, and you don’t have access to Sandbox.
–Developer looking to explore the Lightning Platform for FREE!
•Partner Developer Edition is ideal if you:
–Are developing in a team and you require a master environment to manage all the source code. In this case, each developer has
a Developer Edition environment and checks code in and out of this master repository environment.
–Expect more than two developers to log in to develop and test.
–Require a larger environment that allows more users to run robust tests against larger data sets.
•Sandbox is ideal if you:
–Are a Salesforce customer with Professional, Enterprise, Performance, Unlimited, or Lightning Platform Edition, which includes
Sandbox.
–Are developing a Salesforce application specifically for your production environment.
–Aren’t planning to build a Salesforce application to be distributed commercially.
–Have no intention to list on the AppExchange or distribute through Trialforce.
17
Developer Edition or Sandbox Environment?Getting Started With Mobile SDK 6.0 for Android and iOS

Development Prerequisites for Android and iOS
We recommend some background knowledge and system setup before you begin building Mobile SDK apps.
It’s helpful to have some experience with Lightning Platform. Familiarity with OAuth, login and passcode flows, and Salesforce connected
apps is essential to designing and debugging Mobile SDK apps. See Authentication, Security, and Identity in Mobile Apps.
Note: Have you completed the Mobile SDK Trailhead project, “Set Up Your Mobile SDK Developer Tools”? It’s the easiest route to
a complete Mobile SDK installation.
General Requirements (for All Platforms and Environments)
The following software is required for all Mobile SDK development.
•Node.js
•Npm version 3.10 or later (installed with Node.js).
•A Salesforce Developer Edition organization with a connected app.
iOS Native Requirements
•iOS 10 or later.
•Xcode version 9 or later. (We recommend the latest version.)
•CocoaPods version 1.2 or later (cocoapods.org).
•forceios version 6.0.
Android Native Requirements
•Java JDK 1.8.x or later—www.oracle.com/downloads.
•forcedroid npm package, version 6.0.
•Android Studio 3.0 or later—developer.android.com/sdk.
•Android SDK and Android SDK Tools—Install from within Android Studio.
1. In the Android Studio menu, click Tools > Android > SDK Manager.
2. Click the SDK Platforms tab.
3. Install at least the following required SDK levels and all intervening levels:
–Minimum API: Android KitKat (API 21)
–Target API: Android Oreo (API 27)
4. Click the SDK Tools tab.
5. Install the latest Android SDK Tools version.
•Android Virtual Device (AVD)—Install from within Android Studio.
1. In the Android Studio menu, click Tools > Android > AVD Manager.
2. Click Create Virtual Device....
3. Install at least one AVD that targets Android KitKat (API 21) and above. To learn how to set up an AVD in Android Studio, follow
the instructions at developer.android.com/guide/developing/devices/managing-avds.html.
18
Development Prerequisites for Android and iOSGetting Started With Mobile SDK 6.0 for Android and iOS

Hybrid Requirements
•For each mobile platform you support, all native requirements except for forceios and forcedroid npm packages.
•Cordova CLI 7.0.0.
•Forcehybrid npm package, version 6.0.
•Proficiency in HTML5 and JavaScript languages.
•For hybrid remote applications:
–A Salesforce organization that has Visualforce.
–A Visualforce start page.
React Native Requirements
•For each mobile platform you support, all native requirements except for forceios and forcedroid npm packages.
•Forcereact npm package, version 6.0.
•Proficiency in JavaScript (ES2015).
Sign Up for Lightning Platform
To access a wealth of tutorials, blogs, and support forums for all Salesforce developer programs, join the Lightning Platform.
1. In your browser go to https://developer.salesforce.com/signup.
2. Fill in the fields about you and your company.
3. In the Email Address field, make sure to use a public address you can easily check from a Web browser.
4. Enter a unique Username. Note that this field is also in the form of an email address, but it does not have to be the same as your
email address, and in fact, it's usually better if they aren't the same. Your username is your login and your identity on
developer.salesforce.com, and so you're often better served by choosing a username that describes the work you're
doing, such as develop@workbook.org, or that describes you, such as firstname@lastname.com.
5. Read and then select the checkbox for the Master Subscription Agreement.
6. Enter the Captcha words shown and click Submit Registration.
7. In a moment you'll receive an email with a login link. Click the link and change your password.
Creating a Connected App
To enable your mobile app to connect to the Salesforce service, you need to create a connected app. The connected app includes a
consumer key, a prerequisite to all development scenarios in this guide.
Create a Connected App
A Salesforce administrator creates connected apps on the Salesforce server. Salesforce connected apps include many settings that are
used only by other mobile offerings such as the Salesforce app. The following steps cover the settings that apply to Mobile SDK apps.
To create a connected app:
1. Log into your Lightning Platform instance.
19
Sign Up for Lightning PlatformGetting Started With Mobile SDK 6.0 for Android and iOS

2. In Setup, enter Apps in the Quick Find box, then select Apps.
3. Under Connected Apps, click New.
4. Perform steps for Basic Information.
5. Perform steps for API (Enable OAuth Settings).
6. If applicable, perform the optional steps for Mobile App Settings.
7. Click Save.
If you plan to support push notifications, see Push Notifications and Mobile SDK for additional connected app settings. You can add
these settings later if you don’t currently have the necessary information.
After you create your connected app, be sure to copy the consumer key and callback URL for safekeeping. You use these values in Mobile
SDK apps for OAuth configuration. To look them up later in Lightning Experience:
1. In Lightning Experience go to Setup.
2. Navigate to Apps > App Manager.
3. Select an unmanaged connected app (where App Type equals Connected).
4. Click the dropdown button at the right end of the row and select View.
Note:
•For basic Mobile SDK apps, the callback URL doesn’t have to be a valid URL; it only has to match what the app expects in this
field. You can use any custom prefix, such as sfdc://.
•To support advanced authentication, the callback URL must be a valid endpoint using your custom URI scheme.
•For IdP use cases, the callback URL must be a valid endpoint using the HTTPS protocol.
•The detail page for your connected app displays a consumer key. It’s a good idea to copy this key, as you’ll need it later.
•After you create a new connected app, wait a few minutes for the token to propagate before running your app.
Basic Information
Specify basic information about your Mobile SDK app in this section.
1. Enter a connected app name and press Return. The name you enter must be unique among connected apps in your org and may
contain spaces.
Note: Salesforce automatically fills in the API Name field with a version of the name without spaces.
2. Enter a contact email.
Other basic information fields are optional and are not used by Mobile SDK.
API (Enable OAuth Settings)
1. Select Enable OAuth Settings.
2. Enter the callback URL (endpoint). Mobile SDK uses this URL to call back to your application during authentication. This value must
match the OAuth redirect URI specified in your app’s project configuration.
3. For Selected OAuth Scopes, select Access and manage your data (api), Perform requests on your behalf at any time
(refresh_token, offline_access), and Provide access to your data via the Web (web).
4. To support Mobile SDK apps that perform authentication through the device’s native browser, deselect Require Secret for Web
Server Flow.
20
Create a Connected AppGetting Started With Mobile SDK 6.0 for Android and iOS

Mobile App Settings
Most settings in this section are not used by Mobile SDK. Here are the exceptions.
1. To support PIN protection, select PIN Protect.
2. To support push notifications, select Push Messaging Enabled. You can find instructions for this section at Step 2: Creating a
Connected App in the Salesforce Mobile Push Notifications Implementation Guide.
See Also
Create a Connected App in Salesforce Help.
SEE ALSO:
Scope Parameter Values
Installing Mobile SDK
Salesforce Mobile SDK provides two installation paths.
•(Recommended) Use a Node Packaged Module (npm) script to create and configure ready-to-run Mobile SDK projects.
•Download the Mobile SDK open source code from GitHub and set up your own development environment.
Do This First: Install Node.js, npm, and git
To use the Mobile SDK npm installers, you first install Node.js. The Node.js installer automatically installs npm. You also install the latest
version of the Git command line.
Mobile SDK 6.0 requires the following minimum versions:
•npm 3.10
•Git command line (latest version)
1. Download the Node.js installer from www.nodejs.org.
2. Run the installer, accepting all prompts that ask for permission to install. This module installs both node.js and npm.
3. Test your installation at a command prompt by running the npm command. If you don’t see a page of command usage information,
revisit Step 2 to find out what’s missing.
4. Go to https://git-scm.com/ to download and install the latest Git package for your system.
Now you’re ready to download the Salesforce Mobile SDK npm scripts that create Android and iOS apps.
Mobile SDK npm Packages
Most mobile developers want to use Mobile SDK as a “black box” and begin creating apps as quickly as possible. For this use case
Salesforce provides a set of npm packages. Each package installs a command line tool that you can use at a Terminal window or in a
Windows command prompt.
Mobile SDK command line tools provide a static snapshot of an SDK release. For iOS, the npm package installs binary modules rather
than uncompiled source code. For Android, the npm package installs a snapshot of the SDK source code rather than binaries. You use
the npm scripts not only to install Mobile SDK, but also to create projects.
Mobile SDK provides the following command line tools:
21
Installing Mobile SDKGetting Started With Mobile SDK 6.0 for Android and iOS

forcedroid
Creates native Android projects in Java or Kotlin.
forceios
Creates native iOS projects in Objective-C or Swift.
forcehybrid
Creates a hybrid project based on Cordova with build targets for iOS, Android, or both.
forcereact
Creates a React Native project with build targets for iOS, Android, or both.
Npm packages reside at https://www.npmjs.org. We recommend installing Mobile SDK packages globally using the following command:
•On Windows:
–npm install -g <npm-package-name>
–To install a package locally, omit -g.
•On Mac OS X:
–sudo npm install -g <npm-package-name>
–If you have read-write permissions to /usr/local/bin/, you can omit sudo.
–To install a package locally in a user-owned directory, omit sudo and -g.
•If npm doesn’t exist on your system, install the latest release of Node.js from nodejs.org.
•Npm packages do not support source control, so you can’t update your installation dynamically for new releases. Instead, you install
each release separately. To upgrade to new versions of the SDK, go to the npmjs.org website and download the new package.
iOS Preparation
Before you try to create Mobile SDK apps for iOS—native, hybrid, or React Native—install CocoaPods and the iOS native development
environment.
In Mobile SDK 4.0 and later, forceios requires CocoaPods. Apps created with forceios run in a CocoaPod-driven workspace. The CocoaPods
utility enhances debugging by making Mobile SDK source code available in your workspace. Also, with CocoaPods, updating to a new
Mobile SDK version is painless. You merely update the podfile and then run pod update in a terminal window.
Follow these instructions to make sure you’re fully prepared for Mobile SDK development on iOS.
•Regardless of the type of iOS app you’re developing, make sure that you’re up to speed with the iOS native requirements listed at
Native iOS Requirements.
•To install CocoaPods, use the Getting Started instructions at guides.cocoapods.org.
•To install forceios, forcehybrid, or forcereact, see Mobile SDK npm Packages.
SEE ALSO:
Use CocoaPods with Mobile SDK
Refreshing Mobile SDK Pods
22
iOS PreparationGetting Started With Mobile SDK 6.0 for Android and iOS

Android Preparation
Before you try to create Mobile SDK apps for Android—native, hybrid, or React Native—install the Android native development
environment.
Follow these instructions to make sure you’re fully prepared for Mobile SDK development on Android.
•Make sure that you’re up to speed with the requirements listed at Native Android Requirements.
•To install forcedroid, forcehybrid, or forcereact, see Mobile SDK npm Packages.
Uninstalling Mobile SDK npm Packages
If you need to uninstall an npm package, use the npm script.
Uninstall Global Installations
For global installations, run the following command from any folder:
•On Mac OS X:
sudo npm uninstall <package-name> -g
Use sudo if you lack read-write permissions on the /usr/local/bin/ directory.
•On Windows:
npm uninstall <package-name> -g
where <package-name> is replaced by one of the following values:
•forcedroid
•forceios
•forcehybrid
•forcereact
Uninstall Local Installations
For local installations, run the following command from the folder where you installed the package:
•On Mac OS X or Windows:
npm uninstall <package-name>
where <package-name> is replaced by one of the following values:
•forcedroid
•forceios
•forcehybrid
•forcereact
23
Android PreparationGetting Started With Mobile SDK 6.0 for Android and iOS

Mobile SDK GitHub Repositories
More adventurous developers can delve into the SDK, keep up with the latest changes, and possibly contribute to SDK development
through GitHub. Using GitHub allows you to monitor source code in public pre-release development branches. In this scenario, your
app includes the SDK source code, which is built along with your app.
You don’t have to sign up for GitHub to access the Mobile SDK, but it’s a good idea to join this social coding community.
https://github.com/forcedotcom
You can always find the latest Mobile SDK releases in our public repositories:
•https://github.com/forcedotcom/SalesforceMobileSDK-iOS
•https://github.com/forcedotcom/SalesforceMobileSDK-Android
Important: To submit pull requests for any Mobile SDK platform, check out the dev branch as the basis for your changes.
If you’re using GitHub only to build source code for the current release, check out the master branch.
Cloning the Mobile SDK for iOS GitHub Repository (Optional)
1. Clone the Mobile SDK for iOS repository to your local file system by issuing the following command at the OS X Terminal app: git
clone git://github.com/forcedotcom/SalesforceMobileSDK-iOS.git
Note: If you have the GitHub app for Mac OS X, click Clone in Mac. In your browser, navigate to the Mobile SDK iOS GitHub
repository: https://github.com/forcedotcom/SalesforceMobileSDK-iOS.
2. In the OS X Terminal app, change to the directory where you installed the cloned repository (SalesforceMobileSDK-iOS
by default).
3. Run the install script from the command line: ./install.sh
Cloning the Mobile SDK for Android GitHub Repository (Optional)
1. In your browser, navigate to the Mobile SDK for Android GitHub repository:
https://github.com/forcedotcom/SalesforceMobileSDK-Android.
2. Clone the repository to your local file system by issuing the following command: git clone
git://github.com/forcedotcom/SalesforceMobileSDK-Android.git
3. Open a terminal prompt or command window in the directory where you installed the cloned repository.
4. Run ./install.sh on Mac, or cscript install.vbs on Windows
Note: After you’ve run cscript install.vbs on Windows, git status returns a list of modified and deleted files.
This output is an unfortunate side effect of resolving symbolic links in the repo. Do not clean or otherwise revert these files.
Creating Android Projects with the Cloned GitHub Repository
To create native and hybrid projects with the cloned SalesforceMobileSDK-Android repository, follow the instructions in
native/README.md and hybrid/README.md files.
Creating iOS Projects with the Cloned GitHub Repository
To create projects with the cloned SalesforceMobileSDK-iOS repository, follow the instructions in build.md in the
repository’s root directory.
24
Mobile SDK GitHub RepositoriesGetting Started With Mobile SDK 6.0 for Android and iOS

Important: Before building Mobile SDK for Android or iOS, be sure to install npm (nodejs.org).
SEE ALSO:
Do This First: Install Node.js, npm, and git
Mobile SDK Sample Apps
Salesforce Mobile SDK includes a wealth of sample applications that demonstrate its major features. You can use the hybrid and native
samples as the basis for your own applications, or just study them for reference.
Installing the Sample Apps
In GitHub, sample apps live in the Mobile SDK repository for the target platform. For hybrid samples, you have the option of using the
Cordova command line with source code from the SalesforceMobileSDK-Shared repository.
Accessing Sample Apps From the GitHub Repositories
For Android:
•Clone or refresh the SalesforceMobileSDK-Android GitHub repo (https://github.com/forcedotcom/SalesforceMobileSDK-Android).
•In the repo root folder, run the install script:
–Windows: cscript install.vbs
–Mac OS X: ./install.sh
•In Android Studio, import the folder that contains your local SalesforceMobileSDK-Android clone.
•Look for sample apps in the hybrid/HybridNativeSamples and native/NativeHybridSamples project folders.
Important: On Windows, be sure to run Android Studio as administrator.
For iOS:
•Clone or refresh the SalesforceMobileSDK-iOS GitHub repo (https://github.com/forcedotcom/SalesforceMobileSDK-iOS).
•Run ./install.sh in the repository root folder.
•In Xcode, open the SalesforceMobileSDK-iOS/SalesforceMobileSDK.xcworkspace file.
•Look for the sample apps in the NativeSamples and HybridSamples workspace folders.
Building Hybrid Sample Apps With Cordova
To build hybrid sample apps using the Cordova command line, see Build Hybrid Sample Apps.
Android Sample Apps
Native
•RestExplorer demonstrates the OAuth and REST API functions of Mobile SDK. It’s also useful for investigating REST API actions from
a tablet.
25
Mobile SDK Sample AppsGetting Started With Mobile SDK 6.0 for Android and iOS
•SmartSyncExplorer demonstrates the power of the native SmartSync Data Framework library on Android. It resides in Mobile SDK
for Android under native/NativeSampleApps/SmartSyncExplorer.
Hybrid
•AccountEditor: Demonstrates how to synchronize offline data using the smartsync.js library.
•NoteSync: Demonstrates how to use non-REST APIs to retrieve Salesforce Notes.
•SmartSyncExplorerHybrid: Demonstrates how to synchronize offline data using the SmartSync Data Framework plugin.
iOS Sample Apps
Native
•RestAPIExplorer exercises all native REST API wrappers. It resides in Mobile SDK for iOS under
native/SampleApps/RestAPIExplorer.
•SmartSyncExplorer demonstrates the power of the native SmartSync Data Framework library on iOS. It resides in Mobile SDK for
iOS under native/SampleApps/SmartSyncExplorer.
Hybrid
•AccountEditor: Demonstrates how to synchronize offline data using the smartsync.js library.
•NoteSync: Demonstrates how to use non-REST APIs to retrieve Salesforce Notes.
•SmartSyncExplorerHybrid: Demonstrates how to synchronize offline data using the SmartSync Data Framework plugin.
Hybrid Sample Apps (Source Only)
Mobile SDK provides only the web app source code for most hybrid sample apps. You can build platform-specific versions of these apps
using the Cordova command line. To get the source code, clone the SalesforceMobileSDK-Shared GitHub repository and look in the
samples folder. To build these hybrid apps for specific mobile platforms, follow the instructions at Build Hybrid Sample Apps.
•accounteditor: Uses the SmartSync Data Framework to access Salesforce data.
•contactexplorer: Uses Cordova to retrieve local device contacts. It also uses the force.js toolkit to implement REST transactions
with the Salesforce REST API. The app uses the OAuth2 support in Salesforce SDK to obtain OAuth credentials and then propagates
those credentials to force.js by sending a javascript event.
•fileexplorer: Demonstrates the Files API.
•notesync: Uses non-REST APIs to retrieve Salesforce Notes.
•simplesyncreact:: Demonstrates a React Native app that uses the SmartSync Data Framework plug-in.
•smartstoreexplorer: Lets you explore SmartStore APIs.
•smartsyncexplorer: Demonstrates using smartsync.js, rather than the SmartSync Data Framework plug-in, for offline
synchronization.
•userandgroupsearch: Lets you search for users in groups.
•userlist: Lists users in an organization. This is the simplest hybrid sample app.
•usersearch: Lets you search for users in an organization.
•vfconnector: Wraps a Visualforce page in a native container. This example assumes that your org has a Visualforce page called
BasicVFTest. The app first obtains OAuth login credentials using the Salesforce SDK OAuth2 support and then uses those
credentials to set appropriate webview cookies for accessing Visualforce pages.
26
Installing the Sample AppsGetting Started With Mobile SDK 6.0 for Android and iOS

CHAPTER 5 Updating Mobile SDK Apps (5.0 and Later)
In Mobile SDK 5.0, native and React native apps get an easier path to future Mobile SDK upgrades. Instead
of creating an app and porting your app’s resources to it, you now update a simple configuration file
and then run a script that regenerates your app with the new SDK libraries.
In this chapter ...
•Using Maven to
Update Mobile SDK
Updating Native and React Native Apps
Each native and React native app directory contains a package.json file at its root level. This JSON
file contains a “dependencies” object that includes a list of name-value pairs describing Mobile SDK
Libraries in Android
Apps
source paths. You can set these values to any local or network path that points to a valid copy of the
platform’s Mobile SDK. After you’ve updated this file, perform the update by running:
•install.js for Android native, iOS native, and native Swift apps
•installandroid.js for React native apps on Android
•installios.js for React native apps on iOS
You can find the appropriate file in your app’s root folder.
For example, here’s the dependencies section of a native Android package.json file:
"dependencies": {
"salesforcemobilesdk-android":
"https://github.com/forcedotcom/SalesforceMobileSDK-Android.git"
}
This path points to the current release branch of the SalesforceMobileSDK-Android repo.
For iOS, it’s the same idea:
"dependencies": {
"salesforcemobilesdk-ios":
"https://github.com/forcedotcom/SalesforceMobileSDK-iOS.git"
}
For React native, you can set targets for both Android and iOS, as well as React native versions:
"dependencies": {
"react": "15.3.2",
"react-native": "0.35.0",
"salesforcemobilesdk-ios":
"https://github.com/forcedotcom/SalesforceMobileSDK-iOS.git",
"react-native-force":
"https://github.com/forcedotcom/SalesforceMobileSDK-ReactNative.git",
"salesforcemobilesdk-android":
"https://github.com/forcedotcom/SalesforceMobileSDK-Android.git"
}
Important: Remember that your React native version must be paired with compatible Mobile
SDK versions.
27

To point to the development branch of any Mobile SDK repo—that is, the branch where the upcoming
release is being developed—append “#dev” to the URL. For example:
"dependencies": {
"salesforcemobilesdk-android":
"https://github.com/forcedotcom/SalesforceMobileSDK-Android.git#dev"
}
Example: The following steps update an Android native app.
1. From your app directory, open package.json for editing.
2. In the “dependencies” section, change the value for “salesforcemobilesdk-android” to point a
different version of the SalesforceMobileSDK-Android repo. You can point to the development
branch or a different tag of the master branch (5.x or later).
3. Run install.js for native apps, or installandroid.js for React native apps.
The steps for iOS are identical. Just replace the Android references with iOS labels.
Updating Hybrid Apps
For hybrid apps, the Mobile SDK libraries are delivered through the Mobile SDK Cordova plug-in. However,
with a major release such as 5.0, we recommend that you start with a new template app.
1. Run: forcehybrid create
2. Create the same type of hybrid project with the same name as your existing project, but in a different
folder.
3. When the script finishes, cd to your new project folder.
4. Add any third-party Cordova plug-ins that your original app used. For example, if your app uses the
Cordova status bar plug-in, type:
cordova plugin add cordova-plugin-statusbar
5. After you’ve added all your third-party plugins, remove and then re-add the Mobile SDK Cordova
plugin as follows:
cordova plugin remove com.salesforce
cordova plugin add
https://github.com/forcedotcom/SalesforceMobileSDK-CordovaPlugin
--force
6. Copy your web app resources—JavaScript, HTML5, and CSS files, and so on—from the original
project into your new project’s www/ folder. For example, on Mac OS X:
cp -RL ~/MyProjects/MyMobileSDK50Project/www/* www/
7. Run: cordova prepare
Note: For details on required changes for specific releases, see Migrating from Previous Releases.
28
Updating Mobile SDK Apps (5.0 and Later)

Using Maven to Update Mobile SDK Libraries in Android Apps
Beginning with version 5.0, Mobile SDK provides native Android libraries on Bintray’s jCenter Maven repository. As a result, you can now
consume any Mobile SDK library by adding a single line to the dependencies section of your app’s build.gradle file.
To import a library with Gradle, you add a compile statement to the dependencies section of your project’s build.gradle
file. To update a library with Gradle, you simply change its version number in the compile statement to the updated version, and
then resync your libraries.
The Details
Here’s what a typical Gradle dependencies section looks like:
dependencies {
classpath 'com.android.tools.build:gradle:2.2.3'
}
A compile statement takes the form
compile '<groupID>:<artifactID>:<version>'
For Mobile SDK libraries:
•groupID is “com.salesforce.mobilesdk”
•artifactID is “SalesforceSDK”, “SalesforceHybrid”, “SmartStore”, or “SmartSync”
•version is “x.x.x” (for example, “5.0.1”)
The compile statement imports not only the specified library, but also all its dependencies. As a result, you never have to explicitly
compile SalesforceAnalytics, for example, because every other library depends on it. It also means that you can get everything you need
with just one statement.
To import Mobile SDK 5.0.1 libraries, add one of the following lines:
•For the SalesforceSDK library:
compile 'com.salesforce.mobilesdk:SalesforceSDK:5.0.1'
•For the SmartStore library (also imports the SalesforceSDK library):
compile 'com.salesforce.mobilesdk:SmartStore:5.0.1'
•For the SmartSync Data Framework library (also imports the SalesforceSDK and SmartStore libraries):
compile 'com.salesforce.mobilesdk:SmartSync:5.0.1'
•For the SalesforceHybrid library (also imports the SalesforceSDK, SmartStore, SmartSync Data Framework, and Apache Cordova
libraries):
compile 'com.salesforce.mobilesdk:SalesforceHybrid:5.0.1'
Note:
•The Salesforce React library is not currently available through Maven.
•Mobile SDK enforces a few coding requirements for proper initialization and configuration. To get started, see Android
Application Structure.
29
Using Maven to Update Mobile SDK Libraries in Android
Apps
Updating Mobile SDK Apps (5.0 and Later)

CHAPTER 6 Welcome to Mobile SDK Labs!
Mobile SDK Labs is where we share information on newer technologies that we’re currently testing, or
that could become unstable because they’re rapidly evolving. Check here with each release if you’re
eager to experiment with the cutting edge in your Mobile SDK apps.
In this chapter ...
•Mobile UI Elements
with Polymer
Introducing Salesforce Mobile SDK Labs
Salesforce is committed to empowering developers to create mobile apps on their own terms. We hope
to provide you with complete freedom to use the technologies that best serve your needs.
In the mobile development world, innovation moves at breakneck speeds. New tools, frameworks,
libraries, and design patterns emerge almost on a weekly basis. Some of these technologies become
mainstream—stable and secure enough for production apps—while others fade away. The Mobile SDK
team is always testing emerging technologies for use with SDK libraries, samples, and resources. Salesforce
Mobile SDK Labs gives you the opportunity to try out the third-party tools and frameworks as we’re
investigating them.
Because Mobile SDK is a community-assisted effort, we value your feedback and typically incorporate it
into our decision-making process. You can contact us at our Google+ community: SalesforceMobileSDK.
Warning: Salesforce does not officially support the apps and code in Salesforce Mobile SDK Labs.
Use these projects with caution in production apps.
30

Mobile UI Elements with Polymer
Happy mobile app developers spend their time creating innovative functionality—not writing yet another detail page bound to a set
of APIs. The Salesforce Mobile UI Elements library wraps Lightning Platform APIs in Google’s Polymer framework for rapid HTML5
development.
Mobile UI Elements empower HTML and JavaScript developers to build powerful Salesforce mobile apps with technologies they already
know. The open source Mobile UI Elements project provides a pre-built component library that is flexible and surprisingly easy to learn.
You can deploy a Mobile UI Elements app several ways.
•In a Visualforce page
•In a remotely hosted page on www.heroku.com or another third-party service
•As a stand-alone app, using the hybrid container provided by Salesforce Mobile SDK
Mobile UI Elements is an open-source, unsupported library based on Google’s Polymer framework. It provides fundamental building
blocks that you can combine to create fairly complex mobile apps. The component library enables any HTML developer to quickly and
easily build mobile applications without having to dig into complex mobile frameworks and design patterns.
You can find the source code for Mobile UI Elements at github.com/ForceDotComLabs/mobile-ui-elements.
Third-Party Code
The Mobile UI Elements library uses these third-party components:
•Polymer, a JavaScript library for adding new extensions and features to modern HTML5 browsers. It's built on Web Components and
is designed to use the evolving Web platform on modern browsers.
•jQuery, the JavaScript library that makes it easy to write JavaScript.
•Backbone.js, a JavaScript library providing the model–view–presenter (MVP) application design paradigm.
•Underscore.js, a “utility belt” library for JavaScript.
•Ratchet, prototype iPhone apps with simple HTML, CSS, and JavaScript components.
See github.com/ForceDotComLabs/mobile-ui-elements for a catalog of currently available elements.
force_selector_list
The force-selector-list element is an extension of core-selector element and provides a wrapper around the
force-sobject-collection element. force-selector-list acts as a base for any list UI element that needs selector
functionality. It automatically updates the selected attribute when the user taps a row.
Example
<force-selector-list sobject="Account" querytype="mru"></force-selector-list>
force-selector-relatedlist
The force-selector-relatedlist element is an extension of the core-selector element and fetches the records of
related sObjects using a force-sobject-collection element. force-selector-relatedlist is a base element for
UI elementx that render a record’s related list and also require selector functionality.
31
Mobile UI Elements with PolymerWelcome to Mobile SDK Labs!

Example
<force-selector-relatedlist related="{{related}}"></force-selector-relatedlist>
force-sobject
The force-sobject element wraps the SmartSync Force.SObject in a Polymer element. The force-sobject element:
•Provides automatic management of the offline store for caching
•Provides a simpler DOM-based interface to interact with the SmartSync Data Framework SObject Model
•Allows other Polymer elements to consume SmartSync Data Framework easily
Example
<force-sobject sobject="Account" recordid="001000000000AAA"></force-sobject>
force-sobject-collection
The force-sobject-collection element is a low-level Polymer wrapper for the SmartSync Force.SObjectCollection
object. This element:
•Automatically manages the offline data store for caching (when running inside a container)
•Provides a simple DOM-based interface for SmartSync Data Framework interactions
•Allows other Polymer elements to easily consume data from SmartSync Data Framework
Example
<force-sobject-collection sobject="Account" querytype="mru"></force-sobject-collection>
force-sobject-layout
The force-sobject-layout element provides the layout information for a particular sObject record. It wraps the
describeLayout API call. The layout information is cached in memory for the existing session and is stored in SmartStore for offline
consumption. The force-sobject-layout element also provides a base definition for elements that depend on page layouts,
such as force-ui-detail and force-sobject-related.
Example
<force-sobject-layout sobject="Account"></force-sobject-layout>
force-sobject-relatedlists
The force-sobject-relatedlists element enables the rendering of related lists of a sObject record. It embeds the
force-sobject-layout element to fetch the related lists configuraton from the page layout settings. It parses the related lists
configuration for a particular sObject type. If the recordid attribute is provided, it also generates a SOQL/cache query to fetch the
related record items.
32
force-sobjectWelcome to Mobile SDK Labs!

Example
<force-sobject-relatedlists sobject="Account"
recordid="001000000000AAA"></force-sobject-relatedlists>
force-sobject-store
The force-sobject-store element wraps the SmartSync Force.StoreCache in a Polymer element. This element:
•Automatically manages the lifecycle of the SmartStore soup for each sObject type
•Automatically creates index specs based on the lookup relationships on the sObject
•Provides a simpler DOM-based interface to interact with the SmartSync Data Framework SObject model
•Allows other Polymer elements to easily consume SmartStore data
.
Example
<force-sobject-store sobject="Account"></force-sobject-store>
force-ui-app
The force-ui-app element is a top-level UI element that provides the basic styling and structure for the application. This element
uses Polymer layout features to enable flexible sections on the page. This is useful in a single-page view with split view panels. All children
of the main section must specify the "content" class to apply the correct styles.
Example
When used in a Visualforce context:
<force-ui-app multipage="true"></force-ui-app>
force-ui-detail
The force-ui-detail element enables the rendering of a full view of a Salesforce record. This element uses the
force-sobject-layout element to fetch the page layout for the record. This element also embeds a force-sobject
element to allow all the CRUD operations on an sObject. To inherit the default styles, this element should always be a child of
force-ui-app.
Example
<force-ui-detail sobject="Account" recordid="001000000000AAA"></force-ui-detail>
force-ui-list
The force-ui-list element enables the rendering of the list of records for any sObject. Using attributes, you can configure this
element to show specific set of records. To inherit the appropriate styles, this element should always be a child of force-ui-app.
33
force-sobject-storeWelcome to Mobile SDK Labs!

Example
<force-ui-list sobject="Account" querytype="mru"></force-ui-list>
force-ui-relatedlist
The force-ui-relatedlist element extends force-selector-relatedlistelement and renders a list of related
records to an sobject record. To inherit the default styles, this element should always be a child of force-ui-app.
Example
<force-ui-relatedlist related="{{related}}"></force-ui-relatedlist>
34
force-ui-relatedlistWelcome to Mobile SDK Labs!

CHAPTER 7 React Native Development
React Native is a third-party framework that lets you access native UI elements directly with JavaScript,
style sheets, and markup. You can combine this technology with special Mobile SDK native modules for
rapid development using native resources.
In this chapter ...
•Creating a React
Native Project with
Forcereact Since its inception, Mobile SDK has supported two types of mobile apps:
•Native apps provide the best user experience and performance. However, you have to use a different
development technology for each mobile platform you support.
•Using Mobile SDK
Components in React
Native Apps •Hybrid apps let you share your JavaScript and style sheets code across platforms, but the generic
underlying web view can compromise the user experience.
•Mobile SDK Native
Modules for React
Native Apps In Mobile SDK 4.0 and later, you have a third option: React Native. React Native couples the cross-platform
advantages of JavaScript development with the platform-specific "look and feel" of a native app. At the
same time, the developer experience matches the style and simplicity of hybrid development.
•Mobile SDK Sample
App Using React
Native •You use flexible, widely known web technologies (JavaScript, style sheets, and markup) for layout
and styling.
•Defer Login
•No need to recompile to check your code updates. You simply refresh the browser to see your
changes.
•Upload Binary
Content
•To debug, you use your favorite browser’s developer tools.
•All views are rendered natively, so your customers get the user experience of a native app.
Mobile SDK 6.0 uses React Native 0.50.4. You can find React Native 0.50.4 source code and documentation
at github.com/facebook/react-native/releases/ under the 0.50.4 tag.
What’s New in React Native for Mobile SDK 6.0
Forcereact Tool:
Mobile SDK 6.0 introduces a new npm package, forcereact, for creating React Native apps. See Creating
a React Native Project with Forcereact.
Version Updates:
•React Native: 0.50.4.
Getting Started
React Native requires some common Mobile SDK components and at least one native development
environment—iOS or Android. Your best bet for getting started is the React Native Trailhead module.
See you back here afterwards.
35

Creating a React Native Project with Forcereact
After you’ve successfully installed a native Mobile SDK environment, you can begin creating React Native apps.
To create an app, use forcereact in a terminal window or at a Windows command prompt. The forcereact utility gives you two ways to
create your app.
•Specify the type of application you want, along with basic configuration data.
OR
•Use an existing Mobile SDK app as a template. You still provide the basic configuration data.
You can use forcereact in interactive mode with command-line prompts, or in scripted mode with the parameterized command-line
version.
Using Forcereact Interactively
To enter application options interactively at a command prompt, type forcereact create. The forcereact utility then prompts
you for each configuration option.
Using Forcereact with Command-Line Options
If you prefer, you can specify forcereact parameters directly at the command line. To see usage information, type forcereact without
arguments. The list of available options displays:
$ forcereact
forcereact: tool for building react native mobile applications using Salesforce Mobile SDK
Usage:
# create ios/android react_native mobile application
forcereact create
--platform=Comma separated platforms (ios, android)
--appname=Application Name
--packagename=App Package Identifier (e.g. com.mycompany.myapp)
--organization=Organization Name (Your company's/organization's name)
[--outputdir=Output Directory (Leave empty for current directory)]
Using this information, type forcereact create, followed by your options and values. For example:
$ forcereact create
--platform=ios,android
--appname=CoolReact
--packagename=com.test.my_new_app
--organization="Acme Widgets, Inc."
--outputdir=CoolReact
Specifying a Template
forcereact createWithTemplate is identical to forcereact create except that it also asks for a template repo URI.
You set this path to point to any repo directory that contains a Mobile SDK app that can be used as a template. Your template app can
36
Creating a React Native Project with ForcereactReact Native Development

be any supported Mobile SDK app type. The force script changes the template’s identifiers and configuration to match the values you
provide for the other parameters.
Here’s command-line usage information for forcereact createWithTemplate:
forcereact createWithTemplate
--platform=Comma separated platforms (ios, android)
--templaterepouri=Template repo URI
--appname=Application Name
--packagename=App Package Identifier (e.g. com.mycompany.myapp)
--organization=Organization Name (Your company's/organization's name)
[--outputdir=Output Directory (Leave empty for current directory)]
For example, consider the following command-line call:
forcereact createWithTemplate
--platform=ios,android
--templaterepouri=https://github.com/forcedotcom/SmartSyncExplorerReactNative
--appname=MyReact
-—packagename=com.mycompany.react
--organization="Acme Software, Inc."
-—outputdir=""
This call creates a React Native app in the current directory that supports both iOS and Android. It uses the same source code and
resources as the SmartSyncExplorerReactNative sample app. However, this call changes the app name from “SmartSyncExplorerReactNative”
to “MyReact”.
Build and Run Your App in Android Studio
1. In a Terminal window or at Windows command prompt, change to your project’s root directory.
cd <my_project_root>
2. Run the following command:
•On Mac OS: npm start
•On Windows: npm run-script start-windows
3. Open your project in Android Studio.
•From the Welcome screen, click Import Project (Eclipse ADT, Gradle, etc.).
OR
•From the File menu, click File > New > Import Project....
4. Browse to your <project_ root>/android/ directory and click OK.
Android Studio automatically builds your workspace. This process can take several minutes. When the status bar reports “Gradle
build successful”, you’re ready to run the project.
5. Click Run 'app', or press SHIFT+F10.
Android Studio launches your app in the emulator or on your connected Android device.
37
Creating a React Native Project with ForcereactReact Native Development

Build and Run Your App in Xcode
1. In a Terminal window, change to your project’s root directory.
cd <my_project_root>
2. Type npm start, then press Return.
3. In Xcode, open <project_ root>/ios/<project_name>.xcworkspace.
4. Click Run.
Xcode launches your app in the simulator or on your connected iOS device.
How the Forcereact Script Generates New Apps
•The script downloads templates at runtime from a GitHub repo. For the forcereact create command, the script uses the
default templates in the SalesforceMobileSDK-Templates GitHub repo.
•The script uses npm to download React Native dependencies.
•The script uses git (Android) or CocoaPods (iOS) to download Mobile SDK libraries.
Using Mobile SDK Components in React Native Apps
React Native apps access the same Mobile SDK libraries as Mobile SDK native apps. For React Native, Mobile SDK provides JavaScript
components, or bridges, that execute your JavaScript code as native Mobile SDK instructions.
In React Native, you access Mobile SDK functionality through the following native bridges:
•react.force.oauth.js
•react.force.network.js
•react.force.smartstore.js
•react.force.smartsync.js
To use these bridges, add an import statement in your JavaScript code. The following example imports all four bridges.
import {oauth, net, smartstore, smartsync} from 'react-native-force';
React native apps built with forcereact specify the react-native-force source path in the package.json file:
"react-native-force": "https://github.com/forcedotcom/SalesforceMobileSDK-ReactNative.git"
Note: You can’t use the force.js library with React Native.
Mobile SDK Native Modules for React Native Apps
Mobile SDK provides native modules for React Native that serve as JavaScript bridges to native Mobile SDK functionality.
OAuth
The OAuth bridge is similar to the OAuth plugin for Cordova.
38
Using Mobile SDK Components in React Native AppsReact Native Development

Usage
import {oauth} from 'react-native-force';
Methods
oauth.getAuthCredentials(success, fail);
oauth.logout();
Network
The Network bridge is similar to the force.js library for hybrid apps.
Usage
import {net} from 'react-native-force';
Methods
net.setApiVersion(version);
net.getApiVersion();
net.versions(callback, error);
net.resources(callback, error);
net.describeGlobal(callback, error);
net.metadata(objtype, callback, error);
net.describe(objtype, callback, error);
net.describeLayout(objtype, recordTypeId, callback, error);
net.create(objtype, fields, callback, error);
net.retrieve(objtype, id, fieldlist, callback, error);
net.upsert(objtype, externalIdField, externalId, fields, callback, error);
net.update(objtype, id, fields, callback, error);
net.del(objtype, id, callback, error);
net.query(soql, callback, error);
net.queryMore( url, callback, error);
net.search(sosl, callback, error);
net.getAttachment(id, callback, error);
SmartStore
The SmartStore bridge is similar to the SmartStore plugin for Cordova. Unlike the plugin, however, first arguments are not optional in
React Native.
Usage
import {smartstore} from 'react-native-force';
Methods
smartstore.buildAllQuerySpec(indexPath, order, pageSize,
selectPaths);
smartstore.navigator.smartstore.buildExactQuerySpec(
path, matchKey, pageSize, order, orderPath, selectPaths);
smartstore.navigator.smartstore.buildRangeQuerySpec(
path, beginKey, endKey, order, pageSize, orderPath, selectPaths);
smartstore.navigator.smartstore.buildLikeQuerySpec(
39
Mobile SDK Native Modules for React Native AppsReact Native Development

path, likeKey, order, pageSize, orderPath, selectPaths);
smartstore.navigator.smartstore.buildMatchQuerySpec(
path, matchKey, order, pageSize, orderPath, selectPaths);
smartstore.buildSmartQuerySpec(smartSql, pageSize);
smartstore.getDatabaseSize(isGlobalStore, successCB, errorCB);
smartstore.getDatabaseSize(storeConfig, successCB, errorCB);
smartstore.registerSoup(isGlobalStore, soupName, indexSpecs,
successCB, errorCB);
smartstore.registerSoup(storeConfig, soupName, indexSpecs,
successCB, errorCB);
smartstore.registerSoupWithSpec(storeConfig, soupSpec, indexSpecs, successCB, errorCB);
smartstore.removeSoup(isGlobalStore, soupName, successCB, errorCB);
smartstore.removeSoup(storeConfig, soupName, successCB, errorCB);
smartstore.getSoupIndexSpecs(isGlobalStore, soupName, successCB,
errorCB);
smartstore.getSoupIndexSpecs(storeConfig, soupName, successCB,
errorCB);
smartstore.getSoupSpec(storeConfig, soupName, successCB, errorCB);
smartstore.alterSoup(isGlobalStore, soupName, indexSpecs, reIndexData,
successCB, errorCB);
smartstore.alterSoup(storeConfig, soupName, indexSpecs, reIndexData,
successCB, errorCB);smartstore.reIndexSoup(storeConfig, soupName, paths, successCB,
errorCB);
smartstore.alterSoupWithSpec(storeConfig, soupName, soupSpec, indexSpecs, reIndexData,
successCB, errorCB);
smartstore.reIndexSoup(storeConfig, soupName, paths, successCB, errorCB);
smartstore.clearSoup(isGlobalStore, soupName, successCB, errorCB);
smartstore.clearSoup(storeConfig, soupName, successCB, errorCB);
smartstore.showInspector(isGlobalStore);
smartstore.showInspector(storeConfig);
smartstore.soupExists(isGlobalStore, soupName, successCB, errorCB);
smartstore.soupExists(storeConfig, soupName, successCB, errorCB);
smartstore.querySoup(isGlobalStore, soupName, querySpec,
successCB, errorCB);
smartstore.querySoup(storeConfig, soupName, querySpec,
successCB, errorCB);
smartstore.runSmartQuery(isGlobalStore, querySpec, successCB, errorCB);
smartstore.runSmartQuery(storeConfig, querySpec, successCB, errorCB);
smartstore.retrieveSoupEntries(isGlobalStore, soupName, entryIds,
successCB, errorCB);
40
Mobile SDK Native Modules for React Native AppsReact Native Development

smartstore.retrieveSoupEntries(storeConfig, soupName, entryIds,
successCB, errorCB);
smartstore.upsertSoupEntries(isGlobalStore, soupName, entries,
successCB, errorCB);
smartstore.upsertSoupEntries(storeConfig, soupName, entries,
successCB, errorCB);
smartstore.upsertSoupEntriesWithExternalId(isGlobalStore, soupName,
entries, externalIdPath, successCB, errorCB);
smartstore.upsertSoupEntriesWithExternalId(storeConfig, soupName,
entries, externalIdPath, successCB, errorCB);
smartstore.removeFromSoup(isGlobalStore, soupName, entryIds,
successCB, errorCB);
smartstore.removeFromSoup(storeConfig, soupName, entryIds,
successCB, errorCB);
smartstore.moveCursorToPageIndex(isGlobalStore, cursor, newPageIndex,
successCB, errorCB);
smartstore.moveCursorToPageIndex(storeConfig, cursor, newPageIndex,
successCB, errorCB);
smartstore.moveCursorToNextPage(isGlobalStore, cursor, successCB,
errorCB);
smartstore.moveCursorToNextPage(storeConfig, cursor, successCB,
errorCB);
smartstore.moveCursorToPreviousPage(isGlobalStore, cursor, successCB,
errorCB);
smartstore.moveCursorToPreviousPage(storeConfig, cursor, successCB,
errorCB);
smartstore.closeCursor(isGlobalStore, cursor, successCB, errorCB);
smartstore.closeCursor(storeConfig, cursor, successCB, errorCB);
smartstore.getAllStores(storeConfig, successCB, errorCB);
smartstore.getAllGlobalStores(successCB, errorCB);
smartstore.removeStore(storeConfig, successCB, errorCB);
smartstore.removeAllGlobalStores(successCB, errorCB);
smartstore.removeAllStores(successCB, errorCB);
SmartSync Data Framework
The SmartSync Data Framework bridge is similar to the SmartSync Data Framework plugin for Cordova. Unlike the plugin, however, first
arguments are not optional in React Native.
Usage
import {smartsync} from 'react-native-force';
41
Mobile SDK Native Modules for React Native AppsReact Native Development

Methods
smartsync.syncDown(isGlobalStore, target, soupName, options, syncName, successCB,
errorCB);
smartsync.syncDown(storeConfig, target, soupName, options, syncName, successCB, errorCB);
smartsync.reSync(isGlobalStore, syncIdOrName, successCB, errorCB);
smartsync.reSync(storeConfig, syncIdOrName, successCB, errorCB);
smartsync.cleanResyncGhosts(isGlobalStore, syncId, successCB, errorCB);
smartsync.cleanResyncGhosts(storeConfig, syncId, successCB, errorCB);
smartsync.syncUp(isGlobalStore, target, soupName, options, syncName, successCB,
errorCB);
smartsync.syncUp(storeConfig, target, soupName, options, syncName, successCB,
errorCB);
smartsync.getSyncStatus(isGlobalStore, syncIdOrName, successCB, errorCB);
smartsync.getSyncStatus(storeConfig, syncIdOrName, successCB, errorCB);
smartstore.deleteSync(isGlobalStore, syncIdOrName, successCB, errorCB);
smartstore.deleteSync(storeConfig, syncIdOrName, successCB, errorCB);
Note: Handling of field lists for “sync up” operations has changed in Mobile SDK 5.1. See SmartSync Data Framework Plugin
Methods for a description of the JavaScript syncUp() method.
Mobile SDK Sample App Using React Native
The best way to get up-to-speed on React Native in Mobile SDK is to study the sample code.
Mobile SDK provides four implementations of the SmartSyncExplorer application:
•Objective-C (for iOS native)
•Java (for Android native)
•HTML/JavaScript (for hybrid on iOS and Android)
•JavaScript with React (for React Native on iOS and Android)
AndroidiOSImplementation
Native (Objective-C/Java) 1. Clone the SalesforceMobileSDK-Android
GitHub repo.
1. Clone the SalesforceMobileSDK-iOS
GitHub repo.
2. Open the SalesforceMobileSDK
workspace in Xcode.
2. Import the
SalesforceMobileSDK-Android project
in Android Studio.
3. Run the SmartSyncExplorer
application (in the NativeSamples
workspace folder).
3. Run the SmartSyncExplorer application
(in the
native/NativeSampleApps
project folder).
42
Mobile SDK Sample App Using React NativeReact Native Development

AndroidiOSImplementation
Hybrid (HTML/JavaScript) 1. Clone the SalesforceMobileSDK-Android
GitHub repo.
1. Clone the SalesforceMobileSDK-iOS
GitHub repo.
2. Open the SalesforceMobileSDK
workspace in Xcode.
2. Import the
SalesforceMobileSDK-Android project
in Android Studio.
3. Run the
SmartSyncExplorerHybrid 3. Run the “SmartSyncExplorer” application
(in the
application (in the HybridSamples
workspace folder). hybrid/HybridSampleApps
project folder).
React Native (JavaScript with React) 1. Clone SmartSyncExplorerReactNative
GitHub repo.
1. Clone SmartSyncExplorerReactNative
GitHub repo.
2. In a terminal window or command
prompt, run ./install.sh (on
2. In a terminal window or command
prompt, run ./install.sh (on
Mac) or cscript install.vbs
(on Windows)
Mac) or cscript install.vbs
(on Windows)
3. cd to the app folder and run npm
start
3. cd to the app folder and run npm
start
4. Open the app/ios folder in Xcode. 4. Open the app/android folder in
Android Studio
5. Run the
SmartSyncExplorerReactNative
application
5. Run the
SmartSyncExplorerReactNative
application
A few notes about the SmartSyncExplorer for React Native
Table 1: Key Folder and Files
DescriptionPath
Instructions to get startedREADME.md
Dependencies (iOS/Android SDKs) They are downloaded when
you run ./install.sh (Mac) or cscript install.vbs
(Windows)
external
The iOS applicationapp/ios
The Android applicationapp/android
The JavaScript source files for the applicationapp/js
43
Mobile SDK Sample App Using React NativeReact Native Development

Table 2: React Components
DescriptionComponentFile
Android starting scriptapp/js/index.android.js
iOS starting scriptapp/js/index.ios.js
Root component (the entire application)
(iOS and Android)
SmartSyncExplorerReactNativeapp/js/App.js
Search screen (iOS and Android)SearchScreenapp/js/SearchScreen.js
Used for viewing and editing a single
contact (iOS and Android)
ContactScreenapp/jsContactScreen.js
Search bar in the search screen (iOS)SearchBarapp/js/SearchBar.ios.js
Search bar in the search screen (Android)SearchBarapp/js/SearchBar.android.js
A single row in the list of results in the
search screen (iOS and Android)
ContactCellapp/js/ContactCell.js
Colored circle with initials used in the search
results screen (iOS and Android)
ContactBadgeapp/js/ContactBadge.js
A field name and value used in the contact
screen (iOS and Android)
Fieldapp/js/Field.js
Interacts with SmartStore and the server (via
SmartSync Data Framework).
StoreMgrapp/js/StoreMgr.js
Note: Most components are shared between iOS and Android. However, some components are platform specific.
Defer Login
Apps built with early versions of React Native for Mobile SDK always present a Salesforce login screen at startup. Sometimes, however,
these apps can benefit from deferring authentication until some later point. Beginning with React Native for Mobile SDK 4.2, you can
defer login to any logical place in your app.
Deferred login implementation is a two-step process:
1. In your iOS or Android native container app, you call Mobile SDK native methods to disable authentication at startup.
2. In your React code, you call a Mobile SDK JavaScript function at the point where you plan to initiate authentication.
Read on for the implementation details.
Step1: Disable Login at Startup
iOS (Objective-C):
By default, the Salesforce login screen appears at startup. To disable this behavior, set the authenticateAtLaunch property of
SalesforceSDKManager to NO.
1. Edit the AppDelegate.m file.
44
Defer LoginReact Native Development

2. Change this line:
[SalesforceSDKManager sharedManager].authenticateAtLaunch = YES;
to:
[SalesforceSDKManager sharedManager].authenticateAtLaunch = NO;
Android (Java):
By default, the Salesforce login screen appears at startup. To disable this behavior, override the shouldAuthenticate() method
in your MainActivity class (or whichever class subclasses SalesforceReactActivity), as follows:
@Override
public boolean shouldAuthenticate() {
return false;
}
Step 2: Initiate Authentication in React (JavaScript)
To initiate the authentication process, call the following react.force.oauth.js function:
function authenticate(success, fail)
This function takes two arguments: a success callback function and a failure callback function. If authentication fails, your failure callback
is invoked. If authentication succeeds, your success callback is invoked with a dictionary containing the following keys:
•accessToken
•refreshToken
•clientId
•userId
•orgId
•loginUrl
•instanceUrl
•userAgent
•communityId
•communityUrl
Upload Binary Content
Beginning with Mobile SDK 4.2, you can upload binary content to any force.com endpoint that supports the binary upload feature.
The sendRequest() method in react.force.net.js has a new optional parameter named fileParams.
function sendRequest(endPoint, path, successCB, errorCB, method, payload, headerParams,
fileParams)
This parameter expects the following form:
{
<fileParamNameInPost>: // value depends on the endpoint
{
45
Upload Binary ContentReact Native Development

fileMimeType:<someMimeType>,
fileUrl:<fileUrl>, // url to file to upload
fileName:<fileNameForPost>
}
}
For example:
{
fileUpload:
{
fileMimeType:'image/jpeg',
fileUrl:localPhotoUrl,
fileName:'pic.jpg'
}
}
Example: The github.com/wmathurin/MyUserPicReactNative sample app demonstrates binary upload. This sample allows you
to change your profile picture. Binary upload of the new pic happens in the uploadPhoto() function of the UserPic.js
file.
Here’s the sample’s sendRequest() call in the getUserInfo() function:
getUserInfo(callback) {
forceClient.sendRequest('/services/data',
'/v36.0/connect/user-profiles/' +this.state.userId + '/photo',
(response) => {
callback(response);
},
(error) => {
console.log('Failed to upload user photo:' + error);
},
'POST',
{},
{'X-Connect-Bearer-Urls':'true'},
{fileUpload:
{
fileUrl:localPhotoUrl,
fileMimeType:'image/jpeg',
fileName:'pic.jpg'
}
}
);
},
46
Upload Binary ContentReact Native Development

CHAPTER 8 Native iOS Development
Salesforce Mobile SDK delivers libraries and sample Xcode projects for developing mobile apps on iOS.
In this chapter ...
Two important features that the iOS native SDK provides are:
•iOS Native Quick Start
•Automation of the OAuth2 login process, making it easy to integrate OAuth with your app.
•Native iOS
Requirements •Access to the REST API with infrastructure classes that make that access as easy as possible.
•Creating an iOS
Project with Forceios
When you create a native app using the forceios application, your project starts as a fully functioning
app. This app allows you to connect to a Salesforce organization and run a simple query. It doesn’t do
much, but it lets you know things are working as designed.
•Use CocoaPods with
Mobile SDK
•Developing a Native
iOS App
•Using iOS App
Extensions with
Mobile SDK
•Tutorial: Creating a
Native iOS
Warehouse App
•iOS Sample
Applications
47

iOS Native Quick Start
Use the following procedure to get started quickly.
1. Make sure you meet the native iOS requirements.
2. Install nodejs (includes npm)—https://nodejs.org
3. Install the current version of CocoaPods—https://www.cocoapods.org.
4. Using npm, install forceios. (npm is automatically installed with nodejs).
sudo npm install -g forceios
5. In a Terminal window, use forceios on page 48 to create an app.
forceios create
Native iOS Requirements
The following software is required for all Mobile SDK development.
•Node.js
•Npm version 3.10 or later (installed with Node.js).
•A Salesforce Developer Edition organization with a connected app.
iOS development with Mobile SDK 6.0 also requires the following software.
•iOS 10 or later.
•Xcode version 9 or later. (We recommend the latest version.)
•CocoaPods version 1.2 or later (cocoapods.org).
•forceios version 6.0.
Note: Mobile SDK for iOS supports Cocoa Touch dynamic frameworks.
SEE ALSO:
iOS Preparation
Use CocoaPods with Mobile SDK
Refreshing Mobile SDK Pods
Creating an iOS Project with Forceios
To create an app, use forceios in a terminal window. The forceios utility gives you two ways to create your app.
•Specify the type of application you want, along with basic configuration data.
or
•Use an existing Mobile SDK app as a template. You still provide the basic configuration data.
You can use forceios in interactive mode with command-line prompts, or in script mode with command-line arguments. To see command
usage information, type forceios without arguments.
48
iOS Native Quick StartNative iOS Development

Note: Be sure to install CocoaPods before using forceios. See iOS Preparation.
Forceios Project Types
The forceios create command requires you to specify one of the following project types:
LanguageArchitectureApp Type
Objective-CNativenative
SwiftNativenative_swift
To develop a native iOS app in Objective-C, specify native.
Using forceios create Interactively
To use interactive prompts to create an app, open a Terminal window and type forceios create. For example:
$ forceios create
Enter your application type (native, native_swift): native
Enter your application name: testNative
Enter the package name for your app (com.mycompany.myapp): com.bestapps.ios
Enter your organization name (Acme, Inc.): BestApps.com
Enter output directory for your app (leave empty for the current directory): testNative
This command creates a native Objective-C iOS app named “testNative” in the testNative/ subdirectory of your current directory.
Using forceios create in Script Mode
In script mode, you can use forceios without interactive prompts. For example, to create a native app written in Objective-C:
$ forceios create --apptype="native" --appname="package-test"
--packagename="com.acme.mobile_apps"
--organization="Acme Widgets, Inc." --outputdir="PackageTest"
Or, to create a native app written in Swift:
$ forceios create --apptype="native_swift" --appname="package-test"
--packagename="com.acme.mobile_apps"
--organization="Acme Widgets, Inc." --outputdir="PackageTest"
Each of these calls creates a native app named “package-test” and places it in the PackageTest/ subdirectory of your current
directory.
Creating an App from a Template
The forceios createWithTemplate command is identical to forceios create except that it asks for a GitHub repo
URI instead of an app type. You set this URI to point to any repo directory that contains a Mobile SDK app that can be used as a template.
Your template app can be any supported Mobile SDK app type. The script changes the template’s identifiers and configuration to match
the values you provide for the other parameters.
49
Creating an iOS Project with ForceiosNative iOS Development

Here’s command-line usage information for forceios createWithTemplate:
Usage:
forceios createWithTemplate
--templaterepouri=<Template repo URI> (e.g.
https://github.com/forcedotcom/SmartSyncExplorerReactNative)]
--appname=<Application Name>
--packagename=<App Package Identifier> (e.g. com.mycompany.myapp)
--organization=<Organization Name> (Your company's/organization's name)
--outputdir=<Output directory> (Leave empty for current directory)]
You can use forceios createWithTemplate interactively or in script mode. For example, here’s a script mode call:
forceios createWithTemplate
--templaterepouri=https://github.com/forcedotcom/SmartSyncExplorerReactNative
--appname=MyReact
-—packagename=com.mycompany.react
--organization="Acme Software, Inc."
-—outputdir=testWithTemplate
This call creates a React Native app with the same source code and resources as the SmartSyncExplorerReactNative sample app. Forceios
places the new app in the testWithTemplate/ subdirectory of your current directory. It also changes the name
“SmartSyncExplorerReactNative” to “MyReact” throughout the app.
Checking the Forceios Version
To find out which version of forceios you’ve installed, run the following command:
forceios version
Open the New Project in XCode
Apps created with forceios are ready to run, right out of the box. After the app creation script finishes, you can open and run the project
in Xcode.
1. In Xcode, select File > Open.
2. Navigate to the output folder you specified.
3. Open the workspace file (<project_name>.xcworkspace).
4. When Xcode finishes building, click the Run button.
.
How the Forceios Script Generates New Apps
•Apps are based on CocoaPods.
•The script downloads templates at runtime from a GitHub repo.
•For the forceios create command, the script uses the default templates in the SalesforceMobileSDK-Templates GitHub
repo.
•The script uses npm at runtime to download Mobile SDK libraries. The podfile refers to these libraries with :path =>
node_modules/... directives.
50
Creating an iOS Project with ForceiosNative iOS Development
•For native Swift apps only, the podfile includes !use_frameworks.
SEE ALSO:
Updating Mobile SDK Apps (5.0 and Later)
Run the Xcode Project Template App
The Xcode project template includes a sample application you can run right away.
1. Press Command-R and the default template app runs in the iOS simulator.
2. On startup, the application starts the OAuth authentication flow, which results in an authentication page. Enter your credentials,
and click Login.
3. Tap Allow when asked for permission.
You should now be able to compile and run the sample project. It’s a simple app that logs you into an org via OAuth2, issues a select
Name from Account SOQL query, and displays the result in a UITableView instance.
Using a Custom Template to Create Apps
Wishing you could use your own—or someone else’s—custom app as a template? Good idea! Custom templates promote reuse of
code, rapid development, and internal consistency. Beginning in Mobile SDK 5.0, you can use either forceios or forcedroid to create apps
with custom templates. To turn a Mobile SDK app into a template, you perform a few steps to prepare the app’s repo for Mobile SDK
consumption.
About Mobile SDK Templates
Mobile SDK defines a template for each architecture it supports on iOS and Android. These templates are maintained in the
github.com/forcedotcom/SalesforceMobileSDK-Templates repo. When a customer runs the forcedroid or forceios create command,
the script copies the appropriate built-in template from the repo and transforms this copy into the new app. Apps created this way are
basic Mobile SDK apps with little functionality.
Perhaps you’d like to create your own template, with additional functionality, resources, or branding. You can harness the same Mobile
SDK mechanism to turn your own app into a template. You can then tell forcedroid or forceios to use that template instead of its own.
How to Use a Custom Template
In addition to forcedroid and forceios create, Mobile SDK defines a createWithTemplate command.When you run forcedroid
or forceios createWithTemplate, you specify a template app repo instead of an app type, followed by the remaining app creation
parameters. The template app repo contains a Mobile SDK app that the script recognizes as a template. To create a new Mobile SDK app
from this template, the script copies the template app to a new folder and applies your parameter values to the copied code.
The template.js File
To accept your unknown app as a template, forceios and forcedroid require you to define a template.js configuration file. You
save this file in the root of your template app repo. This file tells the script how to perform its standard app refactoring tasks—moving
files, replacing text, removing and renaming resources. However, you might have even more extensive changes that you want to apply.
In such cases, you can also adapt template.js to perform customizations beyond the standard scope. For example, if you insert
your app name in classes other than the main entry point class, you can use template.js to perform those changes.
51
Run the Xcode Project Template AppNative iOS Development

A template.js file contains two parts: a JavaScript “prepare” function for preparing new apps from the template, and a declaration
of exports.
The template.js Prepare Funtion
Most of a template.js file consists of the “prepare” function. By default, prepare functions use the following signature:
function prepare(config, replaceInFiles, moveFile, removeFile)
You can rename this function, as long as you remember to specify the updated name in the list of exports. The Mobile SDK script calls
the function you export with the following arguments:
•config: A dictionary identifying the platform (iOS or Android), app name, package name, organization, and Mobile SDK version.
•replaceInFiles: Helper function to replace a string in files.
•moveFile: Helper function to move files and directories.
•removeFile: Helper function to remove files and directories.
The default prepare function found in Mobile SDK templates replaces strings and moves and removes the files necessary to personalize
a standard template app. If you intend to add functionality, place your code within the prepare function. Note, however, that the helper
functions passed to your prepare function can only perform the tasks of a standard template app. For custom tasks, you’ll have to
implement and call your own methods.
Exports Defined in template.js
Each template.js file defines the following two exports.
appType
Assign one of the following values:
•'native'
•'native_kotlin' (forcedroid only)
•'native_swift' (forceios only)
•'react_native'
•'hybrid_local'
•'hybrid_remote'
prepare
The handle of your prepare function (listed without quotation marks).
Here’s an example of the export section of a template.js file. This template is for a native app that defines a prepare function
named prepare:
//
// Exports
//
module.exports = {
appType: 'native',
prepare: prepare
};
In this case, the prepare function’s handle is, in fact, “prepare”:
function prepare(config, replaceInFiles, moveFile, removeFile)
52
Using a Custom Template to Create AppsNative iOS Development

Template App Identification in template.js (Native and React Native Apps)
For native and React native apps, a template app’s prepare function defines an app name, a package name, and an organization or
company name. These values identify the template app itself—not a new custom app created from the template. At runtime, the Mobile
SDK script uses these values to find the strings to be replaced with the script’s input values. Here’s an example of the settings for these
iOSNativeTemplate template app:
// Values in template
var templateAppName = 'iOSNativeTemplate';
var templatePackageName = 'com.salesforce.iosnativetemplate';
var templateOrganization = 'iOSNativeTemplateOrganizationName';
Examples of template.js Files
Mobile SDK defines the following template.js files in the github.com/forcedotcom/SalesforceMobileSDK-Templates repo:
•iOSNativeTemplate/template.js (forceios only)
•iOSNativeSwiftTemplate/template.js (forceios only)
•ReactNativeTemplate/template.js
•HybridLocalTemplate/template.js
•HybridRemoteTemplate/template.js
•AndroidNativeTemplate/template.js (forcedroid only)
These templates are the bare bones apps used by forceios create and forcedroid create. Their level of complexity is
intentionally low. For an example of a more complex template repo created from a full-fledged app, check out
github.com/forcedotcom/SmartSyncExplorerReactNative.
Note: Always match the script command to the template. Use iOS-specific templates with forceios
createWithTemplate only, and Android-specific templates with forcedroid createWithTemplate only. This
restriction doesn’t apply to hybrid and React native templates.
Define a Basic template.js File
The following steps describe the quickest way to create a basic template.js file.
1. Copy a template.js file from the github.com/forcedotcom/SalesforceMobileSDK-Templates repo to the root of your custom
template app repo. Be sure to choose the template that matches the type of app your template should build.
2. For native or React native apps only, update the app name, package name, and organization to reflect your template app.
3. If necessary, update the appType and prepare settings in the module.exports object, as described earlier. Although
this step isn’t required for this basic example, you might need it later if you create your own template.js files.
Restrictions and Guidelines
A few restrictions apply to custom templates.
•The template app can be any valid Mobile SDK app that targets any supported platform and architecture.
•A primary requirement is that the template repo and your local Mobile SDK repo must be on the same Mobile SDK version. You can
use git version tags to sync both repos to a specific earlier version, but doing so isn’t recommended.
53
Using a Custom Template to Create AppsNative iOS Development

•Always match the script command to the template. Use iOS-specific templates with forceios createWithTemplate
only, and Android-specific templates with forcedroid createWithTemplate only. This restriction doesn’t apply to hybrid
and React native templates.
Use CocoaPods with Mobile SDK
CocoaPods provides a convenient mechanism for merging Mobile SDK modules into existing Xcode projects. The steps in this article
guide you through manually setting up CocoaPods in a Mobile SDK iOS app. If you created your app with forceios 4.0 or later, you get
the CocoaPods setup automatically. In that case, you don’t have to perform the steps in this article—you only have to install CocoaPods
software, and forceios does the rest. If you’re creating apps some other way, use this article to import Mobile SDK modules through
CocoaPods.
Beginning in Mobile SDK 4.0, forceios uses CocoaPods to create projects. Developers can also use CocoaPods manually to add Mobile
SDK to existing iOS apps.
You’re required to install CocoaPods to import Mobile SDK 4.0 and later into iOS apps. If you’re unfamiliar with CocoaPods, start by
reading the documentation at www.cocoapods.org.
Mobile SDK provides CocoaPods pod specifications, or podspecs, for each Mobile SDK module.
•SalesforceSDKCore—Implements OAuth, passcodes, networking, and REST APIs. All other pods depend on this pod, either
directly or indirectly.
•SmartStore—Implements secure offline storage. Depends on FMDB.
•SmartSync Data Framework—Implements offline synchronization. Depends on SalesforceRestAPI and
SmartStore.
•SalesforceReact—Implements Salesforce Mobile SDK React Native bridges for apps written with React JavaScript and markup.
Depends on SmartSync Data Framework.
•SalesforceAnalytics—Implements a reporting mechanism that sends Salesforce anonymous statistics on Mobile SDK
feature usage and popularity.
Mobile SDK also consumes FMDB, an external module, through CocoaPods.
The following chart shows the dependencies between specs. In this chart, the arrows point from the dependent specs to their
dependencies.
54
Use CocoaPods with Mobile SDKNative iOS Development
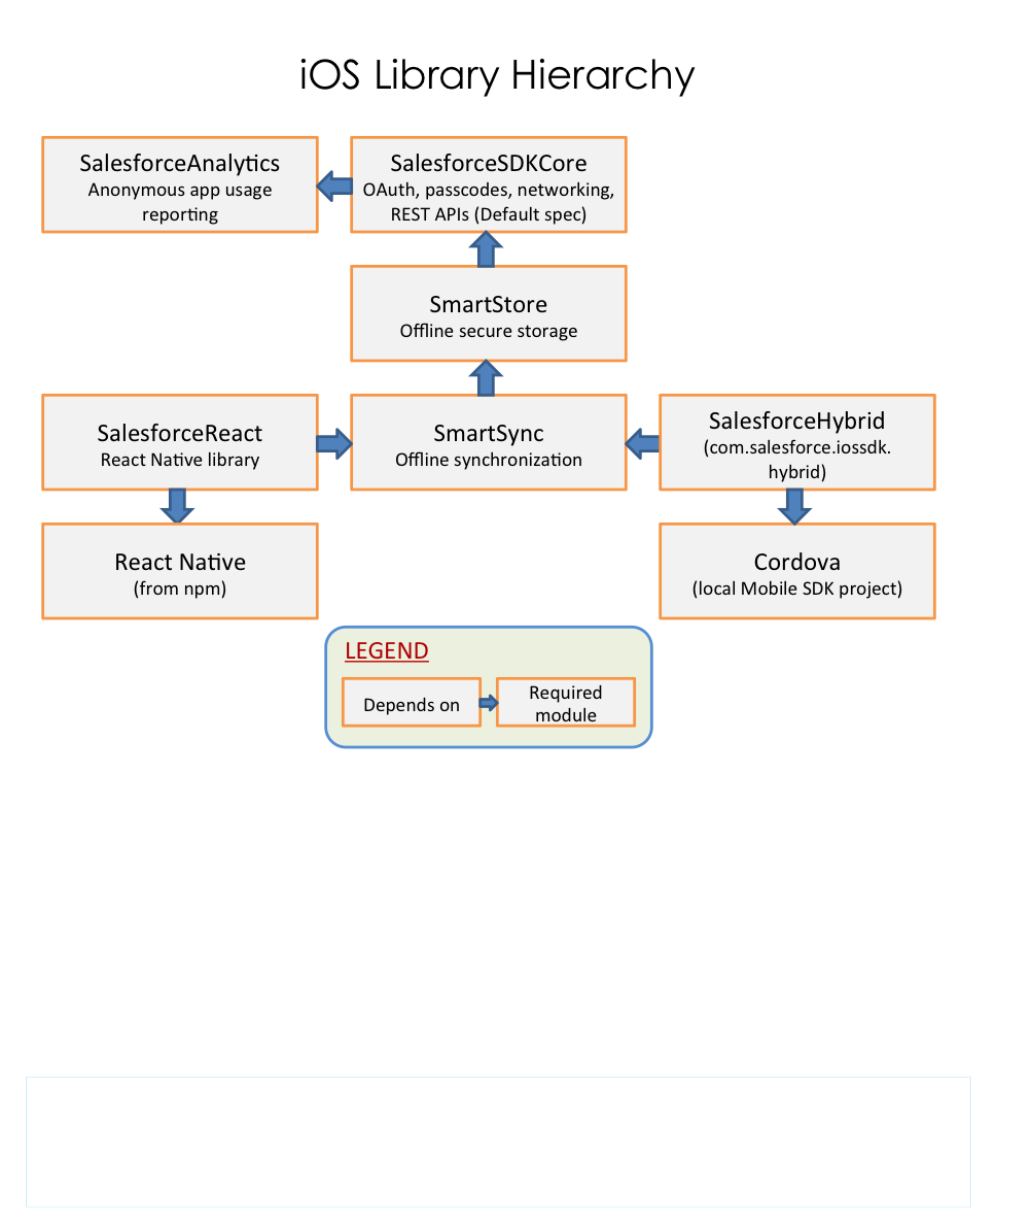
If you declare a pod, you automatically get everything in that pod’s dependency chain. For example, by declaring a pod for
SalesforceReact, you automatically get the entire chain of Mobile SDK.
You can access all versions of the Mobile SDK podspecs in the github.com/forcedotcom/SalesforceMobileSDK-iOS-Specs repo. You can
also get the current version from the github.com/forcedotcom/SalesforceMobileSDK-iOS repo.
To use CocoaPods with the current Mobile SDK release, follow these steps.
1. Be sure you’ve installed the cocoapods Ruby gem as described at www.cocoapods.org. Mobile SDK 6.0 requires pod version 1.2
minimum.
2. In your project's Podfile, add the SalesforceMobileSDK-iOS-Specs repo as a source. Make sure that you put this entry first, before the
CocoaPods source path.
target 'YourAppName' do
source 'https://github.com/forcedotcom/SalesforceMobileSDK-iOS-Specs.git' # needs to be
first
source 'https://github.com/CocoaPods/Specs.git'
...
55
Use CocoaPods with Mobile SDKNative iOS Development

3. (Mobile SDK 5.3 and later only) Declare the FMDB pod so that you can specify a special build that works with Xcode 9 and iOS 11.
target 'YourAppName' do
source 'https://github.com/forcedotcom/SalesforceMobileSDK-iOS-Specs.git' # needs to be
first
source 'https://github.com/CocoaPods/Specs.git'
# NB: get rid of next line once FMDB works with Xcode 9
pod 'FMDB', :git => 'https://github.com/forcedotcom/fmdb', :branch => '2.7.2_xcode9'
end
4. Reference the Mobile SDK podspec that you intend to merge into your app. For example, to add OAuth and passcode modules to
your app, declare the SalesforceSDKCore pod in your Podfile. For example:
target 'YourAppName' do
source 'https://github.com/forcedotcom/SalesforceMobileSDK-iOS-Specs.git' # needs to be
first
source 'https://github.com/CocoaPods/Specs.git'
NB: get rid of next line once FMDB works with xcode 9
pod 'FMDB', :git => 'https://github.com/forcedotcom/fmdb', :branch => '2.7.2_xcode9'
pod 'SalesforceSDKCore'
end
This pod configuration is the minimum for a Mobile SDK app. Note that SalesforceSDKCore implicitly includes
SalesforceAnalytics, as well as third-party SqlCipher and CocoaLumberJack pods.
5. To add other modules, replace SalesforceSDKCore with a different pod declaration. For example, to use SmartSync Data
Framework:
target 'YourAppName' do
source 'https://github.com/forcedotcom/SalesforceMobileSDK-iOS-Specs.git' # needs to be
first
source 'https://github.com/CocoaPods/Specs.git'
NB: get rid of next line once FMDB works with xcode 9
pod 'FMDB', :git => 'https://github.com/forcedotcom/fmdb', :branch => '2.7.2_xcode9'
pod 'SmartSync'
end
Since the SmartSync pod depends on SmartStore, SalesforceSDKCore, and SalesforceAnalytics, there’s
no need to declare those pod dependencies explicitly.
6. (Alternate method) To work with the upcoming release of Mobile SDK, you clone the SalesforceMobileSDK-iOS repo, check out the
dev branch, and then pull resources from it. In this case, you must declare each pre-release dependency explicitly so you can
indicate its repo path. If you omit a dependency declaration, CocoaPods loads its production version.
a. Clone github.com/forcedotcom/SalesforceMobileSDK-iOS locally at the desired commit.
b. At the Terminal window, run git checkout dev to switch to the development branch.
c. Run ./install.sh in the root directory of your clone.
d. To each pod call in your Podfile, add a :path parameter that points to your clone.
56
Use CocoaPods with Mobile SDKNative iOS Development

Here's the previous example repurposed to pull resources from a local clone:
target 'YourAppName' do
source 'https://github.com/forcedotcom/SalesforceMobileSDK-iOS-Specs.git' # need to be
first
source 'https://github.com/CocoaPods/Specs.git'
# NB: get rid of next line once FMDB works with xcode 9
pod 'FMDB', :git => 'https://github.com/forcedotcom/fmdb', :branch => '2.7.2_xcode9'
# Specify each pre-release pod
pod 'SalesforceSDKCore', :path => '/<path-to-clone-of>/SalesforceMobileSDK-iOS/'
pod 'SalesforceAnalytics', :path => '/<path-to-clone-of>/SalesforceMobileSDK-iOS/'
pod 'SmartStore', :path => '/<path-to-clone-of>/SalesforceMobileSDK-iOS/'
pod 'SmartSync', :path => '/<path-to-clone-of>/SalesforceMobileSDK-iOS/'
end
7. In a Terminal window, run pod install from your project directory. CocoaPods downloads the dependencies for your requested
pods, merges them into your project, and creates a workspace containing the newly merged project.
Important: After running CocoaPods, always access your project only from the workspace that pod install creates.
For example, instead of opening MyProject.xcodeproj, open MyProject.xcworkspace.
8. To use Mobile SDK APIs in your merged app, remember these important tips.
a. Import header files using angle brackets (“<” and “>”) rather than double quotes. For example:
import <SalesforceSDKCore/SFRestAPI.h>
b. For Swift applications, be sure to specify use_frameworks! in your Podfile. Also, in your Swift source files, remember to
import modules instead of header files. For example:
import SalesforceSDKCore
Note: If you’re upgrading an app created with forceios 5.2 or earlier to Mobile SDK 5.3 or later, you’re required to add the FMDB
pod to your existing podfile, as shown in the preceding examples.
Refreshing Mobile SDK Pods
CocoaPods caches its pods in repos stored locally on your machine. If the pod repo gets out of sync with forceios, you can manually
update it.
When forceios creates a native app, it prints a list of installed pods and their versions. For example:
Installing SalesforceSDKCore (5.0.0)
Installing SalesforceAnalytics (5.0.0)
Installing SmartStore (5.0.0)
Installing SmartSync (5.0.0)
You can compare these versions to your forceios version by typing:
forceios version
57
Refreshing Mobile SDK PodsNative iOS Development

If the reported pod versions are older than your forceios version, run the following commands in the Terminal window:
pod repo remove forcedotcom
pod setup
After setup completes, recreate your app with forceios create.
Developing a Native iOS App
The Salesforce Mobile SDK for native iOS provides the tools you need to build apps for Apple mobile devices. Features of the SDK include:
•Classes and interfaces that make it easy to call the Salesforce REST API
•Fully implemented OAuth login and passcode protocols
•SmartStore library for securely managing user data offline
The native iOS SDK requires you to be proficient in Objective-C coding. You also need to be familiar with iOS application development
principles and frameworks. If you’re a newbie, developer.apple.com/develop/ is a good place to begin learning. See Native iOS Requirements
for additional prerequisites.
In a few Mobile SDK interfaces, you’re required to override some methods and properties. SDK header (.h) files include comments that
indicate mandatory and optional overrides.
About Login and Passcodes
To access Salesforce objects from a Mobile SDK app, the customer logs in to an organization on a Salesforce server. When the login flow
begins, your app sends its connected app configuration to Salesforce. Salesforce responds by posting a login screen to the mobile device.
Optionally, a Salesforce administrator can set the connected app to require a passcode after login. Mobile SDK handles presentation of
the login and passcode screens, as well as authentication handshakes. Your app doesn’t have to do anything to display these screens.
However, it’s important to understand the login flow and how OAuth tokens are handled. See About PIN Security and OAuth 2.0
Authentication Flow.
Note: Mobile SDK for iOS supports the use of Touch ID to supply the PIN. Customers must type the PIN when first launching the
app. After first launch, the app prompts the customer to use either Touch ID or the keyboard to enter the PIN.
About Memory Management
Beginning in Mobile SDK 2.0, native iOS apps use Automatic Reference Counting (ARC) to manage object memory. You don’t have to
allocate and then remember to deallocate your objects. See the Mac Developer Library at https://developer.apple.com for ARC syntax,
guidelines, and best practices.
Overview of Application Flow
A project created with forceios defines three classes: AppDelegate, InitialViewController, and RootViewController.
The AppDelegate object loads InitialViewController as the first view to show. After the authentication process completes,
the AppDelegate object displays the view associated with RootViewController as the entry point to your app.
Native iOS apps built with Mobile SDK follow the same design as other iOS apps. The main.m source file creates a
UIApplicationMain object that is the root object for the rest of the application. The UIApplicationMain constructor
creates an AppDelegate object that manages the application lifecycle.
58
Developing a Native iOS AppNative iOS Development
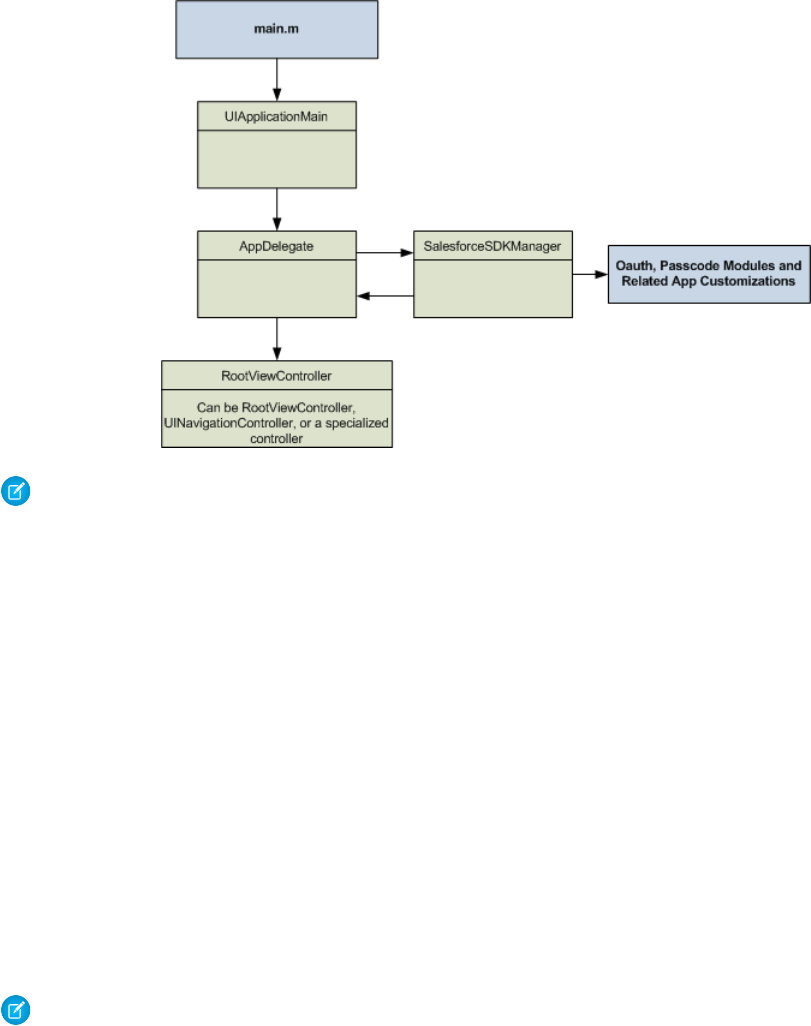
AppDelegate uses a Mobile SDK service object, SalesforceSDKManager, to coordinate Salesforce authentication and passcode
activities. After the user is authenticated, AppDelegate passes control to the RootViewController object.
Note: The workflow demonstrated by the template app is just an example. You can tailor your AppDelegate and supporting
classes to achieve your desired workflow. For example, you can postpone Salesforce authentication until a later point. You can
retrieve data through REST API calls and display it, launch other views, perform services, and so on. Your app remains alive in
memory until the user explicitly terminates it, or until the device is rebooted.
SEE ALSO:
SDK Manager Classes
SDK Manager Classes
The SalesforceSDKManager class combines app identity and bootstrap configuration in a single component. It manages complex
interactions between authentication and passcodes using configuration provided by the app developer. In effect,
SalesforceSDKManager shields developers from having to control the bootstrap process.
The Mobile SDK template application uses the SalesforceSDKManager class to implement most of the Salesforce-specific startup
functionality for you. SalesforceSDKManager manages and coordinates all objects involved in app launching, including PIN
code, OAuth configuration, and other bootstrap processes. Using SalesforceSDKManager ensures that interactions between
these processes occur in the proper sequence, while still letting you customize individual parts of the launch flow. Beginning with Mobile
SDK 3.0, all iOS native apps must use SalesforceSDKManager to manage application launch behavior.
Note: The SalesforceSDKManager class, which debuted in Mobile SDK 3.0, does not replace existing authentication
management objects or events. Rather, it’s a super-manager of the existing boot management objects. Existing code should
continue to work fine, but we strongly urge developers to upgrade to the latest Mobile SDK version and
SalesforceSDKManager.
59
SDK Manager ClassesNative iOS Development

What About SmartStoreSDKManager and Other SDK Manager Classes?
Mobile SDK 6.0 adds a complement of specialized SDK manager classes. For example, apps that use SmartStore now require an instance
of the SmartStoreSDKManager class. This class does not replace SalesforceSDKManager in your code. Instead, you
configure the shared SalesforceSDKManager instance to use SmartStoreSDKManager as its instance class.
Here’s the list of SDK manager classes.
•SalesforceSDKManager
•SmartStoreSDKManager—subclass of SalesforceSDKManager (replaces the
SalesforceSDKManagerWithSmartStore legacy class)
•SmartSyncSDKManager—subclass of SmartStoreSDKManager (new in 6.0)
•SalesforceHybridSDKManager—subclass of SmartSyncSDKManager (new in 6.0)
•SalesforceReactSDKManager—subclass of SmartSyncSDKManager (new in 6.0)
•SalesforceSwiftSDKManager—subclass of SmartSyncSDKManager (new in 6.0)
If you’re updating apps from pre-6.0 Mobile SDK releases, we recommend using Mobile SDK npm scripts to create a new app from a
template, and then importing your assets. This approach saves you from directly changing the SDK manager code, the pod specs, and
other code changes. For the curious, however, the following example shows an updated SDK manager configuration. This code configures
a native iOS app to use SmartStore but not the SmartSync Data Framework.
In your AppDelegate.m file:
1. Import the SmartStoreSDKManager header:
#import <SmartStore/SmartStoreSDKManager.h>
2. In your init method, before the first use of [SalesforceSDKManager sharedManager], add the following call:
[SalesforceSDKManager setInstanceClass:[SmartStoreSDKManager class]];
This call is the only place where you explicitly reference the SmartStoreSDKManager class. No other code changes are required.
Other types of apps configure the SDK manager similarly, using the following values.
•Native apps using SmartSync Data Framework and SmartStore:
#import <SmartSync/SmartSyncSDKManager.h>
...
[SalesforceSDKManager setInstanceClass:[SmartSyncSDKManager class]];
•Hybrid apps (configuration occurs in the AppDelegate+SalesforceHybrid.m file of the hybrid plug-in):
#import <SalesforceHybrid/SalesforceHybridSDKManager.h>
...
[SalesforceSDKManager setInstanceClass:[SalesforceHybridSDKManager class]];
•React Native apps:
#import <SalesforceReact/SalesforceReactSDKManager.h>
...
[SalesforceSDKManager setInstanceClass:[SalesforceReactSDKManager class]];
60
SDK Manager ClassesNative iOS Development

•Swift apps require a different setup, in the AppDelegate.swift file.These apps call initSDK() on the
SalesforceSwiftSDKManager class and, eventually, launch() on the shared SalesforceSwiftSDKManager
object:
import SalesforceSwiftSDK
...
override
init()
{
super.init()
SalesforceSwiftSDKManager.initSDK()
...
}
func application(_ application: UIApplication, didFinishLaunchingWithOptions
launchOptions: [UIApplicationLaunchOptionsKey: Any]?) -> Bool
{
self.window = UIWindow(frame: UIScreen.main.bounds)
self.initializeAppViewState();
//
// If you wish to register for push notifications, uncomment the line below.
// Note that, if you want to receive push notifications from Salesforce,
// you will also need to implement the
// application:didRegisterForRemoteNotificationsWithDeviceToken: method below.
//
// SFPushNotificationManager.sharedInstance().registerForRemoteNotifications()
//
// Uncomment the code below to see how you can customize the color, textcolor,
// font and fontsize of the navigation bar
//
// let loginViewController = SFLoginViewController.sharedInstance();
// Set showNavBar to NO if you want to hide the top bar
// loginViewController.showNavbar = true;
// Set showSettingsIcon to NO if you want to hide the settings icon on
// the nav bar
// loginViewController.showSettingsIcon = true;
// Set primary color to different color to style the navigation header
// loginViewController.navBarColor = UIColor(red: 0.051, green: 0.765,
// blue: 0.733, alpha: 1.0);
// loginViewController.navBarFont = UIFont (name: "Helvetica Neue",
// size: 16);
// loginViewController.navBarTextColor = UIColor.black;
//
SalesforceSwiftSDKManager.shared().launch()
return true
}
For a full example, see the AppDelegate class in the SmartSyncExplorer sample app.
61
SDK Manager ClassesNative iOS Development

Life Cycle
SalesforceSDKManager is a singleton object that you access by sending the sharedManager class message:
[SalesforceSDKManager sharedManager]
This shared object is created exactly once, the first time your app calls [SalesforceSDKManager sharedManager]. It serves
as a delegate for three other Mobile SDK manager objects:
•SFUserAccountManager
•SFAuthenticationManager
•SFPasscodeManager
Your app uses the SalesforceSDKManager object in two scenarios:
1. At application startup, in the init and application:didFinishLaunchingWithOptions: methods of
AppDelegate
2. Anytime the current user’s OAuth tokens become invalid—either through logout, token expiration, or token revocation—while the
app continues to run
The events in the first scenario happen only once during the app life cycle. The second scenario, though, can happen anytime. When
Mobile SDK detects invalid tokens, it reruns the SalesforceSDKManager application launch flow, including any related event
handlers that your app provides. Be sure to code these event handlers defensively so that you don’t suffer unwanted losses of data or
state if the app is reinitialized.
Application Launch Flow
When the application:didFinishLaunchingWithOptions: message arrives, you launch your app by sending the
launch message to the shared SalesforceSDKManager instance. If the app’s connected app requires a passcode,
SalesforceSDKManager displays the passcode verification screen to the user before continuing with the bootstrap process. The
following diagram shows this flow.
62
SDK Manager ClassesNative iOS Development
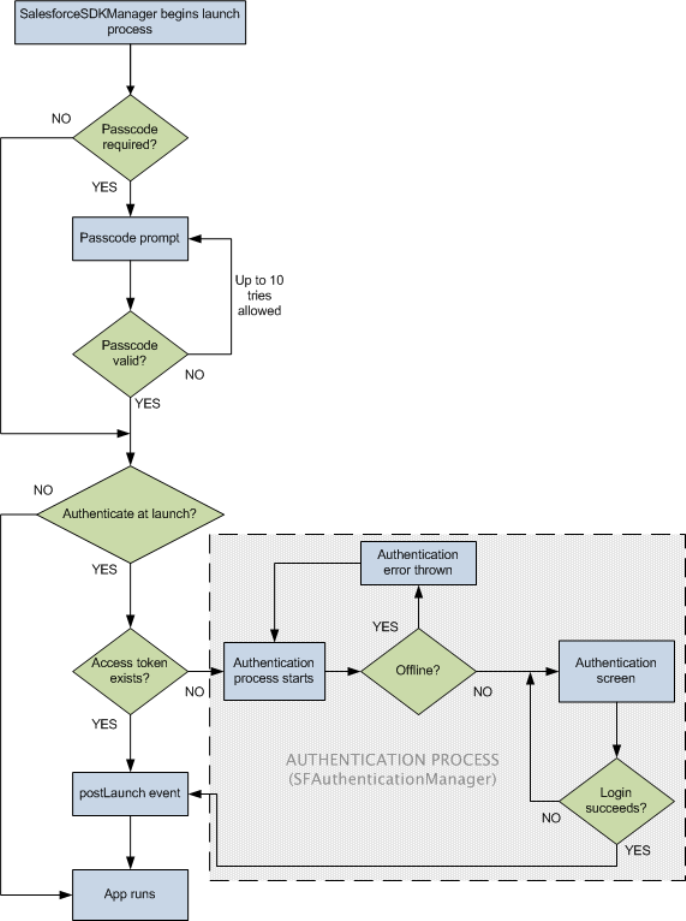
Key points:
•If the OAuth settings in the connected app definition don’t require a passcode, the flow proceeds directly to Salesforce authentication.
•If a valid access token is found, the flow bypasses Salesforce authentication.
•If no access token is found and the device is offline, the authentication module throws an error and returns the user to the login
screen. SalesforceSDKManager doesn’t reflect this event to the app.
•The postLaunch event occurs only after all credentials and passcode challenges are verified.
Besides what’s shown in the diagram, the SalesforceSDKManager launch process also delegates user switching and push
notification setup to the app if the app supports those features. If the user fails or cancels either the passcode challenge or Salesforce
login, a postLogout event fires, after which control returns to AppDelegate.
63
SDK Manager ClassesNative iOS Development

After the postLaunch event, the SalesforceSDKManager object doesn’t reappear until a user logout or user switch event
occurs. For either of these events, SalesforceSDKManager notifies your app. At that point, you can reset your app’s Mobile SDK
state and restart the app.
SalesforceSDKManager Launch Events
SalesforceSDKManager directs the app’s bootstrap process according to the state of the app and the device. During the bootstrap
process, several events fire at important points in the launch sequence. You can use these events to run your own logic after the
SalesforceSDKManager flow is complete. For foregrounding, be sure to wait until your app receives the postAppForeground
event before you resume your app’s logic.
Table 3: Launch Events
DescriptionEvent
Arrives after all launch activities have completed. The app can
proceed with its business processes.
postLaunch
Sent if fatal errors occur during the launch process.launchError
Arrives after the current user has logged out, or if the user fails the
passcode test or the login authentication.
postLogout
Arrives after the app returns to the foreground and the passcode
(if applicable) has been verified. This event indicates that
postAppForeground
authentication is valid. After your app receives this event, you can
take extra actions to handle foregrounding.
Arrives after the current user has changed.switchUser
Certain events supersede others. For example, if passcode validation fails during launch, the postLogout event fires, but the
postLaunch event does not. Between priority levels, the higher ranking event fires in place of the lower ranking event. Here is the
list of priorities, with 1 as the highest priority level:
Table 4: Launch Event Priority Levels
CommentsEventsPriority Level
These events supersede all others.postLogout, switchUser1
It’s important to note that these events
always supersede
postLaunch, launchError2
postAppForeground. For instance, if
you send the app to the background and
then return it to the foreground during
login, postLaunch fires if login succeeds,
but postAppForeground does not.
Any of the other events can supplant this
lowest ranking event.
postAppForeground3
64
SDK Manager ClassesNative iOS Development

SalesforceSDKManager Properties
You configure your app’s launch behavior by setting SalesforceSDKManager properties in the init method of AppDelegate.
These properties contain your app’s startup configuration, including:
•Connected app identifiers
•Required OAuth scopes
•Authentication behavior and associated customizations
You’re required to specify at least the connected app and OAuth scopes settings.
You also use SalesforceSDKManager properties to define handler blocks for launch events. Event handler properties are optional.
If you don’t define them, the app logs a runtime warning when the event occurs. In general, it’s a good idea to provide implementations
for these blocks so that you have better control over the app flow.
Another especially useful property is the optional authenticateAtLaunch. Set this property to NO to defer Salesforce authentication
until some point after the app has started running. You can run the authentication process at any point by sending the authenticate
message to SalesforceSDKManager. However, always set the launch properties in the init method of AppDelegate and
send the launch message to SalesforceSDKManager in the application:didFinishLaunchingWithOptions:
method.
The following table describes SalesforceSDKManager properties.
Table 5: SalesforceSDKManager Properties
DescriptionProperty
(Required) The consumer ID from the associated Salesforce
connected app.
connectedAppId
(Required) The Callback URI from the associated Salesforce
connected app.
connectedAppCallbackUri
(Required) The OAuth scopes required for the app.authScopes
(Required) Controls how the app resumes functionality after
launch completes.
postLaunchAction
(Optional) If set to YES (the default), SalesforceSDKManager
attempts authentication at launch. Set this value to NO to defer
authenticateAtLaunch
authentication to a different stage of your application. At the
appropriate time, send the authenticate message to
SalesforceSDKManager to initiate authentication.
(Optional) If defined, this block responds to any errors that occur
during the launch process.
launchErrorAction
(Optional) If defined, this block is executed when the current user
has logged out.
postLogoutAction
(Optional) If defined, this block handles a switch from the current
user to an existing or new user.
switchUserAction
Note: This property is required if your app supports user
switching.
65
SDK Manager ClassesNative iOS Development

DescriptionProperty
(Optional) If defined, this block is executed after Mobile SDK finishes
its post-foregrounding tasks.
postAppForegroundAction
(Optional) Set to YES to use a snapshot view when your app is in
the background. This view obscures sensitive content in the app
useSnapshotView
preview screen that displays when the user browses background
apps from the home screen. Default is YES.
(Optional) Specifies the view that obscures sensitive app content
from home screen browsing when your app is in the background.
The default view is a white opaque screen.
snapshotView
(Optional) You can configure a different passcode provider to use
a different passcode encryption scheme. Default is the Mobile SDK
PBKDF2 provider.
preferredPasscodeProvider
AppDelegate Class
The AppDelegate class is the true entry point for an iOS app. In Mobile SDK apps, AppDelegate implements the standard iOS
UIApplicationDelegate interface. It initializes Mobile SDK by using the shared SalesforceSDKManager object to oversee
the app launch flow.
OAuth functionality resides in an independent module. This separation makes it possible for you to use Salesforce authentication on
demand. You can start the login process from within your AppDelegate implementation, or you can postpone login until it’s actually
required—for example, you can call OAuth from a subview.
Setup
To customize the AppDelegate template, start by resetting the following static variables to values from your Salesforce Connected
Application:
•RemoteAccessConsumerKey
static NSString * const RemoteAccessConsumerKey =
@"3MVG9Iu66FKeHhINkB1l7xt7kR8...YFDUpqRWcoQ2.dBv_a1Dyu5xa";
This variable corresponds to the Consumer Key in your connected app.
•OAuthRedirectURI
static NSString * const OAuthRedirectURI = @"testsfdc:///mobilesdk/detect/oauth/done";
This variable corresponds to the Callback URL in your connected app.
Initialization
The following listing shows the init method as implemented by the template app. It is followed by a call to the launch method
of SalesforceSDKManager in the application:didFinishLaunchingWithOptions: method.
- (id)init
{
66
AppDelegate ClassNative iOS Development

self = [super init];
if (self) {
[SalesforceSDKManager sharedManager].connectedAppId =
RemoteAccessConsumerKey;
[SalesforceSDKManager sharedManager].
connectedAppCallbackUri = OAuthRedirectURI;
[SalesforceSDKManager sharedManager].authScopes =
@[ @”web”, @”api” ];
__weak AppDelegate *weakSelf = self;
[SalesforceSDKManager sharedManager].postLaunchAction =
^(SFSDKLaunchAction launchActionList) {
[weakSelf log:SFLogLevelInfo
format:@"Post-launch: launch actions taken: %@",
[SalesforceSDKManager
launchActionsStringRepresentation:
launchActionList]];
[weakSelf setupRootViewController];
};
[SalesforceSDKManager sharedManager].launchErrorAction =
^(NSError *error, SFSDKLaunchAction launchActionList) {
[weakSelf log:SFLogLevelError
format:@"Error during SDK launch: %@",
[error localizedDescription]];
[weakSelf initializeAppViewState];
[[SalesforceSDKManager sharedManager] launch];
};
[SalesforceSDKManager sharedManager].postLogoutAction = ^{
[weakSelf handleSdkManagerLogout];
};
[SalesforceSDKManager sharedManager].switchUserAction =
^(SFUserAccount *fromUser, SFUserAccount *toUser) {
[weakSelf handleUserSwitch:fromUser toUser:toUser];
};
return self;
}
- (BOOL)application:(UIApplication *)application
didFinishLaunchingWithOptions:(NSDictionary *)launchOptions
{
[[SalesforceSDKManager sharedManager] launch];
}
In the init method, the SalesforceSDKManager object:
•Initializes configuration items, such as Connected App identifiers amd OAuth scopes, using the SalesforceSDKManager
shared instance. For example:
[SalesforceSDKManager sharedManager].connectedAppId =
RemoteAccessConsumerKey;
[SalesforceSDKManager sharedManager].connectedAppCallbackUri =
OAuthRedirectURI;
[SalesforceSDKManager sharedManager].authScopes =
@[ @"web", @"api" ];
67
AppDelegate ClassNative iOS Development

•Assigns code blocks to properties that handle the postLaunchAction, launchErrorAction, postLogoutAction,
and switchUserAction events. Notice the use of weak self in the block implementations. Besides protecting the code against
cycles, this usage demonstrates an important point: SalesforceSDKManager is just a manager—any real work requiring a
persistent self occurs within the delegate methods that actually perform the task. The following table summarizes how the
AppDelegate template handles each event.
Default BehaviorDelegate MethodEvent
Instantiates the controller for the app’s root
view and assigns it to the
setupRootViewControllerpostLaunch
window.rootViewController
property of AppDelegate.
Resets the root view controller to the initial
view controller.
initializeAppViewStatelaunchError
If there are multiple active user accounts,
changes the root view controller to the
handleSdkManagerLogoutpostLogout
multi-user view controller to allow the user
to choose a previously authenticated
account. If there is only one active account,
automatically switches to that account. If
there are no active accounts, presents the
login screen.
Resets the root view controller to the initial
view controller, and then re-initiates the
launch flow.
handleUserSwitch:toUser:switchUser
You can customize any part of this process. At a minimum, change setupRootViewController to display your own controller
after authentication. You can also customize initializeAppViewState to display your own launch page, or the
InitialViewController to suit your needs. You can also move the authentication details to where they make the most sense
for your app. The Mobile SDK does not stipulate when—or if—actions must occur, but standard iOS conventions apply. For example,
self.window must have a rootViewController by the time application:didFinishLaunchingWithOptions:
completes.
UIApplication Event Handlers
You can also use the application delegate class to implement UIApplication event handlers. Important event handlers that you
might consider implementing or customizing include:
application:didFinishLaunchingWithOptions:
First entry point when your app launches. Called only when the process first starts (not after a backgrounding/foregrounding cycle).
The template app uses this method to:
•Initialize the window property
•Set the root view controller to the initial view controller (see initializeAppViewState)
•Display the initial window
•Initiate authentication by sending the launch message to the shared SalesforceSDKManager instance.
68
AppDelegate ClassNative iOS Development
applicationDidBecomeActive
Called every time the application is foregrounded. The iOS SDK provides no default parent behavior; if you use it, you must implement
it from the ground up.
application:didRegisterForRemoteNotificationsWithDeviceToken:,
application:didFailToRegisterForRemoteNotificationsWithError:
Used for handling incoming push notifications from Salesforce.
For a list of all UIApplication event handlers, see “UIApplicationDelegate Protocol Reference” in the iOS Developer Library.
About Deferred Login
You can defer user login authentication to any logical point after the postLaunch event occurs. To defer authentication:
1. In the init method of your AppDelegate class, set the authenticateAtLaunch property of
SalesforceSDKManager to NO.
2. Send the launch method to SalesforceSDKManager.
3. Call the loginWithCompletion:failure: method of SFAuthenticationManager at the point of deferred login.
If you defer authentication, the logic that handles login completions and failures is left to your app’s discretion.
Upgrading Existing Apps
If you’re upgrading an app from Mobile SDK 2.3 or earlier, you can reuse any custom code that handles launch events, but you’ll have
to move it to slightly different contexts. For example, code that formerly implemented the authManagerDidLogout: method
of SFAuthenticationManagerDelegate now goes into the postLogoutAction block of SalesforceSDKManager.
Likewise, code that implemented the useraccountManager:didSwitchFromUser:toUser: method of
SFUserAccountManagerDelegate now belongs in the switchUserAction block of SalesforceSDKManager.
Finally, in your AppDelegate implementation, replace all calls to the loginWithCompletion:failure: method of
SFAuthenticationManager with the launch method of SalesforceSDKManager. Move the code in your completion
block to the postLaunchAction property, and move the failure block code to the launchErrorAction property.
SEE ALSO:
Using Push Notifications in iOS
About View Controllers
In addition to the views and view controllers discussed with the AppDelegate class, Mobile SDK exposes the
SFAuthorizingViewController class. This controller displays the login screen when necessary.
To customize the login screen display:
1. Override the SFAuthorizingViewController class to implement your custom display logic.
2. Set the [SFAuthenticationManager sharedManager].authViewController property to an instance of your
customized class.
The most important view controller in your app is the one that manages the first view that displays, after login or—if login is
postponed—after launch. This controller is called your root view controller because it controls everything else that happens in your app.
The Mobile SDK for iOS project template provides a skeletal class named RootViewController that demonstrates the minimal
required implementation.
69
About View ControllersNative iOS Development

If your app needs additional view controllers, you’re free to create them as you wish. The view controllers used in Mobile SDK projects
reveal some possible options. For example, the Mobile SDK iOS template project bases its root view class on the
UITableViewController interface, while the RestAPIExplorer sample project uses the UIViewController interface.
Your only technical limits are those imposed by iOS itself and the Objective-C language.
RootViewController Class
The RootViewController class exists only as part of the template project and projects generated from it. It implements the
SFRestDelegate protocol to set up a framework for your app’s interactions with the Salesforce REST API. Regardless of how you
define your root view controller, it must implement SFRestDelegate if you intend to use it to access Salesforce data through the
REST APIs.
RootViewController Design
As an element of a very basic app built with the Mobile SDK, the RootViewController class covers only the bare essentials. Its
two primary tasks are:
•Use Salesforce REST APIs to query Salesforce data
•Display the Salesforce data in a table
To do these things, the class inherits UITableViewController and implements the SFRestDelegate protocol. The action
begins with an override of the UIViewController:viewDidLoad method:
- (void)viewDidLoad
{
[super viewDidLoad];
self.title = @"Mobile SDK Sample App";
// Here we use a query that should work on either
// Salesforce or Database.com
SFRestRequest *request =
[[SFRestAPI sharedInstance]
requestForQuery:@"SELECT Name FROM User LIMIT 10"];
[[SFRestAPI sharedInstance] send:request delegate:self];
}
The iOS runtime calls viewDidLoad only once in the view’s life cycle, when the view is first loaded into memory. The intention in
this skeletal app is to load only one set of data into the app’s only defined view. If you plan to create other views, you might need to
perform the query somewhere else. For example, if you add a detail view that lets the user edit data shown in the root view, you’ll want
to refresh the values shown in the root view when it reappears. In this case, you can perform the query in a more appropriate method,
such as viewWillAppear.
After calling the superclass method, this code sets the title of the view and then issues a REST request in the form of an asynchronous
SOQL query. The query in this case is a simple SELECT statement that gets the Name property from each User object and limits the
number of rows returned to ten. Notice that the requestForQuery and send:delegate: messages are sent to a singleton
shared instance of the SFRestAPI class. Use this singleton object for all REST requests. This object uses authenticated credentials
from the singleton SFAccountManager object to form and send authenticated requests.
The Salesforce REST API responds by passing status messages and, hopefully, data to the delegate listed in the send message. In this
case, the delegate is the RootViewController object itself:
[[SFRestAPI sharedInstance] send:request delegate:self];
70
RootViewController ClassNative iOS Development

The RootViewController object can act as an SFRestAPI delegate because it implements the SFRestDelegate protocol.
This protocol declares four possible response callbacks:
•request:didLoadResponse:—Request was processed. The delegate receives the response in JSON format. This callback
is the only one that indicates success.
•request:didFailLoadWithError:—Request couldn’t be processed. The delegate receives an error message.
•requestDidCancelLoad—Request was canceled due to some external factor, such as administrator intervention, a network
glitch, or another unexpected event. The delegate receives no return value.
•requestDidTimeout—The Salesforce server failed to respond in time. The delegate receives no return value.
The response arrives in one of the callbacks you’ve implemented in RootViewController. Place your code for handling Salesforce
data in the request:didLoadResponse: callback. For example:
- (void)request:(SFRestRequest *)request
didLoadResponse:(id)jsonResponse {
NSArray *records = [jsonResponse objectForKey:@"records"];
NSLog(@"request:didLoadResponse: #records: %d", records.count);
self.dataRows = records;
[self.tableView reloadData];
}
As the use of the id data type suggests, this code handles JSON responses in generic Objective-C terms. It addresses the
jsonResponse object as an instance of NSDictionary and treats its records as an NSArray object. Because
RootViewController implements UITableViewController, it’s simple to populate the table in the view with extracted
records.
A call to request:didFailLoadWithError: results from one of the following conditions:
•If you use invalid request parameters, you get a kSFRestErrorDomain error code. For example, you get this error if you pass
nil to requestForQuery:, or you try to update a nonexistent object.
•If an OAuth access token expires, the framework tries to obtain a new access token and, if successful, retries the query. If a request
for a new access token or session ID fails, you get a kSFOAuthErrorDomain error code. For example, you get this error if the
access token expires, and the OAuth refresh token is invalid. This scenario rarely occurs.
•If the low-level HTTP request fails, you get an RKRestKitErrorDomain error code. For example, you get this error if a Salesforce
server becomes temporarily inaccessible.
The other callbacks are self-describing and don’t return an error code. You can choose to handle the result however you want: display
an error message, write to the log, retry the request, and so on.
About Salesforce REST APIs
Salesforce makes a wide range of object-based tasks and data available through authenticated REST endpoints. To provide easy access
to these services, Mobile SDK delivers a set of REST API classes and interfaces that handle low-level network configuration for you. For
REST requests, Mobile SDK implements convenience methods that conform to specific request parameters. For other Salesforce APIs,
Mobile SDK provides wrapper methods that help you manually configure a custom request object. You can even use Mobile SDK REST
API wrappers to make unauthenticated and external API calls.
In Mobile SDK for iOS, all REST requests are performed asynchronously. You can choose between delegate and block versions of the
REST wrapper classes to adapt your requests to various scenarios. REST responses are formatted as NSArray or NSDictionary
objects for a successful request, or, if the request fails, NSError.
71
About Salesforce REST APIsNative iOS Development

Salesforce supports an ever-growing variety of REST APIs. For an overview of our offerings, see Which API Do I Use? in Salesforce Help.
For information on REST request and response formats, see REST API Developer Guide.
SEE ALSO:
Native REST API Classes for iOS
Supported Operations
The iOS REST APIs support the standard object operations offered by Salesforce REST and SOAP APIs. Salesforce Mobile SDK offers delegate
and block versions of its REST request APIs. All versions return an SFRestRequest object that you can then send to Salesforce for
execution. With delegate methods, the REST response goes to an implementation of the SFRestDelegate protocol that you specify.
With block methods, the REST response goes to the success or failure block that you define in your method call.
Delegate request methods are defined in the SFRestAPI class, while block request methods are defined in the SFRestAPI
(Blocks) category. File requests are defined in the SFRestAPI (Files) category and are documented in SFRestAPI
(Files) Category.
The following sections describe the supported operations.
Manual REST Request
Execute a request that you’ve built.
Delegate Method
- (void)send:(SFRestRequest *)request
delegate:(nullable id<SFRestDelegate>)delegate;
Block Method
- (void) sendRESTRequest:(SFRestRequest *)request
failBlock:(SFRestFailBlock)failBlock
completeBlock:(SFRestResponseBlock)completeBlock;
SOQL Query
Execute the given SOQL string and return the resulting data set.
Delegate Method
- (SFRestRequest *)requestForQuery:(NSString *)soql;
Block Method
- (SFRestRequest *) performSOQLQuery:(NSString *)query
failBlock:(SFRestFailBlock)failBlock
completeBlock:(SFRestDictionaryResponseBlock)completeBlock;
SOQL Query All
Execute the given SOQL string. The result includes all current and deleted objects that satisfy the query.
Delegate Method
- (SFRestRequest *)requestForQueryAll:(NSString *)soql;
72
About Salesforce REST APIsNative iOS Development

Block Method
- (SFRestRequest *) performSOQLQueryAll:(NSString *)query
failBlock:(SFRestFailBlock)failBlock
completeBlock:(SFRestDictionaryResponseBlock)completeBlock;
Batch Request
Execute a batch of up to 25 subrequests specified as an array of SFRestRequest objects. Each subrequest counts against rate limits.
Delegate Method
- (SFRestRequest *) batchRequest:(NSArray<SFRestRequest*>*)
requests haltOnError:(BOOL) haltOnError;
Block Method
(Not supported)
Composite Request
Execute a composite request. The Boolean allOrNone parameter indicates whether to treat all requests as a transactional block in
error conditions. Regardless of the number of subrequests, each composite request counts as one API call. See “Composite” in the REST
API Developer Guide.
Delegate Method
- (SFRestRequest *) compositeRequest:(NSArray<SFRestRequest*>*) requests
refIds:(NSArray<NSString*>*)refIds
allOrNone:(BOOL) allOrNone;
Block Method
(Not supported)
SOSL Search
Execute the given SOSL string and return the resulting data set.
Delegate Method
- (SFRestRequest *)requestForSearch:(NSString *)sosl;
Block Method
- (SFRestRequest *) performSOSLSearch:(NSString *)search
failBlock:(SFRestFailBlock)failBlock
completeBlock:(SFRestArrayResponseBlock)completeBlock;
Search Result Layout
Get a search result layout.
Delegate Method
- (SFRestRequest *)requestForSearchResultLayout:(NSString*)objectList;
73
About Salesforce REST APIsNative iOS Development

Block Method
- (SFRestRequest *) performRequestForSearchResultLayout:(NSString*)objectList
failBlock:(SFRestFailBlock)failBlock
completeBlock:(SFRestArrayResponseBlock)completeBlock;
Search Scope and Order
Get the search scope and order.
Delegate Method
- (SFRestRequest *)requestForSearchScopeAndOrder;
Block Method
- (SFRestRequest *)
performRequestForSearchScopeAndOrderWithFailBlock:(SFRestFailBlock)failBlock
completeBlock:(SFRestArrayResponseBlock)completeBlock;
Metadata
Return the object’s metadata.
Delegate Method
- (SFRestRequest *)requestForMetadataWithObjectType:(NSString *)objectType;
Block Method
- (SFRestRequest *) performMetadataWithObjectType:(NSString *)objectType
failBlock:(SFRestFailBlock)failBlock
completeBlock:(SFRestDictionaryResponseBlock)completeBlock;
Describe Global
Return a list of all available objects in your org and their metadata.
Delegate Method
- (SFRestRequest *)requestForDescribeGlobal;
Block Method
- (SFRestRequest *)
performDescribeGlobalWithFailBlock:(SFRestFailBlock)failBlock
completeBlock:(SFRestDictionaryResponseBlock)completeBlock;
Describe with Object Type
Return a description of a single object type.
Delegate Method
- (SFRestRequest *)requestForDescribeWithObjectType:(NSString *)objectType;
74
About Salesforce REST APIsNative iOS Development

Block Method
- (SFRestRequest *) performDescribeWithObjectType:(NSString *)objectType
failBlock:(SFRestFailBlock)failBlock
completeBlock:(SFRestDictionaryResponseBlock)completeBlock;
Retrieve
Retrieve a single record by object ID.
Delegate Method
- (SFRestRequest *)requestForRetrieveWithObjectType:(NSString *)objectType
objectId:(NSString *)objectId
fieldList:(nullable NSString *)fieldList;
Block Method
- (SFRestRequest *) performRetrieveWithObjectType:(NSString *)objectType
objectId:(NSString *)objectId
fieldList:(NSArray<NSString*> *)fieldList
failBlock:(SFRestFailBlock)failBlock
completeBlock:(SFRestDictionaryResponseBlock)completeBlock;
Update
Update an object with the given map and, optionally, that satisfies a given If-Modified-Since condition.
Delegate Method
- (SFRestRequest *)requestForUpdateWithObjectType:(NSString *)objectType
objectId:(NSString *)objectId
fields:(nullable NSDictionary<NSString*, id> *)fields;
- (SFRestRequest *)requestForUpdateWithObjectType:(NSString *)objectType
objectId:(NSString *)objectId
fields:(nullable NSDictionary<NSString*, id> *)fields
ifUnmodifiedSinceDate:(nullable NSDate *) ifUnmodifiedSinceDate;
Block Method
- (SFRestRequest *) performUpdateWithObjectType:(NSString *)objectType
objectId:(NSString *)objectId
fields:(NSDictionary<NSString*, id> *)fields
failBlock:(SFRestFailBlock)failBlock
completeBlock:(SFRestDictionaryResponseBlock)completeBlock;
Upsert
Update or insert an object from external data, based on whether the external ID currently exists in the external ID field. If you set the
name of the external ID field to “Id” and the external ID to null, a new record is created.
75
About Salesforce REST APIsNative iOS Development

Delegate Method
- (SFRestRequest *)requestForUpsertWithObjectType:(NSString *)objectType
externalIdField:(NSString *)externalIdField
externalId:(nullable NSString *)externalId
fields:(NSDictionary<NSString*, id> *)fields;
Block Method
- (SFRestRequest *) performUpsertWithObjectType:(NSString *)objectType
externalIdField:(NSString *)externalIdField
externalId:(NSString *)externalId
fields:(NSDictionary<NSString*, id> *)fields
failBlock:(SFRestFailBlock)failBlock
completeBlock:(SFRestDictionaryResponseBlock)completeBlock;
Create
Create a record in the specified object.
Delegate Method
- (SFRestRequest *)requestForCreateWithObjectType:(NSString *)objectType
fields:(nullable NSDictionary<NSString*, id> *)fields;
Block Method
- (SFRestRequest *) performCreateWithObjectType:(NSString *)objectType
fields:(NSDictionary<NSString*, id> *)fields
failBlock:(SFRestFailBlock)failBlock
completeBlock:(SFRestDictionaryResponseBlock)completeBlock;
Delete
Delete the object of the given type with the given ID.
Delegate Method
- (SFRestRequest *)requestForDeleteWithObjectType:(NSString *)objectType
objectId:(NSString *)objectId;
Block Method
- (SFRestRequest *) performDeleteWithObjectType:(NSString *)objectType
objectId:(NSString *)objectId
failBlock:(SFRestFailBlock)failBlock
completeBlock:(SFRestDictionaryResponseBlock)completeBlock;
Versions
Return Salesforce version metadata.
Delegate Method
- (SFRestRequest *)requestForVersions;
76
About Salesforce REST APIsNative iOS Development

Block Method
- (SFRestRequest *) performRequestForVersionsWithFailBlock:(SFRestFailBlock)failBlock
completeBlock:(SFRestDictionaryResponseBlock)completeBlock;
Resources
Return available resources for the specified API version, including resource name and URI.
Delegate Method
- (SFRestRequest *)requestForResources;
Block Method
- (SFRestRequest *) performRequestForResourcesWithFailBlock:(SFRestFailBlock)failBlock
completeBlock:(SFRestDictionaryResponseBlock)completeBlock;
SObject Tree
Returns an SFRestRequest object that requests one or more sObject trees.
Delegate Method
- (SFRestRequest*) requestForSObjectTree:(NSString*)objectType
objectTrees:(NSArray<SFSObjectTree*>*)objectTrees;
Block Method
(Not supported)
Example: For sample calls, see
/libs/SalesforceSDKCore/SalesforceSDKCoreTests/SalesforceRestAPITests.m at
github.com/forcedotcom/SalesforceMobileSDK-iOS.
SFRestAPI Interface
SFRestAPI defines the native interface for creating and formatting Salesforce REST requests. It works by formatting and sending your
requests to the Salesforce service, then relaying asynchronous responses to your implementation of the SFRestDelegate protocol.
SFRestAPI serves as a factory for SFRestRequest instances. It defines a group of methods that represent the request types
supported by the Salesforce REST API. Each SFRestAPI method corresponds to a single request type. Each of these methods returns
your request in the form of an SFRestRequest instance. You then use that return value to send your request to the Salesforce
server. The HTTP coding layer is encapsulated, so you don’t have to worry about REST API syntax.
For a list of supported query factory methods, see Supported Operations
SFRestDelegate Protocol
When a class adopts the SFRestDelegate protocol, it intends to be a target for REST responses sent from the Salesforce server.
When you send a REST request to the server, you tell the shared SFRestAPI instance which object receives the response. When the
server sends the response, Mobile SDK routes the response to the appropriate protocol method on the given object.
The SFRestDelegate protocol declares four possible responses:
77
About Salesforce REST APIsNative iOS Development

•request:didLoadResponse:—Request was processed. The delegate receives the response in JSON format. This callback
is the only one that indicates success.
•request:didFailLoadWithError:—Request couldn’t be processed. The delegate receives an error message.
•requestDidCancelLoad—Request was canceled due to some external factor, such as administrator intervention, a network
glitch, or another unexpected event. The delegate receives no return value.
•requestDidTimeout—The Salesforce server failed to respond in time. The delegate receives no return value.
The response arrives in your implementation of one of these delegate methods. Because you can’t predict the type of response, you’re
required to implement all the methods.
request:didLoadResponse: Method
The request:didLoadResponse: method is the only protocol method that handles a success condition, so place your code
for handling Salesforce data in that method. For example:
- (void)request:(SFRestRequest *)request
didLoadResponse:(id)jsonResponse {
NSArray *records = [jsonResponse objectForKey:@"records"];
NSLog(@"request:didLoadResponse: #records: %d", records.count);
self.dataRows = records;
[self.tableView reloadData];
}
At the server, all responses originate as JSON strings. Mobile SDK receives these raw responses and reformats them as iOS SDK objects
before passing them to the request:didLoadResponse: method. Thus, the jsonResponse payload arrives as either an
NSDictionary object or an NSArray object. The object type depends on the type of JSON data returned. If the top level of the
server response represents a JSON object, jsonResponse is an NSDictionary object. If the top level represents a JSON array
of other data, jsonResponse is an NSArray object.
If your method cannot infer the data type from the request, use [NSObject isKindOfClass:] to determine the data type. For
example:
if ([jsonResponse isKindOfClass:[NSArray class]]) {
// Handle an NSArray here.
} else {
// Handle an NSDictionary here.
}
You can address the response as an NSDictionary object and extract its records into an NSArray object. To do so, send the
NSDictionary:objectForKey: message using the key “records”.
request:didFailLoadWithError: Method
A call to the request:didFailLoadWithError: callback results from one of the following conditions:
•If you use invalid request parameters, you get a kSFRestErrorDomain error code. For example, you pass nil to
requestForQuery:, or you try to update a non-existent object.
•If an OAuth access token expires, the framework tries to obtain a new access token and, if successful, retries the query. If a request
for a new access token or session ID fails, you get a kSFOAuthErrorDomain error code. For example, the access token expires,
and the OAuth refresh token is invalid. This scenario rarely occurs.
•If the low-level HTTP request fails, you get an RKRestKitErrorDomain error code. For example, a Salesforce server becomes
temporarily inaccessible.
78
About Salesforce REST APIsNative iOS Development

requestDidCancelLoad and requestDidTimeout Methods
The requestDidCancelLoad and requestDidTimeout delegate methods are self-describing and don’t return an error
code. You can choose to handle the result however you want: display an error message, write to the log, retry the request, and so on.
Creating REST Requests
Salesforce Mobile SDK for iOS natively supports many types of SOQL and SOSL REST requests. The SFRestAPI class provides factory
methods that handle most of the syntactical details for you. Mobile SDK also offers considerable flexibility for how you create REST
requests.
•For standard SOQL queries and SOSL searches, SFRestAPI methods create query strings based on minimal data input and
package them in an SFRestRequest object that can be sent to the Salesforce server.
•If you are using a Salesforce REST API that isn’t based on SOQL or SOSL, SFRestRequest methods let you configure the request
itself to match the API format.
•The SFRestAPI (QueryBuilder) category provides methods that create free-form SOQL queries and SOSL search strings
so you don’t have to manually format the query or search string.
•Request methods in the SFRestAPI (Blocks) category let you pass callback code as block methods, instead of using a
delegate object.
Sending a REST Request
Salesforce Mobile SDK for iOS natively supports many types of SOQL and SOSL REST requests. Luckily, the SFRestAPI provides factory
methods that handle most of the syntactical details for you.
At runtime, Mobile SDK creates a singleton instance of SFRestAPI. You use this instance to obtain an SFRestRequest object
and to send that object to the Salesforce server.
To send a REST request to the Salesforce server from an SFRestAPI delegate:
1. Build a SOQL, SOSL, or other REST request string.
For standard SOQL and SOSL queries, it’s most convenient and reliable to use the factory methods in the SFRestAPI class. See
Supported Operations.
2. Create an SFRestRequest object with your request string.
Message the SFRestAPI singleton with the request factory method that suits your needs. For example, this code uses
theSFRestAPI:requestForQuery: method, which prepares a SOQL query.
// Send a request factory message to the singleton SFRestAPI instance
SFRestRequest *request = [[SFRestAPI sharedInstance]
requestForQuery:@"SELECT Name FROM User LIMIT 10"];
3. Send the send:delegate: message to the shared SFRestAPI instance. Use your new SFRestRequest object as the
send: parameter. The second parameter designates an SFRestDelegate object to receive the server’s response. In the
following example, the class itself implements the SFRestDelegate protocol, so it sets delegate: to self.
// Use the singleton SFRestAPI instance to send the
// request, specifying this class as the delegate.
[[SFRestAPI sharedInstance] send:request delegate:self];
79
About Salesforce REST APIsNative iOS Development

SFRestRequest Class
Salesforce Mobile SDK provides the SFRestRequest interface as a convenience class for apps. SFRestAPI provides request
methods that use your input to form a request. This request is packaged as an SFRestRequest instance and returned to your app.
In most cases you don’t manipulate the SFRestRequest object. Typically, you simply pass it unchanged to the
SFRestAPI:send:delegate: method.
If you’re sending a REST request that isn’t directly supported by the Mobile SDK—for example, if you want to use the Chatter REST
API—you can manually create and configure an SFRestRequest object.
Using SFRestRequest Methods
SFRestAPI tools support SOQL and SOSL statements natively: they understand the grammar and can format valid requests based
on minimal input from your app. However, Salesforce provides some product-specific REST APIs that have no relationship to SOQL
queries or SOSL searches. You can still use Mobile SDK resources to configure and send these requests. This process is similar to sending
a SOQL query request. The main difference is that you create and populate your SFRestRequest object directly, instead of relying
on SFRestAPI methods.
To send a non-SOQL and non-SOSL REST request using the Mobile SDK:
1. Create an instance of SFRestRequest.
2. Set the properties you need on the SFRestRequest object.
3. Call send:delegate: on the singleton SFRestAPI instance, passing in the SFRestRequest object you created as the
first parameter.
The following example performs a GET operation to obtain all items in a specific Chatter feed.
SFRestRequest *request = [[SFRestRequest alloc] init];
[request setDelegate:self];
[request setEndpoint:kSFDefaultRestEndpoint];
[request setMethod:SFRestMethodGET];
[request setPath:
[NSString stringWithFormat:@"/v26.0/chatter/feeds/record/%@/feed-items",
recordId]];
[[SFRestAPI sharedInstance] send:request delegate:self];
4. Alternatively, you can create the same request using the requestWithMethod:path:queryParams class method.
SFRestRequest *request =
[SFRestRequest
requestWithMethod:SFRestMethodGET
path:
[NSString
stringWithFormat:
@"/v26.0/chatter/feeds/
record/%@/feed-items",
recordId]
queryParams:nil];
[[SFRestAPI sharedInstance] send:request delegate:self];
5. To perform a request with parameters, create a parameter string, and then use the SFJsonUtils:objectFromJSONString
static method to wrap it in an NSDictionary object. (If you prefer, you can create your NSDictionary object directly,
before the method call, instead of creating it inline.)
80
About Salesforce REST APIsNative iOS Development

The following example performs a POST operation that adds a comment to a Chatter feed.
NSData params =
[[NSString stringWithFormat:
@"{ \"body\" :
{\"messageSegments\" :
[{ \"type\" : \"Text\",
\"text\" : \"%@\"}]
}
}",
comment] dataUsingEncoding:NSUTF8StringEncoding];
SFRestRequest *request =
[SFRestRequest
requestWithMethod:SFRestMethodPOST
path:[NSString
stringWithFormat:
@"/v26.0/chatter/feeds/
record/%@/feed-items",
recordId]
queryParams: nil];
[request setCustomRequestBodyData:params contentType:@”/application/json”];
[[SFRestAPI sharedInstance] send:request delegate:self];
To do the same request with an NSDictionary object instead of NSString, use the
setCustomRequestBodyDictionary:contentType: method.
6. To set an HTTP header for your request, use the setHeaderValue:forHeaderName method. This method can help you
when you’re displaying Chatter feeds, which come pre-encoded for HTML display. If you find that your native app displays unwanted
escape sequences in Chatter comments, set the X-Chatter-Entity-Encoding header to “false” before sending your
request, as follows:
...
[request setHeaderValue:@"false" forHeaderName:@"X-Chatter-Entity-Encoding"];
[[SFRestAPI sharedInstance] send:request delegate:self];
Unauthenticated REST Requests
In certain cases, some applications must make REST calls before the user becomes authenticated. In other cases, the application must
access services outside of Salesforce that don’t require Salesforce authentication. To configure your SFRestRequest instance so
that it doesn’t require an authentication token, set its requiresAuthentication property to NO.
Note: Unauthenticated REST requests require a full path URL. Mobile SDK doesn’t prepend an instance URL to unauthenticated
endpoints.
Example:
SFRestRequest *request = [[SFRestAPI sharedInstance] requestForVersions];
request.requiresAuthentication = NO;
81
About Salesforce REST APIsNative iOS Development

SFRestAPI (Blocks) Category
If you prefer, you can use blocks instead of a delegate to execute callback code. Salesforce Mobile SDK for native iOS provides a block
corollary for each SFRestAPI request method. These methods are defined in the SFRestAPI (Blocks) category.
Block request methods look a lot like delegate request methods. They all return a pointer to SFRestRequest, and they require the
same parameters. Block request methods differ from their delegate siblings in these ways:
1. In addition to copying the REST API parameters, each method requires two blocks: a fail block of type SFRestFailBlock, and
a complete block of type SFRestDictionaryResponseBlock or type SFRestArrayResponseBlock, depending
on the expected response data.
2. Block-based methods send your request for you, so you don’t need to call a separate send method. If your request fails, you can use
the SFRestRequest * return value to retry the request. To do this, use the
SFRestAPI:sendRESTRequest:failBlock:completeBlock: method.
Judicious use of blocks and delegates can help fine-tune your app’s readability and ease of maintenance. Prime conditions for using
blocks often correspond to those that mandate inline functions in C++ or anonymous functions in Java. However, this observation is
just a general suggestion. Ultimately, you need to make a judgement call based on research into your app’s real-world behavior.
SFRestAPI (QueryBuilder) Category
If you’re unsure of the correct syntax for a SOQL query or a SOSL search, you can get help from the SFRestAPI (QueryBuilder)
category methods. These methods build query strings from basic conditions that you specify, and return the formatted string. You can
pass the returned value to one of the following SFRestAPI methods.
•– (SFRestRequest *)requestForQuery:(NSString *)soql;
•– (SFRestRequest *)requestForSearch:(NSString *)sosl;
SFRestAPI (QueryBuilder) provides two static methods each for SOQL queries and SOSL searches: one takes minimal
parameters, while the other accepts a full list of options.
SOSL Methods
SOSL query builder methods are:
+ (NSString *) SOSLSearchWithSearchTerm:(NSString *)term
objectScope:(NSDictionary *)objectScope;
+ (NSString *) SOSLSearchWithSearchTerm:(NSString *)term
fieldScope:(NSString *)fieldScope
objectScope:(NSDictionary *)objectScope
limit:(NSInteger)limit;
Parameters for the SOSL search methods are:
•term is the search string. This string can be any arbitrary value. The method escapes any SOSL reserved characters before processing
the search.
•fieldScope indicates which fields to search. It’s either nil or one of the IN search group expressions: “IN ALL FIELDS”, “IN EMAIL
FIELDS”, “IN NAME FIELDS”, “IN PHONE FIELDS”, or “IN SIDEBAR FIELDS”. A nil value defaults to “IN NAME FIELDS”. See Salesforce
Object Search Language (SOSL).
•objectScope specifies the objects to search. Acceptable values are:
–nil—No scope restrictions. Searches all searchable objects.
82
About Salesforce REST APIsNative iOS Development

–An NSDictionary object pointer—Corresponds to the SOSL RETURNING fieldspec. Each key is an sObject name; each
value is a string that contains a field list as well as optional WHERE, ORDER BY, and LIMIT clauses for the key object.
If you use an NSDictionary object, each value must contain at least a field list. For example, to represent the following
SOSL statement in a dictionary entry:
FIND {Widget Smith}
IN Name Fields
RETURNING Widget__c (name Where createddate = THIS_FISCAL_QUARTER)
set the key to “Widget__c” and its value to “name WHERE createddate = “THIS_FISCAL_QUARTER”. For example:
[SFRestAPI
SOSLSearchWithSearchTerm:@"all of these will be escaped:~{]"
objectScope:[NSDictionary
dictionaryWithObject:@"name WHERE
createddate="THIS_FISCAL_QUARTER"
forKey:@"Widget__c"]];
–NSNull—No scope specified.
•limit—If you want to limit the number of results returned, set this parameter to the maximum number of results you want to
receive.
SOQL Methods
SOQL QueryBuilder methods that construct SOQL strings are:
+ (NSString *) SOQLQueryWithFields:(NSArray *)fields
sObject:(NSString *)sObject
where:(NSString *)where
limit:(NSInteger)limit;
+ (NSString *) SOQLQueryWithFields:(NSArray *)fields
sObject:(NSString *)sObject
where:(NSString *)where
groupBy:(NSArray *)groupBy
having:(NSString *)having
orderBy:(NSArray *)orderBy
limit:(NSInteger)limit;
Parameters for the SOQL methods correspond to SOQL query syntax. All parameters except fields and sObject can be set to
nil.
DescriptionParameter name
An array of field names to be queried.fields
Name of the object to query.sObject
An expression specifying one or more query conditions.where
An array of field names to use for grouping the resulting records.groupBy
An expression, usually using an aggregate function, for filtering
the grouped results. Used only with groupBy.
having
83
About Salesforce REST APIsNative iOS Development

DescriptionParameter name
An array of fields name to use for ordering the resulting records.orderBy
Maximum number of records you want returned.limit
See SOQL SELECT Syntax.
SOSL Sanitizing
The QueryBuilder category also provides a class method for cleaning SOSL search terms:
+ (NSString *) sanitizeSOSLSearchTerm:(NSString *)searchTerm;
This method escapes every SOSL reserved character in the input string, and returns the escaped version. For example:
NSString *soslClean = [SFRestAPI sanitizeSOSLSearchTerm:@"FIND {MyProspect}"];
This call returns “FIND \{MyProspect\}”.
The sanitizeSOSLSearchTerm: method is called in the implementation of the SOSL and SOQL QueryBuilder methods, so you
don’t need to call it on strings that you’re passing to those methods. However, you can use it if, for instance, you’re building your own
queries manually. SOSL reserved characters include:
\ ? & | ! { } [ ] ( ) ^ ~ * : " ' + -
SFRestAPI (Files) Category
The SFRestAPI (Files) category provides methods that create file operation requests. Each method returns a new
SFRestRequest object. Applications send this object to the Salesforce service to process the request. For example, the following
code snippet calls the requestForOwnedFilesList:page: method to retrieve a SFRestRequest object. It then sends
the request object to the server, specifying its owning object as the delegate that receives the response.
SFRestRequest *request = [[SFRestAPI sharedInstance] requestForOwnedFilesList:nil page:0];
[[SFRestAPI sharedInstance] send:request delegate:self];
Note: This example passes nil to the first parameter (userId). This value tells the requestForOwnedFilesList:page:
method to use the ID of the context, or logged in, user. Passing 0 to the pageNum parameter tells the method to fetch the first
page.
See Files and Networking for a full description of the Files feature and networking functionality.
Methods
SFRestAPI (Files) category supports the following operations. For a full reference of this category, see SFRestAPI (Files)
Category—Request Methods (iOS). For a full description of the REST request and response bodies, go to Chatter REST API Resources >
FilesResources at http://www.salesforce.com/us/developer/docs/chatterapi.
- (SFRestRequest*) requestForOwnedFilesList:(NSString*) userId page:(NSUInteger)page;
Builds a request that fetches a page from the list of files owned by the specified user.
- (SFRestRequest*) requestForFilesInUsersGroups: (NSString*)userId page:(NSUInteger)page;
Builds a request that fetches a page from the list of files owned by the user’s groups.
84
About Salesforce REST APIsNative iOS Development

- (SFRestRequest*) requestForFilesSharedWithUser: (NSString*)userId page:(NSUInteger)page;
Builds a request that fetches a page from the list of files that have been shared with the user.
- (SFRestRequest*) requestForFileDetails: (NSString*)sfdcId forVersion:(NSString*)version;
Builds a request that fetches the file details of a particular version of a file.
- (SFRestRequest*) requestForBatchFileDetails: (NSArray*)sfdcIds;
Builds a request that fetches the latest file details of one or more files in a single request.
- (SFRestRequest*) requestForFileRendition: (NSString*)sfdcId version:(NSString*)version renditionType:
(NSString*)renditionType page:(NSUInteger)page;
Builds a request that fetches the a preview/rendition of a particular page of the file (and version).
- (SFRestRequest*) requestForFileContents: (NSString*) sfdcId version:(NSString*) version;
Builds a request that fetches the actual binary file contents of this particular file.
- (SFRestRequest*) requestForAddFileShare: (NSString*)fileId entityId:(NSString*)entityId shareType:(NSString*)shareType;
Builds a request that add a file share for the specified file ID to the specified entity ID.
- (SFRestRequest*) requestForDeleteFileShare: (NSString*)shareId;
Builds a request that deletes the specified file share.
- (SFRestRequest*) requestForFileShares: (NSString *)sfdcId page:(NSUInteger)page;
Builds a request that fetches a page from the list of entities that share this file.
- (SFRestRequest*) requestForDeleteFileShare: (NSString*)shareId;
Builds a request that deletes the specified file share.
- (SFRestRequest*) requestForUploadFile: (NSData*)data name:(NSString*)name description: (NSString*)description
mimeType: (NSString*)mimeType;
Builds a request that uploads a new file to the server. Creates a new file with version set to 1.
Handling Authentication Errors
Mobile SDK provides default error handlers that display messages and divert the app flow when authentication errors occur. These error
handlers are instances of the SFAuthErrorHandler class. They’re managed by the SFAuthErrorHandlerList class, which
stores references to all authentication error handlers. Error handlers define their implementation in anonymous blocks that use the
following prototype:
typedef BOOL (^SFAuthErrorHandlerEvalBlock)(NSError *, SFOAuthInfo *);
A return value of YES indicates that the handler was used for the current error condition, and none of the other error handlers apply.
If the handler returns NO, the block was not used, and the error handling process continues to the next handler in the list. Implementation
details for error handlers are left to the developer’s discretion. To see how the Mobile SDK defines these blocks, look at the
SFAuthenticationManager.m file in the SalesforceSDKCore project.
To substitute your own error handling mechanism, you can:
•Override the Mobile SDK default error handler by adding your own handler to the top of the error handler stack (at index 0):
SFAuthErrorHandler *authErrorHandler =
[[SFAuthErrorHandler alloc] initWithName:@"myAuthErrorHandler"
evalBlock:^BOOL(NSError *error, SFOAuthInfo *authInfo) {
// Add your error-handling code here
}];
[[SFAuthenticationManager sharedManager].authErrorHandlerList
addAuthErrorHandler:authErrorHandler atIndex:0];
85
Handling Authentication ErrorsNative iOS Development

•Remove the Mobile SDK generic “catch-all” error handler from the list. This causes authentication errors to fall through to the
launchErrorAction block of your SalesforceSDKManager implementation during the launch process, or to the
failure: block of your loginWithCompletion:failure: definition if you’ve implemented deferred login. Here’s how
you disable the generic error handler:
SFAuthErrorHandler *genericHandler =
[SFAuthenticationManager sharedManager].genericAuthErrorHandler;
[[SFAuthenticationManager sharedManager].authErrorHandlerList
removeAuthErrorHandler:genericHandler];
Using iOS App Extensions with Mobile SDK
iOS app extensions provide opportunities for developers to extend their app’s functionality beyond the app window. Mobile SDK supports
app extensions with only a small amount of extra configuration.
About iOS App Extensions in Mobile SDK Apps
An iOS app extension is itself an app. It lives in a separate folder in your Xcode project. The app extension can access the same resources
and libraries as your main app.
To enable extensions, you add special configuration in two areas:
•Workspace settings: When you add an app extension, Xcode creates an app extension build target. You configure the existing
main target and the new extension target to join the same app group and share keychains.
•Application code: At runtime, the two apps must share bootstrap configuration and user authentication. For this purpose, you add
special bootstrapping code to both apps.
Once everything is properly configured, your app extension can run any Mobile SDK code that’s appropriate for the extension type.
Workspace Configuration
1. In your Mobile SDK app, create an extension target as described in the Apple developer documentation. How you handle this step
is between you and iOS.
2. After you’ve created the target, select the top-level node of your Mobile SDK project in the Xcode Project Navigator. This step opens
your app’s configuration wizard.
86
Using iOS App Extensions with Mobile SDKNative iOS Development
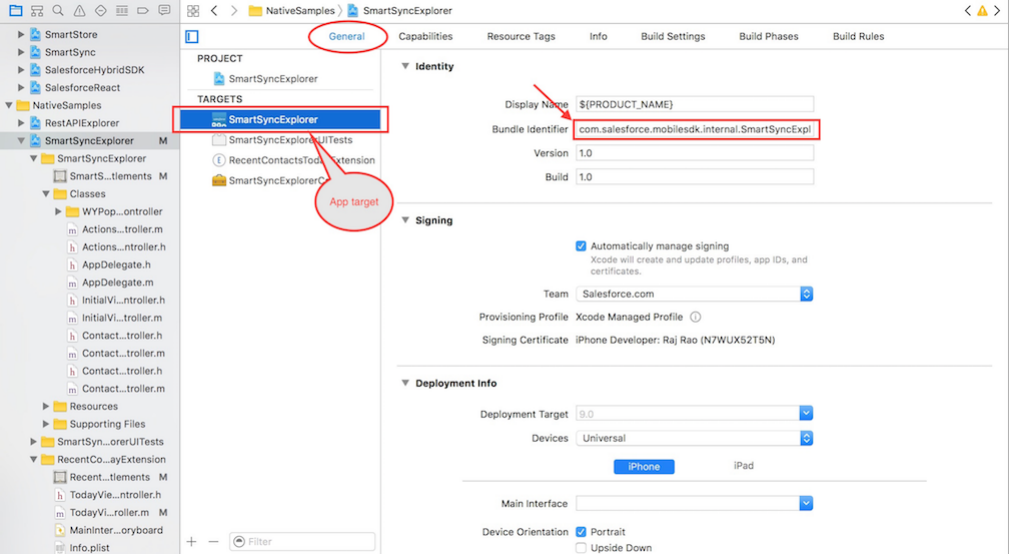
3. Click General, and then specify a unique bundle identifier for the Mobile SDK app target. Here’s how it looks in Xcode 8.2.1.
4. Repeat the bundle identifier step for the extension target. This identifier must also be unique.
5. In your app configuration, select your Mobile SDK app target and then click Capabilities.
6. Turn on App Groups and Keychain Sharing in your Mobile SDK target.
7. Under App Groups, select or create an app group. Use a unique label that identifies your app, such as “group.myapp.shared”.
87
Using iOS App Extensions with Mobile SDKNative iOS Development
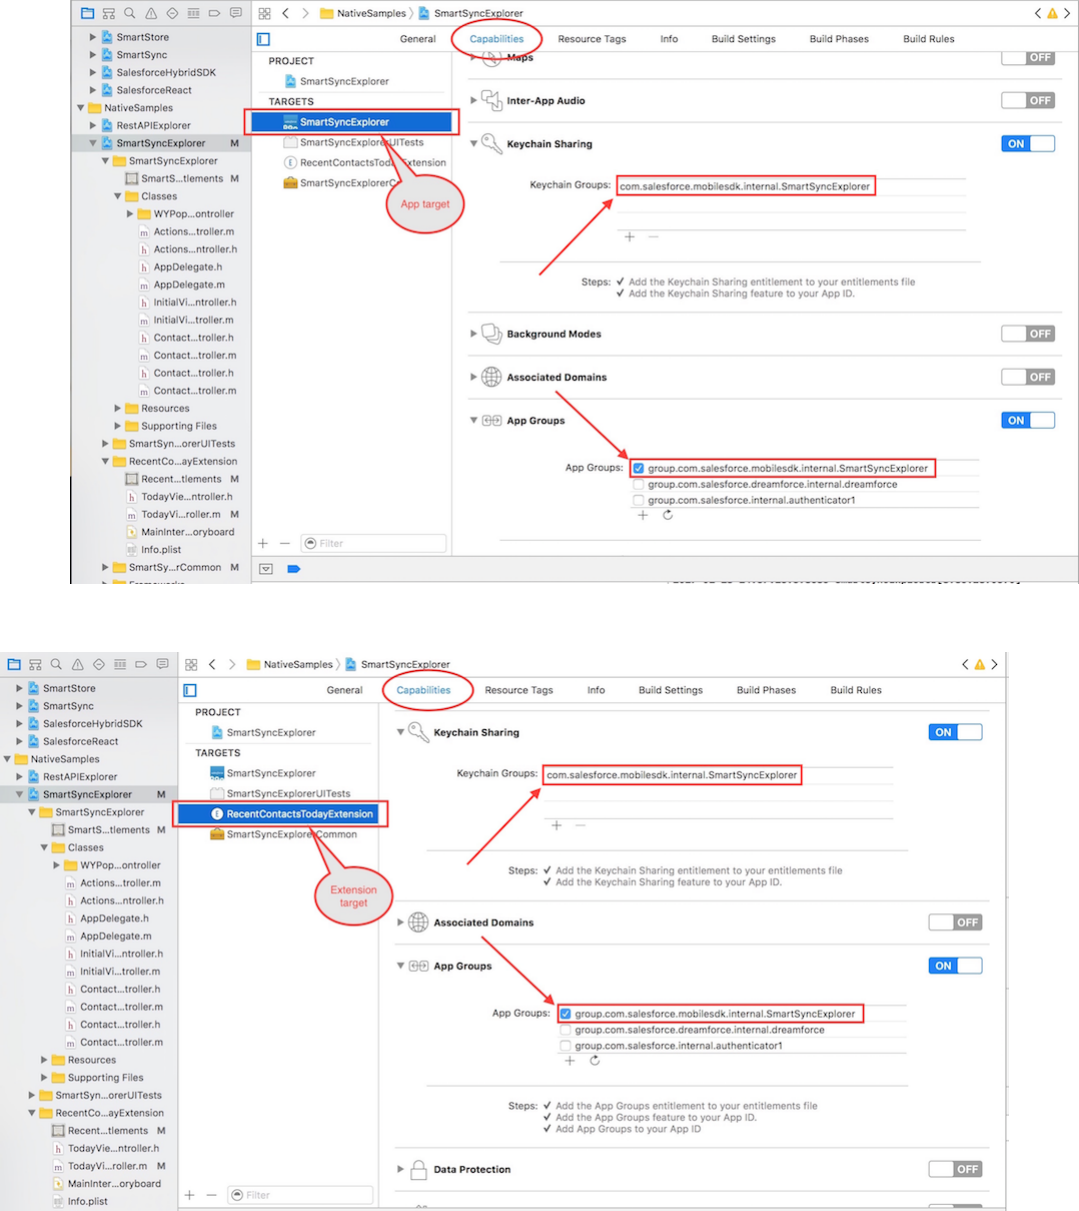
8. Under Keychain Sharing, select or create a keychain group. Use a unique label that identifies your app, such as “com.myapp.MyApp”.
9. Repeat the App Groups and Keychain Sharing steps for your extension target. The two values in the extension target must exactly
match the corresponding values in the application
target.
88
Using iOS App Extensions with Mobile SDKNative iOS Development

Application Bootstrapping
In Mobile SDK template apps, the AppDelegate class contains “bootstrapping” code that initializes Mobile SDK. When you incorporate
an iOS app extension, you add a couple of lines that tell Mobile SDK that you’re working in an app group.
To support extensions, you change your AppDelegate class to make it aware of the app group that you’ve defined. You then add
similar code to your app extension view controller. Mobile SDK 5.0 introduces a new class, SFSDKDatasharingHelper, for this
purpose.
AppDelegate Code Changes
The following steps apply to the init method of your main app’s AppDelegate class.
1. In the init method, set appGroupName and appGroupEnabled on the SFSDKDatasharingHelper shared instance
before setting any SalesforceSDKManager properties.
...
// Insert these two lines, using your app group name
[SFSDKDatasharingHelper sharedInstance].appGroupName = @"<your app group name>";
[SFSDKDatasharingHelper sharedInstance].appGroupEnabled = YES;
// Now it's OK to set SalesforceSDKManager properties
[SalesforceSDKManager sharedManager].connectedAppId = @"<your consumer key>";
[SalesforceSDKManager sharedManager].connectedAppCallbackUri = @"<your callback URL>";
[SalesforceSDKManager sharedManager].authScopes = @[@"api", @"web", <any other scopes
your app requires>];
2. In the postLaunchAction block, use NSUserDefaults to cache a flag that indicates login success. Store the value with
the userLoggedIn key.
[SalesforceSDKManager sharedManager].postLaunchAction = ^(SFSDKLaunchAction
launchActionList) {
...
/* Write a boolean indicating whether a user has logged into the app.
To make the data accessible to your app extension, use NSUserDefaults
to save it into your app group. */
[[NSUserDefaults initWithSuiteName:@"<your app group name>"] setBool:@YES
forKey:@"userLoggedIn"];
}
It’s important to also reset this key in the postLogoutAction and switchUserAction blocks.
App Extension Code Changes
At runtime, your iOS app extension operates as a second app, so you have to “bootstrap” it as well. You apply the same appGroupName
and appGroupEnabled changes as you did in the main app’s AppDelegate class. You also set the following
SalesforceSDKManager properties in your extension view controller as you did in your AppDelegate class:
•[SalesforceSDKManager sharedManager].connectedAppId
•[SalesforceSDKManager sharedManager].connectedAppCallbackUri
•[SalesforceSDKManager sharedManager].authScopes
App extensions can’t perform authentication tasks such as user logins. However, before making calls to SalesforceSDKManager,
you must verify that a user has logged in. You do this verification by checking the userLoggedIn value that you captured in the
postLaunchAction block of AppDelegate.
89
Using iOS App Extensions with Mobile SDKNative iOS Development

1. In your app extension’s initialization entry point, set and enable the app group.
[SFSDKDatasharingHelper sharedInstance].appGroupName = @"<your app group name>";
[SFSDKDatasharingHelper sharedInstance].appGroupEnabled = YES;
2. Add the check for the userLoggedIn value. Continue with bootstrapping and other Mobile SDK calls only if userLoggedIn
equals YES.
[SFSDKDatasharingHelper sharedInstance].appGroupName = @"<your app group name>";
[SFSDKDatasharingHelper sharedInstance].appGroupEnabled = YES;
/* Before calling SalesforceSDKManager, check whether a user has logged in
through the main app. As your condition, use the userLoggedIn Boolean value
that you set in your app's postLaunchAction block. Remember that you saved
this value in your app group using NSUserDefaults. */
if ([[NSUserDefaults initWithSuiteName:@"<your app group name>"]
boolForKey:@"userLoggedIn"]]) {
/* Now you can set the following SalesforceSDKManager properties
as you did in your AppDelegate init method */
[SalesforceSDKManager sharedManager].connectedAppId = @"<your consumer key>"
[SalesforceSDKManager sharedManager].connectedAppCallbackUri =
@"<your callback URL>";
[SalesforceSDKManager sharedManager].authScopes = @[@"api", @"web",
<any other scopes your app requires>];
// Call other Mobile SDK APIs
...
}
// Continue with standard extension implementation
If the bootstrapping succeeds, your app extension can use the current user’s shared credentials to directly access Salesforce data. The
following example shows typical REST API calls that you can add to an extension.
...
NSDictionary *fields = @{@"FirstName": @"\%",@"LastName": @"\%"};
SFRestRequest* request = [[SFRestAPI sharedInstance] requestForQuery:
@"SELECT FirstName,LastName FROM Contact ORDER BY CreatedDate DESC LIMIT 5"];
[[SFRestAPI sharedInstance] send:request delegate:self];
...
Important:
•It’s the developer’s responsibility to determine the user’s login status. The iOS app extension code must not attempt to invoke
the SalesforceSDKManager object before the user successfully logs in.
•For testing iOS app extensions, there’s one important restriction: You’re required to use a real device. You can’t test iOS app
extensions in an iOS simulator.
Example: The following code is taken from the SmartSyncExplorer native sample app. This app defines an app extension that
looks up Contact records and displays a list of MRU records.
Here’s the init method from AppDelegate.m. Notice that the userLoggedIn property must be reset for three different
actions: postLaunchAction, postLogoutAction, and switchUserAction.
- (id)init
{
self = [super init];
90
Using iOS App Extensions with Mobile SDKNative iOS Development

if (self) {
#if defined(DEBUG)
[SFLogger sharedLogger].logLevel = SFLogLevelDebug;
#else
[SFLogger sharedLogger].logLevel = SFLogLevelInfo;
#endif
SmartSyncExplorerConfig *config = [SmartSyncExplorerConfig sharedInstance];
[SFSDKDatasharingHelper sharedInstance].appGroupName = config.appGroupName;
[SFSDKDatasharingHelper sharedInstance].appGroupEnabled =
config.appGroupsEnabled;
// Need to use SalesforceSDKManagerWithSmartStore when using smartstore
[SalesforceSDKManager setInstanceClass:
[SmartStoreSDKManager class]];
[SalesforceSDKManager sharedManager].connectedAppId =
config.remoteAccessConsumerKey;
[SalesforceSDKManager sharedManager].connectedAppCallbackUri =
config.oauthRedirectURI;
[SalesforceSDKManager sharedManager].authScopes = config.oauthScopes;
__weak typeof(self) weakSelf = self;
[SalesforceSDKManager sharedManager].postLaunchAction =
^(SFSDKLaunchAction launchActionList) {
__strong typeof(weakSelf) strongSelf = weakSelf;
//
// If you wish to register for push notifications, uncomment the line
// below. Note that if you want to receive push notifications from
// Salesforce, you will also need to implement the
// application:didRegisterForRemoteNotificationsWithDeviceToken:
// method (below).
//
//[[SFPushNotificationManager sharedInstance]
// registerForRemoteNotifications];
//
[strongSelf setUserLoginStatus:YES];
[strongSelf log:SFLogLevelInfo
format:@"Post-launch: launch actions taken: %@",
[SalesforceSDKManager
launchActionsStringRepresentation:launchActionList]];
[strongSelf setupRootViewController];
};
[SalesforceSDKManager sharedManager].launchErrorAction = ^(NSError *error,
SFSDKLaunchAction launchActionList) {
__strong typeof(weakSelf) strongSelf = weakSelf;
[strongSelf log:SFLogLevelError format:@"Error during SDK
launch: %@", [error localizedDescription]];
[strongSelf initializeAppViewState];
[[SalesforceSDKManager sharedManager] launch];
};
[SalesforceSDKManager sharedManager].postLogoutAction = ^{
__strong typeof(weakSelf) strongSelf = weakSelf;
[strongSelf setUserLoginStatus:NO];
91
Using iOS App Extensions with Mobile SDKNative iOS Development

[strongSelf handleSdkManagerLogout];
};
[SalesforceSDKManager sharedManager].switchUserAction =
^(SFUserAccount *fromUser,
SFUserAccount *toUser) {
__strong typeof(weakSelf) strongSelf = weakSelf;
[strongSelf setUserLoginStatus:NO];
[strongSelf handleUserSwitch:fromUser toUser:toUser];
};
}
return self;
}
The setUserLoginStatus: method stores the passed value in the user defaults dictionary under the userLoggedIn
key.
- (void)setUserLoginStatus :(BOOL) loggedIn {
[[NSUserDefaults msdkUserDefaults] setBool:loggedIn forKey:@"userLoggedIn"];
[[NSUserDefaults msdkUserDefaults] synchronize];
[self log:SFLogLevelDebug format:@"%d userLoggedIn",
[[NSUserDefaults msdkUserDefaults] boolForKey:@"userLoggedIn"] ];
}
The app extension is implemented in the RecentContactsTodayExtension/TodayViewController.m file. For
a Today extension, the entry point method is widgetPerformUpdateWithCompletionHandler:. The app extension
only reads the userLoggedIn value, which it queries through the userIsLoggedIn “getter” method.
- (void)widgetPerformUpdateWithCompletionHandler:(void
(^)(NCUpdateResult))completionHandler {
SmartSyncExplorerConfig *config = [SmartSyncExplorerConfig sharedInstance];
[SFSDKDatasharingHelper sharedInstance].appGroupName = config.appGroupName;
[SFSDKDatasharingHelper sharedInstance].appGroupEnabled = YES;
if([self userIsLoggedIn] ) {
[self log:SFLogLevelError format:@"User has logged in"];
[SalesforceSDKManager
setInstanceClass:[SmartStoreSDKManager class]];
[SalesforceSDKManager sharedManager].connectedAppId =
config.remoteAccessConsumerKey;
[SalesforceSDKManager sharedManager].connectedAppCallbackUri =
config.oauthRedirectURI;
[SalesforceSDKManager sharedManager].authScopes = config.oauthScopes;
[SalesforceSDKManager sharedManager].authenticateAtLaunch =
config.appGroupsEnabled;
SFUserAccountIdentity *activeUserIdentity =
[SFUserAccountManager sharedInstance].activeUserIdentity;
SFUserAccount *currentUser = [[SFUserAccountManager sharedInstance]
userAccountForUserIdentity:activeUserIdentity];
[SFUserAccountManager sharedInstance].currentUser = currentUser;
__weak typeof(self) weakSelf = self;
void (^completionBlock)(void) = ^{
[weakSelf refreshList];
92
Using iOS App Extensions with Mobile SDKNative iOS Development

};
// If a current user exists, get the MRU list of Contacts
if(currentUser) {
if (!self.dataMgr) {
self.dataMgr = [[SObjectDataManager alloc]
initWithDataSpec:[ContactSObjectData dataSpec]];
}
[self.dataMgr lastModifiedRecords:kNumberOfRecords
completion:completionBlock];
}
}
completionHandler(NCUpdateResultNewData);
}
- (BOOL)userIsLoggedIn {
SmartSyncExplorerConfig *config = [SmartSyncExplorerConfig sharedInstance];
return [[NSUserDefaults msdkUserDefaults] boolForKey:config.userLogInStatusKey];
}
Tutorial: Creating a Native iOS Warehouse App
Prerequisites
•This tutorial uses a Warehouse app that contains a basic inventory database. You’ll need to install this app in a DE org. If you install
it in an existing DE org, be sure to delete any existing Warehouse components you’ve made before you install.
1. Click the installation URL link: http://goo.gl/1FYg90
2. If you aren’t logged in, enter the username and password of your DE org.
3. Select an appropriate level of visibility for your organization.
4. Click Install.
5. Click Done.
6. Once the installation completes, you can select the Warehouse app from the app picker in the upper right corner.
93
Tutorial: Creating a Native iOS Warehouse AppNative iOS Development
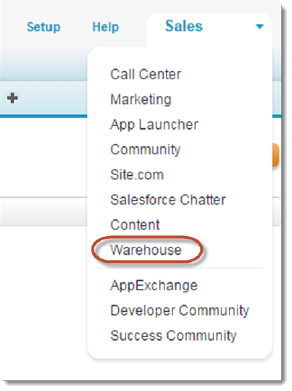
7. To create data, click the Data tab.
8. Click the Create Data button.
•Install the latest versions of Xcode and the iOS SDK.
•Install CocoaPods as described at www.cocoapods.org. (Mobile SDK 4.0 and later)
•Install the Salesforce Mobile SDK using npm:
1. If you’ve already successfully installed Node.js and npm, skip to step 4.
2. Install Node.js on your system. The Node.js installer automatically installs npm.
i. Download Node.js from www.nodejs.org.
ii. Run the downloaded installer to install Node.js and npm. Accept all prompts asking for permission to install.
3. At the Terminal window, type npm and press Return to make sure your installation was successful. If you don’t see a page
of usage information, revisit Step 2 to find out what’s missing.
4. At the Terminal window, type sudo npm install forceios -g
This command uses the forceios package to install the Mobile SDK globally. With the -g option, you can run npm install
from any directory. The npm utility installs the package under /usr/local/lib/node_modules, and links binary
modules in /usr/local/bin. Most users need the sudo option because they lack read-write permissions in /usr/local.
Create a Native iOS App
In this tutorial, you learn how to get started with the Salesforce Mobile SDK, including how to install the SDK and a quick tour of the
native project template using your DE org. Subsequent tutorials show you how to modify the template app and make it work with the
Warehouse schema.
Step 1: Create a Connected App
In this step, you learn how to configure a Connected App in Force.com. Doing so authorizes the mobile app you will soon build to
communicate securely with Force.com and access Force.com APIs on behalf of users via the industry-standard OAuth 2.0 protocol.
1. In your Developer Edition organization, from Setup, enter Apps in the Quick Find box, then select Apps.
94
Create a Native iOS AppNative iOS Development
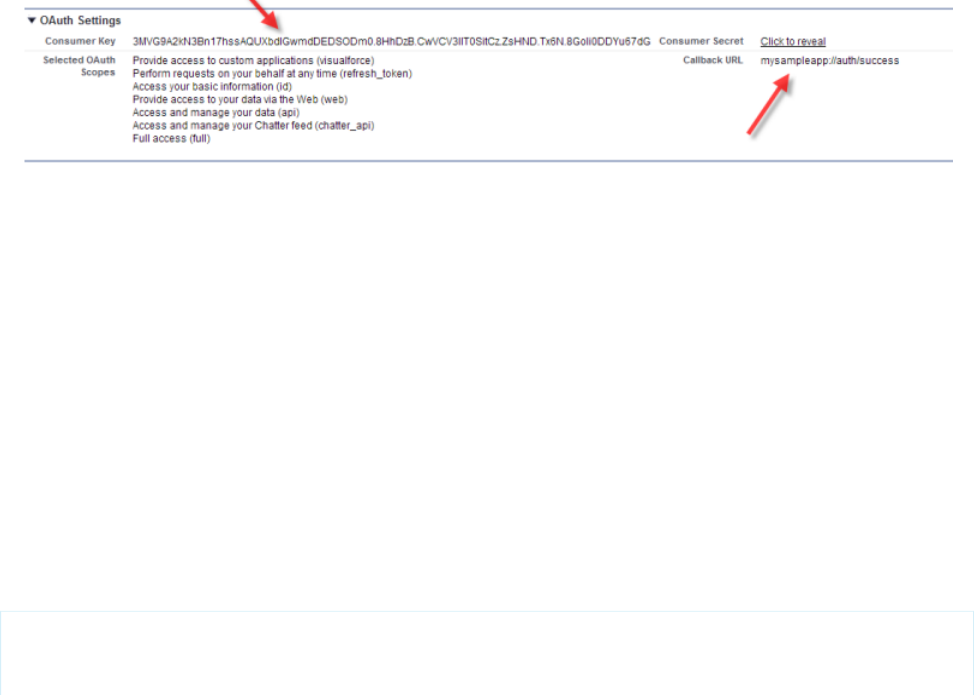
2. Under Connected Apps, click New to bring up the New Connected App page.
3. Under Basic Information, complete the form as follows.
•Connected App Name: My Native iOS App
•API Name: accept the suggested value
•Contact Email: enter your email address
4. Under OAuth Settings, check Enable OAuth Settings.
5. Set Callback URL to mysampleapp://auth/success.
6. Under Available OAuth Scopes, check the following:
•Access and manage your data (api)
•Provide access to your data via the Web (web)
•Perform requests on your behalf at any time (refresh_token, offline_access)
7. Click Add.
8. Click Save.
After you save the configuration, notice the details of the connected app you just created.
•Note the Callback URL and Consumer Key values. You will use these when you set up your app in the next step.
•Mobile SDK apps do not use the consumer secret, so you can ignore this value.
Step 2: Create a Native iOS Project
To create a new Mobile SDK project, use the forceios utility again in the Terminal window.
1. Change to the directory in which you want to create your project.
2. To create an iOS project, type forceios create.
The forceios utility prompts you for each configuration value.
3. For application type, enter native.
4. For application name, enter MyNativeiOSApp.
5. For package name, enter com.acme.goodapps.
6. For organization name, enter GoodApps, Inc..
7. For output directory, enter tutorial/iOSNative.
The input screen should look similar to this:
Enter your application type (native, native_swift, react_native,
hybrid_remote, or hybrid_local): native
Enter your application name: MyNativeiOSApp
95
Create a Native iOS AppNative iOS Development
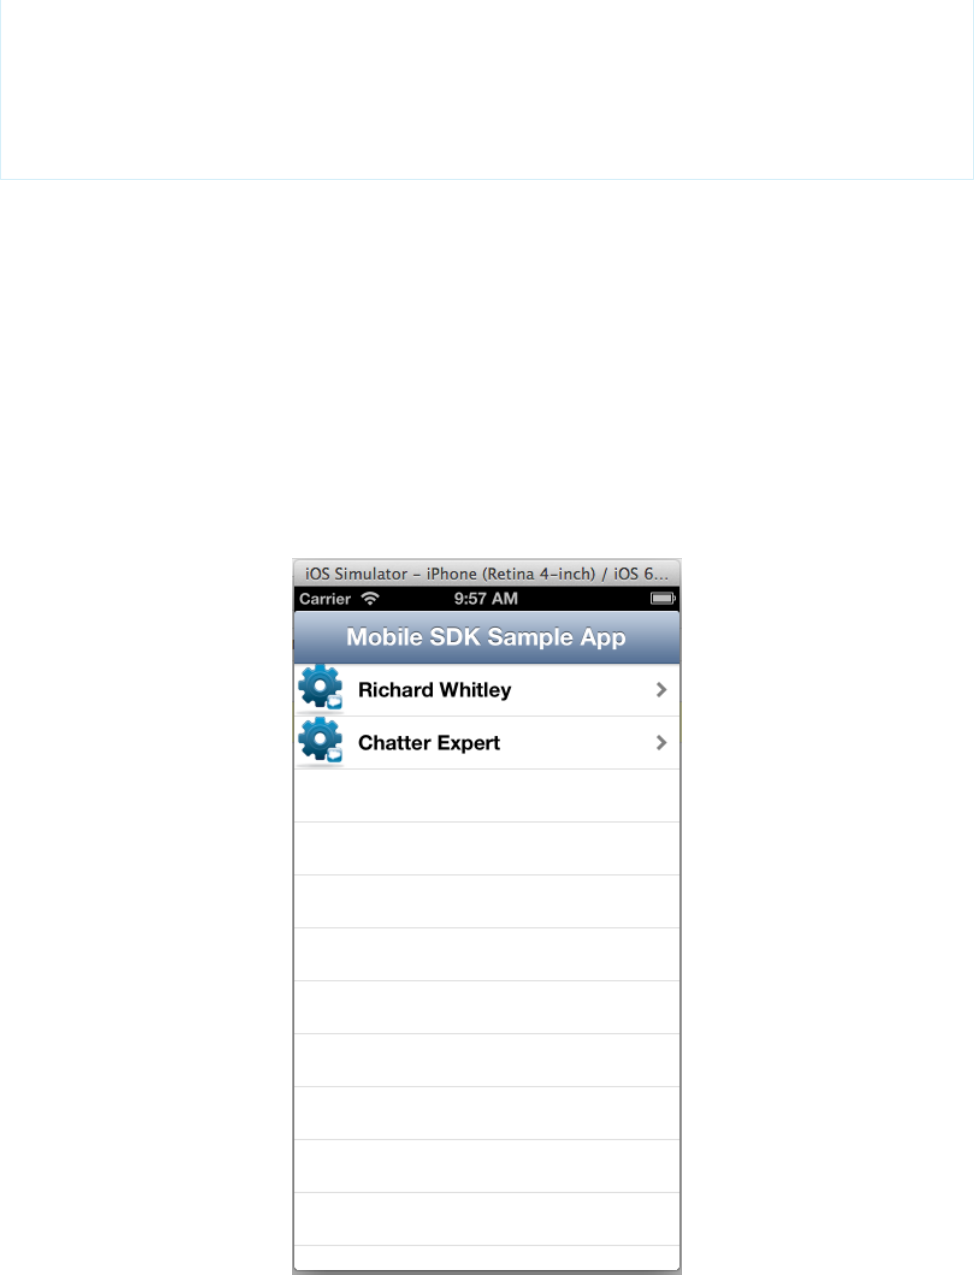
Enter the output directory for your app (defaults to the current directory):
tutorial/iOSNative
Enter the package name for your app (com.mycompany.my_app): com.acme.goodapps
Enter your organization name (Acme, Inc.): GoodApps, Inc.
Creating output folder tutorial/iOSNative
Creating app in /Users/rwhitley/SalesforceMobileSDK-iOS/tutorial/iOSNative/MyNativeiOSApp
Successfully created native app ‘MyNativeiOSApp’
Step 3: Run the New iOS App
1. In Xcode, select File > Open.
2. Navigate to the output folder you specified.
3. Open your app’s xcworkspace file.
4. Select a simulator device in the Xcode toolbar, and then click Run.
When you start the app, an initial splash screen appears, followed by the Salesforce login screen.
5. Log in with your DE username and password.
6. When prompted, click Allow to let the app access your data in Salesforce. You should see a table listing the names of users defined
in your DE org.
96
Create a Native iOS AppNative iOS Development

Step 4: Explore How the iOS App Works
The native iOS app uses a straightforward Model View Controller (MVC) architecture.
•The model is the Force.com database schema
•The views come from the nib and implementation files in your project
•The controller functionality represents a joint effort between the iOS SDK classes, the Salesforce Mobile SDK, and your app
AppDelegate Class and the Root View Controller
When the app is launched, the AppDelegate class initially controls the execution flow. After the login process completes, the
AppDelegate instance passes control to the root view. In the template app, the root view controller class is named
RootViewController. This class becomes the root view for the app in the AppDelegate.m file, where it’s subsumed by a
UINavigationController instance that controls navigation between views:
- (void)setupRootViewController
{
RootViewController *rootVC = [[RootViewController alloc]
initWithNibName:nil bundle:nil];
UINavigationController *navVC = [[UINavigationController alloc]
initWithRootViewController:rootVC];
self.window.rootViewController = navVC;
}
Before it’s customized, though, the app doesn’t include other views or touch event handlers. It simply logs into Salesforce, issues a request
using Salesforce Mobile SDK REST APIs, and displays the response in the root view.
UITableViewController Class
RootViewController inherits the UITableViewController class. Because it doesn’t customize the table in its inherited
view, there’s no need for a nib or xib file. The controller class simply loads data into the tableView property and lets the super class
handle most of the display tasks. However, RootViewController does add some basic cell formatting by calling the
tableView:cellForRowAtIndexPath: method. It creates a new cell, assigns it a generic ID (@"CellIdentifier"),
puts an icon on the left side of the cell, and adds an arrow on the right side. Most importantly, it sets the cell’s label to assume the Name
value of the current row from the REST response object. Here’s the code:
// Customize the appearance of table view cells.
- (UITableViewCell *)tableView:(UITableView *)tableView_
cellForRowAtIndexPath:(NSIndexPath *)indexPath {
static NSString *CellIdentifier = @"CellIdentifier";
// Dequeue or create a cell of the appropriate type.
UITableViewCell *cell = [tableView_
dequeueReusableCellWithIdentifier:CellIdentifier];
if (cell == nil) {
cell = [[UITableViewCell alloc]
initWithStyle:UITableViewCellStyleValue1
reuseIdentifier:CellIdentifier];
}
//if you want to add an image to your cell, here's how
UIImage *image = [UIImage imageNamed:@"icon.png"];
cell.imageView.image = image;
97
Create a Native iOS AppNative iOS Development

// Configure the cell to show the data.
NSDictionary *obj =
[dataRows objectAtIndex:indexPath.row];
cell.textLabel.text = [obj objectForKey:@"Name"];
//this adds the arrow to the right hand side.
cell.accessoryType =
UITableViewCellAccessoryDisclosureIndicator;
return cell;
}
SFRestAPI Shared Object and SFRestRequest Class
You can learn how the app creates and sends REST requests by browsing the RootViewController.viewDidLoad method.
The app defines a literal SOQL query string and passes it to the SFRestAPI:requestForQuery: instance method. To call this
method, the app sends a message to the shared singleton SFRestAPI instance. The method creates and returns an appropriate,
preformatted SFRestRequest object that wraps the SOQL query. The app then forwards this object to the server by sending the
send:delegate: message to the shared SFRestAPI object:
SFRestRequest *request = [[SFRestAPI sharedInstance]
requestForQuery:@"SELECT Name FROM User LIMIT 10"];
[[SFRestAPI sharedInstance] send:request delegate:self];
The SFRestAPI class serves as a factory for SFRestRequest instances. It defines a series of request methods that you can call
to easily create request objects. If you want, you can also build SFRestRequest instances directly, but, for most cases, manual
construction isn’t necessary.
Notice that the app specifies self for the delegate argument. This tells the server to send the response to a delegate method
implemented in the RootViewController class.
SFRestDelegate Interface
To be able to accept REST responses, RootViewController implements the SFRestDelegate interface. This interface
declares four methods—one for each possible response type. The request:didLoadResponse: delegate method executes
when the request succeeds. When RootViewController receives a request:didLoadResponse: callback, it copies the
returned records into its data rows and reloads the data displayed in the view. Here’s the code that implements the SFRestDelegate
interface in the RootViewController class:
#pragma mark - SFRestDelegate
- (void)request:(SFRestRequest *)request
didLoadResponse:(id)jsonResponse {
NSArray *records = [jsonResponse objectForKey:@"records"];
NSLog(@"request:didLoadResponse: #records: %lu", (unsigned long)records.count);
self.dataRows = records;
dispatch_async(dispatch_get_main_queue(), ^{
[self.tableView reloadData];
});
}
98
Create a Native iOS AppNative iOS Development

- (void) request:(SFRestRequest*)request
didFailLoadWithError:(NSError*)error {
NSLog(@"request:didFailLoadWithError: %@", error);
//add your failed error handling here
}
- (void)requestDidCancelLoad:(SFRestRequest *)request {
NSLog(@"requestDidCancelLoad: %@", request);
//add your failed error handling here
}
- (void)requestDidTimeout:(SFRestRequest *)request {
NSLog(@"requestDidTimeout: %@", request);
//add your failed error handling here
}
As the comments indicate, this code fully implements only the request:didLoadResponse: success delegate method. For
responses other than success, this template app simply logs a message.
Customize the List Screen
In this tutorial, you modify the root view controller to make the app specific to the Warehouse schema. You also adapt the existing SOQL
query to obtain all the information we need from the Merchandise custom object.
Step 1: Modify the Root View Controller
To adapt the template project to our Warehouse design, let’s rename the RootViewController class.
1. In the Project Navigator, choose the RootViewController.h file.
2. In the Editor, click the name “RootViewController” on this line:
@interface RootViewController : UITableViewController <SFRestDelegate>{
3. Using the Control-Click menu, choose Refactor > Rename. Be sure that Rename Related Files is checked.
4. Change “RootViewController” to “WarehouseViewController”. Click Preview.
Xcode presents a new window that lists all project files that contain the name “RootViewController” on the left. The central pane
shows a diff between the existing version and the proposed new version of each changed file.
5. Click Save.
The Refactoring window goes away, and you’re back in your newly refactored project. Notice that the file names
RootViewController.h and RootViewController.m are now WarehouseViewController.h and
WarehouseViewController.m. Every instance of RootViewController in your project code has also been changed to
WarehouseViewController.
Step 2: Create the App's Root View
The native iOS template app creates a SOQL query that extracts Name fields from the standard User object. For this tutorial, though, you
use records from a custom object. Later, you create a detail screen that displays Name, Quantity, and Price fields. You also need the
record ID.
99
Customize the List ScreenNative iOS Development

Let’s update the SOQL query to operate on the custom Merchandise__c object and to retrieve the fields needed by the detail screen.
1. In the Project Navigator, select WarehouseViewController.m.
2. Scroll to the viewDidLoad method.
3. Update the view’s display name to “Warehouse App”. Change:
self.title = @"Mobile SDK Sample App"
to
self.title = @"Warehouse App"
4. Change the SOQL query in the following line:
SFRestRequest *request = [[SFRestAPI sharedInstance] requestForQuery:@"SELECT Name
FROM User LIMIT 10"];
to:
SELECT Name, Id, Quantity__c, Price__c FROM Merchandise__c LIMIT 10
Note: In some rare cases, developers create the Merchandise table manually. If you did this, you must preface the API name of
each custom object and field with your four-letter developer prefix. This rule applies to the SOQL statement and every other usage
in your app. For example, if your developer prefix is "ABCD", the Merchandise__c object's API name becomes
ABCD__Merchandise__c.
Step 3:Try Out the App
Build and run the app. When prompted, log into your DE org. The initial page should look similar to the following screen.
100
Customize the List ScreenNative iOS Development
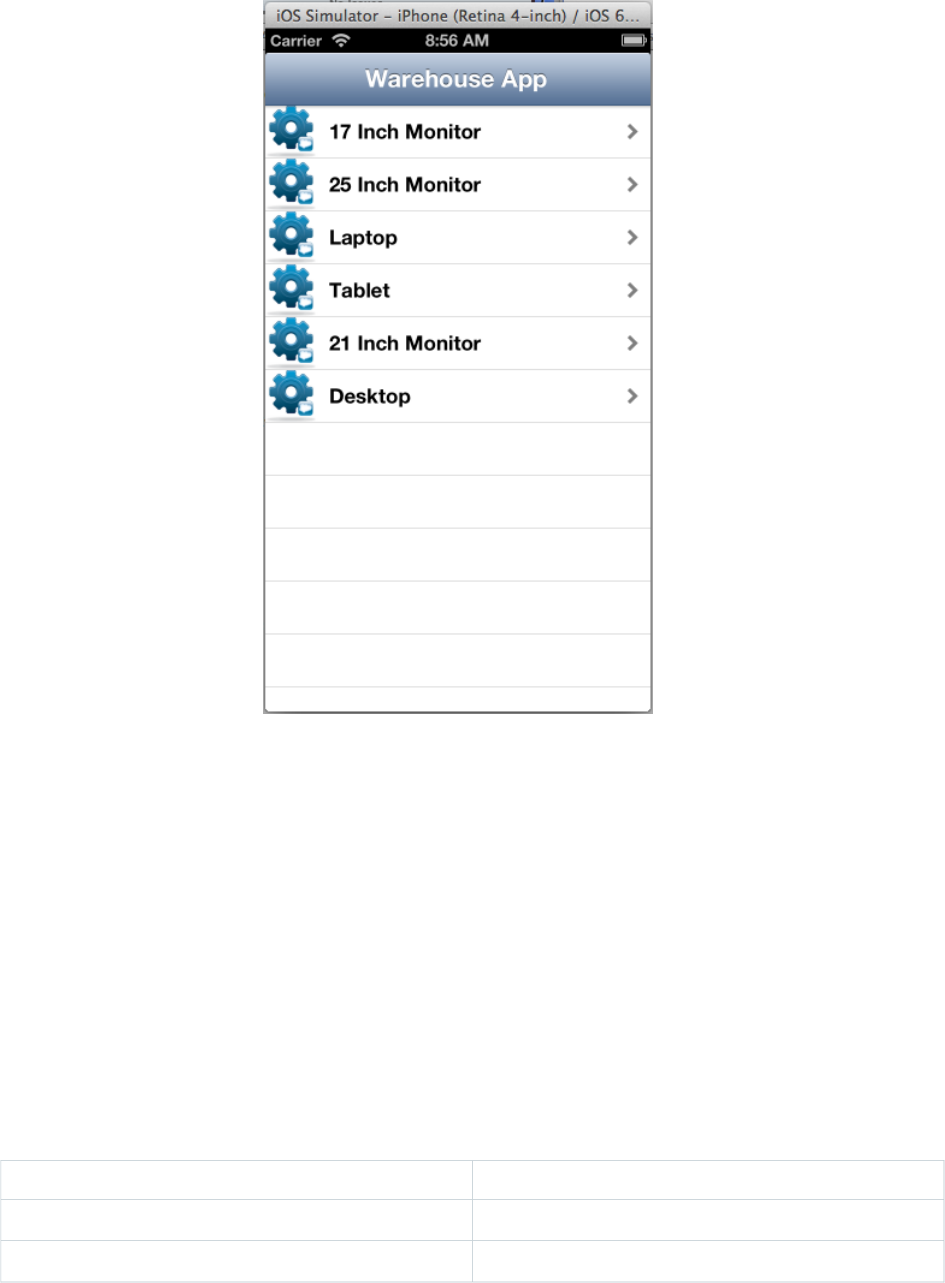
At this point, if you click a Merchandise record, nothing happens. You'll fix that in the next tutorial.
Create the Detail Screen
In the previous tutorial, you modified the template app so that, after it starts, it lists up to ten Merchandise records. In this tutorial, you
finish the job by creating a detail view and controller. You also establish communication between list view and detail view controllers.
Step 1: Create the App's Detail View Controller
When a user taps a Merchandise record in the Warehouse view, an IBAction generates record-specific information and then loads
a view from DetailViewController that displays this information. However, this view doesn’t yet exist, so let’s create it.
1. Click File > New > File... and select Source > Cocoa Touch Class.
2. Click Next.
3. Set the following properties:
ValueProperty
DetailViewControllerClass
UIViewControllerSubclass of
101
Create the Detail ScreenNative iOS Development

ValueProperty
Checked, iPhoneAlso create XIB file
Objective-CLanguage
4. Place the new class in the Classes group under MyNativeiOSApp in the Groups drop-down menu.
5. Click Create.
Xcode creates three new files in the Classes folder: DetailViewController.h, DetailViewController.m, and
DetailViewController.xib.
6. Select DetailViewController.xib in the Project Navigator to open the Interface Builder.
7. From the Utilities view , select the Attributes inspector.
8. Click an empty space in the frame and then, under Simulated Metrics, select an iPhone configuration from the Size dropdown menu.
9. In the lower right-hand panel, show the Object library . Drag three labels, two text fields, and one button onto
the view layout. Arrange and resize the controls so that the screen looks like this:
102
Create the Detail ScreenNative iOS Development
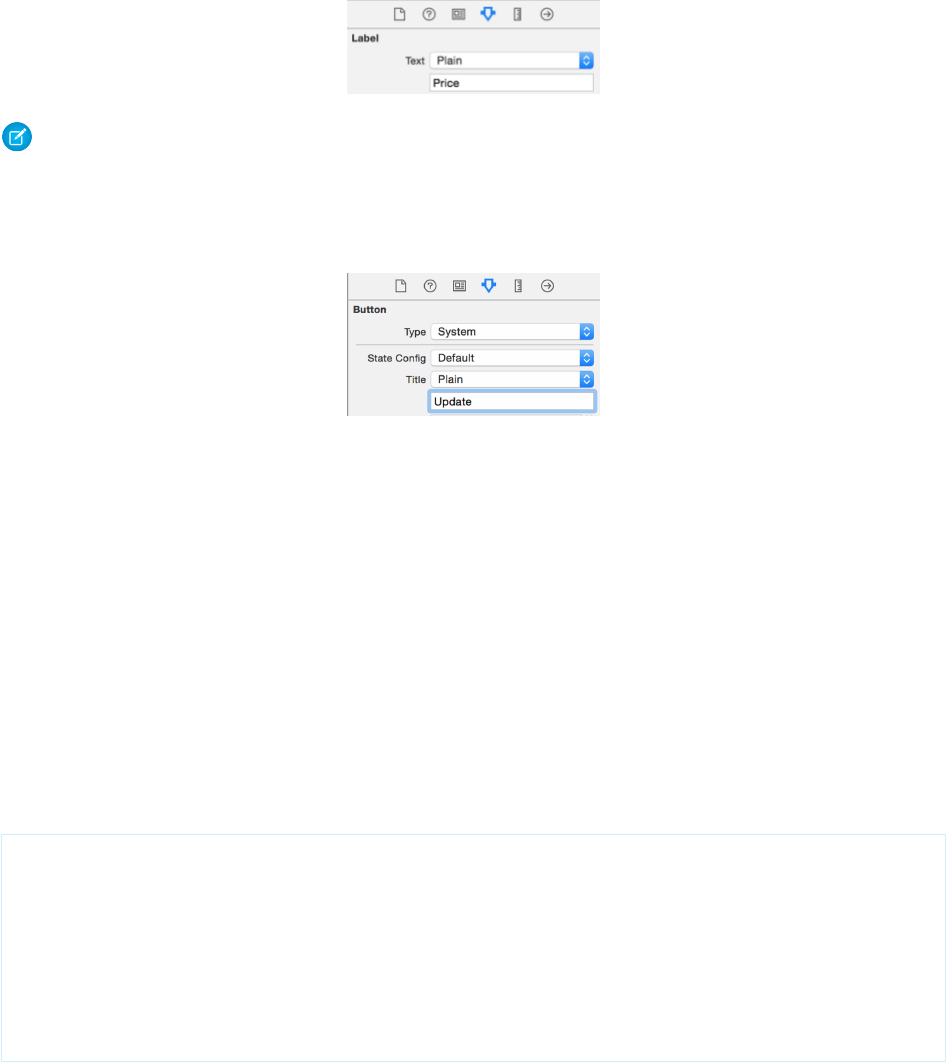
We’ll refer to topmost label as the Name label. This label is dynamic. In the next tutorial, you’ll add controller code that resets it at
runtime to a meaningful value.
10. In the Attributes inspector, set the display text for the static Price and Quantity labels to the values shown. Select each label individually
in the Interface Builder and specify display text in the unnamed entry field below the Text drop-down menu.
Note: Adjust the width of the labels as necessary to see the full display text. The Name label requires about two-thirds of the
screen width.
11. In the Attributes inspector, set the display text for the Update button to the value shown. Select the button in the Interface Builder
and specify its display text in the unnamed entry field below the Title drop-down menu.
12. Build and run to check for errors. You won’t yet see your changes.
The detail view design shows Price and Quantity fields, and provides a button for updating the record's Quantity. However, nothing
currently works. In the next step, you learn how to connect this design to Warehouse records.
Step 2: Set Up DetailViewController
To establish connections between view elements and their view controller, you can use the Xcode Interface Builder to connect UI
elements with code elements.
Add Instance Properties
1. Create properties in DetailViewController.h to contain the values passed in by the WarehouseViewController:
Name, Quantity, Price, and Id. Place these properties within the @interface block. Declare each nonatomic and strong,
using these names:
@interface DetailViewController : UIViewController
@property (nonatomic, strong) NSNumber *quantityData;
@property (nonatomic, strong) NSNumber *priceData;
@property (nonatomic, strong) NSString *nameData;
@property (nonatomic, strong) NSString *idData;
@end
103
Create the Detail ScreenNative iOS Development
2. In DetailViewController.m, just after the @implementation tag, synthesize each of the properties.
@implementation DetailViewController
@synthesize nameData;
@synthesize quantityData;
@synthesize priceData;
@synthesize idData;
Add IBOutlet Variables
IBOutlet member variables let the controller manage each non-static control. Instead of coding these manually, you can use the
Interface Builder to create them. Interface Builder provides an Assistant Editor that gives you the convenience of side-by-side editing
windows. To make room for the Assistant Editor, you’ll usually want to reclaim screen area by hiding unused controls.
1. In the Project Navigator, click the DetailViewController.xib file.
The DetailViewController.xib file opens in the Standard Editor.
2. Hide the Navigator by clicking Hide or Show Navigator on the View toolbar .
3. Open the Assistant Editor by clicking Show the Assistant editor in the Editor toolbar .
Make sure that the Assistant Editor shows the DetailViewController.h file. The Assistant Editor guesses which files are
most likely to be used together. If you need to open a different file, click the Related Files control in the upper left hand corner of
the Assistant Editor.
4. At the top of the interface block in DetailViewController.h, add a pair of empty curly braces:
@interface DetailViewController : UiViewController <SFRestDelegate>
{
}
104
Create the Detail ScreenNative iOS Development

5. In the Standard Editor, control-click the Price text field control and drag it into the new curly brace block in the
DetailViewController.h file.
6. In the popup dialog box, name the new outlet _priceField, and click Connect.
7. Repeat steps 2 and 3 for the Quantity text field, naming its outlet _quantityField.
8. Repeat steps 2 and 3 for the Name label, naming its outlet _nameLabel.
Your interface code now includes this block:
@interface DetailViewController : UIViewController
{
__weak IBOutlet UITextField *_priceField;
__weak IBOutlet UITextField *_quantityField;
__weak IBOutlet UILabel *_nameLabel;
}
Add an Update Button Event
1. In the Interface Builder, select the Update button and open the Connections Inspector .
2. In the Connections Inspector, select the circle next to Touch Up Inside and drag it into the DetailViewController.h file.
Be sure to drop it below the closing curly brace. Name it updateTouchUpInside, and click Connect.
The Touch Up Inside event tells you that the user raised the finger touching the Update button without first leaving the button.
You’ll perform a record update every time this notification arrives.
Step 3: Create the Designated Initializer
Now, let’s get down to some coding. Start by adding a new initializer method to DetailViewController that takes the name,
ID, quantity, and price. The method name, by convention, must begin with “init”.
1. Click Show the Standard Editor and open the Navigator.
2. Add this declaration to the DetailViewController.h file just above the @end marker:
- (id) initWithName:(NSString *)recordName
sobjectId:(NSString *)salesforceId
quantity:(NSNumber *)recordQuantity
price:(NSNumber *)recordPrice;
Later, we’ll code WarehouseViewController to use this method for passing data to the DetailViewController.
3. Open the DetailViewController.m file, and copy the signature you created in the previous step to the end of the file, just
above the @end marker.
4. Replace the terminating semi-colon with a pair of curly braces for your implementation block.
- (id) initWithName:(NSString *)recordName
sobjectId:(NSString *)salesforceId
quantity:(NSNumber *)recordQuantity
price:(NSNumber *)recordPrice {
}
5. In the method body, send an init message to the super class. Assign the return value to self:
self = [super init];
105
Create the Detail ScreenNative iOS Development

This init message gives you a functional object with base implementation which will serve as your return value.
6. Add code to verify that the super class initialization succeeded, and, if so, assign the method arguments to the corresponding instance
variables. Finally, return self.
if (self) {
self.nameData = recordName;
self.idData = salesforceId;
self.quantityData = recordQuantity;
self.priceData = recordPrice;
}
return self;
Here’s the completed method:
- (id) initWithName:(NSString *)recordName
sobjectId:(NSString *)salesforceId
quantity:(NSNumber *)recordQuantity
price:(NSNumber *)recordPrice {
self = [super init];
if (self) {
self.nameData = recordName;
self.idData = salesforceId;
self.quantityData = recordQuantity;
self.priceData = recordPrice;
}
return self;
}
7. To make sure the controls are updated each time the view appears, add a new viewWillAppear: event handler after the
viewDidLoad method implementation. Begin by calling the super class method.
- (void)viewWillAppear:(BOOL)animated {
[super viewWillAppear:animated];
}
8. Copy the values of the property variables to the corresponding dynamic controls.
- (void)viewWillAppear:(BOOL)animated {
[super viewWillAppear:animated];
[_nameLabel setText:self.nameData];
[_quantityField setText:[self.quantityData stringValue]];
[_priceField setText:[self.priceData stringValue]];
}
9. Build and run your project to make sure you’ve coded everything without compilation errors. The app will look the same as it did at
first, because you haven’t yet added the code to launch the Detail view.
Note: The [super init] message used in the initWithName: method calls [super
initWithNibName:bundle:] internally. We use [super init] here because we’re not passing a NIB name or a
bundle. If you are specifying these resources in your own projects, you’ll need to call [super initWithNibName:bundle:]
explicitly.
106
Create the Detail ScreenNative iOS Development

Step 4: Establish Communication Between the View Controllers
Any view that consumes Salesforce content relies on a SFRestAPI delegate to obtain that content. You can designate a single view
to be the central delegate for all views in the app, which requires precise communication between the view controllers. For this exercise,
let’s take a slightly simpler route: Make WarehouseViewController and DetailViewController each serve as its own
SFRestAPI delegate.
Update WarehouseViewController
First, let’s equip WarehouseViewController to pass the quantity and price values for the selected record to the detail view, and
then display that view.
1. In WarehouseViewController.m, above the @implementation block, add the following line:
#import "DetailViewController.h"
2. On a new line after the #pragma mark – Table view data source marker, type the following starter text to bring
up a list of UITableView delegate methods:
- (void)tableView
3. From the list, select the tableView:didSelectRowAtIndexPath: method.
4. Change the tableView parameter name to itemTableView.
- (void)tableView:(UITableView *)itemTableView didSelectRowAtIndexPath:(NSIndexPath
*)indexPath
5. At the end of the signature, type an opening curly brace ({) and press return to stub in the method implementation block.
6. At the top of the method body, per standard iOS coding practices, add the following call to deselect the row.
[itemTableView deselectRowAtIndexPath:indexPath animated:NO];
7. Next, retrieve a pointer to the NSDictionary object associated with the selected data row.
NSDictionary *obj = [self.dataRows objectAtIndex:indexPath.row];
8. At the end of the method body, create a local instance of DetailViewController by calling the
DetailViewController.initWithName:salesforceId:quantity:price: method. Use the data stored in
the NSDictionary object to set the name, Salesforce ID, quantity, and price arguments. The finished call looks like this:
DetailViewController *detailController =
[[DetailViewController alloc]
initWithName:[obj objectForKey:@"Name"]
sobjectId:[obj objectForKey:@"Id"]
quantity:[obj objectForKey:@"Quantity__c"]
price:[obj objectForKey:@"Price__c"]];
9. To display the Detail view, add code that pushes the initialized DetailViewController onto the
UINavigationController stack:
[[self navigationController] pushViewController:detailController animated:YES];
107
Create the Detail ScreenNative iOS Development

Great! Now you’re using a UINavigationController stack to handle a set of two views. The root view controller is always
at the bottom of the stack. To activate any other view, you just push its controller onto the stack. When the view is dismissed, you
pop its controller, which brings the view below it back into the display.
10. Build and run your app. Click on any Warehouse item to display its details.
Add Update Functionality
Now that the WarehouseViewController is set up, we need to modify the DetailViewController class to send the
user’s updates to Salesforce via a REST request.
1. In the DetailViewController.h file, add an instance method to DetailViewController that lets a user update
the price and quantity fields. This method needs to send a record ID, the names of the fields to be updated, the new quantity and
price values, and the name of the object to be updated. Add this declaration after the interface block and just above the @end
marker.
- (void)updateWithObjectType:(NSString *)objectType
objectId:(NSString *)objectId
quantity:(NSString *)quantity
price:(NSString *)price;
To implement the method, you create an SFRestRequest object using the input values, then send the request object to the
shared instance of the SFRestAPI.
2. In the DetailViewController.h file, add the following import statement just above the @interface declaration.
#import "SFRestAPI.h"
3. At the end of the DetailViewController.h file, just above the @end marker, copy the
updateWithObjectType:objectId:quantity:price: signature, followed by a pair of curly braces:
- (void)updateWithObjectType:(NSString *)objectType
objectId:(NSString *)objectId
quantity:(NSString *)quantity
price:(NSString *)price {
}
4. In the implementation block, create a new NSDictionary object to contain the Quantity and Price fields. To allocate this object,
use the dictionaryWithObjectsAndKeys: ... NSDictionary class method with the desired list of fields.
- (void)updateWithObjectType:(NSString *)objectType
objectId:(NSString *)objectId
quantity:(NSString *)quantity
price:(NSString *)price
{
NSDictionary *fields = [NSDictionary
dictionaryWithObjectsAndKeys: quantity, @"Quantity__c",
price, @"Price__c",
nil];
}
108
Create the Detail ScreenNative iOS Development

5. Create a SFRestRequest object. To allocate this object, use the
requestForUpdateWithObjectType:objectId:fields: instance method on the SFRestAPI shared instance.
- (void)updateWithObjectType:(NSString *)objectType
objectId:(NSString *)objectId
quantity:(NSString *)quantity
price:(NSString *)price
{
NSDictionary *fields = [NSDictionary
dictionaryWithObjectsAndKeys: quantity, @"Quantity__c",
price, @"Price__c",
nil];
SFRestRequest *request = [[SFRestAPI sharedInstance]
requestForUpdateWithObjectType:objectType
objectId:objectId
fields:fields];
}
6. Finally, send the new SFRestRequest object to the service by calling send:delegate: on the SFRestAPI shared
instance. For the delegate argument, be sure to specify self, since DetailViewController is the SFRestDelegate
in this case.
- (void)updateWithObjectType:(NSString *)objectType
objectId:(NSString *)objectId
quantity:(NSString *)quantity
price:(NSString *)price
{
NSDictionary *fields = [NSDictionary
dictionaryWithObjectsAndKeys: quantity, @"Quantity__c",
price, @"Price__c",
nil];
SFRestRequest *request = [[SFRestAPI sharedInstance]
requestForUpdateWithObjectType:objectType
objectId:objectId
fields:fields];
[[SFRestAPI sharedInstance] send:request delegate:self];
}
7. Edit the updateTouchUpInside: action method to call the
updateWithObjectType:objectId:quantity:price: method when the user taps the Update button.
- (IBAction)updateTouchUpInside:(id)sender {
// For Update button
[self updateWithObjectType:@"Merchandise__c"
objectId:self.idData
quantity:[_quantityField text]
price:[_priceField text]];}
Note:
•Extra credit: Improve your app’s efficiency by performing updates only when the user has actually changed the quantity
value.
109
Create the Detail ScreenNative iOS Development

Add SFRestDelegate to DetailViewController
We’re almost there! We’ve issued the REST request, but still need to provide code to handle the response.
1. Open the DetailViewController.h file and change the DetailViewController interface declaration to include
<SFRestDelegate>
@interface DetailViewController : UIViewController <SFRestDelegate>
2. Open the WarehouseViewController.m file.
3. Find the pragma that marks the SFRestAPIDelegate section.
#pragma mark - SFRestAPIDelegate
Note: SFRestAPIDelegate is a typo in the template. The name of the protocol is SFRestDelegate. Hopefully, it’ll
be fixed by the time you read this!
4. Copy the four methods under this pragma into the DetailViewController.m file.
- (void)request:(SFRestRequest *)request didLoadResponse:(id)jsonResponse {
NSArray *records = [jsonResponse objectForKey:@"records"];
NSLog(@"request:didLoadResponse: #records: %d",
records.count);
self.dataRows = records;
[self.tableView reloadData];
}
- (void)request:(SFRestRequest*)request didFailLoadWithError:(NSError*)error {
NSLog(@"request:didFailLoadWithError: %@", error);
//add your failed error handling here
}
- (void)requestDidCancelLoad:(SFRestRequest *)request {
NSLog(@"requestDidCancelLoad: %@", request);
//add your failed error handling here
}
- (void)requestDidTimeout:(SFRestRequest *)request {
NSLog(@"requestDidTimeout: %@", request);
//add your failed error handling here
}
These methods are all we need to implement the SFRestAPI interface. For this tutorial, we can retain the simplistic handling of
error, cancel, and timeout conditions. However, the request:didLoadResponse: method is generating compiler errors.
We need to change the request:didLoadResponse: method to suit the detail view purposes. Let’s eliminate the errors
and then use the UINavigationController stack to return to the list view after an update occurs.
5. In the DetailViewController.m file, delete the existing code in the request:didLoadResponse: delegate method.
In its place, add code that logs a success message and then pops back to the root view controller. The revised method looks like this.
- (void)request:(SFRestRequest *)request
didLoadResponse:(id)jsonResponse {
110
Create the Detail ScreenNative iOS Development

NSLog(@"1 record updated");
dispatch_async(dispatch_get_main_queue(), ^{
[self.navigationController popViewControllerAnimated:YES];
});
}
6. Build and run your app. In the Warehouse view, click one of the items. You’re now able to access the Detail view and edit its quantity,
but there’s a problem: the keyboard won’t go away when you want it to. You need to add a little finesse to make the app truly
functional.
Refreshing the Query with viewWillAppear
The viewDidLoad method lets you configure the view when it first loads. In the WarehouseViewController implementation,
this method contains the REST API query that populates both the list view and the detail view. However, since
WarehouseViewController represents the root view, the viewDidLoad notification is called only once—when the view
is initialized. What does this mean? When a user updates a quantity in the detail view and returns to the list view, the query is not
refreshed. Thus, if the user returns to the same record in the detail view, the updated value does not display, and the user is not happy.
You need a different method to handle the query. The viewWillAppear method is called each time its view is displayed. Let’s add
this method to WarehouseViewController and move the SOQL query into it.
1. In the WarehouseViewController.m file, add the following code after the viewDidLoad implementation.
- (void)viewWillAppear:(BOOL)animated {
[super viewWillAppear:animated];
}
2. Cut the following lines from the viewDidLoad method and paste them into the viewWillAppear: method, after the call
to super:
SFRestRequest *request =
[[SFRestAPI sharedInstance] requestForQuery:
@"SELECT Name, ID, Price__c, Quantity__c "
"FROM Merchandise__c LIMIT 10"];
[[SFRestAPI sharedInstance] send:request delegate:self];
The final viewDidLoad and viewWillAppear: methods look like this.
- (void)viewDidLoad{
[super viewDidLoad];
self.title = @"Warehouse App";
}
- (void)viewWillAppear:(BOOL)animated {
[super viewWillAppear:animated];
SFRestRequest *request = [[SFRestAPI sharedInstance]
requestForQuery:@"SELECT Name, ID, Price__c, "
"Quantity__c "
"FROM Merchandise__c LIMIT 10"];
[[SFRestAPI sharedInstance] send:request delegate:self];
}
111
Create the Detail ScreenNative iOS Development

The viewWillAppear: method refreshes the query each time the user navigates back to the list view. Later, when the user revisits
the detail view, the list view controller updates the detail view with the refreshed data.
Step 5: Try Out the App
1. Build your app and run it in the iPhone emulator. If you did everything correctly, a detail page appears when you click a Merchandise
record in the Warehouse screen.
2. Update a record's quantity and price. Be sure to click the Update button in the detail view after you edit the values. When you
navigate back to the detail view, the updated values display.
3. Log into your DE org and view the record using the browser UI to see the updated values.
iOS Sample Applications
The app you created in Run the Xcode Project Template App is itself a sample application, but it only does one thing: issue a SOQL query
and return a result. The native iOS sample apps demonstrate more functionality you can examine and work into your own apps.
•RestAPIExplorer exercises all native REST API wrappers. It resides in Mobile SDK for iOS under
native/SampleApps/RestAPIExplorer.
•SmartSyncExplorer demonstrates the power of the native SmartSync Data Framework library on iOS. It resides in Mobile SDK for
iOS under native/SampleApps/SmartSyncExplorer.
Mobile SDK provides iOS wrappers for the following hybrid apps.
•AccountEditor: Demonstrates how to synchronize offline data using the smartsync.js library.
•NoteSync: Demonstrates how to use non-REST APIs to retrieve Salesforce Notes.
•SmartSyncExplorerHybrid: Demonstrates how to synchronize offline data using the SmartSync Data Framework plugin.
112
iOS Sample ApplicationsNative iOS Development

CHAPTER 9 Native Android Development
Salesforce Mobile SDK for Android provides source code, build scripts, and native sample apps to get
you off and running. It gives you template apps that implement two basic features of any Mobile SDK
app:
In this chapter ...
•Android Native Quick
Start •Automation of the OAuth2 authentication flow, making it easy to integrate the process with your
app.
•Native Android
Requirements •Access to the Salesforce REST API, with utility classes that simplify that access.
•Creating an Android
Project with
Forcedroid
Sample native applications show you basic techniques for implementing login, REST API calls, and other
Mobile SDK features.
•Setting Up Sample
Projects in Android
Studio
•Developing a Native
Android App
•Tutorial: Creating a
Native Android
Warehouse
Application
•Android Sample
Applications
113

Android Native Quick Start
Use the following procedure to get started quickly.
1. Make sure you meet all of the native Android requirements.
2. Install Mobile SDK for Android. If you prefer, you can install Mobile SDK from the Mobile SDK GitHub Repositories instead.
3. At the command line, run the forcedroid application to create a new Android project, and then run that app in Android Studio or
from the command line.
4. Follow the instructions at Setting Up Sample Projects in Android Studio.
Native Android Requirements
The following software is required for all Mobile SDK development.
•Node.js
•Npm version 3.10 or later (installed with Node.js).
•A Salesforce Developer Edition organization with a connected app.
Mobile SDK 6.0 Android development also requires the following software.
•Java JDK 1.8.x or later—www.oracle.com/downloads.
•forcedroid npm package, version 6.0.
•Android Studio 3.0 or later—developer.android.com/sdk.
•Android SDK and Android SDK Tools—Install from within Android Studio.
1. In the Android Studio menu, click Tools > Android > SDK Manager.
2. Click the SDK Platforms tab.
3. Install at least the following required SDK levels and all intervening levels:
–Minimum API: Android KitKat (API 21)
–Target API: Android Oreo (API 27)
4. Click the SDK Tools tab.
5. Install the latest Android SDK Tools version.
•Android Virtual Device (AVD)—Install from within Android Studio.
1. In the Android Studio menu, click Tools > Android > AVD Manager.
2. Click Create Virtual Device....
3. Install at least one AVD that targets Android KitKat (API 21) and above. To learn how to set up an AVD in Android Studio, follow
the instructions at developer.android.com/guide/developing/devices/managing-avds.html.
On the Salesforce side, you also need:
•Salesforce Mobile SDK 6.0 or later for Android. See Android Preparation.
•A Salesforce Developer Edition organization with a connected app.
The SalesforceSDK project is built with the Android KitKat (API 21) library.
114
Android Native Quick StartNative Android Development

Tip:
•For best results, install all Android SDK versions recommended by the Android SDK Manager, and all available versions of
Android SDK tools.
•On Windows, be sure to run Android Studio as administrator.
•For detailed Android Studio requirements, see developer.android.com/sdk.
Creating an Android Project with Forcedroid
To create an app, use forcedroid in a terminal window or at a Windows command prompt. The forcedroid utility gives you two ways to
create your app.
•Specify the type of application you want, along with basic configuration data.
OR
•Use an existing Mobile SDK app as a template. You still provide the basic configuration data.
You can use forcedroid in interactive mode with command-line prompts, or in script mode with command-line arguments. To see
command usage information, type forcedroid without arguments.
Forcedroid Project Types
The forcedroid create command requires you to specify one of the following project types:
LanguageArchitectureApp Type
JavaNativenative
KotlinNativenative_kotlin
To develop a native Android app in Java, specify native.
Using forcedroid create Interactively
To enter application options interactively at a command prompt, type forcedroid create. The forcedroid utility then prompts
you for each configuration option. For example:
$ forcedroid create
Enter your application type (native, native_kotlin): native
Enter your application name: testNative
Enter the package name for your app (com.mycompany.myapp): com.bestapps.android
Enter your organization name (Acme, Inc.): BestApps
Enter output directory for your app (leave empty for the current directory): testNative
This command creates a native Java Android app named “testNative” in the testNative\ subdirectory of your current directory.
115
Creating an Android Project with ForcedroidNative Android Development

Using forcedroid create in Script Mode
In script mode, you can use forcedroid without interactive prompts. For example, to create a native app written in Java:
$ forcedroid create --apptype="native" --appname="package-test"
--packagename="com.acme.mobile_apps"
--organization="Acme Widgets, Inc." --outputdir="PackageTest"
Or, to create a native app written in Kotlin:
$ forcedroid create --apptype="native_kotlin" --appname="package-test"
--packagename="com.acme.mobile_apps"
--organization="Acme Widgets, Inc." --outputdir="PackageTest"
Each of these calls creates a native app named “package-test” and places it in the PackageTest/ subdirectory of your current
directory.
Creating an App from a Template
The forcedroid createWithTemplate command is identical to forcedroid create except that it asks for a GitHub
repo URI instead of an app type. You set this URI to point to any repo directory that contains a Mobile SDK app that can be used as a
template. Your template app can be any supported Mobile SDK app type. The script changes the template’s identifiers and configuration
to match the values you provide for the other parameters.
Here’s command-line usage information for forcedroid createWithTemplate:
Usage:
forcedroid createWithTemplate
--templaterepouri=<Template repo URI> (e.g.
https://github.com/forcedotcom/SmartSyncExplorerReactNative)]
--appname=<Application Name>
--packagename=<App Package Identifier> (e.g. com.mycompany.myapp)
--organization=<Organization Name> (Your company's/organization's name)
--outputdir=<Output directory> (Leave empty for current directory)]
You can use forcedroid createWithTemplate interactively or in script mode. For example, here’s a script mode call:
forcedroid createWithTemplate
--templaterepouri=https://github.com/forcedotcom/SmartSyncExplorerReactNative
--appname=MyReact
-—packagename=com.mycompany.react
--organization="Acme Software, Inc."
-—outputdir=testWithTemplate
This call creates a React Native app with the same source code and resources as the SmartSyncExplorerReactNative sample app. Forcedroid
places the new app in the testWithTemplate/ subdirectory of your current directory. It also changes the name
“SmartSyncExplorerReactNative” to “MyReact” throughout the app.
Checking the Forcedroid Version
To find out which version of forcedroid you’ve installed, run the following command:
forcedroid version
116
Creating an Android Project with ForcedroidNative Android Development

Import and Build Your App in Android Studio
1. Open the project in Android Studio.
•From the Welcome screen, click Import Project (Eclipse ADT, Gradle, etc.).
OR
•From the File menu, click File > New > Import Project....
2. Browse to your project directory and click OK.
Android Studio automatically builds your workspace. This process can take several minutes. When the status bar reports “Gradle
build successful”, you’re ready to run the project.
3. Click Run <project_name>, or press SHIFT+F10. For native projects, the project name is the app name that you specified.
Android Studio launches your app in the emulator or on your connected Android device.
Building and Running Your App from the Command Line
After the command-line returns to the command prompt, the forcedroid script prints instructions for running Android utilities to configure
and clean your project. Follow these instructions if you want to build and run your app from the command line.
1. Build the new application.
•Windows:
cd <your_project_directory>
gradlew assembleDebug
•Mac:
cd <your_project_directory>
./gradlew assembleDebug
When the build completes successfully, you can find your signed APK debug file in the project’s build/outputs/apk directory.
2. If you’re using an emulator that isn’t running, use the Android AVD Manager to start it. If you’re using a physical device, connect it.
3. Install the APK file on the emulator or device.
•Windows:
adb install <path_to_your_app>\build\outputs\apk\<app_name>.apk
•Mac:
./adb install <path_to_your_app>/build/outputs/apk/<app_name>.apk
If you can’t find your newly installed app, try restarting your emulator or device. For more information, see “Building and Running from
the Command Line” at developer.android.com.
How the Forcedroid Script Generates New Apps
•The script downloads templates at runtime from a GitHub repo.
117
Creating an Android Project with ForcedroidNative Android Development

•For the forcedroid create command, the script uses the default templates in the SalesforceMobileSDK-Templates GitHub
repo.
•Generated apps use Gradle.
•The script uses npm at runtime to download Mobile SDK libraries. The settings.gradle file points to these libraries under
node_modules.
SEE ALSO:
Updating Mobile SDK Apps (5.0 and Later)
Using a Custom Template to Create Apps
About Mobile SDK Templates
Mobile SDK defines a template for each architecture it supports on iOS and Android. These templates are maintained in the
github.com/forcedotcom/SalesforceMobileSDK-Templates repo. When a customer runs the forcedroid or forceios create command,
the script copies the appropriate built-in template from the repo and transforms this copy into the new app. Apps created this way are
basic Mobile SDK apps with little functionality.
Perhaps you’d like to create your own template, with additional functionality, resources, or branding. You can harness the same Mobile
SDK mechanism to turn your own app into a template. You can then tell forcedroid or forceios to use that template instead of its own.
How to Use a Custom Template
In addition to forcedroid and forceios create, Mobile SDK defines a createWithTemplate command.When you run forcedroid
or forceios createWithTemplate, you specify a template app repo instead of an app type, followed by the remaining app creation
parameters. The template app repo contains a Mobile SDK app that the script recognizes as a template. To create a new Mobile SDK app
from this template, the script copies the template app to a new folder and applies your parameter values to the copied code.
The template.js File
To accept your unknown app as a template, forceios and forcedroid require you to define a template.js configuration file. You
save this file in the root of your template app repo. This file tells the script how to perform its standard app refactoring tasks—moving
files, replacing text, removing and renaming resources. However, you might have even more extensive changes that you want to apply.
In such cases, you can also adapt template.js to perform customizations beyond the standard scope. For example, if you insert
your app name in classes other than the main entry point class, you can use template.js to perform those changes.
A template.js file contains two parts: a JavaScript “prepare” function for preparing new apps from the template, and a declaration
of exports.
The template.js Prepare Funtion
Most of a template.js file consists of the “prepare” function. By default, prepare functions use the following signature:
function prepare(config, replaceInFiles, moveFile, removeFile)
You can rename this function, as long as you remember to specify the updated name in the list of exports. The Mobile SDK script calls
the function you export with the following arguments:
•config: A dictionary identifying the platform (iOS or Android), app name, package name, organization, and Mobile SDK version.
118
Using a Custom Template to Create AppsNative Android Development

•replaceInFiles: Helper function to replace a string in files.
•moveFile: Helper function to move files and directories.
•removeFile: Helper function to remove files and directories.
The default prepare function found in Mobile SDK templates replaces strings and moves and removes the files necessary to personalize
a standard template app. If you intend to add functionality, place your code within the prepare function. Note, however, that the helper
functions passed to your prepare function can only perform the tasks of a standard template app. For custom tasks, you’ll have to
implement and call your own methods.
Exports Defined in template.js
Each template.js file defines the following two exports.
appType
Assign one of the following values:
•'native'
•'native_kotlin' (forcedroid only)
•'native_swift' (forceios only)
•'react_native'
•'hybrid_local'
•'hybrid_remote'
prepare
The handle of your prepare function (listed without quotation marks).
Here’s an example of the export section of a template.js file. This template is for a native app that defines a prepare function
named prepare:
//
// Exports
//
module.exports = {
appType: 'native',
prepare: prepare
};
In this case, the prepare function’s handle is, in fact, “prepare”:
function prepare(config, replaceInFiles, moveFile, removeFile)
Template App Identification in template.js (Native and React Native Apps)
For native and React native apps, a template app’s prepare function defines an app name, a package name, and an organization or
company name. These values identify the template app itself—not a new custom app created from the template. At runtime, the Mobile
SDK script uses these values to find the strings to be replaced with the script’s input values. Here’s an example of the settings for these
iOSNativeTemplate template app:
// Values in template
var templateAppName = 'iOSNativeTemplate';
var templatePackageName = 'com.salesforce.iosnativetemplate';
var templateOrganization = 'iOSNativeTemplateOrganizationName';
119
Using a Custom Template to Create AppsNative Android Development

Examples of template.js Files
Mobile SDK defines the following template.js files in the github.com/forcedotcom/SalesforceMobileSDK-Templates repo:
•iOSNativeTemplate/template.js (forceios only)
•iOSNativeSwiftTemplate/template.js (forceios only)
•ReactNativeTemplate/template.js
•HybridLocalTemplate/template.js
•HybridRemoteTemplate/template.js
•AndroidNativeTemplate/template.js (forcedroid only)
These templates are the bare bones apps used by forceios create and forcedroid create. Their level of complexity is
intentionally low. For an example of a more complex template repo created from a full-fledged app, check out
github.com/forcedotcom/SmartSyncExplorerReactNative.
Note: Always match the script command to the template. Use iOS-specific templates with forceios
createWithTemplate only, and Android-specific templates with forcedroid createWithTemplate only. This
restriction doesn’t apply to hybrid and React native templates.
Define a Basic template.js File
The following steps describe the quickest way to create a basic template.js file.
1. Copy a template.js file from the github.com/forcedotcom/SalesforceMobileSDK-Templates repo to the root of your custom
template app repo. Be sure to choose the template that matches the type of app your template should build.
2. For native or React native apps only, update the app name, package name, and organization to reflect your template app.
3. If necessary, update the appType and prepare settings in the module.exports object, as described earlier. Although
this step isn’t required for this basic example, you might need it later if you create your own template.js files.
Restrictions and Guidelines
A few restrictions apply to custom templates.
•The template app can be any valid Mobile SDK app that targets any supported platform and architecture.
•A primary requirement is that the template repo and your local Mobile SDK repo must be on the same Mobile SDK version. You can
use git version tags to sync both repos to a specific earlier version, but doing so isn’t recommended.
•Always match the script command to the template. Use iOS-specific templates with forceios createWithTemplate
only, and Android-specific templates with forcedroid createWithTemplate only. This restriction doesn’t apply to hybrid
and React native templates.
Setting Up Sample Projects in Android Studio
The SalesforceMobileSDK-Android GitHub repository contains sample apps you can build and run.
1. If you haven’t already done so, clone the SalesforceMobileSDK-Android GitHub repository.
•Mac:
git clone https://github.com/forcedotcom/SalesforceMobileSDK-Android.git
./install.sh
120
Setting Up Sample Projects in Android StudioNative Android Development

•Windows:
git clone https://github.com/forcedotcom/SalesforceMobileSDK-Android.git
cscript install.vbs
2. Open the project in Android Studio.
•From the Welcome screen, click Import Project (Eclipse ADT, Gradle, etc.).
OR
•From the File menu, click File > New > Import Project....
3. Browse to <path_to_SalesforceMobileSDK-Android>/native/NativeSampleApps/ or
<path_to_SalesforceMobileSDK-Android>/hybrid/HybridSampleApps/
4. Select one of the listed sample apps and click OK..
5. When the project finishes building, select the sample project in the Select Run/Debug Configurations drop-down menu.
6. Press SHIFT-F10.
Android Project Files
When you browse a native app in the Project window of Android Studio, you can find these library projects:
•libs/SalesforceAnalytics—Analytics project. Reports non-sensitive data on Mobile SDK app usage to Salesforce.
•libs/SalesforceSDK—Salesforce Mobile SDK project. Provides support for OAuth2 and REST API calls
•libs/SmartStore—SmartStore project. Provides an offline storage solution
•libs/SmartSync—SmartSync Data Framework project. Implements offline data synchronization tools
Mobile SDK libraries reference each other in a dependency hierarchy, as shown in the following diagram.
121
Android Project FilesNative Android Development
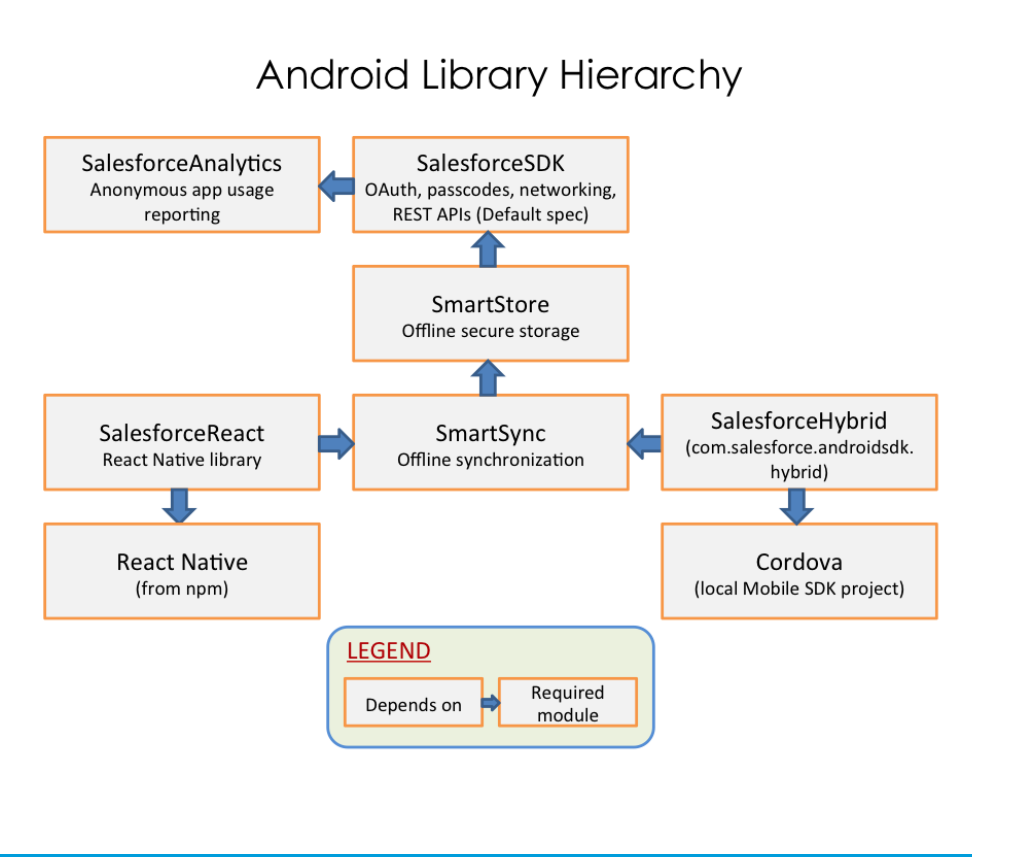
Developing a Native Android App
The native Android version of the Salesforce Mobile SDK empowers you to create rich mobile apps that directly use the Android operating
system on the host device. To create these apps, you need to understand Java and Android development well enough to write code
that uses Mobile SDK native classes.
Android Application Structure
Native Android apps that use the Mobile SDK typically require:
•An application entry point class that extends android.app.Application.
•At least one activity that extends android.app.Activity.
With Mobile SDK, you:
•Create a stub class that extends android.app.Application.
•Implement onCreate() in your Application stub class to call SalesforceSDKManager.initNative().
122
Developing a Native Android AppNative Android Development
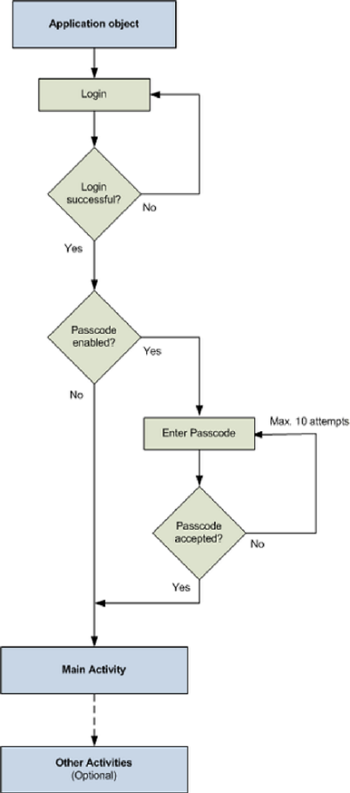
•Extend SalesforceActivity, SalesforceListActivity, or SalesforceExpandableListActivity. This
extension is optional but recommended.
The top-level SalesforceSDKManager class implements passcode functionality for apps that use passcodes, and fills in the blanks
for those that don’t. It also sets the stage for login, cleans up after logout, and provides a special event watcher that informs your app
when a system-level account is deleted. OAuth protocols are handled automatically with internal classes.
The SalesforceActivity, SalesforceListActivity, and SalesforceExpandableListActivity classes
offer free handling of application pause and resume events and related passcode management. We recommend that you extend one
of these classes for all activities in your app—not just the main activity. If you use a different base class for an activity, you’re responsible
for replicating the pause and resume protocols found in SalesforceActivity.
Within your activities, you interact with Salesforce objects by calling Salesforce REST APIs. The Mobile SDK provides the
com.salesforce.androidsdk.rest package to simplify the REST request and response flow.
You define and customize user interface layouts, image sizes, strings, and other resources in XML files. Internally, the SDK uses an R class
instance to retrieve and manipulate your resources. However, the Mobile SDK makes its resources directly accessible to client apps, so
you don’t need to write code to manage these features.
123
Android Application StructureNative Android Development

Native API Packages
Salesforce Mobile SDK groups native Android APIs into Java packages. For a quick overview of these packages and points of interest
within them, see Android Packages and Classes.
Overview of Native Classes
This overview of the Mobile SDK native classes give you a look at pertinent details of each class and a sense of where to find what you
need.
SalesforceSDKManager Class
The SalesforceSDKManager class is the entry point for all native Android applications that use the Salesforce Mobile SDK. It
provides mechanisms for:
•Login and logout
•Passcodes
•Encryption and decryption of user data
•String conversions
•User agent access
•Application termination
•Application cleanup
initNative() Method
During startup, you initialize the singleton SalesforceSDKManager object by calling its static initNative() method. This
method takes four arguments:
DescriptionParameter Name
An instance of Context that describes your application’s context. In an
Application extension class, you can satisfy this parameter by passing a
call to getApplicationContext().
applicationContext
An instance of your implementation of the KeyInterface Mobile SDK
interface. You are required to implement this interface.
keyImplementation
The descriptor of the class that displays your main activity. The main activity is
the first activity that displays after login.
mainActivity
(Optional) The class descriptor of your custom LoginActivity class.loginActivity
Here’s an example from the TemplateApp:
SalesforceSDKManager.initNative(getApplicationContext(), new KeyImpl(), MainActivity.class);
In this example, KeyImpl is the app’s implementation of KeyInterface. MainActivity subclasses SalesforceActivity
and is designated here as the first activity to be called after login.
124
Native API PackagesNative Android Development

logout() Method
The SalesforceSDKManager.logout() method clears user data. For example, if you’ve introduced your own resources that
are user-specific, you don’t want them to persist into the next user session. SmartStore destroys user data and account information
automatically at logout.
Always call the superclass method somewhere in your method override, preferably after doing your own cleanup. Here’s a pseudo-code
example.
@Override
public void logout(Activity frontActivity) {
// Clean up all persistent and non-persistent app artifacts
// Call superclass after doing your own cleanup
super.logout(frontActivity);
}
getLoginActivityClass() Method
This method returns the descriptor for the login activity. The login activity defines the WebView through which the Salesforce server
delivers the login dialog.
getUserAgent() Methods
The Mobile SDK builds a user agent string to publish the app’s versioning information at runtime. This user agent takes the following
form.
SalesforceMobileSDK/<salesforceSDK version> android/<android OS version> appName/appVersion
<Native|Hybrid>
Here’s a real-world example.
SalesforceMobileSDK/2.0 android mobile/4.2 RestExplorer/1.0 Native
To retrieve the user agent at runtime, call the SalesforceSDKManager.getUserAgent() method.
isHybrid() Method
Imagine that your Mobile SDK app creates libraries that are designed to serve both native and hybrid clients. Internally, the library code
switches on the type of app that calls it, but you need some way to determine the app type at runtime. To determine the type of the
calling app in code, call the boolean SalesforceSDKManager.isHybrid() method. True means hybrid, and false means
native.
KeyInterface Interface
KeyInterface is a required interface that you implement and pass into the SalesforceSDKManager.initNative() method.
getKey() Method
You are required to return a Base64-encoded encryption key from the getKey() abstract method. Use the Encryptor.hash()
and Encryptor.isBase64Encoded() helper methods to generate suitable keys. The Mobile SDK uses your key to encrypt app
data and account information.
125
Overview of Native ClassesNative Android Development

PasscodeManager Class
The PasscodeManager class manages passcode encryption and displays the passcode page as required. It also reads mobile policies
and caches them locally. This class is used internally to handle all passcode-related activities with minimal coding on your part. As a rule,
apps call only these three PasscodeManager methods:
•public void onPause(Activity ctx)
•public boolean onResume(Activity ctx)
•public void recordUserInteraction()
These methods must be called in any native activity class that
•Is in an app that requires a passcode, and
•Does not extend SalesforceActivity, SalesforceListActivity, or SalesforceExpandableListActivity.
You get this implementation for free in any activity that extends SalesforceActivity, SalesforceListActivity, or
SalesforceExpandableListActivity.
onPause() and onResume()
These methods handle the passcode dialog box when a user pauses and resumes the app. Call each of these methods in the matching
methods of your activity class. For example, SalesforceActivity.onPause() calls PasscodeManager.onPause(),
passing in its own class descriptor as the argument, before calling the superclass.
@Override
public void onPause() {
passcodeManager.onPause(this);
super.onPause();
}
Use the boolean return value of PasscodeManager.onResume() method as a condition for resuming other actions. In your
app’s onResume() implementation, be sure to call the superclass method before calling the PasscodeManager version. For
example:
@Override
public void onResume() {
super.onResume();
// Bring up passcode screen if needed
passcodeManager.onResume(this);
}
recordUserInteraction()
This method saves the time stamp of the most recent user interaction. Call PasscodeManager.recordUserInteraction()
in the activity's onUserInteraction() method. For example:
@Override
public void onUserInteraction() {
passcodeManager.recordUserInteraction();
}
126
Overview of Native ClassesNative Android Development

Encryptor class
The Encryptor helper class provides static helper methods for encrypting and decrypting strings using the hashes required by the
SDK. It’s important for native apps to remember that all keys used by the Mobile SDK must be Base64-encoded. No other encryption
patterns are accepted. Use the Encryptor class when creating hashes to ensure that you use the correct encoding.
Most Encryptor methods are for internal use, but apps are free to use this utility as needed. For example, if an app implements its
own database, it can use Encryptor as a free encryption and decryption tool.
SalesforceActivity, SalesforceListActivity, and SalesforceExpandableListActivity Classes
SalesforceActivity, SalesforceListActivity, and SalesforceExpandableListActivity are the skeletal
base classes for native SDK activities. They extend android.app.Activity,android.app.ListActivity, and
android.app.ExpandableListActivity, respectively.
Each of these classes provides a free implementation of PasscodeManager calls. When possible, it’s a good idea to extend one of
these classes for all of your app’s activities, even if your app doesn’t currently use passcodes.
For passcode-protected apps: If any of your activities don’t extend SalesforceActivity, SalesforceListActivity,
or SalesforceExpandableListActivity, you’ll need to add a bit of passcode protocol to each of those activities. See Using
Passcodes
Each of these activity classes contain a single abstract method:
public abstract void onResume(RestClient client);
This method overloads the Activity.onResume() method, which is implemented by the class. The class method calls your
overload after it instantiates a RestClient instance. Use this method to cache the client that’s passed in, and then use that client
to perform your REST requests.
UI Classes
Activities in the com.salesforce.androidsdk.ui package represent the UI resources that are common to all Mobile SDK
apps. You can style, skin, theme, or otherwise customize these resources through XML. With the exceptions of SalesforceActivity,
SalesforceListActivity, and SalesforceExpandableListActivity, do not override these activity classes with
intentions of replacing the resources at runtime.
ClientManager Class
ClientManager works with the Android AccountManager class to manage user accounts. More importantly for apps, it provides
access to RestClient instances through two methods:
•getRestClient()
•peekRestClient()
The getRestClient() method asynchronously creates a RestClient instance for querying Salesforce data. Asynchronous in
this case means that this method is intended for use on UI threads. The peekRestClient() method creates a RestClient
instance synchronously, for use in non-UI contexts.
Once you get the RestClient instance, you can use it to send REST API calls to Salesforce.
RestClient Class
As its name implies, the RestClient class is an Android app’s liaison to the Salesforce REST API.
127
Overview of Native ClassesNative Android Development

You don’t explicitly create new instances of the RestClient class. Instead, you use the ClientManager factory class to obtain
a RestClient instance. Once you get the RestClient instance, you can use it to send REST API calls to Salesforce. The method
you call depends on whether you’re calling from a UI context. See ClientManager Class.
Use the following RestClient methods to send REST requests:
•sendAsync()—Call this method if you obtained your RestClient instance by calling
ClientManager.getRestClient().
•sendSync()—Call this method if you obtained your RestClient instance by calling
ClientManager.peekRestClient().
sendSync() Method
You can choose from three overloads of RestClient.sendSync(), depending on the degree of information you can provide
for the request.
sendAsync() Method
The RestClient.sendAsync() method wraps your RestRequest object in a new instance of WrappedRestRequest.
It then adds the WrappedRestRequest object to the request queue and returns that object. If you wish to cancel the request while
it’s pending, call cancel() on the WrappedRestRequest object.
getRequestQueue() Method
You can access the underlying RequestQueue object by calling restClient.getRequestQueue() on your RestClient
instance. With the RequestQueue object you can directly cancel and otherwise manipulate pending requests. For example, you can
cancel an entire pending request queue by calling restClient.getRequestQueue().cancelAll(). See a code example
at Managing the Request Queue.
RestRequest Class
The RestRequest class creates and formats REST API requests from the data your app provides. It is implemented by Mobile SDK
and serves as a factory for instances of itself.
Don’t directly create instances of RestRequest. Instead, call an appropriate RestRequest static factory method such as
RestRequest.getRequestForCreate(). To send the request, pass the returned RestRequest object to
RestClient.sendAsync() or RestClient.sendSync(). See Using REST APIs.
The RestRequest class natively handles the standard Salesforce data operations offered by the Salesforce REST API and SOAP API.
Supported operations are:
DescriptionParametersOperation or Resource
Returns Salesforce version metadataNoneVersions
Returns a RestRequest object
containing a batch of up to 25 subrequests
API version, flag telling the batch process
whether to halt in the case of error, list of
subrequests
Batch request
specified in a list of RestRequest
objects. Each subrequest counts against rate
limits.
128
Overview of Native ClassesNative Android Development

DescriptionParametersOperation or Resource
Returns available resources for the specified
API version, including resource name and
URI
API versionResources
Returns the object’s complete metadata
collection
API version, object typeMetadata
Returns a list of all available objects in your
org and their metadata
API versionDescribeGlobal
Returns a description of a single object typeAPI version, object typeDescribe
Creates a new record in the specified objectAPI version, object type, map of field names
to value objects
Create
Returns a RestRequest object that you
use to execute the composite request.
API version, “all or none” flag that indicates
whether to treat all requests as a
transactional block in error conditions, hash
CompositeRequest
Regardless of the number of subrequests,
map of subrequests (values) and their
reference ID (keys)
each composite request counts as one API
call. See “Composite” in the REST API
Developer Guide.
Retrieves a record by object IDAPI version, object type, object ID, list of
fields
Retrieve
Executes the specified SOQL searchAPI version, SOQL query stringSearch
Returns search result layout information for
the specified objects
API version, list of objectsSearchResultLayout
Returns an ordered list of objects in the
default global search scope of a logged-in
user
API versionSearchScopeAndOrder
Returns a RestRequest object for an
SObject tree based on the given list of
SObject tree nodes.
API version, object type, list of SObject tree
nodes
SObject Tree
Updates an object with the given map. For
conditional updates, Mobile SDK supports
If-Unmodified-Since requests.
API version, object type, object ID, map of
field names to value objects,
If-Unmodified-Since date
(optional)
Update
Updates or inserts an object from external
data, based on whether the external ID
API version, object type, external ID field,
external ID, map of field names to value
objects
Upsert
currently exists in the external ID field. If you
set the name of the external ID field to“Id”
and the external ID to null, a new record is
created.
Deletes the object of the given type with
the given ID
API version, object type, object IDDelete
129
Overview of Native ClassesNative Android Development

To obtain an appropriate RestRequest instance, call the RestRequest static method that matches the operation you want to
perform. Here are the RestRequest static methods.
•getBatchRequest()
•getRequestForCreate()
•getRequestForDelete()
•getRequestForDescribe()
•getRequestForDescribeGlobal()
•getRequestForMetadata()
•getRequestForQuery()
•getRequestForResources()
•getRequestForRetrieve()
•getRequestForSearch()
•getRequestForSearchResultLayout()
•getRequestForSearchScopeAndOrder()
•getRequestForSObjectTree()
•getRequestForUpdate()
•getRequestForUpsert()
•getRequestForVersions()
These methods return a RestRequest object which you pass to an instance of RestClient. The RestClient class provides
synchronous and asynchronous methods for sending requests: sendSync() and sendAsync(). UsesendAsync() when
you’re sending a request from a UI thread. Use sendSync() only on non-UI threads, such as a service or a worker thread spawned
by an activity.
Example: For sample calls, see
/libs/test/SalesforceSDKTest/src/com/salesforce/androidsdk/rest/RestRequestTest.java
at github.com/forcedotcom/SalesforceMobileSDK-Android.
FileRequests Class
The FileRequests class provides methods that create file operation requests. Each method returns a new RestRequest object.
Applications send this object to the Salesforce service to process the request. For example, the following code snippet calls the
ownedFilesList() method to retrieve a RestRequest object. It then sends the RestRequest object to the server using
RestClient.sendAsync():
RestRequest ownedFilesRequest = FileRequests.ownedFilesList(null, null);
RestClient client = this.client;
client.sendAsync(ownedFilesRequest, new AsyncRequestCallback() {
// Do something with the response
});
Note: This example passes null to the first parameter (userId). This value tells the ownedFilesList() method to use
the ID of the context, or logged in, user. The second null, for the pageNum parameter, tells the method to fetch the first page of
results.
See Files and Networking for a full description of FileRequests methods.
130
Overview of Native ClassesNative Android Development

Methods
For a full reference of FileRequests methods, see FileRequests Methods (Android). For a full description of the REST request and
response bodies, go to Chatter REST API Resources > Files Resources at http://www.salesforce.com/us/developer/docs/chatterapi.
DescriptionMethod Name
Builds a request that fetches a page from the list of files owned by the
specified user.
ownedFilesList
Builds a request that fetches a page from the list of files owned by the
user’s groups.
filesInUsersGroups
Builds a request that fetches a page from the list of files that have
been shared with the user.
filesSharedWithUser
Builds a request that fetches the file details of a particular version of
a file.
fileDetails
Builds a request that fetches the latest file details of one or more files
in a single request.
batchFileDetails
Builds a request that fetches the a preview/rendition of a particular
page of the file (and version).
fileRendition
Builds a request that fetches the actual binary file contents of this
particular file.
fileContents
Builds a request that fetches a page from the list of entities that this
file is shared to.
fileShares
Builds a request that add a file share for the specified file ID to the
specified entity ID.
addFileShare
Builds a request that deletes the specified file share.deleteFileShare
Builds a request that uploads a new file to the server. Creates a new
file.
uploadFile
OkHttp: The Underlying Network Library
Beginning with Mobile SDK 4.2, the Android REST request system uses OkHttp (v3.2.0), an open-source external library from Square Open
Source, as its underlying architecture. This library replaces the Google Volley library from past releases. As a result, Mobile SDK no longer
defines the WrappedRestRequest class.
Example: The following examples show how to perform some common network operations with OkHttpClient.
Common Imports
import okhttp3.Headers;
import okhttp3.HttpUrl;
import okhttp3.OkHttpClient;
import okhttp3.Call;
import okhttp3.Dispatcher;
131
Overview of Native ClassesNative Android Development

import okhttp3.Request;
import okhttp3.RequestBody;
import okhttp3.Response;
Obtain the Current OkHttp Client Handle
To get the handle of the OkHttpClient that the current RestClient instance is using:
OkHttpClient okClient = restClient.getOkHttpClient();
Obtain the OkHttp Dispatcher
Dispatcher dispatcher = restClient.getOkHttpClient().dispatcher();
Cancel All Pending Calls
Dispatcher dispatcher = restClient.getOkHttpClient().dispatcher();
dispatcher.cancelAll();
Store the OkHttp Handle to a REST Request
Call call = restClient.sendAsync(restRequest, callback);
Cancel a Specific REST Request Using a Stored Handle
Call call = restClient.sendAsync(restRequest, callback);
...
call.cancel();
For more information, see square.github.io/okhttp/.
LoginActivity Class
LoginActivity defines the login screen. The login workflow is worth describing because it explains two other classes in the activity
package. In the login activity, if you press the Menu button, you get three options: Clear Cookies, Reload, and Pick Server. Pick Server
launches an instance of the ServerPickerActivity class, which displays Production, Sandbox, and Custom Server options.
When a user chooses Custom Server, ServerPickerActivity launches an instance of the CustomServerURLEditor
class. This class displays a popover dialog that lets you type in the name of the custom server.
Other UI Classes
Several other classes in the ui package are worth mentioning, although they don’t affect your native API development efforts.
The PasscodeActivity class provides the UI for the passcode screen. It runs in one of three modes: Create, CreateConfirm, and
Check. Create mode is presented the first time a user attempts to log in. It prompts the user to create a passcode. After the user submits
the passcode, the screen returns in CreateConfirm mode, asking the user to confirm the new passcode. Thereafter, that user sees the
screen in Check mode, which simply requires the user to enter the passcode.
SalesforceR is a deprecated class. This class was required when the Mobile SDK was delivered in JAR format, to allow developers
to edit resources in the binary file. Now that the Mobile SDK is available as a library project, SalesforceR is not needed. Instead,
you can override resources in the SDK with your own.
SalesforceDroidGapActivity and SalesforceGapViewClient are used only in hybrid apps.
132
Overview of Native ClassesNative Android Development

UpgradeManager Class
UpgradeManager provides a mechanism for silently upgrading the SDK version installed on a device. This class stores the SDK
version information in a shared preferences file on the device. To perform an upgrade, UpgradeManager queries the current
SalesforceSDKManager instance for its SDK version and compares its version to the device’s version information. If an upgrade
is necessary—for example, if there are changes to a database schema or to encryption patterns—UpgradeManager can take the
necessary steps to upgrade SDK components on the device. This class is intended for future use. Its implementation in Mobile SDK 2.0
simply stores and compares the version string.
Utility Classes
Though most of the classes in the util package are for internal use, several of them can also benefit third-party developers.
DescriptionClass
See the source code for a list of all events that the Mobile SDK for
Android propagates.
EventsObservable
Implement this interface to eavesdrop on any event. This
functionality is useful if you’re doing something special when
certain types of events occur.
EventsObserver
You can directly call this static helper class. It parses a given URI,
breaks its parameters into a series of key/value pairs, and returns
them in a map.
UriFragmentParser
ForcePlugin Class
All classes in thecom.salesforce.androidsdk.phonegap package are intended for hybrid app support. Most of these
classes implement Javascript plug-ins that access native code. The base class for these Mobile SDK plug-ins is ForcePlugin. If you
want to implement your own Javascript plug-in in a Mobile SDK app, extend ForcePlugin, and implement the abstract execute()
function.
ForcePlugin extends CordovaPlugin, which works with the Javascript framework to let you create a Javascript module that
can call into native functions. PhoneGap provides the bridge on both sides: you create a native plug-in with CordovaPlugin and
then you create a Javascript file that mirrors it. Cordova calls the plug-in’s execute() function when a script calls one of the plug-in’s
Javascript functions.
Using Passcodes
User data in Mobile SDK apps is secured by encryption. The administrator of your Salesforce org has the option of requiring the user to
enter a passcode for connected apps. In this case, your app uses that passcode as an encryption hash key. If the Salesforce administrator
doesn’t require a passcode, you’re responsible for providing your own key.
Salesforce Mobile SDK does all the work of implementing the passcode workflow. It calls the passcode manager to obtain the user input,
and then combines the passcode with prefix and suffix strings into a hash for encrypting the user's data. It also handles decrypting and
re-encrypting data when the passcode changes. If an organization changes its passcode requirement, the Mobile SDK detects the change
at the next login and reacts accordingly. If you choose to use a passcode, your only responsibility is to implement the
SalesforceSDKManager.getKey() method. All your implementation has to do in this case is return a Base64-encoded string
that can be used as an encryption key.
133
Using PasscodesNative Android Development

Internally, passcodes are stored as Base64-encoded strings. The SDK uses the Encryptor class for creating hashes from passcodes.
You should also use this class to generate a hash when you provide a key instead of a passcode. Passcodes and keys are used to encrypt
and decrypt SmartStore data as well as oAuth tokens, user identification strings, and related security information. To see exactly what
security data is encrypted with passcodes, browse the ClientManager.changePasscode() method.
Mobile policy defines certain passcode attributes, such as the length of the passcode and the timing of the passcode dialog. Mobile
policy files for connected apps live on the Salesforce server. If a user enters an incorrect passcode more than ten consecutive times, the
user is logged out. The Mobile SDK provides feedback when the user enters an incorrect passcode, apprising the user of how many more
attempts are allowed. Before the screen is locked, the PasscodeManager class stores a reference to the front activity so that the
same activity can be resumed if the screen is unlocked.
If you define activities that don’t extend SalesforceActivity, SalesforceListActivity, or
SalesforceExpandableListActivity in a passcode-protected app, be sure to call these three PasscodeManager
methods from each of those activity classes:
•PasscodeManager.onPause()
•PasscodeManager.onResume(Activity)
•PasscodeManager.recordUserInteraction()
Call onPause() and onResume() from your activity's methods of the same name. Call recordUserInteraction() from
your activity’s onUserInteraction() method. Pass your activity class descriptor to onResume(). These calls ensure that your
app enforces passcode security during these events. See PasscodeManager Class.
Note: The SalesforceActivity, SalesforceListActivity, and SalesforceExpandableListActivity
classes implement these mandatory methods for you for free. Whenever possible, base your activity classes on one of these classes.
Resource Handling
Salesforce Mobile SDK resources are configured in XML files that reside in the libs/SalesforceSDK/res folder. You can customize
many of these resources by making changes in this folder.
Resources in the /res folder are grouped into categories, including:
•Drawables—Backgrounds, drop shadows, image resources such as PNG files
•Layouts—Screen configuration for any visible component, such as the passcode screen
•Values—Strings, colors, and dimensions that are used by the SDK
Two additional resource types are mostly for internal use:
•Menus
•XML
Drawable, layout, and value resources are subcategorized into folders that correspond to a variety of form factors. These categories
handle different device types and screen resolutions. Each category is defined in its folder name, which allows the resource file name to
remain the same for all versions. For example, if the developer provides various sizes of an icon named icon1.png, for example, the
smart phone version goes in one folder, the low-end phone version goes in another folder, while the tablet icon goes into a third folder.
In each folder, the file name is icon1.png. The folder names use the same root but with different suffixes.
The following table describes the folder names and suffixes.
UsageFolder name
Generic versions of drawable resourcesdrawable
High resolution; for most smart phonesdrawable-hdpi
134
Resource HandlingNative Android Development

UsageFolder name
Low resolution; for low-end feature phonesdrawable-ldpi
Medium resolution; for low-end smart phonesdrawable-mdpi
Resources for extra high-density screens (~320dpidrawable-xhdpi
For tablet screens in landscape orientationdrawable-xlarge
For tablet screens in portrait orientationdrawable-xlarge-port
Resources for extra-extra high density screens (~480 dpi)drawable-xxhdpi-port
Generic versions of layoutslayout
Add Connection dialog and login menu for phonesmenus
Generic styles and valuesvalues
General app configurationxml
The compiler looks for a resource in the folder whose name matches the target device configuration. If the requested resource isn’t in
the expected folder (for example, if the target device is a tablet, but the compiler can’t find the requested icon in the
drawables-xlarge or drawables-xlarge-port folder) the compiler looks for the icon file in the generic drawable
folder.
Layouts
Layouts in the Mobile SDK describe the screen resources that all apps use. For example, layouts configure dialog boxes that handle logins
and passcodes.
The name of an XML node in a layout indicates the type of control it describes. For example, the following EditText node from
res/layout/sf__passcode.xml describes a text edit control:
<EditText android:id="@+id/sf__passcode_text"
style="@style/SalesforceSDK.Passcode.Text.Entry"
android:inputType="textPassword" />
In this case, the EditText control uses an android:inputType attribute. Its value, “textPassword”, tells the operating system
to obfuscate the typed input.
The style attribute references a global style defined elsewhere in the resources. Instead of specifying style attributes in place, you define
styles defined in a central file, and then reference the attribute anywhere it’s needed. The value
@style/SalesforceSDK.Passcode.Text.Entry refers to an SDK-owned style defined in
res/values/sf__styles.xml. Here’s the style definition.
<style name="SalesforceSDK.Passcode.Text.Entry">
<item name="android:layout_width">wrap_content</item>
<item name="android:lines">1</item>
<item name="android:maxLength">10</item>
<item name="android:minWidth">
@dimen/sf__passcode_text_min_width</item>
<item name="android:imeOptions">actionGo</item>
</style>
135
Resource HandlingNative Android Development

You can override any style attribute with a reference to one of your own styles. Rather than changing sf__styles.xml, define your
styles in a different file, such as xyzcorp__styles.xml. Place your file in the res/values for generic device styles, or the
res/values-xlarge folder for tablet devices.
Values
The res/values and res/values-xlarge folders contain definitions of style components, such as dimens and colors, string resources, and
custom styles. File names in this folder indicate the type of resource or style component. To provide your own values, create new files
in the same folders using a file name prefix that reflects your own company or project. For example, if your developer prefix is XYZ, you
can override sf__styles.xml in a new file named XYZ__styles.xml.
ContainsFile name
Colors referenced by Mobile SDK stylessf__colors.xml
Dimensions referenced by Mobile SDK stylessf__dimens.xml
Strings referenced by Mobile SDK styles; error messages can be overriddensf__strings.xml
Visual styles used by the Mobile SDKsf__styles.xml
App-defined stringsstrings.xml
You can override the values in strings.xml. However, if you used the create_native script to create your app, strings in
strings.xml already reflect appropriate values.
Other Resources
Two other folders contain Mobile SDK resources.
•res/menu defines menus used internally. If your app defines new menus, add them as resources here in new files.
•res/xml includes one file that you must edit: servers.xml. In this file, change the default Production and Sandbox servers
to the login servers for your org. The other files in this folder are for internal use. The authenticator.xml file configures the
account authentication resource, and the config.xml file defines PhoneGap plug-ins for hybrid apps.
SEE ALSO:
Android Resources
Using REST APIs
To query, describe, create, or update data from a Salesforce org, Mobile SDK apps call Salesforce REST APIs. Salesforce REST APIs honor
SOQL and SOSL strings and can accept and return data in either JSON or XML format. Mobile SDK wraps REST requests in methods that
handle the low-level HTTP configuration for you. For other Salesforce APIs, Mobile SDK provides methods for manually creating a custom
request object and receiving the response. You can even use Mobile SDK REST API methods to make unauthenticated and external API
calls.
Salesforce supports an ever-growing variety of REST APIs. For an overview of our offerings, see Which API Do I Use? in Salesforce Help.
For information on REST request and response formats, see REST API Developer Guide.
136
Using REST APIsNative Android Development

Coding REST Interactions
With Android native apps, you do minimal coding to access Salesforce data through REST calls. The classes in the
com.salesforce.androidsdk.rest package initialize the communication channels and encapsulate low-level HTTP plumbing.
These classes, all of which are implemented by Mobile SDK, include:
•ClientManager—Serves as a factory for RestClient instances. It also handles account logins and handshakes with the Salesforce
server.
•RestClient—Handles protocol for sending REST API requests to the Salesforce server.
Don’t directly create instances of RestClient. Instead, call the ClientManager.getRestClient() method.
•RestRequest—Formats REST API requests from the data your app provides. Also serves as a factory for instances of itself.
Don’t directly create instances of RestRequest. Instead, call an appropriate RestRequest static getter function such as
RestRequest.getRequestForCreate().
•RestResponse—Formats the response content in the requested format, returns the formatted response to your app, and closes
the content stream. The RestRequest class creates instances of RestResponse and returns them to your app through your
implementation of the RestClient.AsyncRequestCallback interface.
Here’s the basic procedure for using the REST classes on a UI thread:
1. Create an instance of ClientManager.
a. Use the SalesforceSDKManager.getInstance().getAccountType() method to obtain the value to pass as
the second argument of the ClientManager constructor.
b. For the LoginOptions parameter of the ClientManager constructor, call
SalesforceSDKManager.GetInstance().getLoginOptions().
2. Implement the ClientManager.RestClientCallback interface.
3. Call ClientManager.getRestClient() to obtain a RestClient instance, passing it an instance of your
RestClientCallback implementation. This code from the native/SampleApps/RestExplorer sample app
implements and instantiates RestClientCallback inline.
String accountType =
SalesforceSDKManager.getInstance().getAccountType();
LoginOptions loginOptions =
SalesforceSDKManager.getInstance().getLoginOptions();
// Get a rest client
new ClientManager(this, accountType, loginOptions,
SalesforceSDKManager.getInstance().
shouldLogoutWhenTokenRevoked()).
getRestClient(this, new RestClientCallback() {
@Override
public void
authenticatedRestClient(RestClient client) {
if (client == null) {
SalesforceSDKManager.getInstance().
logout(ExplorerActivity.this);
return;
}
// Cache the returned client
ExplorerActivity.this.client = client;
137
Using REST APIsNative Android Development

}
}
);
4. Call a static RestRequest() getter method to obtain the appropriate RestRequest object for your needs. For example, to
get a description of a Salesforce object:
request = RestRequest.getRequestForDescribe(apiVersion, objectType);
5. Pass the RestRequest object you obtained in the previous step to RestClient.sendAsync() or
RestClient.sendSync(). If you’re on a UI thread and therefore calling sendAsync():
a. Implement the ClientManager.AsyncRequestCallback interface.
b. Pass an instance of your implementation to the sendAsync() method.
c. Receive the formatted response through your ASyncRequestCallback.onSuccess() method. Before using the
response, double-check that it’s valid by calling RestResponse.isSuccess().
The following code implements and instantiates AsyncRequestCallback inline.
private void sendFromUIThread(RestRequest restRequest) {
client.sendAsync(restRequest, new AsyncRequestCallback() {
private long start = System.nanoTime();
@Override
public void onSuccess(RestRequest request, RestResponse result) {
// Network component doesn’t report app layer status.
// Use the Mobile SDK RestResponse.isSuccess() method to check
// whether the REST request itself succeeded.
if (result.isSuccess()) {
try {
// Do something with the result
}
catch (Exception e) {
printException(e);
}
EventsObservable.get().notifyEvent(EventType.RenditionComplete);
}
}
@Override
public void onError(Exception exception)
{
printException(exception);
EventsObservable.get().notifyEvent(EventType.RenditionComplete);
}
});
}
If you’re calling the sendSync() method from a service, use the same procedure with the following changes.
1. To obtain a RestClient instance call ClientManager.peekRestClient() instead of
ClientManager.getRestClient().
2. Retrieve your formatted REST response from the sendSync() method’s return value.
138
Using REST APIsNative Android Development

Unauthenticated REST Requests
In certain cases, some applications must make REST calls before the user becomes authenticated. In other cases, the application must
access services outside of Salesforce that don’t require Salesforce authentication. To implement such requirements, use a special
RestClient instance that doesn’t require an authentication token.
To obtain an unauthenticated RestClient on Android, use one of the following ClientManager factory methods:
/**
* Method to created an unauthenticated RestClient asynchronously
* @param activityContext
* @param restClientCallback
*/
public void getUnauthenticatedRestClient(Activity activityContext, RestClientCallback
restClientCallback);
/**
* Method to create an unauthenticated RestClient.
* @return
*/
public RestClient peekUnauthenticatedRestClient();
Note: A REST request sent through either of these RestClient objects requires a full path URL. Mobile SDK doesn’t prepend
an instance URL to unauthenticated endpoints.
Example:
RestClient unauthenticatedRestClient = clientManager.peekUnauthenticatedRestClient();
RestRequest request = new RestRequest(RestMethod.GET,
"https://api.spotify.com/v1/search?q=James%20Brown&type=artist", null);
RestResponse response = unauthenticatedRestClient.sendSync(request);
Deferring Login in Native Android Apps
When you create Mobile SDK apps using forcedroid, forcedroid bases your project on a template app that gives you lots of free standard
functionality. For example, you don’t have to implement authentication—login and passcode handling are built into your launcher
activity. This design works well for most apps, and the free code is a big time-saver. However, after you’ve created your forcedroid app
you might find reasons for deferring Salesforce authentication until some point after the launcher activity runs.
You can implement deferred authentication easily while keeping the template app’s built-in functionality. Here are the guidelines and
caveats:
•Replace the launcher activity (named MainActivity in the template app) with an activity that does not extend any of the
following Mobile SDK activities:
–SalesforceActivity
–SalesforceListActivity
–SalesforceExpandableListActivity
This rule likewise applies to any other activities that run before you authenticate with Salesforce.
•Do not call the peekRestClient() or the getRestClient() ClientManager method from your launcher activity
or from any other pre-authentication activities.
•Do not change the initNative() call in the TemplateApp class. It must point to the activity class that launches after
authentication (MainActivity in the template app).
139
Unauthenticated REST RequestsNative Android Development

•When you’re ready to authenticate with Salesforce, launch the MainActivity class.
The following example shows how to place a non-Salesforce activity ahead of Salesforce authentication. You can of course expand and
embellish this example with additional pre-authentication activities, observing the preceding guidelines and caveats.
1. Create an XML layout for the pre-authentication landing page of your application. For example, the following layout file,
launcher.xml, contains only a button that triggers the login flow.
Note: The following example uses a string resource, @string/login, that is defined in the res/strings.xml file
as follows:
<string name="login">Login</string>
<?xml version="1.0" encoding="utf-8"?>
<LinearLayout xmlns:android="http://schemas.android.com/apk/res/android"
android:layout_width="match_parent"
android:layout_height="match_parent"
android:orientation="vertical"
android:background="@android:color/white"
android:id="@+id/root">
<Button android:id="@+id/login_button"
android:layout_width="80dp"
android:layout_height="60dp"
android:text="@string/login"
android:textColor="@android:color/black"
android:textStyle="bold"
android:gravity="center"
android:layout_gravity="center"
android:textSize="18sp"
android:onClick="onLoginClicked" />
</LinearLayout>
2. Create a landing screen activity. For example, here’s a landing screen activity named LauncherActivity. This screen simply
inflates the XML layout defined in launcher.xml. This class must not extend any of the Salesforce activities or call
peekRestClient() or getRestClient(), since these calls trigger the authentication flow. When the user taps the login
button, the onLoginClicked() button handler launches MainActivity, and login ensues.
package com.salesforce.samples.smartsyncexplorer.ui;
import com.salesforce.samples.smartsyncexplorer.R;
import android.app.Activity;
import android.content.Intent;
import android.os.Bundle;
import android.view.View;
public class LauncherActivity extends Activity {
@Override
public void onCreate(Bundle savedInstance) {
super.onCreate(savedInstance);
setContentView(R.layout.launcher);
}
140
Deferring Login in Native Android AppsNative Android Development

/**
* Callback received when the 'Delete' button is clicked.
*
* @param v View that was clicked.
*/
public void onLoginClicked(View v) {
/*
* TODO: Add logic here to determine if we are already
* logged in, and skip this screen by calling
* 'finish()', if that is the case.
*/
final Intent mainIntent =
new Intent(this, MainActivity.class);
mainIntent.addCategory(Intent.CATEGORY_DEFAULT);
startActivity(mainIntent);
finish();
}
}
3. Modify the AndroidManifest.xml to specify LauncherActivity as the activity to be launched when the app first
starts.
<!-- Launcher screen -->
<activity android:name=
"com.salesforce.samples.smartsyncexplorer.ui.LauncherActivity"
android:label="@string/app_name"
android:theme="@style/SalesforceSDK.ActionBarTheme">
<intent-filter>
<action android:name="android.intent.action.MAIN" />
<category
android:name="android.intent.category.LAUNCHER" />
</intent-filter>
</activity>
<!-- Main screen -->
<activity android:name=
"com.salesforce.samples.smartsyncexplorer.ui.MainActivity"
android:label="@string/app_name"
android:theme="@style/SalesforceSDK.ActionBarTheme">
<intent-filter>
<category android:name=
"android.intent.category.DEFAULT" />
</intent-filter>
</activity>
When you start the application. the LauncherActivity screen appears. Click the login button to initiate the Salesforce authentication
flow. After authentication completes, the app launches MainActivity.
Android Template App: Deep Dive
The TemplateApp sample project implements everything you need to create a basic native Android app. Because it’s a “bare bones”
example, it also serves as the template that the Mobile SDK’s create_native ant script uses to set up new native Android projects. By
studying this app, you can gain a quick understanding of native apps built with Mobile SDK for Android.
141
Android Template App: Deep DiveNative Android Development

The TemplateApp project defines two classes: TemplateApp and MainActivity.
•The TemplateApp class extends Application and calls SalesforceSDKManager.initNative() in its
onCreate() override.
•The MainActivity class subclasses the SalesforceActivity class.
These two classes are all you need to create a running mobile app that displays a login screen and a home screen.
Despite containing only about 200 lines of code, TemplateApp is more than just a “Hello World” example. In its main activity, it retrieves
Salesforce data through REST requests and displays the results on a mobile page. You can extend TemplateApp by adding more activities,
calling other components, and doing anything else that the Android operating system, the device, and security restraints allow.
TemplateApp Class
Every native Android app requires an instance of android.app.Application. The TemplateApp class accomplishes two main
tasks:
•Calls initNative() to initialize the app
•Passes in the app’s implementation of KeyInterface
Here’s the entire class:
package com.salesforce.samples.templateapp;
import android.app.Application;
import com.salesforce.androidsdk.app.SalesforceSDKManager;
/**
* Application class for our application.
*/
public class TemplateApp extends Application {
@Override
public void onCreate() {
super.onCreate();
SalesforceSDKManager.initNative(getApplicationContext(),
new KeyImpl(), MainActivity.class);
}
}
Most native Android apps can use similar code. For this small amount of work, your app gets free implementations of passcode and
login/logout mechanisms, plus a few other benefits. See SalesforceActivity, SalesforceListActivity, and SalesforceExpandableListActivity
Classes.
MainActivity Class
In Mobile SDK apps, the main activity begins immediately after the user logs in. Once the main activity is running, it can launch other
activities, which in turn can launch sub-activities. When the application exits, it does so by terminating the main activity. All other activities
terminate in a cascade from within the main activity.
The template app’s MainActivity class extends the abstract Mobile SDK activity class,
com.salesforce.androidsdk.ui.SalesforceActivity. This superclass gives you free implementations of mandatory
passcode and login protocols. If you use another base activity class instead, you’re responsible for implementing those protocols.
MainActivity initializes the app's UI and implements its UI buttons.
142
Android Template App: Deep DiveNative Android Development

The MainActivity UI includes a list view that can show the user's Salesforce Contacts or Accounts. When the user clicks one of
these buttons, the MainActivity object performs a couple of basic queries to populate the view. For example, to fetch the user's
Contacts from Salesforce, the onFetchContactsClick() message handler sends a simple SOQL query:
public void onFetchContactsClick(View v) throws UnsupportedEncodingException {
sendRequest("SELECT Name FROM Contact");
}
Internally, the private sendRequest() method formulates a server request using the RestRequest class and the given SOQL
string:
private void sendRequest(String soql) throws UnsupportedEncodingException
{
RestRequest restRequest =
RestRequest.getRequestForQuery(
getString(R.string.api_version), soql);
client.sendAsync(restRequest, new AsyncRequestCallback()
{
@Override
public void onSuccess(RestRequest request,
RestResponse result) {
// Network component doesn’t report app layer status.
// Use the Mobile SDK RestResponse.isSuccess() method to check
// whether the REST request itself succeeded.
if (result.isSuccess()) {
try {
listAdapter.clear();
JSONArray records =
result.asJSONObject().getJSONArray("records");
for (int i = 0; i < records.length(); i++) {
listAdapter.add(
records.getJSONObject(i).getString("Name"));
}
} catch (Exception e) {
onError(e);
}
}
}
@Override
public void onError(Exception exception)
{
Toast.makeText(MainActivity.this,
MainActivity.this.getString(
SalesforceSDKManager.getInstance().
getSalesforceR().stringGenericError(),
exception.toString()),
Toast.LENGTH_LONG).show();
}
});
}
This method uses an instance of the com.salesforce.androidsdk.rest.RestClient class, client, to process its
SOQL query. The RestClient class relies on two helper classes—RestRequest and RestResponse—to send the query
and process its result. The sendRequest() method calls RestClient.sendAsync() to process the SOQL query asynchronously.
143
Android Template App: Deep DiveNative Android Development

To support the sendAsync() call, the sendRequest() method constructs an instance of
com.salesforce.androidsdk.rest.RestRequest, passing it the API version and the SOQL query string. The resulting
object is the first argument for sendAsync(). The second argument is a callback object. When sendAsync() has finished running
the query, it sends the results to this callback object. If the query is successful, the callback object uses the query results to populate a
UI list control. If the query fails, the callback object displays a toast popup to display the error message.
Overriding the Default API Version
For Android, Mobile SDK core libraries define a hard-coded default API version. This value matches the Salesforce API version on the date
of the current Mobile SDK release. You can override the default version in your app by setting api_version in the strings.xml
resource file.
If you override the default version, be careful when calling methods such as RestRequest.getRequestForQuery() that
require an API version argument. It’s tempting to pass ApiVersionStrings.getVersionNumber(), but in some cases this
call returns unexpected values. Here are some tips.
•To return either your overridden version or the default value if no override exists, set the context argument to a valid subclass
of Context. High-level subclasses include extensions of Activity, Service, and Application.
•If you’re calling getVersionNumber() from a class that isn’t a Context subclass, you can pass
SalesforceSDKManager.getInstance().getAppContext() as the context argument.
•If you set the context argument to null, getVersionNumber() always returns the hard-coded default value.
Using an Anonymous Class in Java
In the call to RestClient.sendAsync() the code instantiates a new AsyncRequestCallback object as its second
argument. However, the AsyncRequestCallbackconstructor is followed by a code block that overrides a couple of methods:
onSuccess() and onError(). If that code looks strange to you, take a moment to see what's happening.
ASyncRequestCallback is defined as an interface, so it has no implementation. In order to instantiate it, the code implements
the two ASyncRequestCallback methods inline to create an anonymous class object. This technique gives TemplateApp
a sendAsync() implementation of its own that can never be called from another object and doesn't litter the API landscape with a
group of specialized class names.
TemplateApp Manifest
A look at the AndroidManifest.xml file in the TemplateApp project reveals the components required for Mobile SDK native
Android apps. The only required component is the activity named “.MainActivity”. This component represents the first activity
that is called after login. The class by this name is defined in the project. Here’s an example from AndroidManifest.xml:
DescriptionTypeName
The first activity to be called
after login. The name and
ActivityMainActivity
the class are defined in the
project.
Because any app created by forcedroid is based on the TemplateApp project, the MainActivity component is already included in
its manifest. As with any Android app, you can add other components, such as custom activities or services, by editing the manifest in
Android Studio.
144
Android Template App: Deep DiveNative Android Development
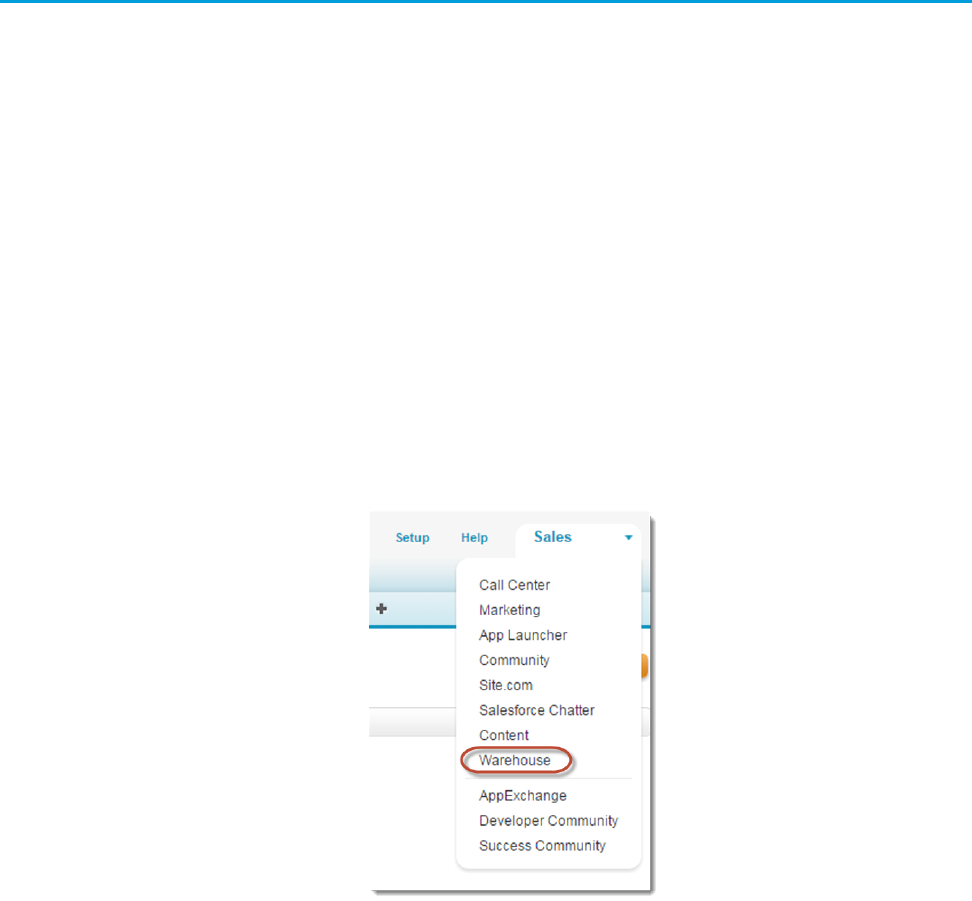
Tutorial: Creating a Native Android Warehouse Application
Apply your knowledge of the native Android SDK by building a mobile inventory management app. This tutorial demonstrates a simple
master-detail architecture that defines two activities. It demonstrates Mobile SDK application setup, use of REST API wrapper classes,
and Android SDK integration.
Prerequisites
This tutorial requires the following tools and packages.
•This tutorial uses a Warehouse app that contains a basic inventory database. You'll need to install this app in a Developer Edition
org. If you install it in an existing DE org, be sure to delete any existing Warehouse components you’ve made before you install.
1. Click the installation URL link: http://goo.gl/1FYg90
2. If you aren’t logged in, enter the username and password of your DE org.
3. Select an appropriate level of visibility for your organization.
4. Click Install.
5. Click Done.
6. Once the installation completes, you can select the Warehouse app from the app picker in the upper right corner.
7. To create data, click the Data tab.
8. Click the Create Data button.
•Install the latest versions of:
–Java JDK 1.8.x or later—www.oracle.com/downloads.
–forcedroid npm package, version 6.0.
–Android Studio 3.0 or later—developer.android.com/sdk.
–Android SDK and Android SDK Tools—Install from within Android Studio.
1. In the Android Studio menu, click Tools > Android > SDK Manager.
2. Click the SDK Platforms tab.
145
Tutorial: Creating a Native Android Warehouse ApplicationNative Android Development
3. Install at least the following required SDK levels and all intervening levels:
•Minimum API: Android KitKat (API 21)
•Target API: Android Oreo (API 27)
4. Click the SDK Tools tab.
5. Install the latest Android SDK Tools version.
–Android Virtual Device (AVD)—Install from within Android Studio.
1. In the Android Studio menu, click Tools > Android > AVD Manager.
2. Click Create Virtual Device....
3. Install at least one AVD that targets Android KitKat (API 21) and above. To learn how to set up an AVD in Android Studio,
follow the instructions at developer.android.com/guide/developing/devices/managing-avds.html.
•Install the Salesforce Mobile SDK using npm:
1. If you’ve already successfully installed Node.js and npm, skip to step 4.
2. Install Node.js on your system. The Node.js installer automatically installs npm.
i. Download Node.js from www.nodejs.org/download.
ii. Run the downloaded installer to install Node.js and npm. Accept all prompts asking for permission to install.
3. At the Terminal window, type npm and press Return to make sure your installation was successful. If you don’t see a page
of usage information, revisit Step 2 to find out what’s missing.
4. At the Terminal window, type sudo npm install forcedroid -g
This command uses the forcedroid package to install the Mobile SDK globally. With the -g option, you can run npm install
from any directory. The npm utility installs the package under /usr/local/lib/node_modules, and links binary
modules in /usr/local/bin. Most users need the sudo option because they lack read-write permissions in /usr/local.
Create a Native Android App
In this tutorial, you learn how to get started with the Salesforce Mobile SDK, including how to install the SDK and a quick tour of the
native project template using your DE org. Subsequent tutorials show you how to modify the template app and make it work with the
Warehouse schema.
Step 1: Create a Connected App
A connected app authorizes your mobile app to communicate securely with Lightning Platform. It’s required for accessing Salesforce
services and Lightning Platform APIs. An interesting thing to know about connected apps is that they allow access to any valid Salesforce
org—not just the org where the connected app is defined.
1. In your Developer Edition org, from Setup, enter Apps in the Quick Find box, then select Apps.
2. Under Connected Apps, click New to bring up the New Connected App page.
3. Under Basic Information, fill out the form as follows:
•Connected App Name: My Native Android App
•API Name: accept the suggested value
•Contact Email: enter your email address
146
Create a Native Android AppNative Android Development

4. Under OAuth Settings, check the Enable OAuth Settings checkbox.
5. Set Callback URL to: mysampleapp://auth/success
6. Under Available OAuth Scopes, check “Access and manage your data (api)” and “Perform requests on your behalf at any time
(refresh_token)”.
7. Click Add, and then click Save.
Important: Here are some important points to consider about your connected app.
•Copy the callback URL and consumer key. You use these values to set up your native app.
•Mobile SDK apps do not use the consumer secret, so you can ignore this value.
•Changes to a connected app take several minutes to go into effect.
Step 2: Create a Native Android Project
To create a new Mobile SDK project, use the forcedroid utility again in the Terminal window.
1. Change to the directory in which you want to create your project.
2. To create an Android project, type forcedroid create.
The forcedroid utility prompts you for each configuration value.
3. For application type, enter native.
4. For application name, enter Warehouse.
5. For output directory, enter tutorial/AndroidNative.
6. For package name, enter com.samples.warehouse.
Step 3: Run the New Android App
Now that you’ve successfully created an Android app, build and run it to verify your configuration.
Note: If you run into problems, first check the Android SDK Manager to make sure that you’ve got the latest Android SDK, build
tools, and development tools. You can find the Android SDK Manager under Tools > Android > SDK Manager in Android Studio.
After you’ve installed anything that’s missing, close and restart Android SDK Manager to make sure you’re up-to-date.
Importing and Building Your App in Android Studio
The forcedroid script prints instructions for running the new app in the Android Studio editor.
1. Launch Android Studio and select Import project (Eclipse ADT, Gradle, etc.) from the Welcome screen.
2. Select the tutorial/AndroidNative folder and click OK.
3. If you see the message “Unregistered VCS roots detected”, click Add roots.
Android Studio automatically builds your workspace. This process can take several minutes. When the status bar reports a successful
build, you’re ready to run the app.
1. From the target drop-down menu, select Warehouse.
2. Click Run or press SHIFT+F10.
Android Studio launches your app in the emulator or on your connected Android device.
147
Create a Native Android AppNative Android Development
Step 4: Explore How the Android App Works
The native Android app uses a straightforward Model View Controller (MVC) architecture.
•The model is the Warehouse database schema
•The views come from the activities defined in your project
•The controller functionality represents a joint effort between the Android SDK classes, the Salesforce Mobile SDK, and your app
Within the view, the finished tutorial app defines two Android activities in a master-detail relationship. MainActivity lists records from
the Merchandise custom objects. DetailActivity, which you access by clicking on an item in MainActivity, lets you view and edit the fields
in the selected record.
MainActivity Class
When the app is launched, the WarehouseApp class initially controls the execution flow. After the login process completes, the
WarehouseApp instance passes control to the main activity class, via the SalesforceSDKManager singleton.
In the template app that serves as the basis for your new app, and also in the finished tutorial, the main activity class is named
MainActivity. This class subclasses SalesforceActivity, which is the Mobile SDK base class for all activities.
Before it’s customized, though, the app doesn’t include other activities or touch event handlers. It simply logs into Salesforce, issues a
request using Salesforce Mobile SDK REST APIs, and displays the response in the main activity. In this tutorial you replace the template
app controls and repurpose the SOQL REST request to work with the Merchandise custom object from the Warehouse schema.
DetailActivity Class
The DetailActivity class also subclasses SalesforceActivity, but it demonstrates more interesting customizations.
DetailActivity implements text editing using standard Android SDK classes and XML templates. It also demonstrates how to
update a database object in Salesforce using the RestClient and RestRequest classes from the Mobile SDK.
RestClient and RestRequest Classes
Mobile SDK apps interact with Salesforce data through REST APIs. However, you don’t have to construct your own REST requests or work
directly at the HTTP level. You can process SOQL queries, do SOSL searches, and perform CRUD operations with minimal coding by using
static convenience methods on the RestRequest class. Each RestRequest convenience method returns a RestRequest
object that wraps the formatted REST request.
To send the request to the server, you simply pass the RestRequest object to the sendAsync() or sendSync() method
on your RestClient instance. You don’t create RestClient objects. If your activity inherits a Mobile SDK activity class such as
SalesforceActivity, Mobile SDK passes an instance of RestClient to the onResume() method. Otherwise, you can
call ClientManager.getRestClient(). Your app uses the connected app information from your bootconfig.xml file
so that the RestClient object can send REST requests on your behalf.
Customize the List Screen
In this tutorial, you modify the main activity and its layout to make the app specific to the Warehouse schema. You also adapt the existing
SOQL query to obtain all the information we need from the Merchandise custom object.
Step 1: Remove Existing Controls
The template code provides a main activity screen that doesn’t suit our purposes. Let’s gut it to make room for our code.
148
Customize the List ScreenNative Android Development

1. From the Project window in Android Studio, open the res/layout/main.xml file. Make sure to set the view to text mode.
This XML file contains a <LinearLayout> root node, which contains three child nodes: an <include> node, a nested
<LinearLayout> node, and a <ListView> node.
2. Delete the nested <LinearLayout> node that contains the three <Button> nodes. The edited file looks like this:
<?xml version="1.0" encoding="utf-8"?>
<LinearLayout
xmlns:android="http://schemas.android.com/apk/res/android"
android:orientation="vertical"
android:layout_width="match_parent"
android:layout_height="match_parent"
android:background="#454545"
android:id="@+id/root">
<include layout="@layout/header" />
<ListView
android:id="@+id/contacts_list"
android:layout_width="match_parent"
android:layout_height="match_parent" />
</LinearLayout>
3. Save the file and then open the src/com.samples.warehouse/MainActivity.java file.
4. Delete the onClearClick(), onFetchAccountsClick(), and onFetchContactsClick() methods. If the
compiler warns you that the sendRequest() method is never used locally, that’s OK. You just deleted all calls to that method,
but you’ll fix that in the next step.
Step 2: Update the SOQL Query
The sendRequest() method provides code for sending a SOQL query as a REST request. You can reuse some of this code while
customizing the rest to suit your new app.
1. Rename sendRequest() to fetchDataForList(). Replace
private void sendRequest(String soql) throws UnsupportedEncodingException
with
private void fetchDataForList()
Note that you’ve removed the throw declaration. You’ll reinstate it within the method body to keep the exception handling local.
You’ll add a try...catch block around the call to RestRequest.getRequestForQuery(), rather than throwing
exceptions to the fetchDataForList() caller.
2. Add a hard-coded SOQL query that returns up to 10 records from the Merchandise__c custom object:
private void fetchDataForList() {
String soql = "SELECT Name, Id, Price__c, Quantity__c
FROM Merchandise__c LIMIT 10";
3. Wrap a try...catch block around the call to RestRequest.getRequestForQuery(). Replace this:
RestRequest restRequest = RestRequest.getRequestForQuery(getString(R.string.api_version),
soql);
149
Customize the List ScreenNative Android Development

with this:
RestRequest restRequest = null;
try {
restRequest =
RestRequest.getRequestForQuery(getString(R.string.api_version), soql);
} catch (UnsupportedEncodingException e) {
showError(MainActivity.this, e);
return;
}
Here’s the completed version of what was formerly the sendRequest() method:
private void fetchDataForList() {
String soql = "SELECT Name, Id, Price__c, Quantity__c FROM
Merchandise__c LIMIT 10";
RestRequest restRequest = null;
try {
restRequest =
RestRequest.getRequestForQuery(
getString(R.string.api_version), soql);
} catch (UnsupportedEncodingException e){
showError(MainActivity.this, e);
return;
}
client.sendAsync(restRequest, new AsyncRequestCallback() {
@Override
public void onSuccess(RestRequest request,
RestResponse result) {
// Network component doesn’t report app layer status.
// Use the Mobile SDK RestResponse.isSuccess() method to check
// whether the REST request itself succeeded.
if (result.isSuccess()) {
try {
listAdapter.clear();
JSONArray records =
result.asJSONObject().getJSONArray("records");
for (int i = 0; i < records.length(); i++) {
listAdapter.add(records.
getJSONObject(i).getString("Name"));
}
} catch (Exception e) {
onError(e);
}
)
}
@Override
public void onError(Exception exception) {
Toast.makeText(MainActivity.this,
MainActivity.this.getString(
SalesforceSDKManager.getInstance().
150
Customize the List ScreenNative Android Development

getSalesforceR().stringGenericError(),
exception.toString()),
Toast.LENGTH_LONG).show();
}
});
}
We’ll call fetchDataForList() when the screen loads, after authentication completes.
4. In the onResume(RestClient client) method, add the following line at the end of the method body:
@Override
public void onResume(RestClient client) {
// Keeping reference to rest client
this.client = client;
// Show everything
findViewById(R.id.root).setVisibility(View.VISIBLE);
// Fetch data for list
fetchDataForList();
}
5. Finally, implement the showError() method to report errors through a given activity context. At the top of the file, add the
following line to the end of the list of imports:
import android.content.Context;
6. At the end of the MainActivity class definition add the following code:
public static void showError(Context context, Exception e) {
Toast toast = Toast.makeText(context,
context.getString(
SalesforceSDKManager.getInstance().
getSalesforceR().stringGenericError(),
e.toString()),
Toast.LENGTH_LONG);
toast.show();
}
7. Save the MainActivity.java file.
Step 3:Try Out the App
Build and run your app in Android Studio. When the Android emulator displays, wait a few minutes as it loads. Unlock the screen and
wait a while longer for the Salesforce login screen to appear. After you log into Salesforce successfully, click Allow to give the app the
permissions it requires.
At this point, if you click a Merchandise record, nothing happens. You'll fix that in the next tutorial.
Create the Detail Screen
In the previous step, you modified the template app so that the main activity presents a list of up to ten Merchandise records. In this
step, you finish the job by creating a detail activity and layout. You then link the main activity and the detail activity.
151
Create the Detail ScreenNative Android Development

Step 1: Create the Detail Screen
To start, design the layout of the detail activity by creating an XML file named res/layout/detail.xml.
1. In Package Explorer, expand res/layout.
2. Control-click the layout folder and select New > Android XML File.
3. In the File field, type detail.xml.
4. Under Root Element, select LinearLayout.
5. Click Finish.
In the new file, define layouts and resources to be used in the detail screen. Start by adding fields and labels for name, price, and
quantity.
6. Replace the contents of the new file with the following XML code.
<?xml version="1.0" encoding="utf-8"?>
<LinearLayout xmlns:android="http://schemas.android.com/apk/res/android"
android:id="@+id/root"
android:layout_width="match_parent"
android:layout_height="match_parent"
android:background="#454545"
android:orientation="vertical" >
<include layout="@layout/header" />
<LinearLayout
android:layout_width="match_parent"
android:layout_height="wrap_content"
android:orientation="horizontal" >
<TextView
android:layout_width="wrap_content"
android:layout_height="wrap_content"
android:text="@string/name_label"
android:width="100dp" />
<EditText
android:id="@+id/name_field"
android:layout_width="match_parent"
android:layout_height="wrap_content"
android:inputType="text" />
</LinearLayout>
<LinearLayout
android:layout_width="match_parent"
android:layout_height="wrap_content"
android:orientation="horizontal" >
<TextView
android:layout_width="wrap_content"
android:layout_height="wrap_content"
android:text="@string/price_label"
android:width="100dp" />
152
Create the Detail ScreenNative Android Development

<EditText
android:id="@+id/price_field"
android:layout_width="match_parent"
android:layout_height="wrap_content"
android:inputType="numberDecimal" />
</LinearLayout>
<LinearLayout
android:layout_width="match_parent"
android:layout_height="wrap_content"
android:orientation="horizontal" >
<TextView
android:layout_width="wrap_content"
android:layout_height="wrap_content"
android:text="@string/quantity_label"
android:width="100dp" />
<EditText
android:id="@+id/quantity_field"
android:layout_width="match_parent"
android:layout_height="wrap_content"
android:inputType="number" />
</LinearLayout>
</LinearLayout>
7. Save the file.
8. To finish the layout, define the display names for the three labels (name_label, price_label, and quantity_label)
referenced in the TextView elements.
Add the following to res/values/strings.xml just before the close of the <resources> node:
<!-- Detail screen -->
<string name="name_label">Name</string>
<string name="price_label">Price</string>
<string name="quantity_label">Quantity</string>
9. Save the file and then open the AndroidManifest.xml file in text view. If you don’t get the text view, click the
AndroidManifest.xml tab at the bottom of the editor screen.
10. Declare the new activity in AndroidManifest.xml by adding the following in the <application> section:
<!-- Merchandise detail screen -->
<activity android:name="com.samples.warehouse.DetailActivity"
android:theme="@android:style/Theme.NoTitleBar.Fullscreen">
</activity>
Except for a button that we’ll add later, you’ve finished designing the layout and the string resources for the detail screen. To implement
the screen’s behavior, you define a new activity.
Step 2: Create the DetailActivity Class
In this module we’ll create a new class file named DetailActivity.java in the com.samples.warehouse package.
153
Create the Detail ScreenNative Android Development

1. In Package Explorer, expand the WarehouseApp > src > com.samples.warehouse node.
2. Control-click the com.samples.warehouse folder and select New > Class.
3. In the Name field, enter DetailActivity.
4. In the Superclass field, enter or browse for com.salesforce.androidsdk.ui.SalesforceActivity.
5. Click Finish.
The compiler provides a stub implementation of the required onResume() method. Mobile SDK passes an instance of
RestClient to this method. Since you need this instance to create REST API requests, it’s a good idea to cache a reference to it.
6. Add the following declaration to the list of member variables at the top of the new class:
private RestClient client;
7. In the onResume() method body, add the following code:
@Override
public void onResume(RestClient client) {
// Keeping reference to rest client
this.client = client;
}
Step 3: Customize the DetailActivity Class
To complete the activity setup, customize the DetailActivity class to handle editing of Merchandise field values.
1. Add the following imports to the list of imports at the top of DetailActivity.java:
import android.widget.EditText;
import android.os.Bundle;
2. At the top of the class body, add private EditText members for the three input fields.
private EditText nameField;
private EditText priceField;
private EditText quantityField;
3. Add a variable to contain a record ID from the Merchandise custom object. You’ll add code to populate it later when you link the
main activity and the detail activity.
private String merchandiseId;
4. Add an onCreate() method that configures the view to use the detail.xml layout you just created. Place this method
just before the end of the class definition.
@Override
protected void onCreate(Bundle savedInstanceState) {
super.onCreate(savedInstanceState);
// Setup view
setContentView(R.layout.detail);
nameField = (EditText) findViewById(R.id.name_field);
priceField = (EditText) findViewById(R.id.price_field);
quantityField = (EditText)
154
Create the Detail ScreenNative Android Development

findViewById(R.id.quantity_field);
}
Step 4: Link the Two Activities, Part 1: Create a Data Class
Next, you need to hook up MainActivity and DetailActivity classes so they can share the fields of a selected Merchandise
record. When the user clicks an item in the inventory list, MainActivity needs to launch DetailActivity with the data it
needs to display the record’s fields.
Right now, the list adapter in MainActivity.java is given only the names of the Merchandise fields. Let’s store the values of the
standard fields (id and name) and the custom fields (quantity, and price) locally so you can send them to the detail screen.
To start, define a static data class to represent a Merchandise record.
1. In the Package Explorer, open src > com.samples.warehouse > MainActivity.java.
2. Add the following class definition at the end of the MainActivity definition:
/**
* Simple class to represent a Merchandise record
*/
static class Merchandise {
public final String name;
public final String id;
public final int quantity;
public final double price;
public Merchandise(String name, String id, int quantity, double price) {
this.name = name;
this.id = id;
this.quantity = quantity;
this.price = price;
}
public String toString() {
return name;
}
}
3. To put this class to work, modify the main activity’s list adapter to take a list of Merchandise objects instead of strings. In the
listAdapter variable declaration, change the template type from String to Merchandise:
private ArrayAdapter<Merchandise> listAdapter;
4. To match the new type, change the listAdapter instantiation in the onResume() method:
listAdapter = new ArrayAdapter<Merchandise>(this, android.R.layout.simple_list_item_1,
new ArrayList<Merchandise>());
Next, modify the code that populates the listAdapter object when the response for the SOQL call is received.
5. Add the following import to the existing list at the top of the file:
import org.json.JSONObject;
155
Create the Detail ScreenNative Android Development

6. Change the onSuccess() method in fetchDataForList() to use the new Merchandise object:
public void onSuccess(RestRequest request, RestResponse result) {
// Network component doesn’t report app layer status.
// Use the Mobile SDK RestResponse.isSuccess() method to check
// whether the REST request itself succeeded.
if (result.isSuccess()) {
try {
listAdapter.clear();
JSONArray records = result.asJSONObject().getJSONArray("records");
for (int i = 0; i < records.length(); i++) {
JSONObject record = records.getJSONObject(i);
Merchandise merchandise =
new Merchandise(record.getString("Name"),
record.getString("Id"), record.getInt("Quantity__c"),
record.getDouble("Price__c"));
listAdapter.add(merchandise);
}
} catch (Exception e) {
onError(e);
}
}
}
Step 5: Link the Two Activities, Part 2: Implement a List Item Click Handler
Next, you need to catch click events and launch the detail screen when these events occur. Let's make MainActivity the listener
for clicks on list view items.
1. Open the MainActivity.java file in the editor.
2. Add the following import:
import android.widget.AdapterView.OnItemClickListener;
3. Change the class declaration to implement the OnItemClickListener interface:
public class MainActivity extends SalesforceActivity implements OnItemClickListener {
4. Add a private member for the list view:
private ListView listView;
5. Add the following code in bold to the onResume() method just before the super.onResume() call:
public void onResume() {
// Hide everything until we are logged in
findViewById(R.id.root).setVisibility(View.INVISIBLE);
// Create list adapter
listAdapter = new ArrayAdapter<Merchandise>(
this, android.R.layout.simple_list_item_1, new ArrayList<Merchandise>());
((ListView) findViewById(R.id.contacts_list)).setAdapter(listAdapter);
// Get a handle for the list view
156
Create the Detail ScreenNative Android Development

listView = (ListView) findViewById(R.id.contacts_list);
listView.setOnItemClickListener(this);
super.onResume();
}
Now that you’ve designated a listener for list item clicks, you’re ready to add the list item click handler.
6. Add the following imports:
import android.widget.AdapterView;
import android.content.Intent;
7. Just before the Merchandise class definition, add an onItemClick() method.
public void onItemClick(AdapterView<?> parent, View view, int position, long id) {
}
8. Get the selected item from the list adapter in the form of a Merchandise object.
public void onItemClick(AdapterView<?> parent, View view, int position, long id) {
Merchandise merchandise = listAdapter.getItem(position);
}
9. Create an Android intent to start the detail activity, passing the merchandise details into it.
public void onItemClick(AdapterView<?> parent, View view, int position, long id) {
Merchandise merchandise = listAdapter.getItem(position);
Intent intent = new Intent(this, DetailActivity.class);
intent.putExtra("id", merchandise.id);
intent.putExtra("name", merchandise.name);
intent.putExtra("quantity", merchandise.quantity);
intent.putExtra("price", merchandise.price);
startActivity(intent);
}
Let's finish by updating the DetailActivity class to extract the merchandise details from the intent.
10. In the Package Explorer, open src > com.samples.warehouse > DetailActivity.java.
11. In the onCreate() method, assign values from the list screen selection to their corresponding data members in the detail activity:
protected void onCreate(Bundle savedInstanceState) {
super.onCreate(savedInstanceState);
// Setup view
setContentView(R.layout.detail);
nameField = (EditText) findViewById(R.id.name_field);
priceField = (EditText) findViewById(R.id.price_field);
quantityField = (EditText)
findViewById(R.id.quantity_field);
// Populate fields with data from intent
Bundle extras = getIntent().getExtras();
merchandiseId = extras.getString("id");
157
Create the Detail ScreenNative Android Development

nameField.setText(extras.getString("name"));
priceField.setText(extras.getDouble("price") + "");
quantityField.setText(extras.getInt("quantity") + "");
}
Step 6: Implement the Update Button
You’re almost there! The only part of the UI that’s missing is a button that writes the user’s edits to the server. You need to:
•Add the button to the layout
•Define the button’s label
•Implement a click handler
•Implement functionality that saves the edits to the server
1. Reopen detail.xml and add the following <Button> node as the last node in the outermost layout.
<Button
android:id="@+id/update_button"
android:layout_width="match_parent"
android:layout_height="wrap_content"
android:onClick="onUpdateClick"
android:text="@string/update_button" />
2. Save the detail.xml file, then open strings.xml.
3. Add the following button label string to the end of the list of strings:
<string name="update_button">Update</string>
4. Save the strings.xml file and then open DetailActivity.java.
In the DetailActivity class, add a handler for the Update button’s onClick event. The handler’s name must match the
android:onClick value in the <Button> node that you just added to detail.xml. In this case, the name is
onUpdateClick. This method simply creates a map that matches Merchandise__c field names to corresponding values
in the detail screen. Once the values are set, it calls the saveData() method to write the changes to the server.
5. To support the handler, add the following imports to the existing list at the top of the file:
import java.util.HashMap;
import java.util.Map;
import android.view.View;
6. Add the following method to the DetailActivity class definition:
public void onUpdateClick(View v) {
Map<String, Object> fields = new HashMap<String, Object>();
fields.put("Name", nameField.getText().toString());
fields.put("Quantity__c", quantityField.getText().toString());
fields.put("Price__c", priceField.getText().toString());
saveData(merchandiseId, fields);
}
The compiler reminds you that saveData() isn’t defined. Let’s fix that. The saveData() method creates a REST API update
request to update the Merchandise__c object with the user’s values. It then sends the request asynchronously to the server
158
Create the Detail ScreenNative Android Development

using the RestClient.sendAsync() method. The callback methods that receive the server response (or server error) are
defined inline in the sendAsync() call.
7. Add the following imports to the existing list at the top of the file:
import com.salesforce.androidsdk.rest.RestRequest;
import com.salesforce.androidsdk.rest.RestResponse;
8. Implement the saveData() method in the DetailActivity class definition:
private void saveData(String id, Map<String, Object> fields) {
RestRequest restRequest;
try {
restRequest = RestRequest.getRequestForUpdate(
getString(R.string.api_version),
"Merchandise__c", id, fields);
} catch (Exception e) {
// You might want to log the error or show it to the user
return;
}
client.sendAsync(restRequest, new RestClient.AsyncRequestCallback() {
@Override
public void onSuccess(RestRequest request, RestResponse result) {
// Network component doesn’t report app layer status.
// Use the Mobile SDK RestResponse.isSuccess() method to check
// whether the REST request itself succeeded.
if (result.isSuccess()) {
try {
DetailActivity.this.finish();
} catch (Exception e) {
// You might want to log the error
// or show it to the user
}
}
}
@Override
public void onError(Exception e) {
// You might want to log the error
// or show it to the user
}
});
}
That’s it! Your app is ready to run and test.
Step 7: Try Out the App
1. Build your app and run it in the Android emulator. If you did everything correctly, a detail page appears when you click a Merchandise
record in the Warehouse screen.
2. Update a record's quantity and price. Be sure to click the Update button in the detail view after you edit the values. When you
navigate back to the detail view, the updated values display.
3. Log into your DE org and view the record using the browser UI to see the updated values.
159
Create the Detail ScreenNative Android Development

Android Sample Applications
Salesforce Mobile SDK includes the following native Android sample applications.
•RestExplorer demonstrates the OAuth and REST API functions of Mobile SDK. It’s also useful for investigating REST API actions from
a tablet.
•SmartSyncExplorer demonstrates the power of the native SmartSync Data Framework library on Android. It resides in Mobile SDK
for Android under native/NativeSampleApps/SmartSyncExplorer.
Mobile SDK also provides Android wrappers for a few hybrid apps under hybrid/HybridSampleApps/.
•AccountEditor: Demonstrates how to synchronize offline data using the smartsync.js library.
•NoteSync: Demonstrates how to use non-REST APIs to retrieve Salesforce Notes.
•SmartSyncExplorerHybrid: Demonstrates how to synchronize offline data using the SmartSync Data Framework plugin.
160
Android Sample ApplicationsNative Android Development

CHAPTER 10 HTML5 and Hybrid Development
HTML5 lets you create lightweight mobile interfaces without installing software on the target device.
Any mobile, touch or desktop device can access these mobile interfaces. HTML5 now supports advanced
In this chapter ...
•Getting Started mobile functionality such as camera and GPS, making it simple to use these popular device features in
your Salesforce mobile app.
•HTML5 Development
Tools You can create an HTML5 application that leverages the Lightning Platform by:
•Delivering HTML5
Content With
Visualforce
•Using Visualforce to deliver the HTML content
•Using JavaScript remoting to invoke Apex controllers for fetching records from Salesforce
•Accessing Salesforce
Data: Controllers vs.
APIs
In addition, you can repurpose HTML5 code in a standalone Mobile SDK hybrid app, and then distribute
it through an app store. To convert to hybrid, you use the third-party Cordova command line to create
a Mobile SDK container project, and then import your HTML5, JavaScript, and CSS files into that project.
•Hybrid Apps Quick
Start
•Creating Hybrid Apps
•Debugging Hybrid
Apps On a Mobile
Device
•Controlling the Status
Bar in iOS 7 Hybrid
Apps
•JavaScript Files for
Hybrid Apps
•Versioning and
JavaScript Library
Compatibility
•Managing Sessions
in Hybrid Apps
•Defer Login
161

Getting Started
If you're already a web developer, you're set up to write HTML5 apps that access Salesforce. HTML5 apps can run in a browser and don't
require the Salesforce Mobile SDK. You simply call Salesforce APIs, capture the return values, and plug them into your logic and UI. The
same advantages and challenges of running any app in a mobile browser apply. However, Salesforce and its partners provide tools that
help streamline mobile web design and coding.
If you want to build your HTML5 app as standalone in a hybrid container and distribute it in the Apple® AppStore® or an Android
marketplace, you’ll need to create a hybrid app using the Mobile SDK.
Using HTML5 and JavaScript
You don't need a professional development environment such as Xcode or Microsoft® Visual Studio® to write HTML5 and JavaScript
code. Most modern browsers include sophisticated developer features including HTML and JavaScript debuggers. You can literally write
your application in a text editor and test it in a browser. However, you do need a good knowledge of popular industry libraries that can
help to minimize your coding effort.
The recent growth in mobile development has led to an explosion of new web technology toolkits. Often, these JavaScript libraries are
open-source and don't require licensing. Most of the tools provided by Salesforce for HTML5 development are built on these third-party
technologies.
HTML5 Development Requirements
If you’re planning to write a browser-based HTML5 Salesforce application, you don’t need Salesforce Mobile SDK.
•You’ll need a Lightning Platform organization.
•Some knowledge of Apex and Visualforce is necessary.
Note: This type of development uses Visualforce. You can’t use Database.com.
Multi-Device Strategy
With the worldwide proliferation of mobile devices, HTML5 mobile applications must support a variety of platforms, form factors, and
device capabilities. Developers who write device-independent mobile apps in Visualforce face these key design questions:
•Which devices and form factors should my app support?
•How does my app detect various types of devices?
•How should I design a Salesforce application to best support multiple device types?
Which Devices and Form Factors Should Your App Support?
The answer to this question is dependent on your specific use case and end-user requirements. It is, however, important to spend some
time thinking about exactly which devices, platforms, and form factors you do need to support. Where you end up in the spectrum of
‘Support all platforms/devices/form factors’ to ‘Support only desktop and iPhone’ (as an example) plays a major role in how you answer
the subsequent two questions.
As can be expected, important trade-offs have to be made when making this decision. Supporting multiple form factors obviously
increases the reach for your application. But, it comes at the cost of additional complexity both in terms of initially developing the
application, and maintaining it over the long-term.
162
Getting StartedHTML5 and Hybrid Development

Developing true cross-device applications is not simply a question of making your web page look (and perform) optimally across different
form factors and devices (desktop vs phone vs tablet). You really need to rethink and customize the user experience for each specific
device/form factor. The phone or tablet version of your application very often does not need all the bells and whistles supported by your
existing desktop-optimized Web page (e.g., uploading files or supporting a use case that requires many distinct clicks).
Conversely, the phone/tablet version of your application can support features like geolocation and taking pictures that are not possible
in a desktop environment. There are even significant differences between the phone and tablet versions of the better designed applications
like LinkedIn and Flipboard (e.g,. horizontal navigation in a tablet version vs single hand vertical scrolling for a phone version). Think of
all these consideration and the associated time and cost it will take you to support them when deciding which devices and form factors
to support for your application.
Once you’ve decided which devices to support, you then have to detect which device a particular user is accessing your Web application
from.
Client-Side Detection
The client-side detection approach uses JavaScript (or CSS media queries) running on the client browser to determine the device type.
Specifically, you can detect the device type in two different ways.
•Client-Side Device Detection with the User-Agent Header — This approach uses JavaScript to parse out the User-Agent HTTP
header and determine the device type based on this information. You could of course write your own JavaScript to do this. A better
option is to reuse an existing JavaScript. A cursory search of the Internet will result in many reusable JavaScript snippets that can
detect the device type based on the User-Agent header. The same cursory search, however, will also expose you to some of the
perils of using this approach. The list of all possible User-Agents is huge and ever growing and this is generally considered to be a
relatively unreliable method of device detection.
•Client-Side Device Detection with Screen Size and/or Device Features — A better alternative to sniffing User-Agent strings
in JavaScript is to determine the device type based on the device screen size and or features (e.g., touch enabled). One example of
this approach can be found in the open-source Contact Viewer HTML5 mobile app that is built entirely in Visualforce. Specifically,
the MobileAppTemplate.page includes a simple JavaScript snippet at the top of the page to distinguish between phone and tablet
clients based on the screen size of the device. Another option is to use a library like Device.js or Modernizr to detect the device type.
These libraries use some combination of CSS media queries and feature detection (e.g., touch enabled) and are therefore a more
reliable option for detecting device type. A simple example that uses the Modernizr library to accomplish this can be found at
http://www.html5rocks.com/static/demos/cross-device/feature/index.html. A more complete
example that uses the Device.js library and integrates with Visualforce can be found in this GitHub repo:
https://github.com/sbhanot-sfdc/Visualforce-Device.js. Here is a snippet from the DesktopVersion.page in
that repo.
<apex:page docType="html-5.0" sidebar="false" showHeader="false" standardStylesheets="false"
cache="false" >
<head>
<!-- Every version of your webapp should include a list of all
versions. -->
<link rel="alternate" href="/apex/DesktopVersion" id="desktop"
media="only screen and (touch-enabled: 0)"/>
<link rel="alternate" href="/apex/PhoneVersion" id="phone"
media="only screen and (max-device-width: 640px)"/>
<link rel="alternate" href="/apex/TabletVersion" id="tablet"
media="only screen and (min-device-width: 641px)"/>
<meta name="viewport" content="width=device-width, user-scalable=no"/>
<script src="{!URLFOR($Resource.Device_js)}"/>
</head>
163
Multi-Device StrategyHTML5 and Hybrid Development

<body>
<ul>
<li><a href="?device=phone">Phone Version</a></li>
<li><a href="?device=tablet">Tablet Version</a></li>
</ul>
<h1> This is the Desktop Version</h1>
</body>
</apex:page>
The snippet above shows how you can simply include a <link> tag for each device type that your application supports. The
Device.js library then automatically redirects users to the appropriate Visualforce page based on device type detected. There is
also a way to override the default Device.js redirect by using the ‘?device=xxx’ format shown above.
Server-Side Device Detection
Another option is to detect the device type on the server (i.e., in your Apex controller/extension class). Server-side device detection is
based on parsing the User-Agent HTTP header and here is a small code snippet of how you can detect if a Visualforce page is being
viewed from an iPhone client.
<apex:page docType="html-5.0"
sidebar="false"
showHeader="false"
cache="false"
standardStylesheets="false"
controller="ServerSideDeviceDetection"
action="{!detectDevice}">
<h1> This is the Desktop Version</h1>
</apex:page>
public with sharing class ServerSideDeviceDetection {
public boolean isIPhone {get;set;}
public ServerSideDeviceDetection() {
String userAgent =
System.currentPageReference().
getHeaders().get('User-Agent');
isIPhone = userAgent.contains('iPhone');
}
public PageReference detectDevice(){
if (isIPhone)
return Page.PhoneVersion.setRedirect(true);
else
return null;
}
}
Note that User-Agent parsing in the code snippet above is far from comprehensive and you should implement something more robust
that detects all the devices that you need to support based on regular expression matching. A good place to start is to look at the RegEx
included in the detectmobilebrowsers.com code snippets.
164
Multi-Device StrategyHTML5 and Hybrid Development
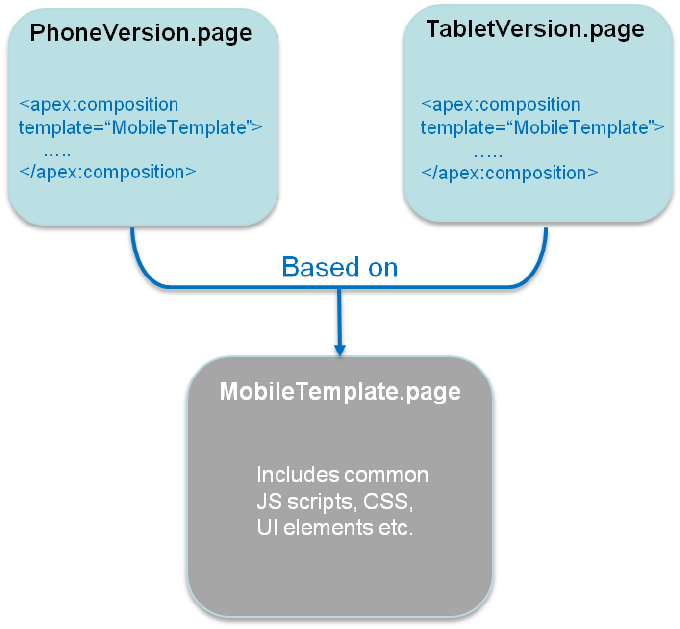
How Should You Design a Salesforce Application to Best Support Multiple Device
Types?
Finally, once you know which devices you need to support and how to distinguish between them, what is the optimal application design
for delivering a customized user experiences for each device/form factor? Again, a couple of options to consider.
For simple applications where all you need is for the same Visualforce page to display well across different form factors, a responsive
design approach is an attractive option. In a nutshell, Responsive design uses CCS3 media queries to dynamically reformat a page to fit
the form factor of the client browser. You could even use a responsive design framework like Twitter Bootstrap to achieve this.
Another option is to design multiple Visualforce pages, each optimized for a specific form factor and then redirect users to the appropriate
page using one of the strategies described in the previous section. Note that having separate Visualforce pages does not, and should
not, imply code/functionality duplication. A well architected solution can maximize code reuse both on the client-side (by
using Visualforce strategies like Components, Templates etc.) as well as the server-side (e.g., encapsulating common business logic in
an Apex class that gets called by multiple page controllers). An excellent example of such a design can be found in the same open-source
Contact Viewer application referenced before. Though the application has separate pages for its phone and tablet version
(ContactsAppMobile.page and ContactsApp.page respectively), they both share a common template
(MobileAppTemplate.page), thus maximizing code and artifact reuse. The figure below is a conceptual representation of the
design for the Contact Viewer application.
Lastly, it is also possible to service multiple form factors from a single Visualforce page by doing server-side device detection and making
use of the ‘rendered’ attribute available in most Visualforce components (or more directly, the CSS ‘display:none/block’ property on a
<div> tag) to selectively show/hide page elements. This approach however can result in bloated and hard-to-maintain code and should
be used sparingly.
165
Multi-Device StrategyHTML5 and Hybrid Development

HTML5 Development Tools
Modern Web developers frequently leverage open source tools to speed up their app development cycles. These tools can make HTML5
coding surprisingly simple. For example, to create Salesforce-enabled apps in only a few hours, you can couple Google’s Polymer
framework with Lightning Platform JavaScript libraries. Salesforce provides a beta open source library—Mobile UI Elements—that does
exactly that.
To investigate and get started with Mobile UI Elements, see Mobile UI Elements with Polymer.
Delivering HTML5 Content With Visualforce
Traditionally, you use Visualforce to create custom websites for the desktop environment. When combined with HTML5, however,
Visualforce becomes a viable delivery mechanism for mobile Web apps. These apps can leverage third-party UI widget libraries such as
Sencha, or templating frameworks such as AngularJS and Backbone.js, that bind to data inside Salesforce.
To set up an HTML5 Apex page, change the docType attribute to “html-5.0”, and use other settings similar to these:
<apex:page docType="html-5.0" sidebar="false" showHeader="false" standardStylesheets="false"
cache="true" >
</apex:page>
This code sets up an Apex page that can contain HTML5 content, but, of course, it produces an empty page. With the use of static
resources and third-party libraries, you can add HTML and JavaScript code to build a fully interactive mobile app.
Accessing Salesforce Data: Controllers vs. APIs
In an HTML5 app, you can access Salesforce data two ways.
•By using JavaScript remoting to invoke your Apex controller.
•By accessing the Salesforce API with force.js.
Using JavaScript Remoting to Invoke Your Apex Controller
Apex supports the following two means of invoking Apex controller methods from JavaScript:
•apex:actionFunction
•JavaScript remoting
Both techniques use an AJAX request to invoke Apex controller methods directly from JavaScript. The JavaScript code must be hosted
on a Visualforce page.
In comparison to apex:actionFunction, JavaScript remoting offers several advantages.
•It offers greater flexibility and better performance than apex:actionFunction.
•It supports parameters and return types in the Apex controller method, with automatic mapping between Apex and JavaScript
types.
•It uses an asynchronous processing model with callbacks.
•Unlike apex:actionFunction, the AJAX request does not include the view state for the Visualforce page. This results in a
faster round trip.
166
HTML5 Development ToolsHTML5 and Hybrid Development

Compared to apex:actionFunction, however, JavaScript remoting requires you to write more code.
The following example inserts JavaScript code in a <script> tag on the Visualforce page. This code calls the invokeAction()
method on the Visualforce remoting manager object. It passes invokeAction() the metadata needed to call a function named
getItemId() on the Apex controller object objName. Because invokeAction() runs asynchronously, the code also defines
a callback function to process the value returned from getItemId(). In the Apex controller, the @RemoteAction annotation
exposes the getItemId() function to external JavaScript code.
//Visualforce page code
<script type="text/javascript">
Visualforce.remoting.Manager.invokeAction(
'{!$RemoteAction.MyController.getItemId}',
objName,
function(result, event){
//process response here
},
{escape: true}
);
<script>
//Apex Controller code
@RemoteAction
global static String getItemId(String objectName) { ... }
See https://developer.salesforce.com/docs/atlas.en-us.apexcode.meta/apexcode/apex_classes_annotation_RemoteAction.htm to learn
more about @RemoteAction annotations.
Accessing the Salesforce API with Force.js
The following sample code queries Salesforce records from Apex by using the the cordova.js and force.js libraries. To add
these resources to your Apex page:
1. Create an archive file, such as a ZIP file, that contains cordova.js, force.js, and any other static resources your project
requires.
If you’re developing for Android 19 and using Mobile SDK promise-based APIs, include this file:
https://www.promisejs.org/polyfills/promise-7.0.4.min.js. Mobile SDK promised-based APIs include:
•The smartstoreclient Cordova plugin (com.salesforce.plugin.smartstore.client)
•force+promise.js
•smartsync.js
2. In Salesforce, upload the archive file via Your Name > App Setup > Develop > Static Resources.
The sample code uses an instance of the force.js library to log in to Salesforce. It then calls the force.query() method to
process a SOQL query. The query callback function displays the Name fields returned by the query as HTML in an object with ID “users.”
At the end of the Apex page, the HTML5 content defines the users element as a simple <ul> tag.
<apex:page docType="html-5.0" sidebar="false" showHeader="false"
contentType="text/html" applyHtmlTag="false" applyBodyTag="false"
standardStylesheets="false" cache="true">
<html>
<head>
<meta charset="utf-8"></meta>
167
Accessing Salesforce Data: Controllers vs. APIsHTML5 and Hybrid Development

<meta name="viewport"
content="initial-scale=1, maximum-scale=1, user-scalable=no"></meta>
<apex:includeScript value="{!URLFOR($Resource.Easy,
'cordova/cordova.js')}"
<apex:includeScript value="{!URLFOR($Resource.Easy,
'libs/force.js')}" />
<script>
(function() {
/* Do login */
force.login(
function() {
console.log("Auth succeeded");
showUsersList();
},
function(error) {
console.log("Auth failed: " + error);
}
);
/* This method will render a list of users from current salesforce org */
var showUsersList = function() {
fetchRecords(function(data) {
var users = data.records;
var listItemsHtml = '';
for (var i=0; i < users.length; i++) {
listItemsHtml += ('<li class="table-view-cell"><
div class="media-body">' + users[i].Name + '</div></li>');
}
document.querySelector('#users').innerHTML = listItemsHtml;
})
}
/* This method will fetch a list of user records from salesforce.
Just change the soql query to fetch another sobject. */
var fetchRecords = function (successHandler) {
var soql = 'SELECT Id, Name FROM User LIMIT 10';
force.query(soql, successHandler, function(error) {
alert('Failed to fetch users: ' + error);
});
};
})();
</script>
</head>
<body>
<header>
<h1>Hello, Visualforce!</h1>
</header>
168
Accessing Salesforce Data: Controllers vs. APIsHTML5 and Hybrid Development

<!-- Placeholder to add users list -->
<ul id="users">
</ul>
<p>Welcome to Mobile SDK.</p>
</body>
</html>
</apex:page>
Note:
•Using the REST API—even from a Visualforce page—consumes API calls.
•Salesforce API calls made through a Mobile SDK container or through a Cordova webview do not require proxy services.
Cordova webviews disable same-origin policy, so you can make API calls directly. This exemption applies to all Mobile SDK
hybrid and native apps.
Additional Options
You can use the SmartSync Data Framework in HTML5 apps. Just include the required JavaScript libraries as static resources. Take
advantage of the model and routing features. Offline access is disabled for this use case. See Using SmartSync Data Framework to Access
Salesforce Objects.
Salesforce Developer Marketing provides developer mobile packs that can help you get a quick start with HTML5 apps.
Offline Limitations
Read these articles for tips on using HTML5 with Lightning Platform offline.
•https://developer.salesforce.com/blogs/developer-relations/2011/06/using-html5-offline-with-forcecom.html
•http://developer.salesforce.com/blogs/developer-relations/2013/03/using-javascript-with-force-com.html
Hybrid Apps Quick Start
Hybrid apps give you the ease of JavaScript and HTML5 development while leveraging Salesforce Mobile SDK
If you’re comfortable with the concept of hybrid app development, use the following steps to get going quickly.
1. To develop Android hybrid apps for Mobile SDK 6.0, you need:
•Cordova 7.0.0.
•Cordova CLI 7.0.0 or later.
•Java JDK 1.8.x or later—www.oracle.com/downloads.
•forcedroid npm package, version 6.0.
•Android Studio 3.0 or later—developer.android.com/sdk.
•Android SDK and Android SDK Tools—Install from within Android Studio.
a. In the Android Studio menu, click Tools > Android > SDK Manager.
b. Click the SDK Platforms tab.
169
Hybrid Apps Quick StartHTML5 and Hybrid Development

c. Install at least the following required SDK levels and all intervening levels:
–Minimum API: Android KitKat (API 21)
–Target API: Android Oreo (API 27)
d. Click the SDK Tools tab.
e. Install the latest Android SDK Tools version.
•Android Virtual Device (AVD)—Install from within Android Studio.
a. In the Android Studio menu, click Tools > Android > AVD Manager.
b. Click Create Virtual Device....
c. Install at least one AVD that targets Android KitKat (API 21) and above. To learn how to set up an AVD in Android Studio,
follow the instructions at developer.android.com/guide/developing/devices/managing-avds.html.
2. To develop iOS hybrid apps for Mobile SDK 6.0, you need:
•Cordova 4.5.4.
•Cordova CLI 7.0.0 or later.
•Xcode version 9 or later. (We recommend the latest version.)
•iOS 10 or later.
•CocoaPods version 1.2 or later (cocoapods.org).
3. Install Mobile SDK.
•Android Preparation
•iOS Preparation
4. If you don’t already have a connected app, see Creating a Connected App. For OAuth scopes, select api, web, and
refresh_token.
Note: When specifying the Callback URL, there’s no need to use a real address. Use any value that looks like a URL, such as
myapp:///mobilesdk/oauth/done.
5. Create a hybrid app.
•Follow the steps at Create Hybrid Apps. Use hybrid_local for the application type.
6. Run your new app.
•Build and Run Your Hybrid App on Android
•Build and Run Your Hybrid App On iOS
.
Creating Hybrid Apps
Hybrid apps combine the ease of HTML5 Web app development with the power and features of the native platform. They run within a
Salesforce mobile container—a native layer that translates the app into device-specific code—and define their functionality in HTML5
and JavaScript files. These apps fall into one of two categories:
•Hybrid local—Hybrid apps developed with the force.js library wrap a Web app inside the mobile container. These apps store
their HTML, JavaScript, and CSS files on the device.
170
Creating Hybrid AppsHTML5 and Hybrid Development

•Hybrid remote — Hybrid apps developed with Visualforce technology deliver Apex pages through the mobile container. These
apps store some or all of their HTML, JavaScript, and CSS files either on the Salesforce server or on the device (at
http://localhost).
In addition to providing HTML and JavaScript code, you also must maintain a minimal container app for your target platform. These apps
are little more than native templates that you configure as necessary.
If you’re creating libraries or sample apps for use by other developers, we recommend posting your public modules in a version-controlled
online repository such as GitHub (https://github.com). For smaller examples such as snippets, GitHub provides gist, a low-overhead code
sharing forum (https://gist.github.com).
SEE ALSO:
Updating Mobile SDK Apps (5.0 and Later)
About Hybrid Development
Developing hybrid apps with the Mobile SDK container requires you to recompile and rebuild after you make changes. JavaScript
development in a browser is easier. After you’ve altered the code, you merely refresh the browser to see your changes. For this reason,
we recommend you develop your hybrid app directly in a browser, and only run your code in the container in the final stages of testing.
We recommend developing in a browser such as Google Chrome that comes bundled with developer tools. These tools let you access
the symbols and code of your web application during runtime.
Building Hybrid Apps With Cordova
Salesforce Mobile SDK 6.0 provides a hybrid container that uses a specific version of Apache Cordova for each platform (4.5.4 for iOS,
7.0.0 for Android). Architecturally, Mobile SDK hybrid apps are Cordova apps that use Salesforce Mobile SDK as a Cordova plug-in. Cordova
provides a simple command line tool for updating the plug-in in an app. To read more about Cordova benefits, see
https://cordova.apache.org/.
Using Forcehybrid
For creating hybrid apps, Mobile SDK provides the forcehybrid npm utility. This utility works with the Cordova command line to build
hybrid Mobile SDK projects. With forcehybrid, you can create hybrid projects for iOS, Android, or both in a single pass.
Forcehybrid gives you two ways to create your app.
•Specify the type of application you want, along with basic configuration data.
OR
•Use an existing Mobile SDK app as a template. You still provide the basic configuration data.
You can use forcehybrid interactively at the command line, or in script mode with command line parameters. To see usage information,
type forcehybrid without arguments.
Using forcehybrid create Interactively
To enter application options interactively at a command prompt, type forcehybrid create. The forcehybrid utility then prompts
you for each configuration option. For example:
$ forcehybrid create
Enter the target platform(s) separated by commas (ios, android): ios,android
171
About Hybrid DevelopmentHTML5 and Hybrid Development

Enter your application type (hybrid_local, hybrid_remote): hybrid_local
Enter your application name: LocalHybridTest
Enter your package name: com.myhybrid.ios
Enter your organization name (Acme, Inc.): BestApps.com
Enter output directory for your app (leave empty for the current directory): LocalHybridTest
This example creates a hybrid local app named “LocalHybridTest” in the ./LocalHybridTest/ directory, with iOS and Android
targets.
Note: Although forcehybrid create sets up hybrid projects for the platforms you specify, the app isn’t ready for building
until you’ve finished the setup at the Cordova command line. See Create Hybrid Apps
Using forcehybrid create in Script Mode
In script mode, you enter your parameters in a single command line instruction:
$ forcehybrid create --platform=ios,android --apptype=hybrid_local --appname=packagetest
--packagename=com.test.my_new_app --organization="Acme Widgets, Inc."
--outputdir=PackageTest
This example creates a hybrid local app named “packagetest” in the ./PackageTest/ directory, with iOS and Android targets.
Here’s a description of the available options.
Usage:
# create ios/android hybrid_local or hybrid_remote mobile application
forcehybrid create
--platform=Comma separated platforms (ios, android)
--apptype=Application Type (hybrid_local, hybrid_remote)
--appname=Application Name
--packagename=App Package Identifier (e.g. com.mycompany.myapp)
--organization=Organization Name (Your company's/organization's name)
[--startpage=App Start Page (The start page of your remote app. Only required for
hybrid_remote)]
[--outputdir=Output Directory (Leave empty for current directory)]
Using forcehybrid createWithTemplate
The forcehybrid createWithTemplate command is identical to forcehybrid create except that it asks for a GitHub
repo URI instead of an app type. You set this path to point to any repo directory that contains a Mobile SDK app that can be used as a
template. Your template app can be any supported Mobile SDK app type. The force script changes the template’s identifiers and
configuration to match the values you provide for the other parameters.
Here’s command line usage information for forcehybrid createWithTemplate:
# create ios/android hybrid_local or hybrid_remote mobile application from a template
forcehybrid createWithTemplate
--platform=Comma separated platforms (ios, android)
--templaterepouri=Template repo URI
--appname=Application Name
--packagename=App Package Identifier (e.g. com.mycompany.myapp)
--organization=Organization Name (Your company's/organization's name)
[--outputdir=Output Directory (Leave empty for current directory)]
172
Building Hybrid Apps With CordovaHTML5 and Hybrid Development

For example, consider the following command line call:
forcehybrid createWithTemplate
--platform=android
--templaterepouri=https://github.com/forcedotcom/SmartSyncExplorerReactNative
--appname=MyHybrid
-—packagename=com.mycompany.react
--organization="Acme Software, Inc."
This call replicates the SmartSyncExplorerReactNative sample app. It recreates the React Native app in the current directory with the
same source code and resources as the sample app. However, forcehybrid changes the app name to “MyHybrid”.
How the Forcehybrid Script Generates New Apps
The forcehybrid script
•Generates apps with the Cordova command line.
•Downloads the template app and a bootconfig.json file from GitHub.
•Downloads the SalesforceMobileSDK Cordova plugin from GitHub. This plugin delivers the Mobile SDK libraries as Android library
projects.
Create Hybrid Apps
Once you’ve installed forcehybrid and the Cordova command line, you’re ready to create functioning hybrid apps.
Set Up Your Tools
If you haven’t already set up the required tools, use the following instructions. Or, if you prefer, complete the Set Up Your Mobile SDK
Developer Tools Trailhead project and win Trailhead points for your efforts. Afterwards, return here and pick up at Create a Hybrid Mobile
SDK App.
Note: Some of the following steps use the sudo keyword. This keyword is required in Mac OS X if you lack read/write permissions.
Omit the sudo command if you’re sure you don’t need it or if you’re installing on Windows.
1. Make sure that you meet the requirements listed at Development Prerequisites for Android and iOS on page 18. Hybrid development
requires at least one native environment, which can be either iOS or Android.
2. Open a command prompt or terminal window.
3. Run cordova -v.
4. If cordova -v reports that the command is not found, install the Cordova command line, version 7.0.0 or later:
sudo npm install -g cordova
5. Install the forcehybrid npm package:
sudo npm install -g forcehybrid
If you previously installed an earlier version of forcehybrid, be sure to uninstall it before reinstalling forcehybrid.
Create a Hybrid Mobile SDK App
1. At a command prompt or terminal window, run forcehybrid create.
•For platform, enter “ios”, “android”, or “ios,android”.
173
Building Hybrid Apps With CordovaHTML5 and Hybrid Development

•For application type:
–Specify hybrid_local for a Cordova hybrid app that stores its code on the mobile device.
–Specify hybrid_remote for a Cordova hybrid app that runs a Visualforce app on the server.
•Provide your own app name, package name, and organization strings.
•(Hybrid remote apps only) For start page, specify the relative URL of your Apex landing page—for example,
apex/BasicVFPage.
2. If you’re importing HTML, JavaScript, CSS, or bootconfig.json files, put them in your project’s <outputdir>/www/
directory.
Important:
•Do not include cordova.js, cordova.force.js, or any Cordova plug-ins.
•If you’re developing for Android 19 and using Mobile SDK promise-based APIs, include this file:
https://www.promisejs.org/polyfills/promise-7.0.4.min.js. Mobile SDK promised-based APIs include:
–The smartstoreclient Cordova plugin (com.salesforce.plugin.smartstore.client)
–force+promise.js
–smartsync.js
3. In your project directory, open the www/bootconfig.json file in a UTF-8 compliant text editor and replace the values of the
following properties:
•remoteAccessConsumerKey—Replace the default value with the consumer key from your connected app
•oauthRedirectURI—Replace the default value with the callback URL from your connected app
4. cd to your app’s project directory. The force script prints the directory name to the screen when it has finished creating your project.
For example: “Your application project is ready in <project directory name>.”
5. For each additional Cordova plug-in you want to add, type:
cordova plugin add <plug-in repo or plug-in name>
Note: Go to https://plugins.cordova.io to search for available plug-ins.
6. If you’ve added other Cordova plug-ins, remove and then readd the Salesforce Cordova plug-in:
cordova plugin remove com.salesforce
cordova plugin add https://github.com/forcedotcom/SalesforceMobileSDK-CordovaPlugin
--force
For example, to add the cordova-plugin-contacts and cordova-plugin-statusbar plug-ins:
cordova plugin add cordova-plugin-contacts
cordova plugin add cordova-plugin-statusbar
cordova plugin remove com.salesforce
cordova plugin add https://github.com/forcedotcom/SalesforceMobileSDK-CordovaPlugin
--force
Important: Be sure to include the --force parameter when you readd the Salesforce plug-in.
7. (Optional—Mac only) To add a second platform “after the fact”:
174
Building Hybrid Apps With CordovaHTML5 and Hybrid Development

To add iOS support, type:
cordova platform add ios@4.5.4
•
•To add Android support, type:
cordova platform add android@7.0.0
8. Type:
cordova prepare
to deploy your web assets to their respective platform-specific directories under the www/ directory.
Important: During development, always run cordova prepare after you’ve changed the contents of the www/
directory, to deploy your changes to the platform-specific project folders.
See “The Command-Line Interface” in the Cordova 3.5 documentation for more information on the Cordova command line.
Build and Run Your Hybrid App on Android
Before building, be sure that you’ve installed Android Studio, including Android SDK and at least one Android emulator. Refer to the
Android requirements for Mobile SDK to make sure you install the correct versions of the Android components.
After you’ve run cordova prepare, build and run the project.
To run the app in Android Studio:
1. Launch Android Studio.
2. From the welcome screen, select Import project (Eclipse ADT, Gradle, etc.). Or, if Android Studio is already running, select File >
New > Import Project.
3. Select <your_project_dir>/platforms/android and click OK. If you’re prompted to use the Gradle wrapper, accept
the prompt.
4. After the build finishes, select the android target and click Run ‘android’ from either the menu or the toolbar.
5. Select a connected Android device or emulator.
Important: If Android Studio offers to update your Gradle wrapper version, accept the offer. After the process finishes, Android
Studio automatically re-imports your project.
Build and Run Your Hybrid App On iOS
After you’ve run cordova prepare on an iOS hybrid app, you can open the project in Xcode to run the app in an iOS simulator.
To run the app in Xcode:
1. In Xcode, select File > Open.
2. Navigate to the platforms/ios/ directory in your new app’s directory.
3. Double-click the <app name>.xcodeworkspace file.
4. Click the Run button in the upper left corner, or press COMMAND-R.
175
Building Hybrid Apps With CordovaHTML5 and Hybrid Development

Developing Hybrid Remote Apps
You can easily convert the FileExplorer SDK sample
(github.com/forcedotcom/SalesforceMobileSDK-Shared/tree/master/samples/fileexplorer), which is a hybrid local app, into a hybrid
remote app. To convert the app, you redefine the main HTML page as a Visualforce page that is delivered from the server. You can then
bundle the CSS and JavaScript resources with the app so that they’re stored on the device.
Let’s start by creating the Visualforce page.
1. In your Salesforce Developer Edition org, create a Visualforce page named “FileExplorer” with the following attributes.
<apex:page docType="html-5.0" showHeader="false" sidebar="false">
<!-- Paste content of FileExplorer.html here, but remove the “<!DOCTYPE html>” directive
-->
</apex:page>
2. Copy the contents of the samples/fileexplorer/FileExplorer.html file into the FileExplorer Visualforce page.
3. Delete the <!DOCTYPE html> directive at the top of the inserted content.
4. Save your work.
Next, create a hybrid remote app to contain the sample code.
1. cd to the directory where you want to develop your app. The only requirement is that this directory cannot already contain a
subdirectory named “fileexplorer”.
2. In a Terminal window or command prompt, run forcehybrid create with the following values:
ios,androidPlatform:
hybrid_remoteApplication type:
fileexplorerApplication name:
com.salesforce.fileexplorerPackage name:
Acme Apps, Inc.Organization name:
apex/FileExplorerStart page:
<press RETURN>Output directory:
3. In a text editor, open fileexplorer/www/bootconfig.json and change the following properties as follows:
"isLocal": false,
"startPage": "apex/FileExplorer",
These settings configure your app to be a hybrid remote app.
4. Return to your Terminal window or command prompt, and then type:
cordova prepare
Done! To run the Android target, import the <my_app_directory>/fileexplorer/platforms/android folder into
Android Studio and run the app. Or, to run the iOS target, import the
<my_app_directory>/fileexplorer/platforms/ios/fileexplorer.xcworkspace file into Xcode and run
the app. When you test this sample, be sure to log in to the organization where you created the Visualforce page.
176
Developing Hybrid Remote AppsHTML5 and Hybrid Development

Using App Resources Stored on localhost
For hybrid remote applications, you are no longer required to host cordova.js or any plug-ins on the server. Instead, you can include
cordova.js as https://localhost/cordova.js in your HTML source. For example:
<script src="https://localhost/cordova.js"></script>
You can also use https://localhost for all your CSS and JavaScript resources. You can then bundle those files with the app,
rather than delivering them from the server. This approach gives your hybrid remote apps a performance boost while letting you develop
with Visualforce and Apex.
Note:
•Mobile SDK 2.3 and later automatically whitelists https://localhost in hybrid remote apps. If your app was developed
in an earlier version of Mobile SDK, you can manually whitelist https://localhost in your config.xml file.
•A Visualforce page that uses https://localhost to include source files works only in the Salesforce Mobile SDK container
application. To make the page also run in a web browser, examine the user agent in Apex and detect whether the client is a
Mobile SDK container. Based on your findings, use the appropriate script include tags.
Using localhost in Hybrid Remote Apps for iOS
Beginning with version 5.0, Mobile SDK follows Apple’s mandate and deprecates the UIWebView class in favor of WKWebView.
These classes provide the means by which Mobile SDK displays Visualforce pages in iOS hybrid remote apps.
WKWebView offers significant graphics performance improvements. It also lets you disable JavaScript when you’re loading a web page.
There’s a catch, though. With UIWebView, apps could choose to access their web app files through localhost, thus avoiding many
roundtrips to the server. WKWebView enforces a stricter content security protocol than its predecessor and does not support
localhost. This restriction obviously defeats hybrid remote apps that store their web app files locally.
All hope is not gone, however: If your app uses localhost, you can simply switch back to UIWebView. Here are the steps for
making that switch.
1. In Xcode, open your hybrid remote project.
2. In the Project Navigator, expand the Plugins folder.
3. Select the AppDelegate+SalesforceHybridSDK.m file.
4. In the code editor, find the setupRootViewController method definition.
5. On the right-hand side of the self.viewController assignment, add a userUIWebView:YES argument to the end of
the parameter list:
self.viewController = [[SFHybridViewController alloc]
initWithConfig:(SFHybridViewConfig*)
[SalesforceSDKManager sharedManager].appConfig
useUIWebView:YES];
This code change persists unless you recreate your app with forceios create. If you do recreate your app, don’t forget to add
this code to the freshly generated AppDelegate+SalesforceHybridSDK.m file.
Important: Before switching to UIWebView, be sure to read up on the differences between the two classes. You can find
information on sites such as blog.initlabs.com, stackexchange.com, and forums.developer.apple.com.
177
Developing Hybrid Remote AppsHTML5 and Hybrid Development
Hybrid Sample Apps
Salesforce Mobile SDK provides hybrid samples that demonstrate how to use Mobile SDK features in JavaScript. We provide hybrid
samples two ways:
•As platform-specific apps with native wrappers. We provide these wrappers for a limited subset of our hybrid samples. You can
access the iOS samples through the Mobile SDK workspace (SalesforceMobileSDK.xcodeproj) in the root directory of
the SalesforceMobileSDK-iOS GitHub repository. Also, you can access the Android samples from the hybrid/SampleApps
directory of the SalesforceMobileSDK-Android repository.
•As platform-agnostic web apps including only the HTML5, JavaScript, CSS source code. These apps include all of our hybrid samples
and provide the basis for the platform-specific hybrid apps. You can download these sample apps from the SalesforceMobileSDK-Shared
GitHub repo and build them using the Cordova command line.
Android Hybrid Sample Wrappers
•AccountEditor: Demonstrates how to synchronize offline data using the smartsync.js library.
•NoteSync: Demonstrates how to use non-REST APIs to retrieve Salesforce Notes.
•SmartSyncExplorerHybrid: Demonstrates how to synchronize offline data using the SmartSync Data Framework plugin.
iOS Hybrid Sample Wrappers
•AccountEditor: Demonstrates how to synchronize offline data using the smartsync.js library.
•NoteSync: Demonstrates how to use non-REST APIs to retrieve Salesforce Notes.
•SmartSyncExplorerHybrid: Demonstrates how to synchronize offline data using the SmartSync Data Framework plugin.
Source-only Hybrid Sample Apps
Salesforce Mobile SDK provides the following platform-agnostic hybrid sample apps in the the SalesforceMobileSDK-Shared GitHub
repository.
•accounteditor: Uses the SmartSync Data Framework to access Salesforce data.
•contactexplorer: Uses Cordova to retrieve local device contacts. It also uses the force.js toolkit to implement REST transactions
with the Salesforce REST API. The app uses the OAuth2 support in Salesforce SDK to obtain OAuth credentials and then propagates
those credentials to force.js by sending a javascript event.
•fileexplorer: Demonstrates the Files API.
•notesync: Uses non-REST APIs to retrieve Salesforce Notes.
•simplesyncreact:: Demonstrates a React Native app that uses the SmartSync Data Framework plug-in.
•smartstoreexplorer: Lets you explore SmartStore APIs.
•smartsyncexplorer: Demonstrates using smartsync.js, rather than the SmartSync Data Framework plug-in, for offline
synchronization.
•userandgroupsearch: Lets you search for users in groups.
•userlist: Lists users in an organization. This is the simplest hybrid sample app.
•usersearch: Lets you search for users in an organization.
•vfconnector: Wraps a Visualforce page in a native container. This example assumes that your org has a Visualforce page called
BasicVFTest. The app first obtains OAuth login credentials using the Salesforce SDK OAuth2 support and then uses those
credentials to set appropriate webview cookies for accessing Visualforce pages.
178
Hybrid Sample AppsHTML5 and Hybrid Development

Build Hybrid Sample Apps
To build hybrid apps from the samples directory of the SalesforceMobileSDK-Shared repository, you use forcehybrid and the Cordova
command line. You create a hybrid_local or hybrid_remote app and then add the web assets—HTML, JavaScript, and CSS
files—and the bootconfig.json file from the Shared repo.
Note: The ContactExplorer sample requires the cordova-plugin-contacts and cordova-plugin-statusbar
plug-ins.
The other hybrid sample apps do not require special Cordova plug-ins.
To build one of the sample apps:
1. Open a command prompt or terminal window.
2. Clone the shared repo:
git clone https://github.com/forcedotcom/SalesforceMobileSDK-Shared
3. Use forcehybrid to create an app.
•For platform, enter one or both platform names: “ios”, “android”, or “ios,android”.
•For application type (or the apptype parameter), enter “hybrid_local”.
4. Change to your new app directory:
cd <app_target_directory>
5. For each additional Cordova plug-in you want to add, type:
cordova plugin add <plug-in repo or plug-in name>
Note: Go to https://plugins.cordova.io to search for available plug-ins.
6. If you’ve added other Cordova plug-ins, remove and then readd the Salesforce Cordova plug-in:
cordova plugin remove com.salesforce
cordova plugin add https://github.com/forcedotcom/SalesforceMobileSDK-CordovaPlugin
--force
For example, to add the cordova-plugin-contacts and cordova-plugin-statusbar plug-ins:
cordova plugin add cordova-plugin-contacts
cordova plugin add cordova-plugin-statusbar
cordova plugin remove com.salesforce
cordova plugin add https://github.com/forcedotcom/SalesforceMobileSDK-CordovaPlugin
--force
Important: Be sure to include the --force parameter when you readd the Salesforce plug-in.
7. (Optional—Mac only) To add iOS support to an Android project “after the fact”:
cordova platform add ios@4.5.4
8. (Optional—Mac only) To add Android support to an iOS project “after the fact”:
cordova platform add android@7.0.0
179
Hybrid Sample AppsHTML5 and Hybrid Development

9. Copy the sample source files to the www folder of your new project directory.
On Mac:
cp -RL <local path to SalesforceMobileSDK-Shared>/SampleApps/<template>/* www/
On Windows:
copy <local path to SalesforceMobileSDK-Shared>\SampleApps\<template>\*.* www
If you’re asked, affirm that you want to overwrite existing files.
10. Do the final Cordova preparation:
cordova prepare
Note:
•Android Studio refers to forcehybrid projects by the platform name ("android"). For example, to run your project, select "android"
as the startup project and then click Run.
•On Windows, Android Studio sets the default project encoding to windows-1252. This setting conflicts with the UTF-8
encoding of the forcehybrid Gradle build files. For best results, change the default project encoding to UTF-8.
•On Windows, be sure to run Android Studio as administrator.
Running the ContactExplorer Hybrid Sample
Let’s look at the ContactExplorer sample app, which is included in Mobile SDK. You can do this exercise on Mac OS or Windows, but you
can fully validate the iOS target only on a Mac.
Before starting this exercise, be sure that you have:
•A directory to contain the SalesforceMobileSDK-Shared cloned repo—your root directory, or any other easily accessible
location.
•A directory for creating and developing Mobile SDK hybrid projects. Since Cordova projects can contain both Android and iOS targets,
it’s a good idea to put them in a platform-neutral directory.
Source code for sample apps lives on GitHub, so let’s start by cloning the shared repository.
1. Open a command prompt or Terminal window.
2. Clone the shared repo:
git clone https://github.com/forcedotcom/SalesforceMobileSDK-Shared
3. cd to your app’s project directory. The force script prints the directory name to the screen when it has finished creating your project.
For example: “Your application project is ready in <project directory name>.”
4. Run forcehybrid create with the following values:
Enter the target platform(s) separated by commas (ios, android): ios,android
Enter your application type (hybrid_local, hybrid_remote): hybrid_local
Enter your application name: contactsApp
Enter the package name for your app (com.mycompany.myapp): com.salesforce.contactexplorer
Enter your organization name (Acme, Inc.): AcmeApps.com
Enter output directory for your app (leave empty for the current directory): <press
RETURN>
180
Running the ContactExplorer Hybrid SampleHTML5 and Hybrid Development

5. After forcehybrid finishes, run the following commands. Windows users: To run the script on Windows, replace the cp command
with the Windows copy command. Be aware, however, that the JS and CSS files are merely aliases to the “real” files. Make sure
that you copy the aliased files rather than their links. Also, remove the cordova platform add ios command, which isn’t
Windows-compatible.
cd contactsApp
cordova plugin add cordova-plugin-contacts
cordova plugin add cordova-plugin-statusbar
cordova plugin remove com.salesforce
cordova plugin add https://github.com/forcedotcom/SalesforceMobileSDK-CordovaPlugin
--force
cp -RL <local path to SalesforceMobileSDK-Shared>/samples/contactexplorer/* www/
cordova prepare
The script creates an iOS project and an Android project, both of which wrap the ContactExplorer sample app. Now we’re ready to run
the app on one of these platforms. If you’re using an iOS device, you must configure a profile for the simulator, as described in the Xcode
User Guide at developer.apple.com/library. Similarly, Android devices must be set up as described at developer.android.com/tools.
When you run the app, after an initial splash screen, you see the Salesforce login screen.
181
Running the ContactExplorer Hybrid SampleHTML5 and Hybrid Development
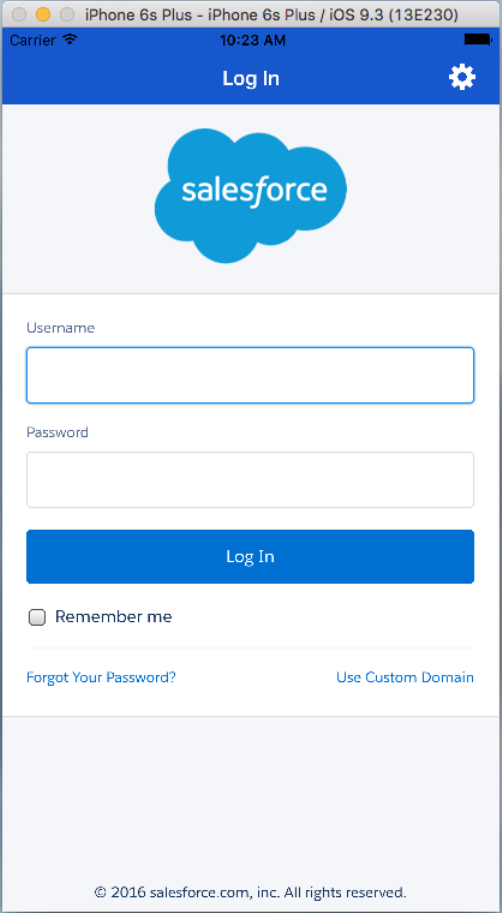
Log in with your Developer Edition org username and password. To allow the app to access your Salesforce data, tap Allow. Now that
you’re in the app, you can retrieve lists of contacts and accounts. Tap Fetch SFDC contacts to retrieve Salesforce contact names or
Fetch SFDC Accounts to retrieve account names from your DE organization.
182
Running the ContactExplorer Hybrid SampleHTML5 and Hybrid Development
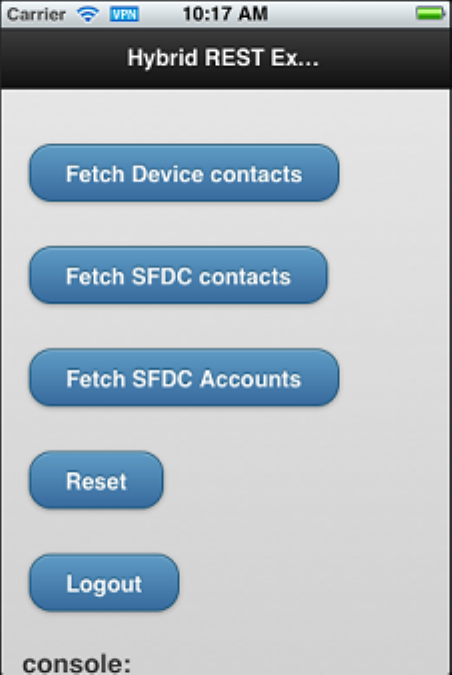
With each tap, the app appends rows to an infinite list. Scroll down to see the full list.
183
Running the ContactExplorer Hybrid SampleHTML5 and Hybrid Development
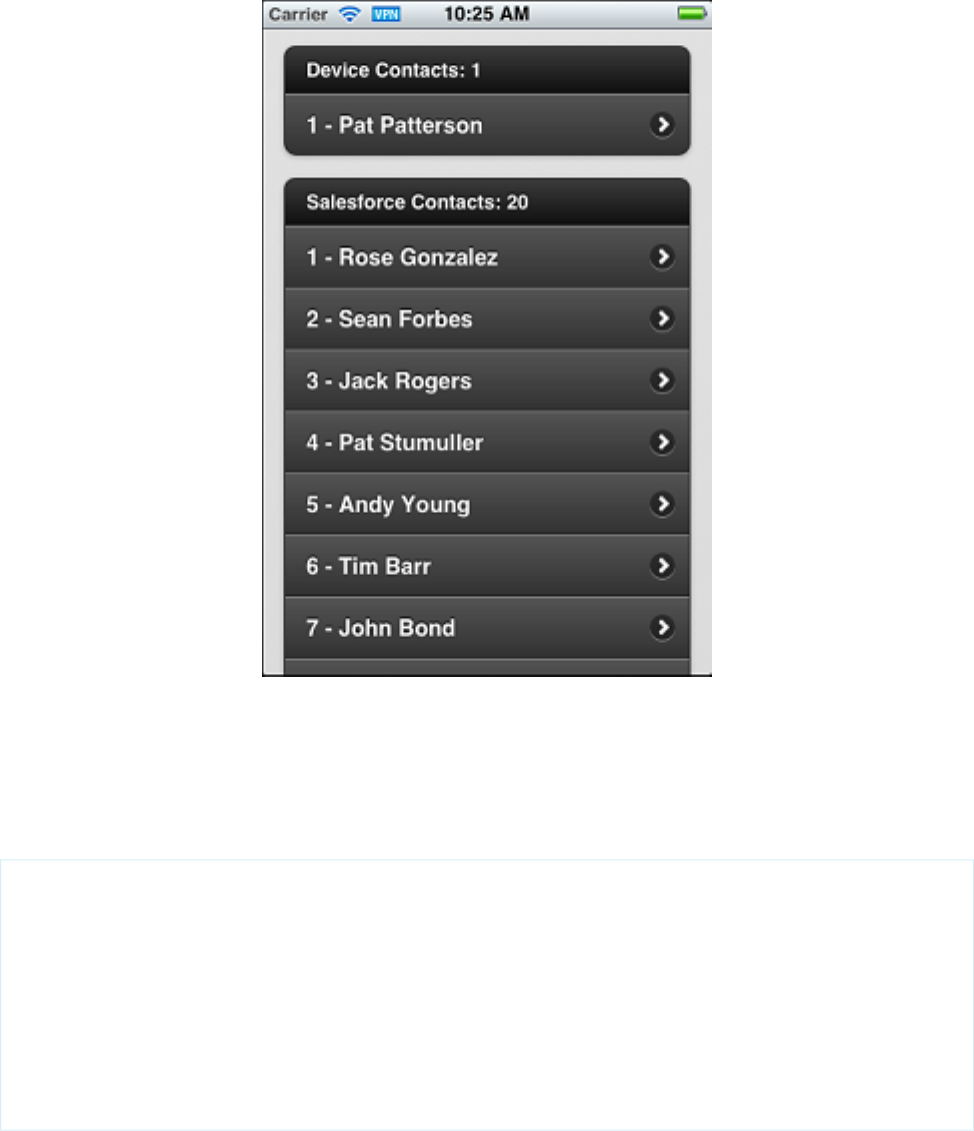
Let's take a closer look at how the app works.
To initiate a user session with force.js, you call force.login(). After the user logs in to an app running in the container, the network
plug-in refreshes tokens as necessary when the app tries to access Salesforce resources. The following code, adapted from the
ContactExplorer sample, demonstrates a typical force.login() implementation.
When the device notifies that it’s ready, you call the force.login() method to post the login screen.
/* Do login */
force.login(
function() {
console.log("Auth succeeded");
// Call your app’s entry point
// ...
},
function(error) {
console.log("Auth failed: " + error);
}
);
After completing the login process, the sample app displays index.html (located in the www folder). When the page has completed
loading and the mobile framework is ready, the jQuery(document).ready() function calls regLinkClickHandlers().
184
Running the ContactExplorer Hybrid SampleHTML5 and Hybrid Development

This function (in inline.js) sets up click handlers for the various functions in the sample app. For example,
the #link_fetch_sfdc_contacts handler runs a query using the force object.
$j('#link_fetch_sfdc_contacts').click(function() {
logToConsole("link_fetch_sfdc_contacts clicked");
force.query("SELECT Name FROM Contact",
onSuccessSfdcContacts, onErrorSfdc);
});
The force object is set up during the initial OAuth 2.0 interaction, and gives access to the REST API in the context of the authenticated
user. Here, we retrieve the names of all the contacts in the DE organization. onSuccessSfdcContacts() then renders the
contacts as a list on the index.html page.
$j('#link_fetch_sfdc_accounts').click(function() {
logToConsole("link_fetch_sfdc_accounts clicked");
force.query("SELECT Name FROM Account",
onSuccessSfdcAccounts, onErrorSfdc);
});
Similarly to the #link_fetch_sfdc_contacts handler, the #link_fetch_sfdc_accounts handler fetches Account
records via the REST API. The #link_reset and#link_logout handlers clear the displayed lists and log out the user, respectively.
Notice that the app can also retrieve contacts from the device—something that an equivalent web app would be unable to do. The
following click handler retrieves device contact query by calling the Cordova contacts plug-in.
$j('#link_fetch_device_contacts').click(function() {
logToConsole("link_fetch_device_contacts clicked");
var contactOptionsType = cordova.require(
"org.apache.cordova.contacts.ContactFindOptions");
var options = new contactOptionsType();
options.filter = ""; // empty search string returns all contacts
options.multiple = true;
var fields = ["name"];
var contactsObj = cordova.require(
"org.apache.cordova.contacts.contacts");
contactsObj.find(fields, onSuccessDevice,
onErrorDevice, options);
});
});
This handler calls find() on the org.apache.cordova.contacts.contacts object to retrieve the contact list from the
device. The onSuccessDevice() function (not shown here) renders the contact list into the index.html page.
Get the complete ContactExplorer sample application here:
https://github.com/forcedotcom/SalesforceMobileSDK-Shared/tree/master/samples/contactexplorer
SEE ALSO:
Build and Run Your Hybrid App On iOS
Build and Run Your Hybrid App on Android
Create a Mobile Page to List Information
The ContactExplorer sample hybrid app is useful in many respects, and serves as a good starting point to learn hybrid mobile app
development. You can have more fun with it by modifying it to display merchandise records from a custom Salesforce schema named
185
Running the ContactExplorer Hybrid SampleHTML5 and Hybrid Development
Warehouse. You'll need to install this app in a Developer Edition org. If you install it in an existing DE org, be sure to delete any existing
Warehouse components you’ve made before you install.
To install the Warehouse app:
1. Click the installation URL link: http://goo.gl/1FYg90
2. If you aren’t logged in, enter the username and password of your DE org.
3. Select an appropriate level of visibility for your organization.
4. Click Install.
5. Click Done.
6. Once the installation completes, you can select the Warehouse app from the app picker in the upper right corner.
7. To create data, click the Data tab.
8. Click the Create Data button.
Note:
•If you’re modifying a Cordova iOS project in Xcode, you may need to copy your code to the Staging/www/ project folder
to test your changes. If you use only the Cordova command line instead of Xcode to build Cordova iOS apps, you should modify
only the <projectname>/www/ folder.
Modify the App's Initialization Block (index.html)
In this section, you modify the view file (index.html) and the controller (inline.js) to make the app specific to the Warehouse
schema and display all records in the Merchandise custom object.
In your app, you want a list of Merchandise records to appear on the default Home page of the mobile app. Consequently, the first thing
to do is to modify what happens automatically when the app calls the jQuery(document).ready function. Comment out the
call to regLinkClickHanders() in the jQuery(document).ready function. Then, add the following code immediately
after this now-commented line.
logToConsole("Auth succeeded");
// regLinkClickHandlers();
186
Running the ContactExplorer Hybrid SampleHTML5 and Hybrid Development

// retrieve Merchandise records, including the Id for links
force.query("SELECT Id, Name, Price__c, Quantity__c
FROM Merchandise__c", onSuccessSfdcMerchandise, onErrorSfdc);
Notice that this JavaScript code leverages the force.js library to process a SOQL statement that retrieves records from the Merchandise
custom object. On success, the function calls the JavaScript function onSuccessSfdcMerchandise (which you add in a moment).
Create the App's mainpage View (index.html)
To display the Merchandise records in a standard mobile, touch-oriented user interface, scroll down in index.html and replace the
entire contents of the <body> tag with the following HTML.
<!-- Main page, to display list of Merchandise once app starts -->
<div data-role="page" data-theme="b" id="mainpage">
<!-- page header -->
<div data-role="header">
<!-- button for logging out -->
<a href='#' id="link_logout" data-role="button"
data-icon='delete'>
Log Out
</a>
<!-- page title -->
<h2>List</h2>
</div>
<!-- page content -->
<div id="#content" data-role="content">
<!-- page title -->
<h2>Mobile Inventory</h2>
<!-- list of merchandise, links to detail pages -->
<div id="div_merchandise_list">
<!-- built dynamically by function onSuccessSfdcMerchandise -->
</div>
</div>
</div>
Overall, notice that the updated view uses standard HTML tags and jQuery Mobile markup (e.g., data-role, data-theme, data-icon) to
format an attractive touch interface for your app. Developing hybrid-based mobile apps is straightforward if you already know some
basic standard Web development technology, such as HTML, CSS, JavaScript, and jQuery.
Modify the App's Controller (inline.js)
In the previous section, the initialization block in the view defers to the onSuccessSfdcMerchandise function of the controller
to dynamically generate the HTML that renders Merchandise list items in the encompassing div, div_merchandise_list. In this
step, you build the onSuccessSfdcMerchandise function.
Open the inline.js file and add the following controller action, which is somewhat similar to the sample functions.
Important: Be careful if you cut and paste this or any code from a binary file! It’s best to purify it first by pasting it into a plain text
editor and then copying it from there. Also, remove any line breaks that occur in the middle of code statements.
// handle successful retrieval of Merchandise records
function onSuccessSfdcMerchandise(response) {
// avoid jQuery conflicts
187
Running the ContactExplorer Hybrid SampleHTML5 and Hybrid Development

var $j = jQuery.noConflict();
var logToConsole =
cordova.require("com.salesforce.util.logger").logToConsole;
// debug info to console
logToConsole("onSuccessSfdcMerchandise: received " +
response.totalSize + " merchandise records");
// clear div_merchandise_list HTML
$j("#div_merchandise_list").html("");
// set the ul string var to a new UL
var ul = $j('<ul data-role="listview" data-inset="true"
data-theme="a" data-dividertheme="a"></ul>');
// update div_merchandise_list with the UL
$j("#div_merchandise_list").append(ul);
// set the first li to display the number of records found
// formatted using list-divider
ul.append($j('<li data-role="list-divider">Merchandise records: '
+ response.totalSize + '</li>'));
// add an li for the merchandise being passed into the function
// create array to store record information for click listener
inventory = new Array();
// loop through each record, using vars i and merchandise
$j.each(response.records, function(i, merchandise) {
// create an array element for each merchandise record
inventory[merchandise.Id] = merchandise;
// create a new li with the record's Name
var newLi = $j("<li class='detailLink' data-id='" +
merchandise.Id + "'><a href='#'>" +
merchandise.Name + "</a></li>");
ul.append(newLi);
});
// render (create) the list of Merchandise records
$j("#div_merchandise_list").trigger( "create" );
// send the rendered HTML to the log for debugging
logToConsole($j("#div_merchandise_list").html());
// set up listeners for detailLink clicks
$j(".detailLink").click(function() {
// get the unique data-id of the record just clicked
var id = $j(this).attr('data-id');
// using the id, get the record from the array created above
var record = inventory[id];
// use this info to set up various detail page information
$j("#name").html(record.Name);
$j("#quantity").val(record.Quantity__c);
$j("#price").val(record.Price__c);
$j("#detailpage").attr("data-id",record.Id);
188
Running the ContactExplorer Hybrid SampleHTML5 and Hybrid Development

// change the view to the detailpage
$j.mobile.changePage('#detailpage', {changeHash: true});
});
}
The comments in the code explain each line. Notice the call to logToConsole(); the JavaScript outputs rendered HTML to the
console log so that you can see what the code creates. Here's an excerpt of some sample output.
<ul data-role="listview" data-inset="true" data-theme="a"
data-dividertheme="a" class="ui-listview ui-listview-inset
ui-corner-all ui-shadow">
<li data-role="list-divider" role="heading"
class=
"ui-li ui-li-divider ui-btn ui-bar-a ui-corner-top">
Merchandise records: 6
</li>
<li class="detailLink ui-btn ui-btn-up-a ui-btn-icon-right ui-li"
data-id="a00E0000003BzSfIAK" data-theme="a">
<div class="ui-btn-inner ui-li">
<div class="ui-btn-text">
<a href="#" class="ui-link-inherit">Tablet</a>
</div>
</div>
</li>
<li class="detailLink ui-btn ui-btn-up-a ui-btn-icon-right ui-li"
data-id="a00E0000003BuUpIAK" data-theme="a">
<div class="ui-btn-inner ui-li">
<div class="ui-btn-text">
<a href="#" class="ui-link-inherit">Laptop</a>
</div>
</div>
</li>
...
</ul>
In particular, notice how the code:
•creates a list of Merchandise records for display on the app's primary page
•creates each list item to display the Name of the Merchandise record
•creates each list item with unique link information that determines what the target detail page displays
Test the New App
Restart the simulator for your mobile app. When you do, the initial page should look similar to the following screen.
189
Running the ContactExplorer Hybrid SampleHTML5 and Hybrid Development
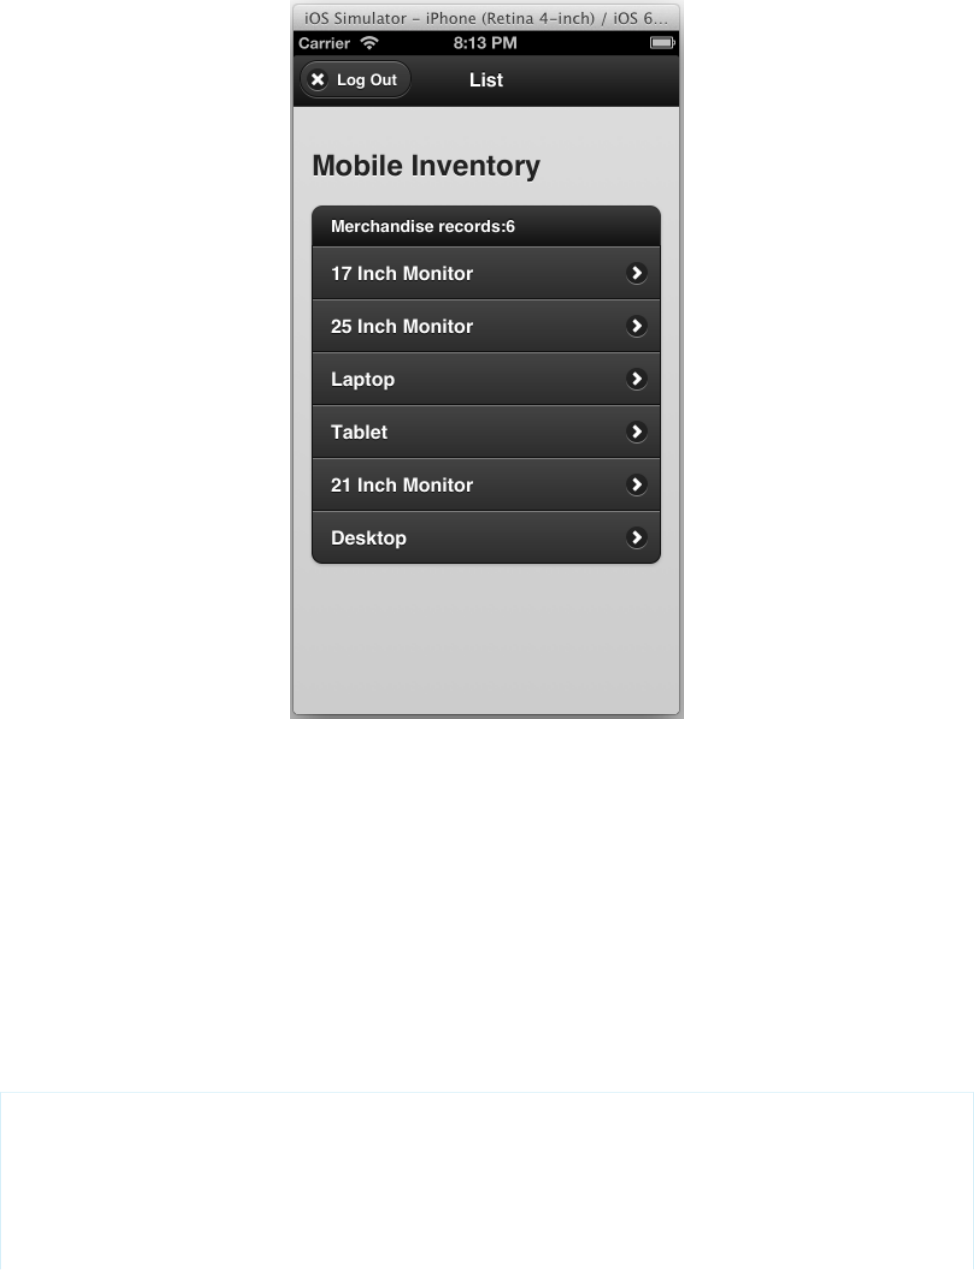
If you click any particular Merchandise record, nothing happens yet. The list functionality is useful, but even better when paired with the
detail view. The next section helps you build the detailpage that displays when a user clicks a specific Merchandise record.
Create a Mobile Page for Detailed Information
In the previous topic, you modified the sample hybrid app so that, after it starts, it lists all Merchandise records and provides links to
detail pages. In this topic, you finish the job by creating a detailpage view and updating the app's controller.
Create the App's detailpage View (index.html)
When a user clicks on a Merchandise record in the app's mainpage view, click listeners generate record-specific information and then
load a view named detailpage that displays this information. To create the detailpage view, add the following div tag after the mainpage div
tag.
<!-- Detail page, to display details when user clicks specific Merchandise record -->
<div data-role="page" data-theme="b" id="detailpage">
<!-- page header -->
<div data-role="header">
<!-- button for going back to mainpage -->
<a href='#mainpage' id="backInventory"
190
Running the ContactExplorer Hybrid SampleHTML5 and Hybrid Development

class='ui-btn-left' data-icon='home'>
Home
</a>
<!-- page title -->
<h1>Edit</h1>
</div>
<!-- page content -->
<div id="#content" data-role="content">
<h2 id="name"></h2>
<label for="price">
Price ($):</label>
<input type="text" id="price" readonly="readonly"></input>
<br/>
<label for="quantity">
Quantity:</label>
<!-- note that number is not universally supported -->
<input type="number" id="quantity"></input>
<br/>
<a href="#" data-role="button" id="updateButton"
data-theme="b">Update</a>
</div>
</div>
The comments explain each part of the HTML. Basically, the view is a form that lets the user see a Merchandise record's Price and Quantity
fields, and optionally update the record's Quantity.
Recall, the jQuery calls in the last part of the onSuccessSfdcMerchandise function (in inline.js) update the detail page
elements with values from the target Merchandise record. Review that code, if necessary.
Modify the App's Controller (inline.js)
What happens when a user clicks the Update button in the new detailpage view? Nothing, yet. You need to modify the app's controller
(inline.js) to handle clicks on that button.
In inline.js, add the following JavaScript to the tail end of the onSuccessSfdcMerchandise function.
// handle clicks to Update on detailpage
$j("#updateButton").click(function() {
// update local information in the inventory array
inventory[$j("#detailpage").attr("data-id")].Quantity__c = $j("#quantity").val();
currentRecord = inventory[$j("#detailpage").attr("data-id")];
// repackage the ID with the quantity value before updating the database
var data = new Object();
data.Quantity__c = $j("#quantity").val();
data.Id = currentRecord.Id;
// update the database
force.update("Merchandise__c",data,updateSuccess,onErrorSfdc);
});
191
Running the ContactExplorer Hybrid SampleHTML5 and Hybrid Development
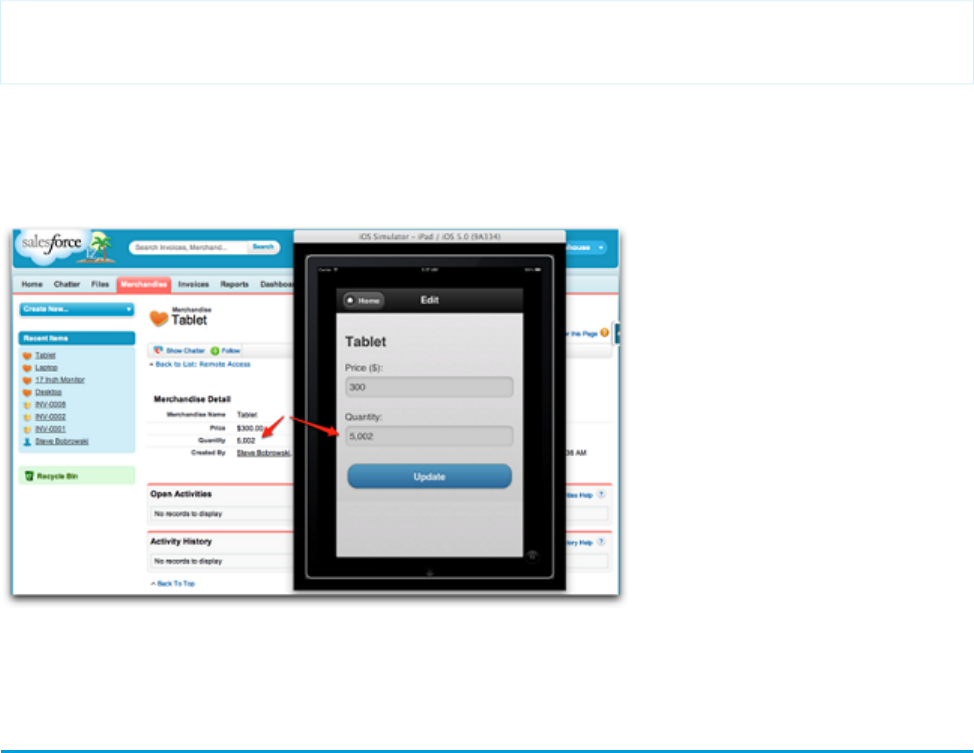
The comments in the code explain each line. On success, the new handler calls the updateSuccess function, which is not currently
in place. Add the following simple function to inline.js.
function updateSuccess(message) {
alert("Item Updated");
}
Test the App
Restart the simulator for your mobile app. When you do, a detail page should appear when you click a specific Merchandise record and
look similar to the following screen.
Feel free to update a record's quantity, and then check that you see the same quantity when you log into your DE org and view the
record using the app UI (see above).
Debugging Hybrid Apps On a Mobile Device
You can debug hybrid apps while they’re running on a mobile device. How you do it depends on your development platform.
If you run into bugs that show up only when your app runs on a real device, you’ll want to use your desktop developer tools to troubleshoot
those issues. It’s not always obvious to developers how to connect the two runtimes, and it’s not well documented in some cases. Here
are general platform-specific steps for attaching a Web app debugger on your machine to a running app on a connected device.
Debugging a Hybrid App On an Android Device
To debug hybrid apps on Android devices, use Google Chrome.
The following steps summarize the full instructions posted at https://developer.chrome.com/devtools/docs/remote-debugging
1. Enable USB debugging on your device: https://developer.chrome.com/devtools/docs/remote-debugging
2. Open Chrome on your desktop (development) machine and navigate to: chrome://inspect
3. Select Discover USB Devices.
4. Select your device.
5. To use your device to debug a web application that’s running on your development machine:
192
Debugging Hybrid Apps On a Mobile DeviceHTML5 and Hybrid Development

a. Click Port forwarding….
b. Set the device port and the localhost port.
c. Select Enable port forwarding. See https://developer.chrome.com/devtools/docs/remote-debugging#port-forwarding for
details.
Debugging a Hybrid App Running On an iOS Device
To debug hybrid apps on real or simulated iOS devices, use Safari on the desktop and the device.
1. Open Safari on the desktop.
2. Select Safari > Preferences.
3. Click the Advanced tab.
4. Click Show Develop menu in menu bar.
5. If you’re using the iOS simulator:
•If Xcode is open, press CONTROL and click the Xcode icon in the task bar and then select Open Developer Tool > iOS Simulator.
•Or, in a Terminal window, type open -a iOS\ Simulator.
6. In the iOS Simulator menu, select Hardware > Device.
7. Select a device.
8. Open Safari from the home screen of the device or iOS Simulator.
9. Navigate to the location of your web app.
10. In Safari on your desktop, select Developer > <your device>, and then select the URL that you opened in Safari on the device or
simulator.
The Web Inspector window opens and attaches itself to the running Safari instance on your device.
PhoneGap provides instructions for debugging PhoneGap (Cordova) hybrid apps on iOS here. See
https://developer.apple.com/library/ios/documentation/IDEs/Conceptual/iOS_Simulator_Guide/.
Controlling the Status Bar in iOS 7 Hybrid Apps
In iOS 7 you can choose to show or hide the status bar, and you can control whether it overlays the web view. You use the Cordova
status bar plug-in to configure these settings. By default, the status bar is shown and overlays the web view in Salesforce Mobile SDK
2.3 and later.
To hide the status bar, add the following keys to the application plist:
<key>UIStatusBarHidden</key>
<true/>
<key>UIViewControllerBasedStatusBarAppearance</key>
<false/>
For an example of a hidden status bar, see the AccountEditor sample app.
To control status bar appearance--overlaying, background color, translucency, and so on--add org.apache.cordova.statusbar to your
app:
cordova plugin add org.apache.cordova.statusbar
193
Debugging a Hybrid App Running On an iOS DeviceHTML5 and Hybrid Development

You control the appearance either from the config.xml file or from JavaScript. See
https://github.com/apache/cordova-plugin-statusbar for full instructions. For an example of a status bar that doesn’t overlay the web
view, see the ContactExplorer sample app.
SEE ALSO:
Hybrid Sample Apps
JavaScript Files for Hybrid Apps
External Dependencies
Mobile SDK uses the following external dependencies for various features of hybrid apps.
DescriptionExternal JavaScript File
Popular HTML utility libraryjquery.js
SmartSync Data Framework supportunderscore.js
SmartSync Data Framework supportbackbone.js
Which JavaScript Files Do I Include?
Beginning with Mobile SDK 2.3, the Cordova utility copies the Cordova plug-in files your application needs to your project’s platform
directories. You don’t need to add those files to your www/ folder.
Files that you include in your HTML code (with a <script> tag> depend on the type of hybrid project. For each type described here,
include all files in the list.
For basic hybrid apps:
•cordova.js
To make REST API calls from a basic hybrid app:
•cordova.js
•force.js
To use SmartSync Data Framework in a hybrid app:
•jquery.js
•underscore.js
•backbone.js
•cordova.js
•force.js
•smartsync.js
194
JavaScript Files for Hybrid AppsHTML5 and Hybrid Development

Versioning and JavaScript Library Compatibility
In hybrid applications, client JavaScript code interacts with native code through Cordova (formerly PhoneGap) and SalesforceSDK plug-ins.
When you package your JavaScript code with your mobile application, your testing assures that the code works with native code.
However, if the JavaScript code comes from the server—for example, when the application is written with VisualForce—harmful conflicts
can occur. In such cases you must be careful to use JavaScript libraries from the version of Cordova that matches the Mobile SDK version
you’re using.
For example, suppose you shipped an application with Mobile SDK 1.2, which uses PhoneGap 1.2. Later, you ship an update that uses
Mobile SDK 1.3. The 1.3 version of the Mobile SDK uses Cordova 1.8.1 rather than PhoneGap 1.2. You must make sure that the JavaScript
code in your updated application accesses native components only through the Cordova 1.8.1 and Mobile SDK 1.3 versions of the
JavaScript libraries. Using mismatched JavaScript libraries can crash your application.
You can’t force your customers to upgrade their clients, so how can you prevent crashes? First, identify the version of the client. Then,
you can either deny access to the application if the client is outdated (for example, with a "Please update to the latest version" warning),
or, preferably, serve compatible JavaScript libraries.
The following table correlates Cordova and PhoneGap versions to Mobile SDK versions.
Cordova or PhoneGap versionMobile SDK version
PhoneGap 1.21.2
Cordova 1.8.11.3
Cordova 2.21.4
Cordova 2.31.5
Cordova 2.32.0
Cordova 2.32.1
Cordova 2.32.2
Cordova 3.52.3
Cordova 3.63.0
Cordova 3.63.1
Cordova 3.63.2
Cordova 3.63.3
Cordova 5.0.0 (for Android), 3.9.2 (for iOS)4.0
Cordova 5.0.0 (for Android), 3.9.2 (for iOS)4.1
Cordova 5.0.0 (for Android), 3.9.2 (for iOS)4.2
Cordova 5.0.0 (for Android), 4.2.0 (for iOS)4.3
195
Versioning and JavaScript Library CompatibilityHTML5 and Hybrid Development

Finding the Mobile SDK Version with the User Agent
You can leverage the user agent string to look up the Mobile SDK version. The user agent starts with
SalesforceMobileSDK/<version>. Once you obtain the user agent, you can parse the returned string to find the Mobile SDK
version.
You can obtain the user agent on the server with the following Apex code:
userAgent = ApexPages.currentPage().getHeaders().get('User-Agent');
On the client, you can do the same in JavaScript using the navigator object:
userAgent = navigator.userAgent;
Detecting the Mobile SDK Version with the sdkinfo Plugin
In JavaScript, you can also retrieve the Mobile SDK version and other information by using the sdkinfo plug-in. This plug-in, which
is defined in the cordova.force.js file, offers one method:
getInfo(callback)
This method returns an associative array that provides the following information:
DescriptionMember name
Version of the Salesforce Mobile SDK used to build to the container.
For example: “1.4”.
sdkVersion
Name of the hybrid application.appName
Version of the hybrid application.appVersion
Array containing the names of Salesforce plug-ins installed in the
container. For example: "com.salesforce.oauth",
"com.salesforce.smartstore", and so on.
forcePluginsAvailable
The following code retrieves the information stored in the sdkinfo plug-in and displays it in alert boxes.
var sdkinfo = cordova.require("com.salesforce.plugin.sdkinfo");
sdkinfo.getInfo(new function(info) {
alert("sdkVersion->" + info.sdkVersion);
alert("appName->" + info.appName);
alert("appVersion->" + info.appVersion);
alert("forcePluginsAvailable->" +
JSON.stringify(info.forcePluginsAvailable));
});
SEE ALSO:
Example: Serving the Appropriate Javascript Libraries
196
Versioning and JavaScript Library CompatibilityHTML5 and Hybrid Development

Example: Serving the Appropriate Javascript Libraries
To provide the correct version of Javascript libraries, create a separate bundle for each Salesforce Mobile SDK version you use. Then,
provide Apex code on the server that downloads the required version.
1. For each Salesforce Mobile SDK version that your application supports, do the following.
a. Create a ZIP file containing the Javascript libraries from the intended SDK version.
b. Upload the ZIP file to your org as a static resource.
For example, if you ship a client that uses Salesforce Mobile SDK v. 1.3, add these files to your ZIP file:
•cordova.force.js
•SalesforceOAuthPlugin.js
•bootconfig.js
•cordova-1.8.1.js, which you should rename as cordova.js
Note: In your bundle, it’s permissible to rename the Cordova Javascript library as cordova.js (or PhoneGap.js if
you’re packaging a version that uses a PhoneGap-x.x.js library.)
2. Create an Apex controller that determines which bundle to use. In your controller code, parse the user agent string to find which
version the client is using.
a. In your org, from Setup, click Develop > Apex Class.
b. Create a new Apex controller named SDKLibController with the following definition.
public class SDKLibController {
public String getSDKLib() {
String userAgent =
ApexPages.currentPage().
getHeaders().get('User-Agent');
if (userAgent.contains('SalesforceMobileSDK/1.3')) {
return 'sdklib13';
}
// Add if statements for other SalesforceSDK versions
// for which you provide library bundles.
}
}
3. Create a Visualforce page for each library in the bundle, and use that page to redirect the client to that library.
For example, for the SalesforceOAuthPlugin library:
a. In your org, from Setup, enter Visualforce Pages in the Quick Find box, then select Visualforce Pages.
b. Create a new page called “SalesforceOAuthPlugin” with the following definition.
<apex:page controller="SDKLibController"
action="{!URLFor($Resource[SDKLib],
'SalesforceOAuthPlugin.js')}">
</apex:page>
197
Example: Serving the Appropriate Javascript LibrariesHTML5 and Hybrid Development

c. Reference the VisualForce page in a <script> tag in your HTML code. Be sure to point to the page you created in step 3b.
For example:
<script type="text/javascript"
src="/apex/SalesforceOAuthPlugin" />
Note: Provide a separate <script> tag for each library in your bundle.
Managing Sessions in Hybrid Apps
To help resolve common issues that often affect mobile apps, Mobile SDK wraps hybrid apps in native containers. These containers
provide seamless authentication and session management by internally managing OAuth token exchanges. However, as popular mobile
app architectures evolve, this “one size fits all” approach proves to be too limiting in some cases. For example, if a mobile app uses
JavaScript remoting in Visualforce, Salesforce cookies can be lost if the user lets the session expire. These cookies can be retrieved only
when the user manually logs back in.
Modern versions of Mobile SDK use reactive session management. “Reactive” means that apps can participate in session management,
rather than letting the container do all the work. Apps created before Mobile SDK 1.4, however, used proactive, or container controlled,
session management. In the proactive scenario, some types of apps would restart when the session expired, resulting in a less than
satisfactory user experience. In the reactive scenario, your app can prevent such restarts by refreshing the session token without interrupting
the runtime flow.
If you’re upgrading an app from version 1.3 to any later version, you’re required to switch to reactive management. To switch to reactive
management, adjust your session management settings according to your app’s architecture. This table summarizes the behaviors and
recommended approaches for common architectures.
Steps for Upgrading CodeReactive Behavior in Mobile SDK 5.0
and Later
App Architecture
No coding is required for apps that use
force.js, which handles network calls natively
Refresh from JavaScript using the
com.salesforce.plugin.network
plug-in
REST API
through the
com.salesforce.plugin.network
plug-in. Apps that use other frameworks
should also adopt the
com.salesforce.plugin.network
plug-in for network calls.
Catch the session timeout event, and then
either reload the page or load a new iFrame.
Refresh session and CSRF token from
JavaScript
JavaScript Remoting in Visualforce
Note: In Mobile SDK 5.0 and later, JQuery Mobile, which some hybrid apps use for networking, is no longer supported as a
networking option.
The following sections provide code examples for supported architectures.
198
Managing Sessions in Hybrid AppsHTML5 and Hybrid Development

REST APIs (Including Apex2REST)
Hybrid apps that use REST APIs are required to refresh expired access tokens before each REST call. You can meet this requirement simply
by using force.js, which refreshes sessions implicitly through the com.salesforce.plugin.network plug-in. With force.js,
your app doesn’t have to add refresh code.
To initiate a user session with force.js, you call force.login(). After the user logs in to an app running in the container, the network
plug-in refreshes tokens as necessary when the app tries to access Salesforce resources. The following code, adapted from the
ContactExplorer sample, demonstrates a typical force.login() implementation.
•When the device notifies that it’s ready, call the force.login() method to post the login screen.
/* Do login */
force.login(
function() {
console.log("Auth succeeded");
// Call your app’s entry point
// ...
},
function(error) {
console.log("Auth failed: " + error);
}
);
Get the complete ContactExplorer sample application here:
https://github.com/forcedotcom/SalesforceMobileSDK-Shared/tree/master/samples/contactexplorer
JavaScript Remoting in Visualforce
For mobile apps that use JavaScript remoting to access Visualforce pages, incorporate the session refresh code into the method parameter
list. In JavaScript, use the Visualforce remote call to check the session state and adjust accordingly.
<Controller>.<Method>(
<params>,
function(result, event) {
if (hasSessionExpired(event)) {
// Reload will try to redirect to login page
// Container will intercept the redirect and
// refresh the session before reloading the
// origin page
window.location.reload();
} else {
// Everything is OK.
// Go ahead and use the result.
// ...
},
{escape: true}
);
This example defines hasSessionExpired() as:
function hasSessionExpired(event) {
return (event.type == "exception" &&
event.message.indexOf("Logged in?") != -1);
}
199
Managing Sessions in Hybrid AppsHTML5 and Hybrid Development

Advanced use case: Reloading the entire page doesn’t always provide the best user experience. To avoid reloading the entire page, you’ll
need to:
1. Refresh the access token
2. Refresh the Visualforce domain cookies
3. Finally, refresh the CSRF token
Instead of fully reloading the page as follows:
window.location.reload();
Do something like this:
// Refresh oauth token
cordova.require("com.salesforce.plugin.oauth").authenticate(
function(creds) {
// Reload hidden iframe that points to a blank page to
// to refresh Visualforce domain cookies
var iframe = document.getElementById("blankIframeId");
iframe.src = src;
// Refresh CSRF cookie
// Get the provider array
var providers = Visualforce.remoting.Manager.providers;
// Get the last provider in the arrays (usually only one)
var provider = Visualforce.remoting.last;
provider.refresh(function() {
//Retry call for a seamless user experience
});
},
function(error) {
console.log("Refresh failed");
}
);
Defer Login
Mobile SDK hybrid apps always present a Salesforce login screen at startup. Sometimes, however, these apps can benefit from deferring
authentication until some later point.With a little configuration, you can defer login to any logical place in your app.
Deferred login implementation with force.js is a two-step process:
1. Configure the project to skip authentication at startup.
2. In your JavaScript code, call the force.init() function, followed by the force.login() function, at the point where you
plan to initiate authentication.
Step 1: Configure the Project to Skip Authentication
1. In your platform-specific project, open the www/bootconfig.json file.
2. Set the shouldAuthenticate property to “false”.
200
Defer LoginHTML5 and Hybrid Development

Step 2: Initiate Authentication in JavaScript
To initiate the authentication process, call the force.js login() functions at the point of deferred login. The force.init()
method is usually necessary only for testing or other non-production scenarios.
/* Do login */
force.login(
function() {
console.log("Auth succeeded");
// Call your app’s entry point
// ...
},
function(error) {
console.log("Auth failed: " + error);
}
);
The force.login() function takes two arguments: a success callback function and a failure callback function. If authentication
fails, your failure callback is invoked. If authentication succeeds, the force object caches the access token in its
oauth.access_token configuration property and invokes your success callback.
201
Defer LoginHTML5 and Hybrid Development

CHAPTER 11 Offline Management
Salesforce Mobile SDK provides two modules that help you store and synchronize data for offline use:
In this chapter ...
•SmartStore lets you store app data in encrypted databases, or soups, on the device. When the device
goes back online, you can use SmartStore APIs to synchronize data changes with the Salesforce
server.
•Using SmartStore to
Securely Store Offline
Data
•SmartSync Data Framework provides a mechanism for easily fetching Salesforce data, modeling it
as JavaScript objects, and caching it for offline use. When it’s time to upload offline changes to the
•Using SmartSync
Data Framework to
Salesforce server, SmartSync Data Framework gives you highly granular control over the
Access Salesforce
Objects synchronization process. SmartSync Data Framework is built on the popular Backbone.js open
source library and uses SmartStore as its default cache.
202

Using SmartStore to Securely Store Offline Data
Mobile devices can lose connection at any time, and environments such as hospitals and airplanes often prohibit connectivity. To handle
these situations, it’s important that your mobile apps continue to function when they go offline.
Mobile SDK provides SmartStore, a multithreaded, secure solution for offline storage on mobile devices. With SmartStore, your customers
can continue working with data in a secure environment even when the device loses connectivity.
IN THIS SECTION:
About SmartStore
SmartStore provides the primary features of non-relational desktop databases—data segmentation, indexing, querying—along
with caching for offline storage.
Enabling SmartStore in Hybrid and Native Apps
To use SmartStore in hybrid Android apps, you perform a few extra steps.
Adding SmartStore to Existing Android Apps
Hybrid projects created with Mobile SDK 4.0 or later automatically include SmartStore. If you used Mobile SDK 4.0+ to create an
Android native project without SmartStore, you can easily add it later.
Creating and Accessing User-based Stores
When an app initializes SmartStore, it creates an instance of a store. It then uses the store to register and populate soups and
manipulate soup data. For a user-based store, SmartStore manages the store’s life cycle—you don’t need to think about cleaning
up after the user’s session ends. For global stores, though, your app is responsible for deleting the store’s data when the app terminates.
Using Global SmartStore
Although you usually tie a SmartStore instance to a specific customer’s credentials, you can also access a global instance for special
requirements.
Registering a Soup
Before you try to access a soup, you’re required to register it.
Using Arrays in Index Paths
Index paths can contain arrays, but certain rules apply.
Populating a Soup
To add Salesforce records to a soup for offline access, use the REST API in conjunction with SmartStore APIs.
Retrieving Data from a Soup
SmartStore provides a set of helper methods that build query strings for you.
Smart SQL Queries
To exert full control over your queries—or to reuse existing SQL queries—you can define custom SmartStore queries.
Using Full-Text Search Queries
To perform efficient and flexible searches in SmartStore, you use full-text queries. Full-text queries yield significant performance
advantages over “like” queries when you’re dealing with large data sets.
Working with Query Results
Mobile SDK provides mechanisms on each platform that let you access query results efficiently, flexibly, and dynamically.
Inserting, Updating, and Upserting Data
SmartStore defines standard fields that help you track entries and synchronize soups with external servers.
203
Using SmartStore to Securely Store Offline DataOffline Management

Using External Storage for Large Soup Elements
If your soup includes large elements, you can get better performance by using external encrypted storage. For example, if you see
warnings that you’ve exceeded an index limit, try switching to external storage. Trade-offs are minimal.
Removing Soup Elements
Traditionally, SmartStore methods let you remove soup elements by specifying an array of element IDs. To do so, you usually run a
preliminary query to retrieve the candidate IDs, then call the method that performs the deletion. In Mobile SDK 4.2, SmartStore ups
the game by adding a query option to its element deletion methods. With this option, you provide only a query, and SmartStore
deletes all elements that satisfy that query. This approach delivers a performance boost because both the query and the deletion
operation occur in a single call.
Managing Soups
SmartStore provides utility functionality that lets you retrieve soup metadata and perform other soup-level operations. This functionality
is available for hybrid, Android native, and iOS native apps.
Managing Stores
If you create global stores, you’re required to perform cleanup when the app exits. Also, if you create multiple user stores, you can
perform cleanup if you’re no longer using particular stores. SmartStore provides methods deleting named and global stores. For
hybrid apps, SmartStore also provides functions for getting a list of named stores.
Testing with the SmartStore Inspector
Verifying SmartStore operations during testing can become a tedious and time-consuming effort. SmartStore Inspector comes to
the rescue.
Using the Mock SmartStore
To facilitate developing and testing code that makes use of the SmartStore while running outside the container, you can use an
emulated SmartStore.
About SmartStore
SmartStore provides the primary features of non-relational desktop databases—data segmentation, indexing, querying—along with
caching for offline storage.
To provide offline synchronization and conflict resolution services, SmartStore uses StoreCache, a Mobile SDK caching mechanism. We
recommend that you use StoreCache to manage operations on Salesforce data.
Note: Pure HTML5 apps store offline information in a browser cache. Browser caching isn’t part of Mobile SDK, and we don’t
document it here. SmartStore uses storage functionality on the device. This strategy requires a native or hybrid development path.
About the Sample Code
Code snippets in this chapter use Account and Opportunity objects, which are predefined in every Salesforce organization. Accounts
and opportunities are linked through a master-detail relationship. An account can be the master for more than one opportunity.
IN THIS SECTION:
SmartStore Soups
SmartStore soups let you partition your offline content.
SmartStore Stores
SmartStore puts encrypted soup data in an underlying system database known as the store. The store is where all soup data is stored,
encrypted, related, and indexed. If the device loses connectivity, the user can continue to work on data in the store until the Salesforce
cloud is again accessible.
204
About SmartStoreOffline Management

SmartStore Data Types
Like any database, SmartStore defines a set of data types that you use to create soups. SmartStore data types mirror the underlying
SQLite database.
SEE ALSO:
Using StoreCache For Offline Caching
Conflict Detection
Smart SQL Queries
SmartStore Soups
SmartStore soups let you partition your offline content.
SmartStore stores offline data in logical collections known as soups. A SmartStore soup represents a single table in the underlying SQLite
database, or store, and typically maps to a standard or custom Salesforce object. Soups contain soup elements. Each element is a JSON
object that mirrors a single database row. To streamline data access, you define indexes for each soup. You use these indexes to query
the soup with either SmartStore helper methods or SmartStore’s Smart SQL query language. SmartStore indexes also makes your life
easier by supporting full-text search queries.
It’s helpful to think of soups as tables, and stores as databases. You can define as many soups as you like in an application. As self-contained
data sets, soups don’t have predefined relationships to each other, but you can use Smart SQL joins to query across them. Also, in native
apps you can write to multiple soups within a transaction.
Warning: SmartStore data is volatile. Its lifespan is tied to the authenticated user and to OAuth token states. When the user logs
out of the app, SmartStore deletes all soup data associated with that user. Similarly, when the OAuth refresh token is revoked or
expires, the user’s app state is reset, and all data in SmartStore is purged. When designing your app, consider the volatility of
SmartStore data, especially if your organization sets a short lifetime for the refresh token.
SmartStore Stores
SmartStore puts encrypted soup data in an underlying system database known as the store. The store is where all soup data is stored,
encrypted, related, and indexed. If the device loses connectivity, the user can continue to work on data in the store until the Salesforce
cloud is again accessible.
When you initialize SmartStore, you specify the name of a store to open. You assign a custom name or use a standard name, such as
kDefaultSmartStoreName in iOS native apps, to define the store. Named stores are user-specific—like soups, the store persists
only while the user’s session remains valid.
In a traditional SmartStore session, all soups reference, organize, and manipulate content from a single store. Single-store configuration
is the best choice for many apps. However, if an app queries large quantities of data from many objects, performance can begin to
degrade. To avoid slower response time, you can create multiple named stores and partition your data between them. For example, if
your app defines tasks that operate on clear-cut domains of Salesforce data, you can create a store for each task. Runtime access to a
smaller store can make a big difference in user satisfaction.
Some use cases require a store that isn’t tied to a user’s login credentials and can persist between user and app sessions. SmartStore
accommodates this requirement by supporting global stores. Global stores are also named stores, but you create and remove them
through a different set of APIs.
SEE ALSO:
Using Global SmartStore
Creating and Accessing User-based Stores
205
About SmartStoreOffline Management

SmartStore Data Types
Like any database, SmartStore defines a set of data types that you use to create soups. SmartStore data types mirror the underlying
SQLite database.
SmartStore supports the following data types for declaring index specs. In a SmartStore soup definition, an index spec defines the data
type that SmartStore expects to find in the given field.
DescriptionType
Signed integer, stored in 4 bytes (SDK 2.1 and earlier) or 8 bytes
(SDK 2.2 and later)
integer
Floating point value, stored as an 8-byte IEEE floating point numberfloating
Text string, stored with database encoding (UTF-8)string
String that supports full-text searchingfull_text
Index type based on the SQLite JSON1 extension. Can be used in
place of integer, floating, and string types. Behaves identically to
JSON1
those types of index specs, except that JSON1 does not support
index paths that traverse arrays.
IN THIS SECTION:
Date Representation
SEE ALSO:
Using Arrays in Index Paths
Date Representation
SmartStore does not define a date/time data type. When you create index specs for date/time fields, choose a SmartStore type that
matches the format of your JSON input. For example, Salesforce sends dates as strings, so always use a string index spec for Salesforce
date fields. To choose an index type for non-Salesforce or custom date fields, consult the following table.
DescriptionFormat AsType
"YYYY-MM-DD HH:MM:SS.SSS"An ISO 8601 stringstring
The number of days since noon in
Greenwich on November 24, 4714 BC
A Julian day numberfloating
according to the proleptic Gregorian
calendar. This value can include partial days
that are expressed as decimal fractions.
The number of seconds since 1970-01-01
00:00:00 UTC
Unix timeinteger
206
About SmartStoreOffline Management

Enabling SmartStore in Hybrid and Native Apps
To use SmartStore in hybrid Android apps, you perform a few extra steps.
Hybrid apps access SmartStore through JavaScript. To enable offline access in a hybrid app, your Visualforce or HTML page must include
the cordova.js library file.
In iOS and Android native apps, SmartStore is always included.
Note: The SmartStore plugin, com.salesforce.plugin.smartstore.client, uses promises. If you’re developing
for Android 19 and using Mobile SDK promise-based APIs, include this file: https://www.promisejs.org/polyfills/promise-7.0.4.min.js.
SEE ALSO:
Creating an Android Project with Forcedroid
Creating an iOS Project with Forceios
Adding SmartStore to Existing Android Apps
Hybrid projects created with Mobile SDK 4.0 or later automatically include SmartStore. If you used Mobile SDK 4.0+ to create an Android
native project without SmartStore, you can easily add it later.
To add SmartStore to an existing native Android project (Mobile SDK 4.0 or later):
1. Add the SmartStore library project to your project. In Android Studio, open your project’s build.gradle file and add a compile
directive for :libs:SmartStore in the dependencies section. If the dependencies section doesn’t exist, create it.
dependencies {
...
compile project(':libs:SmartStore')
}
2. In your <projectname>App.java file, import the SmartStoreSDKManager class instead of
SalesforceSDKManager. Replace this statement:
import com.salesforce.androidsdk.
app.SalesforceSDKManager
with this one:
import com.salesforce.androidsdk.smartstore.app.SmartStoreSDKManager
3. In your <projectname>App.java file, change your App class to extend the SmartStoreSDKManager class rather than
SalesforceSDKManager.
Note:
1. To add SmartStore to apps created with Mobile SDK 3.x or earlier, begin by upgrading to the latest version of Mobile SDK.
2. The SmartStore plugin, com.salesforce.plugin.smartstore.client, uses promises internally. If you’re
developing for Android 19 and using Mobile SDK promise-based APIs, include this file:
https://www.promisejs.org/polyfills/promise-7.0.4.min.js.
SEE ALSO:
Migrating from Previous Releases
207
Enabling SmartStore in Hybrid and Native AppsOffline Management

Creating and Accessing User-based Stores
When an app initializes SmartStore, it creates an instance of a store. It then uses the store to register and populate soups and manipulate
soup data. For a user-based store, SmartStore manages the store’s life cycle—you don’t need to think about cleaning up after the user’s
session ends. For global stores, though, your app is responsible for deleting the store’s data when the app terminates.
Android Native Apps
Android requires you to first get an instance of SmartStoreSDKManager which you then use to create stores.
SmartStoreSDKManager sdkManager =
SmartStoreSDKManager.getInstance();
SmartStore smartStore = sdkManager.getSmartStore(); // Creates a default store for the
current user
A call to SmartStoreSDKManager.getSmartStore() without arguments always accesses the default anonymous store. To
create a named user-based store, call the following method.
public SmartStore getSmartStore(String dbNamePrefix, UserAccount account, String communityId)
Both account and communityId can be null. You can call these methods as many times as necessary to create additional stores.
iOS Native Apps
For creating stores, iOS provides the sharedStoreWithName: class message.
- (SFSmartStore *)store
{
return [SFSmartStore sharedStoreWithName:kDefaultSmartStoreName]; // Creates a default
store for the current user
}
You can create a store with a custom name by passing in any string other than kDefaultSmartStoreName. You can call this
method as many times as necessary to create additional stores.
Hybrid Apps
In hybrid apps, you access user-based stores and global stores the same way. Rather than creating stores explicitly, you automatically
create stores that don’t already exist when you call registerSoup(). To use a named store—for subsequent direct references, for
example—you call this function with a StoreConfig object as the first argument. This function object takes a store name and a
Boolean value that indicates whether the store is global.
var StoreConfig = function (storeName, isGlobalStore) {
this.storeName = storeName;
this.isGlobalStore = isGlobalStore;
};
You can pass this object as the optional first argument to most soup functions. If used, the StoreConfig object configures the
execution context. Either storeName or isGlobalStore can be optional—you can specify one or both. SmartStore evaluates
StoreConfig objects as follows:
•If storeName is not specified, this.storeName is set to the SmartStore default store name.
•If isGlobalStore is not specified, this.isGlobalStore is set to false.
208
Creating and Accessing User-based StoresOffline Management

•Store names aren’t necessarily unique. A single store name can be used twice—once for a user-based store, and once for a global
store.
•If you provide a store name that doesn’t exist in the space indicated by your isGlobalStore setting, SmartStore creates it.
The following example creates a user-based store named “Store1” that contains the soupName soup.
navigator.smartstore.registerSoup({storeName: "Store1", isGlobalStore:false}, soupName,
indexSpecs, successCallback, errorCallback)
You can call registerSoup() with as many different soup names as necessary. If you call a soup function without passing in
StoreConfig, SmartStore always performs the operation on the default user-based (non-global) store. This behavior applies even
if you’ve created named stores. The following example creates a soup named soupName, with the provided index specs, in the current
user’s default store.
var sfSmartstore = function() {
return cordova.require("com.salesforce.plugin.smartstore");
};
sfSmartstore().registerSoup(soupName, indexSpecs, successCallback, errorCallback);
SEE ALSO:
SmartStore Stores
Using Global SmartStore
Although you usually tie a SmartStore instance to a specific customer’s credentials, you can also access a global instance for special
requirements.
Under certain circumstances, some applications require access to a SmartStore instance that is not tied to Salesforce authentication. This
situation can occur in apps that store application state or other data that does not depend on a Salesforce user, organization, or community.
To address this situation, Mobile SDK supports global stores that persists beyond the app’s life cycle.
Data stored in global stores does not depend on user authentication and therefore is not deleted at logout. Since a global store remains
intact after logout, you are responsible for deleting its data when the app exits. Mobile SDK provides APIs for this purpose.
Important: Do not store user-specific data in global SmartStore. Doing so violates Mobile SDK security requirements because
user data can persist after the user logs out.
Android APIs
In Android, you access global SmartStore through an instance of SmartStoreSDKManager.
209
Using Global SmartStoreOffline Management

•public SmartStore getGlobalSmartStore(String dbName)
Returns a global SmartStore instance with the specified database name. You can set dbName to any string other than “smartstore”.
Set dbName to null to use the default global SmartStore database.
•public boolean hasGlobalSmartStore(String dbName)
Checks if a global SmartStore instance exists with the specified database name. Set dbName to null to verify the existence of the
default global SmartStore.
•public void removeGlobalSmartStore(String dbName)
Deletes the specified global SmartStore database. You can set this name to any string other than “smartstore”. Set dbName to null
to remove the default global SmartStore.
iOS APIs
In iOS, you access global SmartStore through an instance of SFSmartStore.
•+ (id)sharedGlobalStoreWithName:(NSString *)storeName
Returns a global SmartStore instance with the specified database name. You can set storeName to any string other than
“defaultStore”. Set storeName to kDefaultSmartStoreName to use the default global SmartStore.
•+ (void)removeSharedGlobalStoreWithName:(NSString *)storeName
Deletes the specified global SmartStore database. You can set storeName to any string other than “defaultStore”. Set storeName
to kDefaultSmartStoreName to use the default global SmartStore.
Hybrid APIs
Most SmartStore JavaScript soup methods take an optional first argument that specifies whether to use global SmartStore. This argument
can be a Boolean value or a StoreConfig object. If this argument is absent, Mobile SDK uses the default user store.
For example:
querySoup([isGlobalStore, ]soupName, querySpec,
successCB, errorCB);
querySoup([storeConfig, ]soupName, querySpec,
successCB, errorCB);
SmartStore defines the following functions for removing stores. Each function takes success and error callbacks. The removeStore()
function also requires either a StoreConfig object that specifies the store name, or just the store name as a string.
removeStore(storeConfig,successCB, errorCB)
removeAllGlobalStores(successCB, errorCB)
removeAllStores(successCB, errorCB)
SEE ALSO:
SmartStore Stores
Managing Stores
Creating and Accessing User-based Stores
210
Using Global SmartStoreOffline Management

Registering a Soup
Before you try to access a soup, you’re required to register it.
To register a soup, you provide a soup name and a list of one or more index specifications. Each of the following examples—hybrid,
Android, and iOS—builds an index spec array consisting of name, ID, and owner (or parent) ID fields.
You index a soup on one or more fields found in its entries. SmartStore makes sure that these indices reflect any insert, update, and
delete operations. Always specify at least one index field when registering a soup. For example, if you are using the soup as a simple
key-value store, use a single index specification with a string type.
Note: If your soup contains unusually large elements (> 1 MB), consider registering it to use external storage. See Using External
Storage for Large Soup Elements.
Hybrid Apps
The JavaScript function for registering a soup requires callback functions for success and error conditions.
var sfSmartstore = function() {
return cordova.require("com.salesforce.plugin.smartstore");
};
sfSmartstore().registerSoup(soupName, indexSpecs, successCallback, errorCallback);
If the soup does not exist, this function creates it. If the soup exists, registering lets you access it.
indexSpecs
Use the indexSpecs array to create the soup with predefined indexing. Entries in the indexSpecs array specify how to index
the soup. Each entry consists of a path:type pair. path is the name of an index field; type is either “string”, “integer”, “floating”,
“full_text”, or “json1”.
var indexSpecs = [
{path:"Name",type:"string"},
{path:"Id",type:"string"}
];
Note:
•Index paths are case-sensitive and can include compound paths, such as Owner.Name.
•Index entries that are missing any fields described in an indexSpecs array are not tracked in that index.
•The type of the index applies only to the index. When you query an indexed field (for example, “select {soup:path}
from {soup}”), the query returns data of the type that you specified in the index specification.
•Index columns can contain null fields.
•Beginning in Mobile SDK 4.1, you can specify index paths that point to internal (non-leaf) nodes. You can use these paths
with like and match (full-text) queries. Use the string type when you define internal node paths.
For example, consider this element in a soup named “spies”:
{
"first_name":"James",
"last_name":"Bond",
"address":{
"street_number":10,
"street_name":"downing",
"city":"london"
211
Registering a SoupOffline Management

}
}
In this case, “address” is an internal node because it has children. Through the index on the path “address”, you can use a
like or match query to find the “city” value—“london”—in “address”. For example:
SELECT {spies:first_name, spies:last_name} FROM spies WHERE {spies:address} LIKE
'london'
•Beginning in Mobile SDK 4.1, you can include arrays in index paths, with some restrictions. See Using Arrays in Index Paths.
successCallback
The success callback function you supply takes one argument: the soup name. For example:
function(soupName) { alert("Soup " + soupName + " was successfully created"); }
When the soup is successfully created, registerSoup() calls the success callback function to indicate that the soup is ready.
Wait to complete the transaction and receive the callback before you begin any activity. If you register a soup under the passed
name, the success callback function returns the soup.
errorCallback
The error callback function takes one argument: the error description string.
function(err) { alert ("registerSoup failed with error: " + err); }
During soup creation, errors can happen for various reasons, including:
•An invalid or bad soup name
•No index (at least one index must be specified)
•Other unexpected errors, such as a database error
To find out if a soup exists, use:
navigator.smartstore.soupExists(soupName, successCallback, errorCallback);
Android Native Apps
For Android, you define index specs in an array of type com.salesforce.androidsdk.smartstore.store.IndexSpec.
Each index spec comprises a path—the name of an index field—and a type. Index spec types are defined in the SmartStore.Type
enum and include the following values:
•string
•integer
•floating
•full_text
•json1
public class OfflineStorage extends SalesforceActivity {
private SmartStore smartStore;
final IndexSpec[] ACCOUNTS_INDEX_SPEC = {
new IndexSpec("Name", SmartStore.Type.string),
new IndexSpec("Id", SmartStore.Type.string),
new IndexSpec("OwnerId", SmartStore.Type.string)
};
212
Registering a SoupOffline Management

public OfflineStorage() {
smartStore = SmartStoreSDKManager.getInstance().getSmartStore();
smartStore.registerSoup("Account", ACCOUNTS_INDEX_SPEC);
}
// ...
}
iOS Native Apps
For iOS, you define index specs in an array of SFSoupIndex objects. Each index spec comprises a path—the name of an index
field—and a type. Index spec types are defined as constants in the SFSoupIndex class and include the following values:
•kSoupIndexTypeString
•kSoupIndexTypeInteger
•kSoupIndexTypeFloating
•kSoupIndexTypeFullText
•kSoupIndexTypeJSON1
NSString* const kAccountSoupName = @"Account";
...
- (SFSmartStore *)store
{
return [SFSmartStore sharedStoreWithName:kDefaultSmartStoreName];
}
...
- (void)createAccountsSoup {
if (![self.store soupExists:kAccountSoupName]) {
NSArray *keys = @[@"path", @"type"];
NSArray *nameValues = @[@"Name", kSoupIndexTypeString];
NSDictionary *nameDictionary = [NSDictionary
dictionaryWithObjects:nameValues forKeys:keys];
NSArray *idValues = @[@"Id", kSoupIndexTypeString];
NSDictionary *idDictionary =
[NSDictionary dictionaryWithObjects:idValues forKeys:keys];
NSArray *ownerIdValues = @[@"OwnerId", kSoupIndexTypeString];
NSDictionary *ownerIdDictionary =
[NSDictionary dictionaryWithObjects:ownerIdValues
forKeys:keys];
NSArray *accountIndexSpecs =
[SFSoupIndex asArraySoupIndexes:@[nameDictionary,
idDictionary, ownerIdDictionary]];
NSError* error = nil;
[self.store registerSoup:kAccountSoupName
withIndexSpecs:accountIndexSpecs
213
Registering a SoupOffline Management

error:&error];
if (error) {
NSLog(@"Cannot create SmartStore soup '%@'\nError: '%@'",
kAccountSoupName, error.localizedDescription);
}
}
}
IN THIS SECTION:
Preparing Soups for SmartSync Data Framework
Soups that exchange information with the Salesforce cloud typically use SmartSync Data Framework for synchronization. To support
SmartSync Data Framework, most app types require you to create and manage special soup fields for “sync up” operations.
Registering Soups with Configuration Files
Mobile SDK 6.0 introduces the ability to define your SmartStore schemas through configuration files rather than code. Since all
platforms and app types use the same configuration files, you can describe your schema in a single file and then import it into any
Mobile SDK app.
SEE ALSO:
SmartStore Data Types
Using Full-Text Search Queries
Preparing Soups for SmartSync Data Framework
Soups that exchange information with the Salesforce cloud typically use SmartSync Data Framework for synchronization. To support
SmartSync Data Framework, most app types require you to create and manage special soup fields for “sync up” operations.
Types of apps that require you to code these special fields include:
•Hybrid apps that do not use Force.SObject (from SmartSync.js) to create and manage local records
•Native apps
•React Native apps
If your hybrid app uses Force.SObject for local records, SmartSync Data Framework automatically creates and manages these
fields for you. You can ignore the rest of this discussion.
Required Fields
If you’re required to do so, add the following four fields to your soup elements. The first three are operation type fields:
__locally_created__
Set this field to true on elements that your app creates locally.
__locally_updated__
Set this field to true after your app updates an element locally.
__locally_deleted__
Set this field to true when your app is deleting an element locally.
Be sure to set the appropriate field to true for every create, update, or delete operation.
The fourth field is a control field:
214
Registering a SoupOffline Management

__local__
This field indicates that some local change has occurred. You’re required to:
•Set this field to true when any of the operation type fields is true.
•Add a string index spec on this field.
SmartSync Data Framework Behavior
During sync up operations, SmartSync Data Framework looks for soup elements with __local__ set to true. For each match, it
evaluates the operation type fields and then performs the operation indicated by the following precedence hierarchy.
If set to true...FieldPrecedence
__locally_deleted__1 (highest) •__locally_created__ and __locally_updated__
flags are ignored.
•SmartSync Data Framework deletes the local record and, if it exists,
the server record. If the server record does not exist, no remote action
occurs.
__locally_created__2•__locally_updated__ flag is ignored.
•If __locally_deleted__ is not true, SmartSync Data
Framework creates the record on the server.
__locally_updated__3•Ignored if either __locally_deleted__ or
__locally_created__ is true.
•Otherwise, SmartSync Data Framework writes the updated record to
the server.
Finally, SmartSync Data Framework resets all four fields to false.
Example: The following examples are taken from the various language versions of the SmartSyncExplorer sample app.
iOS Native
This Objective-C example sets system fields by sending updateSoupForFieldName:fieldValue: messages to an
SObjectData object. Using SFSmartSyncSyncManager constants for the field names, it sets the __local__ and
__locally_created__ fields before upserting the new element. You can find the SObjectData definition in the iOS
sample app.
- (void)createLocalData:(SObjectData *)newData {
[newData updateSoupForFieldName:kSyncManagerLocal fieldValue:@YES];
[newData updateSoupForFieldName:kSyncManagerLocallyCreated fieldValue:@YES];
[self.store upsertEntries:@[ newData.soupDict ] toSoup:[[newData class]
dataSpec].soupName];
}
Android Native
215
Registering a SoupOffline Management

The following Java example handles created and updated elements, but not deletions. It calls the JSONObject put() method
to create and initialize the system fields, using SyncManager constants for the field names. After the fields are properly assigned,
it either creates or upserts the element based on the isCreate control flag.
contact.put(SyncManager.LOCAL, true);
contact.put(SyncManager.LOCALLY_UPDATED, !isCreate);
contact.put(SyncManager.LOCALLY_CREATED, isCreate);
contact.put(SyncManager.LOCALLY_DELETED, false);
if (isCreate) {
smartStore.create(ContactListLoader.CONTACT_SOUP, contact);
}else {
smartStore.upsert(ContactListLoader.CONTACT_SOUP, contact);
}
Hybrid with the SmartSync Data Framework Plug-in and React Native
The following React Native code can easily be adapted for hybrid apps that use the SmartSync Data Framework plug-in. This
example shows how to update and delete—or undelete—a contact. The onSaveContact() function marks the record as
updated, sets __local__ to true, and then saves the changes. The onDeleteUndeleteContact() function flips the
__locally_deleted__ field. It then sets the __local__ field to match the operation type value and saves the changes.
The storeMgr object is defined in the sample project as a wrapper around SmartStore and the SmartSync Data Framework
plug-in. Its saveContact() function accepts a contact object and a callback, and upserts the contact into the soup. The
callback shown here calls navigator.pop(), which is specific to React Native. Hybrid apps can replace the saveContact()
function with any code that calls the SmartStore upsert() function.
onSaveContact: function() {
var contact = this.state.contact;
contact.__locally_updated__ = contact.__local__ = true;
storeMgr.saveContact(contact, () => {navigator.pop();});
},
onDeleteUndeleteContact: function() {
var contact = this.state.contact;
contact.__locally_deleted__ = !contact.__locally_deleted__;
contact.__local__ = contact.__locally_deleted__ || contact.__locally_updated__ ||
contact.__locally_created__;
storeMgr.saveContact(contact, () => {navigator.pop();});
},
Registering Soups with Configuration Files
Mobile SDK 6.0 introduces the ability to define your SmartStore schemas through configuration files rather than code. Since all platforms
and app types use the same configuration files, you can describe your schema in a single file and then import it into any Mobile SDK
app.
Overview
SmartStore configuration files use JSON objects to express soup schemata. Hybrid apps load the configuration files automatically, while
other apps load them with a single line of code. To keep the mechanism simple, Mobile SDK enforces the following file naming conventions:
•To define soups for the default global store, provide a file named globalstore.json.
•To define soups for the default user store, provide a file named userstore.json.
216
Registering a SoupOffline Management

Note:
•The JSON used to define soups is the same for all app types and platforms.
•Configuration file locations required by Mobile SDK vary according to app type and platform.
•If a configuration file defines a soup that already exists, Mobile SDK ignores the configuration file. In this case, you can set up
and manage your soups only through code.
•Configuration files can define only the default global store and default user store. For other named stores, you register the
soup through code.
•Configuration files cannot be used to set up externally stored soups.
Using Configuration Files in iOS Native Apps
You load soup configuration files in iOS native apps by calling a method on the SmartStoreSDKManager object. (Before Mobile
SDK 6.0, SmartStoreSDKManager went by the name SalesforceSDKManagerWithSmartStore.)
Load a Default User Store
[[SmartStoreSDKManager sharedManager] setupUserStoreFromDefaultConfig];
Load a Default Global Store
[[SmartStoreSDKManager sharedManager] setupGlobalStoreFromDefaultConfig];
Using Configuration Files in Android Native Apps
You load soup configuration files in Android native apps by calling a method on the SmartStoreSDKManager object. (Before
Mobile SDK 6.0, SmartStoreSDKManager went by the name SalesforceSDKManagerWithSmartStore.)
Load a Default User Store
SmartStoreSDKManager.getInstance().setupUserStoreFromDefaultConfig();
Load a Default Global Store
SmartStoreSDKManager.getInstance().setupGlobalStoreFromDefaultConfig();
Configuration File Format
The JSON format is self evident as illustrated in the following example.
{ "soups": [
{
"soupName": "soup1",
"indexes": [
{ "path": "stringField1", "type": "string"},
{ "path": "integerField1", "type": "integer"},
{ "path": "floatingField1", "type": "floating"},
{ "path": "json1Field1", "type": "json1"},
{ "path": "ftsField1", "type": "full_text"}
]
},
{
"soupName": "soup2",
"indexes": [
{ "path": "stringField2", "type": "string"},
{ "path": "integerField2", "type": "integer"},
{ "path": "floatingField2", "type": "floating"},
217
Registering a SoupOffline Management

{ "path": "json1Field2", "type": "json1"},
{ "path": "ftsField2", "type": "full_text"}
]
}
]
}
Expected locations of configuration files are:
iOS
For native applications:
Under / in the Resources bundle
For hybrid applications:
Under /www in the Resources bundle
Android
For native applications:
Under the /res/raw project folder
For hybrid applications:
Under the /assets/www project folder
Sample code
SmartSyncExplorer and SmartSyncExplorerHybrid sample apps use a config file to setup SmartStore soups.
Setup on iOS
Excerpt from SObjectDataManager.m from iOS SmartSyncExplorer native sample app:
- (id)initWithDataSpec:(SObjectDataSpec *)dataSpec {
self = [super init];
if (self) {
(...)
[[SmartStoreSDKManager sharedManager] setupUserStoreFromDefaultConfig];
(...)
}
return self;
}
Setup on Android
Excerpt from ContactListLoader.java from Android SmartSyncExplorer native sample app:
public ContactListLoader(Context context, UserAccount account) {
super(context);
(...)
SmartStoreSDKManager.getInstance().setupUserStoreFromDefaultConfig();
(...)
}
218
Registering a SoupOffline Management

Configuration file
Example: Configuration file
SmartStore uses the same configuration file—userconfig.json—for all four sample apps: SmartSyncExplorer for iOS and
Android, SmartSyncExplorerHybrid for iOS and Android.
{ "soups": [
{
"soupName": "contacts",
"indexes": [
{ "path": "Id", "type": "string"},
{ "path": "FirstName", "type": "string"},
{ "path": "LastName", "type": "string"},
{ "path": "__local__", "type": "string"},
{ "path": "__locally_created__", "type": "string"},
{ "path": "__locally_updated__", "type": "string"},
{ "path": "__locally_deleted__", "type": "string"}
]
}
]
}
iOS Native
From SObjectDataManager.m in the SmartSyncExplorer native sample app:
- (id)initWithDataSpec:(SObjectDataSpec *)dataSpec {
self = [super init];
if (self) {
...
[[SmartStoreSDKManager sharedManager] setupUserStoreFromDefaultConfig];
...
}
return self;
}
Android Native
From ContactListLoader.java in the SmartSyncExplorer native sample app:
public ContactListLoader(Context context, UserAccount account) {
super(context);
...
SmartStoreSDKManager.getInstance().setupUserStoreFromDefaultConfig();
...
}
Using Arrays in Index Paths
Index paths can contain arrays, but certain rules apply.
Before Mobile SDK 4.1, index paths supported only maps—in other words, dictionaries or associative arrays. For example, in a path such
as a.b.c, SmartStore required both b and c to be maps. Otherwise, when evaluating the path, SmartStore returned nothing.
219
Using Arrays in Index PathsOffline Management

In Mobile SDK 4.1 and later, index paths can contain arrays and maps. In the a.b.c example, if the value of b is an array, SmartStore
expects the array to contain maps that define c. SmartStore then returns an array containing values of c keys found in the b array’s
maps.
Note: You can’t use index paths that traverse arrays with JSON1 index specs.
Example: The following table shows various examples of a.b.c paths and the values returned by a SmartStore query.
Value for path a.b.cExample soup elementDescription
1
{
"a":{
No arrays
"b":{ "c":1 }
}
}
[
1,
{
"a":{
c points to an array (internal node).
2,"b":{
3
]
"c":[1,2,3]
}
}
}
[
1,
{
"a":{
b points to an array of maps. Some maps
contain the c key. Other maps are
ignored. 2
]
"b":[
{
"c":1
},
{
"c":2
},
{
"no-c":3
}
]
}
}
[
0,
{
"a":[
a points to an array of maps. In some
maps, b points to a map containing a key.
In other maps, b points to an array of [{
maps. Only values from c keys are
returned.
1,
2
]
]
"b":{
"c":0
}
},
{
"b":[
{
220
Using Arrays in Index PathsOffline Management

Value for path a.b.cExample soup elementDescription
"c":1
},
{
"c":2
},
{
"no-c":3
}
]
}
]
}
Populating a Soup
To add Salesforce records to a soup for offline access, use the REST API in conjunction with SmartStore APIs.
When you register a soup, you create an empty named structure in memory that’s waiting for data. You typically initialize the soup with
data from a Salesforce organization. To obtain the Salesforce data, use Mobile SDK’s standard REST request mechanism. When a successful
REST response arrives, extract the data from the response object and then upsert it into your soup.
Hybrid Apps
Hybrid apps use SmartStore functions defined in the force.js library. In this example, the click handler for the Fetch Contacts button
calls force.query() to send a simple SOQL query ("SELECT Name, Id FROM Contact") to Salesforce. This call designates
onSuccessSfdcContacts(response) as the callback function that receives the REST response. The
onSuccessSfdcContacts(response) function iterates through the returned records in response and populates UI
controls with Salesforce values. Finally, it upserts all records from the response into the sample soup.
// Click handler for the “fetch contacts” button
$('#link_fetch_sfdc_contacts').click(function() {
logToConsole()("link_fetch_sfdc_contacts clicked");
force.query("SELECT Name,Id FROM Contact",
onSuccessSfdcContacts, onErrorSfdc);
});
var sfSmartstore = function() {
return cordova.require("com.salesforce.plugin.smartstore");};
function onSuccessSfdcContacts(response) {
logToConsole()("onSuccessSfdcContacts: received " +
response.totalSize + “ contacts");
var entries = [];
$("#div_sfdc_contact_list").html("");
var ul = $('<ul data-role="listview" data-inset="true"
data-theme="a" data-dividertheme="a"></ul>');
$("#div_sfdc_contact_list").append(ul);
221
Populating a SoupOffline Management

ul.append(
$('<li data-role="list-divider">Salesforce Contacts: ' +
response.totalSize + '</li>'));
$.each(response.records, function(i, contact) {
entries.push(contact);
logToConsole()("name: " + contact.Name);
var newLi = $("<li><a href='#'>" + (i+1) + " - " +
contact.Name + "</a></li>");
ul.append(newLi);
});
if (entries.length > 0) {
sfSmartstore().upsertSoupEntries(SAMPLE_SOUP_NAME,
entries,
function(items) {
var statusTxt = "upserted: " + items.length +
" contacts";
logToConsole()(statusTxt);
$("#div_soup_status_line").html(statusTxt);
$("#div_sfdc_contact_list").trigger( "create" );
},
onErrorUpsert);
}
}
function onErrorUpsert(param) {
logToConsole()("onErrorUpsert: " + param);
$("#div_soup_status_line").html("Soup upsert ERROR");
}
iOS Native Apps
iOS native apps use the SFRestAPI protocol for REST API interaction. The following code creates and sends a REST request for the
SOQL query SELECT Name, Id, OwnerId FROM Account. If the request is successful, Salesforce sends the REST response
to the requestForQuery:send:delegate: delegate method. The response is parsed, and each returned record is upserted
into the SmartStore soup.
- (void)requestAccounts
{
SFRestRequest *request = [[SFRestAPI sharedInstance]
requestForQuery:@"SELECT Name, Id, OwnerId FROM Account"];
[[SFRestAPI sharedInstance] send:request delegate:self];
}
//SFRestAPI protocol for successful response
- (void)request:(SFRestRequest *)request didLoadResponse:(id)dataResponse
{
NSArray *records = dataResponse[@"records"];
if (nil != records) {
for (int i = 0; i < records.count; i++) {
[self.store upsertEntries:@[records[i]]
toSoup:kAccountSoupName];
}
222
Populating a SoupOffline Management

}
}
Android Native Apps
For REST API interaction, Android native apps typically use the RestClient.sendAsync() method with an anonymous inline
definition of the AsyncRequestCallback interface. The following code creates and sends a REST request for the SOQL query
SELECT Name, Id, OwnerId FROM Account. If the request is successful, Salesforce sends the REST response to the provided
AsyncRequestCallback.onSuccess() callback method. The response is parsed, and each returned record is upserted into
the SmartStore soup.
private void sendRequest(String soql, final String obj)
throws UnsupportedEncodingException {
final RestRequest restRequest =
RestRequest.getRequestForQuery(
getString(R.string.api_version),
"SELECT Name, Id, OwnerId FROM Account", "Account");
client.sendAsync(restRequest, new AsyncRequestCallback() {
@Override
public void onSuccess(RestRequest request,
RestResponse result) {
// Network component doesn’t report app layer status.
// Use the Mobile SDK RestResponse.isSuccess() method to check
// whether the REST request itself succeeded.
if (result.isSuccess()) {
try {
final JSONArray records =
result.asJSONObject().getJSONArray("records");
insertAccounts(records);
} catch (Exception e) {
onError(e);
} finally {
Toast.makeText(MainActivity.this,
"Records ready for offline access.",
Toast.LENGTH_SHORT).show();
}
}
}
@Override
public void onError(Exception e) {
// You might want to log the error
// or show it to the user
}
});
}
/**
* Inserts accounts into the accounts soup.
*
* @param accounts Accounts.
*/
public void insertAccounts(JSONArray accounts) {
try {
223
Populating a SoupOffline Management

if (accounts != null) {
for (int i = 0; i < accounts.length(); i++) {
if (accounts[i] != null) {
try {
smartStore.upsert(
ACCOUNTS_SOUP, accounts[i]);
} catch (JSONException exc) {
Log.e(TAG,
"Error occurred while attempting "
+ "to insert account. Please verify "
+ "validity of JSON data set.");
}
}
}
}
} catch (JSONException e) {
Log.e(TAG, "Error occurred while attempting to "
+ "insert accounts. Please verify validity "
+ "of JSON data set.");
}
}
Retrieving Data from a Soup
SmartStore provides a set of helper methods that build query strings for you.
For retrieving data from a soup, SmartStore provides helper functions that build query specs for you. A query spec is similar to an index
spec, but contains more information about the type of query and its parameters. Query builder methods produce specs that let you
query:
•Everything (”all” query)
•Using a Smart SQL
•For exact matches of a key (”exact” query)
•For full-text search on given paths (”match” query)
•For a range of values (”range” query)
•For wild-card matches (”like” query)
To query for a set of records, call the query spec factory method that suits your specifications. You can optionally define the index field,
sort order, and other metadata to be used for filtering, as described in the following table:
DescriptionParameter
(Optional in JavaScript) Narrows the query scope to only a list of fields that you specify. See
Narrowing the Query to Return a Subset of Fields.
selectPaths or
withSelectPaths
Describes what you’re searching for; for example, a name, account number, or date.indexPath or path
(Optional in JavaScript) Used to define the start of a range query.beginKey
(Optional in JavaScript) Used to define the end of a range query.endKey
(Optional in JavaScript) Used to specify the search string in an exact or match query.matchKey
224
Retrieving Data from a SoupOffline Management

DescriptionParameter
(Optional in JavaScript—defaults to the value of the path parameter) For exact, range, and like
queries, specifies the indexed path field to be used for sorting the result set. To query without
sorting, set this parameter to a null value.
orderPath
Note: Mobile SDK versions 3.2 and earlier sort all queries on the indexed path field specified
in the query.
(Optional in JavaScript)order
•JavaScript: Either “ascending” (default) or “descending.”
•iOS: Either kSFSoupQuerySortOrderAscending or
kSFSoupQuerySortOrderDescending.
•Android: Either Order.ascending or Order.descending.
(Optional in JavaScript. If not present, the native plug-in calculates an optimal value for the resulting
Cursor.pageSize) Number of records to return in each page of results.
pageSize
For example, consider the following buildRangeQuerySpec() JavaScript call:
navigator.smartstore.buildRangeQuerySpec(
"name","Aardvark","Zoroastrian","ascending", 10, "name");
This call builds a range query spec that finds entries with names between Aardvark and Zoroastrian, sorted on the name field in ascending
order:
{
"querySpec":{
"queryType":"range",
"indexPath":"name",
"beginKey":"Aardvark",
"endKey":"Zoroastrian",
"orderPath":"name",
"order":"ascending",
"pageSize":10
}
}
In JavaScript build* functions, you can omit optional parameters only at the end of the function call. You can’t skip one or more
parameters and then specify the next without providing a dummy or null value for each option you skip. For example, you can use these
calls:
•buildAllQuerySpec(indexPath)
•buildAllQuerySpec(indexPath, order)
•buildAllQuerySpec(indexPath, order, pageSize)
•buildAllQuerySpec(indexPath, order, pageSize, selectPaths)
However, you can’t use this call because it omits the order parameter:
buildAllQuerySpec(indexPath, pageSize)
Note: All parameterized queries are single-predicate searches. Only Smart SQL queries support joins.
225
Retrieving Data from a SoupOffline Management

Query Everything
Traverses everything in the soup.
See Working with Query Results for information on page sizes.
Note: As a base rule, set pageSize to the number of entries you want displayed on the screen. For a smooth scrolling display,
you can to increase the value to two or three times the number of entries shown.
JavaScript:
buildAllQuerySpec(indexPath, order, pageSize, selectPaths) returns all entries in the soup, with no
particular order. order and pageSize are optional, and default to “ascending” and 10, respectively. The selectPaths argument
is also optional.
iOS native:
+ (SFQuerySpec*) newAllQuerySpec:(NSString*)soupName
withPath:(NSString*)path
withOrder:(SFSoupQuerySortOrder)order
withPageSize:(NSUInteger)pageSize;
+ (SFQuerySpec*) newAllQuerySpec:(NSString*)soupName
withSelectPaths:(NSArray*)selectPaths
withOrderPath:(NSString*)orderPath
withOrder:(SFSoupQuerySortOrder)order
withPageSize:(NSUInteger)pageSize;
Android native:
public static QuerySpec buildAllQuerySpec(
String soupName,
String path,
Order order,
int pageSize)
public static QuerySpec buildAllQuerySpec(
String soupName,
String[] selectPaths,
String orderPath,
Order order,
int pageSize);
Query with a Smart SQL SELECT Statement
Executes the query specified by the given Smart SQL statement. This function allows greater flexibility than other query factory functions
because you provide your own SELECT statement. See Smart SQL Queries.
The following sample code shows a Smart SQL query that calls the SQL COUNT function.
JavaScript:
var querySpec =
navigator.smartstore.buildSmartQuerySpec(
"select count(*) from {employees}", 1);
navigator.smartstore.runSmartQuery(querySpec, function(cursor) {
226
Retrieving Data from a SoupOffline Management

// result should be [[ n ]] if there are n employees
});
In JavaScript, pageSize is optional and defaults to 10.
iOS native:
SFQuerySpec* querySpec =
[SFQuerySpec
newSmartQuerySpec:@"select count(*) from {employees}"
withPageSize:1];
NSArray* result = [_store queryWithQuerySpec:querySpec pageIndex:0 error:nil];
// result should be [[ n ]] if there are n employees
Android native:
try {
JSONArray result =
store.query(QuerySpec.buildSmartQuerySpec(
"select count(*) from {Accounts}", 1), 0);
// result should be [[ n ]] if there are n employees
Log.println(Log.INFO, "REST Success!", "\nFound " +
result.getString(0) + " accounts.");
} catch (JSONException e) {
Log.e(TAG, "Error occurred while counting the number of account records. "
+ "Please verify validity of JSON data set.");
}
Query by Exact
Finds entries that exactly match the given matchKey for the indexPath value. You use this method to find child entities of a given
ID. For example, you can find opportunities by Status.
JavaScript:
In JavaScript, you can set the order parameter to either “ascending” or “descending”. order, pageSize, and orderPath are
optional, and default to “ascending”, 10, and the path argument, respectively. The selectPaths argument is also optional.
navigator.smartstore.buildExactQuerySpec(
path, matchKey, pageSize, order, orderPath, selectPaths)
The following JavaScript code retrieves children by ID:
var querySpec = navigator.smartstore.buildExactQuerySpec(
“sfdcId”,
“some-sfdc-id”);
navigator.smartstore.querySoup(“Catalogs”,
querySpec, function(cursor) {
// we expect the catalog to be in:
// cursor.currentPageOrderedEntries[0]
});
The following JavaScript code retrieves children by parent ID:
var querySpec = navigator.smartstore.buildExactQuerySpec(“parentSfdcId”, “some-sfdc-id);
navigator.smartstore.querySoup(“Catalogs”, querySpec, function(cursor) {});
iOS native:
227
Retrieving Data from a SoupOffline Management

In iOS, you can set the order parameter to either kSFSoupQuerySortOrderAscending or
kSFSoupQuerySortOrderDescending. To narrow the query’s scope to certain fields, use the second form and pass an array
of field names through the withSelectPaths parameter.
+ (SFQuerySpec*) newExactQuerySpec:(NSString*)soupName
withPath:(NSString*)path
withMatchKey:(NSString*)matchKey
withOrderPath:(NSString*)orderPath
withOrder:(SFSoupQuerySortOrder)order
withPageSize:(NSUInteger)pageSize;
+ (SFQuerySpec*) newExactQuerySpec:(NSString*)soupName
withSelectPaths:(NSArray*)selectPaths
withPath:(NSString*)path
withMatchKey:(NSString*)matchKey
withOrderPath:(NSString*)orderPath
withOrder:(SFSoupQuerySortOrder)order
withPageSize:(NSUInteger)pageSize;
Android native:
In Android, you can set the order parameter to either Order.ascending or Order.descending. To narrow the query’s
scope to certain fields, use the second form and pass an array of field names through the selectPaths parameter.
public static QuerySpec buildExactQuerySpec(
String soupName, String path, String exactMatchKey,
String orderPath, Order order, int pageSize)
public static QuerySpec buildExactQuerySpec(
String soupName, String[] selectPaths, String path,
String exactMatchKey, String orderPath,
Order order, int pageSize);
Query by Match
Finds entries that exactly match the full-text search query in matchKey for the indexPath value. See Using Full-Text Search Queries.
JavaScript:
In JavaScript, you can set the order parameter to either “ascending” or “descending”. order, pageSize, and orderPath are
optional, and default to “ascending”, 10, and the path argument, respectively. The selectPaths argument is also optional.
navigator.smartstore.buildMatchQuerySpec(
path, matchKey, order, pageSize, orderPath, selectPaths)
iOS native:
In iOS, you can set the order parameter to either kSFSoupQuerySortOrderAscending or
kSFSoupQuerySortOrderDescending. To narrow the query’s scope to certain fields, use the second form and pass an array
of field names through the withSelectPaths parameter.
+ (SFQuerySpec*) newMatchQuerySpec:(NSString*)soupName
withPath:(NSString*)path
withMatchKey:(NSString*)matchKey
withOrderPath:(NSString*)orderPath
withOrder:(SFSoupQuerySortOrder)order
withPageSize:(NSUInteger)pageSize;
228
Retrieving Data from a SoupOffline Management

+ (SFQuerySpec*) newMatchQuerySpec:(NSString*)soupName
withSelectPaths:(NSArray*)selectPaths
withPath:(NSString*)path
withMatchKey:(NSString*)matchKey
withOrderPath:(NSString*)orderPath
withOrder:(SFSoupQuerySortOrder)order
withPageSize:(NSUInteger)pageSize;
Android native:
In Android, you can set the order parameter to either Order.ascending or Order.descending. To narrow the query’s
scope to certain fields, use the second form and pass an array of field names through the selectPaths parameter.
public static QuerySpec buildMatchQuerySpec(
String soupName, String path, String exactMatchKey,
String orderPath, Order order, int pageSize)
public static QuerySpec buildMatchQuerySpec(
String soupName, String[] selectPaths, String path,
String matchKey, String orderPath, Order order,
int pageSize)
Query by Range
Finds entries whose indexPath values fall into the range defined by beginKey and endKey. Use this function to search by
numeric ranges, such as a range of dates stored as integers.
By passing null values to beginKey and endKey, you can perform open-ended searches:
•To find all records where the field at indexPath is greater than or equal to beginKey, pass a null value to endKey.
•To find all records where the field at indexPath is less than or equal to endKey, pass a null value to beginKey.
•To query everything, pass a null value to both beginKey and endKey.
JavaScript:
In JavaScript, you can set the order parameter to either “ascending” or “descending”. order, pageSize, and orderPath are
optional, and default to “ascending”, 10, and the path argument, respectively. The selectPaths argument is also optional.
navigator.smartstore.buildRangeQuerySpec(
path, beginKey, endKey, order, pageSize, orderPath, selectPaths)
iOS native:
In iOS, you can set the order parameter to either kSFSoupQuerySortOrderAscending or
kSFSoupQuerySortOrderDescending. To narrow the query’s scope to certain fields, use the second form and pass an array
of field names through the withSelectPaths parameter.
+ (SFQuerySpec*) newRangeQuerySpec:(NSString*)soupName
withPath:(NSString*)path
withBeginKey:(NSString*)beginKey
withEndKey:(NSString*)endKey
withOrderPath:(NSString*)orderPath
withOrder:(SFSoupQuerySortOrder)order
withPageSize:(NSUInteger)pageSize;
229
Retrieving Data from a SoupOffline Management

+ (SFQuerySpec*) newRangeQuerySpec:(NSString*)soupName
withSelectPaths:(NSArray*)selectPaths
withPath:(NSString*)path
withBeginKey:(NSString*)beginKey
withEndKey:(NSString*)endKey
withOrderPath:(NSString*)orderPath
withOrder:(SFSoupQuerySortOrder)order
withPageSize:(NSUInteger)pageSize;
Android native:
In Android, you can set the order parameter to either Order.ascending or Order.descending. To narrow the query’s
scope to certain fields, use the second form and pass an array of field names through the selectPaths parameter.
public static QuerySpec buildRangeQuerySpec(
String soupName, String path, String beginKey,
String endKey, String orderPath, Order order, int pageSize)
public static QuerySpec buildRangeQuerySpec(
String soupName, String[] selectPaths, String path,
String beginKey, String endKey, String orderPath,
Order order, int pageSize);
Query by Like
Finds entries whose indexPath values are like the given likeKey. You can use the “%” wild card to search for partial matches as
shown in these syntax examples:
•To search for terms that begin with your keyword: “foo%”
•To search for terms that end with your keyword: “%foo”
•To search for your keyword anywhere in the indexPath value: “%foo%”
. Use this function for general searching and partial name matches. Use the query by “match” method for full-text queries and fast queries
over large data sets.
Note: Query by “like” is the slowest query method.
JavaScript:
In JavaScript, you can set the order parameter to either “ascending” or “descending”. order, pageSize, and orderPath are
optional, and default to “ascending”, 10, and the path argument, respectively. The selectPaths argument is also optional.
navigator.smartstore.buildLikeQuerySpec(
path, likeKey, order, pageSize, orderPath, selectPaths)
iOS native:
In iOS, you can set the order parameter to either kSFSoupQuerySortOrderAscending or
kSFSoupQuerySortOrderDescending. To narrow the query’s scope to certain fields, use the second form and pass an array
of field names through the withSelectPaths parameter.
+ (SFQuerySpec*) newLikeQuerySpec:(NSString*)soupName
withPath:(NSString*)path
withLikeKey:(NSString*)likeKey
withOrderPath:(NSString*)orderPath
withOrder:(SFSoupQuerySortOrder)order
230
Retrieving Data from a SoupOffline Management

withPageSize:(NSUInteger)pageSize;
+ (SFQuerySpec*) newLikeQuerySpec:(NSString*)soupName
withSelectPaths:(NSArray*)selectPaths
withPath:(NSString*)path
withLikeKey:(NSString*)likeKey
withOrderPath:(NSString*)orderPath
withOrder:(SFSoupQuerySortOrder)order
withPageSize:(NSUInteger)pageSize;
Android native:
In Android, you can set the order parameter to either Order.ascending or Order.descending. To narrow the query’s
scope to certain fields, use the second form and pass an array of field names through the selectPaths parameter.
public static QuerySpec buildLikeQuerySpec(
String soupName, String path, String likeKey,
String orderPath, Order order, int pageSize)
public static QuerySpec buildLikeQuerySpec(
String soupName, String[] selectPaths,
String path, String likeKey, String orderPath,
Order order, int pageSize)
Executing the Query
In JavaScript, queries run asynchronously and return a cursor to your success callback function, or an error to your error callback function.
The success callback takes the form function(cursor). You use the querySpec parameter to pass your query specification
to the querySoup method.
navigator.smartstore.querySoup(soupName, querySpec,
successCallback, errorCallback);
Narrowing the Query to Return a Subset of Fields
In Smart SQL query specs, you can limit the list of fields that the query returns by specifying the fields in the Smart SQL statement. For
other types of query specs, you can do the same thing with the selectPaths parameter. When this argument is used, the method
returns an array of arrays that contains an array for each element that satisfies the query. Each element array includes only the fields
specified in selectPaths. This parameter is available for “all”, “exact”, “match”, “range”, and “like” query specs.
Here’s an example. Consider a soup that contains elements such as the following:
{"_soupEntryId":1, "name":"abc", "status":"active", ...},
{"_soupEntryId":2, "name":"abd", "status":"inactive", ...}, ...
Let’s run a “like” query that uses “ab%” as the LIKE key and name as the path. This query returns an array of objects, each of which
contains an entire element:
[ {"_soupEntryId":1, "name": "abc", "status":"active",...},
{"_soupEntryId":2, "name":"abd", "status":"inactive",...},
...]
231
Retrieving Data from a SoupOffline Management

Now let’s refine the query by adding _soupEntryId and name as selected paths. The query now returns a more efficient array of
arrays with only the _soupEntryId and name field values:
[[1, "abc"], [2, "abd"], ...]
Retrieving Individual Soup Entries by Primary Key
All soup entries are automatically given a unique internal ID (the primary key in the internal table that holds all entries in the soup). That
ID field is made available as the _soupEntryId field in the soup entry.
To look up soup entries by _soupEntryId in JavaScript, use the retrieveSoupEntries function. This function provides the
fastest way to retrieve a soup entry, but it’s usable only when you know the _soupEntryId:
navigator.smartStore.retrieveSoupEntries(soupName, indexSpecs,
successCallback, errorCallback)
The return order is not guaranteed. Also, entries that have been deleted are not returned in the resulting array.
Smart SQL Queries
To exert full control over your queries—or to reuse existing SQL queries—you can define custom SmartStore queries.
Beginning with Salesforce Mobile SDK version 2.0, SmartStore supports a Smart SQL query language for free-form SELECT statements.
Smart SQL queries combine standard SQL SELECT grammar with additional descriptors for referencing soups and soup fields. This
approach gives you maximum control and flexibility, including the ability to use joins. Smart SQL supports all standard SQL SELECT
constructs.
Smart SQL Restrictions
•Smart SQL supports only SELECT statements and only indexed paths.
•You can’t write MATCH queries with Smart SQL. For example, the following query doesn’t work: SELECT {soupName:_soup}
FROM {soupName} WHERE {soupName:name} MATCH 'cat'
Syntax
Syntax is identical to the standard SQL SELECT specification but with the following adaptations:
SyntaxUsage
{<soupName>:<path>}To specify a column
{<soupName>}To specify a table
{<soupName>:_soup}To refer to the entire soup entry JSON string
{<soupName>:_soupEntryId}To refer to the internal soup entry ID
{<soupName>:_soupLastModifiedDate}To refer to the last modified date
Sample Queries
Consider two soups: one named Employees, and another named Departments. The Employees soup contains standard fields such as:
232
Smart SQL QueriesOffline Management

•First name (firstName)
•Last name (lastName)
•Department code (deptCode)
•Employee ID (employeeId)
•Manager ID (managerId)
The Departments soup contains:
•Name (name)
•Department code (deptCode)
Here are some examples of basic Smart SQL queries using these soups:
select {employees:firstName}, {employees:lastName}
from {employees} order by {employees:lastName}
select {departments:name}
from {departments}
order by {departments:deptCode}
Joins
Smart SQL also allows you to use joins. For example:
select {departments:name}, {employees:firstName} || ' ' || {employees:lastName}
from {employees}, {departments}
where {departments:deptCode} = {employees:deptCode}
order by {departments:name}, {employees:lastName}
You can even do self joins:
select mgr.{employees:lastName}, e.{employees:lastName}
from {employees} as mgr, {employees} as e
where mgr.{employees:employeeId} = e.{employees:managerId}
Note: Doing a join on a JSON1 index requires a slightly extended syntax. For example, instead of
select {soup1:path1} from {soup1}, {soup2}
use
select {soup1}.{soup1:path1} from {soup1}, {soup2}
Aggregate Functions
Smart SQL support the use of aggregate functions such as:
•COUNT
•SUM
•AVG
233
Smart SQL QueriesOffline Management

For example:
select {account:name},
count({opportunity:name}),
sum({opportunity:amount}),
avg({opportunity:amount}),
{account:id},
{opportunity:accountid}
from {account},
{opportunity}
where {account:id} = {opportunity:accountid}
group by {account:name}
Using Full-Text Search Queries
To perform efficient and flexible searches in SmartStore, you use full-text queries. Full-text queries yield significant performance advantages
over “like” queries when you’re dealing with large data sets.
Beginning with Mobile SDK 3.3, SmartStore supports full-text search. Full-text search is a technology that internet search engines use
to collate documents placed on the web.
About Full-Text
Here's how full-text search works: A customer inputs a term or series of terms. Optionally, the customer can connect terms with binary
operators or group them into phrases. A full-text search engine evaluates the given terms, applying any specified operators and groupings.
The search engine uses the resulting search parameters to find matching documents, or, in the case of SmartStore, matching soup
elements. To support full text search, SmartStore provides a full-text index spec for defining soup fields, and a query spec for performing
queries on those fields.
Full-text queries, or "match" queries, are more efficient than "like" queries. "Like" queries require full index scans of all keys, with run times
proportional to the number of rows searched. "Match" queries find the given term or terms in the index and return the associated record
IDs. The full-text search optimization is negligible for fewer than 1000 records, but, beyond that threshold, run time stays nearly constant
as the number of records increases. If you're searching through tens of thousands of records, “match” queries can be 10–100 times faster
than “like” queries.
Keep these points in mind when using full-text fields and queries:
•Insertions with a full-text index field take longer than ordinary insertions.
•You can't perform MATCH queries in a Smart SQL statement. For example, the following query is not supported:
SELECT {soupName:_soup} FROM {soupName} WHERE {soupName:name} MATCH 'cat'
Instead, use a “match” query spec.
Staying Current with Full-Text Search
In Mobile SDK 4.2, SmartStore updates its full-text search version from FTS4 to FTS5. This upgrade lets Mobile SDK take advantage of
full-text index specs.
If you upgrade an app from Mobile SDK 4.1 to 4.2, existing FTS4 virtual tables remain intact. On the other hand, new soups that you
create after upgrading use FTS5 virtual tables. These soups all work seamlessly together, but you can choose to upgrade legacy soups.
Simply call alterSoup and pass in your original set of index specs. This call uses FTS5 to recreate the virtual tables that back full-text
index specs.
234
Using Full-Text Search QueriesOffline Management

See “Appendix A” at www.sqlite.org/fts5.html for a comparison of FTS4 to FTS5.
IN THIS SECTION:
Full-Text Search Index Specs
To use full-text search, you register your soup with one or more full-text-indexed paths. SmartStore provides a full_text index spec
for designating index fields.
Full-Text Query Specs
To perform a full-text query, you create a SmartStore "match" query spec using your platform’s match query method. For the
matchKey argument, you provide a full-text search query.
Full-Text Query Syntax
Mobile SDK full-text queries use SQLite's enhanced query syntax. With this syntax, you can use logical operators to refine your search.
Full-Text Search Index Specs
To use full-text search, you register your soup with one or more full-text-indexed paths. SmartStore provides a full_text index spec for
designating index fields.
When you define a path with a full-text index, you can also use that path for non-full-text queries. These other types of queries—”all”,
“exact”, “:like”, “range”, and “smart” queries—interpret full-text indexed fields as string indexed fields.
The following examples show how to instantiate a full-text index spec.
Example: iOS:
[[SFSoupIndex alloc]
initWithDictionary:@{kSoupIndexPath: @"some_path",
kSoupIndexType: kSoupIndexTypeFullText}]
Android:
new IndexSpec("some_path", Type.full_text)
JavaScript:
new navigator.smartstore.SoupIndexSpec("some_path", "full_text")
Full-Text Query Specs
To perform a full-text query, you create a SmartStore "match" query spec using your platform’s match query method. For the matchKey
argument, you provide a full-text search query.
Use the following methods to create full-text query specs.
iOS:
+ (SFQuerySpec*) newMatchQuerySpec:(NSString*)soupName
withPath:(NSString*)path
withMatchKey:(NSString*)matchKey
withOrderPath:(NSString*)orderPath
withOrder:(SFSoupQuerySortOrder)order
withPageSize:(NSUInteger)pageSize;
235
Using Full-Text Search QueriesOffline Management

+ (SFQuerySpec*) newMatchQuerySpec:(NSString*)soupName
withSelectPaths:(NSArray*)selectPaths
withPath:(NSString*)path
withMatchKey:(NSString*)matchKey
withOrderPath:(NSString*)orderPath
withOrder:(SFSoupQuerySortOrder)order
withPageSize:(NSUInteger)pageSize;
Android:
public static QuerySpec buildMatchQuerySpec(
String soupName, String path, String exactMatchKey,
String orderPath, Order order, int pageSize)
public static QuerySpec buildMatchQuerySpec(
String soupName, String[] selectPaths, String path,
String matchKey, String orderPath, Order order,
int pageSize)
JavaScript:
navigator.smartstore.buildMatchQuerySpec(
path, matchKey, order, pageSize, orderPath, selectPaths)
Full-Text Query Syntax
Mobile SDK full-text queries use SQLite's enhanced query syntax. With this syntax, you can use logical operators to refine your search.
The following table shows the syntactical options that Mobile SDK queries support. Following the table are keyed examples of the various
query styles and sample output. For more information, see Sections 3.1, “Full-text Index Queries,” and 3.2, “Set Operations Using The
Enhanced Query Syntax,” at sqlite.org.
Related ExamplesSmartStore BehaviorQuery Option
g, h, i, j, and k
Performs match against values only at the
paths you defined.
Specify one or more full-text indexed paths
a,b,c,d,e, and f
Performs match against all full-text indexed
paths
Set the path to a null value
Note: If your path is null, you can still
specify a target field in the
matchKey argument. Use this
format:
{soupName:path}:term
b and hAssumes an “AND” between termsSpecify more than one term without
operators or grouping
d and jMatches rows containing words that start
with the query term
Place a star at the end of a term
c and iFinds one or both termsUse “OR” between terms
e, f, and kIgnores rows that contain that termUse the unary “NOT” operator before a term
236
Using Full-Text Search QueriesOffline Management

Related ExamplesSmartStore BehaviorQuery Option
Returns soup elements in which the entire
phrase occurs in one or more full-text
indexed fields
Specify a phrase search by placing multiple
terms within double quotes (“ ”).
Example: For these examples, a soup named “animals” contains the following records. The name and color fields are indexed
as full_text.
{"id”: 1, "name": "cat", "color": "black"}
{"id”: 2, "name": "cat", "color": "white"}
{"id”: 3, "name": "dog", "color": "black"}
{"id”: 4, "name": "dog", "color": "brown"}
{"id”: 5, "name": "dog", "color": "white"}
Table 6: Query Syntax Examples
Records
Returned
Selects...Match KeyPathExample
1, 3Records containing the word
“black” in any full-text indexed
field
“black”nulla.
1Records containing the words
“black” and “cat” in any full-text
indexed field
“black cat”nullb.
1, 2, 3Records containing either the
word “black” or the word “cat” in
any full-text indexed field
“black OR cat”nullc.
1, 3Records containing a word
starting with “b” in any full-text
indexed field
“b*”nulld.
3Records containing the word
“black” but not the word “cat” in
any full-text indexed field
“black NOT cat”nulle.
3Records containing the word
“black” in the color field and not
“{animals:color}:black NOT
cat”
nullf.
having the word “cat” in any
full-text indexed field
1, 3Records containing the word
“black” in the color field
“black”“color”g.
No recordsRecords containing the words
“black” and “cat” in the color
field
“black cat”“color”h.
237
Using Full-Text Search QueriesOffline Management

Records
Returned
Selects...Match KeyPathExample
1, 3Records containing either the
word “black” or the word “cat” in
the color field
“black OR cat”“color”i.
1, 3Records containing a word
starting with “b” in the color
field
“b*”“color”j.
1, 3Records containing the word
“black” but not the word “cat” in
the color field
“black NOT cat”“color”k.
Working with Query Results
Mobile SDK provides mechanisms on each platform that let you access query results efficiently, flexibly, and dynamically.
Often, a query returns a result set that is too large to load all at once into memory. In this case, Mobile SDK initially returns a small subset
of the results—a single page, based on a size that you specify. You can then retrieve more pages of results and navigate forwards and
backwards through the result set.
JavaScript:
When you perform a query in JavaScript, SmartStore returns a cursor object that lets you page through the query results. Your code can
move forward and backwards through the cursor’s pages. To navigate through cursor pages, use the following functions.
•navigator.smartstore.moveCursorToPageIndex(cursor, newPageIndex, successCallback,
errorCallback)—Move the cursor to the page index given, where 0 is the first page, and totalPages - 1 is the last
page.
•navigator.smartstore.moveCursorToNextPage(cursor, successCallback, errorCallback)—Move
to the next entry page if such a page exists.
•navigator.smartstore.moveCursorToPreviousPage(cursor, successCallback,
errorCallback)—Move to the previous entry page if such a page exists.
•navigator.smartstore.closeCursor(cursor, successCallback, errorCallback)—Close the cursor
when you’re finished with it.
Note:
•The successCallback function accepts one argument: the updated cursor.
•Cursors are not static snapshots of data—they are dynamic. The only data the cursor holds is the original query and your
current position in the result set. When you move your cursor, the query runs again. If you change the soup while paging
through the cursor, the cursor shows those changes. You can even access newly created soup entries, assuming they satisfy
the original query.
iOS native:
Internally, iOS native apps use the third-party FMResultSet class to obtain query results. When you call a SmartStore query spec
method, use the pageSize parameter to control the amount of data that you get back from each call. To traverse pages of results,
iteratively call the queryWithQuerySpec:pageIndex:withDB: or queryWithQuerySpec:pageIndex:error:
238
Working with Query ResultsOffline Management
method of the SFSmartStore class with the same query spec object while incrementing or decrementing the zero-based
pageIndex argument.
Android native:
Internally, Android native apps use the android.database.Cursor interface for cursor manipulations. When you call a SmartStore
query spec method, use the pageSize parameter to control the amount of data that you get back from each call. To traverse pages
of results, iteratively call the SmartStore.query() method with the same query spec object while incrementing or decrementing
the zero-based pageIndex argument.
Inserting, Updating, and Upserting Data
SmartStore defines standard fields that help you track entries and synchronize soups with external servers.
System Fields: _soupEntryId and _soupLastModifiedDate
To track soup entries for insert, update, and delete actions, SmartStore adds a few fields to each entry:
•_soupEntryId—This field is the primary key for the soup entry in the table for a given soup.
•_soupLastModifiedDate, _soupCreatedDate—The number of milliseconds since 1/1/1970.
–To convert a date value to a JavaScript date, use new Date(entry._soupLastModifiedDate).
–To convert a date to the corresponding number of milliseconds since 1/1/1970, use date.getTime().
When you insert or update soup entries, SmartStore automatically sets these fields. When you remove or retrieve specific entries, you
can reference them by _soupEntryId.
Beginning with Mobile SDK 4.2, SmartStore creates indexes on the _soupLastModifiedDate and _soupCreatedDate
fields. These indexes provide a performance boost for queries that use these fields. In older soups, the _soupLastModifiedDate
and _soupCreatedDate fields exist but are not indexed. To create these indexes to legacy soups, simply call alterSoup and
pass in your original set of index specs.
About Upserting
To insert or update soup entries—letting SmartStore determine which action is appropriate—you use an upsert method.
If _soupEntryId is already set in any of the entries presented for upsert, SmartStore updates the soup entry that matches that ID.
If an upsert entry doesn’t have a _soupEntryId slot, or if the provided _soupEntryId doesn’t match an existing soup entry,
SmartStore inserts the entry into the soup and overwrites its _soupEntryId.
Upserting with an External ID
If your soup entries mirror data from an external system, you usually refer to those entries by their external primary key IDs. For that
purpose, SmartStore supports upsert with an external ID. When you perform an upsert, you can designate any index field as the external
ID field. SmartStore looks for existing soup entries with the same value in the designated field with the following results:
•If no field with the same value is found, SmartStore creates a soup entry.
•If the external ID field is found, SmartStore updates the entry with the matching external ID value.
•If more than one field matches the external ID, SmartStore returns an error.
To create an entry locally, set the external ID field to a value that you can query when uploading the new entries to the server.
When you update the soup with external data, always use the external ID. Doing so guarantees that you don’t end up with duplicate
soup entries for the same remote record.
239
Inserting, Updating, and Upserting DataOffline Management

SmartStore also lets you track inter-object relationships. For example, imagine that you create a product offline that belongs to a catalog
that doesn’t yet exist on the server. You can capture the product’s relationship with the catalog entry through the
parentSoupEntryId field. Once the catalog exists on the server, you can capture the external relationship by updating the local
product record’s parentExternalId field.
Upsert Methods
JavaScript:
The cordova.force.js library provides two JavaScript upsert functions, each with one overload:
navigator.smartStore.upsertSoupEntries(isGlobalStore, soupName,
entries[], successCallback, errorCallback)
navigator.smartStore.upsertSoupEntries(storeConfig, soupName,
entries[], successCallback, errorCallback)
navigator.smartStore.upsertSoupEntriesWithExternalId(isGlobalStore, soupName,
entries[], externalPathId, successCallback, errorCallback)
navigator.smartStore.upsertSoupEntriesWithExternalId(storeConfig, soupName,
entries[], externalPathId, successCallback, errorCallback)
To upsert local data only, use the first upsert() function. To upsert data from an external server, use the second function, which
supports the externalPathId parameter.
iOS native:
The iOS SFSmartStore class provides two instance methods for upserting. The first lets you specify all available options:
•Soup name
•NSArray object containing index specs
•Path for an external ID field name
•An output NSError object to communicate errors back to the app
- (NSArray *)upsertEntries:(NSArray *)entries
toSoup:(NSString *)soupName
withExternalIdPath:(NSString *)externalIdPath
error:(NSError **)error;
The second method uses the _soupEntryId field for the external ID path:
- (NSArray *)upsertEntries:(NSArray *)entries
toSoup:(NSString *)soupName;
Android native:
Android provides three overloads of its upsert() method. The first overload lets you specify all available options:
•Soup name
•JSON object containing one or more entries for upserting
•Path for an arbitrary external ID field name
•Flag indicating whether to use a transactional model for inserts and updates
public JSONObject upsert(
String soupName, JSONObject soupElt, String externalIdPath,
boolean handleTx)
throws JSONException
240
Inserting, Updating, and Upserting DataOffline Management

The second overload enforces the use of a transactional model for inserts and updates:
public JSONObject upsert(
String soupName, JSONObject soupElt, String externalIdPath)
throws JSONException
The third overload enforces the transactional model and uses the _soupEntryId field for the external ID path:
public JSONObject upsert(
String soupName, JSONObject soupElt)
throws JSONException
Example: The following JavaScript code contains sample scenarios. First, it calls upsertSoupEntries to create an account
soup entry. In the success callback, the code retrieves the new record with its newly assigned soup entry ID. It then changes the
account description and calls forcetk.mobilesdk methods to create the account on the server and then update it. The
final call demonstrates an upsert with external ID. To make the code more readable, no error callbacks are specified. Also, because
all SmartStore calls are asynchronous, real applications perform each step in the success callback of the previous step.
This code uses the value new for the id field because the record doesn’t yet exist on the server. When the app comes online, it
can query for records that exist only locally (by looking for records where id == "new") and upload them to the server. Once
the server returns IDs for the new records, the app can update their id fields in the soup.
var sfSmartstore =
function() {return cordova.require("com.salesforce.plugin.smartstore");};
// ...
// Specify data for the account to be created
var acc = {id: "new", Name: "Cloud Inc",
Description: "Getting started"};
// Create account in SmartStore
// This upsert does a "create" because
// the account has no _soupEntryId field
sfSmartstore().upsertSoupEntries("accounts", [ acc ],
function(accounts) {
acc = accounts[0];
// acc should now have a _soupEntryId field
// (and a _lastModifiedDate as well)
});
// Update account's description in memory
acc["Description"] = "Just shipped our first app ";
// Update account in SmartStore
// This does an "update" because acc has a _soupEntryId field
sfSmartstore().upsertSoupEntries("accounts", [ acc ],
function(accounts) {
acc = accounts[0];
});
// Create account on server
// (sync client -> server for entities created locally)
force.create("account", {
"Name": acc["Name"],
"Description": acc["Description"]},
241
Inserting, Updating, and Upserting DataOffline Management

function(result) {
acc["id"] = result["id"];
// Update account in SmartStore
sfSmartstore().upsertSoupEntries("accounts", [ acc ]);
});
// Update account's description in memory
acc["Description"] = "Now shipping for iOS and Android";
// Update account's description on server
// Sync client -> server for entities existing on server
force.update("account", acc["id"],
{"Description": acc["Description"]});
// Later, there is an account (with id: someSfdcId) that you want
// to get locally
// There might be an older version of that account in the
// SmartStore already
// Update account on client
// sync server -> client for entities that might or might not
// exist on client
force.retrieve(
"account", someSfdcId, "id,Name,Description",
function(result) {
// Create or update account in SmartStore
// (looking for an account with the same sfdcId)
sfSmartstore().upsertSoupEntriesWithExternalId(
"accounts", [result], "id");
});
Using External Storage for Large Soup Elements
If your soup includes large elements, you can get better performance by using external encrypted storage. For example, if you see
warnings that you’ve exceeded an index limit, try switching to external storage. Trade-offs are minimal.
When you populate a soup, SmartStore formats your data elements as JSON strings and writes the soup data to the underlying SQLite
database. This strategy proves efficient and easy to use for most cases. However, if your JSON blobs are 1 MB or larger, you can direct
SmartStore to store them, encrypted, in the device file system. Mobile SDK 4.3 and later define a special SmartStore feature, external
storage, for this use case.
Using external storage for large elements can reduce memory usage and, hence, improve SmartStore performance. This benefit grows
with the size of the soup elements. We don’t recommend external storage for soup elements smaller than 1 MB.
To use external storage, you:
1. Create a soup spec object. Configure this object with the soup name and a list of features that includes external storage.
2. Register the soup using a soup registration method that takes a soup spec object rather than the soup name.
3. To change the soup specs after you register the soup, use an alterSoup method that takes a soup spec object.
242
Using External Storage for Large Soup ElementsOffline Management

Important: SmartStore treats external elements exactly as normal soup elements, with one exception: You cannot use JSON1
indexes with external storage. If you attempt to register a soup that uses external storage and JSON1 indexes, SmartStore throws
an error.
IN THIS SECTION:
Soup Specs
To register or alter a soup that uses special SmartStore features such as external storage, you provide a soup spec rather than just a
soup name. SmartStore provides methods for creating and retrieving soup spec objects.
Register a Soup with External Storage
Soup registration for external storage requires different APIs than ordinary soup registration. You use a registration method that
takes a soup spec object.
Alter a Soup with External Storage
To alter a soup that uses a special feature such as external storage, use an alterSoup method that takes a soup spec object.
Soup Specs
To register or alter a soup that uses special SmartStore features such as external storage, you provide a soup spec rather than just a soup
name. SmartStore provides methods for creating and retrieving soup spec objects.
In your soup spec object, you specify the soup name and a list of the SmartStore special features that your soup uses. You can then pass
the soup spec object to a registerSoupWithSpec method or an alterSoup method.
Note: Currently, SmartStore defines only one special feature: external storage.
Android Native
Soup spec creation methods (SoupSpec.java)
public SoupSpec(String soupName) // for future use
public SoupSpec(String soupName, String... features)
Soup spec retrieval method (SmartStore.java)
public SoupSpec getSoupSpec(String soupName)
iOS Native
Soup spec creation methods (SFSoupSpec.h)
+ (SFSoupSpec *)newSoupSpec:(NSString *)soupName withFeatures:(NSArray *)features;
+ (SFSoupSpec *)newSoupSpecWithDictionary:(NSDictionary *)dictionary;
Soup spec retrieval method (SFSmartStore.h)
- (SFSoupSpec*)attributesForSoup:(NSString*)soupName;
JavaScript
Soup spec creation methods (cordova.force.smartstore.js, react.force.smartstore.js)
SoupSpec(soupName, features)
243
Using External Storage for Large Soup ElementsOffline Management

Soup spec retrieval method (cordova.force.smartstore.js, react.force.smartstore.js)
getSoupSpecs(soupName)
Register a Soup with External Storage
Soup registration for external storage requires different APIs than ordinary soup registration. You use a registration method that takes a
soup spec object.
A soup spec is an object that contains the soup name along with a list of special features for the soup to support. In this case, you set
the feature list to include the Mobile SDK platform-specific identifier for “external storage”. All identifiers resolve to the string
“externalStorage”.
Constant IdentifierPlatform
kSoupFeatureExternalStorageiOS native
SoupSpec.FEATURE_EXTERNAL_STORAGE
Android native
“externalStorage” (no constant defined)Hybrid, React Native
Android Native
Soup spec registration methods (SmartStore.java)
public void registerSoupWithSpec(
SoupSpec soupSpec,
IndexSpec[] indexSpecs)
iOS Native
Soup spec registration methods (SFSmartStore.h)
- (BOOL)registerSoupWithSpec:(SFSoupSpec*)soupSpec
withIndexSpecs:(NSArray*)indexSpecs
error:(NSError**)error;
JavaScript
Soup spec registration methods (cordova.force.smartstore.js, react.force.smartstore.js)
registerSoupWithSpec(storeSpec, soupSpec, indexSpecs,
successCB, errorCB)
Alter a Soup with External Storage
To alter a soup that uses a special feature such as external storage, use an alterSoup method that takes a soup spec object.
244
Using External Storage for Large Soup ElementsOffline Management

Android Native
Soup spec alteration methods (SmartStore.java)
public void alterSoup(
String soupName,
SoupSpec soupSpec,
IndexSpec[] indexSpecs,
boolean reIndexData)
throws JSONException
iOS Native
Soup spec alteration methods (SFSmartStore.h)
- (BOOL) alterSoup:(NSString*)soupName
withSoupSpec:(SFSoupSpec*)soupSpec
withIndexSpecs:(NSArray*)indexSpecs
reIndexData:(BOOL)reIndexData;
JavaScript
Soup spec alteration methods (cordova.force.smartstore.js, react.force.smartstore.js)
alterSoupWithSpec(storeSpec, soupName, soupSpec,
indexSpecs, reIndexData, successCB, errorCB)
Removing Soup Elements
Traditionally, SmartStore methods let you remove soup elements by specifying an array of element IDs. To do so, you usually run a
preliminary query to retrieve the candidate IDs, then call the method that performs the deletion. In Mobile SDK 4.2, SmartStore ups the
game by adding a query option to its element deletion methods. With this option, you provide only a query, and SmartStore deletes all
elements that satisfy that query. This approach delivers a performance boost because both the query and the deletion operation occur
in a single call.
Hybrid Apps
In hybrid apps, you use the third parameter to pass either an ID array or a SmartStore query spec.
removeFromSoup([isGlobalStore, ]soupName, entryIdsOrQuerySpec,
successCB, errorCB)
removeFromSoup([storeConfig, ]soupName, entryIdsOrQuerySpec,
successCB, errorCB)
In addition to success and error callbacks, this function takes the following arguments:
Table 7: Parameters
Argument DescriptionParameter Name
(Optional) Boolean that indicates whether this operation occurs in
a global or user-based SmartStore database. Defaults to false.
isGlobalStore
245
Removing Soup ElementsOffline Management

Argument DescriptionParameter Name
(Optional) StoreConfig object that specifies a store name and
whether the store is global or user-based.
storeConfig
String. Pass in the name of the soup.soupName
Array or QuerySpec object. Pass in the name of the soup.entryIdsOrQuerySpec
Android Native Apps
Android native methods for removing entries give you the option of either handling the transaction yourself, or letting the method
handle the transaction transparently. If you set the handleTx argument to false, you’re responsible for starting the transaction
before the call and ending it afterwards. If you use the overload that doesn’t include handleTx, or if you set handleTx to false,
Mobile SDK handles the transaction for you.
To remove entries by ID array in Android native apps, call either of the following methods:
public void delete(String soupName, Long... soupEntryIds)
public void delete(String soupName, Long[] soupEntryIds, boolean handleTx)
To remove entries by query in Android native apps, call either of the following methods:
public void deleteByQuery(String soupName, QuerySpec querySpec)
public void deleteByQuery(String soupName, QuerySpec querySpec, boolean handleTx)
iOS Native Apps
To remove entries by ID array in iOS native apps, call:
- (void)removeEntries:(NSArray*)entryIds fromSoup:(NSString*)soupName error:(NSError
**)error;
To remove entries by query in iOS native apps, call either of the following methods:
- (void)removeEntriesByQuery:(SFQuerySpec*)querySpec
fromSoup:(NSString*)soupName;
- (void)removeEntriesByQuery:(SFQuerySpec*)querySpec
fromSoup:(NSString*)soupName
error:(NSError **)error;
Managing Soups
SmartStore provides utility functionality that lets you retrieve soup metadata and perform other soup-level operations. This functionality
is available for hybrid, Android native, and iOS native apps.
Hybrid Apps
Each soup management function in JavaScript takes two callback functions: a success callback that returns the requested data, and an
error callback. Success callbacks vary according to the soup management functions that use them. Error callbacks take a single argument,
which contains an error description string. For example, you can define an error callback function as follows:
function(e) { alert(“ERROR: “ + e);}
246
Managing SoupsOffline Management

To call a soup management function in JavaScript, first invoke the Cordova plug-in to initialize the SmartStore object. You then use the
SmartStore object to call the soup management function. The following example defines named callback functions discretely, but you
can also define them inline and anonymously.
var sfSmartstore = function() {
return cordova.require("com.salesforce.plugin.smartstore");};
function onSuccessRemoveSoup(param) {
logToConsole()("onSuccessRemoveSoup: " + param);
$("#div_soup_status_line").html("Soup removed: "
+ SAMPLE_SOUP_NAME);
}
function onErrorRemoveSoup(param) {
logToConsole()("onErrorRemoveSoup: " + param);
$("#div_soup_status_line").html("removeSoup ERROR");
}
sfSmartstore().removeSoup(SAMPLE_SOUP_NAME,
onSuccessRemoveSoup,
onErrorRemoveSoup);
Android Native Apps
To use soup management APIs in a native Android app that’s SmartStore-enabled, you call methods on the shared SmartStore instance:
SmartStore smartStore =
SmartStoreSDKManager.getInstance().getSmartStore();
smartStore.clearSoup("user1Soup");
iOS Native Apps
To use soup management APIs in a native iOS app, import SFSmartStore.h. You call soup management methods on a
SFSmartStore shared instance. Obtain the shared instance by using one of the following SFSmartStore class methods.
Using the SmartStore instance for the current user:
+ (id)sharedStoreWithName:(NSString*)storeName;
Using the SmartStore instance for a specified user:
+ (id)sharedStoreWithName:(NSString*)storeName
user:(SFUserAccount *)user;
For example:
self.store = [SFSmartStore sharedStoreWithName:kDefaultSmartStoreName];
if ([self.store soupExists:@"Accounts"]) {
[self.store removeSoup:@"Accounts"];
}
247
Managing SoupsOffline Management

IN THIS SECTION:
Get the Database Size
To query the amount of disk space consumed by the database, call the database size method.
Clear a Soup
To remove all entries from a soup, call the soup clearing method.
Retrieve a Soup’s Index Specs
If you want to examine or display the index specifications for a soup, call the applicable index specs retrieval method.
Change Existing Index Specs on a Soup
To change existing index specs, call the applicable soup alteration method.
Reindex a Soup
Use reindexing if you previously altered a soup without reindexing the data, but later you want to make sure all elements in the
soup are properly indexed. Both alterSoup() and reindexSoup() perform better for conversion to, or creation of, JSON1
index specs than for other index spec types.
Remove a Soup
Removing a soup deletes it. When a user signs out, all soups are deleted automatically. For other occasions in which you want to
delete a soup, call the applicable soup removal method.
SEE ALSO:
Adding SmartStore to Existing Android Apps
Get the Database Size
To query the amount of disk space consumed by the database, call the database size method.
Hybrid Apps
In hybrid apps, call:
navigator.smartstore.getDatabaseSize(successCallback, errorCallback)
The success callback supports a single parameter that contains the database size in bytes. For example:
function(dbSize) { alert("db file size is:" + dbSize + " bytes"); }
Android Native Apps
In Android apps, call:
public int getDatabaseSize ()
iOS Native Apps
In Android apps, call:
- (long)getDatabaseSize
248
Managing SoupsOffline Management

Clear a Soup
To remove all entries from a soup, call the soup clearing method.
Hybrid Apps
In hybrid apps, call:
navigator.smartstore.clearSoup(soupName, successCallback, errorCallback)
The success callback supports a single parameter that contains the soup name. For example:
function(soupName) { alert("Soup " + soupName + " was successfully emptied."); }
Android Apps
In Android apps, call:
public void clearSoup ( String soupName )
iOS Apps
In iOS apps, call:
- (void)clearSoup:(NSString*)soupName;
Retrieve a Soup’s Index Specs
If you want to examine or display the index specifications for a soup, call the applicable index specs retrieval method.
Hybrid Apps
In hybrid apps, call:
getSoupIndexSpecs()
In addition to the success and error callback functions, this function takes a single argument, soupName, which is the name of the
soup. For example:
navigator.smartstore.getSoupIndexSpecs(soupName, successCallback,
errorCallback)
The success callback supports a single parameter that contains the array of index specs. For example:
function(indexSpecs) { alert("Soup " + soupName +
" has the following indexes:" + JSON.stringify(indexSpecs); }
Android Apps
In Android apps, call:
public IndexSpec [] getSoupIndexSpecs ( String soupName )
249
Managing SoupsOffline Management

iOS Apps
In iOS apps, call:
- (NSArray*)indicesForSoup:(NSString*)soupName
Change Existing Index Specs on a Soup
To change existing index specs, call the applicable soup alteration method.
Keep these important performance tips in mind when reindexing data:
•The reIndexData argument is optional, because reindexing can be expensive. When reIndexData is set to false, expect
your throughput to be faster by an order of magnitude.
•Altering a soup that already contains data can degrade your app’s performance. Setting reIndexData to true worsens the
performance hit.
•As a performance guideline, expect the alterSoup() operation to take one second per 1000 records when reIndexData
is set to true. Individual performance varies according to device capabilities, the size of the elements, and the number of indexes.
•alterSoup() and reindexSoup() perform better for conversion to, or creation of, JSON1 index specs than for other index
spec types.
•Insert performance tends to be faster with JSON1 index specs.
•Database size is smaller with JSON1 index specs.
•Query performance is typically unaffected by JSON1 index specs.
•Other SmartStore operations must wait for the soup alteration to complete.
•If the operation is interrupted—for example, if the user exits the application—the operation automatically resumes when the
application reopens the SmartStore database.
Changing Index Specs with External Storage
If you’ve registered a soup to use the external storage feature, use the alterSoup methods described in Alter a Soup with External
Storage.
Hybrid Apps
In hybrid apps, call:
navigator.smartstore.alterSoup(soupName, indexSpecs, reIndexData,
successCallback, errorCallback)
In addition to success and error callbacks, this function takes the following arguments:
Table 8: Parameters
Argument DescriptionParameter Name
String. Pass in the name of the soup.soupName
Array. Pass in the set of index entries in the index specification.indexSpecs
Boolean. Indicate whether you want the function to re-index the
soup after replacing the index specifications.
reIndexData
250
Managing SoupsOffline Management

The success callback supports a single parameter that contains the soup name. For example:
function(soupName) { alert("Soup " + soupName +
" was successfully altered"); }
The following example demonstrates a simple soup alteration. To start, the developer defines a soup that’s indexed on name and
address fields, and then upserts an agent record.
navigator.smartstore.registerSoup("myAgents",
[{path:'name', type:'string'},
{path:'address', type:'string'}]);
navigator.smartstore.upsertSoupEntries("myAgents",
[{name:'James Bond',
address:'1 market st',
agentNumber:"007"}]);
When time and experience show that users really wanted to query their agents by "agentNumber" rather than address, the developer
decides to drop the index on address and add an index on agentNumber.
navigator.smartstore.alterSoup("myAgents", [{path:'name',type:'string'}, {path:'agentNumber',
type:'string'}], true);
Note: If the developer sets the reIndexData parameter to false, a query on agentNumber does not find the already
inserted entry (”James Bond”). However, you can query that record by name. To support queries by agentNumber, you’d first
have to call navigator.smartstore.reIndexSoup("myAgents", ["agentNumber"])
Android Native Apps
In an Android native app, call:
public void alterSoup(String soupName, IndexSpec [] indexSpecs, boolean reIndexData) throws
JSONException
iOS Native Apps
In an iOS native app, call:
- (BOOL) alterSoup:(NSString*)soupName withIndexSpecs:(NSArray*)indexSpecs
reIndexData:(BOOL)reIndexData;
Reindex a Soup
Use reindexing if you previously altered a soup without reindexing the data, but later you want to make sure all elements in the soup
are properly indexed. Both alterSoup() and reindexSoup() perform better for conversion to, or creation of, JSON1 index
specs than for other index spec types.
Hybrid Apps
In hybrid apps, call:
navigator.smartstore.reIndexSoup(soupName, listOfPaths, successCallback, errorCallback)
In addition to the success and error callback functions, this function takes a single argument, soupName, which is the name of the
soup. For example:this function takes additional arguments:
251
Managing SoupsOffline Management

Argument DescriptionParameter Name
String. Pass in the name of the soup.soupName
Array. List of index paths on which you want to re-index.listOfPaths
The success callback supports a single parameter that contains the soup name. For example:
function(soupName) { alert("Soup " + soupName +
" was successfully re-indexed."); }
Android Apps
In Android apps, call:
public void reIndexSoup(String soupName, String[] indexPaths, boolean handleTx)
iOS Apps
In iOS apps, call:
- (BOOL) reIndexSoup:(NSString*)soupName
withIndexPaths:(NSArray*)indexPaths
Remove a Soup
Removing a soup deletes it. When a user signs out, all soups are deleted automatically. For other occasions in which you want to delete
a soup, call the applicable soup removal method.
Hybrid Apps
In hybrid apps, call:
navigator.smartstore.removeSoup(soupName,successCallback,errorCallback);
Android Apps
In Android apps, call:
public void dropSoup ( String soupName )
iOS Apps
In iOS apps, call:
- (void)removeSoup:(NSString*)soupName
252
Managing SoupsOffline Management

Managing Stores
If you create global stores, you’re required to perform cleanup when the app exits. Also, if you create multiple user stores, you can perform
cleanup if you’re no longer using particular stores. SmartStore provides methods deleting named and global stores. For hybrid apps,
SmartStore also provides functions for getting a list of named stores.
Android Native Apps
Mobile SDK for Android defines the following SmartStoreSDKManager methods for removing stores.
public void removeGlobalSmartStore(String dbName)
public void removeSmartStore()
public void removeSmartStore(UserAccount account)
public void removeSmartStore(UserAccount account, String communityId)
public void removeSmartStore(String dbNamePrefix, UserAccount account, String communityId)
In addition, SmartStore provides the following methods for retrieving store names.
public List<String> getGlobalStoresPrefixList()
public List<String> getUserStoresPrefixList()
iOS Native Apps
Mobile SDK for iOS defines the following SFSmartStore class methods for removing stores.
+ (void)removeSharedStoreWithName:(NSString *)storeName;
+ (void)removeSharedStoreWithName:(NSString *)storeName forUser:(SFUserAccount *)user;
+ (void)removeSharedGlobalStoreWithName:(NSString *)storeName;
+ (void)removeAllStores;
+ (void)removeAllStoresForUser:(SFUserAccount *)user;
+ (void)removeAllGlobalStores;
In addition, SmartStore provides the following methods for retrieving store names.
+ (NSArray *)allStoreNames;
+ (NSArray *)allGlobalStoreNames;
Hybrid Apps
SmartStore defines the following functions for removing stores. Each function takes success and error callbacks. The removeStore()
function also requires either a StoreConfig object that specifies the store name, or just the store name as a string.
removeStore(storeConfig,successCB, errorCB)
removeAllGlobalStores(successCB, errorCB)
removeAllStores(successCB, errorCB)
In addition, the hybrid version of SmartStore provides the following functions for retrieving the StoreConfig objects for defined
stores.
getAllStores(successCB, errorCB)
getAllGlobalStores(successCB, errorCB)
253
Managing StoresOffline Management

getAllStores(successCB, errorCB)
getAllGlobalStores(successCB, errorCB)
Testing with the SmartStore Inspector
Verifying SmartStore operations during testing can become a tedious and time-consuming effort. SmartStore Inspector comes to the
rescue.
During testing, it’s helpful to see if your code is handling SmartStore data as you intended. The SmartStore Inspector provides a mobile
UI class for that purpose. With the SmartStore Inspector you can:
•Examine soup metadata, such as soup names and index specs for any soup
•Clear a soup’s contents
•Perform Smart SQL queries
Note: SmartStore Inspector is for testing and debugging only. Be sure to remove all references to SmartStore Inspector before
you build the final version of your app.
Hybrid Apps
To launch the SmartStore Inspector, call showInspector() on the SmartStore plug-in object. In HTML:
<!-- include Cordova -->
<script src="cordova.js"></script>
In a <script> block or a referenced JavaScript library:
var sfSmartstore = function() {return
cordova.require("com.salesforce.plugin.smartstore");};sfSmartstore().showInspector();
Android Native Apps
In native Android apps, use the SmartStoreInspectorActivity class to launch the SmartStore Inspector:
this.startActivity(SmartStoreInspectorActivity.getIntent(this, false, null));
iOS Native Apps
In native iOS apps, send the presentViewController message of the current view controller to launch the SmartStore Inspector:
#import <SalesforceSDKCore/SFSmartStoreInspectorViewController.h>
...
SFSmartStoreInspectorViewController *inspector =
[[SFSmartStoreInspectorViewController alloc] initWithStore:self.store];
[self presentViewController:inspector animated:NO completion:nil];
where self is itself a view controller. The SFSmartStoreInspectorViewController class typically manages its own life
cycle, so you’re typically not required to dismiss it explicitly.
254
Testing with the SmartStore InspectorOffline Management

Using the Mock SmartStore
To facilitate developing and testing code that makes use of the SmartStore while running outside the container, you can use an emulated
SmartStore.
MockSmartStore is a JavaScript implementation of SmartStore that stores data in local storage (or optionally just in memory).
In the external/shared/test directory, you’ll find the following files:
•MockCordova.js—A minimal implementation of Cordova functions intended only for testing plug-ins outside the container.
Intercepts Cordova plug-in calls.
•MockSmartStore.js—A JavaScript implementation of SmartStore intended only for development and testing outside the
container. Also intercepts SmartStore Cordova plug-in calls and handles them using a MockSmartStore.
When you’re developing an application using SmartStore, make the following changes to test your app outside the container:
•Include MockCordova.js instead of cordova.js.
•Include MockSmartStore.js.
To see a MockSmartStore example, check out external/shared/test/test.html.
Same-Origin Policies
Same-origin policy permits scripts running on pages originating from the same site to access each other’s methods and properties with
no specific restrictions; it also blocks access to most methods and properties across pages on different sites. Same-origin policy restrictions
are not an issue when your code runs inside the container, because the container disables same-origin policy in the webview. However,
if you call a remote API, you need to worry about same-origin policy restrictions.
Fortunately, browsers offer ways to turn off same-origin policy, and you can research how to do that with your particular browser. If you
want to make XHR calls against Lightning Platform from JavaScript files loaded from the local file system, you should start your browser
with same-origin policy disabled. The following article describes how to disable same-origin policy on several popular browsers: Getting
Around Same-Origin Policy in Web Browsers.
Authentication
For authentication with MockSmartStore, you will need to capture access tokens and refresh tokens from a real session and hand code
them in your JavaScript app. You’ll also need these tokens to initialize the force.js JavaScript toolkit.
Note:
•MockSmartStore doesn’t encrypt data and is not meant to be used in production applications.
•MockSmartStore currently supports the following forms of Smart SQL queries:
–SELECT...WHERE.... For example:
SELECT {soupName:selectField} FROM {soupName} WHERE {soupName:whereField} IN
(values)
–SELECT...WHERE...ORDER BY.... For example:
SELECT {soupName:_soup} FROM {soupName} WHERE {soupName:whereField} LIKE 'value'
ORDER BY LOWER({soupName:orderByField})
–SELECT count(*) FROM {soupName}
255
Using the Mock SmartStoreOffline Management

MockSmartStore doesn’t directly support the simpler types of Smart SQL statements that are handled by the
build*QuerySpec() functions. Instead, use the query spec function that suits your purpose.
SEE ALSO:
Retrieving Data from a Soup
Using SmartSync Data Framework to Access Salesforce Objects
The SmartSync Data Framework library makes it easy for customers to synchronize Salesforce data on their mobile apps with Salesforce
servers. In particular, SmartSync Data Framework enables customers whose devices have lost connectivity to continue working on
Salesforce data. When connectivity is restored, SmartSync Data Framework synchronizes any changes made to local records in SmartStore
with the corresponding records on the Salesforce server. SmartSync Data Framework predefines cache policies for fine-tuning interactions
between cached data and server data in offline and online scenarios. SmartSync Data Framework convenience methods automate
common network activities—fetching sObject metadata, fetching a list of most recently used objects, and building SOQL and SOSL
queries.
Using SmartSync Data Framework in Native Apps
The native SmartSync Data Framework library provides native iOS and Android APIs that simplify the development of offline-ready apps.
A subset of this native functionality is also available to hybrid apps through a Cordova plug-in.
SmartSync Data Framework libraries offer parallel architecture and functionality for Android and iOS, expressed in each platform’s native
language. The shared functional concepts are straightforward:
•Query Salesforce object metadata by calling Salesforce REST APIs.
•Store the retrieved object data locally and securely for offline use.
•Sync data changes when the device goes from an offline to an online state.
With SmartSync Data Framework native libraries, you can:
•Get and post data by interacting with a server endpoint. SmartSync Data Framework helper APIs encode the most commonly used
endpoints. These APIs help you fetch sObject metadata, retrieve the list of most recently used (MRU) objects, and build SOQL and
SOSL queries. You can also use arbitrary endpoints that you specify in a custom class.
•Fetch Salesforce records and metadata and cache them on the device, using one of the pre-defined cache policies.
•Edit records offline and save them offline in SmartStore.
•Synchronize batches of records by pushing locally modified data to the Salesforce cloud.
SmartSync Data Framework Components
The following components form the basis of SmartSync Data Framework architecture.
Sync Manager
•Android class: com.salesforce.androidsdk.smartsync.manager.SyncManager
•iOS class: SFSmartSyncSyncManager
Provides APIs for synchronizing large batches of sObjects between the server and SmartStore. This class works independently of the
metadata manager and is intended for the simplest and most common sync operations. Sync managers can “sync down”—download
sets of sObjects from the server to SmartStore—and “sync up”—upload local sObjects to the server.
256
Using SmartSync Data Framework to Access Salesforce
Objects
Offline Management
The sync manager works in tandem with the following utility classes:
Sync State Classes
•Android: com.salesforce.androidsdk.smartsync.util.SyncState
•iOS: SFSyncState
–Tracks the state of a sync operation. States include:
•New—The sync operation has been initiated but has not yet entered a transaction with the server.
•Running—The sync operation is negotiating a sync transaction with the server.
•Done—The sync operation finished successfully.
•Failed—The sync operation finished unsuccessfully.
Sync Target Classes
•Android: com.salesforce.androidsdk.smartsync.util.SyncTarget
•iOS: SFSyncTarget
–Specifies the sObjects to be downloaded during a “sync down” operation.
Sync Options Classes
•Android: com.salesforce.androidsdk.smartsync.util.SyncOptions
•iOS: SFSyncOptions
–Specifies configuration options for a “sync up” operation. Options include the list of field names to be synced.
Metadata Manager
•Android class: com.salesforce.androidsdk.smartsync.manager.MetadataManager
•iOS class: SFSmartSyncMetadataManager
Performs data loading functions. This class helps you handle more full-featured queries and configurations than the sync manager
protocols support. For example, metadata manager APIs can:
•Load SmartScope object types.
•Load MRU lists of sObjects. Results can be either global or limited to a specific sObject.
•Load the complete object definition of an sObject, using the describe API.
•Load the list of all sObjects available in an organization.
•Determine if an sObject is searchable, and, if so, load the search layout for the sObject type.
•Load the color resource for an sObject type.
•Mark an sObject as viewed on the server, thus moving it to the top of the MRU list for its sObject type.
To interact with the server, MetadataManager uses the standard Mobile SDK REST API classes:
•Android: RestClient, RestRequest
•iOS: SFRestAPI, SFRestRequest
It also uses the SmartSync Data Framework cache manager to read and write data to the cache.
Cache Manager
•Android class: com.salesforce.androidsdk.smartsync.manager.CacheManager
•iOS class: SFSmartSyncCacheManager
257
Using SmartSync Data Framework in Native AppsOffline Management

Reads and writes objects, object types, and object layouts to the local cache on the device. It also provides a method for removing
a specified cache type and cache key. The cache manager stores cached data in a SmartStore database backed by SQLCipher. Though
the cache manager is not off-limits to apps, the metadata manager is its principle client and typically handles all interactions with
it.
SOQL Builder
•Android class: com.salesforce.androidsdk.smartsync.util.SOQLBuilder
•iOS class: SFSmartSyncSoqlBuilder
Utility class that makes it easy to build a SOQL query statement, by specifying the individual query clauses.
SOSL Builder
•Android class: com.salesforce.androidsdk.smartsync.util.SOSLBuilder
•iOS class: SFSmartSyncSoslBuilder
Utility class that makes it easy to build a SOSL query statement, by specifying the individual query clauses.
SmartSyncSDKManager (Android only)
For Android, SmartSync Data Framework apps use a different SDK manager object than basic apps. Your App class extends
SmartSyncSDKManager instead of SalesforceSDKManager. If you create a SmartStore app with forcedroid version 3.0
or later, this substitution happens automatically. This change applies to both native and hybrid SmartSync Data Framework apps on
Android.
Note: To support multi-user switching, SmartSync Data Framework creates unique instances of its components for each user
account.
Cache Policies
When you’re updating your app data, you can specify a cache policy to tell SmartSync Data Framework how to handle the cache. You
can choose to sync with server data, use the cache as a fallback when the server update fails, clear the cache, ignore the cache, and so
forth. For Android, cache policies are defined in the
com.salesforce.androidsdk.smartsync.manager.CacheManager.CachePolicy class. For iOS, they’re part
of the SFDataCachePolicy enumeration defined in SFSmartSyncCacheManager.h.
You specify a cache policy every time you call any metadata manager method that loads data. For example, here are the Android
MetadataManager data loading methods:
public List<SalesforceObjectType>
loadSmartScopeObjectTypes(CachePolicy cachePolicy,
long refreshCacheIfOlderThan);
public List<SalesforceObject> loadMRUObjects(String objectTypeName,
int limit, CachePolicy cachePolicy, long refreshCacheIfOlderThan,
String networkFieldName);
public List<SalesforceObjectType> loadAllObjectTypes(
CachePolicy cachePolicy, long refreshCacheIfOlderThan);
public SalesforceObjectType loadObjectType(
String objectTypeName, CachePolicy cachePolicy,
long refreshCacheIfOlderThan);
public List<SalesforceObjectType> loadObjectTypes(
258
Using SmartSync Data Framework in Native AppsOffline Management

List<String> objectTypeNames, CachePolicy cachePolicy,
long refreshCacheIfOlderThan);
You also specify cache policy to help the cache manager decide if it’s time to reload the cache:
Android:
public boolean needToReloadCache(boolean cacheExists,
CachePolicy cachePolicy, long lastCachedTime, long refreshIfOlderThan);
iOS:
- (BOOL)needToReloadCache:(BOOL)cacheExists
cachePolicy:(SFDataCachePolicy)cachePolicy
lastCachedTime:(NSDate *)cacheTime
refreshIfOlderThan:(NSTimeInterval)refreshIfOlderThan;
Here’s a list of cache policies.
Table 9: Cache Policies
DescriptionCache Policy (iOS)
Ignores cached data. Always goes to the server for fresh
data.
iOS:
IgnoreCacheData
Android:
IGNORE_CACHE_DATA
Attempts to load data from the server, but falls back on
cached data if the server call fails.
iOS:
ReloadAndReturnCacheOnFailure
Android:
RELOAD_AND_RETURN_CACHE_ON_FAILURE
Returns data from the cache,\ and doesn’t attempt to make
a server call.
iOS:
ReturnCacheDataDontReload
Android:
RETURN_CACHE_DATA_DONT_RELOAD
Reloads data from the server and updates the cache with
the new data.
iOS:
ReloadAndReturnCacheData
Android:
RELOAD_AND_RETURN_CACHE_DATA
Reloads data from the server if cache data has become
stale (that is, if the specified timeout has expired).
Otherwise, returns data from the cache.
iOS:
ReloadIfExpiredAndReturnCacheData
Android:
RELOAD_IF_EXPIRED_AND_RETURN_CACHE_DATA
Clears the cache and does not reload data from the server.
iOS:
InvalidateCacheDontReload
259
Using SmartSync Data Framework in Native AppsOffline Management

DescriptionCache Policy (iOS)
Android:
INVALIDATE_CACHE_DONT_RELOAD
Clears the cache and reloads data from the server.
iOS:
InvalidateCacheAndReload
Android:
INVALIDATE_CACHE_AND_RELOAD
Object Representation
When you use the metadata manager, SmartSync Data Framework model information arrives as a result of calling metadata manager
load methods. The metadata manager loads the data from the current user’s organization and presents it in one of three classes:
•Object
•Object Type
•Object Type Layout
Object
•Android class: com.salesforce.androidsdk.smartsync.model.SalesforceObject
•iOS class: SFObject
These classes encapsulate the data that you retrieve from an sObject in Salesforce. The object class reads the data from a JSONObject
in Android, or an NSDictionary object in iOS, that contains the results of your query. It then stores the object’s ID, type, and name
as properties. It also stores the JSONObject itself as raw data.
Object Type
•Android class com.salesforce.androidsdk.smartsync.model.SalesforceObjectType
•iOS class SFObjectType
The object type class stores details of an sObject, including the prefix, name, label, plural label, and fields.
Object Type Layout
•Android class com.salesforce.androidsdk.smartsync.model.SalesforceObjectTypeLayout
•iOS class SFObjectTypeLayout
The object type layout class retrieves the columnar search layout defined for the sObject in the organization, if one is defined. If no layout
exists, you’re free to choose the fields you want your app to display and the format in which to display them.
SEE ALSO:
Cache Policies
260
Using SmartSync Data Framework in Native AppsOffline Management

Creating Native Apps with SmartSync Data Framework
In forceios and forcedroid version 5.0 and later, creating native SmartSync Data Framework apps literally requires no extra effort. Any
native app you create automatically includes the SmartStore and SmartSync Data Framework libraries.
Adding SmartSync Data Framework to Existing Android Apps
The following steps show you how to add SmartSync Data Framework to an existing Android project (hybrid or native) created with
Mobile SDK 4.0 or later.
1. If your app is currently built on Mobile SDK 3.3 or earlier, upgrade your project to the latest SDK version as described in Migrating
from Previous Releases.
2. Add the SmartSync Data Framework library project to your project. SmartSync Data Framework uses SmartStore, so you also need
to add that library if your project wasn’t originally built with SmartStore.
a. In Android Studio, add the libs/SmartSync project to your module dependencies.
3. Throughout your project, change all code that uses the SalesforceSDKManager object to use SmartSyncSDKManager
instead.
Note: If you do a project-wide search and replace, be sure not to change the KeyInterface import, which should remain
import com.salesforce.androidsdk.app.SalesforceSDKManager.KeyInterface;
Adding SmartSync Data Framework to Existing iOS Apps
You can easily upgrade existing iOS projects to support SmartSync Data Framework: just use forceios to create a new project, then add
in your assets. However, if you’d like to know the steps for upgrading older SmartSync Data Framework apps to Mobile SDK 6.0 or later,
you’re in the right place.
In Mobile SDK 4.0, SmartSync Data Framework moved out of Mobile SDK core into its own library. You can add this new module to your
project by updating your podspec.
SmartSync Data Framework relies on SmartStore, so CocoaPods automatically adds SmartStore to your project. In addition, native iOS
projects in Mobile SDK 6.0 and later require a SmartSyncSDKManager object to initialize the app.
Instead of making the changes manually, we recommend that you create a new native project with forceios, then copy your assets into
that project. The forceios native template uses the SmartSyncSDKManager class by default and gets the correct pods for you, plus
many other updates. Since you’re a hands-on developer, though, we’ll state the details.
1. In your podspec, add SmartSync Data Framework as a subspec:
pod 'SalesforceMobileSDK-iOS', :subspecs => [
'SmartSync'
]
end
2. In your AppDelegate.m file:
a. Import the SmartSyncSDKManager header:
#import <SmartStore/SmartSyncSDKManager.h>
261
Using SmartSync Data Framework in Native AppsOffline Management

b. In your init method, before the first use of [SalesforceSDKManager sharedManager], add the following call:
[SalesforceSDKManager setInstanceClass:[SmartSyncSDKManager class]];
This call is the only place where you explicitly reference the SmartSyncSDKManager class. No other code changes are
required.
For a full example, see the AppDelegate class in the SmartSyncExplorer sample app.
About Sync Targets
Sync targets configure data transfers between the Salesforce cloud and a local database on a mobile device. Mobile SDK 5.1 enhances
the capabilities of targets to give developers more control over two-way data synchronization.
SmartSync Data Framework is all about syncing data. In essence, it
•Syncs data down from the server to a local database, and
•Syncs data up from the local database to the server.
Often, the data you’re transferring doesn’t cross break any rules, and the default sync targets work fine. For special cases, though, you
can provide your own sync target to make sure that data transfers occur as expected. An example is when an object contains fields that
are required but that apps can’t update. If a sync up operation tries to upload both new and updated records with a single field list, the
operation fails if it tries to update locked fields. Beginning in Mobile SDK 5.1, you have other options that can often spare you from
implementing a custom target.
Decentralizing Sync Manager Tasks (Or, Power to the Custom Targets!)
In the first SmartSync Data Framework release, the sync manager class internally handled all server and local database interactions. In
addition, the sync manager was a “final” class that was off-limits for developer customization. Developers were unable to add their own
nuances or extended functionality.
Later, an architectural refactoring delegated all server interactions from the sync manager class to sync down and sync up target classes.
Thus began a transfer of power from the monolithic sync manager to the flexible sync targets. Unlike sync manager class, the
second-generation target classes let developers subclass sync targets for their own purposes. By controlling interactions with servers,
custom sync targets can talk to arbitrary server endpoints, or transform data before storing it.
Mobile SDK 5.1 enhances SmartSync Data Framework still further by moving local database interactions into targets. This enhancement
offers several benefits.
•It decouples SmartSync Data Framework from SmartStore, giving developers the freedom to use other stores.
•It allows developers to use their own data layouts and capture local data changes however they like.
•It enables more complex objects, such as targets that can simultaneously handle multiple record types.
In short, SmartSync Data Framework now offers developers significant control over the entire round trip of data synchronization.
Note: Beginning in Mobile SDK 5.1, additional “sync up” options can sometimes obviate the need for a custom target. See Defining
a Custom Sync Up Target.
SEE ALSO:
Migrate iOS Apps from 5.0 to 5.1
Migrate Android Apps from 5.0 to 5.1
262
Using SmartSync Data Framework in Native AppsOffline Management

Syncing Data
In native SmartSync Data Framework apps, you can use the sync manager to sync data easily between the device and the Salesforce
server. The sync manager provides methods for syncing “up”—from the device to the server—or “down”—from the server to the device.
All data requests in SmartSync Data Framework apps are asynchronous. Asynchronous means that the sync method that you call returns
the server response in a callback method or update block that you define.
Each sync up or sync down method returns a sync state object. This object contains the following information:
•Sync operation ID. You can check the progress of the operation at any time by passing this ID to the sync manager’s
getSyncStatus method.
•Your sync parameters (soup name, target for sync down operations, options for sync up operations).
•Type of operation (up or down).
•Progress percentage (integer, 0–100).
•Total number of records in the transaction.
Using the Sync Manager
The sync manager object performs simple sync up and sync down operations. For sync down, it sends authenticated requests to the
server on your behalf, and stores response data locally in SmartStore. For sync up, it collects the records you specify from SmartStore
and merges them with corresponding server records according to your instructions. Sync managers know how to handle authentication
for Salesforce users and community users. Sync managers can store records in any SmartStore instance—the default SmartStore, the
global SmartStore, or a named instance.
Sync manager classes provide factory methods that return customized sync manager instances. To use the sync manager, you create
an instance that matches the requirements of your sync operation. It is of utmost importance that you create the correct type of sync
manager for every sync activity. If you don't, your customers can encounter runtime authentication failures.
Once you've created an instance, you can use it to call typical sync manager functionality:
•Sync down
•Sync up
•Resync
Sync managers can perform three types of actions on SmartStore soup entries and Salesforce records:
•Create
•Update
•Delete
If you provide custom targets, sync managers can use them to synchronize data at arbitrary REST endpoints.
SyncManager Instantiation (Android)
In Android, you use a different factory method for each of the following scenarios:
For the current user:
public static synchronized SyncManager getInstance();
For a specified user:
public static synchronized SyncManager
getInstance(UserAccount account);
263
Using SmartSync Data Framework in Native AppsOffline Management

For a specified user in a specified community:
public static synchronized SyncManager
getInstance(UserAccount account, String communityId);
For a specified user in a specified community using the specified SmartStore database:
public static synchronized SyncManager
getInstance(UserAccount account, String communityId, SmartStore smartStore);
SFSmartSyncSyncManager Instantiation (iOS)
In iOS, you use pairs of access and removal methods. You call the sharedInstance: class methods on the SFSmartSyncSyncManager
class to access a preconfigured shared instance for each scenario. When you're finished using the shared instance for a particular use
case, remove it with the corresponding removeSharedInstance*:... method.
For a specified user:
+ (instancetype)sharedInstance:(SFUserAccount *)user;
+ (void)removeSharedInstance:(SFUserAccount *)user;
For a specified user using the specified SmartStore database:
+ (instancetype)sharedInstanceForUser:(SFUserAccount *)user
storeName:(NSString *)storeName;
+ (void)removeSharedInstanceForUser:(SFUserAccount *)user
storeName:(NSString *)storeName;
For a specified SmartStore database:
+ (instancetype)sharedInstanceForStore:(SFSmartStore *)store;
+ (void)removeSharedInstanceForStore:(SFSmartStore *)store;
Syncing Down
To download sObjects from the server to your local SmartSync Data Framework soup, use the “sync down” method:
•Android SyncManager methods:
public SyncState syncDown(SyncTarget target, String soupName,
SyncUpdateCallback callback) throws JSONException;
public SyncState syncDown(SyncTarget target, SyncOptions options,
String soupName, SyncUpdateCallback callback)
throws JSONException;
•iOS SFSmartSyncSyncManager methods:
- (SFSyncState*)
syncDownWithTarget:(SFSyncTarget*)target
soupName:(NSString*)soupName
updateBlock:(SFSyncSyncManagerUpdateBlock)updateBlock;
- (SFSyncState*)
264
Using SmartSync Data Framework in Native AppsOffline Management

syncDownWithTarget:(SFSyncTarget*)target
options:(SFSyncOptions*)options
soupName:(NSString*)soupName
updateBlock:(SFSyncSyncManagerUpdateBlock)updateBlock;
For “sync down” methods, you define a target that provides the list of sObjects to be downloaded. To provide an explicit list, use
JSONObject on Android, or NSDictionary on iOS. However, you can also define the target with a query string. The sync target
class provides factory methods for creating target objects from a SOQL, SOSL, or MRU query.
You also specify the name of the SmartStore soup that receives the downloaded data. This soup is required to have an indexed string
field named __local__. Mobile SDK reports the progress of the sync operation through the callback method or update block that
you provide.
Merge Modes
The options parameter lets you control what happens to locally modified records. You can choose one of the following behaviors:
1. Overwrite modified local records and lose all local changes. Set the options parameter to the following value:
•Android: SyncOptions.optionsForSyncDown(MergeMode.OVERWRITE)
•iOS: [SFSyncOptions newSyncOptionsForSyncDown:SFSyncStateMergeModeOverwrite]
2. Preserve all local changes and locally modified records. Set the options parameter to the following value:
•Android: SyncOptions.optionsForSyncDown(MergeMode.LEAVE_IF_CHANGED)
•iOS: [SFSyncOptions newSyncOptionsForSyncDown:SFSyncStateMergeModeLeaveIfChanged])
Important: If you use a version of syncDown that doesn’t take an options parameter, existing sObjects in the cache can
be overwritten. To preserve local changes, always run sync up before running sync down.
Example: Android:
The native SmartSyncExplorer sample app demonstrates how to use SmartSync Data Framework with Contact records. In Android,
it defines a ContactObject class that represents a Salesforce Contact record as a Java object. To sync Contact data down to
the SmartStore soup, the syncDown() method creates a sync target from a SOQL query that’s built with information from the
ContactObject instance.
In the following snippet, note the use of SOQLBuilder. SOQLBuilder is a SmartSync Data Framework factory class that
makes it easy to specify a SOQL query dynamically in a format that reads like an actual SOQL string. Each SOQLBuilder property
setter returns a new SOQLBuilder object built from the calling object, which allows you to chain the method calls in a single logical
statement. After you’ve specified all parts of the SOQL query, you call build() to create the final SOQL string.
If the sync down operation succeeds—that is, if SyncState.isDone() equals true—the received data goes into the specified
soup. The callback method then only needs to fire an intent that reloads the data in the Contact list.
public synchronized void syncDown() {
smartStore.registerSoup(ContactListLoader.CONTACT_SOUP, CONTACTS_INDEX_SPEC);
final SyncUpdateCallback callback = new SyncUpdateCallback() {
@Override
public void onUpdate(SyncState sync) {
265
Using SmartSync Data Framework in Native AppsOffline Management

if (Status.DONE.equals(sync.getStatus())) {
fireLoadCompleteIntent();
}
}
};
try {
if (syncId == -1) {
final SyncOptions options =
SyncOptions.optionsForSyncDown(SyncState.MergeMode.LEAVE_IF_CHANGED);
final String soqlQuery =
SOQLBuilder.getInstanceWithFields(
ContactObject.CONTACT_FIELDS_SYNC_DOWN).from(Constants.CONTACT).limit(ContactListLoader.LIMIT).build();
final SyncDownTarget target = new SoqlSyncDownTarget(soqlQuery);
final SyncState sync = syncMgr.syncDown(target, options,
ContactListLoader.CONTACT_SOUP, callback);
syncId = sync.getId();
} else {
syncMgr.reSync(syncId, callback);
}
} catch (JSONException e) {
Log.e(TAG, "JSONException occurred while parsing", e);
} catch (SmartSyncException e) {
Log.e(TAG, "SmartSyncException occurred while attempting to sync down", e);
}
}
iOS:
The native SmartSyncExplorer sample app demonstrates how to use SmartSync Data Framework with Contact records. In iOS, this
sample defines a ContactSObjectData class that represents a Salesforce Contact record as an Objective-C object. The
sample also defines several classes that support the ContactSObjectData class:
266
Using SmartSync Data Framework in Native AppsOffline Management

•ContactSObjectDataSpec
•SObjectData
•SObjectDataSpec
•SObjectDataFieldSpec
•SObjectDataManager
To sync Contact data down to the SmartStore soup, the refreshRemoteData method of SObjectDataManager
creates a SFSyncDownTarget object using a SOQL string. This query string is built with information from the Contact object.
The syncDownWithTarget:options:soupName:updateBlock: method of SFSmartSyncSyncManager
takes this target and the name of the soup that receives the returned data. In this example, the target specifies one option,
SFSyncStateMergeModeLeaveIfChanged, to prevent SmartSync Data Framework from overwriting local changes.
This method also requires an update block that is called when the sync operation has either succeeded or failed. Here, the update
block saves the sync operation ID so that the method can call the reSync:updateBlock: method after the first sync down
operation.
- (void)refreshRemoteData:(void (^)(void))completionBlock {
if (![self.store soupExists:self.dataSpec.soupName]) {
[self registerSoup];
}
__weak SObjectDataManager *weakSelf = self;
SFSyncSyncManagerUpdateBlock updateBlock = ^(SFSyncState* sync) {
__strong typeof(weakSelf) strongSelf = weakSelf;
if ([sync isDone] || [sync hasFailed]) {
strongSelf.syncDownId = sync.syncId;
[strongSelf refreshLocalData:completionBlock];
}
};
if (self.syncDownId == 0) {
// First time.
NSString *soqlQuery =
[NSString stringWithFormat:@"SELECT %@ FROM %@ LIMIT %lu",
[self.dataSpec.fieldNames componentsJoinedByString:@","],
self.dataSpec.objectType,
(unsigned long)kSyncLimit];
SFSyncOptions *syncOptions =
[SFSyncOptions
newSyncOptionsForSyncDown:SFSyncStateMergeModeLeaveIfChanged];
SFSyncDownTarget *syncTarget =
[SFSoqlSyncDownTarget newSyncTarget:soqlQuery];
[self.syncMgr syncDownWithTarget:syncTarget
options:syncOptions
soupName:self.dataSpec.soupName
updateBlock:updateBlock];
} else {
// Subsequent times.
[self.syncMgr reSync:[NSNumber numberWithInteger:self.syncDownId]
updateBlock:updateBlock];
}
}
267
Using SmartSync Data Framework in Native AppsOffline Management

If the sync down operation succeeds—that is, if the isDone method of SFSyncState returns YES—the specified soup
receives the server data. The update block then passes control to the refreshLocalData method, which retrieves the data
from the soup and updates the UI to reflect any changes.
- (void)refreshLocalData {
if (![self.store soupExists:self.dataSpec.soupName]) {
[self registerSoup];
}
SFQuerySpec *sobjectsQuerySpec =
[SFQuerySpec
newAllQuerySpec:self.dataSpec.soupName
withOrderPath:self.dataSpec.orderByFieldName
withOrder:kSFSoupQuerySortOrderAscending
withPageSize:kMaxQueryPageSize];
NSError *queryError = nil;
NSArray *queryResults =
[self.store
queryWithQuerySpec:sobjectsQuerySpec
pageIndex:0
error:&queryError];
[self log:SFLogLevelDebug
msg:@"Got local query results. "
"Populating data rows."];
if (queryError) {
[self log:SFLogLevelError
format:@"Error retrieving '%@' data "
"from SmartStore: %@",
self.dataSpec.objectType,
[queryError localizedDescription]];
return;
}
self.fullDataRowList = [self populateDataRows:queryResults];
[self log:SFLogLevelDebug
format:@"Finished generating data rows. "
"Number of rows: %d. Refreshing view.",
[self.fullDataRowList count]];
self.dataRows = [self.fullDataRowList copy];
if (completionBlock) completionBlock();
}
Incrementally Syncing Down
For certain target types, you can incrementally resync a previous sync down operation. Mobile SDK fetches only new or updated records
if the sync down target supports resync. Otherwise, it reruns the entire sync operation.
Of the three built-in sync down targets (MRU, SOSL-based, and SOQL-based), only the SOQL-based sync down target supports resync.
To support resync in custom sync targets, use the maxTimeStamp parameter passed during a fetch operation.
During sync down, Mobile SDK checks downloaded records for the modification date field specified by the target and determines the
most recent timestamp. If you request a resync for that sync down, Mobile SDK passes the most recent timestamp, if available, to the
sync down target. The sync down target then fetches only records created or updated since the given timestamp. The default modification
date field is lastModifiedDate.
268
Using SmartSync Data Framework in Native AppsOffline Management

Limitation
After an incremental sync, the following unused records remain in the local soup:
•Deleted records
•Records that no longer satisfy the sync down target
If you choose to remove these orphaned records, you can:
•Run a full sync down operation, or
•Compare the IDs of local records against the IDs returned by a full sync down operation.
Invoking the Re-Sync Method
Android:
On a SyncManager instance, call:
SyncState reSync(long syncId, SyncUpdateCallback callback);
iOS:
On a SFSmartSyncSyncManager instance, call:
- (SFFSyncState*) reSync:(NSNumber *)syncId
updateBlock:(SFSyncSyncManagerUpdateBlock)updateBlock;
Hybrid:
Call:
cordova.require("com.salesforce.plugin.SmartSync").reSync(syncId,successCB);
Sample Apps
Android
The SmartSyncExplorer sample app uses reSync() in the ContactListLoader class.
iOS
The SmartSyncExplorer sample app uses reSync() in the SObjectDataManager class.
Hybrid
The SimpleSync sample app uses reSync() in SimpleSync.html’s app.views.SearchPage class.
Syncing Up
Performing “Sync Up” Operations
To apply local changes on the server, use one of the “sync up” methods:
•Android SyncManager method:
public SyncState syncUp(SyncUpTarget target, SyncOptions options, String soupName,
SyncUpdateCallback callback) throws JSONException
•iOS SFSmartSyncSyncManager method:
- (SFSyncState*)
syncUpWithOptions:(SFSyncOptions*)options
269
Using SmartSync Data Framework in Native AppsOffline Management

soupName:(NSString*)soupName
updateBlock:(SFSyncSyncManagerUpdateBlock)updateBlock;
These methods update the server with data from the given SmartStore soup. They look for created, updated, or deleted records in the
soup, and then replicate those changes on the server. The options argument specifies a list of fields to be updated. In Mobile SDK5.1
and later, you can override this field list by initializing the sync manager object with separate field lists for create and update operations.
See Handling Field Lists in Create and Update Operations.
Locally created objects must include an “attributes” field that contains a “type” field that specifies the sObject type. For example, for an
account named Acme, use: {Id:”local_x”, Name: Acme, attributes: {type:”Account”}}.
Specifying Merge Modes
For sync up operations, you can specify a mergeMode option. You can choose one of the following behaviors:
1. Overwrite server records even if they've changed since they were synced down to that client. When you call the syncUp method:
•Android: Set the options parameter to SSyncOptions.optionsForSyncUp(fieldlist,
SyncState.MergeMode.OVERWRITE)
•iOS: Set the options parameter to [SFSyncOptions newSyncOptionsForSyncUp:fieldlist
mergeMode:SFSyncStateMergeModeOverwrite]
•Hybrid: Set the syncOptions parameter to {mergeMode:"OVERWRITE"}
2. If any server record has changed since it was synced down to that client, leave it in its current state. The corresponding client record
also remains in its current state. When you call the syncUp() method:
•Android: Set the options parameter to SyncOptions.optionsForSyncUp(fieldlist,
SyncState.MergeMode.LEAVE_IF_CHANGED)
•iOS: Set the options parameter to [SFSyncOptions newSyncOptionsForSyncUp:fieldlist
mergeMode:SFSyncStateMergeModeLeaveIfChanged]
•Hybrid: Set the syncOptions parameter to {mergeMode:"LEAVE_IF_CHANGED"}
If your local record includes the target’s modification date field, Mobile SDK detects changes by comparing that field to the matching
field in the server record. The default modification date field is lastModifiedDate. If your local records do not include the
modification date field, the LEAVE_IF_CHANGED sync up operation reverts to an overwrite sync up.
Important: The LEAVE_IF_CHANGED merge requires extra round trips to the server. More importantly, the status check and
the record save operations happen in two successive calls. In rare cases, a record that is updated between these calls can be
prematurely modified on the server.
Example: Android:
When it’s time to sync up to the server, you call syncUp() with the same arguments as syncDown(): list of fields, name of
source SmartStore soup, and an update callback. The only coding difference is that you format the list of affected fields as an
instance of SyncOptions instead of SyncTarget. Here’s the way it’s handled in the SmartSyncExplorer sample:
public synchronized void syncUp() {
final SyncUpTarget target = new SyncUpTarget();
final SyncOptions options =
SyncOptions.optionsForSyncUp(Arrays.asList(ContactObject.CONTACT_FIELDS_SYNC_UP),
270
Using SmartSync Data Framework in Native AppsOffline Management

MergeMode.LEAVE_IF_CHANGED);
try {
syncMgr.syncUp(target, options, ContactListLoader.CONTACT_SOUP,
new SyncUpdateCallback() {
@Override
public void onUpdate(SyncState sync) {
if (Status.DONE.equals(sync.getStatus())) {
syncDown();
}
}
});
} catch (JSONException e) {
Log.e(TAG, "JSONException occurred while parsing", e);
} catch (SmartSyncException e) {
Log.e(TAG, "SmartSyncException occurred while attempting to sync up", e);
}
}
In the internal SyncUpdateCallback implementation, this example takes the extra step of calling syncDown() when
sync up is done. This step guarantees that the SmartStore soup remains up-to-date with any recent changes made to Contacts
on the server.
iOS:
When it’s time to sync up to the server, you send the syncUp:withOptions:soupName:updateBlock: message to
SFSmartSyncSyncManager with the same arguments used for syncing down: list of fields, name of source SmartStore
soup, and an update block. The only coding difference is that you format the list of affected fields as an instance of
SFSyncOptions instead of SFSyncTarget. Here’s how the SmartSyncExplorer sample sends the sync up message:
- (void)updateRemoteData:
(SFSyncSyncManagerUpdateBlock)completionBlock {
SFSyncOptions *syncOptions =
[SFSyncOptions
newSyncOptionsForSyncUp:self.dataSpec.fieldNames
mergeMode:SFSyncStateMergeModeLeaveIfChanged]];
[self.syncMgr syncUpWithOptions:syncOptions
soupName:self.dataSpec.soupName
271
Using SmartSync Data Framework in Native AppsOffline Management

updateBlock:^(SFSyncState* sync) {
if ([sync isDone] || [sync hasFailed]) {
completionBlock(sync);
}
}
];
}
If the update block provided here determines that the sync operation has finished, it calls the completion block that’s passed into
updateRemoteData. A user initiates a syncing operation by tapping a button. Therefore, to see the definition of the completion
block, look at the syncUpDown button handler in ContactListViewController.m. The handler calls
updateRemoteData with the following block.
[self.dataMgr updateRemoteData:^(SFSyncState *syncProgressDetails)
{
dispatch_async(dispatch_get_main_queue(), ^{
__strong typeof(weakSelf) strongSelf = weakSelf;
strongSelf.navigationItem.rightBarButtonItem.enabled = YES;
// When the sync failed it means not everything could be synced up
// it doesn't necessarily mean nothing could be synced up
// Therefore we refresh regardless of success status
[strongSelf.dataMgr refreshLocalData:completionBlock];
[strongSelf.dataMgr refreshRemoteData:completionBlock];
// We’ll again call refreshLocalData when completing
// Letting the user know whether the sync succeeded
if ([syncProgressDetails isDone]) {
[strongSelf showToast:@"Sync complete!"];
} else if ([syncProgressDetails hasFailed]) {
[strongSelf showToast:@"Sync failed."];
}
});
}];
If the sync up operation succeeded, this block first refreshes the display on the device, along with a “Sync complete!” confirmation
toast. Regardless of the status of the sync operation, this method refreshes local and remote data. This step covers any partial
successes as well as completions.
The Refresh Sync Down Target
Many apps download records, cache all of them, and then let users edit them from the SmartStore cache when connectivity drops. Local
“offline” work is quick and efficient—a great user experience—but, when connectivity resumes, it's important to refresh the cached
records with server updates.
Unfortunately, in Mobile SDK 4.3 or earlier, refreshing records that didn’t originate from a recent sync down operation isn't straightforward
or efficient.
For a quicker, easier route, Mobile SDK 5.0 introduces the refresh sync down target. The refresh target provides a single call that doesn't
require preparatory coding. You create an instance of the target with a soup name, an object type, and a list of fields. You then pass the
target instance to a sync down method. The refresh target gathers IDs of the pertinent soup records, queries the server for the current
field values, and then refreshes the soup.
272
Using SmartSync Data Framework in Native AppsOffline Management

Refresh Target APIs
The refresh sync down target is available on iOS and Android for native, React native, and hybrid apps.
Android
Class:
com.salesforce.androidsdk.smartsync.util.RefreshSyncDownTarget
Constructor:
public RefreshSyncDownTarget(List<String> fieldlist,
String objectType, String soupName)
iOS
Class:
SFRefreshSyncDownTarget
Factory method:
+ (SFRefreshSyncDownTarget*) newSyncTarget:(NSString*)soupName
objectType:(NSString*)objectType fieldlist:(NSArray*)fieldlist
JavaScript (Hybrid, React Native)
Function:
var target = {soupName:xxx, type:"refresh",
sobjectType:yyy, fieldlist:["Id", ...]};
Syncing Related Records
It’s a common problem in syncing offline data: You can easily sync your explicit changes, but how do you update affected related records?
You can do it manually with enough knowledge, determination, and perspicacity, but that’s the old way. Starting with Mobile SDK 5.2,
SmartSync Data Framework provides tools that let you sync parent records and their related records with a single call.
Supported Relationship Types
Related record sync supports two types of one-to-many relationships: Lookup and Master-detail. Both types are defined in the
child-to-parent, many-to-one direction. Each child knows its parent, but the parent doesn’t know its children.
Lookup Relationships
A lookup relationship is a “loose” link between objects based on one or more fields. For lookup relationships:
•Child records do not require a parent field.
•Changes to one object do not affect the security, access, or deletion of a linked object.
Salesforce supports up to 25 lookup fields per object. Lookup relationships can be multiple layers deep.
Master-detail Relationships
A master-detail relationship is a parent-child link in which the parent object exerts some control over its children. In master-detail linkage:
•Child records require a parent field.
•The parent’s access level determines the access level of its children.
•If a parent record is deleted, its children are also deleted.
273
Using SmartSync Data Framework in Native AppsOffline Management

Salesforce supports up to two master-detail fields per object, and up to three levels of master-detail relationships.
See Object Relationships Overview in Salesforce Help.
Note: SmartSync Data Framework does not support many-to-many relationships.
Objects Used in Related Record Sync
Related record sync uses two special types of sync targets:
Parent-children sync up target
•Android: ParentChildrenSyncUpTarget
•iOS: SFParentChildrenSyncUpTarget
Handles locally created or updated records and deleted records.
Parent-children sync down target
•Android: ParentChildrenSyncDownTarget
•iOS: SFParentChildrenSyncDownTarget
Supports resync and cleanResyncGhosts methods.
These targets support leave-if-changed and overwrite merge modes. Each target provides a factory method (on iOS) or a constructor (on
Android) that initializes an instance with the required information you provide. To perform the sync, you configure a new target class
instance and pass it to the standard SmartSync Data Framework sync method that accepts a target object.
To initialize the targets, you also provide two helper objects that deliver necessary related record information:
Parent information object
•Android: ParentInfo
•iOS: SFParentInfo
Includes:
•Object type
•Soup name
•ID field (Optional in all cases. Defaults to “Id”. Set this value only if you are specifying a different field to identify the records.)
•Last Modified Date field (Optional in all cases. Defaults to “LastModifiedDate”. Set this value only if you are specifying a different
field for time stamps.)
Child information object
•Android: ChildrenInfo
•iOS: SFChildrenInfo
Includes:
•Object type
•Soup name
•Parent ID field
•ID field (Optional in all cases. Defaults to “Id”. Set this value only if you are specifying a different field to identify the records.)
•Last Modified Date field (Optional in all cases. Defaults to “LastModifiedDate”. Set this value only if you are specifying a different
field for time stamps.)
274
Using SmartSync Data Framework in Native AppsOffline Management
Preparing Your SmartStore Data Model
To prepare for handling related objects offline, you first set up a SmartStore soup for each expected parent and child object type. For
each soup, you add indexed ID fields that model the server-side relationships. Here’s the list of required indexed fields:
Soup for a parent object:
Field for server ID of record
Soup for a child object:
Field for server ID of record
Field for server ID of parent record
All sync operations—up and down—begin with the parent soup and then continue to the child soups. Here’s how this flow works:
•When you sync down related records, you are targeting parent records, and the sync downloads those records and all their children.
For example, if you’re syncing accounts with their contacts, you get the contacts linked to the accounts you’ve downloaded. You
don’t get contacts that aren’t linked to those accounts.
•When you sync up related records, SmartSync Data Framework iterates over the soup of parent records and picks up related children
records. Modified children records that are not related to a parent record are ignored during that sync up operation.
Sync Up
To initialize the parent-child sync-up target, you provide parent information objects and child information objects. These objects fully
describe the relationships between parent-child records, both on the server and in the local store. You also provide the list of fields to
sync. Here’s the full list of required information:
•Parent information object
•Child information object
•Relationship type (for example, master-detail or lookup)
•Fields to sync up in parent and children soups
The sync up operation iterates over the soup containing the parent records and uses the given information to pull related records from
the children’s soups. A record is considered dirty when the __local__ field is set to true. A record tree—consisting of one parent
and its children—is a candidate for sync up when any record in the tree is dirty. Whether the sync up actually occurs depends on how
SmartSync Data Framework handles the merge mode.
“Leave-if-changed” Merge Mode Handling
SmartSync Data Framework fetches Last Modified Date fields of the target parent and children server records. The sync up operation
skips that record tree if
•the last modified date of any fetched server record is more recent than its corresponding local record
or
•if any fetched server record has been deleted.
Updates Applied after Sync Up
After the local changes have been synced to the server, SmartSync Data Framework cleans up related records.
•If sync up creates any parent or child record on the server, SmartSync Data Framework updates the server ID field of the corresponding
local record. If the created record is a parent, the parent ID fields of its children are also updated in the local store.
•If any server records were deleted since the last sync down, deletes the corresponding local records.
•If sync up deletes a parent record and the relationship type is master-detail, SmartSync Data Framework deletes the record’s children
on the server and in the local store.
275
Using SmartSync Data Framework in Native AppsOffline Management

Sync Down
To initialize the parent-children sync-down target, you provide parent information objects and children information objects. These
objects fully describe the relationships between parent-child records, both on the server and in the local store. You also provide a list of
fields to sync and some SOQL filters.
The new sync down target is actually a subclass of the SOQL sync down target. Instead of being given the SOQL query, however, the
target generates it from the parent and children information objects, list of fields, and SOQL filters.
Information Passed to Sync Down Targets
•Parent information object
•Child information object
•Relationship type (for example, master-detail or lookup)
•Fields to sync down in parent and children soups
•SOQL filter to apply in query on root records during sync down—for example, the condition of a WHERE clause
Server Call
SmartSync Data Framework fetches the record trees, each consisting of one parent and its children, using SOQL. It then separates parents
from their children and stores them in their respective soups.
“Leave-if-changed” Merge Mode Handling
Local record trees that contain any dirty records—locally created, modified, or deleted records—are left unaltered. For example, if a
parent record has one dirty child, SmartSync Data Framework doesn’t update the parent or the child. This rule applies even if the parent
is clean locally but has been changed on the server.
Handling Resync
During resync, SmartSync Data Framework adjusts the SOQL query to download only those record trees in which the parent changed
since the last sync.
Implementing Related Record Sync
Once you understand the principles and requirements involved, implementing it is straightforward. You can add related record sync to
your code in a few steps. The following code snippets demonstrate the technique using Account (parent) and Contact (child) objects.
Android
1. Create SmartStore soups that define the required indexed fields.
// Creating soup for accounts
final IndexSpec[] indexSpecs = {
new IndexSpec(Constants.ID, SmartStore.Type.string),
new IndexSpec(Constants.NAME, SmartStore.Type.string),
new IndexSpec(Constants.DESCRIPTION, SmartStore.Type.string),
new IndexSpec(SyncTarget.LOCAL, SmartStore.Type.string)
};
smartStore.registerSoup("AccountSoup", indexSpecs);
// Creating soup for contacts
final IndexSpec[] contactsIndexSpecs = {
new IndexSpec(Constants.ID, SmartStore.Type.string),
276
Using SmartSync Data Framework in Native AppsOffline Management

new IndexSpec(Constants.LAST_NAME, SmartStore.Type.string),
new IndexSpec(SyncTarget.LOCAL, SmartStore.Type.string),
new IndexSpec(ACCOUNT_ID, SmartStore.Type.string)
};
smartStore.registerSoup(CONTACTS_SOUP, contactsIndexSpecs);
2. Create instance of a sync target object and its supporting informational objects.
// Creating object for parent info
ParentInfo parentInfo =
new ParentInfo(Constants.ACCOUNT, "AccountSoup", Constants.ID,
Constants.LAST_MODIFIED_DATE);
// Creating object for children info
ChildrenInfo childrenInfo = new ChildrenInfo(
Constants.CONTACT, Constants.CONTACT + "s","ContactSoup", ACCOUNT_ID,
Constants.ID, Constants.LAST_MODIFIED_DATE);
// Creating sync up target
ParentChildrenSyncUpTarget syncUpTarget =
new ParentChildrenSyncUpTarget(
parentInfo,
Arrays.asList(Constants.ID, Constants.NAME, Constants.DESCRIPTION),
Arrays.asList(Constants.NAME, Constants.DESCRIPTION),
childrenInfo,
Arrays.asList(Constants.LAST_NAME, ACCOUNT_ID),
Arrays.asList(Constants.LAST_NAME, ACCOUNT_ID),
RelationshipType.MASTER_DETAIL); // account-contacts are master-detail
// Creating sync down target
ParentChildrenSyncDownTarget syncDownTarget =
new ParentChildrenSyncDownTarget(
parentInfo,
Arrays.asList(Constants.ID, Constants.NAME, Constants.DESCRIPTION),
parentSoqlFilter,
childrenInfo,
Arrays.asList(Constants.LAST_NAME, ACCOUNT_ID),
RelationshipType.MASTER_DETAIL); // account-contacts are master-detail
3. Call the SmartSync Data Framework sync method that takes a sync target.
For sync up:
// Running sync up
syncManager.syncUp(syncUpTarget, options, "AccountSoup",new SyncUpdateCallback() {
@Override
public void onUpdate(SyncState sync) {
// Handle updates
277
Using SmartSync Data Framework in Native AppsOffline Management

}
});
For sync down:
//Running sync down target
syncManager.syncDown(syncDownTarget, options, "AccountSoup",
new SyncUpdateCallback() {
@Override
public void onUpdate(SyncState sync) {
// Handle updates
}
});
iOS
1. Create SmartStore soups that define the required indexed fields.
// Creating soup for accounts
NSArray* indexSpecs = @[
[[SFSoupIndex alloc] initWithPath:@"Id"
indexType:kSoupIndexTypeString
columnName:nil],
[[SFSoupIndex alloc] initWithPath:@"Name"
indexType:kSoupIndexTypeString
columnName:nil],
[[SFSoupIndex alloc] initWithPath:@"Description"
indexType:kSoupIndexTypeFullText
columnName:nil],
[[SFSoupIndex alloc] initWithPath:kSyncTargetLocal
indexType:kSoupIndexTypeString
columnName:nil]
];
[store registerSoup:@"AccountSoup" withIndexSpecs:indexSpecs error:nil];
// Creating soup for contacts
indexSpecs = @[
[[SFSoupIndex alloc] initWithPath:@"Id"
indexType:kSoupIndexTypeString
columnName:nil],
[[SFSoupIndex alloc] initWithPath:@"LastName"
indexType:kSoupIndexTypeString
columnName:nil],
[[SFSoupIndex alloc] initWithPath:@"AccountId"
indexType:kSoupIndexTypeString
columnName:nil],
[[SFSoupIndex alloc] initWithPath:kSyncTargetLocal
indexType:kSoupIndexTypeString
columnName:nil]
];
[store registerSoup:@"ContactSoup" withIndexSpecs:indexSpecs error:nil];
278
Using SmartSync Data Framework in Native AppsOffline Management

2. Create instance of a sync target object and its supporting informational objects.
// Creating object for parent info
SFParentInfo* parentInfo =
[SFParentInfo newWithSObjectType:@"Account"
soupName:@"AccountSoup"
idFieldName:@"Id"
modificationDateFieldName:@"LastModifiedDate"];
// Creating object for children info
SFChildrenInfo* childrenInfo =
[SFChildrenInfo newWithSObjectType:@"Contact"
sobjectTypePlural:@"Contacts"
soupName:@"ContactSoup"
parentIdFieldName:@"AccountId"
idFieldName:@"Id"
modificationDateFieldName:@"LastModifiedDate"];
// Creating sync up target
SFParentChildrenSyncUpTarget *syncUpTarget =
[SFParentChildrenSyncUpTarget newSyncTargetWithParentInfo:parentInfo
parentCreateFieldlist:@[@"Id", @"Name", @"Description"]
parentUpdateFieldlist:@[@"Name", @"Description"]
childrenInfo:childrenInfo
childrenCreateFieldlist:@[@"LastName", @"AccountId"]
childrenUpdateFieldlist:@[@"LastName", @"AccountId"]
relationshipType:SFParentChildrenRelationpshipMasterDetail];
// account-contacts are master-detail
// Creating sync down target
SFParentChildrenSyncDownTarget *syncDownTarget =
[SFParentChildrenSyncDownTarget
newSyncTargetWithParentInfo:parentInfo
parentFieldlist:@[@"Id", @"Name", @"Description"]
parentSoqlFilter:@"Name LIKE 'A%'"
childrenInfo:childrenInfo
childrenFieldlist:@[@"LastName", @"AccountId"]
relationshipType:SFParentChildrenRelationpshipMasterDetail];
// account-contacts are master-detail
3. Call the SmartSync Data Framework sync method that takes a sync target.
For sync up:
// Running sync up
[syncManager syncUpWithTarget:syncUpTarget
options:options
soupName:@"AccountSoup"
updateBlock:^(SFSyncState* sync) {
// Handle updates
279
Using SmartSync Data Framework in Native AppsOffline Management

}
];
For sync down:
//Running sync down target
[syncManager syncDownWithTarget:syncDownTarget
options:options
soupName:@"AccountSoup"
updateBlock:^(SFSyncState* sync) {
// Handle updates
}
];
Handling “Ghost” Records After Sync Down Operations
If you’re finding that sync down operations sometimes leave unwanted records in your SmartStore soups, you can use the
cleanResyncGhosts API to get rid of them.
In certain prescribed cases, SmartStore soups do not reflect the exact contents of the most recent sync down operation. For example, if
a record is deleted on the Salesforce server, the next sync down operation doesn’t remove that record from SmartStore. Also, records
that don’t satisfy the sync criteria are excluded from the sync down results but aren’t automatically removed from the soup. These records
that unexpectedly remain in the SmartStore soup are known as ghost records.
In Mobile SDK 4.2, SmartSync Data Framework adds a cleanResyncGhosts method that identifies and removes ghost records.
This method is available for Android native, iOS native, hybrid, and React Native platforms.
Warning: Exercise restraint in using the cleanResyncGhosts method. Calls to this method can be expensive in both
runtime performance and payload size. Use this method as a low-frequency cleanup operation, rather than as part of every sync
down operation.
Android Native
public void cleanResyncGhosts(long syncId)
iOS Native
- (void)
cleanResyncGhosts:(NSNumber*)syncId
completionStatusBlock:(SFSyncSyncManagerCompletionStatusBlock)completionStatusBlock
Hybrid
cleanResyncGhosts(isGlobalStore, syncId, successCB, errorCB)
cleanResyncGhosts(storeConfig, syncId, successCB, errorCB)
React Native
smartsync.cleanResyncGhosts(isGlobalStore, syncId, successCB, errorCB)
smartsync.cleanResyncGhosts(storeConfig, syncId, successCB, errorCB)
Using cleanResyncGhosts with Custom Sync Down Targets
If your app uses a custom sync down target, cleanResyncGhosts requires the custom target to implement the
getListOfRemoteIds method. This method returns the list of Salesforce IDs that satisfy the sync down target’s criteria. For
280
Using SmartSync Data Framework in Native AppsOffline Management

getListOfRemoteIds coding examples, see the SOQL, SOSL, or MRU sync down target in these SmartSync Data Framework
library folders:
iOS
https://github.com/forcedotcom/SalesforceMobileSDK-iOS/tree/master/libs/SmartSync/SmartSync/Classes/Util
Android
https://github.com/forcedotcom/SalesforceMobileSDK-Android/tree/master/libs/SmartSync/src/com/salesforce/androidsdk/smartsync/util
Using the Sync Manager with Global SmartStore
To use SmartSync Data Framework with a global SmartStore instance, call a static factory method on the sync manager object to get a
compatible sync manager instance.
Android:
DescriptionStatic Method
Returns a sync manager instance that talks to the server as the
given community user and writes to or reads from the given
SyncManager getInstance(UserAccount
account, String communityId, SmartStore
smartStore); SmartStore instance. Use this factory method for syncing data
with the global SmartStore instance.
Returns a sync manager instance that talks to the server as the
given community user and writes to or reads from the user’s
default SmartStore instance.
SyncManager getInstance(UserAccount
account, String communityId);
Returns a sync manager instance that talks to the server as the
given user and writes to or reads from the user’s default
SmartStore instance.
SyncManager getInstance(UserAccount
account);
Returns a sync manager instance that talks to the server as the
current user and writes to or reads from the current user’s default
SmartStore instance.
SyncManager getInstance();
iOS:
DescriptionStatic Method
Returns a sync manager instance that talks to the
server as the given user and writes to or reads from
the user’s default SmartStore instance.
+ (instancetype)
sharedInstanceForUser:
(SFUserAccount *)user
storeName:
(NSString *)storeName;
Returns a sync manager instance that talks to the
server as the current user and writes to or reads
+ (instancetype)
sharedInstanceForStore:
(SFSmartStore *)store; from the given SmartStore instance. Use this
factory method for syncing data with the global
SmartStore instance.
281
Using SmartSync Data Framework in Native AppsOffline Management

DescriptionStatic Method
Returns a sync manager instance that talks to the
server as the given user and writes to or reads from
the user’s default SmartStore instance.
+ (instancetype)
sharedInstance:
(SFUserAccount *)user;
Hybrid:
In each of the following methods, the optional first argument tells the SmartSync Data Framework plug-in whether to use a global
store. This argument accepts a Boolean value or a StoreConfig object. If you use a StoreConfig object, you can specify
storeName, isGlobalStore, or both, depending on your context. See Creating and Accessing User-based Stores.
•syncDown(isGlobalStore, target, soupName, options, successCB, errorCB);
syncDown(storeConfig, target, soupName, options, successCB, errorCB);
•reSync(isGlobalStore, syncId, successCB, errorCB);
reSync(storeConfig, syncId, successCB, errorCB);
•syncUp(isGlobalStore, target, soupName, options, successCB, errorCB);
syncUp(storeConfig, target, soupName, options, successCB, errorCB);
•getSyncStatus(isGlobalStore, syncId, successCB, errorCB);
getSyncStatus(storeConfig, syncId, successCB, errorCB);
SEE ALSO:
Creating and Accessing User-based Stores
Using Global SmartStore
Using Custom Sync Down Targets
During sync down operations, a sync down target controls the set of records to be downloaded and the request endpoint. You can use
pre-formatted MRU, SOQL-based, and SOSL-based targets, or you can create custom targets. Custom targets can access arbitrary REST
endpoints both inside and outside of Salesforce.
Defining a Custom Sync Down Target
You define custom targets for sync down operations by subclassing your platform’s abstract base class for sync down targets. To use
custom targets in hybrid apps, implement a custom native target class for each platform you support. The base sync down target classes
are:
•Android: SyncDownTarget
•iOS: SFSyncDownTarget
Note: These classes sync the requested records but not their related records. To include related records, use the sync target classes
described in Syncing Related Records.
282
Using SmartSync Data Framework in Native AppsOffline Management

Required Methods
Every custom target class must implement the following required methods.
Start Fetch Method
Called by the sync manager to initiate the sync down operation. If maxTimeStamp is greater than 0, this operation becomes a
“resync”. It then returns only the records that have been created or updated since the specified time.
Android:
JSONArray startFetch(SyncManager syncManager, long maxTimeStamp);
iOS:
- (void) startFetch:(SFSmartSyncSyncManager*)syncManager
maxTimeStamp:(long long)maxTimeStamp
errorBlock:(SFSyncDownTargetFetchErrorBlock)
errorBlock
completeBlock:(SFSyncDownTargetFetchCompleteBlock)
completeBlock;
Continue Fetching Method
Called by the sync manager repeatedly until the method returns null. This process retrieves all records that require syncing.
Android:
JSONArray continueFetch(SyncManager syncManager);
iOS:
- (void)
continueFetch:(SFSmartSyncSyncManager*)syncManager
errorBlock:(SFSyncDownTargetFetchErrorBlock)
errorBlock
completeBlock:(SFSyncDownTargetFetchCompleteBlock)
completeBlock;
modificationDateFieldName Property (Optional)
Optionally, you can override the modificationDateFieldName property in your custom class. Mobile SDK uses the field
with this name to compute the maxTimestamp value that startFetch uses to rerun the sync down operation. This operation
is also known as resync. The default field is lastModifiedDate.
Android:
String getModificationDateFieldName();
iOS:
modificationDateFieldName property
idFieldName Property (Optional)
Optionally, you can override the idFieldName property in your custom class. Mobile SDK uses the field with this name to get
the ID of the record. For example, during sync up, Mobile SDK obtains the ID that it passes to the updateOnServer() method
from the field whose name matches idFieldName in the local record.
Android:
String getIdFieldName();
iOS:
idFieldName property
283
Using SmartSync Data Framework in Native AppsOffline Management

Invoking the Sync Down Method with a Custom Target
Android:
Pass an instance of your custom SyncDownTarget class to the SyncManager sync down method:
SyncState syncDown(SyncDownTarget target, SyncOptions options, String soupName,
SyncUpdateCallback callback);
iOS:
Pass an instance of your custom SFSyncDownTarget class to the SFSmartSyncSyncManager sync down method:
- (SFSyncState*)
syncDownWithTarget:(SFSyncDownTarget*)target
soupName:(NSString*)soupName
updateBlock:
(SFSyncSyncManagerUpdateBlock)updateBlock;
Hybrid:
1. Create a target object with the following property settings:
•Set type to "custom".
•Set at least one of the following properties:
Android (if supported):
Set androidImpl to the package-qualified name of your Android custom class.
iOS (if supported):
Set iOSImpl to the name of your iOS custom class.
The following example supports both Android and iOS:
var target =
{type:"custom",
androidImpl:
"com.salesforce.samples.notesync.ContentSoqlSyncDownTarget",
iOSImpl:"SFContentSoqlSyncDownTarget",
…
};
2. Pass this target to the hybrid sync down method:
cordova.require("com.salesforce.plugin.SmartSync").syncDown(target, …);
Sample Apps
Android
The NoteSync native Android sample app defines and uses the
com.salesforce.samples.notesync.ContentSoqlSyncDownTarget sync down target.
iOS
The NoteSync native iOS sample app defines and uses the SFContentSoqlSyncDownTarget sync down target.
284
Using SmartSync Data Framework in Native AppsOffline Management

Using Custom Sync Up Targets
During sync up operations, a sync up target controls the set of records to be uploaded and the REST endpoint for updating records on
the server. You can access arbitrary REST endpoints—both inside and outside of Salesforce—by creating custom sync up targets.
Defining a Custom Sync Up Target
You define custom targets for sync up operations by subclassing your platform’s abstract base class for sync up targets. To use custom
targets in hybrid apps, you’re required to implement a custom native target class for each platform you support. The base sync up target
classes are:
•Android: SyncUpTarget
•iOS: SFSyncUpTarget
Note: These classes sync the requested records but not their related records. To include related records, use the sync target classes
described in Syncing Related Records.
Handling Field Lists in Create and Update Operations
A target’s Create On Server and Update On Server methods operate only on the list of fields specified in their argument lists. However,
a Salesforce object can require the target to create certain fields that can’t be updated by apps. With these objects, a target that uses a
single field list for both create and update operations can fail if it tries to update locked fields.
To specify distinct field lists for create and update operations, you can use an initializer method that supports createFieldlist
and updateFieldlist parameters. This option can save you the effort of defining a custom target if you’re doing so only to provide
these field lists.
•Android: Use the following SyncUpTarget constructor:
public SyncUpTarget(List<String> createFieldlist, List<String> updateFieldlist)
If you provide the createFieldlist and updateFieldlist arguments, the target uses them where applicable. In those
cases, the target ignores the field list defined in the SyncOptions object.
•iOS: Call the following SFSyncUpTarget init method:
- (instancetype)initWithCreateFieldlist:(NSArray *)createFieldlist
updateFieldlist:(NSArray *)updateFieldlist
If you provide the createFieldlist and updateFieldlist arguments, the target uses them where applicable. In those
cases, the target ignores the field list defined in the SFSyncOptions object.
Required Methods
Every custom target class must implement the following required methods.
Create On Server Method
Sync up a locally created record. Hybrid and React native apps can override the fields parameter by calling syncUp with the
optional createFieldList parameter.
Android:
String createOnServer(SyncManager syncManager,
String objectType, Map<String, Object> fields);
285
Using SmartSync Data Framework in Native AppsOffline Management

iOS:
- (void) createOnServer:(NSString*)objectType
fields:(NSDictionary*)fields
completionBlock:(SFSyncUpTargetCompleteBlock)
completionBlock
failBlock:(SFSyncUpTargetErrorBlock)failBlock;
Update On Server Method
Sync up a locally updated record. For the objectId parameter, SmartSync Data Framework uses the field specified in the
getIdFieldName() method (Android) or the idFieldName property (iOS) of the custom target. Hybrid and React native
apps can override the fields parameter by calling syncUp with the optional updateFieldList parameter.
Android:
updateOnServer(SyncManager syncManager, String objectType, String objectId,
Map<String, Object> fields);
iOS:
- (void) updateOnServer:(NSString*)objectType
objectId:(NSString*)objectId
fields:(NSDictionary*)fields
completionBlock:(SFSyncUpTargetCompleteBlock)
completionBlock
failBlock:(SFSyncUpTargetErrorBlock)failBlock;
Delete On Server Method
Sync up a locally deleted record. For the objectId parameter, SmartSync Data Framework uses the field specified in the
getIdFieldName() method (Android) or the idFieldName property (iOS) of the custom target.
Android:
deleteOnServer(SyncManager syncManager, String objectType,
String objectId);
iOS:
- (void) deleteOnServer:(NSString*)objectType
objectId:(NSString*)objectId
completionBlock:(SFSyncUpTargetCompleteBlock)
completionBlock
failBlock:(SFSyncUpTargetErrorBlock)failBlock;
Optional Configuration Changes
Optionally, you can override the following values in your custom class.
getIdsOfRecordsToSyncUp
List of record IDs returned for syncing up. By default, these methods return any record where __local__ is true.
Android:
Set<String> getIdsOfRecordsToSyncUp(SyncManager syncManager,
String soupName);
286
Using SmartSync Data Framework in Native AppsOffline Management

iOS:
- (NSArray*)
getIdsOfRecordsToSyncUp:(SFSmartSyncSyncManager*)syncManager
soupName:(NSString*)soupName;
Modification Date Field Name
Field used during a LEAVE_IF_CHANGED sync up operation to determine whether a record was remotely modified. Default
value is lastModifiedDate.
Android:
String getModificationDateFieldName();
iOS:
modificationDateFieldName property
Last Modification Date
The last modification date value returned for a record. By default, sync targets fetch the modification date field value for the
record.
Android:
String fetchLastModifiedDate(SyncManager syncManager,
String objectType, String objectId);
iOS:
- (void)
fetchRecordModificationDates:(NSDictionary *)record
modificationResultBlock:(SFSyncUpRecordModificationResultBlock)
modificationResultBlock
ID Field Name
Field used to get the ID of the record. For example, during sync up, Mobile SDK obtains the ID that it passes to the
updateOnServer() method from the field whose name matches idFieldName in the local record.
Android:
String getIdFieldName();
iOS:
idFieldName property
Invoking the Sync Up Method with a Custom Target
Android:
On a SyncManager instance, call:
SyncState syncUp(SyncUpTarget target,
SyncOptions options, String soupName,
SyncUpdateCallback callback);
iOS:
On a SFSyncManager instance, call:
- (SFSyncState*)
syncUpWithOptions:(SFSyncOptions*)options
287
Using SmartSync Data Framework in Native AppsOffline Management

soupName:(NSString*)soupName
updateBlock:(SFSyncSyncManagerUpdateBlock)updateBlock
Hybrid:
cordova.require("com.salesforce.plugin.smartsync").
syncUp(isGlobalStore, target, soupName,
options, successCB, errorCB);
cordova.require("com.salesforce.plugin.smartsync").
syncUp(storeConfig, target, soupName,
options, successCB, errorCB);
Syncing Related Records
It’s a common problem in syncing offline data: You can easily sync your explicit changes, but how do you update affected related records?
You can do it manually with enough knowledge, determination, and perspicacity, but that’s the old way. Starting with Mobile SDK 5.2,
SmartSync Data Framework provides tools that let you sync parent records and their related records with a single call.
Supported Relationship Types
Related record sync supports two types of one-to-many relationships: Lookup and Master-detail. Both types are defined in the
child-to-parent, many-to-one direction. Each child knows its parent, but the parent doesn’t know its children.
Lookup Relationships
A lookup relationship is a “loose” link between objects based on one or more fields. For lookup relationships:
•Child records do not require a parent field.
•Changes to one object do not affect the security, access, or deletion of a linked object.
Salesforce supports up to 25 lookup fields per object. Lookup relationships can be multiple layers deep.
Master-detail Relationships
A master-detail relationship is a parent-child link in which the parent object exerts some control over its children. In master-detail linkage:
•Child records require a parent field.
•The parent’s access level determines the access level of its children.
•If a parent record is deleted, its children are also deleted.
Salesforce supports up to two master-detail fields per object, and up to three levels of master-detail relationships.
See Object Relationships Overview in Salesforce Help.
Note: SmartSync Data Framework does not support many-to-many relationships.
Objects Used in Related Record Sync
Related record sync uses two special types of sync targets:
Parent-children sync up target
•Android: ParentChildrenSyncUpTarget
•iOS: SFParentChildrenSyncUpTarget
Handles locally created or updated records and deleted records.
288
Using SmartSync Data Framework in Native AppsOffline Management
Parent-children sync down target
•Android: ParentChildrenSyncDownTarget
•iOS: SFParentChildrenSyncDownTarget
Supports resync and cleanResyncGhosts methods.
These targets support leave-if-changed and overwrite merge modes. Each target provides a factory method (on iOS) or a constructor (on
Android) that initializes an instance with the required information you provide. To perform the sync, you configure a new target class
instance and pass it to the standard SmartSync Data Framework sync method that accepts a target object.
To initialize the targets, you also provide two helper objects that deliver necessary related record information:
Parent information object
•Android: ParentInfo
•iOS: SFParentInfo
Includes:
•Object type
•Soup name
•ID field (Optional in all cases. Defaults to “Id”. Set this value only if you are specifying a different field to identify the records.)
•Last Modified Date field (Optional in all cases. Defaults to “LastModifiedDate”. Set this value only if you are specifying a different
field for time stamps.)
Child information object
•Android: ChildrenInfo
•iOS: SFChildrenInfo
Includes:
•Object type
•Soup name
•Parent ID field
•ID field (Optional in all cases. Defaults to “Id”. Set this value only if you are specifying a different field to identify the records.)
•Last Modified Date field (Optional in all cases. Defaults to “LastModifiedDate”. Set this value only if you are specifying a different
field for time stamps.)
Preparing Your SmartStore Data Model
To prepare for handling related objects offline, you first set up a SmartStore soup for each expected parent and child object type. For
each soup, you add indexed ID fields that model the server-side relationships. Here’s the list of required indexed fields:
Soup for a parent object:
Field for server ID of record
Soup for a child object:
Field for server ID of record
Field for server ID of parent record
All sync operations—up and down—begin with the parent soup and then continue to the child soups. Here’s how this flow works:
•When you sync down related records, you are targeting parent records, and the sync downloads those records and all their children.
For example, if you’re syncing accounts with their contacts, you get the contacts linked to the accounts you’ve downloaded. You
don’t get contacts that aren’t linked to those accounts.
289
Using SmartSync Data Framework in Native AppsOffline Management
•When you sync up related records, SmartSync Data Framework iterates over the soup of parent records and picks up related children
records. Modified children records that are not related to a parent record are ignored during that sync up operation.
Sync Up
To initialize the parent-child sync-up target, you provide parent information objects and child information objects. These objects fully
describe the relationships between parent-child records, both on the server and in the local store. You also provide the list of fields to
sync. Here’s the full list of required information:
•Parent information object
•Child information object
•Relationship type (for example, master-detail or lookup)
•Fields to sync up in parent and children soups
The sync up operation iterates over the soup containing the parent records and uses the given information to pull related records from
the children’s soups. A record is considered dirty when the __local__ field is set to true. A record tree—consisting of one parent
and its children—is a candidate for sync up when any record in the tree is dirty. Whether the sync up actually occurs depends on how
SmartSync Data Framework handles the merge mode.
“Leave-if-changed” Merge Mode Handling
SmartSync Data Framework fetches Last Modified Date fields of the target parent and children server records. The sync up operation
skips that record tree if
•the last modified date of any fetched server record is more recent than its corresponding local record
or
•if any fetched server record has been deleted.
Updates Applied after Sync Up
After the local changes have been synced to the server, SmartSync Data Framework cleans up related records.
•If sync up creates any parent or child record on the server, SmartSync Data Framework updates the server ID field of the corresponding
local record. If the created record is a parent, the parent ID fields of its children are also updated in the local store.
•If any server records were deleted since the last sync down, deletes the corresponding local records.
•If sync up deletes a parent record and the relationship type is master-detail, SmartSync Data Framework deletes the record’s children
on the server and in the local store.
Sync Down
To initialize the parent-children sync-down target, you provide parent information objects and children information objects. These
objects fully describe the relationships between parent-child records, both on the server and in the local store. You also provide a list of
fields to sync and some SOQL filters.
The new sync down target is actually a subclass of the SOQL sync down target. Instead of being given the SOQL query, however, the
target generates it from the parent and children information objects, list of fields, and SOQL filters.
Information Passed to Sync Down Targets
•Parent information object
•Child information object
•Relationship type (for example, master-detail or lookup)
•Fields to sync down in parent and children soups
•SOQL filter to apply in query on root records during sync down—for example, the condition of a WHERE clause
290
Using SmartSync Data Framework in Native AppsOffline Management

Server Call
SmartSync Data Framework fetches the record trees, each consisting of one parent and its children, using SOQL. It then separates parents
from their children and stores them in their respective soups.
“Leave-if-changed” Merge Mode Handling
Local record trees that contain any dirty records—locally created, modified, or deleted records—are left unaltered. For example, if a
parent record has one dirty child, SmartSync Data Framework doesn’t update the parent or the child. This rule applies even if the parent
is clean locally but has been changed on the server.
Handling Resync
During resync, SmartSync Data Framework adjusts the SOQL query to download only those record trees in which the parent changed
since the last sync.
Implementing Related Record Sync
Once you understand the principles and requirements involved, implementing it is straightforward. You can add related record sync to
your code in a few steps. The following code snippets demonstrate the technique using Account (parent) and Contact (child) objects.
Android
1. Create SmartStore soups that define the required indexed fields.
// Creating soup for accounts
final IndexSpec[] indexSpecs = {
new IndexSpec(Constants.ID, SmartStore.Type.string),
new IndexSpec(Constants.NAME, SmartStore.Type.string),
new IndexSpec(Constants.DESCRIPTION, SmartStore.Type.string),
new IndexSpec(SyncTarget.LOCAL, SmartStore.Type.string)
};
smartStore.registerSoup("AccountSoup", indexSpecs);
// Creating soup for contacts
final IndexSpec[] contactsIndexSpecs = {
new IndexSpec(Constants.ID, SmartStore.Type.string),
new IndexSpec(Constants.LAST_NAME, SmartStore.Type.string),
new IndexSpec(SyncTarget.LOCAL, SmartStore.Type.string),
new IndexSpec(ACCOUNT_ID, SmartStore.Type.string)
};
smartStore.registerSoup(CONTACTS_SOUP, contactsIndexSpecs);
2. Create instance of a sync target object and its supporting informational objects.
// Creating object for parent info
ParentInfo parentInfo =
new ParentInfo(Constants.ACCOUNT, "AccountSoup", Constants.ID,
Constants.LAST_MODIFIED_DATE);
// Creating object for children info
291
Using SmartSync Data Framework in Native AppsOffline Management

ChildrenInfo childrenInfo = new ChildrenInfo(
Constants.CONTACT, Constants.CONTACT + "s","ContactSoup", ACCOUNT_ID,
Constants.ID, Constants.LAST_MODIFIED_DATE);
// Creating sync up target
ParentChildrenSyncUpTarget syncUpTarget =
new ParentChildrenSyncUpTarget(
parentInfo,
Arrays.asList(Constants.ID, Constants.NAME, Constants.DESCRIPTION),
Arrays.asList(Constants.NAME, Constants.DESCRIPTION),
childrenInfo,
Arrays.asList(Constants.LAST_NAME, ACCOUNT_ID),
Arrays.asList(Constants.LAST_NAME, ACCOUNT_ID),
RelationshipType.MASTER_DETAIL); // account-contacts are master-detail
// Creating sync down target
ParentChildrenSyncDownTarget syncDownTarget =
new ParentChildrenSyncDownTarget(
parentInfo,
Arrays.asList(Constants.ID, Constants.NAME, Constants.DESCRIPTION),
parentSoqlFilter,
childrenInfo,
Arrays.asList(Constants.LAST_NAME, ACCOUNT_ID),
RelationshipType.MASTER_DETAIL); // account-contacts are master-detail
3. Call the SmartSync Data Framework sync method that takes a sync target.
For sync up:
// Running sync up
syncManager.syncUp(syncUpTarget, options, "AccountSoup",new SyncUpdateCallback() {
@Override
public void onUpdate(SyncState sync) {
// Handle updates
}
});
For sync down:
//Running sync down target
syncManager.syncDown(syncDownTarget, options, "AccountSoup",
new SyncUpdateCallback() {
@Override
public void onUpdate(SyncState sync) {
// Handle updates
}
});
iOS
292
Using SmartSync Data Framework in Native AppsOffline Management

1. Create SmartStore soups that define the required indexed fields.
// Creating soup for accounts
NSArray* indexSpecs = @[
[[SFSoupIndex alloc] initWithPath:@"Id"
indexType:kSoupIndexTypeString
columnName:nil],
[[SFSoupIndex alloc] initWithPath:@"Name"
indexType:kSoupIndexTypeString
columnName:nil],
[[SFSoupIndex alloc] initWithPath:@"Description"
indexType:kSoupIndexTypeFullText
columnName:nil],
[[SFSoupIndex alloc] initWithPath:kSyncTargetLocal
indexType:kSoupIndexTypeString
columnName:nil]
];
[store registerSoup:@"AccountSoup" withIndexSpecs:indexSpecs error:nil];
// Creating soup for contacts
indexSpecs = @[
[[SFSoupIndex alloc] initWithPath:@"Id"
indexType:kSoupIndexTypeString
columnName:nil],
[[SFSoupIndex alloc] initWithPath:@"LastName"
indexType:kSoupIndexTypeString
columnName:nil],
[[SFSoupIndex alloc] initWithPath:@"AccountId"
indexType:kSoupIndexTypeString
columnName:nil],
[[SFSoupIndex alloc] initWithPath:kSyncTargetLocal
indexType:kSoupIndexTypeString
columnName:nil]
];
[store registerSoup:@"ContactSoup" withIndexSpecs:indexSpecs error:nil];
2. Create instance of a sync target object and its supporting informational objects.
// Creating object for parent info
SFParentInfo* parentInfo =
[SFParentInfo newWithSObjectType:@"Account"
soupName:@"AccountSoup"
idFieldName:@"Id"
modificationDateFieldName:@"LastModifiedDate"];
// Creating object for children info
SFChildrenInfo* childrenInfo =
[SFChildrenInfo newWithSObjectType:@"Contact"
sobjectTypePlural:@"Contacts"
soupName:@"ContactSoup"
293
Using SmartSync Data Framework in Native AppsOffline Management

parentIdFieldName:@"AccountId"
idFieldName:@"Id"
modificationDateFieldName:@"LastModifiedDate"];
// Creating sync up target
SFParentChildrenSyncUpTarget *syncUpTarget =
[SFParentChildrenSyncUpTarget newSyncTargetWithParentInfo:parentInfo
parentCreateFieldlist:@[@"Id", @"Name", @"Description"]
parentUpdateFieldlist:@[@"Name", @"Description"]
childrenInfo:childrenInfo
childrenCreateFieldlist:@[@"LastName", @"AccountId"]
childrenUpdateFieldlist:@[@"LastName", @"AccountId"]
relationshipType:SFParentChildrenRelationpshipMasterDetail];
// account-contacts are master-detail
// Creating sync down target
SFParentChildrenSyncDownTarget *syncDownTarget =
[SFParentChildrenSyncDownTarget
newSyncTargetWithParentInfo:parentInfo
parentFieldlist:@[@"Id", @"Name", @"Description"]
parentSoqlFilter:@"Name LIKE 'A%'"
childrenInfo:childrenInfo
childrenFieldlist:@[@"LastName", @"AccountId"]
relationshipType:SFParentChildrenRelationpshipMasterDetail];
// account-contacts are master-detail
3. Call the SmartSync Data Framework sync method that takes a sync target.
For sync up:
// Running sync up
[syncManager syncUpWithTarget:syncUpTarget
options:options
soupName:@"AccountSoup"
updateBlock:^(SFSyncState* sync) {
// Handle updates
}
];
For sync down:
//Running sync down target
[syncManager syncDownWithTarget:syncDownTarget
options:options
soupName:@"AccountSoup"
updateBlock:^(SFSyncState* sync) {
// Handle updates
}
];
294
Using SmartSync Data Framework in Native AppsOffline Management

Storing and Retrieving Cached Data
The cache manager provides methods for writing and reading sObject metadata to the SmartSync Data Framework cache. Each method
requires you to provide a key string that identifies the data in the cache. You can use any unique string that helps your app locate the
correct cached data.
You also specify the type of cached data. Cache manager methods read and write each of the three categories of sObject data: metadata,
MRU (most recently used) list, and layout. Since only your app uses the type identifiers you provide, you can use any unique strings that
clearly distinguish these data types.
Cache Manager Classes
•Android: com.salesforce.androidsdk.smartsync.manager.CacheManager
•iOS: SFSmartSyncCacheManager
Read and Write Methods
Here are the CacheManager methods for reading and writing sObject metadata, MRU lists, and sObject layouts.
•Android:
sObjects Metadata
public List<SalesforceObject> readObjects(String cacheType,
String cacheKey);
public void writeObjects(List<SalesforceObject> objects,
String cacheKey, String cacheType);
MRU List
public List<SalesforceObjectType>
readObjectTypes(String cacheType, String cacheKey);
public void
writeObjectTypes(List<SalesforceObjectType> objects,
String cacheKey, String cacheType);
sObject Layouts
public List<SalesforceObjectTypeLayout>
readObjectLayouts(String cacheType, String cacheKey);
public void
writeObjectLayouts(List<SalesforceObjectTypeLayout> objects,
String cacheKey, String cacheType);
•iOS:
Read Method
- (NSArray *)
readDataWithCacheType:(NSString *)cacheType
cacheKey:(NSString *)cacheKey
cachePolicy:(SFDataCachePolicy)cachePolicy
objectClass:(Class)objectClass
cachedTime:(out NSDate **)lastCachedTime;
295
Using SmartSync Data Framework in Native AppsOffline Management

Write Method
- (void)writeDataToCache:(id)data
cacheType:(NSString *)cacheType
cacheKey:(NSString *)cacheKey;
Clearing the Cache
When your app is ready to clear the cache, use the following cache manager methods:
•Android:
public void removeCache(String cacheType, String cacheKey);
•iOS:
- (void)removeCache:(NSString *)cacheType
cacheKey:(NSString *)cacheKey;
These methods let you clear a selected portion of the cache. To clear the entire cache, call the method for each cache key and data type
you’ve stored.
Using SmartSync Data Framework in Hybrid and React Native Apps
SmartSync Data Framework for JavaScript is a Mobile SDK library that represents Salesforce objects as JavaScript objects. To use SmartSync
Data Framework in JavaScript, you create models of Salesforce objects and manipulate the underlying records just by changing the
model data. If you perform a SOQL or SOSL query, you receive the resulting records in a model collection rather than as a JSON string.
In hybrid apps, Mobile SDK provides two options for using SmartSync Data Framework.
•com.salesforce.plugin.smartsync: The SmartSync Data Framework plug-in offers basic “sync up” and “sync down”
functionality. This plug-in exposes part of the native SmartSync Data Framework library. For simple syncing tasks, you can use the
plug-in to sync records rapidly in a native thread, rather than in the web view.
•smartsync.js: The SmartSync Data Framework JavaScript library provides a Force.SObject data framework for more complex
syncing operations. This library is based on backbone.js, an open-source JavaScript framework that defines an extensible data
modeling mechanism. To understand this technology, browse the examples and documentation at backbonejs.org.
A set of sample hybrid applications demonstrate how to use SmartSync Data Framework. Sample apps in the
hybrid/SampleApps/AccountEditor/assets/www folder demonstrate how to use the Force.SObject library in
smartsync.js:
•Account Editor (AccountEditor.html)
•User Search (UserSearch.html)
•User and Group Search (UserAndGroupSearch.html)
The sample app in the hybrid/SampleApps/SimpleSync folder demonstrates how to use the SmartSync Data Framework
plug-in.
Should I Use Smartsync.js or the SmartSync Data Framework Plugin?
Smartsync.js—the JavaScript version of SmartSync Data Framework—and native SmartSync Data Framework—available to hybrid
apps through a Cordova plug-in—share a name, but they offer different advantages.
296
Using SmartSync Data Framework in Hybrid and React Native
Apps
Offline Management

smartsync.js is built on backbone.js and gives you easy-to-use model objects to represent single records or collections of records.
It also provides convenient fetch, save, and delete methods. However, it doesn't give you true sync down and sync up functionality.
Fetching records with an SObjectCollection is similar to the plug-in’s syncDown method, but it deposits all the retrieved objects in
memory. For that reason, it's not the best choice for moving large data sets. Furthermore, you’re required to implement the sync up
functionality yourself. The AccountEditor sample app demonstrates a typical JavaScript syncUp() implementation.
Native SmartSync Data Framework doesn't return model objects, but it provides robust syncUp and syncDown methods for moving
large data sets to and from the server.
You can also use the two libraries together. For example, you can set up a Force.StoreCache with smartsync.js, sync data
into it using the SmartSync Data Framework plug-in, and then call fetch or save using smartsync.js. You can then sync up from
the same cache using the SmartSync Data Framework plug-in, and it all works.
Both libraries provide the means to define your own custom endpoints, so which do you choose? The following guidelines can help you
decide:
•Use custom endpoints from smartsync.js if you want to talk to the server directly for saving or fetching data with JavaScript.
•If you talk only to SmartStore and get data into SmartStore using the SmartSync Data Framework plug-in and then you don't need
the custom endpoints in smartsync.js. However, you must define native custom targets.
Note: smartsync.js uses promises internally. If you’re developing for Android 19 and using Mobile SDK promise-based APIs,
include this file: https://www.promisejs.org/polyfills/promise-7.0.4.min.js.
About Backbone Technology
The SmartSync Data Framework library, smartsync.js, provides extensions to the open-source Backbone JavaScript library. The
Backbone library defines key building blocks for structuring your web application:
•Models with key-value binding and custom events, for modeling your information
•Collections with a rich API of enumerable functions, for containing your data sets
•Views with declarative event handling, for displaying information in your models
•A router for controlling navigation between views
Salesforce SmartSync Data Framework extends the Model and Collection core Backbone objects to connect them to the Salesforce
REST API. SmartSync Data Framework also provides optional offline support through SmartStore, the secure storage component of the
Mobile SDK.
To learn more about Backbone, see http://backbonejs.org/ and http://backbonetutorials.com/. You can also search online for “backbone
javascript” to find a wealth of tutorials and videos.
Models and Model Collections
Two types of objects make up the SmartSync Data Framework:
•Models
•Model collections
Definitions for these objects extend classes defined in backbone.js, a popular third-party JavaScript framework. For background
information, see http://backbonetutorials.com.
Models
Models on the client represent server records. In SmartSync Data Framework, model objects are instances of Force.SObject, a
subclass of the Backbone.Model class. SObject extends Model to work with Salesforce APIs and, optionally, with SmartStore.
297
Using SmartSync Data Framework in Hybrid and React Native
Apps
Offline Management

You can perform the following CRUD operations on SObject model objects:
•Create
•Destroy
•Fetch
•Save
•Get/set attributes
In addition, model objects are observable: Views and controllers can receive notifications when the objects change.
Properties
Force.SObject adds the following properties to Backbone.Model:
sobjectType
Required. The name of the Salesforce object that this model represents. This value can refer to either a standard object or a custom
object.
fieldlist
Required. Names of fields to fetch, save, or destroy.
cacheMode
Offline behavior.
mergeMode
Conflict handling behavior.
cache
For updatable offline storage of records. The SmartSync Data Framework comes bundled with Force.StoreCache, a cache
implementation that is backed by SmartStore.
cacheForOriginals
Contains original copies of records fetched from server to support conflict detection.
Examples
You can assign values for model properties in several ways:
•As properties on a Force.SObject instance.
•As methods on a Force.SObject sub-class. These methods take a parameter that specifies the desired CRUD action (“create”,
“read”, “update”, or “delete”).
•In the options parameter of the fetch(), save(), or destroy() function call.
For example, these code snippets are equivalent.
// As properties on a Force.SObject instance
acc = new Force.SObject({Id:"<some_id>"});
acc.sobjectType = "account";
acc.fieldlist = ["Id", "Name"];
acc.fetch();
// As methods on a Force.SObject sub-class
Account = Force.SObject.extend({
sobjectType: "account",
fieldlist: function(method) { return ["Id", "Name"];}
});
298
Using SmartSync Data Framework in Hybrid and React Native
Apps
Offline Management

Acc = new Account({Id:"<some_id>"});
acc.fetch();
// In the options parameter of fetch()
acc = new Force.SObject({Id:"<some_id>"});
acc.sobjectType = "account";
acc.fetch({fieldlist:["Id", "Name"]);
Model Collections
Model collections in the SmartSync Data Framework are containers for query results. Query results stored in a model collection can come
from the server via SOQL, SOSL, or MRU queries. Optionally, they can also come from the cache via SmartSQL (if the cache is SmartStore),
or another query mechanism if you use an alternate cache.
Model collection objects are instances of Force.SObjectCollection, a subclass of the Backbone.Collection class.
SObjectCollection extends Collection to work with Salesforce APIs and, optionally, with SmartStore.
Properties
Force.SObjectCollection adds the following properties to Backbone.Collection:
config
Required. Defines the records the collection can hold (using SOQL, SOSL, MRU or SmartSQL).
cache
For updatable offline storage of records. The SmartSync Data Framework comes bundled with Force.StoreCache, a cache
implementation that’s backed by SmartStore.
cacheForOriginals
Contains original copies of records fetched from server to support conflict detection.
Examples
You can assign values for model collection properties in several ways:
•As properties on a Force.SObject instance
•As methods on a Force.SObject sub-class
•In the options parameter of the fetch(), save(), or destroy() function call
For example, these code snippets are equivalent.
// As properties on a Force.SObject instance
list = new Force.SObjectCollection({config:<valid_config>});
list.fetch();
// As methods on a Force.SObject sub-class
MyCollection = Force.SObjectCollection.extend({
config: function() { return <valid_config>; }
});
list = new MyCollection();
list.fetch();
// In the options parameter of fetch()
list = new Force.SObjectCollection();
list.fetch({config:valid_config});
299
Using SmartSync Data Framework in Hybrid and React Native
Apps
Offline Management

Using the SmartSync Data Framework Plugin
Beginning with Mobile SDK 3.0, the SmartSync Data Framework plug-in provides JavaScript access to the native SmartSync Data Framework
library’s “sync up” and “sync down” functionality. As a result, performance-intensive operations—network negotiations, parsing, SmartStore
management—run on native threads that do not affect web view operations.
Adding the SmartSync Data Framework plug-in to your hybrid project is a function of the Mobile SDK npm scripts:
•For forceios version 3.0 or later, the plug-in is automatically included.
•For forcedroid version 3.0 or later, answer “yes” when asked if you want to use SmartStore.
If you’re adding the SmartSync Data Framework plug-in to an existing hybrid app, it’s best to re-create the app using the latest version
of forcedroid or forceios. When the new app is ready, copy your custom HTML, CSS, and JavaScript files from your old project into the
new project.
SmartSync Data Framework Plugin Methods
The SmartSync Data Framework plug-in exposes two methods: syncDown() and syncUp(). When you use these methods, several
important guidelines can make your life simpler:
•To create, update, or delete records locally for syncing with the plug-in, use Force.SObject from smartsync.js. SmartSync
Data Framework expects some special fields on soup records that smartsync.js creates for you.
•Similarly, to create the soup that you’ll use in your sync operations, use Force.StoreCache from smartsync.js.
•If you’ve changed objects in the soup, always call syncUp() before calling syncDown().
syncDown() Method
Downloads the sObjects specified by target into the SmartStore soup specified by soupName. If sObjects in the soup have the
same ID as objects specified in the target, SmartSync Data Framework overwrites the duplicate objects in the soup.
SmartSync Data Framework also supports a refresh sync down target, which simplifies the process of refreshing cached records. See The
Refresh Sync Down Target.
Syntax
cordova.require("com.salesforce.plugin.smartsync").syncDown(
[isGlobalStore, ]target, soupName, options, callback);
cordova.require("com.salesforce.plugin.smartsync").syncDown(
[storeConfig, ]target, soupName, options, callback);
Parameters
isGlobalStore
(Optional) Boolean that indicates whether this operation occurs in a global or user-based SmartStore database. Defaults to false.
storeConfig
(Optional) StoreConfig object that specifies a store name and whether the store is global or user-based.
target
Indicates which sObjects to download to the soup. Can be any of the following strings:
300
Using SmartSync Data Framework in Hybrid and React Native
Apps
Offline Management

•{type:"soql", query:"<soql query>"}
Downloads the sObjects returned by the given SOQL query.
•{type:"sosl", query:"<sosl query>"}
Downloads the sObjects returned by the given SOSL query.
•{type:"mru", sobjectType:"<sobject type>", fieldlist:"<fields to fetch>"}
Downloads the specified fields of the most recently used sObjects of the specified sObject type.
•{type:"custom", androidImpl:"<name of native Android target class (if supported)>",
iOSImpl:"<name of native iOS target class (if supported)>"}
Downloads the records specified by the given custom targets. If you use custom targets, provide either androidImpl or
iOSImpl, or, preferably, both. See Using Custom Sync Down Targets.
soupName
Name of soup that receives the downloaded sObjects.
options
Use one of the following values:
•To overwrite local records that have been modified, pass {mergeMode:Force.MERGE_MODE_DOWNLOAD.OVERWRITE}.
•To preserve local records that have been modified, pass
{mergeMode:Force.MERGE_MODE_DOWNLOAD.LEAVE_IF_CHANGED}. With this value, locally modified records
are not overwritten.
callback
Function called once the sync has started. This function is called multiple times during a sync operation:
1. When the sync operation begins
2. When the internal REST request has completed
3. After each page of results is downloaded, until 100% of results have been received
Status updates on the sync operation arrive via browser events. To listen for these updates, use the following code:
document.addEventListener("sync",
function(event) {
// event.detail contains the status of the sync operation
}
);
The event.detail member contains a map with the following fields:
•syncId: ID for this sync operation
•type: “syncDown”
•target: Targets you provided
•soupName: Soup name you provided
•options: “{}”
•status: Sync status, which can be “NEW”, “RUNNING”, “DONE” or “FAILED”
•progress: Percent of total records downloaded so far (integer, 0–100)
•totalSize: Number of records downloaded so far
301
Using SmartSync Data Framework in Hybrid and React Native
Apps
Offline Management

syncUp() Method
Uploads created, deleted, or updated records in the SmartStore soup specified by soupName, and then updates, creates, or deletes
the corresponding records on the Salesforce server. Updates are reported through browser events.
Syntax
cordova.require("com.salesforce.plugin.smartsync").syncUp(isGlobalStore, target, soupName,
options, callback);
cordova.require("com.salesforce.plugin.smartsync").syncUp(storeConfig, target, soupName,
options, callback);
Parameters
isGlobalStore
(Optional) Boolean that indicates whether this operation occurs in a global or user-based SmartStore database. Defaults to false.
storeConfig
(Optional) StoreConfig object that specifies a store name and whether the store is global or user-based.
target
JSON object that contains at least the name of one native custom target class, if you define custom targets.
A Salesforce object can require certain fields that can’t be updated by apps. With these objects, a target that uses a single field list
for both create and update operations can fail if it tries to update locked fields. Past versions of SmartSync Data Framework required
the developer to create a custom native target to differentiate between create and update field lists.
As of Mobile SDK 5.1, you no longer have to define custom native targets for these scenarios. Instead, to specify distinct field lists for
create and update operations, add the following JSON object to the target object:
{createFieldlist: [<array_of_fields_to_create>], updateFieldlist:
[<another_array_of_fields_to_update>]}
If you provide createFieldlist and updateFieldlist arguments, the native custom target uses them where applicable.
In those cases, the target ignores the field list defined in its “sync options” settings.
See the syncDown() method description for more information on target metadata.
soupName
Name of soup from which to upload sObjects.
options
A map with the following keys:
•fieldlist: List of fields sent to the server.
•mergeMode:
–To overwrite remote records that have been modified, pass “OVERWRITE”.
–To preserve remote records that have been modified, pass “LEAVE_IF_CHANGED”. With this value, modified records on the
server are not overwritten.
–Defaults to “OVERWRITE” if not specified.
callback
Function called multiple times after the sync has started. During the sync operation, this function is called for these events:
1. When the sync operation begins
2. When the internal REST request has completed
3. After each page of results is uploaded, until 100% of results have been received
302
Using SmartSync Data Framework in Hybrid and React Native
Apps
Offline Management

Status updates on the sync operation arrive via browser events. To listen for these updates, use the following code:
document.addEventListener("sync",
function(event) {
// event.detail contains the status of the sync operation
}
);
The event.detail member contains a map with the following fields:
•syncId: ID for this sync operation
•type: “syncUp”
•target: “{}” or a map or dictionary containing the class names of Android and iOS custom target classes you’ve implemented
•soupName: Soup name you provided
•options:
–fieldlist: List of fields sent to the server
–mergeMode: “OVERWRITE” or “LEAVE_IF_CHANGED”
•status: Sync status, which can be “NEW”, “RUNNING”, “DONE” or “FAILED”
•progress: Percent of total records downloaded so far (integer, 0–100)
•totalSize: Number of records downloaded so far
SEE ALSO:
Creating and Accessing User-based Stores
Using SmartSync Data Framework in JavaScript
To use SmartSync Data Framework in a hybrid app, import these files with <script> tags:
•jquery-x.x.x.min.js (use the version in the dependencies/jquery/ directory of the SalesforceMobileSDK-Shared
repository)
•underscore-x.x.x.min.js (use the version in the dependencies/underscore/ directory of the
SalesforceMobileSDK-Shared repository)
•backbone-x.x.x.min.js (use the version in the dependencies/backbone/ directory of the
SalesforceMobileSDK-Shared repository)
•cordova.js
•force.js
•smartsync.js
Implementing a Model Object
To begin using SmartSync Data Framework objects, define a model object to represent each SObject that you want to manipulate.
The SObjects can be standard Salesforce objects or custom objects. For example, this code creates a model of the Account object
that sets the two required properties—sobjectType and fieldlist—and defines a cacheMode() function.
app.models.Account = Force.SObject.extend({
sobjectType: "Account",
fieldlist: ["Id", "Name", "Industry", "Phone"],
303
Using SmartSync Data Framework in Hybrid and React Native
Apps
Offline Management

cacheMode: function(method) {
if (app.offlineTracker.get("offlineStatus") == "offline") {
return "cache-only";
}
else {
return (method == "read" ?
"cache-first" : "server-first");
}
}
});
Notice that the app.models.Account model object extends Force.SObject, which is defined in smartsync.js. Also,
the cacheMode() function queries a local offlineTracker object for the device's offline status. You can use the Cordova
library to determine offline status at any particular moment.
SmartSync Data Framework can perform a fetch or a save operation on the model. It uses the app’s cacheMode value to determine
whether to perform an operation on the server or in the cache. Your cacheMode member can either be a simple string property or
a function returning a string.
Implementing a Model Collection
The model collection for this sample app extends Force.SObjectCollection.
// The AccountCollection Model
app.models.AccountCollection = Force.SObjectCollection.extend({
model: app.models.Account,
fieldlist: ["Id", "Name", "Industry", "Phone"],
setCriteria: function(key) {
this.key = key;
},
config: function() {
// Offline: do a cache query
if (app.offlineTracker.get("offlineStatus") == "offline") {
return {type:"cache", cacheQuery:{queryType:"like",
indexPath:"Name", likeKey: this.key+"%",
order:"ascending"}};
}
// Online
else {
// First time: do a MRU query
if (this.key == null) {
return {type:"mru", sobjectType:"Account",
fieldlist: this.fieldlist};
}
// Other times: do a SOQL query
else {
var soql = "SELECT " + this.fieldlist.join(",")
+ " FROM Account"
+ " WHERE Name like '" + this.key + "%'";
return {type:"soql", query:soql};
}
}
}
});
304
Using SmartSync Data Framework in Hybrid and React Native
Apps
Offline Management

This model collection uses an optional key that is the name of the account to be fetched from the collection. It also defines a config()
function that determines what information is fetched. If the device is offline, the config() function builds a cache query statement.
Otherwise, if no key is specified, it queries the most recently used record ("mru"). If the key is specified and the device is online, it builds
a standard SOQL query that pulls records for which the name matches the key. The fetch operation on the
Force.SObjectCollection prototype transparently uses the returned configuration to automatically fill the model collection
with query records.
See querySpec for information on formatting a cache query.
Note: These code examples are part of the Account Editor sample app. See Account Editor Sample for a sample description.
Offline Caching
To provide offline support, your app must be able to cache its models and collections. SmartSync Data Framework provides a configurable
mechanism that gives you full control over caching operations.
Default Cache and Custom Cache Implementations
For its default cache, the SmartSync Data Framework library defines StoreCache, a cache implementation that uses SmartStore. Both
StoreCache and SmartStore are optional components for SmartSync Data Framework apps. If your application runs in a browser instead
of the Mobile SDK container, or if you don't want to use SmartStore, you must provide an alternate cache implementation. SmartSync
Data Framework requires cache objects to support these operations:
•retrieve
•save
•save all
•remove
•find
SmartSync Data Framework Caching Workflow
The SmartSync Data Framework model performs all interactions with the cache and the Salesforce server on behalf of your app. Your
app gets and sets attributes on model objects. During save operations, the model uses these attribute settings to determine whether
to write changes to the cache or server, and how to merge new data with existing data. If anything changes in the underlying data or
in the model itself, the model sends event notifications. Similarly, if you request a fetch, the model fetches the data and presents it to
your app in a model collection.
305
Using SmartSync Data Framework in Hybrid and React Native
Apps
Offline Management
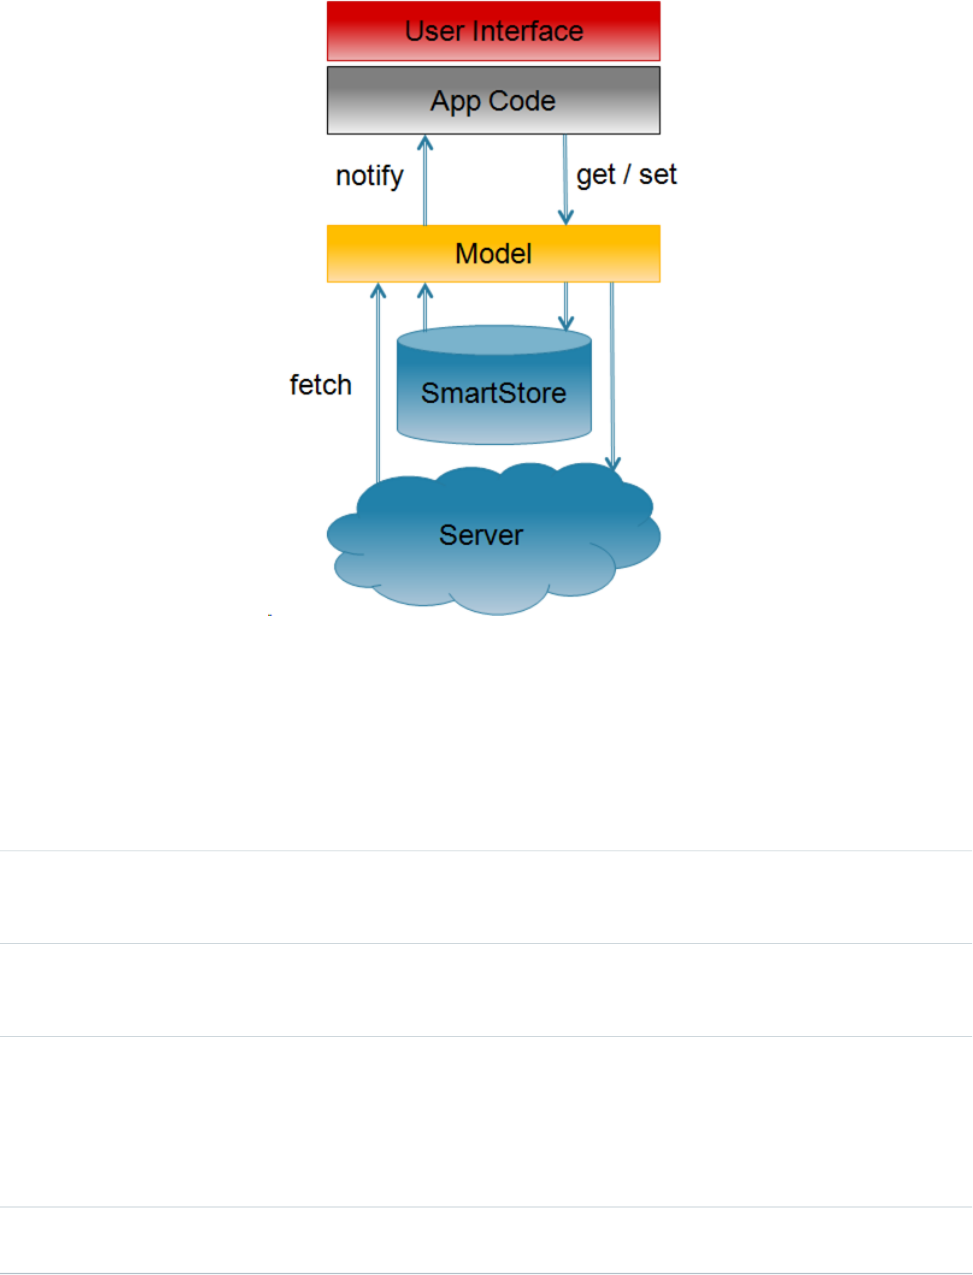
SmartSync Data Framework updates data in the cache transparently during CRUD operations. You can control the transparency level
through optional flags. Cached objects maintain "dirty" attributes that indicate whether they've been created, updated, or deleted locally.
Cache Modes
When you use a cache, you can specify a mode for each CRUD operation. Supported modes are:
DescriptionConstantMode
Read from, or write to, the
cache. Do not perform the
operation on the server.
Force.CACHE_MODE.CACHE_ONLY“cache-only”
Read from, or write to, the
server. Do not perform the
operation on the cache.
Force.CACHE_MODE.SERVER_ONLY“server-only”
For FETCH operations only.
Fetch the record from the
Force.CACHE_MODE.CACHE_FIRST“cache-first”
cache. If the cache doesn't
contain the record, fetch it
from the server and then
update the cache.
Perform the operation on the
server, then update the cache.
Force.CACHE_MODE.SERVER_FIRST“server-first”
(default)
306
Using SmartSync Data Framework in Hybrid and React Native
Apps
Offline Management

To query the cache directly, use a cache query. SmartStore provides query APIs as well as its own query language, Smart SQL. See
Retrieving Data from a Soup.
Implementing Offline Caching
To support offline caching, SmartSync Data Framework requires you to supply your own implementations of a few tasks:
•Tracking offline status and specifying the appropriate cache control flag for CRUD operations, as shown in the
app.models.Account example.
•Collecting records that were edited locally and saving their changes to the server when the device is back online. The following
example uses a SmartStore cache query to retrieve locally changed records, then calls the SyncPage function to render the results
in HTML.
sync: function() {
var that = this;
var localAccounts = new app.models.AccountCollection();
localAccounts.fetch({
config: {type:"cache", cacheQuery: {queryType:"exact",
indexPath:"__local__", matchKey:true}},
success: function(data) {
that.slidePage(new app.views.SyncPage({model: data}).render());
}
});
}
app.views.SyncPage = Backbone.View.extend({
template: _.template($("#sync-page").html()),
render: function(eventName) {
$(this.el).html(this.template(_.extend(
{countLocallyModified: this.model.length},
this.model.toJSON())));
this.listView = new app.views.AccountListView(
{el: $("ul", this.el), model: this.model});
this.listView.render();
return this;
},
...
});
Using StoreCache For Offline Caching
The smartsync.js library implements a cache named StoreCache that stores its data in SmartStore. Although SmartSync Data
Framework uses StoreCache as its default cache, StoreCache is a stand-alone component. Even if you don’t use SmartSync Data Framework,
you can still leverage StoreCache for SmartStore operations.
Note: Although StoreCache is intended for use with SmartSync Data Framework, you can use any cache mechanism with SmartSync
Data Framework that meets the requirements described in Offline Caching.
307
Using SmartSync Data Framework in Hybrid and React Native
Apps
Offline Management

Construction and Initialization
StoreCache objects work internally with SmartStore soups. To create a StoreCache object backed by the soup soupName, use the
following constructor:
new Force.StoreCache(soupName [, additionalIndexSpecs, keyField])
soupName
Required. The name of the underlying SmartStore soup.
additionalIndexSpecs
Fields to include in the cache index in addition to default index fields. See Registering a Soup for formatting instructions.
keyField
Name of field containing the record ID. If not specified, StoreCache expects to find the ID in a field named "Id."
Soup items in a StoreCache object include four additional boolean fields for tracking offline edits:
•__locally_created__
•__locally_updated__
•__locally_deleted__
•__local__ (set to true if any of the previous three are true)
These fields are for internal use but can also be used by apps. If your app uses the SmartSync Data Framework plugin to sync up to the
server, you’re probably required to create these fields in the source soup. See Preparing Soups for SmartSync Data Framework for
instructions.
StoreCache indexes each soup on the __local__ field and its ID field. You can use the additionalIndexSpecs parameter
to specify additional fields to include in the index.
To register the underlying soup, call init() on the StoreCache object. This function returns a jQuery promise that resolves once soup
registration is complete.
StoreCache Methods
init()
Registers the underlying SmartStore soup. Returns a jQuery promise that resolves when soup registration is complete.
retrieve(key [, fieldlist])
Returns a jQuery promise that resolves to the record with key in the keyField returned by the SmartStore. The promise resolves to
null when no record is found or when the found record does not include all the fields in the fieldlist parameter.
key
The key value of the record to be retrieved.
fieldlist
(Optional) A JavaScript array of required fields. For example:
["field1","field2","field3"]
save(record [, noMerge])
Returns a jQuery promise that resolves to the saved record once the SmartStore upsert completes. If noMerge is not specified or
is false, the passed record is merged with the server record with the same key, if one exists.
308
Using SmartSync Data Framework in Hybrid and React Native
Apps
Offline Management

record
The record to be saved, formatted as:
{<field_name1>:"<field_value1>"[,<field_name2>:"<field_value2>",...]}
For example:
{Id:"007", Name:"JamesBond", Mission:"TopSecret"}
noMerge
(Optional) Boolean value indicating whether the passed record is to be merged with the matching server record. Defaults to
false.
saveAll(records [, noMerge])
Identical to save(), except that records is an array of records to be saved. Returns a jQuery promise that resolves to the saved
records.
records
An array of records. Each item in the array is formatted as demonstrated for the save() function.
noMerge
(Optional) Boolean value indicating whether the passed record is to be merged with the matching server record. Defaults to
false.
remove(key)
Returns a jQuery promise that resolves when the record with the given key has been removed from the SmartStore.
key
Key value of the record to be removed.
find(querySpec)
Returns a jQuery promise that resolves once the query has been run against the SmartStore. The resolved value is an object with the
following fields:
DescriptionField
All fetched recordsrecords
Function to check if more records can be retrievedhasMore
Function to fetch more recordsgetMore
Function to close the open cursor and disable further fetchcloseCursor
querySpec
A specification based on SmartStore query function calls, formatted as:
{queryType: "like" | "exact" | "range" | "smart"[, query_type_params]}
where query_type_params match the format of the related SmartStore query function call. See Retrieving Data from a
Soup.
309
Using SmartSync Data Framework in Hybrid and React Native
Apps
Offline Management

Here are some examples:
{queryType:"exact", indexPath:"<indexed_field_to_match_on>", matchKey:<value_to_match>,
order:"ascending"|"descending", pageSize:<entries_per_page>}
{queryType:"range", indexPath:"<indexed_field_to_match_on>", beginKey:<start_of_Range>,
endKey:<end_of_range>, order:"ascending"|"descending", pageSize:<entries_per_page>}
{queryType:"like", indexPath:"<indexed_field_to_match_on>", likeKey:"<value_to_match>",
order:"ascending"|"descending", pageSize:<entries_per_page>}
{queryType:"smart", smartSql:"<smart_sql_query>", order:"ascending"|"descending",
pageSize:<entries_per_page>}
Examples
The following example shows how to create, initialize, and use a StoreCache object.
var cache = new Force.StoreCache("agents", [{path:"Mission", type:"string"} ]);
// initialization of the cache / underlying soup
cache.init()
.then(function() {
// saving a record to the cache
return cache.save({Id:"007", Name:"JamesBond", Mission:"TopSecret"});
})
.then(function(savedRecord) {
// retrieving a record from the cache
return cache.retrieve("007");
})
.then(function(retrievedRecord) {
// searching for records in the cache
return cache.find({queryType:"like", indexPath:"Mission", likeKey:"Top%",
order:"ascending", pageSize:1});
})
.then(function(result) {
// removing a record from the cache
return cache.remove("007");
});
The next example shows how to use the saveAll() function and the results of the find() function.
// initialization
var cache = new Force.StoreCache("agents", [ {path:"Name", type:"string"}, {path:"Mission",
type:"string"} ]);
cache.init()
.then(function() {
// saving some records
return cache.saveAll([{Id:"007", Name:"JamesBond"},{Id:"008", Name:"Agent008"},
{Id:"009", Name:"JamesOther"}]);
})
.then(function() {
// doing an exact query
return cache.find({queryType:"exact", indexPath:"Name", matchKey:"Agent008",
order:"ascending", pageSize:1});
310
Using SmartSync Data Framework in Hybrid and React Native
Apps
Offline Management

})
.then(function(result) {
alert("Agent mission is:" + result.records[0]["Mission"];
});
Conflict Detection
Model objects support optional conflict detection to prevent unwanted data loss when the object is saved to the server. You can use
conflict detection with any save operation, regardless of whether the device is returning from an offline state.
To support conflict detection, you specify a secondary cache to contain the original values fetched from the server. SmartSync Data
Framework keeps this cache for later reference. When you save or delete, you specify a merge mode. The following table summarizes
the supported modes. To understand the mode descriptions, consider "theirs" to be the current server record, "yours" the current local
record, and "base” the record that was originally fetched from the server.
Description
Mode Constant
Write "yours" to the server, without
comparing to "theirs" or "base”. (This
Force.MERGE_MODE.OVERWRITE
is the same as not using conflict
detection.)
Merge "theirs" and "yours". If the
same field is changed both locally
and remotely, the local value is kept.
Force.MERGE_MODE.MERGE_ACCEPT_YOURS
Merge "theirs" and "yours". If the
same field is changed both locally
and remotely, the operation fails.
Force.MERGE_MODE.MERGE_FAIL_IF_CONFLICT
Merge "theirs" and "yours". If any field
is changed remotely, the operation
fails.
Force.MERGE_MODE.MERGE_FAIL_IF_CHANGED
If a save or delete operation fails, you receive a report object with the following fields:
ContainsField Name
Originally fetched attributesbase
Latest server attributestheirs
Locally modified attributesyours
List of fields changed between base and theirsremoteChanges
List of fields changed between base and yourslocalChanges
List of fields changed both in theirs and yours, with different valuesconflictingChanges
311
Using SmartSync Data Framework in Hybrid and React Native
Apps
Offline Management
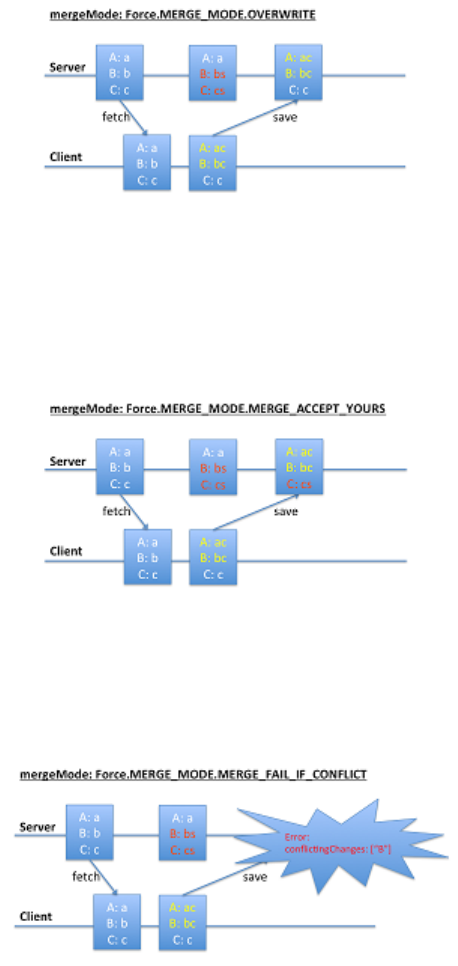
Diagrams can help clarify how merge modes operate.
MERGE_MODE.OVERWRITE
In the MERGE_MODE.OVERWRITE diagram, the client changes A and B, and the server changes B and C. Changes to B conflict,
whereas changes to A and C do not. However, the save operation blindly writes all the client’s values to the server, overwriting any
changes on the server.
MERGE_ACCEPT_YOURS
In the MERGE_MODE.MERGE_ACCEPT_YOURS diagram, the client changes A and B, and the server changes B and C. Client changes
(A and B) overwrites corresponding fields on the server, regardless of whether conflicts exist. However, fields that the client leaves
unchanged (C) do not overwrite corresponding server values.
MERGE_FAIL_IF_CONFLICT (Fails)
In the first MERGE_MODE.MERGE_FAIL_IF_CONFLICT diagram, both the client and the server change B. These conflicting
changes cause the save operation to fail.
312
Using SmartSync Data Framework in Hybrid and React Native
Apps
Offline Management

MERGE_FAIL_IF_CONFLICT (Succeeds)
In the second MERGE_MODE.MERGE_FAIL_IF_CONFLICT diagram, the client changed A, and the server changed B. These
changes don’t conflict, so the save operation succeeds.
Mini-Tutorial: Conflict Detection
The following mini-tutorial demonstrates how merge modes affect save operations under various circumstances. It takes the form of an
extended example within an HTML context.
1. Set up the necessary caches:
var cache = new Force.StoreCache(soupName);
var cacheForOriginals =
new Force.StoreCache(soupNameForOriginals);
var Account = Force.SObject.extend({
sobjectType:"Account",
fieldlist:["Id", "Name", "Industry"],
cache:cache,
cacheForOriginals:cacheForOriginals});
2. Get an existing account:
var account = new Account({Id:<some actual account id>});
account.fetch();
3. Let's assume that the account has Name:"Acme" and Industry:"Software". Change the name to “Acme2.”
Account.set("Name", "Acme2");
4. Save to the server without specifying a merge mode, so that the default "overwrite" merge mode is used:
account.save(null);
The account’s Name is now "Acme2" and its Industry is "Software" Let's assume that Industry changes on the server to "Electronics."
5. Change the account Name again:
Account.set("Name", "Acme3");
You now have a change in the cache (Name) and a change on the server (Industry).
6. Save again, using "merge-fail-if-changed" merge mode.
account.save(null,
{mergeMode: "merge-fail-if-changed", error: function(err) {
// err will be a map of the form:
// {base:…, theirs:…, yours:…,
313
Using SmartSync Data Framework in Hybrid and React Native
Apps
Offline Management

// remoteChanges:["Industry"], localChanges:["Name"],
// conflictingChanges:[]}
});
The error callback is called because the server record has changed.
7. Save again, using "merge-fail-if-conflict" merge mode. This merge succeeds because no conflict exists between the change on the
server and the change on the client.
account.save(null, {mergeMode: "merge-fail-if-conflict"});
The account’s Name is now "Acme3" (yours) and its Industry is "Electronics" (theirs). Let's assume that, meanwhile, Name on the
server changes to "NewAcme" and Industry changes to "Services."
8. Change the account Name again:
Account.set("Name", "Acme4");
9. Save again, using "merge-fail-if-changed" merge mode. The error callback is called because the server record has changed.
account.save(null, {mergeMode: "merge-fail-if-changed", error: function(err) {
// err will be a map of the form:
// {base:…, theirs:…, yours:…,
// remoteChanges:["Name", "Industry"],
// localChanges:["Name"], conflictingChanges:["Name"]}
});
10. Save again, using "merge-fail-if-conflict" merge mode:
account.save(null, {mergeMode: "merge-fail-if-changed", error: function(err) {
// err will be a map of the form:
// {base:…, theirs:…, yours:…,
// remoteChanges:["Name", "Industry"],
// localChanges:["Name"], conflictingChanges:["Name"]}
});
The error callback is called because both the server and the cache change the Name field, resulting in a conflict:
11. Save again, using "merge-accept-yours" merge mode. This merge succeeds because your merge mode tells the save() function
which Name value to accept. Also, since you haven’t changed Industry, that field doesn’t conflict.
account.save(null, {mergeMode: "merge-accept-yours"});
Name is “Acme4” (yours) and Industry is “Services” (theirs), both in the cache and on the server.
Accessing Custom API Endpoints
In Mobile SDK 2.1, SmartSync expands its scope to let you work with any REST API. Previously, you could only perform basic operations
on sObjects with the Lightning Platform API. Now you can use SmartSync with Apex REST objects, Chatter Files, and any other Salesforce
REST API. You can also call non-Salesforce REST APIs.
Force.RemoteObject Class
To support arbitrary REST calls, SmartSync Data Framework introduces the Force.RemoteObject abstract class.
Force.RemoteObject serves as a layer of abstraction between Force.SObject and Backbone.Model. Instead of directly
subclassing Backbone.Model, Force.SObject now subclasses Force.RemoteObject, which in turn subclasses
314
Using SmartSync Data Framework in Hybrid and React Native
Apps
Offline Management

Backbone.Model. Force.RemoteObject does everything Force.SObject formerly did except communicate with the
server.
Calling Custom Endpoints with syncRemoteObjectWithServer()
The RemoteObject.syncRemoteObjectWithServer() prototype method handles server interactions. Force.SObject
implements syncRemoteObjectWithServer() to use the Lightning Platform REST API. If you want to use other server end
points, create a subclass of Force.RemoteObject and implement syncRemoteObjectWithServer(). This method is
called when you call fetch() on an object of your subclass, if the object is currently configured to fetch from the server.
Example: Example
The FileExplorer sample application is a SmartSync Data Framework app that shows how to use Force.RemoteObject.
HybridFileExplorer calls the Chatter REST API to manipulate files. It defines an app.models.File object that extends
Force.RemoteObject. In its implementation of syncRemoteObjectWithServer(), app.models.File calls
Force.forceJsClient.fileDetails(), which wraps the /chatter/files/fileId REST API.
app.models.File = Force.RemoteObject.extend({
syncRemoteObjectWithServer: function(method, id) {
if (method != "read")
throw "Method not supported " + method;
return Force.forceJsClient.fileDetails(id, null);
}
})
Force.RemoteObjectCollection Class
To support collections of fetched objects, SmartSync Data Framework introduces the Force.RemoteObjectCollection
abstract class. This class serves as a layer of abstraction between Force.SObjectCollection and Backbone.Collection. Instead
of directly subclassing Backbone.Collection, Force.SObjectCollection now subclasses Force.RemoteObjectCollection, which in turn
subclasses Backbone.Collection. Force.RemoteObjectCollection does everything
Force.SObjectCollection formerly did except communicate with the server.
Implementing Custom Endpoints with fetchRemoteObjectFromServer()
The RemoteObject.fetchRemoteObjectFromServer() prototype method handles server interactions. This method
uses the REST API to run SOQL/SOSL and MRU queries. If you want to use arbitrary server end points, create a subclass of
Force.RemoteObjectCollection and implement fetchRemoteObjectFromServer(). This method is called when
you call fetch() on an object of your subclass, if the object is currently configured to fetch from the server.
When the app.models.FileCollection.fetchRemoteObjectsFromServer() function returns, it promises an
object containing valuable information and useful functions that use metadata from the response. This object includes:
•totalSize: The number of files in the returned collection
•records: The collection of returned files
•hasMore: A function that returns a boolean value that indicates whether you can retrieve another page of results
•getMore: A function that retrieves the next page of results (if hasMore() returns true)
•closeCursor: A function that indicates that you’re finished iterating through the collection
These functions leverage information contained in the server response, including Files.length and nextPageUrl.
315
Using SmartSync Data Framework in Hybrid and React Native
Apps
Offline Management

Example: Example
The HybridFileExplorer sample application also demonstrates how to use Force.RemoteObjectCollection. This example
calls the Chatter REST API to iterate over a list of files. It supports three REST operations: ownedFilesList,
filesInUsersGroups, and filesSharedWithUser.
You can write functions such as hasMore() and getMore(), shown in this example, to navigate through pages of results.
However, since apps don’t call fetchRemoteObjectsFromServer() directly, you capture the returned promise object
when you call fetch() on your collection object.
app.models.FileCollection = Force.RemoteObjectCollection.extend({
model: app.models.File,
setCriteria: function(key) {
this.config = {type:key};
},
fetchRemoteObjectsFromServer: function(config) {
var fetchPromise;
switch(config.type) {
case "ownedFilesList": fetchPromise =
Force.forceJsClient.ownedFilesList("me", 0);
break;
case "filesInUsersGroups": fetchPromise =
Force.forceJsClient.
filesInUsersGroups("me", 0);
break;
case "filesSharedWithUser": fetchPromise =
Force.forceJsClient.
filesSharedWithUser("me", 0);
break;
};
return fetchPromise
.then(function(resp) {
var nextPageUrl = resp.nextPageUrl;
return {
totalSize: resp.files.length,
records: resp.files,
hasMore: function() {
return nextPageUrl != null; },
getMore: function() {
var that = this;
if (!nextPageUrl)
return null;
return
forceJsClient.queryMore(nextPageUrl)
.then(function(resp) {
nextPageUrl = resp.nextPageUrl;
that.records.
pushObjects(resp.files);
return resp.files;
});
},
closeCursor: function() {
316
Using SmartSync Data Framework in Hybrid and React Native
Apps
Offline Management

return $.when(function() {
nextPageUrl = null;
});
}
};
});
}
});
Using Apex REST Resources
To support Apex REST resources, Mobile SDK provides two classes: Force.ApexRestObject and
Force.ApexRestObjectCollection. These classes subclass Force.RemoteObject and
Force.RemoteObjectCollection, respectively, and can talk to a REST API that you have created using Apex REST.
Force.ApexRestObject
Force.ApexRestObject is similar to Force.SObject. Instead of an sobjectType, Force.ApexRestObject
requires the Apex REST resource path relative to services/apexrest. For example, if your full resource path is
services/apexrest/simpleAccount/*, you specify only /simpleAccount/*. Force.ApexRestObject also
expects you to specify the name of your ID field if it's different from "Id".
Example: Example
Let's assume you’ve created an Apex REST resource called "simple account," which is just an account with two fields: accountId
and accountName.
@RestResource(urlMapping='/simpleAccount/*')
global with sharing class SimpleAccountResource {
static String getIdFromURI() {
RestRequest req = RestContext.request;
return req.requestURI.substring(req.requestURI.lastIndexOf('/')+1);
}
@HttpGet global static Map<String, String> doGet() {
String id = getIdFromURI();
Account acc = [select Id, Name from Account
where Id = :id];
return new Map<String, String>{
'accountId'=>acc.Id, 'accountName'=>acc.Name};
}
@HttpPost global static Map<String, String>
doPost(String accountName) {
Account acc = new Account(Name=accountName);
insert acc;
return new Map<String, String>{
'accountId'=>acc.Id, 'accountName'=>acc.Name};
}
@HttpPatch global static Map<String, String>
doPatch(String accountName) {
String id = getIdFromURI();
317
Using SmartSync Data Framework in Hybrid and React Native
Apps
Offline Management

Account acc = [select Id from Account
where Id = :id];
acc.Name = accountName;
update acc;
return new Map<String, String>{
'accountId'=>acc.Id, 'accountName'=>acc.Name};
}
@HttpDelete global static void doDelete() {
String id = getIdFromURI();
Account acc = [select Id from Account where Id = :id];
delete acc;
RestContext.response.statusCode = 204;
}
}
With SmartSync Data Framework, you do the following to create a "simple account".
var SimpleAccount = Force.ApexRestObject.extend(
{apexRestPath:"/simpleAccount",
idAttribute:"accountId",
fieldlist:["accountId", "accountName"]});
var acc = new SimpleAccount({accountName:"MyFirstAccount"});
acc.save();
You can update that "simple account".
acc.set("accountName", "MyFirstAccountUpdated");
acc.save(null, {fieldlist:["accountName"]);
// our apex patch endpoint only expects accountName
You can fetch another "simple account".
var acc2 = new SimpleAccount({accountId:"<valid id>"})
acc.fetch();
You can delete a "simple account".
acc.destroy();
Note: In SmartSync Data Framework calls such as fetch(), save(), and destroy(), you typically pass an options
parameter that defines success and error callback functions. For example:
acc.destroy({success:function(){alert("delete succeeded");}});
Force.ApexRestObjectCollection
Force.ApexRestObjectCollection is similar to Force.SObjectCollection. The config you specify for fetching
doesn't support SOQL, SOSL, or MRU. Instead, it expects the Apex REST resource path, relative to services/apexrest. For example,
if your full resource path is services/apexrest/simpleAccount/*, you specify only /simpleAccount/*.
318
Using SmartSync Data Framework in Hybrid and React Native
Apps
Offline Management

You can also pass parameters for the query string if your endpoint supports them. The Apex REST endpoint is expected to return a
response in this format:
{ totalSize: <number of records returned>
records: <all fetched records>
nextRecordsUrl: <url to get next records or null>
}
Example: Example
Let's assume you’ve created an Apex REST resource called "simple accounts". It returns "simple accounts" that match a given name.
@RestResource(urlMapping='/simpleAccounts/*')
global with sharing class SimpleAccountsResource {
@HttpGet global static SimpleAccountsList doGet() {
String namePattern =
RestContext.request.params.get('namePattern');
List<SimpleAccount> records = new List<SimpleAccount>();
for (SObject sobj : Database.query(
'select Id, Name from Account
where Name like \'' + namePattern + '\'')) {
Account acc = (Account) sobj;
records.add(new
SimpleAccount(acc.Id, acc.Name));
}
return new SimpleAccountsList(records.size(), records);
}
global class SimpleAccountsList {
global Integer totalSize;
global List<SimpleAccount> records;
global SimpleAccountsList(Integer totalSize,
List<SimpleAccount> records) {
this.totalSize = totalSize;
this.records = records;
}
}
global class SimpleAccount {
global String accountId;
global String accountName;
global SimpleAccount(String accountId, String accountName)
{
this.accountId = accountId;
this.accountName = accountName;
}
}
}
With SmartSync Data Framework, you do the following to fetch a list of "simple account" records.
var SimpleAccountCollection =
Force.ApexRestObjectCollection.extend(
{model: SimpleAccount,
319
Using SmartSync Data Framework in Hybrid and React Native
Apps
Offline Management

config:{
apexRestPath:"/simpleAccounts",
params:{namePattern:"My%"}
}
}
);
var accs = new SimpleAccountCollection();
accs.fetch();
Note: In SmartSync Data Framework calls such as fetch(), you typically pass an options parameter that defines success
and error callback functions. For example:
acc.fetch({success:function(){alert("fetched " +
accs.models.length + " simple accounts");}});
Tutorial: Creating a Hybrid SmartSync Data Framework Application
This tutorial demonstrates how to create a local hybrid app that uses the SmartSync Data Framework. It recreates the UserSearch sample
application that ships with Mobile SDK. UserSearch lets you search for User records in a Salesforce organization and see basic details
about them.
This sample uses the following web technologies:
•Backbone.js
•Ratchet
•HTML5
•JavaScript
Create a Template Project
First, make sure you’ve installed Salesforce Mobile SDK using the NPM installer. For iOS instructions, see iOS Preparation. For Android
instructions, see Android Preparation.
Also, download the ratchet.css file from http://goratchet.com/.
Once you’ve installed Mobile SDK, create a local hybrid project for your platform.
1. At a Terminal window or Windows command prompt, run the forcehybrid create command using the following values:
ValuePrompt (or Parameter)
ios, android, or ios,androidPlatform (--platform)
hybrid_localApplication type (--apptype)
UserSearchApplication name (--appname)
com.acme.usersearchPackage name (--packagename)
“Acme Widgets, Inc.”Organization (--organization)
Leave blank for current directory, or enter a name to create a
new subdirectory for the project
Output directory (--outputdir)
320
Using SmartSync Data Framework in Hybrid and React Native
Apps
Offline Management

Here’s a command line example:
forcehybrid create --platform=ios,android --apptype=hybrid_local
--appname=UserSearch --packagename=com.acme.usersearch
--organization="Acme Widgets, Inc." --outputdir=""
2. Copy all files—actual and symbolic—from the samples/usersearch directory of the
https://github.com/forcedotcom/SalesforceMobileSDK-Shared/ repository into the www/ folder, as follows:
•In a Mac OS X terminal window, change to your project’s root directory—./UserSearch/—and type this command:
cp -RL <insert local path to SalesforceMobileSDK-Shared>/samples/UserSearch/* www/
•In Windows, make sure that every file referenced in the <shared repo>\samples\usersearch folder also appears
in your <project_name>\www folder. Resolve the symbolic links explicitly, as shown in the following script:
cd <your project's root directory>
set SHARED_REPO=<insert local path to SalesforceMobileSDK-Shared>
copy %SHARED_REPO%\samples\usersearch\UserSearch.html www
copy %SHARED_REPO%\samples\usersearch\bootconfig.json www
copy %SHARED_REPO%\dependencies\ratchet\ratchet.css www
copy %SHARED_REPO%\samples\common\styles.css www
copy %SHARED_REPO%\test\MockCordova.js www
copy %SHARED_REPO%\samples\common\auth.js www
copy %SHARED_REPO%\dependencies\backbone\backbone-min.js www
copy %SHARED_REPO%\libs\cordova.force.js www
copy %SHARED_REPO%\dependencies\fastclick\fastclick.js www
copy %SHARED_REPO%\libs\force.js www
copy %SHARED_REPO%\libs\force+promise.js www
copy %SHARED_REPO%\dependencies\jquery\jquery.min.js www
copy %SHARED_REPO%\libs\smartsync.js www
copy %SHARED_REPO%\samples\common\stackrouter.js www
copy %SHARED_REPO%\dependencies\underscore\underscore-min.js www
3. Run the following command:
cordova prepare
4. Open the platforms/android/ project folder in Android Studio (for Android) or Xcode (for iOS) by following the onscreen
instructions printed by forcehybrid.
5. From the www folder, open UserSearch.html in your code editor and delete all its contents.
Edit the Application HTML File
To create your app’s basic structure, define an empty HTML page that contains references, links, and code infrastructure.
1. From the www folder, open UserSearch.html in your code editor and delete all its contents.
2. Delete the contents and add the following basic structure:
<!DOCTYPE html>
<html>
<head>
</head>
<body>
321
Using SmartSync Data Framework in Hybrid and React Native
Apps
Offline Management

</body>
</html>
3. In the <head> element:
a. Specify that the page title is “Users”.
<title>Users</title>
b. Turn off scaling to make the page look like an app rather than a web page.
<meta name="viewport" content="width=device-width, initial-scale=1.0,
maximum-scale=1.0, user-scalable=no;" />
c. Provide a mobile “look” by adding links to the styles.css and ratchet.css files.
<link rel="stylesheet" href="css/styles.css"/>
<link rel="stylesheet" href="css/ratchet.css"/>
4. Now let’s start adding content to the body. In the <body> block, add an empty div tag, with ID set to “content”, to contain the
app’s generated UI.
<body>
<div id="content"></div>
5. Include the necessary JavaScript files.
<script src="js/jquery.min.js"></script>
<script src="js/underscore-min.js"></script>
<script src="js/backbone-min.js"></script>
<script src="cordova.js"></script>
<script src="js/force.js"></script>
<script src="js/force+promise.js"></script>
<script src="js/smartsync.js"></script>
<script src="js/fastclick.js"></script>
<script src="js/stackrouter.js"></script>
<script src="js/auth.js"></script>
Example: Here’s the complete application to this point.
<!DOCTYPE html>
<html>
<head>
<title>Users</title>
<meta name="viewport" content="width=device-width,
initial-scale=1.0, maximum-scale=1.0;
user-scalable=no" />
<link rel="stylesheet" href="css/styles.css"/>
<link rel="stylesheet" href="css/ratchet.css"/>
</head>
<body>
<div id="content"></div>
<script src="js/jquery.min.js"></script>
<script src="js/underscore-min.js"></script>
<script src="js/backbone-min.js"></script>
322
Using SmartSync Data Framework in Hybrid and React Native
Apps
Offline Management

<script src="cordova.js"></script>
<script src="js/force.js"></script>
<script src="js/force+promise.js"></script>
<script src="js/smartsync.js"></script>
<script src="js/fastclick.js"></script>
<script src="js/stackrouter.js"></script>
<script src="js/auth.js"></script>
</body>
</html>
Create a SmartSync Data Framework Model and a Collection
Now that we’ve configured the HTML infrastructure, let’s get started using SmartSync Data Framework by extending two of its primary
objects:
•Force.SObject
•Force.SObjectCollection
These objects extend Backbone.Model, so they support the Backbone.Model.extend() function. To extend an object
using this function, pass it a JavaScript object containing your custom properties and functions.
1. In the <body> tag, create a <script> object.
2. In the <script> tag, create a model object for the Salesforce user sObject. Extend Force.SObject, and specify the sObject
type and the fields we are targeting.
app.models.User = Force.SObject.extend({
sobjectType: "User",
fieldlist: ["Id", "FirstName", "LastName",
"SmallPhotoUrl", "Title", "Email",
"MobilePhone","City"]
})
3. Immediately after setting the User object, create a UserCollection object to hold user search results. Extend
Force.SObjectCollection, and specify your new model (app.models.User) as the model for items in the collection.
app.models.UserCollection = Force.SObjectCollection.extend({
model: app.models.User,
fieldlist: ["Id", "FirstName", "LastName",
"SmallPhotoUrl", "Title"],
});
4. In this collection, implement a function named setCriteria that takes a search key and builds a SOQL query using it. You also
need a getter to return the key at a later point.
<script>
// The Models
// ==========
// The User Model
app.models.User = Force.SObject.extend({
sobjectType: "User",
fieldlist: ["Id", "FirstName",
"LastName", "SmallPhotoUrl",
"Title", "Email",
323
Using SmartSync Data Framework in Hybrid and React Native
Apps
Offline Management

"MobilePhone","City"]
});
// The UserCollection Model
app.models.UserCollection = Force.SObjectCollection.extend({
model: app.models.User
fieldlist: ["Id", "FirstName", "LastName",
"SmallPhotoUrl", "Title"],
getCriteria: function() {
return this.key;
},
setCriteria: function(key) {
this.key = key;
this.config = {type:"soql", query:"SELECT "
+ this.fieldlist.join(",")
+ " FROM User"
+ " WHERE Name like '" + key + "%'"
+ " ORDER BY Name "
+ " LIMIT 25 "
};
}
});
</script>
Example: Here’s the complete model code.
<script>
// The Models
// The User Model
app.models.User = Force.SObject.extend({
sobjectType: "User",
fieldlist: ["Id", "FirstName", "LastName",
"SmallPhotoUrl", "Title", "Email",
"MobilePhone","City"]
});
// The UserCollection Model
app.models.UserCollection = Force.SObjectCollection.extend({
model: app.models.User
fieldlist: ["Id", "FirstName", "LastName",
"SmallPhotoUrl", "Title"],
getCriteria: function() {
return this.key;
},
setCriteria: function(key) {
this.key = key;
this.config = {
type:"soql",
query:"SELECT " + this.fieldlist.join(",")
324
Using SmartSync Data Framework in Hybrid and React Native
Apps
Offline Management

+ " FROM User"
+ " WHERE Name like '" + key + "%'"
+ " ORDER BY Name "
+ " LIMIT 25 "
};
}
});
</script>
Create View Templates
Templates let you describe an HTML layout within a container HTML page. To define an inline template in your HTML page, you use a
<script> tag of type “text/template”. JavaScript code can apply your template to the page design when it instantiates a new HTML
page at runtime.
The search-page template is simple. It includes a header, a search field, and a list to hold the search results. At runtime, the search
page instantiates the user-list-item template to render the results list. When a customer clicks a list item, the list instantiates
the user-page template to show user details.
1. Add a template script block with an ID set to “search-page”. Place the block within the <body> block after the “content” <div>
tag.
<script id="search-page" type="text/template">
</script>
2. In the new <script> block, define the search page HTML template using Ratchet styles.
<script id="search-page" type="text/template">
<header class="bar-title">
<h1 class="title">Users</h1>
</header>
<div class="bar-standard bar-header-secondary">
<input type="search" class="search-key"
placeholder="Search"/>
</div>
<div class="content">
<ul class="list"></ul>
</div>
</script>
3. Add a second script block for a user list template.
<script id="user-list-item" type="text/template">
</script>
4. Define the user list template. Notice that this template contains references to the SmallPhotoUrl, FirstName, LastName,
and Title fields from the Salesforce user record. References that use the <%= varname %> format are called “free variables”
in Ratchet apps.
<script id="user-list-item" type="text/template">
<a href="#users/<%= Id %>" class="pad-right">
<img src="<%= SmallPhotoUrl %>" class="small-img" />
325
Using SmartSync Data Framework in Hybrid and React Native
Apps
Offline Management

<div class="details-short">
<b><%= FirstName %> <%= LastName %></b><br/>
Title<%= Title %>
</div>
</a>
</script>
5. Add a third script block for a user details template.
<script id="user-page" type="text/template">
</script>
6. Add the template body. Notice that this template contains references to the SmallPhotoUrl, FirstName, LastName, and
Title fields from the Salesforce user record. References that use the <%= varname %> format in Ratchet apps are called “free
variables”.
<script id="user-page" type="text/template">
<header class="bar-title">
<a href="#" class="button-prev">Back</a>
<h1 class="title">User</h1>
</header>
<footer class="bar-footer">
<span id="offlineStatus"></span>
</footer>
<div class="content">
<div class="content-padded">
<img id="employeePic" src="<%= SmallPhotoUrl %>"
class="large-img" />
<div class="details">
<b><%= FirstName %> <%= LastName %></b><br/>
<%= Id %><br/>
<% if (Title) { %><%= Title %><br/><% } %>
<% if (City) { %><%= City %><br/><% } %>
<% if (MobilePhone) { %> <a
href="tel:<%= MobilePhone %>">
<%= MobilePhone %></a><br/><% } %>
<% if (Email) { %><a
href="mailto:<%= Email %>">
<%= Email %></a><% } %>
</div>
</div>
</div>
</script>
Add the Search View
To create the view for a screen, you extend Backbone.View. Let’s start by defining the search view. In this extension, you load the
template, define subviews and event handlers, and implement the functionality for rendering the views and performing a SOQL search
query.
326
Using SmartSync Data Framework in Hybrid and React Native
Apps
Offline Management

1. In the <script> block where you defined the User and UserCollection models, create a Backbone.View extension named
SearchPage in the app.views array.
app.views.SearchPage = Backbone.View.extend({
});
For the remainder of this procedure, add all code to the extend({}) block. Each step adds another item to the implementation
list and therefore ends with a comma, until the last item.
2. Load the search-page template by calling the _.template() function. Pass it the raw HTML content of the search-page
script tag.
template: _.template($("#search-page").html()),
3. Add a keyup event. You define the search handler function a little later.
events: {
"keyup .search-key": "search"
},
4. Instantiate a subview named UserListView that contains the list of search results. (You define app.views.UserListView
later.)
initialize: function() {
this.listView = new app.views.UserListView({model: this.model});
},
5. Create a render() function for the search page view. Rendering the view consists of loading the template as the app’s HTML
content. Restore any criteria previously typed in the search field and render the subview inside the <ul> element.
render: function(eventName) {
$(this.el).html(this.template());
$(".search-key", this.el).val(this.model.getCriteria());
this.listView.setElement($("ul", this.el)).render();
return this;
},
6. Implement the search function. This function is the keyup event handler that performs a search when the customer types a
character in the search field.
search: function(event) {
this.model.setCriteria($(".search-key", this.el).val());
this.model.fetch();
}
Example: Here’s the complete extension.
app.views.SearchPage = Backbone.View.extend({
template: _.template($("#search-page").html()),
events: {
"keyup .search-key": "search"
},
initialize: function() {
327
Using SmartSync Data Framework in Hybrid and React Native
Apps
Offline Management

this.listView = new app.views.UserListView({model: this.model});
},
render: function(eventName) {
$(this.el).html(this.template());
$(".search-key", this.el).val(this.model.getCriteria());
this.listView.setElement($("ul", this.el)).render();
return this;
},
search: function(event) {
this.model.setCriteria($(".search-key", this.el).val());
this.model.fetch();
}
});
Add the Search Result List View
The view for the search result list doesn’t need a template. It is simply a container for list item views. It tracks these views in the
listItemViews member. If the underlying collection changes, it re-renders itself.
1. In the <script> block that contains the SearchPage view, extend Backbone.View to show a list of search view results.
Add an array for list item views and an initialize() function.
app.views.UserListView = Backbone.View.extend({
listItemViews: [],
initialize: function() {
this.model.bind("reset", this.render, this);
},
For the remainder of this procedure, add all code to the extend({}) block.
2. Create the render() function. This function cleans up any existing list item views by calling close() on each one.
render: function(eventName) {
_.each(this.listItemViews,
function(itemView) { itemView.close(); });
3. Still in the render() function, create a set of list item views for the records in the underlying collection. Each of these views is
just an entry in the list. You define app.views.UserListItemView later.
this.listItemViews = _.map(this.model.models, function(model) { return new
app.views.UserListItemView({model: model}); });
4. Still in the render() function, append each list item view to the root DOM element and then return the rendered UserListView
object.
$(this.el).append(_.map(this.listItemViews, function(itemView) {
return itemView.render().el;} ));
return this;
}
328
Using SmartSync Data Framework in Hybrid and React Native
Apps
Offline Management

Example: Here’s the complete extension:
app.views.UserListView = Backbone.View.extend({
listItemViews: [],
initialize: function() {
this.model.bind("reset", this.render, this);
},
render: function(eventName) {
_.each(this.listItemViews, function(itemView) {
itemView.close(); });
this.listItemViews = _.map(this.model.models,
function(model) {
return new app.views.UserListItemView(
{model: model}); });
$(this.el).append(_.map(this.listItemViews,
function(itemView) {
return itemView.render().el;
} ));
return this;
}
});
Add the Search Result List Item View
To define the search result list item view, you design and implement the view of a single row in a list. Each list item displays the following
user fields:
•SmallPhotoUrl
•FirstName
•LastName
•Title
1. Immediately after the UserListView view definition, create the view for the search result list item. Once again, extend
Backbone.View and indicate that this view is a list item by defining the tagName member. For the remainder of this procedure,
add all code in the extend({}) block.
app.views.UserListItemView = Backbone.View.extend({
});
2. Add an <li> tag.
app.views.UserListItemView = Backbone.View.extend({
tagName: "li",
});
3. Load the template by calling _.template() with the raw content of the user-list-item script.
template: _.template($("#user-list-item").html()),
4. Add a render() function. The template() function, from underscore.js, takes JSON data and returns HTML crafted
from the associated template. In this case, the function extracts the customer’s data from JSON and returns HTML that conforms to
329
Using SmartSync Data Framework in Hybrid and React Native
Apps
Offline Management

the user-list-item template. During the conversion to HTML, the template() function replaces free variables in the
template with corresponding properties from the JSON data.
render: function(eventName) {
$(this.el).html(this.template(this.model.toJSON()));
return this;
},
5. Add a close() method to be called from the list view that does necessary cleanup and stops memory leaks.
close: function() {
this.remove();
this.off();
}
Example: Here’s the complete extension.
app.views.UserListItemView = Backbone.View.extend({
tagName: "li",
template: _.template($("#user-list-item").html()),
render: function(eventName) {
$(this.el).html(this.template(this.model.toJSON()));
return this;
},
close: function() {
this.remove();
this.off();
}
});
Add the User View
Finally, you add a simple page view that displays a selected customer’s details. This view is the second page in this app. The customer
navigates to it by tapping an item in the Users list view. The user-page template defines a Back button that returns the customer
to the search list.
1. Immediately after the UserListItemView view definition, create the view for a customer’s details. Extend Backbone.View
again. For the remainder of this procedure, add all code in the extend({}) block.
app.views.UserPage = Backbone.View.extend({
});
2. Specify the template to be instantiated.
app.views.UserPage = Backbone.View.extend({
template: _.template($("#user-page").html()),
});
3. Implement a render() function. This function re-reads the model and converts it first to JSON and then to HTML.
app.views.UserPage = Backbone.View.extend({
template: _.template($("#user-page").html()),
330
Using SmartSync Data Framework in Hybrid and React Native
Apps
Offline Management

render: function(eventName) {
$(this.el).html(this.template(this.model.toJSON()));
return this;
}
});
Example: Here’s the complete extension.
app.views.UserPage = Backbone.View.extend({
template: _.template($("#user-page").html()),
render: function(eventName) {
$(this.el).html(this.template(this.model.toJSON()));
return this;
}
});
Define a Router
A Backbone router defines navigation paths among views. To learn more about routers, see What is a router?
1. In the final <script> block, define the application router by extending Backbone.StackRouter.
app.Router = Backbone.StackRouter.extend({
});
For the remainder of this procedure, add all code in the extend({}) block.
2. Because the app supports a search list page and a user page, add a route for each page inside a routes object. Also add a route
for the main container page ("").
routes: {
"": "list",
"list": "list",
"users/:id": "viewUser"
},
3. Define an initialize() function that creates the search results collection and the search page and user page views.
initialize: function() {
Backbone.Router.prototype.initialize.call(this);
// Collection behind search screen
app.searchResults = new app.models.UserCollection();
app.searchPage = new app.views.SearchPage(
{model: app.searchResults});
app.userPage = new app.views.UserPage();
},
331
Using SmartSync Data Framework in Hybrid and React Native
Apps
Offline Management

4. Define the list() function for handling the only item in this route. Call slidePage() to show the search results page right
away—when data arrives, the list redraws itself.
list: function() {
app.searchResults.fetch();
this.slidePage(app.searchPage);
},
5. Define a viewUser() function that fetches and displays details for a specific user.
viewUser: function(id) {
var that = this;
var user = new app.models.User({Id: id});
user.fetch({
success: function() {
app.userPage.model = user;
that.slidePage(app.userPage);
}
});
}
6. After saving the file, run the cordova prepare command.
7. Run the application.
Example: You’ve finished! Here’s the entire application:
<!DOCTYPE html>
<html>
<head>
<title>Users</title>
<meta name="viewport" content="width=device-width, initial-scale=1.0, maximum-scale=1.0,
user-scalable=no;" />
<link rel="stylesheet" href="css/styles.css"/>
<link rel="stylesheet" href="css/ratchet.css"/>
</head>
<body>
<div id="content"></div>
<script src="js/jquery.min.js"></script>
<script src="js/underscore-min.js"></script>
<script src="js/backbone-min.js"></script>
<!-- Local Testing -/->
<script src="js/MockCordova.js"></script>
<script src="js/cordova.force.js"></script>
<script src="js/MockSmartStore.js"></script>
<!-- End Local Testing -->
<!-- Container -->
<script src="cordova.js"></script>
<!-- End Container -->
<script src="js/force.js"></script>
<script src="js/force+promise.js"></script>
332
Using SmartSync Data Framework in Hybrid and React Native
Apps
Offline Management

<script src="js/smartsync.js"></script>
<script src="js/fastclick.js"></script>
<script src="js/stackrouter.js"></script>
<script src="js/auth.js"></script>
<!-- ----Search page template ---- -->
<script id="search-page" type="text/template">
<header class="bar-title">
<h1 class="title">Users</h1>
</header>
<div class="bar-standard bar-header-secondary">
<input type="search"
class="search-key"
placeholder="Search"/>
</div>
<div class="content">
<ul class="list"></ul>
</div>
</script>
<!-- ---- User list item template ---- -->
<script id="user-list-item" type="text/template">
<a href="#users/<%= Id %>" class="pad-right">
<img src="<%= SmallPhotoUrl %>" class="small-img" />
<div class="details-short">
<b><%= FirstName %> <%= LastName %></b><br/>
Title<%= Title %>
</div>
</a>
</script>
<!-- ---- User page template ---- -->
<script id="user-page" type="text/template">
<header class="bar-title">
<a href="#" class="button-prev">Back</a>
<h1 class="title">User</h1>
</header>
<footer class="bar-footer">
<span id="offlineStatus"></span>
</footer>
<div class="content">
<div class="content-padded">
<img id="employeePic"
src="<%= SmallPhotoUrl %>" class="large-img" />
<div class="details">
<b><%= FirstName %> <%= LastName %></b><br/>
<%= Id %><br/>
<% if (Title) { %><%= Title %><br/><% } %>
333
Using SmartSync Data Framework in Hybrid and React Native
Apps
Offline Management

<% if (City) { %><%= City %><br/><% } %>
<% if (MobilePhone) { %>
<a href="tel:<%= MobilePhone %>">
<%= MobilePhone %></a><br/><% } %>
<% if (Email) { %>
<a href="mailto:<%= Email %>">
<%= Email %></a><% } %>
</div>
</div>
</div>
</script>
<script>
// ---- The Models ---- //
// The User Model
app.models.User = Force.SObject.extend({
sobjectType: "User",
fieldlist: ["Id", "FirstName", "LastName", "SmallPhotoUrl",
"Title", "Email", "MobilePhone","City"]
});
// The UserCollection Model
app.models.UserCollection = Force.SObjectCollection.extend({
model: app.models.User,
fieldlist: ["Id", "FirstName", "LastName", "SmallPhotoUrl",
"Title"],
getCriteria: function() {
return this.key;
},
setCriteria: function(key) {
this.key = key;
this.config = {type:"soql",
query:"SELECT "
+ this.fieldlist.join(",")
+ " FROM User"
+ " WHERE Name like '" + key + "%'"
+ " ORDER BY Name "
+ " LIMIT 25 "
};
}
});
// -------------------------------------------------- The Views
---------------------------------------------------- //
app.views.SearchPage = Backbone.View.extend({
template: _.template($("#search-page").html()),
events: {
"keyup .search-key": "search"
334
Using SmartSync Data Framework in Hybrid and React Native
Apps
Offline Management

},
initialize: function() {
this.listView =
new app.views.UserListView(
{model: this.model});
},
render: function(eventName) {
$(this.el).html(this.template());
$(".search-key", this.el).val(this.model.getCriteria());
this.listView.setElement($("ul", this.el)).render();
return this;
},
search: function(event) {
this.model.setCriteria($(".search-key", this.el).val());
this.model.fetch();
}
});
app.views.UserListView = Backbone.View.extend({
listItemViews: [],
initialize: function() {
this.model.bind("reset", this.render, this);
},
render: function(eventName) {
_.each(this.listItemViews,
function(itemView) {itemView.close(); });
this.listItemViews =
_.map(this.model.models, function(model) {
return new app.views.UserListItemView(
{model: model}); });
$(this.el).append(_.map(this.listItemViews,
function(itemView) {
return itemView.render().el;} ));
return this;
}
});
app.views.UserListItemView = Backbone.View.extend({
tagName: "li",
template: _.template($("#user-list-item").html()),
render: function(eventName) {
$(this.el).html(this.template(this.model.toJSON()));
return this;
},
close: function() {
335
Using SmartSync Data Framework in Hybrid and React Native
Apps
Offline Management

this.remove();
this.off();
}
});
app.views.UserPage = Backbone.View.extend({
template: _.template($("#user-page").html()),
render: function(eventName) {
$(this.el).html(this.template(this.model.toJSON()));
return this;
}
});
// ----------------------------------------------- The Application Router
------------------------------------------ //
app.Router = Backbone.StackRouter.extend({
routes: {
"": "list",
"list": "list",
"users/:id": "viewUser"
},
initialize: function() {
Backbone.Router.prototype.initialize.call(this);
// Collection behind search screen
app.searchResults = new app.models.UserCollection();
// We keep a single instance of SearchPage and UserPage
app.searchPage = new app.views.SearchPage(
{model: app.searchResults});
app.userPage = new app.views.UserPage();
},
list: function() {
app.searchResults.fetch();
// Show page right away
// List will redraw when data comes in
this.slidePage(app.searchPage);
},
viewUser: function(id) {
var that = this;
var user = new app.models.User({Id: id});
user.fetch({
success: function() {
app.userPage.model = user;
that.slidePage(app.userPage);
336
Using SmartSync Data Framework in Hybrid and React Native
Apps
Offline Management

}
});
}
});
</script>
</body>
</html>
SmartSync Data Framework Sample Apps
Salesforce Mobile SDK provides sample apps that demonstrate how to use SmartSync Data Framework in hybrid apps. Account Editor
is the most full-featured of these samples. You can switch to one of the simpler samples by changing the startPage property in the
bootconfig.json file.
Running the Samples in iOS
In your Salesforce Mobile SDK for iOS installation directory, double-click the SalesforceMobileSDK.xcworkspace to open
it in Xcode. In Xcode Project Navigator, select the Hybrid SDK/AccountEditor project and click Run.
Running the Samples in Android
To run the sample in Android Studio, you first add references to basic libraries from your clone of the SalesforceMobileSDK-Android
repository. Add the following dependencies to your sample module, setting Scope to “Compile” for each one:
•libs/SalesforceSDK
•libs/SmartStore
•hybrid/SampleApps/AccountEditor
After Android Studio finishes building, click Run ‘<sample_name>’ in the toolbar or menu.
Account Editor Sample
Account Editor is the most complex SmartSync Data Framework-based sample application in Mobile SDK 2.0. It allows you to
create/edit/update/delete accounts online and offline, and also demonstrates conflict detection.
To run the sample:
1. If you’ve made changes to external/shared/sampleApps/smartsync/bootconfig.json, revert it to its original
content.
2. Launch Account Editor.
This application contains three screens:
•Accounts search
•Accounts detail
•Sync
When the application first starts, you see the Accounts search screen listing the most recently used accounts. In this screen, you can:
•Type a search string to find accounts whose names contain the given string.
•Tap an account to launch the account detail screen.
•Tap Create to launch an empty account detail screen.
337
Using SmartSync Data Framework in Hybrid and React Native
Apps
Offline Management
•Tap Online to go offline. If you are already offline, you can tap the Offline button to go back online. (You can also go offline by
putting the device in airplane mode.)
To launch the Account Detail screen, tap an account record in the Accounts search screen. The detail screen shows you the fields in the
selected account. In this screen, you can:
•Tap a field to change its value.
•Tap Save to update or create the account. If validation errors occur, the fields with problems are highlighted.
If you’re online while saving and the server’s record changed since the last fetch, you receive warnings for the fields that changed
remotely.
Two additional buttons, Merge and Overwrite, let you control how the app saves your changes. If you tap Overwrite, the app
saves to the server all values currently displayed on your screen. If you tap Merge, the app saves to the server only the fields you
changed, while keeping changes on the server in fields you did not change.
•Tap Delete to delete the account.
•Tap Online to go offline, or tap Offline to go online.
To see the Sync screen, tap Online to go offline, then create, update, or delete an account. When you tap Offline again to go back
online, the Sync screen shows all accounts that you modified on the device.
Tap Process n records to try to save your local changes to the server. If any account fails to save, it remains in the list with a notation
that it failed to sync. You can tap any account in the list to edit it further or, in the case of a locally deleted record, to undelete it.
Looking Under the Hood
To view the source code for this sample, open AccountEditor.html in an HTML or text editor.
Here are the key sections of the file:
•Script includes
•Templates
•Models
•Views
•Router
Script Includes
This sample includes the standard list of libraries for SmartSync Data Framework applications.
•jQuery—See http://jquery.com/.
•Underscore—Utility-belt library for JavaScript, required by backbone. See http://underscorejs.org/.
•Backbone—Gives structure to web applications. Used by SmartSync Data Framework. See http://backbonejs.org/.
•cordova.js—Required for hybrid applications using the Salesforce Mobile SDK.
•force.js—Lightning Platform JavaScript library for making REST API calls. Required by SmartSync Data Framework.
•smartsync.js—The Mobile SDK SmartSync Data Framework.
•fastclick.js—Library used to eliminate the 300 ms delay between physical tap and firing of a click event. See
https://github.com/ftlabs/fastclick.
•stackrouter.js and auth.js—Helper JavaScript libraries used by all three sample applications.
338
Using SmartSync Data Framework in Hybrid and React Native
Apps
Offline Management

Templates
Templates for this application include:
•search-page
•sync-page
•account-list-item
•edit-account-page (for the Account detail page)
Models
This sample defines three models: AccountCollection, Account and OfflineTracker.
AccountCollection is a subclass of SmartSync Data Framework’s Force.SObjectCollection class, which is a subclass
of the Backbone framework’s Collection class.
The AccountCollection.config() method returns an appropriate query to the collection. The query mode can be:
•Most recently used (MRU) if you are online and haven’t provided query criteria
•SOQL if you are online and have provided query criteria
•SmartSQL when you are offline
When the app calls fetch() on the collection, the fetch() function executes the query returned by config(). It then uses
the results of this query to populate AccountCollection with Account objects from either the offline cache or the server.
AccountCollection uses the two global caches set up by the AccountEditor application: app.cache for offline storage, and
app.cacheForOriginals for conflict detection. The code shows that the AccountCollection model:
•Contains objects of the app.models.Account model (model field)
•Specifies a list of fields to be queried (fieldlist field)
•Uses the sample app’s global offline cache (cache field)
•Uses the sample app’s global conflict detection cache (cacheForOriginals field)
•Defines a config() function to handle online as well as offline queries
Here’s the code (shortened for readability):
app.models.AccountCollection = Force.SObjectCollection.extend({
model: app.models.Account,
fieldlist: ["Id","Name","Industry","Phone","Owner.Name",
"LastModifiedBy.Name","LastModifiedDate"],
cache: function() { return app.cache},
cacheForOriginals: function() {
return app.cacheForOriginals;},
config: function() {
// Offline: do a cache query
if (!app.offlineTracker.get("isOnline")) {
// ...
}
// Online
else {
// ...
}
}
});
339
Using SmartSync Data Framework in Hybrid and React Native
Apps
Offline Management

Account is a subclass of SmartSync Data Framework’s Force.SObject class, which is a subclass of the Backbone framework’s
Model class. Code for the Account model shows that it:
•Uses a sobjectType field to indicate which type of sObject it represents (Account, in this case).
•Defines fieldlist as a method rather than a field, because the fields that it retrieves from the server are not the same as the
ones it sends to the server.
•Uses the sample app’s global offline cache (cache field).
•Uses the sample app’s global conflict detection cache (cacheForOriginals field).
•Supports a cacheMode() method that returns a value indicating how to handle caching based on the current offline status.
Here’s the code:
app.models.Account = Force.SObject.extend({
sobjectType: "Account",
fieldlist: function(method) {
return method == "read"
? ["Id","Name","Industry","Phone","Owner.Name",
"LastModifiedBy.Name","LastModifiedDate"]
: ["Id","Name","Industry","Phone"];
},
cache: function() { return app.cache;},
cacheForOriginals: function() { return app.cacheForOriginals;},
cacheMode: function(method) {
if (!app.offlineTracker.get("isOnline")) {
return Force.CACHE_MODE.CACHE_ONLY;
}
// Online
else {
return (method == "read" ?
Force.CACHE_MODE.CACHE_FIRST :
Force.CACHE_MODE.SERVER_FIRST);
}
}
});
OfflineTracker is a subclass of Backbone’s Model class. This class tracks the offline status of the application by observing the
browser’s offline status. It automatically switches the app to offline when it detects that the browser is offline. However, it goes online
only when the user requests it.
Here’s the code:
app.models.OfflineTracker = Backbone.Model.extend({
initialize: function() {
var that = this;
this.set("isOnline", navigator.onLine);
document.addEventListener("offline",function() {
console.log("Received OFFLINE event");
that.set("isOnline", false);
}, false);
document.addEventListener("online",function() {
console.log("Received ONLINE event");
// User decides when to go back online
}, false);
}
});
340
Using SmartSync Data Framework in Hybrid and React Native
Apps
Offline Management

Views
This sample defines five views:
•SearchPage
•AccountListView
•AccountListItemView
•EditAccountView
•SyncPage
A view typically provides a template field to specify its design template, an initialize() function, and a render() function.
Each view can also define an events field. This field contains an array whose key/value entries specify the event type and the event
handler function name. Entries use the following format:
"<event-type>[ <control>]": "<event-handler-function-name>"
For example:
events: {
"click .button-prev": "goBack",
"change": "change",
"click .save": "save",
"click .merge": "saveMerge",
"click .overwrite": "saveOverwrite",
"click .toggleDelete": "toggleDelete"
},
SearchPage
View for the entire search screen. It expects an AccountCollection as its model. It watches the search input field for changes
(the keyup event) and updates the model accordingly in the search() function.
events: {
"keyup .search-key": "search"
},
search: function(event) {
this.model.setCriteria($(".search-key", this.el).val());
this.model.fetch();
}
AcountListView
View for the list portion of the search screen. It expects an AccountCollection as its model and creates
AccountListItemView object for each account in the AccountCollection object.
AccountListItemView
View for an item within the list.
EditAccountPage
View for account detail page. This view monitors several events:
Handler function nameTarget ControlEvent Type
goBackbutton-prevclick
changeNot set (can be any edit control)change
savesaveclick
341
Using SmartSync Data Framework in Hybrid and React Native
Apps
Offline Management

Handler function nameTarget ControlEvent Type
saveMergemergeclick
saveOverwriteoverwriteclick
toggleDeletetoggleDeleteclick
A couple of event handler functions deserve special attention. The change() function shows how the view uses the event target
to send user edits back to the model:
change: function(evt) {
// apply change to model
var target = event.target;
this.model.set(target.name, target.value);
$("#account" + target.name + "Error", this.el).hide();
}
The toggleDelete() function handles a toggle that lets the user delete or undelete an account. If the user clicks to undelete,
the code sets an internal __locally_deleted__ flag to false to indicate that the record is no longer deleted in the cache.
Else, it attempts to delete the record on the server by destroying the local model.
toggleDelete: function() {
if (this.model.get("__locally_deleted__")) {
this.model.set("__locally_deleted__", false);
this.model.save(null, this.getSaveOptions(
null, Force.CACHE_MODE.CACHE_ONLY));
}
else {
this.model.destroy({
success: function(data) {
app.router.navigate("#", {trigger:true});
},
error: function(data, err, options) {
var error = new Force.Error(err);
alert("Failed to delete account:
" + (error.type === "RestError" ?
error.details[0].message :
"Remote change detected - delete aborted"));
}
});
}
}
SyncPage
View for the sync page. This view monitors several events:
Handler function nameControlEvent Type
goBackbutton-prevclick
syncsyncclick
342
Using SmartSync Data Framework in Hybrid and React Native
Apps
Offline Management

To see how the screen is rendered, look at the render method:
render: function(eventName) {
$(this.el).html(this.template(_.extend(
{countLocallyModified: this.model.length},
this.model.toJSON())));
this.listView.setElement($("ul",this.el)).render();
return this;
},
Let’s take a look at what happens when the user taps Process (the sync control).
The sync() function looks at the first locally modified Account in the view’s collection and tries to save it to the server. If the save
succeeds and there are no more locally modified records, the app navigates back to the search screen. Otherwise, the app marks
the account as having failed locally and then calls sync() again.
sync: function(event) {
var that = this;
if (this.model.length == 0 ||
this.model.at(0).get("__sync_failed__")) {
// We push sync failures back to the end of the list.
// If we encounter one, it means we are done.
return;
}
else {
var record = this.model.shift();
var options = {
mergeMode: Force.MERGE_MODE.MERGE_FAIL_IF_CHANGED,
success: function() {
if (that.model.length == 0) {
app.router.navigate("#", {trigger:true});
}
else {
that.sync();
}
},
error: function() {
record = record.set("__sync_failed__", true);
that.model.push(record);
that.sync();
}
};
return record.get("__locally_deleted__")
? record.destroy(options) :
record.save(null, options);
}
});
343
Using SmartSync Data Framework in Hybrid and React Native
Apps
Offline Management

Router
When the router is initialized, it sets up the two global caches used throughout the sample.
setupCaches: function() {
// Cache for offline support
app.cache = new Force.StoreCache("accounts",
[ {path:"Name", type:"string"} ]);
// Cache for conflict detection
app.cacheForOriginals = new Force.StoreCache("original-accounts");
return $.when(app.cache.init(), app.cacheForOriginals.init());
},
Once the global caches are set up, it also sets up two AccountCollection objects: One for the search screen, and one for the
sync screen.
// Collection behind search screen
app.searchResults = new app.models.AccountCollection();
// Collection behind sync screen
app.localAccounts = new app.models.AccountCollection();
app.localAccounts.config = {
type:"cache",
cacheQuery: {
queryType:"exact",
indexPath:"__local__",
matchKey:true,
order:"ascending",
pageSize:25}};
Finally, it creates the view objects for the Search, Sync, and EditAccount screens.
// We keep a single instance of SearchPage / SyncPage and EditAccountPage
app.searchPage = new app.views.SearchPage({model: app.searchResults});
app.syncPage = new app.views.SyncPage({model: app.localAccounts});
app.editPage = new app.views.EditAccountPage();
The router has a routes field that maps actions to methods on the router class.
routes: {
"": "list",
"list": "list",
"add": "addAccount",
"edit/accounts/:id": "editAccount",
"sync":"sync"
},
The list action fills the search result collections by calling fetch() and brings the search page into view.
list: function() {
app.searchResults.fetch();
// Show page right away - list will redraw when data comes in
this.slidePage(app.searchPage);
},
344
Using SmartSync Data Framework in Hybrid and React Native
Apps
Offline Management

The addAccount action creates an empty account object and bring the edit page for that account into view.
addAccount: function() {
app.editPage.model = new app.models.Account({Id: null});
this.slidePage(app.editPage);
},
The editAccount action fetches the specified Account object and brings the account detail page into view.
editAccount: function(id) {
var that = this;
var account = new app.models.Account({Id: id});
account.fetch({
success: function(data) {
app.editPage.model = account;
that.slidePage(app.editPage);
},
error: function() {
alert("Failed to get record for edit");
}
});
}
The sync action computes the localAccounts collection by calling fetch and brings the sync page into view.
sync: function() {
app.localAccounts.fetch();
// Show page right away - list will redraw when data comes in
this.slidePage(app.syncPage);
}
Defining Sync Names and Sync Configuration Files
Beginning in Mobile SDK 6.0, you can define sync configuration files and assign names to sync configurations. You can use sync names
to run, edit, or delete a saved sync operation.
You can define “sync down” and “sync up” operations through configuration files rather than code. To keep the mechanism simple,
Mobile SDK enforces the following file naming conventions:
•To define sync operations for the default global store, provide a file named globalsyncs.json.
•To define sync operations for the default user store, provide a file named usersyncs.json.
Hybrid apps load sync configuration files automatically, while other apps load them with a single line of code. To see examples, study
the SmartSyncExplorer and SmartSyncExplorerHybrid sample apps. These apps use configuration files to set up their sync operations.
Note:
•The JSON used to define sync operations is the same for all app types and platforms.
•Configuration file locations required by Mobile SDK vary according to app type and platform.
•If the name that a configuration file assigns to a sync operation already exists, Mobile SDK ignores the configuration file.
345
Defining Sync Names and Sync Configuration FilesOffline Management

Configuration File Format
The following example demonstrates the configuration file format.
{
"syncs": [
{
"syncName": "sync1",
"syncType": "syncDown",
"soupName": "accounts",
"target": {"type":"soql", "query":"SELECT Id, Name, LastModifiedDate FROM
Account"},
"options": {"mergeMode":"OVERWRITE"}
},
{
"syncName": "sync2",
"syncType": "syncUp",
"soupName": "accounts",
"target": {"createFieldlist":["Name"]},
"options": {"fieldlist":["Id", "Name", "LastModifiedDate"],
"mergeMode":"LEAVE_IF_CHANGED"}
}
]
}
Expected Locations of Configuration Files
iOS
•Native applications: / in the Resources bundle
•Hybrid applications: /www in the Resources bundle
Android
•Native applications: /res/raw
•Hybrid applications: /assets/www
Configuration File Example
SmartSyncExplorer sample apps—SmartSyncExplorer for iOS and Android, SmartSyncExplorerHybrid for iOS and Android—use a
configuration file named userconfig.json:
{ "syncs":
[
{
"syncName": "syncDownContacts",
"syncType": "syncDown",
"soupName": "contacts",
"target": {"type":"soql",
"query":"SELECT FirstName,
LastName,
Title,
MobilePhone,
Email,
346
Defining Sync Names and Sync Configuration FilesOffline Management

Department,
HomePhone
FROM Contact
LIMIT 10000"},
"options": {"mergeMode":"OVERWRITE"}
},
{
"syncName": "syncUpContacts",
"syncType": "syncUp",
"soupName": "contacts",
"target": {"createFieldlist":["FirstName",
"LastName",
"Title",
"MobilePhone",
"Email",
"Department",
"HomePhone"]},
"options": {"fieldlist":["Id",
"FirstName",
"LastName",
"Title",
"MobilePhone",
"Email",
"Department",
"HomePhone"],
"mergeMode":"LEAVE_IF_CHANGED"}
}
]
}
Loading Sync Definitions from Configuration Files (iOS Native Apps)
Loading methods are defined on the SmartSyncSDKManager class.
User store
[[SmartSyncSDKManager sharedManager] setupUserSyncsFromDefaultConfig];
Global store
[[SmartSyncSDKManager sharedManager] setupGlobalSyncsFromDefaultConfig];
Here’s an example. This excerpt is from SObjectDataManager.m in the iOS SmartSyncExplorer native sample app.
- (id)initWithDataSpec:(SObjectDataSpec *)dataSpec {
self = [super init];
if (self) {
(...)
[[SmartSyncSDKManager sharedManager] setupUserSyncsFromDefaultConfig];
(...) }
return self;
}
Loading Sync Definitions from Configuration Files (Android Native Apps)
Loading methods are defined on the SmartSyncSDKManager.
347
Defining Sync Names and Sync Configuration FilesOffline Management

User store
SmartSyncSDKManager.getInstance().setupUserSyncsFromDefaultConfig();
Global store
SmartSyncSDKManager.getInstance().setupGlobalSyncsFromDefaultConfig();
Here’s an example. This excerpt is from ContactListLoader.java in the Android SmartSyncExplorer native sample app:
public ContactListLoader(Context context, UserAccount account) {
super(context);
(...)
SmartSyncSDKManager.getInstance().setupUserSyncsFromDefaultConfig();
(...)
}
Using Sync Names
Mobile SDK provides a collection of APIs for using and managing named sync operations. You can programmatically create and delete
named syncs at runtime, run or rerun them by name, and manage named syncs in memory.
Name-Based APIs (iOS)
Most of these methods are new. Updated methods use the same parameters as their existing analogs for target, options, and
updateBlock.
Get sync status by name
- (nullable
SFSyncState*)getSyncStatusByName:(NSString*)syncName;
Check for an existing sync by name
- (BOOL)hasSyncWithName:(NSString*)syncName;
Delete a sync configuration by name
- (void)deleteSyncByName:(NSString*)syncName;
Create a named sync configuration
- (SFSyncState *)createSyncDown:(SFSyncDownTarget *)target
options:(SFSyncOptions *)options
soupName:(NSString *)soupName
syncName:(NSString *)syncName;
- (SFSyncState *)createSyncUp:(SFSyncUpTarget *)target
options:(SFSyncOptions *)options
soupName:(NSString *)soupName
syncName:(NSString *)syncName;
Note: These operations fail if the requested sync name already exists.
348
Defining Sync Names and Sync Configuration FilesOffline Management

Create and run a named sync configuration
These operations both create a sync configuration with the given name and then run it in the same call.
- (SFSyncState*)syncDownWithTarget:(SFSyncDownTarget*)target
options:(SFSyncOptions*)options
soupName:(NSString*)soupName
syncName:(NSString* __nullable)syncName
updateBlock:(SFSyncSyncManagerUpdateBlock)updateBlock;
- (SFSyncState*)syncUpWithTarget:(SFSyncUpTarget*)target
options:(SFSyncOptions*)options
soupName:(NSString*)soupName
syncName:(NSString*)syncName
updateBlock:(SFSyncSyncManagerUpdateBlock)updateBlock;
Note: These operations fail if the requested sync name already exists.
Rerun a named sync configuration
- (nullable SFSyncState*)reSyncByName:(NSString*)syncName
updateBlock:(SFSyncSyncManagerUpdateBlock)updateBlock;
Name-Based APIs (Android)
Most of these methods are new. Overridden methods use the same parameters as their existing analogs for target, options, and
callback.
Get sync status by name
public SyncState getSyncStatus(String name);
Check for an existing sync by name
public boolean hasSyncWithName(String name);
Delete a sync configuration by name
public void deleteSync(String name);
Create a named sync configuration
public SyncState createSyncDown(SyncDownTarget target, SyncOptions options,
String soupName, String syncName);
public SyncState createSyncUp(SyncUpTarget target, SyncOptions options,
String soupName, String syncName);
Note: These operations fail if the requested sync name already exists.
Create and run a named sync configuration
public SyncState syncDown(SyncDownTarget target, SyncOptions options,
String soupName, String syncName, SyncUpdateCallback callback);
public SyncState syncUp(SyncUpTarget target, SyncOptions options,
String soupName, String syncName, SyncUpdateCallback callback);
349
Defining Sync Names and Sync Configuration FilesOffline Management

Note: These operations both create and run a sync configuration with the given name. They fail if the requested sync name
already exists.
Rerun a named sync configuration
public SyncState reSync(String syncName, SyncUpdateCallback callback);
Name-Based APIs (Hybrid)
Most of these methods are existing legacy APIs. Wherever a sync ID is accepted, you can pass the sync name instead.
Get sync status by name
You can use this function to determine if a sync configuration exists. It returns null if the sync configuration doesn’t exist.
getSyncStatus(storeConfig, syncIdOrName, successCB, errorCB)
Delete a sync configuration by name
deleteSync(storeConfig, syncIdOrName, successCB, errorCB)
Create and run a named sync configuration
The legacy syncDown() function now includes a syncName parameter. If the name is provided, Mobile SDK creates a
configuration with the given name. This function fails if the requested sync name already exists.
syncDown(storeConfig, target, soupName, options, syncName, successCB, errorCB)
syncUp(storeConfig, target, soupName, options, syncName, successCB, errorCB)
Run (or re-run) any sync by name
This existing method now has an overload that accepts either a sync ID or name.
reSync(storeConfig, syncIdOrName, successCB, errorCB)
Name-Based APIs (React Native)
Most of these methods are existing legacy APIs. Wherever a sync ID is accepted, you can pass the sync name instead.
Get sync status by name
This existing method now has an overload that accepts either a sync ID or a sync name.
getSyncStatus(storeConfig, syncIdOrName, successCB, errorCB)
Delete by name
This method, new in Mobile SDK 6.0, accepts either a sync ID or a sync name.
deleteSync(storeConfig, syncIdOrName, successCB, errorCB)
Create and run a sync with a name - new optional parameter syncName
This existing method now has an optional parameter that accepts a sync name.
syncDown(storeConfig, target, soupName, options, syncName, successCB, errorCB)
syncUp(storeConfig, target, soupName, options, syncName, successCB, errorCB)
Run (or re-run) any sync by name - overloaded to accept id or name
This existing method now has an overload that accepts either a sync ID or a sync name.
reSync(storeConfig, syncIdOrName, successCB, errorCB)
350
Defining Sync Names and Sync Configuration FilesOffline Management

Example: Invoking the Resync Method in Native Android Apps
Excerpt from ContactListLoader.java from Android SmartSyncExplorer native sample app:
public synchronized void syncUp() {
try {
syncMgr.reSync(SYNC_UP_NAME /* see usersyncs.json */, new SyncUpdateCallback()
{
@Override
public void onUpdate(SyncState sync) {
if (Status.DONE.equals(sync.getStatus())) {
syncDown();
}
}
});
} catch (JSONException e) {
Log.e(TAG, "JSONException occurred while parsing", e);
} catch (SmartSyncException e) {
Log.e(TAG, "SmartSyncException occurred while attempting to sync up", e);
}
}
public synchronized void syncDown() {
try {
syncMgr.reSync(SYNC_DOWN_NAME /* see usersyncs.json */, new SyncUpdateCallback()
{
@Override
public void onUpdate(SyncState sync) {
if (Status.DONE.equals(sync.getStatus())) {
fireLoadCompleteIntent();
}
}
});
} catch (JSONException e) {
Log.e(TAG, "JSONException occurred while parsing", e);
} catch (SmartSyncException e) {
Log.e(TAG, "SmartSyncException occurred while attempting to sync down", e);
}
}
Example: Invoking the Resync Method in Native iOS Apps
Excerpt from SObjectDataManager.m from iOS SmartSyncExplorer native sample app:
- (void)refreshRemoteData:(void (^)(void))completionBlock {
__weak SObjectDataManager *weakSelf = self;
// See usersyncs.json
[self.syncMgr reSyncByName:kSyncDownName updateBlock:^(SFSyncState *sync) {
__strong typeof(weakSelf) strongSelf = weakSelf;
if ([sync isDone] || [sync hasFailed]) {
[strongSelf refreshLocalData:completionBlock];
}
351
Defining Sync Names and Sync Configuration FilesOffline Management

}];
}
- (void)updateRemoteData:(SFSyncSyncManagerUpdateBlock)completionBlock {
// See usersyncs.json
[self.syncMgr reSyncByName:kSyncUpName updateBlock:^(SFSyncState* sync) {
if ([sync isDone] || [sync hasFailed]) {
completionBlock(sync);
}
}];
}
Example: Invoking the Resync Method in Hybrid Apps
Excerpt from SmartSyncExplorer.html from SmartSyncExplorerHybrid sample app:
syncDown: function() {
cordova.require("com.salesforce.plugin.smartsync").reSync("syncDownContacts" /*
see usersyncs.json */,
this.handleSyncUpdate.bind(this));
},
syncUp: function() {
cordova.require("com.salesforce.plugin.smartsync").reSync("syncUpContacts" /* see
usersyncs.json */,
this.handleSyncUpdate.bind(this));},
352
Defining Sync Names and Sync Configuration FilesOffline Management

CHAPTER 12 Files and Networking
Mobile SDK provides an API for files management that implements two levels of technology. For files
management, Mobile SDK provides convenience methods that process file requests through the Chatter
In this chapter ...
•Architecture REST API. Under the REST API level, networking classes give apps control over pending REST requests.
•Downloading Files
and Managing
Sharing
Together, these two sides of the same coin give the SDK a robust content management feature as well
as enhanced networking performance.
•Uploading Files
•Encryption and
Caching
•Using Files in
Android Apps
•Using Files in iOS
Native Apps
•Using Files in Hybrid
Apps
353

Architecture
Beginning with Mobile SDK 4.2, the Android REST request system uses OkHttp (v3.2.0), an open-source external library from Square Open
Source, as its underlying architecture. This library replaces the Google Volley library from past releases. As a result, Mobile SDK no longer
defines the WrappedRestRequest class. For more information, see square.github.io/okhttp/.
In iOS, file management and networking rely on the SalesforceNetwork library. All REST API calls—for files and any other REST
requests—go through this library.
Note: If you directly accessed a third-party networking library in older versions of your app, update that code to use the
SalesforceNetwork library.
Hybrid JavaScript functions use the the Mobile SDK architecture for the device operating system (Android, iOS, or Windows) to implement
file operations. These functions are defined in force.js.
Downloading Files and Managing Sharing
Salesforce Mobile SDK provides convenience methods that build specialized REST requests for file download and sharing operations.
You can use these requests to:
•Access the byte stream of a file.
•Download a page of a file.
•Preview a page of a file.
•Retrieve details of File records.
•Access file sharing information.
•Add and remove file shares.
Pages in Requests
The term “page” in REST requests can refer to either a specific item or a group of items in the result set, depending on the context. When
you preview a page of a specific file, for example, the request retrieves the specified page from the rendered pages. For most other
requests, a page refers to a section of the list of results. The maximum number of records or topics in a page defaults to 25.
The response includes a NextPageUrl field. If this value is defined, there is another page of results. If you want your app to scroll
through pages of results, you can use this field to avoid sending unnecessary requests. You can also detect when you’re at the end of
the list by simply checking the response status. If nothing or an error is returned, there’s nothing more to display and no need to issue
another request.
Uploading Files
Native mobile platforms support a method for uploading a file. You provide a path to the local file to be uploaded, the name or title of
the file, and a description. If you know the MIME type, you can specify that as well. The upload method returns a platform-specific request
object that can upload the file to the server. When you send this request to the server, the server creates a file with version set to 1.
Use the following methods for the given app type:
354
ArchitectureFiles and Networking

SignatureUpload MethodApp Type
public static RestRequest
uploadFile(
FileRequests.uploadFile()
Android native
File theFile,
String name,
String description,
String mimeType)
throws UnsupportedEncodingException
- (SFRestRequest *)
requestForUploadFile:(NSData *)data
- requestForUploadFile:
name:description:mimeType:
iOS native
name:(NSString *)name
description:(NSString *)description
mimeType:(NSString *)mimeType
N/AN/AHybrid (Android and
iOS)
Encryption and Caching
Mobile SDK gives you access to the file’s unencrypted byte stream but doesn’t implement file caching or storage. You’re free to devise
your own solution if your app needs to store files on the device.
Using Files in Android Apps
The FileRequests class provides static methods for creating RestRequest objects that perform file operations. Each method
returns the new RestRequest object. Applications then call the ownedFilesList() method to retrieve a RestRequest
object. It passes this object as a parameter to a function that uses the RestRequest object to send requests to the server:
performRequest(FileRequests.ownedFilesList(null, null));
This example passes null to the first parameter (userId). This value tells the ownedFilesList() method to use the ID of the
context, or logged-in, user. The second null, for the pageNum parameter, tells the method to fetch the first page of results.
For native Android apps, file management classes and methods live in the com.salesforce.androidsdk.rest.files
package.
SEE ALSO:
FileRequests Methods (Android)
Managing the Request Queue
The RestClient class internally uses an instance of the OkHttpClient class to manage REST API requests. You can access
underlying OkHttp objects directly to cancel pending requests. To manage a specific request, you can use the OkHttp Call object
returned by the RestClient.sendAsync() Mobile SDK method.
355
Encryption and CachingFiles and Networking

Example: The following examples show how to perform some common network operations with OkHttpClient.
Common Imports
import okhttp3.Headers;
import okhttp3.HttpUrl;
import okhttp3.OkHttpClient;
import okhttp3.Call;
import okhttp3.Dispatcher;
import okhttp3.Request;
import okhttp3.RequestBody;
import okhttp3.Response;
Obtain the Current OkHttp Client Handle
To get the handle of the OkHttpClient that the current RestClient instance is using:
OkHttpClient okClient = restClient.getOkHttpClient();
Obtain the OkHttp Dispatcher
Dispatcher dispatcher = restClient.getOkHttpClient().dispatcher();
Cancel All Pending Calls
Dispatcher dispatcher = restClient.getOkHttpClient().dispatcher();
dispatcher.cancelAll();
Store the OkHttp Handle to a REST Request
Call call = restClient.sendAsync(restRequest, callback);
Cancel a Specific REST Request Using a Stored Handle
Call call = restClient.sendAsync(restRequest, callback);
...
call.cancel();
For more information, see square.github.io/okhttp/.
SEE ALSO:
OkHttp: The Underlying Network Library
Using Files in iOS Native Apps
To handle files in native iOS apps, use convenience methods defined in the SFRestAPI (Files) category. These methods parallel
the files API for Android native and hybrid apps. They send requests to the same list of REST APIs, but use different underpinnings.
356
Using Files in iOS Native AppsFiles and Networking

REST Responses and Multithreading
The SalesforceNetwork library always dispatches REST responses to the thread where your SFRestDelegate currently runs. This
design accommodates your app no matter how your delegate intends to handle the server response. When you receive the response,
you can do whatever you like with the returned data. For example, you can cache it, store it in a database, or immediately blast it to UI
controls. If you send the response directly to the UI, however, remember that your delegate must dispatch its messages to the main
thread.
SEE ALSO:
SFRestAPI (Files) Category—Request Methods (iOS)
Managing Requests
The SalesforceNetwork library for iOS defines two primary objects, SFNetworkEngine and SFNetworkOperation.
SFRestRequest internally uses a SFNetworkOperation object to make each server call.
If you’d like to access the SFNetworkOperation object for any request, you have two options.
•The following methods return SFNetworkOperation*:
–[SFRestRequest send:]
–[SFRestAPI send:delegate:]
•SFRestRequest objects include a networkOperation object of type SFNetworkOperation*.
To cancel pending REST requests, you also have two options.
•SFRestRequest provides a new method that cancels the request:
- (void) cancel;
•And SFRestAPI has a method that cancels all requests currently running:
- (void)cancelAllRequests;
Example: Examples of Canceling Requests
To cancel all requests:
[[SFRestAPI sharedInstance] cancelAllRequests];
To cancel a single request:
SFRestRequest *request = [[SFRestAPI sharedInstance] requestForOwnedFilesList:nil
page:0];
[[SFRestAPI sharedInstance] send:request delegate:self];
...
// User taps Cancel Request button while waiting for the response
-(void) cancelRequest:(SFRestRequest *) request {
[request cancel];
}
357
Managing RequestsFiles and Networking

Using Files in Hybrid Apps
Hybrid file request wrappers reside in the force.js JavaScript library. When using the hybrid functions, you pass in a callback function
that receives and handles the server response. You also pass in a function to handle errors.
To simplify the code, you can leverage the smartsync.js and force.js libraries to build your HTML app. The FileExplorer
sample app in the github.com/forcedotcom/SalesforceMobileSDK-Shared repo demonstrates this.
Note: Mobile SDK does not support file uploads in hybrid apps.
SEE ALSO:
Files Methods For Hybrid Apps
358
Using Files in Hybrid AppsFiles and Networking

CHAPTER 13 Push Notifications and Mobile SDK
Push notifications from Salesforce help your mobile users stay on top of important developments in
their organizations. The Salesforce Mobile Push Notification Service, which becomes generally available
In this chapter ...
•About Push
Notifications in Summer ’14, lets you configure and test mobile push notifications before you implement any code.
To receive mobile notifications in a production environment, your Mobile SDK app implements the
•Using Push
Notifications in
Hybrid Apps
mobile OS provider’s registration protocol and then handles the incoming notifications. Mobile SDK
minimizes your coding effort by implementing most of the registration tasks internally.
•Using Push
Notifications in
Android
•Using Push
Notifications in iOS
359

About Push Notifications
With the Salesforce Mobile Push Notification Service, you can develop and test push notifications in Salesforce Mobile SDK apps. Mobile
SDK provides APIs that you can implement to register devices with the push notification service. However, receiving and handling the
notifications remain the responsibility of the developer.
Push notification setup occurs on several levels:
•Configuring push services from the device technology provider (Apple for iOS, Google for Android)
•Configuring your Salesforce connected app definition to enable push notifications
•Implementing Apex triggers
OR
Calling the push notification resource of the Chatter REST API
•Modifying code in your Mobile SDK app
•Registering the mobile device at runtime
You’re responsible for Apple or Google service configuration, connected app configuration, Apex or Chatter REST API coding, and minor
changes to your Mobile SDK app. Salesforce Mobile SDK handles runtime registration transparently.
For a full description of how to set up mobile push notifications for your organization, see the Salesforce Mobile Push Notifications
Implementation Guide.
Using Push Notifications in Hybrid Apps
To use push notifications in a hybrid app, first be sure to
•Register for push notifications with the OS provider.
•Configure your connected app to support push notifications for your target device platform.
Salesforce Mobile SDK lets your hybrid app register itself to receive notifications, and then you define the behavior that handles incoming
notifications.
SEE ALSO:
Using Push Notifications in Android
Using Push Notifications in iOS
Code Modifications (Hybrid)
1. (Android only) If your target platform is Android:
a. Add an entry for androidPushNotificationClientId. In assets/www/bootconfig.json:
"androidPushNotificationClientId": "33333344444"
This value is the project number of the Google project that is authorized to send push notifications to an Android device.
360
About Push NotificationsPush Notifications and Mobile SDK

2. In your callback for cordova.require("com.salesforce.plugin.oauth").getAuthCredentials(), add
the following code:
cordova.require("com.salesforce.util.push").registerPushNotificationHandler(
function(message) {
// add code to handle notifications
},
function(error) {
// add code to handle errors
}
);
Example: This code demonstrates how you might handle messages. The server delivers the payload in message["payload"].
function(message) {
var payload = message["payload"];
if (message["foreground"]) {
// Notification is received while the app is in
// the foreground
// Do something appropriate with payload
}
if (!message["foreground"]) {
// Notification was received while the app was in
// the background, and the notification was clicked,
// bringing the app to the foreground
// Do something appropriate with payload
}
}
Using Push Notifications in Android
Salesforce sends push notifications to Android apps through the Google Cloud Messaging for Android (GCM) framework. See
http://developer.android.com/google/gcm/index.html for an overview of this framework.
When developing an Android app that supports push notifications, remember these key points:
•You must be a member of the Android Developer Program.
•You can test GCM push services only on an Android device with either the Android Market app or Google Play Services installed.
Push notifications don’t work on an Android emulator.
•You can also use the Send Test Notification link in your connected app detail view to perform a "dry run" test of your GCM setup
without pinging any device.
To begin, create a Google API project for your app. Your project must have the GCM for Android feature enabled. See
http://developer.android.com/google/gcm/gs.html for instructions on setting up your project.
The setup process for your Google API project creates a key for your app. Once you’ve finished the project configuration, you’ll need to
add the GCM key to your connected app settings.
Note: Push notification registration occurs at the end of the OAuth login flow. Therefore, an app does not receive push notifications
unless and until the user logs into a Salesforce organization.
361
Using Push Notifications in AndroidPush Notifications and Mobile SDK
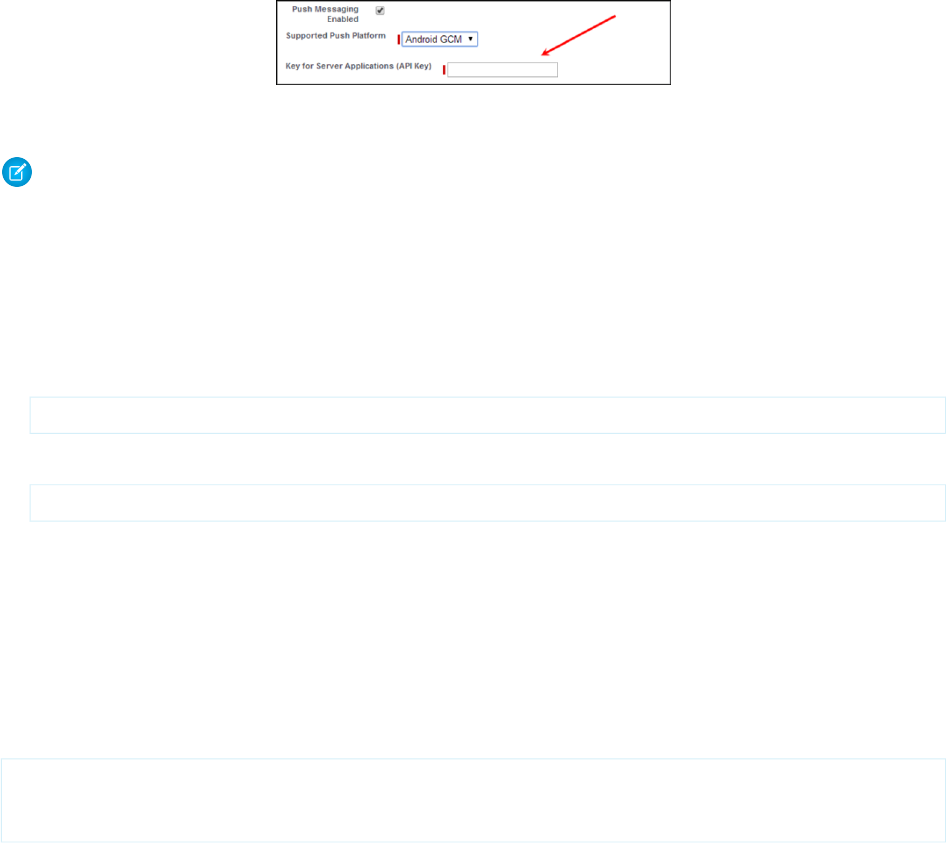
Configure a Connected App For GCM (Android)
To configure your Salesforce connected app to support push notifications:
1. In your Salesforce organization, from Setup, enter Apps in the Quick Find box, then select Apps.
2. In Connected Apps, click Edit next to an existing connected app, or New to create a new connected app.
If you’re creating a new connected app, see Create a Connected App.
3. Under Mobile App Settings, select Push Messaging Enabled.
4. For Supported Push Platform, select Android GCM.
5. For Key for Server Applications (API Key), enter the key you obtained during the developer registration with Google.
6. Click Save.
Note: After saving a new connected app, you’ll get a consumer key. Mobile apps use this key as their connection token.
Code Modifications (Android)
To configure your Mobile SDK app to support push notifications:
1. Add an entry for androidPushNotificationClientId.
•In res/values/bootconfig.xml (for native apps):
<string name="androidPushNotificationClientId">33333344444</string>
•In assets/www/bootconfig.json (for hybrid apps):
"androidPushNotificationClientId": "33333344444"
This value is the project number of the Google project that is authorized to send push notifications to an Android device.
Behind the scenes, Mobile SDK automatically reads this value and uses it to register the device against the Salesforce connected
app. This validation allows Salesforce to send notifications to the connected app. At logout, Mobile SDK also automatically unregisters
the device for push notifications.
2. Create a class in your app that implements PushNotificationInterface. PushNotificationInterface is a
Mobile SDK Android interface for handling push notifications. PushNotificationInterface has a single method,
onPushMessageReceived(Bundle message):
public interface PushNotificationInterface {
public void onPushMessageReceived(Bundle message);
}
In this method you implement your custom functionality for displaying, or otherwise disposing of, push notifications.
3. In the onCreate() method of your Application subclass, call the
SalesforceSDKManager.setPushNotificationReceiver() method, passing in your implementation of
362
Configure a Connected App For GCM (Android)Push Notifications and Mobile SDK

PushNotificationInterface. Call this method immediately after the SalesforceSDKManager.initNative()
call. For example:
@Override
public void onCreate() {
super.onCreate();
SalesforceSDKManager.initNative(getApplicationContext(),
new KeyImpl(), MainActivity.class);
SalesforceSDKManager.getInstance().
setPushNotificationReceiver(myPushNotificationInterface);
}
Using Push Notifications in iOS
When developing an iOS app that supports push notifications, remember these key points:
•You must be a member of the iOS Developer Program.
•You can test Apple push services only on an iOS physical device. Push notifications don’t work in the iOS simulator.
•There are no guarantees that all push notifications will reach the target device, even if the notification is accepted by Apple.
•Apple Push Notification Services setup requires the use of the OpenSSL command line utility provided in Mac OS X.
Before you can complete registration on the Salesforce side, you need to register with Apple Push Notification Services. The following
instructions provide a general outline for what’s required. See http://www.raywenderlich.com/32960/ for complete instructions.
Configuration for Apple Push Notification Services
Registering with Apple Push Notification Services (APNS) requires the following items.
Certificate Signing Request (CSR) File
Generate this request using the Keychain Access feature in Mac OS X. You’ll also use OpenSSL to export the CSR private key to a file
for later use.
App ID from iOS Developer Program
In the iOS Developer Member Center, create an ID for your app, then use the CSR file to generate a certificate. Next, use OpenSSL to
combine this certificate with the private key file to create a .p12 file. You’ll need this file later to configure your connected app.
iOS Provisioning Profile
From the iOS Developer Member Center, create a new provisioning profile using your iOS app ID and developer certificate. You then
select the devices to include in the profile and download to create the provisioning profile. You can then add the profile to Xcode.
Install the profile on your test device using Xcode's Organizer.
When you’ve completed the configuration, sign and build your app in Xcode. Check the build logs to verify that the app is using the
correct provisioning profile. To view the content of your provisioning profile, run the following command at the Terminal window:
security cms -D -i <your profile>.mobileprovision
Configure a Connected App for APNS (iOS)
To configure your Salesforce connected app to support push notifications with Apple Push Notification Services (APNS):
1. In your Salesforce organization, from Setup, enter Apps in the Quick Find box, then select Apps.
2. In Connected Apps, either click Edit next to an existing connected app, or New to create a new connected app. If you’re creating a
new connected app, see Create a Connected App.
363
Using Push Notifications in iOSPush Notifications and Mobile SDK
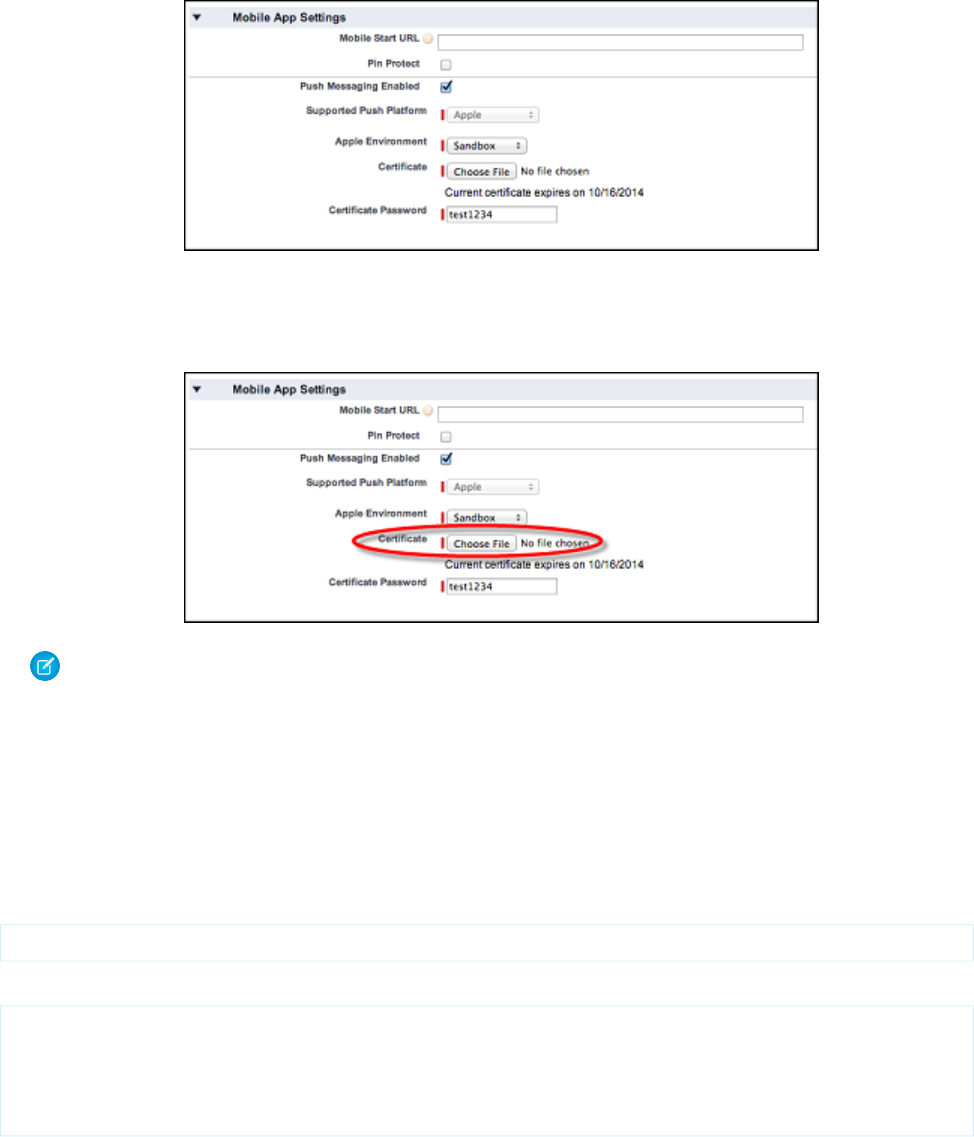
3. Under Mobile App Settings, select Push Messaging Enabled.
4. For Supported Push Platform, select Apple.
The page expands to show additional settings.
5. Select the Apple Environment that corresponds to your APNS certificate.
6. Add your .p12 file and its password under Mobile App Settings > Certificate and Mobile App Settings > Certificate Password.
Note: You obtain the values for Apple Environment, Certificate, and Certificate Password when you configure your app with
APNS.
7. Click Save.
Code Modifications (iOS)
Salesforce Mobile SDK for iOS provides the SFPushNotificationManager class to handle push registration. To use it, import
<SalesforceSDKCore/SFPushNotificationManager>. The SFPushNotificationManager class is available
as a runtime singleton:
[SFPushNotificationManager sharedInstance]
This class implements four registration methods:
- (void)registerForRemoteNotifications;
- (void)didRegisterForRemoteNotificationsWithDeviceToken:
(NSData*)deviceTokenData;
- (BOOL)registerForSalesforceNotifications; // for internal use
- (BOOL)unregisterSalesforceNotifications; // for internal use
364
Code Modifications (iOS)Push Notifications and Mobile SDK

Mobile SDK calls registerForSalesforceNotifications after login and unregisterSalesforceNotifications
at logout. You call the other two methods from your AppDelegate class.
Example: SFPushNotificationManager Example
To configure your AppDelegate class to support push notifications:
1. Register with Apple for push notifications by calling registerForRemoteNotifications. Call this method in the
application:didFinishLaunchingWithOptions: method.
- (BOOL)application:(UIApplication *)application
didFinishLaunchingWithOptions:(NSDictionary *)launchOptions
{
self.window =
[[UIWindow alloc] initWithFrame:
[UIScreen mainScreen].bounds];
[self initializeAppViewState];
//
// Register with APNS for push notifications. Note that,
// to receive push notifications from Salesforce,
// you also need to register for Salesforce notifications
// in the application:
// didRegisterForRemoteNotificationsWithDeviceToken:
// method (as demonstrated below.)
//
[[SFPushNotificationManager sharedInstance]
registerForRemoteNotifications];
[[SFAuthenticationManager sharedManager]
loginWithCompletion:self.initialLoginSuccessBlock
failure:self.initialLoginFailureBlock]
credentials:(SFOAuthCredentials *)credentials;
return YES;
}
If registration succeeds, Apple passes a device token to the
application:didRegisterForRemoteNotificationsWithDeviceToken: method of your
AppDelegate class.
2. Forward the device token from Apple to SFPushNotificationManager by calling
didRegisterForRemoteNotificationsWithDeviceToken on the SFPushNotificationManager
shared instance.
- (void)application:(UIApplication*)application
didRegisterForRemoteNotificationsWithDeviceToken:
(NSData*)deviceToken
{
//
// Register your device token
// with the push notification manager
//
[[SFPushNotificationManager sharedInstance]
didRegisterForRemoteNotificationsWithDeviceToken:
deviceToken];
365
Code Modifications (iOS)Push Notifications and Mobile SDK

}
3. Register to receive Salesforce notifications through the connected app by calling
registerForSalesforceNotifications. Call this method only if the access token for the current session is valid.
- (void)application:(UIApplication*)application
didRegisterForRemoteNotificationsWithDeviceToken:
(NSData*)deviceToken
{
//
// Register your device token with the
// push notification manager
//
[[SFPushNotificationManager sharedInstance]
didRegisterForRemoteNotificationsWithDeviceToken:deviceToken];
if ([SFAccountManager sharedInstance].
credentials.accessToken != nil) {
[[SFPushNotificationManager sharedInstance]
registerForSalesforceNotifications];
}}
4. To log an error if registration with Apple should fail, add the following method.
- (void)application:(UIApplication*)application
didFailToRegisterForRemoteNotificationsWithError:(NSError*)error
{
NSLog(@"Failed to get token, error: %@", error);
}
366
Code Modifications (iOS)Push Notifications and Mobile SDK

CHAPTER 14 Authentication, Security, and Identity in
Mobile Apps
Secure authentication is essential for enterprise applications running on mobile devices. OAuth 2.0, the
industry-standard protocol, enables secure authorization for access to a customer’s data, without handing
In this chapter ...
•OAuth Terminology out the username and password. It is often described as the valet key of software access. A valet key
•OAuth 2.0
Authentication Flow
restricts access to certain features of your car. For example, a parking attendant can’t open the trunk or
glove compartment using a valet key.
•Connected Apps Mobile app developers can quickly and easily embed the Salesforce OAuth 2.0 implementation. The
implementation uses an HTML view to collect the username and password, which are then sent to the
•Portal Authentication
Using OAuth 2.0 and
Salesforce Sites
server. The server returns a session token and a persistent refresh token that are stored on the device for
future interactions.
•Using MDM with
Salesforce Mobile
SDK Apps
A Salesforce connected app is the primary means by which a mobile app connects to Salesforce. A
connected app gives both the developer and the administrator control over how the app connects and
who has access. For example, a connected app can restrict access to a set of customers, set or relax an
IP range, and so on.
•Using Advanced
Authentication in iOS
Apps
•Enabling
Browser-Based
Authentication in
Android Apps
367

OAuth Terminology
Access Token
A value used by the consumer to gain access to protected resources on behalf of the user, instead of using the user’s Salesforce
credentials. The access token is a session ID, and can be used directly.
Authorization Code
A short-lived token that represents the access granted by the end user. The authorization code is used to obtain an access token
and a refresh token.
Connected App
An application external to Salesforce that uses the OAuth protocol to verify both the Salesforce user and the external application.
Consumer Key
A value used by the consumer—in this case, the Mobile SDK app—to identify itself to Salesforce. Referred to as client_id.
Consumer Secret
A secret that the consumer uses to verify ownership of the consumer key. To heighten security, Mobile SDK apps do not use the
consumer secret.
Refresh Token
A token used by the consumer to obtain a new access token, without having the end user approve the access again.
Remote Access Application (DEPRECATED)
A remote access application is an application external to Salesforce that uses the OAuth protocol to verify both the Salesforce user
and the external application. A remote access application is implemented as a connected app. Remote access applications have
been deprecated in favor of connected apps.
OAuth 2.0 Authentication Flow
The authentication flow depends on the state of authentication on the device. The following steps assume that Salesforce authentication
occurs at app startup.
First Time Authorization Flow
1. The customer opens a Mobile SDK app.
2. An authentication prompt appears.
3. The customer enters a username and password.
4. The app sends the customer’s credentials to Salesforce and, in return, receives a session ID as confirmation of successful authentication.
5. The customer approves the app’s request to grant access to the app.
6. The app starts.
Ongoing Authorization
1. The customer opens a mobile app.
2. If the session ID is active, the app starts immediately. If the session ID is stale, the app uses the refresh token from its initial authorization
to get an updated session ID.
3. The app starts.
368
OAuth TerminologyAuthentication, Security, and Identity in Mobile Apps

PIN Authentication (Optional)
PIN protection is a function of the mobile policy and is used only when it’s enabled in the Salesforce connected app definition. It can be
shown whether you are online or offline, if enough time has elapsed since you last used the application. See About PIN Security.
1. The customer opens a mobile app after not using it for some time.
2. If the elapsed time exceeds the configured PIN timeout value, a passcode entry screen appears. The customer enters the PIN.
3. The app re-uses the existing session ID.
4. The app starts.
OAuth 2.0 User-Agent Flow
The user-agent authentication flow is used by client applications residing on the user’s mobile device. The authentication is based on
the user-agent’s same-origin policy.
In the user-agent flow, the client app receives the access token as an HTTP redirection. The client app requests the authorization server
to redirect the user-agent to another web server or to an accessible local resource. The server can extract the access token from the
response and pass it to the client app. For security, the token response is provided as a hash (#) fragment on the URL. It prevents the
token from being passed to the server or to any other servers in referral headers.
The user-agent authentication flow doesn’t use the client secret because the client executables reside on the user’s device, which makes
the client secret accessible and exploitable.
Warning: Because the access token is encoded into the redirection URI, it might be exposed to the user and other apps residing
on the device.
If you’re using JavaScript to authenticate, call window.location.replace(); to remove the callback from the browser’s
history.
1. The client app directs the user to Salesforce to authenticate and authorize the app.
369
OAuth 2.0 User-Agent FlowAuthentication, Security, and Identity in Mobile Apps

2. The user approves access for this authentication flow.
3. The app receives the callback from Salesforce.
After obtaining an access token, the consumer can use the access token to access data on the end-user’s behalf and receive a refresh
token. Refresh tokens let the consumer get a new access token if the access token becomes invalid for any reason.
OAuth 2.0 Refresh Token Flow
After the consumer has been authorized for access, it can use a refresh token to get a new access token (session ID). This process happens
only after the consumer has received a refresh token using either the web server or user-agent flow. It’s up to the consumer to determine
when an access token is no longer valid and when to apply for a new one. Bearer flows can be used only after the consumer has received
a refresh token.
Using the refresh token authentication flow involves the following steps.
1. The consumer uses the existing refresh token to request a new access token.
2. After the request is verified, Salesforce sends a response to the client.
Note: Mobile SDK apps can use the SmartStore feature to store data locally for offline use. SmartStore data is inherently volatile.
Its lifespan is tied to the authenticated user as well as to OAuth token states. When the user logs out of the app, SmartStore deletes
all soup data associated with that user. Similarly, when the OAuth refresh token is revoked or expires, the user’s app state is reset,
and all data in SmartStore is purged. Carefully consider the volatility of SmartStore data when designing your app. This warning
is especially important if your org sets a short lifetime for the refresh token.
Scope Parameter Values
OAuth requires scope configuration both on server and on client. The agreement between the two sides defines the scope contract.
•Server side—Define scope permissions in a connected app on the Salesforce server. These settings determine which scopes client
apps, such as Mobile SDK apps, can request. At a minimum, configure your connected app OAuth settings to match what’s specified
in your code. For hybrid apps and iOS native apps, refresh_token, web, and api are usually sufficient. For Android native
apps, refresh_token and api are usually sufficient.
•Client side—Define scope requests in your Mobile SDK app. Client scope requests must be a subset of the connected app’s scope
permissions.
Server Side Configuration
Scope parameter values.
DescriptionValue
Allows access to the current, logged-in user’s account using APIs, such as REST API and Bulk API. This
value also includes chatter_api, which allows access to Chatter REST API resources.
api
Allows access to Chatter REST API resources only.chatter_api
Allows access to the custom permissions in an organization associated with the connected app, and
shows whether the current user has each permission enabled.
custom_permissions
Allows access to all data accessible by the logged-in user, and encompasses all other scopes. full
does not return a refresh token. You must explicitly request the refresh_token scope to get
a refresh token.
full
370
OAuth 2.0 Refresh Token FlowAuthentication, Security, and Identity in Mobile Apps

DescriptionValue
Allows access to the identity URL service. You can request profile, email, address, or
phone, individually to get the same result as using id; they are all synonymous.
id
Allows access to the current, logged in user’s unique identifier for OpenID Connect apps.
The openid scope can be used in the OAuth 2.0 user-agent flow and the OAuth 2.0 Web server
authentication flow to get back a signed ID token conforming to the OpenID Connect specifications
in addition to the access token.
openid
Allows a refresh token to be returned if you are eligible to receive one. This lets the app interact with
the user’s data while the user is offline, and is synonymous with requesting offline_access.
refresh_token
Allows access to Visualforce pages.visualforce
Allows the ability to use the access_token on the Web. This also includes visualforce,
allowing access to Visualforce pages.
web
Note: For Mobile SDK apps, you’re always required to select refresh_token in server-side Connected App settings. Even if
you select the full scope, you still must explicitly select refresh_token.
Client Side Configuration
The following rules govern scope configuration for Mobile SDK apps.
Mobile SDK App ConfigurationScope
Implicitly requested by Mobile SDK for your app; no need to include
in your request.
refresh_token
Include in your request if you’re making any Salesforce REST API
calls (applies to most apps).
api
Include in your request if your app accesses pages defined in a
Salesforce org (for hybrid apps, as well as native apps that load
Salesforce-based Web pages.)
web
Include if you wish to request all permissions. (Mobile SDK implicitly
requests refresh_token for you.)
full
Include in your request if your app calls Chatter REST APIs.chatter_api
(Not needed)id
Use web instead.visualforce
371
Scope Parameter ValuesAuthentication, Security, and Identity in Mobile Apps

Using Identity URLs
If an authorization request is successful, the HTTP response contains the identity URL along with the access token. The URL is returned
in the id scope parameter. For example,
https://login.salesforce.com/id/00Dx0000000BV7z/005x00000012Q9P.
The identity URL is also a RESTful API that you use to query for additional information about users, such as their username, email address,
and org ID. It also returns endpoints that the client can talk to, such as photos for profiles and accessible API endpoints.
The format of the URL is https://login.salesforce.com/id/orgID/userID, where orgId is the ID of the Salesforce
org that the user belongs to, and userID is the Salesforce user ID.
Note: For a sandbox, login.salesforce.com is replaced with test.salesforce.com.
The URL must be HTTPS.
Identity URL Parameters
You can use the following parameters with the access token and identity URL. You can use the access token in an authorization request
header or a request with the oauth_token parameter.
DescriptionParameter
See Use the Access Token.access token
Optional. Specify the format of the returned output. Values are:format
•json
•xml
Instead of using the format parameter, the client can also specify the returned format in
an accept-request header using one of the following.
•Accept: application/json
•Accept: application/xml
•Accept: application/x-www-form-urlencoded
Note the following:
•Wildcard accept headers are allowed. */* is accepted and returns JSON.
•A list of values is also accepted and is checked left-to-right. For example:
application/xml,application/json,application/html,*/* returns
XML.
•The format parameter takes precedence over the accept request header.
Optional. Specify a SOAP API version number or the literal string latest. If this value isn’t
specified, the returned API URLs contain the literal value {version} in place of the version
version
number for the client to do string replacement. If the value is specified as latest, the most
recent API version is used.
Optional and accepted only in a header, not as a URL parameter. Specify to optimize the
returned XML or JSON output for readability rather than size. For example, use the following
in a header: X-PrettyPrint:1.
PrettyPrint
372
Using Identity URLsAuthentication, Security, and Identity in Mobile Apps

DescriptionParameter
Optional. Specify a valid JavaScript function name. You can use this parameter when the
specified format is JSON. The output is wrapped in this function name (JSONP). For example,
callback
if a request to https://server/id/orgid/userid/ returns {"foo":"bar"},
a request to https://server/id/orgid/userid/?callback=baz returns
baz({"foo":"bar"});.
Identity URL Response
A valid request returns the following information in JSON format.
•id—Identity URL (the same URL that was queried)
•asserted_user—Boolean value indicating whether the specified access token was issued for this identity
•user_id—Salesforce user ID
•username—Salesforce username
•organization_id—Salesforce org ID
•nick_name—Community nickname of the queried user
•display_name—Display name (full name) of the queried user
•email—Email address of the queried user
•email_verified—Indicates whether the user’s email was verified after the user clicked a link in an email confirmation message.
The email_verified value is set to true when org and community users click a link in the email they receive after:
–They change their email address
–They change their password, or a Salesforce admin resets their password
–They verify their identity, such as in two-factor authentication
–A Salesforce admin creates them as a new user
For example, a Salesforce admin creates the user Roberta Smith. Roberta receives a “Welcome to Salesforce” email message with a
link to verify her account. After she clicks the link, the email_verified value is set to true.
•first_name—First name of the user
•last_name—Last name of the user
•timezone—Time zone in the user’s settings
•photos—Map of URLs to the user’s profile pictures
Note: Accessing these URLs requires passing an access token. See Use the Access Token.
–picture
–thumbnail
•addr_street—Street specified in the address of the user’s settings
•addr_city—City specified in the address of the user’s settings
•addr_state—State specified in the address of the user’s settings
•addr_country—Country specified in the address of the user’s settings
•addr_zip—Zip or postal code specified in the address of the user’s settings
•mobile_phone—Mobile phone number in the user’s settings
373
Using Identity URLsAuthentication, Security, and Identity in Mobile Apps

•mobile_phone_verified—User confirmed that the mobile phone number is valid (see the Mobile User field description)
•status—User’s current Chatter status
–created_date—xsd datetime value of the creation date of the last post by the user, for example,
2010-05-08T05:17:51.000Z
–body—Body of the post
•urls—Map containing various API endpoints that can be used with the specified user
Note: Accessing the REST endpoints requires passing an access token. See Use the Access Token.
–enterprise (SOAP)
–metadata (SOAP)
–partner (SOAP)
–rest (REST)
–sobjects (REST)
–search (REST)
–query (REST)
–recent (REST)
–profile
–feeds (Chatter)
–feed-items (Chatter)
–groups (Chatter)
–users (Chatter)
–custom_domain—This value is omitted if the org doesn’t have a custom domain configured and propagated
•active—Boolean specifying whether the queried user is active
•user_type—Type of the queried user
•language—Queried user’s language
•locale—Queried user’s locale
•utcOffset—Offset from UTC of the time zone of the queried user, in milliseconds
•last_modified_date—xsd datetime format of the last modification of the user, for example, 2010-06-28T20:54:09.000Z
•is_app_installed—Value is true when the connected app is installed in the user’s org, and the user’s access token was
created using an OAuth flow. If the connected app isn’t installed, the property doesn’t exist (instead of being false). When parsing
the response, check both for the existence and value of this property.
•mobile_policy—Specific values for managing mobile connected apps. These values are available only when the connected
app is installed in the current user’s org, the app has a defined session timeout value, and a PIN (Personal Identification Number) has
a length value.
–screen_lock—Length of time to wait to lock the screen after inactivity
–pin_length—Length of the identification number required to gain access to the mobile app
•push_service_type—Set to apple if the connected app is registered with Apple Push Notification Service (APNS) for iOS
push notifications or androidGcm if it’s registered with Google Cloud Messaging (GCM) for Android push notifications. The
response value type is an array.
•custom_permissions—When a request includes the custom_permissions scope parameter, the response includes
a map containing custom permissions in an org associated with the connected app. If the connected app isn’t installed in the org
374
Using Identity URLsAuthentication, Security, and Identity in Mobile Apps

or has no associated custom permissions, the response doesn’t contain a custom_permissions map. Here’s an example
request.
http://login.salesforce.com/services/oauth2/authorize?response_type=token&client_
id=3MVG9lKcPoNINVBKV6EgVJiF.snSDwh6_2wSS7BrOhHGEJkC_&redirect_uri=http://www.example.org/qa/security/oauth
/useragent_flow_callback.jsp&scope=api%20id%20custom_permissions
Here’s the JSON block in the identity URL response.
"custom_permissions":
{
"Email.View":true,
"Email.Create":false,
"Email.Delete":false
}
Here’s a response in XML format.
<?xml version="1.0" encoding="UTF-8"?>
<user xmlns:xsi="http://www.w3.org/2001/XMLSchema-instance">
<id>https://yourInstance.salesforce.com/id/00Dx0000001T0zk/005x0000001S2b9</id>
<asserted_user>true</asserted_user>
<user_id>005x0000001S2b9</user_id>
<organization_id>00Dx0000001T0zk</organization_id>
<nick_name>admin1.2777578168398293E12foofoofoofoo</nick_name>
<display_name>Alan Van</display_name>
<email>admin@2060747062579699.com</email>
<status>
<created_date xsi:nil="true"/>
<body xsi:nil="true"/>
</status>
<photos>
<picture>https://yourInstance.salesforce.com/profilephoto/005/F</picture>
<thumbnail>https://yourInstance.salesforce.com/profilephoto/005/T</thumbnail>
</photos>
<urls>
<enterprise>https://yourInstance.salesforce.com/services/Soap/c/{version}/00Dx0000001T0zk
</enterprise>
<metadata>https://yourInstance.salesforce.com/services/Soap/m/{version}/00Dx0000001T0zk
</metadata>
<partner>https://yourInstance.salesforce.com/services/Soap/u/{version}/00Dx0000001T0zk
</partner>
<rest>https://yourInstance.salesforce.com/services/data/v{version}/
</rest>
<sobjects>https://yourInstance.salesforce.com/services/data/v{version}/sobjects/
</sobjects>
<search>https://yourInstance.salesforce.com/services/data/v{version}/search/
</search>
<query>https://yourInstance.salesforce.com/services/data/v{version}/query/
</query>
<profile>https://yourInstance.salesforce.com/005x0000001S2b9
</profile>
375
Using Identity URLsAuthentication, Security, and Identity in Mobile Apps

</urls>
<active>true</active>
<user_type>STANDARD</user_type>
<language>en_US</language>
<locale>en_US</locale>
<utcOffset>-28800000</utcOffset>
<last_modified_date>2010-06-28T20:54:09.000Z</last_modified_date>
</user>
Here’s a response in JSON format.
{"id":"https://yourInstance.salesforce.com/id/00Dx0000001T0zk/005x0000001S2b9",
"asserted_user":true,
"user_id":"005x0000001S2b9",
"organization_id":"00Dx0000001T0zk",
"nick_name":"admin1.2777578168398293E12foofoofoofoo",
"display_name":"Alan Van",
"email":"admin@2060747062579699.com",
"status":{"created_date":null,"body":null},
"photos":{"picture":"https://yourInstance.salesforce.com/profilephoto/005/F",
"thumbnail":"https://yourInstance.salesforce.com/profilephoto/005/T"},
"urls":
{"enterprise":"https://yourInstance.salesforce.com/services/Soap/c/{version}/00Dx0000001T0zk",
"metadata":"https://yourInstance.salesforce.com/services/Soap/m/{version}/00Dx0000001T0zk",
"partner":"https://yourInstance.salesforce.com/services/Soap/u/{version}/00Dx0000001T0zk",
"rest":"https://yourInstance.salesforce.com/services/data/v{version}/",
"sobjects":"https://yourInstance.salesforce.com/services/data/v{version}/sobjects/",
"search":"https://yourInstance.salesforce.com/services/data/v{version}/search/",
"query":"https://yourInstance.salesforce.com/services/data/v{version}/query/",
"profile":"https://yourInstance.salesforce.com/005x0000001S2b9"},
"active":true,
"user_type":"STANDARD",
"language":"en_US",
"locale":"en_US",
"utcOffset":-28800000,
"last_modified_date":"2010-06-28T20:54:09.000+0000"}
After making an invalid request, the following are possible responses from Salesforce.
Request ProblemError Code
HTTP403 (forbidden) — HTTPS_Required
Missing access token403 (forbidden) — Missing_OAuth_Token
Invalid access token403 (forbidden) — Bad_OAuth_Token
Users in a different org403 (forbidden) — Wrong_Org
376
Using Identity URLsAuthentication, Security, and Identity in Mobile Apps

Request ProblemError Code
Invalid or bad user or org ID404 (not found) — Bad_Id
Deactivated user or inactive org404 (not found) — Inactive
User lacks proper access to org or information404 (not found) — No_Access
Request to an invalid endpoint of a site404 (not found) — No_Site_Endpoint
No response from server404 (not found) — Internal Error
Invalid version406 (not acceptable) — Invalid_Version
Invalid callback406 (not acceptable) — Invalid_Callback
Setting Custom Login Servers in Android Apps
For special cases—for example, if you’re a Salesforce partner using Trialforce—you can redirect your user’s login requests to a custom
login URI.
In Android, login hosts are known as server connections. You can see the standard list of server connections in the
res/xml/servers.xml file of the SalesforceSDK project. Mobile SDK uses this file to define production and sandbox servers.
For Android, the default login host can potentially be set through any of the following means.
1. MDM enforced
•At startup, your app’s MDM provider configures the login URI.
•The MDM policy can also hide the navigation bar and Settings icon to prevent users from changing the login host.
2. App configuration through the servers.xml file
You can add your custom servers to the runtime list by creating your own res/xml/servers.xml file in your native Android
project. The first server listed in your servers.xml file is used as the default login server at app startup. The root XML element
for servers.xml is <servers>. This root can contain any number of <server> entries. Each <server> entry requires
two attributes: name (an arbitrary human-friendly label) and url (the web address of the login server, including the “https://”
prefix).
Here’s an example of a servers.xml file.
<?xml version="1.0" encoding="utf-8"?>
<servers>
<server name="XYZ.com Login" url="https://myloginserver.cloudforce.com"/>
</servers>
Note: To test XML changes in an Android emulator, we’ve found that it’s best to:
a. Force stop the app if it’s already running in the emulator.
b. Uninstall the app in the emulator.
c. Do a full clean and rebuild.
d. Run the app.
3. User configuration through the Add Connection button
Here’s how a user can configure a custom login server.
377
Setting Custom Login Servers in Android AppsAuthentication, Security, and Identity in Mobile Apps

Start the app without logging in.a.
b. In the login screen, tap the Settings icon in the upper left corner.
c. Tap Change Server.
d. Tap Add Connection.
e. To help identify this configuration in future visits, enter a name.
f. Enter your custom login host’s URI. Be sure to include the https:// prefix. For example, here’s how you enter a typical
community URI:
https://mycommunity-developer-edition.na15.force.com/fineapps
Mobile SDK enables this functionality by default. You can’t disable the Change Server or Add Connection option programmatically
in Mobile SDK for Android.
Important:
•In Android, always include the “https://” prefix when specifying the login URL.
•At startup, MDM runtime configuration overrides compile-time settings.
Setting Custom Login Servers in iOS Apps
For special cases—for example, if you’re a Salesforce partner using Trialforce—you can redirect your user’s login requests to a custom
login URI.
In iOS apps, login servers are often called login hosts. Mobile SDK defines standard login URIs for production and sandbox servers in the
SalesforceSDKCore project. These two login hosts appear in the Choose Connection login screen.
For iOS, the default login host can potentially be set through any of the following means.
1. MDM enforced
•At startup, your app’s MDM provider configures the login URI.
•The MDM policy can also hide the navigation bar and Settings icon to prevent users from changing the login host.
2. App configuration through the info.plist file
•Your app can configure the default login URI in the project’s info.plist properties file. The login host property name is
SFDCOAuthLoginHost.
•At startup, the SFDCOAuthLoginHost setting overrides user-defined login hosts.
•By default, SFDCOAuthLoginHost property is set to “login.salesforce.com”.
•Do not use a protocol prefix such as “https://” when specifying the login URI.
3. User configuration through the Add Connection screen
Here’s how a user can configure a custom login server.
a. Start the app without logging in.
b. In the login screen, tap the Settings, or ”gear,” icon in the top navigation bar.
c. In the Choose Connection screen, tap the Plus icon .
d. (Optional but recommended) To help identify this configuration in future visits, enter a label.
378
Setting Custom Login Servers in iOS AppsAuthentication, Security, and Identity in Mobile Apps

e. Enter your custom login host’s URI. Be sure to omit the https:// prefix. For example, here’s how you enter a typical community
URI:
mycommunity-developer-edition.na15.force.com/fineapps
Mobile SDK enables this functionality by default. You can disable the Add Connection option by setting
SFLoginHostViewController properties.
Important:
•At startup, MDM runtime configuration overrides compile-time settings.
•Before version 4.1, Mobile SDK apps for iOS defined their custom login URIs in the app’s Settings bundle. In Mobile SDK 4.1
and later, iOS apps lose the Settings bundle. Instead, you can use the SFDCOAuthLoginHost property in the app’s
info.plist file to build in a custom login URI.
SEE ALSO:
Hiding the Settings Icon in iOS Apps
Hiding the Settings Icon in iOS Apps
Currently, the Mobile SDK login screen for iOS provides a top navigation bar that includes a Settings icon. Customers can use the Settings
icon to select a login server from a built-in list, or to specify a custom login URI. Some companies, however, don’t allow users to choose
the login server. If you’re bound by such restrictions, here’s how you can use code to hide the Settings icon and customize the navigation
bar appearance.
By default, the Salesforce Mobile SDK login screen shows both the top navigation bar and its embedded Settings icon. The Settings icon
is often referred to as the “gear” icon due to its sprocket-like shape . To disable switching login servers, you can hide either the
Settings icon itself or the navigation bar that contains it. You can also customize colors and font. Use the following
SFSDKLoginViewControllerConfig properties to control the visibility and appearance of these UI elements.
showSettingsIcon
Controls the display of the Settings icon only. Does not affect the visibility of the navigation bar.
Behavior
MeaningValue
Default value. The Settings icon is visible and accessible.YES (default)
The Settings icon is hidden. Users cannot access the login host
list and cannot add custom hosts.
NO
showNavbar
Controls the display of the navigation bar, which in turn hides the Settings icon.
379
Hiding the Settings Icon in iOS AppsAuthentication, Security, and Identity in Mobile Apps

Behavior
MeaningValue
Default value. The navigation bar is visible. The Settings icon
display depends on the showSettingsIcon property.
YES (default)
The navigation bar and the Settings icon are hidden. Users cannot
access the login host list and cannot add custom hosts.
NO
Note: To hide the gear icon in hybrid apps, apply these steps to the native wrapper app created by Cordova.
Navigation Bar Colors and Font
You can set the following style properties:
•navBarColor
•navBarTextColor
•navBarFont
Example: Import the header file, then add the subsequent lines to the
application:didFinishLaunchingWithOptions: method of your AppDelegate class.
#import <SalesforceSDKCore/SFSDKLoginViewControllerConfig.h>
...
SFSDKLoginViewControllerConfig *loginViewConfig = [[SFSDKLoginViewControllerConfig
alloc] init];
loginViewConfig.showSettingsIcon = NO;
loginViewConfig.showNavbar = YES;
loginViewConfig.navBarColor = [UIColor redColor];
loginViewConfig.navBarTextColor = [UIColor whiteColor];
loginViewConfig.navBarFont = [UIFont boldSystemFontOfSize:20.0f];
[SFUserAccountManager sharedInstance].loginViewControllerConfig = loginViewConfig;
SEE ALSO:
Setting Custom Login Servers in iOS Apps
Revoking OAuth Tokens
When a user logs out of an app, or the app times out or in other ways becomes invalid, the logged-in users’ credentials are cleared from
the mobile app. This effectively ends the connection to the server. Also, Mobile SDK revokes the refresh token from the server as part of
logout.
Revoking Tokens
To revoke OAuth 2.0 tokens, use the revocation endpoint.
https://login.salesforce.com/services/oauth2/revoke
380
Revoking OAuth TokensAuthentication, Security, and Identity in Mobile Apps

Construct a POST request that includes the following parameters using the application/x-www-form-urlencoded format
in the HTTP request entity-body. For example:
POST /revoke HTTP/1.1
Host: https://login.salesforce.com/services/oauth2/revoke
Content-Type: application/x-www-form-urlencoded
token=currenttoken
If an access token is included, Salesforce invalidates it and revokes the token. If a refresh token is included, Salesforce revokes it and any
associated access tokens.
The authorization server indicates successful processing of the request by returning an HTTP status code 200. For all error conditions, a
status code 400 is used along with one of the following error responses.
•unsupported_token_type—Token type not supported
•invalid_token—Token was invalid
For a sandbox, use test.salesforce.com instead of login.salesforce.com.
Refresh Token Revocation in Android Native Apps
When a refresh token is revoked by an administrator, the default behavior is to automatically log out the current user. As a result of this
behavior:
•Any subsequent REST API calls your app makes will fail.
•The system discards your user’s account information and cached offline data.
•The system forces the user to navigate away from your page.
•The user must log into Salesforce again to continue using your app.
These side effects provide a secure response to the administrator’s action.
Token Revocation Events
When a token revocation event occurs, the ClientManager object sends an Android-style notification. The intent action for this
notification is declared in the ClientManager.ACCESS_TOKEN_REVOKE_INTENT constant.
SalesforceActivity.java, SalesforceListActivity.java, SalesforceExpandableListActivity.java,
and SalesforceDroidGapActivity.java implement ACCESS_TOKEN_REVOKE_INTENT event listeners. These
listeners automatically take logged out users to the login page when the refresh token is revoked. A toast message notifies the user of
this occurrence.
Connected Apps
A connected app integrates an application with Salesforce using APIs. Connected apps use standard SAML and OAuth protocols to
authenticate, provide single sign-on, and provide tokens for use with Salesforce APIs. In addition to standard OAuth capabilities, connected
apps allow Salesforce admins to set various security policies and have explicit control over who can use the corresponding apps.
Here’s a general list of information that you provide when you create a connected app.
•Name, description, logo, and contact information
•URL where Salesforce can locate the app for authorization or identification
•Authorization protocol: OAuth, SAML, or both
381
Refresh Token Revocation in Android Native AppsAuthentication, Security, and Identity in Mobile Apps

•IP ranges from where users can log in to connected app (optional)
•Information about mobile policies that the connected app can enforce (optional)
Salesforce Mobile SDK apps use connected apps to access Salesforce OAuth services and to call Salesforce REST APIs.
About PIN Security
Salesforce connected apps have an additional layer of security via PIN protection on the app. This PIN protection is for the mobile app
itself, and isn’t the same as the PIN protection on the device or the login security provided by the Salesforce organization.
In order to use PIN protection, the developer must select the Implements Screen Locking & Pin Protection checkbox when creating
the connected app. Mobile app administrators then have the options of enforcing PIN protection, customizing timeout duration, and
setting PIN length.
Note: Because PIN security is implemented in the mobile device’s operating system, only native and hybrid mobile apps can use
PIN protection; HTML5 Web apps can’t use PIN protection.
In practice, PIN protection can be used so that the mobile app locks up if it isn’t used for a specified number of minutes. When a mobile
app is sent to the background, the clock continues to tick.
To illustrate how PIN protection works:
1. Customer turns on a phone and enters the PIN for the device.
2. Customer launches a Mobile SDK app.
3. Customer enters login information for Salesforce organization.
4. Customer enters PIN code for the Mobile SDK app.
5. Customer works in the app and then sends it to the background by opening another app (or receiving a call, and so on).
6. The app times out.
7. Customer reopens the app, and the app PIN screen displays (for the Mobile SDK app, not the device).
8. Customer enters app PIN and can resume working.
Portal Authentication Using OAuth 2.0 and Salesforce Sites
The Salesforce Spring '13 Release adds enhanced flexibility for portal authentication. If your app runs in a Salesforce portal, you can use
OAuth 2.0 with a Salesforce site to obtain API access tokens on behalf of portal users. In this configuration you can:
•Authenticate portal users via Auth providers and SAML, rather than a SOAP API login() call.
•Avoid handling user credentials in your app.
•Customize the login screen provided by the Salesforce site.
Here's how to get started.
1. Associate a Salesforce site with your portal. The site generates a unique URL for your portal. See Associating a Portal with Salesforce
Sites.
2. Create a custom login page on the Salesforce site. See Managing Salesforce Site Login and Registration Settings.
3. Use the unique URL that the site generates as the redirect domain for your users' login requests.
The OAuth 2.0 service recognizes your custom host name and redirects the user to your site login page if the user is not yet authenticated.
382
About PIN SecurityAuthentication, Security, and Identity in Mobile Apps

Example: For example, rather than redirecting to https://login.salesforce.com:
https://login.salesforce.com/services/oauth2/authorize?
response_type=code&client_id=<your_client_id>&
redirect_uri=<your_redirect_uri>
redirect to your unique Salesforce site URL, such as https://mysite.secure.force.com:
https://mysite.secure.force.com/services/oauth2/authorize?
response_type=code&client_id=<your_client_id>&
redirect_uri=<your_redirect_uri>
For more information and a demonstration video, see OAuth for Portal Users on the Lightning Platform Developer Relations Blogs
page.
Using MDM with Salesforce Mobile SDK Apps
Mobile Device Management (MDM) can facilitate app configuration, updating, and authentication. Salesforce and Mobile SDK support
the use of MDM for connected apps.
To use MDM, you work with a Salesforce administrator and an MDM provider. The Salesforce administrator configures your connected
app to suit your use case. The MDM provider is a trusted third party who distributes your mobile app settings to your customers’ devices.
For example, you can use MDM to configure custom login URLs for your app. You can also use MDM for certificate-based authentication.
In this case, you upload certificates to the MDM provider.
MDM enablement does not require changes to your Mobile SDK app code.
The following outline explains the basic MDM runtime flow.
Authentication and Configuration Runtime Flow
1. To download an MDM-enabled Mobile SDK app, a customer first installs the MDM provider’s app.
2. The MDM provider uses its app to push the following items to the device:
•Your Mobile SDK app
•Any configuration details you’ve specified, such as custom login URLs or enhanced security settings
•A user certificate if you’re also using MDM for authentication
3. When the customer launches your app, behavior varies according to the mobile operating system.
•Android: If you’re supporting for certificate-based authentication, the login server requests a certificate. Android launches a
web view and presents a list of one or more available certificates for the customer’s selection.
•iOS: The Mobile SDK app checks whether the Salesforce connected app definition enables certificate-based authentication. If
so, the app navigates to a Safari window. Safari retrieves the stored MDM certificate and transparently authenticates the device.
4. After it accepts the certificate, the login server sends access and refresh tokens to the app.
5. Salesforce posts a standard screen requesting access to the customer’s data.
The following sections describe the MDM configuration options that Mobile SDK supports.
383
Using MDM with Salesforce Mobile SDK AppsAuthentication, Security, and Identity in Mobile Apps

Certificate-Based Authentication
Using certificates to authenticate simplifies provisioning your mobile users, and your day-to-day mobile administration tasks by eliminating
usernames and passwords. Salesforce uses X.509 certificates to authenticate users more efficiently, or as a second factor in the login
process.
MDM Settings for Certificate-Based Authentication
To enable certificate-based authentication for your mobile users, you need to configure key-value pair assignments through your
MDM suite. Here are the supported keys:
DescriptionPlatformData TypeKey
If true, the certificate-based
authentication flow initiates.
Android: Uses the user
certificate on the device for
Android, iOSBooleanRequireCertAuth
authentication inside a
webview.
iOS: Redirects the user to Safari
for all authentication requests.
Alias of the certificate deployed
on the device picked by the
AndroidStringManagedAppCertAlias
application for user
authentication. Required for
Android only.
Note: There’s a minimum device OS version requirement to use certificate-based authentication. For Android, the minimum
supported version is 5.0. For iOS, the minimum supported version is 7.0.
Once you save your key-value pair assignments, you can push the mobile app with the updated certificate-based authentication
flow to your users via your MDM suite.
Automatic Custom Host Provisioning
You can now push custom login host settings to your mobile users. This spares your mobile users from having to manually type long
URLs for login hosts—typically a frustrating and error-prone activity. You can configure key-value pair assignments through your MDM
to define multiple custom login hosts for your mobile users.
MDM Settings for Automatic Custom Host Provisioning
To push custom login host configurations to your mobile users, you need to configure key-value pair assignments through your
MDM suite. Here are the supported keys:
DescriptionPlatformData TypeKey
Login hosts. First value in the
array is the default host.
Android: Requires https:// in
the host URL.
Android, iOSString, String ArrayAppServiceHosts
384
Using MDM with Salesforce Mobile SDK AppsAuthentication, Security, and Identity in Mobile Apps

DescriptionPlatformData TypeKey
iOS: Doesn't require https:// in
the host URL.
Labels for the hosts.
The number of
AppServiceHostLabels
Android, iOSString, String ArrayAppServiceHostLabels
entries must match the number
of AppServiceHosts
entries.
If true, prevents users from
modifying the list of hosts that
Android, iOSBooleanOnlyShowAuthorizedHosts
the Salesforce app can connect
to.
Additional Security Enhancements
You can add an extra layer of security for your iOS users by clearing the contents of their clipboard whenever the mobile app is in the
background. Users may copy and paste sensitive data as a part of their day-to-day operations, and this enhancement ensures any data
they copy onto their clipboards are cleared whenever they background the app.
MDM Settings for More Security Enhancements
To clear the clipboards of your iOS users when the mobile app is in the background, you need to configure key-value pair assignments
through your MDM suite. Here is the supported key:
DescriptionPlatformData TypeKey
If true, the contents of the iOS
clipboard are cleared when the
iOSBooleanClearClipboardOnBackground
mobile app is backgrounded.
This prevents the user from
accidentally copying and
pasting sensitive data outside
of the application.
Note: If the mobile app stops working unexpectedly, the copied data can remain on the clipboard. The contents of the
clipboard are cleared once the user starts and backgrounds the mobile app.
This security functionality is available through Android for Android devices running OS 5.0 and greater, and that have Android for
Work set up. Contact your MDM provider to configure this functionality for your Android users.
Sample Property List Configuration
Note: Setting key-value pair assignments through a plist is only available on iOS.
385
Sample Property List ConfigurationAuthentication, Security, and Identity in Mobile Apps

One method of setting key-value pair assignments is through an XML property list, or plist. The plist contains the key-value pair assignments
that an MDM provider sends to a mobile app to enforce security configurations.
Here is a sample plist:
<?xml version="1.0" encoding="UTF-8"?>
<!DOCTYPE plist PUBLIC "-//Apple//DTD PLIST 1.0//EN"
"http://www.apple.com/DTDs/PropertyList-1.0.dtd">
<plist version="1.0">
<dict>
<key>AppServiceHosts</key>
<array>
<string>host1</string>
<string>host2</string>
</array>
<key>AppServiceHostLabels</key>
<array>
<string>Production</string>
<string>Sandbox</string>
</array>
<key>RequireCertAuth</key>
<true/>
<key>ClearClipboardOnBackground</key>
<false/>
<key>OnlyShowAuthorizedHosts</key>
<false/>
</dict>
</plist>
Using Advanced Authentication in iOS Apps
Mobile SDK currently supports two iOS authentication flows: standard authentication and advanced authentication. By default, Mobile
SDK apps use the standard flow. To take advantage of tighter security or advanced authentication schemes, you can reconfigure your
app to use the advanced flow.
•Standard authentication flow: This flow uses WKWebView. Because it is a UIView, WKWebView offers a superior user experience
with access to the iOS view toolbar and other compelling features.
•Advanced authentication flow: Before Mobile SDK 5.2, advanced authentication used the Safari browser, which required “swizzling”
out of the app to the browser and back. Mobile SDK 5.2 and later use SFSafariViewController.
SFSafariViewController doesn’t swizzle away from the app, and it supports useful Safari features such as autofill, iCloud
keychain, and security certificates. Advanced authentication is also the more secure option—it doesn’t allow the app to set cookies
or inject content into the view without the customer's consent. Use advanced authentication if you require any of these features, or
if you’re using MDM, certificate-based login, or another advanced login flow.
Note: Although SFSafariViewController doesn’t use swizzling, the login page remains full-screen. This presentation
might give some customers the impression that they've temporarily left your app.
Enabling Advanced Authentication with My Domain
On orgs that use My Domain, you can enable advanced authentication through a server-side setting. However, in Mobile SDK apps, your
code determines whether that setting is honored. For advanced authentication, code changes to your app are required with or without
My Domain.
386
Using Advanced Authentication in iOS AppsAuthentication, Security, and Identity in Mobile Apps

For information on server-side My Domain configuration, see Customize Your Login Page with Your Own Branding in the Identity
Implementation Guide.
Configuring Advanced Authentication Support in Your Code
Mobile SDK defines an SFOAuthAdvancedAuthConfiguration enum that is the gatekeeper for advanced authentication
requests. This enum has three states:
SFOAuthAdvancedAuthConfigurationNone
Your app uses standard authentication. No advanced authentication is allowed.
SFOAuthAdvancedAuthConfigurationAllow
If the org’s My Domain settings enable advanced authentication, your app will also use advanced authentication.
SFOAuthAdvancedAuthConfigurationRequire
Your app uses advanced authentication regardless of the org’s My Domain settings.
To enable advanced authentication:
•In the init method of AppDelegate, set the SFAuthenticationManager.advancedAuthConfiguration
property to either SFOAuthAdvancedAuthConfigurationAllow or
SFOAuthAdvancedAuthConfigurationRequire. The forceios native template app provides the pre-coded options in
the comments. All you have to do is uncomment the setting you require.
•Implement the application:openURL:options: method in AppDelegate. The template app provides a stubbed
version of this method with instructions and the necessary code in comments.
•Add your custom URL schemes for the OAuth redirect URI to your project’s Info.plist file.
Configuring Your Custom URL Schemes
To configure your app to use its custom URL schemes for the OAuth callback URI:
1. In your app’s Info.plist file, create a key named CFBundleURLTypes.
2. Assign the key an array that contains a dictionary with the following keys:
ValueTypeName
A unique abstract name of the URL
scheme, preferably an identifier in
reverse-DNS style. For example:
com.acme.myscheme
StringCFBundleURLName
.
URL scheme names, such as http, mailto,
and so on.
Array of stringsCFBundleURLSchemes
Example: The following example enforces advanced authentication regardless of the org’s My Domain setting.
1. In your AppDelegate.m file, uncomment or add the following call in the init method.
[SFAuthenticationManager sharedManager].advancedAuthConfiguration =
SFOAuthAdvancedAuthConfigurationRequire;
387
Using Advanced Authentication in iOS AppsAuthentication, Security, and Identity in Mobile Apps

2. In the application:openURL:options: method, replace the template’s original return NO statement with the
commented version. Here’s how the method looks after this change:
- (BOOL)application:(UIApplication *)app
openURL:(NSURL *)url
options:(NSDictionary<UIApplicationOpenURLOptionsKey,id> *)
options {
// If you're using advanced authentication:
// --Configure your app to handle incoming requests to your
// OAuth Redirect URI custom URL scheme.
// --Uncomment the following line and delete the original return statement:
return [[SFAuthenticationManager sharedManager]
handleAdvancedAuthenticationResponse:url];
}
3. In your Info.plist file, register your OAuth callback URI scheme as a custom scheme for your application. For example,
if your OAuth callback URI is com.mydomain.myapp://oauth/success, add the following key:
<key>CFBundleURLTypes</key>
<array>
<dict>
<key>CFBundleURLName</key>
<string>com.mydomain.myapp</string>
<key>CFBundleURLSchemes</key>
<array>
<string>com.mydomain.myapp</string>
</array>
</dict>
</array>
In this example, the URL scheme and URL name are the same, but this matching is not required. You can add as many schemes
as your app requires. For information on configuring iOS URL schemes, look up “Inter-App Communication” or “Custom URL
Schemes” in the App Programming Guide for iOS at developer.apple.com/documentation/.
Enabling Browser-Based Authentication in Android Apps
If your Mobile SDK Android app uses Google as an identity provider, a code change is coming your way. Google is dropping support for
logins through embedded web views. Instead of web views, Google recommends switching to native OAuth or browser-based login
flows. Mobile SDK 6.0 makes it possible for these apps to authenticate with the native browser instead of the Android WebView class.
To support native browser authentication, Mobile SDK uses a Chrome custom tab in the application. If Chrome is not available at runtime,
Mobile SDK uses the default system browser.
1. In a code editor, open your Application subclass.
2. After your call to initNative() or initHybrid(), call the following method:
SalesforceSDKManager.getInstance().setBrowserLoginEnabled(true);
388
Enabling Browser-Based Authentication in Android AppsAuthentication, Security, and Identity in Mobile Apps

This call typically goes in the onCreate() method. In apps created with forcedroid templates, you can simply uncomment this
line:
@Override
public void onCreate() {
super.onCreate();
SmartSyncSDKManager.initNative(getApplicationContext(),
new NativeKeyImpl(), MainActivity.class);
/*
* Uncomment the following line to enable browser based login. This will use a
* Chrome custom tab to login instead of the default WebView. You will also need
* to uncomment a few lines of code in SalesforceSDK library project's
AndroidManifest.xml.
*/
// SmartSyncSDKManager.getInstance().setBrowserLoginEnabled(true);
...
}
In hybrid apps, you can uncomment the same line in the HybridApp.java file of the SalesforceHybrid library.
3. Open your app’s AndroidManifest.xml file.
4. In the LoginActivity declaration, uncomment the following lines:
<activity android:name="com.salesforce.androidsdk.ui.LoginActivity"
android:theme="@style/SalesforceSDK.ActionBarTheme"
android:launchMode="singleInstance">
<!--
<intent-filter>
<data android:scheme="testsfdc"
android:host="*"
android:path="/mobilesdk/detect/oauth/done" />
<action android:name="android.intent.action.VIEW" />
<category android:name="android.intent.category.BROWSABLE" />
<category android:name="android.intent.category.DEFAULT" />
</intent-filter>
-->
</activity>
5. Replace the values for android:scheme, android:host, and android:path with their corresponding values from
your connected app. Here are a couple of examples.
If the callback URL of your connected app is testsfdc:///mobilesdk/detect/oauth/done:
•android:scheme is testsfdc.
•android:host is *, meaning that it doesn't exist.
•android:path is /mobilesdk/detect/oauth/done.
If the callback URL of your connected app is sfdc://login.salesforce.com/oauth/done:
•android:scheme is sfdc.
•android:host is login.salesforce.com.
•android:path is /oauth/done.
389
Enabling Browser-Based Authentication in Android AppsAuthentication, Security, and Identity in Mobile Apps

Here’s the updated portion of your AndroidManifest.xml, using the testsfdc:///mobilesdk/detect/oauth/done
scheme.
<!-- Login activity -->
<!--
Launch mode of "singleInstance" ensures that the activity isn't restarted
by a callback from Chrome custom tab when auth flow is complete. This is
required for the Chrome custom tab auth flow to work correctly.
-->
<!--
To enable browser bath authentication, uncomment the lines below and replace
'scheme', 'host' and 'path' with their corresponding values from your connected app.
For example, if the callback URL of your connected app is
"testsfdc:///mobilesdk/detect/oauth/done",
'scheme' would be "testsfdc", 'host' would be "*" since it doesn't exist, and
'path' would be "/mobilesdk/detect/oauth/done".
If the callback URL is "sfdc://login.salesforce.com/oauth/done",
'scheme' would be "sfdc", 'host' would be "login.salesforce.com",
and 'path' would be "/oauth/done".
-->
<activity android:name="com.salesforce.androidsdk.ui.LoginActivity"
android:theme="@style/SalesforceSDK.ActionBarTheme"
android:launchMode="singleInstance">
<intent-filter>
<data android:scheme="testsfdc"
android:host="*"
android:path="/mobilesdk/detect/oauth/done" />
<action android:name="android.intent.action.VIEW" />
<category android:name="android.intent.category.BROWSABLE" />
<category android:name="android.intent.category.DEFAULT" />
</intent-filter>
</activity>
You're all set! Your Mobile SDK app now performs authentication through a browser tab instead of an embedded web view.
See Also
•Chrome Custom Tabs
•Google’s developer blog
390
Enabling Browser-Based Authentication in Android AppsAuthentication, Security, and Identity in Mobile Apps

CHAPTER 15 Customizing the Salesforce Login Page
Although Mobile SDK doesn’t control the Salesforce login page, you can still customize and brand it in
certain cases.
Customize the Login Screen Appearance through
Mobile SDK
On iOS, you can also configure some properties of the login page, including the navigation bar and
Settings icon. See Hiding the Settings Icon in iOS Apps
Customizing the Login Screen through the Salesforce
Server
Salesforce Mobile SDK provides an OAuth implementation for its client apps, but it doesn’t define or
control the login page. Instead, it requests the page from the Salesforce server. Salesforce itself then
presents a web view that gathers your customer’s credentials. The login web view is not part of your
Mobile SDK app.
On the server side, you can change the login web view if your Salesforce org uses either of the following
features:
•Communities
•My Domain
Both of these features provide handy utilities for login page branding and customization. To use your
branded page, you set the default login URL of your Mobile SDK app to the Community custom domain
or My Domain subdomain address. Your app then displays your customized login page.
Use the following links to learn about these features.
•Use Your Branded Login Page
•Customize Login, Self-Registration, and Password Management for Your
Community—https://help.salesforce.com/articleView?id=networks_customize_login.htm
•What is My Domain?—https://help.salesforce.com/articleView?id=domain_name_overview.htm
•My Domain login page customization
instructions—https://help.salesforce.com/articleView?id=domain_name_login_branding.htm
•Sample My Domain customized login
page—https://github.com/salesforceidentity/MyDomain-Sample
•My Domain FAQ—https://help.salesforce.com/articleView?id=faq_domain_name.htm
391

CHAPTER 16 Using Mobile SDK Apps as Identity
Providers
In version 6.0, Mobile SDK enhances its authentication handling by adding identity provider services.
Identity providers help known users avoid reentering their Salesforce credentials every time they log in
to a Mobile SDK app. At the same time, it preserves the stringent security level of previous Mobile SDK
releases.
In this chapter ...
•Identity Providers:
Architecture, Flow,
and Connected App
Requirements An identity provider setup consists of two primary components:
•An identity provider is an ordinary Mobile SDK app that’s configured to manage Salesforce logins
for one or more users on a single mobile device. This app serves as the broker between Mobile SDK
•Android Architecture
and Flow
apps on the device and the Salesforce authentication service. It tracks device users that have recently
logged in and kicks off the authentication process when they return to the app.
•Configuring an
Android App to Be an
Identity Provider •An identity provider client is an ordinary Mobile SDK app that’s configured to use an identity provider
for logins. These apps are also called “service providers” because they provide the services that the
•Configuring an
Android App to Be an user is trying to access. A traditional service provider gives the user one choice for authentication:
the Salesforce login screen. An identity provider client, on the other hand, gives the user the choice
Identity Provider
Client of logging in through either the Salesforce login screen or a specific identity provider. With the
identity provider option, the user simply selects an account from a list of recently active users.
•Configuring an iOS
App to Be An Identity
Provider Typically, a single device hosts a single identity provider app, but this limitation is not enforced. A single
device can host any number of identity provider client apps.
•Configuring an iOS
App to Be An Identity
Provider Client
Several rules apply to identity provider apps and their clients.
•They must be built with Mobile SDK 6.0 or later.
•They must be discrete apps. You can’t combine identity provider and identity provider client
implementations in a single app.
•A client and the identity provider it delegates to must use different Salesforce connected apps with
differing OAuth callback URIs.
392
Identity Providers: Architecture, Flow, and Connected App Requirements
All Mobile SDK identity provider setups follow the same flows and architectural outlines, regardless of platform. Salesforce connected
apps for identity provider components also impose a few special requirements.
High-Level Flow
A user can start the identity provider flow from either an identity provider app or one of its clients. When a user starts the flow by launching
an identity provider client app, the first step is to choose a login preference: through either the standard Salesforce login view or an
identity provider. The user can also choose identity provider login by directly launching an identity provider app. In this case, the identity
provider launches the requested client app to start authentication.
Here’s a high-level diagram of what happens when the flow begins in an identity provider client. The client app doesn’t collect credentials
from the user. Instead, it delegates login interaction to the identity provider app.
1. At the user’s request, the identity provider client app requests authorization from an identity provider. The identity provider responds
by displaying a list of logged-in users.
2. After the user makes a selection, the identity provider forwards an authorization request to a Salesforce authorization endpoint.
3. Salesforce sends an authorization code back to the identity provider.
4. Identity provider forwards the authorization code to the identity provider client.
5. Identity provider client forwards the authorization code to the Salesforce OAuth token endpoint.
6. Salesforce exchanges the authorization code for access and refresh tokens and returns the tokens to the identity provider client app.
Only the client app handles the user’s OAuth tokens.
All the user has to do is click the identity provider button, then select an account. After accepting the standard request for access to
Salesforce data, the user can begin working in the client app.
393
Identity Providers: Architecture, Flow, and Connected App
Requirements
Using Mobile SDK Apps as Identity Providers

A Bit More Detail
Here’s more granular information for the authentication flow. In the identity provider client:
1. If the user has a valid refresh token in the identity provider client app, they’re automatically in––just the usual refresh token exchange
occurs.
2. If the user doesn’t have a valid refresh token, the identity provider client prompts the user to choose either standard Salesforce login
or identity provider login.
Mobile SDK ignores a user’s selection of identity provider login and instead displays the standard Salesforce login screen if:
•No identity provider app is configured in the identity provider client app.
•The configured identity provider app is not found or is not running.
•No users are currently logged in to the identity provider app.
If authorization succeeds, the client asks Salesforce to refresh the user’s tokens. When Salesforce returns the refresh token, the flow
defaults to the standard Mobile SDK post-login flow. Mobile SDK caches the refresh token returned from Salesforce.
Connected App Requirements
•Create two connected apps––one for the identity provider app, one for identity provider client apps.
•Uncheck “Require Consumer Secret” on the connected app for identity provider client apps.
•Set the OAuth Callback URI to a custom scheme that you devise. The custom URI scheme for an identity provider client app cannot
match the scheme for its identity provider app.
Important:
•An identity provider app must enable the web scope on the connected app and request it in the mobile app. Otherwise,
Mobile SDK redirects the user to a login page with an error message. At this point, the flow cannot continue.
•An identity provider and its clients must use different connected apps with their own consumerKey and callbackUrl
values. Otherwise, the Salesforce service returns an “invalid credentials” error message when the identity provider requests an
authorization code. Currently, all Mobile SDK sample apps use the same consumerKey and callbackUrl. If you plan
to adopt these apps as identity provider-client pairs, make sure that each app uses its own unique values.
Android Architecture and Flow
To kick off the identity provider flow, a user can open either an identity provider or an identity provider client app. In Android, the
implementation differs depending on which side initiates it.
Identity Provider Client
The following diagram shows the identity provider flow when launched from an identity provider client (identified here as “SP”). To
summarize:
1. User launches the identity provider client and chooses “Log in with IDP”.
2. Identity provider client swizzles to the identity provider for authentication.
3. Identity provider completes authentication and swizzles back to the client app.
394
Android Architecture and FlowUsing Mobile SDK Apps as Identity Providers
Several specialized classes support this flow:
•IDPAccountPickerActivity
•IDPCodeGeneratorActivity
•IDPRequestHandler
•SPRequestHandler
Apps have the option of overriding the IDP activity classes to customize the identity provider’s user interface. The
SPRequestHandler and IDPRequestHandler classes handle internal communications. These classes usually do not require
customization.
Initiated by an Identity Provider
The following diagram shows the identity provider flow when launched from an identity provider (identified here as “IDP”). To summarize:
1. User launches the identity provider app.
2. Identity provider app displays a list of client apps it supports.
3. User selects a client app from the list.
4. Identity provider app swizzles to the selected client app, passing the username (user_hint).
5. If needed:
•Client app swizzles back to the identity provider app for authentication.
•Identity provider app completes authentication and swizzles back to the client app.
6. Client app performs the refresh token exchange, thus allowing user to begin using the app.
395
Android Architecture and FlowUsing Mobile SDK Apps as Identity Providers
Configuring an Android App to Be an Identity Provider
You can configure any app built on Mobile SDK 6.0 or later as an identity provider. You configure it to label itself as an identity provider,
and Mobile SDK does the rest.
Example: Beginning with forcedroid 6.0, the AndroidManifest.xml files in forcedroid templates contain the code shown
in this example.
To configure your Mobile SDK app as an identity provider:
1. In your app's AndroidManifest.xml file, uncomment the lines that describe the activity named
IDPAccountPickerActivity:
<!-- IDP account picker activity -->
<!--
To enable this app as an IDP app that's
capable of handling authentication requests originating
from other SP apps, uncomment the lines below and replace
'scheme' and 'host' with the values you wish to use to
define your IDP app.
The URI constructed from this must be unique and will be set in
the identity provider client app as well. This will be used to
launch the IDP app from the client app.
In the example given below, 'scheme' is "com.salesforce.samples.smartsyncexplorer"
and 'host' is "authenticator". The full
URI that needs to be set on the SP app
would be "com.salesforce.samples.smartsyncexplorer://authenticator".
396
Configuring an Android App to Be an Identity ProviderUsing Mobile SDK Apps as Identity Providers

-->
<activity
android:name="com.salesforce.androidsdk.auth.idp.IDPAccountPickerActivity"
android:excludeFromRecents="true"
android:theme="@style/SalesforceSDK.ActionBarTheme">
<intent-filter>
<data android:scheme="com.salesforce.samples.smartsyncexplorer"
android:host="authenticator" />
<action android:name="android.intent.action.VIEW" />
<category android:name="android.intent.category.BROWSABLE" />
<category android:name="android.intent.category.DEFAULT" />
</intent-filter>
</activity>
2. In this block, replace the <intent-filter> scheme—in this case,
com.salesforce.samples.smartsyncexplorer—with your app's package name.
<activity>
...
<intent-filter>
<data android:scheme="com.salesforce.samples.smartsyncexplorer"
android:host="authenticator" />
...
</intent-filter>
</activity>
Note: You aren’t required to change the <intent-filter> host name.
Configuring an Android App to Be an Identity Provider Client
You can configure any app built on Mobile SDK 6.0 or later as an identity provider client. You configure it to identify itself as an identity
provider client, and Mobile SDK does the rest.
To enable your Mobile SDK app as an identity provider client:
1. In your Application class, uncomment the line that calls setIDPAppURIScheme().
/*
* Uncomment the following line to enable IDP login flow. This will allow the user to
* either authenticate using the current app or use a designated IDP app for login.
* Replace 'idpAppURIScheme' with the URI scheme of the IDP app meant to be used.
*/
SalesforceSDKManager.getInstance().setIDPAppURIScheme(idpAppURIScheme);
2. Replace idpAppURIScheme with the URI scheme defined in the designated identity provider app.
Configuring an iOS App to Be An Identity Provider
You can configure any app built on Mobile SDK 6.0 or later as an identity provider. You configure it to identify itself as an identity provider,
and Mobile SDK does the rest.
397
Configuring an Android App to Be an Identity Provider ClientUsing Mobile SDK Apps as Identity Providers

Configuring a Mobile SDK App to Be an Identity Provider
In the implementation block of your AppDelegate class:
•Add the following line to the init method:
[SalesforceSDKManager sharedManager].isIdentityProvider = YES;
•Add the following method implementation.
- (BOOL)application:(UIApplication *)app openURL:(NSURL
*)urlOptions:(NSDictionary<UIApplicationOpenURLOptionsKey,id>*)options{return
[[SFUserAccountManager sharedInstance] handleAdvancedAuthenticationResponse:url
options:options];}
1. Add your custom URI scheme to the info.plist configuration. For example, the following XML defines “sampleidpapp” as a custom
URI scheme:
<key>CFBundleURLTypes</key>
<array>
<dict>
<key>CFBundleURLSchemes</key>
<array>
<string>sampleidpapp</string>
</array>
</dict>
</array>
(Optional) Customizing the Identity Provider UI
When a client app forwards a login request, the identity provider typically presents a selection dialog box. This dialog box, which lists
known users, appears only if at least one of the following conditions is true:
•A user has logged in from any other identity provider client app before this request.
•A user has directly logged in to the identity provider app before this request.
•Multiple users are currently logged in.
Note: Note: If no users have logged in before this request, Mobile SDK displays a login screen and continues to authentication
after the user successfully finishes the login flow.
To customize the user selection view, an identity provider app extends the UIViewController class and must also implement
the SFSDKUserSelectionView protocol.
@protocol SFSDKUserSelectionViewDelegate
- (void)createNewUser:(NSDictionary *)spAppOptions;
- (void)selectedUser:(SFUserAccount *)user
spAppContext:(NSDictionary *)spAppOptions;
- (void)cancel();
@protocol SFSDKUserSelectionView<NSObject>
@property (nonatomic,weak) id<SFSDKUserSelectionViewDelegate> userSelectionDelegate;
@property (nonatomic,strong) NSDictionary *spAppOptions;
@end
398
Configuring an iOS App to Be An Identity ProviderUsing Mobile SDK Apps as Identity Providers

In identity provider client apps, Mobile SDK sets up an instance of the userSelectionDelegate and spAppOptions properties
defined in the SFSDKUserSelectionView protocol. You use these objects in your identity provider’s view controller to notify
Mobile SDK of the user’s user account selection. For example, assume that you’ve implemented the SFSDKUserSelectionView
protocol in a UIViewController class named UserSelectionViewController. You then can use that view controller
as the user selection dialog box by setting the idpUserSelectionBlock on the SalesforceSDKManager shared instance,
as follows:
//optional : Customize the User Selection Screen
[SalesforceSDKManager sharedManager].idpUserSelectionBlock =
^UIViewController<SFSDKUserSelectionView> *{
UserSelectionViewController *controller =
[[UserSelectionViewController alloc] init];
return controller;
}
Configuring an iOS App to Be An Identity Provider Client
You can configure any app built on Mobile SDK 6.0 or later as an identity provider client. You configure it to identify itself as an identity
provider client and to specify its identity provider. Mobile SDK does the rest.
Configuring an iOS App to Be an Identity Provider Client
1. In the init method of your AppDelegate class, specify the URI scheme for the identity provider you’re using:
[SalesforceSDKManager sharedManager].idpAppURIScheme = @"sampleidpapp";
1. In your app's info.plist file, add the URI scheme defined in your identity provider clients’ connected app:
<key>CFBundleURLTypes</key>
<array>
<dict>
<key>CFBundleURLSchemes</key>
<array>
<string>sampleidpclientapp</string>
</array>
</dict>
</array>
1. In your AppDelegate class implementation, add the following method:
- (BOOL)application:(UIApplication *)app
openURL:(NSURL *)url
options:(NSDictionary<UIApplicationOpenURLOptionsKey,id> *)options
{
return
[[SFUserAccountManager sharedInstance]handleAdvancedAuthenticationResponse:url
options:options];
}
Your app is now ready for use as an identity provider client.
399
Configuring an iOS App to Be An Identity Provider ClientUsing Mobile SDK Apps as Identity Providers

(Optional) Customizing the Login Flow Selection View in the Client App
Mobile SDK provides template apps for both identity providers and their client apps. The client template defines a view that lets the user
choose to log in through an identity provider or the Salesforce login screen. When a user opens an app built from the client template,
the app presents this view if
•the user hasn’t yet logged in, or
•the current user hasn't been set.
To customize the login style selection view, a client app extends the UIViewController class and also must implement the
SFSDKLoginFlowSelectionView protocol.
@protocol SFSDKLoginFlowSelectionViewDelegate<NSObject>
-(void)loginFlowSelectionIDPSelected:(UIViewController *)controller
options:(NSDictionary *)appOptions;
-(void)loginFlowSelectionLocalLoginSelected:(UIViewController *)controller
options:(NSDictionary *)appOptions;
@end
@protocol SFSDKLoginFlowSelectionView<NSObject>
@property (weak,nonatomic) id <SFSDKLoginFlowSelectionViewDelegate>selectionFlowDelegate;
@property (nonatomic,strong) NSDictionary *appOptions;
@end
During the client app’s identity provider flow, Mobile SDK sets up an instance of the selectionFlowDelegate and appOptions
properties defined in this protocol. You use these artifacts in your view controller to notify Mobile SDK of the user's login method selection.
For example, assume that you’ve implemented the SFSDKUserSelectionView protocol in a UIViewController class
named IDPLoginNavViewController. You then can use that view controller as the user selection dialog box by setting the
idpLoginFlowSelectionAction on the SalesforceSDKManager shared instance, as follows:
//optional : Customize the Login Flow Selection screen
[SalesforceSDKManager sharedManager].idpLoginFlowSelectionAction =
^UIViewController<SFSDKLoginFlowSelectionView> *{
IDPLoginNavViewController *controller =[[IDPLoginNavViewController alloc] init];
return controller;
}
400
Configuring an iOS App to Be An Identity Provider ClientUsing Mobile SDK Apps as Identity Providers

CHAPTER 17 Using Communities With Mobile SDK Apps
Salesforce Communities is a social aggregation feature that supersedes the Portal feature of earlier
releases. Communities can include up to millions of users, as allowed by Salesforce limits. With proper
In this chapter ...
•Communities and
Mobile SDK Apps configuration, your customers can use their community login credentials to access your Mobile SDK app.
Communities also leverage Site.com to enable you to brand your community site and login screen.
•Set Up an
API-Enabled Profile To learn more about the Salesforce communties features, see “Salesforce Communities Overview” in
Salesforce Help.
•Set Up a Permission
Set
•Grant API Access to
Users
•Configure the Login
Endpoint
•Brand Your
Community
•Customize Login,
Self-Registration, and
Password
Management for
Your Community
•Use Your Branded
Login Page
•Using External
Authentication With
Communities
•Example: Configure
a Community For
Mobile SDK App
Access
•Example: Configure
a Community For
Facebook
Authentication
401

Communities and Mobile SDK Apps
To enable community members to log into your Mobile SDK app, set the appropriate permissions in Salesforce, and change your app’s
login server configuration to recognize your community URL.
With Communities, members that you designate can use your Mobile SDK app to access Salesforce. You define your own community
login endpoint, and the Communities feature builds a branded community login page according to your specifications. It also lets you
choose authentication providers and SAML identity providers from a list of popular choices.
Community membership is determined by profiles and permission sets. To enable community members to use your Mobile SDK app,
configure the following:
•Make sure that each community member has the API Enabled permission. You can set this permission through profiles or permission
sets.
•Configure your community to include your API-enabled profiles and permission sets.
•Configure your Mobile SDK app to use your community’s login endpoint.
In addition to these high-level steps, you must take the necessary steps to configure your users properly. Example: Configure a Community
For Mobile SDK App Access walks you through the community configuration process for Mobile SDK apps. For the full documentation
of the Communities feature, see the Salesforce Help.
Note: Community login is supported for native and hybrid local Mobile SDK apps on Android and iOS. It is not currently supported
for hybrid remote apps using Visualforce.
Set Up an API-Enabled Profile
If you’re new to communities, start by enabling the community feature in your org. See Enable Salesforce Communities in Salesforce
Help. When you’re asked to create a domain name, be sure that it doesn’t use SSL (https://).
To set up your community, see Create Communities in Salesforce Help. Note that you’ll define a community URL based on the domain
name you created when you enabled the community feature.
Next, configure one or more profiles with the API Enabled permissions. You can use these profiles to enable your Mobile SDK app for
community members. For detailed instructions, follow the tutorial at Example: Configure a Community For Mobile SDK App Access.
1. Create a new profile or edit an existing one.
2. Edit the profile’s details to select API Enabled under Administrative Permissions.
3. Save your changes, and then edit your community from Setup by entering Communities in the Quick Find box and then
selecting All Communities.
4. Select the name of your community. Then click Administration > Members.
5. Add your API-enabled profile to Selected Profiles.
Users to whom these profiles are assigned now have API access. For an overview of profiles, see User Profiles Overview in Salesforce
Help.
Set Up a Permission Set
Another way to enable mobile apps for your community is through a permission set.
1. To add the API Enabled permission to an existing permission set, in Setup, enter Permission Sets in the Quick Find
box, then select Permission Sets, select the permission set, and skip to Step 6.
402
Communities and Mobile SDK AppsUsing Communities With Mobile SDK Apps
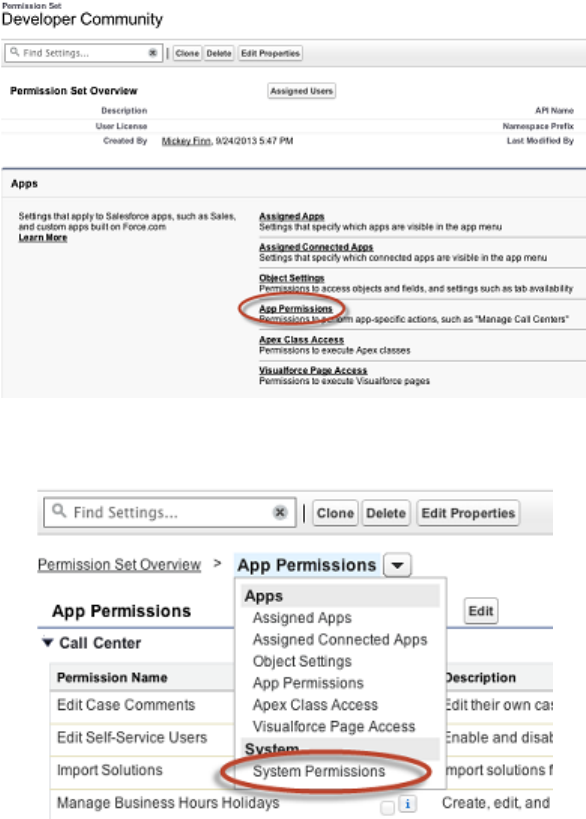
2. To create a permission set, in Setup, enter Permission Sets in the Quick Find box, then select Permission Sets.
3. Click New.
4. Give the Permission Set a label and press Return to automatically create the API Name.
5. Click Next.
6. Under the Apps section, click App Permissions.
7. Click App Permissions and select System > System Permissions.
8. On the System Permissions page, click Edit and select API Enabled.
9. Click Save.
10. From Setup, enter Communities in the Quick Find box, select All Communities, and click Manage next to your community
name.
11. In Administration, click Members.
12. Under Select Permission Sets, add your API-enabled permission set to Selected Permission Sets.
Users in this permission set now have API access.
403
Set Up a Permission SetUsing Communities With Mobile SDK Apps

Grant API Access to Users
To extend API access to your community users, add them to a profile or a permission set that sets the API Enabled permission. If you
haven’t yet configured any profiles or permission sets to include this permission, see Set Up an API-Enabled Profile and Set Up a Permission
Set.
Configure the Login Endpoint
Finally, configure the app to use your community login endpoint. The app’s mobile platform determines how you configure this setting.
Android
In Android, login hosts are known as server connections. You can see the standard list of server connections in the
res/xml/servers.xml file of the SalesforceSDK project. Mobile SDK uses this file to define production and sandbox
servers.You can add your custom servers to the runtime list by creating your own res/xml/servers.xml file in your native
Android project. The first server listed in your servers.xml file is used as the default login server at app startup. The root XML
element for servers.xml is <servers>. This root can contain any number of <server> entries. Each <server> entry
requires two attributes: name (an arbitrary human-friendly label) and url (the web address of the login server, including the “https://”
prefix).
For example:
<?xml version="1.0" encoding="utf-8"?>
<servers>
<server name="XYZ.com Login" url="https://myloginserver.cloudforce.com"/>
</servers>
iOS
Before version 4.1, Mobile SDK apps for iOS defined their custom login URIs in the app’s Settings bundle. In Mobile SDK 4.1 and later,
iOS apps lose the Settings bundle. Instead, you can use the SFDCOAuthLoginHost property in the app’s info.plist file to
build in a custom login URI.
Customers can also set their own custom login hosts at runtime in your app. Here’s how:
1. Start the app without logging in.
2. In the login screen, tap the Settings, or ”gear,” icon in the top navigation bar.
3. In the Choose Connection screen, tap the Plus icon .
4. (Optional but recommended) To help identify this configuration in future visits, enter a label.
5. Enter your custom login host’s URI. Be sure to omit the https:// prefix. For example, here’s how you enter a typical community
URI:
mycommunity-developer-edition.na15.force.com/fineapps
404
Grant API Access to UsersUsing Communities With Mobile SDK Apps

Brand Your Community
EDITIONS
Available in: Salesforce
Classic and Lightning
Experience
Available in: Enterprise,
Performance, Unlimited,
and Developer Editions
USER PERMISSIONS
To create, customize, or
publish a community:
•Create and Set Up
Communities AND View
Setup and Configuration
If you are using the Salesforce Tabs + Visualforce template, you can customize the look and feel of
your community in Community Workspaces or Community Management by adding your company
logo, colors, and copyright. This ensures that your community matches your company’s branding
and is instantly recognizable to your community members.
Note: Lightning community support is coming to Mobile SDK in a future release! At present,
however, Mobile SDK does not support building apps that wrap Lightning communities.
1. Open Community Workspaces or Community Management.
2. Click Administration > Branding.
3. Use the lookups to choose a header and footer for the community.
The files you’re choosing for header and footer must have been previously uploaded to the
Documents tab and must be publicly available. The header can be .html, .gif, .jpg, or .png. The
footer must be an .html file. The maximum file size for .html files is 100 KB combined. The
maximum file size for .gif, .jpg, or .png files is 20 KB. So, if you have a header .html file that is 70
KB and you want to use an .html file for the footer as well, it can only be 30 KB.
The header you choose replaces the Salesforce logo below the global header. The footer you
choose replaces the standard Salesforce copyright and privacy footer.
4. Click Select Color Scheme to select from predefined color schemes or click the text box next to the page section fields to select a
color from the color picker.
Note that some of the selected colors impact your community login page and how your community looks in the Salesforce app as
well.
Where it AppearsColor Choice
Top of the page, under the black global header. If an HTML file is selected in the Header field, it overrides
this color choice.
Top of the login page.
Header Background
Login page in the Salesforce app.
Background color for all pages in your community, including the login page.Page Background
Tab that is selected.Primary
Top borders of lists and tables.
Button on the login page.
Secondary
Background color for section headers on edit and detail pages.Tertiary
5. Click Save.
405
Brand Your CommunityUsing Communities With Mobile SDK Apps

Customize Login, Self-Registration, and Password Management for
Your Community
EDITIONS
Available in: Salesforce
Classic and Lightning
Experience
Available in: Enterprise,
Performance, Unlimited,
and Developer Editions
USER PERMISSIONS
To create, customize, or
publish a community:
•Create and Set Up
Communities AND View
Setup and Configuration
Configure the standard login, logout, password management, and self-registration options for your
community, or customize the behavior with Apex and Visualforce.
By default, each community comes with default login, password management, and self-registration
pages and associated Apex controllers that drive this functionality under the hood. You can use
Visualforce or Apex to create custom branding and change the default behavior. See the following
steps in Salesforce Help.
Note: Lightning community support is coming to Mobile SDK in a future release! At present,
however, Mobile SDK does not support building apps that wrap Lightning communities.
•Brand your community’s login page.
•Customize your community’s login experience by modifying the default login page behavior,
using a custom login page, and supporting other authentication providers.
•Redirect users to a different URL on logout.
•Use custom Change Password and Forgot Password pages.
•Set up self-registration for unlicensed guest users in your community.
Use Your Branded Login Page
Starting with Mobile SDK 5.2, you can display a branded community login page on your client app.
Typically, the authorization URL for a branded login page looks like this example:
https://community.force.com/services/oauth2/authorize/<brand>?response_type=code&...
In this URL, <brand> is the branding parameter that you reuse in your app. Use the following methods to set this value, where
loginBrand is the branding parameter for your community login page.
Android
SalesforceSDKManager.getInstance().setLoginBrand(loginBrand);
iOS
[SalesforceSDKManager sharedManager].brandLoginPath = loginBrand;
Using External Authentication With Communities
You can use an external authentication provider, such as Facebook©, to log community users into your Mobile SDK app.
Note: Although Salesforce supports Janrain as an authentication provider, it’s primarily intended for internal use by Salesforce.
We’ve included it here for the sake of completeness.
406
Customize Login, Self-Registration, and Password
Management for Your Community
Using Communities With Mobile SDK Apps

External Authentication Providers
EDITIONS
Available in: Lightning
Experience and Salesforce
Classic
Available in: Enterprise,
Performance, Unlimited,
and Developer Editions
USER PERMISSIONS
To view the settings:
•View Setup and
Configuration
To edit the settings:
•Customize Application
AND
Manage Auth. Providers
An authentication provider lets your users log in to your Salesforce org using their login credentials
from an external service provider. Salesforce provides authentication providers for apps that support
the OpenID Connect protocol, such as Google, Facebook, Twitter, and LinkedIn. For apps that don’t
support OpenID Connect, Salesforce provides an Apex Auth.AuthProviderPluginClass
abstract class to create a custom authentication provider.
You can enable users to log in to your Salesforce org using their login credentials from an external
service provider such as Facebook or Janrain.
Note: Social Sign-On (Salesforce Classic) (11:33 minutes)
Learn how to configure single sign-on (SSO) and OAuth-based API access to Salesforce from
other sources of user identity.
Do the following to set up a custom authentication provider for SSO.
•Configure the service provider website.
•Create a registration handler using Apex.
•Define the authentication provider in your org.
When setup is complete, the authentication provider flow is as follows.
1. The user tries to log in to Salesforce using a third-party (external) identity.
2. The login request is redirected to the external authentication provider.
3. The user follows the third-party login process and approves access.
4. The external authentication provider redirects the user to Salesforce with credentials.
5. The user is signed in to Salesforce.
Note: If users have an existing Salesforce session, after authentication with the third party, they’re redirected to the page where
they can approve the link to their Salesforce account.
Define Your Authentication Provider
Salesforce supports the following authentication providers.
•Facebook
•Google
•LinkedIn
•Microsoft Access Control Service
•Salesforce
•Twitter
•Janrain
•Amazon
•Microsoft Azure AD
•Any service provider who implements the OpenID Connect protocol
•Any service provider who supports OAuth but not the OpenID Connect protocol
407
External Authentication ProvidersUsing Communities With Mobile SDK Apps

Add Functionality to Your Authentication Provider
You can add functionality to your authentication provider by using extra request parameters.
•Authorization Endpoint—Sends the user to a specific endpoint for authentication (Salesforce authentication providers only)
•Community—Sends the user to a specific community after authentication
•Expid—Enables passing the dynamic user experience to the registration handler in authentication providers
•Prompt—Specifies how the authorization server prompts the user for reauthentication and reapproval
•Scope—Customizes the permissions requested from the third party
•Site—Enables using the authentication provider with a site
•StartURL—Sends the user to a specified location after authentication
Create an Apex Registration Handler
Implement a registration handler to use authentication providers for SSO. The Apex registration handler class must implement
the Auth.RegistrationHandler interface, which defines two methods. Salesforce invokes the appropriate method on callback,
depending on whether the user has used the provider before. When you create an authentication provider, you can create an Apex
template class for testing purposes. For more information, see RegistrationHandler in the Apex Code Developer's Guide.
Use the Community URL Parameter
EDITIONS
Available in: Lightning
Experience and Salesforce
Classic
Available in: Enterprise,
Performance, Unlimited,
and Developer Editions
USER PERMISSIONS
To view the settings:
•View Setup and
Configuration
To edit the settings:
•Customize Application
AND
Manage Auth. Providers
Send your user to a specific community after authenticating.
To direct your users to a specific community after authenticating, specify a URL with the
community request parameter. If you don’t add the parameter, Salesforce sends the user to
either /home/home.jsp (for a portal or standard application) or the default sites page (for a
site) after authentication completes.
Example: For example, with Single Sign-On Initialization URL, Salesforce
sends users to this location after they log in. For Existing User Linking URL, the
Continue to Salesforce link on the confirmation page leads to this page.
Here’s an example of a community parameter added to Single Sign-On
Initialization URL, where:
•orgID is your Auth. Provider ID
•URLsuffix is the value you specified when you defined the authentication provider
https://login.salesforce.com/services/auth/sso/orgID/URLsuffix?community=https://acme.force.com/support
408
Use the Community URL ParameterUsing Communities With Mobile SDK Apps

Use the Scope Parameter
EDITIONS
Available in: Lightning
Experience and Salesforce
Classic
Available in: Enterprise,
Performance, Unlimited,
and Developer Editions
USER PERMISSIONS
To view the settings:
•View Setup and
Configuration
To edit the settings:
•Customize Application
AND
Manage Auth. Providers
Customize the permissions requested from a third party, like Facebook or Janrain, so that the
returned access token has additional permissions.
You can customize requests to a third party to receive access tokens with additional permissions.
Then you use Auth.AuthToken methods to retrieve the access token that was granted so that
you can use those permissions with the third party.
The default scopes vary depending on the third party, but they usually don’t allow access to much
more than basic user information. Every provider type, such as Open ID Connect, Facebook, and
Salesforce, has a set of default scopes that it sends along with the request to the authorization
endpoint. For example, Salesforce’s default scope is id.
You can send scopes in a space-delimited string. Salesforce sends the space-delimited string of
requested scopes as-is to the third party and overrides the default permissions requested by
authentication providers.
Janrain doesn’t use this parameter. Configure additional permissions within Janrain.
Example: Here’s an example of a scope parameter requesting the Salesforce scopes api
and web, added to Single Sign-On Initialization URL, where:
•orgID is your Auth. Provider ID
•URLsuffix is the value you specified when you defined the authentication provider
https://login.salesforce.com/services/auth/sso/orgID/URLsuffix?scope=id%20api%20web
Valid scopes vary depending on the third party; refer to your third-party documentation. For example, Salesforce uses these scopes.
DescriptionValue
Allows access to the current, logged-in user’s account using APIs, such as REST API and Bulk API. This
value also includes chatter_api, which allows access to Chatter REST API resources.
api
Allows access to Chatter REST API resources only.chatter_api
Allows access to the custom permissions in an organization associated with the connected app, and
shows whether the current user has each permission enabled.
custom_permissions
Allows access to all data accessible by the logged-in user, and encompasses all other scopes. full
does not return a refresh token. You must explicitly request the refresh_token scope to get
a refresh token.
full
Allows access to the identity URL service. You can request profile, email, address, or
phone, individually to get the same result as using id; they are all synonymous.
id
Allows access to the current, logged in user’s unique identifier for OpenID Connect apps.
The openid scope can be used in the OAuth 2.0 user-agent flow and the OAuth 2.0 Web server
authentication flow to get back a signed ID token conforming to the OpenID Connect specifications
in addition to the access token.
openid
Allows a refresh token to be returned if you are eligible to receive one. This lets the app interact with
the user’s data while the user is offline, and is synonymous with requesting offline_access.
refresh_token
Allows access to Visualforce pages.visualforce
409
Use the Scope ParameterUsing Communities With Mobile SDK Apps

DescriptionValue
Allows the ability to use the access_token on the Web. This also includes visualforce,
allowing access to Visualforce pages.
web
Configure a Facebook Authentication Provider
EDITIONS
Available in: Lightning
Experience and Salesforce
Classic
Available in: Enterprise,
Performance, Unlimited,
and Developer Editions
USER PERMISSIONS
To view the settings:
•View Setup and
Configuration
To edit the settings:
•Customize Application
AND
Manage Auth. Providers
Configure a Facebook authentication provider to let your users log in to your Salesforce org using
their Facebook credentials.
Configuring Facebook as an authentication provider involves these high-level steps.
1. Set up a Facebook app, making Salesforce the app domain.
2. Define a Facebook authentication provider in your Salesforce org.
3. Update your Facebook app to use the Callback URL generated by Salesforce as the Facebook
website URL.
4. Test the connection.
Set Up a Facebook App
Before you can configure Facebook for your Salesforce org, you must set up an app in Facebook.
Note: You can skip this step by allowing Salesforce to use its own default app. For more
information, see Use Salesforce-Managed Values in the Auth. Provider Setup Page.
1. Go to the Facebook website and create an app.
2. Modify the app settings and set the Application Domain to Salesforce.
3. Note the app ID and the app secret.
Define a Facebook Provider in Your Salesforce Org
You need the Facebook app ID and app secret to set up a Facebook provider in your Salesforce org.
Note: You can skip this step by allowing Salesforce to manage the values for you. For more information, see Use Salesforce-Managed
Values in the Auth. Provider Setup Page.
1. From Setup, enter Auth. Providers in the Quick Find box, then select Auth. Providers.
2. Click New.
3. For provider type, select Facebook.
4. Enter a name for the provider.
5. Enter the URL suffix, which is used in the client configuration URLs. For example, if the URL suffix of your provider is MyFacebookProvider,
your single sign-on (SSO) URL is similar to:
https://login.salesforce.com/auth/sso/00Dx00000000001/MyFacebookProvider.
6. Use the Facebook app ID for the Consumer Key field.
7. Use the Facebook app secret for the Consumer Secret field.
8. Optionally, set the following fields.
410
Configure a Facebook Authentication ProviderUsing Communities With Mobile SDK Apps

Enter the base URL from Facebook for the Authorize Endpoint URL. For example,
https://www.facebook.com/v2.2/dialog/oauth. If you leave this field blank, Salesforce uses the version of
the Facebook API that your app uses.
a.
Tip: You can add query string parameters to the base URL, if necessary. For example, to get a refresh token from Facebook
for offline access, use
https://accounts.facebook.com/o/oauth2/auth?access_type=offline&approval_prompt=force.
You need the approval_prompt parameter to ask the user to accept the refresh action so that Facebook continues
to provide refresh tokens after the first one.
b. Enter the Token Endpoint URL from Facebook. For example, https://www.facebook.com/v2.2/dialog/oauth.
If you leave this field blank, Salesforce uses the version of the Facebook API that your app uses.
c. Enter the User Info Endpoint URL to change the values requested from Facebook’s profile API. See
https://developers.facebook.com/docs/facebook-login/permissions/v2.0#reference-public_profile for more information on
fields. The requested fields must correspond to the requested scopes. If you leave this field blank, Salesforce uses the version of
the Facebook API that your app uses.
d. Default Scopes to send along with the request to the authorization endpoint. Otherwise, the hardcoded defaults for the
provider type are used (see Facebook’s developer documentation for these defaults).
For more information, see Use the Scope Parameter.
e. Custom Error URL for the provider to use to report any errors.
f. Custom Logout URL to provide a specific destination for users after they log out, if they authenticated using the SSO flow.
Use this field to direct users to a branded logout page or destination other than the default Salesforce logout page. The URL
must be fully qualified with an http or https prefix, such as https://acme.my.salesforce.com.
g. Select an existing Apex class as the Registration Handler class. Or click Automatically create a registration handler
template to create an Apex class template for the registration handler. Edit this class later, and modify the default content before
using it.
Note: A Registration Handler class is required for Salesforce to generate the SSO initialization URL.
h. For Execute Registration As, select the user that runs the Apex handler class. The user must have the “Manage Users”
permission. A user is required regardless of whether you’re specifying an existing registration handler class or creating one from
the template.
i. To use a portal with your provider, select the portal from the Portal dropdown list.
j. Use the Icon URL field to add a path to an icon to display as a button on the login page for a community. This icon applies
to a community only. It doesn’t appear on the login page for your Salesforce org or domain created with My Domain. Users click
the button to log in with the associated authentication provider for the community.
Specify a path to your own image, or copy the URL for one of our sample icons into the field.
9. Click Save.
Note the generated Auth. Provider Id value. You use it with the Auth.AuthToken Apex class.
Several client configuration URLs are generated after defining the authentication provider.
•Test-Only Initialization URL—Salesforce admins use this URL to ensure that the third-party provider is set up correctly. The admin
opens this URL in a browser, signs in to the third party, and is redirected back to Salesforce with a map of attributes.
•Single Sign-On Initialization URL—Use this URL to perform SSO into Salesforce from a third party using its third-party credentials.
The user opens this URL in a browser and logs in to the third party. The third party either creates a user or updates an existing user.
Then the third party signs the user into Salesforce as that user.
411
Configure a Facebook Authentication ProviderUsing Communities With Mobile SDK Apps

•Existing User Linking URL—Use this URL to link existing Salesforce users to a third-party account. The user opens this URL in a browser,
signs in to the third party, signs in to Salesforce, and approves the link.
•Oauth-Only Initialization URL—Use this URL to obtain OAuth access tokens for a third party. Users must authenticate with Salesforce
for the third-party service to get a token. This flow doesn’t provide for future SSO functionality.
•Callback URL—Use the callback URL for the endpoint that the authentication provider calls back to for configuration. The authentication
provider must redirect to the callback URL with information for each client configuration URL.
Client configuration URLs support additional request parameters that enable you to direct users to log in to specific sites, obtain customized
permissions from the third party, or go to a specific location after authenticating.
Update Your Facebook App
After defining the Facebook authentication provider in your Salesforce org, go back to Facebook and update your app to use the Callback
URL as the Facebook Website Site URL.
Test the SSO Connection
In a browser, open the Test-Only Initialization URL on the Auth. Provider detail page. It redirects you to Facebook and asks you to sign
in. You’re then asked to authorize your app. After you authorize, you’re redirected back to Salesforce.
Configure a Salesforce Authentication Provider
EDITIONS
Available in: Lightning
Experience and Salesforce
Classic
Available in: Enterprise,
Performance, Unlimited,
and Developer Editions
USER PERMISSIONS
To view the settings:
•View Setup and
Configuration
To edit the settings:
•Customize Application
AND
Manage Auth. Providers
To configure a Salesforce authentication provider, create a connected app that uses single sign-on
(SSO).
Configuring a Salesforce authentication provider involves these high-level steps.
1. Create a Connected App.
2. Define the Salesforce authentication provider in your org.
3. Test the connection.
Create a Connected App
You can create a connected app from either Lightning Experience or Salesforce Classic.
In Lightning Experience, from Setup, enter App in the Quick Find box, select App Manager,
then click New Connected App.
In Salesforce Classic, from Setup, enter Apps in the Quick Find box, select Apps. Then, under
the Connected Apps section, click New.
After you finish creating a connected app, note the values from the Consumer Key and
Consumer Secret fields.
Note: You can skip this step by allowing Salesforce to use its own default app. For more
information, see Use Salesforce-Managed Values in the Auth. Provider Setup Page.
Define the Salesforce Authentication Provider in Your Org
To set up the authentication provider in your org, you need the values from the Consumer Key and Consumer Secret fields
of the connected app definition.
412
Configure a Salesforce Authentication ProviderUsing Communities With Mobile SDK Apps

Note: You can skip this step by allowing Salesforce to manage the values for you. For more information, see Use Salesforce-Managed
Values in the Auth. Provider Setup Page.
1. From Setup, enter Auth. Providers in the Quick Find box, then select Auth. Providers.
2. Click New.
3. For provider type, select Salesforce.
4. Enter a name for the provider.
5. Enter the URL suffix, which is used in the client configuration URLs. For example, if the URL suffix of your provider is MySFDCProvider,
your SSO URL is similar to https://login.salesforce.com/auth/sso/00Dx00000000001/MySFDCProvider.
6. Paste the consumer key value from the connected app definition into the Consumer Key field.
7. Paste the consumer secret value from the connected app definition into the Consumer Secret field.
8. Optionally, set the following fields.
a. Authorize Endpoint URL to specify an OAuth authorization URL.
For the Authorize Endpoint URL, the host name can include a sandbox or custom domain name (created using My
Domain), but the URL must end in .salesforce.com, and the path must end in /services/oauth2/authorize.
For example, https://login.salesforce.com/services/oauth2/authorize.
b. Token Endpoint URL to specify an OAuth token URL.
For the Token Endpoint URL, the host name can include a sandbox or custom domain name (created using My Domain),
but the URL must end in .salesforce.com, and the path must end in /services/oauth2/token. For example,
https://login.salesforce.com/services/oauth2/token.
c. Default Scopes to send along with the request to the authorization endpoint. Otherwise, the hardcoded default is used.
For more information, see Use the Scope Parameter.
d. Include identity organization's organization ID for third-party account linkage.
This option doesn't appear if the authentication provider was created after the Winter ’15 release. Before Winter '15, the destination
org couldn't differentiate between users with the same user ID on different orgs, for example, between a production and sandbox
org. As of Winter ’15, user identities contain the org ID, so this option doesn’t appear. For older authentication providers, enable
this option to keep the identities separate in the destination org. However, if you enable this option, your users must reapprove
all their third-party links. The links are listed in the Third-Party Account Links section of a user’s detail page.
e. Custom Error URL for the provider to use to report any errors.
f. Custom Logout URL to provide a specific destination for users after they log out, if they authenticated using the SSO flow.
Use this field to direct users to a branded logout page or destination other than the default Salesforce logout page. The URL
must be fully qualified with an http or https prefix, such as https://acme.my.salesforce.com.
9. Select an existing Apex class as the Registration Handler class. Or click Automatically create a registration handler
template to create an Apex class template for the registration handler. Edit this class later, and modify the default content before
using it.
Note: A Registration Handler class is required for Salesforce to generate the SSO initialization URL.
10. For Execute Registration As, select the user that runs the Apex handler class. The user must have the “Manage Users”
permission. A user is required regardless of whether you’re specifying an existing registration handler class or creating one from the
template.
11. To use a portal with your provider, select the portal from the Portal dropdown list.
413
Configure a Salesforce Authentication ProviderUsing Communities With Mobile SDK Apps
12. Use the Icon URL field to add a path to an icon to display as a button on the login page for a community. This icon applies to a
community only. It doesn’t appear on the login page for your Salesforce org or domain created with My Domain. Users click the
button to log in with the associated authentication provider for the community.
Specify a path to your own image, or copy the URL for one of our sample icons into the field.
13. Click Save.
Note the value of the Client Configuration URLs. You need the callback URL to complete the last step. Use the Test-Only initialization
URL to check your configuration. Also note the Auth. Provider Id value because you use it with the Auth.AuthToken
Apex class.
14. Return to the connected app definition that you created earlier from Setup. Paste the callback URL value from the authentication
provider into the Callback URL field.
Several client configuration URLs are generated after defining the authentication provider.
•Test-Only Initialization URL—Salesforce admins use this URL to ensure that the third-party provider is set up correctly. The admin
opens this URL in a browser, signs in to the third party, and is redirected back to Salesforce with a map of attributes.
•Single Sign-On Initialization URL—Use this URL to perform SSO into Salesforce from a third party using its third-party credentials.
The user opens this URL in a browser and logs in to the third party. The third party either creates a user or updates an existing user.
Then the third party signs the user into Salesforce as that user.
•Existing User Linking URL—Use this URL to link existing Salesforce users to a third-party account. The user opens this URL in a browser,
signs in to the third party, signs in to Salesforce, and approves the link.
•Oauth-Only Initialization URL—Use this URL to obtain OAuth access tokens for a third party. Users must authenticate with Salesforce
for the third-party service to get a token. This flow doesn’t provide for future SSO functionality.
•Callback URL—Use the callback URL for the endpoint that the authentication provider calls back to for configuration. The authentication
provider must redirect to the callback URL with information for each client configuration URL.
Client configuration URLs support additional request parameters that enable you to direct users to log in to specific sites, obtain customized
permissions from the third party, or go to a specific location after authenticating.
Test the SSO Connection
In a browser, open the Test-Only Initialization URL on the Auth. Provider detail page. It redirects you to the authentication provider and
asks you to sign in. You’re then asked to authorize your app. After you authorize, you’re redirected to Salesforce.
414
Configure a Salesforce Authentication ProviderUsing Communities With Mobile SDK Apps

Configure an OpenID Connect Authentication Provider
EDITIONS
Available in: Lightning
Experience and Salesforce
Classic
Available in: Enterprise,
Performance, Unlimited,
and Developer Editions
USER PERMISSIONS
To view the settings:
•View Setup and
Configuration
To edit the settings:
•Customize Application
AND
Manage Auth. Providers
You can use any third-party web app that implements the server side of the OpenID Connect
protocol, such as Amazon, Google, and PayPal, as an authentication provider.
Complete these steps to configure an OpenID authentication provider.
1. Register your app, making Salesforce the app domain.
2. Define an OpenID Connect authentication provider in your Salesforce org.
3. Update your app to use the callback URL generated by Salesforce.
4. Test the connection.
Register an OpenID Connect App
Before you can configure a web app for your Salesforce org, you must register it with your service
provider. The process varies depending on the service provider. For example, to register a Google
app, Create an OAuth 2.0 Client ID.
1. Register your app on your service provider’s website.
2. Modify the app settings and set the app domain (or Home Page URL) to Salesforce.
3. From the provider’s documentation, get the client ID, client secret, authorize endpoint URL,
token endpoint URL, and the user info endpoint URL. Here are some common OpenID Connect
service providers.
•Amazon
•Google
•PayPal
Define an OpenID Connect Provider in Your Salesforce Org
1. From Setup, enter Auth. Providers in the Quick Find box, then select Auth. Providers.
2. Click New.
3. For provider type, select OpenID Connect.
4. Enter a name for the provider.
5. Enter the URL suffix, which is used in the client configuration URLs. For example, if the URL suffix of your provider is
MyOpenIDConnectProvider, your single sign-on URL is similar to:
https://login.salesforce.com/auth/sso/00Dx00000000001/MyOpenIDConnectProvider.
6. Use the client ID from your provider for the Consumer Key field.
7. Use the client secret from your provider for the Consumer Secret field.
8. Enter the base URL from your provider for the Authorize Endpoint URL.
Tip: You can add query string parameters to the base URL, if necessary. For example, to get a refresh token from Google for
offline access, use
https://accounts.google.com/o/oauth2/auth?access_type=offline&approval_prompt=force.
You need the approval_prompt parameter to ask the user to accept the refresh action so that Google continues to
provide refresh tokens after the first one.
415
Configure an OpenID Connect Authentication ProviderUsing Communities With Mobile SDK Apps

9. Enter the token endpoint URL from your provider.
10. Optionally, set the following fields.
a. User Info Endpoint URL from your provider.
b. Token Issuer. This value identifies the source of the authentication token in the form https: URL. If this value is
specified, the provider must include an id_token value in the response to a token request. The id_token value isn’t
required for a refresh token flow (but will be validated by Salesforce if provided).
c. Default Scopes to send along with the request to the authorization endpoint. Otherwise, the hardcoded defaults for the
provider type are used. See the OpenID Connect developer documentation for these defaults.
For more information, see Use the Scope Parameter.
11. Optionally, select Send access token in header to have the token sent in a header instead of a query string.
12. Optionally, set the following fields.
a. Custom Error URL for the provider to use to report any errors.
b. Custom Logout URL to provide a specific destination for users after they log out, if they authenticated using the SSO flow.
Use this field to direct users to a branded logout page or destination other than the default Salesforce logout page. The URL
must be fully qualified with an http or https prefix, such as https://acme.my.salesforce.com.
c. Select an existing Apex class as the Registration Handler class. Or click Automatically create a registration handler
template to create an Apex class template for the registration handler. Edit this class later, and modify the default content before
using it.
Note: A Registration Handler class is required for Salesforce to generate the single sign-on initialization URL.
d. For Execute Registration As, select the user that runs the Apex handler class. The user must have the “Manage Users”
permission. A user is required regardless of whether you’re specifying an existing registration handler class or creating one from
the template.
e. To use a portal with your provider, select the portal from the Portal dropdown list.
f. Use the Icon URL field to add a path to an icon to display as a button on the login page for a community. This icon applies
to a community only. It doesn’t appear on the login page for your Salesforce org or domain created with My Domain. Users click
the button to log in with the associated authentication provider for the community.
Specify a path to your own image, or copy the URL for one of our sample icons into the field.
13. Click Save.
Be sure to note the generated Auth. Provider Id value. You must use it with the Auth.AuthToken Apex class.
Several client configuration URLs are generated after defining the authentication provider.
•Test-Only Initialization URL—Salesforce admins use this URL to ensure that the third-party provider is set up correctly. The admin
opens this URL in a browser, signs in to the third party, and is redirected back to Salesforce with a map of attributes.
•Single Sign-On Initialization URL—Use this URL to perform SSO into Salesforce from a third party using its third-party credentials.
The user opens this URL in a browser and logs in to the third party. The third party either creates a user or updates an existing user.
Then the third party signs the user into Salesforce as that user.
•Existing User Linking URL—Use this URL to link existing Salesforce users to a third-party account. The user opens this URL in a browser,
signs in to the third party, signs in to Salesforce, and approves the link.
•Oauth-Only Initialization URL—Use this URL to obtain OAuth access tokens for a third party. Users must authenticate with Salesforce
for the third-party service to get a token. This flow doesn’t provide for future SSO functionality.
416
Configure an OpenID Connect Authentication ProviderUsing Communities With Mobile SDK Apps

•Callback URL—Use the callback URL for the endpoint that the authentication provider calls back to for configuration. The authentication
provider must redirect to the callback URL with information for each client configuration URL.
Client configuration URLs support additional request parameters that enable you to direct users to log in to specific sites, obtain customized
permissions from the third party, or go to a specific location after authenticating.
Update Your OpenID Connect App
After defining the authentication provider in your Salesforce org, go back to your provider and update your app’s callback URL. For
Google apps, the callback URL is called the Authorized Redirect URI. For PayPal, it’s called the Return URL.
Test the SSO Connection
In a browser, open the Test-Only Initialization URL on the Auth. Provider Setup page. It redirects you to your provider’s service and asks
you to sign in. You’re then asked to authorize your app. After you authorize, you’re redirected back to Salesforce.
Example: Configure a Community For Mobile SDK App Access
Configuring your community to support logins from Mobile SDK apps can be tricky. This tutorial helps you see the details and correct
sequence first-hand.
When you configure community users for mobile access, sequence and protocol affect your success. For example, a user that’s not
associated with a contact cannot log in on a mobile device. Here are some important guidelines to keep in mind:
•Create users only from contacts that belong to accounts. You can’t create the user first and then associate it with a contact later.
•Be sure you’ve assigned a role to the owner of any account you use. Otherwise, the user gets an error when trying to log in.
•When you define a custom login host in an iOS app, be sure to remove the http[s]:// prefix. The iOS core appends the prefix
at runtime. Explicitly including it could result in an invalid address.
1. Add Permissions to a Profile
2. Create a Community
3. Add the API User Profile To Your Community
4. Create a New Contact and User
5. Test Your New Community Login
Add Permissions to a Profile
Create a profile that has API Enabled and Enable Chatter permissions.
1. From Setup, enter Profiles in the Quick Find box, then select Profiles.
2. Click New Profile.
3. For Existing Profile select Customer Community User.
4. For Profile Name type FineApps API User.
5. Click Save.
6. On the FineApps API User page, click Edit.
7. For Administrative Permissions select API Enabled and Enable Chatter.
417
Example: Configure a Community For Mobile SDK App AccessUsing Communities With Mobile SDK Apps

Note: A user who doesn’t have the Enable Chatter permission gets an insufficient privileges error immediately after successfully
logging into your community in Salesforce.
8. Click Save.
Note: In this tutorial we use a profile, but you can also use a permission set that includes the required permissions.
Create a Community
Create a community and a community login URL.
The following steps are fully documented at Enable Salesforce Communities and Creating Communities in Salesforce Help.
1. In Setup, enter Communities in the Quick Find box.
2. If you don’t see All Communities:
a. Click Communities Settings.
b. Select Enable communities.
c. Enter a unique name for your domain name, such as fineapps.<your_name>.force.com for Domain name.
d. Click Check Availability to make sure the domain name isn’t already being used.
e. Click Save.
3. From Setup, enter Communities in the Quick Find box, then select All Communities.
4. Click New Community.
5. Choose a template and name the new community FineApps Users.
6. For URL, type customers in the suffix edit box.
The full URL shown, including your suffix, becomes the new URL for your community.
7. Click Create Community, and then click Go to Community Management.
Add the API User Profile To Your Community
Add the API User profile to your community setup on the Members page.
1. Click Administration > Members.
2. For Search, select All.
3. Select FineApps API User in the Available Profiles list and then click Add.
4. Click Save.
5. Click Publish.
6. Dismiss the confirmation dialog box and click Close.
Create a New Contact and User
Instead of creating users directly, create a contact on an account and then create the user from that contact.
If you don’t currently have any accounts,
1. Click the Accounts tab.
418
Create a CommunityUsing Communities With Mobile SDK Apps

2. If your org doesn’t yet contain any accounts:
a. In Quick Create, enter My Test Account for Account Name.
b. Click Save
3. In Recent Accounts click My Test Account or any other account name. Note the Account Owner’s name.
4. From Setup, enter Users in the Quick Find box, select Users, and then click Edit next to your Account Owner’s name.
5. Make sure that Role is set to a management role, such as CEO.
6. Click Save.
7. Click the Accounts tab and again click the account’s name.
8. In Contacts, click New Contact.
9. Fill in the following information: First Name: Jim, Last Name: Parker. Click Save.
10. On the Contact page for Jim Parker, click Manage External User and then select Enable Customer User.
11. For User License select Customer Community.
12. For Profile select the FineApps API User.
13. Use the following values for the other required fields:
ValueField
Enter your active valid email address.Email
jimparker@fineapps.comUsername
jimmypNickname
You can remove any non-required information if it’s automatically filled in by the browser.
14. Click Save.
15. Wait for an email to arrive in your inbox welcoming Jim Parker and then click the link in the email to create a password. Set the
password to “mobile333”.
Test Your New Community Login
Test your community setup by logging in to your Mobile SDK native or hybrid local app as your new contact.
To log in to your community from your Mobile SDK app, configure your app to recognize your community login URL.
1. For Android:
a. Open your Android project in Android Studio.
b. In the Project Explorer, go to the res folder and create a new (or select the existing) xml folder.
c. In the xml folder, create a text file. You can do this using either the File menu or the CTRL-Click (or Right-Click)
menu.
d. In the new text file, add the following XML. Replace the server URL with your community login URL:
<?xml version="1.0" encoding="utf-8"?>
<servers>
<server name="Community Login" url=
419
Test Your New Community LoginUsing Communities With Mobile SDK Apps

"https://fineapps-developer-edition.<instance>.force.com/fineapps">
</servers>
e. Save the file as servers.xml.
2. For iOS:
a. Start the app without logging in.
b. In the login screen, tap the Settings, or ”gear,” icon in the top navigation bar.
c. In the Choose Connection screen, tap the Plus icon .
d. (Optional but recommended) To help identify this configuration in future visits, enter a label.
e. Enter your custom login host’s URI. Be sure to omit the https:// prefix. For example, here’s how you enter a typical community
URI:
mycommunity-developer-edition.na15.force.com/fineapps
Alternatively, set the login screen through MDM if you’re using MDM for configuration.
3. Start your app on your device, simulator, or emulator, and log in with username jimparker@fineapps.com and password
mobiletest1234.
Note: If your mobile app remains at the login screen for an extended time, you can get an “insufficient privileges” error upon
login. In this case, close and reopen the app, and then log in immediately.
Example: Configure a Community For Facebook Authentication
You can extend the reach of your community by configuring an external authentication provider to handle community logins.
This example extends the previous example to use Facebook as an authentication front end. In this simple scenario, we configure the
external authentication provider to accept any authenticated Facebook user into the community.
If your community is already configured for mobile app logins, you don’t need to change your mobile app or your connected app to
use external authentication. Instead, you define a Facebook app, a Salesforce Auth. Provider, and an Auth. Provider Apex class. You also
make a minor change to your community setup.
Create a Facebook App
To enable community logins through Facebook, start by creating a Facebook app.
A Facebook app is comparable to a Salesforce connected app. It is a container for settings that govern the connectivity and authentication
of your app on mobile devices.
1. Go to developers.facebook.com.
2. Log in with your Facebook developer account, or register if you’re not a registered Facebook developer.
3. Go to Apps > Create a New App.
4. Set display name to “FineApps Community Test”.
5. Add a Namespace, if you want. Per Facebook’s requirements, a namespace label must be twenty characters or less, using only
lowercase letters, dashes, and underscores. For example, “my_fb_goodapps”.
6. For Category, choose Utilities.
420
Example: Configure a Community For Facebook
Authentication
Using Communities With Mobile SDK Apps

7. Copy and store your App ID and App Secret for later use.
You can log in to the app using the following URL:
https://developers.facebook.com/apps/<App ID>/dashboard/
Define a Salesforce Auth. Provider
To enable external authentication in Salesforce, create an Auth. Provider.
External authentication through Facebook requires the App ID and App Secret from the Facebook app that you created in the previous
step.
1. In Setup, enter Auth. Providers in the Quick Find box, then select Auth. Providers.
2. Click New.
3. Configure the Auth. Provider fields as shown in the following table.
ValueField
Select Facebook.Provider Type
Enter FB Community Login.Name
Accept the default.URL Suffix
Note: You may also provide any other string that
conforms to URL syntax, but for this example the default
works best.
Enter the App ID from your Facebook app.Consumer Key
Enter the App Secret from your Facebook app.Consumer Secret
Leave blank.Custom Error URL
4. For Registration Handler, click Automatically create a registration handler template.
5.
For Execute Registration As:, click Search and choose a community member who has administrative privileges.
6. Leave Portal blank.
7. Click Save.
Salesforce creates a new Apex class that extends RegistrationHandler. The class name takes the form
AutocreatedRegHandlerxxxxxx….
8. Copy the Auth. Provider ID for later use.
9. In the detail page for your new Auth. Provider, under Client Configuration, copy the Callback URL for later use.
The callback URL takes the form
https://login.salesforce.com/services/authcallback/<id>/<Auth.Provider_URL_Suffix>.
421
Define a Salesforce Auth. ProviderUsing Communities With Mobile SDK Apps

Configure Your Facebook App
Next, you need to configure the community to use your Salesforce Auth. Provider for logins.
Now that you’ve defined a Salesforce Auth. Provider, complete the authentication protocol by linking your Facebook app to your Auth.
Provider. You provide the Salesforce login URL and the callback URL, which contains your Auth. Provider ID and the Auth. Provider’s URL
suffix.
1. In your Facebook app, go to Settings.
2. In App Domains, enter login.salesforce.com.
3. Click +Add Platform.
4. Select Website.
5. For Site URL, enter your Auth. Provider’s callback URL.
6. For Contact Email, enter your valid email address.
7. In the left panel, set Status & Review to Yes. With this setting, all Facebook users can use their Facebook logins to create user accounts
in your community.
8. Click Save Changes.
9. Click Confirm.
Customize the Auth. Provider Apex Class
Use the Apex class for your Auth. Provider to define filtering logic that controls who may enter your community.
1. In Setup, enter Apex Classes in the Quick Find box, then select Apex Classes.
2. Click Edit next to your Auth. Provider class. The default class name starts with “AutocreatedRegHandlerxxxxxx…”
3. To implement the canCreateUser() method, simply return true.
global boolean canCreateUser(Auth.UserData data) {
return true;
}
This implementation allows anyone who logs in through Facebook to join your community.
Note: If you want your community to be accessible only to existing community members, implement a filter to recognize
every valid user in your community. Base your filter on any unique data in the Facebook packet, such as username or email
address, and then validate that data against similar fields in your community members’ records.
4. Change the createUser() code:
a. Replace “Acme” with FineApps in the account name query.
b. Replace the username suffix (“@acmecorp.com”) with @fineapps.com.
c. Change the profile name in the profile query (“Customer Portal User”) to API Enabled.
5. In the updateUser() code, replace the suffix to the username (“myorg.com”) with @fineapps.com.
6. Click Save.
Configure Your Salesforce Community
For the final step, configure the community to use your Salesforce Auth. Provider for logins.
422
Configure Your Facebook AppUsing Communities With Mobile SDK Apps

1. In Setup, enter Communities in the Quick Find box, then select All Communities.
2. Click Manage next to your community name.
3. Click Administration > Login & Registration.
4. Under Login, select your new Auth. Provider.
5. Click Save.
You’re done! Now, when you log into your mobile app using your community login URL, look for an additional button inviting you to
log in using Facebook. Click the button and follow the on-screen instructions to see how the login works.
To test the external authentication setup in a browser, customize the Single Sign-On Initialization URL (from your Auth. Provider) as
follows:
https://login.salesforce.com/services/auth/sso/orgID/
URLsuffix?community=<community_login_url>
For example:
https://login.salesforce.com/services/auth/sso/00Da0000000TPNEAA4/
FB_Community_Login?community=
https://mobilesdk-developer-edition.server_instance.force.com/fineapps
To form the Existing User Linking URL, replace sso with link:
https://login.salesforce.com/services/auth/link/00Da0000000TPNEAA4/
FB_Community_Login?community=
https://mobilesdk-developer-edition.server_instance.force.com/fineapps
423
Configure Your Salesforce CommunityUsing Communities With Mobile SDK Apps

CHAPTER 18 Multi-User Support in Mobile SDK
If you need to enable simultaneous logins for multiple users, Mobile SDK provides a basic implementation
and APIs for user switching.
In this chapter ...
•About Multi-User
Support Mobile SDK provides a default dialog box that lets the user select from authenticated accounts. Your
app implements some means of launching the dialog box and calls the APIs that initiate the user switching
workflow.
•Implementing
Multi-User Support
424

About Multi-User Support
Beginning in version 2.2, Mobile SDK supports simultaneous logins from multiple user accounts. These accounts can represent different
users from the same organization, or different users on different organizations (such as production and sandbox, for instance.)
Once a user signs in, that user’s credentials are saved to allow seamless switching between accounts, without the need to re-authenticate
against the server. If you don’t wish to support multiple logins, you don’t have to change your app. Existing Mobile SDK APIs work as
before in the single-user scenario.
Mobile SDK assumes that each user account is unrelated to any other authenticated user account. Accordingly, Mobile SDK isolates data
associated with each account from that of all others, thus preventing the mixing of data between accounts. Data isolation protects
SharedPreferences files, SmartStore databases, AccountManager data, and any other flat files associated with an account.
Example: For native Android, the RestExplorer sample app demonstrates multi-user switching:
For native iOS, the RestAPIExplorer sample app demonstrates multi-user switching:
The following hybrid sample apps demonstrate multi-user switching:
•Without SmartStore: ContactExplorer
•With SmartStore: AccountEditor
Implementing Multi-User Support
Mobile SDK provides APIs for enabling multi-user support in native Android, native iOS, and hybrid apps.
Although Mobile SDK implements the underlying functionality, multi-user switching isn’t initialized at runtime unless and until your app
calls one of the following APIs:
Android native (UserAccountManager class methods)
public void switchToUser(UserAccount user)
public void switchToNewUser()
iOS native (SFUserAccountManager class methods)
- (void)switchToUser:(SFUserAccount *)newCurrentUser
- (void)switchToNewUser
Hybrid (JavaScript method)
switchToUser
To let the user switch to a different account, launch a selection screen from a button, menu, or some other control in your user interface.
Mobile SDK provides a standard multi-user switching screen that displays all currently authenticated accounts in a radio button list. You
can choose whether to customize this screen or just show the default version. When the user makes a selection, call the Mobile SDK
method that launches the multi-user flow.
Before you begin to use the APIs, it’s important that you understand the division of labor between Mobile SDK and your app. The following
lists show tasks that Mobile SDK performs versus tasks that your app is required to perform in multi-user contexts. In particular, consider
how to manage:
•Push Notifications (if your app supports them)
•SmartStore Soups (if your app uses SmartStore)
•Account Management
425
About Multi-User SupportMulti-User Support in Mobile SDK
Push Notifications Tasks
Mobile SDK (for all accounts):
•Registers push notifications at login
•Unregisters push notifications at logout
•Delivers push notifications
Your app:
•Differentiates notifications according to the target user account
•Launches the correct user context to display each notification
SmartStore Tasks
Mobile SDK (for all accounts):
•Creates a separate SmartStore database for each authenticated user account
•Switches to the correct backing database each time a user switch occurs
Your app:
•Refreshes its cached credentials, such as instances of SmartStore held in memory, after every user switch or logout
Account Management Tasks
Mobile SDK (for all accounts):
•Loads the correct account credentials every time a user switch occurs
Your app:
•Refreshes its cached credentials, such as authenticated REST clients held in memory, after every user switch or logout
Android Native APIs
Native classes in Mobile SDK for Android do most of the work for multi-user support. Your app makes a few simple calls and handles any
data cached in memory. You also have the option of customizing the user switching activity.
To support user switching, Mobile SDK for Android defines native classes in the com.salesforce.androidsdk.accounts,
com.salesforce.androidsdk.ui, and com.salesforce.androidsdk.util packages. Classes in the
com.salesforce.androidsdk.accounts package include:
•UserAccount
•UserAccountManager
The com.salesforce.androidsdk.ui package contains the AccountSwitcherActivity class. You can extend this
class to add advanced customizations to the account switcher activity.
The com.salesforce.androidsdk.util package contains the UserSwitchReceiver abstract class. You must implement
this class if your app caches data other than tokens.
The following sections briefly describe these classes. For full API reference documentation, see
http://forcedotcom.github.io/SalesforceMobileSDK-Android/index.html.
426
Android Native APIsMulti-User Support in Mobile SDK

Multi-User Flow
For native Android apps, the UserAccountManager.switchToUser() Mobile SDK method launches the multi-user flow.
Once your app calls this method, the Mobile SDK core handles the execution flow through all possible paths. The following diagram
illustrates this flow.
IN THIS SECTION:
UserAccount Class
The UserAccount class represents a single user account that is currently authenticated. It encapsulates data that can be used
to uniquely identify a user account.
UserAccountManager Class
The UserAccountManager class provides methods to access authenticated accounts, add new accounts, log out existing
accounts, and switch between existing accounts.
AccountSwitcherActivity Class
Use or extend the AccountSwitcherActivity class to display the user switching interface.
UserSwitchReceiver Class
If your native Android app caches data other than tokens, implement the UserSwitchReceiver abstract class to receive
notifications of user switching events.
UserAccount Class
The UserAccount class represents a single user account that is currently authenticated. It encapsulates data that can be used to
uniquely identify a user account.
427
Android Native APIsMulti-User Support in Mobile SDK

Constructors
You can create UserAccount objects directly, from a JSON object, or from a bundle.
DescriptionConstructor
Creates a UserAccount object using values you specify.
public UserAccount(
String authToken,
String refreshToken,
String loginServer,
String idUrl,
String instanceServer,
String orgId,
String userId,
String username,
String accountName,
String clientId,
String communityId,
String communityUrl
)
Creates a UserAccount object from a JSON string.
public UserAccount(JSONObject object)
Creates a UserAccount object from an Android application
bundle.
public UserAccount(Bundle bundle)
Methods
DescriptionMethod
Returns the organization level storage path for this user account,
relative to the higher level directory of app data. The higher level
public String getOrgLevelStoragePath()
directory could be files. The output is in the format
/{orgID}/. This storage path is meant for data that can be
shared across multiple users of the same organization.
Returns the user level storage path for this user account, relative
to the higher level directory of app data. The higher level directory
public String getUserLevelStoragePath()
could be files. The output is in the format
/{orgID}/{userID}/. This storage path is meant for data
that is unique to a particular user in an organization, but common
across all the communities that the user is a member of within that
organization.
Returns the community level storage path for this user account,
relative to the higher level directory of app data. The higher level
public String
getCommunityLevelStoragePath(String
communityId) directory could be files. The output is in the format
/{orgID}/{userID}/{communityID}/. If
communityID is null and then the output would be
/{orgID}/{userID}/internal/. This storage path is
428
Android Native APIsMulti-User Support in Mobile SDK

DescriptionMethod
meant for data that is unique to a particular user in a specific
community.
Returns a unique suffix for this user account, that can be appended
to a file to uniquely identify this account, at an organization level.
public String getOrgLevelFilenameSuffix()
The output is in the format _{orgID}. This suffix is meant for
data that can be shared across multiple users of the same
organization.
Returns a unique suffix for this user account, that can be appended
to a file to uniquely identify this account, at a user level. The output
public String getUserLevelFilenameSuffix()
is in the format _{orgID}_{userID}. This suffix is meant for
data that is unique to a particular user in an organization, but
common across all the communities that the user is a member of
within that organization.
Returns a unique suffix for this user account, that can be appended
to a file to uniquely identify this account, at a community level.
public String
getCommunityLevelFilenameSuffix(String
communityId) The output is in the format
_{orgID}_{userID}_{communityID}. If
communityID is null and then the output would be
_{orgID}_{userID}_internal. This suffix is meant for
data that is unique to a particular user in a specific community.
UserAccountManager Class
The UserAccountManager class provides methods to access authenticated accounts, add new accounts, log out existing accounts,
and switch between existing accounts.
You don’t directly create instances of UserAccountManager. Instead, obtain an instance using the following call:
SalesforceSDKManager.getInstance().getUserAccountManager();
Methods
DescriptionMethod
Returns the currently active user account.public UserAccount getCurrentUser()
Returns the list of authenticated user accounts.public List<UserAccount>
getAuthenticatedUsers()
Checks whether the specified user account is already authenticated.public boolean
doesUserAccountExist(UserAccount account)
Switches the application context to the specified user account. If
the specified user account is invalid or null, this method launches
the login flow.
public void switchToUser(UserAccount user)
Launches the login flow for a new user to log in.public void switchToNewUser()
429
Android Native APIsMulti-User Support in Mobile SDK

DescriptionMethod
Logs the specified user out of the application and wipes the
specified user’s credentials.
public void signoutUser(UserAccount
userAccount, Activity frontActivity)
AccountSwitcherActivity Class
Use or extend the AccountSwitcherActivity class to display the user switching interface.
The AccountSwitcherActivity class provides the screen that handles multi-user logins. It displays a list of existing user accounts
and lets the user switch between existing accounts or sign into a new account. To enable multi-user logins, launch the activity from
somewhere in your app using the following code:
final Intent i = new Intent(this, SalesforceSDKManager.getInstance().
getAccountSwitcherActivityClass());
i.setFlags(Intent.FLAG_ACTIVITY_NEW_TASK);
this.startActivity(i);
For instance, you might launch this activity from a “Switch User” button in your user interface. See SampleApps/RestExplorer
for an example.
If you like, you can customize and stylize AccountSwitcherActivity through XML.
For more control, you can extend AccountSwitcherActivity and replace it with your own custom sub-class. To replace the
default class, call SalesforceSDKManager.setAccountSwitcherActivityClass(). Pass in a reference to the class
file of your replacement activity class, such as AccountSwitcherActivity.class.
UserSwitchReceiver Class
If your native Android app caches data other than tokens, implement the UserSwitchReceiver abstract class to receive notifications
of user switching events.
Every time a user switch occurs, Mobile SDK broadcasts an intent. The intent action is declared in the UserAccountManager class
as:
public static final String USER_SWITCH_INTENT_ACTION =
"com.salesforce.USERSWITCHED";
This broadcast event gives applications a chance to properly refresh their cached resources to accommodate user switching. To help
apps listen for this event, Mobile SDK provides the UserSwitchReceiver abstract class. This class is implemented in the following
Salesforce activity classes:
•SalesforceActivity
•SalesforceListActivity
•SalesforceExpandableListActivity
If your main activity extends one of the Salesforce activity classes, you don’t need to implement UserSwitchReceiver.
If you’ve cached only tokens in memory, you don’t need to do anything—Mobile SDK automatically refreshes tokens.
If you’ve cached user data other than tokens, override your activity’s refreshIfUserSwitched() method with your custom
refresh actions.
If your main activity does not extend one of the Salesforce activity classes, implement UserSwitchReceiver to handle
cached data during user switching.
To set up the broadcast receiver:
430
Android Native APIsMulti-User Support in Mobile SDK

1. Implement a subclass of UserSwitchReceiver.
2. Register your subclass as a receiver in your activity’s onCreate() method.
3. Unregister your receiver in your activity’s onDestroy() method.
For an example, see the ExplorerActivity class in the RestExplorer sample application.
If your application is a hybrid application, no action is required.
The SalesforceDroidGapActivity class refreshes the cache as needed when a user switch occurs.
Methods
A single method requires implementation.
DescriptionMethod Name
Implement this method to handle cached user data (other than
tokens) when user switching occurs.
protected abstract void onUserSwitch();
iOS Native APIs
Native classes in Mobile SDK for iOS do most of the work for multi-user support. Your app makes a few simple calls and handles any data
cached in memory. You also have the option of customizing the user switching activity.
To support user switching, Mobile SDK for iOS defines native classes in the Security folder of the SalesforceSDKCore library.
Classes include:
•SFUserAccount
•SFUserAccountManager
The following sections briefly describe these classes. For full API reference documentation, see SalesforceSDKCore Reference.
IN THIS SECTION:
SFUserAccount Class
The SFUserAccount class represents a single user account that’s currently authenticated. It encapsulates data that can be used
to uniquely identify a user account.
SFUserAccountManager Class
The SFUserAccountManager class provides methods to access authenticated accounts, add new accounts, log out accounts,
and switch between accounts.
SFUserAccount Class
The SFUserAccount class represents a single user account that’s currently authenticated. It encapsulates data that can be used to
uniquely identify a user account.
Properties
You can create SFUserAccount objects directly, from a JSON object, or from a bundle.
431
iOS Native APIsMulti-User Support in Mobile SDK

DescriptionProperty
The access scopes for this user.
@property (nonatomic, copy)
NSSet *accessScopes
The credentials that are associated with this user.
@property (nonatomic, strong)
SFOAuthCredentials *credentials;
The identity data that’s associated with this user.
@property (nonatomic, strong)
SFIdentityData *idData;
The URL that can be used to invoke any API on the server side. This
URL takes into account the current community if available.
@property (nonatomic, copy, readonly)
NSURL *apiUrl;
The user's email address.
@property (nonatomic, copy)
NSString *email;
The name of the user's organization.
@property (nonatomic, copy)
NSString *organizationName;
The user's first and last names.
@property (nonatomic, copy)
NSString *fullName;
The user's username.
@property (nonatomic, copy)
NSString *userName;
The user's photo, typically a thumbnail of the user. The consumer
of this class must set this property at least once in order to use the
@property (nonatomic, strong)
UIImage *photo; photo. This class doesn't fetch the photo from the server; it stores
and retrieves the photo locally.
The access restrictions that are associated with this user.
@property (nonatomic)
SFUserAccountAccessRestriction
accessRestrictions;
The current community ID, if the user is logged into a community.
Otherwise, this property is nil.
@property (nonatomic, copy)
NSString *communityId;
Returns YES if the user has an access token and, presumably, a valid
session.
@property (nonatomic, readonly, getter =
isSessionValid)
BOOL sessionValid;
432
iOS Native APIsMulti-User Support in Mobile SDK

DescriptionProperty
The custom data for the user. Because this data can be serialized,
the objects that are contained in customData must follow the
NSCoding protocol.
@property (nonatomic, copy)
NSDictionary *customData;
Global Function
DescriptionFunction Name
Returns a key that uniquely identifies this user account for the given
scope. If you set scope to SFUserAccountScopeGlobal,
the same key will be returned regardless of the user account.
NSString *SFKeyForUserAndScope
(SFUserAccount *user, SFUserAccountScope
scope);
SFUserAccountManager Class
The SFUserAccountManager class provides methods to access authenticated accounts, add new accounts, log out accounts,
and switch between accounts.
To access the singleton SFUserAccountManager instance, send the following message:
[SFUserAccountManager sharedInstance]
Properties
DescriptionProperty
The current user account. If the user has never logged in, this
property may be nil.
@property (nonatomic, strong) SFUserAccount
*currentUser
A convenience property to retrieve the current user's ID. This
property is an alias for
currentUser.credentials.userId.
@property (nonatomic, readonly) NSString
*currentUserId
A convenience property to retrieve the current user's community
ID. This property is an alias for currentUser.communityId.
@property (nonatomic, readonly) NSString
*currentCommunityId
An NSArray of all the SFUserAccount instances for the
app.
@property (nonatomic, readonly) NSArray
*allUserAccounts
Returns an array that contains all user IDs.@property (nonatomic, readonly) NSArray
*allUserIds
The most recently active user ID. If the user that’s specified by
activeUserId is removed from the accounts list, this user
may be temporarily different from the current user.
@property (nonatomic, copy) NSString
*activeUserId
The host to be used for login.@property (nonatomic, strong) NSString
*loginHost
433
iOS Native APIsMulti-User Support in Mobile SDK

DescriptionProperty
A flag that controls whether the login process restarts after it fails.
The default value is YES.
@property (nonatomic, assign) BOOL
retryLoginAfterFailure
The OAuth callback URL to use for the OAuth login process. Apps
can customize this property. By default, the property’s value is
@property (nonatomic, copy) NSString
*oauthCompletionUrl
copied from the SFDCOAuthRedirectUri property in the
main bundle. The default value is
@"testsfdc:///mobilesdk/detect/oauth/done".
The OAuth scopes that are associated with the app.@property (nonatomic, copy) NSSet *scopes
Methods
DescriptionMethod
Returns the path of the .plist file
for the specified user account.
- (NSString*)
userAccountPlistFileForUser:(SFUserAccount*)user
Adds a delegate to this user account
manager.
- (void)
addDelegate:(id<SFUserAccountManagerDelegate>)delegate
Removes a delegate from this user
account manager.
- (void)
removeDelegate:(id<SFUserAccountManagerDelegate>)delegate
Sets the app-level login host to the
value in app settings.
- (SFLoginHostUpdateResult*)updateLoginHost
Loads all accounts.
- (BOOL)loadAccounts:(NSError**)error
Can be used to create an empty user
account if you want to configure all of
- (SFUserAccount*)createUserAccount
the account information yourself.
Otherwise, use
[SFAuthenticationManager
loginWithCompletion:failure:]
to automatically create an account
when necessary.
Returns the user account that’s
associated with a given user ID.
- (SFUserAccount*)
userAccountForUserId:(NSString*)userId
Returns all accounts that have access
to a particular organization.
- (NSArray*)
accountsForOrgId:(NSString*)orgId
434
iOS Native APIsMulti-User Support in Mobile SDK

DescriptionMethod
Returns all accounts that match a
particular instance URL.
- (NSArray *)
accountsForInstanceURL:(NSString *)instanceURL
Adds a user account.
- (void)addAccount:(SFUserAccount
*)acct
Removes the user account that’s
associated with the given user ID.
- (BOOL)
deleteAccountForUserId:(NSString*)userId
error:(NSError **)error
Clears the account’s state in memory
(but doesn’t change anything on the
disk).
- (void)clearAllAccountState
Applies the specified credentials to the
current user. If no user exists, a user is
created.
- (void)
applyCredentials:
(SFOAuthCredentials*)credentials
Applies custom data to the
SFUserAccount that can be
- (void)applyCustomDataToCurrentUser:
(NSDictionary*)customData accessed outside that user's sandbox.
This data persists between app
launches. Because this data will be
serialized, make sure that objects that
are contained in customData follow
the NSCoding protocol.
Important: Use this method
only for nonsensitive
information.
Switches from the current user to a new
user context.
- (void)switchToNewUser
Switches from the current user to the
specified user account.
- (void)switchToUser:(SFUserAccount *)newCurrentUser
Informs the
SFUserAccountManager object
- (void)
userChanged:(SFUserAccountChange)change that something has changed for the
current user.
Hybrid APIs
Hybrid apps can enable multi-user support through Mobile SDK JavaScript APIs. These APIs reside in the SFAccountManagerPlugin
Cordova-based module.
435
Hybrid APIsMulti-User Support in Mobile SDK

SFAccountManagerPlugin Methods
Before you call any of these methods, you need to load the sfaccountmanager plug-in. For example:
cordova.require("com.salesforce.plugin.sfaccountmanager").logout();
DescriptionMethod Name
Returns the list of users already logged in.getUsers
Returns the current active user.getCurrentUser
Logs out the specified user if a user is passed in, or the current user
if called with no arguments.
logout
Switches the application context to the specified user, or launches
the account switching screen if no user is specified.
switchToUser
Hybrid apps don’t need to implement a receiver for the multi-user switching broadcast event. This handler is implemented by the
SalesforceDroidGapActivity class.
436
Hybrid APIsMulti-User Support in Mobile SDK

CHAPTER 19 Mobile SDK Tools for Developers
Mobile SDK provides tools that help developers see what’s happening in their apps at runtime.
In this chapter ...
For instance, you can inspect and query SmartStore soups, browse authenticated users, and view the
user agent string. These tools are designed primarily for debugging purposes. In most cases, you disable
this information in production builds.
•In-App Developer
Support
437
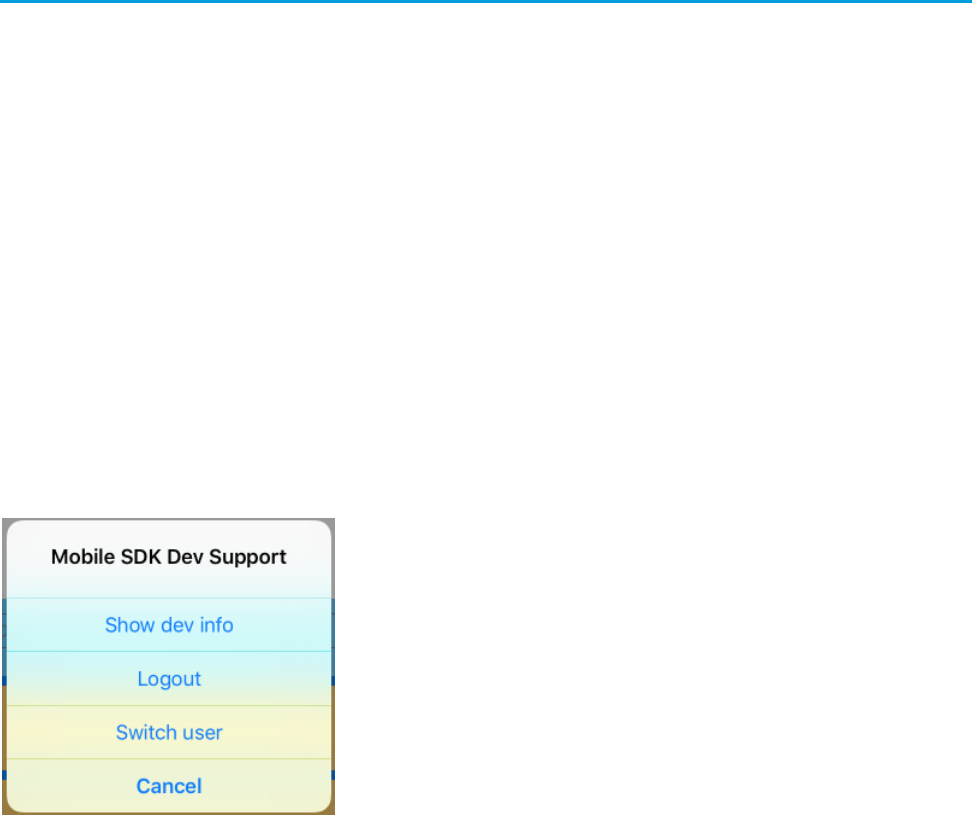
In-App Developer Support
Mobile SDK 6.0 introduces several new screens in all types of apps for debugging during app development. These features usually do
not require coding and are designed for debug builds.
The Dev Support dialog box is the launchpad for all available support screens and other useful actions. The dialog box presents only the
options that are pertinent to the type of app you’re running. During debugging on a desktop, you can access the Dev Support through
a keyboard shortcut or gesture.
By default, these tools are available only in debug builds. However, you can use an API call to enable or disable the Dev Support screen
at other times.
Launching the Dev Support Dialog Box
iOS
To launch the Dev Support dialog box, use one of the following options.
•Shake your physical device.
•From the iOS Simulator menu, select Hardware > Shake Gesture.
•When your app is running in the iOS Simulator, use the ^+Command+z keyboard shortcut.
Here’s the iOS screen.
Android
Screenshot: Dev Support dialog on Android
To launch the Dev Support dialog box, use one of the following options.
•When your app is running in the Android emulator, use the Command+m (Mac) or Ctrl+m (Windows) keyboard shortcut.
•In a system command shell, run: adb shell input keyevent 82
Here’s the Android screen.
438
In-App Developer SupportMobile SDK Tools for Developers
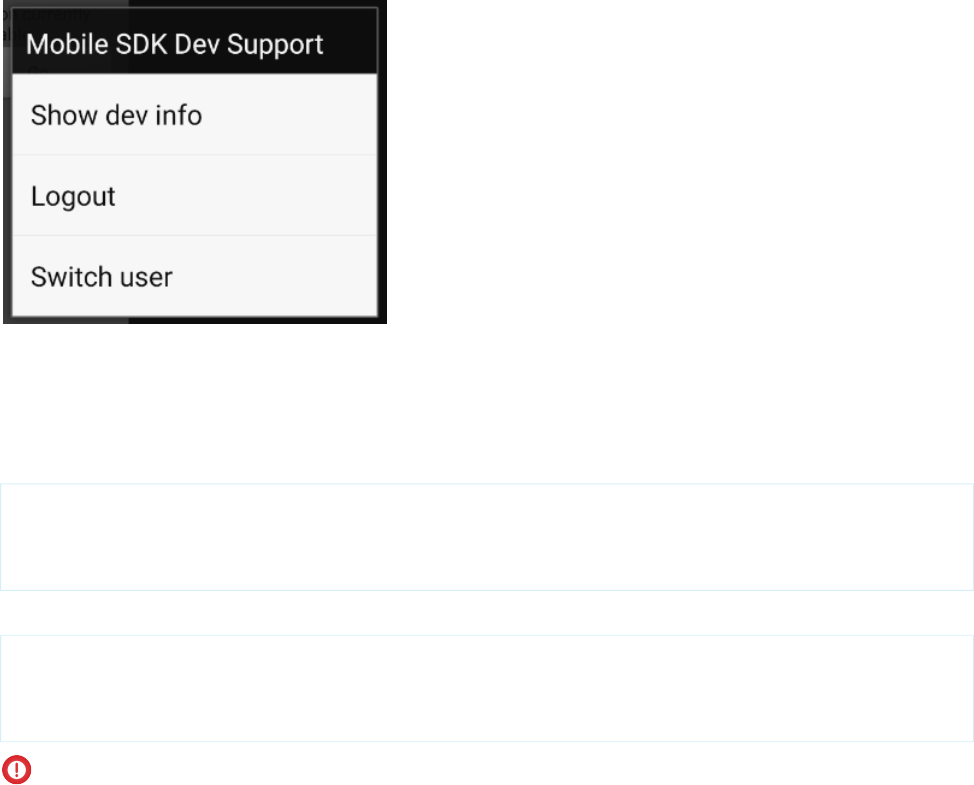
API to Display or Hide Dev Support
If a scenario arises that requires the Developer Support tools in a production setting, call the API to enable the Dev Support dialog box.
iOS
// To enable
[SalesforceSDKManager sharedManager].isDevSupportEnabled = YES;
// To disable
[SalesforceSDKManager sharedManager].isDevSupportEnabled = NO;
Android
// To enable
SalesforceSDKManager.getInstance().setDevSupportEnabled(true);
// To disable
SalesforceSDKManager.getInstance().setDevSupportEnabled(false);
Important: Don’t forget to disable the feature before distributing your app to the public.
Support Options
The Dev Support dialog box presents options based on the app type. In every case you get:
•Show dev info—brings up the dev info screen.
•Logout—Logs out the current user. Useful when you’re getting started and have not yet had time to add a logout button or action
into your UI.
•Switch user—Switch to a different user. Useful when you are getting started and have not yet had time to add a switch user button
or action into your UI.
If your application uses SmartStore, you also see:
Inspect SmartStore—Displays the SmartStore inspector screen.
SmartStore inspector is useful during development because it decrypts the data for display purposes. This decryption applies only
to the inspector display—data remains encrypted on disk.
If your application is a React Native application, you also see:
React native dev support—The React Native dev menu.
439
In-App Developer SupportMobile SDK Tools for Developers
Dev Info Screen
The Dev Info screen shows a collection of information about the app, its configuration, and so on, based on the app type. In every case
you get:
•SDK version
•App type
•User agent
•Native browser for login enabled (indicates whether advanced authentication is configured)
•Identity Provider login enabled (indicates whether the app can use another app to provide login)
•Current user
•Authenticated users
•Boot config settings
•Managed (indicates whether the app is managed)
•Managed preferences (app settings pushed to the app by the MDM provider, if applicable)
For SmartStore apps, you get the following additional information:
•SQLCipher version
•SQLCipher compile options
•Names of user stores
•Names of global stores
Here’s the iOS info screen.
440
In-App Developer SupportMobile SDK Tools for Developers
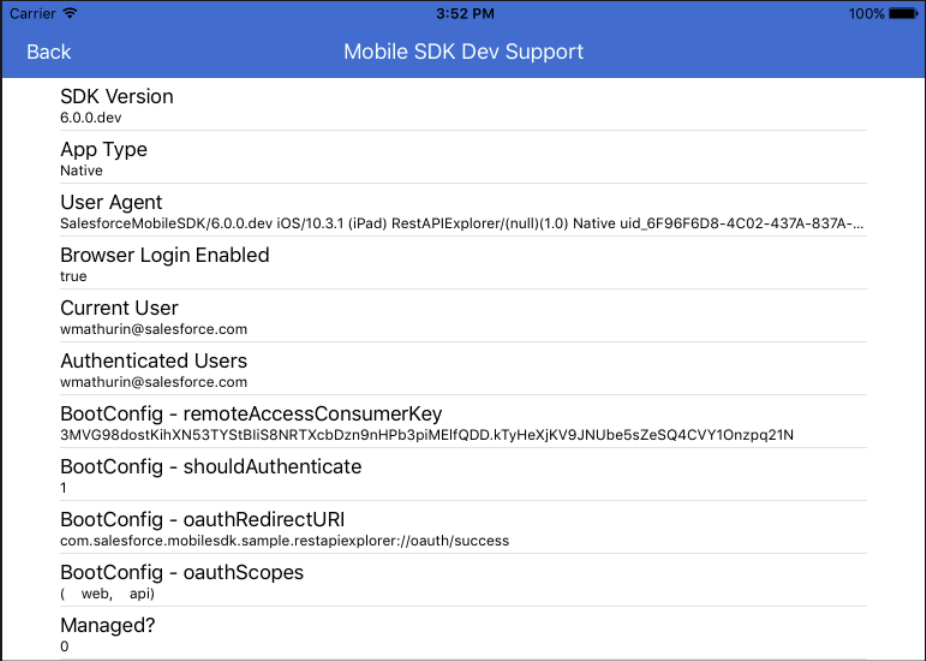
And here’s the Android info screen.
441
In-App Developer SupportMobile SDK Tools for Developers
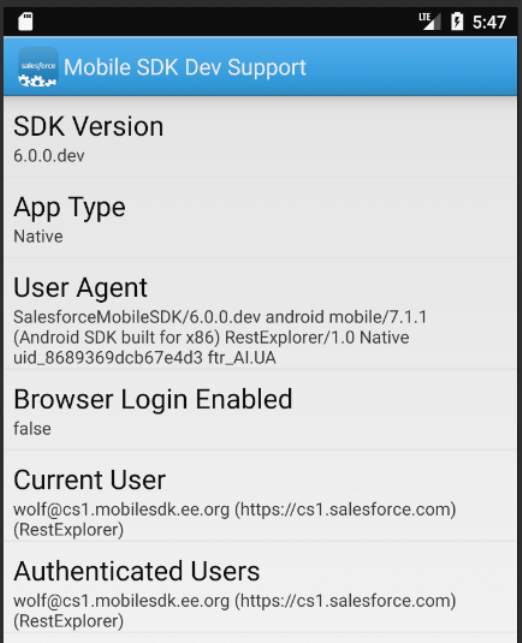
SmartStore Inspector
The SmartStore Inspector screen is a legacy feature that lets user see a list of SmartStore soups and their indices, and run custom queries.
In Mobile SDK 6.0, this screen adds a store picker that lets you choose which global or user store to inspect.
Here’s the SmartStore Inspector for iOS.
442
In-App Developer SupportMobile SDK Tools for Developers
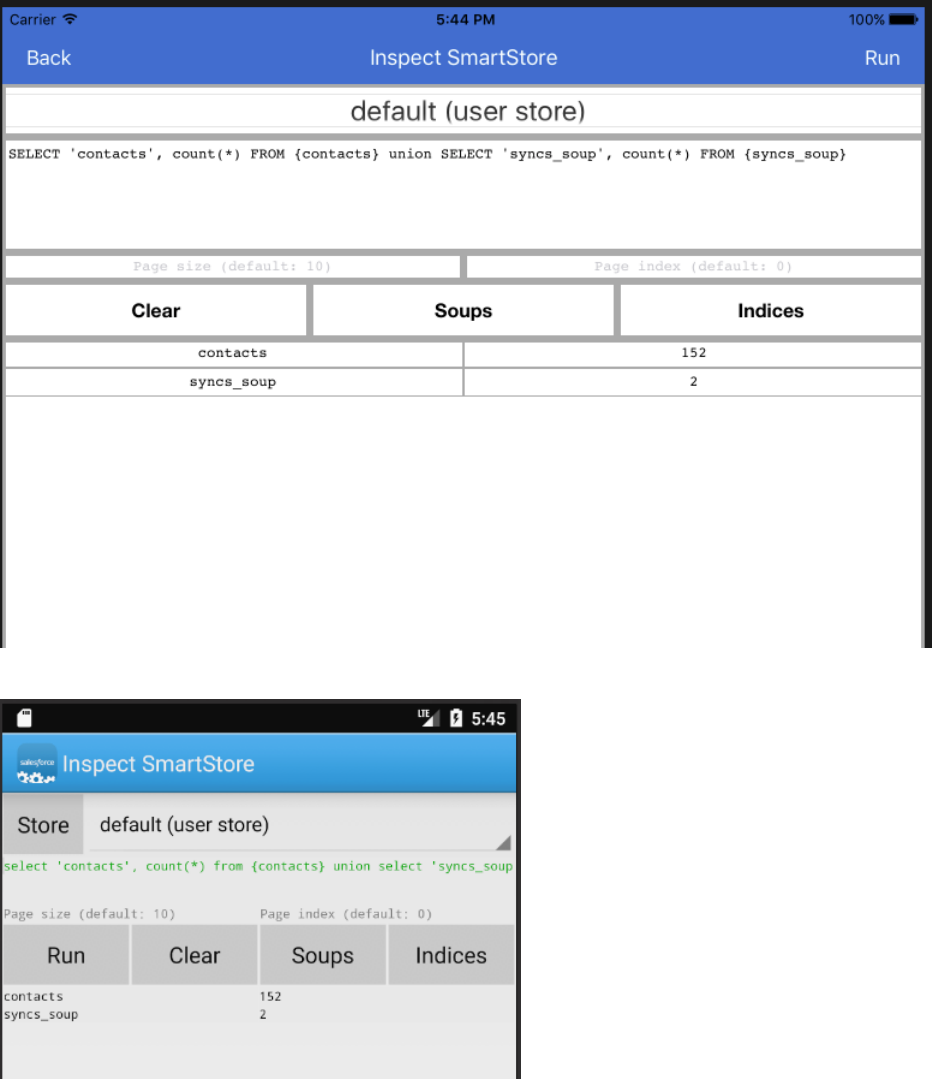
And here’s the SmartStore Inspector for Android.
Extending the Dev Info Screen
The Dev Info screen gets the information shown in its screen from a method named getDevSupportInfos in
SalesforceSDKManager. This method is overridden by some subclasses of SalesforceSDKManager. To show your own
custom information, you can also override this method. Just implement a subclass of SalesforceSDKManager, override the
method, and use it in your application.
443
In-App Developer SupportMobile SDK Tools for Developers

iOS
/**
* @return Array of name1, value1, name2, value2, etc.) to show in
SFSDKDevInfoViewController
*/
- (NSArray*) getDevSupportInfos;
Android
/**
* @return Dev info (list of name1, value1, name2, value2, etc.) to show in DevInfoActivity
*/
public List<String> getDevSupportInfos();
444
In-App Developer SupportMobile SDK Tools for Developers

CHAPTER 20 Analytics and Logging
Mobile SDK uses analytics and logging for its own purposes and also provides a logging framework for
apps. You can disable the analytics feature in your app, and you can use the logging framework to output
messages for your custom components.
In this chapter ...
•Salesforce Mobile
SDK Logging
Framework
•Instrumentation and
Event Collection
445

Salesforce Mobile SDK Logging Framework
Mobile SDK 5.2 introduces a logging framework that allows developers to easily create logs for app components.
With this framework, you can
•Output logs to both console and file.
•Output logs for your custom components and Mobile SDK components.
•Log at a component level. For example, SmartSync Data Framework and SmartStore use separate loggers. You can also create custom
loggers for your own components.
•Set logging levels, such as ERROR, DEBUG, and VERBOSE.
•Configure logging levels per component. For example, you can set SmartSync Data Framework to the ERROR level and SmartStore
to VERBOSE.
Using the logging framework is like playing tunes on a juke box. To obtain and use a logger instance:
1. Browse the tunes—Obtain a list of your app’s available components. This runtime-only step isn’t necessary if you already know
the name of the component.
2. Make your selection—Pass the name of a component to the framework. To “play” your selection, Mobile SDK returns a logger
instance for the chosen component. It doesn’t matter whether the logger exists—Mobile SDK creates one if necessary.
3. Bust a move—Set the logging level, write a line to the log, limit the number of log lines, turn logging off or on.
Not a perfect analogy, but hopefully you get the point. To get the details, continue reading.
Get All Components
The following methods return a list of the names of all components that currently have an associated logger. If you don’t know the
names of Mobile SDK internal components, your code can discover them at runtime in this list. You can use this list, for instance, to turn
off logging for all components. How your app uses this information is up to your business logic.
Android
public synchronized static Set<String> getComponents();
iOS
+ (nonnull NSArray<NSString *> *)allComponents;
Create a Logger for Your Component
A component represents a virtual domain in your app’s functionality. The component can represent your entire app or just a portion of
its feature set. You devise a name for the component when you create the logger. You can then use the logger to document any notable
conditions arising in the component’s domain.
To create a logger for your own component, you don’t have to override, extend, or implement anything. Instead, you request a logger
from the logging framework using the name of your component. If the logger isn’t already in the components list, the logging framework
creates a singleton logger and adds the component to the list. Otherwise, it returns the existing logger. All threads share this logger.
You can create a single logger or multiple loggers. For example, to log all messages from your app at the same level, create a single
logger that uses your app name. One logger is often sufficient for an app. However, if you want to differentiate logging levels between
various parts of your app, you can create more loggers with component-based names. Be careful not to go overboard—you don’t want
excessive logging activity to degrade your app’s performance.
446
Salesforce Mobile SDK Logging FrameworkAnalytics and Logging

You request loggers through the following objects.
•Android: com.salesforce.androidsdk.analytics.logger.SalesforceLogger
•iOS: SFSDKLogger (#import <SalesforceAnalytics/SFSDKLogger.h>)
Use the following APIs to get loggers for custom components or standard Mobile SDK components.
Android
public synchronized static SalesforceLogger getLogger(String componentName, Context context);
For example:
SalesforceLogger.getLogger(”MyComponent”, context);
iOS
+ (nonnull instancetype)sharedInstanceWithComponent:(nonnull NSString *)componentName;
For example:
[SFSDKLogger sharedInstanceWithComponent:@”MyComponent”];
Customize Logger Output
Once you get a logger instance, you can control the type and quantity of information the logger outputs.
•Set a Component’s Log Level
Each app component can have its own logger instance and its own log level. The default log level is DEBUG for a debug build and
ERROR for a release build. Use the following APIs to set a component’s log levels.
Android
public void setLogLevel(Level level);
Android loggers use an internal public enum that mirrors the Android default log levels. For example:
logger.setLogLevel(Level.INFO);
iOS
@property (nonatomic, readwrite, assign, getter=getLogLevel) DDLogLevel logLevel;
iOS loggers use the Lumberjack DDLogLevel enum defined in the DDLog.h file. For example:
logger.logLevel = DDLogLevelInfo;
•Write a Log Line
The following APIs can be used to write a log line using the new framework. The log line is automatically written to both console
and file, unless file logging is disabled for that component.
Android
public void log(Level level, String tag, String message);
public void log(Level level, String tag, String message, Throwable e);
iOS
447
Salesforce Mobile SDK Logging FrameworkAnalytics and Logging

Write a log line:
- (void)log:(nonnull Class)class level:(DDLogLevel)level message:(nonnull NSString
*)message;
Write a log line with variadic arguments:
- (void)log:(nonnull Class)class level:(DDLogLevel)level format:(nonnull NSString
*)format, ...;
Convenience methods are available for each log level on both Android and iOS.
•Enable or Disable File Logging
The logging framework logs messages to both console and file by default. File logging can be disabled if necessary, using the
following APIs.
Android
public synchronized void disableFileLogging();
Enable file logging:
public synchronized void enableFileLogging(int maxSize);
In this API, maxSize represents the maximum number of log lines that the file can hold before the log lines are rolled.
iOS
@property (nonatomic, readwrite, assign, getter=isFileLoggingEnabled) BOOL
fileLoggingEnabled;
Mobile SDK Logging Components
Mobile SDK provides a default logger for each of its standard components. This architecture allows you to control the log level of each
component independently of other components. For example, you could set the log level of SmartSync Data Framework to INFO while
the log level of SmartStore is set to ERROR.
Here are lists of the standard component loggers in Mobile SDK.
Android
•SalesforceAnalyticsLogger
•SalesforceSDKLogger
•SmartStoreLogger
•SmartSyncLogger
•SalesforceReactLogger
•SalesforceHybridLogger
iOS
•SFSDKAnalyticsLogger
•SFSDKCoreLogger
•SFSDKSmartStoreLogger
•SFSDKSmartSyncLogger
•SFSDKReactLogger
448
Salesforce Mobile SDK Logging FrameworkAnalytics and Logging

•SFSDKHybridLogger
Each of these logging components has convenience methods for adjusting log levels and logging messages associated with those core
components.
Instrumentation and Event Collection
Mobile SDK 5.0 introduces a new framework that adds analytical instrumentation to Mobile SDK apps. Through this instrumentation,
apps collect event data that describe how consuming apps use Mobile SDK. Mobile SDK periodically uploads logs of these events to the
Salesforce cloud. This information helps us focus on the features that matter most to your customers. We do not collect any data specific
to users or their Salesforce organizations.
Mobile SDK app users and developers do not have access to the information Salesforce gathers. Salesforce collects it solely for its own
use. The software that collects the data is maintained in Mobile SDK open source repos at github.com/forcedotcom.
Mobile SDK 5.0 and later enable instrumentation by default. Mobile SDK automatically publishes collected framework events to the
Salesforce cloud on the following schedule:
•iOS: When the app goes to the background.
•Android: Every 8 hours.
Your app can toggle event logging on or off. On Android, your app can also change the collection upload frequency.
To manage the event logging service, use the following APIs. You call each API on an instance of an analytics manager object, which
you initialize with your app’s current user account.
Toggle Event Logging
Android
For Android, call the enableLogging(boolean enabled) method.
final UserAccount curAccount = UserAccountManager.getInstance().getCurrentUser();
final SalesforceAnalyticsManager sfAnalyticsManager =
SalesforceAnalyticsManager.getInstance(curAccount);
sfAnalyticsManager.enableLogging(false);
iOS
For iOS, set the BOOL loggingEnabled property.
SFUserAccount *account = [SFUserAccountManager
sharedInstance].currentUser;
SFSDKSalesforceAnalyticsManager *sfAnalyticsManager =
[SFSDKSalesforceAnalyticsManager
sharedInstanceWithUser:account];
sfAnalyticsManager.loggingEnabled = NO;
Check Event Logging Status
Android
For Android, call the isLoggingEnabled(boolean enabled) method.
final UserAccount curAccount = UserAccountManager.getInstance().getCurrentUser();
final SalesforceAnalyticsManager sfAnalyticsManager =
449
Instrumentation and Event CollectionAnalytics and Logging

SalesforceAnalyticsManager.getInstance(curAccount);
boolean enabled = sfAnalyticsManager.isLoggingEnabled();
iOS
For iOS, check the BOOL isLoggingEnabled property.
SFUserAccount *account = [SFUserAccountManager sharedInstance].currentUser;
SFSDKSalesforceAnalyticsManager *sfAnalyticsManager =
[SFSDKSalesforceAnalyticsManager sharedInstanceWithUser:account];
BOOL enabled = sfAnalyticsManager.isLoggingEnabled;
Set Upload Frequency (Android Only)
On Android, you can set the frequency, in hours, of event log uploads. The default value is 8.
final UserAccount curAccount = UserAccountManager.getInstance().getCurrentUser();
final SalesforceAnalyticsManager sfAnalyticsManager =
SalesforceAnalyticsManager.getInstance(curAccount);
sfAnalyticsManager.setPublishFrequencyInHours(numHours); // numHours is the desired upload
interval in hours.
450
Instrumentation and Event CollectionAnalytics and Logging

CHAPTER 21 Migrating from Previous Releases
If you’re upgrading an app built with Salesforce Mobile SDK 5.3, follow these instructions to update your
app to 6.0.
In this chapter ...
•Migrate All Apps
from 5.3 to 6.0 If you’re upgrading an app that’s built with a version earlier than Salesforce Mobile SDK 5.3, start upgrading
with Migrating from Earlier Releases.
•Migrating from
Earlier Releases
451

Migrate All Apps from 5.3 to 6.0
Migration is easy in Mobile SDK 6.0 if you use the npm scripts.
Mobile SDK 6.0 require a few code changes, but the Mobile SDK npm scripts can handle almost every case for you. Check the following
instructions for exceptions. Note that we’ve added forcereact and forcehybrid npm scripts for creating React Native and hybrid.
Native Android
Recreate your app with forcedroid, and then migrate your app’s artifacts into the new template. Follow the instructions in “Updating
Native and React Native Apps” at Updating Mobile SDK Apps (5.0 and Later).
Native iOS
Recreate your app with forceios, and then migrate your app’s artifacts into the new template. Follow the instructions in “Updating
Native and React Native Apps” at Updating Mobile SDK Apps (5.0 and Later).
If you’re using the SFLoginViewController class to manage the Settings icon on the login screen, update your code to use
the SFSDKLoginViewControllerConfig class instead. Import
SalesforceSDKCore/SFSDKLoginViewControllerConfig.h and change this line:
SFLoginViewController *loginViewController =
[SFLoginViewController sharedInstance];
to this one:
SFSDKLoginViewControllerConfig *loginViewConfig = [[SFSDKLoginViewControllerConfig
alloc] init];
For a list of new features in this version, see What's New in Mobile SDK 6.0.
React Native
Recreate your app with forcereact, and then migrate your app’s artifacts into the new template. Follow the instructions in “Updating
Native and React Native Apps” at Updating Mobile SDK Apps (5.0 and Later).
Hybrid
Recreate your app with forcehybrid, and then migrate your app’s artifacts into the new template. Follow the instructions in “Updating
Hybrid Apps” at Updating Mobile SDK Apps (5.0 and Later).
For a list of new features in this version, see What's New in Mobile SDK 6.0.
Migrating from Earlier Releases
To migrate from versions older than the previous release, perform the code upgrade steps for each intervening release, starting at your
current version.
Migrate All Apps from 5.2 to 5.3
Migration is easy in Mobile SDK 5.3.
Mobile SDK 5.3 doesn’t require code changes. Instead, use the following steps to update your apps to version 5.3.
Native Android
Follow the instructions in “Updating Native and React Native Apps” at Updating Mobile SDK Apps (5.0 and Later).
452
Migrate All Apps from 5.3 to 6.0Migrating from Previous Releases

Native iOS
1. Add the following line to your podfile:
pod 'FMDB', :path => 'mobile_sdk/SalesforceMobileSDK-iOS'
2. Follow additional instructions in “Updating Native and React Native Apps” at Updating Mobile SDK Apps (5.0 and Later).
React Native
Follow the instructions in “Updating Native and React Native Apps” at Updating Mobile SDK Apps (5.0 and Later).
Hybrid
We strongly recommend that you create an app with forceios or forcedroid, and then migrate your app’s artifacts into the new
template. Follow the instructions in “Updating Hybrid Apps” at Updating Mobile SDK Apps (5.0 and Later).
For a list of new features in this version, see What's New in Mobile SDK 6.0.
Migrate Android Apps from 5.1 to 5.2
Migration is easy in Mobile SDK 5.2.
Mobile SDK 5.2 doesn’t require code changes. To upgrade native Android apps, see Updating Mobile SDK Apps (5.0 and Later).
For a list of new features in this version, see What's New in Mobile SDK 6.0.
Migrate iOS Apps from 5.1 to 5.2
Migration is easy in Mobile SDK 5.2.
Mobile SDK 5.2 doesn’t require code changes. To upgrade iOS native apps, see Updating Mobile SDK Apps (5.0 and Later).
For a list of new features in this version, see What's New in Mobile SDK 6.0.
Migrate Hybrid Apps from 5.1 to 5.2
To upgrade hybrid apps, we strongly recommend that you create an app with forceios or forcedroid, and then migrate your app’s artifacts
into the new template. See Updating Mobile SDK Apps (5.0 and Later).
For a list of new features in this version, see What's New in Mobile SDK 6.0.
Migrate React Native Apps from 5.1 to 5.2
Migration is easy in Mobile SDK 5.2.
Mobile SDK 5.2 doesn’t require code changes. To upgrade React native apps, see Updating Mobile SDK Apps (5.0 and Later).
For a list of new features in this version, see What's New in Mobile SDK 6.0.
Migrate Android Apps from 5.0 to 5.1
Updates to SmartSync Data Framework APIs account for the majority of changes in Mobile SDK 5.1.
In Mobile SDK 5.1, we’ve refactored SmartSync Data Framework classes to decouple the SyncManager class from SyncTarget
classes. This new architecture includes API changes that affect all apps that use SmartSync Data Framework. However, the majority of
the changes apply only to SmartSync Data Framework apps that define custom targets.
453
Migrate Android Apps from 5.1 to 5.2Migrating from Previous Releases

General API Changes
The following changes apply to all native SmartSync Data Framework apps.
•SyncTarget and its subclasses have moved from the com.salesforce.smartsync.util package to the
com.salesforce.smartsync.target package.
•The LOCAL, LOCALLY_CREATED, LOCALLY_UPDATED, and LOCALLY_DELETED constants are now defined in
SyncTarget.java instead of SyncManager.java.
API Changes for Custom Sync Targets
The following changes apply only if your SmartSync Data Framework app defines custom targets.
SyncTarget base class:
The following method is new:
void saveRecordsToLocalStore(SyncManager syncManager, String soupName, JSONArray records)
Resets given records to “clean” and saves them to the local store.
The following methods have moved from the SyncManager class to the SyncTarget class. In each case, the method’s behavior
has also changed.
SortedSet<String> getDirtyRecordIds(SyncManager syncManager, String soupName, String
idField)
New behaviorFormer behavior
Returns IDs of “dirty” records.On dirty records, __local__ field was set to true.
void cleanAndSaveInLocalStore(SyncManager syncManager, String soupName, JSONObject
record)
New behaviorFormer behavior
Resets record to clean and save it to the local store.Set the __local* fields to false and then saved the record to
SmartStore.
boolean isLocallyCreated(JSONObject record)
New behaviorFormer behavior
Returns true if the record was locally created.Returned the value of the __locally_created__ field.
boolean isLocallyUpdated(JSONObject record)
New behaviorFormer behavior
Returns true if the record was locally updated.Returned the value of the __locally_updated__ field.
454
Migrate Android Apps from 5.0 to 5.1Migrating from Previous Releases

boolean isLocallyDeleted(JSONObject record)
New behaviorFormer behavior
Returns true if the record was locally deleted.Returned the value of the __locally_deleted__ field.
boolean isDirty(JSONObject record)
New behaviorFormer behavior
Returns true if tthe record was locally created/updated or deleted.Returned the value of the __local__ field.
JSONObject getFromLocalStore(SyncManager syncManager, String soupName, String storeId)
New behaviorFormer behavior
Gets a record from the local store.Retrieved the record directly from SmartStore.
void deleteFromLocalStore(SyncManager syncManager, String soupName, JSONObject record)
New behaviorFormer behavior
Deletes a record from the local store.Deleted the record directly in SmartStore.
SyncUpTarget class:
The following method moves from the SyncManager class to the SyncUpTarget class. It formerly returned IDs of records that
had __local__ set to true.
Set<String> getIdsOfRecordsToSyncUp(SyncManager syncManager, String soupName)
Called by the sync manager during sync up to determine which records to sync.
The following new methods complement existing methods of the same name, but with different signatures. The existing methods are
no longer public. In each case, the new method, rather than the sync manager, now calls the existing method.
void createOnServer(SyncManager syncManager, JSONObject record, List<String> fieldlist)
Called by sync manager to create the record on the server.
int deleteOnServer(SyncManager syncManager, JSONObject record)
Called by sync manager to delete the record on the server.
int updateOnServer(SyncManager syncManager, JSONObject record, List<String> fieldlist)
Called by sync manager to update the record on the sever.
The following method moves from the SyncManager class to the SyncUpTarget class. In its former incarnation, it called the
fetchLastModifiedDate method of the target. The fetchLastModifiedDate method is no longer public.
boolean isNewerThanServer(SyncManager syncManager, JSONObject record)
Called by the sync manager when merge mode is LEAVE_IF_CHANGED to decide whether the record requires syncing.
SyncDownTarget class:
The following method moves from the SyncManager class to the SyncDownTarget class.
455
Migrate Android Apps from 5.0 to 5.1Migrating from Previous Releases

int cleanGhosts(SyncManager syncManager, String soupName)
Called by the sync manager to clean and resync ghosts.
Set<String> getIdsToSkip(SyncManager syncManager, String soupName)
Called by the sync manager during sync down to determine which records should not be overwritten. In its previous form, it returned
IDs of records that had __local__ set to true.
Migrate iOS Apps from 5.0 to 5.1
Updates to SmartSync Data Framework APIs account for the majority of changes in Mobile SDK 5.1.
In Mobile SDK 5.1, we’ve refactored SmartSync Data Framework classes to decouple the SFSmartSyncSyncManager class from
SFSyncTarget classes. This new architecture includes API changes that affect all apps that use SmartSync Data Framework. However,
the majority of the changes apply only to SmartSync Data Framework apps that define custom targets.
General API Changes
The following changes apply to all native SmartSync Data Framework apps.
•SFSyncTarget and its subclasses have moved from the Util folder to the Target folder.
•We’ve renamed the following constants and moved them from SFSmartSyncSyncManager.h to SFSyncTarget.h.
New Name (in SFSyncTarget.h)Old Name (in SFSmartSyncSyncManager.h)
kSyncTargetLocalkSyncManagerLocal
kSyncTargetLocallyCreatedkSyncManagerLocallyCreated
kSyncTargetLocallyUpdatedkSyncManagerLocallyUpdated
kSyncTargetLocallyDeletedkSyncManagerLocallyDeleted
API Changes for Custom Sync Targets
The following changes apply only if your SmartSync Data Framework app defines custom targets.
SFSyncTarget base class:
The following method is new:
•
-(void) saveRecordsToLocalStore:(SFSmartSyncSyncManager*)syncManager
soupName:(NSString*)soupName
records:(NSArray*)records
Resets given records to “clean” and saves them to the local store.
The following methods have moved from the SyncManager class to the SyncTarget class. In each case, the method’s behavior
has also changed.
456
Migrate iOS Apps from 5.0 to 5.1Migrating from Previous Releases

-(NSOrderedSet*) getDirtyRecordIds:(SFSmartSyncSyncManager*)syncManager
soupName:(NSString*)soupName idField:(NSString*)idField
New behaviorFormer behavior
Returns IDs of “dirty” records.On dirty records, __local__ field was set to true.
-(void) cleanAndSaveInLocalStore:(SFSmartSyncSyncManager*)syncManager
soupName:(NSString*)soupName record:(NSDictionary*)record
New behaviorFormer behavior
Resets record to clean and save it to the local store.Set the __local* fields to false and then saved the record to
SmartStore.
-(BOOL) isLocallyCreated:(NSDictionary*)record
New behaviorFormer behavior
Returns true if the record was locally created.Returned the value of the __locally_created__ field.
-(BOOL) isLocallyUpdated:(NSDictionary*)record
New behaviorFormer behavior
Returns true if the record was locally updated.Returned the value of the __locally_updated__ field.
-(BOOL) isLocallyDeleted:(NSDictionary*)record
New behaviorFormer behavior
Returns true if the record was locally deleted.Returned the value of the __locally_deleted__ field.
-(BOOL) isDirty:(NSDictionary*)record
New behaviorFormer behavior
Returns true if tthe record was locally created/updated or deleted.Returned the value of the __local__ field.
-(NSDictionary*) getFromLocalStore:(SFSmartSyncSyncManager *)syncManager
soupName:(NSString*)soupName storeId:(NSString*)storeId
New behaviorFormer behavior
Gets a record from the local store.Retrieved the record directly from SmartStore.
457
Migrate iOS Apps from 5.0 to 5.1Migrating from Previous Releases

-(void) deleteFromLocalStore:(SFSmartSyncSyncManager *)syncManager
soupName:(NSString*)soupName record:(NSDictionary*)record
New behaviorFormer behavior
Deletes a record from the local store.Deleted the record directly in SmartStore.
SFSyncUpTarget class:
The following method moves from the SFSmartSyncSyncManager class to the SFSyncUpTarget class. It formerly returned
IDs of records that had __local__ set to true.
-(NSArray *) getIdsOfRecordsToSyncUp:(SFSmartSyncSyncManager *)syncManager
soupName:(NSString *)soupName
Called by the sync manager during sync up to determine which records to sync.
The following new methods complement existing methods of the same name, but with different signatures. The existing methods are
no longer public. In each case, the new method, rather than the sync manager, now calls the existing method.
•-(void) createOnServer:(SFSmartSyncSyncManager *)syncManager
record:(NSDictionary*)record
fieldlist:(NSArray*)fieldlist
completionBlock:(SFSyncUpTargetCompleteBlock)completionBlock
failBlock:(SFSyncUpTargetErrorBlock)failBlock
Called by the sync manager to create the record on the server.
•-(void) updateOnServer:(SFSmartSyncSyncManager *)syncManager
record:(NSDictionary*)record
fieldlist:(NSArray*)fieldlist
completionBlock:(SFSyncUpTargetCompleteBlock)completionBlock
failBlock:(SFSyncUpTargetErrorBlock)failBlock
Called by the sync manager to delete the record on the server.
•-(void) updateOnServer:(SFSmartSyncSyncManager *)syncManager
record:(NSDictionary*)record
fieldlist:(NSArray*)fieldlist
completionBlock:(SFSyncUpTargetCompleteBlock)completionBlock
failBlock:(SFSyncUpTargetErrorBlock)failBlock
Called by the sync manager to update the record on the server.
We’ve added the following new method to the SFSyncUpTarget class:
-(void) isNewerThanServer:(SFSmartSyncSyncManager *)syncManager
record:(NSDictionary*)record resultBlock:(SFSyncUpRecordNewerThanServerBlock)resultBlock
Called by the sync manager when merge mode is LEAVE_IF_CHANGED to decide whether the record requires syncing.
SFSyncDownTarget class:
The following methods move from the SFSmartSyncSyncManager class to the SFSyncDownTarget class.
458
Migrate iOS Apps from 5.0 to 5.1Migrating from Previous Releases

•-(void) cleanGhosts:(SFSmartSyncSyncManager *)syncManager
soupName:(NSString *)soupName
errorBlock:(SFSyncDownTargetFetchErrorBlock)errorBlock
completeBlock:(SFSyncDownTargetFetchCompleteBlock)completeBlock
Called by the sync manager to clean and resync ghosts.
•- (NSOrderedSet *)getIdsToSkip:(SFSmartSyncSyncManager *)syncManager
soupName:(NSString *)soupName
Called by the sync manager during sync down to determine which records should not be overwritten. In its previous form, it returned
IDs of records that had __local__ set to true.
Migrate Hybrid Apps from 5.0 to 5.1
To upgrade hybrid apps, we strongly recommend that you create an app with forceios or forcedroid, and then migrate your app’s artifacts
into the new template. See Updating Mobile SDK Apps (5.0 and Later).
Migrate Android Apps from 4.3 to 5.0
To upgrade native Android apps, create an app with forcedroid, and then migrate your app’s artifacts into the new app.
Mobile SDK for Android now requires the following versions of third-party tools.
•Java JDK 8
•Gradle 2.14.1
•Target API version: Android Nougat (API 25)
•Android Studio 2.2
•Cordova Android 6.1.0 (hybrid apps)
•Cordova CLI 6.4.0 (hybrid apps)
Migrate iOS Apps from 4.3 to 5.0
To upgrade native iOS apps, create an app with forceios, and then migrate your app’s artifacts into the new app.
Another recommended approach is to upgrade using only CocoaPods. See Use CocoaPods with Mobile SDK. If you upgrade a SmartStore
app with CocoaPods, be sure to update your AppDelegate class as described in SDK Manager Classes.
Mobile SDK for iOS now requires the following versions of third-party tools.
•iOS 9 (minimum), iOS 10 (fully supported)
•Xcode 8
•CocoaPods 1.10 (minimum)
•Cordova iOS 4.3.0 (hybrid apps)
•Cordova CLI 6.4.0 (hybrid apps)
Breaking Changes
•CocoaPods for Mobile SDK no longer includes SalesforceRestAPI or SalesforceNetwork pods. Both libraries have
been rolled into SalesforceSDKCore.
•Mobile SDK apps now require the SalesforceAnalytics pod.
459
Migrate Hybrid Apps from 5.0 to 5.1Migrating from Previous Releases

Migrate Hybrid Apps from 4.3 to 5.0
•To upgrade hybrid apps, we strongly recommend that you create an app with forceios or forcedroid, and then migrate your app’s
artifacts into the new template. See Updating Mobile SDK Apps (5.0 and Later).
•Mobile SDK updates its Cordova support to the following versions:
–iOS: Upgraded to Cordova 4.3.0 and Cordova CLI 6.4.0.
–Android: Upgraded to Cordova 6.1.0 and Cordova CLI 6.4.0.
Be sure to specify these versions when you use the cordova platform add command.
Breaking Changes
•The forcetk.mobilesdk.js and forcetk.ui.js libraries have been replaced with force.js. All hybrid apps that
upgrade to Mobile SDK 5.0 are required to change all forcetk.mobilesdk.js references to force.js. The new library
handles networking natively, which means you don’t have to worry about refreshing tokens. Most method prototypes are identical
to their older counterparts, with a few exceptions.
–The update method has changed how it handles the Id field.
// Obsolete forcetk signature. The fields argument
// must NOT contain object’s "Id" field.
function update(objtype, id, fields, callback, error)
// Modernized force.js signature. Before calling,
// add object’s "Id" field to the data object
function update(objectName, data, successHandler, errorHandler)
For example:
var data = new Object();
data.Quantity__c = $j("#quantity").val(); // Same as in previous version
data.Id = currentRecord.Id; // New requirement of force.js
// Update the database
// force.js version does not accept a separate ID argument
force.update("Merchandise__c", data,updateSuccess,onErrorSfdc);
–Files functions now live in the force+files.js library.
–The following Files functions are no longer available:
•fileRendition
•fileRenditionPath
•fileContents
•fileContentsPath
•The smartsync.js library no longer depends on jQuery. It now uses native promises. To use this library on Android 19, you're
required to include the promise polyfill (github.com/taylorhakes/promise-polyfill).
•Error callbacks for the moveCursorToNextPage() and moveCursorToPreviousPage() SmartStore functions have
changed. In previous releases, these callbacks used the following signature:
function(cursor, error) {...}
460
Migrate Hybrid Apps from 4.3 to 5.0Migrating from Previous Releases

Beginning with Mobile SDK 5.0, they use this signature:
function(error) {...}
•The technique for running hybrid tests and samples in a browser has changed.
In previous release, you ran tests and samples by opening the start page in a browser with web security disabled. Beginning with
Mobile SDK 5.0, you run the force-server utility from the root of your shared repo. You then load your app in the browser through
localhost.
For full instructions, see github.com/forcedotcom/SalesforceMobileSDK-Shared/tree/master/test#running-the-tests-in-a-browser .
Migrate Android Apps from 4.2 to 4.3
To upgrade native Android apps, we strongly recommend that you create an app with forcedroid, and then migrate your app’s artifacts
into the new template.
Migrate iOS Apps from 4.2 to 4.3
To upgrade native iOS apps, we strongly recommend that you create an app with forceios, and then migrate your app’s artifacts into
the new template.
Another recommended approach is to upgrade using only CocoaPods. See Use CocoaPods with Mobile SDK. If you upgrade a SmartStore
app with CocoaPods, be sure to update your AppDelegate class as described in SDK Manager Classes.
Migrate Hybrid Apps from 4.2 to 4.3
•Mobile SDK 4.3 updates its Cordova support to the following versions:
–iOS: Cordova 4.3.0
–Android: Cordova 6.1.0
–Cordova CLI 6.4.0 or later
Be sure to specify these versions when you use the cordova platform add command.
•To upgrade hybrid apps, we strongly recommend that you create an app with forceios or forcedroid, and then migrate your app’s
artifacts into the new template. Or, you can simply use the Cordova command line to upgrade the Salesforce Cordova plugins. First
remove, then readd the plugin:
$ cd MyCordovaAppDir
$ cordova plugin rm com.salesforce
$ cordova plugin add https://github.com/forcedotcom/SalesforceMobileSDK-CordovaPlugin
$ cordova prepare
Migrate Android Apps from 4.1 to 4.2
To upgrade native Android apps, we strongly recommend that you create an app with forcedroid, and then migrate your app’s artifacts
into the new template.
461
Migrate Android Apps from 4.2 to 4.3Migrating from Previous Releases

Migrate iOS Apps from 4.1 to 4.2
To upgrade native iOS apps, we strongly recommend that you create an app with forceios, and then migrate your app’s artifacts into
the new template.
Another recommended approach is to upgrade using only CocoaPods. See Use CocoaPods with Mobile SDK. If you upgrade a SmartStore
app with CocoaPods, be sure to update your AppDelegate class as described in SDK Manager Classes.
Migrate Hybrid Apps from 4.1 to 4.2
To upgrade hybrid apps, we strongly recommend that you create an app with forceios or forcedroid, and then migrate your app’s artifacts
into the new template. Or, you can simply use the Cordova command line to upgrade the Salesforce Cordova plugins. First remove, then
readd the plugin:
$ cd MyCordovaAppDir
$ cordova plugin rm com.salesforce
$ cordova plugin add https://github.com/forcedotcom/SalesforceMobileSDK-CordovaPlugin
$ cordova prepare
Migrate Android Apps from 4.0 to 4.1
To upgrade native Android apps, we strongly recommend that you create an app with forcedroid, and then migrate your app’s artifacts
into the new template.
Migrate iOS Apps from 4.0 to 4.1
To upgrade native iOS apps, we strongly recommend that you create an app with forceios, and then migrate your app’s artifacts into
the new template.
Another recommended approach is to upgrade using only CocoaPods. If you upgrade a SmartStore app with CocoaPods, be sure to
update your AppDelegate class as described in SDK Manager Classes.
SEE ALSO:
Use CocoaPods with Mobile SDK
Migrate Hybrid Apps from 4.0 to 4.1
To upgrade hybrid apps, we strongly recommend that you create an app with forceios or forcedroid, and then migrate your app’s artifacts
into the new template. Or, you can simply use the Cordova command line to upgrade the Salesforce Cordova plugins. First remove, then
readd the plugin:
$ cd MyCordovaAppDir
$ cordova plugin rm com.salesforce
$ cordova plugin add https://github.com/forcedotcom/SalesforceMobileSDK-CordovaPlugin
$ cordova prepare
462
Migrate iOS Apps from 4.1 to 4.2Migrating from Previous Releases

CHAPTER 22 Reference
Reference documentation is hosted on GitHub.
In this chapter ...
•For iOS:
•iOS Architecture
–SalesforceSDKCore Library Reference at
http://forcedotcom.github.io/SalesforceMobileSDK-iOS/Documentation/SalesforceSDKCore/html/index.html
•Android Architecture
•Files API Reference
–SalesforceRestAPI Library Reference at
http://forcedotcom.github.io/SalesforceMobileSDK-iOS/Documentation/SalesforceRestAPI/html/index.html
•Tool and Component
Supported Versions
for Mobile SDK 6.0 –SalesforceNetwork Library Reference at
http://forcedotcom.github.io/SalesforceMobileSDK-iOS/Documentation/SalesforceNetwork/html/index.html
–SmartStore Library Reference at
http://forcedotcom.github.io/SalesforceMobileSDK-iOS/Documentation/SmartStore/html/index.html
–SmartSync Data Framework Library Reference at
http://forcedotcom.github.io/SalesforceMobileSDK-iOS/Documentation/SmartSync/html/index.html
–SalesforceHybridSDK Library Reference at
http://forcedotcom.github.io/SalesforceMobileSDK-iOS/Documentation/SalesforceHybridSDK/html/index.html
–SalesforceReact Library Reference at
http://forcedotcom.github.io/SalesforceMobileSDK-iOS/Documentation/SalesforceReact/html/index.html
•For Android: http://forcedotcom.github.com/SalesforceMobileSDK-Android/index.html
463

iOS Architecture
Mobile SDK is essentially one library that depends on and exposes the following modules:
•SalesforceAnalytics—Implements a logging and instrumentation framework for Mobile SDK.
•SalesforceHybridSDK—Defines the Mobile SDK Cordova plugin. For use only in hybrid apps.
•SalesforceReact—Native bridges to Mobile SDK features. For use only in React Native apps.
•SalesforceSDKCore—Implements OAuth authentication, passcode, and networking.
•SmartStore—Mobile SDK offline secure storage solution.
•SmartSync—Mobile SDK offline synchronization solution.
If you use forceios to create native apps, CocoaPods incorporates the required modules based on the app type you specify. If you create
native apps with a clone of the SalesforceMobileSDK-iOS git repo, your project uses these modules as dynamic libraries.
SEE ALSO:
Analytics and Logging
Native REST API Classes for iOS
Use these Objective-C APIs to access Salesforce data in your native app:
•SFRestAPI class
•SFRestAPI (Blocks) category
•SFRestRequest class
•SFRestAPI (QueryBuilder) category
•SFRestDelegate protocol
SFRestAPI
SFRestAPI is the entry point for making REST requests and is accessed as a singleton instance via [SFRestAPI
sharedInstance].
You can easily create many standard canned queries from this object, such as:
SFRestRequest* request = [[SFRestAPI sharedInstance]
requestForUpdateWithObjectType:@"Contact"
objectId:contactId
fields:updatedFields];
You can then initiate the request with the following:
[[SFRestAPI sharedInstance] send:request delegate:self];
SFRestAPI (Blocks)
Use this category extension of the SFRestAPI class to specify blocks as your callback mechanism. For example:
NSMutableDictionary *fields = [NSMutableDictionary dictionaryWithObjectsAndKeys:
@"John", @"FirstName",
@"Doe", @"LastName",
464
iOS ArchitectureReference

nil];
[[SFRestAPI sharedInstance] performCreateWithObjectType:@"Contact"
fields:fields
failBlock:^(NSError *e) {
NSLog(@"Error: %@", e);
}
completeBlock:^(NSDictionary *d) {
NSLog(@"ID value for object: %@", [d objectForKey:@"id"]);
}];
SFRestRequest
In addition to the standard REST requests that SFRestAPI provides, you can use SFRestRequest methods directly to create
your own:
NSString *path = @"/v31.0";
SFRestRequest* request = [SFRestRequest
requestWithMethod:SFRestMethodGET path:path queryParams:nil];
SFRestAPI (QueryBuilder)
This category extension provides utility methods for creating SOQL and SOSL query strings. Examples:
NSString *soqlQuery =
[SFRestAPI SOQLQueryWithFields:[NSArray arrayWithObjects:@"Id", @"Name", @"Company",
@"Status", nil]
sObject:@"Lead"
where:nil
limit:10];
NSString *soslQuery =
[SFRestAPI
SOSLSearchWithSearchTerm:@"all of these will be escaped:~{]"
objectScope:[NSDictionary
dictionaryWithObject:@"WHERE isactive=true
ORDER BY lastname
asc limit 5"
forKey:@"User"]];
SFRestDelegate
A class that implements this protocol can serve as the target for REST responses. This protocol defines four abstract methods for handling
various request states. When you implement these methods, remember to wrap any code that accesses UI elements in a
dispatch_async(dispatch_get_main_queue(), ^{...} block. Example:
- (void)request:(SFRestRequest *)request didLoadResponse:(id)dataResponse {
dispatch_async(dispatch_get_main_queue(), ^{
_tfResult.backgroundColor =
[UIColor colorWithRed:1.0 green:204/255.0 blue:102/255.0 alpha:1.0];
_tfResponseFor.text = [self formatRequest:request];
_tfResult.text = [dataResponse description];
});
465
Native REST API Classes for iOSReference

}
- (void)request:(SFRestRequest*)request didFailLoadWithError:(NSError*)error {
dispatch_async(dispatch_get_main_queue(), ^{
_tfResult.backgroundColor = [UIColor redColor];
_tfResponseFor.text = [self formatRequest:request];
_tfResult.text = [error description];
});
}
- (void)requestDidCancelLoad:(SFRestRequest *)request {
dispatch_async(dispatch_get_main_queue(), ^{
_tfResult.backgroundColor = [UIColor redColor];
_tfResponseFor.text = [self formatRequest:request];
_tfResult.text = @"Request was cancelled";
});
}
- (void)requestDidTimeout:(SFRestRequest *)request {
dispatch_async(dispatch_get_main_queue(), ^{
_tfResult.backgroundColor = [UIColor redColor];
_tfResponseFor.text = [self formatRequest:request];
_tfResult.text = @"Request timedout";
});
}
Android Architecture
Salesforce Mobile SDK is provided as a library project. Android apps reference the SalesforceSDK project from their application
project. See the Android developer documentation.
Android Packages and Classes
Java source files for the Android Mobile SDK are under libs/SalesforceSDK/src.
Catalog of Top-Level Packages
For package and class descriptions, see the Salesforce Mobile SDK Android Reference.
Android Resources
Resources are under /res.
drawable-hdpi
UseFile
Server picker screensf__edit_icon.png
466
Android ArchitectureReference

UseFile
Login screensf__highlight_glare.png
Native application iconsf__icon.png
drawable-ldpi
UseFile
Application iconsf__icon.png
drawable-mdpi
UseFile
Server picker screensf__edit_icon.png
Login screensf__highlight_glare.png
Application iconsf__ic_refresh_sync_anim0.png
Application iconsf__icon.png
drawable-xhdpi
UseFile
Native application iconsf__icon.png
drawable-xlarge
UseFile
Login screen (tablet)sf__header_bg.png
Login screen (tablet)sf__header_drop_shadow.xml
Login screen (tablet)sf__header_left_border.xml
Login screen (tablet)sf__header_refresh.png
Login screen (tablet)sf__header_refresh_press.png
Login screen (tablet)sf__header_refresh_states.xml
Login screen (tablet)sf__header_right_border.xml
Login screen (tablet)sf__login_content_header.xml
467
Android ResourcesReference

UseFile
Login screen (tablet)sf__nav_shadow.png
Login screen (tablet)sf__oauth_background.png
Login screen (tablet)sf__oauth_container_dropshadow.9.png
Login screen (tablet)sf__progress_spinner.xml
Login screen (tablet)sf__refresh_loader.png
Login screen (tablet)sf__toolbar_background.xml
drawable-xlarge-port
UseFile
Login screen (tablet)sf__oauth_background.png
drawable-xxhdpi
UseFile
Native application iconsf__icon.png
drawable
UseFile
Login screensf__header_bg.png
Login screensf__progress_spinner.xml
Login screensf__toolbar_background.xml
layout
UseFile
Account switching screensf__account_switcher.xml
Server picker screensf__custom_server_url.xml
Login screensf__login.xml
Screen that allows the user to clear app data and log outsf__manage_space.xml
Pin screensf__passcode.xml
468
Android ResourcesReference

UseFile
Server picker screen (deprecated)sf__server_picker.xml
Server picker screensf__server_picker_list.xml
menu
UseFile
Add connection dialogsf__clear_custom_url.xml
Login menu (phone)sf__login.xml
values
UseFile
Connected app configuration settingsbootconfig.xml
Colorssf__colors.xml
Dimensionssf__dimens.xml
SDK stringssf__strings.xml
Stylessf__style.xml
Other strings (app name)strings.xml
xml
UseFile
Preferences for account used by applicationauthenticator.xml
Server configuration.servers.xml
Files API Reference
API access for the Files feature is available in Android, iOS, and hybrid flavors.
FileRequests Methods (Android)
All FileRequests methods are static, and each returns a RestRequest instance. Use the RestClient.sendAsync()
or the RestClient.sendSync() method to send the RestRequest object to the server. See Using REST APIs.
469
Files API ReferenceReference

For a full description of the REST request and response bodies, see “Files Resources” under Chatter REST API Resources at
http://www.salesforce.com/us/developer/docs/chatterapi.
ownedFilesList
Generates a request that retrieves a list of files that are owned by the specified user. Returns one page of results.
Signature
public static RestRequest ownedFilesList(String userId, Integer pageNum);
Parameters
DescriptionTypeName
ID of a user. If null, the ID of the context (logged-in) user is used.StringuserId
Zero-based index of the page of results to be fetched. If null, fetches
the first page.
IntegerpageNum
Example
RestRequest request = FileRequests.ownedFilesList(null, null);
filesInUsersGroups
Generates a request that retrieves a list of files that are owned by groups that include the specified user.
Signature
public static RestRequest filesInUsersGroups(String userId, Integer pageNum);
Parameters
DescriptionTypeName
ID of a user. If null, the ID of the context (logged-in) user is used.StringuserId
Zero-based index of the page of results to be fetched. If null, fetches
the first page.
IntegerpageNum
Example
RestRequest request = FileRequests.filesInUsersGroups(null, null);
filesSharedWithUser
Generates a request that retrieves a list of files that are shared with the specified user.
Signature
public static RestRequest filesSharedWithUser(String userId, Integer pageNum);
470
FileRequests Methods (Android)Reference

Parameters
DescriptionTypeName
ID of a user. If null, the ID of the context (logged-in) user is used.StringuserId
Zero-based index of the page of results to be fetched. If null, fetches
the first page.
IntegerpageNum
Example
RestRequest request = FileRequests.filesSharedWithUser(null, null);
fileDetails
Generates a request that can fetch the file details of a particular version of a file.
Signature
public static RestRequest fileDetails(String sfdcId, String version);
Parameters
DescriptionTypeName
ID of a file. If null, IllegalArgumentException is thrown.StringsfdcId
Version to fetch. If null, fetches the most recent version.Stringversion
Example
String id = <some_file_id>;
RestRequest request = FileRequests.fileDetails(id, null);
batchFileDetails
Generates a request that can fetch details of multiple files.
Signature
public static RestRequest batchFileDetails(List sfdcIds);
Parameters
DescriptionTypeName
List of IDs of one or more files. If any ID in the list is null,
IllegalArgumentException is thrown.
ListsfdcIds
471
FileRequests Methods (Android)Reference

Example
List<String> ids = Arrays.asList("id1", "id2", ...);
RestRequest request = FileRequests.batchFileDetails(ids);
fileRendition
Generates a request that can fetch a rendered preview of a page of the specified file.
Signature
public static RestRequest fileRendition(String sfdcId,
String version,
RenditionType renditionType,
Integer pageNum);
Parameters
DescriptionTypeName
ID of a file to be rendered. If null, IllegalArgumentException
is thrown.
StringsfdcId
Version to fetch. If null, fetches the most recent version.Stringversion
Specifies the type of rendition to be returned. Valid values include:RenditionTyperenditionType
•PDF
•FLASH
•SLIDE
•THUMB120BY90
•THUMB240BY180
•THUMB720BY480
If null, THUMB120BY90 is used.
Zero-based index of the page to be fetched. If null, fetches the first page.IntegerpageNum
Example
String id = <some_file_id>;
RestRequest request = FileRequests.fileRendition(id, null, "PDF", 0);
fileContents
Generates a request that can fetch the binary contents of the specified file.
Signature
public static RestRequest fileContents(String sfdcId, String version);
472
FileRequests Methods (Android)Reference

Parameters
DescriptionTypeName
ID of a file to be rendered. If null, IllegalArgumentException
is thrown.
StringsfdcId
Version to fetch. If null, fetches the most recent version.Stringversion
Example
String id = <some_file_id>;
RestRequest request = FileRequests.fileContents(id, null);
fileShares
Generates a request that can fetch a page from the list of entities that share the specified file.
Signature
public static RestRequest fileShares(String sfdcId, Integer pageNum);
Parameters
DescriptionTypeName
ID of a file to be rendered. If null, IllegalArgumentException
is thrown.
StringsfdcId
Zero-based index of the page of results to be fetched. If null, fetches
the first page.
IntegerpageNum
Example
String id = <some_file_id>;
RestRequest request = FileRequests.fileShares(id, null);
addFileShare
Generates a request that can share the specified file with the specified entity.
Signature
public static RestRequest addFileShare(String fileId, String entityId,
String shareType);
Parameters
DescriptionTypeName
ID of a file to be shared. If null, IllegalArgumentException
is thrown.
StringfileId
473
FileRequests Methods (Android)Reference

DescriptionTypeName
ID of a user or group with whom to share the file. If null,
IllegalArgumentException is thrown.
StringentityID
Type of share. Valid values are “V” for view and “C” for collaboration.StringshareType
Example
String idFile = <some_file_id>;
String idEntity = <some_user_or_group_id>;
RestRequest request = FileRequests.addFileShare(idFile, idEntity, "V");
deleteFileShare
Generates a request that can delete the specified file share.
Signature
public static RestRequest deleteFileShare(String shareId);
Parameters
DescriptionTypeName
ID of a file share to be deleted. If null,
IllegalArgumentException is thrown.
StringshareId
Example
String id = <some_fileShare_id>;
RestRequest request = FileRequests.deleteFileShare(id);
uploadFile
Generates a request that can upload a local file to the server. On the server, this request creates a file at version 1.
Signature
public static RestRequest uploadFile(File theFile,
String name, String description, String mimeType)
throws UnsupportedEncodingException;
Parameters
DescriptionTypeName
Path of the local file to be uploaded to the server.FiletheFile
Name of the file.Stringname
Description of the file.Stringdescription
474
FileRequests Methods (Android)Reference

DescriptionTypeName
MIME type of the file, if known. Otherwise, null.StringmimeType
Throws
UnsupportedEncodingException
Example
RestRequest request = FileRequests.uploadFile("/Users/JayVee/Documents/",
"mypic.png", "Profile pic", "image/png");
SFRestAPI (Files) Category—Request Methods (iOS)
In iOS native apps, the SFRestAPI (Files) category defines file request methods. You send request messages to the SFRestAPI
singleton.
SFRestRequest *request = [[SFRestAPI sharedInstance] requestForOwnedFilesList:nil page:0];
Each method returns an SFRestRequest instance. Use the SFRestAPI singleton again to send the request object to the server.
In the following example, the calling class (self) is the delegate, but you can specify any other object that implements
SFRestDelegate.
[[SFRestAPI sharedInstance] send:request delegate:self];
requestForOwnedFilesList:page:
Generates a request that retrieves a list of files that are owned by the specified user. Returns one page of results.
Signature
- (SFRestRequest *)
requestForOwnedFilesList:(NSString *)userId
page:(NSUInteger)page;
Parameters
DescriptionTypeName
ID of a user. If nil, the ID of the context (logged-in) user is used.NSString *userId
Zero-based index of the page to be fetched. If nil, fetches the first page.NSUIntegerpage
Example
SFRestRequest *request =
[[SFRestAPI sharedInstance] requestForOwnedFilesList:nil
page:0];
requestForFilesInUsersGroups:page:
Generates a request that retrieves a list of files that are owned by groups that include the specified user.
475
SFRestAPI (Files) Category—Request Methods (iOS)Reference

Signature
- (SFRestRequest *)
requestForFilesInUsersGroups:(NSString *)userId
page:(NSUInteger)page;
Parameters
DescriptionTypeName
ID of a user. If nil, the ID of the context (logged-in) user is used.NSString *userId
Zero-based index of the page to be fetched. If nil, fetches the first page.NSUIntegerpage
Example
SFRestRequest *request = [[SFRestAPI sharedInstance]
requestForFilesInUsersGroups:nil
page:0];
requestForFilesSharedWithUser:page:
Generates a request that retrieves a list of files that are shared with the specified user.
Signature
- (SFRestRequest *)
requestForFilesSharedWithUser:(NSString *)userId
page:(NSUInteger)page;
Parameters
DescriptionTypeName
ID of a user. If nil, the ID of the context (logged-in) user is used.NSString *userId
Zero-based index of the page to be fetched. If nil, fetches the first page.NSUIntegerpage
Example
SFRestRequest *request =
[[SFRestAPI sharedInstance] requestForFilesSharedWithUser:nil
page:0];
requestForFileDetails:forVersion:
Generates a request that can fetch the file details of a particular version of a file.
Signature
- (SFRestRequest *)
requestForFileDetails:(NSString *)sfdcId
forVersion:(NSString *)version;
476
SFRestAPI (Files) Category—Request Methods (iOS)Reference

Parameters
DescriptionTypeName
ID of a file. If nil, the request fails.NSString *sfdcId
Version to fetch. If nil, fetches the most recent version.NSString *version
Example
NSString *id = [NSString stringWithString:@"some_file_id"];
SFRestRequest *request =
[[SFRestAPI sharedInstance] requestForFileDetails:id
forVersion:nil];
requestForBatchFileDetails:
Generates a request that can fetch details of multiple files.
Signature
- (SFRestRequest *)
requestForBatchFileDetails:(NSArray *)sfdcIds;
Parameters
DescriptionTypeName
Array of IDs of one or more files. IDs are expressed as strings.NSArray *sfdcIds
Example
NSArray *ids = [NSArray arrayWithObject:@"id1",@"id2",...,nil];
SFRestRequest *request =
[[SFRestAPI sharedInstance] requestForBatchFileDetails:ids];
requestForFileRendition:version:renditionType:page:
Generates a request that can fetch a rendered preview of a page of the specified file.
Signature
- (SFRestRequest *)
requestForFileRendition:(NSString *)sfdcId
version:(NSString *)version
renditionType:(NSString *)renditionType
page:(NSUInteger)page;
Parameters
DescriptionTypeName
ID of a file to be rendered. If nil, the request fails.NSString *sfdcId
477
SFRestAPI (Files) Category—Request Methods (iOS)Reference

DescriptionTypeName
Version to fetch. If nil, fetches the most recent version.NSString *version
Specifies the type of rendition to be returned. Valid values include:NSString *renditionType
•"PDF"
•"FLASH"
•"SLIDE"
•"THUMB120BY90"
•"THUMB240BY180"
•"THUMB720BY480"
If nil, THUMB120BY90 is used.
Zero-based index of the page to be fetched. If nil, fetches the first page.NSUIntegerpage
Example
NSString *id = [NSString stringWithString:@"some_file_id"];
SFRestRequest *request =
[[SFRestAPI sharedInstance] requestForFileRendition:id
version:nil
renditionType:nil
page:nil];
requestForFileContents:version:
Generates a request that can fetch the binary contents of the specified file.
Signature
- (SFRestRequest *)
requestForFileContents:(NSString *) sfdcId
version:(NSString*) version;
Parameters
DescriptionTypeName
ID of a file to be rendered. If nil, the request fails.NSString *sfdcId
Version to fetch. If nil, fetches the most recent version.NSString *version
Example
NSString *id = [NSString stringWithString:@"some_file_id"];
SFRestRequest *request =
[[SFRestAPI sharedInstance] requestForFileContents:id
version:nil];
478
SFRestAPI (Files) Category—Request Methods (iOS)Reference

requestForFileShares:page:
Generates a request that can fetch a page from the list of entities that share the specified file.
Signature
- (SFRestRequest *)
requestForFileShares:(NSString *)sfdcId
page:(NSUInteger)page;
Parameters
DescriptionTypeName
ID of a file to be rendered. If nil, the request fails.NSString *sfdcId
Zero-based index of the page to be fetched. If nil, fetches the first page.NSUIntegerpage
Example
NSString *id = [NSString stringWithString:@"some_file_id"];
SFRestRequest *request =
[[SFRestAPI sharedInstance] requestForFileShares:id
page:nil];
requestForAddFileShare:entityId:shareType: Method
Generates a request that can share the specified file with the specified entity.
Signature
- (SFRestRequest *)
requestForAddFileShare:(NSString *)fileId
entityId:(NSString *)entityId
shareType:(NSString*)shareType;
Parameters
DescriptionTypeName
ID of a file to be shared. If nil, the request fails.NSString *fileId
ID of a user or group with whom to share the file. If nil, the request fails.NSString *entityId
Type of share. Valid values are “V” for view and “C” for collaboration.NSString *shareType
Example
NSString *id = [NSString stringWithString:@"some_file_id"];
NSString *entId = [NSString stringWithString:@"some_entity_id"];
SFRestRequest *request =
[[SFRestAPI sharedInstance] requestForAddFileShare:id
entityId:entId
shareType:@"V"];
479
SFRestAPI (Files) Category—Request Methods (iOS)Reference

requestForDeleteFileShare:
Generates a request that can delete the specified file share.
Signature
- (SFRestRequest *)
requestForDeleteFileShare:(NSString *)shareId;
Parameters
DescriptionTypeName
ID of a file share to be deleted. If nil, the request fails.NSString *shareId
Example
NSString *id = [NSString stringWithString:@"some_fileshare_id"];
SFRestRequest *request =
[[SFRestAPI sharedInstance] requestForDeleteFileShare:id];
requestForUploadFile:name:description:mimeType: Method
Generates a request that can upload a local file to the server. On the server, this request creates a new file at version 1.
Signature
- (SFRestRequest *)
requestForUploadFile:(NSData *)data
name:(NSString *)name
description:(NSString *)description
mimeType:(NSString *)mimeType;
Parameters
DescriptionTypeName
Data to upload to the server.NSData *data
Name of the file.NSString *name
Description of the file.NSString *description
MIME type of the file, if known. Otherwise, nil.NSString *mimeType
Example
NSData *data = [NSData dataWithContentsOfFile:@"/Users/JayVee/Documents/mypic.png"];
SFRestRequest *request =
[[SFRestAPI sharedInstance] requestForUploadFile:data
name:@"mypic.png"
description:@"Profile pic"
mimeType:@"image/png"];
480
SFRestAPI (Files) Category—Request Methods (iOS)Reference

Files Methods For Hybrid Apps
Hybrid methods for the Files API reside in the force+files.js library. Examples in the following reference topics assume that
you’ve included force+files.js in your project. These examples use the force client object, which implements a traditional
callback model.
Note: In smartsync.js, the force.js library is passed in as Force.forceJsClient. You’re free to use either client
for Files API calls in a SmartSync Data Framework app. However, REST API methods called on Force.forceJsClient differ
from their force.Client cousins in that they return JavaScript promises. If you use Force.forceJsClient, reformat
the examples that require success and error callbacks in the following manner:
Force.forceJsClient.ownedFilesList(null, null)
.done(function(response) {/* do something with the returned JSON data */})
.fail(function(error) { alert("Error!");});
See the FileExplorer sample app in the github.com/forcedotcom/SalesforceMobileSDK-Shared repo for examples.
ownedFilesList Method
Returns a page from the list of files owned by the specified user.
Signature
force.ownedFilesList =
function(userId, page, callback, error)
Parameters
DescriptionName
An ID of an existing user. If null, the ID of the context (currently logged in) user is used.userId
Zero-based index of the page of results to be fetched. If null, fetches the first page.page
A function that receives the server response asynchronously and handles it.callback
A function that handles server errors.error
Example
force.ownedFilesList(null, null,
function(response){ /* do something with the returned JSON data */},
function(error){ alert("Error!");}
);
filesInUsersGroups Method
Returns a page from the list of files owned by groups that include specified user.
Signature
force.filesInUsersGroups =
function(userId, page, callback, error)
481
Files Methods For Hybrid AppsReference

Parameters
DescriptionName
An ID of an existing user. If null, the ID of the context (currently logged in) user is used.userId
Zero-based index of the page of results to be fetched. If null, fetches the first page.page
A function that receives the server response asynchronously and handles it.callback
A function that handles server errors.error
Example
force.filesInUsersGroups(null, null,
function(response){
/* do something with the returned JSON data */
},
function(error){ alert("Error!");}
);
filesSharedWithUser Method
Returns a page from the list of files shared with the specified user.
Signature
force.filesSharedWithUser =
function(userId, page, callback, error)
Parameters
DescriptionName
An ID of an existing user. If null, the ID of the context (currently logged in) user is used.userId
Zero-based index of the page of results to be fetched. If null, fetches the first page.page
A function that receives the server response asynchronously and handles it.callback
A function that handles server errors.error
Example
force.filesSharedWithUser(null, null,
function(response){
/* do something with the returned JSON data */
},
function(error){ alert("Error!");}
);
482
Files Methods For Hybrid AppsReference

fileDetails Method
Generates a request that can fetch the file details of a particular version of a file.
Signature
force.fileDetails = function
(fileId, version, callback, error)
Parameters
DescriptionName
An ID of an existing file. If null, an error is returned.sfdcId
The version to fetch. If null, fetches the most recent version.version
A function that receives the server response asynchronously and handles it.callback
A function that handles server errors.error
Example
force.fileDetails(id, null,
function(response){
/* do something with the returned JSON data */
},
function(error){ alert("Error!");}
);
batchFileDetails Method
Returns file details for multiple files.
Signature
force.batchFileDetails =
function(fileIds, callback, error)
Parameters
DescriptionName
A list of IDs of one or more existing files. If any ID in the list is null, an error is returned.fileIds
A function that receives the server response asynchronously and handles it.callback
A function that handles server errors.error
Example
force.batchFileDetails(ids,
function(response){
/* do something with the returned JSON data */
},
483
Files Methods For Hybrid AppsReference

function(error){ alert("Error!");}
);
fileRenditionPath Method
Returns file rendition path relative to service/data. In HTML (for example, an img tag), use the bearer token URL instead.
Signature
force.fileRenditionPath =
function(fileId, version, renditionType, page)
Parameters
DescriptionName
ID of an existing file to be rendered. If null, an error is returned.fileId
The version to fetch. If null, fetches the most recent version.version
Specify the type of rendition to be returned. Valid values include:renditionType
•PDF
•FLASH
•SLIDE
•THUMB120BY90
•THUMB240BY180
•THUMB720BY480
If null, THUMB120BY90 is used.
Zero-based index of the page to be fetched. If null, fetches the first page.page
Example
force.fileRenditionPath(id, null, "THUMB240BY180", null);
fileContentsPath Method
Returns file content path (relative to service/data). From html (for example, an img tag), use the bearer token URL instead.
Signature
force.fileContentsPath =
function(fileId, version)
Parameters
DescriptionName
ID of an existing file to be rendered. If null, an error is returned.fileId
The version to fetch. If null, fetches the most recent version.version
484
Files Methods For Hybrid AppsReference

Example
force.fileContentsPath(id, null);
fileShares Method
Returns a page from the list of entities that share this file.
Signature
force.fileShares =
function(fileId, page, callback, error)
Parameters
DescriptionName
ID of an existing file to be rendered. If null, an error is returned.fileId
Zero-based index of the page of results to be fetched. If null, fetches the first page.page
A function that receives the server response asynchronously and handles it.callback
A function that handles server errors.error
Example
force.fileShares(id, null,
function(response){
/* do something with the returned JSON data */
},
function(error){ alert("Error!");}
);
addFileShare Method
Adds a file share for the specified file ID to the specified entity ID.
Signature
force.addFileShare =
function(fileId, entityId, shareType, callback, error)
Parameters
DescriptionName
ID of an existing file to be shared. If null, IllegalArgumentException is thrown.fileId
ID of an existing user or group with whom to share the file. If null,
IllegalArgumentException is thrown.
entityID
The type of share. Valid values are “V” for view and “C” for collaboration.shareType
A function that receives the server response asynchronously and handles it.callback
485
Files Methods For Hybrid AppsReference

DescriptionName
A function that handles server errors.error
Example
force.addFileShare(id, null, "V",
function(response){
/* do something with the returned JSON data */
},
function(error){ alert("Error!");}
);
deleteFileShare Method
Deletes the specified file share.
Signature
force.deleteFileShare =
function(sharedId, callback, error)
Parameters
DescriptionName
ID of an existing file share to be deleted. If null, IllegalArgumentException is thrown.shareId
A function that receives the server response asynchronously and handles it.callback
A function that handles server errors.error
Example
force.deleteFileShare(id,
function(response){
/* do something with the returned JSON data */
},
function(error){ alert("Error!");}
);
Tool and Component Supported Versions for Mobile SDK 6.0
All Platforms
Installation DetailsSupported VersionTool or Component
Install from nodejs.orgLatestNode.js
Installed by Node.js3.10npm
486
Tool and Component Supported Versions for Mobile SDK 6.0Reference

Installation DetailsSupported VersionTool or Component
Installed by Node.js0.7.0shelljs
Installed by Mobile SDK3.15.2SQLite
Installed by Mobile SDK3.5.7 for Android, 3.4.1 for iOSSQLCipher
Installed by Mobile SDKFTS5Full Text Search (FTS)
Hybrid
Installation DetailsSupported VersionTool or Component
Install from cordova.apache.org7.0.0 (for Android), 4.5.4 (for iOS)Cordova
At a command line or Terminal prompt,
type: npm install -g cordova
7.0.0Cordova command line
Install through the Android SDK Manager
in Android Studio
Target version is Android Oreo (API 27),
minimum version is Android KitKat (API 21)
Default Android SDK version for hybrid apps
Android
Installation DetailsSupported VersionTool or Component
Install from oracle.com1.8.xJava JDK
Install from developer.android.com/studio/3.0Android Studio
Installed by Android Studio4.1Gradle
Install through the Android SDK Manager
in Android Studio
Android KitKat (API 21)Android SDK minApi
Install through the Android SDK Manager
in Android Studio
Android Oreo (API 27)Android SDK targetApi
Install through the Android SDK Manager
in Android Studio
Target version is Android Oreo (API 27),
minimum version is Android KitKat (API 21)
Default Android SDK version for hybrid apps
Installed by Mobile SDK3.9.0OkHttp
At a command line or Terminal prompt,
type: npm install -g
forcedroid
6.0forcedroid
487
Tool and Component Supported Versions for Mobile SDK 6.0Reference

iOS
Installation DetailsSupported VersionTool or Component
Install from the Mac App Store9Xcode
Installed by Xcode10iOS SDK
Install from cocoapods.org1.2CocoaPods
At a command line or Terminal prompt,
type: npm install -g forceios
6.0forceios
488
Tool and Component Supported Versions for Mobile SDK 6.0Reference
INDEX
_soupEntryId 239
_soupLastModifiedDate 239
A
about 171
About 4
access SmartStore stores 208
Account Editor sample 337
advanced authentication flow 386
alterSoup (for external storage) 244
analytics 445
Android
browser-based authentication 388
cancel() method, Android network call 131
cancelAll() method, Android network call 131
configuring app as an identity provider client 397
configuring identity provider flow 396
deferring login in native apps 139
FileRequests methods 130
identity provider architecture and flow 394
multi-user support 426
native classes 124
OkHttp library 131
push notifications 361–362
push notifications, code modifications 362
request queue 355
RestClient class 127
RestRequest class 128
run hybrid apps 175
sample apps 25–26
tutorial 145, 155–156
UserAccount class 427, 430
UserAccountManager class 429
WrappedRestRequest class 131
Android apps
using Maven to update Mobile SDK libraries 29
Android architecture 466
Android development 113, 120–121
Android project 115
Android requirements 114
Android sample app 160
Android template app 141
Android template app, deep dive 141
Android, native development 122
Apex controller 197
Apex REST resources, using 317
API access, granting to community users 404
API endpoints
custom 314–315
AppDelegate class 66
Application flow, iOS 58
application structure, Android 122
Architecture, Android 466
arrays
in index paths 219
Audience 4
authentication 367
authentication error handlers 85
Authentication flow 368
authentication providers 407
Authentication providers
Facebook 408–410
Google 415
Janrain 408–409
OpenID Connect 415
PayPal 415
Salesforce 408–409, 412
authentication schemes
advanced flow 386
standard flow 386
authentication, browser-based in Android apps 388
authorization 367
Authorization 382
B
Backbone framework 297
Base64 encoding 127
BLOBs 255
Book version 4
brower-based authentication, Android 388
C
cache policies for SmartSync Data Framework 258
CachePolicy class 258
caching data 202
caching, offline 305
Callback URL 19
certificate-based authentication 383, 386
Client-side detection 162
ClientManager class 81, 127, 136, 139
CocoaPods, refreshing 57
com.salesforce.androidsdk.rest package 136
489
Comments and suggestions 4
communities
add profiles 418
API Enabled permission 417
branding 405
configuration 417
configure for external authentication 422
create a community 418
create a login URL 418
create new contact and user 418
creating a Facebook app for external authentication 420
custom pages 406
Enable Chatter permission 417
external authentication 406
external authentication example 420–422
external authentication provider 420–421
Facebook app
420
example of creating for external authentication 420
login 406
login endpoint 404
logout 406
Salesforce Auth. Provider 421–422
self-registration 406
testing 419
tutorial 417–419
Communities
branding 406
communities, configuring for Mobile SDK apps 402, 404
Communities, configuring for Mobile SDK apps 401–402
communities, granting API access to users 404
community request parameter 408
component versions 486
configuration files, SmartStore 216
configuration files, SmartSync Data Framework 345
connected app
configuring for Android GCM push notifications 362
configuring for Apple push notifications 363
identity provider requirements 393
connected app, creating 19
connected apps 367
Connected apps 381
Consumer key 19
Container 170
Cordova
building hybrid apps with 171
Cross-device strategy 162
custom endpoints, using 314–315
custom targets 262
custom template apps 51, 118
D
data collection 449
data types
date representation 206
SmartStore 206
debugging
hybrid apps running on a device 192
hybrid apps running on an Android device 192
hybrid apps running on an iOS device 193
deferring login, Android native 139
Delete soups 211, 224, 238–239
deleteByQuery() method, Android 245
designated initializer 105
Detail page 190
Dev Support dialog box 438
Developer Edition
vs. sandbox 17
Developer Support 437
Developer.force.com 19
Developing HTML apps 161
Developing HTML5 apps 162, 166
Development 18
Development requirements, Android 114
Development, Android 113, 120–121
Development, hybrid 170
downloading files 354
E
encoding, Base64 127
Encryptor class 127
endpoint, custom 314–315
endpoints, REST requests 263–264, 269, 281
error handlers
authentication 85
errors, authentication
handling 85
Events
Refresh token revocation 381
external authentication
using with communities 406
F
Feedback 4
file requests, downloading 354
file requests, managing 353–356, 358
FileRequests class
methods 469, 475, 481
490
Index
FileRequests methods 130
Files
JavaScript 194
Files API
reference 469
files, uploading 354
Flow 368–370
Force.RemoteObject class 314
Force.RemoteObjectCollection class 315
forcedotcom pod 57
forcehybrid, using 171
forceios, using 48
ForcePlugin class 133
full-text index specs 235
full-text query specs 235
full-text query syntax 236
full-text search
full-text index specs 235
full-text query specs 235
full-text query syntax 236
G
Getting Started 16
ghost records, handling 280
GitHub 24
H
HTML5
Getting Started 162
Mobile UI Elements 31–34
using with JavaScript 162
HTML5 development 6, 8, 162
HTML5 development tools 166
hybrid
SFAccountManagerPlugin class 435
Hybrid applications
JavaScript files 194
JavaScript library compatibility 195
Versioning 195
hybrid apps
authenticate() JavaScript method 200
authentication, deferred 200
control status bar on iOS 7 193
deferring login 200
developing hybrid remote apps 176
push notifications 360
run on Android 175
run on iOS 175
using https://localhost 176
hybrid development 171
Hybrid development
debugging a hybrid app running on an Android device 192
debugging a hybrid app running on an iOS device 193
debugging an app running on a device 192
Hybrid iOS sample 173
hybrid project 171
Hybrid quick start 169
Hybrid sample app 180
hybrid sample apps
building 179
hybrid, create project 171
I
identity provider client
about 397, 399
identity provider client, configuring Android apps as 397
identity provider client, configuring iOS apps as 399
identity provider flow, configuring Android apps 396
identity provider flow, configuring iOS apps 397
identity providers
about 392–394, 396–397
Android flow 394
identity providers, Android architecture 394
identity providers, Android flow 394
identity providers, architecture 393
identity providers, connected app requirements 393
identity providers, flow 393
identity providers, Mobile SDK apps as 392
Identity URLs 372
in-app developer support 437–438
index paths
with arrays 219
installation, Mobile SDK 21
installing sample apps
iOS 26
Installing the SDK 22–23
instrumentation 445, 449
interface
KeyInterface 125
Inventory 185, 190
iOS
adding Mobile SDK to an existing app 54
configuring app as an identity provider client 399
configuring identity provider flow 397
control status bar on iOS 7 193
file requests 356
installing sample apps 26
multi-user support 431
491
Index
iOS (continued)
push notifications 363
push notifications, code modifications 364
request queue 357
required software 48
REST requests
81
unauthenticated 81
run hybrid apps 175
SFRestDelegate protocol 77
SFUserAccount class 431
SFUserAccountManager class 433
using CocoaPods 54
using iOS app extensions 86
using SFRestRequest methods 80
view controllers 69
iOS apps
memory management 58
SFRestAPI 77
iOS architecture 48, 114, 464
iOS development 47
iOS Hybrid sample app 173
iOS native app, developing 58
iOS native apps
AppDelegate class 66
iOS sample app 51, 112
iOS Xcode template 51
iOS, creating native projects 48
IP ranges 381
J
JavaScript
using with HTML5 162
JavaScript library compatiblity 195
Javascript library version 197
JavaScript, files 194
K
KeyInterface interface 125
L
Labs, Mobile SDK 30
launching PIN code authentication in iOS native apps 59
List page 185
localhost
using in hybrid remote apps 176
localStorage 255
logging 445–446
login and passcodes 58
login page, customizing
Inspector, testing with 391
LoginActivity class 132
M
MainActivity class 142
managing file download requests 354
managing file requests
iOS 356
Manifest, TemplateApp 144
Maven, using to update Android apps 29
MDM 383
memory management, iOS apps 58
methods
FileRequests class 469, 475, 481
Migrating
from the previous release 451
from versions older than the previous release 452
migration
4.0 to 4.1 462
4.1 to 4.2 461–462
4.2 to 4.3 461
4.3 to 5.0 459–460
5.0 to 5.1 453, 456, 459
5.1 to 5.2 453
5.2 to 5.3 452
5.3 to 6.0 452
all applications, 5.2 to 5.3 452
all applications, 5.3 to 6.0 452
Android applications, 4.0 to 4.1 462
Android applications, 4.1 to 4.2 461
Android applications, 4.2 to 4.3 461
Android applications, 4.3 to 5.0 459
Android applications, 5.0 to 5.1 453
Android applications, 5.1 to 5.2 453
hybrid applications, 4.0 to 4.1 462
hybrid applications, 4.1 to 4.2 462
hybrid applications, 4.2 to 4.3 461
hybrid applications, 4.3 to 5.0 460
hybrid applications, 5.0 to 5.1 459
hybrid applications, 5.1 to 5.2 453
iOS applications, 4.0 to 4.1 462
iOS applications, 4.1 to 4.2 462
iOS applications, 4.2 to 4.3 461
iOS applications, 4.3 to 5.0 459
iOS applications, 5.0 to 5.1 456
iOS applications, 5.1 to 5.2 453
React native applications, 5.1 to 5.2 453
Mobile container 170
492
Index
Mobile development 5
Mobile Device Management (MDM) 383
Mobile inventory app 185, 190
Mobile policies 381
Mobile SDK installation
node.js 21
Mobile SDK Labs
Mobile UI Elements 31
Mobile SDK packages 21
Mobile SDK Repository 24
Mobile SDK, when to use instead of the Salesforce app 2
Mobile UI Elements
force-selector-list 31
force-selector-relatedlist 31
force-sobject 32
force-sobject-collection 32
force-sobject-layout 32
force-sobject-relatedlists 32
force-sobject-store 33
force-ui-app 33
force-ui-detail 33
force-ui-list 33
force-ui-relatedlist 34
multi-user support
about 425
Android APIs 426–427, 429–430
hybrid APIs 435
implementing 425
iOS APIs 431, 433
N
named sync APIs 348
named syncs 345
named syncs, using 348
native Android classes 124
Native Android development 122
Native Android UI classes 132
Native Android utility classes 133
native API packages, Android 124
Native apps
Android 381
Native development 6, 8, 162
Native iOS architecture 48, 114, 464
Native iOS development 47
Native iOS project template 51
node.js
installing 21
npm 21
O
OAuth
custom login host 377
custom login host, iOS 378
server whitelist error 379
OAuth 2.0 367–368
offline caching 305, 307
offline management 202
Offline storage 203–207
Online documentation 4
P
Parameters, scope 370
PasscodeManager class 126
passcodes, using 133
PIN protection 382
Prerequisites 18
Printed date 4
project template, Android 142
Project, Android 115
project, hybrid 171
project, native iOS 48
project, React Native 36
push notifications
Android 361–362
Android, code modifications 362
hybrid apps 360
hybrid apps, code modifications 360
iOS 363
iOS, code modifications 364
using 360
Q
Queries, Smart SQL 232
querying a soup 219
Querying a soup 211, 224, 238–239
querySpec 211, 219, 224, 238–239
Quick start, hybrid 169
R
React Native
authenticate() JavaScript method 44
authentication, deferred 44
binary uploads 45
deferring login 44
samples 42
React Native components 38
React Native components, using in Mobile SDK apps 38
React Native project 36
493
Index
react.force.network.js 38
react.force.oauth.js 38
react.force.smartstore.js 38
react.force.smartsync.js 38
reference
Files API 469
Reference documentation 463
refresh sync down target 272
refresh token 198
Refresh token
Revocation 381
Refresh token flow 370
Refresh token revocation 381
Refresh token revocation events 381
registerSoup 211, 224, 238–239
registerSoup (for external storage) 244
RegistrationHandler class
extending for Auth. Provider 422
related records 273, 288
Releases 24
Remote access application 19
RemoteObject class 314
RemoteObjectCollection class 315
removeEntriesByQuery:fromSoup:error: method, iOS Objective-C
245
removeFromSoup() function, JavaScript (hybrid and ReactNative)
245
Request parameters
community 408
scope 409
request queue, managing 355
request queue, managing, iOS 357
requirements, iOS 48
resource handling, Android native apps 134
resources, Android 466
Responsive design 162
REST API
supported operations 72
REST APIs 71
REST APIs, using 81, 136, 139
REST request 79
REST request endpoints 263–264, 269, 281
REST requests
files 353–356, 358
unauthenticated 81, 139
REST requests, iOS 79
RestAPIExplorer 112
RestClient class 127, 136
RestRequest class 128, 136
RestResponse class 136
Restricting user access 381
Revoking tokens 380
RootViewController class 70
S
Salesforce app development
Salesforce app vs. custom apps 2
Salesforce app, when to use instead of Mobile SDK 2
Salesforce Auth. Provider
Apex class 422
Salesforce Platform development 1–2
SalesforceActivity class 127
SalesforceAnalyticsManager (Android) 446, 449
SalesforceSDKManager class 124
SalesforceSDKManager class (iOS native)
launch method 59
SalesforceSDKManager.shouldLogoutWhenTokenRevoked()
method 381
SAML
authentication providers 408–410, 412, 415
Sample app, Android 160
Sample app, iOS 112
sample apps
Android 25–26
building hybrid 179
hybrid 178
iOS 26
SmartSync Data Framework 337
Sample hybrid app 180
Sample iOS app 51
samples, React Native 42
sandbox org 17
Scope parameters 370
scope request parameter 409
SDK prerequisites 18
SDK version 197
SDKLibController 197
security 367
Send feedback 4
server whitelist 379
Server-side detection 162
session management 198
SFAccountManagerPlugin class 435
SFRestAPI (Blocks) category, iOS 82
SFRestAPI (Files) category, iOS 84
SFRestAPI (QueryBuilder) category 82
SFRestAPI interface, iOS 77
SFRestDelegate protocol, iOS 77
494
Index
SFRestRequest class, iOS
iOS
80
SFRestRequest class 80
SFRestRequest methods, using 80
SFSafariViewController 386
SFSDKSalesforceAnalyticsManager (iOS) 446, 449
SFSmartSyncSyncManager 263
SFUserAccount class 431
SFUserAccountManager class 433
shouldLogoutWhenTokenRevoked() method 381
Sign up 19
Single sign-on
authentication providers 407
Smart SQL 204, 232
SmartStore
“ghost” records 280
about 204
adding to existing Android apps 207
alterSoup functions for external storage 244
alterSoup() function 246, 249–250
clearSoup() function 246, 249
compatibility with SmartSync Data Framework 214
configuration files 216
data types 206
date representation 206
enabling in hybrid apps 207
external storage, using 242
full-text index specs 235
full-text query specs 235
full-text query syntax 236
full-text search 234
getDatabaseSize() function 246, 248
getSoupIndexSpecs() function 246
global SmartStore 209
Inspector, testing with 254
listing stores 253
managing soups 246, 248–252
managing stores 253
populate soups 221
registerSoup function, for external storage 244
reindexSoup() function 246
reIndexSoup() function 251
removeAllGlobalStores() function 253
removeAllStores() function 253
removeAllStoresForUser() function 253
removeSharedGlobalStoreWithName() function 253
removeSharedStoreWithName() function 253
removeSoup() function 246, 252
SmartStore (continued)
removeStores() function 253
removing stores 253
soup spec functions, for external storage 243
soups 205, 214
special fields for sync up operations 214
store types 205
stores, accessing 208
SmartStore extensions 255
SmartStore functions 211, 224, 238–239, 243–245
SmartStore queries 219
SmartStoreSDKManager class (iOS native) 59
SmartSync Data Framework
adding to existing Android apps 261
CacheManager 256
CachePolicy class 258
configuration files 345
conflict detection 311, 313
custom sync down target, samples 284
custom sync down targets 282
custom sync down targets, defining 282
custom sync down targets, invoking 284
custom sync up targets 285
custom sync up targets, invoking 287
custom sync up targets, related records 273, 288
custom sync up targets. defining 285
ghost records in SmartStore soups, handling 280
handling “ghost” records 280
hybrid apps 296
incremental sync 268
JavaScript 303
Metadata API 256
MetadataManager 256
model collections 297, 299
model objects 297
models 297
named syncs 345
named syncs, using 348
native apps, creating 261
NetworkManager 256
object representation 260
offline caching 305
offline caching, implementing 307
plug-in, methods 300
plug-in, using 300
React native apps 296
refresh sync down target 272
related records, syncing 273, 288
resync 268
495
Index
SmartSync Data Framework (continued)
reSync:updateBlock: iOS method 268
reSync() Android method 268
Salesforce endpoints 263–264, 269, 281
search layouts 256
sending requests 263–264, 269, 281
smartsync.js vs. SmartSync Data Framework plug-in 296
SmartSyncSDKManager 256
SObject types 256
SOQLBuilder 256
SOSLBuilder 256
storing and retrieving cached data 295
sync manager, using 263
targets, about 262
tutorial 297, 320–321, 323, 325–326, 328–331
using in JavaScript 303
using in native apps 256
SmartSync Data Framework plug-in 296
SmartSync Data Framework sample apps 337
SmartSync Data Framework samples
Account Editor 337
smartsync.js 296
SmartSyncSDKManager 261
soup spec functions (for external storage) 243
soups
populate 221
remove entries 245
Soups 211, 224, 238–239
soups, managing 246, 248–253
Source code 24
status bar
controlling in iOS 7 hybrid apps 193
store types, SmartStore 205
StoreCache 204, 307
storing files 255
supported compilers 486
supported environments 486
supported operations, REST API 72
sync down, refresh target 272
sync manager
using 263
SyncManager 263
syncs, named 345, 348
T
Template app, Android 141
template project, Android 142
template.js 51, 118
TemplateApp sample project 142
TemplateApp, manifest 144
Tokens, revoking 380
tutorial
Android 155–156
conflict detection 313
SmartSync Data Framework 297, 320–321, 323, 325–326,
328–331
SmartSync Data Framework, setup 320
tutorials
Android 145, 154, 158
iOS 105, 107
Tutorials 93–97, 99–101, 103, 112, 145–149, 151–153, 159
U
UI classes (Android native) 127
UI classes, native Android 132
unauthenticated REST requests 81, 139
unauthenticated RestClient instance 81, 139
Uninstalling Mobile SDK npm packages 23
updating apps 27
UpgradeManager class 133
uploading files 354
upsertSoupEntries 211, 224, 238–239
URLs, indentity 372
User-agent flow 369
UserAccount class 427, 430
UserAccountManager class 429
Utility classes, native Android 133
V
Versioning 195
versions
compilers 486
development environments 486
internal components 486
Versions 4
view controllers, iOS 69
W
Warehouse schema 185, 190
What Was New 12
What’s New 9
whitelist 379
WKWebView 386
WrappedRestRequest class 131
X
Xcode project template 51
496
Index
