NGScloud Manual
User Manual: Pdf
Open the PDF directly: View PDF ![]() .
.
Page Count: 121 [warning: Documents this large are best viewed by clicking the View PDF Link!]

NGScloud v0.90
Bioinformatic system for RNA-seq analysis of non-model species using cloud computing
GI Genética, Fisiología e Historia Forestal
Dpto. Sistemas y Recursos Naturales
ETSI Montes, Forestal y del Medio Natural
Universidad Politécnica de Madrid
http://gfhforestal.com/
https://github.com/ggfhf/

NGScloud Manual
Page i
Table of contents
Introduction .................................................................................................................................. 1
Installation ..................................................................................................................................... 3
NGScloud installation ................................................................................................................ 3
Additional software installation and dependencies ................................................................. 4
Ubuntu Linux ......................................................................................................................... 4
Microsoft Windows ............................................................................................................... 5
Mac OS X ............................................................................................................................... 6
First steps ...................................................................................................................................... 8
Connect to your AWS account .................................................................................................. 8
Search the Account Id ............................................................................................................... 9
Create an Access Key Id and Secret Access Key ........................................................................ 9
Starting NGScloud ................................................................................................................... 10
Configuring your first NGScloud environment ........................................................................ 11
A step by step example ............................................................................................................... 16
Create volumes ....................................................................................................................... 17
Link volumes in cluster templates ........................................................................................... 18
Create cluster with the t2.micro template.............................................................................. 19
Upload the read files to the cluster ........................................................................................ 21
Setup bioinformatic applications in the cluster ...................................................................... 27
Review the quality of reads using FastQC ............................................................................... 27
Download the quality analysis results ..................................................................................... 34
Trim reads using Trimmomatic ............................................................................................... 37
Terminate the cluster with a t2.micro template and create another cluster with a r3.4xlarge
template .................................................................................................................................. 42
Assembly reads using Trinity ................................................................................................... 45
Evaluate the transcriptome using RSEM-EVAL........................................................................ 53
Terminate the cluster with r3.4xlarge template and create another cluster with r3.xlarge
template .................................................................................................................................. 59
Transcriptome filtering using transcript-filter......................................................................... 63
Transcriptome clustering using CD-HIT-EST ............................................................................ 70
Terminate the cluster with r3.xlarge template and create another cluster with c3.xlarge
template .................................................................................................................................. 78
Upload the protein database to the cluster ............................................................................ 82

NGScloud Manual
Page ii
Add nodes to the cluster with a c3.xlarge template ............................................................... 86
Annotate the filtered and clustered transcriptome using transcriptome-blastx .................... 89
Terminate the cluster with c3.xlarge template and create another cluster with t2.micro
template .................................................................................................................................. 97
Download the transcriptome, evaluation and annotation files ............................................ 101
Terminate the cluster with the t2.micro template ............................................................... 113
How-to ....................................................................................................................................... 115
How to display this manual ................................................................................................... 115
How to recreate the NGScloud config file ............................................................................. 115
How to create a new environment ....................................................................................... 115
How to change to another environment .............................................................................. 115
How to view characteristics of a cluster template ................................................................ 115
How to create a cluster ......................................................................................................... 115
How to terminate a cluster ................................................................................................... 115
How to list the running clusters ............................................................................................ 115
How to create a volume ........................................................................................................ 115
How to remove a volume ...................................................................................................... 115
How to list the created volumes ........................................................................................... 115
How to link a volume in cluster templates............................................................................ 115
How to add a node in a cluster ............................................................................................. 115
How to remove a node in a cluster ....................................................................................... 115
How to open a terminal of a cluster ..................................................................................... 115
How to set up a bioinformatic software in a cluster ............................................................. 116
How to run a RNA-seq bioinformatic software in a cluster .................................................. 116
How to display datasets of a volume .................................................................................... 116
How to display the contents of a dataset ............................................................................. 116
How to upload reference files to a cluster ............................................................................ 116
How to compress/decompress reference files in a cluster ................................................... 116
How to upload database files to a cluster ............................................................................. 116
How to compress/decompress database files in a cluster.................................................... 116
How to upload read files to a cluster .................................................................................... 117
How to compress/decompress read files in a cluster ........................................................... 117
How to download results files from a cluster ....................................................................... 117
How to compress/decompress results files in a cluster ....................................................... 117
How to view submission logs in the local computer ............................................................. 117
How to view result logs in the cluster ................................................................................... 117

NGScloud Manual
Page iii
NGScloud Manual
Page 1
Introduction
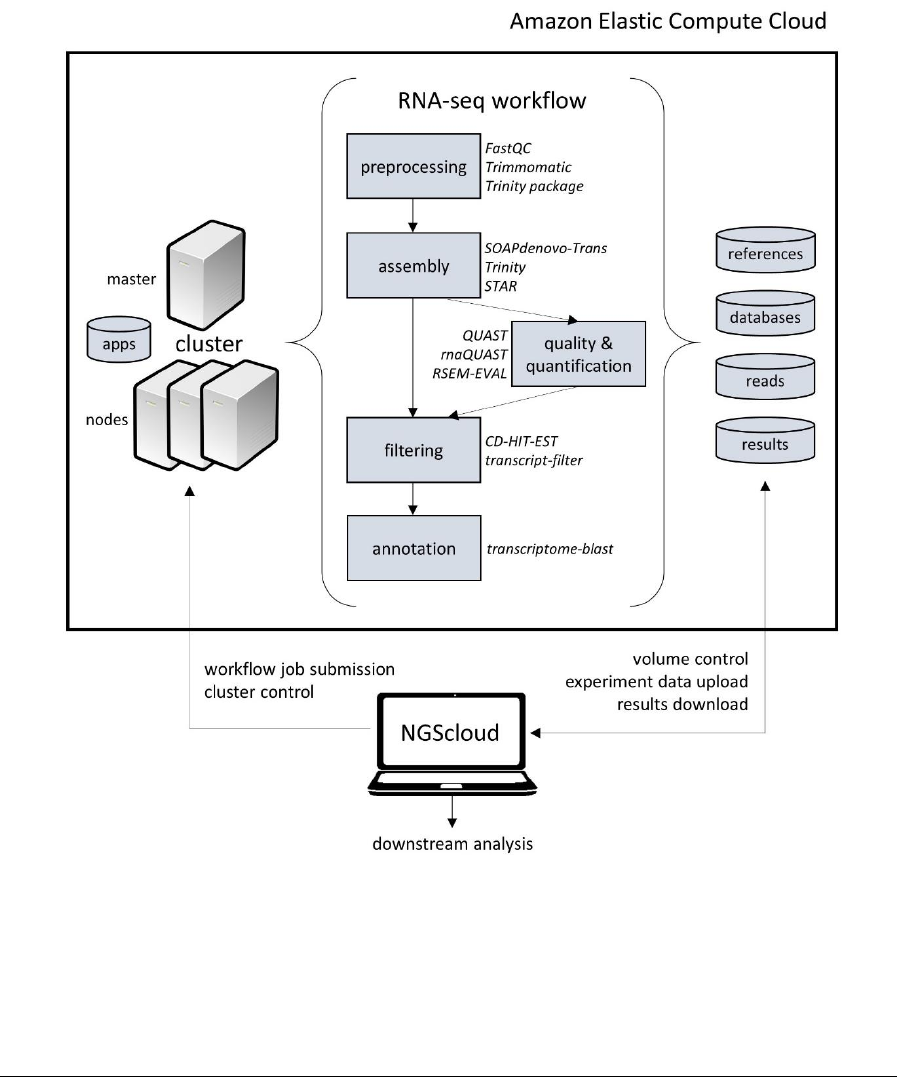
NGScloud is a bioinformatic system developed to analyze RNA-seq data using the cloud
computing services of Amazon - Elastic Compute Cloud (EC2)- that permit the access to ad hoc
computing infrastructure scaled according to the complexity of the experiment, so its costs
and times can be optimized. The application provides a user-friendly front-end to easily
operate Amazon's hardware resources, and to control a workflow of RNA-seq analysis oriented
to non-model species, incorporating the cluster concept, which allows parallel runs of common
RNA-seq analysis programs in several virtual machines for faster analysis (see Figure 1).
Figure. 1. NGScloud architecture. NGScloud operates EC2 resources, submits workflow and manages datasets from
RNA-seq experiments.

NGScloud Manual
Page 2
The development of NGScloud stems from the needs of specific user-friendly tools for RNA-seq
analysis in small laboratories, or by researchers that lack advanced knowledge in the
bioinformatic analysis of RNA-seq experiments. NGScloud is specially oriented to RNA-seq
analysis in non-model organisms or when large experiments involving many libraries and
massive data generation is expected. NGScloud was designed to facilitate RNA-seq analyses
since the researcher is guided in the choice of the input files for bioinformatic applications and
the parameters to be used, encapsulating the complexity of the command line. In addition,
NGScloud takes advantage of the resources provided by the Amazon Web Services, so it can
also be considered as an alternative to private clusters, to perform the analysis, and to store
the read files, results, and associated databases.
NGScloud Manual
Page 3
Installation
NGScloud installation
NGScloud was programmed in Python3, and it runs in any computer with an OS that allows for
Python 3: Linux, Microsoft Windows, Mac OS X and other platforms.
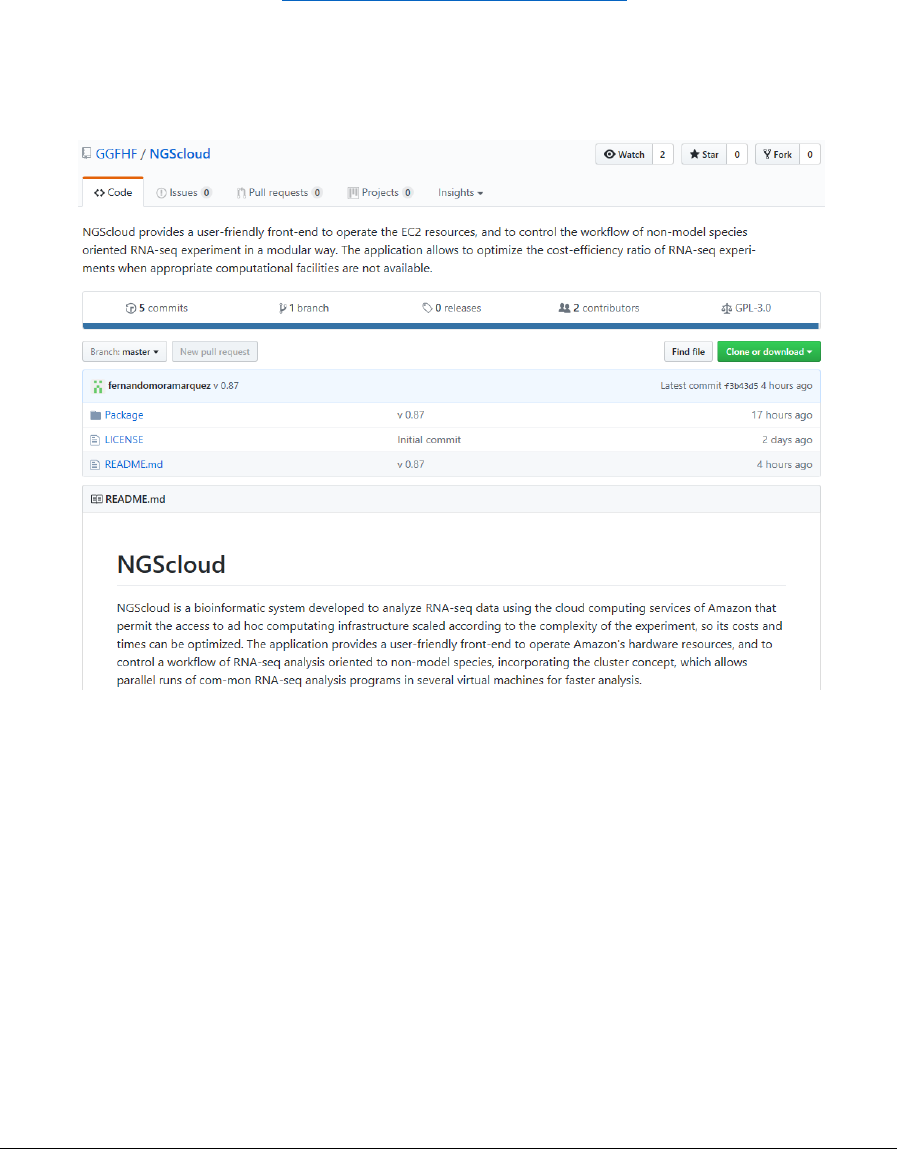
NGScloud is available from the GitHub software repository of the Forest Genetics and
Physiology Research Group (https://github.com/GGFHF/NGScloud/), and it is distributed under
GNU General Public Licence Version 3.
To download NGScloud, click in Clone or download and then in Download ZIP:
To install NGScloud on Linux and Mac OS X, simply decompress the NGScloud-master.zip into a
directory, typing the following command in a terminal window:
$ unzip NGScloud-master.zip
Then, the execution permissions of the programs must be set by using this command:
$ chmod u+x *.py *.sh
For Microsoft Windows, simply unzip NGScloud-master.zip in the usual way.

NGScloud Manual
Page 4
Additional software installation and dependencies
Python 2 and Python 3 are necessary for a correct functioning of NGScloud. Python 2 is
necessary because StarCluster, an additional software used to manage clusters of EC2 virtual
machines (see “Additional software installation”) has been programmed in Python 2. For
Ubuntu Linux both versions are already preinstalled. However, Python is not preinstalled on
Microsoft Windows and Mac OS X in any of its versions.
If you use Windows, you can download both Python versions from the official website
(https://www.python.org/), or use one of the several distributions that include Python along
with other software packages for standard bioinformatic analysis. We recommend installing
Anaconda (a version corresponding to Python 3.6 or higher). Anaconda is a free cross-platform
for Microsoft Windows, Linux and Mac OS X (https://www.continuum.io/). The installation
instructions for Anaconda are available on its web site.
If you are a Mac OS X user and you are not sure about how to install Python, we recommend
installing Anaconda as well.
Next, we present how to install the additional software that is required to run NGSCloud (AWS
CLI, Boto3, Paramiko and StarCluster) on Ubuntu Linux, Microsoft Windows and Mac OS X.
To work properly, NGScloud needs the following software packages to be installed in the OS:
• AWS CLI (https://aws.amazon.com/cli/), the AWS Command Line Interface.
• Boto3 (https://boto3.readthedocs.io/), the AWS SDK (Software Development Kit) for
Python.
• Paramiko (http://www.paramiko.org/), an implementation of the SSHv2 protocol in
Python.
• StarCluster (http://star.mit.edu/cluster/), an open source cluster-computing toolkit for
Amazon EC2 (Elastic Compute Cloud).
Ubuntu Linux
First, you open a terminal window and type the following command to install the Python3
modules Tk, PIL and PIL.ImageTk, if necessary:
$ sudo apt-get install python3-tk python3-pil python3-pil.imagetk
The additional software may be installed by typing the following commands in the terminal
window.
• AWS CLI:
$ sudo pip3 install awscli
• Boto3:
$ sudo pip3 install boto3

NGScloud Manual
Page 5
• Paramiko:
$ sudo apt-get install build-essential libssl-dev libffi-dev python3-dev
$ sudo pip3 install cryptography
$ sudo pip3 install paramiko
• StarCluster:
$ sudo pip install starcluster
Microsoft Windows
Assuming that Anaconda has been installed in Windows with Python 3.6 or higher as main
environment, Python 2.7 must be installed as additional environment identified as py27
running the following command on a Command Prompt started as Administrator:
> conda create --name py27 python=2.7 anaconda
Then, the additional software is installed into the same Command Prompt started as
Administrator:
• AWS CLI:
> pip install awscli
• Boto3:
> conda install boto3
• Paramiko:
> pip install paramiko
• StarCluster:
> activate py27
> pip install starcluster
> deactivate py27
If Anaconda3_path is the directory where you have installed Anaconda3, you must review the
"Environment Variables" in "System Properties" dialog box and verify that the following
directories are declared as PATH variables:

NGScloud Manual
Page 6
o Anaconda3_path
o Anaconda3_path\Scripts
o Anaconda3_path\Library\bin
o Anaconda3_path\envs\py27\Scripts
Mac OS X
Assuming that Anaconda distribution has been installed in Windows with Python 3.6 or higher
as main environment, the steps are similar to the installation in Microsoft Windows.
First, Python 2.7 must be installed as additional environment identified as py27 typing the
following command on a terminal:
$ conda create --name py27 python=2.7 anaconda
Then you can install the additional software, by typing:
• AWS CLI:
$ pip install awscli
• Boto3:
$ conda install boto3
• Paramiko:
$ pip install paramiko

NGScloud Manual
Page 7
• StartCluster:
$ activate py27
$ pip install starcluster
$ deactivate py27
If Anaconda3_path is the directory where you have installed Anaconda3, you must review the
.bash_profile file in your home directory to include in the PATH variable the following
directories:
o Anaconda3_path/bin
o Anaconda3_path/envs/py27/bin
The last line in .bash_profile should be something like this:
export PATH=Anaconda3_path/bin:Anaconda3_path/envs/py27/bin:$PATH
NGScloud Manual
Page 8
First steps
The following steps are mandatory before you can use NGScloud, after NGScloud and the
additional software have been installed:
• Connect to your AWS Account
• Search the Account Id
• Create an Access Key Id and Secret Access Key
• Start NGScloud
• Configuring your first NGScloud environment
Connect to your AWS account
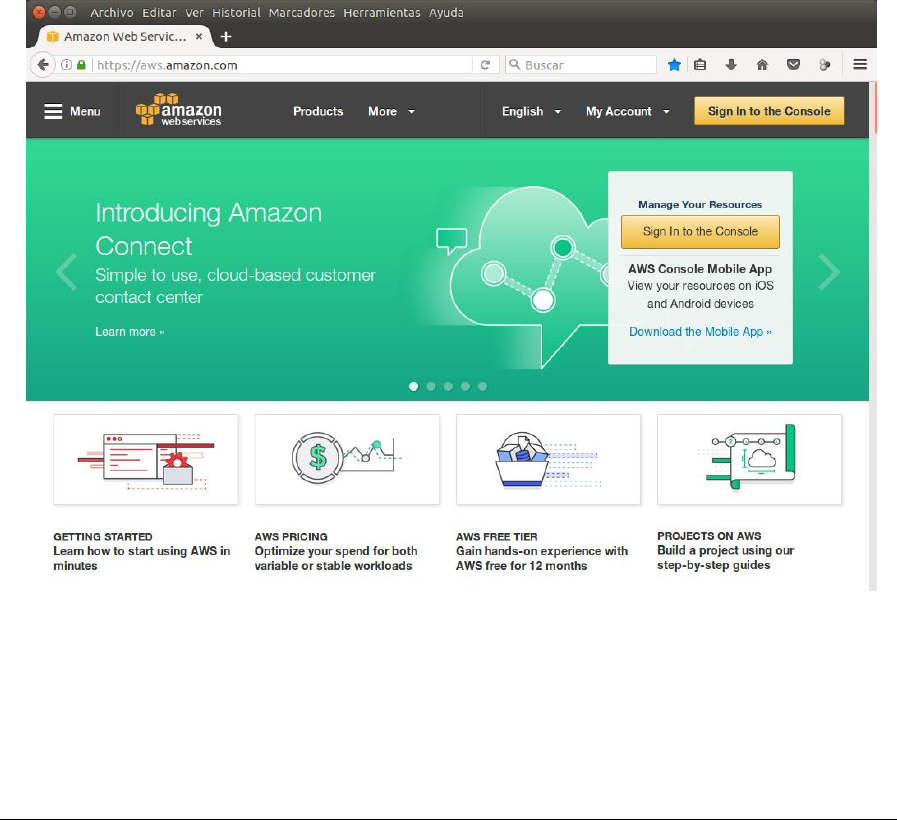
First, you must connect to your AWS Account in the web site htpps://aws.amazon.com clicking
in Sign in to the Console:
Then, complete your e-mail and password personal information in the corresponding text
boxes:
NGScloud Manual
Page 9
If you don't have an AWS Account, you can create one. Currently, Amazon allows the users the
access to restricted services for free for one year. Information about how to use the free tier is
properly explained in: http://docs.aws.amazon.com/awsaccountbilling/latest/aboutv2/billing-
free-tier.html.
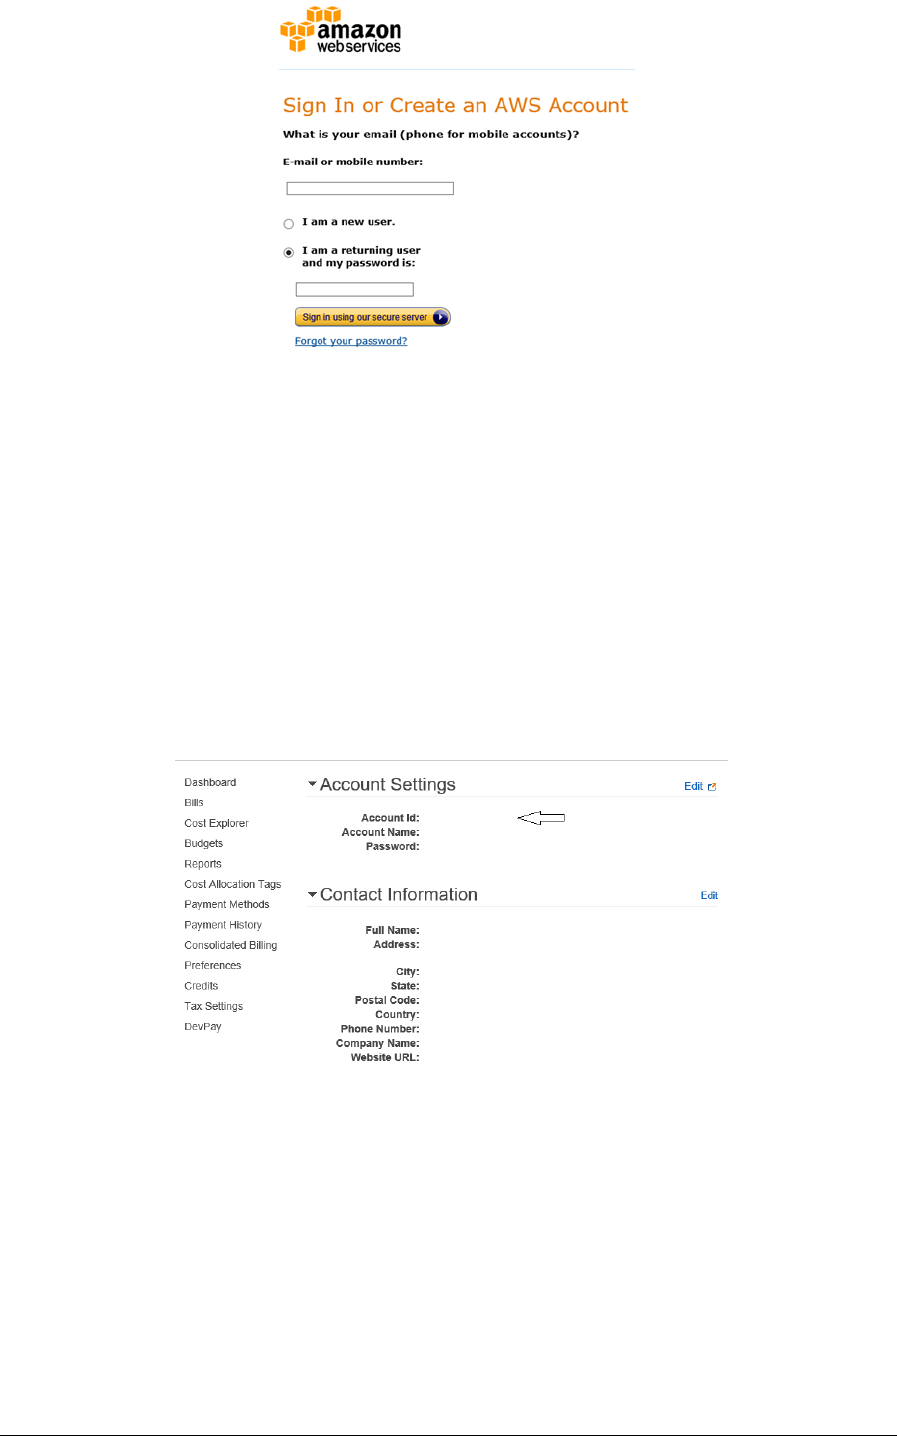
Search the Account Id
The Account Id is a 12 digits' number located in My Account information:
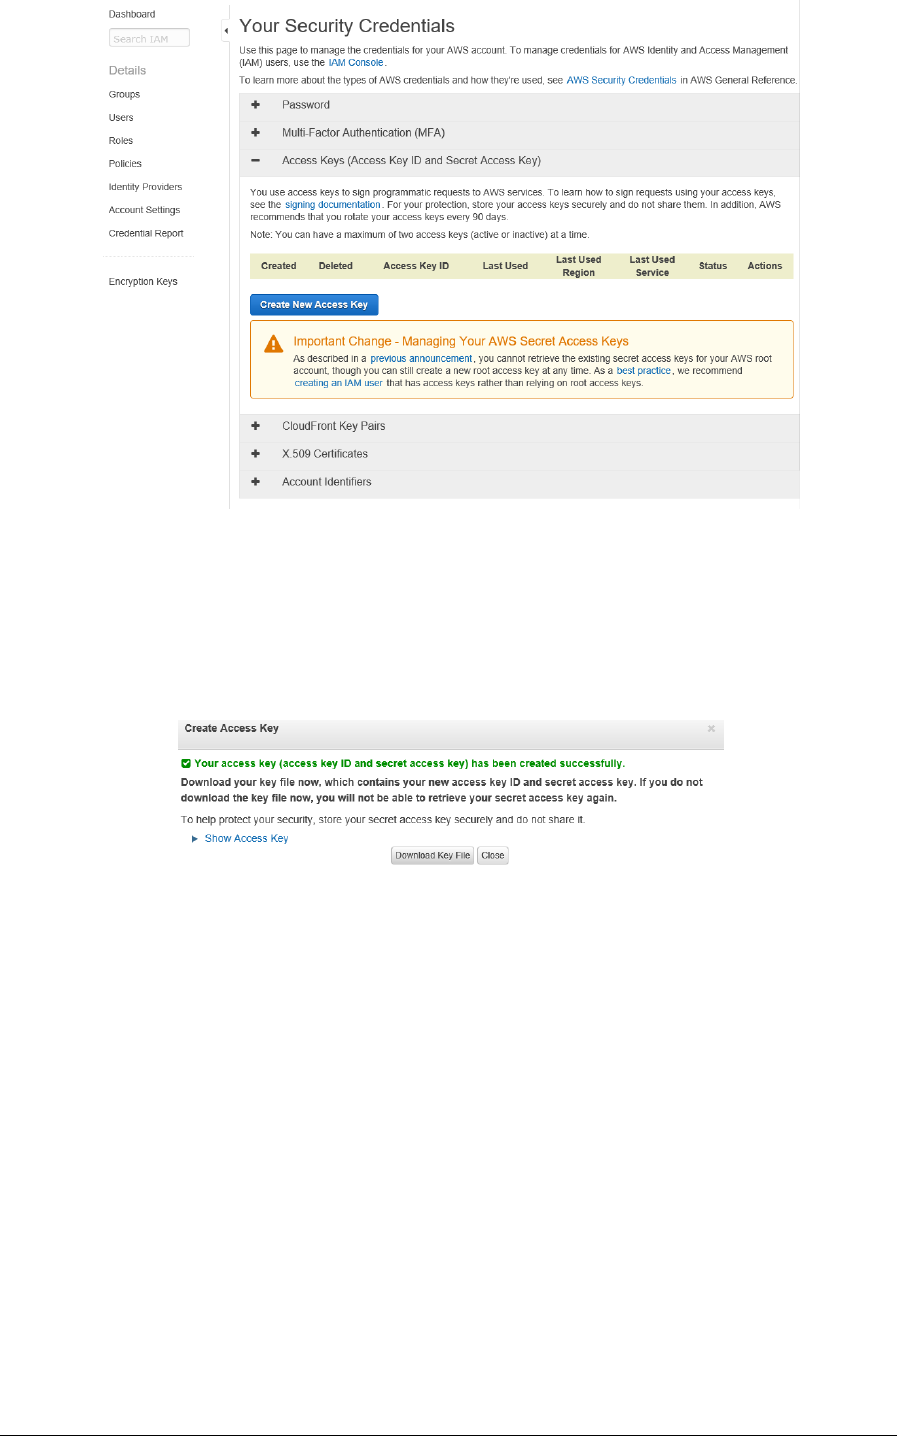
Create an Access Key Id and Secret Access Key
In Your Security Credentials, you must click in Access Keys (Access Key Id and Secret Access Key)
option. Then, new information will be displayed, and you must click in Create New Access Key).
NGScloud Manual
Page 10
Next, a dialog box will display to confirm that your Access Key Id and Secret Access Key have
been created successfully. Once this has been checked, you must download a file containing
your personal Access Key Id and Secret Access key by clicking in Download Key File button.
Starting NGScloud
You must set the directory where NGScloud.zip was decompressed as the current directory in
a terminal window or command prompt. NGScloud will run in graphical mode using the
graphical user interface (GUI), but it can also be run in console mode on server machines
without GUI installed. Here, we explain how to run NGScloud in GUI mode. However, the
console mode has menus with the same options available in GUI mode.
If you are a Linux or Mac OS X user, you start NGScloud in GUI mode typing the following
command in a terminal window in the directory where the package of NGScloud is
downloaded:
$ ./NGScloud.py

NGScloud Manual
Page 11
Alternatively, you can type also:
$ ./NGScloud.py --mode=gui
To run NGScloud in console mode:
$ ./NGScloud.py --mode=console
The file NGScloud.bat allows to execute NGScloud.py to the Microsoft Windows users calling
the Python interpreter. Then, type the following command to run NGScloud in a Command
Prompt in the directory where the package of NGScloud is downloaded:
> NGScloud
You can type too:
> NGScloud --mode=gui
And to run NGScloud in console mode, type the command:
> NGScloud --mode=console
Configuring your first NGScloud environment
NGSCloud philosophy is based on the "cluster" concept. A cluster is a set of virtual machines of
an AWS instance type. Each instance type has its hardware features: machine type, CPU
number, memory amount, etc. You can consult these features in
https://aws.amazon.com/ec2/instance-types/.
When a cluster is created, it has only a virtual machine named "master node". After the master
node creation, you can add "subsidiary nodes" if they are necessary to run some processes in
parallel. In this case, the new job will be run in the node determined according to the
workload.
"Data volumes" allow us to save data and keep them even if there is not any cluster created.
NGScloud always uses the following volumes:
(1) "application volume": to install the bioinformatic applications; this volume is
mandatory.
(2) "read volume": to upload the read files of the experiments; this volume is
mandatory.
(3) "result volume": to store the results of the experiments; this volume is mandatory.
NGScloud Manual
Page 12
(4) "reference volume": to hold reference genomes/transcriptomes and information
about gene structure that may be used by some applications to refine the results; this
volume is optional.
(5) "database volume": to hold data from reference sequence databases (RefSeq) used
by some annotation processes; this volume is optional.
Before starting an experiment in NGSCloud, it is very important to estimate the sizes each
volume will need, particularly for the reads and results volumes. The reads volume must be
able to store the uploaded read files and new read dataset obtained after trimming, if needed.
The results of running the bioinformatic applications implemented in NGSCloud may have big
size; therefore, the results volume size must be set accordingly. We recommend configuring
unique results and reads volumes for each experiment.
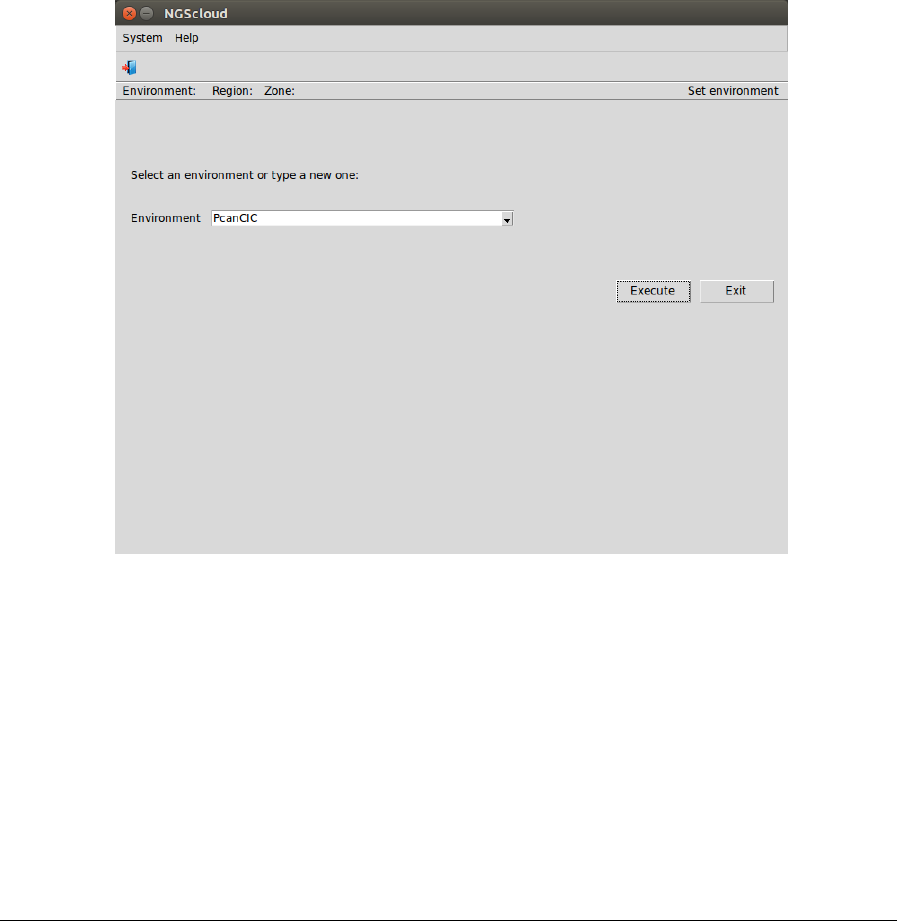
An "environment" identifies a user, a volume set and the AWS zone where processes run and
the volumes are stored. When starting NGScloud for the first time, you must type the name of
the environment (alphanumeric characters only) in the box Environment. E. g. PcanCIC:
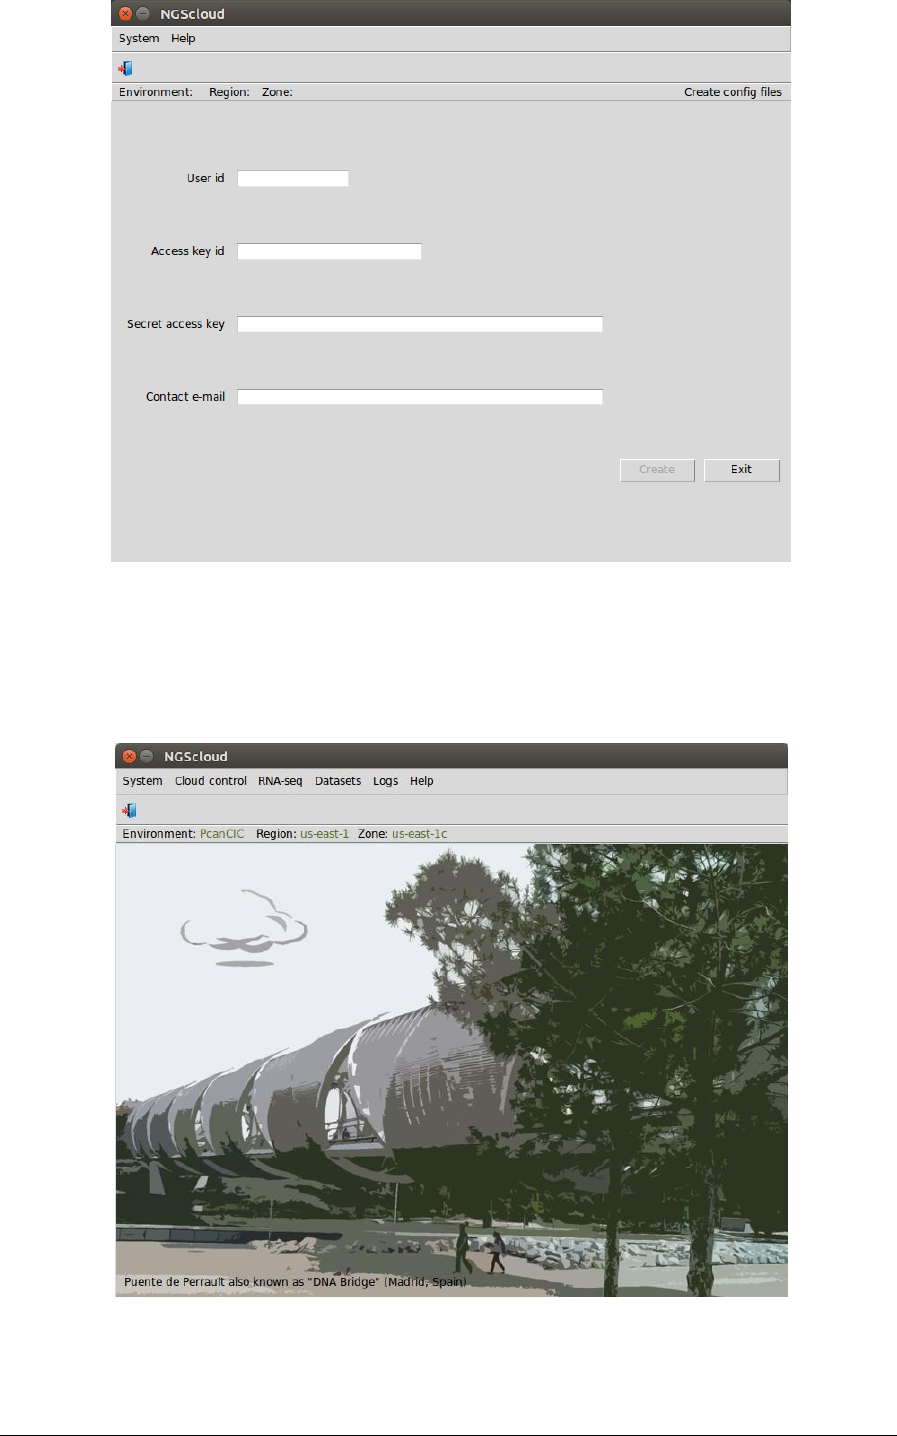
In the next window, you must type your AWS user id, access key id and secret access key. A
contact e-mail address is required too. This e-mail address is used to warn you when a
submitted job ends.
NGScloud Manual
Page 13
Once the first steps are completed, the main window of NGSCloud is shown, and it is ready to
use.

NGScloud Manual
Page 14
NGSCloud is structured in several menus:
System menu
Just to exit the application.
Cloud control menu
This menu contains all the items related to:
• Set an environment
• NGScloud configuration and security
• Creation of clusters, nodes and volumes, and options to operate with them
• Setup of bioinformatic applications in a cluster
• Open a terminal in a cluster node
RNA-seq menu
Here, all options related to RNA-seq experiments are implemented:
• Quality, trimming and digital normalization of reads
• De-novo assembly and reference-based assembly
• Assembly quality assessment and transcript quantification
• Transcriptome filtering
• Annotation
Datasets menu
The options included here allow to handle the read, reference, database and result datasets:
• List dataset
• Upload read files from local computers to a cluster.
• Download the results files from a cluster to the local computer.
• Compress and decompress files in a cluster.
• Remove datasets.
Logs menu
This menu allows the access to logs of submissions in the local computer and logs of results in
the clusters.
Help menu
It contains the documentation of the application.
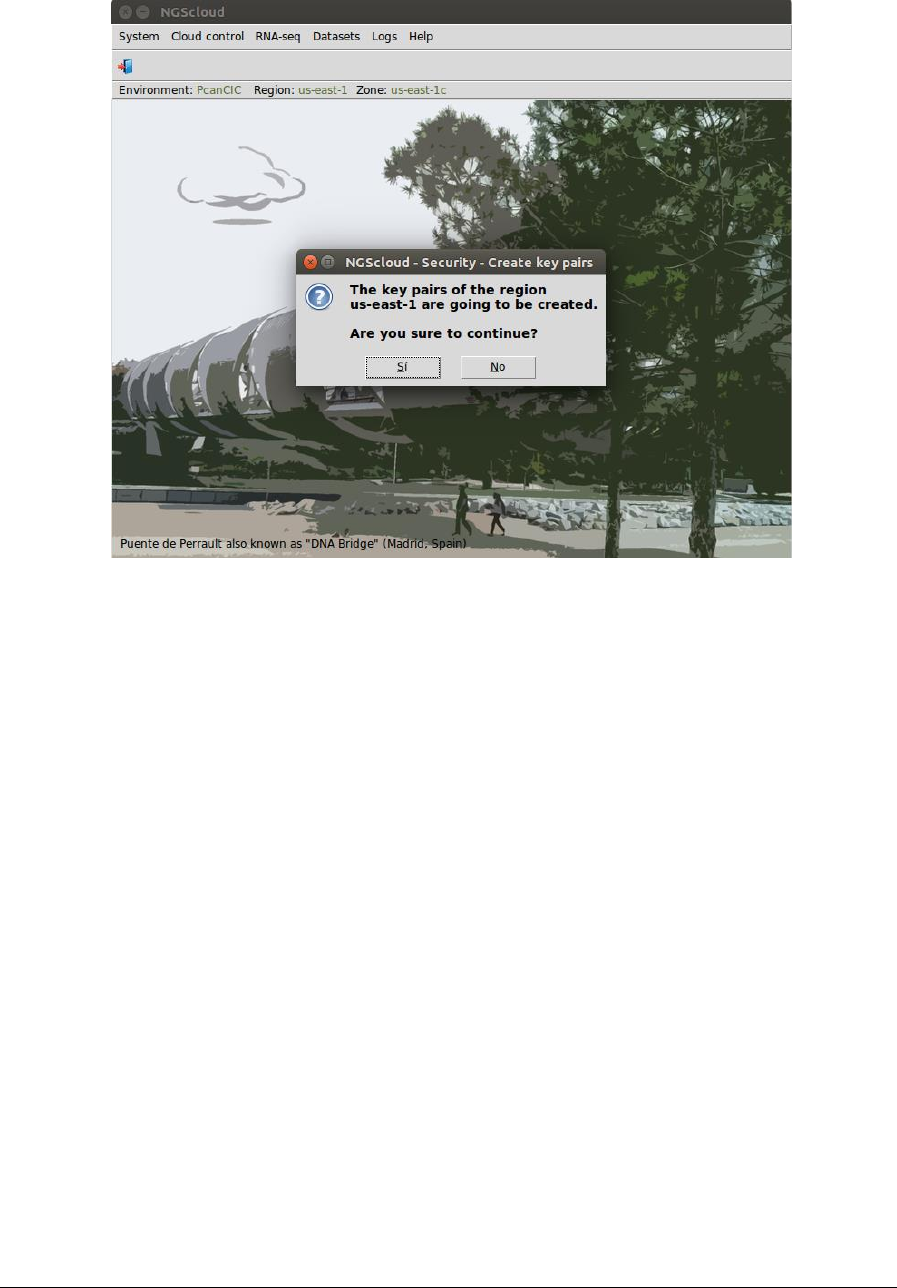
Before using any of the options in the menus, "key pairs" need to be created. Key pairs are
used to encrypt and decrypt login information. You can create key pairs, by selecting the menu
item with this path:
Main menu > Cloud control > Security > Create key pairs
A dialog box will be raised to confirm the action.
NGScloud Manual
Page 15
A key pair is valid for all zones within a region. Then if you have created a key pair in a zone,
and you change to another zone of the same region, you do not have to create the key pair
again.
NGScloud Manual
Page 16
A step by step example
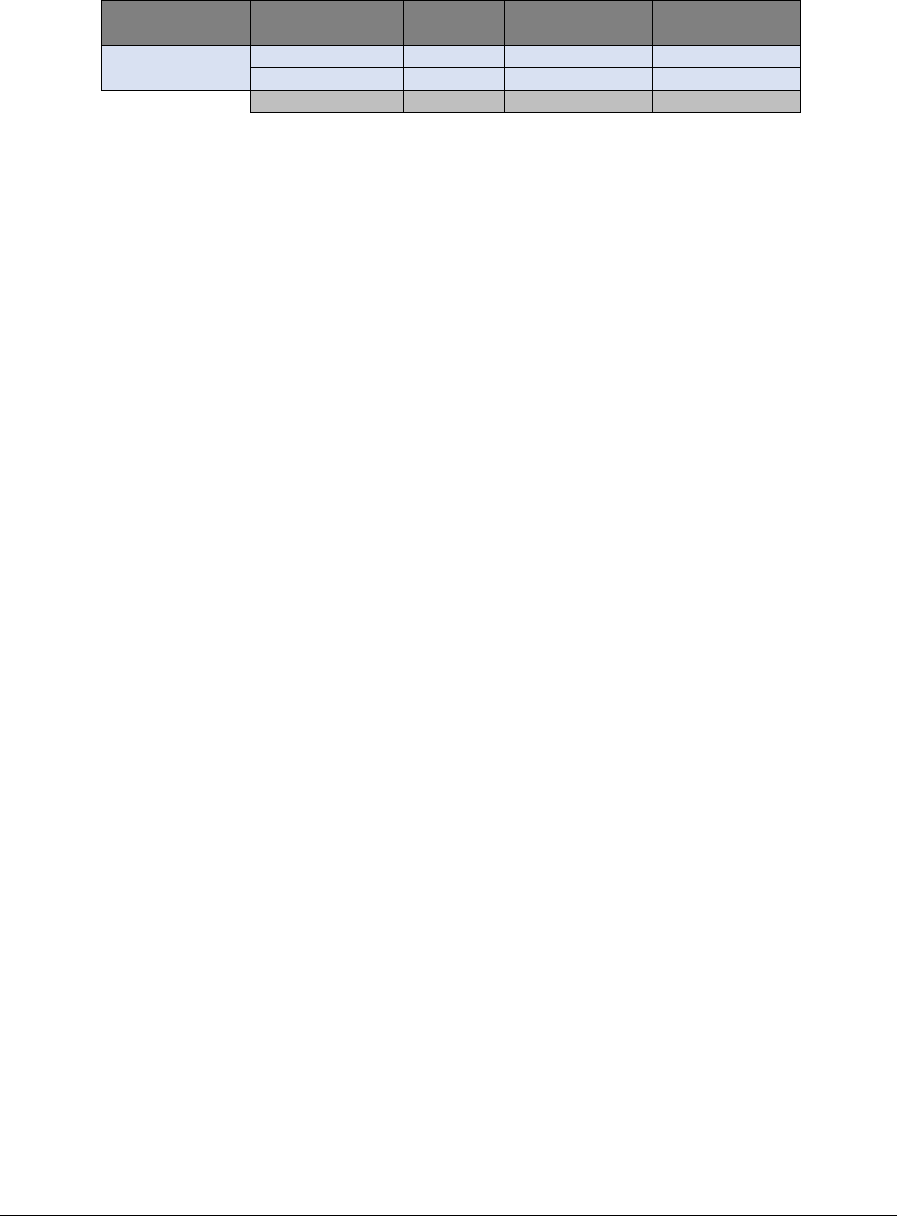
We have sequencing data corresponding to a RNA-seq Illumina library of an experiment about
the process of cicatrization after wounding the xylem of the stem of the Canary Island pine
(Pinus canariensis). The next table shows the size characteristics of the read files yield by the
NGS platform:
In this example, we are going to review the quality of reads, to trim read ends with bad scores
and to assembly the reads yielding a transcriptome.
The steps are the following:
• Create volumes
• Link volumes in cluster templates
• Create a cluster with the t2.micro template
• Upload the read files to the cluster
• Setup the bioinformatic applications in the cluster
• Review the quality of reads using FastQC
• Trim the reads using Trimmomatic
• Terminate the cluster with a t2.micro template and create another cluster with a
r3.4xlarge template
• Assembly the reads using Trinity
• Evaluate the transcriptome quality using RSEM-EVAL
• Terminate the cluster with a r3.4xlarge template and create another cluster with
r3.xlarge template
• Transcriptome filtering using transcript-filter
• Transcriptome clustering using CD-HIT-EST
• Terminate the cluster with a r3.xlarge template and create another cluster with
c3.xlarge template
• Upload the protein database to the cluster
• Add nodes to the cluster with a c3.xlarge template
• Annotate the filtered and clustered transcriptome using transcriptome-blastx
• Terminate the cluster with a c3.xlarge template and create another cluster with
t2.micro template
• Download the transcriptome, evaluation and annotation files
• Terminate the cluster with a t2.micro template
Pcan-CIC_1.fastq.gz 21.444.414 1.648.808.931 5.178.672.000
Pcan-CIC_2.fastq.gz 21.444.414 1.632.988.106 5.178.672.000
2 42.888.828 3.281.797.037 10.357.344.000
Decompressed size
(in B)
Pcan-CIC
Library
File
Read number
Compressed size
(in B)
NGScloud Manual
Page 17
Create volumes
First, we need to create the data volumes to have persistent storage of the installed
bioinformatic applications, read data, and results. We have to decide the type and the size of
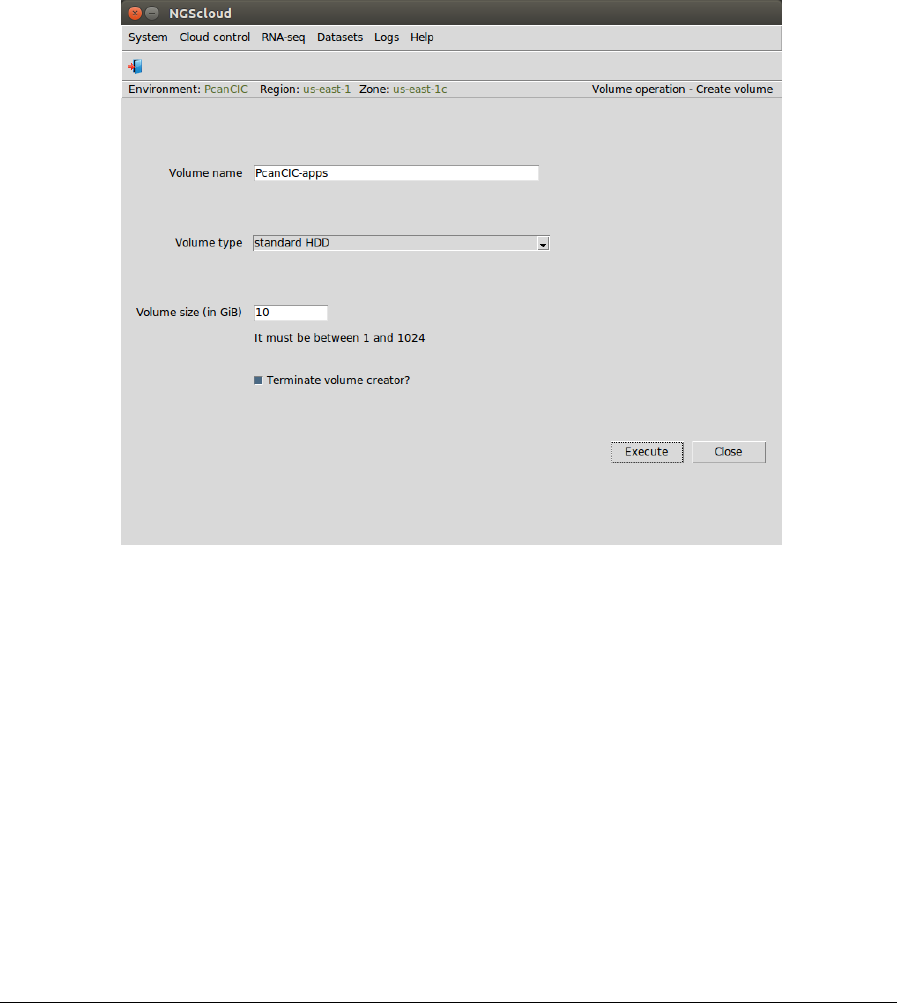
each volume. Ten GiB can be enough size for the app volume. In this case, we choose a
standard HDD type, given the size and the cost per GiB of each volume type. To create the
volume, select the menu item with this path:
Main menu > Cloud control > Volume Operation > Create volume
In the raised window, we type PcanCIC-apps in Volume name textbox, we select standard HDD
in Volume type combobox, and we type 10 in Volume size (in GiB) textbox; we untick
Terminate volume creator? checkbox; and we press the Execute button:
A volume creator instance will be started to create and format the volume. When the volume
is created and formatted, the volume creator will not be terminated (we have unticked
Terminate volume creator? checkbox), which will allow us to create the other volumes quickly.
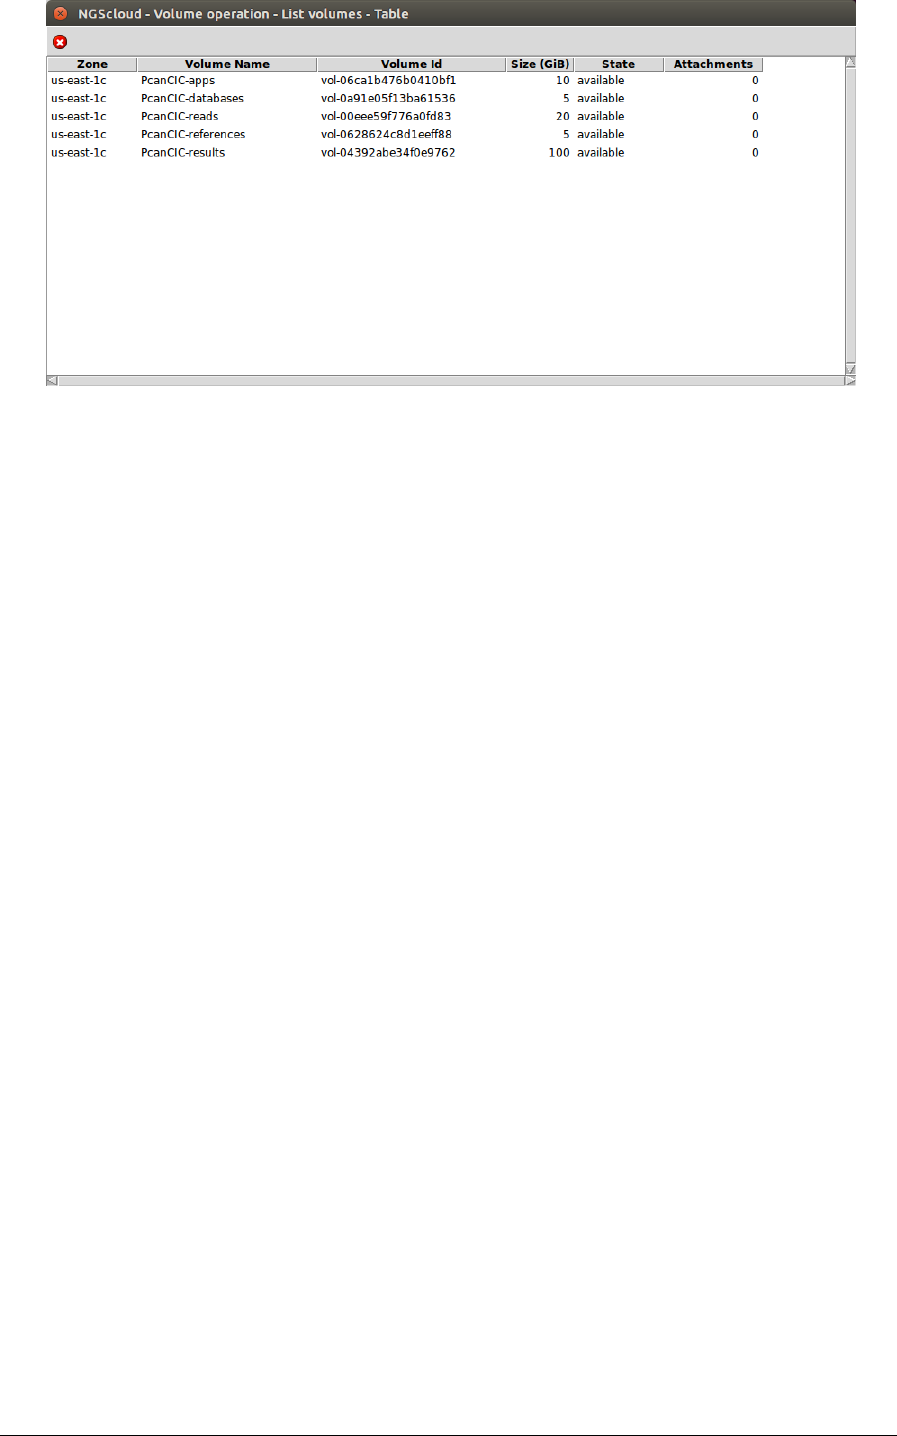
The sizes of read, reference, database and result volumes are 20 GiB, 5GiB, 5GiB and 100 GiB,
respectively. The volume type is a standard HDD for both cases. We repeat the steps done to
configure the app volume, to configure the reads and results volumes, making sure that the
flag of Terminate volume creator? checkbox must be ticked when creating our last volume.
We can review the created volumes selecting the menu item as follows:
Main menu > Cloud control > Volume Operation > List volumes
The raised window will show information about the created volumes:
NGScloud Manual
Page 18
Link volumes in cluster templates
A cluster template identifies the instance type, the machine image and other characteristics of
a cluster when it is booted.
We must link the created volumes to the cluster templates so that the volumes are
automatically attached at the start of the cluster. There are five mounting points.
• /apps: to the application volume;
• /references, to the reference volume;
• /databases to database volume;
• /reads to read volume
• /results to result volume
To link a volume to a cluster template, select the menu item with this path:
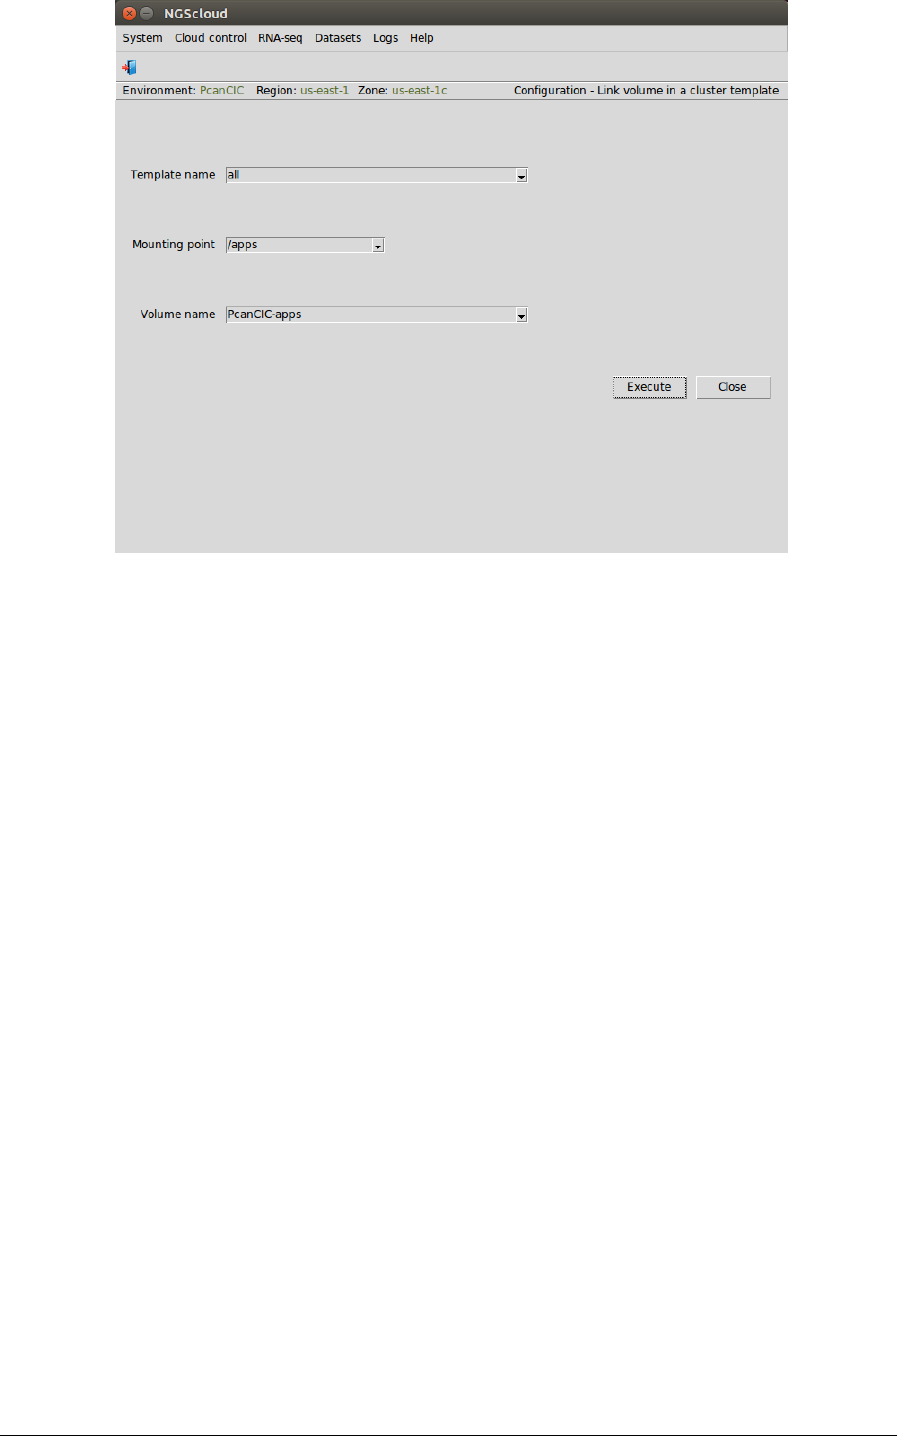
Main menu > Cloud control > Configuration > Link volume in a cluster template
In the raised window, we must fill in the boxes with the information relative to the template
(we can choose a specific template or all templates), the mounting point and the name of the
volume in Volume name. To link the application volume to all the templates, we select all in
Template name combobox, /apps in Mounting point combobox, and PcanCIC-apps in Volume
name combobox. Then we have to press the Execute button.
NGScloud Manual
Page 19
Then we repeat this step for the other two volumes created earlier.
Create cluster with the t2.micro template
Now we create a cluster with a t2.micro template, 1 CPU and 1 GiB of RAM, because the read
file upload and the read trimming require few hardware resources. We select the menu item
with this path:
Main menu > Cloud control > Cluster operation > Create cluster
In the raised window, we select PcanCIC-t2.micro, the template corresponding to a t2.micro
instance type, in Template name combo-box; and then we press the Execute button:
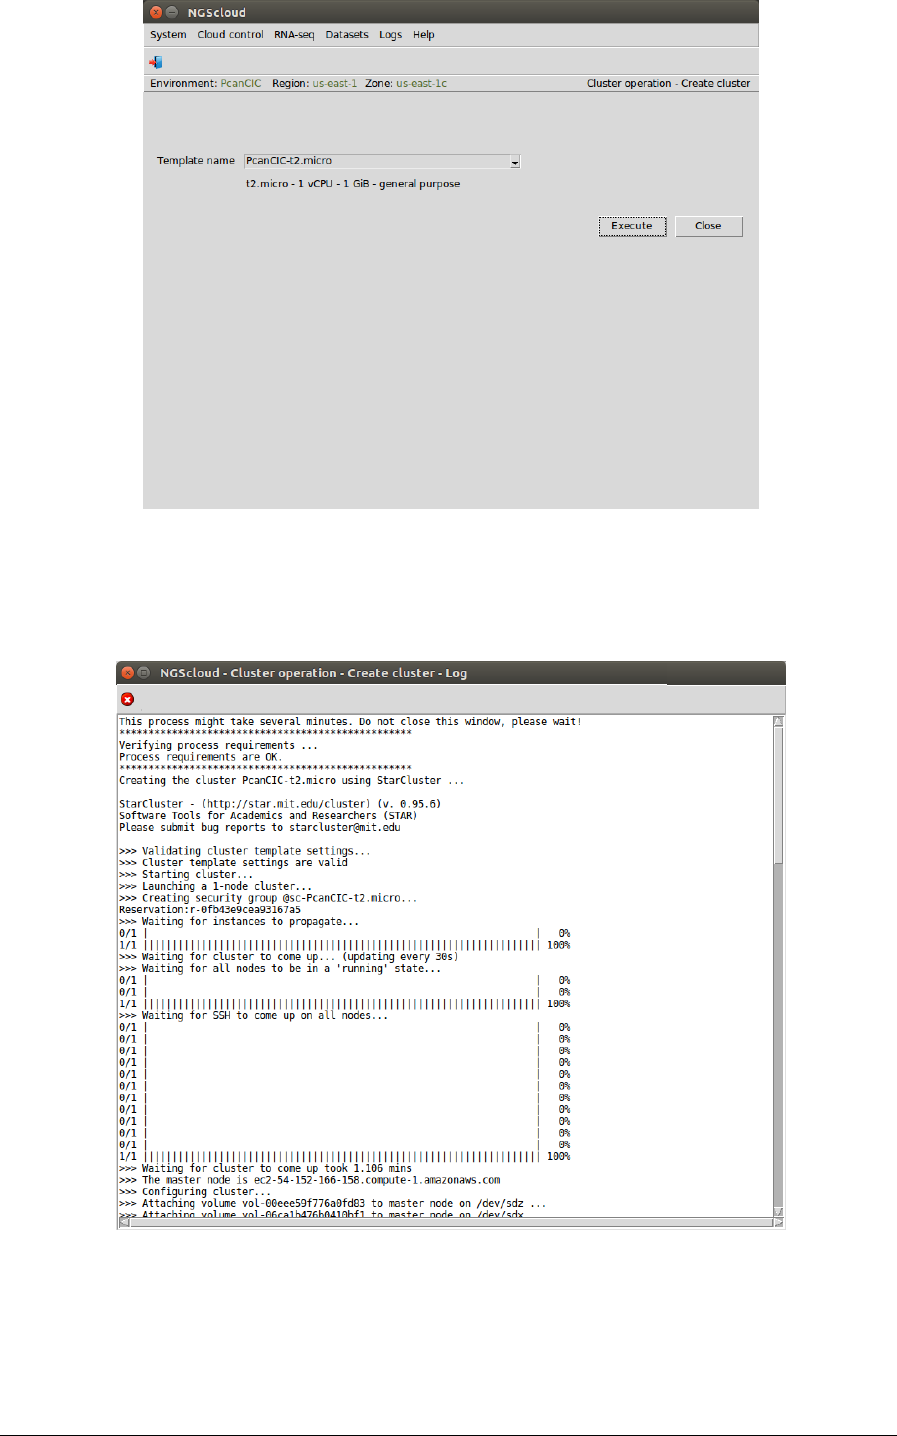
NGScloud Manual
Page 20
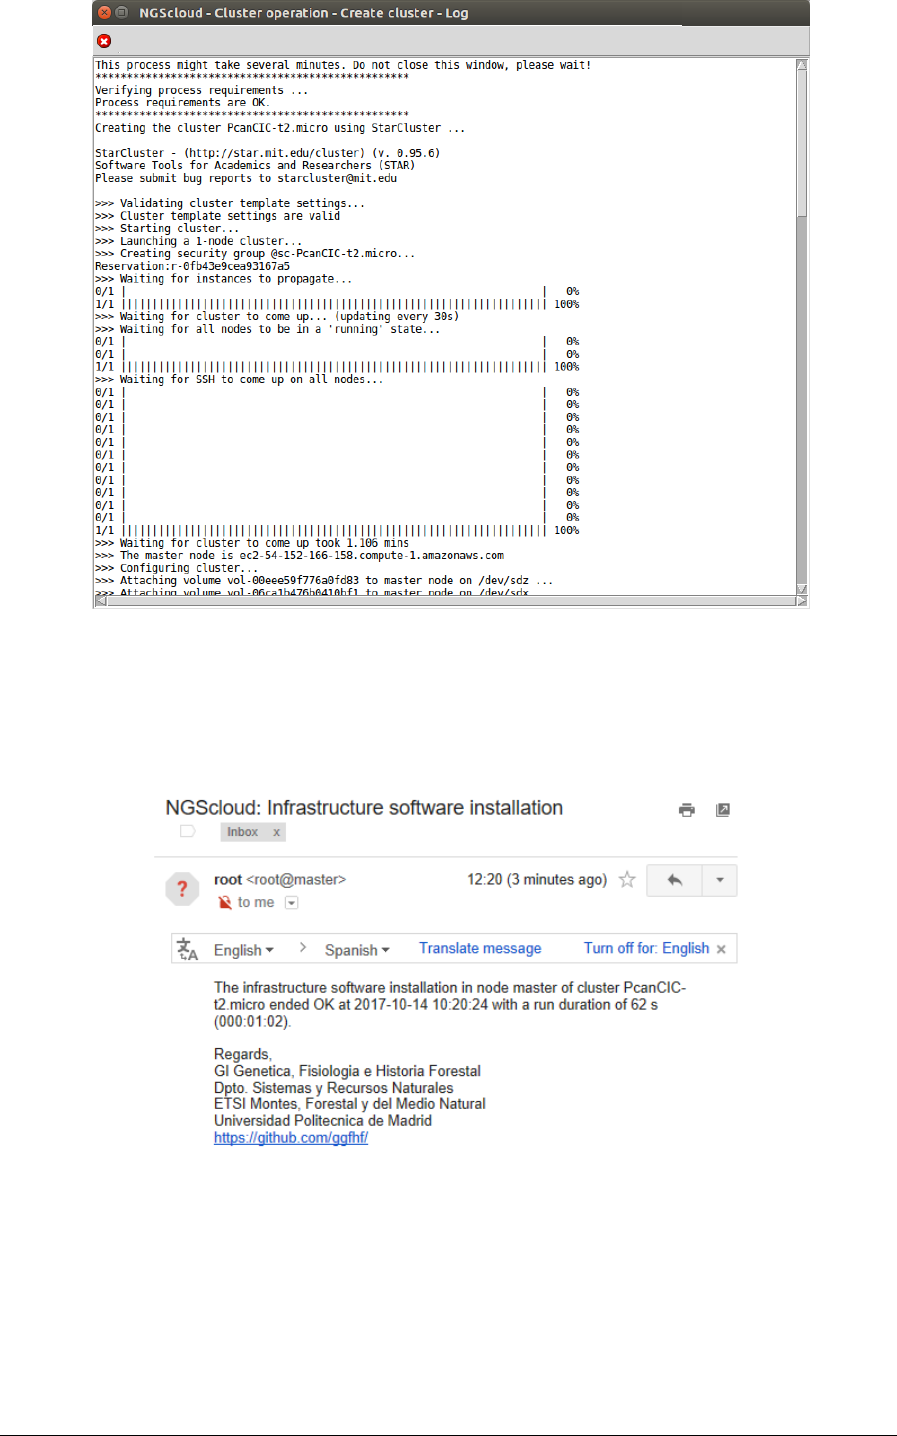
A window is raised displaying the run log:
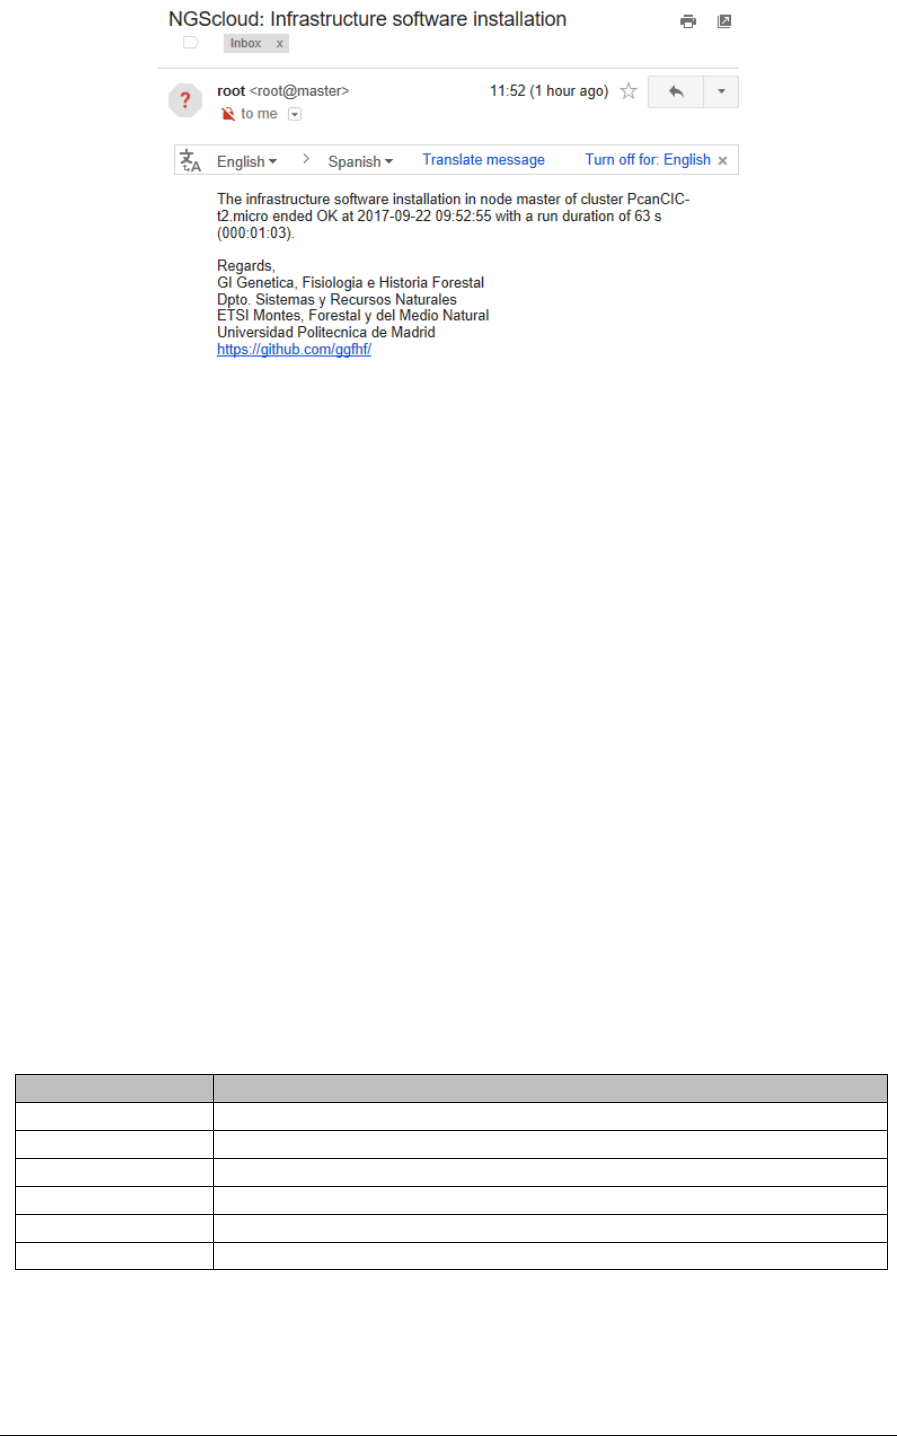
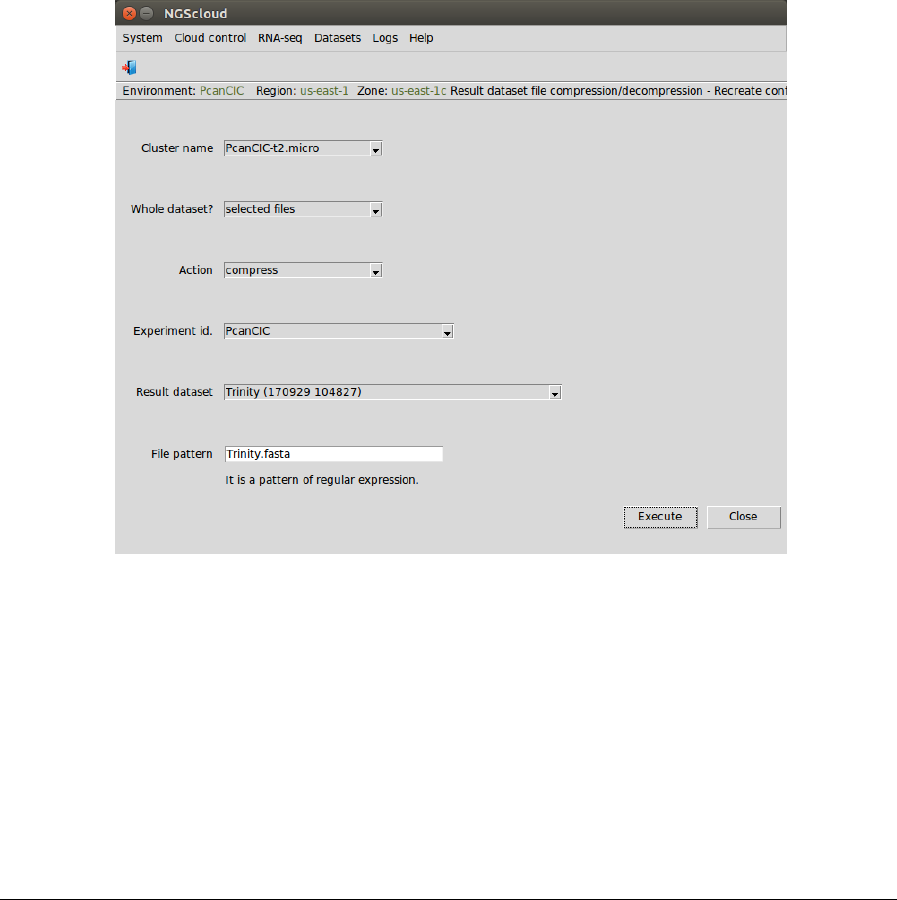
When the cluster is started, an infrastructure software will be installed. At the end of the
installation, an email is sent, informing of its completion:
NGScloud Manual
Page 21
Upload the read files to the cluster
Each task related to datasets or to the run of a bioinformatic program has:
• First, a window to help to select datasets or specific files. A config file is created
according to the user selection and default values of the parameters of the program.
• Then, a window where the parameters of the program are shown with an explanation
of its meaning. Every parameter has a default value that can be changed.
• Finally, a building of a bash script to run the program using the config file and the
submission of this script to the cluster.
To select specific files, the first window has a text box where a pattern must be entered. The
pattern must be a Python regular expression. A regular expression is used to find a string in
other string(s). The pattern is formed by a sequence of characters; some of them have a
special meaning, e.g. "." means "any character except newline" and "*" means "0 or more
repetitions of the preceding element". You can learn about Python regular expressions at:
https://docs.python.org/3.6/library/re.html
Perhaps, these examples are useful for your selection:
Pattern
Selection
.*
all the files
transcriptome.fasta
the file whose name is "transcriptome.fasta"
.*fastq
the files whose name ended in "fastq"
.*fastq.gz
the files whose name ended in "fastq".gz"
.*Pcan.*
the files whose name contains the characters "Pcan"
.*PCan.*fastq
the files whose name contains the characters "Pcan" and ends in "fastq"
To create a config file to upload the read files to a cluster, select the menu item with this path:
Main menu > Dataset > Read dataset file transfer > Recreate config file

NGScloud Manual
Page 22
In the raised window, we type PcanCIC in the Experiment id textbox, the local directory where
the files are in the Local directory textbox (or we select it using the next button), and we type
.* as the pattern to select the files in the File pattern textbox. Then we press the Execute
button:
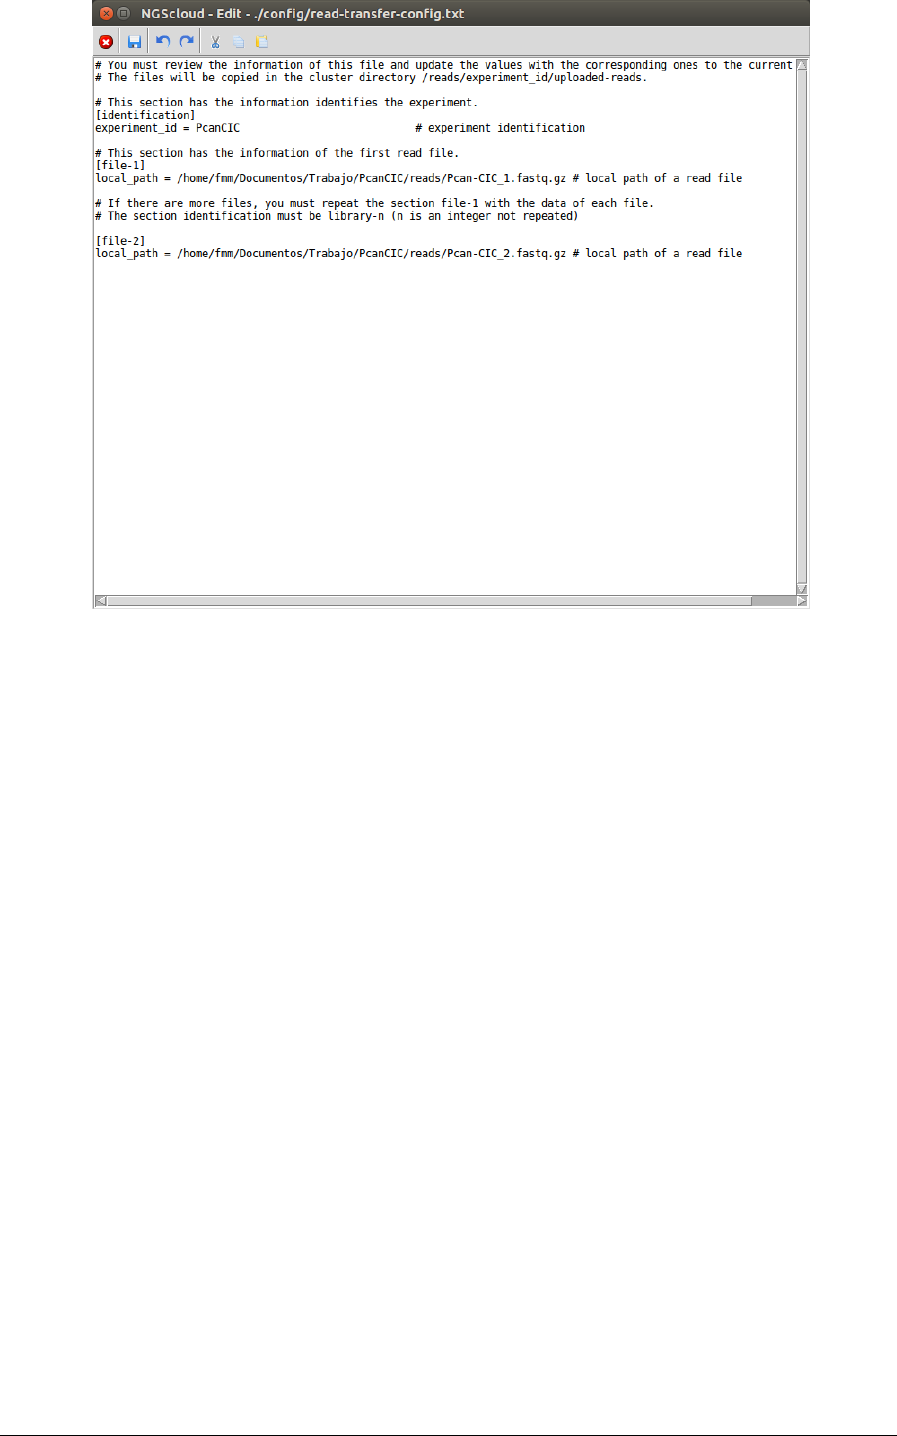
In the next window, we can edit the config file created, and remove files or add new files if the
file pattern has not selected the appropriate ones. This window is a text editor, and can be
easily modified. When we save the configuration file, the modifications are validated. If there
are errors, a list of them is displayed.
In this example, we can notice that the configure file has three sections: identification, with the
experiment identification; file-1, with the local path of the first read file; and file-2 with the
second one:
NGScloud Manual
Page 23
This window is a text editor, and can be easily modified. When we save the configuration file,
the modifications are validated. If there are errors, a list of them is displayed.
In this example, we can notice that the configure file has three sections: identification, with the
experiment identification; file-1, with the local path of the first read file; and file-2 with the
second one.
It is convenient to perform the file transfer steps when an Internet connection with a large
bandwidth is availabe due to the large size of many of the files necessary to perform full RNA-
seq analysis.
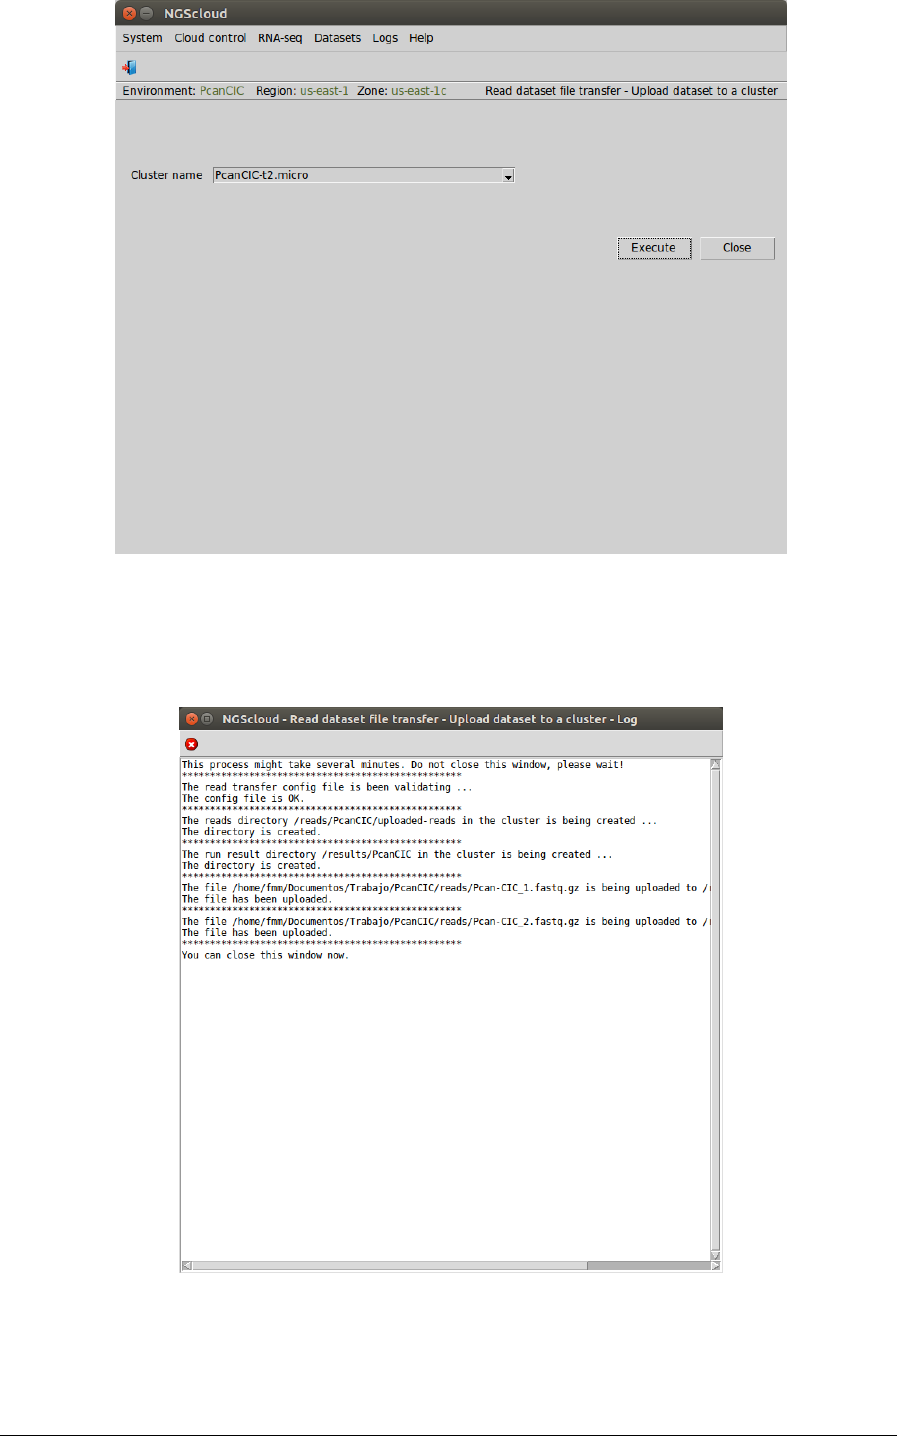
To upload the read files to the cluster, we select the menu item with this path:
Main menu > Dataset > Read dataset file transfer > Upload dataset to a cluster
In the raised window, we select PcanCIC-t2.micro in Cluster name combo-box; and then we
press the Execute button:
NGScloud Manual
Page 24
A window is raised with the upload log:
Now, we are going to review the uploaded files. We select the menu item with this path:

NGScloud Manual
Page 25
Main menu > Dataset > List dataset
In the raised window, we select PcanCIC-t2.micro in the Cluster name combo-box and reads in
the Volume combo-box. Then we press the Execute button:
We can check the experiments whose read files have been uploaded in the next window. We
click in PcanCIC row:

NGScloud Manual
Page 26
Now, a window with the read datasets of the experiment PcanCIC is shown:
So far, we only have one: the dataset corresponding to the uploaded-reads. We click on it and
another window appears with the content of the uploaded-reads dataset. In this case, the two
files are shown.
If we click in a file row, e.g. the Pcan-CIC_1.fastq.gz one, the characteristics of this file are
listed:

NGScloud Manual
Page 27
Setup bioinformatic applications in the cluster
Bioconda is necessary to setup the bionformatic applications. To setup Bioconda in the
application volume in a cluster, select the menu item with this path:
Main menu > Bioinfo software setup > Miniconda3 (Python & Bioconda environment)
And, in the next windows, type the cluster name.
To setup FastQC in the application volume in a cluster, select the menu item with this path:
Main menu > Bioinfo software setup > FastQC
And in the next windows, type the cluster name. Also, install Trimmomatic and Trinity as in the
setup FastQC.
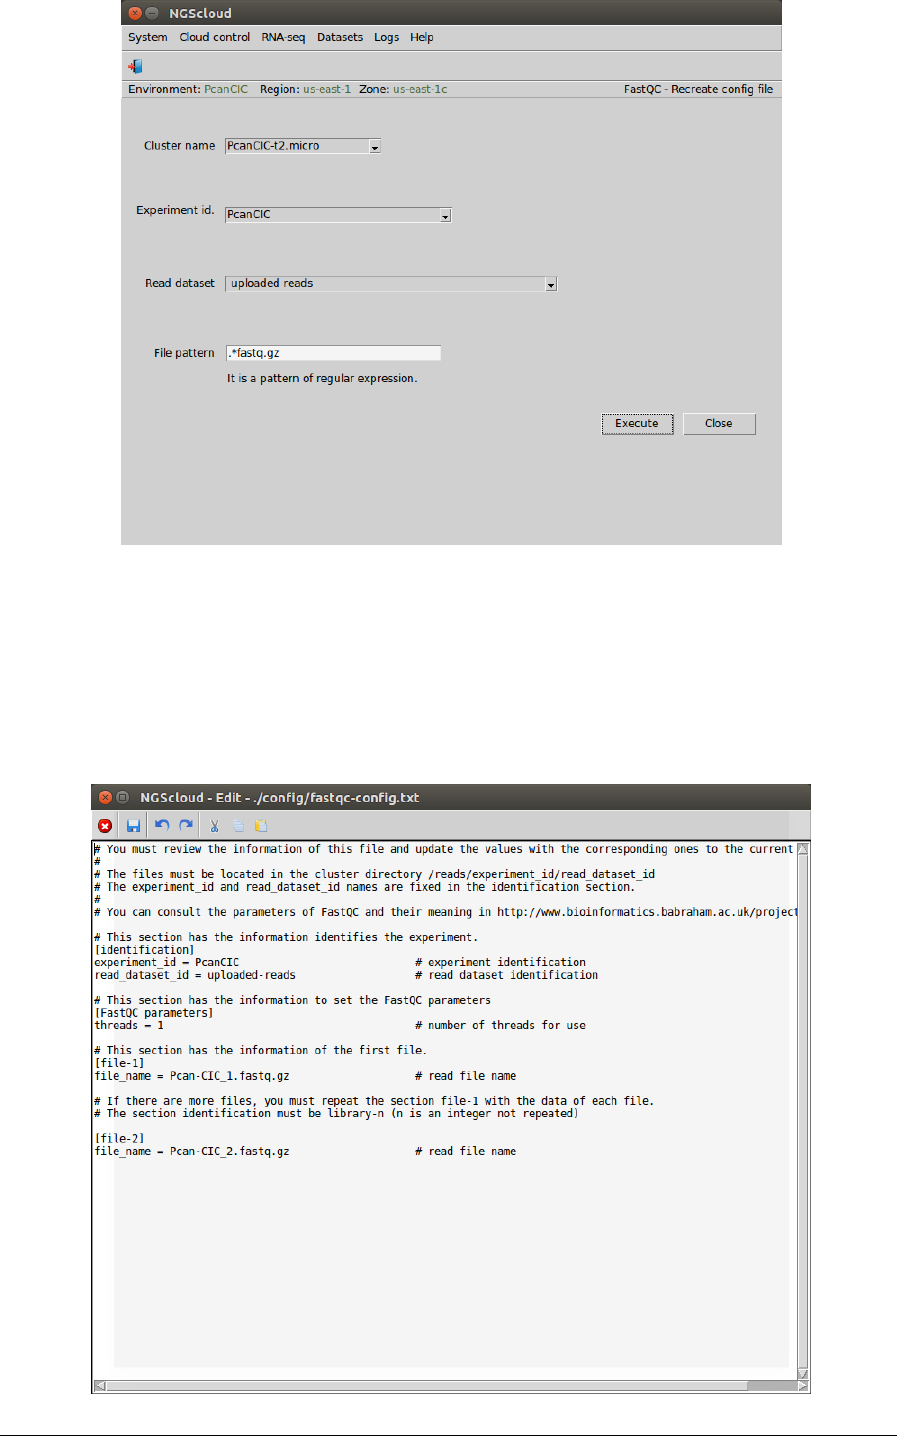
Review the quality of reads using FastQC
Now we are going to review the quality of reads using FastQC. First, we create the
configuration file, we select the menu item wit this path:
Main menu > RNA-seq > Read quality > FastQC > Recreate config file
In the raised window, we select PcanCIC-t2.micro in the Cluster name combo-box, PcanCIC in
the Experiment id combo-box, uploaded reads in the Read dataset combo-box, and we type
.*fastq.gz as the pattern to select the files in the File pattern textbox. Then we press the
Execute button:
NGScloud Manual
Page 28
In the next window, we can inspect the config file. In this example, there are four sections:
identification, with the experiment and the read dataset identifications; FastQC parameters,
with the thread number parameter of FastQC (we modify its value to 1); file-1, with the local
path of the first read file; and file-2 with the path of the second one:
NGScloud Manual
Page 29
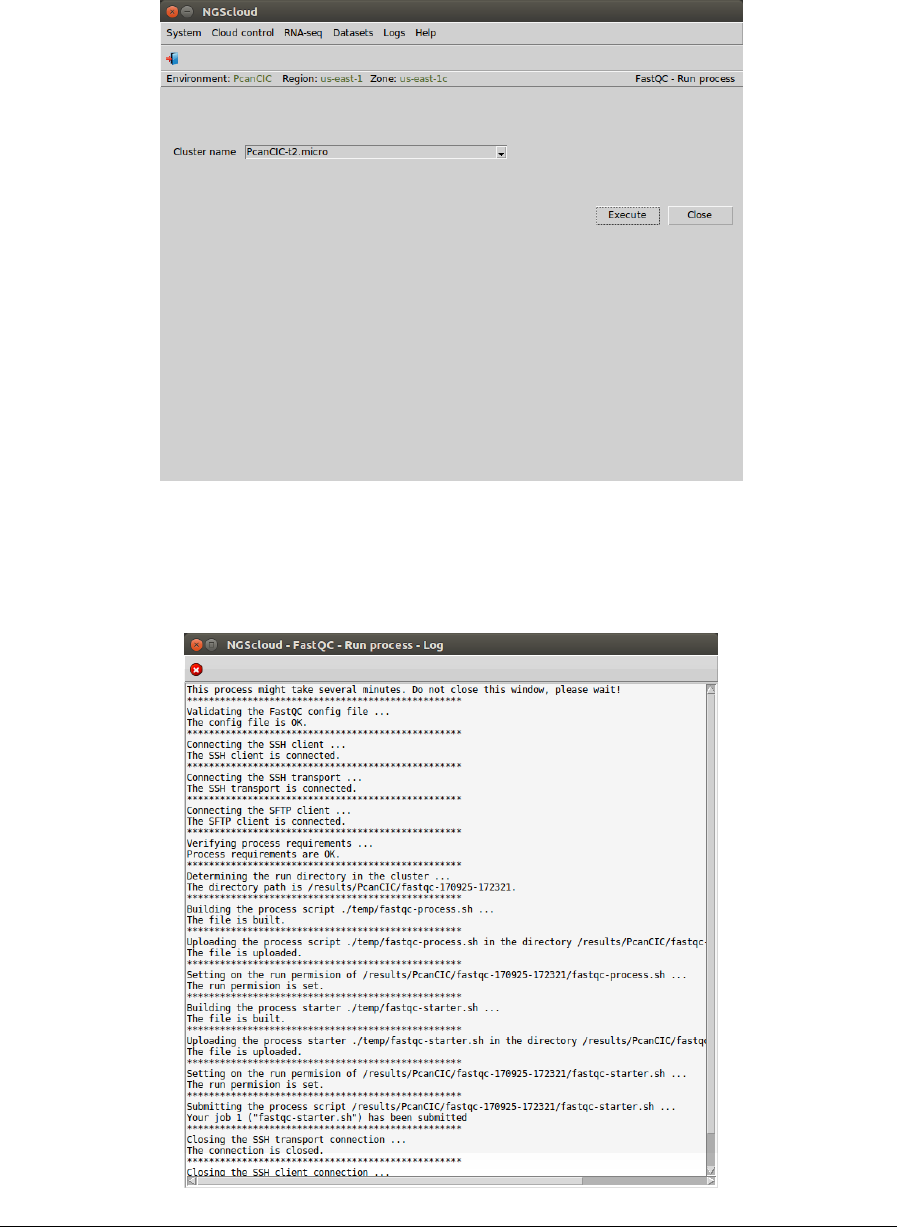
To run the quality process in the cluster, we select the menu item with this path:
Main menu > RNA-seq > Read quality > FastQC > Run read quality process
In the raised window, we select PcanCIC-t2.micro in the Cluster name combo-box; and then
we press the Execute button:
A window is raised with the submission log:
NGScloud Manual
Page 30
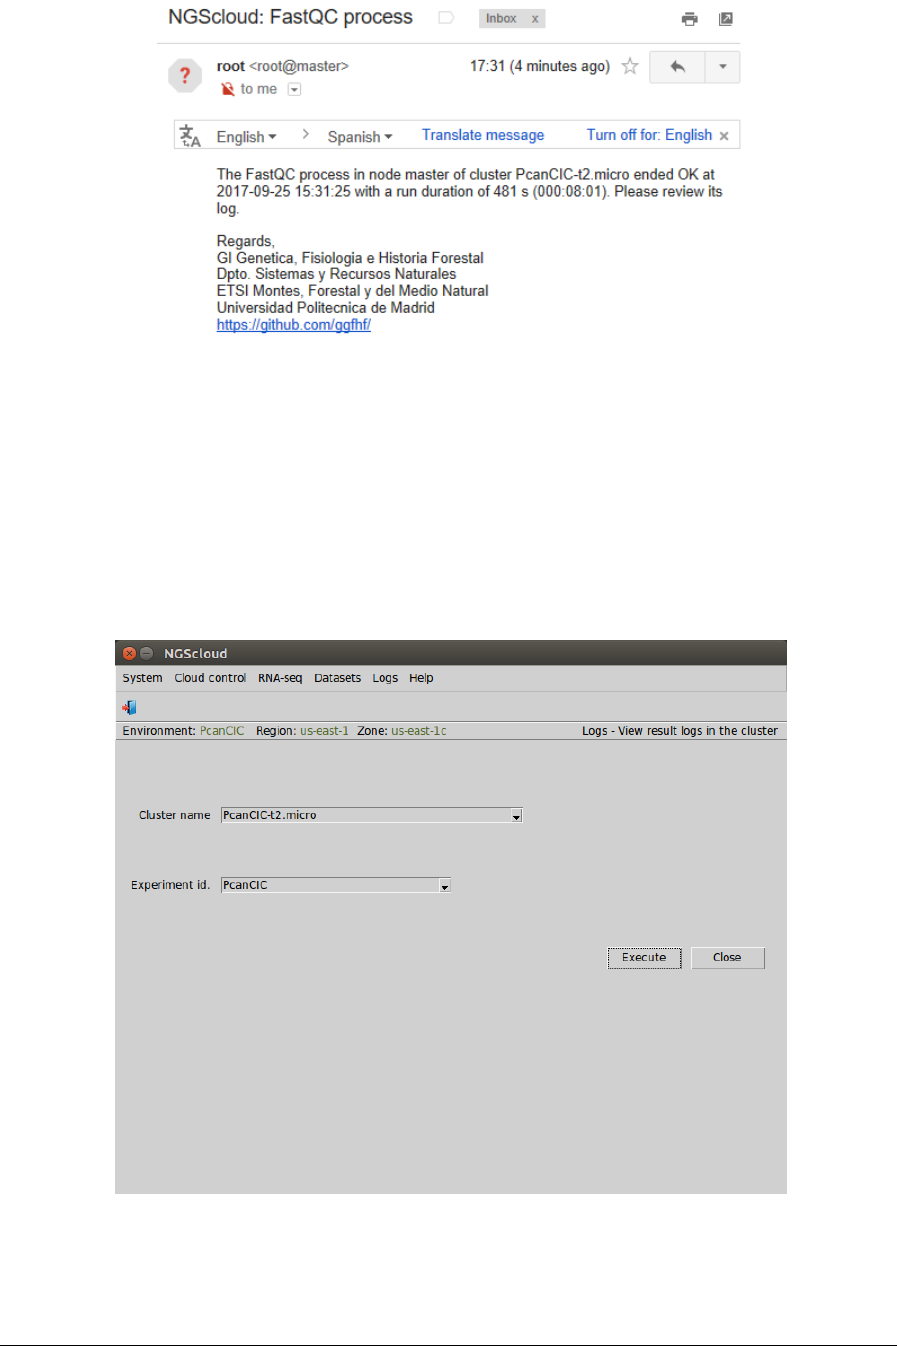
At the end of the run, an email is sent, informing of its completion:
We can view the process log during and after the run. To do so, we select the menu item with
this path:
Main menu > Logs > View result logs in the cluster
In the raised window, we select PcanCIC-t2.micro in the Cluster name combo-box and PcanCIC
in the Experiment id combo-box; and then we press the Execute button:
NGScloud Manual
Page 31
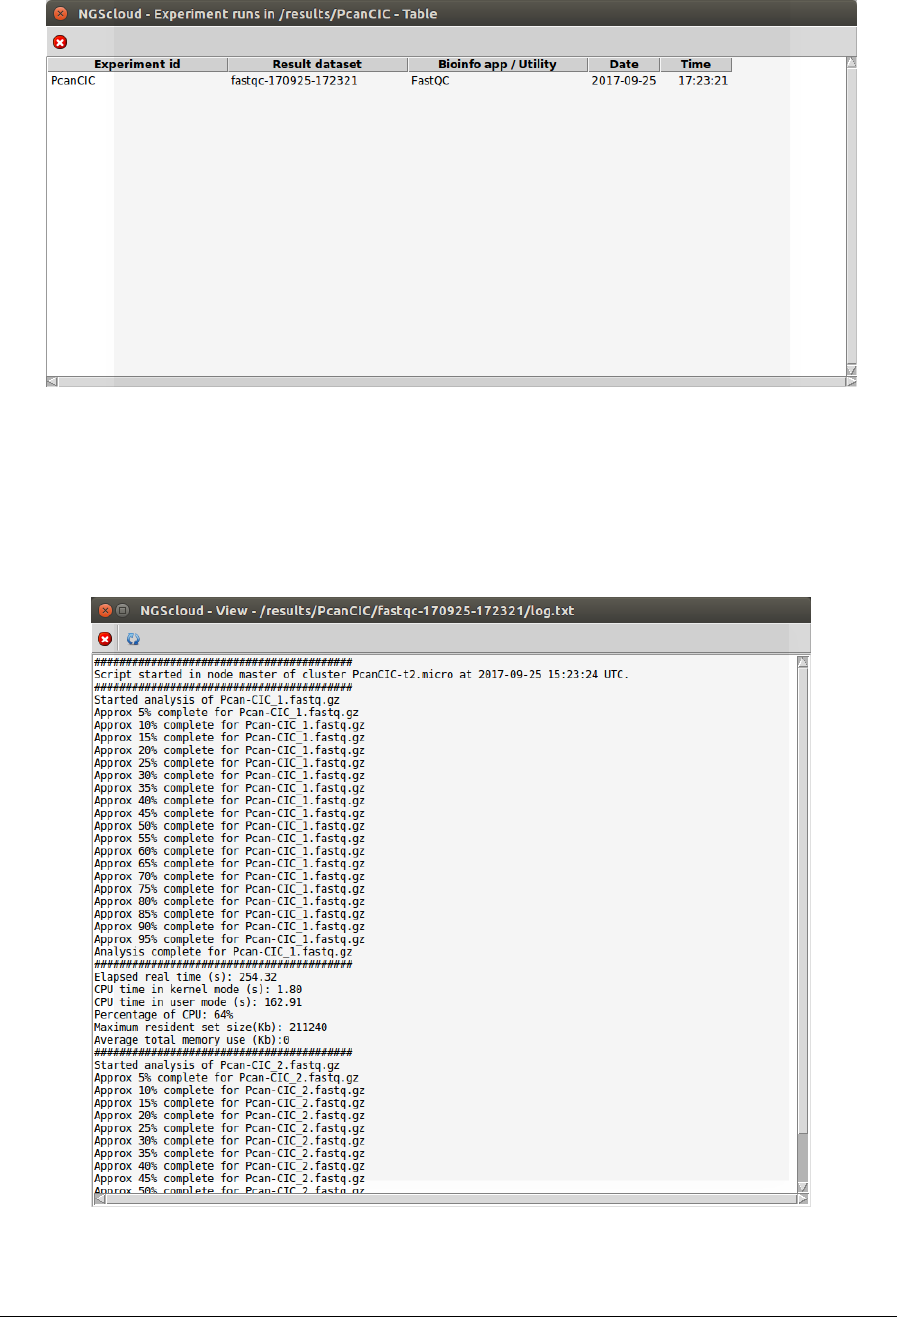
Now, a window with the result datasets of each bioinformatic program run in the experiment
PcanCIC is shown:
So far, we have only performed a single run: the dataset fastqc-170925-172321 corresponding
to the last (and unique) FastQC run. Clicking on it, another window appears with its
corresponding log.
NGScloud Manual
Page 32
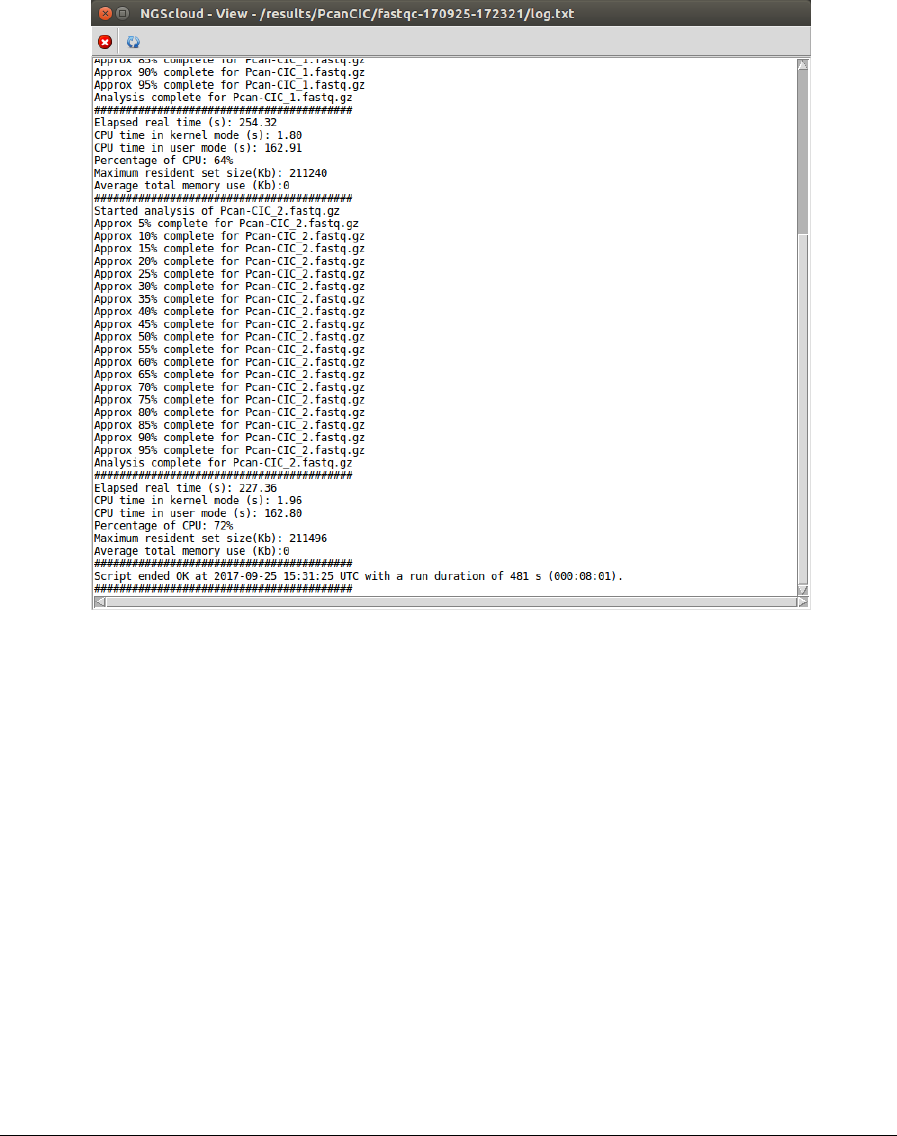
In the toolbar, there is a button to refresh the run status. Clicking it, the log will be updated.
All the process logs have:
• A header with the node where the script runs and the time when it started.
• Information about the elapsed time, the CPU usage and the maximum memory is
displayed for each run of the bioinformatic program.
• At the bottom, a summary with the status (OK, if all the programs have ended without
errors; WRONG, otherwise), the end time, and the duration of the script run.
In order to access a list with the output files generated by FastQC, we select the menu item
with this path:
Main menu > Dataset > List dataset
In the raised window, we select PcanCIC-t2.micro in the Cluster name combo-box and results
in the Volume combo-box. Then we press the Execute button:
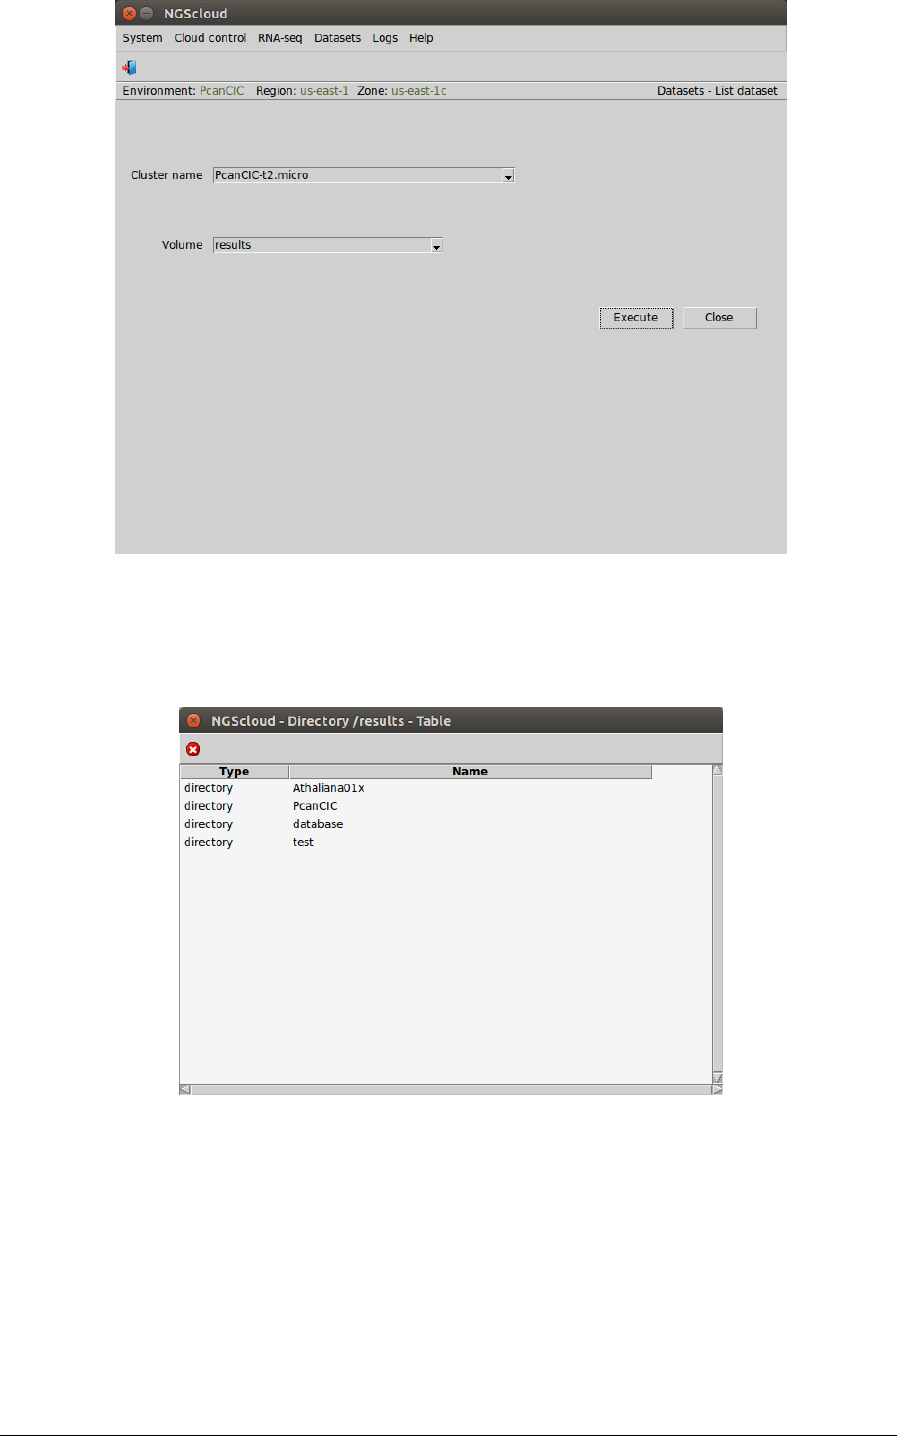
NGScloud Manual
Page 33
To inspect the experiments that have result datasets, we click in the PcanCIC row:
Next, a window with the result datasets of the experiment PcanCIC is shown:
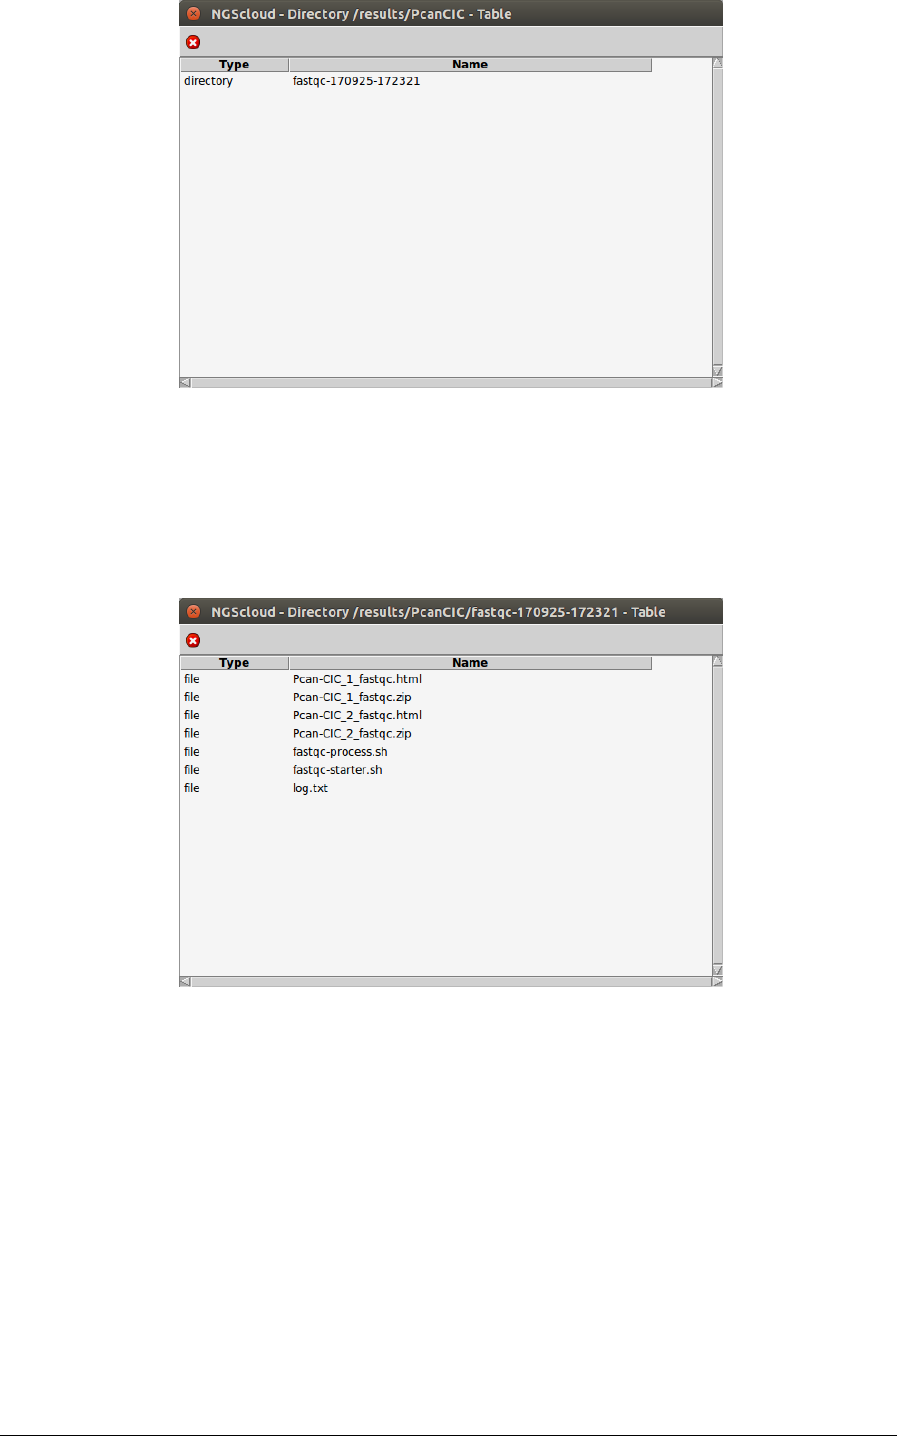
NGScloud Manual
Page 34
So far, we only have one: the dataset corresponding to the FastQC analysis recently
completed. We click on it and another window appears with the content of the files
corresponding to this analysis.
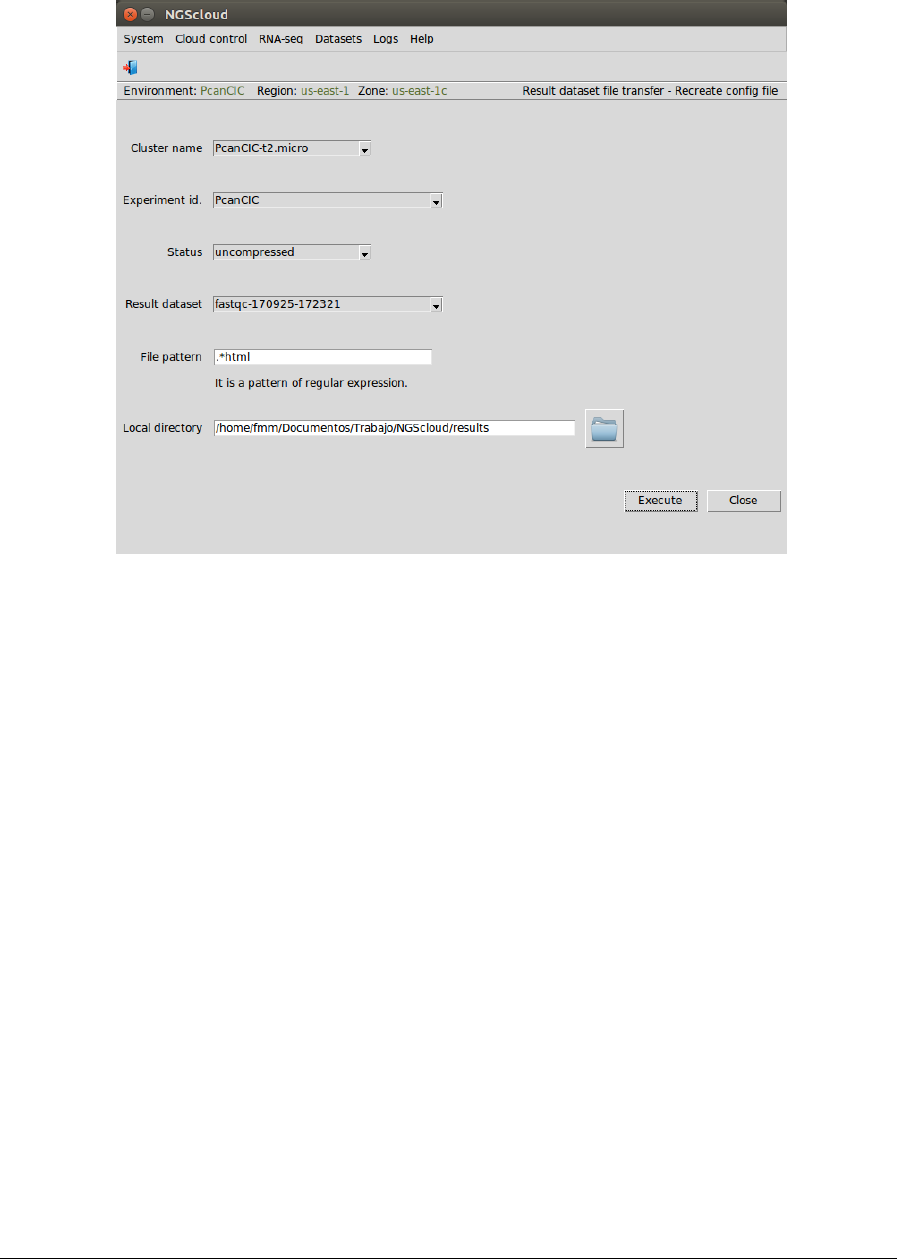
Download the quality analysis results
Next, we are going to review the analysis files generated by FastQC. First, we have to
download the ".html" files with the results to a local computer. To do so, we first create the
configuration file by selecting the menu item with the following path:
Main menu > Datasets > Result dataset file transfer > Recreate config file
In the raised window, we select PcanCIC-t2.micro in the Cluster name combo-box, PcanCIC in
the Experiment id combo-box, uncompressed in the Status combo-box (because the dataset
NGScloud Manual
Page 35
has not been previously compressed), fastqc-170925-172321 in the Result dataset combo-box,
and we type .*html as the pattern to select the files in the File pattern textbox and the local
directory where the files will be downloaded in the Local directory textbox (or we select it
using the button close to the textbox). Then we press the Execute button:
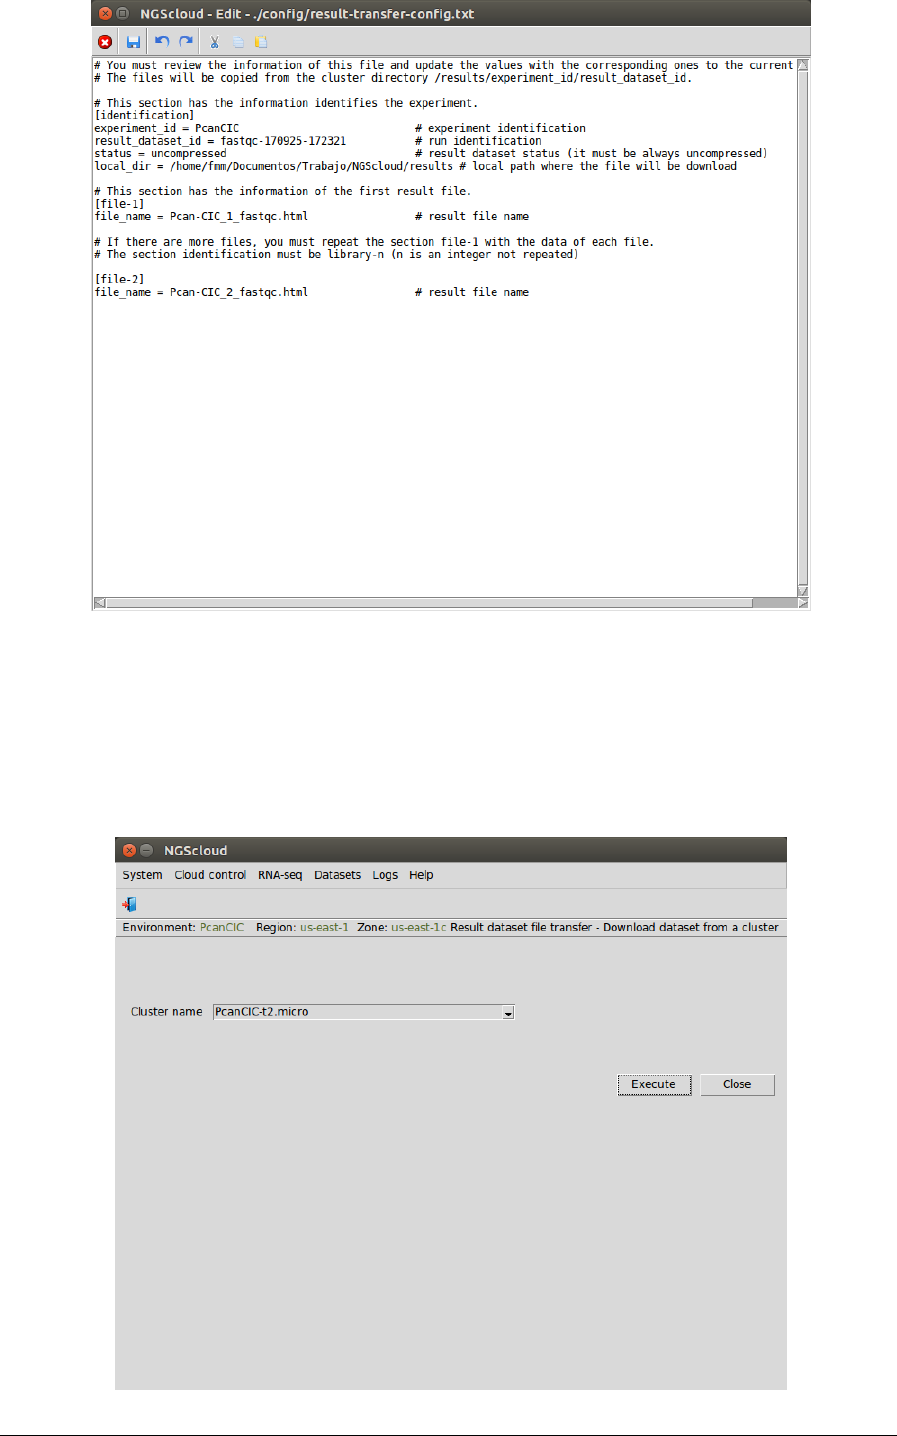
In the next window, we can inspect the config file. It has three sections: identification, with the
experiment and the result dataset identifications, the compression status of the dataset, and
the local directory; file-1, with the name of the first result file; and file-2 with the name of the
second one:
NGScloud Manual
Page 36
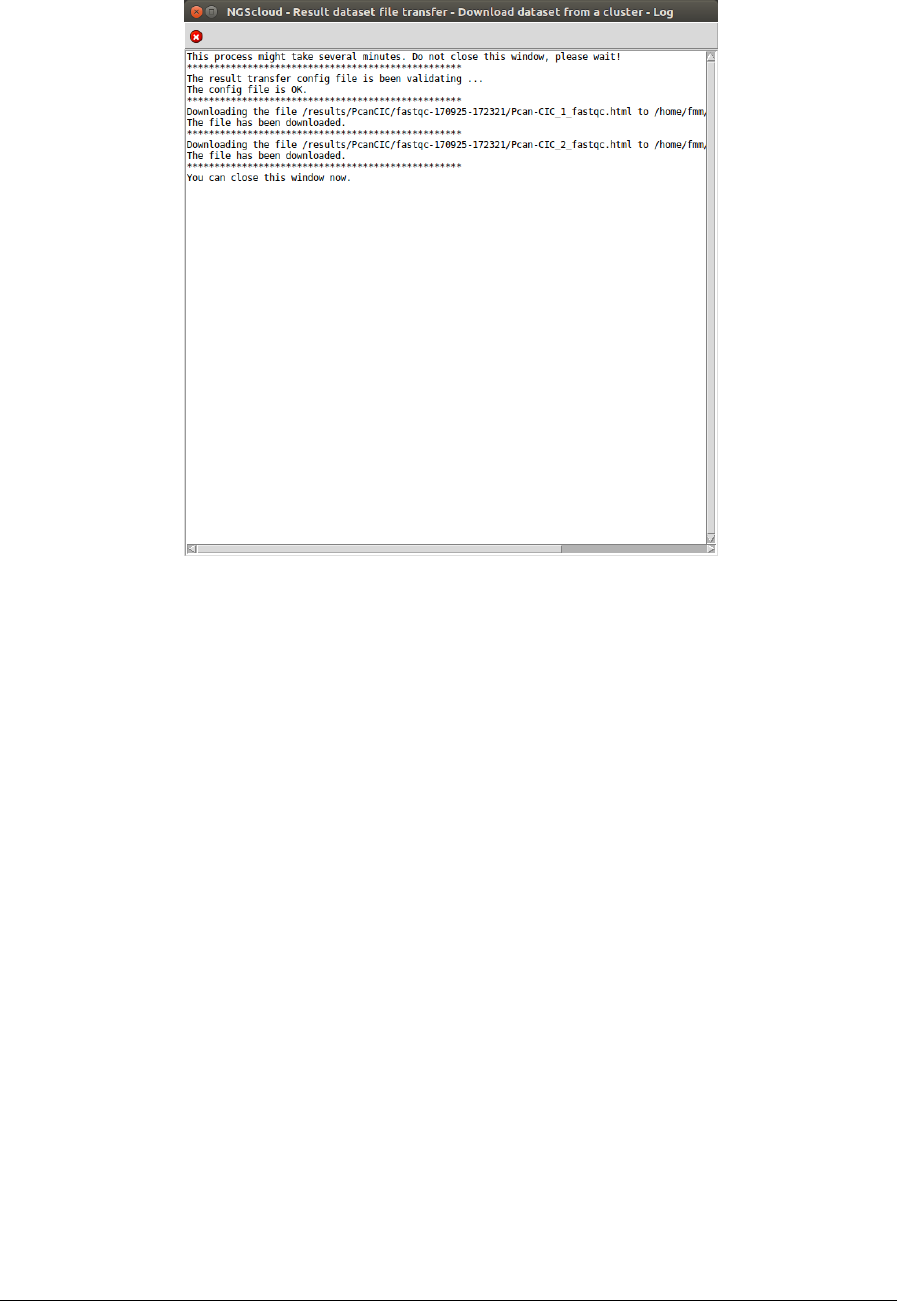
To download the result files from the cluster, we select the menu item with this path:
Main menu > Dataset > Result dataset file transfer > Download dataset from a cluster
In the raised window, we select PcanCIC-t2.micro in the Cluster name combo-box; and then
we press the Execute button:
NGScloud Manual
Page 37
A window is raised with the log corresponding to the download:
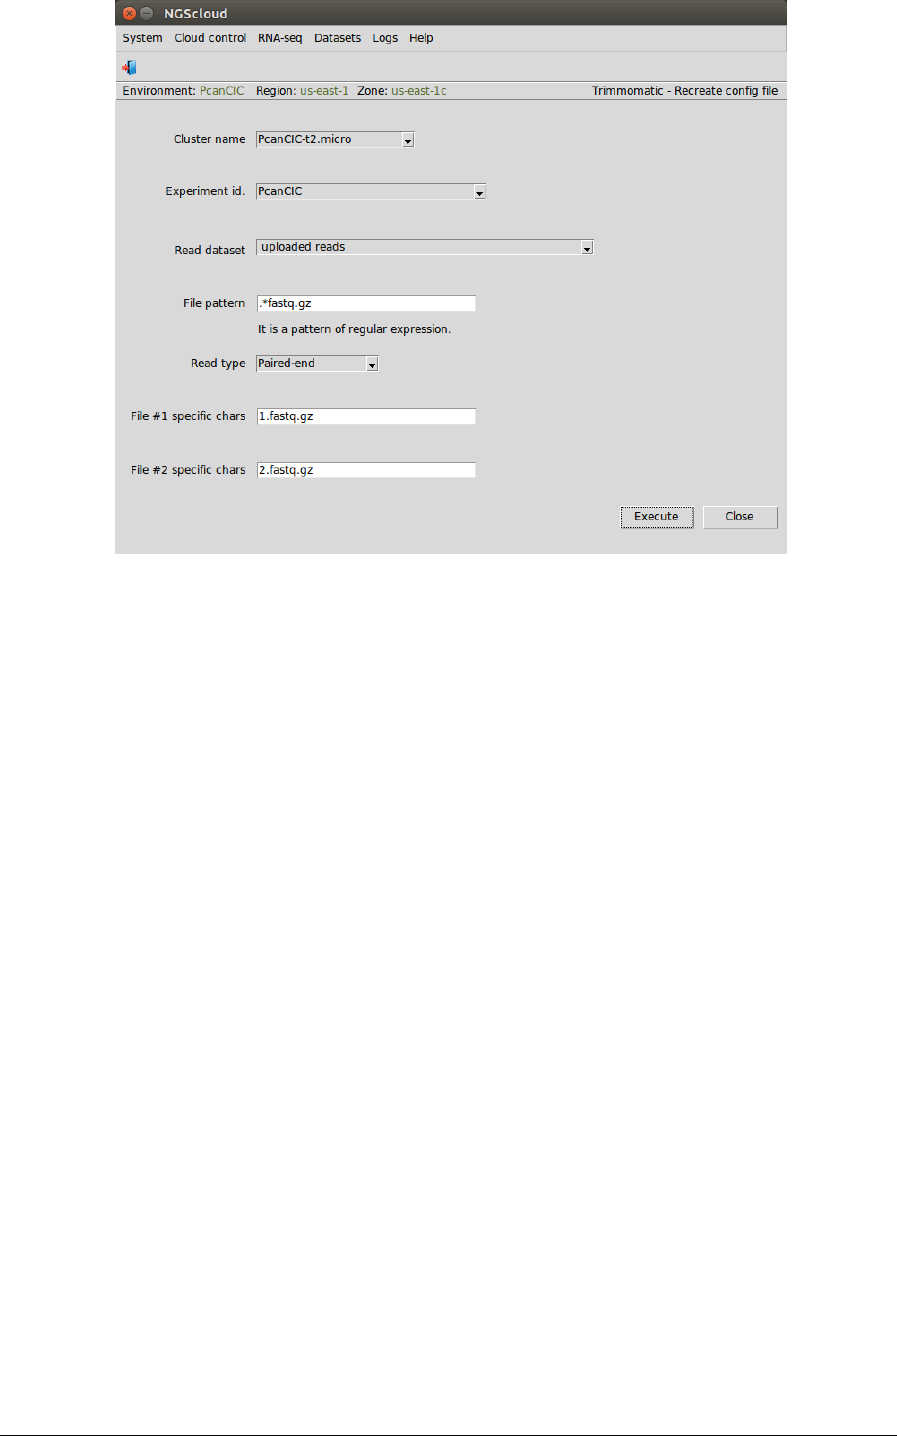
Trim reads using Trimmomatic
Once we have reviewed the two result files and have decided to cut 12 nucleotides from the
start of reads. In this point, we are going to use Trimmomatic to do this step.
First, we create the configuration file by selecting the menu item with this path:
Main menu > RNA-seq > Trimming > Trimmomatic > Recreate config file
In the raised window, we select PcanCIC-t2.micro in the Cluster name combo-box, PcanCIC in
the Experiment id combo-box, uploaded reads in the Read dataset combo-box, we type
.*fastq.gz as the pattern to select the files in File pattern textbox and we select Paired-end in
the Read type combo-box; finally, we type 1.fastq.gz in the File #1 specific chars textbox and
2.fastq.gz in the File #2 specific chars textbox. These last two strings are used to distinguish the
file of each strand among the selected files by the pattern corresponding to the experiment
libraries. In this example, there is only one library.
Then we press the Execute button:
NGScloud Manual
Page 38
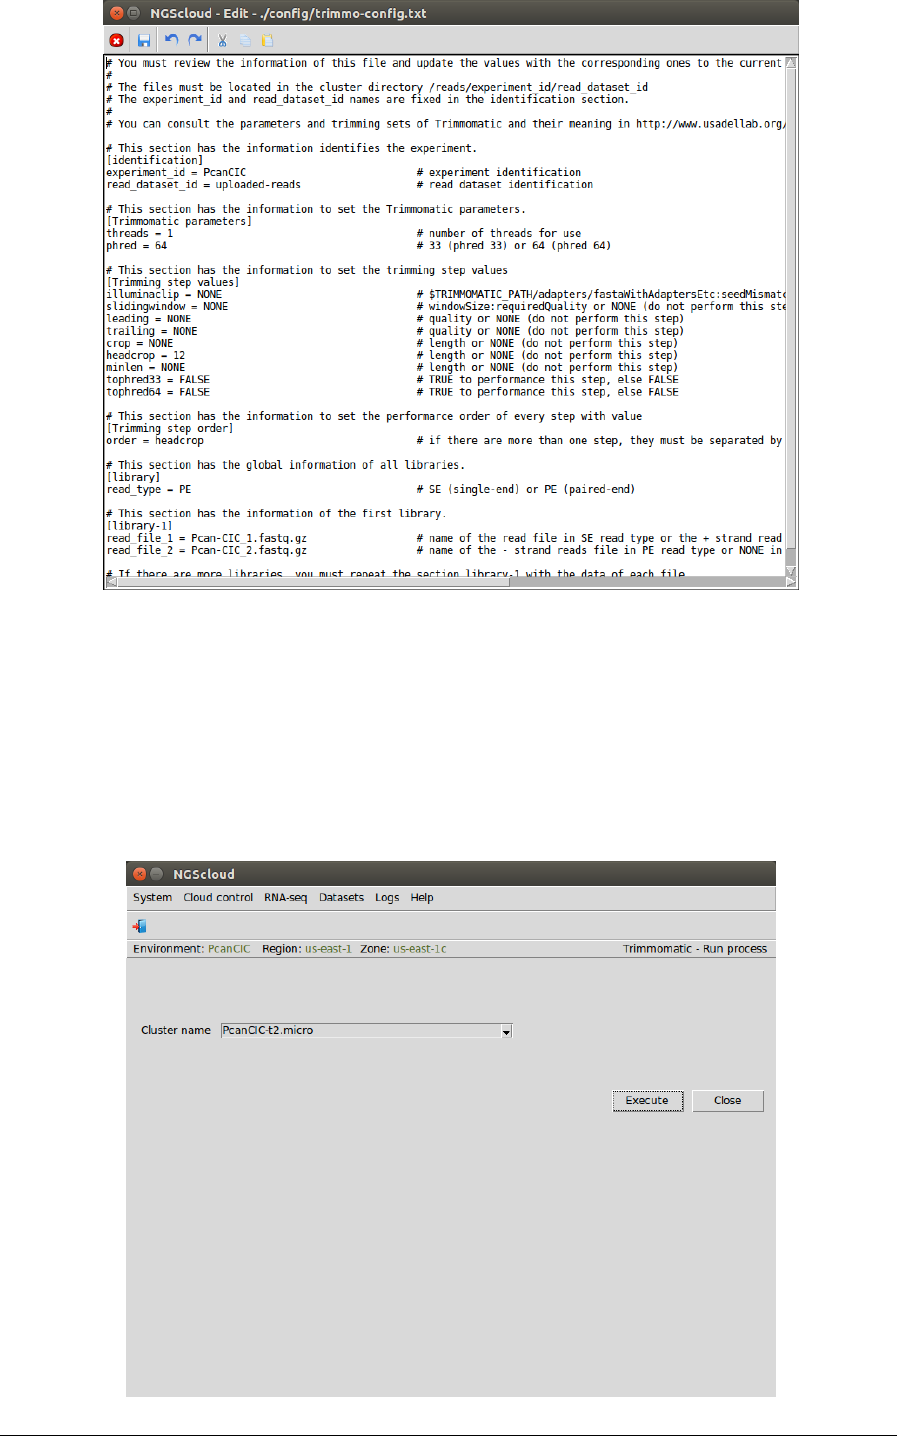
In the next window, we visualize the config file. In this example, it has six sections:
identification, with the experiment and the read dataset identifications; Trimmomatic
parameters, with the thread number (we modify its value to 1) and phred quality score;
Trimming step values, with the step list that Trimmomatic can perform (we modify the
headcrop value to 12); Trimming step order with the order in which Trimmomatic must carry
out every step indicated in the previous section; library with the library type; library-1 with the
two read files for the first library (in this example, we only have one library):
NGScloud Manual
Page 39
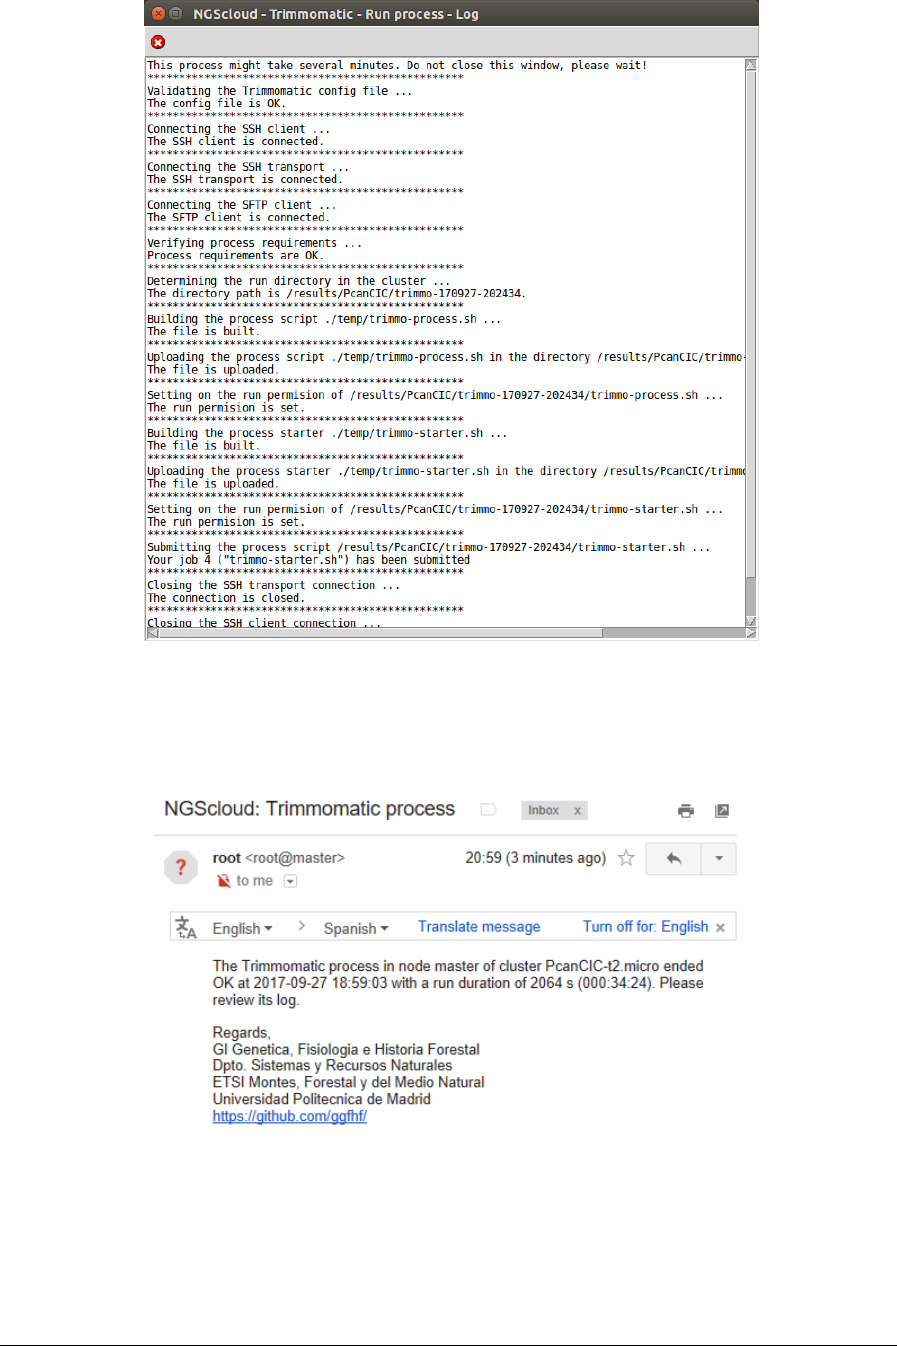
We run the trimming process in the cluster by selecting the menu item with this path:
Main menu > RNA-seq > Trimming > Trimmomatic > Run trimming process
In the raised window, we select PcanCIC-t2.micro in the Cluster name combo-box; and then
we press the Execute button:
NGScloud Manual
Page 40
A window is raised with the submission log:
At the end of the run, an email is sent, informing of its completion:
We can view the process log during and after its run. To do so, we select the menu item with
this path:
Main menu > Logs > View result logs in the cluster

NGScloud Manual
Page 41
In the raised window, we select PcanCIC-t2.micro in the Cluster name combo-box and PcanCIC
in the Experiment id combo-box; and then we press the Execute button:
A window with the result datasets for each run of the bioinformatic programs that correspond
to the experiment PcanCIC is shown:
At this moment, there are two result datasets: fastqc-170925-172321, corresponding to the
previous run of FastQC; and trimmo-170927-202434, corresponding to the run of

NGScloud Manual
Page 42
Trimmomatic. We click on this last dataset and another window appears with its
corresponding log:
Terminate the cluster with a t2.micro template and create another cluster with a
r3.4xlarge template
After read trimming, we are going to assembly a preliminary transcriptome using Trinity.
Trinity's hardware requirements are very high in terms of CPUs and GiBs of RAM memory. We
must terminate the current cluster and create another one fulfilling these requirements. We
choose a r3.4xlarge template whose instances have 16 CPUs and 122 GiBs of RAM memory, in
order to be able to analyze the large read files of our experiment with Trinity.
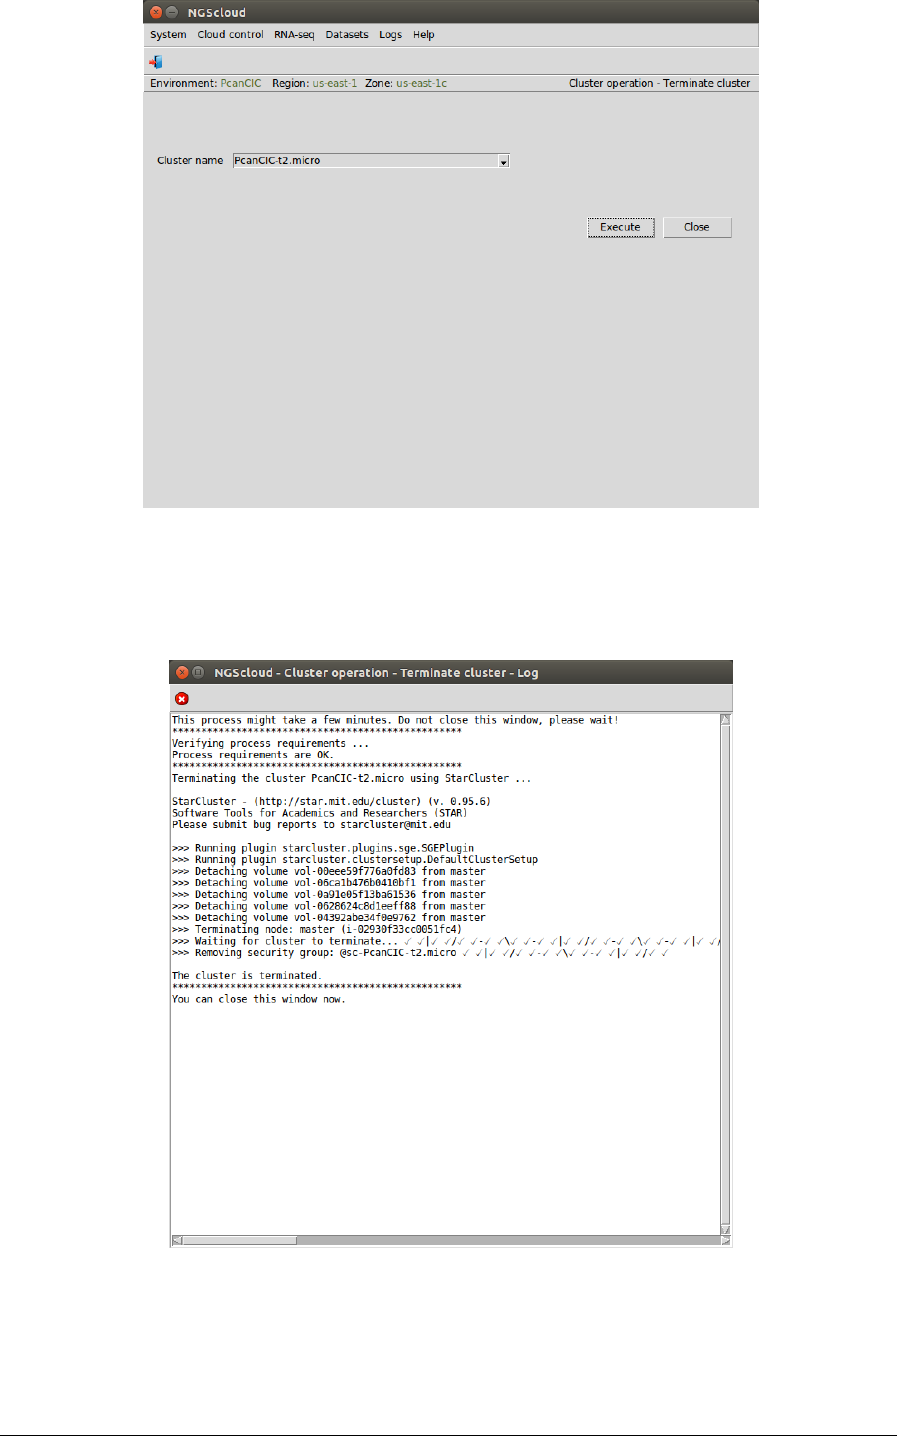
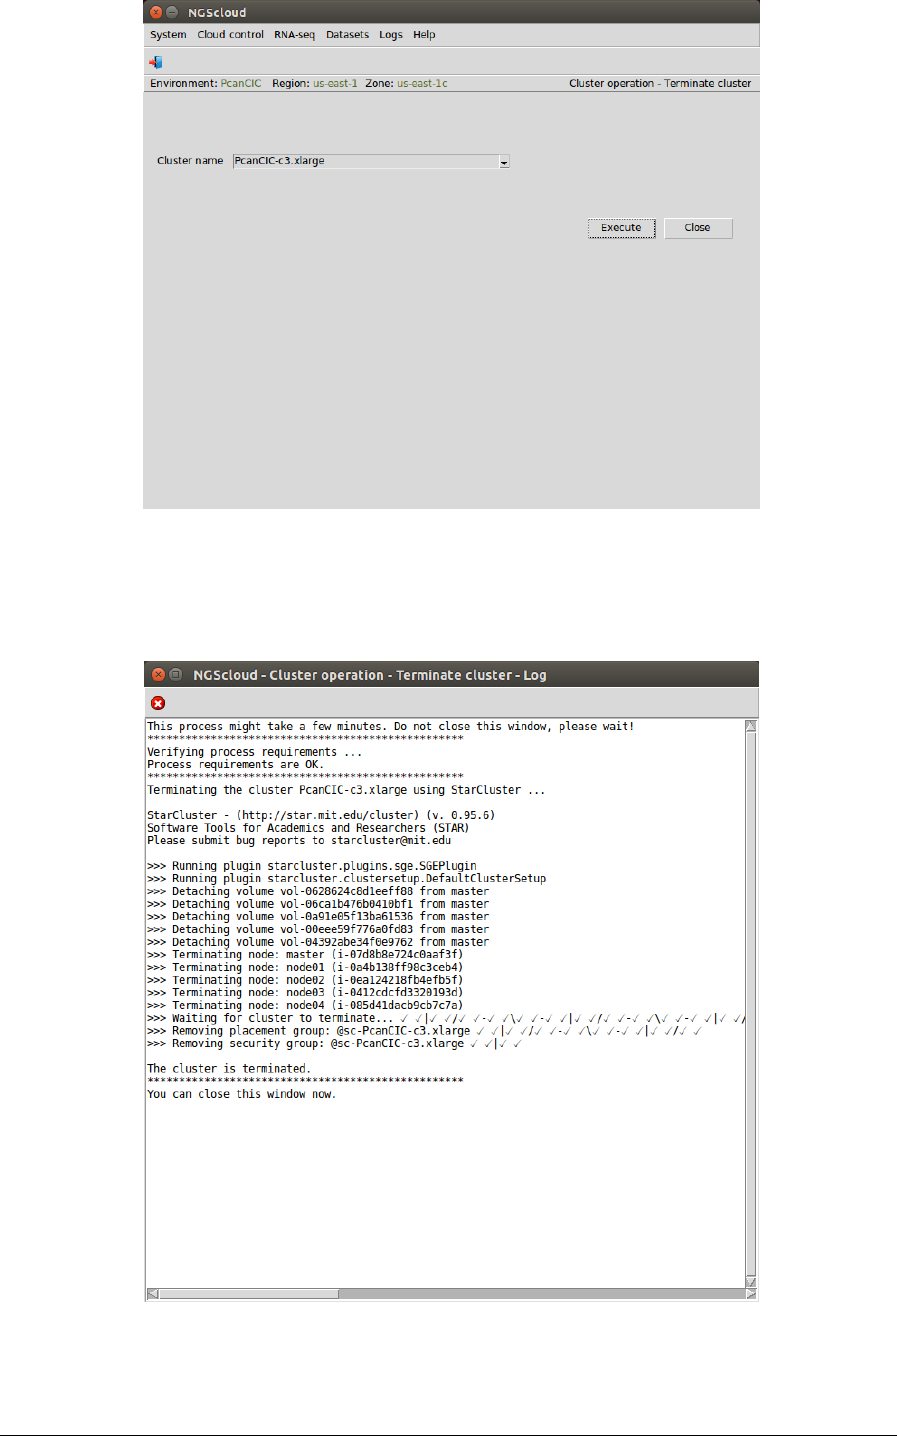
To terminate the current cluster, we select the menu item with this path:
Main menu > Cloud control > Cluster operation > Terminate cluster
In the raised window, we select PcanCIC-t2.micro in the Cluster name combo-box; and then
we press the Execute button:
NGScloud Manual
Page 43
A window is raised displaying the run log:
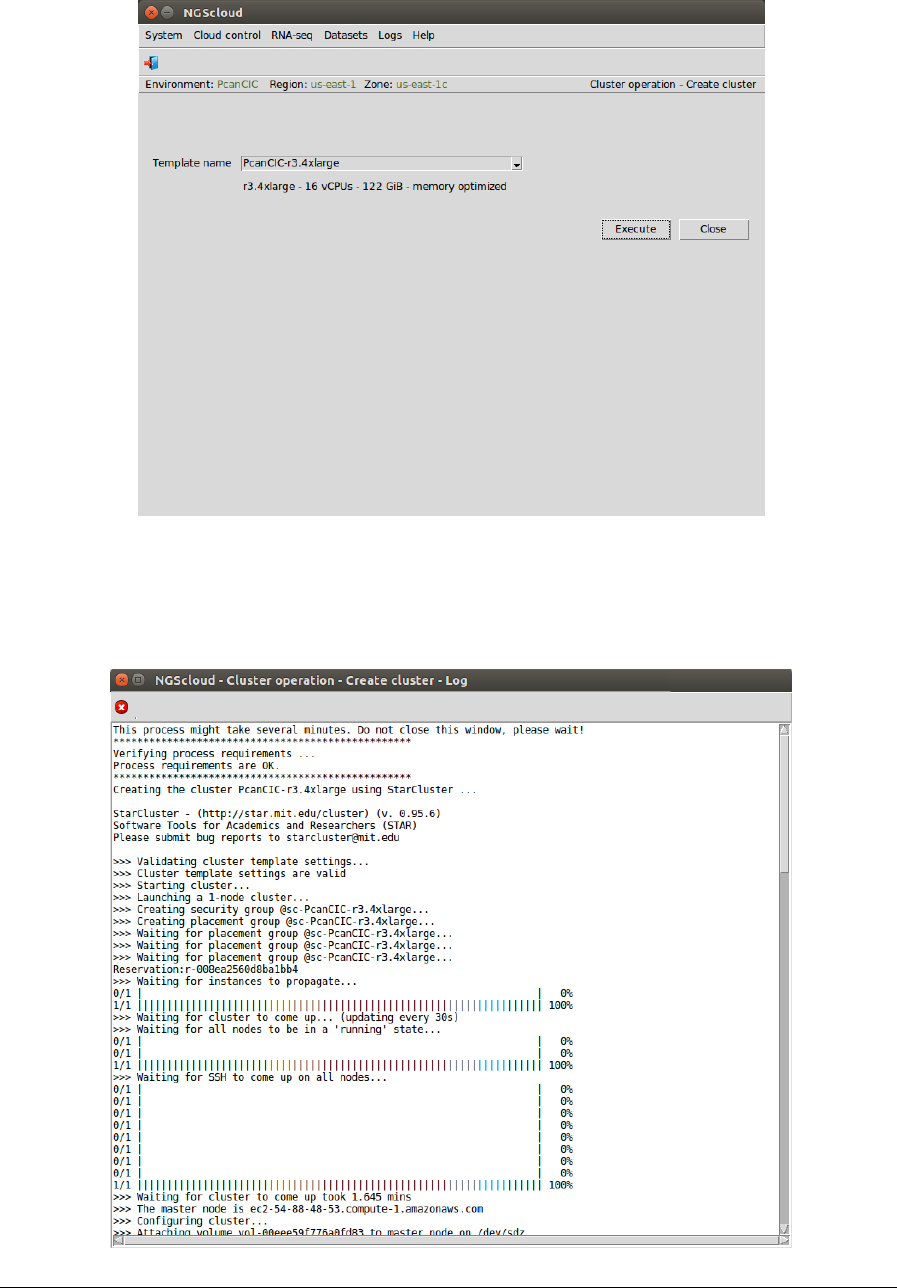
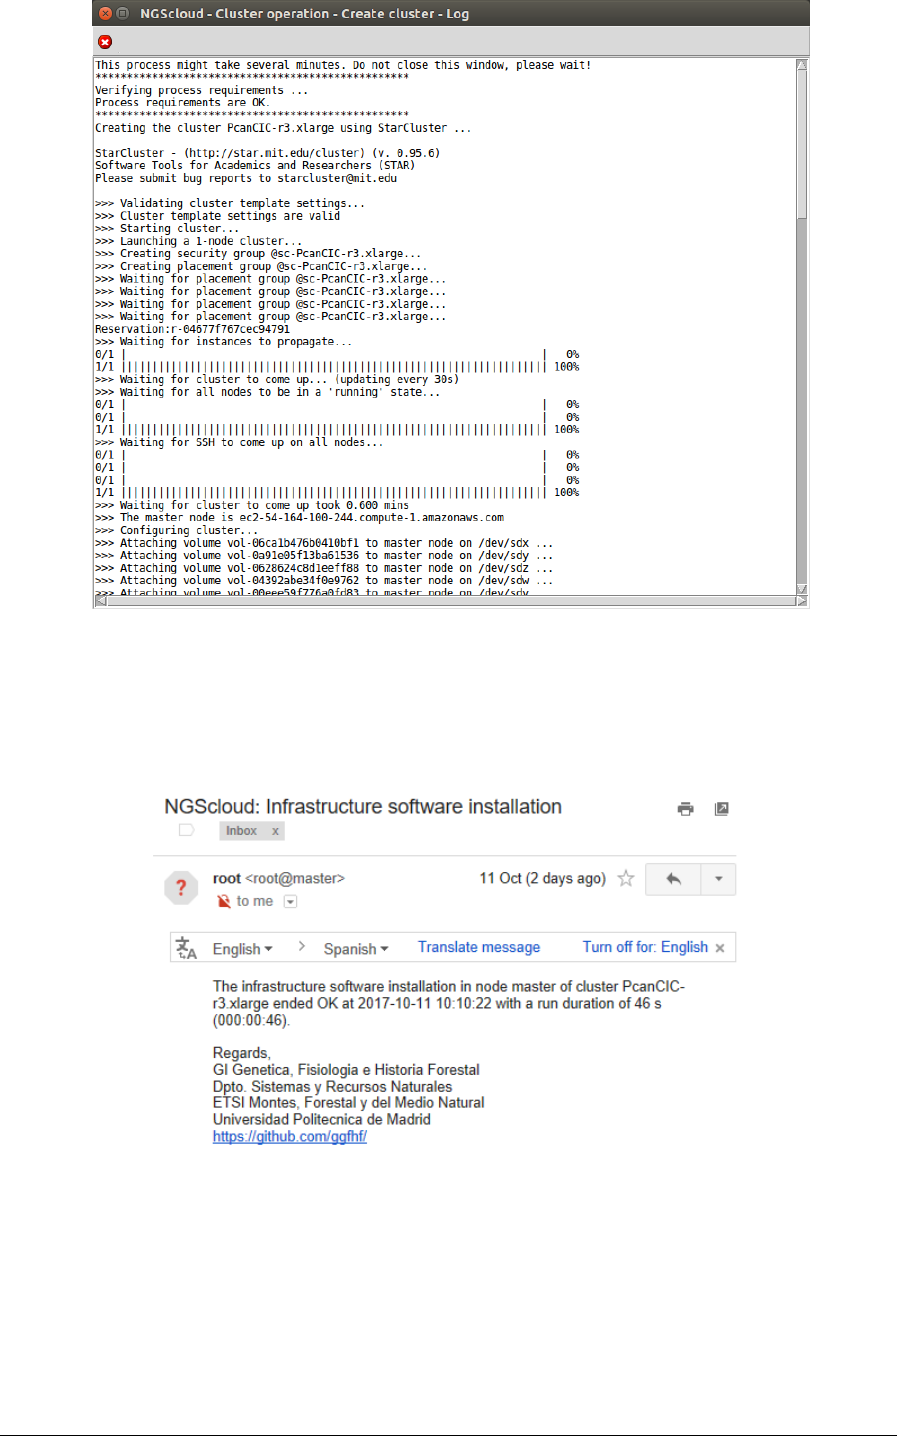
To create the cluster with r3.4xlarge template, we select the menu item with this path:
Main menu > Cloud control > Cluster operation > Create cluster
NGScloud Manual
Page 44
In the raised window, we select PcanCIC-r3.4xlarge, the template corresponding to a
r3.4xlarge instance type, in the Template name combo-box; and then we press the Execute
button:
A window is raised displaying the run log:
NGScloud Manual
Page 45
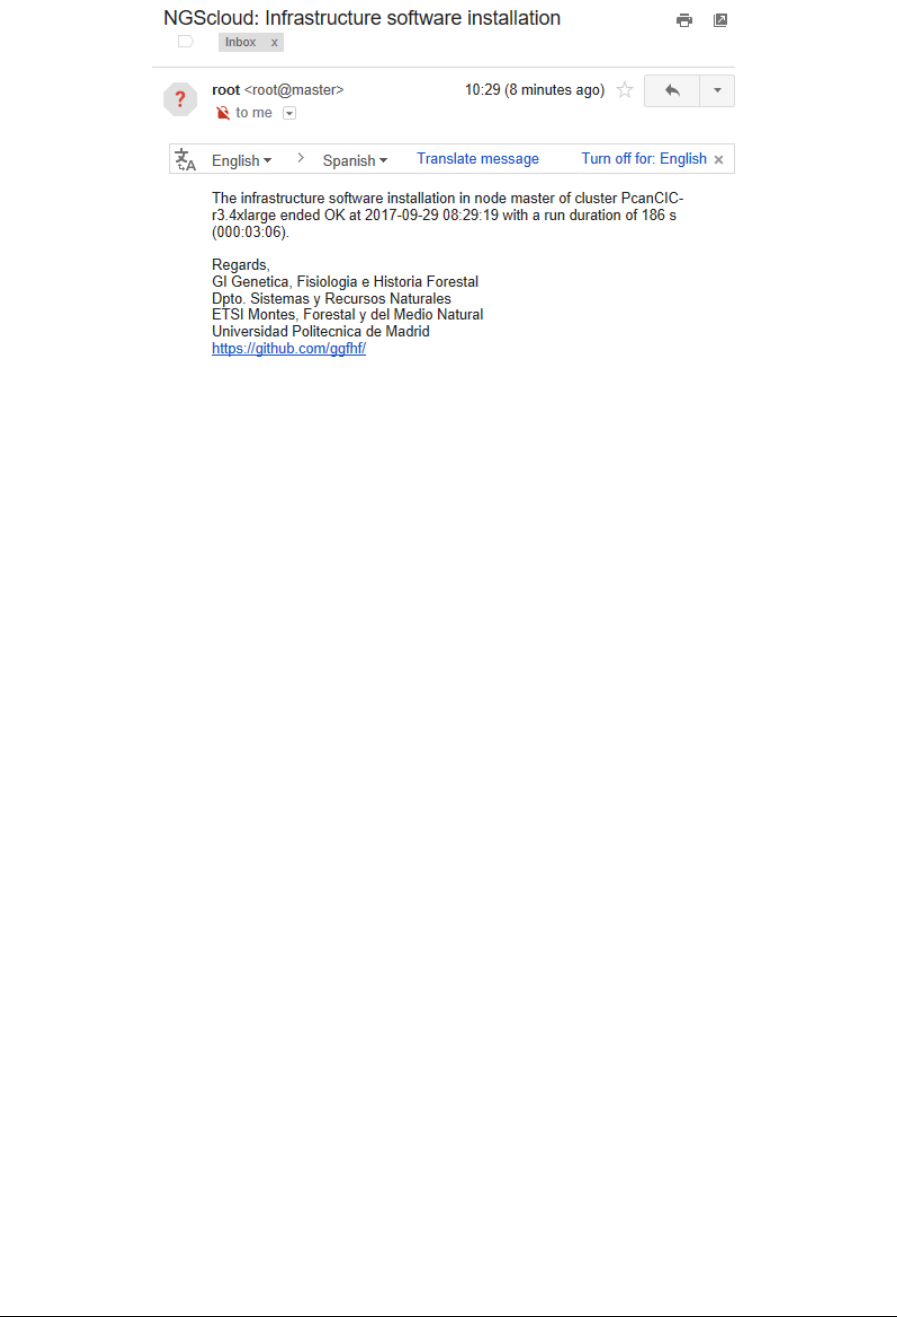
When the cluster is started, infrastructure software will be installed. At the end of the
installation, an email is sent, informing of its completion:
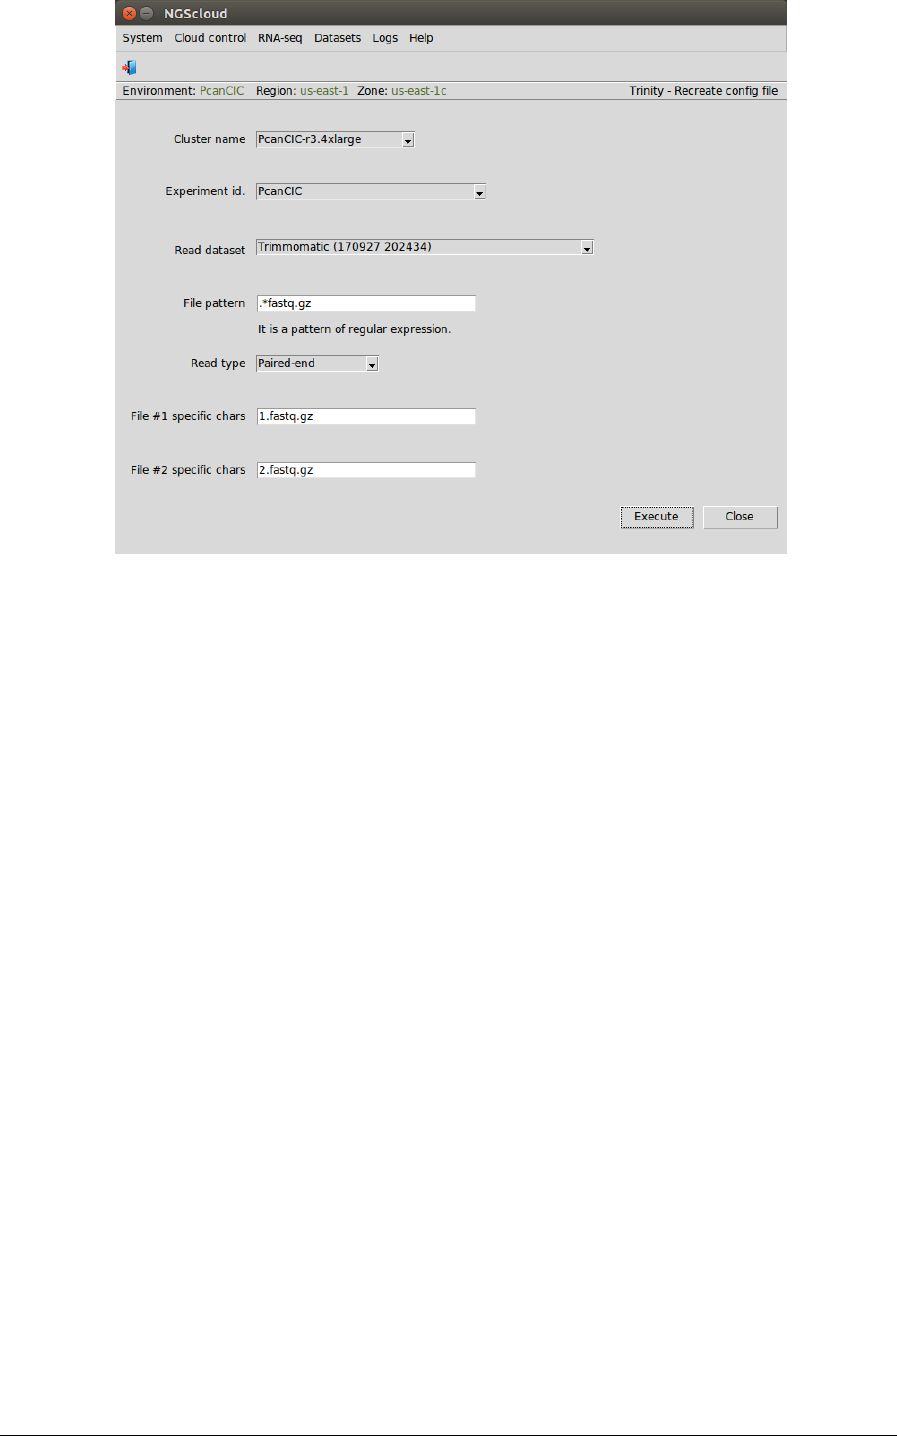
Assembly reads using Trinity
First, we create the config file by selecting the menu item with this path:
Main menu > RNA-seq > De novo assembly > Trinity > Recreate config file
In the raised window, we select PcanCIC-r3.4xlarge in the Cluster name combo-box, PcanCIC in
the Experiment id combo-box, Trimmomatic (170927 202434) in the Read dataset combo-box,
we type .*fastq.gz as the pattern to select the files in File pattern textbox, and we select
Paired-end in the Read type combo-box; finally, we type 1.fastq.gz in the File #1 specific chars
textbox and 2.fastq.gz in the File #2 specific chars textbox. Then we press the Execute button:
NGScloud Manual
Page 46
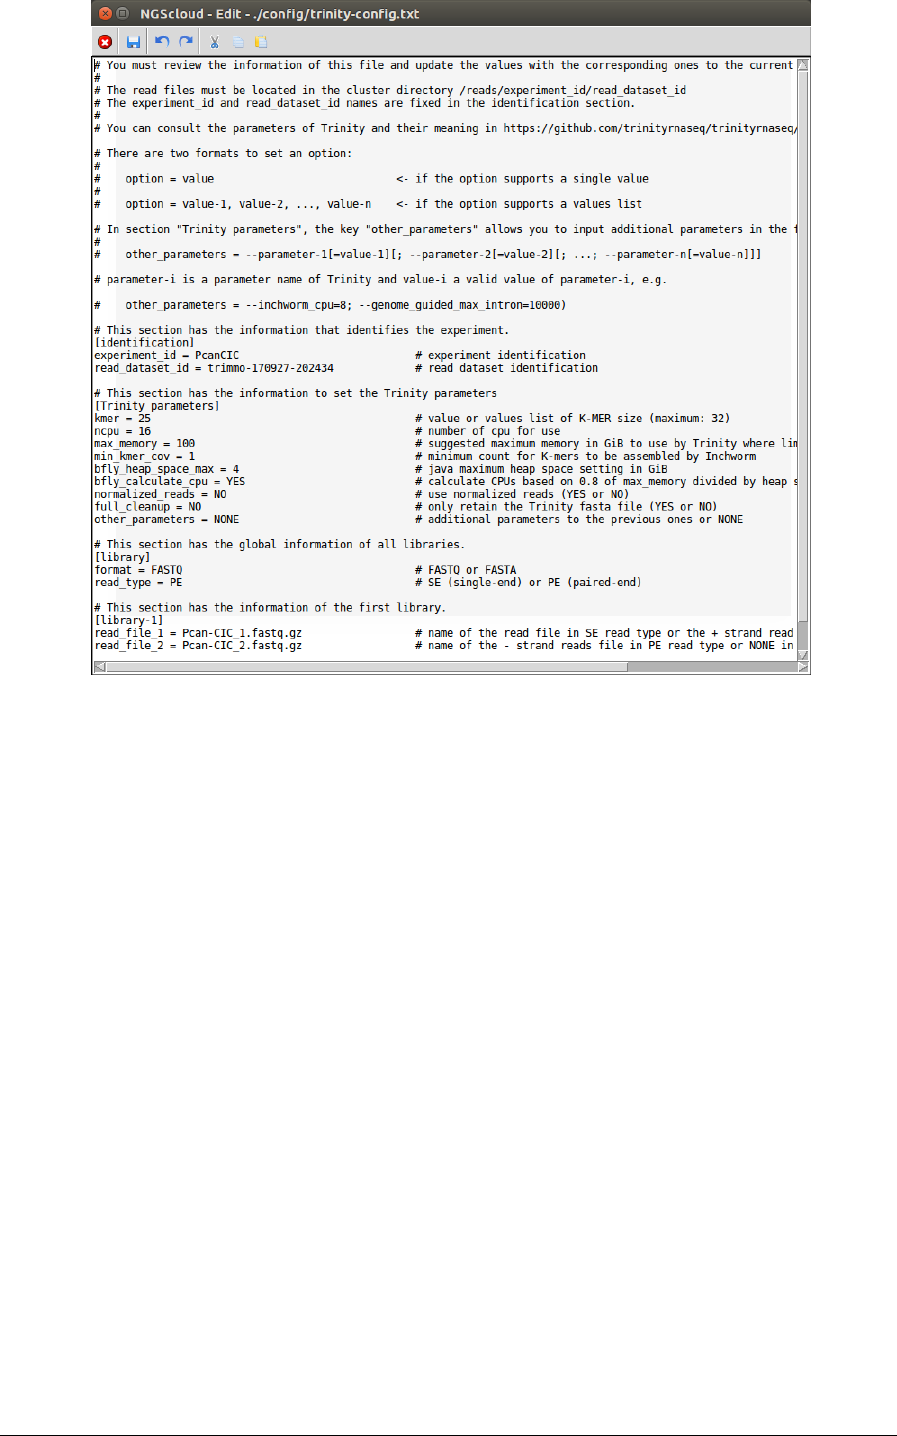
In the next window, we can examine the config file. In this example, it has four sections:
identification, with the experiment and the read dataset identifications; Trinity parameters,
with several parameters used by Trinity in which we can modify the value of CPUs number to
16, and the value of suggested maximum memory to 100; library with the format and library
type; library-1 with the two read files for the first library (in this example, we only have one
library):
NGScloud Manual
Page 47
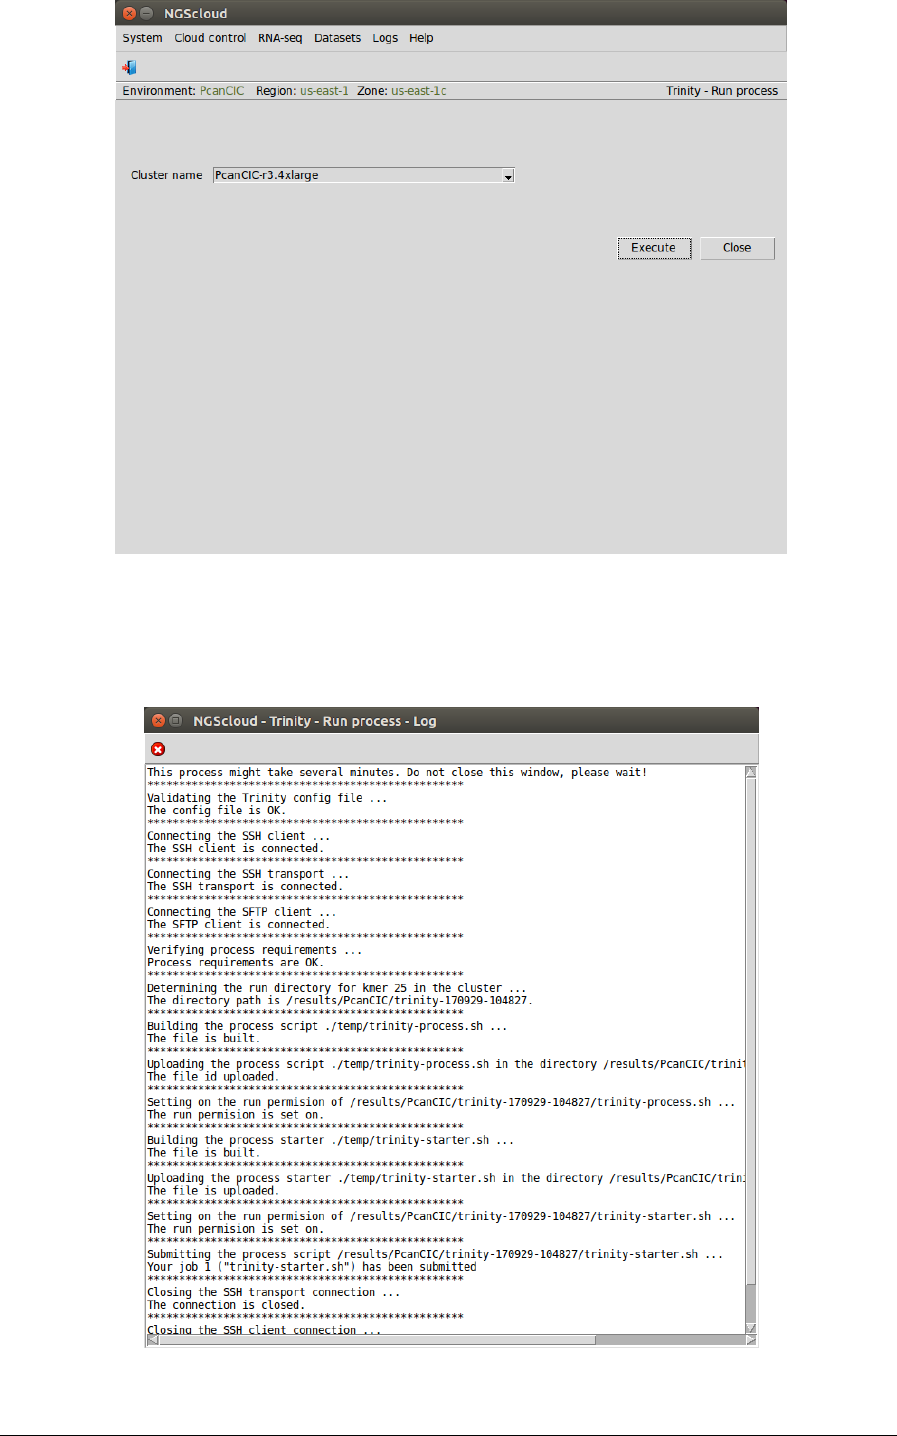
We run the assembly process in the cluster by selecting the menu item with this path:
Main menu > RNA-seq > De novo assembly > Trinity > Run assembly process
In the raised window, we select PcanCIC-r3.4xlarge in the Cluster name combo-box; and then
we press the Execute button:
NGScloud Manual
Page 48
A window is raised showing the submission log:
NGScloud Manual
Page 49
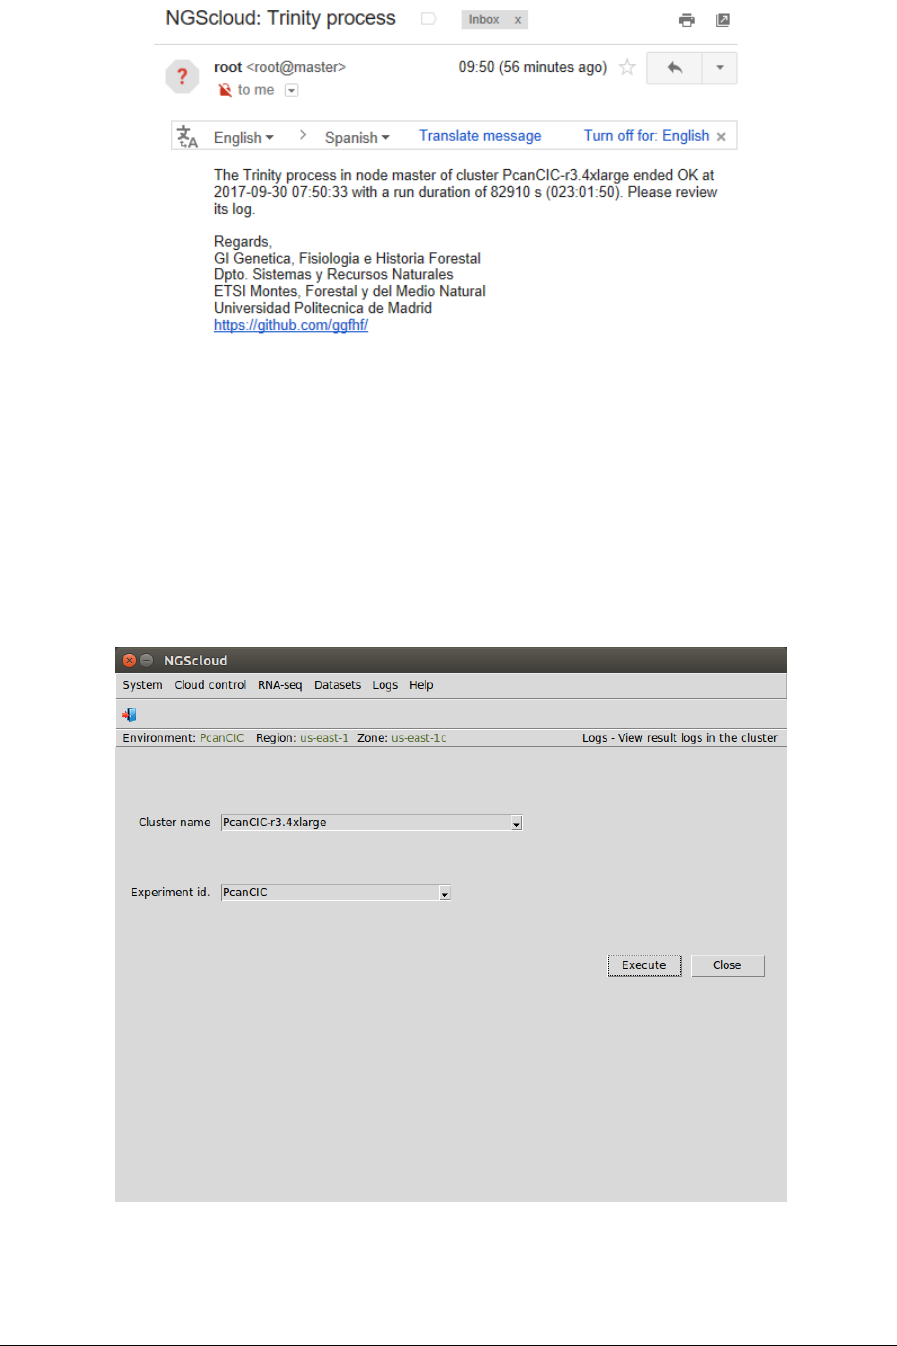
At the end of the run, an email is sent, informing of its completion:
We can view the process log during and after the run. To do so, we select the menu item with
this path:
Main menu > Logs > View result logs in the cluster
In the raised window, we select PcanCIC-r3.4xlarge in the Cluster name combo-box and
PcanCIC in the Experiment id combo-box; and then we press the Execute button:
NGScloud Manual
Page 50
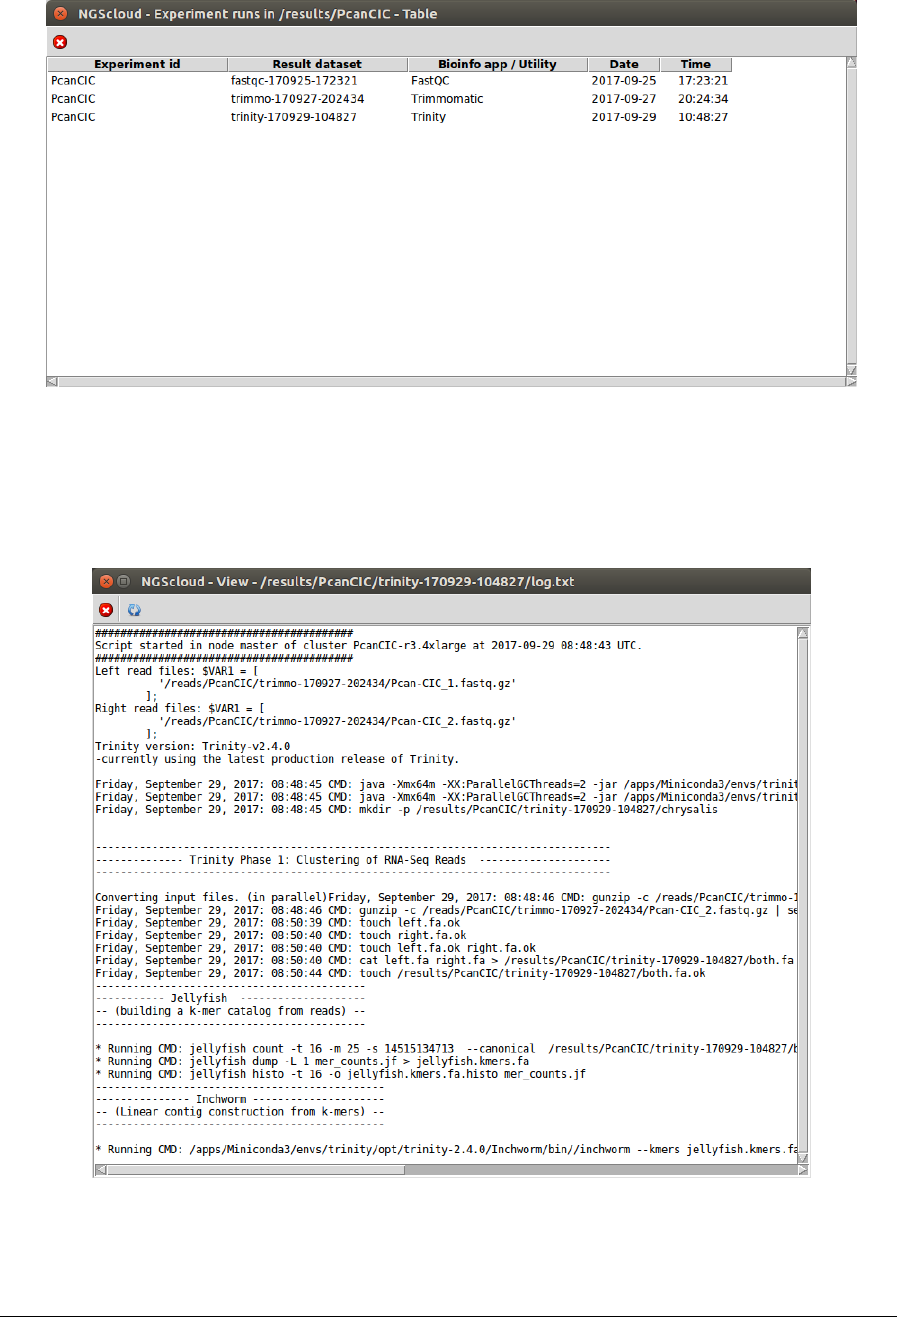
A window with the result datasets for each run of the bioinformatic programs that correspond
to the experiment PcanCIC is shown:
Three result datasets are shown. We click on the trinity-170929-104827 row, which is the
dataset generated by the Trinity run, and another window appears with its corresponding log:
NGScloud Manual
Page 51
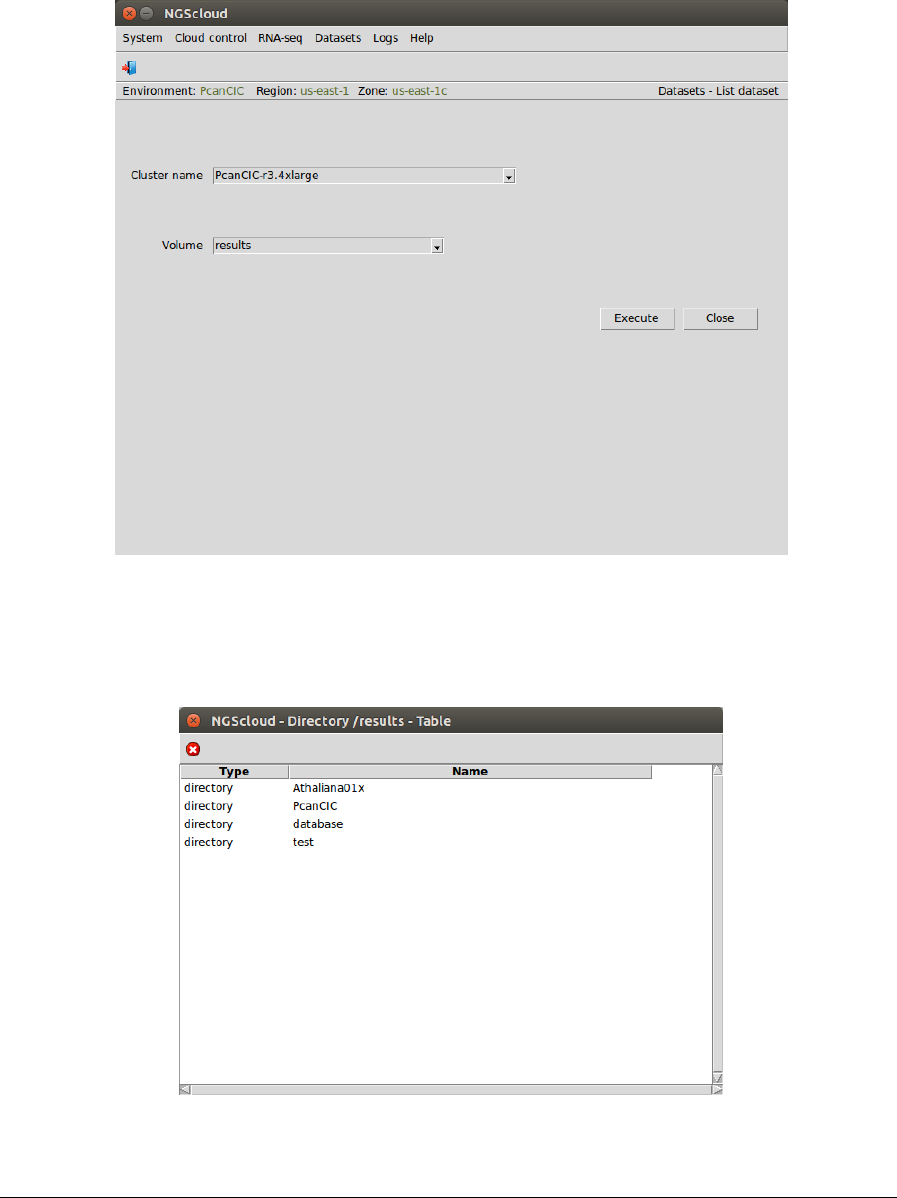
Now, we are going to list the assembly generated by Trinity. We select the menu item with this
path:
Main menu > Dataset > List dataset
In the raised window, we select PcanCIC-r3.4xlarge in the Cluster name combo-box and results
in the Volume combo-box. Then we press the Execute button:
Now, we click in the PcanCIC row:
NGScloud Manual
Page 52
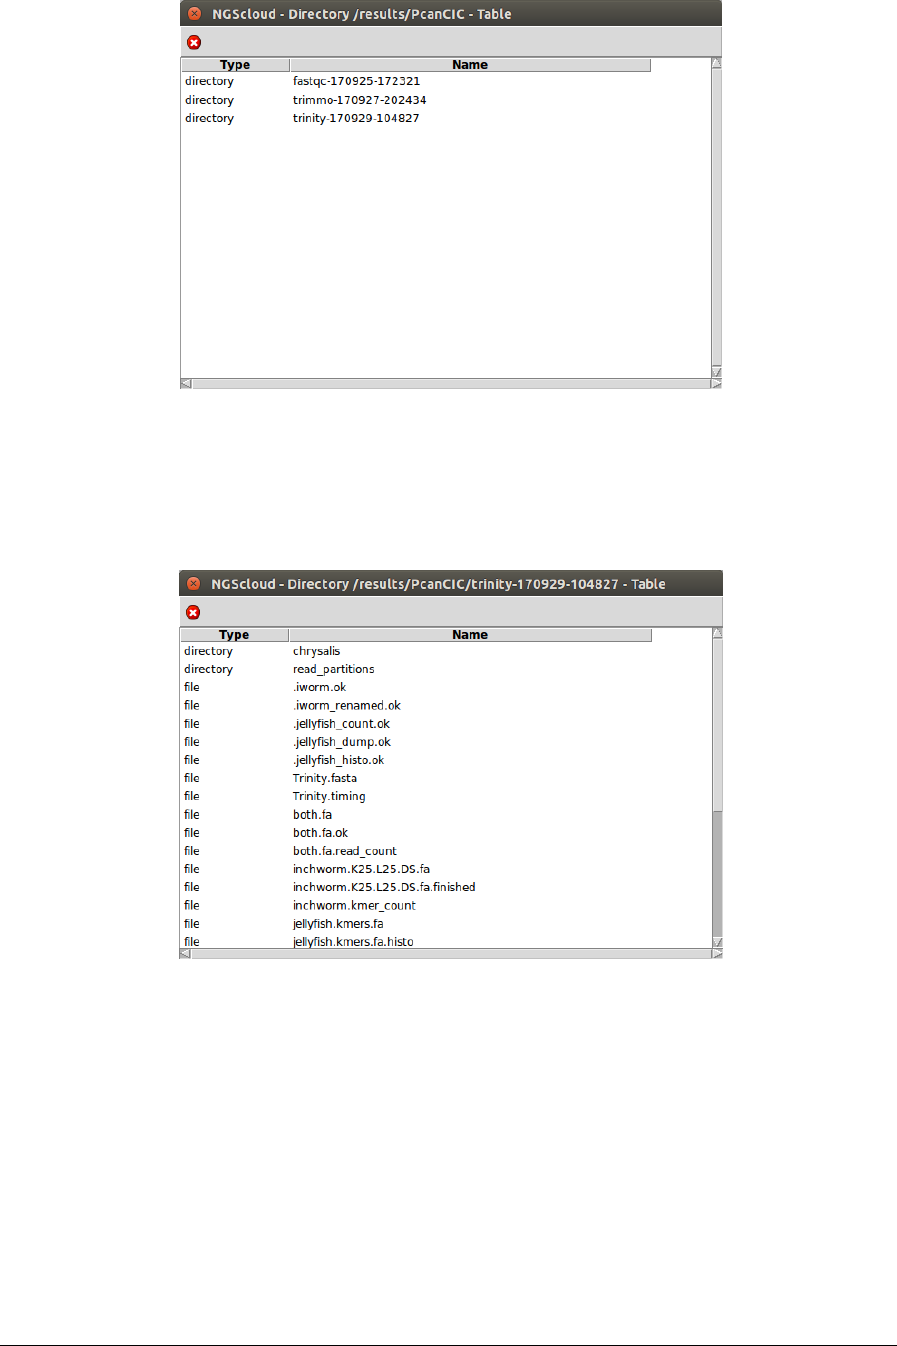
Next, a window with the result datasets of the experiment PcanCIC is shown:
We click on the trinity-170929-104827 row, and another window appears with the content of
the files corresponding to this assembly.
The file Trinity.fasta is the one corresponding to the transcriptome. To observe its
characteristics, we click on it:

NGScloud Manual
Page 53
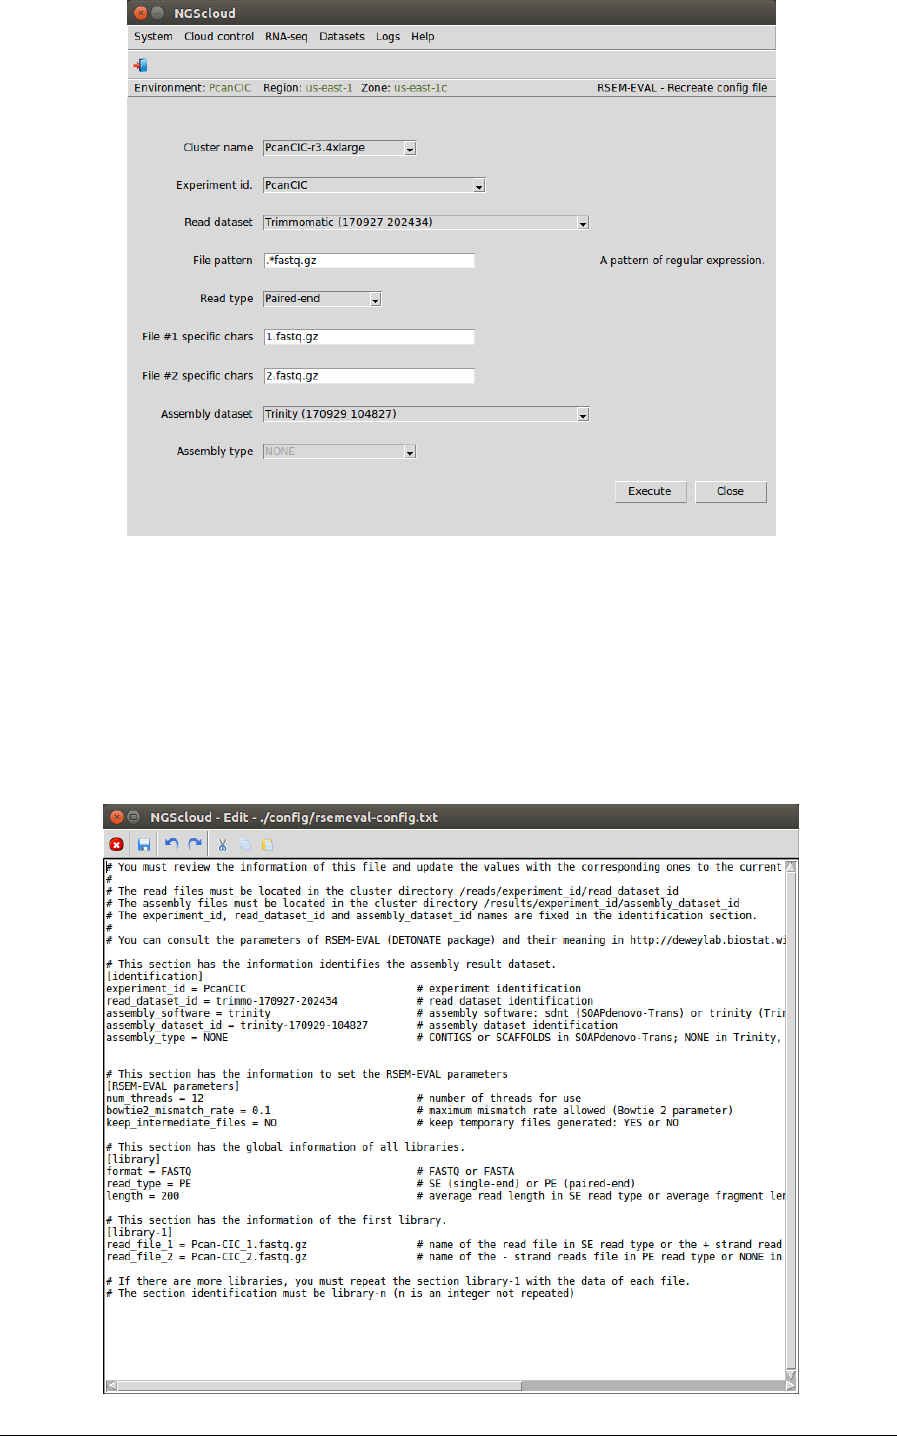
Evaluate the transcriptome using RSEM-EVAL
Next, we are going to evaluate the quality of the transcriptome generated by Trinity with
RSEM-EVAL, which is included in the DETONATE package. To do so, we first create the config
file by selecting the menu item with the following path:
Main menu > RNA-seq > Assembly quality and transcript quantification > RSEM-EVAL
(DETONATE package) > Recreate config file
In the raised window, we select PcanCIC-r3.4xlarge in the Cluster name combo-box, PcanCIC in
the Experiment id combo-box, Trimmomatic (170927 202434) in the Read dataset combo-box,
we type .*fastq.gz as the pattern to select the files in File pattern textbox, and we select
Paired-end in the Read type combo-box; we type 1.fastq.gz in the File #1 specific chars textbox
and 2.fastq.gz in the File #2 specific chars textbox; finally, we selected Trinity (170927 104827)
in the Assembly dataset combo-box. The Assembly type combo-box only is activated when the
assembly dataset was generated by SOAPdenovo-Trans; in this case, the combo-box has two
items: CONTIGS and SCAFFOLDS. Then we press the Execute button:
NGScloud Manual
Page 54
In the next window, we can examine the config file. In this example, it has four sections:
identification, with the experiment, read and assembly dataset identifications; RSEM-EVAL
parameters, with several parameters used by RSEM-EVAL, where we can modify the value of
threads number to 16; library with the format and library type; and library-1 with the two read
files for the first library (in this example, we only have one library):
NGScloud Manual
Page 55
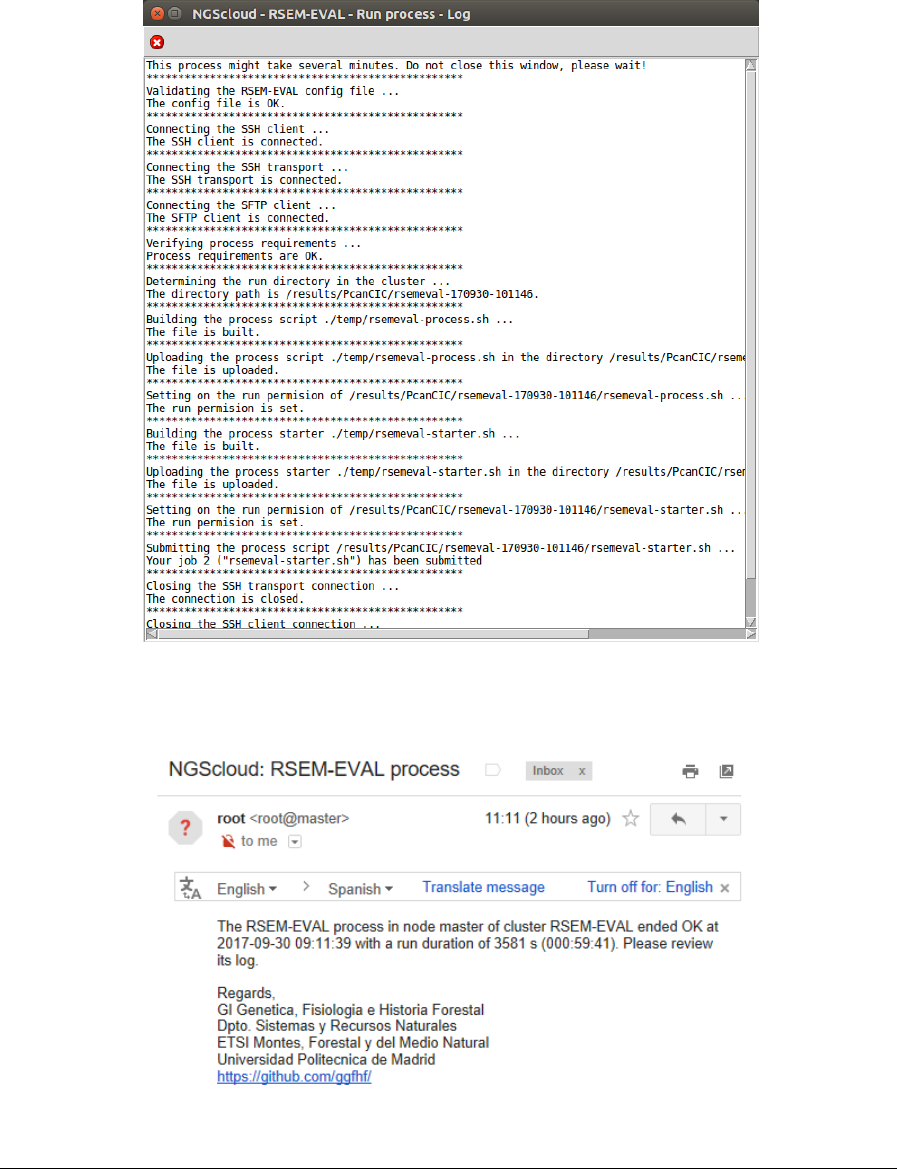
We run the assembly assessment process in the cluster by selecting the menu item with this
path:
Main menu > RNA-seq > Assembly quality and transcript quantification > RSEM-EVAL
(DETONATE package) > Run assembly assessment process file
In the raised window, we select PcanCIC-r3.4xlarge in the Cluster name combo-box; and then
we press the Execute button:
At the end of the run, an email is sent, informing of its completion:

NGScloud Manual
Page 56
We can view the process log during and after its run. To do so, we select the menu item with
this path:
Main menu > Logs > View result logs in the cluster
In the raised window, we select PcanCIC-r3.4xlarge in the Cluster name combo-box and
PcanCIC in the Experiment id combo-box; and then we press the Execute button:
A window with the result datasets for each run of the bioinformatic programs that correspond
to the experiment PcanCIC is shown:

NGScloud Manual
Page 57
Four result datasets are shown. We click on the rsemeval-170930-101146 row, the dataset
generated by RSEM-EVAL run, and another window appears with its corresponding log:
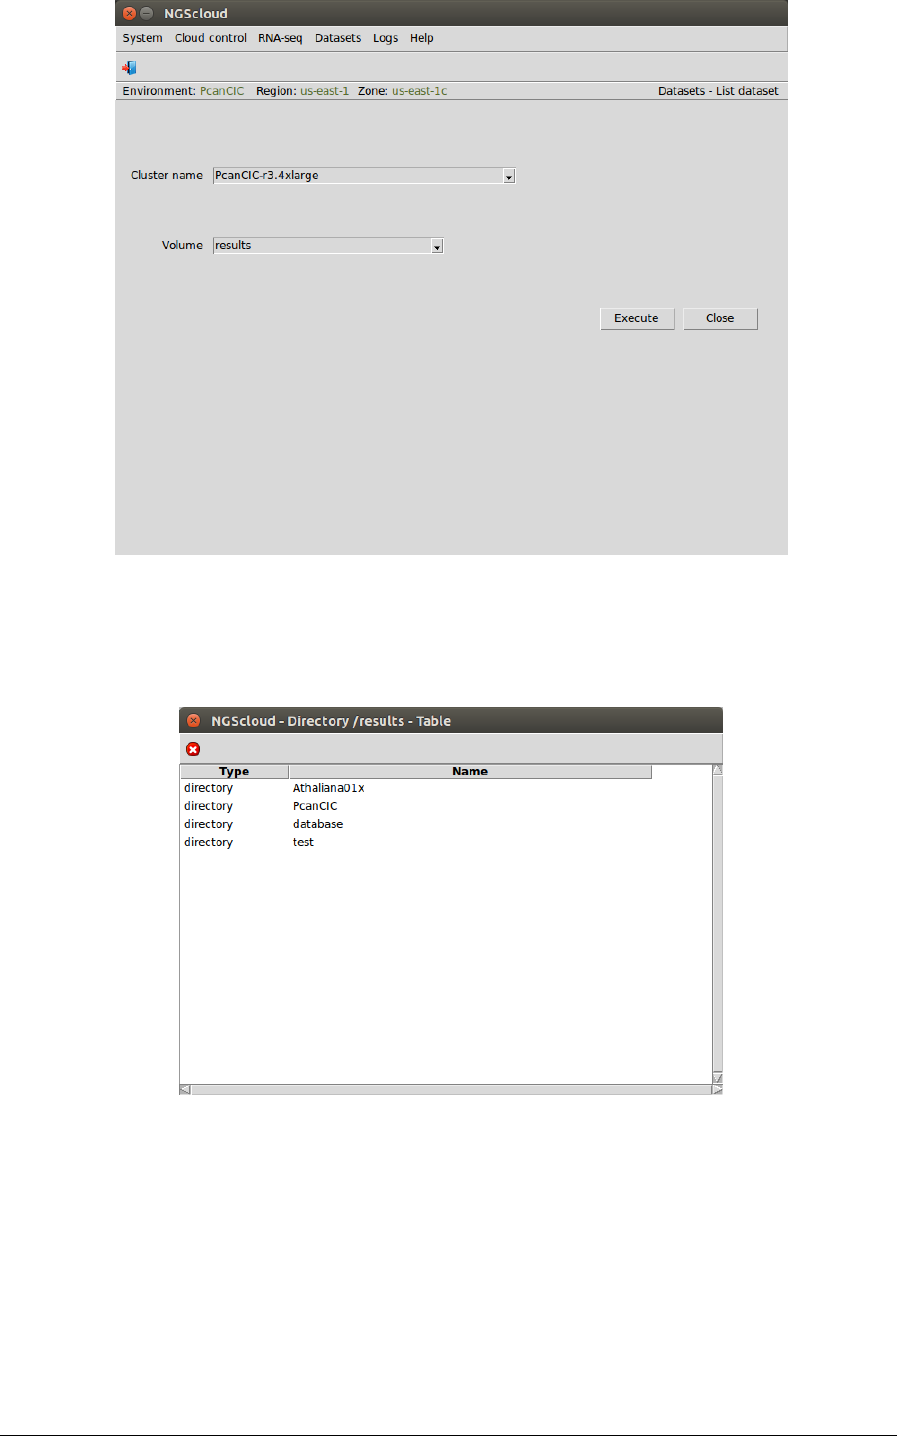
Now, we are going to view the assessment files generated by RSEM-EVAL. We select the menu
item with this path:
Main menu > Dataset > List dataset
In the raised window, we select PcanCIC-r3.4xlarge in the Cluster name combo-box and results
in the Volume combo-box. Then we press the Execute button:
NGScloud Manual
Page 58
Now, we click in the PcanCIC row:
Next, a window with the result datasets of the experiment PcanCIC is shown:

NGScloud Manual
Page 59
We click on the rsemeval-170930-101146 row, and another window appears with the content
of the files corresponding to this assembly.
The files whose name end in ".results" have the information about the assembly assessment.
Terminate the cluster with r3.4xlarge template and create another cluster with
r3.xlarge template
Now we are going to terminate the PcanCIC-r3.4xlarge and to create a cluster with a r3.xlarge
template, 4 CPUs and 30.5 GiB of RAM, because it is not necessary to use an instance with
many CPUs and large RAM memory in order to .do the task of filtering.
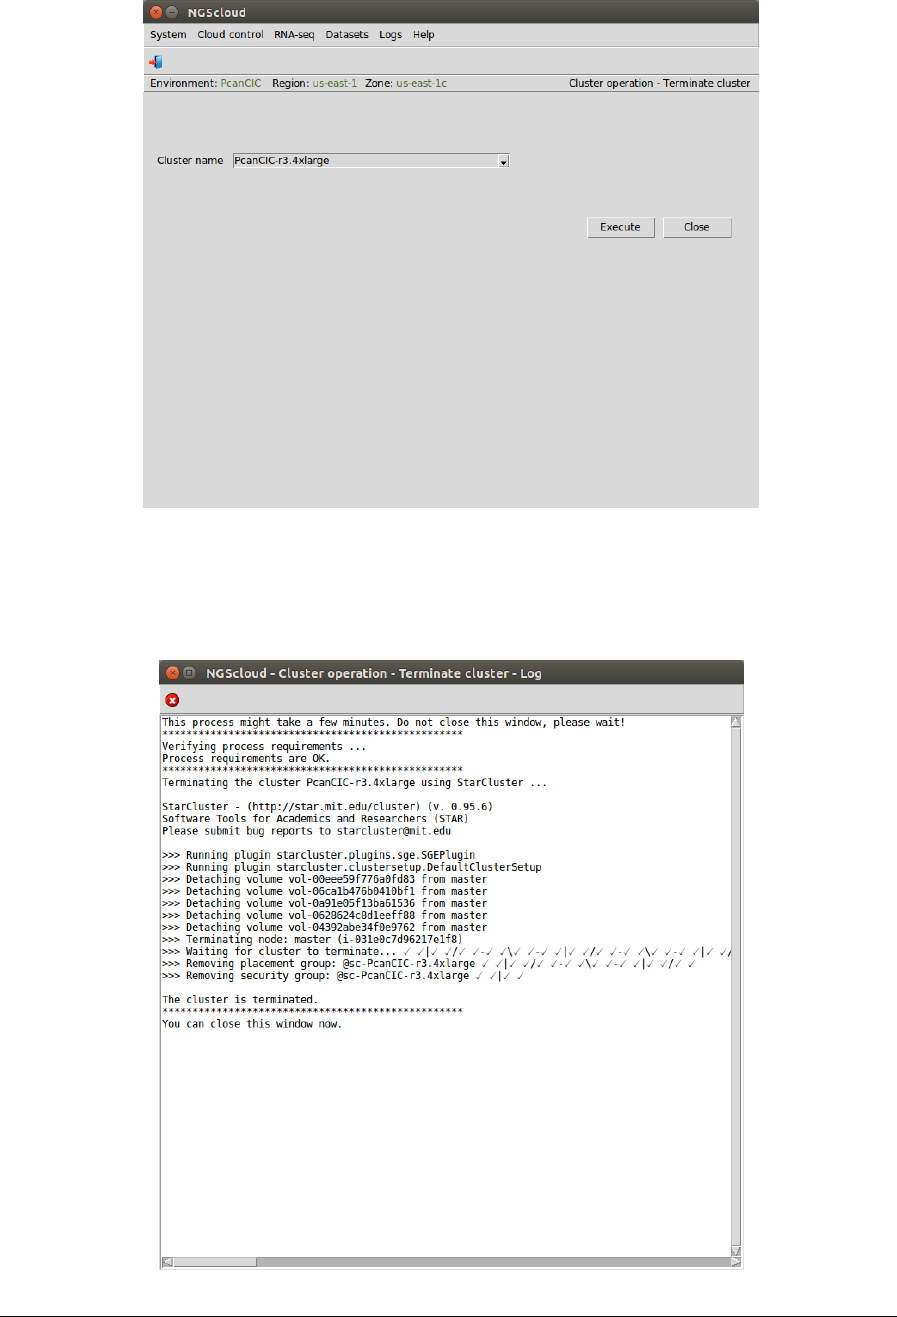
First, we select the menu item with this path:
Main menu > Cloud control > Cluster operation > Terminate cluster
NGScloud Manual
Page 60
In the raised window, we select PcanCIC-r3.4xlarge in the Cluster name combo-box; and then
we press the Execute button:
A window is raised displaying the run log:

NGScloud Manual
Page 61
Now we create a cluster with a t2.micro template. We select the menu item with this path:
Main menu > Cloud control > Cluster operation > Create cluster
In the raised window, we select PcanCIC-r3.xlarge, the template corresponding to a t2.micro
instance type, in Template name combo-box; and then we press the Execute button:
A window is raised displaying the run log:
NGScloud Manual
Page 62
When the cluster is started, infrastructure software will be installed. At the end of the
installation, an email is sent, informing of its completion:
NGScloud Manual
Page 63
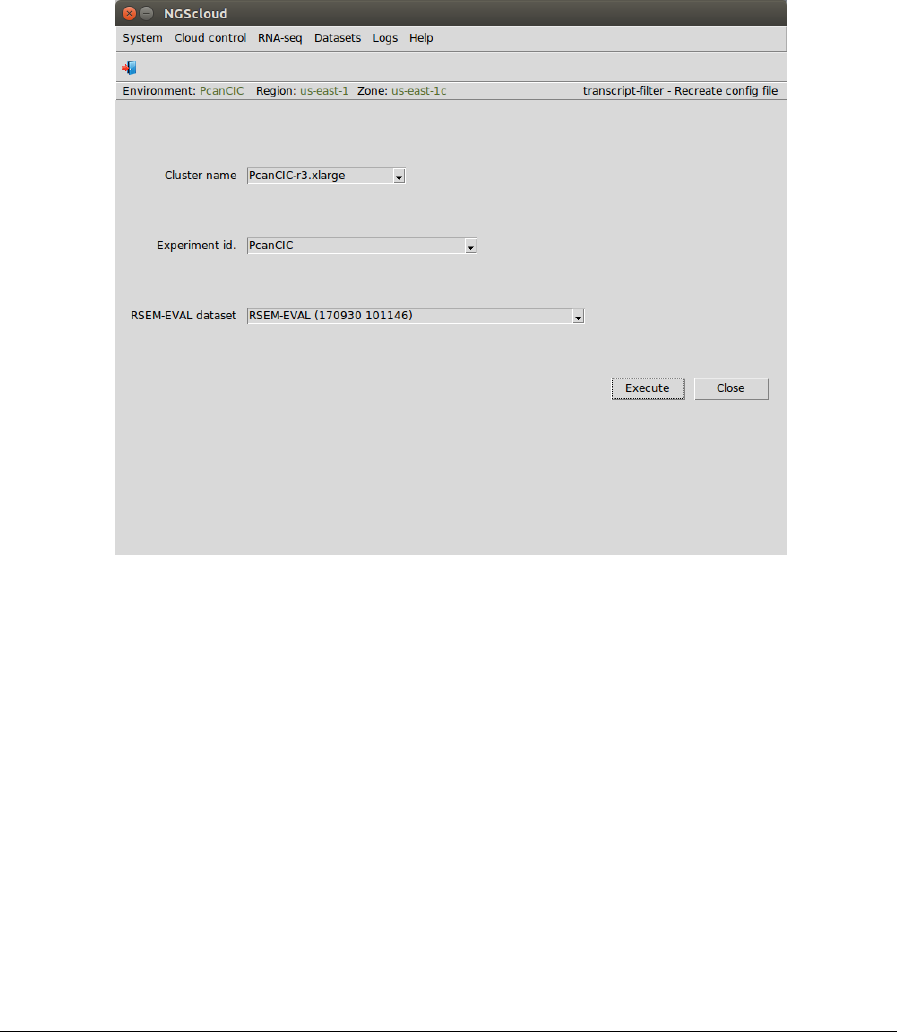
Transcriptome filtering using transcript-filter
Transcript-filter uses a result of RSEM-EVAL to filter transcripts by length (max or min), or by
FPKM or TPM. To do this step, we create the config file by selecting the menu item with this
path:
Main menu > RNA-seq > Transcriptome filtering > transcript.filter (NGShelper package) >
Recreate config file
In the raised window, we select PcanCIC-r3.xlarge in the Cluster name combo-box, PcanCIC in
the Experiment id combo-box, and RSEM-EVAL (170930 101146) in the RSEM-EVAL dataset
combo-box. Then we press the Execute button:
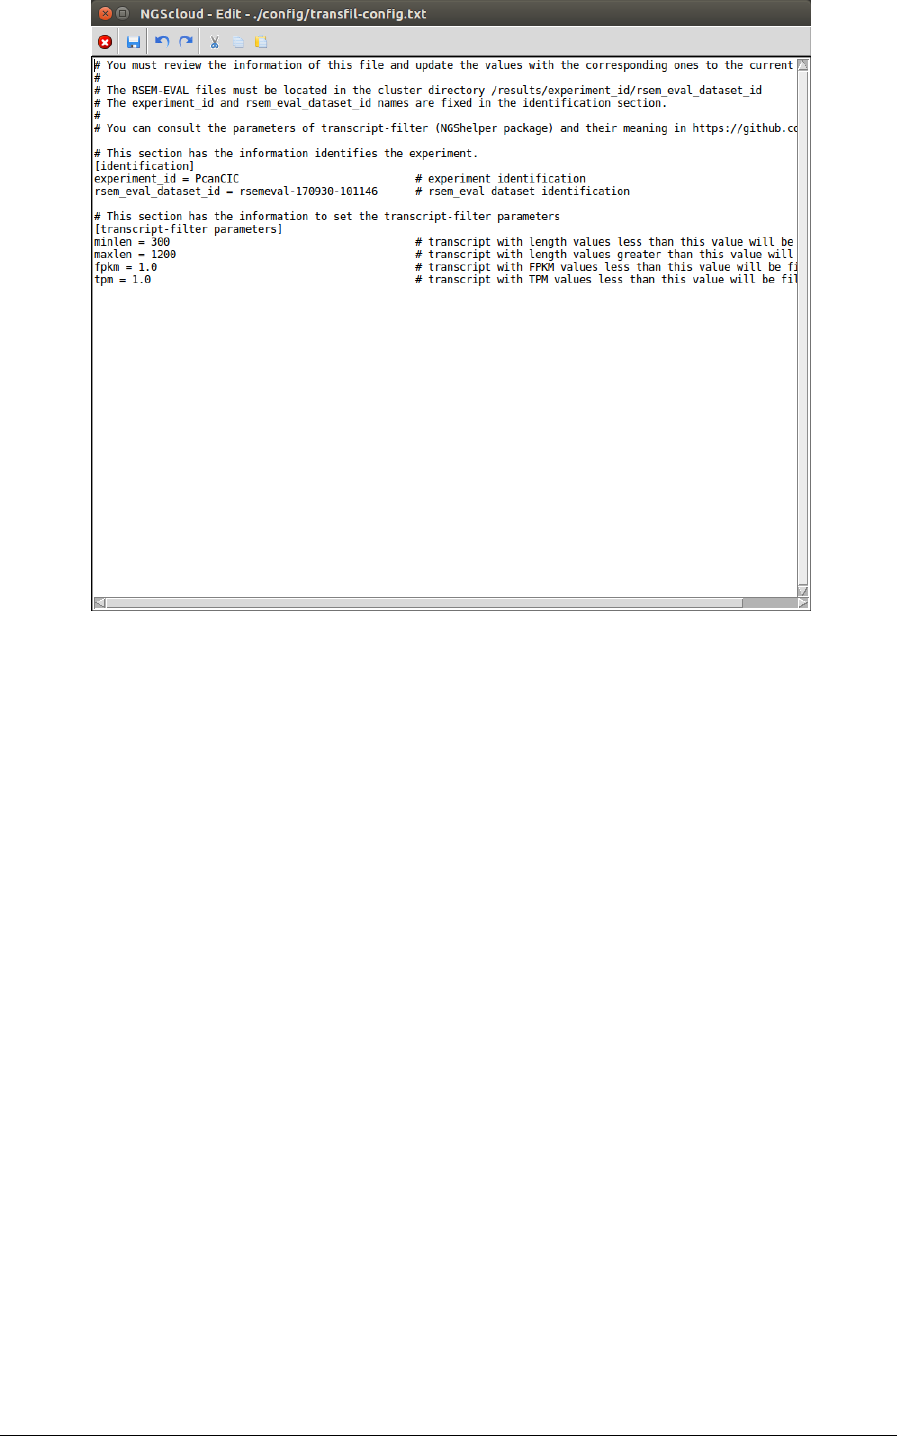
In the next window, we can examine the config file. There are two sections: identification, with
the experiment and the RSEM-EVAL dataset identifications; and transcript-filter parameters,
with the minimum and maximum lengths of transcripts, and the minimum FPKM and TPM
values selected by the user:
NGScloud Manual
Page 64
We run the assembly process in the cluster by selecting the menu item with this path:
Main menu > RNA-seq > Transcriptome filtering > transcript.filter (NGShelper package) > Run
transcriptome filtering process
In the raised window, we select PcanCIC-r.xlarge in the Cluster name combo-box; and then we
press the Execute button:

NGScloud Manual
Page 65
A window is raised showing the submission log:
NGScloud Manual
Page 66
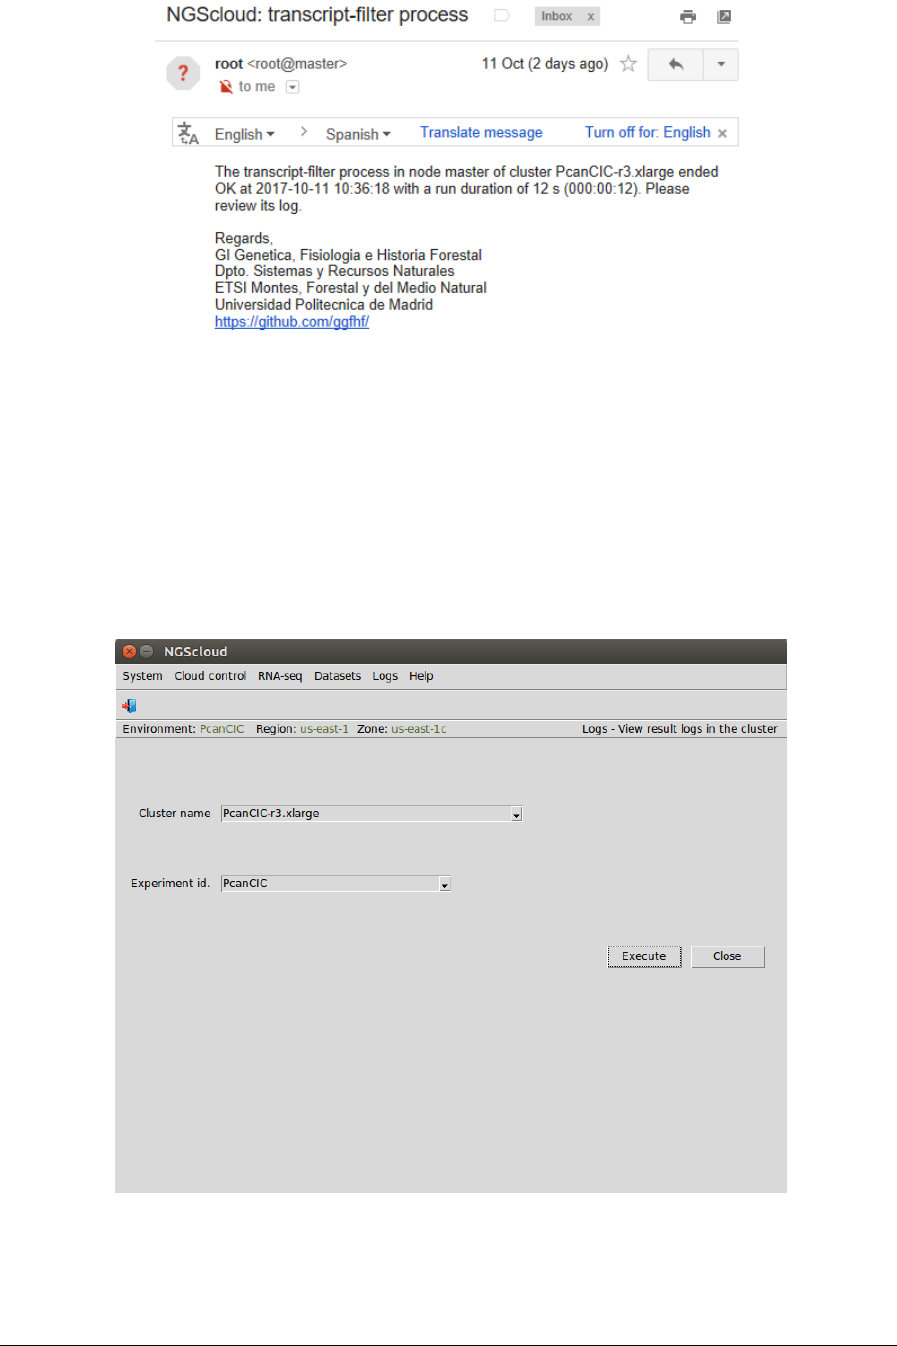
At the end of the run, an email is sent, informing of its completion:
We can view the process log during and after the run. To do so, we select the menu item with
this path:
Main menu > Logs > View result logs in the cluster
In the raised window, we select PcanCIC-r3.xlarge in the Cluster name combo-box and PcanCIC
in the Experiment id combo-box; and then we press the Execute button:
NGScloud Manual
Page 67
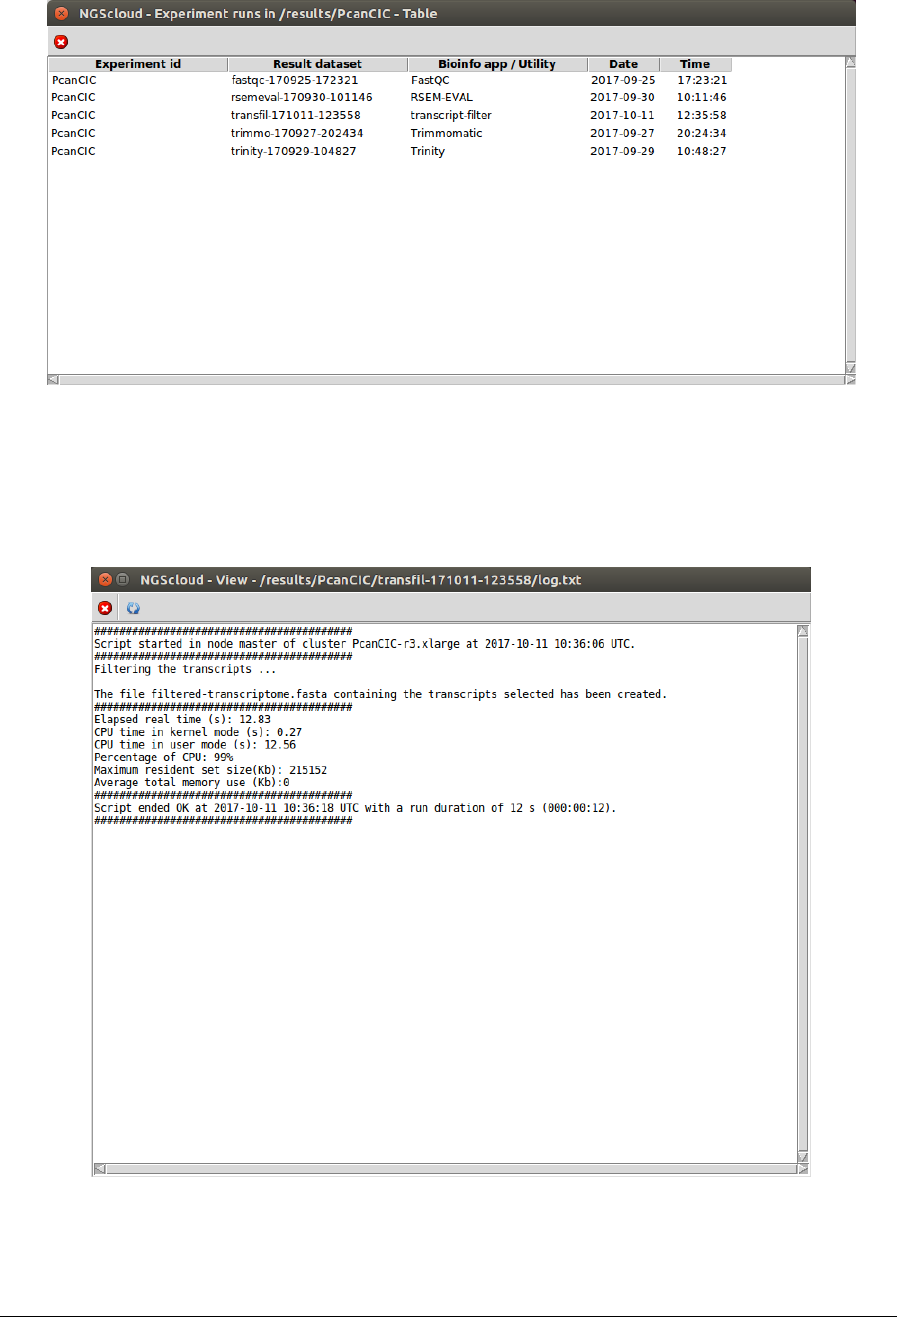
A window with the result datasets for each run of the bioinformatic programs that correspond
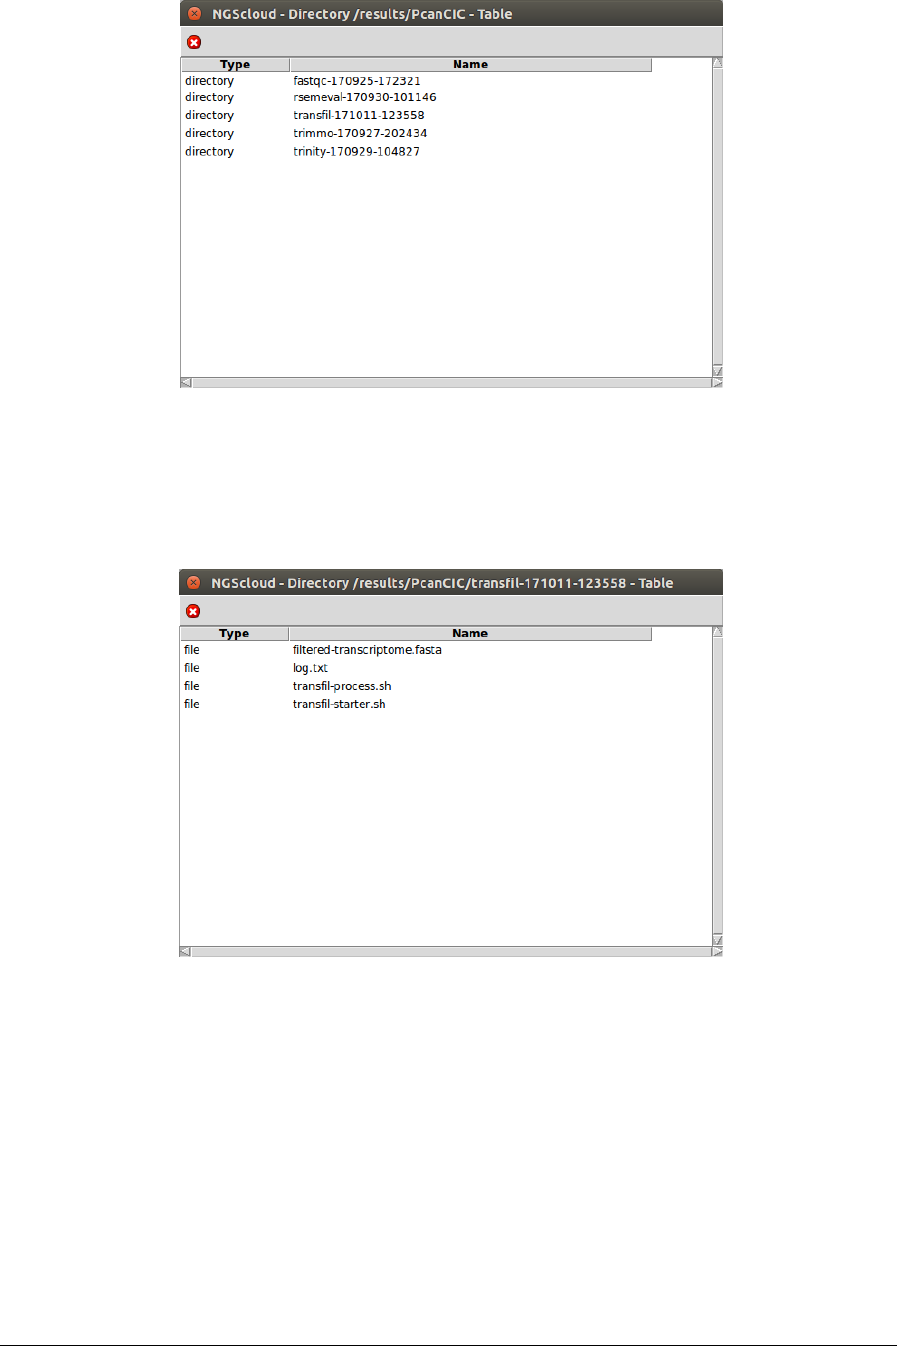
to the experiment PcanCIC is shown:
Five result datasets are shown. We click on the transfil-171011-123558 row, which is the
dataset generated by the Trinity run, and another window appears with its corresponding log:

NGScloud Manual
Page 68
Now, we are going to list the assembly generated by transcript-filter. We select the menu item
with this path:
Main menu > Dataset > List dataset
In the raised window, we select PcanCIC-r3.xlarge in the Cluster name combo-box and results
in the Volume combo-box. Then we press the Execute button:
Now, we click in the PcanCIC row:
NGScloud Manual
Page 69
Next, a window with the result datasets of the experiment PcanCIC is shown:
We click on the transfil-171011-123558 row, and another window appears with the content of
the files corresponding to this assembly.
The file filtered-transcriptome.fasta is the one corresponding to the transcriptome generated
by transcript.filter. To inspect its characteristics, we click on it:

NGScloud Manual
Page 70
Transcriptome clustering using CD-HIT-EST
First, we create the config file by selecting the menu item with this path:
Main menu > RNA-seq > Transcriptome filtering > CD-HIT-EST (CD-HIT package) > Recreate
config file
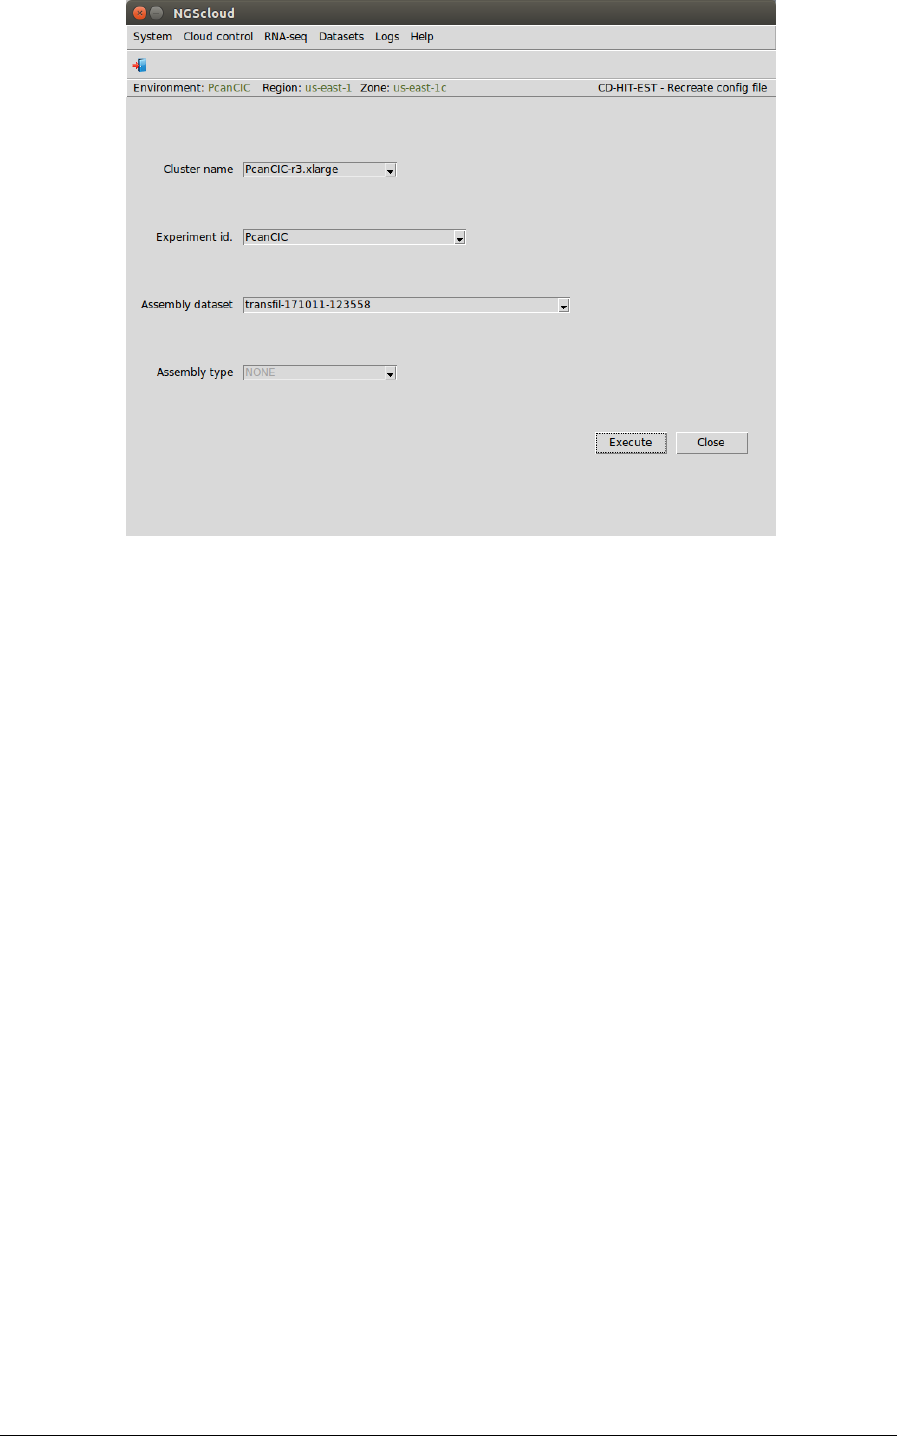
In the raised window, we select PcanCIC-r3.xlarge in the Cluster name combo-box, PcanCIC in
the Experiment id combo-box, and transcript-filter (171011 123538) in the Assembly dataset
combo-box. The Assembly type combo-box is only activated when the assembly dataset was
generated by SOAPdenovo-Trans; in this case, the combo-box has two items: CONTIGS and
SCAFFOLDS. Then we press the Execute button:
NGScloud Manual
Page 71
In the next window, we can examine the config file. In this example, it has two sections:
identification, with the experiment and the assembly dataset identifications; CD-HIT-EST
parameters, with several parameters used by CD-HIT-EST, where we can modify the value of
threads number to 0 (this value indicates that all CPUs sill be used), the value of memory_limit
to 0 (this value indicates unlimited value), and the value sequence identity threshold to 0.8 (or
any desired value above 0.8):

NGScloud Manual
Page 72
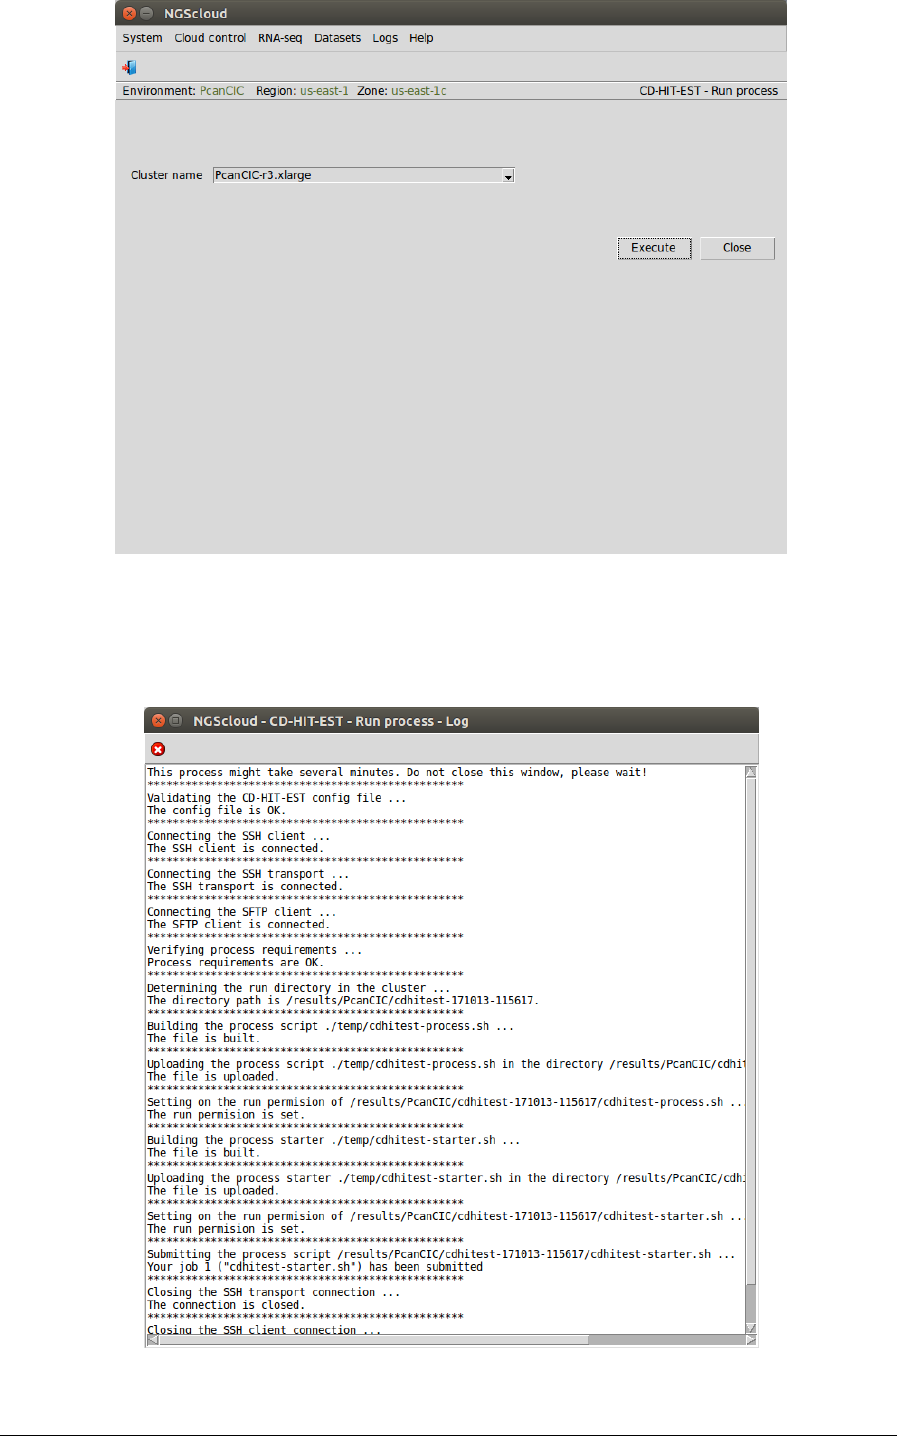
We run the assembly process in the cluster by selecting the menu item with this path:
Main menu > RNA-seq > Transcriptome filtering > CD-HIT-EST (CD-HIT package) > Run
transcriptome filtering process
In the raised window, we select PcanCIC-r3.xlarge in the Cluster name combo-box; and then
we press the Execute button:
NGScloud Manual
Page 73
A window is raised showing the submission log:
NGScloud Manual
Page 74
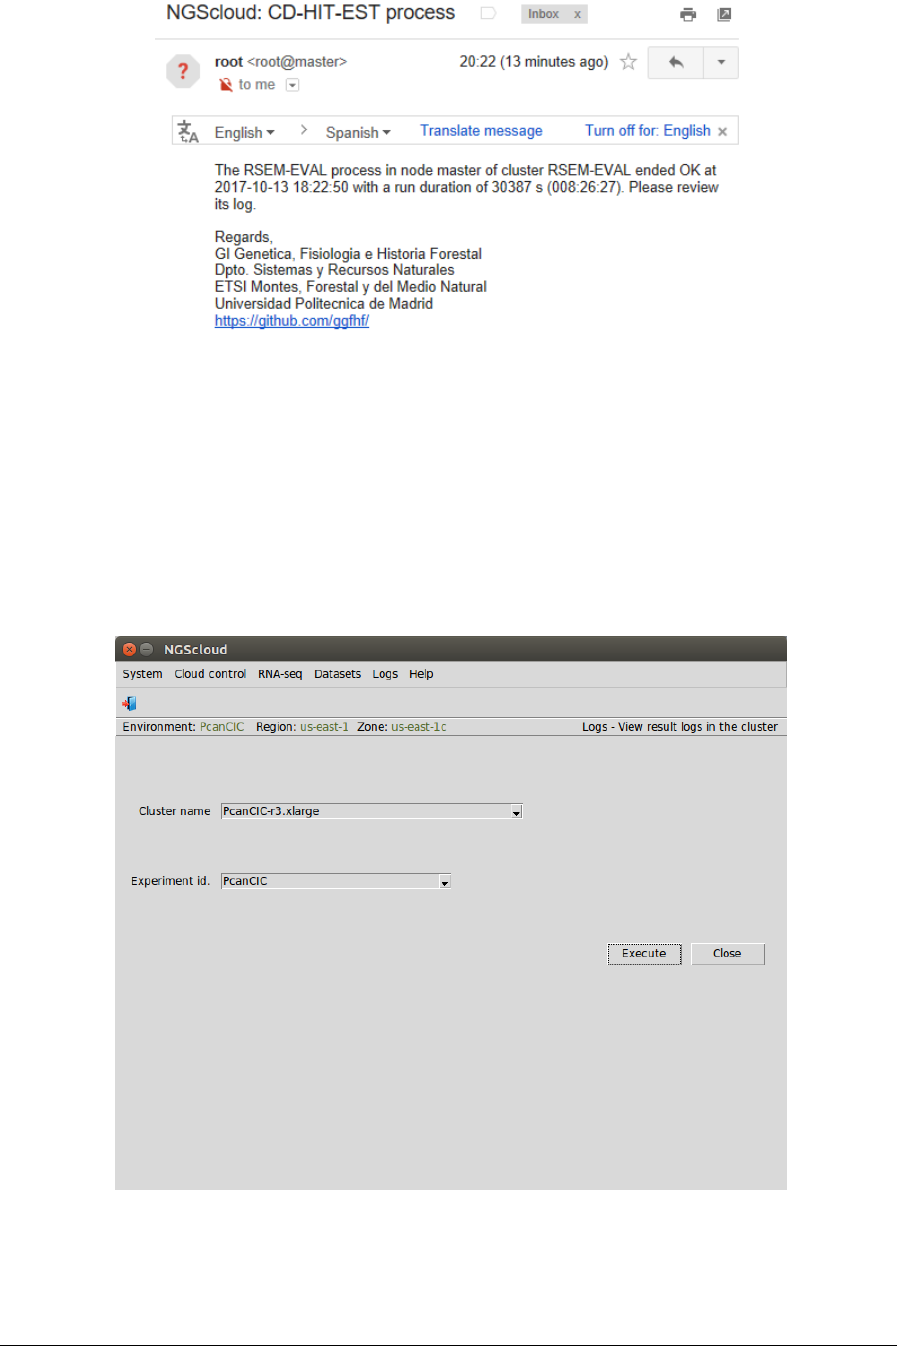
At the end of the run, an email is sent, informing of its completion:
We can view the process log during and after the run. To do so, we select the menu item with
this path:
Main menu > Logs > View result logs in the cluster
In the raised window, we select PcanCIC-r3.xlarge in the Cluster name combo-box and PcanCIC
in the Experiment id combo-box; and then we press the Execute button:
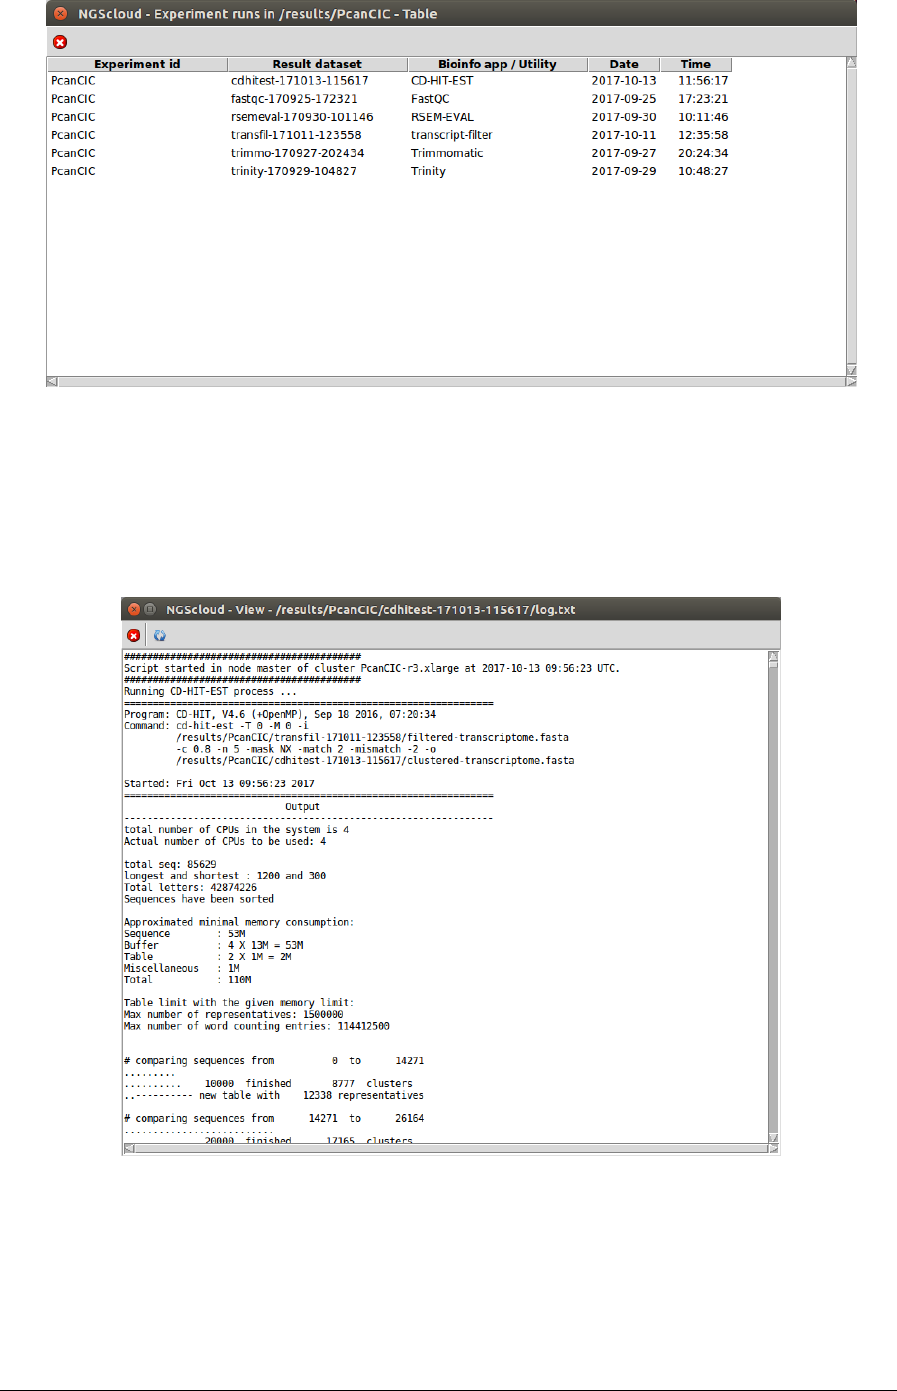
A window with the result datasets for each run of the bioinformatic programs that correspond
to the experiment PcanCIC is shown:
NGScloud Manual
Page 75
Six result datasets are shown. We click on the cdhitest-171013-115617 row, which is the
dataset generated by the CD-HIT-EST run, and another window appears with its corresponding
log:
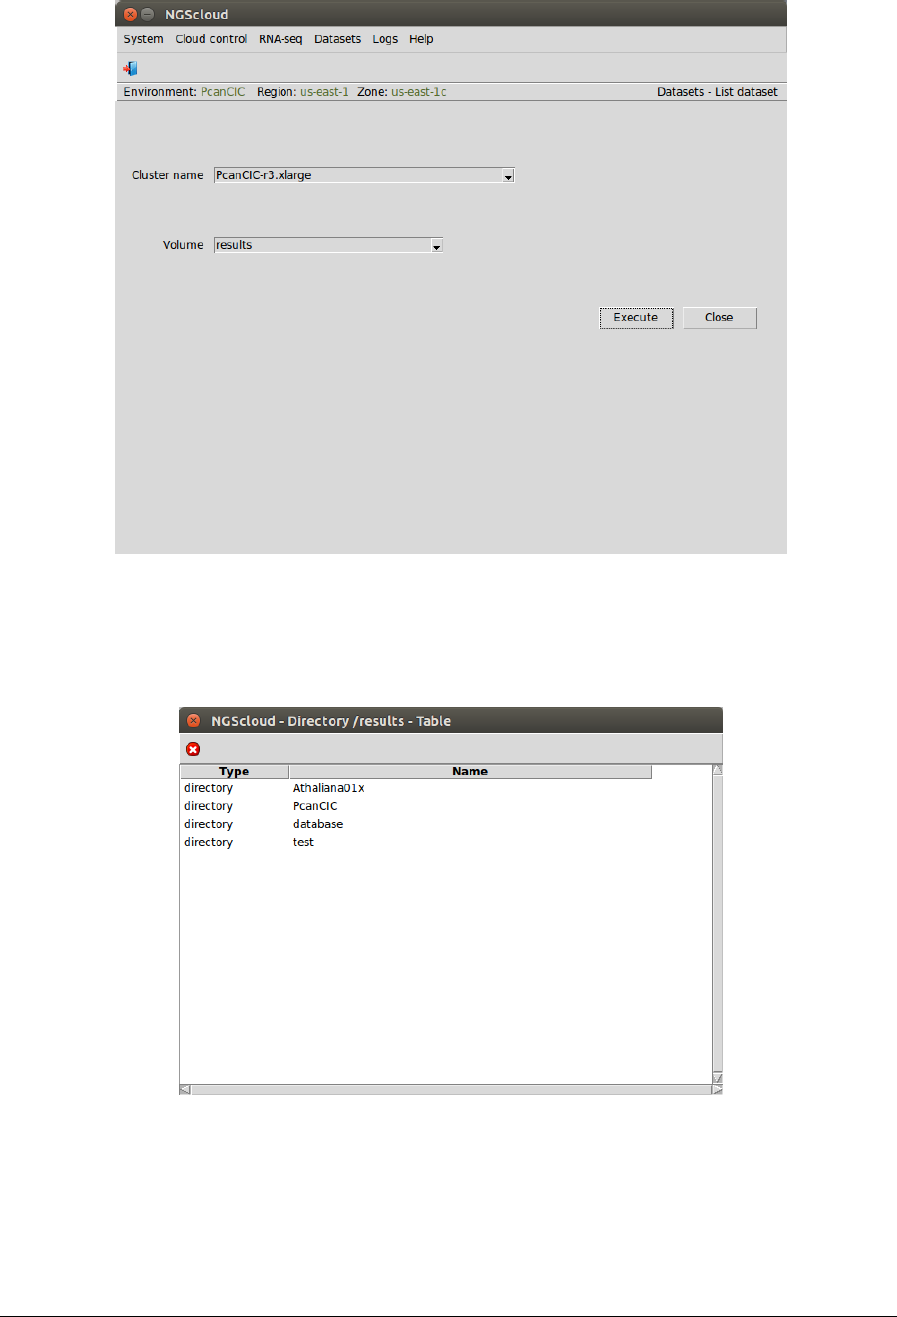
Now, we are going to list the assembly generated by CD-HIT-EST. We select the menu item
with this path:
Main menu > Dataset > List dataset
NGScloud Manual
Page 76
In the raised window, we select PcanCIC-r4.xlarge in the Cluster name combo-box and results
in the Volume combo-box. Then we press the Execute button:
Now, we click in the PcanCIC row:
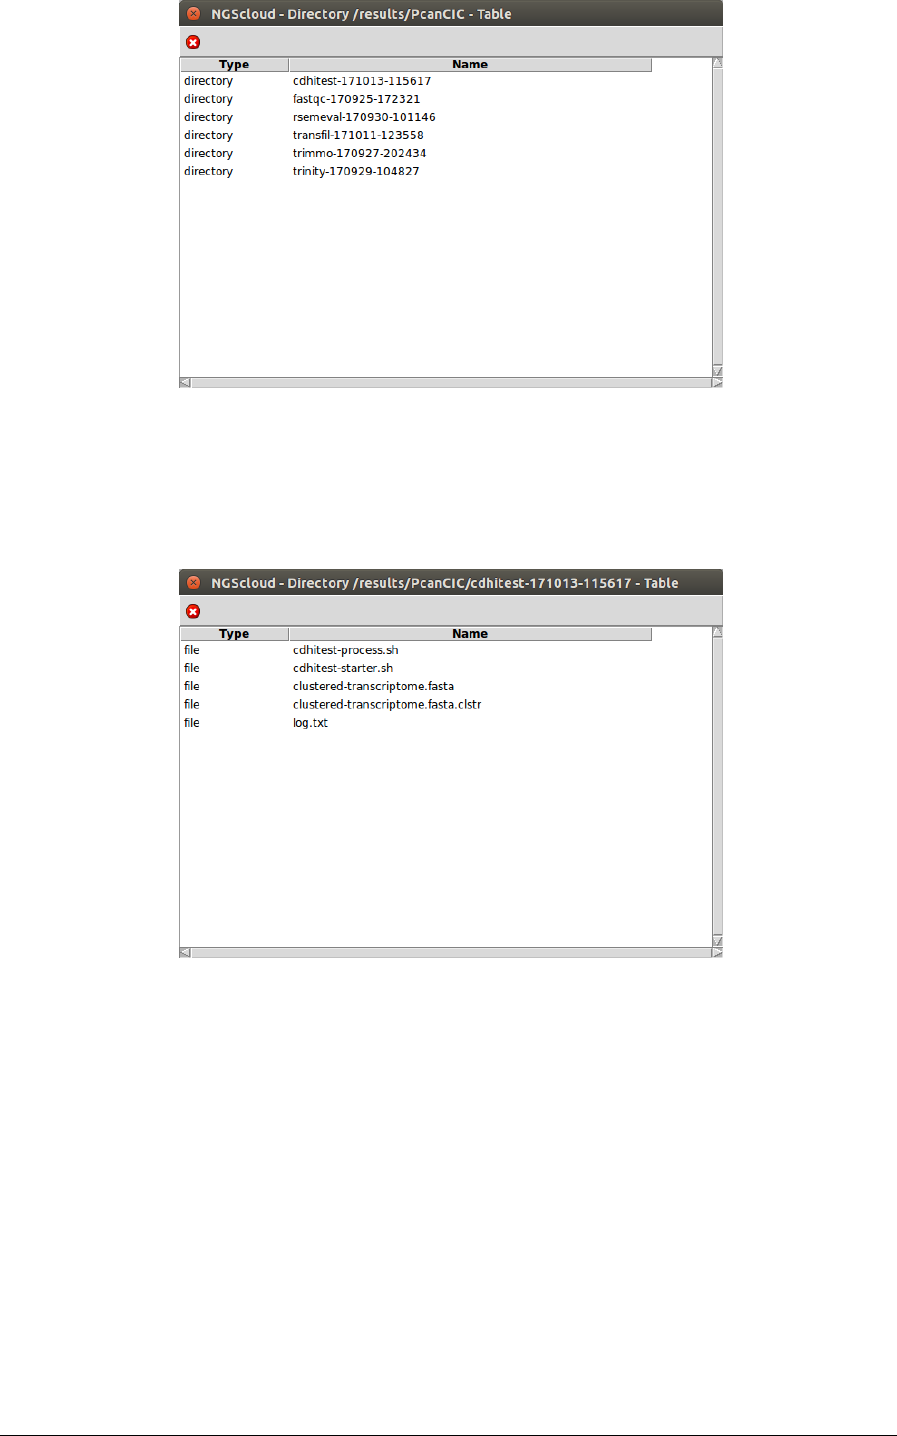
Next, a window with the result datasets of the experiment PcanCIC is shown:
NGScloud Manual
Page 77
We click on the cdhitest-171013-115617 row, and another window appears with the content
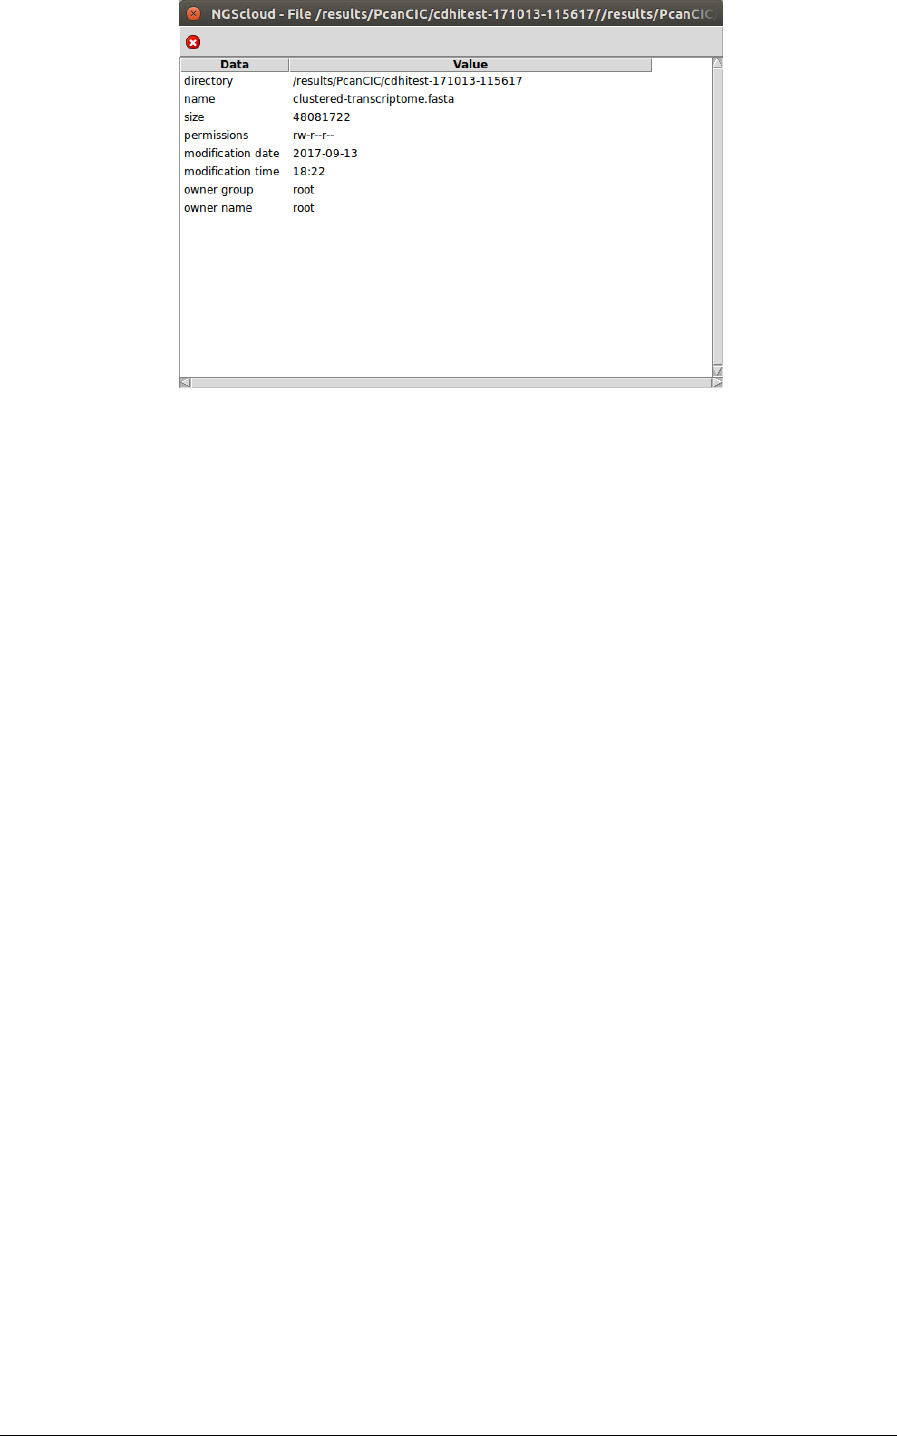
of the files corresponding to this assembly.
The file Trinity.fasta is the one corresponding to the transcriptome. To observe its
characteristics, we click on it:
NGScloud Manual
Page 78
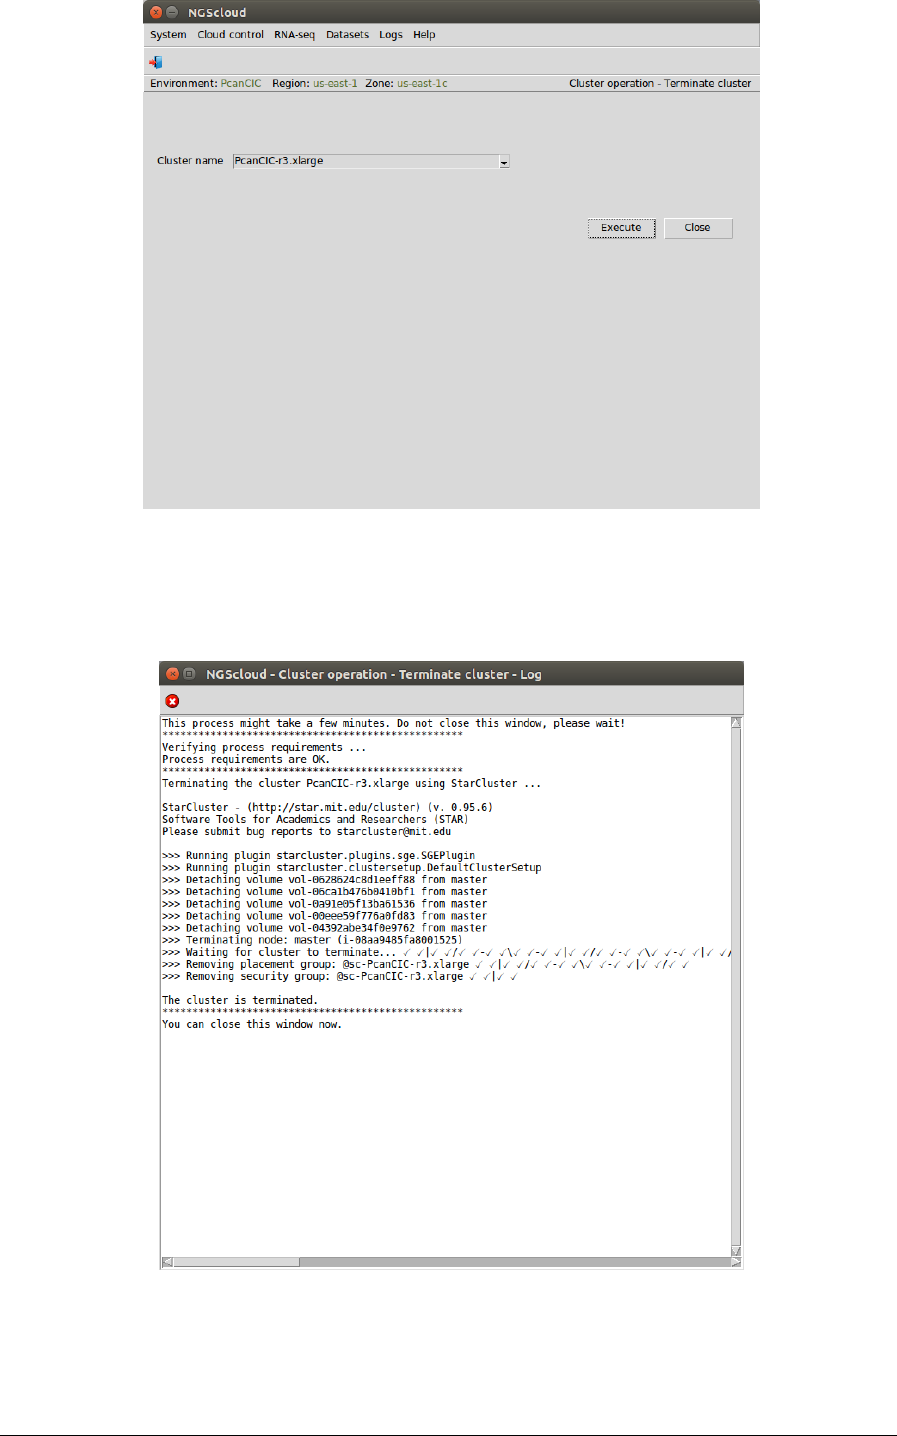
Terminate the cluster with r3.xlarge template and create another cluster with
c3.xlarge template
Now we are going to terminate the PcanCIC-r3.xlarge and to create a cluster with a c3.xlarge
template with the same CPU number but with less memory amount because it is not necessary
in order to annotate the transcriptome and so we will save money.
First, we select the menu item with this path:
Main menu > Cloud control > Cluster operation > Terminate cluster
In the raised window, we select PcanCIC-r3.xlarge in the Cluster name combo-box; and then
we press the Execute button:
NGScloud Manual
Page 79
A window is raised displaying the run log:

NGScloud Manual
Page 80
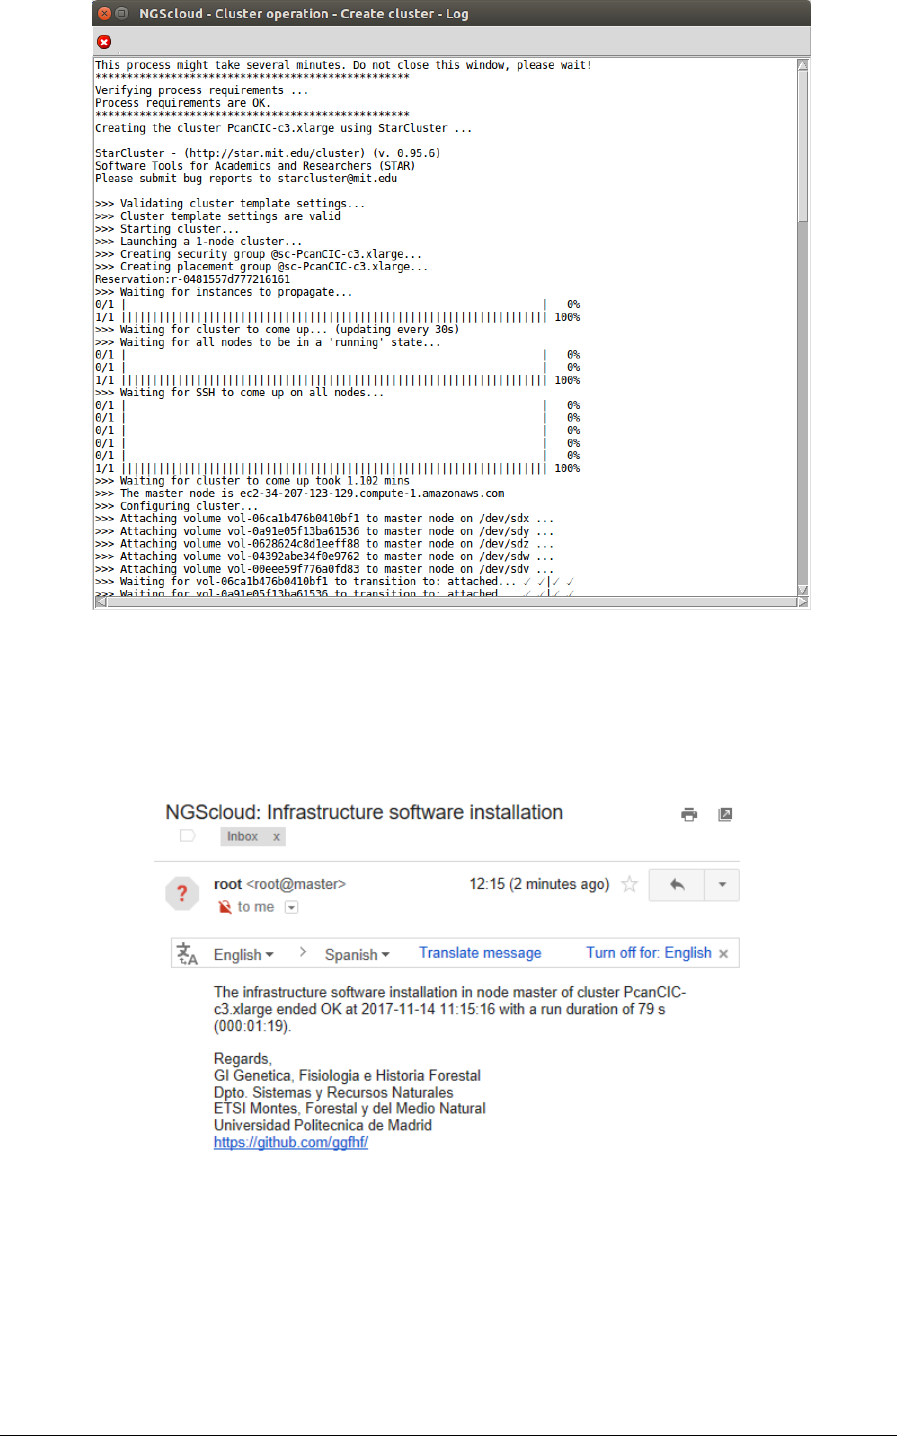
Now we create a cluster with a c3.xlarge template. We select the menu item with this path:
Main menu > Cloud control > Cluster operation > Create cluster
In the raised window, we select PcanCIC-c3.xlarge, the template corresponding to a c3.xlarge
instance type, in Template name combo-box; and then we press the Execute button:
A window is raised displaying the run log:
NGScloud Manual
Page 81
When the cluster is started, infrastructure software will be installed. At the end of the
installation, an email is sent, informing of its completion:
NGScloud Manual
Page 82
Upload the protein database to the cluster
Previously we had downloaded the FASTA protein files from TAIR (The Arabidopsis Information
Resource) whose URL is
https://www.arabidopsis.org/download_files/Proteins/Araport11_protein_lists/Araport11_ge
nes.201606.pep.fasta.gz
to the local computer and we had built the database with the program makeblastdb. The name
of database file passed to makeblastdb is Araport11_genes.
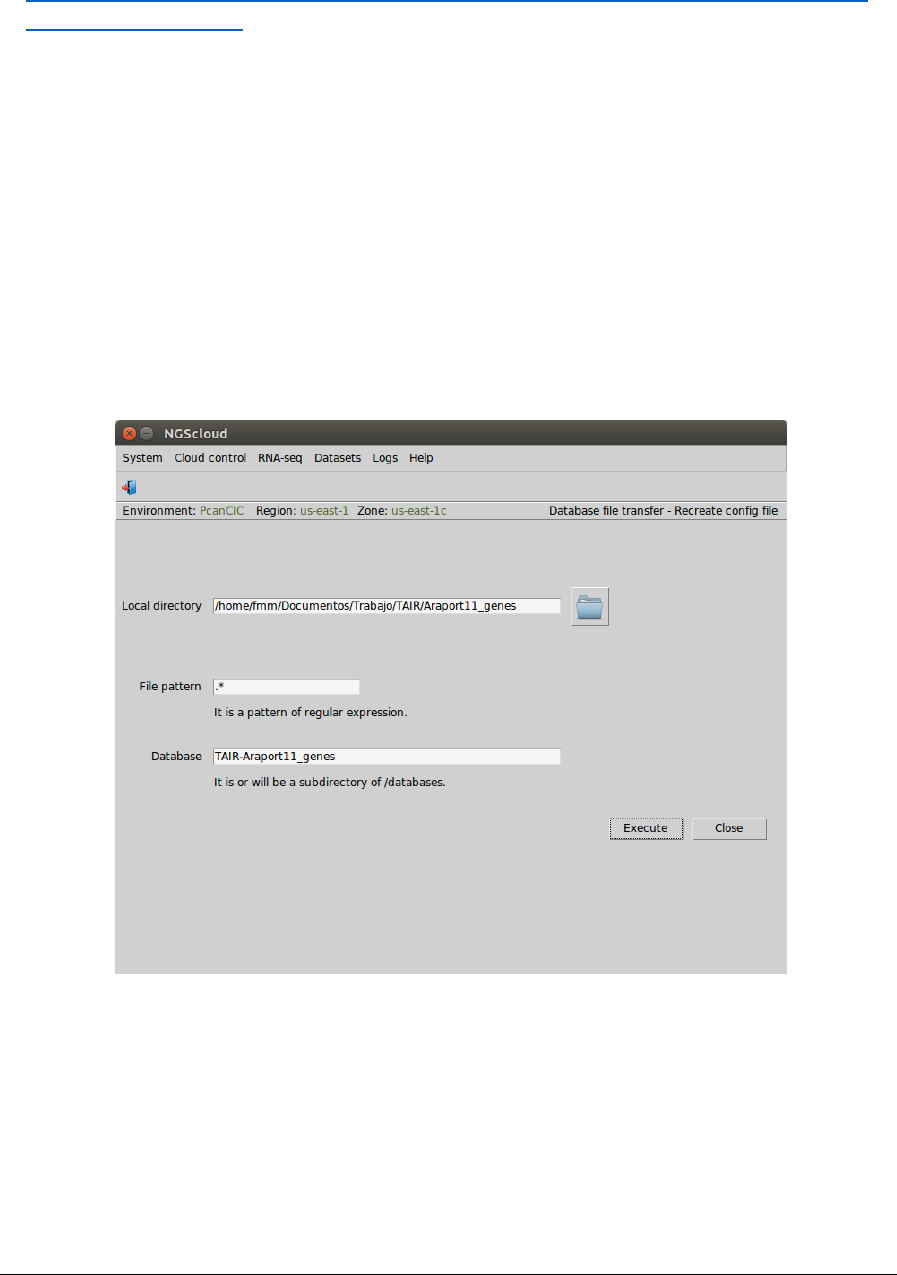
To create a config file to upload the database files to a cluster, select the menu item with this
path:
Main menu > Dataset > Database file transfer > Recreate config file
In the raised window, we type the local directory where the database is in the Local directory
textbox (or we select it using the next button), .* as the pattern to select the files in the File
pattern textbox, and TAIR-Araport11_genes in the Database textbox. Then we press the
Execute button:
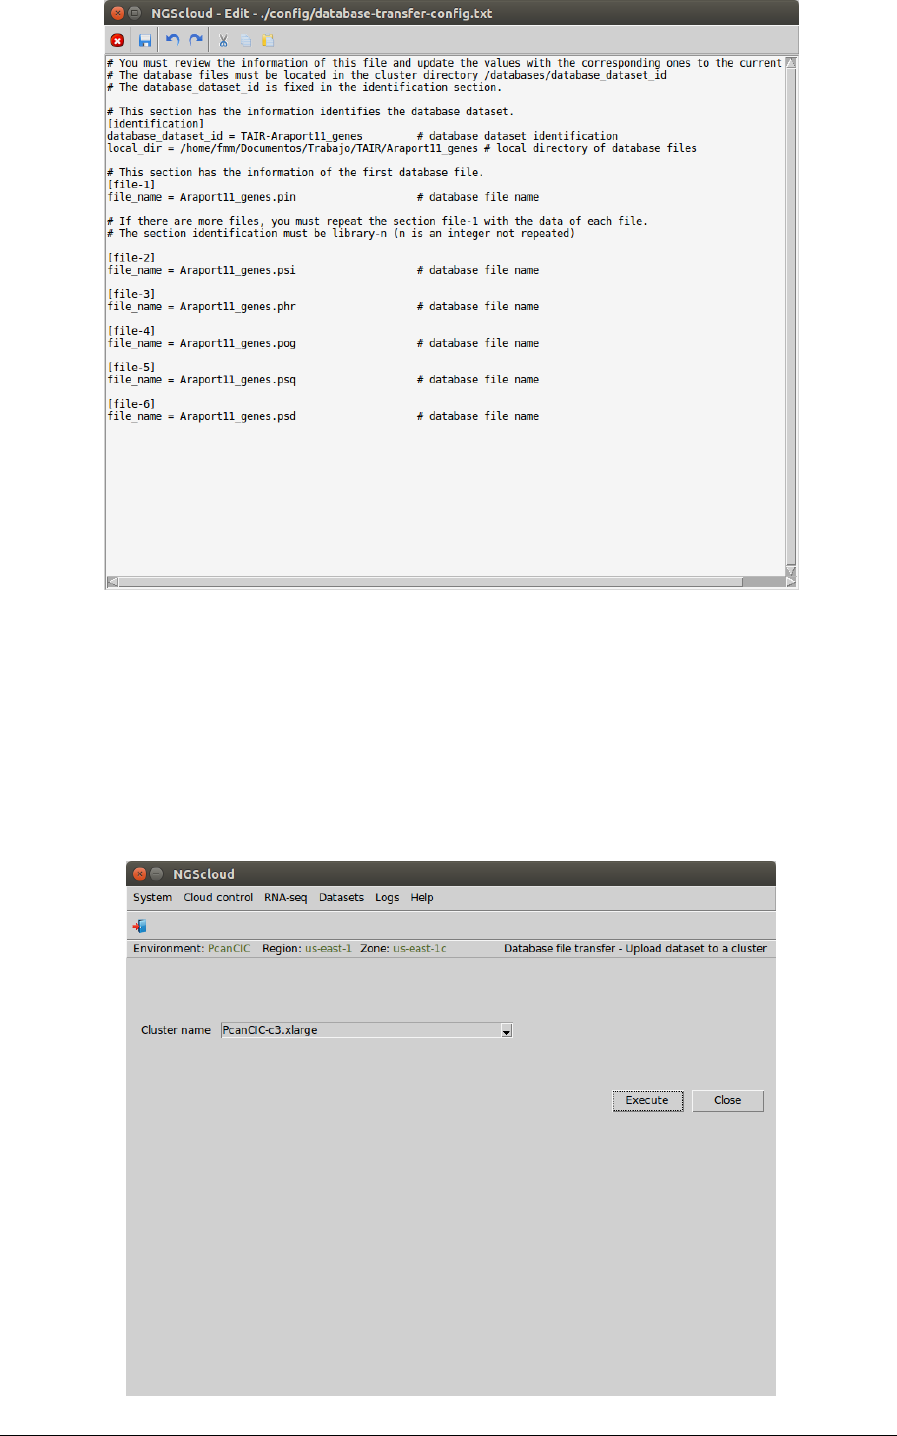
In the next window, we can edit the config file created. In this example, we can notice that the
configure file has a section identification, with the database identification and the local
directory where the database is; and several section file-i, with the name of each file of the
local directory:
NGScloud Manual
Page 83
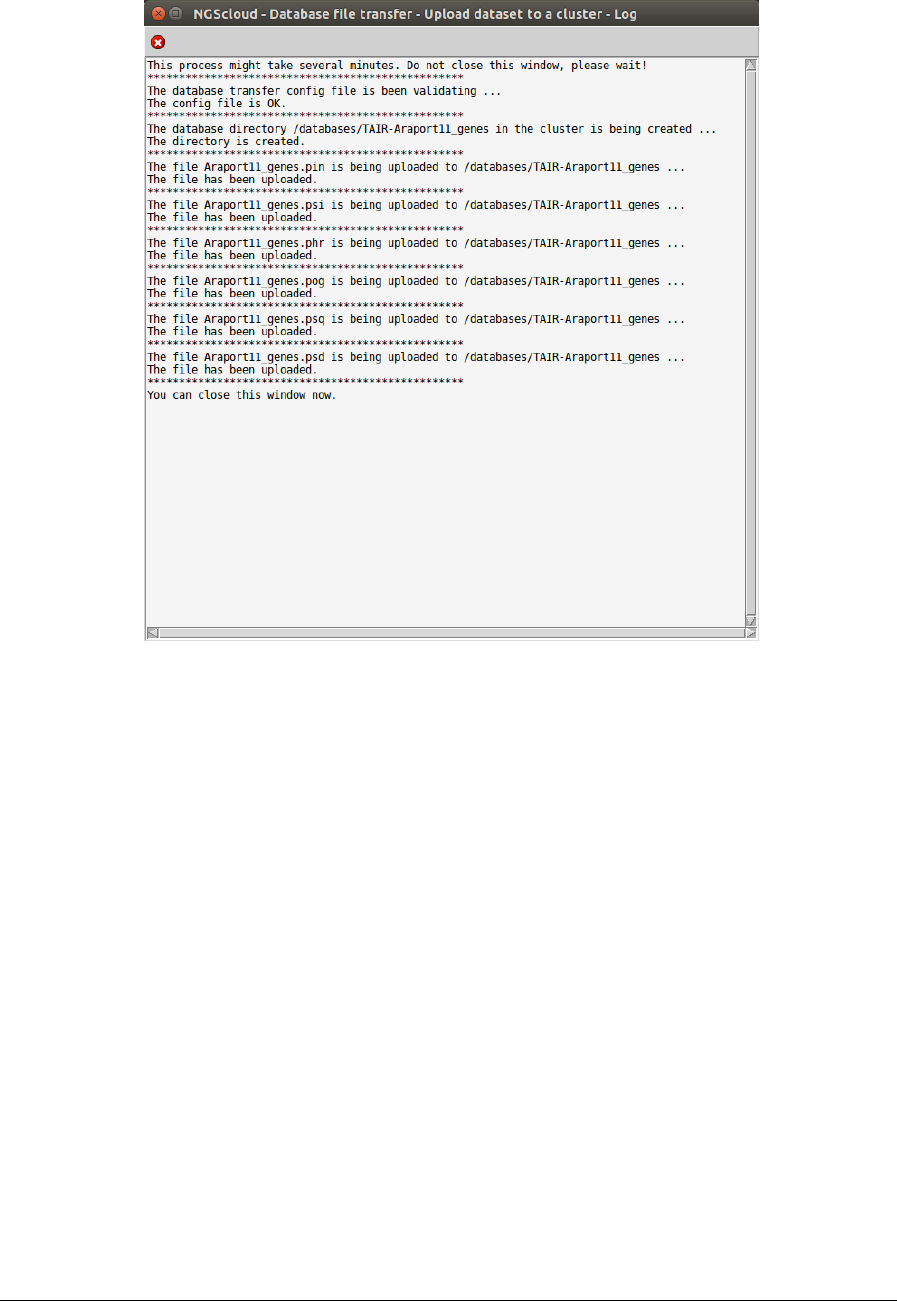
To upload the database files to the cluster, we select the menu item with this path:
Main menu > Dataset > Database file transfer > Upload dataset to a cluster
In the raised window, we select PcanCIC-c3.large in Cluster name combo-box; and then we
press the Execute button:
NGScloud Manual
Page 84
A window is raised with the upload log:
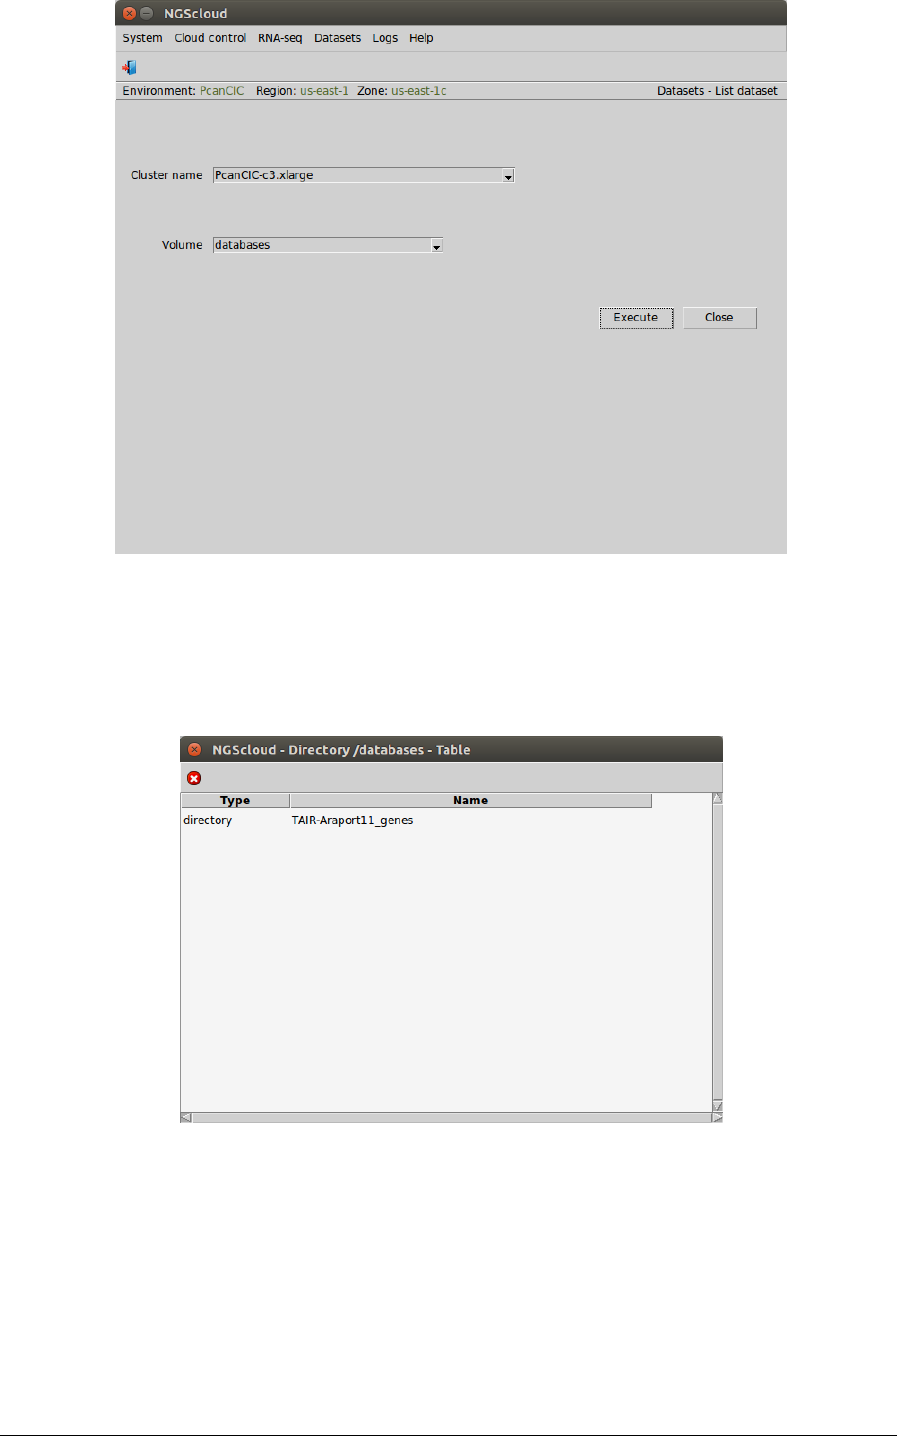
Now, we are going to review the uploaded files. We select the menu item with this path:
Main menu > Dataset > List dataset
In the raised window, we select PcanCIC-c3.xlarge in the Cluster name combo-box and
databases in the Volume combo-box. Then we press the Execute button:
NGScloud Manual
Page 85
We can check the experiments whose read files have been uploaded in the next window. We
click in TAIR-Araport11_genes row:
So far, we only have one: the dataset corresponding to the uploaded-database. We click on it
and another window appears with the content of the uploaded-database:

NGScloud Manual
Page 86
Add nodes to the cluster with a c3.xlarge template
We are going to use transcriptome-blastx to annotate the transcriptome. This program
supports parallelization, so it can use several nodes to increase the run speed. In this example,
we are going to add 4 nodes to the cluster PcanCIC-c3.xlarge. So, we will have 5 nodes
running, the master and the 4 subsidiary nodes, in such a way one node distributing the work
to the other 4.
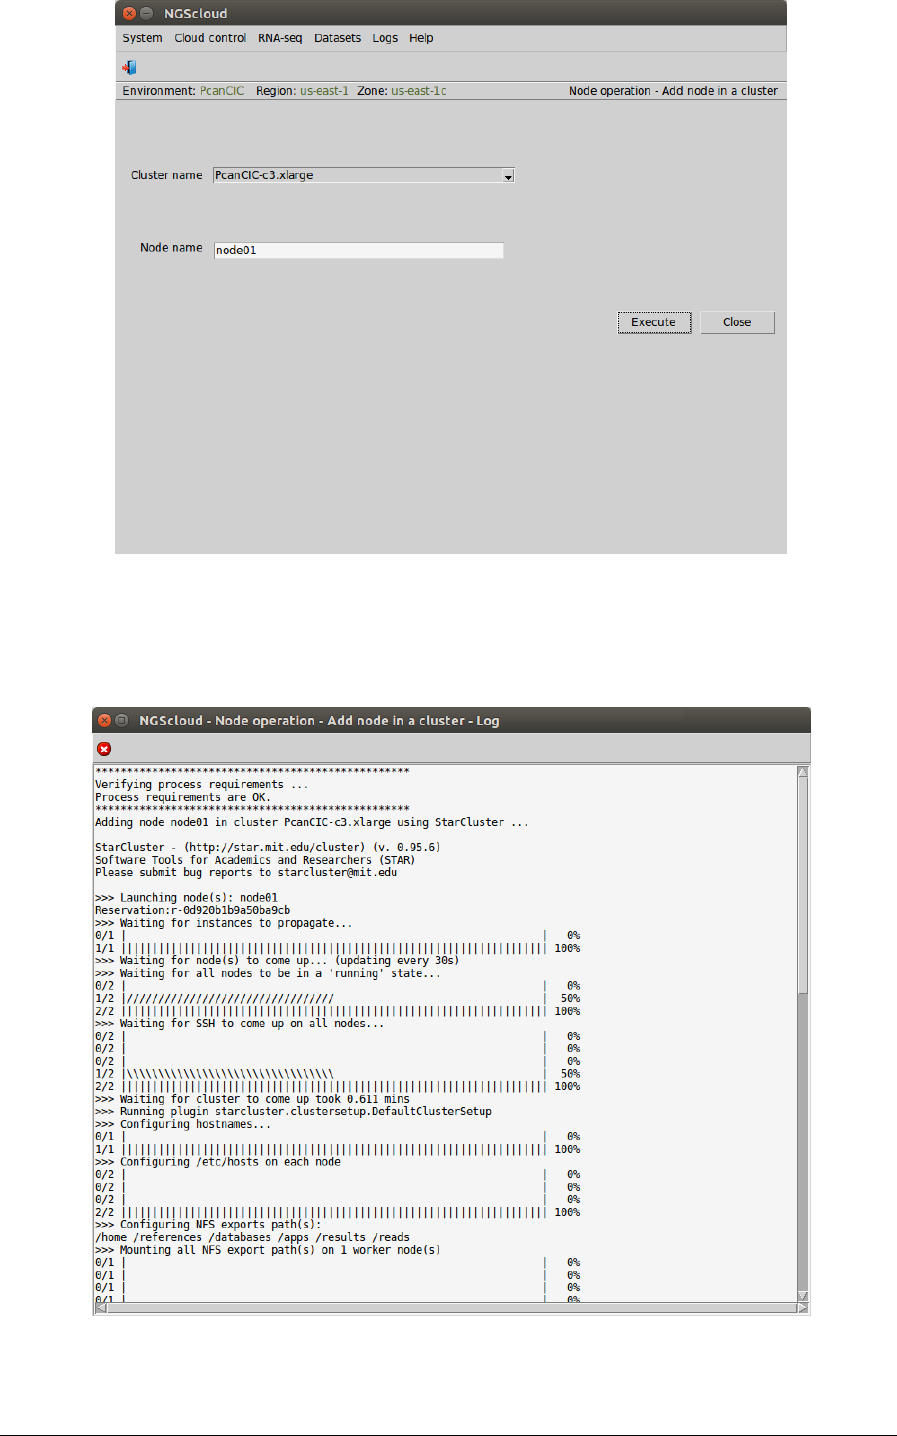
To add a node to a cluster, we select the menu item with this path:
Main menu > Cloud control > Node operation > Add node in a cluster
In the raised window, we select PcanCIC-c3.xlarge in the Cluster name combo-box and node01
in the Volume combo-box. Then we press the Execute button:
NGScloud Manual
Page 87
A window is raised displaying the run log:

NGScloud Manual
Page 88
At the end of the run, an email is sent, informing of its completion:
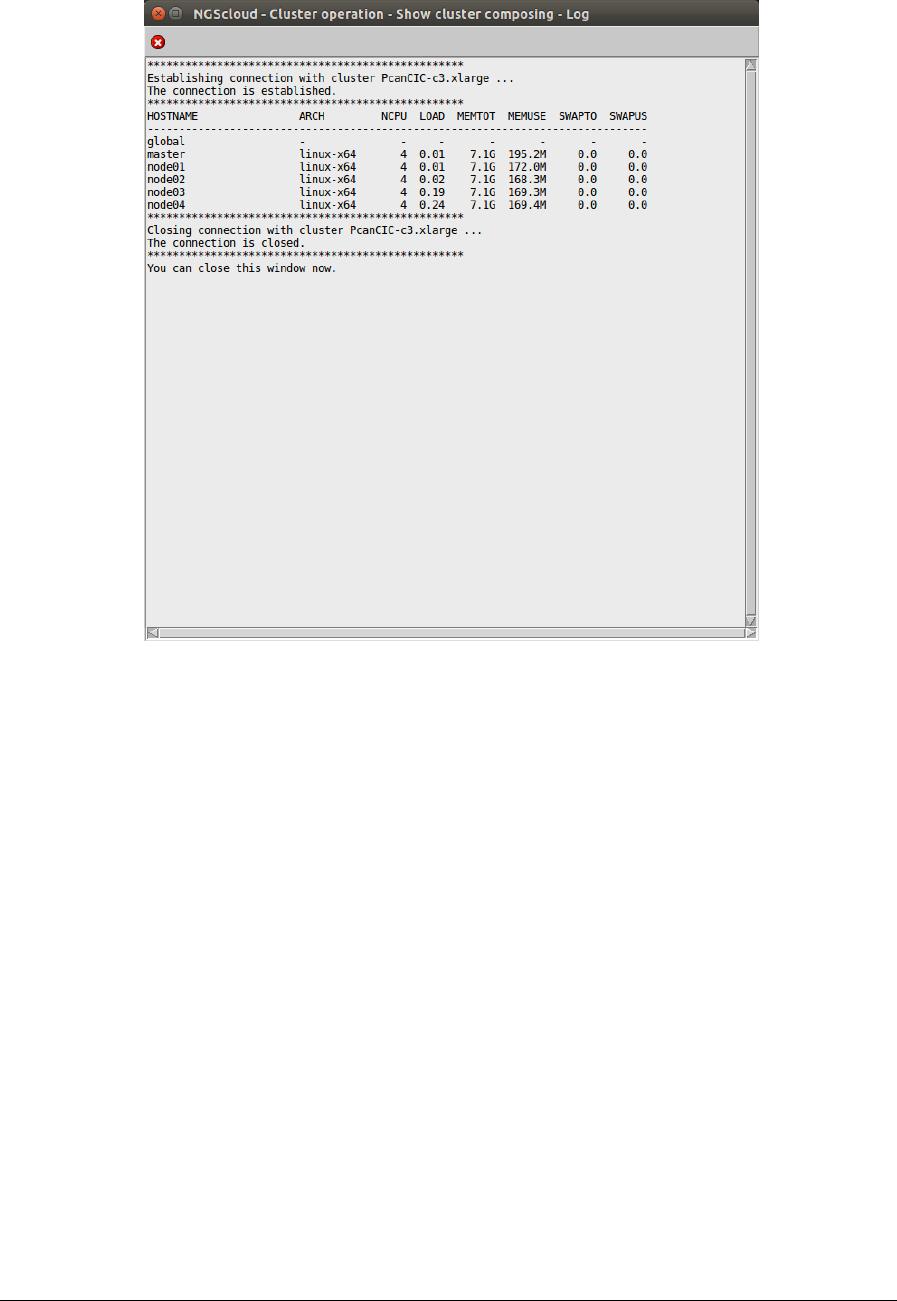
We repeat these actions to add the nodes node2, node3 and node04.
Now we are going to inspect the cluster composition selecting the menu item with this path:
Main menu > Cloud control > Cluster operation > Show cluster composing
In the raised window, we select PcanCIC-c3.xlarge in the Cluster name combo-box and press
the Execute button:
NGScloud Manual
Page 89
A window is raised with the cluster composition and the characteristics of the nodes:
Annotate the filtered and clustered transcriptome using transcriptome-blastx
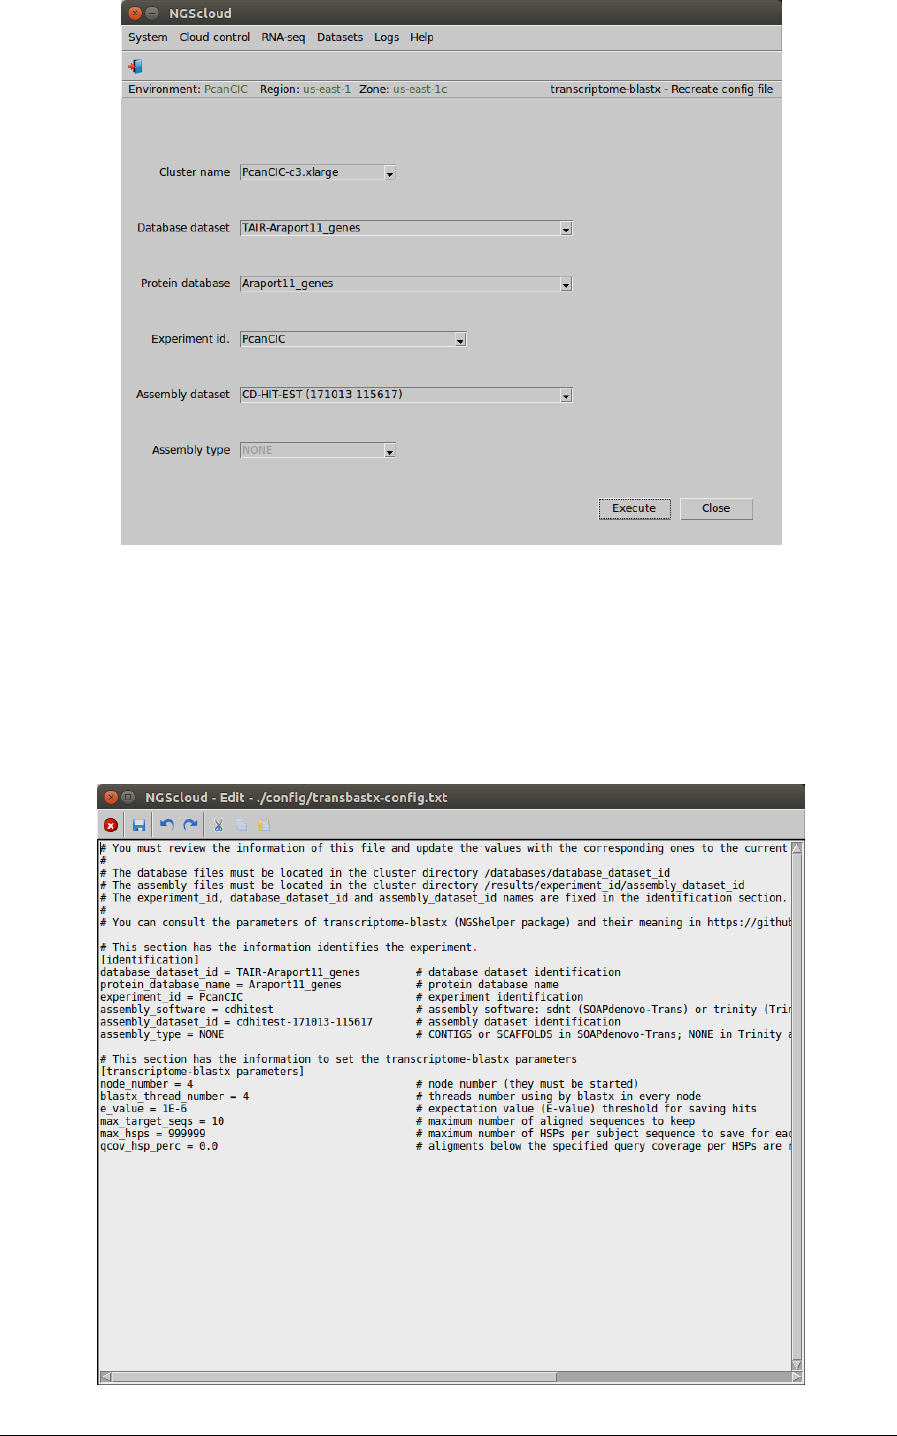
First, we create the config file by selecting the menu item with this path:
Main menu > RNA-seq > Annotation > transcriptome-blastx (NGShelper package) > Recreate
config file
In the raised window, we select PcanCIC-c3.xlarge in the Cluster name combo-box, TAIR-
Araport11_genes in the Database dataset combo-box, Araport11_genes in the Database file
combo-box, PcanCIC in the Experiment id combo-box, and CD-HIT-EST (171013 115617) in the
Assembly dataset combo-box. The Assembly type combo-box is only activated when the
assembly dataset was generated by SOAPdenovo-Trans; in this case, the combo-box has two
items: CONTIGS and SCAFFOLDS. Then we press the Execute button:
NGScloud Manual
Page 90
In the next window, we can examine the config file. There are two sections: identification, with
the database, experiment and assembly identifications; and transcriptome-blastx parameters,
with the parameters used by transcriptome-blastx. We modify the node number to 4 and the
threads number by node to 4 (every node has 4 CPUs):
NGScloud Manual
Page 91
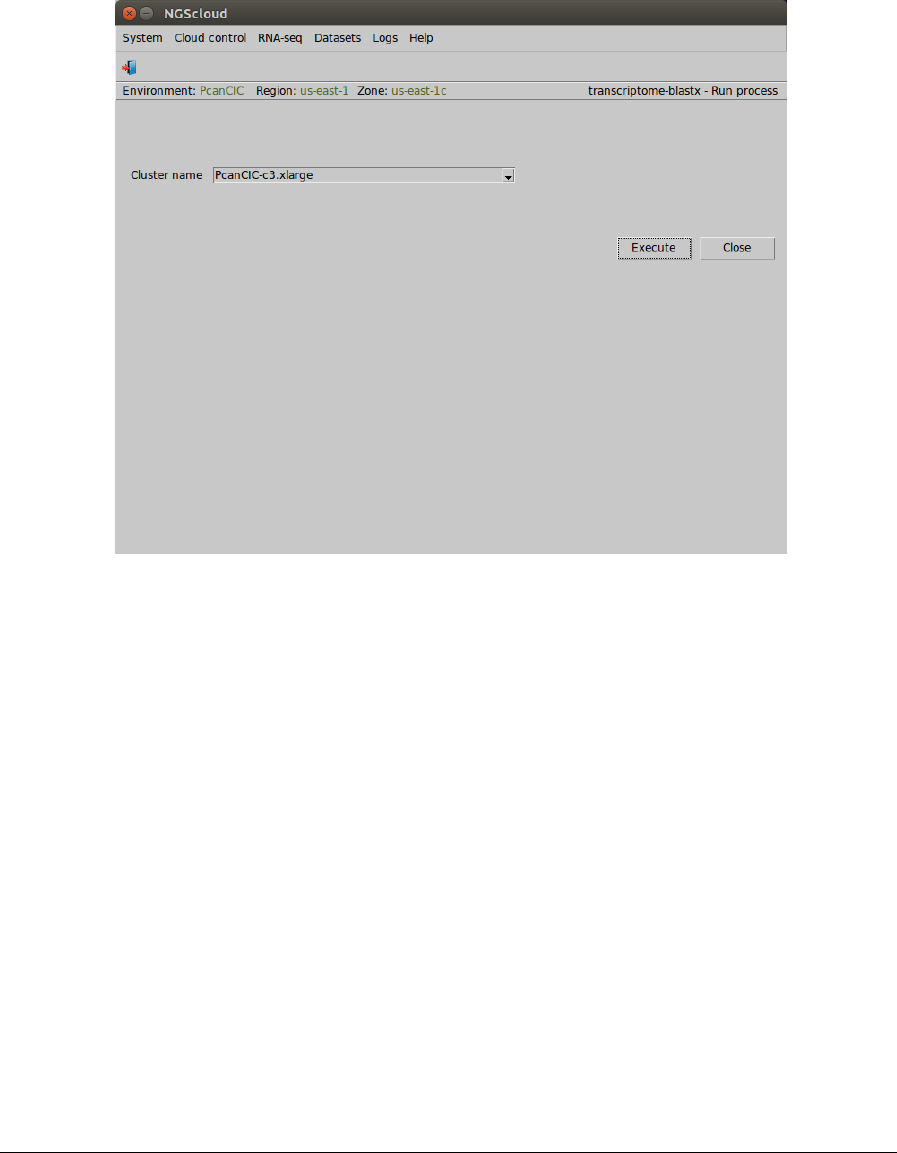
We run the annotation process in the cluster by selecting the menu item with this path:
Main menu > RNA-seq > Annotation > transcriptome-blastx (NGShelper package) > Run
annotation process
In the raised window, we select PcanCIC-c3.xlarge in the Cluster name combo-box; and then
we press the Execute button:
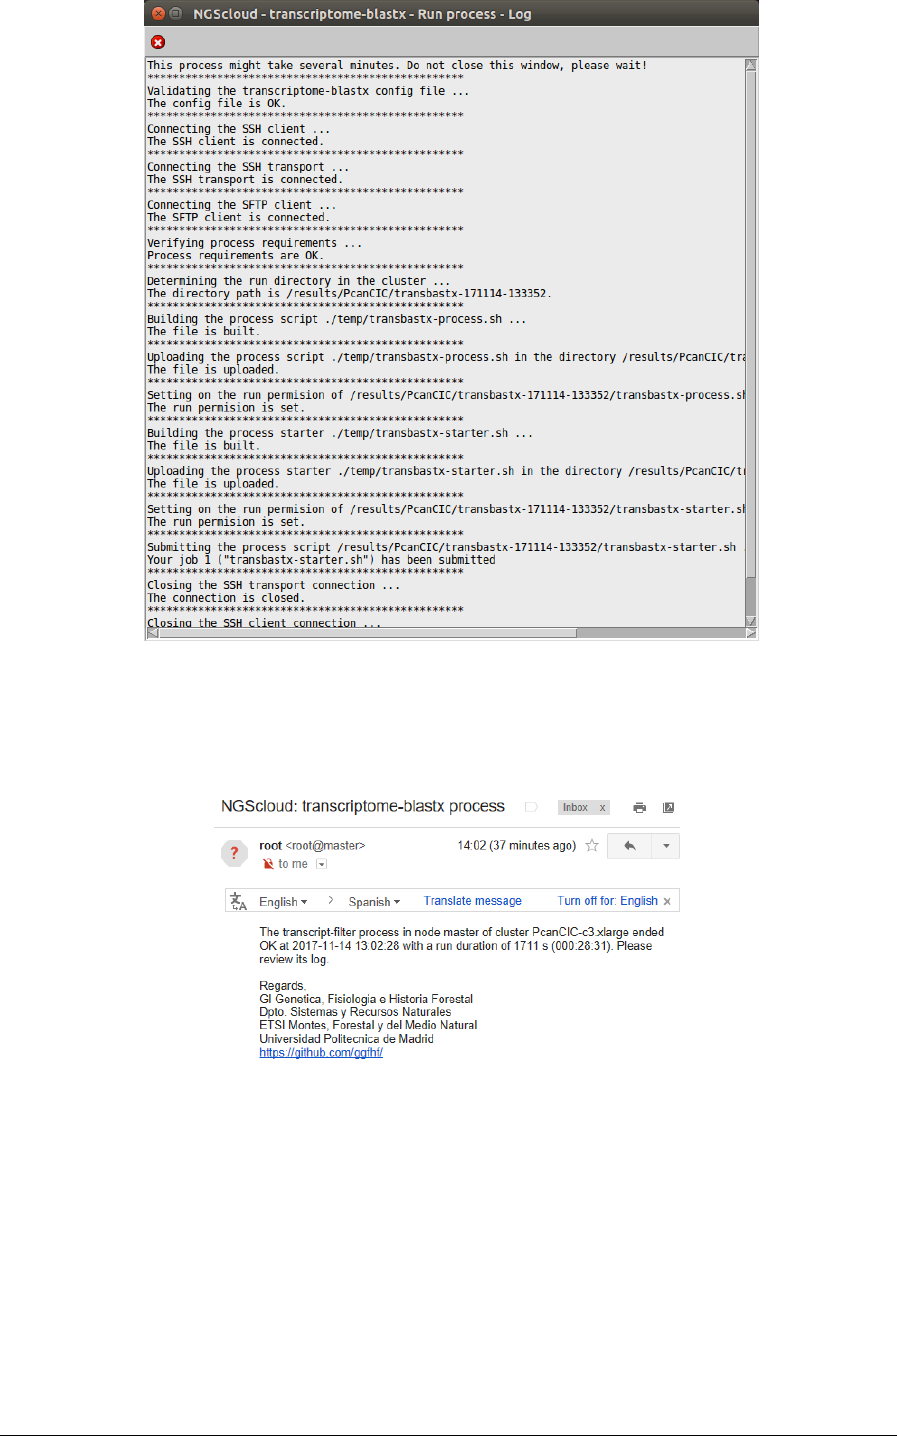
A window is raised showing the submission log:
NGScloud Manual
Page 92
At the end of the run, an email is sent, informing of its completion:
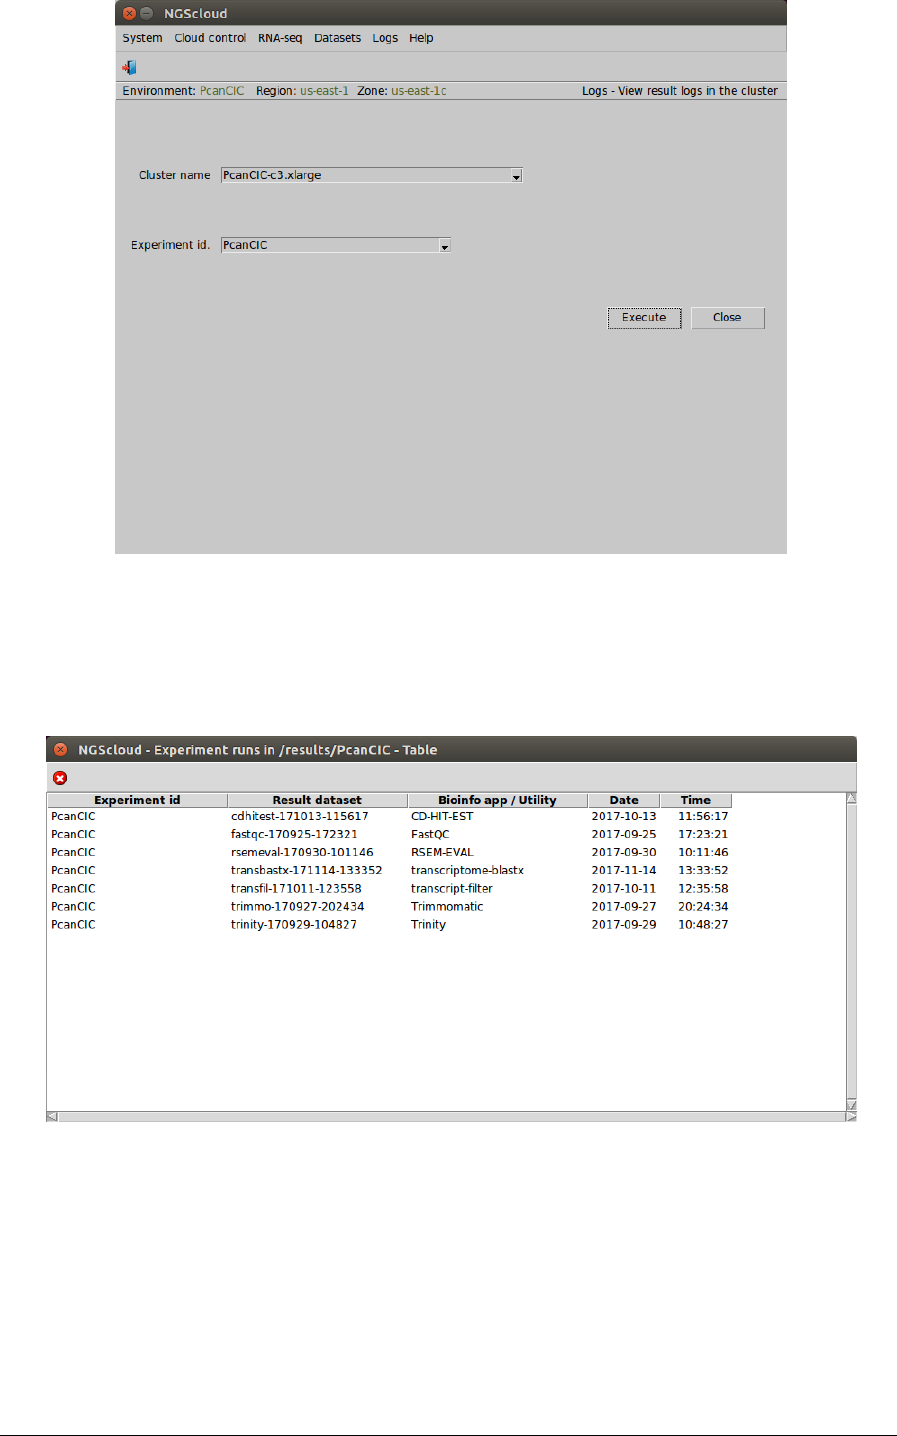
We can view the process log during and after the run. To do so, we select the menu item with
this path:
Main menu > Logs > View result logs in the cluster
In the raised window, we select PcanCIC-c3.xlarge in the Cluster name combo-box and PcanCIC
in the Experiment id combo-box; and then we press the Execute button:
NGScloud Manual
Page 93
A window with the result datasets for each run of the bioinformatic programs that correspond
to the experiment PcanCIC is shown:
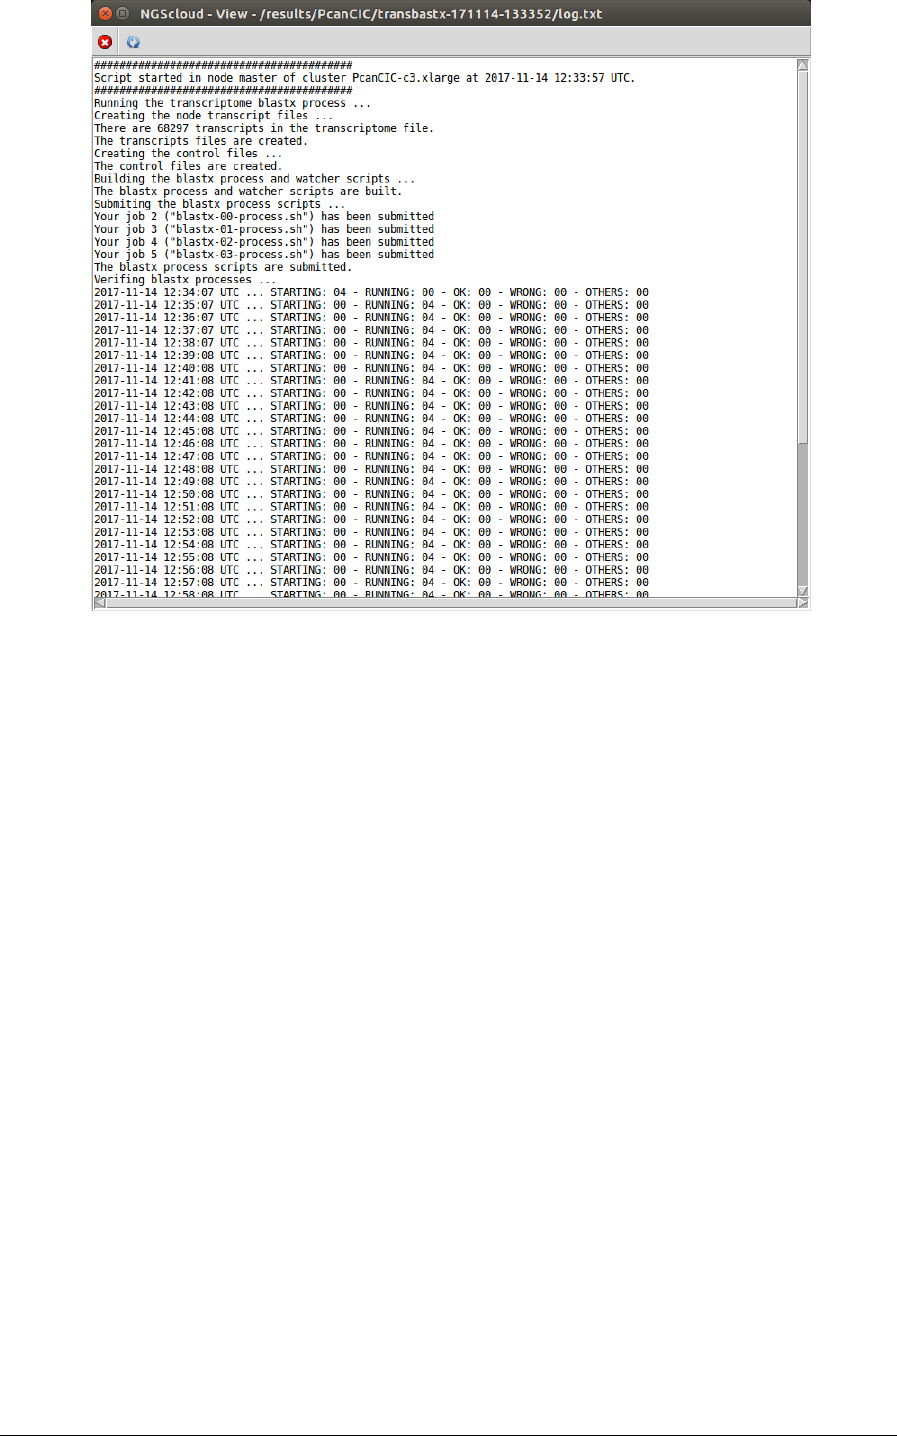
Seven result datasets are shown. We click on the transbastx-171114-133353 row, which is the
dataset generated by the transcriptome-blaxtx run, and another window appears with its
corresponding log:
NGScloud Manual
Page 94
Now, we are going to list the annotation generated by transcriptome-blastx. We select the
menu item with this path:
Main menu > Dataset > List dataset
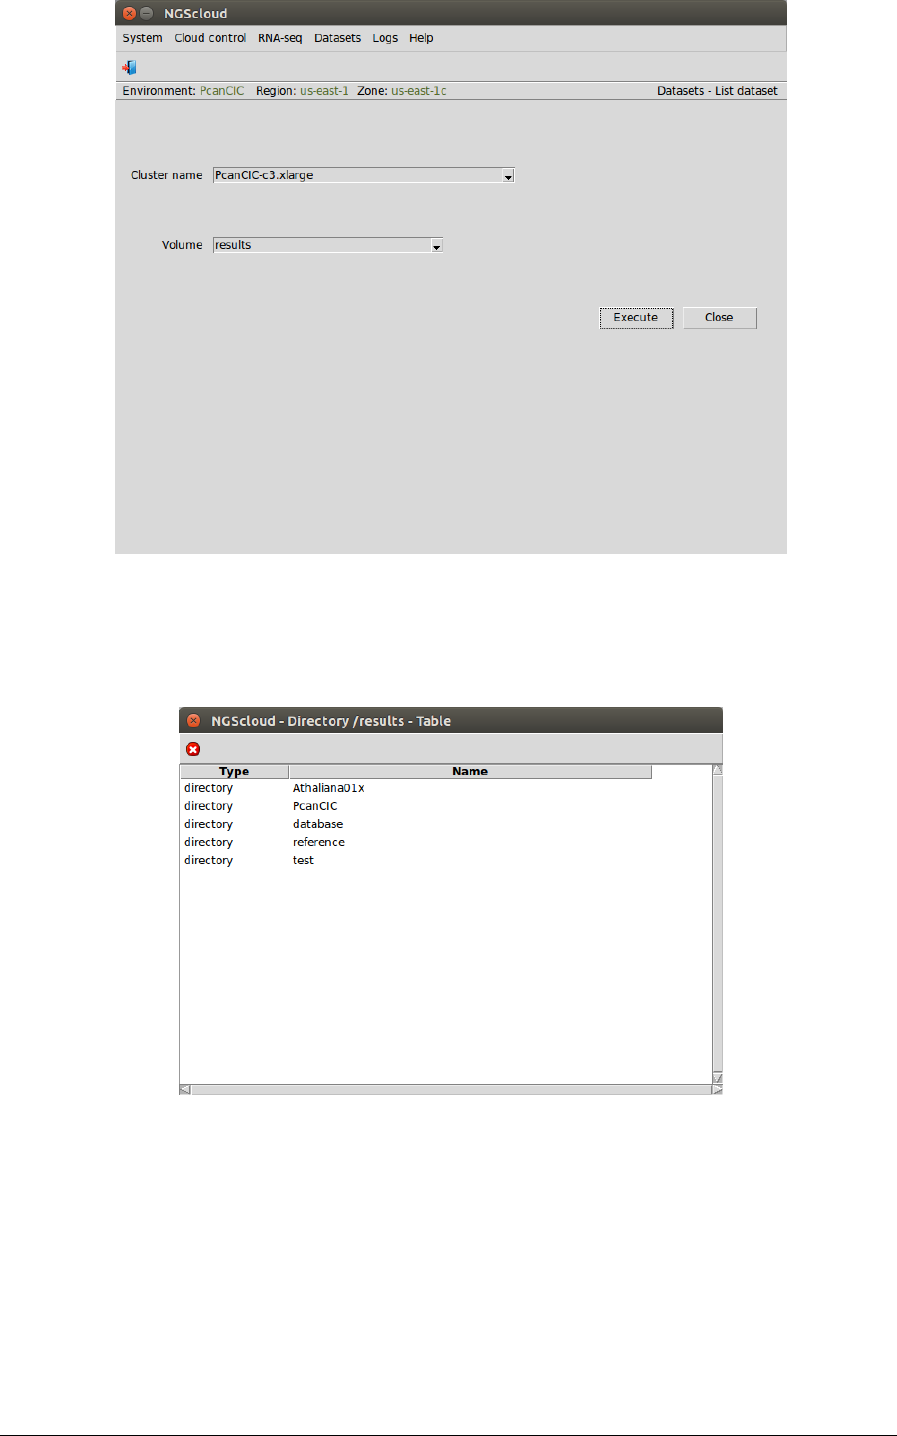
In the raised window, we select PcanCIC-c3.xlarge in the Cluster name combo-box and results
in the Volume combo-box. Then we press the Execute button:
NGScloud Manual
Page 95
Now, we click in the PcanCIC row:
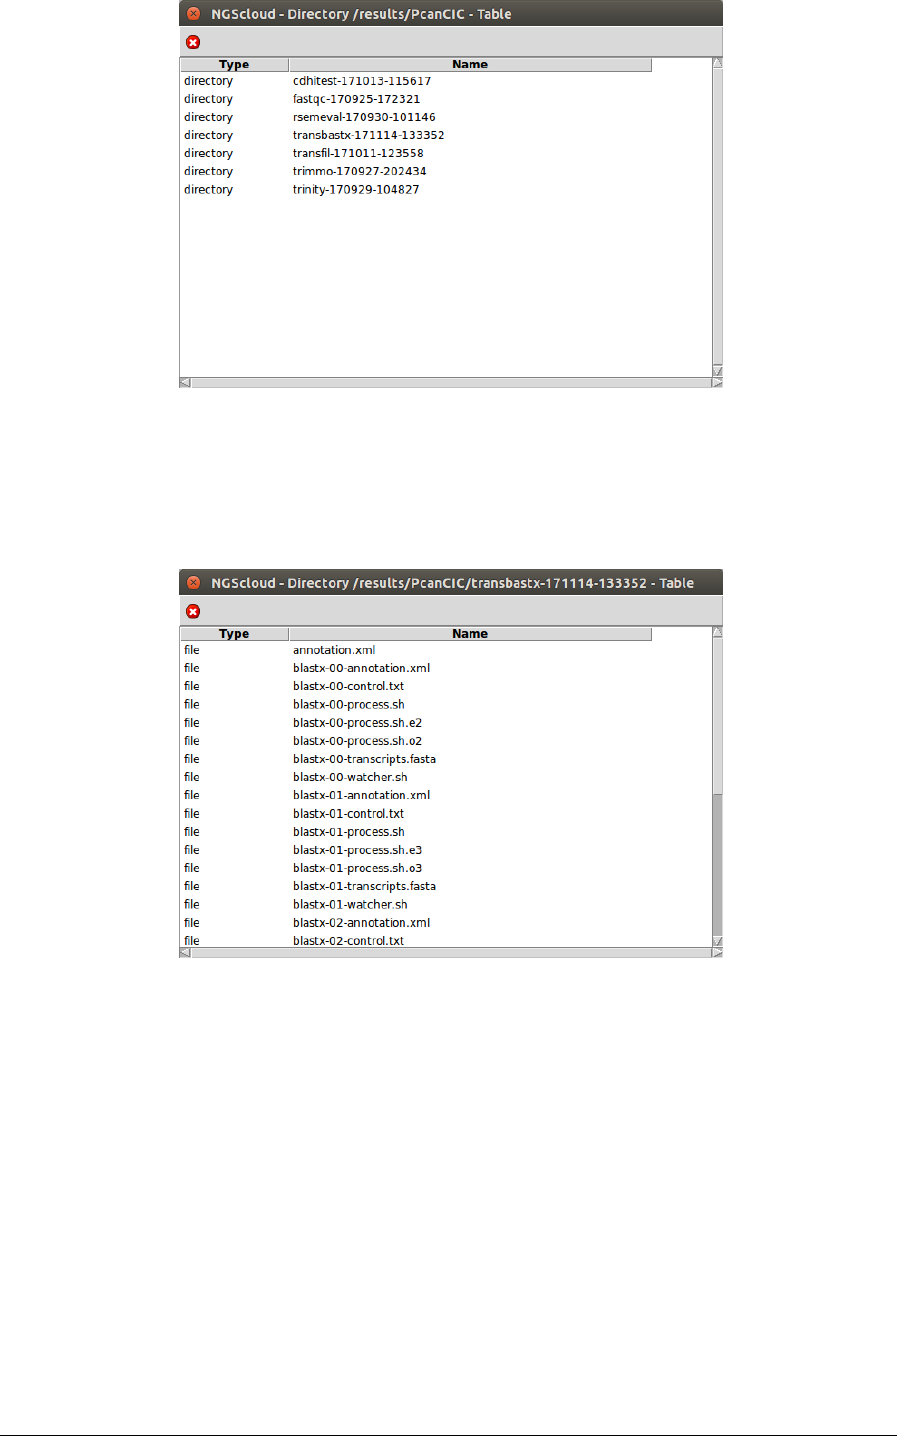
Next, a window with the result datasets of the experiment PcanCIC is shown:
NGScloud Manual
Page 96
We click on the transbastx-171114-133353 row, and another window appears with the
content of the files corresponding to this assembly.
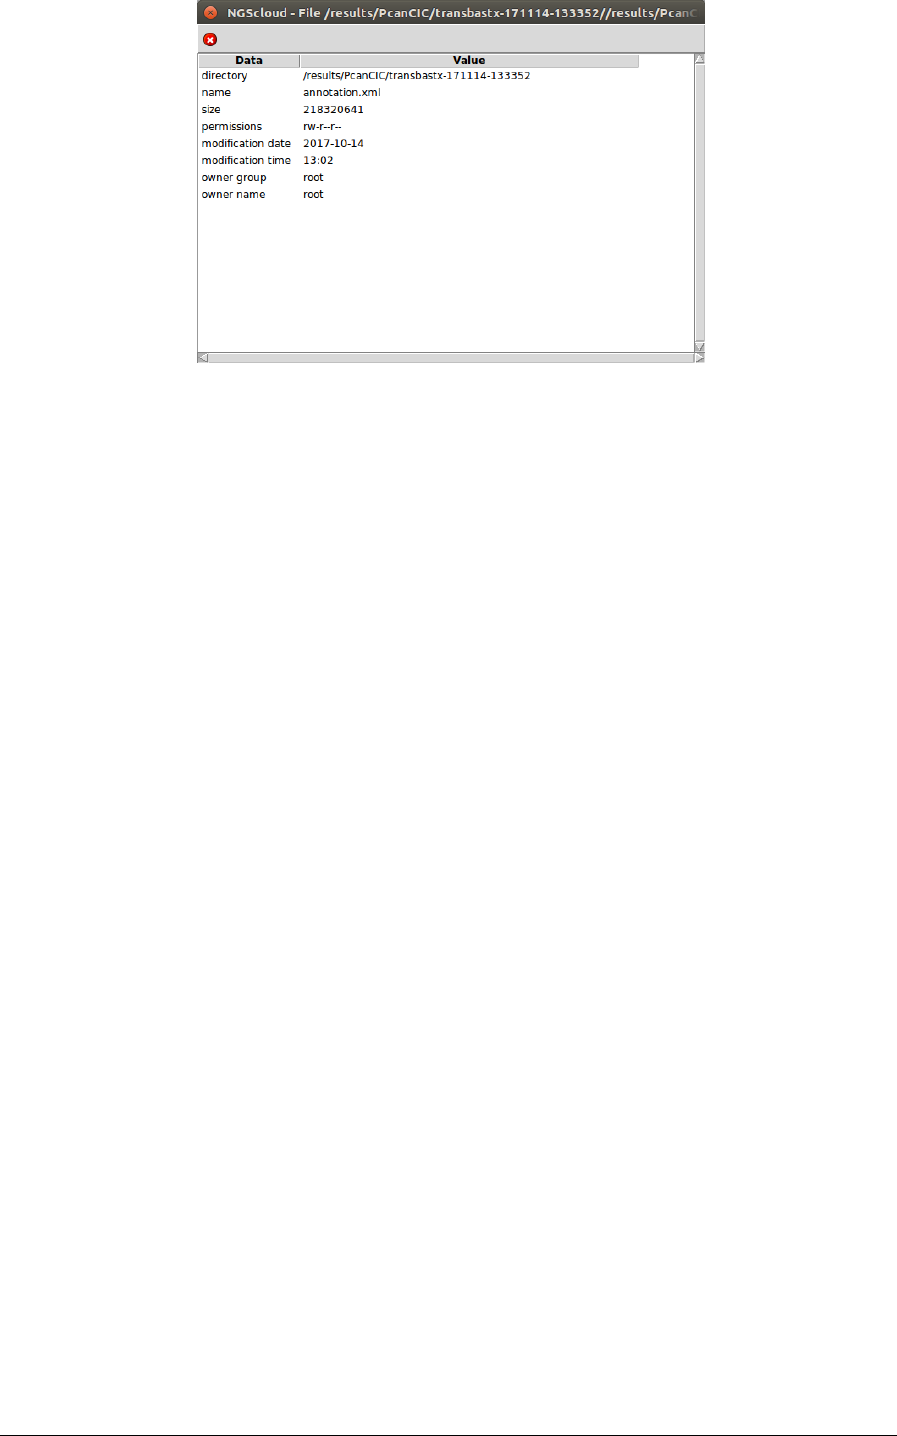
The file annotation.xml is the one corresponding to the complete annotation, after
concatenating the annotation files of all nodes. To observe its characteristics, we click on it:
NGScloud Manual
Page 97
Terminate the cluster with c3.xlarge template and create another cluster with
t2.micro template
Now we are going to terminate the PcanCIC-c3.xlarge and to create a cluster with a t2.micro
template, because it is not necessary to use an instance with many CPUs and large RAM
memory in order to download them to our local computer.
First, we select the menu item with this path:
Main menu > Cloud control > Cluster operation > Terminate cluster
In the raised window, we select PcanCIC-c3.xlarge in the Cluster name combo-box; and then
we press the Execute button:
NGScloud Manual
Page 98
A window is raised displaying the run log:

NGScloud Manual
Page 99
Now we create a cluster with a t2.micro template. We select the menu item with this path:
Main menu > Cloud control > Cluster operation > Create cluster
In the raised window, we select PcanCIC-t2.micro, the template corresponding to a t2.micro
instance type, in Template name combo-box; and then we press the Execute button:
A window is raised displaying the run log:
NGScloud Manual
Page 100
When the cluster is started, infrastructure software will be installed. At the end of the
installation, an email is sent, informing of its completion:
NGScloud Manual
Page 101
Download the transcriptome, evaluation and annotation files
In this step, we are going to download the transcriptome generated by Trinity and the filtered
and clustered transcriptome, the complete annotation file, and the result files yielded by
RSEM-EVAL. Due to the size of the transcriptome file, we are going to compress it previously.
To compress the assembly file, we first create the configuration file by selecting the menu item
with the following path:
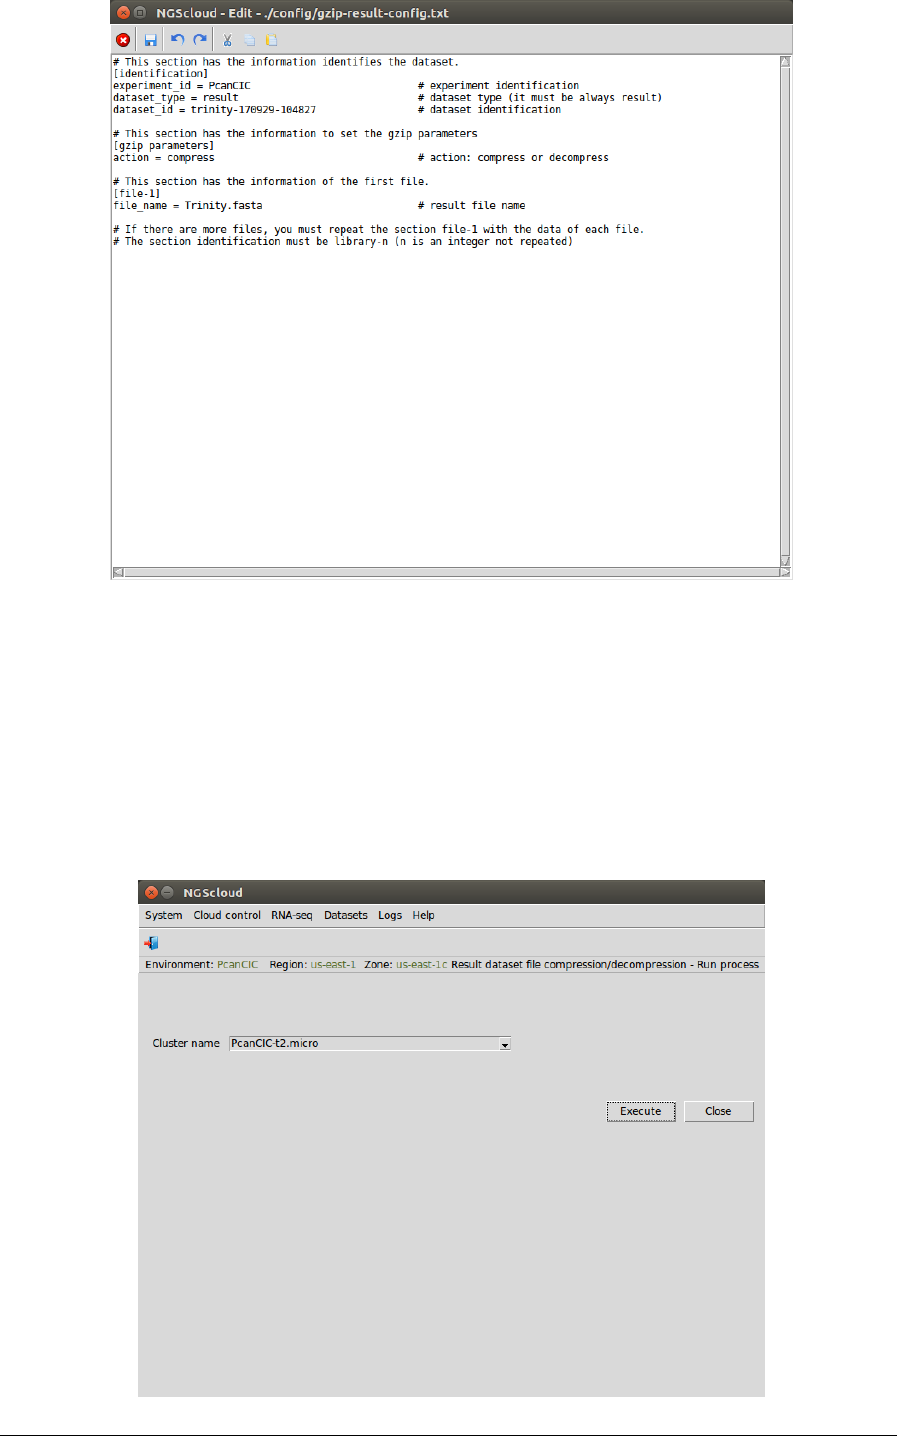
Main menu > Datasets > Result dataset file compression/decompression > Recreate config file
In the raised window, we select PcanCIC-t2.micro in the Cluster name combo-box, PcanCIC in
the Experiment id combo-box, uncompressed in the Status combo-box (because the dataset
has not been previously compressed), trinity-170929-104827 in the Result dataset combo-box,
and we type Trinity.fasta.gz as the pattern to select the files in the File pattern textbox and the
local directory where the files will be downloaded in the Local directory textbox (or we select it
using the button close to the textbox). Then we press the Execute button:
In the next window, we can examine the config file. In this example, it has three sections:
identification, with the dataset type and the experiment and dataset identifications, the action
to do; and file-1 with the file name of the Trinity assembly (in this example, we have only
selected this file):
NGScloud Manual
Page 102
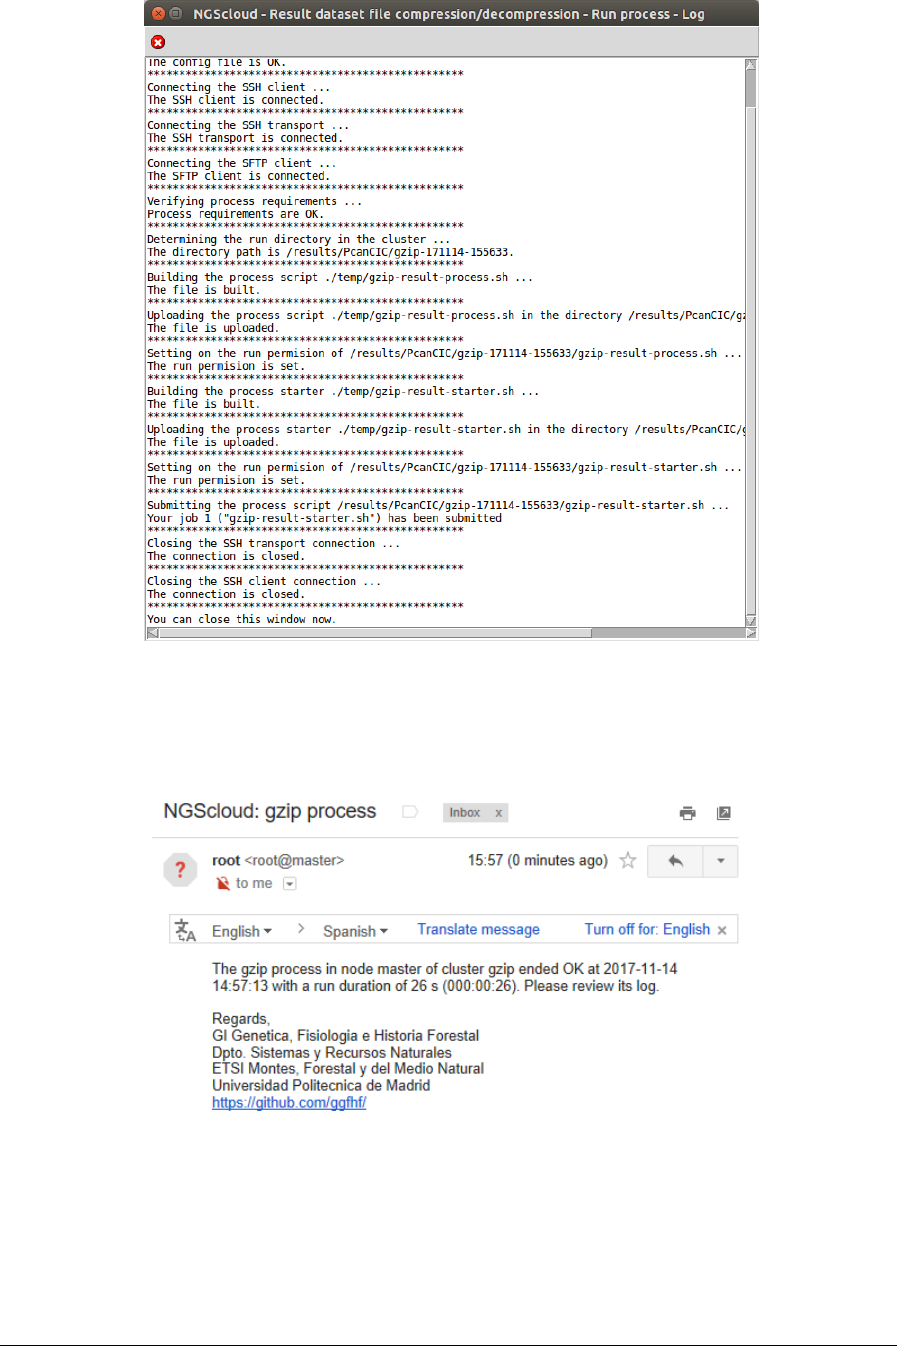
To compress the assembly file, we select the menu item with this path:
Main menu > Dataset > Result dataset compression/decompression > Run
compression/decompression process
In the raised window, we select PcanCIC-t2.micro in the Cluster name combo-box; and then
we press the Execute button:
NGScloud Manual
Page 103
A window is raised with the submission log:
At the end of the run, an email is sent, informing of its completion:
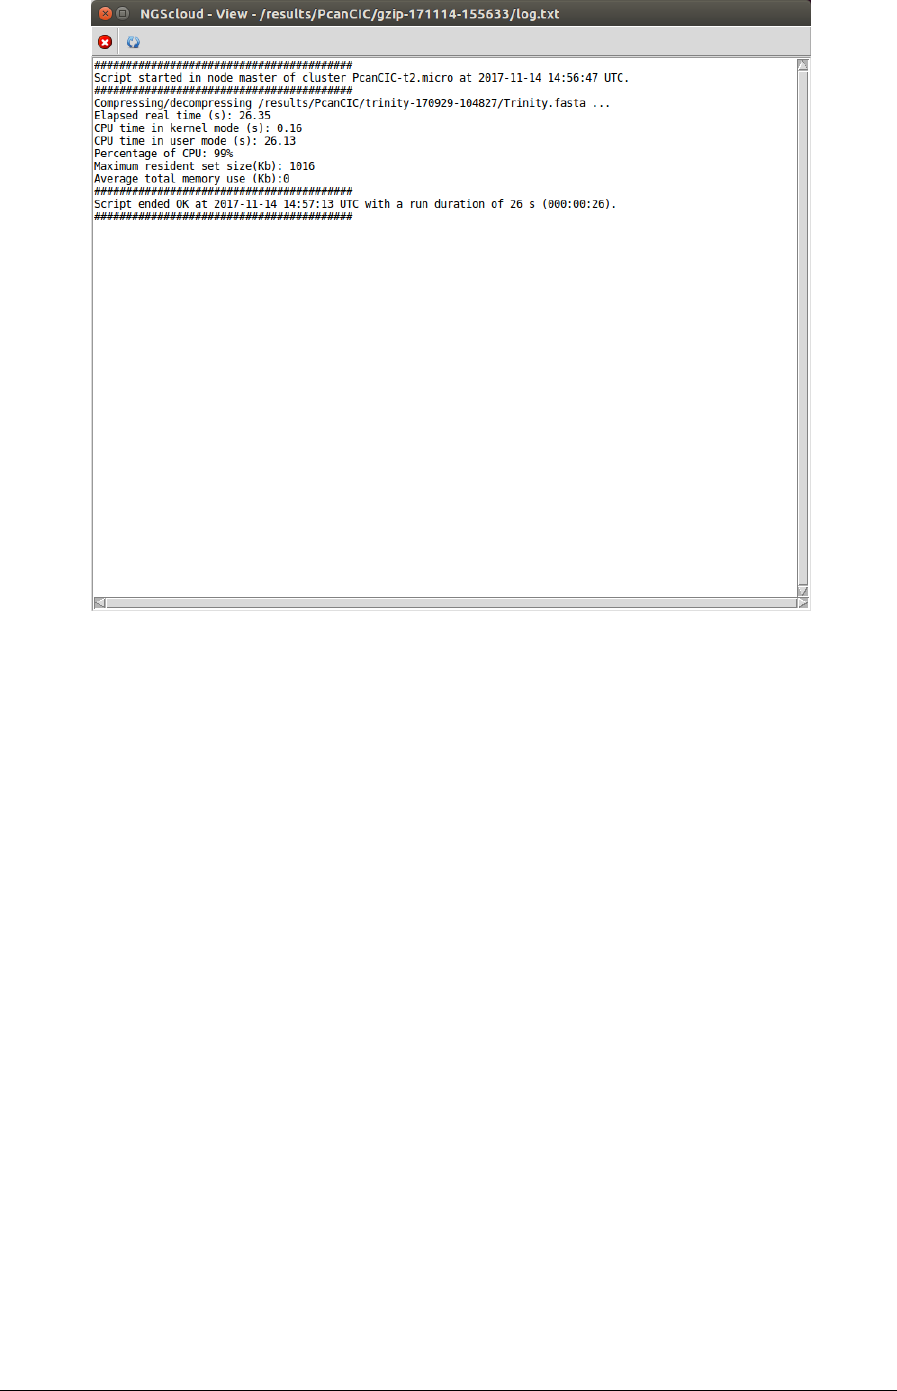
We can view the process log during and after its run. To do so, we select the menu item with
this path:
Main menu > Logs > View result logs in the cluster

NGScloud Manual
Page 104
In the raised window, we select PcanCIC-t2.micro in the Cluster name combo-box and PcanCIC
in the Experiment id combo-box; and then we press the Execute button:
A window with the result datasets for each run of the bioinformatic programs that correspond
to the experiment PcanCIC is shown:
Five result datasets are shown. We click on the gzip-171114-155633 row, the dataset
generated by gzip, the compression program, and another window appears with its
corresponding log:
NGScloud Manual
Page 105
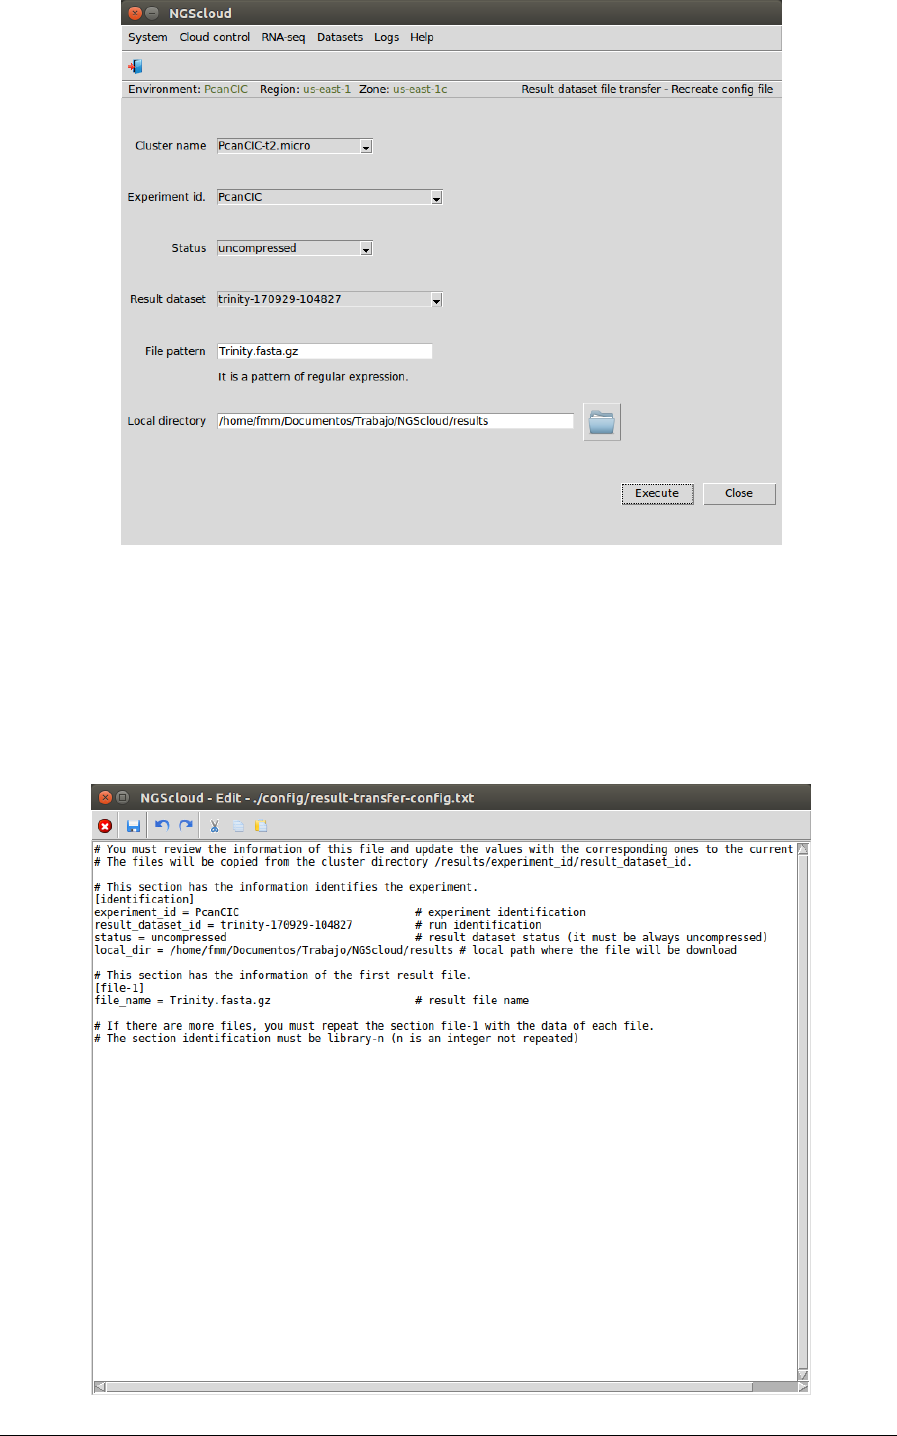
Next, we are going to download the compressed assembly file. To do so, we first create the
configuration file by selecting the menu item with the following path:
Main menu > Datasets > Result dataset file transfer > Recreate config file
In the raised window, we select PcanCIC-t2.micro in the Cluster name combo-box, PcanCIC in
the Experiment id combo-box, uncompressed in the Status combo-box (because the dataset
has not been previously compressed), trinity-170929-104827 in the Result dataset combo-box,
and we type Trinity.fasta.gz as the pattern to select the files in the File pattern textbox and the
local directory where the files will be downloaded in the Local directory textbox (or we select it
using the button close to the textbox). Then we press the Execute button:
NGScloud Manual
Page 106
In the next window, we can examine the config file. In this example, it has two sections:
identification, with the experiment and result dataset identifications, the status of the dataset
and the local path where files will be download; and file-1 with the file name of the
compressed Trinity assembly (in this example, we have only selected this file):
NGScloud Manual
Page 107
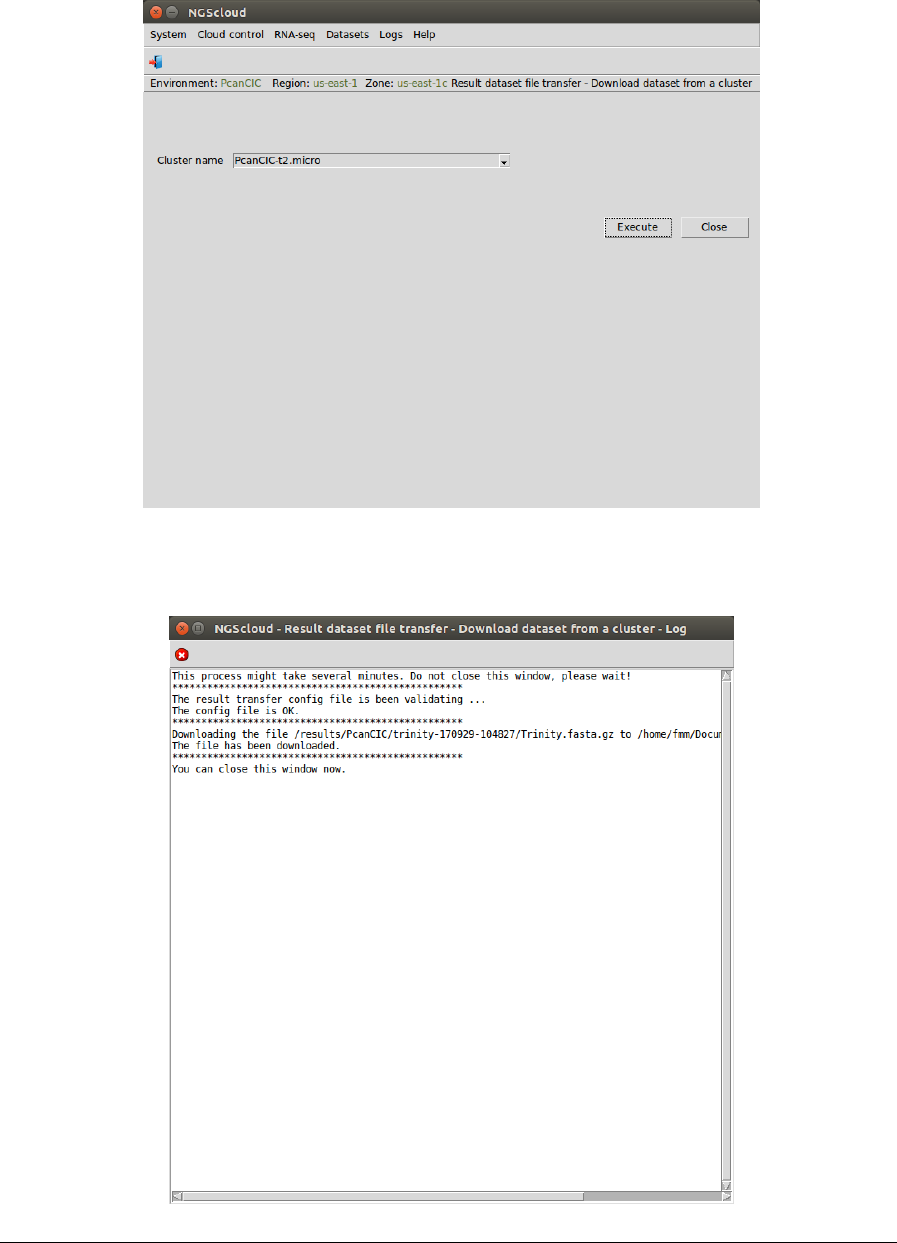
To download the compressed Trinity assembly from the cluster, we select the menu item with
this path:
Main menu > Dataset > Result dataset file transfer > Download dataset from a cluster
In the raised window, we select PcanCIC-t2.micro in the Cluster name combo-box; and then
we press the Execute button:
A window is raised with the log corresponding to the download:
NGScloud Manual
Page 108
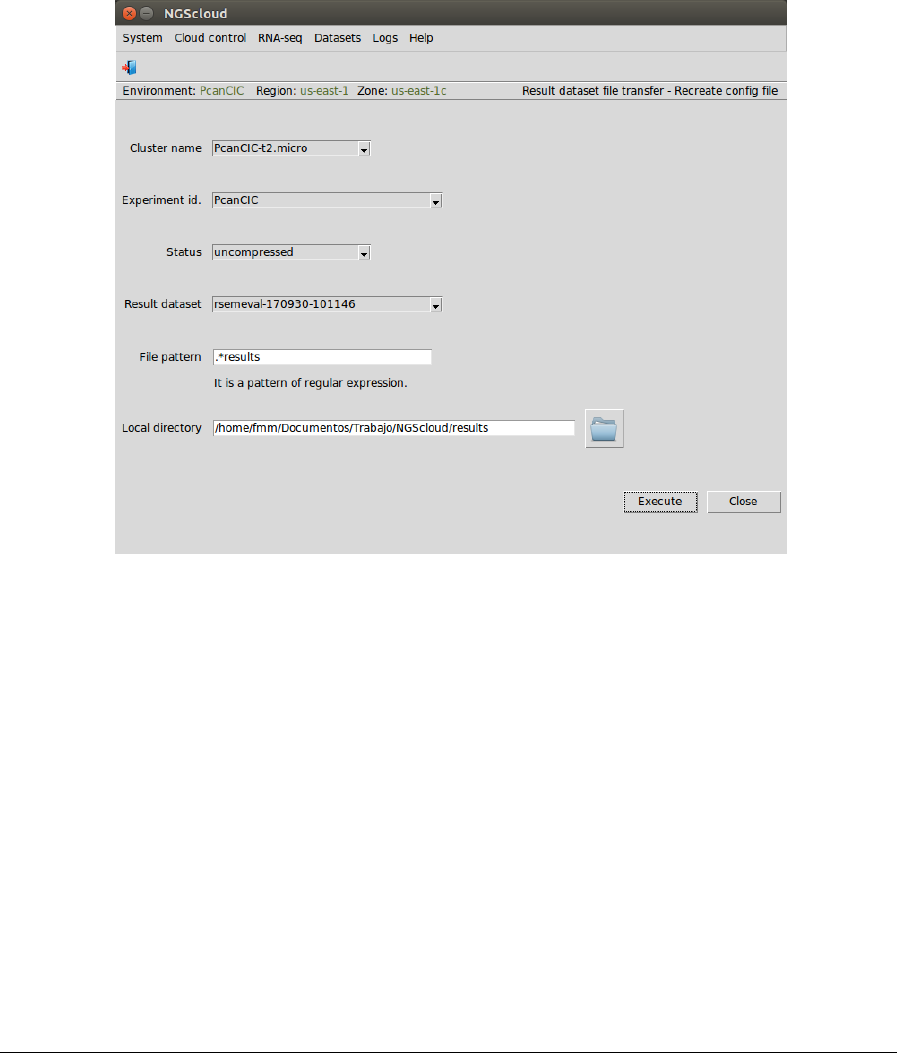
Next, we are going to download the assembly assessment files generated by RSEM-EVAL. We
have to download the ".results" files generated by this program. To do so, we first create the
configuration file by selecting the menu item with the following path:
Main menu > Datasets > Result dataset file transfer > Recreate config file
In the raised window, we select PcanCIC-t2.micro in the Cluster name combo-box, PcanCIC in
the Experiment id combo-box, uncompressed in the Status combo-box (because the dataset
has not been previously compressed), rsemeval-170930-101146 in the Result dataset combo-
box, and we type .*results as the pattern to select the files in the File pattern textbox and the
local directory where the files will be downloaded in the Local directory textbox (or we select it
using the button close to the textbox). Then we press the Execute button:
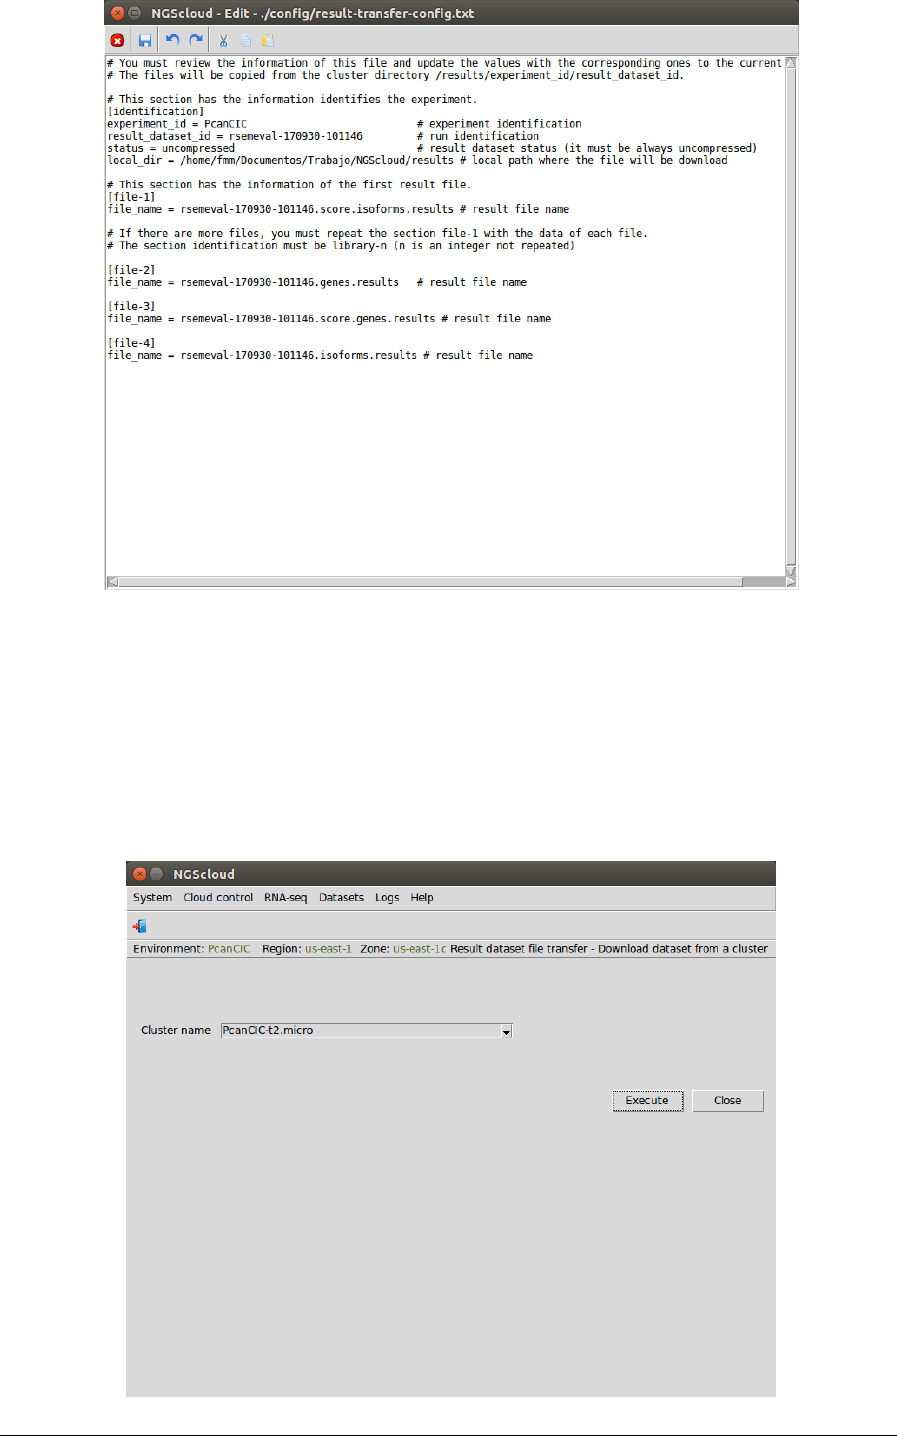
In the next window, we can examine the config file. In this example, it has five sections:
identification, with the experiment and result dataset identifications, the status of the dataset
and the local path where files will be downloaded; and file-1 to file-4 with the file names of
four result files:
NGScloud Manual
Page 109
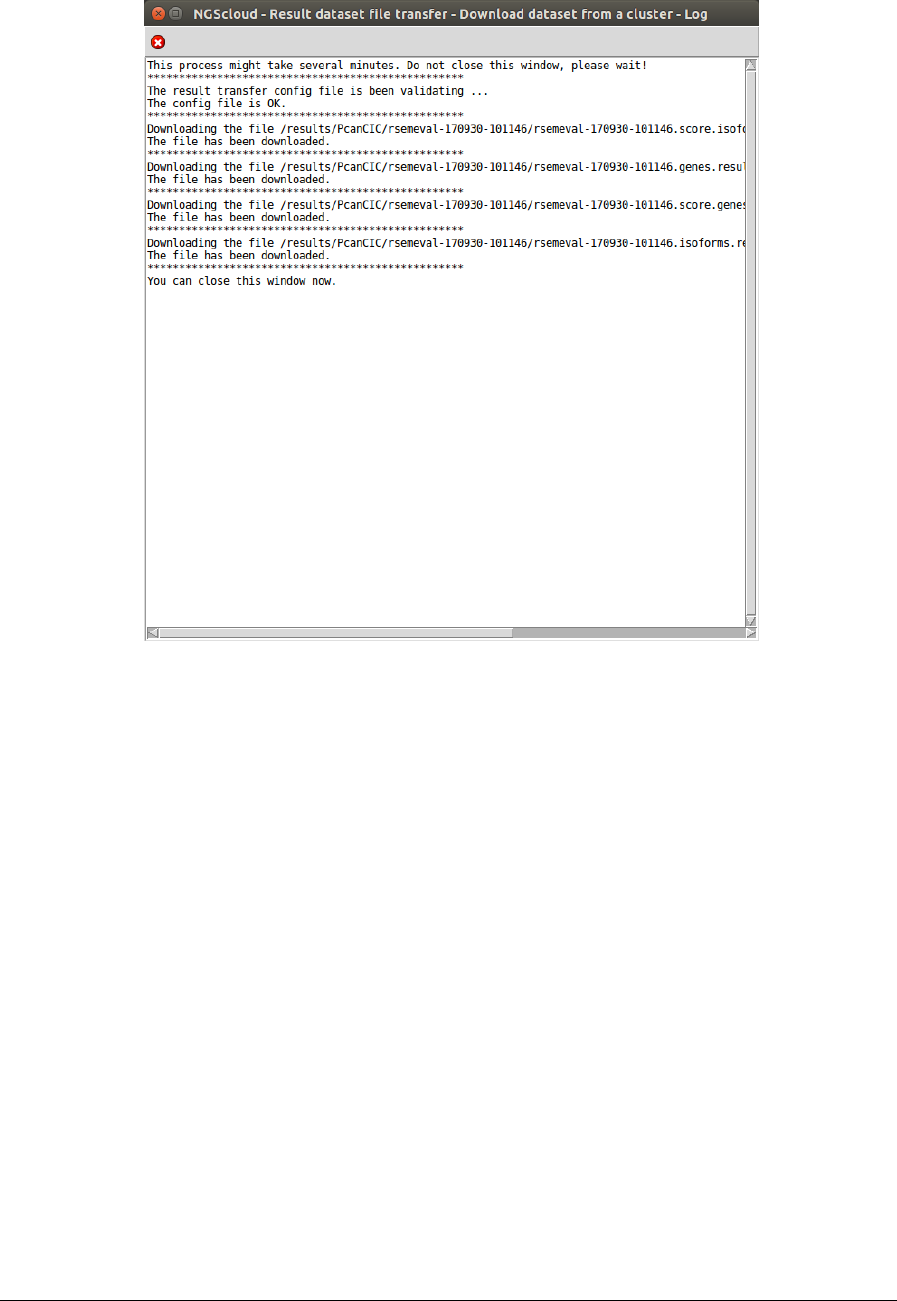
To download the result files from the cluster, we select the menu item with this path:
Main menu > Dataset > Result dataset file transfer > Download dataset from a cluster
In the raised window, we select PcanCIC-t2.micro in the Cluster name combo-box; and then
we press the Execute button:
NGScloud Manual
Page 110
A window is raised with the log corresponding to the download:
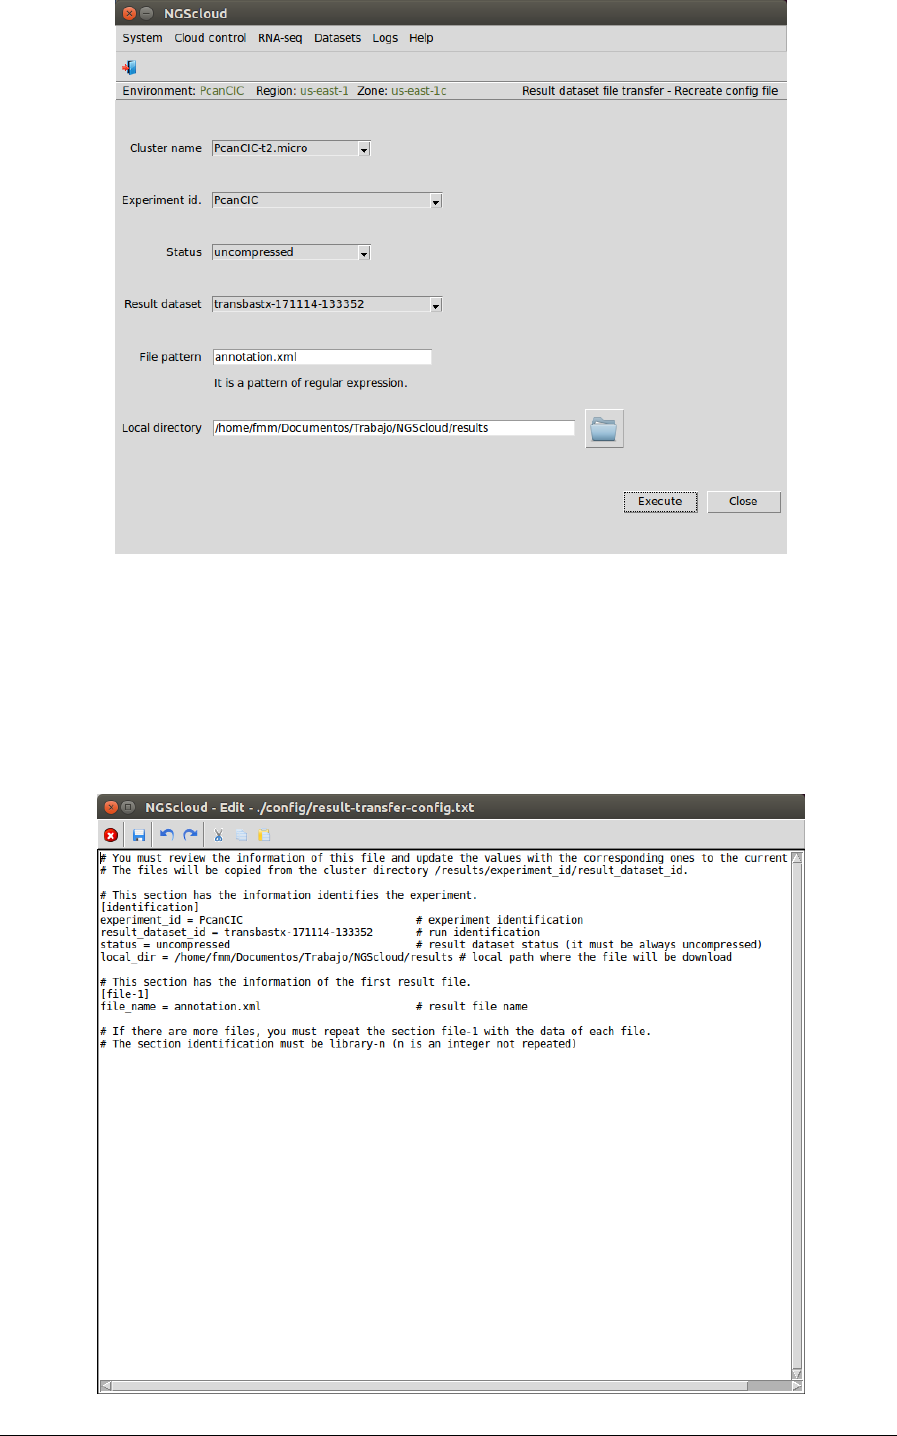
And finally, we are going to download the annotation file generated by transcriptome-blastx.
We have to download the file annotation.xml generated by this program. To do so, we first
create the configuration file by selecting the menu item with the following path:
Main menu > Datasets > Result dataset file transfer > Recreate config file
In the raised window, we select PcanCIC-t2.micro in the Cluster name combo-box, PcanCIC in
the Experiment id combo-box, uncompressed in the Status combo-box (because the dataset
has not been previously compressed), transbastx-171114-133353 in the Result dataset combo-
box, and we type annotation.xml as the pattern to select the files in the File pattern textbox
and the local directory where the files will be downloaded in the Local directory textbox (or we
select it using the button close to the textbox). Then we press the Execute button:
NGScloud Manual
Page 111
In the next window, we can examine the config file. In this example, it has two sections:
identification, with the experiment and result dataset identifications, the status of the dataset
and the local path where files will be downloaded; and file-1 with the file name of the
annotation file:
NGScloud Manual
Page 112
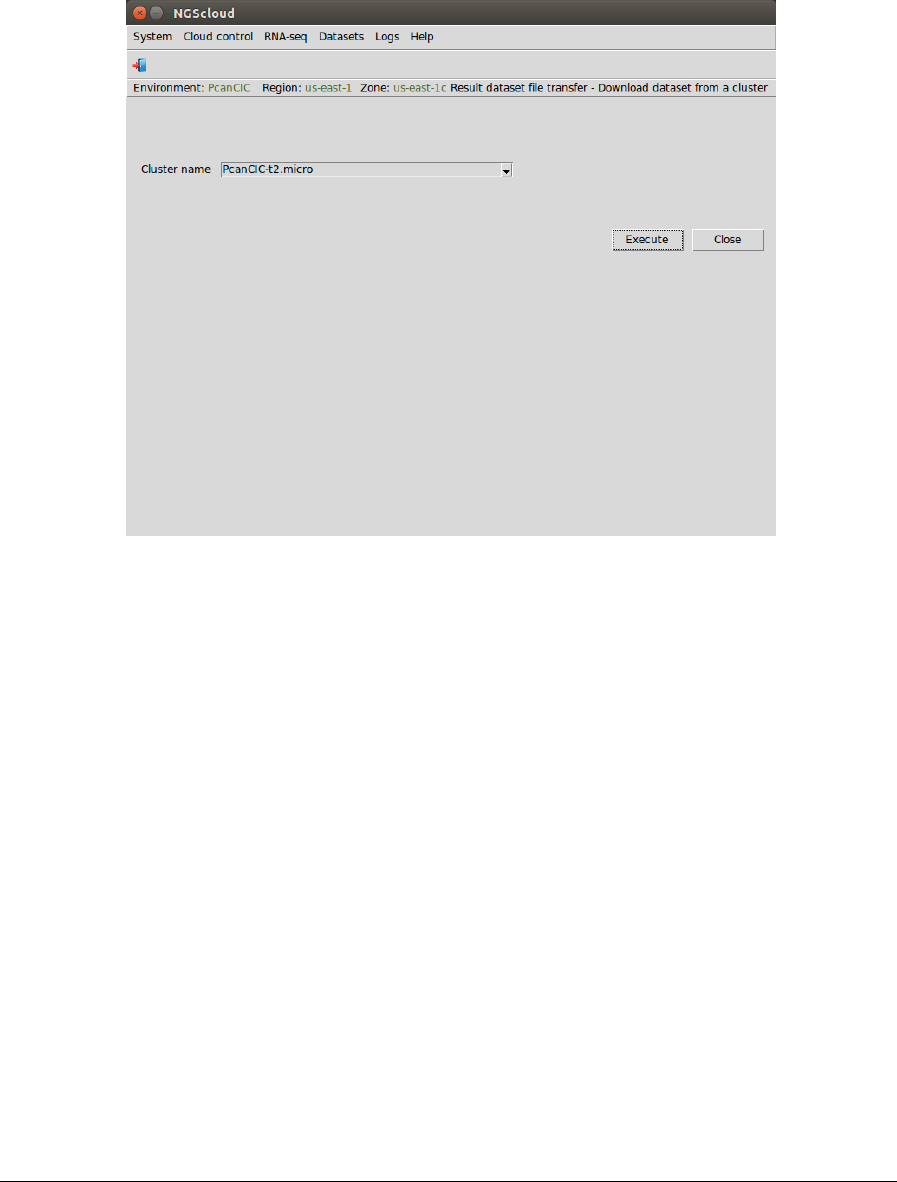
To download the result files from the cluster, we select the menu item with this path:
Main menu > Dataset > Result dataset file transfer > Download dataset from a cluster
In the raised window, we select PcanCIC-t2.micro in the Cluster name combo-box; and then
we press the Execute button:
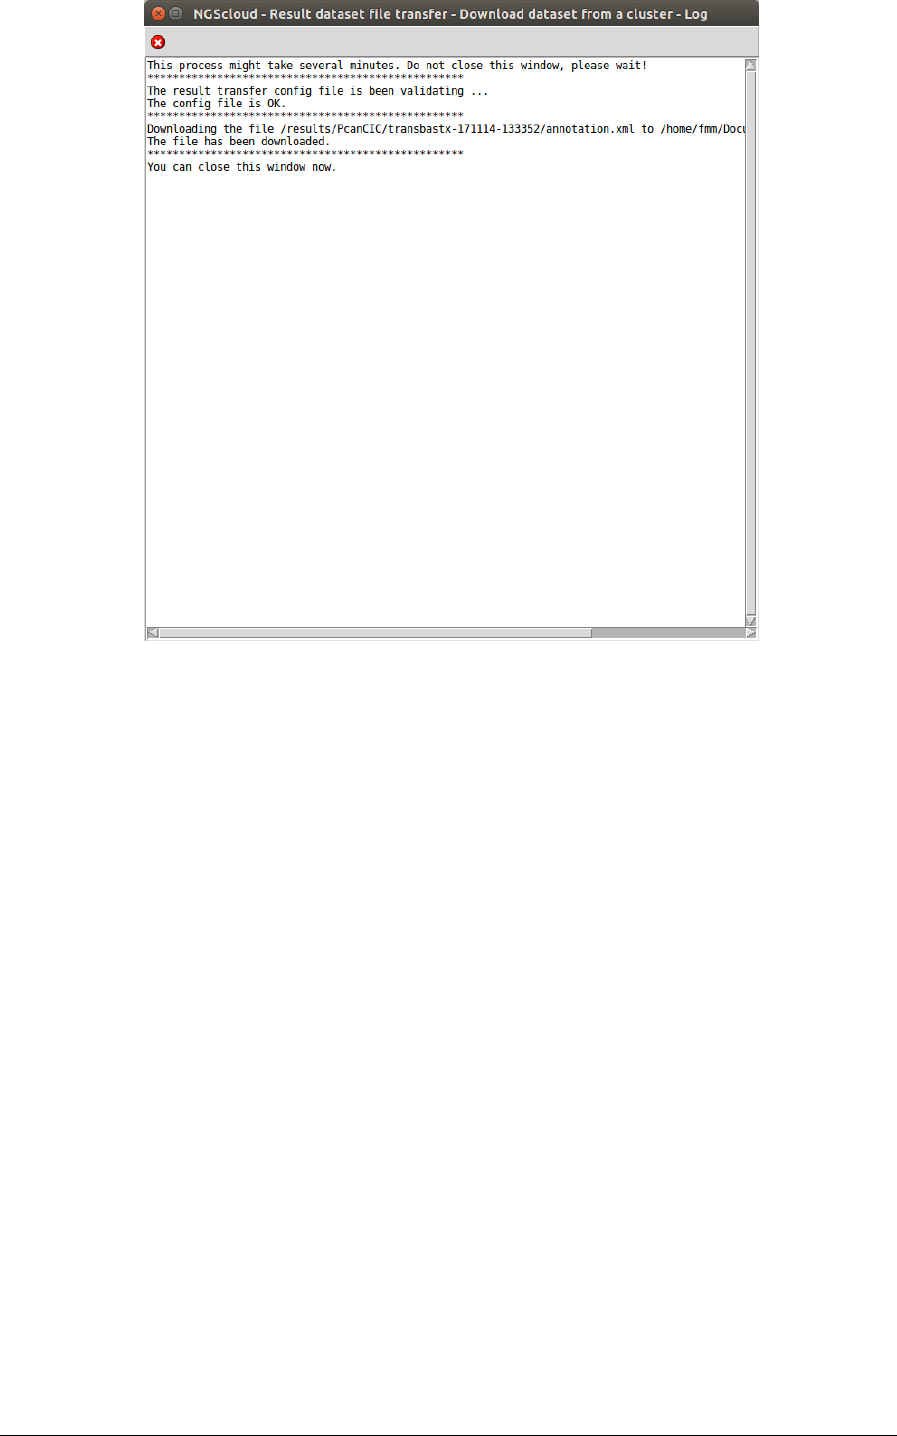
A window is raised with the log corresponding to the download:
NGScloud Manual
Page 113
Terminate the cluster with the t2.micro template
Once the analysis is complete, we terminate the cluster PcanCIC-t2.micro. To do so, we select
the menu item with this path:
Main menu > Cloud control > Cluster operation > Terminate cluster
In the raised window, we select PcanCIC-t2.micro in the Cluster name combo-box; and then
we press the Execute button:
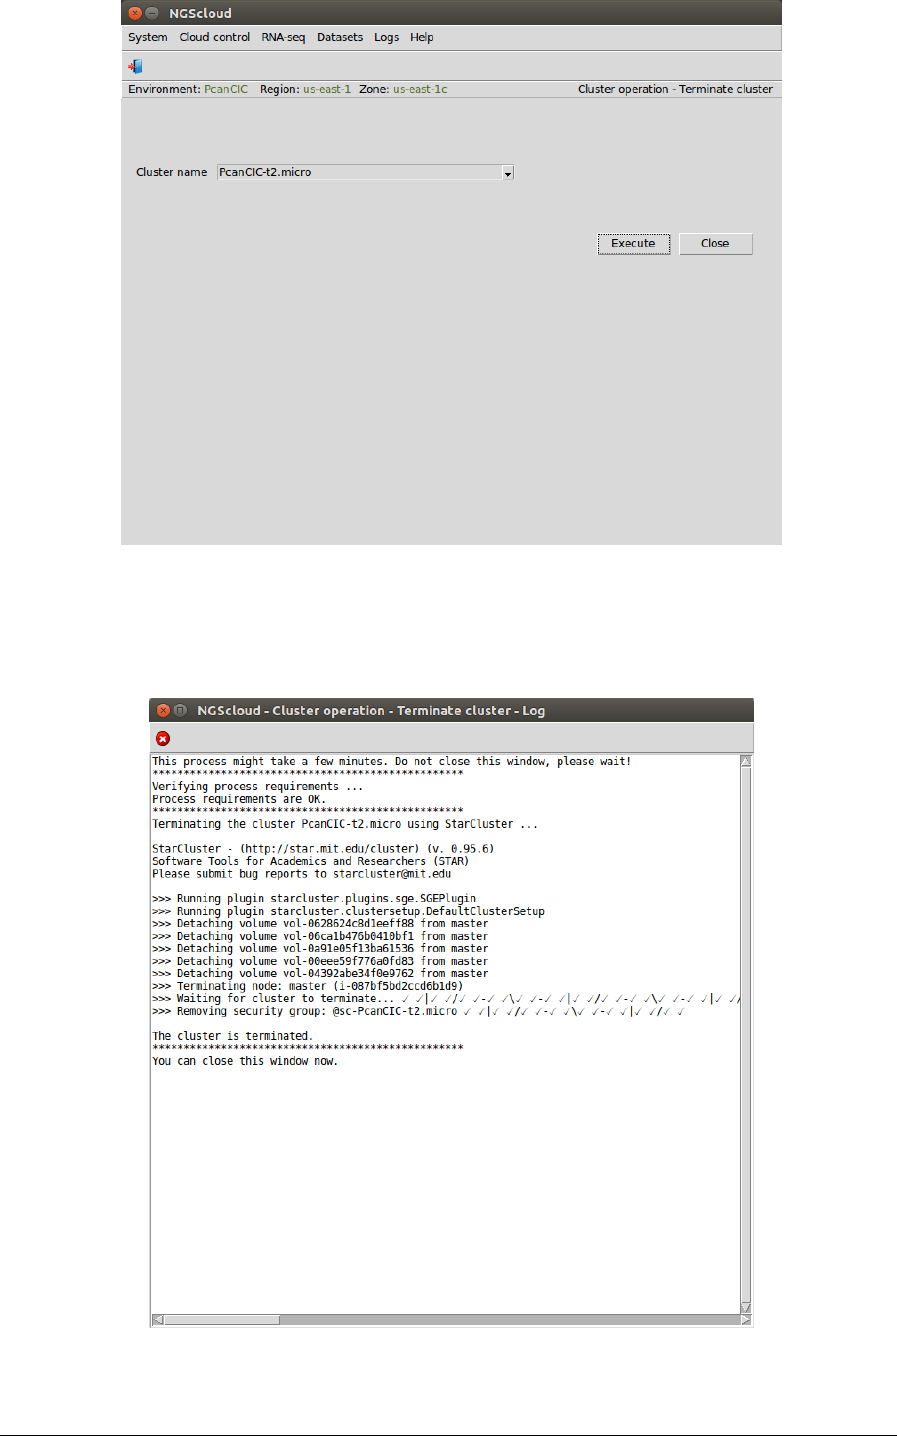
NGScloud Manual
Page 114
A window is raised displaying the run log:

NGScloud Manual
Page 115
How-to
Below is the menu path of the tasks the most common tasks:
How to display this manual
Main menu > Help > View help ... or pressing F1 key
How to recreate the NGScloud config file
Main menu > Cloud control > Configuration > Recreate NGScloud config file
How to create a new environment
Main menu > Cloud control > Set environment
How to change to another environment
Main menu > Cloud control > Set environment
How to view characteristics of a cluster template
Main menu > Cloud control > Configuration > List cluster templates
How to create a cluster
Main menu > Cloud control > Cluster operation > Create cluster
How to terminate a cluster
Main menu > Cloud control > Cluster operation > Terminate cluster
How to list the running clusters
Main menu > Cloud control > Cluster operation > List clusters
How to create a volume
Main menu > Cloud control > Volume Operation > Create volume
How to remove a volume
Main menu > Cloud control > Volume Operation > Remove volume
How to list the created volumes
Main menu > Cloud control > Volume Operation > List volumes
How to link a volume in cluster templates
Main menu > Cloud control > Configuration > Link volume in a cluster templates
How to add a node in a cluster
Main menu > Cloud control > Node operation > Add node in a cluster
How to remove a node in a cluster
Main menu > Cloud control > Node operation > Remove node in a cluster
How to open a terminal of a cluster
Main menu > Cloud control > Open a terminal

NGScloud Manual
Page 116
How to set up a bioinformatic software in a cluster
Main menu > Cloud control > Bioinfo software setup > bioinformatic software to use
How to run a RNA-seq bioinformatic software in a cluster
Main menu > RNA-seq > "Task of RNA-seq workflow" > "Bioinformatic software" > Recreate
config file
Main menu > RNA-seq > "Task of RNA-seq workflow" > "Bioinformatic software" > "Run
process"
Task of RNA-seq workflow
Bioinformatic software
Read quality
FastQC
Trimming
Trimmomatic
Digital normalization
Insilico_read_normalization (Trinity package)
De novo assembly
SOAPdenovo-Trans
Trinity
Reference-based assembly
STAR
Assembly quality and
transcript quantification
QUAST
rnaQUAST
RSEM-EVAL (DETONATE package)
Transcriptome filtering
CD-HIT-EST (CD-HIT package)
transcript-filter (NGShelper package)
Annotation
Transcriptome-blast (NGShelper package)
How to display datasets of a volume
Main menu > Dataset > List dataset
How to display the contents of a dataset
Main menu > Dataset > List dataset
How to upload reference files to a cluster
Main menu > Datasets > Reference dataset file transfer > Recreate config file
Main menu > Datasets > Reference dataset file transfer > Upload dataset to a cluster
How to compress/decompress reference files in a cluster
Main menu > Datasets > Reference dataset file compression/decompression > Recreate config
file
Main menu > Datasets > Reference dataset file compression/decompression > Run
compression/decompression process
How to upload database files to a cluster
Main menu > Datasets > Database dataset file transfer > Recreate config file
Main menu > Datasets > Database dataset file transfer > Upload dataset to a cluster
How to compress/decompress database files in a cluster
Main menu > Datasets > Database dataset file compression/decompression > Recreate config
file

NGScloud Manual
Page 117
Main menu > Datasets > Database dataset file compression/decompression > Run
compression/decompression process
How to upload read files to a cluster
Main menu > Datasets > Read dataset file transfer > Recreate config file
Main menu > Datasets > Read dataset file transfer > Upload dataset to a cluster
How to compress/decompress read files in a cluster
Main menu > Datasets > Read dataset file compression/decompression > Recreate config file
Main menu > Datasets > Read dataset file compression/decompression > Run
compression/decompression process
How to download results files from a cluster
Main menu > Datasets > Result dataset file transfer > Recreate config file
Main menu > Datasets > Result dataset file transfer > Download dataset from a cluster
How to compress/decompress results files in a cluster
Main menu > Datasets > Result dataset file compression/decompression > Recreate config file
Main menu > Datasets > Result dataset file compression/decompression > Run
compression/decompression process
How to view submission logs in the local computer
Main menu > Logs > View submission logs in the local computer
How to view result logs in the cluster
Main menu > Logs > View result logs in the cluster
