NJ SQL Best Practices Quick Start Guide V1.0 V1 0 En 201504 P77I E 01
User Manual: Pdf
Open the PDF directly: View PDF ![]() .
.
Page Count: 16
- Disclaimer
- Summary
- The Basics
- SQL Setup
- NJ Setup
- Writing the Program
- Calling a Stored Procedure
- Spooling
- Introduction
- How to enable
- Important Notes about Spooling
- Backup to the Spooling – File Save
- EtherNet/IP An Ethernet based communication system using the CIP protocol. The NJ uses EtherNet/IP for NJ to computer, NJ to HMI, NJ to NJ, NJ to some IO and drives, communications.
- Global Variable This is a variable that should be accessible from many programs or devices.
- Local I/O I/O connected physically to the NJ CPU.
- Local Variable A variable that is only accessible from the program it was declared in.
- NA The Omron NA series of touch screens for use with NJ and CJ controllers.
- NJ The Omron NJ series CPU’s
- NJ SQL The Omron NJ series of CPU’s that also have SQL client software in them.
- Remote I/O I/O connected to the CPU by a communication cable (example: EtherCAT)
- SQL Usually refers to any SQL server but actually means Structured Query Language. Microsoft SQL, Oracle, MySQL, and IBM DB2 are all sequel servers.
- Tags Instead of using fixed numbering system for I/O the NJ uses a free allocation of memory and you give each I/O or variable a name.
- Task The NJ series controller runs several tasks (Program and IO refresh) in a time slice manner. Each task gets so many microseconds (μs) of time to execute then the processor moves on to the next task (comes back to the current task later).
- Backup to the Spooling – File Save
- Revision History
- Index

NJ SQL Best Practices
Johnston Hall
March 13th, 2015
NJ SQL Best Practices V1.0

Contents
Disclaimer...................................................................................................................................................... 3
Summary ....................................................................................................................................................... 3
The purpose of this paper ......................................................................................................................... 3
The Basics ...................................................................................................................................................... 3
SQL Setup ...................................................................................................................................................... 3
NJ Setup ........................................................................................................................................................ 3
Writing the Program ..................................................................................................................................... 5
Connect: .................................................................................................................................................... 5
Map ........................................................................................................................................................... 6
Insert Data ................................................................................................................................................. 8
Select Data ................................................................................................................................................ 9
Update Data ............................................................................................................................................ 11
Delete Data ............................................................................................................................................. 11
Calling a Stored Procedure .......................................................................................................................... 12
Spooling....................................................................................................................................................... 13
Introduction ................................................................................................................................................ 13
How to enable ............................................................................................................................................. 13
Important Notes About Spooling ................................................................................................................ 13
Backup to the Spooling – File Save ......................................................................................................... 14
Revision History .......................................................................................................................................... 15
Index............................................................................................................................................................ 15
2

Disclaimer
This startup guide does not replace the Omron manuals concerning the safe startup of equipment.
Summary
The purpose of this paper
Use this as a guideline when configuring and programming an NJ controller so that you get the most out
of the system in the least amount of time. The document is created from our programming experiences
and may not be ideal for everyone but should provide a good start.
This particular paper shows how to get the most out of your NJ with respect to connecting it to a SQL
server.
The Basics
The NJ family of controllers comes with SQL client software if the part number ends in 20. (for example
NJ501-1320). The client software allows the NJ to log into a SQL server and “insert” (send data), “select”
(read data), “update” (find a record and overwrite the data), “delete” (find a record and delete the
data).
The SQL servers the NJ works with are Oracle, Microsoft SQL, MySQL (now also controlled by Oracle),
IBM DB2, and Firebird.
The advantages of using the NJ SQL include:
1) Very fast read and write to the SQL server. Anywhere from 3 to 100ms depending on the
state of the system and how many fields are in the record. Typical speeds of 30ms.
2) No interposing software or drivers. The NJ SQL comes loaded with all the drivers and
instructions it needs and the NJ SQL talks to native drivers in the SQL servers.
3) The NJ SQL has a 10 year plus mean time between failures so this solution will last a long
time. – usually as long as the machine.
4) When you “select” read the database you may get more than one record – the answer can
be put into an array of data.
SQL Setup
You will most likely want to create a user (login) and password on the SQL server just for the NJ. Making
the desired database a default for this user will help with setup at the NJ end.
NJ Setup
The primary SQL setup is here and is straightforward – easy – and should be done with the database
administrator handy. It only takes a few minutes to create and test the connection.
The NJ can support up to three database connections and is setup here:
3

Figure 1
I typically rename the connection the same as the database name.
You can connect up to three databases but we cannot guarantee stability if the three databases are not
the same (i.e.: all 1 is Oracle and 2 are SQL Server).
The NJ SQL is configured in Sysmac Studio – create a project and you will see something similar to Figure
2.
1) Connection Name: Should match the name you gave to the configured connection in Figure
1.
2) Database Type: Oracle, Microsoft SQL etc.
3) You can specify the SQL Server by IP address or by Host Name. If you select Host Name then
you must go to Controller Setup – Built-in EtherNet/IP Settings – TCP/IP - and configure the
DNS location so the NJ SQL knows where to go find the Database name. The DNS is usually
the server or the router in the network.
4) The “Instance Name Port” refers to the listening port for the SQL server. For Microsoft SQL it
is typically 1433 (but you can have more than one database on a server so the port number
can be set to something else – ask the IT person.) MySQL is typically 3306. Oracle is typically
1521.
5) The user name and password should be set up in the SQL server just for the NJ to use.
4

6) Login Timeout and Query Execution Timeout on this page should be set to 20s. The database
instructions have their own time out. If you set this number too small the NJ will not be able
to log into the database.
7) You will also see a “Communications Test” button. It gets the NJ to try and log into the
database. Great for testing. You do not have to “Rebuild Controller” and synchronize to the
NJ each time you make a change and test. Just the first time to get the basics into the
controller. After testing and getting a connect – rebuild – and synchronize with the NJ.
Figure 2
Writing the Program
There are a couple of things to keep in mind when you write the program.
1) Only 32 special instructions can executed simultaneously. Since these instructions are
typically network communications instructions, many of them take several scans to execute.
You have to pay attention to how many you are using. The SQL database instructions are
part of these special instructions. Therefore we need to be careful how many of these
instructions we use.
2) We can execute many “insert”, “select” etc. instructions at once but bear in mind they are
executed sequentially – not in parallel.
Connect:
The first thing our program needs to do is connect (or disconnect) to the SQL database. The DB_Connect
(DB_Close) instructions are used to do this. I show an example below. Note that the DBConnectionName
is the name you used in the connection settings above. This instruction uses the connection settings
from above for all its connection information.
The _DBC_Status.Run flag is an internal flag that lets us know the SQL client is actually up and running.
This service is one of the last to run in the controller.
5
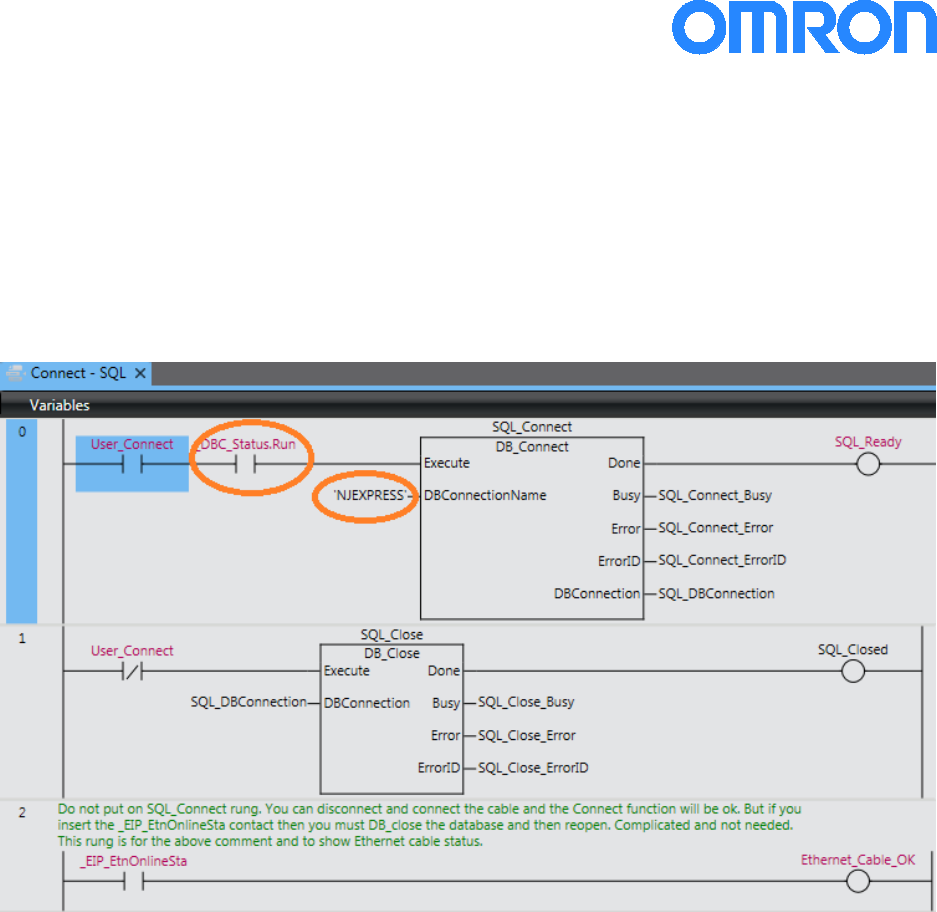
Notes:
1) The SQL_Ready relay will turn on if the connection is successful. It will not go out if the
connection is lost. We talk about that later.
2) The connection to the database will self-heal if the connection loss is temporary. There are
situations where this does not work. The best way to restore the connection is to DB_Close
– wait for the connection to close – then DB_Connect again. A good example would be if
the database reboots.
3) Line 2 shows the _EIP_EtnOnlineSta flag. I use this to quickly tell if the Ethernet cable is
plugged into the EtherNet/IP port on the controller
Figure 3
Map
The section above created a connection to the database and server. Now we need to specify the table(s)
and fields. This is done with a DB_CreateMapping instruction.
1) You need one DB_CreateMapping instruction for each variable you are linking to the SQL
database.
2) You need one variable for each “insert”, “select”, “delete”, “update” command that will be
used with the SQL database.
3) Each variable does not need to map to all the fields in the table – only the ones you want to
write to or read from.
4) The DBConnection (top left input) comes from the bottom right corner of the DB_Connect
instruction above. Use the same variable for the DB_Connect output and
DB_CreateMapping input.
5) The “TableName” is shown as a constant (by using ‘ ‘ around the name). In this case
‘Table4’. This is how you specify the table.
6

6) MapVar is where you put your variable. The MapVar must be of type Custom Data
Structure. You go to “Data Type” and create a custom data structure. An example is shown
in the two images below. The “members” in the “Data Type” must be character for
character a match to the field names in the table. There is a table for each of the SQL
servers showing the correct base type to use for each field type in the SQL server. The
manual is W527 for the tables.
7) This leaves the SQLtype input. This can be “_DBC_SQLTYPE_INSERT”,
“_DBC_SQLTYPE_SELECT”, “_DBC_SQLTYPE_DELETE”, “_DBC_SQLTYPE_UPDATE”.
8) The DB_CreateMapping instructions are part of the instruction set limited to 32 executing
on any given scan. You only need to execute them once every time you turn the controller
on. Hence you can set a set coil output on the done bit which will prevent the instruction
from executing again till the processor cycles power.
9) I usually string the DB_CreateMapping instructions one after another. Using the done
output from one to trigger the next one. This prevents me from using more than one
“special instruction” limitation at a time.
Figure 4
7

Custom Data Type
Figure 5
Insert Data
This is done using the DB_Insert instruction. This instruction is very straightforward. Put the variable
next to the MapVar input and trigger the instruction until it is done. It is not done until the “Done” or
“Error” outputs come on. If you turn it off earlier – it may not execute. The TimeOut input is the only
one that requires some thought. Set the duration long enough to prevent nuisance tripping , but shorter
than the cycle time of the data log. I usually set to longer than 100ms because the switches and server
can be a little slow on first use.
Figure 6
In this case the Table4_Insert_Data variable is a global variable – it does not have to be global.
Figure 7
8

SQL_Table4_Type is declared in the “Data” “Data Types”
Figure 8
Select Data
This is done using the DB_Select instruction. This instruction has two added parameters. “Where” which
allows you to specify which record you are looking for and “Sort” which allows you to tell the database if
you want the data in ascending or descending order etc.
There are a couple of things you need to know for this instruction:
• The “MapVar” variable can be an array. Each select may have more than one record as an
answer so you need an array to put the answer in. If the array is size 20 as shown below and
there are 30 answers – you will get the first 20. This will not create an error.
Figure 9
• Note “MapVar” syntax is “Table4_Select_Data” not” Table4_Select_Data[0]” as with many
other instructions when specifying an array as a variable.
Figure 10
9
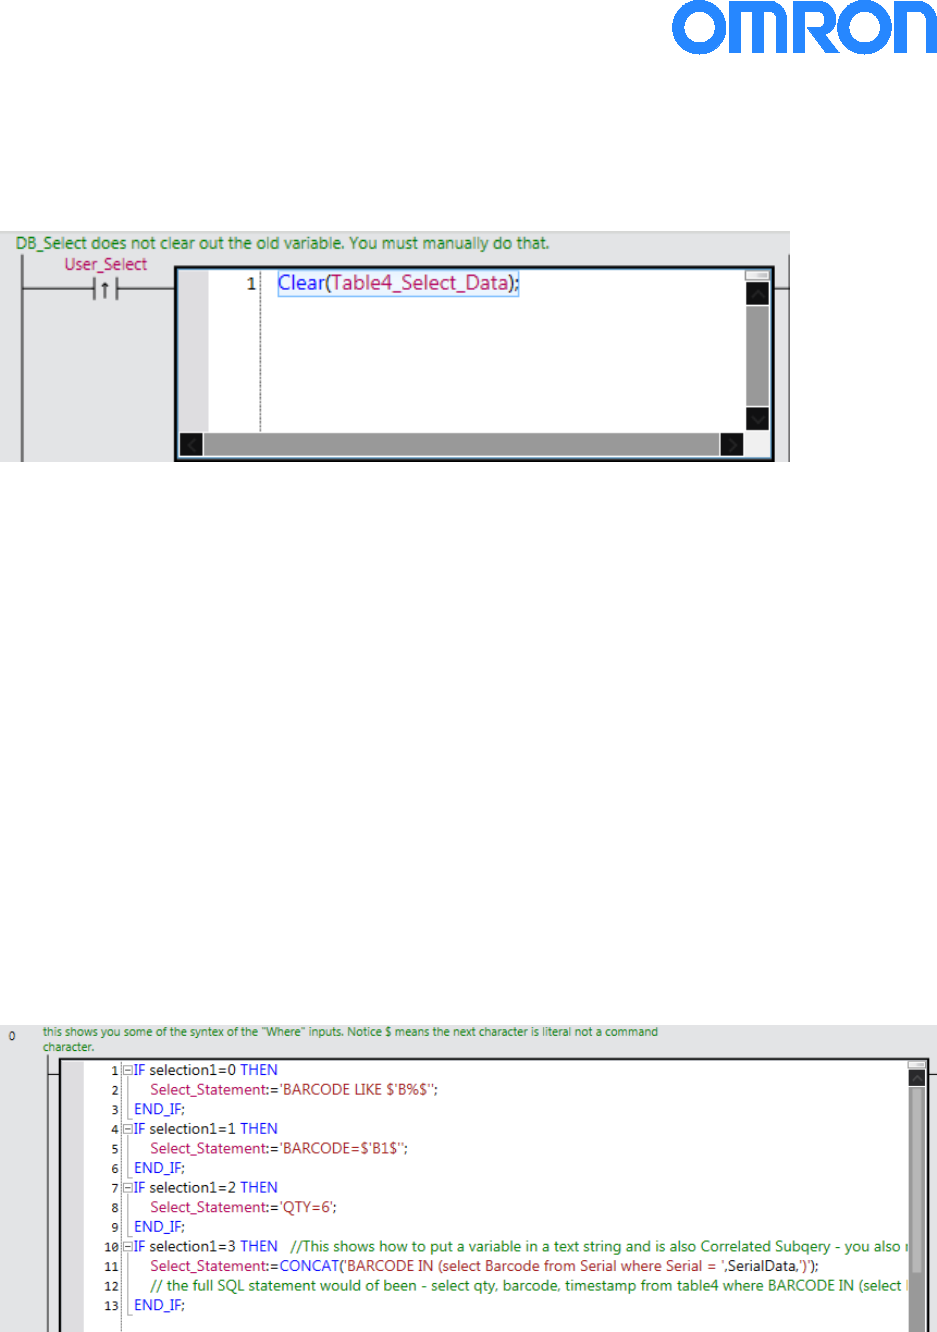
• Like all the other DB instructions it is not done till the “Done” or “Error” output comes on. You
must enable until one of these outputs comes on.
• You must clear the “MapVar” variable before using the instruction – the instruction does not
clear out the old data.
Figure 11
• Here are some examples and tricks using a “where” statement:
Example of using a wildcard – barcode starts with “B”
Select_Statement:='BARCODE LIKE $'B%$'';
Sysmac Studio uses ‘ and so does SQL. To make Sysmac Studio ignore the ‘ put a $ in front of it.
So this example really means ‘BARCODE=$B1’
Select_Statement:='BARCODE=$'B1$'';
Simple example
Select_Statement:='QTY=6';
This example shows how to join (concat) text and a variable. “SerialData is a “string”.
Select_Statement:=CONCAT('BARCODE IN (select Barcode from Serial where Serial = ',SerialData,')');
This example shows how to concat string and integer into a select statement.
Select_Statement:=CONCAT('EmpNum =',INT_TO_STRING(Operator_Rolled));
• You can put this code in an inline “Insert Inline ST” box
Figure 12
10
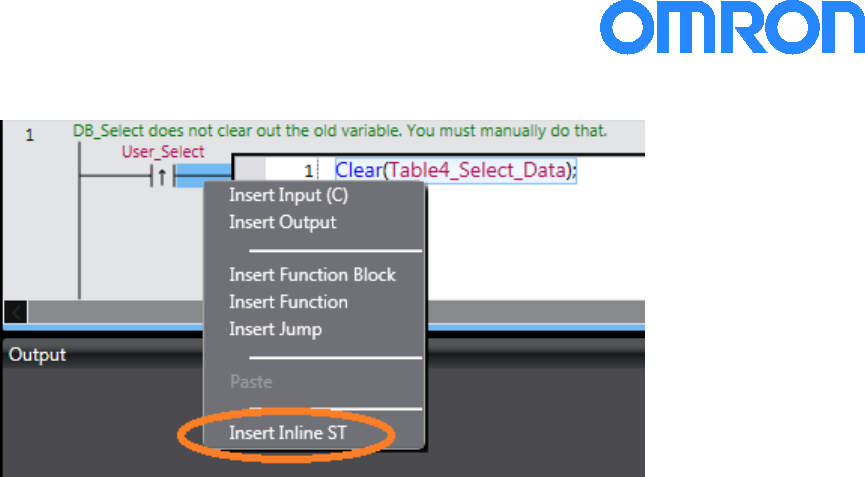
To insert a structured text box on a rung put cursor on the rung – right click
Figure 13
Update Data
This is done using the DB_Update instruction. It works very much like the Select instruction. Be careful
to create a “where” statement with one answer or you will change multiple records.
Delete Data
This is done using the DB_Delete instruction. It works very much like the Select instruction. Be careful to
create “where” statement with one answer or you will delete multiple records.
11
Calling a Stored Procedure
Stored procedures are typically used to check data on its way into multiple tables. If part of the data is
incorrect the stored procedure can prevent all of the data from going to whatever table it was heading
for.
Some of our competitor’s customers also use this technique to speed things up. By sending data to a
stored procedure you only need one write to send data to many tables.
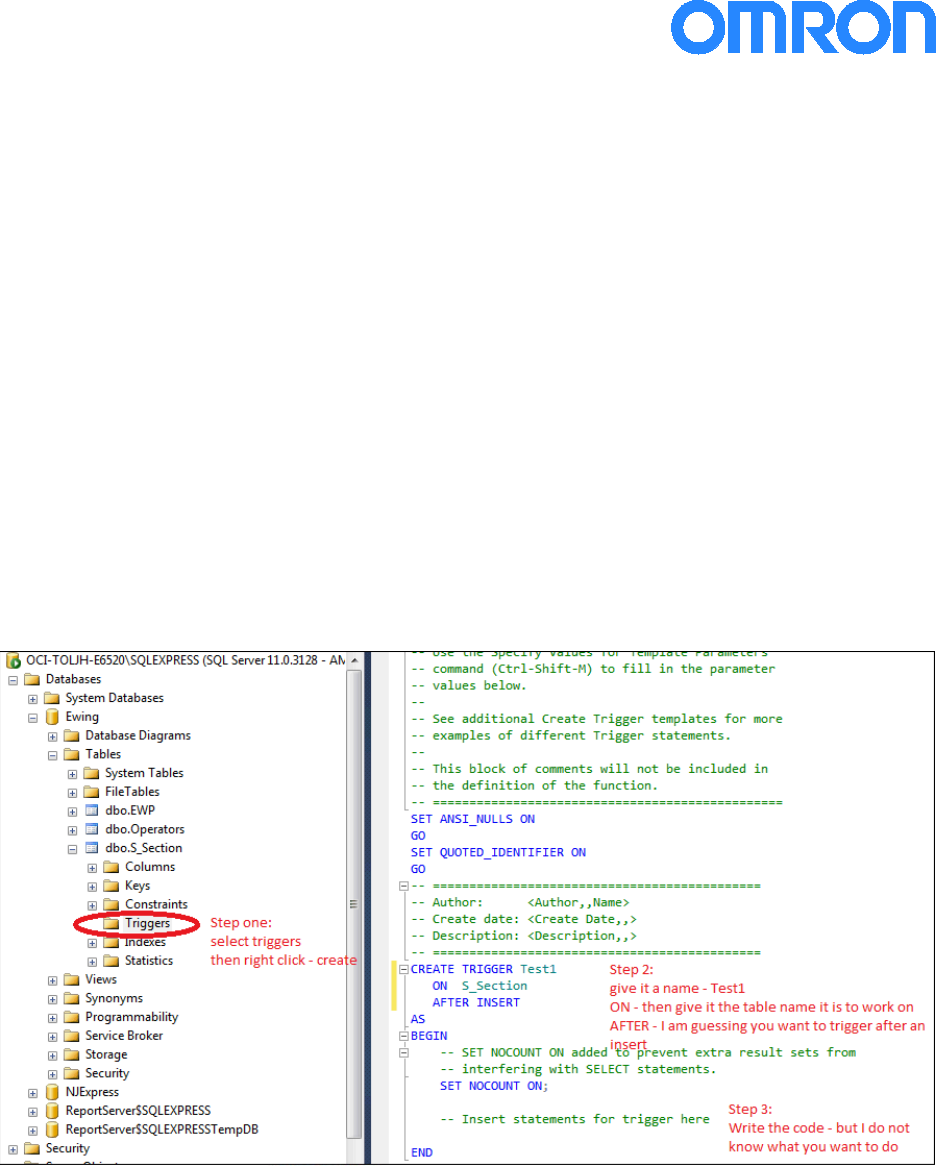
The NJ cannot call a stored procedure directly.
You can send the data to a (temporary) table and put a trigger in the table which accomplishes the same
end. The trigger can be configured to run every time you send data to the table automatically.
A typical complaint about the NJ method is that the NJ does not know if the trigger (procedure) found a
problem with the data. My answer to that is – what exactly did you want the NJ to do about it - if the
data was invalid. At least this way the data is in a table – someone can go fix it and then send it on its
way. You can go read the end destination tables to see if the data made it if you need confirmation.
The trigger has the exact same code as a stored procedure.
Figure 14
12
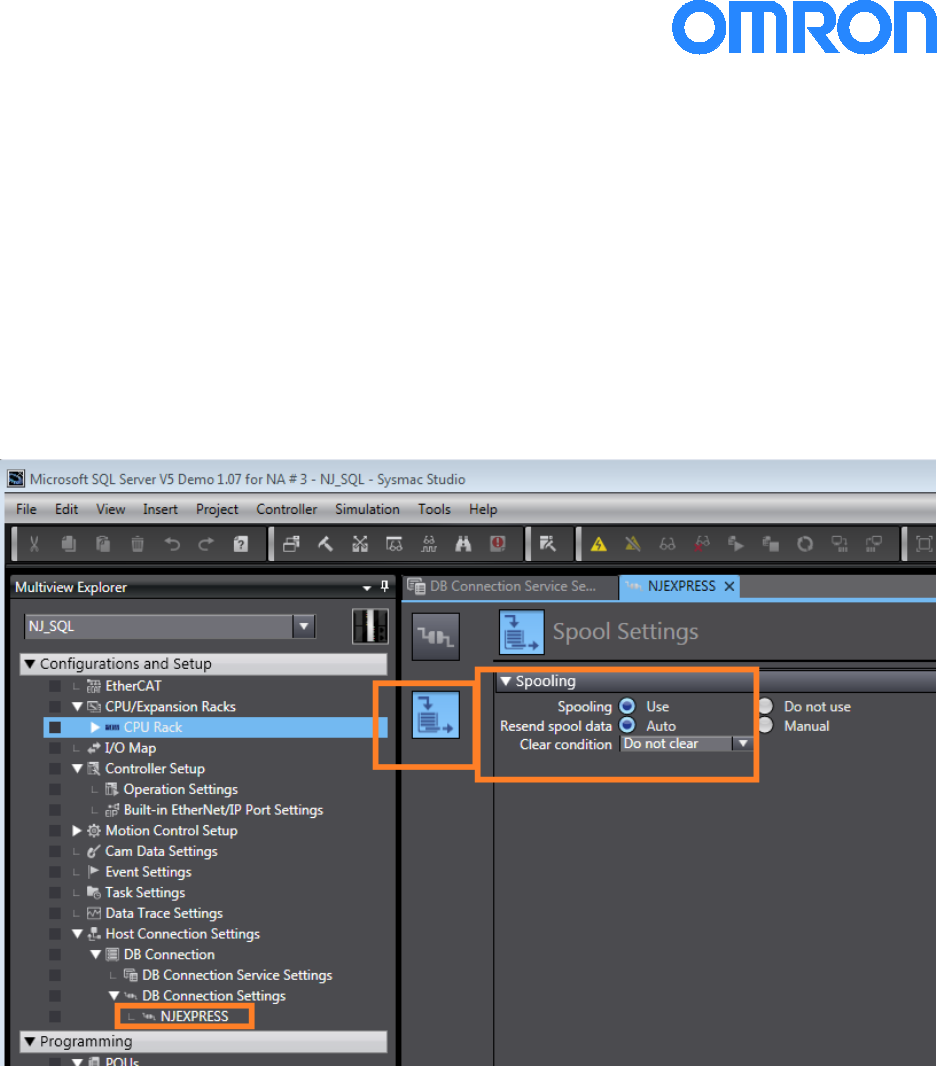
Spooling
Introduction
Spooling is when the NJ SQL sends the “Insert” data to an internal memory area because the connection
to the SQL data base has been lost. This memory area is 1Mbyte in size and cannot be changed.
How to enable
The spooling feature is default off. You need to turn it on.
The “Resend Spool Data” tells the NJ to automatically send all spooled data to the SQL server when
connection is restored. If you have many (over 30) NJ’s in the plant – you may not wish to do this – all
controllers trying to dump their spools at the same time can overload the SQL server and prevent
current operations from logging. You can also use the DB_ControlSpool instruction to determine when
to transmit the spooled data.
Important Notes about Spooling
Spooling is a great feature – but:
You cannot spool if you have not had a successful DB_CreateMapping.
You cannot have a successful DB_CreateMapping if you do not have a successful DB_Connect.
This means you cannot power up the NJ (SQL server is still down) and expect the NJ to log to the spool.
When the NJ first turns on – it must make a connection to the SQL database in order to set up the spool.
13
The NJ will auto recover from most SQL breaks (cable break etc.) but sometimes it cannot.
The best way to fix this problem is to use DB_Close to break the connection entirely and then
DB_Connect again. You must also run DB_CreateMapping again. The dilemma here is that once you
issue DB_Close – the spool will stop working until you successfully DB_Connect.
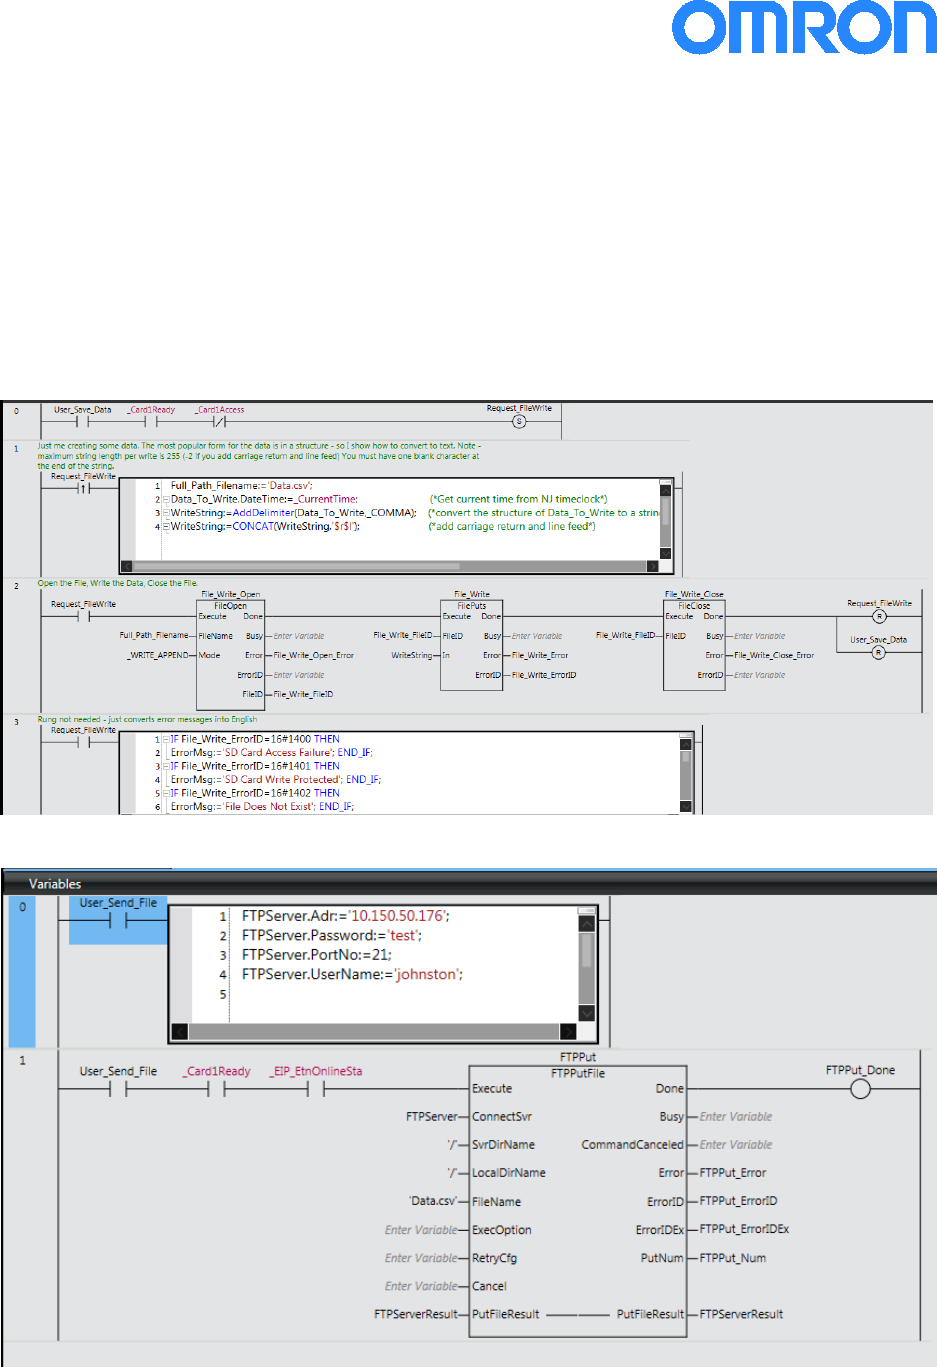
Backup to the Spooling – File Save
Sometimes you may want a backup of the data.
You can convert the variable to text and save to the SD card on the NJ. We can then send the file using
FTP client to the server which has the NJ SQL on it. At that point in time the SQL server person could
import the data.
This is the technique to convert the data to ASCII and send to the SD card on the NJ.
This is how you FTP data to the FTP server.
14

Glossary
EtherNet/IP An Ethernet based communication system using the CIP protocol. The NJ
uses EtherNet/IP for NJ to computer, NJ to HMI, NJ to NJ, NJ to some IO and
drives, communications.
Global Variable This is a variable that should be accessible from many programs or devices.
Local I/O I/O connected physically to the NJ CPU.
Local Variable A variable that is only accessible from the program it was declared in.
NA The Omron NA series of touch screens for use with NJ and CJ controllers.
NJ The Omron NJ series CPU’s
NJ SQL The Omron NJ series of CPU’s that also have SQL client software in them.
Remote I/O I/O connected to the CPU by a communication cable (example: EtherCAT)
SQL Usually refers to any SQL server but actually means Structured Query
Language. Microsoft SQL, Oracle, MySQL, and IBM DB2 are all sequel
servers.
Tags Instead of using fixed numbering system for I/O the NJ uses a free allocation
of memory and you give each I/O or variable a name.
Task The NJ series controller runs several tasks (Program and IO refresh) in a
time slice manner. Each task gets so many microseconds (μs) of time to
execute then the processor moves on to the next task (comes back to the
current task later).
Revision History
Rev 1.0
First Release
Jan 13th, 2015
Index
create a user (login) ........................................... 3
DB_Close ............................................................ 5
DB_Connect ....................................................... 5
DB_CreateMapping ............................................ 6
DB_Delete ........................................................ 11
DB_Update ....................................................... 11
DBConnectionName .......................................... 5
password on the SQL server .............................. 3
Select_Statement ............................................ 10
15

OMRON CANADA, INC. • HEAD OFFICE
Toronto, ON, Canada • 416.286.6465 • 866.986.6766 • www.omron247.com
OMRON ELECTRONICS DE MEXICO • HEAD OFFICE
México DF • 52.
55.59.01.43.00
• 01-800-226-6766 • mela@omron.com
OMRON ELECTRONICS DE MEXICO • SALES OFFICE
Apodaca, N.L. • 52.81.11.56.99.20 • 01-800-226-6766 • mela@omron.com
OMRON ELETRÔNICA DO BRASIL LTDA • HEAD OFFICE
São Paulo, SP, Brasil • 55.11.2101.6300 • www.omron.com.br
OMRON ARGENTINA • SALES OFFICE
Cono Sur • 54.11.4783.5300
OMRON CHILE • SALES OFFICE
Santiago • 56.9.9917.3920
OTHER OMRON LATIN AMERICA SALES
54.11.4783.5300
Authorized Distributor:
P77I-E-01 04/15 Note: Specifications are subject to change. © 2015 Omron Electronics LLC Printed in U.S.A.
Printed on recycled paper.
Automation Control Systems
• Machine Automation Controllers (MAC) • Programmable Controllers (PLC)
• Operator interfaces (HMI) • Distributed I/O • Software
Drives & Motion Controls
• Servo & AC Drives • Motion Controllers & Encoders
Temperature & Process Controllers
• Single and Multi-loop Controllers
Sensors & Vision
• Proximity Sensors • Photoelectric Sensors • Fiber-Optic Sensors
• Amplified Photomicrosensors • Measurement Sensors
• Ultrasonic Sensors • Vision Sensors
Industrial Components
• RFID/Code Readers • Relays • Pushbuttons & Indicators
• Limit and Basic Switches • Timers • Counters • Metering Devices
• Power Supplies
Safety
• Laser Scanners • Safety Mats • Edges and Bumpers • Programmable Safety
Controllers • Light Curtains • Safety Relays • Safety Interlock Switches
OMRON AUTOMATION AND SAFETY • THE AMERICAS HEADQUARTERS • Chicago, IL USA • 847.843.7900 • 800.556.6766 • www.omron247.com
OMRON EUROPE B.V. •
Wegalaan 67-69, NL-2132 JD, Hoofddorp, The Netherlands.
•
+31 (0) 23 568 13 00
•
www.industrial.omron.eu
