OMCF User Instructions
OMCF%20User%20Instructions
User Manual: Pdf
Open the PDF directly: View PDF ![]() .
.
Page Count: 12
1
RESTAURANTS UNLIMITED
I n f o r m a t i o n T e c h n o l o g y
October 2011

2
Online Menu Change Form
Table of Contents
1. Getting Started: ....................................................................................................................... 3
2. CREATING A REQUEST: ............................................................................................................. 4
3. EDITING ITEMS ON AN OPEN REQUEST: ..................................................................................... 8
4. ATTACHING MENUS: .............................................................................................................. 10
5. SUBMITTING COMPLETED REQUESTS TO THE RSC ..................................................................... 11
6. SEARCHING FOR SUBMITTED REQUESTS: ................................................................................. 12
All POS changes must be submitted through the Menu Change Request
Website one week in advance! Filling out the form correctly and thoroughly
will ensure a quick and efficient turn around for your menu changes.
3
1. Getting Started:
Open Internet Explorer and type OMCF into the address bar. This will take you to the Online Menu
Change form. OMCF will recognize your windows Log-In
Once you are logged in, you can Create Request, Edit your account or Search Requests; Select the
action you wish to do from the choices on the left side of your screen. You can navigate back to any
screen using the menu on the upper left of your screen.
Navigate to any screen
by clicking on one of
these headings
.
4
2. CREATING A REQUEST:
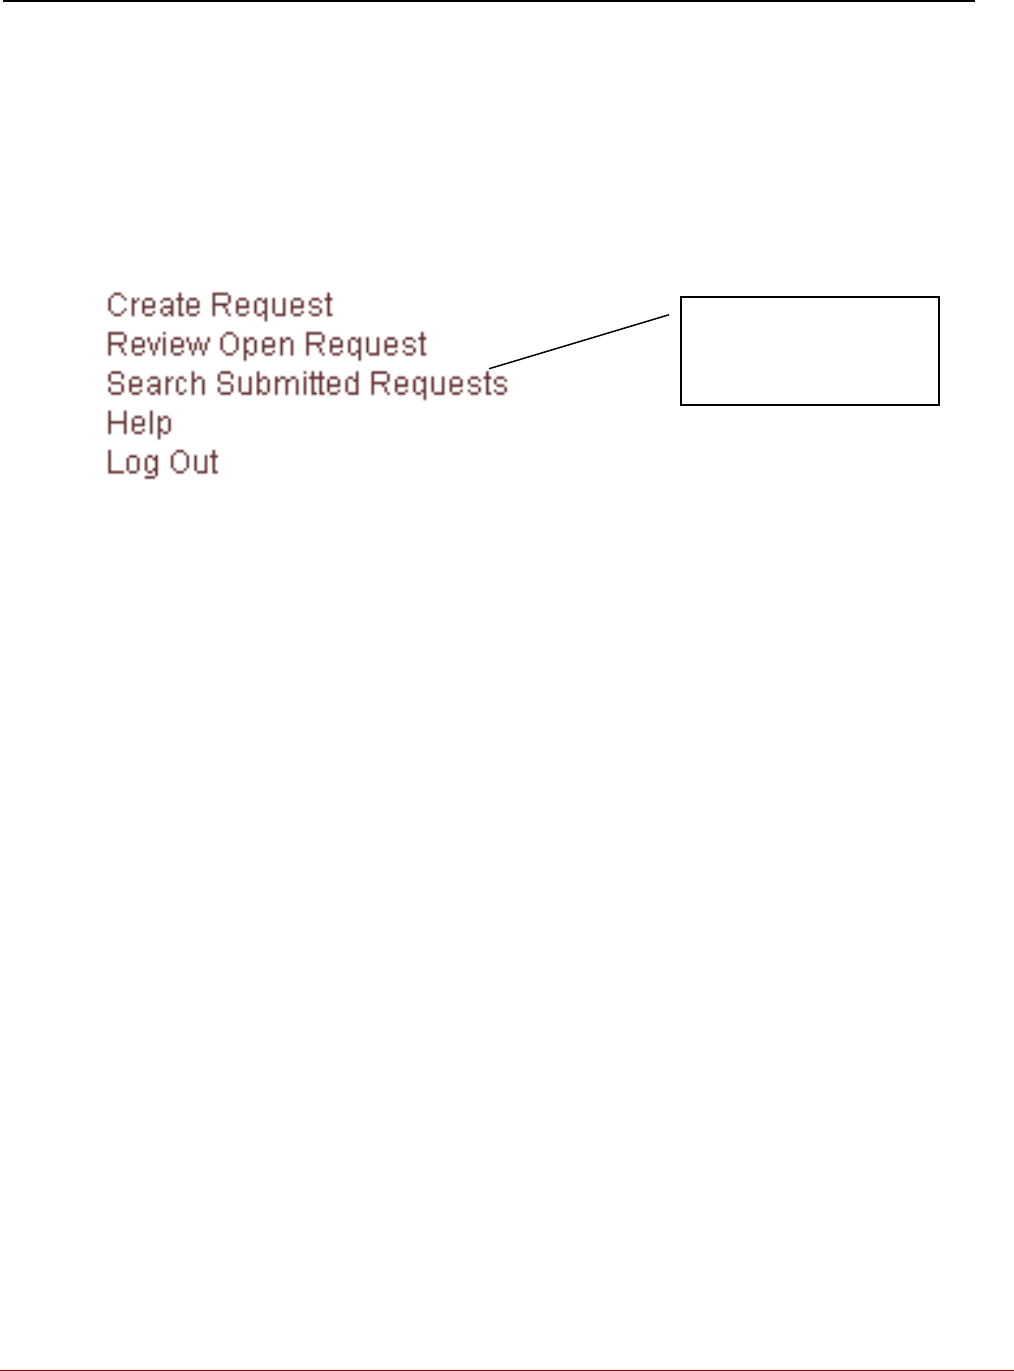
1. Double check the restaurant displayed in the restaurant field. If the incorrect restaurant is
listed, change it by using the drop down menu.
2. Go Live Date: Choose the date you will need the changes to be effective. All changes on a
request must have the same go-live date. Changes needed on different dates, will have to be
entered on separate requests. (REMEMBER The IT Department needs a one week notice on all
changes.)
3. For POS Clean-up, Check the Request may be completed at any time. IT will get to it as soon as
possible.
4. CLICK NEXT
5. Choose REQUEST TYPE: Choose from the pull down menu to select.
o Add Item – Choose when adding new items to your POS screens.
o Change Item – Choose when changing anything about an existing key.
o Remove Item – Choose when removing a menu item from ALL programs and menu
screens.
Choose type of change
from the drop down.
Select Your
Restaurant
from the drop-
down menu.
Select Request
Class from drop-
down menu
Select Go Live
Date
For POS Clean-up, check
“Request May be
completed at any time.
5
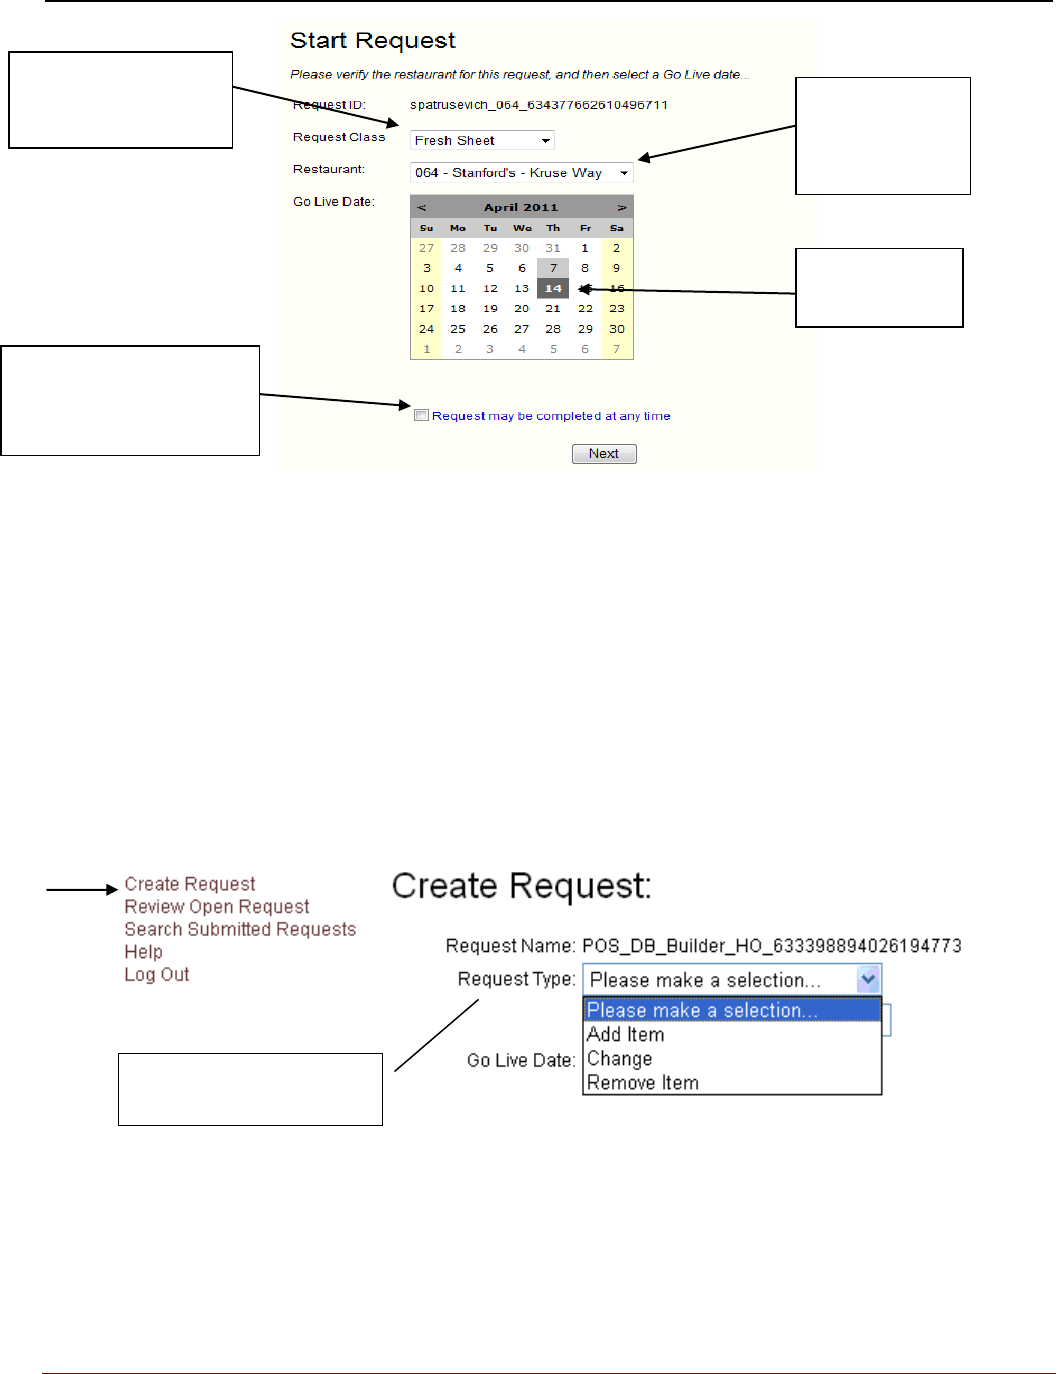
A. Add Item - Be sure to fill in every field.
1. Description – Enter description of item to be added, not abbreviations or generic. (ex.
Alexander Valley Cabernet, not AV Cab)
2. Entrée Y/N – Indicate whether or not the item is an entrée.
3. Program – Choose the appropriate meal period for the new item.
4. Forced Modifier - Select (if needed) the required modifier prompt. If no forced modifier is
needed, choose None.
5. Printer – Select the location the new item is prepared. Please only choose multiple stations
if the item is in fact prepared at two stations.
6. Prices – Please enter a price for all 4 meal periods.
7. Comment – Use this box for any special instructions in addition to completing the entire
form. This field is optional.
8. Add to Request – Click to add this item to the menu change request.
If any of the required fields have been left blank, they will be flagged when you choose Add
to Request. Enter the requested information and choose Add to Request again. The entire
request will not be sent to the RSC until you hit Review and Submit Request.
9. Continue with your next change request. When finished, choose Review to review your
request before submitting.
7. Comment
is optional.
6. Enter
prices. Fill
out every
field.
1. For new
item enter a
description.
3. Enter time
period item will be
available.
4. Choose
forced mods or
choose
“none”.
2. Indicate
whether or not
item is an
entrée.
8. Click here
when all
information is
complete.
5. Choose
printer.
6
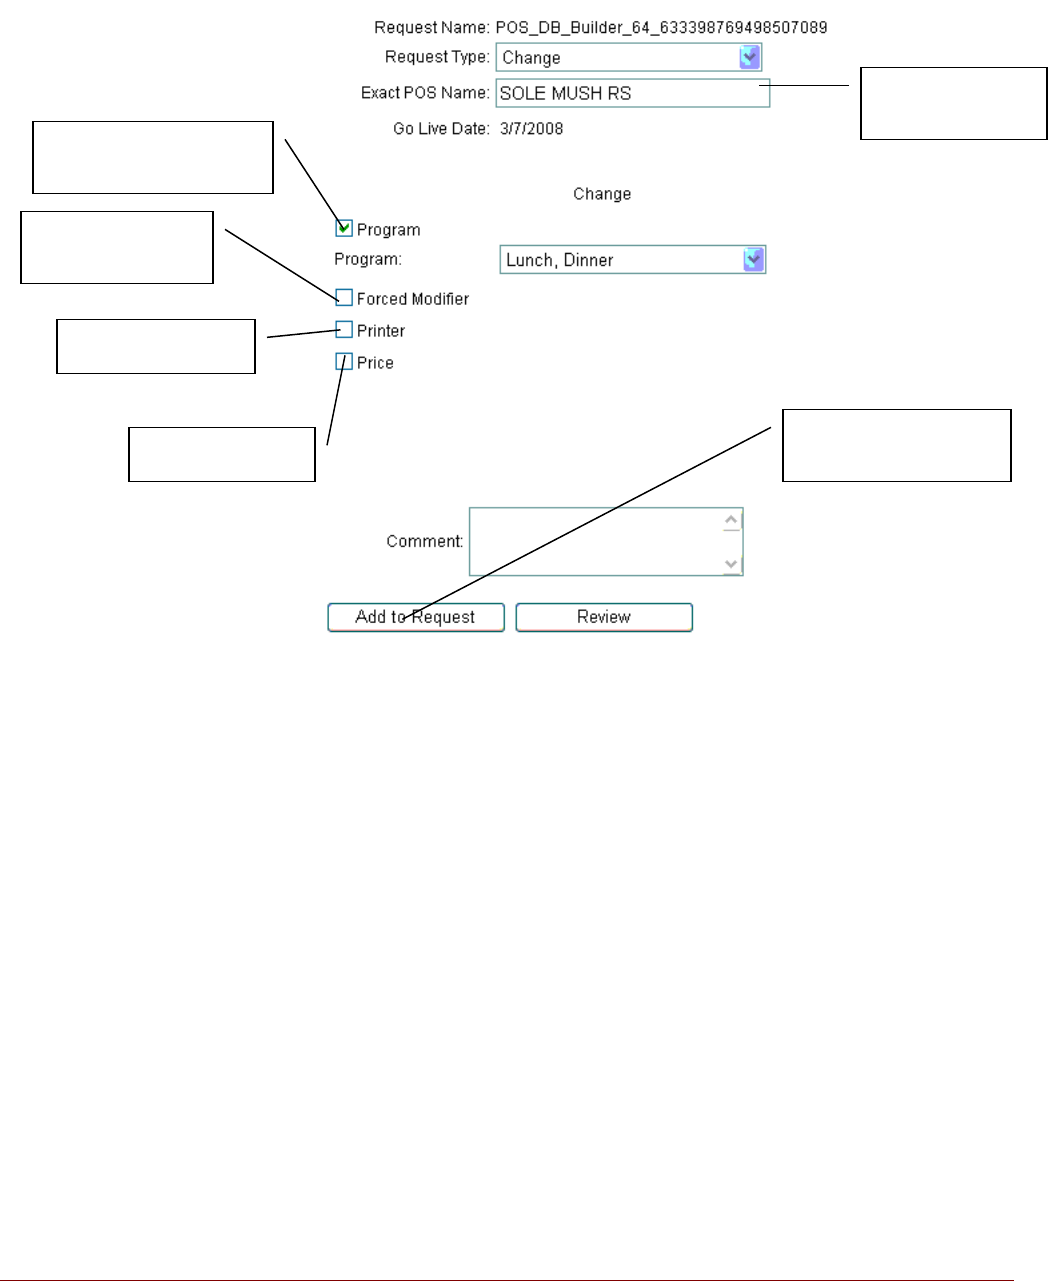
B. Item Change
1. Exact POS Name – Enter the EXACT POS name that appears on the Micros screen for the
item to be changed. This is very important to eliminate the possibility of changing the
wrong item.
2. Change – Check the box(es) for each needed change (Program, Forced Modifier, Printer
and/or Price). You will be prompted for the necessary information needed for each change
checked.
3. Comment – Use this box for any special instructions in addition to completing the entire
form. This field is optional.
4. Add to Request – Click to add this menu item change to the menu change request
5. Continue with your next change request. When finished, choose Review to review your
request before submitting.
Change times periods
menu item is available.
Add or change a
forced modifier.
Change printer.
Change price.
Click add request
when finished.
Enter EXACT POS
Name.
7
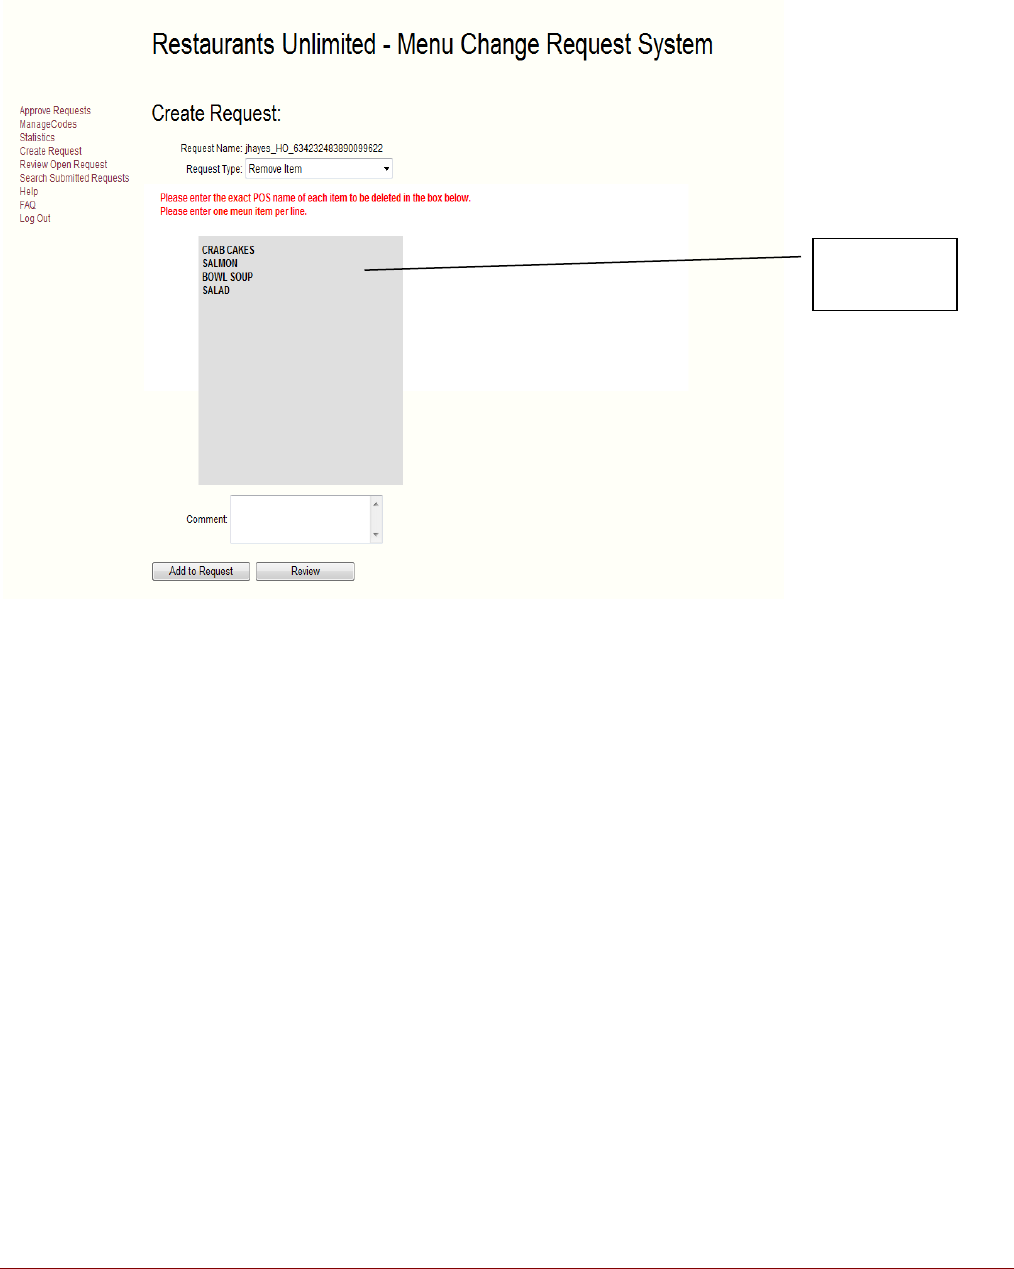
C. Remove Item - This removes menu item from all programs and all screens. If you wish to change
the meal periods an item is available, Choose Change, then Program.
1. Exact POS Name - Enter the exact name that appears on the micros screen for the item to
be deleted. This is very important to eliminate the possibility of deleting the wrong item.
Enter one POS name per line.
2. Comment – Use this box for any special instructions in addition to completing the entire
form
3. Add to Request – Click to add this item to the menu change. The entire request will not be
sent to the RSC until you hit Review and Submit Request (see below for detailed
explanation).
4. Review – Click this to review all items in the current menu change request. From this
screen you can edit or cancel changes, attach menus or submit your request to the RSC if no
changes are needed.
List exact POS
name.

8
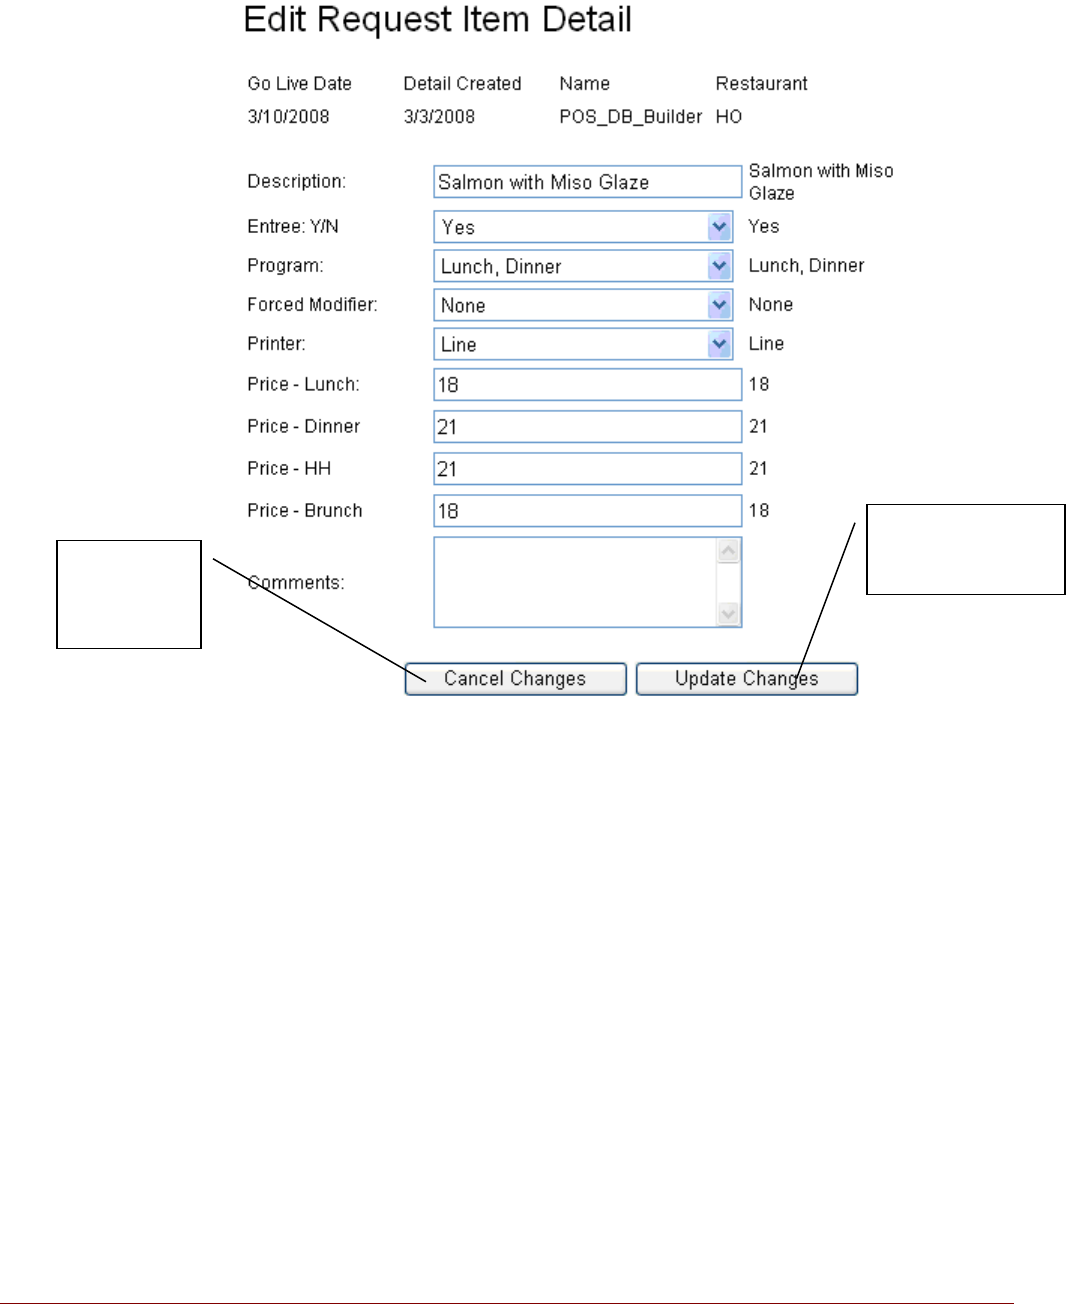
3. EDITING ITEMS ON AN OPEN REQUEST:
An open request means that the request has not yet been received. You must click on Submit
a Request before it will be processed.
From this screen you can perform several functions.
o Edit an Entry - To Change information within an entry, place your cursor somewhere on
the item then double click . The Edit Request Item Detail Screen will appear.
o Change Go Live Date – All items on a request have to have the same Go Live Date. If
you have change requests with different Go Live Dates, you need to create multiple
requests.
o Attach Menus – You must attach menus for all Fresh Sheet changes and promotions
with menus.
o Submit Changes to the RSC – Once a request form is submitted to the RSC it cannot be
changed.
Click Add to
Request to submit
item
request.
Double click to edit an
item.
Click here to
Change Go Live
Date.
Click here to Submit
Changes to the Home
Office.
Click here to Attach
Menus.
Click here to
continue adding
items to this
request.
9
1. Make the desired changes in the appropriate fields.
2. Choose Update Changes at the bottom of the screen to save or Cancel Changes to go
back to review form without saving changes.
Make changes
then click here to
save.
Click here to
cancel
changes.
10
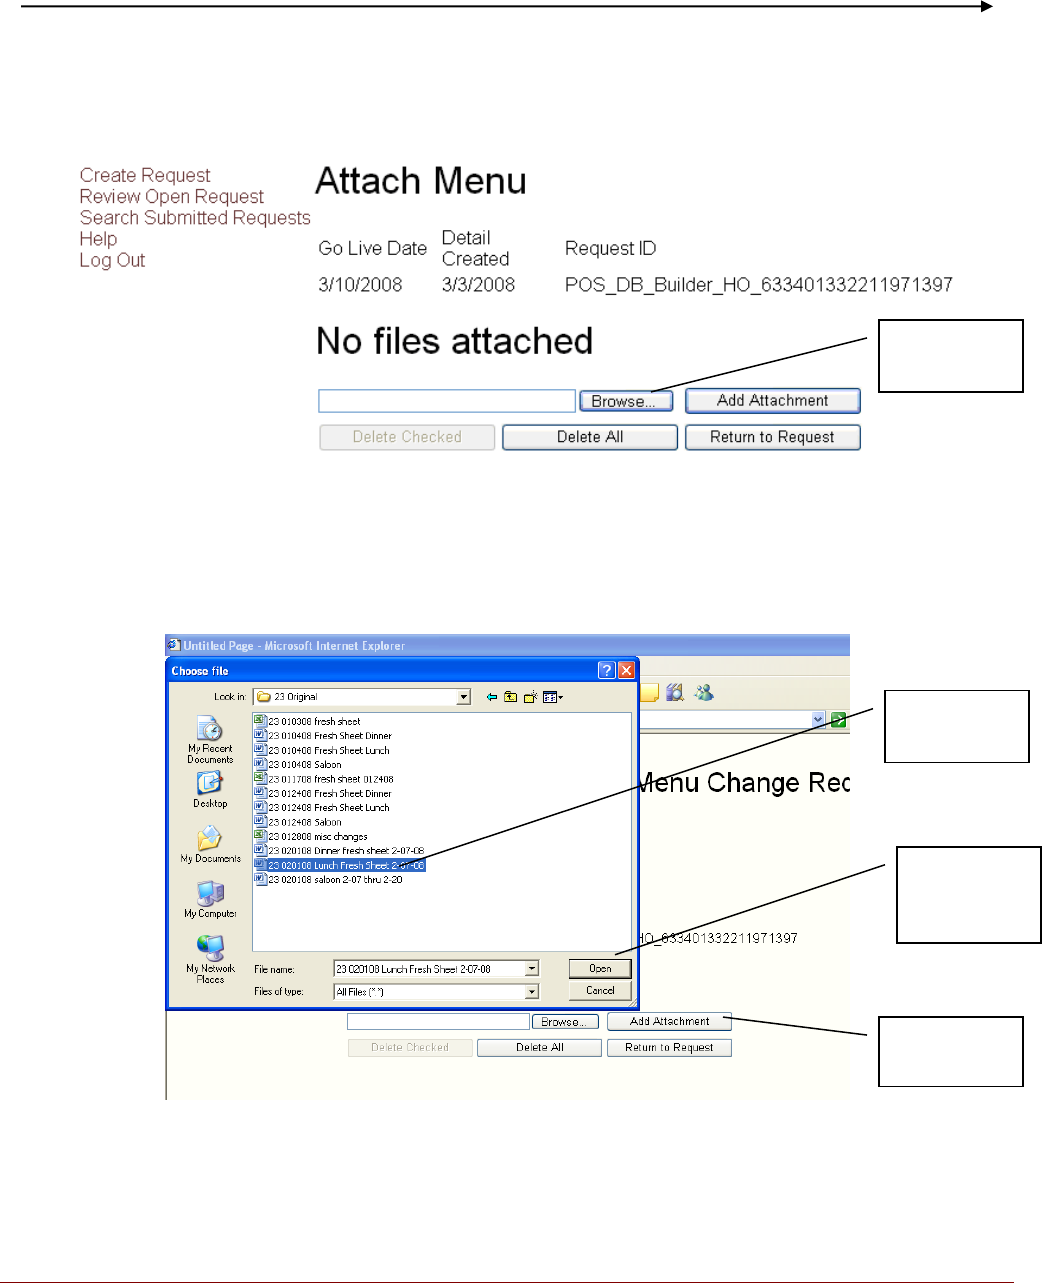
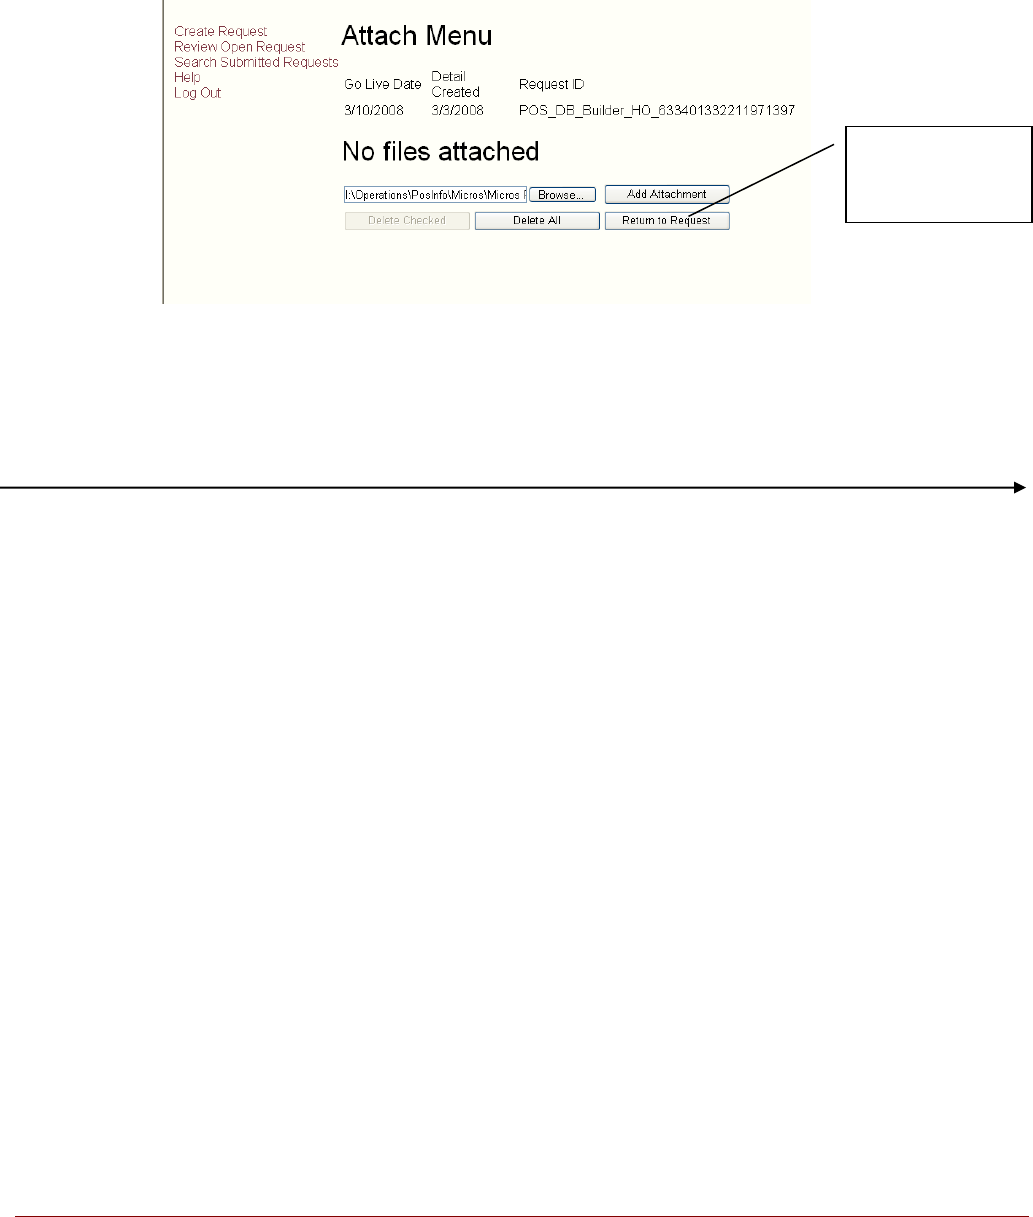
4. ATTACHING MENUS:
You must attach menus for all Fresh Sheet changes and all promotions with a menu.
1. From the Review Open Requests screen, choose Attach Menu.
2. Choose Browse
3. Highlight file.
4. Choose Open.
5. Choose Add Attachment.
6. Repeat process for any additional menu files to be added to change request.
Highlight
file.
Click here to
choose file.
Click Add
Attachment.
Choose
Browse.
11
o When all menus have been added, choose Return to Request.
5. SUBMITTING COMPLETED REQUESTS TO THE RSC
o Submit Request – Choose Submit Request to send the request to the RSC. If your
request has been submitted with the required 1 week notice your requested new items
should appear on your POS screens by the day before your go live date. This will give
you time to test the new keys and notify the RSC if any modifications are needed. Once
a request is submitted, it cannot be edited again. You must create a new request to
submit any additional changes.
o Your changes will NOT be submitted to the RSC until you choose the Submit Request
button. You will receive an automatic email stating that your request was submitted
successfully. If you do not receive the email, your request was not submitted. If you log
out of the program before hitting the Submit Request button, a dialogue box will
appear the next time you log on prompting you to submit the unfinished request.
o You will receive a notification of completion via email when your request has been
processed. The email will tell you which of your changes were approved, POS Key
names for any “Add Items”, any comments filled out by the admin, and which change
requests were denied. For an explanation on why change requests for individual items
were changed or denied, there will be an explanation in the comments field.
Click here to
return to Review
Screen.
12
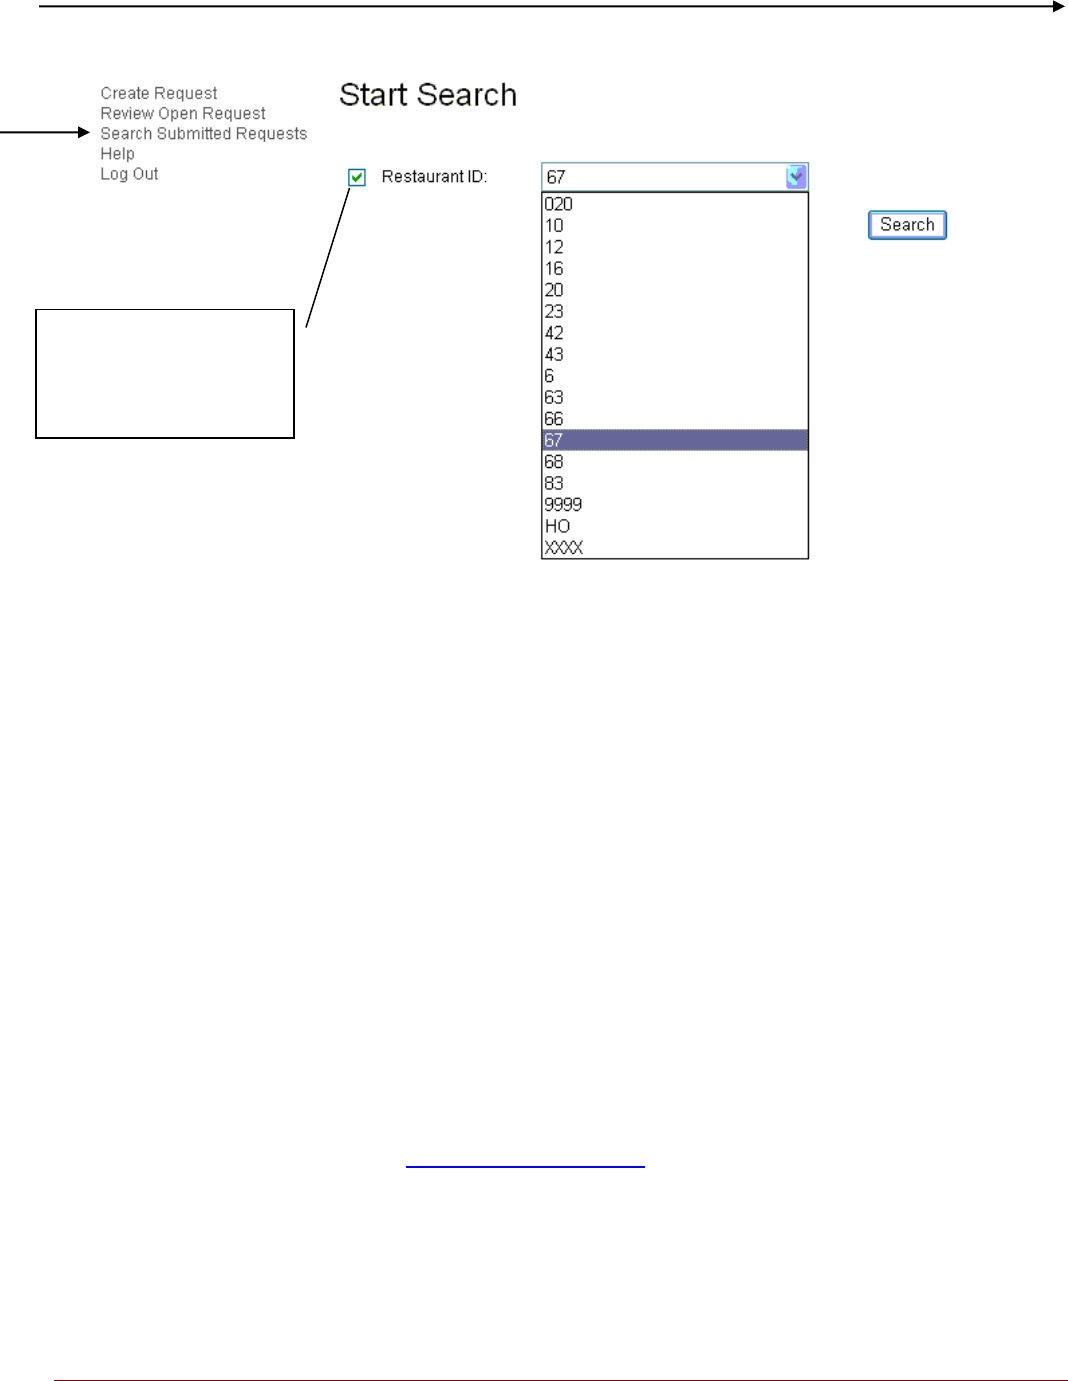
6. SEARCHING FOR SUBMITTED REQUESTS:
1. To view requests that have been submitted to the RSC, choose Search Submitted Requests
from the menu on the left side of the screen.
2. Choose your restaurant from the drop down menu then choose Search. All requests for this
restaurant will be displayed sorted by Request Date with the most recent at the top of the list.
3. All requests for this restaurant will be displayed sorted by Request Date with the most recent at
the top of the list. To change the category the list is sorted by, click the white heading on the
blue bar.
4. Place cursor on request you wish to view and double-click. You cannot make changes to a
request after it has been submitted to the RSC. You must create a new change request for any
additional changes.
5. You cannot make changes to a request after it has been submitted to the RSC. You must create
a new change request for any additional changes.
***All POS Menu Change Requests MUST be submitted at least 1 week in advance of menu changes.
Questions?
Contact your POS Support Team at POSRequests@r-u-i.com
Place a check here then
choose your restaurant
from the dropdown
menu.
