CFS/COSMOS/VM Getting Started Open Sat Kit User Guide 01 22 18
User Manual: Pdf
Open the PDF directly: View PDF ![]() .
.
Page Count: 49

OpenSatKit User’s
Guide
Version 1.1 , Released January 22, 2018
OpenSatKit User’s Guide – Version 1.1
1
Table of Contents
1.0 Introduction ...................................................................................................................................... 4
1.1 Motivation ..................................................................................................................................... 4
1.2 cFS Overview ................................................................................................................................. 6
1.2.1 cFS Architecture .................................................................................................................... 9
1.2.2 cFS Application Context ...................................................................................................... 11
1.3 COSMOS Overview ...................................................................................................................... 12
1.4 42 Simulator Overview ................................................................................................................ 13
1.5 PiSat Target ................................................................................................................................. 14
2.0 Using Starter Kit Features ............................................................................................................... 15
2.1 Launching the Starter Kit ............................................................................................................ 15
2.2 Feature Overview ........................................................................................................................ 17
2.3 cFS Functions............................................................................................................................... 18
2.3.1 Manage Files ....................................................................................................................... 18
2.3.2 Manage Tables .................................................................................................................... 18
2.3.3 Manage Memory ................................................................................................................. 18
2.3.4 Manage Recorder ................................................................................................................ 18
2.3.5 Manage Autonomy ............................................................................................................. 19
2.3.6 Manage Applications........................................................................................................... 19
2.4 Kit Tools ....................................................................................................................................... 19
2.4.1 Verify cFS Configuration ...................................................................................................... 19
2.4.2 Run cFS Performance Monitor ............................................................................................ 19
2.4.3 Run Benchmarks ................................................................................................................. 19
2.4.4 Run 42 Simulator ................................................................................................................. 19
2.4.5 Add Application ................................................................................................................... 19
2.4.6 Manage Hardware Targets.................................................................................................. 19
2.5 Pre-installed Applications ........................................................................................................... 19
2.5.1 Kit Applications ................................................................................................................... 20
2.5.2 cFS Applications .................................................................................................................. 20
3.0 Managing Applications .................................................................................................................... 21
3.1 cFS Application Build Environment ............................................................................................. 21
3.1.1 Building and installing the cFS ............................................................................................ 22
3.2 COSMOS Application Definition Environment ............................................................................ 24
3.3 OpenSatKit Application Runtime Environment .......................................................................... 25
3.4 Creating New Applications .......................................................................................................... 27
OpenSatKit User’s Guide – Version 1.1
2
3.5 Adding Existing Applications ....................................................................................................... 28
3.6 Removing Applications................................................................................................................ 30
3.7 Creating Application Unit Test .................................................................................................... 31
4.0 Implementing a Mission .................................................................................................................. 32
4.1 Porting to a new platform ........................................................................................................... 33
4.2 PiSat ............................................................................................................................................ 33
4.3 Configuring the cFE ..................................................................................................................... 33
4.4 Creating your application suite ................................................................................................... 33
4.5 Development process ................................................................................................................. 33
4.6 Ground system ............................................................................................................................ 33
4.7 Systems Topics ............................................................................................................................ 33
5.0 Demos and Tutorials ....................................................................................................................... 34
5.1 Demos ......................................................................................................................................... 34
5.2 Tutorials ...................................................................................................................................... 35
6.0 Starter Kit Design and Maintenance ............................................................................................... 38
6.1 COSMOS Configuration ............................................................................................................... 38
6.1.1 Ruby Gems .......................................................................................................................... 38
6.2 Kit Application Design ................................................................................................................. 38
6.3 Component Releases .................................................................................................................. 39
6.3.1 cFE ....................................................................................................................................... 39
Appendix A - Acronyms ............................................................................................................................... 40
Appendix B – Online Resources .................................................................................................................. 42
B.1 First Time Kit Installation ................................................................................................................ 42
B.2 Updating the Kit .............................................................................................................................. 42
B.3 COSMOS Resources ......................................................................................................................... 43
B.4 42 Resources ................................................................................................................................... 43
B.5 PiSat ................................................................................................................................................ 43
Appendix C – User FAQs .............................................................................................................................. 44
C.1 Installation Issues ............................................................................................................................ 44
C.2 COSMOS-cFS Connections Issues .................................................................................................... 45
C.4 COSMOS .......................................................................................................................................... 45
C.3 cFS ................................................................................................................................................... 46
C.4 42 .................................................................................................................................................... 46
C.5 JSON Files ........................................................................................................................................ 46
Appendix D – Naming Conventions ............................................................................................................ 47
OpenSatKit User’s Guide – Version 1.1
3
D.1 Command & Telemetry Database ................................................................................................... 47
D.2 Abbreviations .................................................................................................................................. 47
OpenSatKit User’s Guide – Version 1.1
4
1.0 Introduction
OpenSatKit was developed for the following reasons:
1. Serve as a distribution of the core Flight System (cFS). The cFS is an open architecture that has
separately configuration managed components. NASA controls the framework and Application
Programming Interfaces (APIs) and the cFS community including NASA provides components.
2. Serve as a cFS educational platform. This includes teaching users about the cFS itself and also
providing an environment that could be used as a classroom “lab” for doing exercises.
3. Provide an application prototyping environment. It supports creating, integrating, and
removing apps from the kit. It can also be used for initial configuration of apps for a mission.
4. Support target embedded platform evaluation and initial ports. A benchmarking app allows a
user to run and compare benchmarks for different platforms. A plan is to create a platform
verification app that will verify a target platforms functional behavior.
The kit is not intended to support a mission throughout the entire lifecycle. For example it does not
support hardware in the loop configurations. This does leave a gap if a mission is using COSMOS as its
ground system for spacecraft integration and test and/or mission ops. The current options are for a user
to create COSMOS extensions to the kit to meet their mission needs or to port the portions of the kit
(command & telemetry definitions, pages, scripts, etc.) from the kit to the COSMOS platform that has
been configured/extended for their mission.
This section describes the motivation for creating the starter kit and a high level introduction to each of
the architectural components. If you want to jump in and start using the kit go to Section 2. If you want
to use the kit to customize the Core Flight System (cFS) sections 3 and 4 explain how to manage
applications and transition from the kit virtual machine to your target hardware platform, respectively.
Please keep in mind the starter kit is composed of three complex products and the goal of this
documentation is not to explain the details of each product. This document is written from the
perspective of a flight software (FSW) developer that wants to use the cFS to control an embedded
device.
Section 5 describes how to maintain the kit and delves into the starter kit’s design. A typical product
user’s guide wouldn’t include this information, but just as the kit’s components are ‘open architectures’
the kit itself is open and may be modified by the user to be part of an operational system so this
information will be helpful to those users.
1.1 Motivation
Until around 2010 the development of spacecraft flight software (FSW) was performed by large
organizations that had custom proprietary solutions. FSW ran on processors lagging terrestrial
processor performance by orders of magnitude often forcing software engineers to opt for
performance over generalized solutions. With the exception of communications satellites many
organizations produced ‘one off’ customized satellites to designed for a specific application.
These product development lifecycles were often 5-10 years so even when FSW reuse was
occurring the maturation of the reusable artifacts across products was very slow.
OpenSatKit User’s Guide – Version 1.1
5
During this period from roughly 2005 until 2015, the National Aeronautics and Space
Administration (NASA) Goddard Space Flight Center (GSFC) developed the Core Flight System
(cFS) and in January 2015 the cFS was released as open source. This was great news for the
aerospace community, however there were many challenges with people actually adopting the
cFS for their missions. The cFS is a reusable FSW architecture that provides a portable and
extendable platform with a product line deployment model. As an open architecture, the cFS
can be technically challenging for new users to configure and deploy. In addition, as a
government organization, it is difficult for NASA to implement an open source product business
model.
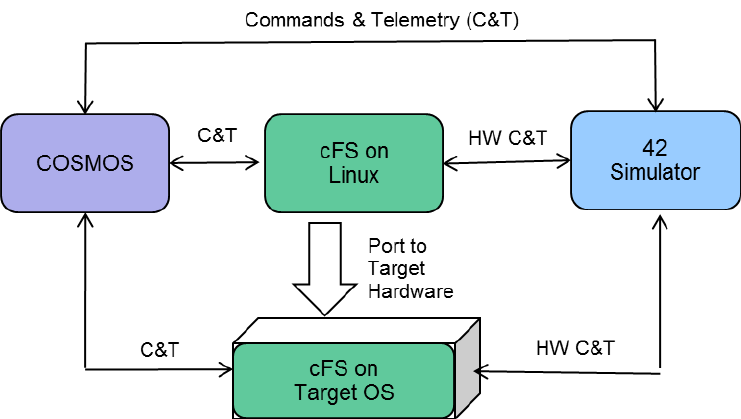
This starter kit addresses these issues by providing a fully functioning flight-ground system that
runs on a desktop computer. The starter kit components are shown in Figure 1. Ball
Aerospace’s COSMOS, a user interface for command and control of embedded systems, is used
as the ground system. The cFS running on Linux provides a desktop FSW component. The 42
Simulator provides a simulation of spacecraft attitude and orbit dynamics and control. See
Appendix B for details on obtaining more information on each of these components.
OpenSatKit User’s Guide – Version 1.1
6
Figure 1-1 – Starter Kit Block Diagram
Starting with an operational flight-ground system makes the FSW developer’s job much easier.
They can focus on porting the cFS to their target platform, tailoring the kit’s cFS components to
their needs, and adding new mission-specific components. A future version of the kit will
include a low cost commercially available target. This version describes the steps necessary for
using the kit to verify that the cFS with the kit apps has successfully been ported to any target.
The starter kit also serves as a cFS training platform. It provides demonstrations to highlight
common cFS features and it contains a tool for automatically creating a “Hello World”
application. Since it is freely available and easy to install, it can be used as a platform for
academic projects.
The cFS can have a significant impact on a mission’s FSW costs. The cFS has provided about a
third of the FSW on recent NASA missions using source lines of code (SLOC) as a metric and
excluding the operating system from the SLOC count. Much of the functionality provided by
the cFS is based on decades of FSW experience. This functionality can be very beneficial to
inexperienced teams because they may not even recognize that they may need some of the
functionality provided by the cFS, especially the inflight diagnostic and maintenance features.
The remainder of the introduction provides a brief description of the cFS, COSMOS, and the
kit’s architecture. If you are familiar with these components you can skip to Section 2 to get
started with using the kit.
1.2 cFS Overview
OpenSatKit User’s Guide – Version 1.1
7
Before jumping into the cFS architecture it’s worth understanding some of the rationale behind
the design. Prior to the cFS NASA GSFC FSW reuse efforts had limited success in reducing cost
and schedules. Early reuse efforts used a “clone and own” approach where a new project would
copy FSW components from one or more previous missions based on functional requirement
similarities. This informal source-code based approach to reuse proved difficult for managers
to control the scope of the changes and as a result a comprehensive verification and validation
effort had to be performed for the new mission which severely limited the cost savings. In
addition since FSW components were not configuration managed independent of projects,
component quality did not necessarily increase because a single lineage for each component
was not maintained.
To address these challenges the Goddard’s FSW Branch formed a team of senior engineers to
perform a structured heritage analysis across a decade of missions. The initial funding was
from non-mission sources which allowed the engineers to participate uninhibited by near-term
mission schedules. The diversity of the heritage missions (single string vs. redundant string,
varying orbits, different operational communication scenarios, etc.) provided valuable insights
into what drove FSW commonality and variability across different missions. The team took the
entire FSW life-cycle into consideration, including in-orbit FSW sustaining engineering, as they
performed their analysis. Identifying system and application level variation points to address
the range and scope of the flight systems domain. The goal was to enable portability across
embedded computing platforms and to implement different end-user functional needs without
the need to modify the source code. The cFS uses compile-time configuration parameters to
implement the variation points. Figure 1-2 shows the results using a classic software
engineering “V-model”. The shaded components are cFS artifacts and the <p> notation
indicates a parameterized artifact. This lifecycle product line approach dramatically increased
the number of reusable artifacts and changed how future missions would approach their FSW
development efforts.

OpenSatKit User’s Guide – Version 1.1
8
Figure 1-2 – cFS-based Project FSW Lifecycle
All of the artifacts in Figure 1-2’s cFS Repository boxes are available as part of the open source
release. The starter kit’s features primarily support the developer’s integration activities.
There are tools that create a “hello world” application and a corresponding unit test harness.
The kit is not intended to be an Integrated Development Environment (IDE) so the user is free
to use the development environment of their choosing. Once an application is mature the kit
supports the integration of an application into the kit. Build testing support may be added as a
future enhancement.
The cFS was originally developed for NASA Software Class B projects as defined by the NASA
Procedural Requirement NPR-7150.2B (https://nodis3.gsfc.nasa.gov/main_lib.cfm ). These
process requirements are defined based on best practices that have produced high quality
software. However, the cFS supports a wide range of platforms and therefore a wide range of
applications and some applications may not require the same level of rigor. The following steps
outline how the artifacts are used in a typical Class B lifecycle.
1. Requirements Management
a. The FSW team receives project requirements. These requirements are traced to
existing cFS subsystem requirements. Most if not all of the requirements at this
level are implemented by cFS applications so a FSW systems engineer can tailor
the cFS to a project by selecting the appropriate cFS applications. These options
will continue to grow as the cFS App Store contains more applications.
OpenSatKit User’s Guide – Version 1.1
9
b. The detailed FSW requirements are instantiated by selecting specific
configuration parameters for parameterized requirements.
2. Code Instantiation
a. The cFS configuration parameters are contained in C header files that are set by
the FSW team. These parameters are refined as the development effort matures.
b. Note in Figure 1-2 that some configuration parameters trace to requirements
and some are only contained in the C header files. The header-only parameters
are design in nature and do not impact functional requirements. For example
default file paths and names are defined as configuration parameters and these
do not trace to a functional requirement. These design parameters are verified
during system integration.
3. Verification and Validation
a. A project does not typically rerun component unit tests unless a component has been
modified. The unit tests have been designed to test all source lines and to provide
maximal code path coverage. The current unit tests have not been designed to adapt to
project-specific configuration parameters.
b. The current cFS artifacts do not include integration tests. Projects must perform this
step to verify the cFS properly functions as a system.
c. The cFS build test verify functional requirements and these have been designed to read
in the C header files and adapt the test accordingly so the project-instantiated
functional requirements can be verified. However the cFS build tests execute on the
Advanced Spacecraft Integration & System Test (ASIST) ground system so if a project is
using a different ground system then the build test can’t be rerun as delivered.
d. Most GSFC projects perform system level test which are designed based on user
scenarios rather than from a functional requirements perspective. The current cFS
artifacts do not cover this level of testing.
1.2.1 cFS Architecture
While a majority of the heritage analysis focused on FSW functional features a significant and
conscious effort was made to address the cFS’s architectural quality attributes such as
portability, performance, scalability, interoperability, verifiability, and complexity. Figure 3
illustrates the cFS architecture and two fundamental architectural features are the Application
Program Interface (API)-based layers and the definition of an application as a distinct well-
defined architectural component. Applications can easily be integrated into the build system
and even dynamically added/removed during runtime.

OpenSatKit User’s Guide – Version 1.1
10
Figure 1-3 – cFS Layered Architecture
The cFS defines 3 layers with an API between each layers. Layer 1 supports portability by
decoupling the higher levels from hardware and operating system implementation details. All
access to the platform is controlled through two APIs: the Operating System Abstraction Layer
(OSAL) and the Platform Support Package (PSP).
Layer 2 contains the core Flight Executive (cFE) that provides five services that were determined
to be common across most FSW projects. The core services include a Software Bus
(messaging), Time Management, Event Messages (Alerts), Table Management (runtime
parameters), and Executive Services (startup and runtime). The Software Bus provides a
publish-and-subscribe CCSDS standards-based inter application messaging system that supports
single and multi-processor configurations. Time Management provides time services for
applications. The Event Message service allows applications to send time-stamped
parameterized text messages. Four message classes based on severity are defined and filtering
can be applied on a per-class basis. Tables are binary files containing groups of application
defined parameters that can be changed during runtime. The table service provides a ground
interface for loading and dumping an application’s tables. Executive Services provides the

OpenSatKit User’s Guide – Version 1.1
11
runtime environment that allows applications to be managed as an architectural component.
All of the services contain tunable compile-time parameters allowing developers to scale the
cFE to their needs.
The APIs in Layers 1 and 2 have been instrumental in the cFS’ success across multiple platforms
and the cFE API has remained unchanged since the launch of the Lunar Reconnaissance Orbiter
in 2009. The APIs, their underlying services, and the cFS build tool chain provide the
architectural infrastructure that make applications an explicit architectural component. A cFS
compliant application will run unchanged regardless of the host platform. The application layer
contains thread-based applications as well as libraries (e.g. linear algebra math library) which
can be shared among multiple applications.
As shown in Figure 3 all of the source code has been released as open source. The code is
managed by a multi-NASA Center configuration control board (CCB) that ensures that the
application context will evolved in a controlled manner.
1.2.2 cFS Application Context
The application layer is where the bulk of the cFS scalability and extendibility occurs. Users
create new missions using a combination of existing cFS compliant apps (partial or complete
reuse) and new mission-specific apps. Just as the cFE provides common FSW services there is a
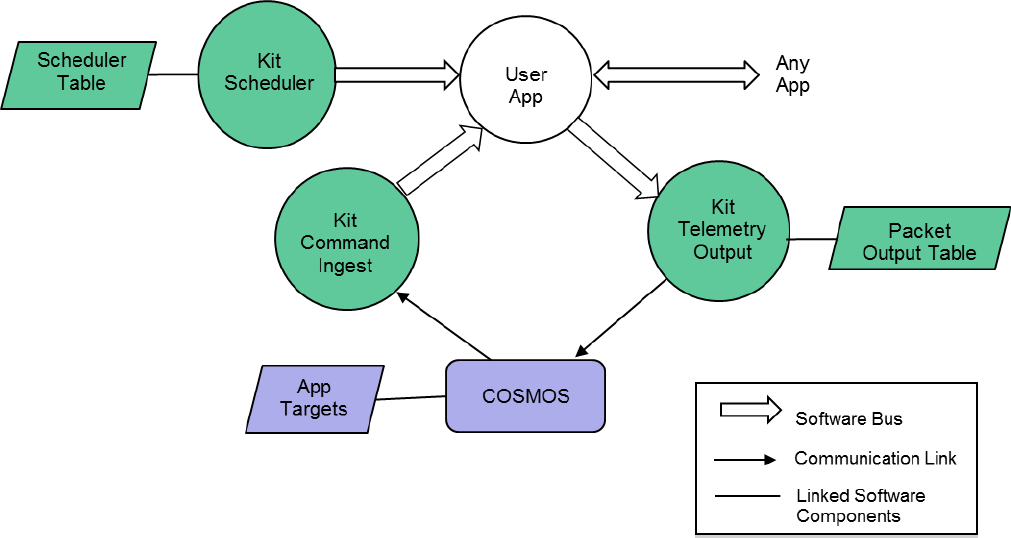
set of apps that provide common higher level functional services. Figure 4 shows the minimal
context for a user app on a single processor system. Three ‘kit’ apps provide the higher level
services. The details of why they’re kit apps is explained in Section TBD.

OpenSatKit User’s Guide – Version 1.1
12
Figure 1-4 – User Application Context
Apps must have the ability to receive commands from and send telemetry to the ground system. The
Command Ingest app receives commands from the ground and sends them on the software bus. The
software bus uses the command message identifier to route the command to the app that has
subscribed to the message id. An app will also generate one or more telemetry packets and send them
on the software bus. The Telemetry Output app uses a table to determine which message ids to
subscribe to and how often to forward them to the ground system.
Users have multiple mechanisms for how to control the execution of an application. The scheduler app
provides a time synchronized mechanism for scheduling application activities. The Scheduler app uses a
table to define time slots for when to send a message that users can use to initiate an activity. Activities
can be scheduled to occur faster or slower than 1 second. Even if an app’s execution is data driven (.i.e.
pends for one or more data packets to start its execution) it is often convenient to use the scheduler as
a means to send time-based housekeeping telemetry.
1.3 COSMOS Overview
Ball Aerospace’s COSMOS is a freely available open source command and control system for
operations and test of an embedded system. A set of 15 applications provide automated
procedures, real-time and offline telemetry display and graphing, logged data analysis and
Comma Separated Variables (CSV) extraction, limits monitoring, command and telemetry
handbook creation, and binary file editing. COSMOS scripting offers the full power of the Ruby
programming language allowing operators to send commands, verify telemetry, read and write
files, access the network, and even send an email upon completion. Advanced debugging
functionality allows for single-stepping through procedures, setting breakpoints, and complete
logging of all script and user interaction with the system. Detailed data visualization allows for
custom screen creation, line and x-y plotting of data, and easy creation of custom 3d
visualizations. Offline data analysis and data extraction capabilities make narrowing down
anomalies easy.
This user’s guide describes the components of COSMOS that are relevant to using the starter
kit. For a complete description of COSMOS refer to the documentation at http://cosmosrb.com.
The OSK uses the following COSMOS applciations:
CmdTlmServer
o Establishes a connection with the system running the cFS. This interface is defined in
cosmos/config/tools/cmd_tlm/cmd_tlm_server.txt. Each cFS application is defined as a
COSMOS target for the interface.
o The CmdTlmServer provides a GUI that allows the user to send commands and receive
telemetry for each target.
TlmViewer
OpenSatKit User’s Guide – Version 1.1
13
o Organizes and displays custom telemetry pages. The OSK uses this application to display
the main OSK page.
ScriptRunner
o Provides a ruby script execution environment. The OSK’s integration test uses
ScriptRunner. This will be replaced by the COSMOS TestRunner application in a future
release.
1.4 42 Simulator Overview
42 is an open source software package that simulates spacecraft attitude and orbital dynamics and
control. 42 is design to be both powerful and easy to configure and run. It supports multiple spacecraft
anywhere in the solar system and each spacecraft is a multi-body model that can be a combination of
rigid and flexible bodies. 42 consists of a dynamics engine and a visualization front end. The two
components can run on the same processor, different processors, or just the dynamics can be run
without visualization.
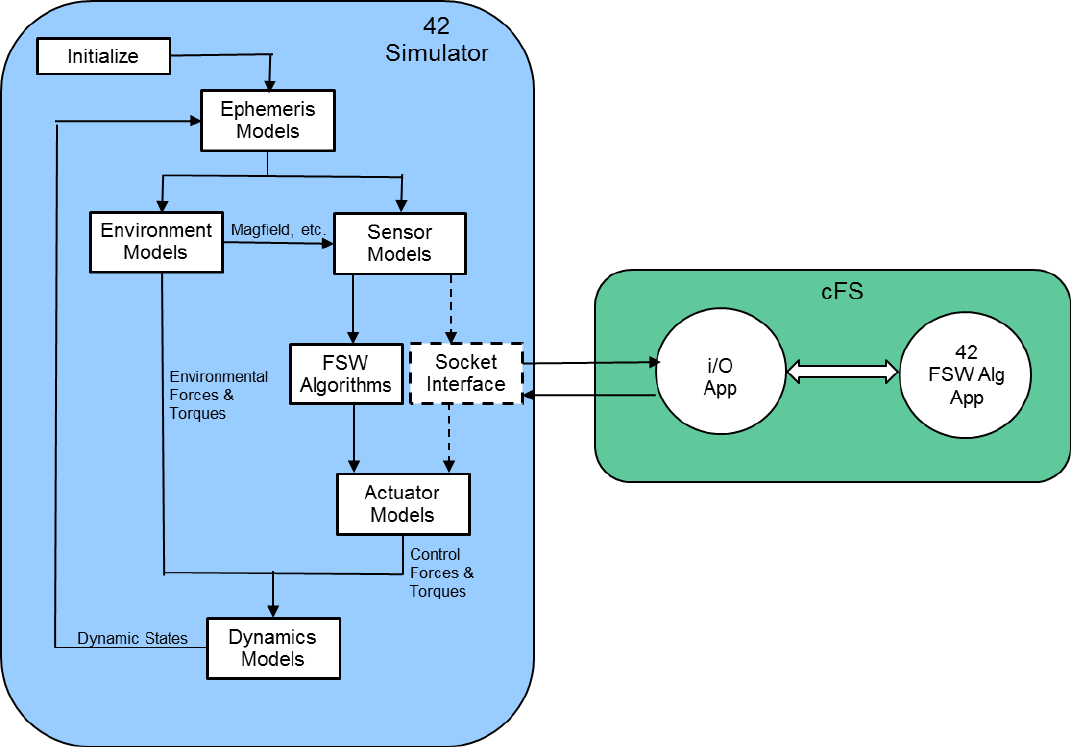
Figure 5 shows the processing flow of the 42 simulation models. The Ephemeris Models determine
object (spacecraft, sun, earth, etc.) positions and velocities in a particular reference frame. This
information is input to the Environmental Models that computes the forces and torques exerted on each
object. The ephemeris and environmental data is read by the Sensor Models. The FSW algorithms read
the sensor data, estimate states, run control laws, and output actuator commands. The Actuator
Models compute control forces and torques. The forces and torques from Environmental Models and
Actuator Models are input the Dynamics Model that integrates the dynamic equations of motion over a
time step. The new states are fed back to the Ephemeris Models and the simulation process is repeated.
OpenSatKit User’s Guide – Version 1.1
14
Figure 1-5 – 42 Simulator
The dashed Socket Interface box in Figure 5 has been added to the 42 simulator for the OpenSatKit and
replaces the FSW Algorithm box. The FSW Algorithm App running on the cFS implements the 42 FSW
algorithms. The I/O App communicates with the new 42 Socket Interface to transfer sensor and actuator
data between 42 and the cFS platform. 42 is command line driven which allows it to be controlled by
and external program such as COSMOS. This control is not shown in Figure 5.
1.5 PiSat Target
TBD – Describe PiSat
OpenSatKit User’s Guide – Version 1.1
15
2.0 Using Starter Kit Features
This section describes the starter kit features and how to use them. Everything in the kit is open source
so if there’s a feature you like you can use the underlying implementation to customize a solution to
meet your needs. Note the kit is typically run in a desktop VM and it is not intended to be configured to
meet real-time embedded FSW requirements. Therefore it isn’t helpful, for example, to create a
scheduler table that schedules an app at 10 Hz. The kit assists in functionally integrating apps and
Section 5 outlines steps for transitioning from the kit to an embedded system.
2.1 Launching the Starter Kit
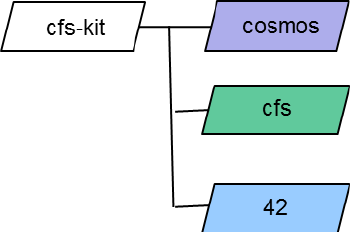
After you have installed the starter kit following the instructions in Appendix B you will have the
following directory structure as shown in Figure 2-1.
Figure 2-1 – Starter Kit Directory Structure
Start the kit by performing the steps below. When you install the kit for the first time COSMOS is
launched as the final installation step so you can start with step 4 in this situation.
1. Create a terminal window by entering
CTRL-ALT-T
2. By default you will be in in your home directory. Change the directory to the COSMOS base
directory by entering
cd cfs-kit/cosmos
3. Start COSMOS
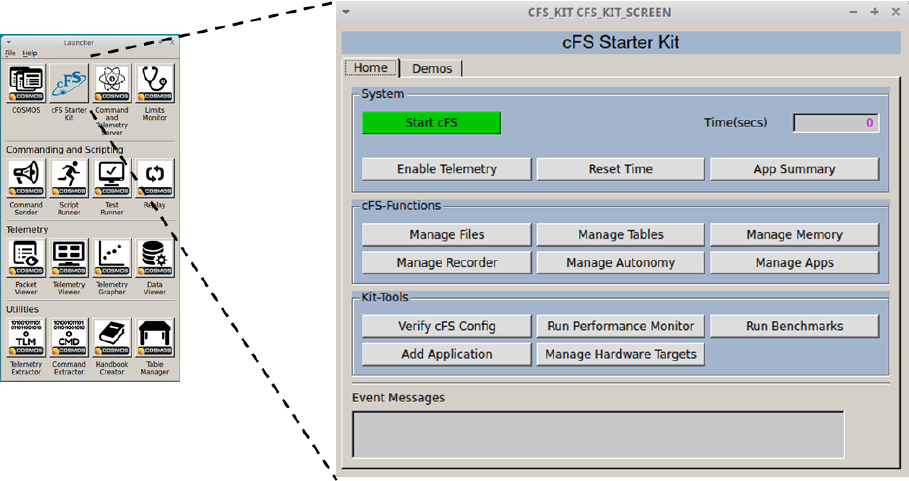
Enter ruby Launcher
This starts the COSMOS Tool Launcher window as shown on the left side of Figure 2-2.
4. Start the starter kit
Click on the <cFS Starter Kit> button
This starts the COSMOS Command and Telemetry Server and Telemetry View tools. The
server is needed to connect to the cFS and Telemetry Viewer is sued to launch the kit’s
the kit’s main window as shown on the right side of Figure 2-2.
5. Start the cFS
OpenSatKit User’s Guide – Version 1.1
16
Click on the green <Start cFS> button
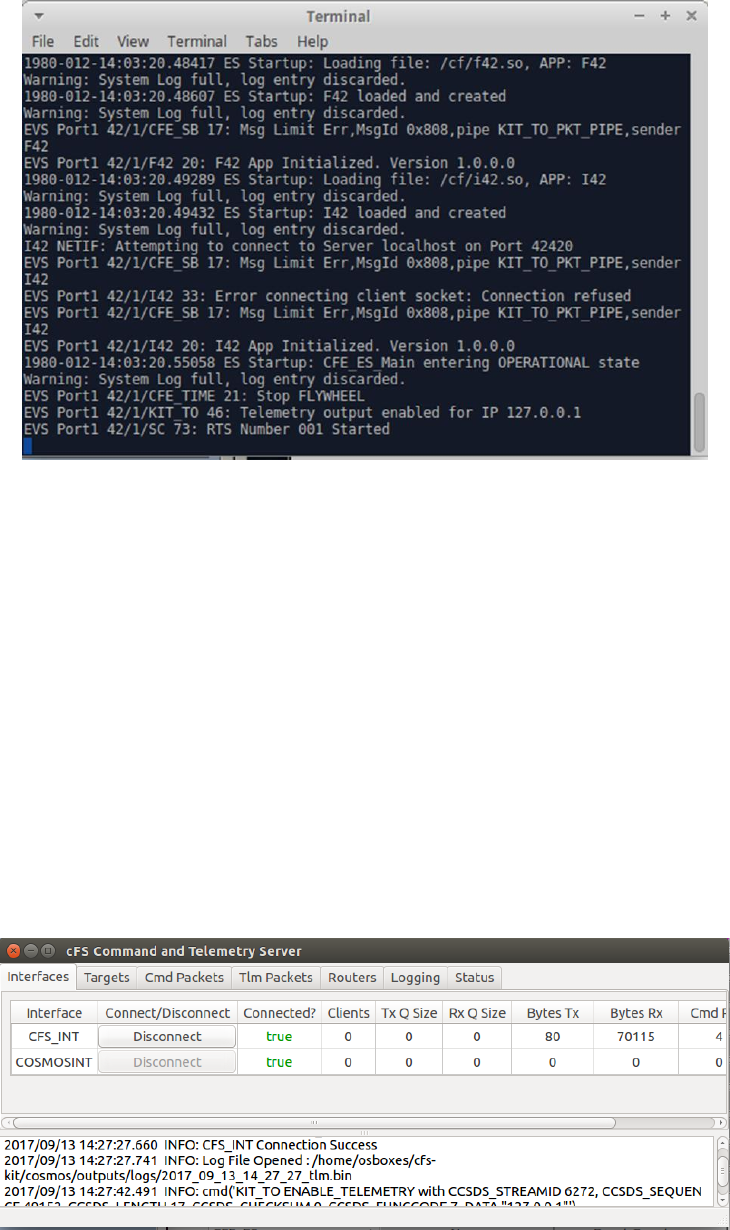
This creates a new terminal window as shown in Figure 2-3 and starts the cFS within in
the window. A series of startup messages are displayed. There may be some warnings
such as system log buffer full, messages sent with no subscribers, etc. These messages
will not affect the functionality of the system and they will be cleaned up in future
releases.
6. Enable telemetry by clicking on the <Enable Telemetry> button. This sends a command to the
kit’s telemetry output (KIT_TO) app to connect COSMOS. If the command is successful the Time
field will turn white and you’ll see time incrementing. If you get a COSMOS connection error
then click the <Enable Telemetry> button as second time.
At this point you have a running system and can start to explore the kit’s features.
Figure 2-2 – Launcher
OpenSatKit User’s Guide – Version 1.1
17
Figure 2-3 – cFS Terminal Window
2.2 Feature Overview
The main page layout reflects the primary goals of the kit: provide a complete cFS system to simplify the
cFS learning curve, simplify the cFS deployment, simplify application development and integration into a
cFS system, and assist in porting the cFS to a new platform. The cFS is a complex system so not every
cFS feature is covered by the kit. A conscious effort was made to limit the kit’s complexity while
supporting enough cFS functionality to allow a new user to successfully use the cFS with pre-configured
applications. The kit’s pages provide access to the most commonly used commands and telemetry.
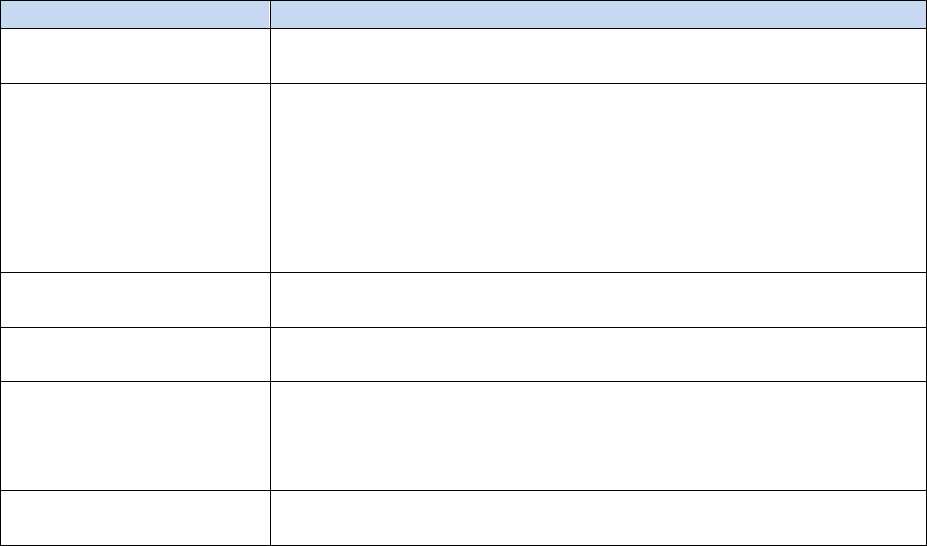
Note that all cFS commands and telemetry are accessible from the COSMOS Command and Telemetry
Server tool that is shown in Figure 2-4Ths tool is automatically launched when the <cFS Starter Kit>
button is clicked.
Figure 2-4 – Command and Telemetry Server

OpenSatKit User’s Guide – Version 1.1
18
The main page has two tabs: Home and Demo. The Home tab provides buttons to perform all of the
kit’s functions. The Demo tab provides pre-configured demonstrations for the buttons in the Home
tab’s cFS-Functions section. The Home tab is divided into four sections: System, cFS-Functions, Kit-
Tools, and Event Messages. The System section is described in Table 2-1. The cFS Functions and Kit-
Tools are described in their own subsections. The Event Message window displays the last event
message sent by the FSW.
Button/Field
Description
Start cFS
Start the cFS in a terminal window
Time
cFE Executive Service’s housekeeping telemetry time seconds value.
Should start incrementing after the cFS is started
Enable
Telemetry
Telemetry Output’s telemetry to COSMOS should be enabled when the
cFS is started with the cFS button. If the cFS is running and telemetry
has not been enabled this button provides a convenient way to start
telemetry.
Reset Time
Resetting time command is a quick and convenient way to show
COSMOS and the cFS are communicating properly.
App Summary
Opens a page showing all of the apps in the kit with their housekeeping
telemetry (see Section 3) sequence counters and command counters.
This provides a quick look capability to show that all fo the apps are
running.
Table 1 – Home Page System Buttons and Fields
2.3 cFS Functions
2.3.1 Manage Files
TBD
2.3.2 Manage Tables
TBD
2.3.3 Manage Memory
TBD
2.3.4 Manage Recorder
TBD
OpenSatKit User’s Guide – Version 1.1
19
2.3.5 Manage Autonomy
TBD
2.3.6 Manage Applications
TBD
2.4 Kit Tools
2.4.1 Verify cFS Configuration
TBD
2.4.2 Run cFS Performance Monitor
TBD
2.4.3 Run Benchmarks
TBD
2.4.4 Run 42 Simulator
TBD
2.4.5 Add Application
TBD
2.4.6 Manage Hardware Targets
TBD
2.5 Pre-installed Applications
OpenSatKit User’s Guide – Version 1.1
20
2.5.1 Kit Applications
TBD - Describe
Benchmark
Heater Control
Heater Simulation
Kit Command Ingest
Kit Scheduler
Kit Telemetry Output
TFTP
2.5.2 cFS Applications
TBD - Describe
Checksum
Data Storage
File Manager
Health & Safety
Limit Checker
Memory Dwell
Memory Manager
Stored Command

OpenSatKit User’s Guide – Version 1.1
21
3.0 Managing Applications
This section describes how to create, compile/link, add, and remove applications from within the kit. All
of the steps needed to perform these functions are described, however, it is not intended to be a
comphrensive application developer’s guide. The cFE Application Developers Guide.doc located in
cfs/cfe/docs provides a complete description of developing apps for the cFS.
3.1 cFS Application Build Environment
The cfs directories that you’ll need to work with for managing apps and building the system are show in
Figure 3-1. The cfs/apps directory contains the source code for each app. The cFS build system does not
require the apps to be physically located in the same base directory but the kit is structured this way for
convenience. The apps subdirectories are described in the cFE Application Developers Guide. The
for_build directory is not required, because the kit uses the cmake build environment and the for_build
directory is used by the cFS “classic build” system which will eventually be deprecated. The tables
subdirectories is only required if the app has a table. Note the OpenSatKit apps follow a different design
pattern than the cFS apps. An overview of the kit app design is provided in Section 5 and the OpenSatKit
Application Developer’s Guide contains a complete description.
Figure 3-1 – cFS Application Directories
The cfs/build/cpu1 directory is automatically generated by the cmake preparation step. When
OpenSatKit is installed this preparation step is automatically performed. The cfs/build/exe/cpu1/cf
directory is where the build system locates the cFS binary image, application object files, and table files.
The cf directory stands for compact flash because it is the directory used to boot the cFS. The cmake
build system supports building for multiple targets. The kit is configured to build the default
configuration for a single cpu named cpu1.
cfs
|- apps
| |- aaa
| |- for_build
| |- mission_inc
| |- platform_inc
| |- src
| |- table
| |- unit_test
| |- bbb
| ...
|- build
| |- cpu1/...
| |- exe/cpu1/cf
|
|- osk_def (was sample_def)
OpenSatKit User’s Guide – Version 1.1
22
3.1.1 Building and installing the cFS
When you first install OpenSatKit the cFS is automatically built for you. If you modify any existing source
files you can build the cFS by performing the following steps:
1. Change your directory to OpenSatKit/cfs
2. OpenSatKit/cfs$ make
a. This rebuilds the files but does not install them into cfs/build/exe/cpu1/cf
3. OpenSatKit/cfs$ make install
a. This rebuilds the files and installs them into cfs/build/exe/cpu1/cf
b. The installation process copies files in the OpenSatKit/cfs/osk_def directory prefixed
with “cpu1_” into cfs/build/exe/cpu1/cf. This means if you changed cfe_es_startup.scr
or any table files in the /cf directory they will be overwritten.
Table 3-1 identifies key directories and files used in the building and installation of the cFS.
Directory/File
Purpose
/cfs/osk_defs
Directory that contains key files used by cmake to build and install the
cFS
targets.cmake
Defines the cFS targets (with build rules) and apps to be built for the
target. Also lists files to be copied from osk_defs to the target ‘cf’
directory. The kit uses target 1 (TGT1) and the important definitions
are
SET(TGT1_NAME cpu1) – Identifies the targets name
SET(TGT1_APPLIST …) – Apps to be built and installed
SET(TGT1_FILELIST …) – Files prefixed with “cpu1_” to be copied to ‘cf’
cpu1_*.*
Identifies files for the cpu1 target. If they are listed in targets.cmake’s
TGT1_FILELIST they will be copied to the ‘cf’ directory
cpu1_cfe_es_startup.scr
This startup script must be defined. It defines the apps that will be
loaded by the cFE during initialization.
cfs/apps/xxx/
cmakelist.txt
Each app is contained within its own apps directory and at the
cmakelist.txt must be present in the top-level app directory. This file
defines what gets compiled for the app and any dependencies. See the
example in Figure 3-2.
cfs/build/exe/cpu1/cf
“Compact Flash” directory that contains all of the files necessary to
run the cFS.
Table 3-1 – cFS Application Build Directories
Figure 3-2 shows an example cmakelist.txt file that must be included in the top-level directory for each
app. The include_directories statements define the search paths used by cmake to locate
include files. The aux_source_directory statements define directory paths that contain the
source code to build the app and populate the symbol passed to the function. The add_cfe_app
statement adds the specified app to the cmake build. The apps object file name is the same name as the
first function parameter. The add_cfe_tables statement only needs to be present if the app has
cFE style tables and it causes the app’s tables to be built.

OpenSatKit User’s Guide – Version 1.1
23
Figure 3-2 – Example cFS App cmakelist.txt
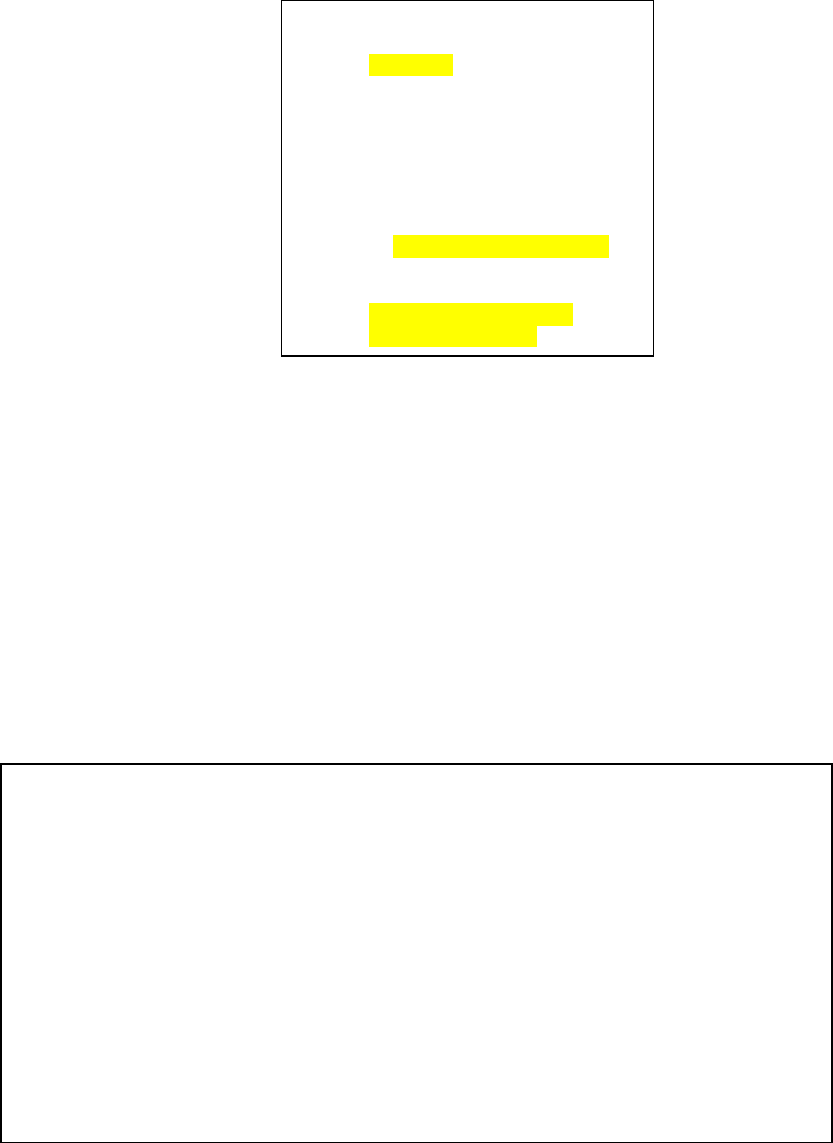
Figure 3-3 shows a cmakelist.txt file for an app using the OSK app design pattern. The main differences
are the cFS’s library and OSK’s app framework include paths must be included and the
add_cfe_tables statement is not needed since the app manages its own table files. See OpenSatKit
Application Developer’s Guide for more details.
Figure 3-3 – Example OSK App cmakelist.txt
Note if the application requires the math libraries to be linked in then after the add_cfe_app() line
include the following function call: target_link_libraries(my_app m), where “my_app” is the same app
name used in the add_cfe_app() call.
cmake_minimum_required(VERSION 2.6.4)
project(CFS_HS C)
include_directories(fsw/src)
include_directories(fsw/mission_inc)
include_directories(fsw/platform_inc)
aux_source_directory(fsw/src APP_SRC_FILES)
aux_source_directory(fsw/tables APP_TABLE_FILES)
# Create the app module
add_cfe_app(hs ${APP_SRC_FILES})
add_cfe_tables(hs ${APP_TABLE_FILES})
cmake_minimum_required(VERSION 2.6.4)
project(CFS_OSK_DEMO C)
include_directories(fsw/src)
include_directories(fsw/mission_inc)
include_directories(fsw/platform_inc)
include_directories(${cfs_lib_MISSION_DIR}/fsw/public_inc)
include_directories(${app_fw_lib_MISSION_DIR}/fsw/platform_inc)
include_directories(${app_fw_lib_MISSION_DIR}/fsw/mission_inc)
aux_source_directory(fsw/src APP_SRC_FILES)
aux_source_directory(fsw/tables APP_TABLE_FILES)
# Create the app module
add_cfe_app(osk_demo ${APP_SRC_FILES})
OpenSatKit User’s Guide – Version 1.1
24
3.2 COSMOS Application Definition Environment
The COSMOS directory structure shown in Figure 3-4 highlights the most relevant OSK COSMOS
directories for installing applications. See Section 5 for a more complete COSMOS description.
Figure 3-4 – COSMOS Directories
Each cFS app is defined as a COSMOS target in the cosmos/config/targets directory. The APP directory
must be uppercase and within the APP directory is a cmd_tlm directory that contains files that define
the app’s command and telemetry packets. . Figures 3-5 and 3-6 show part of the File Manager app’s
command and telemetry definitions, respectively. The OSK uses Embedded RuBy (ERB), delineated by
“<%” and “%>”, to standardize and simplify the packet definitions. cfs_kit_config.rb is contained in the
cosmos/lib directory and serves as the single point for all OSK configuration definitions/settings. Any
dependencies are also contained with the cosmos/lib directory. message_ids.rb defines all message IDs
and the convention is to have “MID” in the symbol name. In the two examples, FM_CMD_MID and
FM_HK_TLM_MID, are defined in message_Ids.rb. The cFS is evolving towards adopting the CCSDS
Electronic Data Sheets (EDS) standard and it is anticipated that the message_ids.rb file will be
automatically generated.
cosmos
|- config
| |- targets
| | ...
| | |- APP
| | |- cmd_tlm
| | |- lib
| | |- screens
| | ...
| |- tools
| |-cmd_tlm_server.txt
|
|- lib
|- cfs_kit_config.rb
|- message_ids.rb
<%
require 'cfs_kit_config'
@APP_PREFIX_STR = "FM"
@CMD_MID_STR = "FM_CMD_MID"
@DEF_FILENAME = "default"
@DEF_DIR_NAME = "/cf"
%>
COMMAND FM NOOP <%= CfsKitConfig.processor_endian %> "Comment"
<%= CfsKitConfig.cmd_hdr(@APP_PREFIX_STR, @CMD_MID_STR, 0, 0) %>
COMMAND FM RESET_CTRS <%= CfsKitConfig.processor_endian %> "Comment"
<%= CfsKitConfig.cmd_hdr(@APP_PREFIX_STR, @CMD_MID_STR, 1, 0) %>
COMMAND FM COPY_FILE <%= CfsKitConfig.processor_endian %> "Comment"
<%= CfsKitConfig.cmd_hdr(@APP_PREFIX_STR, @CMD_MID_STR, 2, 130) %>
APPEND_PARAMETER OVERWRITE 16 UINT MIN_UINT16 MAX_UINT16 0 "Allow overwrite"
APPEND_PARAMETER SOURCE 512 STRING <%= @DEF_FILENAME %> "Source filename"
APPEND_PARAMETER TARGET 512 STRING <%= @DEF_FILENAME %> "Target filename"

OpenSatKit User’s Guide – Version 1.1
25
Figure 3-5 – Example Command Definition
Figure 3-6 – Example Telemetry Definition
3.3 OpenSatKit Application Runtime Environment
Figure 3-7 shows the runtime context for a user application. It’s important to understand this context
because it identifies all of a user application’s interfaces that must be resolved in order for it to operate
properly. Note that all of these interfaces are to other applications which means an organization can
standardize on a different set of applications thus altering the context.
<%
require 'cfs_kit_config'
@APP_PREFIX_STR = "FM"
@HK_TLM_MID_STR = "FM_HK_TLM_MID"
@FILE_INFO_TLM_MID_STR = "FM_FILE_INFO_TLM_MID"
@DIR_LIST_TLM_MID_STR = "FM_DIR_LIST_TLM_MID"
@OPEN_FILES_TLM_MID_STR = "FM_OPEN_FILES_TLM_MID"
@FREE_SPACE_TLM_MID_STR = "FM_FREE_SPACE_TLM_MID"
%>
TELEMETRY FM HK_TLM_PKT <%= CfsKitConfig.processor_endian %> "Comment”
<%= CfsKitConfig.tlm_hdr(@APP_PREFIX_STR, @HK_TLM_MID_STR) %>
APPEND_ITEM CMD_VALID_COUNT 8 UINT "Application command counter"
APPEND_ITEM CMD_ERROR_COUNT 8 UINT "Application command error counter"
APPEND_ITEM SPARE 8 UINT "Unused”
APPEND_ITEM NUMOPENFILES 8 UINT "Number of open files in the system"
APPEND_ITEM CHILDCMDCOUNTER 8 UINT "Child task command counter"
APPEND_ITEM CHILDCMDERRCOUNTER 8 UINT "Child task command error counter"
APPEND_ITEM CHILDCMDWARNCOUNTER 8 UINT "Child task command warning counter"
APPEND_ITEM CHILDQUEUECOUNT 8 UINT "Number of pending commands in queue"
APPEND_ITEM CHILDCURRENTCC 8 UINT "Command code currently executing"
APPEND_ITEM CHILDPREVIOUSCC 8 UINT "Command code previously executed"
OpenSatKit User’s Guide – Version 1.1
26
Figure 3-7 – User Application Context
Apps must have the ability to receive commands from and send telemetry to the ground system. The Kit
Command Ingest app receives commands from the ground and sends them on the software bus. The
software bus uses the command message identifier to route the command to the app that has
subscribed to the message id. An app also generates one or more telemetry packets and sends them on
the software bus. The Kit Telemetry Output app uses a table to determine which message ids to
subscribe to and how often to forward them to the ground system.
Users have multiple mechanisms for how to control the execution of an application. The Kit Scheduler
app provides a time synchronized mechanism for scheduling application activities. The Kit Scheduler
app uses a table to define time slots for when to send a message that users can use to initiate an
activity. Activities can be scheduled to occur faster or slower than 1 second. Even if an app’s execution
is data driven (.i.e. pends for one or more data packets to start its execution) it is often convenient to
use the scheduler as control mechanism for when to send time-based “housekeeping” telemetry.
The kit apps in Figure 3-7 perform the same functions as the “lab” apps released with the cFE. However
the kit apps use text files for tables which simplifies the automation of integrating an app into the kit.
The kit scheduler has not been qualified for flight so a user will have to transition from the kit SCH to the
cFS SCH app. The cFE only provides CI_LAB and TO_LAB which are not flight qualified so the kit apps do
not create additional work since every user must develop their own CI and TO apps.
OpenSatKit User’s Guide – Version 1.1
27
3.4 Creating New Applications
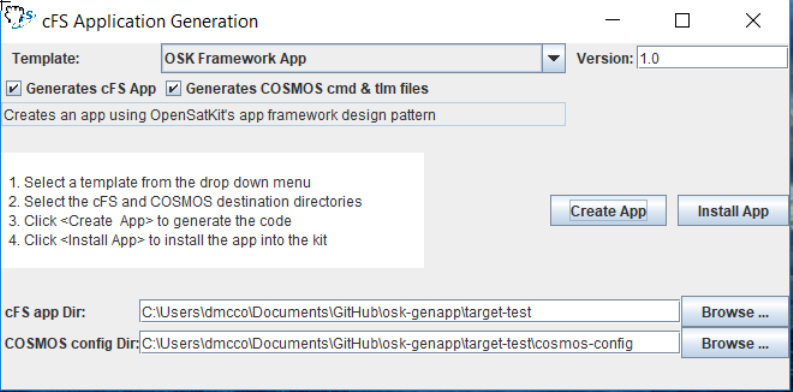
The easiest way to create and integrate a new app is to use the Create Application tool. This tool is
launched from the kit’s main page’s home tab using the Create Application button in the Kit Tools
section. Figure 3-8 shows the Create Application screen. Follow the instructions in the main screen’s
text box. These instructions assume you named your app “example”. Note when naming your app you
must avoid cmake keywords such as “test”.
Figure 3-8 – Create Application Tool
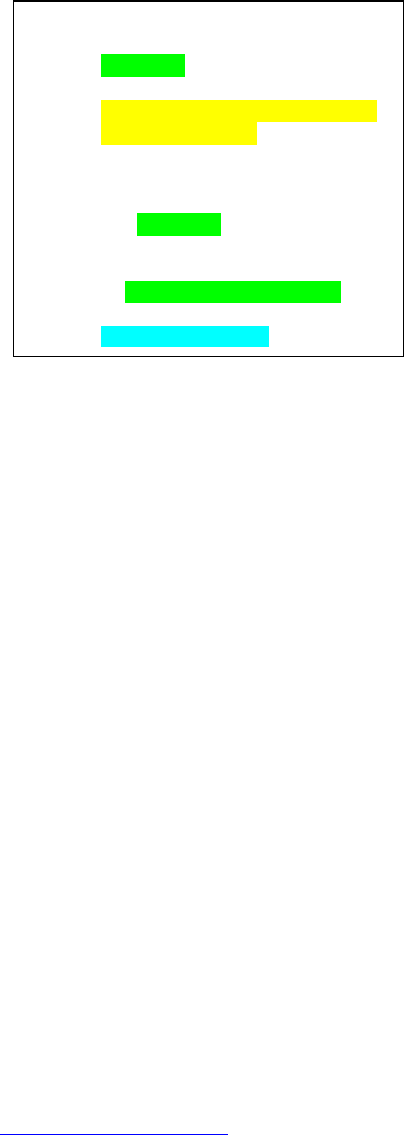
Figure 3-9 shows the directories and files that are involved with creating and integrating a new app. The
green directories are automatically created and populated by the Create Application tool. The green file
cosmos/config/tools/cmd_tlm_server.txt is autmatically updated with the new target. The tool inserts
the new target name between the <cfs_kit> tags that are under the cFS interface definition line that
starts with “INTERFACE CFS_INT” . The yellow highlighted files must be edited and the blue highlighted
files provide definitions used by the generated code.
OpenSatKit User’s Guide – Version 1.1
28
Figure 3-9 – Create Application Directories
Perform the following steps to integrate the example application into the kit:
1. Edit cfs/osk_defs/targets.cmake and locate the line starting with SET (TRGT1_APPLIST …) and
add “example” to the list of app names).
2. Edit cfs/osk_defs/cpu1_cfe_es_startup.scr and and add the following line.
a. CFE_APP, /cf/example.so, EXAMPLE_AppMain, EXAMPLE, 90, 16384, 0x0, 0
b. Note the startup file is processed until the first ‘!’ character is encountered so this line
must be before any commented out lines.
3. Rebuild and install the cFS by issuing the following make commands from the opensatkit/cfs
directory
a. (1) Make (2) Make install
b. Under cFE 6.5 people have experienced a cmake failure and a syntax error is report
(missing separator). Repeating the make command and/or issuing a “make clean”
followed by a “make prep” seems to solve the problem.
4. Follow the instructions in Section 2.1 to start COSMOS and the cFS.
5. Use COSMOS’s command and telemetry server to send commands to and receive telemetry
from the example app.
TBD – Build 1.1, Describe apps with tables.
3.5 Adding Existing Applications
The NASA Goddard wesbite (https://cfs.gsfc.nasa.gov/) lists the open source apps released by Goddard.
All of these apps come with directory the structure shown in Figure 3-1. The following steps are
required to integrate one of these apps. These steps are more involved than the steps peformed when
using the Create Application tool because the tool automaticly performs some steps and the default
message IDs are already defined in the OSK.
1. Copy the application code into the cfs/apps dirctory
cfs
|- apps
| |- example
|- osk_def
|- cpu1_cfe_es_startup.scr
|- targets.cmake
cosmos
|- config
|- targets
| |- EXAMPLE
| |- cmd_tlm
|- tools
|-cmd_tlm_server.txt
|- lib
|- message_ids.rb

OpenSatKit User’s Guide – Version 1.1
29
2. Create a new app target directory in cosmos/config/targets and create command and telemetry
definition files. See Section 3.2 for details.
3. All of the cFS apps send a housekeeping telemetry in response to a specific messsage ID and
many apps execute their main loop in response to another message ID. These message IDs are
defined in the app’s xxx_msgids.h file. These messages are sent from from the Kit Scheduler
app. This app uses two tables to manage sending messages on the software bus.
a. kit_sch_schtbl.xml defines the frequency at which messages are sent. Each scheduler
table entry has an index into the message table kit_sch_msgtbl.xml. The following File
Manager table entires illustrate how the tables are configured. Message table entry #13
si sent every 3 seconds. The message table entires must be byte swapped for a little
endian target and they are specified in decimal. The comment shows the
hex(dec)=>Byte swapped hex (dec)
b. kit_sch_schtbl.xml
i. <!-- FM -->
ii. <slot id="1" entry="3" enable="true" frequency="5" offset="0" msg_id="13" />
c. kit_sch_schtbl.xml
i. <!-- FM_SEND_HK_MID 0x188D(6285) => 0x8D18(36120), 0xC000(48152) =>
0x00C0(192), 0x0001 => 0x0100(256) -->
ii. <entry id="13" stream-id="36120" seq-seg="192" length="256" />
4. The app’s telemetry packets must be defined in kit_to’s table file kit_to_pkttbl.xml in order to
be downlinked. The following entry is for the FM app’s housekeeping telemetry
packet. The stream_id is the message ID and buffer limit defines how many packets can
back up in TO”s queue. 4 is fine.
a. <!-- FM_HK_TLM_MID 0x088A -->
b. <entry stream-id="2186" priority="0" reliability="0" buf-limit="4"/>
5. To complete the integration follow the steps in Section 3.4 Creating New Applications.
Additonal applications can be found in the application catalog maintain at http://coreflightsystem.org/.
At the moment there is no standard for ensuring compliance with the cFS application conventions so the
integration steps may vary.
OpenSatKit User’s Guide – Version 1.1
30
3.6 Removing Applications
TBD
OpenSatKit User’s Guide – Version 1.1
31
3.7 Creating Application Unit Test
TBD – Build 1.1
OpenSatKit User’s Guide – Version 1.1
32
4.0 Implementing a Mission
TBD - Address systems engineering activities. More in depth than a checklist but keep details to a what
must be done and references source for how to achieve them.
TBD – Use an example mission. Show end goal and hightlight lifecycle challenges. Some notes…
1. First create a mission concept of operations. This will help flesh out scenarios and functionality
required by the FSW to meet the scenarios.
2. Identify existing apps that may meet your needs. The kit doesn’t include all of the open source
apps but I tried to include the most common. For example, Data Storage and downlink:
a. If you have ground contacts every X minutes and you’re continuously collecting data
then the data will needed to be stored. Data Storage will need to be configured to store
packets in files. Systems thinking needs to go into what data into which files and how
big the files should get.
b. How is a contact initiated? Stored Command (SC) tables can be used to send commands
to configure hardware/software for a time-based event. We often use an absolute time
sequence to start relative time sequences that perform a common sequence of
commands. SC does not allow parameters to stored commands.
c. Once the contact is initiated then the files will need to be downlinked which involves CF
app (see hurdle #2 below). Another option is to downlink packets. There’s a data
storage playback app that someone has developed that I could look into. It reads DS files
and puts the packets on the software bus so Telemetry Output would send packets to
the ground.
d. Regardless of the downlink method files (which are really CFDP packets) or packets
telemetry out table’s out table will have to be configured (See hurdle #1 and #3).
3. The cFS does not include hardware interface apps. We typically write one app that collects data
and publishes data required by the attitude determination and control (ADC) app. This
simplifies the ADC app because it can pend on a single packet. If this isn’t doable there are other
techniques that keep the ADC app simple.
Some known hurdles:
1. Command Ingest and Telemetry output will need to be replaced. The kit apps are simple UDP
apps. Johnson Space Center just released new CI and TO apps that are layered so the same
cmd/tlm interface can be used and the data transport library can be swapped at compile time
depending upon platform.
2. File transfer: The kit includes a very simple TFTP app. It is not suitable for flight. The cFS CF app
is being used on current missions. However it has a steep learning curve and it requires a ground
engine. The ASIST and ITOS ground systems (available for government projects) contain a built in
CFDP engine. Efforts are underway to create an open source COSMOS CFDP engine.
3. Tables: We do not have a tool do edit tables and generate the binary tables. The Goddard tools
are tied to the ground systems we use (ASIST and ITOS).
4. Scripts: Testing and op scenarios are controlled by ground scripts. I’ve only tested the COSMOS
scripting world with the “integration script”. A test script framework is planned for Build 1.1.
OpenSatKit User’s Guide – Version 1.1
33
4.1 Porting to a new platform
TBD
4.2 PiSat
4.3 Configuring the cFE
Startip log & messages
Time
4.4 Creating your application suite
Ops concepts
4.5 Development process
TBD
4.6 Ground system
TBD
4.7 Systems Topics
OpenSatKit User’s Guide – Version 1.1
34
5.0 Demos and Tutorials
Demos and tutorials are included to improve the educational aspects of the kit. The relevant directories
are highlighted in Figure 5-1. The Demos and Tutorials subsections provide details on each feature.
Figure 5-1 – Demo & Tutorial Directories
5.1 Demos
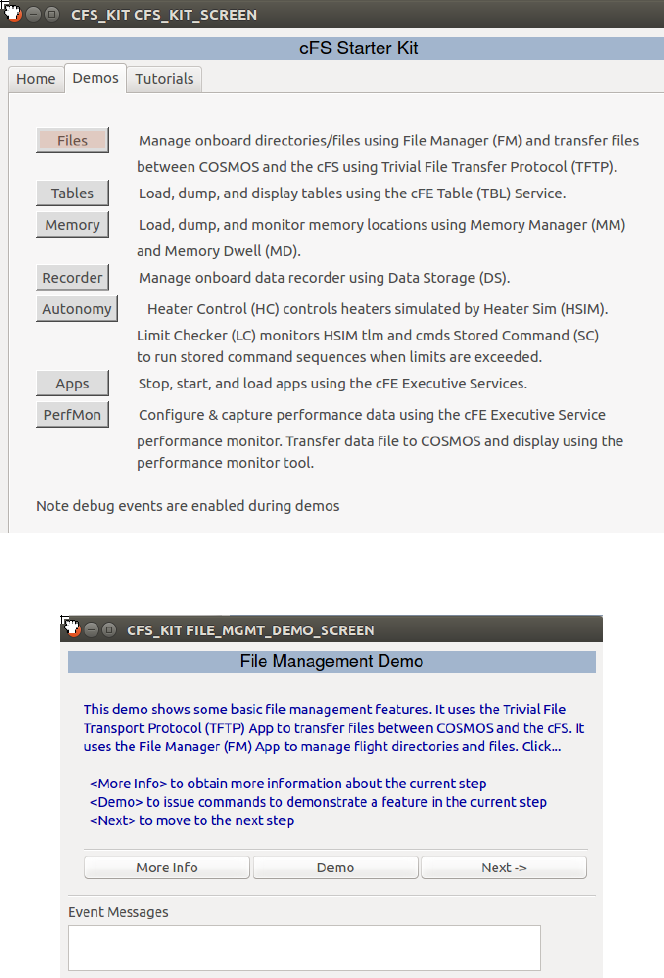
Demos are screen-driven scripts that are intended to be self-guided. They can be launched from the
Demos tab as shown in Figure 5-2. Figure 5-3 shows the initial screen when the File Management Demo
is launched. The demo screens are defined CFS_KIT/screens target directory and the Ruby scripts that
control the demos are defined in the CFS_KIT/lib directory. Demos are pre-canned scripts that are not
intended to be modified by the user but since this is an open source project nothing precludes the user
from modifying or extending them.
cosmos
|- config
| |- targets
| | ...
| | |- CFS_KIT
| | |- lib
| | |- screens
| | ...
|
|- cfs_kit
| |- tutorials
| |- osk_tutorial.json
| |- tutorial_x
| |- lesson_a.rb
| |- lesson_b.rb
|
|- lib
| ...
OpenSatKit User’s Guide – Version 1.1
35
Figure 5-2 – Demo Main Screen
Figure 5-3 – File Management Initial Demo Screen
5.2 Tutorials
Tutorials are scripts that are executed from the COSMOS Script Runner tool. A framework is provided
that makes it very easy to add and remove scripts so the kit can be tailored to serve a particular
educational purpose. Tutorials are defined in the file cfs_kit/tutorials/osk_tutorials.json that is shown in
Figure 5-4. Each entry in the “tutorials” array defines a tutorial. First navigate to the Tutorials Tab
screen shown in Figure 5-5 and select <Tutorials> that will launch the tutorial main screen shown in
Figure 5-6. As you can see the JSON “button” definition is used to label the button and the “description”
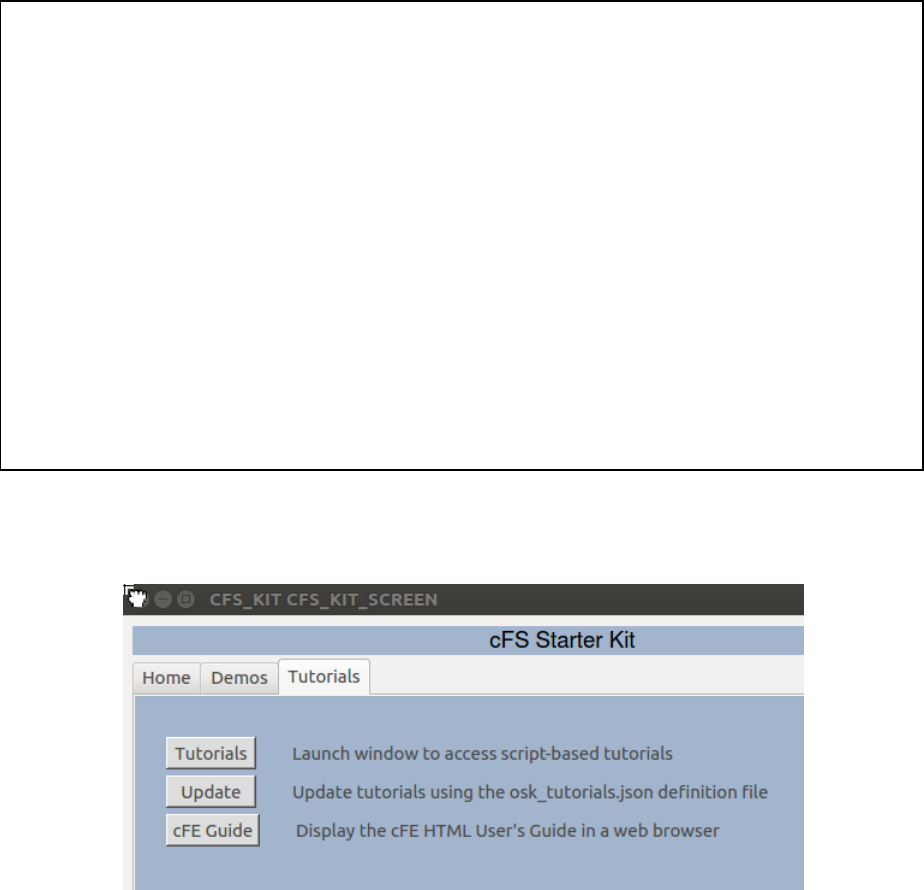
OpenSatKit User’s Guide – Version 1.1
36
definition is used in the text to the right of the button. When a tutorial is selected the tutorial’s
selection message box provides a drop down menu with each of the lessons as shown in Figure 5-7.
When a lesson is selected the Script Runner is launched and starts to run the script located at
cosmos/cfs_kit/tutorials/”directory”/”lesson”.rb. In the cFE example if the user selected executive
services (ES) then the cosmos/cfs_kit/tutorials/cfe/es.rb is launched.
Figure 5-4 –Tutorial Definition File osk_tutorials.json
Figure 5-5 – Tutorial Tab Screen
{
"tutorials": [
{
"name": "cFE",
"directory": "cfe",
"button": "cFE",
"description": "Core Flight Executive",
"user-prompt": "Select tutorial",
"lessons": ["ES","TBL"]
},
{
"name": "Operational Applications",
"directory": "op_apps",
"button": "Op Apps",
"description": "Apps that provide an operational runtime environment",
"user-prompt": "Select tutorial",
"lessons": ["CI","SCH","TO","HK","SC","SBN"]
}
]
}
OpenSatKit User’s Guide – Version 1.1
37
Figure 5-6 – Tutorial Main Screen
Figure 5-7 – cFE Tutorial Selection Message Box
Perform the following steps to create a new tutorial:
1. Create a new directory in the cfs_kit/tutorials directory
2. In your new directory create one ruby script for each lesson
3. Create a new tutorial entry in the “tutorials” array in osk_tutorials.json
4. Navigate to the Tutorial Tab Screen shown in Figure 5-5 and select <Update>
a. This creates a new turorial_screen.txt file in the CFS_KIT/screens target directory. The
previous turorial_screen.txt file is preserved in
turorial_screen_year_month_day_hourminutesecond.txt file
5. If a tutorial is added without any scripts defined, the screen will be created but the user will get
an error if the try to launch a lesson in a tutorial without a script file.
Tutorials can be removed from the tutorial screen by removing its definition from the JOSN file. The
scripts do not have to be removed.

OpenSatKit User’s Guide – Version 1.1
38
6.0 Starter Kit Design and Maintenance
This section describes the kit’s design. It provides enough information for someone to maintain and
expand the kit. If this section gets too large it will be split into a separate document. It is included with
the user’s guide because most users are developers and they may want more information even if they’re
not maintaining the kit.
6.1 COSMOS Configuration
The COSMOS directory structure is shown in Figure TBD.
Ruby search path
Cosmos caching
6.1.1 Ruby Gems
The application layer is where the bulk of the cFS scalability and extendibility occurs. Users
6.2 Kit Application Design
TBD – Provide basic description and reference kit app design document
cosmos
|- cfs-kit
|- docs
|- file_server
|- tables
|- tools
|- create-app
|- perf-monitor
|- config
|- data
|- system
|- targets
...
|- cfs-kit
|- cmd_tlm
|- lib
|- screens
...
|- tools
| |-cmd_tlm_server.txt
|- lib
|- outputs
|- procedures
|- kit_test
|- kit_utils
|- scripts
|- tools
OpenSatKit User’s Guide – Version 1.1
39
6.3 Component Releases
This sections outlines the steps needed to update a particular component of the starter kit.
6.3.1 cFE
Tools
Copy docs
CFE_ES_SYSTEM_LOG_SIZE to 16384
OpenSatKit User’s Guide – Version 1.1
40
Appendix A - Acronyms
API………………………………………...……………………………………….Application Programming Interface
cFE ................................................................................................................................... Core Flight Executive
C&DH ................................................................................................................. Command and Data Handling
CCSDS………………………………………………………….. Consultative Committee for Space Data Systems
cFS…………………………………………………………….…………………………Core Flight Software System
CM ......................................................................................................................... Configuration Management
CMD .................................................................................................................................................. Command
COTS ....................................................................................................................... Commercial Off-The-Shelf
CPM ......................................................................................................................... CFS Performance Monitor
CPU ............................................................................................................................. Central Processing Unit
DCR ................................................................................................................... Discrepancy/Change Request
EDAC ................................................................................................................ Error Detection and Correction
EDS ................................................................................................................................. Electronic Data Sheet
EEPROM .................................................................. Electrically-erasable Programmable Read-Only Memory
ES ....................................................................................................................................... Executive Services
ETU ................................................................................................................................. Engineering Test Unit
EVS-- ......................................................................................................................................... Event Services
FC .............................................................................................................................................. Function Code
FDC ................................................................................................................ Failure Detection and Correction
FSB ............................................................................................................................... Flight Software Branch
FSW ........................................................................................................................................... Flight Software
HW ..................................................................................................................................................... Hardware
ICD ......................................................................................................................... Interface Control Document
I&T ........................................................................................................................................ Integration & Test
MET ................................................................................................................................ Mission Elapsed Time
OS ......................................................................................................................................... Operating System
OSAL……………………………………………………………………….……Operating System Abstraction Layer
PID ............................................................................................................................................... Pipe Identifier
RTOS .................................................................................................................. Real-Time Operating System
SB .................................................................................................................................. Software Bus Services
STCF .......................................................................................................... Spacecraft Time Correlation Factor
T&C ........................................................................................................................... Telemetry and Command
TAI ............................................................................................................................ International Atomic Time
TBD .......................................................................................................................................To Be Determined
OpenSatKit User’s Guide – Version 1.1
41
TBL ............................................................................................................................................ Table Services
TIME ........................................................................................................................................... Time Services
TLM .................................................................................................................................................... Telemetry
URL ....................................................................................................................... Universal Resource Locator
UTC ....................................................................................................................... Coordinated Universal Time
UTF…………………………………………………………………………………………….….Unit Test Framework
VDD .................................................................................................................. Version Description Document
VM ............................................................................................................................................. Virtual Machine
OpenSatKit User’s Guide – Version 1.1
42
Appendix B – Online Resources
B.1 First Time Kit Installation
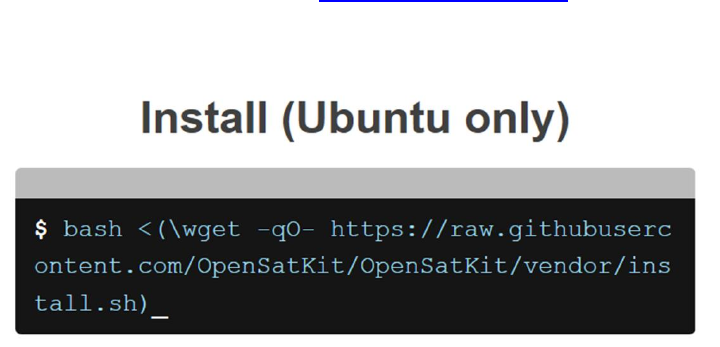
The current kit installation script is designed to run on Ubuntu. Due to limited resources we wanted to
keep the installation simple, robust, and easy to maintain. A single platform significantly lowers the
resources required to verify the installation.
Perform the following steps to install the kit:
1. Create an Ubuntu host platform. A virtual machine is the typical solution. The osboxes.org
website provides freely available Ubuntu images for Virtual Box and VMWare.
a. TBR – Check if auto login allows cFS to be launched without a prompt so telemetry can
be enabled.
2. From within the Ubuntu platform go to https://opensatkit.github.io and you’ll see the following
information.
3. Open a terminal window on your Ubuntu platform. Copy the bash line from the website into
your terminal window and the run the shell script. This script will take from 30-60 minutes to
complete depending upon your internet connection and host machine performance. There are
some prompts that must be answered.
4. After the script successfully runs COSMOS is automatically launched. Refer to Section 2 for how
to use the kit features.
In order to use the PiSat (see TBD for obtaining a PiSat) port forwarding must be enabled in the VM.
B.2 Updating the Kit
TBD

OpenSatKit User’s Guide – Version 1.1
44
Appendix C – User FAQs
C.1 Installation Issues
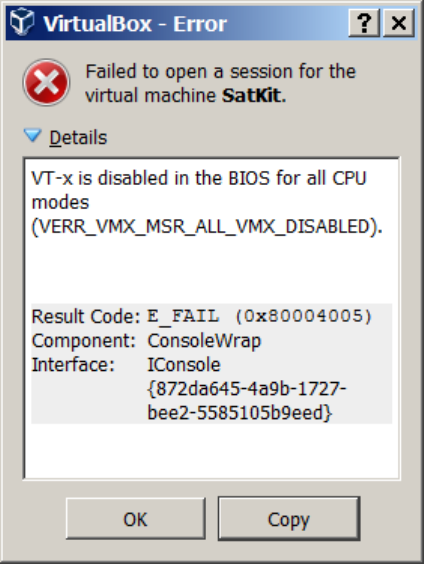
1. When I try to start a virtual machine either after I importing a .ova file or when I try to run any
virtual machine, I get an error such as
a. This particular error is due to the virtual technology extensions (VT-x) being disabled in
your BIOS. You can enable VT-x by performing the following steps
i. Reboot your PC. As soon as the first logo appears immediately press the
F2 key
ii. Locate the VT-x settings (menu system specific to your bios) and change it
to enabled
2. When I try to update COSMOS by running “bundle update cosmos” from my COSMOS project
folder I get a ‘permission denied’ error in a ‘dot’ folder such as .rbenv or .gem when a gem is
being installed. This typically occurs in a VM. It is best not to install the gem as root so the
easiest solution is to change the file permissions for the particular ‘dot’ directory and all of its
OpenSatKit User’s Guide – Version 1.1
45
children. The first line below shows the general format and the second line is a specific
example.
a. sudo chown -R username:group ~/.xxx
b. sudo chown -R vagrant:vagrant ~/.rbenv
3. I don’t have all of the tools to build and run the kit. The safest way to install the kit is to use the
shell script on github. Here are some specific error and causes that may be helpful:
a. cmake not found
i. sudo apt-get install cmake
b. cmake prep fails due to test program not being compiled.
i. sudo apt-get install gcc-multilib
c. cmake build fails during OSAL with obscure error messages
i. sudo apt-get install –y curl
d. Java runtime not found when trying to run java-based kit tools
i. sudo apt-get install default-jre
e. When a try to start the cFS I get a xfce error
i. sudo apt install xfce4-terminal
C.2 COSMOS-cFS Connections Issues
1. When I start the cFS I get an error box stating failed to establish connection.
a. Press the ‘Enable Telemetry” button on the main screen.
b. If this doesn’t work then try restarting the COSMOS Command & Telemetry Server. The
cFS can remain running when you do this.
2. After I start the cFS it seems to run fine, and I see event messages in the terminal window, but I
don’t see any telemetry
a. Look at cFS startup messages. If there are kit_ci and/or kit_to socket bind error 98 then
a cFS process is still running
b. Open a new terminal window (ctrl-alt-t on an Ubuntu VM)
c. Issue a ‘pgrep core’ command. If more than one process ID shows up then you have an
orphan cFS running.
d. Issue a sudo kill ‘xxxxx’ to end the old process where xxxxx is the process ID
C.4 COSMOS
1. After I change an Embedded Ruby script I don’t see it take effect.
a. The results of the ERB processing are cached. You either have to modify the file, or
delete the cache from the outputs/tmp folder.

OpenSatKit User’s Guide – Version 1.1
46
C.3 cFS
1. I modified ../cf/cfe_es_startup.scr and my changes disappeared.
a. When you build the cFS with cmake and then do a ‘cmake install’ it copies the
cfe_es_startup.scr from the root cmake directory into the target CPU’s boot directory.
Therefore if you modify the target startup script it will get overwritten when you install
a new build.
2. When I start the cFS a terminal window opens and the cFS looks like it starts but nothing
updates.
a. First confirm it’s not a connection issue. See FAQ C.1.1.
b. Look through the startup messages and if you see messages stating tables were not
loaded then the problem is most likely that the default tables in the /cf directory were
deleted during the cFS build process. These tables include the scheduler tables and the
telemetry output table.
C.4 42
1. The 42 graphics is extremely slow in my VM
a. In the VM display settings turn off 3D acceleration
b. In 42/InOut/Inp_Graphics.txt under the “CAM Show Menu” category set “Shadows” to
FALSE
C.5 JSON Files
1. Here are some common JSON parser formatting mistakes. The exact output of the ground and
flight software JSON parsers are not identical but they should be similar to the following errors.
a. Expecting 'STRING' - You probably have an extra comma at the end of your collection.
Something like { "a": "b", }
b. Expecting 'STRING', 'NUMBER', 'NULL', 'TRUE', 'FALSE', '{', '[' - You probably have an
extra comma at the end of your list. Something like: ["a", "b", ]
c. Enclosing your collection keys in quotes. Proper format for a collection is { "key": "value"
}
d. Make sure you follow JSON's syntax properly. For example, always use double quotes,
always define your keys in quotes, and remove all callback functions.
OpenSatKit User’s Guide – Version 1.1
47
Appendix D – Naming Conventions
D.1 Command & Telemetry Database
FM HK_TLM_PKT
State processor endian at top of packet and don’t repeat for appended data parameters
I followed the command mnemonics abbreviations in the HTML. However I made CAPS and used
underscores rather than the CamelBack.
I used “write” when writing info to a file and “send” when sending a telemetry packet with info.
Descriptive comments. Start command descriptions with a verb. No period at the end of single sentence
comments.
D.2 Abbreviations
ADDR Address
ADJ Adjust
APP Application
ATP Absolute Time Processor
ATS Absolute Time Sequence
BIN Binary
CLR Clear
CMD Command
CNT Count
CONT Continue
CTR(S) Counter(s)
DEST Destination
DIAG Diagnostic
DIS Disable
ENA Enable
ERR Error
EXE Executing
EVT Event
FLTR Filter
FMT Format
IDX Index
MON Monitor
MSG Message
NUM Number
PARAM(S) Parameter(s)
REG Register, Registry
RST Reset
RTS Relative Time Sequence
SEQ Sequence
OpenSatKit User’s Guide – Version 1.1
48
STATS Statistics
SUB Subtract
SYS System
TBD To Be Determined
TLM Telemetry
