Oracle Fusion Middleware Developer’s Guide For Universal Content Management Web Center CMS Dev
User Manual: Pdf
Open the PDF directly: View PDF ![]() .
.
Page Count: 392 [warning: Documents this large are best viewed by clicking the View PDF Link!]
- Contents
- Preface
- New and Changed Features
- Part I Getting Started with Customizing Oracle WebCenter Content Server
- 1 Introduction to Oracle WebCenter Content Server
- 2 Introduction to the Oracle Fusion Order Demo Sample Application
- Part II Changing the Look and Feel of the Content Server Interface
- 3 Customizing the Content Server Interface
- 3.1 About Customizing the Content Server Interface
- 3.2 Choosing a Different Skin or Layout
- 3.3 Configuring a Default Skin and Layout for New Users and Guests
- 3.4 Modifying the Template for a Skin or Layout
- 3.5 Altering the Anonymous User Interface
- 3.6 Changing the URL of the Login Page
- 3.7 Creating and Publishing a New Layout
- 3.8 Optimizing the Use of Published Files
- 4 Creating Dynamic Server Pages
- 4.1 About Dynamic Server Pages
- 4.2 Altering the Appearance and Navigation of Web Pages
- 4.3 Creating an IDOC File with Custom Includes for Dynamic Server Pages
- 4.4 Creating an HCST Page
- 4.5 Creating an HCSP Page
- 4.6 Creating an HCSF Page
- 4.7 Verifying the Display of an HCST, HCSP, or HCSF Page in a Web Browser
- Part III Modifying the Functionality of Content Server
- 5 Changing System Settings
- 5.1 About Changing System Settings
- 5.2 Changing System Settings Through the Admin Server
- 5.3 Changing System Settings Through the System Properties Application
- 5.4 Customizing the Library and System Home Page with the Web Layout Editor
- 5.5 Defining Security and Accounts for Users with the User Admin Application
- 6 Changing Configuration Information
- 7 Customizing Services
- 8 Generating Actions Menus
- Part IV Customizing Content Server with Components
- 9 Getting Started with Content Server Components
- 10 Enabling and Disabling Components for Content Server
- 11 Updating Component Configurations
- 12 Customizing Content Tracker
- 12.1 About Content Tracker
- 12.2 Content Tracker Components and Functions
- 12.3 Configuration and Customization
- 12.4 Service Call Configuration
- 12.4.1 About the Service Call Configuration File
- 12.4.2 About the Content Tracker Logging Service
- 12.4.3 Managing Service Call Information
- 12.4.4 Service Call Management and the User Interface
- 12.5 Customizing Content Tracker
- 12.6 Web Beacon Functionality
- 13 Customizing Content Categorizer
- 14 Downloading Custom Components
- 15 Creating Custom Components
- 15.1 About Creating Custom Components
- 15.2 Creating Resources for a Component
- 15.3 Creating a Component Definition File
- 15.4 Restarting Content Server to Apply a Component
- 16 Installing Components
- 17 Uninstalling a Component
- Part V Integrating WebCenter Content into Your Environment
- 18 Getting Started with Integrating WebCenter Content into Your Environment
- 19 Configuring WebCenter Content Web Services for Integration
- 20 Integrating JavaServer Pages with Content Server
- 21 Using the IdcCommand Utility to Access Content Server
- 22 Using the COM API for Integration
- 22.1 About the COM API
- 22.2 Calling Content Server Services with the IntradocClient OCX component
- 22.2.1 OCX Interface
- 22.2.2 IdcClient OCX Description
- 22.2.3 IdcClient OCX Control Setup
- 22.2.4 IdcClient Events
- 22.2.5 IdcClient OCX Methods
- 22.2.5.1 AboutBox
- 22.2.5.2 Back
- 22.2.5.3 CancelRequest
- 22.2.5.4 DoCheckoutLatestRev
- 22.2.5.5 DownloadFile
- 22.2.5.6 DownloadNativeFile
- 22.2.5.7 Drag
- 22.2.5.8 EditDocInfoLatestRev
- 22.2.5.9 Forward
- 22.2.5.10 GoCheckinPage
- 22.2.5.11 Home
- 22.2.5.12 InitiateFileDownload
- 22.2.5.13 InitiatePostCommand
- 22.2.5.14 Move
- 22.2.5.15 Navigate
- 22.2.5.16 NavigateCgiPage
- 22.2.5.17 Refresh Browser
- 22.2.5.18 SendCommand
- 22.2.5.19 SendPostCommand
- 22.2.5.20 SetFocus
- 22.2.5.21 ShowDMS
- 22.2.5.22 ShowDocInfoLatestRev
- 22.2.5.23 ShowWhatsThis
- 22.2.5.24 StartSearch
- 22.2.5.25 Stop
- 22.2.5.26 UndoCheckout
- 22.2.5.27 ViewDocInfo
- 22.2.5.28 ViewDocInfoLatestRev
- 22.2.5.29 ZOrder
- 22.2.6 IdcClient Properties
- 22.3 Using the ODMA API to Access Content Server from a Desktop Application
- 23 Using RIDC to Access Content Server
- 23.1 About Remote Intradoc Client (RIDC)
- 23.2 Initializing Connections
- 23.3 Configuring Clients
- 23.4 Authenticating Users
- 23.5 Using Services
- 23.6 Understanding Connection Pooling
- 23.7 Understanding Streams
- 23.8 Understanding Binders
- 23.9 Understanding Convenience Classes
- 23.10 Understanding RIDC Filters
- 23.11 Using the RIDC JDeveloper Extension
- 24 Using the Content Server JCR Adapter
- 25 Configuring Web Services with WSDL, SOAP, and the WSDL Generator
- 25.1 About Configuring Web Services with WSDL, SOAP, and the WSDL Generator
- 25.2 Accessing Content Server with a SOAP Client
- 25.3 Calling Content Server Services with SOAP
- 25.3.1 SOAP Packet Format
- 25.3.2 Special Characters
- 25.3.3 Sample Service Calls with SOAP Response/Request
- 25.3.3.1 Ping the Server
- 25.3.3.2 Add a New User
- 25.3.3.3 Edit Existing User
- 25.3.3.4 Get User Information
- 25.3.3.5 Delete User
- 25.3.3.6 Check In Content Item
- 25.3.3.7 Check out Content Item
- 25.3.3.8 Undo Content Item Checkout
- 25.3.3.9 Get Content Item Information
- 25.3.3.10 Get File
- 25.3.3.11 Get Search Results
- 25.3.3.12 Get Table Data
- 25.3.3.13 Get Criteria Workflow Information
- 25.4 Using SOAP Packets in Active Server Pages
- 25.5 Generating WSDL Files to Access WebCenter Content
- 25.6 Customizing WSDL Files
- 26 Customizing the DesktopTag Component
- 26.1 About the DesktopTag Component
- 26.2 Enabling the DesktopTag and OracleCleanContent Components
- 26.3 Checking Out and Checking In Content Items with DesktopTag
- 26.4 Adding Properties to Checked-Out Content Items
- 26.5 Configuring the DesktopTag Component
- 26.5.1 DesktopTagFormats Property
- 26.5.2 DesktopTagPrefix Property
- 26.5.3 DesktopTagFields Property
- 26.5.4 DesktopTagPrefixCustom Property
- 26.5.5 DesktopTagFieldsCustom Property
- 26.5.6 DesktopTagPrefixExtended Property
- 26.5.7 DesktopTagFieldsExtended Property
- 26.5.8 DefaultTaskPaneUrl Property
- 26.5.9 DesktopTagLog Property
- 26.5.10 DesktopTagFormatsExclude Property
- Part VI Appendices
- A Troubleshooting
- Index

Oracle® WebCenter Content
Developer’s Guide for Content Server
11g Release 1 (11.1.1)
E10807-04
November 2011
Oracle WebCenter Content Developer's Guide for Content Server, 11g Release 1 (11.1.1)
E10807-04
Copyright © 1994, 2011, Oracle and/or its affiliates. All rights reserved.
Primary Author: Bonnie Vaughan
Contributing Authors: Sean Cearley, Sandra Christiansen, Will Harris, Karen Johnson, Jean Wilson
Contributors: Sharmarke Aden, Scott Nelson, Rick Petty, David Truckenmiller, Ron van de Crommert
This software and related documentation are provided under a license agreement containing restrictions on
use and disclosure and are protected by intellectual property laws. Except as expressly permitted in your
license agreement or allowed by law, you may not use, copy, reproduce, translate, broadcast, modify, license,
transmit, distribute, exhibit, perform, publish, or display any part, in any form, or by any means. Reverse
engineering, disassembly, or decompilation of this software, unless required by law for interoperability, is
prohibited.
The information contained herein is subject to change without notice and is not warranted to be error-free. If
you find any errors, please report them to us in writing.
If this is software or related documentation that is delivered to the U.S. Government or anyone licensing it
on behalf of the U.S. Government, the following notice is applicable:
U.S. GOVERNMENT RIGHTS Programs, software, databases, and related documentation and technical data
delivered to U.S. Government customers are "commercial computer software" or "commercial technical data"
pursuant to the applicable Federal Acquisition Regulation and agency-specific supplemental regulations. As
such, the use, duplication, disclosure, modification, and adaptation shall be subject to the restrictions and
license terms set forth in the applicable Government contract, and, to the extent applicable by the terms of
the Government contract, the additional rights set forth in FAR 52.227-19, Commercial Computer Software
License (December 2007). Oracle America, Inc., 500 Oracle Parkway, Redwood City, CA 94065.
This software or hardware is developed for general use in a variety of information management
applications. It is not developed or intended for use in any inherently dangerous applications, including
applications that may create a risk of personal injury. If you use this software or hardware in dangerous
applications, then you shall be responsible to take all appropriate fail-safe, backup, redundancy, and other
measures to ensure its safe use. Oracle Corporation and its affiliates disclaim any liability for any damages
caused by use of this software or hardware in dangerous applications.
Oracle and Java are registered trademarks of Oracle and/or its affiliates. Other names may be trademarks of
their respective owners.
Intel and Intel Xeon are trademarks or registered trademarks of Intel Corporation. All SPARC trademarks
are used under license and are trademarks or registered trademarks of SPARC International, Inc. AMD,
Opteron, the AMD logo, and the AMD Opteron logo are trademarks or registered trademarks of Advanced
Micro Devices. UNIX is a registered trademark of The Open Group.
This software or hardware and documentation may provide access to or information on content, products,
and services from third parties. Oracle Corporation and its affiliates are not responsible for and expressly
disclaim all warranties of any kind with respect to third-party content, products, and services. Oracle
Corporation and its affiliates will not be responsible for any loss, costs, or damages incurred due to your
access to or use of third-party content, products, or services.

iii
Contents
Preface .............................................................................................................................................................. xvii
Audience.................................................................................................................................................... xvii
Documentation Accessibility.................................................................................................................. xvii
Related Documents .................................................................................................................................. xvii
Conventions ............................................................................................................................................. xviii
New and Changed Features.................................................................................................................. xix
New Features for 11g Release 1 (11.1.1) ................................................................................................. xix
Changed Features for 11g Release 1 (11.1.1).......................................................................................... xx
Part I Getting Started with Customizing Oracle WebCenter Content Server
1 Introduction to Oracle WebCenter Content Server
1.1 Overview of Content Server Architecture............................................................................... 1-1
1.1.1 WebCenter Content Directories and Files........................................................................ 1-1
1.1.1.1 Terminology for WebCenter Content Directories ................................................... 1-2
1.1.1.2 The bin Directory.......................................................................................................... 1-2
1.1.1.3 The config Directory..................................................................................................... 1-3
1.1.1.4 The components Directory.......................................................................................... 1-5
1.1.1.5 The resources Directory............................................................................................... 1-5
1.1.1.6 The weblayout Directory............................................................................................. 1-6
1.1.2 Resources .............................................................................................................................. 1-6
1.2 Customization Types.................................................................................................................. 1-7
1.3 Customization Planning ............................................................................................................ 1-8
1.4 Recommended Skills and Tools for Customizing Content Server ...................................... 1-9
1.5 Content Server Behavior......................................................................................................... 1-10
1.5.1 Startup Behavior ............................................................................................................... 1-11
1.5.1.1 Startup Steps............................................................................................................... 1-11
1.5.1.2 Effects of Configuration Loading............................................................................ 1-12
1.5.2 Resource Caching ............................................................................................................. 1-13
1.5.3 Page Assembly .................................................................................................................. 1-13
1.5.4 Database Interaction......................................................................................................... 1-14
1.5.5 Localized String Resolution ............................................................................................ 1-14
1.5.6 Application Integrations.................................................................................................. 1-14
iv
2 Introduction to the Oracle Fusion Order Demo Sample Application
2.1 About Fusion Order Demo and the Suppliers Module......................................................... 2-1
2.2 Setting Up the Fusion Order Demo Application.................................................................... 2-2
2.3 Running the Suppliers Module................................................................................................. 2-2
2.3.1 Suppliers Module Code ...................................................................................................... 2-3
2.3.2 Suppliers Module Pages ..................................................................................................... 2-5
Part II Changing the Look and Feel of the Content Server Interface
3 Customizing the Content Server Interface
3.1 About Customizing the Content Server Interface.................................................................. 3-1
3.1.1 Types of Skins and Layouts................................................................................................ 3-1
3.1.2 Skins....................................................................................................................................... 3-2
3.1.3 Layouts.................................................................................................................................. 3-2
3.2 Choosing a Different Skin or Layout ....................................................................................... 3-2
3.2.1 How to Choose a Different Skin or Layout...................................................................... 3-2
3.2.2 What Happens at Runtime................................................................................................. 3-2
3.3 Configuring a Default Skin and Layout for New Users and Guests................................... 3-3
3.4 Modifying the Template for a Skin or Layout........................................................................ 3-3
3.4.1 About Dynamic Publishing................................................................................................ 3-3
3.5 Altering the Anonymous User Interface ................................................................................. 3-4
3.5.1 How to Alter the Anonymous User Interface.................................................................. 3-4
3.5.2 What Happens at Runtime................................................................................................. 3-4
3.6 Changing the URL of the Login Page ...................................................................................... 3-5
3.7 Creating and Publishing a New Layout.................................................................................. 3-7
3.8 Optimizing the Use of Published Files .................................................................................... 3-7
3.8.1 Bundling Files....................................................................................................................... 3-7
3.8.2 Referencing Published Files ............................................................................................... 3-9
4 Creating Dynamic Server Pages
4.1 About Dynamic Server Pages.................................................................................................... 4-1
4.1.1 Page Types............................................................................................................................ 4-3
4.1.1.1 IDOC File ....................................................................................................................... 4-3
4.1.1.2 HCST File....................................................................................................................... 4-3
4.1.1.3 HCSP File....................................................................................................................... 4-4
4.1.1.4 HCSF File ....................................................................................................................... 4-4
4.2 Altering the Appearance and Navigation of Web Pages...................................................... 4-4
4.2.1 Syntax .................................................................................................................................... 4-4
4.2.1.1 Idoc Script Expressions................................................................................................ 4-5
4.2.1.2 Comparison Operators ................................................................................................ 4-6
4.2.1.3 Special Characters......................................................................................................... 4-6
4.2.1.4 Referencing Metadata .................................................................................................. 4-7
4.2.2 Idoc Script Functions........................................................................................................... 4-7
4.2.2.1 docLoadResourceIncludes Function.......................................................................... 4-7
4.2.2.1.1 Requirements for Calling the docLoadResourceIncludes Function .............. 4-7
4.2.2.1.2 Parameters.............................................................................................................. 4-8
v
4.2.2.2 executeService Function .............................................................................................. 4-8
4.2.3 Development Recommendations ...................................................................................... 4-9
4.2.3.1 General Guidelines....................................................................................................... 4-9
4.2.3.2 HCSF Guidelines ....................................................................................................... 4-10
4.2.4 HCSF Pages........................................................................................................................ 4-10
4.2.4.1 Load Section ............................................................................................................... 4-10
4.2.4.1.1 HTML Declaration ............................................................................................. 4-11
4.2.4.1.2 The docLoadResourceIncludes Function........................................................ 4-11
4.2.4.1.3 Meta Element ...................................................................................................... 4-11
4.2.4.1.4 Variables and Includes ...................................................................................... 4-11
4.2.4.2 Data Section................................................................................................................ 4-11
4.2.4.2.1 Data Section Structure ....................................................................................... 4-11
4.2.4.2.2 The idcformrules Element................................................................................. 4-12
4.2.4.2.3 Metadata Elements............................................................................................. 4-13
4.2.4.2.4 Nested Elements................................................................................................. 4-13
4.2.4.2.5 Referencing XML Elements............................................................................... 4-13
4.2.4.2.6 Form Elements.................................................................................................... 4-14
4.2.4.2.7 ResultSets............................................................................................................. 4-14
4.2.4.3 Form Section............................................................................................................... 4-17
4.2.4.3.1 Form Begin .......................................................................................................... 4-17
4.2.4.3.2 Form Properties.................................................................................................. 4-17
4.2.4.3.3 Form Fields.......................................................................................................... 4-17
4.2.4.3.4 Form Buttons....................................................................................................... 4-18
4.2.4.3.5 Form End............................................................................................................. 4-18
4.3 Creating an IDOC File with Custom Includes for Dynamic Server Pages...................... 4-19
4.4 Creating an HCST Page........................................................................................................... 4-19
4.5 Creating an HCSP Page........................................................................................................... 4-20
4.6 Creating an HCSF Page........................................................................................................... 4-20
4.6.1 Common Code for Forms................................................................................................ 4-25
4.6.1.1 Retrieving File Information...................................................................................... 4-25
4.6.1.2 Referencing a File Extension.................................................................................... 4-25
4.6.1.3 Defining Form Information...................................................................................... 4-26
4.6.1.4 Defining Form Fields ................................................................................................ 4-26
4.6.1.5 Defining Hidden Fields ............................................................................................ 4-26
4.6.1.6 Submitting a Form..................................................................................................... 4-27
4.7 Verifying the Display of an HCST, HCSP, or HCSF Page in a Web Browser................. 4-27
Part III Modifying the Functionality of Content Server
5 Changing System Settings
5.1 About Changing System Settings............................................................................................. 5-1
5.2 Changing System Settings Through the Admin Server ........................................................ 5-2
5.3 Changing System Settings Through the System Properties Application ........................... 5-2
5.4 Customizing the Library and System Home Page with the Web Layout Editor .............. 5-3
5.5 Defining Security and Accounts for Users with the User Admin Application ................. 5-3
vi
6 Changing Configuration Information
6.1 About Changing Configuration Information ......................................................................... 6-1
6.2 Changing Configurations with the Idoc Script Custom Scripting Language.................... 6-1
6.3 Changing Configurations with Development Tools and Technologies ............................. 6-2
7 Customizing Services
7.1 About Customizing Services..................................................................................................... 7-1
7.2 Customizing Services for Communicating with Content Server......................................... 7-2
7.3 Customizing Services for Accessing the Database................................................................. 7-2
8 Generating Actions Menus
8.1 About Generating Actions Menus............................................................................................ 8-1
8.2 Creating Display Tables............................................................................................................. 8-2
8.2.1 Headline View Tables ......................................................................................................... 8-2
8.2.2 Thumbnail View Tables...................................................................................................... 8-4
8.3 Customizing Actions Menus..................................................................................................... 8-4
Part IV Customizing Content Server with Components
9 Getting Started with Content Server Components
9.1 About Standard, System, and Custom Components............................................................. 9-1
9.1.1 Component Files Overview................................................................................................ 9-1
9.1.2 Using Components.............................................................................................................. 9-2
9.1.3 About Directories and Files................................................................................................ 9-4
9.1.3.1 HDA Files ...................................................................................................................... 9-4
9.1.3.1.1 Elements in HDA Files ......................................................................................... 9-5
9.1.3.1.2 The idccs_components.hda, idcibr_components.hda, or
idcurm_components.hda File .............................................................................. 9-7
9.1.3.1.3 Component Definition Files................................................................................. 9-8
9.1.3.2 Custom Resource Files................................................................................................. 9-8
9.1.3.3 Data Binder.................................................................................................................... 9-9
9.1.3.3.1 LocalData................................................................................................................ 9-9
9.1.3.3.2 ResultSets................................................................................................................ 9-9
9.1.3.3.3 Environment .......................................................................................................... 9-9
9.1.3.4 Manifest File .................................................................................................................. 9-9
9.1.3.5 Other Files................................................................................................................... 9-11
9.1.3.5.1 Customized Site Files......................................................................................... 9-11
9.1.3.5.2 Component ZIP File........................................................................................... 9-11
9.1.3.5.3 Custom Installation Parameter Files................................................................ 9-12
9.1.3.6 Typical Directory Structure...................................................................................... 9-12
9.1.4 Development Recommendations ................................................................................... 9-12
9.1.4.1 Creating a Component.............................................................................................. 9-12
9.1.4.1.1 How to Create a Custom Component............................................................. 9-12
9.1.4.2 Working with Component Files .............................................................................. 9-13
9.1.4.3 Using a Development Content Server.................................................................... 9-13
vii
9.1.4.4 Component File Organization ................................................................................. 9-14
9.1.4.5 Naming Conventions................................................................................................ 9-15
9.2 Tools for Managing Components.......................................................................................... 9-15
9.2.1 Component Wizard .......................................................................................................... 9-15
9.2.2 Advanced Component Manager .................................................................................... 9-16
9.2.3 ComponentTool ................................................................................................................ 9-18
9.3 Component Files ...................................................................................................................... 9-18
9.3.1 The idc Product _components.hda File ......................................................................... 9-18
9.3.2 Components ResultSet..................................................................................................... 9-19
9.3.3 Component Definition (Glue) File.................................................................................. 9-19
9.3.3.1 ResourceDefinition ResultSet .................................................................................. 9-20
9.3.3.1.1 ResourceDefinition ResultSet Columns.......................................................... 9-21
9.3.3.2 MergeRules ResultSet ............................................................................................... 9-22
9.3.3.2.1 MergeRules ResultSet Columns....................................................................... 9-22
9.3.3.3 Filters ResultSet.......................................................................................................... 9-23
9.3.3.4 ClassAliases ResultSet .............................................................................................. 9-23
9.4 Resources for Assembling Web Pages.................................................................................. 9-24
10 Enabling and Disabling Components for Content Server
10.1 About Enabling and Disabling Components....................................................................... 10-1
10.2 Enabling a Component............................................................................................................ 10-1
10.3 Disabling a Component .......................................................................................................... 10-2
11 Updating Component Configurations
11.1 About Updating Component Configurations...................................................................... 11-1
11.2 Updating a Component Configuration with the Advanced Component Manager....... 11-2
11.3 Updating a Component Configuration Through the Configuration for instance
Screen ......................................................................................................................................... 11-2
12 Customizing Content Tracker
12.1 About Content Tracker............................................................................................................ 12-1
12.1.1 Content Tracker and Content Tracker Reports ............................................................ 12-2
12.2 Content Tracker Components and Functions...................................................................... 12-2
12.2.1 DataBinder Dump Facility............................................................................................... 12-2
12.2.1.1 Values for the DataBinder Dump Facility.............................................................. 12-3
12.2.1.2 Location of the DataBinder Object Dump Files .................................................... 12-3
12.2.1.3 Names of the DataBinder Object Dump Files ....................................................... 12-3
12.2.2 Performance Optimization.............................................................................................. 12-4
12.2.3 Installation Considerations ............................................................................................. 12-4
12.3 Configuration and Customization......................................................................................... 12-4
12.3.1 Configuration Variables................................................................................................... 12-4
12.3.1.1 Access Control Lists and Content Tracker Reports Secure Mode...................... 12-7
12.3.1.2 Values for the Security Checks Preference Variable ............................................ 12-8
12.3.1.3 File Types for Entries in the SctAccessLog ............................................................ 12-8
12.3.2 Manually Setting Content Tracker Configuration Variables ..................................... 12-8
12.3.3 External Users and Content Item Tracking................................................................... 12-9
viii
12.4 Service Call Configuration...................................................................................................... 12-9
12.4.1 About the Service Call Configuration File .................................................................... 12-9
12.4.1.1 General Service Call Logging ................................................................................ 12-10
12.4.1.2 Extended Service Call Tracking Function............................................................ 12-10
12.4.1.2.1 Service Call ResultSet Combinations............................................................. 12-11
12.4.1.2.2 General Purpose Columns in the Output Table .......................................... 12-11
12.4.1.3 Service Call Configuration File Contents............................................................. 12-12
12.4.1.4 ResultSet Examples ................................................................................................. 12-13
12.4.1.4.1 ServiceExtraInfo ResultSet Entries................................................................. 12-14
12.4.1.4.2 Linked Service Entries and Field Map ResultSets....................................... 12-14
12.4.2 About the Content Tracker Logging Service .............................................................. 12-15
12.4.3 Managing Service Call Information............................................................................. 12-16
12.4.3.1 Manually Editing the SctServiceFilter.hda File................................................... 12-16
12.4.3.2 Setting Required DataBinder Fields to Call the Content Tracker Logging
Service ....................................................................................................................... 12-17
12.4.3.3 Calling the Content Tracker Logging Service from an Application ................ 12-18
12.4.3.4 Calling the Content Tracker Logging Service from Idoc Script........................ 12-18
12.4.4 Service Call Management and the User Interface...................................................... 12-18
12.4.4.1 Adding, Editing, or Deleting Service Entries ...................................................... 12-19
12.4.4.2 Adding, Editing, or Deleting Field Map ResultSets........................................... 12-19
12.5 Customizing Content Tracker.............................................................................................. 12-21
12.5.1 Activity Metrics SQL Queries ....................................................................................... 12-21
12.5.1.1 Customizing the Activity Metrics SQL Queries.................................................. 12-21
12.5.2 External Users and Content Item Tracking................................................................. 12-22
12.6 Web Beacon Functionality .................................................................................................... 12-22
12.6.1 Web Beacon Use Cases................................................................................................... 12-23
12.6.2 Web Beacon Overview................................................................................................... 12-23
12.6.3 Web Beacon Object ......................................................................................................... 12-24
12.6.4 Web Beacon References ................................................................................................. 12-25
12.6.4.1 Format Structure for URL References .................................................................. 12-25
12.6.4.2 Placement and Retrieval Scheme .......................................................................... 12-26
12.6.4.3 Data Capture and Storage ...................................................................................... 12-26
12.6.5 Reduction Processing for Web Beacon References ................................................... 12-27
12.6.6 Limitations and Guidelines........................................................................................... 12-27
12.6.6.1 Limitations................................................................................................................ 12-28
12.6.6.2 Guidelines................................................................................................................. 12-28
12.6.7 Examples of Web Beacon Embedding......................................................................... 12-29
12.6.7.1 Embedded HTML Example ................................................................................... 12-29
12.6.7.2 Embedded JavaScript Example ............................................................................. 12-30
12.6.7.3 Served JavaScript Example .................................................................................... 12-32
13 Customizing Content Categorizer
13.1 About Content Categorizer .................................................................................................... 13-1
13.2 Customizing Content Categorizer......................................................................................... 13-1
ix
14 Downloading Custom Components
14.1 About Downloading Custom Components ......................................................................... 14-1
14.2 Downloading a Component with the Advanced Component Manager ......................... 14-1
14.3 Downloading a Component from Oracle Technology Network...................................... 14-2
15 Creating Custom Components
15.1 About Creating Custom Components .................................................................................. 15-1
15.2 Creating Resources for a Component ................................................................................... 15-1
15.2.1 HTML Includes ................................................................................................................. 15-2
15.2.1.1 The Super Tag ............................................................................................................ 15-2
15.2.1.2 Editing an HTML Include Resource ....................................................................... 15-3
15.2.2 Dynamic Data Tables ....................................................................................................... 15-3
15.2.2.1 Specifying Table Formats ......................................................................................... 15-3
15.2.2.2 Editing a Dynamic Data Table Resource................................................................ 15-5
15.2.2.3 Specifying Table Properties...................................................................................... 15-5
15.2.2.3.1 Merge Properties ................................................................................................ 15-6
15.2.2.3.2 Assembly Properties .......................................................................................... 15-7
15.2.2.3.3 Sort Properties..................................................................................................... 15-8
15.2.2.3.4 Filter and Include Properties ............................................................................ 15-9
15.2.2.4 Using Dynamicdata Idoc Script Functions .......................................................... 15-10
15.2.3 String Resources.............................................................................................................. 15-10
15.2.3.1 String Parameters .................................................................................................... 15-12
15.2.3.2 Editing a String Resource ....................................................................................... 15-13
15.2.4 Dynamic Tables............................................................................................................... 15-13
15.2.4.1 Merge Rules for Dynamic Tables .......................................................................... 15-14
15.2.4.2 Editing a Dynamic Table Resource....................................................................... 15-14
15.2.5 Static Tables ..................................................................................................................... 15-14
15.2.5.1 Merge Rules for Static Tables................................................................................. 15-14
15.2.5.2 Editing a Static Table Resource ............................................................................. 15-14
15.2.6 Queries ............................................................................................................................. 15-14
15.2.6.1 Query Example ........................................................................................................ 15-15
15.2.6.2 Editing a Query Resource....................................................................................... 15-16
15.2.7 Services............................................................................................................................. 15-16
15.2.7.1 Service Example....................................................................................................... 15-19
15.2.7.1.1 Attributes........................................................................................................... 15-20
15.2.7.1.2 Actions ............................................................................................................... 15-21
15.2.7.2 Editing a Service Resource ..................................................................................... 15-24
15.2.8 Templates......................................................................................................................... 15-24
15.2.8.1 Template and Report Pages ................................................................................... 15-27
15.2.8.1.1 Template Page Example .................................................................................. 15-27
15.2.8.1.2 Report Page Example....................................................................................... 15-28
15.2.8.2 Editing a Template Resource ................................................................................. 15-30
15.2.9 Environment Resources................................................................................................. 15-31
15.2.9.1 Environment Resource Example........................................................................... 15-31
15.2.9.2 Editing an Environment Resource ........................................................................ 15-32
x
15.3 Creating a Component Definition File................................................................................ 15-32
15.4 Restarting Content Server to Apply a Component........................................................... 15-33
16 Installing Components
16.1 About Installing Components................................................................................................ 16-1
16.2 Packaging a Component for Installation.............................................................................. 16-2
16.3 Installing a Component with the Advanced Component Manager................................. 16-2
16.4 Installing a Component with the Component Wizard....................................................... 16-3
16.5 Installing a Component with the ComponentTool Utility................................................. 16-3
17 Uninstalling a Component
17.1 About Uninstalling a Component ......................................................................................... 17-1
17.2 How to Uninstall a Component............................................................................................. 17-1
Part V Integrating WebCenter Content into Your Environment
18 Getting Started with Integrating WebCenter Content into Your Environment
18.1 About Integration Methods.................................................................................................... 18-1
18.2 Overview of Web Services...................................................................................................... 18-2
18.3 Virtual Folders and WebDAV Integration........................................................................... 18-3
18.3.1 Virtual Folders................................................................................................................... 18-3
18.3.2 WebDAV Integration ....................................................................................................... 18-4
18.3.2.1 WebDAV Clients ....................................................................................................... 18-4
18.3.2.2 WebDAV Servers....................................................................................................... 18-4
18.3.2.3 WebDAV Architecture.............................................................................................. 18-5
19 Configuring WebCenter Content Web Services for Integration
19.1 About Configuring WebCenter Content Web Services for Integration........................... 19-1
19.1.1 WebCenter Content Web Services.................................................................................. 19-3
19.2 Configuring Web Service Security Through Web Service Policies................................... 19-4
19.2.1 Configuring WS-Security through WS-Policy.............................................................. 19-4
19.3 Configuring SAML Support................................................................................................... 19-5
19.3.1 Configuring a Keystore.................................................................................................... 19-5
19.3.2 Configuring JPS for WebCenter Content to Use the Keystore................................... 19-5
19.3.3 Creating a Client CSF....................................................................................................... 19-6
19.3.4 Configuring a Java Client to Use the Keystore and CSF............................................. 19-7
20 Integrating JavaServer Pages with Content Server
20.1 About JSP Integration.............................................................................................................. 20-1
20.1.1 JSP Execution..................................................................................................................... 20-1
20.1.2 Tomcat................................................................................................................................ 20-2
20.1.3 Features .............................................................................................................................. 20-2
20.2 Configuring JSP Support ........................................................................................................ 20-3
20.3 Loading Example Pages.......................................................................................................... 20-3
xi
21 Using the IdcCommand Utility to Access Content Server
21.1 About the IdcCommand Utility............................................................................................. 21-1
21.2 Setting Up IdcCommand ........................................................................................................ 21-2
21.2.1 Specifying a Command File ............................................................................................ 21-2
21.2.1.1 Command File Syntax............................................................................................... 21-2
21.2.1.2 Precedence .................................................................................................................. 21-3
21.2.1.3 Special Tags and Characters .................................................................................... 21-4
21.2.2 Specifying Configuration Options ................................................................................. 21-4
21.2.2.1 Command File............................................................................................................ 21-4
21.2.2.2 User.............................................................................................................................. 21-4
21.2.2.3 Log File........................................................................................................................ 21-5
21.2.2.4 Connection Mode ...................................................................................................... 21-5
21.3 Running IdcCommand............................................................................................................ 21-5
21.4 Using the Launcher.................................................................................................................. 21-6
21.4.1 Quotation Rules ................................................................................................................ 21-7
21.4.2 Computed Settings ........................................................................................................... 21-7
21.4.3 Launcher Environment Variables ................................................................................ 21-10
21.4.4 User Interface .................................................................................................................. 21-11
21.4.5 Configuring the Launcher ............................................................................................. 21-11
21.4.6 Configuration File Example .......................................................................................... 21-11
21.5 Calling Services Remotely .................................................................................................... 21-14
22 Using the COM API for Integration
22.1 About the COM API................................................................................................................ 22-1
22.2 Calling Content Server Services with the IntradocClient OCX component.................... 22-1
22.2.1 OCX Interface .................................................................................................................... 22-2
22.2.2 IdcClient OCX Description.............................................................................................. 22-2
22.2.2.1 OCX Events ................................................................................................................ 22-3
22.2.2.2 OCX Methods............................................................................................................. 22-3
22.2.2.3 OCX Properties .......................................................................................................... 22-3
22.2.2.4 IdcClient OCX Interface............................................................................................ 22-4
22.2.3 IdcClient OCX Control Setup.......................................................................................... 22-4
22.2.3.1 Setting Up the IdcClient OCX Component............................................................ 22-4
22.2.3.2 Creating a Visual Interface....................................................................................... 22-4
22.2.4 IdcClient Events.............................................................................................................. 22-13
22.2.4.1 IntradocBeforeDownload....................................................................................... 22-13
22.2.4.2 IntradocBrowserPost............................................................................................... 22-14
22.2.4.3 IntradocBrowserStateChange ................................................................................ 22-14
22.2.4.4 IntradocRequestProgress........................................................................................ 22-14
22.2.4.5 IntradocServerResponse......................................................................................... 22-14
22.2.5 IdcClient OCX Methods................................................................................................. 22-15
22.2.5.1 AboutBox .................................................................................................................. 22-16
22.2.5.2 Back............................................................................................................................ 22-16
22.2.5.3 CancelRequest.......................................................................................................... 22-16
22.2.5.4 DoCheckoutLatestRev ............................................................................................ 22-16
22.2.5.5 DownloadFile........................................................................................................... 22-17
xii
22.2.5.6 DownloadNativeFile............................................................................................... 22-17
22.2.5.7 Drag ........................................................................................................................... 22-18
22.2.5.8 EditDocInfoLatestRev............................................................................................. 22-18
22.2.5.9 Forward..................................................................................................................... 22-19
22.2.5.10 GoCheckinPage........................................................................................................ 22-19
22.2.5.11 Home ......................................................................................................................... 22-20
22.2.5.12 InitiateFileDownload .............................................................................................. 22-20
22.2.5.13 InitiatePostCommand ............................................................................................. 22-21
22.2.5.14 Move.......................................................................................................................... 22-21
22.2.5.15 Navigate.................................................................................................................... 22-21
22.2.5.16 NavigateCgiPage ..................................................................................................... 22-22
22.2.5.17 Refresh Browser....................................................................................................... 22-22
22.2.5.18 SendCommand ........................................................................................................ 22-22
22.2.5.19 SendPostCommand................................................................................................. 22-23
22.2.5.20 SetFocus .................................................................................................................... 22-23
22.2.5.21 ShowDMS ................................................................................................................. 22-23
22.2.5.22 ShowDocInfoLatestRev .......................................................................................... 22-24
22.2.5.23 ShowWhatsThis ....................................................................................................... 22-24
22.2.5.24 StartSearch ................................................................................................................ 22-24
22.2.5.25 Stop ............................................................................................................................ 22-24
22.2.5.26 UndoCheckout......................................................................................................... 22-25
22.2.5.27 ViewDocInfo............................................................................................................. 22-25
22.2.5.28 ViewDocInfoLatestRev........................................................................................... 22-25
22.2.5.29 ZOrder....................................................................................................................... 22-26
22.2.6 IdcClient Properties........................................................................................................ 22-26
22.2.6.1 ClientControlledContextValue.............................................................................. 22-26
22.2.6.2 HostCgiUrl ............................................................................................................... 22-27
22.2.6.3 Password................................................................................................................... 22-27
22.2.6.4 UseBrowserLoginPrompt....................................................................................... 22-27
22.2.6.5 UseProgressDialog .................................................................................................. 22-27
22.2.6.6 UserName................................................................................................................. 22-27
22.2.6.7 Working Directory................................................................................................... 22-27
22.3 Using the ODMA API to Access Content Server from a Desktop Application............ 22-28
22.3.1 ODMA Client .................................................................................................................. 22-28
22.3.2 ODMA Interfaces............................................................................................................ 22-28
23 Using RIDC to Access Content Server
23.1 About Remote Intradoc Client (RIDC) ................................................................................. 23-1
23.1.1 Using HttpClient Library Version 4............................................................................... 23-3
23.2 Initializing Connections.......................................................................................................... 23-4
23.3 Configuring Clients ................................................................................................................. 23-5
23.4 Authenticating Users............................................................................................................... 23-9
23.5 Using Services......................................................................................................................... 23-10
23.6 Understanding Connection Pooling.................................................................................... 23-11
23.7 Understanding Streams ........................................................................................................ 23-11
23.8 Understanding Binders......................................................................................................... 23-12
xiii
23.9 Understanding Convenience Classes.................................................................................. 23-13
23.9.1 Setting User Security ...................................................................................................... 23-13
23.9.2 Setting the ADF Connection Facade ............................................................................ 23-15
23.10 Understanding RIDC Filters................................................................................................. 23-17
23.11 Using the RIDC JDeveloper Extension ............................................................................... 23-18
23.11.1 Deploying the RIDC Extension..................................................................................... 23-18
23.11.2 Creating a New Application and Project with RIDC Technologies........................ 23-19
23.11.3 Working with Connections ........................................................................................... 23-20
23.11.4 Example Service Call...................................................................................................... 23-21
24 Using the Content Server JCR Adapter
24.1 About the Java Content Repository Adapter....................................................................... 24-1
24.1.1 JCR Data Model................................................................................................................. 24-2
24.1.2 JCR Adapter Data Model for Content Server .............................................................. 24-2
24.2 Installing Required APIs and Runtime Libraries................................................................ 24-4
24.2.1 Installing ADF Runtime Libraries.................................................................................. 24-4
24.2.2 Deploying Remote Intradoc Client (RIDC)................................................................... 24-4
24.2.3 Deploying the JCR API .................................................................................................... 24-4
24.2.4 Installing the JCR Integration Libraries......................................................................... 24-5
24.2.5 Installing the XML Integration Files .............................................................................. 24-5
24.3 Deploying the JCR Adapter.................................................................................................... 24-5
24.4 Configuring Communication with Content Server ............................................................ 24-5
24.4.1 Supplying a Communication Method ........................................................................... 24-6
24.4.2 Configuring Socket Communication (Listener Port)................................................... 24-6
24.4.3 Configuring Secure Socket Communication (SSL) ...................................................... 24-6
24.4.4 Configuring Web Communication (Web Server Filter).............................................. 24-7
24.4.5 Configuring the User Agent............................................................................................ 24-7
24.4.6 Supplying Cache Settings................................................................................................ 24-7
24.5 Finding Information About a Content Item......................................................................... 24-7
24.6 Using a Search Index ............................................................................................................... 24-9
24.7 Using the File Store Provider ................................................................................................. 24-9
25 Configuring Web Services with WSDL, SOAP, and the WSDL Generator
25.1 About Configuring Web Services with WSDL, SOAP, and the WSDL Generator......... 25-1
25.1.1 Web Services Framework ................................................................................................ 25-2
25.1.1.1 XML Data.................................................................................................................... 25-2
25.1.1.2 WSDL Interface.......................................................................................................... 25-2
25.1.1.3 SOAP Communication.............................................................................................. 25-3
25.1.1.4 UDDI Registry............................................................................................................ 25-3
25.1.1.5 DIME Message Format ............................................................................................. 25-3
25.1.1.6 How the Enabling Technologies Work Together.................................................. 25-3
25.1.1.7 Implementation Architecture .................................................................................. 25-4
25.1.1.8 Implementation on .NET.......................................................................................... 25-4
25.1.1.9 The SOAP Protocol.................................................................................................... 25-5
25.2 Accessing Content Server with a SOAP Client.................................................................... 25-5
25.2.1 Using a Java SOAP Client................................................................................................ 25-5
xiv
25.3 Calling Content Server Services with SOAP........................................................................ 25-6
25.3.1 SOAP Packet Format........................................................................................................ 25-6
25.3.1.1 HTTP Headers............................................................................................................ 25-6
25.3.1.2 Namespaces................................................................................................................ 25-6
25.3.1.3 Nodes........................................................................................................................... 25-7
25.3.1.3.1 Service Node ....................................................................................................... 25-7
25.3.1.3.2 Document Node ................................................................................................. 25-8
25.3.1.3.3 User Node............................................................................................................ 25-8
25.3.1.3.4 Optionlist Node .................................................................................................. 25-8
25.3.1.3.5 Option Subnode in an IDC Optionlist Node.................................................. 25-9
25.3.1.3.6 Resultset Subnode .............................................................................................. 25-9
25.3.1.3.7 Row Subnode ...................................................................................................... 25-9
25.3.1.3.8 Field Subnode ..................................................................................................... 25-9
25.3.2 Special Characters........................................................................................................... 25-10
25.3.3 Sample Service Calls with SOAP Response/Request ............................................... 25-11
25.3.3.1 Ping the Server......................................................................................................... 25-11
25.3.3.1.1 Required Parameters........................................................................................ 25-12
25.3.3.1.2 SOAP Request................................................................................................... 25-12
25.3.3.1.3 Response ............................................................................................................ 25-12
25.3.3.2 Add a New User ...................................................................................................... 25-12
25.3.3.2.1 Required Parameters........................................................................................ 25-13
25.3.3.2.2 Optional Parameters ........................................................................................ 25-13
25.3.3.2.3 Optional Attribute Information...................................................................... 25-13
25.3.3.2.4 SOAP Request................................................................................................... 25-14
25.3.3.2.5 Response ............................................................................................................ 25-14
25.3.3.3 Edit Existing User.................................................................................................... 25-15
25.3.3.3.1 Required Parameters........................................................................................ 25-16
25.3.3.3.2 Optional Parameters ........................................................................................ 25-16
25.3.3.3.3 Optional Attribute Information...................................................................... 25-16
25.3.3.3.4 SOAP Request................................................................................................... 25-17
25.3.3.3.5 Response ............................................................................................................ 25-17
25.3.3.4 Get User Information .............................................................................................. 25-18
25.3.3.4.1 Required Parameters........................................................................................ 25-18
25.3.3.4.2 SOAP Request................................................................................................... 25-18
25.3.3.4.3 Response ............................................................................................................ 25-19
25.3.3.5 Delete User ............................................................................................................... 25-20
25.3.3.5.1 Required Parameters........................................................................................ 25-20
25.3.3.5.2 SOAP Request................................................................................................... 25-20
25.3.3.5.3 Response ............................................................................................................ 25-20
25.3.3.6 Check In Content Item............................................................................................ 25-21
25.3.3.6.1 Required Parameters........................................................................................ 25-22
25.3.3.6.2 Additional Parameters..................................................................................... 25-22
25.3.3.6.3 Optional Parameters ........................................................................................ 25-23
25.3.3.6.4 SOAP Request................................................................................................... 25-23
25.3.3.6.5 Response ............................................................................................................ 25-24
xv
25.3.3.7 Check out Content Item.......................................................................................... 25-25
25.3.3.7.1 Required Parameters........................................................................................ 25-25
25.3.3.7.2 Optional Parameters ........................................................................................ 25-25
25.3.3.7.3 SOAP Request................................................................................................... 25-26
25.3.3.7.4 Response ............................................................................................................ 25-26
25.3.3.8 Undo Content Item Checkout................................................................................ 25-27
25.3.3.8.1 Required Parameters........................................................................................ 25-27
25.3.3.8.2 Optional Parameters ........................................................................................ 25-27
25.3.3.8.3 SOAP Request................................................................................................... 25-28
25.3.3.8.4 Response ............................................................................................................ 25-28
25.3.3.9 Get Content Item Information ............................................................................... 25-29
25.3.3.9.1 Required Parameters........................................................................................ 25-29
25.3.3.9.2 SOAP Request................................................................................................... 25-29
25.3.3.9.3 Response ............................................................................................................ 25-29
25.3.3.10 Get File ...................................................................................................................... 25-30
25.3.3.10.1 Required Parameters........................................................................................ 25-31
25.3.3.10.2 Optional Parameter.......................................................................................... 25-32
25.3.3.10.3 SOAP Request................................................................................................... 25-32
25.3.3.10.4 Response............................................................................................................ 25-32
25.3.3.11 Get Search Results ................................................................................................... 25-34
25.3.3.11.1 Required Parameters........................................................................................ 25-34
25.3.3.11.2 Optional Parameters ........................................................................................ 25-34
25.3.3.11.3 SOAP Request................................................................................................... 25-35
25.3.3.11.4 Response............................................................................................................ 25-35
25.3.3.12 Get Table Data.......................................................................................................... 25-37
25.3.3.12.1 Required Parameters........................................................................................ 25-37
25.3.3.12.2 SOAP Request................................................................................................... 25-37
25.3.3.12.3 Response............................................................................................................ 25-37
25.3.3.13 Get Criteria Workflow Information...................................................................... 25-38
25.3.3.13.1 Required Parameters........................................................................................ 25-38
25.3.3.13.2 SOAP Request................................................................................................... 25-39
25.3.3.13.3 Response............................................................................................................ 25-39
25.4 Using SOAP Packets in Active Server Pages ..................................................................... 25-40
25.4.1 Sample SOAP Request ................................................................................................... 25-40
25.4.2 Sample Active Server Page............................................................................................ 25-41
25.5 Generating WSDL Files to Access WebCenter Content................................................... 25-44
25.5.1 Understanding WSDL Files........................................................................................... 25-44
25.5.1.1 WSDL File Structure................................................................................................ 25-44
25.5.1.1.1 Data Type .......................................................................................................... 25-45
25.5.1.1.2 Message.............................................................................................................. 25-45
25.5.1.1.3 Port Type ........................................................................................................... 25-45
25.5.1.1.4 Binding............................................................................................................... 25-45
25.5.1.1.5 Service and Port................................................................................................ 25-46
25.5.2 Sample WSDL File.......................................................................................................... 25-46
25.5.3 Generating WSDL Files.................................................................................................. 25-49
25.5.4 Generating Proxy Class from WSDL Files .................................................................. 25-50
25.6 Customizing WSDL Files...................................................................................................... 25-50
xvi
26 Customizing the DesktopTag Component
26.1 About the DesktopTag Component ...................................................................................... 26-1
26.2 Enabling the DesktopTag and OracleCleanContent Components................................... 26-2
26.3 Checking Out and Checking In Content Items with DesktopTag.................................... 26-2
26.3.1 File Get Operation............................................................................................................. 26-2
26.3.2 File Check-In Operation................................................................................................... 26-2
26.4 Adding Properties to Checked-Out Content Items ............................................................ 26-3
26.4.1 Viewing Custom Properties ............................................................................................ 26-4
26.4.2 Checking In Documents from Outside Content Server .............................................. 26-5
26.5 Configuring the DesktopTag Component............................................................................ 26-6
26.5.1 DesktopTagFormats Property......................................................................................... 26-6
26.5.2 DesktopTagPrefix Property............................................................................................. 26-6
26.5.3 DesktopTagFields Property............................................................................................. 26-7
26.5.4 DesktopTagPrefixCustom Property............................................................................... 26-7
26.5.5 DesktopTagFieldsCustom Property............................................................................... 26-7
26.5.6 DesktopTagPrefixExtended Property............................................................................ 26-8
26.5.7 DesktopTagFieldsExtended Property............................................................................ 26-8
26.5.8 DefaultTaskPaneUrl Property......................................................................................... 26-8
26.5.9 DesktopTagLog Property ................................................................................................ 26-9
26.5.10 DesktopTagFormatsExclude Property .......................................................................... 26-9
Part VI Appendices
A Troubleshooting
A.1 About Troubleshooting Aids.................................................................................................... A-1
A.2 Viewing Server Errors............................................................................................................... A-1
A.3 Viewing Page Data .................................................................................................................... A-1
A.4 Monitoring Resource Loading ................................................................................................. A-2
Index

xvii
Preface
Oracle WebCenter Content Server is highly functional out of the box, but you can
tailor it to your site requirements in many different ways. This developer’s guide
provides information to help you customize your Content Server instance.
Audience
This guide is intended for developers and administrators who want to customize
Oracle WebCenter Content Server software to suit content management needs that are
specific to their business or organization.
Documentation Accessibility
For information about Oracle's commitment to accessibility, visit the Oracle
Accessibility Program website at
http://www.oracle.com/pls/topic/lookup?ctx=acc&id=docacc.
Access to Oracle Support
Oracle customers have access to electronic support through My Oracle Support. For
information, visit
http://www.oracle.com/pls/topic/lookup?ctx=acc&id=info or visit
http://www.oracle.com/pls/topic/lookup?ctx=acc&id=trs if you are
hearing impaired.
Related Documents
For more information, see the following Oracle WebCenter Content 11g Release 1
(11.1.1) documents, which are part of the Oracle Fusion Middleware documentation
set:
■Oracle WebCenter Content Application Administrator's Guide for Content Server
■Oracle WebCenter Content Idoc Script Reference Guide
■Oracle WebCenter Content Remote Intradoc Client (RIDC) Java API Reference
■Oracle WebCenter Content Services Reference Guide
■Oracle WebCenter Content System Administrator's Guide for Content Server

xviii
For additional information, also see the following Oracle Fusion Middleware 11g
Release 1 (11.1.1) documents:
■Oracle Fusion Middleware Fusion Developer's Guide for Oracle Application
Development Framework
■Oracle Fusion Middleware Getting Started With JAX-WS Web Services for Oracle
WebLogic Server
■Oracle Fusion Middleware Interoperability Guide for Oracle Web Services Manager
■Oracle Fusion Middleware Programming Advanced Features of JAX-WS Web Services for
Oracle WebLogic Server
■Oracle Fusion Middleware Security and Administrator's Guide for Web Services
■Oracle Fusion Middleware Third-Party Application Server Guide
Conventions
This document uses the following text conventions.
Convention Meaning
boldface Boldface type indicates graphical user interface elements associated
with an action, or terms defined in text or the glossary.
italic Italic type indicates book titles, emphasis, or placeholder variables for
which you supply particular values.
monospace Monospace type indicates commands within a paragraph, URLs, code
in examples, text that appears on the screen, or text that you enter.

xix
New and Changed Features
This section introduces the new and changed features of Oracle WebCenter Content
that are covered in this guide for Oracle WebCenter Content Server developers.
New Features for 11g Release 1 (11.1.1)
11g Release 1 (11.1.1) includes the following new features:
■This guide combines information that was previously contained in the following
documents:
–Dynamic Server Pages Guide
–Getting Started with the Stellent Developer’s Kit (SDK)
–Idc Command Reference Guide
–Modifying the Content Server Interface
–Oracle Fusion Middleware JCR Adapter Guide for Content Server
–Oracle Fusion Middleware Developer's Guide for Remote Intradoc Client (RIDC)
–Using WSDL Generator and SOAP
–Working with Components
■Web services
WebCenter Content uses Oracle WebLogic Server web services. For more
information, see Chapter 19, "Configuring WebCenter Content Web Services for
Integration."
■ComponentTool
The ComponentTool utility has been added to provide a command-line tool for
installing, enabling, and disabling components. For more information, see
Chapter 9, "Getting Started with Content Server Components."
■Oracle WebCenter Content Server deployment: Content Server is deployed with
WebCenter Content to an Oracle WebLogic Server domain, which means changes
in configuring and administering Content Server. For more information, see the
Oracle WebCenter Content System Administrator's Guide for Content Server.
xx
Changed Features for 11g Release 1 (11.1.1)
11g Release 1 (11.1.1) includes the following changes:
■Oracle WebCenter Content directories and files: WebCenter Content 11g Release 1
(11.1.1) is provided as part of a full media installation of Oracle WebCenter
Content, with the WebCenter Content directories and files. The directory structure
for a WebCenter Content 11g instance is different from an Oracle Universal
Content Management 10g instance. For a description of terms and path names that
are important for understanding and working with the WebCenter Content
structure, see Section 1.1.1.1, "Terminology for WebCenter Content Directories."
■SOAP: SOAP is provided with Oracle WebLogic Server, not in Oracle WebCenter
Content.
■Web Form Editor: The Web Form Editor user interface and FCKEditor are not
supported.
■CIS deprecated: Content Integration Suite (CIS) has been deprecated. Developers
and system integrators are directed to use Remote Intradoc Client (RIDC), which
provides a thin communication API for communication with Oracle WebCenter
Content Server. For details, see the Oracle WebCenter Content Remote Intradoc Client
(RIDC) Java API Reference. For more information, see Section 23, "Using RIDC to
Access Content Server."
■Oracle Enterprise Content Management Suite (Oracle ECM) is now part of the
Oracle WebCenter product stack to provide the most complete, open, and unified
enterprise content management platform. The Oracle WebCenter Content Server
software and documentation have been rebranded accordingly.

Part I
Part I Getting Started with Customizing Oracle
WebCenter Content Server
This part provides an overview of customizing Oracle WebCenter Content Server
customization and describes the tools and resources that are available for
customization. This part also describes the Oracle Fusion Order Demo sample
application.
Part I contains the following chapters:
■Chapter 1, "Introduction to Oracle WebCenter Content Server"
■Chapter 2, "Introduction to the Oracle Fusion Order Demo Sample Application"

1
Introduction to Oracle WebCenter Content Server 1-1
1Introduction to Oracle WebCenter Content
Server
This chapter provides an overview of Oracle WebCenter Content Server and describes
the tools you need and the resources available for customization.
This chapter includes the following sections:
■Section 1.1, "Overview of Content Server Architecture"
■Section 1.2, "Customization Types"
■Section 1.3, "Customization Planning"
■Section 1.4, "Recommended Skills and Tools for Customizing Content Server"
■Section 1.5, "Content Server Behavior"
For information about troubleshooting aids, see Appendix A, "Troubleshooting."
1.1 Overview of Content Server Architecture
Before beginning a customization project, you need to understand the architecture of
Content Server and how it works. To create a customization efficiently and effectively,
you should have an understanding of the Oracle WebCenter Content directories and
files, available resources, and Content Server behavior.
The web user interface for WebCenter Content, Content Server is deployed as an
application to an Oracle WebLogic Server domain. For information about how Content
Server works, see Section 1.5, "Content Server Behavior."
Content Server can also be deployed to an IBM WebSphere Application Server. For
more information, see "Managing Oracle WebCenter Content on IBM WebSphere" in
the Oracle Fusion Middleware Third-Party Application Server Guide.
1.1.1 WebCenter Content Directories and Files
When you create custom components or dynamic server pages, you work primarily
with WebCenter Content files in these directories:
■bin
■config
■components
■resources
■weblayout

Overview of Content Server Architecture
1-2 Oracle WebCenter Content Developer's Guide for Content Server
1.1.1.1 Terminology for WebCenter Content Directories
Oracle WebCenter Content documentation uses the following terms when referring to
variables in the directories associated with the Oracle WebCenter Content installation,
configuration, and deployment:
■IdcHomeDir: This variable refers to the ucm/idc directory in the WebCenter
Content Oracle home, where the WebCenter Content server media is located. The
server media can run Oracle WebCenter Content Server, Oracle WebCenter
Content: Inbound Refinery, or Oracle WebCenter Content: Records. This is
essentially a read-only directory. The default location is WC_CONTENT_ORACLE_
HOME/ucm/idc. The variable portion of the default location can be changed, but
the path cannot be changed from ucm/idc.
■DomainHome: The user-specified directory where an Oracle WebCenter Content
application is deployed to run on an application server. The
DomainHome/ucm/short-product-id/bin directory contains the
intradoc.cfg file and executables. The default location for DomainHome is MW_
HOME/user_projects/domains/base_domain, but you can change the path
and domain name (base_domain) during the deployment of an Oracle
WebCenter Content application to an application server.
■short-product-id: An abbreviated name for the type of Oracle WebCenter
Content application deployed to an application server. This name is used as the
context root (default HttpRelativeWebRoot configuration value). Possible
values follow:
■cs (Content Server)
■ibr (Inbound Refinery)
■urm (Records)
■IntradocDir: The root directory for configuration and data files specific to a
Content Server instance that is part of an Oracle WebCenter Content application
deployed to an application server. This Idoc Script variable is configured for one
type of Content Server instance: Content Server (cs), Inbound Refinery (ibr), or
Records (urm). The default location of IntradocDir is
DomainHome/ucm/short-product-id, but the IntradocDir directory can be
located elsewhere (as defined in the intradoc.cfg file). The specified
directory must be an absolute path to the instance directory and must be unique to
a particular server or node. The directory files include startup files
(intradoc.cfg and executables).
1.1.1.2 The bin Directory
The bin directory is the root directory for Content Server startup files. It contains the
intradoc.cfg file and the executable files that run Content Server services, applets,
and utilities. It is located at DomainHome/ucm/short-product-id/bin, in which
short-product-id specifies whether it is for Content Server (cs), Inbound Refinery
(ibr), or Records (urm). Table 1–1 describes the contents of the bin directory.
Caution: Modifying the default variables in these files can cause
WebCenter Content to malfunction. For more information about
configuration variables, see the Oracle WebCenter Content Idoc Script
Reference Guide.

Overview of Content Server Architecture
Introduction to Oracle WebCenter Content Server 1-3
The intradoc.cfg file is used to define system variables for Content Server,
including directory, Internet, and Inbound Refinery settings. Several of these variables
can be set using the WebCenter Content System Properties utility. Example 1–1 shows
a typical intradoc.cfg file.
Example 1–1 intradoc.cfg File
<?cfg jcharset="Cp1252"?>
#Content Server Directory Variables
IntradocDir=C:/oracle/idcm1/
WebBrowserPath=C:/Program Files/Internet Explorer/iexplore.exe
CLASSPATH=$COMPUTEDCLASSPATH;$SHAREDDIR/classes/jtds.jar
#Additional Variables
HTMLEditorPath=C:/Program Files/Windows XP/Accessories/wordpad.exe
JAVA_SERVICE_EXTRA_OPTIONS=-Xrs
1.1.1.3 The config Directory
The config directory is located at IntradocDir/config. The default location of
IntradocDir is DomainHome/ucm/short-product-id, but the IntradocDir
directory can be located elsewhere (as defined in the intradoc.cfg file).
Table 1–2 describes the contents of the config directory.
Table 1–1 Contents of the bin Directory for Startup Files
Element Description
Executables Services
■IdcServer
■IdcServerNT
Applet
■IntradocApp (launches all Admin tools)
Utilities
■BatchLoader
■Installer
■IdcAnalyze
■ComponentWizard
■SystemProperties
■IdcCommand
intradoc.cfg file Configuration file that contains the settings for Content Server
services, applets, and utilities
Note: If Content Server is set up as an automatic service and you
attempt to start a Content Server service (IdcServer or
IdcServerNT) from the command line, you will receive an error
message: The port could not be listened to and is
already is use.
Table 1–2 Contents of the config Directory
File Description
config.cfg Defines system configuration variables.

Overview of Content Server Architecture
1-4 Oracle WebCenter Content Developer's Guide for Content Server
The config.cfg file is used to define global variables for the Content Server system.
Several of these variables can be set using the WebCenter Content System Properties
utility or by modifying the variables on the Admin Server General Configuration page.
Example 1–2 shows a typical config.cfg file.
Example 1–2 config.cfg File
<?cfg jcharset="Cp1252"?>
#Content Server System Properties
IDC_Name=idcm1
SystemLocale=English-US
InstanceMenuLabel=JeanWTestSystem
InstanceDescription=idcm1
SocketHostAddressSecurityFilter=127.0.0.1|10.10.1.14
#Database Variables
IsJdbc=true
JdbcDriver=com.internetcds.jdbc.tds.Driver
JdbcConnectionString=jdbc:freetds:sqlserver://jwilsonnote:1433/oracle1;charset=UTF
8;TDS=7.0
JdbcUser=sa
JdbcPassword=UADle/+jRz7Fi8D/VzTDaGUCwUaQgQjKOQQEtI0PAqA=
JdbcPasswordEncoding=Intradoc
DatabasePreserveCase=0
#Internet Variables
HttpServerAddress=jwilsonnote
MailServer=mail.example.com
SysAdminAddress=sysadmin@example.com
SmtpPort=25
HttpRelativeWebRoot=/oracle/
CgiFileName=idcplg
UseSSL=No
WebProxyAdminServer=true
NtlmSecurityEnabled=No
UseNtlm=Yes
#General Option Variables
EnableDocumentHighlight=true
EnterpriseSearchAsDefault=0
IsDynamicConverterEnabled=0
IsJspServerEnabled=0
JspEnabledGroups=
#IdcRefinery Variables
#Additional Variables
WebServer=iis
UseAccounts=true
IdcAdminServerPort=4440
SearchIndexerEngineName=DATABASE
VIPApproval:isRepromptLogin=true
Vdk4AppSignature=SF37-432B-222T-EE65-DKST
Vdk4AppName=INTRANET INTEGRATION GROUP
IntradocServerPort=4444

Overview of Content Server Architecture
Introduction to Oracle WebCenter Content Server 1-5
1.1.1.4 The components Directory
The IntradocDir/data/components directory contains the files that Content
Server uses to configure system components. Table 1–3 describes the contents of the
components directory.
Example 1–3 shows a component.hda file that defines the configuration status for a
component called help.
Example 1–3 component.hda File
<?hda version="11.1.1.2.0-dev idcprod1 (091209T125156)" jcharset=UTF8
encoding=utf-8?>
@Properties LocalData
blDateFormat=M/d{/yy} {h:mm[:ss] {aa}[zzz]}!tAmerica/Chicago!mAM,PM
@end
@ResultSet Components
2
name
location
help
components/help/help.hda
@end
1.1.1.5 The resources Directory
The IdcHomeDir/resources directory contains two directories: admin and core.
The resources/core directory contains files that Content Server uses to assemble
web pages. Table 1–4 describes the subdirectories of the resources/core directory.
Table 1–3 Contents of the data/components Directory
File Description
idcshort-product-id_
components.hda
Identifies components that have been added to the Content
Server system and whether they are enabled or disabled.
Example: idccs_components.hda.
component.hda Identifies the configuration status for a component.
Table 1–4 Contents of the resources/core Directory
Subdirectory Description
config Holds base configuration files for Content Server.
idoc Holds IdocScript dynamichtml and dynamicdata definitions.
install Holds files that are used by the installer and related
applications.
javascript Holds files that are processed by the publishing engine and end
up in the weblayout directory as raw JavaScript files.
jspserver Holds jspserver XML files.
lang Holds localized string definitions for Content Server.
reports Holds templates for Content Server reports.
resources Holds resource definitions (queries, page resources, services,
and other resource data) for Content Server.
tables Holds IdocScript resource table definitions.
templates Holds templates for all Content Server pages (except reports).

Overview of Content Server Architecture
1-6 Oracle WebCenter Content Developer's Guide for Content Server
Table 1–5 describes the subdirectories of the resources/admin directory.
1.1.1.6 The weblayout Directory
The DomainHome/ucm/short-product-id/weblayout directory contains the
files that are available to the web server for display on the various pages of the
Content Server web site. Table 1–6 describes the subdirectories of the weblayout
directory.
1.1.2 Resources
Resources are files that define and implement the actual customization you make to
Content Server. They can be pieces of HTML code, dynamic page elements, queries
that gather data from the database, services that perform Content Server actions, or
special code to conditionally format information.
Resources are a critical part of the Content Server software, so you must be familiar
with them before you attempt to create a custom component or dynamic server page.
You can create, edit, or remove a resource file by using the Component Wizard. You
also can use the Component Wizard as a starting point for creating custom resources.
Resources fall into distinct categories, which table describes. The first five types listed
in the table are also called resource-type resources. Table 1–7 describes these resource
types.
Table 1–5 Contents of the resources/admin Directory
Subdirectory Description
idoc Holds IdocScript dynamichtml and dynamicdata definitions.
tables Holds IdocScript resource table definitions.
templates Holds templates for all Content Server pages (except reports).
Table 1–6 Contents of the weblayout Directory
Subdirectory Description
groups Holds the web-viewable content items and dynamic server
pages.
images Holds images, such as icons and home page graphics.
resources Holds layouts, skins, and schema information.

Customization Types
Introduction to Oracle WebCenter Content Server 1-7
1.2 Customization Types
Three major types of alterations can be made to Content Server:
■Altering the look and feel of the product
You can customize the look and feel of the Content Server interface to meet your
organization's specifications. Interface modifications can be as simple as replacing
the icons that appear on the standard Content Server web pages or as complex as a
complete redesign of the interface.
■Modifying the functionality of the product
By changing how the product functions, you can tailor Content Server to the way
your business or organization functions. For example, you can change the default
date and time stamp, or change aspects of check-in behavior.
■Integrating the product into your environment
You can use shell scripts, SOAP, J2EE, JSP, and clusters to more fully integrate
Content Server into your site's current environment.
Table 1–7 Resource Types
Resource Type Description Example of Standard Resource
HTML Include Defines pieces of HTML markup
and Idoc Script code that are used
on multiple Content Server web
pages.
IdcHomeDir/resources/core/idoc/std_
page.idoc
Dynamic Data
Table Defines a table of data in a
dynamicdata include from within
IdocScript to load an HTML table
definition, interface menu actions,
or information about metadata
fields or from within Java code as
an alternative to static tables loaded
into SharedObjects.
IdcHomeDir/resources/core/idoc/std_
data.idoc
String Defines localized strings for the
user interface and error messages.
IdcHomeDir/resources/core/lang/cs_
strings.htm
Dynamic Table
(HDA format) Provides dynamic (frequently
changed) content in table format to
Content Server.
IdcHomeDir/resources/core/templates/templat
es.hda
Static Table
(HTML format) Provides static (seldom changed)
content in table format to Content
Server.
IdcHomeDir/resources/core/tables/std_
locale.htm
Query Defines database queries. IdcHomeDir/resources/core/tables/query.htm
Service Defines scripts for services that can
be performed by Content Server.
IdcHomeDir/resources/core/tables/std_
services.htm
Template Defines templates, which contain
the code that Content Server uses to
assemble a particular web page.
IdcHomeDir/resources/core/templates/checkin
_new.htm
Environment Defines configuration settings for
Content Server.
IntradocDir/config/config.cfg

Customization Planning
1-8 Oracle WebCenter Content Developer's Guide for Content Server
1.3 Customization Planning
Before approaching customization, it is important to clarify exactly why the
customization is being undertaken. For example, to add corporate branding, you can
use the Modify Layout Samples to do so. Or to change security features, you can use
components to modify the default security settings.
Customization often occurs to make Content Server match the business practices of an
organization. Often, after evaluating your business processes, you may find that
sometimes it is more efficient to slightly alter your procedures before customizing
Content Server.
There are six major stages in customization:
1. Determine why you want to customize.
Is there corporate personalization to be done? Is there a better way to present
navigation options or material? Depending on what type of need you find, you
can determine which tools are best to use.
Oftentimes the cosmetic details that you change are the ones that can most satisfy
your users; changing items such as layout, colors, and images often provide the
effect that users are looking for.
2. Plan the customization carefully.
Take into account those aspects of the Content Server environment that might be
changed even peripherally by the customization. All customization should be
done in a test environment, separate from the site's production environment.
3. Check to see if a solution may be available.
The samples on the Support web site contain many types of customizations. You
might be able to use an existing component with just a little editing. A number of
samples are provided on an as-is basis. These are components or files that
demonstrate, enhance, or extend the functionality of WebCenter Content.
4. Evaluate the problem and how essential it is to solve.
Some problems might require more effort to fix than the resulting payback.
Perhaps customization is not needed, but simply a minor change in business
practices.
5. Test the customization thoroughly in a separate environment.
If possible, have end users assist with the testing. When the testing has passed all
criteria for release, inform users about the changes and how to implement them.
6. Document the customization that you create.
All alterations should be documented as completely as possible, both within the
actual customization (for example, as a comment in a dynamic server page or in a
component) and as a separate README document. This documentation provides a
historical audit trail for others who might need to add to the customization later.

Recommended Skills and Tools for Customizing Content Server
Introduction to Oracle WebCenter Content Server 1-9
1.4 Recommended Skills and Tools for Customizing Content Server
Content Server brings together a wide variety of technologies to deliver advanced
functionality. To modify Content Server, certain experience and skills with some or all
of these technologies are required.
The technical skills required to customize Content Server can vary depending on the
complexity of the customization. For example, much customization can be
accomplished with knowledge of HTML and Idoc Script.
This list describes, in descending order of importance, the technologies and experience
you might need to modify Content Server:
■Content Server architecture
You should thoroughly understand how Content Server works and how
components and dynamic server pages function before you begin customizing
your system.
■HTML and cascading style sheets (CSS)
You will need a good understanding of HTML and CSS to make changes to the
Content Server web page templates. The templates are not complex in their use of
HTML, but they make constant use of HTML tables and frequent use of forms. The
std_page.idoc and std_css.idoc files include cascading style sheets to
control the look and feel of the default templates, including fonts and layouts.
■Idoc Script
Idoc Script is the custom, server-side scripting language for Content Server.
Almost every Content Server web page includes some Idoc Script code, which
provides the methods for processing various page elements.
■JavaScript
The internal content of most Content Server pages do not use JavaScript, but the
Search, Check-In, and Update pages are notable exceptions. You must have an
understanding of JavaScript before you create a customization that is called in
place of these pages. Also, you must understand JavaScript to alter layouts.
Changing layouts relies heavily on JavaScript and cascading style sheets for design
and navigation.
■Structured Query Language (SQL)
Content Server uses SQL to perform queries on the database. Knowledge of SQL
can help you understand the standard queries and create your own custom
queries.
■Java programming
Content Server is implemented with Java classes. You should have a thorough
understanding of Java and the Content Server Java class files before attempting to
make any changes to the underlying functionality. However, you can customize
the product extensively without working with Java.
■Other programming
Experience with other tools, such as Visual Basic, COM, .Net, C++, or VBScript,
might be helpful if you are doing complex customization or integrating
WebCenter Content with other systems.
Content Server Behavior
1-10 Oracle WebCenter Content Developer's Guide for Content Server
You may find the following tools useful when customizing Content Server:
■Text editor
Most product customizing can be done with a normal text editor, such as
Microsoft WordPad or vi.
■HTML editor
If you prefer to use a graphical HTML editor to work with HTML pages, use a
nongraphical mode for editing.
■Multiple browsers
You should test customization on multiple versions of any web browsers that
might be used to interface with the content management system. Internet Explorer,
Firefox, and Chrome do not display content in the same manner, and different
versions of the same browser may exhibit different behaviors.
■JavaScript debugger
A JavaScript debugger can ease the task of JavaScript development. A number of
JavaScript debuggers are available for download from the Internet.
■Integrated Development Environment (IDE) for Java
If your customization requires the development of Java code, you need an
appropriate Java development environment.
1.5 Content Server Behavior
Before you customize WebCenter Content, you need to understand the behavior of
Oracle WebCenter Content Server:
■Startup behavior
■Resource caching
■Page assembly
■Database interaction
■Localized string resolution
■Application integrations
For an overview of Content Server, see "Introduction to Content Server
Administration" in the Oracle WebCenter Content System Administrator's Guide for
Content Server.
Caution: Graphical HTML editor programs often change the source
HTML, which can cause Idoc Script tags to be converted into strings
of characters that are no longer recognized by Content Server. If you
use a graphical editor, make sure you edit in a nongraphical mode.
Content Server Behavior
Introduction to Oracle WebCenter Content Server 1-11
1.5.1 Startup Behavior
During startup, a Content Server instance performs internal initialization and loads
these items:
1. Configuration variables
2. Standard templates, resources, and reports
3. Custom components, including templates, resources, configuration variables, and
reports
Figure 1–1 illustrates the four steps that Content Server goes through during startup.
Section 1.5.1.1, "Startup Steps," describes each step in more detail.
Figure 1–1 Content Server Startup Behavior
1.5.1.1 Startup Steps
During startup, Content Server goes through these steps:
1. Internal initialization occurs.
When Content Server initializes internally, the Java class files from Content Server
are read and the Java Virtual Machine (JVM) is invoked. Any variables in the
DomainHome/ucm/short-product-id/intradoc.cfg file are initialized as
well.
2. Configuration variables load.
After initialization, Content Server loads the config.cfg file from the
IntradocDir/config directory. This file stores the system properties and
configuration variables, which are defined by name/value pairs (such as
SystemLocale=English-US).

Content Server Behavior
1-12 Oracle WebCenter Content Developer's Guide for Content Server
The default information contained within the configuration file was supplied
during the Oracle WebCenter Content installation process, but you can modify this
file in several ways:
■Use the Admin Server General Configuration page, accessible from the
Administration menu
■Run the SystemProperties executable, located in the bin directory of the
Oracle WebCenter Content installation (UNIX operating system)
■Edit the configuration files directly
■Use a custom component
Any time changes are made to the config.cfg file, you must restart Content
Server for the changes to take effect.
3. Standard resources, templates, and reports load.
For Content Server to function properly, many standard resources, templates, and
reports must be loaded. After the configuration settings have been loaded, Content
Server reads the entries in the
IdcHomeDir/resources/core/templates/templates.hda file and the
IdcHomeDir/resources/core/reports/reports.hda file. These files tell
Content Server which templates to load, which in turn loads any standard
resources referenced in the template and report pages.
4. Custom components load.
Content Server loads all of the components listed in
IntradocDir/data/components/idcshort_product_id_
components.hda, and in turn that loads system components out of
IdcHomeDir/components/ComponentName/ComponentName.hda or, for
custom components, out of
IntradocDir/custom/ComponentName/ComponentName.hda.
1.5.1.2 Effects of Configuration Loading
It is important to understand the effect of the load order for the different configuration
files because if a variable is set in more than one file, the last variable loaded takes
precedence. For example, the IntradocDir/config/config.cfg file is loaded
before the IntradocDir/data/components/component_name/config.cfg file,
so the component_name/config.cfg can change the value of a variable that was
set by the config/config.cfg file.
Files are loaded in this order (not all files exist for each component):
1. DomainHome/ucm/short-product-id/bin/intradoc.cfg
2. IntradocDir/config/config.cfg
3. DomainHome/ucm/short-product-id/custom/component_name/*_
environment.cfg
Some components might not have this file, or it might be named
environment.cfg.
4. IntradocDir/data/components/component_name/install.cfg
5. IntradocDir/data/components/component_name/config.cfg
6. DomainHome/ucm/short-product-id/bin/intradoc.cfg
This file is reread at the end of startup to allow overrides to other settings.

Content Server Behavior
Introduction to Oracle WebCenter Content Server 1-13
If, for example, the same variable was set in each of the files in the list, the variable’s
value in intradoc.cfg would take precedence because this file was loaded last.
To view the configuration, you can use the GET_SYSTEM_AUDIT_INFO service to
show all configuration entries and where they were set.
To change a component variable, you can use the Update Component Configuration
area in the Advanced Component Manager. This area displays a dropdown list of
components that have editable configurations in the component_name/config.cfg
file. You can choose a component and click Update to get to the Update Component
Configuration page in Content Server.
You can also edit the configuration file manually. If a component is not displayed in
the Update Component Configuration list in the Advanced Component Manager, you
can make your changes directly in one of the configuration files.
1.5.2 Resource Caching
Content Server handles caching for template pages and resources as follows:
■When Content Server loads template pages and resources, they are cached in
memory to accelerate page presentation.
■If you change a template page, report page, or HTML include resource, or you
check in a revision to a dynamic server page, your changes go into effect
immediately.
The next request for the associated web page or refresh of the page reflects the
changes, and the new information is cached. This occurs because pages are
assembled dynamically for each page request. You can disable this behavior to
improve performance by setting the configuration variable
DisableSharedCacheChecking.
■If you change any other component file (including services, queries, environment
variables, tables, the idcshort-product-id_components.hda file, and the
template.hda file), you must restart Content Server before the changes go into
effect. Such changes could cause Content Server to malfunction if they were
implemented immediately.
You do not need to restart Content Server after changing strings; however, you
must republish the ww_strings.js files by clicking publish string and dynamic
files or publish string, static, and dynamic files in the Weblayout Publishing area
of the Admin Actions page. For more information, see Chapter 9, "Getting Started
with Content Server Components."
1.5.3 Page Assembly
Content Server uses the following information from the files in the
IdcHomeDir/resources directory to assemble dynamic web pages:
■The structure and format of a web page
This structure and format are defined by a particular HTML template file. The
template files are primarily in the resources/core/templates directory, and
some templates are in the resources/core/reports and
resources/admin/templates directories.
■The templates reference resources
These resources are located in .htm and .idoc files in subdirectories of the
resources directory. Resources can include HTML and Idoc Script markup,

Content Server Behavior
1-14 Oracle WebCenter Content Developer's Guide for Content Server
localized strings, queries to gather information from the database, and special
code to conditionally format the information.
As a rule, each web page includes the following resources:
■Standard page header
■Standard page beginning
■Standard page ending
Because all of the Content Server resources are cached in memory at startup, Content
Server has a definition for the standard pieces that appear on the page. Content Server
then combines the standard resources with the unique resources specified in the
template to create the web page.
For dynamic server pages, the template page and custom resource files are checked
into Content Server. When one of these pages is requested by a web browser, Content
Server recognizes the file extension as a dynamic server page, which enables special
processing. At that point, the page assembly process is the essentially the same as the
standard process, except that the page can use both the standard resources in the
resources directory and the custom resources that are checked in to Content Server.
1.5.4 Database Interaction
Some databases, such as Oracle Database, return all column names in uppercase
characters. Therefore, when Content Server receives query results from these
databases, column names must be mapped from the uppercase characters to the values
used in Content Server.
Because of this case mapping issue, custom components created for a Content Server
instance using one database might not work correctly on a Content Server instance
using a different database.
To map column names, the IdcHomeDir/resources/core/resources/upper_
clmns_map.htm file contains a mapping table named ColumnTranslation. Add
the query values to this file when you create a component that accesses fields that are
not WebCenter Content database fields (for example, if you create a component that
accesses a custom table within the WebCenter Content database).
For information about using the upper_clmns_map.htm file, see Section 5,
"Changing System Settings."
1.5.5 Localized String Resolution
Localized strings are the means by which the user interface and error messages are
presented in the language specified by the user's locale. Content Server loads the
string resource files for a base language and also loads resource files for every
supported language. Instead of presenting hard-coded text, the template pages,
applets, and error messages reference string IDs in these resource files, which are then
resolved using the ExecutionContext that contains the locale information for the user.
1.5.6 Application Integrations
Content Server not only serves as a content management solution for content-centric
web sites, but also provides a scalable content management infrastructure that
supports multiple enterprise applications in many diverse environments and
platforms. The integration solutions enable other enterprise applications to access
content managed by the content management system and provides these applications
with critical content management capabilities such as full-text and metadata searching,

Content Server Behavior
Introduction to Oracle WebCenter Content Server 1-15
library services, workflow, subscription notifications, and content conversion
capabilities through a wide array of integration methods.
For information about integrating Content Server with enterprise applications, see
Section 18, "Getting Started with Integrating WebCenter Content into Your
Environment."

Content Server Behavior
1-16 Oracle WebCenter Content Developer's Guide for Content Server

2
Introduction to the Oracle Fusion Order Demo Sample Application 2-1
2Introduction to the Oracle Fusion Order
Demo Sample Application
This chapter describes the Oracle Fusion Order Demo sample application, how to set it
up, and how to run the Suppliers Module.
This chapter includes the following sections:
■Section 2.1, "About Fusion Order Demo and the Suppliers Module"
■Section 2.2, "Setting Up the Fusion Order Demo Application"
■Section 2.3, "Running the Suppliers Module"
The instructions in this chapter are for setting up and running the sample application
on Oracle WebLogic Server. Content Server can also be deployed to an IBM WebSphere
Application Server. For more information, see "Managing Oracle WebCenter Content
on IBM WebSphere" in the Oracle Fusion Middleware Third-Party Application Server
Guide.
2.1 About Fusion Order Demo and the Suppliers Module
In the Oracle Fusion Order Demo sample application, electronic devices are sold
through a storefront web application. Customers can visit the web site, register, and
place orders for products.
To view and run the demo, you need to install Oracle JDeveloper 11g. Then you need
to download the application for the demonstration. For instructions to complete these
tasks, see Section 2.2, "Setting Up the Fusion Order Demo Application."
After the application is installed and running, you can view the code using Oracle
JDeveloper. You can view the application at runtime by logging in as an existing
customer and placing an order.
The Suppliers module of Fusion Order Demo demonstrates the use of Java EE to create
web applications for a web supplier management system. The demonstration
application is used to illustrate points and provide code samples.
The Suppliers module consists of a business services project named Model and a web
user interface project named ViewController. You run the Suppliers module of the
Fusion Order Demo application in JDeveloper by running the ViewController
project. The ViewController project uses JavaServer Faces (JSF) as the view
technology, and the project relies on the ADF Model layer to interact with the EJBs in
the Model project. To learn more about the Suppliers module and to understand its
implementation details, see Section 2.3.1, "Suppliers Module Code" and Section 2.3.2,
"Suppliers Module Pages."
Setting Up the Fusion Order Demo Application
2-2 Oracle WebCenter Content Developer's Guide for Content Server
2.2 Setting Up the Fusion Order Demo Application
The Fusion Order Demo application runs using an Oracle database and Oracle
JDeveloper 11g. The platforms supported are the same as those supported by
JDeveloper.
To set up the Fusion Order Demo application:
1. Install Oracle JDeveloper 11g and meet the installation prerequisites. The Fusion
Order Demo application requires an existing Oracle database.
2. Install the Fusion Order Demo application from the Oracle Technology Network.
3. Install Mozilla FireFox, version 2.0 or higher, or Internet Explorer, version 7.0 or
higher.
4. Run the application on a monitor that supports a screen resolution of 1024 X 768 or
higher.
For more information, see "Setting Up the Fusion Order Demo Application" in the
Oracle Fusion Middleware Fusion Developer's Guide for Oracle Application Development
Framework.
2.3 Running the Suppliers Module
To run the Suppliers module of the Fusion Order Demo application:
1. Download and install the Fusion Order Demo application as described in "Setting
Up the Fusion Order Demo Application" in the Oracle Fusion Middleware Fusion
Developer's Guide for Oracle Application Development Framework.
2. Open the application in Oracle JDeveloper:
a. From the JDeveloper main menu, choose Open from the File menu.
b. Navigate to the location to which you extracted the demo ZIP file, select the
SupplierModule_2.0.jws application workspace from the SupplierModule
directory, and click Open.
Figure 2–1 shows the Application Navigator after you open the file for the
application workspace. For a description of each of the projects in the
workspace, see Section 2.3.1, "Suppliers Module Code."
Figure 2–1 The Suppliers Module Projects in Oracle JDeveloper

Running the Suppliers Module
Introduction to the Oracle Fusion Order Demo Sample Application 2-3
3. In the Application Navigator, click the Application Resources accordion title to
expand the panel.
4. In the Application Resources panel, expand the Connections and Database nodes.
5. Right-click FOD connection and choose Properties.
6. In the Edit Database Connection dialog, modify the connection information shown
in Table 2–1 for your environment.
Do not modify the user name and password fod/fusion. These must remain
unchanged. Click OK.
7. In the Application Navigator, right-click Model and choose Rebuild.
8. In the Application Navigator, right-click ViewController and choose Run.
The login.jspx page is displayed. Because of the way security is configured in
this module, you must first log in.
9. Enter SHEMANT for User Name and welcome1 for Password.
Once you log in, the browse page appears, which allows you to search for products.
Once you select a product in the results table, you can edit or remove the product
information. Using the command links at the top of the page, you can edit the
corresponding supplier’s information, or add a new supplier. For more information
about the Suppliers module at runtime, see Section 2.3.2, "Suppliers Module Pages."
2.3.1 Suppliers Module Code
Once you have opened the projects in Oracle JDeveloper, you can then begin to review
the artifacts within each project. The Model project contains the Java classes and
metadata files that allow the data to be displayed in the web application. The
oracle.fodemo.common project contains components used by multiple classes in
the application. The oracle.fodemo.supplier project contains the components
used to access the supplier data. Figure 2–2 shows the Model project and its associated
directories.
Table 2–1 Connection Properties Required to Run the Fusion Order Demo Application
Property Description
Host Name The host name for your database. For example:
localhost
JDBC Port The port for your database. For example:
1521
SID The SID of your database. For example:
ORCL or XE
Running the Suppliers Module
2-4 Oracle WebCenter Content Developer's Guide for Content Server
Figure 2–2 The Model Project in JDeveloper
The ViewController project contains the files for the web interface, including the
backing beans, deployment files, and JSPX files. The Application Sources node
contains the code used by the web client, including the managed and backing beans,
property files used for internationalization, and the metadata used by Oracle ADF to
display bound data. The Web Content node contains web files, including the JSP files,
images, skin files, deployment descriptors, and libraries. Figure 2–3 shows the
ViewController project and its associated directories.
Running the Suppliers Module
Introduction to the Oracle Fusion Order Demo Sample Application 2-5
Figure 2–3 The ViewController Project in JDeveloper
2.3.2 Suppliers Module Pages
The Supplier module contains eight main pages that enable a user to perform these
tasks:
■Search for products: The browse.jspx page enables a user to search for products.
Search results are displayed in a table. Figure 2–4 shows the search form on the
browse page.
Figure 2–4 Search Form in Supplier Module
Running the Suppliers Module
2-6 Oracle WebCenter Content Developer's Guide for Content Server
■Edit row data in a table: From the table on the browse.jspx page, a user can
select a product and choose Update to navigate to the productInfo.jspx page
(clicking the product link also navigates to this page). From the table, a user can
also click Remove, which launches a popup that allows the removal of the selected
product. Figure 2–5 shows the table on the browse page.
Figure 2–5 Table on the browse Page
■Edit row data in a form: From the productInfo.jspx page, a user can change
the data for a row. A selection list contains valid values for the product status. The
Choose File button enables a user to upload a graphic file, which is then displayed
below the form. Figure 2–6 shows a productInfo.jspx page.
Figure 2–6 Product Details Page
■The Add Supplier link takes the user to a series of pages contained within the
regisrationDetails.jspx page that are used to create a new supplier, as
shown in Figure 2–7.
Running the Suppliers Module
Introduction to the Oracle Fusion Order Demo Sample Application 2-7
Figure 2–7 Create a Supplier Train
■Log in to the application: The login.jspx page allows users to log in to the
application. For more information, see "Enabling ADF Security in a Fusion Web
Application" in the Oracle Fusion Middleware Fusion Developer's Guide for Oracle
Application Development Framework.

Running the Suppliers Module
2-8 Oracle WebCenter Content Developer's Guide for Content Server

Part II
Part II Changing the Look and Feel of the
Content Server Interface
This part provides information about the several different methods that you can use to
change the appearance and navigation of the Oracle WebCenter Content Server
interface.
Part II contains the following chapters:
■Chapter 3, "Customizing the Content Server Interface"
■Chapter 4, "Creating Dynamic Server Pages"

3
Customizing the Content Server Interface 3-1
3Customizing the Content Server Interface
This chapter provides information about the several different methods that you can
use to customize the look and feel of the Oracle WebCenter Content Server interface.
You can use skins and layouts to change the appearance of the user interface and
dynamic server pages to change the navigation.
This chapter includes the following sections:
■Section 3.1, "About Customizing the Content Server Interface"
■Section 3.2, "Choosing a Different Skin or Layout"
■Section 3.3, "Configuring a Default Skin and Layout for New Users and Guests"
■Section 3.4, "Modifying the Template for a Skin or Layout"
■Section 3.5, "Altering the Anonymous User Interface"
■Section 3.6, "Changing the URL of the Login Page"
■Section 3.7, "Creating and Publishing a New Layout"
■Section 3.8, "Optimizing the Use of Published Files"
3.1 About Customizing the Content Server Interface
Skins and layouts provide alternate color schemes and alternate navigation designs.
3.1.1 Types of Skins and Layouts
Some skins and layouts are provided by default with Oracle WebCenter Content
Server. In addition, you can design custom skins and layouts. When you change the
skin or layout, you change the look and feel of the interface. You can select a skin and
layout from the options provided on the User Profile page.
The only skills required to create and modify skins or layouts is an understanding of
HTML, Cascading Style Sheets, and JavaScript. After altering the appearance, the
edited layouts and skins are published so that others in your environment can use
them.
Tip: In addition to using the methods discussed in this chapter, you
can alter the metadata fields that are presented to users and modify
the types of presentations used for check-in pages, search pages, and
other user interfaces. For information about creating and modifying
metadata fields and creating content profiles, see "Managing
Repository Content" in the Oracle WebCenter Content Application
Administrator's Guide for Content Server.

Choosing a Different Skin or Layout
3-2 Oracle WebCenter Content Developer's Guide for Content Server
3.1.2 Skins
Skins define the color scheme and other aspects of appearance of the layout such as
graphics, fonts, or font size. (the default skin is Oracle). You can design custom skins
or modify the existing skins.
3.1.3 Layouts
Layouts define the navigation hierarchy display (the default layout is Trays) and
custom layouts can be designed.
Custom layouts change behavior and the look-and-feel systemwide. If you want your
changes to apply only in limited situations, you might want to consider dynamic
server pages.These layouts are provided:
■Trays : This layout with the standard Oracle skin is the default interface. High-level
navigation occurs through the navigation trays.
■Top Menus: This layout provides an alternate look with top menus providing
navigation.
3.2 Choosing a Different Skin or Layout
You can choose a different skin to provide an alternate color scheme or a different
layout to provide an alternate navigation design, or both.
3.2.1 How to Choose a Different Skin or Layout
The User Personalization settings available on the User Profile page enable users to
change the layout of Content Server or the skin.
To choose a different skin or layout:
1. On the Content Server Home page, click your_user_name in the top menu bar.
The User Profile page appears.
2. Choose the desired skin and layout.
3. Click Update, and view the changes.
3.2.2 What Happens at Runtime
After you choose a different skin or layout, it becomes the user interface for Content
Server whenever you log in.
Note: Only administrators can make new or custom skins. For more
information about setting the default look and feel of the user
interface, see Section 3.3, "Configuring a Default Skin and Layout for
New Users and Guests."
Important: This personalization functionality works with Internet
Explorer 7+ or Mozilla Firefox 3+ and later versions.

Modifying the Template for a Skin or Layout
Customizing the Content Server Interface 3-3
3.3 Configuring a Default Skin and Layout for New Users and Guests
These values can be placed in the IntradocDir/config/config.cfg file to alter
the default behavior for the Content Server instance:
■LmDefaultSkin: The name of the skin used by guests, and new users. The default
is Oracle.
■LmDefaultLayout: The name of the layout used by guests, and new users. The
default is Trays, but it can be set to Top Menus.
3.4 Modifying the Template for a Skin or Layout
The Top Menus and Trays layouts are included by default with the system. The two
layouts have two skin options (Oracle and Oracle2). The layouts are written in
JavaScript, and the look of the skins is created using Cascading Style Sheets.
You can modify skins and layouts by altering the template files provided with Content
Server or design new skins and layouts by creating components that can be shared
with other users.
3.4.1 About Dynamic Publishing
When Content Server starts, or when the PUBLISH_WEBLAYOUT_FILES service is run,
the PublishedWeblayoutFiles table in the std_resource.htm file is used to
publish files to the weblayout directory. To have your custom component use this
publishing mechanism, create a template, and then merge a custom row that uses that
template into the PublishedWeblayoutFiles table.
Other users who want to modify or customize your file can override your template or
your row in the PublishedWeblayoutFiles table. If your template uses any
resource includes, other users can override any of these includes or insert their own
Idoc Script code using the standard super notation. When your component is
disabled, the file is no longer published or modified and Content Server returns to its
default state.
In addition to giving others an easy way to modify and add to your work, you can also
construct these former static files using Idoc Script. For example, you can have the files
change depending on the value of a custom configuration flag. You can use core
Content Server objects and functionality by writing custom Idoc Script functions and
referencing them from inside your template.
Because this Idoc Script is evaluated once during publishing, you cannot use Idoc
Script as you would normally do from the
IdcHomeDir/resources/core/idoc/std_page.idoc file. When a user requests
that file, it has already been created, so the script that was used to create it did not
have any access to the current service’s DataBinder object or to any information
about the current user.
This does limit the type of Idoc Script you can write in these files. If you are writing
CSS or JavaScript that needs information that dynamically changes with users or
services, consider having the pages that need this code include the code inline. This
increases the size of pages delivered by your web server and so increases the amount
of bandwidth used.

Altering the Anonymous User Interface
3-4 Oracle WebCenter Content Developer's Guide for Content Server
3.5 Altering the Anonymous User Interface
The ExtranetLook component can be used to change the interface for anonymous,
random users. An example of this is when a web site based on Content Server must be
available to external customers without a login, but you want employees to be able to
contribute content to that web site.
When Content Server is running on Oracle WebLogic Server, the ExtranetLook
component alters privileges for certain pages so that they require write privilege to
access. The component also makes small alterations to the static portal page to remove
links that anonymous, random users should not see.
The ExtranetLook component is installed (disabled) with Content Server. To use the
component, you must enable it with the Component Manager.
You can customize your web pages to make it easy for customers to search for content,
and then give employees a login that permits them to see the interface on login. To do
the customization, modify the ExtranetLook.idoc file, which provides dynamic
resource includes that can be customized based on user login. The IDOC file is
checked in to the Content Server repository so it can be referenced by the Content
Server templates.
3.5.1 How to Alter the Anonymous User Interface
You can update the look and feel of the anonymous user interface for the Content
Server web site by altering the following files in the IntradocDir/data/users
directory:
■prompt_login.htm
■access_denied.htm
■report_error.htm
To alter the anonymous user interface:
1. Display the Web Layout Editor.
2. From the Options menu, choose Update Portal.
3. Modify the portal page as you want to. You can use dynamic resource includes to
customize this page.
4. Click OK.
5. Customize the ExtranetLook.idoc file as you want to.
6. Check out the ExtranetLook content item from Content Server.
7. Check in the revised ExtranetLook.idoc file to Content Server.
3.5.2 What Happens at Runtime
After you modify the portal page and customize theExtranetLook.idoc file, your
design becomes the user interface for Content Server whenever a user goes to the web
site without logging in.
Note: The ExtranetLook component does not provide form-based
authentication for Oracle WebLogic Server or provide customizable
error pages.

Changing the URL of the Login Page
Customizing the Content Server Interface 3-5
3.6 Changing the URL of the Login Page
You can change the URL of the Login page for Content Server by changing its context
root, which is normally /cs/. You cannot change the URL by setting a relative context
root with the HttpRelativeWebRoot property because the value of this property
does not apply to the Login page. If you need to change the web location where users
log in, you can redeploy the WebCenter Content application with a deployment plan.
To change the URL of the Login page:
1. Log in to the Oracle WebLogic Server Administration Console as the administrator
of the domain where WebCenter Content is deployed.
2. Click Deployments under the name of your domain, in the Domain Structure area
on the left.
3. Click Oracle WebCenter Content - Content Server in the Deployments table on
the Control tab of the Summary of Deployments page.
This application may be on the second or third page of the table.
4. Note the path to the deployment plan.
If no plan is specified for your WebCenter Content instance, you can create one:
a. Click Configuration on the Settings for Oracle WebCenter Content - Content
Server page.
b. Change the value of any parameter on the Configuration tab.
c. Click Save.
d. Confirm the path to the deployment plan on the Save Deployment Plan
Assistant page, or change the path.
e. Click OK.
5. In a text editor, add lines at two places in the deployment plan:
a. Add the original_loginpage_path and original_loginerror_path
variables, each in a <variable> element of a <variable-definition>
element, as in this example:
<deployment-plan xmlns="http://xmlns.oracle.com/weblogic/deployment-plan"
xmlns:xsi="http://www.w3.org/2001/XMLSchema-instance"
xsi:schemaLocation="http://xmlns.oracle.com/weblogic/deployment-plan
http://xmlns.oracle.com/weblogic/deployment-plan/1.0/deployment-plan.xsd">
<application-name>ServletPlugin</application-name>
<variable-definition>
<variable>
<name>original_loginpage_path</name>
<value>/content/login/login.htm</value>
</variable>
<variable>
<name>original_loginerror_path</name>
<value>/content/login/error.htm</value>
</variable>
<variable>
<name>SessionDescriptor_timeoutSecs_12996472139160</name>
<value>3600</value>
</variable>

Changing the URL of the Login Page
3-6 Oracle WebCenter Content Developer's Guide for Content Server
b. In the <module-descriptor> element of web.xmlin the cs.war file, add
two <variable-assignment> elements that assign the following values to
the original_loginpage_path and original_loginerror_path
variables, respectively:
*/web-app/login-config/form-login-config/form-login-page
*/web-app/login-config/form-login-config/form-error-page
For example:
<module-override>
<module-name>cs.war</module-name>
<module-type>war</module-type>
<module-descriptor external="false">
<root-element>weblogic-web-app</root-element>
<uri>WEB-INF/weblogic.xml</uri>
</module-descriptor>
<module-descriptor external="false">
<root-element>web-app</root-element>
<uri>WEB-INF/web.xml</uri>
<variable-assignment>
<name>original_loginpage_path</name>
<xpath>/web-app/login-config/form-login-config/form-login-page</xpath>
</variable-assignment>
<variable-assignment>
<name>original_loginerror_path</name>
<xpath>/web-app/login-config/form-login-config/form-error-page</xpath>
</variable-assignment>
</module-descriptor>
</module-override>
<module-override>
6. Stop the WebCenter Content Managed Server (UCM_server1 by default), with the
stopManagedWebLogic script.
■UNIX script:
DomainHome/bin/stopManagedWebLogic.sh UCM_server1
■Windows script:
DomainHome\bin\stopManagedWebLogic.cmd UCM_server1
7. In the Administration Console, click Deployments under the name of your
domain.
8. Select Oracle WebCenter Content - Content Server in the Deployments table, and
click Update.
9. Select Redeploy this application using the following deployment files, make
sure the path to the deployment plan is correct, and then click Finish.
10. After the redeployment completes successfully, click Apply Changes.
11. Start the WebCenter Content Managed Server with the startManagedWebLogic
script.
■UNIX script:
DomainHome/bin/startManagedWebLogic.sh UCM_server1
■Windows script:
DomainHome\bin\startManagedWebLogic.cmd UCM_server1

Optimizing the Use of Published Files
Customizing the Content Server Interface 3-7
12. In the Administration Console, click Deployments.
13. Select Oracle WebCenter Content - Content Server in the Deployments table, and
from the Start menu, choose Servicing all requests.
14. After the WebCenter Content application is launched, verify that the URL of the
login page has changed.
3.7 Creating and Publishing a New Layout
The following general steps are necessary to create and publish new layouts:
1. Merge a table into the LmLayouts table in
IdcHomeDir/resources/core/tables/std_publishing.htm to define the
new layout. Define the layout ID, label, and whether it is enabled (set to 1) or not.
2. Merge a table into the PublishedWeblayoutFiles table in
IdcHomeDir/resources/core/tables/std_publishing.htm. This new
table describes the files that are created from Content Server templates and then
pushed out to the weblayout directory. Specify the necessary skin.css files to
push out to each skin directory.
3. Merge a table with the PublishedStaticFiles table in std_
publishing.htm. This lists the directories that contain files, such as images,
that should be published to the weblayout directory.
3.8 Optimizing the Use of Published Files
You can direct Content Server to bundle published files so that they can be delivered
as one, minimizing the number of page requests to the server. In addition, you can
optimize file use by referencing published pages using Idoc Script.
3.8.1 Bundling Files
Multiple resources may be packaged together into units called bundles. A bundle is a
single file containing one or more published resources. Only JavaScript and css
resources should be bundled and only with other resources of the same type. Bundling
helps reduce the client overhead when pages are loaded but increases client parse,
compile, and execute overhead. Generally, it is recommended to bundle resources that
have some thematic similarity or are expected to be included at similar times. For
example, if you know that resources A, B, and C are needed on every page, and
resources D, E, and F are needed rarely but are all needed together, it is recommended
to bundle A, B, and C together and to put D, E, and F into a separate bundle.
Almost all JavaScript resources for the Content Server core are bundled into one of two
bundles: yuiBundle.js, which contains script provided by the third-party Yahoo
User Interface library, and bundle.js, which contains the rest of the resources.
The PublishedBundles table is used for determining how resources are bundled.
Essentially a bundle is identified by its target bundlePath, which is the path name to
the bundle (relative to the weblayout directory), and a list of rules detailing which
resource classes are included or excluded. A loadOrder value in this table applies
only to the order in which the filtering rules are applied, not the order in which the
resources appear in the bundle.

Optimizing the Use of Published Files
3-8 Oracle WebCenter Content Developer's Guide for Content Server
Static weblayout file contents are cached on client machines and on web proxies,
significantly lowering the amount of server bandwidth they use. Therefore, the best
practice is to use these types of files wherever possible.
However, each static weblayout file requested by the client’s browser requires a
round-trip to the server just to verify that the client has the most up-to-date version of
the file. This occurs even if the file is cached. As the number of these files grows, so
does the number of downloads from the server for each page request.
To help minimize the number of round-trips, Content Server can bundle multiple
published files so that they are delivered as one. You can disable this feature by setting
the following configuration in the server’s IntradocDir/config/config.cfg file:
BundlePublishedWeblayoutFiles=false
Bundling is accomplished by using the PublishedBundles table in the
std_publishing.htm file, which Example 3–1 shows.
Example 3–1 PublishedBundles Table in std_publishing.htm File
<@table PublishedBundles@>
<table border=1><caption><strong>
<tr>
<td>bundlePath</td>
<td>includeClass</td>
<td>excludeClass</td>
<td>loadOrder</td>
</tr>
<tr>
<td>resources/bundle.js</td>
<td>javascript:common</td>
<td></td>
<td>128</td>
</tr>
. . .
</table>
<@end@>
The columns in this table are as follows:
■bundlePath: The eventual location where the bundle is published. This path is
relative to the weblayout directory.
■includeClass: This is used to determine which resources to include in a bundle.
■excludeClass: This is used to determine which resources to exclude from a
bundle.
■loadOrder: The order in which the includeClass and excludeClass filters
are applied.
In the previous example, files of the javascript:common class are published to a
single bundle located at resources/layouts/commonBundle.js. The contents of
all bundled files that match this class are appended to form a single file to be stored at
that location.
Note: The bundling has changed since Oracle Universal Content
Management 10g, which used a different table and had a loadOrder
value that determined the order of resources in each bundle.

Optimizing the Use of Published Files
Customizing the Content Server Interface 3-9
3.8.2 Referencing Published Files
Most published files (both bundled and unbundled) must be directly referenced from
within HTML to be included in a page. It can therefore be difficult to know exactly
which files to include for a given situation, especially when bundling can be enabled
or disabled by server administrators. A simple Idoc Script method can be used to
easily and transparently include all of the files you need on a given page.
For example, if you write a page that includes all files associated with the
javascript:common bundle (as described previously), then do not write HTML that
includes all of the files mentioned in the first table in addition to the bundle mentioned
in the second, the server is asked for each file. This negates the purpose of bundling
because the server is pinged for each file whether it actually exists or not.
Example 3–2 shows Idoc Script code, within the HEAD section for a page, to correctly
include these files on the page.
Example 3–2 Idoc Script to Reference a Bundle of Files
<$exec createPublishedResourcesList("javascript:common")$>
<$loop PublishedResources$>
<script language="JavaScript" src="<$HttpWebRoot$><$PublishedResources.path$>" />
</script>
<$endloop$>
This code fragment includes all javascript:common files even if bundling is
switched off. If javascript instead of javascript:common is passed, all files
whose class starts with javascript are included.
This PublishedResources result set is sorted by loadOrder, so files and bundles
with the lowest loadOrder are included first. Files with a greater loadOrder can
override JavaScript methods or CSS styles that were declared earlier.

Optimizing the Use of Published Files
3-10 Oracle WebCenter Content Developer's Guide for Content Server

4
Creating Dynamic Server Pages 4-1
4Creating Dynamic Server Pages
This chapter describes how to use the building blocks necessary for creating dynamic
server pages to alter the appearance and navigation of web pages.
This chapter includes the following sections:
■Section 4.1, "About Dynamic Server Pages"
■Section 4.2, "Altering the Appearance and Navigation of Web Pages"
■Section 4.3, "Creating an IDOC File with Custom Includes for Dynamic Server
Pages"
■Section 4.4, "Creating an HCST Page"
■Section 4.5, "Creating an HCSP Page"
■Section 4.6, "Creating an HCSF Page"
■Section 4.7, "Verifying the Display of an HCST, HCSP, or HCSF Page in a Web
Browser"
4.1 About Dynamic Server Pages
Dynamic server pages are files that are checked in to Content Server and then used to
generate web pages dynamically. Dynamic server pages are typically used to alter the
look-and-feel and the navigation of web pages. For example, dynamic server pages
can be used to do these tasks:
■Create web pages to be published through Content Publisher
■Implement HTML forms
■Maintain a consistent look-and-feel throughout a web site
Dynamic server pages include the following file formats:
■IDOC: A proprietary scripting language
■HCST: Hypertext Content Server Template, similar to a standard Content Server
template page stored in the IdcHomeDir/resources/core/templates
directory.
■HCSP: Hypertext Content Server Page, an HTML-compliant version of the HCST
page, usually used for published content.
■HCSF: Hypertext Content Server Form, similar to HCSP and HCST pages, but
containing HTML form fields that can be filled out and submitted from a web
browser

About Dynamic Server Pages
4-2 Oracle WebCenter Content Developer's Guide for Content Server
When you use dynamic server pages, Content Server assembles web pages
dynamically using a custom template (HCST, HCSP, or HCSF file) that you have
checked in to Content Server. The template calls HTML includes from a text file (IDOC
file) that you have also checked in to Content Server.
To make changes to the look-and-feel or navigation on a web page, you modify the
HCS* template page, or the IDOC file, or both, and then check in the revised files as
new revisions. Your changes are available immediately.
Using dynamic server pages with Content Server gives you these advantages:
■You can introduce and test customizations quickly and easily. Simply checking
in a revision of a dynamic server page implements the changes immediately—you
do not have to restart Content Server.
■Your web pages can make use of functionality not found in standard HTML. For
example, HTML forms can be submitted directly to Content Server without the
need for CGI scripts. Also, Idoc Script enables you to work directly with
environment and state information about Content Server.
■You do not have to install or keep track of component files. It can be difficult to
maintain and troubleshoot components if they have a lot of files or your system is
highly customized. Dynamic server pages are easier to work with because you can
check in just a few content items that contain all of your customizations.
■Customizations can be applied to individual pages. Dynamic server pages
enable you to apply customizations to a single page rather than globally, leaving
the standard Content Server page coding intact.
Keep the following constraints in mind when deciding whether to use dynamic server
pages:
■Dynamic server pages cannot be used to modify core functionality of Content
Server. Dynamic server pages are most useful for customizing your web design
and form pages.
■Frequent revisions to dynamic server pages can result in a large number of
obsolete content items. You should do as much work on a development system as
possible before deploying to a production instance, and you may need to delete
out-of-date pages regularly.
Figure 4–1 shows the process for generating and using a Dynamic Server Page.

About Dynamic Server Pages
Creating Dynamic Server Pages 4-3
Figure 4–1 The Dynamic Server Page Process
4.1.1 Page Types
There are four types of dynamic server pages, which are identified in Content Server
by their four-character file-name extensions:
■IDOC
■HCST
■HCSP
■HCSF
4.1.1.1 IDOC File
An IDOC file is a text file containing HTML includes that are called by HCST, HCSP,
and HCSF pages.
For more information about includes, see Chapter 9, "Getting Started with Content
Server Components."
4.1.1.2 HCST File
A Hypertext Content Server Template (HCST) file is a template page, similar to a
standard Content Server template page, that is used as a framework for assembling a
web page.
■HCST pages are typically used when the content of the page itself is dynamic or
where Content Server functionality is needed, such as on a search page, search
results page, or custom check-in page.
■Because this type of page consists mostly of dynamically assembled code, HCST
files are not indexed in Content Server.

Altering the Appearance and Navigation of Web Pages
4-4 Oracle WebCenter Content Developer's Guide for Content Server
4.1.1.3 HCSP File
A Hypertext Content Server Page (HCSP) file is a published web page that displays
actual web site content.
■HCSP files are typically created either by generating the web page through
Content Publisher using an HCST page as a template, or by submittal of a form in
Content Server through an HCSF page.
■Because this type of page contains web-viewable content, HCSP files are indexed
in Content Server.
4.1.1.4 HCSF File
A Hypertext Content Server Form (HCSF) file is similar to an HCSP file, except that it
contains HTML form fields that can be filled out and submitted from a web browser.
■When a user fills out and submits a form from an HCSF page, an HCSP file is
checked in as a separate content item with metadata defined by XML elements for
the HCSF page.
■Because this type of page contains web-viewable content, HCSF files are indexed
in Content Server.
For more information about HCSF pages, see Section 4.1.1.4, "HCSF File."
4.2 Altering the Appearance and Navigation of Web Pages
Although dynamic server pages are implemented in Content Server differently than
custom components, you must be familiar with WebCenter Content component
architecture concepts, particularly Content Server templates and HTML includes. For
more information, see Chapter 9, "Getting Started with Content Server Components."
Use the following basic procedure to customize your Content Server instance with
dynamic server pages:
1. Create an IDOC file with custom includes.
2. Check in the IDOC file to Content Server.
3. Create an HCST, HCSP, or HCSF file that references the IDOC file.
4. Check in the HCS* file to Content Server.
5. Display the HCS* file in your web browser by searching for it in Content Server or
linking to it from a published web page.
4.2.1 Syntax
Because the different types of dynamic server pages are interpreted and displayed
differently, the Idoc Script in the files must be coded differently. The following table
summarizes these differences.
Tip: Using dynamic server pages with Content Publisher can be a
powerful tool for web publishing. For more information, see the
Content Publisher documentation.
Altering the Appearance and Navigation of Web Pages
Creating Dynamic Server Pages 4-5
4.2.1.1 Idoc Script Expressions
For HCSP and HCSF pages, Idoc Script expressions are generally placed between
HTML comment tags. When a page is viewed statically, this placement enables a web
browser to present the page content while ignoring any dynamic code that is used to
format the content. This also enables the full-text indexing engine to successfully index
the contents of these pages.
Some examples follow.
■IDOC or HCST file: <$include MyIdocExpression$>
■HCSP or HCSF file: <!--$include MyIdocExpression-->
In some situations, you might want to control the opening and closing of the HTML
comment. In HCSP and HCSF files, this can be done by substituting other characters
for the dash (-) in the closing tag after an Idoc Script expression, as Example 4–1
shows.
Example 4–1 Pound Sign Delimiter for HTML Comment in HCSP or HCSF File
<!--$a="ab"##> HTML comment remains open
<a href="<!--$myUrlAsVariable##>">MyUrl</a> Static view does not see this
<!--$dummy=""--> <!—Ended the comment area-->.
In Example 4–1, the pound sign (#) is substituted for the dash (-).
Another option in HCSP and HCSF files is to substitute brackets ([]) for the opening
and closing tags (< >) of the standard HTML comment, as Example 4–2 shows. This
substitution enables an XHTML parser to properly identify all the script when viewed
statically.
Example 4–2 Bracket Delimiters for HTML Comment in HCSP or HCSF File
<!--$a="ab"--] HTML comment remains open
<a href="[!--$myUrlAsVariable--]">MyUrl</a> Static view does not see this
[!--$dummy=""--> <!—Ended the comment area-->.
File Type .idoc .hcst .hcsp .hcsf
Full Text Indexed? No No Yes Yes
Idoc Script Expressions <$ … $> <$ … $> <!--$ … -->
[!--$ … --]
<!--$ … -->
[!--$ … --]
Comparison Operators Symbols (==) Symbols (==) Special operators
(eq) Special operators
(eq)
Special Characters Symbols (&) Symbols (&) Escape sequence
(&) Escape sequence
(&)
Referencing Metadata Required Required Required Required
Notes: Idoc Script uses standard HTML include coding. For more
information, see Section 15.2.1, "HTML Includes."
HCST uses standard Content Server template coding. For more
information, see Section 15.2.8.1, "Template and Report Pages."
Special coding is used with HCSP and HCSF to allow the page to be
rendered both statically and dynamically, and full-text indexed.

Altering the Appearance and Navigation of Web Pages
4-6 Oracle WebCenter Content Developer's Guide for Content Server
4.2.1.2 Comparison Operators
For HCSP and HCSF pages, the standard comparison operators (such as ==) cannot be
used because of their special meaning to HTML parsers. Use the following comparison
operators in dynamic server pages.
For example, the following code evaluates whether or not the value of the variable
count is greater than 10.
4.2.1.3 Special Characters
For HCSP and HCSF pages, special characters such as the ampersand (&) cannot used
because of their special meaning to HTML parsers. You must use the standard HTML
or XML escape format (such as & or &).
As the following examples show, in Idoc Script, a quotation mark can be included in a
string by preceding it with a backslash escape character, but in an HCSP or HCSF
page, the quotation mark character must be represented by an HTML escape character.
■IDOC or HCST file: "Enter \"None\" in this field."
■HCSP or HCSF file: "Enter "None" in this field."
In an HCST page, a line feed is inserted using \n. In an HCSP page, insert the line feed
directly in the file or encode it in the XML using the numeric ASCII number for a line
feed.
IDOC or HCST File HCSP or HCSF File Description
== eq Tests for equality.
!= ne Tests for inequality.
< lt Tests if less than.
> gt Test if greater than.
<= le Tests if less or equal than.
>= ge Tests if greater or equal than.
IDOC or HCST File HCSP or HCSF File
<$if count > 10$>
<$"Count is greater than"$>
<$endif$>
<!--$if count gt 10-->
<!--$"Count is greater than"-->
<!--$endif-->
Note: It is especially important to use the & escape character
when you call the docLoadResourceIncludes function from an HCSP or
HCSF page. For more information, see Section 4.2.2.1,
"docLoadResourceIncludes Function."
Note: You can now substitute the word join for the & string join
operator. For example, you can write [!--$a join b--] instead of [!--$a &
b--]. The first is accepted by an XML parser inside an attribute of a
element, but the second is not.

Altering the Appearance and Navigation of Web Pages
Creating Dynamic Server Pages 4-7
4.2.1.4 Referencing Metadata
For dynamic server pages, several metadata values are stored with a ref: prefix,
which makes them available to the page but does not replace ResultSet values. (This
prevents pollution of result sets by dynamic server pages.)
When you reference any of the following metadata values on a dynamic server page,
you must include the ref: prefix:
■hasDocInfo
■dDocName
■dExtension
■dSecurityGroup
■isLatestRevision
■dDocType
For example, the following statement determines if the document type is Page:
<$if strEquals(ref:dDocType,"Page"))$>
4.2.2 Idoc Script Functions
Two special Idoc Script functions are required for dynamic server pages:
■docLoadResourceIncludes
■executeService
4.2.2.1 docLoadResourceIncludes Function
To be able to use the HTML includes in an IDOC file, an HCS* file must call the
docLoadResourceIncludes function, as in the following examples. This function
loads all the includes from the specified IDOC file for use in assembling the current
page. Example 4–3 shows the format for calling this function from an HCST file.
Example 4–3 docLoadResourceIncludes Function Call in HCST File
<$docLoadResourceIncludes("dDocName=system_std_
page&RevisionSelectionMethod=Latest")$>
Example 4–4 shows the format for calling this function from an HCSP or HCSF file.
Example 4–4 docLoadResourceIncludes Function Call in HCSP or HCSF file
<!--$docLoadResourceIncludes("dDocName=system_std_
page&RevisionSelectionMethod=Latest")-->
4.2.2.1.1 Requirements for Calling the docLoadResourceIncludes Function ■The native file
for the specified content item must have a.idoc extension.
■The docLoadResourceIncludes call must be placed before the first include call
in the HCS* file. It is recommended that you place this function within the HEAD
section of the page.
■You must use the correct ampersand character when you call the
docLoadResourceIncludes function from an HCS* page. For more
information, see Section 4.2.1.3, "Special Characters."

Altering the Appearance and Navigation of Web Pages
4-8 Oracle WebCenter Content Developer's Guide for Content Server
4.2.2.1.2 Parameters Use the following parameters with the
docLoadResourceIncludes function to specify which IDOC file to call.
■You must define either a dDocName or a dID; do not use both parameters together.
■If you define a dDocName, you must define RevisionSelectionMethod to be
Latest or LatestReleased.
■If you define a dID, do not define a RevisionSelectionMethod, or define the
RevisionSelectionMethod to be Specific.
4.2.2.2 executeService Function
The executeService function executes a Content Server service from within a
dynamic server page. For example:
HCST file: <$executeService("GET_SEARCH_RESULTS")$>
HCSP or HCSF file: <!--$executeService("GET_SEARCH_RESULTS")-->
■Services that can be called with the executeService function must be scriptable,
meaning that they do not require parameter input.
■Scriptable services have an access level of 32 or more. For more information, see
Chapter 18, "Getting Started with Integrating WebCenter Content into Your
Environment."
■For a list of standard Content Server services, see the
IdcHomeDir/resources/core/tables/std_services.htm file.
■For more information about the executeService function, see the Oracle
WebCenter Content Idoc Script Reference Guide.
■For more information about services, see the Chapter 18, "Getting Started with
Integrating WebCenter Content into Your Environment."
Parameter Description
dDocName Specifies the Content ID value of the IDOC file.
This parameter should always be present when the Content ID value is known.
Error messages are based on the assumption that it is present, as are other features,
such as forms.
dID Specifies the unique ID number of a particular revision of the IDOC file.
RevisionSelectionMetho
d
Specifies which revision of the IDOC file to use:
■Latest: The latest checked-in revision of the document is used (including
revisions in a workflow).
■LatestReleased: The latest released revision of the document is used.
■Specific: Use only with dID.
Rendition Specifies which rendition of the IDOC file to use:
■Primary: The primary (native) file. This is the default value in effect if no
Rendition value is specified.
■Web: The web-viewable file.
■Alternate: The alternate file.
Performance Tip: Use services sparingly. Too many service calls on a
page can affect performance and limit scalability.

Altering the Appearance and Navigation of Web Pages
Creating Dynamic Server Pages 4-9
4.2.3 Development Recommendations
The following recommendations to assist you in developing dynamic server pages
include general guidelines and HCSF guidelines.
4.2.3.1 General Guidelines
The following recommendations apply to the development of all types of dynamic
server pages:
■Keep templates as simple and free of code as possible. Strive to have only HTML
includes in your templates, with all code and conditionals in an IDOC file. This is
especially helpful for HCSF pages, where submitted forms also reflect changes
made to the IDOC file.
■Whenever you are customizing an Oracle WebCenter Content Server instance, you
should isolate your development efforts from your production system. Keep in
mind that frequent revisions to dynamic server pages can result in a large number
of obsolete content items. You should do as much work on a development system
as possible before deploying to a production instance, and you may need to delete
out-of-date pages regularly.
■When you develop a web site using dynamic server pages, think of the
development and contribution processes in terms of ownership:
– Structure, including site design and navigation, is owned by the webmaster.
When you use dynamic server pages, structure is contained in and controlled
with includes that are defined in IDOC files.
–Content, that is, the actual text of the web pages, is owned by the contributors.
When you use dynamic server pages, content is contained primarily in HCSP
files that make use of the includes in the IDOC files.
■Using dynamic server pages with Content Publisher can be a powerful tool for
web publishing. You can create content using Word documents or HCSF pages,
and then use Content Publisher to convert the documents to published HCSP files.
You can also use the "include before" and the "include after" options in the SCP
template to insert additional Idoc Script includes.
■If you publish dynamic server pages with Content Publisher, use the prefix option
for easy identification of your documents.
■Use a consistent naming convention. For example, for "system" level includes, you
could name your IDOC file system_std_page, and then name each include in
that file with the prefix system_. This makes locating the includes easier.
■You may want to create a content type for each type of dynamic server page (such
as HCSF_templates or submitted_forms).
■In accordance with good coding practices, you should always put comments in
dynamic server pages to document your customizations.

Altering the Appearance and Navigation of Web Pages
4-10 Oracle WebCenter Content Developer's Guide for Content Server
4.2.3.2 HCSF Guidelines
The following recommendations apply specifically to the development of HCSF pages:
■When designing a form, consider how the template will be used:
–Will this template change depending on the role of the user submitting the
form?
–Will the submitted content enter into a criteria workflow?
–What default metadata values should be set?
–Does the form contain ResultSets for multiple line entries?
■To see the form parameters as they are passed from the web browser to the web
server, filtered through Oracle WebCenter Content Server, and then passed back to
the web browser, change the method attribute in the include code from POST to
GET:
<form name="<$formName$>" method="GET" action="<$HttpCgiPath$>">
■If you add a form field called DataScript to a form being submitted, then any Idoc
Script for that value is evaluated by Oracle WebCenter Content Server when it
processes the form.
4.2.4 HCSF Pages
In addition to following the standard formatting rules for Oracle WebCenter Content
Server templates and HTML forms, HCSF pages require several special sections and
tags that enable Oracle WebCenter Content Server to process them. These special
sections appear in the following order in a typical HCSF file:
1. Load section
2. Data section
3. Form section
For an example of a complete HCSF page, see Section 4.1.1.4, "HCSF File."
4.2.4.1 Load Section
The load section at the beginning of an HCSF page declares the file as an HTML file,
loads an IDOC file, and loads other information about the page. Example 4–5 shows a
typical load section.
Example 4–5 Load Section for an HCSF Page
<!DOCTYPE HTML PUBLIC "-//IETF//DTD HTML//EN">
<html>
<head>
<!--$docLoadResourceIncludes("dDocName=my_idoc_
page&RevisionSelectionMethod=Latest")-->
<meta NAME="idctype" CONTENT="form; version=1.0">
<!--$defaultPageTitle="Department News Form"-->
<!--$include std_html_head_declarations-->
</head>

Altering the Appearance and Navigation of Web Pages
Creating Dynamic Server Pages 4-11
The load section has these items:
■HTML declaration
■docLoadResourceIncludes function
■meta element
■Variables and includes
4.2.4.1.1 HTML Declaration The HTML declaration identifies the file as an HTML file,
with the following syntax:
<!DOCTYPE HTML PUBLIC "-//IETF//DTD HTML//EN">
4.2.4.1.2 The docLoadResourceIncludes Function The docLoadResourceIncludes function
loads all the includes from the specified IDOC file for use in assembling the current
page. For more information, see Section 4.2.4.1.2, "The docLoadResourceIncludes
Function."
4.2.4.1.3 Meta Element The meta element is used by Content Publisher to identify that
this is a special type of page.
■This element is not required if the form is not being published through Content
Publisher.
■The meta element must be placed inside the HEAD section of your HTML file.
■Use the following syntax for the meta tag:
<meta NAME="idctype" CONTENT="form; version=1.0">
4.2.4.1.4 Variables and Includes The HEAD section for an HCSF page can contain variable
definitions and HTML includes as necessary. Example 4–6 shows lines in a HEAD
section that define the default page title and load the std_html_head_
declarations code.
Example 4–6 Variable Definition and Include in the HEAD Section for an HCSF Page
!--$defaultPageTitle="Department News Form"-->
<!--$include std_html_head_declarations-->
4.2.4.2 Data Section
The data section for an HCSF page contains rules and metadata information that is
used to process the form. There is a close relationship between the information in the
data section and the presentation of the page:
■Upon delivery of the HCSF page to the user, the information in the data section is
parsed into a DataBinder object and merged into the Form Section.
■Upon form submittal, the information in the data section is merged with the
request and written out again to the data section. For more information, see
Chapter 9.1.3.3, "Data Binder," and Section 9.1.3.1.1, "Elements in HDA Files."
4.2.4.2.1 Data Section Structure The data section consists of XML elements that are
placed between idcbegindata and idcenddata Idoc Script tags, as Example 4–7
shows.

Altering the Appearance and Navigation of Web Pages
4-12 Oracle WebCenter Content Developer's Guide for Content Server
Example 4–7 Data Section for an HCSF Page
<!--$idcbegindata-->
<idcformrules isFormFinished="0"/>
<model_number content="html">AB-123</model_number>
<revision>12</revision>
…
<!--$idcenddata-->
The following rules apply to the data section:
■The data section must be placed inside the <BODY> section of your HTML file,
before the beginning of the form section.
■You can place Idoc Script variable definitions and includes before or after the data
section, but not within it.
■Two types of XML elements are used in the data section:
–The idcformrules Element
–Metadata Elements
■You can also use the following types of formatting in the data section:
–Nested Elements
–Referencing XML Elements
–Form Elements
–ResultSets
4.2.4.2.2 The idcformrules Element The idcformrules element defines Content Server
rules in the data section. This element requires one attribute, either isFormFinished
or resultsets.
■IsFormFinished Attribute: The isFormFinished attribute indicates whether the
form can be submitted again or not.
–Use the following attribute value to specify that the form can be submitted
again:
<idcformrules isFormFinished="0"/>
–Use the following attribute value to specify that the form cannot be submitted
again:
<idcformrules isFormFinished="1"/>
This code results in a read-only form.
■resultsets Attribute: The resultsets attribute indicates which XML elements in the
data section are interpreted as ResultSets.
–This attribute specifies one or more XML tag names separated by commas. For
example:
<idcformrules resultsets="volume,chapter">
–During delivery of an HCSF page to the user, the core Content Server reads
the resultsets attribute and, if necessary, places empty ResultSets with the
specified names into the DataBinder object so that they are available for
merging.

Altering the Appearance and Navigation of Web Pages
Creating Dynamic Server Pages 4-13
For more information about ResultSet formatting in the data section, see
Section 4.2.4.2.7, "ResultSets."
4.2.4.2.3 Metadata Elements Metadata elements specify the metadata values that appear
in form fields when a form is displayed in a browser. For example:
<model_number>AB-123</model_number>
Each metadata element can be assigned a content attribute that indicates which type
of content the element contains. For example:
<model_number content="html">AB-123</model_number>
■The value of the content attribute can be either html or text: Text indicates that
the content of the element should be interpreted strictly as text. HTML indicates
that the content of the element should be interpreted as HTML code.
■If the content attribute is not specified for a metadata element, it defaults to
html.
■Content Publisher ignores all other attributes except the content attribute.
4.2.4.2.4 Nested Elements If you are not publishing HCSF pages through Content
Publisher, you can use nested XML elements (also called nodes) within the data
section. Example 4–8 shows a <section> element nested in a <chapter> element.
Example 4–8 Nested XML Tags in a Data Section
<chapter title="Chapter 1">
This is the beginning of the chapter.
<section title="First Section">
This is the first section of the chapter.
</section>
</chapter>
4.2.4.2.5 Referencing XML Elements To refer to a nested XML element, start with the
root-level element, and use an exclamation point (!) between element levels. For
example:
chapter!section
To refer to the attribute of any element, use a colon (:) after the tag name. For example:
chapter!section:title
■If you reference an element in the data section, the element value can be merged
back into the data section upon form submission only if one of the following
statements are true:
–The root element has already been referenced in the data area.
–The root element is referenced in an ExtraRootNodes form element.
–A prefix part of the tag is referenced as a ResultSet in the resultsets form
element.
■Default values can be specified by applying the :default suffix to a tag path.
Note that default elements might contain Idoc Script for further evaluation.
Example 4–9 shows the format for specifying a default dDocTitle value.
Note: Nested XML elements are not allowed in Content Publisher.

Altering the Appearance and Navigation of Web Pages
4-14 Oracle WebCenter Content Developer's Guide for Content Server
Example 4–9 Specification of a Default Metadata Value
<input type=hidden name="dDocTitle:default" value="<$'MyTitle ' &
dateCurrent()$>">0
4.2.4.2.6 Form Elements ■The ExtraRootNodes form element enables you to add tags
by creating an Idoc Script variable and then appending the tag names to it, rather
than specifying the tags in the data section of the form. At the end of your form,
you can substitute a string value in place of the ExtraRootNodes value to be
merged back into the data section.
■The resultsets form element enables you to add a tag as a ResultSet, rather than
specifying the ResultSet in the data section.
■Both the ExtraRootNodes and resultset form elements take a comma-delimited list
of tags.
Example 4–10 shows form elements that add the mychapters!chapter element as a
valid ResultSet if it is not already defined in the idcformrules resultsets
attribute. They also add the root element mychapters, if necessary.
Example 4–10 Form Elements That Add Elements to a ResultSet
<input type=hidden name="resultsets" value="mychapters!chapter">
<input type=hidden name="ExtraRootNodes" value="mychapters">
4.2.4.2.7 ResultSets You can define a ResultSet using XML elements within the data
section for an HCSF page, as follows:
■You must use the resultsets attribute of the idcformrules element to specify
a ResultSet.
■The element names must be completely qualified, and the full reference path from
the root node must be used.
■The columns in the ResultSet are the element content and the element attributes.
For information about limitations on repeating and nesting XML elements in a
ResultSet, see Example 4–13 and Example 4–15.
Example 4–11 shows XML elements that define two ResultSets, named volume and
chapter.
Example 4–11 XML Elements for Defining ResultSets in the Data Section for an HCSF
Page
<idcformrules resultsets="volume,chapter">
<volume title="First Volume">
Volume content here
</volume>
<chapter title="First Chapter">
Chapter content here
</chapter>
This code evaluates to two ResultSets with two columns each. Example 4–12 shows
these ResultSets.

Altering the Appearance and Navigation of Web Pages
Creating Dynamic Server Pages 4-15
Example 4–12 ResultSets Defined by XML Elements
@ResultSet volume
2
volume
volume:title
Volume content here
First Volume
@end
@ResultSet chapter
2
chapter
chapter:title
Chapter content here
First Chapter
@end
If you are not publishing HCSF pages through Content Publisher, you can use
repeated elements for a ResultSet in the data section. Repeated elements are typically
useful for looping over code to create the ResultSet.
The following rules apply to repeated elements for ResultSets:
■Repeated elements are not allowed unless they are part of a ResultSet.
■Repeated XML elements are not allowed in Content Publisher.
Example 4–13 shows how the chapter element is repeated for the chapter
ResultSet.
Example 4–13 Repeated Elements for a ResultSet
<idcformrules resultsets="chapter">
<chapter title="First Chapter">
Some content here
</chapter>
<chapter title="Second Chapter">
More content here
</chapter>
This code evaluates to a ResultSet with two columns and two rows. Example 4–14
shows this ResultSet.
Example 4–14 ResultSet Created with Repeated Elements
@ResultSet chapter
2
chapter
chapter:title
Some content here
First Chapter
More content here
Second Chapter
@end
A ResultSet can have nested elements, but the nested elements cannot be repeated
within a parent element, as Example 4–15 shows. In this example code, an additional
<section> element would not be allowed within the first <chapter> element.

Altering the Appearance and Navigation of Web Pages
4-16 Oracle WebCenter Content Developer's Guide for Content Server
Example 4–15 Repeated Nested Elements for a ResultSet
<idcformrules resultsets="chapter">
<chapter title="First Chapter">
Some content here
<section title="First Section of First Chapter">
Section content
</section>
</chapter>
<chapter title="Second Chapter">
More content here
</chapter>
This code evaluates into a ResultSet that has four columns and four rows, with the last
two cells blank, as Example 4–16 shows.
Example 4–16 ResultSet Created with Repeated Nested Elements
@ResultSet chapter
4
chapter
chapter:title
chapter!section
chapter!section:title
Some content here
First Chapter
Section Content
First Section of First Chapter
More content here
Second Chapter
@end
The following guidelines apply to editing ResultSets:
■Updating a specific row in a ResultSet requires that you indicate the ResultSet row
number in the request parameter. The pound sign character (#) is used by Content
Server to indicate a specific row. If you do not specify a row with the # character,
then a row is appended. If you specify a row # that does not yet exist, then enough
empty rows are added to provide a row to be edited.
Example 4–17 shows how to update the first row (row 0) of a ResultSet.
Example 4–17 Editing a Row in a ResultSet
<input type="text" name="comment#0"
value="new comment">
<input type="text" name="comment!title#0"
value="new title"
■Use the exclamation point character (!) to insert new fields into a ResultSet.
For example, to insert author and title fields into the comment ResultSet, you
could name the input fields comment!author and comment!title. If those
fields are not already in the ResultSet, they would be added when the form is
submitted.
■To delete a row from a ResultSet, empty all the field values so that they are blank,
as Example 4–18 shows.

Altering the Appearance and Navigation of Web Pages
Creating Dynamic Server Pages 4-17
Example 4–18 Deleting the First Row from a ResultSet
<input type="hidden" name="comment#0" value="">
<input type="hidden" name="comment!title#0" value="">
<input type="hidden" name="comment!date#0" value="">
<input type="hidden" name="comment!author#0" value="">
Another method for deleting rows from a ResultSet is to set the DeleteRows form
element to a list of comma-delimited pairs of ResultSet names and row numbers.
For example, to delete row 2 from the comment ResultSet and row 5 from the
book ResultSet, the DeleteRows form element would be set to the following
comma-delimited pairs:
comment:2,book:5
4.2.4.3 Form Section
The form section contains the code for presentation of the HTML form elements and
any other functionality that the page requires. The form properties, form fields, and
form buttons are placed in an HTML table to control the formatting of the assembled
web page.
For code examples, see Section 4.6.1, "Common Code for Forms."
4.2.4.3.1 Form Begin The form section begins two lines of Idoc Script, as Example 4–19
shows.
Example 4–19 Idoc Script to Begin Form Section
<!--$formName="HTMLForm"-->
<!--$include std_html_form_submit_start-->
The std_html_form_submit_start include in the std_page.idoc resource file
contains code to create a standard HTML form using a POST method, set the
IdcService to SUBMIT_HTML_FORM, and set the dID variable to the value of the
current HCSF page. Example 4–20 shows this code.
Example 4–20 Standard HTML Form for an HCSF Page
<form name="<$formName$>" method="POST"action="<$HttpCgiPath$>">7
<input type=hidden name="IdcService"value="SUBMIT_HTML_FORM">
<input type=hidden name="dID" value="<$SourceID$>">
4.2.4.3.2 Form Properties The form table typically begins with property definitions that
create the fields as form fields, allow the fields to be edited, and set the size of the field
caption area. Example 4–21 shows these property definitions.
Example 4–21 Field Property Definitions for a Form Table
<!--$isFormSubmit=1,isEditMode=1-->
<!--$captionFieldWidth=200, captionEntryWidth=80-->
4.2.4.3.3 Form Fields A few lines of code are typically used to create each input field,
as Example 4–22 shows.
Example 4–22 Code to Create an Input Field on a Form
<!--$eval("<$product_name:maxLength=250$>")-->
<!--$fieldName="model", fieldCaption="Model Number"-->
<!--$include std_display_field-->

Altering the Appearance and Navigation of Web Pages
4-18 Oracle WebCenter Content Developer's Guide for Content Server
■DataScript: If you add a form field called DataScript to a form being submitted,
then any Idoc Script for that value is evaluated by Content Server when it
processes the form.
There are two tables (coming from the data island inside the HCSP form) with an
entry in one table that references entries in the other table. Your goal is to change a
value in a specific column and row in the second table when you update a row in
the first table. To accomplish this value change, you can write JavaScript to set the
DataScript value with Idoc Script, as Example 4–23 shows.
Example 4–23 Changing a Field Value in a Table When You Update a Row in Another
Table
modifyRowAndColumn(row, column, value)
{
document.myform.DataScript = "<$setValue('#local', 'table2!'"+ column + "#'"+ row
+
"','" + value + "')$>";
}
Then, when you call the function with column = "myColumn" and row="1" and
value = "Test" while submitting the update form, the resulting DataScript
value before submit would be as follows:
DataScript.value = <$setValue('#local', 'table2!myColumn#1', 'Test')$>
The result would be the column table2!myColumn in row 1 of the table table2
would be updated with the value Test after the form was submitted.
Another way of saying this is that the DataScript can allow arbitrary edits of other
entries in the data island without having to actually create HTML form fields that
reference their names.
4.2.4.3.4 Form Buttons Two lines of code are typically used to create the form
submission and reset buttons. Example 4–24 shows these lines.
Example 4–24 Code for Creating Form Submission and Reset Buttons
<input type=submit name=Submit value=" Submit ">
<input type=reset name=Reset value="Reset">
4.2.4.3.5 Form End After all the form elements and default values have been defined,
the form must end with a </form> tag.
Note: Some fields might require additional code for proper display.
For example, you might need to override the standard std_memo_
entry include to increase the size of text areas. You can do this by
defining a custom include in the IDOC file, as follows:
<@dynamicalhtml std_memo_entry@>
<textarea name="<$fieldName$>" rows=15 cols=50
wrap=virtual><$fieldValue$></textarea>
<@end@>

Creating an HCST Page
Creating Dynamic Server Pages 4-19
4.3 Creating an IDOC File with Custom Includes for Dynamic Server
Pages
Dynamic server pages can work together to modify Content Server behavior. Before
you can create a dynamic server page, you need an IDOC file with custom includes for
the page to reference.
To create an IDOC file with custom includes for dynamic server pages:
1. Create an IDOC file with a custom include, in the format that Example 4–25
shows.
Example 4–25 Custom Include
<@dynamichtml HelloWorld@>
<H1>Hello World/<H1>
<@end@>
In the example, the first include is named HelloWorld, and the second include
defines one line of HTML code.
2. Save the file with the .idoc extension; for example, helloworld.idoc.
3. Check in the IDOC file to Content Server with a Content ID that you can reference
from another file, such as helloworld.
The IDOC file is available to any HCS* pages that reference it.
4.4 Creating an HCST Page
You can create an HCST dynamic server page by referencing an IDOC file in an HCST
file.
To create an HCST page:
1. Create an HCST file that references an include in an IDOC file, like the HCST file
that Example 4–26 shows.
Example 4–26 HCST File Referencing Custom Include
<HTML>
<HEAD>
<$docLoadResourceIncludes("dDocName=helloworld&RevisionSelectionMethod=LatestReleased")$>
</HEAD>
<BODY>
You should see it:
<$include HelloWorld$>
</BODY>
</HTML>
In the example, the line after the <HEAD> tag loads the helloworld.idoc file so
that the includes in the IDOC file are available to this HCST page. The second line
after the <BODY> tag displays the code from the HelloWorld include from the
helloworld.idoc file. Note the use of the standard Idoc Script tags, <$...$>.
2. Save the file with a .hcst extension; for example, helloworld.hcst.
3. Check in the HCST file to Content Server.

Creating an HCSP Page
4-20 Oracle WebCenter Content Developer's Guide for Content Server
4.5 Creating an HCSP Page
You can create an HCSP dynamic server page by referencing an IDOC file in an HCSP
file.
To create an HCSP Page
1. Create an HCSP file that references an include in an IDOC file, like the HCSP file
that Example 4–27 shows.
Example 4–27 HCSP File Referencing Custom Include
<HTML>
<HEAD>
<!--$docLoadResourceIncludes("dDocName=helloworld&RevisionSelectionMethod=LatestReleased")-->
</HEAD>
<BODY>
You should see it:
<!--$include HelloWorld-->
</BODY>
</HTML>
In the example, the line after the <HEAD> tag loads the helloworld.idoc file so
that the includes in the IDOC file are available to this HCSP page. The second line
after the <BODY> tag displays the code from the HelloWorld include from the
helloworld.idoc file. Note the use of the HTML comment tags, <!--...-->.
2. Save the file with a .hcsp extension; for example, helloworld.hcsp.
3. Check in the HCSP file to Content Server.
4.6 Creating an HCSF Page
A typical HCSF page and its associated IDOC file are shown in Example 4–28. This
example creates a form that users can fill out and submit to enter product descriptions
as content items.
To create an HCSF page:
1. Create an HCSF file that references an IDOC file named form_std_page, as
Example 4–28 shows.
Example 4–28 Product Description Form in HCSF File
<!DOCTYPE HTML PUBLIC "-//IETF//DTD HTML//EN">
<html>
<!--$docLoadResourceIncludes("dDocName=form_std_page&
RevisionSelectionMethod=Latest")-->
<head>
<meta NAME="idctype’ CONTENT="form; version=1.0">
<!--$include form_head_section-->
</head>
<!--$include form_pre_xml_section-->

Creating an HCSF Page
Creating Dynamic Server Pages 4-21
<!--$idcbegindata-->
<idcformrules isFormFinished="0"/>
<product_name content="html">
</product_name?
<model_number content="html">
SC-
</model_number>
<summary_description>
Enter a summary here.
</summary_description>
<full_description>
Enter a full description here.
</full_description>
<author>
<division>
Household Products
</division>
<revision>
</revision>
<!--$idcenddata-->
<!--$include form_post_xml_section-->
</body>
</html>
In the example, the line after the html tag loads the IDOC file with the Content ID
of form_std_page so that the includes in the IDOC file are available to this
HCSF page.
The meta tag is required for Content Publisher to acknowledge that this is a
Content Server HTML form.
The two includes after the meta tag, defined in the form_std_page IDOC file,
generate the code at the beginning of the web page.
The isFormFinished attribute of the idcformrules tag tells Content Server
that the form is not finished, so the fields can be edited, and the form can be
submitted.
The content property does not have to be set for each tag; it defaults to html.
The idcbegindata and idcenddata tags define the XML tagged area, which
specifies rules and initial metadata values for the form.
The text in each set of XML tags will populate the corresponding field on the form.
The last include in the example, defined in the form_std_page IDOC file,
generates the code at the end of the web page.
2. Save the file as product_form.hcsf.
3. Check in the HCSF file to Content Server.
4. Create an IDOC file with custom includes, as Example 4–29 shows.

Creating an HCSF Page
4-22 Oracle WebCenter Content Developer's Guide for Content Server
Example 4–29 IDOC File with Custom Includes
<!DOCTYPE HTML PUBLIC "-//IETF//DTD HTML//EN">
<html>
<body>
<@dynamichtml form_head_section@>
<!--standard includes for a standard hcsp page-->
<$defaultPageTitle="Product Description Form"$>
$include std_html_head_declarations$>
<@end@>
<@dynamichtml form_pre_xml_section@>
<!--This code is here for static viewing.-->
<$if 0$>
<body>
<$endif$>
<$include body_def$>
<@end@>
<@dynamichtml form_post_xml_section@>
<$include std_page_begin$>
<$include std_header$>
<$formName="HTMLForm"$>
<$include std_html_form_submit_start$>
<table>
<$if strEquals(ref:dExtension,"hcsf"))$>
<$isHcsf=1$>
<$else$>
<$isHcsp=1$>
<$endif$>
<$if isHcsf$>
<$isFormSubmit=1,isEditMode=1$>
<$endif$>
<$captionFieldWidth=150, captionEntryWidth=200$>
<$eval("<$product_name:maxLength=250$>")$>
<$fieldName="product_name", fieldCaption="Product Name"$>
<$if isHcsp$><isInfoOnly=1$><$endif$>
<$include std_display_field$>
<$eval("<$model_number:maxLngth=250$>")$>
<$fieldName="model_number", fieldCaption="Model Number"$>
<$if isHcsp$><$isInfoOnly=1$><$endif$>
<$include std_display_field$>
<$fieldName="summary_description",
fieldCaption="Summary Description",
fieldType="Memo"$>
<$if isHcsp$><$isInfoOnly=1$><$endif$>
<$include std_display_field$>

Creating an HCSF Page
Creating Dynamic Server Pages 4-23
<fieldName="full_descripton",
fieldCaption="Full Description",
fieldType="Memo"$>
<$if isHcsp$><$isInfoOnly=1$><$endif$>
<$include std_display_field$>
<$eval("<$author:maxLength=250$>")$>
<$fieldName="author", fieldCaption="Author"$>
<$if isHcsp$><$isInfoOnly=1$><$endif$>
<$include std_display_field$>
<$eval("<$division:maxLength=250$>")$>
<$fieldName="division", fieldCaption="Division"$>
<$if isHcsp$><$isInfoOnly=1$><$endif$>
<$include std_display_field$>
<$eval("<$revision:maxLength=250$>")$>
<$fieldName="revision", fieldCaption="Revision"$>
<$if isHcsp$><$isInfoOnly=1$><$endif$>
<$include std_display_field$>
<tr>
<td colspand=2><hr></td>
</tr>
<tr>align=center>
<td colspan=2>
<$if isHcsf$>
<input type=submit name=Submit value=" Submit ">
<input type=reset name=Reset Value="Reset">
<$endif$>
<input type=hidden name="dDocTitle:default"
value="<$"Product Description " & dateCurrent()$>">
</td>
</tr>
</table>
</form>
<$include std_page_end$>
<@end@>
</body>
</html>
In the example, the form_head_section include defines the page title and the
code for the standard HTML head section (referencing the std_html_head_
declarations include in the std_page.htm resource file).
The form_pre_xml_section include allows the page to be viewed statically
and defines code for a standard Content Server web page (referencing the body_
def include in the std_page.htm resource file).
The form_post_xml_section include defines the form fields. The std_page_
begin and std_header includes, which are defined in the std_page.htm
resource file, define code for a standard Content Server web page. The two lines
after these includes define the form name and the code for a standard HTML form
(referencing the std_htm_form_submit_start include in the std_page.htm
file).

Creating an HCSF Page
4-24 Oracle WebCenter Content Developer's Guide for Content Server
The conditional after the table tag determines if this is an editable form or a page
that has already been submitted, based on the file name extension. If this is an
editable page (isHcsf=1), the next conditional sets variables that create the fields
as form fields and allow the fields to be edited. The line after the conditionals sets
the width of the table cells for field captions to 150 pixels and sets the width of the
table cells for input fields to 200 pixels.
The eval function sets the maximum length of a text field to 250 characters.
The fieldName tag defines the name, caption, and type of field. If fieldType is
not defined, it defaults to Text.
If this is a form that has already been submitted (isHcsp=1), the if isHcsp
conditional sets a variable that makes the form field read-only.
The std_display_field include, defined in the std_page.htm resource file,
defines code that creates the form field.
If this is an editable form (isHcsf=1), the if isHcsf conditional creates the
Submit and Reset buttons.
The line after the if isHcsf conditional generates the document title
(dDocTitle) automatically.
The std_page_end include, defined in the std_page.htm resource file,
generates the code at the end of the web page.
5. Save the file as form_std_page.idoc.
6. Check in the IDOC file to Content Server with a Content ID of form_std_page.
(This is the name that is referenced by the HCSF page.)
7. Search for the HCSF content item in Content Server.
8. Click the link to display the form to create an HCSF page in your web browser.
The form should look like the sample in Figure 4–2.
Figure 4–2 Form to Create HCSF Page Displayed in a Web Browser
9. Fill out the form with some sample values, and click Submit.
A content item is created as an HCSP page.
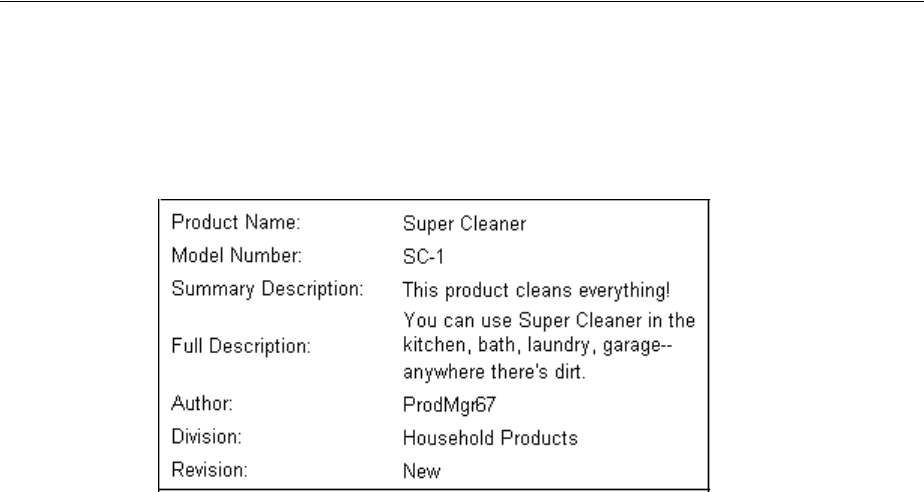
Creating an HCSF Page
Creating Dynamic Server Pages 4-25
10. Search for the HCSP page in Content Server.
11. Click the link to display the HCSP page in your web browser. Figure 4–3 shows
how the page should look.
Figure 4–3 HCSP Page
4.6.1 Common Code for Forms
The following features are commonly used in HCSF pages and associated IDOC files.
■Retrieving file information
■Referencing a file extension
■Defining form information
■Defining form fields
■Defining hidden fields
■Submitting a form
4.6.1.1 Retrieving File Information
Executing the service DOC_INFO_SIMPLE makes metadata from a specific file
available to the page. Example 4–30 shows the Idoc Script to execute this service.
Example 4–30 Idoc Script to Retrieve Metadata
<$dID=SourceID$>
<$executeService("DOC_INFO_SIMPLE")$>
4.6.1.2 Referencing a File Extension
You can reference a file extension in an if statement for a form to determine whether
the form has been submitted (.hcsp file) or unsubmitted (.hcsf file), as
Example 4–31 shows.
Example 4–31 Statement to Reference a File Extension
<$if (strEquals(ref:dExtension,"hcsf"))$>
<$isHcsf=1$>
<$else$>
<$isHcsp=1$>
<$endif$>
For information about the ref: prefix, see Section 4.2.1.4, "Referencing Metadata."

Creating an HCSF Page
4-26 Oracle WebCenter Content Developer's Guide for Content Server
4.6.1.3 Defining Form Information
Two lines of code define the form name and the standard include to start an HTML
form, as Example 4–32 shows.
Example 4–32 Name and Standard Include for an HTML Form
<$formName="HTMLForm"$>
<$include std_html_form_submit_start$>
Example 4–33 shows typical code to define form properties.
Example 4–33 Form Properties
<table border=0 width=100%>
<$isEditMode=1,isFormSubmit=1$>
<$captionFieldWidth="25%", captionEntryWidth="75%"$>
4.6.1.4 Defining Form Fields
Use standard Idoc Script variables and the std_display_field include to display the
form fields, as Example 4–34 shows.
Example 4–34 Standard Idoc Script to Display Form Fields
<$fieldName="news_
author",fieldDefault=dUser,fieldCaption="Author",isRequired=1,requiredMsg =
"Please specify the author."$>
<$include std_display_field$>
Some fields might require extra code to display the field correctly. For instance, the
standard text area for a memo field is 3 rows by 40 columns, but you might need to
override the standard include to increase the size of the text area. Example 4–35 shows
the standard std_memo_entry include.
Example 4–35 Standard Include for a Memo Field
<@dynamichtml std_memo_entry@>
<textarea name="<$fieldName$>" rows=3 cols=40 wrap=virtual> <$fieldValue$></textarea>
<@end@>
Example 4–36 shows how to use a custom std_memo_entry include to increase the
text area to a specified size, in this case 15 rows by 50 columns.
Example 4–36 Custom Include for a Memo Field
<@dynamichtml std_memo_entry@>
<textarea name=<$fieldName$> rows=15 cols=50 wrap=virtual><$fieldValue$></textarea>
<@end@>
4.6.1.5 Defining Hidden Fields
You can specify metadata for a submitted form (HCSP) by defining a hidden field,
which contributors cannot change. For example, the following code assigns the
document type News_Forms to each submitted form:
<input type=hidden name="dDocType" value="News_Forms">
This code specifies the security group of the submitted forms:
<input type=hidden name="dSecurityGroup" value="Public">
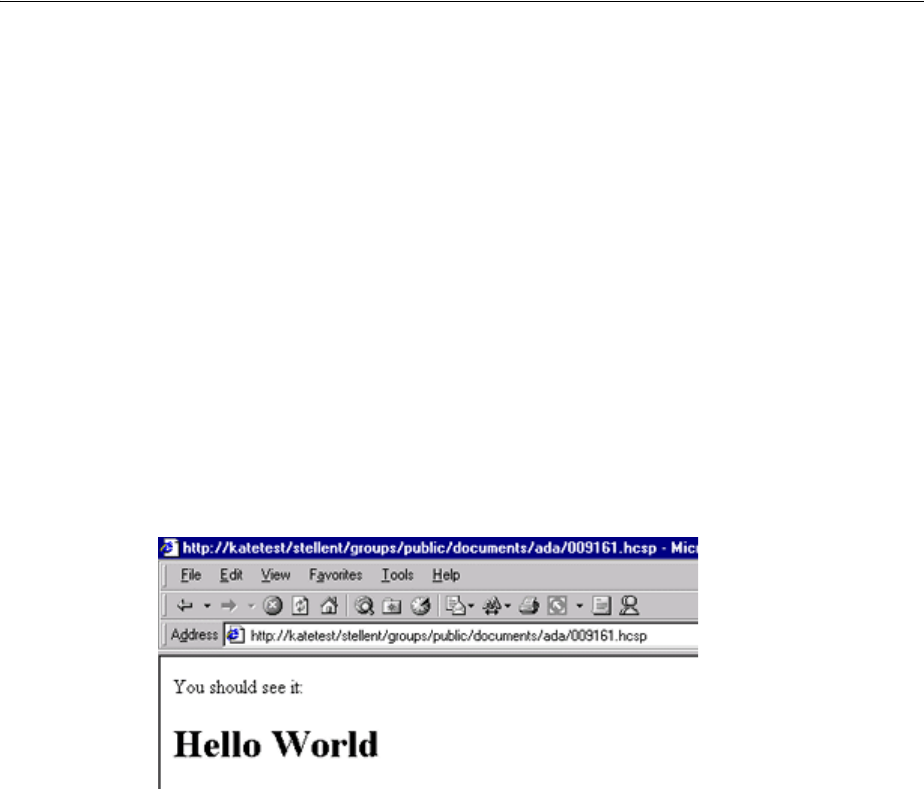
Verifying the Display of an HCST, HCSP, or HCSF Page in a Web Browser
Creating Dynamic Server Pages 4-27
4.6.1.6 Submitting a Form
When a form is submitted, you may want to call a Java function to perform additional
validation or processing. For example:
<input type=button name=Submit value="Save" onClick="postCheckIn(this.form)">
4.7 Verifying the Display of an HCST, HCSP, or HCSF Page in a Web
Browser
After you save an HCST, HCSP, or HCSF file, you can verify the page display in a Web
Browser, as Example 4–37 shows.
Example 4–37 Displaying an HCST Page and HCSP Page
1. Search for the helloworld content items in Content Server.
2. Display the HCST file and HCSP files in your web browser. They should both look
like the example in Figure 4–4.
Figure 4–4 HelloWorld Content Item Displayed in a Web Browser

Verifying the Display of an HCST, HCSP, or HCSF Page in a Web Browser
4-28 Oracle WebCenter Content Developer's Guide for Content Server

Part III
Part III Modifying the Functionality of Content
Server
This part describes how to change the basic functionality of Oracle WebCenter Content
Server.
Part III contains the following chapters:
■Chapter 5, "Changing System Settings"
■Chapter 6, "Changing Configuration Information"
■Chapter 7, "Customizing Services"
■Chapter 8, "Generating Actions Menus"

5
Changing System Settings 5-1
5Changing System Settings
This chapter describes how to change the basic functionality of Oracle WebCenter
Content Server.
This chapter includes the following sections:
■Section 5.1, "About Changing System Settings"
■Section 5.2, "Changing System Settings Through the Admin Server"
■Section 5.3, "Changing System Settings Through the System Properties
Application"
■Section 5.4, "Customizing the Library and System Home Page with the Web
Layout Editor"
■Section 5.5, "Defining Security and Accounts for Users with the User Admin
Application"
The instructions in this chapter are for changing system settings on Oracle WebLogic
Server. Oracle WebCenter Content can also be deployed to an IBM WebSphere
Application Server. For more information, see the Oracle Fusion Middleware Third-Party
Application Server Guide.
5.1 About Changing System Settings
Oracle WebCenter Content Server has a number of features that you can set up to
change features systemwide according to your needs. For example, you can use the
following administration tools within Oracle WebCenter Content Server to customize
your content management system settings:
■Admin Server
■System Properties utility
■Web Layout Editor
■User Admin application
■Other administration customizations
In addition to changing system setting with these tools, you can change other
settings in different ways to meet the needs of your site:
–Workflows can be designed, customized, and implemented using the
Workflow Admin tool available from the Admin Applets menu

Changing System Settings Through the Admin Server
5-2 Oracle WebCenter Content Developer's Guide for Content Server
–New custom metadata fields can be created and default values set using the
Configuration Manager
–Customized action screens (such as check-in, search, and check-out) can be
created using Content Profiles
5.2 Changing System Settings Through the Admin Server
The Admin Server is a collection of web pages that you can use to configure
systemwide settings for Oracle WebCenter Content Server. To access these web pages,
click Admin Server from the Administration tray in the portal navigation bar, which
displays the Admin Server main page. From this page, you can check the status of
each server that is running, and you can check console output.
For more information about changing system settings through the Admin Server, see
"Managing System Settings" in the Oracle WebCenter Content System Administrator's
Guide for Content Server.
5.3 Changing System Settings Through the System Properties
Application
The System Properties administration application is used to configure systemwide
Oracle WebCenter Content settings for content security, Internet settings, localization,
and other types of settings. In the System Properties application, you can set these
options:
■Optional functionality for Content Server
■Options related to content item security
■Options related to the Internet and web interaction
■JDBC connectivity options
■Functionality such as time zones and IP filters
■Localization features
■Directory paths
The application server is the primary tool for setting system properties for Oracle
WebCenter Content; however, for some purposes you must use the System Properties
application. You do not need administrative-level permissions to set these options; just
access to the directory where the instance is installed.
For more information about changing system settings through the System Properties
application, see "Managing System Settings" in the Oracle WebCenter Content System
Administrator's Guide for Content Server.

Defining Security and Accounts for Users with the User Admin Application
Changing System Settings 5-3
5.4 Customizing the Library and System Home Page with the Web Layout
Editor
The Web Layout Editor is used to customize the Library and system home (portal)
page. To access this editor, click Web Layout Editor on the Admin Applets page. With
the Web Layout Editor, you can change the organization of local web pages in the
Library and build new portal pages for your site. You can create links to web sites
outside your local site.
For information about the screens you can use to create web pages with the Web
Layout Editor, see "Web Layout Editor Interface" in the Oracle WebCenter Content
Application Administrator's Guide for Content Server.
5.5 Defining Security and Accounts for Users with the User Admin
Application
You can define security groups, aliases, roles, and accounts for the users at your site
using the User Admin function. To access this screen, select Admin Applets from
Administration tray or menu, then click User Admin on the Administration Applets
for user page. Options on this screen are used to create aliases, set permissions for
security groups, establish roles and permissions associated with those roles, and
customize information that is stored about users.
For more information, see "Managing Security and User Access" in the Oracle
WebCenter Content System Administrator's Guide for Content Server.

Defining Security and Accounts for Users with the User Admin Application
5-4 Oracle WebCenter Content Developer's Guide for Content Server

6
Changing Configuration Information 6-1
6Changing Configuration Information
This chapter describes how to change Oracle WebCenter Content Server
configurations with the Idoc Script Custom Scripting Language and with other
development tools and technologies.
This chapter includes the following sections:
■Section 6.1, "About Changing Configuration Information"
■Section 6.2, "Changing Configurations with the Idoc Script Custom Scripting
Language"
■Section 6.3, "Changing Configurations with Development Tools and Technologies"
6.1 About Changing Configuration Information
You can change configuration information with Idoc Script, a proprietary, server-side
custom scripting language for Content Server. With Idoc Script, you can reference
variables, conditionally include content in HTML pages, and loop over results
returned from queries. Because Idoc Script is evaluated on the server side (rather than
the client side), page elements are processed after the browser has made a request, but
before the requested page is returned to the client.
For advanced customizations and integration with other business systems, you can
use other development tools and technologies that Content Server supports.
6.2 Changing Configurations with the Idoc Script Custom Scripting
Language
Idoc Script is primarily used in the following situations:
■For include code, an include defines pieces of code used to build Oracle
WebCenter Content Server web pages. They are defined once in a resource file
then referenced by template files as necessary. Includes are used on almost every
page of the Oracle WebCenter Content Server web site.
A super tag can also be used, which defines exceptions to an existing include. The
super tag tells the include to start with an existing include and add to it or modify
it using the specified code.
■For variables, you can use variables to customize the Oracle WebCenter Content
Server behavior. Variable values can be stored in an environment resource, such as
the config.cfg file and many are predefined in Oracle WebCenter Content Server.
You can also define your own custom variables.

Changing Configurations with Development Tools and Technologies
6-2 Oracle WebCenter Content Developer's Guide for Content Server
■For functions, many built-in global functions are used in Oracle WebCenter
Content Server. These perform actions such as date formatting or string
comparisons. Some functions return results and some are used for personalization
functions, such as those found on the My Profile page.
■For conditionals, you can use conditionals to test code and include or exclude the
code from an assembled web page.
■For looping, two types of looping are available using Idoc Script: ResultSet
looping, in which a set of code is repeated for each row in a ResultSet that is
returned from a query and while looping, which is a conditional loop.
■In Administration areas, such as Workflow customization, web layouts, archiver
and search expressions.
For information about usage, syntax, and configuration variables, see the Oracle
WebCenter Content Idoc Script Reference Guide.
6.3 Changing Configurations with Development Tools and Technologies
For advanced customizations and integration with other business systems, Content
Server supports the following development tools and technologies:
■VBScript
■ASP
■J++
■JavaScript
■ASP+
■J2EE
■Java
■JSP
■COM
■Visual Basic
■DreamWeaver
■.Net
■C++
■Visual InterDev

7
Customizing Services 7-1
7Customizing Services
This chapter describes how to customize Oracle WebCenter Content Server services.
This chapter includes the following sections:
■Section 7.1, "About Customizing Services"
■Section 7.2, "Customizing Services for Communicating with Content Server"
■Section 7.3, "Customizing Services for Accessing the Database"
7.1 About Customizing Services
Content Server services are functions or procedures performed by Oracle WebCenter
Content Server. Calling an Oracle WebCenter Content Server service (making a service
request) is the only way to communicate with Oracle WebCenter Content Server or to
access the database.
Any service can be called externally (from outside Oracle WebCenter Content Server)
or internally (from within Oracle WebCenter Content Server). Client services are
usually called externally while administrative services are called internally. The service
uses its own attributes and actions to execute the request, based on any parameters
passed to the service.
The standard Oracle WebCenter Content Server services are defined in the
StandardServices table in DomainHome/resources/core/tables/std_
services.htm. A service definition contains three main elements:
■The service name.
■The service attributes, which define the following aspects of the service:
– service class, which specifies which Java class the service has access to. This
determines what actions can be performed by the service.
– access level, which assigns a user permission level to the service.
– template page, which specifies the template that displays the results of the
service
–service type, which specifies if the service is to be executed as a subservice
inside another service
– subjects notified, which specifies the subsystems to be notified by the service.
– error message, which is returned by the service if no action error message
overrides it

Customizing Services for Communicating with Content Server
7-2 Oracle WebCenter Content Developer's Guide for Content Server
■The service action, which is a colon-separated list that defines the following
aspects of the action:
–Action type
–Action name
–Action parameters
–Action control mask
–Action error message
Understanding and using services is an integral part of creating components and
customizing Oracle WebCenter Content Server. For more information, see Chapter 18,
"Getting Started with Integrating WebCenter Content into Your Environment."
7.2 Customizing Services for Communicating with Content Server
Clients use services to communicate with Content Server. A service call can be
performed from either the client or server side, so services can be performed on behalf
of the web browser client or within the system itself.
For more information about services, see Section 15.2.7, "Services."
For more information about customizing services, see "Customizing Services" in the
Oracle WebCenter Content Services Reference Guide.
7.3 Customizing Services for Accessing the Database
Clients use services to access the Oracle WebCenter Content database. Any program or
HTML page can use services to request information from Content Server.
For more information about services, see Section 15.2.7, "Services."
For more information about customizing services, see "Customizing Services" in the
Oracle WebCenter Content Services Reference Guide.

8
Generating Actions Menus 8-1
8Generating Actions Menus
This chapter describes how to generate Actions menus.
This chapter includes the following sections:
■Section 8.1, "About Generating Actions Menus"
■Section 8.2, "Creating Display Tables"
■Section 8.3, "Customizing Actions Menus"
8.1 About Generating Actions Menus
In previous versions of Oracle WebCenter Content Server, when a component writer
wanted to create an HTML table like those used on the search results page, HTML
code had to be copied and pasted. The information in the tables was mixed with the
HTML, with no separation between data and display.
The same issue was true for action menus. Data and display for the tables and menus
were tightly coupled, making it impossible to perform global changes to all tables in
Oracle WebCenter Content Server except for those changes done with CSS
modifications. It was also difficult for components to target and modify specific
aspects of both the tables and the menus.
To customize a page's action menu, a developer can override one of the following
include files then modify the PageMenusData resultset. These includes are all defined
in the DomainHome/resources/core/resources/std_page.idoc file:
■custom_searchapi_result_menus_setup
■custom_docinfo_menus_setup
■custom_query_page_menus_setup
■custom_audit_info_menus_setup
In addition, tables like the one used on the search results page can be created by
setting up result sets of data then calling specific resource includes which use that data
to display the page. Result sets can also be used to create action menus like those
found on the Workflow In Queue and Search Results pages.
The action menu and HTML table display frameworks allow developers to create
quick and flexible web pages that match the look and feel of the rest of the system.
They also allow component writers to easily extend, add to, and override any or all of
the Headline View or Thumbnail View tables on the server, and any of the action
menus.

Creating Display Tables
8-2 Oracle WebCenter Content Developer's Guide for Content Server
8.2 Creating Display Tables
Different display tables are used for the search results page for each display type:
■Headline view
■Thumbnail view
One of the first steps in any table setup is to retrieve documents to display, as
Example 8–1 shows.
Example 8–1 Code to Retrieve Documents
<$QueryText = "dDocAuthor <matches> `sysadmin`"$>
<$executeService("GET_SEARCH_RESULTS")$>
8.2.1 Headline View Tables
The following example shows how to create a Headline View table. The concepts
discussed here are also used to create the other table types.
The initial step in this process is to create a result set that describes the columns of the
table, as Example 8–2 shows.
Example 8–2 ResultSet to Describe Table Columns
<$exec rsCreateResultSet("ColumnProperties",
"id,width,headerLabel,rowAlign")$>
<$exec rsAppendNewRow("ColumnProperties")$>
<$ColumnProperties.id = "dDocName"$>
<$ColumnProperties.width = "150px"$>
<$ColumnProperties.headerLabel = lc("wwDocNameTag")$>
<$ColumnProperties.rowAlign = "center"$>
<$exec rsAppendNewRow("ColumnProperties")$>
<$ColumnProperties.id = "dDocTitle"$>
<$ColumnProperties.width = "auto"$>
<$ColumnProperties.headerLabel = lc("wwTitle")$>
<$ColumnProperties.rowAlign = "left"$>
<$exec rsAppendNewRow("ColumnProperties")$>
<$ColumnProperties.id = "actions"$>
<$ColumnProperties.width = "75px"$>
<$ColumnProperties.headerLabel = lc("wwActions")$>
<$ColumnProperties.rowAlign = "center"$>
A result set called ColumnProperties is created. Each row in the table corresponds
to a column on the table to be created. Each column can have several attributes
associated with it. Some of the more common attributes are:
■id: This is a mandatory attribute. Each column in the table being created must
have an ID associated with it. The ID is used later to determine what will be
displayed in every row.
■width: The width of the column. This can be any CSS width declaration such as
100px, 15em, or auto, which causes the column to auto-size, filling as much of
the table as possible.
■headerLabel: The text to be displayed in the header of this column.

Creating Display Tables
Generating Actions Menus 8-3
■rowAlign: An indication of whether the contents should be left, right, or center
aligned.
■headerURL: Used to link the column header text to a URL.
The next step is to specify what data will be displayed in each row of the table, as
Example 8–3 shows.
Example 8–3 Data to Display in a Result Set
<$exec rsCreateResultSet("RowData","dDocName,dDocTitle,actions")$>
<$exec rsAppendNewRow("RowData")$>
<$RowData.dDocName = "<$dDocName$>"$>
<$RowData.dDocTitle = "<$dDocTitle$>"$>
<$RowData.actions = "<$include doc_info_action_image$>"$>
The ColumnProperties result set technically has a row for each column in the table,
while in RowData, there is only one row. Data entered into this result set is of the
following form:
<$RowData.%COLUMN_ID% = "%IDOCSCRIPT%"$>
Each column in the RowData result set refers to an actual column that will appear in
the final table. Each column in this result set has a corresponding "ID" in the
ColumnProperties result set declared earlier. An Idoc Script expression is assigned
to each cell in this result set. It will then be evaluated during the display of each row as
it is written to the HTML document.
Next the resource include must be created to display each row in the table.
<$include create_slim_table_row_include$>
Calling this resource include creates the slim_table_row_include resource
include. Instead of parsing and evaluating the RowData result set for each row in the
table, it is done once.
Use the following steps to set multiple row includes (for example, for a single table
which displays different rows for different types of items):
1. Delete and re-create the RowData result set.
2. Set rowIncludeName to the name of the resource include to create.
3. Include create_slim_table_row_include again.
Example 8–4 shows code that displays the table.
Example 8–4 Code to Display a Table
<$include slim_table_header$>
<$loop SearchResults$>
<$include slim_table_row_include$>
<$endloop$>
<$include slim_table_footer$>
To make the table look like the table on the search results page, set the following value
in the script:
<$UseRowHighlighting = true$>
One special customization with the Headline View table allows any component writer
or administrator to easily override how the data in any column is presented.
Example 8–5 shows a custom include that can be declared from within a component.

Customizing Actions Menus
8-4 Oracle WebCenter Content Developer's Guide for Content Server
Example 8–5 Custom Include Declaration in a Component
<@dynamichtml slim_table_title@>
<b><$dDocTitle$></b>
<@end@>
If dDocTitle:slimTableCellInclude=slim_table_title is added to the
IntradocDir/config/config.cfg file or set from within a script, all Headline
View tables with a column ID of dDocTitle are displayed using the defined custom
include. This overrides the RowData for these columns.
8.2.2 Thumbnail View Tables
The table for the Thumbnail View is created differently. The ColumnProperties and
RowData result sets are not constructed. Instead, the number of columns are set, and
an Idoc Script include name is used to paint each cell, as Example 8–6 shows. This is
less easy to customize and less data-driven than the other methods, but this type of
table is also much less structured.
Example 8–6 Code for Cells in a Thumbnail View Table
<$numDamColumns = 4$>
<$damCellIncludeName = "my_sample_dam_cell"$>
<$include dam_table_header$>
<$loop SearchResults$>
<$include dam_table_item$>
<$endloop$>
<$include dam_table_footer$>
8.3 Customizing Actions Menus
The first step in customization is to add the Actions menu icon to the Actions
column. Example 8–7 incorporates an action menu into each row of the Headline View
sample table used previously.
Example 8–7 Code to Incorporate Actions Menus in Rows
<$RowData.actions = "<$include action_popup_image$>" &
" <$include doc_info_action_image$>"$>
This inserts the action image into the appropriate column. However, clicking it does
nothing because the actual menu is not written to the HTML page. Example 8–8 shows
code that creates the data to be used to construct this menu.
Example 8–8 Data to Construct an Actions Menu
<$exec rsCreateResultSet("PopupProps",
"label,onClick,function,class,id,ifClause")$>
<$exec rsAppendNewRow("PopupProps")$>
<$PopupProps.label = lc("wwCheckOut")$>
<$PopupProps.function = "<$HttpCgiPath$>?IdcService=CHECKOUT" &
"&dID=<$dID$>&dDocName=<$url(dDocName)$>" &
"&dDocTitle=<$url(dDocTitle)$>"$>
<$PopupProps.class = "document"$>
<$PopupProps.id = "checkout"$>

Customizing Actions Menus
Generating Actions Menus 8-5
<$exec rsAppendNewRow("PopupProps")$>
<$PopupProps.label = lc("wwGetNativeFile")$>
<$PopupProps.function = "<$HttpCgiPath$>?IdcService=GET_FILE" &
"&dID=<$dID$>&dDocName=<$url(dDocName)$>" &
"&allowInterrupt=1"$>
<$PopupProps.ifClause = "showNativeFileLink"$>
<$PopupProps.class = "document"$>
<$PopupProps.id = "getNativeFile"$>
<$exec rsAppendNewRow("PopupProps")$>
<$PopupProps.label = lc("wwTest")$>
<$PopupProps.function = "javascript:alert('<$js(dDocName)$>');"$>
<$PopupProps.ifClause = "showTestAction"$>
<$PopupProps.class = "debug"$>
<$PopupProps.id = "alertDocName"$>
This code creates a result set called PopupProps, where each row corresponds to an
action in the menu being created. Each action can have several attributes associated
with it. Some of the more common attributes follow:
■label: A string displayed as the label for the action.
■function: The URL or JavaScript method to be associated with this action.
■class: A classification for this action. It can be something as simple as "search",
"document", "workflow", or even the name of your component. It places the action
into a group so that it can be quickly enabled or disabled with the rest of the
actions within that same group.
■id: Another method of classification, much more specific than "class". This
method should be unique to the application, and you can use it to hide certain
actions from appearing within the menus.
■ifClause: An optional attribute evaluated every time that action is about to be
written to the HTML document. If the clause evaluates to FALSE, the action is not
displayed.
■isDisabled: If set to 1, the action is never displayed.
■linkTarget: Used to make this link open a page in a different window. This
attribute points to any anchor tag target.
After the data is set, it can be used to create an Idoc Script resource that writes this
Actions menu, as Example 8–9 shows.
Example 8–9 Resource to Write an Actions Menu
<$include create_action_popup_container_include$>
This resource works like create_slim_table_row_include. It constructs a new
Idoc Script resource called action_popup_container_include. To rename it, you
could set <$actionPopupContainerIncludeName = new_include_name$> in
the script.
Example 8–10 shows code to have this include called for each row of the Headline
View table.

Customizing Actions Menus
8-6 Oracle WebCenter Content Developer's Guide for Content Server
Example 8–10 Code to Call an Include for Each Row of a Table
<$exec rsCreateResultSet("PopupData", "actions")$>
<$exec rsAppendNewRow("PopupData")$>
<$PopupData.actions="<$include action_popup_container_include$>"$>
This code creates a PopupData result set similar to the RowData result set. It is
structured in the same way, and is used as a location to print the action menu
containers which are hidden until a user clicks on the action image.
The table created now has Acitons menus, similar to those normally seen on the search
results page whenever the appropriate image is clicked.
Editing these actions is done by adding and deleting rows from the PopupProps
result set or editing rows that already exist. In addition to this type of customization,
actions can be hidden by setting the disabledActionPopupClasses and
disabledActionPopupIds variables. These can be set in the config/config.cfg
file or in the Idoc Script itself, as Example 8–11 shows.
Example 8–11 Code to Hide Items in an Actions Menu
<$disabledActionPopupClasses = "workflow,folders"$>
<$disabledActionPopupIds = "getNativeFile,alertDocName"$>
Setting these variables causes any actions whose class is either workflow or folders,
or whose ID is getNativeFile or alertDocName, to always be hidden. Using these
variables enable Oracle WebCenter Content Server administrators and component
writers to hide specific actions either globally or for specific pages.
Component writers also can override a number of Idoc Script resource includes to
modify functionality in this area on either a global or targeted scale. The following
includes are just a few of the available resource includes:
■custom_add_to_action_popup_data
■custom_modify_action_popup_data
■classic_table_row_pre_display
■slim_table_row_pre_display
■custom_row_pre_display

Part IV
Part IV Customizing Content Server with
Components
This part describes how to work with Oracle WebCenter Content Server components,
which are programs that modify Content Server functionality.
Part IV contains the following chapters:
■Chapter 9, "Getting Started with Content Server Components"
■Chapter 10, "Enabling and Disabling Components for Content Server"
■Chapter 11, "Updating Component Configurations"
■Chapter 12, "Customizing Content Tracker"
■Chapter 13, "Customizing Content Categorizer"
■Chapter 14, "Downloading Custom Components"
■Chapter 15, "Creating Custom Components"
■Chapter 16, "Installing Components"
■Chapter 17, "Uninstalling a Component"

9
Getting Started with Content Server Components 9-1
9Getting Started with Content Server
Components
This chapter describes how to work with Oracle WebCenter Content Server
components, which are programs used to modify Content Server functionality.
This chapter includes the following sections:
■Section 9.1, "About Standard, System, and Custom Components"
■Section 9.2, "Tools for Managing Components"
■Section 9.3, "Component Files"
■Section 9.4, "Resources for Assembling Web Pages"
9.1 About Standard, System, and Custom Components
Components are modular programs designed to interact with Content Server at
runtime. Standard components, system components, and custom components are
included with Content Server to add or change the standard core functionality of
Content Server.
9.1.1 Component Files Overview
When you define a custom component, you create or make changes to the following
files:
■The idcshort-product-id_components.hda file, which tells Content Server
what components are enabled and where to find the definition file for each
component.
■The component definition (or glue) file, which tells Content Server where to find
the resources for the custom component.
■Different custom resource files, which define your customization to standard
Content Server resources.
■Template files, which define custom template pages.
■Other files which contain customization to Content Server graphics, Java code,
help files, and so on.
For more detailed information about these files, see Section 9.1.3, "About Directories
and Files."

About Standard, System, and Custom Components
9-2 Oracle WebCenter Content Developer's Guide for Content Server
Any type of file can be included in a component, but the following file formats are
used most often:
■HDA
■HTM
■CFG
■Java CLASS
If you build or unpackage components in the Component Wizard, or upload and
download components in the Component Manager, you work with the following files:
■A compressed ZIP file used to deploy a component on other Content Server
instances.
■A manifest.hda file that tells Content Server where to place the files that are
unpackaged or uploaded from a component ZIP file.
9.1.2 Using Components
Components are modular programs that are designed to interact with Oracle
WebCenter Content Server at runtime. The component architecture model is derived
from object-oriented technologies, and encourages the use of small modules to
customize Oracle WebCenter Content Server as necessary, rather than creation of a
huge, all-inclusive (but cumbersome) application.
Any type of file can be included in a component, but the following file formats are
used most often:
■HDA
■HTM
■CFG
■Java CLASS
Components are typically used to alter the core functionality of Oracle WebCenter
Content Server. For example, you could use a component could to perform any of
these tasks:
■Modify the standard security features
■Change the way search results are requested and returned
■Enable Oracle WebCenter Content Server to work with a particular system (such
as a Macintosh client or a proprietary CAD program)
Using component architecture with Oracle WebCenter Content Server gives you these
advantages:
■You can modify source code without compromising the integrity of the product.
Oracle WebCenter Content Server loads many of its resources from external text
files, so you can view the files to analyze how the system works, and then copy
and modify the files to your requirements.
Note: You can create custom components by manually creating the
necessary files and resources. However, the Component Wizard has
no limitations compared to the manual method, and using it prevents
many common mistakes.

About Standard, System, and Custom Components
Getting Started with Content Server Components 9-3
■You can use a custom component on multiple instances across multiple platforms.
When you have created a custom component, you can package it as a ZIP file and
load it on other Oracle WebCenter Content Server instances. Many custom
components can work on Oracle WebCenter Content Server platforms other than
the original development platform.
■You can turn individual components on and off for troubleshooting purposes.
You can group customizations so that each component customizes a specific
Oracle WebCenter Content Server function or area. If you have problems,
disabling components one at a time can help you quickly isolate the trouble.
■You can reinstall or upgrade an Oracle WebCenter Content Server instance
without compromising customizations.
Custom components override existing product resources rather than replace them.
Replacing the standard Oracle WebCenter Content Server files might not affect
your customizations.
Keep the following constraints in mind when deciding whether to use custom
components:
■Custom components change behavior and look-and-feel systemwide. If you
want your changes to apply only in limited situations, you might want to consider
dynamic server pages.
■Custom components can be affected by changes to the Oracle WebCenter
Content Server core functionality. Because new functionality may change the way
your components behave, customizations are not guaranteed to work for future
Oracle WebCenter Content Server releases. Whenever you upgrade, you should
review and test your custom components.
■A component may not be necessary for simple customizations. A large number
of simple components could become difficult to manage.
Components must be installed and enabled to be used by Oracle WebCenter Content
Server. Components provided with Oracle WebCenter Content Server are
automatically installed, and they are enabled or disabled by default. Custom
components must be installed and enabled to be usable. Several tools are available for
working with components:
■The Component Wizard automates the process of creating custom components.
You can use the Component Wizard to create new components, modify existing
components, and package components for use on other Oracle WebCenter Content
Server instances. For more information, see Section 9.2.1, "Component Wizard."
■The Advanced Component Manager provides a way to manage custom
components in Oracle WebCenter Content Server. By using the Advanced
Component Manager, you can add new components and enable or disable
components for Oracle WebCenter Content Server. For more information, see
Section 9.2.2, "Advanced Component Manager."
■The ComponentTool is a command-line utility for installing, enabling, and
disabling components for Oracle WebCenter Content Server.
For information about component architecture and creation, see Chapter 9, "Getting
Started with Content Server Components."

About Standard, System, and Custom Components
9-4 Oracle WebCenter Content Developer's Guide for Content Server
9.1.3 About Directories and Files
The following files are used in component creation:
■HDA files
■Custom resource files
■Manifest file
■Other files, such as customized site files, the component ZIP file, and custom
installation parameter files
In the typical directory structure for WebCenter Content, the files for a component are
stored in a component directory, in the
DomainHome/ucm/short-product-id/custom directory.
Content Server uses a data binder to cache data, such as variable values and lookup
keys.
9.1.3.1 HDA Files
A HyperData File (HDA) is used to define properties and tabular data in a simple,
structured ASCII file format. It is a text file that is used by Content Server to determine
which components are enabled and disabled and where to find the definition files for
that component.
The HDA file format is useful for data that changes frequently because the compact
size and simple format make data communication faster and easier for Content Server.
The HDA file type is used to define the following component files:
■Components file (idcshort-product-id_components.hda)
■Component definition file
■Manifest file
■Dynamic table resource file
■Template resource file
Example 9–1 shows an idccs_components.hda file that points to a component
called customhelp.
Example 9–1 idccs_components.hda File for a Component
<?hda charset=Cp1252 encoding=iso-8859-1?>
@Properties LocalData
blDateFormat=M/d{/yy} {h:mm[:ss] {aa}[zzz]}!tAmerica/Chicago!mAM,PM
@end
@ResultSet Components
2
name
location
customhelp
custom/customhelp/customhelp.hda
@end

About Standard, System, and Custom Components
Getting Started with Content Server Components 9-5
9.1.3.1.1 Elements in HDA Files Each HDA file contains a header line and one or more
sections. The header line identifies the Content Server version, character set, and Java
encoding for the HDA file. If an HDA file contains double-byte (Asian language)
characters, the correct character set and encoding must be specified so that Content
Server can read the file properly. The header line is not required for single-byte
characters, but it is a good practice to include it in your HDA files.
Two types of sections, Properties and ResultSet, are relevant to component
development. These sections are used to define the properties of the file (name,
location, and so on) and the ResultSet, which defines a table or columns and rows of
data. A ResultSet often represents the results of a query. All other sections tags are for
internal application use only.
Comments are not allowed within a section of an HDA file. However, you can place
comments in the HDA file before the first section, between sections, or after the last
section. Blank lines within a section of an HDA file are interpreted as a NULL value.
Blank lines before the first section, between sections, or after the last section are
ignored. None of the section types are mandatory in an HDA file, so unused sections
can be deleted.
■The Properties section contains a group of name/value pairs. For a custom
component, the most common name for a Properties section is LocalData,
which means that the name/value pairs are valid only for the current HDA file.
You can also define global name/value pairs in a Properties section called
Environment, but this section is rarely used. The recommended practice is to
define global environment variables in a configuration file, such as config.cfg.
Example 9–2 shows a Properties section from an HDA file.
Example 9–2 Properties Section of an HDA File
@Properties LocalData
PageLastChanged=952094472723
LocationInfo=Directory,Public,
IsJava=1
refreshSubMonikers=
PageUrl=/intradoc/groups/public/pages/index.htm
LastChanged=-1
TemplatePage=DIRECTORY_PAGE
IdcService=PAGE_HANDLER
LinkSelectedIndex=0
PageName=index
HeaderText=This is a sample page. The Page Name must remain index. The Page
Properties for this index page should be customized.
PageFunction=SavePage
dSecurityGroup=Public
restrictByGroup=1
PageType=Directory
PageTitle=Content Server Index Page
@end

About Standard, System, and Custom Components
9-6 Oracle WebCenter Content Developer's Guide for Content Server
■Each ResultSet section of an HDA file defines a table or columns and rows of
data. A ResultSet can be used to pass information to a database or to represent the
result of a database query. A ResultSet section has the following structure:
–The first line defines the name of the ResultSet table, using the format
@ResultSet resultset_name.
–The second line defines the number of columns.
–The next n lines define the column names.
–The remaining lines define the values in each cell of the table.
–The last line of the section ends the table, using the format @end.
Example 9–3 shows a ResultSet called Scores that has 4 columns and 3 rows.
Example 9–3 ResultSet Section of an HDA File
@ResultSet Scores
4
name
match1
match2
match3
Margaret
68
67
72
Sylvia
70
66
70
Barb
72
71
69
@end
The following table shows the ResultSet data in a columnar form. A ResultSet can
be given any name.
Content Server uses some predefined ResultSets with the following names, which
should not be used for the custom component table.
name match1 match2 match3
Margaret 68 67 72
Sylvia 70 66 70
Barb 72 71 69
ResultSet Name Location Purpose
Components IntradocDir/data/components/idcshort-prod
uct-id_components.hda
Defines the name and
location of any custom
components you have
created. You must specify
the short product ID (cs,
ibr, urm) for
short-product-id.

About Standard, System, and Custom Components
Getting Started with Content Server Components 9-7
9.1.3.1.2 The idccs_components.hda, idcibr_components.hda, or idcurm_components.hda File
The idcshort-product-id_components.hda file is a text file that tells Content
Server which components are enabled and where to find the definition file for each
component.
The idcshort-product-id_components.hda file is always stored in the
IntradocDir/data/components directory. The Component Wizard, Component
Manager, and ComponentTool can be used to make changes to this file if needed.
Example 9–4 shows an idccs_components.hda file that lists several enabled
components, such as schema, configuration migration, and SOAP components.
Example 9–4 idccs_components.hda File for Multiple Enabled Components
@properties LocalData
blDateFormat=M/d/yy
@end
@ResultSet Components
2
name
location
SchemaDCL
custom/SchemaDCL/SchemaDCL.hda
ConfigMigrationUtility
custom/ConfigMigrationUtility/Cmu.hda
Soap
custom/Soap/Soap.hda
@end
IntradocReports IdcHomeDir/resources/core/reports/reports
.hda
Specifies the default report
templates for Content
Server.
IntradocTemplates IdcHomeDir/resources/core/templates/templ
ates.hda
Specifies all of the default
templates for Content
Server (except for search
results and report
templates).
ResourceDefinition DomainHome/ucm/short-product-id/custom/co
mponent_name/component_name.hda
Defines resources for a
custom component.
SearchResultTemplates IdcHomeDir/resources/core/templates/templ
ates.hda
Specifies the default search
results templates for
Content Server.
Note: As of release 11gR1, the components.hda file and edit_
components.hda file have been combined into one file called
idcshort-product-id_components.hda. If the Admin Server
does not find the idcshort-product-id_components.hda file
but does find the legacy files, then it will migrate the data from the
legacy file and create an idcshort-product-id_
components.hda file containing the appropriate data.
ResultSet Name Location Purpose

About Standard, System, and Custom Components
9-8 Oracle WebCenter Content Developer's Guide for Content Server
9.1.3.1.3 Component Definition Files A component definition file points to the custom
resources that you have defined. This file specifies information about custom
resources, ResultSets, and merge rules. Because it serves as the "glue" that holds a
component together, the component definition file is sometimes called the glue file.
The definition file for a component is typically named component_name.hda, and it
is located in the DomainHome/ucm/short-product-id/custom/component_
name directory.
9.1.3.2 Custom Resource Files
Custom resource files define your Content Server customization. They are usually
HDA files but some are HTM files.
The custom resource files for a component are typically located in the
DomainHome/ucm/short-product-id/custom/component_name directory.
Some resource files may be placed in subdirectories, such as
resources/core/templates.
Table 9–1 describes these resources.
For more detailed information about these files, see Section 9.4, "Resources for
Assembling Web Pages."
In addition, a template.htm page is used by Content Server to assemble web pages.
For more detailed information about the template.hdm file, see Section 15.2.8,
"Templates."
A ResultSet HTM table file is used by other resources. A ResultSet table in an HTM file
is similar to the ResultSet of an HDA file, except that it uses HTML table tags to lay
out the data. Static table resources, service resources, and query resources all use this
table format.
A ResultSet table in an HTM file begins with <@table table_name@> and ends
with <@end@>. The markup between the start and end tags is an HTML table. Unlike a
ResultSet in an HDA file, the number of columns is implied by the table tags.
Note: Do not confuse the idcshort-product-id_
components.hda file with the component_name.hda file. The
idcshort-product-id_components.hda file is used to track all
installed components. The component_name.hda file contains
information that is specific to a single component.
Table 9–1 Custom Resource Files
Resource Type File Type Contents
HTML include HTM Definitions of includes
String HTM Localized string definitions
Dynamic table HDA Tables for data that changes often
Static table HTM Tables for data that seldom changes
Query HTM Tables that define queries
Service HTM Tables that define service scripts
Template HDA Tables that specify location and file name for template pages
Environment CFG Configuration variable name/value pairs

About Standard, System, and Custom Components
Getting Started with Content Server Components 9-9
Any HTML syntax that does not define the data structure is ignored when the table is
loaded. Therefore, HTML comments are allowed within tables in an HTM file, and
HTML style attributes can be used to improve the presentation of the data in a web
browser.
9.1.3.3 Data Binder
Content Server caches data (such as variable values and lookup keys) internally in a
data binder. All data in the data binder is categorized according to where it came from
and how it was created. When a value is required to fulfill a service request, the data in
the data binder is evaluated in the following default order:
1. LocalData
2. ResultSets
3. Environment
This precedence can be changed using Idoc Script functions. For more information, see
the Oracle WebCenter Content Idoc Script Reference Guide.
9.1.3.3.1 LocalData The @Properties LocalData section in an HDA file maps to
the LocalData category of the data binder. The LocalData information consists of
name/value pairs.
LocalData information is maintained only during the lifetime of the Content Server
request and response. Unlike information about the server environment, which rarely
changes, the LocalData information for each request is dynamic.
From the point of view of an HTTP request, the initial LocalData information is
collected from the REQUEST_METHOD, CONTENT_LENGTH, and QUERY_STRING HTTP
environment variables. As the service request is processed, the LocalData
name/value pairs can be added and changed.
9.1.3.3.2 ResultSets Each @ResultSet section of an HDA file maps to a named result
in the DataBinder object. Some result sets can be made active, taking precedence over
other ResultSets during a value search. A ResultSet becomes active when the ResultSet
is looped on during page assembly. An active ResultSet take precedence over any
other ResultSets during a value search of the DataBinder object. When a service
request requires data and the value is not found in the LocalData or an active
ResultSet, the remaining ResultSets (those that are not active) are searched next.
9.1.3.3.3 Environment Environment values are placed in the DataBinder object as
name/value pairs, which are defined in configuration files such as
IntradocDir/config/config.cfg, intradoc.cfg, and environment-type
resource files.
9.1.3.4 Manifest File
Manifest files are used to upload or unpackage a component ZIP file on Content
Server. This file tells Content Server where to place the individual files that are
included in the component ZIP file. A manifest file is created automatically when you
build a component in the Component Wizard, or when you download a component
using the Admin Server Advanced Component Manager.
All manifest files must be called manifest.hda. The manifest.hda file is included in the
component ZIP file along with the other component files. It must be at the top level of
the ZIP file directory structure.

About Standard, System, and Custom Components
9-10 Oracle WebCenter Content Developer's Guide for Content Server
The manifest.hda file contains a ResultSet table called Manifest, which consists
of two columns:
■The entryType column defines the type of entry in the manifest file.
■The location column defines the directory where the files associated with the
entry are installed and specifies the file name for some entry types.
–For a Component entry type, the location is the path and file name for the
definition file. The definition file then tells Content Server which resource files
are included in the component.
–For other entry types, the location can be a path without a file name (to specify
all files in a particular subdirectory) or a path with a file name (to specify an
individual file).
–The location should be a path relative to the
DomainHome/ucm/short-product-id/custom directory. You can use an
absolute path, but then the component can be installed only on Content Server
instances with the same installation directory path.
Example 9–5 shows a manifest.hda file.
Entry Type Description Default Path
Classes Java class files DomainHome/ucm/short-product-id/classes
Common Common files DomainHome/ucm/short-product-id/weblayout/
common
Component Component
resource files
DomainHome/ucm/short-product-id/custom
ComponentExtra Associated
files, such as a
readme
DomainHome/ucm/short-product-id/custom
Help Online help
files
DomainHome/ucm/short-product-id/weblayout/
help
Images Graphics files DomainHome/ucm/short-product-id/weblayout/
images
Jsp JavaServer
Pages
DomainHome/ucm/short-product-id/weblayout/
jsp
Caution: Avoid using the entry types Common, Help, Images, and
Jsp because they are deprecated in WebCenter Content 11g.
WebCenter Content has a publishing engine that pushes files into the
weblayout directory from components. If you want the same
behavior as in a previous release, use the publishing engine;
otherwise, the publishing engine may place files directly into the
weblayout directory from a custom component, overwriting existing
files. The overwritten files could be permanently lost.

About Standard, System, and Custom Components
Getting Started with Content Server Components 9-11
Example 9–5 manifest.hda File
@ResultSet Manifest
2
entryType
location
component
MyComponent/MyComponent.hda
componentExtra
MyComponent/readme.txt
images
MyComponent/
@end
9.1.3.5 Other Files
Your custom components can include any type of file that Content Server uses for
functionality or to generate its look and feel.
9.1.3.5.1 Customized Site Files You can add customized files for your site to change the
look or actions of Content Server. For example, the following types of files are often
referenced in custom resources:
■Graphics
Replace the icons, backgrounds, and logos that constitute the standard Content
Server interface.
■Help
With the assistance of Consulting Services, you can customize help files for your
content management system.
■Classes
Java code can change or extend the functionality of Content Server. Java class files
must be packaged into directories for placement in the
DomainHome/ucm/short-product-id/classes directory.
9.1.3.5.2 Component ZIP File A component ZIP file contains all files that define a
Content Server component. It can be unpackaged to deploy the component on other
Content Server instances.
Caution: Avoid placing Graphics and Help files in the weblayout
directory manually because your files may be overwritten by the
WebCenter Content 11g publishing engine, which pushes files into the
weblayout directory from components. If you want the same
behavior as in a previous release, use the publishing engine;
otherwise, the publishing engine may place files in this directory
directly from a custom component, overwriting existing files. The
overwritten files could be permanently lost. If you need to place these
files in the weblayout directory manually, contact Oracle Consulting
Services.

About Standard, System, and Custom Components
9-12 Oracle WebCenter Content Developer's Guide for Content Server
9.1.3.5.3 Custom Installation Parameter Files When you define one or more custom
installation parameters, several additional files are created in addition to the files that
compose the basic component file structure.
If installation parameters are created for the component, then during the component
installation process the component installer automatically places two files in the
directory for the component within the data/components directory. These files hold
the preference data as follows:
■The config.cfg file: Contains the parameters that can be reconfigured after
installation.
■The install.cfg file: Contains the preference data definitions and prompt
answers.
■Backup ZIP file: A backup file that is created if the component is currently
installed and is being reinstalled.
9.1.3.6 Typical Directory Structure
If you use the Component Wizard to create custom components, your files are stored
in the appropriate directory.
Different component directories are established for each custom component in the
DomainHome/ucm/short-product-id/custom directory. Within each component
directory, separate subdirectories are established for reports, templates, and resources,
all named appropriately (for example, component_name/resources). The
component_name.hda file (the definition file) is stored in the component_name
directory.
9.1.4 Development Recommendations
The following sections provide some guidelines to assist you in developing custom
components:
■Section 9.1.4.1, "Creating a Component"
■Section 9.1.4.2, "Working with Component Files"
■Section 9.1.4.3, "Using a Development Content Server"
■Section 9.1.4.4, "Component File Organization"
■Section 9.1.4.5, "Naming Conventions"
For more detailed information about creating or modifying components, see the Oracle
WebCenter Content System Administrator's Guide for Content Server or online help.
9.1.4.1 Creating a Component
If your site needs some functionality in Content Server that the existing components
do not provide, you can create a custom component for your Content Server instance.
9.1.4.1.1 How to Create a Custom Component You can create a custom component in a
definition file, then enable the component and apply it to Content Server.

About Standard, System, and Custom Components
Getting Started with Content Server Components 9-13
To create and enable a custom component:
1. Create a definition file.
2. Add a reference to the definition file in the idcshort-product-id_
components.hda file to enable the component.
3. Restart Content Server to apply the component.
4. Create resources and other files to define your customization. A good approach is
to copy, rename, and modify standard Content Server files to create your custom
resource files.
5. Test and revise your customization as necessary. You may need to restart Content
Server to apply your changes.
6. If you want to package the component for later use or for deployment on other
Content Servers instances, build the component and create a component ZIP file.
9.1.4.2 Working with Component Files
Two tools are available for working with component files:
■Component Wizard
The Component Wizard is a Content Server utility that can help you create and
edit component files. You can also use the Component Wizard to package,
unpackage, enable, and disable components. For more information about using
this utility, see the Oracle WebCenter Content System Administrator's Guide for
Content Server.
■Text editor
Because most component files are plain text files, you can create and edit the files
in your favorite text editor.
You should use the Component Wizard as much as possible when working with
custom components.
The Component Wizard does several tasks for you and minimizes the amount of work
you need to do in a text editor. Using the Component Wizard helps you follow the
recommended file structure and naming conventions. The Component Wizard
automatically adds a readme text file when you build a component, which helps you
document your customization. You should also include comments within your
component files.
For information about using the Component Wizard to create components, see the
Oracle WebCenter Content System Administrator's Guide for Content Server.
9.1.4.3 Using a Development Content Server
Whenever you are customizing Content Server, you should isolate your development
efforts from your production system. Remember to include the same custom metadata
fields on your development Content Server as you have defined for your production
Content Server.
When you have successfully tested your modifications on a development Content
Server, use the Component Wizard to build a component ZIP file and then unpackage
the component on your production system.
Remember to restart Content Server after enabling or disabling a component.

About Standard, System, and Custom Components
9-14 Oracle WebCenter Content Developer's Guide for Content Server
If you are having problems with Content Server after you have installed a custom
component, disable the component and restart Content Server. If this fixes the
problem, you probably need to troubleshoot your component. If the problem is not
fixed, you may need to remove the component completely, using the Component
Wizard, to determine whether there is a problem with the component or with Content
Server.
9.1.4.4 Component File Organization
To keep your custom components organized, follow these file structure guidelines. For
more information, see Section 9.1.3.6, "Typical Directory Structure."
Place each custom component in its own directory within a directory called
DomainHome/ucm/short-product-id/custom. If your custom component
includes resource-type or template-type resources, or both, the component directory
should have subdirectories that follow the structure of the
IdcHomeDir/data/resources/core directory:
■resources to hold HTML include and table resource files
■resources/lang to hold string resource files
■templates to hold template files
■reports to hold report files
When considering files and their organization, keep the following points in mind:
■Place the definition file for each custom component at the top level of the
component’s directory.
■When referring to other files within a component, use relative path names instead
of absolute path names. Using relative path names enables you to move the
component to a different location without having to edit all of the files in the
component.
■Content Server is a Java-based application, so forward slashes must be used in all
path names.
■Custom components do not have to be stored on the same computer as Content
Server, but all component files must be accessible to your Content Server instance.
■Images and other objects that are referenced by Content Server web pages must
reside somewhere in the DomainHome/ucm/short-product-id/weblayout
directory (so that they can be accessed by the web server).
Note: If you use the Component Wizard, it creates component
directories for you and places the component files in the correct
directories.

Tools for Managing Components
Getting Started with Content Server Components 9-15
9.1.4.5 Naming Conventions
To keep your component files organized and ensure that the files work properly in
Content Server, follow these naming conventions for directories, individual files, and
file contents:
■You should give all of your component directories and files unique and
meaningful names. Keep in mind that as each component is loaded into Content
Server, it overrides any resources with the same file names, so you should use
duplicate file names only if you want certain components to take precedence.
■If you are copying a standard Content Server file, a common practice is to place
the prefix custom_ in front of the original file name. This ensures that you do not
overwrite any default templates, and your customization is easy to identify.
■HTM file types should have a .htm extension, and HDA file types should have a
.hda extension.
■If you are creating a new component file with a text editor, like WordPad, place the
file name within quotation marks in the Save dialog box so that the proper file
extension is assigned to it (for example, myfile.hda). Failure to use quotation
marks to define the file name may result in a file name such as myfile.hda.txt.
■Content Server is case sensitive even if your file system is not. For example, if a file
is named My_Template, Content Server does not recognize case variations such as
my_template or MY_TEMPLATE.
■For localized string resources, you must follow the standard file naming
conventions for Content Server to recognize the strings. You should also use the
standard two-character prefix (cs, sy, ap, or ww) when naming your custom
strings. For more information, see Section 1.5.5, "Localized String Resolution."
9.2 Tools for Managing Components
You can use the following tools to manage components:
■Component Wizard
■Component Manager
■Advanced Component Manager
■ComponentTool
9.2.1 Component Wizard
The Component Wizard utility automates the process of creating custom components,
including creating and editing all the files necessary for custom components. You can
also use the Component Wizard to modify existing components and to package and
unpackage components for use on Content Server instances.
Figure 9–1 shows the interface to the Component Wizard. For more information, see
"Using the Component Wizard" in the Oracle WebCenter Content System Administrator's
Guide for Content Server.
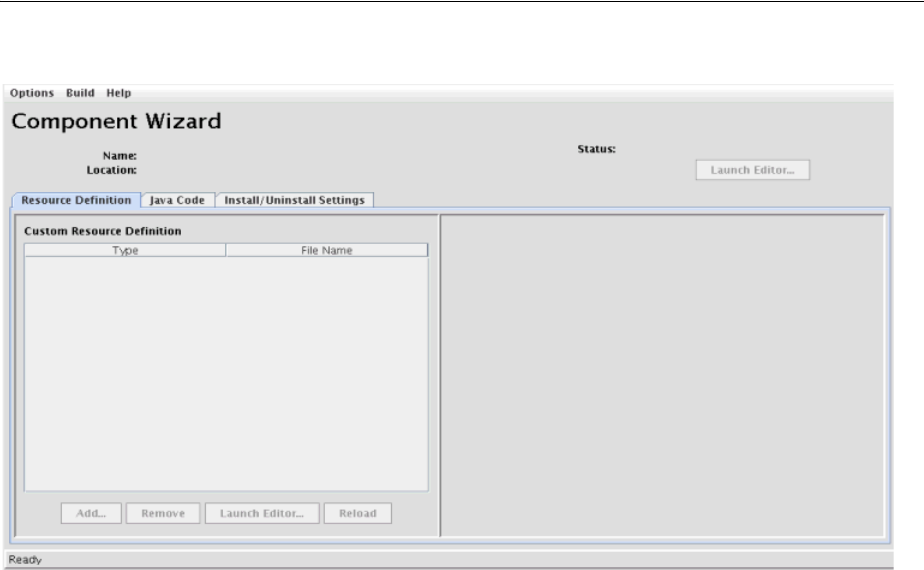
Tools for Managing Components
9-16 Oracle WebCenter Content Developer's Guide for Content Server
Figure 9–1 Component Wizard Interface
To access the Component Wizard
■UNIX operating system: Run ComponentWizard, stored in
DomainHome/ucm/short-product-id/bin/.
The Component Wizard main page is displayed.
■Windows operating system: From the Start menu, choose the instance name, then
Utilities, and then Component Wizard.
The Component Wizard main page is displayed.
9.2.2 Advanced Component Manager
The Advanced Component Manager provides a way to manage custom components in
Content Server. With the Advanced Component Manager, you can easily enable or
disable components or add new components to Content Server.
To use the Advanced Component Manager:
1. In the Administration tray or menu, choose Admin Server.
The Admin Server displays the Component Manager page.
2. In the first paragraph on the Component Manager page, click advanced
component manager.
The Admin Server displays the Advanced Component Manager page, which
Figure 9–2 shows. This page has lists of enabled and disabled components.
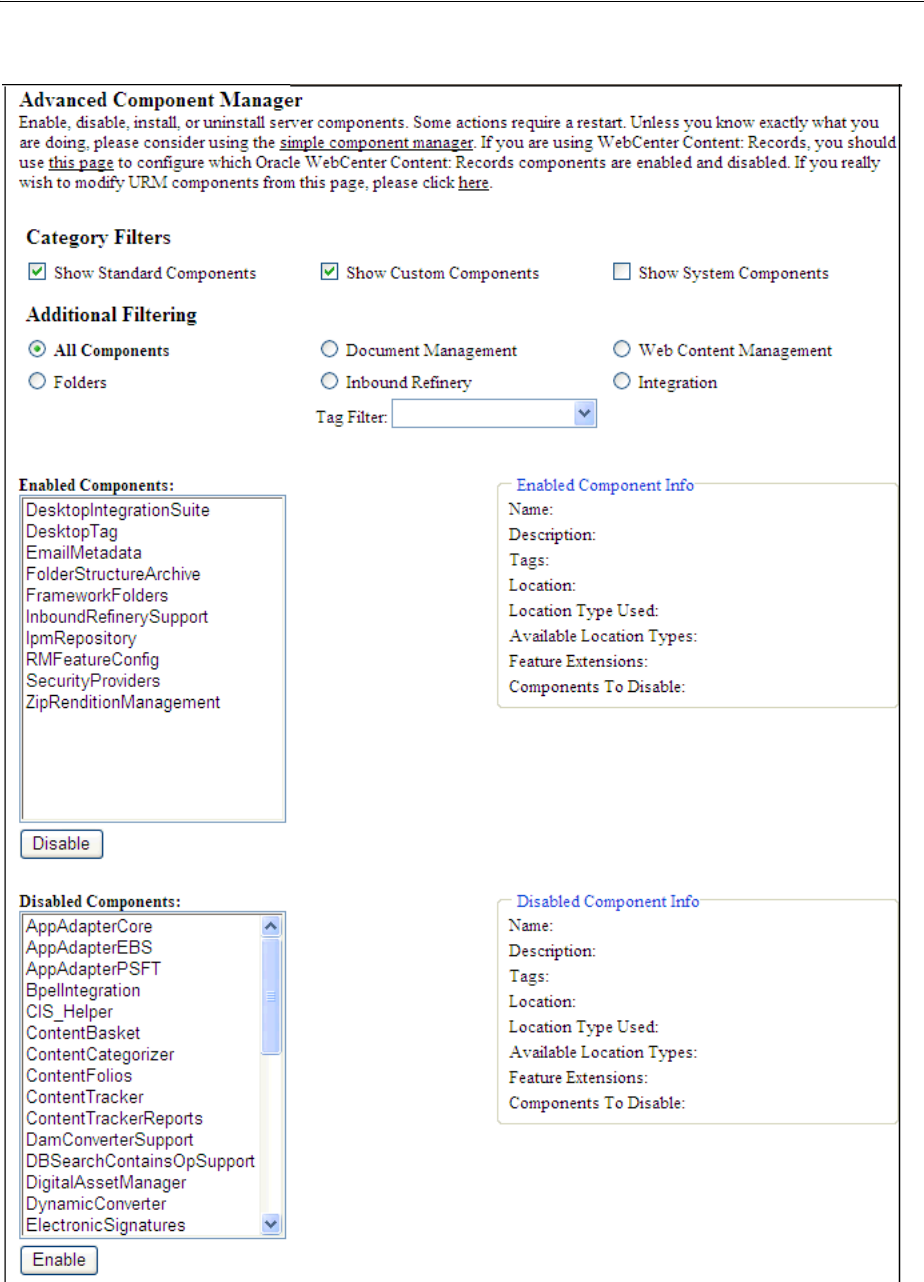
Tools for Managing Components
Getting Started with Content Server Components 9-17
Figure 9–2 Advanced Component Manager Page

Component Files
9-18 Oracle WebCenter Content Developer's Guide for Content Server
3. On the Advanced Component Manager page, you can do these tasks:
■View lists of enabled and disabled components by categories and other filters
■Select a component to view details about it
■Enable components
■Disable components
■Install custom components
■Uninstall custom components
For more information, see "Using the Component Wizard" in the Oracle WebCenter
Content System Administrator's Guide for Content Server.
9.2.3 ComponentTool
ComponentTool is a command-line utility for installing, enabling, and disabling
components in Oracle WebCenter Content Server. After installing a component,
ComponentTool automatically enables it. ComponentTool is located in the
DomainHome/ucm/cs/bin directory.
9.3 Component Files
The idcshort-product-id_components.hda file tells Oracle WebCenter Content
which components are enabled and where to find the component definition (glue) file
for each component. In 11g Release 1 (11.1.1), this file has three forms, one for each of
the WebCenter Content applications: idccs_components.hda (for Content Server),
idcibr_components.hda (for Inbound Refinery), and idcurm_components.hda
(for Records). The file is always stored in the IntradocDir/data/components
directory.
You should not create these files manually. Always use the Component Wizard to
create your component files.
9.3.1 The idc Product _components.hda File
The idcshort-product-id_components.hda file always includes a ResultSet
called Components that defines the name and file path of each definition file. You can
use the Component Wizard or the Component Manager to make changes to the
components HDA file. For more information, see Chapter 10, "Enabling and Disabling
Components for Content Server."
Example 9–6 shows an idccs_components.hda file that specifies two enabled
components, MyComponent and CustomHelp, for Content Server.
Example 9–6 idccs_components.hda File
<?hda version="5.1.1 (build011203)" jcharset=Cp1252 encoding=iso-8859-1?>
@Properties LocalData
blDateFormat=M/d{/yy} {h:mm[:ss] {aa}[zzz]}!tAmerica/Chicago!mAM,PM
blFieldTypes=
@end
@ResultSet Components
2
name
location
MyComponent
custom/MultiCheckin/my_component.hda

Component Files
Getting Started with Content Server Components 9-19
CustomHelp
custom/customhelp/customhelp.hda
@end
9.3.2 Components ResultSet
The order that components are listed in the Components ResultSet determines the
order that components are loaded when you start Content Server. If a component
listed later in the ResultSet has a resource with the same name as an earlier
component, the resource in the later component takes precedence.
A Components ResultSet has two columns:
■The name column provides a descriptive name for each component, which is used
in the Component Wizard, Component Manager, and Content Server error
messages.
■The location column defines the location of the definition file for each
component. The location can be an absolute path or can be a path relative to the
Content Server installation directory.
9.3.3 Component Definition (Glue) File
A component definition file, or glue file, points to the custom resources that you have
defined. The definition file for a component is named component_name.hda, and it
is typically located in the
DomainHome/ucm/short-product-id/custom/component_name directory. The
Component Wizard can be used to create and make changes to a definition file.
A definition file contains a ResourceDefinition ResultSet and may contain a
MergeRules ResultSet, a Filters ResultSet, a ClassAliases ResultSet, or any combination
of these ResultSets. Example 9–7 shows a typical component definition file.
Example 9–7 Component Definition File
<?hda jcharset=UTF8 encoding=utf-8?>
@Properties LocalData
classpath=$COMPONENT_DIR/classes.jar
ComponentName=Custom DCL Component
serverVersion=7.3
version=2010_10_22
@end
@ResultSet ResourceDefinition
4
type
filename
tables
loadOrder
template
dcl_templates.hda
DCLCustomTemplates
1
resource
dcl_resource.htm
null
1
resource
Note: Always use forward slashes in the location path.

Component Files
9-20 Oracle WebCenter Content Developer's Guide for Content Server
dcl_upper_clmns_map.htm
DCLColumnTranslationTable
1
resource
dcl_data_sources.htm
dclDataSources
1
service
dcl_services.htm
CustomServices
1
query
dcl_query.htm
CustomQueryTable
1
resource
dcl_checkin_tables.hda
null
1
@end
@ResultSet MergeRules
3
fromTable
toTable
column
DCLCustomTemplates
IntradocTemplates
name
DCLColumnTranslationTable
ColumnTranslation
alias
DCLDataSources
DataSources
name
CustomDCLServiceQueries
ListBoxServiceQueries
dataSource
@end
@ResultSet Filters
4
type
location
parameter
loadOrder
loadMetaOptionsLists
intradoc.server.ExecuteSubServiceFilter
GET_CHOICE_LIST_SUB
1
@end
9.3.3.1 ResourceDefinition ResultSet
The ResourceDefinition ResultSet table defines the type, file name, table names,
and load order of custom resources. Example 9–8 shows the structure of a
ResourceDefinition ResultSet:

Component Files
Getting Started with Content Server Components 9-21
Example 9–8 ResourceDefinition ResultSet
@ResultSet ResourceDefinition
4
type
filename
tables
loadOrder
template
dcl_templates.hda
DCLCustomTemplates
1
resource
dcl_resource.htm
null
1
resource
dcl_upper_clmns_map.htm
DCLColumnTranslationTable
1
resource
dcl_data_sources.htm
dclDataSources
1
service
dcl_services.htm
CustomServices
1
query
dcl_query.htm
CustomQueryTable
1
resource
dcl_checkin_tables.hda
null
1
@end
9.3.3.1.1 ResourceDefinition ResultSet Columns A ResourceDefinition ResultSet
consists of four columns:
■The type column defines the resource type, which must be one of the following
values:
–resource, which points to an HTML include (HTM), string (HTM), dynamic
table (HDA), or static table (HTM) resource file.
–environment, which points to an environment resource (CFG) file.
–template, which points to a template resource (HDA) file.
–query, which points to a query resource (HTM) file.
–service, which points to a service resource (HTM) file.
■The filename column defines the path and file name of the custom resource file.
This can be an absolute path or a relative path. Relative paths are relative to the
DomainHome/ucm/short-product-id/custom/component_name directory.

Component Files
9-22 Oracle WebCenter Content Developer's Guide for Content Server
■The tables column defines the ResultSet tables to be loaded from the resource
file. ResultSet names are separated with a comma. If the resource file does not
include ResultSets, this value is null. For example, HTML include resources do not
include table definitions, so the value for the tables column is always null for an
HTML include file.
■The loadOrder column defines the order in which the resource is loaded.
Resources are loaded in ascending order, starting with resources that have a
loadOrder of 1. If multiple resources have the same loadOrder, the resources are
loaded in the order they are listed in the ResourceDefinition ResultSet. If there are
multiple resources with the same name, the last resource loaded is the one used by
the system. Normally, you should set the loadOrder to 1, unless there is a
particular reason to always load one resource after the others.
9.3.3.2 MergeRules ResultSet
The MergeRules ResultSet table identifies new tables that are defined in a custom
component, and specifies which existing tables the new data is loaded into.
MergeRules are required for custom template resources but are optional for custom
dynamic table and static table resources. MergeRules are not required for custom
service, query, HTML include, string, and environment resources.
Example 9–9 shows a MergeRules ResultSet.
Example 9–9 MergeRules ResultSet
@ResultSet MergeRules
4
fromTable
toTable
column
loadOrder
DCLCustomTemplates
IntradocTemplates
name
1
DCLColumnTranslationTable
ColumnTranslation
alias
1
DCLDataSources
DataSources
name
1
CustomDCLServiceQueries
ListBoxServiceQueries
dataSource
1
@end
9.3.3.2.1 MergeRules ResultSet Columns A MergeRules ResultSet consists of three
columns:
■The fromTable column specifies a table that was loaded by a custom resource
and contains new data to be merged with the existing data. To properly perform a
merge, the fromTable table must have the same number of columns and the
same column names as the toTable table.

Component Files
Getting Started with Content Server Components 9-23
■The toTable column specifies the name of the existing table into which the new
data is merged. Usually, the toTable value is one of the standard Content Server
tables, such as IntradocTemplates or QueryTable.
■The column column specifies the name of the table column that Content Server
uses to compare and update data.
–Content Server compares the values of column in fromTable and toTable.
For each fromTable value that is identical to a value currently in toTable,
the row in toTable is replaced by the row in fromTable. For each
fromTable value that is not identical to a value currently in toTable, a new
row is added to toTable and populated with the data from the row of
fromTable.
–The column value is usually name. Setting this value to null defaults to the
first column, which is generally a name column.
9.3.3.3 Filters ResultSet
The Filters ResultSet table defines filters, which are used to execute custom Java
code when certain Content Server events are triggered, such as when new content is
checked in or when the server first starts. Example 9–10 shows a typical Filters
ResultSet.
Example 9–10 Filters ResultSet
@ResultSet Filters
4
type
location
parameter
loadOrder
loadMetaOptionsLists
intradoc.server.ExecuteSubServiceFilter
GET_CHOICE_LIST_SUB
1
@end
9.3.3.4 ClassAliases ResultSet
The ClassAliases ResultSet table points to custom Java class files, which are used to
extend the functionality of an entire Content Server Java class. Example 9–11 shows a
typical ClassAliases ResultSet.
Example 9–11 ClassAliases ResultSet
@ResultSet ClassAliases
2
classname
location
WorkflowDocImplementor
WorkflowCheck.CriteriaWorkflowImplementor
@end

Resources for Assembling Web Pages
9-24 Oracle WebCenter Content Developer's Guide for Content Server
9.4 Resources for Assembling Web Pages
Resources are the files that define and implement the actual customization you make
to Content Server. Resources can be snippets of HTML code, dynamic page elements,
queries that gather data from the database, services that perform Content Server
actions, or special code to conditionally format information.
The custom resource files for a component are typically located in the
DomainHome/ucm/short-product-id/custom/component_name directory. If
your component has more than a few resources, it is easier to maintain the files if you
place them in subdirectories (such as component_name/resources or component_
name/templates) within the component directory.
Always use the Component Wizard to create your resource files.You should not create
a resource file manually. There are two ways to edit a resource file after it is created:
■Component Wizard
You can add, edit, or remove a resource file from a component using the
Component Wizard. The Component Wizard provides code for predefined
resources that you can use as a starting point for creating custom resources. You
can also open resource files in a text editor from within the Component Wizard.
■Manual editing in a text editor
After creating a resource file with the Component Wizard, you can open the
resource file in a text editor and edit the code manually, if necessary.
For more information, see Section 15.2, "Creating Resources for a Component."
Note: You must restart Content Server after changing a resource file.

10
Enabling and Disabling Components for Content Server 10-1
10Enabling and Disabling Components for
Content Server
This chapter describes how to enable components that have been installed in Oracle
WebCenter Content Server and how to disable components.
This chapter includes the following sections:
■Section 10.1, "About Enabling and Disabling Components"
■Section 10.2, "Enabling a Component"
■Section 10.3, "Disabling a Component"
10.1 About Enabling and Disabling Components
By definition, a component is enabled when it is properly defined in the Components
ResultSet in the idcshort-product-id_components.hda file. A component is
disabled if there is no entry or the entry is not formatted correctly.
10.2 Enabling a Component
There are several ways to enable a component:
■ComponentTool: Run
DomainHome/ucm/short-product-id/bin/ComponentTool to enable a
component. For example:
ComponentTool -enable component_name
■Component Wizard: Choose Enable from the Options menu. For more
information, see the Oracle WebCenter Content System Administrator's Guide for
Content Server.
■Component Manager: Select the checkbox next to a component name to enable a
server component specified on the Component Manager screen. For more
information, see the Oracle WebCenter Content System Administrator's Guide for
Content Server.
■Advanced Component Manager: On the Advanced Component Manager page,
select a component name, and then click Enable to enable the component.

Disabling a Component
10-2 Oracle WebCenter Content Developer's Guide for Content Server
10.3 Disabling a Component
There are several ways to disable a component:
■ComponentTool: Run
DomainHome/ucm/short-product-id/bin/ComponentTool to disable a
component. For example:
ComponentTool -disable component_name
■Component Wizard: Choose Disable from the Options menu. For more
information, see the Oracle WebCenter Content System Administrator's Guide for
Content Server.
■Component Manager: Clear the checkbox next to a component name to disable a
server component on the Component Manager screen. For more information, see
the Oracle WebCenter Content System Administrator's Guide for Content Server.
■Advanced Component Manager: On the Advanced Component Manager page,
select a component name, and then click Disable to disable the component.

11
Updating Component Configurations 11-1
11Updating Component Configurations
This chapter provides information about updating the configuration of components in
Oracle WebCenter Content Server.
This chapter includes the following sections:
■Section 11.1, "About Updating Component Configurations"
■Section 11.2, "Updating a Component Configuration with the Advanced
Component Manager"
■Section 11.3, "Updating a Component Configuration Through the Configuration
for instance Screen"
11.1 About Updating Component Configurations
You can update, or modify, the configuration of some Content Server components with
the Advanced Component Manager or the Configure for Instance screen, whether the
component is enabled or disabled. The Advanced Component Manager has a list of
the components whose configuration you can modify in the Update component
configuration field. From the Configure for Instance screen, the Update Component
Configuration screen is displayed for the specified component if you can modify its
configuration, or if you cannot modify it, a message is displayed.
Content Server has Update Component Configuration screens for these components:
■Folders_g
■PDF Watermark
■Content Tracker
■Content Tracker Reports
■Site Studio
■DesktopIntegrationSuite
■DesktopTag
■EmailMetadata

Updating a Component Configuration with the Advanced Component Manager
11-2 Oracle WebCenter Content Developer's Guide for Content Server
11.2 Updating a Component Configuration with the Advanced
Component Manager
For information about updating a component configuration with the Advanced
Component Manager, see "Modifying a Component Configuration" in the Oracle
WebCenter Content System Administrator's Guide for Content Server.
11.3 Updating a Component Configuration Through the Configuration for
instance Screen
For information about updating a component configuration through the Configuration
for instance screen, see "Using the Configuration for Instance Screen" in the Oracle
WebCenter Content System Administrator's Guide for Content Server.

12
Customizing Content Tracker 12-1
12
Customizing Content Tracker
Content Tracker and Content Tracker Reports, both optional components of Oracle
WebCenter Content Server, are installed with Oracle WebCenter Content. When
enabled, these components provide information about system usage, such as which
content items are most frequently accessed and what content is most valuable to users
or specific groups. You can customize these components to provide specific
information about the consumption patterns of your organization’s content
This chapter includes the following sections:
■Section 12.1, "About Content Tracker"
■Section 12.2, "Content Tracker Components and Functions"
■Section 12.3, "Configuration and Customization"
■Section 12.4, "Service Call Configuration"
■Section 12.5, "Customizing Content Tracker"
■Section 12.6, "Web Beacon Functionality"
For information about using Content Tracker with the default settings, see the Oracle
WebCenter Content Application Administrator's Guide for Content Server.
12.1 About Content Tracker
Content Tracker monitors activity on your Content Server instance and records
selected details of those activities. It then generates reports that illustrate the way the
system is being used. This section includes an overview about Content Tracker and
Content Tracker Reports functionality.
Content Tracker incorporates several optimization functions which are controlled by
configuration variables. The default values for the variables set Content Tracker to
function as efficiently as possible for use in high volume production environments. For
more information about Content Tracker configuration variable, see the Oracle
WebCenter Content Idoc Script Reference Guide.

Content Tracker Components and Functions
12-2 Oracle WebCenter Content Developer's Guide for Content Server
12.1.1 Content Tracker and Content Tracker Reports
Content Tracker monitors a system and records information about various activities
which is collected from various sources, then merged and written to a set of tables in
your Content Server database. Content Tracker can monitor activity based on these
accesses and services:
■Content item accesses: Information about content item usage
Data is obtained from Web filter log files, the Content Server database, and other
external applications, such as portals and web sites. Content item access data
includes dates, times, content IDs, and current metadata.
■Content Server services: All services that return content, as well as services that
handle search requests. By default, Content Tracker logs only the services that
have content access event types but by changing configuration, Content Tracker
can monitor any Content Server service, even custom services.
■User accesses: Information about other non-content access events such as the
collection and synthesis of user profile summaries. This data includes user names
and user profile information.
After Content Tracker extracts data and populates database tables, Content Tracker
Reports can be used to:
■Generate reports: Content Tracker Reports queries the tables and generates
summary reports of activities and usage history of content items. The reports help
analyze specific groups of content or users based on metadata, file extensions, or
user profiles. Use the pre-defined reports, customize them, or use a compatible
third-party reporting package.
■Optimize content management practices: The reported data can be used for
content retention management. Depending on the access frequency, some items
could be archived or deleted. Applications can also use the data to provide portlets
with the top content for particular types of users.
12.2 Content Tracker Components and Functions
Content Tracker provides a debugging configuration variable that, if enabled,
configures the service handler filter to write out the service DataBinder objects into
dump files (SctDebugServiceBinderDumpEnable). These can be used as diagnostic
tools when developing field map screens. The dump files enable you to see what data
is available at the time the particular service events are recorded.
12.2.1 DataBinder Dump Facility
When Content Tracker records a specific service in the log file, the contents of that
service's DataBinder object are written to a serialized dump file. The contents of these
files are useful for debugging when creating field maps to use the extended service call
tracking function. These dump files allow you to see the available LocalData fields for
the recorded service.
The Content Tracker service handler filter only creates dump files for DataBinder
objects if the associated services are defined in the SctServiceFilter.hda file.

Content Tracker Components and Functions
Customizing Content Tracker 12-3
12.2.1.1 Values for the DataBinder Dump Facility
The values for this configuration variable include:
■SctDebugServiceBinderDumpEnabled=False prevents the Content Tracker
service handler filter from writing out the DataBinder objects into dump files. This
is the default value.
■SctDebugServiceBinderDumpEnabled=True configures the Content Tracker
service handler filter to write out the DataBinder objects into dump files. Use a
dump file as a diagnostic aid when you are developing field maps for extended
service logging. If creating field maps for services, the dump files enable you to see
what data is available at the time the service events are recorded.
12.2.1.2 Location of the DataBinder Object Dump Files
The serialized DataBinder objects are written to:
IntradocDir/data/ContentTracker/DEBUG_BINDERDUMP/dump_file_name
12.2.1.3 Names of the DataBinder Object Dump Files
The dump file of DataBinder Objects are text files and their names consist of three
parts as follows:
service_name_filter_function_serial_number.hda
Where:
■service_name is the name of the logged service (such as, GET_FORM_FILE).
■filter_function is one of the following:
–End: Filter Event ’on EndServiceRequestActions’ - Normal end-of-service
event.
–EndSub: FilterEvent ’on EndScriptSubServiceActions’ - Normal end-of-service
for service called as SubService.
–Error: Filter Event ’on ServiceRequestError’ - End of service where an error
occurred. May happen in addition to End.
■serial_numberi s the unique identification number assigned to the file. This enables
Content Tracker to create more than one DataBinder object dump file for a given
service.
Example:
GET_SEARCH_RESULTS_End_1845170235.hda
Caution: The dump files for DataBinder objects continue to
accumulate until manually deleted. Use the
SctDebugServiceBinderDumpEnabled
configuration variable only as
necessary.

Configuration and Customization
12-4 Oracle WebCenter Content Developer's Guide for Content Server
12.2.2 Performance Optimization
Content Tracker incorporates several optimization functions which are controlled by
configuration variables. The default values for the variables set Content Tracker to
function as efficiently as possible for use in high volume production environments.
Content Tracker collects and records only content access event data. This excludes
information gathering on non-content access events like searches or the collection and
synthesis of user profile summaries. Alternate values can be set during installation or
changed later.
Performance variables include:
■
SctTrackContentAccessOnly
. Content Access Only: This determines what types
of information is collected. When enabled (the default), only content access events
are recorded.
■
SctDoNotPopulateAccessLogColumns
. Exclude Columns: This is a list of columns
that Content Tracker does not populate in the
SctAccessLog
table. By default,
bulky and rarely used information is not collected which reduces the size of the
output table.
■
SctSimplifyUserAgent
. Simplify User Agent: This minimizes the information
that is stored in the
cs_userAgent
column of the
SctAccessLog
table.
■
SctDoNotArchive
. Do Not Archive: This ensures that the database tables contain
the most current data and expired table rows are discarded rather than archived.
This is applicable to all Content Tracker database tables. By default, only the
SctAccessLog
table is populated but expired rows are not archived. However, if
both
SctTrackContentAccessOnly
and
SctDoNotArchive
are disabled, all tables
are populated and their expired data archived.
12.2.3 Installation Considerations
Set the
SctUseGMT
configuration parameter to true to use Greenwich Mean Time
(GMT). It is set to false by default, to use local time. When upgrading from an earlier
version of Content Tracker there is a one-time retreat (or advance, depending on
location) in access times. To accommodate the biannual daylight savings time changes,
discontinuities in recorded user access times are used (contingent on the use of local
time and the location).
12.3 Configuration and Customization
You can use configuration variables to customize Content Tracker.
12.3.1 Configuration Variables
The following table lists the default values of the configuration settings used in the
current version of Content Tracker. These configuration variables are contained in the
Content Tracker configuration file:
cs_root/data/contenttracker/config/sct.cfg

Configuration and Customization
Customizing Content Tracker 12-5
Config. Setting Default Value Remarks
SctAutoTruncateDataStri
ngs FALSE Used by: JAVA
Determines if the reduction process truncates data strings to fit
into the corresponding table column.
SctComponentDir cs_
root/data/contenttra
cker/
Used by: JAVA
Path to the directory where Content Tracker is installed.
SctDebugLogEnabled FALSE Used by: JAVA
Set TRUE to enable Java code execution trace. Used with
SctDebugLogFilePath.
SctDebugLogFilePath cs_
root/data/contenttra
cker/log/SCT_
DEBUG_TRACE.log
Used by: JAVA
Directory for Java code execution trace. Used with
SctDebugLogEnabled.
SctDebugServiceBinderD
umpEnabled FALSE Used by: JAVA
Set TRUE to enable diagnostic output of Service DataBinder
objects during Service logging.
SctExternalUserLogEnabl
ed TRUE Used by: JAVA
Set TRUE to enable replication of External user account and role
information to UserSecurityAttributes table.
SctFilterPluginLogDir cs_
root/data/contenttra
cker/data/
Used by: filter plugin
Path to the directory where filter plug-in stores the event logs.
SctIdcAuthExtraConfigP
arams List of Content Tracker configuration parameters passed to the
filter plugin, merged programmatically into
idcAuthExtraConfigParams by the Content Tracker startup filter.
SctIgnoreDirectories
DomainHome/ucm/cs/
resources/
;
DomainH
ome/ucm/cs/common/
Used by: filter plugin
Directs filter plugin to disregard URLs contained within the
listed directory roots.
SctIgnoreFileTypes gif,jpg,js,css Used by: filter plugin
Directs filter plugin to disregard URLs with the listed file types.
SctLogDir
cs_
root/data/contentt
racker/data/
Used by: JAVA
Path to one or more directories where Content Tracker looks for
the raw event logs - sctLog, and so on. This parameter can be
multivalued, as
dir1;dir2;…;dirn
.
SctLogEnabled TRUE Used by: filter plugin, JAVA
If False, directs service handler filters and web server filter
plugin to ignore all events and create no logs. This is the Content
Tracker Master On/Off switch.
SctLogSecurity TRUE Used by: filter plugin, JAVA
If true, directs filter plugin to record IMMEDIATE_RESPONSE_
PAGE events in the sctSecurityLog event log, and the reduction
process to read the event log.
SctMaxRecentCount 5 Used by: JAVA
Maximum number of days worth of reduced data kept in the
"Recent" state. Overflow from Recent is moved to Archive state.

Configuration and Customization
12-6 Oracle WebCenter Content Developer's Guide for Content Server
SctMaxRereadTime 3600 Used by: JAVA
Maximum number of seconds that can occur between
consecutive references by a particular user to a particular
content item, e.g. a PDF file, and have the adjacent references be
considered a single sustained access. Consecutive references
which occur further apart in time count as separate accesses.
SctReductionAvailableDa
tesLookback 0 Used by: JAVA
Used with SctReductionRequireEventLogs to limit Available
Dates range. Unit = Days. Zero = unlimited.
SctReductionLogDir cs_
root/data/contenttra
cker/log/
Used by: JAVA
Path to the directory where the Content Tracker reduction logs
are stored.
SctReductionRequireEve
ntLogs TRUE Used by: JAVA
Used in Detached configurations. FALSE means proceed with
Reduction even if no event logs are found.
SctScheduledReductionE
nable TRUE Used by: JAVA
Used in Multi-JVM configurations to select which Content
Server instance performs the reduction.
SctSnapshotEnable FALSE Used by: JAVA
Set TRUE to enable Snapshot functions. Set from Data Engine
Control Center.
SctSnapshotLastAccessE
nable FALSE Used by: JAVA
Set TRUE to enable Last Access Date Snapshot function. Set from
Data Engine Control Center.
SctSnapshotLastAccessFi
eld [none] Used by: JAVA
Metadata field name for Last Access Date, e.g. xLastAccessDate.
Set from Data Engine Control Center.
SctSnapshotLongCountE
nable FALSE Used by: JAVA
Set TRUE to enable "Long" interval access count Snapshot
function. Set from Data Engine Control Center.
SctSnapshotLongCountFi
eld [none] Used by: JAVA
Metadata field name for Long Interval Count, e.g.
xAccessesInLast90Days. Set from Data Engine Control Center.
SctSnapshotLongCountI
nterval [none] Used by: JAVA
Number of days for "Long" Interval. Set from Data Engine
Control Center.
SctSnapshotShortCountE
nable FALSE Used by: JAVA
Set TRUE to enable "Short" interval access count Snapshot
function. Set from Data Engine Control Center.
SctSnapshotShortCountF
ield [none] Used by: JAVA
Metadata field name for Short Interval Count, e.g.
xAccessesInLast10Days. Set from Data Engine Control Center.
Config. Setting Default Value Remarks

Configuration and Customization
Customizing Content Tracker 12-7
The following variables are not available in the
sct.cfg
file and are accessible only
through the Component Manager.
12.3.1.1 Access Control Lists and Content Tracker Reports Secure Mode
The security checks preference variable (
SctrEnableSecurityChecks
) is set when the
Content Tracker Reports component is installed. This preference variable enables
selection of one of two security modes: secure and non-secure. The security checks
preference provides the option to employ individual user role and account
information to restrict the visibility of content item information in report results.
This means you control what content items (and, subsequently, the metadata) that
users can see in their generated reports. Ideally, users should not see anything through
Content Tracker Reports that they couldn't find via a Content Server search. If secure
mode is used, the information in any generated report is filtered based on the user's
role and account privileges.
However, if Access Control Lists (ACLs) are enabled on your Content Server instance,
the secure mode option in Content Tracker Reports does not work. During installation,
leave the security checks preference check box blank. This means that on an
ACL-based system, the secure mode must be disabled. In this case, it is possible for
users other than a system administrator to see information about content items that
they would not otherwise be authorized to access and view.
SctSnapshotShortCountI
nterval [none] Used by: JAVA
Number of days for "Short" Interval. Set from Data Engine
Control Center.
SctUseGMT FALSE Used by: filter plugin, JAVA
Set TRUE for logged event times to be converted to Universal
Coordinated Time. FALSE uses local time.
Config. Setting Default Value Remarks
SctPostReductionExec [none] Used by: JAVA
Path to Post Reduction Executable (assumed to be in
IntradocDir/custom/ContentTracker/bin/)
SctProxyNameMaxLengt
h50 Used by: JAVA
Maximum number of characters in the name of any Content
Server proxy server in the configuration. Used to increase the
size of user name fields in Content Tracker table creation.
SctUrlMaxLength 3000 Used by: JAVA
Maximum expected length (characters) for URL fields. Used to
determine column widths when creating tables. There may be
several such columns in a given table.
SctWebBeaconIDList [none] Used by: filter plugin
List of zero or more web beacon objects. Required to add the
ability to feed data to Content Tracker using client-side tags.
Enables Content Tracker to gather data from cached pages and
pages generated from cached services.
Config. Setting Default Value Remarks

Configuration and Customization
12-8 Oracle WebCenter Content Developer's Guide for Content Server
12.3.1.2 Values for the Security Checks Preference Variable
The values for the security checks preference variable include:
■
SctrEnableSecurityChecks=True
enables the security checks installation
preference and configures Content Tracker Reports to operate in secure mode.
In secure mode, the same security criteria (role and account qualifications) used to
limit Content Server search results are also applied to the Content Tracker Report
Generator's queries and the generated reports. Thus, it is possible that two
different users running the Top Content Items report may see different results.
■
SctrEnableSecurityChecks=False
disables the security checks installation
preference and configures Content Tracker Reports to operate in non-secure mode.
This is the default setting.
In non-secure mode, the additional role and account criteria used to restrict
Content Server search results are not applied to Content Tracker Report
Generator's queries and the generated reports. Thus, it is possible for a user other
than a system administrator to see information about content items that they
would not be authorized to access and view.
12.3.1.3 File Types for Entries in the SctAccessLog
By default, Content Tracker does not log accesses to GIF, JPG, JS, CSS, CAB, and
CLASS file types. Therefore, entries for these file types are not included in the
combined output table after data reduction.
To log these file types, enable the file type in the sct.cfg file located in the
IntradocDir/custom/ContentTracker/resources/ directory. Change the default setting
for the
SctIgnoreFileTypes
configuration variable (
gif,jpg,js,css
). The default
setting excludes these file types. To include one or more of these file types, delete each
desired file type from the list. To ensure that these changes take effect, it is necessary to
restart the web server and Content Server.
12.3.2 Manually Setting Content Tracker Configuration Variables
To set or edit any of the Content Tracker configuration variables:
1. In a text editor, open the sct.cfg file:
cs_root/data/contenttracker/config/sct.cfg
2. Locate the configuration variable to be edited.
3. Enter the applicable value.
4. Save and close the sct.cfg file.
5. Restart Content Server to apply the changes.
Add or edit the configuration variables for the activity metrics metadata fields with
the user interface included in the Data Engine Control Center. These include the
following variables:
■SctSnapshotEnable
■SctSnapshotLastAccessEnable
■SctSnapshotLastAccessField
■SctSnapshotLongCountEnable
■SctSnapshotLongCountField

Service Call Configuration
Customizing Content Tracker 12-9
■SctSnapshotLongCountInterval
■SctSnapshotShortCountEnable
■SctSnapshotShortCountField
■SctSnapshotShortCountInterval
For more information about the user interface and the activity metrics functions, see
"Data Engine Control Center" and "Snapshot Tab" in the Oracle WebCenter Content
Application Administrator's Guide for Content Server.
12.3.3 External Users and Content Item Tracking
The option exists to control if Content Tracker includes data about external user
accesses in the applicable reports. These authenticated users are qualified based on
their user roles and accounts. By default, the configuration parameter
SctExternalUserLogEnabled
is set to true (enabled). This allows Content Tracker to
monitor external user logins and automatically propagate their role and account
information to the UserSecurityAttributes table.
Regardless of whether the SctExternalUserLogEnabled configuration variable is
enabled or disabled, all of the content item access information for external users is
tracked and recorded. But when it is enabled, this variable ensures that this data is
included in reports that explicitly correlate externally authenticated user names with
their associated user roles and accounts. Specifically, the Top Content Items by User
Role report and the Users by User Role report include all of the content item access
activity by external users. For more information, see "Content Tracker Report
Generator Main Page" in the Oracle WebCenter Content Application Administrator's Guide
for Content Server.
12.4 Service Call Configuration
You can configure service calls in the service call configuration file, configure the
Content Tracker logging service to log events, and manage service call information.
12.4.1 About the Service Call Configuration File
The Content Tracker service handler filter makes it possible to gather information
about Content Server activity other than content requests. Service request details are
collected by the service handler filter and stored in the SctAccessLog table in real time.
The details are obtained from the DataBinder that accompanies the service call. For a
Content Server service call to be logged, it must have an entry in the service call
configuration file (SctServiceFilter.hda).
The
SctServiceFilter.hda
file is a user-modifiable configuration file that is used to
limit the number of logged service calls. This enables you to selectively control which
services are logged. The data logging function for any service call included in the
SctServiceFilter.hda file can also be expanded, to log and track data values of specific
DataBinder fields relevant to a particular service. For more information, see
Section 12.4.1.2, "Extended Service Call Tracking Function."
Service tracking is limited to top-level services called via the server socket port.
Sub-services, or services called internally, cannot be tracked.
Note: To manually disable the SctExternalUserLogEnabled
configuration variable, see Section 12.3.2, "Manually Setting Content
Tracker Configuration Variables."
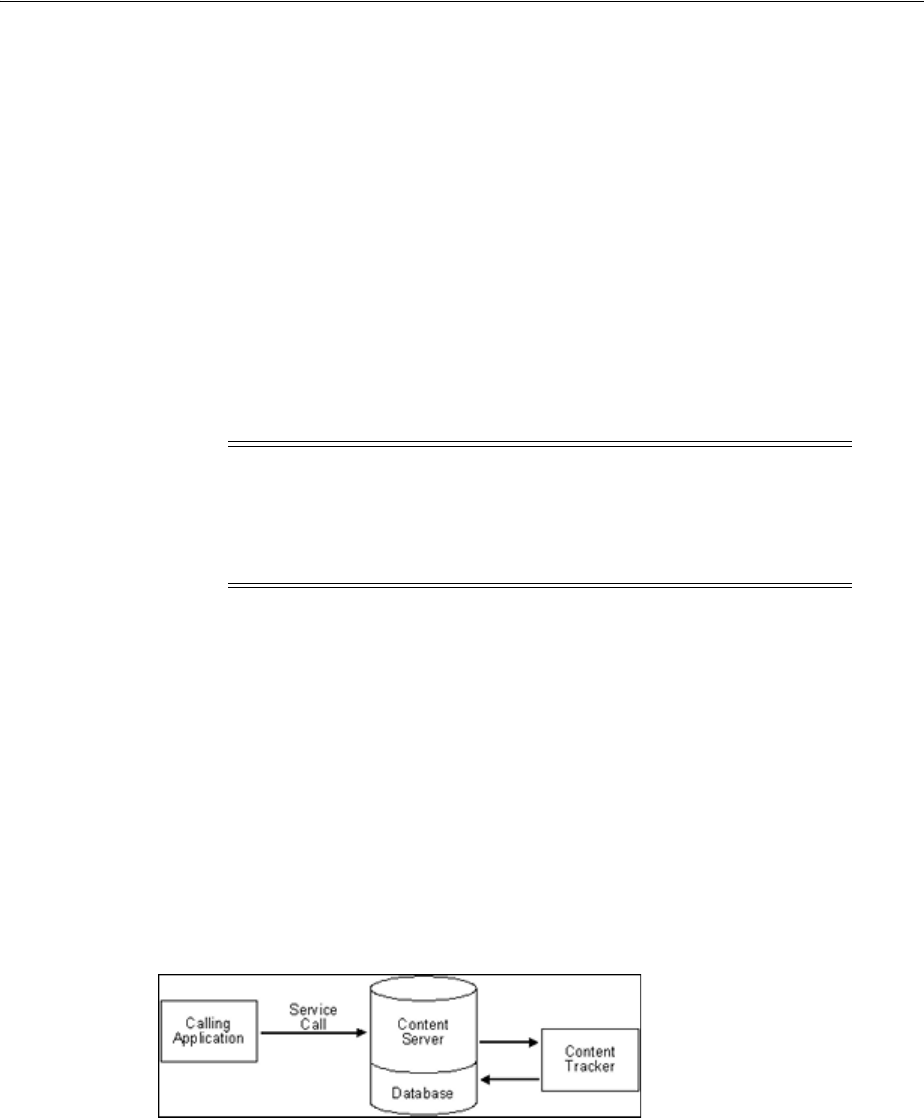
Service Call Configuration
12-10 Oracle WebCenter Content Developer's Guide for Content Server
The purpose of the SctServiceFilter.hda file is to define which parts of Content Server
are of particular interest to users. If a Content Server service is not listed in the
SctServiceFilter.hda file, it is ignored by Content Tracker. Additionally, if a service is
not listed in this file, it can only be logged by the Content Tracker logging service. For
more information, see Section 12.4.2, "About the Content Tracker Logging Service."
You can make changes to the SctServiceFilter.hda file in two ways:
■Add new services and edit the existing service call parameters in the file from the
Data Engine Control Center.
For more information, see "Services Tab" in the Oracle WebCenter Content
Application Administrator's Guide for Content Server.
■Manually edit the SctServiceFilter.hda file.
For more information, see Section 12.4.3.1, "Manually Editing the
SctServiceFilter.hda File."
12.4.1.1 General Service Call Logging
Services listed in the SctServiceFilter.hda file are detected by the Content Tracker
service handler filter and the values of selected data fields are captured. Content
Tracker then logs the named service calls. The information with the timestamps, etc.
are written dynamically into the SctAccessLog table.
For each enabled service, Content Tracker automatically logs certain standard
DataBinder fields, such as
dUser
and
dDocName
. Also, DataBinder fields associated
with the extended service call tracking function are logged to the general purpose
columns in the SctAccessLog table.
Data is inserted into the SctAccessLog table in real time using Content Tracker-specific
services sequence numbers and a type designation of "S" for service. ("W" designations
indicate static URL event types). Manual and/or scheduled reductions are only
required to process the static URL access information gathered by the web server filter.
12.4.1.2 Extended Service Call Tracking Function
The extended service call tracking function enables the logging of Content Server
service calls and supplement this information by also logging relevant data values
from one or more additional DataBinder fields other than the standard DataBinder
fields logged by each configured service call.
Tip: Control the services to log by including or excluding them from
the SctServiceFilter.hda file. This is an effective method to control
logging for particular services or for all services. Also, the extended
service call tracking function enables customization of the type of data
that is logged for a specific service.

Service Call Configuration
Customizing Content Tracker 12-11
12.4.1.2.1 Service Call ResultSet Combinations Each service that Content Tracker logs
must have an entry in the ServiceExtraInfo ResultSet that is contained in the
SctServiceFilter.hda file. Content Tracker automatically logs various standard
DataBinder fields, such as dUser and dDocName. However, the service-related data
logged by Content Tracker can be expanded by logging and tracking relevant data
values from supplementary DataBinder fields.
The extended service call tracking function is implemented by linking the entries in
the ServicesExtraInfo ResultSet to field map ResultSets. Each field map ResultSet
contains one or more sets of data field names, the source location, and the destination
table column name in the SctAccessLog table. This grouping allows you to select data
fields relevant to the associated service call and have the data values logged into the
specified column in the SctAccessLog table.
Since more than one expanded service can be logged using the extended tracking
function, the contents of the general purpose columns in the SctAccessLog table cannot
be properly interpreted without knowing which service is being logged. The service
name is always logged in the sc_scs_idcService column. Your queries should match
this column with the desired service name.
For examples of linked service entries and ResultSets, see Section 12.4.1.4.2, "Linked
Service Entries and Field Map ResultSets." For more information about the contents of
the SctAccessLog table and the general purpose columns intended to be mapped to
data fields, see "Combined Output Table" in the Oracle WebCenter Content Application
Administrator's Guide for Content Server. For more information about the service call
user interface, see "Services Tab" in the Oracle WebCenter Content Application
Administrator's Guide for Content Server.
12.4.1.2.2 General Purpose Columns in the Output Table In the field map ResultSets for
extended service tracking, map the DataBinder fields to columns in the SctAccessLog
table. The general purpose columns (extField_1 through extField_10) are available for
mapping. These columns may be filled with any data values you consider appropriate
for logging and tracking for a particular service. It is recommended and expected that
you use these columns to avoid overwriting the standard table columns.
Caution: In field map ResultSets, you can map data fields to existing,
standard SctAccessLog table columns. The extended service mapping
occurs after the standard field data values are collected. You can
override any of the standard table column fields.
For example, the service you are logging might carry a specific user
name (such as, MyUserName=john) in a data field. You could use the
extended tracking function to override the contents of the sc_scs_
dUser column. In this case, you simply combine MyUserName and
sc_scs_dUser and use them as the data field, location, and table
column set in the field map ResultSet.
It is your responsibility to ensure that the data being logged is a
reasonable fit with the SctAccessLog column type.

Service Call Configuration
12-12 Oracle WebCenter Content Developer's Guide for Content Server
12.4.1.3 Service Call Configuration File Contents
The initial contents of the service call configuration file (SctServiceFilter.hda) are the
commonly used content access, search, and user authentication services native to
Content Server. This file contains a ResultSet structure with one entry for each service
to be logged. To support the extended service call tracking function, this file may also
include field map ResultSets linked to the service entries contained in the
ServiceExtraInfo ResultSet.
Add new entries or edit existing entries, or both, in the SctServiceFilter.hda file with
the Services user interface accessed through the Data Engine Control Center or change
entries in the file manually. For more information, see Section 12.4.3.1, "Manually
Editing the SctServiceFilter.hda File," or "Services Tab" in the Oracle WebCenter Content
Application Administrator's Guide for Content Server.
The following tables provide details of the service call configuration file result set
schema. The values are copied directly to the corresponding columns in the
SctAccessLog table.
ServiceExtraInfo ResultSet Contents:
Tip: The name of the service is always logged to the sc_scs_
idcService column. Include it as a qualifier in any query that uses the
contents of the extended fields. For more information about custom
reports that include specific SQL queries involving SctAccessLog table
columns, see "Creating Custom Report Queries" in the Oracle
WebCenter Content Application Administrator's Guide for Content Server.
Note: To review the set of initial services that Content Tracker logs
into the SctAccessLog table see the SctServiceFilter.hda file:
cs_root/data/contenttracker/config/SctServiceFilter.hda
Feature Description
Service Name
(sctServiceName) The name of the service to be logged. For example, GET_FILE.
If no row is present in the ResultSet for a given service, the
service is not logged.
Calling Product
(sctCallingProduct) An arbitrary string. It is generally set to "Core Server" for all
standard Content Server entries.
Event Type (sctEventType) An arbitrary string. It is generally set to "Content Access" for all
standard Content Server entries.
Reference (sctReference) Used to set the sc_scs_reference field in the SctAccessLog table.
If blank, the internal getReference logic is used.
Field Map (sctFieldMap) The name of the field map ResultSet that is added to the
SctServiceFilter.hda file. This field is only required if the
extended service call tracking function is used. This function
enables the logging of DataBinder field information to one or
more of the general purpose columns in the SctAccessLog
table.

Service Call Configuration
Customizing Content Tracker 12-13
Field Map ResultSet Contents:
The fields copied from the DataBinder and inserted into the SctAccessLog table
include:
dID
,
dDocName
,
IdcService
,
dUser
,
SctCallingProduct
,
SctEventType
, and
SctReference
. If the values for the latter three fields are included in a service's entry in
the
SctServiceFilter.hda
file, they override the corresponding values in the data
field.
There should be no duplication or conflicts between services logged via the service
handler filter and those logged via the Content Tracker logging service. If a service is
named in the Content Tracker service handler filter file then such services are
automatically logged so there is no need for the Content Tracker logging service to
do it.
12.4.1.4 ResultSet Examples
The default SctServiceFilter.hda file includes various common service calls.
Feature Description
Field Map Link The name of the field map ResultSet.
A configuration variable can be set that writes out the service
DataBinder object. This enables you to see the data available at
the time the event is recorded.
DataBinder Field
(dataFieldName) The name of the DataBinder field name whose data values are
logged to a general purpose column in the SctAccessLog table.
See also the Field Name field on the Field Map Screen.
Data Location (dataLocation) The section in the Content Server service DataBinder where the
field to be logged is located.See also the Field Location field on
the Field Map Screen.
Access Log Column
(accessLogColumnName) The specific general purpose column in the SctAccessLog table
where data values from a specified DataBinder field are logged.
See also the Column Name field on the Field Map Screen.
Tip: Adding desired service calls to the SctServiceFilter.hda file and
using this method to log specific activity allows you the advantage of
providing values for the CallingProduct, EventType, and Reference
fields. The assigned values are copied directly to the corresponding
columns in the in the SctAccessLog table.
Note: To review the initial set of services that Content Tracker logs
into the SctAccessLog table and the service entries and field map
ResultSets see the SctServiceFilter.hda file:
cs_root/data/contenttracker/config/SctServiceFilter.hda
For more detailed information about these services, see the Oracle
WebCenter Content Services Reference Guide

Service Call Configuration
12-14 Oracle WebCenter Content Developer's Guide for Content Server
12.4.1.4.1 ServiceExtraInfo ResultSet Entries The following list provides examples of
several service entries contained in the SctServiceFilter.hda file's ServiceExtraInfo
ResultSet.
■
GET_FILE_BY_NAME
Core Server
Content Access
■
GET_DYNAMIC_URL
Core Server
Content Access
■
GET_DYNAMIC_CONVERSION
Core Server
Content Access
■
GET_EXTERNAL_DYNAMIC_CONVERSION
Core Server
Content Access
■
GET_ARCHIVED_FILE
Core Server
Content Access
■
COLLECTION_GET_FILE
Folders
Content Access
12.4.1.4.2 Linked Service Entries and Field Map ResultSets The following table lists several
examples of service entries linked to field map ResultSets. These examples, or other
similar ones, are included in the initial SctServiceFilter.hda file.
Service Entries Field Map ResultSets
GET_SEARCH_RESULTS
Core Server
Search
SearchFieldMap
@ResultSet SearchFieldMap
3
dataFieldName 6 255
dataLocation 6 255
accessLogColumnName 6 255
MiniSearchText
LocalData
extField_1
TranslatedQueryText
LocalData
extField_2
IsSavedQuery
LocalData
extField_7
@end

Service Call Configuration
Customizing Content Tracker 12-15
12.4.2 About the Content Tracker Logging Service
The Content Tracker logging service is a single service call (SCT_LOG_EVENT) that
allows an application to log a single event to the SctAccessLog table. The service may
be called directly via a URL or as an action in a service script. It may also be called
from Idoc Script using the executeService() function. The calling application is
responsible for setting any and all fields in the service DataBinder to be recorded,
including the descriptive fields listed in the Content Tracker SctServiceFilter.hda
configuration file.
The SCT_LOG_EVENT service copies information out of the service DataBinder. This
data is inserted into the SctAccessLog table in real time using the Content Tracker
specific services sequence numbers and a type designation of "S" for service. Manual
or scheduled reductions, or both, are required only to process the static URL access
information gathered by the web server filter. For more information, see "Web Server
Filter Plug-in" in the Oracle WebCenter Content Application Administrator's Guide for
Content Server.
PNE_GET_SEARCH_RESULTS
Core Server
Search
SearchFieldMap
@ResultSet SearchFieldMap
3
dataFieldName 6 255
dataLocation 6 255
accessLogColumnName 6 255
MiniSearchText
LocalData
extField_1
TranslatedQueryText
LocalData
extField_2
IsSavedQuery
LocalData
extField_7
@end
GET_FILE
Core Server
Content Access
GetFileFieldMap
@ResultSet GetFileFieldMap
3
dataFieldName 6 255
dataLocation 6 255
accessLogColumnName 6 255
RevisionSelectionMethod
LocalData
extField_1
Rendition
LocalData
extField_2
@end
Note: There should be no duplication or conflicts between services
logged via the service handler filter and those logged via the Content
Tracker logging service. If a service is named in the Content Tracker
service handler filter file then such services are automatically logged
so there is no need for the Content Tracker logging service to do it.
However, Content Tracker makes no attempt to prevent such
duplication.
Service Entries Field Map ResultSets

Service Call Configuration
12-16 Oracle WebCenter Content Developer's Guide for Content Server
12.4.3 Managing Service Call Information
This section provides information and task procedures for mapping and logging data
from Content Server services to the combined output database table (SctAccessLog).
12.4.3.1 Manually Editing the SctServiceFilter.hda File
To add or change entries in the SctServiceFilter.hda file:
1. In a text editor, open the SctServiceFilter.hda file:
cs_root/data/contenttracker/config/.../SctServiceFilter.hd
2. Edit an existing entry or add a new service entry. For example, to add the GET_
FILE_FORM service, enter the following service entry to the ServiceExtraInfo
ResultSet in the file:
GET_FORM_FILE
Threaded Discussion
Content Access
optional_reference_value
optional_field_map_link_value
where the optional_field_map_link_value is used when implementing the extended
service call tracking function. In this case, add or edit the corresponding field map
ResultSet. If implementing extended service tracking, skip Step 3.
3. When using extended service tracking, add or edit the corresponding field map
ResultSet. For example, to add the SS_GET_PAGE service and track additional
data field values, enter the following service entry and corresponding field map
ResultSets to the file:
4. Save and close the file.
5. Restart the Content Server to apply the new definitions.
Service Entry Field Map ResultSet
SS_GET_PAGE
Site Studio
Web Hierarchy Access
web
SSGetPageFieldMap
@ResultSet SSGetPageFieldMap
3
dataFieldName 6 255
dataLocation 6 255
accessLogColumnName 6 255
DataBinder_field_name
data_field_location_name
access_log_column_name
@end
Note: Include as many sets of DataBinder field, location, and table
column names as necessary.
Note: Search request events are logged into the SctAccessLog table in
real time and do not need to be reduced. Add or edit services with the
user interface included in the Data Engine Control Center. For more
information, see "Data Engine Control Center" and "Services Tab" in
the Oracle WebCenter Content Application Administrator's Guide for
Content Server.

Service Call Configuration
Customizing Content Tracker 12-17
12.4.3.2 Setting Required DataBinder Fields to Call the Content Tracker Logging
Service
The following table provides the SctAccessLog column names and the corresponding
DataBinder fields that Content Tracker looks for when the Content Tracker logging
service (SCT_LOG_EVENT) is called. When an application calls the Content Tracker
logging service, the application is responsible for setting the necessary fields in the
service DataBinder for Content Tracker to find. For more detailed information about
the SctAccessLog fields, see "Combined Output Table" in the Oracle WebCenter Content
Application Administrator's Guide for Content Server.
SctAccessLog Column Name Service DataBinder LocalData Field
SctDateStamp [computed]
SctSequence SctSequence
SctEntryType "S"
eventDate [computed]
SctParentSequence SctParentSequence
c_ip REMOTE_HOST
cs_username HTTP_INTERNETUSER
cs_method REQUEST_METHOD
cs_uriStem HTTP_CGIPATHROOT
cs_uriQuery QUERY_STRING
cs_host SERVER_NAME
cs_userAgent HTTP_USER_AGENT
cs_cookie HTTP_COOKIE
cs_referer HTTP_REFERER
sc_scs_dID dID
sc_scs_dUser dUser
sc_scs_idcService IdcService (or SctIdcService)
sc_scs_dDocName dDocName
sc_scs_callingProduct sctCallingProduct
sc_scs_eventType sctEventType
sc_scs_status StatusCode
sc_scs_reference sctReference (also ...)
comp_username [computed - HTTP_INTERNETUSER or ...]
sc_scs_isPrompt n/a
sc_scs_isAccessDenied n/a
sc_scs_inetUser n/a
sc_scs_authUser n/a
sc_scs_inetPassword n/a
sc_scs_serviceMsg StatusMessage

Service Call Configuration
12-18 Oracle WebCenter Content Developer's Guide for Content Server
12.4.3.3 Calling the Content Tracker Logging Service from an Application
You can call the SCT_LOG_EVENT service from an application. This can be done by
the application developer, or by a user willing to modify the application service
scripts. The application can call SCT_LOG_EVENT from Java. Or, the application can
include calls to SCT_LOG_EVENT in the service script.
12.4.3.4 Calling the Content Tracker Logging Service from Idoc Script
You can call the SCT_LOG_EVENT service indirectly from Idoc Script, using the
executeService( ) function. This is the same as calling the SCT_LOG_EVENT service
from an application except that it occurs from Idoc Script instead of the application
Java code. Content Tracker cannot distinguish if the SCT_LOG_EVENT service is
called from Java or from Idoc Script.
12.4.4 Service Call Management and the User Interface
Content Tracker enables the logging of service calls with data values relevant to the
associated services. Every service to be logged must have a service entry in the service
call configuration file (SctServiceFilter.hda). In addition to the logged services, their
corresponding field map ResultSets can be included in the SctServiceFilter.hda.
Content Tracker only logs services that have event types for content access or services
that cause an entry to be made in the DocHistory table. This ensures maximum
performance, but some service events are not logged.
The enabled services automatically log general DataBinder fields, such as dUser and
dDocName. Linking a field map ResultSet to a service entry enables the use of the
extended service call tracking function.
The SctAccessLog database table provides additional columns for use with the
extended service call tracking function which can be filled with any data values
appropriate for the associated service call. When listing the data field names in the
field map ResultSet, also list the location name for the source of the data field, and the
table column name where the data is logged.
Caution: In field map ResultSets, you can map data fields to existing,
standard SctAccessLog table columns. The extended service mapping
occurs after the standard field data values are collected. Therefore, any
of the standard table column fields can be overwritten.
For example, the service you log might carry a specific user name
(
MyUserName=john
) in a data field. You could use the extended
tracking function to overwrite the contents of the sc_scs_dUser
column. In this case, combine MyUserName and sc_scs_dUser and
use them as the data field, location, and table column set in the field
map ResultSet.
It is your responsibility to ensure that the data being logged is a
reasonable fit with the SctAccessLog column type.

Service Call Configuration
Customizing Content Tracker 12-19
12.4.4.1 Adding, Editing, or Deleting Service Entries
Follow these steps to add or edit a service:
1. Choose Administration then Content Tracker Administration from the Main
menu. Choose Data Engine Control Center.
The Data Engine Control Center opens.
2. Click the Services tab.
3. Click Add to create a new service entry or select an existing service entry from the
Service Name list and click Edit.
The Extended Services Tracking screen opens. The fields are empty when adding a
new service entry. When editing an existing service entry, the fields are populated
with values that can be edited.
4. Enter or modify the applicable field values (except in the Field Map field).
To link this service entry to a field map ResultSet, enter the applicable name in the
Field Map field, and then link the field. For more information, see "Linking
Activity Metrics to Metadata Fields" in the Oracle WebCenter Content Application
Administrator's Guide for Content Server.
5. Click OK.
A confirmation dialog box is displayed.
6. Click OK.
The Services tab is redisplayed with the new service or newly edited service in the
Services list. The services state and Content Tracker's SctServiceFilter.hda are
updated.
Content Tracker does not perform error checking (such as field type or spelling
verification) for the extended services tracking function in the Data Engine Control
Center. Errors are not generated until a reduction is done. These fields are
case-sensitive. When adding new services or editing existing services, be careful to
enter the proper service call names. Ensure that all field values are spelled and
capitalized correctly.
To delete an entry, follow the previous steps, highlight an entry, and select Delete.
12.4.4.2 Adding, Editing, or Deleting Field Map ResultSets
To implement the extended service call tracking function, service entries must be
linked to field map ResultSets in the SctServiceFilter.hda file.
Follow these steps to add a field map and link it:
1. Choose Administration then Content Tracker Administration from the Main
menu. Choose Data Engine Control Center.
The Data Engine Control Center opens.
2. Click the Services tab.
3. To add a new entry, follow the procedure in Section 12.4.4.1, "Adding, Editing, or
Deleting Service Entries." Select the service entry from the Service Name list.
4. Click Edit.
The Extended Services Tracking screen opens. If necessary, edit this service entry's
values now in addition to adding the field map ResultSet.

Service Call Configuration
12-20 Oracle WebCenter Content Developer's Guide for Content Server
If the service is already linked to a field map ResultSet, the name is listed in the
Field Map field and one or more data field, location, and table column set are
listed in the Field pane.
5. If the selected service is not linked to a secondary ResultSet, the Field Map field is
empty. Enter the name of the field map ResultSet. If the selected service is already
linked, skip this step.
6. Click Add.
The Field Map screen opens.
7. Enter the appropriate values in the fields:
■Field Name: The name of the data field in the service DataBinder whose data
values are logged to a general purpose column in the SctAccessLog table.
■Field Location: The section in the Oracle WebCenter Content Server service
DataBinder where the data field to be logged is located. The follow values can
be used:
–LocalData (the default value)
–Environment
–BinderResultSet. This returns a comma-delimited string containing all
values in the ResultSet. Size is restricted to 255 characters so this value is
only useful for small ResultSets. The size is restricted to 255 characters,
allowing for the comma's, etc.)
To accommodate more characters, enlarge or redefine the SctAccessLog
table columns using standard database tools. For example, if you open up
extField_3 to 2047, then it holds the equivalent amount of data. However,
most databases have page size limitations. In addition, note that SQL does
not parse strings efficiently.
■Column Name: The column in the SctAccessLog table where data values from
a specified DataBinder field are logged.
8. Click OK.
The Field Map screen closes and the values are added to the Field Name and
Column Name fields.
9. Click OK again.
A confirmation dialog box is displayed.
The Services tab is redisplayed with the updated information.
10. Click OK.
Content Tracker does not perform error checking (such as field type or spelling
verification) for the extended services tracking function in the Data Engine Control
Center. Errors are not generated until a reduction is done. These fields are
case-sensitive. When adding new field map ResultSets or editing existing field map
ResultSets, be sure to enter the proper names and ensure that all field values are
spelled and capitalized correctly.
To edit a field map, perform the previous steps, and edit the entries as needed.
To delete an entry, perform the previous steps, highlight a service entry, and select
Delete.

Customizing Content Tracker
Customizing Content Tracker 12-21
12.5 Customizing Content Tracker
This section covers the following topics:
■Section 12.5.1, "Activity Metrics SQL Queries"
■Section 12.3.3, "External Users and Content Item Tracking"
For details about Content Tracker configuration variables, see the Oracle WebCenter
Content Idoc Script Reference Guide.
12.5.1 Activity Metrics SQL Queries
The snapshot feature enables you to log and track search relevance custom metadata
fields. Content Tracker fills these fields with content item usage and access information
that reflects the popularity of particular content items. The information includes the
date of the most recent access and the number of accesses in two distinct time
intervals. For more information about the snapshot feature, see "Snapshot Tab" in the
Oracle WebCenter Content Application Administrator's Guide for Content Server.
If the snapshot feature and activity metrics are enabled, the values in the custom
metadata fields are updated following the reduction processing phase. When users
access content items, the values of the applicable search relevance metadata fields
change accordingly. Subsequently, Content Tracker runs three SQL queries as a
post-reduction processing step to determine which content items were accessed during
the reporting period. For more information about the post-processing reduction step,
see "Data Reduction Process with Activity Metrics" in the Oracle WebCenter Content
Application Administrator's Guide for Content Server.
12.5.1.1 Customizing the Activity Metrics SQL Queries
The SQL queries are available as a resource and can be customized to filter
information from the final tracking data. For example, you might want to exclude
accesses by certain users in the tabulated results.
The SQL queries are included in the sctQuery.htm file:
IntradocDir/custom/ContentTracker/resources/SctQuery.htm
The following SQL queries are used for the search relevance custom metadata fields:
■
qSctLastAccessDate
: For the last access function, this query uses the
SctAccessLog table. It checks for all content item accesses on the reduction date
and collects the latest timestamp for each
dID
. The parameter for the query is the
reduction date. In this case, dates may be reduced in random order because the
comparison test for the last access date only signals a change if the existing
DocMeta
value is older than the proposed new value.
■
qSctAccessCountShort
and
qSctAccessCountLong
: For the short and long access
count functions, the
qSctAccessCountShort
and
qSctAccessCountLong
SQL
queries are identical except for the "column name" for the count. They use the
SctAccessLog table to calculate totals for all accesses for each
dID
across the time
intervals specified (in days) for each. The parameters are the beginning and
ending dates for the applicable rollups.
Note: In general, the WHERE clause can be modified in any of the
SQL queries. It is recommended that nothing else be modified.

Web Beacon Functionality
12-22 Oracle WebCenter Content Developer's Guide for Content Server
12.5.2 External Users and Content Item Tracking
The option exists to control if Content Tracker includes data about external user
accesses in the applicable reports. These authenticated users are qualified based on
their user roles and accounts. By default, the configuration parameter
SctExternalUserLogEnabled is set to true (enabled). This allows Content Tracker to
monitor external user logins and automatically propagate their role and account
information to the UserSecurityAttributes table.
Regardless of whether the SctExternalUserLogEnabled configuration variable is
enabled or disabled, all of the content item access information for external users is
tracked and recorded. But when it is enabled, this variable ensures that this data is
included in reports that explicitly correlate externally authenticated user names with
their associated user roles and accounts. Specifically, the Top Content Items by User
Role report and the Users by User Role report include all of the content item access
activity by external users. For more information, see "Content Tracker Report
Generator Main Page" in the Oracle WebCenter Content Application Administrator's Guide
for Content Server.
12.6 Web Beacon Functionality
A web beacon is a managed object that facilitates specialized tracking support for
indirect user accesses to web pages or other managed content. In earlier releases,
Content Tracker was unable to gather data from cached pages and pages generated
from cached services. When users access cached web pages and content items, Oracle
WebCenter Content Server and Content Tracker are unaware that these requests ever
happened. Without using web beacon referencing, Content Tracker does not record
and count such requests.
The web beacon involves the use of client side embedded references that are invisible
references to the managed beacon objects within Oracle WebCenter Content Server.
This enables Content Tracker to record and count user access requests for managed
content items that have been copied by an external entity for redistribution without
obtaining content directly from Oracle WebCenter Content Server. For details about
circumstances when this might be used, see Section 12.6.1, "Web Beacon Use Cases."
When cached content is served to consumers, users perceive that the requested object
was served by Oracle WebCenter Content Server. The managed content is actually
provided using non-dynamic content delivery methods. In these situations, the
managed content is served by a static web site, a reverse proxy server, or out of a file
system. The web beacon feature ensures that this type of activity can be tracked.
Note: To manually disable the SctExternalUserLogEnabled
configuration variable, see Section 12.3.2, "Manually Setting Content
Tracker Configuration Variables."
Important: The implementation requirements for the web beacon
feature are contingent on the system configurations involved. All of
the factors cannot be addressed in this documentation. Information
about the access records collected and processed by Content Tracker
are an indication of general user activity and not exact counts.

Web Beacon Functionality
Customizing Content Tracker 12-23
12.6.1 Web Beacon Use Cases
Two situations in particular may merit the use of the web beacon functionality: reverse
proxy activity and when using Site Studio.
In a reverse proxy scenario, the reverse proxy server is positioned between the users
and Oracle WebCenter Content Server. The reverse proxy server caches managed
content items by making a copy of requested objects. The next time another user asks
for the document, it displays its copy from the private cache. If the reverse proxy
server does not already have the object in its cache, it requests a copy.
Because it is delivering cached content, the reverse proxy server does not directly
interact with Oracle WebCenter Content Server. Therefore, Content Tracker cannot
detect these requests and does not track this type of user access activity.
A reverse proxy server is often used to improve web performance by caching or by
providing controlled web access to applications and sites behind a firewall. Such a
configuration provides load balancing by moving copies of frequently accessed
content to a web server where it is updated on a scheduled basis.
For the web beacon feature to work, each user access includes an additional request to
the managed beacon object in Oracle WebCenter Content Server. This adds overhead
to normal requests, but the web beacon object is very small and does not significantly
interfere with the reverse proxy server’s performance. Note that it is only necessary to
embed the web beacon references in objects you specifically want to track.
Another usage scenario involves Site Studio, a product that is used to create web sites
which are stored and managed in Oracle WebCenter Content Server. When Site Studio
and Oracle WebCenter Content Server are located on the same server, Content Tracker
is configured to automatically track the applicable user accesses. The gathered Site
Studio activity data is then used in predefined reports. For more information, see "Site
Studio Web Site Activity Reporting" in the Oracle WebCenter Content Application
Administrator's Guide for Content Server.
If your web site is intended for an external audience, you may decide to create a copy
of the site and transfer it to another server. In addition to being viewed publicly, this
solution also ensures that site development remains separate from the production site.
In this arrangement, however, implement the web beacon feature to make sure that
Content Tracker can collect and process user activity.
12.6.2 Web Beacon Overview
Content Tracker records and counts requests for objects managed by Oracle
WebCenter Content Server. The web beacon feature counts requests for managed
objects copied by an external entity (such as a reverse proxy server or other functions
not involving Oracle WebCenter Content Server).
Note: Two modes of Site Studio integration are available with
Content Tracker. One type is the existing built-in integration that
automatically occurs when Site Studio is installed. This is typically
used when a web site is under construction and the web pages are
managed in Oracle WebCenter Content Server.
The other form uses the web beacon feature and Content Tracker
regards Site Studio the same as any other web site generator. This is
typically used when a web site is in production mode and content is
no longer managed in Oracle WebCenter Content Server.

Web Beacon Functionality
12-24 Oracle WebCenter Content Developer's Guide for Content Server
The following list provides a brief overview of the web beacon feature’s functionality
and implementation requirements.
■To begin implementing the web beacon feature, create a Web Beacon object. This is
usually a small object such as a 1x1 pixel transparent image. The object is then
checked in and added to Content Tracker’s list of web beacon object names.
■Next create the Web Beacon references to the checked-in web beacon object and
embedding them into cached HTML pages or managed content items. The first
part of the reference is a URL reference to the web beacon object and the second
part is identification information encoded as pseudo query parameters.
■Content Tracker logs the web beacon reference to the beacon object and performs
Reduction Processing for Web Beacon references. During data reduction, Content
Tracker checks the dDocName of each referenced object against the list of
registered web beacons. If the dDocName is on the list, the query parameters are
processed in such a manner to ensure that the URL request is logged as a request
for the tagged object (web page or managed content item) rather than the web
beacon object.
12.6.3 Web Beacon Object
One or more content items must be created to use as the web beacon object(s). These
are usually a 1x1 pixel transparent image or anything with low overhead that won't
disrupt the page being rendered. The ideal web beacon object has zero content.
Multiple web beacon objects can be created but only one is required. Make sure the
object is not a file type included in the
SctIgnoreFileType
configuration variable.
Check in the completed object then update Content Tracker’s
SctWebBeaconIDList
configuration variable. During data reduction, Content Tracker checks the
SctWebBeaconIDList
settings to determine how the web beacon reference listings in
the event logs should be processed. If the applicable web beacon object is listed,
Content Tracker processes the data appropriately. See the Oracle WebCenter Content Idoc
Script Reference Guide for details about configuration variables.
During installation the dDocNames of web beacon objects can be entered into the
SctWebBeaconIDList preference variable or it can be added or edited later. Follow
these steps to add or edit object names in the ID list:
1. Choose Administration then Admin Server from the Main menu.
The Content Admin Server page opens.
2. Click the name of the instance whose web beacon preference setting will be
changed.
The Content Admin Server instance_name page opens.
3. Click Component Manager.
The Component Manager page opens.
4. In the Update Component configuration field, select Content Tracker from the list.
5. Click Update.
The Update Component Configuration page opens.
6. In the SctWebBeaconIDList preference field, enter the applicable web beacon object
dDocNames separated by commas.
7. Click Update.
8. Restart Oracle WebCenter Content Server to apply the changes.

Web Beacon Functionality
Customizing Content Tracker 12-25
12.6.4 Web Beacon References
After creating and checking in the web beacon object(s), create their corresponding
reference(s). A single web beacon object works in most systems because different
query strings appended to the web beacon static URL make each reference unique.
Each query parameter set also consists of distinct combinations of variables that
identify specific cached web pages or managed content items.
12.6.4.1 Format Structure for URL References
Web beacon URL references consist of the web beacon static URL used to access the
web beacon object managed by Oracle WebCenter Content Server and a pseudo query
string with content item variables.
When creating the references, make sure the web beacon static URL in Oracle
WebCenter Content Server does not use a directory root that is included in the
SctIgnoreDirectories
configuration variable. If the URL is one of the listed values,
Content Tracker does not collect the activity data. For more information about the
SctIgnoreDirectories
configuration variable, see the Oracle WebCenter Content Idoc
Script Reference Guide.
The query parameter set functions as a code that informs Content Tracker what the
actual managed content item is that the user accessed. One of the query parameters is
the item’s
dID
. Including a unique set of query parameter values allows monitoring of
indirect user access activity for managed objects that have been copied and cached.
The query string is never actually executed but the query parameter values provide
information for Content Tracker to be able to identify the associated managed object.
The following examples illustrate general format structures associated with the web
beacon feature. The examples demonstrate how to use one web beacon object while
creating an unbounded number of different query strings. The same web beacon object
(dDocName =
bcn_2.txt
) is used in all of the examples. By varying the query
parameters, the requests for this web beacon object can convey to Content Tracker a
'request' for any managed object in the repository.
These examples have the following assumptions:
■The web beacon object (
bcn_2.txt
) is checked in and is included in the web
beacon list (SctWebBeaconIDList).
■The applicable web beacon references are embedded into the associated managed
content items (doc1, doc2, and doc3).
■To resolve the web beacon reference, the browser must request a copy of the web
beacon object from Oracle WebCenter Content Server.
■The web beacon requests occur because users are indirectly requesting the related
content items.
Example 12–1 Web Beacon Request Without Query Parameters
http://myhost.somewhere.else/idc/groups/public/documents/adacct/bcn_2.txt
This begins with a static web reference to the web beacon object. Although it is a
legitimate direct access to the web beacon object, there are no appended query
parameters. Content Tracker processes this access event as a request for the web
beacon object itself.

Web Beacon Functionality
12-26 Oracle WebCenter Content Developer's Guide for Content Server
Example 12–2 Web Beacon Request for Tracking doc1
http://myhost.somewhere.else/idc/groups/public/documents/adacct/bcn_2.txt?sct_
dDocName=doc1&sct_dID=1234&...
This also begins with the usual static web reference to this beacon object. It has a
pseudo query string appended to it that contains an arbitrary number of query
parameters. The values contained in these query parameters convey the information
about the specific managed object (
doc1
) the user has requested.
Example 12–3 Web Beacon Request for Tracking doc2
http://myhost.somewhere.else/idc/groups/public/documents/adacct/bcn_2.txt?sct_
dDocName=doc2&sct_Ext_2=WebSite4
This is similar to Example 12–4. The parameter values provide information about the
user requested content item (
doc2
). In this example the query string includes another
parameter to convey additional information about the tagged item. The added
parameter uses an extField column name. The value
WebSite4
is copied into the
extField_2 column of the SctAccessLog table. The extField column substitution is
optional and application dependent.
Example 12–4 Web Beacon Request for Tracking doc3
http://myhost.somewhere.else/idc/groups/public/documents/adacct/bcn_2.txt?sct_
dDocName=doc2&sct_Ext_2=WebSite4&sct_Ext_8=SubscriptionClass6
This example modifies Example 12–3 by adding a second (although non-sequential)
extField column name. In this case,
WebSite4
is copied into the extField_2 column of
the SctAccessLog table, and
SubscriptionClass6
is copied into the extField_8 column.
The extField column substitutions are optional and application dependent.
12.6.4.2 Placement and Retrieval Scheme
The specially constructed web beacon references must be embedded in the managed
object to track. Web beacon references can be embedded in any HTML page. Users
indirectly request access to the modified "managed" content items via an external Site
Studio web site or a reverse proxy server.
The browser encounters the web beacon reference while rendering the page. Each
display of the managed object, regardless of how the object was obtained, causes the
browser to request a copy of the web beacon object directly from Oracle WebCenter
Content Server. When the browser resolves the web beacon reference, Content Tracker
captures the data that includes the web beacon reference with the set of pseudo query
parameters that identify the managed content item.
12.6.4.3 Data Capture and Storage
Ordinarily, query parameters in static URLs serve no function for the web browser. But
when resolving the web beacon static URL, the browser ignores the appended query
parameters long enough for Content Tracker’s web server filter plugin to record them.
Although the pseudo query string is never executed, Content Tracker captures the
query parameter values with other data such as the client IP address and date/time
stamp. Content Tracker records the data in web access event logs.

Web Beacon Functionality
Customizing Content Tracker 12-27
12.6.5 Reduction Processing for Web Beacon References
When these specially constructed web beacon references are processed during data
reduction, Content Tracker compares the web beacon’s dDoc Name to the list of
dDocNames in the SctWebBeaconID list to determine if the request was for a web
beacon object rather than a regular content item.
If there is no match or if no query parameters are appended to the web beacon
reference, Content Tracker processes the access event normally. If the web beacon’s
dDocName is identified, Content Tracker continues to process and interpret the
associated URL query parameters with the data reduction process treating the web
beacon access request as a request for the web page or content item.
During data reduction, Content Tracker completes the processing by parsing the query
parameters and performing various value substitutions for fields ultimately written to
the SctAccessLog. The query parameter values are mapped as follows:
■
sct_dID
replaces the web beacon object’s dID
■
sct_dDocName
replaces the web beacon object’s dDocName
■
sct_uriStem
replaces the web beacon object’s URI stem (everything preceding the
’?’)
■
sct_uriQuery
replaces the web beacon object’s URI query portion (everything
following the ’?’)
■
sct_Ext_n
is copied directly into the SctAccessLog Extended Field n
Example 12–5 Data Reduction Processing for Query Parameter Values
/idc/groups/public/documents/adacct/bcn_2.txt?sct_dDocName=WW_1_21&sct_dID=42&sct_
Ext_1=WillowStreetServer&sct_Ext_2=SubscriptionTypeA
After data reduction, Content Tracker records this web beacon type request in the
SctAccessLog table as an access to
WW_1_21
rather than to
bcn_2.txt
. Other data, such
as the user name, time of access, and client IP, is derived from the HTTP request.
Additionally,
WillowStreetServer
is copied into the extField_1 column of the
SctAccessLog table, and
SubscriptionTypeA
is copied into the extField_2 column.
(These last two field substitutions are optional and application dependent.)
12.6.6 Limitations and Guidelines
Perform the following tasks to implement Content Tracker’s web beacon feature:
1. Create the web beacon object.
2. Check it in.
3. Update the SctWebBeaconIDList.
4. Define the web beacon references.
5. Embed them into the cached content items and/or web sites to track.

Web Beacon Functionality
12-28 Oracle WebCenter Content Developer's Guide for Content Server
12.6.6.1 Limitations
The following limitations should be considered:
■One difficulty is determining the means by which the web beacon reference is
attached to a tagged object. There are situations where the requested object does
not allow embedded references (for example, a PDF or Word document). In this
case, the web beacon object must be requested directly from Oracle WebCenter
Content Server before the actual content item is requested.
■The web beacon feature does not work in many situations, such as with certain
browser configurations. If the user has disabled cross-domain references in their
browser, and both the web page and Oracle WebCenter Content Server instance
are in different domains, the web beacon object is never requested from Oracle
WebCenter Content Server and the user access is not counted.
–Content Server
–Content Server
■The first time a managed content item is accessed via a reverse proxy server, it is
counted twice: once when the Oracle WebCenter Content Server provides the item
to the reverse proxy server, and a second time when the browser requests the web
beacon object.
■Depending on the specific configuration, it might be necessary to devise a method
to prevent the reverse proxy server and external Site Studio from caching the web
beacon object itself. Browsers also do caching. This situation would prevent
Content Tracker from counting any relevant content accesses. To avoid this
append a single-use query parameter to the web beacon reference that contains a
random number as in this example:
dDocName=vvvv_1_21&FoolTheProxyServer=12345654321
By changing the number on each request, the cache, web server and the browser
view the request as new.
12.6.6.2 Guidelines
The following guidelines should be considered:
■The sct_dDocName and sct_dID parameter values in the web beacon reference
must resolve to an actual managed content item in the same Oracle WebCenter
Content Server instance that provides the requested web beacon object.
■Using the ExtField columns in the SctAccssLog table is optional and application
dependent.
■Use of ExtField_10 is reserved for the web beacon object’s dDocName. This allows
report writers a way to determine which web beacon object was used to signal the
access to the actual managed content item.
■Spelling and capitalization of the query parameter names must be exact.
■Embedded commas or spaces in the query parameter values are not allowed.

Web Beacon Functionality
Customizing Content Tracker 12-29
■The dDocName and dID of a managed object are usually included in the web
beacon reference although to be considered a legitimate access request, it is not
necessary to provide both. If any of the standard fields are missing, Content
Tracker resolves the identification parameters as follows:
–Given a dID, Content Tracker can determine the content item’s dDocName.
–Given a dDocName, Content Tracker can determine the content item’s dID.
The dID is the content item’s most current revision. If the revision changes
after the content item is cached, then the user sees the older version. However,
Content Tracker counts this access request as a view of the most recent
revision of the content item.
–Given a proper URI Stem, Content Tracker can determine the content item’s
dDocName but assumes the dID of the most recent revision.
■Restart Oracle WebCenter Content Server after making changes to the web beacon
list (SctWebBeaconIDList).
■Do not create a web beacon object that uses a file type or is located in a directory
that Content Tracker is configured to disregard.
■Content Tracker is unable to verify if the cached content item was delivered.
■Content Tracker performs normal folding of static URL accesses. If a user
repeatedly requests the same content item and makes no intervening requests for
another document, then Content Tracker assumes that the consecutive requests are
the same document. In this case, these access requests are considered to be all one
access request.
■The query parameters can represent any managed object and need not necessarily
be what the user is actually viewing.
12.6.7 Examples of Web Beacon Embedding
Several embedding methods can be used to implement the web beacon feature. Each
technique has advantages and disadvantages and one may be more appropriate for a
particular situation than another. Because of differences in system configurations, there
is no optimal single technique.
All of the examples below use the following information:
■WebBeacon.bmp web beacon object
■Oracle WebCenter Content Server instance IFHE.comcast.net/idc/
■dDocName of wb_bmp
Code fragment files for all of the examples are included in Content Tracker’s
documentation directory. These examples are intended to demonstrate general
approaches and are provided as a starting point. They will need to be adapted to work
with your specific application and network topology.
12.6.7.1 Embedded HTML Example
The simplest, most direct use of a web beacon for tracking managed content access is
to embed a reference to the beacon directly into the HTLM source for the containing
web page. When the requesting user's browser attempts to render the page, it sends a
request to the instance where the web beacon object resides.

Web Beacon Functionality
12-30 Oracle WebCenter Content Developer's Guide for Content Server
In this example, the technique places an image tag in the web page to be tracked. The
src attribute
of the image refers to the web beacon object (
wb_bmp
) which was
checked into an instance. When the user’s browser loads the image the instance, the
additional query information is recorded and ultimately interpreted as a reference to
dDocName
BOPR
.
This approach is simple but has the disadvantage that the user’s browser or a reverse
proxy server, might cache a copy of the web beacon object. As such, no additional
requests are posted directly to the instance and no additional accesses to any content
tagged with this web beacon are counted.
The HTML fragment for this method might be written as follows:
<!-- WebBeaconEmbeddedHtml.htm - Adjust the Web Beacon web location and managed
object identfiers in the img src attribute, then paste into your web page -->
<img src="http://IFHE.comcast.net/idc/groups/public/documents/adacct/wb_
bmp.bmp?sct_dID=1&sct_dDocName=BOPR&sct_
uriStem=http://IFHE.comcast.net/idc/groups/public/documents/adacct/bopr.pdf&sct_
Ext_1=Sample_Html_Beacon_Access" width="21" height="21" />
12.6.7.2 Embedded JavaScript Example
The cached web beacon problem can be overcome by using JavaScript instead of
HTML Using the embedded JavaScript method requires two script tags:
■The
cs_callWebBeacon
function that issues the actual web beacon request.
■An unnamed block that assigns context values to certain JavaScript variables, then
calls the
cs_callWebBeacon
function.
The identifying information for the managed content object is defined in a list of
variables which improves readability. The web beacon request is also made effectively
unique by adding a random number to the pseudo query parameters.
Disadvantages include more code to manage and the URL of the web beacon server is
hard coded in each web page. In addition, the user's browser might not have
JavaScript enabled.
The JavaScript fragment for this method might be written as follows:
// WebBeaconEmbeddedJavascript.js - Adjust the managed object and Web Beacon
descriptors,
then paste this into your web page.
//
<script type="text/javascript" >
var cs_obj_dID = "" ;
var cs_obj_dDocName = "" ;
var cs_obj_uriStem = "" ;
var cs_extField_1 = "" ;
var cs_extField_2 = "" ;
var cs_extField_3 = "" ;
var cs_extField_4 = "" ;
var cs_extField_5 = "" ;
var cs_extField_6 = "" ;
var cs_extField_7 = "" ;
var cs_extField_8 = "" ;
var cs_extField_9 = "" ;
var cs_beaconUrl = "" ;
function cs_void( ) { return ; }

Web Beacon Functionality
Customizing Content Tracker 12-31
function cs_callWebBeacon( ) {
//
var cs_imgSrc = "" ;
var cs_inQry = false ;
if ( cs_beaconUrl && cs_beaconUrl != "" ) {
cs_imgSrc += cs_beaconUrl ;
}
if ( cs_obj_dID && cs_obj_dID != "" ) {
if ( cs_inQry ) {
cs_imgSrc += "&" ;
} else {
cs_imgSrc += "?" ;
cs_inQry = true ;
}
cs_imgSrc += "sct_dID=" + cs_obj_dID ;
}
if ( cs_obj_dDocName && cs_obj_dDocName != "" ) {
if ( cs_inQry ) {
cs_imgSrc += "&" ;
} else {
cs_imgSrc += "?" ;
cs_inQry = true ;
}
cs_imgSrc += "sct_dDocName=" + cs_obj_dDocName ;
}
if ( cs_obj_uriStem && cs_obj_uriStem != "" ) {
if ( cs_inQry ) {
cs_imgSrc += "&" ;
} else {
cs_imgSrc += "?" ;
cs_inQry = true ;
}
cs_imgSrc += "sct_uriStem=" + cs_obj_uriStem ;
}
if ( cs_extField_1 && cs_extField_1 != "" ) {
if ( cs_inQry ) {
cs_imgSrc += "&" ;
} else {
cs_imgSrc += "?" ;
cs_inQry = true ;
}
cs_imgSrc += "sct_Ext_1=" + cs_extField_1 ;
}
if ( cs_extField_2 && cs_extField_2 != "" ) {
if ( cs_inQry ) {
cs_imgSrc += "&" ;
} else {
cs_imgSrc += "?" ;
cs_inQry = true ;
}
cs_imgSrc += "sct_Ext_2=" + cs_extField_2 ;
}
<!-- and so on for the remaining extended fields -->

Web Beacon Functionality
12-32 Oracle WebCenter Content Developer's Guide for Content Server
if ( cs_inQry ) {
cs_imgSrc += "&" ;
} else {
cs_imgSrc += "?" ;
cs_inQry = true ;
}
var dc = Math.round( Math.random( ) * 2147483647 ) ;
cs_imgSrc += "sct_defeatCache=" + dc ;
var wbImg = new Image( 1, 1 ) ;
wbImg.src = cs_imgSrc ;
wbImg.onload = function( ) { cs_void( ) ; }
}
</script>
<script type="text/javascript">
//
var cs_obj_dID = "1" ;
var cs_obj_dDocName = "BOPR" ;
var cs_obj_uriStem =
"http://IFHE.comcast.net/idc/groups/public/documents/adacct/bopr.pdf" ;
var cs_extField_1 = "Sample_Javascript_Beacon_Access" ;
var cs_beaconUrl =
"http://IFHE.comcast.net/idc/groups/public/documents/adacct/wb_bmp.bmp" ;
cs_callWebBeacon( ) ;
</script>
12.6.7.3 Served JavaScript Example
The hard-coded web beacon server problem described in the Embedded JavaScript
Example can be overcome by splitting the code into two fragments:
■The managed code fragment contains the
cs_callWebBeacon
function. It can be
checked in and managed by an Oracle WebCenter Content Server instance, either
the instance that manages the web beacon or some other instance. The
src
attribute contained in the in-page code fragment refers to the managed code
fragment and causes it to be dynamically loaded into the web page.
■The in-page code fragment still consists of two
<script>
tags, but the first contains
only a reference to the
cs_callWebBeacon
code instead of the code itself. The
advantage for this is that changes to the
cs_callWebBeacon
function can be
managed centrally instead of having to modify each and every tagged web page.
This solution incurs the additional network overhead of loading the managed
code into the web page on the user’s browser. However, the requirement for a web
beacon assist to tracking implies that the network environment includes an
efficient reverse proxy server, or other caching mechanism. The same cache that
conceals managed object access also minimizes the impact of the code download.

Web Beacon Functionality
Customizing Content Tracker 12-33
Managed Code Fragment
// WebBeaconServedJavascript_Checkin.js - Check this in to your Content Server,
then fixup
// the JavaScript include src attribute in
WebBeaconManagedJavascriptIncludeSample.js
//
var cs_obj_dID = "" ;
var cs_obj_dDocName = "" ;
var cs_obj_uriStem = "" ;
var cs_extField_1 = "" ;
var cs_extField_2 = "" ;
var cs_extField_3 = "" ;
var cs_extField_4 = "" ;
var cs_extField_5 = "" ;
var cs_extField_6 = "" ;
var cs_extField_7 = "" ;
var cs_extField_8 = "" ;
var cs_extField_9 = "" ;
var cs_beaconUrl =
"http://IFHE.comcast.net/idc/groups/public/documents/adacct/wb_bmp.bmp" ;
function cs_void( ) { return ; }
function cs_callWebBeacon( ) {
//
var cs_imgSrc = "" ;
var cs_inQry = false ;
if ( cs_beaconUrl && cs_beaconUrl != "" ) {
cs_imgSrc += cs_beaconUrl ;
}
if ( cs_obj_dID && cs_obj_dID != "" ) {
if ( cs_inQry ) {
cs_imgSrc += "&" ;
} else {
cs_imgSrc += "?" ;
cs_inQry = true ;
}
cs_imgSrc += "sct_dID=" + cs_obj_dID ;
}
if ( cs_obj_dDocName && cs_obj_dDocName != "" ) {
if ( cs_inQry ) {
cs_imgSrc += "&" ;
} else {
cs_imgSrc += "?" ;
cs_inQry = true ;
}
cs_imgSrc += "sct_dDocName=" + cs_obj_dDocName ;
}
if ( cs_obj_uriStem && cs_obj_uriStem != "" ) {
if ( cs_inQry ) {
cs_imgSrc += "&" ;
} else {
cs_imgSrc += "?" ;
cs_inQry = true ;
}

Web Beacon Functionality
12-34 Oracle WebCenter Content Developer's Guide for Content Server
cs_imgSrc += "sct_uriStem=" + cs_obj_uriStem ;
}
if ( cs_extField_1 && cs_extField_1 != "" ) {
if ( cs_inQry ) {
cs_imgSrc += "&" ;
} else {
cs_imgSrc += "?" ;
cs_inQry = true ;
}
cs_imgSrc += "sct_Ext_1=" + cs_extField_1 ;
}
if ( cs_extField_2 && cs_extField_2 != "" ) {
if ( cs_inQry ) {
cs_imgSrc += "&" ;
} else {
cs_imgSrc += "?" ;
cs_inQry = true ;
}
cs_imgSrc += "sct_Ext_2=" + cs_extField_2 ;
}
<!-- and so on for the remaining extended fields -->
if ( cs_inQry ) {
cs_imgSrc += "&" ;
} else {
cs_imgSrc += "?" ;
cs_inQry = true ;
}
var dc = Math.round( Math.random( ) * 2147483647 ) ;
cs_imgSrc += "sct_defeatCache=" + dc ;
var wbImg = new Image( 1, 1 ) ;
wbImg.src = cs_imgSrc ;
wbImg.onload = function( ) { cs_void( ) ; }
}
In-Page Code Fragment
<script type="text/javascript"
src="http://IFHE.comcast.net/idc/groups/public/documents/adacct/wbmjcs.js" >
</script>
<script type="text/javascript">
//
var cs_obj_dID = "1" ;
var cs_obj_dDocName = "BOPR" ;
var cs_obj_uriStem =
"http://IFHE.comcast.net/idc/groups/public/documents/adacct/bopr.pdf" ;
var cs_extField_1 = "Sample_Managed_Javascript_Beacon_Access" ;
cs_callWebBeacon( ) ;
</script>

13
Customizing Content Categorizer 13-1
13
Customizing Content Categorizer
This chapter provides information about the customization of Content Categorizer, an
optional component that is automatically installed with Oracle WebCenter Content
Server. When enabled, Content Categorizer suggests metadata values for documents
being checked into Content Server.
■Section 13.1, "About Content Categorizer"
■Section 13.2, "Customizing Content Categorizer"
13.1 About Content Categorizer
Content Categorizer suggests metadata values for new documents being checked into
Content Server, and for existing documents that may or may not already have
metadata values. These metadata values are determined according to search rules
provided by the System Administrator.
For Content Categorizer to recognize structural properties, the content must go
through XML Conversion (eXtensible Markup Language).
The Content Categorizer Batch utility can search a large number of files and create a
Batch Loader control file containing appropriate metadata field values. The Batch
utility can also be used to recategorize existing content (already checked into the
repository).
13.2 Customizing Content Categorizer
To customize Content Categorizer for your site, you can set the XML conversion
method, define field properties for the metadata fields, and define search rules for
each file type. You can also define your own eXtensible Style Sheet Language
Transformations (XSLT) for the XML translation, to accommodate your site’s
document processing needs.
For details about setting up Content Categorizer and customizing it, see "Using
Content Categorizer" and "Content Categorizer Interface" in the Oracle WebCenter
Content Application Administrator's Guide for Content Server.

Customizing Content Categorizer
13-2 Oracle WebCenter Content Developer's Guide for Content Server

14
Downloading Custom Components 14-1
14Downloading Custom Components
This chapter describes how to download packaged custom components to Oracle
WebCenter Content Server.
This chapter includes the following sections:
■Section 14.1, "About Downloading Custom Components"
■Section 14.2, "Downloading a Component with the Advanced Component
Manager"
■Section 14.3, "Downloading a Component from Oracle Technology Network"
14.1 About Downloading Custom Components
You can download custom components for Content Server with the Advanced
Component Manager or from Oracle Technology Network.
14.2 Downloading a Component with the Advanced Component Manager
You can use the Advanced Component Manager to download a component for
Content Server.
To download a component:
1. In the Administration tray or menu, choose Admin Server.
The Admin Server displays the Component Manager page.
2. In the first paragraph on the Component Manager page, click advanced
component manager.
This displays the Advanced Component Manager page, which has a list of
components available for downloading.
3. Select the component to be packaged from the Download Component list
4. Click Download to display the File Download screen.
5. Select Save this file to disk, and click OK.
6. In the Save As dialog box, navigate to a directory, change the file name if
necessary, and click Save.

Downloading a Component from Oracle Technology Network
14-2 Oracle WebCenter Content Developer's Guide for Content Server
14.3 Downloading a Component from Oracle Technology Network
You can download a component for Content Server from Oracle Technology Network
(OTN).
To download a component from OTN:
1. In a web browser, go to the OTN web site at
http://www.oracle.com/technetwork/middleware/downloads/index.
html.
2. On the Oracle Fusion Middleware 11g Software Downloads page, click WebCenter
Content on the left.
3. On the Oracle WebCenter Content page, click Core Capabilities.
4. On the Oracle WebCenter Content Core Capabilities page, click Download.
5. On the Downloads page, click Individual UCM Component Downloads, and
download the component you want.

15
Creating Custom Components 15-1
15Creating Custom Components
This chapter describes how to create custom components to use with Oracle
WebCenter Content Server.
This chapter includes the following sections:
■Section 15.1, "About Creating Custom Components"
■Section 15.2, "Creating Resources for a Component"
■Section 15.3, "Creating a Component Definition File"
■Section 15.4, "Restarting Content Server to Apply a Component"
15.1 About Creating Custom Components
Custom components can alter defaults for your system, add new functionality, or
streamline repetitive functions. You can create and use custom components to modify
a Content Server instance without compromising the system integrity.
15.2 Creating Resources for a Component
You can use the following types of resources to customize Content Server:
■HTML includes
■Dynamic data tables
■String resources
■Dynamic tables
■Static tables
■Queries
■Services
■Templates
■Environment resources

Creating Resources for a Component
15-2 Oracle WebCenter Content Developer's Guide for Content Server
15.2.1 HTML Includes
An include is defined within <@dynamichtml name@> and <@end@> tags in an
HTM resource file. The include is then called using this syntax:
<$include name$>
Includes can contain Idoc Script and valid HTML code, including JavaScript, Java
applets, cascading style sheets, and comments. Includes can be defined in the same file
as they are called from, or they can be defined in a separate HTM file. Standard HTML
includes are defined in the IdcHomeDir/resources/core/idoc files.
HTML includes, strings, and static tables can be present in the same HTM file. An
HTML include resource does not require merge rules.
15.2.1.1 The Super Tag
The super tag is used to define exceptions to an existing HTML include. The super
tag tells the include to start with an existing include and then add to it or modify using
the specified code.
The super tag is particularly useful when making a small customization to large
includes or when you customize standard code that is likely to change from one
software version to the next. When you upgrade to a new version of Oracle WebCenter
Content Server, the super tag ensures that your components are using the most recent
version of the include, modifying only the specific code you need to customize your
instance.
The super tag uses the following syntax:
<@dynamichtml my_resource@>
<$include super.my_resource$>
exception code
<@end@>
You can use the super tag to refer to a standard include or a custom include. The
super tag incorporates the include that was loaded last.
Example 15–1 shows the use of a super tag.
Example 15–1 super Tag
In this example, a component defines the my_resource include as follows:
<@dynamichtml my_resource@>
<$a = 1, b = 2$>
<@end@>
Another component that is loaded later enhances the my_resource include using the
super tag. The result of the following enhancement is that a is assigned the value 1
and b is assigned the value 3:
<@dynamichtml my_resource@>
<$include super.my_resource$>
<!--Change "b" but not "a" -->
<$b = 3$>
<@end@>
Note: The placement of a super tag will determine how the Idoc
Script is evaluated.

Creating Resources for a Component
Creating Custom Components 15-3
15.2.1.2 Editing an HTML Include Resource
Use the following procedure to edit an existing HTML include resource using the
Component Wizard.
1. In the Component Wizard, open the component that contains the resource to edit.
2. Select the resource in the Custom Resource Definition list.
3. If the resource file contains multiple types of resources, click the Includes tab on
the right.
4. Modify the includes in the Custom HTML Includes list.
■To edit an existing include, select the include, click Edit, modify the code, and
then click OK.
■To add an include to the resource file, click Add.
■To remove an include, select the include, click Delete, and then click Yes to
confirm.
15.2.2 Dynamic Data Tables
A dynamic data table resource is a dynamicdata table. This type of resource enables
you to define tables of data from within Idoc Script to load an HTML table definition,
interface menu actions, or information about metadata fields or from within Java code
as an alternative to static tables loaded into SharedObjects.
While tables loaded into SharedObjects are static and rarely change, a lot of code
within Content Server will modify the contents of a dynamicdata table when it is
loaded into a user's context. You can use dynamicdata resources to display different
data to users depending on anything from their security attributes to the specific
actions they are performing. Components can do targeted merging into tables created
with this resource type, and Idoc Script pages can select and sort rows.
You can declare a dynamicdata resource in any resource file that can contain
dynamichtml constructions, as Example 15–2 shows.
Example 15–2 dynamicdata Resource
<@dynamicdata NameOfTable@>
<?formatoftable properties-of-table?>
table-data
<@end@>
A dynamicdata table is defined within <@dynamicdata name@> and <@end@>
tags in a resource file. To reference dynamicdata tables, you need to use the Idoc
Script functions whose names begin with dd, such as ddLoadResultSet, which
loads a merged dynamicdata table and creates a ResultSet in the current data binder.
The IdcHomeDir/resources/core/idoc files define standard dynamicdata
resources.
15.2.2.1 Specifying Table Formats
For the formatoftable parameter in a dynamicdata resource, you can specify
either of two format types:
■commatable
■htmltable
The default format is commatable.

Creating Resources for a Component
15-4 Oracle WebCenter Content Developer's Guide for Content Server
commatable
The commatable format is for tables with values that do not have line feeds or
carriage returns. In this format, you enter a comma-separated list of field names on
one line followed by a comma-separated list of values on the following lines, one line
for each field, as Example 15–3 shows.
Example 15–3 commatable Format
<@dynamicdata SampleTable@>
<?commatable?>
col1, col2
val1_1, val1_2
val2_1, val2_2
<@end@>
If you need to insert a comma (,) into a value, then use a circumflex (^) instead of the
comma. If you need to insert a circumflex, then enter the escape sequence
hash-circumflex (#^, and if you need to insert a hash (#) that is followed by a hash or a
circumflex, then enter the escape sequence hash-hash (##), as Example 15–4 shows.
Example 15–4 Special Characters in Values
<@dynamicdata SampleTable@>
field1, field2
A^B, C##^D#^E#F^G
<@end@>
This dynamicdata resource would load a table row whose value for field1 would
be A,B and for field2 would be C#^D^E#F,G.
You cannot escape line feeds or carriage returns. If you need to specify a value that
contains either of those characters, then you should use the htmltable format.
htmltable
The htmltable format is the same as the format used for static HTML table
constructs in Content Server, as Example 15–5 shows.
Example 15–5 htmltable Format
<@dynamicdata SampleTable@>
<?htmltable?>
<table>
<tr>
<td>col1</td>
<td>col2</td>
</tr>
<tr>
<td>val11</td>
<td>val12</td>
</tr>
<tr>
<td>val21</td>
<td>val22</td>
</tr>
</table>
<@end@>

Creating Resources for a Component
Creating Custom Components 15-5
15.2.2.2 Editing a Dynamic Data Table Resource
Use the following procedure to edit an existing dynamicdata resource using the
Component Wizard.
1. In the Component Wizard, open the component that contains the resource to edit.
2. Select the resource in the Custom Resource Definition list.
3. If the resource file contains multiple types of resources, click the Includes tab on
the right.
4. You can modify any of the dynamicdata tables in the custom resource definition,
add a dynamicdata table, or remove a dynamicdata table:
■To edit an existing dynamicdata table, choose the table, click Edit, modify
the code, and then click OK.
■To add a dynamicdata table to the resource file, click Add.
■To remove a dynamicdata table, choose the table, click Delete, and then click
Yes to confirm.
15.2.2.3 Specifying Table Properties
The properties-of-table parameter in a dynamicdata resource has this format:
field1="value1" field2="value2" . . .
The properties are like attributes defined in an XML node. Example 15–6 shows a
typical table declaration.
Example 15–6 Table Properties in a Table Definition
<@dynamicdata ExampleTable@>
<?commatable mergeField="fieldA" indexedColumns="fieldA,fieldB"?>
fieldA, fieldB
1, 2
3, 4
<@end@>
The quotation marks that enclose the values are optional for values that have no
spaces, and you can use either single or double quotation marks. Also, the default
property value is "1", so you can omit the assignment of a value for a table property if
it is "1".
Omitting the value is useful for Boolean properties such a notrim and mergeBlanks.
Example 15–7 shows a declaration specifying a table that is not to trim its values:
Example 15–7 notrim Property
<@dynamicdata ExampleTable@>
<?commatable mergeField="fieldA" indexedColumns="fieldA,fieldB" notrim?>
fieldA, fieldB
1, 2
3, 4
<@end@>
In this example, the space would not be trimmed before the 2 or the 4. (Field names
are always trimmed.)

Creating Resources for a Component
15-6 Oracle WebCenter Content Developer's Guide for Content Server
You can specify the following kinds of table properties:
■Merge properties
■Assembly properties
■Sort properties
■Filter and dynamicdata table properties
15.2.2.3.1 Merge Properties The dynamicdata tables can be merged together
automatically, which is part of the power of using these tables. If two dynamicdata
tables have the same name but are in separate resource files, they will be automatically
merged. You can use the mergeOtherData option to merge another existing table
into the current existing table. Using this technique, you can build very complicated
tables all merged from various other tables. This merging can improve the readability
of the data and enable you to have some tables as subsets of other tables.
You can specify one or more of the following merge properties in the
properties-of-table parameter in a dynamicdata resource:
■mergeKey -- The name of the field to do a merge on. This value applies to both
this and the existing tables when doing an overlay unless mergeNewKey is set in
which case it only applies to the existing table. If this value is not set, then the
merge key defaults to the first column of this table. If the mergeKey refers to a
column in the existing table that does not exist, then the result will be to append
this table to the existing table unless the mergeRule is set to a value that dictates a
different outcome. This property has merge scope.
■mergeNewKey -- The name of the field in this table to use as a basis of comparison
with the mergeKey column in the existing table. The default is to be the value of
mergeKey. This property has merge scope.
■mergeRule -- The rule to use when performing a merge of two tables. This
property has three possible values, the default being merge. This property has
merge scope.
■merge -- Merge using the mergeKey (and if specified, the mergeNewKey)
properties to perform the merge.
■mergenoappend -- Perform the merge, but do not append any new rows. If there
is no valid merge to perform (for example, if the mergeKey does not refer to a
valid column in the existing table), then the result is to not perform a merge at all
and the overlaying table has no effect on the final result.
■replace -- Replace the existing table with this table. This option has the outcome of
suppressing any prior table resource. This would be similar to not using the super
include in a dynamichtml resource.
■mergeBlanks -- By default, when values are merged from this table to the existing
table, any values that are blank in this table do not replace the overlaid value in
the existing table. This allows for targeted replacement of column values in the
existing table by this table. But if this option is enabled (set without a value, or set
with the value 1 or true), then blanks in this table replace non-blank values in the
existing table. The default is 0 (or false) and the property has merge scope.
■mergeAppendColumns -- This is a comma-separated list of columns in this table.
For any column mentioned in the list, column values in this table for that column
do not replace values in the existing table for that column but instead append or
replace the new value (using comma as the separator) to the current value. Each of
the subvalues in the comma-separated list is assumed to be of the form
key=value with the =value part being optional. If this table has the same key in

Creating Resources for a Component
Creating Custom Components 15-7
its comma-separated list, then that key=value pair will replace the value in the
existing table. For example, if the existing table has a column value of the form
a=1,b=2 and this table has the value b=3,c=4, then the merged result will be
a=1,b=3,c=4. This property has merge scope.
■cssStyleMergeAppendFormat -- This is a boolean property and changes the
separator values used for the mergeAppendColumns property. Normally the
value of a field mentioned in the mergeAppendColumns is a comma separated list
of name equal value pairs with the equal operator (=) being the assignment
operator. If this property is enabled, then the lists separator becomes a semi-colon
(;) and the name value pairs use a colon (:) for the assignment. So, instead of the
field value looking like A=1,B=2, it would be A:1;B:2. The default is false, and
the property has merge scope.
■wildcard -- Normally when a merge is performed, the merge test is a case
insensitive match comparison. When this option is enabled, the comparison is a
standard Content Server wildcard match (* = 0 or more of any character, ? = any
single character). Typically the option is used with mergeNewKey being set to a
column different from mergeKey and in many cases the mergeKey does not even
refer to a valid column in this table. The default is 0 (or false) and the property has
merge scope.
■mergeOtherData -- A comma separated list of other dynamicdata resources to
merge into this one. Each of the other dynamicdata resources are fully merged
before they are merged into this resource (if those other resources also are using
mergeOtherData, then those merges are done first -- the code does have recursion
detection). If the one of the referenced dynamicdata resources has multiple
definitions in multiple files, then the merge keys used to merge into this resource
are the ones defined that is highest in merge order (the one that is merged into
last) for that other resource. If this dynamicdata resource (the one that has the
mergeOtherData property on it) has multiple definitions in multiple files, the
mergeOtherData parameter is produced by merging all the referenced named
resources from all the resources in the merge stack. The default is null and has
global scope.
15.2.2.3.2 Assembly Properties You can specify one or more of the following assembly
properties in the properties-of-table parameter in a dynamicdata resource:
■notrim -- This option only applies to the commatable format. Normally, all the
values that are parsed for a table resource are trimmed. Setting this option
prevents the values from being trimmed. It is presumed that this will be a rarely
used option. The default is 0 (or false) and the property has local table scope.
■indexedColumns -- This property lists columns that should be optimized for
indexed lookup. Specialized Idoc Script functions exist to take advantage of the
any of the indexed columns. When a lookup is done against an indexed column,
the column name and a value must be specified. A filtered table consisting of just
the rows whose values for the indexed column match (case insensitive) the value
passed in to the function is returned. Note that these indexed column lookups are
all computed at load and merge time and stored in a hash table for fast retrieval.
The list of indexed column values for all the overlaying tables are merged together
and the index computations are done after the merge is finished. This property has
global table scope.
■countColumn -- This value specifies a column in the fully merged table into which
the values of a row count is put. The count starts at 1 and increments for each row
in the table. Any existing values in that column of the merged table are replaced
by the count value. This property can be used to create a quick unique key for each

Creating Resources for a Component
15-8 Oracle WebCenter Content Developer's Guide for Content Server
row. The default value for this property is "count", so any table with the column
name "count" that does not specify a different countColumn will automatically
have counter values put into that column. If the value of this property does not
match a column name in the final merged table, then it is ignored. If an overlaying
table resource specifies a different countColumn from one specified in a prior table
resource, then the overlaying one will be used. The property has global table
scope.
■defaultValues -- This property specifies a comma-separated list of default values
to apply to the table. Each default value in this list is of the format
fieldname:value. If the value is an empty string then the colon can be dropped. For
example, the string field1:val1,field2:val2,field3 specifies the default value val1 for
field1, val2 for field2, and the empty string for field3. A colon can be escaped with
a star (*) and a star can be escaped by preceding it with a hash (#). If either a hash
or a star follows a hash, then the hash can be escaped by adding another hash (see
the similar rule for escaping commas given earlier). If a field specified in a default
value construction does not exist in the final merged table, then it is added as a
new field and given the default value for all rows in that table. If the field exists,
then the default value will override any blank values in that table for that field.
The definitions of defaultValues from the newer overlaying tables are collated
with the active definition of the existing table. If there is a conflict in the definition
of a particular default value, the newer overlaying table wins. The default for this
property is null and it has global table scope.
■derivedColumns -- This property specifies columns to be built up from values
from other columns. The general syntax is a comma separated list of derived
column definitions of the form derivedColumnDef1,derivedColumnDef2,... with
each column definition being of the form
fieldName:sourceField1+sourceField2+.... The fieldName refers to the name of the
field to be created and the sourceFieldN refer to fields whose value will be sourced
to create the derived column. The derived value will hold the values of the source
fields separated by a double colon (::). If the derived column exists and has a non
empty value, then it is not replaced. As with the defaultValues property, there is a
second pass after the final table is assembled to determine whether any derived
values still need to be filled in. The most typical usage for derived columns is to
allow one dynamicdata resource to use multiple columns for specifying a merge
criteria instead of just one. The derived column is used as the target of a merge
and is defined in the definition of the existing table. The derived column
definitions are inherited into the newer overlaying tables and if there is a conflict
in definition of a particular derived column then the newer table's definition wins.
Otherwise, the definitions of derived columns from the existing and new tables are
collated together. The default value for this property is null and it has global table
scope.
15.2.2.3.3 Sort Properties You can specify one or more of the following sort properties
in the properties-of-table parameter in a dynamicdata resource:
■sortColumn -- Specifies a column to sort on. If an overlaying table resource
specifies a different sortColumn from one specified in a prior table resource, then
the overlaying one will be used. If the name of the column does not match any
column name in the final merged table, then no sort is performed. The default
value is "sortOrder". So, creating a column with this name will cause the table to
be automatically sorted. This property has global table scope
■sortType -- Specifies what data type should be assumed for the column being
sorted. This type applies to both the sortColumn and the sortParentColumn. The
values can be "int", "string", or "date". The default value for this property is "int".

Creating Resources for a Component
Creating Custom Components 15-9
Rules for overlaying tables both specifying this property are identical to
sortColumn. This property has global table scope.
■sortOrder -- Specifies what sort order to use when performing a sort. The possible
values are "asc" (for ascending) and "desc" (for descending). The default is "asc".
Rules for overlaying tables both specifying this property are identical to
sortColumn. This property has global table scope.
■sortIsTree -- Specifies whether the sort is actually a tree sort with a
sortParentColumn being sorted along with the sortChildColumn. The assumption
is that the child to parent row mapping relationship is done by using the child
row's value in the sortParentColumn to the find the parent row with a matching
value in its sortChildColumn field. The sort is performed so that the top level
parents are sorted first, then the children of each parent are sorted as a subgroup
for each parent, and so on recursively for all the children of the children. The
default value is 0 (or false). Rules for overlaying tables both specifying this
property are identical to sortColumn. This property has global table scope.
■sortParentColumn -- This value must be specified if the sortIsTree option is
enabled. If the value of this property is missing or specifies an invalid column,
then the sortIsTree option is ignored and has no effect. For more information about
what it does, see the preceding description of the sortIsTree property. The default
for the sortParentColumn property is null. Rules for overlaying tables both
specifying this property are identical to sortColumn. This property has global
scope.
■sortChildColumn -- This value must be specified if the sortIsTree option is
enabled. If the value of this property is missing or specifies an invalid column,
then the sortIsTree option is ignored and has no effect. For more information about
what it does, see the preceding description of the sortIsTree property. The default
for the sortChildColumn property is null. Rules for overlaying tables both
specifying this property are identical to sortColumn. This property has global
scope.
■sortNestLevelColumn -- This value is only available if the sortIsTree option is
enabled. If the value of this property references an invalid column then it has no
effect. If a valid column is specified, then that column will get an integer value that
specifies its nest level (starting at 0). The nest level is defined as the number of
immediate parents that have to be traversed before reaching a parent that itself has
no parent. The default value for this property is "nestLevel" and it has global
scope.
15.2.2.3.4 Filter and Include Properties You can specify one or more of the following filter
and include properties in the properties-of-table parameter in a dynamicdata
resource:
■filterInclude -- This property specifies an include to be executed for each row of a
table (or subtable if an indexed column is being used to select a subtable). This
execution will happen when the table is loaded into the current user's context. Its
main purpose is either to create a side effect or to determine if the row should be
excluded. To prevent the row from being loaded into the final result set, you can
set the variable ddSkipRow to 1 (<$ddSkipRow=1$>). During execution of this
include, the table is made active, allowing for easy access and replacement of
values in the table. The default value of this property is null, and it has global
scope.
■includeColumns -- This property specifies a comma-separated list of columns
whose row values are the names of resource includes to be executed. After the
resource includes are executed, the result is fed back into the result set to become

Creating Resources for a Component
15-10 Oracle WebCenter Content Developer's Guide for Content Server
the new value for that column for that row. The timing and rules for execution are
similar to filterInclude except that includeColumns cannot suppress the
loading of a row. If a filter include is specified and there are active include
columns, then during the looping of the temporary active result set, the include
column values are executed first and then the filter include. If one of the specified
include columns in not present in the final merged table, then it will have no
effect. Empty values in an include column are ignored. The includeColumns
attribute is commonly combined with the defaultValues attribute to create
columns whose values are derived from other columns. The default value of this
property is null, and it has global scope.
15.2.2.4 Using Dynamicdata Idoc Script Functions
For dynamic data tables, you can use the following dynamicdata Idoc Script
functions:
■ddAppendIndexedColumnResultSet
■ddAppendResultSet
■ddApplyTableSortToResultSet
■ddGetFieldList
■ddIncludePreserveValues
■ddLoadIndexedColumnResultSet
■ddLoadResultSet
■ddMergeIndexedColumnResultSet
■ddMergeResultSet
■ddMergeUsingIndexedKey
■ddSetLocal
■ddSetLocalByColumnsFromFirstRow
■ddSetLocalByColumnsFromFirstRowIndexed
■ddSetLocalEmpty
■ddSetLocalEmptyByColumns
15.2.3 String Resources
A string resource defines locale-sensitive text strings that are used in error messages
and on Content Server web pages and applets. Strings are resolved by Content Server
each time a web page is assembled, an applet is started, or an error message is
displayed.
A string is defined in an HTM file using the following format:
<@stringID=Text string@>
Note: Using includeColumns may not be as useful as it first
appears. The resource includes are executed at the time the Idoc Script
function is executed to load the table, but a component that
customizes output may determine the value for the column only after
further processing (after other tables are merged into this table,
summaries of row statistics are calculated, and so on).

Creating Resources for a Component
Creating Custom Components 15-11
A string is called from an HTM template file using the following Idoc Script format:
<$lc("wwStringID")$>
Standard English strings are defined in the IdcHomeDir/resources/core/lang
directory. Strings for other supported languages are provided by the Localization
component.
HTML includes, strings, and static tables can be present in the same HTM file. A
string resource does not require merge rules.
You must use HTML escape encoding to include the following special characters in a
string value.
You can specify strings for multiple languages in the same resource file using the
language identifier prefix, if the languages all have single-byte characters or all have
multibyte characters. Example 15–8 shows prefixes for strings in several languages in a
resource file.
Example 15–8 Multiple Languages in the Same Resource File
<@myString=Thank you@>
<@es.myString=Gracias@>
<@fr.myString=Merci@>
<@de.myString=Danke@>
If you are specifying multibyte strings in your custom string resource, ensure that the
character set specification on your HTML pages changes to the appropriate encoding.
Resource files should have a correct http-equiv charset tag so that Content
Server reads them correctly.
Note: On Content Server web pages, you should use only the strings
in the ww_strings.htm file.
Escape Sequence Character
&at; @
\&lf; line feed (ASCII 10)
\&cr; carriage return (ASCII 13)
\&tab; tab (ASCII 9)
\&eatws; Eats white space until the next nonwhite space character.
\< < (less than)
\> > (greater than)
\&sp; space (ASCII 32)
\&#xxx; ASCII character that a decimal number represents (nnn)
Caution: Do not specify single-byte strings and multibyte strings in
the same resource file. You should create separate resource files for
single-byte and multibyte strings.

Creating Resources for a Component
15-12 Oracle WebCenter Content Developer's Guide for Content Server
15.2.3.1 String Parameters
Text strings can contain variable parameters, which are specified by placing the
parameter argument inside curly braces (for example, {1}). When a string is localized,
the arguments are passed along with the string ID and the ExecutionContext value
that contains the locale information. The following table describes the syntax for
parameterized strings.
Syntax Meaning Examples
{{} Opening curly brace. (Note that only
the opening curly brace must be
expressed as a literal.)
{{}Text in braces}
{n} Substitute the nth argument. Content ID {1} not found
{ni} Substitute the nth argument, formatted
as an integer. dID {1i} does not exist
{nx} Substitute the nth argument, formatted
as an integer in hexadecimal.
{nd} Substitute the nth argument, formatted
as a date. The release date is {1d}
{nD} Substitute the nth argument, formatted
as a date. The argument should be
ODBC-formatted.
The release date is {1D}
{nt} Substitute the nth argument, formatted
as a date and time. The release date is {1t}
{ne} Substitute the nth argument, formatted
as elapsed time.
{nT} Substitute the nth argument, formatted
as a date and time. The argument
should be ODBC-formatted.
The release date is {1T}
{nfm} Substitute the nth argument, formatted
as a float with m decimal places. The distance is {1f3} miles.
{nk} Substitute a localized string using the
nth argument as the string ID. Unable to find {1k} revision
of {2}
{nm} Localize the nth argument as if it were
a string-stack message. (For example,
the argument could include
concatenated text strings and localized
string IDs.)
Indexing internal error: {1m}
{nl} Substitute the nth argument as a list.
The argument must be a list with
commas (,) and carets (^) as the
separators.
Add-ons: {1l}
{nK} Takes a list of localization key names,
separated by commas, and localizes
each key into a list.
Unsupported byte feature(s):
{1K}
{nM} Takes a list of message strings and
localizes each message into a list. {1q} component, version
{2q}, provides older versions
of features than are currently
enabled. {3M}

Creating Resources for a Component
Creating Custom Components 15-13
15.2.3.2 Editing a String Resource
Use the following procedure to edit an existing string resource using the Component
Wizard.
1. In the Component Wizard, open the component that contains the resource to edit.
2. Select the resource in the Custom Resource Definition list.
3. If the resource file contains multiple types of resources, click the Strings tab on the
right.
4. Modify the strings in the Custom Strings list.
■To edit an existing string, select the string, click Edit, modify the string text,
and then click OK.
■To add a string to the resource file, click Add.
■To remove a string, select the string, click Delete, and then click Yes to
confirm.
15.2.4 Dynamic Tables
Dynamic table resources are defined in the HDA file format. For more information and
an example of an HDA ResultSet table, see Section 9.1.3.1.1, "Elements in HDA Files."
{nq} If the nth argument is non-null and
nonzero in length, substitute the
argument in quotation marks.
Otherwise, substitute the string
"syUndefined".
Content item {1q} was not
successfully checked in
{no} Performs ordinal substitution on the
nth argument. For example, 1st, 2nd,
3rd, and so on. The argument must be
an integer.
"I am {1o}." with the
argument 7 would localize
into "I am 7th."
{n?text} If the value of the nth argument is not
1, substitute the text. {1} file{1?s} deleted
{n?text1:text2} ■If the value of the nth argument is
not 1, substitute text1.
■If the value of the nth argument is
1, substitute text2.
The (n?) function can be extended with
as many substitution variables as
required. The last variable in the list
always corresponds to a value of 1.
There {1?are:is} currently {1}
active search{1?es}.
{n?text1:text2:text3} ■If the value of the nth argument is
not 1 or 2, substitute text1.
■If the value of the nth argument is
2, substitute text2.
■If the value of the nth argument is
1, substitute text3.
The (n?) function can be extended with
as many substitution variables as
required. The last variable in the list
always corresponds to a value of 1.
Contact {1?their:her:his}
supervisor.
Syntax Meaning Examples

Creating Resources for a Component
15-14 Oracle WebCenter Content Developer's Guide for Content Server
15.2.4.1 Merge Rules for Dynamic Tables
Merge rules are required for a dynamic table resource if data from the custom resource
replaces data in an existing table. Merge rules are not required if data from the custom
resource is to be placed in a new table.
15.2.4.2 Editing a Dynamic Table Resource
Use the following procedure to edit an existing dynamic table resource using the
Component Wizard.
1. In the Component Wizard, open the component that contains the resource to edit.
2. Select the resource file in the Custom Resource Definition list.
3. Click Launch Editor.
4. Modify the table in the text editor.
5. Save and close the resource file.
Changes are reflected on the right of the Resource Definition tab.
15.2.5 Static Tables
Static tables, HTML includes, and strings can be present in the same HTM file.
15.2.5.1 Merge Rules for Static Tables
Merge rules are required for a static table resource if data from the custom resource
replaces data in an existing table. Merge rules are not required if data from the custom
resource is to be placed in a new table.
15.2.5.2 Editing a Static Table Resource
Use this procedure to edit an existing static table resource with the Component
Wizard.
1. In the Component Wizard, open the component that contains the resource to edit.
2. Select the resource file in the Custom Resource Definition list.
3. Click Launch Editor.
4. Modify the table in the text editor.
5. Save and close the resource file. Changes are reflected in the Resource Tables list.
15.2.6 Queries
A query resource defines SQL queries, which are used to manage information in the
Content Server database. Queries are used with service scripts to perform tasks such
as adding to, deleting, and retrieving data from the database.
The standard Content Server queries are defined in the QueryTable table in the
IdcHomeDir/resources/core/tables/query.htm file. You can also find
special-purpose queries in the indexer.htm and workflow.htm files that are stored
in the IdcHomeDir/resources/core/tables directory. Merge rules are not
required for a query resource.
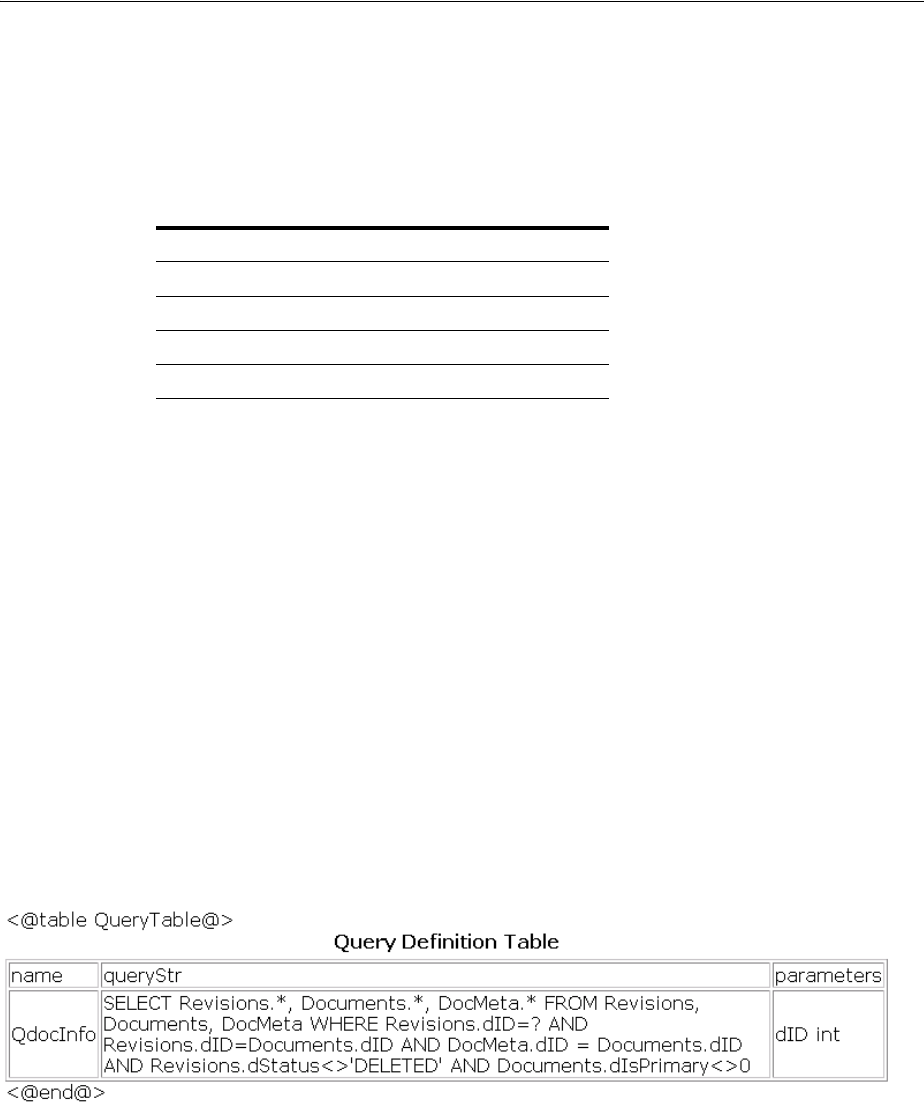
Creating Resources for a Component
Creating Custom Components 15-15
A query resource is defined in an HTM file using a ResultSet table with three columns:
name, queryStr, and parameters.
■The name column defines the name for each query. To override an existing query,
use the same name for your custom query. To add a new query, use a unique query
name. When naming a new query, identify the type of query by starting the name
with one of the following characters.
■The queryStr column defines the query expression. Query expressions are in
standard SQL syntax. If there are any parameter values to pass to the database,
their place is held with a question mark (?) as an escape character.
■The parameters column defines the parameters that are passed to the query
from a service. A request from a web browser calls a service, which in turn calls
the query. It is the responsibility of the web browser to provide the values for the
query parameters, which are standard HTTP parameters The browser can pass
query parameters from the URL or from FORM elements in the web page. For
example, the QdocInfo query requires the dID (revision ID) to be passed as a
parameter, so the value is obtained from the service request URL.
15.2.6.1 Query Example
The standard QdocInfo query, which Figure 15–1 shows, is defined in the
IntradocDir/core/config/resources/query.htm file. This query obtains the
metadata information to display on the DOC_INFO template page, which is the page
displayed when a user clicks the Information icon on a search results page.
Figure 15–1 Standard QDocInfo Query
The parameter passed from the web browser URL is the dID, which is the unique
identification number for the content item revision. The query expression selects the
data that matches the dID for the primary revision from the Revisions, Documents,
and DocMeta database tables, if the revision does not have the DELETED status.
Example 15–9 shows the contents of a query.htm file.
First Character Query Type
DDelete
IInsert
QSelect
UUpdate

Creating Resources for a Component
15-16 Oracle WebCenter Content Developer's Guide for Content Server
Example 15–9 query.htm File
<HTML>
<HEAD>
<META HTTP-EQUIV='Content-Type' content='text/html; charset=iso-8859-1'>
<TITLE>Query Definition Resources</TITLE>
</HEAD>
<BODY>
<@table QueryTable@>
<table border=1><caption><strong>Query Definition Table</strong></caption>
<tr>
<td>name</td>
<td>queryStr</td>
<td>parameters</td>
</tr>
<tr>
<td>QdocInfo</td>
<td>SELECT Revisions.*, Documents.*, DocMeta.*
FROM Revisions, Documents, DocMeta
WHERE Revisions.dID=? AND Revisions.dID=Documents.dID AND DocMeta.dID =
Documents.dID AND Revisions.dStatus<>'DELETED' AND Documents.dIsPrimary<>0</td>
<td>dID int</td>
</tr>
</table>
<@end@>
</BODY>
</HTML>
15.2.6.2 Editing a Query Resource
Use the following procedure to edit a query resource using the Component Wizard.
1. In the Component Wizard, open the component that contains the resource to edit.
2. Select the resource in the Custom Resource Definition list.
3. If there are multiple tables in the resource, select the query table to edit from the
Tab l e N a m e list.
4. Modify the selected query table.
■To add a query to the table, click Add.
■To edit an existing query, select the query, click Edit, modify the query
expression or parameters or both, and then click OK.
■To remove a query, select the query, click Delete, and then click Yes to confirm.
15.2.7 Services
A service resource defines a function or procedure that is performed by Content
Server. A service call can be performed from either the client or server side, so services
can be performed on behalf of the web browser client or within the system itself. For
example:
■Client-side request: When you click a Search link on a Content Server web page,
the standard search page is delivered to your web browser by the GET_DOC_
PAGE service, using the following URL segment:
IdcService=GET_DOC_PAGE&Action=GetTemplatePage&Page=STANDARD_QUERY_PAGE
■Server-side request: You can use the START_SEARCH_INDEX service to update
or rebuild the search index automatically in a background thread.
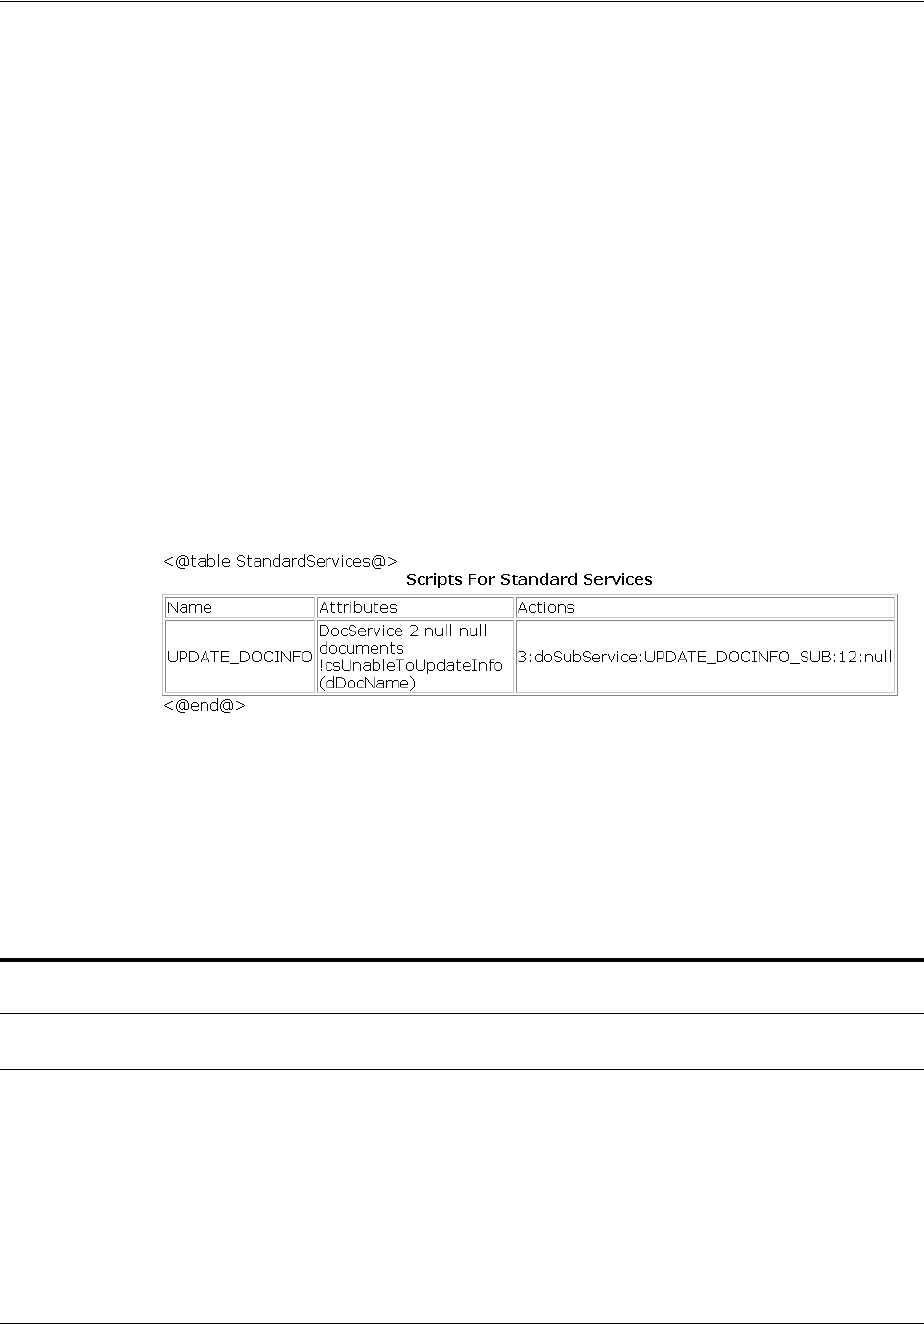
Creating Resources for a Component
Creating Custom Components 15-17
Services are the only way a client can communicate with the server or access the
database. Any program or HTML page can use services to request information from
Content Server or perform a specified function.
The standard Content Server services are defined in the StandardServices table in
the IdcHomeDir/resources/core/tables/std_services.htm file. You can
also find special-purpose services in the workflow.htm file in the
IdcHomeDir/resources/core/tables directory. For more information about
standard and special-purpose services that Content Server provides, see the Oracle
WebCenter Content Services Reference Guide.
Services depend on other resource definitions to perform their functions. Any service
that returns HTML requires a template to be specified. A common exception is the
PING_SERVER service, which does not return a page to the browser.
Most services use a query. A common exception is the SEARCH service, which sends a
request directly to the search collection. Merge rules are not required for a service
resource.
Figure 15–2 shows an example of a service definition.
Figure 15–2 Service Definition Example
A service resource is defined in an HTM file using a ResultSet table with the following
three columns:
■The Name column defines the name for each service. For client-side service
requests, this is the name called in the URL. To override an existing service, use the
same name for your custom service. To add a new service, use a unique service
name.
■The Attributes column defines the following attributes for each service.
Attribute Description
Example (attributes from the DELETE_
DOC service)
Service class Determines, in part, what actions can be performed
by the service.
DocService 4 MSG_PAGE null documents
!csUnableToDeleteItem(dDocName)
Access level Assigns a user access level to the service. This
number is the sum of the following possible bit
flags:
READ_PRIVILEGE = 1
WRITE_PRIVILEGE = 2
DELETE_PRIVILEGE = 4
ADMIN_PRIVILEGE = 8
GLOBAL_PRIVILEGE = 16
SCRIPTABLE_SERVICE=32
DocService 4 MSG_PAGE null documents
!csUnableToDeleteItem(dDocName)

Creating Resources for a Component
15-18 Oracle WebCenter Content Developer's Guide for Content Server
■The Actions column defines the actions for each service. An action is an
operation to be performed as part of a service script. The action can execute an
SQL statement, perform a query, run code, cache the results of a query, or load an
option list. Each service includes one or more actions, which specify what happens
upon execution.
The <br> tags in the Actions column are for browser display purposes only, so
they are optional. However, the </td> tag must occur immediately after the
actions, without a line break in between. An action is defined using the following
format:
type:name:parameters:control mask:error message
Template page Specifies the template that presents the results of the
service. If the results of the service do not require
presentation, this attribute is null.
DocService 4 MSG_PAGE null documents
!csUnableToDeleteItem(dDocName)
Service type If the service is to be executed inside another service,
this attribute is SubService; otherwise, this
attribute is null.
DocService 4 MSG_PAGE null documents
!csUnableToDeleteItem(dDocName)
Subjects
notified Specifies the subjects (subsystems) to be notified by
the service. If no subjects are notified, this attribute
is null.
DocService 4 MSG_PAGE null documents
!csUnableToDeleteItem(dDocName)
Error message Defines the error message returned by the service if
no action error message overrides it. This can be
either an actual text string or a reference to a
locale-sensitive string. For more information, see
Section 1.5.5, "Localized String Resolution."
DocService 4 MSG_PAGE null documents
!csUnableToDeleteItem(dDocName)
Section Description
Example (first action from the
DELETE_DOC service)
type Defines the type of action:
QUERY_TYPE = 1
EXECUTE_TYPE = 2
CODE_TYPE = 3
OPTION_TYPE = 4
CACHE_RESULT_TYPE = 5
5:QdocInfo:DOC_
INFO:6:!csUnableToDeleteItem(dDocNa
me)!csRevisionNoLongerExists
name Specifies the name of the action.
5:QdocInfo:DOC_
INFO:6:!csUnableToDeleteItem(dDocNa
me)!csRevisionNoLongerExist
parameters Specifies parameters required by the action. If no
parameters are required, leave this part empty (two
colons in a row).
5:QdocInfo:DOC_
INFO:6:!csUnableToDeleteItem(dDocNa
me)!csRevisionNoLongerExist
Attribute Description
Example (attributes from the DELETE_
DOC service)
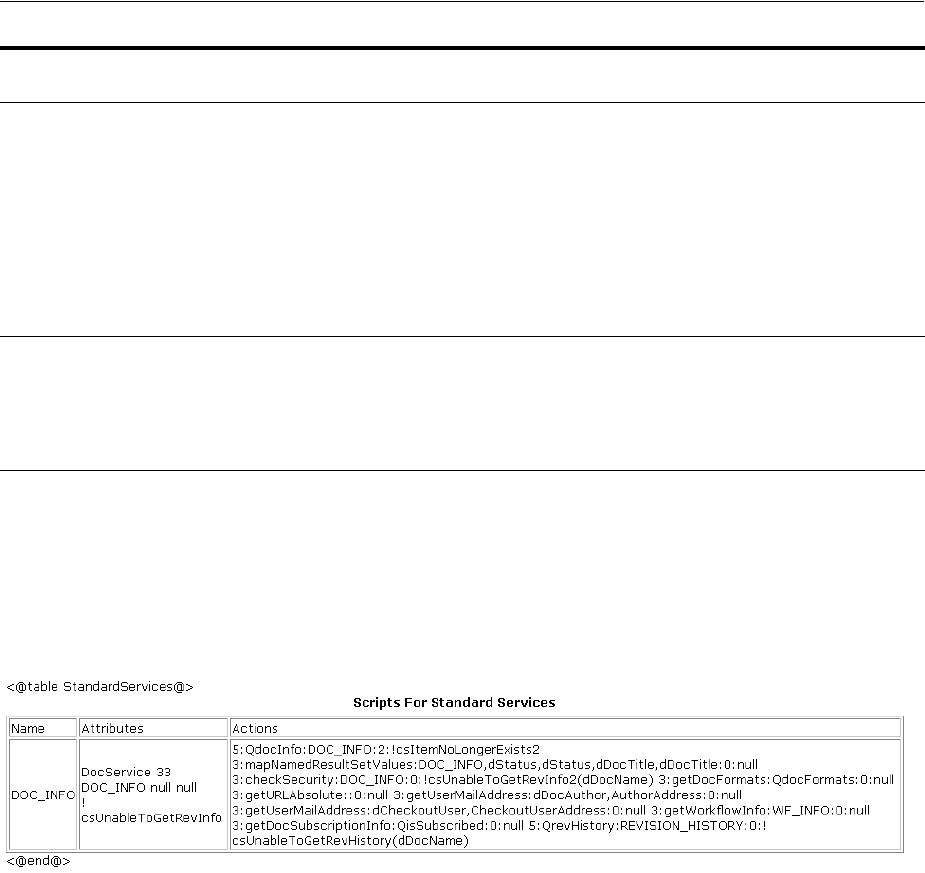
Creating Resources for a Component
Creating Custom Components 15-19
15.2.7.1 Service Example
The DOC_INFO service provides a good example of how services, queries, and
templates work together. Figure 15–3 shows the actions that the DOC_INFO service can
take.
Figure 15–3 DOC_INFO Service
Example 15–10 shows the definition of the DOC_INFO service in the
IntradocDir/config/resources/std_services.htm file.
Example 15–10 DOC_INFO Service Definition in std_services.htm File
<HTML>
<HEAD>
<META HTTP-EQUIV='Content-Type' content='text/html; charset=iso-8859-1'>
<TITLE>Standard Scripted Services</TITLE>
</HEAD>
<BODY>
<@table StandardServices@>
<table border=1><caption><strong>Scripts For Standard
Services</strong></caption>
<tr>
<td>Name</td><td>Attributes</td><td>Actions</td>
</tr>
<tr>
<td>DOC_INFO</td>
control
mask
Controls the results of queries to the database. This
number is the sum of the following possible bit flags:
No control mask = 0
CONTROL_IGNORE_ERROR = 1
CONTROL_MUST_EXIST = 2
CONTROL_BEGIN_TRAN = 4
CONTROL_COMMIT_TRAN = 8
CONTROL_MUST_NOT_EXIST = 16
5:QdocInfo:DOC_
INFO:6:!csUnableToDeleteItem(dDocNa
me)!csRevisionNoLongerExist
Error
message
Defines the error message to be displayed by this action.
This error message overrides the error message provided
as an attribute of the service. This can be either an actual
text string or a reference to a locale-sensitive string. For
more information, see Section 1.5.5, "Localized String
Resolution."
5:QdocInfo:DOC_
INFO:6:!csUnableToDeleteItem(dDocNa
me)!csRevisionNoLongerExist
Section Description
Example (first action from the
DELETE_DOC service)

Creating Resources for a Component
15-20 Oracle WebCenter Content Developer's Guide for Content Server
<td>DocSgervice
33
DOC_INFO
null
null<br>
!csUnableToGetRevInfo</td>
<td>5:QdocInfo:DOC_INFO:2:!csItemNoLongerExists2
3:mapNamedResultSetValues:DOC_
INFO,dStatus,dStatus,dDocTitle,dDocTitle:0:null
3:checkSecurity:DOC_INFO:0:!csUnableToGetRevInfo2(dDocName)
3:getDocFormats:QdocFormats:0:null
3:getURLAbsolute::0:null
3:getUserMailAddress:dDocAuthor,AuthorAddress:0:null
3:getUserMailAddress:dCheckoutUser,CheckoutUserAddress:0:null
3:getWorkflowInfo:WF_INFO:0:null
3:getDocSubscriptionInfo:QisSubscribed:0:null
5:QrevHistory:REVISION_HISTORY:0:!csUnableToGetRevHistory(dDocName)</td>
</tr>
</table>
<@end@>
</BODY>
</HTML>
15.2.7.1.1 Attributes The following table describes the attributes of the preceding DOC_
INFO service.
Attribute Value Description
Service
class
DocService This service is providing information about a
content item.
Access level 33 32 = This service can be executed with the
executeService Idoc Script function.
1 = The user requesting the service must have
Read privilege for the content item.
Template
page
DOC_INFO This service uses the DOC_INFO template (doc_
info.htm file). The results from the actions are
merged with this template and presented to the
user.
Service type null This service is not a subservice.
Subjects
notified
null No subjects are affected by this service.
Error
message
!csUnableToGetRevI
nfo
If this service fails on an English Content Server
system, it returns this error message string:
Unable to retrieve information about
the revision

Creating Resources for a Component
Creating Custom Components 15-21
15.2.7.1.2 Actions The DOC_INFO service executes the following actions:
■5:QdocInfo:DOC_INFO:2:!csItemNoLongerExists2
■3:mapNamedResultSetValues:DOC_
INFO,dStatus,dStatus,dDocTitle,dDocTitle:0:null
■3:checkSecurity:DOC_INFO:0:!csUnableToGetRevInfo2(dDocName)
Action Definition Description
5Cached query action that retrieves information from the database
using a query.
QDocInfo This action retrieves content item information using the
QDocInfo query in the query.htm file.
DOC_INFO The result of the query is assigned to the parameter DOC_INFO
and stored for later use.
2The CONTROL_MUST_EXIST control mask specifies that either the
query must return a record, or the action fails.
!csItemNoLongerExist
s2
If this action fails on an English Content Server system, it returns
this error message string: This content item no longer
exists
Action Definition Description
3Java method action specifying a module
that is a part of the Java class implementing
the service.
mapNamedResultSetValues This action retrieves the values of dStatus
and dDocTitle from the first row of the
DOC_INFO ResultSet and stores them in the
local data. (This increases speed and
ensures that the correct values are used.)
DOC_
INFO,dStatus,dStatus,dDocTitle,dDocT
itle
Parameters required for the
mapNamedResultSetValues action.
0No control mask is specified.
null No error message is specified.
Action Definition Description
3Java method action specifying a module that is a part
of the Java class implementing the service.
checkSecurity This action retrieves the data assigned to the DOC_
INFO parameter and evaluates the assigned security
level to verify that the user is authorized to perform
this action.
DOC_INFO Parameter that contains the security information to be
evaluated by the checkSecurity action.
0No control mask is specified.
!csUnableToGetRevInfo2(dDocN
ame)
If this action fails on an English Content Server
system, it returns this error message string: Unable
to retrieve information for
''{dDocName}."

Creating Resources for a Component
15-22 Oracle WebCenter Content Developer's Guide for Content Server
■3:getDocFormats:QdocFormats:0:null
■3:getURLAbsolute::0:null
■3:getUserMailAddress:dDocAuthor,AuthorAddress:0:null
■3:getUserMailAddress:dCheckoutUser,CheckoutUserAddress:0:null
Action Definition Description
3Java method action specifying a module that is a part of the Java
class implementing the service.
getDocFormats This action retrieves the file formats for the content item using the
QdocFormats query in the query.htm file. A comma-delimited list
of the file formats is stored in the local data as dDocFormats.
QdocFormats Specifies the query used to retrieve the file formats.
0No control mask is specified.
null No error message is specified.
Action Definition Description
3 Java method action specifying a module that is a part of the Java
class implementing the service.
getURLAbsolute This action resolves the URL of the content item and stores it in
the local data as DocUrl.
blank This action takes no parameters.
0 No control mask is specified.
null No error message is specified.
Action Definition Description
3 Java method action specifying a module that is a part of the Java
class implementing the service.
getUserMailAddress This action resolves the e-mail address of the content item
author.
dDocAuthor,AuthorAddress This action passes dDocAuthor and AuthorAddress as parameters.
0 No control mask is specified.
null No error message is specified.
Action Definition Description
3 Java method action specifying a module that is a part
of the Java class implementing the service.
getUserMailAddress This action resolves the e-mail address of the user
who has the content item checked out.
dCheckoutUser,CheckoutUserAddress This action passes dCheckoutUser and
CheckoutUserAddress as parameters.
0 No control mask is specified.
null No error message is specified.

Creating Resources for a Component
Creating Custom Components 15-23
■3:getWorkflowInfo:WF_INFO:0:null
■3:getDocSubscriptionInfo:QisSubscribed:0:null
■5:QrevHistory:REVISION_
HISTORY:0:!csUnableToGetRevHistory(dDocName)
Action Definition Description
3 Java method action specifying a module that is a part of the Java
class implementing the service.
getWorkflowInfo This action evaluates whether the content item is part of a
workflow. If the WF_INFO ResultSet exists, then workflow
information is merged into the DOC_INFO template.
WF_INFO This action passes WF_INFO as a parameter.
0 No control mask is specified.
null No error message is specified.
Action Definition Description
3 Java method action specifying a module that is a part of the Java
class implementing the service.
getDocSubscriptionInfo This action evaluates if the current user has subscribed to the
content item:
■If the user is subscribed, an Unsubscribe button is displayed.
■If the user is not subscribed, a Subscribe button is displayed.
QisSubscribed Specifies the query used to retrieve the subscription information.
0 No control mask is specified.
null No error message is specified.
Action Definition Description
5 Cached query action that retrieves information from the
database using a query.
QrevHistory This action retrieves revision history information using the
QrevHistory query in the query.htm file.
REVISION_HISTORY The result the query is assigned to the parameter
REVISION_HISTORY. The DOC_INFO template uses this
parameter in a loop to present information about each
revision.
0 No control mask is specified.
!csUnableToGetRevHistory(dDoc
Name) If this action fails on an English Content Server system, it
returns the error message string:
Unable to retrieve revision history for
''{dDocName}.''

Creating Resources for a Component
15-24 Oracle WebCenter Content Developer's Guide for Content Server
15.2.7.2 Editing a Service Resource
Use the following procedure to edit a service resource using the Component Wizard:
1. In the Component Wizard, open the component that contains the resource to edit.
2. Select the resource in the Custom Resource Definition list.
3. If there are multiple tables in the resource, select the service table to edit from the
Tab l e N a m e list.
4. Modify the selected service table.
■To add a service to the table, click Add.
■To edit an existing service, select the service, click Edit, modify the service
attributes or actions or both, and then click OK.
■To remove a service, select the service, click Delete, and then click Yes to
confirm.
15.2.8 Templates
A template resource defines the names, types, and locations of custom template files to
be loaded for the component.
The actual template pages are separate.htm files that are referenced in the template
resource file. Template HTM files contain the code that Content Server uses to
assemble web pages. HTML markup in a template file defines the basic layout of the
page, while Idoc Script in a template file generates additional HTML code for the web
page at the time of the page request. Because HTM template files contain a large
amount of script that is not resolved by Content Server until the final page is
assembled, these files are not viewable web pages.
The template type of HTM file is used to define the following component files:
■Temp l a t e pages: Standard template pages are located in the
IdcHomeDir/resources/core/templates directory.
■Report pages: Standard report pages are located in the
IdcHomeDir/resources/core/reports directory.
A template resource (templates.hda) is defined in the HDA file format. The standard
templates are defined in the
IdcHomeDir/resources/core/templates/templates.hda file. For more
information and an example of an HDA ResultSet table, see Section 9.1.3.1.1,
"Elements in HDA Files."
Merge rules are required for merging the new template definition into the
IntradocTemplates table or SearchResultTemplates table. Typically, the merge is on
the name column. Example 15–11 shows a MergeRules ResultSet for a template.

Creating Resources for a Component
Creating Custom Components 15-25
Example 15–11 MergeRules ResultSet
@ResultSet MergeRules
4
fromTable
toTable
column
loadOrder
MultiCheckinTemplates
IntradocTemplates
name
1
@end
The standard templates.hda file defines three ResultSet tables:
■The IntradocTemplates ResultSet table defines the template pages for all Content
Server web pages except search results pages. This table consists of five columns:
–The name column defines the name for each template page. This name is how
the template is referenced in the Content Server CGI URLs and in code.
–The class column defines the general category of the template. The most
common class type is Document.
–The formtype column defines the specific type of functionality the page is
intended to achieve. The formtype is typically the same as the name of the
form, except in lowercase characters.
–The filename column defines the path and file name of the template file. The
location can be an absolute path or can be relative to the template resource file
when the template page is in the same directory as the template resource file.
–The description column defines a description of the template.
■The VerifyTemplates ResultSet table is no longer used by Content Server, but this
table remains in the templates.hda file as legacy code for reverse compatibility.
■The SearchResultTemplates table defines the template pages for search results
pages. Template pages define how query results are displayed on the search
results pages in the Library. Query result pages are a special type of search results
page. This table consists of six columns:
–The name column defines the name for each template page. This name is how
the template is referenced in the Content Server CGI URLs, in code, and in the
Web Layout Editor utility.
–The formtype column defines the specific type of functionality the page is
intended to achieve. ResultsPage is the only form type currently supported for
search results pages.
Note: The StandardResults template (search_results.htm file) is
typically used as the global template for standard search results pages
and the query results pages in the Library. You can create a new
template or change the "flexdata" of the StandardResults template
through the Web Layout Editor, but these changes are saved in a
separate file (IntradocDir/data/results/custom_
results.hda) rather than in the SearchResultTemplates table
in the templates.hda file.

Creating Resources for a Component
15-26 Oracle WebCenter Content Developer's Guide for Content Server
–The filename column defines the path and file name of the template file. The
location can be an absolute path or can be relative to the template resource file
when the template page is in the same directory as the template resource file.
–The outfilename column is for future use; the value is always null.
–The flexdata column defines the metadata to be displayed for each row on
the search results page. The format of text in the flexdata column follows:
Text1 "text 1 contents"%<Tab>Text2 "text 2 contents"%
In the format, the Text1 value appears on the first line in each search results
row, and the Text2 value appears on the second line. <Tab> represents a literal
tab character.
Idoc Script can be used to define the contents in the flexdata field. You can
also change the flexdata of the StandardResults template through the
Web Layout Editor, but these changes are saved in a separate file
(IntradocDir/data/results/custom_results.hda) rather than in the
SearchResultTemplates table in the templates.hda file.
–The description column defines a description of the template.
Example 15–12 shows a custom template resource file that points to a custom Content
Management page (multicheckin_doc_man.htm) and a custom search results page
(MultiCheckin_search_results.htm).
Example 15–12 Custom Template Resource File
<?hda version="5.1.1 (build011203)" jcharset=Cp1252 encoding=iso-8859-1?>
@Properties LocalData
blDateFormat=M/d{/yy} {h:mm[:ss] {aa}[zzz]}!tAmerica/Chicago!mAM,PM
blFieldTypes=
@end
@ResultSet MultiCheckinTemplates
5
name
class
formtype
filename
description
DOC_MANAGEMENT_LINKS
DocManagement
DocManagementLinks
multicheckin_doc_man.htm
Page containing links to various document management functions
@end
@ResultSet MultiCheckin_2
6
name
formtype
filename
outfilename
flexdata
description
StandardResults
SearchResultsPage
MultiCheckin_search_results.htm
null
Text2 <$dDocTitle$> <$dInDate$>%Text1 <$dDocName$>%
apStandardResultsDesc
@end

Creating Resources for a Component
Creating Custom Components 15-27
15.2.8.1 Template and Report Pages
Template pages and report pages are also called presentation pages, because Content
Server uses them to assemble, format, and present the results of a web page request.
The standard template pages are located in the
IdcHomeDir/resources/core/templates directory. The standard report pages
are located in the IdcHomeDir/resource/core/reports directory.
15.2.8.1.1 Template Page Example The template file for the standard Content
Management page is doc_man.htm. Example 15–13 shows the contents of this file.
Example 15–13 The doc_man.htm File
<$include std_doctype_html_decl$>
<head>
<$defaultPageTitle=lc("wwContentMgmt")$>
<$include std_html_head_declarations$>
</head>
<$include body_def$>
<$include std_page_begin$>
<$include std_header$>
<table border="0" cellpadding="2" cellspacing="2" width="450" summary="">
<$include std_doc_man_pages$>
</table>
<table cellpadding="7" cellspacing="7" summary="">
<$if showQuickHelp$>
<tr><td><form><INPUT type=Button onClick="QuickHelp('<$getHelpPage("QH_DocMan")$>', 'QH_DocMan')"
value="<$lc("wwQuickHelp")$>"></form></td></tr>
<$endif$>
</table>
<$include std_page_end$>
</body>
</html>
In the example, the std_doctype_html_decl include references the standard
Content Server document type. The <head> element references the page title, and the
code for the head section is built using the std_html_head_declarations include
code from the std_page.htm resource file. Other elements of the page definition
follow:
1. Page elements common to most Content Server web pages are built using the
body_def, std_page_begin, and std_header include code from the std_
page.htm resource file.
2. The links on the Content Management page are built using include code from the
std_page.htm resource file.
3. The <table> element in the example defines whether a Quick Help button
should appear on the Content Management page.

Creating Resources for a Component
15-28 Oracle WebCenter Content Developer's Guide for Content Server
4. The code at the end of the page is built using the std_page_end include code
from the std_page.htm resource file.
Figure 15–4 shows a Content Management page.
Figure 15–4 Content Management Page
15.2.8.1.2 Report Page Example The template file for the standard Document Types
report page is in the doc_types.htm file. Example 15–14 shows the contents of this
file.
Example 15–14 The doc_types.htm File
<$include std_doctype_html_decl$>
<head>
<$defaultPageTitle=lc("wwDocumentTypes")$>
<$include std_html_head_declarations$>
</head>
<$include body_def$>
<$include std_page_begin$>
<$include std_header$>
<!--Directory Title--->
<table border="0" cellpadding="0" cellspacing="0" summary="">
<tr>
<td width="75"><$if PageParent$><a href="<$PageParent$>">
<$strTrimWs(inc("open_folder_image"))$></a>
<$endif$></td>
<td colspan="2" width="390"><span class=title><$PageTitle$></span></td>
</tr>
</table>
<$if IsSavedQuery$>
<!---Parameters for historical reports-->
<table border="0" cellpadding="0" cellspacing="0" summary="">
<tr>
<td width="75" height="45"> </td><!---Indent-->
<td><strong><span class=highlightField><$lc("wwReportCreated")$></span>
<$ReportCreationDate$></strong></td>
</tr>
</table>
<$endif$>

Creating Resources for a Component
Creating Custom Components 15-29
<!--Directory Header--->
<table border="0" cellspacing="0" summary="">
<tr>
<td width="75" height="45"> </td><!---Indent-->
<td colspan="2" width="390"><$HeaderText$></td>
</tr>
</table>
<!---Doc types report-->
<table border=0 cellpadding=0 cellspacing=0 summary="">
<tr><td> </td></tr>
<tr>
<td align=center width=<$StdPageWidth$>>
<h1 class="underlinePageTitle"><$lc("wwDocumentTypes")$></h1>
</td>
</tr>
<tr><td> </td></tr>
<$if IsMultiPage$>
<!---Navigation Bar-->
<tr>
<td width=565 align="center"><$include std_page_nav_bar$></td>
</tr>
<$endif$>
<tr>
<td>
<table class="xuiTable" width=<$StdPageWidth$>
summary="<$stripXml(lc("wwReportResultsTable"))$>">
<tr class="xuiAltHeader">
<td width=12% class="xuiAltHeader" scope="col"></td>
<td width=29% class="xuiAltHeader"
scope="col"><$lc("wwDocumentType")$></td>
<td width=49% class="xuiAltHeader" scope="col"><$lc("wwDescription")$></td>
<td width=12% class="xuiAltHeader"
scope="col"><$lc("wwImageFileName")$></td>
</tr>
<$rowCount=0$>
<$loop DocTypes$>
<$if rowCount%2 == 0$>
<$rowClass="xuiRow"$>
<$else$>
<$rowClass="xuiAltRow"$>
<$endif$>
<tr class="<$rowClass$>">
<!--Document types are localized to each instance, so we must use direct
path to images directory.-->
<td><img src="<$HttpWebRoot$>images/docgifs/<$dGif$>"
alt="<$stripXml(lc("wwDoctypeIcon"))$>" border=0></td>
<td><$dDocType$></td>
<td><$dDescription$></td>
<td><$dGif$></td>
</tr>
<$rowCount=rowCount+1$>
<$endloop$>
</table>
</td>
</tr>
</table>

Creating Resources for a Component
15-30 Oracle WebCenter Content Developer's Guide for Content Server
<$include std_page_end$>
</body>
</html>
In the example, the std_doctype_html_decl include references the standard
Content Server document type. The <head> element in the example references the
page title and metadata, and the code for the head section is built using the std_
html_head_declarations include code from the std_page.htm resource file.
Other elements of the page definition follow:
1. Page elements common to most Content Server web pages are built using the
body_def, std_page_begin, and std_header include code from the std_
page.htm resource file.
2. The Directory Title section in the example displays the open folder image,
links it to the parent page, and displays the page title.
3. The Parameters for historical reports section displays the original
query date for a historical report.
4. The Directory Header section displays the report description.
5. The Doc types report section displays the table title.
6. The Navigation Bar section displays the page navigation bar if a historical
report requires more than one page.
7. In the next <table> element, the first part displays the table column headers.
8. The last part of the <table> element loops on the document types to create the
rows of the report table.
9. The code at the end of the page is built using the std_page_end include code
from the std_page.htm resource file.
15.2.8.2 Editing a Template Resource
Use the following procedure to edit an existing template resource using the
Component Wizard.
1. In the Component Wizard, open the component that contains the resource to edit.
2. Select the resource in the Custom Resource Definition list.
3. To remove a template definition table or edit a template definition manually, click
Launch Editor in the Custom Resource Definition area.
4. If there are multiple tables in the resource, select the template table to edit from the
Tab l e N a m e list.
5. Modify the selected template table.
■To add a template definition to the table, click Add.
■To edit an existing template definition, select the definition, click Edit, modify
the parameters, and then click OK.
■To remove a template definition, select the definition, click Delete, and then
click Yes to confirm.

Creating Resources for a Component
Creating Custom Components 15-31
15.2.9 Environment Resources
An environment resource defines configuration variables, either by creating new
variable values or replacing existing values. Because custom resources are loaded after
the standard config.cfg file is loaded, the variable values defined in the custom
environment resource replace the original variable values.
An environment resource is defined in a CFG file using a name/value pair format:
variable_name=value
After defining a variable value, you can reference the variable in templates and other
resource files with the following Idoc Script tag:
<$variable_name$>
Environment resource files can include comment lines, which are designated with a #
symbol:
#Set this variable to true to enable the function.
15.2.9.1 Environment Resource Example
Example 15–15 shows the contents of an environment resource file.
Example 15–15 Environment Resource File
# Use this to turn on or off alternate row coloring
nsUseColoredRows=0
# These are the nested search field definitions.
nsFld1Caption=Document Text
nsFld1Name=
nsFld1Type=FullText
nsFld1OptionKey=
#
nsFld2Caption=Text
nsFld2Name=xtext
nsFld2Type=Text
nsFld2OptionKey=
#
nsFld3Caption=Date
nsFld3Name=xdate
nsFld3Type=Date
nsFld3OptionKey=
#
nsFld4Caption=Integer
nsFld4Name=xinteger
nsFld4Type=Int
nsFld4OptionKey=
#
nsFld5Caption=Option List
nsFld5Name=xoptionlist
nsFld5Type=OptionList
nsFld5OptionKey=optionlistList
#
nsFld6Caption=Info Topic
nsFld6Name=xwfsInfoTopic
nsFld6Type=OptionList
nsFld6OptionKey=wfsInfoTopicList

Creating a Component Definition File
15-32 Oracle WebCenter Content Developer's Guide for Content Server
The colored_search_resource.htm template resource file in the Nested Search
component references the nsUseColoredRows variable as follows:
<$if isTrue(#active.nsUseColoredRows)$>
<$useColoredRows=1, bkgHighlight=1$>
<$endif$>
Standard configuration variables are defined in the
IntradocDir/config/config.cfg file. For a complete list of configuration
variables, see the Oracle WebCenter Content Idoc Script Reference Guide.
15.2.9.2 Editing an Environment Resource
Use the following procedure to edit an existing environment resource using the
Component Wizard.
1. In the Component Wizard, open the component that contains the resource to edit.
2. Select the resource file in the Custom Resource Definition list.
3. Click Launch Editor.
4. Modify the configuration variables in the text editor.
5. Save and close the resource file.
Changes are reflected in the Custom Environment Parameters list.
15.3 Creating a Component Definition File
You can use the Component Wizard to create a component definition file or make
changes to it.
Example 15–16 shows a component definition file that points to an environment
resource file called customhelp_environment.cfg.
Example 15–16 Component Definition File for an Environment Resource
<?hda version="5.1.1 (build011203)" jcharset=Cp1252 encoding=iso-8859-1?>
@Properties LocalData
blDateFormat=M/d{/yy} {h:mm[:ss] {aa}[zzz]}!tAmerica/Chicago!mAM,PM
blFieldTypes=
@end
@ResultSet ResourceDefinition
4
type
filename
tables
loadOrder
environment
customhelp_environment.cfg
null
1
@end
Note: The configuration settings might not appear in the Custom
Environment Parameters list in the order they actually appear in the
resource file. For easier viewing, launch the text editor.

Restarting Content Server to Apply a Component
Creating Custom Components 15-33
15.4 Restarting Content Server to Apply a Component
Before you can apply a custom component to Content Server, you need to restart it.
You can restart Content Server by restarting the WebCenter Content Managed Server
with the Administration Console, shutdown and startup scripts, or Fusion
Middleware Control.
The following example shows how to restart WebCenter Content with the
stopManagedWebLogic and startManagedWebLogic scripts.
For more information, see "Restarting Content Server" in the Oracle WebCenter Content
System Administrator's Guide for Content Server.
To restart the WebCenter Content Managed Server with scripts on the command
line:
1. Stop the WebCenter Content Managed Server with the stopManagedWebLogic
script.
■UNIX script:
DomainHome/bin/stopManagedWebLogic.sh UCM_server1
■Windows script:
DomainHome\bin\stopManagedWebLogic.cmd UCM_server1
2. Stop the Administration Server with the stopWebLogic script.
■UNIX script: DomainHome/bin/stopWebLogic.sh
■Windows script: DomainHome\bin\stopWebLogic.cmd
3. Start the Administration Server with the startWebLogic script.
■UNIX script: DomainHome/bin/startWebLogic.sh
■Windows script: DomainHome\bin\startWebLogic.cmd
4. Start the WebCenter Content Managed Server with the startManagedWebLogic
script.
■UNIX script:
DomainHome/bin/startManagedWebLogic.sh UCM_server1
■Windows script:
DomainHome\bin\startManagedWebLogic.cmd UCM_server1

Restarting Content Server to Apply a Component
15-34 Oracle WebCenter Content Developer's Guide for Content Server

16
Installing Components 16-1
16Installing Components
This chapter describes how to install additional components in Oracle WebCenter
Content Server.
This chapter includes the following sections:
■Section 16.1, "About Installing Components"
■Section 16.2, "Packaging a Component for Installation"
■Section 16.3, "Installing a Component with the Advanced Component Manager"
■Section 16.4, "Installing a Component with the Component Wizard"
■Section 16.5, "Installing a Component with the ComponentTool Utility"
16.1 About Installing Components
Server components for Content Server are installed by default, however, custom
components and components downloaded from Oracle Technology Network must be
installed and enabled before they can be used.
You can install components using one the methods that the following sections
describe:
■Section 16.3, "Installing a Component with the Advanced Component Manager"
■Section 16.4, "Installing a Component with the Component Wizard"
■Section 16.5, "Installing a Component with the ComponentTool Utility"
Before installing a component, you must first download it to your instance. A
component cannot be downloaded unless it meets the following requirements:
■The component must exist outside of the IdcHomeDir/system directory (that is,
DomainHome/ucm/idc/system). This excludes all packaged components unless
a patch has been uploaded to a component.
■The component must have a ZIP file with the appropriate name and be located
inside the custom component or core component directory.
Note: If you need only to enable or disable an installed component,
see Chapter 10, "Enabling and Disabling Components for Content
Server."

Packaging a Component for Installation
16-2 Oracle WebCenter Content Developer's Guide for Content Server
16.2 Packaging a Component for Installation
You can package a custom component in a ZIP file for installation on multiple Content
Server instances with the Component Wizard.
To package a component for installation:
1. In the Administration tray or menu, choose Admin Server.
The Admin Server displays the Component Manager page.
2. In the first paragraph on the Component Manager page, click advanced
component manager.
This displays the Advanced Component Manager page, which has a list of
components available for downloading.
3. Select the component to be packaged from the Download Component list
4. Click Download to display the File Download screen.
5. Select Save this file to disk, and click OK.
6. In the Save As dialog box, navigate to a directory, change the file name if
necessary, and click Save.
This creates a component ZIP file that can be used to install the component.
16.3 Installing a Component with the Advanced Component Manager
Follow these steps to install the component using the Advanced Component Manager:
1. In the Administration tray or menu, choose Admin Server.
The Admin Server displays the Component Manager screen.
2. Click the Browse button, and find the ZIP file that was downloaded and saved.
3. Highlight the component name, and click Open.
4. Click Install. A message is displayed, detailing what will be installed.
5. Click Continue to continue with installation or Cancel to stop installation.
6. If you click Continue, a message appears after successful installation. You can
select one of two options:
■To enable the component and restart Content Server.
■To return to the Component Manager, where you can continue adding
components. When done, highlight the components you want to enable, and
click Enable. When finished enabling components, restart the server.

Installing a Component with the ComponentTool Utility
Installing Components 16-3
16.4 Installing a Component with the Component Wizard
Follow these steps to install the component using the Component Wizard:
1. Start the Component Wizard:
■(Windows operating system) From the Start menu, choose Programs, then
Oracle WebCenter Content Server, then your server, then Utilities, and then
Component Wizard.
■(UNIX operating system) Run the ComponentWizard script in the
DomainHome/ucm/cs/bin directory.
The Component Wizard main screen and the Component List screen are
displayed.
2. On the Component List screen, click Install.
The Install screen is displayed.
1. Click Select.
2. Navigate to the ZIP file that was downloaded and saved, and select it.
3. Click Open.
The ZIP file contents are added to the Install screen list.
4. Click OK. You are prompted to enable the component.
5. Click Yes. The component is listed as enabled on the Component List screen.
6. Exit the Component Wizard.
7. Restart Oracle WebCenter Content Server.
Depending on the component being installed, a new menu option appears in the
Administration tray or on the Admin Applet page. Some components simply extend
existing functionality and do not appear as separate new options. For more
information, see the component's documentation.
16.5 Installing a Component with the ComponentTool Utility
Run the ComponentTool utility and specify the ZIP file for the component to install
and enable:
DomainHome/ucm/cs/bin/ComponentTool path_to_file/component.zip

Installing a Component with the ComponentTool Utility
16-4 Oracle WebCenter Content Developer's Guide for Content Server

17
Uninstalling a Component 17-1
17Uninstalling a Component
This chapter describes how to uninstall a component from Oracle WebCenter Content
Server.
This chapter includes the following sections:
■Section 17.1, "About Uninstalling a Component"
■Section 17.2, "How to Uninstall a Component"
17.1 About Uninstalling a Component
The Component List screen of the Content Server Component Wizard lists all the
currently installed components. Starting the Component Wizard displays this screen,
from which you can uninstall components.
17.2 How to Uninstall a Component
You can select a component and uninstall it from the Component List screen.
1. Start the Component Wizard, as described in Section 9.2.1, "Component Wizard."
2. On the Component List screen, select the component you want to uninstall.
3. Click the Uninstall button.
This removes the selected component from the Content Server instance. The
component files remain in the file system, but the component no longer appears
on the list of components.

How to Uninstall a Component
17-2 Oracle WebCenter Content Developer's Guide for Content Server

Part V
Part V Integrating WebCenter Content into Your
Environment
This part describes how to integrate Oracle WebCenter Content with enterprise
applications.
Part V contains the following chapters:
■Chapter 18, "Getting Started with Integrating WebCenter Content into Your
Environment"
■Chapter 19, "Configuring WebCenter Content Web Services for Integration"
■Chapter 20, "Integrating JavaServer Pages with Content Server"
■Chapter 21, "Using the IdcCommand Utility to Access Content Server"
■Chapter 22, "Using the COM API for Integration"
■Chapter 23, "Using RIDC to Access Content Server"
■Chapter 24, "Using the Content Server JCR Adapter"
■Chapter 25, "Configuring Web Services with WSDL, SOAP, and the WSDL
Generator"
■Chapter 26, "Customizing the DesktopTag Component"
Note: Content Integration Suite (CIS) has been deprecated.
Developers and system integrators are directed to use Remote
Intradoc Client (RIDC), which provides a thin communication API for
communication with Oracle WebCenter Content Server. For details,
see the Oracle WebCenter Content Remote Intradoc Client (RIDC) Java API
Reference. For more information, see Section 23, "Using RIDC to Access
Content Server."

18
Getting Started with Integrating WebCenter Content into Your Environment 18-1
18Getting Started with Integrating WebCenter
Content into Your Environment
This chapter describes how to integrate Oracle WebCenter Content with enterprise
applications.
This chapter includes the following sections:
■Section 18.1, "About Integration Methods"
■Section 18.2, "Overview of Web Services"
■Section 18.3, "Virtual Folders and WebDAV Integration"
18.1 About Integration Methods
Several methods are available for integrating Oracle WebCenter Content with
enterprise applications, such as application servers, catalog solutions, personalization
applications, enterprise portals, and client-side software. In general, these integration
methods serve to translate or pass methods and associated parameters with the goal of
executing Oracle WebCenter Content Server services.
A Content Server service is a window for accessing the content and content
management functions within Oracle WebCenter Content. For example, one simple
integration option is to reference content that is managed within WebCenter Content
by a persistent URL. Some other integration options enable you to use the Java API,
the Microsoft Component Object Model (COM) interface, or the ActiveX control.
The focus of this chapter is to present the available integration options, suggest an
approach, (like IdcCommand X, or persistent URL, or SOAP), and provide information
about where to get the detailed documentation on that approach. Specifically, this
chapter provides basic conceptual information about the integration of Oracle
WebCenter Content within network system environments using various protocols,
interfaces, and mapping services.
For information about using the IdcCommand utility to access Content Server services
from other applications, see Chapter 21, "Using the IdcCommand Utility to Access
Content Server."
For information about the COM interface, see Chapter 22, "Using the COM API for
Integration."
For information about Remote Intradoc Client (RIDC) integration, see Chapter 23,
"Using RIDC to Access Content Server."

Overview of Web Services
18-2 Oracle WebCenter Content Developer's Guide for Content Server
18.2 Overview of Web Services
Web services reside as a layer on top of existing software systems, such as application
servers, .NET servers, and Content Server. Adapted to the Internet as the model for
communication, web services rely on the HyperText Transfer Protocol (HTTP) as the
default network protocol. You can use web services as a bridge between dissimilar
operating systems or programming languages to build applications with a
combination of components.
WebCenter Content supports two ways of using web services to build applications
that are integrated with Content Server:
■WebCenter Content web services together with Oracle WebLogic Server web
services, with security configuration and Security Assertion Markup Language
(SAML) support (introduced in WebCenter Content 11g)
Content Server provides some web services built into the core product. Oracle
WebLogic Server provides SOAP capabilities, and Oracle WebCenter Content
Server supports several SOAP requests through Oracle WebLogic Server. For more
information, see Chapter 19, "Configuring WebCenter Content Web Services for
Integration."
■Web Services Definition Language (WSDL) and SOAP (Simple Object Access
Protocol) files, with or without the WSDL generator component of Content Server
(introduced in Oracle Universal Content Management 10g)
The WSDL Generator component, WsdlGenerator, provides integration
technologies for accessing the functionality of Content Server. This Content Server
system component is installed and enabled by default. The WSDL Generator can
create WSDLs for the services of Content Server, or the service calls can be written
in SOAP. For more information, see Chapter 25, "Configuring Web Services with
WSDL, SOAP, and the WSDL Generator."
With either way of using web services, you can use Oracle Web Services Manager
(Oracle WSM) for security. For more information about Oracle WSM, see Chapter 19,
"Configuring WebCenter Content Web Services for Integration," and the Oracle Fusion
Middleware Security and Administrator's Guide for Web Services.
Note: The web services information in this document applies to
Oracle WebLogic Server. For information about IBM WebSphere web
services, see the Oracle Fusion Middleware Third-Party Application Server
Guide.

Virtual Folders and WebDAV Integration
Getting Started with Integrating WebCenter Content into Your Environment 18-3
18.3 Virtual Folders and WebDAV Integration
The Folders and WebDAV components, Folders_g and CoreWebdav, are installed
with WebCenter Content, as part of Content Server. The CoreWebdav component, a
system component, is enabled by default. You can enable the Folders_g component
to set up an interface to Oracle WebCenter Content Server in the form of virtual
folders, which you can use to create a multilevel folder structure. You can use the
CoreWebdav component to author and manage your content remotely, using clients
that support the WebDAV (Web-Based Distributed Authoring and Versioning)
protocol.
■The Folders_g component provides a hierarchical folder interface to content in
Content Server. This component is required for WebDAV functionality and the
WebDAV Client product.
■The CoreWebdav component enables WebDAV functionality for remotely
authoring and managing your content using clients that support the WebDAV
protocol. For example, you can use Microsoft Windows Explorer to check out
content from the repository, modify the content, and check it in rather than using a
web browser interface.
18.3.1 Virtual Folders
The Folders component sets up an interface to Oracle WebCenter Content Server in the
form of virtual folders (also called hierarchical folders). Virtual folders enable you to
create a multilevel folder structure.
Virtual folders provide two main benefits:
■Users can find content by drilling down through a familiar folder-type interface.
■Users can apply default metadata to content items by checking them in through a
particular folder.
The following structure is used for the Folders component:
■Each Oracle WebCenter Content Server instance has a common set of virtual
folders. Any change to the folders is applied systemwide.
■There is one default system-level folder, called Contribution Folders. If you
are using a custom folders interface, folders for these products may also appear at
the system level of the Folders hierarchy.
■The system administrator can change the name of a system-level folder, but cannot
delete it or add a custom system-level folder except through changes to the
database. (Deleting a system-level folder disables it, but does not remove it from
the system.)
■Each folder in the hierarchy contains content items that have the same numeric
Folder value, which is assigned automatically upon creation of the folder.
Changing the value of the Folder field for a content item places it in a different
folder.
■The number of folders and number of files in each folder can be limited by the
system administrator so that virtual folder functions do not affect system
performance.
For detailed information about configuring Content Server for WebDAV integration,
see the Oracle Fusion Middleware Application Administrator’s Guide for Content Server.

Virtual Folders and WebDAV Integration
18-4 Oracle WebCenter Content Developer's Guide for Content Server
18.3.2 WebDAV Integration
WebDAV (Web-Based Distributed Authoring and Versioning) provides a way to
remotely author and manage your content using clients that support the WebDAV
protocol. For example, you can use Microsoft Windows Explorer to check in, check
out, and modify content in the repository rather than using a web browser interface.
WebDAV is an extension to the HTTP/1.1 protocol that allows clients to perform
remote web content authoring operations. The WebDAV protocol is specified by RFC
2518.0.
For more information, see the WebDAV Resources web site at
http://www.webdav.org
WebDAV provides support for the following authoring and versioning functions:
■Version management
■Locking for overwrite protection
■Web page properties
■Collections of web resources
■Name space management (copy or move pages on a web server)
■Access control
When WebDAV is used with a content management system such as Content Server,
the WebDAV client serves as an alternate user interface to the native files in the content
repository. The same versioning and security controls apply, whether an author uses
the Content Server web browser interface or a WebDAV client.
In Content Server, the WebDAV interface is based on the hierarchical Folders interface.
For more information, see Section 18.3.1, "Virtual Folders."
18.3.2.1 WebDAV Clients
A WebDAV client is an application that can send requests and receive responses using
a WebDAV protocol (for example, Microsoft Windows Explorer, Word, Excel, and
PowerPoint). Check the current WebDAV client documentation for supported
versions. The WebCenter Content WebDAV Client is a different product that enhances
the WebDAV interface to Oracle WebCenter Content Server.
You can use WebDAV virtual folders in Windows Explorer to manage files that were
created in a non-WebDAV client, but you cannot use the native application to check
content in to and out of the Oracle WebCenter Content Server repository.
The Desktop software package also includes a WebDAV Client component and a
Check Out and Open component.
18.3.2.2 WebDAV Servers
A WebDAV server is a server that can receive requests and send responses using
WebDAV protocol and can provide authoring and versioning capabilities. Because
WebDAV requests are sent over HTTP protocol, a WebDAV server typically is built as
an add-on component to a standard web server. In Content Server, the WebDAV server
is used only as an interpreter between clients and Content Server.

Virtual Folders and WebDAV Integration
Getting Started with Integrating WebCenter Content into Your Environment 18-5
18.3.2.3 WebDAV Architecture
WebDAV is implemented in Oracle WebCenter Content Server by the WebDAV
component. The architecture of a WebDAV request follows these steps:
1. The WebDAV client makes a request to Oracle WebCenter Content Server.
2. The message is processed by the web server (through a DLL in IIS).
3. On Oracle WebCenter Content Server, the WebDAV component performs these
functions:
■Recognizes the client request as WebDAV.
■Maps the client request to the appropriate WebDAV service call on Oracle
WebCenter Content Server.
■Converts the client request from a WebDAV request to the appropriate Oracle
WebCenter Content Server request.
■Connects to the core Oracle WebCenter Content Server and executes the
Oracle WebCenter Content Server request.
4. The WebDAV component converts the Oracle WebCenter Content Server response
into a WebDAV response and returns it to the WebDAV client.

Virtual Folders and WebDAV Integration
18-6 Oracle WebCenter Content Developer's Guide for Content Server

19
Configuring WebCenter Content Web Services for Integration 19-1
19Configuring WebCenter Content Web
Services for Integration
This chapter describes how to use Oracle WebCenter Content web services with Oracle
WebLogic Server web services to integrate a client application with Oracle WebCenter
Content Server.
This chapter includes the following sections:
■Section 19.1, "About Configuring WebCenter Content Web Services for
Integration"
■Section 19.2, "Configuring Web Service Security Through Web Service Policies"
■Section 19.3, "Configuring SAML Support"
For general information about web services that you can use with Content Server, see
Section 18.2, "Overview of Web Services."
The way to use web services described in this chapter was introduced in Oracle
Universal Content Management 11g. If you want to use the way introduced in Oracle
Universal Content Management 10g, with Web Services Definition Language (WSDL)
and SOAP (Simple Object Access Protocol) files and the WSDL generator, see
Section 25, "Configuring Web Services with WSDL, SOAP, and the WSDL Generator."
19.1 About Configuring WebCenter Content Web Services for Integration
WebCenter Content web services work with Oracle WebLogic Server web services to
perform management functions for Content Server. Oracle WebLogic Server web
services provide SOAP capabilities, and WebCenter Content web services include
several built-in SOAP requests. WebCenter Content web services are automatically
installed with Content Server, but they require additional configuration to set up
security.
The core enabling technologies for WebCenter Content web services follow:
■SOAP (Simple Object Access Protocol) is a lightweight XML-based messaging
protocol used to encode the information in request and response messages before
sending them over a network. SOAP requests are sent from WebCenter Content
web services to Oracle WebLogic Server web services for implementation. For
more information about SOAP, see Simple Object Access Protocol (SOAP) at
http://www.w3.org/TR/soap12.

About Configuring WebCenter Content Web Services for Integration
19-2 Oracle WebCenter Content Developer's Guide for Content Server
■Web Services Security (WS-Security) is a standard set of SOAP extensions for
securing web services for confidentiality, integrity, and authentication. For
WebCenter Content web services, WS-Security is used for authentication, either for
a client to connect to the server as a particular user or for one server to talk to
another as a user. For more information, see the OASIS Web Service Security web
page at http://www.oasis-open.org/committees/tc_home.php?wg_
abbrev=wss.
■Web Service Policy (WS-Policy) is a standard for attaching policies to web services.
For WebCenter Content web services, policies are used for applying WS-Security
to web services. The two supported policies are username-token security and
SAML security.
Historically, Oracle used Oracle Web Services Manager (Oracle WSM) to secure its
web services, and Oracle WebLogic Server used Web Services Security Policy
(WS-SecurityPolicy) to secure its web services. Because web services security is
partially standardized, some Oracle WSM and WS-SecurityPolicy policies can
work with each other.
WebCenter Content web services (idcws/ as context root) are SOAP based, while
WebCenter Content native web services (idcnativews/ as context root) are JAX_
WS based. Both kinds of web services can be assigned Oracle WSM policies
through the Oracle WebLogic Server Administration Console.
The generic WebCenter Content web services are JAX-WS based and can be
assigned Oracle WSM policies and managed by Oracle WSM. The native
WebCenter Content web Services are SOAP based and can only support WS-Policy
policies managed through the Oracle WebLogic Server Administration Console.
For more information about Oracle WSM, see the Oracle Fusion Middleware Security
and Administrator's Guide for Web Services.
A subset of Oracle WebLogic Server web services policies interoperate with Oracle
WSM policies. For more information, see "Interoperability with Oracle WebLogic
Server 11g Web Service Security Environments" in the Oracle Fusion Middleware
Interoperability Guide for Oracle Web Services Manager.
Web Services Security Policy (WS-SecurityPolicy) is a set of security policy
assertions for use with the WS-Policy framework. For more information, see the
Web Services Security Policy (WS-SecurityPolicy) specification at
http://docs.oasis-open.org/ws-sx/ws-securitypolicy/200702/ws-
securitypolicy-1.2-spec-os.html.
■SAML is an XML standard for exchanging authentication and authorization
between different security domains. For more information, see the Security
Assertion Markup Language (SAML) specification at
http://docs.oasis-open.org/security/saml/v2.0/.
■WebLogic Scripting Tool (WLST) is a command-line tool for managing Oracle
WebLogic Server. For more information, see Oracle Fusion Middleware WebLogic
Scripting Tool Command Reference.
Note: Use Oracle WSM policies over Oracle WebLogic Server web
services whenever possible. You cannot mix your use of Oracle WSM
and Oracle WebLogic Server web services policies in the same web
service.

About Configuring WebCenter Content Web Services for Integration
Configuring WebCenter Content Web Services for Integration 19-3
19.1.1 WebCenter Content Web Services
WebCenter Content provides two types of web services: a general (generic) JAX-WS
based web service, and a native SOAP based web service. The two types of web
services reside in two different context roots. The context root is the primary identifier
in the URL for accessing the web services.
The context roots follow:
■idcws
Use this context root for general access to Content Server through any regular web
services client.
■idcnativews
The Remote Intradoc Client (RIDC) uses the native web services. Oracle
recommends that you do not develop a custom client against these services. For
more information about RIDC, see Chapter 23, "Using RIDC to Access Content
Server."
The following table describes the WebCenter Content web service in the idcws
context root.
The following table describes the WebCenter Content web services in the
idcnativews context root.
WebCenter Content Web
Service Descriptions
GenericSoapService This service uses a generic format similar to HDA for its SOAP
format. It is almost identical to the generic SOAP calls that you
can make to Content Server when you set IsSoap=1. For details
of the format, see the published WSDL at
idcws/GenericSoapPort?WSDL.
You can apply WS-Security to GenericSoapService through
WS-Policy. Content Server supports Oracle WSM policies for
SAML and username-token.
As a result of allowing WS-Security policies to be applied to this
service, streaming Message Transmission Optimization
Mechanism (MTOM) is not available for use with this service.
Very large files (greater than the memory of the client or the
server) cannot be uploaded or downloaded.
WebCenter Content Web
Services Descriptions
IdcWebRequestServic
e
This is the general WebCenter Content service. Essentially, it is a
normal socket request to Content Server, wrapped in a SOAP
request. Requests are sent to Content Server using streaming
Message Transmission Optimization Mechanism (MTOM) in
order to support large files.
Streaming MTOM and WS-Security do not mix. As a result, do not
apply WS-Security to this service because it will break the
streaming file support. In order to achieve security, you must first
log in using the IdcWebLoginService, then use the same
JSESSIONID received from that service in the next call to
IdcWebRequestService as a cookie.

Configuring Web Service Security Through Web Service Policies
19-4 Oracle WebCenter Content Developer's Guide for Content Server
19.2 Configuring Web Service Security Through Web Service Policies
The WebCenter Content web services are installed and ready to use by default with the
WebCenter Content EAR. However, unless you configure web service security
(WS-Security) on any of the WebCenter Content web services, all connections to
Content Server will use the anonymous user. To configure security for WebCenter
Content web services, you configure WS-Security through WS-Policy. Additional
configuration is required to enable authentication.
19.2.1 Configuring WS-Security through WS-Policy
WS-Security is set through the use of web service policies (WS-Policy). Security
policies can be set for web services to define their security protocol. In particular, the
WebCenter Content web services support Oracle WSM policies.
WebCenter Content supports two general classes of policies, username-token and
SAML, and the following Oracle WSM policies:
■oracle/wss11_saml_token_with_message_protection_service_
policy
■oracle/wss11_username_token_with_message_protection_service_
policy
To configure WS-Security through WS-Policy:
1. Access the Oracle WebLogic Server Administration Console.
2. Select Deployments from the side panel.
3. Expand either WebCenter Content Native Web Services or WebCenter Content
Web Services in the Deployments table.
4. Click the name of a web service, such as GenericSoapService
5. Click the Configuration tab on the Settings page for the web service, and then
click the WS-Policy tab.
6. Click the main service. From here you can choose which Oracle WSM policies to
add.
7. When you have finished adding Oracle WSM policies, you need to update the
WebCenter Content native web services or the WebCenter Content generic web
services to save your additions.
IdcWebLoginService This service is solely for adding security to
IdcWebRequestService calls. There are no parameters for this
service; it simply creates a session. The important field to retrieve
is the JSESSIONID value for future calls to
IdcWebRequestService.
If you want to use WS-Security with IdcWebRequestService,
then apply it here. Content Server supports Oracle WSM policies
for SAML and username-token.
WebCenter Content Web
Services Descriptions

Configuring SAML Support
Configuring WebCenter Content Web Services for Integration 19-5
19.3 Configuring SAML Support
You can also provide SAML support for client-side certificate authentication. To
provide SAML support so that the client can be the identity provider (that is, assert
credentials), you need to configure a keystore, configure a Java Platform Security (JPS)
provider to use the keystore, create a client credential store (CSF), and configure a Java
client to use the keystore and CSF.
19.3.1 Configuring a Keystore
Both the server and client need a copy of a keystore. The server uses the keystore to
authenticate the credentials passed by the client. A self-signed certificate can work for
this situation, because the keystore is used only as a shared secret.
You can use the keytool utility to generate a self-signed certificate. Many of the
values in the following example are the default values for the domain’s
config/fmwconfig/jps-config.xml file, described in Section 19.3.2,
"Configuring JPS for WebCenter Content to Use the Keystore":
$ keytool -genkey -alias orakey -keyalg RSA -keystore default-keystore.jks
-keypass welcome -storepass welcome
You can enter any relevant data in the keytool command. The specifics do not matter
except for the passwords for the keystore and the certificate, which the client uses.
19.3.2 Configuring JPS for WebCenter Content to Use the Keystore
Configuring the keystore in an Oracle WebLogic Server domain involves editing the
DomainHome/config/fmwconfig/jps-config.xml file.
To configure JPS for WebCenter Content to use the keystore:
1. Verify that a provider is defined in the <serviceProviders> element, or define
one.
A provider should be defined in this element by default. If not, you need to add a
<serviceProvider> element that defines a provider, as Example 19–1 shows.
Example 19–1 Service Provider Definition in jps-config.xml
<serviceProviders>
<serviceProvider type="KEY_STORE" name="keystore.provider"
class="oracle.security.jps.internal.keystore.KeyStoreProvider">
<description>PKI Based Keystore Provider</description>
<property name="provider.property.name" value="owsm"/>
</serviceProvider>
</serviceProviders>
2. Verify that a keystore instance is defined in <serviceInstances>.
A keystore instance should be defined by default.
A keystore instance should be defined in this element by default. If not, you need
to add a <serviceInstance> element that defines a keystore instance, as
Example 19–2 shows.

Configuring SAML Support
19-6 Oracle WebCenter Content Developer's Guide for Content Server
Example 19–2 Keystore Instance Definition in jps-config.xml
<serviceInstances>
<serviceInstance name="keystore" provider="keystore.provider"
location="./default-keystore.jks">
<description>Default JPS Keystore Service</description>
<property name="keystore.type" value="JKS"/>
<property name="keystore.csf.map" value="oracle.wsm.security"/>
<property name="keystore.pass.csf.key" value="keystore-csf-key"/>
<property name="keystore.sig.csf.key" value="sign-csf-key"/>
<property name="keystore.enc.csf.key" value="enc-csf-key"/>
</serviceInstance>
</serviceInstances>
The location of the keystore instance must be set to the same location as where you
created the keystore.
3. Verify that a reference to the keystore is in the <jpsContexts> element.
This setting should be in the jps-config.xml file by default. If not, you need to
add the setting, as Example 19–3 shows.
Example 19–3 Keystore in the JPS Context
<jpsContext name="default">
<serviceInstanceRef ref="credstore"/>
<serviceInstanceRef ref="keystore"/>
<serviceInstanceRef ref="policystore.xml"/>
<serviceInstanceRef ref="audit"/>
<serviceInstanceRef ref="idstore.ldap"/>
</jpsContext>
4. Save the jps-config.xml file, and restart the WebCenter Content Managed
Server and the Administration Server, as described in Section 15.4, "Restarting
Content Server to Apply a Component."
19.3.3 Creating a Client CSF
On the client, there must be a credential store to store the keys to unlock the keystore.
Oracle WebLogic Server provides a variety of ways to create a Credential Store
Framework (CSF). One way you can create a CSF is with Oracle WebLogic Server
Scripting Tool (WLST) commands.
To create a client CSF
1. Connect to the Oracle WebLogic Server domain, as Example 19–4 shows.
Example 19–4 Creating a Client CSF with WLST Commands
$ ./wlst.sh
$ connect()
$ createCred(map="oracle.wsm.security", key="keystore-csf-key", user="keystore",
password="welcome")
$ createCred(map="oracle.wsm.security", key="sign-csf-key", user="orakey",
password="welcome")
$ createCred(map="oracle.wsm.security", key="enc-csf-key", user="orakey",
password="welcome")

Configuring SAML Support
Configuring WebCenter Content Web Services for Integration 19-7
2. Use WLST createCred commands to define the CSF, as Example 19–4 shows.
Change the values in the example to match the alias and passwords from the
keystore you created.
WLST creates a CSF wallet at DomainHome/config/fmwconfig/cwallet.sso.
You can use the wallet only on the client.
3. Exit from WLST, and restart the Administration Server for the domain.
4. Send a copy of the wallet to the client.
19.3.4 Configuring a Java Client to Use the Keystore and CSF
Before you can configure a Java client to use the keystore and CSF, the client must have
these items:
■A copy of the keystore
■A copy of the CSF wallet
■A client version of the jps-config.xml file
To configure a Java client to use the keystore and CSF:
1. Edit the jps-config.xml file for the Java client.
2. Add the locations of the keystore and the CSF wallet, as Example 19–5 shows, and
save the file.
Example 19–5 Keystore and CSF Locations in the jps-config.xml file for a Java Client
<jpsConfig xmlns:xsi="http://www.w3.org/2001/XMLSchema-instance"
xsi:noNamespaceSchemaLocation="jps-config.xsd">
<serviceProviders>
<serviceProvider name="credstoressp"
class="oracle.security.jps.internal.credstore.ssp.SspCredentialStoreProvider">
<description>SecretStore-based CSF Provider</description>
</serviceProvider>
<serviceProvider type="KEY_STORE" name="keystore.provider"
class="oracle.security.jps.internal.keystore.KeyStoreProvider">
<description>PKI Based Keystore Provider</description>
<property name="provider.property.name" value="owsm"/>
</serviceProvider>
</serviceProviders>
<serviceInstances>
<serviceInstance name="credstore" provider="credstoressp" location="./">
<description>File Based Credential Store Service Instance</description>
</serviceInstance>
<serviceInstance name="keystore" provider="keystore.provider"
location="./default-keystore.jks">
<description>Default JPS Keystore Service</description>
<property name="keystore.type" value="JKS"/>
<property name="keystore.csf.map" value="oracle.wsm.security"/>
<property name="keystore.pass.csf.key" value="keystore-csf-key"/>
<property name="keystore.sig.csf.key" value="sign-csf-key"/>
<property name="keystore.enc.csf.key" value="enc-csf-key"/>
</serviceInstance>
</serviceInstances>

Configuring SAML Support
19-8 Oracle WebCenter Content Developer's Guide for Content Server
<jpsContexts default="default">
<jpsContext name="default">
<serviceInstanceRef ref="credstore"/>
<serviceInstanceRef ref="keystore"/>
</jpsContext>
</jpsContexts>
</jpsConfig>
3. Set oracle.security.jps.config, a Java system property, to point to the
jps-config.xml file:
System.setProperty("oracle.security.jps.config", “jps-config.xml”);
You can set this location in the client, during execution.

20
Integrating JavaServer Pages with Content Server 20-1
20Integrating JavaServer Pages with Content
Server
This chapter describes how to integrate Oracle WebCenter Content Server with
JavaServer Pages (JSP).
This chapter includes the following sections:
■Section 20.1, "About JSP Integration"
■Section 20.2, "Configuring JSP Support"
■Section 20.3, "Loading Example Pages"
20.1 About JSP Integration
You can access the Content Server core functionality from JavaServer Pages (JSP) to
deliver forms and custom pages through the JSP page execution functionality using
the built-in Apache Jakarta Tomcat Server.
20.1.1 JSP Execution
The JSP Execution functionality uses the built-in Apache Jakarta Tomcat Servlet/JSP
Server to access the content and content management functions within Content Server.
The Apache Jakarta Tomcat Server is a free, open-source server of Java Servlet and
JavaServer Pages that is run inside of Content Server when the feature is enabled. The
integration of Tomcat Server with WebCenter Content provides the benefit of
increased performance for content delivery.
Using JSP Execution functionality enables developers to access and modify Content
Server content, ResultSets, personalization and security definitions, and predefined
variables and configuration settings through JavaServer Pages rather than through
standard component architecture. Services and Idoc Script functions can also be
executed from JSP pages which reside as executable content in Content Server.
Note: The Content Server JSP functionality should not be enabled
when you are using Site Studio for External Applications (SSXA) in
conjunction with Content Server. Enabling the Content Server JSP
functionality would cause parsing errors in SSXA templates.

About JSP Integration
20-2 Oracle WebCenter Content Developer's Guide for Content Server
20.1.2 Tomcat
The capability for JSP to call services is provided by integrating the Tomcat 5.025
server with the Content Server core functionality.
■Tomcat is a free, open-source server of Java Server and JavaServer Pages; version
5.025 complies with Servlet 2.4 and JSP 2.0 specifications.
■The main benefit of integrating Tomcat into Content Server is the increase in
performance of delivering content. The direct integration eliminates the need for a
socket-based interface and enables the use of all Oracle WebCenter Content Server
core capabilities.
■Although Tomcat is embedded in Content Server, you can use server.xml as the
configuration file to modify the internal Tomcat engine to suit your needs.
20.1.3 Features
With JSP support enabled, custom components can include JSP pages of type jsp and
jspx.
■The DomainHome/ucm/cs/weblayout/jsp directory is able to host JSP pages
by default.
■The Oracle WebCenter Content distribution media also includes the current Java
EE SDK.
Important: JSP pages can execute Idoc Script functions only when
the JSP page is being served on Oracle WebCenter Content Server as
part of the JSP Execution functionality. JSP pages served on a separate
JSP server do not have this functionality. In those cases, checking in a
JSP page to Oracle WebCenter Content Server provides revision
control but does not provide dynamic execution of Idoc Script
functions on the presentation tier (JSP server).
Note: This product includes software developed by the Apache
Software Foundation (http://www.apache.org/).

Loading Example Pages
Integrating JavaServer Pages with Content Server 20-3
20.2 Configuring JSP Support
Use the following procedure to enable and configure JSP support.
1. In Content Server, create a new security group to be used for JSP pages (called jsp
in the subsequent steps). This security group should be restricted to developers.
This step is not required but it is recommended for developer convenience. Any
security groups to be enabled for JSP must be specified in Step 5.
a. Display the User Admin screen.
b. From the Security menu, choose Permissions by Group.
c. Click Add Group.
d. Enter jsp as the group name, enter a description, and then click OK.
e. Assign Admin permission to the admin role and any developer roles.
f. Assign Read permission to all non-admin roles.
g. Click Close.
2. If you run on AIX, HP-UX, or Linux s390, the Java 2 SDK, which is required for the
JSP integration, is not installed on your system automatically, nor is it provided on
the distribution media. For the internal JSP engine to run on any of these operating
systems, a 1.5 JDK must be present on the server, and the CLASSPATH value in
the intradoc.cfg file must be modified to include the path to the tools.jar file. For
example, for a default 1.5 install on AIX, this file should be in /usr/java15/lib.
3. Click one of the following options:
■On the Admin Server page, click General Configuration.
■From the System Properties utility, click the Server tab.
4. Enable the JSP prompt:
■For the Admin Server: click Enable Java Server Page (JSP)
■For System Properties: click Execute Java Server Page (JSP)
5. Enter the security groups to be enabled for JSP (including the security group you
created in Step 1).
6. Save the settings, and restart Content Server.
20.3 Loading Example Pages
Use either of the following procedures to load example pages into Content Server:
■Check in the .war file in the JSP security group. Make sure to check in other
content to the JSP security group before checking in the WAR file.
■Start the JSP Server Web App Admin from the Administration page.

Loading Example Pages
20-4 Oracle WebCenter Content Developer's Guide for Content Server

21
Using the IdcCommand Utility to Access Content Server 21-1
21Using the IdcCommand Utility to Access
Content Server
This chapter describes how to use the IdcCommand utility to access Oracle WebCenter
Content Server services from other applications
This chapter includes the following sections:
■Section 21.1, "About the IdcCommand Utility"
■Section 21.2, "Setting Up IdcCommand"
■Section 21.3, "Running IdcCommand"
■Section 21.4, "Using the Launcher"
■Section 21.5, "Calling Services Remotely"
21.1 About the IdcCommand Utility
The IdcCommand utility is a standalone Java application that executes Content Server
services. Almost any action you can perform from the Content Server browser
interface or administration applets can be executed from IdcCommand.
The program reads a Specifying a Command File, which contains service commands
and parameters, and then calls the specified services. A log file can record the time that
the call was executed, whether the service was successfully executed, and if there were
execution errors.
To run the IdcCommand utility, you must specify the following parameters on the
command line or in the intradoc.cfg configuration file:
■A command file containing the service commands and parameters
■A Content Server user name for a user who has permission to execute the services
being called
■A path and file name for a log file
■The connection mode (auto, server, or standalone)
Note: The IdcCommand utility returns only information about the
success or failure of the command. To retrieve information from
Oracle WebCenter Content Server in an interactive session, use the
Java COM wrapper IdcCommandX, available on Microsoft Windows
platforms.

Setting Up IdcCommand
21-2 Oracle WebCenter Content Developer's Guide for Content Server
Certain commands that cannot be executed in standalone mode. In general, the
server performs these commands asynchronously in a background thread. This
happens in the update or rebuild of the search index.
For information about using services in custom components, see Chapter 9, "Getting
Started with Content Server Components," and the Oracle WebCenter Content Services
Reference Guide.
21.2 Setting Up IdcCommand
To set up IdcCommand, you must specify the following two things:
■A Specifying a Command File, which specifies the services to be executed and any
service parameters.
■Specifying Configuration Options, which specify the command file and other
IdcCommand information. You can set IdcCommand configuration options in two
places:
–In a configuration file, using name/value pairs, as Example 21–1 shows.
Example 21–1 IdcCommand Options in a Configuration File
IdcCommandFile=newfile.hda
IdcCommandUserName=sysadmin
IdcCommandLog=C:/domain/newlog.txt
ConnectionMode=server
–On the command line, when running IdcCommand, specifying option flags
such as these:
Example 21–2 IdcCommand Options on the Command Line
-f newfile.hda -u admin -l C:/domain/newlog.txt -c server
IdcCommand is run from a command line. You can specify the Specifying
Configuration Options either from the command line or in a configuration file. For
more information, see Section 21.3, "Running IdcCommand."
21.2.1 Specifying a Command File
The command file defines the service commands and parameters that are executed by
the IdcCommand utility. Command files must follow rules for syntax, precedence, and
special tags and characters.
21.2.1.1 Command File Syntax
The command file uses the HDA (hyperdata file) syntax to define service commands.
■Each service to be executed, along with its parameters, is specified in a
@Properties LocalData section.
■For some services, a @ResultSet section is used to specify additional
information.
Note: Command-line configuration options override the settings in
the configuration file.

Setting Up IdcCommand
Using the IdcCommand Utility to Access Content Server 21-3
■Data from one section of the command file is not carried over to the next section.
Each section must contain a complete set of data for the command.
■Service names and parameters are case sensitive.
Example 21–3 shows a command file that executes the ADD_USER service and defines
attributes for two new users.
Example 21–3 Command File for the ADD_USER Service
<?hda version="5.1.1 (build011203)" jcharset=Cp1252 encoding=iso-8859-1?>
# Add users
@Properties LocalData
IdcService=ADD_USER
dName=jsmith
dUserAuthType=Local
dFullName=Jennifer Smith
dPassword=password
dEmail=email@example.com
@end
@ResultSet UserAttribInfo
2
dUserName
AttributeInfo
jsmith
role,contributor,15
@end
<<EOD>>
@Properties LocalData
IdcService=ADD_USER
dName=pwallek
dUserAuthType=Local
dFullName=Peter Wallek
dPassword=password
dEmail=email@example.com
@end
@ResultSet UserAttribInfo
2
dUserName
AttributeInfo
pwallek
role,contributor,15,account,marketing,7
@end
<<EOD>>
21.2.1.2 Precedence
IdcCommand uses precedence to resolve conflicts among the name/value pairs within
the LocalData section of the command file. When normal name/value pairs are
parsed, they are assumed to be within the @Properties LocalData tag. If the
section contains HDA tags, the normal name/value pairs take precedence over
name/value pairs within the @Properties LocalData tag.
For example, if foo=x is in a normal name/value pair and foo=y is within the
@Properties LocalData tag, the name/value pair foo=x takes precedence
because it is outside the tag.

Setting Up IdcCommand
21-4 Oracle WebCenter Content Developer's Guide for Content Server
21.2.1.3 Special Tags and Characters
These special tags and characters can be used in a command file.
21.2.2 Specifying Configuration Options
To run the IdcCommand utility, specify the following parameters on the command line
or in the DomainHome/ucm/cs/bin/intradoc.cfg configuration file.
21.2.2.1 Command File
You must specify the name of the command file that contains the service commands
and parameters. The command file parameter can specify a full path (such as
C:/command_files/command.txt), or it can specify a relative path. For more
information, see Section 21.2.1, "Specifying a Command File."
21.2.2.2 User
You must specify an Oracle WebCenter Content Server user name. This user must have
permission to execute the services being called.
Special Character Description
IdcService=service_name Each section of the command file must specify the name of the
service it is calling.
<<EOD>> The end of data marker. The command file can include one or
more sections separated with an end of data marker. For an
example, see Section 21.2.1.1, "Command File Syntax."
# The pound character placed at the beginning of a line indicates
that the line is a comment.
\ The backslash is an escape character.
@Include filename This tag enables you to include content from another file at the
spot where the @Include tag is placed. This tag can be used to
include a complete HDA file or to include shared name/value
pairs. This inclusion takes the exact content of the specified file
and places it in the location of the @Include tag. A file can be
included as many times as desired and an included file may
include other files. However, circular inclusions are not allowed.
Parameter Required? Command Line Syntax Configuration File Syntax
Command File Yes
-f name.txt IdcCommandFile=name.txt
User Yes
-u sysadmin IdcCommandUserName=sysadmin
Log File No
-l C:/logs/log.txt IdcCommandLog=C:/logs/log.txt
Connection Mode No
-c auto ConnectionMode=auto
Note: Command-line configuration options override the settings in
the configuration file.

Running IdcCommand
Using the IdcCommand Utility to Access Content Server 21-5
21.2.2.3 Log File
You can specify a path and file name for an IdcCommand log file. As each command is
executed, a message is sent to the log file, which records the time the command was
executed and its success or failure status. If the log file already exists, it is overwritten
with the new message. The log file can be used to display processing information to
the user.
■If the action performed is successful, a "success" message is written to the log file.
■If the action performed is not successful, an error message is written to the log file.
■If no log file is specified, information is logged only to the screen.
21.2.2.4 Connection Mode
You can specify the connection mode for executing the IdcCommand services.
21.3 Running IdcCommand
To run IdcCommand:
1. Create a new IdcCommand working directory.
Use this directory for your command file and configuration file.
2. Create a Specifying a Command File in the working directory to specify the
desired service commands.
3. Copy the intradoc.cfg configuration file from the DomainHome/ucm/cs/bin
directory into the working directory.
Connection Mode Description
auto IdcCommand attempts to connect to the Oracle WebCenter
Content Server instance. If this fails, services are executed in
standalone mode.
This is the default connection mode.
server IdcCommand executes services only through Content Server.
standalone IdcCommand executes services in a standalone session.
There are certain services that cannot be executed in standalone
mode. In general, these services are performed asynchronously
by the server in a background thread. For example, this happens
during update or rebuild of the search index.
Important: Do not delete the IntradocDir or WebBrowserPath
information.

Using the Launcher
21-6 Oracle WebCenter Content Developer's Guide for Content Server
4. Add IdcCommand options to the intradoc.cfg file in the working directory, as
Example 21–4 shows.
Example 21–4 IdcCommand Options in the intradoc.cfg File
IdcCommandFile=newfile.hda
IdcCommandUserName=sysadmin
IdcCommandLog=C:/domain/newlog.txt
For more information, see Section 21.2.2, "Specifying Configuration Options."
5. Run the IdcCommand utility from the DomainHome/ucm/cs/bin directory:
IdcCommand.exe
21.4 Using the Launcher
The Launcher is a native C++ application used to manage services in Windows
environments and to construct command line arguments and environment settings for
the Java VM.
The main operation of the Launcher is to find and read its configuration files, compute
any special values, then launch an executable with a command line that it constructs.
Configuration files support Bourne Shell-like substitutions, all of which start with the
dollar sign ($) followed by an alphanumeric identifier or expression inside
braces ({}).
The Launcher executable is installed in
DomainHome/ucm/native/platform/bin/Launcher. On UNIX systems,
symlinks are created in the bin directory to Launcher.sh, a Bourne Shell wrapper
that executes the Launcher executable. The purpose of this wrapper is to locate the
correct binary Launcher executable for the platform. The term Launcher is used here to
refer to the native Launcher executable or to the Launcher.sh Bourne Shell script.
The Launcher or the symlink to Launcher.sh must reside in a directory with a valid
intradoc.cfg configuration file and must have the same name as the Java class file
to be launched (case sensitive). The Launcher uses this name to set the environment
variable STARTUP_CLASS.
On Windows this name is computed by calling GetModuleFileName(). On UNIX
systems, it is computed by inspecting argv[0]. The PLATFORM variable is set to the
Content Server identifier for the platform. The variable BIN_DIR is set to the directory
where the Launcher is located.
The Launcher reads a file named intradoc.cfg from BIN_DIR. This file should contain
a value for IntradocDir. The IntradocDir directory is used as the base directory
for resolving relative paths. Any unqualified path in this document should be taken as
relative to the IntradocDir. Future releases of Content Server may change or
remove these variable names.
If the intradoc.cfg file does not contain a value for IdcResourcesDir, the
Launcher sets IdcResourcesDir to $IntradocDir/resources. If the Launcher is
starting a Windows service, it sets IS_SERVICE to 1. If it is unset, the Launcher also
sets PATH_SEPARATOR to the correct character for the platform.

Using the Launcher
Using the IdcCommand Utility to Access Content Server 21-7
The Launcher reads the intradoc.cfg file first to find the locations of configuration
files, then reads all available configuration files in this order:
1. $IdcResourcesDir/core/config/launcher.cfg
2. $BIN_DIR/../config/config.cfg
3. $IntradocDir/config/config.cfg
4. $IntradocDir/config/config-$PLATFORM.cfg
5. $IntradocDir/config/state.cfg
6. $IdcResourcesDir/core/config/launcher-$PLATFORM.cfg
7. $BIN_DIR/intradoc.cfg
8. $BIN_DIR/intradoc-$PLATFORM.cfg
9. All files specified on the command line, using the -cfg option.
21.4.1 Quotation Rules
The Launcher uses Bourne Shell-like quotation rules. A string can be inside double
quotation marks (") to escape spaces. A backslash (\) can precede any character to
provide that character. After a final command line is computed, the Launcher
separates it into spaces without quotation marks. Each string is then used without
quotation marks as an entry in the argv array for the command.
21.4.2 Computed Settings
After reading the configuration files, the Launcher processes variable substitutions.
Some variables can have extra computations to validate directories or files, build
command-line argument lists, or construct PATH-like variables.
These special computations are performed for variables based on their type. To set a
type for a variable, set TYPE_variable_name=typename in any of the configuration
files listed previously.
The following list describes Launcher variable types:
■file
Example 21–5 shows some file type variables.
Example 21–5 file Launcher Variables
TYPE_PASSWD_FILE=file
PASSWD_FILE_sys5=/etc/passwd
PASSWD_FILE_bsd=/etc/master.passwd
This type looks for a file. If the value of variable_name is a path to an existing
file, it is kept. If not, every variable beginning with variable_name_ is checked.
The last value, which is a path to an existing file, is used for the new value of
variable_name.
In this example PASSWD_FILE is set to /etc/master if /etc/master.passwd
exists, or it is set to /etc/passwd</span> if /etc/passwd exists. Otherwise,
PASSWD_FILE is undefined.
Tip: You can assign variable values directly on the command line by
using the -cfg option NAME=VALUE.

Using the Launcher
21-8 Oracle WebCenter Content Developer's Guide for Content Server
■directory
Example 21–6 shows some directory type variables.
Example 21–6 directory Launcher Variables
TYPE_JDK=directory
JDK_java_home=$JAVA_HOME
IdcNativeDir=$IdcHomeDir/native
DEFAULT_JDK_DIR=$OS_DIR/$PLATFORM
JDK_legacy142=$DEFAULT_JDK_DIR/j2sdk1.4.2_04
JDK_default=$DEFAULT_JDK_DIR/jdk1.5.0_07
In this example JDK is set to the same value as the last of the JDK_ variables that is
a directory. Typically, this would point at the JDK installed with Oracle Fusion
Middleware. Note that JDK_java_home references $JAVA_HOME; if a variable is
not defined in any configuration file but is in the environment, the environment
value is used.
■executable
Example 21–7 shows some executable type variables.
Example 21–7 executable Launcher Variables
TYPE_JAVA_EXE=executable
JAVA_EXE_default=java$EXE_SUFFIX
JAVA_EXE_jdk_default=$JDK/bin/java$EXE_SUFFIX
The executable type looks for an executable. It works very much like the file type,
but looks through every directory in $PATH for each candidate value. In this
example JAVA_EXE is set to the Java executable in the JDK if it exists. Otherwise it
is set to the first Java executable in the PATH.
■list
Example 21–8 shows some list type variables.
Example 21–8 list Launcher Variables
TYPE_JAVA_OPTIONS=list
JAVA_MAX_HEAP_SIZE=384
DEFINE_PREFIX=-D
JAVA_OPTIONS_BIN_DIR=${DEFINE_PREFIX}idc.bin.dir=$BIN_DIR
JAVA_OPTIONS_maxheap=${JAVA_MAX_HEAP_SIZE+-Xmx${JAVA_MAX_HEAP_SIZE\}m}
JAVA_OPTIONS_service=${IS_SERVICE+$JAVA_SERVICE_EXTRA_OPTIONS}
The list type computes a list of options for an executable. Each value that begins
with variable_name_ becomes a quoted option, and variable_name is set to
the entire list. In this example, JAVA_OPTIONS is set to the string:
"-Didc.bin.dir=/intradocdir/bin/" "-Xmx384m"
■path
Example 21–9 shows some path type variables.

Using the Launcher
Using the IdcCommand Utility to Access Content Server 21-9
Example 21–9 path Launcher Variables
IdcResourcesDir=${IdcResourcesDir-$IdcHomeDir/resources}
BASE_JAVA_CLASSPATH_source=$IdcResourcesDir/classes
BASE_JAVA_CLASSPATH_serverlegacy=$SharedDir/classes/server.zip
BASE_JAVA_CLASSPATH_server=$JLIB_DIR/idcserver.jar
The path type computes a path-like value.The value of each variable starting with
variable_name_ is appended to the value of variable_name separated by the
value of PATH_SEPARATOR. In this example, BASE_JAVA_CLASSPATH is set to a
very long class path.
■lookupstring
Example 21–10 shows some lookupstring type variables.
Example 21–10 lookupstring Launcher Variables
TYPE_VDK_PLATFORM=lookupstring
PARAMETER_VDK_PLATFORM=${PLATFORM}_${UseVdkLegacySearch+vdk27}
VDK_PLATFORM_aix_vdk27=_rs6k41
VDK_PLATFORM_aix_=_rs6k43
VDK_PLATFORM_hpux_vdk27=_hpux11
VDK_PLATFORM_hpux_=_hpux11
VDK_PLATFORM_freebsd_vdk27=_ilnx21
VDK_PLATFORM_freebsd_=_ilnx21
VDK_PLATFORM_linux_vdk27=_ilnx21
VDK_PLATFORM_linux_=_ilnx21
VDK_PLATFORM_solaris_vdk27=_ssol26
VDK_PLATFORM_solaris_=_ssol26
VDK_PLATFORM_win32_vdk27=_nti40
VDK_PLATFORM_win32_=_nti40
The lookupstring type uses a second parameter to construct a lookup key for
the final value. The second parameter is the value of $PARAMETER_variable_
name. If this value is undefined, the current value of variable_name is used as
the lookup key. In this example, PARAMETER_VDK_PLATFORM has the value of
${PLATFORM}_ or ${PLATFORM}_vdk27 depending on the value of
UseVdkLegacySearch.
This value is then used to look up the value of the variable VDK_PLATFORM_
${PARAMETER_VDK_PLATFORM} which is then enclosed in quotation marks and
assigned to VDK_PLATFORM.
■lookuplist
Example 21–11 shows some lookuplist type variables.
Example 21–11 lookuplist Launcher Variables
TYPE_STARTUP_CLASS=lookuplist
STARTUP_CLASS_version=Installer --version
STARTUP_CLASS_installer=Installer
STARTUP_CLASS_WebLayoutEditor=IntradocApp WebLayout
STARTUP_CLASS_UserAdmin=IntradocApp UserAdmin
STARTUP_CLASS_RepositoryManager=IntradocApp RepositoryManager
STARTUP_CLASS_Archiver=IntradocApp Archiver
STARTUP_CLASS_WorkflowAdmin=IntradocApp Workflow
STARTUP_CLASS_ConfigurationManager=IntradocApp ConfigMan

Using the Launcher
21-10 Oracle WebCenter Content Developer's Guide for Content Server
The lookuplist type uses a second parameter to construct a lookup key for the
final value. The second parameter is the value of $PARAMETER_variable_name.
If this value is undefined, the current value of variable_name is used as the
lookup key.
Unlike lookupstring, lookuplist does not enclose the final value in
quotation marks. For this example, the current value of STARTUP_CLASS is
version. STARTUP_CLASS is replaced with the value Installer --version.
21.4.3 Launcher Environment Variables
After processing the computed settings, the Launcher iterates over all variables that
begin with the string EXPORT_. The value of each variable is used as an environment
variable name, which has the value of the second half of the EXPORT_ variable
assigned. For example, EXPORT_IDC_LIBRARY_PATH=LD_LIBRARY_PATH exports
the value of the IDC_LIBRARY_PATH variable with the name LD_LIBRARY_PATH.
The variable JAVA_COMMAND_LINE is used to get the command line. Any command
line arguments to the Launcher that have not been consumed are appended to the
command line. On UNIX systems, the command line is parsed and quoting is undone
and then execv is called. On Windows, a shutdown mutex is created and
CreateProcess is called with the command line. Care should be taken because
CreateProcess does not undo backslash-quoting.
The principal mechanism for debugging the Launcher is to add the flag -debug before
any arguments for the final command. You can also create a file named $BIN_
DIR/debug.log which triggers debug mode and contain the debug output.
The Launcher has knowledge of the following configuration entries, which it either
sets or uses to control its behavior. Note that these configuration variables might
change or be removed in future releases of Content Server:
■IDC_SERVICE_NAME: the name of the win32 service used for service registration,
unregistration, startup, and shutdown.
■IDC_SERVICE_DISPLAY_NAME: the display name of the win32 used for service
registration.
■IntradocDir: the base directory for relative path names.
■IdcBaseDir: an alternate name for IntradocDir.
■IdcResourcesDir: set to $IdcHomeDir/resources if otherwise undefined.
■IdcNativeDir: defaults to $IdcHomeDir/native if otherwise unset.
■PATH_SEPARATOR: set to either colon (:) or semi-colon (;) if otherwise unset.
■STARTUP_CLASS: set to the name of the Launcher executable.
■MUTEX_NAME: the name used to create a shutdown mutex on win32.
■BEFORE_WIN_SERVICE_START_CMD: if set, is a command line that is executed
before a win32 service starts.
■UseRedirectedOutput: if set tells the Launcher on win32 to redirect the output
from the Java VM to a file.
■ServiceStartupTimeout: the time out used for waiting for a Java process to
successfully start on win32.

Using the Launcher
Using the IdcCommand Utility to Access Content Server 21-11
21.4.4 User Interface
The UI for the Launcher is the same as the application it launches. For example, if the
Launcher is renamed to IntradocApp, the following command-line arguments are
specified to launch the Web Layout Editor:
IntradocApp WebLayout
This launches the Web Layout Editor as a standalone application.
By default, the application is launched without console output. However, when
launching IdcServer, IdcAdmin, IdcCommandX, or the Installer, Java output is printed
to the screen. In all other cases, the output is suppressed for a cleaner interface.
For some applications, such as the Batch Loader and the Repository Manager, it is
desirable to view the Java output from the application. To force the Launcher to dump
the Java output to the screen, use the -console flag in this manner:
IntradocApp RepMan -console
The output is now written to the console from which the Repository Manager was
launched.
If the Launcher is renamed IdcServer, BatchLoader, SystemProperties, or any other
Java class that requires no additional parameters, it can be launched with a simple
double-click. In other cases, a shortcut can be used to launch them by double-clicking.
21.4.5 Configuring the Launcher
To use the Launcher, you must first rename the Launcher.exe file to an executable with
the same name as the class file to be launched. Typical examples include
IdcServer.exe and IntradocApp.exe.
21.4.6 Configuration File Example
You can modify the configuration file for the applications you need to run.
Example 21–12 shows configuration file entries that are sufficient to launch nearly all
Content Server applications.
Tip: By using Launcher.exe, changing the status.dat file, and
altering the value of the JVM command line, you could theoretically
run any Java program as a Windows service. This is not recommended
for normal use, but it does explain some ways you could configure the
Launcher.
Note: If you want to make a custom application, you must create a
custom directory and rename the Launcher.exe file to the service
that is to be launched. A valid intradoc.cfg file must be in the
same directory as the executable. The only required parameter is
IntradocDir; however, you can include other entries to alter the
way the Java application is launched.

Using the Launcher
21-12 Oracle WebCenter Content Developer's Guide for Content Server
Example 21–12 Configuration File Entries for Content Server Applications
<?cfg jcharset="Cp1252"?>
#Content Server Directory Variables
IntradocDir=C:/domain/idcm1/
BASE_JAVA_CLASSPATH_source=$IdcResourcesDir/classes
BASE_JAVA_CLASSPATH_serverlegacy=$SharedDir/classes/server.zip
BASE_JAVA_CLASSPATH_server=$JLIB_DIR/idcserver.jar
Other applications, such as Oracle WebCenter Content: Inbound Refinery, require
additional classes in the class path. This file can also be modified to enable Content
Server to be run with different Java Virtual Machines.
The CLASSPATH is designed to look for class files in order of the listed entries. In other
words, the Launcher will search the entire DomainHome/ucm/idc/native directory
before it looks in the resources directory or server.zip file. This is desirable if the
users want to overload Java classes without patching the ZIP file.
Additionally, the Launcher can be used to install, uninstall, and run Java applications
as Windows Services, if they follow the correct API for communicating back to the
Launcher. For more details on how to make any Java application run as a Windows
service with the Launcher, see the source code for IdcServer.java or
IdcAdmin.java.
The COMPUTEDCLASSPATH is used to add class files to the CLASSPATH that the
Launcher uses. To add class files, override this flag.
Example 21–13 shows a command to run Content Server with the IBM virtual machine
on a Windows operating system.
Example 21–13 Command for Running Content Server with a Custom JVM
#customized for running the IBM VM
JAVA_EXE=full path
When using a custom JVM, specify the full path to the Java executable file to be used.
You can set JAVA_COMMAND_LINE_SELECTION entry in the configuration file to
idcclassloader or traditional.
If you choose to change which JVM you are using, and if that VM has all the standard
Sun SDK JAR files, then it is better to use the J2SDK configuration entry to relocate the
root directory of the SDK directory rather than use JAVA_EXE to specify the location of
the Java executable. (This is not applicable for the IBM VM.)
Note: The intradoc.cfg file is usually altered to include the
locations of JDBC drivers for particular databases upon installation. If
you want to use an alternate JDBC driver, place it outside of the
IdcHomeDir directory for Content Server, IntradocDir, and alter
the JDBC_JAVA_CLASSPATH_customjdbc entry in the
intradoc.cfg file with the location of the driver.
Caution: Avoid overriding the JVM command line. Customization is
more complicated because of the custom class loader. If you do
override the JVM command line, start with the
$IdcHomeDir/resources/core/config/launcher.cfg file.

Using the Launcher
Using the IdcCommand Utility to Access Content Server 21-13
The J2SDK variable changes the directory where the Sun SDK libraries are found (such
as tools.jar). If you change this entry without setting the JAVA_EXE entry, then
Java executables are assumed to be in the bin directory of the path in J2SDK. The
default value for J2SDK is ...\shared\os\win32\j2sdk1.4.2_04.
To add a value to JAVA_OPTIONS, use JAVA_OPTIONS_server=-server or another
similar value.
The following table describes commonly used command-line options. Those options
noted with an asterisk (*) are available on a Windows operating system only.
Unmarked options are available for a Windows or UNIX operating system.
Option Description
-console * Forces the Launcher to keep a Windows console window
open so that the Java output and error streams are printed to the
console.
-debug Shows paths and variables in use at startup, and startup errors.
Also enables Java debugging in Content Server; when repeated,
this increases verbosity.
-fileDebug Similar to the -debug option but this option dumps debug data
to the debug.log file. It is usually only set in JAVA_OPTIONS or
JAVA_SERVICE_EXTRA_OPTIONS in the intradoc.cfg file to
debug Windows services.
-install * Used to install the Java application referred to by the
Launcher as a Windows Service.
-install_autostart * Similar to the -install option but this option installs the
application to start when the server starts.
-uninstall * Used to uninstall the Java application referred to by the
Launcher as a Windows Service.
-remove * Same as -uninstall.
-dependent service-name * Makes the Windows service dependent on whether the
service-name service is also running.
This command is useful when you want to make a dependent
call for each service.
For example, if you want to launch a database before starting
Content Server, you can specify the Content Server startup to be
dependent on the database startup.
-dependent user password *Used with -install, installs the service with the credentials
of the user specified by user with password password.
This command will check the user regardless of the credentials,
but may not install the service. The credentials of the user need
to extend to the service for the auto-start to run the service
automatically.
For certain services, such as Inbound Refinery, the last flag is
required so that the service can run with higher permissions.
The user name must be in the typical Microsoft format
DOMAIN\User. Once users change passwords, the service will
not be able to log in, and therefore will not run.
-help Provides verbose output on Launcher use.
-version Displays the version number for the Launcher and exits.
-asuser user password * Used during an install to install a service as a specified user
with a specific password.
Calling Services Remotely
21-14 Oracle WebCenter Content Developer's Guide for Content Server
If you want to load custom .dll files, you should put them in the
IdcHomeDir/native/win32/lib directory.
21.5 Calling Services Remotely
To use services remotely, you must have these files on the remote system:
■DomainHome/ucm/cs/bin/IdcCommand.exe
■DomainHome/ucm/cs/bin/intradoc.cfg (same file as on Oracle WebCenter
Content Server)
■IntradocDir/config/config.cfg
In addition, the following configuration entries must be defined in the #Additional
Variables section of the config.cfg file on the remote system:
■IntradocServerPort=4444
■IntradocServerHostName=IP or DNS
-exec path _name Overrides the argv[0] setting. Used by the Launcher.sh to specify
the target path_name because the target of the symlink does not
know its source.
-cfg configfilename Specifies additional config files to read before determining
computed settings.
-idcServiceName
servicename
* Specifies the name of the Windows service. This can used
with -remove to uninstall another Content Server service
without using that Content Server Launcher (for example, if an
entire installation directory has been removed).
Tip: To customize the class path to alter the system path to load
Oracle .dll files, you can set the path as follows:
IDC_LIBRARY_PATH_customfiles=/path-to-customfiles
Custom shared objects and .dll files must not be installed into
IdcHomeDir.
Option Description

22
Using the COM API for Integration 22-1
22Using the COM API for Integration
This chapter describes Microsoft Component Object Model (COM) integration. Oracle
WebCenter Content Server utilizes a COM-based API, which provides the capability to
call functionality from within a COM environment.
This chapter includes the following sections:
■Section 22.1, "About the COM API"
■Section 22.2, "Calling Content Server Services with the IntradocClient OCX
component"
■Section 22.3, "Using the ODMA API to Access Content Server from a Desktop
Application"
22.1 About the COM API
You can use a COM interface to integrate Content Management with Microsoft
environments and applications. An ActiveX control and an OCX component are
provided as interface options to gain access to the content and content management
functions within Content Server. Additionally, you can communicate with
ODMA-aware applications through a COM interface.
22.2 Calling Content Server Services with the IntradocClient OCX
component
An Object Linking and Embedding Control Extension (OCX) control is provided for
connecting to a remote Oracle WebCenter Content Server instance and executing
Content Server services. The IdcClient OCX control is used within a Windows Visual
Basic development environment to gain access to the content and content management
functions within Content Server.
You can call Content Server services with the IdcClient OCX control. The
IdcClient.ocx control is used to connect to a remote Oracle WebCenter Content
Server instance and perform typical server functions.
Note: A Visual Basic or Visual C++ development environment is
required for using the IdcClient OCX component.

Calling Content Server Services with the IntradocClient OCX component
22-2 Oracle WebCenter Content Developer's Guide for Content Server
22.2.1 OCX Interface
The IntradocClient OCX component is used within a Windows Visual Basic
development environment to gain access to the content and content management
functions within Content Server. The OCX integration is designed to call services in a
visual development environment, or to connect to a remote Oracle WebCenter Content
Server instance.
The IntradocClient OCX component provides functionality that you can access with a
method call. Methods perform actions and often return results. Information is passed to
methods using parameters. Some functions do not take parameters; some functions
take one parameter; some take several.
The IntradocClient OCX component requires a username and password to execute the
commands. The user must have the appropriate permissions to execute the
commands. Some commands will require an administrative access level, other
commands may require only write permission.
Outside of the init and connection managing methods, all methods use the
serialized HDA format for communication. The returned serialized HDA format string
contains information about the success or failure of the command. The StatusCode
will be negative if a failure occurs, and StatusMessage indicates the error.
For more information, see the Oracle WebCenter Content Services Reference Guide. This
guide also contains information about the IntradocClient OCX API specifications
listing the properties, methods, and events.
22.2.2 IdcClient OCX Description
IdcClient is an ActiveX control that allows a program to perform actions such as
executing a service and retrieving file path information. The IdcClient control is also a
wrapper for the Microsoft Internet Explorer browser.
The IdcClient OCX control is designed to use the Unicode standard and in most cases
exchanges data with Oracle WebCenter Content Server in UTF-8 format. Unicode uses
two bytes (16 bits) of storage per character and can represent characters used in a wide
range of languages (for example, English, Japanese, Arabic). Since English language
ASCII (American Standard Code for Information Interchange) characters only require
one byte (8 bits), when an ASCII character is represented the upper byte of each
Unicode character is zero.
See the Unicode Consortium on the Web for additional information about the Unicode
standard at http://www.unicode.org.
In most cases, the methods use the serialized HDA format for communication. A
serialized HDA format is a Java method used for communication. The returned
serialized HDA format string contains information about the success or failure of the
command.
Important: IdcClient OCX is built atop the Microsoft Layer for
Unicode, which allows Unicode applications to run on Win9x
platforms. When distributing the IdcClient OCX Control on 9x
platforms, the "unicows.dll" must also be distributed. This companion
DLL cannot be distributed on Windows-based systems.

Calling Content Server Services with the IntradocClient OCX component
Using the COM API for Integration 22-3
The IdcClient OCX control provides functionality that can be performed with a
method call. Methods perform actions and often return results. Information is passed
to methods using parameters. Some functions do not take parameters; some functions
take one parameter; some take several. For example, a function with two parameters
passed as strings would use this format:
Function(Parameter As String, Parameter As String) As String
■IdcClient OCX enables users to write client applications to execute services. The
OCX control takes name/value pairs containing commands and parameters and
calls the specified services. Execution results are passed back to the calling
program.
■IdcClient OCX requires a user name and password to execute the commands. The
user must have the appropriate permissions to execute the commands. Some
commands will require an administrative access level, other commands may
require only write permission.
For more information, see the Oracle WebCenter Content Services Reference Guide.
22.2.2.1 OCX Events
Events are executed when the user or server performs an action. For example:
■The IntradocBrowserPost event executes every time a user submits a form
from within a browser.
■The IntradocServerResponse event executes after the server completes a
requested action.
22.2.2.2 OCX Methods
The Visual Basic Standard Controls provide methods that are common to every Visual
Basic development environment. In addition, the IdcClient OCX control provides
methods that are private and unique to this specific control. These methods are used to
perform or initiate an action rather than setting a characteristic.
For example:
■The AboutBox() method launches the About box containing product version
information.
■The GoCheckinPage method checks in a new content item or a content item
revision.
22.2.2.3 OCX Properties
Properties describe or format an object and can be modified with code or by using the
property window in the Visual Basic development environment. Properties describe
the basic characteristic of an object.
For example:
■The UserName property provides the assigned user name.
■The WorkingDir property specifies the location where downloaded files are
placed.

Calling Content Server Services with the IntradocClient OCX component
22-4 Oracle WebCenter Content Developer's Guide for Content Server
22.2.2.4 IdcClient OCX Interface
The IdcClient OCX control is used within a Windows Visual Basic development
environment to gain access to the content and content management functions within
Content Server. The OCX integration is designed to call services in a visual
development environment, or to connect to a remote Content Server instance.
In most cases, methods use the serialized HDA format for communication. The
returned serialized HDA format string contains information about the success or
failure of the command. The StatusCode will be negative if a failure occurs, and
StatusMessage will indicate the error. If the returned HDA does not contain a
StatusCode parameter, the service call succeeded.
22.2.3 IdcClient OCX Control Setup
You can set up the IdcClient OCX component and create a visual interface in the
Microsoft Visual Basic development environment.
22.2.3.1 Setting Up the IdcClient OCX Component
Follow these steps to set up the IdcClient OCX component in the Microsoft Visual
Basic development environment:
1. Create a new project.
2. Select Project, and then choose Components.
3. Browse to the IdcClient.ocx file on your system, and click Open.
The IdcClient module is added to the Component Controls list.
4. Ensure that the checkbox for the IdcClient ActiveX Control module is enabled,
and click OK.
The IdcClient OCX control is placed in the list of controls.
5. (Optional) You can use the Visual Basic development environment to build your
own visual interface or follow the steps provided in Section 22.2.3.2, "Creating a
Visual Interface," to build a basic visual interface.
22.2.3.2 Creating a Visual Interface
The following procedure for creating a visual interface is based on the assumption that
a Visual Basic project has been created and the IdcClient OCX control has been placed
in the list of controls. For more information, see Section 22.2.3.1, "Setting Up the
IdcClient OCX Component."
Follow these steps to build a basic visual interface:
1. Select the control, and draw it on the Visual Basic form.
Figure 22–1 shows the IdcClient OCX control.
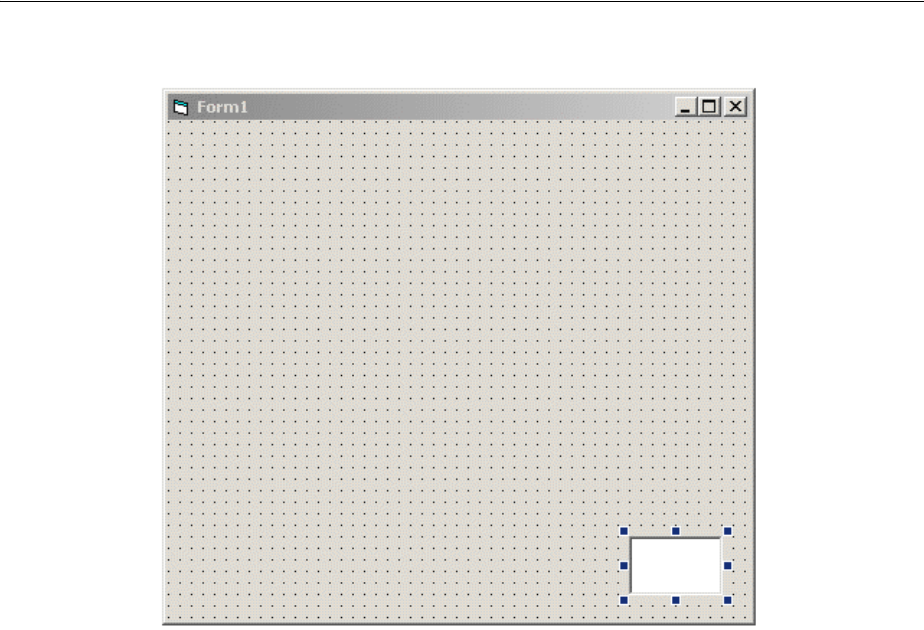
Calling Content Server Services with the IntradocClient OCX component
Using the COM API for Integration 22-5
Figure 22–1 OCX Control Drawn on a Visual Basic Form
2. From the drop-down list of the Properties window, choose IdcClient OCX.
If the Properties window is not currently displayed, select View, and then choose
Properties Window from the main menu.
3. Rename the IdcClient OCX control IdcClientCtrl.
4. Define HostCgiUrl to reference the iss_idc_cgi.dll for your particular
instance.
For example:
http://testserver/intradoc-cgi/iss_idc_cgi.dll
Figure 22–2 shows this URL as the value of HostCgiUrl.
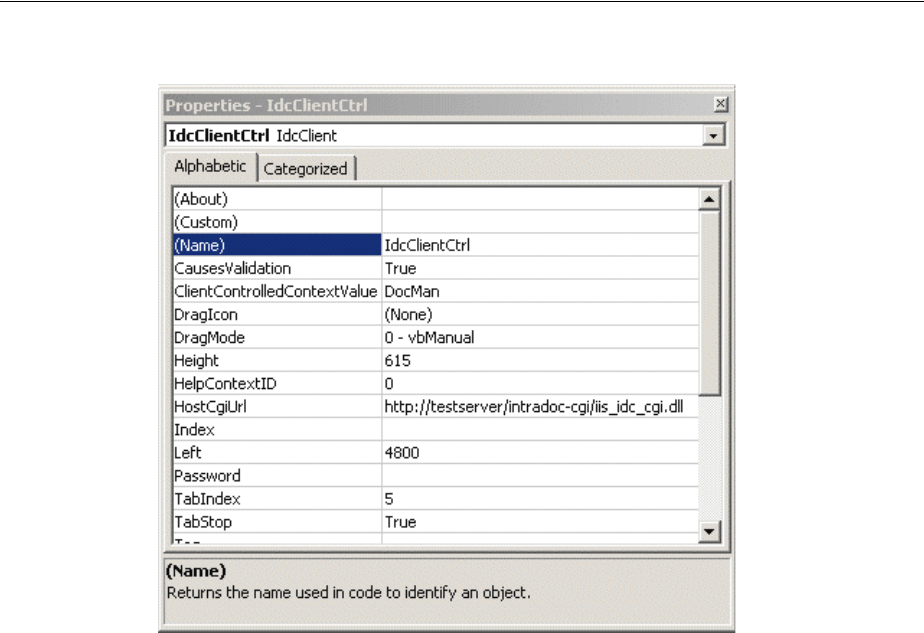
Calling Content Server Services with the IntradocClient OCX component
22-6 Oracle WebCenter Content Developer's Guide for Content Server
Figure 22–2 Edited IdcClient Properties
5. On the form, draw a text box, and name it CgiUrl.
6. For the Text field, enter the HostCgiUrl value as the text to be displayed, such as
http://testserver/intradoc-cgi/iss_idc_cgi.dll.
Figure 22–3 shows this URL as the Tex t value.
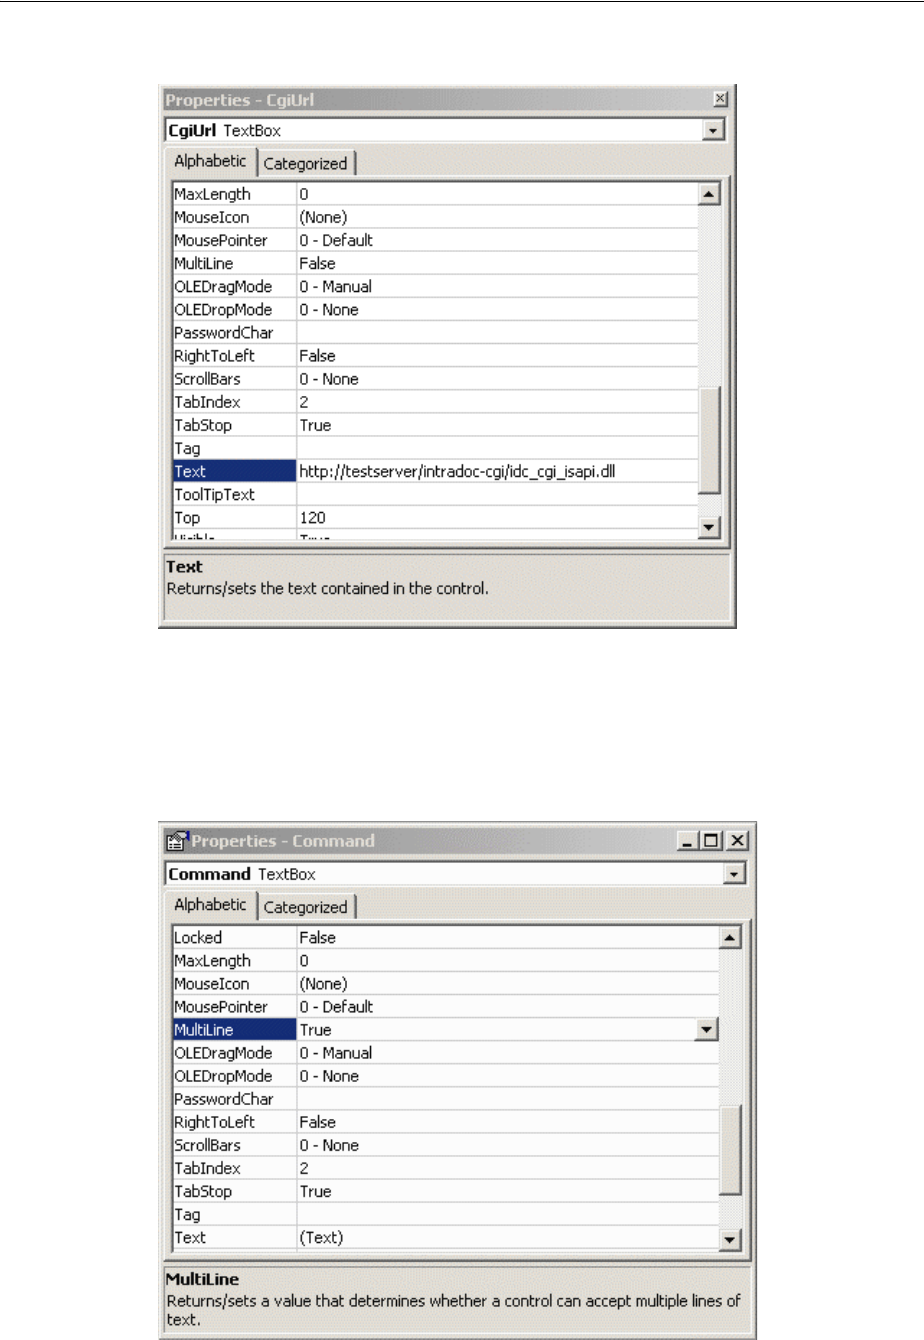
Calling Content Server Services with the IntradocClient OCX component
Using the COM API for Integration 22-7
Figure 22–3 Edited CgiUrl TextBox Properties
7. On the form, draw a text box, and name it Command.
8. Clear the entry for the Tex t field (leave blank), and set MultiLine to True.
Figure 22–4 shows a MultiLine value.
Figure 22–4 Edited Command TextBox Properties
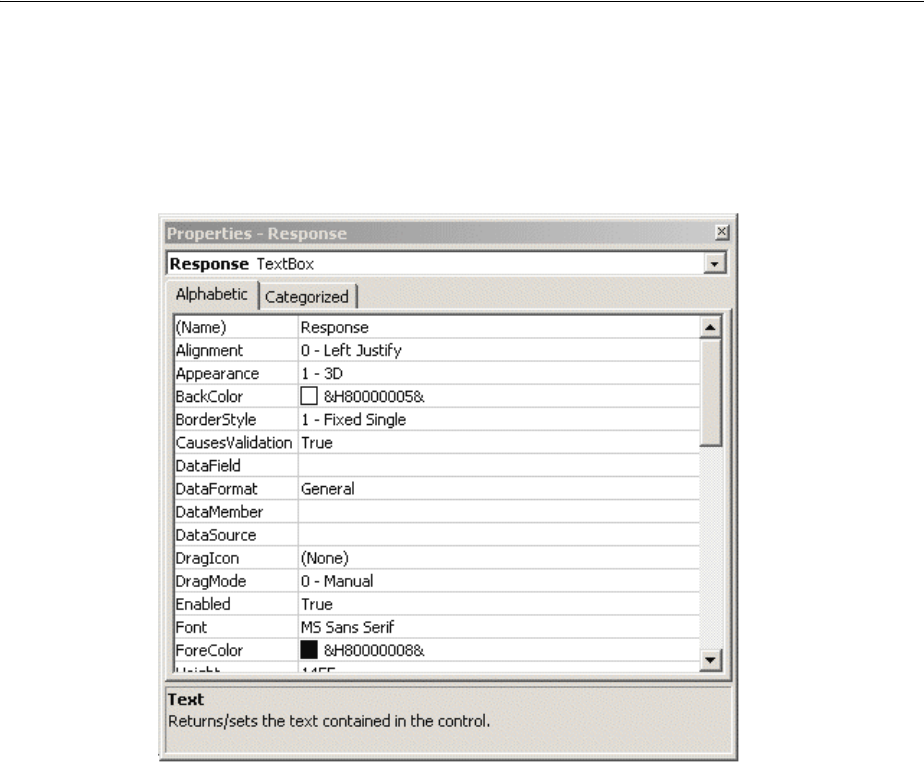
Calling Content Server Services with the IntradocClient OCX component
22-8 Oracle WebCenter Content Developer's Guide for Content Server
9. On the form, draw a text box, and name it Response.
10. Clear the entry for the Tex t field (leave blank).
Figure 22–5 shows field values for a Response text box.
Figure 22–5 Edited Response TextBox Properties
11. On the form, draw a button, and name it SendPostCommand.
12. For the Caption field, enter Send Post Command as the text to be displayed.
Figure 22–6 shows a Caption value to be displayed on a SendPostCommand
button.
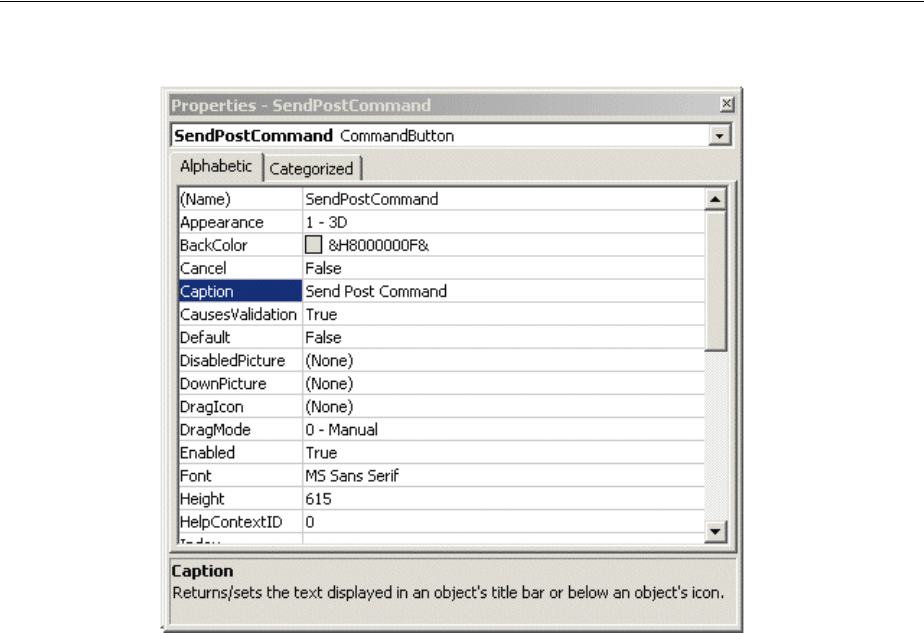
Calling Content Server Services with the IntradocClient OCX component
Using the COM API for Integration 22-9
Figure 22–6 Edited SendPostCommand CommandButton Properties
13. On the form, select View, and then choose Code.
14. Select SendPostCommand, and then click the drop-down lists and modify the
code to perform these actions:
■Set the Host Cgi URL value.
■Issue the command.
■(Optional) Replace LF with CRLF to make the presentation in the edit control
more readable.
■Display the response.
Modify the code as follows:
Dim R As String
IdcClientCtrl.HostCgiUrl = CgiUrl.Text
R = IdcClientCtrl.1.SendPostCommand(Command.Text)
R = Replace(R, vbLf, vbCrLf
Response.Text = R
Figure 22–7 shows the code modifications.
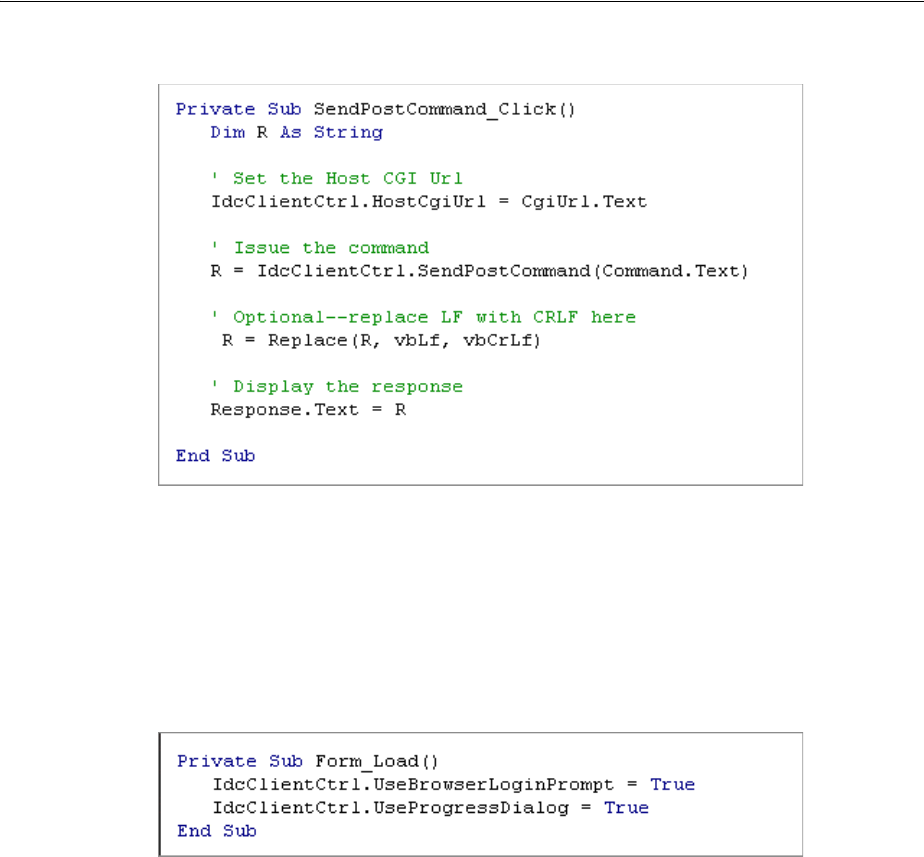
Calling Content Server Services with the IntradocClient OCX component
22-10 Oracle WebCenter Content Developer's Guide for Content Server
Figure 22–7 Edited SendPostCommand_Click Code
15. Choose Form and then Load from the drop-down lists, and add the following lines
to set the login prompt for the Oracle WebCenter Content Server instance:
IdcClientCtrl.UseBrowserLoginPrompt = True
IdcClientCtrl.UseProgressDialog = True
Figure 22–8 shows the modified code.
Figure 22–8 Edited Form_Load Code
16. (Optional) Add appropriate descriptive labels, such as Cgi Url, Command, and
Response
Figure 22–9 shows a form with descriptive labels.
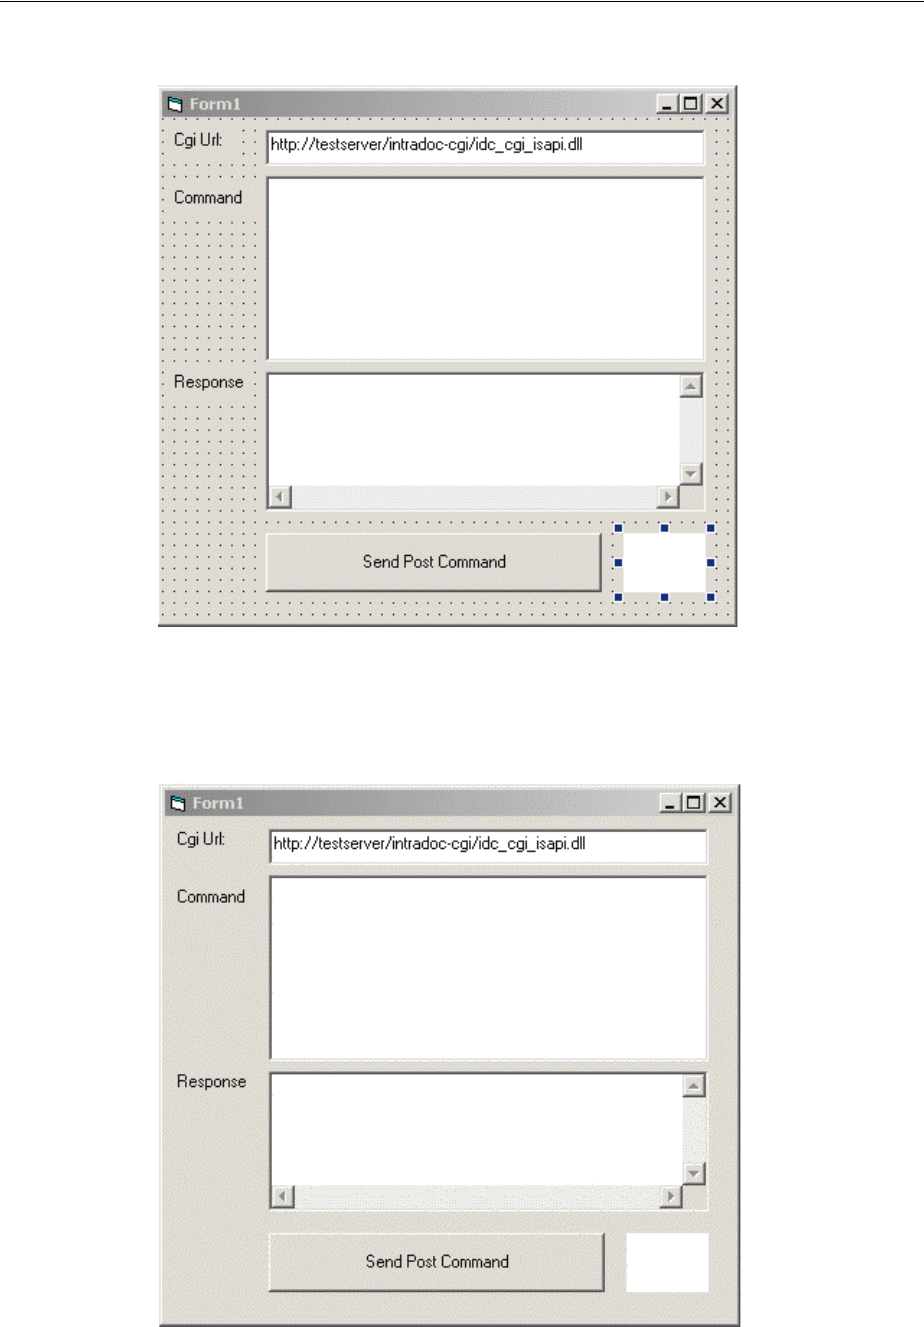
Calling Content Server Services with the IntradocClient OCX component
Using the COM API for Integration 22-11
Figure 22–9 Visual Interface with a Descriptive Label
17. Select Run, and then choose Start to test the visual interface.
Figure 22–10 shows a successful test result.
Figure 22–10 Completed Visual Interface

Calling Content Server Services with the IntradocClient OCX component
22-12 Oracle WebCenter Content Developer's Guide for Content Server
18. Enter a formatted command in the Command field.
Figure 22–11 shows the ADD_USER command to add a user.
For more information about the ADD_USER service, see the Oracle WebCenter
Content Services Reference Guide.
Figure 22–11 Visual Interface with Defined Command
19. Click the Send Post Command button to execute the command. The returned
results are displayed in the Response field.
Figure 22–12 shows some returned results.

Calling Content Server Services with the IntradocClient OCX component
Using the COM API for Integration 22-13
Figure 22–12 Visual Interface with Returned Results
To verify the command:
1. In a web browser, log in to Oracle WebCenter Content Server as an administrator.
2. In the Administration tray, select Admin Applets.
3. Click User Admin. The applet launches and displays the added user (for example,
user99).
22.2.4 IdcClient Events
Events are executed when the user or server performs an action. The following
IdcClient OCX events are available:
■IntradocBeforeDownload
■IntradocBrowserPost
■IntradocBrowserStateChange
■IntradocRequestProgress
■IntradocServerResponse
22.2.4.1 IntradocBeforeDownload
Executes before a file is downloaded.
■Initiates the server actions and updates required before a download.
Parameters
The event passes these parameters:
■ByVal params As String
■cancelDownload As Boolean

Calling Content Server Services with the IntradocClient OCX component
22-14 Oracle WebCenter Content Developer's Guide for Content Server
22.2.4.2 IntradocBrowserPost
Executes every time a form is submitted from within a browser.
Parameters
The event passes these parameters:
■ByVal url As String
■ByVal params As String
■cancelPost As Boolean
22.2.4.3 IntradocBrowserStateChange
Executes whenever the browser state changes.
Parameters
The event passes these parameters:
■ByVal browserStateItem As String
■ByVal enabled As Boolean
22.2.4.4 IntradocRequestProgress
Executes a request for a progress report to be sent from the server. This event occurs
only after a method has been called.
Parameters
The event passes these parameters:
■ByVal statusData As String
■ByVal isDone As Boolean
22.2.4.5 IntradocServerResponse
Executes after the server completes a requested action. For example, after a file has
been downloaded. This event handles HDA encoded data that is a response from the
server. This event only occurs when an action is performed in the browser.
Parameters
The event passes one parameter:
■ByVal response As String

Calling Content Server Services with the IntradocClient OCX component
Using the COM API for Integration 22-15
22.2.5 IdcClient OCX Methods
The following IdcClient OCX methods are available:
■AboutBox
■Back
■CancelRequest*
■DoCheckoutLatestRev
■DownloadFile
■DownloadNativeFile
■Drag
■EditDocInfoLatestRev
■Forward
■GoCheckinPage
■Home
■InitiateFileDownload*
■InitiatePostCommand*
■Move
■Navigate
■NavigateCgiPage
■Refresh Browser
■SendCommand*
■SendPostCommand*
■SetFocus
■ShowDMS
■ShowDocInfoLatestRev
■ShowWhatsThis
■StartSearch
■Stop
■UndoCheckout
■ViewDocInfo
■ViewDocInfoLatestRev
■ZOrder
Methods marked with an asterisk (*) are ones which are not related to browser activity
and which return a value.
Important: All parameters are required unless otherwise indicated.

Calling Content Server Services with the IntradocClient OCX component
22-16 Oracle WebCenter Content Developer's Guide for Content Server
22.2.5.1 AboutBox
Sub AboutBox()
Description
Launches the About box containing product version information.
■This method displays the product About box.
■The method returns FALSE if the call cannot be executed.
Parameters
None
22.2.5.2 Back
Sub Back()
Description
Displays the previous HTML page.
■Returns the user to the previous screen.
■The method retrieves the previous HTML page from cached information for
display to the user.
Parameters
None
22.2.5.3 CancelRequest
Function CancelRequest() As Boolean
Description
This method cancels the currently active request. Returns FALSE if the function is
unable to cancel the request or if there is no request currently active.
Parameters
None
Output
Returns a Boolean value:
■Returns TRUE if request is canceled.
■Returns FALSE if the cancel request is not performed.
22.2.5.4 DoCheckoutLatestRev
Sub DoCheckoutLatestRev(docName As String, curID As String)
Description
Checks out or locks the latest content item revision.
■Given a content item name and the version label, the method checks out the latest
content item revision.
■Executes the IntradocServerResponse event. The event is executed before the
method occurs. For details, see Section 22.2.4, "IdcClient Events."

Calling Content Server Services with the IntradocClient OCX component
Using the COM API for Integration 22-17
This function returns the following values:
■Serialized HDA containing dID and dDocName.
■FALSE if the latest revision cannot be checked out or cannot be found in the
system.
■The data that was passed in as parameters.
Parameters
■docName: The user-assigned content item name.
■curID: The unique identifier for the latest revision. Optional.
22.2.5.5 DownloadFile
Function DownloadFile(command As String, filename As String) As String
Description
Downloads the defined file.
■Given a currently associated command and the file type, this method performs a
file download of the postconversion file (compare DownloadNativeFile).
■Executes the IntradocBeforeDownload event. The event is executed before the
method occurs. For details, see Section 22.2.4, "IdcClient Events."
This function returns the following:
■Serialized HDA containing the status code and status method.
■The data that was passed in as parameters.
■FALSE if it is unable to download the specified file.
Parameters
■command: The currently associated command.
■filename: The file format. This is the file type such as PDF, HTM, or other
supported format.
22.2.5.6 DownloadNativeFile
Function DownloadNativeFile(id As String, docName As String, filename As String) As String
Description
Downloads the defined native file.
■Given a content item revision ID, a content item name, and a file type, this method
performs a file download of the native file (compare DownloadFile).
■Executes the IntradocBeforeDownload event. The event is executed before the
method occurs. For details, see Section 22.2.4, "IdcClient Events.".
Note: The curID value is the content item version label, not the
generated content item revision ID.
Note: The id value is the generated content item revision ID, not the
content item version label.

Calling Content Server Services with the IntradocClient OCX component
22-18 Oracle WebCenter Content Developer's Guide for Content Server
This function returns the following:
■Serialized HDA containing dID and dDocName.
■The data that was passed in as parameters.
■FALSE if it is unable to download the specified file.
Parameters
■id: The unique identifier for the latest revision.
■docName: The user-assigned content item name.
■filename: The file format. This is the file type such as DOC, RTF, or any other
supported format.
22.2.5.7 Drag
Sub Drag([nAction])
Description
Begins, ends, or cancels a drag operation.
■The Drag method is handled the same as a Standard Control implementation.
■Refer to a Visual Basic API reference for additional information.
Parameters
■nAction: Indicates the action to perform. If you omit nAction, nAction is set to
1.
The settings for the Drag method are:
■0: Cancel drag operation; restore original position of control.
■1: (Default) Begin dragging the control.
■2: End dragging, that is, drop the control.
22.2.5.8 EditDocInfoLatestRev
Sub EditDocInfoLatestRev(docName As String, curID As String, activateAction As String)
Description
Edits the content item information for the latest revision.
■ODMA related.
■Given a content item name, the version label, and the currently active requested
action, the method edits the content item information for the latest revision.
■The function returns FALSE if the content item information for the latest revision
cannot be edited or cannot be found in the system.
Note: The curID value is the content item version label, not the
generated content item revision ID.

Calling Content Server Services with the IntradocClient OCX component
Using the COM API for Integration 22-19
Parameters
■curID: The unique identifier for the latest revision.
■activateAction: Passed to ODMActivate. This can be used as Idoc Script. Optional.
■docName: The user-assigned content item name. Optional.
22.2.5.9 Forward
Sub Forward()
Description
Displays the next HTML page.
■Moves the user to the next screen.
■This method retrieves cached information for the next HTML page for display to
the user.
Parameters
None
22.2.5.10 GoCheckinPage
Sub GoCheckinPage(id As String, docName As String, isNew As Boolean, params As String)
Description
Checks in a new content item or a content item revision.
■Given the content item revision ID and the content item name, the function checks
in a new content item or a content item revision.
■This method opens the content item check-in page and enters the unique content
item identifier, user-assigned content item name, and any assigned content item
parameters into the associated text fields. It is also specified whether this is a new
content item or a revision.
Output
This function returns the following:
■FALSE if it is unable to check in the specified file.
■Serialized HDA containing dID and dDocName.
■The data that was passed in as parameters.
Note: The id value is the generated content item revision ID, not the
content item version label.

Calling Content Server Services with the IntradocClient OCX component
22-20 Oracle WebCenter Content Developer's Guide for Content Server
Parameters (All Optional)
■id: The unique identifier for the latest revision.
■docName: The user-assigned content item name.
■IsNew: Defines whether the content item to be checked in is a new content item or
a revision.
–If TRUE, a new unique content item version label is assigned.
–Default is TRUE.
■params: The parameters that prefill the Check In page.
22.2.5.11 Home
Sub Home()
Description
Returns the user to the defined home page.
■Moves the user to the home screen.
■Executes an HTML page request and displays the defined home page to the user.
Parameters
None
22.2.5.12 InitiateFileDownload
Function InitiateFileDownload(command As String, filename As String) As String
Description
Initiates a file download.
■Given the currently associated command and the file type, the function initiates a
file download. This method initiates a file download of a specific rendition of a
content item, the latest revision, or the latest released revision.
■Executes the IntradocServerResponse event. The event is executed before the
method occurs. For details, see Section 22.2.4, "IdcClient Events."
Parameters
■command: The currently associated command.
■filename: The file format. This is the file type, such as PDF, HTM, or another
supported format.
Output
■Returns serialized HDA containing the requested information.
■Returns the data that was passed in as parameters.

Calling Content Server Services with the IntradocClient OCX component
Using the COM API for Integration 22-21
22.2.5.13 InitiatePostCommand
Function InitiatePostCommand(postData As String) As String
Description
Initiates a post command.
■Initiates a service call. Given assigned post data, this method initiates a post
command.
■Executes the IntradocServerResponse event. The event is executed before the
method occurs. For details, see Section 22.2.4, "IdcClient Events."
Parameters
■postData: The serialized HDA containing the service command and any necessary
service parameters.
Output
■Returns serialized HDA containing the requested information.
■Returns StatusCode and StatusMessage.
–The StatusCode will be negative if a failure occurs, and StatusMessage will
indicate the error.
–If the returned HDA does not contain a StatusCode parameter, the service call
succeeded.
22.2.5.14 Move
Sub Move(Left As Single, [Top], [Width], [Height])
Description
Moves an object.
■The Move method is handled the same as a Standard Control implementation.
■Refer to a Visual Basic API reference for additional information.
Parameters
■nLeft: Specifies the horizontal coordinate for the left edge of the object. This is a
single-precision value.
■nTop: Specifies the vertical coordinate for the top edge of the object. This is a
single-precision value.
■nWidth: Specifies the new width of the object. This is a single-precision value.
■nHeight: Specifies the new height of the object. This is a single-precision value.
22.2.5.15 Navigate
Sub Navigate(url As String
Description
Computes the URL path.
■Given a complete URL, this method computes the URL from the serialized HDA
and returns the value as a string.

Calling Content Server Services with the IntradocClient OCX component
22-22 Oracle WebCenter Content Developer's Guide for Content Server
This function returns the following values:
■Serialized HDA containing the requested information.
■The data that was passed in as parameters.
Parameters
■url: The complete URL path.
22.2.5.16 NavigateCgiPage
Sub NavigateCgiPage(params As String)
Description
Computes the CGI path.
■Given defined content item parameters, this method computes the CGI path from
the serialized HDA and returns the value as a string.
Parameters
■params: The assigned content item parameters.
22.2.5.17 Refresh Browser
Description
Refreshes the browser.
■This method refreshes the web browser and updates dynamic information.
Parameters
None
22.2.5.18 SendCommand
Function SendCommand(params As String) As String
Description
Issues a service request to Oracle WebCenter Content Server.
■Given defined content item parameters, the function executes a service from
Oracle WebCenter Content Server related to content item handling.
Parameters
■params: The CGI URL encoded parameters.
Output
■Returns serialized HDA containing the requested information.
■Returns the data that was passed in as parameters.

Calling Content Server Services with the IntradocClient OCX component
Using the COM API for Integration 22-23
22.2.5.19 SendPostCommand
Function SendPostCommand(postData As String) As String
Description
Sends a post command.
■Executes a service call.
■Executes the IntradocBrowserPost event. The event is executed before the
method occurs. For details, see Section 22.2.4, "IdcClient Events."
Parameters
■postData: The serialized HDA containing the service command and any necessary
service parameters.
Output
■Returns serialized HDA containing the requested information.
■Returns StatusCode and StatusMessage.
–The StatusCode will be negative if a failure occurs, and StatusMessage
will indicate the error.
–If the returned HDA does not contain a StatusCode parameter, the service call
succeeded.
22.2.5.20 SetFocus
Sub SetFocus()
Description
Assigns the focus to a control.
■The SetFocus method is handled the same as a Standard Control
implementation.
■Refer to a Visual Basic API reference for additional information.
Parameters
None
22.2.5.21 ShowDMS
Sub ShowDMS()
Description
Opens the HTML page associated with the Content Manager.
■ODMA related.
■Displays the Content Manager access page in a browser.
Parameters
None

Calling Content Server Services with the IntradocClient OCX component
22-24 Oracle WebCenter Content Developer's Guide for Content Server
22.2.5.22 ShowDocInfoLatestRev
Sub ShowDocInfoLatestRev(docName As String, curID As String, activateAction As String)
Description
Displays the content item information for the latest revision.
Parameters
■docName: The user-assigned content item name.
■curID: The unique identifier for the latest revision. Optional.
■activateAction: The currently active requested action. Optional.
22.2.5.23 ShowWhatsThis
Sub ShowWhatsThis()
Description
Displays the What's This Help topic specified for an object with the WhatsThisHelpID
property.
■The ShowWhatsThis method is handled the same as a Standard Control
implementation.
■Refer to a Visual Basic API reference for additional information.
Parameters
■Object: Specifies the object for which the What's This Help topic is displayed.
22.2.5.24 StartSearch
Sub StartSearch()
Description
Displays the query page in the browser control.
■Preforms browser manipulation.
Parameters
None
22.2.5.25 Stop
Sub Stop()
Description
Stops the browser.
■This method stops or cancels the loading of information in the browser.
Parameters
None
Note: The curID value is the content item version label, not the
generated content item revision ID.

Calling Content Server Services with the IntradocClient OCX component
Using the COM API for Integration 22-25
22.2.5.26 UndoCheckout
Sub UndoCheckout(docName As String, curID As String)
Description
This service reverses a content item checkout.
■Given a content item name and a version label, this service attempts to locate the
content item in the system and undo the check out. The service fails if the content
item does not exist in the system, if the content item is not checked out or the user
does not have sufficient privilege to undo the checkout.
■Executes the IntradocServerResponse event. The event is executed before
the method occurs. For details, see Section 22.2.4, "IdcClient Events."
Parameters
■curID: The unique identifier for the latest revision.
■docName: The user-assigned content item name. Optional.
22.2.5.27 ViewDocInfo
Sub ViewDocInfo(id As String)
Description
Navigates to the content item information page and displays content item information
in a browser.
■Performs browser manipulation.
■Given a content item revision ID, the method displays content item information in
a browser.
Parameters
■id: The unique identifier for the latest revision.
22.2.5.28 ViewDocInfoLatestRev
Sub ViewDocInfoLatestRev(docName As String, curID As String)
Description
Navigates to the content item information page and displays content item information
for the latest revision.
■Given a content item name and a version label, the method displays the content
item information for the latest revision.
Note: The curID value is the content item version label, not the
generated content item revision ID.
Note: The id value is the generated content item revision ID, not the
content item version label.
Note: The curID value is the content item version label, not the
generated content item revision ID.

Calling Content Server Services with the IntradocClient OCX component
22-26 Oracle WebCenter Content Developer's Guide for Content Server
This function returns the following values:
■Serialized HDA containing dID and dDocName.
■The data that was passed in as parameters.
Parameters
■docName: The user assigned content item name.
■curID: The unique identifier for the latest revision.
22.2.5.29 ZOrder
Sub ZOrder([Position])
Description
Places a specified form or control at the front or back of the z-order within its graphical
level.
■The ZOrder method is handled the same as a Standard Control implementation.
■Refer to a Visual Basic API reference for additional information.
Parameters
■nOrder: Specifies an integer indicating the position of the object relative to other
objects. If you omit nOrder, the setting is 0.
The settings for the ZOrder method follow:
■0: (Default) The object is positioned at the front of the z-order.
■1: The object is positioned at the back of the z-order.
22.2.6 IdcClient Properties
Each data item or attribute is implemented as a property in Visual Basic. Properties are
exposed through the Public Interface of an object within the Visual Basic development
environment. These attributes can be used to further describe elements.
These are the IdcClient OCX properties:
■ClientControlledContextValue
■HostCgiUrl
■Password
■UseBrowserLoginPrompt
■UseProgressDialog
■UserName
■Working Directory
22.2.6.1 ClientControlledContextValue
Provides the user-supplied context value. This value becomes available to Idoc Script
as the variable ClientControlled in any web page delivered by Oracle WebCenter
Content Server.
■Returns the value as a string.
■Takes no parameters.

Calling Content Server Services with the IntradocClient OCX component
Using the COM API for Integration 22-27
22.2.6.2 HostCgiUrl
Provides the complete URL path of the host CGI bin.
■Returns the value as a string.
■Takes no parameters.
22.2.6.3 Password
Provides the assigned user password.
■Returns the value as a string.
■Takes no parameters.
22.2.6.4 UseBrowserLoginPrompt
Allows the use of a browser login prompt. Defines whether a dialog box for user
authentication will display.
■If set to TRUE, control will open a dialog box for user authentication.
■The default value is TRUE.
Returns a Boolean value:
■TRUE if the login was successful
■FALSE if the login was denied
22.2.6.5 UseProgressDialog
Enables the use of a user progress dialog. Defines whether a dialog box for user
authentication will display.
■If set to TRUE, control will open a dialog box for user progress.
■Default is TRUE.
Returns a Boolean value:
■Returns TRUE if the action was completed.
■Returns FALSE if the action failed.
22.2.6.6 UserName
Provides the assigned user name.
Returns the value as a string.
Takes no parameters.
22.2.6.7 Working Directory
Specifies the working directory as a full path. This is the location where downloaded
files are placed.
■Returns the value as a string.
■Takes no parameters.

Using the ODMA API to Access Content Server from a Desktop Application
22-28 Oracle WebCenter Content Developer's Guide for Content Server
22.3 Using the ODMA API to Access Content Server from a Desktop
Application
The Open Document Management Application (ODMA) is a standard API used to
interface between desktop applications and file management software. The ODMA
integration for Content Server is available with Desktop, a separate product. Use the
ODMA-integration products to gain access to the content and content management
functions within Content Server (for ODMA-compliant desktop applications).
You can publish files to your web repository directly from any ODMA-compliant
application, such as Microsoft Word, Corel WordPerfect, and Adobe FrameMaker.
With the web-centric adoption of ODMA, you can check in and publish information
directly to the Web. This is a significant advancement over traditional ODMA
client/server implementations, where information is published first to a server and is
not immediately available on the Web for consumption.
For more information, refer to the ODMA or ODMA/FrameMaker online help.
22.3.1 ODMA Client
The ODMA Client is a separate product and does not ship with the core product. It is
used to check in and publish information directly to the Web from your desktop
applications. ODMA Client surpasses traditional ODMA client–server models, which
publish information to a server and not immediately to the Web for consumption. You
can use ODMA Client from within your desktop application to perform many tasks
which interact with Oracle WebCenter Content Server, for example:
■Save a file and immediately check it in to Oracle WebCenter Content Server.
■Save a file to check in later.
■Check out a file from Oracle WebCenter Content Server.
■Update a file's metadata (content information).
■Save the file to your local file system and bypass the ODMA Client system.
22.3.2 ODMA Interfaces
These ODMA interfaces are available:
■ODMA Client Interface: The Select Document screen with the Recent Files option
selected displays a list of files that you recently used through ODMA. This screen
is displayed instead of the typical Open dialog box. If a file does not display on
this screen, you can search for it in Content Server or on the local file system.
■ODMA Desktop Shell Interface: The Client Desktop Shell provides a
drag-and-drop check-in functionality, and access to the ODMA Client - Select
Document screen from outside of your desktop application. Through the Desktop
Shell, you can:
–Select a file from your desktop or a Windows Explorer window and drag it to
the Desktop Shell to check in the file to Content Server.
–Select and open a file from the Recent Files list or from Content Server.
■Content Server Interface with ODMA: You can open and check out an ODMA file
directly from the Content Server Content Information page. When you open a file
from Content Server, the file opens in its native application so that you can edit it
and quickly check the file back in to Content Server.

Using the ODMA API to Access Content Server from a Desktop Application
Using the COM API for Integration 22-29
Note: You can also open and check out a file from within an
ODMA-compliant application, and you can open a copy of a file
instead of checking it out. For more information, see the ODMA
Online Help.

Using the ODMA API to Access Content Server from a Desktop Application
22-30 Oracle WebCenter Content Developer's Guide for Content Server

23
Using RIDC to Access Content Server 23-1
23Using RIDC to Access Content Server
This chapter describes how to initialize and use Remote Intradoc Client (RIDC), which
provides a thin communication API for communication with Oracle WebCenter
Content Server. For more information, see the Oracle WebCenter Content Remote Intradoc
Client (RIDC) Java API Reference.
The Remote Intradoc Client (RIDC) can be downloaded from the Oracle Technology
Network (OTN) at http://otn.oracle.com.
This chapter includes the following sections:
■Section 23.1, "About Remote Intradoc Client (RIDC)"
■Section 23.2, "Initializing Connections"
■Section 23.3, "Configuring Clients"
■Section 23.4, "Authenticating Users"
■Section 23.5, "Using Services"
■Section 23.6, "Understanding Connection Pooling"
■Section 23.7, "Understanding Streams"
■Section 23.8, "Understanding Binders"
■Section 23.9, "Understanding Convenience Classes"
■Section 23.10, "Understanding RIDC Filters"
■Section 23.11, "Using the RIDC JDeveloper Extension"
23.1 About Remote Intradoc Client (RIDC)
Remote Intradoc Client (RIDC) is a thin communication API for talking to the Content
Server. It's main functionality is to provide the ability to remotely execute Content
Server services. In addition, RIDC handles things like connection pooling, security,
and protocol specifics.
Note: Remote Intradoc Client (RIDC) version 11.1.1.6 (11gR1 PS5)
requires Java Runtime Environment (JRE) 1.6 or greater. The current
Java JRE/JDK can be downloaded from the Oracle Technology
Network (OTN) at http://otn.oracle.com.

About Remote Intradoc Client (RIDC)
23-2 Oracle WebCenter Content Developer's Guide for Content Server
Key Features
Remote Intradoc Client (RIDC) has these features:
■Supports Intradoc socket-based communication and the HTTP and JAX-WS
protocols.
■Supports Secure Socket Layer (SSL) communication with Content Server.
■Provides client configuration including setting the socket time outs, connection
pool size, and so on.
■RIDC objects follow the standard Java Collection paradigms.
Supported Protocols
Remote Intradoc Client (RIDC) version 11.1.1.6.0 supports the idc, idcs, http, https, and
jax-ws protocols.
Intradoc: The Intradoc protocol communicates to the Content Server over the over the
Intradoc socket port (typically 4444). This protocol requires a trusted connection
between the client and Content Server and will not perform any password validation.
Clients that use this protocol are expected to perform any required authentication
themselves before making RIDC calls. The Intradoc communication can also be
configured to run over SSL.
HTTP: Using the Apache HttpClient package, RIDC communicates with the web
server attached to the Content Server. Unlike Intradoc, this protocol requires
authentication credentials for each request. HttpClient version 3 is the default.
However, version 4 of the httpClient library may also be used. See Section 23.1.1,
"Using HttpClient Library Version 4" for details. Refer to the Jakarta Commons
HttpClient documentation on the HttpClient Home page of the Apache HttpClient
web site for additional information.
http://hc.apache.org/
JAX-WS: The JAX-WS protocol is only supported in Oracle WebCenter Content 11g
with a properly configured Content Server instance and the RIDC client installed.
JAX-WS is not supported outside this environment.
For more information about JAX-WS, see Oracle Fusion Middleware Getting Started With
JAX-WS Web Services for Oracle WebLogic Server and Oracle Fusion Middleware
Programming Advanced Features of JAX-WS Web Services for Oracle WebLogic Server on the
Oracle Technology Network (OTN). Also see the Java API for XML Web Services
(JAX-WS) documentation on the Java Community Process web site:
http://www.jcp.org/
Supported URL Formats
The following table shows the URL formats that are supported.
URL Description
idc://localhost:4444 Uses the Intradoc port; requires only the
hostname and the port number.
idcs://localhost:4443 Uses SSL over the Intradoc port; requires
extra configuration to load the SSL
certificates.
http://localhost:16200/cs/idcplg Specifies the URL to the Content Server CGI
path.
About Remote Intradoc Client (RIDC)
Using RIDC to Access Content Server 23-3
Required Environments
The following table summarizes the environment RIDC needs to support each
connection type.
23.1.1 Using HttpClient Library Version 4
Using the Apache HttpClient package, RIDC communicates with the web server
attached to the Content Server. Unlike Intradoc, this protocol requires authentication
credentials for each request. Remote Intradoc Client (RIDC) version 11.1.1.6.0 uses
HttpClient version 3 as the default. However, version 4 of the HttpClient library may
also be used.
Refer to the Jakarta Commons HttpClient documentation on the HttpClient Home
page of the Apache HttpClient web site for additional information.
http://hc.apache.org/
To request HttpClient version 4 in Java code:
IdcClient idcClient = manager.createClient("http://localhost/idc/idcplg");
idcClient.getConfig ().setProperty ("http.library", "apache4");
If you are creating a new RIDC application using the JDeveloper extension, you can
add to your connection, in the Configuration Parameters section, the parameter
"http.library" with a value of "apache4". See Section 23.11, "Using the RIDC JDeveloper
Extension" for more information on the RIDC JDeveloper extension
If you are in a Site Studio for External Applications (SSXA) application in JDeveloper,
because there is no UI, you need to create your connection and save it without testing
the connection first. Then open the connections.xml file in the Connections >
Descriptors > ADF META-INF node. Add the following StringRefAddr section
(shown in Example 23–1) to the connections.xml file and save the file.
https://localhost:16200/cs/idcplg Uses SSL over HTTP; requires extra
configuration to load the SSL certificates.
http://wlsserver:16200/idcnativews Uses the JAX-WS protocol to connect to the
Content Server.
URL Description
idc:// ■oracle.ucm.ridc-11.1.1.jar
idcs:/ ■oracle.ucm.ridc-11.1.1.jar
■SSL certificate configuration
http:/ ■oracle.ucm.ridc-11.1.1.jar
■HttpClient libraries. These are included in the
httpclient-3.*.jar and httpclient-4.*.jar.
https:/ ■oracle.ucm.ridc-11.1.1.jar
■HttpClient libraries. These are included in the
httpclient-3.*.jar and httpclient-4.*.jar.
■SSL certificate configuration
jax-ws ■Oracle shiphome having WLS and JRF stacks
URL Description

Initializing Connections
23-4 Oracle WebCenter Content Developer's Guide for Content Server
Example 23–1 Connection Example in connections.xml
<Reference name="sample"
className="oracle.stellent.ridc.convenience.adf.mbeans.IdcConnection" xmlns="">
<Factory className=
"oracle.stellent.ridc.convenience.adf.mbeans.IdcConnectionFactory"/>
<RefAddresses>
<StringRefAddr addrType="oracle.stellent.idc.connectionUrl">
<Contents>idc://localhost:4444</Contents>
</StringRefAddr>
<StringRefAddr addrType="oracle.stellent.idc.idcServerURL">
<Contents>http://localhost/cs/idcplg</Contents>
</StringRefAddr>
<StringRefAddr addrType="oracle.stellent.idc.http.library">
<Contents>apache4</Contents>
</StringRefAddr>
</RefAddresses>
</Reference>
Note that the connection types for SSXA and RIDC are similar:
■When you are using SSXA connections in JDeveloper, the addrType value in the
connections.xml file is oracle.stellent.idc.http.library.
■When you are using RIDC connections in JDeveloper the addrType value in the
connections.xml file is oracle.stellent.ridc.http.library.
23.2 Initializing Connections
This section provides sample code to initialize an Intradoc connection, an HTTP
connection, and code that initializes a JAX-WS client.
The code in Example 23–2 initializes an Intradoc connection.
Example 23–2 Intradoc Connection Initialization
// create the manager
IdcClientManager manager = new IdcClientManager();
// build a client that will communicate using the intradoc protocol
IdcClient idcClient = manager.createClient("idc://localhost:4444");
The code in Example 23–3 initializes an HTTP connection. The only difference from an
Intradoc connection is the URL.
Example 23–3 HTTP Connection Initialization
// create the manager
IdcClientManager manager = new IdcClientManager();
// build a client that will communicate using the HTTP protocol
IdcClient idcClient = manager.createClient("http://localhost:16200/idc/idcplg");
The code in Example 23–4 initializes a JAX-WS client. Note that the URL includes the
idcnativews web context root. This web context root (by default) is used by two
web services exposed by the Content Server: the login service and the request
service.

Configuring Clients
Using RIDC to Access Content Server 23-5
Example 23–4 JAX-WS Client Initialization
// create the manager
IdcClientManager manager = new IdcClientManager();
// build a client that will communicate using the JAXWS protocol
IdcClient idcClient = manager.createClient
("http://wlsserver:16200/idcnativews");
23.3 Configuring Clients
Configuration of the clients can be done after they are created. Configuration
parameters include setting the socket timeouts, connection pool size, etc. The
configuration is specific to the protocol; if you cast the IdcClient object to the specific
type, then you can retrieve the protocol configuration object for that type.
Client Configuration for Intradoc Connections
The code in Example 23–5 sets the socket time-out and wait time for Intradoc
connections.
Example 23–5 Client Configuration for Intradoc Connections
// build a client as cast to specific type
IntradocClient idcClient =
(IntradocClient)manager.createClient("http://localhost/idc/idcplg");
// get the config object and set properties
idcClient.getConfig().setSocketTimeout(30000); // 30 seconds
idcClient.getConfig().setConnectionSize(20); // 20 connections
Configuring SSL
Remote Intradoc Client (RIDC) allows Secure Socket Layer (SSL) communication with
Content Server using the Intradoc communication protocol. The typical port used is
4444. For more information about configuring SSL and enabling ports, see the Oracle
WebCenter Content System Administrator's Guide for Content Server.
For SSL communication, you must install and enable the SecurityProviders component
in the Content Server instance that you want to access. You must configure Content
Server for SSL communication with a new incoming provider, and specify the
truststore or keystore information. You must have a valid keystore or trust manager
with signed, trusted certificates on both the client and Content Server.
Oracle does not provide signed certificates. For most implementations, you will want a
certificate signed by a universally recognized Certificate Authority.
To configure SSL communication with Content Server, you need to do these tasks:
1. Install and enable the SecurityProviders component. The SecurityProviders
component must be installed and enabled in the Content Server instance that you
want to access with SSL communication.
This component is installed and enabled by default in Oracle WebCenter Content
Server 11gR1.
2. Configure an incoming provider for SSL communication.
For more information about configuring SSL, see the Oracle WebCenter Content
System Administrator's Guide for Content Server.

Configuring Clients
23-6 Oracle WebCenter Content Developer's Guide for Content Server
3. Create self-signed key pairs and certificates.
The code in Example 23–6 uses the IDC protocol over a Secure Socket (SSL).
Example 23–6 IDC Protocol over SSL
// build a secure IDC client as cast to specific type
IntradocClient idcClient = (IntradocClient)
manager.createClient("idcs://localhost:4443");
// set the SSL socket options
config.setKeystoreFile("ketstore/client_keystore"); //location of keystore file
config.setKeystorePassword ("password"); // keystore password
config.setKeystoreAlias("SecureClient"); //keystore alias
config.setKeystoreAliasPassword("password"); //password for keystore alias
Configuring JAX-WS
There are several JAX-WS specific configurations that can be done after you have
created the client. However, in most cases, you should use the default settings.
This code builds a client as a cast for a JAX-WS type:
JaxWSClient jaxwsClient = (JaxWSClient) manager.createClient
("http://wlsserver:7044/idcnativews");
JaxWSClientConfig jaxwsConfig = jaxwsClient.getConfig();
You can set the instance name of the Content Server that you would like to connect to.
This is set to "/cs/" by default which is the default webcontext for UCM installation. If
the server webcontext is different than the default, then you may set it as:
// set the property
jaxwsConfig.setServerInstanceName("/mywebcontext/");
Setting the JPS configuration file location. A JPS configuration file is required for most
policies such SAML and/or Message Token.
jaxwsConfig.setJpsConfigFile("/my/path/to/the/jps-config.xml");
Setting the security policy:
jaxwsConfig.setClientSecurityPolicy("policy:oracle/wss11_username_token_with_
message_protection_client_policy");
Changing the Login Port WSDL URL
RIDC uses the default values for the installed webservices. If for some reason, the
webservices have been modified and does not conform to the default URI/URLs, you
may need to modify the default values.
Changing the login port WSDL URL:
jaxwsConfig.setLoginServiceWSDLUrl
(new URL("http://server:7044/webservices/loginPort?WSDL"));
Change the request service URL:
jaxwsConfig.setRequestServiceWSDLUrl
(new URL("http://server:7044/anotherservice/myrequestport?WSDL"));
The default streaming chuck size is 8192. This example changes the chunk size:
jaxwsConfig.setStreamingChunkSize(8190);

Configuring Clients
Using RIDC to Access Content Server 23-7
Configuring JAX-WS Policy
To determine service side policy set for UCM: from the Admin Console select
Deployments > Oracle UCM Native Web Services > IdcWebLoginService >
Configuration > WS-Policy > IdcWebLoginPort > OWSM.
To determine GPA policy for a ws-client that will be leveraged by RIDC over JAX-WS
should no explicit LPA be set: initialize the WebLogic Scripting Tool (WLST) and use
the WebLogic Server Administration Scripting Shell.
The code in Example 23–7 provides an example.
Example 23–7 Determining GPA Policy with the WebLogic Scripting Tool
(/u01/app/oracle/product/Middleware/oracle_common/common/bin)% ./wlst.sh
...
Initializing WebLogic Scripting Tool (WLST) ...
Welcome to WebLogic Server Administration Scripting Shell
Type help() for help on available commands
wls:/offline> connect('weblogic','welcome1','t3://localhost:7001')
Connecting to t3://localhost:7001 with userid weblogic ...
Successfully connected to Admin Server 'AdminServer' that belongs to domain 'base_
domain'.
wls:/base_domain/serverConfig> help('wsmManage')
Operations that provide support to manage the global policy attachments and
Oracle MDS repository.
help('abortRepositorySession')
Abort the current repository session,
discarding the changes made to repository.
help('attachPolicySet')
Attach a policy set to the specified resource scope.
help('attachPolicySetPolicy')
Attach a policy to a policy set using the policy's URI.
help('beginRepositorySession')
Begin a session to modify the repository.
help('clonePolicySet')
Clone a new policy set from an existing policy set.
help('commitRepositorySession')
Write the contents of the current session to the repository.
help('createPolicySet')
Create a new, empty policy set.
help('deletePolicySet')
Delete a specified policy set.
help('describeRepositorySession')
Describe the contents of the current repository session.
help('detachPolicySetPolicy')
Detach a policy from a policy set using the policy's URI.
help('displayPolicySet')
Display the configuration of a specified policy set.
help('enablePolicySet')
Enable or disable a policy set.

Configuring Clients
23-8 Oracle WebCenter Content Developer's Guide for Content Server
help('enablePolicySetPolicy')
Enable or disable a policy attachment
for a policy set using the policy's URI.
help('exportRepository')
Export a set of documents from the repository into a supported ZIP archive.
help('importRepository')
Import a set of documents from a supported ZIP archive into the repository.
help('listPolicySets')
Lists the policy sets in the repository.
help('migrateAttachments')
Migrates direct policy attachments to global policy attachments
if they are identical.
help('modifyPolicySet')
Specify an existing policy set for modification in the current session.
help('resetWSMPolicyRepository')
Clean the Oracle MDS repository and re-seed with the current set
of WSM policies.
help('setPolicySetDescription')
Specify a description for the policy set selected within a session.
help('upgradeWSMPolicyRepository')
Add newly introduced WSM policies to the Oracle MDS repository.
help('validatePolicySet')
Validate an existing policy set in the repository or in a session.
wls:/base_domain/serverConfig> listPolicySets()
Location changed to domainRuntime tree. This is a read-only tree with DomainMBean
as the root.
For more help, use help(domainRuntime)
Global Policy Sets in Repository:
base-domain-ws-client
wls:/base_domain/serverConfig> displayPolicySet('base-domain-ws-client')
Policy Set Details:
-------------------
Name: base-domain-ws-client
Type of Resources: Web Service Client
Scope of Resources: Domain("base_domain")
Description: Global policy attachments for Web Service Client resources.
Enabled: true
Policy Reference: security : oracle/wss10_saml_token_client_policy, enabled=true
Setting the GPA Policy
The code in Example 23–8 sets the ws-client GPA policy.

Authenticating Users
Using RIDC to Access Content Server 23-9
Example 23–8 Add GPA for the Web Service Client
# add GPA for the web service client assuming domain name is base_domain
beginRepositorySession()
createPolicySet('base_domain-ws-client','ws-client','Domain("base_domain")')
# assuming service policy is hardcoded to
# oracle/wss11_saml_token_with_message_protection_service_policy
# and that we want the RIDC client to leverage client policy:
# oracle/wss11_saml_token_with_message_protection_client_policy
attachPolicySetPolicy
('oracle/wss11_saml_token_with_message_protection_client_policy')
validatePolicySet()
commitRepositorySession()
# confirm policy set created
listPolicySets()
23.4 Authenticating Users
All calls to Remote Intradoc Client (RIDC) require some user identity for
authentication. Optionally, this identity credential can be accompanied by other
parameters such as a password as required by the protocol. The user identity is held in
the IdcContext object; once created, it can be reused for all subsequent calls. To
create a context, you pass in the user name and, optionally, some credentials.
Create a simple context with no password (for idc:// urls):
IdcContext userContext = new IdcContext("weblogic");
Create a context with a password:
IdcContext userPasswordContext = new IdcContext("weblogic", "welcome1");
For Intradoc URLs, no password is required in the credentials because the request is
trusted between Content Server and the client.
For JAX-WS URLs, the requirement for credentials will be dependent on the service
policy that the web service is configured to use by the server.

Using Services
23-10 Oracle WebCenter Content Developer's Guide for Content Server
23.5 Using Services
To invoke a service use the IdcClient class method:
public ServiceResponse sendRequest (IdcContext userContext, DataBinder dataBinder)
throws IdcClientException
For more information, see the Oracle WebCenter Content Remote Intradoc Client (RIDC)
Java API Reference.
The code in Example 23–9 executes a service request and gets back a data binder of the
results.
Example 23–9 Executing a Service Request
// get the binder
DataBinder binder = idcClient.createBinder();
// populate the binder with the parameters
binder.putLocal ("IdcService", "GET_SEARCH_RESULTS");
binder.putLocal ("QueryText", "");
binder.putLocal ("ResultCount", "20");
// execute the request
ServiceResponse response = idcClient.sendRequest (userContext, binder);
The ServiceResponse contains the response from Content Server. From the
response, you can access the stream from the Content Server directly, or you can parse
it into a DataBinder and query the results.
The code in Example 23–10 takes the ServiceResponse and gets the search results,
printing out the title and author value.
Example 23–10 Get the Binder and Loop Over the Results
// get the binder
DataBinder binder = response.getResponseAsBinder ();
DataResultSet resultSet = binder.getResultSet ("SearchResults");
// loop over the results
for (DataObject dataObject : resultSet.getRows ()) {
System.out.println ("Title is: " + dataObject.get ("dDocTitle"));
System.out.println ("Author is: " + dataObject.get ("dDocAuthor"));
}
If you consume a stream, your code is responsible for closing the stream. The code in
Example 23–11 provides an example of closing the stream.
Example 23–11 Closing the Steam
IdcContext user = new IdcContext ("weblogic", "welcome1");
IdcClientManager manager = new IdcClientManager ();
IdcClient idcClient = manager.getClient ("some url");
DataBinder binder = idcClient.createBinder ();
binder.putLocal ("IdcService", "GET_FILE");
binder.putLocal ("dID", "12345");
ServiceResponse response = idcClient.sendRequest (user, binder);

Understanding Streams
Using RIDC to Access Content Server 23-11
InputStream stream = null;
try {
stream = response.getResponseStream ();
int read = 0;
int total = 0;
byte[] buf = new byte[256];
while ((read = stream.read (buf)) != -1) {
total += read;
}
} finally {
if (stream != null) {
stream.close ();
}
}
See Section 23.6, "Understanding Connection Pooling" for information on connection
pooling and closing via the stream.
23.6 Understanding Connection Pooling
The IdcClientConfig#getConnectionPool property determines how RIDC will
handle pooling of connections. There are two options, simple and pool.
■The simple option is the default. The simple option does not enforce a
connection maximum and rather lets every connection proceed without blocking
and does not enforce a connection maximum. In most cases this option should be
used.
■The pool option specifies the use of an internal pool that allows a configurable
number of active connections at a time (configurable through the
IdcClientConfig#getConnectionSize property), with the default active
size set to 20.
Usually, when the RIDC library is used to communicate from an application that itself
is in an application container (such as a web application), the inbound requests have
already been throttled. Thus, the simple option is the correct choice to use. The only
scenario to use the pool option is if you are creating a stand-alone server, and you are
manufacturing a large number of concurrent calls to the Content Server which may
cause the Content Server to become overwhelmed.
A different pool implementation can be registered via the
IdcClientManager#getConnectionPoolManager()#registerPool()
method, which maps a name to an implementation of the ConnectionPool interface.
The name can then be used in the IdcClientConfig object to select that pool for a
particular client.
23.7 Understanding Streams
Streams are sent to the Content Server through the TransferFile class. This class
wraps the actual stream with metadata about the stream (length, name, and so on). For
information about methods that allow check-ins of files and streams, see the Oracle
WebCenter Content Remote Intradoc Client (RIDC) Java API Reference.
The code in Example 23–12 performs a check-in to the Content Server:

Understanding Binders
23-12 Oracle WebCenter Content Developer's Guide for Content Server
Example 23–12 Content Server Check-In
// create request
DataBinder binder = idcClient.createBinder();
binder.putLocal ("IdcService", "CHECKIN_UNIVERSAL");
// get the binder
binder.putLocal ("dDocTitle", "Test File");
binder.putLocal ("dDocName", "test-checkin-6");
binder.putLocal ("dDocType", "ADACCT");
binder.putLocal ("dSecurityGroup", "Public");
// add a file
binder.addFile ("primaryFile", new TransferFile ("test.doc"));
// check in the file
idcClient.sendRequest (userContext, binder);
Response from the Content Server
Streams are received from the Content Server via the ServiceResponse object. For a
summary of available methods, see the Oracle WebCenter Content Remote Intradoc Client
(RIDC) Java API Reference.
The response is not converted into a DataBinder unless specifically requested. If you
just want the raw HDA data, you can get that directly, along with converting the
response to a String or DataBinder.
The code in Example 23–13 executes a service, gets the response as a string, and parses
it into a data binder.
Example 23–13 Parsing a String into a DataBinder
// create request
DataBinder binder = idcClient.createBinder ();
// execute the service
ServiceResponse response = idcClient.sendRequest (userContext, binder);
// get the response stream
InputStream stream = response.getResponseStream ();
// get the response as a string
String responseString = response.getResponseAsString ();
// parse into data binder
DataBinder dataBinder = response.getResponseAsBinder ();
23.8 Understanding Binders
Binders can be reused among multiple requests. A binder from one request can be sent
in to another request. Note that if you reuse a binder from one call to the next you
need to be very careful there is nothing leftover in the binder that could impact your
next call. RIDC does not clean the binder after each call.
The code in Example 23–14 provides an example that pages the search results by
reusing the same binder for multiple calls to Content Server.

Understanding Convenience Classes
Using RIDC to Access Content Server 23-13
Example 23–14 Reusing Binders
// create the user context
IdcContext idcContext = new IdcContext ("sysadmin", "idc");
// build the search request binder
DataBinder binder = idcClient.createBinder();
binder.putLocal("IdcService", "GET_SEARCH_RESULTS");
binder.putLocal("QueryText", "");
binder.putLocal("ResultCount", "20");
// send the initial request
ServiceResponse response = idcClient.sendRequest (binder, idcContext);
DataBinder responseBinder = response.getResponseAsBinder();
// get the next page
binder.putLocal("StartRow", "21");
response = idcConnection.executeRequest(idcContext, binder);
responseBinder = response.getResponseAsBinder();
// get the next page
binder.putLocal("StartRow", "41");
response = idcConnection.executeRequest(binder, idcContext);
responseBinder = response.getResponseAsBinder();
23.9 Understanding Convenience Classes
There are some patterns of actions that many applications perform using RIDC. The
convenience package supplies some of these for reuse. The classes in the convenience
package space are consumers of the RIDC code and as such don't add any new
functionality. They can be thought of as a new layer on top of RIDC.
23.9.1 Setting User Security
The Content Server has several security models that are controlled by settings on the
Content Server. To resolve if a particular user has access to a document, three things
are needed: The user's permission controls, the document's permission controls, and
Content Server security environment settings.
It is assumed that the Application Program calling the UserSecurity module will fetch
documents and the DOC_INFO metadata (in the document's binder, typically the
result of a Search) as some superuser and cache this information. When the
Application needs to know if a particular user has access to the document, a call is
made to the Content Server as that user to fetch that user's permissions. Once the
user's permission controls are known, then they can matched to the information in the
document's metadata to resolve the access level for that user. (Access level is READ or
READ/WRITE or READ/WRITE/DELETE). The need therefore is to reduce the
number of calls to the Content Server (with a cache) and to provide a default
implementation for matching the user's permissions information with the document's
permission information. One further complication is that the Content Server controls
which types of security are used in some server environment properties:
UseAccounts=true and UseCollaboration=true or UseEntitySecurity=1.
Additionally, a method allows testing to see if admin rights are assigned to a security
type for that document.

Understanding Convenience Classes
23-14 Oracle WebCenter Content Developer's Guide for Content Server
The user security convenience is accessed through the IUserSecurityCache
interface. There classes implement the optional Content Server security:
■The UserSGAcctAclCache class should always be called. This class will check
the Content Server for security configuration and internally adjust itself to match.
■The UserSecurityGroupsCache class keeps a cache of user permissions and
will match documents considering only Security Group information. Do not call
this class directly. The UserSGAcctAclCache class will check the Content Server
for security configuration and internally adjust itself to match.
■The UserSGAccountsCache class adds a resolver to also consider Account
information if the Content Server has the UseAccounts=true setting. Do not call
this class directly. The UserSGAcctAclCache class will check the Content Server
for security configuration and internally adjust itself to match.
For more information, see the Oracle WebCenter Content Remote Intradoc Client (RIDC)
Java API Reference.
The code in Example 23–15 provides an example of setting user security.
Example 23–15 Setting User Security
IdcClientManager m_clientManager = new IdcClientManager ();
IdcClient m_client = m_clientManager.createClient
("http://localhost/scs/idcplg");
//RIDC superuser context
IdcContext m_superuser = new IdcContext("sysadmin", "idc");
//This class will self-adjust (downwards) to match the security model
// on the content server
IUserSecurityCache m_userSecurityCache = new UserSGAcctAclCache
(m_client, 20, 1000, 20000, m_superuser);
ITrace trace = null;
//Example test
testDocPermission () {
//If you don't want to do any logging, you can leave trace as null
if (m_log.isLogEnabled(ILog.Level.TRACE)) {
trace = new Trace ();
}
DataBinder m_doc1 = getDataBinder ("TEST");
//Get the document information (typically in the first row of DOC_INFO)
DataObject docInfo = m_doc1.getResultSet ("DOC_INFO").getRows ().get (0);
//Get the cache id for this user
//This makes a live call to content server to get the user ID for "Acme1"
//CacheId acme1 = m_userSecurityCache.getCacheIdForUser
// (new IdcContext("Acme1", "idc"), trace);
IdcContext context = new IdcContext("Acme1", "idc");
CacheId acme1 = new CacheId (context.getUser (), context);
//Get the access level for this document by this user
int access = m_userSecurityCache.getAccessLevelForDocument
(acme1, docInfo, trace);
//Check if user has ACL admin permissions
boolean aclAdmin = m_userSecurityCache.isAdmin
(acme1, docInfo, IUserSecurityCache.AdminType.ACL, trace);
if (m_log.isLogEnabled(ILog.Level.TRACE)) {
m_log.log (trace.formatTrace (), ILog.Level.TRACE);
}
}

Understanding Convenience Classes
Using RIDC to Access Content Server 23-15
//Example code to get a Document's DOC_INFO databinder
DataBinder getDataBinder (String dDocName) throws IdcClientException {
DataBinder dataBinder = m_client.createBinder ();
dataBinder.putLocal ("IdcService", "DOC_INFO_BY_NAME");
dataBinder.putLocal ("dDocName", dDocName);
ServiceResponse response = m_client.sendRequest (m_superuser, dataBinder);
return response.getResponseAsBinder ();
}
//Example code to create a DataObject
DataObject dataObject = m_client.getDataFactory ().createDataObject ();
dataObject.put ("dSecurityGroup", "public");
dataObject.put ("dDocAccount", "Eng/Acme");
Internally, these fields from the document are examined during
getAccessLevelForDocument():
■For the AccessResolverSecurityGroups class: dSecurityGroup.
■For the AccessResolverAccounts class: dDocAccount.
■For the AccessResolverSecurityGroups class: xClbraUserList,
xClbraAliasList, and xClbraRoleList.
The IAccessResolver classes determine if they should participate based on cached
information from the Content Server, if they do participate, the access levels are
ANDed together. You can use the hasAdmin() method to determine if there is admin
access. For more information, see the Oracle WebCenter Content Remote Intradoc Client
(RIDC) Java API Reference.
23.9.2 Setting the ADF Connection Facade
Remote Intradoc Client (RIDC) version 11.1.1.6.0 includes the
AdfConnectionFacade convenience class which provides a simple way to store
connection details, obtain the idcClient object and create the user credential objects.
It also provides a connection UI in the jdeveloper extension.
The code in Example 23–16 will fetch a facade for a connection named "example1" and
performs a test to see if the connection can be made.
Example 23–16 Fetch Facade and Perform Test
AdfConnectionFacade facade = new AdfConnectionFacade ("example1");
boolean ok = facade.testConnection ("user").isSuccess()
//or
AdfConnectionFacade.ResultTestConnection testResult =
facade.testConnection ("user");
if (!testResult.isSuccess ()) {
throw new IdcClientException (testResult.getMessage ());
}
You can add more user credentials in the Jdeveloper UI by following this naming
pattern for the parameter names <Credentials Label>.<Credentials Type>.<Field
Name>.
Note: This functionality is only available when the RIDC application
is deployed in a shiphome provisioned with the proper ADF libraries.

Understanding Convenience Classes
23-16 Oracle WebCenter Content Developer's Guide for Content Server
For example:
admin1.basic.name
admin1.basic.password
Using facade.getUserCredentials("admin1") will return populated
BasicCredentials class.
public.nameonly.name
Using facade.getUserCredentials("public") will return populated
UserNameOnlyCredentials class. Use value of <default> to get the internal
default username
myuser.adf.name
Using facade.getUserCredentials("myuser") will return
AdfUserCredentials class.
When the RIDC call is made the logged user is fetched with this code:
ADFContext.getCurrent ().getSecurityContext().getUserName()
These additional parameters are understood automatically by RIDC:
■connectionSize
■connectionWaitTime
■connectionPool
■socketTimeout
■useSystemProxy
■http.proxyHost
■http.proxyPort
■http.nonProxyHosts
■http.proxyUserName
■http.proxyPassword
■http.library
■sslKeystoreFile
■sslKeystorePassword
■sslAlgorithm
■sslKeystoreAlias
■sslKeystoreAliasPassword
■sslTrustManagerFile
■sslTrustManagerPassword
■clientSecurityPolicy
■jaxWsStack
■streamingChunkSiz

Understanding RIDC Filters
Using RIDC to Access Content Server 23-17
23.10 Understanding RIDC Filters
Remote Intradoc Client (RIDC) version 11.1.1.4.0 and greater, permits your application
code the ability to add a filter before the DataBinder is processed and sent to the
Content Server. You can create a filter by extending one of the IdcFilterAdapter
classes, and then register that filter to execute with the IdcFilterManager class.
Filters are executed in the order specified when registered. You can also get and
remove previously registered filters.
The code in Example 23–17 extends an adapter and overrides a method to perform an
action.
Example 23–17 Calling RIDC Filter Before Service Request
public class IdcFilterAddComment extends BeforeServiceRequestFilter {
@Override
public void beforeServiceRequest
(IdcClient client, IdcContext context, DataBinder binder)
throws IdcClientException {
String existingComments = binder.getLocal("xComments");
if (existingComments != null) {
binder.putLocal("xComments", String.format
("%s %s", existingComments, "--DGT WAS HERE--"));
} else {
binder.putLocal("xComments", "--DGT WAS HERE--");
}
}
}
Remote Intradoc Client (RIDC) version 11.1.1.5.0 or later provides two more filter
locations in the JAX-WS processing area. To use these filters, extend the
BeforeJaxwsServiceFilter class.
The code in Example 23–18 extends the BeforeJaxwsServiceFilter class.
Example 23–18 Calling RIDC Filter Before JAX-WS Call
/**
* RIDC filter called just before jaxws call is made to
* loginPort.contentServerLogin () in authenticateUser ()
**/
public void beforeJaxwsAuthenticateUser (IdcContext context, DataBinder binder,
Map<String, Object> requestContext) throws IdcClientException {
requestContext.put(oracle.wsm.security.util.SecurityConstants.
ClientConstants.WSM_SUBJECT_PRECEDENCE, “false”);
}
/**
* RIDC filter called just before jaxws call is made to
* loginPort.contentServerRequest () in performServiceRequest ()
**/
public void beforeJaxwsServiceRequest (IdcContext context, DataBinder binder,
Map<String, Object> requestContext) throws IdcClientException {
//Override this class and implement your filter here
}
The code in Example 23–19 registers your filter class(es).

Using the RIDC JDeveloper Extension
23-18 Oracle WebCenter Content Developer's Guide for Content Server
Example 23–19 Register Filer Classes
// If you are at the start of a pure RIDC application, you typically
// will create a ClientManager, for example:
IdcClientManager m_clientManager = new IdcClientManager();
// New method added to IdcClient to get the ClientManager
// if you do not have the ClientManager instance:
IdcClient client = myClient;
client.getClientManager();
// From the ClientManager, you can get the FilterManager:
IdcFilterManager fmanager = m_clientManager.getFilterManager();
// Then register your filter:
IIdcFilter addCommentFilter = new IdcFilterAddComment();
int slot = fmanager.registerFilter(100, addCommentFilter);
// Optionally, you can deregister. However, it might not be in the slot you
// assigned because there might have already been a filter in that slot.
// When registering, the next available higher slot will be used. You also need
// to pass in the instance currently in the slot you want to remove:
fmanager.deRegisterFilter(slot, addCommentFilter);
// Here is an example to remove all the filters,
// including the ones you did not register
for (Integer slot:fmanager.getUsedSlots()) {
fmanager.deRegisterFilter(slot, fmanager.getFilter (slot));
}
23.11 Using the RIDC JDeveloper Extension
The Remote Intradoc Client (RIDC) communication API is provided as a deployable
extension for Oracle JDeveloper. The RIDC JDeveloper extension places a copy of the
RIDC library in the JDeveloper environment.
Required Versions and Extensions
This JDeveloper version and RIDC extension is required:
■Oracle Remote Intradoc Client (RIDC) extension 11.1.1.6 (11gR1 PS5)
■Oracle JDeveloper version 11.1.1.6 (11gR1 PS5)
The Oracle Remote Intradoc Client (RIDC) extension (oracle.ucm.ridc.jdev-11.1.1.6.zip)
is located in the /modules/jdev directory of the Remote Intradoc Client (RIDC) suite
distribution (ridc-suite-11.1.1.6.zip). The RIDC suite distribution can be downloaded
from the Oracle Technology Network (OTN) at http://otn.oracle.com.
23.11.1 Deploying the RIDC Extension
Follow these steps to deploy the RIDC extension on Oracle JDeveloper:
1. Download the Remote Intradoc Client (RIDC) suite distribution from Oracle
Technology Network (OTN).
2. Unbundle RIDC suite distribution (ridc-suite-11.1.1.6.zip) to a location on the
system hosting your Oracle JDeveloper instance.
3. From the JDeveloper main menu, select Help then Check for Updates.

Using the RIDC JDeveloper Extension
Using RIDC to Access Content Server 23-19
4. Enable the Install from Local File option.
5. Click Browse and navigate to the unbundled RIDC suite distribution
(ridc-suite-11.1.1.6.zip).
6. Select the RIDC extension (oracle.ucm.ridc.jdev-11.1.1.6.zip) located in the
/modules/jdev directory and click Open.
7. Click Next to deploy the extension.
8. Click Finish.
After JDeveloper has installed the extension, you can verify that the RIDC library is
accessible to JDeveloper by selecting Tools > Preferences > Extensions and scroll to
the RIDC entry. To verify the RIDC library is on the disk, check the directory
<JDeveloper Home>/jdeveloper/ucm/Distribution/RIDC and confirm these
files exist:
+-- lib
¦ +-- commons-codec-1.2.jar
¦ +-- commons-httpclient-3.1.jar
¦ +-- commons-logging-1.0.4.jar
¦ +-- httpclient-4.1.1.jar
¦ +-- httpcore-4.1.jar
¦ +-- httpmime-4.1.1.jar
+-- oracle.ucm.ridc-11.1.1.jar
+-- oracle.ucm.ridc.app-lib-11.1.1.ear
23.11.2 Creating a New Application and Project with RIDC Technologies
This topic describes the steps to create a new application and project, add RIDC
technologies, and verify the shared library references. It is recommended that you
create a new RIDC-enabled project rather than add RIDC technologies to an existing
project.
To create a new application and project with RIDC technologies:
1. From the main menu, select File > New.
The New Gallery dialog opens.
2. In Categories, select General > Applications.
3. In Items, select Generic Application.
4. Click OK.
The Create Generic Application wizard displays.
5. Provide an application name.
6. Accept the default directory or provide a different directory.
7. Click Next.
8. Provide a project name that identifies this as an RIDC-enabled project.
Note: Do not use special characters such as the apostrophe ( ' ) or
asterisk ( * ) in the project name.

Using the RIDC JDeveloper Extension
23-20 Oracle WebCenter Content Developer's Guide for Content Server
9. On the Project Technologies tab, select RIDC, HTML, and JSP and Servlets from
the list and click the shuttle button to transfer each of these selections to the
Selected list.
10. Click Next.
11. Review the settings and click Finish.
To verify shared library references:
1. From the main menu, select View > Application Navigator.
2. In the Application Navigator, select the Application Resources panel.
3. Expand Descriptors > META-INF.
4. Right-click weblogic-application.xml and select Open.
5. In the editor, select the Overview tab.
6. Select Libraries and expand Shared Library References.
7. Verify that the Library Name oracle.ucm.ridc.app-lib is listed.
23.11.3 Working with Connections
This topic describes various procedures for working with connections. Refer to the
RIDC section of the JDeveloper Online Help for more information on working with
connections.
In JDeveloper 11g you have two ways of creating and managing connections. You can
define a connection to be used in the context of an application (called an Application
Resource connection), or for the IDE as a whole (called an IDE connection). You use
the same dialog to define both of these connections, but their scope within JDeveloper
is different.
Application Resources: These connections are locally scoped and just available within
the application. The connection information is stored within the application itself, and
can be deployed with the application. These types of connections are listed in the
Application Resources panel of the Application Navigator, under the Connections
node.
IDE Connections: These connections are globally defined and available for reuse.
These types of connections are listed in the IDE Connections panel of the Resource
Palette. You can copy IDE connections to the Application Navigator to use them
within an application
To create a new content server connection:
1. From the main menu, select View > Application Navigator.
2. In the Application Navigator, select the Applications Resources panel.
3. Right-click Connections and select New Connection > RIDC.
4. Use the Create Content Server Connection dialog to create a new connection. Click
Help for descriptions of the options and fields on this dialog.
5. Click Test Connection.
If the connection fails, verify that you have the correct connection information for
the content server and have supplied valid login credentials.
6. Click OK.

Using the RIDC JDeveloper Extension
Using RIDC to Access Content Server 23-21
To edit or update an Application Resources connection:
1. From the main menu, select View > Application Navigator.
2. In the Application Navigator, select the Applications Resources panel.
3. Expand Connections > RIDC.
4. Right-click a connection and select Properties.
5. Use the Edit Content Server Connection dialog to edit or update the connection
details for your connection. Click Help for descriptions of the options and fields
on this dialog.
6. Click Test Connection.
If the connection fails, verify that you have the correct connection information for
the content server and have supplied valid login credentials.
7. Click OK.
To edit or update an IDE connection:
1. From the main menu, select View > Resource Palette.
2. In the Resource Palette, select the IDE Connections panel.
3. Expand the RIDC node.
4. Right-click a connection and select Properties.
5. Use the Edit Content Server Connection dialog to edit or update the connection
details for your connection. Click Help for descriptions of the options and fields
on this dialog.
6. Click Test Connection.
If the connection fails, verify that you have the correct connection information for
the content server and have supplied valid login credentials.
7. Click OK.
To add an IDE connection to your application with RIDC technologies:
1. From the main menu, select View > Application Navigator.
2. From the drop-down list, select an application with RIDC technologies.
3. From the main menu, select View > Resource Palette.
4. In the Resource Palette, select the IDE Connections panel.
5. Expand the RIDC node.
6. Right-click a connection and select Add to Application.
Note: The connection is added to the application currently open in JDeveloper.
The connection is listed in the Application Resources panel of the Application
Navigator, under the Connections node.
23.11.4 Example Service Call
This topic provides example code of a service call on a JSP page. These steps assume
you have created a JSP page for your RIDC-enabled project. Refer to the RIDC section
of the JDeveloper Online Help for more information.

Using the RIDC JDeveloper Extension
23-22 Oracle WebCenter Content Developer's Guide for Content Server
Use these JSP page directives to your JSP page to import required java packages and
classes:
<%@ page import="oracle.stellent.ridc.*"%>
<%@ page import="oracle.stellent.ridc.model.*"%>
<%@ page import="oracle.stellent.ridc.model.impl.*"%>
<%@ page
import="oracle.stellent.ridc.convenience.adf.connection.*"%>
The code in Example 23–20 provides an example service call added to the body of a
JSP page.
Example 23–20 Example Code for Service Call
<h1>Example of service call</h1>
<%
AdfConnectionFacade facade = new AdfConnectionFacade("demo");
AdfConnectionFacade.ResultTestConnection rtest; rtest =
facade.testConnection("user");
if (!rtest.isSuccess()) {
%>
<h3>Content server not available because</h3>
<p><%=rtest.getmessaage()%></p>
<%
} else {
IdcClient client = facead.getIdcClient();
IdcContext ctx = new IdcContext(facade.gtUserCredentials("user"));
DataBinder binder = client.createBinder();
binder.putLocal("IdcService", "GET_USER_PERMISSIONS");
DataBinder r = client.sendRequest(ctx, binder).getResponseAsBinder();
%>
<pre><%=(DataBinderImpl)r%></pre>
<% } %>

24
Using the Content Server JCR Adapter 24-1
24Using the Content Server JCR Adapter
This chapter describes how to use the Java Content Repository (JCR) adapter for
Oracle WebCenter Content Server.
This chapter includes the following sections:
■Section 24.1, "About the Java Content Repository Adapter"
■Section 24.2, "Installing Required APIs and Runtime Libraries"
■Section 24.3, "Deploying the JCR Adapter"
■Section 24.4, "Configuring Communication with Content Server"
■Section 24.5, "Finding Information About a Content Item"
■Section 24.6, "Using a Search Index"
■Section 24.7, "Using the File Store Provider"
24.1 About the Java Content Repository Adapter
The Java Content Repository API is a specification for accessing content repositories in
a standardized manner. This specification was developed under the Java Community
Process as JSR-170 and includes the Content Repository for Java API and the Java
Content Repository (JCR).
The standard APIs associated with the JSR-170 specification are functional and
exposed in the JCR adapter for Content Server. The JCR 1.0 API is required and must
be predeployed and integrated as part of the underlying framework.
Oracle adapters are fully standards based and compliant with both the J2EE Connector
Architecture and the Web Services Architecture. The JCR adapter can be deployed on
any JSR-170-compliant application to enable communication with Content Server
through the standards-based JCR specification.

About the Java Content Repository Adapter
24-2 Oracle WebCenter Content Developer's Guide for Content Server
24.1.1 JCR Data Model
The JCR standard uses a hierarchical data model based on extensible node types and
content properties. This data model is used by the repository's underlying storage
subsystems. For more information, see the JCR and JSR-170 standards.
■The nt:folder node type represents a structured collection of nodes. It is closely
related to the directory or folder concept found in many file systems and is the
node type that is normally used when mapping file system directories to a content
repository.
■The nt:resource child node is normally used instead of a plain binary property
when more resource metadata is required.
■The nt:file node type represents a file with some content.
■The nt:unstructured node type permits all kinds of properties and child nodes to
be added to a node. It is normally used when nothing is known about the content
that will be stored within a node.
24.1.2 JCR Adapter Data Model for Content Server
This is the data model for the Content Server JCR adapter:
A Folder [nt:folder]
+- jcr:content [nt:resource]
+- jcr:created DATE
<returns dCreateDate for the folder>
+- ojcr:owner STRING
<returns dCollectionOwner for the folder>
+- ojcr:creator STRING
<returns dCollectionCreator if it is available,
otherwise it returns dCollectionOwner>
+- ojcr:lastModifier STRING
<returns dCollectionModifier if it is available,
otherwise it returns dCollectionOwner
+- ojcr:lastModified STRING
<returns dLastModifiedDate>
+- ojcr:displayName STRING
<returns dCollectionName for the folder>
+- idc:defaultMetadata [nt:unstructured]
<metadata that should by default be applied to content checked
into this folder. see idc:metadata under nt:file/jcr:content for
example fields>
+- idc:folderMetadata [nt:unstructured]
+- idc:dCollectionName STRING
+- idc:dCreateDate DATE
+- idc:dCollectionPath STRING
+- idc:dLastModifiedDate DATE
+- idc:dCollectionOwner STRING
+- idc:dCollectionGUID STRING
+- idc:dParentCollectionID INTEGER
+- idc:dCollectionQueries INTEGER
+- idc:dCollectionEnabled INTEGER
+- idc:dCollectionInherit INTEGER
+- idc:dChildManipulation INTEGER
+- idc:dCollectionID INTEGER
+- idc:dCollectionCreator STRING
+- idc:dCollectionModifier STRING

About the Java Content Repository Adapter
Using the Content Server JCR Adapter 24-3
+- idc:folderPermissions [nt:unstructured]
+- idc:userCanRead INTEGER
+- idc:userCanWrite INTEGER
+- idc:userCanDelete INTEGER
A Document.txt [nt:file]
+- jcr:content [nt:resource]
+- jcr:data=...
+- jcr:created DATE
<returns dDocCreatedDate from the RevClasses table>
+- ojcr:creator STRING
<returns dDocCreator from the RevClasses table>
+- ojcr:lastModifier STRING
<returns dDocLastModifier from the RevClasses table>
+- ojcr:lastModified STRING
<returns dDocLastModifiedDate >
+- ojcr:author STRING
<returns dDocAuthor for the document>
+- ojcr:comment STRING
<if xComments exists as a metadata field, that is returned>
+- ojcr:displayName STRING
<returns the filename>
+- ojcr:language STRING
<if xIdcLanguage exists as a metadata field, that is returned>
+- idc:metadata [nt:unstructured]
<returns values for everything in the RevClasses table,
please see the definition of that table to see exactly what is defined
+- idc:dID INTEGER
+- idc:dDocName STRING
+- idc:dDocTitle STRING
+- idc:dDocAuthor STRING
+- idc:dRevClassID INTEGER
+- idc:dRevisionID INTEGER
+- idc:dRevLabel STRING
+- idc:dIsCheckedOut INTEGER
+- idc:dSecurityGroup STRING
+- idc:dCreateDate DATE
+- idc:dInDate DATE
+- idc:dOutDate DATE
+- idc:dStatus STRING
+- idc:dReleaseState STRING
+- idc:dWebExtension STRING
+- idc:dProcessingState STRING
+- idc:dMessage STRING
+- idc:dDocAccount STRING
+- idc:dReleaseDate DATE
+- idc:dRendition1 STRING
+- idc:dRendition2 STRING
+- idc:dIndexerState STRING
+- idc:dPublishType STRING
+- idc:dPublishState STRING
+- idc:dWorkflowState STRING
+- idc:dRevRank INTEGER
<all custom metadata properties for a revision
like idc:xComments STRING>

Installing Required APIs and Runtime Libraries
24-4 Oracle WebCenter Content Developer's Guide for Content Server
24.2 Installing Required APIs and Runtime Libraries
The JCR adapter can be used with any application that supports the JSR-170
specification, but the adapter requires a custom integration. This custom integration
requires that an underlying framework consisting of several APIs and runtime
libraries be installed.
24.2.1 Installing ADF Runtime Libraries
Several of the Application Development Framework (ADF) runtime libraries are
required and must be installed on your application. These files are available in your
Oracle JDeveloper instance. You can perform the installation using the ADF Runtime
Installer wizard in JDeveloper, or you can do it manually.
The following ADF runtime libraries must be deployed on your application:
■adf-share-base.jar
■adf-share-ca.jar
■adf-share-support.jar
■adflogginghandler.jar
If you choose to manually install these libraries on your application, they must be
installed in the lib directory. For example, an installation on Tomcat would use the
TOMCAT_HOME/common/lib directory, and an installation on Oracle WebLogic Server
would use the WL_HOME/ADF/lib directory. (For Oracle WebLogic Server, you must
create the ADF and lib directories.)
24.2.2 Deploying Remote Intradoc Client (RIDC)
Remote Intradoc Client must be deployed on your application. RIDC provides a thin
communication API for communication with Oracle WebCenter Content Server. This
API removes data abstractions to the Oracle WebCenter Content Server instance while
still providing a wrapper to handle connection pooling, security, and protocol
specifics. RIDC is included with the JCR adapter distribution file and is available from
the Oracle Technology Network (OTN).
For more information, see Chapter 23, "Using RIDC to Access Content Server."
24.2.3 Deploying the JCR API
The Java Content Repository (JCR) API must be deployed on your application. The
JCR API is available from Oracle JDeveloper or for download from The Apache
Software Foundation web site at http://www.apache.org/
The JCR API is also part of the JSR-170 specifications download from the Java
Community Process web site at
http://www.jcp.org/
Note: All of these APIs and runtime libraries are provided with
Oracle JDeveloper and WebCenter, with the exception of the JCR
adapter and Remote Intradoc Client (RIDC).

Configuring Communication with Content Server
Using the Content Server JCR Adapter 24-5
24.2.4 Installing the JCR Integration Libraries
The following JCR integration libraries are required and must be deployed on your
application:
■jcr-common-runtime.jar
■ojcr.jar
■ojdbc5.jar
These files are available in your Oracle JDeveloper instance.
24.2.5 Installing the XML Integration Files
The following XML integration libraries are required and must be deployed on your
application:
■xmlparserv2.jar
■xquery.jar
These files are available in your Oracle JDeveloper instance.
24.3 Deploying the JCR Adapter
The JCR adapter must be deployed on your application to enable communication with
Content Server. The JCR adapter utilizes Remote Intradoc Client (RIDC) as part of the
underlying framework and works in conjunction with the general JSR-170 architecture.
Follow the general instructions of your specific JSR-170-compliant application for
deploying JCR adapters. The JCR adapter uses an embedded deployment descriptor
(rep_descriptor.xml). Upon deployment, many applications will use the deployment
descriptor to populate the configuration entries as part of an administration interface
or deployment wizard. If your application does not use an administration interface or
deployment wizard, you will need to edit the deployment descriptor directly and
provide the required values.
24.4 Configuring Communication with Content Server
To enable communication between the JCR adapter and Content Server, you configure
these items:
■Communication method
■Socket communication (listener port)
■Secure Socket Communication (SSL)
■Web communication (web servlet filter)
■User agent
■Cache settings

Configuring Communication with Content Server
24-6 Oracle WebCenter Content Developer's Guide for Content Server
24.4.1 Supplying a Communication Method
You must supply the provider name and communication method with this
configuration setting:
CIS_SOCKET_TYPE_CONFIG: This configuration setting defines the communication
method with Content Server. The options are socket, socketssl, and web. For
example:
oracle.stellent.jcr.configuration.cis.config.socket.type
■The socket (listener port) communication method specifies that RIDC should use
the Content Server listener port. If socket is used as the communication method,
you must provide the required configuration values.
■The socketssl communication method specifies that secure socket
communication (SSL) be used as the communication protocol. If socketssl is
used as the communication method, you must provide configuration values for
both socket communication and secure socket communication.
■ The web (web server filter) communication method specifies that RIDC should
communicate through the web server filter, which requires individual
authentication for each request. If web is used as the communication method, you
must provide the required configuration value.
24.4.2 Configuring Socket Communication (Listener Port)
You must supply values for these configuration settings if secure socket
communication (SSL) is used as the communication protocol:
■SERVER_HOST_CONFIG: The hostname of the machine on which Content Server
is running. The default value is localhost.
oracle.stellent.jcr.configuration.server.host
■SERVER_PORT_CONFIG: The port on which Content Server is listening. The
default value is 16200.
oracle.stellent.jcr.configuration.server.port
24.4.3 Configuring Secure Socket Communication (SSL)
You must supply values for both socket communication (listener port) and these
configuration settings if secure socket communication (SSL) is used as the
communication protocol:
■KEYSTORE_LOCATION: The location and name of the keystore file.
oracle.stellent.jcr.configuration.ssl.keystore.location
■KEYSTORE_PASSWORD: The password for the keystore file.
oracle.stellent.jcr.configuration.ssl.keystore.password
■PRIVATE_KEY_ALIAS: The private key alias for authentication.
oracle.stellent.jcr.configuration.ssl.privatekey.alias
■PRIVATE_KEY_PASSWORD: The private key password.
oracle.stellent.jcr.configuration.ssl.privatekey.password

Finding Information About a Content Item
Using the Content Server JCR Adapter 24-7
For information about socket communication values, see Section 24.4.2, "Configuring
Socket Communication (Listener Port)."
24.4.4 Configuring Web Communication (Web Server Filter)
You need to supply a value for one of these configuration settings if your application is
connecting through the web server filter (web communication):
■SERVER_WEB_CONTEXT_ROOT_CONFIG: The web server context root for Content
Server, in the format /context_root. This setting provides a more seamless
integration for Oracle WebCenter and for other application integrations.
For example: /cs
■SERVER_WEB_URL_CONFIG: The full URL to the Content Server web server
extension. Include the protocol (usually http or https), host name, port, relative
web root, and extension root (usually idcplg). If a port other than port 80 is used,
the port number needs to be specified.
For example: http://myserver.example.com:8080/cs/idcplg/
oracle.stellent.jcr.configuration.server.web.url
24.4.5 Configuring the User Agent
You can optionally supply a value for this configuration setting to identify JCR
requests:
■CIS_USER_AGENT_CONFIG: A string to append to the RIDC user agent. This
value can be set to help identify requests made by the JCR adapter.
oracle.stellent.jcr.configuration.cis.config.userAgent
24.4.6 Supplying Cache Settings
You can optionally supply values for these cache settings:
■VCR_CACHE_INVALIDATION_INTERVAL: Polling interval used by the
WebCenter Content SPI to check for cache invalidations, in minutes. Defaults to 0
(zero), cache invalidation disabled. The minimum value is 2 minutes.
com.oracle.content.spi.ucm.CacheInvalidationInterval
■VCR_BINARY_CACHE_MAX_SIZE: Maximum size of documents stored in the
VCR binary cache, in bytes. The default value is 102400 (800 KB).
com.bea.content.federated.binaryCacheMaxEntrySize
24.5 Finding Information About a Content Item
Content managed by Content Server is primarily tracked by four tables:
■Revisions
■Documents
■DocMeta
■RevClasses
These tables track the content's metadata, state, and actions as well as information that
is associated with each file.

Finding Information About a Content Item
24-8 Oracle WebCenter Content Developer's Guide for Content Server
Revisions
This table tracks core information about each revision of the content:
■One row per revision
■Different revisions with the same content that share the same content ID and
RevClass ID
■System metadata for each revision:
–Metadata for revisions: content ID, title, author, check-in date, and so on
–Metadata for categorization and security: type, security group, doc account
■State information for various actions:
–Indexing
–Workflow
–Document conversion
■Numeric IDs and text labels to help track and retrieve a revision:
–A unique dID value for each revision (the primary key in the table)
–A unique dRevClassID value for the content
–A revision ID to mark the revision number for each revision
Documents
This table tracks information for files that are associated with each content revision:
■One row per revision
■Multiple rows per revision, one row for each of these files:
–Primary
–Alternate
–Web-viewable
■File information: original name, location, language, size, and so on
DocMeta
This table contains extended metadata fields:
■One row per revision
■One column per metadata field
■Definition for each field stored in the DocMetaDefinition table
RevClasses
This table tracks information for each content revision:
■One row per content item
■Row locked for content modification
■Unique dDocName and RevClassId values

Using the File Store Provider
Using the Content Server JCR Adapter 24-9
■Current indexed revision
■Dates and users:
–Creation date and creator
–Last modified date and user
–Owner
24.6 Using a Search Index
Content Server provides various ways to search the repository. Metadata searches can
be based on the Revisions, Documents, DocMeta, and RevClasses tables. To
efficiently perform text searches, the full-text search feature of Oracle Database can be
utilized, and the IdcText table can be created to hold the search index.
IdcText
This table contains selected columns from the Revisions, Documents, DocMeta, and
RevClasses tables as well as columns for other data:
■It contains a predefined list from the Revisions, RevClasses, and Documents
tables.
■It contains custom metadata that is indicated as searchable from the DocMeta
table.
■The OtsMeta column (CLOB field) contains an SDATA section and additional
indexable fields that are not in the other columns. However, SDATA has significant
limitations.
■The OtsContent column contains an indexable document.
■The ResultSetInterface column can be used for sorting or count estimation, or to
drill down.
24.7 Using the File Store Provider
The File Store Provider can be used to distribute files managed by Content Server on
the file system, a database, other devices, or any combination of these. The files are
stored in SecureFiles in Oracle WebCenter Content Server 11g. For database-backed file
storage, the FileStorage and FileCache tables store the information related to each file.
FileStorage
This table stores file information and some additional information:
■File stored in a BLOB field (SecureFiles in Oracle WebCenter Content Server 11g)
The database administrator can turn on additional BLOB optimizations. For
example, deduplication, compression, and encryption with SecureFiles.
■Values for dID and dRenditionID that point to a particular file managed by
Content Server
■Tracking information in a small number of fields: last modified date and file size
FileCache
This table stores pointers for files cached on the file system, for certain types of
processing (extraction, conversion, and so on), and for quick access by the web server.
This pointer is also used to perform cleanup.

Using the File Store Provider
24-10 Oracle WebCenter Content Developer's Guide for Content Server

25
Configuring Web Services with WSDL, SOAP, and the WSDL Generator 25-1
25Configuring Web Services with WSDL,
SOAP, and the WSDL Generator
This chapter describes how to integrate Oracle WebCenter Content into a client
application with WSDL and SOAP files by using them to manage Oracle WebCenter
Content Sever. It also describes how to use the WSDL Generator component, which
provides integration technologies to access the functionality of Content Server.
This chapter includes the following sections:
■Section 25.1, "About Configuring Web Services with WSDL, SOAP, and the WSDL
Generator"
■Section 25.2, "Accessing Content Server with a SOAP Client"
■Section 25.3, "Calling Content Server Services with SOAP"
■Section 25.4, "Using SOAP Packets in Active Server Pages"
■Section 25.5, "Generating WSDL Files to Access WebCenter Content"
■Section 25.6, "Customizing WSDL Files"
For general information about web services that you can use with Content Server, see
Section 18.2, "Overview of Web Services." The way to use web services described in
this chapter was introduced in Oracle Universal Content Management 10g. If you want
to use WebCenter Content web services with security configuration and Security
Assertion Markup Language (SAML) support, introduced in Oracle Universal Content
Management 11g, see Chapter 19, "Configuring WebCenter Content Web Services for
Integration."
With either way of using web services, you can use the Oracle Web Services Manager
(Oracle WSM) for security. For more information about Oracle WSM, see the Oracle
Fusion Middleware Security and Administrator's Guide for Web Services.
25.1 About Configuring Web Services with WSDL, SOAP, and the WSDL
Generator
You can use Web Services Definition Language (WSDL) and SOAP (Simple Object
Access Protocol) files to manage Content Server from a client application. SOAP is a
lightweight, XML-based messaging protocol for encoding the information in web
service request and response messages before sending them over a network.
The WSDL Generator component, WsdlGenerator, which is installed and enabled by
default in Content Server, generates WSDLs for the services of Content Server. You can
take the WSDLs and plug them into APIs to create web services for use with Content
Server.

About Configuring Web Services with WSDL, SOAP, and the WSDL Generator
25-2 Oracle WebCenter Content Developer's Guide for Content Server
Some SOAP functionality has been built into the core Content Server. The WSDL
Generator component is not essential for using SOAP. Administrators can still write
service calls to Content Server in SOAP if needed. The WSDL Generator provides
flexibility in altering existing client applications.
WebCenter Content has a WSDL 1.1 implementation that exposes the WebCenter
Content IDCService (Internet Distributed Content Service), which in turn extends all of
the capabilities of Content Server. With IDCService, you can do any of these tasks:
■Check in or check out content
■Create, run, or approve workflows
■Make content available for publishing
■Search content by category (metadata), content (full text), or a combination of both
You can use WSDL files to map to WebCenter Content and SOAP to access content and
content management functions within WebCenter Content and to deploy your content
management capabilities as a web service. Alternatively, you can write service calls to
Content Server in SOAP.
25.1.1 Web Services Framework
The core enabling technologies for web services follow:
■XML Data
■WSDL Interface
■SOAP Communication
■UDDI Registry
25.1.1.1 XML Data
The eXtensible Markup Language (XML) is a bundle of specifications that provides the
foundation of all web services technologies. Using the XML structure and syntax as the
foundation allows for the exchange of data between different programming languages,
middleware, and database management systems.
The XML syntax incorporates instance data, typing, structure, and semantic
information associated with data. XML describes data independently and also
provides information for mapping the data to software systems or programming
languages. Because of this flexibility, any software program can be mapped to web
services.
When web services are invoked, the underlying XML syntax provides the data
encapsulation and transmission format for the exchanged data. The XML elements and
attributes define the type and structure information for the data. XML provides the
capability to model data and define the structure specific to the programming
language (such as Java, C#, or Visual Basic), the database management system, or the
software application. Web services use the XML syntax to specify how data is
represented, how the data is transmitted, and how the service interacts with the
referenced application.
25.1.1.2 WSDL Interface
The Web Services Description Language (WSDL) provides the interface that is exposed
to web services. The WSDL layer enables web services to be mapped to underlying
programs and software systems. A WSDL file is an XML file that describes how to
connect to and use a web service.
About Configuring Web Services with WSDL, SOAP, and the WSDL Generator
Configuring Web Services with WSDL, SOAP, and the WSDL Generator 25-3
25.1.1.3 SOAP Communication
The Simple Object Access Protocol (SOAP) provides Content Server communications
for web services interfaces to communicate with each other over a network. SOAP is
an XML-based communication protocol used to access web services. The web services
receive requests and return responses using SOAP packets that are encapsulated
within an XML document.
25.1.1.4 UDDI Registry
The Universal Description Discovery and Integration (UDDI) service provides registry
and repository services for storing and retrieving web services interfaces. UDDI is a
public or private XML-based directory for registering and looking up web services.
Content Server currently does not publish to any public or private UDDI sources.
However, this does not prevent users from integrating Content Server with other
applications using web services.
25.1.1.5 DIME Message Format
DIME is a lightweight, binary message format that can be used to encapsulate one or
more application-defined groups of file content, of arbitrary type and size, into a single
message construct. You can use this format for uploading or downloading content. The
payloads consist of the SOAP message and one or more groups of file content.
25.1.1.6 How the Enabling Technologies Work Together
The XML, WSDL, SOAP, and UDDI technologies work together as layers on the web
services protocol stack. As Figure 25–1 shows, the web services protocol stack consists
of these layers:
■The service transport layer between applications (HTTP)
■The messaging layer, which provides a common communication method (XML and
SOAP)
■The service description layer, which describes the public interface to a specific web
service (WSDL)
■The service discovery layer, which provides registry and repository services for
storing and retrieving web services interfaces (UDDI)
Figure 25–1 Layers of the Web Services Protocol Stack
About Configuring Web Services with WSDL, SOAP, and the WSDL Generator
25-4 Oracle WebCenter Content Developer's Guide for Content Server
To help grasp the connection between these technologies, consider this simple analogy:
Think of HTTP as the telephone wire (transport between applications) and UDDI as a
telephone book (where a developer can browse a UDDI registry to locate a registered
service). SOAP could be described as the voices of the people talking on the telephone
(the exchange of information), and XML as the language they are speaking in (the
underlying structure for the exchange of data). To continue with the telephone
analogy, WSDL would be the phone number that calls a specific web service (of
course, WSDL is more than just a phone number because it includes information such
as the available functions and data types).
25.1.1.7 Implementation Architecture
Web services are not executable, but rather they exchange data within the
development environment. So, web services are a means to exchange information with
an application server or software package that is performing the communication
between the programs exchanging data.
Figure 25–2 shows the web services implementation architecture for the Content
Server application. The primary value of this architecture remains in the features and
functions of Content Server. Web services access Content Server through the WSDL
Generator and use the exposed Content Server services to execute actions and provide
data transactions between the user employing web services and Content Server.
Figure 25–2 Web Services Implementation Architecture
25.1.1.8 Implementation on .NET
The Microsoft .NET products, including the .NET platform, .NET Framework, and
Visual Studio .NET, all support the XML schema, WSDL, and SOAP specifications:
■The .NET platform is designed as a programming model that enables developers
to build XML web services and applications. The platform provides a set of servers
that integrates, executes, and manages XML web services and applications.
■The .NET Framework product enables developers to build and deploy web
services and applications. It provides a structured environment for integrating
web services, consists of a common language runtime and unified class libraries,
and includes the ASP .NET server.
Note: While several protocols are available for a transport layer
(such as HTTP, SMTP, FTP, and BEEP), the HTTP protocol is most
commonly used. The WSDL Generator component relies on the HTTP
protocol as the transport layer.

Accessing Content Server with a SOAP Client
Configuring Web Services with WSDL, SOAP, and the WSDL Generator 25-5
■The Visual Studio .NET product provides tools for developers to write application
software according to the XML-based web service specifications.
Using the .NET architecture, development and deployment of a web service are
integrated as a single step. Because every program written in a .NET language is
designed to function as a web service, the .NET server is able to create and deploy the
program as a web service.
25.1.1.9 The SOAP Protocol
SOAP is an XML-based messaging protocol consisting of these parts:
■An envelope that defines what is in a message and how to process it
■A set of encoding rules for defining application data types
■A convention for representing remote procedure calls and responses
Employing a SOAP integration provides a standardized interface for executing
Content Server services using the Java API (IdcCommand) and provides XML and
non-XML content managed by Content Server.
Because SOAP uses the Hypertext Transfer Protocol (HTTP) for data transmission, it
can be invoked across the Web, and it can enable content to be accessible over a
network in a platform-independent and language-neutral way.
25.2 Accessing Content Server with a SOAP Client
Using SOAP to access content management capabilities as a web service enables
real-time programmatic interaction between applications, enables the integration of
business processes, and facilitates information exchange.
Web services are modular components that are contained in an XML wrapper and
defined by the WSDL specifications. The UDDI) Web-based registry system is used to
locate these services.
25.2.1 Using a Java SOAP Client
With a Java SOAP client, you can use the command-line parameters that Table 25–1
describes.
Note: If you are developing SOAP client implementations, make
sure that chunking is disabled in your client API code.
Tip: While .NET servers support WSDL and integrate with the SOAP
Toolkit, you must specify that a SOAP packet is sending a Remote
Procedure Call (RPC). The default is to evaluate SOAP messages as
document-style SOAP messages, rather than RPC-style SOAP
messages. Using the SOAP Toolkit client with a .NET-developed web
service returns a read error for the WSDL document. To permit the
SOAP Toolkit to read the generated WSDL and call your .NET web
service, you must specify the SoapRpcService() attribute in your
web service class.
Calling Content Server Services with SOAP
25-6 Oracle WebCenter Content Developer's Guide for Content Server
25.3 Calling Content Server Services with SOAP
You can execute various Content Server IdcCommand services with the SOAP
interface. Your user ID must have appropriate permissions to execute the commands.
Some commands require administrative access, and other commands require only
write permission.
The WSDL Generator component is installed and enabled by default with Content
Server, and it must remain enabled to call services. For lists of available services and
the required parameters, see the Oracle WebCenter Content Services Reference Guide.
25.3.1 SOAP Packet Format
A SOAP request is an XML-based Remote Procedure Call (RPC) sent using the HTTP
transport protocol. The payload of the SOAP packet is an XML document that specifies
the call being made and the parameters being passed.
25.3.1.1 HTTP Headers
This entry is required in the HTTP header of a SOAP request:
Content-Type: text/xml; charset="utf-8"
This SOAPAction header is suggested, but not required:
SOAPAction: "http://www.oracle.com/IdcService"
25.3.1.2 Namespaces
Within the body of a SOAP message, XML namespaces are used to qualify element
and attribute names in the parts of the document. Element names can be global
(referenced throughout the SOAP message) or local. A local element name is provided
by a namespace, and the name is used in the particular part of the message where it is
located. So, SOAP messages use namespaces to qualify element names in the separate
parts of a message. Application-specific namespaces qualify application-specific
element names. Namespaces also identify the envelope version and encoding style.
Content Server defines a namespace called idc that explains the schema and
allowable tags for the SOAP content.
Table 25–1 Command-Line Parameters for Java SOAP Clients
Parameter Description
-c config file The configuration file containing server settings (host, port, and
so on)
-x xml file The XML file containing the SOAP request to pass to Content
Server
-p primary file The file name of the primary file to upload
-a alternate file The file name of the alternate file to upload (optional)
-l log file The file name of the file containing the request and response
data (optional)

Calling Content Server Services with SOAP
Configuring Web Services with WSDL, SOAP, and the WSDL Generator 25-7
25.3.1.3 Nodes
A SOAP node is the entity that processes a SOAP message according to the rules for
accessing the services provided by the underlying protocols through the SOAP
bindings. So, message processing involves mapping to the underlying services. The
SOAP specification defines a correlation between the parts of a SOAP message and the
software handlers that will process each part of the message.
The following nodes might be required for a service request or might be returned in
the response:
■Service Node
■Document Node
■User Node
■Optionlist Node
■Option Subnode in an IDC Optionlist Node
■Resultset Subnode
■Row Subnode
■Field Subnode
25.3.1.3.1 Service Node As the main node in the IDC namespace, the <idc:service>
node has these requirements:
■This node must exist for a request to be processed.
■The required attribute IdcService defines the service you are requesting.
■The subnodes of <idc:service> are not required to carry the namespace in their
tags.
For example, you can use <document> rather than <idc:document>. However,
if you do define the namespace identifier in the child nodes, it must match the
identifier specified in the service tag.
Example 25–1 shows an <idc:service> node with a PING_SERVER service request.
Example 25–1 Service Node in the IDC Namespace
<idc:service xmlns:idc="http://www.oracle.com/IdcService/" IdcService="PING_
SERVER">
</idc:service>
Note: In requests, Content Server services are lenient regarding
where data is specified. If you specify a data field in a field node and it
is supposed to be a document attribute, or vice versa, the service still
processes the data correctly. The response puts the data in the correct
node.

Calling Content Server Services with SOAP
25-8 Oracle WebCenter Content Developer's Guide for Content Server
25.3.1.3.2 Document Node The <document> node contains all content-item
information and is the parent node of all data nodes.
Attributes that are valid for your content items are defined by your particular Content
Server. For example, dID, dDocTitle, and dDocType are common attributes. These
rules apply to the <document> node:
■Custom content-item information, such as xSpec, is valid if it is defined as
metadata.
■All known document fields can be used as attributes.
Example 25–2 shows a <document> node that uses the CHECKOUT_BY_NAME service.
Example 25–2 Document Node in an IDC Service Node
<idc:service xmlns:idc="http://www.oracle.com/IdcService/" IdcService="CHECKOUT_
BY_NAME">
<idc:document dDocName="soap_sample">
</idc:document>
</idc:service>
25.3.1.3.3 User Node The <user> node contains all user information. These rules
apply to the <user> node:
■Attributes that are valid for users are defined by a specific Content Server. For
example, dName, dFullName, and dEmail are common attributes.
■Custom user information is valid if it is defined as metadata.
■All known user fields can be used as attributes.
Example 25–3 shows a <user> node that specifies a user for the GET_USER_INFO
service request.
Example 25–3 User Node in an IDC Service Node
<idc:service xmlns:idc="http://www.oracle.com/IdcService/" IdcService="GET_USER_
INFO">
<idc:user dUser="sysadmin">
</idc:user>
</idc:service>
25.3.1.3.4 Optionlist Node The <optionlist> node contains any option lists. The
name attribute specifies the name of the option list. Each <option> subnode contains
a value in the <optionlist> node.
Example 25–4 shows an <optionlist> node with an <option> subnode that has a
locale value.
Example 25–4 Optionlist Node for Locale
<idc:optionlist name="Users_UserLocaleList">
<idc:option>
English-US
</idc:option>
</idc:optionlist>

Calling Content Server Services with SOAP
Configuring Web Services with WSDL, SOAP, and the WSDL Generator 25-9
25.3.1.3.5 Option Subnode in an IDC Optionlist Node The <option> subnode is specified
within the <optionlist> node. The option attribute specifies the name of the
option for the option list.
Example 25–5 shows <option> nodes with dDocType values.
Example 25–5 Option Subnodes of an Optionlist Node
<idc:optionlist name="dDocType">
<idc:option>ADACCT</idc:option>
<idc:option>ADHR</idc:option>
<idc:option>ADSALES</idc:option>
</idc:optionlist>
25.3.1.3.6 Resultset Subnode The <resultset> subnode can be specified within a
<document> or <user> node. This subnode contains result set information in a
request or response. The name attribute specifies the name of the result set.
Example 25–6 specifies a <resultset> subnode for a result set that contains a
revision history.
Example 25–6 Resultset Subnode for a Revision History
<idc:resultset name="REVISION_HISTORY">
<idc:row dFormat="text/plain" dInDate="4/12/02 1:27 PM" dOutDate=""
dStatus="RELEASED" dProcessingState="Y" dRevLabel="1" dID="6" dDocName="stellent"
dRevisionID="1">
</idc:row>
</idc:resultset>
25.3.1.3.7 Row Subnode The <row> subnode is specified within a <resultset>
subnode, which can have multiple <row> subnodes. Each <row> subnode specifies a
row in the result set.
Attributes that are valid are defined by your specific Content Server. Valid attributes
are the same fields that can appear as attributes in a <document> or <user> node.
Example 25–7 specifies a row in a result set of user attributes.
Example 25–7 Row Subnode of a Resultset Subnode
<idc:resultset name="UserAttribInfo">
<idc:row dUserName="jsmith" AttributeInfo="role,contributor,15">
</idc:row>
</idc:resultset>
25.3.1.3.8 Field Subnode The <field> subnode can be specified within a
<document>, <user>, or <row> node. The name attribute specifies the name of the
field. A <field> subnode often represents data, such as refreshSubjects or
dSubscriptionID.
A <field> subnode can represent document or user metadata that a user can
configure, or it can represent custom metadata, such as xComments. Example 25–8
specifies a field subnode that represents subscription ID data.

Calling Content Server Services with SOAP
25-10 Oracle WebCenter Content Developer's Guide for Content Server
Example 25–8 Field Node to Represent Metadata
<idc:field name="dSubscriptionID">
stellent
</idc:field>
Another use for a <field> subnode is to pass search result values for fields such as
QueryText and OriginalQueryText, as Example 25–9 shows.
Example 25–9 Field Subnode to Pass a Value
<idc:field name="QueryText">
dDocType <Substring> "ADSALES&"
</idc:field>
25.3.2 Special Characters
When passing special characters, such as a left angle bracket (<) or right angle bracket
(>), to WebCenter Content, you must use the XML-encoding format, which Table 25–2
shows.
You can pass a string to Content Server for a content-item query (using universal
query syntax) in either format. Example specifies a string in standard format
Example 25–10 Parameter with a Standard-Format String
QueryText=dDocType <Substring> "ADSALES"
Example specifies a string in XML-encoded format.
Example 25–11 Parameter with an XML-Encoded String:
<idc:field name="QueryText">
dDocType <Substring> `ADSALES`
</idc:field>
Table 25–2 Special Character Formats
Standard Format XML-Encoding Format
< <
> >
" "
` (use back quotation mark if you are using universal query
syntax)
& &
\ '
Note: Some search result values, such as the QueryText and
OriginalQueryText values, are URL-encoded in the response.

Calling Content Server Services with SOAP
Configuring Web Services with WSDL, SOAP, and the WSDL Generator 25-11
25.3.3 Sample Service Calls with SOAP Response/Request
Using service calls with SOAP response/request, you can execute Content Server
services in a SOAP request. For a list of available services and the required parameters,
see the Oracle WebCenter Content Services Reference Guide
These IdcCommand services are used as SOAP request examples.
25.3.3.1 Ping the Server
The PING_SERVER service evaluates whether a connection to the server exists.
■This service returns status information for Content Server.
■If this service is unable to execute, this message is displayed to the user: Unable
to establish connection to the server.
IdcCommand Description
PING_SERVER This service evaluates whether a connection to
the server exists. See Section 25.3.3.1, "Ping the
Server,".
ADD_USER This service adds a new user to the system.
See "Add a New User" on page 25-12.
EDIT_USER This service edits an existing user. See "Edit
Existing User" on page 25-15.
GET_USER_INFO This service retrieves the user list. See "Get
User Information" on page 25-18.
DELETE_USER This service deletes an existing user. See
"Delete User" on page 25-20.
CHECKIN_UNIVERSAL This service performs a Content Server
controlled check-in. See "Check In Content
Item" on page 25-21.
CHECKOUT_BY_NAME This service marks the latest revision of the
specified content item as locked. See "Check
out Content Item" on page 25-25.
UNDO_CHECKOUT_BY_NAME This service reverses a content item checkout
using the Content ID. See "Undo Content Item
Checkout" on page 25-27.
DOC_INFO This service retrieves content item revision
information. See "Get Content Item
Information" on page 25-29.
GET_FILE This service retrieves a copy of a content item
without performing a check out. See "Get File"
on page 25-30.
GET_SEARCH_RESULTS This service retrieves the search results for the
passed query text. See "Get Search Results" on
page 25-34.
GET_TABLE This service exports the specified table from
the WebCenter Content database. See "Get
Table Data" on page 25-37.
GET_CRITERIA_WORKFLOWS_FOR_GROUP This service returns criteria workflow
information. See "Get Criteria Workflow
Information" on page 25-38.
Calling Content Server Services with SOAP
25-12 Oracle WebCenter Content Developer's Guide for Content Server
25.3.3.1.1 Required Parameters These parameters must be specified.
25.3.3.1.2 SOAP Request
<?xml version='1.0' ?>
<SOAP-ENV:Envelope xmlns:SOAP-ENV="http://schemas.xmlsoap.org/soap/envelope/">
<SOAP-ENV:Body>
<idc:service xmlns:idc="http://www.oracle.com/IdcService/" IdcService="PING_SERVER">
</idc:service>
</SOAP-ENV:Body>
</SOAP-ENV:Envelope
25.3.3.1.3 Response
<?xml version='1.0' ?>
<SOAP-ENV:Envelope xmlns:SOAP-ENV="http://schemas.xmlsoap.org/soap/envelope/">
<SOAP-ENV:Body>
<idc:service xmlns:idc="http://www.oracle.com/IdcService/" IdcService="PING_SERVER">
<idc:document>
<idc:field name="changedSubjects">
</idc:field>
<idc:field name="refreshSubjects">
</idc:field>
<idc:field name="loadedUserAttributes">
1
</idc:field>
<idc:field name="StatusMessage">
You are logged in as 'sysadmin'.
</idc:field>
<idc:field name="changedMonikers">
</idc:field>
<idc:field name="refreshSubMonikers">
</idc:field>
<idc:field name="refreshMonikers">
</idc:field>
</idc:document>
<idc:user dUser="sysadmin">
</idc:user>
</idc:service>
</SOAP-ENV:Body>
</SOAP-ENV:Envelope>
25.3.3.2 Add a New User
The ADD_USER service adds a new user to the system.
■Given a user name, the service determines if the user is in the system. If the user
does not exist, the service will add the user.
■The most likely error is when the user name is not unique. If this service is unable
to execute, an error message is displayed to the user.
Tip: Execute a PING_SERVER request before calling other services to
ensure that there is a connection to Content Server and that you are
logged in as a user authorized to execute commands.
Parameter Description
IdcService Must be set to PING_SERVER.

Calling Content Server Services with SOAP
Configuring Web Services with WSDL, SOAP, and the WSDL Generator 25-13
25.3.3.2.1 Required Parameters These parameters must be specified.
25.3.3.2.2 Optional Parameters These optional parameters may be specified.
25.3.3.2.3 Optional Attribute Information This optional data defines the user's attribute
information, the roles the user belongs to, and the accounts the user has access to.
Attribute information consists of a list of three comma-delimited strings. The first
string indicates the type of attribute, the second the name of the attribute, and the
third is the access number.
Access Number
These access numbers can be assigned to the user.
Parameter Description
dName The unique name.
dUserAuthType The user authorization type. This value must be set to either
LOCAL or GLOBAL.
IdcService Must be set to ADD_USER.
Parameter Description
dEmail The email address for the user.
dFullName The full name of the user.
dPassword The password for the user.
Important: The user attribute information is not pre-defined. The
user by default will belong to no roles or accounts, and will become a
guest in the system.
Attribute Information Description
Access Number The access number determines the level of access or privileges
assigned to the user
Attribute Name The attribute name is the name of the role or account to be
assigned. For example, admin, contributor, or editor may be
assigned.
Attribute Type The attribute types consists of role or account.
Access Level Flags Description
1 Read only.
3 Read and write.
7 Read, write, and delete.
15 Administrative privileges.

Calling Content Server Services with SOAP
25-14 Oracle WebCenter Content Developer's Guide for Content Server
Attribute Name
A user can belong to multiple roles and accounts, there may be multiple role and
account information strings separated by commas in the attribute information column.
■If the user is to have the admin role, define the user attribute information as
follows:
<idc:resultset name="UserAttribInfo">
<idc:row dUserName="jsmith" AttributeInfo="role,contributor,15">
■If the user is to belong to both the contributor and editor roles and has read
privilege on the account books, define the user attribute information as follows:
<idc:resultset name="UserAttribInfo">
<idc:row dUserName="jsmith"
AttributeInfo="role,contributor,15,role,editor,15,account,books,1">
Attribute Type
When defining a role, the first string specifies that this is a role attribute, the second
string is the name of the role, and the third is the default entry of 15.
When defining an account, the first string specifies that this is an account attribute, the
second string is the name of the account, and the third is the access level.
■For an attribute role, the information is in this form:
role,contributor,15
■For an attribute account where the access level determines the user’s rights to the
named account, the information is in this form:
account,books,1
25.3.3.2.4 SOAP Request
<?xml version='1.0' ?>
<SOAP-ENV:Envelope xmlns:SOAP-ENV="http://schemas.xmlsoap.org/soap/envelope/">
<SOAP-ENV:Body>
<idc:service xmlns:idc="http://www.oracle.com/IdcService/" IdcService="ADD_USER">
<idc:user dName="Jennifer" dFullName="Jennifer Anton" dPassword="password"
dEmail="email@example.com" dUserAuthType="local">
<idc:resultset name="UserAttribInfo">
<idc:row dUserName="Jennifer" AttributeInfo="role,contributor,3">
</idc:row>
</idc:resultset>
</idc:user>
</idc:service>
</SOAP-ENV:Body>
</SOAP-ENV:Envelope>
25.3.3.2.5 Response
<?xml version='1.0' ?>
<SOAP-ENV:Envelope xmlns:SOAP-ENV="http://schemas.xmlsoap.org/soap/envelope/">
<SOAP-ENV:Body>
<idc:service xmlns:idc="http://www.oracle.com/IdcService/" IdcService="ADD_USER">
<idc:document>
<idc:field name="refreshMonikers">
</idc:field>
<idc:field name="refreshSubMonikers">
</idc:field>
<idc:field name="refreshSubjects">

Calling Content Server Services with SOAP
Configuring Web Services with WSDL, SOAP, and the WSDL Generator 25-15
</idc:field>
<idc:field name="isAdd">
1
</idc:field>
<idc:field name="copyAll">
1
</idc:field>
<idc:field name="alwaysSave">
1
</idc:field>
<idc:field name="dAttributeName">
contributor
</idc:field>
<idc:field name="loadedUserAttributes">
1
</idc:field>
<idc:field name="doAdminFields">
1
</idc:field>
<idc:field name="dAttributePrivilege">
3
</idc:field>
<idc:field name="dAttributeType">
role
</idc:field>
<idc:field name="changedMonikers">
</idc:field>
<idc:field name="changedSubjects">
userlist,1018884022874
</idc:field>
</idc:document>
<idc:user dUserAuthType="local" dEmail="email@example.com" dFullName="Jennifer
Anton" dUser="sysadmin" dPassword="password" dName="Jennifer">
</idc:user>
</idc:service>
</SOAP-ENV:Body>
</SOAP-ENV:Envelope>
25.3.3.3 Edit Existing User
The EDIT_USER service edits the information for an existing user.
■Given a user name and user authorization type, the service determines if the user
is in the system. If the user does not exist, the service fails. Otherwise the user
information is updated and replaced.
■The most likely error is the user does not have the security level to perform this
action. If this service is unable to execute, an error message is displayed to the
user.
Note: The user attribute information replaces the current attributes.
It does not add to the list. Consequently, if the user attribute
information is not defined, the user will become a guest in the system.

Calling Content Server Services with SOAP
25-16 Oracle WebCenter Content Developer's Guide for Content Server
25.3.3.3.1 Required Parameters These parameters must be specified.
25.3.3.3.2 Optional Parameters These optional parameters can be specified.
25.3.3.3.3 Optional Attribute Information A result set containing the user's attribute
information and referencing the roles to which the user belongs and the accounts to
which the user has access. Attribute information consists of a list of three
comma-delimited strings. The first string indicates the type of attribute, the second the
name of the attribute, and the third is the access number.
Access Number
These access numbers can be assigned to the user.
Parameter Description
dName The unique name.
dUserAuthType The user authorization type. This value must be set to either
LOCAL or GLOBAL.
IdcService Must be set to EDIT_USER.
Parameter Description
dEmail The email address of the user.
dFullName The full name of the user.
dPassword The password for the user.
dUserLocale The locale designation such as English-US, English-UK, Deutsch,
Français, Español.
dUserType The defined user type.
Important: The user attribute information is not pre-defined. The
user by default will belong to no roles or accounts, and will become a
guest in the system
Attribute Information Description
Access Number The access number determines the level of access or privileges
assigned to the user
Attribute Name The attribute name is the name of the role or account to be
assigned. For example, admin, contributor, or editor may be
assigned.
Attribute Type The attribute types consist of role or account.
Access Level Flags Description
1 Read only.
3 Read and write.
7 Read, write, and delete.
15 Administrative privileges.

Calling Content Server Services with SOAP
Configuring Web Services with WSDL, SOAP, and the WSDL Generator 25-17
A user can belong to multiple roles and accounts, there may be multiple role and
account information strings separated by commas in the attribute information column.
■If the user is to have the admin role, define the user attribute information as
follows:
<idc:resultset name="UserAttribInfo">
<idc:row dUserName="jsmith" AttributeInfo="role,contribut
or,15">
■If the user is to belong to both the contributor and editor roles and has read
privilege for the account books, define the user attribute information as follows:
<idc:resultset name="UserAttribInfo">
<idc:row dUserName="jsmith"
AttributeInfo="role,contributor,15,role,editor,15,account,books,1">
Attribute Type
In the definition of a role, the first string specifies that this is a role attribute, the
second string is the name of the role, and the third is the default entry of 15.
In the definition of an account, the first string specifies that this is an account attribute,
the second string is the name of the account, and the third is the access level.
■For an attribute role, the information is in this form:
role,contributor,15
■For an attribute account where the access level determines the user’s rights to the
named account, the information is in this form:
account,books,1
25.3.3.3.4 SOAP Request
<?xml version='1.0' ?>
<SOAP-ENV:Envelope xmlns:SOAP-ENV="http://schemas.xmlsoap.org/soap/envelope/">
<SOAP-ENV:Body>
<idc:service xmlns:idc="http://www.oracle.com/IdcService/" IdcService="EDIT_USER">
<idc:user dName="Jennifer" dFullName="Jennifer Anton" dPassword="password"
dEmail="jennifer@example.com" dUserAuthType="local">
<idc:resultset name="UserAttribInfo">
<idc:row dUserName="Jennifer" AttributeInfo="role,guest,1">
</idc:row>
</idc:resultset>
</idc:user>
</idc:service>
</SOAP-ENV:Body>
</SOAP-ENV:Envelope>
25.3.3.3.5 Response
<?xml version='1.0' ?>
<SOAP-ENV:Envelope xmlns:SOAP-ENV="http://schemas.xmlsoap.org/soap/envelope/">
<SOAP-ENV:Body>
<idc:service xmlns:idc="http://www.oracle.com/IdcService/" IdcService="EDIT_USER">
<idc:document>
<idc:field name="refreshMonikers">
</idc:field>
<idc:field name="refreshSubMonikers">
</idc:field>
<idc:field name="refreshSubjects">

Calling Content Server Services with SOAP
25-18 Oracle WebCenter Content Developer's Guide for Content Server
</idc:field>
<idc:field name="alwaysSave">
1
</idc:field>
<idc:field name="dAttributeName">
guest
</idc:field>
<idc:field name="loadedUserAttributes">
1
</idc:field>
<idc:field name="doAdminFields">
1
</idc:field>
<idc:field name="dAttributePrivilege">
1
</idc:field>
<idc:field name="dAttributeType">
role
</idc:field>
<idc:field name="changedMonikers">
</idc:field>
<idc:field name="changedSubjects">
userlist,1018884022877
</idc:field>
</idc:document>
<idc:user dUserAuthType="local" dEmail="jennifer@example.com" dFullName="Jennifer
Anton" dUser="sysadmin" dPassword="password" dName="Jennifer">
</idc:user>
</idc:service>
</SOAP-ENV:Body>
</SOAP-ENV:Envelope>
25.3.3.4 Get User Information
The GET_USER_INFO service retrieves the user list.
■Given a defined user, the service retrieves the user list.
■If this service is unable to execute, this message is displayed to the user: Unable to
retrieve user list.
25.3.3.4.1 Required Parameters These parameters must be specified.
25.3.3.4.2 SOAP Request
<?xml version='1.0' ?>
<SOAP-ENV:Envelope xmlns:SOAP-ENV="http://schemas.xmlsoap.org/soap/envelope/">
<SOAP-ENV:Body>
<idc:service xmlns:idc="http://www.oracle.com/IdcService/" IdcService="GET_USER_
INFO">
<idc:user dUser="sysadmin">
</idc:user>
</idc:service>
</SOAP-ENV:Body>
</SOAP-ENV:Envelope>
Parameter Description
dUser The defined user.
IdcService Must be set to GET_USER_INFO.

Calling Content Server Services with SOAP
Configuring Web Services with WSDL, SOAP, and the WSDL Generator 25-19
25.3.3.4.3 Response
<?xml version='1.0' ?>
<SOAP-ENV:Envelope xmlns:SOAP-ENV="http://schemas.xmlsoap.org/soap/envelope/">
<SOAP-ENV:Body>
<idc:service xmlns:idc="http://www.oracle.com/IdcService/" IdcService="GET_USER_
INFO">
<idc:document>
<idc:field name="changedSubjects">
</idc:field>
<idc:field name="refreshSubjects">
</idc:field>
<idc:field name="loadedUserAttributes">
1
</idc:field>
<idc:field name="changedMonikers">
</idc:field>
<idc:field name="refreshSubMonikers">
</idc:field>
<idc:field name="refreshMonikers">
</idc:field>
<idc:optionlist name="Users_UserLocaleList">
<idc:option>
English-US
</idc:option>
</idc:optionlist>
</idc:document>
<idc:user dUser="sysadmin" dName="sysadmin">
<idc:resultset name="UserMetaDefinition">
<idc:row umdName="dFullName" umdType="BigText" umdCaption="apTitleFullName"
umdIsOptionList="0" umdOptionListType="0" umdOptionListKey="" umdIsAdminEdit="0"
umdOverrideBitFlag="1">
</idc:row>
<idc:row umdName="dEmail" umdType="BigText" umdCaption="apTitleEmailAddress"
umdIsOptionList="0" umdOptionListType="" umdOptionListKey="" umdIsAdminEdit="0"
umdOverrideBitFlag="2">
</idc:row>
<idc:row umdName="dUserType" umdType="Text" umdCaption="apTitleUserType"
umdIsOptionList="1" umdOptionListType="combo" umdOptionListKey="Users_
UserTypeList" umdIsAdminEdit="0" umdOverrideBitFlag="4">
</idc:row>
<idc:row umdName="dUserLocale" umdType="Text" umdCaption="apTitleUserLocale"
umdIsOptionList="1" umdOptionListType="choice,locale" umdOptionListKey="Users_
UserLocaleList" umdIsAdminEdit="0" umdOverrideBitFlag="8">
</idc:row>
</idc:resultset>
<idc:resultset name="USER_INFO">
<idc:row dName="sysadmin" dFullName="System Administrator" dEmail=""
dPasswordEncoding="" dPassword="-----" dUserType="" dUserAuthType="LOCAL"
dUserOrgPath="" dUserSourceOrgPath="" dUserSourceFlags="0" dUserArriveDate=""
dUserChangeDate="" dUserLocale="" dUserTimeZone="">
</idc:row>
</idc:resultset>
</idc:user>
</idc:service>
</SOAP-ENV:Body>
</SOAP-ENV:Envelope>

Calling Content Server Services with SOAP
25-20 Oracle WebCenter Content Developer's Guide for Content Server
25.3.3.5 Delete User
The DELETE_USER service deletes an existing user.
■Given a user name, the service deletes the user from the system.
■The most likely error is when the user has been assigned to an alias.If this service
is unable to execute, an error message is returned.
25.3.3.5.1 Required Parameters These parameters must be specified.
25.3.3.5.2 SOAP Request
<?xml version='1.0' ?>
<SOAP-ENV:Envelope xmlns:SOAP-ENV="http://schemas.xmlsoap.org/soap/envelope/">
<SOAP-ENV:Body>
<idc:service xmlns:idc="http://www.oracle.com/IdcService/" IdcService="DELETE_
USER">
<idc:user dName="Jennifer" >
</idc:user>
</idc:service>
</SOAP-ENV:Body>
</SOAP-ENV:Envelope>
25.3.3.5.3 Response
<idc:service xmlns:idc="http://www.oracle.com/IdcService/"
IdcService="DELETE_USER">
<idc:document>
<idc:field name="changedSubjects">
userlist,1018884022876
</idc:field>
<idc:field name="refreshSubjects">
</idc:field>
<idc:field name="loadedUserAttributes">
1
</idc:field>
<idc:field name="changedMonikers">
</idc:field>
<idc:field name="dUserName">
Jennifer
</idc:field>
<idc:field name="refreshSubMonikers">
</idc:field>
<idc:field name="refreshMonikers">
</idc:field>
</idc:document>
<idc:user dUser="sysadmin" dName="Jennifer">
</idc:user>
</idc:service>
</SOAP-ENV:Body>
</SOAP-ENV:Envelope>
Parameter Description
dName The unique name.
IdcService Must be set to DELETE_USER.

Calling Content Server Services with SOAP
Configuring Web Services with WSDL, SOAP, and the WSDL Generator 25-21
25.3.3.6 Check In Content Item
The CHECKIN_UNIVERSAL service performs a controlled check-in to Content Server:
■This service determines if the content item is new or already exists in the system
by querying the database using the content ID (dDocName) as the key.
■If the content item exists in the system, the publish state (dPublishState) must be
empty.
■If a revision label (dRevLabel) is specified, this service will check if the content
revision exists in the system; an exception is thrown if the revision exists.
■This service will dispatch this request to one of these subservices:
–CHECKIN_NEW_SUB - If the content item does not exist in the server.
–CHECKIN_SEL_SUB - If the content item exists on the system and no valid
revision was specified and the content item is checked out.
–WORKFLOW_CHECKIN_SUB - If the content item exists and is part of a
workflow.
■The most likely errors are mismatched parameters or when the content item was
not successfully checked in. If this service is unable to execute, this message is
displayed to the user: Content item ''{dDocName}'' was not
successfully checked in.
The CHECKIN_UNIVERSAL service is a controlled check-in to Content Server. The
check-in will fall into either a new, selected, or workflow check-in process and follow
the same logic as a check-in through the browser or Repository Manager application. If
the content item to be checked in already exists in the system, the content item must be
checked out for the check in to succeed.
These are essentially the same subservices used during a controlled check-in to
Content Server. However, these subservices are not called during a BatchLoad or
Archive import. This service will check security to determine if the user has sufficient
privilege to perform a check in on the content item and if the content item (if it exists)
has been checked out. Also, it will determine if the content item matches a workflow
criteria or belongs to an active basic workflow.
If the content item is not found the content item is checked in using the CHECKIN_
NEW_SUB subservice. This subservice validates the check in data and determines if this
content item belongs to a criteria workflow. If the content item already exists in the
system and the content item does not belong to a workflow, the CHECKIN_SEL_SUB is
used. Otherwise the content item exists and belongs to a workflow and the
WORKFLOW_CHECKIN_SUB is used.
Note: All paths use the slash (/) as the file separator, because the
backslash (\) is an escape character. For example,
primaryFile=d:/temp/myfile.txt should point to the primary
file to check in.

Calling Content Server Services with SOAP
25-22 Oracle WebCenter Content Developer's Guide for Content Server
25.3.3.6.1 Required Parameters These parameters must be specified.
25.3.3.6.2 Additional Parameters This parameter may be required.
Parameter Description
dDocAuthor The content item author (contributor).
dDocName The content item identifier (Content ID).
■This field is optional if the system has been configured with
IsAutoNumber set to TRUE. In this scenario, if the
dDocName is not specified, the check in will always be new,
and the system will generate a new name for the content
item.
■Otherwise, if dDocName is specified, the service will use this
key to do a look up to determine what type of check in to
perform.
dDocTitle The content item title.
dDocType The content item type.
doFileCopy Set this flag to TRUE (1) or the file will be removed from your
hard drive.
dSecurityGroup The security group such as PUBLIC or SECURE.
IdcService Must be set to CHECKIN_UNIVERSAL.
primaryFile The absolute path to the location of the file as seen from the
server. Use the slash as the file separator.
A primary file must be specified unless checking in metadata
only. If an alternate file is specified with the primary file, Oracle
WebCenter Content: Inbound Refinery will convert the alternate
file. Otherwise, the primary file will be converted.
■If a primary file is not specified, a metafile can be used in its
place. Only one metafile can exist though for each content
item (that is, a primary AND alternate meta file cannot
coexist).
■If both a primary and alternate file is specified, their
extensions must be different.
Important: Custom metadata fields that are defined must also be
specified.
Parameter Description
dDocAccount The security account for the content item.
If you have accounts enabled, you must pass this parameter.

Calling Content Server Services with SOAP
Configuring Web Services with WSDL, SOAP, and the WSDL Generator 25-23
25.3.3.6.3 Optional Parameters These optional parameters may be specified.
25.3.3.6.4 SOAP Request
<?xml version='1.0' ?>
<SOAP-ENV:Envelope xmlns:SOAP-ENV="http://schemas.xmlsoap.org/soap/envelope/">
<SOAP-ENV:Body>
<idc:service xmlns:idc="http://www.oracle.com/IdcService/" IdcService="CHECKIN_
UNIVERSAL">
<idc:document dDocName="SoapUpload2" dDocAuthor="sysadmin" dDocTitle="Soap Upload
2 Document" dDocType="ADACCT" dSecurityGroup="Public" dDocAccount="">
<idc:file name="primaryFile"
href="C:/stellent/custom/Soap/JavaSamples/SoapClientUpload/soaptest.doc">
</idc:file>
</idc:document>
</idc:service>
</SOAP-ENV:Body>
</SOAP-ENV:Envelope>
Parameter Description
alternateFile The alternate file for conversion.
■Only one metafile can exist though for each content item (a
primary AND alternate meta file cannot coexist.)
■If an alternate file is specified with the primary file, Inbound
Refinery will convert the alternate file. Otherwise, the
primary file will be converted.
dCreateDate The date the content item was created. By default, this is the
current date.
dInDate The content release date. The date the content item is to be
released to the web. By default, this is the current date.
If the content release date (dInDate) is not specified, the creation
date (dCreateDate) is used. This value is auto generated if it is
not supplied.
dOutDate The content expiration date. By default, this is blank and does
not specify an expiration date.
If the content expiration date (dOutDate) is not entered, the value
remains empty. This is a valid state.
dRevLabel The revision label for the content item. If set, the label will be
used to locate the specified revision.
isFinished Set to TRUE (1) if this is a workflow check-in and you have
finished editing it.
See WORKFLOW_CHECKIN for additional information.
Note: Do not confuse the Content ID (dDocName) with the internal
content item revision identifier (dID). The dID value is a generated
reference to a specific rendition of a content item

Calling Content Server Services with SOAP
25-24 Oracle WebCenter Content Developer's Guide for Content Server
25.3.3.6.5 Response
<?xml version='1.0' ?>
<SOAP-ENV:Envelope xmlns:SOAP-ENV="http://schemas.xmlsoap.org/soap/envelope/">
<SOAP-ENV:Body>
<idc:service xmlns:idc="http://www.oracle.com/IdcService/" IdcService="CHECKIN_
UNIVERSAL">
<idc:document dDocAuthor="sysadmin" dDocName="SoapUpload2" dExtension="doc"
dDocAccount="" dIsPrimary="1" dRevisionID="1" dPublishType="" dInDate="4/22/02
1:31PM" dReleaseState="N" dRevClassID="12" dCreateDate="4/22/02 1:31 PM"
dIsWebFormat="0" dPublishState="" dLocation="" dStatus="DONE"
dOriginalName="12.doc" dOutDate="" dDocID="24" dRevLabel="1" dProcessingState="Y"
dDocTitle="Soap Upload 2 Document" dID="12" dDocType="ADACCT"
dSecurityGroup="Public" dFileSize="19456" dFormat="application/msword">
<idc:field name="primaryFile:path">
c:/stellent/vault/~temp/1230750423.doc
</idc:field>
<idc:field name="dRawDocID">
23
</idc:field>
<idc:field name="changedSubjects">
documents,1019482656706
</idc:field>
<idc:field name="StatusCode">
0
</idc:field>
<idc:field name="soapFile:path">
c:/stellent/vault/~temp/1230750422.xml
</idc:field>
<idc:field name="xComments">
</idc:field>
<idc:field name="soapStartContentID">
SoapContent
</idc:field>
<idc:field name="refreshSubMonikers">
</idc:field>
<idc:field name="changedMonikers">
</idc:field>
<idc:field name="dActionDate">
4/22/02 1:31 PM
</idc:field>
<idc:field name="dActionMillis">
30263
</idc:field>
<idc:field name="loadedUserAttributes">
1
</idc:field>
<idc:field name="WebfilePath">
c:/stellent/weblayout/groups/public/documents/adacct/soapupload2~1.doc
</idc:field>
<idc:field name="StatusMessage">
Successfully checked in content item 'SoapUpload2'.
</idc:field>
<idc:field name="refreshSubjects">
</idc:field>
<idc:field name="dConversion">
PASSTHRU
</idc:field>

Calling Content Server Services with SOAP
Configuring Web Services with WSDL, SOAP, and the WSDL Generator 25-25
<idc:field name="primaryFile">
C:/stellent/custom/Soap/JavaSamples/SoapClientUpload/soaptest.doc
</idc:field>
<idc:field name="dAction">
Checkin
</idc:field>
<idc:field name="refreshMonikers">
</idc:field>
<idc:field name="VaultfilePath">
c:/stellent/vault/adacct/12.doc
</idc:field>
</idc:document>
<idc:user dUser="sysadmin">
</idc:user>
</idc:service>
</SOAP-ENV:Body>
</SOAP-ENV:Envelope>
25.3.3.7 Check out Content Item
The CHECKOUT_BY_NAME checks out the latest revision of the specified content item.
■Given a content item revision ID, this service attempts to locate the content item in
the system and undo the checkout.
■The service fails if the content item does not exist in the system, if the content item
is not checked out, or the user does not have sufficient privilege to undo the
checkout.
■The most likely error is a content item name that does not exist. If this service is
unable to execute, an error message is displayed to the user.
25.3.3.7.1 Required Parameters These parameters must be specified.
25.3.3.7.2 Optional Parameters This optional parameter may be specified.
Note: This service only marks the content item as locked. It does not
perform a download.
Parameter Description
dDocName The content item identifier (Content ID).
IdcService Must be set to CHECKOUT_BY_NAME.
Note: Do not confuse the Content ID (dDocName) with the internal
content item revision identifier (dID). The dID value is a generated
reference to a specific rendition of a content item.
Parameter Description
dDocTitle The content item title.

Calling Content Server Services with SOAP
25-26 Oracle WebCenter Content Developer's Guide for Content Server
25.3.3.7.3 SOAP Request
<?xml version='1.0' ?>
<SOAP-ENV:Envelope xmlns:SOAP-ENV="http://schemas.xmlsoap.org/soap/envelope/">
<SOAP-ENV:Body>
<idc:service xmlns:idc="http://www.oracle.com/IdcService/" IdcService="CHECKOUT_
BY_NAME">
<idc:document dDocName="soap_sample">
</idc:document>
</idc:service>
</SOAP-ENV:Body>
</SOAP-ENV:Envelope>
25.3.3.7.4 Response
<?xml version='1.0' ?>
<SOAP-ENV:Envelope xmlns:SOAP-ENV="http://schemas.xmlsoap.org/soap/envelope/">
<SOAP-ENV:Body>
<idc:service xmlns:idc="http://www.oracle.com/IdcService/" IdcService="CHECKOUT_
BY_NAME">
<idc:document dDocTitle="soap_sample" dID="10" dRevLabel="1" dDocAccount=""
dRevClassID="10" dDocName="soap_sample" dOriginalName="soap_sample.txt"
dSecurityGroup="Public">
<idc:field name="dActionMillis">
39964
</idc:field>
<idc:field name="refreshMonikers">
</idc:field>
<idc:field name="dActionDate">
4/22/02 12:20 PM
</idc:field>
<idc:field name="latestID">
10
</idc:field>
<idc:field name="refreshSubMonikers">
</idc:field>
<idc:field name="refreshSubjects">
</idc:field>
<idc:field name="CurRevID">
10
</idc:field>
<idc:field name="CurRevIsCheckedOut">
0
</idc:field>
<idc:field name="dAction">
Check out
</idc:field>
<idc:field name="loadedUserAttributes">
1
</idc:field>
<idc:field name="CurRevCheckoutUser">
sysadmin
</idc:field>
<idc:field name="changedMonikers">
</idc:field>
<idc:field name="changedSubjects">
documents,1019482656687
</idc:field>
<idc:resultset name="DOC_INFO">
<idc:row dID="10" dDocName="soap_sample" dDocType="ADACCT" dDocTitle="soap_sample"

Calling Content Server Services with SOAP
Configuring Web Services with WSDL, SOAP, and the WSDL Generator 25-27
dDocAuthor="sysadmin" dRevClassID="10" dRevisionID="1" dRevLabel="1"
dIsCheckedOut="1" dCheckoutUser="sysadmin" dSecurityGroup="Public"
dCreateDate="4/22/02 12:18 PM" dInDate="4/22/02 12:18 PM" dOutDate=""
dStatus="RELEASED" dReleaseState="Y" dFlag1="" dWebExtension="txt"
dProcessingState="Y" dMessage="" dDocAccount="" dReleaseDate="4/22/02 12:19 PM"
dRendition1="" dRendition2="" dIndexerState="" dPublishType="" dPublishState=""
dDocID="19" dIsPrimary="1" dIsWebFormat="0" dLocation="" dOriginalName="soap_
sample.txt" dFormat="text/plain" dExtension="txt" dFileSize="12">
<idc:field name="xComments">
</idc:field>
</idc:row>
</idc:resultset>
</idc:document>
<idc:user dUser="sysadmin">
</idc:user>
</idc:service>
</SOAP-ENV:Body>
</SOAP-ENV:Envelope>
25.3.3.8 Undo Content Item Checkout
The UNDO_CHECKOUT_BY_NAME service reverses a content item checkout using the
Content ID.
■Given a content item name, this service attempts to locate the content item in the
system and undo the checkout.
■The service fails if the content item does not exist in the system, if the content item
is not checked out, or if the user does not have sufficient privilege to undo the
checkout.
■This service is used by an applet or application.
■If this service is unable to execute, this message is displayed to the user: Unable
to undo checkout for ''{dDocName}''.
25.3.3.8.1 Required Parameters These parameters must be specified.
25.3.3.8.2 Optional Parameters This optional parameter may be specified.
Parameter Description
dDocName The content item identifier (Content ID).
IdcService Must be set to UNDO_CHECKOUT_BY_NAME.
Note: Do not confuse the Content ID (dDocName) with the internal
content item revision identifier (dID). The dID value is a generated
reference to a specific rendition of a content item.
Parameter Description
dDocTitle The content item title.

Calling Content Server Services with SOAP
25-28 Oracle WebCenter Content Developer's Guide for Content Server
25.3.3.8.3 SOAP Request
<?xml version='1.0' ?>
<SOAP-ENV:Envelope xmlns:SOAP-ENV="http://schemas.xmlsoap.org/soap/envelope/">
<SOAP-ENV:Body>
<idc:service xmlns:idc="http://www.oracle.com/IdcService/" IdcService="UNDO_
CHECKOUT_BY_NAME">
<idc:document dDocName="soap_sample">
</idc:document>
</idc:service>
</SOAP-ENV:Body>
</SOAP-ENV:Envelope>
25.3.3.8.4 Response
<?xml version='1.0' ?>
<SOAP-ENV:Envelope xmlns:SOAP-ENV="http://schemas.xmlsoap.org/soap/envelope/">
<SOAP-ENV:Body>
<idc:service xmlns:idc="http://www.oracle.com/IdcService/" IdcService="UNDO_
CHECKOUT_BY_NAME">
<idc:document dCheckoutUser="sysadmin" dPublishState="" dDocTitle="soap_sample"
dID="10" dRevLabel="1" dDocAccount="" dDocName="soap_sample" dRevClassID="10"
dOriginalName="soap_sample.txt" dSecurityGroup="Public">
<idc:field name="dActionMillis">
5317
</idc:field>
<idc:field name="refreshMonikers">
</idc:field>
<idc:field name="dActionDate">
4/22/02 12:23 PM
</idc:field>
<idc:field name="latestID">
10
</idc:field>
<idc:field name="refreshSubMonikers">
</idc:field>
<idc:field name="refreshSubjects">
</idc:field>
<idc:field name="CurRevID">
10
</idc:field>
<idc:field name="CurRevIsCheckedOut">
1
</idc:field>
<idc:field name="dAction">
Undo Checkout
</idc:field>
<idc:field name="loadedUserAttributes">
1
</idc:field>
<idc:field name="CurRevCheckoutUser">
sysadmin
</idc:field>
<idc:field name="changedMonikers">

Calling Content Server Services with SOAP
Configuring Web Services with WSDL, SOAP, and the WSDL Generator 25-29
</idc:field>
<idc:field name="changedSubjects">
documents,1019482656689
</idc:field>
</idc:document>
<idc:user dUser="sysadmin">
</idc:user>
</idc:service>
</SOAP-ENV:Body>
</SOAP-ENV:Envelope>
25.3.3.9 Get Content Item Information
The DOC_INFO service retrieves content item revision information.
■Given a content item revision ID, the service retrieves content item revision
information
■The most likely errors are when the content item no longer exists in the system or
when the user does not have the security level to perform this action. If this service
is unable to execute, an error message is displayed to the user.
25.3.3.9.1 Required Parameters These parameters must be specified.
25.3.3.9.2 SOAP Request
<?xml version='1.0' ?>
<SOAP-ENV:Envelope xmlns:SOAP-ENV="http://schemas.xmlsoap.org/soap/envelope/">
<SOAP-ENV:Body>
<idc:service xmlns:idc="http://www.oracle.com/IdcService/" IdcService="DOC_INFO">
<idc:document dID="6">
</idc:document>
</idc:service>
</SOAP-ENV:Body>
</SOAP-ENV:Envelope>
25.3.3.9.3 Response
<?xml version='1.0' ?>
<SOAP-ENV:Envelope xmlns:SOAP-ENV="http://schemas.xmlsoap.org/soap/envelope/">
<SOAP-ENV:Body>
<idc:service xmlns:idc="http://www.oracle.com/IdcService/" IdcService="DOC_INFO">
<idc:document dStatus="RELEASED" dDocFormats="text/plain" dID="6"
DocUrl="HTTP://wharristest/stellent/groups/public/documents/adacct/stellent.txt"
dDocTitle="stellent">
<idc:field name="dSubscriptionAlias">
sysadmin
</idc:field>
<idc:field name="changedSubjects">
</idc:field>
<idc:field name="dSubscriptionID">
stellent
</idc:field>
<idc:field name="refreshSubjects">
</idc:field>
Parameter Description
dID The generated content item revision ID.
IdcService Must be set to DOC_INFO.

Calling Content Server Services with SOAP
25-30 Oracle WebCenter Content Developer's Guide for Content Server
<idc:field name="loadedUserAttributes">
1
</idc:field>
<idc:field name="changedMonikers">
</idc:field>
<idc:field name="refreshSubMonikers">
</idc:field>
<idc:field name="refreshMonikers">
</idc:field>
<idc:field name="dSubscriptionType">
Basic
</idc:field>
<idc:resultset name="REVISION_HISTORY">
<idc:row dFormat="text/plain" dInDate="4/12/02 1:27 PM" dOutDate=""
dStatus="RELEASED" dProcessingState="Y" dRevLabel="1" dID="6" dDocName="stellent"
dRevisionID="1">
</idc:row>
</idc:resultset>
<idc:resultset name="WF_INFO">
</idc:resultset>
<idc:resultset name="DOC_INFO">
<idc:row dID="6" dDocName="stellent" dDocType="ADACCT" dDocTitle="stellent"
dDocAuthor="sysadmin" dRevClassID="6" dRevisionID="1" dRevLabel="1"
dIsCheckedOut="0" dCheckoutUser="" dSecurityGroup="Public" dCreateDate="4/12/02
1:27 PM" dInDate="4/12/02 1:27 PM" dOutDate="" dStatus="RELEASED"
dReleaseState="Y" dFlag1="" dWebExtension="txt" dProcessingState="Y" dMessage=""
dDocAccount="" dReleaseDate="4/12/02 1:27 PM" dRendition1="" dRendition2=""
dIndexerState="" dPublishType="" dPublishState="" dDocID="11" dIsPrimary="1"
dIsWebFormat="0" dLocation="" dOriginalName="stellent.txt" dFormat="text/plain"
dExtension="txt" dFileSize="8">
<idc:field name="xComments">
stellent
</idc:field>
</idc:row>
</idc:resultset>
</idc:document>
<idc:user dUser="sysadmin">
</idc:user>
</idc:service>
</SOAP-ENV:Body>
</SOAP-ENV:Envelope>
25.3.3.10 Get File
The GET_FILE service returns a specific rendition of a content item, the latest revision,
or the latest released revision. A copy of the file is retrieved without performing a
check out.
■This command computes the dID (content item revision ID) for the revision, and
then determines the file name of a particular rendition of the revision with the
computed dID. A specified dID or a dDocName (content item name) along with a
RevisionSelectionMethod parameter can be used.
■Given a dID or a dDocName along with a RevisionSelectionMethod
parameter, the service determines the file name of a particular rendition of the
revision and returns that file to the client.

Calling Content Server Services with SOAP
Configuring Web Services with WSDL, SOAP, and the WSDL Generator 25-31
■The most likely errors are some form of mismatched parameters or a request for a
revision or rendition that does not exist. If this service is unable to execute, an
error message is displayed to the user.
25.3.3.10.1 Required Parameters
Note: Use dDocName in all requests for content items where the
requester knows the dDocName value. Error messages in Content
Server are based on the assumption that the dDocName value is
present, as are other features, such as forms.
Important: Either the content item revision ID (dID) must be
specified or a content item name (dDocName) along with a
RevisionSelectionMethod parameter must be defined.
Parameter Description
dDocName The content item identifier (Content ID).
■If dDocName is not present, dID must be present, and
RevisionSelectionMethod must not be present.
■If RevisionSelectionMethod is present, a rendition of a
revision of the content item with this name will be returned,
if it exists.
■If RevisionSelectionMethod is not present, dDocName
can be used in error messages.
dID The generated content item revision ID.
■If dID is not specified, dDocName, and
RevisionSelectionMethod must specified.
■A rendition of the revision of the content item with this ID
will be returned, if it exists, and the
RevisionSelectionMethod parameter does not exist or has
the value Specific.
RevisionSelectionMet
hod
The revision selection method.
If present, dDocName must be present. The value of this variable
is the method used to compute a dID from the specified
dDocName. Its value can be Specific, Latest, or
LatestReleased.
■If the value is Specific, dDocName is ignored, and dID is
required, and it is used to get a rendition.
■If the value is Latest, the latest revision of the content item
is used to compute the dID.
■If the value is LatestReleased, the latest released revision
of the content item is used to compute the dID.
IdcService Must be set to GET_FILE.
Calling Content Server Services with SOAP
25-32 Oracle WebCenter Content Developer's Guide for Content Server
25.3.3.10.2 Optional Parameter This optional parameters may be specified.
25.3.3.10.3 SOAP Request
<?xml version='1.0' ?>
<SOAP-ENV:Envelope xmlns:SOAP-ENV="http://schemas.xmlsoap.org/soap/envelope/">
<SOAP-ENV:Body>
<idc:service xmlns:idc="http://www.oracle.com/IdcService/" IdcService="GET_FILE">
<idc:document dID="10">
</idc:document>
</idc:service>
</SOAP-ENV:Body>
</SOAP-ENV:Envelope>
25.3.3.10.4 Response
<?xml version='1.0' ?>
<SOAP-ENV:Envelope xmlns:SOAP-ENV="http://schemas.xmlsoap.org/soap/envelope/">
<SOAP-ENV:Body>
<idc:service xmlns:idc="http://www.oracle.com/IdcService/" IdcService="GET_FILE">
<idc:document dID="10">
</idc:document>
</idc:service>
</SOAP-ENV:Body>
</SOAP-ENV:Envelope>
Receving response...
HTTP/1.1 200 OK
Server: Microsoft-IIS/5.0
Connection: keep-alive
Date: Mon, 29 Apr 2002 16:09:42 GMT
Content-type: Multipart/Related; boundary=-----------------4002588859573015789;
type=text/xml; start="<SoapContent>"
Content-Length: 1717
-------------------4002588859573015789
Content-Type: text/xml; charset=utf-8
Content-ID: <SoapContent>
Parameter Description
Rendition The content item rendition. This parameter specifies the rendition
of the content item and can be set to Primary, Web, or Alternate. If
Rendition is not present, it defaults to Primary.
■If the value is Primary, the primary rendition of the selected
revision is returned.
■If the value is Web, the web viewable rendition of the
selected revision is returned.
■If the value is Alternate, the alternate rendition of the selected
revision is returned.
Note: Do not confuse the Content ID (dDocName) with the internal
content item revision identifier (dID). The dID value is a generated
reference to a specific rendition of a content item.

Calling Content Server Services with SOAP
Configuring Web Services with WSDL, SOAP, and the WSDL Generator 25-33
<?xml version='1.0' ?>
<SOAP-ENV:Envelope xmlns:SOAP-ENV="http://schemas.xmlsoap.org/soap/envelope/">
<SOAP-ENV:Body>
<idc:service xmlns:idc="http://www.oracle.com/IdcService/" IdcService="GET_FILE">
<idc:document dID="10" dExtension="txt">
<idc:field name="changedSubjects">
</idc:field>
<idc:field name="refreshSubjects">
</idc:field>
<idc:field name="loadedUserAttributes">
1
</idc:field>
<idc:field name="changedMonikers">
</idc:field>
<idc:field name="refreshSubMonikers">
</idc:field>
<idc:field name="refreshMonikers">
</idc:field>
<idc:resultset name="FILE_DOC_INFO">
<idc:row dID="10" dDocName="soap_sample" dDocType="ADACCT" dDocTitle="soap_sample"
dDocAuthor="sysadmin" dRevClassID="10" dRevisionID="1" dRevLabel="1"
dIsCheckedOut="0" dCheckoutUser="" dSecurityGroup="Public" dCreateDate="4/22/02
12:18PM" dInDate="4/22/02 12:18 PM" dOutDate="" dStatus="RELEASED"
dReleaseState="Y" dFlag1="" dWebExtension="txt" dProcessingState="Y" dMessage=""
dDocAccount="" dReleaseDate="4/22/02 12:19 PM" dRendition1="" dRendition2=""
dIndexerState="" dPublishType="" dPublishState="" dDocID="19" dIsPrimary="1"
dIsWebFormat="0" dLocation="" dOriginalName="soap_sample.txt" dFormat="text/plain"
dExtension="txt" dFileSize="12">
<idc:field name="xComments">
</idc:field>
</idc:row>
</idc:resultset>
</idc:document>
<idc:user dUser="sysadmin">
</idc:user>
</idc:service>
</SOAP-ENV:Body>
</SOAP-ENV:Envelope>
-------------------4002588859573015789
Content-Type: text/html
Content-ID: <soap_sample.txt>
...File content...
-------------------4002588859573015789--

Calling Content Server Services with SOAP
25-34 Oracle WebCenter Content Developer's Guide for Content Server
25.3.3.11 Get Search Results
The GET_SEARCH_RESULTS service retrieves the search results for the passed query
text.
■Used to display the search results to a user making a content item query.
■You can append values for Title, Content ID, and so on, in the QueryText
parameter, to refine this service.
The QueryText parameter defines the query. For use in a SOAP message, this
query must be XML-encoded. This example passes a string submitted for a content
item query in both standard format and XML-encoded format:
–Parameter with standard formatted string:
QueryText=dDocType <Substring> "ADSALES"
–Parameter with XML-encoded string:
<idc:field name="QueryText">
dDocType <Substring> `ADSALES`
</idc:field>
For more information about formatting XML-encoded strings, see
Section 25.3.2, "Special Characters."
■If this service is unable to execute, it displays the following message: Unable to
retrieve search results.
25.3.3.11.1 Required Parameters These parameters must be specified.
25.3.3.11.2 Optional Parameters These parameters may be specified.
Parameter Description
IdcService Must be set to GET_SEARCH_RESULTS.
QueryText The user supplied text submitted for the content item query.
Parameter Description
resultCount The number of results to return, defaults to 25.
sortField The name of the metadata field to sort on.
■Examples: dInDate, dDocTitle, Score.
■Defaults to dInDate.
sortOrder The sort order. Allowed values are ASC (ascending) and DES
(descending).
startRow The row to begin the search results. For example, if a result
returns 200 rows, and resultCount is 25, set startRow to 26 to
obtain the second set of results.

Calling Content Server Services with SOAP
Configuring Web Services with WSDL, SOAP, and the WSDL Generator 25-35
25.3.3.11.3 SOAP Request
<?xml version='1.0' ?>
<SOAP-ENV:Envelope xmlns:SOAP-ENV="http://schemas.xmlsoap.org/soap/envelope/">
<SOAP-ENV:Body>
<idc:service xmlns:idc="http://www.oracle.com/IdcService/" IdcService="GET_SEARCH_
RESULTS">
<idc:document>
<idc:field name="QueryText">
dDocType <Substring> "ADSALES"
</idc:field>
</idc:document>
</idc:service>
</SOAP-ENV:Body>
</SOAP-ENV:Envelope>
25.3.3.11.4 Response
<?xml version='1.0' ?>
<SOAP-ENV:Envelope xmlns:SOAP-ENV="http://schemas.xmlsoap.org/soap/envelope/">
<SOAP-ENV:Body>
<idc:service xmlns:idc="http://www.oracle.com/IdcService/" IdcService="GET_SEARCH_
RESULTS">
<idc:document StartRow="1" TotalDocsProcessed="6" TotalRows="0"
QueryText="dDocType+%3cSubstring%3e+%22ADSALES%22" EndRow="25"
SearchProviders="Master_on_wharristest" NumPages="0" PageNumber="1">
<idc:field name="refreshMonikers">
</idc:field>
<idc:field name="refreshSubMonikers">
</idc:field>
<idc:field name="refreshSubjects">
</idc:field>
<idc:field name="EnterpriseSearchMaxRows">
4
</idc:field>
<idc:field name="FullRequest">
&QueryText=dDocType+%3cSubstring%3e+%22ADSALES%22
</idc:field>
<idc:field name="loadedUserAttributes">
1
</idc:field>
<idc:field name="changedMonikers">
</idc:field>
<idc:field name="changedSubjects">
</idc:field>
<idc:field name="Text2">
<$dDocTitle$>
</idc:field>
<idc:field name="Text1">
<$dDocName$>
</idc:field>
<idc:field name="OriginalQueryText">
dDocType+%3cSubstring%3e+%22ADSALES%22
</idc:field>
<idc:resultset name="SearchResults">
</idc:resultset>
<idc:resultset name="NavigationPages">
</idc:resultset>

Calling Content Server Services with SOAP
25-36 Oracle WebCenter Content Developer's Guide for Content Server
<idc:resultset name="Master_on_wharristest">
</idc:resultset>
<idc:resultset name="EnterpriseSearchResults">
<idc:row ProviderName="Master_on_wharristest" IDC_Name="Master_on_wharristest"
TotalRows="0" TotalDocsProcessed="6">
<idc:field name="ProviderDescription">
!csProviderLocalContentServerLabel
</idc:field>
<idc:field name="InstanceMenuLabel">
Master_on_wharristest
</idc:field>
<idc:field name="InstanceDescription">
Master_on_wharristest
</idc:field>
<idc:field name="IntradocServerHostName">
wharristest
</idc:field>
<idc:field name="HttpRelativeWebRoot">
/stellent/
</idc:field>
<idc:field name="IsImplicitlySearched">
</idc:field>
<idc:field name="UserAccounts">
#all
</idc:field>
<idc:field name="IsLocalCollection">
true
</idc:field>
<idc:field name="Selected">
</idc:field>
<idc:field name="StatusMessage">
Success
</idc:field>
<idc:field name="ResultSetName">
Master_on_wharristest
</idc:field>
<idc:field name="SearchCgiWebUrl">
/idcplg/idc_cgi_isapi.dll/stellent/pxs
</idc:field>
</idc:row>
</idc:resultset>
</idc:document>
<idc:user dUser="sysadmin">
</idc:user>
</idc:service>
</SOAP-ENV:Body>
</SOAP-ENV:Envelope>

Calling Content Server Services with SOAP
Configuring Web Services with WSDL, SOAP, and the WSDL Generator 25-37
25.3.3.12 Get Table Data
The GET_TABLE service exports the specified table in the WebCenter Content
database.
■Exports the specified table by creating a result set and adding it to the serialized
HDA file. If the table is not found, the service will fail. It is up to the calling
program that is receiving the serialized HDA file to store this result set for later
use.
■The most likely error is a table name that does not exist. If this service is unable to
execute, an error message is displayed to the user.
25.3.3.12.1 Required Parameters These parameters must be specified.
25.3.3.12.2 SOAP Request
<?xml version='1.0' ?>
<SOAP-ENV:Envelope xmlns:SOAP-ENV="http://schemas.xmlsoap.org/soap/envelope/">
<SOAP-ENV:Body>
<idc:service xmlns:idc="http://www.oracle.com/IdcService/" IdcService="GET_TABLE">
<idc:document>
<idc:field name="tableName">
DocTypes
</idc:field>
</idc:document>
</idc:service>
</SOAP-ENV:Body>
</SOAP-ENV:Envelope>
25.3.3.12.3 Response
<?xml version='1.0' ?>
<SOAP-ENV:Envelope xmlns:SOAP-ENV="http://schemas.xmlsoap.org/soap/envelope/">
<SOAP-ENV:Body>
<idc:service xmlns:idc="http://www.oracle.com/IdcService/" IdcService="GET_TABLE">
<idc:document>
<idc:field name="tableName">
DocTypes
</idc:field>
<idc:field name="changedSubjects">
</idc:field>
<idc:field name="refreshSubjects">
</idc:field>
<idc:field name="loadedUserAttributes">
1
</idc:field>
<idc:field name="changedMonikers">
</idc:field>
<idc:field name="refreshSubMonikers">
</idc:field>
<idc:field name="refreshMonikers">
</idc:field>
Parameter Description
IdcService Must be set to GET_TABLE.
tableName The name of table to export.

Calling Content Server Services with SOAP
25-38 Oracle WebCenter Content Developer's Guide for Content Server
<idc:resultset name="DocTypes">
<idc:row dDocType="ADACCT" dDescription="Acme Accounting Department"
dGif="adacct.gif">
</idc:row>
<idc:row dDocType="ADCORP" dDescription="Acme Corporate Department"
dGif="adcorp.gif">
</idc:row>
<idc:row dDocType="ADENG" dDescription="Acme Engineering Department"
dGif="adeng.gif">
</idc:row>
<idc:row dDocType="ADHR" dDescription="Acme Human Resources Department"
dGif="adhr.gif">
</idc:row>
<idc:row dDocType="ADMFG" dDescription="Acme Manufacturing Department"
dGif="admfg.gif">
</idc:row>
<idc:row dDocType="ADMKT" dDescription="Acme Marketing Department"
dGif="admkt.gif">
</idc:row>
<idc:row dDocType="ADSALES" dDescription="Acme Sales Department"
dGif="adsales.gif">
</idc:row>
</idc:resultset>
</idc:document>
<idc:user dUser="sysadmin">
</idc:user>
</idc:service>
</SOAP-ENV:Body>
</SOAP-ENV:Envelope>
25.3.3.13 Get Criteria Workflow Information
The GET_CRITERIA_WORKFLOWS_FOR_GROUP service returns criteria workflow
information.
■Given a named security group, this service returns a list of workflows and related
steps.
■Returns the result sets WorkflowsForGroup and WorkflowStepsForGroup:
–WorkflowsForGroup lists all of the workflows for this group (dWfID,
dWfName).
–WorkflowStepsForGroup lists all of the steps in all of the workflows for
this group (dWfID, dWfName, dWfStepID, dWfStepName).
■Criteria workflows and subworkflows can be added, edited, enabled, disabled,
and deleted from the Criteria tab of the Workflow Admin administration applet.
■The most likely error is a named security group that does not exist or a user failing
the security check. The service throws reasonable exceptions for display to the
user in these situations.
25.3.3.13.1 Required Parameters These parameters must be specified.
Parameter Description
dSecurityGroup The security group such as PUBLIC or SECURE.
IdcService Must be set to GET_CRITERIA_WORKFLOWS_FOR_GROUPS.

Calling Content Server Services with SOAP
Configuring Web Services with WSDL, SOAP, and the WSDL Generator 25-39
25.3.3.13.2 SOAP Request
<?xml version="1.0" ?>
<SOAP-ENV:Envelope xmlns:SOAP-ENV="http://schemas.xmlsoap.org/soap/envelope/">
<SOAP-ENV:Body>
<idc:service xmlns:idc="http://www.oracle.com/IdcService/" IdcService="GET_
CRITERIA_WORKFLOWS_FOR_GROUP">
<idc:document dSecurityGroup="Public" />
</idc:service>
</SOAP-ENV:Body>
</SOAP-ENV:Envelope>
25.3.3.13.3 Response
<?xml version='1.0' ?>
<SOAP-ENV:Envelope xmlns:SOAP-ENV="http://schemas.xmlsoap.org/soap/envelope/">
<SOAP-ENV:Body>
<idc:service xmlns:idc="http://www.oracle.com/IdcService/" IdcService="GET_
CRITERIA_WORKFLOWS_FOR_GROUP">
<idc:document dSecurityGroup="Public">
<idc:field name="changedSubjects">
</idc:field>
<idc:field name="refreshSubjects">
</idc:field>
<idc:field name="loadedUserAttributes">
1
</idc:field>
<idc:field name="changedMonikers">
</idc:field>
<idc:field name="refreshSubMonikers">
</idc:field>
<idc:field name="refreshMonikers">
</idc:field>
<idc:resultset name="WorkflowStepsForGroup">
<idc:row>
<idc:field name="dWfID">
1
</idc:field>
<idc:field name="dWfName">
TestWorkflow
</idc:field>
<idc:field name="dWfStepID">
1
</idc:field>
<idc:field name="dWfStepName">
contribution
</idc:field>
</idc:row>
<idc:row>
<idc:field name="dWfID">
1
</idc:field>
<idc:field name="dWfName">
TestWorkflow
</idc:field>
<idc:field name="dWfStepID">
2
</idc:field>

Using SOAP Packets in Active Server Pages
25-40 Oracle WebCenter Content Developer's Guide for Content Server
<idc:field name="dWfStepName">
StepOne
</idc:field>
</idc:row>
</idc:resultset>
<idc:resultset name="WorkflowsForGroup">
<idc:row>
<idc:field name="dWfID">
1
</idc:field>
<idc:field name="dWfName">
TestWorkflow
</idc:field>
</idc:row>
</idc:resultset>
</idc:document>
<idc:user dUser="sysadmin">
</idc:user>
</idc:service>
</SOAP-ENV:Body>
</SOAP-ENV:Envelope>
25.4 Using SOAP Packets in Active Server Pages
You can execute Content Server IdcCommand services from an Active Server Page by
encapsulating a SOAP packet that defines the service to execute and the required
parameters. You must have appropriate permissions to execute the commands. Some
commands require administrative access, other commands may require only write
permission.
25.4.1 Sample SOAP Request
An Active Server Page can call a service from Content Server. The following
description of a sample service includes the required and optional parameters. It also
provides an XML-formatted version of the embedded SOAP request.
For more information about service calls, including required and optional parameters,
see Section 25.3.3, "Sample Service Calls with SOAP Response/Request."
In the following example, an XML-formatted SOAP request uses the GET_SEARCH_
RESULTS service to retrieve the search results for the passed query text.
<?xml version='1.0' ?>
<SOAP-ENV:Envelope xmlns:SOAP-ENV="http://schemas.xmlsoap.org/soap/envelope/">
<SOAP-ENV:Body>
<idc:service xmlns:idc="http://www.oracle.com/IdcService/" IdcService="GET_SEARCH_RESULTS">
<idc:document>
<idc:field name="QueryText">
dDocType <Substring> "ADSALES"
</idc:field>
</idc:document>
</idc:service>
</SOAP-ENV:Body>
</SOAP-ENV:Envelope>

Using SOAP Packets in Active Server Pages
Configuring Web Services with WSDL, SOAP, and the WSDL Generator 25-41
25.4.2 Sample Active Server Page
The embedded SOAP request forms the basis of the Active Server Page. The following
sample executes GET_SEARCH_RESULTS.
For more information about service calls and examples of SOAP response/request
messages, see Section 25.3.3, "Sample Service Calls with SOAP Response/Request."
<%
‘ Sample ASP page of sending a DOC_INFO Soap request.
Option Explicit
Response.Write("Search Results")
%>
<br><br>
<%
‘ Construct the Soap request.
Dim strSoapRequest, strQueryText
strQueryText = Request.Form("QueryText")
strQueryText = Server.HtmlEncode(strQueryText)
strSoapRequest = "<?xml version=’1.0’ ?>" _
& "<SOAP-ENV:Envelope xmlns:SOAP-ENV=""http://schemas.xmlsoap.org/soap/envelope/"">" _
& "<SOAP-ENV:Body>" _
& "<idc:service xmlns:idc=""http://www.oracle.com/IdcService/"" IdcService=""GET_SEARCH_
RESULTS"">" _
& "<idc:document>" _
& "<idc:field name=""QueryText"">" & strQueryText & "</idc:field>" _
& "<idc:field name=""SortField"">" & Request.Form("SortField") & "</idc:field>" _
& "<idc:field name=""SortOrder"">" & Request.Form("SortOrder") & "</idc:field>" _
& "<idc:field name=""ResultCount"">" & Request.Form("ResultCount") & "</idc:field>" _
& "<idc:field name=""Auth"">Internet</idc:field>" _
& "</idc:document>" _
& "</idc:service>" _
& "</SOAP-ENV:Body>" _
& "</SOAP-ENV:Envelope>"
‘ Send the Soap request.
Dim objXmlHttp
Set objXmlHttp = Server.CreateObject("MSXML2.ServerXMLHTTP")
objXmlHttp.open "POST", "http://localhost/stellent/idcplg", False, "sysadmin", "idc"
objXmlHttp.setRequestHeader "Content-Type", "text/xml; charset=utf-8"
objXmlHttp.send(strSoapRequest)
‘ Parse the Soap response.
Dim objXmlDoc
Set objXmlDoc = Server.CreateObject("Msxml2.DOMDocument")
objXmlDoc.async = False
objXmlDoc.Load objXmlHttp.responseXml
‘ Check for errors.
Dim strResponseError
strResponseError = objXmlDoc.parseError.reason
If strResponseError <> "" Then
Response.Write(objXmlHttp.ResponseText)
DisplayBackButton()
Response.End
End If

Using SOAP Packets in Active Server Pages
25-42 Oracle WebCenter Content Developer's Guide for Content Server
‘ Check for a fault string.
Dim objXmlFaultNode
Set objXmlFaultNode =
objXmlDoc.documentElement.selectSingleNode("//SOAP-ENV:Fault/faultstring")
If (Not (objXmlFaultNode Is Nothing)) Then
Response.Write(objXmlFaultNode.Text)
DisplayBackButton()
Response.End
End If
‘ Check the status code.
Dim objXmlStatusCodeNode, objXmlStatusMessageNode, strStatusCode, nStatusCode,
strStatusMessage
Set objXmlStatusCodeNode =
objXmlDoc.documentElement.selectSingleNode("//idc:field[@name=’StatusCode’]")
If (Not objXmlStatusCodeNode Is Nothing) Then
nStatusCode = CInt(objXmlStatusCodeNode.Text)
If (nStatusCode < 0) Then
Response.Write(objXmlDoc.documentElement.selectSingleNode("//idc:field[@name=’StatusMessage’]
").Text)
DisplayBackButton()
Response.End
End If
End If
‘ Display search results
Dim strDocName, strDocTitle, strDocType, strInDate, strComments, nCurRow, nTotalRows
Dim objXmlResultNodeList, objXmlCommentNode
Set objXmlResultNodeList =
objXmlDoc.documentElement.selectNodes("//idc:resultset[@name=’SearchResults’]/idc:row")
nTotalRows = objXmlResultNodeList.Length
%>
<table>
<tr>
<td><b>Content ID</b></td>
<td> </td>
<td><b>Title</b></td>
<td> </td>
<td><b>Type</b></td>
<td> </td>
<td><b>Release Date</b></td>
<td> </td>
<td><b>Comments</b></td>
</tr>
<%
For nCurRow = 0 To (nTotalRows - 1)
strDocName = GetXmlNodeValue(objXmlResultNodeList.Item(nCurRow), "dDocName")
strDocTitle = GetXmlNodeValue(objXmlResultNodeList.Item(nCurRow), "dDocTitle")
strDocType = GetXmlNodeValue(objXmlResultNodeList.Item(nCurRow), "dDocType")
strInDate = GetXmlNodeValue(objXmlResultNodeList.Item(nCurRow), "dInDate")
strComments = GetXmlNodeValue(objXmlResultNodeList.Item(nCurRow), "xComments")
%>

Using SOAP Packets in Active Server Pages
Configuring Web Services with WSDL, SOAP, and the WSDL Generator 25-43
<tr>
<td><%=strDocName%></td>
<td> </td>
<td><%=strDocTitle%></td>
<td> </td>
<td><%=strDocType%></td>
<td> </td>
<td><%=strInDate%></td>
<td> </td>
<td><%=strComments%></td>
</tr>
<%
Next
%>
</table>
<%
DisplayBackButton()
‘----------------------------
Function GetXmlNodeValue(objXmlRowNode, strNodeName)
‘----------------------------
Dim objXmlNode, objXmlNodeValue
Set objXmlNode = objXmlRowNode.selectSingleNode("@" & strNodeName)
If (objXmlNode Is Nothing) Then
Set objXmlNode = objXmlRowNode.selectSingleNode("idc:field[@name=’" & strNodeName & "‘]")
End If
If (Not (objXmlNode Is Nothing)) Then
GetXmlNodeValue = objXmlNode.Text
End If
‘----------------------------
End Function
‘----------------------------
‘----------------------------
Sub DisplayBackButton()
‘----------------------------
%>
<form method=POST action="request.asp">
<table>
<tr>
<td><input type=submit value="Back"></td>
</tr>
</table>
</form>
<%
‘----------------------------
End Sub
‘---------------------------
%>

Generating WSDL Files to Access WebCenter Content
25-44 Oracle WebCenter Content Developer's Guide for Content Server
25.5 Generating WSDL Files to Access WebCenter Content
You can generate WSDL files for interfacing with WebCenter Content services.
25.5.1 Understanding WSDL Files
WSDL files provide the ability to pass data that can be understood by Content Server
services, which enables access to the content and content management functions
within WebCenter Content. The WSDL files provided with the component are stored
in the IntradocDir/weblayout/groups/secure/wsdl/custom directory.
These WSDL files are provided with the WSDL Generator component:
■CheckIn.wsdl
■DocInfo.wsdl
■GetFile.wsdl
■MetaData.wsdl
■PortalInfo.wsdl
■Search.wsdl
■Subscription.wsdl
■Workflow.wsdl
Additional WSDL files can be generated using the Soap Custom WSDL administrative
pages. See Section 25.5.2, "Sample WSDL File," for additional information.
25.5.1.1 WSDL File Structure
WSDL files are formally structured with elements that contain a description of the data
to be passed to the web service. This structure enables both the sending application
and the receiving application to interpret the data being exchanged.
WSDL elements contain a description of the operation to perform on the data and a
binding to a protocol or transport. This permits the receiving application to both
process the data and interpret how to respond or return data. Additional subelements
may be contained within each WSDL element.
The WSDL file structure includes these major elements:
■Data Types: Generally in the form of XML schema to be used in the messages.
■Message: The definition of the data in the form of a message either as a complete
document or as arguments to be mapped to a method invocation.
■Port Type: A set of operations mapped to an address. This defines a collection of
operations for a binding.
■Binding: The actual protocol and data formats for the operations and messages
defined for a particular port type.
■Service and Port: The service maps the binding to the port and the port is the
combination of a binding and the network address for the communication
exchange.
Note: The following code fragments are from the DocInfo.wsdl file
provided with the WSDL Generator component. For a complete
WSDL file, see Section 25.5.2, "Sample WSDL File."

Generating WSDL Files to Access WebCenter Content
Configuring Web Services with WSDL, SOAP, and the WSDL Generator 25-45
25.5.1.1.1 Data Type The Data Type <types> defines the complex types and associated
elements. Web services supports both simple data types (such as string, integer, or
boolean) and complex data types. A complex type is a structured XML document that
contains several simple types or an array of subelements.
The following code fragment for the ContentInfo set defines the Name, Title, Author,
and Group elements and specifies that they are strings.
<s:complexType name="ContentInfo">
<s:sequence>
<s:element minOccurs="0" maxOccurs="1" name="dDocName" type="s:string"/>
<s:element minOccurs="0" maxOccurs="1" name="dDocTitle" type="s:string"/>
<s:element minOccurs="0" maxOccurs="1" name="dDocType" type="s:string"/>
<s:element minOccurs="0" maxOccurs="1" name="dDocAuthor" type="s:string"/>
<s:element minOccurs="0" maxOccurs="1" name="dSecurityGroup" type="s:string"/>
</s:sequence>
</s:complexType>
25.5.1.1.2 Message The Message <message> defines the data as arguments to be
mapped to a method invocation.
<message name="DocInfoByIDSoapIn">
<part name="parameters" element="s0:DocInfoByID" />
</message>
<message name="DocInfoByIDSoapOut">
<part name="parameters" element="s0:DocInfobyIDResponse" />
</message>
25.5.1.1.3 Port Type The Port Type <portType> defines a collection of operations for a
binding. The DocInfo.wsdl file provides the DocInfoSoap and the DocInfo operation
name (method name) with I/O information for processing the message.
<portType name="DocInfoSoap">
<operation name="DocInfoByID">
<input message="s0:DocInfoByIDSoapIn" />
<output message="s0:DocInfoByIDSoapOut" />
</operation>
</portType>
25.5.1.1.4 Binding The binding <binding> defines the actual protocol and data formats
for the operations and messages for the particular port type.
<binding name="DocInfoSoap" type="s0:DocInfoSoap">
<soap:binding transport="http://schemas.xmlsoap.org/soap/http" style="document" />
<operation name="DocInfoByID">
<soap:operation soapAction="http://wwww.oracle.com/Soap/DocInfo/" style="document" />
<input>
<soap:body use="literal" />
</input>
<output>
<soap:body use="literal" />
</output>
</operation>
</binding>
Note: While a port type is a collection of operations (like classes in
Java), WSDL is an independent data abstraction that provides more
functionality than simply mapping to .NET, EJB, or CORBA objects.

Generating WSDL Files to Access WebCenter Content
25-46 Oracle WebCenter Content Developer's Guide for Content Server
25.5.1.1.5 Service and Port The service <service> maps the binding to the port. The port
is the combination of a binding and the network address for the communication
exchange. The port is used to expose a set of port types (operations) on the defined
transport.
<service name="DocInfo">
<port name="DocInfoSoap" binding="s0:DocInfoSoap">
<soap:address location="http://myhost.example.com:16200/_dav/cs/idcplg" />
</port>
</service>
25.5.2 Sample WSDL File
This sample code presents the complete DocInfo.wsdl file. This file and the
CheckIn.wsdl, GetFile.wsdl, and Search.wsdl files are found in the
IntradocDir/weblayout/groups/secure/wsdl/custom directory for the Content Server
instance.
<?xml version='1.0' encoding='utf-8' ?>
<definitions xmlns:http="http://schemas.xmlsoap.org/wsdl/http/"
xmlns:soap="http://schemas.xmlsoap.org/wsdl/soap/"
xmlns:s="http://www.w3.org/2001/XMLSchema"
xmlns:s0="http://wwww.oracle.com/DocInfo/"
targetNamespace="http://wwww.oracle.com/DocInfo/"
xmlns="http://schemas.xmlsoap.org/wsdl/">
<types>
<s:schema elementFormDefault="qualified" targetNamespace="http://www.oracle.com/DocInfo/">
<s:element name="DocInfoByID">
<s:complexType>
<s:sequence>
<s:element minOccurs="0" maxOccurs="1" name="dID" type="s:int" />
<s:element minOccurs="0" maxOccurs="1" name="extraProps" type="s0:IdcPropertyList" />
</s:sequence>
</s:complexType>
</s:element>
<s:element name="DocInfoByIDResponse">
<s:complexType>
<s:sequence>
<s:element minOccurs="0" maxOccurs="1" name="DocInfoByIDResult" type="s0:DocInfoByIDResult"
/>
</s:sequence>
</s:complexType>
</s:element>
<s:complexType name="DocInfoByIDResult">
<s:sequence>
<s:element minOccurs="0" maxOccurs="unbounded" name="ContentInfo" type="s0:ContentInfo" />
<s:element minOccurs="0" maxOccurs="unbounded" name="Revisions" type="s0:Revisions" />
<s:element minOccurs="0" maxOccurs="unbounded" name="WorkflowInfo" type="s0:WorkflowInfo" />
<s:element minOccurs="0" maxOccurs="1" name="StatusInfo" type="s0:StatusInfo" />
</s:sequence>
</s:complexType>
<s:element name="DocInfoByName">
<s:complexType>
<s:sequence>
<s:element minOccurs="0" maxOccurs="1" name="dDocName" type="s:string" />
<s:element minOccurs="0" maxOccurs="1" name="extraProps" type="s0:IdcPropertyList" />
</s:sequence>
</s:complexType>
</s:element>
Tip: You can add &IsSoap=1 to the URL of a Content Server
browser window to view the underlying SOAP code for that page.

Generating WSDL Files to Access WebCenter Content
Configuring Web Services with WSDL, SOAP, and the WSDL Generator 25-47
<s:element name="DocInfoByNameResponse">
<s:complexType>
<s:sequence>
<s:element minOccurs="0" maxOccurs="1" name="DocInfoByNameResult"
type="s0:DocInfoByNameResult" />
</s:sequence>
</s:complexType>
</s:element>
<s:complexType name="DocInfoByNameResult">
<s:sequence>
<s:element minOccurs="0" maxOccurs="unbounded" name="ContentInfo" type="s0:ContentInfo" />
<s:element minOccurs="0" maxOccurs="unbounded" name="Revisions" type="s0:Revisions" />
<s:element minOccurs="0" maxOccurs="unbounded" name="WorkflowInfo" type="s0:WorkflowInfo" />
<s:element minOccurs="0" maxOccurs="1" name="StatusInfo" type="s0:StatusInfo" />
</s:sequence>
</s:complexType>
<s:complexType name="ContentInfo">
<s:sequence>
<s:element minOccurs="0" maxOccurs="1" name="dDocName" type="s:string" />
<s:element minOccurs="0" maxOccurs="1" name="dDocTitle" type="s:string" />
<s:element minOccurs="0" maxOccurs="1" name="dDocType" type="s:string" />
<s:element minOccurs="0" maxOccurs="1" name="dDocAuthor" type="s:string" />
<s:element minOccurs="0" maxOccurs="1" name="dSecurityGroup" type="s:string" />
<s:element minOccurs="0" maxOccurs="1" name="dDocAccount" type="s:string" />
<s:element minOccurs="0" maxOccurs="1" name="dID" type="s:int" />
<s:element minOccurs="0" maxOccurs="1" name="dRevClassID" type="s:int" />
<s:element minOccurs="0" maxOccurs="1" name="dRevisionID" type="s:int" />
<s:element minOccurs="0" maxOccurs="1" name="dRevLabel" type="s:string" />
<s:element minOccurs="0" maxOccurs="1" name="dIsCheckedOut" type="s:boolean" />
<s:element minOccurs="0" maxOccurs="1" name="dCheckoutUser" type="s:string" />
<s:element minOccurs="0" maxOccurs="1" name="dCreateDate" type="s:string" />
<s:element minOccurs="0" maxOccurs="1" name="dInDate" type="s:string" />
<s:element minOccurs="0" maxOccurs="1" name="dOutDate" type="s:string" />
<s:element minOccurs="0" maxOccurs="1" name="dStatus" type="s:string" />
<s:element minOccurs="0" maxOccurs="1" name="dReleaseState" type="s:string" />
<s:element minOccurs="0" maxOccurs="1" name="dFlag1" type="s:string" />
<s:element minOccurs="0" maxOccurs="1" name="dWebExtension" type="s:string" />
<s:element minOccurs="0" maxOccurs="1" name="dProcessingState" type="s:string" />
<s:element minOccurs="0" maxOccurs="1" name="dMessage" type="s:string" />
<s:element minOccurs="0" maxOccurs="1" name="dReleaseDate" type="s:string" />
<s:element minOccurs="0" maxOccurs="1" name="dRendition1" type="s:string" />
<s:element minOccurs="0" maxOccurs="1" name="dRendition2" type="s:string" />
<s:element minOccurs="0" maxOccurs="1" name="dIndexerState" type="s:string" />
<s:element minOccurs="0" maxOccurs="1" name="dPublishType" type="s:string" />
<s:element minOccurs="0" maxOccurs="1" name="dPublishState" type="s:string" />
<s:element minOccurs="0" maxOccurs="1" name="dDocID" type="s:int" />
<s:element minOccurs="0" maxOccurs="1" name="dIsPrimary" type="s:boolean" />
<s:element minOccurs="0" maxOccurs="1" name="dIsWebFormat" type="s:boolean" />
<s:element minOccurs="0" maxOccurs="1" name="dLocation" type="s:string" />
<s:element minOccurs="0" maxOccurs="1" name="dOriginalName" type="s:string" />
<s:element minOccurs="0" maxOccurs="1" name="dFormat" type="s:string" />
<s:element minOccurs="0" maxOccurs="1" name="dExtension" type="s:string" />
<s:element minOccurs="0" maxOccurs="1" name="dFileSize" type="s:int" />
<s:element minOccurs="0" maxOccurs="1" name="CustomDocMetaData" type="s0:IdcPropertyList" />
</s:sequence>
</s:complexType>

Generating WSDL Files to Access WebCenter Content
25-48 Oracle WebCenter Content Developer's Guide for Content Server
<s:complexType name="Revisions">
<s:sequence>
<s:element minOccurs="0" maxOccurs="1" name="dFormat" type="s:string" />
<s:element minOccurs="0" maxOccurs="1" name="dInDate" type="s:string" />
<s:element minOccurs="0" maxOccurs="1" name="dOutDate" type="s:string" />
<s:element minOccurs="0" maxOccurs="1" name="dStatus" type="s:string" />
<s:element minOccurs="0" maxOccurs="1" name="dProcessingState" type="s:string" />
<s:element minOccurs="0" maxOccurs="1" name="dRevLabel" type="s:string" />
<s:element minOccurs="0" maxOccurs="1" name="dID" type="s:int" />
<s:element minOccurs="0" maxOccurs="1" name="dDocName" type="s:string" />
<s:element minOccurs="0" maxOccurs="1" name="dRevisionID" type="s:int" />
</s:sequence>
</s:complexType>
<s:complexType name="WorkflowInfo">
<s:sequence>
<s:element minOccurs="0" maxOccurs="1" name="dWfID" type="s:int" />
<s:element minOccurs="0" maxOccurs="1" name="dDocName" type="s:string" />
<s:element minOccurs="0" maxOccurs="1" name="dWfDocState" type="s:string" />
<s:element minOccurs="0" maxOccurs="1" name="dWfComputed" type="s:string" />
<s:element minOccurs="0" maxOccurs="1" name="dWfCurrentStepID" type="s:int" />
<s:element minOccurs="0" maxOccurs="1" name="dWfDirectory" type="s:string" />
<s:element minOccurs="0" maxOccurs="1" name="dClbraName" type="s:string" />
<s:element minOccurs="0" maxOccurs="1" name="dWfName" type="s:string" />
<s:element minOccurs="0" maxOccurs="1" name="dWfDescription" type="s:string" />
<s:element minOccurs="0" maxOccurs="1" name="dCompletionDate" type="s:string" />
<s:element minOccurs="0" maxOccurs="1" name="dSecurityGroup" type="s:string" />
<s:element minOccurs="0" maxOccurs="1" name="dWfStatus" type="s:string" />
<s:element minOccurs="0" maxOccurs="1" name="dWfType" type="s:string" />
<s:element minOccurs="0" maxOccurs="1" name="dProjectID" type="s:string" />
<s:element minOccurs="0" maxOccurs="1" name="dIsCollaboration" type="s:boolean" />
</s:sequence>
</s:complexType>
<s:complexType name="StatusInfo">
<s:sequence>
<s:element minOccurs="0" maxOccurs="1" name="statusCode" type="s:int" />
<s:element minOccurs="0" maxOccurs="1" name="statusMessage" type="s:string" />
</s:sequence>
</s:complexType>
<s:complexType name="IdcPropertyList">
<s:sequence>
<s:element minOccurs="0" maxOccurs="unbounded" name="property" type="s0:IdcProperty" />
</s:sequence>
</s:complexType>
<s:complexType name="IdcProperty">
<s:sequence>
<s:element minOccurs="0" maxOccurs="1" name="name" type="s:string" />
<s:element minOccurs="0" maxOccurs="1" name="value" type="s:string" />
</s:sequence>
</s:complexType>
</s:schema>
</types>
<message name="DocInfoByIDSoapIn">
<part name="parameters" element="s0:DocInfoByID" />
</message>
<message name="DocInfoByIDSoapOut">
<part name="parameters" element="s0:DocInfoByIDResponse" />
</message>
<message name="DocInfoByNameSoapIn">
<part name="parameters" element="s0:DocInfoByName" />
</message>
<message name="DocInfoByNameSoapOut">
<part name="parameters" element="s0:DocInfoByNameResponse" />
</message>

Generating WSDL Files to Access WebCenter Content
Configuring Web Services with WSDL, SOAP, and the WSDL Generator 25-49
<portType name="DocInfoSoap">
<operation name="DocInfoByID">
<input message="s0:DocInfoByIDSoapIn" />
<output message="s0:DocInfoByIDSoapOut" />
</operation>
<operation name="DocInfoByName">
<input message="s0:DocInfoByNameSoapIn" />
<output message="s0:DocInfoByNameSoapOut" />
</operation>
</portType>
<binding name="DocInfoSoap" type="s0:DocInfoSoap">
<soap:binding transport="http://schemas.xmlsoap.org/soap/http" style="document" />
<operation name="DocInfoByID">
<soap:operation soapAction="http://www.oracle.com/DocInfo/" style="document" />
<input>
<soap:body use="literal" />
</input>
<output>
<soap:body use="literal" />
</output>
</operation>
<operation name="DocInfoByName">
<soap:operation soapAction="http://www.oracle.com/DocInfo/" style="document" />
<input>
<soap:body use="literal" />
</input>
<output>
<soap:body use="literal" />
</output>
</operation>
</binding>
<service name="DocInfo">
<port name="DocInfoSoap" binding="s0:DocInfoSoap">
<soap:address location="http://myhost.example.com:16200/_dav/cs/idcplg/idc_cgi_isapi.dll" />
</port>
</service>
</definitions>
25.5.3 Generating WSDL Files
When the WSDL Generator component is installed and enabled during Oracle
WebCenter Content installation, several folders and related HDA files are generated
that expose several services as web services. Two directories are created in the
IntradocDir/data/soap directory. The generic directory contains a
generic.hda file, and the custom directory contains a wsdl_custom.hda file.
Administrators can customize or add WSDL files using the Soap Wsdl administration
pages. These pages are accessed by clicking the Soap WSDL link from the
Administration section of the Admin Applet page.
For step-by-step instructions on creating and editing a custom WSDL using the Soap
Custom Wsdl administration pages, see Section 25.6, "Customizing WSDL Files."
Note: The WSDL Generator component must be enabled to generate
WSDL files.

Customizing WSDL Files
25-50 Oracle WebCenter Content Developer's Guide for Content Server
25.5.4 Generating Proxy Class from WSDL Files
Using the WSDL files, developers may choose to create proxy classes to plug into a
development tool. A number of software products and tool kits are available for
converting WSDL files to programming class files in languages such as Java, Visual
Basic, and C#. For example, Apache AXIS provides a SOAP to Java toolkit, and
Microsoft .NET Development Environment provides functionality to convert WSDL
files to C#.
If you are using Microsoft .NET, you can use utilitywsdl.exe to generate the proxy
classes:
wsdl /l:CS DocInfo.wsdl
This utility generates the file DocInfoService.cs (C# class) which contains the class
DocInfoService and the function DocInfo with the parameters specified. The return
value is the DocInfoSet class, which is all the response parameters specified, along
with ErrorCode and ErrorMessage values. If the ErrorCode is less than zero, an error
has occurred in the service call, and you can see the specifics of it in the value
ErrorMessage.
25.6 Customizing WSDL Files
The Soap Custom Wsdl administration pages provide an administrator with the ability
to edit and customize WSDL files. This chapter provides an administrative tutorial
that gives step-by-step instructions on creating and editing a custom WSDL.
The WSDL Generator component must be enabled to generate WSDL files. In addition
to the WSDL files provided with the WSDL Generator component, you can generate
additional WSDL files for any WebCenter Content service. See Section 25.5.3,
"Generating WSDL Files," for additional information.
For a list of available services and the required parameters, see the Oracle WebCenter
Content Services Reference Guide.
To create and edit a custom WSDL file with the Soap Custom WSDL
administration pages:
1. In a web browser, log in to Oracle WebCenter Content Server as an administrator.
2. From the Administration tray or menu, choose Soap Wsdls.
This option displays the Wsdl List page, which Figure 25–3 shows.
Note: In addition to the WSDL files provided with the WSDL
Generator component, you can generate WSDL files for any
WebCenter Content service. For more information, see Section 25.5.3,
"Generating WSDL Files."
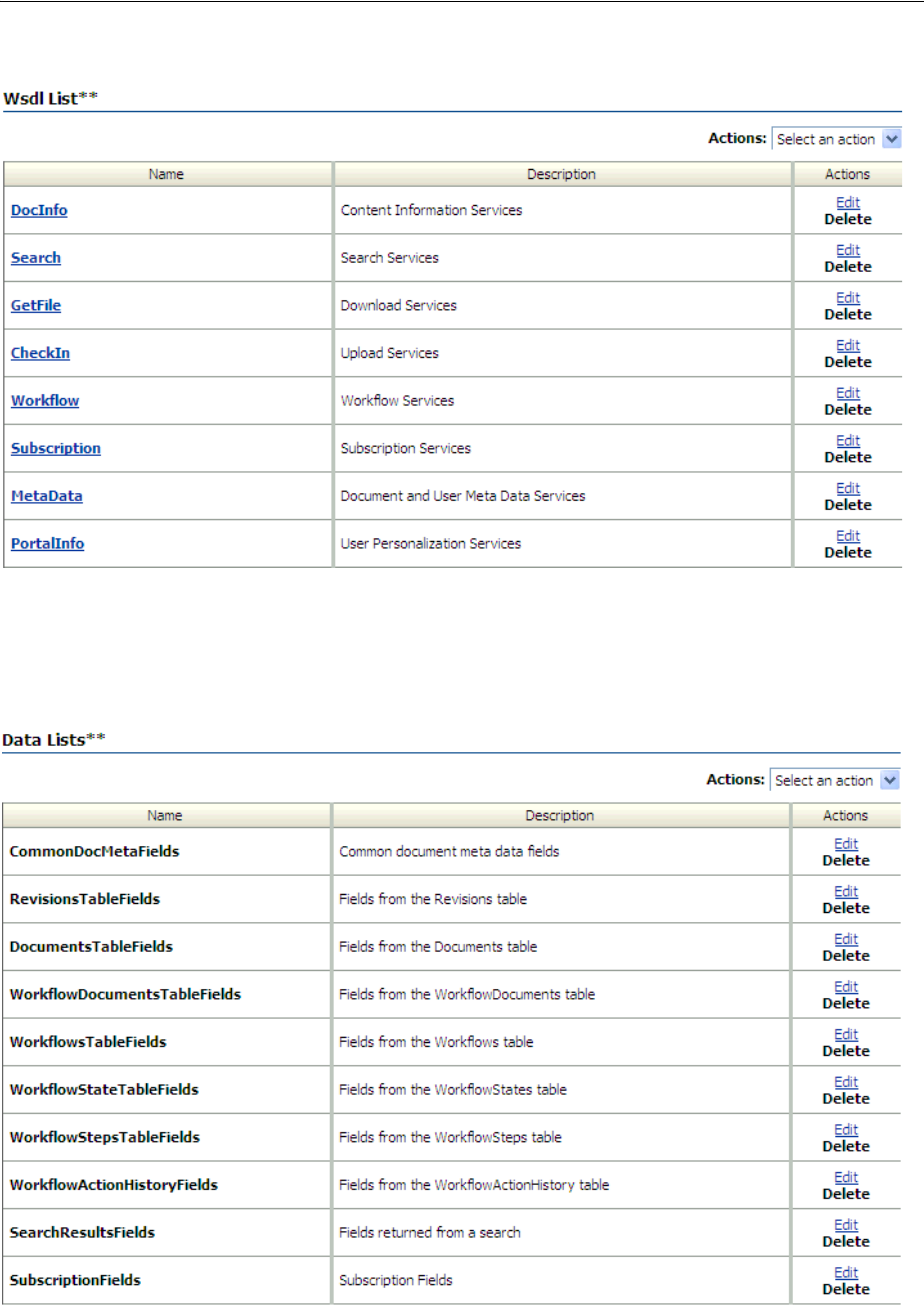
Customizing WSDL Files
Configuring Web Services with WSDL, SOAP, and the WSDL Generator 25-51
Figure 25–3 Wsdl List Page
3. From the Actions menu, choose Data Lists.
This option displays the Data Lists page, which Figure 25–4 shows.
Figure 25–4 Data Lists Page

Customizing WSDL Files
25-52 Oracle WebCenter Content Developer's Guide for Content Server
Data Lists are global lists of data that can be used with complex types, service
parameters, or other Data Lists. When a Data List is specified as a parameter or a
subtype of a complex type, all the subtypes of the Data List will appear as data
types. Data Lists are defined once but can be referenced multiple times with
different WSDLs and services. All the Data Lists have a prefix of "d:" in the data
type list.
4. Select Add Data List from the Actions menu.
The Add Data List page is displayed.
5. Enter the following information:
Name: UserMetaFields
Description: User Metadata Fields
6. Click Add.
7. In the Data List Elements Name column, enter the following names for user
metadata fields:
■dName
■dFullName
■dPassword
■dEmail
■dUserAuthType
For each name, choose field:string from the menu in the Type column, and
make sure Enabled is selected, as Figure 25–5 shows.
Figure 25–5 Data List Elements
8. Click Update.
You are returned to the updated Data Lists page. Note that UserMetaFields
now appears at the bottom of the list.
9. Select Wsdl List from the Actions menu.
The Wsdl List page is displayed again, as Figure 25–6 shows.
Note: System-specific WSDLs cannot be deleted. You can, however,
edit the WSDL and enable or disable the complex type elements for
that WSDL.
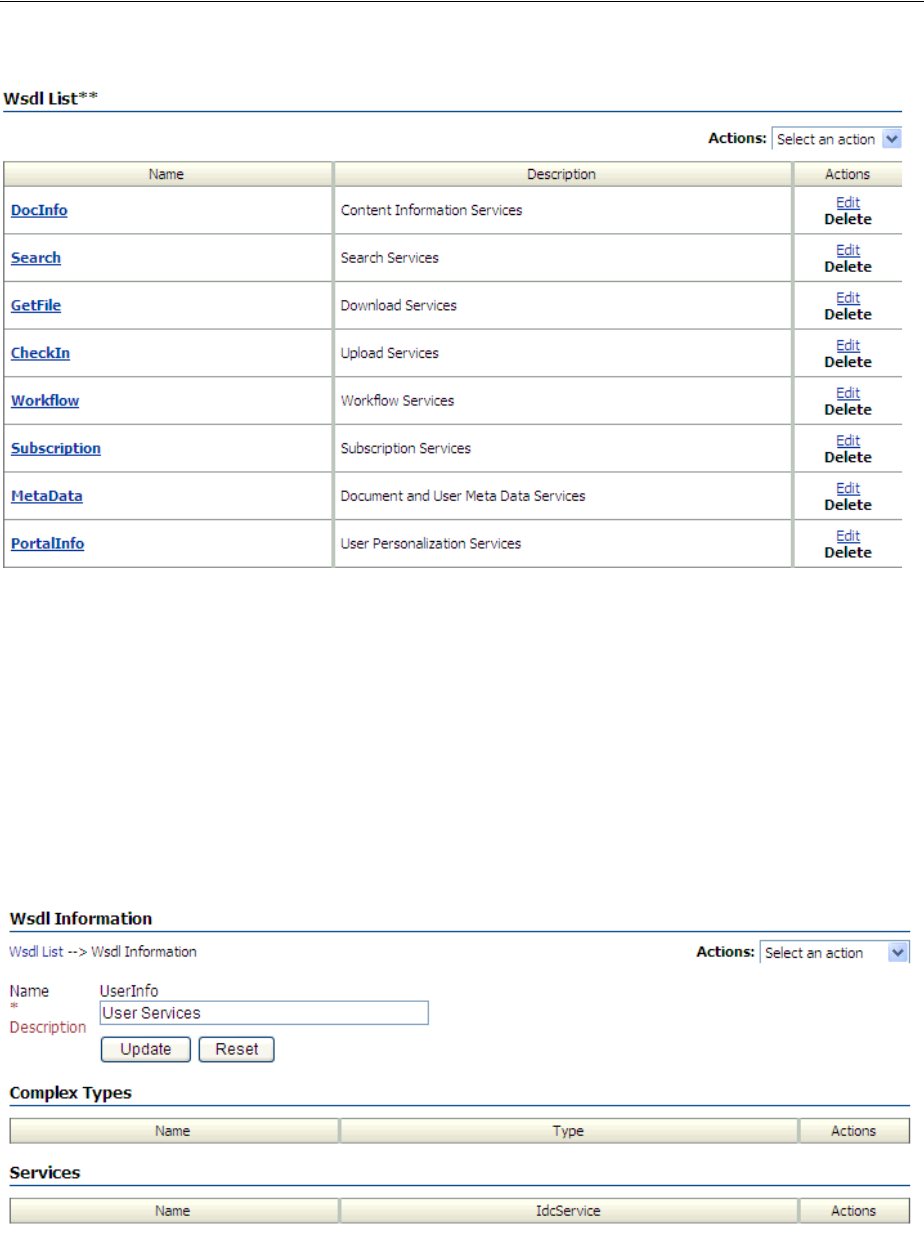
Customizing WSDL Files
Configuring Web Services with WSDL, SOAP, and the WSDL Generator 25-53
Figure 25–6 Wsdl List Page Redisplayed
10. Select Add Wsdl from the Actions menu.
The Add Wsdl page is displayed.
11. Enter the following information:
Name: UserInfo
Description: User Services
12. Click Add.
The Wsdl Information page is displayed, as Figure 25–7 shows.
Figure 25–7 Wsdl Information Page
13. Select Add Complex Type from the Actions menu.
The Add Complex Type page is displayed.
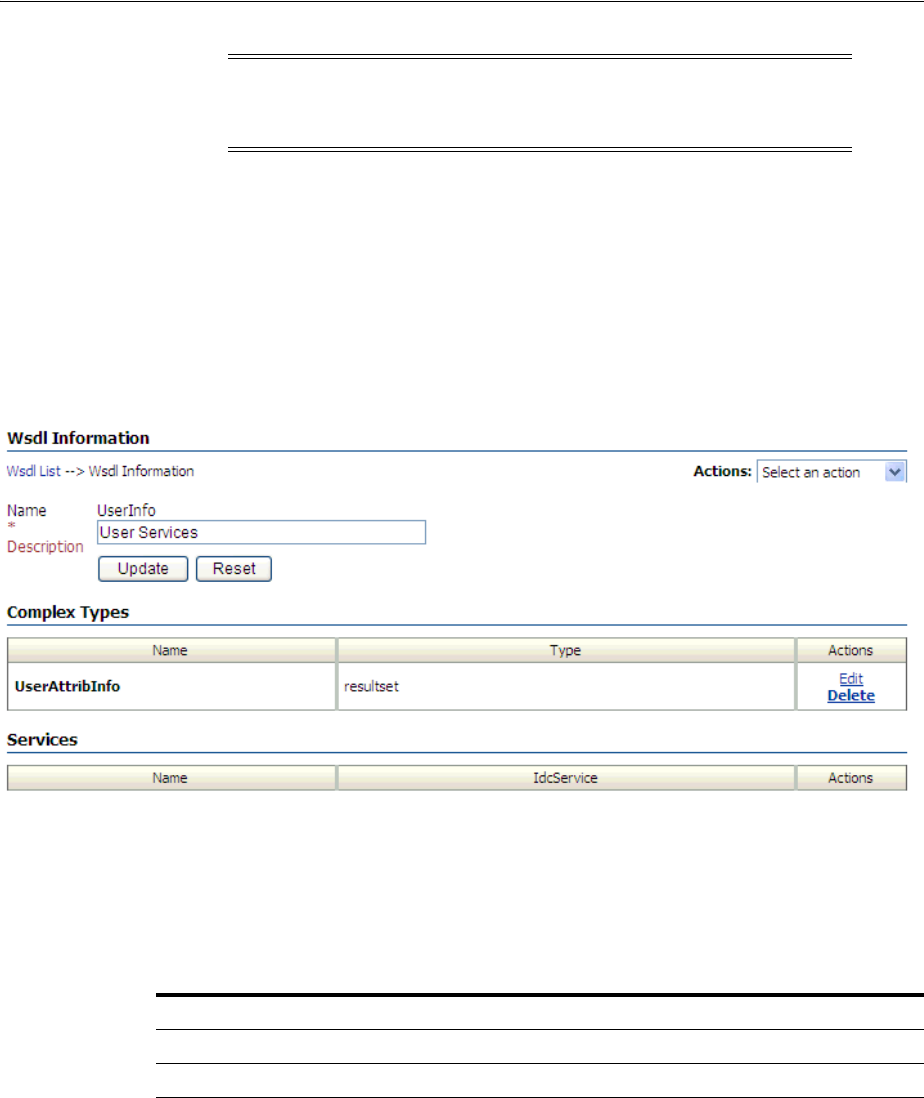
Customizing WSDL Files
25-54 Oracle WebCenter Content Developer's Guide for Content Server
14. Enter the following Complex Type information:
Name: UserAttribInfo
Type: select resultset from the menu
15. Click Add.
The Wsdl Information page is displayed again, as Figure 25–8 shows.
Figure 25–8 Wsdl Information Page Redisplayed
16. Select Edit from the UserAttribInfo line.
The Complex Type Information/Complex Type Elements page is displayed.
17. Enter the following Complex Type Elements, and select the Type value for each
one from the menu.
18. Click Update in the Complex Type Elements section.
You are returned to the updated Wsdl Information page. Note that User
AttribInfo now appears as a complex type.
19. Select Add Service from the Actions menu.
The Add Service page is displayed.
Note: Complex types contain other data types as subtypes. After
these are created, any service in the WSDL can use these complex
types as parameters.
Name Type Idc Name
dUserName field:string
AttributeInfo field:string
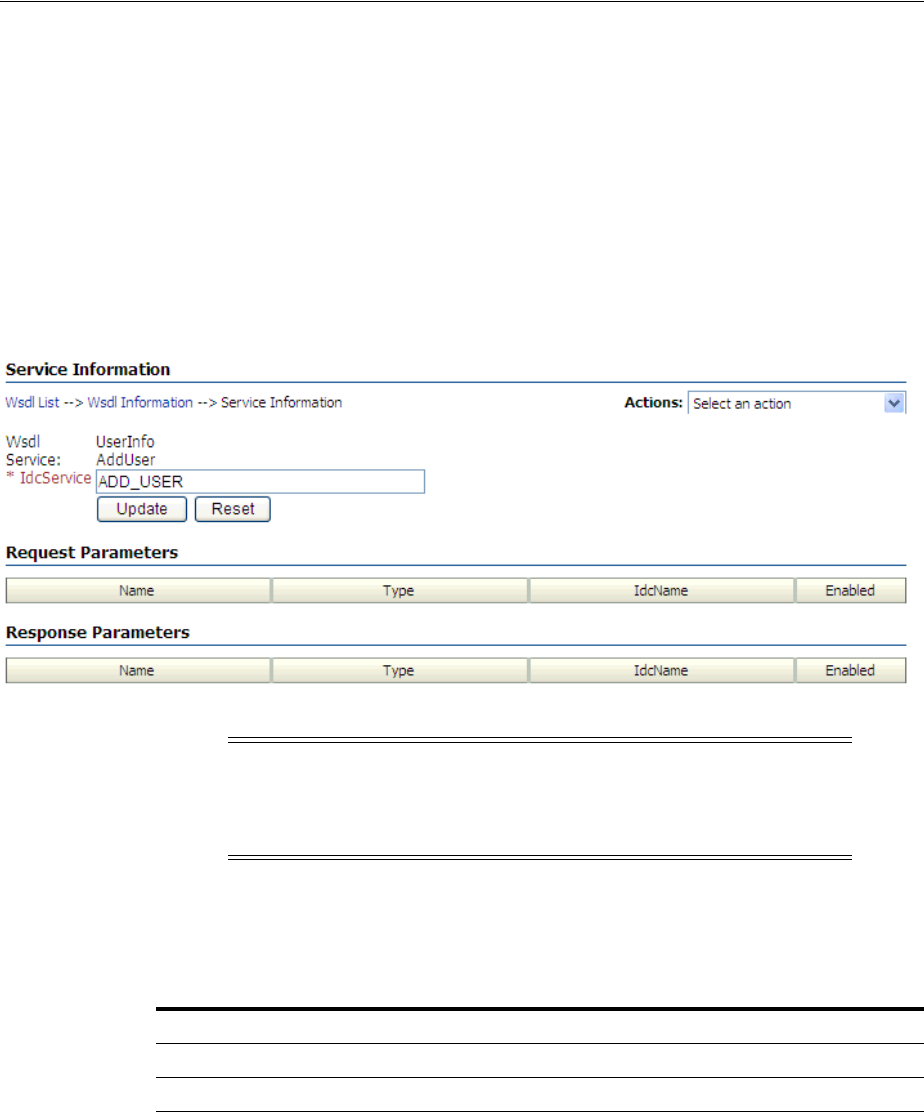
Customizing WSDL Files
Configuring Web Services with WSDL, SOAP, and the WSDL Generator 25-55
20. Enter the following information:
Name: AddUser
IdcService: ADD_USER
21. Click Add.
The Wsdl Information page is displayed.
22. Select Edit from the AddUser Service line.
This option displays the Service Information page, which Figure 25–9 shows.
Figure 25–9 Service Information Page
23. Select Update Request Parameters from the Actions menu.
The Request Parameters page is displayed.
24. Enter the following information, selecting the Type from the menu.
25. Click Update.
You are returned to the updated Service Information page. Note that DataList
and CustomUserData now appear in the Request Parameters section.
26. Click Update.
You are returned to the updated Wsdl Information page, showing the service that
you just added.
27. Click Update again.
Note: When you create a WSDL, you create services that correspond
to the IdcServices feature of Content Server. You also specify the
request and response parameters that you want the service to pass
and receive from the Web Service call.
Name Type Idc Name
DataList d:UserMetaFields
CustomUserData propertylist:CustomUserMeta

Customizing WSDL Files
25-56 Oracle WebCenter Content Developer's Guide for Content Server
You are returned to the updated Wsdl List page. UserInfo appears at the bottom of
the list.
28. Select Generate Wsdls from the Actions menu.
A confirmation message displays after the Wsdls are generated successfully.
29. Click Back.
You are returned to the Wsdl List page.
30. Click the UserInfo link in the Name column.
The source code for the generated Wsdl file is displayed (a portion is shown in
Example 25–12).
Example 25–12 Partial Source Code, Wsdl File
<?xml version="1.0" encoding="utf-8" ?>
- <definitions xmins:http="http://schemas.xmlsoap.org/wsdl/http/"
xmlns:soap="http://schemas.smlsoap.org/wsdl/soap/"
xmlns:s="http://www.w3.org/2001/XMLSchema"
xmlns:s0="http://www.example.com/UserInfo/"
targetNamespace="http://www.example.com/UserInfo/"
xmlns="http://schemas.xmlsoap.org/wsdl/">
- <types>
- <s:schema elementFormDefault="qualified"
targetNamespace="http://www.example.com/UserInfo/">
- <s:element name="AddUser">
- <s:complexType>
- <s:sequence>
<s:element minOccurs="0" maxOccurs="1" name="dName"
type="s:string" />
<s:element minOccurs="0" maxOccurs="1" name="dFullName"
type="s:string" />
<s:element minOccurs="0" maxOccurs="1" name="dPassword"
type="s:string" />
<s:element minOccurs="0" maxOccurs="1" name="dEmail"
type="s:string" />
<s:element minOccurs="0" maxOccurs="1" name="dUserAuthType"
type="s:string: />
<s:element minOccurs="0" maxOccurs="1" name="CustomUserData"
type="s0:IdcPropertyList" />
<s:element minOccurs="0" maxOccurs="1" name="extraProps"
type="s0:IdcPropertyList" />
</s:sequence>
</s:complexType>
</s:element>
31. Click the browser Back button.
You are returned to the Soap Custom Wsdl page.
Tip: You can right click View and save the WSDL file to your
desktop (for use with .NET, and so on). However, be sure to save the
file with a .wsdl file extension rather than the default .xml file
extension.

26
Customizing the DesktopTag Component 26-1
26Customizing the DesktopTag Component
This chapter describes how to customize the DesktopTag component of Oracle
WebCenter Content Server to specify properties for checked out versions of Microsoft
Word, Excel, and PowerPoint files.
This chapter includes the following sections:
■Section 26.1, "About the DesktopTag Component"
■Section 26.2, "Enabling the DesktopTag and OracleCleanContent Components"
■Section 26.3, "Checking Out and Checking In Content Items with DesktopTag"
■Section 26.4, "Adding Properties to Checked-Out Content Items"
■Section 26.5, "Configuring the DesktopTag Component"
26.1 About the DesktopTag Component
DesktopTag is a Content Server component that manages custom properties in files
created using the default formats of Microsoft Office applications (2002 or later
versions). The component adds custom properties to Word documents (DOC, DOCX,
and DOT files), Excel spreadsheets (XLS, XLSX, and XLT files), and PowerPoint
presentations (PPT and PPTX files) when they are checked out of Content Server, and
removes this information when they are checked in again.
The properties to be added to the Microsoft Office files are specified in the DesktopTag
configuration file. For more information, see Section 26.5, "Configuring the
DesktopTag Component."
The custom properties provide information about where a content item resides in
Content Server so that the file can be checked in to the right location, with the right
content management parameters, and so on. This is particularly useful if the content
item is processed outside of Content Server after check-out; for example, in an external
workflow (that is, one that is not managed by Content Server). Also, the information
can be exposed to users; for example, in the task area of Microsoft Office applications.
DesktopTag uses the Oracle Clean Content technology to add custom properties to and
remove them from Microsoft Office files.

Enabling the DesktopTag and OracleCleanContent Components
26-2 Oracle WebCenter Content Developer's Guide for Content Server
26.2 Enabling the DesktopTag and OracleCleanContent Components
The DesktopTag component is included with Content Server 11gR1. It must be enabled
on Content Server because it is not enabled by default. The DesktopTag component
requires that the OracleCleanContent component is enabled as well. The
OracleCleanContent component is enabled with typical Content Server installations.
You can enable components using Component Manager, which is launched from the
Content Admin Server page. For more information about enabling components, see
"Enabling and Disabling a Component" in the Oracle WebCenter Content System
Administrator's Guide for Content Server.
DesktopTag can add custom properties to the following Microsoft Office applications:
■Microsoft Word 2002 (XP) and later versions
■Microsoft Excel 2002 (XP) and later versions
■Microsoft PowerPoint 2002 (XP) and later versions
26.3 Checking Out and Checking In Content Items with DesktopTag
The DesktopTag component modifies the check-out (file get) and check-in operations
for Content Server.
26.3.1 File Get Operation
The DesktopTag component installs a service handler override for the
createFileName method, which should be called for all file get operations that go
through the server (native URL requests do not call this method). If the file type is
supported by the configuration, a set of custom properties are added to the file. These
custom properties are used in various ways by the DesktopIntegrationSuite
component and are made available to other components.
26.3.2 File Check-In Operation
The DesktopTag component installs an extension filter that hooks the
validateCheckinData filter, which is part of the DesktopIntegrationSuite component. It
removes the custom properties that were added by a file get operation before the data
is checked in to the server.
The result set returned for this operation includes the properties that would be added
to the Microsoft Office file in a subsequent file get operation. This is provided to allow
the client to modify the file rather than having to get a new copy. This method calls the
desktopTagGetFilter extension filter, just like the file get operation.
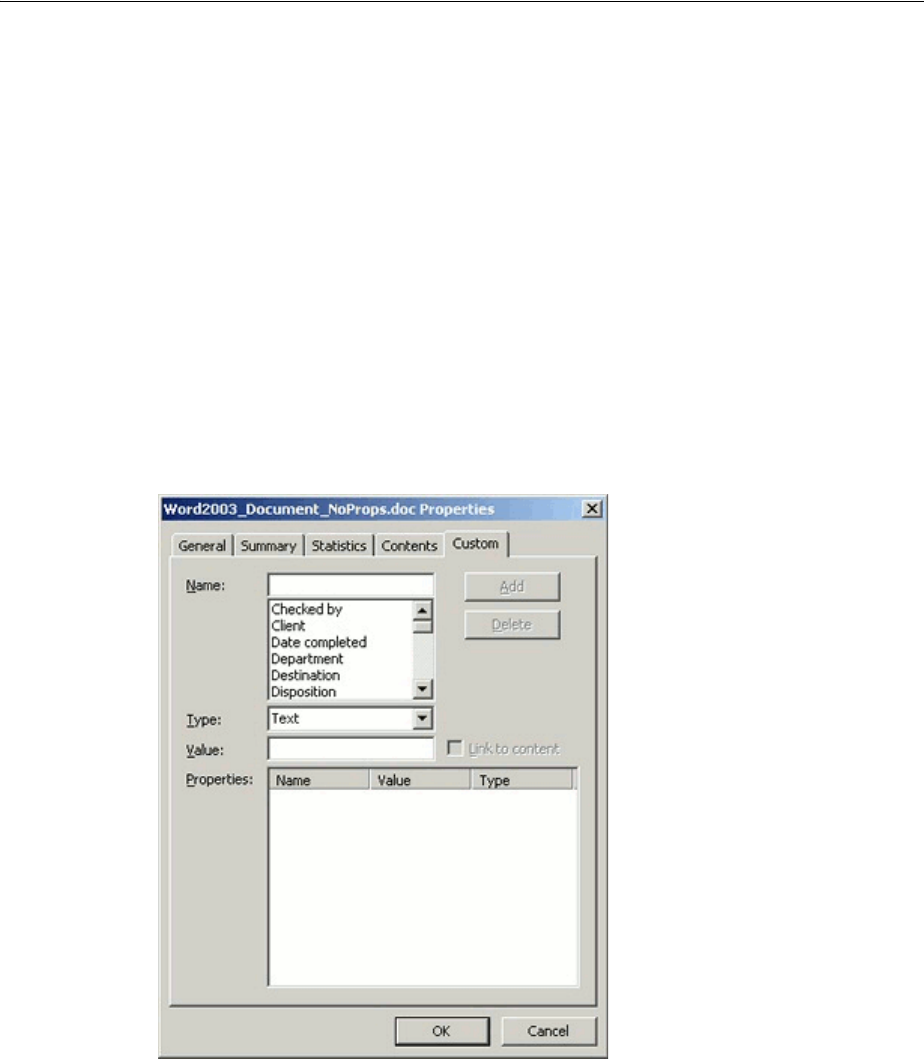
Adding Properties to Checked-Out Content Items
Customizing the DesktopTag Component 26-3
26.4 Adding Properties to Checked-Out Content Items
The functionality offered by the DesktopTag component is provided entirely in the
background. There is no direct user interaction. It is typically used for content tracking
purposes, although the information can be exposed to users.
The properties that are added to the Microsoft Office files depend on the settings in the
DesktopTag configuration file (see Section 26.5, "Configuring the DesktopTag
Component"). In Figure 26–2, the content ID (dDocName), user name (dUser), and
unique content item identifier (dID) are added to the Word document. The
DISProperties custom property is always added. It lists all custom properties
added by DesktopTag (as specified in the configuration file), and is used to ensure that
the correct custom properties are deleted when a file is checked into Content Server
again.
Figure 26–1 shows an example of a Word 2003 document without any custom
properties that DesktopTag would add.
Figure 26–1 Word 2003 Document Without Custom Properties Added by DesktopTag
Figure 26–2 shows a number of custom properties added to a Word 2003 document.
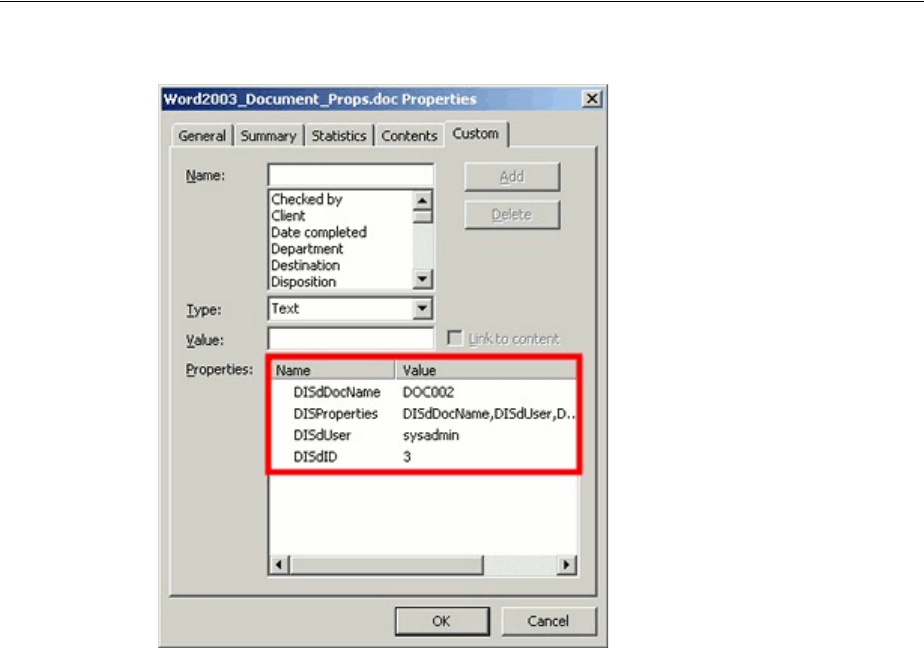
Adding Properties to Checked-Out Content Items
26-4 Oracle WebCenter Content Developer's Guide for Content Server
Figure 26–2 Word 2003 Document with Custom Properties Added by DesktopTag
26.4.1 Viewing Custom Properties
Users can view the custom properties of a Microsoft Office file as follows:
■Microsoft Office XP (2002) and 2003: Choose File, then Properties, and then click
the Custom tab.
■Microsoft Office 2007: Click the Office button in the application, then choose
Prepare, then Properties, then Document Properties, then Advanced Properties,
and then click the Custom tab.
■Microsoft Office 2010: Open the File panel, then click Info, then Properties, then
Advanced Properties, and then click the Custom tab.
Figure 26–3 shows the custom properties that DesktopTag has added to a Word 2003
document.
Adding Properties to Checked-Out Content Items
Customizing the DesktopTag Component 26-5
Figure 26–3 Custom Document Properties (Microsoft Word 2003)
26.4.2 Checking In Documents from Outside Content Server
These custom document properties enable Oracle Webcenter Content: Desktop to keep
track of where a managed file resides in Content Server. This, in turn, enables users to
check a Microsoft Office document back in to Content Server even from outside a
content management integration context.
To check in a document, the user must have a connection to the server set up. The
Office add-in looks at the CGI URL, Server, and IDCNAME properties to try to match
the document to a server, so the user must be on the same network and have access to
the server.
This feature can be useful in a number of situations; for example:
■A user receives a managed Word document from someone else, as an attachment
to an e-mail.
■A user copies a managed Word document from a server in the integration
hierarchy to a folder outside that hierarchy.
In either case, users can open the file in Microsoft Word, make changes, and then check
the file back in to the server using the Oracle WebCenter Content menu or ribbon in
Word. Desktop checks the custom properties embedded in the Word document to find
out where to upload the file to.

Configuring the DesktopTag Component
26-6 Oracle WebCenter Content Developer's Guide for Content Server
26.5 Configuring the DesktopTag Component
The DesktopTag component is configured using a configuration file, desktoptag_
environment.cfg, which is located in the component installation directory. This is a
plain-text file that you can edit in any text editor. The component installation directory
is MW_HOME/ECM_ORACLE_HOME/ucm/idc/components/DesktopTag.
The following properties can be set in the configuration file:
■DesktopTagFormats
■DesktopTagPrefix
■DesktopTagFields
■DesktopTagPrefixCustom
■DesktopTagFieldsCustom
■DesktopTagPrefixExtended
■DesktopTagFieldsExtended
■DefaultTaskPaneUrl
■DesktopTagLog
■DesktopTagFormatsExclude
26.5.1 DesktopTagFormats Property
The value of the DesktopTagFormats property is a comma-separated list of MIME
data types that are processed for tagging. If the data type is not in the list, it is not
processed. If this parameter is commented out (using #), empty, or not included in the
configuration file at all, then all supported data types are processed.
Example:
DesktopTagFormats=application/msword,application/ms-excel
If you include a nonsupported MIME data type in the list, DesktopTag will attempt to
process the file, and an error event is included in the log file if logging is enabled.
26.5.2 DesktopTagPrefix Property
The value of the DesktopTagPrefix property is the prefix added to the names of all
standard Content Server metadata fields in the list of standard DesktopTag fields (see
Section 26.5.3, "DesktopTagFields Property"). This prefix is not added if a specific
property name is defined.
If this parameter is commented out (using #), empty, or not included in the
configuration file at all, then DIS is used as the default.
Example: DesktopTagPrefix=STD
Note: Make sure that you restart Content Server after making
changes to the DesktopTag configuration file.

Configuring the DesktopTag Component
Customizing the DesktopTag Component 26-7
26.5.3 DesktopTagFields Property
The value of the DesktopTagFields property is a comma-separated list of all
standard Content Server metadata fields that are added to Microsoft Office files as
custom properties. You should use the server-internal field names (for example,
dDocName for the content ID). For information about the internal field names of the
standard metadata field, see the Oracle WebCenter Content Idoc Script Reference Guide.
You can set a specific property name for a metadata field by adding it in parentheses
after the field name. This is especially useful if the property name will be exposed to
end users (for example, in the task area in Microsoft Office 2007 applications).
Example: DesktopTagFields=dID,dDocName,dUser(User Name)
Figure 26–4 shows the result of the preceding DesktopTagFields definition
(assuming the default DIS prefix is used).
Figure 26–4 Example of Property Names
26.5.4 DesktopTagPrefixCustom Property
The value of the DesktopTagPrefixCustom property is the prefix added to the
names of all custom Content Server metadata fields in the list of custom DesktopTag
fields (see Section 26.5.4, "DesktopTagPrefixCustom Property"). This prefix is not
added if a specific property name is defined.
If this parameter is commented out (using #), empty, or not included in the
configuration file at all, then DISC is used as the default.
Example: DesktopTagPrefixCustom=CST
26.5.5 DesktopTagFieldsCustom Property
The value of the DesktopTagFieldsCustom property is a comma-separated list of
all custom Content Server metadata fields that will be added to Microsoft Office files
as custom properties. You define these fields in exactly the same manner as standard
metadata fields (see Section 26.5.3, "DesktopTagFields Property").
Example: DesktopTagFieldsCustom=xComments(Extra
Info),xArchiveStatus
Note: The DISProperties custom property is always added. Its
value is a list of all properties added by DesktopTag.
Note: The standard and custom Content Server metadata fields are
processed exactly the same by DesktopTag. The separate configuration
entries are there only to make it easier to distinguish between these
fields.

Configuring the DesktopTag Component
26-8 Oracle WebCenter Content Developer's Guide for Content Server
26.5.6 DesktopTagPrefixExtended Property
The value of the DesktopTagPrefixExtended property is the prefix added to the
names of all custom Content Server metadata fields in the list of extended DesktopTag
fields (see Section 26.5.7, "DesktopTagFieldsExtended Property"). This prefix is not
added if a specific property name is defined.
If this parameter is commented out (using #), empty, or not included in the
configuration file at all, then DISX is used as the default.
Example: DesktopTagPrefixExtended=EXT
26.5.7 DesktopTagFieldsExtended Property
The value of the DesktopTagFieldsExtended property is a comma-separated list
of property definitions that come from the ExtendedUserAttributes component. The
general form of a property definition is type/key/subkey(name). The type, key,
and subkey values are the parameters used by the EC_GET_PROPERTY service. If
any of these values begins with the character @, then the parameter value is taken from
the specified Content Server metadata field (see the following example).
You can set a specific property name for a metadata field by adding it in parentheses
after the field name.
Example: DesktopTagFieldsExtended=account/@dSecurityGroup/WCTPUrl
(DIS_Task_Pane_Url)
This example specifies that the property will be named DIS_Task_Pane_Url, and its
value will be the ExtendedUserAttributes item with the type account, the key
value specified by the dSecurityGroup metadata field (the security group of the
content item), and the subKey WCTPUrl.
26.5.8 DefaultTaskPaneUrl Property
The value of the DefaultTaskPaneUrl property is a string that defines the default
URL to use in setting the DISTaskPaneUrl property, which is required to display a
web page for a file in the task area of Microsoft Office applications. Any words
beginning with the character @ are replaced by the values from the binder or by other
means (currently, this applies only to @cgiUrl).
Example: DefaultTaskPaneUrl=@cgiUrl?IdcService=GET_TASK_PANE
&dID=@dID
In this example, @cgiUrl would be replaced by the Content Server Cgi URL value,
and @dID would be replaced by the value of the server-internal, unique content item
identifier (dID).
As another example, if there is an extended user attribute called WebCenterUrl, then
adding the string "WebCenterUrl(DISTaskPaneUrl)" will set the
DISTaskPaneUrl property to the value of the extended user attribute called
WebCenterUrl.
Configuring the DesktopTag Component
Customizing the DesktopTag Component 26-9
26.5.9 DesktopTagLog Property
The value of the DesktopTagLog property is a Boolean value that indicates whether
or not to log the operations and results of the DesktopTag component (1 = yes, 0 = no).
If this parameter is commented out (using #), empty, or not included in the
configuration file at all, then the component operations and results are not logged. The
DesktopTag log information is included in the standard Content Server log files
(accessible from the server’s administration pages), as Figure 26–5 shows.
Figure 26–5 DesktopTag Event in Content Server Log File
26.5.10 DesktopTagFormatsExclude Property
The value of the DesktopTagFormatsExclude property is a comma-separated list
of MIME data types that are not processed for tagging. If the data type is not in the list,
it is processed.
Example: DesktopTagFormatsExclude=application/ms-excel
There is no reason to use both DesktopTagFormats and
DesktopTagFormatsExclude.

Configuring the DesktopTag Component
26-10 Oracle WebCenter Content Developer's Guide for Content Server


A
Troubleshooting A-1
ATroubleshooting
This appendix describes how to use troubleshooting aids to resolve problems with
customizing Oracle WebCenter Content Server.
This appendix includes the following sections:
■Section A.1, "About Troubleshooting Aids"
■Section A.2, "Viewing Server Errors"
■Section A.3, "Viewing Page Data"
■Section A.4, "Monitoring Resource Loading"
A.1 About Troubleshooting Aids
Several troubleshooting aids are available to help evaluate Content Server pages as
they are used.
A.2 Viewing Server Errors
Syntax errors and other mistakes in component files or dynamic server pages can
cause errors in Content Server. If the Content Server instance fails, it reports the error
in the following locations:
■If you run Content Server from a command prompt, you can view the error in the
console window.
■If you can log in to Content Server and display the Admin Server page, you can
view the Content Server log by selecting the Content Server instance and then
clicking View Server Output.
■You can view the Content Server log files in the
DomainHome/ucm/cs/weblayout/groups/secure/logs directory.
A.3 Viewing Page Data
The IsJava setting displays the local data of a Content Server web page.
■In a web browser, add the following code in the Address box to the end of the
page's URL:
&IsJava=1
■On a template page or in an include, use the following code:
<$IsJava=1$>

Monitoring Resource Loading
A-2 Oracle WebCenter Content Developer's Guide for Content Server
The IsPageDebug setting displays a tree structure view of all includes being called on
a Content Server web page. The debug trace appears at the bottom of the web page.
■In a web browser, add the following code in the Address box to the end of the
page's URL:
&IsPageDebug=1
■On a template page or in an include, use the following code:
<$IsPageDebug=1$>
■To place a marker in the script debug trace, place the following code at the point
where you want to see a value or perform a step:
<$trace("marker code")$>
For example, you can use the following code to insert the current user name in the
debug trace (the eval function must be used to evaluate Idoc Script):
<$trace(eval("The user name is <$UserName$>"))$>
For more information about IsJava and IsPageDebug, see the Oracle WebCenter
Content Idoc Script Reference Guide.
A.4 Monitoring Resource Loading
Three configuration settings enable you to view the loading of resources when you run
Content Server from a command line. Set any of these variables equal to 1 in the
IntradocDir/config/config.cfg file:
■TraceResourceLoad logs all resources loaded, resource overrides, resource
conflicts, and resource merges.
■TraceResourceOverride logs when a system resource is overridden by a
component resource or a component resource is loaded twice.
■TraceResourceConflict logs when a system resource is overridden twice by
component resources.
For more information about these configuration setting, see the Oracle WebCenter
Content Idoc Script Reference Guide.
Tip: You can also set the IsPageDebug variable in the config.cfg file
if you want the setting to apply for the whole server.

Index-1
Index
A
AboutBox method, IdcClient OCX, 22-16
access level attribute, 15-17
access numbers, 25-13
accessibility, xvii
accessing services, 21-1
action format, 15-18
action menus
customizing, 8-4
generating, 8-1
icon in Actions column, 8-4
overview, 8-1
actions
control mask, 15-19
error message, 15-19
name, 15-18
parameters, 15-18
service resource, 15-21
type, 15-18
Actions column
action menu icon, 8-4
service ResultSet, 15-18
Active Server Pages
embedded SOAP request, 25-40
service execution, 25-40
ActiveX control
IdcClient OCX, 22-4
activity metrics
customizing the SQL queries, 12-21
SQL queries for post-reduction step, 12-21
ADD_USER service, 25-12
ADF runtime libraries, installing for JCR
adapter, 24-4
Advanced Component Manager
overview, 9-16
page, 9-17
anonymous user interface
customization, 3-4
external customers without login, 3-4
ExtranetLook component for changing, 3-4
Apache Jakarta Tomcat Server, 20-1
APIs, installing for JCR adapter, 24-4
applets, 1-3
architecture
Oracle WebCenter Content, 1-1, 2-1
WebDAV, 18-5
Asian language, 9-5
assembling pages, 1-13
assembly properties, 15-7
attributes
ClientControlledContextValue, 22-26
HostCgiUrl, 22-27
name, 25-14
Password, 22-27
service resources, 15-20
type, 25-14, 25-17
UseBrowserLoginPrompt, 22-27
UseProgressDialog, 22-27
UserName, 22-27
WorkingDir, 22-27
audience, xvii
B
Back method, IdcClient OCX, 22-16
Batch Loader utility, 1-3
Batch mode, 13-1
beginning form section, 4-17
behavior, Content Server, 2-1
bin directory, 1-2
binders for multiple requests, reusing, RIDC, 23-12
Binding element, WSDL file structure, 25-44
browsers
multiple, 1-10
bundling files, 3-7
order of filters, 3-8
overview, 3-7
PublishedBundles table, 3-8
buttons, form, 4-18
C
-c connection_mode
auto, 21-5
server, 21-5
standalone, 21-5
C# class files, 25-50
cache settings, JCR adapter, 24-7
caching resources, 1-13
Index-2
calling services remotely, 21-6
CancelRequest method, IdcClient OCX, 22-16
cascading style sheets, 1-9
Categorize button, 13-1
CFG file, 15-31
CgiUrl TextBox properties, edited, 22-7
changed features, xix, xx
characters, special, command-file syntax, 21-4
CHECKIN_UNIVERSAL service, WSDL, 25-21
CheckIn.wsdl file, 25-44
CHECKOUT_BY_NAME service, WSDL, 25-25
CIS
deprecated, xx
CIS. See Remote Intradoc Client (RIDC)
ClassAliases ResultSet, 9-23
ClientControlledContextValue property, 22-26
clients
configuration, 23-5
WebDAV, 18-4
COM integration
API, 22-1
introduction, 22-1
COM interface, 22-1
Combined output table
change file type logging status, 12-8
file types not logged, 12-8
set file types with SctIgnoreFileTypes, 12-8
command file
IdcCommand parameters, 21-2
IdcCommand service commands, 21-2
IdcCommand utility option, 21-4
syntax
precedence, 21-3
service commands, 21-2
special characters, 21-4
command file syntax, special tags, 21-4
Command TextBox properties, edited, 22-7
command-file
syntax
special characters, 21-4
command-line utility
ComponentTool
description of, 9-18
installing component with, 16-3
options, 21-2
commands, verifying, 22-13
common code forms, 4-25
communication
JCR adapter configuration, 24-5
method, JCR adapter, 24-6
comparison operators, dynamic server pages, 4-5,
4-6
component definition file, 9-8, 9-19
Component Manager
Advanced, 9-3, 9-16
custom components, 9-3
disabling components, 10-2
enabling components, 10-2
installing components with, 16-2
Component Wizard
creating a dynamic table, 15-13
custom components, 9-3, 9-13
description of, 9-15
disabling components, 10-2
editing dynamic tables, 15-14
editing environment resources, 15-32
editing HTML includes, 15-3, 15-5, 15-13
editing service resources, 15-24
editing static tables, 15-14
editing template resources, 15-30
enabling components, 10-2
installing component, 16-3
interface, 9-16
overview of, 9-15
tool for working with component files, 9-13
WebCenter Content utility, 1-3
working with resources, 9-24
Components
operational summary, 12-1
components
Advanced Component Manager, 9-16
Component Manager, 9-16
ComponentTool command-line utility, 9-18
creating, 9-12
custom
Component Wizard, 9-3, 9-13
development recommendations, 9-12
managing, 9-3
working with, 9-1
directories, 9-4, 9-12
disabling, 10-1
enabling, 10-1
files
changing, 1-13
component creation, 9-4
Component Wizard, 9-13
development recommendations, 9-12
organization, 9-14
overview, 9-1
text editor, 9-13
working with, 9-13
functionality, 9-2
HDA file, 9-11, 9-18
IdcClient OCX, 22-4
installation
ComponentTool utility, 16-3
overview, 16-1
limitations, 9-3
loading, 1-12
naming conventions, 9-15
overview, 9-1
standard, 9-1
system, 9-1
using, 9-2
working with, 9-1
working with files, 9-13
ZIP file for deployment, 9-11
components directory, 1-5
Components ResultSet, 9-6, 9-19
Index-3
components, custom
directories and files, 9-4
ComponentTool command-line utility
description of, 9-18
installing component, 16-3
computed settings, Launcher, 21-7
config directory, 1-3, 1-5
config.cfg configuration file, 3-3
configuration
changing information, 6-1
clients, 23-5
config.cfg file, 3-3
entries in configuration file, 3-3
JCR adapter communication, 24-5
JSP support, 20-3
Launcher, 21-11
options, idcCommand utility, 21-4
configuration files
environment resources, 15-31
example, 21-11
load order, 1-12
Configuration settings
default values for Content Tracker, 12-4
SctAutoTruncateDataStrings, 12-5
SctComponentDir, 12-5
SctDebugLogEnabled, 12-5
SctDebugLogFilePath, 12-5
SctDebugServiceBinderDumpEnabled, 12-5
SctFilterPluginLogDir, 12-5
SctIdcAuthExtraConfigParams, 12-5
SctIgnoreDirectories, 12-5
SctIgnoreFileTypes, 12-5
SctLogDir, 12-5
SctLogEnabled, 12-5
SctLogSecurity, 12-5
SctMaxRecentCount, 12-5
SctMaxRereadTime, 12-6
SctPostReductionExec, 12-7
SctProxyNameMaxLength, 12-7
SctReductionAvailableDatesLockback, 12-6
SctReductionLogDir, 12-6
SctReductionRequireEventLogs, 12-6
SctScheduledReductionEnable, 12-6
SctSnapshotEnable, 12-6
SctSnapshotLastAccessEnable, 12-6
SctSnapshotLastAccessField, 12-6
SctSnapshotLongCountEnable, 12-6
SctSnapshotLongCountField, 12-6
SctSnapshotLongCountInterval, 12-6
SctSnapshotShortCountEnable, 12-6
SctSnapshotShortCountField, 12-6
SctSnapshotShortCountInterval, 12-7
SctUrlMaxLength, 12-7
SctUseGMT, 12-7
setting values for Content Tracker, 12-8
configuration variables, loading, 1-11
connections
handling with RIDC, 23-11
mode, IdcCommand utility option, 21-5
content attribute, metadata tag, 4-13
Content Categorizer, 13-1
overview, 13-1
Content Check In Form, 13-1
Content Integration Suite (CIS)
deprecated, xx
Content Integration Suite (CIS). See Remote Intradoc
Client (RIDC)
content items
example, HelloWorld displayed in web
browser, 4-27
finding information for
JCR, 24-7
tables
JCR, 24-7
Content Publisher, 4-9, 13-1
dynamic server pages, 4-4
nested tags, 4-13
repeated ResultSet tags, 4-15
Content Server, 13-1
behavior, 2-1
configuration variables, loading, 1-11
configuring JCR adapter communication, 24-5
custom components, loading, 1-12
development mode, 9-13
interface, 22-28
changing look and feel, 3-1
changing navigation, 3-1
customizing, 3-3
ODMA files, 22-28
interface, Content Server
anonymous user interface, changing, 3-4
modifying, 3-1
internal initialization, 1-11
JCR adapter data model, 24-2
modifying system functionality, 5-1
reports, loading, 1-12
resources, loading, 1-12
startup behavior, 1-11
startup steps, 1-11
templates, loading, 1-12
Content Tracker
default configuration setting values, 12-4
setting configuration variables, 12-8
Content Tracker logging service
calling from an application, 12-18
calling from Idoc Script, 12-18
service call overview, 12-15
context roots, 19-3
Contribution Folders, default system-level
folder, 18-3
control mask, 15-19
controls, IdcClient OCX, 22-2
conventions
naming, 4-9, 9-15
text, xviii
core/config directory, 1-5
creating and executing IdcCommand
parameters, 21-5
CSS, 1-9
custom components

Index-4
Advanced Component Manager, 9-3
Component Wizard, 9-3, 9-13
development recommendations, 9-12
directories and files, 9-4
loading, 1-12
understanding, 9-4, 9-12
working with, 9-1
custom includes
examples of, 4-19
HCSP file references, 4-20
HCST file references, 4-19
IDOC files, 4-21
custom installation parameter files, 9-12
custom resource files, 9-8, 9-11
customization
Content Server interface, 3-1, 3-3
Content Server navigation, 3-1
popup menus, 8-4
services, 7-1
site files, 9-11
skills recommended for, 1-9
stages, 1-8
system settings, 5-1
tips, 1-8
tools recommended for, 1-9
types, 1-7
WebCenter Content instance, 1-1
D
data binder, 9-9
Data collection
change file type logging status Data reduction
change file type logging status, 12-8
file types not logged, 12-8
set file types with SctIgnoreFileTypes, 12-8
Data reduction
file types not logged, 12-8
set file types with SctIgnoreFileTypes, 12-8
data section
overview of, 4-11
structure, 4-11
Data Types element, WSDL file structure, 25-44
database interaction, 1-14
dDocName parameter, 4-8
debug trace, A-2
default suffix, 4-13
DefaultTaskPaneUrl property, DesktopTag, 26-8
defining
form fields, 4-26
form information, 4-26
hidden fields, 4-26
definition file, 9-8
DELETE_USER service, 25-20
deployment
JCR adapter, 24-5
JCR API for JCR adapter, 24-4
JCR integration libraries for JCR adapter, 24-5
RIDC for JCR adapter, 24-4
DesktopTag
check-in, 26-2
check-out, 26-2
configuration file, 26-1, 26-6
configuring, 26-6
custom fields, 26-7
ExtendedUserAttributes component and, 26-8
fields, 26-6
File Check-In operation, 26-2
File Get operation, 26-2
log, 26-9
metadata fields
MicroSoft Office file properties, 26-7
processing, 26-7
properties
DefaultTaskPaneUrl, 26-8
DesktopTagFields, 26-7
DesktopTagFieldsCustom, 26-7
DesktopTagFieldsExtended, 26-8
DesktopTagFormats, 26-6
DesktopTagFormatsExclude, 26-9
DesktopTagLog, 26-9
DesktopTagPrefix, 26-6
DesktopTagPrefixCustom, 26-7
DesktopTagPrefixExtended, 26-8
DISProperties, 26-7
DISTaskPaneUrl property, 26-8
DesktopTagFields property, 26-7
DesktopTagFieldsCustom property, 26-7
DesktopTagFieldsExtended property, 26-8
DesktopTagFormats property
description, 26-6
DesktopTagFormatsExclude and, 26-9
DesktopTagFormatsExclude property
description, 26-9
DesktopTagFormats and, 26-9
DesktopTagLog property, 26-9
DesktopTagPrefix property, 26-6
DesktopTagPrefixCustom property, 26-7
DesktopTagPrefixExtended property, 26-8
development
Content Server, 9-13
dynamic server pages, 4-9
HCSF pages, 4-10
dID parameter, 4-8
DIME message format, 25-3
directories, 1-1
bin, 1-2
components, 1-5
config, 1-3
core/config, 1-5
groups, 1-6
idoc, 1-5
images, 1-6
install, 1-5
javascript, 1-5
jspserver, 1-5
lang, 1-5
naming conventions, 9-15
organization, 9-14
reports, 1-5

Index-5
resources, 1-5, 1-6
structure, 9-12
templates, 1-5, 1-6
terminology, 1-2
WebCenter Content, 1-1
weblayout, 1-6
disabling components, 10-1
display tables, creating, 8-2
DISProperties custom property, 26-7
DISTaskPaneUrl property and DesktopTag, 26-8
DOC_INFO service
content item information retrieval, 25-29
example, 15-19
DOC_INFO_SIMPLE service, 4-25
DoCheckoutLatestRev method, IdcClient
OCX, 22-16
DocInfo.wsdl file, 25-44
docLoadResourceIncludes function
description, 4-7
HCSF pages, 4-11
parameters, 4-8
requirements for calling, 4-7
document node, 25-8
document node, SOAP, 25-8
double-byte characters, 9-5
DownloadFile method, IdcClient OCX, 22-17
DownloadNativeFile method, IdcClient OCX, 22-17
Drag method, IdcClient OCX, 22-18
dynamic data table resources, 1-7, 15-3
dynamic server pages
altering navigation of web pages, 4-1
comparison operators, 4-5, 4-6
Content Publisher, 4-4
creating, 4-4
development recommendations, 4-9
docLoadResourceIncludes function, 4-7
examples, 4-19, 4-20, 4-27
Idoc Script
functions, 4-7
tags, 4-5
naming conventions, 4-9
overview, 4-1
page types, 4-3
process, 4-3
referencing metadata, 4-5, 4-7
special characters, 4-5, 4-6
syntax, 4-4
tips, 4-9
types, 4-3
dynamic table resources
creating, 15-13
editing, 15-14
HDA file format, 15-13
merge rules, 15-14
overview, 1-7
dynamic web pages, assembly, 1-13
Dynamicdata Idoc Script functions, 15-10
dynamicdata includes, 1-7
E
EDIT_USER service, 25-15
EditDocInfoLatestRev method, IdcClient OCX, 22-18
editing
dynamic data table resource, 15-5
dynamic table resource, 15-14
environment resource, 15-32
HTML include resource, 15-3
ResultSet, 4-16
service resource, 15-24
static table, 15-14
string resource, 15-13
template resource, 15-30
elements in HDA files, 9-5
embedded SOAP request, 25-40
enabling components, 10-1
end of form, 4-18
enterprise application integration, 18-1
environment, 9-9
environment resources
description, 15-31
editing, 15-32
example, 15-31
file contents, 15-31
overview, 1-7
environment variables, Launcher, 21-10
EOD
command-file tag, 21-4
end of data marker, 21-4
error message section, service resource, 15-19
error message service attribute, 15-18
errors, server, A-1
events
IdcClient OCX, 22-3
IntradocBeforeDownload, 22-13
IntradocBrowserPost, 22-14
IntradocBrowserStateChange, 22-14
IntradocRequestProgress, 22-14
IntradocServerResponse, 22-14
examples
changing a foreign key value, 4-18
ClassAliases ResultSet, 9-23
code for HCSF pages, 4-25
component definition file, 9-19, 15-32
components HDA file, 9-18
configuration file, 21-11
content item displayed in web browser, 4-27
dynamic server pages, 4-19, 4-20, 4-27
environment resource, 15-31
Filters ResultSet, 9-23
form fields, 4-26
Form_Load code, edited, 22-10
glue file, 9-19, 15-32
HCSF page, 4-20
HCSP page, 4-19
HCST page, 4-19
HDA file, 1-5, 9-4
HelloWorld displayed in web browser, 4-27
HTML includes, 15-2
IdcClient OCX component

Index-6
methods, 22-3
properties, 22-3
IDOC pages, 4-19, 4-20, 4-27
JSP pages, loading, 20-3
LocalData section, 9-5
MergeRules ResultSet, 9-22, 15-24
OCX methods, 22-3
OCX properties, 22-3
Properties section, 9-5
query resource, 15-15
report page, 15-28
ResourceDefinition ResultSet, 9-20
ResultSet section, 9-6
SendPostCommand_Click code, edited, 22-10
services
actions, 15-21
attributes, 15-20
definition, 15-17
resource, 15-17, 15-19
super tag, 15-2
template page, 15-27
Extended service logging
overview, 12-10
ExtendedUserAttributes component and
DesktopTag, 26-8
eXtensible Markup Language, 13-1
ExtranetLook component
changing anonymous user interface, 3-4
overview, 3-4
ExtraRootNodes form element, 4-13, 4-14
F
features
changed, xix
JSP, 20-2
new, xix
field subnode, SOAP, 25-9
fields, form input, 4-17
file extension, referencing, 4-25
file store provider, using
JCR, 24-9
file store tables
JCR, 24-7
files
bundling, 3-7
command, 21-4
command file, IdcCommand utility, 21-2
component definition, 9-8, 9-19
component ZIP, 9-11
components HDA, 9-11, 9-18
config.cfg, 3-3
configuration, 15-31
custom installation parameter, 9-12
custom resource, 9-8, 9-11
customized for site, 9-11
environment, 15-31
glue, 9-8
HCSF
description, 4-4
product description form, 4-20
HCSP
custom include references, 4-20
description, 4-4
HCST
custom include references, 4-19
description, 4-3
HDA
description, 9-4
IDOC
custom includes, 4-21
description, 4-3
information retrieval, 4-25
log, IdcCommand utility option, 21-5
manifest, 9-9
naming conventions, 9-15
optimizing published files, 3-7
organization, 9-14
referencing published, 3-9
search_results.htm, 15-25
types, 9-2
usage, 3-9
WebCenter Content, 1-1
working with in components, 9-13
filter properties, 15-9
Filters ResultSet, 9-23
Flexiondoc, 13-1
Folders component
benefits of virtual folders, 18-3
structure, 18-3
virtual folders interface, 18-3
foreign key, changing value of, 4-18
form properties, 4-17
form section, 4-17
begin, 4-17
form buttons, 4-18
form end, 4-18
properties, 4-17
Form_Load code, edited, 22-10
formats
action, 15-18
table specification, 15-3
forms
buttons, 4-18
common code, 4-25
defining form information, 4-26
elements, 4-14
end of form section, 4-18
fields
defining, 4-26
for input, 4-17
properties, 4-26
submitting, 4-27
Forward method, IdcClient OCX, 22-19
functionality, modifying, 5-1

Index-7
functions
docLoadResourceIncludes, 4-7
Dynamicdata Idoc Script, 15-10
Idoc Script, 4-7
Fusion Order Demo application
description, 2-1
setting up, 2-2
G
generating action menus, 8-1
generating proxy class from WSDL files, 25-50
generating WSDL files, 25-49
GenericSoapService, 19-3
GET_CRITERIA_WORKFLOWS_FOR_GROUP
service, 25-38
GET_FILE service, 25-30
GET_SEARCH_RESULTS service, 25-34
GET_TABLE service, 25-37
GET_USER_INFO service, 25-18
GetFile.wsdl file, 25-44
glue file, 9-8
GoCheckinPage method, IdcClient OCX, 22-19
groups directory, 1-6
H
HCSF files
description, 4-4
product description form, 4-20
syntax, 4-5
.hcsf files. See HCSF files
HCSF pages
common code, 4-25
creating, 4-20
data section, 4-11
defining form fields, 4-26
defining form information, 4-26
defining hidden fields, 4-26
description, 4-10
docLoadResourceIncludes function, 4-11
example, 4-20
form buttons, 4-18
form elements, 4-14
form end, 4-18
form properties, 4-17
form section, 4-17
form to create in web browser, 4-24
HTML declaration, 4-11
HTML includes, 4-11
isFormFinished attribute, 4-12
load section, 4-10
meta tag, 4-11
metadata tags, 4-13
nested tags, 4-13
referencing file extensions, 4-25
referencing XML tags, 4-13
ResultSets, 4-14
resultsets attribute, 4-12
retrieving file information, 4-25
submitting forms, 4-27
tips, 4-10
variables, 4-11
HCSP files
custom include reference, 4-20
description, 4-4
syntax, 4-5
.hcsp files. See HCSP files
HCSP pages
creating, 4-19, 4-20, 4-27
example, 4-19
link to display, 4-25
HCST files
custom include reference, 4-19
description, 4-3
syntax, 4-5
.hcst files. See HCST files
HCST pages
creating, 4-19, 4-20, 4-27
examples, 4-19
HDA files
component definition, 9-18
description, 9-4
elements, 9-5
example, 1-5, 9-4
idc file for components, 9-7
idc for components, 9-18
idc_components.hda, 9-18
ResultSet section, 9-6
.hda files. See HDA files
HEAD section, HCSF page, 4-11
Headline View tables, 8-2
HelloWorld content item displayed in web
browser, 4-27
hidden fields, defining, 4-26
hierarchical folders, 18-3
Home method, IdcClient OCX, 22-20
HostCgiUrl property, IdcClient, 22-27
HTML declaration, HCSF pages, 4-11
HTML editor, 1-10
HTML in templates, 1-9
HTML includes, 15-2
creating, 15-13
editing, 15-3, 15-5, 15-13
example, 15-2
HCSF pages, 4-11
overview, 1-7
standard, 15-2, 15-3, 15-11
super tag, 15-2
HTTP headers, 25-6
I
idc HDA file for components, 1-5, 9-7
idc namespace, 25-6
idc_components.hda file, 9-18
IdcAnalyze WebCenter Content utility, 1-3
idcbegindata tag, 4-11
IdcClient ActiveX Control module, 22-4
IdcClient events, 22-13
Index-8
IdcClient OCX component
Content server functions, 22-3
control setup, 22-4
description, 22-2
interface, 22-4
methods, 22-3
AboutBox, 22-16
Back, 22-16
CancelRequest, 22-16
DoCheckoutLatestRev, 22-16
DownloadFile, 22-17
DownloadNativeFile, 22-17
Drag, 22-18
EditDocInfoLatestRev, 22-18
Forward, 22-19
GoCheckinPage, 22-19
Home, 22-20
InitiateFileDownload, 22-20
InitiatePostCommand, 22-21
Move, 22-21
Navigate, 22-21
NavigateCgiPage, 22-22
RefreshBrowser, 22-22
SendCommand, 22-22
SendPostCommand, 22-23
SetFocus, 22-23
ShowDMS, 22-23
ShowDocInfoLatestRev, 22-24
ShowWhatsThis, 22-24
StartSearch, 22-24
Stop, 22-24
UndoCheckout, 22-25
ViewDocInfo, 22-25
ViewDocInfoLatestRev, 22-25
ZOrder, 22-26
properties
example, 22-3
overview, 22-3
setting up, 22-4
IdcClient OCX control
description, 22-2
events, 22-3
IdcClient OCX methods, 22-15
IdcClient properties
edited, 22-6
overview, 22-26
IdcCommand utility
accessing services, 21-1
calling services remotely, 21-6
command-file syntax, 21-2
command-line options, 21-2
configuration options, 21-4
execution, 21-2
options
command file, 21-4
connection mode, 21-5
log file, 21-5
user, 21-4
overview, 21-1
repository server, 21-5
setup, 21-2
using the Launcher, 21-14
WebCenter Content, 1-3
idccs_components.hda file, 9-11
idcenddata tag, 4-11
idcformrules tag, 4-12
idcibr_components.hda file, 9-11
IdcServer service, 1-3
IdcServerNT service, 1-3
IdcService command-file syntax tag, 21-4
idcurm_components.hda file, 9-11
IdcWebLoginService web service, 19-4
IdcWebRequestService web service, 19-3
IDE, 1-10
idoc directory, 1-5
IDOC files
custom includes, 4-21
description, 4-3
syntax, 4-5
.idoc files. See IDOC files
IDOC pages
creating, 4-19, 4-20, 4-27
examples, 4-19, 4-20, 4-27
idoc resource type, 1-6
Idoc Script
description, 1-9
functions, dynamic server pages, 4-7
tags, dynamic server pages, 4-5
images directory, 1-6
implementation architectures, web services mapped
to Content Server, 25-4
includes
custom
examples of, 4-19
IDOC file, 4-21
properties, 15-9
initialization
RIDC, 23-4
InitiateFileDownload method, IdcClient OCX, 22-20
InitiatePostCommand method, IdcClient OCX, 22-21
install directory, 1-5
installation
Component Manager, 16-2
Component Wizard, 16-3
components
ComponentTool utility, 16-3
overview, 16-1
JCR adapter
ADF runtime libraries, 24-4
APIs required, 24-4
runtime libraries required, 24-4
Installer, 1-3
Integrated Development Environment, 1-10
integration
COM API, 22-1
enterprise applications with WebCenter
Content, 18-1
JSP, 20-1
methods, overview, 18-1
ODMA, 22-28

Index-9
WebCenter Content with enterprise
applications, 18-1
WebDAV, 18-4
Interactive mode, 13-1
interface, Content Server
anonymous user interface, changing, 3-4
changing look and feel, 3-1
changing navigation, 3-1
customizing
layouts and skins, 3-3
overview, 3-1
modifying, 3-1
internal initialization, 1-11
IntradocApp applet, 1-3
IntradocBeforeDownload event, IdcClient, 22-13
IntradocBrowserPost event, IdcClient, 22-14
IntradocBrowserStateChange event, IdcClient, 22-14
IntradocClient OCX component, 22-2
IntradocReports ResultSet, 9-7
IntradocRequestProgress event, IdcClient, 22-14
IntradocServerResponse event, IdcClient, 22-14
IntradocTemplates ResultSet, 9-7
isEditMode variable, 4-26
isFormFinished attribute, 4-12
isFormSubmit variable, 4-26
IsJava setting, A-1
IsPageDebug setting, A-2
J
Java Content Repository Adapter
introduction, 24-1
using, 24-1
Java SOAP Client, 25-5
JavaScript
Content Server use of, 1-9
debugger, 1-10
javascript directory, 1-5
JavaServer Pages. See JSP
JCR
content items
finding information for, 24-7
tables, 24-7
file store provider, using, 24-9
file store tables, 24-7
search index
tables, 24-7
using, 24-9
tables
content items, 24-7
file store, 24-7
search index, 24-7
JCR adapter
communication
configuring, 24-5
configuring socket communication, 24-6
configuring SSL, 24-6
listener port, 24-6
method, 24-6
provider, 24-6
configuration, 24-7
cache settings, 24-7
user agent, 24-7
data model
code, 24-2
Content Server, 24-2
deploying, 24-5
deploying JCR API, 24-4
deploying RIDC, 24-4
installing ADF runtime libraries, 24-4
installing required APIs and runtime
libraries, 24-4
JCR integration libraries, 24-5
web communication, 24-7
JCR API, deploying for JCR adapter, 24-4
JCR data model, 24-2
JCR integration libraries, deploying for JCR
adapter, 24-5
JSP
access to Content Server, 20-1
execution, 20-1
features, 20-2
integration
configuring JSP support, 20-3
loading example pages, 20-3
overview, 20-1
support, configuration, 20-3
jspserver directory, 1-5
L
labels, visual interface, 22-11
lang directory, 1-5
Launcher
computed settings, 21-7
configuration, 21-11
environment variables, 21-10
quotation rules, 21-7
user interface, 21-11
using the, 21-14
layouts
creating new, 3-7
description, 3-2
overview, 3-1
selection, 3-2
Top Menus, 3-2
Trays, 3-2
types, 3-1
link, HCSP page display, 4-25
listener port, JCR adapter communication, 24-6
load section, 4-10
loading
configuration variables, 1-11
custom components, 1-12
monitoring resources, A-2
standard reports, 1-12
standard resources, 1-12
standard templates, 1-12

Index-10
LocalData, 9-9
data binder evaluation of, 9-9
properties section name, 9-5
localization, resolving strings, 1-14
log file, IdcCommand utility option, 21-5
look and feel, customizing Content Server, 3-1
M
manifest file, 9-9
Manifest ResultSet, 9-10
manifest.hda file, 9-9
marker, trace, A-2
menus, action, generation of, 8-1
merge properties, 15-6
merge rules
dynamic table resources, 15-14
static tables, 15-14
MergeRules ResultSet, 9-22
columns, 9-22
example, 9-22
template resource, 15-24
toTable column, 9-23
Message element, WSDL file structure, 25-44
messaging protocol, 25-5
meta tag, 4-11
metadata, 13-1
referencing, 4-5, 4-7
tags
content attribute, 4-13
form field values, 4-13
MetaData.wsdl file, 25-44
methods
CancelRequest, 22-16
DoCheckoutLatestRev, 22-16
DownloadFile, 22-17
DownloadNativeFile, 22-17
Drag, 22-18
EditDocInfoLatestRev, 22-18
Forward, 22-19
GoCheckinPage, 22-19
IdcClient OCX
AboutBox, 22-16
Back, 22-16
CancelRequest, 22-16
DoCheckoutLatestRev, 22-16
DownloadFile, 22-17
DownloadNativeFile, 22-17
Drag, 22-18
EditDocInfoLatestRev, 22-18
Forward, 22-19
GoCheckinPage, 22-19
Home, 22-20
InitiateFileDownload, 22-20
InitiatePostCommand, 22-21
Move, 22-21
Navigate, 22-21
NavigateCgiPage, 22-22
RefreshBrowser, 22-22
SendCommand, 22-22
SendPostCommand, 22-23
SetFocus, 22-23
ShowDMS, 22-23
ShowDocInfoLatestRev, 22-24
ShowWhatsThis, 22-24
StartSearch, 22-24
Stop, 22-24
UndoCheckout, 22-25
ViewDocInfo, 22-25
ViewDocInfoLatestRev, 22-25
ZOrder, 22-26
InitiateFileDownload, 22-20
InitiatePostCommand, 22-21
Move, 22-21
Navigate, 22-21
NavigateCgiPage, 22-22
RefreshBrowser, 22-22
SendCommand, 22-22
SendPostCommand, 22-23
SetFocus, 22-23
ShowDocInfoLatestRev, 22-24
ShowWhatsThis, 22-24
StartSearch, 22-24
Stop, 22-24
UndoCheckout, 22-25
ViewDocInfo, 22-25
ViewDocInfoLatestRev, 22-25
Zorder, 22-26
Microsoft .NET, 25-4
Microsoft Visual Basic, 22-4
modes, 13-1
monitoring resource loading, A-2
Move method, IdcClient OCX, 22-21
N
namespaces, 25-6
name/value pair, 15-31
naming conventions
directories, 9-15
dynamic server pages, 4-9
files, 9-15
Navigate method, IdcClient OCX, 22-21
NavigateCgiPage method, IdcClient OCX, 22-22
navigation
customizing Content Server, 3-1
dynamic server pages, 4-1
nested tags
ResultSets, 4-15
XML nodes, 4-13
.NET architecture, 25-5
.NET Framework, 25-4
.NET platform, 25-4
new features, xix
nodes, SOAP
packet format, 25-7
service, 25-7
nonactive ResultSets, 9-9
Non-secure mode reports
values for preference variable, 12-8

Index-11
O
OCX Component. See IdcClient OCX component
OCX control, Visual Basic form, 22-5
OCX events, 22-3
OCX examples
methods, 22-3
properties, 22-3
OCX interface, 22-2
ODMA Client, 22-28
ODMA Client Interface, 22-28
ODMA Desktop Shell Interface, 22-28
ODMA integration, 22-28
ODMA interfaces, 22-28
operating modes, 13-1
Operational summary
Content Tracker components, 12-1
operators, dynamic server pages, 4-5
optimization, published files, 3-7
option subnode, SOAP, 25-9
optionlist node, 25-8
SOAP, 25-8
Oracle Web Services Manager, 18-2, 19-2, 25-1
Oracle WebCenter Content
architecture, 1-1, 2-1
customization, 1-1
directories, 1-1
components, 1-5
terminology, 1-2
files, 1-1
integration with enterprise applications, 18-1
Oracle WebCenter Content Server. See Content Server
organization, component files, 9-14
overview, 13-1
Content Categorizer, 13-1
P
pages
dynamic server, types, 4-3
dynamic web, assembly, 1-13
HCSF
description, 4-10
form to create in web browser, 4-24
HCSP, link to display, 4-25
report, 15-24, 15-27
template, 15-24, 15-27
parameters
action, 15-18
docLoadResourceIncludes function, 4-8
string, 15-12
password, 22-27
PING_SERVER service, 25-11
popup menus. See action menus
Port element, WSDL file structure, 25-44
Port Type element, WSDL file structure, 25-44
PortalInfo.wsdl, 25-44
Post-reduction processing
SQL queries for activity metrics, 12-21
precedence, 21-3
predefined ResultSets, 9-6
presentation pages, 15-27
product description form, HCSF file, 4-20
programming
Java, 1-9
other, 1-9
properties
assembly, 15-7
CgiUrl TextBox, edited, 22-7
Command TextBox, edited, 22-7
filter, 15-9
forms, 4-17, 4-26
IdcClient OCX component, 22-3
idcClient, edited, 22-6
include, 15-9
merge, 15-6
Response TextBox, edited, 22-8
SendPostCommand CommandButton,
edited, 22-9
sort, 15-8
table, specification, 15-5
provider
JCR adapter communication, 24-6
public files, bundling for optimization, 3-7
published files
optimizing use of, 3-7
referencing, 3-9
PublishedBundles table, 3-8
PublishedResources, 3-9
Q
QDocInfo query, standard, 15-15
queries, QDocInfo, standard, 15-15
query resources, 15-14
editing, 15-16
example, 15-15
overview, 1-7
quotation rules, Launcher, 21-7
R
recommended skills, 1-9
ref prefix
referencing file extensions, 4-25
referencing metadata, 4-7
referencing metadata
dynamic server pages, 4-5, 4-7
ref prefix, 4-7
referencing XML tags, 4-13
RefreshBrowser method, IdcClient OCX, 22-22
related documents, xvii
Remote Intradoc Client (RIDC)
ADF Connection facade, 23-15
binders for multiple requests, reusing, 23-12
convenience classes, 23-13
deploying for JCR adapter, 24-4
handling connections, 23-11
initialization, 23-4
Introduction, 23-1
services, 23-10

Index-12
streams
receiving, 23-11
sending, 23-11
user authentication, 23-9
user security, providing, 23-13
using, 23-1
Remote Procedure Call, 25-5
Rendition parameter, 4-8
repeated tags in ResultSets, 4-15
report pages
example, 15-28
location, 15-24
presentation pages, 15-27
results of web page request, 15-27
reports
directory, 1-5
loading, 1-12
resource categories, 15-1
resource loading, monitoring, A-2
resource types
idoc, 1-6
tables, 1-6
templates, 1-6
ResourceDefinition ResultSet
columns, 9-21
description, 9-20
example, 9-20
location, 9-7
purpose, 9-7
resources, 9-24
caching, 1-13
changing, 1-13
custom
other files, 9-11
directory, 1-5
dynamic table, 15-13
environment, 15-31
overview, 1-6
query
editing, 15-16
overview, 15-14
service, 15-16
standard, 1-7
static table, 15-14
string, 15-10
resources directory, 1-6
Response TextBox properties, edited, 22-8
ResultSet section, HDA file, 9-6
resultset subnode, SOAP, 25-9
ResultSets, 9-9
ClassAliases, 9-23
Components, 9-6, 9-19
defined by XML tags, 4-14
editing, 4-16
Filters, 9-23
IntradocReports, 9-7
IntradocTemplates, 9-7
Manifest, 9-10
MergeRules, 9-22
nested tags, 4-15
nonactive, 9-9
predefined, 9-6
repeated tags, 4-15
ResourceDefinition, 9-7, 9-20
SearchResultTemplates, 9-7
XML tags, 4-14
resultsets attribute, 4-12
resultsets form element, 4-13, 4-14
retrieving file information, 4-25
reverse proxy server
web beacon feature, 12-23
RevisionSelectionMethod parameter, 4-8
RIDC. See Remote Intradoc Client (RIDC)
row subnode, SOAP, 25-9
RPC, 25-5
runtime libraries
ADF, installing for JCR adapter, 24-4
installing for JCR adapter, 24-4
S
SAML, 19-2
sample service calls, GET_USER_INFO, 25-18
Sample WSDL File, 25-46
scriptable services, 4-8
SctAutoTruncateDataStrings
Content Tracker configuration setting, 12-5
SctComponentDir
Content Tracker configuration setting, 12-5
SctDebugLogEnabled
Content Tracker configuration setting, 12-5
SctDebugLogFilePath
Content Tracker configuration setting, 12-5
SctDebugServiceBinderDumpEnabled
Content Tracker configuration setting, 12-5
SctFilterPluginLogDir
Content Tracker configuration setting, 12-5
SctIdcAuthExtraConfigParams
Content Tracker configuration setting, 12-5
SctIgnoreDirectories
Content Tracker configuration setting, 12-5
SctIgnoreFileTypes
Content Tracker configuration setting, 12-5
SctLogDir
Content Tracker configuration setting, 12-5
SctLogEnabled
Content Tracker configuration setting, 12-5
SctLogSecurity
Content Tracker configuration setting, 12-5
SctMaxRecentCount
Content Tracker configuration setting, 12-5
SctMaxRereadTime
Content Tracker configuration setting, 12-6
SctPostReductionExec
Content Tracker configuration setting, 12-7
SctProxyNameMaxLength
Content Tracker configuration setting, 12-7
SctReductionAvailableDatesLookback
Content Tracker configuration setting, 12-6
Index-13
SctReductionLogDir
Content Tracker configuration setting, 12-6
SctReductionRequireEventLogs
Content Tracker configuration setting, 12-6
SctScheduledReductionEnable
Content Tracker configuration setting, 12-6
SctServiceFilter
configuration file, 12-9
contents, 12-12
editing entries, 12-16
SctSnapshotEnable
Content Tracker configuration setting, 12-6
SctSnapshotLastAccessEnable
Content Tracker configuration setting, 12-6
SctSnapshotlastAccessField
Content Tracker configuration setting, 12-6
SctSnapshotLongCountEnable
Content Tracker configuration setting, 12-6
SctSnapshotLongCountField
Content Tracker configuration setting, 12-6
SctSnapshotLongCountInterval
Content Tracker configuration setting, 12-6
SctSnapshotShortCountEnable
Content Tracker configuration setting, 12-6
SctSnapshotShortCountField
Content Tracker configuration setting, 12-6
SctSnapshotShortCountInterval
Content Tracker configuration setting, 12-7
SctUrlMaxLength
Content Tracker configuration setting, 12-7
SctUseGMT
Content Tracker configuration setting, 12-7
SctWebBeaconIDList
Content Tracker configuration setting, 12-7
search index
tables
JCR, 24-7
using
JCR, 24-9
search_results.htm file, 15-25
SearchML, 13-1
SearchResultTemplates ResultSet, 9-7
Search.wsdl, 25-44
Search.wsdl file, 25-44
sections
data, 4-11
form, 4-17
HEAD, HCSF page, 4-11
load, 4-10
LocalData, 9-5
ResultSet, 9-6
Secure mode reports
values for preference variable, 12-8
secure socket communication (SSL)
JCR adapter, 24-6
secure socket communication (SSL), JCR
adapter, 24-6
Security Assertion Markup Language, 19-2
Security checks
values for preference variable, 12-8
SendCommand method, IdcClient OCX, 22-22
SendPostCommand CommandButton properties,
edited, 22-9
SendPostCommand method, IdcClient OCX, 22-23
SendPostCommand_Click code, edited, 22-10
server errors, viewing, A-1
servers, WebDAV, 18-4
service attributes
access level, 15-17
error message, 15-18
service class, 15-17
service type, 15-18
subjects notified, 15-18
template page, 15-18
Service Calls
ADD_USER, 25-12
CHECKIN_UNIVERSAL, 25-21
CHECKOUT_BY_NAME, 25-25
DELETE_USER, 25-20
DOC_INFO, 25-29
EDIT_USER, 25-15
GET_CRITERIA_WORKFLOWS_FOR_
GROUP, 25-38
GET_FILE, 25-30
GET_SEARCH_RESULTS, 25-34
GET_TABLE, 25-37
UNDO_CHECKOUT_BY_NAME, 25-27
Service calls
logging, 12-10
service calls
PING_SERVER, 25-11
samples, 25-11
SOAP response/request, 25-11
service class attribute, 15-17
service definition table, 15-17
Service element, WSDL file structure, 25-44
Service handler filter
configuration file contents, 12-12
configuration file overview, 12-9
editing entries, 12-16
service node, 25-7
service node, SOAP, 25-7
service resource attributes, 15-20
service resources, 15-16
actions, 15-21
editing, 15-24
example, 15-17, 15-19
overview, 1-7
service ResultSet, Actions column, 15-18
service type attribute, 15-18
services
accessing, IdcCommand Utility, 21-1
actions, 15-18
add user, 25-12
customizing, 7-1
DOC_INFO, 15-19, 25-29
DOC_INFO_SIMPLE, 4-25
examples
actions, 15-21
attributes, 15-20
Index-14
definition, 15-17
resource, 15-17
executables, 1-3
RIDC, 23-10
scriptable, 4-8
startup error, 1-3
Services tab
adding and editing service entries, 12-19
adding field map ResultSets, 12-19
SetFocus method, IdcClient OCX, 22-23
settings
IsJava, A-1
TraceResourceConflict, A-2
TraceResourceOverride, A-2
ShowDMS method, IdcClient OCX, 22-23
ShowDocInfoLatestRev method, IdcClient
OCX, 22-24
ShowWhatsThis method, IdcClient OCX, 22-24
Simple Object Access Protocol, 19-1
Simple Object Access Protocol. See SOAP
Site Builder, 13-1
Site Studio
web beacon feature, 12-23
skills for customization, 1-9
skins
description, 3-2
overview, 3-1
selection, 3-2
types, 3-1
SOAP
communication, 25-3
Data List Elements page, 25-52
definition, 25-1
messages, 25-5
nodes
packet format, 25-7
service, 25-7
packet format
document, 25-8
field, 25-9
HTTP headers, 25-6
idc namespace, 25-6
namespaces, 25-6
nodes, 25-7
optionlist, 25-8
overview, 25-6
resultset, 25-9
service, 25-7
user, 25-8
request, 25-6
web services, accessing, special characters, 25-10
sort properties, 15-8
Special Characters, 25-10
special characters
command file syntax
#, 21-4
command-file syntax
\, 21-4
description, 21-4
EOD, 21-4
dynamic server pages, 4-5, 4-6
EOD command-file tag, 21-4
IdcService command-file tag, 21-4
in strings, 15-11
SOAP
passing with XML format, 25-10
web services, accessing, 25-10
special tags, command-file syntax, 21-4
SQL queries
customizing for activity metrics, 12-21
post-reduction step for activity metrics, 12-21
standard components, 9-1
standard page beginning, 1-14
standard page ending, 1-14
standard page header, 1-14
standard report pages, 15-27
standard resources
examples, 1-7
loading, 1-12
standard template pages, 15-27
StandardResults template, 15-25
StartSearch method, IdcClient OCX, 22-24
startup behavior, Content Server, 1-11
startup steps, Content Server, 1-11
static table resource, 1-7
static tables, 15-14
editing, 15-14
merge rules, 15-14
Stop method, IdcClient OCX, 22-24
streams
receiving, RIDC, 23-11
sending, RIDC, 23-11
string parameters, 15-12
strings
overview, 1-7
resolving, 1-14
resource files, 15-10
special characters, 15-11
structure, 15-10
structure, files and directories, 9-14
subjects notified attribute, 15-18
submitting forms, 4-27
subnodes, SOAP
field, 25-9
option, 25-9
resultset, 25-9
row, 25-9
super tag, 15-2
Suppliers module
description, 2-1
syntax
dynamic server pages, 4-4
HCSF file, 4-5
HCSP file, 4-5
HCST file, 4-5
IDOC file, 4-5
service action, 15-18
system components, 9-1
system functionality, modifying, 5-1

Index-15
System Properties utility, 1-3, 5-1
system settings, changing, 5-1
T
tables
content items
JCR, 24-7
display, creating, 8-2
dynamic data, 15-3
file store
JCR, 24-7
formats, specification, 15-3
Headline View, 8-2
properties, specification, 15-5
resource types, 1-6
search index
JCR, 24-7
Thumbnail View, 8-4
tables directory, 1-5
tags
idcformrules, 4-12
Idoc Script, 4-5
ResultSets
nested in, 4-15
repeated in, 4-15
special, command-file syntax, 21-4
XML definitions of ResultSets, 4-14
template pages
attributes, 15-18
example, 15-27
location of standard, 15-24
presentation pages, 15-27
results of web page request, 15-27
template resources, 15-24
editing, 15-30
MergeRules ResultSet, 15-24
overview, 1-7
templates
loading, 1-12
page, example, 15-27
resource types, 1-6
templates directory, 1-5
terminology, WebCenter Content directories, 1-2
text editor, 1-10
text editor, editing component files, 9-13
Thumbnail View tables, 8-4
tips
dynamic server pages, 4-9
HCSF pages, 4-10
Tomcat server, 20-1, 20-2
tools, customization, 1-9
toTable column, 9-23
trace marker, A-2
TraceResourceConflict setting, A-2
TraceResourceOverride setting, A-2
troubleshooting, A-1
types
customization, 1-7
dynamic server pages, 4-3
layouts, 3-1
skins, 3-1
U
UDDI service registry, 25-3, 25-5
UNDO_CHECKOUT_BY_NAME service, 25-27
UndoCheckout method, IdcClient OCX, 22-25
URL encoding
, XML format, 25-10
UseBrowserLoginPrompt property, 22-27
user administration, 5-1
user agent, JCR adapter configuration, 24-7
user authentication, RIDC, 23-9
user interface, Launcher, 21-11
user node
SOAP, 25-8
user node, SOAP, 25-8
User Personalization settings, 3-2
user profile personalization settings, 3-2
user security, providing, RIDC, 23-13
user, IdcCommand utility option, 21-4
UserName property, IdcClient OCX, 22-27
utilities, 1-3
IdcCommand
accessing services, 21-1
V
variables
configuration, 15-31
environment, 15-31
HCSF pages, 4-11
verify command, 22-13
ViewDocInfo method, IdcClient OCX, 22-25
ViewDocInfoLatestRev method, IdcClient
OCX, 22-25
virtual folders, 18-3
Visual Basic, 22-4
Visual Basic environment
visual interface for development, 22-4
Visual Basic form, OCX control, 22-5
visual interface
command defined, 22-12
creating, 22-4
descriptive label, 22-11
returned results, 22-13
testing, 22-11
Visual Studio .NET, 25-4
W
web beacon
design guidelines, 12-28
design limitations, 12-28
embedded HTML example, 12-29
embedded JavaScript example, 12-30
examples of embedding, 12-29
implementation considerations, 12-27
operational overview, 12-23
overview, 12-22

Index-16
references - overview, 12-25
served JavaScript example, 12-32
with reverse proxy server, 12-23
with Site Studio, 12-23
web beacon references
data capture, 12-26
embedding, 12-26
format structure, 12-25
formatting examples, 12-25
overview, 12-25
Web Layout Editor, 15-26
web pages
altering navigation with dynamic server
pages, 4-1
web pages, assembly of dynamic, 1-13
web resource publishing, 3-3
Web Service Policy standard, 19-2
web services
context roots, 19-3
GenericSoapService, 19-3
IdcWebLoginService, 19-4
IdcWebRequestService, 19-3
.NET, implementing, 25-4
Oracle WebLogic Server
WebCenter Content web services, using
with, 19-1
Oracle WSM, 18-2, 19-2, 25-1
overview, 18-2
SAML, 19-2
security, 19-2
SOAP, accessing
overview, 19-1
special characters, 25-10
WebCenter Content with Oracle WebLogic Server
web services, 19-1
WS-Policy standard, 19-2
WS-Security standard, 19-2
Web Services Definition Language. See WSDL
web services framework, 18-2
SOAP communication, 25-3
UDDI service registry, 25-3
WSDL interface, 25-2
XML data, 25-2
WebCenter Content web services, with Oracle
WebLogic Server web services, 19-1
WebDAV
architecture, 18-5
clients, 18-4
functions, 18-4
integration, 18-3, 18-4
servers, 18-4
WebDAV Client, 18-4
WebDAV client, 18-4
WebDAV component, 18-3
weblayout directory, 1-6
Workflow.wsdl file, 25-44
working with component files, 9-13
WSDL
definition, 25-1
interface, 25-2
specifications, 25-5
WSDL elements
Binding, 25-44
Data Types, 25-44
Message, 25-44
Port, 25-44
Port Type, 25-44
Service, 25-44
WSDL file structure, 25-44
Binding element, 25-45
Data Type element, 25-45
Message element, 25-45
Port type, 25-45
Service and Port elements, 25-46
WSDL files
CheckIn.wsdl, 25-44
DocInfo.wsdl, 25-44
GetFile.wsdl, 25-44
MetaData.wsdl, 25-44
PortalInfo.wsdl, 25-44
Search.wsdl, 25-44
Workflow.wsdl, 25-44
wsdl.hda file, 25-49
X
XML, 13-1
conversion, 13-1
XML data, 25-2
XML tags, 4-12, 4-13
definitions of ResultSets, 4-14
referencing, 4-13
XML-based messaging protocol, 25-5
XML-based Remote Procedure Call, 25-6
XML-encoding for special characters, SOAP, 25-10
Z
ZIP file, 9-11
ZOrder method, IdcClient OCX, 22-26
