PHP For The Web: Visual QuickStart Guide Web Quick Start Fifth Edition
User Manual: Pdf
Open the PDF directly: View PDF ![]() .
.
Page Count: 497 [warning: Documents this large are best viewed by clicking the View PDF Link!]
- Cover
- Title Page
- Copyright Page
- Table of Contents
- Introduction
- Chapter 1 Getting Started with PHP
- Chapter 2 Variables
- Chapter 3 HTML Forms and PHP
- Chapter 4 Using Numbers
- Chapter 5 Using Strings
- Chapter 6 Control Structures
- Chapter 7 Using Arrays
- Chapter 8 Creating Web Applications
- Chapter 9 Cookies and Sessions
- Chapter 10 Creating Functions
- Chapter 11 Files and Directories
- Chapter 12 Intro to Databases
- Chapter 13 Putting It All Together
- Appendix A: Installation and Configuration
- Appendix B: Resources and Next Steps
- Index
ptg18144795

ptg18144795
Peachpit Press
VISUAL QUICKSTART GUIDE
PHP for
the Web
Fifth Edition
LARRY ULLMAN

ptg18144795
Visual QuickStart Guide
PHP for the Web, Fifth Edition
Larry Ullman
Peachpit Press
1301 Sansome Street
San Francisco, CA 94111
Find us on the web at: www.peachpit.com
To report errors, please send a note to: errata@peachpit.com
Peachpit Press is a division of Pearson Education.
Copyright © 2016 by Larry Ullman
Senior Editor: Karyn Johnson
Development Editor: Robyn G. Thomas
Copyeditor: Liz Welch
Technical Reviewer: Paul Reinheimer
Proofreader: Scout Festa
Production Coordinator: David Van Ness
Compositor: WolfsonDesign
Indexer: Valerie Haynes Perry
Notice of Rights
All rights reserved. No part of this book may be reproduced or transmitted in any form by any means, electronic,
mechanical, photocopying, recording, or otherwise, without the prior written permission of the publisher. For
nformation on getting permission for reprints and excerpts, contact permissions@peachpit.com.
Notice of Liability
The information in this book is distributed on an “As Is” basis, without warranty. While every precaution has
been taken in the preparation of the book, neither the author nor Peachpit Press shall have any liability to any
person or entity with respect to any loss or damage caused or alleged to be caused directly or indirectly by the
instructions contained in this book or by the computer software and hardware products described in it.
Trademarks
Visual QuickStart Guide is a registered trademark of Peachpit Press, a division of Pearson Education. Macintosh
and Mac OS X are registered trademarks of Apple Computer, Inc. Microsoft and Windows are registered
trademarks of Microsoft Corp. Other product names used in this book may be trademarks of their own respective
owners. Images of websites in this book are copyrighted by the original holders and are used with their kind
permission. This book is not officially endorsed by nor affiliated with any of the above companies.
Many of the designations used by manufacturers and sellers to distinguish their products are claimed as
trademarks. Where those designations appear in this book, and Peachpit was aware of a trademark claim,
the designations appear as requested by the owner of the trademark. All other product names and services
identified throughout this book are used in editorial fashion only and for the benefit of such companies with no
intention of infringement of the trademark. No such use, or the use of any trade name, is intended to convey
ndorsement or other affiliation with this book.
ISBN-13: 978-0-134-29125-3
ISBN-10: 0-134-29125-5
9 8 7 6 5 4 3 2 1
Printed and bound in the United States of America

ptg18144795
Dedication
For Jessica, Gina, and Rich, with gratitude for all their love and support.

ptg18144795
Special Thanks to:
Many, many thanks to everyone at Peachpit Press for their assistance
and hard work, especially:
Robyn Thomas, for managing the project adeptly, and for knowing when
to push and poke.
Liz Welch, for fine-tuning my prose with her copyediting skills.
Paul Reinheimer, for the superlative technical review, keeping me honest,
and finding things to improve even in a fifth edition.
Scout Festa, for the sharp proofreading eye.
David Van Ness, who takes a bunch of disparate stuff and turns it into
a book.
Thanks for doing what’s required to create, publish, distribute, market,
sell, and support these books.
My sincerest thanks to the readers of the other editions of this book and
my other books. Thanks for your feedback and support and for keeping
me in business.
Rasmus Lerdorf (who got the PHP ball rolling), the people at PHP.net
and Zend.com, those who frequent the various newsgroups and mailing
lists, and the greater PHP and open source communities for developing,
improving upon, and supporting such wonderfully useful technology.
Zoe and Sam, for continuing to be the kid epitome of awesomeness.
Jessica, for doing everything you do and everything you can.

ptg18144795
Table of Contents v
Table of Contents
Introduction. . . . . . . . . . . . . . . . . . . . . . . . . . ix
Chapter 1 Getting Started with PHP . . . . . . . . . . . . . . . . . 1
Basic HTML Syntax . . . . . . . . . . . . . . . . . . . . . . 2
Basic PHP Syntax . . . . . . . . . . . . . . . . . . . . . . . 7
Using SFTP. . . . . . . . . . . . . . . . . . . . . . . . . . 10
Testing Your Script . . . . . . . . . . . . . . . . . . . . . 12
Sending Text to the Browser . . . . . . . . . . . . . . . . 15
Using the PHP Manual . . . . . . . . . . . . . . . . . . . 18
Sending HTML to the Browser . . . . . . . . . . . . . . . 21
Adding Comments to Scripts. . . . . . . . . . . . . . . . 24
Basic Debugging Steps. . . . . . . . . . . . . . . . . . . 27
Review and Pursue . . . . . . . . . . . . . . . . . . . . . 29
Chapter 2 Variables . . . . . . . . . . . . . . . . . . . . . . . . . . . .31
What Are Variables?. . . . . . . . . . . . . . . . . . . . . 32
Variable Syntax . . . . . . . . . . . . . . . . . . . . . . . 36
Types of Variables . . . . . . . . . . . . . . . . . . . . . . 38
Variable Values . . . . . . . . . . . . . . . . . . . . . . . .41
Understanding Quotation Marks . . . . . . . . . . . . . 44
Review and Pursue . . . . . . . . . . . . . . . . . . . . . 48
Chapter 3 HTML Forms and PHP . . . . . . . . . . . . . . . . . . .49
Creating a Simple Form. . . . . . . . . . . . . . . . . . . 50
Choosing a Form Method. . . . . . . . . . . . . . . . . . 54
Receiving Form Data in PHP . . . . . . . . . . . . . . . . 58
Displaying Errors . . . . . . . . . . . . . . . . . . . . . . 63
Error Reporting . . . . . . . . . . . . . . . . . . . . . . . 65
Manually Sending Data to a Page . . . . . . . . . . . . . 68
Review and Pursue . . . . . . . . . . . . . . . . . . . . . 73

ptg18144795
vi Table of Contents
Chapter 4 Using Numbers . . . . . . . . . . . . . . . . . . . . . . .75
Creating the Form . . . . . . . . . . . . . . . . . . . . . . 76
Performing Arithmetic. . . . . . . . . . . . . . . . . . . . 79
Formatting Numbers . . . . . . . . . . . . . . . . . . . . 83
Understanding Precedence . . . . . . . . . . . . . . . . 86
Incrementing and Decrementing a Number . . . . . . . 88
Review and Pursue . . . . . . . . . . . . . . . . . . . . . 92
Chapter 5 Using Strings . . . . . . . . . . . . . . . . . . . . . . . . .93
Creating the HTML Form . . . . . . . . . . . . . . . . . . 94
Concatenating Strings . . . . . . . . . . . . . . . . . . . 97
Handling Newlines . . . . . . . . . . . . . . . . . . . . . 101
HTML and PHP. . . . . . . . . . . . . . . . . . . . . . . .104
Encoding and Decoding Strings . . . . . . . . . . . . . .108
Finding Substrings . . . . . . . . . . . . . . . . . . . . . 113
Replacing Parts of a String . . . . . . . . . . . . . . . . . 117
Review and Pursue . . . . . . . . . . . . . . . . . . . . .120
Chapter 6 Control Structures. . . . . . . . . . . . . . . . . . . . .121
Creating the HTML Form . . . . . . . . . . . . . . . . . . 122
The if Conditional . . . . . . . . . . . . . . . . . . . . . . 125
Validation Functions . . . . . . . . . . . . . . . . . . . .128
Using else . . . . . . . . . . . . . . . . . . . . . . . . . . 132
More Operators . . . . . . . . . . . . . . . . . . . . . . . 135
Using elseif. . . . . . . . . . . . . . . . . . . . . . . . . .144
The Switch Conditional . . . . . . . . . . . . . . . . . . .148
The for Loop . . . . . . . . . . . . . . . . . . . . . . . . .152
Review and Pursue . . . . . . . . . . . . . . . . . . . . . 157
Chapter 7 Using Arrays . . . . . . . . . . . . . . . . . . . . . . . . 159
What Is an Array? . . . . . . . . . . . . . . . . . . . . . .160
Creating an Array . . . . . . . . . . . . . . . . . . . . . .162
Adding Items to an Array . . . . . . . . . . . . . . . . . .166
Accessing Array Elements . . . . . . . . . . . . . . . . . 170
Creating Multidimensional Arrays . . . . . . . . . . . . . 173
Sorting Arrays . . . . . . . . . . . . . . . . . . . . . . . . 178
Transforming Between Strings and Arrays . . . . . . . .182
Creating an Array from a Form. . . . . . . . . . . . . . .186
Review and Pursue . . . . . . . . . . . . . . . . . . . . . 191

ptg18144795
Table of Contents vii
Chapter 8 Creating Web Applications. . . . . . . . . . . . . . .193
Creating Templates . . . . . . . . . . . . . . . . . . . . .194
Using External Files . . . . . . . . . . . . . . . . . . . . .201
Using Constants . . . . . . . . . . . . . . . . . . . . . . 207
Working with the Date and Time. . . . . . . . . . . . . .211
Handling HTML Forms with PHP, Revisited. . . . . . . .214
Making Forms Sticky . . . . . . . . . . . . . . . . . . . 220
Sending Email . . . . . . . . . . . . . . . . . . . . . . . 228
Output Buffering. . . . . . . . . . . . . . . . . . . . . . 233
Manipulating HTTP Headers . . . . . . . . . . . . . . . 237
Review and Pursue . . . . . . . . . . . . . . . . . . . . . 241
Chapter 9 Cookies and Sessions . . . . . . . . . . . . . . . . . . 243
What Are Cookies? . . . . . . . . . . . . . . . . . . . . 244
Creating Cookies . . . . . . . . . . . . . . . . . . . . . 246
Reading from Cookies . . . . . . . . . . . . . . . . . . . 251
Adding Parameters to a Cookie . . . . . . . . . . . . . 254
Deleting a Cookie . . . . . . . . . . . . . . . . . . . . . 257
What Are Sessions? . . . . . . . . . . . . . . . . . . . . 260
Creating a Session . . . . . . . . . . . . . . . . . . . . . 261
Accessing Session Variables. . . . . . . . . . . . . . . 264
Deleting a Session . . . . . . . . . . . . . . . . . . . . 266
Review and Pursue . . . . . . . . . . . . . . . . . . . . 268
Chapter 10 Creating Functions . . . . . . . . . . . . . . . . . . . . 269
Creating and Using Simple Functions. . . . . . . . . . 270
Creating and Calling Functions That Take Arguments 276
Setting Default Argument Values . . . . . . . . . . . . 282
Creating and Using Functions That Return a Value . . 285
Understanding Variable Scope . . . . . . . . . . . . . 290
Review and Pursue . . . . . . . . . . . . . . . . . . . . 296
Chapter 11 Files and Directories . . . . . . . . . . . . . . . . . . . 297
File Permissions . . . . . . . . . . . . . . . . . . . . . . 298
Writing to Files . . . . . . . . . . . . . . . . . . . . . . . 303
Locking Files . . . . . . . . . . . . . . . . . . . . . . . . .310
Reading from Files. . . . . . . . . . . . . . . . . . . . . .313
Handling File Uploads . . . . . . . . . . . . . . . . . . .316
Navigating Directories . . . . . . . . . . . . . . . . . . 325

ptg18144795
viii Table of Contents
Creating Directories. . . . . . . . . . . . . . . . . . . . 330
Reading Files Incrementally . . . . . . . . . . . . . . . 338
Review and Pursue . . . . . . . . . . . . . . . . . . . . 343
Chapter 12 Intro to Databases . . . . . . . . . . . . . . . . . . . . 345
Introduction to SQL . . . . . . . . . . . . . . . . . . . . 346
Connecting to MySQL. . . . . . . . . . . . . . . . . . . 348
MySQL Error Handling . . . . . . . . . . . . . . . . . . 352
Creating a Table . . . . . . . . . . . . . . . . . . . . . . 355
Inserting Data into a Database. . . . . . . . . . . . . . 360
Securing Query Data . . . . . . . . . . . . . . . . . . . 366
Retrieving Data from a Database . . . . . . . . . . . . . 371
Deleting Data in a Database . . . . . . . . . . . . . . . 376
Updating Data in a Database. . . . . . . . . . . . . . . 382
Review and Pursue . . . . . . . . . . . . . . . . . . . . 388
Chapter 13 Putting It All Together . . . . . . . . . . . . . . . . . .389
Getting Started . . . . . . . . . . . . . . . . . . . . . . 390
Connecting to the Database . . . . . . . . . . . . . . . 392
Writing the User-Defined Function . . . . . . . . . . . 393
Creating the Template . . . . . . . . . . . . . . . . . . 396
Logging In . . . . . . . . . . . . . . . . . . . . . . . . . 400
Logging Out . . . . . . . . . . . . . . . . . . . . . . . . 404
Adding Quotes. . . . . . . . . . . . . . . . . . . . . . . 405
Listing Quotes . . . . . . . . . . . . . . . . . . . . . . . 409
Editing Quotes . . . . . . . . . . . . . . . . . . . . . . . .412
Deleting Quotes . . . . . . . . . . . . . . . . . . . . . . .418
Creating the Home Page . . . . . . . . . . . . . . . . . 422
Review and Pursue . . . . . . . . . . . . . . . . . . . . 426
Appendix A Installation and Configuration . . . . . . . . . . . . .427
Appendix B Resources and Next Steps . . . . . . . . . . . . . . . 449
Index . . . . . . . . . . . . . . . . . . . . . . . . . . . . . 459

ptg18144795
When I began the first edition of this book
in 2000, PHP was a little-known
open
source
project. It was adored by technical
people in the know but not yet recognized
as the popular choice for web development
that it is today. When I taught myself PHP,
very little documentation was available on
the language—and that was my motivation
for writing this book in the first place.
Today things are different. The Internet
has gone through a boom and a bust and
has righted itself. Furthermore, PHP is now
the reigning king of dynamic web design
tools and has expanded somewhat beyond
the realm of just web development. But
despite PHP’s popularity and the increase
in available documentation, sample code,
and examples, a good book discussing the
language is still relevant. Although PHP is
in the beginnings of its sixth major release,
a book such as this—which teaches the
language in simple but practical terms—
can still be your best guide in learning the
information you need to know.
Introduction
This book will teach you PHP, providing
both a solid understanding of the funda-
mentals and a sense of where to look for
more advanced information. Although it
isn’t a comprehensive programming refer-
ence, this book, through demonstrations
and real-world examples, provides the
knowledge you need to begin building
dynamic websites and web applications
using PHP.
What Is PHP?
PHP originally stood for
Personal Home
Page.
It was created in 1994 by Rasmus
Lerdorf to track the visitors to his online
résumé. As its usefulness and capabilities
grew (and as it began to be utilized in more
professional situations), PHP came to mean
PHP: Hypertext Preprocessor
. The defini-
tion basically means that PHP handles data
before it becomes HTML—which stands for
Hypertext Markup Language.
ptg18144795
x Chapter
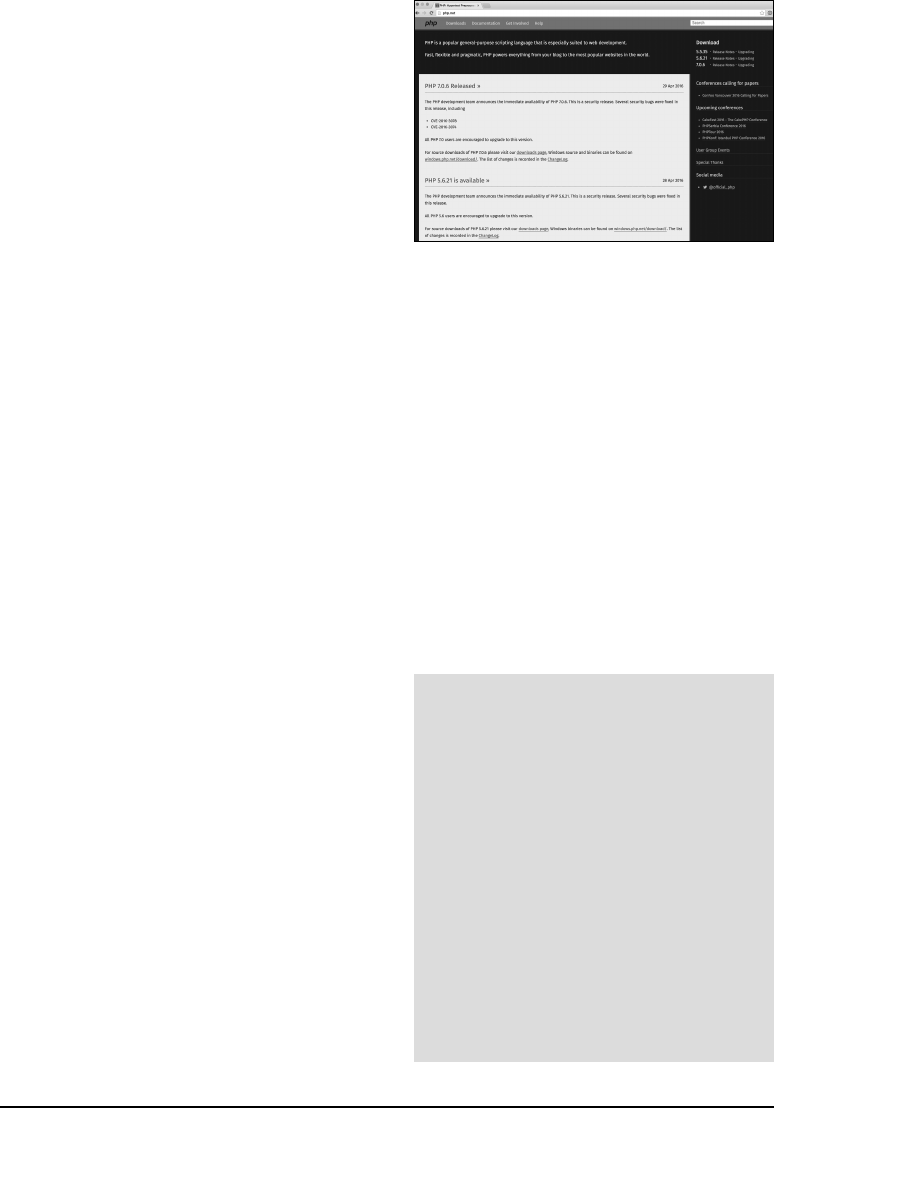
According to the official PHP website,
found at www.php.net A, PHP is “a popu-
lar general-purpose scripting language
that is especially suited to web develop-
ment.” More specifically, PHP is a scripting
language commonly embedded within
HTML. Let’s examine what this means in
more detail.
To say that PHP
can be embedded into
HTML
means that PHP code can be written
within your HTML code—HTML being the
language with which all web pages are
built. Therefore, programming with PHP
starts off as only slightly more complicated
than hand-coding HTML.
Also, PHP is a
scripting language
, as
opposed to a
compiled language
. This
means that PHP is designed to do some-
thing
only after an event occurs
—for
example, when a user submits a form or
goes to a URL (Uniform Resource Locator—
the technical term for a web address).
Another popular example of a scripting
language is JavaScript, which commonly
handles events that occur within the
browser. Both PHP and JavaScript can also
be described as
interpreted
, because the
code must be run through an executable,
such as the PHP module or the browser’s
JavaScript component. Conversely, com-
piled languages such as C and C++ can be
used to write stand-alone applications that
can act independently of any event.
A As of this writing, this is the appearance of
the official PHP website, located at www.php.net.
Naturally, this should be the first place you look
to address most of your PHP questions and
curiosities.
PHP 6?
Yes, as of this writing, the current ver-
sions of PHP were 5 and 7, but not 6!
There’s a long and amusing story here,
but the short version is that PHP 6 was
actively developed for a while. After hit-
ting many snags, the development was
halted and the created work was rolled
into PHP 5.
When it became time to work on the
next major version, after much debate
it was decided that that version would
be named PHP 7. So although there was
once a beta version of PHP 6, no final
release ever saw the light of day.

ptg18144795
Introduction xi
You should also understand that PHP is a
server-side
technology. This refers to the
fact that everything PHP does occurs on
the server (as opposed to on the
client
,
which is the computer being used by the
person viewing the website). A
server
is just a computer set up to provide the
pages you see when you go to a web
address with your browser. I’ll discuss this
process in more detail later in this introduc-
tion (see “How PHP Works”).
Finally, PHP is
cross-platform
, meaning
that it can be used on machines running
Unix, Windows, Macintosh, and other oper-
ating systems. Again, we’re talking about
the
server’s
operating system, not the cli-
ent’s. Not only can PHP run on almost any
operating system, but, unlike many other
programming languages, it enables you
to switch your work from one platform to
another with few or no modifications.
As of this writing, PHP is simultaneously in
versions 5.5.35, 5.6.21, and 7.0.6. (There
are slight differences between versions
5.5 and 5.6, so 5.5 continues to be sup-
ported for a while.) Although I wrote this
book using a stable version of PHP 7, all
of the code is backward compatible, at
least to PHP version 5.
x
. In a couple of
situations where a feature requires a more
current version of PHP, or where older
versions might have slight variations, a
note in a sidebar or a tip will indicate how
you can adjust the code accordingly.
More information can be found at PHP.net
and Zend (www.zend.com), a key company
involved with PHP development B.
B This Zend website contains useful software as
well as a code gallery and well-written tutorials.
What PHP Is Not
The thing about PHP that confuses
most new learners is what PHP can’t do.
Although you can use the language for
an amazing array of tasks, its main limita-
tion is that PHP cannot be used for client-
side features found in some websites.
Using a client-side technology like
JavaScript, you can create a new
browser window, make pop-up dialogs,
dynamically generate and alter forms,
and much more. None of these tasks can
be accomplished using PHP because
PHP is server-side, whereas those are
client-side issues. But you can use PHP
to create JavaScript, just as you can use
PHP to create HTML.
When it comes time to develop your own
PHP projects, remember that you can
use PHP only to send information (HTML
and such) to the browser. You can’t do
anything else within the browser until
another request from the server has
been made (a form has been submitted
or a link has been clicked).

ptg18144795
xii Chapter
Why Use PHP?
Put simply, PHP is better, faster, and easier
to learn than the alternatives. All websites
must begin with just HTML, and you can
create an entire site using a number of
static HTML pages. But basic HTML is a
limited approach that does not allow for
flexibility or dynamic behavior. Visitors
accessing HTML-only sites see simple pages
with no level of customization or dynamic
behavior. With PHP, you can create exciting
and original pages based on whatever
factors you want to consider. PHP can also
interact with databases and files, handle
email, and do many other things that HTML
alone cannot.
Web developers learned a long time ago
that HTML alone won’t produce enticing
and lasting websites. Toward this end,
server-side technologies such as PHP have
become the norm. These technologies
allow developers to create web applica-
tions that are dynamically generated,
taking into account whichever elements
the programmer desires. Often database-
driven, these advanced sites can be
updated and maintained more readily than
static HTML pages.
When it comes to choosing a server-side
technology, the primary alternatives A to
PHP are: ASP.NET (Active Server Pages),
JSP (JavaServer Pages), Ruby (through the
Rails or Sinatra frameworks), and some
newer server-side JavaScript options such
as Node.js.
A The Web Technology Surveys site says that
PHP is running on 82 percent of all websites
(http://w3techs.com/technologies/overview/
programming_language/all).
ptg18144795
Introduction xiii
n
PHP is both free and cross-platform.
Therefore, you can learn and use PHP
on nearly any computer and at no cost.
Furthermore, its open source nature
means that PHP’s users are driving its
development, not some corporate entity.
n
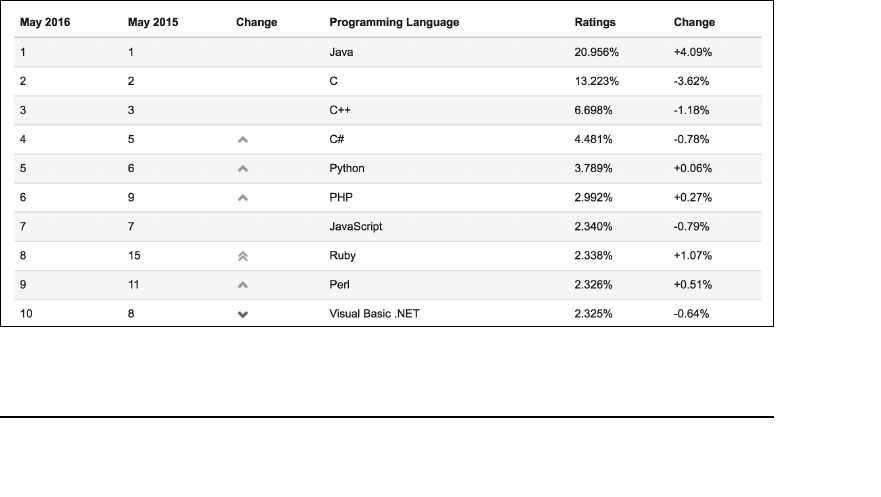
PHP is the most popular tool available
for developing dynamic websites. As
of this writing, PHP is in use on over 82
percent of all websites A and is the
sixth most popular programming lan-
guage overall B. Many of the biggest
websites—Yahoo, Wikipedia, and
Facebook, just to name three—and
content management tools, such as
WordPress, Drupal, Moodle, and Joomla,
use PHP. By learning this one language,
you’ll provide yourself with either a
usable hobby or a lucrative skill.
So the question is, why should a web
developer use PHP instead of ASP.NET,
Node.js, or whatever else to make a
dynamic website?
n
PHP is much easier to learn and use.
People—perhaps like you—without
any formal programming training can
write PHP scripts with ease after read-
ing this one book. In comparison,
ASP.NET requires an understanding of
Visual Basic, C#, or another language;
Node.js requires JavaScript. These are
more complex languages and are much
more difficult to learn.
n
PHP was written specifically for
dynamic web page creation. Perl,
VBScript, Java, and Ruby were not, and
this fact suggests that, by its very intent,
PHP can do certain tasks faster and
more easily than the alternatives. I’d like
to make it clear, however, that although
I’m suggesting that PHP is
better for
certain things
—specifically those it
was created to do, PHP isn’t a “better”
programming language than JavaScript
or C#—they can do things PHP can’t.
B The Tiobe Index (www.tiobe.com/tiobe_index) uses a combination of factors to rank the popularity of
programming languages.
ptg18144795
xiv Chapter
browser, there may or may not be an obvi-
ous difference between what
home.html
and
home.php
look like, but how you arrive
at that point is critically altered. The major
difference is that by using PHP, you can
have the server
dynamically
generate the
HTML code. For example, different infor-
mation could be presented if it’s Monday as
opposed to Tuesday or if the user has visited
the page before. Dynamic web page creation
sets apart the less appealing, static sites
from the more interesting, and therefore
more visited, interactive ones.
The central difference between using PHP
and using straight HTML is that PHP does
everything on the server and then sends
the appropriate information to the browser.
This book covers how to use PHP to send
the right data to the browser.
How PHP Works
PHP is a server-side language, which
means the code you write in PHP resides
on a host computer that serves web pages
to browsers. When you go to a website
(www.LarryUllman.com, for example), your
Internet service provider (ISP) directs
your request to the server that holds the
www.LarryUllman.com information. That
server reads the PHP code and processes
it according to its scripted directions. In
this example, the PHP code tells the server
to send the appropriate web page data to
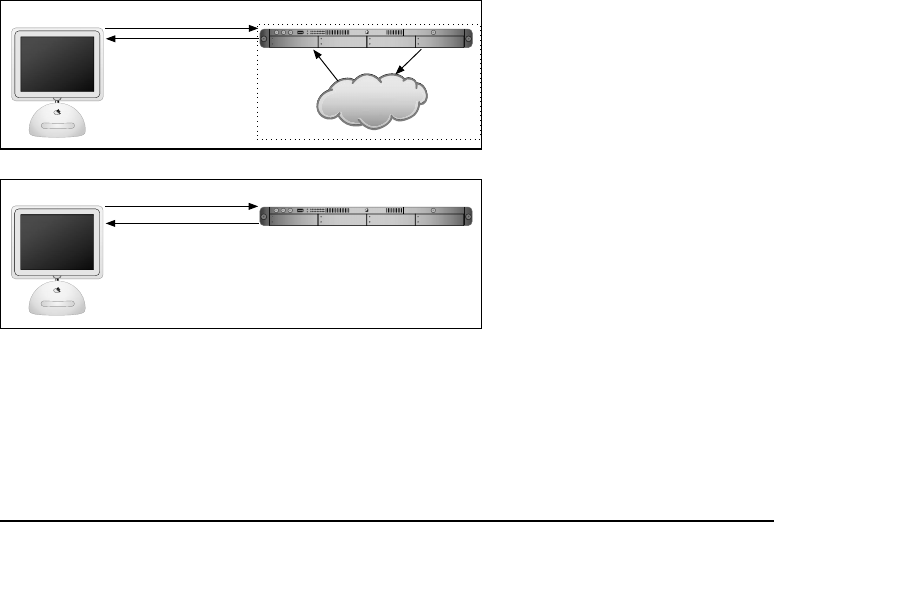
your browser in the form of HTML A. In
short, PHP creates an HTML page on the
fly based on parameters of your choosing.
This differs from an HTML-generated
site in that when a request is made, the
server merely sends the HTML data to
the browser—no server-side interpreta-
tion occurs B. Hence, to the end user’s
URL Request
HTML
Client Server
PHP
HTML
Script
Request
A This graphic demonstrates (albeit in
very simplistic terms) how the process
works between a client, the server, and
a PHP module (an application added to
the server to increase its functionality)
to send HTML back to the browser.
URL Request
HTML
Client Server B Compare this direct relationship of
how a server handles basic HTML to
A. This is also why HTML pages can
be viewed in your browser from your
own computer—they don’t need to be
“served,” but dynamically generated
pages need to be accessed through a
server that handles the processing.
ptg18144795
Introduction xv
What You’ll Need
The most important requirement for work-
ing with PHP—because it’s a server-side
scripting language—is access to a PHP-
enabled server. Considering PHP’s popu-
larity, your web host most likely has this
option available to you on their servers.
You’ll need to contact them to see what
technology they support.
Your other option is to install PHP and a
web server application (like Apache) on
your own computer. Users of Windows,
Mac OS X, or Linux can easily install and
use PHP for no cost. Directions for install-
ing PHP are available in Appendix A,
“Installation and Configuration.” If you’re up
to the task of using your own PHP-installed
server, you can take some consolation in
knowing that PHP is available for free from
the PHP website (www.php.net) and comes
in easy-to-install packages. If you take this
approach, and I recommend that you do,
then your computer will act as both the
client and the server.
The second requirement is almost a
given: You must have a text editor on your
computer. Atom, Notepad++, UltraEdit,
and similar freeware applications are all
sufficient for your purposes, and TextMate,
SublimeText, and other commercial appli-
cations offer more features that you may
appreciate. If you’re accustomed to using
a graphical interface (also referred to as
WYSIWYG—What You See Is What You Get)
such as Adobe Dreamweaver A or Aptana
Studio, you can consult that application’s
manual to see how to program within it.
continues on next page
A The popular Dreamweaver application supports
PHP development, among other server-side
technologies.
ptg18144795
xvi Chapter
Third, you need a method of getting the
scripts you write to the server. If you’ve
installed PHP on your own computer,
you can save the scripts to the appropri-
ate directory. However, if you’re using a
remote server with a web host, you’ll need
an SFTP (Secure File Transfer Protocol)
program to send the script to the server.
There are plenty of SFTP applications avail-
able; for example, in Chapter 1, “Getting
Started with PHP,” I use the free FileZilla
(http://filezilla-project.org B).
Finally, if you want to follow the examples in
Chapter 12, “Intro to Databases,” you need
access to MySQL (www.mysql.com C).
MySQL is available in a free version that
you can install on your own computer.
This book assumes only a basic knowledge
of HTML, although the more comfortable
you are handling raw HTML code
without
the aid of a WYSIWYG application such
as Dreamweaver, the easier the transition
to using PHP will be. Every programmer
will eventually turn to an HTML reference
at some time or other, regardless of how
much you know, so I encourage you to
keep a good HTML book by your side.
One such introduction to HTML is Elizabeth
Castro and Bruce Hyslop’s
HTML, XHTML,
and CSS: Visual QuickStart Guide
(Peachpit Press, 2014).
Previous programming experience is
certainly not required. However, it may
expedite your learning because you’ll
quickly see numerous similarities between,
for example, Perl and PHP or JavaScript
and PHP.
B The FileZilla application can be used on many
different operating systems to move PHP scripts
and other files to a remote server.
C MySQL’s website (as of this writing).

ptg18144795
Introduction xvii
About This Book
This book attempts to convey the funda-
mentals of programming with PHP while
hinting at some of the more advanced
features you may want to consider in the
future, without going into overwhelming
detail. It uses the following conventions to
do so.
The step-by-step instructions indicate what
coding you’re to add to your scripts and
where. The specific text you should type
is printed in a unique type style to separate
it from the main body text. For example:
<?php print "Hello, World!"; ?>
The PHP code is also written as its own
complete script and is numbered by line for
reference (Script i.1). You shouldn’t insert
these line numbers yourself, because
doing so will render your work inoperable.
I recommend using a text editor that
automatically displays the line numbers for
you—the numbers will help when you’re
debugging your work. In the scripts, you’ll
sometimes see particular lines highlighted
in bold, in order to draw attention to new or
relevant material.
Script i.1 A sample PHP script, with line numbers
and bold emphasis on a specific section of code.
1 <!doctype html>
2 <html lang="en">
3 <head>
4 <meta charset="utf-8">
5 <title>Hello, World!</title>
6 </head>
7 <body>
8 <?php print "Hello, world!"; ?>
9 </body>
10 </html>
What’s New in This Book?
I would consider this fifth edition to be a
modest revision of an already solid book.
The biggest changes are
.All examples now use HTML5.
.The MySQL code uses the most
current version of PHP’s MySQL
extension.
.We cover PHP 7, as applicable.
Finally, I tweaked some of the examples
mostly to satisfy my own drive for perfec-
tion. No content from the previous edi-
tion has been removed.
ptg18144795
xviii Chapter
Because of the nature of how PHP works,
you need to understand that there are
essentially three views of every script: the
PHP code (e.g., Script i.1), the code that’s
sent to the browser (primarily HTML), and
what the browser displays to the end user.
Where appropriate, sections of, or all of,
the browser window are revealed, showing
the result of the exercise A. Occasionally,
you’ll also see an image displaying the
HTML source that the browser received B.
You can normally access this view by choos-
ing View Source or View Page Source
from the appropriate browser menu. To
summarize, B displays the HTML the
browser receives, and A demonstrates
how the browser interprets that HTML.
Using PHP, you’ll create the HTML that’s
sent to the browser.
A This is a sample view you’ll see of the browser
window. For the purposes of this book, it won’t
make any difference which browser or operating
system you use.
B By viewing the source code received by the
browser, you can see the HTML created by PHP
and sent by the server.

ptg18144795
Introduction xix
Because the columns in this book are nar-
rower than the common text editor screen,
sometimes lines of PHP code printed in the
steps have to be broken where they would
not otherwise break in your editor. A small
gray arrow indicates when this kind of
break occurs. For example:
print "This is going to be a longer
➝
line of code.";
You should continue to use one line in
your scripts, or else you’ll encounter errors
when executing them. (The gray arrow isn’t
used in scripts that are numbered.)
While demonstrating new features and
techniques, I’ll do my best to explain the
why’s and how’s of them as I go. Between
reading about and using a function, you
should clearly comprehend it. Should
something remain confusing, though, this
book contains a number of references
where you can find answers to any ques-
tions (see Appendix B, “Resources and
Next Steps”). If you’re confused by a par-
ticular function or example, your best bet
will be to check the online PHP manual or
the book’s supporting website (and its user
support forum).

ptg18144795
xx Chapter
Companion Website
While you’re reading this book, you may
also find it helpful to visit the
PHP for the
Web: Visual QuickStart Guide, 5th Edition
website, found within www.LarryUllman.com.
There you’ll find every script in this book
available in a downloadable form. However,
I strongly encourage you to type the scripts
yourself in order to become more familiar
with the structure and syntax of PHP. The
site also provides an errata page listing any
mistakes made in this text.
What many users find most helpful, though,
is the book’s supporting forum, found
through the website or more directly at
www.LarryUllman.com/forums/. Using the
forum, you can
n
Find answers to problems you’re having
n
Receive advice on how to approach an
idea you have
n
Get debugging help
n
See how changes in the technologies
have affected the examples in the book
n
Learn what other people are doing
with PHP
n
Confirm the answers to review questions
n
Receive a faster reply from me than if
you send me a direct email
Which Book Is Right for You?
This is the fifth edition of my first book
on PHP. Like the original, it’s written with
the beginner or nonprogrammer in mind.
If you have little or no programming
experience, prefer a gentler pace, or like
to learn things in bite-sized pieces, this is
the book for you. Make no mistake: This
book covers what you need to know to
begin developing dynamic websites and
uses practical examples, but it does so
without any in-depth theory or advanced
applications.
Conversely, if you pick up new tech-
nologies really quickly or already have
some experience developing websites,
you may find this to be too basic. In that
case, you should consider my
PHP and
MySQL for Dynamic Web Sites: Visual
QuickPro Guide
instead (Peachpit Press,
2012). It discusses SQL and MySQL in
much greater detail and goes through
several more complex examples, but it
does so at a quick jog.

ptg18144795
Introduction xxi
Questions, comments,
or suggestions?
If you have a PHP-specific question, there
are newsgroups, mailing lists, and ques-
tion-and-answer sections available on PHP-
related websites for you to turn to. These
are discussed in more detail in Appendix B.
Browsing through these references or
searching the Internet will almost always
provide you with the fastest answer.
You can also direct your questions, com-
ments, and suggestions to me. You’ll get
the fastest reply using the book’s cor-
responding forum; I always answer those
questions first. If you’d rather email me,
you can do so through the contact page on
the website. I do try to answer every email
I receive, but it will probably take a week or
two (whereas you’ll likely get a reply in the
forum within a couple of days).
For more tips and an enlightening read,
see the sidebar on this page and Eric
Steven Raymond’s “How to Ask Questions
the Smart Way,” at www.catb.org/~esr/faqs/
smart-questions.html. The 10 minutes
you spend on it will save you hours in
the future. Those people who will answer
your questions, like myself, will be most
appreciative!
How to Ask Questions the
Smart Way
Whether you’re posting a message to the
book’s supporting forum, sending me an
email, or asking a question in a news-
group, knowing how to most effectively
ask a question improves the quality of
the response you’ll receive as well as the
speed with which you’ll get your answer.
To receive the best answer in the short-
est amount of time, follow these steps:
1. Search the Internet, read the manu-
als, and browse any applicable
documentation.
2. Ask your question in the most appro-
priate forum (newsgroup, mailing list,
and so on).
3. Use a clear and concise subject.
4. Describe your problem in detail, show
any relevant code, say what went
wrong, indicate what version of PHP
you’re using, and state what operat-
ing system you’re running.

ptg18144795
This page intentionally left blank

ptg18144795
When learning any new programming lan-
guage, always begin with an understanding
of the basic syntax and functionality, which
is what you’ll learn in this chapter. The
focus here is on the fundamentals of HTML
and PHP, and how the two languages work
together. The chapter also covers some
recommended programming and debugging
techniques, the use of which will greatly
ease the learning process.
If you’ve never programmed before, a
focused reading of this chapter will start
you on the right track. If you have some
programming experience, you’ll be able to
breeze through these pages, gaining a per-
spective for the book’s remaining material.
By the end of this chapter you will have
successfully written and executed your first
PHP scripts and be on your way to devel-
oping dynamic web applications.
1
Getting Started
with PHP
In This Chapter
Basic HTML Syntax 2
Basic PHP Syntax 7
Using SFTP 10
Testing Your Script 12
Sending Text to the Browser 15
Using the PHP Manual 18
Sending HTML to the Browser 21
Adding Comments to Scripts 24
Basic Debugging Steps 27
Review and Pursue 29
ptg18144795
2 Chapter 1
Basic HTML Syntax
All web pages are made using HTML
(Hypertext Markup Language). Every web
browser, be it Google’s Chrome, Mozilla’s
Firefox, Microsoft’s Internet Explorer and
Edge, or Apple’s Safari, turns HTML code—
<h1>Hello, World!</h1>
I just wanted to say <em>Hello</em>.
—into the web page presented to the
user A.
As of this writing, the current version of
HTML is 5, which should remain the norm
for some time to come (it was officially
standardized in 2014). HTML5 is a solid
and practical version of the language, well
suited for today’s web.
Before getting into the syntax of PHP, let’s
create one simple but valid HTML document
that can act as a template for many of this
book’s examples.
A How one web browser renders the
HTML code.

ptg18144795
Getting Started with PHP 3
Basic CSS
HTML elements define a page’s content, but formatting the look and behavior of such content is
left to CSS (Cascading Style Sheets). As with HTML, this book does not teach CSS in any detail, but
because some of the book’s code uses CSS, you should be familiar with its basic syntax.
You can add CSS to a web page in a couple of ways. The first, and easiest, method is to use HTML
style tags:
<style type="text/css">
/* rules */
</style>
The CSS rules are defined between the opening and closing style tags.
You can also use the
link
HTML tag to incorporate CSS rules defined in an external file:
<link href="styles.css" rel="stylesheet" type="text/css">
That file would contain only the rules, without the style tags.
CSS rules are applied to combinations of general page elements, CSS classes, and specific items:
img { border: 0px; }
.error { color: red; }
#about { background-color: #ccc; }
The first rule applies to every image tag. The second applies to any element that has a class
of
error
:
<p class="error">Error!</p>
The third rule applies only to the specific element that has an
id
value of
about
:
<p id="about">About...</p>
(Not all elements need to have an
id
attribute, but no two elements should have the same
id
value.)
For the most part, this book uses CSS only to do simple things, such as changing the color or back-
ground color of an element or some text.
For more on CSS, search the web or see a dedicated book on the subject.
ptg18144795
4 Chapter 1
To create an HTML page:
1. Open your text editor or integrated
development environment (IDE).
You can use pretty much any applica-
tion to create HTML and PHP pages.
Popular choices include
> Adobe’s Dreamweaver
(www.adobe.com)
> Aptana Studio (www.aptana.com)
> PhpStorm (www.jetbrains.com)
> Sublime Text (www.sublimetext.com)
> Atom (https://atom.io)
The first three are IDEs, making them
more complicated to use but also more
powerful. The last two are text editors.
All these programs run on most common
operating systems.
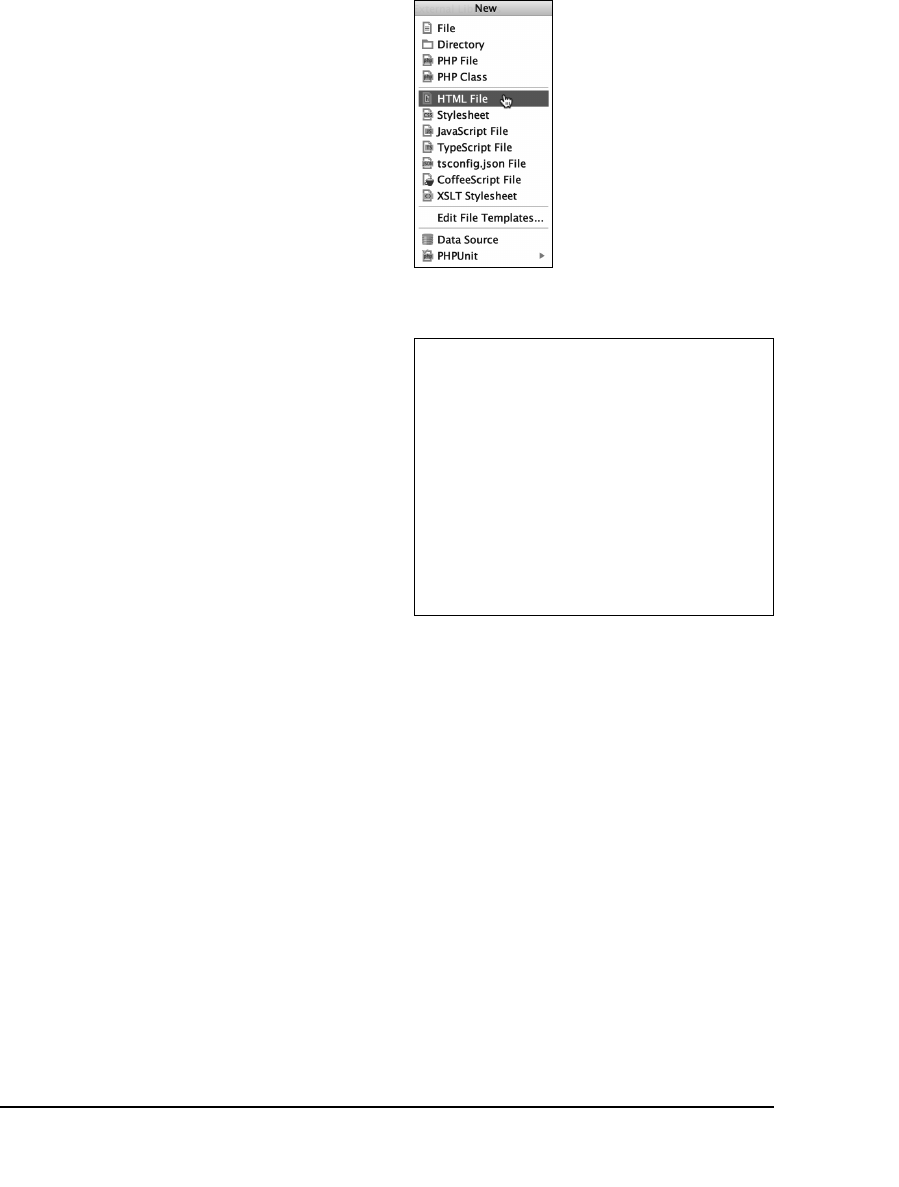
2. Choose File > New to create a new,
blank document.
Some text editors allow you to start by
creating a new document of a certain
type—for example, a new HTML file B.
If your application has this option, use it!
3. Start with the HTML header lines
(Script 1.1):
<!doctype html>
<html lang="en">
A valid HTML5 document begins with
these lines. They tell the web browser
what type of document to expect. For
this template, and in this entire book,
HTML5
pages will be created. One of
the niceties of HTML5 is its minimal
doctype and syntax.
B PhpStorm and most
other web development
applications can create the
basics of an HTML document
for you.
Script 1.1 This simple document contains the
basics of an HTML5 page.
1 <!doctype html>
2 <html lang="en">
3 <head>
4 <meta charset="utf-8">
5 <title>Welcome to this Page!</title>
6 </head>
7 <body>
8 <h1>This is a basic HTML page!</h1>
9 <br>
10 <p>Even with <em>some</em> decoration,
it's still not very exciting.</p>
11 </body>
12 </html>

ptg18144795
Getting Started with PHP 5
4. Create the head section of the page:
<head>
<meta charset="utf-8">
<title>Welcome to this Page!
➝
</title>
</head>
The head of an HTML page should
include the
charset
meta tag. The
“Understanding Encoding” sidebar dis-
cusses what this means in more detail.
The head also contains the page’s
title, which appears at the top of the
browser window or tab, as well as in
the browser’s bookmarks and history.
You can also place JavaScript and CSS
references in the head.
5. Create the body section:
<body>
<h1>This is a basic HTML page!
➝
</h1>
<br>
<p>Even with <em>some</em>
➝
decoration, it's still not
➝
very exciting.</p>
</body>
The page’s content—what is shown in
the browser—goes between opening
and closing
body
tags.
6. Complete the page with a closing
HTML tag:
</html>
continues on next page
Understanding Encoding
Encoding is a huge subject, but what
you most need to understand is this:
The encoding you use in a file dictates
what characters can be represented
(and therefore, what written languages
you can use). To select an encoding, you
must first confirm that your text editor
or IDE can save documents using that
encoding. Some applications let you
set the encoding in the preferences or
options area; others set the encoding
when you save the file.
To indicate the encoding to the browser,
there’s a corresponding
meta
tag:
<meta charset="utf-8">
The
charset=utf-8
part says that
UTF-8 (short for 8-bit Unicode Transfor-
mation Format) encoding is being used.
Unicode is a way of reliably representing
every symbol in every alphabet. Version
8.0.0 of Unicode—the current version as
of this writing—supports over 120,000
characters! The most commonly used
Unicode encoding is UTF-8.
If you want to create a multilingual web
page, UTF-8 is the way to go, and it’ll be
used in this book’s examples. You don’t
have to, of course. But whatever encod-
ing you do use, make sure the encoding
indicated by the HTML page matches the
actual encoding used by the text editor
or IDE. If you don’t, you’ll likely see odd
characters when viewing the page in a
web browser.
ptg18144795
6 Chapter 1
7. Choose File > Save As. In the dialog
box that appears, choose Text Only
(or ASCII) for the format, if you’re given
the option.
HTML and PHP documents are just
plain text files (unlike, for example, a
Microsoft Word document, which is
stored in a proprietary, binary format).
You may also need to indicate the
encoding (
utf-8
) when you save the
file (again, see the “Understanding
Encoding” sidebar).
8. Navigate to the location where you
wish to save the script.
You can place this script anywhere
you’d like on your computer, although
using one dedicated folder for every
script in this book, perhaps with sub-
folders for each chapter, makes sense.
9. Save the file as
welcome.html
.
HTML5 pages use the standard
.html
extension.
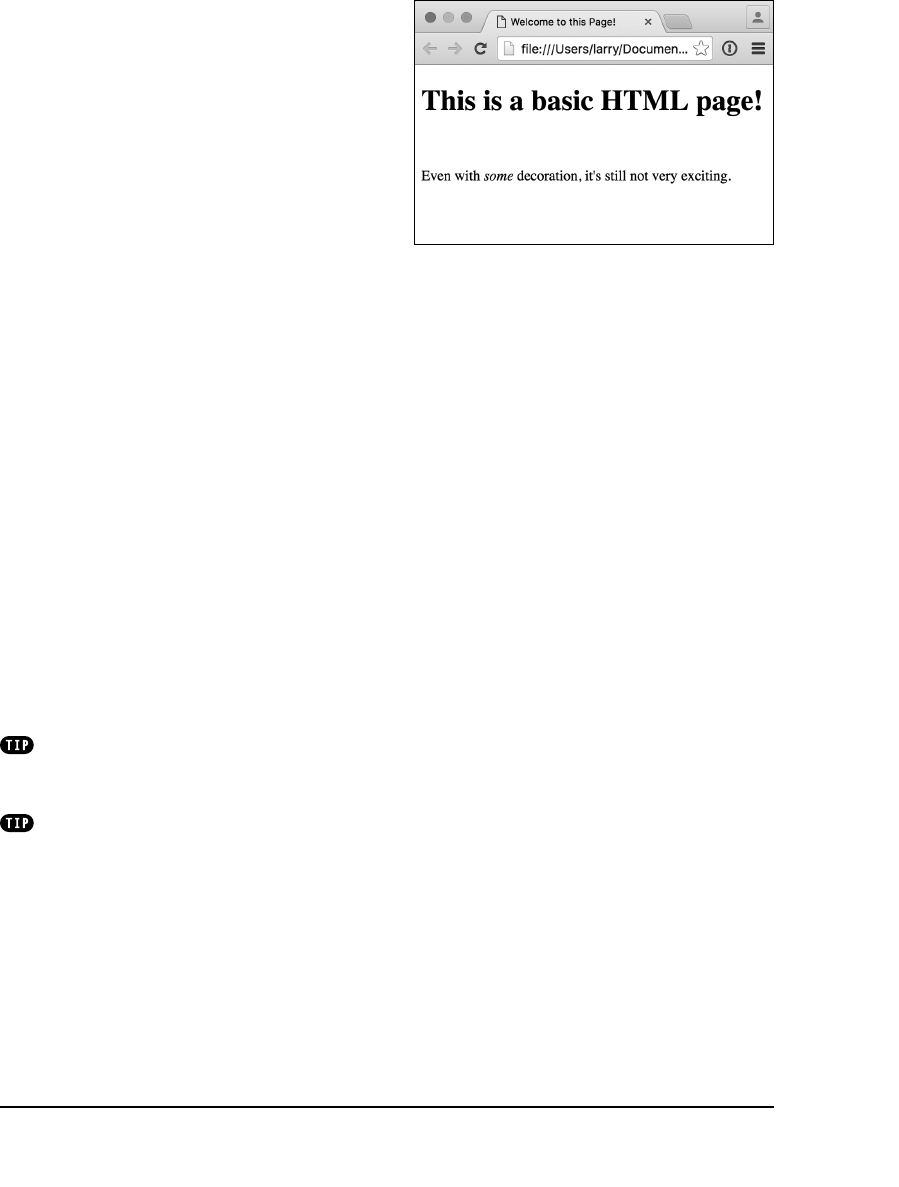
10. Test the page by viewing it in your
browser C.
Unlike with PHP scripts (as you’ll soon
discover), you can test HTML pages by
opening them directly in a browser.
Search the web or use the book’s sup-
port forum (www.LarryUllman.com/forums/) to
find a good HTML and PHP editor or IDE.
For more information on HTML, check out
Elizabeth Castro and Bruce Hyslop’s excellent
book HTML and CSS, Eighth Edition: Visual
QuickStart Guide (Peachpit Press, 2014).
C The HTML page, as interpreted by the browser.

ptg18144795
Getting Started with PHP 7
Basic PHP Syntax
Now that you’ve seen how HTML will be
handled in this book, it’s time to begin
PHP scripting. To create a PHP page, you’ll
start exactly as you would if you were
creating an HTML document from scratch.
Understanding the reason for this is vitally
important: Web browsers are client appli-
cations that understand HTML;
PHP is a
server-side technology
that cannot run in
the client. To bridge this gap, PHP is used
on the server to generate HTML that’s run
in a browser (refer to the section “How
PHP Works” in this book’s “Introduction” for
a visual representation of this relationship).
There are three main differences between
a standard HTML page and a PHP script.
First, PHP scripts should be saved with the
.php
file extension (for example,
index.php
).
Second, you place PHP code within
<?php
and
?>
tags, normally within the context of
some HTML:
...
<body><h1>This is HTML.</h1>
<?php PHP code! ?>
<p>More HTML</p>
...
The PHP tags indicate the parts of the
page to be run through the PHP processor
on the server. This leads to the third major
difference:
PHP scripts must be run on a
PHP-enabled web server
(whereas HTML
pages can be viewed on any computer,
directly in a browser). This means that
PHP scripts must always be run through
a URL
(for example, http://example.com/
page.php). If you’re viewing a PHP script in
a web browser and the address does not
begin with
http
, the PHP script will not work.
ptg18144795
8 Chapter 1
To make this first PHP script do something
without too much programming fuss, you’ll
use the
phpinfo()
function. This function,
when called, sends a table of information to
the web browser. That table lists the specif-
ics of the PHP installation on that particular
server. It’s a great way to test your PHP
installation and has a high “bang for your
buck” quality.
However, the
phpinfo()
function not only
outputs a table of information, it also creates
a complete HTML page for you. So this first
PHP script does not require the standard
HTML code, although subsequent scripts in
this chapter will.
To create a new PHP script
on your computer:
1. Create a new PHP document in
your text editor or IDE, to be named
phpinfo.php
(Script 1.2).
For this specific case, you’ll start with a
blank file. But if your text editor or IDE
has PHP file templates for you, you can
certainly start with one of those.
2. Begin the page with
<?php
on its
own line.
This opening PHP tag tells the server
that the following code is PHP and
should be handled as such.
If your application has a PHP template
for you, it may have created the PHP
tags already.
Script 1.2 This first PHP script invokes a single
PHP function.
1 <?php
2 phpinfo();
3 ?>
ptg18144795
Getting Started with PHP 9
Just as a file’s extension on your computer
tells the operating system in what application
to open the file, a web page’s extension tells
the server how to process the file:
file.php
goes through the PHP module,
file.aspx
is
processed as ASP.NET, and
file.html
is a
static HTML document (normally). The exten-
sion associations are determined by the web
server’s settings.
If you’re developing PHP scripts for a
hosted website, check with your hosting com-
pany to learn which file extensions you can
use for PHP documents. In this book you’ll see
.php
, the most common extension.
You’ll occasionally see PHP’s short tags—
simply
<?
and
?>
—used in other people’s
scripts, although I recommend sticking with
the formal tags:
<?php
and
?>
. Support for the
short tags must be enabled on a server, and
using them makes your code less portable.
You’ll find it handy to have a copy of the
phpinfo.php
file around. As you’ll soon see,
this script reports upon PHP’s capabilities,
settings, and other features of your server.
In fact, this book frequently suggests you
return to this script for those purposes.
PHP scripts can also be executed with-
out a web browser, using a command-line
interface and a standalone PHP executable.
But that topic is well outside the scope of this
book (and it’s a much less common use of PHP
regardless).
3. Add the following on the next line:
phpinfo();
The syntax will be explained in detail
later, but in short, this is just a call to an
existing PHP function named
phpinfo
.
You must use the opening and closing
parentheses, with nothing between
them, and the semicolon.
4. Type
?>
on its own line, as the last line.
The closing PHP tag tells the server that
the PHP section of the script is over.
Again, because the
phpinfo()
function
generates a complete HTML page for
you, no HTML tags are needed.
5. Save the script as
phpinfo.php
.
Not to overstate the point, but remem-
ber that PHP scripts must use a valid
file extension. Most likely you’ll have
no problems if you save your files as
filename.php
.
You also need to be certain that the
application or operating system is not
adding a hidden extension to the file.
Notepad on Windows, for example,
attempts to add
.txt
to uncommon
file extensions, which renders the PHP
script unusable. (Generally speaking,
do not use Notepad.)
ptg18144795
10 Chapter 1
Using SFTP
Unlike HTML, which can be tested directly
in a browser, PHP scripts need to be run
from a PHP-enabled server in order to
see the results. Specifically, PHP is run
through a
web server application
, such
as Apache (http://httpd.apache.org), Nginx
(www.nginx.com), or Internet Information
Server (IIS; www.iis.net).
You can obtain a PHP-enabled server in
one of two ways:
n
Install the software on your own
computer.
n
Acquire web hosting.
PHP is open source software (meaning,
in part, that it’s free) and is generally easy
to install (with no adverse effect on your
computer). If you want to install PHP and
a web server on your computer, follow the
directions in Appendix A, “Installation and
Configuration.” Once you’ve done so, you
can skip ahead to the next section of the
chapter, where you’ll learn how to test your
first PHP script.
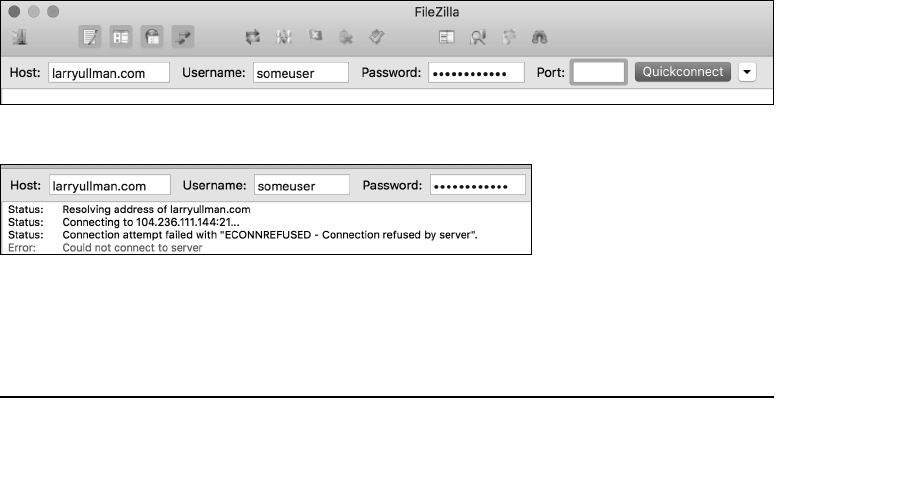
A The connection section of FileZilla’s main window (as it appears on the Mac).
B The reported error says that the connection attempt was refused.
If you’re not running PHP on your own
computer, you’ll need to transfer your PHP
scripts to the PHP-enabled server using
SFTP (Secure File Transfer Protocol). The web
hosting company or server’s administrator
will provide you with SFTP access informa-
tion, which you’ll enter into an SFTP client.
Many SFTP client applications are available;
this next sequence of steps uses the free
FileZilla (http://filezilla-project.org), which
runs on many operating systems.
To SFTP your script to the server:
1. Open your SFTP application.
2. In the application’s connection window,
enter the information provided by your
web host A.
SFTP access requires a host (for exam-
ple, the domain name or an IP address),
username, and password.
3. Click Quickconnect (or your SFTP
client’s equivalent).
If you’ve provided the correct informa-
tion, you should be able to connect. If
not, you’ll see error messages at the
top of the FileZilla window B.
ptg18144795
Getting Started with PHP 11
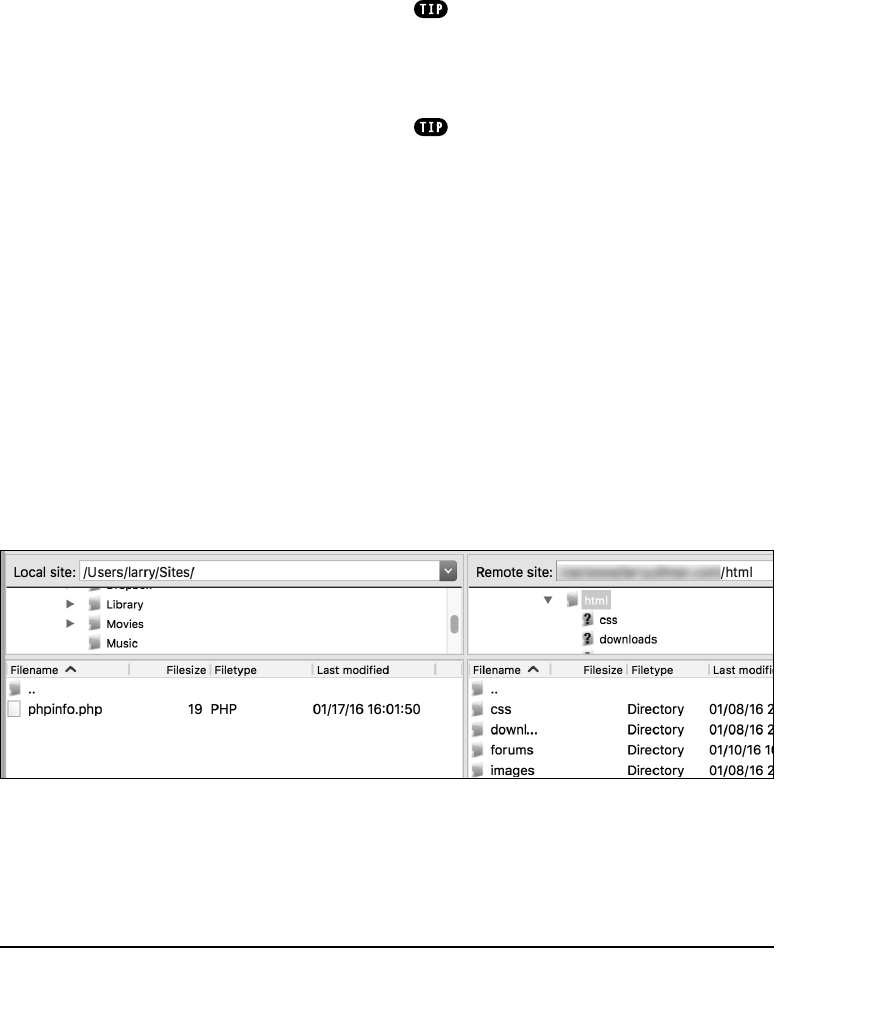
5. Upload your script—
phpinfo.php
—to
the server.
To do this in FileZilla, drag the file from
the left column—your computer—to the
right column—the server.
Some text editors and IDEs have built-in
SFTP capability, allowing you to save your
scripts directly to the server. Other applica-
tions can run PHP scripts without leaving the
application at all.
You can also transfer files to your web
server using version control software, such as
Git (https://git-scm.com). Although this is an
excellent route, it’s well beyond the scope of
a beginner’s guide to PHP.
C I’ve successfully connected to the remote server and navigated into the
html
directory (aka the web
document root).
4. Navigate to the proper directory for
your web pages (for example,
www
,
htdocs
, or
httpdocs
).
The SFTP application won’t necessarily
drop you off in the appropriate directory.
You may need to do some navigation
to get to the
web document root
. The
web document root is the directory on
the server to which a URL directly points
(for example, www.larryullman.com,
as opposed to www.larryullman.com/
somedir/). If you’re unsure of what the
web document root is for your setup, see
the documentation provided by the host-
ing company (or ask them for support).
In FileZilla, the right column represents
the files and directories on the server;
the left column represents the files and
directories on your computer C. Just
double-click folders to open them.

ptg18144795
12 Chapter 1
Testing Your Script
Testing a PHP script is a two-step process.
First, you must put the PHP script in the
appropriate directory for the web server.
Second, you run the PHP script in your web
browser by loading the correct URL.
If you’re using a separate web server,
like one provided by a hosting company,
you just need to use an SFTP application
to upload your PHP script to it (as in the
previous steps). If you have installed PHP
on your personal computer, then you can
test your PHP scripts by saving them in, or
moving them to, the web document root.
This is normally
n
~/Sites
for Mac OS X users (where
~
stands for your home directory; this
is no longer created automatically on
newer versions of Mac OS X, but you
can make one)
n
C:\Inetpub\wwwroot
for Windows
users running IIS
n
C:\xampp\htdocs
for Windows
users running XAMPP
(www.apachefriends.org)
n
/Applications/MAMP/htdocs
for Mac
users running MAMP (www.mamp.info)
If you’re not sure what the web document
root for your setup is, see the documenta-
tion for the web server application or
operating system (if the web server appli-
cation is built in).
Once you’ve got the PHP script in the right
place, use your browser to execute it.
To test your script in the browser:
1. Open your favorite web browser.
For the most part, PHP doesn’t behave
differently on different browsers
(because PHP runs on the server), so
use whichever browser you prefer.
In this book, you’ll see that I primarily
use Chrome, regardless of the operat-
ing system.
2. In the browser’s address bar, enter the
URL of the site where your script has
been saved.
In my case, I enter www.larryullman.com,
but your URL will certainly be different.
If you’re running PHP on your own
computer, the URL is http://localhost
(Windows); or http://localhost
/
~username
(Mac OS X), where you
should replace
username
with your
username. Some all-in-one packages,
such as MAMP and XAMPP, may also
use a
port
as part of the URL: http://
localhost:
8888
.
If you’re not sure what URL to use, see
the documentation for the web server
application you installed.
ptg18144795
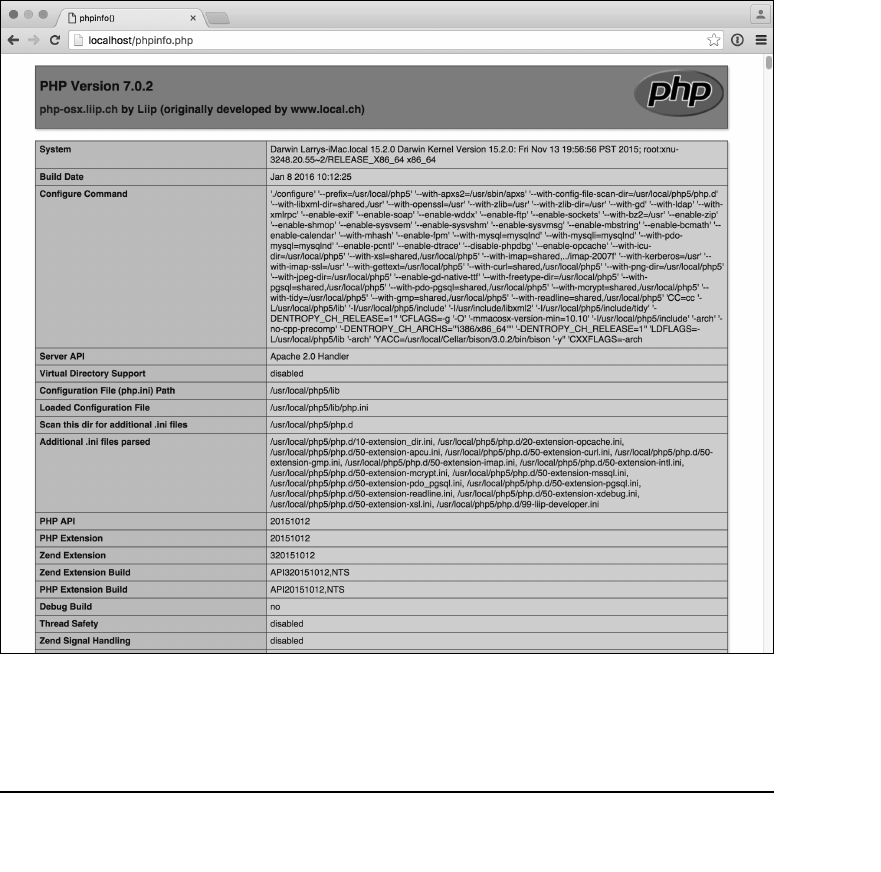
Getting Started with PHP 13
3. Add
/phpinfo.php
to the URL.
If you placed the script within a sub-
directory of the web document root,
you would add that subdirectory
name to the URL as well (for example,
/ch01/phpinfo.php
).
4. Press Return/Enter to load the URL.
The page should load in your browser
window A.
continues on next page
A If the script executed correctly, the browser result should look like this (woohoo!).
ptg18144795
14 Chapter 1
If you see the PHP code B or a blank
page, it could mean many things:
n
You are not loading the PHP script
through a URL (that is, the address
does not begin with
http
). Note that
you may need to click the address bar
to view the full URL, including the
http
,
because many of today’s browsers
hide this by default.
n
PHP has not been enabled on
the server.
n
You are not using the proper extension.
If you see a
file not found
or similar error C,
it could be because
n
You entered the incorrect URL.
n
The PHP script is not in the proper
directory.
n
The PHP script does not have the cor-
rect name or extension.
It’s very important to remember that you
can’t open a PHP file directly in a browser as
you would open HTML pages or files in other
applications. PHP scripts must be processed
by the web server, which means you must
access them via a URL (an address that starts
with http://).
Even if you aren’t a seasoned computer
professional, you should consider installing
PHP on your computer. Doing so isn’t too dif-
ficult, and PHP is free. Again, see Appendix A
for instructions.
B If you see the raw PHP code, then the PHP
code is not being executed.
C This server response indicates a mismatch
between the URL attempted and the files that
actually exist on the server.

ptg18144795
Getting Started with PHP 15
Sending Text to
the Browser
PHP wouldn’t be very useful if all you
could do was see that it works (although
that confirmation is critical). You’ll use PHP
most frequently to send information to the
browser in the form of plain text and HTML
tags. To do so, use
print
:
print "something";
Just type the word
print
, followed by what
you want to display: a simple message, the
value of a variable, the result of a calcula-
tion, and so forth. In that example, the
message is a string of text, so it must be
surrounded with quotation marks.
PHP is case-insensitive when it comes to
calling functions, such as
phpinfo()
and
print
. Using
print
,
Print
, and
PRINT
nets the same results. Later in the book,
you’ll see examples where case makes a
crucial difference.
To be clear,
print
doesn’t actually
print
anything; it just outputs data. When a PHP
script is run through a browser, that PHP
output is received by the browser itself as
if it were content from a static HTML file.
Also note that the line is terminated by a
semicolon (
;
). Every statement in PHP code
must end with a semicolon, and forgetting
this requirement is a common cause of
errors. A
statement
in PHP is an executable
line of code, like
print "something";
or
phpinfo();
Conversely, comments, PHP tags, control
structures (for example, conditionals
and loops), and certain other constructs
discussed in this book don’t require
semicolons.

ptg18144795
16 Chapter 1
Finally, you should know about a minor
technicality: Whereas
phpinfo()
is a
function
,
print
is actually a
language
construct
. Although it’s still standard to
refer to
print
as a function, because
print
is a language construct, no paren-
theses are required when using it, as in
the
phpinfo()
example.
To print a simple message:
1. Begin a new HTML document in
your text editor or IDE, to be named
hello1.php
(Script 1.3):
<!doctype html>
<html lang="en">
<head>
<meta charset="utf-8">
<title>Hello, World!</title>
</head>
<body>
<p>The following was created by
➝
PHP:
Most of this code is the standard HTML.
The last line will be used to distinguish
between the hard-coded HTML and the
PHP-generated HTML.
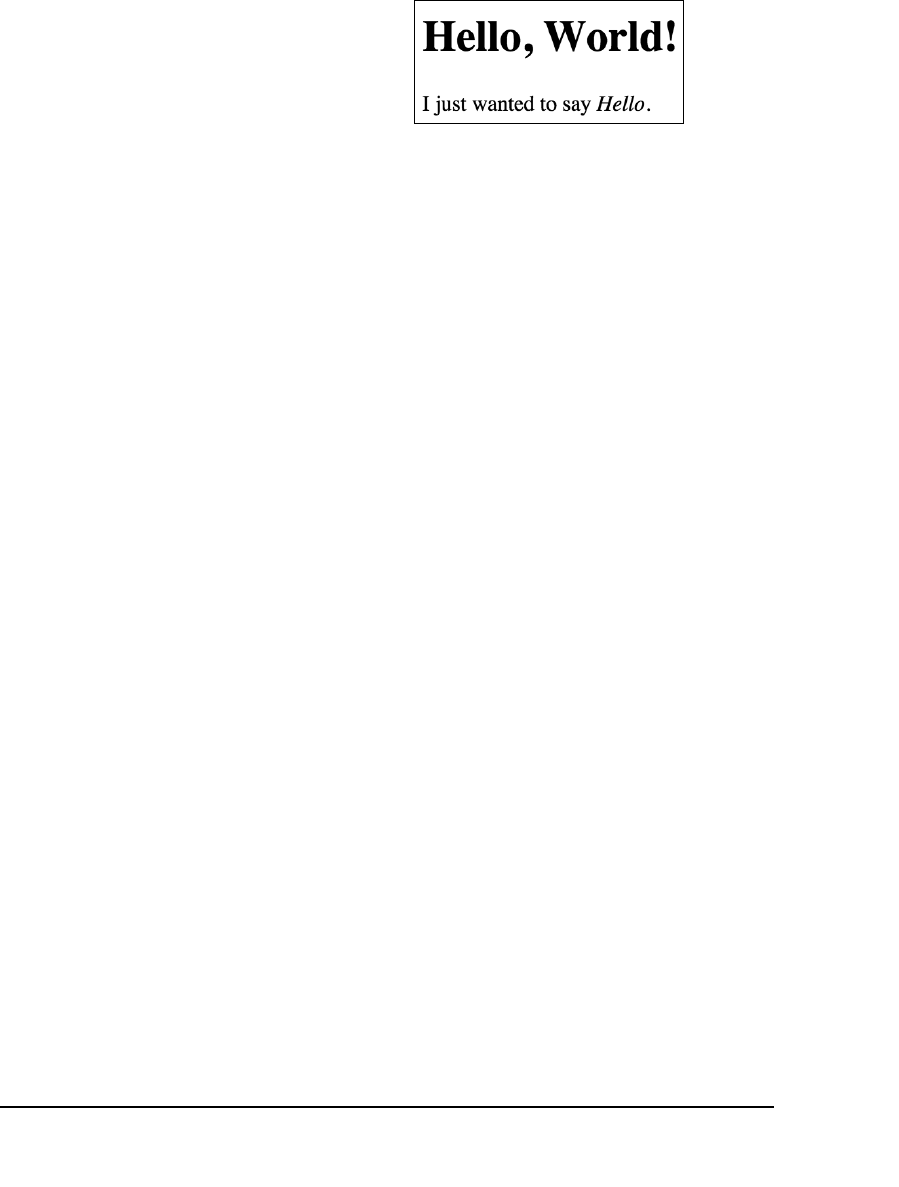
2. On the next line, type
<?php
to create
the initial PHP tag.
3. Add
print "Hello, world!";
Printing the phrase
Hello, world!
is the
first step most programming references
teach. Even though it’s a trivial reason
to use PHP, you’re not really a program-
mer until you’ve made at least one
Hello, world!
application.
Script 1.3 By putting the
print
statement between
the PHP tags, the server will dynamically send the
Hello, world!
greeting to the browser.
1 <!doctype html>
2 <html lang="en">
3 <head>
4 <meta charset="utf-8">
5 <title>Hello, World!</title>
6 </head>
7 <body>
8 <p>The following was created by PHP:
9 <?php
10 print "Hello, world!";
11 ?>
12 </p>
13 </body>
14 </html>

ptg18144795
Getting Started with PHP 17
4. Close the PHP section and complete
the HTML page:
?>
</p>
</body>
</html>
5. Save the file as
hello1.php
, place it on
your PHP-enabled server, and test it in
your browser A.
If you’re running PHP on your own com-
puter, remember that you can save the
file to the proper directory and access
the script via http://localhost/.
If you see an error or a blank page
instead of the results shown in the
figure, review the “Testing Your Script”
section, or skip ahead to the “Basic
Debugging Steps” section at the end of
this chapter.
You can use other functions to send text
to the browser, including
echo
and
printf()
,
but this book primarily uses
print
.
You can—and commonly will—use
print
over multiple lines:
print "This is a longer
sentence of text.";
The closing quotation mark terminates the
message being printed, and the semicolon is
placed only at the end of that line.
A A simple
Hello,
world!
example: your first
foray into PHP programming.
ptg18144795
18 Chapter 1
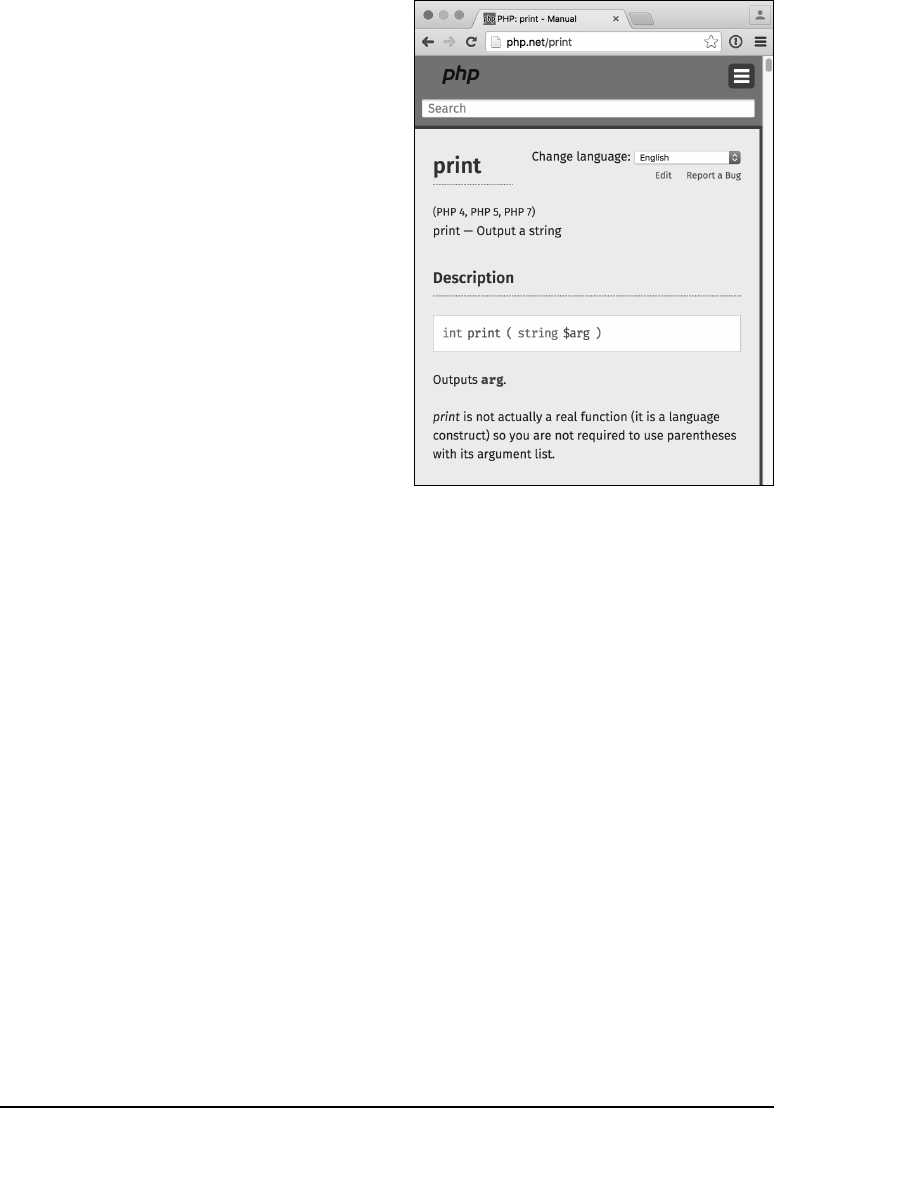
Using the PHP Manual
The PHP manual—accessible online at
www.php.net/manual—lists every function
and feature of the language. The manual
discusses general concepts (installation,
syntax, variables) first and ends with the
functions by topic (MySQL, string functions,
and so on).
To quickly look up any function in the PHP
manual, go to www.php.net/
functionname
in your web browser (for example,
www.php.net/print).
To understand how functions are described,
look at the start of the
print
function’s
page A.
The first line is the name of the function
itself, followed by the versions of PHP in
which it’s available. As the language grows,
new functions are added and, occasionally,
older functions are removed. Then there’s
a textual description of the function along
with the function’s basic usage. The usage
is the most important and confusing part.
In this example, the first value—
int
—says
that
print
returns an integer value (specifi-
cally,
print
returns 1, always). Within the
parentheses,
string
$arg
states that the
function takes one required argument,
which should be in the form of a string.
You’ve already seen this in action.
A The PHP manual’s page for the
print
language
construct.
ptg18144795
Getting Started with PHP 19
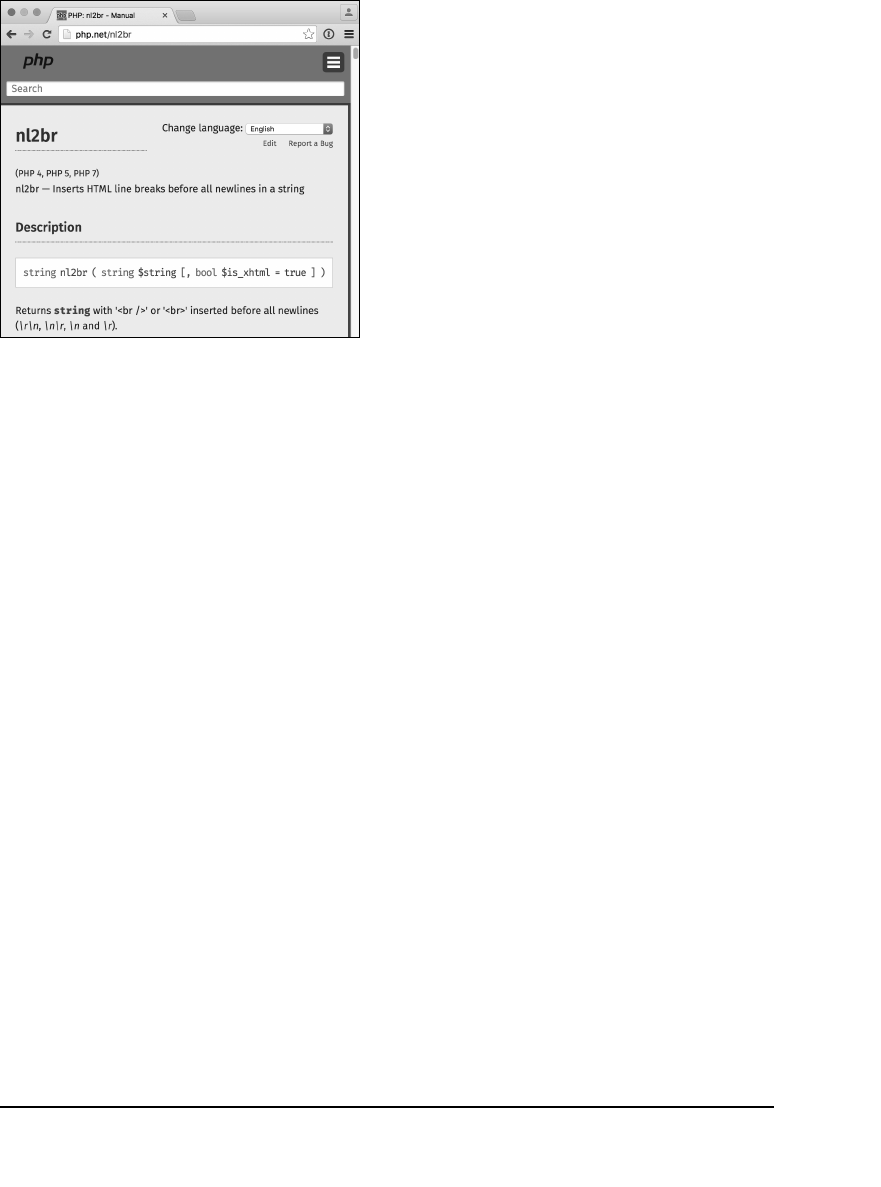
As a comparison, check out the manual’s
listing for the
nl2br()
function B. This
function converts newlines found within
text (the equivalent of pressing Return/
Enter) into HTML break tags. This function,
which returns a string, takes a string as its
first argument and an optional Boolean
(TRUE/FALSE) as its second. The square
brackets indicate optional arguments,
which are always listed last. When a func-
tion takes multiple arguments, they are
separated by commas. Hence, this function
can be called like so:
nl2br("Some text");
nl2br("Some text", false);
As the definition also indicates, the second
argument has a default value of
true
,
meaning it’ll create
<br
/>
tags (which is
XHTML compliant) unless the function is
passed a second argument value of
false
.
In that case, the function will create
<br>
tags instead.
The most important thing to remember
about the PHP manual is that it exists! If
you’re ever confused by a function or how
it is properly used, check the PHP manual’s
reference page for it.
B The PHP manual’s page for the
nl2br()
function.
ptg18144795
20 Chapter 1
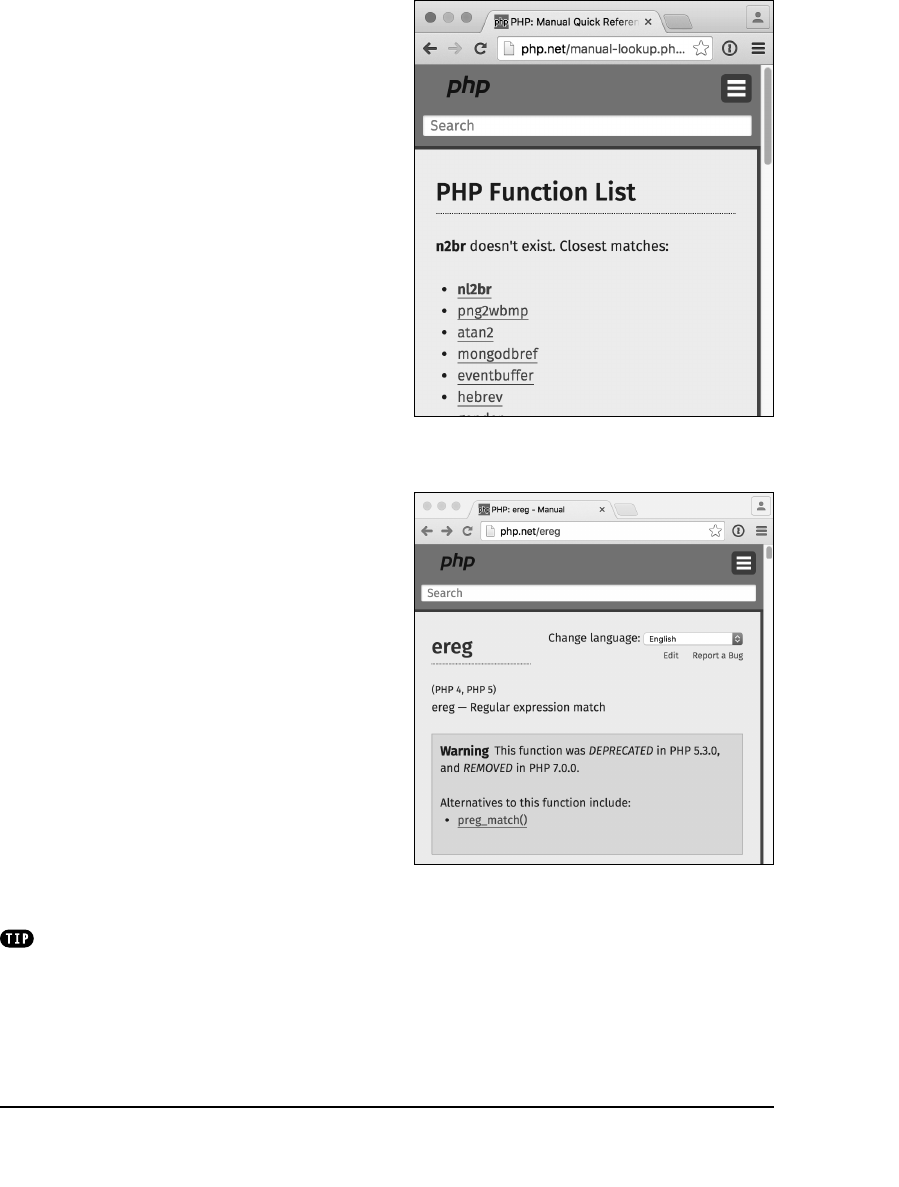
To look up a function definition:
1. Go to www.php.net/
functionname
in
your web browser.
If the PHP manual doesn’t have a
matching record for the function you
tried, check the spelling or look at the
recommended alternatives that the
manual presents C.
2. Compare the versions of PHP that the
function exists in with the version of
PHP you’re using.
Use the
phpinfo()
function, already
demonstrated, to know for certain what
version of PHP you are running. If a func-
tion was added in a later version of PHP,
you’ll need to either upgrade the version
you have or use a different approach.
3. Examine what type of data the function
returns.
Sometimes you may be having a prob-
lem with a function because it returns a
different type of value than you expect
it to.
4. Examine how many and what types
of arguments the function requires or
can take.
The most common mistake when using
functions is sending the wrong number
or type of arguments when the function
is called.
5. Read the user comments, when present,
to learn more.
Sometimes the user comments can be
quite helpful (other times not).
If you see a message saying that a func-
tion has been deprecated D, that means the
function will be dropped from future versions
of PHP, and you should start using the newer,
better alternative (there is almost always a
better alternative identified).
C The manual will present alternative functions if
the entered URL doesn’t exactly match a reference.
D Deprecated functions should be avoided in
your code.

ptg18144795
Getting Started with PHP 21
Sending HTML to
the Browser
As those who first learned HTML quickly
discovered, viewing plain text in a web
browser leaves a lot to be desired. Indeed,
HTML was created to make plain text more
appealing and useful. Because HTML works
by adding tags to text, you can use PHP to
also send HTML tags to the browser, along
with other data:
print "<b>Hello, world!</b>";
There is one situation where you have to be
careful, though. HTML tags that require
double quotation marks, like
<a href=
"page.php">link</a>
, will cause problems
when printed by PHP, because the
print
function uses quotation marks as well A:
print "<a href="page.php">link</a>";
One workaround is to
escape
the quota-
tion marks within the HTML by preceding
them with a backslash (
\
):
print "<a href=\"page.php\">link</a>";
By escaping each quotation mark within
the
print
statement, you tell PHP to print
the mark itself instead of treating the quo-
tation mark as either the beginning or the
end of the string to be printed.
To send HTML to the browser:
1. Open the
hello1.php
script (Script 1.3)
in your text editor or IDE, if it is not
already open.
2. Within the HTML head, declare a CSS
class (Script 1.4):
<style type="text/css">
.bold {
font-weight: bolder;
}
</style>
continues on next page
A Attempting to print double quotation marks will
create errors, because they conflict with the
print
statement’s primary double quotation marks.
Script 1.4 Using
print
, you can send HTML
tags along with text to the browser, where the
formatting will be applied.
1 <!doctype html>
2 <html lang="en">
3 <head>
4 <meta charset="utf-8">
5 <title>Hello, World!</title>
6 <style type="text/css">
7 .bold {
8 font-weight: bolder;
9 }
10 </style>
11 </head>
12 <body>
13 <p>The following was created by PHP:
14 <?php
15 print "<span class=\"bold\">Hello,
world!</span>";
16 ?>
17 </p>
18 </body>
19 </html>

ptg18144795
22 Chapter 1
This CSS code declares a class named
bold
, which will be used to add empha-
sis to text. This is obviously a fairly trivial
use of CSS, but by declaring this as a
class, it can easily be updated, perhaps
to change the color of the text or the
size, along with its weight.
3. Edit the
Hello, world!
message by
adding HTML tags, making it read as
follows:
print "<span class=\"bold\">
➝
Hello, world!</span>";
To make the PHP-generated part of
the message stand out, CSS styling will
bold the greeting. For this to work, you
must escape the quotation marks within
the span tag so they don’t conflict with
the
print
statement’s quotation mark.
4. Save the script as
hello2.php
, place
it on your PHP-enabled server, and run
the page in your browser B.
B The new version of the
Hello, world!
page, with
a little more decoration and appeal.
Using White Space
When programming in PHP, white space is generally (but not universally) ignored. Any blank line
(just one or several in a row) in PHP code is irrelevant to the end result. Likewise, tabs and spaces
are normally inconsequential to PHP. And because PHP code is not visible in the browser (unless
there’s a problem with the server), white space in your PHP files has no impact on what the end
user sees.
The spacing of HTML code shows up in the HTML source of a web page but has only a minimal
effect on what’s viewed in the browser. For example, all of a page’s HTML source code could be
placed on one line without changing what the end user sees. If you had to hunt for a problem in
the HTML source, however, you would not like the long, single line of HTML.
You can affect the spacing of dynamically generated HTML code by printing it in PHP over multiple
lines, or by using the newline character (
\n
) within double quotation marks:
print "Line 1\nLine 2";
Again, use of the newline character affects the
HTML source code
of the web page, not what the
end user sees rendered in the browser.
To adjust the spacing in the rendered web page, you’ll use CSS, plus paragraph, div, and break
tags, among others.
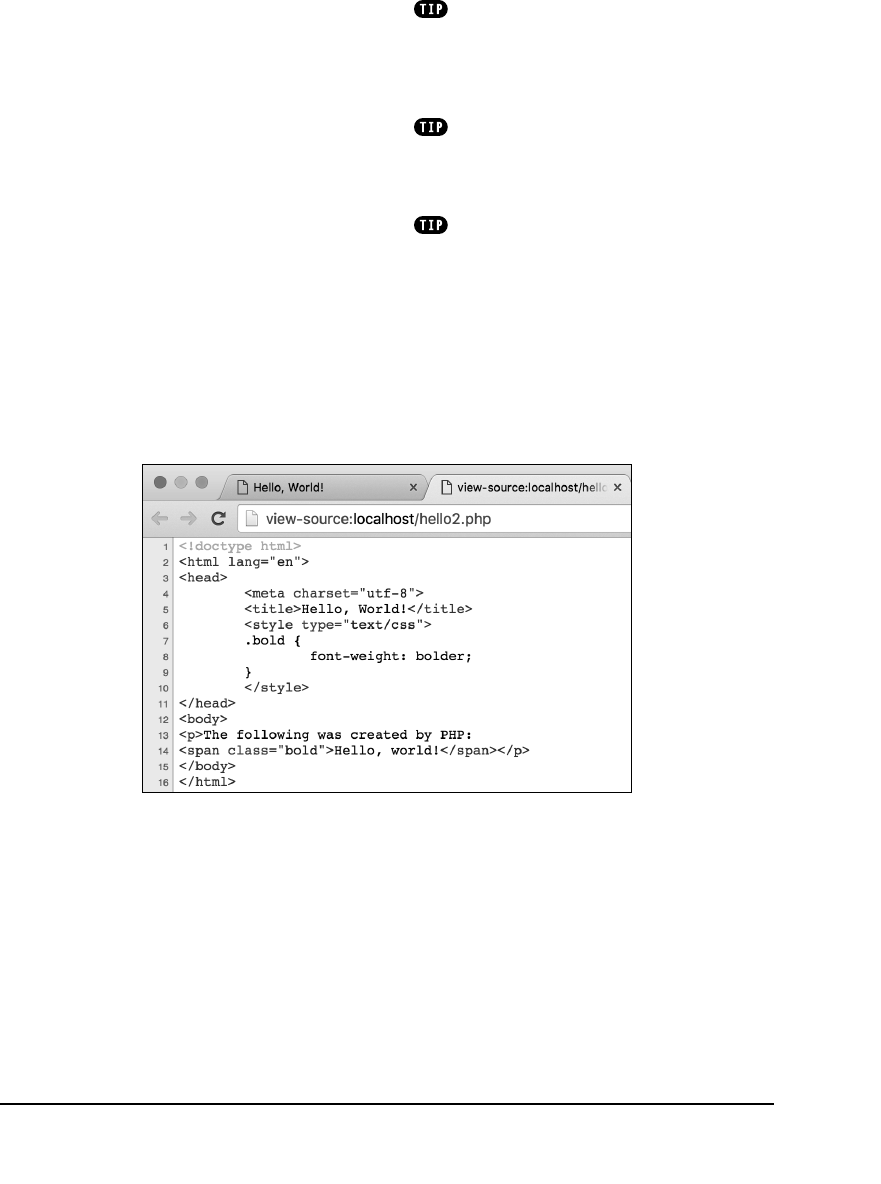
ptg18144795
Getting Started with PHP 23
Understanding the role of quotation
marks and how to escape problematic charac-
ters is crucial to programming with PHP. These
topics will be covered in more detail in the
next two chapters.
The HTML you send to the web browser
from PHP doesn’t need to be this simple. You
can create tables, JavaScript, and much, much
more.
Remember that any HTML outside the
PHP tags will automatically go to the browser.
Within the PHP tags,
print
statements are
used to send HTML to the web browser.
C The resulting HTML source code of
hello2.php
B.
5. View the HTML page source to see the
code that was sent to the browser C.
How you do this depends on the
browser: Select View > Developer >
View Source in Chrome, View > Page
Source in Firefox, or View > Source in
Internet Explorer.
This is a step you’ll want to be in the
habit of taking, particularly when prob-
lems occur. Remember that PHP is
primarily used to generate HTML, sent
to and interpreted by the browser.
Often, confirming what was sent to the
browser (by viewing the source) will help
explain the problem you’re seeing in the
browser’s interpretation (or visible result).

ptg18144795
24 Chapter 1
Adding Comments
to Scripts
Comments are integral to programming,
not because they do anything but because
they help you remember why
you
did
something. The computer ignores these
comments when it processes the script.
Furthermore, PHP comments are never
sent to the browser, remaining your secret.
PHP supports three ways of adding
comments. You can create a single-line
comment by putting either
//
or
#
at the
beginning of the line you want ignored:
// This is a comment.
You can also use
//
or
#
to begin a com-
ment at the end of a PHP line, like so:
print "Hello"; // Just a greeting.
Although it’s largely a stylistic issue,
//
is
much more commonly used in PHP than
#
.
You can create a multiline comment using
/*
to begin the comment and
*/
to con-
clude it:
/* This is a
multi-line comment. */
Some programmers prefer this comment
style because it contains both open and
closing “tags,” providing demarcation for
where the comment begins and ends.
ptg18144795
Getting Started with PHP 25
To add comments to a script:
1. Open the
hello2.php
created earlier
(Script 1.4) in your text editor or IDE.
2. After the initial PHP tag, add some
comments to your script (Script 1.5):
/*
* Filename: hello3.php
* Book reference: Script 1.5
* Created by: Larry Ullman
*/
This is just a sample of the kind of
comments you can write. You should
document what the script does, what
information it relies on, who created it,
when, and so forth. Stylistically, such
comments are often placed at the top
of a script (as the first thing within the
PHP section, that is), using formatting
like this. The extra asterisks aren’t
required; they just draw attention to
the comments.
3. On line 21, in front of the
print
state-
ment, type
//
.
By preceding the
print
statement with
two slashes, you ensure that the func-
tion call is “commented out,” meaning it
will never be executed.
4. After the closing PHP tag (on line 23),
add an HTML comment:
<!-- This is an HTML comment. -->
This line of code will help you distin-
guish among the different comment
types and where they appear. This com-
ment will appear only within the HTML
source code.
continues on next page
Script 1.5 PHP and HTML comments are added
to the script to document it and to render a line of
PHP code inert.
1 <!doctype html>
2 <html lang="en">
3 <head>
4 <meta charset="utf-8">
5 <title>Hello, World!</title>
6 <style type="text/css">
7 .bold {
8 font-weight: bolder;
9 }
10 </style>
11 </head>
12 <body>
13 <p>The following was created by PHP:
<br>
14 <?php
15 /*
16 * Filename: hello3.php
17 * Book reference: Script 1.5
18 * Created by: Larry Ullman
19 */
20
21 //print "<span class=\"bold\">Hello,
world!</span>";
22
23 ?>
24 <!-- This is an HTML comment. -->
25 </p>
26 </body>
27 </html>
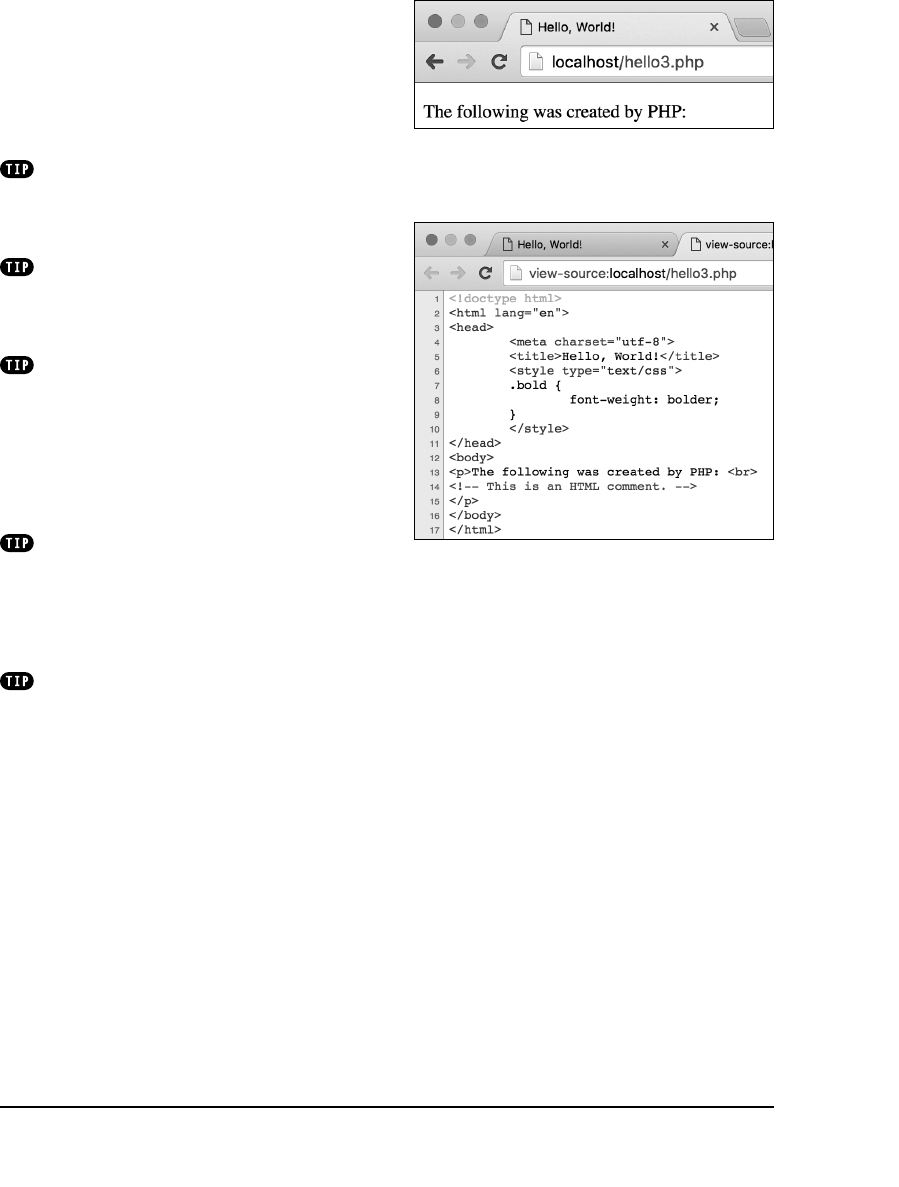
ptg18144795
26 Chapter 1
5. Save the script as
hello3.php
, place
it on your PHP-enabled server, and run
the page in your web browser A.
6. View the source of the page to see the
HTML comment B.
You can comment out just one line of
code or several using the
/*
and
*/
method.
With
//
or
#
, you can negate only one line at
a time.
Different programmers prefer to com-
ment code in different ways. The important
thing is to find a system that works for you
and stick to it.
Note that you cannot use HTML com-
ment characters (
<!--
and
-->
) within PHP to
comment out code. You could have PHP print
those tags to the browser, but in that case
you’d create a comment that appeared in the
HTML source code on the client’s computer
(but not in the browser window). PHP comments
never make it as far as a user’s computer.
Despite my strong belief that you can’t
over-comment your scripts, the scripts in this
book aren’t as documented as they should
be, in order to save space. But the book will
document each script’s name and number, for
cross-reference purposes.
When you change a script’s code, be
certain to update its comments as well. It’s
quite confusing to see a comment that suggests
a script or a line of code does something other
than what it actually does.
A With the
print
statement commented out,
the page looks just as it would if the
print
call
weren’t there.
B HTML comments don’t appear in the web
browser but are in the HTML source. PHP
comments remain in the PHP script on the server,
not visible inside the HTML source.

ptg18144795
Getting Started with PHP 27
Basic Debugging Steps
Debugging is by no means a simple con-
cept to grasp, and unfortunately, it’s one
that is only truly mastered by doing. The
next 50 pages could be dedicated to the
subject and you’d still merely pick up a
fraction of the debugging skills that you’ll
eventually acquire and need.
The reason I introduce debugging in this
harrowing way is that it’s important not to
enter into programming with delusions.
Sometimes code won’t work as expected,
you’ll inevitably create careless errors, and
some days you’ll want to pull your hair out,
even when using a comparatively user-
friendly language such as PHP. In short,
prepare to be perplexed and frustrated
at times
. I’ve been coding in PHP since
1999, and occasionally I still get stuck in
the programming muck. But debugging is
a very important skill to have, and one that
you will eventually pick up out of necessity
and experience. As you begin your PHP
programming adventure, I offer the follow-
ing basic but concrete debugging tips.
ptg18144795
28 Chapter 1
To debug a PHP script:
n
Make sure you’re always running PHP
scripts through a URL!
This is perhaps the most common
beginner’s mistake. PHP code must be
run through the web server applica-
tion, which means it must be requested
through http://
something
. When you
see actual PHP code instead of the
result of that code’s execution, most
likely you’re not running the PHP script
through a URL.
n
Know what version of PHP you’re
running.
Some problems arise from the version
of PHP in use. Before you ever use
any PHP-enabled server, run the
phpinfo.php
file (Script 1.2) to confirm
the version of PHP in use.
n
Make sure
display_errors
is on.
This is a basic PHP configuration set-
ting (discussed in Appendix A). You
can confirm this setting by executing
the
phpinfo()
function (just use your
browser to search for
display_errors
in the resulting page). For security
reasons, PHP may not be set to display
the errors that occur. If that’s the case,
you’ll end up seeing blank pages when
problems occur. To debug most prob-
lems, you’ll need to see the errors, so
turn this setting on while you’re learn-
ing. You’ll find instructions for doing so
in Appendix A and Chapter 3, “HTML
Forms and PHP.”
n
Check the HTML source code.
Sometimes the problem is hidden in
the HTML source of the page. In fact,
sometimes the PHP error message can
be hidden there!
n
Trust the error message.
Another very common beginner’s mis-
take is to not fully read or trust the error
that PHP reports. Although an error
message can often be cryptic and may
seem meaningless, it can’t be ignored.
At the very least, PHP is normally cor-
rect as to the line on which the problem
can be found. And if you need to relay
that error message to someone else
(like when you’re asking me for help),
do include the entire error message!
n
Take a break!
So many of the programming problems
I’ve encountered over the years, and
the vast majority of the toughest ones,
have been solved by stepping away
from my computer for a while. It’s easy
to become frustrated and confused,
and in such situations, any further steps
you take are likely to make matters
only worse.
These are just some general debugging
techniques, specifically tailored to the begin-
ning PHP programmer. They should suffice
for now, because the examples in this book
are relatively simple. More complex coding
requires more advanced debugging tech-
niques, so my PHP and MySQL for Dynamic
Web Sites: Visual QuickPro Guide, Fourth
Edition (Peachpit Press, 2012) dedicates a
whole chapter to this subject.

ptg18144795
Getting Started with PHP 29
Review and Pursue
Each chapter in this book ends with a
“Review and Pursue” section. In these
sections you’ll find:
n
Questions regarding the material just
covered
n
Prompts for ways to expand your
knowledge and experience on your own
If you have any problems with these
sections, in either answering the questions
or pursuing your own endeavors, turn
to the book’s supporting forum
(www.LarryUllman.com/forums/).
Review
n
What is HTML? What is the current
version of HTML?
n
What encoding is your text editor or IDE
set to use? Does that match the encod-
ing specified in your generated HTML
pages? Why does the encoding matter?
n
What is CSS and what is it used for?
n
What file extension should PHP scripts
have for your particular server?
n
What is meant by “web root directory”?
What is the web root directory for
your server?
n
How do you test PHP scripts? What
happens when PHP scripts are not
run through a URL?
n
Name two ways comments can be
added to PHP code. Identify some
reasons to use comments.

ptg18144795
30 Chapter 1
Pursue
n
If you have access to more than one
server, confirm what version of PHP is
running on another server.
n
Create a static HTML page that displays
some information. Then replace some of
the static content with content created
by PHP.
n
Create a template to use for your own
work. The template should contain the
HTML shell, the opening and closing
PHP tags, and some basic comments.
n
Confirm, using the
phpinfo()
function,
that
display_errors
is enabled on
your server. If it’s not, change your
server’s configuration to enable it (see
Chapter 3 and Appendix A).
n
In subsequent chapters, occasionally
check the PHP manual’s page when a
new function is mentioned in the book.

ptg18144795
The previous chapter covered how to use
PHP to send simple text and HTML to a
web browser—in other words, something
for which you don’t need PHP at all! Don’t
worry, though; this book will teach you how
to use
print
in conjunction with other PHP
features to do great and useful things with
your website.
To make the leap from creating simple,
static pages to dynamic web applications
and interactive websites, you need vari-
ables. Understanding what variables are,
the types of variables that a language sup-
ports, and how to use them is critical.
This chapter introduces the fundamentals
of variables in PHP, and later chapters
cover the different types in greater detail.
If you’ve never dealt with variables before,
this chapter will be a good introduction. If
you’re familiar with the concept, then you
should be able to work through this chapter
with ease.
2
Variables
In This Chapter
What Are Variables? 32
Variable Syntax 36
Types of Variables 38
Variable Values 41
Understanding Quotation Marks 44
Review and Pursue 48

ptg18144795
32 Chapter 2
What Are Variables?
A
variable
is a container for data. Once
data has been stored in a variable (or,
stated more commonly, once a variable
has been assigned a value), that data can
be altered, printed to the browser, saved to
a database, emailed, and so forth.
Variables in PHP are, by their nature,
flexible: You can put data into a variable,
retrieve that data from it (without affecting
the value of the variable), put new data in
it, and continue this cycle as many times
as necessary. But variables in PHP are
largely temporary:
Most only exist
—that is,
they only have a value—
for the duration
of the script’s execution on the server
.
Once the execution of the script completes
(often when the final closing PHP tag is
encountered), those variables cease to
exist. Furthermore, after users click a link
or submit a form, they are taken to a new
page that may have an entirely separate
set of variables.
Before getting too deep into the discus-
sion of variables, let’s write a quick script
that reveals some of PHP’s
predefined
variables. These are variables that PHP
automatically creates when a script runs.
Over the course of the book, you’ll be
introduced to many different predefined
variables. This particular example looks
at the predefined
$_SERVER
variable. It
contains lots of information about the com-
puter on which PHP is running.
The
print_r()
function offers an easy way
to display any variable’s value:
print_r($variable_name);
Just provide the name of the variable
you’d like to inspect as a single argument
to the
print_r()
function. (You’ll learn
more about a variable’s syntax throughout
this chapter.)

ptg18144795
Variables 33
To print PHP’s predefined variables:
1. Create a new PHP script in your
text editor or IDE, to be named
predefined.php
(Script 2.1).
2. Create the initial HTML tags:
<!doctype html>
<html lang="en">
<head>
<meta charset="utf-8">
<title>Predefined Variables
➝
</title>
</head>
<body>
<pre>
This code repeats the HTML template
created in the preceding chapter. Within
the body of the page, the
<pre>
tags
are being used to make the generated
PHP information more legible. Without
using the
<pre>
tags, the
print_r()
function’s output would be difficult to
read in a browser.
3. Add the PHP code:
<?php // Script 2.1 -
➝
predefined.php
print_r($_SERVER);
?>
The PHP code contains just one func-
tion call. The function should be pro-
vided with the name of a variable.
In this example, the variable is
$_SERVER
, which is special in PHP.
$_SERVER
stores all sorts of data about
the server: its name and operating
system, the name of the current user,
information about the web server appli-
cation (Apache, Nginx, IIS, and so on),
and more. It also reflects the PHP script
being executed: its name, where it’s
stored on the server, and so forth.
continues on next page
Script 2.1 This script uses the
print_r()
function
to show the values stored in the
$_SERVER
predefined variable.
1 <!doctype html>
2 <html lang="en">
3 <head>
4 <meta charset="utf-8">
5 <title>Predefined Variables</title>
6 </head>
7 <body>
8 <pre>
9 <?php // Script 2.1 - predefined.php
10
11 // Show the value of the $_SERVER
variable:
12 print_r($_SERVER);
13
14 ?>
15 </pre>
16 </body>
17 </html>
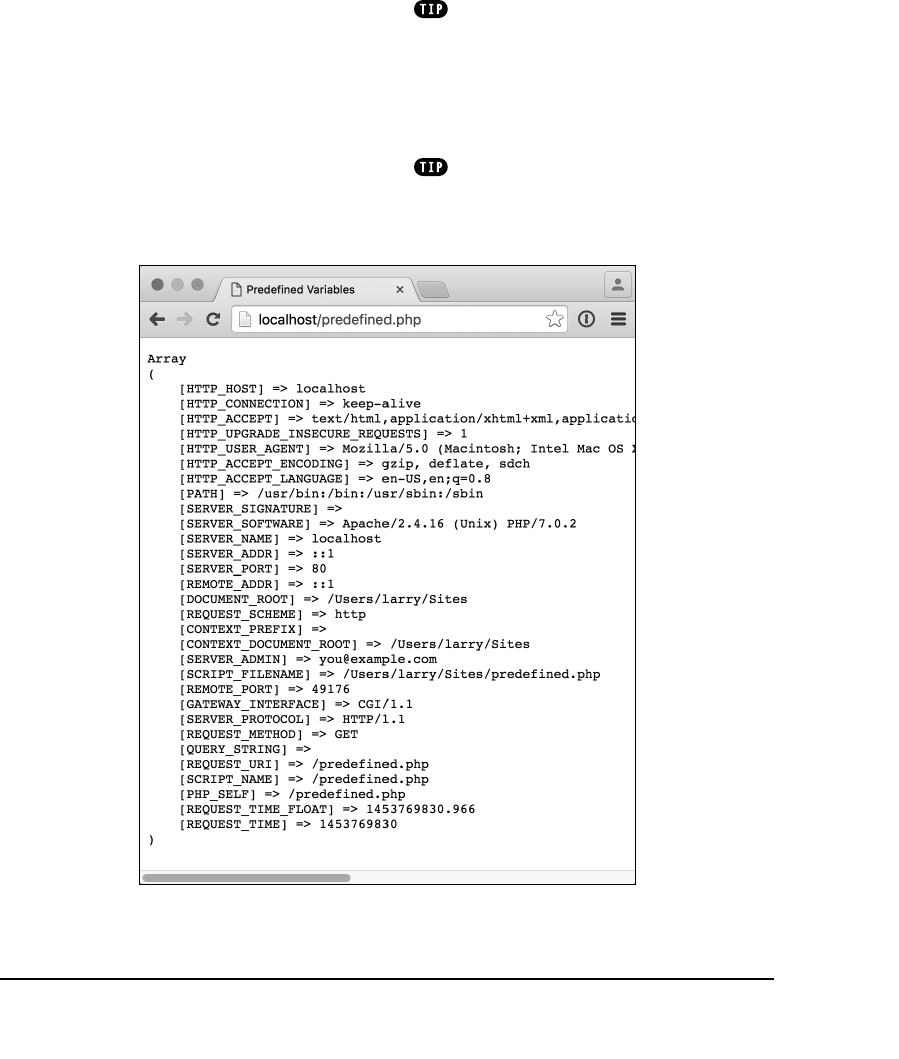
ptg18144795
34 Chapter 2
Note that you must type
$_SERVER
exactly as it is here, in all upper-
case letters.
4. Complete the HTML page:
</pre>
</body>
</html>
5. Save the file as
predefined.php
,
upload it to your server (or save it to the
appropriate directory on your com-
puter), and test it in your browser A.
Once again, remember that you must
run all PHP scripts through a URL (that
is, http://
something
).
6. If possible, transfer the file to another
computer or server running PHP and
execute the script in your browser
again B.
Printing out the value of any variable
as you’ve done here is one of the greatest
debugging tools. Scripts often don’t work
as you expect them to because one or more
variables do not have the values you assume
they should, so confirming their actual values
is extremely helpful.
If you don’t use the HTML
<pre></pre>
tags, the result will be like the jumble of infor-
mation in C.
A The
$_SERVER
variable, as printed out by this script, is a master list
of values pertaining to the server and the PHP script.
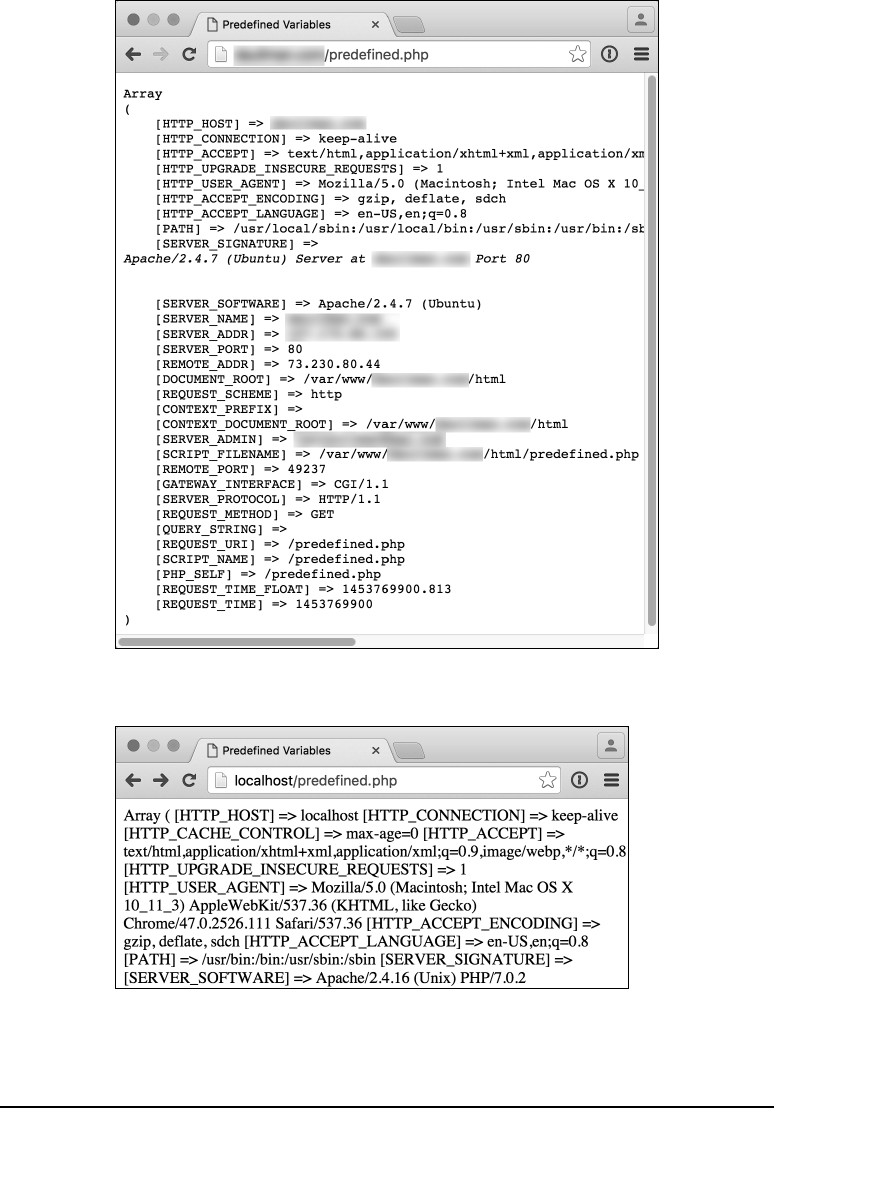
ptg18144795
Variables 35
B With the
predefined.php
page, different servers will generate different
results (compare with A).
C With large, complex variables such as
$_SERVER
, not using the HTML
preformatting tags with
print_r()
creates an incomprehensible mess
(compare to A B).

ptg18144795
36 Chapter 2
Variable Syntax
Now that you’ve had a quick dip in the vari-
able pool, it’s time to swim a bit deeper. In
the preceding example, the script printed
out the value of PHP’s predefined
$_SERVER
variable. You can also create your own
variables, once you understand the proper
syntax. To create appropriate variable
names, you must follow these rules:
n
All variable names must be preceded
by a dollar sign (
$
).
n
Following the dollar sign, the variable
name must begin with either a letter
(A–Z, a–z) or an underscore (
_
). A num-
ber cannot immediately follow the
dollar sign.
n
The rest of the variable name can con-
tain any combination of letters, under-
scores, and numbers.
n
You may not use spaces within the
name of a variable. (Instead, the under-
score is commonly used to separate
words.)
n
Each variable must have a unique
name.
n
Variable names are
case-sensitive
!
Consequently,
$variable
and
$Variable
are two different constructs,
and it would be a bad idea to use two
variables with such similar names.
This last point is perhaps the most important:
Variable names in PHP are case-sensitive.
Using the wrong letter case is a very
common cause of bugs. (If you used, for
example,
$_server
or
$_Server
in the
previous script, you’d see either an error
message or nothing at all A.)
A Misspelling a variable’s name, including its
case, will create undesired and unpredictable
results.
ptg18144795
Variables 37
To help minimize bugs, I recommend the
following policies:
n
Always use all lowercase variable names.
n
Make your variable names descriptive
(for example,
$first_name
is better
than
$fn
).
n
Use comments to indicate the purpose
of variables (Script 2.2), redundant as
that may seem.
n
Above all, be consistent with whatever
naming convention you choose!
Table 2.1 lists some sample valid variables;
Table 2.2 lists some invalid variables and
the rules they violate.
Unlike some other languages, PHP
doesn’t require you to declare or initialize a
variable prior to use, although PHP does issue
warnings when you do. In other words, you
can refer to variables without first defining
them. But it’s best not to do that; try to write
scripts so that every variable is defined or
validated before use.
There are two main variable naming
conventions, determined by how you delineate
words. These are the so-called camel-hump
or camel-case (named because of the way
capital letters break up the word—for example,
$FirstName
) and underscore (
$first_name
)
styles. This book uses the latter convention.
Script 2.2 Properly documenting the purposes of
variables, along with using meaningful names, is a
hallmark of a professional programmer.
1 <!doctype html>
2 <html lang="en">
3 <head>
4 <meta charset="utf-8">
5 <title>Variables and Comments</title>
6 </head>
7 <body>
8 <?php // Script 2.2
9
10 // Define my variables....
11 $year = 2016; // The current year.
12 $june_avg = 88; // The average
temperature for the month of June.
13 $page_title = 'Weather Reports'; //
A title for the page.
14
15 // ... and so forth.
16 ?>
17 </body>
18 </html>
TABLE 2.1 Valid Variables in PHP
Name
$first_name
$person
$address1
$_SERVER
TABLE 2.2 Invalid Variables in PHP
Name Reason
$first name
Has a space
$first.name
Has a period
first_name
Does not begin with
$
$1address
A number cannot follow
$
ptg18144795
38 Chapter 2
Types of Variables
This book covers three common PHP vari-
able types:
numbers
,
strings
, and
arrays
.
This chapter introduces them quickly, and
later chapters discuss them in more detail:
n
Chapter 4, “Using Numbers”
n
Chapter 5, “Using Strings”
n
Chapter 7, “Using Arrays”
A fourth variable type,
objects
, is intro-
duced in Appendix B, “Resources and Next
Steps,” but isn’t covered in this book. That
particular subject is just too advanced for
a beginner’s guide—in fact, basic coverage
of the subject in my
PHP Advanced and
Object-Oriented Programing: Visual
QuickPro Guide, Third Edition
(Peachpit
Press, 2013) requires over 150 pages!
TABLE 2.3 Valid Numbers in PHP
Number Type
1 Integer
1.0 Floating-point
1972 Integer
19.72 Floating-point
–1 Integer
–1.0 Floating-point
TABLE 2.4 Invalid Numbers in PHP
Number Reason
1/3 Contains a slash
1996a Contains a letter
08.02.06 Contains multiple
decimals
Numbers
Technically speaking, PHP breaks numbers
into two types:
integers
and
floating-point
(also known as
double-precision
floating-
point
or
doubles
). Due to the lax way PHP
handles variables, it largely won’t affect your
programming to group the two categories
of numbers into one all-inclusive member-
ship, at least when you’re just starting out.
Still, let’s briefly discuss the differences
between the two, to be precise.
The first type of numbers—
integers
—is also
known as
whole numbers
. They can be pos-
itive or negative but include neither fractions
nor decimals. Numbers that use a decimal
point (even something like 1.0) are
floating-
point
numbers, also known as
floats
. You
use floating-point numbers to refer to frac-
tions, because the only way to express a
fraction in PHP is to convert it to its decimal
equivalent. Hence, 1¼ is written as 1.25.
Table 2.3 lists some sample valid numbers
and their formal type; Table 2.4 lists invalid
numbers and the rules they violate.
As you’ll soon see, you add quotation
marks around invalid numbers to turn them
into valid strings.
ptg18144795
Variables 39
Strings
A string is any number of characters
enclosed within a pair of either single (
'
)
or double (
"
) quotation marks. Strings can
contain any combination of characters
that exist: letters, numbers, symbols, and
spaces. Strings can also contain variables.
Here are examples of valid string values:
"Hello, world!"
"Hello, $first_name!"
"1/3"
'Hello, world! How are you today?'
"08.02.06"
"1996"
''
That last example is an
empty string
—a
string that contains no characters.
To create a string, just wrap 0 or more
characters within quotation marks. There
are cases, however, where you may run
into problems. For example:
"I said, "How are you?""
This string will be tricky. Chapter 1, “Getting
Started with PHP,” hinted at the same prob-
lem with respect to printing HTML code.
When PHP hits the second quotation mark
in the example, it assumes the string ends
there; the continuing text (
How…
) causes
an error. To use a quotation mark within a
string you
escape
the quotation mark by
putting a backslash (
\
) before it:
"I said, \"How are you?\""
The backslash tells PHP to treat each
escaped quotation mark as part of the
value
of the string, rather than using it as
the string’s opening or closing indicators.
You can similarly circumvent this problem
by using different quotation mark types:
'I said, "How are you?"'
"I said, 'How are you?'"
Notice that “1996” converts an integer
into a string, simply by placing the number
within quotes. Essentially, the string contains
the characters 1996, whereas the number (a
nonquoted value) would be equal to 1996. It’s
a fine distinction, and one that won’t matter
in your code, because PHP lets you perform
mathematical calculations with the string 1996
just as you can with the number.
Chapter 1 also demonstrated how to
create a new line by printing the
\n
charac-
ter within double quotation marks. Although
escaping a quotation mark prints the quota-
tion mark, escaping an n prints a new line,
escaping an r creates a carriage return, and
escaping a t creates a tab.
Understanding strings, variables, and the
single and double quotation marks is critical
to programming with PHP. For this reason, a
section at the end of this chapter is dedicated
to the subject.
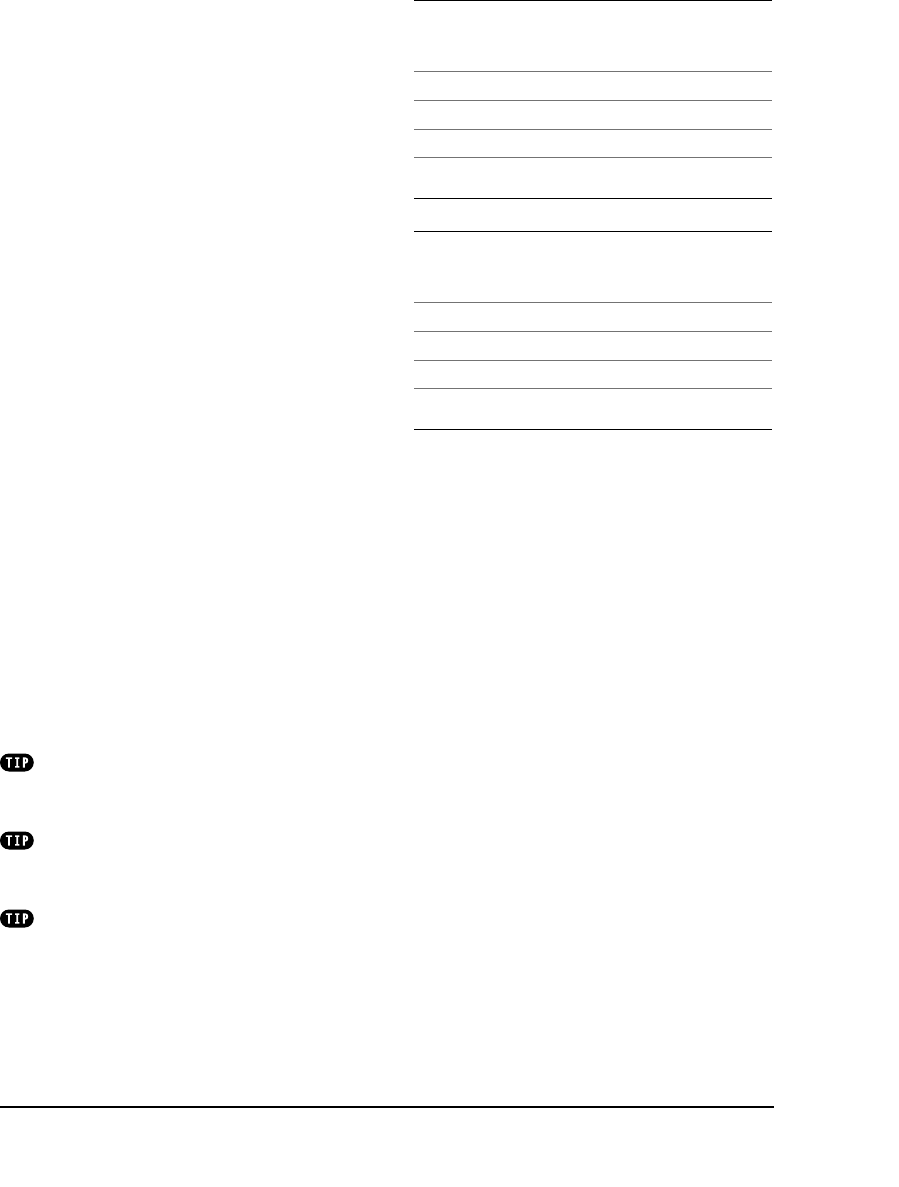
ptg18144795
40 Chapter 2
Arrays
Arrays are covered more thoroughly in
Chapter 7, but let’s look at them briefly
here. Whereas a string or a number con-
tains a single value (both are said to be
scalar
), an array can have more than one
value assigned to it. You can think of an
array as a list or table of values: You can
put multiple strings and/or numbers into
one array.
Arrays use
keys
to create and retrieve the
values they store. The resulting structure—
a list of key-value pairs—is similar to a
two-column spreadsheet. Unlike arrays in
other programming languages, the array
structure in PHP is so flexible that it can use
either numbers or strings for both the keys
and the values. The array doesn’t even need
to be consistent in this respect. (All of this
will make more sense in Chapter 7, when
you start working with specific examples.)
PHP supports two kinds of arrays, based
on the format of the keys. If the array uses
numbers for the keys (Table 2.5), it’s known
as an
indexed
array. If it uses strings for
the keys (Table 2.6), it’s an
associative
array. In either case, the values in the array
can be of any variable type (string, number,
and so on).
The array’s key is also referred to as
its index. You’ll see these two terms used
interchangeably.
An array can, and frequently will, contain
other arrays, creating what is called a multi-
dimensional array.
What PHP refers to as an associative
array is known as a hash in Perl and Ruby,
among other languages.
TABLE 2.5 Indexed Array
Key Value
0 Dev
1 Rachel
2 Denise
3 Arnold
TABLE 2.6 Associative Array
Key Value
VT Vermont
NH New Hampshire
IA Iowa
PA Pennsylvania
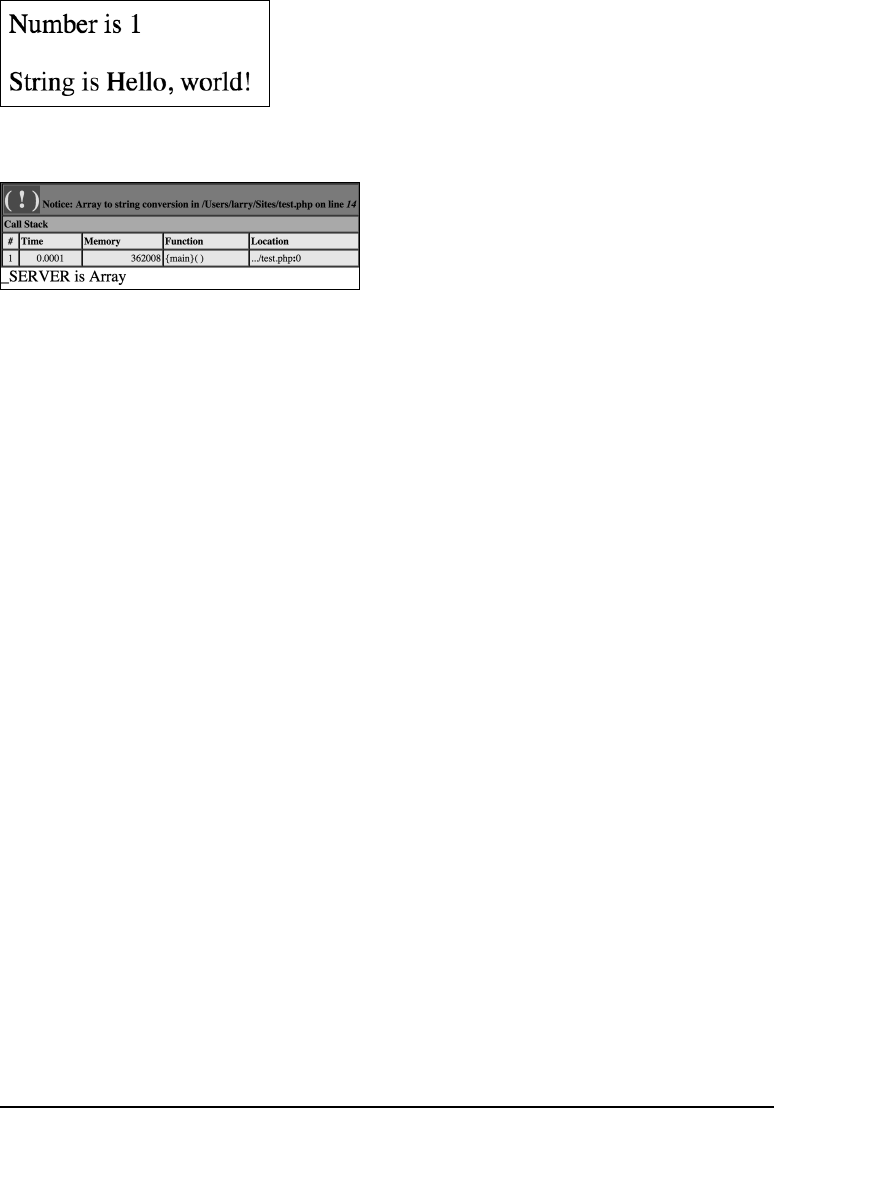
ptg18144795
Variables 41
Variable Values
To assign a value to a variable, regardless
of the variable type, you use the equals
sign (
=
). Therefore, the equals sign is known
as the
assignment operator
, because it
assigns the value on the right to the variable
on the left. For example:
$number = 1;
$floating_number = 1.2;
$string = "Hello, world!";
Each of these lines represents a complete
statement (that is, an executable action),
so each concludes with a semicolon.
To print the value of a variable, use the
print
function:
print $number;
print $string;
If you want to print a variable’s value within
a context, you can place the variable’s
name in the printed string, as long as you
use double quotation marks A:
print "Number is $number";
print "String is $string";
Using
print
in this way works for the sca-
lar (single-valued) variable types—numbers
and strings. For complex variable types—
arrays and objects—you cannot just use
print
B:
print "_SERVER is $_SERVER";
As you’ve already seen,
print_r()
can
handle these nonscalar types, and you’ll
learn other approaches later in the book.
Whether you’re dealing with scalar or non-
scalar variables, don’t forget that printing
out their values is an excellent debugging
technique when you’re having problems
with a script.
A The result of printing the values
of two variables.
B Using the
print
statement on a complex
variable type, such as an array, will not have the
results you desire.
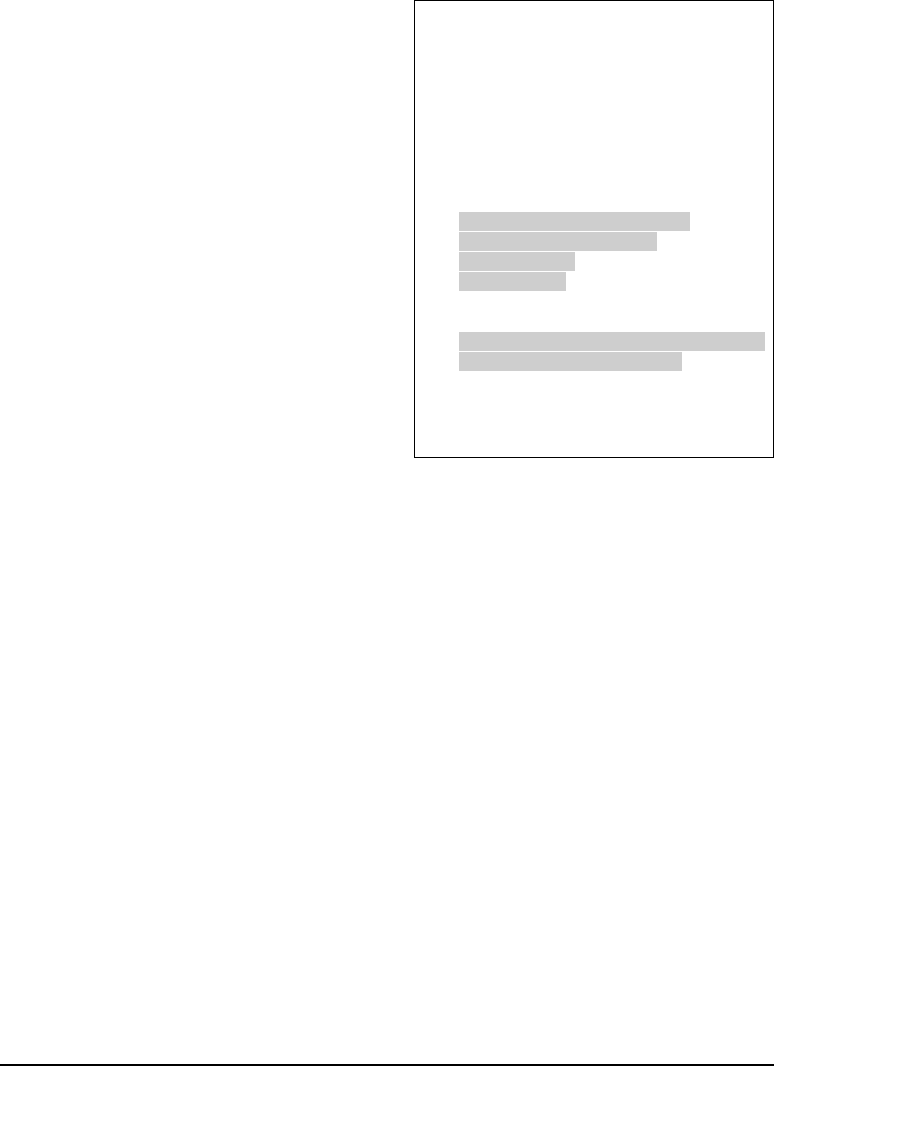
ptg18144795
42 Chapter 2
Because variable types aren’t locked in
(PHP is referred to as a
weakly typed
lan-
guage), they can be changed on the fly:
$variable = 1;
$variable = "Greetings";
If you were to print the value of
$variable
now, the result would be
Greetings
. The
following section better demonstrates the
concept of assigning values to variables
and then accessing those values.
To assign values to and
access variables:
1. Create a new PHP script in your
text editor or IDE, to be named
variables.php
(Script 2.3).
2. Create the initial HTML tags:
<!doctype html>
<html lang="en">
<head>
<meta charset="utf-8">
<title>Variables</title>
</head>
<body>
3. Begin the PHP code:
<?php // Script 2.3 -
➝
variables.php
4. Define some number and string
variables:
$street = "100 Main Street";
$city = "State College";
$state = "PA";
$zip = 16801;
These lines create four different vari-
ables of both string and number types.
The strings are defined using quotation
marks, and each variable name follows
the syntactical naming rules.
Script 2.3 Some basic variables are defined and
their values printed by this script.
1 <!doctype html>
2 <html lang="en">
3 <head>
4 <meta charset="utf-8">
5 <title>Variables</title>
6 </head>
7 <body>
8 <?php // Script 2.3 - variables.php
9
10 // An address:
11 $street = "100 Main Street";
12 $city = "State College";
13 $state = "PA";
14 $zip = 16801;
15
16 // Print the address:
17 print "<p>The address is:<br>$street
<br>$city $state $zip</p>";
18
19 ?>
20 </body>
21 </html>

ptg18144795
Variables 43
Remember that each statement must
conclude with a semicolon and that the
variable names are case-sensitive.
5. Print out the values of the variables
within some context:
print "<p>The address is:
➝
<br>$street <br>$city $state
➝
$zip</p>";
Here a single
print
statement refer-
ences all the variables. The entire string
to be printed (consisting of text, HTML
tags, and variables) is enclosed within
double quotation marks. The HTML
<br>
tags make the text flow over mul-
tiple lines in the browser.
6. Complete the PHP section and the
HTML page:
?>
</body>
</html>
7. Save the file as
variables.php
, upload
it to your server (or save it to the appro-
priate directory on your computer), and
test it in your browser C.
If you see a parse error D when you
run this script, you probably either omitted
a semicolon or have an imbalance in your
quotation marks. In such particular cases, the
mistake itself is likely on the previous line of
code (than reported in the error message) but
wasn’t caught by PHP until the next line.
If one of the variable’s values isn’t
printed out or you see an Undefined variable
error E, you most likely failed to spell a
variable name the same way twice.
If you see a blank page, you most likely
have an error but PHP’s
display_errors
configuration is set to off. See Chapter 3,
“HTML Forms and PHP,” for details.
C Some variables are assigned values, and then
printed within a context.
D Parse errors are the most common type of PHP
error, as you’ll discover. They’re frequently caused
by missing semicolons or mismatched quotation
marks or parentheses.
E The
Undefined variable
error indicates that
you used a variable with no value (it hasn’t been
defined). This can happen with misspellings and
capitalization inconsistencies.

ptg18144795
44 Chapter 2
Understanding
Quotation Marks
Now that you know the basics of variables
and how to create them, let’s do an exer-
cise to make sure you completely under-
stand how to properly use quotation marks.
PHP, like most programming languages,
allows you to use both double (
"
) and
single (
'
) quotation marks—but they give
vastly different results. It’s critical that you
comprehend the distinction, so the next
example will run tests using both types just
to emphasize the different behaviors.
The rule to remember is:
Items within
single quotation marks are treated literally;
items within double quotation marks
are extrapolated
. This means that within
double quotation marks, a variable’s name
is replaced with its value, as in Script 2.3,
but the same is not true for single quota-
tion marks.
This rule applies anywhere in PHP you
might use quotation marks, including
uses of the
print
function and the assign-
ment of values to string variables. An
example is the best way to demonstrate
this critical concept.
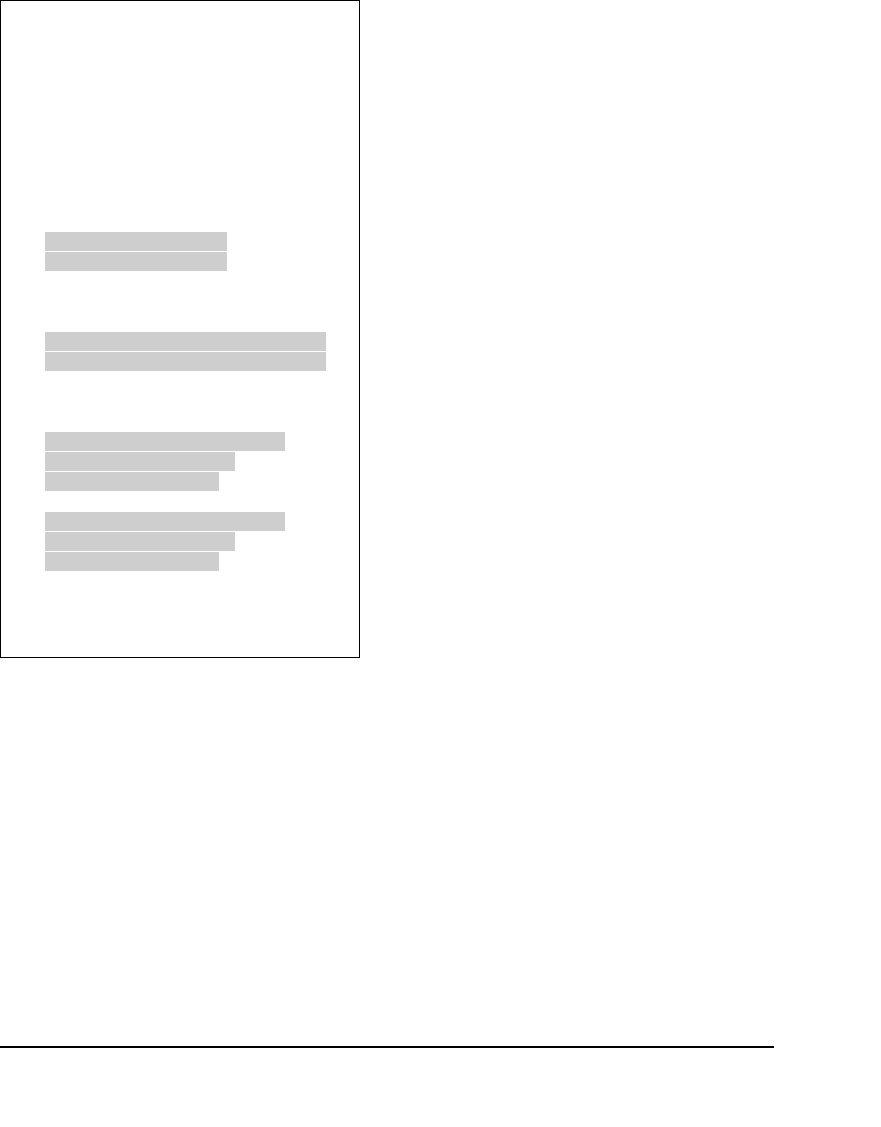
ptg18144795
Variables 45
To use quotation marks:
1. Begin a new PHP script in your text
editor or IDE, to be named
quotes.php
(Script 2.4).
2. Create the initial HTML tags:
<!doctype html>
<html lang="en">
<head>
<meta charset="utf-8">
<title>Quotes</title>
</head>
<body>
3. Begin the PHP code:
<?php // Script 2.4 - quotes.php
4. Create two string variables:
$first_name = 'Larry';
$last_name = "Ullman";
It doesn’t matter whether you use single
or double quotation marks for these two
variables, because each string can be
treated literally. However, if you’re using
your own name here (and feel free to
do so) and it contains an apostrophe,
you’ll need to either use double quota-
tion marks or escape the apostrophe
within single quotation marks:
$last_name = "O'Toole";
$last_name = 'O\'Toole';
continues on next page
Script 2.4 This script simply demonstrates how
the type of quotation mark you use with variables
affects the result.
1 <!doctype html>
2 <html lang="en">
3 <head>
4 <meta charset="utf-8">
5 <title>Quotes</title>
6 </head>
7 <body>
8 <?php // Script 2.4 - quotes.php
9
10 // Single or double quotation marks
won't matter here:
11 $first_name = 'Larry';
12 $last_name = "Ullman";
13
14 // Single or double quotation marks DOES
matter here:
15 $name1 = '$first_name $last_name';
16 $name2 = "$first_name $last_name";
17
18 // Single or double quotation marks DOES
matter here:
19 print "<h1>Double Quotes</h1>
20 <p>name1 is $name1 <br>
21 name2 is $name2</p>";
22
23 print '<h1>Single Quotes</h1>
24 <p>name1 is $name1 <br>
25 name2 is $name2</p>';
26
27 ?>
28 </body>
29 </html>

ptg18144795
46 Chapter 2
5. Create two different
name
variables,
using the existing
first_
and
last_
name
variables:
$name1 = '$first_name
➝
$last_name';
$name2 = "$first_name
➝
$last_name";
In these lines, it makes a huge differ-
ence which quotation marks you use.
The
$name1
variable is now literally
equal to
$first_name
$last_name
,
because no extrapolation occurs.
Conversely,
$name2
is equal to
Larry
Ullman
, presumably the intended result.
6. Print out the variables using both types
of quotation marks:
print "<h1>Double Quotes</h1>
<p>name1 is $name1 <br>
name2 is $name2</p>";
print '<h1>Single Quotes</h1>
<p>name1 is $name1 <br>
name2 is $name2</p>';
Again, the quotation marks make all the
difference here. The first
print
state-
ment, using double quotation marks,
prints out the values of the
$name1
and
$name2
variables, whereas the second,
using single quotation marks, prints out
$name1
and
$name2
literally.
The HTML in the
print
statements
makes them more legible in the
browser. Each statement is executed
over three lines of PHP code for addi-
tional readability, which is perfectly
acceptable.
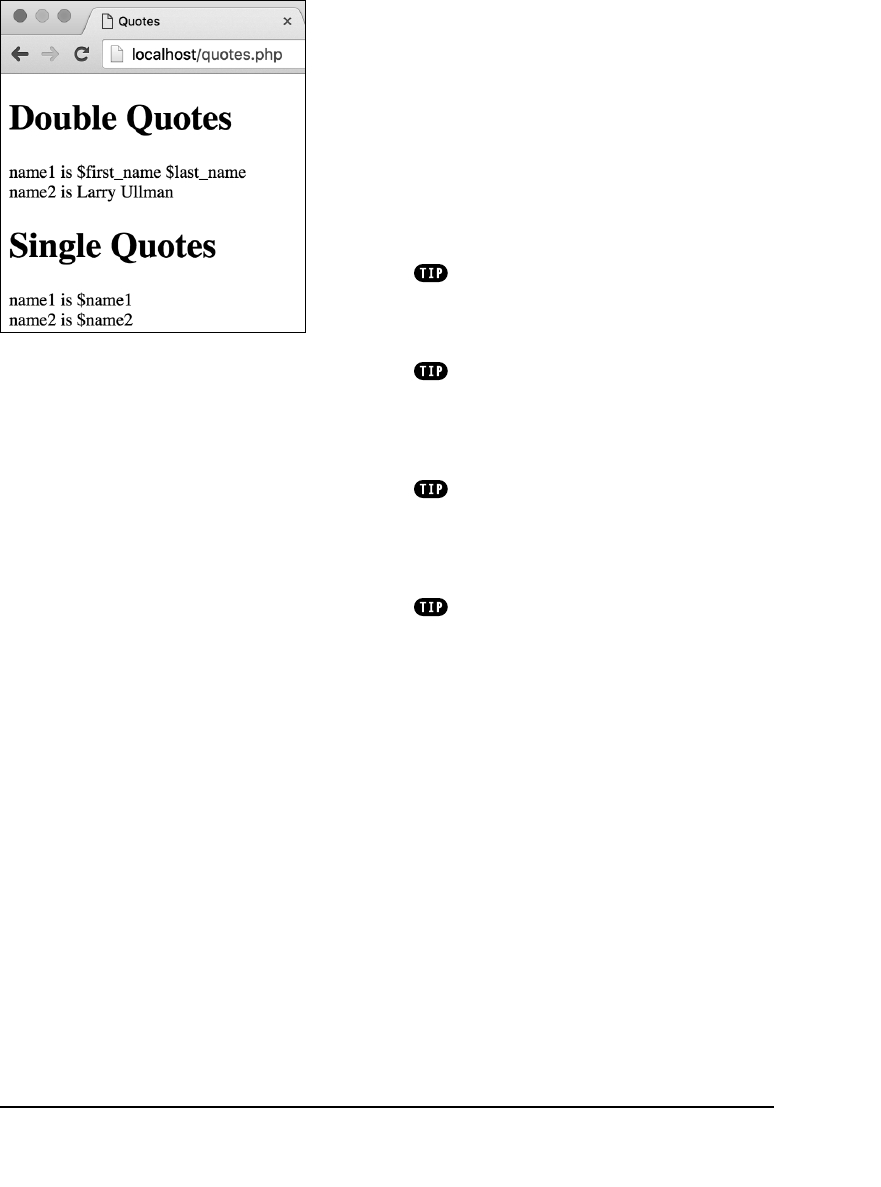
ptg18144795
Variables 47
7. Complete the PHP section and the
HTML page:
?>
</body>
</html>
8. Save the file as
quotes.php
, upload it
to your server (or save it to the appropri-
ate directory on your computer), and
test it in your browser A.
If you’re still confused about the distinc-
tion between the two types of quotation marks,
always stick with double quotation marks and
you’ll be safer.
Arguably, using single quotation marks
when you can is marginally preferable, because
PHP won’t need to search the strings looking
for variables, resulting in better performance.
But, at best, this is a minor optimization.
The shortcuts for creating newlines (
\n
),
carriage returns (
\r
), and tabs (
\t
) must be
used within double quotation marks to have
the desired effect. Within single quotes, each
of those is treated literally.
Remember that you don’t always need to
use quotation marks at all. When assigning a
numeric value or when only printing a variable,
you can omit them:
$num = 2;
print $num;
A The different quotation marks (single
versus double) dictate whether the
variable’s name or value is printed.

ptg18144795
48 Chapter 2
Review and Pursue
If you have any problems with the review
questions or the pursue prompts, turn
to the book’s supporting forum
(www.LarryUllman.com/forums/).
Review
n
What kind of variable is
$_SERVER
an
example of?
n
What character must all variables
begin with?
n
What characters can be used in a vari-
able’s name (after the required initial
character)? What other characters can
be used in a variable’s name, after the
first character?
n
Are variable names case-sensitive or
case-insensitive?
n
What does it mean to say that a variable
is
scalar
? What are examples of scalar
variable types? What is an example of
a nonscalar variable type?
n
What is the assignment operator?
n
What great debugging technique—with
respect to variables—was introduced
in this chapter?
n
What is the difference between using
single and double quotation marks?
Pursue
n
Create another PHP script that defines
some variables and prints their values.
Try using variables of different scalar
types.
n
Create a PHP script that prints the value
of some variables within some HTML.
More sophisticated practice might
involve using PHP and variables to
create a link or image tag.

ptg18144795
The previous chapter provided a brief
introduction to the topic of variables.
Although you’ll commonly create your
own variables, you’ll also frequently use
variables in conjunction with HTML forms.
Forms are a fundamental unit of websites,
enabling such features as registration
and login systems, search capability, and
online shopping. Even the simplest site
will find logical reasons to incorporate
HTML forms. And with PHP, it’s stunningly
simple to receive and handle data gener-
ated by them.
With that in mind, this chapter will cover
the basics of creating HTML forms and
explain how the submitted form data is
available to a PHP script. This chapter will
also introduce several key concepts of real
PHP programming, including how to man-
age errors in your scripts.
3
HTML Forms
and PHP
In This Chapter
Creating a Simple Form 50
Choosing a Form Method 54
Receiving Form Data in PHP 58
Displaying Errors 63
Error Reporting 65
Manually Sending Data to a Page 68
Review and Pursue 73
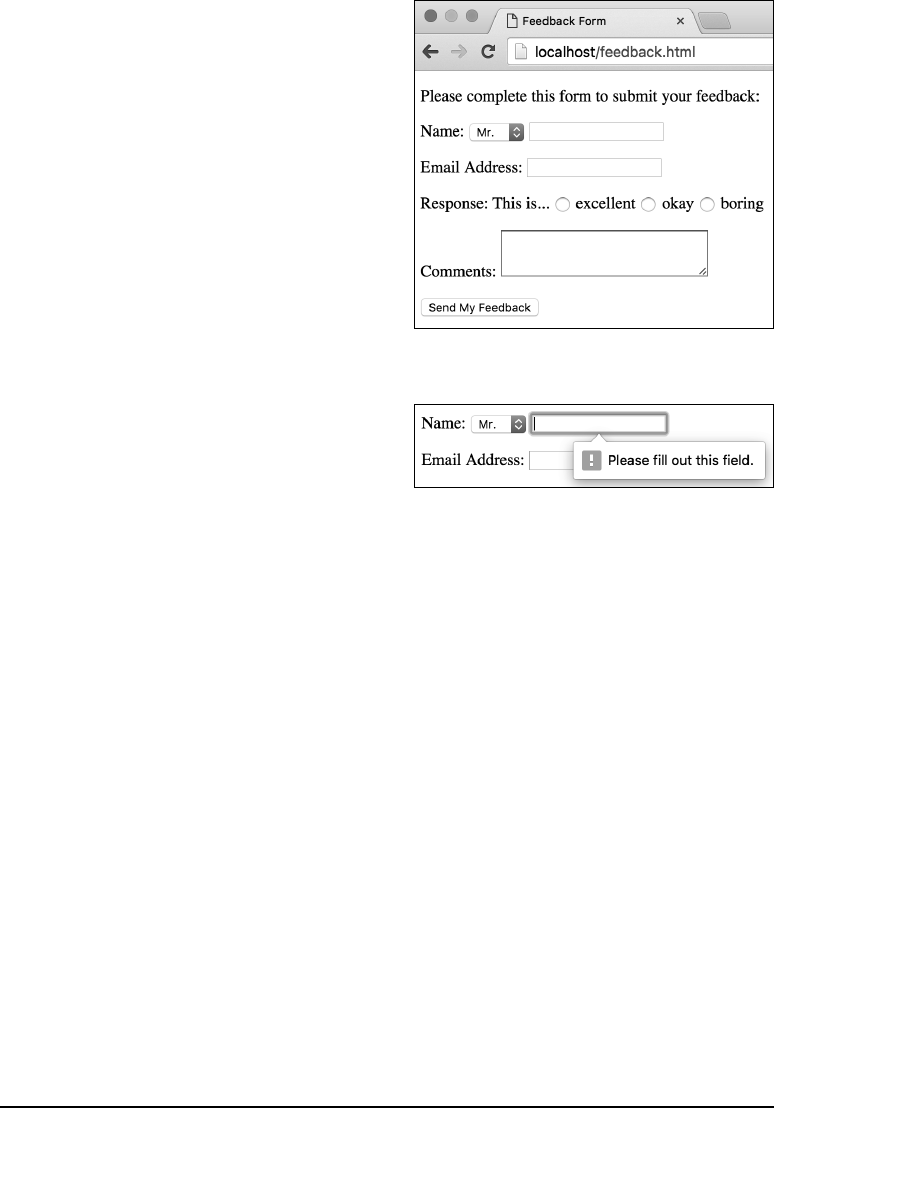
ptg18144795
50 Chapter 3
Creating a
Simple Form
For the HTML form example in this chapter,
you’ll create a feedback page that takes
the user’s salutation (or title), name, email
address, response, and comments A. The
code that generates a form goes between
opening and closing form tags:
<form>
form elements
</form>
The form tags dictate where a form begins
and ends. Every element of the form must
be entered between these two tags. The
opening form tag should also contain an
action
attribute. It indicates the page to
which the form data should be submitted.
This value is one of the most important
considerations when you’re creating a form.
In this book, the
action
attributes will
always point to PHP scripts:
<form action="somepage.php">
Before creating this next form, let’s briefly
revisit the topic of HTML5. HTML5 intro-
duces some new form element types, such
as
email
,
number
, and
url
. These types,
which are generally well supported by
current browsers, provide additional ben-
efits over a simple text input, including:
n
Built-in browser-based validation (for
example, the browser will check that
entered text is a syntactically valid email
address or URL).
n
Better user experience (for example,
an email address-specific keyboard
presented to mobile users).
HTML5 also introduces a
required
attribute
that prevents a form from being submitted
without a value entered or selected B.
A The HTML form that will be used in this
chapter’s examples.
B The
required
attribute validates—in the
browser—that a selection was made or content
was entered.
ptg18144795
HTML Forms and PHP 51
As a final note, give each form element its
own unique name. Stick to a consistent
naming convention when naming elements,
using only letters, numbers, and the under-
score (
_
). The result should be names that
are also logical and descriptive.
To create a basic HTML form:
1. Begin a new document in your text editor
or IDE, to be named
feedback.html
(Script 3.1):
<!doctype html>
<html lang="en">
<head>
<meta charset="utf-8">
<title>Feedback Form</title>
</head>
<body>
<!-- Script 3.1 - feedback.html
➝
-->
<div><p>Please complete this
➝
form to submit your feedback:
➝
</p>
2. Add the opening form tag:
<form action="handle_form.php">
The form tag indicates that this form
will be submitted to the page
handle_
form.php
, found within the same direc-
tory as this HTML page. You can use a
full URL to the PHP script, if you’d prefer
to be explicit (for example,
http://
www.example.com/handle_form.php
).
continues on next page
Script 3.1 This HTML page has a form with several
different input types.
1 <!doctype html>
2 <html lang="en">
3 <head>
4 <meta charset="utf-8">
5 <title>Feedback Form</title>
6 </head>
7 <body>
8 <!-- Script 3.1 - feedback.html -->
9 <div><p>Please complete this form to
submit your feedback:</p>
10
11 <form action="handle_form.php">
12
13 <p>Name: <select name="title"
required>
14 <option value="Mr.">Mr.</option>
15 <option value="Mrs.">Mrs.</option>
16 <option value="Ms.">Ms.</option>
17 </select> <input type="text"
name="name" size="20" required>
</p>
18
19 <p>Email Address: <input
type="email" name="email"
size="20" required></p>
20
21 <p>Response: This is...
22 <input type="radio"
name="response" value="excellent"
required> excellent
23 <input type="radio"
name="response" value="okay"> okay
24 <input type="radio"
name="response" value="boring">
boring</p>
25
26 <p>Comments: <textarea
name="comments" rows="3" cols="30"
required></textarea></p>
27
28 <input type="submit" name="submit"
value="Send My Feedback">
29
30 </form>
31 </div>
32 </body>
33 </html>
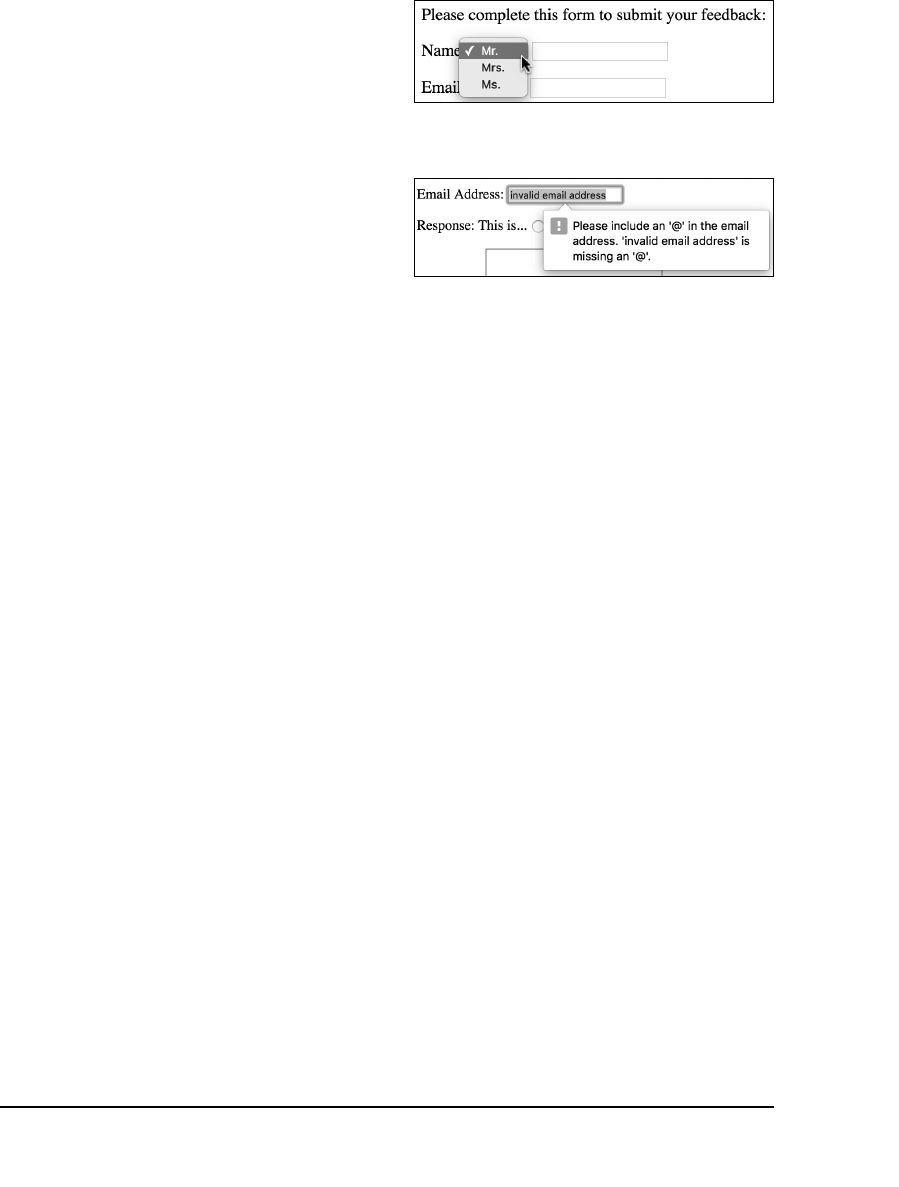
ptg18144795
52 Chapter 3
3. Add a select menu plus a text input for
the person’s name:
<p>Name: <select name="title"
➝
required>
<option value="Mr.">Mr.</option>
<option value="Mrs.">Mrs.
➝
</option>
<option value="Ms.">Ms.</option>
</select> <input type="text"
➝
name="name" size="20" required>
➝
</p>
The inputs for the person’s name will
consist of two elements A. The first is
a drop-down menu of common titles:
Mr.
,
Mrs
., and
Ms
. Each option listed
between the select tags is an answer
the user can choose C. The second
element is a basic text box for the
person’s full name. Arguably, this list
should be expanded, or you could
use a text input to let users enter their
preferred title.
Every form element, except for the submit
button, will have the
required
attribute.
4. Add a text input for the user’s email
address:
<p>Email Address: <input type=
➝
"email" name="email" size="20"
➝
required></p>
The email input type is new in HTML5.
On browsers that support it—all the
most recent ones—client-side validation
is automatic D.
C The select element creates a drop-down menu
of options.
D The email input type, new in HTML5, validates
the syntax of the entered text against what’s
required for email addresses.
ptg18144795
HTML Forms and PHP 53
5. Add radio buttons for a response:
<p>Response: This is...
<input type="radio"
➝
name="response"
➝
value="excellent" required>
➝
excellent
<input type="radio"
➝
name="response" value="okay">
➝
okay
<input type="radio"
➝
name="response"
➝
value="boring"> boring</p>
This HTML code creates three radio
buttons (clickable circles, A). Because
they all have the same value for the
name
attribute, only one of the three
can be selected at a time. Adding the
required
attribute to any one of them
makes selection of one of them a
requirement.
6. Add a
textarea
to record the
comments:
<p>Comments: <textarea
➝
name="comments" rows="3"
➝
cols="30" required>
➝
</textarea></p>
A textarea gives users more space to
enter their comments than a text input
would. However, the text input lets
you limit how much information users
can enter, which you can’t do with the
textarea (not without using JavaScript,
that is). When you’re creating a form,
choose input types appropriate to the
information you wish to retrieve from
the user.
Note that a textarea
does
have a clos-
ing tag, unlike the text input type.
7. Add the submit button:
<input type="submit"
➝
name="submit" value="Send My
➝
Feedback">
The
value
attribute of a submit input
is what appears on the button in the
browser A. You could also use
Go!
or
Submit
, for example.
8. Close the form:
</form>
9. Complete the page:
</div>
</body>
</html>
10. Save the page as
feedback.html
, and
view it in your browser.
Because this is an HTML page, not a
PHP script, you could view it in your
browser directly from your computer.
Note that
feedback.html
uses the
HTML extension because it’s a standard HTML
page (not a PHP script). You could use the
.php
extension without a problem, even though
there’s no actual PHP code. (Remember that
in a PHP page, anything not within the PHP
tags—
<?php
and
?>
—is assumed to be HTML.)
Be certain that your
action
attribute
correctly points to an existing file on the server,
or your form won’t be processed properly.
In this case, the form will be submitted to
handle_form.php
, to be located in the same
directory as the
feedback.html
page.
In this example, an HTML form is created
by hand-coding the HTML, but you can do
this in a webpage application (such as Adobe
Dreamweaver) if you’re more comfortable with
that approach.

ptg18144795
54 Chapter 3
Choosing a
Form Method
The experienced HTML developer will
notice that the feedback form just created
is missing one thing: The initial form tag
has no
method
attribute. The
method
attri-
bute tells the server how to transmit the
data from the form to the handling script.
You have two choices with
method
: GET
and POST. With respect to forms, the dif-
ference between using GET and POST is
squarely in how the information is passed
from the form to the processing script. The
GET method sends all the gathered infor-
mation along as part of the URL. The POST
method transmits the information invisibly
to the user. For example, upon submitting
a form, if you use the GET method, the
resulting URL will be something like
http://example.com/page.php?var=
➝
value&age=20&...
Following the name of the script,
page.php
,
is a question mark, followed by one
name=value
pair for each piece of data
submitted.
When using the POST method, the end
user will only see
http://example.com/page.php
.
ptg18144795
HTML Forms and PHP 55
When deciding which method to use, keep
in mind these four factors:
n
With the GET method, a limited amount
of information can be passed.
n
The GET method sends the data to the
handling script publicly (which means,
for example, that a password entered
in a form would be viewable by anyone
within eyesight of the browser, creating
a larger security risk).
n
A page generated by a form that used
the GET method can be bookmarked,
but one based on POST can’t be.
n
Users will be prompted if they attempt
to reload a page accessed via POST A,
but will not be prompted for pages
accessed via GET.
Generally speaking, GET requests are used
when asking for information from the server.
Search pages almost always use GET (check
out the URLs the next time you use a search
engine), as do sites that paginate results
(like the ability to browse categories of
products). POST is normally used to trigger
a server-based action. This might be the
submission of a contact form (result: an
email gets sent) or the submission of a blog’s
comment form (result: a comment is added
to the database and therefore the page).
This book uses POST almost exclusively for
handling forms, although you’ll also see a
useful technique involving the GET method
(see “Manually Sending Data to a Page” at
the end of this chapter).
A If users refresh a PHP script that data has been
sent to via the POST method, they will be asked to
confirm the action (the specific message will differ
depending on the browser).

ptg18144795
56 Chapter 3
To add a method to a form:
1. Open
feedback.html
(Script 3.1) in your
text editor or IDE, if it is not already
open.
2. Within the initial
form
tag, add
method="post"
(Script 3.2, line 11).
The form’s
method
attribute tells the
browser how to send the form data to
the receiving script. Because there may
be a lot of data in the form’s submission
(including the comments), and because
it wouldn’t make sense for the user to
bookmark the resulting page, POST is
the logical method to use.
3. Save the script and reload it in your
browser.
It’s important that you get in the habit
of reloading pages in the browser after
you make changes. It’s quite easy to
forget the reloading step and find your-
self flummoxed when your changes are
not being reflected.
Script 3.2 Adding a
method
attribute with a value
of
post
completes the form.
1 <!doctype html>
2 <html lang="en">
3 <head>
4 <meta charset="utf-8">
5 <title>Feedback Form</title>
6 </head>
7 <body>
8 <!-- Script 3.2 - feedback.html -->
9 <div><p>Please complete this form to
submit your feedback:</p>
10
11 <form action="handle_form.php"
method="post">
12
13 <p>Name: <select name="title"
required>
14 <option value="Mr.">Mr.</option>
15 <option value="Mrs.">Mrs.</option>
16 <option value="Ms.">Ms.</option>
17 </select> <input type="text"
name="name" size="20" required></p>
18
19 <p>Email Address: <input type="email"
name="email" size="20" required></p>
20
21 <p>Response: This is...
22 <input type="radio" name="response"
value="excellent" required> excellent
23 <input type="radio" name="response"
value="okay"> okay
24 <input type="radio" name="response"
value="boring"> boring</p>
25
26 <p>Comments: <textarea
name="comments" rows="3" cols="30"
required></textarea></p>
27
28 <input type="submit" name="submit"
value="Send My Feedback">
29
30 </form>
31 </div>
32 </body>
33 </html>
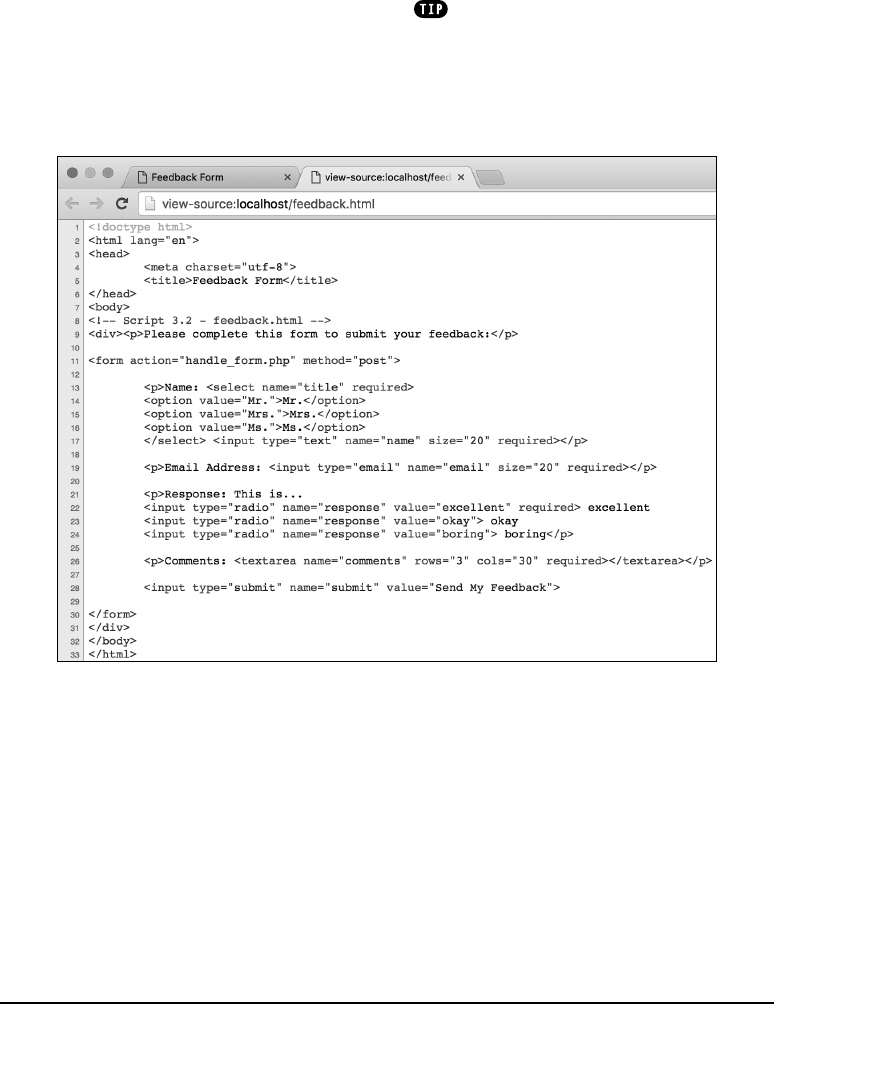
ptg18144795
HTML Forms and PHP 57
4. View the source of the page to make sure
all the required elements are present
and have the correct attributes B.
In the discussion of the methods, GET
and POST are written in capital letters to
make them stand out. However, the form in
the script uses post. Don’t worry about this
inconsistency (if you caught it at all)—the
method will work regardless of case.
B With forms, much of the important information, such as the
action
and
method
values or
element names, can be seen only within the HTML source code.
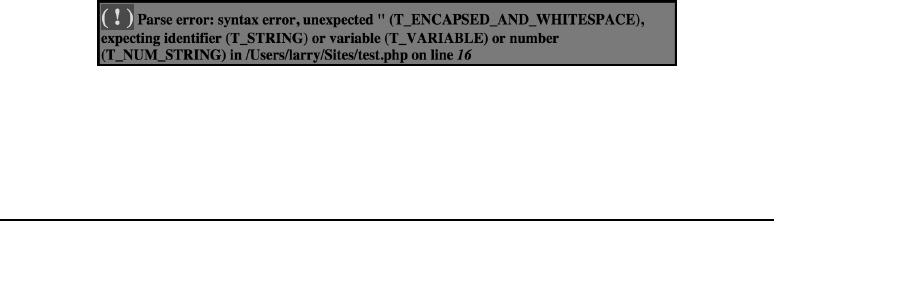
ptg18144795
58 Chapter 3
Receiving
Form Data in PHP
Now that you’ve created a basic HTML
form capable of taking input from a user,
you need to write the PHP script that will
receive and process the submitted form
data. For this example, the PHP script will
simply repeat what the user entered into
the form. In later chapters, you’ll learn how
to take this information and store it in a
database, send it in an email, write it to a
file, and so forth.
To access the submitted form data, you need
to refer to a particular
predefined variable
.
Chapter 2, “Variables,” already introduced
one predefined variable:
$_SERVER
. When
it comes to handling form data, the specific
variable the PHP script would refer to is
either
$_GET
or
$_POST
. If an HTML form
uses the GET method, the submitted form
data will be found in
$_GET
. When an HTML
form uses the POST method, the submitted
form data will be found in
$_POST
.
$_GET
and
$_POST
, besides being predefined
variables (that is, ones you don’t need to
create), are
arrays
, a special variable type
(
$_SERVER
is also an array). This means
that both
$_GET
and
$_POST
may contain
numerous values, making the printing of
those values more challenging. You cannot
treat arrays like so:
print $_POST; // Will not work!
A This ugly parse error is created by attempting to use
$_POST['address']
within double quotation marks.
(Also see B under “Variable Values” in
Chapter 2 for the result of the previous code.)
Instead, to access a specific value, you
must refer to the array’s
index
or
key
.
Chapter 7, “Using Arrays,” goes into this
subject in detail, but the premise is simple.
Start with a form element whose
name
attri-
bute has a value of
address
:
<input type="text" name="address" />
Then, assuming that the form uses the
POST method, the value entered into
that form element would be available in
$_POST['address']
:
print $_POST['address'];
Unfortunately, there is one little hitch here:
When used within double quotation marks,
the single quotation marks around the key
will cause parse errors A:
print "You provided your address as:
➝
$_POST['address']";
You can avoid this problem in a couple of
ways. This chapter will use the solution
that’s syntactically the simpler of the two:
just assign the particular
$_POST
element
to another variable first:
$something = $_POST['something'];
➝
print "Thanks for saying:
➝
$something";
In Chapter 7 you’ll learn another approach.

ptg18144795
HTML Forms and PHP 59
Two final notes before implementing this
information in a new PHP script: First, as
with all variables in PHP,
$_POST
is case
sensitive; it must be typed exactly as you
see it here (a dollar sign, one underscore,
then all capital letters). Second, the indexes
in
$_POST
—
something
in the preceding
example—must exactly match the values
of the
name
attributes in the corresponding
form element.
To handle an HTML form:
1. Begin a new document in your
text editor or IDE, to be named
handle_form.php
(Script 3.3):
<!doctype html>
<html lang="en">
<head>
<meta charset="utf-8">
<title>Your Feedback</title>
</head>
<body>
2. Add the opening PHP tag and any
comments:
<?php // Script 3.3
➝
handle_form.php
// This page receives the data
➝
from feedback.html.
// It will receive: title, name,
➝
email, response, comments, and
➝
submit in $_POST.
Comments are added to make the
script’s purpose clear. Even though
the
feedback.html
page indicates
where the data is sent (via the
action
attribute), a comment here indicates
the reverse (where this script is getting
its data). It also helps to spell out the
exact form element names, in a case-
sensitive manner.
continues on next page
Script 3.3 Form data submitted to the script is
displayed by referencing the associated
$_POST
variables.
1 <!doctype html>
2 <html lang="en">
3 <head>
4 <meta charset="utf-8">
5 <title>Your Feedback</title>
6 </head>
7 <body>
8 <?php // Script 3.3 handle_form.php
9
10 // This page receives the data from
feedback.html.
11 // It will receive: title, name, email,
response, comments, and submit in
$_POST.
12
13 // Create shorthand versions of the
variables:
14 $title = $_POST['title'];
15 $name = $_POST['name'];
16 $response = $_POST['response'];
17 $comments = $_POST['comments'];
18
19 // Print the received data:
20 print "<p>Thank you, $title $name,
for your comments.</p>
21 <p>You stated that you found this
example to be '$response' and
added:<br>$comments</p>";
22
23 ?>
24 </body>
25 </html>

ptg18144795
60 Chapter 3
3. Assign the received data to new
variables:
$title = $_POST['title'];
$name = $_POST['name'];
$response = $_POST['response'];
$comments = $_POST['comments'];
Again, since the form uses the POST
method, the submitted data can be
found in the
$_POST
array. The individual
values are accessed using the syntax
$_POST['name_attribute_value']
.
This works regardless of the form
element’s type (input, email, select,
checkbox, etc.).
To make it easier to use these values
in a
print
statement in Step 4, each
value is assigned to a new variable in
this step. Neither
$_POST['email']
nor
$_POST['submit']
is being addressed,
but you can create variables for those
values if you’d like.
4. Print out the user information:
print "<p>Thank you, $title
➝
$name, for your comments.</p>
<p>You stated that you found
➝
this example to be '$response'
➝
and added:<br>$comments</p>";
This one
print
statement uses the four
variables within a context to show the
user what data the script received.
5. Close the PHP section, and complete
the HTML page:
?>
</body>
</html>

ptg18144795
HTML Forms and PHP 61
6. Save the script as
handle_form.php
.
Note that the name of this file must
exactly match the value of the
action
attribute in the form.
7. Upload the script to the server (or store
it in the proper directory on your com-
puter if you’ve installed PHP), making
sure it’s saved in the same directory as
feedback.html
.
8. Load
feedback.html
in your browser
through a URL (
http://something
).
You must load the HTML form through
a URL so that when it’s submitted to
the PHP script, that PHP script is also
run through a URL.
PHP scripts must
always be run through a URL!
Failure to load a form through a URL is
a common beginner’s mistake.
9. Fill out B, and then submit the form C.
If you see a blank page, read the next
section of the chapter for how to display
the errors that presumably occurred.
If you see an error notice D or see that
a variable does not have a value when
printed, you likely misspelled either
the form element’s
name
value or the
$_POST
array’s index (or you filled out
the form incompletely).
B Whatever the user enters into the HTML form
should be printed out to the browser by the
handle_form.php
script C.
C This is another application of the
print
statement discussed in Chapter 1, but it constitutes
your first dynamically generated web page.
D Notices like these occur when a script refers
to a variable that doesn’t exist. In this particular
case, the cause is erroneously referring to
$_POST['Name']
when it should be
$_POST['name']
.
ptg18144795
62 Chapter 3
If you want to pass a preset value along
to a PHP script, use the hidden type of input
within your HTML form. For example, inserting
<input type="hidden"
name="form_page"
value="feedback.html">
between the form tags will create a variable
in the handling script named
$_POST['form_page']
with the value
feedback.html.
Notice that the value of radio button and
certain menu variables is based on the
value
attribute of the selected item (for example,
excellent from the radio button). This is also
true for checkboxes. For text boxes, the value
of the variable is what the user typed.
If the
handle_form.php
script displays
extra slashes in submitted strings, see the
“Magic Quotes” sidebar for an explanation
and solution.
As a brute-force way of seeing all the
form data submitted to a PHP script, call
print_r($_POST)
, in the same way that
Chapter 2 calls
print_r()
with
$_SERVER
.
You can also access form data, regard-
less of the form’s method, in the
$_REQUEST
predefined variable.
$_GET
and
$_POST
are more precise, however, and therefore
preferable.
Magic Quotes
Earlier versions of PHP had a feature
known as
Magic Quotes
, which has
since been removed (as of PHP 5.4).
Magic Quotes—when enabled—auto-
matically escapes single and double
quotation marks found in submitted form
data. So the string
I’d like more informa-
tion
would be turned into
I\’d like more
information
.
The escaping of potentially problem-
atic characters can be useful and even
necessary in some situations. But if the
Magic Quotes feature is enabled on your
PHP installation, you’ll see these back-
slashes when the PHP script prints out
the form data. You can undo its effect
using the
stripslashes()
function. To
apply it to the
handle_form.php
script,
you would do this, for example:
$comments = stripslashes
➝
($_POST['comments']);
instead of just this:
$comments = $_POST['comments'];
That will have the effect of converting
an escaped submitted string back to its
original, non-escaped value.
If you’re not seeing extraneous slashes
added to submitted form data, you don’t
need to worry about Magic Quotes.
ptg18144795
HTML Forms and PHP 63
Displaying Errors
One of the very first issues that arise when
it comes to debugging PHP scripts is that
you may not even see the errors that occur.
After you install PHP on a web server, it
will run under a default configuration with
respect to security, performance, how it
handles data, and so forth. One of the
default settings is to not display any errors.
In other words, the
display_errors
setting
will be off A. When that’s the case, what
you might see when a script has an error
is a blank page. (This is common on fresh
installations of PHP; most hosting companies
will enable
display_errors
.)
The reason that errors should not be
displayed on a live site is that it’s a security
risk. Simply put, PHP’s errors often give
away too much information for the public at
large to see (not to mention that showing
PHP errors looks unprofessional). But you,
the developer,
do need
to see these errors
in order to fix them!
To have PHP display errors, you can do
one of the following:
n
Turn
display_errors
back on for PHP
as a whole. (See the “Configuring PHP”
section of Appendix A, “Installation and
Configuration,” for more information.)
n
Turn
display_errors
back on for an
individual script.
While developing a site, the first option is
by far preferred. However, it’s a possibility
only for those with administrative control
over the server. But anyone can use the
second option by including this line in a script:
ini_set('display_errors', 1);
The
ini_set()
function allows a script to
temporarily override a setting in PHP’s config-
uration file (many, but not all, settings can
be altered this way). The previous example
changes the
display_errors
setting to
on
, which is represented by the number 1.
Although this second method can be
implemented by anyone, the downside is
that if your script contains certain kinds of
errors (discussed next), the script cannot
be executed. In that situation, this line of
code won’t be executed, and the particular
error—or any that prevents a script from
running at all—still results in a blank page.
A Run a
phpinfo()
script (for example, Script 1.2) to view your server’s
display_errors
setting.
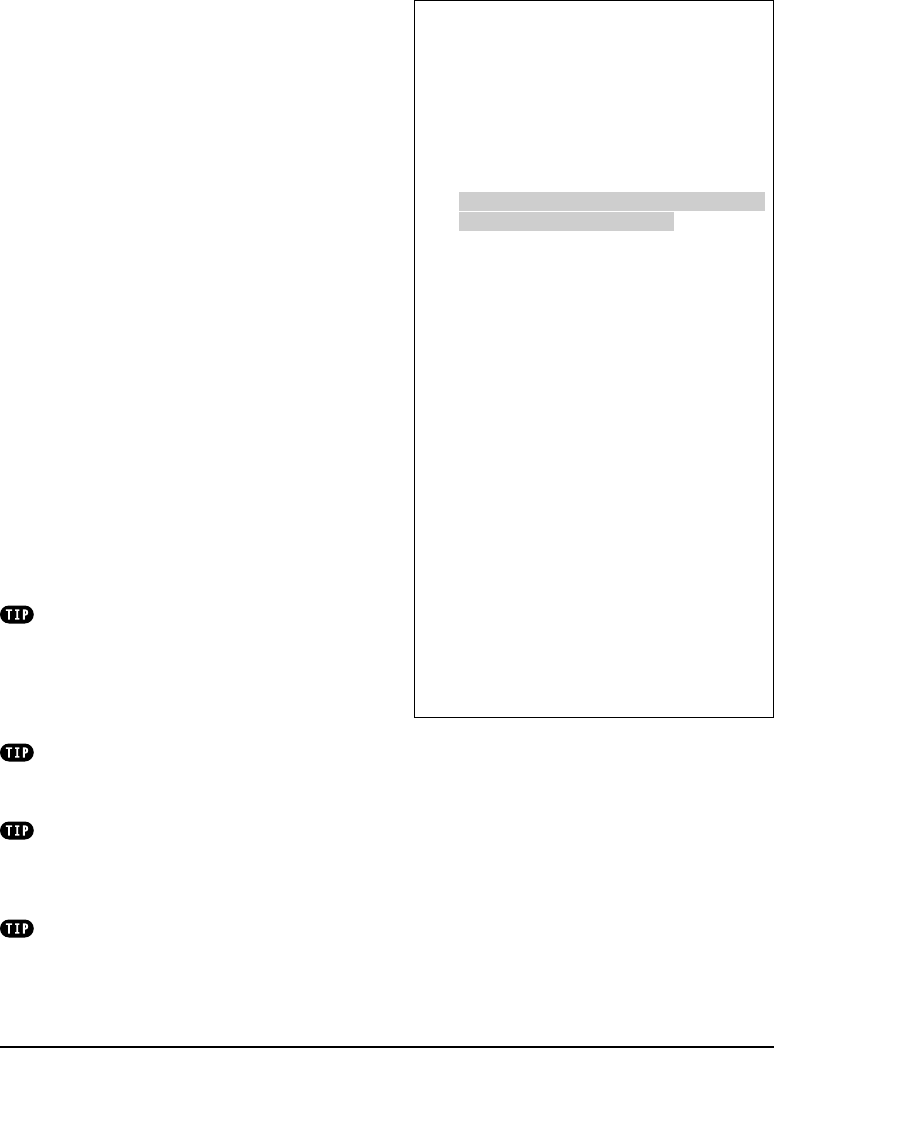
ptg18144795
64 Chapter 3
To display errors in a script:
1. Open
handle_form.php
in your text
editor or IDE, if it is not already open.
2. As the first line of PHP code, enter the
following (Script 3.4):
ini_set('display_errors', 1);
Again, this line tells PHP you’d like to
see any errors that occur. You should
call it first thing in your PHP section so
the rest of the PHP code will abide by
this new setting.
3. Save the file as
handle_form.php
.
4. Upload the file to your web server, and
test it in your browser.
If the resulting page has no errors in it,
then the script will run as it did before.
If you saw a blank page when you ran
the form earlier, you should now see
the actual error messages (like those in
D in the previous section). Again, if you
see such errors, you likely misspelled
the name of a form element, misspelled
the index in the
$_POST
array, or didn’t
fill out the form completely.
Make sure
display_errors
is enabled
anytime you’re having difficulties debugging
a script. If you installed PHP on your computer,
I highly recommend enabling it in your PHP
configuration while you learn (again, see
Appendix A).
If you see a blank page when running a
PHP script, also check the HTML source code
for errors or other problems.
Remember that the
display_errors
directive only controls whether error messages
are sent to the browser. It doesn’t create errors
or prevent them from occurring in any way.
Failure to use an equals sign after
name
in a form element will also cause problems:
<input name"something">
Script 3.4 This addition to the PHP script turns on
the
display_errors
directive so that errors will be
shown.
1 <!doctype html>
2 <html lang="en">
3 <head>
4 <meta charset="utf-8">
5 <title>Your Feedback</title>
6 </head>
7 <body>
8 <?php // Script 3.4 - handle_form.php #2
9
10 ini_set('display_errors', 1); // Let
me learn from my mistakes!
11
12 // This page receives the data from
feedback.html.
13 // It will receive: title, name, email,
response, comments, and submit in
$_POST.
14
15 // Create shorthand versions of the
variables:
16 $title = $_POST['title'];
17 $name = $_POST['name'];
18 $response = $_POST['response'];
19 $comments = $_POST['comments'];
20
21 // Print the received data:
22 print "<p>Thank you, $title $name, for
your comments.</p>
23 <p>You stated that you found this
example to be '$response' and
added:<br>$comments</p>";
24
25 ?>
26 </body>
27 </html>

ptg18144795
HTML Forms and PHP 65
Error Reporting
Another PHP configuration issue you should
be aware of, along with
display_errors
,
is
error reporting
. PHP has more than a
dozen different levels of errors, and you
can define your own (a subject not covered
in this book). Table 3.1 lists the four most
important general error levels, along with a
description and example of each.
You can set what errors PHP reports on in
two ways. First, you can adjust the
error_
reporting
level in PHP’s configuration file
(again, see Appendix A). If you are running
your own PHP server, you’ll probably want
to adjust that global setting while develop-
ing your scripts.
The second option is to use the
error_
reporting()
function in a script. The
function takes either a number or one or
more
constants
—nonquoted strings with
predetermined meanings—to adjust the
levels. (Each constant is associated with a
number.) The most important of these con-
stants are listed in Table 3.2, in order from
most forgiving to least.
TABLE 3.1 PHP Error Levels
Type Description Example
Notice Nonfatal error that may or may not be
indicative of a problem Referring to a variable that has no value
Warning Nonfatal error that is most likely problematic Misusing a function
Parse error Fatal error caused by a syntactical mistake Omission of a semicolon or an imbalance
of quotation marks, braces, or parentheses
Error A general fatal error Memory allocation problem
TABLE 3.2 Error Reporting Constants
Name
E_ERROR
E_WARNING
E_PARSE
E_NOTICE
E_STRICT
E_DEPRECATED
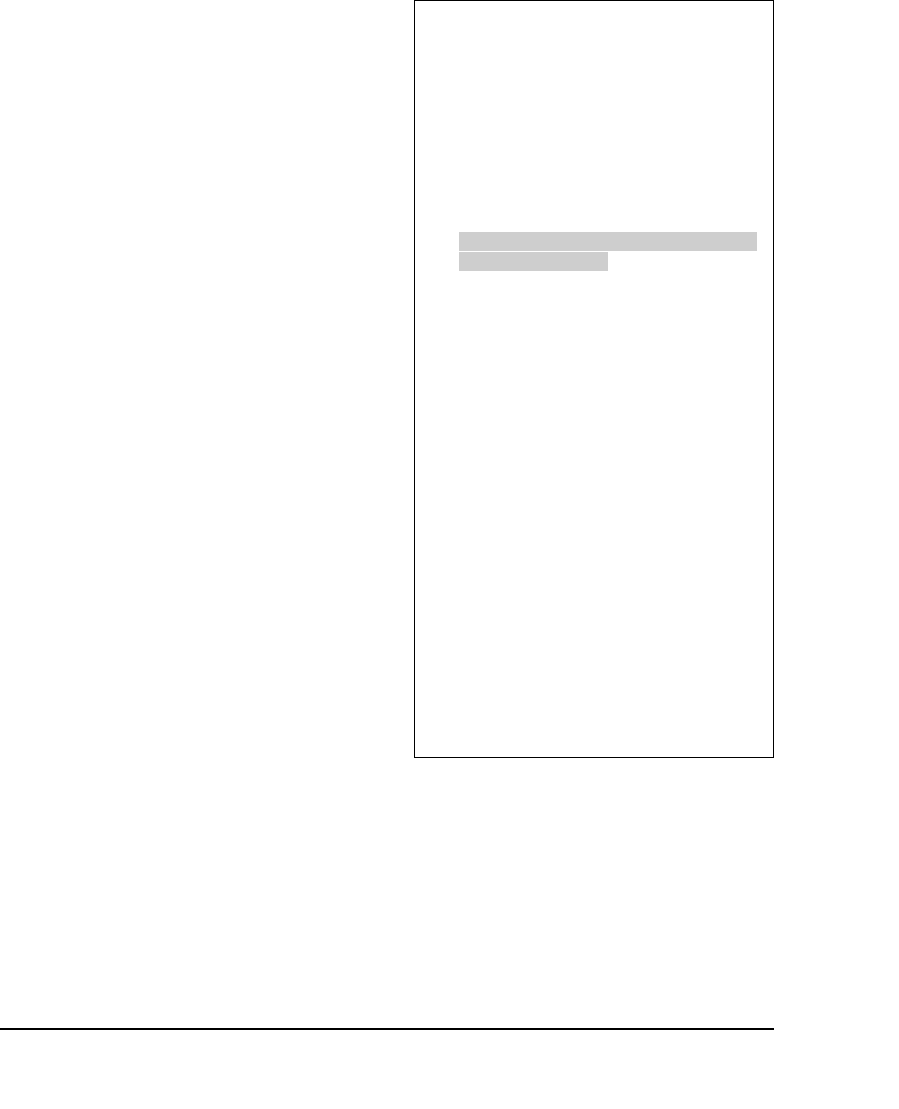
ptg18144795
66 Chapter 3
Using this information, you could add any
of the following to a script:
error_reporting(E_WARNINGS);
error_reporting(E_ALL);
error_reporting(E_ALL & ~E_STRICT);
The first line says that only warnings and
below should be reported. The second
requests that all errors be reported. The
last example states that you want to see
all error messages except strict ones (the
&
~
means
and not
).
E_STRICT
also notifies
you of code that could be problematic in
certain environments or future versions of
PHP. Keep in mind that adjusting this set-
ting doesn’t prevent or create errors; it just
affects whether or not errors are reported.
It’s generally best to develop and test PHP
scripts using the highest level of error report-
ing possible. To accomplish that, declare
that you want
all errors
error reporting:
error_reporting(E_ALL);
Otherwise, the default level of error report-
ing (as of this writing) is
E_ALL
&
~E_NOTICE
&
~E_STRICT
&
~E_DEPRECATED
. Unless you
override this default setting, you will not be
told about notices, strict errors, and depre-
cated code. As a developer, you want to be
notified of any potential or actual problem
with your code.
Let’s apply this adjustment to the
handle_
form.php
page.
To adjust error reporting in a script:
1. Open
handle_form.php
(Script 3.4) in
your text editor or IDE, if it is not open
already.
2. After the
ini_set()
line, add the
following (Script 3.5):
error_reporting(E_ALL);
Script 3.5 Adjust a script’s level of error reporting
to give you more or less feedback on potential and
existing problems. In my opinion, more is always
better.
1 <!doctype html>
2 <html lang="en">
3 <head>
4 <meta charset="utf-8">
5 <title>Your Feedback</title>
6 </head>
7 <body>
8 <?php // Script 3.5 - handle_form.php #3
9
10 ini_set('display_errors', 1); // Let me
learn from my mistakes!
11 error_reporting(E_ALL); // Show all
possible problems!
12
13 // This page receives the data from
feedback.html.
14 // It will receive: title, name, email,
response, comments, and submit in
$_POST.
15
16 // Create shorthand versions of the
variables:
17 $title = $_POST['title'];
18 $name = $_POST['name'];
19 $response = $_POST['response'];
20 $comments = $_POST['comments'];
21
22 // Print the received data:
23 print "<p>Thank you, $title $name, for
your comments.</p>
24 <p>You stated that you found this
example to be '$response' and
added:<br>$comments</p>";
25
26 ?>
27 </body>
28 </html>

ptg18144795
HTML Forms and PHP 67
3. Save the file as
handle_form.php
.
4. Place the file in the proper directory for
your PHP-enabled server, and test it in
your browser by submitting the form
(A and B).
At this point, if the form is filled out
completely and the
$_POST
indexes
exactly match the names of the form
elements, you shouldn’t see any errors
(as in the figures). If any problems
exist, including any potential problems
(thanks to
E_STRICT
), they should be
displayed and reported.
The PHP manual lists all the error-
reporting levels, but those listed here are the
most important.
The code in this book was tested using
the highest level of error reporting:
E_ALL
.
Prior to PHP 5.4.0,
E_STRICT
was not
included in
E_ALL
, so the highest level of error
reporting could be achieved using
error_reporting(E_ALL | E_STRICT);
The vertical bar, known as the pipe, is the
equivalent of an “or” conditional.
A Try the form one more time…
B …and here’s the result (if filled out completely
and without any programmer errors).

ptg18144795
68 Chapter 3
Manually Sending
Data to a Page
The last example for this chapter is a
slight tangent to the other topics but plays
off the idea of handling form data with
PHP. As discussed in the earlier section
“Choosing a Form Method,” if a form uses
the GET method, the resulting URL is
something like
http://example.com/page.php?
➝
var=value&age=20&...
The receiving page (here,
page.php
) is
sent a series of
name=value
pairs, each of
which is separated by an ampersand (
&
).
The whole sequence is preceded by
a question mark (immediately after the
handling script’s name).
To access the values passed to the page
in this way, turn to the
$_GET
variable.
Just as you would when using
$_POST
,
refer to the specific name as an index in
$_GET
. In that example,
page.php
receives
a
$_GET['var']
variable with a value of
value
, a
$_GET['age']
variable with a
value of
20
, and so forth.
You can pass data to a PHP script in this
way by creating an HTML form that uses
the GET method. But you can also use this
same idea to send data to a PHP page
without
the use of the form. Normally you’d
do so by creating links:
<a href="page.php?id=22">
➝
Some Link</a>
That link, which could be dynamically gen-
erated by PHP, will pass the value
22
to
page.php
, accessible in
$_GET['id']
.
To try this for yourself, the next pair of
scripts will easily demonstrate this concept,
using a hard-coded HTML page.
Script 3.6 This HTML page uses links to pass
values to a PHP script in the URL (thereby
emulating a form that uses the GET method).
1 <!doctype html>
2 <html lang="en">
3 <head>
4 <meta charset="utf-8">
5 <title>Greetings!</title>
6 </head>
7 <body>
8 <!-- Script 3.6 - hello.html -->
9 <div><p>Click a link to say hello:</p>
10
11 <ul>
12 <li><a href="hello.
php?name=Michael">Michael</a></li>
13 <li><a href="hello.
php?name=Celia">Celia</a></li>
14 <li><a href="hello.
php?name=Jude">Jude</a></li>
15 <li><a href="hello.
php?name=Sophie">Sophie</a></li>
16 </ul>
17
18 </div>
19 </body>
20 </html>
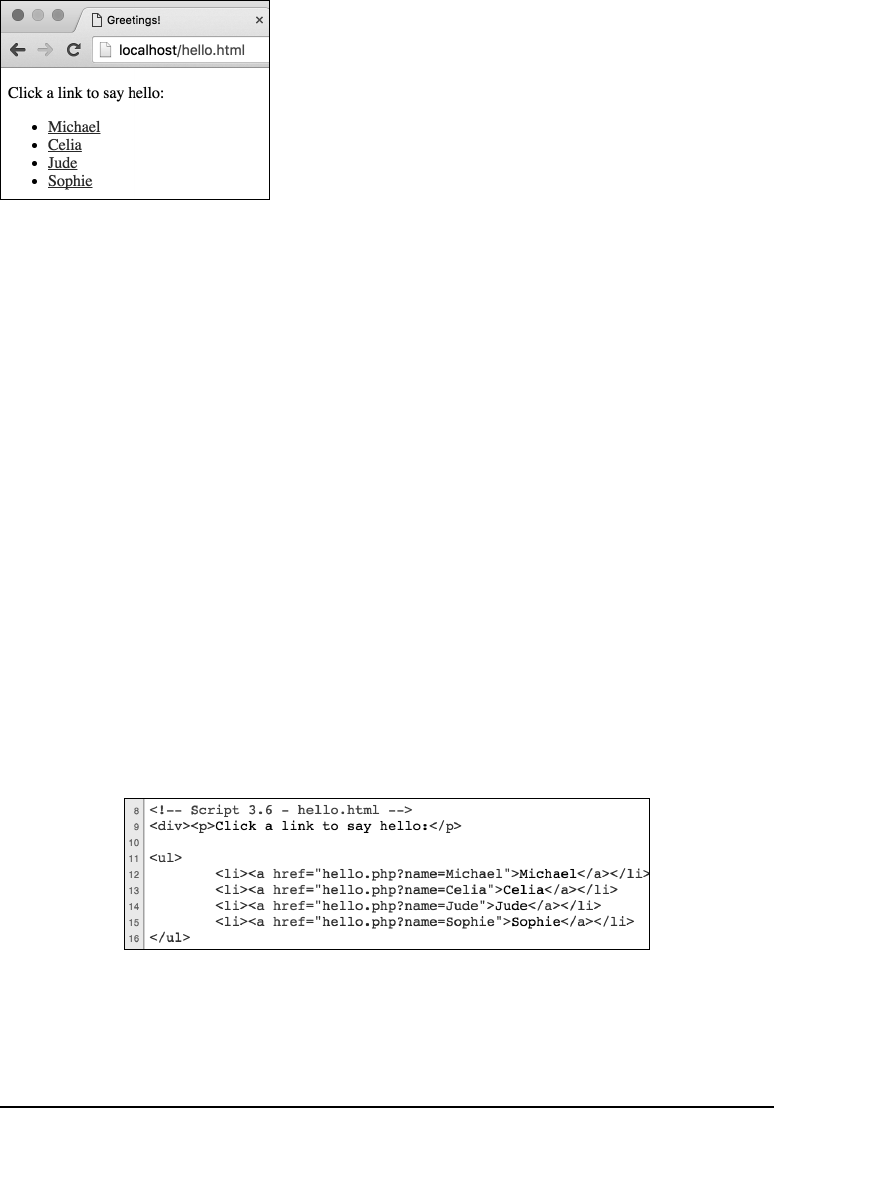
ptg18144795
HTML Forms and PHP 69
To create the HTML page:
1. Begin a new document in your text
editor or IDE, to be named
hello.html
(Script 3.6):
<!doctype html>
<html lang="en">
<head>
<meta charset="utf-8">
<title>Greetings!</title>
</head>
<body>
<!-- Script 3.6 - hello.html -->
2. Create links to a PHP script, passing
values along in the URL:
<ul>
<li><a href="hello.php?name=
➝
Michael">Michael</a></li>
<li><a href="hello.php?name=
➝
Celia">Celia</a></li>
<li><a href="hello.php?name=
➝
Jude">Jude</a></li>
<li><a href="hello.php?name=
➝
Sophie">Sophie</a></li>
</ul>
The premise here is that the user will
see a list of links, each associated with
a specific name A. When the user
clicks a link, that name is passed to
hello.php
in the URL B.
continues on next page
A The simple HTML page, with four
links to the PHP script.
B The HTML source of the page shows how values are being passed
along in the URL for the four links.
ptg18144795
70 Chapter 3
If you want to use different names, that’s
fine, but stick to one-word names without
spaces or punctuation or else they won’t
be passed to the PHP script properly.
3. Complete the HTML page:
</div>
</body>
</html>
4. Save the script as
hello.html
, and
place it within the proper directory on
your PHP-enabled server.
5. Load the HTML page through a URL in
your browser.
Although you can view HTML pages
without going through a URL, you’ll click
links in this page to access the PHP script,
so you’ll need to start off using a URL
here. Don’t click any of the links yet,
because the PHP script doesn’t exist!
To create the PHP script:
1. Begin a new document in your text
editor or IDE, to be named
hello.php
(Script 3.7):
<!doctype html>
<html lang="en">
<head>
<meta charset="utf-8">
<title>Greetings!</title>
<style type="text/css">
.bold {
font-weight: bolder;
}
</style>
</head>
<body>
Script 3.7 This PHP page refers to the
name
value
passed in the URL in order to print a greeting.
1 <!doctype html>
2 <html lang="en">
3 <head>
4 <meta charset="utf-8">
5 <title>Greetings!</title>
6 <style type="text/css">
7 .bold {
8 font-weight: bolder;
9 }
10 </style>
11 </head>
12 <body>
13 <?php // Script 3.7 - hello.php
14
15 ini_set('display_errors', 1); // Let me
learn from my mistakes!
16 error_reporting(E_ALL); // Show all
possible problems!
17
18 // This page should receive a name value
in the URL.
19
20 // Say "Hello":
21 $name = $_GET['name'];
22 print "<p>Hello, <span
class=\"bold\">$name</span>!</p>";
23
24 ?>
25 </body>
26 </html>
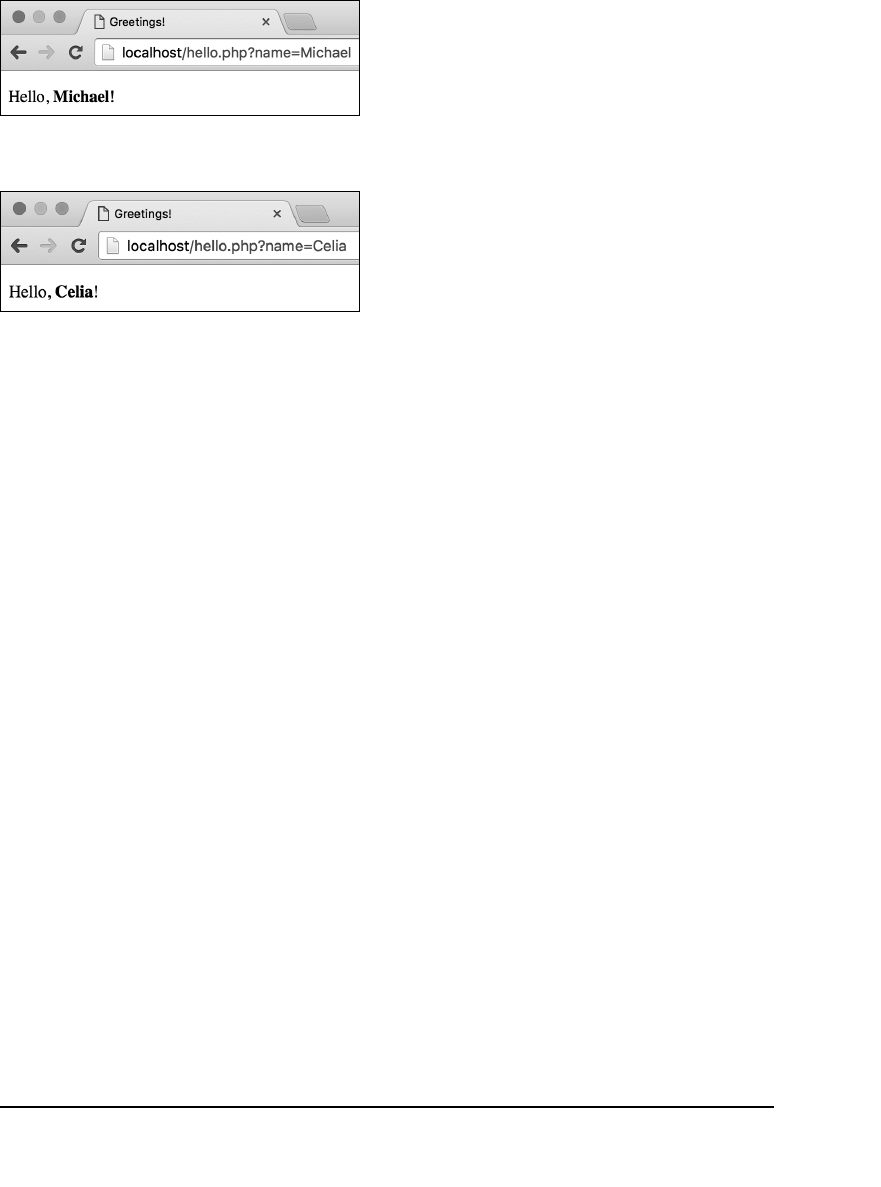
ptg18144795
HTML Forms and PHP 71
2. Begin the PHP code:
<?php // Script 3.7 - hello.php
3. Address the error management,
if desired:
ini_set('display_errors', 1);
error_reporting(E_ALL);
These two lines, which configure how
PHP responds to errors, are explained
in the pages leading up to this section.
They may or may not be necessary for
your situation but can be helpful.
4. Use the
name
value passed in the URL
to create a greeting:
$name = $_GET['name'];
print "<p>Hello, <span class=
➝
\"bold\">$name</span>!</p>";
The
name
variable is sent to the
page through the URL (see Script
3.6). To access that value, refer to
$_GET['name']
. Again, you would use
$_GET
(as opposed to
$_POST
) because
the value is coming from a GET request.
As with earlier PHP scripts, the value in
the predefined variable (
$_GET
) is first
assigned to another variable, to simplify
the syntax in the
print
statement.
5. Complete the PHP code and the HTML
page:
?>
</body>
</html>
6. Save the script as
hello.php
, and place
it within the proper directory on your
PHP-enabled server.
It should be saved in the same directory
as
hello.html
(Script 3.6).
7. Click the links in
hello.html
to view
the result C and D.
continues on next page
C By clicking the first link,
Michael
is passed
along in the URL and is greeted by name.
D By clicking the second link,
Celia
is sent along
in the URL and is also greeted by name.
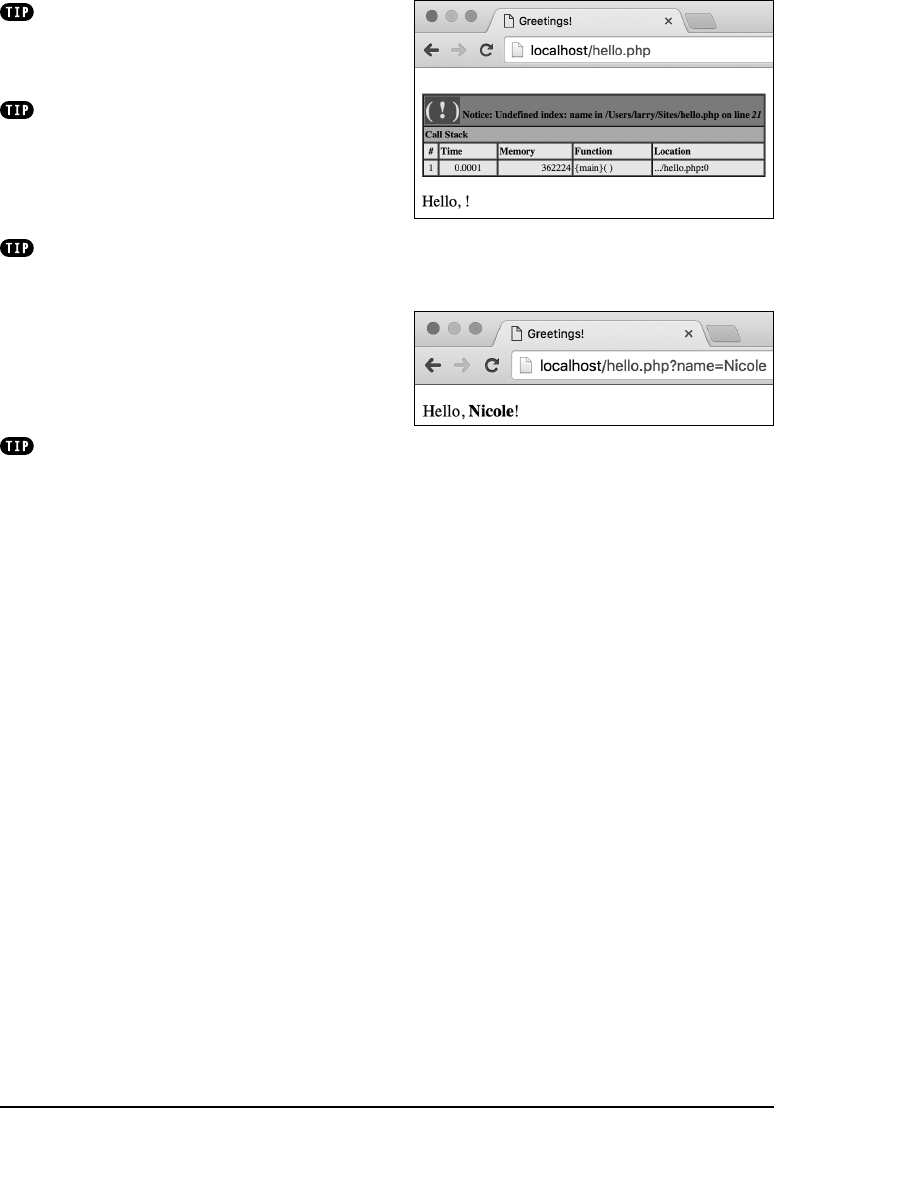
ptg18144795
72 Chapter 3
If you run
hello.php
directly (that
is, without clicking any links), you’ll get an
error notice because no
name
value would be
passed along in the URL E.
Because
hello.php
reads a value from
the URL, it actually works independently of
hello.html
. For example, you can directly
edit the
hello.php
URL to greet anyone,
even if
hello.html
does not have a link for
that name F.
If you want to use a link to send multiple
values to a script, separate the name=value
pairs (for example,
first_name=Larry
) with
the ampersand (
&
). So, another link may be
hello.php?first_name=Larry&last_
name=Ullman
. You should continue to use
only single words, without punctuation or
spaces, however (until you later learn about
the
urlencode()
function).
Although the example here—setting the
value of a person’s name—may not be very
practical, this basic technique is useful on
many occasions. For example, a PHP script
might constitute a template, and the content
of the resulting web page would differ based
on the values the page received in the URL.
E If the
$_GET['name']
variable isn’t assigned
a value, the browser prints out this awkward
message, along with the error notice.
F Any value assigned to
name
(lowercase) in the
URL is used by the PHP script.

ptg18144795
HTML Forms and PHP 73
Review and Pursue
If you have any problems with the review
questions or the pursue prompts, turn
to the book’s supporting forum
(www.LarryUllman.com/forums/).
Review
n
What is the significance of a form’s
action
attribute?
n
What is the significance of a form’s
method
attribute? Is it more secure to
use GET or POST? Which method type
can be bookmarked in the browser?
n
What predefined variable will contain
the data from a form submission? Note:
There are multiple answers.
n
Why must an HTML page that contains
a form that’s being submitted to a PHP
script be loaded through a URL?
n
Under what circumstances will attempts
to enable
display_errors
in a script
not succeed? Why is it less secure to
enable
display_errors
on live sites?

ptg18144795
74 Chapter 3
Pursue
n
Load
feedback.html
in your browser
without going through a URL (that is,
the address bar would likely start with
file://
). Fill out and submit the form.
Observe the result so that you can
recognize this problem, and understand
its cause, in case you see similar results
in the future.
n
If you have not already, and if you
can, make sure that
display_errors
is enabled on your development
environment.
n
If you have not already, and if you can,
make sure that
error_reporting
is
set to
E_ALL
on your development
environment (or
E_ALL
|
E_STRICT
in
earlier versions of PHP).
n
Try introducing different errors in a
PHP script—by improperly balancing
quotation marks, failing to use semi-
colons, referring to variables improperly,
and so on—to see the result.
n
Experiment with the
hello.html
and
hello.php
pages to send different
values, including numbers, to the PHP
script through the URL.
n
Create a variation on
hello.html
that
sends multiple
name=value
pairs to a
PHP script. Have the PHP script then
print all the received values.
n
If you are the inquisitive type and don’t
mind waiting for answers, try passing
more complicated values to a page
through the URL. Try using spaces and
punctuation to see what happens.
n
Create a new HTML form that performs
a task you envision yourself needing
(or a lighter-weight version of that func-
tionality). Then create the PHP script
that handles the form, printing just the
received data.

ptg18144795
Chapter 2, “Variables,” briefly discussed
the various types of variables, how to
assign values to them, and how they’re
generally used. In this chapter, you’ll work
specifically with number variables—both
integers (whole numbers) and floating-
point numbers (aka floats or decimals).
You’ll begin by creating an HTML form that
will be used to generate number variables.
Then you’ll learn how to perform basic arith-
metic, how to format numbers, and how to
cope with operator precedence. The last
two sections of this chapter cover incre-
menting and decrementing numbers, plus
generating random numbers. Throughout
the chapter, you’ll also learn about other
useful number-related PHP functions.
4
Using
Numbers
In This Chapter
Creating the Form 76
Performing Arithmetic 79
Formatting Numbers 83
Understanding Precedence 86
Incrementing and Decrementing
a Number 88
Creating Random Numbers 90
Review and Pursue 92
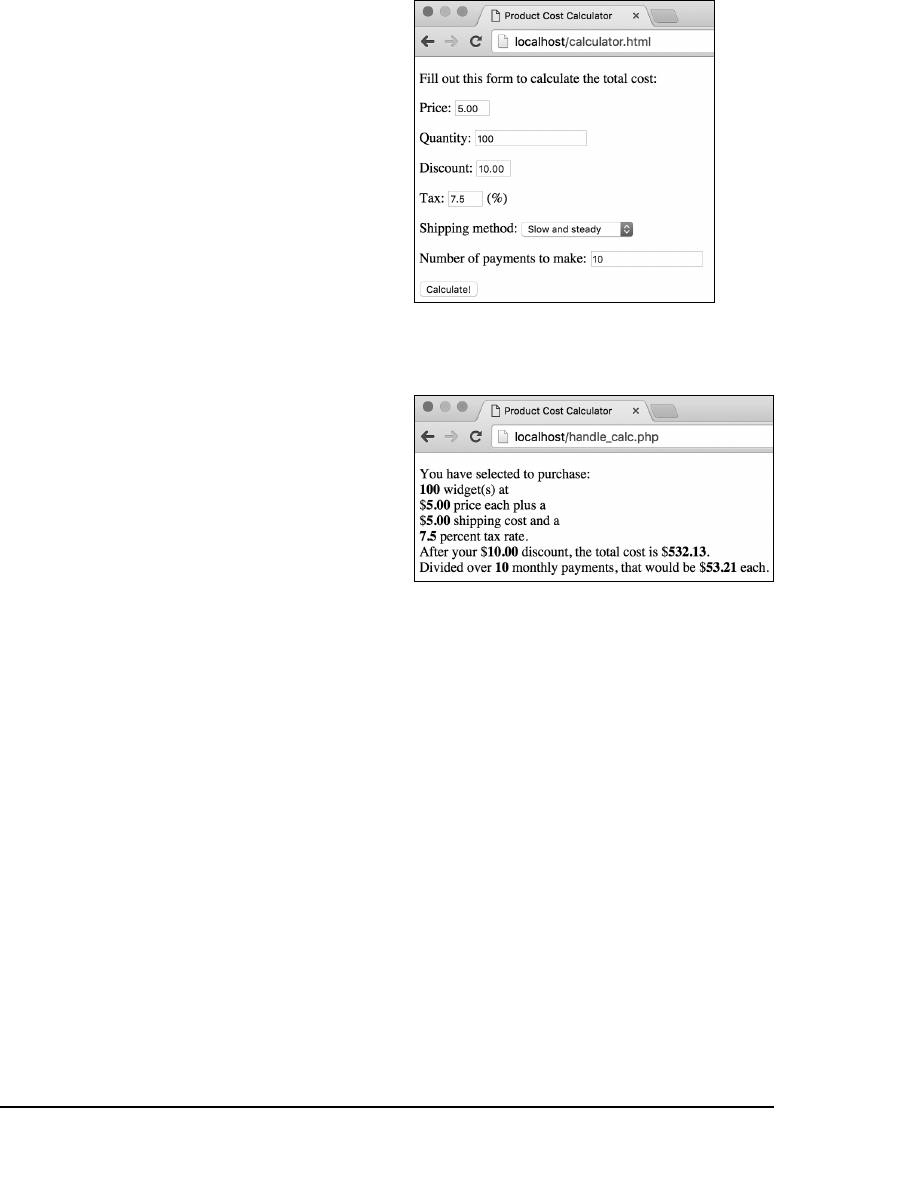
ptg18144795
76 Chapter 4
Creating the Form
Most of the PHP examples in this chapter
will perform various calculations based on
an e-commerce premise. A form will take
price, quantity, discount amount, tax rate,
and shipping cost A, and the PHP script
that handles the form will return a total
cost. That cost will also be broken down by
the number of payments the user wants to
make in order to generate a monthly cost
value B.
To start, let’s create an HTML page that
allows the user to enter the values.
To create the HTML form:
1. Begin a new HTML document in
your text editor or IDE, to be named
calculator.html
(Script 4.1):
<!doctype html>
<html lang="en">
<head>
<meta charset="utf-8">
<title>Product Cost Calculator
➝
</title>
</head>
<body><!-- Script 4.1 -
➝
calculator.html -->
<div><p>Fill out this form to
➝
calculate the total cost:</p>
2. Create the initial form tag:
<form action="handle_calc.php"
method="post">
This form tag begins the HTML form. Its
action
attribute indicates that the form
data will be submitted to a page named
handle_calc.php
. The tag’s
method
attribute tells the page to use POST to
send the data. See Chapter 3, “HTML
Forms and PHP,” for more details on
choosing a method.
A This form takes numbers from the user
and sends them to a PHP page.
B The PHP script performs a series of calculations
on the submitted data and outputs the results. The
results will look like this by the end of the chapter.

ptg18144795
Using Numbers 77
3. Create the inputs for the price, quantity,
discount, and tax:
<p>Price: <input type="text"
➝
name="price" size="5"></p>
<p>Quantity: <input type=
➝
"number" name="quantity"
size="5" min="1" value="1"></p>
<p>Discount: <input type="text"
➝
name="discount" size="5"></p>
<p>Tax: <input type="text"
➝
name="tax" size="5"> (%)</p>
Although HTML5 does have a number
input type, it’s not always the right solu-
tion because it’s more naturally suited
to taking integer values. For that reason,
the quantity input will be a number type,
whereas the others will be text.
To guide the user, a parenthetical indi-
cates that the tax should be entered as
a percent.
Remember that the names used for the
inputs should correspond to valid PHP
variable names: Use letters, numbers,
and the underscore only; don’t start with
a number; and so forth.
continues on next page
Script 4.1 This basic HTML form will provide the
numbers for various mathematical calculations
over multiple PHP scripts.
1 <!doctype html>
2 <html lang="en">
3 <head>
4 <meta charset="utf-8">
5 <title>Product Cost Calculator</title>
6 </head>
7 <body><!-- Script 4.1 - calculator.html
-->
8 <div><p>Fill out this form to calculate
the total cost:</p>
9
10 <form action="handle_calc.php"
method="post">
11
12 <p>Price: <input type="text"
name="price" size="5"></p>
13
14 <p>Quantity: <input type="number"
name="quantity" size="5" min="1"
value="1"></p>
15
16 <p>Discount: <input type="text"
name="discount" size="5"></p>
17
18 <p>Tax: <input type="text" name="tax"
size="5"> (%)</p>
19
20 <p>Shipping method: <select
name="shipping">
21 <option value="5.00">Slow and steady</
option>
22 <option value="8.95">Put a move on it.</
option>
23 <option value="19.36">I need it
yesterday!</option>
24 </select></p>
25
26 <p>Number of payments to make: <input
type="number" name="payments" size="5"
min="1" value="1"></p>
27
28 <input type="submit" name="submit"
value="Calculate!">
29
30 </form>
31
32 </div>
33 </body>
34 </html>

ptg18144795
78 Chapter 4
4. Add a field in which the user can select
a shipping method:
<p>Shipping method: <select
➝
name="shipping">
<option value="5.00">Slow and
➝
steady</option>
<option value="8.95">Put a move
➝
on it.</option>
<option value="19.36">I need it
➝
yesterday!</option>
</select></p>
The shipping selection is made using
a drop-down menu. The value of the
selected option is the cost for that
option. If the user selects, for example,
the
Put a move on it.
option, the value
of
$_POST['shipping']
in
handle_
calc.php
will be
8.95
.
5. Complete the HTML form:
<p>Number of payments to make:
➝
<input type="number"
➝
name="payments" size="5"
➝
min="1" value="1"></p>
<input type="submit" name=
➝
"submit" value="Calculate!">
</form>
The final two input types take a number
for how many payments are required
and then create a submit button (labeled
Calculate!
). The closing form tag marks
the end of the form section of the page.
6. Complete the HTML page:
</div>
</body>
</html>
7. Save the script as
calculator.html
,
and view it in your browser.
Because this is an HTML page, you can
view it directly in a browser.

ptg18144795
Using Numbers 79
Performing Arithmetic
Just as you learned in grade school, basic
mathematics involves the principles of
addition, subtraction, multiplication, and
division. These are performed in PHP using
the most obvious operators:
n
Addition (
+
)
n
Subtraction (
-
)
n
Multiplication (
*
)
n
Division (
/
)
To use these operators, you’ll create a PHP
script that calculates the total cost for the
sale of some widgets. This handling script
could be the basis of a shopping cart appli-
cation—a very practical web page feature
(although in this case the relevant number
values will come from
calculator.html
).
When you’re writing this script, be sure to
note the comments (Script 4.2) used to
illuminate the different lines of code and
the reasoning behind them.
To create your sales cost calculator:
1. Create a new document in your
text editor or IDE, to be named
handle_calc.php
(Script 4.2):
<!doctype html>
<html lang="en">
<head>
<meta charset="utf-8">
<title>Product Cost Calculator
➝
</title>
<style type="text/css">
.number {font-weight:bold;}
</style>
</head>
<body>
continues on next page
Script 4.2 This PHP script performs all the
standard mathematical calculations using the
numbers submitted from the form.
1 <!doctype html>
2 <html lang="en">
3 <head>
4 <meta charset="utf-8">
5 <title>Product Cost Calculator</
title>
6 <style type="text/css">
7 .number { font-weight: bold; }
8 </style>
9 </head>
10 <body>
11 <?php // Script 4.2 - handle_calc.php
12 /* This script takes values from
calculator.html and performs
13 total cost and monthly payment
calculations. */
14
15 // Address error handling, if you want.
16
17 // Get the values from the $_POST array:
18 $price = $_POST['price'];
19 $quantity = $_POST['quantity'];
20 $discount = $_POST['discount'];
21 $tax = $_POST['tax'];
22 $shipping = $_POST['shipping'];
23 $payments = $_POST['payments'];
24
25 // Calculate the total:
26 $total = $price * $quantity;
27 $total = $total + $shipping;
28 $total = $total - $discount;
29
30 // Determine the tax rate:
31 $taxrate = $tax / 100;
32 $taxrate = $taxrate + 1;
33
34 // Factor in the tax rate:
35 $total = $total * $taxrate;
36
37 // Calculate the monthly payments:
38 $monthly = $total / $payments;
39
code continues on next page
ptg18144795
80 Chapter 4
The head of the document defines
one CSS class, named
number
. Any
element within the page that has that
class value will be given extra font
weight. In other words, when the num-
bers from the form, and the results of
the various calculations, are printed
in the script’s output, they’ll be made
more obvious.
2. Insert the PHP tag and address error
handling, if desired:
<?php // Script 4.2 -
➝
handle_calc.php
Depending on your PHP configuration,
you may or may not want to add a couple
of lines that turn on
display_errors
and adjust the level of error reporting.
See Chapter 3 for specifics.
(However, as also mentioned in that
chapter, it’s best to make these adjust-
ments in PHP’s primary configuration file.)
3. Assign the
$_POST
elements to local
variables:
$price = $_POST['price'];
$quantity = $_POST['quantity'];
$discount = $_POST['discount'];
$tax = $_POST['tax'];
$shipping = $_POST['shipping'];
$payments = $_POST['payments'];
The script will receive all the form data
in the predefined
$_POST
variable. To
access individual form values, refer to
$_POST['index']
, replacing
index
with
the corresponding form element’s
name
value. These values are assigned to
individual local variables here, to make
it easier to use them throughout the
rest of the script.
Note that each variable is given a
descriptive name and is written entirely
in lowercase letters.
Script 4.2 continued
40 // Print out the results:
41 print "<p>You have selected to
purchase:<br>
42 <span class=\"number\">$quantity</
span> widget(s) at <br>
43 $<span class=\"number\">$price</span>
price each plus a <br>
44 $<span class=\"number\">$shipping</
span> shipping cost and a <br>
45 <span class=\"number\">$tax</span>
percent tax rate.<br>
46 After your $<span
class=\"number\">$discount</span>
discount, the total cost is
47 $<span class=\"number\">$total</
span>.<br>
48 Divided over <span
class=\"number\">$payments</span>
monthly payments, that would be
$<span class=\"number\">$monthly</
span> each.</p>";
49
50 ?>
51 </body>
52 </html>

ptg18144795
Using Numbers 81
7. Print the results:
print "<p>You have selected to
➝
purchase:<br>
<span class=\"number\">$quantity
➝
</span> widget(s) at <br>
$<span class=\"number\">$price
➝
</span> price each plus a <br>
$<span class=\"number\">$shipping
➝
</span> shipping cost and a <br>
<span class=\"number\">$tax
➝
</span> percent tax rate.<br>
After your $<span class=
➝
\"number\">$discount</span>
➝
discount, the total cost is
$<span class=\"number\">$total
➝
</span>.<br>
Divided over <span class=
➝
\"number\">$payments</span>
➝
monthly payments, that would be
➝
$<span class=\"number\">
➝
$monthly</span> each.</p>";
The
print
statement sends every value
to the browser along with some text.
To make it easier to read,
<br>
tags are
added to format the browser result; in
addition, the
print
function operates
over multiple lines to make the PHP
code cleaner. Each variable’s value will
be highlighted in the browser by wrap-
ping it within span tags that have a
class
attribute of
number
(see Step 1).
8. Close the PHP section, and complete
the HTML page:
?>
</body>
</html>
9. Save the script as
handle_calc.php
,
and place it in the proper directory for
your PHP-enabled server.
Make sure that
calculator.html
is in
the same directory.
continues on next page
4. Begin calculating the total cost:
$total = $price * $quantity;
$total = $total + $shipping;
$total = $total - $discount;
The asterisk (
*
) indicates multiplication in
PHP, so the total is first calculated as the
number of items purchased (
$quantity
)
multiplied by the price. Then the shipping
cost is added to the total value (remem-
ber that the shipping cost correlates
to the
value
attribute of each shipping
drop-down menu’s
option
tags), and
the discount is subtracted.
Note that it’s perfectly acceptable to
determine a variable’s value in part by
using that variable’s existing value (as
is done in the last two lines).
5. Calculate the tax rate and the new total:
$taxrate = $tax / 100;
$taxrate = $taxrate + 1;
$total = $total * $taxrate;
The tax rate should be entered as a
percent—for example, 8 or 5.75. This
number is then divided by 100 to get
the decimal equivalent of the percent
(.08 or .0575). Finally, you calculate how
much something costs with tax by adding
1 to the percent and then multiplying
that new rate by the total. This is the
mathematical equivalent of multiplying
the decimal tax rate times the total and
then adding this result to the total (for
example, a 5 percent tax on $100 is
$5, making the total $105, which is the
same as multiplying $100 times 1.05).
6. Calculate the monthly payment:
$monthly = $total / $payments;
As an example of division, assume that
the widgets can be paid for over the
course of many months. Hence, you
divide the total by the number of pay-
ments to find the monthly payment.
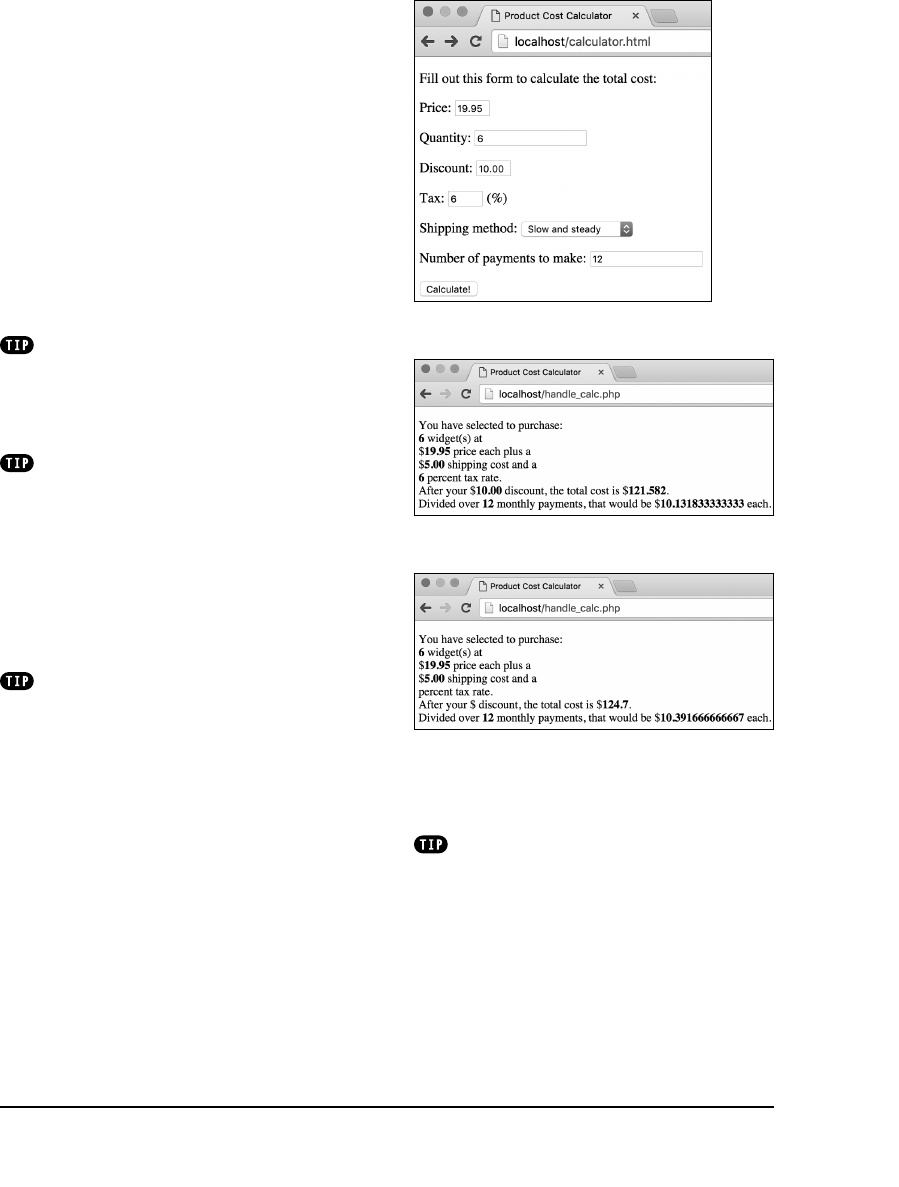
ptg18144795
82 Chapter 4
10. Test the script in your browser by filling
out A and submitting B the form.
Not to belabor the point, but make sure
you start by loading the HTML form
through a URL (
http://something
) so
that when it’s submitted, the PHP script
is also run through a URL.
You can experiment with these values
to see how effectively your calculator
works. If you omit any values, the result-
ing message will just be a little odd but
the calculations should still work C.
As you’ll certainly notice, the calculator
comes up with numbers that don’t correspond
well to real dollar values (see B and C). In
the next section, “Formatting Numbers,” you’ll
learn how to address this issue.
If you want to print the value of the total
before tax or before the discount (or both),
you can do so in two ways. You can insert the
appropriate
print
statements immediately
after the proper value has been determined
but before the
$total
variable has been
changed again. Or you can use new variables
to represent the values of the subsequent
calculations (for example,
$total_with_tax
and
$total_less_discount
).
Attempting to print a dollar sign followed
by the value of a variable, such as $10 (where 10
comes from a variable), has to be handled care-
fully. You can’t use the syntax
$$variable
,
because the combination of two dollar signs
creates a type of variable that’s too complex
to discuss in this book. One solution is to put
something—a space or an HTML tag, as in this
example—between the dollar sign and the
variable name. Another option is to escape the
first dollar sign:
print "The total is \$$total";
A third option is to use concatenation, which is
introduced in the next chapter.
A The HTML form…
B …and the resulting calculations.
C You can omit or change any value and rerun
the calculator. Here the tax and discount values
have been omitted.
This script performs differently, depend-
ing on whether the various fields are submitted.
The only truly problematic field is the number
of monthly payments: If this is omitted, you’ll
see a division-by-zero warning. Chapter 6,
“Control Structures,” will cover validating form
data before it’s used.

ptg18144795
Using Numbers 83
Formatting Numbers
Although the calculator is on its way to
being practical, it still has one legitimate
problem: You can’t ask someone to make
a monthly payment of $10.13183333! To
create more usable numbers, you need to
format them.
Two functions are appropriate for this
purpose. The first,
round()
, rounds a value
to a specified number of decimal places.
The function’s first argument is the number
to be rounded. This can be either a number
or a variable that has a numeric value. The
second argument is optional; it represents
the number of decimal places to which
to round. If omitted, the number will be
rounded to the nearest integer. For example:
round(4.30); // 4
round(4.289, 2); // 4.29
$num = 236.26985;
round($num); // 236
The other function you can use in this
situation is
number_format()
. It works like
round()
in that it takes a number (or a vari-
able with a numeric value) and an optional
decimal specifier. This function has the
added benefit of formatting the number
with commas, the way it would commonly
be written:
number_format(428.4959, 2); // 428.50
number_format(428, 2); // 428.00
number_format(1234567); // 1,234,567
Let’s rewrite the PHP script to format the
numbers appropriately.

ptg18144795
84 Chapter 4
To format numbers:
1. Open
handle_calc.php
in your text
editor or IDE, if it is not already open
(Script 4.2).
2. After all the calculations but before the
print
statement, add the following
(Script 4.3):
$total = number_format($total, 2);
$monthly = number_format
➝
($monthly, 2);
To format these two numbers, apply
this function after every calculation has
been made but before they’re sent to
the browser. The second argument (the
2) indicates that the resulting number
should have exactly two decimal places;
this setting rounds the numbers and
adds zeros at the end, as necessary.
Script 4.3 The
number_format()
function is
applied to the values of two number variables, so
they are more appropriate to the example.
1 <!doctype html>
2 <html lang="en">
3 <head>
4 <meta charset="utf-8">
5 <title>Product Cost Calculator</
title>
6 <style type="text/css">
7 .number { font-weight: bold;}
8 </style>
9 </head>
10 <body>
11 <?php // Script 4.3 - handle_calc.php #2
12 /* This script takes values from
calculator.html and performs
13 total cost and monthly payment
calculations. */
14
15 // Address error handling, if you want.
16
17 // Get the values from the $_POST array:
18 $price = $_POST['price'];
19 $quantity = $_POST['quantity'];
20 $discount = $_POST['discount'];
21 $tax = $_POST['tax'];
22 $shipping = $_POST['shipping'];
23 $payments = $_POST['payments'];
24
25 // Calculate the total:
26 $total = $price * $quantity;
27 $total = $total + $shipping;
28 $total = $total - $discount;
29
30 // Determine the tax rate:
31 $taxrate = $tax/100;
32 $taxrate = $taxrate + 1;
33
34 // Factor in the tax rate:
35 $total = $total * $taxrate;
36
37 // Calculate the monthly payments:
38 $monthly = $total / $payments;
39
40 // Apply the proper formatting:
41 $total = number_format($total, 2);
42 $monthly = number_format($monthly, 2);
43
code continues on next page
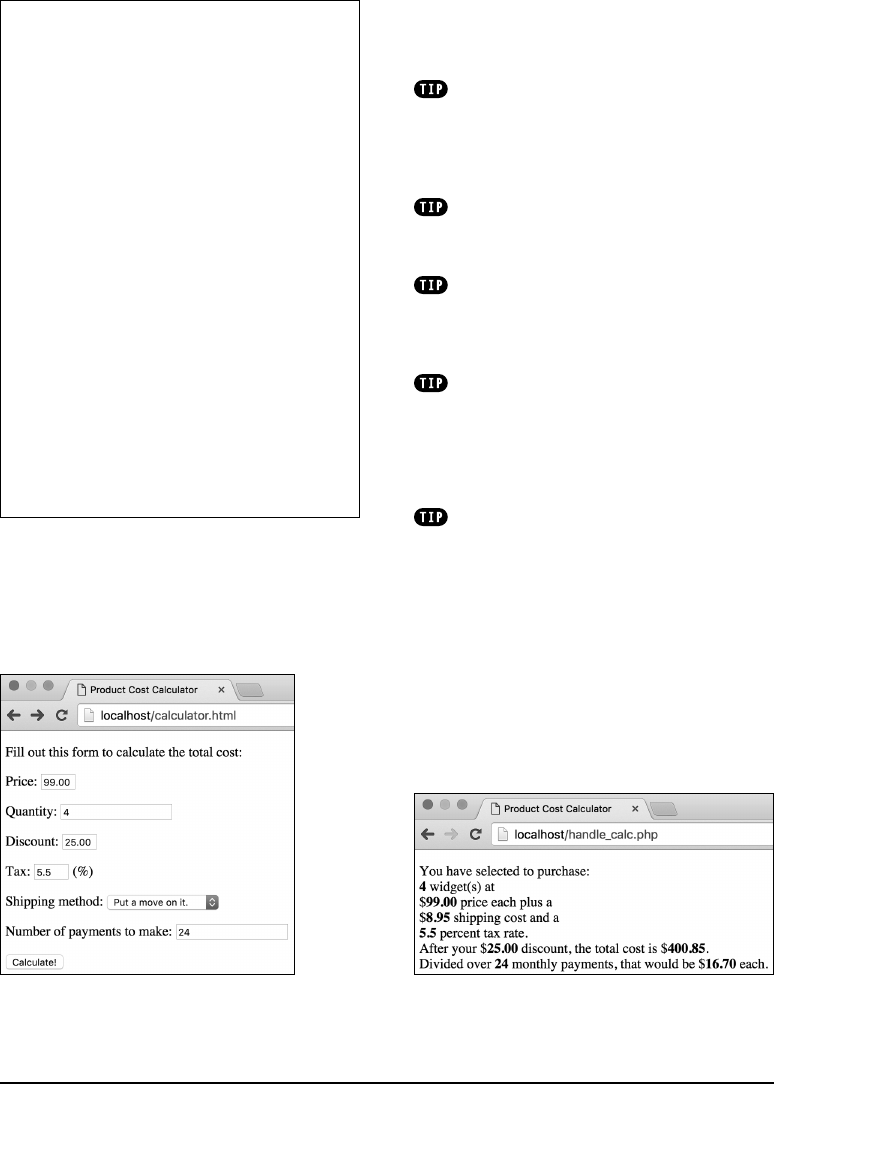
ptg18144795
Using Numbers 85
3. Save the file, place it in the same direc-
tory as
calculator.html
, and test it in
your browser A and B.
Another, much more complex way to
format numbers is to use the
printf()
and
sprintf()
functions. Because of their tricky
syntax, they’re not discussed in this book; see
the PHP manual for more information.
Non-Windows versions of PHP also have
a
money_format()
function, which can be
used in lieu of
number_format()
.
The
round()
function rounds exact
halves (.5, .05, .005, and so on) up, although
this behavior can be configured. See the PHP
manual for details.
In PHP, function calls can have spaces
between the function name and its parentheses
or not. Both of these are fine:
round ($num);
round($num);
The
number_format()
function takes two
other optional arguments that let you specify
what characters to use to indicate a decimal
point and break up thousands. This is useful,
for example, for cultures that write 1,000.89 as
1.000,89. See the PHP manual for the correct
syntax, if you want to use this option.
Script 4.3 continued
44 // Print out the results:
45 print "<p>You have selected to
purchase:<br>
46 <span class=\"number\">$quantity</span>
widget(s) at <br>
47 $<span class=\"number\">$price</span>
price each plus a <br>
48 $<span class=\"number\">$shipping</span>
shipping cost and a <br>
49 <span class=\"number\">$tax</span>
percent tax rate.<br>
50 After your $<span
class=\"number\">$discount</span>
discount, the total cost is
51 $<span class=\"number\">$total</
span>.<br>
52 Divided over <span
class=\"number\">$payments</span>
monthly payments, that would be $<span
class=\"number\">$monthly</span> each.</
p>";
53
54 ?>
55 </body>
56 </html>
A Another form entry. B The updated version of the script returns more
appropriate number values thanks to the
number_
format()
function.

ptg18144795
86 Chapter 4
Understanding
Precedence
Inevitably, after a discussion of the various
sorts of mathematical operators comes the
discussion of precedence.
Precedence
refers to the order in which a series of cal-
culations are executed. For example, what
is the value of the following variable?
$number = 10 – 4 / 2;
Is
$number
worth 3 (10 minus 4 equals 6,
divided by 2 equals 3) or 8 (4 divided by
2 equals 2, subtracted from 10 equals 8)?
The answer here is 8, because division
takes precedence over subtraction.
Appendix B, “Resources and Next Steps,”
shows the complete list of operator
precedence for PHP (including operators
that haven’t been covered yet). However,
instead of attempting to memorize a large
table of peculiar characters, you forgo
any deliberation by using parentheses.
Parentheses always take precedence over
any other operator. Thus:
$number = (10 – 4) / 2; // 3
$number = 10 – (4 / 2); // 8
Using parentheses in your calculations
ensures that you never see peculiar results
due to precedence issues. Parentheses
can also be used to rewrite complex calcu-
lations in fewer lines of code. Let’s rewrite
the
handle_calc.php
script, combining
multiple lines into one by using parentheses,
while maintaining accuracy.
To manage precedence:
1. Open
handle_calc.php
in your text
editor or IDE, if it is not already open
(Script 4.3).
Script 4.4 By using parentheses, calculations
made over multiple lines (compare with Script 4.3)
can be condensed without affecting the script’s
mathematical accuracy.
1 <!doctype html>
2 <html lang="en">
3 <head>
4 <meta charset="utf-8">
5 <title>Product Cost Calculator</
title>
6 <style type="text/css">
7 .number { font-weight: bold;}
8 </style>
9 </head>
10 <body>
11 <?php // Script 4.4 - handle_calc.php #3
12 /* This script takes values from
calculator.html and performs
13 total cost and monthly payment
calculations. */
14
15 // Address error handling, if you want.
16
17 // Get the values from the $_POST array:
18 $price = $_POST['price'];
19 $quantity = $_POST['quantity'];
20 $discount = $_POST['discount'];
21 $tax = $_POST['tax'];
22 $shipping = $_POST['shipping'];
23 $payments = $_POST['payments'];
24
25 // Calculate the total:
26 $total = (($price * $quantity) +
$shipping) - $discount;
27
28 // Determine the tax rate:
29 $taxrate = ($tax / 100) + 1;
30
31 // Factor in the tax rate:
32 $total = $total * $taxrate;
33
34 // Calculate the monthly payments:
35 $monthly = $total / $payments;
36
37 // Apply the proper formatting:
38 $total = number_format ($total, 2);
39 $monthly = number_format ($monthly, 2);
40
code continues on next page
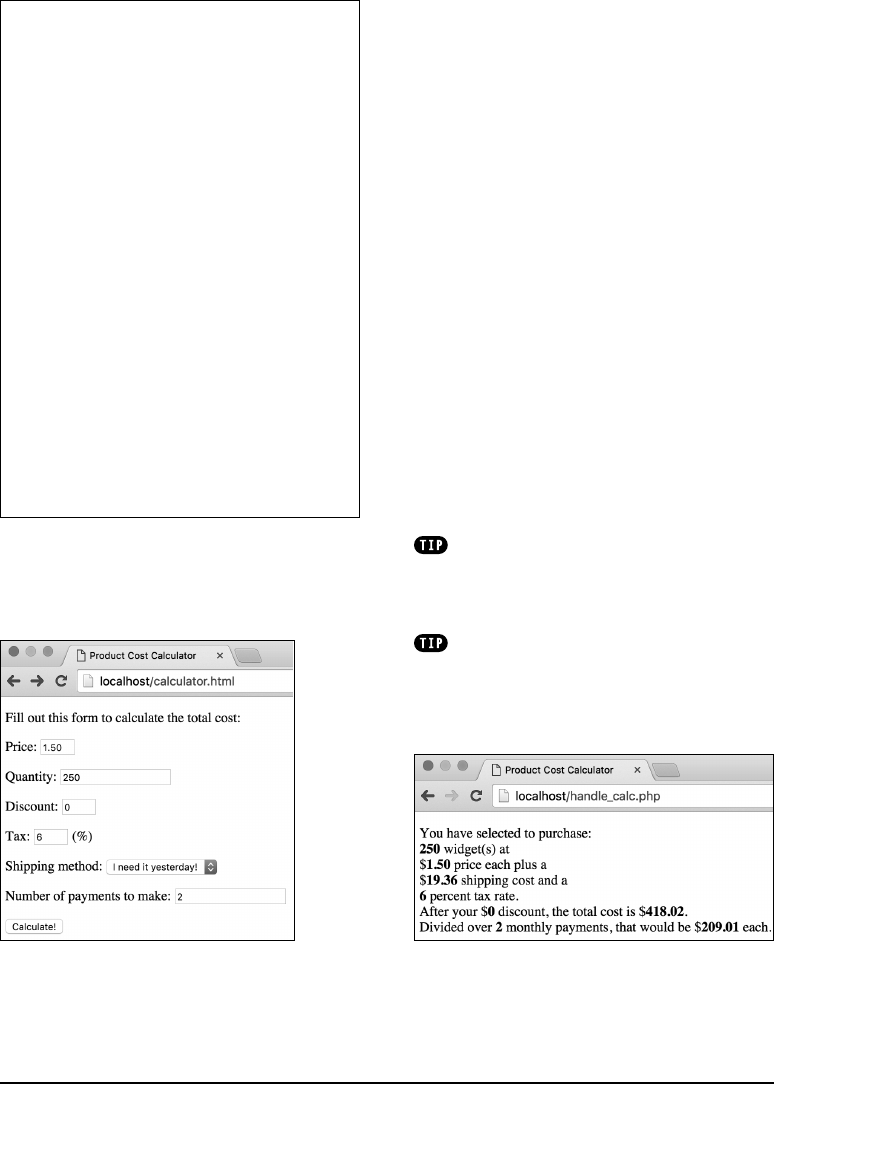
ptg18144795
Using Numbers 87
2. Replace the three lines that initially cal-
culate the order total with the following
(Script 4.4):
$total = (($price * $quantity) +
➝
$shipping) - $discount;
In this script, it’s fine to make all the
calculations in one step, as long as you
use parentheses to ensure that the
math works properly. The other option
is to memorize PHP’s rules of prece-
dence for multiple operators, but using
parentheses is a lot easier.
3. Change the two lines that calculate and
add in the tax to this:
$taxrate = ($tax / 100) + 1;
Again, the tax calculations can be made
in one line instead of two separate ones.
4. Save the script, place it in the same
directory as
calculator.html
, and test
it in your browser A B.
Be sure that you match your parentheses
consistently as you create your formulas (every
opening parenthesis requires a closing paren-
thesis). Failure to do so will cause parse errors.
Granted, using the methods applied here,
you could combine all the total calculations
into just one line of code (instead of three)—
but there is such a thing as oversimplifying.
A Testing the form one more time. B Even though the calculations have been
condensed, the math works out the same. If you
see different results or get an error message,
double-check your parentheses for balance (an
equal number of opening and closing parentheses).
Script 4.4 continued
41 // Print out the results:
42 print "<p>You have selected to
purchase:<br>
43 <span class=\"number\">$quantity</span>
widget(s) at <br>
44 $<span class=\"number\">$price</span>
price each plus a <br>
45 $<span class=\"number\">$shipping</span>
shipping cost and a <br>
46 <span class=\"number\">$tax</span>
percent tax rate.<br>
47 After your $<span
class=\"number\">$discount</span>
discount, the total cost is
48 $<span class=\"number\">$total</
span>.<br>
49 Divided over <span
class=\"number\">$payments</span>
monthly payments, that would be $<span
class=\"number\">$monthly</span> each.</
p>";
50
51 ?>
52 </body>
53 </html>
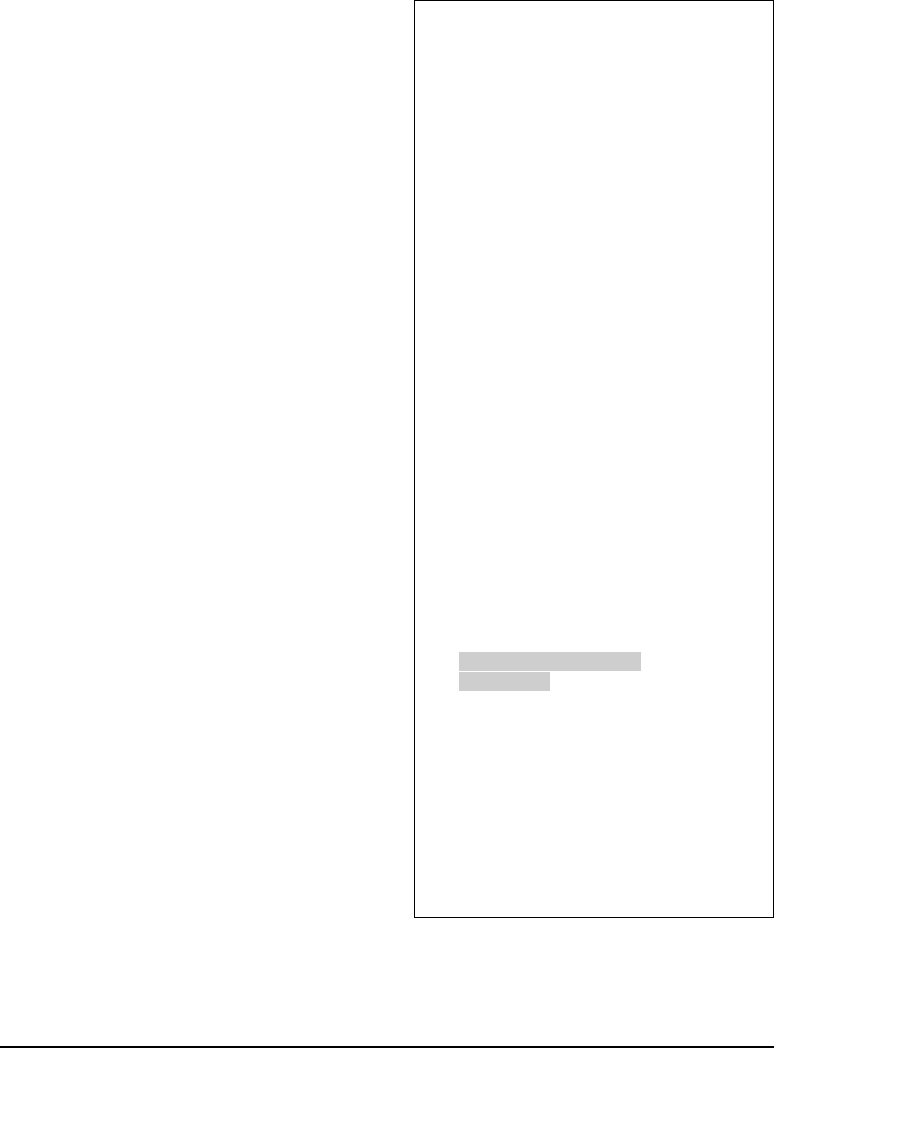
ptg18144795
88 Chapter 4
Incrementing and
Decrementing
a Number
PHP, like most programming languages,
includes shortcuts that let you avoid ugly
constructs such as
$tax = $tax + 1;
When you need to increase the value of
a variable by 1 (known as an
incremental
adjustment) or decrease the value of a
variable by 1 (a
decremental
adjustment),
you can use
++
and
--
, respectively:
$var = 20; // 20
$var++; // 21
$var++; // 22
$var--; // 21
Solely for the sake of testing this concept,
you’ll rewrite the
handle_calc.php
script
one last time.
To increment the value of a variable:
1. Open
handle_calc.php
in your text
editor or IDE, if it is not already open
(Script 4.4).
2. Change the tax rate calculation from
Script 4.3 to read as follows (Script 4.5):
$taxrate = $tax / 100;
$taxrate++;
The first line calculates the tax rate
as the
$tax
value divided by 100. The
second line increments this value by 1
so that it can be multiplied by the total
to determine the total with tax.
3. Save the script, place it in the same
directory as
calculator.html
, and test
it in your browser A B.
Script 4.5 Incrementing or decrementing a
number is a common operation using
++
or
––
,
respectively.
1 <!doctype html>
2 <html lang="en">
3 <head>
4 <meta charset="utf-8">
5 <title>Product Cost Calculator</
title>
6 <style type="text/css">
7 .number { font-weight: bold;}
8 </style>
9 </head>
10 <body>
11 <?php // Script 4.3 - handle_calc.php #4
12 /* This script takes values from
calculator.html and performs
13 total cost and monthly payment
calculations. */
14
15 // Address error handling, if you want.
16
17 // Get the values from the $_POST array:
18 $price = $_POST['price'];
19 $quantity = $_POST['quantity'];
20 $discount = $_POST['discount'];
21 $tax = $_POST['tax'];
22 $shipping = $_POST['shipping'];
23 $payments = $_POST['payments'];
24
25 // Calculate the total:
26 $total = (($price * $quantity) +
$shipping) - $discount;
27
28 // Determine the tax rate:
29 $taxrate = $tax / 100;
30 $taxrate++;
31
32 // Factor in the tax rate:
33 $total = $total * $taxrate;
34
35 // Calculate the monthly payments:
36 $monthly = $total / $payments;
37
38 // Apply the proper formatting:
39 $total = number_format ($total, 2);
40 $monthly = number_format ($monthly, 2);
41
code continues on next page
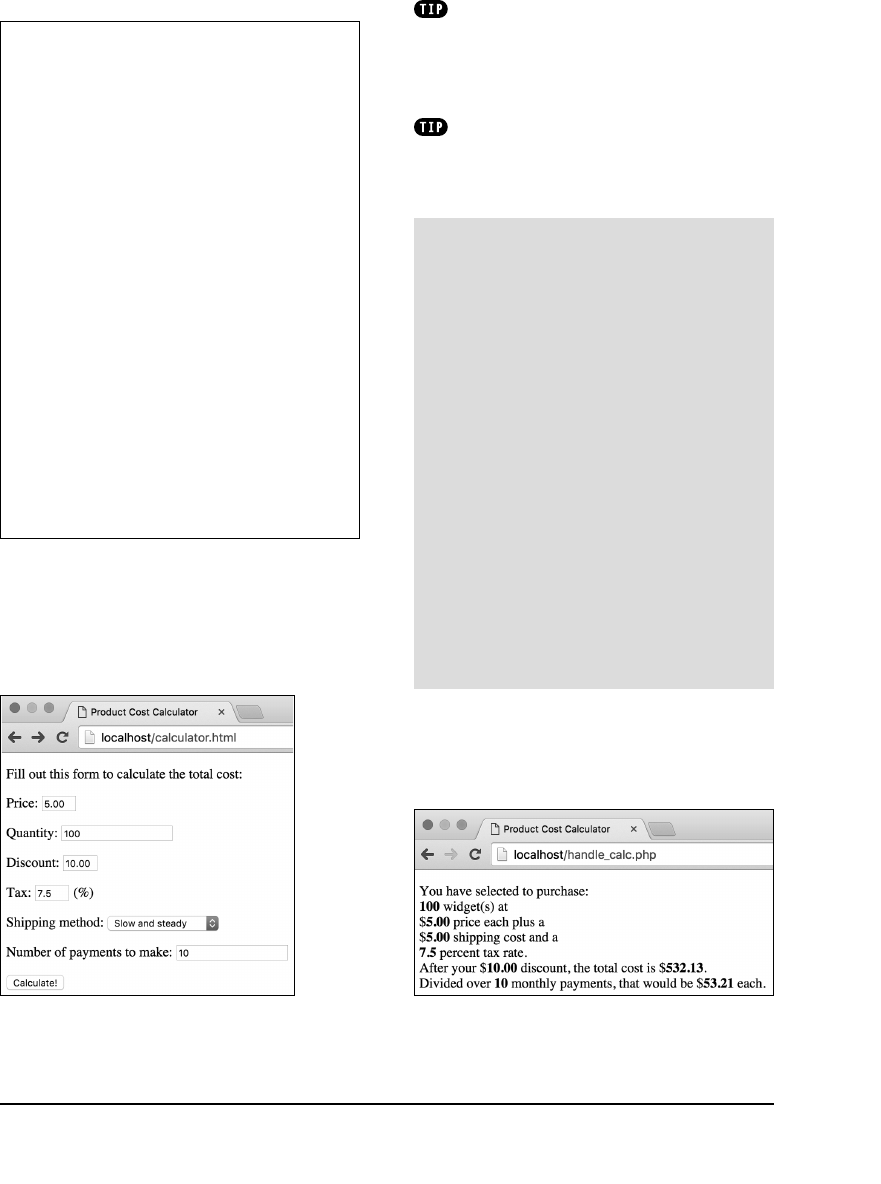
ptg18144795
Using Numbers 89
Although functionally it doesn’t matter
whether you code
$taxrate
=
$taxrate
+
1;
or the abbreviated
$taxrate++
, the latter
method (using the increment operator) is more
professional and common.
In Chapter 6, you’ll see how the increment
operator is commonly used in conjunction
with loops.
A The last execution of the form. B It won’t affect your calculations if you use the
long or short version of incrementing a variable
(compare Scripts 4.4 and 4.5).
Script 4.5 continued
42 // Print out the results:
43 print "<p>You have selected to
purchase:<br>
44 <span class=\"number\">$quantity</span>
widget(s) at <br>
45 $<span class=\"number\">$price</span>
price each plus a <br>
46 $<span class=\"number\">$shipping</span>
shipping cost and a <br>
47 <span class=\"number\">$tax</span>
percent tax rate.<br>
48 After your $<span
class=\"number\">$discount</span>
discount, the total cost is
49 $<span class=\"number\">$total</
span>.<br>
50 Divided over <span
class=\"number\">$payments</span>
monthly payments, that would be $<span
class=\"number\">$monthly</span> each.</
p>";
51
52 ?>
53 </body>
54 </html>
Arithmetic Assignment
Operators
PHP also supports a combination of
mathematical and assignment operators.
These are
+=
,
-=
,
*=
, and
/=
. Each will
assign a value to a variable by perform-
ing a calculation on it. For example, these
next two lines both add 5 to a variable:
$num = $num + 5;
$num += 5;
This means the
handle_calc.php
script
could determine the tax rate using this:
$tax = $_POST['tax']; // Say, 5
$tax /= 100; // Now $tax is .05
$tax += 1; // 1.05
You’ll frequently see these shorthand
ways of performing arithmetic.
ptg18144795
90 Chapter 4
Creating Random
Numbers
The last function you’ll learn about in this
chapter is
mt_rand()
, a random-number
generator. All it does is output a random
number:
$n = mt_rand(); // 31
$n = mt_rand(); // 87
The
mt_rand()
function can also take
minimum and maximum parameters, if you
prefer to limit the generated number to a
specific range:
$n = mt_rand(0, 10);
These values are
inclusive
, so in this case
0 and 10 are feasible returned values.
As an example of generating random
numbers, let’s create a simple “Lucky
Numbers” script.
To generate random numbers:
1. Begin a new document in your text
editor or IDE, to be named
random.php
(Script 4.6):
<!doctype html>
<html lang="en">
<head>
<meta charset="utf-8">
<title>Lucky Numbers</title>
</head>
<body>
2. Include the PHP tag and address error
management, if you need to:
<?php // Script 4.6 - random.php
Script 4.6 The
rand()
function generates a
random number.
1 <!doctype html>
2 <html lang="en">
3 <head>
4 <meta charset="utf-8">
5 <title>Lucky Numbers</title>
6 </head>
7 <body>
8 <?php // Script 4.6 - random.php
9 /* This script generates 3 random
numbers. */
10
11 // Address error handling, if you want.
12
13 // Create three random numbers:
14 $n1 = mt_and(1, 99);
15 $n2 = mt_rand(1, 99);
16 $n3 = mt_rand(1, 99);
17
18 // Print out the numbers:
19 print "<p>Your lucky numbers are:<br>
20 $n1<br>
21 $n2<br>
22 $n3</p>";
23
24 ?>
25 </body>
26 </html>
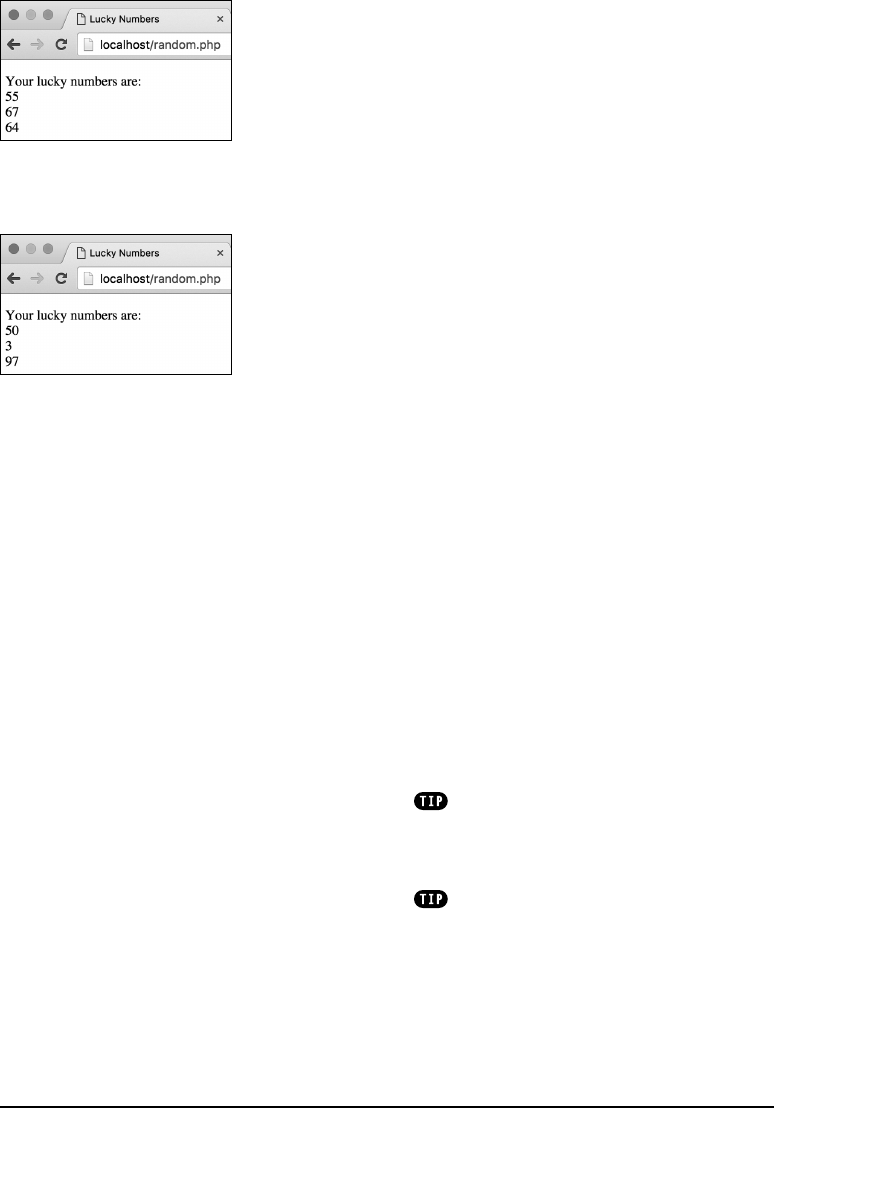
ptg18144795
Using Numbers 91
3. Create three random numbers:
$n1 = mt_rand(1, 99);
$n2 = mt_rand(1, 99);
$n3 = mt_rand(1, 99);
This script prints out a person’s lucky
numbers, like those found on the back
of a fortune cookie. These numbers are
generated by calling the
mt_rand()
function three separate times and assign-
ing each result to a different variable.
4. Print out the numbers:
print "<p>Your lucky numbers
are:<br>
$n1<br>
$n2<br>
$n3</p>";
The
print
statement is fairly simple.
The numbers are printed, each on its
own line, by using the HTML break tag.
5. Close the PHP code and the HTML
page:
?>
</body>
</html>
6. Save the file as
random.php
, place it
in the proper directory for your PHP-
enabled server, and test it in your
browser A. Refresh the page to see
different numbers B.
The
getrandmax()
function returns the
largest possible random number that can be
created using
mt_rand()
. This value differs
by operating system.
PHP has other functions for generating
random numbers, such as
random_int()
.
Unlike
mt_rand()
,
random_init()
creates
cryptographically secure random numbers.
A The three random numbers
created by invoking the
mt_rand()
function.
B Running the script again
produces different results.

ptg18144795
92 Chapter 4
Review and Pursue
If you have any problems with the
review questions or the pursue prompts,
turn to the book’s supporting forum
(www.LarryUllman.com/forums/).
Review
n
What are the four primary arithmetic
operators?
n
Why will the following code not work:
print "The total is $$total";
What must be done instead?
n
Why must an HTML page that contains
a form that’s being submitted to a PHP
script be loaded through a URL?
n
What functions can be used to
format numerical values? How do you
format numbers to a specific number
of decimals?
n
What is the importance of operator
precedence?
n
What are the incremental and decre-
mental operators?
n
What are the arithmetic assignment
operators?
Pursue
n
Look up the PHP manual page for one
of the new functions mentioned in this
chapter. Use the links on that page to
investigate a couple of other number-
related functions that PHP has.
n
Create another HTML form for taking
numeric values. Then create the PHP
script that receives the form data,
performs some calculations, formats
the values, and prints the results.
Other Mathematical Functions
PHP has a number of built-in functions
for manipulating mathematical data.
This chapter introduced
round()
,
number_format()
, and
mt_rand()
.
PHP has broken
round()
into two other
functions. The first,
ceil()
, rounds
every number to the next highest integer.
The second,
floor()
, rounds every
number to the next lowest integer.
Another function the calculator page
could make good use of is
abs()
, which
returns the absolute value of a number.
In case you don’t remember your abso-
lute values, the function works like this:
$number = abs(-23); // 23
$number = abs(23); // 23
In layman’s terms, the absolute value of
a number is always a positive number.
Beyond these functions, PHP supports
all the trigonometry, exponent, base
conversion, and logarithm functions
you’ll ever need. See the PHP manual for
more information.

ptg18144795
As introduced in Chapter 2, “Variables,”
a second category of variables used by
PHP is strings—a collection of characters
enclosed within either single or double
quotation marks. The value of a string
variable may be a single letter, a word, a
sentence, a paragraph, HTML code, or even
a jumble of nonsensical letters, numbers,
and symbols (which might represent a
password). Strings may be the most com-
mon variable type used in PHP.
This chapter covers PHP’s most basic
built-in functions and operators for manipu-
lating string data, regardless of whether
the string originates from a form or is first
declared within the script. Some common
techniques will be introduced: joining strings
together, trimming strings, and encoding
strings. Other uses for strings are illustrated
in subsequent chapters.
5
Using
Strings
In This Chapter
Creating the HTML Form 94
Concatenating Strings 97
Handling Newlines 101
HTML and PHP 104
Encoding and Decoding Strings 108
Finding Substrings 113
Replacing Parts of a String 117
Review and Pursue 120
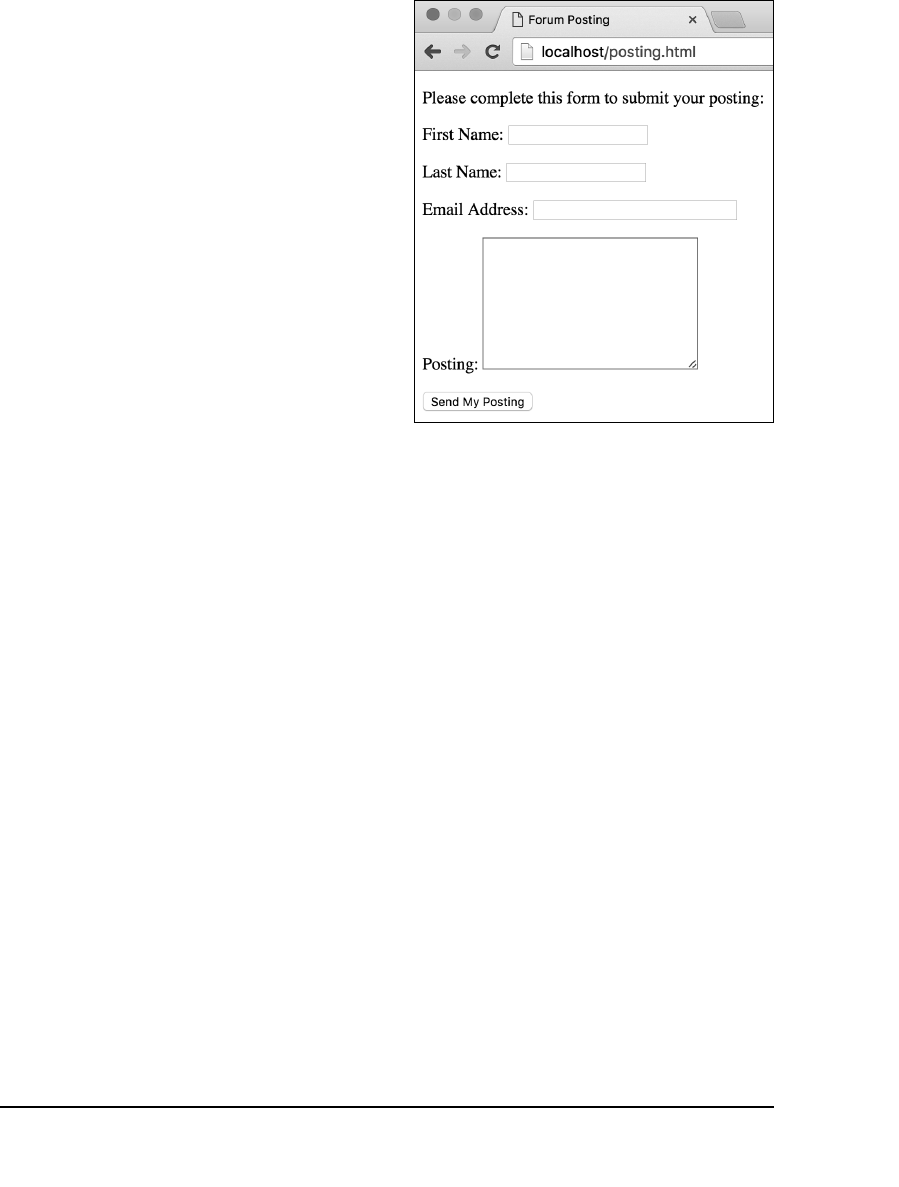
ptg18144795
94 Chapter 5
Creating the
HTML Form
As in Chapter 3, “HTML Forms and PHP,”
let’s begin by creating an HTML form that
sends different values—in the form of string
variables—to a PHP script. The theoretical
example being used is an online bulletin
board or forum where users can post a
message, their email address, and their
first and last names A.
To create the HTML form:
1. Begin a new HTML document in
your text editor or IDE, to be named
posting.html
(Script 5.1):
<!doctype html>
<html lang="en">
<head>
<meta charset="utf-8">
<title>Forum Posting</title>
</head>
<body>
<!-- Script 5.1 - posting.html -->
<div><p>Please complete this form
➝
to submit your posting:</p>
2. Create the initial form tag:
<form action="handle_post.php"
➝
method="post">
This form will send its data to the
handle_post.php
script and will use
the POST method.
3. Add inputs for the first name, last name,
and email address:
<p>First Name: <input type="text"
➝
name="first_name" size="20"></p>
<p>Last Name: <input type="text"
➝
name="last_name" size="20"></p>
<p>Email Address: <input type=
➝
"email" name="email"
size="30"></p>
A This HTML form is the basis for most
of the examples in this chapter.

ptg18144795
Using Strings 95
The form uses two basic text input
types and one email type. Remember
that the various inputs’ name values
should adhere to the rules of PHP vari-
able names (no spaces; must not begin
with a number; must consist only of
letters, numbers, and the underscore).
4. Add an input for the posting:
<p>Posting: <textarea name=
➝
"posting" rows="9" cols="30">
➝
</textarea></p>
The posting field is a
textarea
, which
is a larger type of text input box.
5. Create a submit button, and close
the form:
<input type="submit"
➝
name="submit"
➝
value="Send My Posting">
</form>
Every form must have a submit button
(or a submit image).
6. Complete the HTML page:
</div>
</body>
</html>
continues on next page
Script 5.1 This form sends string data to a
PHP script.
1 <!doctype html>
2 <html lang="en">
3 <head>
4 <meta charset="utf-8">
5 <title>Forum Posting</title>
6 </head>
7 <body>
8 <!-- Script 5.1 - posting.html -->
9 <div><p>Please complete this form to
submit your posting:</p>
10
11 <form action="handle_post.php"
method="post">
12
13 <p>First Name: <input type="text"
name="first_name" size="20"></p>
14
15 <p>Last Name: <input type="text"
name="last_name" size="20"></p>
16
17 <p>Email Address: <input type="email"
name="email" size="30"></p>
18
19 <p>Posting: <textarea name="posting"
rows="9" cols="30"></textarea></p>
20
21 <input type="submit" name="submit"
value="Send My Posting">
22
23 </form>
24 </div>
25 </body>
26 </html>
ptg18144795
96 Chapter 5
7. Save the file as
posting.html
, place
it in the appropriate directory on your
PHP-enabled server, and view it in your
browser A.
This is an HTML page, so it doesn’t
have to be on a PHP-enabled server
in order for you to view it. But because
it will eventually send data to a PHP
script, it’s best to place the file on
your server.
Technically speaking, all form data, aside
from uploaded files, is sent to the handling
script as strings. This includes numeric data
entered into text boxes, options selected
from drop-down menus, checkbox or radio
button values, and so forth. Even the form in
Chapter 4, “Using Numbers,” sent strings with
numeric values to the handling script.
Many forum systems written in PHP
are freely available for your use. This book
doesn’t discuss how to fully develop one, but
a multilingual forum is developed in my PHP
and MySQL for Dynamic Web Sites (Fourth
Edition): Visual QuickPro Guide (Peachpit
Press, 2012).
This book’s website has a forum where
readers can post questions and other readers
(and the author) answer questions. You can
find it at www.LarryUllman.com/forums/.

ptg18144795
Using Strings 97
Concatenating Strings
Concatenation
is an unwieldy term but a
useful concept. It refers to the appending
of one item onto another. Specifically, in
programming, you concatenate
strings
.
The period (
.
) is the operator for perform-
ing this action, and it’s used like so:
$s1 = 'Hello, ';
$s2 = 'world!';
$greeting = $s1 . $s2;
The result of this concatenation is that the
$greeting
variable has a value of
Hello,
world!
Because of the way PHP deals with
variables, the same effect could be
accomplished using
$greeting = "$s1$s2";
This code works because PHP replaces
variables within double quotation marks
with their value. However, the formal method
of using the period to concatenate strings is
more commonly used and is recommended
(it will be more obvious what’s occurring in
your code).
Another way of performing concatenation
involves the
concatenation assignment
operator
:
$greeting = 'Hello, ';
$greeting .= 'world!';
This second line roughly means “assign
to
$greeting
its current value plus the
concatenation of
world!
” The end result is
$greeting
having the value
Hello, world!
once again.
The
posting.html
script sends several
string variables to the
handle_post.php
page. Of those variables, the first and last
names could logically be concatenated.
You’ll write the PHP script with this in mind.

ptg18144795
98 Chapter 5
To use concatenation:
1. Begin a new document in your
text editor or IDE, to be named
handle_post.php
(Script 5.2):
<!doctype html>
<html lang="en">
<head>
<meta charset="utf-8">
<title>Forum Posting</title>
</head>
<body>
2. Create the initial PHP tag, and address
error management, if necessary:
<?php // Script 5.2 -
➝
handle_post.php
If you don’t have
display_errors
enabled, or if
error_reporting
is set
to the wrong level, see Chapter 3 for
the lines to include here to alter those
settings.
3. Assign the form data to local variables:
$first_name =
➝
$_POST['first_name'];
$last_name =
➝
$_POST['last_name'];
$posting = $_POST['posting'];
The form uses the POST method, so
all the form data will be available in
$_POST
.
This example doesn’t have a line for the
email address because you won’t be
using it yet, but you can replicate this
code to reference that value as well.
Script 5.2 This PHP script demonstrates
concatenation, one of the most common
manipulations of a string variable. Think of it as
addition for strings.
1 <!doctype html>
2 <html lang="en">
3 <head>
4 <meta charset="utf-8">
5 <title>Forum Posting</title>
6 </head>
7 <body>
8 <?php // Script 5.2 - handle_post.php
9 /* This script receives five values from
posting.html:
10 first_name, last_name, email, posting,
submit */
11
12 // Address error management, if you
want.
13
14 // Get the values from the $_POST array:
15 $first_name = $_POST['first_name'];
16 $last_name = $_POST['last_name'];
17 $posting = $_POST['posting'];
18
19 // Create a full name variable:
20 $name = $first_name . ' ' .
$last_name;
21
22 // Print a message:
23 print "<div>Thank you, $name, for your
posting:
24 <p>$posting</p></div>";
25
26 ?>
27 </body>
28 </html>
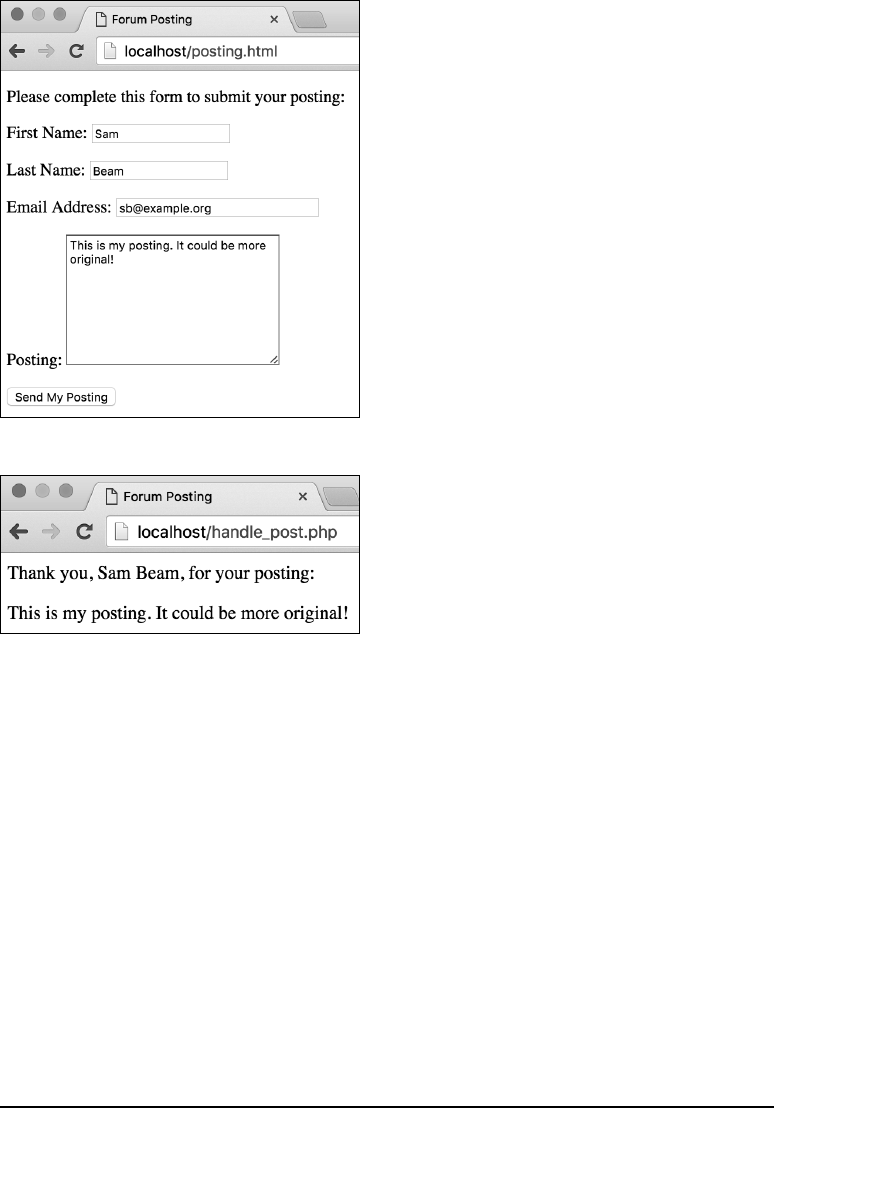
ptg18144795
Using Strings 99
4. Create a new
$name
variable using
concatenation:
$name = $first_name . ' ' .
$last_name;
This act of concatenation takes two
variables plus a space and joins them
all together to create a new variable,
named
$name
. Assuming that you
entered
Elliott
and
Smith
as the names,
$name
would be equal to
Elliott Smith
.
5. Print out the message to the user:
print "<div>Thank you, $name,
➝
for your posting:
<p>$posting</p></div>";
This message reports back to the user
what was entered in the form.
6. Close the PHP section and complete
the HTML page:
?>
</body>
</html>
7. Save your script as
handle_post.php
,
place it in the same directory as
posting.html
(on your PHP-enabled
server), and test both the form and the
script in your browser A B.
As a reminder, you must load the form
through a URL (
http
:
//something
) so that,
when the form is submitted, the handling
PHP script is also run through a URL.
A The HTML form in use…
B …and the resulting PHP page.
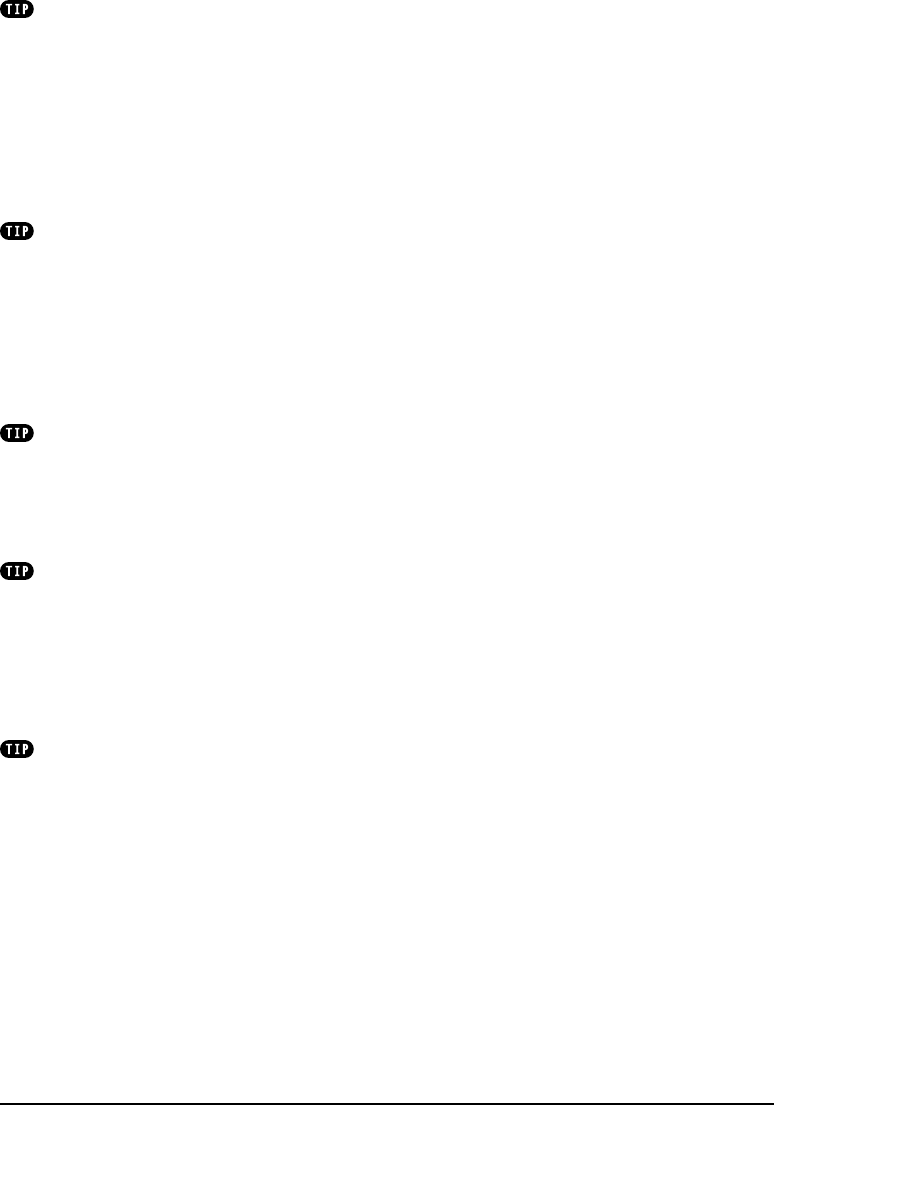
ptg18144795
100 Chapter 5
You can link as many strings as you
want using concatenation. You can even join
numbers to strings:
$new_string = $s1 . $s2 . $number;
This works because PHP is weakly typed,
meaning that its variables aren’t locked in to
one particular format. Here, the
$number
vari-
able will be turned into a string and appended
to the value of the
$new_string
variable.
Concatenation can be used in many
ways, even when feeding arguments to a
function. An uncommon but functional
example would be
$text = nl2br($heading . $body);
The
nl2br()
function, first mentioned in
Chapter 1, “Getting Started with PHP,” will be
discussed in detail next.
If you used quotation marks of any kind
in your form and saw extraneous slashes in
the printed result, see the sidebar “Magic
Quotes” in Chapter 3 for an explanation of
the cause and for the fix. This is uncommon
in current versions of PHP.
As a reminder, it’s important to under-
stand the difference between single and
double quotation marks in PHP. Characters
within single quotation marks are treated
literally; characters within double quotation
marks are interpreted (for example, a variable’s
name will be replaced by its value). See
Chapter 3 for a refresher.
Taking the first and last names as
separate inputs makes for a good concatena-
tion example. However, not everyone has just
two names, and it’s best not to make such
assumptions in your own registration forms.
A more inclusive example would have a single
input for the user’s name.
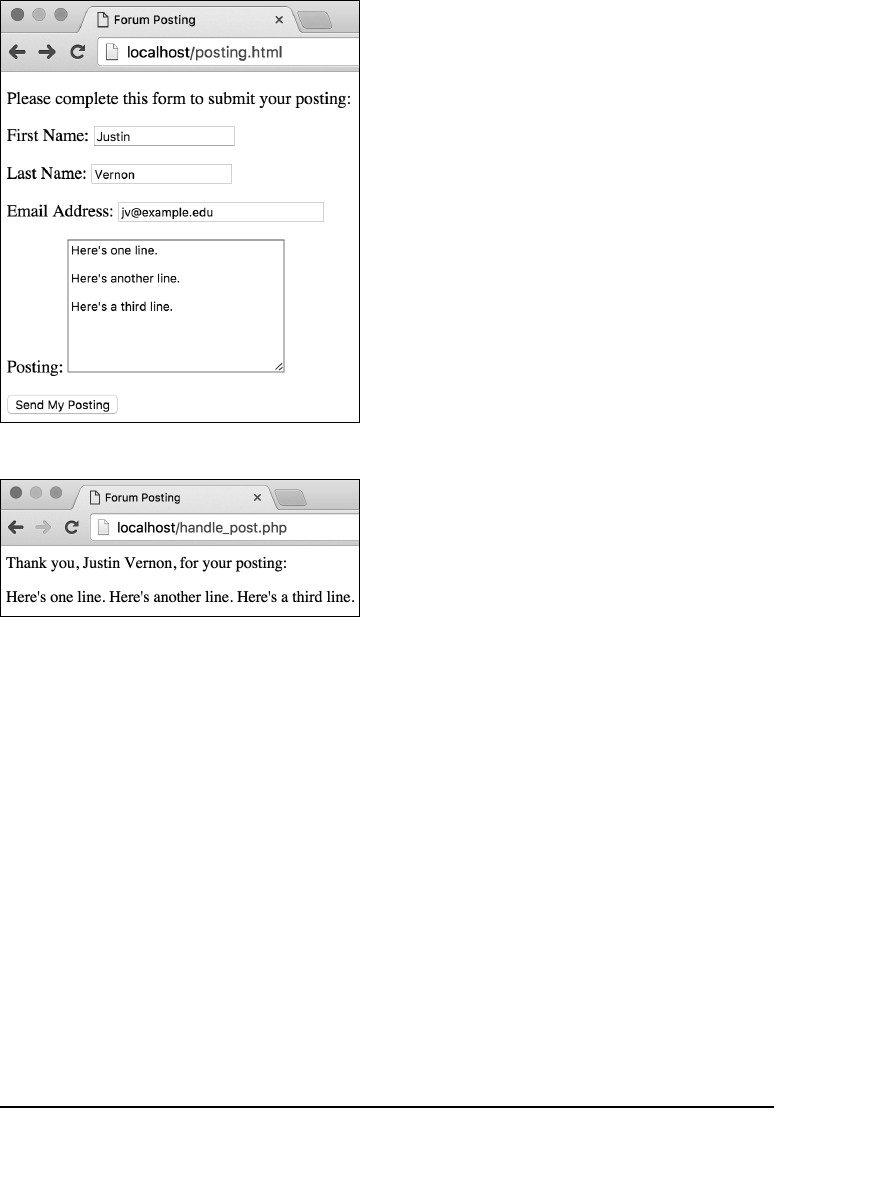
ptg18144795
Using Strings 101
Handling Newlines
A common question beginning PHP devel-
opers have involves handling newlines
in strings. The
textarea
form element
allows a user to enter text over multiple
lines by pressing Return/Enter. Each use
of Return/Enter equates to a newline in
the resulting string. These newlines work
within a
textarea
but have no effect on a
rendered PHP page A B.
To create the equivalent of newlines in a
rendered web page, you use the break tag:
<br>
. Fortunately, PHP has the
nl2br()
function, which automatically converts
newlines into break tags:
$var = nl2br($var);
Let’s apply this function to
handle_post.php
so that the user’s posting retains its
formatting.
To convert newlines to breaks:
1. Open
handle_post.php
(Script 5.2)
in your text editor or IDE, if it is not
already open.
continues on next page
A Newlines in form data like textareas…
B …are not rendered by the browser.
ptg18144795
102 Chapter 5
2. Apply the
nl2br()
function when
assigning a value to the
$posting
variable (Script 5.3):
$posting = nl2br($_POST
➝
['posting'], false);
Now
$posting
will be assigned the
value of
$_POST['posting']
, with any
newlines converted to HTML break tags.
The second argument to the function—
the Boolean
false
—says that you
do
not want
XHTML-compliant break tags
created. In other words, the default
behavior is for this function to replace
newlines with
<br
/>
. In HTML5,
<br>
is more commonly used.
Script 5.3 When you use the
nl2br()
function,
newlines entered into the posting
textarea
are
honored when displayed in the browser.
1 <!doctype html>
2 <html lang="en">
3 <head>
4 <meta charset="utf-8">
5 <title>Forum Posting</title>
6 </head>
7 <body>
8 <?php // Script 5.3 - handle_post.php #2
9 /* This script receives five values from
posting.html:
10 first_name, last_name, email, posting,
submit */
11
12 // Address error management, if you
want.
13
14 // Get the values from the $_POST array:
15 $first_name = $_POST['first_name'];
16 $last_name = $_POST['last_name'];
17 $posting = nl2br($_POST['posting'],
false);
18
19 // Create a full name variable:
20 $name = $first_name . ' ' . $last_name;
21
22 // Print a message:
23 print "<div>Thank you, $name, for your
posting:
24 <p>$posting</p></div>";
25
26 ?>
27 </body>
28 </html>
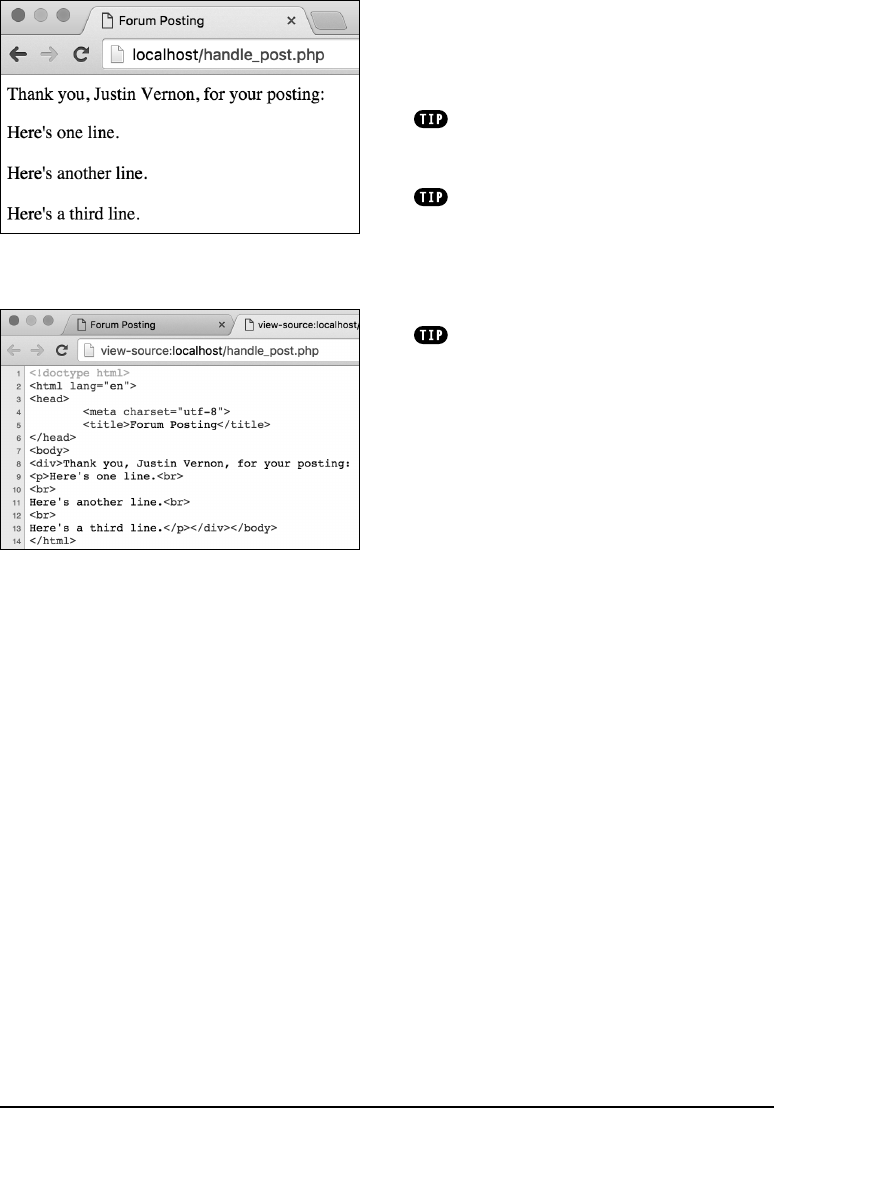
ptg18144795
Using Strings 103
3. Save the file, place it in the same
directory as
posting.html
(on your
PHP-enabled server), and test again
in your browser C.
Newlines can also be inserted into
strings by placing the newline character—
\n
—
between double quotation marks.
Other HTML tags, such as paragraph
tags, also affect spacing in the rendered web
page. You can turn newlines (or any character)
into paragraph tags using a replacing function,
but the code for doing so is far more involved
than just invoking
nl2br()
.
Newlines present in strings sent to the
browser will have an effect, but only in the
HTML source of the page D.
C Now the same submitted data A is properly
displayed over multiple lines in the browser.
D The HTML source, corresponding to B, shows
the effect that newlines have in the browser (i.e.,
they add spacing within the HTML source code).
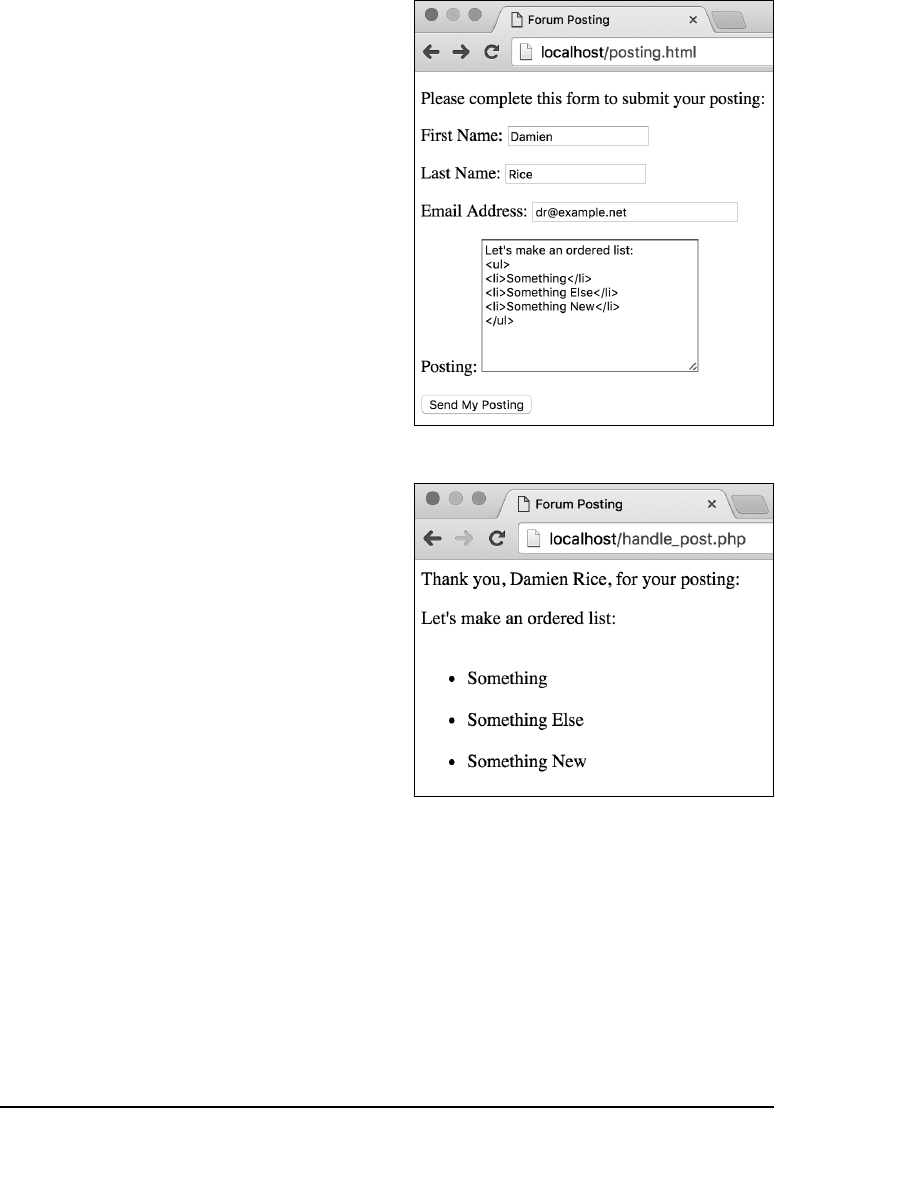
ptg18144795
104 Chapter 5
HTML and PHP
As stated several times over by now, PHP
is a server-side technology that’s fre-
quently used to send data to the browser.
This data can be in the form of plain text,
HTML code, or, more commonly, both.
In this chapter’s primary example, data is
entered in an HTML form and then printed
back to the browser using PHP. A potential
problem is that the user can enter HTML
characters in the form, which can affect
the resulting page’s formatting A B—or,
worse, cause security problems.
You can use a few PHP functions to
manipulate HTML tags within PHP string
variables:
n
htmlspecialchars()
converts certain
HTML tags into their entity versions.
n
htmlentities()
turns all HTML tags
into their entity versions.
n
strip_tags()
removes all HTML and
PHP tags.
The first two functions turn an HTML tag
(for example,
<span>
) into an entity ver-
sion like
<span>
. The entity version
appears in the output but isn’t rendered.
You might use either of these if you wanted
to display code without enacting it. The
third function,
strip_tags()
, removes
HTML and PHP tags entirely.
A If the user enters HTML code in the posting…
B …it’s rendered by the browser when reprinted.
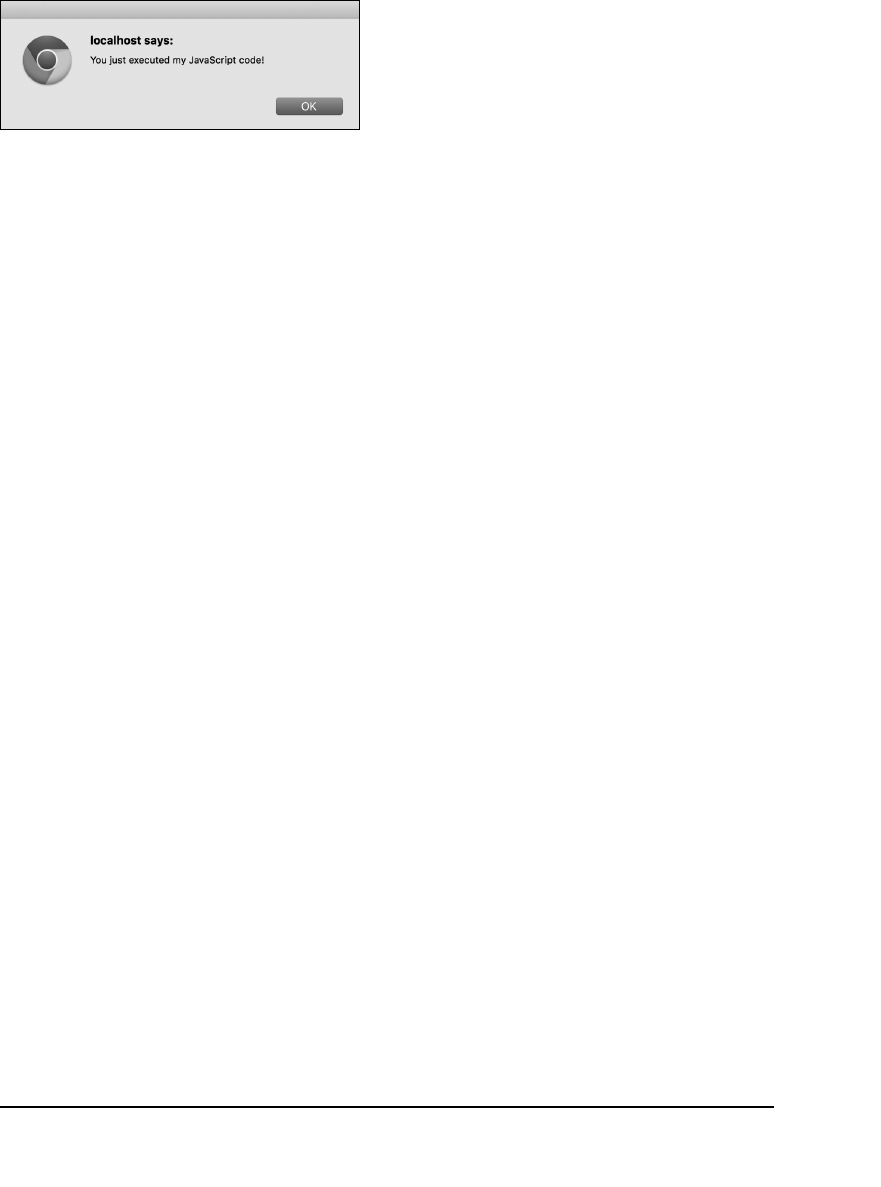
ptg18144795
Using Strings 105
You ought to watch for special tags in
user-provided data for two reasons. First,
as already mentioned, submitted HTML
would likely affect the rendered page
(for example, mess up a table, tweak the
CSS, or just add formatting where there
shouldn’t be any). The second concern
is more important. Because JavaScript is
placed within HTML
script
tags, a malicious
user could submit JavaScript that would
be executed when it’s redisplayed on the
page C. This is how
cross-site scripting
(XSS) attacks are performed.
To see the impact these functions have,
this next rewrite of
handle_post.php
will
use each of them and display the respec-
tive results.
C Displaying HTML submitted by a user in a
browser can have terrible consequences, such as
the execution of JavaScript.
ptg18144795
106 Chapter 5
To address HTML in PHP:
1. Open
handle_post.php
(Script 5.3)
in your text editor or IDE, if it is not
already open.
2. Before the
print
line, add the following
(Script 5.4):
$html_post = htmlentities
➝
($_POST['posting']);
$strip_post = strip_tags
➝
($_POST['posting']);
To clarify the difference between how
these two functions work, apply them
both to the posting text, creating two
new variables in the process. Refer
to
$_POST['posting']
here and not
$posting
because
$posting
already
reflects the application of the
nl2br()
function, which means that break tags
may have been introduced that were
not explicitly entered by the user.
3. Alter the
print
statement to read
as follows:
print "<div>Thank you, $name,
➝
for your posting:
<p>Original: $posting</p>
<p>Entity: $html_post</p>
<p>Stripped: $strip_post</p>
➝
</div>";
To highlight the different results, print
out the three different versions of the
posting text. First is the original posting
as it was entered, after being run through
nl2br()
. Next is the
htmlentities()
version of the posting, which will show
the HTML tags without rendering them.
Finally, the
strip_tags()
version will
be printed; it doesn’t include any HTML
(or PHP) tags.
Script 5.4 This version of the PHP script addresses
HTML tags in two different ways.
1 <!doctype html>
2 <html lang="en">
3 <head>
4 <meta charset="utf-8">
5 <title>Forum Posting</title>
6 </head>
7 <body>
8 <?php // Script 5.4 - handle_post.php #3
9 /* This script receives five values from
posting.html:
10 first_name, last_name, email, posting,
submit */
11
12 // Address error management, if you
want.
13
14 // Get the values from the $_POST array:
15 $first_name = $_POST['first_name'];
16 $last_name = $_POST['last_name'];
17 $posting = nl2br($_POST['posting']);
18
19 // Create a full name variable:
20 $name = $first_name . ' ' . $last_name;
21
22 // Adjust for HTML tags:
23 $html_post =
htmlentities($_POST['posting']);
24 $strip_post =
strip_tags($_POST['posting']);
25
26 // Print a message:
27 print "<div>Thank you, $name, for
your posting:
28 <p>Original: $posting</p>
29 <p>Entity: $html_post</p>
30 <p>Stripped: $strip_post</p></div>";
31
32 ?>
33 </body>
34 </html>

ptg18144795
Using Strings 107
4. Save the file, place it in the same
directory as
posting.html
(on your
PHP-enabled server), and test it again
in your browser D E.
If you view the HTML source code of
the resulting PHP page F, you’ll also
see the effect that applying these func-
tions has.
For security purposes, it’s almost
always a good idea to use
htmlentities()
,
htmlspecialchars()
, or
strip_tags()
to
any user-provided data that’s being printed
to the browser. The only reason I don’t do so
in this book is to minimize clutter.
Today’s browsers can identify and block
execution of potentially malicious JavaScript,
although you should not rely on that behavior.
The
html_entity_decode()
function
does just the opposite of
htmlentities()
,
turning HTML entities into their respective
HTML code.
Another useful function for outputting
strings in the browser is
wordwrap()
. This
function wraps a string to a certain number
of characters.
To turn newlines into breaks while
still removing any HTML or PHP tags, apply
nl2br()
after
strip_tags()
:
$posting = nl2br(strip_tags
➝
($_POST['posting']));
In that line, the
strip_tags()
function will
be called first, and its result will be sent to
the
nl2br()
function.
D The HTML characters entered as part of a
posting will now be addressed by PHP.
E The resulting PHP page shows the original post
as it would look if printed without modification,
the effect of
htmlentities()
, and the effect of
strip_tags()
.
F The HTML source for the content displayed in E.

ptg18144795
108 Chapter 5
Encoding and
Decoding Strings
At the end of Chapter 3, the section
“Manually Sending Data to a Page” demon-
strated how to use the thinking behind the
GET form method to send data to a page.
In that example, instead of using an actual
form, data was appended to the URL, mak-
ing it available to the receiving script. I was
careful to say that only single words could
be passed this way, without spaces or
punctuation. But what if you want to pass
several words as one variable value or use
special characters?
To safely pass any value to a PHP script
through the URL, apply the
urlencode()
function. As its name implies, this function
takes a string and
encodes
it (changes its
format) so that it can properly be passed
as part of a URL. Among other things, the
function replaces spaces with plus signs
(
+
) and translates special characters (for
example, the apostrophe) into less prob-
lematic versions. You can use the function
like so:
$string = urlencode($string);
To demonstrate one application of
urlencode()
, let’s update the
handle_
post.php
page so that it also creates a
link that passes the user’s name and email
address to a third page.
ptg18144795
Using Strings 109
To use urlencode():
1. Open
handle_post.php
(Script 5.4)
in your text editor or IDE, if it is not
already open.
2. Delete the
htmlentities()
and
strip_tags()
lines added in the previ-
ous set of steps (Script 5.5).
3. Revert to the older version of the
print invocation:
print "<div>Thank you, $name,
➝
for your posting:
<p>$posting</p></div>";
4. After the
print
statement, add the
following:
$name = urlencode($name);
$email = urlencode($_POST
➝
['email']);
This script will pass these two variables
to a second page. In order for it to do
so, they must both be encoded.
Because the script has not previously
referred to or used the
$email
vari-
able, the second line both retrieves the
email value from the
$_POST
array and
encodes it in one step. This is the same
as having these two separate lines:
$email = $_POST['email'];
$email = urlencode($email);
continues on next page
Script 5.5 This script encodes two variables
before adding them to a link. Then the values can
be successfully passed to another page.
1 <!doctype html>
1 <html lang="en">
2 <head>
3 <meta charset="utf-8">
4 <title>Forum Posting</title>
5 </head>
6 <body>
7 <?php // Script 5.5 - handle_post.php #4
8 /* This script receives five values from
posting.html:
9 first_name, last_name, email, posting,
submit */
10
11 // Address error management, if you
want.
12
13 // Get the values from the $_POST array:
14 $first_name = $_POST['first_name'];
15 $last_name = $_POST['last_name'];
16 $posting = nl2br($_POST['posting']);
17
18 // Create a full name variable:
19 $name = $first_name . ' ' . $last_name;
20
21 // Print a message:
22 print "<div>Thank you, $name, for your
posting:
23 <p>$posting</p></div>";
24
25 // Make a link to another page:
26 $name = urlencode($name);
27 $email = urlencode($_POST['email']);
28 print "<p>Click <a href=\"thanks.php?
name=$name&email=$email\">here</a> to
continue.</p>";
29
30 ?>
31 </body>
32 </html>
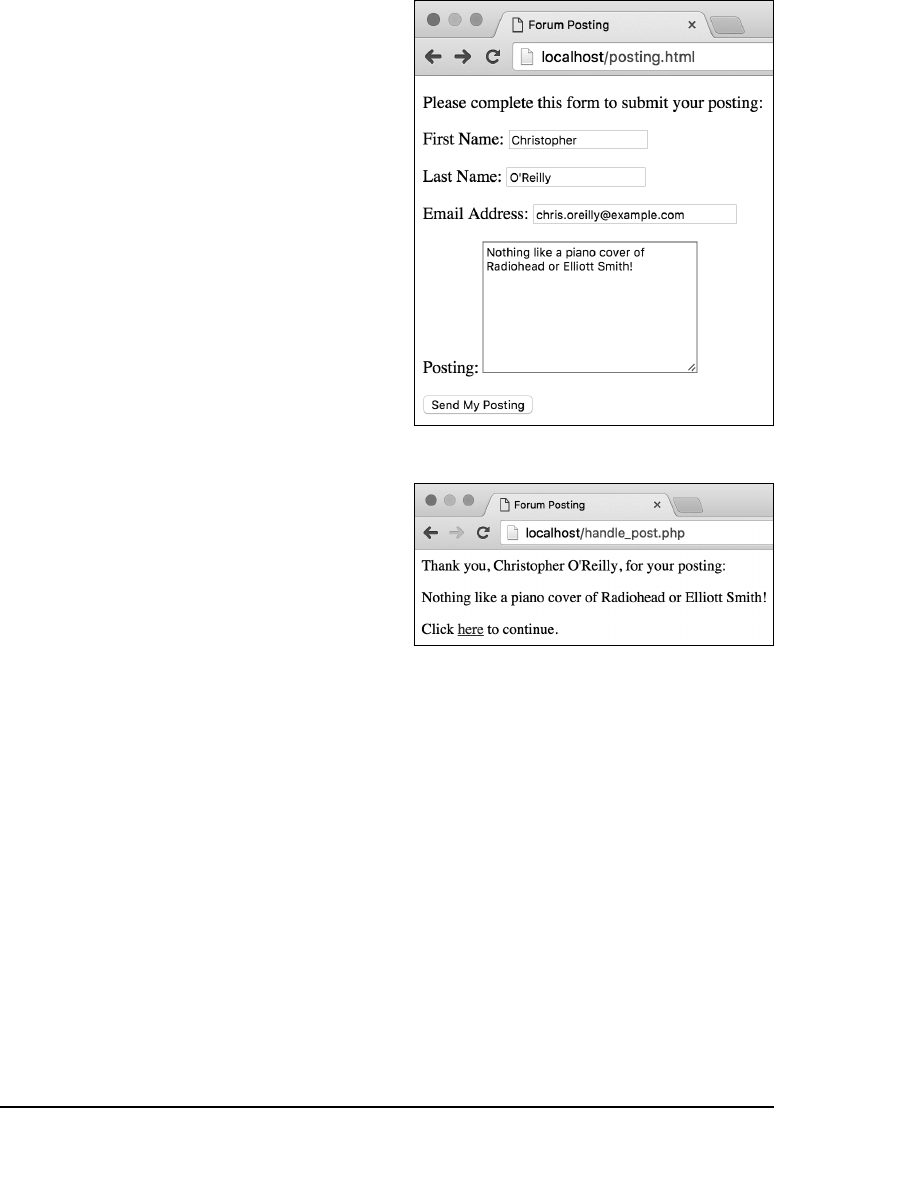
ptg18144795
110 Chapter 5
5. Add another
print
statement that
creates the link:
print "<p>Click <a href=\
➝
"thanks.php?name=$name&email=
➝
$email\">here</a> to continue.
➝
</p>";
The primary purpose of this
print
statement is to create an HTML link
in the web page, the source code of
which would be something like
<a href="thanks.php?name=
➝
Larry+Ullman&email=
➝
larry%40example.com">here</a>
To accomplish this, begin by hard-coding
most of the HTML and then include the
appropriate variable names. Because
the HTML code requires that the URL
for the link be in double quotation marks
—and the
print
statement already
uses double quotation marks—you
must escape them (by preceding them
with backslashes) in order for them to
be printed.
6. Save the file, place it in the proper
directory of your PHP-enabled server,
and test it again in your browser A B.
Note that clicking the link will result in
a server error, because the
thanks.php
script hasn’t yet been written.
A Another use of the form.
B The handling script now displays a link to
another page.

ptg18144795
Using Strings 111
7. View the HTML source code of the
handling page to see the resulting link
in the HTML code C.
Values sent directly from a form are auto-
matically URL-encoded prior to being sent and
decoded upon arrival at the receiving script.
You only need the
urlencode()
function to
manually encode data (as in the example).
The
urldecode()
function does just
the opposite of
urlencode()
—it takes an
encoded URL and turns it back into a standard
form. You’ll use it less frequently, though,
because PHP will automatically decode most
values it receives.
Since you can use concatenation with
functions, the new
print
statement could be
written as follows:
print 'Click <a href="thanks.php?
➝
name=' . $name . '&email=' .
➝
$email . '">here</a> to continue.';
This method has two added benefits over the
original approach. First, it uses single quota-
tion marks to start and stop the statement,
meaning you don’t need to escape the double
quotation marks. Second, the variables used
are more obvious—they aren’t buried in a lot of
other code.
C The HTML source code of the page B shows the dynamically generated link.
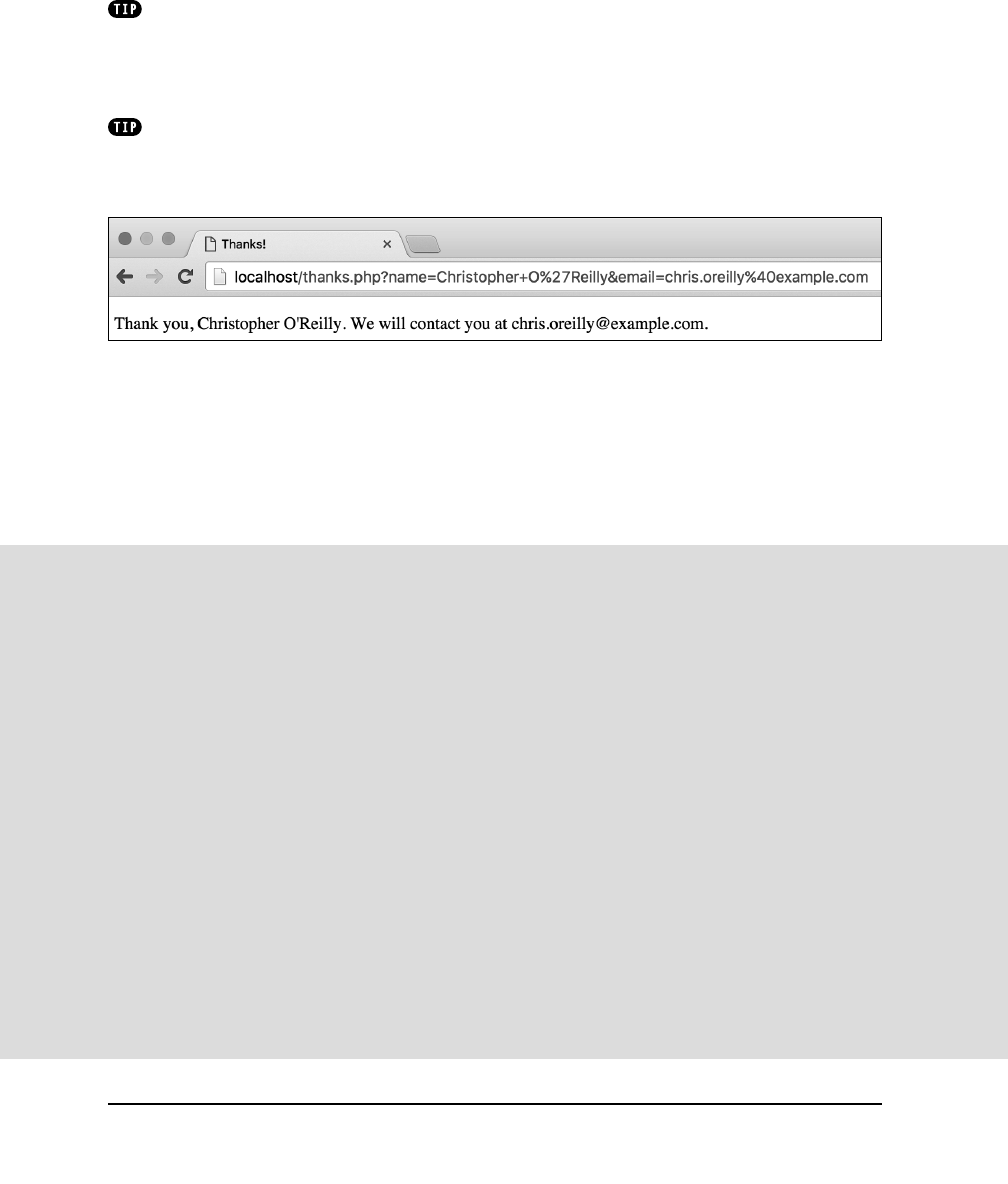
ptg18144795
112 Chapter 5
Encrypting and Decrypting Strings
Frequently, in order to protect data, programmers
encrypt
it—alter its state by transforming it to a
form that’s more difficult, if not impossible, to discern. Passwords are an example of a value you
might want to encrypt. Depending on the level of security you want to establish, usernames, email
addresses, and phone numbers are likely candidates for encryption too.
You can use the
password_hash()
function to encrypt data, but be aware that no decryption
option is available (it’s known as
one-way
encryption). So a password may be encrypted using
it and then stored, but the decrypted value of the password can never be determined. Using
this function in a web application, you might encrypt a user’s password upon registration; then,
when the user logged in, the password the user entered at that time would also be encrypted,
and the two protected versions of the password would be compared. The syntax for using
password_hash()
is
$data = password_hash($data, PASSWORD_DEFAULT);
The second argument says to use the default encryption algorithm (the algorithm determining how
quickly and securely the encryption is performed).
If the data is being stored in a database, you can also use functions built into the database applica-
tion (for example, MySQL, PostgreSQL, Oracle, or SQL Server) to perform encryption and decryp-
tion. Depending on the technology you’re using, it most likely provides both one- and two-way
encryption tools.
You do not need to encode numeric
PHP values in order to use them in a URL,
because they do not contain problematic
characters. That being said, it won’t hurt to
encode them either.
At the end of the chapter you’ll be
prompted to create
thanks.php
, which greets
the user by name and email address D.
D The third page in this process—to be created by you at the end of the chapter—prints a message based
on values it receives in the URL.

ptg18144795
Using Strings 113
Finding Substrings
PHP has a few functions you can use to
pull apart strings, search through them,
and perform comparisons. Although these
functions are normally used with condi-
tionals, discussed in Chapter 6, “Control
Structures,” they are important enough that
they’ll be introduced here; later chapters
will use them more formally.
Earlier in this chapter,
you learned how
to join strings using concatenation. Along
with making larger strings out of smaller
pieces, PHP easily lets you extract subsec-
tions from a string. The trick to using any
method to pull out a subsection of a string
is that you must know something about the
string itself in order to know how to break
it up.
The
strtok()
function creates a substring,
referred to as a
token
, from a larger string
by using a predetermined separator (such
as a comma or a space). For example, if
you have users enter their full name in one
field (presumably with their first and last
names separated by a space), you can pull
out their first name with this code:
$first = strtok($_POST['name'], ' ');
That line tells PHP to extract everything
from the beginning of
$_POST['name']
until it finds a blank space.
If you have users enter their full name in
the format
Surname, First
, you can find
their surname by writing
$last = strtok($_POST['name'], ', ');
Comparing Strings
To compare two strings, you can always
use the equality operator, which you’ll
learn about in the next chapter. Other-
wise, you can use the
strcmp()
function.
It indicates how two strings compare
by returning a whole number: 0 if they
are the same, and a positive or negative
number if one is “greater” than the other.
PHP also has a case-insensitive compan-
ion,
strcasecmp()
.
To see if a substring is contained within
another string (that is, to find a needle in
a haystack), you’ll use these functions:
.
strstr()
returns the haystack from
the first occurrence of a needle to the
end.
.
strpos()
searches through a hay-
stack and returns the numeric loca-
tion of a particular needle.
Both of these functions also have a case-
insensitive alternative:
stristr()
and
stripos()
, respectively. Each of these
functions is normally used in a conditional
to test whether the substring was found.

ptg18144795
114 Chapter 5
A second way to pull out sections of a
string is by referring to the
indexed position
of the characters within the string. The
indexed position of a string is the numeri-
cal location of a character, counting from
the beginning. However, PHP—like most
programming languages—begins all indexes
with the number 0. For example, to index
the string
Larry
, you begin with the L at
position 0, followed by
a
at 1,
r
at 2, the
second
r
at 3, and
y
at 4. Even though the
string length of
Larry
is 5, its index goes
from 0 to 4. In short, indexes always go
from 0 to the length minus 1.
With this in mind, you can call on the
substr()
function to create a substring
based on the index position of the sub-
string’s characters:
$sub = substr($string, 0, 10);
The first argument is the master string from
which the substring will be derived. Second,
indicate where the substring begins, as its
indexed position (0 means that you want
to start with the first character). Third, from
that starting point, state how many char-
acters the substring should contain (10). If
the master string does not have that many
characters in it, the resulting substring
will end with the end of the master string.
This argument is optional; if omitted, the
substring will also go until the end of the
master string.
You can also use negative numbers to
count backward from the end of the string:
$string = 'aardvark';
$sub = substr($string, -3, 3); // ark

ptg18144795
Using Strings 115
The second line says that three characters
should be returned starting at the third
character from the end. With that particular
example, you can again omit the third
argument and have the same result:
$sub = substr($string, -3); // ark
To see how many characters are in a string,
use
strlen()
:
print strlen('Hello, world!'); // 13
The count will include spaces and punc-
tuation. To see how many
words
are in a
string, use
str_word_count()
. This func-
tion, along with
substr()
, will be used in
this next revision of the
handle_post.php
script.
To create substrings:
1. Open
handle_post.php
(Script 5.5)
in your text editor or IDE, if it is not
already open.
2. Before the
print
statement, add the
following (Script 5.6):
$words = str_word_count
➝
($posting);
This version of the script will do two
new things with the user’s posting.
One will be to display the number of
words it contains. That information is
gathered here and assigned to the
$words
variable.
continues on next page
Script 5.6 This version of
handle_post.php
counts the number of words in the posting and
trims the displayed posting down to just the first
50 characters.
1 <!doctype html>
2 <html lang="en">
3 <head>
4 <meta charset="utf-8">
5 <title>Forum Posting</title>
6 </head>
7 <body>
8 <?php // Script 5.6 - handle_post.php #5
9 /* This script receives five values from
posting.html:
10 first_name, last_name, email, posting,
submit */
11
12 // Address error management, if you
want.
13
14 // Get the values from the $_POST array:
15 $first_name = $_POST['first_name'];
16 $last_name = $_POST['last_name'];
17 $posting = nl2br($_POST['posting']);
18
19 // Create a full name variable:
20 $name = $first_name . ' ' . $last_name;
21
22 // Get a word count:
23 $words = str_word_count($posting);
24
25 // Get a snippet of the posting:
26 $posting = substr($posting, 0, 50);
27
28 // Print a message:
29 print "<div>Thank you, $name, for
your posting:
30 <p>$posting...</p>
31 <p>($words words)</p></div>";
32
33 ?>
34 </body>
35 </html>
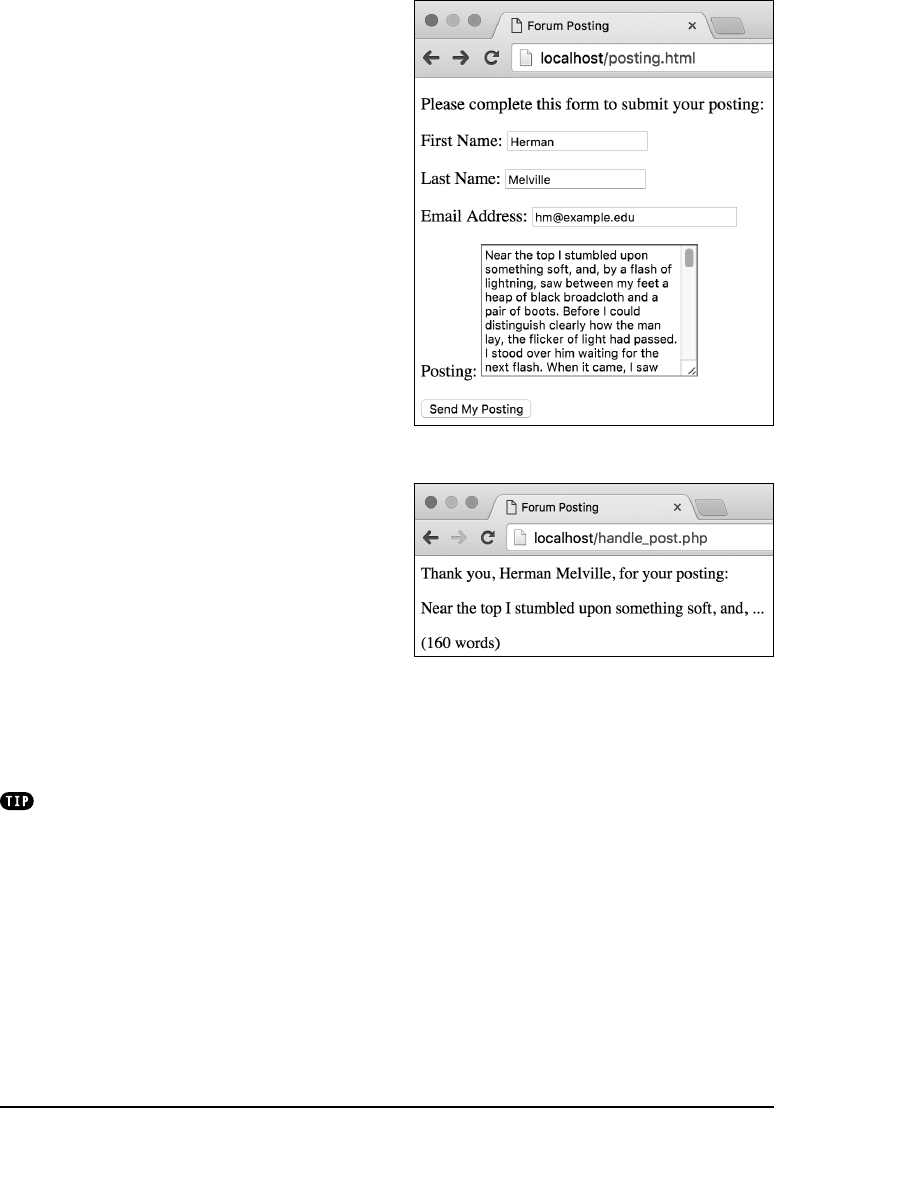
ptg18144795
116 Chapter 5
3. On the next line (also before the
print
statement), add
$posting = substr($posting, 0,
➝
50);
The second new thing this script will do
is limit the displayed posting to its first
50 characters. You might use this, for
example, if one page shows the begin-
ning of a post, then a link takes the user
to the full posting. To implement this
limit, the
substr()
function is called.
4. Update the
print
statement to read
print "<div>Thank you, $name,
➝
for your posting:
<p>$posting...</p>
<p>($words words)</p></div>";
There are two changes here. First,
ellipses are added after the posting to
indicate that this is just part of the whole
posting. Then, within another para-
graph, the number of words is printed.
5. Delete the two
urlencode()
lines and
the corresponding
print
line.
I’m referring specifically to the code
added in the previous incarnation of
the script, linking to
thanks.php
.
6. Save the file, place it in the proper
directory of your PHP-enabled server,
and test it again in your browser A B.
If you want to check whether a string
matches a certain format—for example, to
see if it’s a syntactically valid postal code—
you need to use regular expressions. Regular
expressions are an advanced concept in
which you define patterns and then see if a
value fits the mold. See the PHP manual or
my book PHP and MySQL for Dynamic Web
Sites (Fourth Edition): Visual QuickPro Guide
(Peachpit Press, 2012).
A Postings longer than 50 characters…
B …will be cut short. The word count is also
displayed.

ptg18144795
Using Strings 117
Replacing Parts
of a String
Instead of just finding substrings within a
string, as the previous section discusses,
you might find that you need to
replace
substrings
with new values. You can do
so using the
str_ireplace()
function:
$string = str_ireplace($needle,
➝
$replacement, $haystack);
This function replaces every occurrence
of
$needle
found in
$haystack
with
$replacement
. For example:
$me = 'Larry E. Ullman';
$me = str_ireplace('E.', 'Edward',
➝
$me);
The
$me
variable now has a value of
Larry
Edward Ullman
.
That function performs a
case-insensitive
search. To be more restrictive, you can
perform a
case-sensitive
search using
str_replace()
. In this next script,
str_ireplace()
will be used to eliminate
“bad words” in submitted text.
There’s one last string-related function
I want to discuss:
trim()
. This function
removes any white space—spaces, new-
lines, and tabs—from the beginning and
end of a string. It’s quite common for extra
spaces to be added to a string variable,
either because a user enters information
carelessly or due to sloppy HTML code.
For purposes of clarity, data integrity, and
web design, it’s worth your while to delete
those spaces from the strings before you
use them. Extra spaces sent to the browser
could make the page appear odd, and
those sent to a database or cookie could
have unfortunate consequences at a
later date (for example, if a password has
a superfluous space, it might not match
when it’s entered without the space).
Adjusting String Case
A handful of PHP functions are used to
change the case of a string’s letters:
.
ucfirst()
capitalizes the first letter
of the string.
.
ucwords()
capitalizes the first letter
of words in a string.
.
strtoupper()
makes an entire string
uppercase.
.
strtolower()
makes an entire string
lowercase.
Due to the variance in people’s names
around the globe, there’s no flawless
way to automatically format names with
PHP (or any programming language). In
fact, I would be hesitant to alter the case
of user-supplied data unless you have
good cause to do so.
ptg18144795
118 Chapter 5
The
trim()
function automatically strips
away any extra spaces from both the
beginning and the end of a string (but not
the middle). The format for using
trim()
is
as follows:
$string = ' extra space before and
➝
after text ';
$string = trim($string);
// $string is now equal to 'extra
➝
space before and after text'
To use str_ireplace () and trim():
1. Open
handle_post.php
(Script 5.6)
in your text editor or IDE, if it is not
already open.
2. Apply
trim()
to the form data
(Script 5.7):
$first_name = trim($_POST
➝
['first_name']);
$last_name = trim($_POST
➝
['last_name']);
$posting = trim($_POST
➝
['posting']);
Just in case the incoming data has
extraneous white space at its beginning
or end, the
trim()
function is applied.
3. Remove the use of
substr()
:
$posting = substr($posting,
➝
0, 50);
You’ll want to see the entire posting for
this example, so remove this invocation
of
substr()
.
4. Before the
print
statement, add
$posting = str_ireplace
➝
('badword', 'XXXXX', $posting);
This specific example flags the use of
a bad word in a posting by crossing it
out. Rather than an actual curse word,
the code uses
badword
. (You can use
whatever you want, of course.)
Script 5.7 This final version of the handling script
applies the
trim()
function and then replaces
uses of
badword
with a bunch of Xs.
1 <!doctype html>
2 <html lang="en">
3 <head>
4 <meta charset="utf-8">
5 <title>Forum Posting</title>
6 </head>
7 <body>
8 <?php // Script 5.7 - handle_post.php #6
9 /* This script receives five values from
posting.html:
10 first_name, last_name, email, posting,
submit */
11
12 // Address error management, if you
want.
13
14 // Get the values from the $_POST array.
15 // Strip away extra spaces using trim():
16 $first_name =
trim($_POST['first_name']);
17 $last_name =
trim($_POST['last_name']);
18 $posting = trim($_POST['posting']);
19
20 // Create a full name variable:
21 $name = $first_name . ' ' . $last_name;
22
23 // Get a word count:
24 $words = str_word_count($posting);
25
26 // Take out the bad words:
27 $posting = str_ireplace('badword',
'XXXXX', $posting);
28
29 // Print a message:
30 print "<div>Thank you, $name, for your
posting:
31 <p>$posting</p>
32 <p>($words words)</p></div>";
33
34 ?>
35 </body>
36 </html>

ptg18144795
Using Strings 119
If you’d like to catch many bad words,
you can use multiple lines, like so:
$posting = str_ireplace
➝
('badword1', 'XXXXX', $posting);
$posting = str_ireplace
➝
('badword2', 'XXXXX', $posting);
$posting = str_ireplace
➝
('badword3', 'XXXXX', $posting);
5. Update the
print
statement so that it
no longer uses the ellipses:
print "<div>Thank you, $name,
➝
for your posting:
<p>$posting</p>
<p>($words words)</p></div>";
6. Save the file, place it in the proper
directory of your PHP-enabled server,
and test again in your browser A B.
The
str_ireplace()
function will
even catch bad words in context. For example,
if you entered I feel like using badwords, the
result would be I feel like using XXXXXs.
The
str_ireplace()
function can
also take an array of needle terms, an array
of replacement terms, and even an array as
the haystack. Because you may not know
what an array is yet, this technique isn’t
demonstrated here.
If you need to trim excess spaces from
the beginning or the end of a string but not
both, PHP breaks the
trim()
function into
two more specific functions:
rtrim()
removes
spaces found at the end of a string variable
(on its right side), and
ltrim()
handles those
at the beginning (its left). They’re both used
just like
trim()
:
$string = rtrim($string);
$string = ltrim($string);
A If users enter a word you’d prefer they not use…
B …you can have PHP replace it.

ptg18144795
120 Chapter 5
Pursue
n
Look up the PHP manual page for one
of the new functions mentioned in this
chapter. Use the links on that page to
examine a couple of other string-related
functions that PHP has.
n
Check out the PHP manual page
specifically for the
substr()
function.
Read the other examples found on
that page to get a better sense of how
substr()
can be used.
n
Write the
thanks.php
script that goes
along with Script 5.5. If you need help,
revisit the
hello.php
script from
Chapter 3 (Script 3.7).
n
Rewrite the
print
statement in the final
version of
handle_post.php
(Script 5.7)
so that it uses single quotation marks
and concatenation instead of double
quotation marks.
n
Create another HTML form for taking
string values. Then create the PHP
script that receives the form data,
addresses any HTML or PHP code,
manipulates the data in some way,
and prints out the results.
Review and Pursue
If you have any problems with the
review questions or the pursue prompts,
turn to the book’s supporting forum
(www.LarryUllman.com/forums/).
Review
n
How do you create a string?
n
What are the differences between using
single and double quotation marks?
n
What is the concatenation operator?
What is the concatenation assignment
operator?
n
What is the impact of having a newline
in a string printed to the browser? How
do you convert a newline character to
a break tag?
n
What problems can occur when HTML
is entered into form elements whose
values will later be printed back to the
browser? What steps can be taken to
sanctify submitted form data?
n
What function makes data safe to pass
in a URL?
n
How do you escape problematic char-
acters within a string? What happens if
you do not escape them?
n
The characters in a string are indexed
beginning at what number?
n
What does the
trim()
function do?

ptg18144795
Control structures—conditionals and
loops—are a staple of programming lan-
guages. PHP has two conditionals—
if
and
switch
—both of which you’ll master in this
chapter. Conditionals allow you to estab-
lish a test and then perform actions based
on the results. This functionality provides
the ability to make websites even more
dynamic.
The discussion of
if
conditionals requires
introduction of two last categories of
operators: comparison and logical (you’ve
already seen the arithmetic and assign-
ment operators in the previous chapters).
You’ll commonly use these operators in
your conditionals, along with the Boolean
concepts of TRUE and FALSE.
Finally, this chapter introduces loops,
which allow you to repeat an action for a
specified number of iterations. Loops can
save you programming time and help you
get the most functionality out of arrays, as
you’ll see in the next chapter.
6
Control
Structures
In This Chapter
Creating the HTML Form 122
The if Conditional 125
Validation Functions 128
Using else 132
More Operators 135
Using elseif 144
The Switch Conditional 148
The for Loop 152
Review and Pursue 157
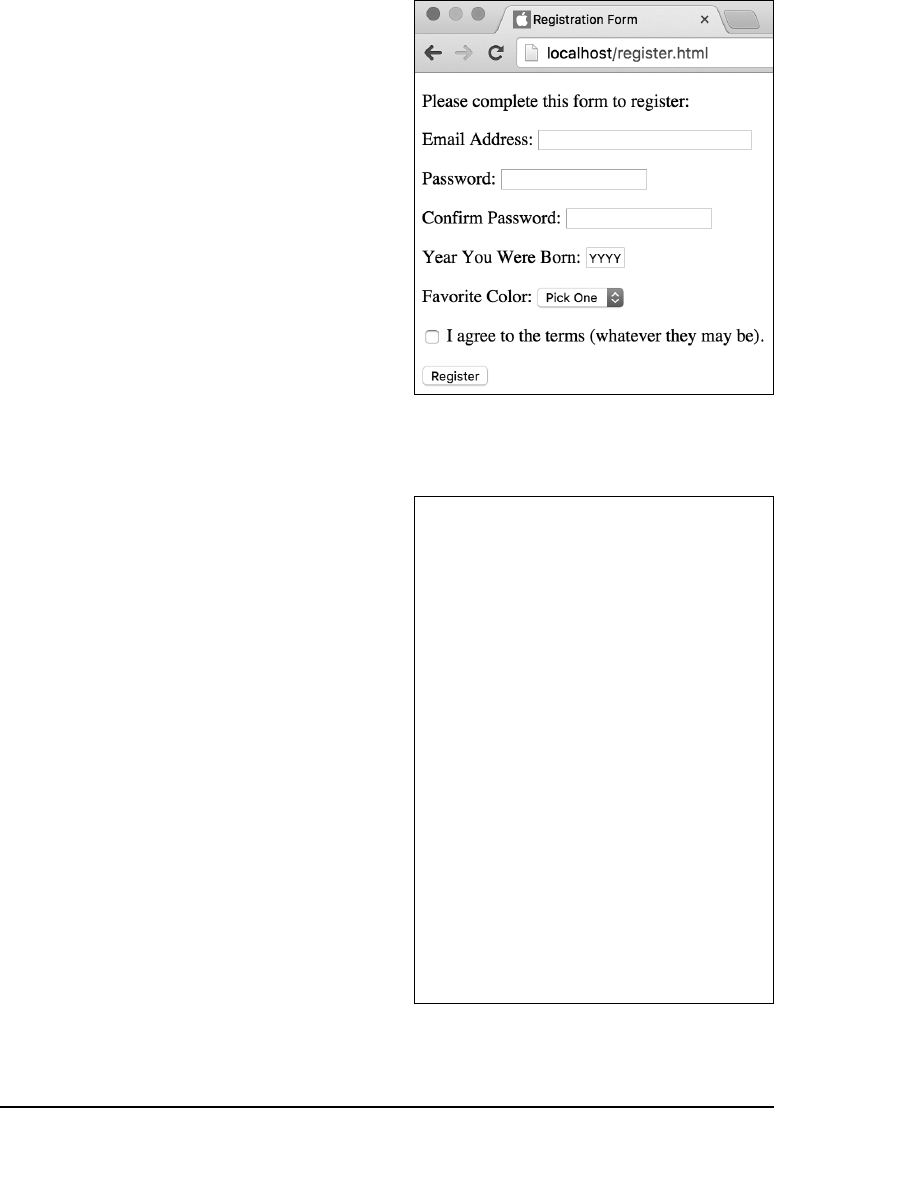
ptg18144795
122 Chapter 6
Creating the
HTML Form
As with the previous chapters, the exam-
ples in this chapter are based on an HTML
form that sends data to a PHP page. In this
case, the form is a simple registration page
that requests the following information A:
n
Email address
n
Password
n
Confirmation of the password
n
Year of birth (to verify age)
n
Favorite color (for customization
purposes)
n
Agreement to the site’s terms
(a common requirement)
The following steps walk through the cre-
ation of this form before getting into
the PHP code.
To create the HTML form:
1. Begin a new HTML document in
your text editor or IDE, to be named
register.html
(Script 6.1):
<!doctype html>
<html lang="en">
<head>
<meta charset="utf-8">
<title>Registration Form</title>
</head>
<body>
<!-- Script 6.1 - register.html -->
<div><p>Please complete this
➝
form to register:</p>
2. Create the initial form tag:
<form action="handle_reg.php"
➝
method="post">
A The HTML form used in this chapter.
Script 6.1 This pseudo-registration form is the
basis for the examples in this chapter.
1 <!doctype html>
2 <html lang="en">
3 <head>
4 <meta charset="utf-8">
5 <title>Registration Form</title>
6 </head>
7 <body>
8 <!-- Script 6.1 - register.html -->
9 <div><p>Please complete this form to
register:</p>
10
11 <form action="handle_reg.php"
method="post">
12
13 <p>Email Address: <input type="text"
name="email" size="30"></p>
14
15 <p>Password: <input type="password"
name="password" size="20"></p>
16
17 <p>Confirm Password: <input
type="password" name="confirm"
size="20"></p>
18
code continues on next page

ptg18144795
Control Structures 123
As with many of the previous examples,
this page uses the POST method. The
handling script, identified by the
action
attribute, will be
handle_reg.php
,
found in the same directory as the
HTML form.
3. Create inputs for the email address and
passwords:
<p>Email Address: <input
➝
type="email" name="email"
➝
size="30"></p>
<p>Password: <input
➝
type="password"
➝
name="password" size="20"></p>
<p>Confirm Password: <input
➝
type="password" name="confirm"
➝
size="20"></p>
These lines should be self-evident by
now. Each line is wrapped in HTML
<p></p>
tags to improve the spacing in
the browser. Also, note that two pass-
word inputs are created—the second
is used to confirm the text entered in
the first. Password input types don’t
reveal what the user enters B, so the
standard is to require the user to enter
passwords twice (theoretically ensuring
that users know exactly what password
they provided).
4. Create an input for the user’s birth year:
<p>Year You Were Born: <input
➝
type="text" name="year"
➝
placeholder="YYYY" size="4"></p>
Rather than use a drop-down menu that
displays 50 or 100 years, have users
enter their birth year in a text box. By
presetting the
placeholder
attribute of
the input, you make the text box indicate
the proper format for the year A.
continues on next page
Script 6.1 continued
19 <p>Year You Were Born: <input
type="text" name="year" value="YYYY"
size="4"></p>
20
21 <p>Favorite Color:
22 <select name="color">
23 <option value="">Pick One</option>
24 <option value="red">Red</option>
25 <option value="yellow">Yellow</
option>
26 <option value="green">Green</option>
27 <option value="blue">Blue</option>
28 </select></p>
29
30 <p><input type="checkbox"
name="terms" value="Yes"> I agree to
the terms (whatever they may be).</p>
31
32 <input type="submit" name="submit"
value="Register">
33
34 </form>
35
36 </div>
37 </body>
38 </html>
B A password input type as it’s being filled out.
ptg18144795
124 Chapter 6
5. Create a drop-down menu for the user’s
favorite color:
<p>Favorite Color:
<select name="color">
<option value="">Pick One</option>
<option value="red">Red</option>
<option value="yellow">Yellow
➝
</option>
<option value="green">Green
➝
</option>
<option value="blue">Blue
➝
</option>
</select></p>
The truth is that I’m adding this input so
that it can be used for a specific exam-
ple later in the chapter, but it might be
used to customize the look of the site
after the user logs in. Naturally, you can
add as many colors as you want here.
6. Create a checkbox for the user to agree
to the site’s terms:
<p><input type="checkbox"
➝
name="terms" value="Yes">
➝
I agree to the terms (whatever
➝
they may be).</p>
Many sites have some sort of terms or
licensing that the user must indicate
acceptance of, normally by selecting a
checkbox. This particular form doesn’t
have a link to where the user can read
the terms, but it probably doesn’t matter
because no one reads them (and this is
just a hypothetical example anyway). In
any case, using this element, you’ll be
able to see how checkboxes are treated
by the handling PHP script.
7. Add a submit button and close the form:
<input type="submit" name=
➝
"submit" value="Register">
</form>
8. Complete the HTML page:
</div>
</body>
</html>
9. Save the file as
register.html
, place it
in the proper directory for your PHP-
enabled server, and load the page in
your browser.
It’s becoming more common to not require
a password confirmation, relying instead on
password reset functionality should users
make a mistake or forget what they entered.
I definitely prefer not having to confirm the
password (and I used a password management
application regardless), but you will see both
approaches online.
Most registration pages use either a nick-
name or an email address for the username.
If you use the email address as a username,
it’s easier for your users to remember their
registration information (a user may have only
a couple of email addresses but a gazillion
usernames for different sites around the web).
Furthermore, email addresses are, by their
nature, unique to an individual, whereas user-
names are not.
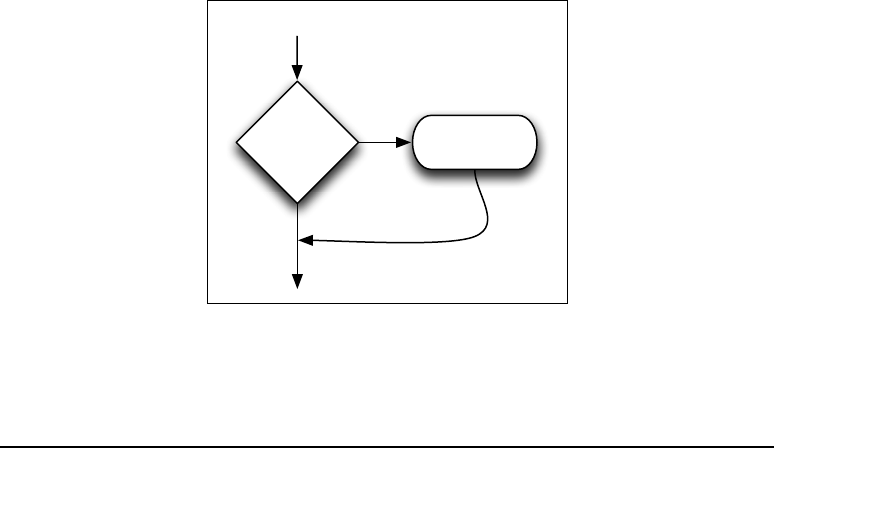
ptg18144795
Control Structures 125
The if Conditional
The basic programming conditional is the
standard
if
(what used to be called an
if
-
then
conditional—the
then
is now
implied). The syntax for this kind of condi-
tional is simple:
if (condition) {
statement(s);
}
The
condition
must go within parentheses;
then the
statement(s)
are placed within
braces (you’ll also see these referred to as
“curly braces” or “curly brackets”). The state-
ments are commands to be executed—for
example, printing a string or adding two
numbers together. Each separate statement
must have its own semicolon indicating the
end of the line, but there’s no limit on the
number of statements that can be associ-
ated with a conditional.
The statements are normally indented from
the initial
if
line to indicate that they’re
the result of a conditional, but that format
isn’t syntactically required. You’ll also see
people use this syntax:
if (condition)
{
statement(s);
}
How you arrange your braces is a matter
of personal preference—and the source of
minor online skirmishes. Just pick a style
you like and stick to it.
Failure to use a semicolon after each state-
ment, forgetting an opening or closing
parenthesis or brace, or using a semicolon
after either of the braces will cause errors
to occur. Be mindful of your syntax as you
code with conditionals!
PHP uses the Boolean concepts of TRUE
and FALSE when determining whether to
execute the statements. If the condition is
TRUE, the statements are executed; if it’s
FALSE, they are not executed A.
A How an
if
conditional affects the program flow
of a script.
ptg18144795
126 Chapter 6
Over the course of this chapter, a PHP script
will be developed until it fully validates the
register.html
form data. To start, this
first version of the script will just create the
basic shell of the validation process, defin-
ing and using a variable with a Boolean
value that will track the success of the
validation process.
To create an if conditional:
1. Begin a new document in your text
editor or IDE, to be named
handle_reg.php
(Script 6.2):
<!doctype html>
<html lang="en">
<head>
<meta charset="utf-8">
<title>Registration</title>
</head>
<body>
<h1>Registration Results</h1>
2. Begin the PHP section and address
error management, if necessary:
<?php // Script 6.2 -
➝
handle_reg.php
If you don’t have
display_errors
enabled, or if
error_reporting
is set to
the wrong level, see Chapter 3, “HTML
Forms and PHP,” for the lines to include
here to alter those settings.
3. Create a flag variable:
$okay = true;
To validate the form data, a
flag
variable
will be used to represent whether or
not the form was properly completed.
It’s known as a “flag” variable because
the variable stores a simple value that
indicates a status. For example: yes,
the form was filled out entirely or no,
it was not.
Script 6.2 This shell of a PHP script will be
expanded to completely validate the form data.
1 <!doctype html>
2 <html lang="en">
3 <head>
4 <meta charset="utf-8">
5 <title>Registration</title>
6 </head>
7 <body>
8 <h1>Registration Results</h1>
9 <?php // Script 6.2 - handle_reg.php
10 /* This script receives seven values
from register.html:
11 email, password, confirm, year, terms,
color, submit */
12
13 // Address error management, if you
want.
14
15 // Flag variable to track success:
16 $okay = true;
17
18 // If there were no errors, print a
success message:
19 if ($okay) {
20 print '<p>You have been
successfully registered (but not
really).</p>';
21 }
22 ?>
23 </body>
24 </html>
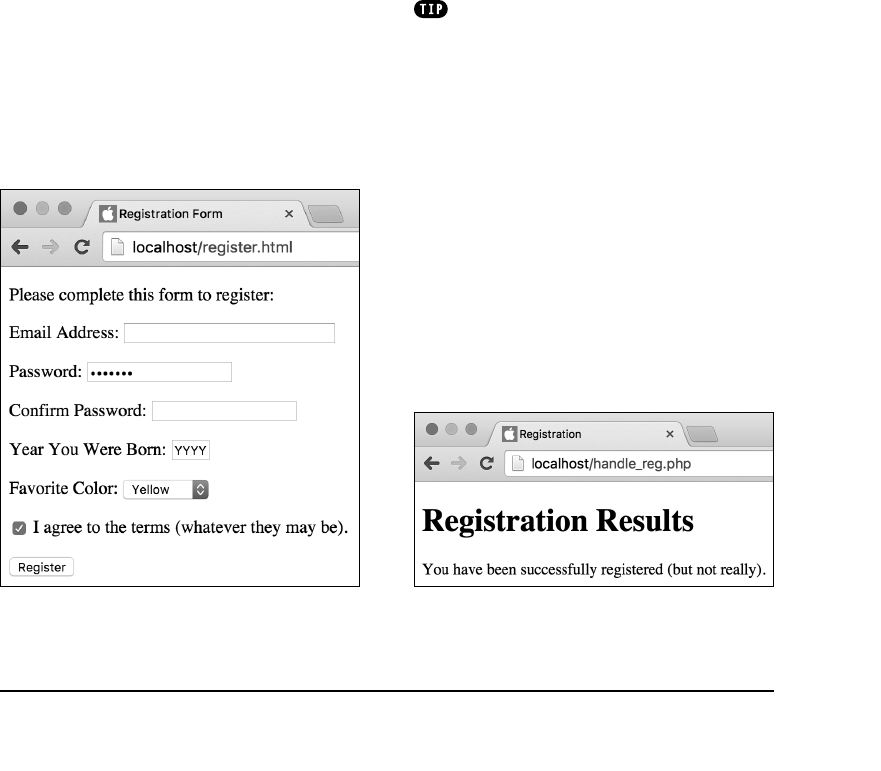
ptg18144795
Control Structures 127
The variable is initialized with a Boolean
value of
TRUE
, meaning that the assump-
tion is that the form was completed
properly. Booleans are
case-insensitive
in PHP, so you could also write
True
or
TRUE
.
4. Print a message if everything is all right:
if ($okay) {
print '<p>You have been
➝
successfully registered (but
➝
not really).</p>';
}
Over the course of this chapter, valida-
tion routines will be added to this script,
checking the submitted form data. If any
data fails a routine, then
$okay
will be
set to FALSE. In that case, this condi-
tional will also be FALSE, so the message
won’t be printed. However, if the data
passes every validation routine, then
$okay
will still be TRUE, in which case
this message will be printed.
B Filling out the HTML form to any degree…
5. Complete the PHP section and the
HTML page:
?>
</body>
</html>
6. Save the file as
handle_reg.php
, place
it in the proper directory for your PHP-
enabled server (in the same directory as
register.html
), and test both in your
browser B and C.
Of course, the fact is that this particular
script will always print the success
message, because no code will set
$okay
to
FALSE
. You can even run the
script directly and see the same result.
If the statement area of your conditional
is only one line long, you technically don’t
need the braces. In that case, you can write
the conditional using either of these formats:
if (condition) statement;
or
if (condition)
statement;
You may run across code in these formats.
However, I think it’s best to always use the
multiline format, with the braces (as demon-
strated in the syntax introduction) to improve
consistency and minimize errors.
C …results in just this.

ptg18144795
128 Chapter 6
Validation Functions
PHP has dozens of functions commonly
used to validate form data. Of these func-
tions, three of the most important ones are
used in this chapter’s examples.
First up is the
empty()
function, which
checks to see if a given variable has an
“empty” value. A variable is considered to
have an empty value if the variable has no
value, has a value of 0, or has a value of
FALSE. In any of these cases, the function
returns TRUE; otherwise, it returns FALSE:
$var1 = 0;
$var2 = 'something';
$var3 = ' '; // An empty string
empty($var); // TRUE, no defined
➝
value
empty($var1); // TRUE, empty value
empty($var2); // FALSE, non-empty
➝
value
empty($var3); // TRUE, empty value
This function is perfect for making sure
that text boxes in forms have been filled
out. For example, if you have a text input
named
email
and the user doesn’t enter
anything in it before submitting the form,
then the
$_POST['email']
variable will
exist but will have an empty value.
Next is the
isset()
function, which is
almost the opposite of
empty()
, albeit with
a slight difference. The
isset()
function
returns TRUE if a variable has any value
(including 0, FALSE, or an empty string).
If the variable does not have a value,
isset()
returns FALSE:
$var1 = 0;
$var2 = 'something';
$var3 = ' '; // An empty string
isset($var); // FALSE, no defined
➝
value
isset($var1); // TRUE
isset($var2); // TRUE
isset($var3); // TRUE
The
isset()
function is commonly used to
validate nontext form elements like check-
boxes, radio buttons, and select menus.
It’s also regularly used to confirm that a
variable exists, regardless of its value.
Finally, the
is_numeric()
function returns
TRUE if the submitted variable has a valid
numerical value and FALSE otherwise.
Integers, decimals, and even strings (if
they’re a valid number) can all pass the
is_numeric()
test:
$var1 = 2309;
$var2 = '80.23';
$var3 = 'Bears';
is_numeric($var1); // TRUE
is_numeric($var2); // TRUE
is_numeric($var3); // FALSE
An interesting thing to note is that using
is_numeric()
on a variable that doesn’t
exist not only returns FALSE, but also
generates a warning. For this reason, you’ll
often see
isset()
used along with other
validation functions like
is_numeric()
.
Let’s start applying these functions to the
PHP script to perform data validation.
ptg18144795
Control Structures 129
To validate form data:
1. Open
handle_reg.php
(Script 6.2) in
your text editor or IDE, if it is not already
open.
2. Within the document’s head, define a
CSS class (Script 6.3):
<style type="text/css"
➝
media="screen">
.error { color: red; }
</style>
This CSS class will be used to format
any printed registration errors.
3. Validate the email address:
if (empty($_POST['email'])) {
print '<p class="error">
➝
Please enter your email
➝
address.</p>';
$okay = false;
}
This
if
conditional uses the code
empty($_POST['email'])
as its condi-
tion. If that variable is empty, meaning
it has no value, a value of 0, or a value
of an empty string, the conditional is
TRUE. In that case, the
print
statement
will be executed and the
$okay
variable
will be assigned a value of FALSE (indi-
cating that everything is not okay).
If the variable isn’t empty, then the
conditional is FALSE, the
print
function
is never called, and
$okay
will retain its
original value.
continues on next page
Script 6.3 Using
if
conditionals and the
empty()
function, this PHP script checks if email address
and password values were provided.
1 <!doctype html>
2 <html lang="en">
3 <head>
4 <meta charset="utf-8">
5 <title>Registration</title>
6 <style type="text/css"
media="screen">
7 .error { color: red; }
8 </style>
9 </head>
10 <body>
11 <h1>Registration Results</h1>
12 <?php // Script 6.3 - handle_reg.php #2
13 /* This script receives seven values
from register.html:
14 email, password, confirm, year, terms,
color, submit */
15
16 // Address error management, if you
want.
17
18 // Flag variable to track success:
19 $okay = true;
20
21 // Validate the email address:
22 if (empty($_POST['email'])) {
23 print '<p class="error">Please
enter your email address.</p>';
24 $okay = false;
25 }
26
27 // Validate the password:
28 if (empty($_POST['password'])) {
29 print '<p class="error">Please
enter your password.</p>';
30 $okay = false;
31 }
32
33 // If there were no errors, print a
success message:
34 if ($okay) {
35 print '<p>You have been successfully
registered (but not really).</p>';
36 }
37 ?>
38 </body>
39 </html>
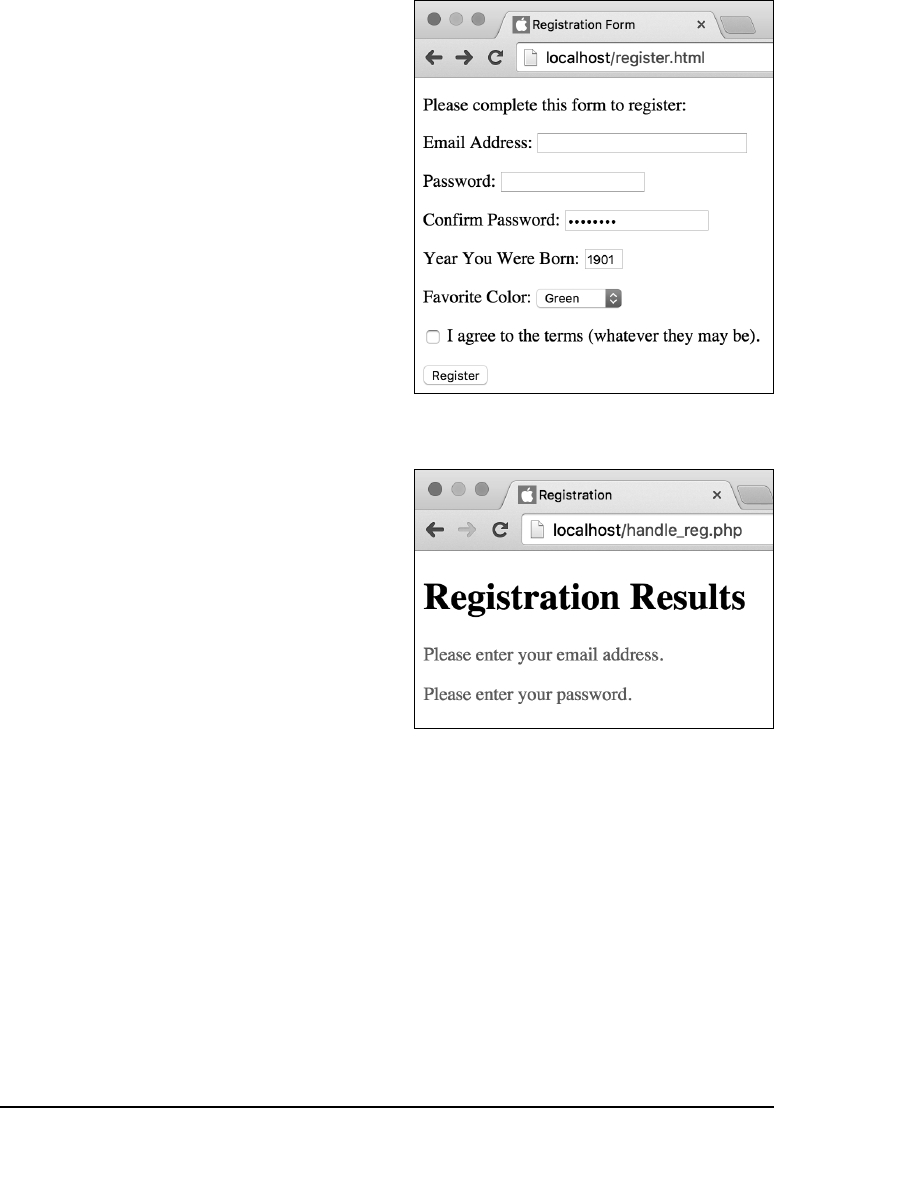
ptg18144795
130 Chapter 6
4. Repeat the validation for the password:
if (empty($_POST['password'])) {
print '<p class="error">Please
➝
enter your password.</p>';
$okay = false;
}
This is a repeat of the email validation,
but with the variable name and
print
statement changed accordingly. The
other form inputs will be validated in time.
All the printed error messages are
placed within HTML paragraph tags that
have a
class
value of
error
. By doing
so, the CSS formatting will be applied
(i.e., the errors will be printed in red).
5. Save the file as
handle_reg.php
, place it
in the same directory as
register.html
(on your PHP-enabled server), and test
both the form and the script in your
browser A and B.
6. Resubmit the form in different states of
completeness to test the results more.
If you do provide both email address
and password values, the result will
be exactly like that in C in the section
“The if Conditional,” because the
$okay
variable will still have a value of TRUE.
A If you omit the email address or password
form input…
B …you’ll see messages like these.
ptg18144795
Control Structures 131
When you use functions within condition-
als, as with
empty()
here, it’s easy to forget
a closing parenthesis and see a parse error.
Be extra careful with your syntax when you’re
coding any control structure.
One use of the
isset()
function is to
avoid referring to a variable unless it exists.
If PHP is set to report notices (see “Error
Reporting” in Chapter 3), then, for example,
using
$var
if it has not been defined will
cause an error. You can avoid this by coding
if (isset($var)) {
// Do whatever with $var.
}
Even though almost all form data is sent
to a PHP script as strings, the
is_numeric()
function can still be used for values coming
from a form because it can handle strings that
contain only numbers.
The
isset()
function can take any
number of variables as arguments:
if (isset($var1, $var2)) {
print 'Both variables exist.';
}
If all the named variables are set, the function
returns TRUE; if any variable is not set, the
function returns FALSE.
Once you’re more comfortable with PHP,
you’ll start using the
filter()
function for
validation, too. It’s a wonderful tool, but a bit
too complicated for beginners.
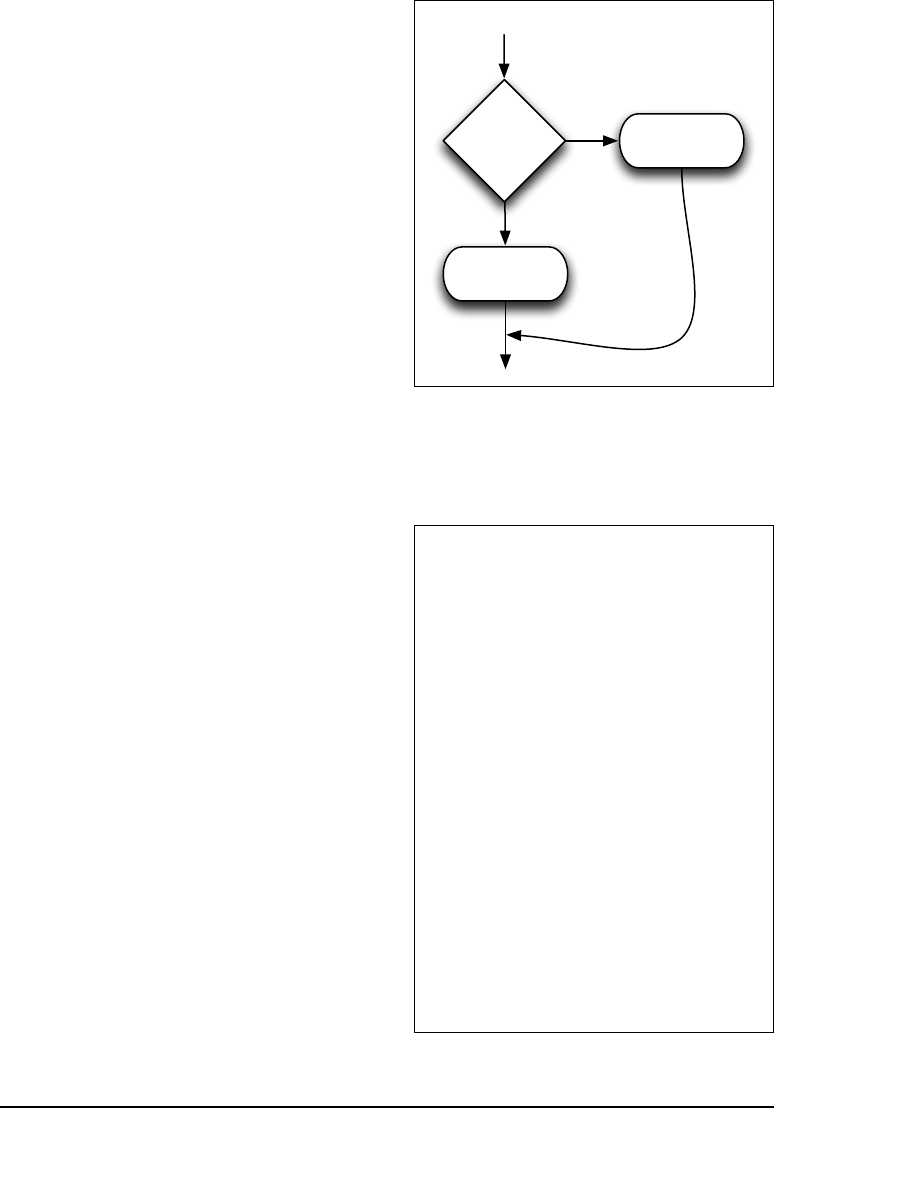
ptg18144795
132 Chapter 6
Using else
The next control structure to discuss is the
if
-
else
conditional. This control structure
allows you to execute one or more state-
ments when a condition is TRUE and
execute one or more other statements
when the condition is FALSE:
if (condition) {
statement(s);
} else {
other_statement(s);
}
The important thing to remember when
using this construct is that unless the
condition is explicitly met, the
else
state-
ment will be executed. In other words, the
statements after the
else
constitute the
default action
, whereas the statements
after the
if
condition are the exception to
the rule A.
Let’s rewrite the
handle_reg.php
page,
incorporating an
if
-
else
conditional to
validate the birth year. In the process, a
new variable will be created, representing
the user’s age.
To use else:
1. Open
handle_reg.php
(Script 6.3) in
your text editor or IDE, if it is not already
open.
2. After the password validation but
before the
$okay
conditional, begin a
new conditional (Script 6.4):
if (is_numeric($_POST['year'])) {
Because the
year
variable should be a
number, you can use the
is_numeric()
function, rather than
empty()
, to check
its value. This is a basic start to this
particular form element’s validation;
later scripts will expand on this.
A How an
if-else
conditional affects the
program flow of a script.
Script 6.4 By adding an
if-else
conditional, this
script validates the birth year and creates a new
variable in the process.
1 <!doctype html>
2 <html lang="en">
3 <head>
4 <meta charset="utf-8">
5 <title>Registration</title>
6 <style type="text/css"
media="screen">
7 .error { color: red; }
8 </style>
9 </head>
10 <body>
11 <h1>Registration Results</h1>
12 <?php // Script 6.4 - handle_reg.php #3
13 /* This script receives seven values
from register.html:
14 email, password, confirm, year, terms,
color, submit */
15
16 // Address error management, if you
want.
17
18 // Flag variable to track success:
19 $okay = true;
20
code continues on next page
ptg18144795
Control Structures 133
3. Create a new variable:
$age = 2016 - $_POST['year'];
If the
$_POST['year']
variable has a
numeric value (meaning that the condi-
tional is TRUE), then the
$age
variable is
assigned the value of the current year
minus the provided year. For now, with-
out knowledge of PHP’s date functions,
just hard-code the current year into the
equation.
4. Add an
else
clause:
} else {
print '<p class="error">Please
➝
enter the year you were born
➝
as four digits.</p>';
$okay = false;
}
If the year does not have a numeric
value, an error message is printed and
the
$okay
variable is set to FALSE (as is
the case if any validation routine fails).
5. After the final
print
statement but
within the same
$okay
conditional, also
print out the value of
$age
:
print "<p>You will turn $age this
➝
year.</p>";
If the
$okay
variable still has a value of
TRUE, then the submitted data passed
every validation routine. This means
that the user’s age has been calculated
(in the sense of how old that user will
be at some point this year), and it can
be printed, too.
continues on next page
Script 6.4 continued
21 // Validate the email address:
22 if (empty($_POST['email'])) {
23 print '<p class="error">Please enter
your email address.</p>';
24 $okay = false;
25 }
26
27 // Validate the password:
28 if (empty($_POST['password'])) {
29 print '<p class="error">Please enter
your password.</p>';
30 $okay = false;
31 }
32
33 // Validate the birth year:
34 if (is_numeric($_POST['year'])) {
35 $age = 2016 - $_POST['year']; //
Calculate age this year.
36 } else {
37 print '<p class="error">Please
enter the year you were born as
four digits.</p>';
38 $okay = false;
39 }
40
41 // If there were no errors, print a
success message:
42 if ($okay) {
43 print '<p>You have been successfully
registered (but not really).</p>';
44 print "<p>You will turn $age this
year.</p>";
45 }
46 ?>
47 </body>
48 </html>

ptg18144795
134 Chapter 6
6. Save your script, place it in the same
directory as
register.html
(on your
PHP-enabled server), and test it in your
browser again B, C, and D.
Another good validation function is
checkdate()
, which you can use to confirm
that a date exists (or existed in the past).
You’d use it like so:
if (checkdate($month, $day, $year))
➝
{...
B Test the form again, without providing a year
value, and…
C …you’ll see this.
D If the user provides a numeric value for their
birth year, the user’s age will now be calculated
and printed (assuming that an email address and
password was also provided).
ptg18144795
Control Structures 135
More Operators
Previous chapters discussed most of
PHP’s operators along with the variable
types that use them. These operators
include
arithmetic
for numbers: addition (
+
),
subtraction (
-
), multiplication (
*
), and
division (
/
), along with the increment (
++
)
and decrement (
--
) shortcuts for increasing
or decreasing the value of a number by 1.
Then there is the
assignment
operator (
=
),
which is used to set the value of a variable,
regardless of type. You’ve also learned
about
concatenation
(
.
), which appends
one string to another.
When it comes to creating conditionals, the
comparison
and
logical
operators are the
most important. Table 6.1 lists the operators
to be discussed, along with those you’ve
already seen.
Comparison
When the assignment operator (the
equals sign) was introduced in Chapter 2,
“Variables,” you learned that its meaning
isn’t exactly what you’d conventionally
think it to be. The line
$var = 5;
doesn’t state that
$var
is equal to
5 but
that it
is assigned the value of
5. This is
an important distinction.
When you’re writing conditionals, you’ll
often want to see if a variable is equal to
a specific value—to match usernames or
passwords, perhaps, which you can’t do
with the equals sign alone (because that
operator is used for assigning a value, not
equating values). Instead, for comparisons,
use the equality operator (
==
):
$var = 5;
if ($var == 5) { ...
continues on next page
TABLE 6.1 PHP’s Operators
Operator Usage Type
+
Addition Arithmetic
-
Subtraction Arithmetic
*
Multiplication Arithmetic
/
Division Arithmetic
%
Modulus (remainder
of a division) Arithmetic
++
Incrementation Arithmetic
-
Decrementation Arithmetic
*
Assigns a value
to a variable Assignment
/
Equality Comparison
%
Inequality Comparison
<
Less than Comparison
>
Greater than Comparison
<=
Less than or
equal to Comparison
>=
Greater than or
equal to Comparison
<=>
Returns an
integer reflecting
comparison
Comparison
!
Negation Logical
AND
And Logical
&&
And Logical
OR
Or Logical
||
Or Logical
XOR
Exclusive or Logical
??
Null coalescing Logical
.
Concatenation String
ptg18144795
136 Chapter 6
These two lines of code together first
establish the value of
$var
as 5 and then
make a TRUE conditional that checks if
$var
is equal to 5. This example demonstrates the
significant difference that one more equals
sign makes in your PHP code and why
you
must distinguish carefully between the
assignment and comparison operators
.
The next comparison operator—
not equal
to
—is represented by an exclamation mark
coupled with an equals sign (
!=
). The
remaining comparison operators are identi-
cal to their mathematical counterparts: less
than (
<
), greater than (
>
), less than or equal
to (
<=
), and greater than or equal to (
>=
).
As a demonstration of comparison opera-
tors, you’ll check that the user’s birth year
is before 2016 and that the confirmed
password matches the original password.
To use comparison operators:
1. Open
handle_reg.php
(Script 6.4)
in your text editor or IDE, if it is not
already open.
2. After the password validation, check
that the two passwords match
(Script 6.5):
if ($_POST['password']
➝
!= $_POST['confirm']) {
print '<p class="error">
➝
Your confirmed password
➝
does not match the original
➝
password.</p>';
$okay = false;
}
To compare these two string values,
use the inequality operator. Alterna-
tively, you could use one of the string
comparison functions (see Chapter 5,
“Using Strings”), but
!=
is just fine.
Script 6.5 This version of the form-handling
script uses comparison operators to validate the
password and year values.
1 <!doctype html>
2 <html lang="en">
3 <head>
4 <meta charset="utf-8">
5 <title>Registration</title>
6 <style type="text/css"
media="screen">
7 .error { color: red; }
8 </style>
9 </head>
10 <body>
11 <h1>Registration Results</h1>
12 <?php // Script 6.5 - handle_reg.php #4
13 /* This script receives seven values
from register.html:
14 email, password, confirm, year, terms,
color, submit */
15
16 // Address error management, if you
want.
17
18 // Flag variable to track success:
19 $okay = true;
20
21 // Validate the email address:
22 if (empty($_POST['email'])) {
23 print '<p class="error">Please enter
your email address.</p>';
24 $okay = false;
25 }
26
27 // Validate the password:
28 if (empty($_POST['password'])) {
29 print '<p class="error">Please enter
your password.</p>';
30 $okay = false;
31 }
32
33 // Check the two passwords for equality:
34 if ($_POST['password'] != $_
POST['confirm']) {
35 print '<p class="error">Your
confirmed password does not match
the original password.</p>';
36 $okay = false;
37 }
38
code continues on next page
ptg18144795
Control Structures 137
3. After the year validation, report an
error if the year is greater than or equal
to 2016:
if ($_POST['year'] >= 2016) {
print '<p class="error">Either
➝
you entered your birth year
➝
wrong or you come from the
➝
future!</p>';
$okay = false;
}
If the user entered the year of birth as
2016 or later, it’s presumably a mistake.
(If you’re reading this book after 2016,
change the year accordingly).
continues on next page
Script 6.5 continued
39 // Validate the birth year:
40 if (is_numeric($_POST['year'])) {
41 $age = 2016 - $_POST['year']; //
Calculate age this year.
42 } else {
43 print '<p class="error">Please enter
the year you were born as four
digits.</p>';
44 $okay = false;
45 }
46
47 // Check that they were born before this
year:
48 if ($_POST['year'] >= 2016) {
49 print '<p class="error">Either you
entered your birth year wrong or
you come from the future!</p>';
50 $okay = false;
51 }
52
53 // If there were no errors, print a
success message:
54 if ($okay) {
55 print '<p>You have been successfully
registered (but not really).</p>';
56 print "<p>You will turn $age this
year.</p>";
57 }
58
59 ?>
60 </body>
61 </html>
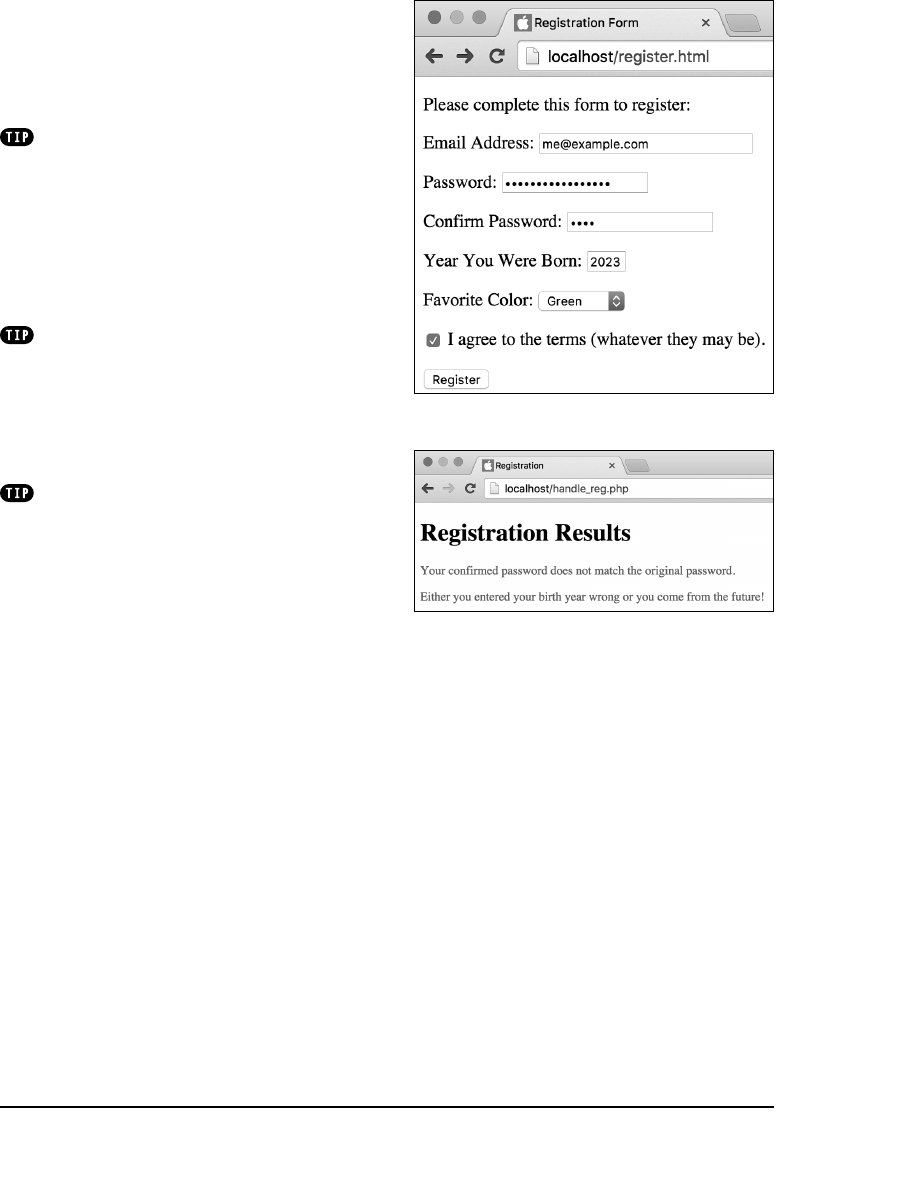
ptg18144795
138 Chapter 6
4. Save your script, place it in the same
directory as
register.html
(on your
PHP-enabled server), and test it in your
browser again A and B.
Before you compare two string values
that come from a form (like the password
and confirmed password), it’s a good idea to
apply the
trim()
function to both, to get rid
of any errant spaces. I didn’t do so here, so as
not to overcomplicate matters, but this habit
is recommended. It’s also prudent to apply
trim()
to values used for logging in, such
as usernames or email addresses.
Another method of checking that a text
input type has been filled out (as opposed to
using the
empty()
function) is this:
if (strlen($var) > 0 ) {
// $var is okay.
}
New in PHP 7 is the “spaceship” opera-
tor:
<=>
. This operator returns: –1 if the left
operand is less than the right operand; 1 if the
left operand is greater than the right; and 0 if
the two are equal. The password confirmation
conditional could be written this way:
if ( ($_POST['password'] <=>
➝
$_POST['confirm']) == 0) {
Except that is unnecessarily complex!
Logical
Writing conditions in PHP comes down to
identifying TRUE or FALSE situations. You
can do this by using functions and com-
parative operators, as you’ve already seen.
Logical
operators—the final operator type
discussed in this chapter—help you create
more elaborate or obvious constructs.
A Run the form once again…
B …with two new validation checks in place.

ptg18144795
Control Structures 139
In PHP, one example of a TRUE condition
is simply a variable name that has a value
that isn’t zero, an empty string, or FALSE,
such as
$var = 5;
if ($var) { ...
You’ve already seen this with the
$okay
variable being used in the handling PHP
script.
A condition is also TRUE if it makes logical
sense:
if (5 >= 3) { ...
A condition will be FALSE if it refers to a
variable and that variable has no value (or
a value of 0 or an empty string), or if you’ve
created an illogical construct. The following
condition is always FALSE:
if (5 <= 3) { ...
In PHP, the exclamation mark (
!
) is the
not
operator. You can use it to invert the TRUE/
FALSE status of a statement. For example:
$var = 'value';
if ($var) {... // TRUE
if (!$var) {... // FALSE
if (isset($var)) {... // TRUE
if (!isset($var)) {... // FALSE
if (!empty($var)) {... // TRUE
To go beyond simple one-part conditions,
PHP supports five more types of logical
operators: two versions of
and
(
AND
and
&&
),
two versions of
or
(
OR
and
||
—a character
called the
pipe
, put together twice), and
or not
(
XOR
). When you have two options
for one operator (as with
and
and
or
), they
differ only in precedence. For almost every
situation, you can use either version of
and
or either version of
or
interchangeably.
Nesting Conditionals
Besides using logical operators to cre-
ate more complex conditionals, you
can use
nesting
for this purpose (the
process of placing one control structure
inside another). The key to doing so is
to place the interior conditional as the
statement(s)
section of the exterior con-
ditional. For example:
if (condition1) {
if (condition2) {
statement(s)2;
} else { // condition2 else
other_statement(s)2;
} // End of 2
} else { // condition1 else
other_statement(s)1;
} // End of 1
As you can see from this example, you
can cut down on the complexity of these
structures by using extensive indenta-
tions and comments. As long as every
conditional is syntactically correct, there
are no rules as to how many levels of
nesting you can have, whether you use
an
else
clause or even whether a sub-
conditional is part of the
if
or the
else
section of the main conditional.
ptg18144795
140 Chapter 6
Using parentheses and logical operators,
you can create even more complex
if
conditionals. For an
AND
conditional, every
conjoined part must be TRUE in order for
the whole conditional to be TRUE. With
OR
,
at least one subsection must be TRUE to
render the whole condition TRUE. These
conditionals are TRUE:
if ( (5 <= 3) OR (5 >= 3) ) { ...
if ( (5 > 3) AND (5 < 10) ) { ...
These conditionals are FALSE:
if ( (5 != 5) AND (5 > 3) ) { ...
if ( (5 != 5) OR (5 < 3) ) { ...
As you construct your conditionals, remem-
ber two important things: First, in order for
the statements that are the result of a condi-
tional to be executed, the entire conditional
must have a TRUE value; second, by using
parentheses, you can ignore rules of prece-
dence and ensure that your operators are
addressed in the order of your choosing.
To demonstrate logical operators, let’s add
more conditionals to the
handle_reg.php
page. You’ll also nest one of the year con-
ditionals inside another conditional (see the
sidebar “Nesting Conditionals” for more).
To use logical operators:
1. Open
handle_reg.php
(Script 6.5) in
your text editor or IDE, if it is not already
open.
2. Delete the existing year validations
(Script 6.6).
You’ll entirely rewrite these conditionals
as one nested conditional, so it’s best to
get rid of the old versions entirely.
Script 6.6 Here the handling PHP script is
changed so that the year validation routine uses
both multiple and nested conditions. Also, the
terms of agreement checkbox is now validated.
1 <!doctype html>
2 <!doctype html>
3 <html lang="en">
4 <head>
5 <meta charset="utf-8">
6 <title>Registration</title>
7 <style type="text/css"
media="screen">
8 .error { color: red; }
9 </style>
10 </head>
11 <body>
12 <h1>Registration Results</h1>
13 <?php // Script 6.6 - handle_reg.php #5
14 /* This script receives seven values
from register.html:
15 email, password, confirm, year, terms,
color, submit */
16
17 // Address error management, if you
want.
18
19 // Flag variable to track success:
20 $okay = true;
21
22 // Validate the email address:
23 if (empty($_POST['email'])) {
24 print '<p class="error">Please enter
your email address.</p>';
25 $okay = false;
26 }
27
28 // Validate the password:
29 if (empty($_POST['password'])) {
30 print '<p class="error">Please enter
your password.</p>';
31 $okay = false;
32 }
33
34 // Check the two passwords for equality:
35 if ($_POST['password'] != $_
POST['confirm']) {
36 print '<p class="error">Your
confirmed password does not match the
original password.</p>';
37 $okay = false;
38 }
code continues on next page
ptg18144795
Control Structures 141
3. Check that the year variable is a four-
digit number:
if ( is_numeric($_POST['year'])
➝
AND (strlen($_POST['year'])
➝
== 4) ) {
This conditional has two parts. The first
you’ve already seen—it tests for a valid
numeric value. The second part gets
the length of the year variable (using
the
strlen()
function) and checks if
the length value is equal to 4. Because
of the
AND
, this conditional is TRUE only
if both conditions are met.
4. Create a subconditional to check if the
year value is before 2016:
if ($_POST['year'] < 2016) {
$age = 2016 - $_POST['year'];
} else {
print '<p class="error">
➝
Either you entered your birth
➝
year wrong or you come from
➝
the future!</p>';
$okay = FALSE;
} // End of 2nd conditional
This
if
-
else
conditional acts as the
statements
part of the main condi-
tional, and is thus executed only if
that condition is TRUE. This
if-else
checks whether the year variable is
less than 2016 (i.e., the user must have
been born before the current year). If
that condition is TRUE, the user’s age
is calculated as before. Otherwise, an
error message is printed and the
$okay
variable is set to FALSE (indicating that
a problem occurred).
Note that this conditional is just the
opposite of the previous version:
verifying that a value is less than some
number instead of greater than or equal
to that number.
continues on next page
Script 6.6 continued
39
40 // Validate the year:
41 if ( is_numeric($_POST['year']) AND
(strlen($_POST['year']) == 4) ) {
42
43 // Check that they were born before
2016.
44 if ($_POST['year'] < 2016) {
45 $age = 2016 - $_POST['year'];
// Calculate age this year.
46 } else {
47 print '<p class="error">Either
you entered your birth year
wrong or you come from the
future!</p>';
48 $okay = false;
49 } // End of 2nd conditional.
50
51 } else { // Else for 1st conditional.
52
53 print '<p class="error">Please
enter the year you were born as
four digits.</p>';
54 $okay = false;
55
56 } // End of 1st conditional.
57
58 // Validate the terms:
59 if ( !isset($_POST['terms'])) {
60 print '<p class="error">You must
accept the terms.</p>';
61 $okay = false;
62 }
63
64 // If there were no errors, print a
success message:
65 if ($okay) {
66 print '<p>You have been successfully
registered (but not really).</p>';
67 print "<p>You will turn $age this
year.</p>";
68 }
69 ?>
70 </body>
71 </html>
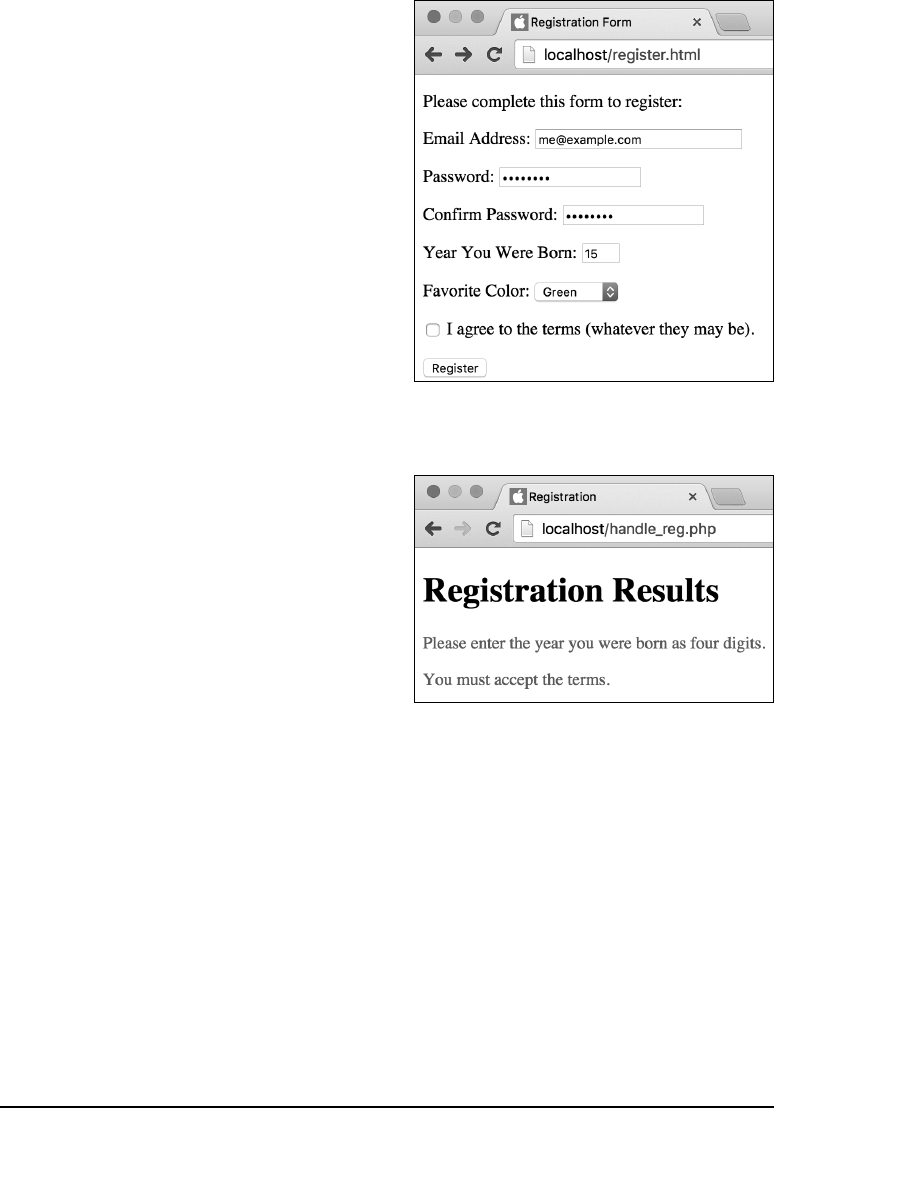
ptg18144795
142 Chapter 6
5. Complete the main year conditional:
} else { // Else for 1st
conditional.
print '<p class="error">Please
➝
enter the year you were born
➝
as four digits.</p>';
$okay = FALSE;
} // End of 1st conditional.
This
else
section completes the condi-
tional begun in Step 3. If at least one of
the conditions set forth there is FALSE,
this message is printed, and
$okay
is
set to FALSE.
6. Confirm that the terms checkbox wasn’t
ignored:
if (!isset($_POST['terms'])) {
print '<p class="error">You
➝
must accept the terms.</p>';
$okay = FALSE;
}
If the
$_POST['terms']
variable is not
set, then the user failed to select that
box, and an error should be reported.
To be more exact, this conditional
could be
if ( !isset($_POST['terms']) AND
➝
($_POST['terms'] != 'Yes') ) {
7. Those are the only changes to the script,
so you can now save it again, place it in
the same directory as
register.html
(on your PHP-enabled server), and test
it in your browser again C and D.
C The PHP script now catches if the year isn’t
a four-digit number, as will be the case with this
form submission.
D Error messages are printed if fields are
incorrectly filled out or if the terms checkbox is
not selected.
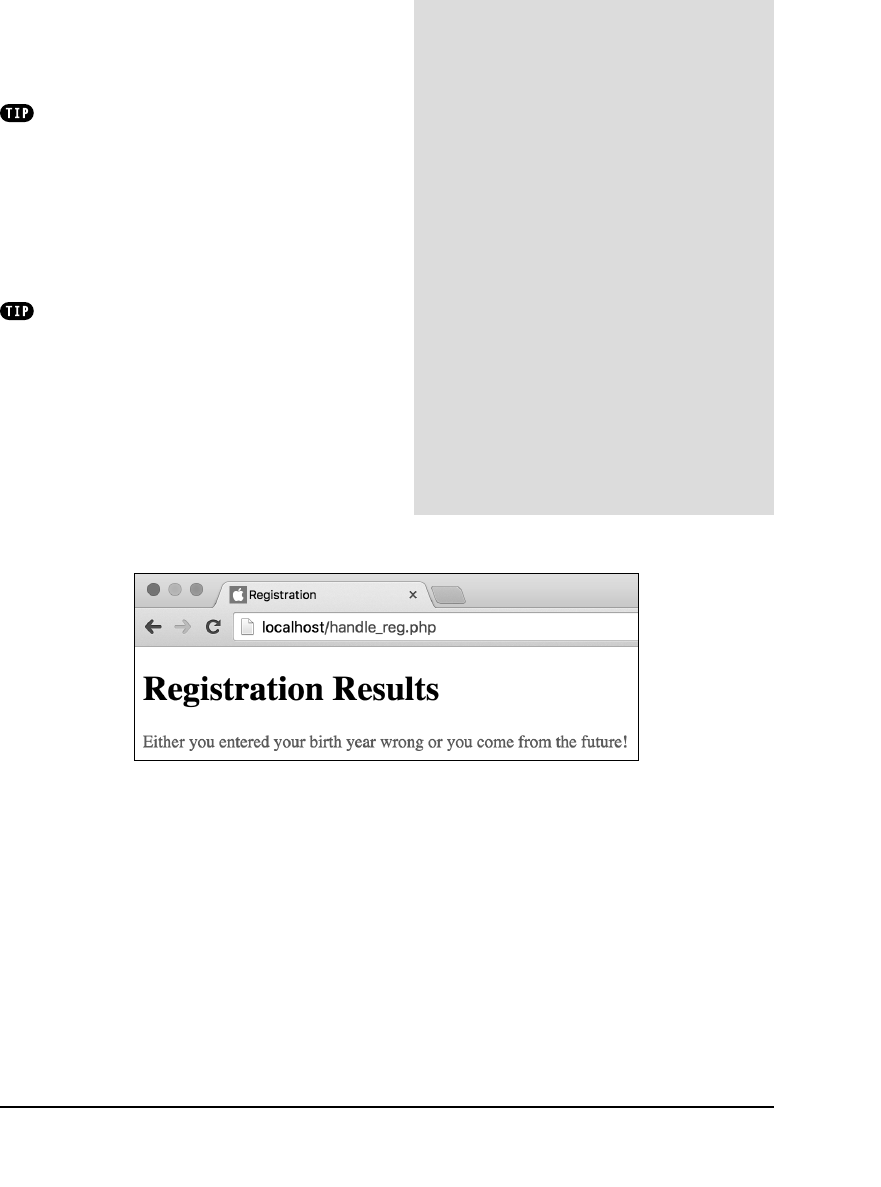
ptg18144795
Control Structures 143
8. If desired, change your
year
value to
be in the future, and submit the form
again E.
It’s very easy in long, complicated
conditionals to forget an opening or closing
parenthesis or brace, which will produce either
error messages or unexpected results. Find
a system (like spacing out your conditionals
and using comments) to help clarify your code.
Another good technique is to create the condi-
tional’s entire structure first, and then go back
to add the details.
If you have problems getting your
if-else
statements to execute, print out the
values of your variables to help debug the
problem. A conditional may not be TRUE or
FALSE because a variable doesn’t have the
value you think it does.
E The year validation still checks that the date is before 2016.
The Null Coalescing Operator
New in PHP 7 is the null coalescing
operator, which is a fancy name for a
useful shortcut. Often you’ll want to
check if a variable has a value and, if not,
assign a default value to it. Before PHP 7,
this would be done using code like
if (isset($_POST['var'])) {
$var = $_POST['var'];
} else {
$var = 'default value';
}
Thanks to the null coalescing operator,
??
, that code can be abbreviated to
$var = $_POST['var'] ?? 'default
➝
value';
The result is semantically the same, but
the latter requires one-fourth as many lines
of code.
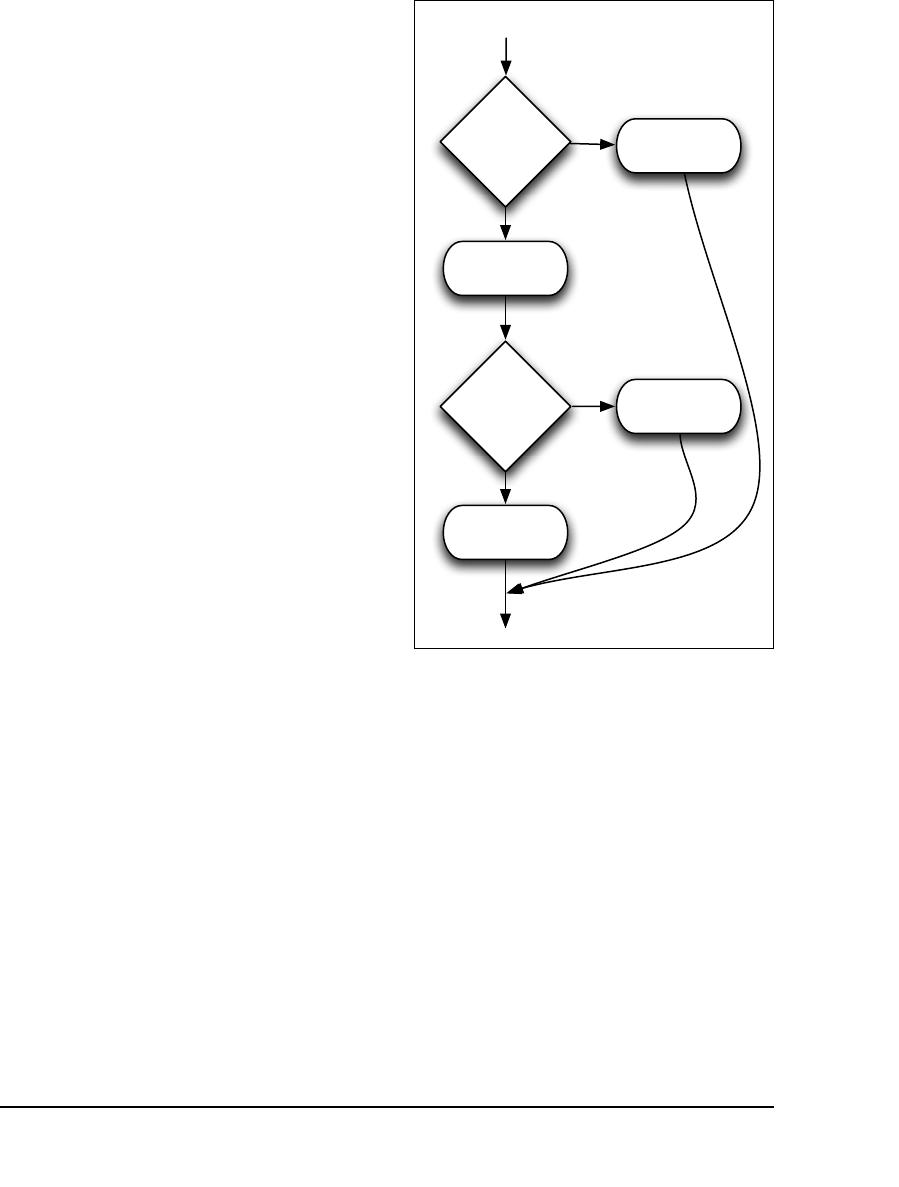
ptg18144795
144 Chapter 6
Using elseif
Similar to the
if
-
else
conditional is
if
-
elseif
(or
if
-
elseif
-
else
). This condi-
tional acts like a running
if
statement and
can be expanded to whatever complexity
you require:
if (condition1) {
statement(s);
} elseif (condition2) {
other_statement(s);
}
Here’s another example A:
if (condition1) {
statement(s);
} elseif (condition2) {
other_statement(s);
} else {
other_other_statement(s);
}
Understand that this structure means,
for example, that
other_statement(s)
are
only executed if
condition1
is FALSE but
condition2
is TRUE. If both conditions are
FALSE, the
other_other_statement(s)
are
executed.
If the
else
is present, you must always make
it the last part of a conditional because
it’s executed unless one of the conditions
to that point has been met (again,
else
represents the
default
behavior). You can,
however, continue to use
elseif
s as many
times as you want as part of one
if
condi-
tional. You may also forgo an
else
clause if
you don’t need a default result.
As an example of this, let’s create a condi-
tional that prints a message based on the
selected color value.
A How an
if-elseif-else
conditional affects the
program flow of a script.

ptg18144795
Control Structures 145
To use elseif:
1. Open
handle_reg.php
(Script 6.6) in
your text editor or IDE, if it is not already
open.
2. Before the
$okay
conditional, begin a
new conditional (Script 6.7):
if ($_POST['color'] == 'red') {
$color_type = 'primary';
The color value comes from a select
menu with four possible options:
red
,
yellow
,
green
, and
blue
. This condi-
tional will determine whether the user
has selected a primary—red, yellow, or
blue—or secondary (all others) color.
The first condition checks if the value
of
$_POST['color']
is equal to the
string
red
.
Be certain to use the
equality
operator
—two equals signs—and not the
assign-
ment
operator—one—in the conditional.
3. Add an
elseif
clause for the second
color:
} elseif ($_POST['color'] ==
➝
'yellow') {
$color_type = 'primary';
The
elseif
continues the main condi-
tional begun in Step 2. The condition
itself is a replication of the condition in
Step 2, using a new color comparison.
continues on next page
Script 6.7 This multiline
if-elseif-else
conditional validates that a submitted color has an
allowed value and is used to determine what type
of color the selection is.
1 <!doctype html>
2 <html lang="en">
3 <head>
4 <meta charset="utf-8">
5 <title>Registration</title>
6 <style type="text/css"
media="screen">
7 .error { color: red; }
8 </style>
9 </head>
10 <body>
11 <h1>Registration Results</h1>
12 <?php // Script 6.7 - handle_reg.php #6
13 /* This script receives seven values
from register.html:
14 email, password, confirm, year, terms,
color, submit */
15
16 // Address error management, if you
want.
17
18 // Flag variable to track success:
19 $okay = true;
20
21 // Validate the email address:
22 if (empty($_POST['email'])) {
23 print '<p class="error">Please enter
your email address.</p>';
24 $okay = false;
25 }
26
27 // Validate the password:
28 if (empty($_POST['password'])) {
29 print '<p class="error">Please enter
your password.</p>';
30 $okay = false;
31 }
32
33 // Check the two passwords for equality:
34 if ($_POST['password'] != $_
POST['confirm']) {
35 print '<p class="error">Your
confirmed password does not match the
original password.</p>';
36 $okay = false;
37 }
38
code continues on next page
ptg18144795
146 Chapter 6
4. Add
elseif
clauses for the other two
colors:
} elseif ($_POST['color'] ==
➝
'green') {
$color_type = 'secondary';
} elseif ($_POST['color'] ==
➝
'blue') {
$color_type = 'primary';
Once you understand the main con-
cept, it’s just a matter of repeating the
elseif
s for every possible color value.
5. Add an
else
clause:
} else {
print '<p class="error">
➝
Please select your favorite
➝
color.</p>';
$okay = FALSE;
}
If the user didn’t select a color, or if the
user manipulated the form to submit
a different color value (other than
red
,
yellow
,
green
, or
blue
), none of the
conditions will be TRUE, meaning this
else
clause will take effect. That clause
prints an error and assigns a value of
FALSE to
$okay
, indicating a problem.
It doesn’t matter in what order the colors
are checked, so long as the
else
clause
comes last.
Script 6.7 continued
39 // Check the two passwords for equality:
40 if ($_POST['password'] != $_
POST['confirm']) {
41 print '<p class="error">Your
confirmed password does not match the
original password.</p>';
42 $okay = false;
43 }
44
45 // Validate the year:
46 if ( is_numeric($_POST['year']) AND
(strlen($_POST['year']) == 4) ) {
47
48 // Check that they were born before
2016.
49 if ($_POST['year'] < 2016) {
50 $age = 2016 - $_POST['year']; //
Calculate age this year.
51 } else {
52 print '<p class="error">Either you
entered your birth year wrong or
you come from the future!</p>';
53 $okay = false;
54 } // End of 2nd conditional.
55
56 } else { // Else for 1st conditional.
57
58 print '<p class="error">Please enter
the year you were born as four
digits.</p>';
59 $okay = false;
60
61 } // End of 1st conditional.
62
63 // Validate the terms:
64 if ( !isset($_POST['terms'])) {
65 print '<p class="error">You must
accept the terms.</p>';
66 $okay = false;
67 }
68
69 // Validate the color:
70 if ($_POST['color'] == 'red') {
71 $color_type = 'primary';
72 } elseif ($_POST['color'] ==
'yellow') {
73 $color_type = 'primary';
74 } elseif ($_POST['color'] == 'green')
{
code continues on next page
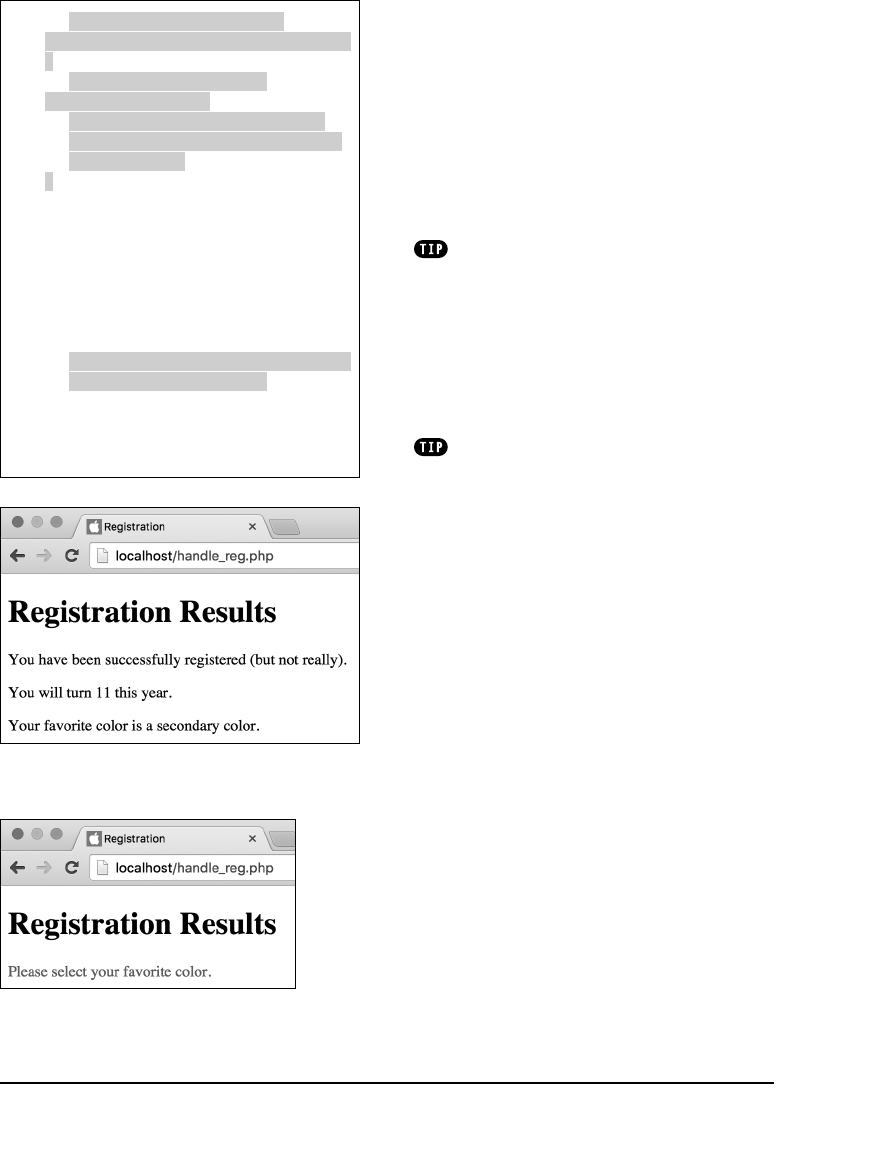
ptg18144795
Control Structures 147
6. Within the
$okay
conditional, print the
user’s favorite color type:
print "<p>Your favorite color is
➝
a $color_type color.</p>";
7. Save the script, place it in the same
directory as
register.html
(on your
PHP-enabled server), and test it in your
browser again, using different color
options B and C.
One thing most beginner developers
don’t realize is that it’s possible—in fact, quite
easy—for a hacker to submit data to your PHP
script without using your HTML form. It’s also
easy with modern browsers to manipulate
forms. For these reasons, it’s important that
you validate the existence of expected vari-
ables (i.e., that they are set), their type, and
their values.
PHP also allows you to write
elseif
as
two words, if you prefer:
if (condition1) {
statement(s);
} else if (condition2) {
statement(s)2;
}
Script 6.7 continued
75 $color_type = 'secondary';
76 } elseif ($_POST['color'] == 'blue')
{
77 $color_type = 'primary';
78 } else { // Problem!
79 print '<p class="error">Please
select your favorite color.</p>';
80 $okay = false;
81 }
82
83 // If there were no errors, print a
success message:
84 if ($okay) {
85 print '<p>You have been successfully
registered (but not really).</p>';
86 print "<p>You will turn $age this
year.</p>";
87 print "<p>Your favorite color is a
$color_type color.</p>";
88 }
89 ?>
90 </body>
91 </html>
B The script now prints a message
acknowledging the user’s color choice.
C Failure to select a color results in this
error message.
ptg18144795
148 Chapter 6
The Switch Conditional
Once you get to the point where you
have longer
if
-
elseif
-
else
conditionals,
you may find that you can save program-
ming time and clarify your code by using
a
switch
conditional instead. The
switch
conditional takes only one possible condi-
tion, normally just a variable:
switch ($var) {
case value1:
statement(s)1;
break;
case value2:
statement(s)2;
break;
default:
statement(s)3;
break;
}
You must understand how a
switch
con-
ditional works in order to use it properly.
After the keyword
switch
, a variable is
identified within parentheses. PHP will
then look at each case in order, trying to
identify a matching value. Note that, as
with any other use of strings and numbers
in PHP, numeric values would not be quoted;
string values should be. After the
case
value
section, a
colon
(not a semicolon)
prefaces the associated statements, which
are normally indented beginning on the
following line.
Once PHP finds a case that matches the
value of the conditional variable, it executes
the subsequent statements. Here’s the
tricky part: Once PHP has found a match-
ing case, it will continue going through the
switch
until it either comes to the end of
the
switch
conditional (the closing brace)
or hits a
break
statement, at which point it
exits the
switch
construct. Thus, it’s imper-
ative that you close every case—even the
Script 6.8 Switch conditionals can simplify
complicated
if-elseif
conditionals.
1 <!doctype html>
2 <html lang="en">
3 <head>
4 <meta charset="utf-8">
5 <title>Registration</title>
6 <style type="text/css"
media="screen">
7 .error { color: red; }
8 </style>
9 </head>
10 <body>
11 <h1>Registration Results</h1>
12 <?php // Script 6.8 - handle_reg.php #7
13 /* This script receives seven values
from register.html:
14 email, password, confirm, year, terms,
color, submit */
15
16 // Address error management, if you
want.
17
18 // Flag variable to track success:
19 $okay = true;
20
21 // Validate the email address:
22 if (empty($_POST['email'])) {
23 print '<p class="error">Please enter
your email address.</p>';
24 $okay = false;
25 }
26
27 // Validate the password:
28 if (empty($_POST['password'])) {
29 print '<p class="error">Please enter
your password.</p>';
30 $okay = false;
31 }
32
33 // Check the two passwords for equality:
34 if ($_POST['password'] != $_
POST['confirm']) {
35 print '<p class="error">Your
confirmed password does not match the
original password.</p>';
36 $okay = false;
37 }
38
code continues on next page
ptg18144795
Control Structures 149
default
case, for consistency’s sake—
with a
break
(the sidebar “Break, Exit, Die,
and Continue” discusses this keyword in
more detail).
This previous
switch
conditional is like a
rewrite of
if ($var == value1) {
statement(s)1;
} elseif ($variable == value2) {
statement(s)2;
} else {
statement(s)3;
}
Because the
switch
conditional uses the
value of
$var
as its condition, it first checks
to see if
$var
is equal to
value1
, and if so,
it executes
statement(s)1
. If not, it checks
to see if
$var
is equal to
value2
, and if so,
it executes
statement(s)2
. If neither condi-
tion is met, the default action of the
switch
conditional is to execute
statement(s)3
.
With this in mind, let’s rewrite the colors
conditional as a
switch
.
To use a switch conditional:
1. Open
handle_reg.php
(Script 6.7) in your
text editor or IDE, if it is not already open.
2. Delete the extended colors conditional
(Script 6.8).
3. Begin the
switch
:
switch ($_POST['color']) {
As mentioned earlier, a
switch
con-
ditional takes only one condition: a
variable’s name. In this example, it’s
$_POST['color']
.
continues on next page
Script 6.8 continued
39 // Validate the year:
40 if ( is_numeric($_POST['year']) AND
(strlen($_POST['year']) == 4) ) {
41
42 // Check that they were born before
2016.
43 if ($_POST['year'] < 2016) {
44 $age = 2016 - $_POST['year']; //
Calculate age this year.
45 } else {
46 print '<p class="error">Either you
entered your birth year wrong or
you come from the future!</p>';
47 $okay = false;
48 } // End of 2nd conditional.
49
50 } else { // Else for 1st conditional.
51
52 print '<p class="error">Please enter
the year you were born as four
digits.</p>';
53 $okay = false;
54
55 } // End of 1st conditional.
56
57 // Validate the terms:
58 if ( !isset($_POST['terms'])) {
59 print '<p class="error">You must
accept the terms.</p>';
60 $okay = false;
61 }
62
63 // Validate the color:
64 switch ($_POST['color']) {
65 case 'red':
66 $color_type = 'primary';
67 break;
68 case 'yellow':
69 $color_type = 'primary';
70 break;
71 case 'green':
72 $color_type = 'secondary';
73 break;
74 case 'blue':
75 $color_type = 'primary';
76 break;
77 default:
code continues on next page

ptg18144795
150 Chapter 6
4. Create the first case:
case 'red':
$color_type = 'primary';
break;
The first case checks to see if
$_POST['color']
has a value of
red
.
If so, then the same statement is
executed as before. Next you include
a
break
statement to exit the
switch
.
5. Add a case for the second color:
case 'yellow':
$color_type = 'primary';
break;
6. Add cases for the remaining colors:
case 'green':
$color_type = 'secondary';
break;
case 'blue':
$color_type = 'primary';
break;
Script 6.8 continued
78 print '<p class="error">Please
select your favorite color.</
p>';
79 $okay = false;
80 break;
81 } // End of switch.
82
83 // If there were no errors, print a
success message:
84 if ($okay) {
85 print '<p>You have been successfully
registered (but not really).</p>';
86 print "<p>You will turn $age this
year.</p>";
87 print "<p>Your favorite color is a
$color_type color.</p>";
88 }
89 ?>
90 </body>
91 </html>
Break, Exit, Die, and Continue
PHP includes many
language constructs
—tools that aren’t functions but still do something in your
scripts. For example,
print
is a language construct. Another example is
break
, which is demon-
strated in the
switch
. A
break
exits the current structure, be it a
switch
, an
if
-
else
conditional,
or a loop.
Similar to this is
continue
, which terminates the current iteration of a loop. Any remaining state-
ments within the loop aren’t executed, but the loop’s condition is checked again to see if the loop
should be entered.
exit
and
die
are more potent versions of
break
(and they’re synonymous). Instead of exiting
the current structure, these two language constructs terminate the execution of the PHP script.
Therefore, all PHP code after a use of
exit
or
die
is never executed. For that matter, any HTML
after these constructs is never sent to the browser. You’ll see
die
used most frequently as a
heavy-handed error handling tool.
exit
is often used in conjunction with the
header()
function.
You’ll see an example of this in Chapter 8, “Creating Web Applications.”

ptg18144795
Control Structures 151
7. Add a
default
case and complete the
switch:
default:
print '<p class="error">
➝
Please select your favorite
➝
color.</p>';
$okay = FALSE;
break;
} // End of switch.
This
default
case is the equivalent
of the
else
clause used in the original
conditional.
8. Save your script, place it in the same
directory as
register.html
(on your
PHP-enabled server), and test it in your
browser again A and B.
A
default
case isn’t required in your
switch
conditional, but if it’s used, it should
be the last case. You could set up a
switch
so
that if the value isn’t explicitly met by one of
the cases, nothing happens.
If you’re using a string in your
switch
conditional as the case value, keep in mind
that it’s case sensitive, meaning that Value
won’t match value.
You can structure switch conditionals
such that more than one case has the same
result. However, that kind of programming,
which requires sound knowledge of PHP’s
behavior, is unnecessarily clever for the begin-
ning programmer.
A The handling script still works the same,
whether the user selects a color…
B …or fails to.
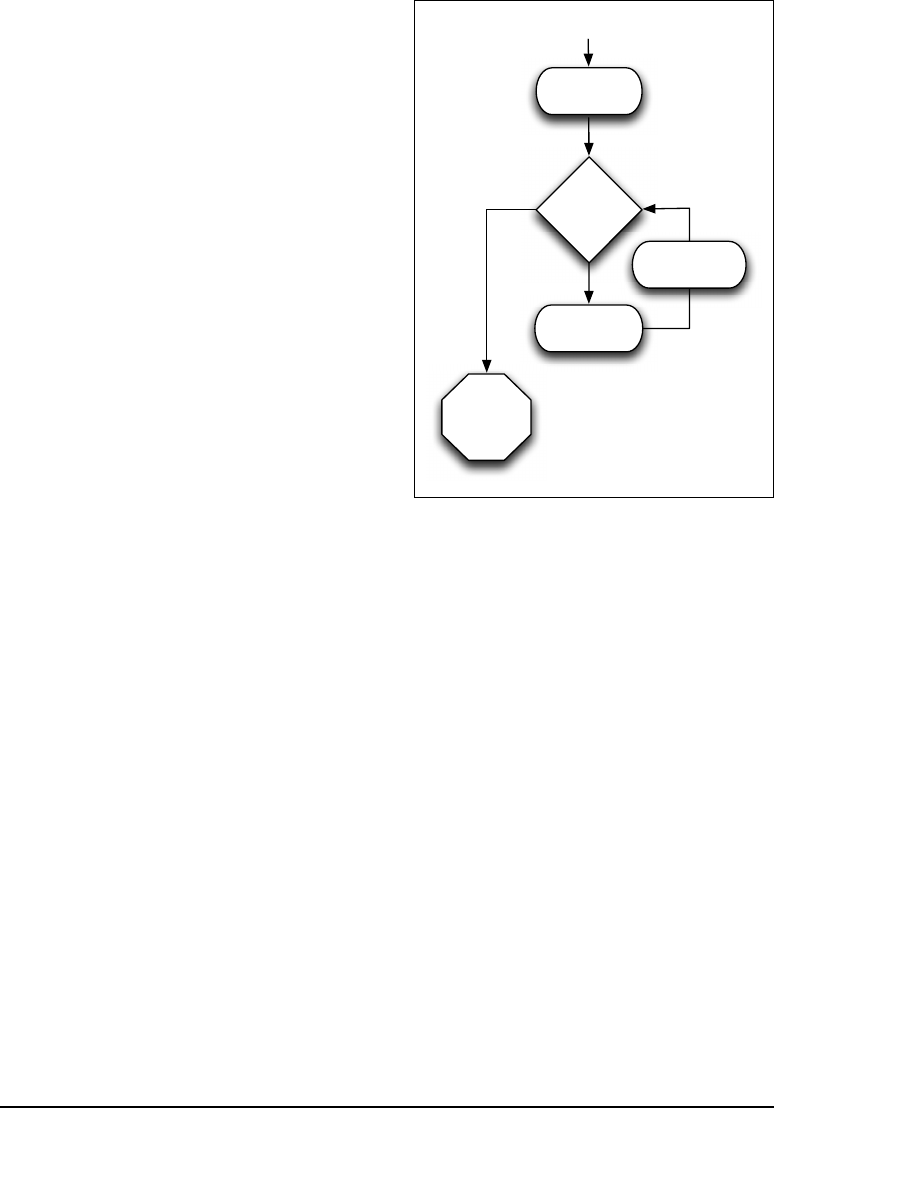
ptg18144795
152 Chapter 6
The for Loop
Loops are the final type of control structure
discussed in this chapter. As suggested
earlier, loops are used to execute a section
of code repeatedly. You may want to print
something a certain number of times, or you
may want to do something with each value
in an array (an array is a list of values). For
either of these cases, and many more, you
can use a loop. (The latter example is dem-
onstrated in the next chapter.)
PHP supports three kinds of loops:
for
,
while
, and
foreach
. The
while
loop is
similar to
for
, but it’s used most frequently
when retrieving values from a database or
reading from a text file (it’s introduced in
the sidebar “The while Loop” and covered
in more detail in the next chapter). The
foreach
loop is related to using arrays and
is introduced in the next chapter.
The
for
loop is designed to perform one
or more statements for a determined
number of iterations (unlike
while
, which
runs until a condition is FALSE—similar,
but significantly different, concepts). You
normally use a dummy variable in the loop
for this purpose:
for (initial expression; condition;
➝
closing expression) {
statement(s);
}
The initial expression is executed once:
the first time the loop is called. Then the
condition is used to determine whether
to execute the statements. The closing
expression is executed each time the con-
dition is found to be TRUE, but only after
the statements are executed A.
A This flowchart represents how a
for
loop is
executed in PHP.
ptg18144795
Control Structures 153
Here’s a simple loop that prints out the
numbers 1 through 10:
for ($i = 1; $i <= 10; $i++) {
print $i;
}
To practice with the
for
loop, let’s expand
the registration form so that it asks users
for their complete birthday. A
for
loop can
be used to easily create a day drop-down
menu in the HTML form.
To write a for loop:
1. Open
register.html
(Script 6.1) in your
text editor or IDE, if it is not already
open.
2. Remove the existing birth year prompt
and input (Script 6.9).
You’ll replace this one prompt with three
separate elements to represent the
entire birthday: month, day, and year.
3. Where the birth year prompt was, after
the password confirmation and before
the color option, add a prompt and a list
of months:
<p>Date Of Birth:
<select name="month">
<option value="">Month</option>
<option value="1">January</
➝
option>
<option value="2">February</
➝
option>
<option value="3">March</option>
<option value="4">April</option>
<option value="5">May</option>
<option value="6">June</option>
<option value="7">July</option>
<option value="8">August</option>
<option value="9">September</
➝
option>
continues on next page
Script 6.9 This script uses a PHP
for
loop to
dynamically generate the day of the month drop-
down menu.
1 <!doctype html>
2 <html lang="en">
3 <head>
4 <meta charset="utf-8">
5 <title>Registration Form</title>
6 </head>
7 <body>
8 <!-- Script 6.9 - register.php -->
9 <div><p>Please complete this form to
register:</p>
10
11 <form action="handle_reg.php"
method="post">
12
13 <p>Email Address: <input type="text"
name="email" size="30"></p>
14
15 <p>Password: <input type="password"
name="password" size="20"></p>
16
17 <p>Confirm Password: <input
type="password" name="confirm"
size="20"></p>
18
19 <p>Date Of Birth:
20 <select name="month">
21 <option value="">Month</option>
22 <option value="1">January</option>
23 <option value="2">February</
option>
24 <option value="3">March</option>
25 <option value="4">April</option>
26 <option value="5">May</option>
27 <option value="6">June</option>
28 <option value="7">July</option>
29 <option value="8">August</option>
30 <option value="9">September</
option>
31 <option value="10">October</
option>
32 <option value="11">November</
option>
33 <option value="12">December</
option>
34 </select>
35 <select name="day">
36 <option value="">Day</option>
code continues on next page

ptg18144795
154 Chapter 6
<option value="10">October</
➝
option>
<option value="11">November</
➝
option>
<option value="12">December</
➝
option>
</select>
First is a textual prompt, telling users to
supply their entire date of birth. Next
comes a select menu in which users
can pick their birth month. The value for
each option is numeric; the viewed text
is a string (the month’s name).
4. Begin a select menu for the day of the
month the user was born:
<select name="day">
<option value="">Day</option>
This code starts the
select
form ele-
ment. The list of possible values will be
generated using PHP.
5. Create a new PHP section:
<?php
Because PHP can be embedded within
HTML, you’ll use it to populate the drop-
down menu. Begin with the standard
PHP tag.
Script 6.9 continued
37 <?php // Print out 31 days:
38 for ($i = 1; $i <= 31; $i++) {
39 print "<option
value=\"$i\">$i</option>\n";
40 }
41 ? >
42 </select>
43 <input type="text" name="year"
value="YYYY" size="4"></p>
44
45 <p>Favorite Color:
46 <select name="color">
47 <option value="">Pick One</option>
48 <option value="red">Red</option>
49 <option value="yellow">Yellow</
option>
50 <option value="green">Green</option>
51 <option value="blue">Blue</option>
52 </select></p>
53
54 <p><input type="checkbox"
name="terms" value="Yes"> I agree to
the terms (whatever they may be).</p>
55
56 <input type="submit" name="submit"
value="Register">
57
58 </form>
59
60 </div>
61 </body>
62 </html>
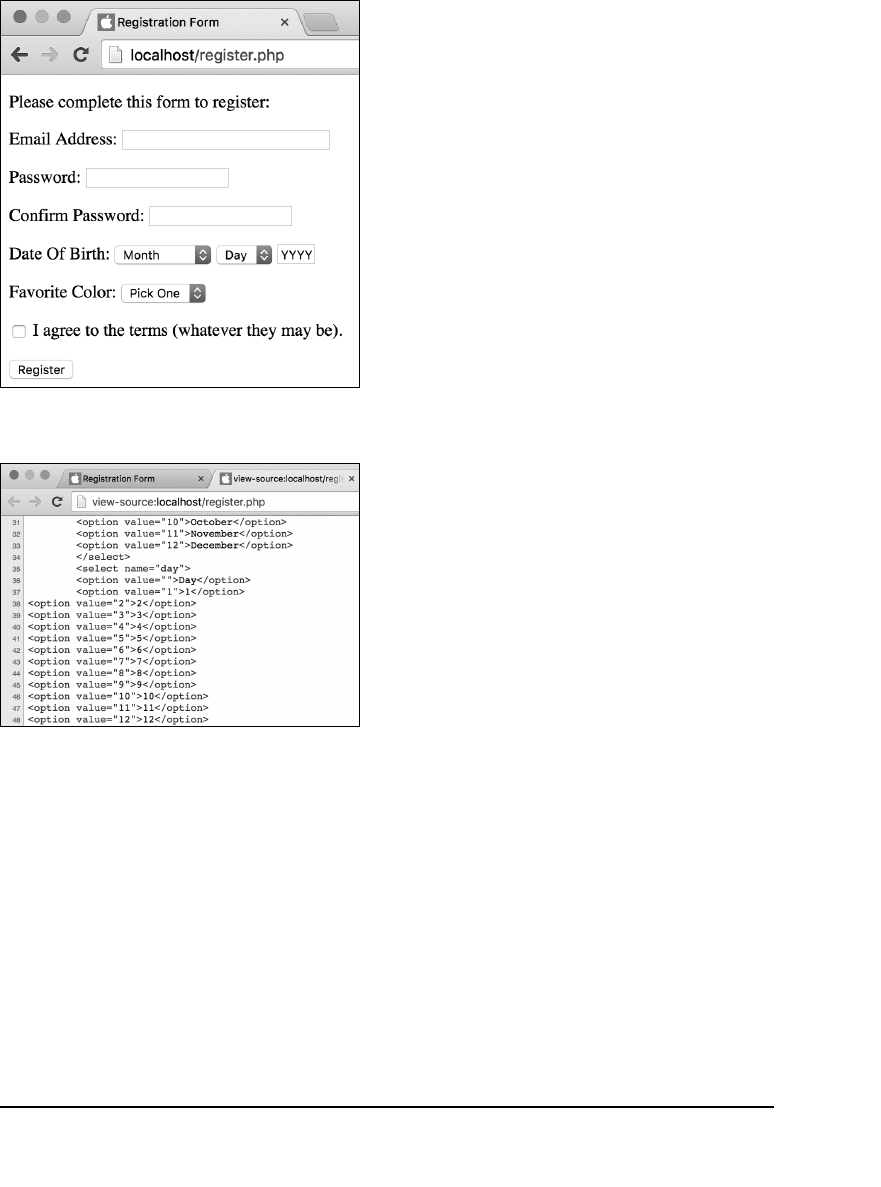
ptg18144795
Control Structures 155
6. Create a
for
loop to print out 31 days as
select menu options:
for ($i = 1; $i <= 31; $i++) {
print "<option
value=\"$i\">$i</option>\n";
}
The loop begins by creating a dummy
variable named
$i
. On the first use of
the loop, this variable is set to 1. Then,
as long as
$i
is less than or equal to 31,
the contents of the loop are executed.
These contents are the
print
line,
which creates code like
<option value="1">1</option>
followed by a return (created with
\n
).
After this statement is executed, the
$i
variable is incremented by 1. Then the
condition (
$i <= 31
) is checked again,
and the process is repeated.
7. Close the PHP section, and the select
element:
?>
</select>
8. Save the file as
register.php
.
You must save the file with the
.php
extension now in order for the PHP
code to be executed.
9. Place the file in the proper directory for
your PHP-enabled server, and test it in
your browser B.
As long as this script is in the same
directory as
handle_reg.php
, you can
even fill out and submit the form as you
would with the plain HTML version.
10. If desired, view the HTML source code
to see the PHP-generated options C.
B The new version of the HTML form, with some
dynamically generated content.
C If you view the HTML source code for the form,
you’ll see the data generated by the
for
loop.

ptg18144795
156 Chapter 6
It’s conventional to use simple variables
as the counters within
for
loops:
$i
,
$j
,
$k
,
and so on.
Just as you can write the
if
conditional
on one line if you have only one statement,
you can do the same with the
while
and
for
loops. Again, though, this isn’t recommended.
Loops can be nested inside each other.
You can also place conditionals within loops,
loops within conditionals, and so forth.
Pay close attention to your loop’s condi-
tion so that the loop ends at some point.
Otherwise, you’ll create an infinite loop, and
the script will run and run and run.
The while Loop
The second of the three types of loops that exist in PHP—the
while
loop—is designed to continue
working as long as the condition you establish is TRUE. Like the
for
loop, it checks the value of
the condition before each iteration. Once the condition becomes FALSE, the
while
loop is exited:
while (condition) {
statement(s);
}
The main difference between
for
and
while
is that
while
doesn’t include a system for setting
initial conditions or for executing closing expressions.
You also have the option of using the
do...while
loop, which guarantees that the statements are
executed at least once (this isn’t necessarily true of the
while
loop):
do {
statement(s);
} while (condition);
Although there is a fair amount of overlap regarding when you can use the two major loop con-
structs (
while
and
for
), you’ll discover as you program that sometimes one is more logical than the
other. The
while
loop is frequently used in the retrieval of data from a database (see Chapter 12,
“Intro to Databases”).

ptg18144795
Control Structures 157
Review and Pursue
If you have any problems with the
review questions or the pursue prompts,
turn to the book’s supporting forum
(www.LarryUllman.com/forums/).
Review
n
What is the basic structure of an
if
conditional in PHP? An
if-else
conditional? An
if-elseif
? An
if-elseif-else
?
n
What are the differences between the
empty()
and
isset()
functions?
n
What is the
assignment
operator?
What is the equality operator?
n
Without knowing anything about
$var
,
will the following conditional be TRUE
or FALSE? Why?
if ($var = 'donut') {
n
What do these operators mean?
>
&&
>
||
>
!
n
What is the syntax of a
switch
conditional? When is a
switch
most
commonly used?
n
What is the syntax of a
for
loop?

ptg18144795
158 Chapter 6
Pursue
n
Check out the PHP manual’s pages for
the various operators.
n
Rewrite
handle_reg.php
so that it uses
a variable for the current year, instead
of hard-coding that value.
n
For debugging purposes, add code to
the beginning of the
handle_reg.php
script that prints out the values of the
received variables. Hint: There’s a short
and a long way to do this.
n
Rewrite one of the versions of
handle_reg.php
so that it prints the
user’s favorite color selection in the
user’s favorite color. Hint: You’ll want
to use CSS and concatenation.
n
Update
handle_reg.php
so that it
validates the user’s birthday by looking
at the three individual form elements:
month, day, and year. Create a variable
that represents the user’s birthday in
the format
XX/DD/YYYY
(again, you’ll
use concatenation for this).

ptg18144795
The next—and last—variable type you’ll
learn about in this book is the array. Arrays
are significantly different from numbers or
strings, and you can’t make the most of
programming in PHP without understand-
ing them.
Because of their unique nature, this chapter
will cover arrays more deliberately and
slowly than the other variable types. The
chapter begins with an introduction to the
concept, along with the basics of creating
and using arrays. Then it covers multidimen-
sional arrays and some of the array-related
functions. The chapter concludes with array-
string conversions and a demonstration on
how to create an array from an HTML form.
7
Using Arrays
In This Chapter
What Is an Array? 160
Creating an Array 162
Adding Items to an Array 166
Accessing Array Elements 170
Creating Multidimensional Arrays 173
Sorting Arrays 178
Transforming Between Strings
and Arrays 182
Creating an Array from a Form 186
Review and Pursue 191

ptg18144795
160 Chapter 7
What Is an Array?
Arrays constitute a complicated but very
useful notion. Whereas numbers and
strings are
scalar
variables—meaning they
always have only a single value—an array
is a collection of multiple values assembled
into one overriding variable. An array can
consist of numbers and/or strings and/or
other arrays, which allows this one variable
to hold exponentially more information
than a simple string or number can. For
example, if you wanted to create a grocery
list using strings, your code would look
something like this:
$item1 = 'apples';
$item2 = 'bananas';
$item3 = 'oranges';
For each added item, you’d need to create
a new string. This approach is cumbersome,
and it makes it difficult to refer back to the
entire list or any specific value later in your
code. You can greatly simplify matters by
placing your entire list into one array (say,
$items
), which contains everything you
need (Table 7.1).
As an array, your list can be added to, sorted,
searched, and so forth. With this context in
mind, let’s look into the syntax of arrays.
TABLE 7.1 Grocery List Array
Item Number Item
1 apples
2 bananas
3 oranges

ptg18144795
Using Arrays 161
Syntactical rules for arrays
The other variable types you’ve dealt
with—numbers and strings—have a vari-
able name and a corresponding value (for
example,
$first_name
could be equal to
Larry
). Arrays also have a name, derived
using the same conventions:
n
They begin with a dollar sign.
n
They continue with a letter or
underscore.
n
They finish with any combination of let-
ters, numbers, or the underscore.
But arrays differ in that they contain multi-
ple
elements
. Think of each row in Table 7.1
as an element. An element consists of an
index
or
key
—the two words can be used
interchangeably—and a value. In Table 7.1,
the Item Number is the key, and the Item is
the value.
An array’s index is used as a reference
point to the values. An array can use either
numbers or strings as its keys, or both,
depending on how you set it up.
Generally, when you use an array it looks
the same as any other variable, except
that you include a key in brackets (
[]
,
sometimes referred to as
square brackets
)
to reference particular values. Whereas
$items
refers to the array as a whole,
$items[1]
points to a specific element in
the array (in this example,
apples
).
Superglobals and You
Throughout this book, you’ve already
dealt with some arrays:
$_SERVER
,
$_GET
, and
$_POST
. These are all special
arrays known as
superglobals
, along
with
$_COOKIE
,
$_SESSION
, and
$_ENV
.
As you know, the
$_POST
array receives
all the data sent to the page from a form
that uses the POST method. Its indexes
are the names of the form elements, and
its values are the values of those form
elements. Therefore,
$_POST['name']
refers to the value typed in a form input
created by the code
<input type="text" name="name">
Similarly,
$_GET
refers to data sent from a
form using the GET method or from data
otherwise passed in the URL.
$_COOKIE
refers to data stored in a cookie, and
$_SESSION
refers to data stored in a
session (you’ll encounter these two in
Chapter 9, “Cookies and Sessions”).
$_ENV
is like
$_SERVER
, containing values
pertaining to the computer on which PHP
is running.

ptg18144795
162 Chapter 7
Creating an Array
The formal method of creating an array is
to use the
array()
function. Its syntax is
$list = array('apples', 'bananas',
➝
'oranges');
Arrays automatically begin their indexing
at 0, unless otherwise specified. In that
example—which doesn’t specify an index
for the elements—the first item,
apples
,
is automatically indexed at 0, the second
item at 1, and the third at 2.
If you desire, you can assign the index
when using
array()
:
$list = array(1 => 'apples', 2 =>
➝
'bananas', 3 => 'oranges');
Because PHP is very liberal when it comes
to blank space in your code, you can make
this structure easier to read by writing it
over multiple lines:
$list = array(
1 => 'apples',
2 => 'bananas',
3 => 'oranges'
);
(For better legibility, it’s common to
indent the array elements as shown here,
although this is not required.)
As of PHP 5.4, you can also create arrays
using the
short array syntax
. Simply use
brackets instead of a call to
array()
:
$list = ['apples', 'bananas',
➝
'oranges'];
Naturally, you can set the indexes with this
syntax as well:
$list = [
1 => 'apples',
2 => 'bananas',
3 => 'oranges'
];
Finally, the index value you specify doesn’t
have to be a number—you can use strings
instead. As an example, you could create
an array that records the soup of the day
for each day of the week, as in the follow-
ing script. This example will also demon-
strate how you can, and cannot, print out
an array (which has already been demon-
strated but is worth rehashing).

ptg18144795
Using Arrays 163
To create an array:
1. Begin a new document in your text
editor or IDE, to be named
soups1.php
(Script 7.1):
<!doctype html>
<html lang="en">
<head>
<meta charset="utf-8">
<title>No Soup for You!</title>
</head>
<body>
<h1>Mmm...soups</h1>
2. Begin the PHP section of the script, and
address error handling, if necessary:
<?php // Script 7.1 - soups1.php
If you don’t have
display_errors
enabled, or if
error_reporting
is set to
the wrong level, see Chapter 3, “HTML
Forms and PHP,” for the lines to include
here to alter those settings.
3. Create an array:
$soups = [
'Monday' => 'Clam Chowder',
'Tuesday' => 'White Chicken
➝
Chili',
'Wednesday' => 'Vegetarian'
];
This is the proper short array syntax
format for initializing—creating and
assigning a value to—an array in PHP,
using strings as the indices. Because
both the keys and values are strings, you
surround them with quotation marks. As
with all strings, you can use either single
or double quotation marks, as long as
you’re mindful of other quotation marks
that might be found within the string.
If you are not using at least PHP version
5.4, or if you prefer to be more explicit,
use the
array()
function instead.
continues on next page
Script 7.1 The
$soups
array contains three
elements and uses strings for its keys.
1 <!doctype html>
2 <html lang="en">
3 <head>
4 <meta charset="utf-8">
5 <title>No Soup for You!</title>
6 </head>
7 <body>
8 <h1>Mmm...soups</h1>
9 <?php // Script 7.1 - soups1.php
10 /* This script creates and prints out an
array. */
11 // Address error management, if you
want.
12
13 // Create the array:
14 $soups = [
15 'Monday' => 'Clam Chowder',
16 'Tuesday' => 'White Chicken
Chili',
17 'Wednesday' => 'Vegetarian'
18 ];
19
20 // Try to print the array:
21 print "<p>$soups</p>";
22
23 // Print the contents of the array:
24 print_r($soups);
25
26 ?>
27 </body>
28 </html>
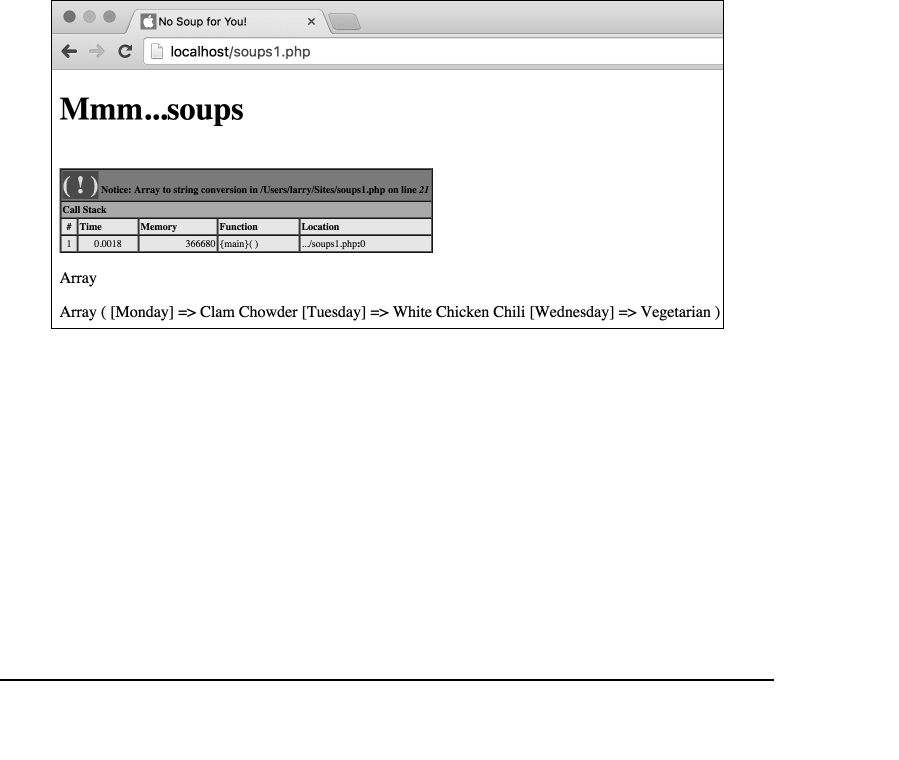
ptg18144795
164 Chapter 7
4. Attempt to print the array:
print "<p>$soups</p>";
As you’ve already seen, arrays are also
different from scalar variables in that
they can’t be printed using this syntax.
5. Use the
print_r()
function to print out
the array differently:
print_r($soups);
In Chapter 2, “Variables,” you learned
how to use
print_r()
to show the
contents and structure of any variable.
Use it here so you can see the differ-
ence between the way this function
and
print
work with arrays.
6. Close the PHP and the HTML sections:
?>
</body>
</html>
7. Save your document as
soups1.php
,
place it in the proper directory for your
PHP-enabled server, and test it in your
browser A.
Remember to run the PHP script
through a URL.
A Because an array is structured differently than other variable types, a request to print out
an array results in the word
Array
. On the other hand, the
print_r()
function prints the array’s
contents and structure.
ptg18144795
Using Arrays 165
The practice of beginning any index at 0
is standard in PHP and most other program-
ming languages. As unnatural as this counting
system may seem, it’s here to stay, so you
have two possible coping techniques. First,
manually start all your arrays indexed at posi-
tion 1. Second, unlearn a lifetime of counting
from 1. You can decide which is easier, but
most programmers just get used to this odd
construct.
You must refer to an array’s elements via
the same index used to create the array. In the
$soups
example,
$soups[0]
has no value
even though the array obviously has a first ele-
ment (the first element normally being indexed
at 0 numerically).
With numeric indexes, you can set the
first index and the others will follow sequen-
tially. For example:
$list = [1 => 'apples', 'bananas',
➝
'oranges'];
Now bananas is indexed at 2 and oranges at 3.
B The
var_dump()
function (used with Script 7.1 instead of the
print_r()
function) shows how many elements are in an array and how long each string
value is.
The
range()
function can also be used
to create an array of items based on a range of
values. Here are two examples:
$ten = range(1, 10);
$alphabet = range('a', 'z');
The
range()
function includes a step param-
eter that lets you specify increments:
$evens = range (0, 100, 2);
If you use the
var_dump()
function
in your script in lieu of
print_r()
, it shows
not only the contents of the array but also its
structure in a more detailed format B.
An array whose keys are numbers is
known as an indexed array. If the keys are
strings, it’s referred to as an associative array.
Other languages refer to associative arrays
as hashes.

ptg18144795
166 Chapter 7
Adding Items
to an Array
In PHP, once an array exists, you can
add extra elements to the array with the
assignment operator (the equals sign), in a
way similar to how you assign a value to a
string or a number. When doing so, you can
specify the key of the added element or
not specify it, but in either case, you must
refer to the array with brackets.
Here’s a definition of the
$list
array:
$list = [
1 => 'apples',
2 => 'bananas',
3 => 'oranges'
];
To add two items to that, you’d write
$list[] = 'pears';
$list[] = 'tomatoes';
If you don’t specify the key, each element
is appended to the existing array, indexed
with the next sequential number. Now
pears
is located at 4 and
tomatoes
at 5.
If you do specify the index, the value is
assigned at that location. Any existing
value already indexed at that point is over-
written, like so:
$list[3] = 'pears';
$list[4] = 'tomatoes';
Now, the value of the element in the fourth
position of the array is
tomatoes
, and no
element of
$list
is equal to
oranges
(that
value was overwritten by
pears
). With this
in mind, unless you intend to overwrite any
existing data, you’ll be better off not naming
a specific key when adding values to your
arrays. However, if the array uses strings for
indices, you’ll probably want to specify keys
so that you don’t end up with an unusual
combination of string keys and numeric keys.
Deleting Arrays and Array
Elements
You won’t frequently need to delete
an individual item from an array, but it’s
possible to do using the
unset()
func-
tion. This function eliminates a variable
and frees up the memory it used. When
applied to an array element, that element
is deleted:
unset($array[4]);
unset($array['key']);
Removing a single element will not
re-index the array, however. The code
removes one element, no element is now
indexed at 4, and every other element
continues to be indexed where they were.
If you apply
unset()
to an entire array or
any other variable type, the whole vari-
able is deleted:
unset($array);
unset($string);
You can also
reset
an array (empty it
without deleting the variable altogether)
using the
array()
function or short
array syntax:
$array = array();
$array = [];
This has the effect of initializing the vari-
able: making it exist and defining its type
without assigning a value.
ptg18144795
Using Arrays 167
To test this process, in the following task
you’ll rewrite
soups1.php
to add more ele-
ments to the array. To see the difference
adding more elements makes, you’ll print
out the number of elements in the array
before and after the new additions. Just
as you can find the length of a string—how
many characters it contains—by using
strlen()
, you can determine the number
of elements in an array by using
count()
:
$how_many = count($array);
To add elements to an array:
1. Open
soups1.php
in your text editor or
IDE, if it is not already open.
2. After the array is initialized on lines 14
through 18, add the following (Script 7.2,
to be named
soups2.php
):
$count1 = count($soups);
print "<p>The soups array
➝
originally had $count1
➝
elements.</p>";
The
count()
function determines
how many elements are in
$soups
. By
assigning that value to a variable, you
can easily print out the number.
3. Add three more elements to the array:
$soups['Thursday'] = 'Chicken
➝
Noodle';
$soups['Friday'] = 'Tomato';
$soups['Saturday'] = 'Cream of
➝
Broccoli';
This code adds three more soups—
indexed at
Thursday
,
Friday
, and
Saturday
—to the existing array.
continues on next page
Script 7.2 You can directly add elements to an
array one at a time by assigning each element a
value with the assignment operator. The
count()
function will help you keep track of how many
elements the array contains.
1 <!doctype html>
2 <html lang="en">
3 <head>
4 <meta charset="utf-8">
5 <title>No Soup for You!</title>
6 </head>
7 <body>
8 <h1>Mmm...soups</h1>
9 <?php // Script 7.2 - soups2.php
10 /* This script creates and prints out an
array. */
11 // Address error management, if you
want.
12
13 // Create the array:
14 $soups = [
15 'Monday' => 'Clam Chowder',
16 'Tuesday' => 'White Chicken Chili',
17 'Wednesday' => 'Vegetarian'
18 ];
19
20 // Count and print the current number of
elements:
21 $count1 = count($soups);
22 print "<p>The soups array originally
had $count1 elements.</p>";
23
24 // Add three items to the array:
25 $soups['Thursday'] = 'Chicken
Noodle';
26 $soups['Friday'] = 'Tomato';
27 $soups['Saturday'] = 'Cream of
Broccoli';
28
29 // Count and print the number of
elements again:
30 $count2 = count($soups);
31 print "<p>After adding 3 more soups,
the array now has $count2 elements.
</p>";
32
33 // Print the contents of the array:
34 print_r($soups);
35
36 ?>
37 </body>
38 </html>
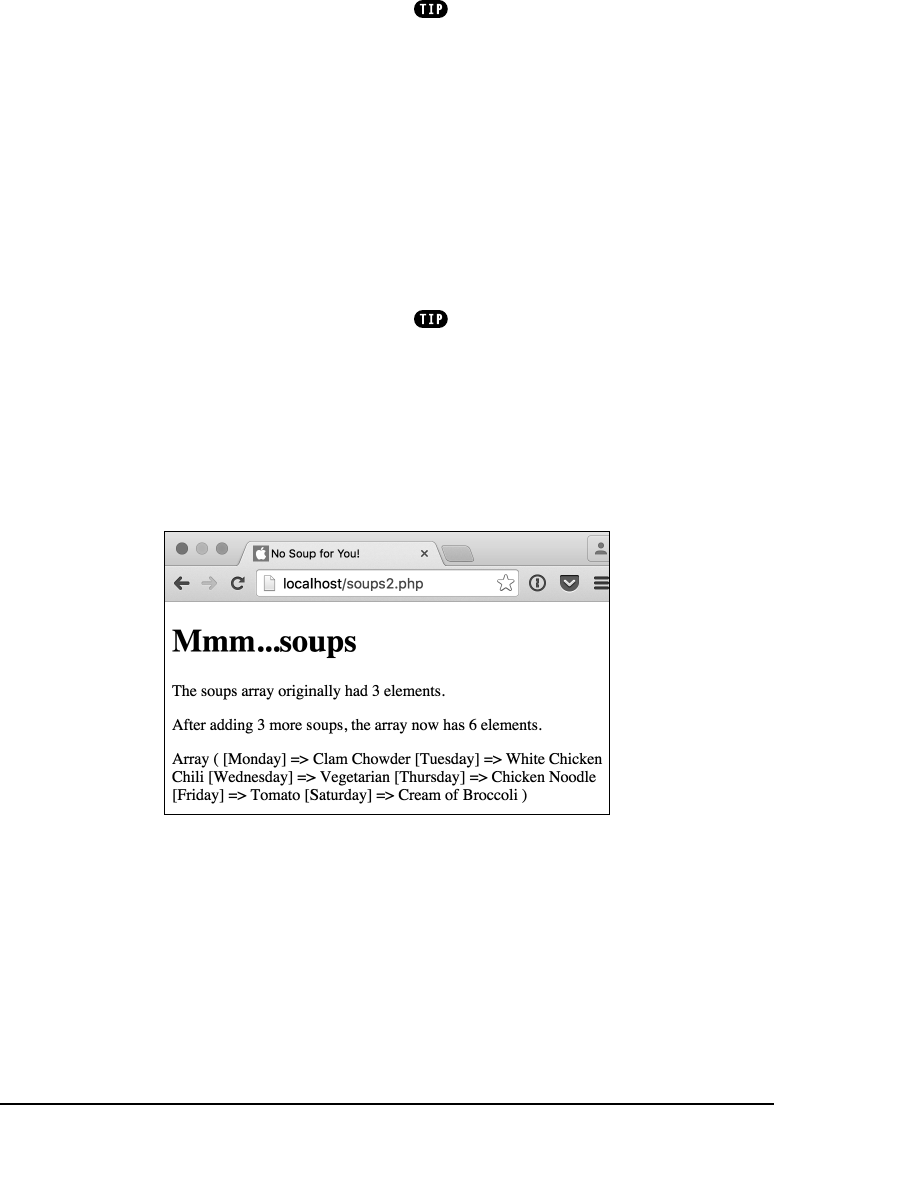
ptg18144795
168 Chapter 7
4. Recount how many elements are in the
array, and print out this value:
$count2 = count ($soups);
print "<p>After adding 3 more
➝
soups, the array now has
➝
$count2 elements.</p>";
This second
print
call is a repetition of
the first, showing how many elements
the array now contains.
5. Delete this line:
print "<p>$soups</p>";
This line isn’t needed anymore, so you
can get rid of it (you now know that you
can’t print out an array that easily).
6. Save your script as
soups2.php
, place
it in the proper directory for your
PHP-enabled server, and test it in your
browser A.
A A direct way to ensure that the new elements were
successfully added to the array is to count the number of
elements before and after you make the additions.
Be very careful when you directly add
elements to an array. There’s a correct way to
do it—
$array[] = 'Add This';
or
$array[1] = 'Add This';
—and an incorrect way:
$array = 'Add This';
If you forget to use the brackets, the new
value will replace the entire existing array,
leaving you with a simple string or number.
The code
$array[] = 'Value';
creates the
$array
variable if it doesn’t
yet exist.
ptg18144795
Using Arrays 169
While working with these arrays, I’m
using single quotation marks to enclose both
the keys and the values. Nothing needs to
be interpolated (like a variable), so double
quotation marks aren’t required. It’s perfectly
acceptable to use double quotation marks,
though, if you want to.
You don’t (and, in fact, shouldn’t) quote
your keys if they’re numbers, variables, or
constants (you’ll learn about constants in
Chapter 8, “Creating Web Applications”).
For example:
$day = 'Sunday';
$soups[$day] = 'Mushroom';
The
sizeof()
function is an alias to
count()
. It also returns the number of
elements in an array.
Merging Arrays
PHP has a function that allows you to append one array onto another. Think of it as concatena-
tion for arrays. The function,
array_merge()
, works like so:
$new_array = array_merge($array1, $array2);
You could also write the
soups2.php
page using this function:
$soups2 = [
'Thursday' => 'Chicken Noodle',
'Friday' => 'Tomato',
'Saturday' => 'Cream of Broccoli'
];
$soups = array_merge($soups, $soups2);
You could even accomplish this result with the plus sign (thus adding two arrays together):
$soups = $soups + $soups2;
or
$soups += $soups2;
A difference between using
array_merge()
and the plus sign is that
array_merge()
will
re-index the arrays in the new array, whereas the plus sign maintains the existing indexes.
Also, with array addition, only elements in the second array indexed at new positions are
added in. Any element in the second array indexed at the same position as an element in the
first array will be ignored.
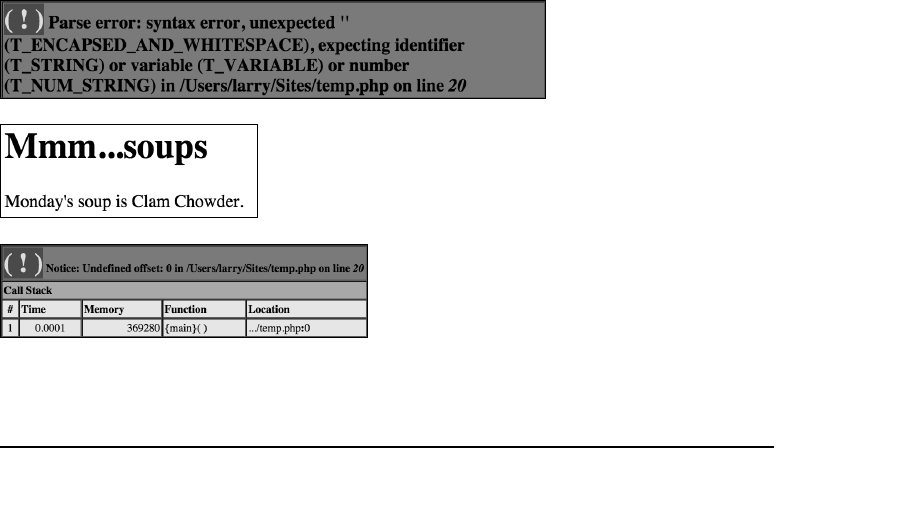
ptg18144795
170 Chapter 7
Accessing Array
Elements
Regardless of how you establish an array,
there’s only one way to retrieve a specific
element (or value) from it, and that is to
refer to its index:
print "The first item is $array[0]";
If the array uses strings for indexes, you
must quote the index, which results in a
problematic syntax when you’re trying to
print an individual array element A:
print "<p>Monday's soup is
➝
$soups['Monday'].</p>";
To combat this issue, wrap the whole array
construct within braces (aka curly brackets)
B:
print "<p>Monday's soup is
➝
{$soups['Monday']}.</p>";
Ironically, the feature that makes arrays so
useful—being able to store multiple values
in one variable—also gives it a limitation
A Referencing within double
quotation marks a specific
element in an associative
array will cause parse errors.
B Wrapping an array element
reference in braces is one way
to avoid parse errors.
C Referring to an array index that does
not exist will create an
Undefined offset
or
Undefined Index
notice.
that the other variable types don’t have:
You must know the keys of the array in
order to access its elements. If the array
was set using strings, like the
$soups
array,
then referring to
$soups[1]
points to noth-
ing C. For that matter, because
indexes
are case-sensitive
,
$soups['monday']
is
meaningless because
Clam Chowder
was
indexed at
$soups['Monday']
.
The fastest and easiest way to access all
the values of an array is to use a
foreach
loop. This construct loops through every
element of an array:
foreach ($array as $key => $value) {
print "<p>Key is $key. Value is
➝
$value</p>";
}
With each iteration of the loop, the current
array element’s key will be assigned to
the
$key
variable and the value to
$value
.
Note that you can use any variable name
here:
$k
and
$v
are likely choices, too.
You can now write a new soups script to
use this knowledge.

ptg18144795
Using Arrays 171
To print out the values of any array:
1. Begin a new document in your text
editor or IDE (Script 7.3, to be named
soups3.php
):
<!doctype html>
<html lang="en">
<head>
<meta charset="utf-8">
<title>No Soup for You!</title>
</head>
<body>
<h1>Mmm...soups</h1>
2. Start the PHP section of the page, and
address error management, if needed:
<?php // Script 7.3 - soups3.php
3. Create the
$soups
array:
$soups = [
'Monday' => 'Clam Chowder',
'Tuesday' => 'White Chicken
➝
Chili',
'Wednesday' => 'Vegetarian',
'Thursday' => 'Chicken
➝
Noodle',
'Friday' => 'Tomato',
'Saturday' => 'Cream of
➝
Broccoli'
];
Here the entire array is created at once,
although you could create the array
in steps, as in the preceding script, if
you’d rather.
continues on next page
Script 7.3 A
foreach
loop is the easiest way to
access every element in an array.
1 <!doctype html>
2 <html lang="en">
3 <head>
4 <meta charset="utf-8">
5 <title>No Soup for You!</title>
6 </head>
7 <body>
8 <h1>Mmm...soups</h1>
9 <?php // Script 7.3 - soups3.php
10 /* This script creates and prints out an
array. */
11
12 // Address error management, if you
want.
13
14 // Create the array:
15 $soups = [
16 'Monday' => 'Clam Chowder',
17 'Tuesday' => 'White Chicken Chili',
18 'Wednesday' => 'Vegetarian',
19 'Thursday' => 'Chicken Noodle',
20 'Friday' => 'Tomato',
21 'Saturday' => 'Cream of Broccoli'
22 ];
23
24 // Print each key and value:
25 foreach ($soups as $day => $soup) {
26 print "<p>$day: $soup</p>\n";
27 }
28
29 ?>
30 </body>
31 </html>
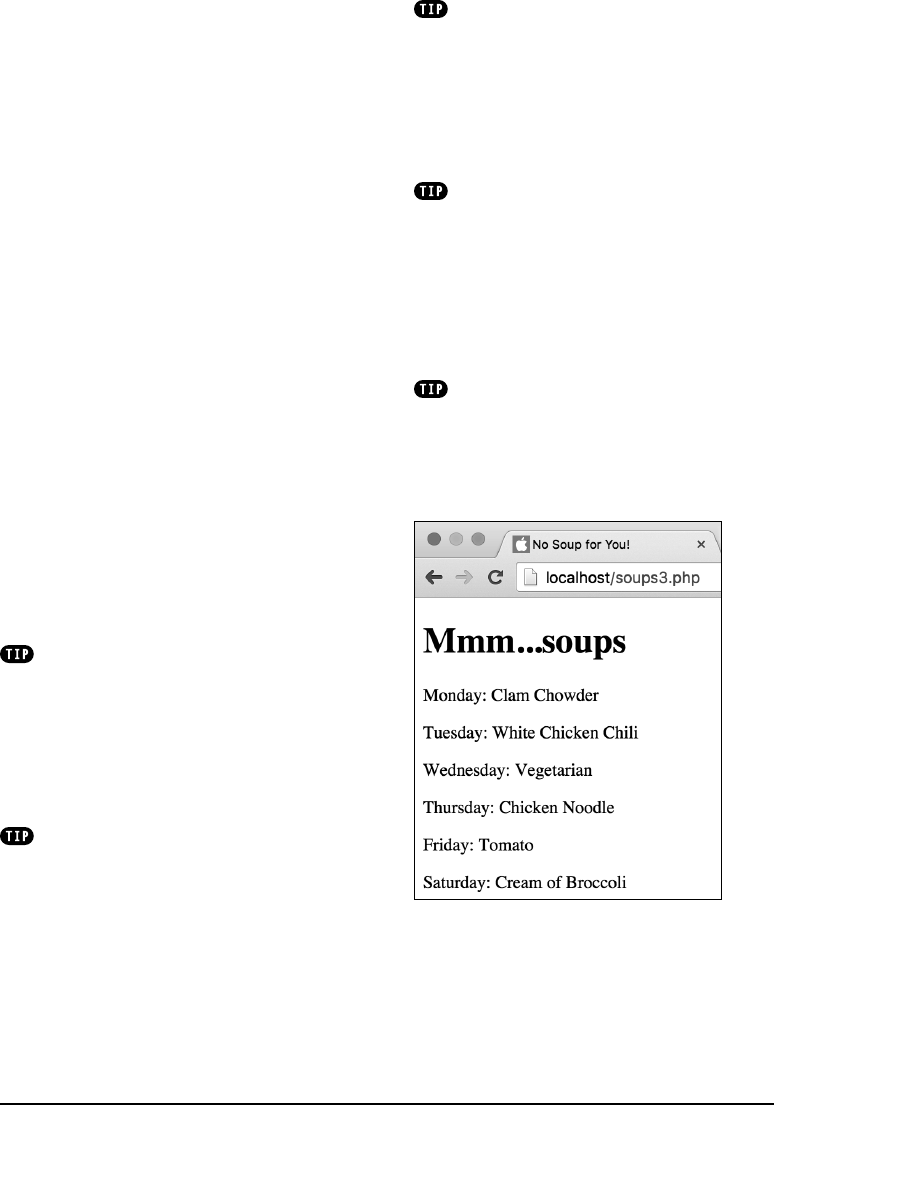
ptg18144795
172 Chapter 7
4. Create a
foreach
loop to print out each
day’s soup:
foreach ($soups as $day =>
➝
$soup) {
print "<p>$day: $soup</p>\n";
}
The
foreach
loop iterates through
every element of the
$soups
array,
assigning each index to
$day
and each
value to
$soup
. These values are then
printed out within HTML paragraph
tags. The
print
statement concludes
with a newline character (created by
\n
), which will make the HTML source
code of the page more legible.
5. Close the PHP section and the HTML
page:
?>
</body>
</html>
6. Save the page as
soups3.php
, place it
in the proper directory for your PHP-
enabled server, and test it in your
browser D.
One option for working with arrays is to
assign a specific element’s value to a separate
variable using the assignment operator:
$total = $array[1];
By doing this, you can preserve the original
value in the array and still manipulate the
value separately as a variable.
If you need to access only an array’s
values (and not its keys), you can use this
foreach
structure:
foreach ($array as $value) {
// Do whatever.
}
D The execution of the loop for every
element in the array generates this page.
The
foreach
construct allows the script to
access each key and value without prior
knowledge of what they are.
Another way to access all of a numeri-
cally indexed array’s elements is to use a
for
loop:
for ($n = 0; $n < count($array);
➝
$n++) {
print "The value is $array[$n]";
}
The braces are used to avoid errors
when printing array values that have strings
for keys. Here are two examples where using
quotation marks is not problematic, so the
braces aren’t required:
$name = trim($array['name']);
$total = $_POST['qty'] *
➝
$_POST['price'];
Braces can also be used to separate a
variable reference from a dollar sign or other
characters:
print "The total is ${$total}.";

ptg18144795
Using Arrays 173
Creating
Multidimensional
Arrays
Multidimensional arrays are both simple
and complicated at the same time. The
structure and concept may be somewhat
difficult to grasp, but creating and access-
ing multidimensional arrays in PHP is
surprisingly easy.
You use a multidimensional array to create
an array containing more information than
a standard array. You accomplish this by
using other arrays for values instead of just
strings and numbers. For example:
$fruits = ['apples', 'bananas',
➝
'oranges'];
$meats = ['steaks', 'hamburgers',
➝
'pork chops'];
$groceries = [
'fruits' => $fruits,
'meats' => $meats,
'other' => 'peanuts',
'cash' => 30.00
];
This array,
$groceries
, now consists of
one string (
peanuts
), one floating-point
number (
30.00
), and two arrays (
$fruits
and
$meats
).
Pointing to an element in an array within
an array can seem tricky. The key (pardon
the pun) is to continue adding indexes in
brackets as necessary, working from the
outer array inward. With that example,
bananas
is at
$groceries['fruits'][1]
.
First, you point to the element (in this case,
an array) in the
$groceries
array by using
['fruits']
. Then, you point to the element
in that array based on its position—it’s the
second item, so you use the index
[1]
.
ptg18144795
174 Chapter 7
In this next task, you’ll write a script that
creates another multidimensional array
example.
To use multidimensional arrays:
1. Begin a new document in your text
editor or IDE, to be named
books.php
(Script 7.4):
<!doctype html>
<html lang="en">
<head>
<meta charset="utf-8">
<title>Larry Ullman's Books and
➝
Chapters</title>
</head>
<body>
<h1>Some of Larry Ullman's
➝
Books</h1>
2. Create the initial PHP tags, and address
error management, if necessary:
<?php // Script 7.4 - books.php
3. Create the first array:
$phpvqs = [1 => 'Getting
➝
Started with PHP', 'Variables',
➝
'HTML Forms and PHP', 'Using
➝
Numbers'];
To build up the multidimensional array,
you’ll create three standard arrays and
then use them as the values for the
larger array. This array (named
$phpvqs
,
which is short for
PHP for the Web:
Visual QuickStart Guide
) uses numbers
for the keys and strings for the values.
The numbers begin with 1 and cor-
respond to the chapter numbers. The
values are the chapter titles.
Script 7.4 The multidimensional
$books
array
stores a lot of information in one big variable.
1 <!doctype html>
2 <html lang="en">
3 <head>
4 <meta charset="utf-8">
5 <title>Larry Ullman's Books and
Chapters</title>
6 </head>
7 <body>
8 <h1>Some of Larry Ullman's Books</h1>
9 <?php // Script 7.4 - books.php
10 /* This script creates and prints out a
multidimensional array. */
11 // Address error management, if you
want.
12
13 // Create the first array:
14 $phpvqs = [1 => 'Getting Started with
PHP', 'Variables', 'HTML Forms and PHP',
'Using Numbers'];
15
16 // Create the second array:
17 $phpadv = [1 => 'Advanced PHP
Techniques', 'Developing Web
Applications', 'Advanced Database
Concepts', 'Basic Object-Oriented
Programming'];
18
19 // Create the third array:
20 $phpmysql = [1 => 'Introduction to
PHP', 'Programming with PHP', 'Creating
Dynamic Web Sites', 'Introduction to
MySQL'];
21
22 // Create the multidimensional array:
23 $books = [
24 'PHP VQS' => $phpvqs,
25 'PHP Advanced VQP' => $phpadv,
26 'PHP and MySQL VQP' => $phpmysql
27 ];
28
29 // Print out some values:
30 print "<p>The third chapter of my
first book is <i>{$books['PHP VQS']
[3]}</i>.</p>";
code continues on next page
ptg18144795
Using Arrays 175
4. Create the next two arrays:
$phpadv = [1 => 'Advanced PHP
➝
Techniques', 'Developing Web
➝
Applications', 'Advanced
➝
Database Concepts', 'Basic
➝
Object-Oriented Programming'];
$phpmysql = [1 => 'Introduction
➝
to PHP', 'Programming with PHP',
➝
'Creating Dynamic Web Sites',
➝
'Introduction to MySQL'];
For each array, add only the book’s
first four chapters for simplicity’s sake.
These other two arrays represent my
PHP Advanced and
Object-Oriented
Programming: Visual QuickPro Guide
(3rd Edition)
(ISBN: 078-5342832181)
and
PHP and MySQL for Dynamic Web
Sites: Visual QuickPro Guid
e
(4th Edi-
tion)
(ISBN: 978-0321784070) books.
5. Create the main, multidimensional array:
$books = [
'PHP VQS' => $phpvqs,
'PHP Advanced VQP' => $phpadv,
'PHP and MySQL VQP' =>
➝
$phpmysql
];
The
$books
array is the master array
for this script. It uses strings for keys,
which are shortened versions of the
book titles, and arrays for values. Use
the short array syntax or the
array()
function to create it, as you would any
other array.
continues on next page
Script 7.4 continued
31 print "<p>The first chapter of my
second book is <i>{$books['PHP
Advanced VQP'][1]}</i>.</p>";
32 print "<p>The fourth chapter of my
fourth book is <i>{$books['PHP and
MySQL VQP'][4]}</i>.</p>";
33
34 // See what happens with foreach:
35 foreach ($books as $key => $value) {
36 print "<p>$key: $value</p>\n";
37 }
38
39 ?>
40 </body>
41 </html>
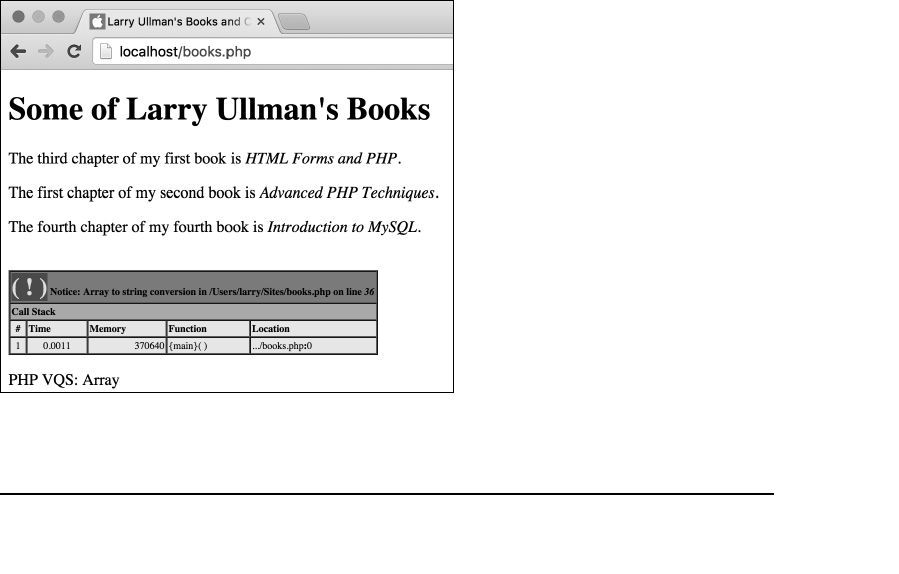
ptg18144795
176 Chapter 7
6. Print out the name of the third chapter
of the
PHP Visual QuickStart Guide
book:
print "<p>The third chapter of
➝
my first book is <i>{$books
➝
['PHP VQS'][3]}</i>.</p>";
Following the rules stated earlier, all you
need to do to access any individual chap-
ter name is to begin with
$books
, follow
that with the first index (
['PHP VQS']
),
and follow that with the next index (
[3]
).
Because you’re placing this in a
print
call, you enclose the whole construct in
braces to avoid parse errors.
7. Print out two more examples:
print "<p>The first chapter of my
➝
second book is <i>{$books['PHP
➝
Advanced VQP'][1]}</i>.</p>";
print "<p>The fourth chapter of
➝
my fourth book is <i>{$books
➝
['PHP and MySQL VQP'][4]}
➝
</i>.</p>";
A The second through fourth lines are
generated by
print
statements. The error
message and the last line show the results
of the
foreach
loop (and the notices come
from attempting to print an array).
8. Run the
$books
array through a
foreach
loop to see the results:
foreach ($books as $key =>
➝
$value) {
print "<p>$key: $value</p>\n";
}
The
$key
variable will be assigned
each abbreviated book title, and the
$value
variable ends up containing
each chapter array.
9. Close the PHP section and complete
the HTML page:
?>
</body>
</html>
10. Save the file as
books.php
, place it
in the proper directory for your PHP-
enabled server, and test it in your
browser A.

ptg18144795
Using Arrays 177
To access every element of every array,
you can nest two
foreach
loops like this B:
foreach ($books as $title =>
➝
$chapters) {
print "<p>$title";
foreach ($chapters as $number =>
➝
$chapter) {
print "<br />Chapter $number is
➝
$chapter";
}
print '</p>';
}
Using the
print_r()
or
var_dump()
function (preferably enclosed in HTML
<pre>
tags for better formatting), you can view an
entire multidimensional array C.
You can create a multidimensional array
in one statement instead of using several
steps as in this example. However, doing so
isn’t recommended for beginners, because
it’s all too easy to make syntactical errors as a
statement becomes more and more nested.
Although all the subarrays in this
example have the same structure (numbers for
indexes and four elements), that isn’t required
with multidimensional arrays.
To learn about the greater “Larry Ullman
collection,” including the three books refer-
enced here, head to www.LarryUllman.com.
B One
foreach
loop within another can access
every element of a two-dimensional array.
C The
print_r()
function shows the structure
and contents of the
$books
array.

ptg18144795
178 Chapter 7
Sorting Arrays
PHP supports a variety of ways to sort an
array.
Sort
refers to an alphabetical sort if
the values being sorted are strings, or a
numerical sort if the values being sorted are
numbers. When sorting an array, you must
keep in mind that an array consists of pairs
of
keys and values
. Thus, an array can be
sorted based on the keys or the values. This
is further complicated by the fact that you
can sort the values and keep the correspond-
ing keys aligned, or you can sort the values
and have them be assigned new keys.
To sort the values without regard to the
keys, use
sort()
. To sort these values
(again, without regard to the keys) in
reverse order, use
rsort()
. The syntax for
every sorting function is
function_name($array);
So,
sort()
and
rsort()
are used as
follows:
sort($array);
rsort($array);
To sort the values while maintaining the
correlation between each value and its key,
use
asort()
. To sort the values in reverse
while maintaining the key correlation, use
arsort()
.
To sort by the keys while maintaining the
correlation between the key and its value,
use
ksort()
. Conversely,
krsort()
sorts
the keys in reverse. Table 7.2 lists all these
functions.
Finally,
shuffle()
randomly reorganizes
the order of an array. Like
sort()
and
rsort()
,
shuffle()
drops the existing
keys in the process.
As an example of sorting arrays, you’ll
create a list of students and the grades
they received on a test, and then sort this
list first by grade and then by name.
TABLE 7.2 Array Sorting Functions
Function Sorts By Maintains
Key-Values?
sort()
Values No
rsort()
Values (inverse) No
asort()
Values Yes
arsort()
Values (inverse) Yes
ksort()
Keys Yes
krsort()
Keys (inverse) Ye s

ptg18144795
Using Arrays 179
To sort an array:
1. Begin a new document in your text
editor or IDE, to be named
sort.php
(Script 7.5):
<!doctype html>
<html lang="en">
<head>
<meta charset="utf-8">
<title>My Little Gradebook
➝
</title>
</head>
<body>
2. Begin the PHP section, and address
error handling, if desired:
<?php // Script 7.5 - sort.php
3. Create the array:
$grades = [
'Richard' => 95,
'Sherwood' => 82,
'Toni' => 98,
'Franz' => 87,
'Melissa' => 75,
'Roddy' => 85
];
The
$grades
array consists of six
students’ names along with their cor-
responding grades. Because the grades
are numbers, they don’t need to be
quoted when assigning them.
4. Print a caption, and then print each ele-
ment of the array using a
foreach
loop:
print '<p>Originally the array
➝
looks like this: <br>';
foreach ($grades as $student =>
➝
$grade) {
print "$student: $grade<br>\n";
}
print '</p>';
continues on next page
Script 7.5 PHP provides a number of different
functions for sorting arrays, including
arsort()
and
ksort()
.
1 <!doctype html>
2 <html lang="en">
3 <head>
4 <meta charset="utf-8">
5 <title>My Little Gradebook</title>
6 </head>
7 <body>
8 <?php // Script 7.5 - sort.php
9 /* This script creates, sorts, and
prints out an array. */
10
11 // Address error management, if you
want.
12
13 // Create the array:
14 $grades = [
15 'Richard' => 95,
16 'Sherwood' => 82,
17 'Toni' => 98,
18 'Franz' => 87,
19 'Melissa' => 75,
20 'Roddy' => 85
21 ];
22
23 // Print the original array:
24 print '<p>Originally the array looks
like this: <br>';
25 foreach ($grades as $student => $grade)
{
26 print "$student: $grade<br>\n";
27 }
28 print '</p>';
29
30 // Sort by value in reverse order, then
print again:
31 arsort($grades);
32 print '<p>After sorting the array by
value using arsort(), the array looks
like this: <br>';
33 foreach ($grades as $student => $grade)
{
34 print "$student: $grade<br>\n";
35 }
36 print '</p>';
37
code continues on next page
ptg18144795
180 Chapter 7
Because the
$grades
array will be
printed three times, captions indicating
each state of the array will be useful.
At first, the script prints the array in the
original order. To do that, use a
foreach
loop, where each index—the student’s
name—is assigned to
$student
, and
each value—the student’s grade—is
assigned to
$grade
. The final
print
call
closes the HTML paragraph.
5. Sort the array in reverse order by value
to determine who has the highest grade:
arsort($grades);
To determine who has the highest
grade, you need to use
arsort()
instead of
asort()
. The latter, which
sorts the array in numeric order, would
order the grades 75, 82, 85, and so on,
rather than the desired 98, 95, 87.
You also must use
arsort()
and not
rsort()
in order to maintain the key-
value relationship (
rsort()
would
eliminate the student’s name associated
with each grade).
6. Print the array again (with a caption),
using another loop:
print '<p>After sorting the array
➝
by value using arsort(), the
➝
array looks like this: <br>';
foreach ($grades as $student =>
➝
$grade) {
print "$student: $grade<br>\n";
}
print '</p>';
7. Sort the array by key to put the array in
alphabetical order by student name:
ksort ($grades);
The
ksort()
function organizes the
array by key (in this case, alphabeti-
cally) while maintaining the key-value
correlation.
Script 7.5 continued
38 // Sort by key, then print again:
39 ksort($grades);
40 print '<p>After sorting the array by
key using ksort(), the array looks like
this: <br>';
41 foreach ($grades as $student => $grade)
{
42 print "$student: $grade<br>\n";
43 }
44 print '</p>';
45
46 ?>
47 </body>
48 </html>
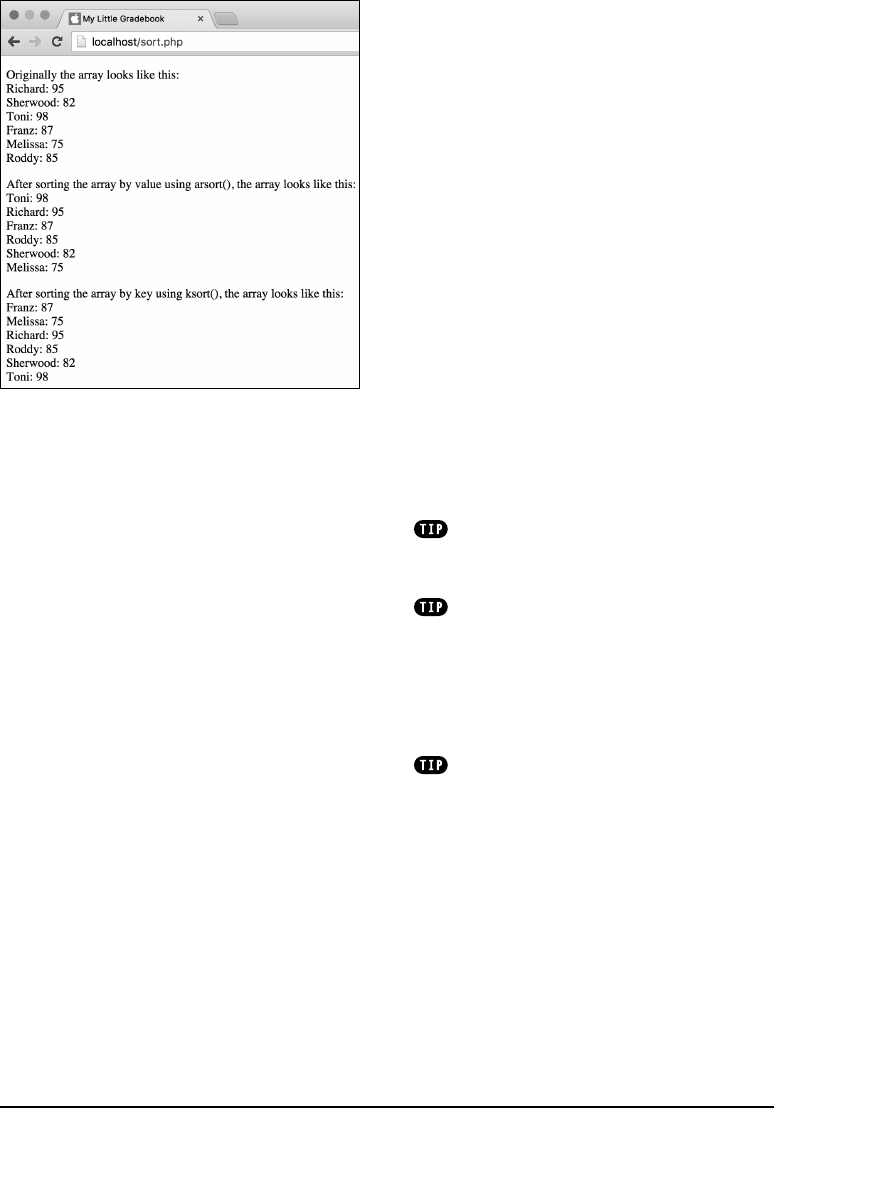
ptg18144795
Using Arrays 181
8. Print a caption and the array one last
time:
print '<p>After sorting the array
➝
by key using ksort(), the array
➝
looks like this: <br>';
foreach ($grades as $student =>
➝
$grade) {
print "$student: $grade<br>\n";
}
print '</p>';
9. Complete the script with the standard
PHP and HTML tags:
?>
</body>
</html>
10. Save your script as
sort.php
, place it
in the proper directory for your PHP-
enabled server, and test it in your
browser A.
Because each element in an array must
have its own unique key, the
$grades
array
will only work using unique student names.
The
natsort()
and
natcasesort()
functions sort a string (while maintaining
key-value associations) using natural order.
The most obvious example of natural order
sorting is that it places name2 before name12,
whereas
sort()
orders them name12 and
then name2.
The
usort()
,
uasort()
, and
ursort()
functions let you sort an array using a user-
defined comparison function. These functions
are most often used with multidimensional
arrays.
A You can sort an array in a number of ways with
varied results. Pay close attention to whether you
want to maintain your key-value association when
choosing a sort function.
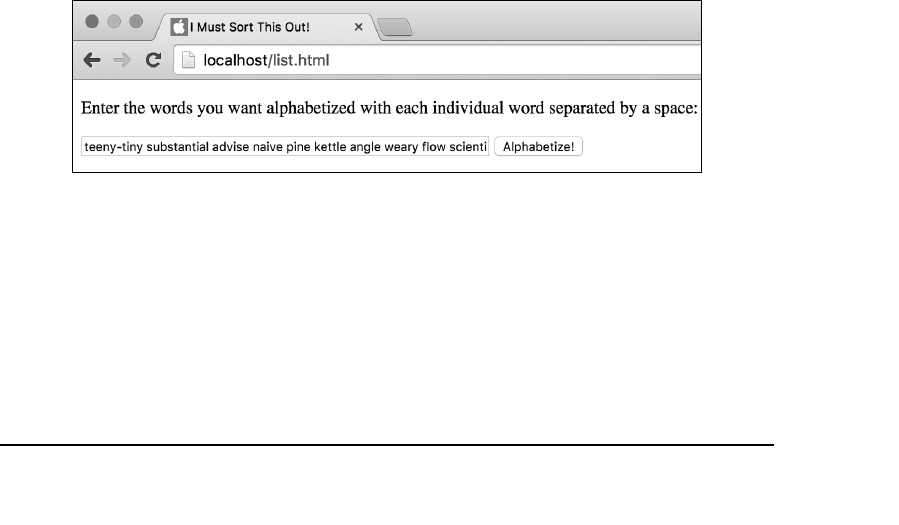
ptg18144795
182 Chapter 7
Transforming Between
Strings and Arrays
Now that you have an understanding of
both strings and arrays, this next section
introduces two functions for switching
between the formats. The first,
implode()
,
turns an array into a string. The second,
explode()
, does just the opposite. Here
are some reasons to use these functions:
n
To turn an array into a string in order
to pass that value appended to a URL
(which you can’t do as easily with an
array)
n
To turn an array into a string in order to
store that information in a database
n
To turn a string into an array to convert
a comma-delimited text field (say, a
keyword search area of a form) into its
separate parts
The syntax for using
explode()
is as
follows:
$array = explode(separator, $string);
A This HTML form takes a list of words, which is then alphabetized by the
list.php
script B.
The
separator
refers to whatever
character(s) define where one value ends
and another begins. Commonly this is a
comma, a tab, or a blank space. Thus your
code might be
$array = explode(',', $string);
or
$array = explode(' ', $string);
To go from an array to a string, you need
to define what the separator (aka the
glue
)
should be, and PHP does the rest:
$string = implode(glue, $array);
$string = implode(',', $array);
or
$string = implode(' ', $array);
To demonstrate how to use
explode()
and
implode()
, you’ll create an HTML form that
takes a space-delimited string of names
from the user A. The PHP script will then
turn the string into an array so that it can
sort the list. Finally, the code will create
and return the alphabetized string B.
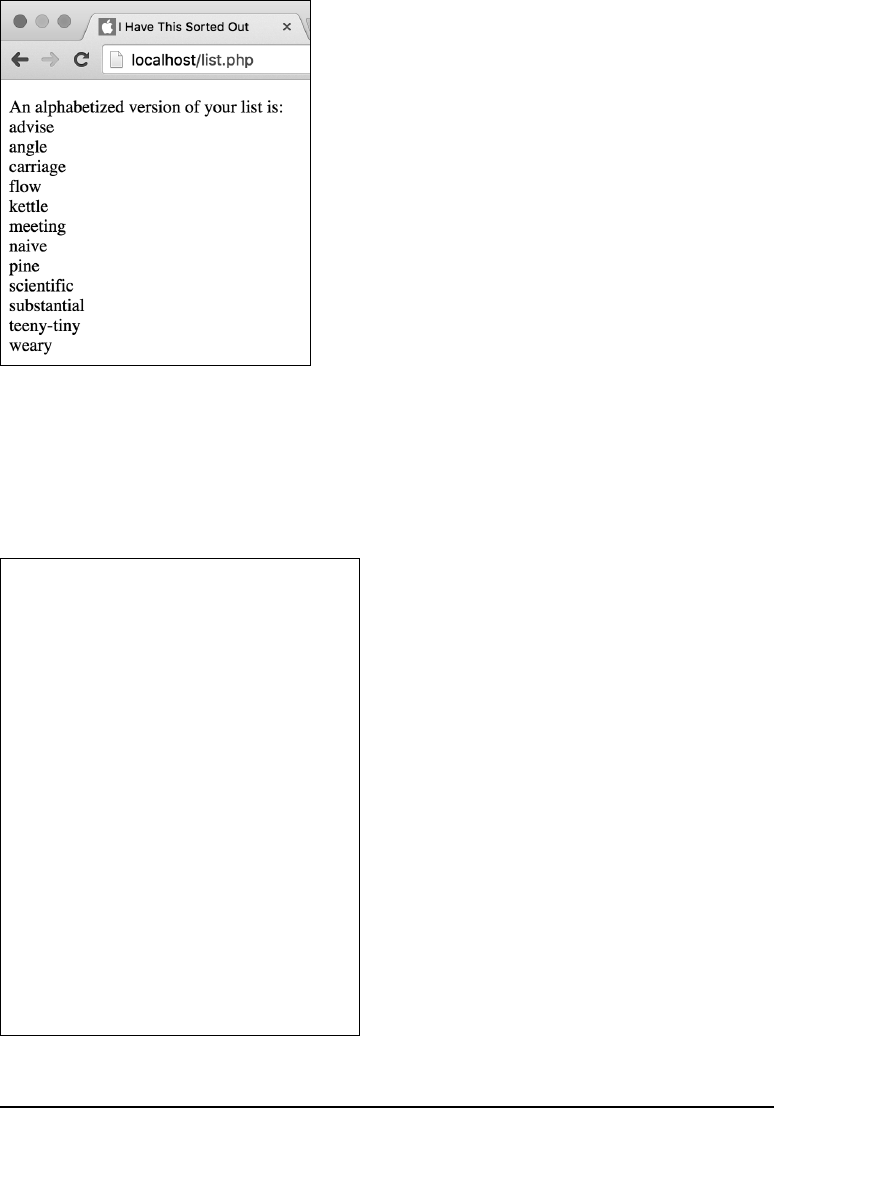
ptg18144795
Using Arrays 183
To create the HTML form:
1. Begin a new document in your text
editor or IDE, to be named
list.html
(Script 7.6):
<!doctype html>
<html lang="en">
<head>
<meta charset="utf-8">
<title>I Must Sort This Out!
➝
</title>
</head>
<body>
<!-- Script 7.6 - list.html -->
2. Create an HTML form with a text input:
<div><p>Enter the words you
➝
want alphabetized with each
➝
individual word separated by
➝
a pace:</p>
<form action="list.php"
➝
method="post">
<input type="text"
➝
name="words" size="60">
It’s important in cases like this to
instruct the user. For example, if the
user enters a comma-delimited list, the
PHP script won’t be able to handle the
string properly (after completing both
scripts, try using commas in lieu of
spaces and see what happens).
3. Create a submit button, and then close
the form and the HTML page:
<input type="submit" name=
"submit" value="Alphabetize!">
</form>
</div>
</body>
</html>
4. Save your script as
list.html
, and
place it in the proper directory for your
PHP-enabled server.
Now you’ll write the
list.php
page to pro-
cess the data generated by
list.html
.
B Here’s the same list, alphabetized for
the user. This process is quick and easy to
code, but doing so would be impossible
without arrays.
Script 7.6 This is a simple HTML form where a
user can submit a list of words. Including detailed
instructions for how the form should be used is a
prudent web design policy.
1 <!doctype html>
2 <html lang="en">
3 <head>
4 <meta charset="utf-8">
5 <title>I Must Sort This Out!</title>
6 </head>
7 <body>
8 <!-- Script 7.6 - list.html -->
9 <div><p>Enter the words you want
alphabetized with each individual word
separated by a space:</p>
10
11 <form action="list.php" method="post">
12
13 <input type="text" name="words"
size="60">
14 <input type="submit" name="submit"
value="Alphabetize!">
15
16 </form>
17 </div>
18 </body>
19 </html>
ptg18144795
184 Chapter 7
To convert between
strings and arrays:
1. Begin a new document in your text
editor or IDE, to be named
list.php
(Script 7.7):
<!doctype html>
<html lang="en">
<head>
<meta charset="utf-8">
<title>I Have This Sorted
➝
Out</title>
</head>
<body>
<?php // Script 7.7 - list.php
2. Turn the incoming string,
$_POST['words']
, into an array:
$words_array = explode(' ' ,
➝
$_POST['words']);
This line of code creates a new array,
$words_array
, out of the string
$_POST['words']
. Each space between
the words in
$_POST['words']
indi-
cates that the next word should be a
new array element. Hence the first
word becomes
$words_array[0]
, then
there is a space in
$_POST['words']
,
then the second word becomes
$words_array[1]
, and so forth, until
the end of
$_POST['words']
.
3. Sort the array alphabetically:
sort($words_array);
Because you don’t need to maintain
key-value associations in the
$words_array
, you can use
sort()
instead of
asort()
.
Script 7.7 Because the
explode()
and
implode()
functions are so simple and powerful, you can
quickly and easily sort a submitted list of words (of
practically any length) in just a couple of lines.
1 <!doctype html>
2 <html lang="en">
3 <head>
4 <meta charset="utf-8">
5 <title>I Have This Sorted Out</title>
6 </head>
7 <body>
8 <?php // Script 7.7 - list.php
9 /* This script receives a string in
$_POST['words']. It then turns it into
an array,
10 sorts the array alphabetically, and
reprints it. */
11
12 // Address error management, if you
want.
13
14 // Turn the incoming string into an
array:
15 $words_array = explode(' ' ,
$_POST['words']);
16
17 // Sort the array:
18 sort($words_array);
19
20 // Turn the array back into a string:
21 $string_words = implode('<br>',
$words_array);
22
23 // Print the results:
24 print "<p>An alphabetized version of
your list is: <br>$string_words</p>";
25
26 ?>
27 </body>
28 </html>
ptg18144795
Using Arrays 185
4. Create a new string out of the sorted
array:
$string_words = implode('<br>',
➝
$words_array);
Arrays don’t print as easily as strings,
so turn
$words_array
into a string
named
$string_words
. The resulting
string starts with the value of
$words_array[0]
, followed by the
HTML
<br>
tag, the value of
$words_array[1]
, and so on. Using
<br>
instead of a space or comma gives
the list a more readable format when it’s
printed to the browser.
5. Print the new string to the browser:
print "<p>An alphabetized
➝
version of your list is:
➝
<br>$string_words</p>";
6. Close the PHP section and the HTML
page:
?>
</body>
</html>
7. Save your page as
list.php
, place it in
the same directory as
list.html
, and
test both scripts in your browser A
and B.
You’ll also run across code written using
the
join()
function, which is synonymous
with
implode()
.
As an extra precaution, use the tech-
niques covered in Chapter 6, “Control
Structures,” to verify that
$_POST['words']
is not empty before attempting to explode it.
Better yet, check that at least one comma is
present first!
ptg18144795
186 Chapter 7
Creating an Array
from a Form
Throughout this chapter, you’ve estab-
lished arrays entirely from within a PHP
page. You can, however, send an array
of data to a PHP script via an HTML form.
In fact, every time you use
$_POST
, this is
the case. But you can take this one step
further by creating arrays using an HTML
form. Such arrays will then be a part of
the greater
$_POST
array (thereby making
$_POST
a multidimensional array).
A logical use of this capability is in dealing
with checkboxes, where users might need
to select multiple options from a group A.
The HTML source code for a checkbox is
as follows:
<input type="checkbox"
➝
name="topping" value="Ham">
The problem in this particular case is that
each form element must have a unique
name. If you created several checkboxes,
each with a name of
topping
, only the
value of the last selected checkbox would
be received in the PHP script. If you were
to create unique names for each check-
box—
ham
,
tomato
,
black_olives
, and
so on—working with the selected values
would be tedious.
A Checkboxes in an HTML form, presenting several possible options.
The workaround is to use array syntax, as
demonstrated in the next example.
To create an array with
an HTML form:
1. Begin a new document in your text
editor or IDE, to be named
event.html
(Script 7.8):
<!doctype html>
<html lang="en">
<head>
<meta charset="utf-8">
<title>Add an Event</title>
</head>
<body>
<!-- Script 7.8 - event.html -->
<div><p>Use this form to add an
➝
event:</p>
2. Begin the HTML form:
<form action="event.php"
➝
method="post">
This form will be submitted to
event.php
, found in the same directory
as this HTML page.
3. Create a text input for an event name:
<p>Event Name: <input type="text"
➝
name="name" size="30"></p>
This example allows the user to enter
an event name and the days of the
week when it takes place.
ptg18144795
Using Arrays 187
4. Create the days checkboxes:
<p>Event Days:
<input type="checkbox" name=
➝
"days[]" value="Sunday"> Sun
<input type="checkbox" name=
➝
"days[]" value="Monday"> Mon
<input type="checkbox" name=
➝
"days[]" value="Tuesday"> Tue
<input type="checkbox" name=
➝
"days[]" value="Wednesday"> Wed
<input type="checkbox" name=
➝
"days[]" value="Thursday"> Thu
<input type="checkbox" name=
➝
"days[]" value="Friday"> Fri
<input type="checkbox" name=
➝
"days[]" value="Saturday"> Sat
</p>
All of these checkboxes use
days[ ]
as the
name
value, which creates a
$_POST['days']
array in the PHP script.
The
value
attributes differ for each
checkbox, corresponding to the day of
the week.
5. Complete the HTML form:
<input type="submit"
➝
name="submit" value="Add the
➝
Event!">
</form>
6. Complete the HTML page:
</div>
</body>
</html>
7. Save your page as
event.html
, and
place it in the proper directory for your
PHP-enabled server.
You also need to write the
event.php
page
to handle this HTML form.
Script 7.8 This HTML form has an array for the
checkbox input names.
1 <!doctype html>
2 <html lang="en">
3 <head>
4 <meta charset="utf-8">
5 <title>Add an Event</title>
6 </head>
7 <body>
8 <!-- Script 7.8 - event.html -->
9 <div><p>Use this form to add an event:</
p>
10
11 <form action="event.php" method="post">
12
13 <p>Event Name: <input type="text"
name="name" size="30"></p>
14 <p>Event Days:
15 <input type="checkbox"
name="days[]" value="Sunday"> Sun
16 <input type="checkbox"
name="days[]" value="Monday"> Mon
17 <input type="checkbox"
name="days[]" value="Tuesday"> Tue
18 <input type="checkbox"
name="days[]" value="Wednesday">
Wed
19 <input type="checkbox"
name="days[]" value="Thursday">
Thu
20 <input type="checkbox"
name="days[]" value="Friday"> Fri
21 <input type="checkbox"
name="days[]" value="Saturday">
Sat
22 </p>
23 <input type="submit" name="submit"
value="Add the Event!">
24
25 </form>
26 </div>
27 </body>
28 </html>
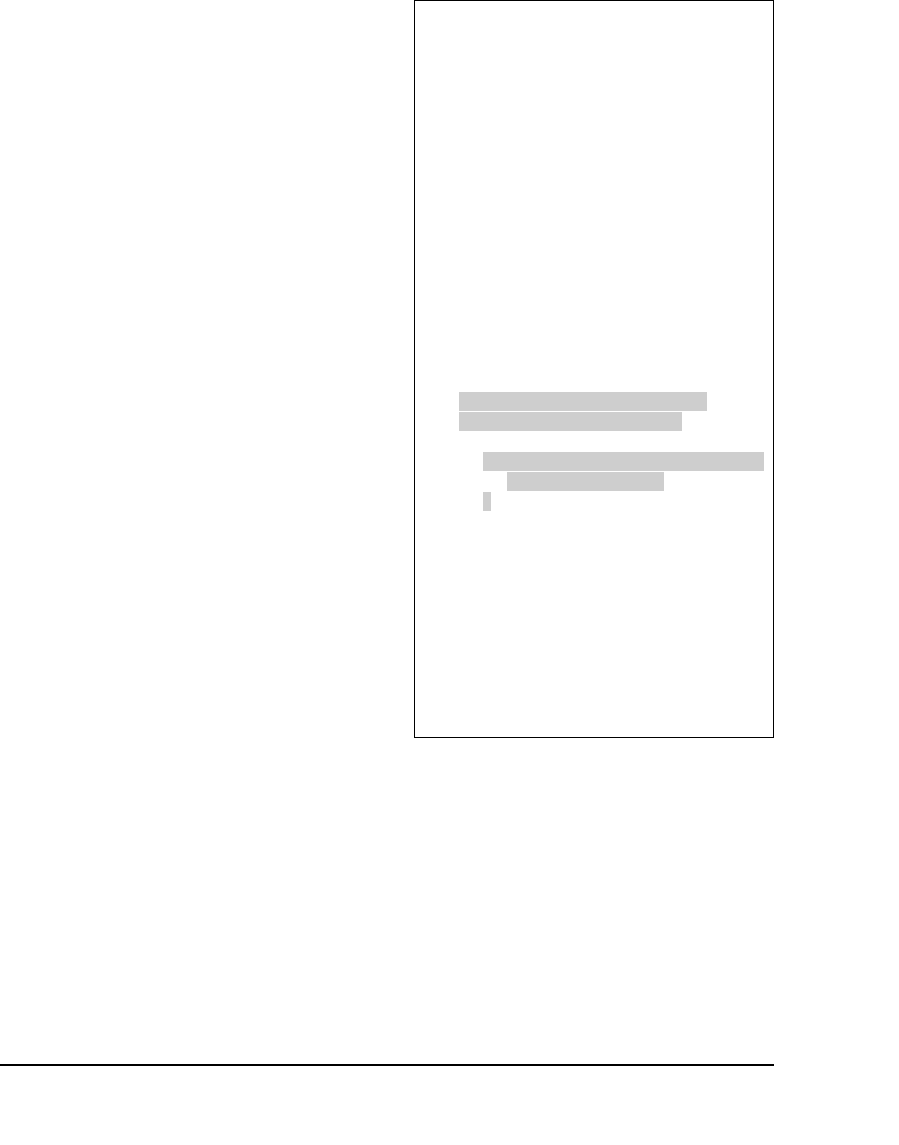
ptg18144795
188 Chapter 7
To handle the HTML form:
1. Begin a new document in your text
editor or IDE, to be named
event.php
(Script 7.9):
<!doctype html>
<html lang="en">
<head>
<meta charset="utf-8">
<title>Add an Event</title>
</head>
<body>
2. Create the initial PHP tag, address error
management (if need be), and print an
introductory message:
<?php // Script 7.9 - event.php
print "<p>You want to add an
➝
event called <b>{$_POST['name']}
➝
</b> which takes place on:
➝
<br>";
The
print
line prints out the value
of the event’s name. In a real-world
version of this script, you would add a
conditional to check that a name value
was entered first (see Chapter 6).
3. Begin a conditional to check that at
least one weekday was selected:
if (isset($_POST['days']) AND
➝
is_array($_POST['days'])) {
If no checkbox was selected, then
$_POST['days']
won’t be an existing
variable. To avoid an error caused by
referring to a variable that does not
exist, the first part of the conditional
checks that
$_POST['days']
is set.
Script 7.9 This PHP script receives an array of
values in
$_POST['days']
.
1 <!doctype html>
2 <html lang="en">
3 <head>
4 <meta charset="utf-8">
5 <title>Add an Event</title>
6 </head>
7 <body>
8 <?php // Script 7.9 - event.php
9 /* This script handle the event form. */
10
11 // Address error management, if you
want.
12
13 // Print the text:
14 print "<p>You want to add an event
called <b>{$_POST['name']}</b> which
takes place on: <br>";
15
16 // Print each weekday:
17 if (isset($_POST['days']) AND
is_array($_POST['days'])) {
18
19 foreach ($_POST['days'] as $day) {
20 print "$day<br>\n";
21 }
22
23 } else {
24 print 'Please select at least one
weekday for this event!';
25 }
26
27 // Complete the paragraph:
28 print '</p>';
29 ?>
30 </body>
31 </html>
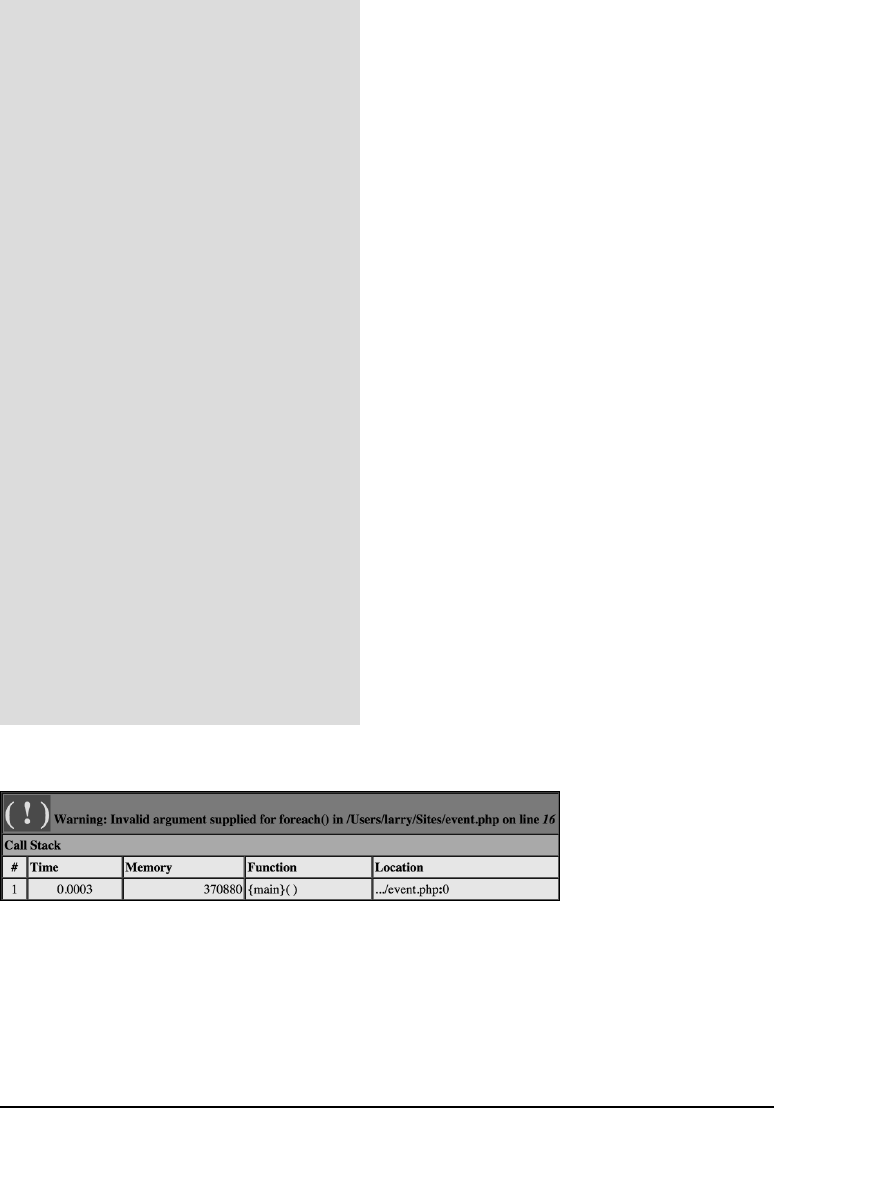
ptg18144795
Using Arrays 189
The second part of the condition—
and both must be TRUE for the entire
condition to be TRUE—confirms that
$_POST['days']
is an array. This is a
good step to take because a
foreach
loop will create an error if it receives a
variable that isn’t an array B.
4. Print each selected weekday:
foreach ($_POST['days'] as $day)
{
print "$day<br>\n";
}
To print out each selected weekday,
run the
$_POST['days']
array through
a
foreach
loop. The array contains the
values (from the HTML form inputs; for
example,
Monday
,
Tuesday
, and so on)
for every checkbox that was selected.
5. Complete the
is_array()
conditional:
} else {
print 'Please select at least
➝
one weekday for this event!';
}
If no weekday was selected, then the
isset()
AND
is_array()
condition is
FALSE
, and this message is printed.
continues on next page
B Attempting to use
foreach
on a variable that is not an array is a common
cause of errors.
The List Function
The
list()
function is used to assign
array element values to individual vari-
ables. Start with an example:
$date = ['Thursday', 23,
➝
'October'];
list($weekday, $day, $month) =
➝
$date;
Now there is a
$weekday
variable with a
value of
Thursday
, a
$day
variable with a
value of
23
, and a
$month
variable with a
value of
October
.
Using
list()
has two caveats. First,
list()
works only on arrays numeri-
cally indexed starting at 0. Second, when
you’re using the
list()
function, you
must acknowledge each array element.
You could not do this:
list($weekday, $month) = $date;
But you can use empty values to ignore
elements:
list ($weekday, , $month) =
$date;
or
list (, , $month) = $date;
The
list()
function is often used when
retrieving values from a database.
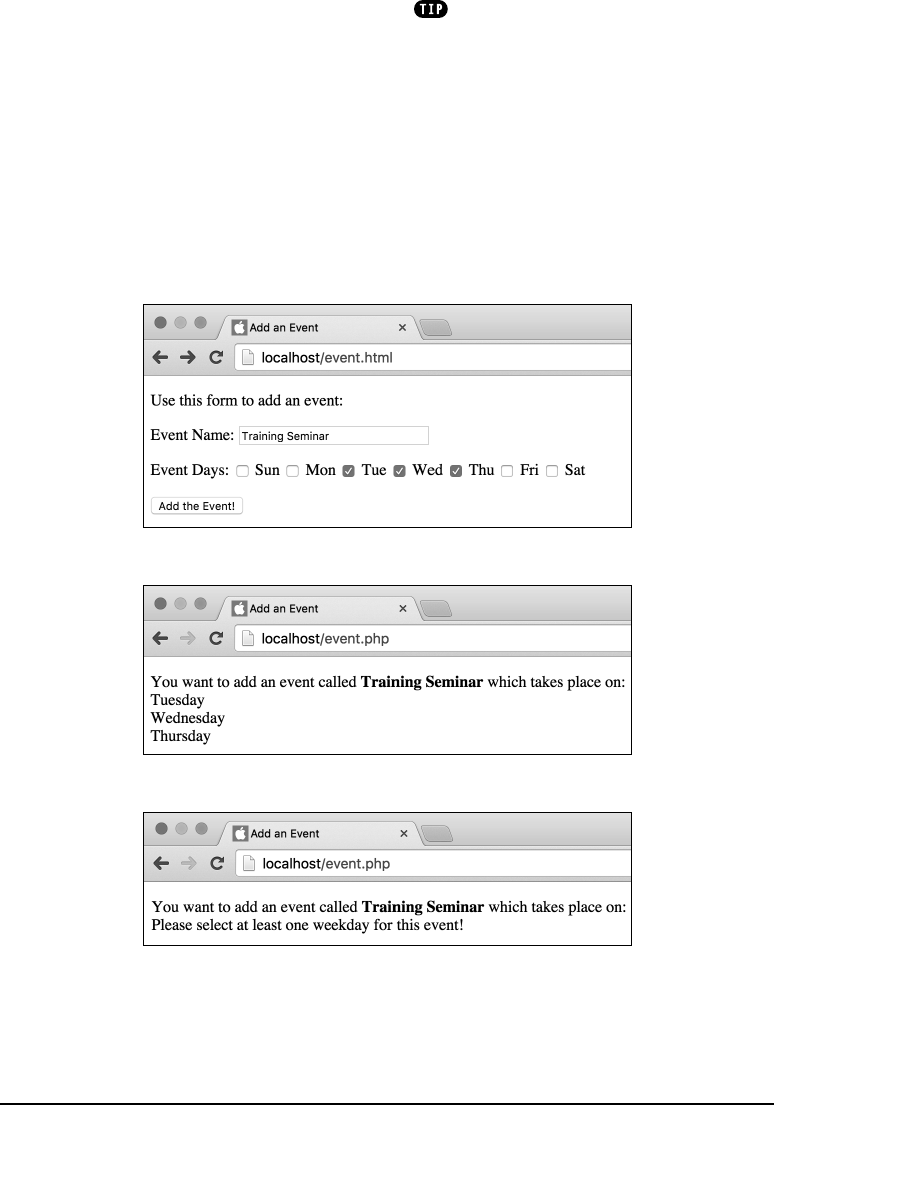
ptg18144795
190 Chapter 7
6. Complete the main paragraph, the PHP
section, and the HTML page:
print '</p>';
?>
</body>
</html>
7. Save the page as
event.php
, place it in
the same directory as
event.html
, and
test both pages in your browser C, D,
and E.
C The HTML form with its checkboxes.
D The results of the HTML form.
E If users don’t select any of the day checkboxes, they’ll see this
message.
The same technique demonstrated here
can be used to allow a user to select multiple
options in a drop-down menu. Just give the
menu a name with a syntax like
something[]
,
and the PHP script will receive every selection
in
$_POST['something']
.

ptg18144795
Using Arrays 191
Review and Pursue
If you have any problems with the review
questions or the pursue prompts, turn
to the book’s supporting forum
(www.LarryUllman.com/forums/).
Review
n
What’s the difference between an
indexed
array and an
associative
array?
n
What is the
short array syntax
and
when was it added to PHP?
n
When should you use quotation marks
for an array’s key or value? When
shouldn’t you?
n
How do you print a specific array ele-
ment? How do you print out every
element in an array?
n
What happens if you don’t use the
brackets when adding an element to
an array?
n
What function returns the number of
elements in an array?
n
When must you use braces for printing
array elements?
n
What is the difference between
the
sort()
and
asort()
functions?
Between
sort()
and
rsort()
?
n
What is the syntax for
explode()
? For
implode()
? If you don’t remember,
check out the PHP manual page for
either function.

ptg18144795
192 Chapter 7
Pursue
n
Check out the PHP manual’s pages
for the array-related functions. Look
into some of the other available array
functions. I recommend familiarizing
yourself with
array_key_exists()
,
array_search()
, and
in_array()
.
n
Rewrite
soups2.php
so that it displays
the number of elements in the array
without using a separate variable. Hint:
You’ll need to concatenate the
count()
function call into the
print
statement.
n
Create another script that creates and
displays a multidimensional array (or
some of it, anyway).
n
Rewrite
list.php
so that it uses
foreach
instead of
implode()
but still
prints out each sorted word on its own
line in the browser. Also add some form
validation so that it attempts to parse
and sort the string only if it has a value.
n
Modify
event.php
so that it prints the
selected days as an unordered list.
n
Add validation conditionals to both
list.php
and
event.php
that check
for submitted form values before
using them.

ptg18144795
The book to this point has covered the
fundamentals of programming with PHP;
now it’s time to begin tying it all together
into actual web applications. In this chap-
ter, you’ll learn a number of functions and
techniques for making your websites more
professional, more feature-rich, and easier
to maintain.
First, you’ll learn how to use external files to
break pages into individual pieces, allowing
you to separate the logic from the presen-
tation. Then you’ll tinker with constants, a
special data type in PHP. After that, you’ll
be introduced to some of the date- and
time-related functions built into PHP.
Two of the chapter’s topics discuss tech-
niques rather than functions: having the
same page both display and handle an
HTML form, and having a form remember
user-submitted values. After that, you’ll see
how easy it can be to send email from PHP.
The chapter concludes with the slightly
more advanced topics of output buffering
and HTTP headers.
8
Creating Web
Applications
In This Chapter
Creating Templates 194
Using External Files 201
Using Constants 207
Working with the Date and Time 211
Handling HTML Forms with PHP,
Revisited 214
Making Forms Sticky 220
Sending Email 228
Output Buffering 233
Manipulating HTTP Headers 237
Review and Pursue 241
ptg18144795
194 Chapter 8
Creating Templates
Every example thus far has been a one-
page script that handles an HTML form,
sorts arrays, performs calculations, and so
on. As you begin to develop multiple-page
websites (which is to say,
web applica-
tions
), it quickly becomes impractical to
repeat common elements on multiple pages.
On more sophisticated websites, many
features, such as the HTML design, will be
used by every, or almost every, page within
the site. You can put these elements into
each page, but when you need to make
a change, you’ll be required to make that
change over and over again. You can save
time by creating
templates
that separate
out the repeating content from the page-
specific materials. For example, a website
may have navigation, copyright, and other
features that repeat across multiple pages
A and B.
When you first start doing dynamic web
development, creating and using templates
can be daunting. The key is to start with
a basic prototype, as if you were creating
a static web page, and then divide that
prototype into reusable parts. By using the
PHP functions introduced in the next sec-
tion of this chapter, you can easily include
the repeating parts in each page while the
new content is generated on a page-by-
page basis.
To create the template in use by this
chapter’s examples, let’s start with the
prototype. This example’s layout C was
created using the Concise CSS Framework
(http://concisecss.com). Concise CSS is one
of many frameworks available that make
developing stylish and responsive web
pages a breeze, even for nondesigners.
A The home page for the fifth edition of this book
has its page-specific content in the left column and
common elements in the right.
B The table of contents page uses some of the
same common elements as the home page A,
thanks to the templates.
C The design for this chapter’s examples, as a
single, static HTML page.

ptg18144795
Creating Web Applications 195
To create the layout model:
1. Begin a new HTML document in
your text editor or IDE, to be named
template.html
(Script 8.1):
<!doctype html>
<html>
<head>
<meta charset="utf-8">
<meta http-equiv="X-UA-
➝
Compatible" content=
➝
"IE=edge,chrome=1">
<meta name="viewport"
➝
content="width=device-width,
➝
initial-scale=1.0">
<meta name="HandheldFriendly"
➝
content="True">
<title>Raise High the Roof
➝
Beam!</title>
The first step in developing any template
system is to create a model document—
an example of what a basic page
should look like. Once you’ve created
this, you can break it down into its parts.
This template begins with the meta
tags recommended by the Concise CSS
Framework.
2. Add the CSS code:
<link rel="stylesheet" type=
➝
"text/css" media="screen"
➝
href="css/concise.min.css" />
<link rel="stylesheet" type=
➝
"text/css" media="screen"
➝
href="css/masthead.css" />
This example uses CSS for the for-
matting and layout controls. The CSS
itself is stored in two external files that
become part of this page through the
link tag. The files are
concise.min.css
and
masthead.css
, stored in a folder
named
css
.
continues on next page
Script 8.1 This script represents the basic look
each page in the site should have.
1 <!doctype html>
2 <html>
3 <head>
4 <meta charset="utf-8">
5 <meta http-equiv="X-UA-Compatible"
content="IE=edge,chrome=1">
6 <meta name="viewport"
content="width=device-width,
initial-scale=1.0">
7 <meta name="HandheldFriendly"
content="True">
8 <title>Raise High the Roof Beam!</
title>
9 <link rel="stylesheet" type="text/
css" media="screen" href="css/
concise.min.css" />
10 <link rel="stylesheet" type="text/
css" media="screen" href="css/
masthead.css" />
11 </head>
12 <body>
13
14 <header container class="siteHeader">
15 <div row>
16 <h1 column=4 class="logo"><a
href="index.php">Raise High the
Roof Beam!</a></h1>
17 <nav column="8" class="nav">
18 < u l >
19 <li><a href="books.
php">Books</a></li>
20 <li><a href="#">Stories</
a></li>
21 <li><a href="#">Quotes</
a></li>
22 <li><a href="login.
php">Login</a></li>
23 <li><a href="register.
php">Register</a></li>
24 < / u l >
25 </nav>
26 </div>
27 </header>
28
29 <main container class="siteContent">
30 <!-- BEGIN CHANGEABLE CONTENT. -->
31 <h2>Welcome to a J.D. Salinger
Fan Club</h2>
32
code continues on next page

ptg18144795
196 Chapter 8
Note that you’ll need to download the
CSS files from the book’s correspond-
ing website (www.LarryUllman.com).
You’ll find it as part of the book’s down-
loadable code.
3. Close the HTML head, and begin the
body:
</head>
<body>
4. Create the page’s header:
<header container
class="siteHeader">
<div row>
<h1 column=4
➝
class="logo"><a
➝
href="index.php">Raise
➝
High the Roof Beam!</a>
➝
</h1>
<nav column="8" class="nav">
< u l >
<li><a href=
➝
"books.php">Books
➝
</a></li>
<li><a href="#">Stories
➝
</a></li>
<li><a href="#">Quotes
➝
</a></li>
<li><a href=
➝
"login.php">Login
➝
</a></li>
<li><a href=
➝
"register.php">
➝
Register</a></li>
</ul>
</nav>
</div>
</header>
Script 8.1 continued
33 <p>Lorem ipsum dolor sit
amet, consectetur adipisicing
elit, sed do eiusmod tempor
incididunt ut labore et
dolore magna aliqua. Ut
enim ad minim veniam, quis
nostrud exercitation ullamco
laboris nisi ut aliquip ex ea
commodo consequat. Duis aute
irure dolor in reprehenderit
in voluptate velit esse
cillum dolore eu fugiat
nulla pariatur. Excepteur
sint occaecat cupidatat non
proident, sunt in culpa qui
officia deserunt mollit anim
id est laborum.</p>
34 <!-- END CHANGEABLE CONTENT. -->
35 </main>
36
37 <footer container class="siteFooter">
38 <p>Design uses <a href="http://
concisecss.com/">Concise CSS
Framework</a></p>
39 </footer>
40
41 </body>
42 </html>

ptg18144795
Creating Web Applications 197
7. Mark the end of the changeable
content:
<!-- END CHANGEABLE CONTENT. -->
</div>
The code in Step 6 is the only text that
will change on a page-by-page basis.
Just as an HTML comment indicates
where that section starts, one here
indicates where it ends.
8. Add the footer:
<footer container
class="siteFooter">
<p>Design uses <a href="http://
➝
concisecss.com/">Concise CSS
➝
Framework</a></p>
</footer>
The footer includes a credit.
9. Finish the HTML page:
</body>
</html>
10. Save the file as
template.html
, and
test it in your browser C.
Once you’ve completed a prototype that
you like, you can break it into its various
parts to generate the template system.
The
header
area (also defined in the
CSS code) creates the banner and the
primary navigation links to the other
pages in the web application. The
specific links reference four PHP
scripts, all of which will be developed
in this chapter.
5. Begin, and mark, the start of the page-
specific content:
<main container class=
➝
"siteContent">
<!-- BEGIN CHANGEABLE CONTENT. -->
Everything up until this comment will
remain the same for every page in the
web application. To indicate where the
page-specific content begins (for your
own benefit), include an HTML com-
ment. When making a choice, err on
the side of overcommenting your HTML
and PHP code!
Just before the comment, the
siteContent
area is begun. This area
is defined in the CSS code and prop-
erly formats the main content part of
the page. In other words, on every
page, that page’s content will go within
the one
main
that has a
class
of
siteContent
.
6. Create the page’s content:
<h2>Welcome to a J.D. Salinger
➝
Fan Club</h2>
<p>Lorem ipsum dolor sit
➝
amet...</p>
For the prototype, the content is just a
header and a whole lot of text (there’s
more in the actual script than I’ve
included in this step).
ptg18144795
198 Chapter 8
To create the header file:
1. Open
template.html
(Script 8.1) in your
text editor or IDE, if it isn’t already open.
2. Select everything from the initial HTML
code to the
<!-- BEGIN CHANGEABLE
CONTENT -->
HTML comment D.
Part of the benefit of identifying the
start of the page-specific content with
an HTML comment is that it simplifies
breaking the model into its parts.
D Using the prototype file, select and copy the initial lines of code to create the header.

ptg18144795
Creating Web Applications 199
3. Copy this code.
Using your Edit menu or keyboard
shortcut (Ctrl+C on Windows,
Command+C on the Macintosh), copy
all the highlighted code to your com-
puter’s clipboard.
4. Create a new, blank document in
your text editor or IDE, to be named
header.html
.
5. Paste the copied text into the document
(Script 8.2).
Using your Edit menu or keyboard
shortcut (Ctrl+V on Windows,
Command+V on the Macintosh), paste
all the highlighted code into this new
document.
6. Save the file as
header.html
.
Now that the header file has been created,
you’ll make the footer file using the
same process.
Script 8.2 This is a basic header file that creates
the HTML head information, includes the CSS file,
and begins the body.
1 <!doctype html>
2 <html>
3 <head>
4 <meta charset="utf-8">
5 <meta http-equiv="X-UA-Compatible"
content="IE=edge,chrome=1">
6 <meta name="viewport"
content="width=device-width,
initial-scale=1.0">
7 <meta name="HandheldFriendly"
content="True">
8 <title>Raise High the Roof Beam!
</title>
9 <link rel="stylesheet" type="text/
css" media="screen" href="css/
concise.min.css" />
10 <link rel="stylesheet" type="text/
css" media="screen" href="css/
masthead.css" />
11 </head>
12 <body>
13
14 <header container class="siteHeader">
15 <div row>
16 <h1 column=4 class="logo"><a
href="index.php">Raise High the
Roof Beam!</a></h1>
17 <nav column="8" class="nav">
18 < u l >
19 <li><a href="books.
php">Books</a></li>
20 <li><a href="#">Stories
</a></li>
21 <li><a href="#">Quotes
</a></li>
22 <li><a href="login.
php">Login</a></li>
23 <li><a href="register.
php">Register</a></li>
24 < / u l >
25 </nav>
26 </div>
27 </header>
28
29 <main container class="siteContent">
30 <!-- BEGIN CHANGEABLE CONTENT. -->
31 <!-- Script 8.2 - header.html -->
ptg18144795
200 Chapter 8
To create the footer file:
1. Open
template.html
(Script 8.1) in your
text editor or IDE, if it isn’t already open.
2. Select everything from the
<!-- END
CHANGEABLE CONTENT -->
HTML
comment to the end of the script E.
3. Copy this code.
4. Create a new, blank document in your
text editor, to be named
footer.html
.
5. Paste the copied text into the document
(Script 8.3).
6. Save the file as
footer.html
.
There are many far more complex tem-
plate systems you can use in PHP to separate
the design from the logic. The best known of
these is probably Smarty (www.smarty.net).
E Again using the prototype file, select and copy the concluding lines of code for the footer.
CSS Templates
Cascading Style Sheets (CSS) have been an increasingly important part of the web for some time.
Their initial usage was focused on cosmetics (font sizes, colors, and so on), but now CSS is com-
monly used, as in this chapter, to control the layout of pages.
This example defines three areas of the page—
header, main
(i.e., content)
,
and
footer
. The
main
area will change for each page. The other areas contain standard items, such as navigation links,
that appear on each page of the site.
Just to be clear: The relationship between PHP and CSS is the same as that between PHP and
HTML—PHP runs on the server and HTML and CSS are significant to the browser. As with HTML,
you
can
use PHP to generate CSS, but in this example, the CSS is hard-coded into a separate file.
Script 8.3 This is a basic footer file that concludes
the HTML page.
1 <!-- Script 8.3 - footer.html -->
2 <!-- END CHANGEABLE CONTENT. -->
3 </main>
4
5 <footer container class="siteFooter">
6 <p>Design uses <a href="http://
concisecss.com/">Concise CSS
Framework</a></p>
7 </footer>
8
9 </body>
10 </html>
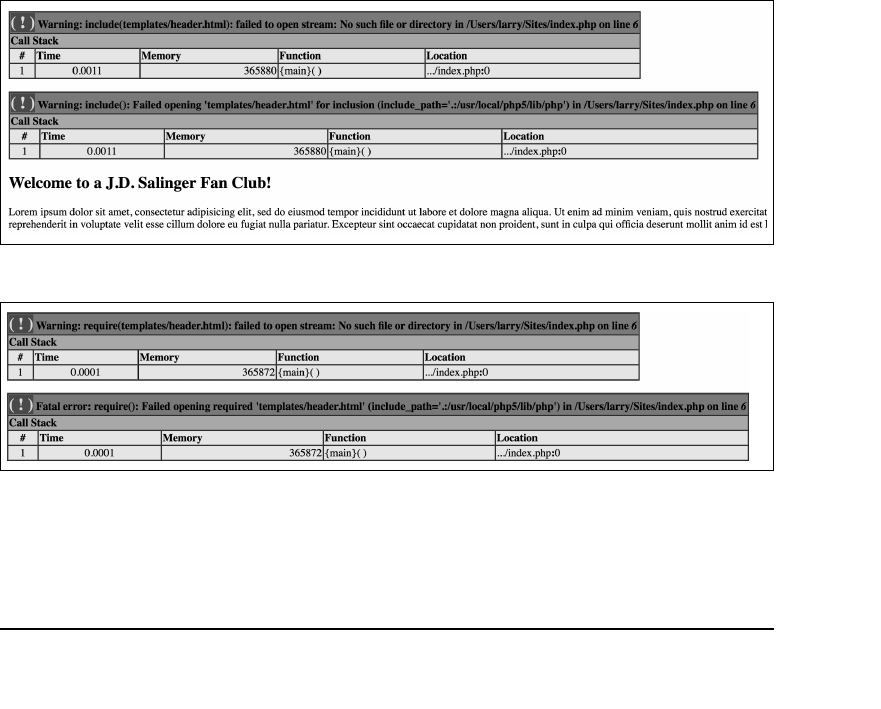
ptg18144795
Creating Web Applications 201
Using External Files
As the preceding section stated, you can
save development time by creating separate
pages for particular elements and then incor-
porating them into the main PHP pages
using specific functions. Two of these func-
tions are
include()
and
require()
:
include('file.php');
require('file.html');
Both functions work the same way, with
one relatively key difference: If an
include()
function fails, the PHP script generates
a warning A but continues to run. Con-
versely, if
require()
fails, it terminates the
execution of the script B.
Both
include()
and
require()
incor-
porate the referenced file into the main
file (for clarity’s sake, the file that has the
include()
or
require()
line is the
includ-
ing
or
parent
file). The result is the same
as if the included code were part of the
parent file in the first place.
Understanding this basic idea is key to
making the most of external files: Includ-
ing a file makes it as if that file’s contents
were in the parent script to begin with. This
means that any code within the included
file not within PHP tags is treated as HTML.
And this is true regardless of what exten-
sion the included file has, because it’s the
extension of the
including
file that counts.
A When an
include()
fails, warnings are issued, but the script continues to execute.
B When a
require()
function call fails, warnings and errors are issued and the script stops running.

ptg18144795
202 Chapter 8
There are many reasons to use included
files. You could put your own defined
functions into a common file (see Chapter
10, “Creating Functions,” for information
on writing your own functions). You might
also want to place your database access
information into a configuration file. First,
however, let’s include the template files
created in the preceding section of the
chapter in order to make pages abide by a
consistent design.
To use external files:
1. Create a new document in your text
editor or IDE, to be named
index.php
.
2. Start with the initial PHP tags, and add
any comments (Script 8.4):
<?php // Script 8.4 - index.php
/* This is the home page for this
➝
site.
It uses templates to create the
➝
layout. */
Notice that, with the template system,
the very first line of the script is the PHP
tag. There’s no need to begin with the
initial HTML, because that is now stored
in the
header.html
file.
3. Address error management, if
necessary.
This topic is discussed in Chapter 3,
“HTML Forms and PHP,” and may or
may not need to be addressed in your
scripts. See that chapter for more; this
will be the last time I specifically men-
tion it in this chapter.
Script 8.4 Once the two included files have been
created, the
include()
function incorporates them
into the parent file to create the complete HTML
page on the fly.
1 <?php // Script 8.4 - index.php
2 /* This is the home page for this site.
3 It uses templates to create the layout.
*/
4
5 // Include the header:
6 include('templates/header.html');
7 // Leave the PHP section to display lots
of HTML:
8 ?>
9
10 <h2>Welcome to a J.D. Salinger Fan
Club!</h2>
11 <p>Lorem ipsum dolor sit amet,
consectetur adipisicing elit, sed do
eiusmod tempor incididunt ut labore et
dolore magna aliqua. Ut enim ad minim
veniam, quis nostrud exercitation
ullamco laboris nisi ut aliquip ex ea
commodo consequat. Duis aute irure dolor
in reprehenderit in voluptate velit esse
cillum dolore eu fugiat nulla pariatur.
Excepteur sint occaecat cupidatat non
proident, sunt in culpa qui officia
deserunt mollit anim id est laborum.</p>
12
13 <?php // Return to PHP.
14 include('templates/footer.html');
// Include the footer.
15 ?>

ptg18144795
Creating Web Applications 203
4. Include the header file:
include('templates/header.html');
To use the template system, you include
the header file here by invoking the
include()
function. Because the header
file contains only HTML, all of its con-
tents will be immediately sent to the
browser as if they were part of this file.
This line uses a
relative path
to refer
to the included file (see the “File
Navigation and Site Structure” sidebar)
and assumes that the file is stored in
the
templates
directory.
5. Close the PHP section, and create the
page-specific content:
?>
<h2>Welcome to a J.D. Salinger
➝
Fan Club</h2>
<p>Lorem ipsum dolor sit
➝
amet...</p>
Because the bulk of this page is stan-
dard HTML, it’s easier to just exit out
of the PHP section and then add the
HTML rather than using
print
to send
it to the browser. Again, there’s more
blather in the actual script than I’ve
included here.
6. Create another PHP section, and
include the footer file:
<?php
include('templates/footer.html');
?>
To finish the page, you need to include
the footer file, which displays the footer
and closes the HTML code. To do this,
you create a new section of PHP—you
can have multiple sections of PHP code
within a script—and call the
include()
function again.
continues on next page
File Navigation and Site Structure
To be able to use external files, you need
to understand file navigation on your
computer or server. Just as you must cor-
rectly refer to other pages in HTML links
or images in websites, you must properly
point a parent file to the included scripts.
You can do this by using
absolute
or
relative
paths. An absolute path is a com-
plete, specific address, like the following:
include('C:\inetpub\wwwfiles\
➝
file.php');
include('/Users/larry/Sites/
➝
file.php');
As long as the included file isn’t moved,
an absolute path will always work.
A relative path indicates where the
included file is in relation to the parent
file. These examples assume both are
within the same directory:
include('file.php');
include('./file.php');
The included file can also be in a direc-
tory below the parent one, as in this
chapter’s example (also see C):
include('templates/header.html');
Or, the included file could be in the direc-
tory above the parent:
include('../file.php');
Finally, a note on site structure: Once you
divvy up your web application into mul-
tiple pieces, you should begin thinking
about arranging the files in appropriate
folders. Complex sites might have the
main folder, another for images, one for
administration files, and a special direc-
tory for templates and included files. As
long as you properly reference the files
in your
include()
or
require()
state-
ment, structuring your applications will
work fine and give the added benefit of
making them easier to maintain.

ptg18144795
204 Chapter 8
7.Save the file as
index.php
.
8. Create a folder named
templates
within the main web document direc-
tory on your PHP-enabled computer
or server.
To further separate the design elements
from the main content, the header and
footer files go within their own directory.
9. Place
header.html
and
footer.html
in the
templates
directory you just
created.
10. Place
index.php
in the same directory
as the
templates
folder.
The relative locations on the computer
between the index page and the two
HTML pages must be correct in order
for the code to work. The two HTML
pages go within the
templates
folder, and the
templates
folder and
index.php
are in the same folder
(such as the web root directory).
11. Create a folder named
css
within the
main web document directory on your
PHP-enabled computer or server.
The CSS scripts will need to go in
this directory.
templates
web root
header.html
footer.html
index.php
css
concise.min.css
masthead.css
C How the files and folders should be organized
on your PHP-enabled server.
ptg18144795
Creating Web Applications 205
D This page has been dynamically generated using included files.
12. Place the
concise.min.css
and
masthead.css
scripts, available as part
of the book’s downloadable code, in
the
css
directory C.
Even though the header file includes
the CSS scripts, the reference to that
script must be relative to
index.php
.
It’s that page, after all, that will include
header.html
.
13. Run
index.php
in your browser D.
The resulting page should look exactly
like the original layout (C in the previ-
ous section of the chapter).
14. View the page’s source code in your
browser.
The source code should be exactly like
the source code of the
template.html
script (Script 8.1), aside from the
added comments for the script names
and numbers.
ptg18144795
206 Chapter 8
All three files in this template system—
header.html
,
footer.html
, and
index.php
—must use the same encoding in order to avoid
problems (see Chapter 1, “Getting Started
with PHP,” for more on encoding). Each file’s
encoding must also match the encoding estab-
lished in the HTML code.
The
require()
and
include()
func-
tions can be used with or without parentheses:
require 'filename.html';
You might sometimes use a variable that
stores the name of the file to be included:
require $filename;
Both
include()
and
require()
have variations:
include_once()
and
require_once()
. Each is identical to its
counterpart except that it ensures that the
same file can be included only one time (in
a parent script). You should generally avoid
using these, because they’ll adversely affect
the script’s performance.
If a section of PHP executes only a single
command, it’s common to place both it and
the PHP tags on a single line:
<?php include('filename.html'); ?>
If you see error messages like those
in A and B, the parent script can’t locate an
included file. This problem is most likely caused
by a misspelled included filename or an error
in the path (for example, using
header.html
instead of
templates/header.html
).
If the rendered page does not seem to
be reflecting the CSS styling, the HTML page
can’t find the corresponding file. Make sure
you’ve stored the file in the proper folder, with
the correct name, and that the reference is
correct relative to
index.php
.
A file’s extension is less important for
included files because they aren’t intended
to be run directly. As a general rule of thumb,
you’ll be safe using
.html
for an included file
containing only or mostly HTML (in which case
the extension indicates it’s an HTML-related
file) and
.php
for included files containing
only or mostly PHP. Some programmers use
an
.inc
extension (for include), but security
risks can arise with this practice. For that
reason, use the
.php
extension for any file
containing sensitive information (like database
access parameters). And, of course, always
use the
.php
extension for any PHP script that
will be executed directly.
Another good use of an external file is
to place your error settings code there so that
those changes are applied to every page in the
website.
The final closing PHP tag is not required,
and many developers advocate omitting it
because it’s unnecessary and the script may
run faster without it.

ptg18144795
Creating Web Applications 207
Using Constants
Many of PHP’s data types have already
been discussed in this book, primarily:
numbers, strings, and arrays.
Constants
are another data type, but unlike variables,
their values cannot change.
Whereas variables are assigned values
via the assignment operator (
=
), constants
are assigned values using the
define()
function:
define('CONSTANT_NAME', value);
Notice that—as a rule of thumb—constants
are named using all capital letters, although
doing so isn’t required. Most important,
constants don’t use the initial dollar sign
as variables do, because constants are not
variables. Here are two constants:
define('PI', 3.14);
define('CURRENCY', 'euros');
As with any value, quote those that are
strings, not those that are numbers.
Referring to constants is generally
straightforward:
print CURRENCY;
number_format(PI, 1);
A The value of a constant cannot be printed using the
constant’s name within quotation marks.
But using constants within quotation
marks is more complicated. You can’t print
constants within single or double quotation
marks, like this A:
print "The cost is 468 CURRENCY";
print 'The cost is 468 CURRENCY';
Instead, concatenation or multiple
print
statements are required:
print 'The cost is 468 ' . CURRENCY;
or
print 'The cost is 468 ';
print CURRENCY;
Along with the
define()
function for creating
constants is the
defined()
function (note
the final “d”). This function returns TRUE if
the submitted constant has been defined. It’s
often used as the basis for a conditional:
if (defined('CONSTANT_NAME')) { ...
As an example of working with constants,
you’ll give the sample application the ability
to display a different title (which appears
at the top of the browser window) for each
page. To accomplish this, you’ll define a
constant in the parent script that will then
be printed by the header file. This tech-
nique works because any variables or
constants that exist in the parent document
before the
include()
or
require()
call are
available to the included file (it’s as if the
included file were part of the parent file).
ptg18144795
208 Chapter 8
To use constants:
1. Create a new PHP document in
your text editor or IDE, to be named
books.php
(Script 8.5):
<?php // Script 8.5 - books.php
2. Define the page title as a constant:
define('TITLE', 'Books by J.D.
➝
Salinger');
Here one constant is defined, named
TITLE
, and given the value
Books by
J.D. Salinger
.
3. Include the header file:
include('templates/header.html');
This script uses the same header file
as all the others, although you’ll modify
that file shortly to take the constant into
account.
4. Close the PHP section, and create
the HTML:
?>
<h2>J.D. Salinger's Books</h2>
<ul>
<li>The Catcher in the Rye</li>
<li>Nine Stories</li>
<li>Franny and Zooey</li>
<li>Raise High the Roof Beam,
➝
Carpenters and Seymour: An
➝
Introduction</li>
</ul>
The content here is simple but serves
the page’s purpose nicely.
5. Create a new PHP section that includes
the footer file:
<?php include('templates/
➝
footer.html'); ?>
Script 8.5 This script uses the same template
system as
index.php
(Script 8.4) but also uses a
constant to identify the page’s title.
1 <?php // Script 8.5 - books.php
2 /* This page lists J.D. Salinger's
bibliography. */
3
4 // Set the page title and include the
header file:
5 define('TITLE', 'Books by J.D.
Salinger');
6 include('templates/header.html');
7
8 // Leave the PHP section to display lots
of HTML:
9 ?>
10
11 <h2>J.D. Salinger's Books</h2>
12 <ul>
13 <li>The Catcher in the Rye</li>
14 <li>Nine Stories</li>
15 <li>Franny and Zooey</li>
16 <li>Raise High the Roof Beam,
Carpenters and Seymour: An
Introduction</li>
17 </ul>
18
19 <?php include('templates/footer.html');
?>

ptg18144795
Creating Web Applications 209
As mentioned earlier in a tip, since the
remaining PHP code consists of just
one line it can all be written on a single
line, including the opening and closing
PHP tags. Just be certain to leave a
space between the executed code—the
include()
—and the tags.
6. Save the file as
books.php
.
To take advantage of the constant, you
now need to modify the
header.html
file.
To print out a constant:
1. Open
header.html
(Script 8.2) in your
text editor or IDE.
2. Delete the
Raise High the Roof Beam!
text that appears between the title tags
(line 6).
Now that the page title will be determined
on a page-by-page basis, you don’t need
it to be hard-coded into the page.
3. In the place of the deleted text
(between the title tags), add the follow-
ing (Script 8.6):
<?php
if (defined('TITLE')) {
print TITLE;
} else {
print 'Raise High the Roof
➝
Beam!';
}
?>
To have PHP create the page title, you
need to begin by starting a section of
PHP code between the title tags. Then
you use a conditional to see if the
TITLE
constant has been defined. If it has,
print its value as the page title. If
TITLE
hasn’t been defined, print a default title.
4. Save the file as
header.html
.
continues on next page
Script 8.6 The
header.html
file is modified so
that it can set the page title value based on the
existence and value of a constant.
1 <!doctype html>
2 <html>
3 <head>
4 <meta charset="utf-8">
5 <meta http-equiv="X-UA-Compatible"
content="IE=edge,chrome=1">
6 <meta name="viewport"
content="width=device-width,
initial-scale=1.0">
7 <meta name="HandheldFriendly"
content="True">
8 <title><?php // Print the page
title.
9 if (defined('TITLE')) { // Is the
title defined?
10 print TITLE;
11 } else { // The title is not
defined.
12 print 'Raise High the Roof
Beam! A J.D. Salinger Fan
Club';
13 }
14 ?></title>
15 <link rel="stylesheet" type="text/
css" media="screen" href="css/
concise.min.css" />
16 <link rel="stylesheet" type="text/
css" media="screen" href="css/
masthead.css" />
17 </head>
18 <body>
19
20 <header container class="siteHeader">
21 <div row>
22 <h1 column=4 class="logo"><a
href="index.php">Raise High the
Roof Beam!</a></h1>
23 <nav column="8" class="nav">
24 < u l >
25 <li><a href="books.
php">Books</a></li>
26 <li><a href="#">Stories
</a></li>
27 <li><a href="#">Quotes
</a></li>
28 <li><a href="login.
php">Login</a></li>
code continues on next page

ptg18144795
210 Chapter 8
5. Upload
books.php
and
header.html
to your PHP-enabled server. The new
PHP script,
books.php
, should go in
the same directory as
index.php
;
header.html
should replace the
previous version, in the same direc-
tory—
templates
—as
footer.html
.
6. Run
books.php
in your browser B.
7. View
index.php
(the home page) in
your browser C.
8. If you want, add the constant definition
line to
index.php
to change its title.
The formal rules for naming constants
are exactly like those for variables except for
the omission of a dollar sign. Constant names
must begin with a letter or an underscore; can
contain any combination of letters, numbers,
and the underscore; and are case-sensitive.
PHP runs with several predefined
constants. These include
PHP_VERSION
(the
version of PHP running) and
PHP_OS
(the oper-
ating system of the server).
In Chapter 9, “Cookies and Sessions,”
you’ll learn about another constant,
SID
(which stands for session ID).
An added benefit of using constants is
that they’re global in scope. This concept will
mean more to you after you read the section
“Understanding Variable Scope” in Chapter 10.
Not only can the value of a constant
never be changed, a constant can’t be deleted
(unset, technically).
As of PHP 5.6, a constant can contain
an array of values. In earlier versions of the
language, a constant was scalar: it could store
only a single value.
Script 8.6 continued
29 <li><a href="register.
php">Register</a></li>
30 < / u l >
31 </nav>
32 </div>
33 </header>
34
35 <main container class="siteContent">
36 <!-- BEGIN CHANGEABLE CONTENT. -->
37 <!-- Script 8.6 - header.html -->
B The books page uses a PHP constant to create
its title.
C Because the index page didn’t have a
TITLE
constant defined in it, the default page title is used
(thanks to the conditional in Script 8.6).

ptg18144795
Creating Web Applications 211
Working with the
Date and Time
PHP has a few functions for working with
the date and time, the most important of
which is
date()
. The only thing the
date()
function does is return date and time infor-
mation in a format based on the arguments
it’s fed, but you’d be surprised how useful
that can be. The basic usage of the
date()
function is just
date('formatting');
A long list of possible options is available
for formatting, as indicated in Table 8.1
(the PHP manual lists a few more). These
parameters can also be combined—for
example,
date('l F j, Y')
returns
Thursday January 26, 2017
.
TABLE 8.1 Date() Function Formatting
Character Meaning Example
Y Year as 4 digits 2017
y Year as 2 digits 17
L Is it a leap year? 1 (for yes)
n Month as 1 or 2 digits 2
m Month as 2 digits 02
F Month February
M Month as 3 letters Feb
j Day of the month as 1 or 2 digits 8
d Day of the month as 2 digits 08
l (lowercase L) Day of the week Monday
D Day of the week as 3 letters Mon
w Day of the week as a single digit 0 (Sunday)
z Day of the year: 0 to 365 189
t Number of days in the month 31
S English ordinal suffix for a day, as 2 characters rd
g Hour; 12-hour format as 1 or 2 digits 6
G Hour; 24-hour format as 1 or 2 digits 18
h Hour; 12-hour format as 2 digits 06
H Hour; 24-hour format as 2 digits 18
i Minutes 45
s Seconds 18
u Microseconds 1234
a am or pm am
A AM or PM PM
U Seconds since the epoch 1048623008
e Time zone UTC
I (capital i) Is it daylight savings? 1 (for yes)
O Difference from GMT +0600

ptg18144795
212 Chapter 8
The
date()
function can take a second
argument, named a
timestamp
. A timestamp
is a number representing how many seconds
have passed since midnight on January 1,
1970—a moment known as the
epoch
.
The
time()
function returns the timestamp
for the current moment. The
mktime()
function can return a timestamp for a par-
ticular time and date:
mktime(hour, minute, second, month,
➝
day, year);
So the code
$ts = mktime(12, 30, 0, 11, 5,
➝
2016);
assigns to
$ts
the number of seconds
from the epoch to 12:30 on November 5,
2016. That number can then be fed into
the
date()
function like so:
date('D', $ts);
This returns
Sat
, which is the three-letter
format for that day of the week.
An important thing to understand is that
timestamps and the epoch use Universal
Coordinated Time (curiously abbreviated
UTC), which is equivalent to Greenwich
Mean Time (GMT).
As of PHP 5.1, you should establish the
server’s time zone prior to calling any date-
or time-related function. To do so, use
date_default_timezone_set(timezone);
The
timezone
value is a string like
America/New_York
or Pacific/Auckland
.
There are too many to list here (Africa
alone has over 50), but see the PHP
manual for them all. If you don’t take this
step, you might see errors about a date or
time function used without the time zone
being set.
Finally, realize that at least three time
zones are involved, then:
n
UTC
n
The server’s time zone
n
The time zone of the user
Because PHP is a server-side technology,
these functions reflect either UTC or the
date and time on the server. To get the
time on the client (in other words, on the
computer where the browser viewing the
page is located), you must use JavaScript.
To demonstrate the
date()
function, let’s
update the footer file so that it shows the
current date and time in the sidebar A. It’s
a trivial use of the function but will get you
started sufficiently.
To use date():
1. Open
footer.html
(Script 8.3) in your
text editor or IDE.
2. After the Concise CSS Framework men-
tion, add the following (Script 8.7):
<p><?php
The initial HTML paragraph tag will
wrap the date and time. Then open a
PHP section so that you can call the
date()
function.
3. Establish the time zone:
date_default_timezone_set
➝
('America/New_York');
Before calling
date()
, you must set
the time zone. To find yours, see
www.php.net/timezones.
ptg18144795
Creating Web Applications 213
4. Use the
date()
function to print out the
current date and time:
print date('g:i a l F j');
Using the formatting parameters from
Table 8.1, the
date()
function will return
a value like
4:15 pm Tuesday Febru-
ary 22
. This value will immediately be
printed.
5. Close the PHP section, and finish the
HTML code:
?></p>
6. Save the file as
footer.html
, place
it in the
templates
directory of your
PHP-enabled server, and test it in your
browser A.
The server’s time zone can also be set
in the PHP configuration file (see Appendix A,
“Installation and Configuration”). Establishing
the time zone there is generally a better idea
than doing so on a script-by-script basis.
Added to PHP 5.3 are new ways to
create and manipulate dates and times using
the
DateTime
class. While useful, this new
tool requires familiarity with object-oriented
programming, therefore making it beyond the
scope of this beginner’s book.
A The site now displays the date and time in the
footer, thanks to the
date()
function.
Script 8.7 The altered
footer.html
file uses the
date()
function to print the current date and time.
1 <!-- Script 8.7 - footer.html -->
2 <!-- END CHANGEABLE CONTENT. -->
3 </main>
4
5 <footer container class="siteFooter">
6 <p>Design uses <a href="http://
concisecss.com/">Concise CSS
Framework</a></p>
7 <p class="float-right"><?php // Print
the current date and time...
8 // Set the timezone:
9 date_default_timezone_
set('America/
New_York');
10
11 // Now print the date and time:
12 print date('g:i a l F j');
13 ?></p>
14 </footer>
15
16 </body>
17 </html>
ptg18144795
214 Chapter 8
Handling HTML Forms
with PHP, Revisited
All the examples in this book so far have
used two separate scripts for handling
HTML forms: one that displayed the form
and another that received and processed
the form’s data. There’s certainly nothing
wrong with this method, but coding the
entire process in one script has its advan-
tages. To make a page both display and
handle a form, use a conditional A.
if (/* form has been submitted */) {
// Handle the form.
} else {
// Display the form.
}
There are many ways to determine if a
form has been submitted. One option is to
check whether any of the form’s variables
are set:
if (isset($_POST['something'])) { ...
However, if the user submitted the form
without completing it, that variable may not
be set (depending on the corresponding
form element type). A more reliable solu-
tion is to add a hidden input to a form so
that it can be checked:
<input type="hidden" name=
➝
"submitted" value="true">
form
<?php
include('template/header.html');
if (/* form has been submitted */) {
Script
validation
} else {
}
include('template/footer.html');
?>
A This flowchart represents how the same PHP
script can both display and handle an HTML form.

ptg18144795
Creating Web Applications 215
Again, the only purpose of this hidden
input is to reliably indicate that the form
has been submitted, even if the user did
nothing to complete the form. To check for
that, the handling PHP code would use this
conditional:
if (isset($_POST['submitted'])) {
...
Another way of checking for a form’s sub-
mission is to examine
how the page was
accessed
. When you have a form that will
be submitted back to the same page, two
different types of requests will be made
of that script B. The first request, which
loads the form, will be a GET request. This
form
GET request POST
request
<?php
include('template/header.html');
if (/* form has been submitted */) {
Script
validation
1
2
} else {
}
include('template/footer.html');
?>
submission
B When the same PHP script both displays and handles an HTML form, the script
will be requested using two different methods.
is the standard request made of most web
pages. When the form is submitted, and its
action
attribute points to the same page,
a second request of the script will be
made, this time a POST request (assuming
the form uses the POST method). With this
in mind, you can test for a form’s submis-
sion by checking the request type, found in
the
$_SERVER
array:
if ($_SERVER['REQUEST_METHOD'] ==
➝
'POST') { ...
As an example of this, you’ll create the
basics of a login form.

ptg18144795
216 Chapter 8
To use one page to display
and handle a form:
1. Begin a new PHP document in your text
editor or IDE, to be named
login.php
(Script 8.8):
<?php // Script 8.8 - login.php
2. Define the page title as a constant and
include the header file:
define('TITLE', 'Login');
include('templates/header.html');
Using the constant system developed
earlier in the chapter, give this page its
own unique page title.
3. Add some introductory text:
print '<h2>Login Form</h2>
<p>Users who are logged in
➝
can take advantage of certain
➝
features like this, that, and
➝
the other thing.</p>';
This text, which appears outside the
main conditional, will always show in
the browser, whether the form is being
displayed or has been submitted.
Because the core of this script revolves
around a PHP conditional, it’s arguably
clearer to print out HTML from PHP
rather than exit out of the PHP code as
you did in the previous two examples
(
index.php
and
books.php
).
4. Begin the conditional to check whether
the form has been submitted:
if ($_SERVER['REQUEST_METHOD'] ==
➝
'POST') {
To test whether the form has
been submitted, check whether
$_SERVER['REQUEST_METHOD']
equals
POST
(case-sensitive).
Script 8.8 The login page serves two purposes: It
displays the login form and handles its submission.
1 <?php // Script 8.8 - login.php
2 /* This page lets people log into the
site (in theory). */
3
4 // Set the page title and include the
header file:
5 define('TITLE', 'Login');
6 include('templates/header.html');
7
8 // Print some introductory text:
9 print '<h2>Login Form</h2>
10 <p>Users who are logged in can take
advantage of certain features like
this, that, and the other thing.
</p>';
11
12 // Check if the form has been submitted:
13 if ($_SERVER['REQUEST_METHOD'] ==
'POST') {
14
15 // Handle the form:
16 if ( (!empty($_POST['email'])) &&
(!empty($_POST['password'])) ) {
17
18 if ( (strtolower($_
POST['email']) == 'me@example.
com') && ($_POST['password'] ==
'testpass') ) { // Correct!
19
20 print '<p class="text--
success">You are logged
in!<br>Now you can blah,
blah, blah...</p>';
21
22 } else { // Incorrect!
23
24 print '<p class="text--
error">The submitted email
address and password do not
match those on file!<br>Go
back and try again.</p>';
25
26 }
27
28 } else { // Forgot a field.
29
code continues on next page
ptg18144795
Creating Web Applications 217
5. Create a nested pair of conditionals to
process the form data:
if ( (!empty($_POST['email'])) &&
(!empty($_POST['password'])) ) {
if ( (strtolower
➝
($_POST['email']) ==
➝
'me@example.com') &&
➝
($_POST['password'] ==
➝
'testpass') ) { // Correct!
print '<p class="text--
➝
success">You are logged
➝
in!<br>Now you can blah,
➝
blah, blah...</p>';
} else { // Incorrect!
print '<p class="text--
➝
error">The submitted email
➝
address and password do not
➝
match those on file!<br>Go
➝
back and try again.</p>';
}
} else { // Forgot a field.
print '<p class="text--
➝
error">Please make sure you
➝
enter both an email address
➝
and a password!<br>Go back
➝
and try again.</p>';
}
These conditionals handle the form data.
The first conditional checks that both the
email address and password variables
have values. If they don’t, a message is
displayed (
Please make sure…
). Within
that first conditional, another conditional
checks whether the email address is
equal to
me@example.com
and the
password is equal to
testpass
. If so, let’s
say the user is logged in (it would be
too advanced at this juncture to store
and retrieve user information to create
a real login system). Otherwise, a mes-
sage indicates that the wrong values
were entered.
Script 8.8 continued
30 print '<p class="text--
error">Please make sure you
enter both an email address and
a password!<br>Go back and try
again.</p>';
31
32 }
33
34 } else { // Display the form.
35
36 print '<form action="login.
php" method="post"
class="form--inline">
37 <p><label for="email">Email
Address:</label><input
type="email" name="email"
size="20"></p>
38 <p><label for="password">Password:
</label><input type="password"
name="password" size="20"></p>
39 <p><input type="submit"
name="submit" value="Log In!"
class="button--pill"></p>
40 </form>';
41
42 }
43
44 include('templates/footer.html'); //
Need the footer.
45 ?>

ptg18144795
218 Chapter 8
Be certain to use the equals operator (
==
)
here and not the assignment operator (
=
)
in this conditional, which is a common
mistake. Also, in case users enter their
address as
Me@example.com
, or any
other capitalized permutation, the
strtolower()
function is first applied
to the email address, prior to checking
for equality.
Finally, some Concise CSS Framework
classes are used to add styling—green
and red coloring—to the printed text.
6. Complete the main conditional:
} else { // Display the form.
print '<form action=
➝
"login.php" method="post"
➝
class="form--inline">
<p><label for="email">
➝
Email Address:</label>
➝
<input type="email"
➝
name="email" size="20"></p>
<p><label for="password">
➝
Password:</label><input type=
➝
"password" name="password"
➝
size="20"></p>
<p><input type="submit" name=
➝
"submit" value="Log In!"
➝
class="button--pill"></p>
</form>';
}
This concludes the main conditional,
which checks whether the form has
been submitted. If the form hasn’t been
submitted, then the form is displayed.
The form itself is very simple C.
To clarify a point of possible confusion,
even though the form’s
method
attribute
has a value of
post
(all lowercase), to
check for the form’s submission the
request method value is still
POST
(all
uppercase).
C This simple login page takes an
email address and a password.
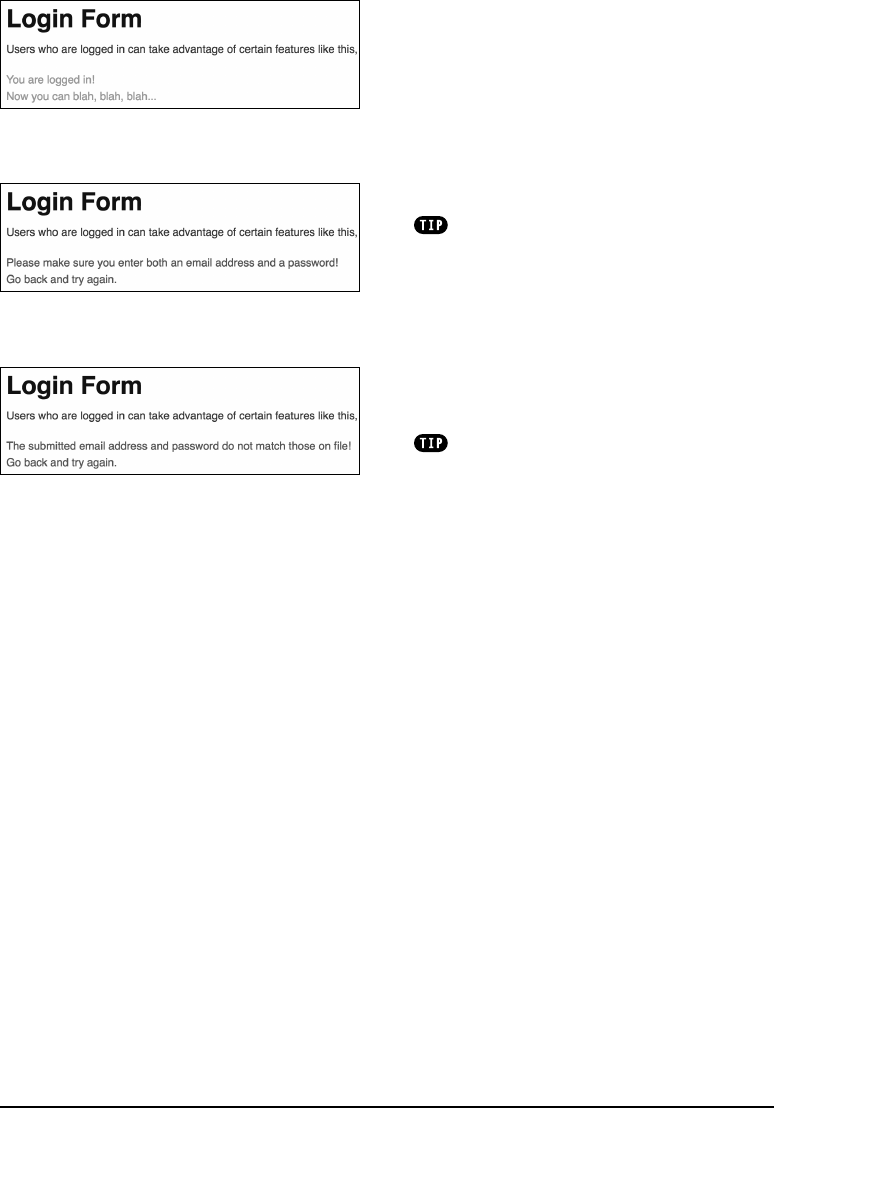
ptg18144795
Creating Web Applications 219
7. Require the footer file, and complete
the PHP page:
include('templates/footer.html');
?>
8. Save the file as
login.php
, place it in
the same directory as
index.php
, and
test it in your browser D, E, and F.
This trick of checking for the presence
of a hidden input can be confusing. It works
because the same script—
login.php
—will be
accessed twice by the user. The first time the
form will not have been submitted, so a con-
ditional checking if
$_POST['submitted']
is set will be FALSE and the form will be dis-
played. Then the page will be accessed again
after the user clicks submit, at which point the
conditional becomes TRUE.
If you want a page to handle a form and
then immediately display the form again, use
this:
if ($_SERVER['REQUEST_METHOD'] ==
➝
'POST') {
// Handle the form.
}
// Display the form.
D Upon successfully logging in, the user sees this
message.
E Failure to submit either an email address or a
password results in this message.
F If either the email address or the password
doesn’t match that in the script, the user sees this
error message.
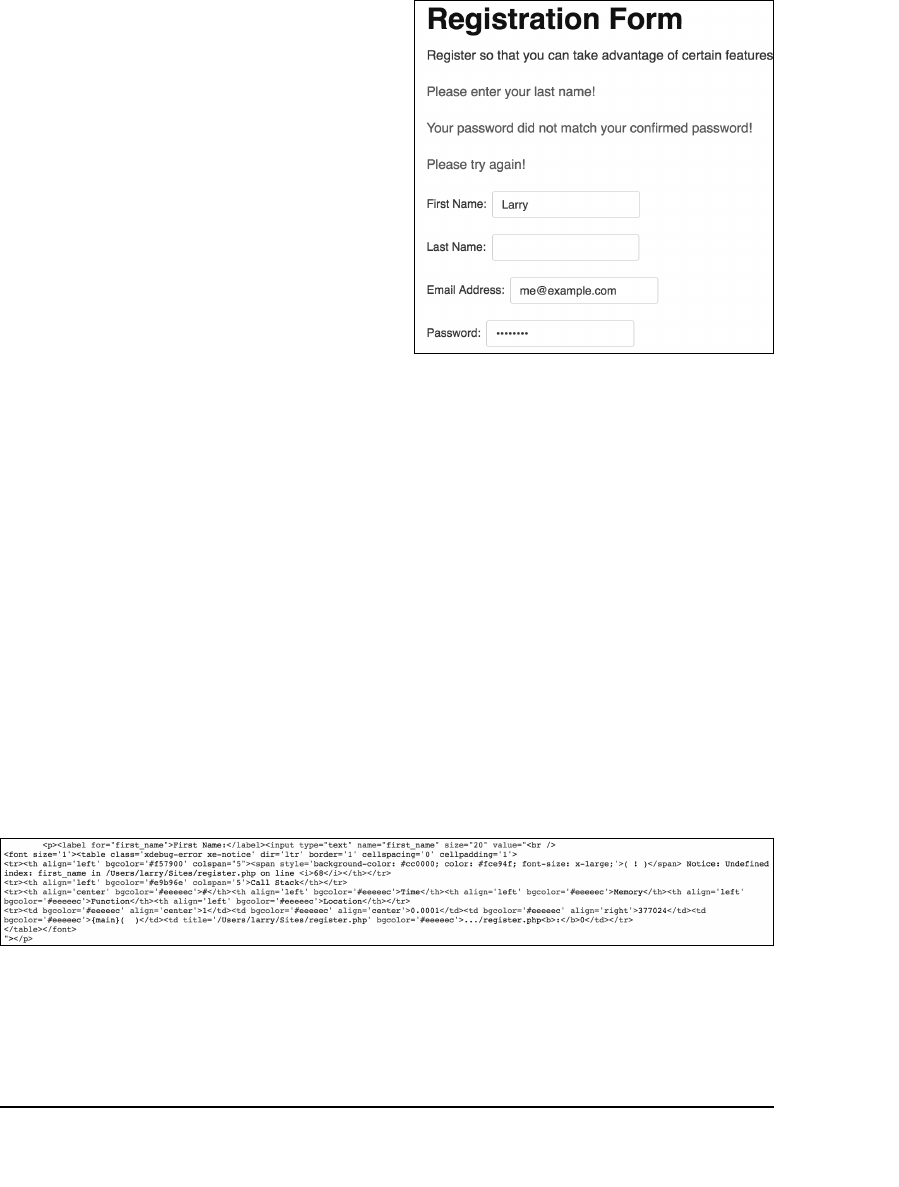
ptg18144795
220 Chapter 8
Making Forms Sticky
A
sticky
form remembers values entered
into it. A common example is a search
engine, which often displays your terms in
the search box, even when showing the
results of the search. You might also want
to use sticky forms on occasions where the
user failed to complete a form accurately
and therefore must resubmit it A.
From a technological standpoint, sticky
forms work by having their form element
values predetermined. You can make this
happen by setting the
value
attribute of
text inputs:
<input type="text" name="first_name"
➝
value="Stephanie">
To have PHP preset that value, print the
appropriate variable between the quota-
tion marks:
<input type="text" name="first_name"
➝
value="<?php print $_POST['first_
➝
name']; ?>">
The first time the form is run, the PHP code
prints nothing (because the variable has no
value). If the form is displayed again after
submission, a value that the user originally
entered in the form input will be displayed
there automatically. That’s the basic idea,
but a more professional implementation
would address two things.
A Creating sticky forms makes it easier for
users to correct omissions in incomplete form
submissions.
B The HTML source of the page shows the PHP error caused by referring to a variable that does not exist.
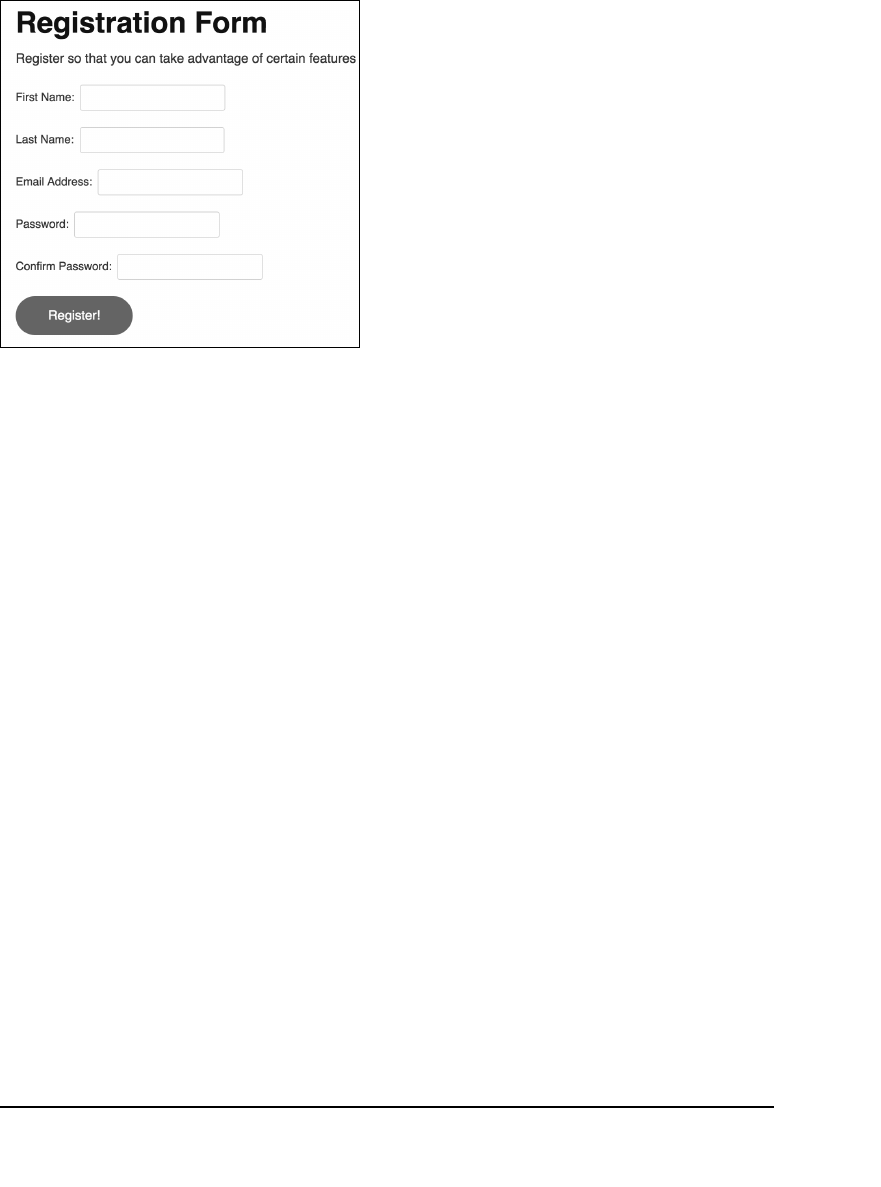
ptg18144795
Creating Web Applications 221
First, it’s best not to refer to variables that
don’t exist. Doing so creates PHP warnings,
and with the PHP code buried in a form
element’s attribute, the warning itself will
only be fully visible in the HTML source
code B. To avoid that, check that the vari-
able is set before printing it:
<input type="text" name="first_name"
➝
value="<?php if (isset($_POST
➝
['first_name']) { print $_POST
➝
['first_name']; } ?>">
Second, certain characters that could
be in a submitted value will cause prob-
lems if printed as a form element’s value.
To prevent such problems, apply the
htmlspecialchars()
function (discussed
in Chapter 5, “Using Strings”). With this in
mind, a longer but better version of this
code is as follows:
<input type="text" name="first_name"
➝
value="<?php if (isset($_POST
➝
['first_name']) { print
➝
htmlspecialchars($_POST
➝
['first_name']); } ?>">
To demonstrate this concept, you’ll create
the shell of a registration form C.
C The registration form as the user first sees it.
ptg18144795
222 Chapter 8
To make a sticky form:
1. Create a new PHP script in your
text editor or IDE, to be named
register.php
(Script 8.9):
<?php // Script 8.9 -
➝
register.php
2. Set the page title, and include the
HTML header:
define('TITLE', 'Register');
include('templates/header.html');
3. Add some introductory text:
print '<h2>Registration Form</h2>
<p>Register so that you can
➝
take advantage of certain
➝
features like this, that, and
➝
the other thing.</p>';
4. Check whether the form has been
submitted:
if ($_SERVER['REQUEST_METHOD'] ==
➝
'POST') {
Like the login page, this one script both
displays and handles the registration
form. To check whether the form has
been submitted, the same code previ-
ously explained is used here.
5. Create a flag variable:
$problem = false;
The
$problem
variable will be used to
indicate whether a problem occurred.
Specifically, you want to make sure that
every form input has been filled out
before you formally register the user.
Initially, this variable is set to FALSE,
because no problems have occurred.
This is the same approach used in
Chapter 6, “Control Structures.”
Script 8.9 The registration form uses a sticky
feature so that it recalls the values previously
entered into it.
1 <?php // Script 8.9 - register.php
2 /* This page lets people register for
the site (in theory). */
3
4 // Set the page title and include the
header file:
5 define('TITLE', 'Register');
6 include('templates/header.html');
7
8 // Print some introductory text:
9 print '<h2>Registration Form</h2>
10 <p>Register so that you can take
advantage of certain features like
this, that, and the other thing.</
p>';
11
12 // Check if the form has been submitted:
13 if ($_SERVER['REQUEST_METHOD'] ==
'POST') {
14
15 $problem = false; // No problems so
far.
16
17 // Check for each value...
18 if (empty($_POST['first_name'])) {
19 $problem = true;
20 print '<p class="text--
error">Please enter your first
name!</p>';
21 }
22
23 if (empty($_POST['last_name'])) {
24 $problem = true;
25 print '<p class="text--
error">Please enter your last
name!</p>';
26 }
27
28 if (empty($_POST['email'])) {
29 $problem = true;
30 print '<p class="text--
error">Please enter your email
address!</p>';
31 }
32
code continues on next page
ptg18144795
Creating Web Applications 223
6. Check that a first name was entered:
if (empty($_POST['first_name']))
{
$problem = true;
print '<p class="text--
➝
error">Please enter your
➝
first name!</p>';
}
As a simple test to determine whether
the user has entered a first name value,
check that the variable isn’t empty.
(This technique was first discussed
in Chapter 6.) If the variable is empty,
then indicate a problem by setting that
variable to TRUE and print an error mes-
sage. The error message has a class
type of
text--error
, so that the CSS for-
matting is applied. (That class is defined
within the Concise CSS Framework.)
7. Repeat the validation for the last name
and email address:
if (empty($_POST['last_name'])) {
$problem = true;
print '<p class="text--
➝
error">Please enter your last
➝
name!</p>';
}
if (empty($_POST['email'])) {
$problem = true;
print '<p class="text--
➝
error">Please enter your
➝
email address!</p>';
}
Both of these checks are variations on
the username validation routine.
continues on next page
Script 8.9 continued
33 if (empty($_POST['password1'])) {
34 $problem = true;
35 print '<p class="text--
error">Please enter a password!
</p>';
36 }
37
38 if ($_POST['password1'] != $_
POST['password2']) {
39 $problem = true;
40 print '<p class="text--error">Your
password did not match your
confirmed password!</p>';
41 }
42
43 if (!$problem) { // If there weren't
any problems...
44
45 // Print a message:
46 print '<p class="text-
-success">You are now
registered!<br>Okay, you are not
really registered but...</p>';
47
48 // Clear the posted values:
49 $_POST = [];
50
51 } else { // Forgot a field.
52
53 print '<p class="text--
error">Please try again!</p>';
54
55 }
56
57 } // End of handle form IF.
58
59 // Create the form:
60 ?>
61 <form action="register.php"
method="post" class="form--inline">
62
63 <p><label for="first_name">First
Name:</label><input type="text"
name="first_name" size="20"
value="<?php if (isset($_POST['first_
name'])) { print htmlspecialchars($_
POST['first_name']); } ?>"></p>
64
code continues on next page
ptg18144795
224 Chapter 8
8. Validate the passwords:
if (empty($_POST['password1'])) {
$problem = true;
print '<p class="text--
➝
error">Please enter a
➝
password!</p>';
}
if ($_POST['password1'] != $_
POST['password2']) {
$problem = true;
print '<p class="text--
➝
error">Your password did
➝
not match your confirmed
➝
password!</p>';
}
The password validation requires two
conditionals. The first checks whether
the
$_POST['password1']
variable is
empty. The second checks whether
the
$_POST['password1']
variable isn’t
equal to the
$_POST['password2']
variable. You don’t need to see if
$_POST['password2']
is empty because
if it is and
$_POST['password1']
isn’t,
the second conditional will catch that
problem. If
$_POST['password1']
and
$_POST['password2']
are both
empty, the first conditional will catch
the mistake.
9. Check whether a problem occurred:
if (!$problem) {
print '<p class="text--
➝
success">You are now
➝
registered!<br>Okay, you
➝
are not really registered
➝
but...</p>';
$_POST = [];
If there were no problems, the
$problem
variable is still FALSE, and
the initial condition here is TRUE (the
condition is that
$problem
has a value
of FALSE). In that case, the registration
Script 8.9 continued
65 <p><label for="last_name">Last
Name:</label><input type="text"
name="last_name" size="20"
value="<?php if (isset($_
POST['last_name'])) { print
htmlspecialchars($_POST['last_
name']); } ?>"></p>
66
67 <p><label for="email">Email
Address:</label><input
type="email" name="email"
size="20" value="<?php if
(isset($_POST['email'])) { print
htmlspecialchars($_POST['email']);
} ?>"></p>
68
69 <p><label
for="password1">Password:
</label><input type="password"
name="password1" size="20"
value="<?php if (isset($_
POST['password1'])) {
print htmlspecialchars($_
POST['password1']); } ?>"></p>
70 <p><label for="password2">Confirm
Password:</label><input
type="password" name="password2"
size="20" value="<?php if
(isset($_POST['password2']))
{ print htmlspecialchars($_
POST['password2']); } ?>"></p>
71
72 <p><input type="submit"
name="submit" value="Register!"
class="button--pill"></p>
73
74 </form>
75
76 <?php include('templates/footer.html');
// Need the footer. ?>

ptg18144795
Creating Web Applications 225
process would take place. The formal
registration process, where the data is
stored in a file or database, has not yet
been developed, so a simple message
appears in its stead here.
Next, the
$_POST
variable is assigned
the value of an empty array using the
short array syntax. This line has the
effect of wiping out the contents of
the
$_POST
variable (i.e., resetting it as
an empty array). This step is taken only
upon a successful (theoretical) registra-
tion so that the values are not redis-
played in the registration form (e.g., see
Step 12).
10. Complete the conditionals:
} else { // Forgot a field.
print '<p class="text--
➝
error">Please try again!
➝
</p>';
}
} // End of handle form IF.
The
else
clause applies if a problem
occurred, in which case the user is
asked to complete the form again.
11. Begin the HTML form:
?>
<form action="register.php"
➝
method="post" class=
➝
"form--inline">
Unlike the login example, this page
always displays the form. Therefore,
the form isn’t part of any conditional.
Also, because there’s a lot of HTML to
be generated, it’ll be easier to leave the
PHP section of the page and just output
the HTML directly.
12. Create the sticky first name input:
<p><label for="first_name">
➝
First Name:</label><input
➝
type="text" name="first_name"
➝
size="20" value="<?php if
➝
(isset($_POST['first_name']))
➝
{ print htmlspecialchars($_
➝
POST['first_name']); } ?>"></p>
To make the first name input sticky,
preset its
value
attribute by printing out
the
$_POST['first_name']
variable,
but only if it’s set. The conditional is
therefore put within PHP tags within
the HTML’s
value
section of the form
element. As already mentioned, the
htmlspecialchars()
function is used
to handle any potentially problematic
characters.
Note that if the user filled out the form
properly, the entire
$_POST
array will
have been reset, making this PHP con-
ditional FALSE.
If it helps your comprehension, write out
the PHP code:
<p><label for="first_name">
➝
First Name:</label><input
➝
type="text" name="first_name"
➝
size="20" value="<?php
if (isset($_POST['first_name']))
{
print htmlspecialchars
➝
($_POST['first_name']);
} ?>"></p>
continues on next page
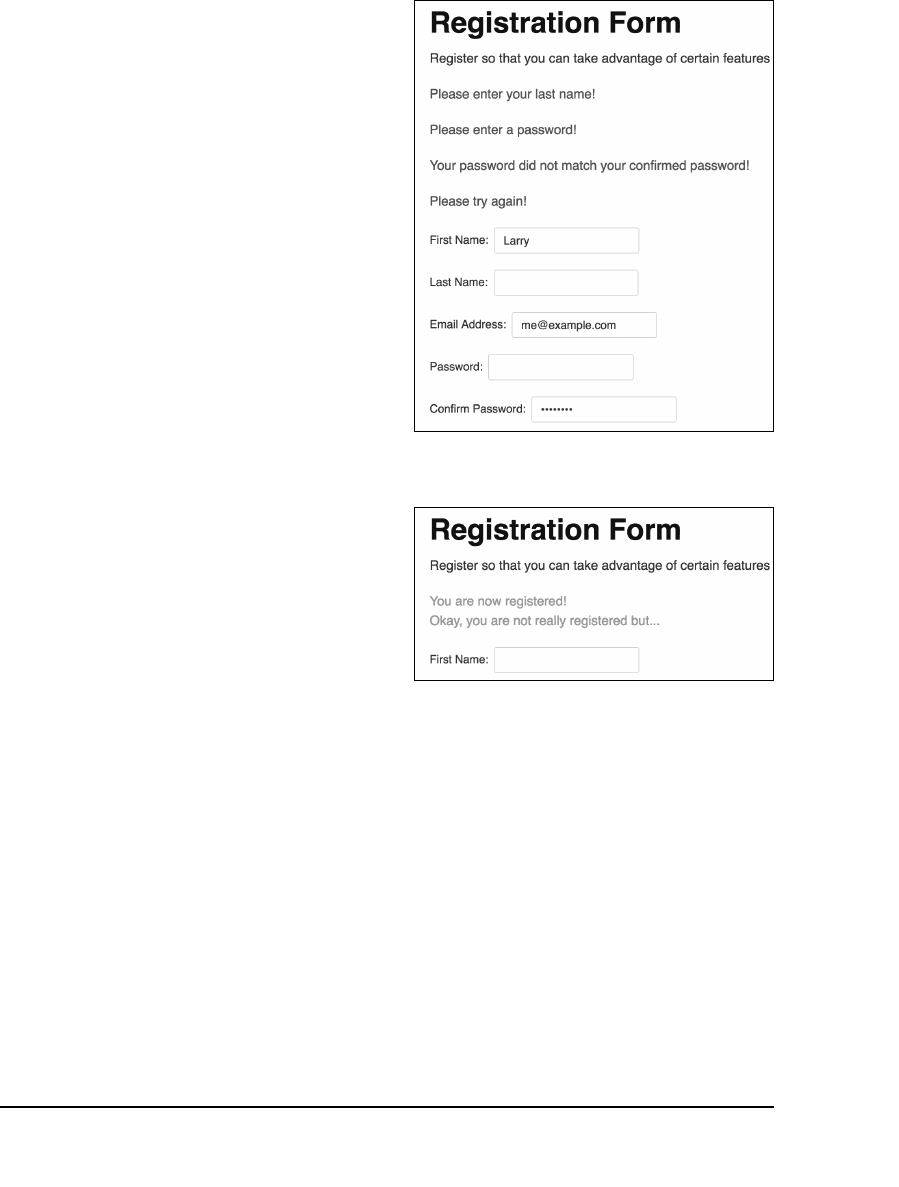
ptg18144795
226 Chapter 8
13. Repeat the process for the last name
and email address:
<p><label for="last_name">
➝
Last Name:</label><input
➝
type="text" name="last_name"
➝
size="20" value="<?php if
➝
(isset($_POST['last_name']))
➝
{ print htmlspecialchars
➝
($_POST['last_name']); } ?>">
➝
</p>
<p><label for="email">Email
➝
Address:</label><input type=
➝
"email" name="email"
➝
size="20" value="<?php if
➝
(isset($_POST['email'])) {
➝
print htmlspecialchars($_POST
➝
['email']); } ?>"></p>
These are variations on Step 12, switch-
ing the variable names as appropriate.
14. Add the rest of the form:
<p><label for="password1">
➝
Password:</label><input
➝
type="password"
➝
name="password1" size="20"
➝
value="<?php if (isset
➝
($_POST['password1'])) {
➝
print htmlspecialchars
➝
($_POST['password1']); } ?>">
➝
</p>
<p><label for="password2">
➝
Confirm Password:</label>
➝
<input type="password"
➝
name="password2" size="20"
➝
value="<?php if (isset
➝
($_POST['password2'])) {
➝
print htmlspecialchars
➝
($_POST['password2']); } ?>">
➝
</p>
<p><input type="submit"
➝
name="submit"
➝
value="Register!"
➝
class="button--pill"></p>
</form>
D The registration form indicates any problems
and retains the form values.
E The registration form after the user successfully
fills it out.
ptg18144795
Creating Web Applications 227
It used to be the case that you couldn’t
preset a value for a password input,
but most browsers now support this
feature. Then there is the submit button
and the closing
form
tag.
15. Complete the PHP page:
<?php include('templates/
➝
footer.html'); ?>
The last step is to include the HTML
footer.
16. Save the file as
register.php
, place it
in the proper directory on your PHP-
enabled server, and test it in your
browser D and E.
You should quote all attribute values in
form inputs. If you don’t quote your values,
any spaces in them mark the end of the value
(for example, Larry Ullman will display as just
Larry in the form input).
To preset the status of radio buttons
or checkboxes as selected, add the code
checked="checked"
to the
input
tag:
<input type="checkbox" name=
➝
"interests[]" value="Skiing"
➝
checked="checked">
Of course, you’d need to use a PHP condi-
tional to see if that text should be added to the
element’s definition.
To preselect a pull-down menu, use
selected="selected"
:
<select name="year">
<option value="2017">2017</option>
<option value="2018" selected=
➝
"selected">2018</option>
</select>
Again, you’d need to use a PHP conditional
to see if that text should be added to the ele-
ment’s definition.
To preset the value of a text area, place
the value between the
textarea
tags:
<textarea name="comments" rows="10"
➝
cols="50">preset value</textarea>

ptg18144795
228 Chapter 8
Sending Email
Sending email using PHP is
theoretically
simple, merely requiring only PHP’s
mail()
function. This function uses the server’s
email application (such as
sendmail
on
Unix or Mac OS X) or an SMTP (Simple Mail
Transfer Protocol) server to send out the
messages. The basic usage of this function
is as follows:
mail(to, subject, body);
The first argument is the email address
(or
addresses
, separated by commas)
to which the email should be sent. The
second argument establishes the mes-
sage’s subject line, and the third argument
creates the message’s content.
This function can take another argument
through which you can add more details
(
additional headers
) to the email, including
a
From
address, email priority, and carbon-
copy (CC) addresses:
mail('someone@example.com', 'Test
➝
Email', 'This is a test email',
➝
'From: 'email@example.com');
Although doing so is easy in theory, using
this function in real-world code can be far
more complex. For starters, setting up your
own computer to send out email can be
a challenge (see the sidebar “Configuring
Your Server to Send Email”).
Second, you should take steps to prevent
malicious people from using your forms
to send out spam. In our next example, an
email will be sent to the provided email
address. If a conniving user supplies mul-
tiple addresses A, an email will be sent to
each one. You can safeguard against this
in many ways. For the level of this book,
one simple option is to confirm that there’s
only a single
@
present in the provided
address (i.e., it’s only one email address).
A A user could easily attempt to send emails to
multiple recipients through a form like this.
Script 8.10 In PHP, you can send email by calling
the
mail()
function.
1 <?php // Script 8.9 - register.php
2 /* This page lets people register for
the site (in theory). */
3
4 // Set the page title and include the
header file:
5 define('TITLE', 'Register');
6 include('templates/header.html');
7
8 // Print some introductory text:
9 print '<h2>Registration Form</h2>
10 <p>Register so that you can take
advantage of certain features like
this, that, and the other thing.
</p>';
11
12 // Check if the form has been submitted:
13 if ($_SERVER['REQUEST_METHOD'] ==
'POST') {
14
15 $problem = false; // No problems so
far.
16
17 // Check for each value...
18 if (empty($_POST['first_name'])) {
19 $problem = true;
20 print '<p class="text--
error">Please enter your first
name!</p>';
21 }
22
23 if (empty($_POST['last_name'])) {
24 $problem = true;
25 print '<p class="text--
error">Please enter your last
name!</p>';
26 }
27
code continues on next page
ptg18144795
Creating Web Applications 229
You can count how many times a substring
is present in a string using the aptly named
substr_count()
function:
if (substr_count($_POST
➝
['email'],'@') == 1) {...
With those caveats, let’s add a
mail()
function call to the registration page so
that you get a sense of how the function
might be used.
To send email with PHP:
1. Open
register.php
(Script 8.9) in your
text editor or IDE.
2. Change the email validation so that it
also checks for a single “at” symbol
(Script 8.10):
if (empty($_POST['email']) ||
➝
(substr_count($_POST['email'],
➝
'@') != 1) ) {
Now the email address validation fails
if the value is empty or if it doesn’t
contain exactly one
@
. This doesn’t con-
stitute thorough validation—far from it—
but the email address becomes less of
a security risk to use. See the tips for
ways to improve upon this.
3. After the registration message (line 46),
add the following:
$body = "Thank you, {$_POST
➝
['first_name']}, for
➝
registering with the J.D.
➝
Salinger fan club!";
mail($_POST['email'],
➝
'Registration Confirmation',
➝
$body, 'From: admin@example.
➝
com');
continues on next page
Script 8.10 continued
28 if (empty($_POST['email']) ||
(substr_count($_POST['email'],
'@') != 1) ) {
29 $problem = true;
30 print '<p class="text--
error">Please enter your email
address!</p>';
31 }
32
33 if (empty($_POST['password1'])) {
34 $problem = true;
35 print '<p class="text--
error">Please enter a password!
</p>';
36 }
37
38 if ($_POST['password1'] != $_
POST['password2']) {
39 $problem = true;
40 print '<p class="text--error">Your
password did not match your
confirmed password!</p>';
41 }
42
43 if (!$problem) { // If there weren't
any problems...
44
45 // Print a message:
46 print '<p class="text-
-success">You are now
registered!<br>Okay, you are not
really registered but...</p>';
47
48 // Send the email:
49 $body = "Thank you, {$_
POST['first_name']}, for
registering with the J.D.
Salinger fan club!'.";
50 mail($_POST['email'],
'Registration Confirmation',
$body, 'From: admin@example.
com');
51
52 // Clear the posted values:
53 $_POST = [];
54
55 } else { // Forgot a field.
56
code continues on next page

ptg18144795
230 Chapter 8
Script 8.10 continued
57 print '<p class="text--error">Please try again!</p>';
58
59 }
60
61 } // End of handle form IF.
62
63 // Create the form:
64 ?>
65 <form action="register.php" method="post" class="form--inline">
66
67 <p><label for="first_name">First Name:</label><input type="text" name="first_name"
size="20" value="<?php if (isset($_POST['first_name'])) { print htmlspecialchars(
$_POST['first_name']); } ?>"></p>
68
69 <p><label for="last_name">Last Name:</label><input type="text" name="last_name"
size="20" value="<?php if (isset($_POST['last_name'])) { print htmlspecialchars(
$_POST['last_name']); } ?>"></p>
70
71 <p><label for="email">Email Address:</label><input type="email" name="email"
size="20" value="<?php if (isset($_POST['email'])) { print htmlspecialchars(
$_POST['email']); } ?>"></p>
72
73 <p><label for="password1">Password:</label><input type="password" name="password1"
size="20" value="<?php if (isset($_POST['password1'])) { print htmlspecialchars(
$_POST['password1']); } ?>"></p>
74
75 <p><label for="password2">Confirm Password:</label><input type="password"
name="password2" size="20" value="<?php if (isset($_POST['password2'])) { print
htmlspecialchars($_POST['password2']); } ?>"></p>
76
77 <p><input type="submit" name="submit" value="Register!" class="button--pill"></p>
78
79 </form>
80
81 <?php include('templates/footer.html'); // Need the footer. ?>

ptg18144795
Creating Web Applications 231
Sometimes the easiest way to use this
function is to establish the body as a
variable and then feed it into the
mail()
function (as opposed to writing the
email’s body within the function call).
The message itself is sent to the address
with which the user registered, with the
subject
Registration Confirmation
, from
the address
admin@example.com
. If
you’ll be running this script on a live
server, you should use an actual email
address for that site as the
from
value.
4. Save the file, place it in the proper
directory of your PHP- and email-
enabled server, and test it in your
browser B.
5. Upon successfully completing the form,
check your email for the message C.
The “Review and Pursue” section at the
end of this chapter points you in the direc-
tion of an excellent tool for validating email
addresses, provided you’re using PHP version
5.2 or later.
The HTML5 email input type limits the
user to only entering a single email address,
but that can easily be circumvented.
In my PHP and MySQL for Dynamic Web
Sites: Visual QuickPro Guide (Peachpit Press)
and online in my forums (www.LarryUllman.com/
forums/), I discuss other ways to secure the
emails that get sent by a PHP script.
If you have problems receiving the PHP-
sent email, start by confirming that the mail
server works on its own without involving
PHP. Then make sure you’re using a valid from
address. Finally, try using different recipient
addresses, and keep an eye on your spam
folder to see that the message isn’t getting put
there (if applicable).
continues on next page
B If users provide multiple email addresses A,
they’ll see an error message.
C This email was sent by the PHP script upon
successful pseudo-registration.

ptg18144795
232 Chapter 8
It’s possible to send email with attach-
ments or HTML email, although doing so
requires far more sophisticated coding
(normally involving classes and objects).
Fortunately, a number of programmers have
already developed workable solutions that are
available for use. See Appendix B, “Resources
and Next Steps,” for websites that may be of
assistance.
The
mail()
function returns a value
(1 or 0) indicating its successful use. This
value indicates only whether PHP was able
to attempt to send the email (by using
whatever email system is in place). There’s
no easy way to use PHP to see whether an
email address is valid or whether the end user
received the message.
To send an email to multiple addresses,
either use the CC parameter or separate each
TO address with a comma.
To create new lines within the email
body, either create the message over multiple
lines or use the newline character (
\n
) within
double quotation marks.
If you want to send multiple headers in
addition to the From address, separate them
with a combination of
\r\n
:
mail ('email@example.com',
➝
'Testing', $body, "From:
➝
email@example.org\r\nBcc:
➝
hidden@example.net,
➝
third@example.com");
Configuring Your Server to Send Email
Sending email with PHP is easy, as long as your web server (or computer) is set up to send email. If
you’re using a web hosting service or your own Unix computer (such as Linux), this shouldn’t be a
problem at all. If you do have a problem, contact the hosting company for support.
If you’re running your own server (for example, if you’re developing locally), the ability to send
email could be a sticking point. If you’re using an all-in-one installer, such as MAMP or XAMPP (see
Appendix A), it should also have an email server as part of the package. If you don’t receive the
email after registering, check the associated software’s documentation for what you may need to
do to enable email.
If you’re using a web server built into the operating system, such as Apache on Mac OS X, you may
already be set up to send email. To start, go ahead and try this example using a valid email address.
If you don’t receive the email, see Appendix A for information about getting
mail()
to work.
I’ll also add that I almost never worry about getting PHP on my own computer to send out emails
because I’ll never be running live websites from my computer. In other words, why waste time get-
ting something to work that you’ll never end up using (whereas getting PHP to send out email on a
live server does matter)?
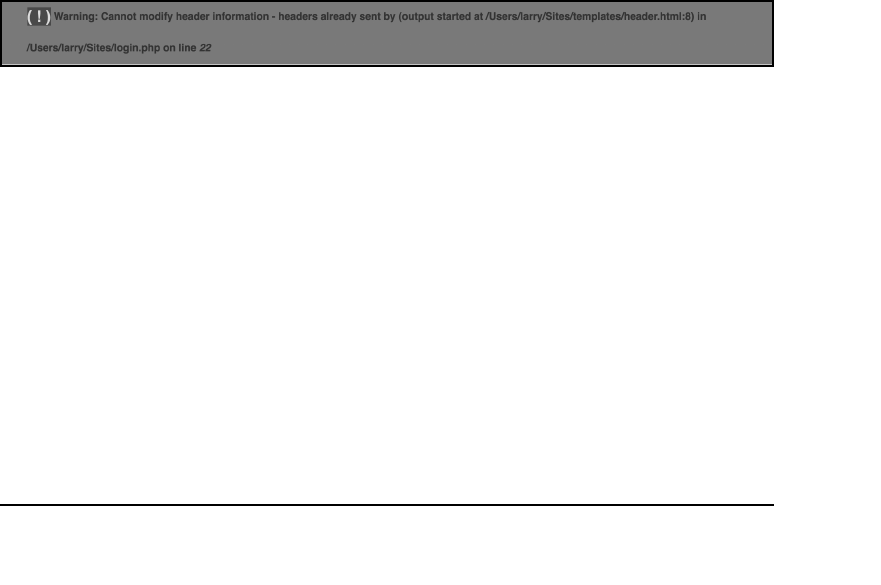
ptg18144795
Creating Web Applications 233
Output Buffering
A handful of functions that you’ll use in this
chapter and the next can be called only
if nothing has been sent to the browser.
These functions include
header()
,
setcookie()
, and
session_start()
.
If you use them after the browser has
already received some text, HTML, or even
a blank space, you’ll get the dreaded
“
headers already sent
”
error message A.
One solution that I recommend for begin-
ning PHP developers is to make use of
output buffering
(also named
output
control
). In a normal PHP script, any HTML
outside the PHP tags is immediately sent
to the browser. This is also true when any
print
statement is executed. With output
buffering, the HTML and printed data—the
output—will instead be placed into a buffer
(that is, memory). At the end of the script,
the buffer will then be sent to the browser,
or if more appropriate, the buffer can be
A If the browser receives any HTML prior to a
header()
call, you’ll see this error message.
cleared without being sent to the browser.
There are many reasons to use output
buffering, but for beginners, one benefit is
that you can use certain functions without
worrying about
headers already sent
errors. Although you haven’t dealt with any
of the named functions yet, this chapter
introduces output buffering now. Using this
feature will greatly reduce errors when you
begin using headers (in the next section of
this chapter), cookies (in the next chapter),
and sessions (also in the next chapter).
To begin output buffering, invoke the
ob_start()
function at the very top of
your page. Once you call it, every
print
and similar function will send data to a
memory buffer rather than to the browser.
Conversely, HTTP calls, such as
header()
and
setcookie()
, won’t be buffered and
will operate as usual. To be more explicit,
it must be invoked before any
print
statements or any HTML gets sent to the
browser.
ptg18144795
234 Chapter 8
At the conclusion of the script, call the
ob_end_flush()
function to send the
accumulated buffer to the browser. Or use
the
ob_end_clean()
function to delete
the buffered data without passing it along.
Both functions also turn off output buffer-
ing for that script. PHP automatically runs
ob_end_flush()
at the conclusion of a
script if it isn’t otherwise done. But it’s still
a good idea to call it yourself.
From a programmer’s perspective, output
buffering allows you to structure a script
in a more linear form, without concern for
HTTP headers. Let’s remake
header.html
and
footer.html
so that every page uses
output buffering. You won’t appreciate the
benefits yet, but the number of errors you
won’t see
over the rest of this book will go
a long way toward preserving your pro-
gramming sanity.
To use output buffering:
1. Open
header.html
(Script 8.7) in your
text editor or IDE.
2. At the very top of the page, before any
HTML code, add the following (Script
8.11):
<?php
ob_start();
?>
Script 8.11 Add output buffering to the web
application by calling the
ob_start()
function at
the top of the
header.html
script.
1 <?php // Script 8.11 - header.html #3
2
3 // Turn on output buffering:
4 ob_start();
5
6 ?><!doctype html>
7 <html>
8 <head>
9 <meta charset="utf-8">
10 <meta http-equiv="X-UA-Compatible"
content="IE=edge,chrome=1">
11 <meta name="viewport"
content="width=device-width,
initial-scale=1.0">
12 <meta name="HandheldFriendly"
content="True">
13 <title><?php // Print the page title.
14 if (defined('TITLE')) { // Is the
title defined?
15 print TITLE;
16 } else { // The title is not defined.
17 print 'Raise High the Roof Beam!
A J.D. Salinger Fan Club';
18 }
19 ?></title>
20 <link rel="stylesheet" type="text/
css" media="screen" href="css/
concise.min.css" />
21 <link rel="stylesheet" type="text/
css" media="screen" href="css/
masthead.css" />
22 </head>
23 <body>
24 <header container class="siteHeader">
25 <div row>
26 <h1 column=4 class="logo">
<a href="index.php">Raise High
the Roof Beam!</a></h1>
27 <nav column="8" class="nav">
code continues on next page

ptg18144795
Creating Web Applications 235
The key to using output buffering is to
call the
ob_start()
function as early as
possible in a script. In this example, you
create a special section of PHP prior to
any HTML and call
ob_start()
there.
By turning on output buffering in your
header file and turning it off in your
footer file, you buffer every page in the
application.
3. Open
footer.html
(Script 8.7) in your
text editor or IDE.
4. At the end of the script, after all the
HTML, add the following (Script 8.12):
<?php
ob_end_flush();
?>
This code turns off output buffering
and sends the accumulated buffer to
the browser. In other words, all the
HTML is sent at this point.
continues on next page
Script 8.11 continued
28 < u l >
29 <li><a href="books.
php">Books</a></li>
30 <li><a href="#">Stories
</a></li>
31 <li><a href="#">Quotes
</a></li>
32 <li><a href="login.
php">Login</a></li>
33 <li><a href="register.
php">Register</a></li>
34 < / u l >
35 </nav>
36 </div>
37 </header>
38
39 <main container class="siteContent">
40 <!-- BEGIN CHANGEABLE CONTENT. -->
41 <!-- BEGIN CHANGEABLE CONTENT.
-->
Script 8.12 Output buffering is completed at the
end of the footer file using
ob_end_flush()
, which
sends the accumulated buffer to the browser.
1 <!-- END CHANGEABLE CONTENT. -->
2 </main>
3
4 <footer container class="siteFooter">
5 <p>Design uses <a href="http://
concisecss.com/">Concise CSS
Framework</a></p>
6 <p class="float-right"><?php // Print
the current date and time...
7 // Set the timezone:
8 date_default_timezone_set('America/
New_York');
9
10 // Now print the date and time:
11 print date('g:i a l F j');
12 ?></p>
13 </footer>
14
15 </body>
16 </html><?php // Script 8.12 - footer.
html #3
17
18 // Send the buffer to the browser and
turn off buffering:
19 ob_end_flush();
20 ?>
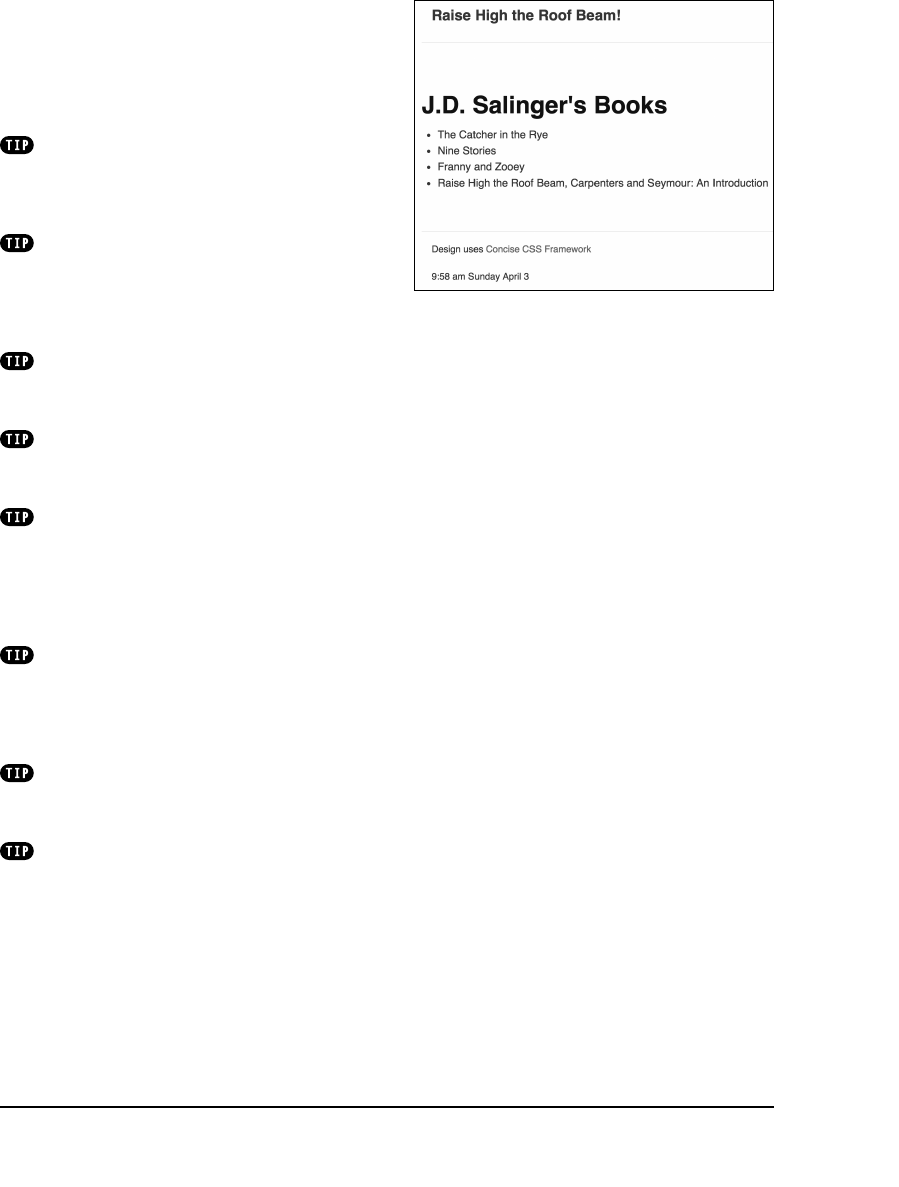
ptg18144795
236 Chapter 8
5. Save both files, and place them in the
templates
directory of your PHP-
enabled server.
6. Test any page in your browser B.
As a reminder, PHP code can be placed
in a file with an
.
html extension—as in these
two examples here—if that file is being
included by a PHP script (such as
index.php
).
For some time now, output buffering has
been automatically enabled in PHP’s default
configuration. The code added in this section
of the chapter will work regardless of that
setting.
You can set the maximum buffer size
in
php.ini
(PHP’s configuration file). The
default is 4,096 bytes.
The
ob_get_length()
function returns
the length (in number of characters) of the cur-
rent buffer contents.
The
ob_get_contents()
function
returns the current buffer so that it can be
assigned to a variable, should the need arise.
For example, you could take the accumulated
content and process it to add dynamic high-
lighting or text manipulation.
The
ob_flush()
function sends the
current contents of the buffer to the browser
and then discards them, allowing a new buffer
to be started. This function lets your scripts
maintain more moderate buffer sizes.
The
ob_clean()
function deletes the
current contents of the buffer without stop-
ping the buffer process.
PHP automatically runs
ob_end_flush()
at the conclusion of a script if it isn’t otherwise
done. But it’s still a good idea to call it yourself.
B The site works the same as it did previously,
but it will be easier to work with when you use
HTTP headers in the next section of this chapter.

ptg18144795
Creating Web Applications 237
Manipulating
HTTP Headers
Most interactions between a server and
a browser (the client) take place over
HTTP (Hypertext Transfer Protocol). This is
why the addresses for pages begin with
http://
. But HTTP communications between
browsers and servers go beyond just
sending HTML, images, and the like.
These additional communications can be
accomplished using HTTP
headers
. There
are dozens of uses for HTTP headers, all
of which you can do using PHP’s
header()
function.
Perhaps the most common use of the
header()
function is to redirect the user
from one page to another. To redirect the
user’s browser with PHP, you send a
loca-
tion
header:
header('Location: page.php');
When using the
header()
function to
redirect the browser, follow that line by
calling
exit()
to cancel the execution of
the script (because the browser has been
redirected to another page):
header('Location: page.php');
exit();
If you don’t invoke
exit()
, the rest of the
script’s code will be executed, despite the
fact that the browser has moved on.
The most important thing to understand
about using
header()
is that the function
must be called before anything else is
sent to the browser—otherwise, you’ll see
the all-too-common
headers already sent
error message (see A in the section “Out-
put Buffering”). If your page receives
any
HTML or even blank space, the
header()
function won’t work.
Fortunately, you learned about output
buffering in the previous section. Because
output buffering is turned on in the applica-
tion, nothing is sent to the browser until
the very last line of the footer script (when
ob_end_flush()
is called). By using this
method, you can avoid the dreaded
head-
ers already sent
error message.
To practice redirection, you’ll update the
login page to take the user to a welcome
page upon successful login.
ptg18144795
238 Chapter 8
To use the header() function:
1. Open
login.php
in your text editor or
IDE (Script 8.8).
2. Delete the
You are logged in…
print
statement (Script 8.13).
Because the user is redirected to
another page, there’s no need to
include this message.
3. Where the
print
statement was, add
the following:
ob_end_clean();
header('Location: welcome.php');
exit();
The first line destroys the page buffer
(because the accumulated buffer won’t
be used). This isn’t strictly required but
is a good idea. The next line redirects
the user to
welcome.php
. The third line
terminates the execution of the rest of
the script.
4. Save the file, and place it in the proper
directory for your PHP-enabled server
(along with the other scripts from
this chapter).
Now you need to create the
welcome.php
page to which the user will be redirected.
Script 8.13 The new version of the login page
redirects the user to another page using the
header()
function.
1 <?php // Script 8.13 - login.php #2
2 /* This page lets people log into the
site (in theory). */
3
4 // Set the page title and include the
header file:
5 define('TITLE', 'Login');
6 include('templates/header.html');
7
8 // Print some introductory text:
9 print '<h2>Login Form</h2>
10 <p>Users who are logged in can take
advantage of certain features like
this, that, and the other thing.
</p>';
11
12 // Check if the form has been submitted:
13 if ($_SERVER['REQUEST_METHOD'] ==
'POST') {
14
15 // Handle the form:
16 if ( (!empty($_POST['email'])) &&
(!empty($_POST['password'])) ) {
17
18 if ( (strtolower($_POST['email'])
== 'me@example.com') && ($_
POST['password'] == 'testpass') )
{ // Correct!
19
20 // Redirect the user to the
welcome page!
21 ob_end_clean(); // Destroy
the buffer!
22 header('Location: welcome.
php');
23 exit();
24
25 } else { // Incorrect!
26
27 print '<p class="text--
error">The submitted email
address and password do not
match those on file!<br>Go
back and try again.</p>';
28
29 }
30
code continues on next page

ptg18144795
Creating Web Applications 239
To write welcome.php:
1. Begin a new PHP document in
your text editor or IDE, to be named
welcome.php
(Script 8.14):
<?php // Script 8.14 - welcome.php
2. Define the page title, and include the
header:
define('TITLE', 'Welcome to the
➝
J.D. Salinger Fan Club!');
include('templates/header.html');
3. Create the page content:
?>
<h2>Welcome to the J.D. Salinger
➝
Fan Club!</h2>
<p>You've successfully logged
➝
in and can now take advantage
➝
of everything the site has to
➝
offer.</p>
4. Return to PHP, and include the footer:
<?php include('templates/
➝
footer.html'); ?>
continues on next page
Script 8.13 continued
31 } else { // Forgot a field.
32
33 print '<p class="text--error">
Please make sure you enter both
an email address and a password!
<br>Go back and try again.</p>';
34
35 }
36
37 } else { // Display the form.
38
39 print '<form action="login.php"
method="post" class="form--inline">
40 <p><label for="email">Email
Address:</label><input type="email"
name="email" size="20"></p>
41 <p><label for="password">Password:</
label><input type="password"
name="password" size="20"></p>
42 <p><input type="submit"
name="submit" value="Log In!"
class="button--pill"></p>
43 </form>';
44
45 }
46
47 include('templates/footer.html'); //
Need the footer.
48 ?>
Script 8.14 The welcome page greets users after
they’ve logged in.
1 <?php // Script 8.14 - welcome.php
2 /* This is the welcome page. The user is
redirected here
3 after they successfully log in. */
4
5 // Set the page title and include the
header file:
6 define('TITLE', 'Welcome to the J.D.
Salinger Fan Club!');
7 include('templates/header.html');
8
9 // Leave the PHP section to display lots
of HTML:
10 ?>
11
code continues on next page
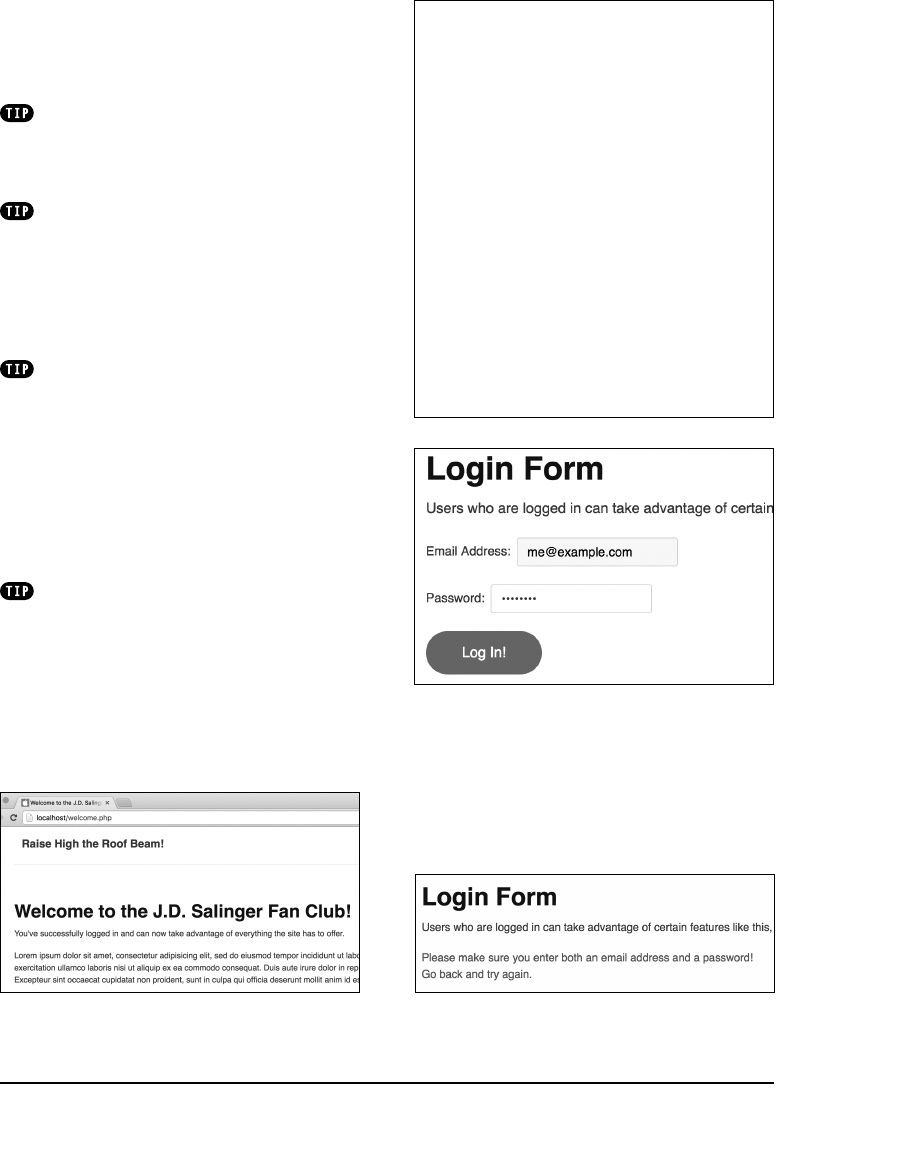
ptg18144795
240 Chapter 8
5. Save the script as
welcome.php
, place
it in the same directory as the new ver-
sion of
login.php
, and test it in your
browser A, B, and C.
The
headers_sent()
function returns
TRUE if the page has already received HTTP
headers and the
header()
function can’t be
used.
Using the GET method trick, you can
pass values from one page to another using
header()
:
$var = urlencode('Pass this text');
header("Location: page.php?
➝
message=$var");
The
header()
function should techni-
cally use a full path to the target page when
redirecting. For example, it should be
header('Location: http://
➝
www.example.com/welcome.php');
or
header('Location: http://localhost/
➝
welcome.php');
In my book PHP and MySQL for Dynamic
Web Sites: Visual QuickPro Guide, I show
some code for dynamically generating an
absolute URL based on the location of the cur-
rent script.
Script 8.14 continued
12 <h2>Welcome to the J.D. Salinger Fan
Club!</h2>
13 <p>You've successfully logged in and
can now take advantage of everything the
site has to offer.</p>
14 <p>Lorem ipsum dolor sit amet,
consectetur adipisicing elit, sed do
eiusmod tempor incididunt ut labore et
dolore magna aliqua. Ut enim ad minim
veniam, quis nostrud exercitation
ullamco laboris nisi ut aliquip ex ea
commodo consequat. Duis aute irure dolor
in reprehenderit in voluptate velit esse
cillum dolore eu fugiat nulla pariatur.
Excepteur sint occaecat cupidatat non
proident, sunt in culpa qui officia
deserunt mollit anim id est laborum.</p>
15
16 <?php include('templates/footer.html');
// Need the footer. ?>
A The login form…
B …and the redirection if the user properly
logged in. C If users don’t properly log in, they remain on
the login page.

ptg18144795
Creating Web Applications 241
Review and Pursue
If you have any problems with the
review questions or the pursue prompts,
turn to the book’s supporting forum
(www.LarryUllman.com/forums/).
Review
n
What is the difference between
include()
and
require()
?
n
Why can you put PHP code into an
included file even when it uses an
.html
extension?
n
What are the differences between
rela-
tive
and
absolute
references to a file?
n
How do you define a constant? Are
constant names case-sensitive or
case-insensitive? How do you check if
a constant has been defined?
n
What is the
epoch
? What is a
timestamp
?
n
What is the significance of
$_SERVER['REQUEST_METHOD']?
n
How do you have a form element
“remember” previously submitted values?
n
How can you see a PHP error that
occurs within a form element (for
example, when presetting a form’s
element’s value)?
n
What does the
headers already sent
error mean? How can it be prevented?

ptg18144795
242 Chapter 8
Pursue
n
Create a new prototype design for
this chapter’s examples, and then
create new header and footer files.
View any of the site’s pages again (you
should not need to change any of the
PHP scripts).
n
Change the parameters to the
date()
function in
footer.html
to display the
date and/or time in a different manner.
n
Rewrite the password conditionals
found in
register.php
as a nested pair
of conditionals. Hint: See Chapter 6 for
examples.
n
If you’re using PHP 5.2 or later, check
out the PHP manual pages for the
Filter
extension. Then incorporate the
filter_var()
function to validate the
email address in
register.php
.
n
Change the subject and body of the
email sent upon (pseudo-) registration
to something more interesting and
informative.
n
Update
login.php
so that it also shows
the form upon a failed login attempt.

ptg18144795
Chapter 8, “Creating Web Applications,”
covered a number of techniques for devel-
oping more fully realized websites. One
missing piece—the focus of this chapter
—is how to maintain “state” as the user
traverses a multipage site. The Hypertext
Transfer Protocol (HTTP) is a stateless
technology, meaning that it has no built-in
method for tracking a user or remembering
data from one page of an application to the
next. This is a serious problem, because
e-commerce applications, user registration
and login systems, and other common online
services rely on being able to follow the
same user from page to page. Fortunately,
maintaining state is quite simple with PHP.
This chapter discusses the two primary
methods for tracking data: cookies and
sessions. You’ll start by learning how to
create, read, modify, and delete cookies.
Then you’ll see how easy it is to master
sessions, a more potent option for main-
taining state.
9
Cookies and
Sessions
In This Chapter
What Are Cookies? 244
Creating Cookies 246
Reading from Cookies 251
Adding Parameters to a Cookie 254
Deleting a Cookie 257
What Are Sessions? 260
Creating a Session 261
Accessing Session Variables 264
Deleting a Session 266
Review and Pursue 268

ptg18144795
244 Chapter 9
What Are Cookies?
Prior to the existence of cookies, travers-
ing a website was a trip without a history.
Although the browser tracks the pages you
visit, allowing you to use the Back button
to return to previously visited pages and
indicating visited links in a different color,
the server does not follow what individual
users see and do. This is still true for sites
that don’t use cookies, as well as for users
who have disabled cookies in their web
browsers A.
A Most browsers let users set the cookie-
handling preferences. In Internet Explorer 11, you
will find this in the Advanced Privacy Settings area.
Debugging Cookies
When you begin working with cookies in PHP, you’ll need to know how to debug your cookie-
related scripts when difficulties arise. Three areas might cause you problems:
.Sending the cookie with PHP
.Receiving the cookie in your browser
.Accessing a cookie in a PHP script
The first and last issues can be debugged by printing out the variable values in your PHP scripts,
as you’ll soon learn. The second issue requires that you know how to work with cookies in your
browser. For debugging purposes, you’ll want your browser to notify you when a cookie is being
sent. This is an easy option in Internet Explorer and not readily available in the other browsers.
With Internet Explorer on Windows, you can do this by choosing Internet Options under the Tools
menu. Then click the Privacy tab, followed by the Advanced button under Settings. Click “Override
automatic cookie handling,” and then choose Prompt for both First-party and Third-party Cookies
(you can actually block the third-party cookies, if you’d rather). Other versions of Internet Explorer
may use different variations on this process. Internet Explorer also has a Developer Tools window
(linked under the Tools menu) that can be useful.
The current versions of Chrome, Opera, Firefox, and Safari no longer offer the ability to be
prompted when cookies are created, which is unfortunate. But you can view existing cookies
in any browser, normally by finding the cookies area (often under Privacy) within the browser’s
preferences or options.
A browser’s developer tools, or third-party extensions such as Firebug, will normally show existing
cookies for the site being viewed without you having to navigate through the browser settings. If
you’re not using Internet Explorer, you’ll want to find what developer tools or extensions are avail-
able for your browser of choice.
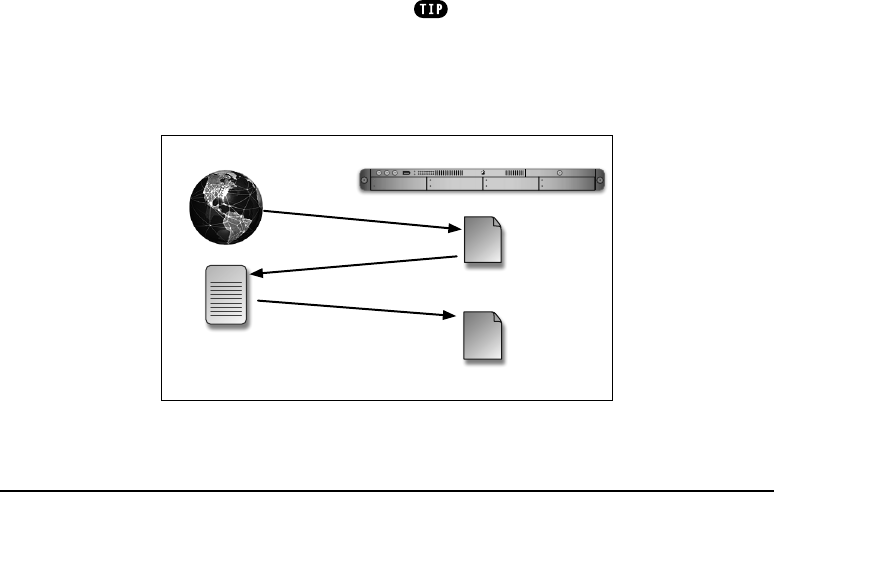
ptg18144795
Cookies and Sessions 245
Why is that a problem? If the server can’t
track a user, there can be no shopping
carts for making purchases online. If cook-
ies didn’t exist (or if they’re disabled in the
browser), people wouldn’t be able to use
popular sites that require user registra-
tion. In short, without cookies, there would
be no Amazon or Facebook or any of the
other most popular or useful sites (not in
their current incarnations, at least).
Cookies are simply a way for a server to
store information on the user’s computer.
By doing so, the server can remember the
user over the course of a visit or through
several visits. Think of a cookie as a name
tag: You tell the server your name, and it
gives you a name tag. Then it can know who
you are by referring back to the name tag.
This brings up another point about the
security issues involved with cookies.
Cookies have gotten a bad rap because
users believe cookies allow a server to
know too much about them. However, a
cookie can only be used to store informa-
tion that you give it, so it’s as secure as
you want it to be (although to be fair, your
“giving” of information is normally not a
conscious choice).
Web Browser (client) Server
if(conn
SELEC
WHERE
print
PHP script
2. Cookies and HTML
1. URL Request
HTML page
if(conn
SELEC
WHERE
print
PHP script
3. URL Request and Cookies
B How cookies are sent back and forth between the server
and the client.
PHP has solid support for cookies. In this
chapter, you’ll learn how to set a cookie,
retrieve information from a cookie, and
then delete the cookie. You’ll also see
some of the optional parameters you can
use to apply limits to a cookie’s existence.
Before moving on, you ought to know two
more things about cookies. The first is how
to debug cookie-related problems. You’ll
inevitably need to know how to do that,
so the topic is discussed in the sidebar
“Debugging Cookies.” The second is how
a cookie is transmitted and received B.
Cookies are stored in the browser, but
only the site that originally sent a cookie
can read it. Also, the cookies are read
by the site when the page on that site is
requested by the browser. In other words,
when the user enters a URL in the address
bar and clicks Go (or whatever), the site
reads any cookies it has access to and
then serves up the requested page. This
order is important because it dictates when
and how cookies can be accessed.
The ability to send, read, and delete
cookies is one of the few overlaps between
server-side PHP and browser-side JavaScript.
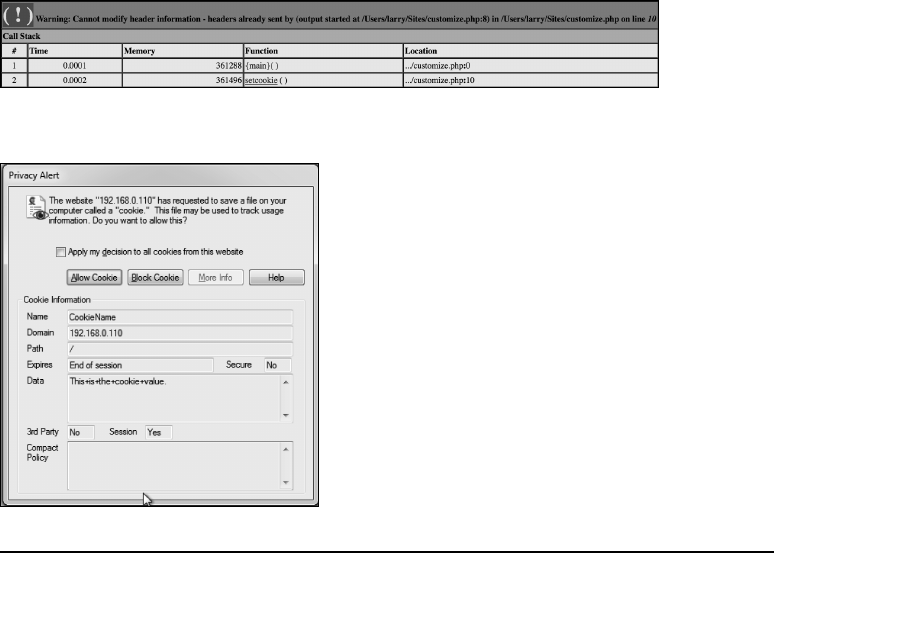
ptg18144795
246 Chapter 9
Creating Cookies
An important thing to understand about
cookies is that
they must be sent from
the server to the client prior to any other
information
. This means a script should
send cookies before any
print
statement,
before including an external file that con-
tains HTML, and so forth.
Should the server attempt to send a
cookie after the web browser has already
received HTML—even an extraneous white
space—an error message will result and
the cookie won’t be sent A. This is by far
the most common cookie-related error.
Cookies are sent using the
setcookie()
function:
setcookie(name, value);
setcookie('CookieName', 'This is the
➝
cookie value.');
A A message like this is what you’ll see if the
setcookie()
function is called after anything,
even a blank line or space, has already been sent to the browser.
B If the browser is set to prompt the user
for cookies, a message like this will appear
for each cookie sent. (Note that the window,
from Internet Explorer 11, shows the value
in a URL-encoded format.)
That line of code sends to the browser a
cookie with the name
CookieName
and the
value
This is the cookie value
. B.
You can continue to send more cookies to
the browser with subsequent uses of the
setcookie()
function, although you’re
limited by the browser as to how many
cookies can be sent from the same site:
setcookie('name2', 'some value');
setcookie('name3', 'another value');
There’s no universal, hard limit as to how
many cookies a browser will accept from
one site, but you should keep the number
to a minimum.
Finally, when creating cookies, you can—as
you’ll see in this example—use a variable for
the name or value attribute of your cookies:
setcookie($cookie_name,
➝
$cookie_value);
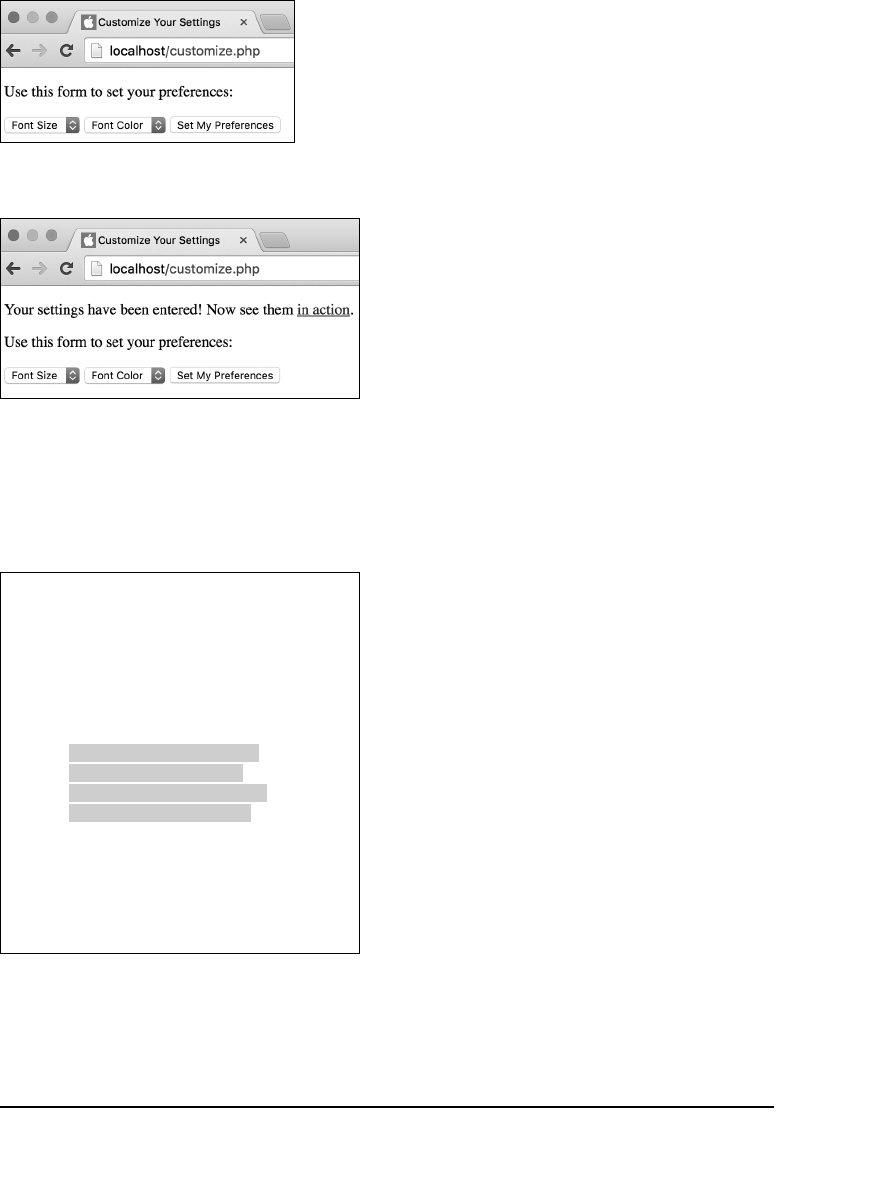
ptg18144795
Cookies and Sessions 247
For an example of setting cookies, you’ll
create a script that allows the user to specify
the default font size and color for a page.
The page displays a form for choosing
these values C and then handles the form
submission D. A separate page, created
in the next section of this chapter, will use
these settings.
To send cookies:
1. Create a new PHP document in
your text editor or IDE, to be named
customize.php
(Script 9.1):
<?php // Script 9.1 -
➝
customize.php
The most critical issue with cookies is
that they’re created before anything is
sent to the browser. To accomplish this,
the script begins with a PHP section
that handles the sending of cookies.
Also be certain not to have any extra-
neous spaces or lines before the initial
PHP tag.
2. Check whether the form has been
submitted:
if (isset($_POST['font_size'],
➝
$_POST['font_color'])) {
This page will both display and handle
the form. It could use the same method
explained in the previous chapter—
checking if the
$_SERVER['REQUEST_
METHOD']
variable has a value of POST,
but as an alternative approach, the
script will perform basic, minimal valida-
tion as the test for a form submission.
The conditional checks for the exis-
tence of two variables:
$_POST['font_
size']
and
$_POST['font_color']
.
If both are set, the form submission will
be addressed.
continues on next page
C This form is used to select the font size
and color for use on another PHP page.
D After submitting the form, the page shows a
message and a link to another page (where the
user’s preferences will be used). You will create
that page next.
Script 9.1 Two cookies will be used to store the
user’s choices for the font size and color. This
page both displays and handles the form.
1 <?php // Script 9.1 - customize.php
2
3 // Handle the form if it has been
submitted:
4 if (isset($_POST['font_size'],
$_POST['font_color'])) {
5
6 // Send the cookies:
7 setcookie('font_size',
$_POST['font_size']);
8 setcookie('font_color',
$_POST['font_color']);
9
10 // Message to be printed later:
11 $msg = '<p>Your settings have been
entered! Now see them <a href="view_
settings.php">in action</a>.</p>';
12
code continues on next page

ptg18144795
248 Chapter 9
3. Create the cookies:
setcookie('font_size',
➝
$_POST['font_size']);
setcookie('font_color',
➝
$_POST['font_color']);
These two lines create two separate
cookies. One is named
font_size
and
the other
font_color
. Their values
will be based on the selected values
from the HTML form, which are stored
in the
$_POST['font_size']
and
$_POST['font_color']
variables.
In a more fully developed application,
you should first confirm that the vari-
ables have acceptable values.
4. Create a message and complete the
conditional and the PHP section:
$msg = '<p>Your settings have
➝
been entered! Now see them
➝
<a href="view_settings.php">
➝
in action</a>.</p>';
} // End of submitted IF.
?>
When the form has been submitted,
the cookies will be sent and the
$msg
variable will be assigned a string value.
This variable will be used later in the
script to print a message. This approach
is necessary; you can’t print the message
at this juncture because not even the
HTML head has been created.
5. Create the HTML head and opening
body tag:
<!doctype html>
<html lang="en">
<head>
<meta charset="utf-8">
<title>Customize Your Settings
➝
</title>
</head>
<body>
Script 9.1 continued
13 } // End of submitted IF.
14 ?><!doctype html>
15 <html lang="en">
16 <head>
17 <meta charset="utf-8">
18 <title>Customize Your Settings
</title>
19 </head>
20 <body>
21 <?php // If the cookies were sent, print
a message.
22 if (isset($msg)) {
23 print $msg;
24 }
25 ?>
26
27 <p>Use this form to set your
preferences:</p>
28
29 <form action="customize.php"
method="post">
30 <select name="font_size">
31 <option value="">Font Size</option>
32 <option value="xx-small">xx-small
</option>
33 <option value="x-small">x-small
</option>
34 <option value="small">small</option>
35 <option value="medium">medium
</option>
36 <option value="large">large</option>
37 <option value="x-large">x-large
</option>
38 <option value="xx-large">xx-large
</option>
39 </select>
40 <select name="font_color">
41 <option value="">Font Color</option>
42 <option value="999">Gray</option>
43 <option value="0c0">Green</option>
44 <option value="00f">Blue</option>
45 <option value="c00">Red</option>
46 <option value="000">Black</option>
47 </select>
48 <input type="submit" name="submit"
value="Set My Preferences">
49 </form>
50
51 </body>
52 </html>

ptg18144795
Cookies and Sessions 249
All this code must come after the
setcookie()
lines. Not to overstate
this, but no text, HTML, or blank spaces
can be sent to the browser prior to the
setcookie()
calls.
6. Create another PHP section to report
on the cookies being sent:
<?php
if (isset($msg)) {
print $msg;
}
?>
This code prints out a message if the
cookies have been sent. The first time
the user comes to the page, the cook-
ies haven’t been sent, so
$msg
is not
set, making this conditional FALSE, and
this
print
invocation never runs. Once
the form has been submitted,
$msg
has
been set by this point, so this conditional
is TRUE D.
7. Begin the HTML form:
<p>Use this form to set your
➝
preferences:</p>
<form action="customize.php"
➝
method="post">
<select name="font_size">
<option value="">Font Size
➝
</option>
<option value="xx-small">
➝
x-small</option>
<option value="x-small">
➝
x-small</option>
<option value="small">
➝
small</option>
<option value="medium">
➝
medium</option>
<option value="large">
➝
large</option>
<option value="x-large">
➝
x-large</option>
<option value="xx-large">
➝
xx-large</option>
</select>
The HTML form itself is very simple C.
The user is given one drop-down menu
to select the font size. The value for
each corresponds to the CSS code
used to set the document’s font size:
from
xx-small
to
xx-large
.
Because this script both displays and
handles the form, the form’s
action
attribute points to the same file.
8. Complete the HTML form:
<select name="font_color">
<option value="">Font Color
➝
</option>
<option value="999">Gray
➝
</option>
<option value="0c0">Green
➝
</option>
<option value="00f">Blue
➝
</option>
<option value="c00">Red
➝
</option>
<option value="000">Black
➝
</option>
</select>
<input type="submit" name=
➝
"submit" value="Set My
➝
Preferences">
</form>
The second drop-down menu is used to
select the font color. The menu displays
the colors in text form, but the values
are HTML color values. Normally such
values are written using six charac-
ters plus a pound sign (for example,
#00cc00
), but CSS allows you to use
just a three-character version, and the
pound sign will be added on the page
that uses these values.
continues on next page
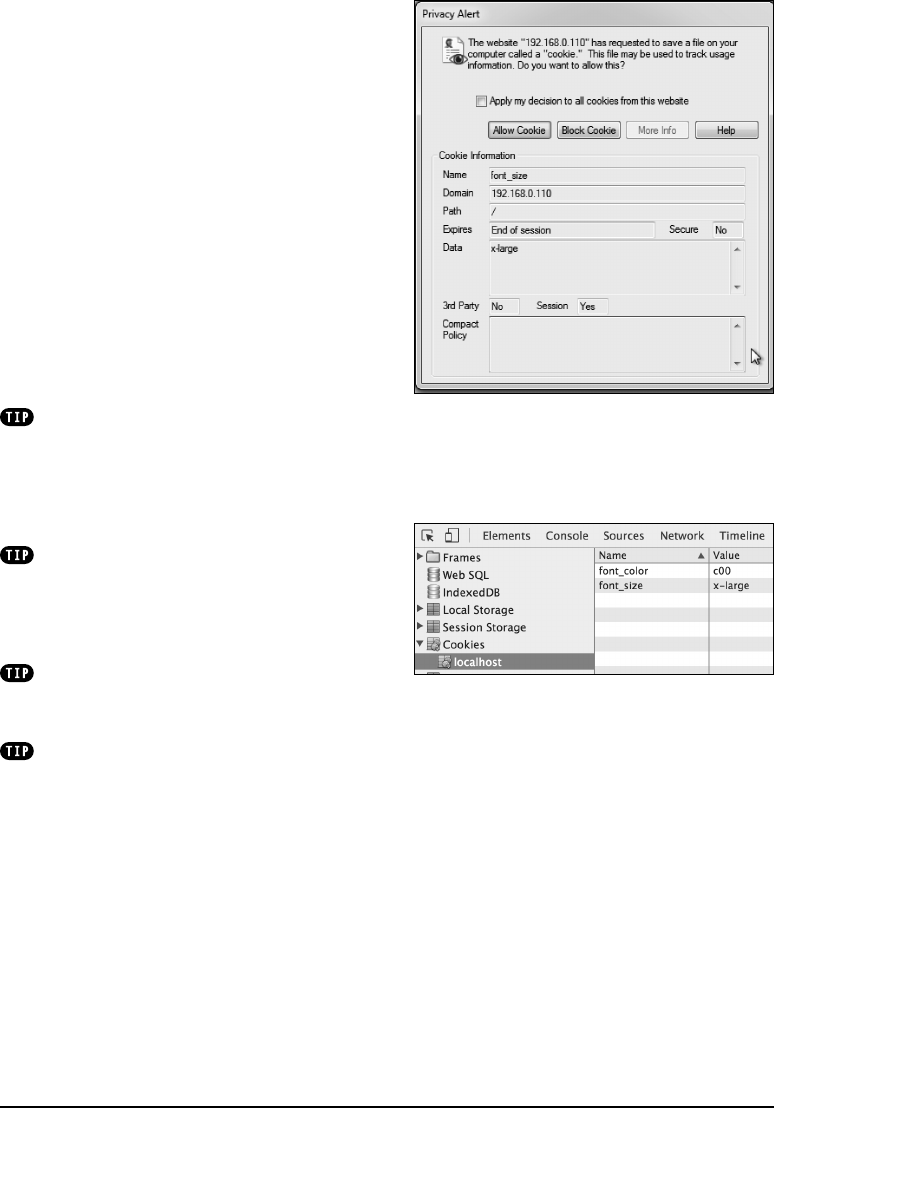
ptg18144795
250 Chapter 9
9. Complete the HTML page:
</body>
</html>
10. Save the file as
customize.php
, and
place it in the proper directory for your
PHP-enabled server.
11. Make sure you’ve set your browser to
prompt for each cookie, if possible.
To guarantee that the script is working,
you want the browser to prompt you
for each cookie, if you can. See the
“Debugging Cookies” sidebar.
12. Run the script in your browser E
and F.
Cookies are one of the few areas in PHP
that can behave differently from browser to
browser or operating system to operating
system. You should test your cookie-based
applications on as many browsers and operat-
ing systems as you can.
If you use the output buffering technique
taught in Chapter 8, then you can place your
setcookie()
calls anywhere within the script
(because the browser won’t receive the data
until the
ob_end_flush()
function is called).
Cookies are limited to approximately
4 KB of total data. This is more than sufficient
for most applications.
To test whether it’s safe to send a cookie,
use the
headers_sent()
function. It reports
on whether HTTP headers have already been
sent to the web browser.
E The user sees this message when the first
setcookie()
call is made, if they’ve opted to be
prompted before accepting a cookie. This cookie
is storing the value of
x-large
in a cookie named
font_size
.
F The Chrome Developer Tools shows the
cookies received by the browser. The second
cookie that’s sent by the PHP script is named
font_color
and has a value of
c00
, representing
the color gray.

ptg18144795
Cookies and Sessions 251
Reading from Cookies
Just as form data is stored in the
$_POST
array (assuming it used the POST method)
and values passed to a script in the
URL are stored in the
$_GET array
, the
setcookie()
function places cookie data
in the
$_COOKIE
array. To retrieve a value
from a cookie, you only need to refer to
the cookie name as the index of this array.
For example, to retrieve the value of the
cookie established with the line
setcookie('user', 'trout');
you would use the variable
$_COOKIE['user']
.
Unless you change the cookie’s parameters
(as you’ll see later in this chapter), the
cookie will automatically be accessible to
every other page in your web application.
You should understand, however, that a
cookie is never accessible to a script imme-
diately after it’s been sent. You can’t do this:
setcookie('user', 'trout');
print $_COOKIE['user']; // No value.
The reason for this is the order in which
cookies are read and sent (see B in the
first section of this chapter).
To see how simple it is to access cookie
values, let’s write a script that uses the
preferences set in
customize.php
to
specify the page’s text size and color. The
script relies on CSS to achieve this effect.
To retrieve cookie data with PHP:
1. Begin a new PHP document in your
text editor or IDE, to be named
view_settings.php
(Script 9.2):
<!doctype html>
<html lang="en">
<head>
continues on next page
Script 9.2 This script sets the font size and color in
CSS, using the values stored in the cookies.
1 <!doctype html>
2 <html lang="en">
3 <head>
4 <meta charset="utf-8">
5 <title>View Your Settings</title>
6 <style type="text/css">
7 body {
8 <?php // Script 9.2 - view_settings.php
9
10 // Check for a font_size value:
11 if (isset($_COOKIE['font_size'])) {
12 print "\t\tfont-size: " .
htmlentities($_COOKIE['font_
size']) . ";\n";
13 } else {
14 print "\t\tfont-size: medium;";
15 }
16
17 // Check for a font_color value:
18 if (isset($_COOKIE['font_color'])) {
19 print "\t\tcolor: #" .
htmlentities($_COOKIE['font_
color']) . ";\n";
20 } else {
21 print "\t\tcolor: #000;";
22 }
23
24 ?>
25 }
26 </style>
27 </head>
28 <body>
29 <p><a href="customize.php">Customize
Your Settings</a></p>
30 <p><a href="reset.php">Reset Your
Settings</a></p>
31
32 <p>yadda yadda yadda yadda yadda
33 yadda yadda yadda yadda yadda
34 yadda yadda yadda yadda yadda
35 yadda yadda yadda yadda yadda
36 yadda yadda yadda yadda yadda</p>
37
38 </body>
39 </html>

ptg18144795
252 Chapter 9
<meta charset="utf-8">
<title>View Your Settings
➝
</title>
2. Start the CSS section:
<style type="text/css">
body {
The page will use CSS to enact the
user’s preferences. The aim is to create
code like
body {
font-size: x-large;
color: #999;
}
The two values will differ based on what
the user selected in the
customize.php
page. In this step, you create the initial
CSS tag.
3. Open a section of PHP code:
<?php // Script 9.2 -
➝
view_settings.php
The script will now use PHP to print
out the remaining CSS, based on
the cookies.
4. Use the font size cookie value, if it
exists:
if (isset($_COOKIE
➝
['font_size'])) {
print "\t\tfont-size:
➝
" . htmlentities($_COOKIE
➝
['font_size']) . ";\n";
} else {
print "\t\tfont-size: medium;";
}
If the script can access a cookie with a
name of
font_size
, it will print out that
cookie’s value as the CSS
font-size
value. The
isset()
function is suf-
ficient to see if the cookie exists. If no
such cookie exists, PHP will print out a
default size,
medium
.
For security purposes, the cookie’s
value is not directly printed. Instead,
it’s run through the
htmlentities()
function, discussed in Chapter 5, “Using
Strings.” This function will prevent bad
things from happening should the user
manipulate the value of the cookie
(which is easy to do).
Also note that two tabs (
\t
) and a
newline
(\n
) are added to the
print
statements so that the resulting CSS
code is formatted properly. Not that this
affects the functionality of the page, but…
5. Repeat this process for the font color
cookie:
if (isset($_COOKIE
➝
['font_color'])) {
print "\t\tcolor:
➝
#" . htmlentities($_COOKIE
➝
['font_color']) . ";\n";
} else {
print "\t\tcolor: #000;";
}
Here the CSS’s
color
attribute is being
assigned a value. The cookie itself is
used the same as in Step 4.
6. Close the PHP section, complete the
CSS code, and finish the HTML head:
?>
}
</style>
</head>
7. Start the HTML body, and create links to
two other pages:
<body>
<p><a href="customize.php">
➝
Customize Your Settings</a></p>
<p><a href="reset.php">Reset Your
➝
Settings</a></p>
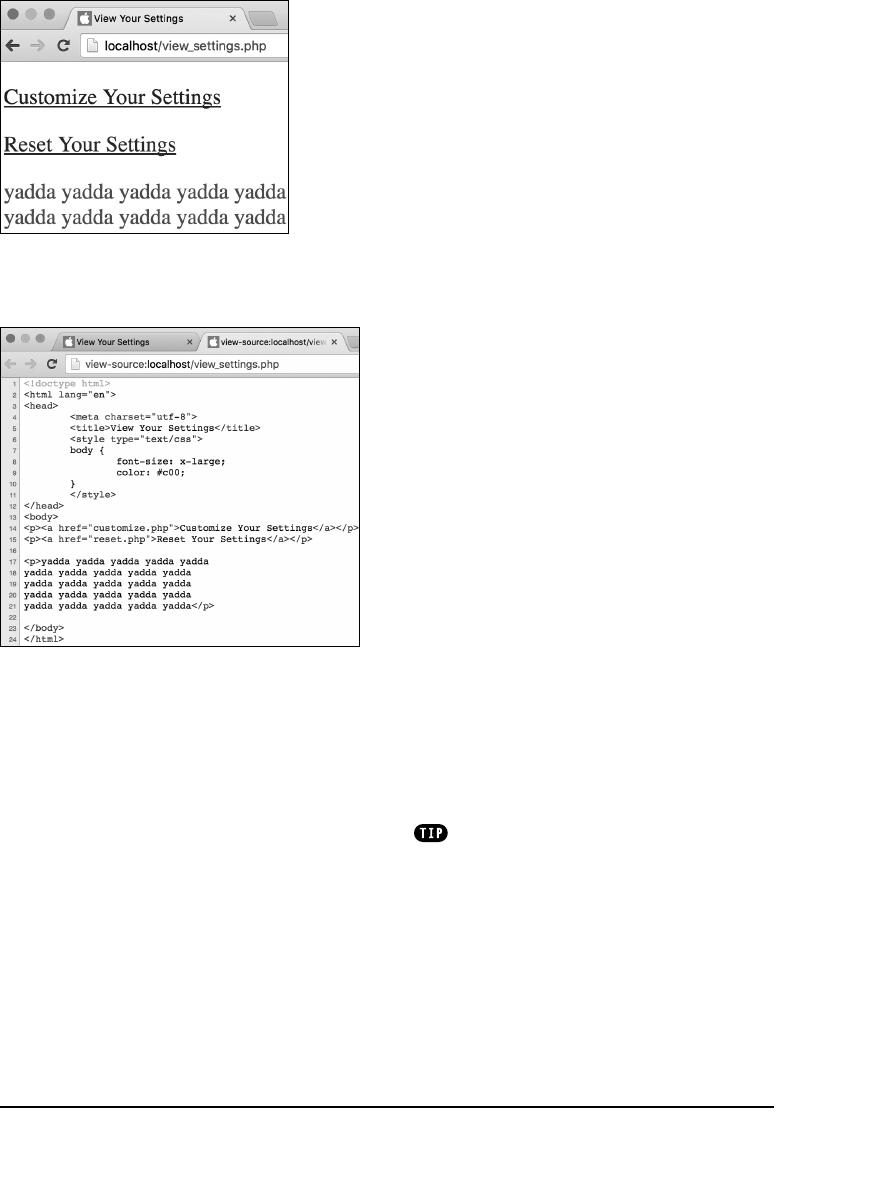
ptg18144795
Cookies and Sessions 253
These two links take the user to
two other PHP pages. The first,
customize.php
, has already been
written and lets users define their set-
tings. The second,
reset.php
, will be
written later in the chapter and lets
users delete their customized settings.
8. Add some text:
<p>yadda yadda yadda yadda yadda
yadda yadda yadda yadda yadda
yadda yadda yadda yadda yadda
yadda yadda yadda yadda yadda
yadda yadda yadda yadda yadda</p>
This text exists simply to show the
effects of the cookie changes.
9. Complete the HTML page:
</body>
</html>
10. Save the file as
view_settings.php
,
place it in the same directory as
customize.php
, and test it in your
browser A by clicking the link on
customize.php
.
11. View the source of the page to see the
resulting CSS code B.
12. Use the customize page to change your
settings and return to this script.
Each submission of the form will create
two new cookies storing the form values,
thereby replacing the existing cookies.
The value of a cookie is automatically
encoded when it’s sent and decoded on being
received by the PHP page. The same is true of
values sent by HTML forms.
A This page reflects the customized font
choices made using the other PHP script.
B By viewing the source code of the page, you
can also track how the CSS values change.
ptg18144795
254 Chapter 9
Adding Parameters
to a Cookie
Although passing just the
name
and
value
arguments to the
setcookie()
function will
suffice for most of your cookie uses, you
ought to be aware of the other arguments
available. The function can take up to five
more parameters, each of which limits the
operation of the cookie:
setcookie(name, value, expiration,
➝
path, domain, secure, httponly);
The
expiration
argument is used to set a
specific length of time for a cookie to exist.
If it isn’t specified, the cookie will continue
to be functional until the user closes the
browser. Normally, you set the expiration
time by adding a particular number of
minutes or hours to the current time. You
can find the current time in PHP by using
the
time()
function (it returns a timestamp;
see Chapter 8). Therefore, this line of code
sets the expiration time of the cookie to be
Script 9.3 When you add the expiration arguments to the two cookies, the cookies will persist even after
users have closed out of and later returned to their browser.
1 <?php // Script 9.1 - customize.php
2
3 // Handle the form if it has been submitted:
4 if (isset($_POST['font_size'], $_POST['font_color'])) {
5
6 // Send the cookies:
7 setcookie('font_size', $_POST['font_size'], time()+10000000, '/');
8 setcookie('font_color', $_POST['font_color'], time()+10000000, '/');
9
10 // Message to be printed later:
11 $msg = '<p>Your settings have been entered! Now see them <a href="view_settings.php">in
action</a>.</p>';
12
13 } // End of submitted IF.
14 ?><!doctype html>
15 <html lang="en">
code continues on next page
one hour (60 seconds times 60 minutes)
from the current moment:
setcookie(name, value, time()+3600);
Because the expiration time will be calcu-
lated as the value of
time()
plus 3600,
that argument isn’t put in quotes (you don’t
want to literally pass
time()
+
3600
as
the expiration but rather the result of that
calculation).
The
path
and
domain
arguments are used
to limit a cookie to a specific folder in a
website—the path—or to a specific domain.
Using the
path
option, you could limit a
cookie to exist only while a user is in a
specific subfolder of the domain:
setcookie(name, value, time()+3600,
➝
'/subfolder/');
Cookies are already specific to a domain,
so the
domain
argument might be used
to limit a cookie to a subdomain, such as
forum.example.com
:
setcookie(name, value, time()+3600, '',
➝
'forum.example.com');

ptg18144795
Cookies and Sessions 255
The
secure
value dictates that a cookie
should only be sent over a secure HTTPS
connection. A value of 1 indicates that a
secure connection must be used, whereas
0 indicates that a secure connection isn’t
necessary. You could ensure a secure
cookie transmission for e-commerce sites:
setcookie('cart', '82ABC3012',
➝
time()+3600, '',
➝
'shop.example.com', 1);
As with all functions that take arguments,
you must pass all the values in order. In the
preceding example, if there’s no need to
specify (or limit) the path, you use empty
quotes. With the
path
argument, you can
also use a single slash (
/
) to indicate the
root folder (i.e., no path restriction). By
doing so, you maintain the proper number
of arguments and can still indicate that an
HTTPS connection is necessary.
The final argument—
httponly
—was added
in PHP 5.2. It can be used to restrict access
to the cookie (for example, preventing a
cookie from being read using JavaScript)
but isn’t supported by all browsers.
Let’s add an expiration date to the existing
customize.php
page so that users’ prefer-
ences will remain even after they’ve closed
their browser and then returned to the
site later.
To set a cookie’s expiration date:
1. Open
customize.php
(Script 9.1) in your
text editor or IDE.
2. Change the two
setcookie()
lines to
read as follows (Script 9.3):
setcookie('font_size', $_POST
➝
['font_size'], time()+10000000,
➝
'/', '', 0);
continues on next page
Script 9.3 continued
16 <head>
17
18 <meta charset="utf-8">
19 <title>Customize Your Settings
</title>
20 </head>
21 <body>
22 <?php // If the cookies were sent, print
a message.
23 if (isset($msg)) {
24 print $msg;
25 }
26 ?>
27
28 <p>Use this form to set your
preferences:</p>
29
30 <form action="customize.php"
method="post">
31 <select name="font_size">
32 <option value="">Font Size</option>
33 <option value="xx-small">xx-small
</option>
34 <option value="x-small">x-small
</option>
35 <option value="small">small</option>
36 <option value="medium">medium
</option>
37 <option value="large">large</option>
38 <option value="x-large">x-large
</option>
39 <option value="xx-large">xx-large
</option>
40 </select>
41 <select name="font_color">
42 <option value="">Font Color</option>
43 <option value="999">Gray</option>
44 <option value="0c0">Green</option>
45 <option value="00f">Blue</option>
46 <option value="c00">Red</option>
47 <option value="000">Black</option>
48 </select>
49 <input type="submit" name="submit"
value="Set My Preferences">
50 </form>
51
52 </body>
53 </html>
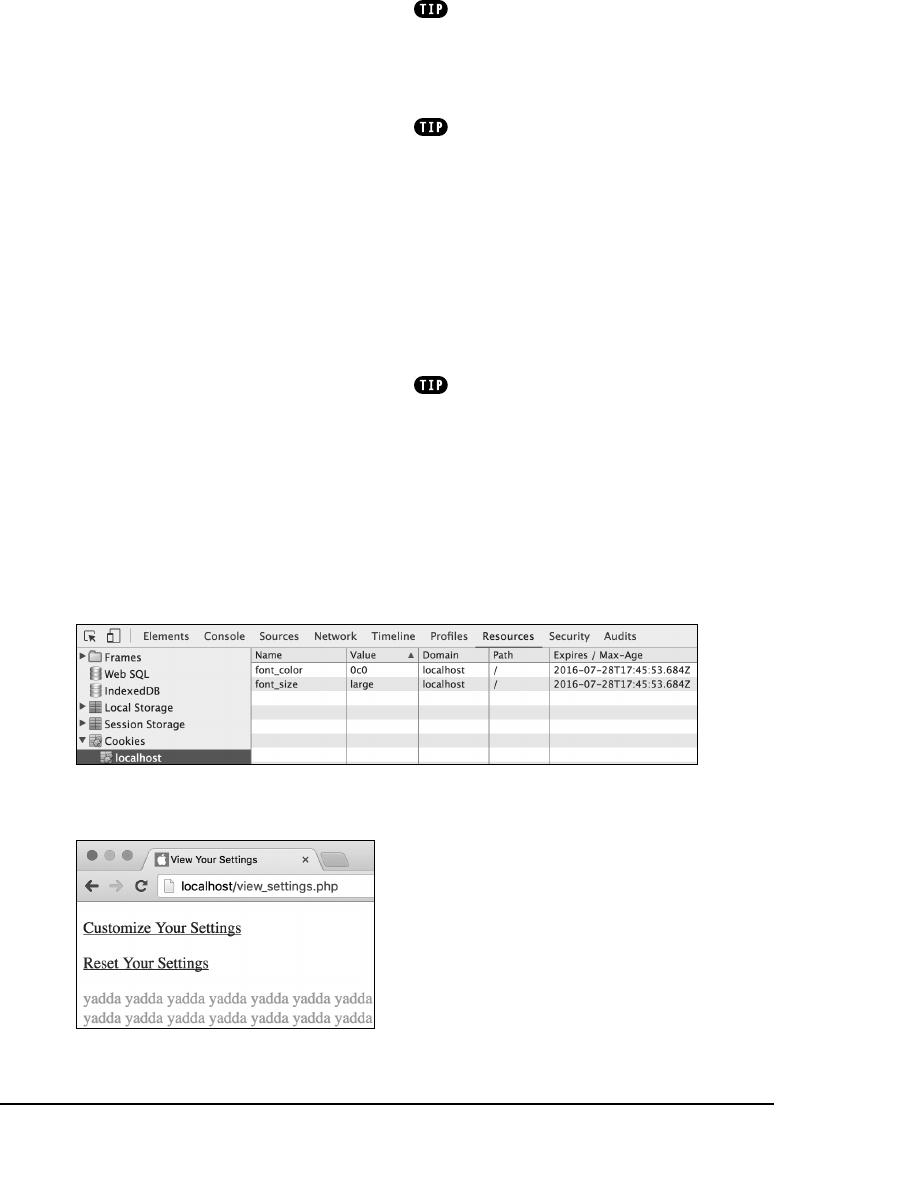
ptg18144795
256 Chapter 9
setcookie('font_color', $_POST
➝
['font_color'], time()
➝
+10000000, '/', '', 0);
To make these cookies persist for a
long time (specifically, for a couple of
months), set the expiration time to be
10,000,000 seconds from now. While
you’re at it, set the
path
argument to the
root of the site (
/
). Doing so may improve
the consistency of sending these cook-
ies across the various browsers.
Because the expiration date of the
cookies is set months into the future,
the user’s preferences, which are
stored in the cookies, will be valid even
after the user has closed and reopened
the browser. Without this expiration date,
users would see the default font size and
color and have to reassign their prefer-
ences with every new browser session.
3. Save the file, place it in the proper direc-
tory for your PHP-enabled server, and
test it again in your browser A and B.
A The browser’s cookie reporting tools (here, Chrome’s Developer Tools) now reflect
the cookie expiration dates.
B The new cookie parameters don’t
adversely affect the functionality of
the application.
Not all browsers acknowledge a cookie’s
adjusted expiration time when the cookie is
being sent from your own computer (i.e., from
localhost). More generally, browsers can be
inconsistent in how they handle local cookies.
Here are some general guidelines for
what kind of expiration date to use with your
cookies: If the cookie should last as long
as the user browses through the site, don’t
set an expiration time. If the cookie should
continue to exist after the user has closed and
reopened the browser, set an expiration time
that’s weeks or months in the future. And if
the cookie can constitute a security risk, set an
expiration time of an hour or a fraction thereof
so that the cookie doesn’t continue to exist
too long after a user has left the browser.
For security purposes, you can set a
5- or 10-minute expiration time on a cookie
and have the cookie re-sent with every new
page the user visits. This way, the cookie will
continue to persist as long as the user is active
but will automatically expire 5 or 10 minutes
after the user’s last action.
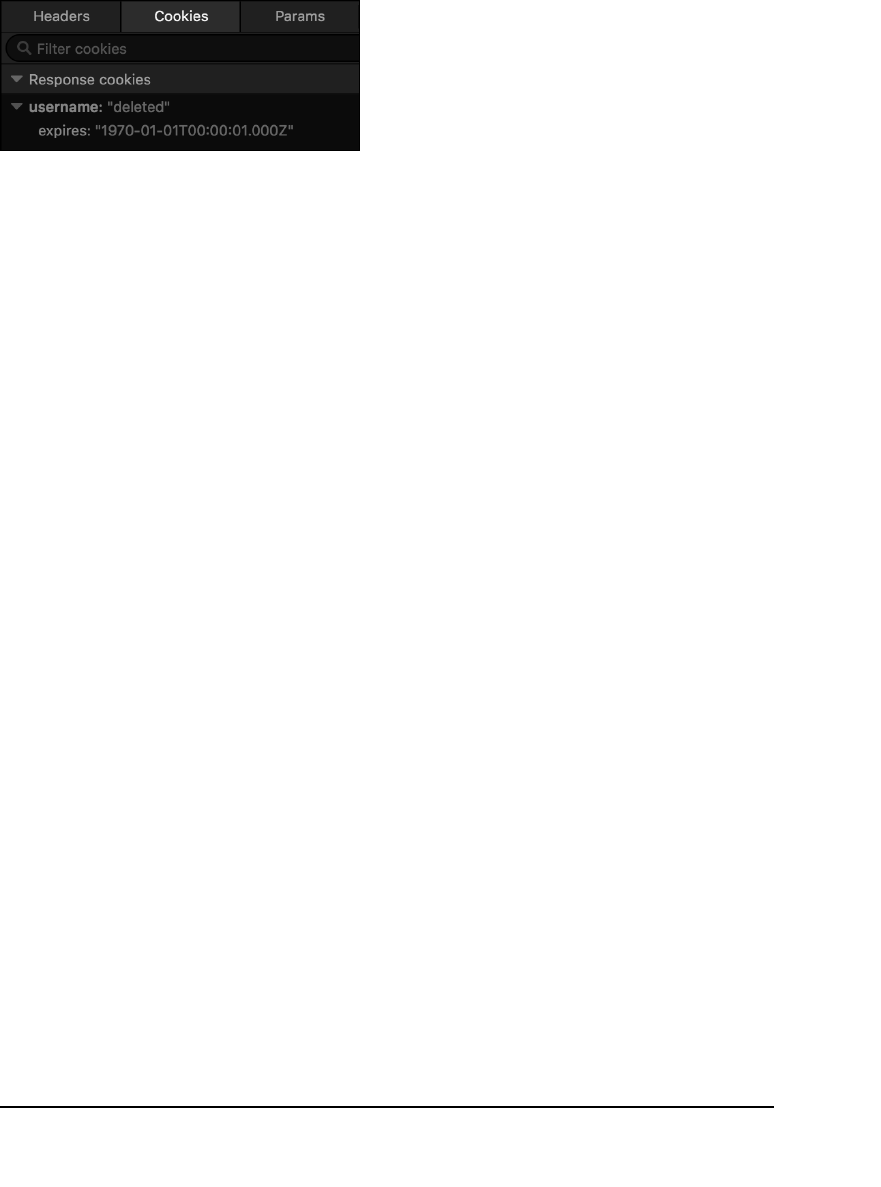
ptg18144795
Cookies and Sessions 257
Deleting a Cookie
The final thing to know about cookies is
how to delete them. Although a cookie
automatically expires when the user’s
browser is closed or when the expiration
date/time is met, sometimes you’ll want
to manually delete the cookie as well. For
example, websites that have registered
users and login capabilities delete any
created cookies when the user logs out.
The
setcookie()
function can take up to
seven arguments, but only one is required—
the name. If you send a cookie that consists
of a name without a value, it will have the
same effect as deleting the existing cookie
of the same name. For example, to create
the cookie
username
, you use this line:
setcookie('username', 'Larry');
To delete the
username
cookie, you code
setcookie('username', '');
or
setcookie('username', FALSE);
As an added precaution, you can also set
an expiration date that’s in the past A:
setcookie('username', FALSE,
➝
time() - 6000);
The only caveat when it comes to deleting
a cookie is that you must use the same
argument values that were used to set
the cookie in the first place, aside from
the value and expiration. For example, if
you set a cookie while providing a domain
value, you must also provide that value
when deleting the cookie:
setcookie('user', 'larry',
➝
time() + 3600, '',
➝
'forums.example.com');
setcookie('user', '', time() - 600,
➝
'', 'forums.example.com');
continues on next page
A How Firefox Developer Edition displays the
cookie information when a deletion cookie is sent.

ptg18144795
258 Chapter 9
To demonstrate this feature, let’s add a
reset page to the web application. This
PHP script will destroy the sent cookies so
that the user’s preferences are forgotten.
1. Begin a new PHP script in your text
editor or IDE, to be named
reset.php
(Script 9.4):
<?php // Script 9.4 - reset.php
2. Delete the existing cookies by sending
blank cookies. Then complete the PHP
code:
setcookie('font_size', '',
➝
time() - 6000, '/');
setcookie('font_color', '',
➝
time() - 6000, '/');
?>
These two lines send cookies named
font_size
and
font_color
, each with
no value and an expiration time of more
than an hour ago. As you did when
creating cookies, you must call the
setcookie()
function before anything
else is sent to the browser.
3. Create the HTML head:
<!doctype html>
<html lang="en">
<head>
<meta charset="utf-8">
<title>Reset Your Settings
➝
</title>
Script 9.4 To delete the existing cookies, send
new cookies with the same names, empty values,
and expirations in the past.
1 <?php // Script 9.4 - reset.php
2
3 // Delete the cookies:
4 setcookie('font_size', '', time() -
600, '/');
5 setcookie('font_color', '', time() -
600, '/');
6
7 ?><!doctype html>
8 <html lang="en">
9 <head>
10 <meta charset="utf-8">
11 <title>Reset Your Settings</title>
12 </head>
13 <body>
14
15 <p>Your settings have been reset!
Feel free to <a href="view_settings.
php">customize</a> them again.</p>
16
17 </body>
18 </html>

ptg18144795
Cookies and Sessions 259
4. Add the page’s body:
<body>
<p>Your settings have been reset!
➝
Feel free to <a href="view_
➝
settings.php">customize</a>
➝
them again.</p>
</body>
The body of this script merely tells
users that their settings have been
reset. A link is then provided to return
to the main page.
5. Complete the HTML:
</html>
6. Save the page as
reset.php
, place it
in the proper directory for your PHP-
enabled server, and test it in your
browser B, C, and D.
To test this page, either click the appro-
priate link in
view_settings.php
(Script
9.2) or just go to this page directly.
Just as creating a cookie doesn’t take
effect until another page is visited, deleting a
cookie doesn’t take effect until another page
is visited. In other words, you can delete a
cookie on a page but still access that cookie
on it (because the cookie was received by the
page before the delete cookie was sent).
Just as creating cookies has mixed results
using different browsers, the same applies
to deleting them. Test your scripts on many
browsers and play with the
setcookie()
set-
tings to ensure the best all-around compatibility.
Just as one example of how different
browsers handle cookies, Firefox Developer
Edition treats any cookie that expires in the
past as having an expiration just after the
epoch B.
B When the
setcookie()
function is used with
a name but no value, the existing cookie of that
name is deleted. The expiration date in the past
also guarantees proper destruction of the existing
cookie.
C The reset page sends two blank cookies and
then displays this message.
D After accessing the reset page, PHP destroys
the cookies B, which will have the effect of
resetting the
view_settings.php
page to its
default formatting.
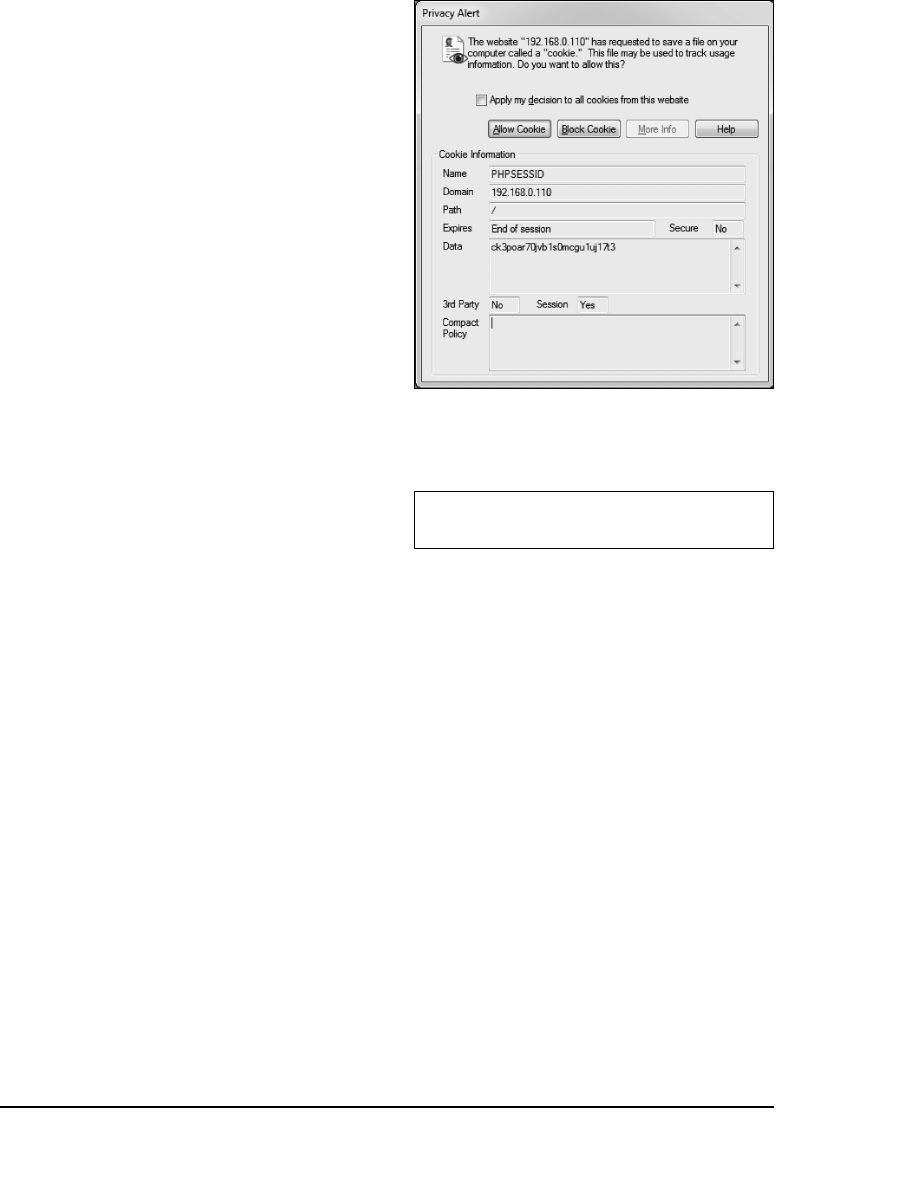
ptg18144795
260 Chapter 9
What Are Sessions?
A session, like a cookie, provides a way
for you to track data for a user over a
series of pages. The difference between
the two—and this is significant—is that a
cookie stores the data on the client (in
the browser), whereas the session data is
stored on the server. Because of this dif-
ference, sessions have numerous benefits
over cookies:
n
Sessions are generally more secure,
because the data isn’t transmitted
back and forth between the client and
server repeatedly.
n
Sessions allow you to store more infor-
mation than you can in a cookie.
n
Sessions can be made to work even
if the user doesn’t accept cookies in
their browser.
n
You can more easily store other types
of data in sessions, such as arrays
and Booleans.
When you start a session, PHP generates a
random session ID. Each user’s session will
have its own session ID, corresponding to
the name of the text file on the server that
stores the user’s session data (Script 9.5).
So that every PHP script on a site can asso-
ciate the same session data with a particu-
lar user, the session ID must be tracked as
well. By default, this session ID is sent to
the browser as a cookie A. Subsequent
PHP pages will use this cookie to retrieve
the session ID and access the session
information.
Over the next few pages, you’ll see just
how easy sessions are to work with in PHP.
A A session cookie being sent to the browser.
Script 9.5 How session data is stored in a file on
the server.
1 email|s:14:"me@example.
com";loggedin|i:1292883103;

ptg18144795
Cookies and Sessions 261
Creating a Session
Creating, accessing, or deleting a session
begins with the
session_start()
function.
This function will attempt to send a cookie
the first time a session is started, so it
absolutely must be called prior to any HTML
or white space being sent to the browser.
Therefore, on pages that use sessions, you
should call the
session_start()
function
as one of the very first lines in your script:
<?php
session_start();
The first time a session is started, a random
session ID is generated and a cookie is sent
to the web browser with a name of
PHP-
SESSID
(the session name) and a value like
mo7puk861tm60tbm4b8coh0og2
.
Once the session has been started, you
can record data to it by assigning values to
the
$_SESSION
array:
$_SESSION['first_name'] = 'Sam';
$_SESSION['age'] = 10;
Unlike with other arrays you might use in
PHP, you should always treat this array as
an associative array. In other words, you
should explicitly use strings for the keys,
such as
first_name
and
age
.
Each time a value is assigned to the
$_SESSION
array, PHP writes that data to
a temporary file stored on the server (see
Script 9.5).
To begin, you’ll rewrite the login script
from Chapter 8, this time storing the email
address in a session.
Choosing Between Sessions
and Cookies
Sessions have many benefits over cook-
ies, but there are still reasons why you
would use the latter. Cookies have these
advantages over sessions:
.Marginally easier to create and retrieve
.Require slightly less work from the
server
.Normally persist over a longer period
of time
As a rule of thumb, you should use cook-
ies in situations where security is less of
an issue and only a minimum of data is
being stored. If security’s a concern and
there will be oodles of information to
remember, you’re best off with sessions.
Understand, though, that using sessions
may require a little more effort in writing
your scripts.
ptg18144795
262 Chapter 9
To create a session:
1. Open
login.php
(Script 8.13) in your
text editor or IDE.
2. Before the
ob_end_clean()
line, add
the following (Script 9.6):
session_start();
$_SESSION['email'] =
➝
$_POST['email'];
$_SESSION['loggedin'] = time();
To store values in a session, begin by
calling the
session_start()
function.
Although you normally have to call this
function first thing in a script (because
it may attempt to send a cookie), that’s
not required here because the header
file for this script begins output buffer-
ing (see Chapter 8).
The session first stores the user’s
submitted email address in
$_SESSION['email']
. Then the time-
stamp of when the user logged in is
assigned to
$_SESSION['loggedin']
.
This value is determined by calling the
time()
function, which returns the num-
ber of seconds that have elapsed since
the
epoch
(midnight on January 1, 1970).
3. Save the file as
login.php
, and place
it in the appropriate directory on your
PHP-enabled computer.
This script should be placed in the same
directory used in Chapter 8, because it
requires some of those other files.
Script 9.6 This script stores two values in the
session and then redirects the user to another
page, where the session values can be accessed.
2 <?php // Script 9.6 - login.php #3
3 /* This page lets people log into the
site (almost!). */
4
5 // Set the page title and include the
header file:
6 define('TITLE', 'Login');
7 include('templates/header.html');
8
9 // Print some introductory text:
10 print '<h2>Login Form</h2>
11 <p>Users who are logged in can take
advantage of certain features like
this, that, and the other thing.
</p>';
12
13 // Check if the form has been submitted:
14 if ($_SERVER['REQUEST_METHOD'] ==
'POST') {
15
16 // Handle the form:
17 if ( (!empty($_POST['email'])) &&
(!empty($_POST['password'])) ) {
18
19 if ( (strtolower($_POST['email'])
== 'me@example.com') && ($_
POST['password'] == 'testpass') )
{ // Correct!
20
21 // Do session stuff:
22 session_start();
23 $_SESSION['email'] =
$_POST['email'];
24 $_SESSION['loggedin'] =
time();
25
26 // Redirect the user to the
welcome page!
27 ob_end_clean(); // Destroy the
buffer!
28 header ('Location: welcome.
php');
29 e x i t ( ) ;
30
31 } else { // Incorrect!
32
code continues on next page
ptg18144795
Cookies and Sessions 263
4. Load the form in your browser to ensure
that it has no errors A.
Don’t complete and submit the login
form yet, because the welcome page
needs to be updated prior to logging in.
The
php.ini
configuration file includes
many session-related settings that you can
tinker with if you have administrative-level
control over your server. Open the
php.ini
file in a text editor and see the manual for
more information.
You can also alter some of the session
settings using the
ini_set()
function.
The
session_name()
function lets you
change the name of the session (instead of
using the default PHPSESSID). It must be used
before every
session_start()
call, like so:
session_name('YourVisit');
session_start();
The
session_set_cookie_params()
function alters the session cookie settings,
such as the expiration time, the path, and the
domain.
The constant
SID
, short for Session ID,
stores a string in the format name=ID.
An example is PHPSESSID=
mo7puk861tm60tbm4b8coh0og2.
You can store any type of value—number,
string, array, or object—or any combination
thereof in your sessions.
Script 9.6 continued
33 print '<p class="text--
error">The submitted email
address and password do not
match those on file!<br>Go
back and try again.</p>';
34
35 }
36
37 } else { // Forgot a field.
38
39 print '<p class="text--
error">Please make sure you
enter both an email address and
a password!<br>Go back and try
again.</p>';
40
41 }
42
43 } else { // Display the form.
44
45 print '<form action="login.php"
method="post" class="form--inline">
46 <p><label for="email">Email
Address:</label><input type="email"
name="email" size="20"></p>
47 <p><label for="password">Password:
</label><input type="password"
name="password" size="20"></p>
48 <p><input type="submit"
name="submit" value="Log In!"
class="button--pill"></p>
49 </form>';
50
51 }
52
53 include('templates/footer.html'); //
Need the footer.
54 ?>
A The login form.
ptg18144795
264 Chapter 9
Accessing Session
Variables
Now that you’ve stored values in a session,
you need to know how to access them. The
first step is to invoke the
session_start()
function. This is necessary on every page
that will make use of sessions, whether it’s
creating a new session or accessing an
existing one.
From there it’s simply a matter of referenc-
ing the
$_SESSION
variable as you would
any other array. With this in mind, you’ll
write another welcome page—similar to
the one from Chapter 8—that accesses the
stored
email
and
loggedin
values.
To access session variables:
1. Create a new PHP document in
your text editor or IDE, to be named
welcome.php
(Script 9.7):
<?php // Script 9.7 - welcome.php
2. Begin the session:
session_start();
When you’re accessing session values,
you should call the
session_start()
function before any data is sent to
the browser.
3. Define a page title, and include the
HTML header:
define('TITLE', 'Welcome to the
➝
J.D. Salinger Fan Club!');
include('templates/header.html');
Because this page uses the same tem-
plate system developed in Chapter 8, it
also uses the same header system.
Script 9.7 You can access stored session values
using the
$_SESSION
array, as long as your script
uses
session_start()
first.
1 <?php // Script 9.7 - welcome.php #2
2 /* This is the welcome page. The user is
redirected here
3 after they successfully log in. */
4
5 // Need the session:
6 session_start();
7
8 // Set the page title and include the
header file:
9 define('TITLE', 'Welcome to the J.D.
Salinger Fan Club!');
10 include('templates/header.html');
11
12 // Print a greeting:
13 print '<h2>Welcome to the J.D. Salinger
Fan Club!</h2>';
14 print '<p>Hello, ' . $_
SESSION['email'] . '!</p>';
15
16 // Print how long they've been logged
in:
17 date_default_timezone_set('America/
New_York');
18 print '<p>You have been logged
in since: ' . date('g:i a', $_
SESSION['loggedin']) . '.</p>';
19
20 // Make a logout link:
21 print '<p><a href="logout.php">Logout
</a></p>';
22
23 include('templates/footer.html'); //
Need the footer.
24 ?>
ptg18144795
Cookies and Sessions 265
6. Complete the content:
print '<p><a href="logout.php">
➝
Logout</a></p>';
The next script will provide logout func-
tionality, so a link to it is added here.
7. Include the HTML footer, and complete
the HTML page:
include('templates/footer.html');
?>
8. Save the file as
welcome.php
, place it
in the proper directory for your PHP-
enabled server, and test it (starting
with
login.php
, Script 9.6) in your
browser A.
To see whether a particular session vari-
able exists, use
isset($_SESSION['var'])
as you would to check if any other variable is
set.
A more secure version of this script
would both check that the variables exist (in
the session) before referring to them and
run the values through an escaping function
before printing them.
Always remember that the data stored in a
session is being stored as plain text in an openly
readable text file. Don’t be cavalier about what
gets stored in a session, and never store sensi-
tive information, such as credit card data, there.
For added security, data can be encrypted
prior to storing it in a session and decrypted
upon retrieval. Doing so requires a cryptography
library and more advanced PHP knowledge,
however.
4. Greet the user by email address:
print '<h2>Welcome to the J.D.
➝
Salinger Fan Club!</h2>';
print '<p>Hello, ' . $_SESSION
➝
['email'] . '!</p>';
To access the stored user’s address,
refer to
$_SESSION['email']
. Here,
that value is concatenated to the rest of
the string that’s being printed out.
5. Show how long the user has been
logged in:
date_default_timezone_set
➝
('America/New_York');
print '<p>You have been logged
➝
in since: ' . date('g:i a',
➝
$_SESSION['loggedin']) .
➝
'.</p>';
Show how long the user has been
logged in, by referring to the
$_SESSION['loggedin']
variable.
By using this as the second argument
sent to the
date()
function, along with
the appropriate formatting parameters,
you make the PHP script create text
like
11:22 pm
.
Before using the
date()
function, you
need to set the default time zone (this
is also discussed in Chapter 8). If you
want, after setting the time zone here,
you can remove the use of the same
function from the footer file.
A After successfully logging in (using
me@example.com
and
testpass
in
the form), the user is redirected to this
page, which greets them using the
session values.
ptg18144795
266 Chapter 9
Deleting a Session
It’s important to know how to delete a ses-
sion, just as it’s important to know how to
delete a cookie: Eventually you’ll want to
get rid of the data you’ve stored. Session
data exists in two places—in an array dur-
ing the execution of the script and in a text
file—so you’ll need to delete both. But first
you must begin with the
session_start()
function, as always:
session_start();
Then, you clear the session variables by
resetting the
$_SESSION
array:
$_SESSION = []; // Or = array();
Finally, remove the session data from the
server (where it’s stored in temporary files).
To do this, use
session_destroy();
With that in mind, let’s write
logout.php
,
which will delete the session, effectively
logging out the user.
To delete a session:
1. Start a new PHP script in your text
editor or IDE, to be named
logout.php
(Script 9.8).
<?php // Script 9.8 - logout.php
2. Begin the session:
session_start();
Remember that you can’t delete a ses-
sion until you activate the session using
this function.
3. Reset the session array:
$_SESSION = [];
As explained in Chapter 7, “Using Arrays,”
the short array syntax, equivalent to
the
array()
function, creates a new,
empty array. By assigning the result of
Script 9.8 Deleting a session is a three-step
process: Start the session, reset the array, and
destroy the session data.
25 <?php // Script 9.8 - logout.php
26 /* This is the logout page. It destroys
the session information. */
27
28 // Need the session:
29 session_start();
30
31 // Reset the session array:
32 $_SESSION = [];
33
34 // Destroy the session data on the
server:
35 session_destroy();
36
37 // Define a page title and include the
header:
38 define('TITLE', 'Logout');
39 include('templates/header.html');
40
41 ?>
42
43 <h2>Welcome to the J.D. Salinger Fan
Club!</h2>
44 <p>You are now logged out.</p>
45 <p>Thank you for using this site. We
hope that you liked it.<br>
46 Blah, blah, blah...
47 Blah, blah, blah...</p>
48
49 <?php include('templates/footer.html');
?>

ptg18144795
Cookies and Sessions 267
this function call to
$_SESSION
, all the
existing
key-value
pairs in
$_SESSION
will be erased.
4. Destroy the session data on the server:
session_destroy();
This step tells PHP to remove the actual
session file on the server.
5. Include the HTML header, and complete
this PHP section:
define('TITLE', 'Logout');
include('templates/header.html');
?>
6. Make the page content:
<h2>Welcome to the J.D. Salinger
➝
Fan Club!</h2>
<p>You are now logged out.</p>
<p>Thank you for using this site.
➝
We hope that you liked it.<br />
Blah, blah, blah...
Blah, blah, blah...</p>
7. Include the HTML footer:
<?php include('templates/
➝
footer.html'); ?>
8. Save the file as
logout.php
, place it
in the proper directory for your PHP-
enabled server, and test it in your
browser by clicking the link in
welcome.php
A.
To delete an individual session value, use
unset($_SESSION['var']);
An additional step would be to delete the
session cookie too.
The PHP module on the server will auto-
matically perform garbage collection based on
settings in its configuration. PHP uses garbage
collection to manually delete session files from
the server, with the assumption that they’re no
longer needed.
A The logout page destroys the session data.

ptg18144795
268 Chapter 9
n
Rewrite
customize.php
so that the
script also applies the user’s prefer-
ences. Hint: You need to take into
account the fact that the cookies aren’t
available immediately after they’ve
been set. Instead, you would write the
CSS code using the
$_POST
values
after the form has been submitted, the
$_COOKIE
values upon first arriving at
the page (if the cookies exist), and the
default values otherwise.
n
Make the form in
customize.php
sticky
so that it reflects the user’s
current choices.
n
Rewrite
welcome.php
so that the
print
statement that greets the user by email
address uses double quotation marks.
n
For an added challenge, rewrite
welcome.php
so that the
print
state-
ment that indicates how long the user
has been logged in also uses double
quotation marks. Hint: You’ll need to
use a variable.
n
Update
welcome.php
so that it con-
firms a session variable exists before it
attempts to use it. Also run the session
values through an escaping function—
see Chapter 5, “Using Strings”—to
prevent XSS attacks.
n
Rewrite the last three scripts so that the
session uses a custom name.
Review and Pursue
If you have any problems with the review
questions or the pursue prompts, turn
to the book’s supporting forum
(www.LarryUllman.com/forums/).
Review
n
Where does a cookie store data?
Where does a session store data?
Which is generally more secure?
n
Name two debugging techniques when
trying to solve issues involving cookies.
n
How do the path and domain arguments
to the
setcookie()
function affect the
accessibility of the cookie?
n
How do you delete a cookie?
n
What function must every page call if it
needs to assign or access session data?
n
Why do sessions also use cookies
(by default)?
Pursue
n
Make sure you know what developer
tools exist for your browser of choice,
and how to basically use them.
n
Look up the PHP manual page for the
setcookie()
function. Review the
information and user comments there
for added instructions on cookies.

ptg18144795
Throughout this book, you’ve used dozens
of functions that provide much-needed
functionality, such as
date()
,
setcookie()
,
and
number_format()
. Although those
functions have already been defined by PHP,
here you’ll be creating your own. However,
functions you’ve created and those built
into PHP are used in the same manner.
Defining your own functions can save
you oodles of time as a programmer.
In fact, they constitute a big step in the
process of creating web applications and
building a solid library of PHP code to use
in future projects.
In this chapter, you’ll see how to write your
own functions that perform specific tasks.
After that, you’ll learn how to pass infor-
mation to a function, use default values
in a function, and have a function return a
value. You’ll also learn how functions and
variables work together.
10
Creating
Functions
In This Chapter
Creating and Using Simple Functions 270
Creating and Calling Functions
That Take Arguments 276
Setting Default Argument Values 282
Creating and Using Functions
That Return a Value 285
Understanding Variable Scope 290
Review and Pursue 296

ptg18144795
270 Chapter 10
Creating and Using
Simple Functions
As you program, you’ll discover that you
use certain sections of code frequently,
either within a single script or over the
course of several scripts. Placing these
routines into a self-defined function can
save you time and make your program-
ming easier, especially as your websites
become more complex. Once you create
a function, the actions of that function take
place each time the function is called, just
as
print
sends text to the browser with
each use.
The syntax for creating a user-defined
function is
function function_name() {
statement(s);
}
For example:
function whatever() {
print 'whatever';
}
You can use roughly the same naming
conventions for functions as you do for
variables, just without the initial dollar sign.
Second to that is the suggestion that you
create
meaningful
function names, just as
you ought to write representative variable
names. For example,
create_header
would
be a better function name than
function1
.
Remember not to use spaces in the name,
though—doing so constitutes two separate
words for the function name, which will
result in error messages. The underscore is
a logical replacement for the space. Unlike
variables, function names in PHP are
not
case-sensitive
, but you should still stick
with a consistent naming scheme.
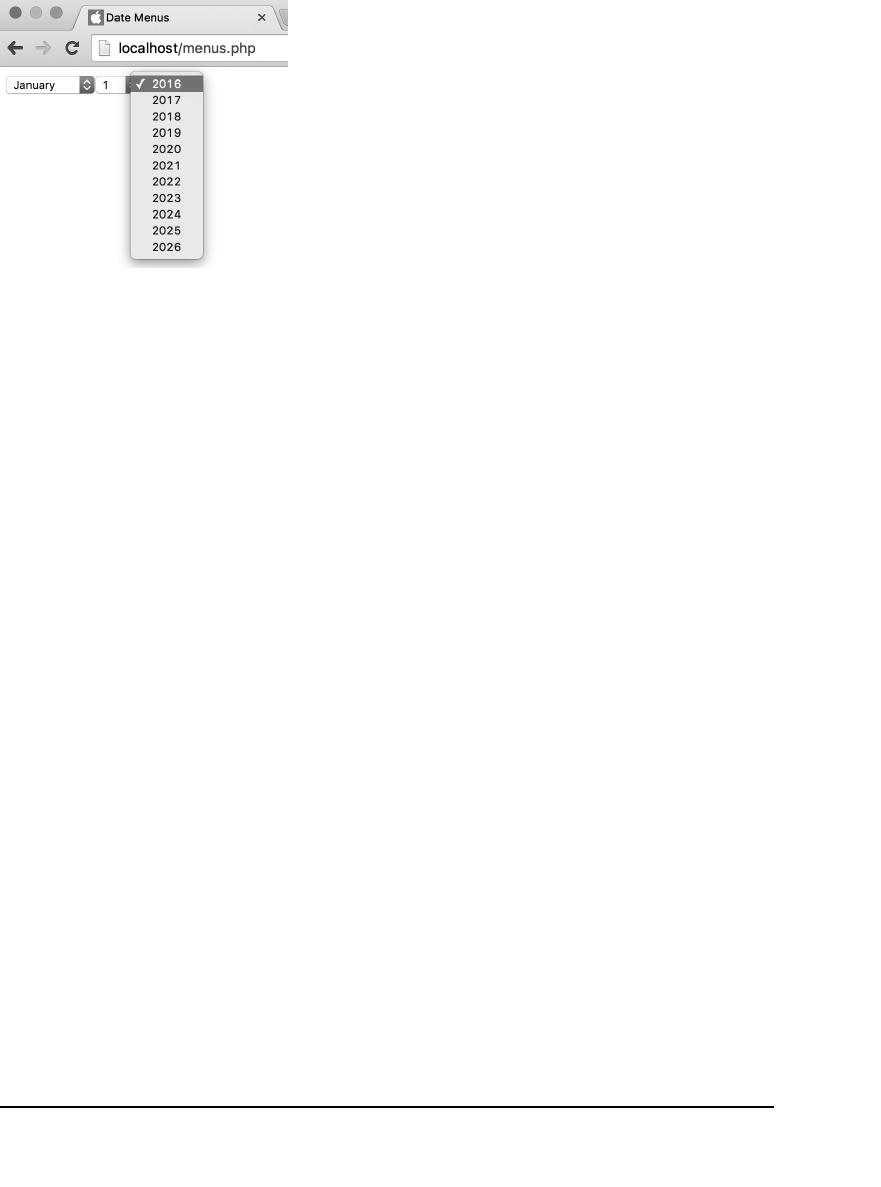
ptg18144795
Creating Functions 271
Any valid PHP code can go within the
statement(s) area of the function, including
calls to other functions. Functions do not
have a limit on the number of statements
they can contain, but make sure you end
each statement with a semicolon, just as
you would within the rest of the PHP script.
Functions can also contain any combination
of control structures: conditionals and loops.
The exact formatting of a function isn’t
important as long as the requisite elements
are there. These elements include the
word
function
, the function’s name, the
opening and closing parentheses, the open-
ing and closing braces, and the statement(s).
It’s conventional to indent a function’s
statement(s) from the
function
keyword
line, for clarity’s sake, as you would with
a loop or conditional. In any case, select
a format style that you like—which is both
syntactically correct and logically sound—
and stick to it.
You call (or invoke) the function by refer-
ring to it just as you do any built-in function.
The line of code
whatever();
will cause the statement part of the previ-
ously defined function—the
print
command
—to be executed.
Let’s begin by creating a function that
generates month, day, and year pull-down
menus for a form A.
A These pull-down menus are created
by a user-defined PHP function.

ptg18144795
272 Chapter 10
To create and call a basic function:
1. Start a new PHP document in your text
editor or IDE, to be named
menus.php
(Script 10.1):
<!doctype html>
<html lang="en">
<head>
<meta charset="utf-8">
<title>Date Menus</title>
</head>
<body>
2. Begin the PHP section:
<?php // Script 10.1 - menus.php
3. Start defining a function:
function make_date_menus() {
The name of this function is
make_
date_menus
, which is both descriptive
of what the function does and easy
to remember.
4. Create the month pull-down menu:
$months = [1 => 'January',
➝
'February', 'March', 'April',
➝
'May', 'June', 'July',
➝
'August', 'September',
➝
'October', 'November',
➝
'December'];
// Make the month pull-down menu:
print '<select name="month">';
foreach ($months as $key =>
➝
$value) {
print "\n<option value=\
➝
"$key\">$value</option>";
}
print '</select>';
To generate a list of months, first create
an array of the month names, indexed
numerically, beginning at 1 for January.
When you specify the index for the first
array element, the others will follow
sequentially without the need to be
explicit in naming them.
After the array has been created, the
initial select tag is printed out. Then, a
foreach
loop runs through the
$months
array. For each element in the array, the
HTML option tag is printed, using each
element’s key (the numbers 1 through 12)
as the option value and each element’s
value (January through December) as
the displayed text. Each line is also
preceded by a newline character (
\n
)
so that each option starts on its own
line within the HTML source.
5. Create the day pull-down menu:
print '<select name="day">';
for ($day = 1; $day <= 31;
➝
$day++) {
print "\n<option value=
➝
\"$day\">$day</option>";
}
print '</select>';
The day menu is a lot easier to create.
To do so, use a simple
for
loop, running
through the numbers 1 through 31.
6. Create the year pull-down menu:
print '<select name="year">';
$start_year = date('Y');
for ($y = $start_year; $y <=
➝
($start_year + 10); $y++) {
print "\n<option value=
➝
\"$y\">$y</option>";
}
print '</select>';
To create the year pull-down menu,
start by using the
date()
function to
get the current year. Then create
options for this year plus the next 10,
using a
for
loop.
continues on page 274

ptg18144795
Creating Functions 273
Script 10.1 The function defined in this script creates three pull-down menus for a form.
1 <!doctype html>
2 <html lang="en">
3 <head>
4 <meta charset="utf-8">
5 <title>Date Menus</title>
6 </head>
7 <body>
8 <?php // Script 10.1 - menus.php
9 /* This script defines and calls a function. */
10
11 // This function makes three pull-down menus for the months, days, and years.
12 function make_date_menus() {
13
14 // Array to store the months:
15 $months = [1 => 'January', 'February', 'March', 'April', 'May', 'June', 'July', 'August',
'September', 'October', 'November', 'December'];
16
17 // Make the month pull-down menu:
18 print '<select name="month">';
19 foreach ($months as $key => $value) {
20 print "\n<option value=\"$key\">$value</option>";
21 }
22 print '</select>';
23
24 // Make the day pull-down menu:
25 print '<select name="day">';
26 for ($day = 1; $day <= 31; $day++) {
27 print "\n<option value=\"$day\">$day</option>";
28 }
29 print '</select>';
30
31 // Make the year pull-down menu:
32 print '<select name="year">';
33 $start_year = date('Y');
34 for ($y = $start_year; $y <= ($start_year + 10); $y++) {
35 print "\n<option value=\"$y\">$y</option>";
36 }
37 print '</select>';
38
39 } // End of make_date_menus() function.
40
41 // Make the form:
42 print '<form action="" method="post">';
43 make_date_menus();
44 print '</form>';
45
46 ?>
47 </body>
48 </html>
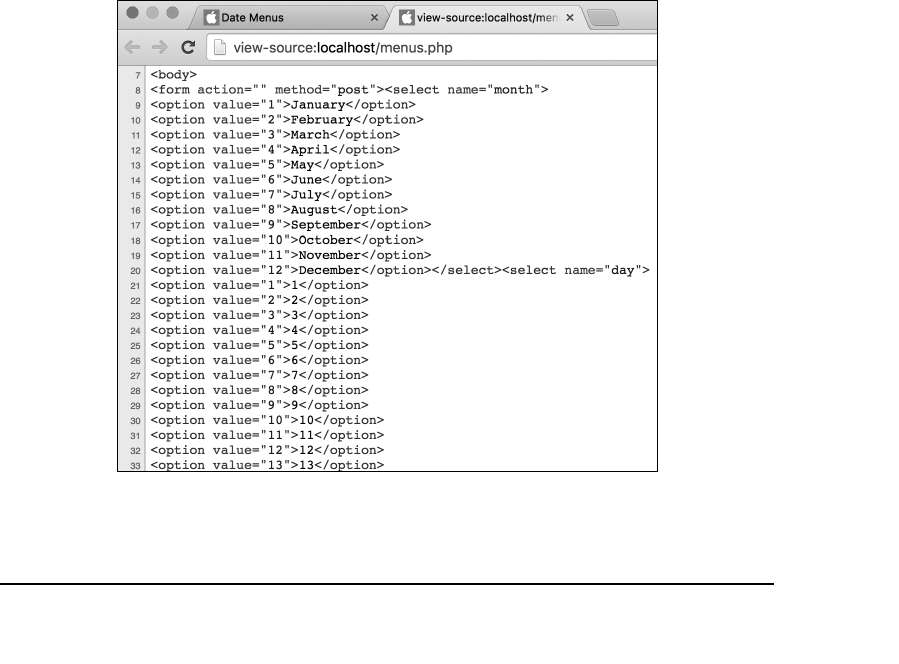
ptg18144795
274 Chapter 10
7. Close the function:
} // End of make_date_menus()
➝
function.
When you’re creating functions, it’s
easy to create parse errors by forget-
ting the closing brace. You may want to
add comments to help you remember
this final step.
8. Make the
form
tags, and call the
function:
print '<form action="" method=
➝
"post">';
make_date_menus();
print '</form>';
The
print
statements are used to
create the HTML form tags. Without a
form, the date pull-down menus won’t
appear properly in the script.
Once you’ve created your function, you
simply have to call it by name—being
careful to use the exact spelling—to make
the function work. Be sure to include
the parentheses as well.
9. Complete the PHP and HTML:
?>
</body>
</html>
10. Save the file as
menus.php
, place it
in the proper directory for your PHP-
enabled server, and run it in your
browser A.
11. If you want, check out the HTML source
of the page to see what was dynami-
cally generated B.
B The source of the page shows the HTML created by the
print
statements in the
make_date_menus()
function.
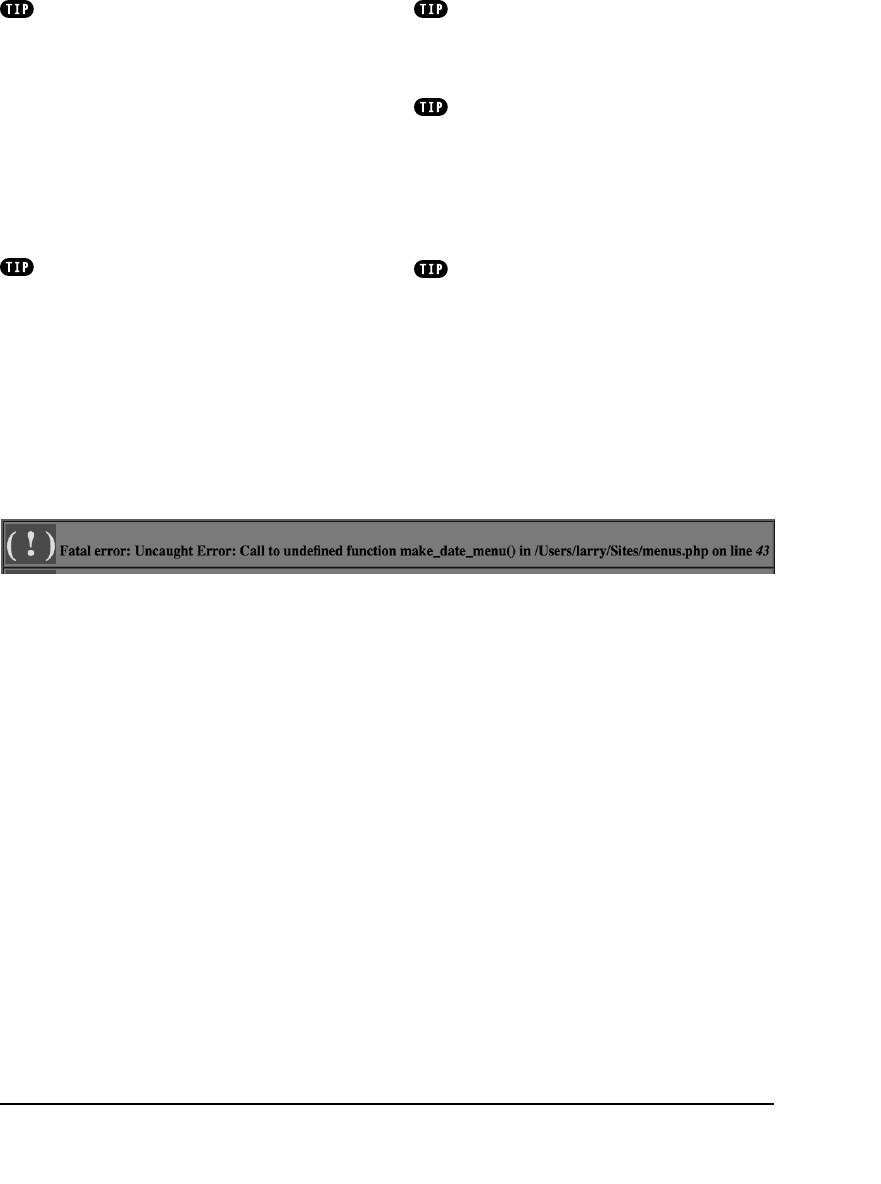
ptg18144795
Creating Functions 275
If you see a “Call to undefined function:
some_function…” error message, it means
you’re trying to call a function that doesn’t
exist C. If you’re trying to call a PHP func-
tion, either you misspelled the name or it’s
not supported on your version of PHP. Check
the PHP manual for more. If you’re calling a
user-defined function when you see this error,
either it hasn’t been defined or you’ve mis-
spelled it. Recheck your spelling in both the
definition of the function and its usage to see
if you made a mistake.
The
function_exists()
function
returns TRUE or FALSE based on whether a
function exists in PHP. This applies to both
user-defined functions and those that can be
built into PHP:
if (function_exists
➝
('some_function')){ ...
C This error means that the PHP script does not have access to a function defined under the given
name. In this case, the problem is due to a missing “s” in the function call:
make_date_menus()
versus
make_date_menu()
.
Although you aren’t required to, I recom-
mend that you habitually define your functions
at the beginning of a script (or in an included
file), rather than at the end of the script.
Some people prefer this syntax for laying
out their functions:
function function_name()
{
statement(s);
}
User-defined functions add extra
memory requirements to your PHP scripts, so
you should be judicious in using them. If you
find that your function merely calls another
PHP function or has but one line of code, it’s
probably not the best use of this capability.

ptg18144795
276 Chapter 10
Creating and Calling
Functions That
Take Arguments
Although being able to create a simple
function is useful, writing one that takes
input and does something with that input is
even better. The input passed to a function
is known as an
argument
. This is a concept
you’ve seen before: The
sort()
function
takes an array as an argument, which the
function then sorts.
The syntax for writing functions that take
arguments is as follows:
function function_name
➝
($arg1,$arg2, ...) {
statement(s);
}
The function is defined with
parameters
:
variables that are assigned the values sent
to the function when you call it. The vari-
ables are defined using the same naming
rules as any other variable in PHP:
function make_full_name($first,
➝
$last) {
print $first . ' ' . $last;
}
Functions that take input are called much
like those that don’t—you just need to
remember to pass along the necessary
values. You can do this either by passing
variables:
make_full_name($fn, $ln);
or by sending literal values, as in
make_full_name('Larry', 'Ullman');
or some combination thereof:
make_full_name('Larry', $ln);

ptg18144795
Creating Functions 277
(To clarify a minor point, the variables in the
function definition are known as
param-
eters
; the values passed to the function
when invoked are known as
arguments
.
That being said, it’s common enough to
use the terms interchangeably.)
To demonstrate functions that take argu-
ments, let’s create a more interesting
example. In Chapter 8, “Creating Web
Applications,” you learned how to make
forms “sticky”: having them remember their
values from previous submissions. The
code for a sticky text input might be
First Name: <input type="text"
➝
name="first_name" size="20"
➝
value="<?php if (isset
➝
($_POST ['first_name']))
➝
{ print htmlspecialchars
➝
($_POST ['first_name']); } ?>">
continues on next page
function make_full_name($first, $last) {
print $first . ' ' . $last;
}
make_full_name($fn, $ln);
make_full_name('Larry', 'Ullman');
make_full_name('Larry', $ln);
A How values in function calls are assigned to function
arguments.
B As with any function (user-defined or built into PHP), passing an incorrect number of arguments when
calling it yields warnings.
The important thing to note is that arguments
are passed quite literally: The first variable
in the function definition is assigned the
first value in the call line, the second func-
tion variable is assigned the second call
value, and so forth A. Functions aren’t
smart enough to intuitively understand how
you meant the values to be associated.
This is also true if you fail to pass a value,
in which case the function will assume that
value is null (
null
isn’t the mathematical 0,
which is actually a value, but closer to the
idea of the word
nothing
). The same thing
applies if a function takes two arguments
and you pass one—the second will be null,
which might create an error B.
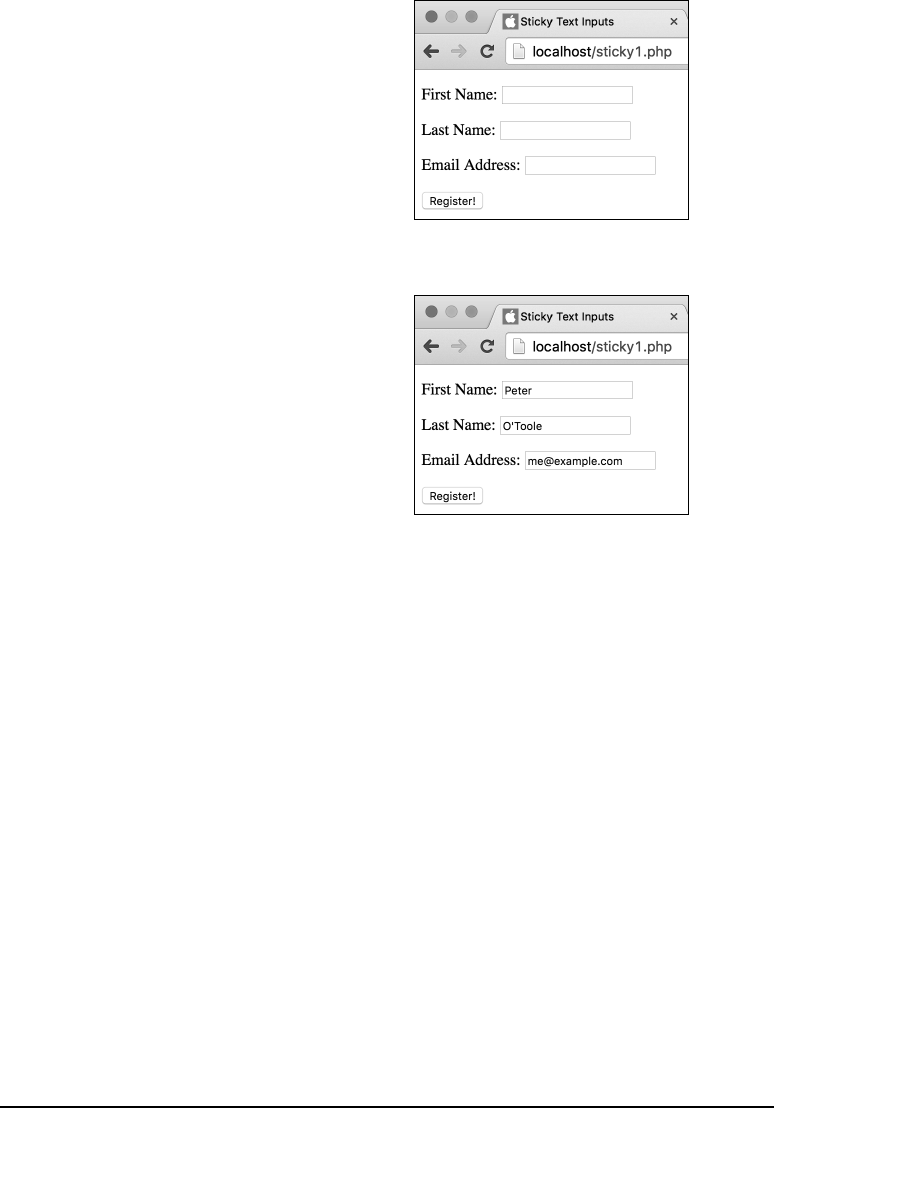
ptg18144795
278 Chapter 10
Since many forms, such as
register.php
from Chapter 8, repeatedly use similar
code, you have a good candidate for a
user-defined function.
This next script will define and call a func-
tion that creates sticky text inputs. The
function will take one argument for the
input’s name, and another for the input’s
label (its textual prompt). The function will
be called multiple times by the script to
generate multiple inputs C. Upon form
submission, the previously entered values
will be remembered D.
To create and call a function
that takes an argument:
1. Start a new PHP document in your
text editor or IDE, to be named
sticky1.php
(Script 10.2):
<!doctype html>
<html lang="en">
<head>
<meta charset="utf-8">
<title>Sticky Text Inputs
➝
</title>
</head>
<body>
2. Begin the PHP section:
<?php // Script 10.2 –
➝
sticky1.php
3. Start defining a function:
function make_text_input
➝
($name, $label) {
The
make_text_input()
function
requires two arguments, which will
be assigned to the
$name
and
$label
variables.
continues on page 280
C These three form inputs are created
by a user-defined function.
D The form inputs reflect the values
entered by the user.

ptg18144795
Creating Functions 279
Script 10.2 The
make_text_input()
function takes two arguments, for the input’s name and label.
1 <!doctype html>
2 <html lang="en">
3 <head>
4 <meta charset="utf-8">
5 <title>Sticky Text Inputs</title>
6 </head>
7 <body>
8 <?php // Script 10.2 - sticky1.php
9 /* This script defines and calls a function that creates a sticky text input. */
10
11 // This function makes a sticky text input.
12 // This function requires two arguments be passed to it.
13 function make_text_input($name, $label) {
14
15 // Begin a paragraph and a label:
16 print '<p><label>' . $label . ': ';
17
18 // Begin the input:
19 print '<input type="text" name="' . $name . '" size="20" ';
20
21 // Add the value:
22 if (isset($_POST[$name])) {
23 print ' value="' . htmlspecialchars($_POST[$name]) . '"';
24 }
25
26 // Complete the input, the label and the paragraph:
27 print '></label></p>';
28
29 } // End of make_text_input() function.
30
31 // Make the form:
32 print '<form action="" method="post">';
33
34 // Create some text inputs:
35 make_text_input('first_name', 'First Name');
36 make_text_input('last_name', 'Last Name');
37 make_text_input('email', 'Email Address');
38
39 print '<input type="submit" name="submit" value="Register!"></form>';
40
41 ?>
42 </body>
43 </html>

ptg18144795
280 Chapter 10
4. Print an opening paragraph and a
label tag:
print '<p><label>' . $label .
➝
': ';
The code being generated by this
function will be essentially like that just
indicated (and in Chapter 8), but it will
be wrapped in a paragraph tag and
the input’s label will be formally placed
within label tags. The value of the
label (for example,
First Name
) will be
passed to the function when the func-
tion is called.
5. Begin the text input:
print '<input type="text"
➝
name="' . $name . '"
➝
size="20" ';
The PHP
print
statement just creates
the HTML input tag, but the value of the
tag’s
name
attribute will come from the
$name
variable. This variable is assigned
a value, such as
first_name
,
when the
function is called.
6. If applicable, add the input’s preset
value:
if (isset($_POST[$name])) {
print ' value="' .
htmlspecialchars
➝
($_POST [$name]) . ' " ';
}
The code in Step 5 didn’t actually com-
plete the text input (the closing
>
wasn’t
created), so another clause—specifi-
cally
value="whatever"
—can still be
added. But that clause should only be
added if
$_POST['input_name']
is set,
so the conditional checks for that. As
with the code in Chapter 8, the value
is printed only after being run through
htmlspecialchars()
.
7. Complete the input, the label, the para-
graph, and the function:
print '></label></p>';
} // End of make_text_input()
➝
function.
8. Make the form tags, and call the
function:
print '<form action=""
➝
method="post">';
make_text_input('first_name',
➝
'First Name');
It’s important that the form uses the
POST method, because the function
checks for existing values in
$_POST
.
You can actually omit an
action
value,
in which case the form will automatically
be submitted back to the same page.
To create a “first name” input, call the
make_text_input()
function, passing it
the name the input should have and an
appropriate label.
9. Create two more inputs:
make_text_input('last_name',
➝
'Last Name');
make_text_input('email', 'Email
➝
Address');
Now the script has used the same
function three times, in three different
ways. The result will be three distinct
text inputs.
Note that although HTML5 has an email
input type, for the sake of simplicity,
only plain text inputs are being created.
10. Complete the form:
print '<input type="submit"
➝
name="submit" value=
➝
"Register!"></form>';
The form needs a submit button in
order to test the sticky feature.
ptg18144795
Creating Functions 281
11. Complete the PHP and HTML:
?>
</body>
</html>
12. Save the file as
sticky1.php
, place it
in the proper directory for your PHP-
enabled server, and run it in your
browser C and D.
You can define as many functions as you
want, not just one per script as the examples
in this chapter portray.
A function is not limited as to the number
of arguments it can take.
Once you’ve defined your own functions
like this, you can place them in an external
file and then require that file when you need
access to the functions.
Declaring Parameter Types
PHP 7 supports the ability to declare
parameter types to indicate what kind of
value must be passed. To use this feature,
provide the type—
bool
,
float
,
int
, or
string
—before the parameter name:
function make_full_name(string
➝
$first, string $last) {
With that code in place, PHP will return
an error if the function is called while pro-
vided with non-string arguments:
make_full_name(12, true);
➝
// Error!
Earlier versions of PHP supported
type
hinting
, which was similar but did not
support scalar variable types such as
string
and
int
. This type of stricter
function definition is best when you want
to guarantee the type of value passed to
a function.
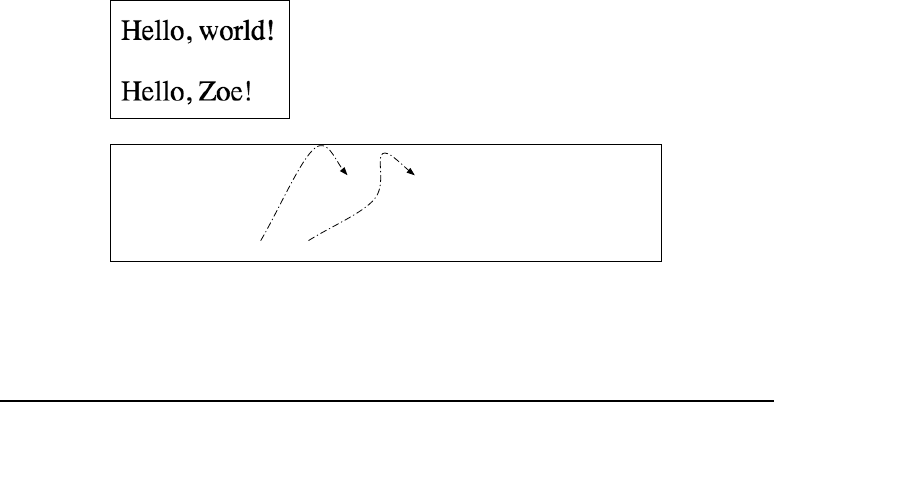
ptg18144795
282 Chapter 10
Setting Default
Argument Values
PHP allows functions to have
default argu-
ment values
: Just assign a value to the
parameter in the function definition:
function greeting($who = 'world') {
print "<p>Hello, $who!</p>";
}
Such a function will use the preset value
unless it receives a value that then over-
writes the default. In other words, by
setting a default value for an argument, you
render that particular argument optional
when calling the function. You’d set an
argument’s default value if you wanted to
assume a certain value but still allow for
other possibilities A:
greeting();
greeting('Zoe');
(Note: This isn’t really a good use of a
user-defined function, or a default argu-
ment value, but it’s easily understood as
an example.)
A Calling the function without any arguments
uses the default value (the first greeting); calling it
with an argument provided means that value will
be used instead (the second).
function calculate_total($qty, $price = 20.00, $tax = 0.06) {
// Make the calculations.
}
calculate_total(3, 0.07);
B Because of the way function arguments work, you cannot “skip” an
argument when calling a function.
The parameters with default values must
always be written after the other param-
eters (those without default values). This
is because PHP directly assigns values to
parameters in the order they’re received
from the call line. Thus, it isn’t possible
to omit a value for the first argument but
include one for the second. For example,
suppose you have
function calculate_total($qty,
➝
$price = 20.00, $tax = 0.06) {...
If you call the function with the line
calculate_total(3, 0.07);
with the intention of setting
$qty
to 3,
leaving
$price
at 20.00, and changing the
$tax
to 0.07, there will be problems.
The result will be that
$qty
is set to 3,
$price
is set to 0.07, and
$tax
remains at
0.06 B, which isn’t the desired outcome.
The proper way to achieve that effect
would be to code
calculate_total(3, 20.00, 0.07);
Let’s rework the
make_text_input()
function to incorporate the notion of
setting default argument values.

ptg18144795
Creating Functions 283
To write a function that
uses default values:
1. Open
sticky1.php
(Script 10.2) in your
text editor or IDE, if it isn’t open already.
2. Add a third argument with a default
value to the
make_text_input()
function (Script 10.3):
function make_text_input($name,
$label, $size = 20) {
Although I like the cleanliness of
having all text inputs be the same size,
a person’s last name and email address
is often longer than their first name, so
an adjustable size would be better. By
taking the input’s size as an argument,
this will be possible. But the size will
have a default value, making it an
optional argument. If three arguments
are sent to the function, then
$size
will be set to the third value instead of
the default.
3. Change the creation of the input so that
it uses the
$size
variable:
print '<input type="text" name="'
. $name . '" size="' .
➝
$size . '" ';
continues on next page
Script 10.3 The function now takes three
arguments, but only two of them are required. If
no
$size
is passed to the function, its value will
be 20.
1 <!doctype html>
2 <html lang="en">
3 <head>
4 <meta charset="utf-8">
5 <title>Sticky Text Inputs</title>
6 </head>
7 <body>
8 <?php // Script 10.3 - sticky2.php
9 /* This script defines and calls a
function that creates a sticky text
input. */
10
11 // This function makes a sticky text
input.
12 // This function requires two arguments
be passed to it.
13 // A third argument is optional (it has
a default value).
14 function make_text_input($name,
$label, $size = 20) {
15
16 // Begin a paragraph and a label:
17 print '<p><label>' . $label . ': ';
18
19 // Begin the input:
20 print '<input type="text" name="' .
$name . '" size="' . $size . '" ';
21
22 // Add the value:
23 if (isset($_POST[$name])) {
24 print ' value="' .
htmlspecialchars
($_POST[$name]) . '"';
25 }
26
27 // Complete the input, the label and
the paragraph:
28 print '></label></p>';
29
30 } // End of make_text_input() function.
31
32 // Make the form:
33 print '<form action="" method="post">';
34
code continues on next page
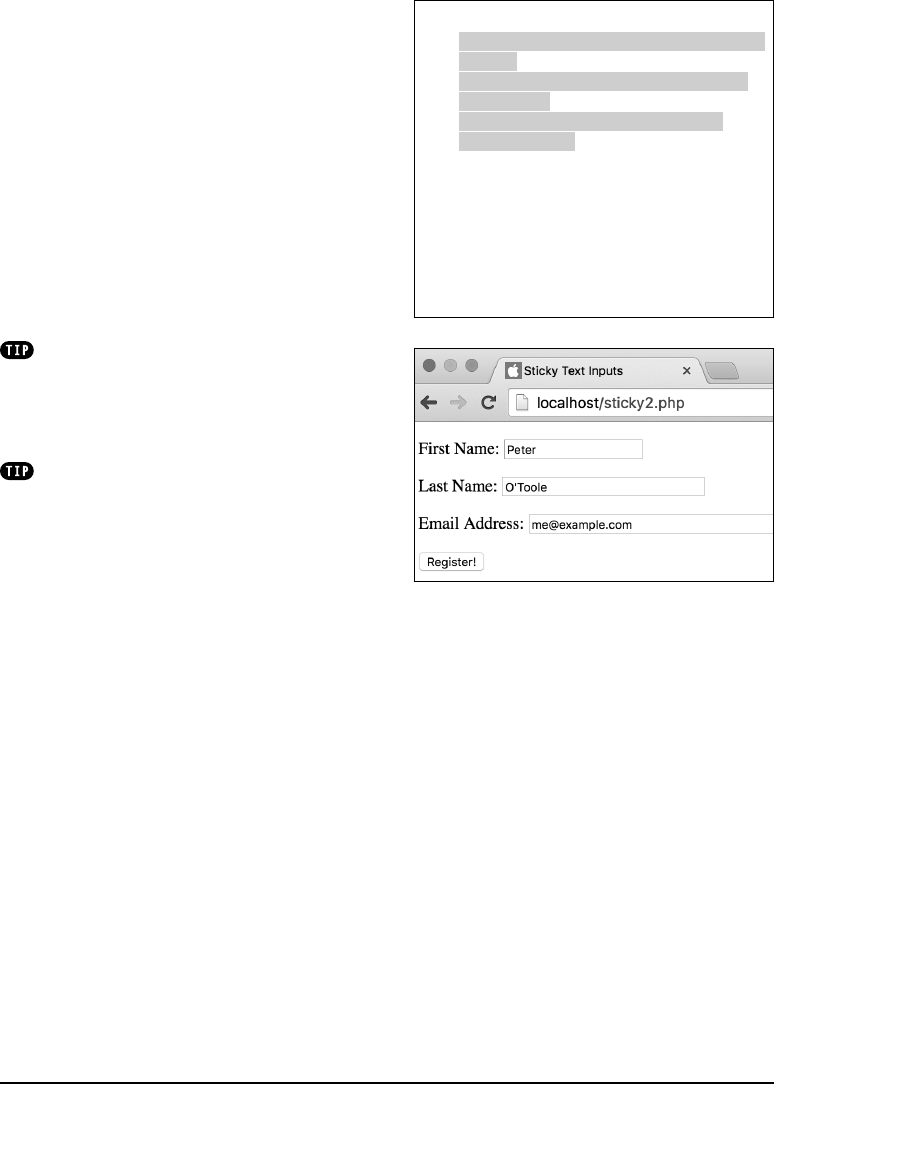
ptg18144795
284 Chapter 10
4. Change the function calls to vary
the sizes:
make_text_input('first_name',
➝
'First Name');
make_text_input('last_name',
➝
'Last Name', 30);
make_text_input('email', 'Email
➝
Address', 50);
Now the first input will use the default
size, and the others will be longer.
5. Save the script as
sticky2.php
, place
it in the proper directory of your PHP-
enabled server, and test it in your
browser C.
To pass no value to a function for a
particular argument, use an empty string (
''
)
or the word NULL (without quotes). Either of
these values will override the default value, if
one is established.
As mentioned way back in Chapter 1,
“Getting Started with PHP,” the PHP manual
marks optional function arguments using
square brackets. For example, when you use
the
number_format()
function, the number
of decimals to round to is optional:
string number_format(float number
➝
[, int decimals = 0])
Script 10.3 continued
35 // Create some text inputs:
36 make_text_input('first_name', 'First
Name');
37 make_text_input('last_name', 'Last
Name', 30);
38 make_text_input('email', 'Email
Address', 50);
39
40 print '<input type="submit"
name="submit" value="Register!"></
form>';
41
42 ?>
43 </body>
44 </html>
C Now the function is capable of changing the
size of the input, based on an argument. If no
value is provided for that argument, the default
size is used instead (the first input).

ptg18144795
Creating Functions 285
Creating and Using
Functions That
Return a Value
Functions do more than take arguments;
they can also return values. Doing so
requires just two more steps. First, you use
the
return
statement within the function.
Second, you use the output somehow
when you call the function. Commonly,
you’ll assign the returned value to a vari-
able, but you can also, for example, directly
print the output. Here is the basic format
for a function that takes two arguments
and returns a value:
function make_full_name
➝
($first, $last) {
$name = $first . ' ' . $last;
return $name;
}
This function could be used like so:
$full_name = make_full_name
➝
($fn, $ln);
There the returned value of the function
is assigned to a variable. Here it’s printed
immediately:
print make_full_name($fn, $ln)
To best demonstrate this concept, let’s
create a function that performs a simple
calculation and formats the result. This
script will display an HTML form where a
user enters a quantity and price A. When
the form is submitted (back to this same
page), a total value will be calculated and
printed B.
A This simple form takes two values on
which calculations will be made.
B The result of the calculation, which
takes place within a user-defined function.

ptg18144795
286 Chapter 10
To create and use a function
that returns a value:
1. Create a new PHP document in
your text editor or IDE, to be named
calculator1.php
(Script 10.4):
<!doctype html>
<html lang="en">
<head>
<meta charset="utf-8">
<title>Cost Calculator</title>
</head>
<body>
2. Begin the PHP code:
<?php // Script 10.4 –
calculator1.php
3. Define the function:
function calculate_total
➝
($quantity, $price) {
$total = $quantity * $price;
$total = number_format
➝
($total, 2);
return $total;
}
This function takes two arguments—
a quantity and a price—and multiplies
them to create a total. The total value is
then formatted before it’s returned by
the function.
Although this may seem like a silly use
of a function, the benefits of putting
even a one-step calculation into a
function are twofold: First, the calcula-
tion will be easier to find and modify at
a later date with your function located
at the beginning of your script instead
of hidden in the rest of the code, and
second, should you want to repeat the
action again in a script, you can do so
without duplicating code.
4. Begin the conditional to see if the form
was submitted:
if ($_SERVER['REQUEST_METHOD'] ==
➝
'POST') {
Because this page both displays
and handles the HTML form, it has a
conditional that checks how the page
is being requested. If it’s a POST
request, that means the form has
been submitted.
5. Validate the form data, and use the
function:
if ( is_numeric($_POST
➝
['quantity']) AND is_numeric
➝
($_POST['price']) ) {
$total = calculate_total
➝
($_POST['quantity'],
➝
$_POST['price']);
print "<p>Your total comes to
➝
$<span style=\"font-weight:
➝
bold;\">$total</span>.</p>";
This part of the PHP code—which
handles the form if it has been submit-
ted—first checks that a numeric quantity
and price were entered. If so, the
total is determined by calling the
calculate_total()
function and
assigning the result to the
$total
vari-
able. This result is then printed out.
continues on page 288

ptg18144795
Creating Functions 287
Script 10.4 This script both displays and handles an HTML form in order to perform some basic calculations.
The script uses a function that takes two arguments and returns a single value.
1 <!doctype html>
2 <html lang="en">
3 <head>
4 <meta charset="utf-8">
5 <title>Cost Calculator</title>
6 </head>
7 <body>
8 <?php // Script 10.4 – calculator1.php
9 /* This script displays and handles an HTML form.
10 It uses a function to calculate a total from a quantity and price. */
11
12 // This function performs the calculations.
13 function calculate_total($quantity, $price) {
14
15 $total = $quantity * $price; // Calculation
16 $total = number_format($total, 2); // Formatting
17
18 return $total; // Return the value.
19
20 } // End of function.
21
22 // Check for a form submission:
23 if ($_SERVER['REQUEST_METHOD'] == 'POST') {
24
25 // Check for values:
26 if ( is_numeric($_POST['quantity']) AND is_numeric($_POST['price']) ) {
27
28 // Call the function and print the results:
29 $total = calculate_total($_POST['quantity'], $_POST['price']);
30 print "<p>Your total comes to $<span style=\"font-weight: bold;\">$total</span>.</p>";
31
32 } else { // Inappropriate values entered.
33 print '<p style="color: red;">Please enter a valid quantity and price!</p>';
34 }
35
36 }
37 ?>
38 <form action="" method="post">
39 <p>Quantity: <input type="text" name="quantity" size="3"></p>
40 <p>Price: <input type="text" name="price" size="5"></p>
41 <input type="submit" name="submit" value="Calculate!">
42 </form>
43 </body>
44 </html>

ptg18144795
288 Chapter 10
6. Complete the conditionals:
} else {
print '<p style="color:
➝
red;">Please enter a valid
➝
quantity and price!</p>';
}
}
If either of the form variables was
not properly submitted, a message is
printed indicating that. The final brace
closes the form submission conditional.
A little CSS is applied to both printed
messages (here and in Step 5).
7. Display the HTML form:
?>
<form action="" method="post">
<p>Quantity: <input type="text"
➝
name="quantity" size="3"></p>
<p>Price: <input type="text"
➝
name="price" size="5"></p>
<input type="submit"
➝
name="submit"
➝
value="Calculate!">
</form>
The form itself is quite simple, request-
ing two different values from the user
A. Because this form is created outside
of the main submission conditional, the
form will always be displayed by the
page B.
8. Complete the HTML page:
</body>
</html>
Returning Multiple Values
User-defined functions frequently return
just a single value but can return multiple
values by using arrays. Here’s how you
go about this:
function some_function($p1, $p2)
{
// Do whatever.
return [$a, $b];
// Or: return array($v1, $v2);
}
Then, to call this function, use the
list()
function to assign the array ele-
ments to individual variables:
list($v1, $v2) = some_function
➝
($a1, $a2);
The result is that
$a
from the function is
assigned to
$v1
in the PHP script, and
$b
from the function is assigned to
$v2
.
ptg18144795
Creating Functions 289
9. Save the page as
calculator1.php
,
place it in the proper directory for your
PHP-enabled server, and test it in your
browser B.
You can have only one return statement
executed in a function, but the same function
can have multiple return statements. As an
example, you may want to write a function
that checks for a condition and returns a value
indicating whether the condition was satisfied.
In such a case, the function might contain
if (condition) {
return true;
} else {
return false;
}
The result returned by the function is
either TRUE or FALSE, indicating whether the
stated condition was met.
Declaring Return Types
PHP 7 supports the ability to declare the
type of value returned by a function. To
use this feature, follow the function name
with a colon and the type returned:
function make_full_name
➝
($first, $last): string {
Or
function calculate_total
➝
($quantity, $price): float {
This type of stricter function definition
is best when you want to guarantee the
type of value returned by a function.

ptg18144795
290 Chapter 10
Understanding
Variable Scope
The concept of
variable scope
wasn’t
introduced in earlier chapters because
without an understanding of functions,
scope makes little sense. Now that you
are acquainted with functions, this section
revisits the topic of variables and discusses
in some detail just how variables and func-
tions work together.
As you saw in the second section of this
chapter, “Creating and Calling Functions
That Take Arguments,” you can send
variables to a function by passing them as
arguments. However, you can also refer-
ence an external variable from within a
function using the
global
statement. This
is possible because of variable scope.
The
scope
of a variable is the realm in
which it exists.
By default, the variables you write in a
script exist for the life of that lone script.
Conversely, environment variables, such as
$_SERVER['PHP_SELF']
, exist throughout
every PHP script on the server.
<?php
// Whatever code.
// Whatever code.
?>
function blah($a1, $a2) {
// Function code.
}Global Scope
Local Scope
A Adding function definitions to a script adds another area of
variable scope.
Functions, though, create a new level
of scope. Function variables—the func-
tion’s parameters as well as any variables
defined within the function—exist only
within that function and aren’t accessible
outside of it. Put another way, function
variables are
local variables
with
local
scope
. Likewise, a variable from outside a
function is not available within the func-
tion, by default A. Even when a variable
is used as an argument to a function call,
that variable’s
value
is being passed to the
function, not the variable itself.
You can, however, make a variable external
to a function available within the function
by using the
global
statement. The
global
statement roughly means, “I want this
variable within the function to refer to the
same named variable outside of the func-
tion.” In other words, the
global
statement
turns a local variable with local scope into
a global variable with global scope. Any
changes made to the variable within the
function are also reflected by the variable
outside of the function, without using the
return
command (assuming the function is
called, of course).

ptg18144795
Creating Functions 291
The syntax of the
global
statement
is simply
function function_name($args) {
global $variable;
statement(s);
}
There is another issue regarding functions
and variables: Because of variable scope,
a local variable within a function is a
different entity—perhaps with a different
value—than a variable outside of the
function,
even if the two variables use
the exact same name
. Let’s look at this
more explicitly…
Say you have:
function foo($param) {
// Do whatever.
}
$var = 1;
foo($var);
When the function is called, the value of
$var
will be assigned
$param
, so their
values are the same but their names are
different and they are different variables.
Now if the name of the parameter in the
function is also
$var
—
function bar($var) {
// Do whatever.
}
$var = 1;
bar($var);
then the
$var
variable within the function
is assigned the same value as the original
$var
outside of the function—but
they’re
still two separate variables
. The one has
a scope within the function, and the other
has a scope outside of it. This means that
you can use the same name for variables in
the function as exist outside of the function
without conflict.
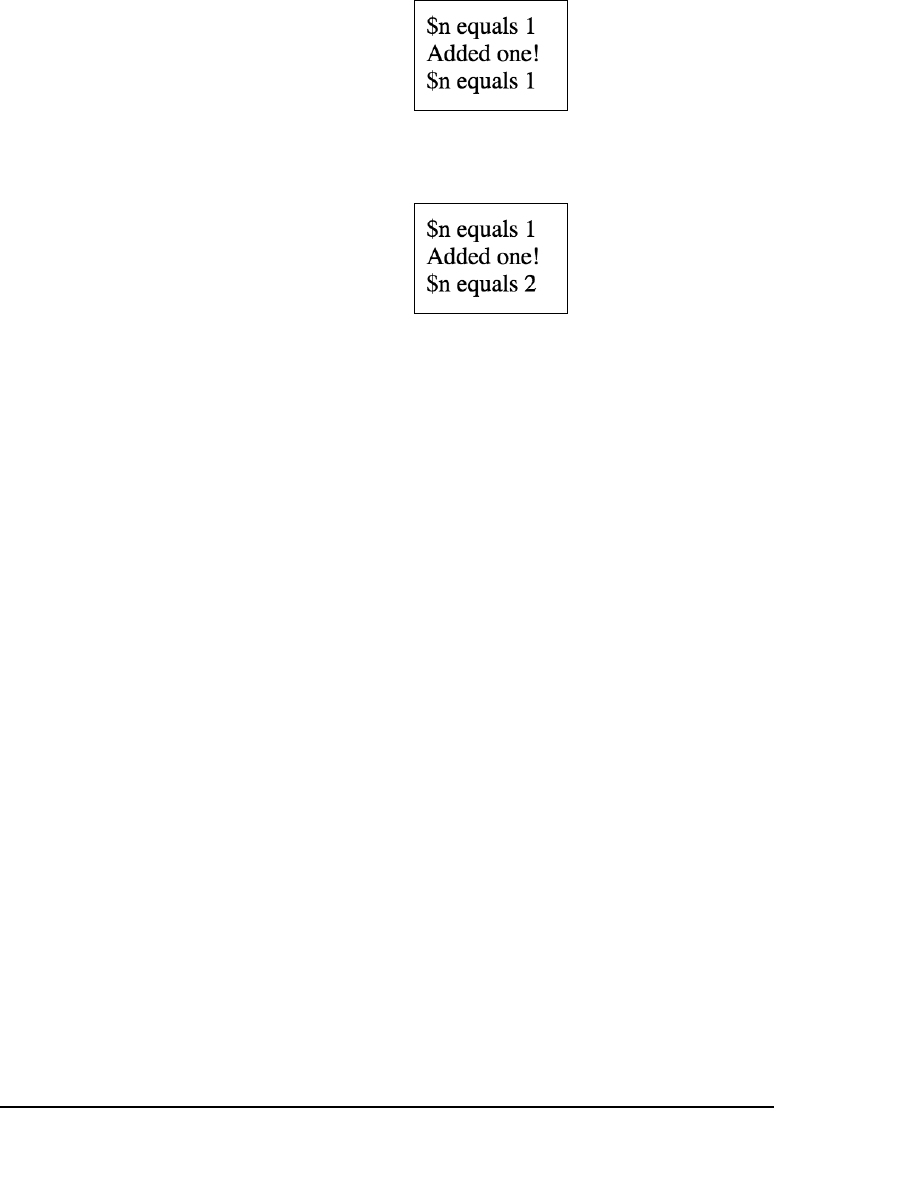
ptg18144795
292 Chapter 10
Just remember they aren’t the same vari-
able. What happens to a variable’s value
within a function only affects that variable
within the function. Here’s an example B:
function add_one($n) {
$n++;
print 'Added one!<br>';
}
$n = 1;
print "\$n equals $n<br>";
add_one($n);
print "\$n equals $n<br>";
This is all true unless you use the
global
statement, which does make the two vari-
ables the same C:
function add_one() {
global $n; // Same!
$n++;
print 'Added one!<br>';
}
$n = 1;
print "\$n equals $n<br>";
add_one();
print "\$n equals $n<br>";
Note that in this case, the variable’s value
no longer needs to be passed to the func-
tion either.
To demonstrate variable scope, let’s
rework the
calculator1.php
script using
the
global
statement.
B Changes to a local variable inside
a function have no effect on a similarly
named global variable.
C Changes made to a global variable
inside of a function will change the
variable outside of that function.
ptg18144795
Creating Functions 293
To use the global statement:
1. Open
calculator1.php
(Script 10.4)
in your text editor or IDE, if it is not
already open.
2. Before the function definition, add the
following (Script 10.5):
$tax = 8.75;
This line creates a
$tax
variable with
a set value that will be used in the
cost calculations. It’s assigned a value
outside of the function because it
will be used later in the main body of
the script.
3. Within the function definition, add a
global
statement:
global $tax;
This statement tells the function to
incorporate the same
$tax
variable
as the one that exists outside of the
function.
4. Before the
$total
in the function is
formatted, recalculate the value using
the tax rate:
$taxrate = ($tax / 100) + 1;
$total = $total * $taxrate;
To add the tax to the total value, you
start by dividing the tax by 100 to create
a percentage. Then you add 1 to this
value to get a multiplier. This result is
then multiplied by the total to come up
with the new, final total.
Notice that you use a
$taxrate
vari-
able (based on
$tax
) to perform these
calculations. This is because you’ll
print out the value of
$tax
later, and
any changes made to it here will be
reflected (because it’s a global variable).
continues on next page
Script 10.5 The function in this script can use the
$tax
variable—even though it hasn’t been passed
to the function—thanks to the
global
statement.
1 <!doctype html>
2 <html lang="en">
3 <head>
4 <meta charset="utf-8">
5 <title>Cost Calculator</title>
6 </head>
7 <body>
8 <?php // Script 10.5 - calculator2.php
#2
9 /* This script displays and handles an
HTML form.
10 It uses a function to calculate a total
from a quantity, price, and tax rate. */
11
12 // Define a tax rate:
13 $tax = 8.75;
14
15 // This function performs the
calculations.
16 function calculate_total ($quantity,
$price) {
17
18 global $tax;
19
20 $total = $quantity * $price; //
Calculation
21 $taxrate = ($tax / 100) + 1;
22 $total = $total * $taxrate; // Add
the tax.
23 $total = number_format ($total, 2);
// Formatting
24
25 return $total; // Return the value.
26
27 } // End of function.
28
29 // Check for a form submission:
30 if (isset($_POST['submitted'])) {
31
32 // Check for values:
33 if ( is_numeric($_POST['quantity'])
AND is_numeric($_POST['price']) ) {
34
code continues on next page
ptg18144795
294 Chapter 10
5. Alter the main
print
line (after the
function call) so that it prints the tax
rate as well:
print "<p>Your total comes to
➝
$<span style=\"font-weight:
➝
bold;\">$total</span>,
➝
including the $tax percent tax
➝
rate.</p>";
The
$tax
variable defined at the begin-
ning of the script is printed out at the
end. If you hadn’t used the
$taxrate
variable within the function and made
the alterations to the global
$tax
instead, those calculations would be
reflected in the value printed here.
6. Save the script, place it in the proper
directory for your PHP-enabled server,
and test it in your browser D and E.
Constants and the superglobal arrays
(
$_GET
,
$_POST
,
$_COOKIE
, and
$_SESSION
)
have the added benefit that they’re always
available inside functions without requiring
the
global
statement. This is why they are
known as superglobals.
Each function has its own, separate
local scope.
Script 10.5 continued
35 // Call the function and print
the results:
36 $total = calculate_
total($_POST['quantity'],
$_POST['price']);
37 print "<p>Your total comes
to $<span style=\"font-
weight: bold;\">$total</span>,
including the $tax percent tax
rate.</p>";
38
39 } else { // Inappropriate values
entered.
40 print '<p style="color: red;">
Please enter a valid quantity and
price!</p>';
41 }
42
43 }
44 ?>
45 <form action="" method="post">
46 <p>Quantity: <input type="text"
name="quantity" size="3"></p>
47 <p>Price: <input type="text"
name="price" size="5"></p>
48 <input type="submit" name="submit"
value="Calculate!">
49 <input type="hidden" name="submitted"
value="true">
50 </form>
51 </body>
52 </html

ptg18144795
Creating Functions 295
D Run the form again…
E …and the calculation now makes use of a
global
$tax
variable.
Function Design Theory
Understanding the syntax for defining
your own functions is important, but you
also need to understand good function
design theory. A proper user-defined
function should be easily reusable and
be likely to be reused (that is, if a website
only ever calls a function once, there’s no
need for it).
There should also be a “black box”
mentality about the function: A program-
mer shouldn’t need to know about the
internals of a function in order to use it
properly. As an example of this, think of
any PHP function: You probably don’t
know what the underlying function code
does specifically, but you can still tap
into its power.
In support of the “black box” approach,
proper function design suggests that
you should be extremely cautious when
using global variables. Arguably (pun!),
a function should be passed all the
information it needs, so that global vari-
ables—including the superglobals and
constants—are not required.
Functions should also not make assump-
tions either, like
make_text_input()
,
which assumes the form was submitted
using the POST method.
By writing functions that neither rely on
global variables nor make assumptions
as to what outside of the function is true,
you make the function more independent
and portable—in short, better. Properly
designing functions is a skill best learned
by experience over time.

ptg18144795
296 Chapter 10
Pursue
n
Make the function in
menus.php
take
arguments to indicate the starting year
and the number of years to generate.
Make the later argument have a default
value. Then rewrite the function body
so that it uses these values in the year
for
loop.
n
Rewrite the
make_text_input()
func-
tion so that it can be told whether to
look for an existing value in either
$_POST
or
$_GET
.
n
Create a variation on the
make_text_input()
function that
can create a text input or a password
input, depending on how the function
is called.
n
Modify the calculator script to also use
the
make_text_input()
function.
n
Come up with an idea for, create, and
use your own custom function.
Review and Pursue
If you have any problems with the
review questions or the pursue prompts,
turn to the book’s supporting forum
(www.LarryUllman.com/forums/).
Review
n
What is the basic syntax of a user-
defined function?
n
What naming rules must your own
functions abide by?
n
What naming rules must function
parameters abide by?
n
How do you provide a default value for
a function argument?
n
In the example code in the
“Understanding Variable Scope” sec-
tion of the chapter, why does the code
use
\$n
? What would happen if that
backslash weren’t there?
n
What is variable scope? What scope
does a function argument variable have?
n
What scope does a variable in an
included file have? Note: This is a
tricky one!

ptg18144795
Taking your web applications to the next
level requires a method of storing and
retrieving data. You have two primary
options in PHP: using the filesystem or
databases. This chapter will discuss the
former, and the next chapter will introduce
the latter. It’s worth your time to learn both
methods. Although a database can be more
powerful and secure than a file-based
system, you may be surprised at what’s
possible by writing and reading simple text
documents on the server.
In this chapter, you’ll learn about file
permissions, a topic that you must grasp
first. Then you’ll learn to write, read from,
and lock files. After that, you’ll see how to
handle file uploads with PHP, how to create
directories, and an alternate method for
reading data from a file. These last two
examples will also demonstrate a simple
file-based registration and login system
that you can use in your web applications.
11
Files and
Directories
In This Chapter
File Permissions 298
Writing to Files 303
Locking Files 310
Reading from Files 313
Handling File Uploads 316
Navigating Directories 325
Creating Directories 330
Reading Files Incrementally 338
Review and Pursue 343

ptg18144795
298 Chapter 11
File Permissions
Before attempting to write to and read
from a file, you must have an understand-
ing of
file permissions
. The topic is large
enough that you may want to pursue it
further, but this quick introduction will get
you started. Up front I will say that most
of the information in this chapter applies
only to non-Windows users. In my experi-
ence, the preparatory steps to be taken
aren’t necessary when running PHP on a
Windows computer (although such things
can change from one version of an operat-
ing system to the next). Still, having an
understanding of permissions as a whole
is a good idea, especially if you might later
be running your PHP scripts on a non-
Windows server.
Permissions identify who can do what with
a file or directory. The options are
read
,
write
, and
execute
(actually, files can be
designated
executable,
whereas directo-
ries are made
searchable
). Each of these
options can be set for three types of users:
n
The
owner
of the file (the person who
created it or put it on the server)
n
Members of a particular
group
, which
a server administrator determines and
which includes the owner
n Others
(those who don’t fall into the
previous two categories)
There is also the implied
everyone
level,
which includes all three user types.
As an example, if you use FTP to transfer a
file to a server, the owner of the transferred
file will be the account used to connect to
the server. The default file permissions will
likely be that everyone can read the file
but that only the owner can modify it (for
example, write to it).
The Web Root Directory
When discussing files, directories, and
security, an important concept is that
of the
web
root
directory
. To grasp this
concept, first consider that a file on a
web server is available in two ways.
First, it exists in the filesystem. For
example, this might be
C:\inetpub\
wwwroot\filename.php
on your own
computer, or
/var/web/sitename/
htdocs/filename.php
on a remote
server (that path would be applicable to
*nix systems).
Second, files placed within the proper
directories for a web server are also
available through HTTP, such as
http://
www.example.com/filename.php
or
http://localhost/filename.php
.
With this in mind, the web root directory
is the folder in the filesystem where the
base URL—such as
www.example.com
—points. Without further restrictions
imposed, a browser can access all the
files found within the web root directory
and below (i.e., in subfolders). A browser
cannot, however, access files found
outside the web root directory.
When creating writable files and direc-
tories, it’s more secure to place them
outside the web directory. In other words,
if your web pages go in
C:\inetpub\
wwwroot
or
/Users/username/Sites
,
then if you place items in
C:\inetpub
or
/Users/username
, they should be
accessible to the locally running PHP
but not to others over the Internet. The
examples in this chapter follow this struc-
ture, and you should do so as well.
In general, the security concern here
is more important for directories than
for files.
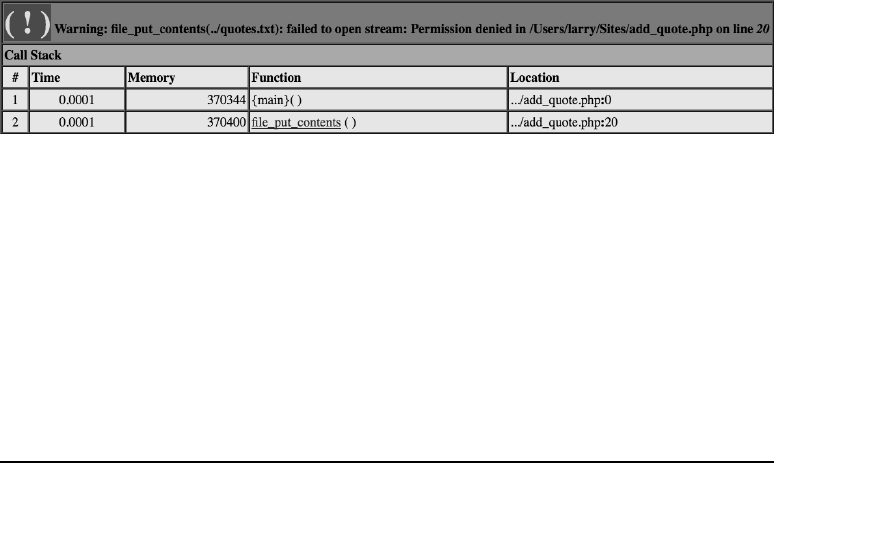
ptg18144795
Files and Directories 299
A catch is that in most cases, PHP will be
running through a web server applica-
tion, which counts as a different server
user. Therefore, PHP and the web server
would be able to read files you put onto
the server (and consequently make them
available for viewing in a browser), but PHP
would not, by default, be able to modify
those files.
For the examples in this chapter, PHP
needs to be able to write to some files
and directories. This means that you must
know how, and be able, to adjust the per-
missions a file or directory has. That being
said, making a file or directory writable (i.e.,
making the permissions less restrictive) can
be a security issue and should be done
only when absolutely necessary.
Finally, a common point of confusion has
to do with what, exactly, a “user” is. A user
is an account created on a computer. On
your own computer, there may be just one
user—you—or several. Servers normally
have multiple users, although most user
A The
…failed to open stream: Permission denied…
message is the result of attempting to do something
to a file that isn’t allowed by the server. Here the server is denying the
fopen()
function that is attempting to
open
quotes.txt
for the purpose of writing to it.
accounts aren’t associated with people
who will log in, but rather with different pro-
grams running on the server. For example,
there may be one user whose processes
handle all web requests and another user
through which the database application
runs. Most importantly, know that a “user”
is not a person on another computer and
that “everyone” means “everyone on the
server.” Just because you’ve made a file
or directory writable by any user doesn’t
mean it’s writable by anyone over the
Internet. The “user” must be a recognized
account on the server.
Creating the text file
In the chapter’s first example, you’ll work
with a text file,
quotes.txt
, that’s located
on the server. If the file doesn’t have the
correct permissions to do what your PHP
script is asking it to, you might see an
error message A. Before proceeding, you
should create
quotes.txt
on the server
and establish its permissions.
ptg18144795
300 Chapter 11
To create quotes.txt:
1. Open your text editor or IDE, and create
a new, blank document.
2. Without typing anything into the file,
save it as
quotes.txt
.
3. Move the file just outside the web root
directory of your PHP-enabled server B.
The sidebar “The Web Root Directory”
explains where you should put the file with
respect to your web directory and why.
The
file_exists()
function returns
TRUE if a provided file or directory exists on
the server. This can be used to test for the
presence of a file before doing anything with it:
if (file_exists('somefile.ext'))
➝
{ ...
Assuming that PHP has write permissions
on a directory, you can create a blank docu-
ment within that directory directly in PHP. This
is accomplished using the
touch()
function:
touch('somefile.ext');
web root
quotes.txt
add_quote.php
web root parent
B The
quotes.txt
file should ideally be placed in the same
directory as your web documents folder (i.e., not in the
directory with the actual web documents).
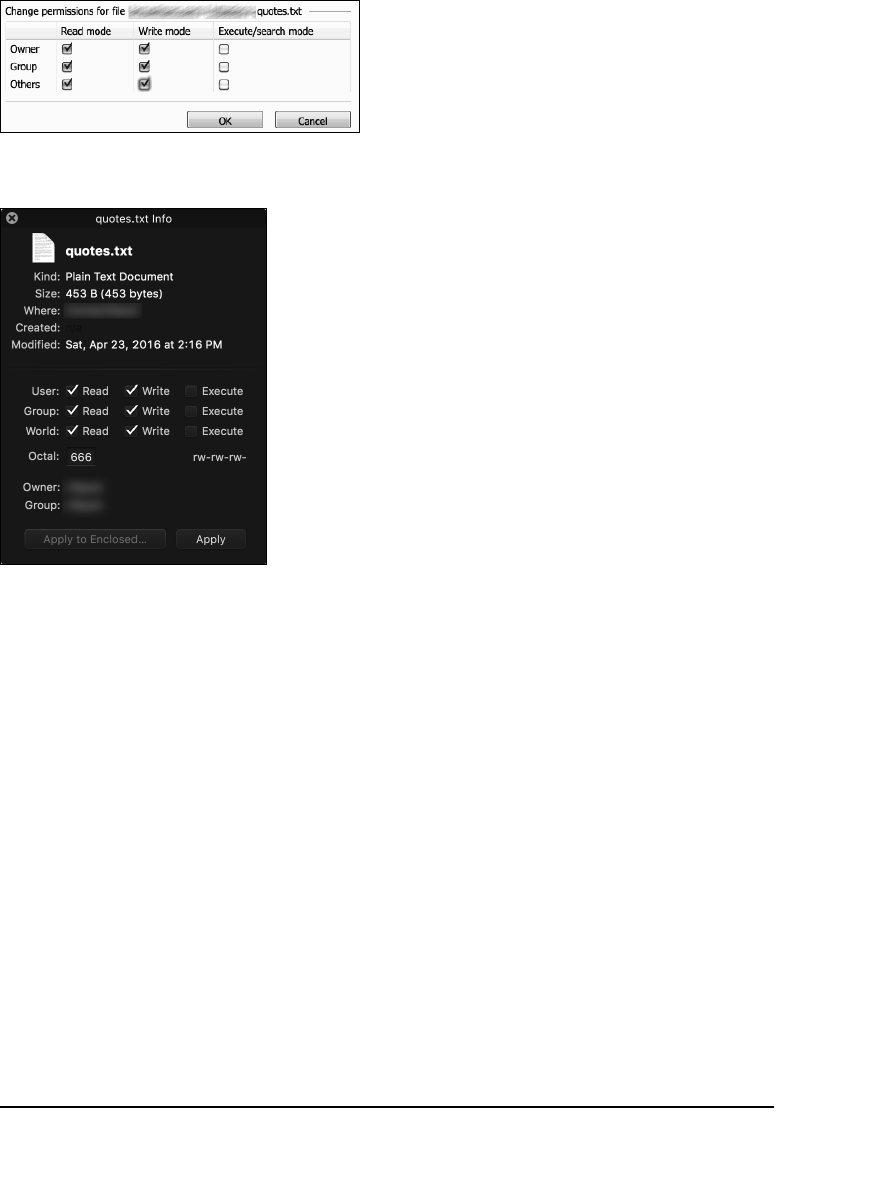
ptg18144795
Files and Directories 301
Setting a file’s permissions
The preceding sequence may seem like
an odd series of steps, but in order to set
the permission on a file, the file must first
exist. You do want the file to be blank,
though, because you’ll use PHP to write
data to it later.
The desired result for this example is to
give either
others
or
everyone
permis-
sion to
read
and
write
(but not
execute
)
quotes.txt
. How you accomplish this
depends on
n
Whether you’re running PHP on your
own computer or on a remote server
n
The operating system of the PHP-
enabled computer
Unfortunately, it would be impossible to
offer steps for how every user should set
the permissions under any circumstances,
but here are some rough guidelines and
steps to get you going.
To set a file’s permissions
on a remote server:
n
Most ISPs offer users a web-based
control panel where they can set file
permissions C as well as set other
hosting parameters.
n
You may be able to change a file’s
permissions using your FTP client D.
C This control panel, provided by a hosting
company, lets users adjust a file’s permissions.
D The Transmit FTP application uses
this pop-up window to allow you to
set a file’s permissions.
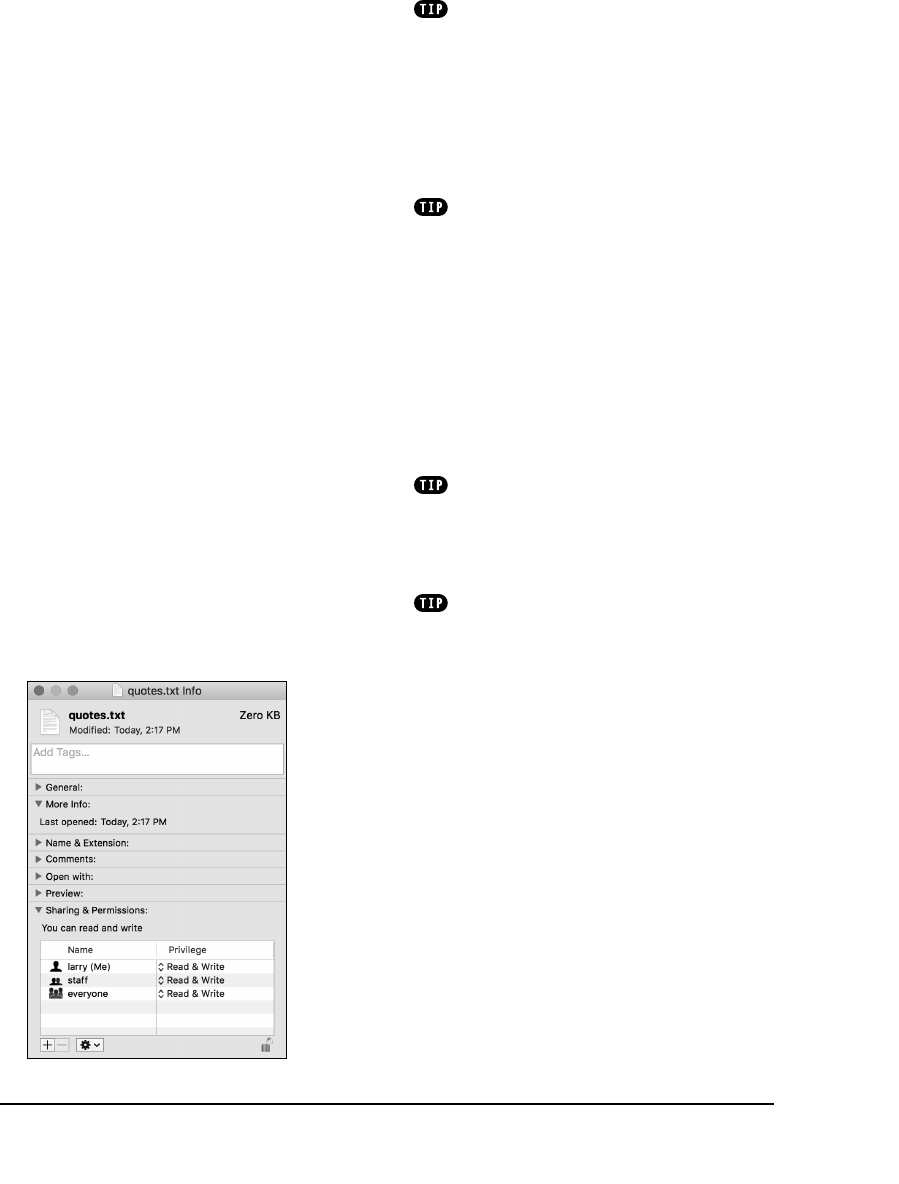
ptg18144795
302 Chapter 11
To set a file’s permissions
on your computer:
n
If you’re working on your own Windows
computer, you may not need to change
the permissions. To test this theory, try
each example first. If a PHP script can’t
write to the file or directory in question,
use the next suggestion to rework the
permissions.
n
Windows users who need to change
the permissions can do so by viewing
the file’s or directory’s properties. The
resulting panel will differ for each ver-
sion of Windows, but basically you just
need to tweak who can access the file
and how.
n
Mac OS X users must select the file in
the Finder and choose Get Info from
the File menu. From there, use the
Ownership & Permissions subpanel to
adjust the file’s permissions E.
n
On Unix (including users of Linux and
Mac OS X), you can also use the com-
mand line
chmod
0666
quotes.txt
in
a terminal window, assuming you have
authority to do so.
E The Mac OS X Get Info panel lets you
adjust a file’s ownership and permissions,
among other things.
Most operating systems have no PHP
user. Instead, the PHP user is essentially the
user the web server application (for example,
Apache or IIS) is running as. In the Unix family,
Apache often runs as nobody. On Windows,
the web server frequently runs as the same
user who is logged in (and who probably
created the file), meaning there will be no
need to alter a file’s permissions.
If you’re already familiar with SSH and
chmod
, you probably also understand what the
0666 number means, but here’s an explana-
tion for those of you who aren’t familiar with it.
The 0 is just a prefix indicating the number is
written in an octal format. Each 6 corresponds
to read (4) plus write (2) permission—first
assigning 6 to the owner, then to the group,
and then to others. Comparatively, 0777
allows read (4) plus write (2) plus execute (1)
permission to all three types of users. This
numbering is applicable for Unix variant oper-
ating systems (Linux, Solaris, and Mac OS X).
PHP has several functions for changing
a file or directory’s permissions, including
chgrp()
,
chmod()
, and
chown()
. However,
they will only work if PHP already has permis-
sion to modify the file or directory in question.
A website running on a shared hosting
environment has greater security risks than
one running on a dedicated server because
there are literally more users. For example,
if you make a file or directory writable by
every user, then anyone with access to that
server can manipulate that file (assuming they
know it exists and that other restrictions are
not in place).

ptg18144795
Files and Directories 303
Writing to Files
Because you need to write something to
a file in order to read something from it,
this chapter explores writing first. The
easiest way to write to a file is to use
the
file_put_contents()
function:
file_put_contents($file, $data);
This function will open the file and write
the data there. The first argument is the
name of the file. This can be an
absolute
or
relative
path (see the sidebar “File
Paths”). The second argument is the data,
which can be a string, number, or array
(one-dimensional, not multidimensional).
Neither the file nor the data has to be
represented by a variable, but it’s common
to do so.
If the file doesn’t exist, the function will
attempt to create it. If the file does exist,
the file’s current contents will be replaced
with the new data. If you’d prefer to have
the new data appended to what’s already
in the file, add the
FILE_APPEND
constant
as a third argument:
file_put_contents($file, $data,
➝
FILE_APPEND);
continues on next page
File Paths
There are two ways of referring to any
file or directory on the computer: using
an
absolute
or
relative
path. An absolute
path begins at the root of the computer:
.
C:\somedir\somefile.txt
(Windows)
.
/Users/username/somefile.txt
(Mac OS X)
A relative path will not start with the
root of the computer—
C:\
or
/
. Instead,
it will be relative to the current working
directory:
.
fileA.txt
(in the same directory)
.
./fileA.txt
(in the same directory)
.
dirB/fileB.txt
(inside
dirB
)
.
../fileC.txt
(inside the parent
directory)
.
../dirD/fileD.txt
(inside the
parallel directory)
Two periods together represent the
current directory’s parent folder. A single
period by itself represents the current
directory. If a
file’s name
begins with a
single period, the file is hidden (on Unix,
Linux, and Mac OS X).
It technically doesn’t matter whether you
use a relative or an absolute path to
refer to a file, as long as the reference is
accurate. An absolute path is easier for
beginners to understand but will only be
correct for that computer. A relative path
can confound those new to the concept,
but can continue to be correct even after
moving the site from one server to another.

ptg18144795
304 Chapter 11
When appending data to a file, you normally
want each piece of data to be written on
its own line, so each submission should
conclude with the appropriate line break
for the operating system of the computer
running PHP. This would be
n
\n
on Unix and Mac OS X
n
\r\n
on Windows
As with any meaningful escape sequence,
these must be placed within double quota-
tion marks in order to work.
Alternatively, you can use the special
PHP constant
PHP_EOL
, which represents
the correct end-of-line character sequence
(e.g.,
\n
or
\r\n
) for the current operating
system:
file_put_contents($file,
➝
$data . PHP_EOL, FILE_APPEND);
With this in mind, let’s create a form that
stores user-submitted quotations in a plain-
text file A. Later in this chapter, another
PHP script will retrieve and randomly display
these quotations. Before you get into the
code, however, there’s one more function
to be introduced:
is_writable()
. This
function returns a Boolean value indicating
the writability of the named file:
if (is_writable($file)) {...
Invoking this function prior to attempting to
write to a file (or directory) is a simple way
to avoid permissions errors.
A This very simple form lets a user submit a
quotation that will be written to a text file.

ptg18144795
Files and Directories 305
Legacy File Writing
Although you won’t see examples in this
book, you should also be familiar with the
legacy approach to writing to files. First, open
the file; second, write your data to it; and
third, close the file:
$fp = fopen($file, mode);
fwrite($fp, $data . PHP_EOL);
fclose($fp);
To write to a file using this legacy approach,
you must create a file pointer when opening
it. The file pointer returned by the
fopen()
function will be used by PHP to refer to the
open file.
The most important consideration when open-
ing the file is what mode you use. Depending
on what you intend to do with the file, the
mode dictates how to open it. The most
forgiving mode is
a+
, which allows you to
read or write to a file. It creates the file if it
doesn’t exist, and it appends—hence
a
—new
data to the end of the file automatically.
Conversely,
r
only allows you to read from
a file. Table 11.1 lists all the possible modes.
Each mode can also be appended with a
b
flag, which forces files to be opened in binary
mode. This is a safer option for files that might
be read on multiple operating systems.
The modes that attempt to create the file if it doesn’t exist can only do so if the PHP script has
permission to create a file in the destination directory.
The
fwrite()
function writes the new data (sent as the second argument in the function call) to
the file in accordance with the selected mode.
As the last step of the writing process, you close the file by once again referring to the file
pointer while calling the
fclose()
function:
fclose($fp);
TABLE 11.1 fopen() Modes
Mode Meaning
r
Reading only; begin reading at the
start of the file.
r+
Reading or writing; begin at the start
of the file.
w
Writing only; create the file if it
doesn’t exist, and overwrite any
existing contents.
w+
Reading or writing; create the file if
it doesn’t exist, and overwrite any
existing contents (when writing).
a
Writing only; create the file if it doesn’t
exist, and append the new data to the
end of the file (retain any existing data
and add to it).
a+
Reading or writing; create the file if it
doesn’t exist, and append the new data
to the end of the file (when writing).
x
Writing only; create the file if it doesn’t
exist, but do nothing (and issue a
warning) if the file does exist.
x+
Reading or writing; create the file if
it doesn’t exist, but do nothing (and
issue a warning) if the file already
exists (when writing).

ptg18144795
306 Chapter 11
To write to an external file:
1. Create a new PHP document in
your text editor or IDE, to be named
add_quote.php
(Script 11.1):
<!doctype html>
<html lang="en">
<head>
<meta charset="utf-8">
<title>Add A Quotation</title>
</head>
<body>
2. Create a section of PHP code, and iden-
tify the file to be used:
<?php // Script 11.1 -
➝
add_quote.php
$file = '../quotes.txt';
This script will reference the same file
twice, so it’s a good idea to identify the
file as a variable. This way, should you
later need to change the name or loca-
tion of the file, only one line of code will
need to be edited.
The file identified is
quotes.txt
, which
should be located in the directory
above this script (which is presumably
in the web directory root; see B in the
previous section, “File Permissions,”
of this chapter). See the sidebar “File
Paths” for more on this syntax.
3. Check if the form has been submitted:
if ($_SERVER['REQUEST_METHOD'] ==
➝
'POST') {
This page both displays and handles the
HTML form. The conditional tests if the
form has been submitted, in which case
the quotation should be written to the
text file.
4. Check that a quotation was entered:
if ( !empty($_POST['quote']) &&
➝
($_POST['quote'] != 'Enter your
quotation here.') ) {
Script 11.1 This script takes a user-submitted
quotation and stores it in a text file.
1 <!doctype html>
2 <html lang="en">
3 <head>
4 <meta charset="utf-8">
5 <title>Add A Quotation</title>
6 </head>
7 <body>
8 <?php // Script 11.1 - add_quote.php
9 /* This script displays and handles an
HTML form. This script takes text input
and stores it in a text file. */
10
11 // Identify the file to use:
12 $file = '../quotes.txt';
13
14 // Check for a form submission:
15 if ($_SERVER['REQUEST_METHOD'] ==
'POST') { // Handle the form.
16
17 if ( !empty($_POST['quote']) &&
($_POST['quote'] != 'Enter your
quotation here.') ) { // Need
something to write.
18
19 if (is_writable($file)) {
// Confirm that the file is
writable.
20
21 file_put_contents($file,
$_POST['quote'] . PHP_EOL,
FILE_APPEND); // Write the
data.
22
23 // Print a message:
24 print '<p>Your quotation has
been stored.</p>';
25
26 } else { // Could not open the
file.
27 print '<p style="color:
red;">Your quotation could
not be stored due to a system
error.</p>';
28 }
29
code continues on next page

ptg18144795
Files and Directories 307
This simple conditional validates
the user-supplied data. The first part
confirms that the
$_POST['quote']
variable isn’t empty. The second part
confirms that the variable doesn’t still
have the default value (as shown in A).
5. Confirm that the file can be written to:
if (is_writable($file)) {
By placing this function call in a condi-
tional, you make the PHP script attempt
to write to the file only if the file is
writable.
6. Write the data to the file, and then print
a message:
file_put_contents($file,
➝
$_POST['quote'] . PHP_EOL,
➝
FILE_APPEND);
print '<p>Your quotation has been
➝
stored.</p>';
The first line writes the user-submitted
data to the file. The
PHP_EOL
constant
is concatenated to the written data, so
that each submission gets stored on its
own line.
7. Complete the conditionals:
} else { // Could not open
➝
the file.
print '<p style="color:
➝
red;">Your quotation
➝
could not be stored
➝
due to a system error.
➝
</p>';
}
} else { // Failed to enter
➝
a quotation.
print '<p style="color:
➝
red;">Please enter a
➝
quotation!</p>';
}
} // End of submitted IF.
continues on next page
Script 11.1 continued
30 } else { // Failed to enter a
quotation.
31 print '<p style="color:
red;">Please enter a quotation!
</p>';
32 }
33
34 } // End of submitted IF.
35
36 // Leave PHP and display the form:
37 ?>
38 <form action="add_quote.php"
method="post">
39 <textarea name="quote" rows="5"
cols="30">Enter your quotation
here.</textarea><br>
40 <input type="submit" name="submit"
value="Add This Quote!">
41 </form>
42
43 </body>
44 </html>
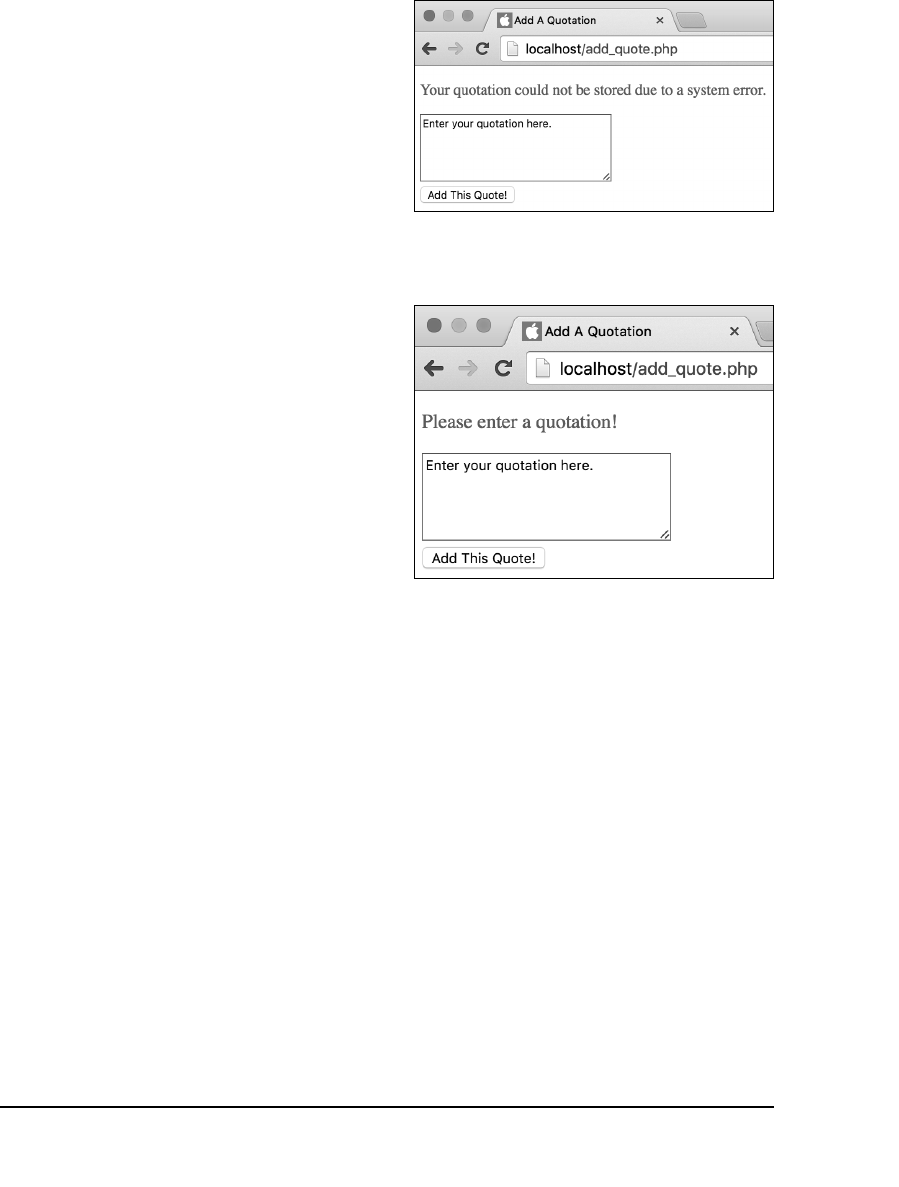
ptg18144795
308 Chapter 11
The first
else
completes the conditional
that checks if PHP could open the file
for writing B. If you see this message,
there’s likely a permissions issue or the
file reference is incorrect. The second
else
completes the conditional that
checks whether no quotation was
entered C. The final closing brace
marks the end of the main submission
conditional.
If you’d rather, you can replace the
inline CSS with an actual CSS class
declaration.
Because this page handles the form
and then displays it again (so that the
user may keep entering quotations),
the form isn’t displayed as part of an
else
statement as it has been in other
examples in this book.
8. Complete the PHP section:
?>
Because the rest of this script is stan-
dard HTML, exit out of the PHP code by
closing the PHP tag.
9. Create the HTML form:
<form action="add_quote.php"
method="post">
<textarea name="quote" rows="5"
➝
cols="30">Enter your
➝
quotation here.</textarea>
➝
<br>
<input type="submit"
➝
name="submit" value="Add This
➝
Quote!">
</form>
This HTML form presents a text box
where the user can enter a quotation.
The text box has a preset value of
Enter
your quotation here.
, created by putting
that text between the
textarea
tags.
B If the PHP script can’t find the
quotes.txt
file, or if it’s not writable, the user will see this
message.
C The script includes basic form validation.
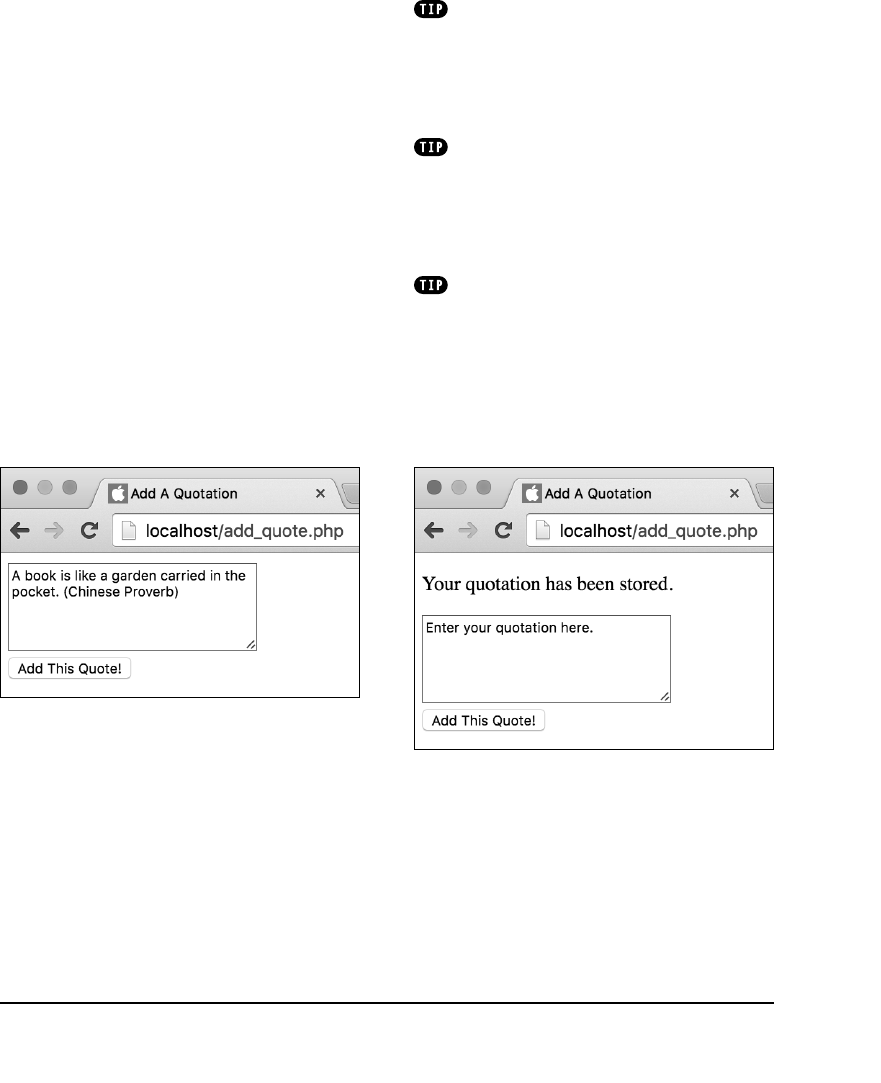
ptg18144795
Files and Directories 309
10. Complete the HTML page:
</body>
</html>
11. Save the file as
add_quote.php
, and
place it in the proper directory for your
PHP-enabled server.
Again, refer back to B in the previ-
ous section, “File Permissions,” of this
chapter for how
add_quote.php
and
quotes.txt
should be placed on your
server relative to each other. If this
arrangement isn’t possible for you,
or if it’s just too confusing, then place
both documents within the same
directory (the one from which you can
execute PHP scripts), and change the
$file
assignment line to
$file = 'quotes.txt';
12. Run the script several times in your
browser D and E.
D Filling out the form…
13. If you want, open the
quotes.txt
file in
a text editor to confirm that the data has
been written to it.
Note that all of the file- and directory-
related functions are usable only on files and
directories on the same computer (i.e., server)
on which PHP is running. A PHP script on a
server has no access to a file on a client’s com-
puter (until the file is uploaded to the server).
If you receive a permissions error when
you run this script B, either the permissions
aren’t set properly or the PHP script couldn’t
access the data file. The latter can happen if
you misspell the filename or incorrectly refer-
ence the file’s path on the server.
If your version of PHP is running in safe
mode or has the
open_basedir
directive set,
you may be limited in using PHP to access
files and directories. Check your
phpinfo()
script to see these settings for your server.
E …and the result if all went well.

ptg18144795
310 Chapter 11
Locking Files
Although the last example worked fine
(hopefully), it could be improved on. If only
a single user were submitting the form at
one time, there would be no problems.
But what if two or more users submitted
different quotations simultaneously? In
such a case, there could be problems
when multiple instances of the PHP script
attempt to write to the same text file at
once. The file could become corrupted.
When there’s a risk of multiple scripts
writing to the same file at once, the solu-
tion is to temporarily
lock
the file while
PHP is writing to it. To do that, add the
LOCK_EX
constant as the third argument
to
file_put_contents()
:
file_put_contents($file, $data,
➝
LOCK_EX);
To use both the
LOCK_EX
and
FILE_APPEND
constants, separate them with the
bitwise
OR operator (
|
):
file_put_contents($file, $data,
➝
FILE_APPEND | LOCK_EX);
It doesn’t matter in which order you pro-
vide the two constants (see the sidebar
“Bitwise Operators”).
The different lock types are represented
by the constants listed in Table 11.2.
A shared lock,
LOCK_SH
, is for reading from
a file, which means it’s okay if multiple
files use the file at the same time (all with
shared locks). Conversely, the exclusive
lock,
LOCK_EX
, means only the locking file
should have access.
The
LOCK_UN
constant is for releasing any
type of lock. It’s provided to the
flock()
function, not used in this chapter (see the
PHP manual for more information).
TABLE 11.2 flock() Lock Types
Lock Meaning
LOCK_SH
Shared lock for reading purposes
LOCK_EX
Exclusive lock for writing
purposes
LOCK_UN
Release of a lock
LOCK_NB
Nonblocking lock
Bitwise Operators
A lesser-known but often useful set of
operators are the bitwise operators.
Beginners will most likely use them in
situations where constants are passed as
arguments, as in the file locking example.
Bitwise operators work with
bits
—the
smallest data type, also referred to as
binary digits
. The operators look and
function like the standard ones: bitwise
&
instead of
&&
, bitwise
|
instead of
||
.
Bitwise operators are often used with
constants like
LOCK_EX
and
FILE_APPEND
because each constant represents a
numeric value. The numeric value in turn
is a type of flag indicating what’s allowed.
The code
FILE_APPEND
|
LOCK_EX
therefore says to apply whatever flags
are represented by the
FILE_APPEND
or
the
LOCK_EX
constants.
Note that you should unlock the
file once the script is done with it,
although PHP will kindly unlock it for
you should you forget.
To demonstrate, let’s update
add_quote.php
to lock the file during
the writing process.
ptg18144795
Files and Directories 311
The
LOCK_NB
constant can be added to
LOCK_SH
or
LOCK_EX
using the bitwise OR.
In normal situations, without using
LOCK_NB
,
PHP will wait until it can lock the file; the
script is blocked from proceeding until it
can execute that lock. With
LOCK_NB
, the
PHP script will just continue executing if no
lock could be obtained.
To use file locks:
1. Open
add_quote.php
(Script 11.1) in your
text editor or IDE, if it isn’t already open.
2. Change the
file_put_contents()
line
to the following (Script 11.2):
file_put_contents($file,
➝
$_POST['quote'] . PHP_EOL,
➝
FILE_APPEND | LOCK_EX);
This command places an exclusive lock
on the file so that other scripts can’t
write to it at the same time.
continues on next page
Script 11.2 The modified version of the
add_quote.php
script locks the data file for
better security and reliability.
1 <!doctype html>
2 <html lang="en">
3 <head>
4 <meta charset="utf-8">
5 <title>Add A Quotation</title>
6 </head>
7 <body>
8 <?php // Script 11.2 - add_quote.php
9 /* This script displays and handles an
HTML form. This script takes text input
and stores it in a text file. */
10
11 // Identify the file to use:
12 $file = '../quotes.txt';
13
14 // Check for a form submission:
15 if ($_SERVER['REQUEST_METHOD'] ==
'POST') { // Handle the form.
16
17 if ( !empty($_POST['quote']) &&
($_POST['quote'] != 'Enter your
quotation here.') ) { // Need
something to write.
18
19 if (is_writable($file)) { //
Confirm that the file is writable.
20
21 file_put_contents($file,
$_POST['quote'] . PHP_EOL,
FILE_APPEND | LOCK_EX); //
Write the data.
22
23 // Print a message:
24 print '<p>Your quotation has
been stored.</p>';
25
26 } else { // Could not open the
file.
27 print '<p style="color:
red;">Your quotation could
not be stored due to a system
error.</p>';
28 }
29
code continues on next page
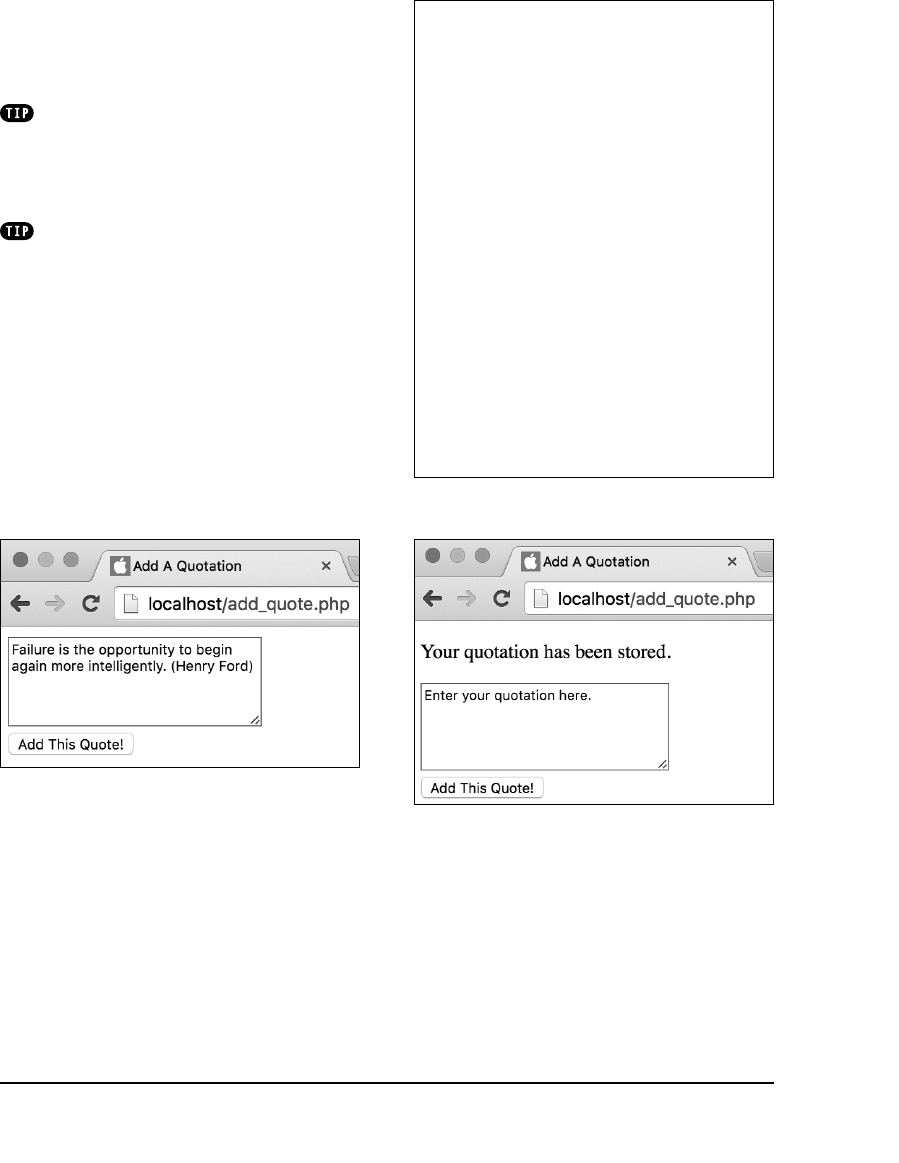
ptg18144795
312 Chapter 11
3. Save the file, place it in the proper
directory for your PHP-enabled server,
and test it again in your browser A
and B.
Technically, if a file is opened in an
appending mode, as in this example, not lock-
ing it probably won’t be a problem even if
multiple scripts are writing to the file simulta-
neously. That said, better safe than sorry!
For file locking to be reliable, every script
that writes to a file needs to use locking.
Script 11.2 continued
30 } else { // Failed to enter a
quotation.
31 print '<p style="color:
red;">Please enter a quotation!</
p>';
32 }
33
34 } // End of submitted IF.
35
36 // Leave PHP and display the form:
37 ?>
38
39 <form action="add_quote.php"
method="post">
40 <textarea name="quote" rows="5"
cols="30">Enter your quotation
here.</textarea><br>
41 <input type="submit" name="submit"
value="Add This Quote!">
42 </form>
43
44 </body>
45 </html>
A Using the form once again…
B …the quotation is still stored without a problem.

ptg18144795
Files and Directories 313
Reading from Files
Now that you’ve created a script that
writes data to a file, it’s time to create one
that can read the information. There are a
number of ways to read from a file; which
approach you take depends on what your
needs are. To read an entire file in as one
string, use
file_get_contents()
:
$data = file_get_contents($file);
Alternatively, if the file has some data on
each line, as is the case with
quotes.txt
,
you’re better off using the
file()
function:
$data = file($file);
The
file()
function is a valuable built-in
tool in PHP. It reads everything from a file
and, unlike
file_get_contents()
, returns
that information as an array. Each array
element contains one line from the file,
where each line is terminated by a newline
(
\n
or
\r\n
).
If the document represented by
$file
contains two lines of information, each of
which ends with a newline, the correspond-
ing array will contain two elements. The
first element will be equal to the first line
of
$file
, and the second element will be
equal to the second line. Once the data is
stored into an array, you can easily manipu-
late or print it, as you learned in Chapter 7,
“Using Arrays.”
Next, let’s use this knowledge to create
a script that randomly displays one of the
stored quotations.

ptg18144795
314 Chapter 11
To read from a file:
1. Create a new PHP document in
your text editor or IDE, to be named
view_quote.php
(Script 11.3):
<!doctype html>
<html lang="en">
<head>
<meta charset="utf-8">
<title>View A Quotation</title>
</head>
<body>
<h1>Random Quotation</h1>
2. Open a PHP code section:
<?php // Script 11.3 -
➝
view_quote.php
3. Read the file contents, and store them
in an array:
$data = file('../quotes.txt');
The function reads the file data into an
array named
$data
. Each element of
$data
is a string, which is the submitted
quotation.
If the
quotes.txt
file is not in the
parent directory of this script, change
the reference here accordingly.
4. Pick a random number based on the
number of elements in
$data
:
$n = count($data);
$rand = rand(0, ($n - 1));
The first line counts how many ele-
ments (which is to say, how many
quotations) are in the
$data
array. Then
the
rand()
function selects a random
number. In order for
rand()
to pick
an appropriate number, a little logic is
required.
Script 11.3 The
view_quote.php
file retrieves all
the quotations from the text file and displays one
at random.
1 <!doctype html>
2 <html lang="en">
3 <head>
4 <meta charset="utf-8">
5 <title>View A Quotation</title>
6 </head>
7 <body>
8 <h1>Random Quotation</h1>
9 <?php // Script 11.3 - view_quote.php
10 /* This script displays and handles an
HTML form. This script reads in a file
and prints a random line from it. */
11
12 // Read the file's contents into an
array:
13 $data = file('../quotes.txt');
14
15 // Count the number of items in the
array:
16 $n = count($data);
17
18 // Pick a random item:
19 $rand = rand(0, ($n - 1));
20
21 // Print the quotation:
22 print '<p>' . trim($data[$rand]) .
'</p>';
23
24 ?>
25 </body>
26 </html>

ptg18144795
Files and Directories 315
If
$data
has 10 elements, they’re
indexed between 0 and 9, so that’s the
range to use for
rand()
. Therefore, to
calculate the range for a variable number
of lines in the text file, use 0 and 1 less
than the number of elements in
$data
.
5. Print out the quotation:
print '<p>' . trim($data
➝
[$rand]) . '</p>';
A simple
print
statement involving
concatenation is used to print the random
quotation. To retrieve the quotation, you
refer to the
$data
array and use the
generated
$rand
number as the index.
The retrieved quotation is then trimmed
to cut off the newline characters from
the end of the quotation.
6. Complete the PHP code and the HTML
page:
?>
</body>
</html>
7. Save the file as
view_quote.php
, place
it on your web server (in the same
directory as
add_quote.php
), and test it
in your browser A.
8. Reload the page in your browser to
view another random quote B.
If you want to be extra careful, you can
use the
is_readable()
function to test that
PHP can read a file before you call the
file()
function (although it’s rare that a file isn’t
readable).
The
readfile()
function reads through
a file and immediately sends the contents to the
output buffer. This means that with output
buffering enabled, the file’s contents get added
to the buffer. With output buffering disabled,
the file’s contents go straight to the browser.
Later in this chapter, you’ll learn a
more complex method of reading a file using
fgets()
and
fgetcsv()
.
A A random quotation is displayed each time the
page is viewed.
B Subsequent viewings of the
view_quote.php
script display different quotations from the text file.
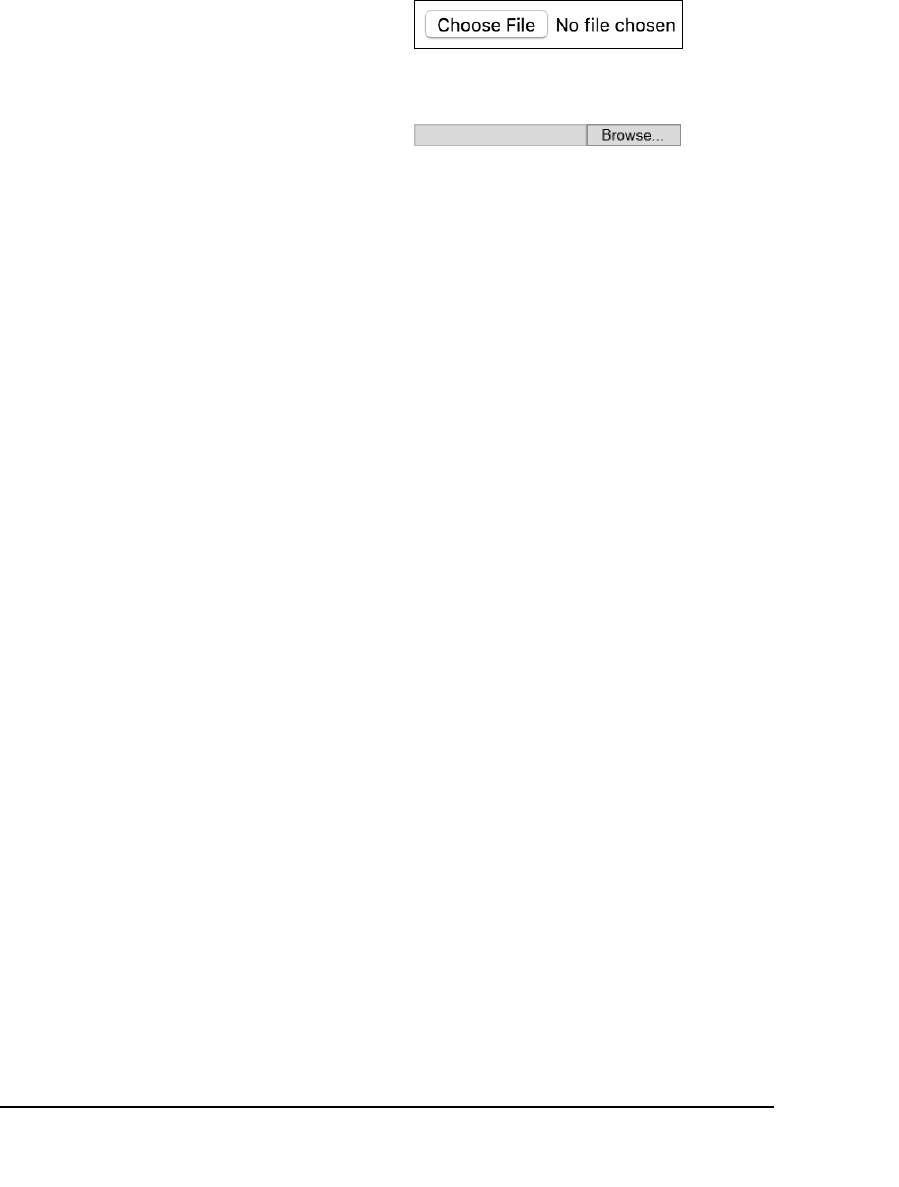
ptg18144795
316 Chapter 11
Handling File Uploads
As this book has demonstrated, handling
HTML forms using PHP is a remarkably
easy achievement. Regardless of the data
being submitted, PHP can handle it easily
and directly. The same is true when the
user uploads a file via an HTML form.
To give the user the option of upload-
ing a file, you must make three changes
to the standard HTML form. First, the
initial
form
tag must include the code
enctype="multipart/form-data"
, which
lets the browser know to expect different
types of form data:
<form action="script.php"
➝
enctype="multipart/form-data"
➝
method="post">
The form must also always use the POST
method.
Second, a special hidden input type should
be added to the form:
<input type="hidden" name=
➝
"MAX_FILE_SIZE" value="30000">
This tells the browser how large a file, in
bytes, can be uploaded.
Third, the file input is used to create the
necessary form field A and B:
<input type="file" name="picture">
The file type of form input allows users to
select a file on their computer, which, upon
submission, will be uploaded to the server.
Note that the file input should be placed
after the
MAX_FILE_SIZE
hidden input.
A This is how Chrome interprets the
file input type (prior to selecting a file).
B This is how Internet Explorer
interprets the file input type.

ptg18144795
Files and Directories 317
Once you’ve configured the HTML form
and the user has submitted a file through
it, you can then use PHP to handle the file.
In the PHP script, you refer to the
$_FILES
variable (think of it as the file equivalent of
$_POST
) to reference the uploaded file. The
$_FILES
array contains five elements:
n
name
, the name of the file as it was on
the user’s computer
n
type
, the MIME type of the file (for
example,
image/jpg
)
n
size
, the size of the file in bytes
n
tmp_name
, the temporary name of the
file as it’s stored on the server
n
error
, an error code if something
goes wrong (Table 11.3; note that, as
strange as this may seem, there is no
error code 5).
When a file is uploaded, the server first
places it in a temporary directory. You should
then use the
move_uploaded_file()
func-
tion to move the file to its final destination:
move_uploaded_file($_FILES
➝
['picture']['tmp_name'],
➝
'/path/to/dest/filename');
The first argument is the temporary
name of the file on the server, found in
$_FILES['input_name']['tmp_name']
.
The second argument is the full path and
name of the destination.
continues on next page
TABLE 11.3 FILE Error Codes
Code Meaning
0 No error has occurred.
1 The file exceeds the
upload_max_filesize
setting
in
php.ini
.
2 The file exceeds the
MAX_FILE_SIZE
setting in the HTML form.
3 The file was only partially uploaded.
4 No file was uploaded.
6 No temporary directory exists.
7 Failed write to disk.
8 Upload prevented by an extension.

ptg18144795
318 Chapter 11
For PHP to be able to take these steps,
you must set several configurations in the
php.ini
file (see the “Configuring PHP for
File Uploads” sidebar), and the web server
needs write access to both the temporary
and the final destination directories. (PHP
should have write access to the temporary
directory by default.)
Next, you’ll write a basic script that uploads
a file and stores it on the server. Like
the
add_quote.php
script, this example
also both creates the HTML form C and
processes it, all in one page. First, though,
you’ll create a writable directory as the
destination point.
To create a writable directory:
1. Create a new folder named
uploads
,
located outside the web directory
root D.
2. Using the steps outlined in the first sec-
tion of this chapter, “File Permissions,”
set the permissions so that everyone
can write to, read from, and search
(
0777
in Unix terms) the directory.
C This HTML form lets users select a file on their
computer to upload to the server.
D For this example, a writable
uploads
directory must exist. Here, it’s placed in the
same directory as the web root folder. Thus,
uploads
is in the directory above the one in
which the
upload_file.php
script resides and
is not accessible via HTTP.
Configuring PHP for File Uploads
In order for file uploading to work, a number of settings in your
php.ini
configuration file must be
set. These may or may not be enabled in your configuration, so you should check them by viewing
the
php.ini
file or running a
phpinfo()
script.
For starters,
file_uploads
must be on. Second, the
upload_tmp_dir
value must be set to a
directory on the server where PHP can place files (in other words, it must exist and be modifiable
by the web server). If this setting has no value, that’s probably fine (meaning that a hidden directory
created expressly for purposes such as these will be used).
The
upload_max_filesize
and
post_max_size
settings dictate how large a file can be sent,
such as 512 KB or 2 MB. Whereas the
MAX_FILE_SIZE
hidden form input is a recommendation to
the browser, these two settings control whether the file is uploaded.
Finally, if really large files—many megabytes or larger—will be uploaded, you may need to increase
the
memory_limit
and
max_execution_time
settings to give PHP the time and the resources to
do what it needs to do.
ptg18144795
Files and Directories 319
Again, if you’re running Windows you
likely don’t need to do anything (try the
next script to see for sure). If you’re run-
ning another operating system, check
the list of bullet points in the first section
of the chapter for the suggestion that
works for your situation.
To use PHP for file uploads:
1. Create a new PHP document in
your text editor or IDE, to be named
upload_file.php
(Script 11.4):
<!doctype html>
<html lang="en">
<head>
<meta charset="utf-8">
<title>Upload a File</title>
</head>
<body>
Script 11.4 This script handles a file upload by first defining the proper HTML form and, second, invoking
move_uploaded_file()
to move the file to the desired location.
1 <!doctype html>
2 <html lang="en">
3 <head>
4 <meta charset="utf-8">
5 <title>Upload a File</title>
6 </head>
7 <body>
8 <?php // Script 11.4 - upload_file.php
9 /* This script displays and handles an HTML form. This script takes a file upload and stores
it on the server. */
10
11 if ($_SERVER['REQUEST_METHOD'] == 'POST') { // Handle the form.
12
13 // Try to move the uploaded file:
14 if (move_uploaded_file ($_FILES['the_file']['tmp_name'], "../uploads/{$_FILES['the_
file']['name']}")) {
15
code continues on next page
2. Create a section of PHP code:
<?php // Script 11.4 -
➝
upload_file.php
3. Check whether the form has been
submitted:
if ($_SERVER['REQUEST_METHOD'] ==
➝
'POST') {
Once again, this script both displays
and handles the HTML form. If it has
been submitted, the uploaded file
should be addressed.
continues on page 321
ptg18144795
320 Chapter 11
Script 11.4 continued
16 print '<p>Your file has been uploaded.</p>';
17
18 } else { // Problem!
19
20 print '<p style="color: red;">Your file could not be uploaded because: ';
21
22 // Print a message based upon the error:
23 switch ($_FILES['the_file']['error']) {
24 case 1:
25 print 'The file exceeds the upload_max_filesize setting in php.ini';
26 break;
27 case 2:
28 print 'The file exceeds the MAX_FILE_SIZE setting in the HTML form';
29 break;
30 case 3:
31 print 'The file was only partially uploaded';
32 break;
33 case 4:
34 print 'No file was uploaded';
35 break;
36 case 6:
37 print 'The temporary folder does not exist.';
38 break;
39 default:
40 print 'Something unforeseen happened.';
41 break;
42 }
43
44 print '.</p>'; // Complete the paragraph.
45
46 } // End of move_uploaded_file() IF.
47
48 } // End of submission IF.
49
50 // Leave PHP and display the form:
51 ?>
52
53 <form action="upload_file.php" enctype="multipart/form-data" method="post">
54 <p>Upload a file using this form:</p>
55 <input type="hidden" name="MAX_FILE_SIZE" value="300000">
56 <p><input type="file" name="the_file"></p>
57 <p><input type="submit" name="submit" value="Upload This File"></p>
58 </form>
59
60 </body>
61 </html>

ptg18144795
Files and Directories 321
4. Attempt to move the uploaded file to its
final destination:
if (move_uploaded_file
➝
($_FILES['the_file']
➝
['tmp_name'], "../uploads/
➝
{$_FILES['the_file']
➝
['name']}")) {
The
move_uploaded_file()
function
attempts to move the uploaded file
(identified by
$_FILES['the_file']
['tmp_name']
) to its new location (
../
uploads/{$_FILES['the_file']
['name']
). The location is the
uploads
directory, which is in the folder above
the one this script is in. The file’s name
will be the same as it was on the user’s
computer.
Placing this function as a condition in an
if
statement makes it easy to respond
based on whether the move worked.
Note that there is an implicit trust here
that the user is uploading a file that’s
safe for you to put onto your server
retaining the same name. See the tips
for suggestions on how to make this
process more secure.
5. Print messages indicating the success
of the operation:
print '<p>Your file has been
➝
uploaded.</p>';
} else { // Problem!
print '<p style="color: red;">
➝
Your file could not be
➝
uploaded because: ';
The first
print
statement is executed if
the move worked E. The
else
applies
if it didn’t work, in which case an error
message is begun. This message will
be made more explicit in Step 6.
continues on next page
E If the file was uploaded and moved successfully,
a message is printed and the form is displayed
again.
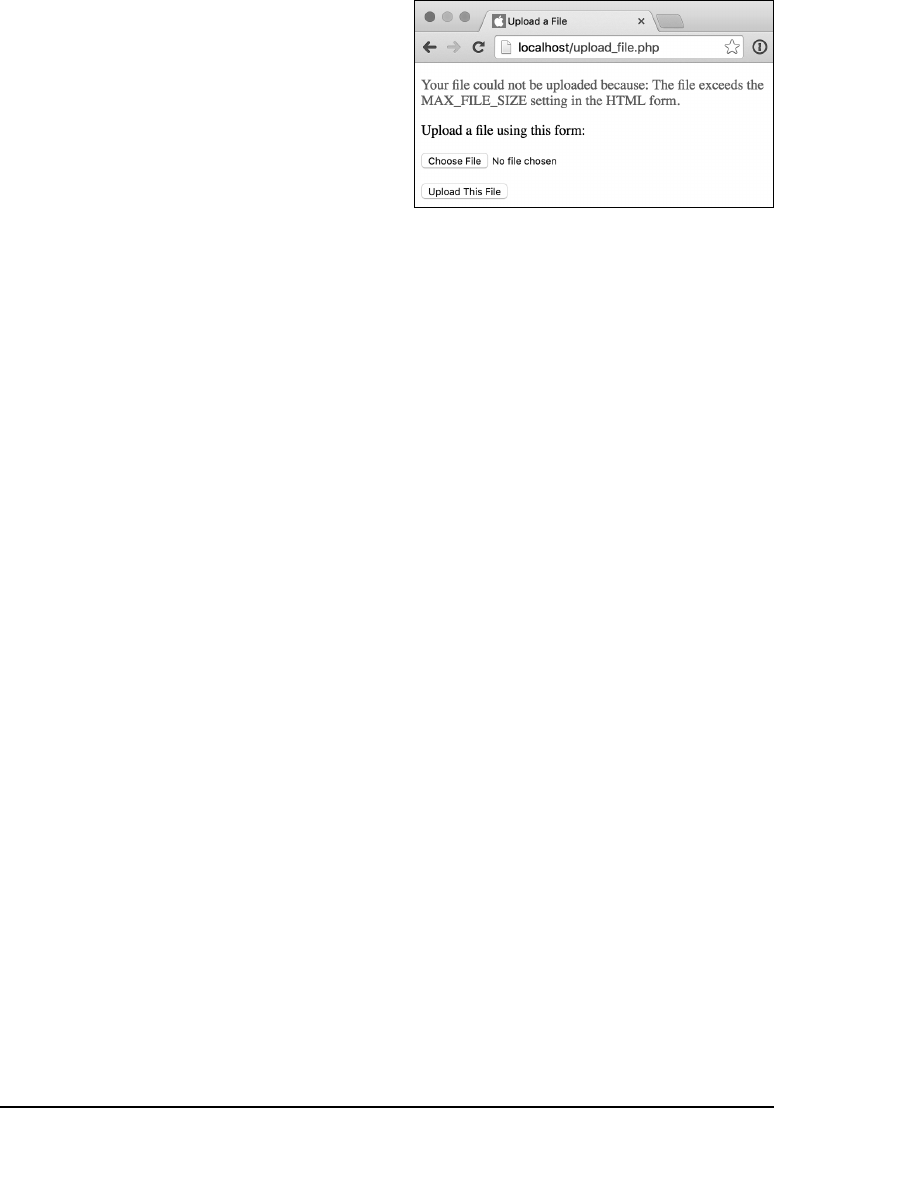
ptg18144795
322 Chapter 11
6. Print out the error message if the move
didn’t work:
switch ($_FILES['the_file']
['error']) {
case 1:
print 'The file exceeds the
➝
upload_max_filesize setting
➝
in php.ini';
break;
case 2:
print 'The file exceeds the
➝
MAX_FILE_SIZE setting in
➝
the HTML form';
break;
case 3:
print 'The file was only
➝
partially uploaded';
break;
case 4:
print 'No file was uploaded';
break;
case 6:
print 'The temporary folder
➝
does not exist.';
break;
default:
print 'Something unforeseen
➝
happened.';
break;
}
If a move doesn’t work, the
$_FILES['the_file']['error']
variable contains a number indicating
the appropriate error message. When
you use this in a
switch
conditional, the
PHP script can print out the appropriate
error message F.
You wouldn’t normally place code like
this in a public site—it’s a little too much
information—but it’s exceptionally good
for helping you debug a problem.
F If a problem occurred, the script indicates the
cause.

ptg18144795
Files and Directories 323
7. Complete the error message, and close
both conditionals:
print '.</p>'; // Complete
➝
the paragraph.
} // End of move_uploaded_
➝
file() IF.
} // End of submission IF.
8. Exit out of PHP, and create the
HTML form:
?>
<form action="upload_file.php"
enctype="multipart/form-data"
method="post">
<p>Upload a file using this
➝
form:</p>
<input type="hidden"
➝
name="MAX_FILE_SIZE"
➝
value="300000">
<p><input type="file"
➝
name="the_file"></p>
<p><input type="submit"
➝
name="submit" value="Upload
➝
This File"></p>
</form>
The HTML form is simple, containing
only two visible elements: a file input
type and a submit button. It differs from
other HTML forms in this book in that
it uses the
enctype
attribute and a
MAX_FILE_SIZE
hidden input type.
Be careful when giving your file input a
name, because this value must exactly
match the index used in the
$_FILES
variable. Here, you use a generic
the_file
.
9. Complete the HTML page:
</body>
</html>
continues on next page

ptg18144795
324 Chapter 11
10. Save the page as
upload_file.php
,
place it in the proper directory for your
PHP-enabled server relative to the
uploads
directory D, and test it in your
browser G.
Only files smaller than about 300 KB
should be allowed, thanks to the
MAX_FILE_SIZE
restriction.
11. Inspect the
uploads
directory to ensure
that the file was placed there.
If the file couldn’t be moved and a
permissions denied error is shown, check
the permissions on the
uploads
directory.
Then check that the path to the directory used
in the script is correct and that there are no
spelling errors.
As you might discover, files uploaded
through the browser are owned—in terms of
permissions—by the web server application,
which put them there.
From a security standpoint, it’s better
to rename an uploaded file. To do so, you’ll
need to devise a system that generates a new,
unique filename and stores both the original
and new filenames in a text file or a database.
A script can handle multiple file uploads
as long as they have different names. In such
a case, you need only one
MAX_FILE_SIZE
hidden input. In the PHP script, you’d
apply the
move_uploaded_file()
function to
$_FILES['filename1']
,
$_FILES['filename2']
, and so on.
You can limit a file upload to a specific
size or type by referencing the appropriate
index (for example,
$_FILES['the_file']
['size']
) in your PHP script (after the file
has been uploaded).
Use
unlink()
to delete a file without
moving or copying it.
You can use the
copy()
function to
make a copy of a file on the server.
G Select a file on your computer to upload.
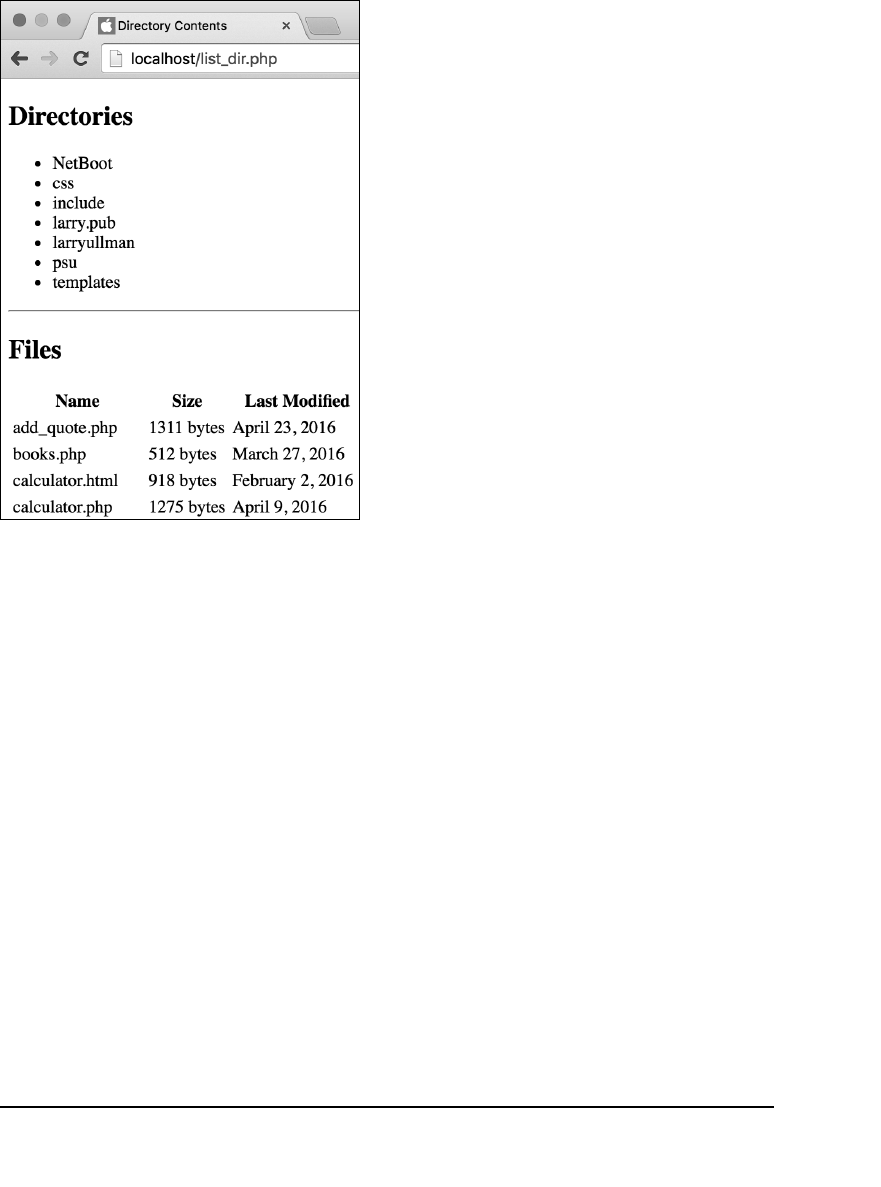
ptg18144795
Files and Directories 325
Navigating Directories
The previous PHP scripts work with files,
but you can also do many things with
directories using PHP. In this example,
you’ll write a script that lists a directory’s
contents, but first you’ll need to under-
stand the usage and syntax of many of the
functions you’ll use.
To find all the contents of a directory,
the easiest option is to use the
scandir()
function:
$stuff = scandir($dir);
This function returns an array of every
item—directory or file—found within the
given directory. As with the file-related
functions, the value of
$dir
can be a rela-
tive or an absolute path to the directory
in question.
This next example uses
scandir()
, but
let’s look at a couple more functions first.
You’ll use the
filesize()
function in this
example; it determines how large a file is
in bytes. This value can be assigned to a
variable or be printed:
$size = filesize($file);
Similarly, the
filemtime()
function
retrieves the modification time of a file. It
returns a timestamp, which can be format-
ted using the
date()
function.
Finally, PHP includes several functions
that identify attributes. This chapter has
already mentioned
is_writable()
and
is_readable()
, but there are also
is_dir()
and
is_file()
. They return
TRUE if the item in question is a directory
or a file, respectively.
You’ll put all of these capabilities together
into one page, which will constitute a
web-based control panel for viewing a
directory’s contents A.
A The
list_dir.php
script shows the contents of
a directory. The top part lists the subfolders, and
the bottom table lists the files.
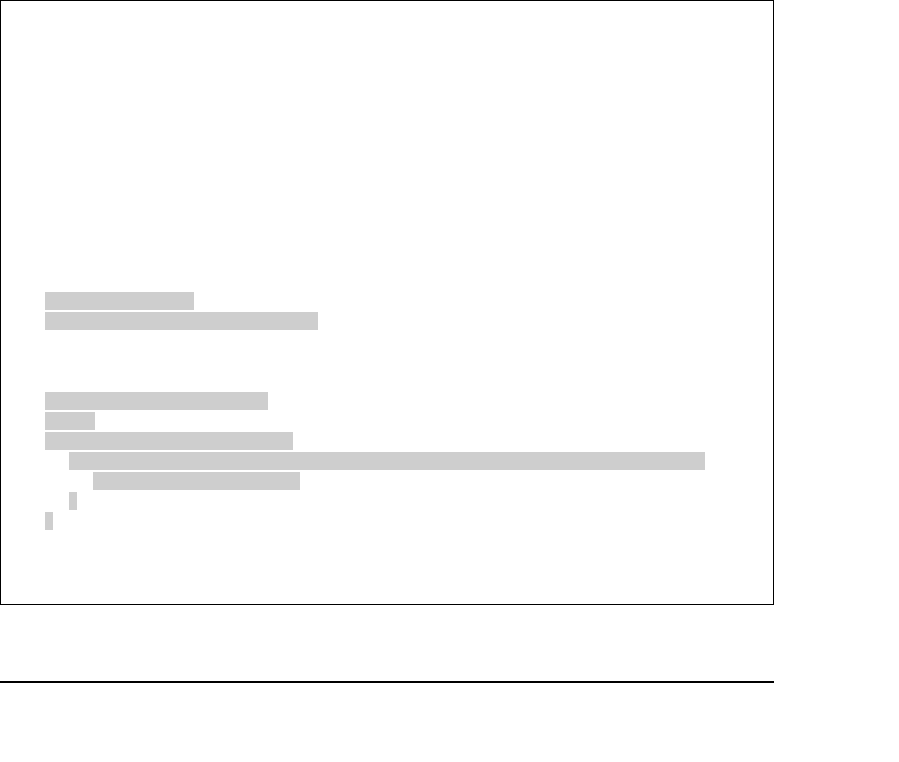
ptg18144795
326 Chapter 11
To create the directory
control panel:
1. Create a new PHP document in
your text editor or IDE, to be named
list_dir.php
(Script 11.5):
<!doctype html>
<html lang="en">
<head>
<meta charset="utf-8">
<title>Directory Contents</
title>
</head>
<body>
Script 11.5 This script displays the contents of a directory. First the subdirectories are listed, followed by the
files (with their sizes and modification dates) in a table.
1 <!doctype html>
2 <html lang="en">
3 <head>
4 <meta charset="utf-8">
5 <title>Directory Contents</title>
6 </head>
7 <body>
8 <?php // Script 11.5 - list_dir.php
9 /* This script lists the directories and files in a directory. */
10
11 // Set the time zone:
12 date_default_timezone_set('America/New_York');
13
14 // Set the directory name and scan it:
15 $search_dir = '.';
16 $contents = scandir($search_dir);
17
18 // List the directories first...
19 // Print a caption and start a list:
20 print '<h2>Directories</h2>
21 <ul>';
22 foreach ($contents as $item) {
23 if ( (is_dir($search_dir . '/' . $item)) AND (substr($item, 0, 1) != '.') ) {
24 print "<li>$item</li>\n";
25 }
26 }
27
28 print '</ul>'; // Close the list.
29
code continues on next page

ptg18144795
Files and Directories 327
2. Begin the PHP code, and set the time
zone:
<?php // Script 11.5 -
➝
list_dir.php
date_default_timezone_set
➝
('America/New_York');
Because this script will make use
of the
date()
function, it needs to
establish the time zone once. See
Chapter 8, “Creating Web Applica-
tions,” to learn more about using the
date_default_timezone_set()
.
3. Identify the directory to be opened,
and scan in its contents:
$search_dir = '.';
$contents = scandir($search_dir);
By establishing this value as a variable
at the top of the PHP script, it will be
easy to find and change as needed.
Here you use a single period to refer
to the current directory. You could also
use an absolute path to another direc-
tory (
/Users/larry/Documents
or
C:\\myfiles\\directory
) or a relative
path (
../myfiles
), as long as PHP has
permission to read the named directory.
The second line scans in the directory’s
contents and assigns them as an array
to the variable
$contents
.
continues on next page
Script 11.5 continued
30 // Create a table header:
31 print '<hr><h2>Files</h2>
32 <table cellpadding="2" cellspacing="2"
align="left">
33 <tr>
34 <th>Name</th>
35 <th>Size</th>
36 <th>Last Modified</th>
37 </tr>';
38
39 // List the files:
40 foreach ($contents as $item) {
41 if ( (is_file($search_dir . '/' .
$item)) AND (substr($item, 0, 1)
!= '.') ) {
42
43 // Get the file size:
44 $fs = filesize($search_dir .
'/' . $item);
45
46 // Get the file's modification
date:
47 $lm = date('F j, Y',
filemtime($search_dir . '/' .
$item));
48
49 // Print the information:
50 print "<tr>
51 <td>$item</td>
52 <td>$fs bytes</td>
53 <td>$lm</td>
54 </tr>\n";
55
56 } // Close the IF.
57
58 } // Close the FOREACH.
59
60 print '</table>'; // Close the HTML
table.
61
62 ?>
63 </body>
64 </html>

ptg18144795
328 Chapter 11
4. List the subdirectories of this directory:
print '<h2>Directories</h2>
<ul>';
foreach ($contents as $item) {
if ( (is_dir($search_dir . '/'
➝
. $item)) AND (substr($item,
➝
0, 1) != '.') ) {
print "<li>$item</li>\n";
}
}
print '</ul>';
This
foreach
loop accesses every item
in the array, assigning each one to the
$item
variable. The script should first
list every directory, so the
is_dir()
function is called to confirm the item’s
type. That same conditional also checks
that the current item isn’t the current
directory or a hidden directory—both
marked by a single period on Unix sys-
tems—or the parent directory, marked
by a double period on Unix systems. If
this conditional is TRUE, then the item’s
name is printed out, within list item tags,
followed by a newline (to make for
neater HTML source code).
So that the
is_dir()
function will work
when dealing with items found in other
directories, the
$search_dir
value, plus
a slash, is appended to each item. If the
code just referred to
$item
without add-
ing the directory path, the code would
only work for the current directory.
5. Create a new heading, and start a table
for the files:
print '<hr><h2>Files</h2>
<table cellpadding="2"
➝
cellspacing="2" align="left">
<tr>
<th>Name</th>
<th>Size</th>
<th>Last Modified</th>
</tr>';
The script also displays the files’ sizes
and modification dates. To make this
look nicer, the results are placed in an
HTML table.
6. Begin looping through the files in this
directory:
foreach ($contents as $item) {
if ( (is_file($search_dir . '/'
➝
. $item)) AND (substr($item,
➝
0, 1) != '.') ) {
Another
foreach
loop is used to go
through the directory contents again.
This time, the conditional only wants
items that are files, but not hidden files
that begin with a single period.
Again, the
$search_dir
value and a
slash is prepended to each item.
7. Calculate the file’s size and modification
date, and then print out the information:
$fs = filesize($search_dir . '/'
➝
. $item);
$lm = date('F j, Y', filemtime
➝
($search_dir . '/' . $item));
print "<tr>
<td>$item</td>
<td>$fs bytes</td>
<td>$lm</td>
</tr>\n";
The first line calls the
filesize()
func-
tion to retrieve the file’s size in bytes.
The second line calls the
filemtime()
function, which returns a timestamp of
the file’s modification time. The time-
stamp is then fed into the
date()
func-
tion, along with the proper formatting,
to return a string like
November 24,
2016
. Finally, these two items and the
file’s name are printed in the appropri-
ate columns of the table.
For additional security, you can also
apply
htmlspecialchars()
to the
item’s name when printing it.

ptg18144795
Files and Directories 329
8. Complete the conditional and the loop:
}
}
9. Close the table:
print '</table>';
10. Complete the PHP code and the
HTML page:
?>
</body>
</html>
11. Save the file as
list_dir.php
, place it
in the proper directory for your PHP-
enabled server, and test it in your
browser A.
12. If you want, change the value of
$search_dir
, and retest the script in
your browser B.
Notice that you need to use double
backslashes to create absolute path names on
a Windows server. This is necessary because
the single backslash, used in Windows path
names, is the escape character. So, it must be
escaped to be taken literally:
C:\\myfiles\\directory
The
glob()
function lets you search a
directory for files whose name matches a pat-
tern (like
something.jpg
or
filename.doc
).
Other file functions you might appreciate
include
fileperms()
, which returns the
file’s permissions;
fileatime()
, which
returns the last time a file was accessed; and
fileowner()
, which returns the user who
owns the file.
The
basename()
and
dirname()
functions are useful for finding subparts of
a full directory or file path.
The
finfo_file()
function is the best
way to find a file’s MIME type.
B The directory listing for another folder
on the server.
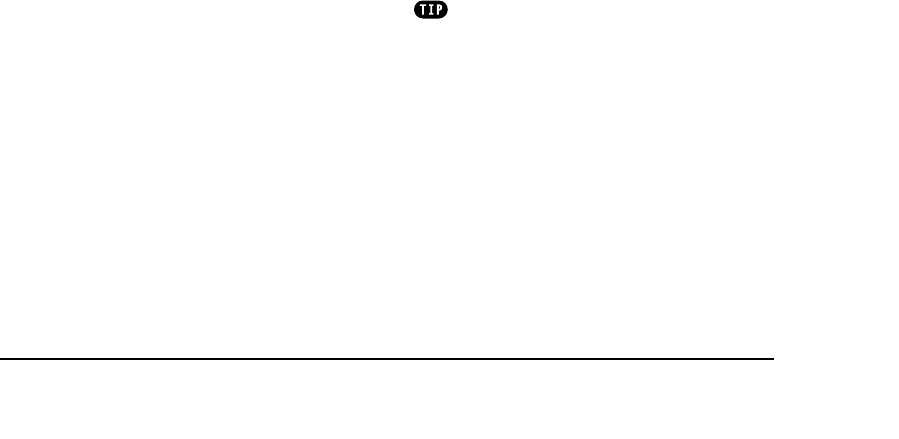
ptg18144795
330 Chapter 11
Creating Directories
Understanding how to read from and write
to files on the server is only part of the data
storage process. It’s likely you’ll want to
read from and write to directories as well.
The command for creating a directory in
PHP is
mkdir()
:
mkdir('directory_name',
➝
permissions);
The directory name is the name of the
directory to be created. This value can be
relative to the current directory (i.e., the
one the script is in), or it can be a full path:
mkdir('C:\\inetpub\\users\\rey');
On Windows servers, the permissions are
ignored and therefore not required (as in
the preceding example). On non-Windows
servers, the permissions are
0777
by
default (see the section “File Permissions”
earlier in this chapter to learn what those
numbers mean).
With this in mind, let’s create a script that
makes a new directory for a user when the
user registers—the theory being that a user
could upload files to that directory. This
script also records the username and pass-
word to a text file so that the user can be
validated when logging in. You’ll begin by
creating the parent directory, which must
be writable so that PHP can create subdi-
rectories in it, and the
users.txt
data file.
To create the directory
and the data file:
1. Create a new folder named
users
,
located outside of the web directory
root.
It could be created in the same direc-
tory as the
uploads
folder made earlier
(see D in “Handling File Uploads”).
2. Using the steps outlined in the first sec-
tion of this chapter, “File Permissions,”
set the permissions so that everyone
can write to, read from, and search
(
0777
in Unix terms) the directory.
If you’re running Windows, this step will
most likely not be necessary.
3. In your text editor, create a new, blank
document.
4. Save this file in the
users
directory with
the name
users.txt
.
5. Again using the steps outlined earlier
in the chapter, set the permissions on
users.txt
so that everyone can write
to and read from the file (
0666
in Unix
terms).
Again, this will probably not be neces-
sary if you’re running Windows on your
PHP server.
Once you create a directory that PHP can
write to, PHP should be able to automatically
create a
users.txt
file in that directory to
which PHP can write. However, it’s best not to
make assumptions about such things.
ptg18144795
Files and Directories 331
To create the registration script:
1. Begin a new PHP document in your
text editor or IDE, to be named
register.php
(Script 11.6):
<!doctype html>
<html lang="en">
<head>
<meta charset="utf-8">
<title>Register</title>
<style type="text/css"
➝
media="screen">
.error { color: red; }
</style>
</head>
<body>
<h1>Register</h1>
In the page’s head, a CSS class is defined
that will be used to format errors.
continues on page 333
Script 11.6 The
register.php
script serves two purposes: It records the user’s information in a text file and
creates a new directory for that user’s stuff.
1 <!doctype html>
2 <html lang="en">
3 <head>
4 <meta charset="utf-8">
5 <title>Register</title>
6 <style type="text/css" media="screen">
7 .error { color: red; }
8 </style>
9 </head>
10 <body>
11 <h1>Register</h1>
12 <?php // Script 11.6 - register.php
13 /* This script registers a user by storing their information in a text file and creating a
directory for them. */
14
15 // Identify the directory and file to use:
16 $dir = '../users/';
17 $file = $dir . 'users.txt';
18
19 if ($_SERVER['REQUEST_METHOD'] == 'POST') { // Handle the form.
20
21 $problem = FALSE; // No problems so far.
22
code continues on next page
ptg18144795
332 Chapter 11
Script 11.6 continued
23 // Check for each value...
24 if (empty($_POST['username'])) {
25 $problem = TRUE;
26 print '<p class="error">Please enter a username!</p>';
27 }
28
29 if (empty($_POST['password1'])) {
30 $problem = TRUE;
31 print '<p class="error">Please enter a password!</p>';
32 }
33
34 if ($_POST['password1'] != $_POST['password2']) {
35 $problem = TRUE;
36 print '<p class="error">Your password did not match your confirmed password!</p>';
37 }
38
39 if (!$problem) { // If there weren't any problems...
40
41 if (is_writable($file)) { // Open the file.
42
43 // Create the data to be written:
44 $subdir = time() . rand(0, 4596);
45 $data = $_POST['username'] . "\t" . sha1(trim($_POST['password1'])) . "\t" .
$subdir . PHP_EOL;
46
47 // Write the data:
48 file_put_contents($file, $data, FILE_APPEND | LOCK_EX);
49
50 // Create the directory:
51 mkdir ($dir . $subdir);
52
53 // Print a message:
54 print '<p>You are now registered!</p>';
55
56 } else { // Couldn't write to the file.
57 print '<p class="error">You could not be registered due to a system error.</p>';
58 }
59
60 } else { // Forgot a field.
61 print '<p class="error">Please go back and try again!</p>';
62 }
63
64 } else { // Display the form.
65
66 // Leave PHP and display the form:
67 ?>
68
code continues on next page

ptg18144795
Files and Directories 333
2. Begin the PHP code, and create two
variables:
<?php // Script 11.6 -
➝
register.php
$dir = '../users/';
$file = $dir . 'users.txt';
These two variables represent the
directory and file being used by the
example. The file will be in the directory,
so its value starts with the directory’s
value. Change the value of
$dir
so that
it’s appropriate for your situation.
3. Check whether the form has been
submitted:
if ($_SERVER['REQUEST_METHOD'] ==
➝
'POST') {
Once again, this page both displays and
handles the HTML form. This is accom-
plished using a conditional that checks
how the script is being requested.
4. Validate the registration information:
$problem = FALSE;
if (empty($_POST['username'])) {
$problem = TRUE;
print '<p class="error">Please
➝
enter a username!</p>';
}
if (empty($_POST['password1'])) {
$problem = TRUE;
print '<p class="error">Please
➝
enter a password!</p>';
}
if ($_POST['password1'] != $_POST
['password2']) {
$problem = TRUE;
print '<p class="error">Your
➝
password did not match your
➝
confirmed password!</p>';
}
continues on next page
Script 11.6 continued
68 <form action="register.php"
method="post">
69 <p>Username: <input type="text"
name="username" size="20"></p>
70 <p>Password: <input type="password"
name="password1" size="20"></p>
71 <p>Confirm Password: <input
type="password" name="password2"
size="20"></p>
72 <input type="submit" name="submit"
value="Register">
73 </form>
74
75 <?php } // End of submission IF. ?>
76 </body>
77 </html>

ptg18144795
334 Chapter 11
The registration form is a simpler ver-
sion of earlier registration forms devel-
oped in this book. The same validation
process you previously developed is
used to check the submitted username
and passwords. The
$problem
variable
is used as a flag to indicate whether a
problem occurred.
5. Check for problems:
if (!$problem) {
Again, the
$problem
variable lets you
know if it’s okay to register the user.
If no problems occurred, it’s safe to
continue.
6. Confirm that the
users.txt
file is
writable:
if (is_writable($file)) {
Like before, the data file is first confirmed
as writable in a conditional so that the
script can respond accordingly.
7. Create the data to be written to the file,
and then write it:
$subdir = time() . rand(0, 4596);
$data = $_POST['username'] .
➝
"\t" . sha1(trim($_POST
➝
['password1'])) . "\t" .
➝
$subdir . PHP_EOL;
file_put_contents($file, $data,
➝
FILE_APPEND | LOCK_EX);
The name of the directory being
created is a number based on the time
the user registered and a random value.
This system helps guarantee that the
directory created is unique and has a
valid name.
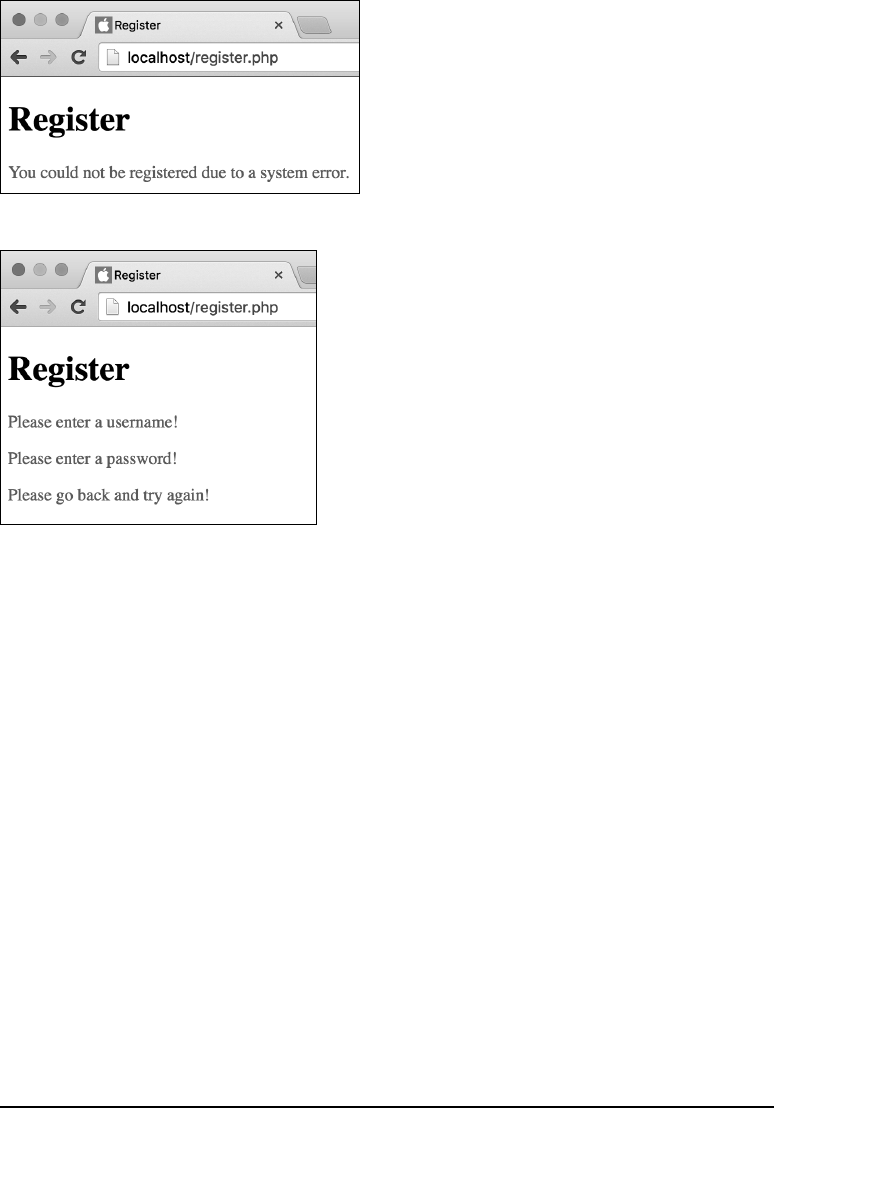
ptg18144795
Files and Directories 335
Instead of storing a single string, as
you previously have, this script stores
three separate pieces of information:
the user’s name; an encrypted version
of the password (using the
sha1()
func-
tion; see the “Encrypting Passwords”
sidebar); and the directory name,
created in the preceding line. The
password is trimmed first, to get rid of
any extraneous spaces.
To distinguish between the pieces of
information, you insert a tab (created
using the
\t
code). A newline is used
to mark the end of the line, again using
the
PHP_EOL
constant.
8. Create the user’s directory, and print a
message:
mkdir($dir . $subdir);
print '<p>You are now
➝
registered!</p>';
The
mkdir()
function creates the
directory in the
users
directory. The
directory is named whatever random
number was generated earlier.
9. Complete the conditionals:
} else { // Couldn't write to
the file.
print '<p class="error">You
➝
could not be registered due
➝
to a system error.</p>';
}
} else { // Forgot a field.
print '<p class="error">Please
➝
go back and try again!</p>';
}
The first
else
completes the conditional
if the script couldn’t open the
users.txt
file for writing A. The second
else
completes the conditional if the user
failed to complete the form properly B.
A The result if the
users.txt
file is not writable.
B The script reports any form validation errors.
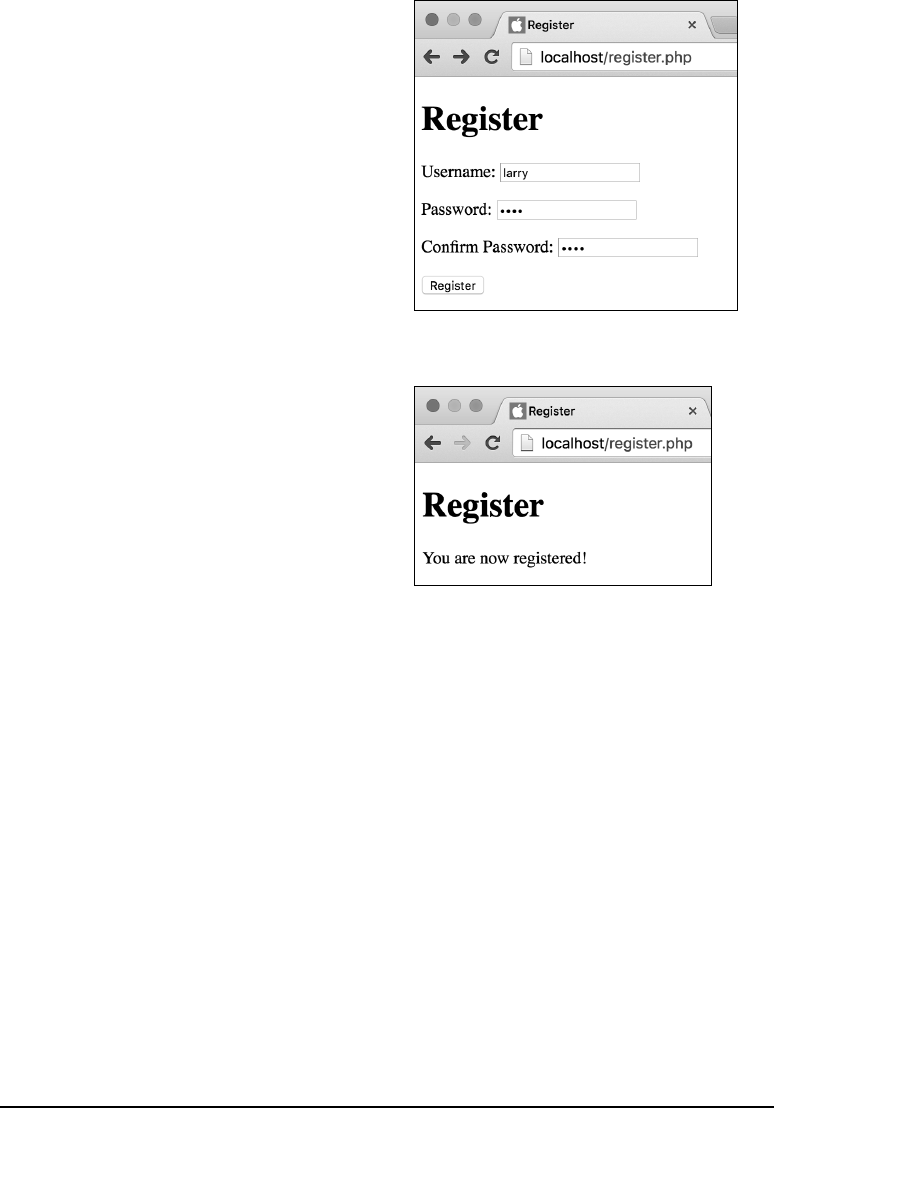
ptg18144795
336 Chapter 11
10. Add an
else
clause to the main condi-
tional, and exit out of PHP:
} else {
?>
Unlike the previous examples in this
chapter, this PHP script first displays
the form and then handles it. Whereas
the other scripts would then display the
form again, this one does not, because
the form creation is part of an
else
statement. The rest of the page is just
HTML, so you exit out of PHP to create
the form.
11. Display the HTML form:
<form action="login.php"
method="post">
<p>Username: <input type="text"
➝
name="username" size="20">
➝
</p>
<p>Password: <input type=
➝
"password" name="password"
➝
size="20"></p>
<input type="submit" name=
➝
"submit" value="Login">
</form>
12. Complete the main conditional:
<?php } // End of submission IF.
?>
This final closing curly bracket closes
the main submit conditional. For it to
work, a new PHP section must first be
created.
13. Complete the HTML page:
</body>
</html>
C The registration form is quite basic but
serves its purpose.
D This is what the user sees if the
registration process worked.
ptg18144795
Files and Directories 337
14. Save the file as
register.php
, place it
in the proper directory for your PHP-
enabled server, and test it in your
browser C and D.
15. If you want, open the
users.txt
file
in your text editor to see its contents
(Script 11.7).
You can also ensure that the page
worked as it should by looking in the
users
directory for the new subdirectories.
The
rmdir()
function deletes an exist-
ing directory, assuming PHP has permission
to do so.
When using a character, such as the tab,
to separate stored values, you should addi-
tionally take measures to escape or strip that
character from the stored values.
Script 11.7 The
users.txt
file lists three tab-delineated fields of information: the username, a scrambled
version of the user’s password, and the user’s associated directory name.
1 larry 9d4e1e23bd5b727046a9e3b4b7db57bd8d6ee684 14615086124319
2 john 5baa61e4c9b93f3f0682250b6cf8331b7ee68fd8 14615086364092
3 paul f0578f1e7174b1a41c4ea8c6e17f7a8a3b88c92a 14615086461481
4 george 81fe8bfe87576c3ecb22426f8e57847382917acf 14615252264106
5 ringo c2543fff3bfa6f144c2f06a7de6cd10c0b650cae 1461525233328
Encrypting Passwords
The
sha1()
function creates a
hash
: a mathematically calculated representation of a string. So the
registration script doesn’t actually store the password but stores a representation of that password
(in theory, no two strings would have the same
sha1()
value). You’ll soon see how the hashed
password is used by a login script.
That being said, the
sha1()
does not create a
secure
representation of the password. For modern
computers, it’s far too easy to perform the calculations necessary to crack passwords hashed
with
sha1()
. But the book does use
sha1()
as an easy approach, with the expectation that you
wouldn’t replicate this in a real-life application.
The current, most secure solution for password management is to use PHP’s built-in
password_
hash()
and
password_verify()
functions. Although not overly complex, they are a bit involved
for beginners, especially if you’re not using at least PHP 5.5 or greater. When you’re ready to
implement your own login capability, see the PHP manual pages for these functions to learn how
to use them.

ptg18144795
338 Chapter 11
Reading Files
Incrementally
In the
view_quote.php
script (Script 11.3),
an entire file was read into an array using
the
file()
function. But what if you
want to read in only a little of the file at
a time? Then you need to use the
fgets()
function.
The
fgets()
function reads a string of a
certain length. It’s most often placed in a
while
loop that uses the
feof()
function
to make sure the end of the file hasn’t
been reached. For example:
$fp = fopen($file, 'rb');
while (!feof($fp)) {
$string = fgets($fp, 1024);
}
fclose ($fp);
With that code, 1,023 bytes of data at a
time will be read in, as
fgets()
always
reads 1 byte less than the length you
specify. Or
fgets()
will stop reading once
it reaches the end of the line or the end of
the file. The second argument is optional,
but if present, it should be a number larger
than a single line of text in the file. If you
want to just read to the end of the line,
omit the length argument:
$string = fgets($fp);
In an example where the data is stored in a
delineated
format (commonly using a
comma, hence a CSV—comma-separated
values—format), you can use the
fgetcsv()
function instead. It breaks the string into
parts, using the marked separator, and
returns an array:
$array = fgetcsv($fp, length,
➝
delimiter);
$array = fgetcsv($fp, 1024);
Again, the preceding function call returns
1023 bytes of data, but it breaks the string
into an array using the default delimiter—a
comma—as an indicator of where to make
elements. This function is the equivalent of
using the
fgets()
and
explode()
func-
tions together. If you provide a delimiter
argument, you can change what character
is used to delineate the data.
Finally, because these functions rely on
identifying the end of a line, it’s a smart
extra precaution to enable PHP’s
auto_detect_line_endings
setting. You
can do so using the
ini_set()
function:
ini_set('auto_detect_line_endings',
➝
1);
As an example, let’s create a login script
that uses the
users.txt
file created in the
preceding example. It will continue to read
a file until a matching username/password
combination has been found.
To read a file incrementally:
1. Begin a new PHP document in your text
editor or IDE, to be named
login.php
(Script 11.8):
<!doctype html>
<html lang="en">
<head>
<meta charset="utf-8">
<title>Login</title>
</head>
<body>
<h1>Login</h1>
2. Create the PHP section, and identify the
file to use:
<?php // Script 11.8 - login.php
$file = '../users/users.txt';
The value of
$file
should be the same
as that in
register.php
.
ptg18144795
Files and Directories 339
3. Check whether the form has been
submitted:
if ($_SERVER['REQUEST_METHOD'] ==
➝
'POST') {
4. Create a dummy variable to use as a
flag:
$loggedin = FALSE;
Script 11.8 The
login.php
script uses the information stored in
users.txt
(created by Script 11.6) to validate
a user.
1 <!doctype html>
2 <html lang="en">
3 <head>
4 <meta charset="utf-8">
5 <title>Login</title>
6 </head>
7 <body>
8 <h1>Login</h1>
9 <?php // Script 11.8 - login.php
10 /* This script logs a user in by check the stored values in text file. */
11
12 // Identify the file to use:
13 $file = '../users/users.txt';
14
15 if ($_SERVER['REQUEST_METHOD'] == 'POST') { // Handle the form.
16
17 $loggedin = FALSE; // Not currently logged in.
18
19 // Enable auto_detect_line_settings:
20 ini_set('auto_detect_line_endings', 1);
21
22 // Open the file:
23 $fp = fopen($file, 'rb');
24
25 // Loop through the file:
26 while ( $line = fgetcsv($fp, 200, "\t") ) {
27
28 // Check the file data against the submitted data:
29 if ( ($line[0] == $_POST['username']) AND ($line[1] == sha1(trim($_
POST['password']))) ) {
30
31 $loggedin = TRUE; // Correct username/password combination.
32
code continues on next page
The
$loggedin
variable is used to
indicate whether the user entered the
correct username/password combina-
tion. When the script first starts, it’s
assumed that the user has not entered
the correct values.
continues on next page
ptg18144795
340 Chapter 11
5. Open the file for reading:
ini_set('auto_detect_line_
➝
endings', 1);
$fp = fopen($file, 'rb');
Unlike the
file()
function, the
fgetcsv()
function requires a file
pointer. Therefore, the
users.txt
file
must be opened with the
fopen()
function, using the appropriate mode.
Here, that mode is
rb
, meaning the
file should be opened for reading in a
binary safe mode.
First, though, just to be safe, PHP’s
auto_detect_line_endings
setting
is enabled. Stylistically, some develop-
ers prefer to adjust settings as the first
line of code in the script, so feel free to
move this up if you’d rather.
6. Loop through each line of the file:
while ( $line = fgetcsv($fp, 200,
➝
"\t") ) {
This
while
loop reads another 200
bytes or one line of the file—whichever
comes first—with each iteration. The
data being read is broken into an
array, using the tab to indicate the
separate elements.
Because the
users.txt
file stores
its data in the format
username
tab
password tab directory newline
, the
$line
array contains three elements
indexed at 0 (
username
), 1 (
password
),
and 2 (
directory
).
Script 11.8 continued
33 // Stop looping through the
file:
34 break;
35
36 } // End of IF.
37
38 } // End of WHILE.
39
40 fclose($fp); // Close the file.
41
42 // Print a message:
43 if ($loggedin) {
44 print '<p>You are now logged in.
</p>';
45 } else {
46 print '<p style="color: red;">The
username and password you entered
do not match those on file.</p>';
47 }
48
49 } else { // Display the form.
50
51 // Leave PHP and display the form:
52 ?>
53
54 <form action="login.php" method="post">
55 <p>Username: <input type="text"
name="username" size="20"></p>
56 <p>Password: <input type="password"
name="password" size="20"></p>
57 <input type="submit" name="submit"
value="Login">
58 </form>
59
60 <?php } // End of submission IF. ?>
61
62 </body>
63 </html>

ptg18144795
Files and Directories 341
10. Print a message to the user:
if ($loggedin) {
print '<p>You are now logged
➝
in.</p>';
} else {
print '<p style="color: red;">
➝
The username and password you
➝
entered do not match those on
➝
file.</p>';
}
Using the
$loggedin
flag, the script can
now say whether the user is “logged in.”
You could add some functionality to this
process by storing the user’s directory
in a session and then sending them to
a file-upload page.
11. Continue the main submit conditional,
and exit PHP:
} else {
?>
12. Create the HTML form:
<form action="login.php"
method="post">
<p>Username: <input type="text"
➝
name="username" size="20">
➝
</p>
<p>Password: <input
➝
type="password"
➝
name="password" size="20">
➝
</p>
<input type="submit"
➝
name="submit" value="Login">
</form>
continues on next page
7. Check the submitted values against the
retrieved values:
if ( ($line[0] == $_POST
➝
['username']) AND ($line[1] ==
➝
sha1(trim($_POST
➝
['password']))) ) {
This two-part conditional checks the
submitted username against the stored
username (
$line[0]
) and checks
the submitted password against the
stored password (
$line[1]
). However,
because the stored password was
scrambled using
sha1()
, apply
sha1()
to the submitted value and then make
the comparison.
8. If a match was found, set
$loggedin
to
TRUE, and exit the
while
loop:
$loggedin = TRUE;
break;
If the conditional is TRUE, the submitted
username and password match those
on file. In this case, the
$loggedin
flag
is set to TRUE, and the
break
statement
is used to exit the
while
loop. The
benefit of this system is that only as
much of the file is read as is required
to find a match.
9. Close the conditional, the
while
loop,
and the file:
}
}
fclose ($fp);

ptg18144795
342 Chapter 11
13. Return to PHP to complete the main
conditional:
<?php } // End of submission
➝
IF. ?>
14. Finish the HTML page:
</body>
</html>
15. Save the file as
login.php
, place it
in the proper directory for your PHP-
enabled server, and test it in your
browser A, B, and C.
As of PHP 5.3, the
fgetcsv()
function
takes another optional argument: the char-
acter used to escape problematic characters.
Naturally, the default escape character is the
backslash.
If a line is blank,
fgetcsv()
returns an
array containing a single null value.
A The login form takes a username and
password.
B If the submitted username and password
match those previously recorded, the user
sees this message.
C The result if the user submits a username and
password combination that doesn’t match the
values previously recorded.

ptg18144795
Files and Directories 343
Review and Pursue
If you have any problems with the review
questions or the pursue prompts, turn
to the book’s supporting forum
(www.LarryUllman.com/forums/).
Review
n
What version of PHP are you running?
n
What steps did you need to take to
make a file or directory writable for
your server?
n
What is the
web root directory
(as a
concept)? What is the web root direc-
tory for your website (whether on your
own computer or on a live server)?
n
What are two ways you can write data
to a file?
n
How do you append new data to
existing files (as opposed to replacing
any existing data)?
n
How do you ensure that new data is
placed on its own line?
n
In order for a form to accept file
uploads, what attributes must the
opening
form
tag have?
n
In what variable will a PHP script be
able to access an uploaded file? What
function is used to move the file to its
final destination on the server?
n
How does the
fgetcsv()
function differ
from
file()
or
file_get_contents()
?
n
Is
sha1()
a secure method for
hashing data?

ptg18144795
344 Chapter 11
Pursue
n
Check out some of the other filesystem-
related functions in the PHP manual
(start at www.php.net/manual/en/
ref.filesystem.php).
n
Modify
add_quote.php
so that it con-
firms that the
quotes.txt
file exists
prior to checking if it’s writable.
n
Make the text area in
add_quote.php
sticky.
n
Change
add_quote.php
so that it
takes the quotation and the attribution
as separate inputs and writes them
separately to the text file. Then modify
view_quote.php
so that it retrieves
and displays both pieces of data.
n
Modify
view_quote.php
so that it
displays two random quotations.
n
Update
upload_file.php
, making it
confirm that the
uploads
directory
is writable.
n
View the PHP manual page for the
glob()
function to see what it can do
and how to use it.
n
Update
list_dir.php
to display other
information about the files in a directory.
n
Create a system to guarantee unique
usernames in
register.php
. Hint:
Before you attempt to create the
directory, use PHP to check your list
of existing usernames for a match to
the just-registered name. If no match
is found, the new name is acceptable.
If the username is already in use, then
PHP can create an error message
requesting a new username.
n
Use the combination of writing to and
reading from text files, plus either
sessions or cookies, to create a real
registration and login system.
n
When you’re ready for a bigger chal-
lenge, rewrite
register.php
and
login.php
to use the
password_hash()
and
password_verify()
functions.

ptg18144795
The Internet wouldn’t be what it is today if
not for the existence of databases. In fact,
PHP probably wouldn’t be as popular or
as useful if not for its built-in support for
numerous types of databases. This chapter
will use MySQL as the example database
management system (DBMS). Although
MySQL—which is available for most
platforms—may not be as powerful as the
highest-end commercial database servers,
it has enough speed and functionality for
most purposes. And its price—free for most
uses—makes it the common choice for
web development.
This chapter walks through the develop-
ment of a simple database for running a
basic blog. Although you’ll learn enough
here to get started working with databases,
you’ll want to visit Appendix B, “Resources
and Next Steps,” once you’ve finished this
chapter to find some references where you
can learn more about the topic.
12
Intro to
Databases
In This Chapter
Introduction to SQL 346
Connecting to MySQL 348
MySQL Error Handling 352
Creating a Table 355
Inserting Data into a Database 360
Securing Query Data 366
Retrieving Data from a Database 371
Deleting Data in a Database 376
Updating Data in a Database 382
Review and Pursue 388
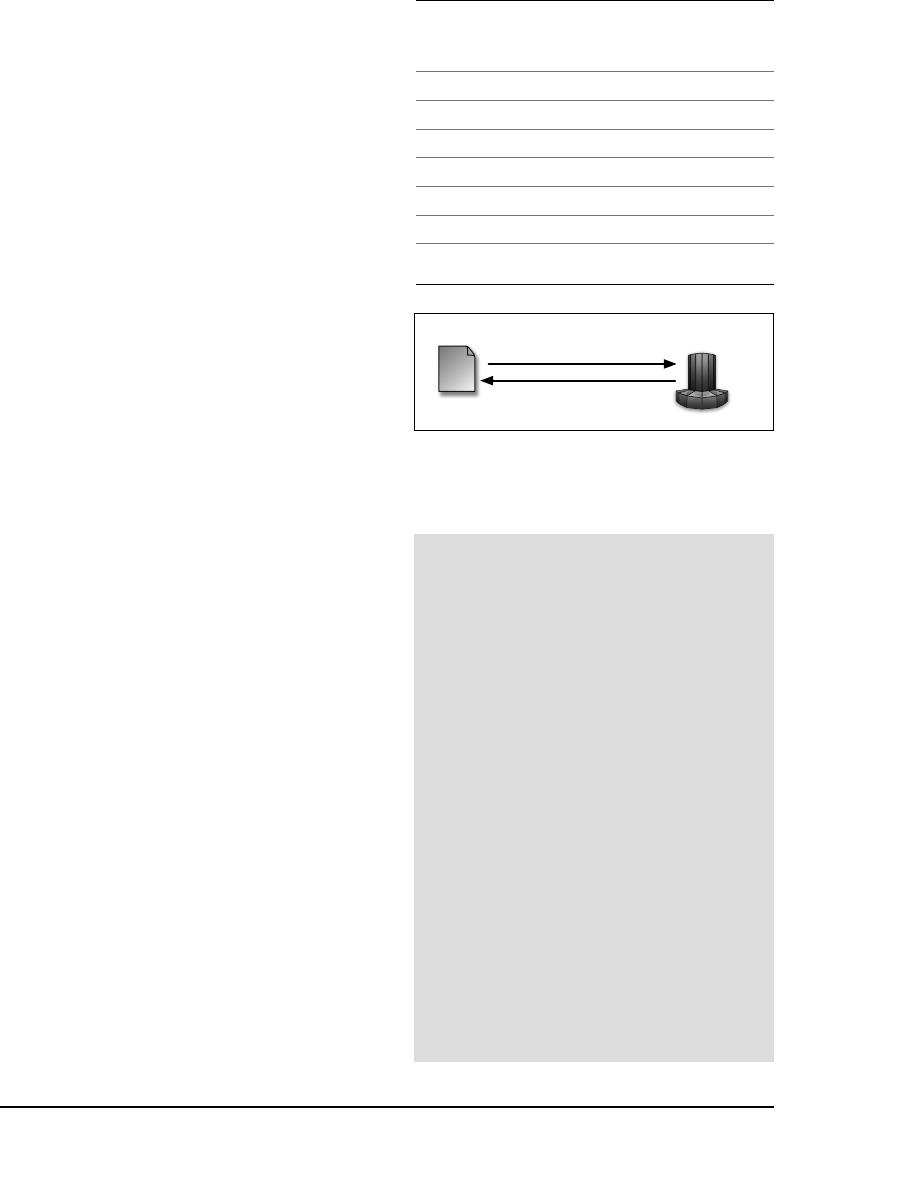
ptg18144795
346 Chapter 12
Introduction to SQL
A
database
is a collection of tables
(made up of columns and rows) that stores
information. Most databases are created,
updated, and read using SQL (Structured
Query Language). SQL has surprisingly few
commands (Table 12.1 lists the seven most
important), which is both a blessing and
a curse.
SQL was designed to be written a lot like
the English language, which makes it very
user friendly. But SQL is still extremely
capable, even if it takes some thought to
create more elaborate SQL statements
with only the handful of available terms. In
this chapter, you’ll learn how to execute all
the fundamental SQL commands.
For people new to PHP, confusion can
stem from PHP’s relationship to HTML
(i.e., PHP can be used to generate HTML,
but PHP code is never executed in the
browser). When you incorporate a data-
base, the relationships can become even
fuzzier. The process is quite simple: PHP is
used to send SQL statements to the data-
base application, where they are executed.
The result of the execution—the creation
of a table, the insertion of a record, the
retrieval of some records, or even an
error—is then returned by the database to
the PHP script A.
With that in mind, PHP’s
mysqli_query()
function will be the most-used tool in
this chapter. It sends an SQL command
to MySQL:
$result = mysqli_query(database
➝
connection, SQL command);
Database application
2. Result of execution
if(conn
SELEC
WHERE
print
PHP script
1. SQL query
A PHP will be used to send an SQL statement
to MySQL. MySQL will execute the statement and
return the result to the PHP script.
TABLE 12.1 Common SQL Commands
Command Purpose
ALTER
Modifies an existing table
CREATE
Creates a database or table
DELETE
Deletes records from a table
DROP
Deletes a database or table
INSERT
Adds records to a table
SELECT
Retrieves records from a table
UPDATE
Updates records in a table
MySQL Support in PHP
Support for the MySQL database server
has to be built into PHP in order for you
to use PHP’s MySQL-specific functions.
For most PHP installations, this should
already be the case. You can confirm
support for MySQL by calling the
phpinfo()
function, which reveals
details of your installation.
When working through this chapter,
if you see an error message saying
…
undefined function mysqli_…
, this
means the version of PHP you’re using
doesn’t have support for MySQL (or you
misspelled the function name, which you
should also check).
Enabling support for MySQL takes a little
effort, but it can be done if you have
administrative-level control over your
server. For more information, see the
PHP manual.
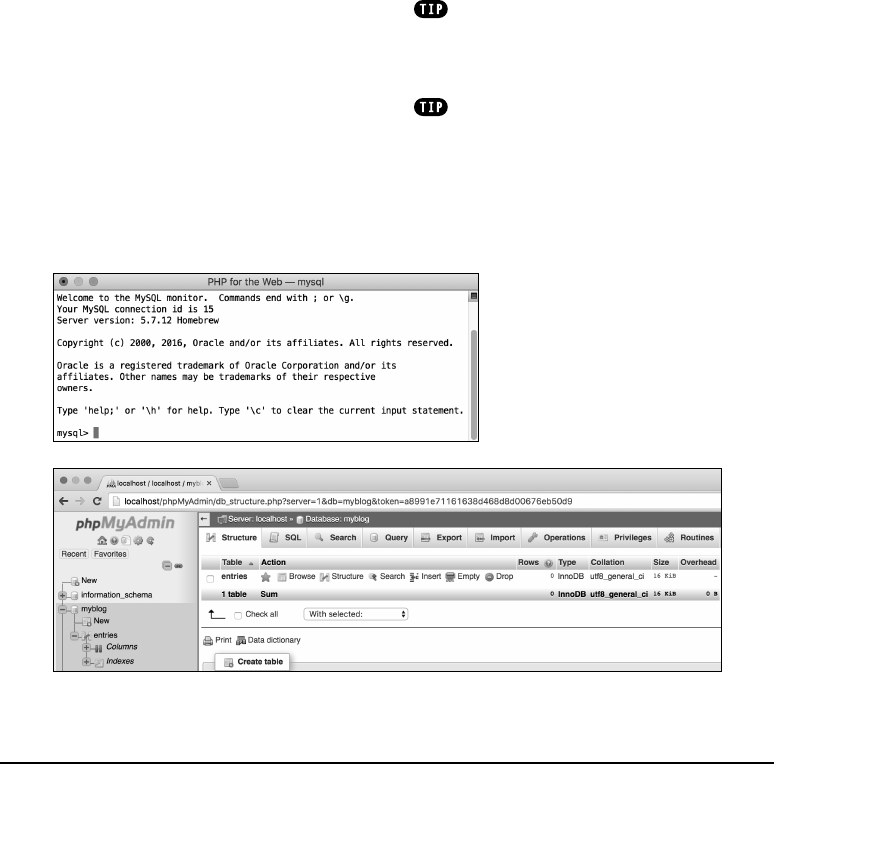
ptg18144795
Intro to Databases 347
Next, you would take the printed query and
execute it using another application. The
two most common options are
n
The MySQL client B, a command-line
tool for interacting with MySQL
n
phpMyAdmin C, a PHP-based
MySQL interface
One or both of these should be provided to
you by your hosting company or the soft-
ware you installed on your own computer.
For a demonstration of using each, see
Appendix A, “Installation and Configuration.”
Technically, a DBMS, or database appli-
cation, is the software that interfaces with the
database proper. However, a lot of people use
the terms database and DBMS synonymously.
Lots of other applications are available
for interacting with MySQL aside from the
MySQL client and phpMyAdmin. Some are free,
and others cost. A quick search using Google
for MySQL, admin, and your operating system
should turn up some interesting results.
I start this chapter with this prologue
because the addition of SQL and MySQL to
the web development process will compli-
cate things. When problems occur—and
undoubtedly they will—you’ll need to know
how to solve them.
When a PHP script that interacts with a
MySQL database does not perform as
expected, the first step is to determine if
the problem is in the query itself—number 1
in A—or in the results of the query—
number 2 in A. To take this step, you can
start by printing out the query being exe-
cuted, using code such as the following:
print $query;
Assuming that
$query
represents the com-
plete SQL command, often containing the
values of PHP variables, this one simple
line will reveal to you the actual SQL state-
ment being run.
B The MySQL client comes
with the MySQL database
software and can be used to
execute queries without the
need for a PHP script.
C phpMyAdmin is perhaps the most popular software written in PHP. It provides a web-based
interface for a MySQL database.

ptg18144795
348 Chapter 12
Connecting to MySQL
When you worked with text files in
Chapter 11, “Files and Directories,” you saw
that some functions, such as
fwrite()
and
fgets()
, require that you first create
a file pointer using
fopen()
. This pointer
then acts as a reference to that open file.
You use a similar process when working
with databases. First, you have to establish
a connection to the database server—in
this case, MySQL. This connection is then
used as the access point for any future
commands. The syntax for connecting to
a database is
$dbc = mysqli_connect(hostname,
➝
username, password,
➝
database_name);
The database connection—assigned to
$dbc
in this example—is normally estab-
lished using at least four arguments: the
host, which is almost always
localhost
; the
username; the password for that user-
name; and the database name.
If you’re using a database through a
hosting company, the company will most
likely provide you with all of these values.
If you’re running MySQL on your own
computer, see Appendix A to learn how
you create a user and a database before
proceeding.
Once you’re finished working with a data-
base, you can close the connection, just as
you’d close an open file:
mysqli_close($dbc);
The PHP script will automatically close
the database connection when the script
terminates, but it’s considered good form
to formally close the connection once it’s
no longer needed.
For the first example of this chapter, you’ll
write a simple script that attempts to con-
nect to the MySQL database. Once you
have this connection working, you can
proceed through the rest of the chapter.
Again, you’ll need to already know the
right hostname, username, password, and
database values in order to execute this
example. And the database will need to
have been created!
To connect to a MySQL database:
1. Begin a new PHP document in
your text editor or IDE, to be named
mysqli_connect.php
(Script 12.1):
<!doctype html>
<html lang="en">
<head>
<meta charset="utf-8">
<title>Connect to MySQL</title>
</head>
<body>
2. Start the section of PHP code:
<?php // Script 12.1 - mysqli_
connect.php
3. Connect to MySQL, and report on the
results:
if ($dbc = mysqli_
connect('localhost', 'username',
'password', 'myblog')) {
print '<p>Successfully
➝
connected to the database!
➝
</p>';
mysqli_close($dbc);
} else {
print '<p style="color:red;">
➝
Could not connect to the
➝
database.</p>';
}
ptg18144795
Intro to Databases 349
By placing the connection attempt as
the condition in an
if-else
statement,
you make it easy to report on whether
the connection worked.
This chapter will continue to use
username
and
password
as values.
For your scripts, you’ll need to replace
these with the values provided by your
web host or set them when you add
a user using the steps outlined in
Appendix A.
The database being used in this chapter
is named
myblog
. It will need to be
created prior to executing this script,
either by your hosting company or by
yourself (see Appendix A).
If a connection was established, a
positive message is printed and then
the connection is closed. Otherwise,
a message stating the opposite is
printed, and there is no need to close
the database connection (because it
wasn’t opened).
4. Complete the PHP code and the
HTML page:
?>
</body>
</html>
continues on next page
Script 12.1 Being able to connect to the MySQL
database is the most important step. This script
tests that process.
1 <!doctype html>
2 <html lang="en">
3 <head>
4 <meta charset="utf-8">
5 <title>Connect to MySQL</title>
6 </head>
7 <body>
8 <?php // Script 12.1 - mysqli_connect.
php
9 /* This script connects to the MySQL
database. */
10
11 // Attempt to connect to MySQL and print
out messages:
12 if ($dbc = mysqli_
connect('localhost', 'username',
'password', 'myblog')) {
13
14 print '<p>Successfully connected to
the database!</p>';
15
16 mysqli_close($dbc); // Close the
connection.
17
18 } else {
19
20 print '<p style="color: red;">Could
not connect to the database.</p>';
21
22 }
23
24 ?>
25 </body>
26 </html>
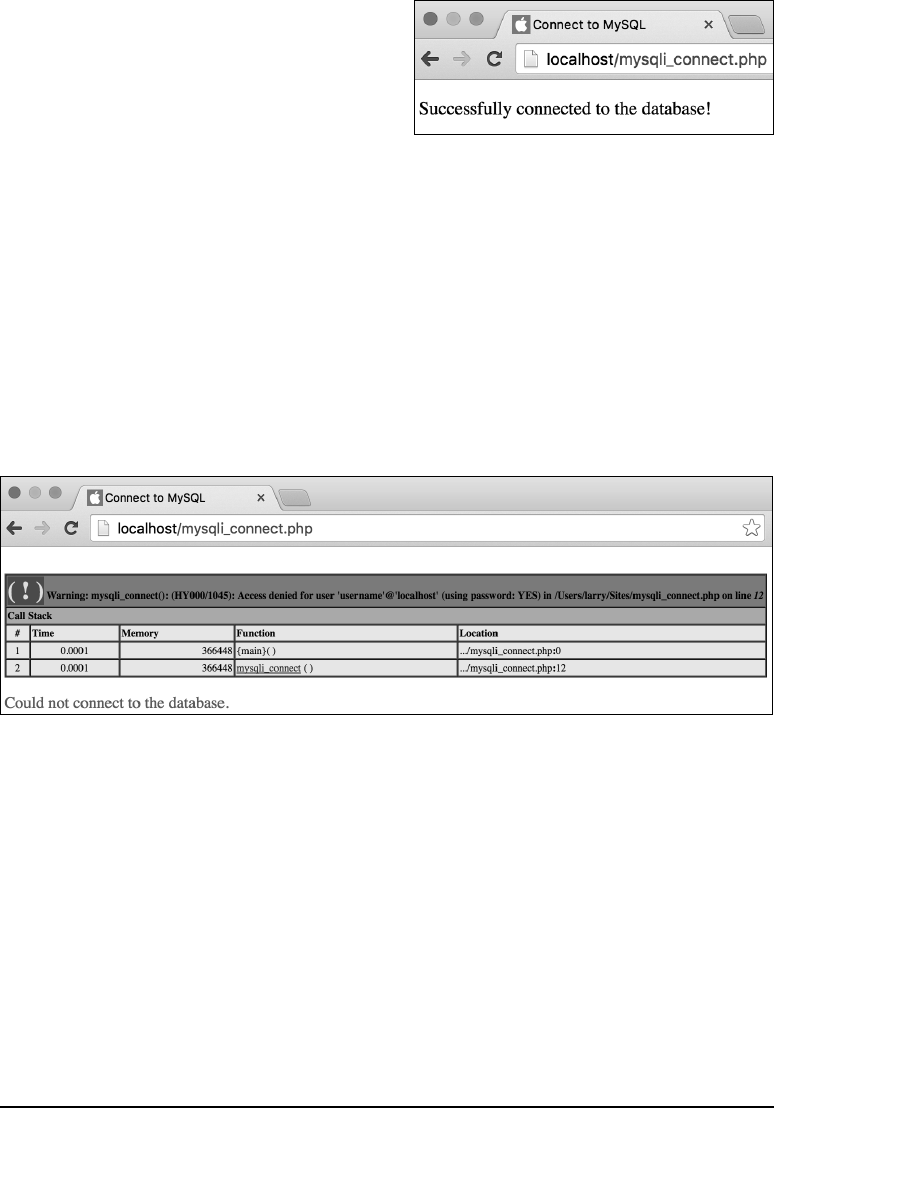
ptg18144795
350 Chapter 12
5. Save the file as
mysqli_connect.php
,
place it in the proper directory of your
PHP-enabled computer, and test it in
your browser A.
If you see results like those in B,
double-check the username and pass-
word values. They should match up
with those provided to you by your web
host or those you used to create the
user. You can always test your connec-
tion username and password by using
them in the MySQL client (again, see
Appendix A).
If you see
call to undefined function
mysqli_connect…
, your version of PHP
doesn’t support MySQL (see the “MySQL
Support in PHP” sidebar).
A If PHP has support for MySQL and the
username/password/host/database combination
you used was correct, you should see this simple
message.
B If PHP couldn’t connect to MySQL, you’ll probably see something like this. The warning message may or
may not appear, depending on your error management settings.
ptg18144795
Intro to Databases 351
The localhost value is used as the
hostname when both the PHP script and the
MySQL database reside on the same com-
puter. You can use PHP to connect to a MySQL
database running on a remote server by
changing the hostname in the PHP script and
creating the proper permissions in MySQL.
PHP has built-in support for most
databases, including MySQL, SQLite,
MongoDB, Oracle, and PostgreSQL. If you’re
using a type of database that doesn’t have
direct support—for example, Access or SQL
Server—you’ll need to use PHP’s ODBC (Open
Database Connectivity) functions along with
that database’s ODBC drivers to interface with
the database.
The combination of using PHP and
MySQL is so common that you may run
across terms that identify servers configured
with both PHP and MySQL: LAMP, MAMP,
and WAMP. These stand for the operating
system—Linux, Mac OS X, or Windows—plus
the Apache web server, the MySQL DBMS,
and PHP.
You’ll be working with MySQL,
so all the functions you use in this chapter
are MySQL specific. For example, to connect
to a database in MySQL the proper function
is
mysqli_connect()
, but if you’re using
PostgreSQL, you’d instead write
pg_connect()
. If you aren’t using a
MySQL DBMS, use the PHP manual (available
through www.PHP.net) to find the appropriate
function names.
You don’t have to select the database
when connecting, but it’s more common to
do so. The most likely exception is if your
application uses multiple databases.
You haven’t done so in these examples,
but in general it’s a good idea to set your
database information—hostname, username,
password, and database name—as variables
or constants. Then you can plug them into the
appropriate functions. By doing so, you can
separate the database specifics from the func-
tionality of the script, allowing you to easily
port that code to other applications.

ptg18144795
352 Chapter 12
MySQL Error Handling
Before this chapter gets too deep into
working with MySQL, it would be best to
discuss some error-handling techniques up
front. Common errors you’ll encounter are
n
Failure to connect to MySQL
n
Inability to run a query
n
No results returned by a query
n
Data not inserted into a table
Experience will teach you why these errors
normally occur, but immediately seeing
what the problem is when running your
scripts can save you much debugging
time. To have your scripts give informative
reports about errors that occur, use the
mysqli_error()
function. This function
returns a textual version of the error that
the MySQL server returned. It needs to be
provided with the database connection:
$dbc
in this chapter:
print mysqli_error($dbc);
Connection errors are slightly different,
however. To report upon those, invoke
mysqli_connect_error()
. This function
does not take any arguments:
print mysqli_connect_error();
Along with these functions, you may want
to use some PHP tools for handling errors.
For beginners, you can start with the error
suppression operator (
@
). When used pre-
ceding a function name, it suppresses any
error messages or warnings the function
might invoke:
@function_name();
Database Permissions
Database permissions are a bit more
complicated than file permissions, but
you need to understand this: Different
types of users can be assigned differ-
ent database capabilities. For example,
one DBMS user may be able to create
new databases and delete existing ones
(you may have dozens of databases in
your DBMS), but a lower-level user may
only be able to create and modify tables
within a single database. The most basic
user may just be able to read from, but
not modify, tables.
If you’re using PHP and MySQL for a
live hosted site, the hosting company
will most likely give you the second
type of access—control over a single
database but not the DBMS itself—and
establish the initial database for you. If
you’re working on your own server or
have administrative access, you should
have the capability to create new users
and databases.
ptg18144795
Intro to Databases 353
Script 12.2 By adding error control to the script (the
@
symbol and the
mysqli_error()
function), you
can more purposefully address problems
that occur.
1 <!doctype html>
2 <html lang="en">
3 <head>
4 <meta charset="utf-8">
5 <title>Connect to MySQL</title>
6 </head>
7 <body>
8 <?php // Script 12.2 - mysqli_connect.
php #2
9 /* This script connects to the MySQL
database. */
10
11 // Attempt to connect to MySQL and print
out messages:
12 if ($dbc = @mysqli_
connect('localhost', 'username',
'password', 'myblog')) {
13
14 print '<p>Successfully connected to
the database!</p>';
15
16 mysqli_close($dbc); // Close the
connection.
17
18 } else {
19
20 print '<p style="color:
red;">Could not connect to the
database:<br>' . mysqli_connect_
error() . '.</p>';
21
22 }
23
24 ?>
25 </body>
26 </html>
Note that this operator doesn’t stop the
error from happening; it just prevents the
message from being immediately dis-
played. You’d use it in situations where you
intend to handle the error yourself, should
one occur. This is an important point: The
error still happens, so you should use the
error suppression operator only when
you’re handling the error in another way.
To use error handling:
1. Open
mysqli_connect.php
(Script 12.1)
in your text editor or IDE.
2. Suppress any PHP errors created by the
mysqli_connect()
function by chang-
ing the
if
conditional as follows (Script
12.2):
if ($dbc = @mysqli_connect
➝
('localhost', 'username',
➝
'password', 'myblog')) {
Rather than have PHP print out an error
message when the
mysqli_connect()
function backfires (B in the previous
section, “Connecting to MySQL”), the
message will be suppressed here using
the
@
symbol. The errors still occur, but
they’re handled by the change made in
the next step.
3. Add the
mysqli_error()
function
to the
print
statement in the
else
section:
print '<p style="color:
➝
red;">Could not connect to
➝
MySQL:<br>' . mysqli_connect_
➝
error() . '.</p>';
continues on next page
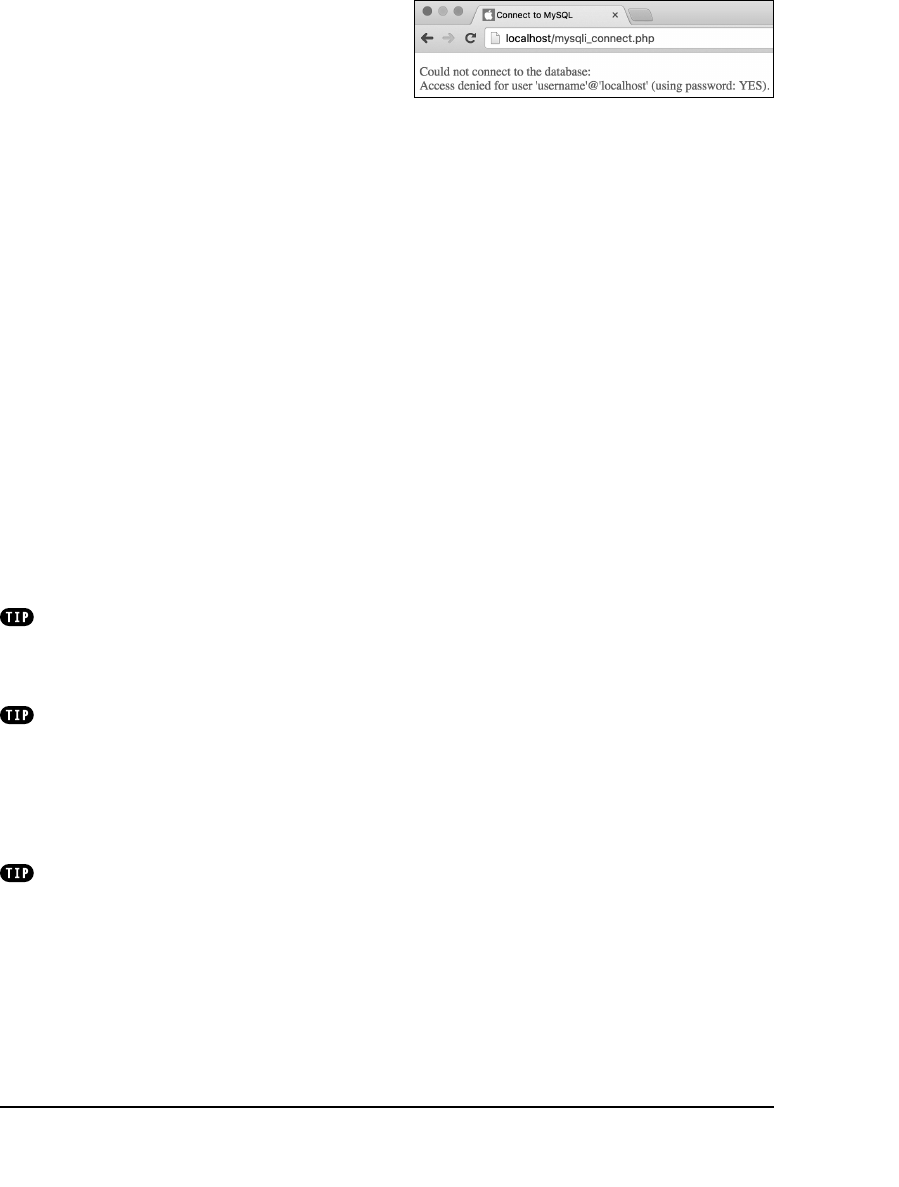
ptg18144795
354 Chapter 12
Instead of printing a message or relying
on whatever error PHP kicks out (see
B in the previous section, “Connecting
to MySQL”), the script now prints the
MySQL error within this context. You
accomplish this by printing some
HTML concatenated with the
mysqli_connect_error()
function.
You should note that the
mysqli_connect_error()
function is
not provided with the database connec-
tion—
$dbc
—as an argument, since no
database connection was made.
4. Save the file, and test it again in your
browser A.
If there was a problem, this result now
looks better than what would have
been shown previously. If the script
connected, the result is like that
shown in A in the previous section,
“Connecting to MySQL,” because
neither of the error-management tools
is involved.
In this chapter, error messages are
revealed to assist in the debugging process.
Live websites should not have this level of
explicit error messages shown to the user.
The error suppression operator should
be used only in very limited situations—
namely, when you’re handling the error in
other ways. As you build your PHP skills, you’ll
learn more sophisticated approaches for error
management, such as using exceptions and
writing your own error handler.
You may also see code where
die()
,
which is an alias for
exit()
, is called when a
connection error occurs. The thinking is that
since a database connection cannot be made,
there’s no point in continuing. In my opinion,
that’s too heavy-handed an approach.
A Using PHP’s error-control functions, you can
adjust how errors are handled.

ptg18144795
Intro to Databases 355
Creating a Table
Once you’ve created and selected the
initial database, you can begin creating
individual tables in it. A database can
consist of multiple tables, but in this simple
example you’ll create one table in which all
the chapter’s data will be stored.
To create a table in the database, you’ll use
SQL—the language that databases under-
stand. Because SQL is a lot like spoken
English, the proper query to create a new
table reads like this:
CREATE TABLE tablename (column1
➝
definition, column2 definition,
➝
etc.)
For each column, separated by commas,
you first indicate the column name and
then the column type. Common types are
TEXT
,
VARCHAR
(a variable number of char-
acters),
DATETIME
, and
INT
(integer).
Because it’s highly recommended that you
create a column that acts as the
primary
key
(a column used to refer to each row),
a simple
CREATE
statement could be
CREATE TABLE my_table (
id INT PRIMARY KEY,
information TEXT
)
A table’s primary key is a special column
of unique values that is used to refer to the
table’s rows. The database makes an index
of this column in order to more quickly nav-
igate through the table. A table can have
only one primary key, which you normally
set up as an automatically incremented col-
umn of integers. The first row has a key of
1, the second has a key of 2, and so forth.
Referring back to the key always retrieves
the values for that row.

ptg18144795
356 Chapter 12
Finally, it’s a good idea to establish the
default character set when creating a table
(or a database). This is accomplished by
adding
CHARACTER
SET
name
at the end of
the table creation statement:
CREATE TABLE my_table (
id INT PRIMARY KEY,
information TEXT
) CHARACTER SET utf8
Like the
charset
meta tag in HTML, this is
merely an indication of what encoding to
use for the stored characters. You almost
certainly want to use
utf8
here.
You can visit the MySQL website for more
information on SQL, column definitions,
and character sets. By following the direc-
tions in this section, though, you should be
able to accomplish some basic database
tasks. The table that you’ll create in this
example is represented by Table 12.2.
In this example, you’ll create the database
table that will be used to store information
submitted via an HTML form. In the next
section of the chapter, you’ll write the script
that inserts the submitted data into the
table created here.
To create the table with PHP, you use the
mysqli_query()
function to execute a
CREATE
TABLE
SQL command:
mysqli_query($dbc, 'CREATE TABLE
➝
entries...');
Alternatively, you can execute that same
SQL command via another interface, such
as the command-line MySQL client or the
web-based phpMyAdmin.
TABLE 12.1 The ENTRIES Table
Column Name Column Type
id
Positive, non-null,
automatically incrementing
integer
Title
Text up to 100 characters
in length
Entry
Text of any length
date_entered
A timestamp including both
the date and the time the row
was added
ptg18144795
Intro to Databases 357
To create a new table:
1. Begin a new PHP document in your
text editor or IDE, to be named
create_table.php
(Script 12.3):
<!doctype html>
<html lang="en">
<head>
<meta charset="utf-8">
<title>Create a Table</title>
</head>
<body>
2. Begin a section of PHP code:
<?php // Script 12.3 - create_
table.php
3. Connect to the MySQL database:
if ($dbc = @mysqli_connect
➝
('localhost', 'username',
➝
'password', 'myblog')) {
4. Define the query for creating the table:
$query = 'CREATE TABLE entries (
id INT UNSIGNED NOT NULL
➝
AUTO_INCREMENT PRIMARY KEY,
title VARCHAR(100) NOT NULL,
entry TEXT NOT NULL,
date_entered DATETIME NOT NULL
) CHARACTER SET utf8';
First, to create a new table, you write
CREATE
TABLE
tablename
(where
table-
name
is replaced by the desired table
name). Then, within parentheses, you
list every column you want, with each
column separated by a comma. Your
table and column names should be
alphanumeric, with no spaces.
continues on next page
Script 12.3 To create a database table, define the
appropriate SQL statement and then invoke the
mysqli_query()
function.
1 <!doctype html>
2 <html lang="en">
3 <head>
4 <meta charset="utf-8">
5 <title>Create a Table</title>
6 </head>
7 <body>
8 <?php // Script 12.3 - create_table.php
9 /* This script connects to the MySQL
server, selects the database, and
creates a table. */
10
11 // Connect and select:
12 if ($dbc = @mysqli_connect('localhost',
'username', 'password', 'myblog')) {
13
14 // Define the query:
15 $query = 'CREATE TABLE entries (
16 id INT UNSIGNED NOT NULL AUTO_
INCREMENT PRIMARY KEY,
17 title VARCHAR(100) NOT NULL,
18 entry TEXT NOT NULL,
19 date_entered DATETIME NOT NULL
20 ) CHARACTER SET utf8 ';
21
22 // Execute the query:
23 if (@mysqli_query($dbc, $query)) {
24 print '<p>The table has been
created!</p>';
25 } else {
26 print '<p style="color:
red;">Could not create the
table because:<br>' . mysqli_
error($dbc) . '.</p><p>The
query being run was: ' . $query
. '</p>';
27 }
28
29 mysqli_close($dbc); // Close the
connection.
30
31 } else { // Connection failure.
32 print '<p style="color: red;">Could
not connect to the database:<br>' .
mysqli_connect_error() . '.</p>';
33 }
34 ?>
35 </body>
36 </html>
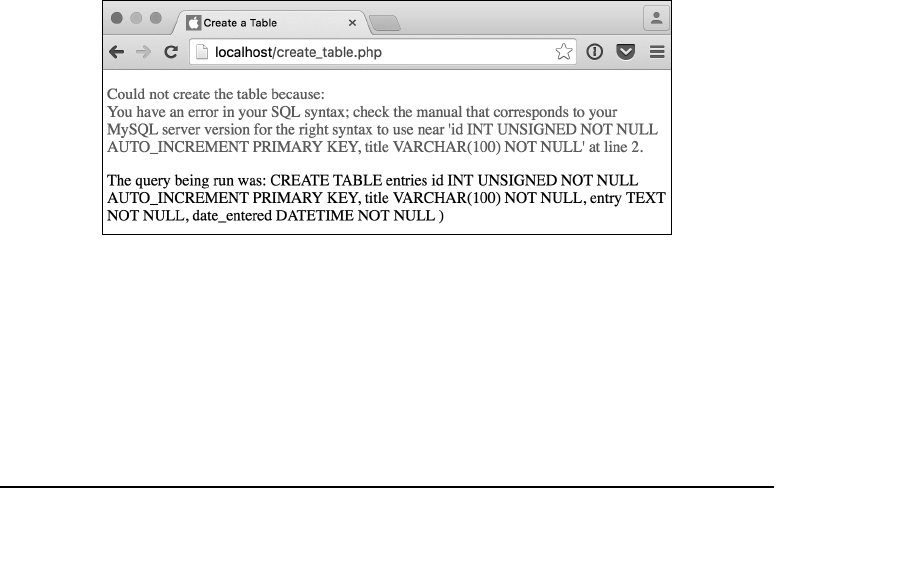
ptg18144795
358 Chapter 12
The first column in the table is
named
id;
it’s an unsigned integer
(
INT
UNSIGNED
—which means that it
can be only a positive whole number).
By including the words
NOT
NULL
, you
indicate that this column must have a
value for each row. The values auto-
matically increase by 1 for each row
added (
AUTO
INCREMENT
) and stand as
the primary key.
The next two columns consist of text.
One, named
title
, is limited to 100
characters
.
The second,
entry
, can
be vast in size. Each of these fields is
also marked as
NOT
NULL
, making them
required fields.
Finally, the
date_entered
column is
a timestamp that marks when each
record was added to the table.
A If the query caused an error, the MySQL error will be reported and the query
itself displayed (for debugging purposes).
5. Execute the query:
if (@mysqli_query($query, $dbc))
{
print '<p>The table has been
➝
created.</p>';
} else {
print '<p style="color:
➝
red;">Could not create the
➝
table because:<br>' . mysqli_
➝
error($dbc) . '.</p><p>The
➝
query being run was: ' .
➝
$query . '</p>';
}
To create the table, call the
mysqli_query()
function using the
database connection as the first argu-
ment and the query variable—
$query
—
as the second. If a problem occurred,
the MySQL error is printed, along with
the value of the
$query
variable. This
last step—printing the actual query
being executed—is a particularly useful
debugging technique A.
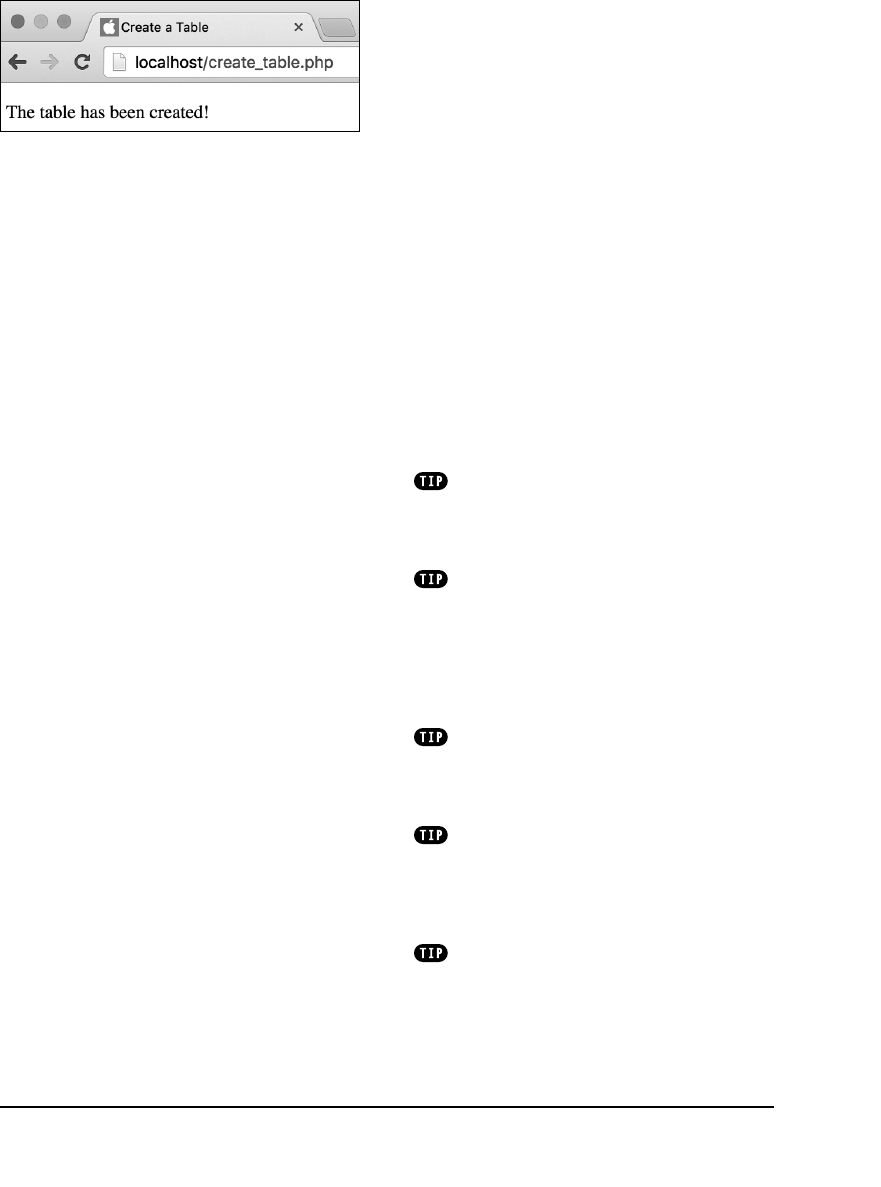
ptg18144795
Intro to Databases 359
6. Close the database connection, and
complete the
$dbc
conditional:
mysqli_close($dbc);
} else { // Connection failure.
print '<p style="color:
➝
red;">Could not connect to
➝
the database:<br>' . mysqli_
➝
connect_error() . '.</p>';
7. Complete the PHP code and the
HTML page:
?>
</body>
</html>
8. Save the script as
create_table.php
,
place it in the proper directory for your
PHP-enabled server, and test it in your
browser B.
It’s not necessary to write your SQL
keywords in all capital letters as I do here, but
doing so helps distinguish the SQL terms from
the table and column names.
On larger web applications, I highly
recommended that you place the database
connection code in a separate file, located out-
side the web directory. Then, each page that
requires the database can include this external
file. You’ll see an example of this in Chapter 13,
“Putting It All Together.”
The
mysqli_query()
function returns
TRUE if a query was successfully run on a
database. That result doesn’t necessarily
mean the desired result occurred.
This chapter presents the basics of
MySQL- and SQL-related knowledge (including
column types). You’ll want to check out other
resources—listed in Appendix B—once you’re
comfortable with the fundamentals.
You wouldn’t normally use a PHP script
to create a table, just as you wouldn’t normally
create a database using a PHP script, but
when you’re just starting with MySQL, this is
an easy way to achieve the desired results.
B If all went well, all you’ll see is this message.

ptg18144795
360 Chapter 12
The values are placed within parentheses,
with each value separated by a comma.
Non-numeric values—strings and dates—
need to be quoted, whereas numbers do
not:
INSERT INTO example (name, age)
➝
VALUES ('Jonah', 1)
The query is executed using the
mysqli_query()
function. Because
INSERT
queries can be complex, it makes sense to
assign each query to a variable and send
that variable to the
mysqli_query()
func-
tion (as previously demonstrated).
To demonstrate, let’s create a page that
adds blog entries to the database. Like
many of the examples in the preceding
chapter, this one will both display and
handle the HTML form. Before getting into
the example, though, I’ll say that this script
knowingly has a security hole in it; it’ll be
explained and fixed in the next section of
the chapter.
Inserting Data
into a Database
As mentioned, this database will be used
as a simple blog, an online journal. Blog
entries—consisting of a title and text—will
be added to the database using one page
and then displayed on another page.
The last script created the table, which
consists of four columns:
id
,
title
,
entry
,
and
date_entered
. The process of adding
information to a table is similar to creating
the table itself in terms of which PHP func-
tions you use, but the SQL query is different.
To insert records, use the
INSERT
SQL com-
mand with either of the following syntaxes:
INSERT INTO tablename VALUES
➝
(value1, value2, value3, etc.)
INSERT INTO tablename
➝
(column1_name, column2_name)
➝
VALUES (value1, value2)
The query begins with
INSERT
INTO
tablename
. Then you can either specify
which columns you’re inserting values for
or not name the columns explicitly. The
former is more specific and is therefore
preferred, but it can be tedious if you’re
populating a slew of columns. In either
case, you must be certain to list the right
number of total values and the right type
of value for each column. Building on This Example
The focus in this chapter is on explaining
and demonstrating the basics of using
PHP with MySQL. This also includes the
core components of SQL. However, this
chapter’s examples do a few things that
you wouldn’t want to do in a real site,
such as allow anyone to insert, edit, and
delete database records.
In the next chapter, a different example
will be developed that is also database
driven. That example will use cookies to
restrict what users can do with the site.
ptg18144795
Intro to Databases 361
Script 12.4 The query statement for adding information to a database is straightforward enough, but be sure
to match the number of values in parentheses to the number of columns in the database table.
1 <!doctype html>
2 <html lang="en">
3 <head>
4 <meta charset="utf-8">
5 <title>Add a Blog Entry</title>
6 </head>
7 <body>
8 <h1>Add a Blog Entry</h1>
9 <?php // Script 12.4 - add_entry.php
10 /* This script adds a blog entry to the database. */
11
12 if ($_SERVER['REQUEST_METHOD'] == 'POST') { // Handle the form.
13
14 // Validate the form data:
15 $problem = FALSE;
16 if (!empty($_POST['title']) && !empty($_POST['entry'])) {
17 $title = trim(strip_tags($_POST['title']));
18 $entry = trim(strip_tags($_POST['entry']));
19 } else {
20 print '<p style="color: red;">Please submit both a title and an entry.</p>';
21 $problem = TRUE;
22 }
23
24 if (!$problem) {
25
26 // Connect and select:
27 $dbc = mysqli_connect('localhost', 'username', 'password', 'myblog');
28
code continues on next page
To enter data into a database
from an HTML form:
1. Begin a new PHP document in your
text editor or IDE, to be named
add_entry.php
(Script 12.4):
<!doctype html>
<html lang="en">
<head>
<meta charset="utf-8">
<title>Add a Blog Entry</title>
</head>
<body>
<h1>Add a Blog Entry</h1>
continues on next page
ptg18144795
362 Chapter 12
2. Create the initial PHP section, and
check for the form submission:
<?php // Script 12.4 -
➝
add_entry.php
if ($_SERVER['REQUEST_METHOD'] ==
➝
'POST') {
3. Validate the form data:
$problem = FALSE;
if (!empty($_POST['title']) &&
!empty($_POST['entry'])) {
$title = trim(strip_tags
➝
($_POST['title']));
$entry = trim(strip_tags
➝
($_POST['entry']));
} else {
print '<p style="color:
➝
red;">Please submit both a
➝
title and an entry.</p>';
$problem = TRUE;
}
Script 12.4 continued
29 // Define the query:
30 $query = "INSERT INTO entries (id, title, entry, date_entered) VALUES (0,
'$title', '$entry', NOW())";
31
32 // Execute the query:
33 if (@mysqli_query($dbc, $query)) {
34 print '<p>The blog entry has been added!</p>';
35 } else {
36 print '<p style="color: red;">Could not add the entry because:<br>' . mysqli_
error($dbc) . '.</p><p>The query being run was: ' . $query . '</p>';
37 }
38
39 mysqli_close($dbc); // Close the connection.
40
41 } // No problem!
42
43 } // End of form submission IF.
44
45 // Display the form:
46 ?>
47 <form action="add_entry.php" method="post">
48 <p>Entry Title: <input type="text" name="title" size="40" maxsize="100"></p>
49 <p>Entry Text: <textarea name="entry" cols="40" rows="5"></textarea></p>
50 <input type="submit" name="submit" value="Post This Entry!">
51 </form>
52 </body>
53 </html>
Before you use the form data in an
INSERT
query, it ought to be validated. Just a
minimum of validation is used here, guar-
anteeing that some values are provided.
If so, new variables are assigned those
values, after trimming away extraneous
spaces and applying
strip_tags()
(to pre-
vent cross-site scripting attacks and other
potential problems). If either of the values
was empty, an error message is printed A,
and the
$problem
flag variable is set to
TRUE (because there is a problem).

ptg18144795
Intro to Databases 363
4. Connect to the database:
if (!$problem) {
$dbc = mysqli_connect
➝
('localhost', 'username',
➝
'password', 'myblog');
Having basically valid data, it’s safe to
add the record to the database, so a
connection must be established. At this
point, if you’re running these examples
in order, I’ll assume you have a work-
ing connection and selection process
down, so I’ll dispense with all the con-
ditionals and error reporting (mostly to
shorten the script). If you have problems
connecting to and selecting the data-
base, apply the code already outlined in
the chapter.
5. Define the
INSERT
query:
$query = "INSERT INTO entries
➝
(id, title, entry, date_
➝
entered) VALUES (0, '$title',
➝
'$entry', NOW())";
The query begins with the necessary
INSERT
INTO
tablename
code. Then it
lists the columns for which values will be
submitted. After that is
VALUES
, followed
by four values—one for each column,
in order—separated by commas. When
assigning this query to the
$query
vari-
able, use double quotation marks so that
the values of the variables will be auto-
matically inserted by PHP. The
$title
and
$entry
variables are strings, so
they must be placed within single quo-
tation marks in the query itself.
continues on next page
A The PHP script performs some basic form
validation so that empty records are not inserted
into the database.
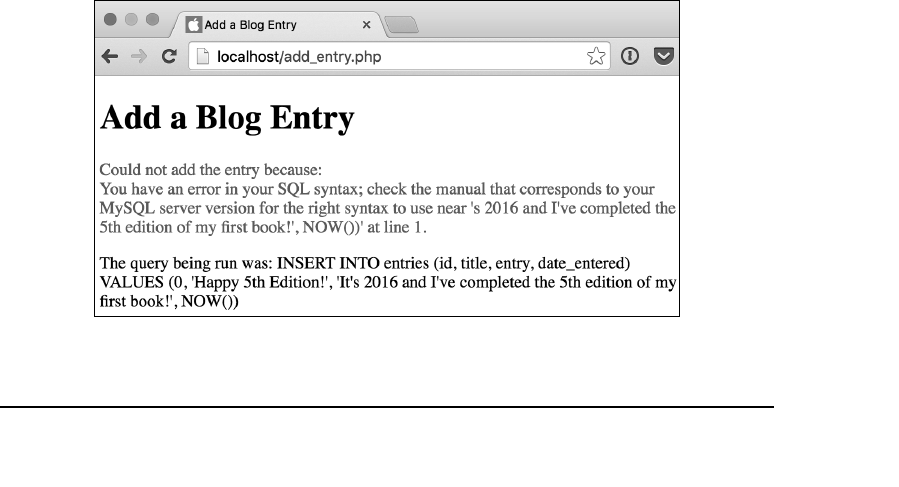
ptg18144795
364 Chapter 12
Because the
id
column has been set
to
AUTO_INCREMENT
, you can use 0 as
the value and MySQL will automati-
cally use the next logical value for that
column. You can also use the special
keyword
NULL
. To set the value of the
date_entered
column, use the MySQL
NOW()
function. It inserts the current
time as that value.
6. Run the query on the database:
if (@mysqli_query($dbc, $query)) {
print '<p>The blog entry has
➝
been added!</p>';
} else {
print '<p style="color:
➝
red;"> Could not add the
➝
entry because:<br />' .
➝
mysqli_ error($dbc) . '.
➝
</p><p>The query being run
➝
was: ' . $query . '</p>';
}
The query, once defined, is run using
the
mysqli_query()
function. By calling
this function as the condition of an
if-else
statement, you can print
simple messages indicating the result
of the query execution.
B If the
INSERT
query didn’t work, the MySQL error is printed out along with the
query that was run.
As an essential debugging tool, if the
query didn’t run properly, the MySQL
error and the query being run are both
printed to the browser B.
7. Close the database connection, the
$problem
conditional, and complete the
main conditional and the PHP section:
mysqli_close($dbc);
} // No problem!
} // End of form submission IF.
?>
From here on out, the form will be
displayed.
8. Create the form:
<form action="add_entry.php"
➝
method="post">
<p>Entry Title: <input type=
➝
"text" name="title" size="40"
➝
maxsize="100"></p>
<p>Entry Text: <textarea
➝
name="entry" cols="40"
➝
rows="5"></textarea></p>
<input type="submit" name=
➝
"submit" value="Post This
➝
Entry!">
</form>
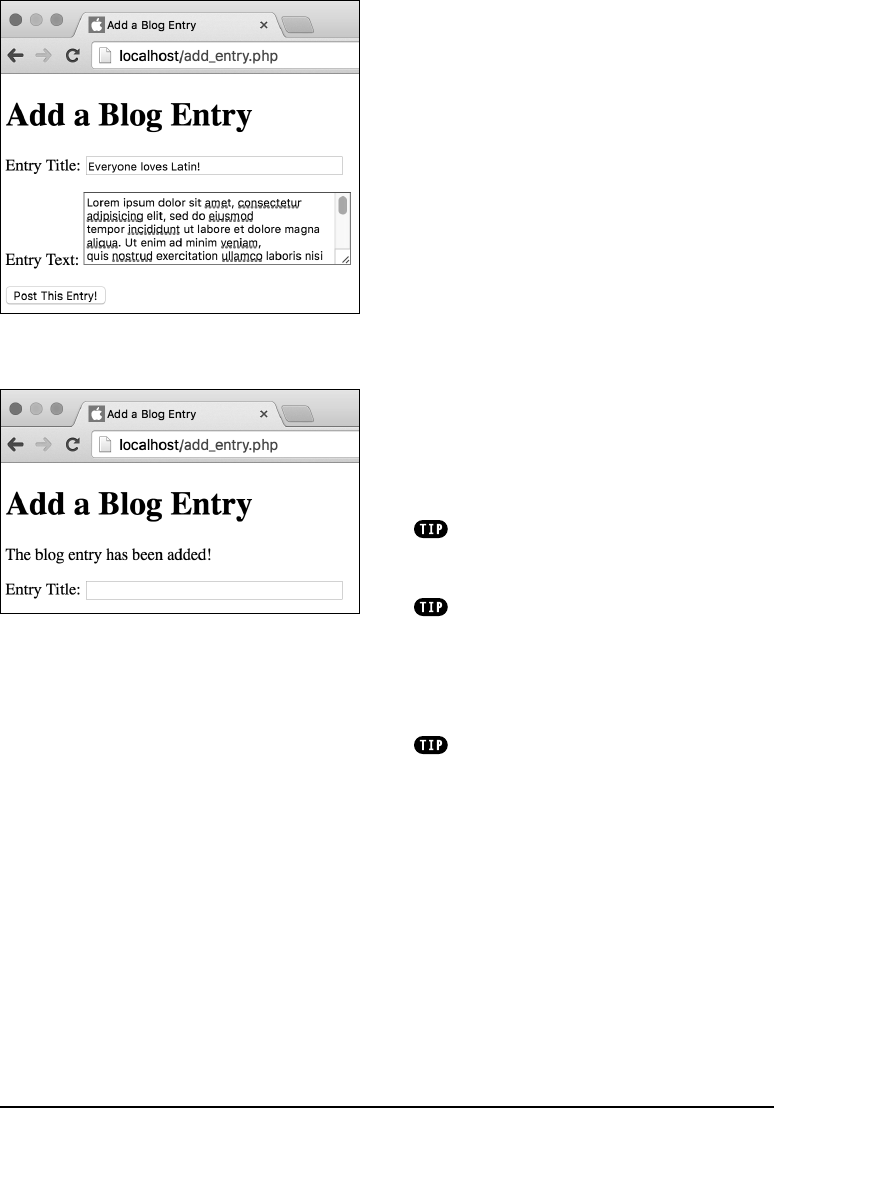
ptg18144795
Intro to Databases 365
The HTML form is very simple, requiring
only a title for the blog entry and the
entry itself. As a good rule of thumb,
use the same name for your form inputs
as for the corresponding column names
in the database. Doing so makes errors
less likely.
9. Finish the HTML page:
</body>
</html>
10. Save the script as
add_entry.php
,
place it in the proper directory for your
PHP-enabled server, and test it in your
browser C and D.
You should probably avoid using
apostrophes in your form values or you
might see results like those in B. You’ll
find the explanation and solution in the
next section.
To retrieve the automatically incremented
number created for an
AUTO_INCREMENT
col-
umn, call the
mysqli_insert_id()
function.
Because of the way auto-incrementing
primary keys work, this query is also fine:
INSERT INTO entries (title, entry,
➝
date_entered) VALUES ('$title',
➝
'$entry', NOW())";
MySQL allows you to insert several
records at once, using this format:
INSERT INTO tablename
➝
(column1_name, column2_name)
➝
VALUES (value1, value2), (value3,
➝
value4);
Most other database applications don’t support
this construct, though.
C This is the form for adding an entry to the
database.
D If the
INSERT
query ran properly, a message is
printed and the form is displayed again.
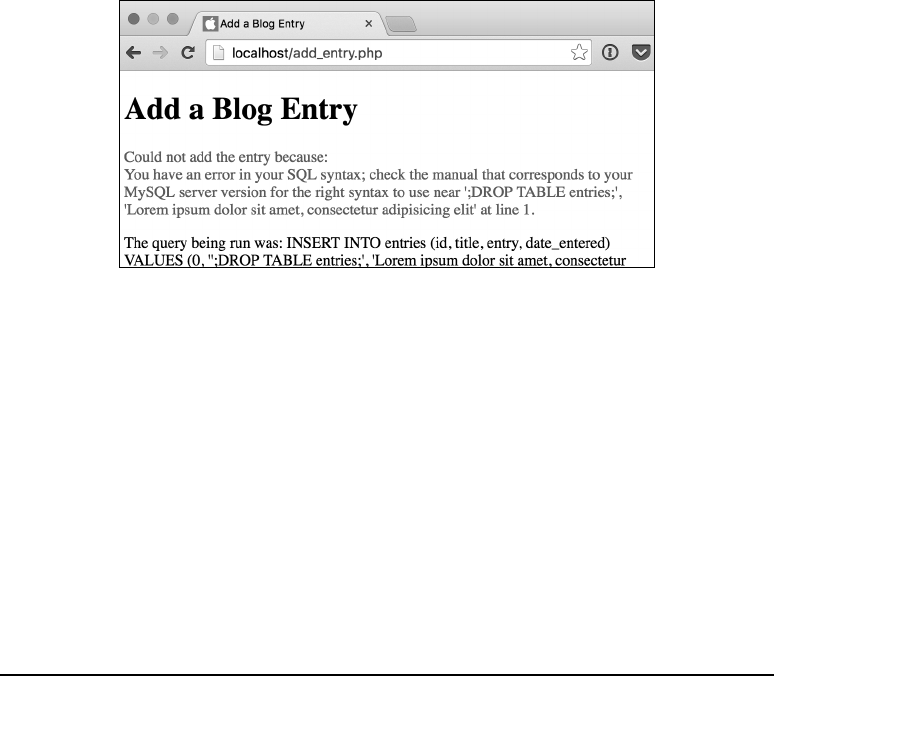
ptg18144795
366 Chapter 12
Securing Query Data
As I mentioned in the introduction to the
section “Inserting Data into a Database,”
the code as written has a pretty bad secu-
rity hole in it. As it stands, if someone
submits text that contains an apostrophe,
that data will break the SQL query A
(security concerns aside, it’s also a pretty
bad bug). The result is obviously undesir-
able, but why is it insecure?
If malicious users know they can break a
query by typing an apostrophe, they may try
to run their own queries using this hole. If
someone submitted
‘;DROP TABLE entries;
A The poor handling of apostrophes allows users to break the query
because apostrophes (or single quotation marks) are used to delimit strings
used in queries.
as the blog post title, the resulting query
would be
INSERT INTO entries
➝
(id, title, entry, date_entered)
➝
VALUES (0, '';DROP TABLE
➝
entries;', '<entry text>', NOW())
The initial apostrophe in the provided entry
title has the effect of completing the blog
title value part of the query. The semicolon
then terminates the
INSERT
query itself.
This will make the original query syntacti-
cally invalid. Then the database will be
provided with a second query—
DROP
TABLE
entries
—with the hope that it will be exe-
cuted when the original
INSERT
query fails.

ptg18144795
Intro to Databases 367
This is known as an
SQL injection attack
,
but fortunately it’s easy to prevent.
To do so, send potentially insecure data
to be used in a query through the
mysqli_real_escape_string()
function.
This function will escape—preface with a
backslash—any potentially harmful char-
acters, making the data safe to use in a
query:
$var = mysqli_real_escape_string
➝
($dbc, $var);
For this function to work properly, the
character set needs to be established for
the communications:
mysqli_set_charset($dbc, 'utf8')
This code effectively serves the same
purpose as the
charset
meta tag in HTML:
indicating the character set—or
character
encoding
—of the data to follow. The previ-
ous code does assume your PHP script,
database, and table are all using UTF-8,
which they really ought to be by default (and
was specifically established on the table
when it was created, just to be certain).
Let’s apply this function to the
preceding script. Because both
mysqli_real_escape_string()
and
mysqli_set_charset()
require the data-
base connection, the logic of the script
must be tweaked a bit.
Showing MySQL Errors
Even if MySQL doesn’t execute an
injected SQL command (normally MySQL
will only run a single SQL query sent
through the
mysqli_query()
function),
hackers will provide bad characters in
form data in the hopes that the syntacti-
cally broken query generates a database
error. By seeing the database error,
the hacker seeks to gain knowledge
about the database that can be used for
malicious purposes. For this reason, it’s
imperative that a live site never reveal
the actual MySQL errors or queries being
executed. The scripts in this chapter
do so only for your own debugging
purposes.

ptg18144795
368 Chapter 12
To secure query data:
1. Open
add_entry.php
(Script 12.4) in
your text editor or IDE, if it is not already
open.
2. Update the assignment of the
$title
and
$entry
variables to read (Script
12.5) as follows:
$title = mysqli_real_escape_
➝
string($dbc, trim(strip_tags
➝
($_POST['title'])));
$entry = mysqli_real_escape_
➝
string($dbc, trim(strip_tags
➝
($_POST['entry'])));
These two lines will greatly improve
the security and functionality of the
script. For both posted variables, their
values are first trimmed and stripped of
tags, then sent through
mysqli_real_
escape_string()
. The result will be
safe to use in the query.
If the application of three functions to
one variable is too confusing for you,
you can separate the code into discrete
steps:
$title = $_POST['title'];
$title = trim(strip_tags
➝
($title));
$title = mysqli_real_escape_
➝
string($dbc, $title);
3. Move the database connection code—
line 27 in Script 12.4—to above the
validation lines.
The database connection should be
established within the form handling
code, but before
$problem
=
FALSE;
.
continues on page 370
Script 12.5 To better secure the web application and the database, the
mysqli_real_escape_string()
function is applied to the form data used in the query.
1 <!doctype html>
2 <html lang="en">
3 <head>
4 <meta charset="utf-8">
5 <title>Add a Blog Entry</title>
6 </head>
7 <body>
8 <h1>Add a Blog Entry</h1>
9 <?php // Script 12.5 - add_entry.php #2
10 /* This script adds a blog entry to the database. It now does so securely! */
11
12 if ($_SERVER['REQUEST_METHOD'] == 'POST') { // Handle the form.
13
code continues on next page

ptg18144795
Intro to Databases 369
Script 12.5 continued
14 // Connect and select:
15 $dbc = mysqli_connect('localhost', 'username', 'password', 'myblog');
16
17 //Set the character set:
18 mysqli_set_charset($dbc, 'utf8');
20 // Validate and secure the form data:
21 $problem = FALSE;
22 if (!empty($_POST['title']) && !empty($_POST['entry'])) {
23 $title = mysqli_real_escape_string($dbc, trim(strip_tags($_POST['title'])));
24 $entry = mysqli_real_escape_string($dbc, trim(strip_tags($_POST['entry'])));
25 } else {
26 print '<p style="color: red;">Please submit both a title and an entry.</p>';
27 $problem = TRUE;
28 }
29
30 if (!$problem) {
31
32 // Define the query:
33 $query = "INSERT INTO entries (id, title, entry, date_entered) VALUES (0, '$title',
'$entry', NOW())";
34
35 // Execute the query:
36 if (@mysqli_query($dbc, $query)) {
37 print '<p>The blog entry has been added!</p>';
38 } else {
39 print '<p style="color: red;">Could not add the entry because:<br>' . mysqli_
error($dbc) . '.</p><p>The query being run was: ' . $query . '</p>';
40 }
41
42 } // No problem!
43
44 mysqli_close($dbc); // Close the connection.
45
46 } // End of form submission IF.
47
48 // Display the form:
49 ?>
50 <form action="add_entry.php" method="post">
51 <p>Entry Title: <input type="text" name="title" size="40" maxsize="100"></p>
52 <p>Entry Text: <textarea name="entry" cols="40" rows="5"></textarea></p>
53 <input type="submit" name="submit" value="Post This Entry!">
54 </form>
55 </body>
56 </html>
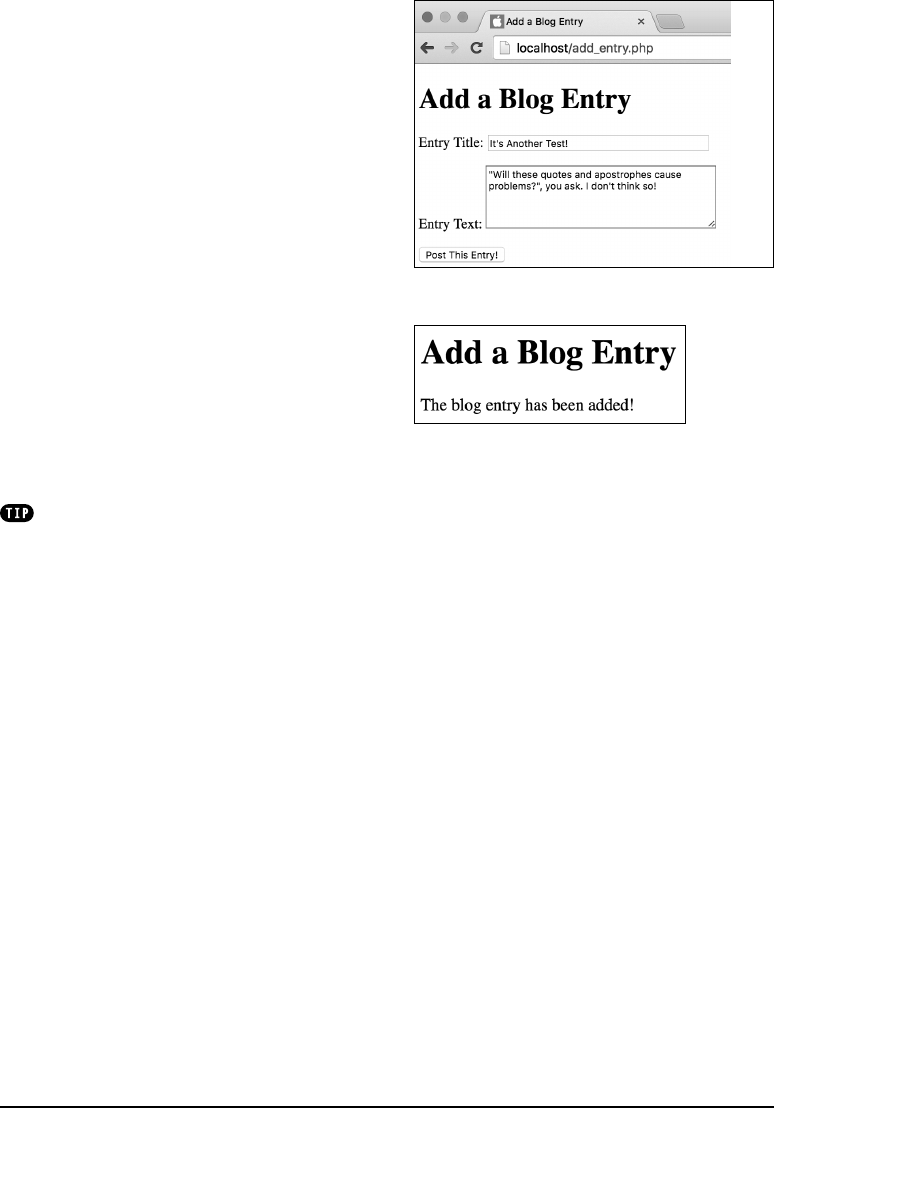
ptg18144795
370 Chapter 12
4. Move the database closing code—
line 39 in Script 12.4—to just before
the close of the form submission
conditional.
Because the database connection is
opened first thing within the form han-
dling conditional, the database connec-
tion should be closed as the last step
within that same block.
5. After opening the database connection,
identify the character set in use:
mysqli_set_charset($dbc, 'utf8');
This needs to be done before
mysqli_real_escape_string()
is invoked.
6. Save the script, place it on your PHP-
enabled server, and test it in your
browser B and C.
PHP’s
addslashes()
function works
similarly to
mysqli_real_escape_string()
but is not nearly as secure.
B Now apostrophes in form data…
C …will not cause problems.

ptg18144795
Intro to Databases 371
Retrieving Data
from a Database
The next process this chapter demon-
strates is retrieving data from a populated
table. You still use the
mysqli_query()
function to run the query, but retrieving
data is slightly different than inserting
data—you have to assign the query result
to a variable and then use another function
to fetch the data.
The basic syntax for retrieving data is the
SELECT
query:
SELECT what columns FROM what table
The easiest query for reading data from a
table is
SELECT * FROM tablename
The asterisk is the equivalent of saying
every column
. If you require only certain
columns to be returned, you can limit your
query, like so:
SELECT name, email FROM users
That query requests that only the infor-
mation from two columns—
name
and
email
—be gathered. Keep in mind that
this structure doesn’t limit what rows (or
records) are returned, just what columns
for those rows.
Another way to alter your query is to add
a conditional restricting which rows are
returned, accomplished using a
WHERE
clause:
SELECT * FROM users WHERE name=
➝
'Larry'
Here you want the information from every
column in the table, but only from the rows
where the
name
column is equal to
Larry
.
This is a good example of how SQL uses
only a few terms effectively and flexibly.
The main difference in retrieving data
from a database as opposed to inserting
data into a database is that you need to
handle the query differently. You should
first assign the results of the query to
a variable:
$result = mysqli_query($dbc,
➝
$query);
Just as
$dbc
is a reference to an open
database connection,
$result
is a refer-
ence to a query result set. This variable
is then provided to the
mysqli_fetch_
array()
function, which retrieves the
query results:
$row = mysqli_fetch_array($result);
The function fetches one row from the
result set at a time, creating an array
in the process. The array will use the
selected column names as its indexes:
$row['name']
,
$row['email']
, and so on.
As with any array, you must refer to the
columns exactly as they’re defined in the
database (the keys are case-sensitive).
So, in this example, you must use
$row['email']
instead of
$row['Email']
.
If the query will return multiple rows,
execute the
mysqli_fetch_array()
function within a loop to access them all:
while ($row = mysqli_fetch_
➝
array($result)) {
// Do something with $row.
}
continues on next page

ptg18144795
372 Chapter 12
With each iteration of the loop, the next
row of information from the query (refer-
enced by
$result
) is assigned to an array
named
$row
. This process continues until
no more rows of information are found.
Within the loop, you would do whatever
you want with
$row
.
The best way to understand this new code
is to try it. You’ll write a script that retrieves
the posts stored in the
entries
table and
displays them A. You may want to run
through
add_entry.php
a couple of more
times to build up the table first.
To retrieve data from a table:
1. Begin a new PHP document in your
text editor or IDE, to be named
view_entries.php
(Script 12.6):
<!doctype html>
<html lang="en">
<head>
<meta charset="utf-8">
<title>View My Blog</title>
</head>
<body>
<h1>My Blog</h1>
A This dynamic web page uses PHP to pull data
from a database.
Script 12.6 The SQL query for retrieving all data from a table is quite simple, but in order for PHP to access
every returned record, you must loop through the results one row at a time.
1 <!doctype html>
2 <html lang="en">
3 <head>
4 <meta charset="utf-8">
5 <title>View My Blog</title>
6 </head>
7 <body>
8 <h1>My Blog</h1>
9 <?php // Script 12.6 - view_entries.php
10 /* This script retrieves blog entries from the database. */
11
12 // Connect and select:
13 $dbc = mysqli_connect('localhost', 'username', 'password', 'myblog');
14
code continues on next page

ptg18144795
Intro to Databases 373
(recorded in the
date_entered
column),
starting with the most recent first. This
last option is set by
DESC
, which is short
for
descending
. If the query was
ORDER
BY
date_entered
ASC
, the most recently
added record would be retrieved last.
4. Run the query:
if ($r = mysqli_query($dbc,
➝
$query)) {
The
SELECT
query is run like any other.
However, the result of the query is
assigned to a
$result
(or, more
tersely,
$r
) variable, which will be
referenced later.
continues on next page
Script 12.6 continued
15 // Define the query:
16 $query = 'SELECT * FROM entries ORDER BY date_entered DESC';
17
18 if ($r = mysqli_query($dbc, $query)) { // Run the query.
19
20 // Retrieve and print every record:
21 while ($row = mysqli_fetch_array($r)) {
22 print "<p><h3>{$row['title']}</h3>
23 {$row['entry']}<br>
24 <a href=\"edit_entry.php?id={$row['id']}\">Edit</a>
25 <a href=\"delete_entry.php?id={$row['id']}\">Delete</a>
26 </p><hr>\n";
27 }
28
29 } else { // Query didn't run.
30 print '<p style="color: red;">Could not retrieve the data because:<br>' . mysqli_
error($dbc) . '.</p><p>The query being run was: ' . $query . '</p>';
31 } // End of query IF.
32
33 mysqli_close($dbc); // Close the connection.
34
35 ?>
36 </body>
37 </html>
2. Begin a PHP section, and connect to
the database:
<?php // Script 12.6 - view_
➝
entries.php
$dbc = mysqli_connect
➝
('localhost', 'username',
➝
'password', 'myblog');
3. Define the
SELECT
query:
$query = 'SELECT * FROM entries
ORDER BY date_entered DESC';
This basic query tells the database
that you’d like to fetch every column
of every row in the
entries
table. The
returned records should be sorted, as
indicated by the
ORDER
BY
clause, by
the order in which they were entered
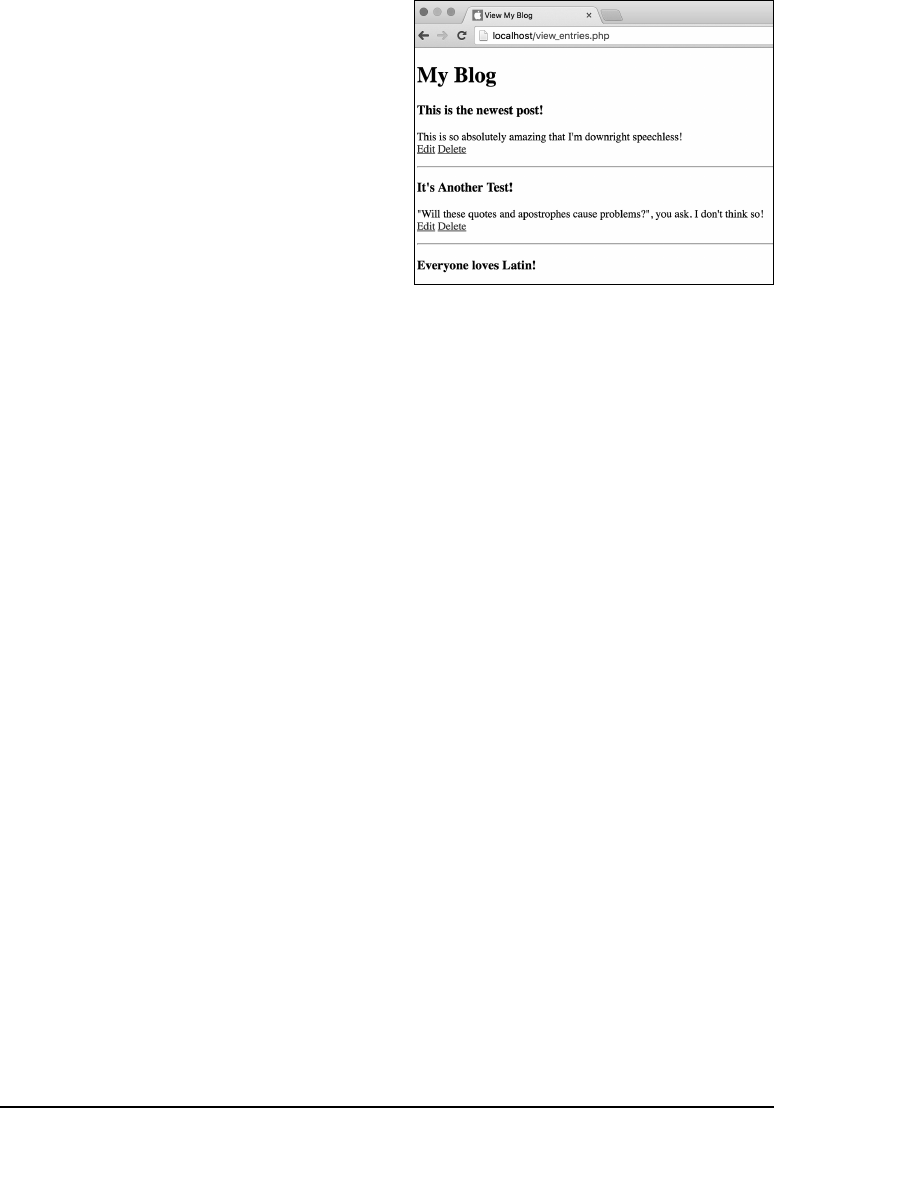
ptg18144795
374 Chapter 12
5. Print out the returned results:
while ($row = mysqli_fetch_
➝
array($r)) {
print "<p><h3>{$row['title']}
➝
</h3>
{$row['entry']}<br />
<a href=\"edit_entry.php?id=
➝
{$row['id']}\">Edit</a>
<a href=\"delete_entry.php?
➝
id={$row['id']}\">Delete</a>
</p><hr />\n";
}
This loop sets the variable
$row
to
an array containing the first record
returned in
$r
. The loop then executes
the following command (the
print
statement). Once the loop gets back to
the beginning, it assigns the next row,
if it exists. It continues to do this until
there are no more rows of information
to be obtained.
Within the loop, the array’s keys are the
names of the columns from the table—
hence,
id
,
title
, and
entry
(it’s not
printing out the
date_entered
).
At the bottom of each post, two links
are created: to
edit_entry.php
and
delete_entry.php
. These scripts will
be written in the rest of the chapter.
Each link passes the posting’s database
ID value along in the URL. That informa-
tion will be necessary for those other
two pages to edit and delete the blog
posting accordingly.
B Thanks to the
SELECT
query, which orders the
returned records by the date they were entered,
the most recently added entry is always listed first.
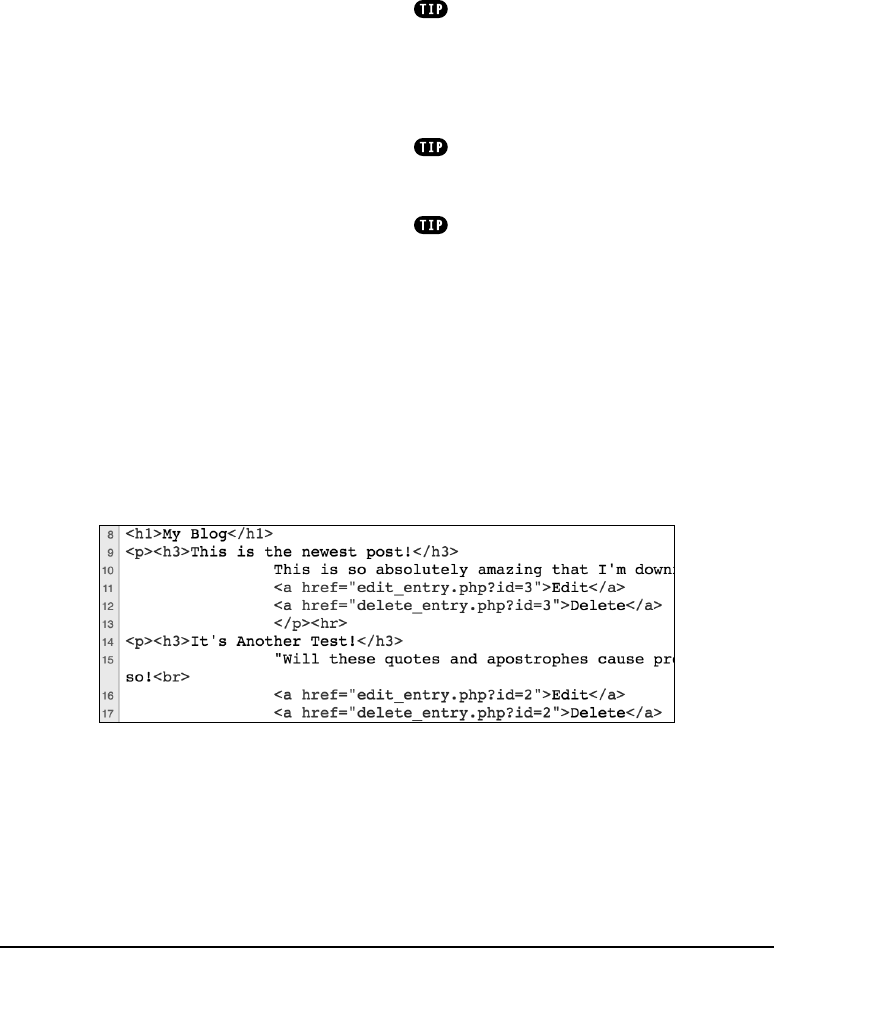
ptg18144795
Intro to Databases 375
6. Handle the errors if the query didn’t run:
} else { // Query didn't run.
print '<p style="color: red;">
➝
Could not retrieve the
➝
data because:<br>' .
➝
mysqli_error($dbc) . '.
➝
</p> <p>The query being run
➝
was: ' . $query . '</p>';
} // End of query IF.
If the query couldn’t run on the data-
base, it should be printed out, along
with the MySQL error (for debugging
purposes).
7. Close the database connection:
mysqli_close($dbc);
8. Complete the PHP section and the
HTML page:
?>
</body>
</html>
9. Save the script as
view_entries.php
,
place it in the proper directory for your
PHP-enabled server, and test it in your
browser A.
C Part of the HTML source of the page. Note that the two links have
?id=X
appended to each URL.
10. If you want, add another record to the
blog using the
add_entry.php
page
(Script 12.6), and run this page again B.
11. Check the source code of the page to
see the dynamically generated links C.
The
mysqli_fetch_array()
function
takes another argument, which is a con-
stant indicating what kind of array should be
returned.
MYSQLI_ASSOC
returns an associa-
tive array, whereas
MYSQLI_NUM
returns a
numerically indexed array.
The
mysqli_num_rows()
function
returns the number of records returned by a
SELECT
query.
It’s possible to paginate returned records
so that 10 or 20 appear on each page (like the
way Google works). Doing so requires more
advanced coding than can be taught in this
book, though. See my book PHP and MySQL
for Dynamic Web Sites: Visual QuickPro Guide
(Peachpit Press, 2012), or look online for code
examples and tutorials.
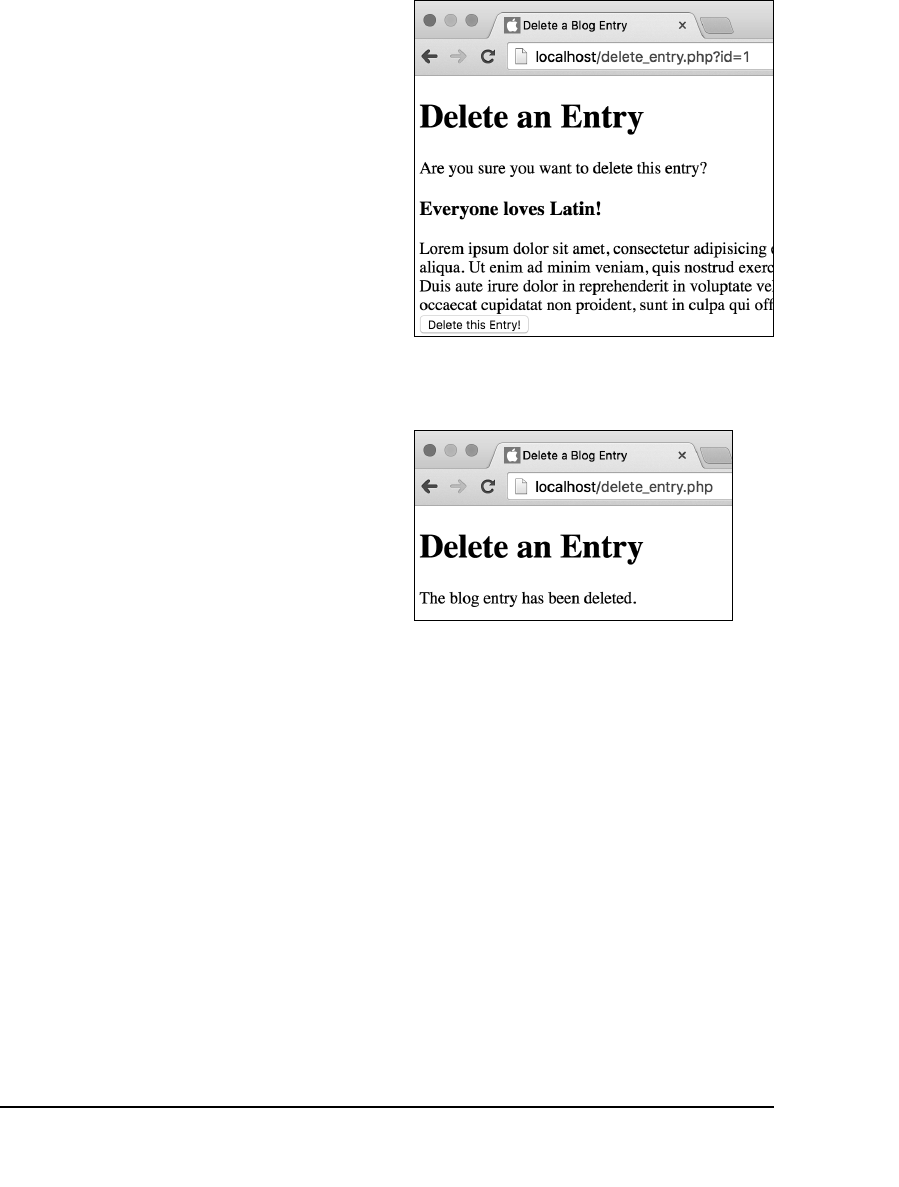
ptg18144795
376 Chapter 12
Deleting Data in
a Database
Sometimes you might also want to run a
DELETE
query on a database. Such a query
removes records from the database. The
syntax for a delete query is
DELETE FROM tablename WHERE
➝
column=value
The
WHERE
clause isn’t required, but if it’s
omitted, you’ll remove every record from
the table. You should also understand that
once you delete a record, there’s no way
to recover it (unless you have a backup of
the database).
As a safeguard, if you want to delete only
a single record from a table, add the
LIMIT
clause to the query:
DELETE FROM tablename WHERE
➝
column=value LIMIT 1
This clause ensures that only one record
is deleted at most. Once you’ve defined
your query, it’s again executed using the
mysqli_query()
function, like any other
query.
To see if a
DELETE
query worked, you can
use the
mysqli_affected_rows()
func-
tion. This function returns the number of
rows affected by an
INSERT
,
DELETE
, or
UPDATE
query. It takes the database con-
nection as an argument.
As an example, let’s write the
delete_
entry.php
script, which is linked from the
view_blog.php
page. This page receives
the database record ID in the URL. It then
displays the entry to confirm that the user
wants to delete it A. If the user clicks the
button, the record will be deleted B.
A When the user arrives at this page, the
blog entry is shown, and the user must confirm
deleting it.
B If the delete query worked properly, the
user sees this result.
ptg18144795
Intro to Databases 377
To delete data from a database:
1. Begin a new PHP document in your
text editor or IDE, to be named
delete_entry.php
(Script 12.7):
<!doctype html>
<html lang="en">
<head>
<meta charset="utf-8">
<title>Delete a Blog Entry
➝
</title>
</head>
<body>
<h1>Delete an Entry</h1>
2. Start the PHP code, and connect to the
database:
<?php // Script 12.7 -
➝
delete_entry.php
$dbc = mysqli_connect
➝
('localhost', 'username',
➝
'password', 'myblog');
continues on page 379
Script 12.7 The
DELETE
SQL command permanently removes a record (or records) from a table.
1 <!doctype html>
2 <html lang="en">
3 <head>
4 <meta charset="utf-8">
5 <title>Delete a Blog Entry</title>
6 </head>
7 <body>
8 <h1>Delete an Entry</h1>
9 <?php // Script 12.7 - delete_entry.php
10 /* This script deletes a blog entry. */
11
12 // Connect and select:
13 $dbc = mysqli_connect('localhost', 'username', 'password', 'myblog');
14
15 if (isset($_GET['id']) && is_numeric($_GET['id']) ) { // Display the entry in a form:
16
17 // Define the query:
18 $query = "SELECT title, entry FROM entries WHERE id={$_GET['id']}";
19 if ($r = mysqli_query($dbc, $query)) { // Run the query.
20
code continues on next page

ptg18144795
378 Chapter 12
Script 12.7 continued
21 $row = mysqli_fetch_array($r); // Retrieve the information.
22
23 // Make the form:
24 print '<form action="delete_entry.php" method="post">
25 <p>Are you sure you want to delete this entry?</p>
26 <p><h3>' . $row['title'] . '</h3>' .
27 $row['entry'] . '<br>
28 <input type="hidden" name="id" value="' . $_GET['id'] . '">
29 <input type="submit" name="submit" value="Delete this Entry!"></p>
30 </form>';
31
32 } else { // Couldn't get the information.
33 print '<p style="color: red;">Could not retrieve the blog entry because:<br>' . mysqli_
error($dbc) . '.</p><p>The query being run was: ' . $query . '</p>';
34 }
35
36 } elseif (isset($_POST['id']) && is_numeric($_POST['id'])) { // Handle the form.
37
38 // Define the query:
39 $query = "DELETE FROM entries WHERE id={$_POST['id']} LIMIT 1";
40 $r = mysqli_query($dbc, $query); // Execute the query.
41
42 // Report on the result:
43 if (mysqli_affected_rows($dbc) == 1) {
44 print '<p>The blog entry has been deleted.</p>';
45 } else {
46 print '<p style="color: red;">Could not delete the blog entry because:<br>' .
mysqli_error($dbc) . '.</p><p>The query being run was: ' . $query . '</p>';
47 }
48
49 } else { // No ID received.
50 print '<p style="color: red;">This page has been accessed in error.</p>';
51 } // End of main IF.
52
53 mysqli_close($dbc); // Close the connection.
54
55 ?>
56 </body>
57 </html>

ptg18144795
Intro to Databases 379
3. If the page received a valid entry ID in
the URL, define and execute a
SELECT
query:
if (isset($_GET['id']) && is_
➝
numeric ($_GET['id']) ) {
$query = "SELECT title,
➝
entry FROM entries WHERE
➝
id={$_GET['id']}";
if ($r = mysqli_query($dbc,
➝
$query)) {
To display the blog entry, the page must
confirm that a numeric ID is received
by the page. Because that value should
first come in the URL (when the user
clicks the link in
view_blog.php
, see C
in the previous section, “Retrieving
Data from a Database”), you reference
$_GET['id']
. The use of
is_numeric()
here does more than just ensure a
record can be retrieved; it’s also an
important security measure. Because
the
$_GET['id']
value is used directly
in the query—without quotes—testing
that value against
is_numeric()
pre-
vents the query from breaking or being
used in an attack.
The query is like the
SELECT
query used
in the preceding example, except that
the
WHERE
clause has been added to
retrieve a specific record. Also, because
only the two stored values are neces-
sary—the title and the entry itself—only
those are being selected.
This query is then executed using the
mysqli_query()
function.
4. Retrieve the record, and display the
entry in a form:
$row = mysqli_fetch_array($r);
print '<form action="delete_
➝
entry.php" method="post">
<p>Are you sure you want to
➝
delete this entry?</p>
<p><h3>' . $row['title'] .
➝
'</h3>' .
$row['entry'] . '<br>
<input type="hidden" name="id"
➝
value="' . $_GET['id'] . '">
<input type="submit" name=
➝
"submit" value="Delete this
➝
Entry!"></p>
</form>';
Instead of retrieving all the records
using a
while
loop, as you did in the
previous example, use one call to the
mysqli_fetch_array()
function to
assign the returned record to the
$row
variable. Using this array, the record to
be deleted can be displayed.
The form first shows the blog entry
details, much as it did in the
view_entries.php
script. When the
user clicks the button, the form will be
submitted back to this page, at which
point the record should be deleted. In
order to do so, the blog identification
number, which is passed to the script
as
$_GET['id']
, must be stored in
a hidden input so that it exists in the
$_POST
array upon submission (because
$_GET['id']
won’t have a value at
that point).
continues on next page

ptg18144795
380 Chapter 12
5. Report an error if the query failed:
} else { // Couldn't get the
➝
information.
print '<p style="color: red;">
➝
Could not retrieve the blog
➝
entry because:<br>' . mysqli_
➝
error($dbc) . '.</p> <p>The
➝
query being run was: ' .
$query . '</p>';
}
If the
SELECT
query failed to run, the
MySQL error and the query itself are
printed out.
6. Check for the submission of the form:
} elseif (isset($_POST['id']) &&
➝
is_numeric($_POST['id'])) { //
➝
Handle the form.
This
elseif
clause is part of the condi-
tional begun in Step 3. It corresponds
to the second usage of this same
script (the form being submitted). If this
conditional is TRUE, the record should
be deleted.
7. Define and execute the query:
$query = "DELETE FROM entries
➝
WHERE id={$_POST['id']} LIMIT
➝
1";
$r = mysqli_query($dbc, $query);
This query deletes the record whose
id
has a value of
$_POST['id']
. The ID
value comes from the form, where it’s
stored as a hidden input. By adding the
LIMIT
1
clause to the query, you can
guarantee that only one record, at most,
is removed.
8. Check the result of the query:
if (mysqli_affected_rows($dbc)
➝
== 1) {
print '<p>The blog entry has
➝
been deleted.</p>';
} else {
print '<p style="color: red;">
➝
Could not delete the blog
➝
entry because:<br>' . mysqli_
➝
error($dbc) . '.</p> <p>The
➝
query being run was: ' .
➝
$query . '</p>';
}
The
mysqli_affected_rows()
function
returns the number of rows altered by
the most recent query. If the query ran
properly, one row was deleted, so this
function should return 1. If so, a mes-
sage is printed. Otherwise, the MySQL
error and query are printed for debug-
ging purposes.
9. Complete the main conditional:
} else { // No ID received.
print '<p style="color: red;">
➝
This page has been accessed
➝
in error.</p>';
} // End of main IF.
If no numeric ID value was passed to
this page using either the GET method
or the POST method, then this
else
clause takes effect C.
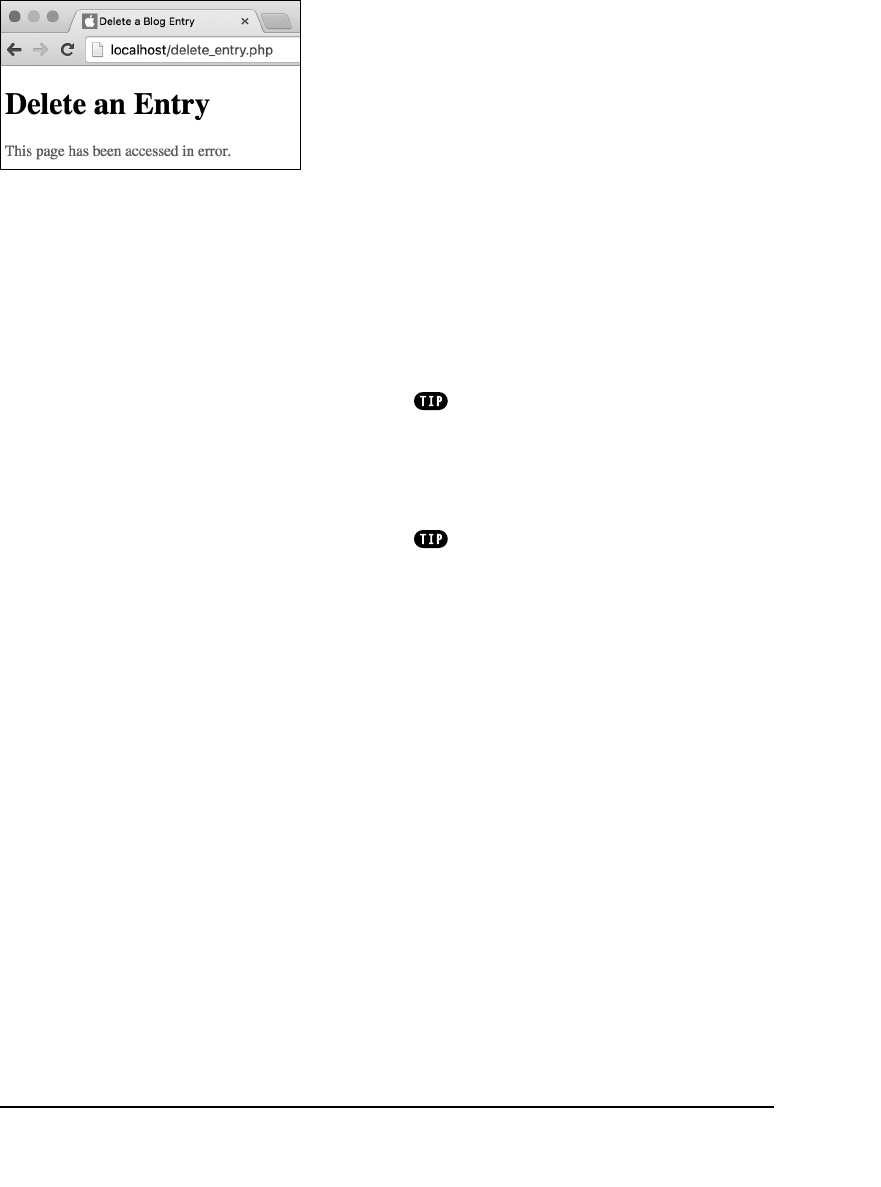
ptg18144795
Intro to Databases 381
10. Close the database connection, and
complete the page:
mysqli_close($dbc);
?>
</body>
</html>
11. Save the script as
delete_entry.php
,
place it in the proper directory for your
PHP-enabled server, and test it in your
browser A and B.
To test this script, you must first run
view_entries.php
. Then, click one
of the Delete links to access
delete_entry.php
.
You can empty a table of all of its records
by running the query
TRUNCATE
TABLE
tablename
. This approach is preferred over
using
DELETE
FROM
tablename
.
TRUNCATE
will completely drop and rebuild the table,
which is better for the database.
It’s a fairly common error to try to run
the query
DELETE
*
FROM
tablename
, like a
SELECT
query. Remember that
DELETE
doesn’t
use the same syntax as
SELECT
, because you
aren’t deleting specific columns.
C If the script does not receive an
id
value in the URL, an error is reported.
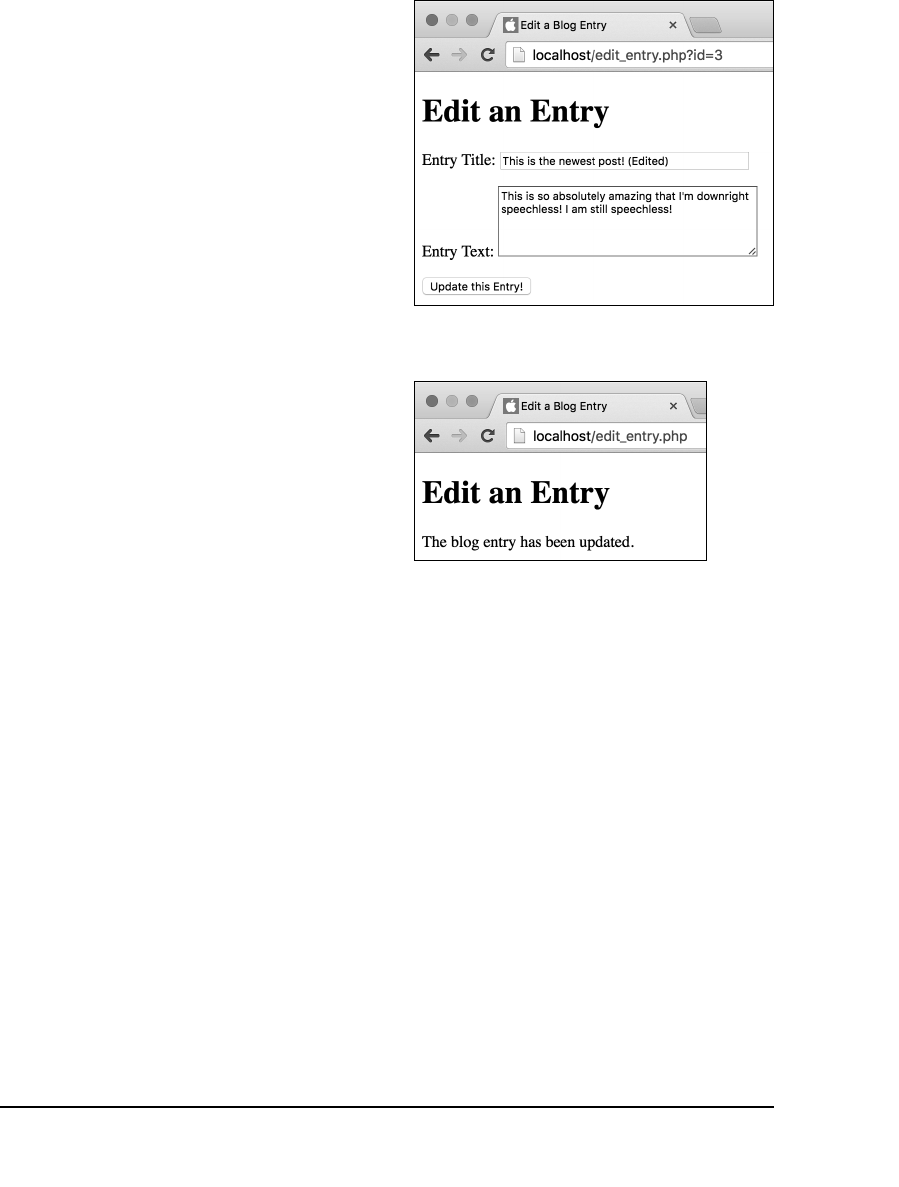
ptg18144795
382 Chapter 12
Updating Data
in a Database
The final type of query this chapter will
cover is
UPDATE
. It’s used to alter the val-
ues of a record’s columns. The syntax is
UPDATE tablename SET
➝
column1_name=value,
➝
column2_name=value2 WHERE
➝
some_column=value
As with any other query, if the values are
strings, they should be placed within single
quotation marks:
UPDATE users SET first_name=
➝
'Eleanor', age=7 WHERE user_id=142
As with a
DELETE
query, you should use
a
WHERE
clause to limit the rows that are
affected. If you don’t do this, every record
in the database will be updated.
To test that an update worked, you can
again use the
mysqli_affected_rows()
function to return the number of
records altered.
To demonstrate, let’s write a page for
editing a blog entry. It will let the user
alter an entry’s title and text, but not the
date entered or the blog ID number (as a
primary key, the ID number should never
be changed). This script will use a structure
like that in
delete_entry.php
(Script 12.7),
first showing the entry A and then handling
the submission of that form B.
A When the user arrives at the edit page, the
form is shown with the existing values.
B Upon submitting the form, the user
sees a message like this.
ptg18144795
Intro to Databases 383
To update data in a database:
1. Begin a new PHP document in
your text editor or IDE, to be named
edit_entry.php
(Script 12.8).
<!doctype html>
<html lang="en">
<head>
<meta charset="utf-8">
<title>Edit a Blog Entry</
➝
title>
</head>
<body>
<h1>Edit an Entry</h1>
Script 12.8 You can edit records in a database table by using an
UPDATE
SQL command.
1 <!doctype html>
2 <html lang="en">
3 <head>
4 <meta charset="utf-8">
5 <title>Edit a Blog Entry</title>
6 </head>
7 <body>
8 <h1>Edit an Entry</h1>
9 <?php // Script 12.8 - edit_entry.php
10 /* This script edits a blog entry using an UPDATE query. */
11
12 // Connect and select:
13 $dbc = mysqli_connect('localhost', 'username', 'password', 'myblog');
14
15 //Set the character set:
16 mysqli_set_charset($dbc, 'utf8');
17
18 if (isset($_GET['id']) && is_numeric($_GET['id']) ) { // Display the entry in a form:
19
20 // Define the query.
21 $query = "SELECT title, entry FROM entries WHERE id={$_GET['id']}";
22 if ($r = mysqli_query($dbc, $query)) { // Run the query.
23
24 $row = mysqli_fetch_array($r); // Retrieve the information.
25
code continues on next page
2. Start your PHP code and connect to the
database:
<?php // Script 12.8 -
➝
edit_entry.php
$dbc = mysqli_connect
➝
('localhost', 'username',
➝
'password', 'myblog');
mysqli_set_charset($dbc, 'utf8');
Because this script uses the
mysqli_
real_escape_string()
function, it also
needs to set the character set (which
you can do for all the scripts, if you want
to be consistent).
continues on page 385

ptg18144795
384 Chapter 12
Script 12.8 continued
26 // Make the form:
27 print '<form action="edit_entry.php" method="post">
28 <p>Entry Title: <input type="text" name="title" size="40" maxsize="100" value="' .
htmlentities($row['title']) . '"></p>
29 <p>Entry Text: <textarea name="entry" cols="40" rows="5">' . htmlentities($row['entry'])
. '</textarea></p>
30 <input type="hidden" name="id" value="' . $_GET['id'] . '">
31 <input type="submit" name="submit" value="Update this Entry!">
32 </form>';
33
34 } else { // Couldn't get the information.
35 print '<p style="color: red;">Could not retrieve the blog entry because:<br>' .
mysqli_error($dbc) . '.</p><p>The query being run was: ' . $query . '</p>';
36 }
37
38 } elseif (isset($_POST['id']) && is_numeric($_POST['id'])) { // Handle the form.
39
40 // Validate and secure the form data:
41 $problem = FALSE;
42 if (!empty($_POST['title']) && !empty($_POST['entry'])) {
43 $title = mysqli_real_escape_string($dbc, trim(strip_tags($_POST['title'])));
44 $entry = mysqli_real_escape_string($dbc, trim(strip_tags($_POST['entry'])));
45 } else {
46 print '<p style="color: red;">Please submit both a title and an entry.</p>';
47 $problem = TRUE;
48 }
49
50 if (!$problem) {
51
52 // Define the query.
53 $query = "UPDATE entries SET title='$title', entry='$entry' WHERE
id={$_POST['id']}";
54 $r = mysqli_query($dbc, $query); // Execute the query.
55
56 // Report on the result:
57 if (mysqli_affected_rows($dbc) == 1) {
58 print '<p>The blog entry has been updated.</p>';
59 } else {
60 print '<p style="color: red;">Could not update the entry because:<br>' .
mysqli_error($dbc) . '.</p><p>The query being run was: ' . $query . '</p>';
61 }
62
63 } // No problem!
64
65 } else { // No ID set.
66 print '<p style="color: red;">This page has been accessed in error.</p>';
67 } // End of main IF.
68
69 mysqli_close($dbc); // Close the connection.
70
71 ?>
72 </body>
73 </html>

ptg18144795
Intro to Databases 385
3. If the page received a valid entry ID in
the URL, define and execute a
SELECT
query:
if (isset($_GET['id']) &&
➝
is_numeric($_GET['id']) ) {
$query = "SELECT title,
➝
entry FROM entries WHERE
➝
id={$_GET['id']}";
if ($r = mysqli_query($dbc,
➝
$query)) {
This code is exactly the same as that
in the delete page; it selects the two
column values from the database for
the provided ID value.
4. Retrieve the record, and display the
entry in a form:
$row = mysqli_fetch_array($r);
print '<form action="edit_entry
➝
php" method="post">
<p>Entry Title: <input type=
➝
"text" name="title" size="40"
➝
maxsize="100" value="' .
➝
htmlentities($row['title']) .
➝
'" /></p>
<p>Entry Text: <textarea name=
➝
"entry" cols="40" rows="5">' .
➝
htmlentities($row['entry']) .
➝
'</textarea></p>
<input type="hidden" name="id"
➝
value="' . $_GET['id'] . '">
<input type="submit" name=
➝
"submit" value="Update this
➝
Entry!">
</form>';
Again, this is almost exactly the same
as in the preceding script, including
the most important step of storing the
ID value in a hidden form input. Here,
though, the stored data isn’t just printed
but is actually used as the values for
form elements. For security and to
avoid potential conflicts, each value is
run through
htmlentities()
first.
5. Report an error if the query failed:
} else { // Couldn't get the
➝
information.
print '<p style="color: red;">
➝
Could not retrieve the blog
➝
entry because: <br>' .
➝
mysqli_error($dbc) . '.
➝
</p><p>The query being run
➝
was: ' . $query . '</p>';
}
6. Check for the submission of the form:
} elseif (isset($_POST['id']) &&
➝
is_numeric($_POST['id'])) {
This conditional will be TRUE when the
form is submitted.
7. Validate and secure the form data:
$problem = FALSE;
if (!empty($_POST['title']) &&
➝
!empty($_POST['entry'])) {
$title = mysqli_real_escape_
➝
string($dbc, trim(strip_tags
➝
($_POST ['title'])));
$entry = mysqli_real_escape_
➝
string($dbc, trim(strip_tags
➝
($_POST ['entry'])));
} else {
print '<p style="color: red;">
➝
Please submit both a title
➝
and an entry.</p>';
$problem = TRUE;
}
This code comes from the page used to
add blog postings. It performs minimal
validation on the submitted data and
then runs it through the
mysqli_real_
escape_string()
function to be safe.
Because the form data can be edited,
the form should be validated as if it
were a new record being created.
continues on next page

ptg18144795
386 Chapter 12
8. Define and execute the query:
if (!$problem) {
$query = "UPDATE entries
➝
SET title='$title',
➝
entry='$entry' WHERE id=
➝
{$_POST['id']}";
$r = mysqli_query($dbc,
➝
$query);
The
UPDATE
query sets the
title
column equal to the value entered
in the form’s title input and sets the
entry
column equal to the value
entered in the form’s entry text area.
Only the record whose
id
is equal
to
$_POST['id']
, which comes from
a hidden form input, is updated.
9. Report on the success of the query:
if (mysqli_affected_rows($dbc)
➝
== 1) {
print '<p>The blog entry has
➝
been updated.</p>';
} else {
print '<p style="color: red;">
➝
Could not update the entry
➝
because:<br>' . mysqli_ error
➝
($dbc) . '.</p><p>The query
➝
being run was: ' . $query .
➝
'</p>';
}
If one row was affected, then a success
message is returned. Otherwise, the
MySQL error and the query are sent to
the browser.
10. Complete the conditionals:
} // No problem!
} else { // No ID set.
print '<p style="color: red;">
➝
This page has been accessed
➝
in error.</p>';
} // End of main IF.
If no numeric ID value was passed to
this page using either the GET method
or the POST method, then this
else
clause takes effect.
11. Close the database connection, and
complete the page:
mysqli_close($dbc);
?>
</body>
</html>
12. Save the file as
edit_entry.php
,
place it in the proper directory for your
PHP-enabled server, and test it in your
browser A and B.
As in the preceding example, to edit an
entry, you must click its
Edit
link in the
view_blog.php
page.
ptg18144795
Intro to Databases 387
13. Revisit
view_blog.php
to confirm that
the changes were made C.
The
id
is a primary key, meaning that its
value should never change. By using a primary
key in your table, you can change every other
value in the record but still refer to the row
using that column.
The
mysqli_real_escape_string()
function does not need to be applied to the ID
values used in the queries, because the
is_
numeric()
test confirms they don’t contain
apostrophes or other problematic characters.
More thorough edit and delete pages
would use the
mysqli_num_rows()
function
in a conditional to confirm that the
SELECT
query returned a row prior to fetching it:
if (mysqli_num_rows($r) == 1) {...
If you run an update on a table but
don’t change a record’s values,
mysqli_
affected_rows()
will return 0.
It can’t hurt to add a
LIMIT
1
clause to
an
UPDATE
query, to ensure that only one row,
at most, is affected.
A common beginner’s mistake is to use
the following erroneous syntax:
UPDATE
tablename
SET
column1_name=
➝
value
AND
column2_name=value2
WHERE
➝
some_column=value
Note the improper
AND
in that example!
C Reloading the
view_blog.php
script reflects
the changes made to the entries.

ptg18144795
388 Chapter 12
Review and Pursue
If you have any problems with the
review questions or the pursue prompts,
turn to the book’s supporting forum
(www.LarryUllman.com/forums/).
Review
n
What version of MySQL are you using?
What values do you personally use to
connect to MySQL?
n
How does a PHP script connect to a
MySQL server? How does it disconnect?
n
What is the error suppression operator?
What does it do?
n
What function returns MySQL-
reported errors?
n
What debugging techniques should
you use when having problems with a
PHP script that interacts with MySQL?
n
What SQL command is used to create
a table? To add new records? To
retrieve records? To modify records?
To remove records?
n
What function should string values
be run through to prevent SQL
injection attacks?
Pursue
n
Find the version of the MySQL manual
that corresponds to your version of
MySQL. Start reading!
n
Move the code for connecting to the
database to a separate script, then
include that script in the PHP pages that
interact with the database. Don’t forget
about setting the character set.
n
Make the
add_entry.php
form sticky.
n
Change the code in
view_entries.php
so that it converts newline characters in
each entry into HTML break tags.

ptg18144795
The 12 chapters to this point have covered
all the fundamentals of using PHP for web
development. In this chapter, you’ll use
your accumulated knowledge to create
a complete and functional website. And
even though the focus of this chapter is on
applying your newfound knowledge, you’ll
still learn a few new tricks. In particular,
you’ll see how to develop a full-scale web
application from scratch.
13
Putting It
All Together
In This Chapter
Getting Started 390
Connecting to the Database 392
Writing the User-Defined Function 393
Creating the Template 396
Logging In 400
Logging Out 404
Adding Quotes 405
Listing Quotes 409
Editing Quotes 412
Deleting Quotes 418
Creating the Home Page 422
Review and Pursue 426
ptg18144795
390 Chapter 13
Getting Started
The first step when starting any project is
identifying the site’s goals. The primary goal
of this chapter is to apply everything taught
in the book thus far (a lofty aim, to be sure).
The example for doing so combines ideas
from the previous two chapters, creating
a site that will store and display quota-
tions. Instead of using a file to do so, as in
Chapter 11, “Files and Directories,” this site
will use a MySQL database as the storage
repository. But as with the blog example
from Chapter 12, “Intro to Databases,” the
ability to create, edit, and delete quotations
will be implemented. Further, the public
user will be able to view the most recent
quotation by default A, or a random one,
or a random quotation previously marked
as a favorite.
For improved security, the site will have an
administrator who can log in and log out.
And only the logged-in administrator will
be allowed to create, edit, or delete quota-
tions B.
A The site’s simple home page.
The site will use a simple template to give
every page a consistent look, with CSS
handling all the formatting and layout. The
site will also use one user-defined function,
stored in an included file.
As in Chapter 12, you must first create the
database and its one table. You can do
so using the instructions in Appendix A,
“Installation and Configuration.”
The database will be named
myquotes
(or
something else if you’d rather). You create
its one table with this SQL command:
CREATE TABLE quotes (
id INT UNSIGNED NOT NULL
➝
AUTO_INCREMENT,
quote TEXT NOT NULL,
source VARCHAR(100) NOT NULL,
favorite TINYINT(1) UNSIGNED NOT
➝
NULL,
date_entered TIMESTAMP NOT NULL
➝
DEFAULT CURRENT_TIMESTAMP,
PRIMARY KEY (id)
) CHARACTER SET utf8
B Nonadministrators are denied access to certain
pages.
ptg18144795
Putting It All Together 391
The
id
is the primary key, and it will
automatically be incremented to the next
logical value with each new submission.
The
quote
field stores the quote itself,
with the
source
field storing the attribu-
tion (unlike in Chapter 11, where the quote
and the source were stored together). The
favorite
field stores a 1 or a 0, marking
the quote as a favorite or not. Finally, the
date_entered
column is a timestamp,
automatically set to the current timestamp
when a new record is created.
You can create this table using a PHP
script, such as Script 12.3, or a third-party
application (like the MySQL client or
phpMyAdmin).
web root
add_quote.php
delete_quote.php
edit_quote.php
index.php
login.php
logout.php
view_quotes.php
mysql_connect.php
css
includes
templates
style.css
functions.php
footer.html
header.html
C The structure and organization
of the files on the server.
Finally, a word about how the site should
be organized on the server C. Ideally the
mysqli_connect.php
script, which estab-
lishes a database connection, would be
stored outside the web root directory. If that
is not possible in your case, you can place
it in the
includes
folder, then change the
code in the other scripts accordingly.
Once you’ve created the database, the
database table, and the necessary folders,
you can begin coding.
If you’d rather, you could move the
templates
and
includes
folders outside the
web root directory as well. If so, you’ll need to
change all the references to them in the code
to reflect the alternative structure.

ptg18144795
392 Chapter 13
Connecting to
the Database
Unlike the scripts in Chapter 12, which
connected to the database using code
repeated in each script, this site will use
the more common practice of placing the
repeated code in a stand-alone file. Every
script that interacts with the database—
which will be most but not all of them—will
then include this file. As you can see in C
in the previous section, “Getting Started,”
this file should be stored outside the web
root directory or, if that’s not possible,
within the
includes
folder.
To create mysqli_connect.php:
1. Begin a new PHP script in your
text editor or IDE, to be named
mysqli_connect.php
(Script 13.1):
<?php
Script 13.1 The
mysqli_connect.php
script connects to the database server and selects the database to
be used.
1 <?php // Script 13.1 - mysqli_connect.php
2 /* This script connects to the database
3 and establishes the character set for communications. */
4
5 // Connect:
6 $dbc = mysqli_connect('localhost', 'username', 'password', 'myquotes');
7
8 //Set the character set:
9 mysqli_set_charset($dbc, 'utf8');
2. Connect to the database:
$dbc = mysqli_connect
➝
('localhost', 'username',
➝
'password', 'myquotes');
Naturally, you’ll need to change the
values used here to be appropriate for
your server.
3. Set the character set:
mysqli_set_charset($dbc, 'utf8');
It’s a best practice to establish the
character set being used for interac-
tions. Also, it’s a requirement when
using
mysqli_real_escape_string()
,
as this chapter will do.
4. Save the file as
mysqli_connect.php
.
You may notice that the script does not
include the terminating PHP tag. This
omission is allowed by PHP, and is com-
monly done for included files like this
one. (Doing so can help prevent
head-
ers already sent
errors from occurring.)
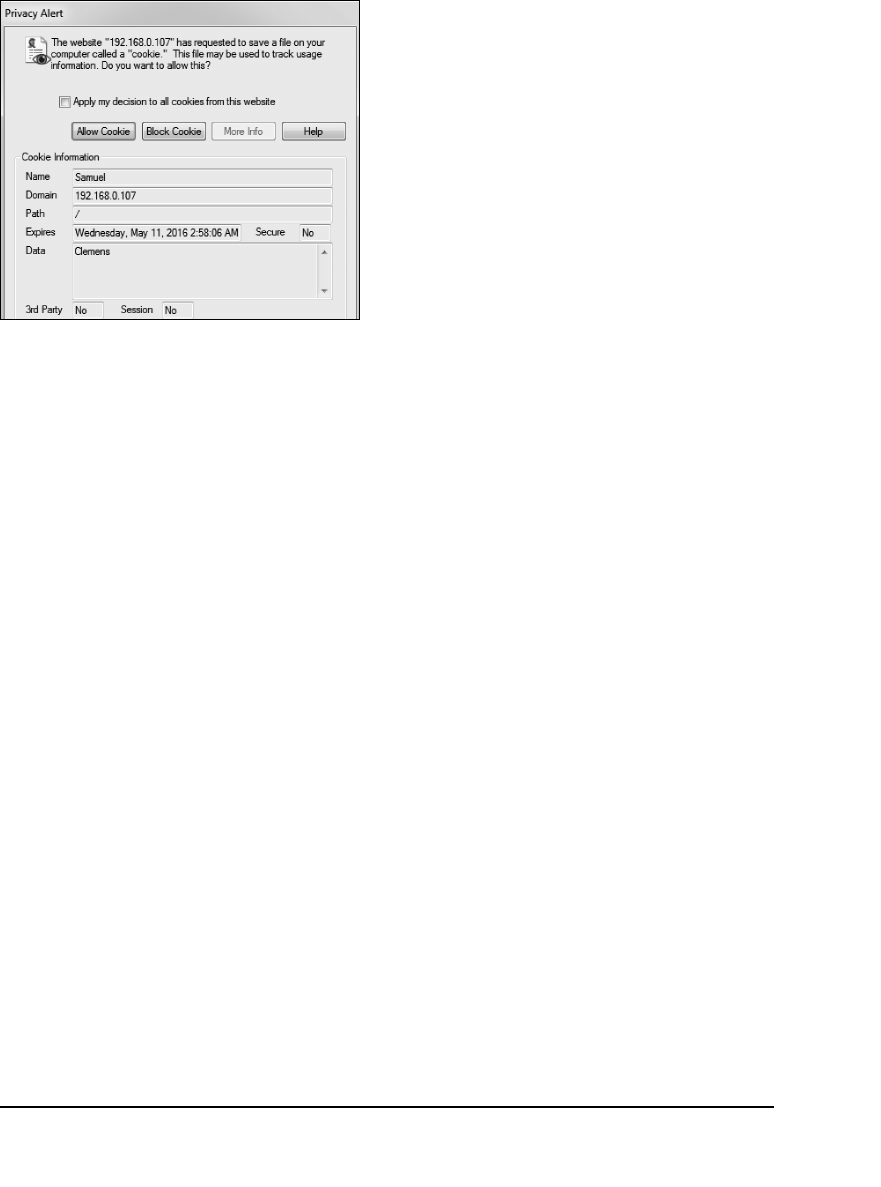
ptg18144795
Putting It All Together 393
Writing the User-
Defined Function
The site will have a single user-defined
function. As discussed in Chapter 10,
“Creating Functions,” the best time to create
your own functions is when a script or a
site might have repeating code. In this site
there are a couple of such instances, but
the most obvious one is this: Many scripts
will need to check whether or not the current
user is an administrator. In this next script,
you’ll create your own function that returns
a Boolean value indicating if the user is an
administrator. But what will be the test of
administrative status?
Upon successfully logging in, a cookie
will be sent to the administrator’s browser,
with a name of
Samuel
and a value of
Clemens
A. This may seem odd or random,
and it is. When using something simple,
like a cookie, for authentication, it’s best
to be obscure about what constitutes veri-
fication. If you went with something more
obvious, such as a name of
admin
and a
value of
true
, that’d be quite easy for any-
one to guess and falsify. With this cookie in
mind, this next function simply checks if a
cookie exists with a name of
Samuel
and a
value of
Clemens
.
A This cookie will be used to identify the
administrator.

ptg18144795
394 Chapter 13
To create functions.php:
1. Begin a new PHP script in your text editor
or IDE, to be named
functions.php
(Script 13.2):
<?php // Script 13.2 -
➝
functions.php
Even though, as written, the script defines
only a single function, I’m naming the
file using the plural—
functions
—with the
understanding that more user-defined
functions might be added to the script
in time.
Script 13.2 The
is_administrator()
function, defined in an includable script, will be called on any page that
needs to verify administrator status.
1 <?php // Script 13.2 - functions.php
2 /* This page defines custom functions. */
3
4 // This function checks if the user is an administrator.
5 // This function takes two optional values.
6 // This function returns a Boolean value.
7 function is_administrator($name = 'Samuel', $value = 'Clemens') {
8
9 // Check for the cookie and check its value:
10 if (isset($_COOKIE[$name]) && ($_COOKIE[$name] == $value)) {
11 return true;
12 } else {
13 return false;
14 }
15
16 } // End of is_administrator() function.
ptg18144795
Putting It All Together 395
2. Begin defining a new function:
function is_administrator
➝
($name = 'Samuel', $value =
➝
'Clemens') {
The function takes two arguments: the
cookie’s name and its value. Both have
default values.
Since the function checks only a single
cookie with a single expected value, it
doesn’t need to take arguments at all,
let alone default ones. But by having
the function take arguments, it can be
used in different ways should the site’s
functionality expand (for example, if you
had multiple types of authentication to
perform). Still, by using default values
for those arguments, function calls don’t
need to provide argument values when
the assumed cookie name and value
are being checked.
3. Return a Boolean value based on the
cookie’s existence and value:
if (isset($_COOKIE[$name]) &&
➝
($_COOKIE[$name] == $value)) {
return true;
} else {
return false;
}
If the cookie exists and has the
appropriate value, the Boolean TRUE
is returned. Otherwise, the function
returns FALSE.
4. Complete the function and the script:
} // End of is_administrator()
➝
function.
Again, the closing PHP tag is being
omitted.
5. Save the file as
functions.php
, stored
in the
includes
directory.
Checking for the presence of a specific
cookie with a specific value is a fairly minimal
level of security, although not totally inappro-
priate for a site such as this. For better security,
create a session element that reflects adminis-
trative status:
$_SESSION['admin'] = true;
Then check this value on each page.

ptg18144795
396 Chapter 13
Creating the Template
Now that the two helper files have been
created, it’s time to move on to the template.
As introduced in Chapter 8, “Creating
Web Applications,” the site’s layout will
be controlled by two includable files: a
header and a footer. Both will be stored in
the
templates
directory. The header also
references a style sheet, to be stored in
the
css
folder. You can find the style sheet
by downloading the book’s code from
www.LarryUllman.com (the file will be in
the
ch13
folder of the download).
Besides generating the primary HTML
for the site, the header file must include
the functions script. The footer file
should also display some administration
links A, should the current user be an
administrator.
To create header.html:
1. Begin a new HTML document in
your text editor or IDE, to be named
header.html
(Script 13.3).
<?php // Script 13.3 -
➝
header.html
include('includes/functions.php');
➝
?>
The header will start with a PHP section
in order to include the
functions.php
script, which will be required by multiple
pages on the site. The reference to the
script is relative to the pages that will
be including the header: files in the
main directory.
A If the person viewing any page is an
administrator, additional links appear.
ptg18144795
Putting It All Together 397
This code also comes from Chapter 8,
printing either the default title or a
custom one, if set as a constant.
4. Complete the head:
</head>
5. Begin the page’s body:
<body>
<div id="container">
<h1>My Site of Quotes</h1>
<br>
<!-- BEGIN CHANGEABLE
➝
CONTENT. -->
6. Save the file as
header.html
, stored in
the
templates
directory.
Script 13.3 The header file includes the
functions.php
script and begins the HTML page.
1 <?php // Script 13.3 - header.html
2
3 // Include the functions script:
4 include('includes/functions.php'); ?>
5 <!doctype html>
6 <html lang="en">
7 <head>
8 <meta charset="utf-8">
9 <link rel="stylesheet" media="all" href="css/style.css">
10 <title><?php // Print the page title.
11 if (defined('TITLE')) { // Is the title defined?
12 print TITLE;
13 } else { // The title is not defined.
14 print 'My Site of Quotes';
15 }
16 ?></title>
17 </head>
18 <body>
19 <div id="container">
20 <h1>My Site of Quotes</h1>
21 <br>
22 <!-- BEGIN CHANGEABLE CONTENT. -->
2. Begin the HTML document:
<!doctype html>
<html lang="en">
<head>
<meta charset="utf-8">
<link rel="stylesheet" media=
➝
"all" href="css/style.css">
Again, the style sheet needs to be down-
loaded from the book’s corresponding
website. And the reference to that
style sheet is relative to the scripts that
include the header, all found within the
main directory.
3. Print the page’s title:
<title><?php
if (defined('TITLE')) {
print TITLE;
} else {
print 'My Site of Quotes';
}
?></title>

ptg18144795
398 Chapter 13
To create footer.html:
1. Begin a new HTML document in
your text editor or IDE, to be named
footer.html
(Script 13.4):
<!-- END CHANGEABLE CONTENT. -->
2. Check if it’s appropriate to display
general administration links:
<?php
if ((is_administrator() &&
➝
(basename($_SERVER['PHP_SELF'])
➝
!= 'logout.php'))
OR (isset($loggedin) &&
➝
$loggedin) ) {
This conditional is a bit complicated.
To start, most pages can confirm that the
current user is an administrator by just
invoking the
is_administrator()
func-
tion. But because of how cookies work,
that function will return inappropriate
results on two pages:
login.php
and
Script 13.4 The footer file displays general administrative links, when appropriate, and completes the
HTML page.
1 <!-- END CHANGEABLE CONTENT. -->
2 <?php // Script 13.4 - footer.html
3
4 // Display general admin links...
5 // - if the user is an administrator and it's not the logout.php page
6 // - or if the $loggedin variable is true (i.e., the user just logged in)
7 if ( (is_administrator() && (basename($_SERVER['PHP_SELF']) != 'logout.php'))
8 OR (isset($loggedin) && $loggedin) ) {
9
10 // Create the links:
11 print '<hr><h3>Site Admin</h3><p><a href="add_quote.php">Add Quote</a> <->
12 <a href="view_quotes.php">View All Quotes</a> <->
13 <a href="logout.php">Logout</a></p>';
14
15 }
16
17 ?>
18 </div><!-- container -->
19 <div id="footer">Content © 2016</div>
20 </body>
21 </html>
logout.php
. On
logout.php
, the
script will have received the administra-
tive cookie prior to deleting it. So on
that page, it will seem like the user
is an administrator (as was just the
case), but links to the administrative
pages should not be shown, as the
user will be blocked from using them
(because when the user gets to those
pages, the cookie will no longer exist).
Hence, the first part of the conditional
requires that
is_administrator()
return TRUE and that the current
page not be
logout.php
. The code
basename($_SERVER['PHP_SELF'])
is a reliable way to get the current
script (and because the footer file
is included by another script,
$_SERVER['PHP_SELF']
will have the
value of the
including
script).

ptg18144795
Putting It All Together 399
The second part of the conditional, after
the
OR
, checks if the
$loggedin
variable
is set and has a TRUE value. This will be
the case on the
login.php
page, after
the user successfully logged in. The
is_administrator()
function won’t
return a TRUE value at that juncture,
because the cookie will have been just
sent by the script and therefore won’t
be available to be read.
3. Create the links:
print '<hr><h3>Site Admin</h3>
➝
<p><a href="add_quote.php">
➝
Add Quote</a> <->
<a href="view_quotes.php">
➝
View All Quotes</a> <->
<a href="logout.php">Logout</a>
➝
</p>';
Three links are created: to a page for
adding new quotes, to a page for view-
ing every quote, and to the logout page.
4. Complete the conditional and the
PHP section:
}
?>
5. Complete the HTML page:
</div><!-- container -->
<div id="footer">Content ©
➝
2016</div>
</body>
</html>
6. Save the file as
footer.html
, stored in
the
templates
directory.
ptg18144795
400 Chapter 13
Logging In
Next, it’s time to create the script through
which the administrator can log in. The
result will be very similar to the scripts in
Chapter 9, “Cookies and Sessions,” with
one structural difference: That chapter used
output buffering
, allowing you to lay out
your script however you want. This site
does not use output buffering, so the han-
dling of the form must be written in such
a way that the cookie can be sent without
generating
headers already sent
errors
(see Chapter 9 if this isn’t ringing a bell for
you). In other words, the script must check
for a form submission prior to including the
header. To still be able to reflect errors and
other messages within the context of the
page, you must use variables.
To create login.php:
1. Begin a new PHP document in your text
editor or IDE, to be named
login.php
(Script 13.5):
<?php // Script 13.5 - login.php
2. Define two variables with default
values:
$loggedin = false;
$error = false;
These two variables will be used
later in the script. Here they are given
default values, indicating that the
person is not logged in and no errors
have yet occurred.
3. Check if the form has been submitted:
if ($_SERVER['REQUEST_METHOD'] ==
➝
'POST') {
Script 13.5 The login script both displays
and handles a form, sending a cookie upon a
successful login attempt.
1 <?php // Script 13.5 - login.php
2 /* This page lets people log into the
site. */
3
4 // Set two variables with default
values:
5 $loggedin = false;
6 $error = false;
7
8 // Check if the form has been submitted:
9 if ($_SERVER['REQUEST_METHOD'] ==
'POST') {
10
11 // Handle the form:
12 if (!empty($_POST['email']) &&
!empty($_POST['password'])) {
13
14 if ( (strtolower($_POST['email'])
== 'me@example.com') &&
($_POST['password'] ==
'testpass') ) { // Correct!
15
16 // Create the cookie:
17 setcookie('Samuel', 'Clemens',
time()+3600);
18
19 // Indicate they are logged in:
20 $loggedin = true;
21
22 } else { // Incorrect!
23
24 $error = 'The submitted email
address and password do not
match those on file!';
25
26 }
27
28 } else { // Forgot a field.
29
30 $error = 'Please make sure you
enter both an email address and a
password!';
31
32 }
33
34 }
35
code continues on next page

ptg18144795
Putting It All Together 401
4. Handle the form:
if (!empty($_POST['email']) &&
➝
!empty($_POST['password'])) {
if ( (strtolower
➝
($_POST['email']) ==
➝
'me@example.com') &&
➝
($_POST ['password'] ==
➝
'testpass') ) {
Similar to examples in Chapter 9, this
script first confirms that
$_POST['email']
and
$_POST['password']
are not
empty. The second conditional compares
the submitted values against what they
need to be.
5. Create the cookie:
setcookie('Samuel', 'Clemens',
➝
time()+3600);
The cookie has a name of
Samuel
and
a value of
Clemens
. It’s set to expire
in an hour. Again, you could alterna-
tively use sessions to track the user
and indicate whether that user is an
administrator.
6. Indicate that the user is logged in:
$loggedin = true;
This variable will be used later in this
same script, and in the footer file (see
Script 13.4).
continues on next page
Script 13.5 continued
36 // Set the page title and include the header file:
37 define('TITLE', 'Login');
38 include('templates/header.html');
39
40 // Print an error if one exists:
41 if ($error) {
42 print '<p class="error">' . $error . '</p>';
43 }
44
45 // Indicate the user is logged in, or show the form:
46 if ($loggedin) {
47
48 print '<p>You are now logged in!</p>';
49
50 } else {
51
52 print '<h2>Login Form</h2>
53 <form action="login.php" method="post">
54 <p><label>Email Address <input type="email" name="email"></label></p>
55 <p><label>Password <input type="password" name="password"></label></p>
56 <p><input type="submit" name="submit" value="Log In!"></p>
57 </form>';
58
59 }
60
61 include('templates/footer.html'); // Need the footer.
62 ?>
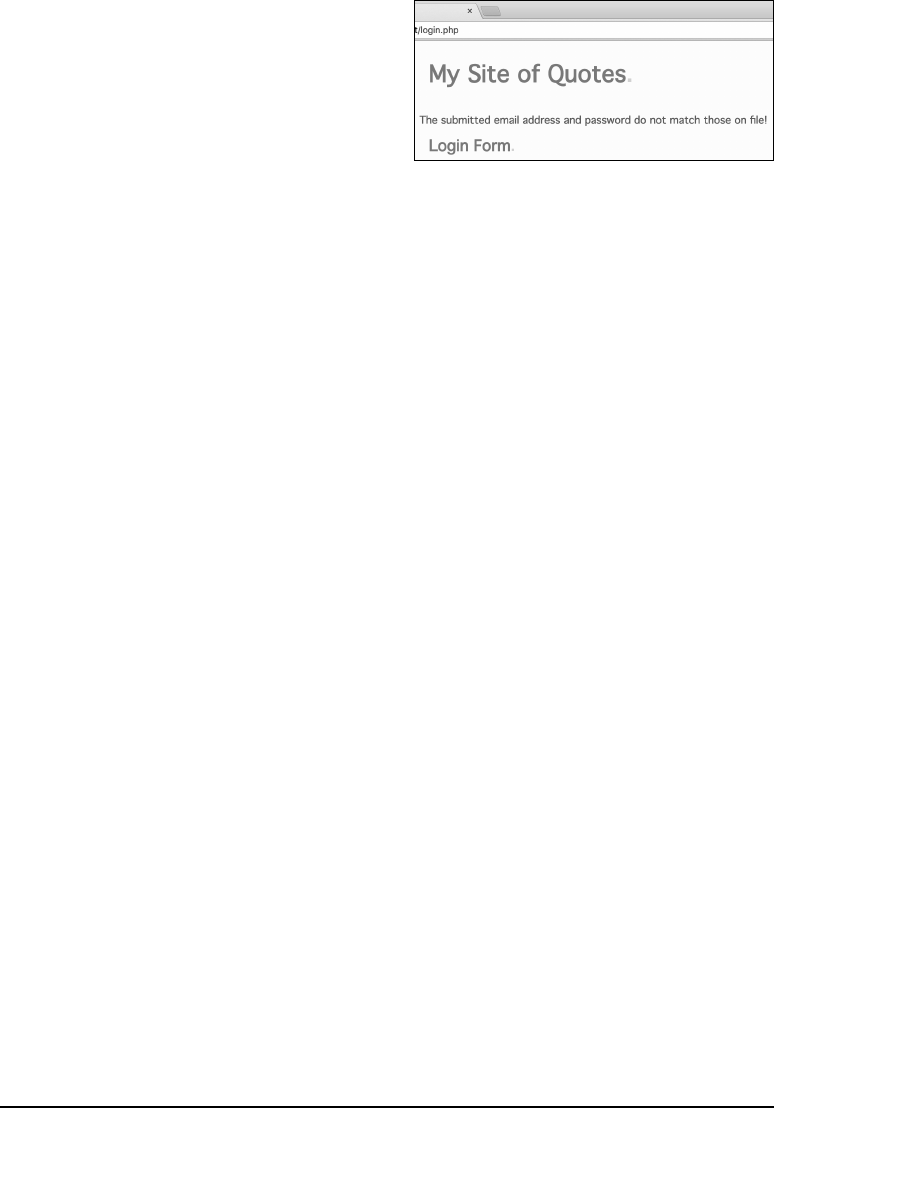
ptg18144795
402 Chapter 13
7. Create error messages for the two
other conditions:
} else { // Incorrect!
$error = 'The submitted
➝
email address and
➝
password do not match
➝
those on file!';
}
} else { // Forgot a field.
$error = 'Please make sure
➝
you enter both an email
➝
address and a password!';
}
}
The first
else
clause applies if an email
address and password were provided
but were wrong. The second
else
clause applies if no email address or
password was submitted. In both cases,
the message is assigned to a variable
so that it may be used later in the script.
8. Set the page title, and include the
header file:
define('TITLE', 'Login');
include('templates/header.html');
9. Print an error if one exists:
if ($error) {
print '<p class="error">' .
➝
$error . '</p>';
}
The error itself will be determined in
Step 7, but it can’t be printed at that
point because the HTML header will not
have been included. The solution is to
have this code check for a non-FALSE
$error
value and then print
$error
within some HTML and CSS A.
A Error messages are displayed after the header
is included but before the HTML form.
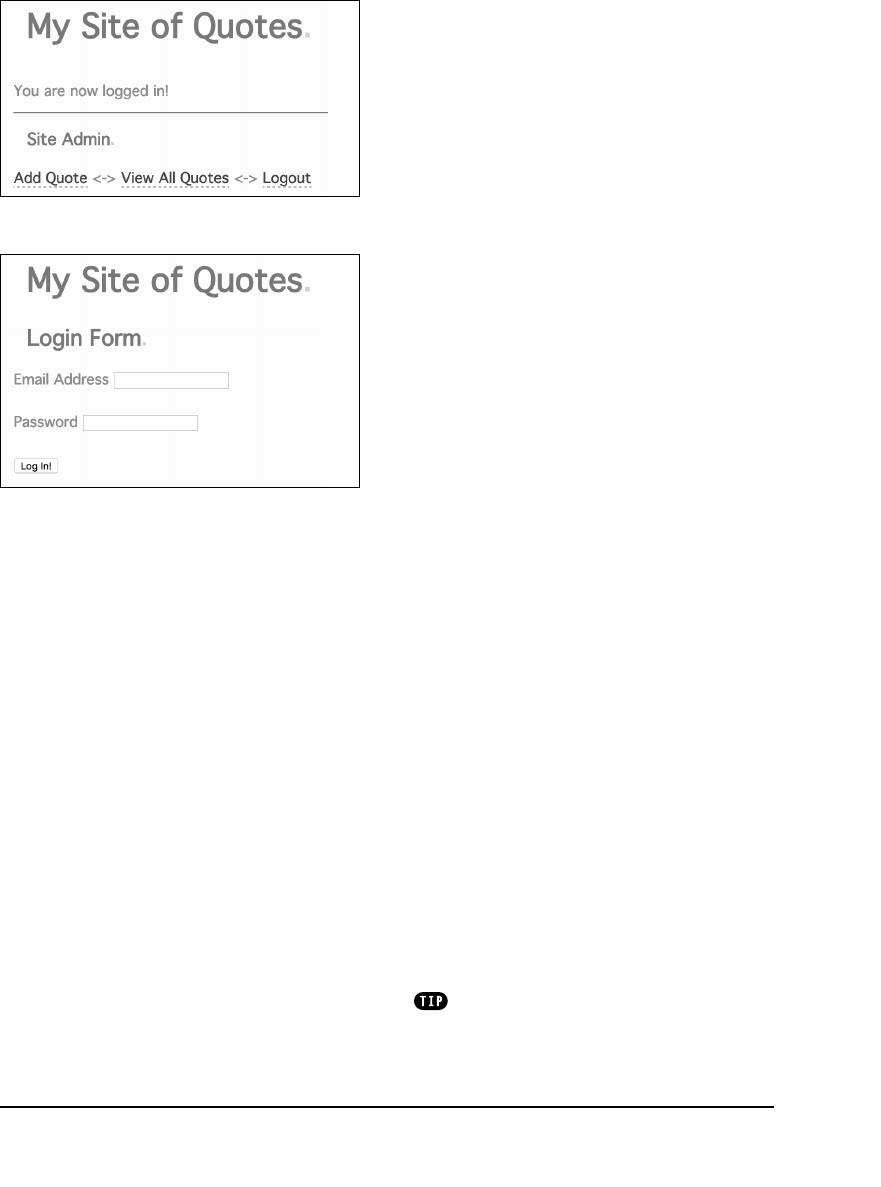
ptg18144795
Putting It All Together 403
10. Indicate that the user is logged in, or
display the form:
if ($loggedin) {
print '<p>You are now logged
➝
in!</p>';
} else {
print '<h2>Login Form</h2>
<form action="login.php"
➝
method="post">
<p><label>Email Address <input
➝
type="email" name="email">
➝
</label></p>
<p><label>Password
➝
<input type="password"
➝
name="password"></label></p>
<p><input type="submit"
➝
name="submit" value=
➝
"Log In!"></p>
</form>';
}
If the
$loggedin
variable has a TRUE
value—its value is FALSE by default—
then the user just successfully logged in
to the site and a message saying so is
displayed B. If the
$loggedin
variable
still has its default value, then the form
should be shown C.
11. Include the footer, and complete the
page:
include('templates/footer.html');
?>
12. Save the file as
login.php
.
13. Test the file in your browser
(A, B, and C).
I purposefully omitted creating a link to
the login section (as a security mea-
sure), so you’ll need to enter the correct
URL in your browser’s address bar.
Note that, as written, the script requires
administrators to log back in after an hour,
whether or not they continue to be active in
the site.
B The result upon successfully logging in.
C The basic login form.
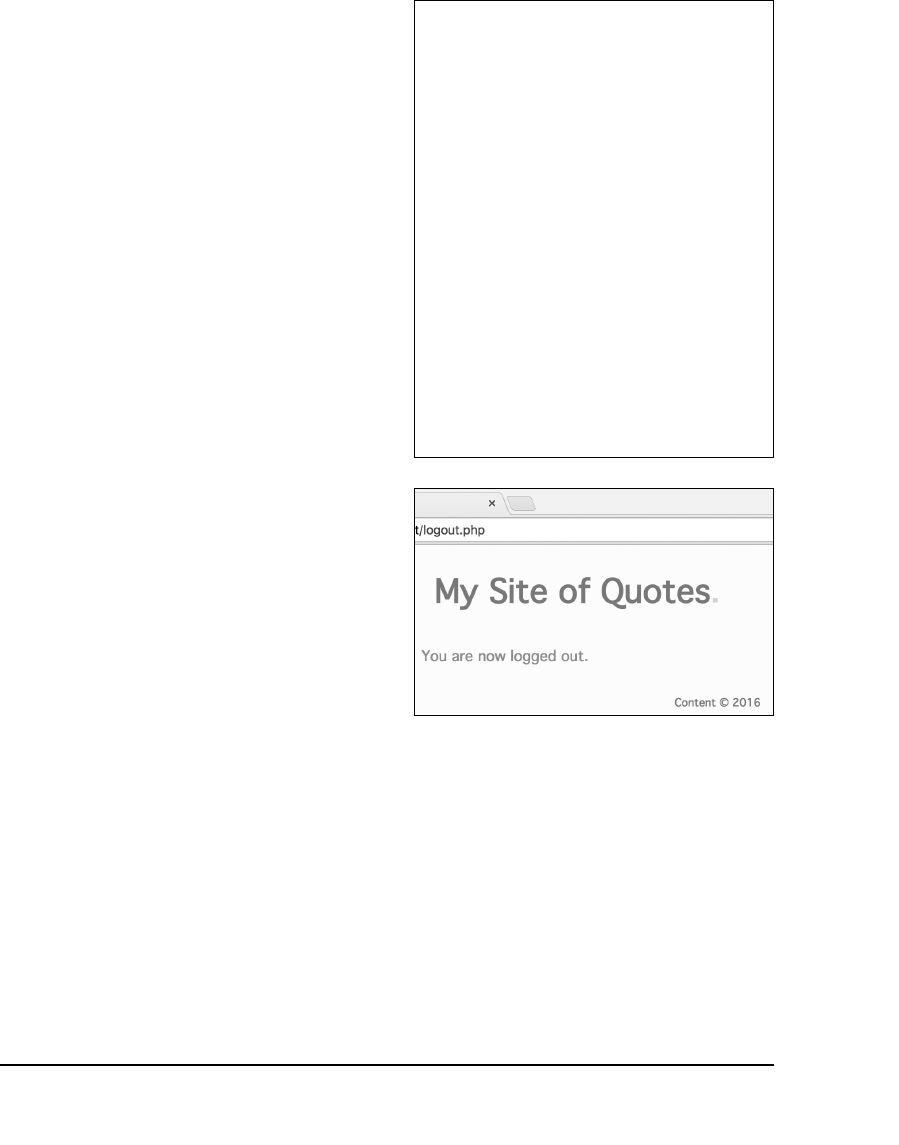
ptg18144795
404 Chapter 13
Logging Out
If you write a login process, there must
be a logout process too. In this case, just
using cookies, it’s a very simple script.
To create logout.php:
1. Begin a new PHP document in your text
editor or IDE, to be named
logout.php
(Script 13.6):
<?php // Script 13.6 - logout.php
2. Destroy the cookie, but only if it already
exists:
if (isset($_COOKIE['Samuel'])) {
setcookie('Samuel', FALSE,
➝
time()-300);
}
As an extra security measure, the script
attempts to delete the cookie only if it
exists. By making this check, the script
prevents hackers from discovering the
name of the cookie used by the site by
accessing the logout script without hav-
ing first logged in.
To delete the existing login cookie,
another cookie is sent with the same
name, a value of FALSE, and an expira-
tion time in the past.
3. Define a page title, and include the
header:
define('TITLE', 'Logout');
include('templates/header.html');
4. Print a message:
print '<p>You are now logged
➝
out.</p>';
5. Include the footer:
include('templates/footer.html');
?>
6. Save the file as
logout.php
.
7. Test the file in your browser A.
Script 13.6 The logout script deletes the
administrator-identifying cookie.
1 <?php // Script 13.6 - logout.php
2 /* This is the logout page. It destroys
the cookie. */
3
4 // Destroy the cookie, but only if it
already exists:
5 if (isset($_COOKIE['Samuel'])) {
6 setcookie('Samuel', FALSE,
time()-300);
7 }
8
9 // Define a page title and include the
header:
10 define('TITLE', 'Logout');
11 include('templates/header.html');
12
13 // Print a message:
14 echo '<p>You are now logged out.</p>';
15
16 // Include the footer:
17 include('templates/footer.html');
18 ?>
A The resulting logout page.
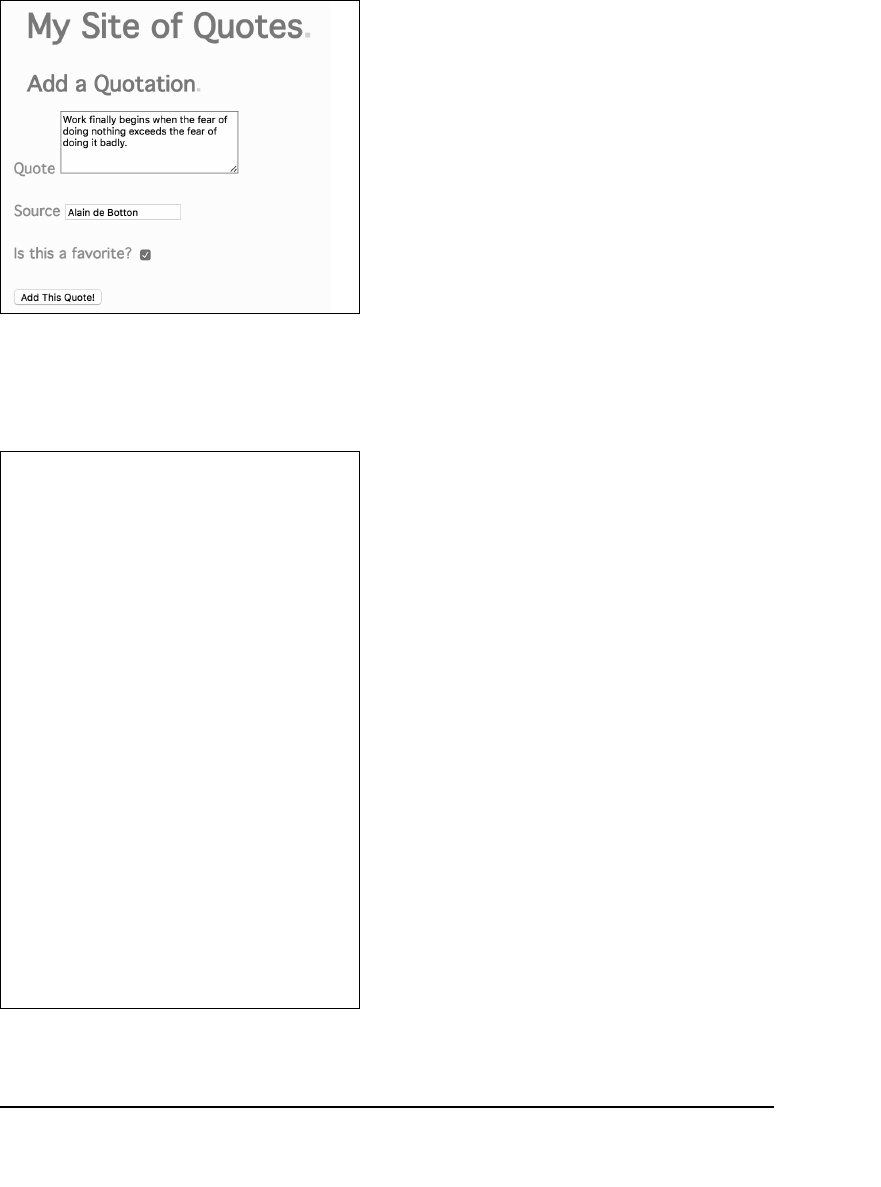
ptg18144795
Putting It All Together 405
Adding Quotes
Now that the administrator has the ability
to log in, she or he should be able to start
adding quotations. The script for doing so
is a lot like the one for adding blog post-
ings (from Chapter 12), but the form will
have an additional checkbox for marking
the quotation as a favorite A.
Because this script creates records in the
database, security must be a primary con-
cern. As an initial precaution, the script will
make sure that only the administrator can
use the page. Second, values to be used
in the SQL command will be sanctified to
prevent invalid queries.
To create add_quote.php:
1. Begin a new PHP document in
your text editor or IDE, to be named
add_quote.php
(Script 13.7):
<?php // Script 13.7 -
➝
add_quote.php
define('TITLE', 'Add a Quote');
include('templates/header.html');
print '<h2>Add a Quotation</h2>';
2. Deny access to the page if the user is
not an administrator:
if (!is_administrator()) {
print '<h2>Access Denied!
➝
</h2><p class="error">
➝
You do not have permission to
➝
access this page.</p>';
include('templates/
➝
footer.html');
exit();
}
continues on next page
A The form for adding quotations to the
database.
Script 13.7 The
add_quote.php
script allows
only administrators to add new quotations to the
database.
1 <?php // Script 13.7 - add_quote.php
2 /* This script adds a quote. */
3
4 // Define a page title and include the
header:
5 define('TITLE', 'Add a Quote');
6 include('templates/header.html');
7
8 print '<h2>Add a Quotation</h2>';
9
10 // Restrict access to administrators
only:
11 if (!is_administrator()) {
12 print '<h2>Access Denied!</h2><p
class="error">You do not have permission
to access this page.</p>';
13 include('templates/footer.html');
14 exit();
15 }
16
17 // Check for a form submission:
18 if ($_SERVER['REQUEST_METHOD'] ==
'POST') { // Handle the form.
19
20 if ( !empty($_POST['quote']) &&
!empty($_POST['source']) ) {
21
code continues on next page

ptg18144795
406 Chapter 13
By invoking the
is_administrator()
function, the script can quickly test
for that condition. If the user is not an
administrator, an
Access Denied
error
is displayed, the footer is included, and
the script is terminated B.
3. Check for a form submission:
if ($_SERVER['REQUEST_METHOD'] ==
➝
'POST') {
Note that this check comes after con-
firming that the user is an administrator.
B Any user not logged in as an administrator is
denied access to the form.
Script 13.7 continued
22 // Need the database connection:
23 include('../mysqli_connect.php');
24
25 // Prepare the values for storing:
26 $quote = mysqli_real_escape_string($dbc, trim(strip_tags($_POST['quote'])));
27 $source = mysqli_real_escape_string($dbc, trim(strip_tags($_POST['source'])));
28
29 // Create the "favorite" value:
30 if (isset($_POST['favorite'])) {
31 $favorite = 1;
32 } else {
33 $favorite = 0;
34 }
35
36 $query = "INSERT INTO quotes (quote, source, favorite) VALUES ('$quote', '$source',
$favorite)";
37 mysqli_query($dbc, $query);
38
39 if (mysqli_affected_rows($dbc) == 1){
40 // Print a message:
41 print '<p>Your quotation has been stored.</p>';
42 } else {
43 print '<p class="error">Could not store the quote because:<br>' . mysqli_error($dbc)
. '.</p><p>The query being run was: ' . $query . '</p>';
44 }
45
46 // Close the connection:
47 mysqli_close($dbc);
48
49 } else { // Failed to enter a quotation.
50 print '<p class="error">Please enter a quotation and a source!</p>';
51 }
52
53 } // End of submitted IF.
54
э
ptg18144795
Putting It All Together 407
6. Create the
favorite
value:
if (isset($_POST['favorite'])) {
$favorite = 1;
} else {
$favorite = 0;
}
In the database, a quotation’s status
as a favorite is indicated by a 1. Non-
favorites are represented by a 0. To
determine which number to use, all
the PHP script has to do is check for
a
$_POST['favorite']
value. If that
variable is set, regardless of what its
value is, it means the user checked the
favorite checkbox. If the user didn’t do
that, then the variable won’t be set, and
the
$favorite
variable will be assigned
the value 0.
7. Define and execute the query:
$query = "INSERT INTO quotes
➝
(quote, source, favorite)
➝
VALUES ('$quote', '$source',
➝
$favorite)";
mysqli_query($dbc, $query);
The query specifies values for three
fields and uses the variables already
defined. The remaining two table
columns—
id
and
date_entered
—will
automatically be assigned values, thanks
to the table’s definition.
continues on next page
Script 13.7 continued
55 // Leave PHP and display the form:
56 ?>
57
58 <form action="add_quote.php" method="post">
59 <p><label>Quote <textarea name="quote" rows="5" cols="30"></textarea></label></p>
60 <p><label>Source <input type="text" name="source"></label></p>
61 <p><label>Is this a favorite? <input type="checkbox" name="favorite" value="yes"></label></p>
62 <p><input type="submit" name="submit" value="Add This Quote!"></p>
63 </form>
64
65 <?php include('templates/footer.html'); ?>
4. Check for values:
if ( !empty($_POST['quote']) &&
➝
!empty($_POST['source']) ) {
This script performs a minimum of vali-
dation, checking that the two variables
aren’t empty. With large blocks of text,
such as a quotation, there’s not much
more that can be done in terms of
validation.
5. Prepare the values for use in the query:
include('../mysqli_connect.php');
$quote = mysqli_real_escape_string
➝
($dbc, trim(strip_tags($_POST
➝
['quote'])));
$source = mysqli_real_escape_string
➝
($dbc, trim(strip_tags($_POST
➝
['source'])));
To make the two textual values safe to
use in the query, they’re run through
the
mysqil_real_escape_string()
function (see Chapter 12). Because this
function requires a database connec-
tion, that file must first be included.
To make the values safe to later display
in the web page, the
strip_tags()
function is applied too (see Chapter 5,
“Using Strings”).

ptg18144795
408 Chapter 13
8. Print a message based on the results:
if (mysqli_affected_rows($dbc)
➝
== 1){
// Print a message:
print '<p>Your quotation has
➝
been stored.</p>';
} else {
print '<p class="error">
➝
Could not store the quote
➝
because:<br>' .
➝
mysqli_error($dbc) . '.
➝
</p><p>The query being run
➝
was: ' . $query . '</p>';
}
If the
INSERT
query created one new row
in the database, a message indicating
that is displayed. Otherwise, debugging
information is shown so that you can try
to figure out what went wrong.
9. Complete the validation conditional:
} else { // Failed to enter a
➝
quotation.
print '<p class="error">
➝
Please enter a quotation and
➝
a source!</p>';
}
10. Complete the submission conditional
and the PHP block:
} // End of submitted IF.
?>
C The result after
adding a quotation.
11. Create the form:
<form action="add_quote.php"
➝
method="post">
<p><label>Quote <textarea
➝
name="quote" rows="5"
➝
cols="30"></textarea>
➝
</label></p>
<p><label>Source <input type=
➝
"text" name="source"></label>
➝
</p>
<p><label>Is this a favorite?
➝
<input type="checkbox"
➝
name="favorite" value="yes">
➝
</label></p>
<p><input type="submit" name=
➝
"submit" value="Add This
➝
Quote!"></p>
</form>
The form has one text area, one text
input, and a checkbox (plus the submit
button, of course). It is not designed to
be sticky—that’s a feature you could
add later, if you wanted.
12. Include the footer:
<?php include('templates/footer.
➝
html'); ?>
13. Save the file as
add_quote.php
, and
test in your browser C.
The ability to create (
INSERT
), retrieve
(
SELECT
), update, and delete database records
is collectively referred to as CRUD.
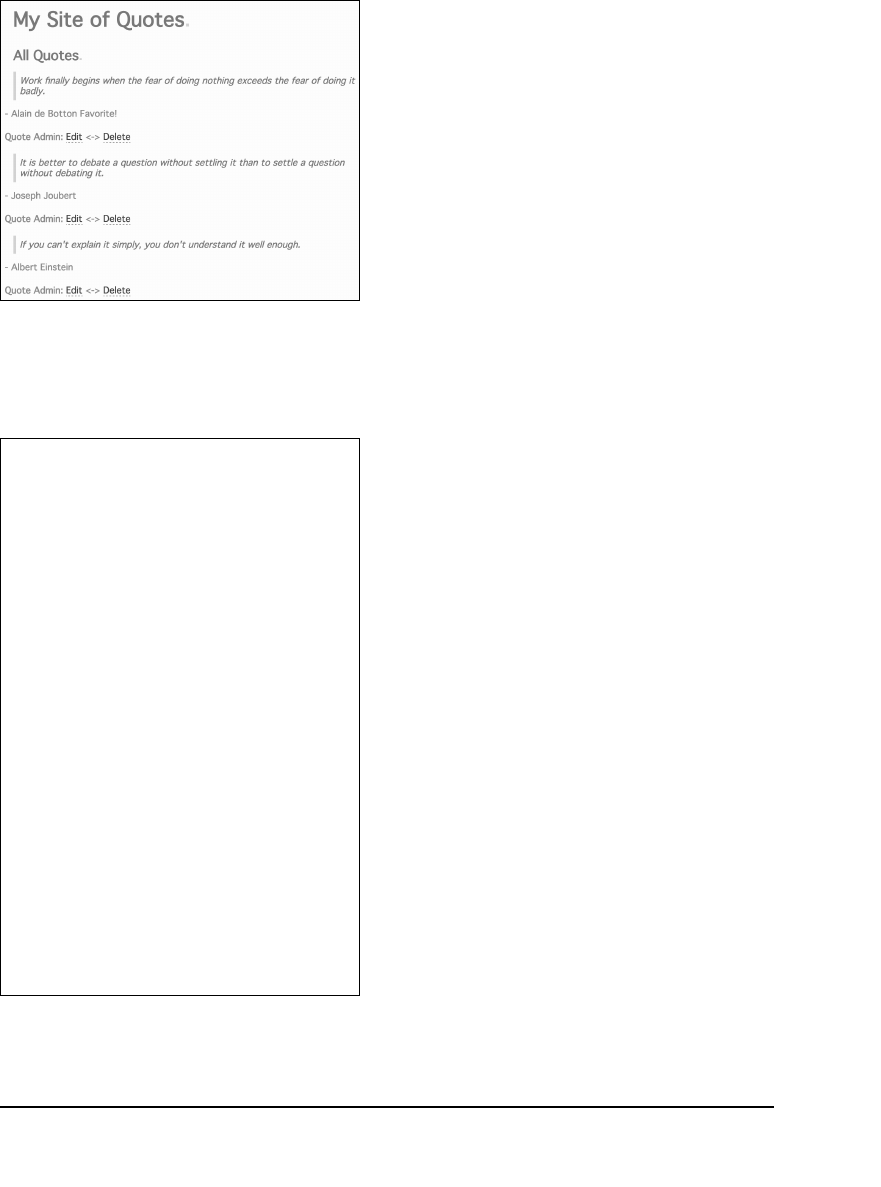
ptg18144795
Putting It All Together 409
Listing Quotes
The administrative side of the site will have
a page that lists every quote stored in the
database A. Although the same script
could easily be adapted for the public side,
its primary purpose is to provide quick links
for the administrator to edit or delete any
quote (as opposed to searching randomly
through the public side for the right quote
to manage).
Like the
add_quote.php
script, this page
will restrict access to just administrators.
To create view_quotes.php:
1. Begin a new PHP document in
your text editor or IDE, to be named
view_quotes.php
(Script 13.8):
<?php // Script 13.8 -
➝
view_quotes.php
define('TITLE', 'View All
➝
Quotes');
include('templates/header.html');
print '<h2>All Quotes</h2>';
2. Terminate the script if the user isn’t an
administrator:
if (!is_administrator()) {
print '<h2>Access Denied!
➝
</h2><p class="error">You do
➝
not have permission to access
➝
this page.</p>';
include('templates/
➝
footer.html');
exit();
}
This is the exact same code as that in
add_quote.php
. Except for the browser’s
title, the result for nonadministrators will
be the same as in B in the previous
section, “Adding Quotes.”
continues on next page
A The full list of stored quotations, with links to
edit or delete each.
Script 13.8 This script lists every quotation currently
stored, providing links for the administrator to edit
or delete them.
1 <?php // Script 13.8 - view_quotes.php
2 /* This script lists every quote. */
3
4 // Include the header:
5 define('TITLE', 'View All Quotes');
6 include('templates/header.html');
7
8 print '<h2>All Quotes</h2>';
9
10 // Restrict access to administrators
only:
11 if (!is_administrator()) {
12 print '<h2>Access Denied!</h2><p
class="error">You do not have permission
to access this page.</p>';
13 include('templates/footer.html');
14 exit();
15 }
16
17 // Need the database connection:
18 include('../mysqli_connect.php');
19
20 // Define the query:
21 $query = 'SELECT id, quote, source,
favorite FROM quotes ORDER BY date_
entered DESC';
22
code continues on next page

ptg18144795
410 Chapter 13
3. Include the database connection, and
define the query:
include('../mysqli_connect.php');
$query = 'SELECT id, quote,
➝
source, favorite FROM quotes
ORDER BY date_entered DESC';
The query returns four columns—all but
the date entered—from the database
for every record. The results will be
returned in order by the date they
were entered.
4. Execute the query, and begin retrieving
the results:
if ($r = mysqli_query
➝
($dbc, $query)) {
while ($row =
➝
mysqli_fetch_array($r)) {
The
while
loop code was explained
in Chapter 12, even though it wasn’t
used in that chapter. This construct is
how you fetch every record returned
by a query.
5. Begin printing out the record:
print "<div><blockquote>
➝
{$row['quote']}</blockquote>-
➝
{$row['source']}\n";
This code starts a DIV, places the
quotation itself within blockquote tags,
and then shows the quote’s attribution.
Script 13.8 continued
23 // Run the query:
24 if ($result = mysqli_query($dbc,
$query)) {
25
26 // Retrieve the returned records:
27 while ($row = mysqli_fetch_
array($result)) {
28
29 // Print the record:
30 print "<div><blockquo
te>{$row['quote']}</
blockquote>- {$row['source']}\n";
31
32 // Is this a favorite?
33 if ($row['favorite'] == 1) {
34 print ' <strong>Favorite!</
strong>';
35 }
36
37 // Add administrative links:
38 print "<p><b>Quote Admin:</
b> <a href=\"edit_quote.
php?id={$row['id']}\">Edit</a>
<->
39 <a href=\"delete_quote.
php?id={$row['id']}\">Delete</
a></p></div>\n";
40
41 } // End of while loop.
42
43 } else { // Query didn't run.
44 print '<p class="error">Could not
retrieve the data because:<br>' .
mysqli_error($dbc) . '.</p><p>The
query being run was: ' . $query . '</
p>';
45 } // End of query IF.
46
47 mysqli_close($dbc); // Close the
connection.
48
49 include('templates/footer.html'); //
Include the footer.
50 ?>
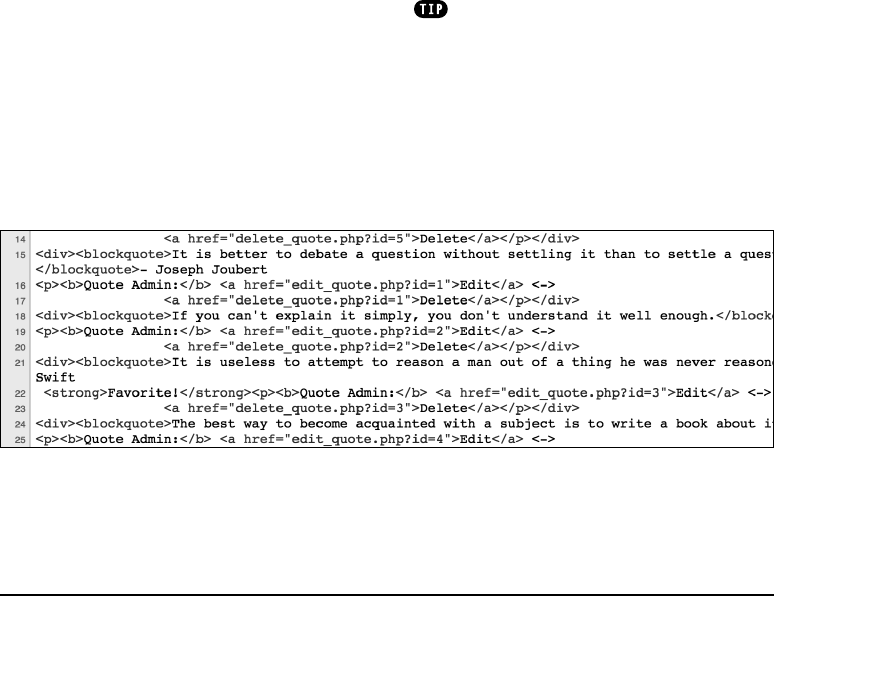
ptg18144795
Putting It All Together 411
6. Indicate that the quotation is a favorite,
if applicable:
if ($row['favorite'] == 1) {
print ' <strong>Favorite!
➝
</strong>';
}
The value of
$row['favorite']
will be
either 1 or 0. If it’s 1, the word
Favorite!
,
emphasized, is displayed along with
the record.
7. Add administrative links for editing and
deleting the quote:
print "<p><b>Quote Admin:</b>
➝
<a href=\"edit_quote.php?id=
➝
{$row['id']}\">Edit</a> <->
<a href=\"delete_quote.php?id=
➝
{$row['id']}\">Delete</a></p>
➝
</div>\n";
For each quote, two links must be
created. The first is to
edit_quote.php
and the second to
delete_quote.php
.
Each link must also pass the
id
value
along in the URL, as the code in
Chapter 12 does B.
The end of the
print
statement closes
the DIV for the specific quotation
(begun in Step 5).
B The HTML source code for the page shows how the
id
value is passed in the URL to the linked pages.
8. Complete the
while
loop and the
mysqli_query()
conditional:
} // End of while loop.
} else { // Query didn't run.
print '<p class="error">
➝
Could not retrieve the
➝
data because:<br>' .
➝
mysqli_error($dbc) . '.
➝
</p><p>The query being run
➝
was: ' . $query . '</p>';
} // End of query IF.
9. Close the database connection:
mysqli_close($dbc);
10. Complete the page:
include('templates/footer.html');
?>
11. Save the view as
view_quotes.php
,
and test in your browser.
As some of the queries in this chapter
demonstrate, you can use a column or value in
an
ORDER
BY
clause even if it’s not selected by
the query.
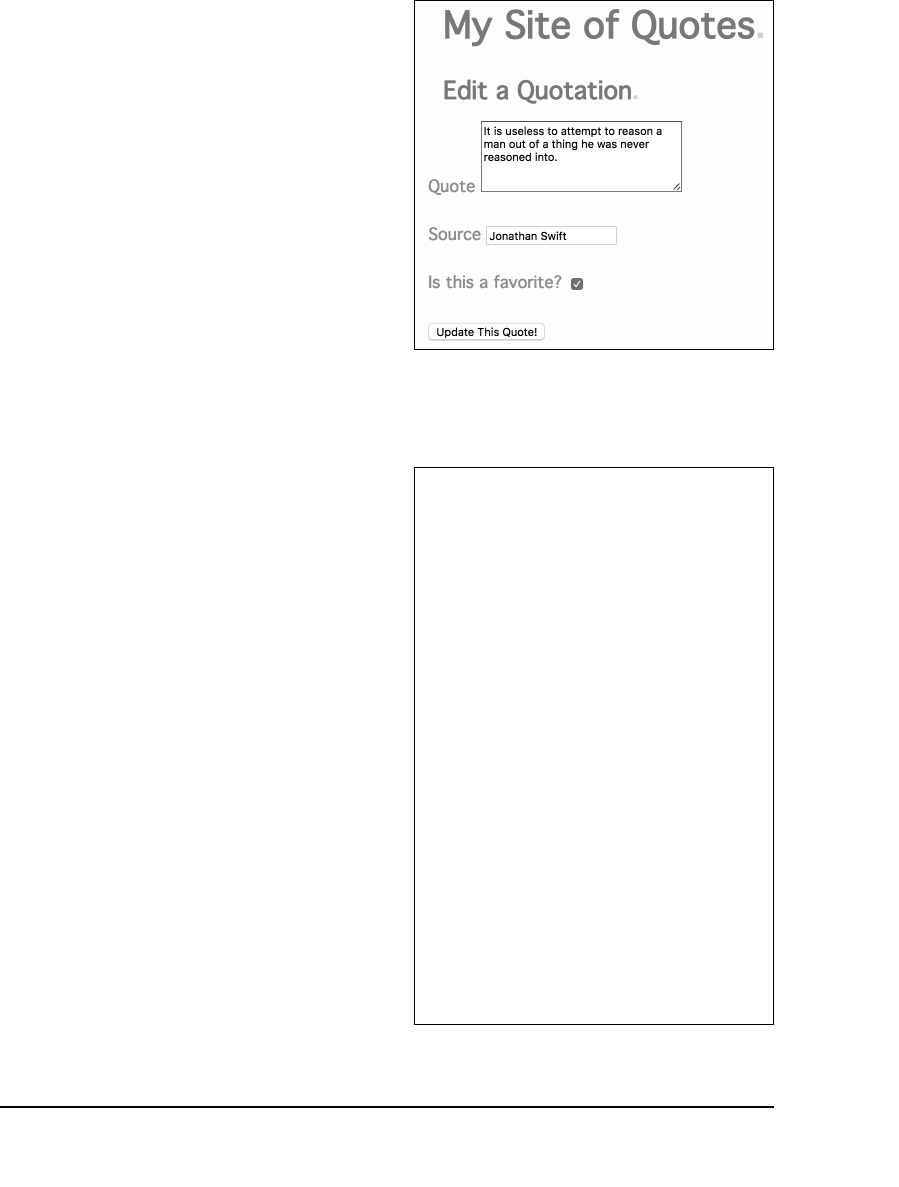
ptg18144795
412 Chapter 13
Editing Quotes
The
view_quotes.php
page (and later,
index.php
) has links to
edit_quote.php
,
where the administrator can update a
quote. Functionally, this script will be very
similar to
edit_entry.php
from Chapter 12:
1. The script needs to receive an ID value
in the URL.
2. Using the ID, the record is retrieved and
used to populate a form A.
3. Upon form submission, the form data
will be validated (even if only slightly).
4. If the form data passes validation, the
record will be updated in the database.
For the most part, this script is just another
application of what you’ve already seen.
But one new thing you’ll learn here is how
to select or not select a form’s checkbox
element based on a preexisting value.
To create edit_quote.php:
1. Begin a new PHP document in
your text editor or IDE, to be named
edit_quote.php
(Script 13.9):
<?php // Script 13.9 -
➝
edit_quote.php
define('TITLE', 'Edit a Quote');
include('templates/header.html');
print '<h2>Edit a Quotation </h2>';
2. Terminate the script if the user isn’t
an administrator:
if (!is_administrator()) {
print '<h2>Access Denied!
➝
</h2><p class="error">You do
➝
not have permission to access
➝
this page.</p>';
include('templates/
➝
footer.html');
exit();
}
A The form’s elements are prepopulated, and
preselected, using the record’s existing values.
Script 13.9 The
edit_quote.php
script gives the
administrator a way to update an existing record.
1 <?php // Script 13.9 - edit_quote.php
2 /* This script edits a quote. */
3
4 // Define a page title and include the
header:
5 define('TITLE', 'Edit a Quote');
6 include('templates/header.html');
7
8 print '<h2>Edit a Quotation</h2>';
9
10 // Restrict access to administrators
only:
11 if (!is_administrator()) {
12 print '<h2>Access Denied!</h2><p
class="error">You do not have permission
to access this page.</p>';
13 include('templates/footer.html');
14 exit();
15 }
16
17 // Need the database connection:
18 include('../mysqli_connect.php');
19
20 if (isset($_GET['id']) && is_numeric($_
GET['id']) && ($_GET['id'] > 0) ) { //
Display the entry in a form:
21
code continues on next page
ptg18144795
Putting It All Together 413
3. Include the database connection:
include('../mysqli_connect.php');
Both phases of the script—displaying
the form and handling the form—require
a database connection, so the included
file is incorporated at this point.
4. Validate that a numeric ID value was
received in the URL:
if (isset($_GET['id']) &&
➝
is_numeric($_GET['id']) &&
➝
($_GET['id'] > 0) ) {
This conditional is like one from
Chapter 12, with the addition of check-
ing that the ID value is greater than 0.
Adding that clause doesn’t do anything
Script 13.9 continued
22 // Define the query.
23 $query = "SELECT quote, source, favorite FROM quotes WHERE id={$_GET['id']}";
24 if ($result = mysqli_query($dbc, $query)) { // Run the query.
25
26 $row = mysqli_fetch_array($result); // Retrieve the information.
27
28 // Make the form:
29 print '<form action="edit_quote.php" method="post">
30 <p><label>Quote <textarea name="quote" rows="5" cols="30">' .
htmlentities($row['quote']) . '</textarea></label></p>
31 <p><label>Source <input type="text" name="source"value="' .
htmlentities($row['source']) . '"></label></p>
32 <p><label>Is this a favorite? <input type="checkbox" name="favorite" value="yes"';
33
34 // Check the box if it is a favorite:
35 if ($row['favorite'] == 1) {
36 print ' checked="checked"';
37 }
38
39 // Complete the form:
40 print '></label></p>
41 <input type="hidden" name="id" value="' . $_GET['id'] . '">
42 <p><input type="submit" name="submit" value="Update This Quote!"></p>
43 </form>';
44
code continues on next page
for the security of the script—the
is_numeric()
test confirms that the
value is safe to use in a query, but
prevents the query from being executed
if the ID has an unusable value.
5. Define and execute the query:
$query = "SELECT quote, source,
➝
favorite FROM quotes WHERE
➝
id={$_GET['id']}";
if ($result = mysqli_query($dbc,
➝
$query)) {
The query returns three columns for a
specific record.
continues on page 415

ptg18144795
414 Chapter 13
Script 13.9 continued
45 } else { // Couldn't get the information.
46 print '<p class="error">Could not retrieve the quotation because:<br>' . mysqli_
error($dbc) . '.</p><p>The query being run was: ' . $query . '</p>';
47 }
48
49 } elseif (isset($_POST['id']) && is_numeric($_POST['id']) && ($_POST['id'] > 0)) { // Handle
the form.
50
51 // Validate and secure the form data:
52 $problem = FALSE;
53 if ( !empty($_POST['quote']) && !empty($_POST['source']) ) {
54
55 // Prepare the values for storing:
56 $quote = mysqli_real_escape_string($dbc, trim(strip_tags($_POST['quote'])));
57 $source = mysqli_real_escape_string($dbc, trim(strip_tags($_POST['source'])));
58
59 // Create the "favorite" value:
60 if (isset($_POST['favorite'])) {
61 $favorite = 1;
62 } else {
63 $favorite = 0;
64 }
65
66 } else {
67 print '<p class="error">Please submit both a quotation and a source.</p>';
68 $problem = TRUE;
69 }
70
71 if (!$problem) {
72
73 // Define the query.
74 $query = "UPDATE quotes SET quote='$quote', source='$source', favorite=$favorite WHERE
id={$_POST['id']}";
75 if ($result = mysqli_query($dbc, $query)) {
76 print '<p>The quotation has been updated.</p>';
77 } else {
78 print '<p class="error">Could not update the quotation because:<br>' . mysqli_
error($dbc) . '.</p><p>The query being run was: ' . $query . '</p>';
79 }
80
81 } // No problem!
82
83 } else { // No ID set.
84 print '<p class="error">This page has been accessed in error.</p>';
85 } // End of main IF.
86
87 mysqli_close($dbc); // Close the connection.
88
89 include('templates/footer.html'); // Include the footer.
90 ?>
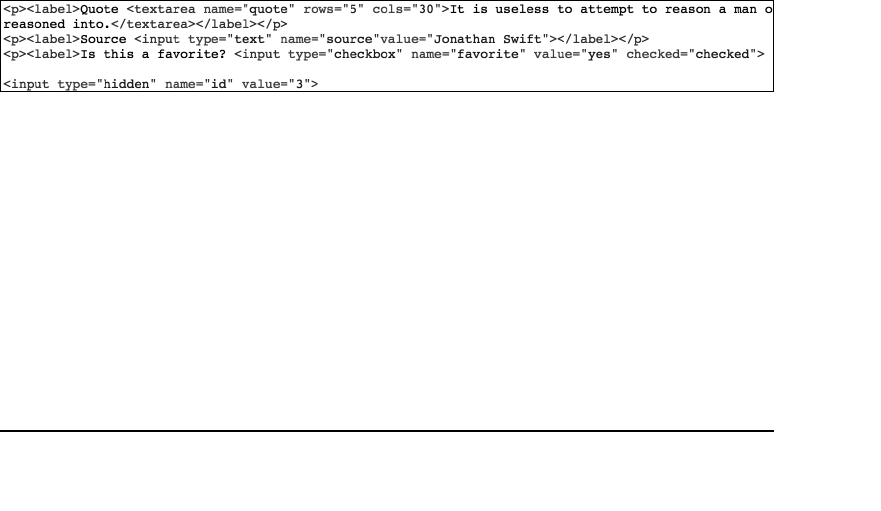
ptg18144795
Putting It All Together 415
6. Begin creating the form:
print '<form action="edit_quote.
php" method="post">
<p><label>Quote
➝
<textarea name="quote"
➝
rows="5" cols="30">' .
➝
htmlentities($row['quote']) .
➝
'</textarea></label></p>
<p><label>Source <input type=
➝
"text" name="source"value=
➝
"' . htmlentities($row
➝
['source']) . '"></label></p>
<p><label>Is this a favorite?
➝
<input type="checkbox"
➝
name="favorite" value="yes"';
The form is posted back to this same
page. It starts with a text area, whose
value will be prepopulated with the quote
value retrieved from the database. That
value is run through
htmlentities()
as a safety precaution.
Next, a text input is created, pre-
populated with the quotation’s source.
Finally, the checkbox for the indication
of the favorite is begun. Note that this
B The HTML source code for the page, upon first arriving, shows how the favorite checkbox can be
preselected.
checkbox element is not completed,
because the script needs to next deter-
mine whether or not to select the box
(in Step 7).
7. Select the box if it is a favorite:
if ($row['favorite'] == 1) {
print ' checked="checked"';
}
If the record’s
favorite
value equals 1,
then the administrator previously marked
this quotation as a favorite. In that
case, additional HTML needs to be
added to the checkbox input to prese-
lect it. After this point in the code, the
favorite checkbox’s underlying HTML
will be either
<input type="checkbox"
➝
name="favorite" value="yes"
or B
<input type="checkbox"
➝
name="favorite" value="yes"
➝
checked="checked"
continues on next page

ptg18144795
416 Chapter 13
8. Complete the form:
print '></label></p>
<input type="hidden" name="id"
➝
value="' . $_GET['id'] . '">
<p><input type="submit"
➝
name="submit" value="Update
➝
This Quote!"></p>
</form>';
The
print
statement starts by closing
the checkbox. Then the form must also
store the ID value in a hidden input, so
that it’s available to the script upon the
form submission.
Note that it’s safe to print out
$_GET['id']
here without using
htmlentities()
because the
is_numeric()
function already con-
firmed that it has a numeric value.
9. Create an error if the record could not
be retrieved:
} else { // Couldn't get the
➝
information.
print '<p class="error">Could
➝
not retrieve the quotation
➝
because:<br>' . mysqli_error
➝
($dbc) . '.</p><p>The query
➝
being run was: ' . $query .
➝
'</p>';
}
10. Check for a form submission:
} elseif (isset($_POST['id']) &&
➝
is_numeric($_POST['id']) &&
➝
($_POST['id'] > 0)) {
This conditional begins the second
phase of the script: handling the
submission of the form. The valida-
tion is the same as in Step 4, but now
$_POST['id']
is referenced instead of
$_GET['id']
.
11. Validate the form data:
$problem = FALSE;
if (!empty($_POST['quote']) &&
➝
!empty($_POST['source']) ) {
The form validation for the edit page
mirrors that in the
add_quote.php
script
(Script 13.7).
12. Prepare the values for use in the query:
$quote = mysqli_real_escape_string
➝
($dbc, trim(strip_tags($_POST
➝
['quote'])));
$source = mysqli_real_escape_string
➝
($dbc, trim(strip_tags($_POST
➝
['source'])));
if (isset($_POST['favorite'])) {
$favorite = 1;
} else {
$favorite = 0;
}
This code is also taken straight from
add_quote.php
.
13. Indicate a problem if the form wasn’t
completed:
} else {
print '<p class="error">
➝
Please submit both a
➝
quotation and a source.</p>';
$problem = TRUE;
}
14. If no problem occurred, update the
database:
if (!$problem) {
$query = "UPDATE quotes
➝
SET quote='$quote',
➝
source=$source',
➝
favorite=$favorite WHERE
➝
id={$_POST['id']}";
if ($r = mysqli_query($dbc,
➝
$query)) {
print '<p>The quotation has
➝
been updated.</p>';

ptg18144795
Putting It All Together 417
The
UPDATE
query updates the values
of three of the record’s columns. The
two string values are enclosed in single
quotation marks (within the query); the
numeric
$favorite
value is not.
The
WHERE
clause, which dictates the
record to be updated, is the critical piece.
Finally, a simple message indicates the
success of the operation C.
15. Indicate a problem if the query failed:
} else {
print '<p class="error">
➝
Could not update the
➝
quotation because:<br>' .
➝
mysqli_error($dbc) . '.
➝
</p><p>The query being run
➝
was: ' . $query . '</p>';
}
16. Complete the conditionals:
} // No problem!
} else { // No ID set.
print '<p class="error">
➝
This page has been accessed
➝
in error.</p>';
} // End of main IF.
The
else
clause applies if no valid ID
value is received by the page via either
GET or POST.
17. Close the database connection, and
complete the page:
mysqli_close($dbc);
include('templates/footer.html');
?>
18. Save the file, and test in your browser
(by clicking a link on
view_quotes.php
).
C The result upon successfully editing a record.

ptg18144795
418 Chapter 13
Deleting Quotes
The script for deleting existing quotations
mimics
delete_entry.php
from Chapter 12.
Upon first arriving, assuming that a valid
record ID was passed along in the URL, the
quote to be deleted is displayed A. If the
administrator clicks the submit button, the
form will be submitted back to this same
page, at which point the record will be
removed from the database B.
To create delete_quote.php:
1. Begin a new PHP document in
your text editor or IDE, to be named
delete_quote.php
(Script 13.10):
<?php // Script 13.10 -
➝
delete_quote.php
define('TITLE', 'Delete a
➝
Quote');
include('templates/header.html');
print '<h2>Delete a Quotation
➝
</h2>';
A The first step for deleting a record is confirming
the record to be removed.
B Upon submission of the form,
the quotation is deleted and a
message is printed.
Script 13.10 The
delete_quote.php
script provides the administrator with a way to delete an existing record.
1 <?php // Script 13.10 - delete_quote.php
2 /* This script deletes a quote. */
3
4 // Define a page title and include the header:
5 define('TITLE', 'Delete a Quote');
6 include('templates/header.html');
7
8 print '<h2>Delete a Quotation</h2>';
9
10 // Restrict access to administrators only:
11 if (!is_administrator()) {
12 print '<h2>Access Denied!</h2><p class="error">You do not have permission to access this
page.</p>';
13 include('templates/footer.html');
14 exit();
15 }
16
code continues on next page
ptg18144795
Putting It All Together 419
2. Terminate the script if the user isn’t
an administrator:
if (!is_administrator()) {
print '<h2>Access Denied!
➝
</h2> <p class="error">You do
➝
not have permission to access
➝
this page.</p>';
include('templates/
➝
footer.html');
exit();
}
continues on next page
Script 13.10 continued
17 // Need the database connection:
18 include('../mysqli_connect.php');
19
20 if (isset($_GET['id']) && is_numeric($_GET['id']) && ($_GET['id'] > 0) ) { // Display the
quote in a form:
21
22 // Define the query:
23 $query = "SELECT quote, source, favorite FROM quotes WHERE id={$_GET['id']}";
24 if ($result = mysqli_query($dbc, $query)) { // Run the query.
25
26 $row = mysqli_fetch_array($result); // Retrieve the information.
27
28 // Make the form:
29 print '<form action="delete_quote.php" method="post">
30 <p>Are you sure you want to delete this quote?</p>
31 <div><blockquote>' . $row['quote'] . '</blockquote>- ' . $row['source'];
32
33 // Is this a favorite?
34 if ($row['favorite'] == 1) {
35 print ' <strong>Favorite!</strong>';
36 }
37
38 print '</div><br><input type="hidden" name="id" value="' . $_GET['id'] . '">
39 <p><input type="submit" name="submit" value="Delete this Quote!"></p>
40 </form>';
41
42 } else { // Couldn't get the information.
43 print '<p class="error">Could not retrieve the quote because:<br>' . mysqli_error($dbc)
. '.</p><p>The query being run was: ' . $query . '</p>';
44 }
45
46 } elseif (isset($_POST['id']) && is_numeric($_POST['id']) && ($_POST['id'] > 0) ) { // Handle
the form.
47
code continues on next page
ptg18144795
420 Chapter 13
3. Include the database connection:
include('../mysqli_connect.php');
4. Validate that a numeric ID value was
received in the URL:
if (isset($_GET['id']) &&
➝
is_numeric($_GET['id']) &&
➝
($_GET['id'] > 0) ) {
This is the same conditional used in
edit_quote.php
.
5. Retrieve the record to be deleted:
$query = "SELECT quote, source,
➝
favorite FROM quotes WHERE
➝
id={$_GET['id']}";
if ($r = mysqli_query($dbc,
➝
$query)) {$row =
➝
mysqli_fetch_array($r);
The standard three fields are
retrieved from the database for the
record. Because only one record is
being addressed in this script, the
mysqli_fetch_array()
function is
called once, outside of any loop.
Script 13.10 continued
48 // Define the query:
49 $query = "DELETE FROM quotes WHERE id={$_POST['id']} LIMIT 1";
50 $result = mysqli_query($dbc, $query); // Execute the query.
51
52 // Report on the result:
53 if (mysqli_affected_rows($dbc) == 1) {
54 print '<p>The quote entry has been deleted.</p>';
55 } else {
56 print '<p class="error">Could not delete the blog entry because:<br>' . mysqli_
error($dbc) . '.</p><p>The query being run was: ' . $query . '</p>';
57 }
58
59 } else { // No ID received.
60 print '<p class="error">This page has been accessed in error.</p>';
61 } // End of main IF.
62
63 mysqli_close($dbc); // Close the connection.
64
65 include('templates/footer.html');
66 ?>
6. Begin creating the form:
print '<form action=
➝
"delete_quote. php"
➝
method="post">
<p>Are you sure you want to
➝
delete this quote?</p>
<div><blockquote>' . $row
➝
['quote'] . '</blockquote>- ' .
➝
$row['source'];
The form, for the most part, just displays
the quotation.
7. Indicate if the quotation is a favorite:
if ($row['favorite'] == 1) {
print ' <strong>Favorite!
➝
</strong>';
}
This code is the same as that on the
view_quotes.php
page, indicating that
the quote is, in fact, a favorite.

ptg18144795
Putting It All Together 421
8. Complete the form:
print '</div><br>
<input type="hidden" name="id"
➝
value="' . $_GET['id'] . '">
<p><input type="submit" name=
➝
"submit" value="Delete this
➝
Quote!"></p>
</form>';
The form must contain a hidden input
that will pass the quote ID back to the
page upon form submission.
9. Complete the
mysqli_query()
conditional:
} else { // Couldn't get the
➝
information.
print '<p class="error">
➝
Could not retrieve the quote
because:<br>' .
➝
mysqli_error($dbc) . '.
➝
</p><p>The query being run
➝
was: ' . $query . '</p>';
}
If the query failed, the MySQL error
and the query itself are displayed for
debugging purposes.
10. Check for a form submission:
} elseif (isset($_POST['id']) &&
➝
is_numeric($_POST['id']) &&
➝
($_POST['id'] > 0) ) {
This conditional begins the second
phase of the script: handling the
submission of the form. The valida-
tion is the same as in Step 4, but now
$_POST['id']
is referenced instead of
$_GET['id']
.
11. Delete the record:
$query = "DELETE FROM quotes
➝
WHERE id={$_POST['id']} LIMIT
➝
1";
$r = mysqli_query($dbc, $query);
The
DELETE
query will remove the
record. The
WHERE
conditional indicates
which specific record is to be removed,
and the
LIMIT 1
clause is applied as an
extra precaution.
12. Report on the result:
if (mysqli_affected_rows($dbc)
➝
== 1) {
print '<p>The quote entry has
➝
been deleted.</p>';
} else {
print '<p class="error">
➝
Could not delete the blog
➝
entry because:<br>' .
➝
mysqli_error($dbc) . '.
➝
</p><p>The query being run
➝
was: ' . $query . '</p>';
}
If the query succeeded, then one
record will have been affected and a
message is displayed to the user B.
13. Complete the conditionals:
} else { // No ID received.
print '<p class="error">
➝
This page has been accessed
➝
in error.</p>';
} // End of main IF.
The
else
clause applies if no valid ID
value is received by the page via either
GET or POST.
14. Close the database connection, and
complete the page:
mysqli_close($dbc);
include('templates/footer.html');
?>
15. Save the file, and test in your browser
(by clicking a link on
view_quotes.php
).
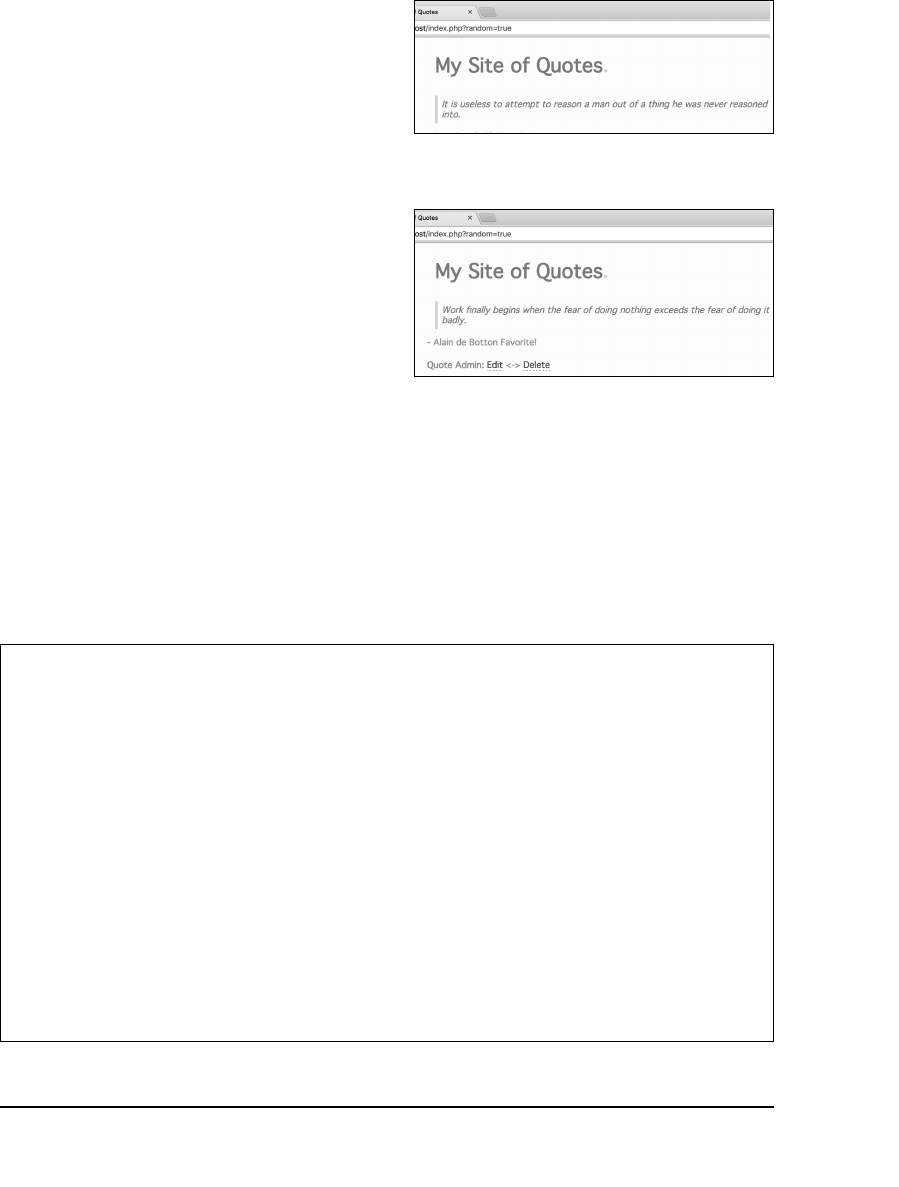
ptg18144795
422 Chapter 13
Creating the
Home Page
Last, but certainly not least, there’s the
home page. For this site, the home page
will be the only page used by the public at
large. The home page will show a single
quotation, but the specific quotation can
be one of the following:
n
The most recent (the default)
n
A random quotation
n
A random favorite quotation
To achieve this effect, links will pass dif-
ferent values in the URL back to this same
page A.
The script should also display administrative
links—edit and delete—for the currently
displayed quote, if the user is an
administrator B.
A Values passed in the URL trigger the execution
of different queries.
B When an administrator views the home page,
extra links are displayed.
Script 13.11 The home page of the site shows a single quotation at a time, plus administrative links (when
appropriate).
1 <?php // Script 13.11 - index.php
2 /* This is the home page for this site. It displays:
3 - The most recent quote (default)
4 - OR, a random quote
5 - OR, a random favorite quote */
6
7 // Include the header:
8 include('templates/header.html');
9
10 // Need the database connection:
11 include('../mysqli_connect.php');
12
13 // Define the query...
14 // Change the particulars depending upon values passed in the URL:
15 if (isset($_GET['random'])) {
16 $query = 'SELECT id, quote, source, favorite FROM quotes ORDER BY RAND() DESC LIMIT 1';
17 } elseif (isset($_GET['favorite'])) {
18 $query = 'SELECT id, quote, source, favorite FROM quotes WHERE favorite=1 ORDER BY RAND()
DESC LIMIT 1';
code continues on next page
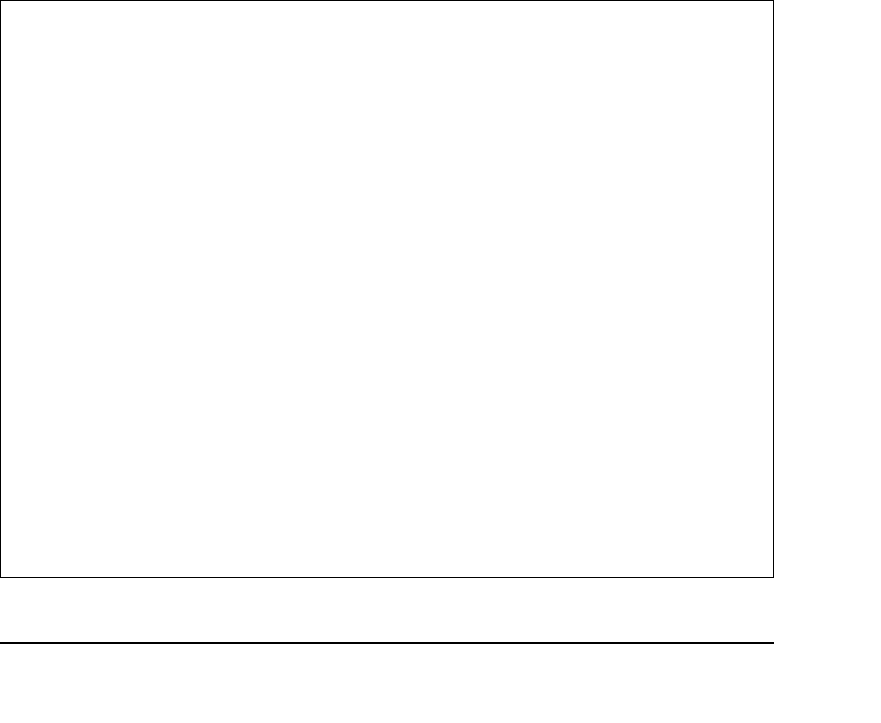
ptg18144795
Putting It All Together 423
4. Begin defining the query to be run:
if (isset($_GET['random'])) {
$query = 'SELECT id, quote,
➝
source, favorite FROM quotes
➝
ORDER BY RAND() DESC LIMIT 1';
If a
$_GET['random']
variable is set,
the user clicked a link requesting a
random quotation. It doesn’t matter
what value this variable has, as long as
it is set.
For all the queries, four columns—
id
, the
quote
, the
source
, and
favorite
—from one row will be
returned. To retrieve only one row, a
LIMIT
1
clause is used.
continues on next page
Script 13.11 continued
19 } else {
20 $query = 'SELECT id, quote, source, favorite FROM quotes ORDER BY date_entered DESC LIMIT
1';
21 }
23 // Run the query:
24 if ($result = mysqli_query($dbc, $query)) {
25
26 // Retrieve the returned record:
27 $row = mysqli_fetch_array($result);
28
29 // Print the record:
30 print "<div><blockquote>{$row['quote']}</blockquote>- {$row['source']}";
31
32 // Is this a favorite?
33 if ($row['favorite'] == 1) {
34 print ' <strong>Favorite!</strong>';
35 }
36
37 // Complete the DIV:
38 print '</div>';
39
40 // If the admin is logged in, display admin links for this record:
41 if (is_administrator()) {
42 print "<p><b>Quote Admin:</b> <a href=\"edit_quote.php?id={$row['id']}\">Edit</a> <->
43 <a href=\"delete_quote.php?id={$row['id']}\">Delete</a>
44 </p>\n";
45 }
46
code continues on next page
To create index.php:
1. Begin a new PHP document in your text
editor or IDE, to be named
index.php
(Script 13.11):
<?php // Script 13.11 - index.php
2. Include the header:
include('templates/header.html');
The home page does not need a
custom title, so no constant is defined
before including the header.
3. Include the database connection:
include('../mysqli_connect.php');
ptg18144795
424 Chapter 13
To select a random row in MySQL, use
the
ORDER
BY
RAND()
clause. This code
uses MySQL’s
RAND()
function, short
for
random
, to return the records in a
random order. So this query first selects
every record in random order, and then
returns only the first in that set.
5. Define the query that selects a random
favorite record:
} elseif (isset
➝
($_GET['favorite'])) {
$query = 'SELECT id, quote,
➝
source, favorite FROM quotes
➝
WHERE favorite=1 ORDER BY
➝
RAND() DESC LIMIT 1';
This query is similar to that in Step 4,
but it uses a
WHERE
clause to restrict the
pool of possible quotations to just those
whose
favorite
value equals 1.
6. Define the default query:
} else {
$query = 'SELECT id, quote,
➝
source, favorite FROM quotes
➝
ORDER BY date_entered DESC
➝
LIMIT 1';
}
Script 13.11 continued
47 } else { // Query didn't run.
48 print '<p class="error">Could not retrieve the data because:<br>' . mysqli_error($dbc) .
'.</p><p>The query being run was: ' . $query . '</p>';
49 } // End of query IF.
50
51 mysqli_close($dbc); // Close the connection.
52
53 print '<p><a href="index.php">Latest</a> <-> <a href="index.php?random=true">Random</a> <-> <a
href="index.php?favorite=true">Favorite</a></p>';
54
55 include('templates/footer.html'); // Include the footer.
56 ?>
If no value was passed in the URL, then
the home page should display the most
recently added quotation. To do that, the
query orders all the quotes in descend-
ing order of date entered and then limits
the results to just a single record.
7. Execute the query, and fetch the
returned record:
if ($r = mysqli_query($dbc,
➝
$query)) {
$row = mysqli_fetch_array($r);
8. Print the quotation:
print "<div><blockquote>
➝
{$row ['quote']}</blockquote>-
➝
{$row['source']} ";
This code is similar to that in
view_quotes.php
, but needs to be
used only once.
9. Indicate if the quotation is a favorite,
and complete the DIV:
if ($row['favorite'] == 1) {
print ' <strong>Favorite!
➝
</strong>';
}
print '</div>';
The conditional is the same as in
delete_quote.php
and
view_quotes.php
.
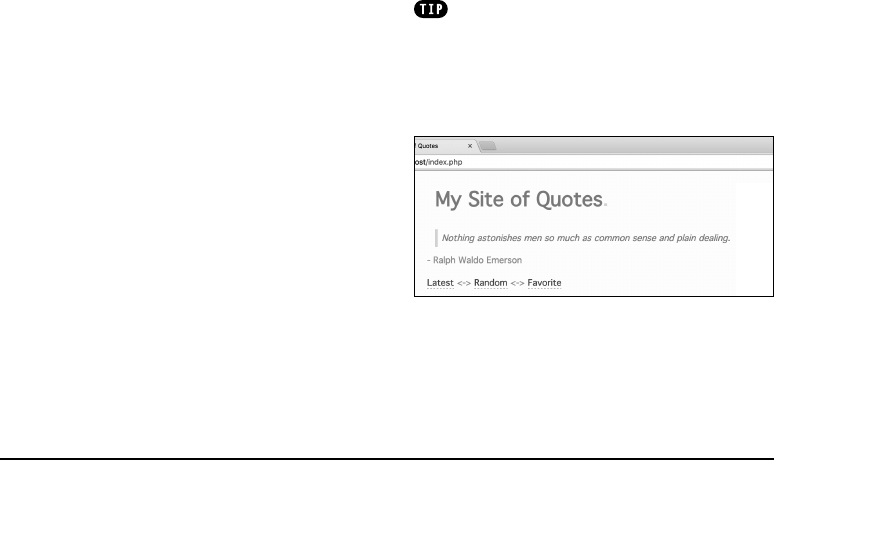
ptg18144795
Putting It All Together 425
13. Create links to other pages:
print '<p><a href="index.php">
➝
Latest</a> <-> <a href=
➝
"index.php?random=true">
➝
Random</a> <-> <a href=
➝
"index.php?favorite=true">
➝
Favorite</a></p>';
Three public links are added to the page,
each back to this same script. The first
link, which passes no values in the
URL, will always show the most recent
quotation. The second, which passes
a
random
value in the URL, will trigger
the query in Step 4, thereby retrieving
a random record. The third link, which
passes a
favorite
value in the URL, will
trigger the query in Step 5, thereby
retrieving a random favorite record.
14. Include the footer, and complete
the page:
include('templates/footer.html');
?>
15. Save the file, and test in your
browser C.
Normally the home page is one of the
first scripts written, not the last. But in this
case I wanted to build up to this point in
the example.
10. If the user is an administrator, create
links to edit or delete this record:
if (is_administrator()) {
print "<p><b>Quote Admin:
➝
</b> <a href=\"edit_quote.
➝
php? id={$row['id']}\">Edit
➝
</a> - + | + -
<a href=\"delete_quote.php?
➝
id={$row['id']}\">Delete</a>
</p>\n";
}
If the user is an administrator, links
to the edit and delete scripts will be
added to the page. The links them-
selves have values just like those in
view_quotes.php
.
11. If the query didn’t run, print out an error
message:
} else { // Query didn't run.
print '<p class="error">
➝
Could not retrieve the data
because:<br>' .
➝
mysqli_error($dbc) . '.
➝
</p><p>The query being run
➝
was: ' . $query . '</p>';
} // End of query IF.
This code is for your own debugging
purposes. You would not display a
MySQL error, or the query that caused
it, to the general public.
As a precaution, you could only show the
MySQL error if
is_administrator()
returns TRUE.
12. Close the database connection:
mysqli_close($dbc);
The database connection will no
longer be needed, so it can be closed
at this point. C The latest quotation (note the URL).

ptg18144795
426 Chapter 13
Review and Pursue
If you have any problems with the
review questions or the pursue prompts,
turn to the book’s supporting forum
(www.LarryUllman.com/forums/).
Review
n
How would the
is_administrator()
function be called to check for the
same cookie—named
Samuel
—with a
different value? A different cookie—not
named
Samuel
—with a different value?
n
Why is the reference to the style sheet in
the header file
css/style.css
instead
of
../css/style.css
? How else could
the style sheet be referenced?
n
Why is the
login.php
script structured
the way it is? How could that script be
organized more linearly?
n
What would be some other good ideas
for user-defined functions with this site?
Hint: Look for repeated code.
Pursue
n
Make the login form sticky.
n
Define the login credentials—the cookie
name and value—as constants in a con-
figuration file. Then include that con-
figuration file on every page, and use
those constants for creating, deleting,
and confirming the value of the cookie.
n
Limit the cookie’s expiration to only
15 minutes, and then re-send the cookie
on each page, if appropriate (i.e., if the
cookie exists).
n
Use sessions instead of a cookie.
n
Make the
add_quote.php
and
edit_quote.php
forms sticky.
n
Change
view_quotes.php
so that the
administrator can list the quotes in
different order. Hint: Create links back
to the page like those on
index.php
,
and change the query accordingly.
n
Before putting this site on a live server
(should you do that), update all the
code so that no MySQL error is ever
shown to a nonadministrative user.
n
See what other repetitive code could
also be moved into your own functions.

ptg18144795
The three technical requirements for exe-
cuting all of this book’s examples are PHP,
the scripting language; the web server appli-
cation that PHP runs through; and MySQL,
the database application. This appendix
describes the installation of these tools
on two different platforms—Windows 10
and Mac OS X. If you are using a hosted
website, all of this will already be provided
for you, but these products are all free and
easy enough to install, so putting them on
your own computer still makes sense.
After the installation section, this appendix
demonstrates some basics for working
with MySQL and configuring PHP. The PHP
and MySQL manuals cover installation and
configuration in a reasonable amount of
detail. You may want to also peruse them,
particularly if you encounter problems.
A
Installation and
Configuration

ptg18144795
428 Appendix A
Installation on
Windows
Although you can certainly install a web
server (such as Apache, Nginx, or IIS), PHP,
and MySQL individually on a Windows
computer, I strongly recommend you use
an all-in-one installer instead. It’s simply
easier and more reliable to do so.
Several all-in-one installers are out there
for Windows. The four that I see mentioned
most frequently are
n
XAMPP (www.apachefriends.org)
n
WAMP (www.wampserver.com)
n
AMPPS (www.ampps.com)
n
Bitnami (www.bitnami.com), which also
partners with XAMPP
For this appendix, I’ll use XAMPP, which
runs on Windows 2008, 2012, Vista, 7, and
8. (The XAMPP site makes no mention of
Windows 10, but you should be able to use
XAMPP on that version of Windows too.)

ptg18144795
Installation and Configuration 429
Along with Apache, PHP, and MySQL,
XAMPP also installs the following:
n
phpMyAdmin, the web-based interface
to a MySQL server
n
OpenSSL, for secure connections
n
A mail server (for sending email)
n
Several useful extensions
As of this writing, XAMPP (Version 7.0.6)
installs PHP 7.0.6, Apache 2.4.18, and
phpMyAdmin 4.5.1. There is one catch,
however!
As of XAMPP 5.5.30, the installer includes
MariaDB (www.mariadb.com) instead of
MySQL. MariaDB is an open source fork
of MySQL that is functionally equivalent.
Despite the fact that XAMPP installs
MariaDB instead of MySQL, you shouldn’t
have any problems following all the MySQL-
specific instructions or code in this book.
I’ll run through the installation process in
these next steps. Note that if you have any
problems, you can use the book’s support-
ing forum (www.LarryUllman.com/forums/),
but you’ll probably have more luck turning
to the XAMPP site (it is their product, after
all). Also, the installer works really well and
isn’t that hard to use, so rather than detail
every single step in the process, I’ll high-
light the most important considerations.
On Firewalls
A firewall prevents communications in
many ways, the most common of which
being over
ports
: an access point to a
computer. Versions of Windows start-
ing with Service Pack 2 of XP include a
built-in firewall. You can also download
and install third-party firewalls. Firewalls
improve the security of your computer,
but they may also interfere with your abil-
ity to run Apache, MySQL, and some of
the other tools used by XAMPP because
they all use ports.
When running XAMPP for the first time,
or during the installation process, if you
see a security prompt indicating that
the firewall is blocking Apache, MySQL,
or the like, choose
Unblock
or
Allow
access
. Otherwise, you can configure
your firewall manually through the oper-
ating system settings.
The ports that need to be open are as
follows: 80 for Apache, 3306 for MySQL,
and 25 for the Mercury mail server. If you
have any problems starting or accessing
one of these, disable your firewall and
see if it works then. If so, you’ll know the
firewall is the problem and that it needs
to be reconfigured.
Just to be clear, firewalls aren’t found just
on Windows, but in terms of the instruc-
tions in this appendix, the presence of a
firewall will more likely trip up a Windows
user than any other.

ptg18144795
430 Appendix A
To install XAMPP on Windows:
1. Download the latest release of
XAMPP for Windows from
www.apachefriends.org A.
I suggest that you grab the latest
version of PHP available, although you’ll
be fine with this book’s content if you
use a PHP 5 version instead.
2. On your computer, double-click the
downloaded file to begin the installation
process.
3. When prompted B, install all the
components.
Admittedly, you don’t need Tomcat—
a Java server—or Perl, but it’s fine to
install them too.
4. When prompted C, install XAMPP
somewhere other than in the Program
Files directory.
You shouldn’t install it in the Program
Files directory because of a permis-
sions issue in Windows. I recommend
installing XAMPP in your root directory
(e.g.,
C:\
).
Wherever you decide to install the
program, make note of that location,
because you’ll need to know it
several other times as you work
through this appendix.
A From the Apache Friends website, grab the
latest installer for Windows.
B The XAMPP components that can be installed.
C Select where XAMPP should be installed.
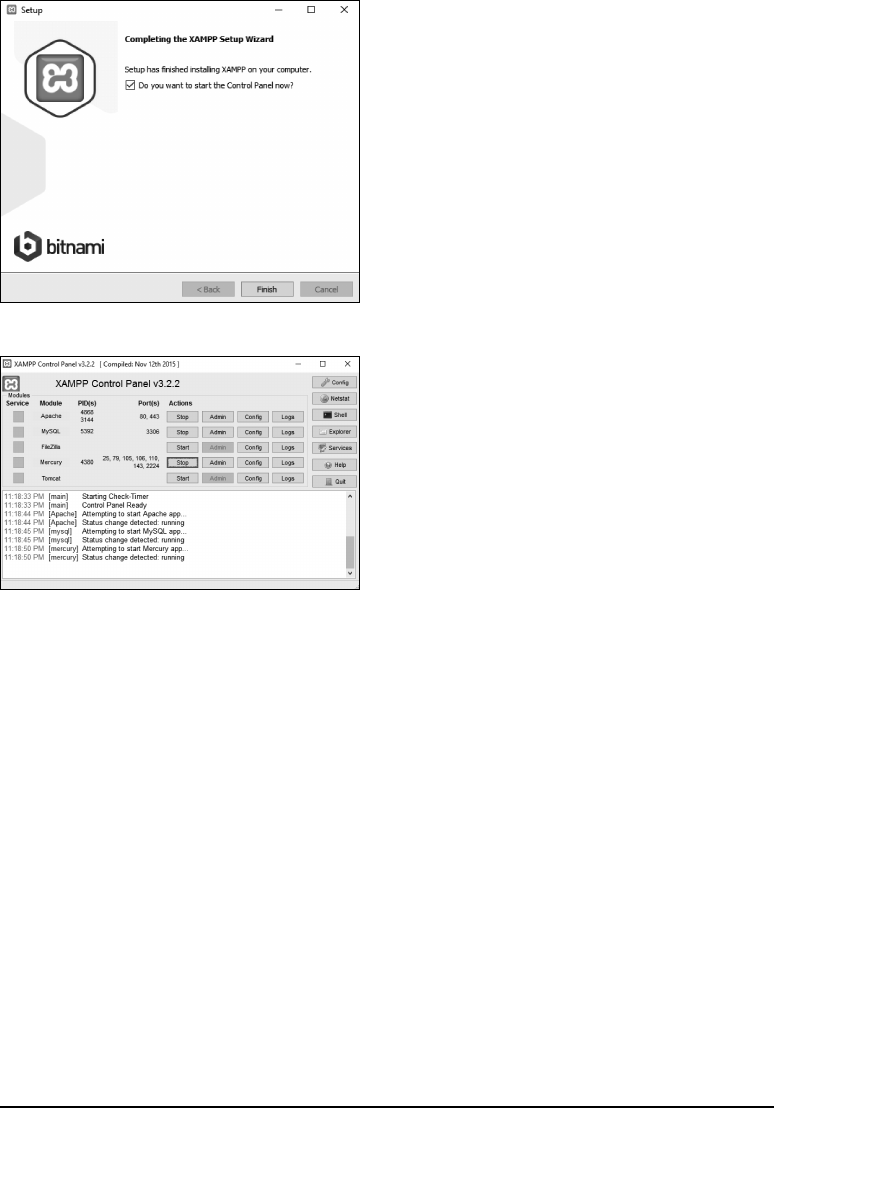
ptg18144795
Installation and Configuration 431
5. After the installation process has done
its thing D, opt to start the XAMPP
Control Panel.
6. To start, stop, and configure XAMPP,
use the XAMPP Control Panel E.
Apache has to be running for every
chapter in this book. MySQL must
be running for Chapter 12, “Intro to
Databases,” and Chapter 13, “Putting
It All Together.” Mercury is the mail
server that XAMPP installs. It needs to
be running in order to send email using
PHP (see Chapter 8, “Creating Web
Applications”).
7. Immediately set a password for the root
MySQL user.
How you do this is explained in the
“Managing MySQL Users” section later
in this appendix.
continues on next page
D The installation of XAMPP is complete!
E The XAMPP Control Panel, used to manage the
software.
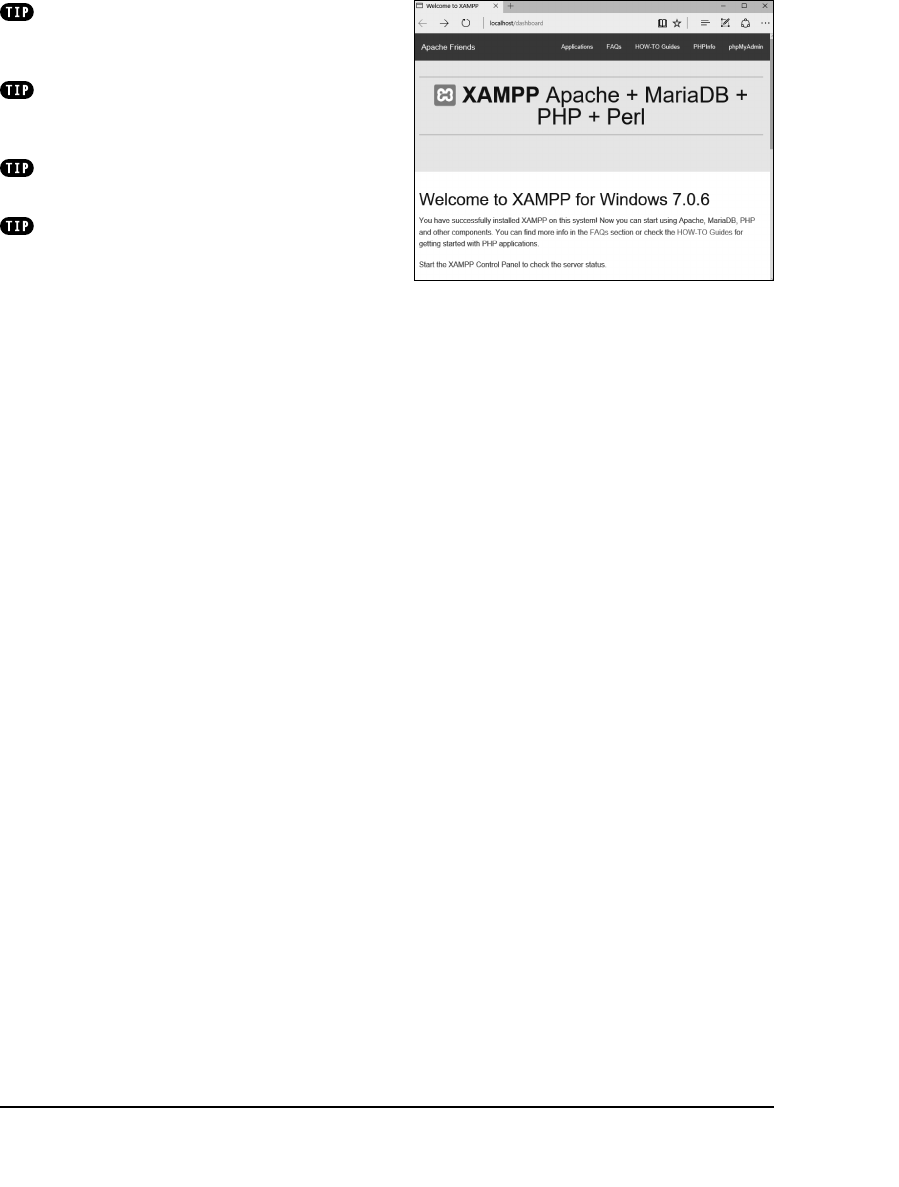
ptg18144795
432 Appendix A
The XAMPP Control Panel’s various
admin links will take you to different web
pages (on your server) and other resources F.
See the “Configuring PHP” section to
learn how to configure PHP by editing the
php.ini
file.
Whenever you restart your computer,
you’ll need to restart the XAMPP services.
Your web root directory—where your PHP
scripts should be placed in order to test them—
is the
htdocs
folder in the directory where
XAMPP was installed. Following my installation
instructions, this would be
C:\xampp\htdocs
.F The web-based splash page for XAMPP, linked
from its Control Panel.

ptg18144795
Installation and Configuration 433
Along with Apache, PHP, and MySQL,
XAMPP also installs the following:
n
phpMyAdmin, the web-based interface
to a MySQL server
n
OpenSSL, for secure connections
n
Several useful extensions
As of this writing, XAMPP (Version 7.0.6)
installs PHP 7.0.6, Apache 2.4.18, and
phpMyAdmin 4.5.1. There is one catch,
however!
As of XAMPP 5.5.30, the installer includes
MariaDB (www.mariadb.com) instead of
MySQL. MariaDB is an open source fork
of MySQL that is functionally equivalent.
Despite the fact that XAMPP installs
MariaDB instead of MySQL, you shouldn’t
have any problems following all the MySQL-
specific instructions or code in this book.
I’ll run through the installation process in
these next steps. Note that if you have any
problems, you can use the book’s support-
ing forum (www.LarryUllman.com/forums/),
but you’ll probably have more luck turning
to the XAMPP site (it is their product, after
all). Also, the installer works really well and
isn’t that hard to use, so rather than detail
every single step in the process, I’ll high-
light the most important considerations.
Installation on
Mac OS X
Mac OS X is at its heart a version of Unix,
and because PHP and MySQL were origi-
nally written for Unix-like systems, numerous
options are available for installing them
on Mac OS X. In fact, Mac OS X already
comes with Apache installed, saving you
that step.
Seasoned developers and those at home
in the Terminal will likely want to install PHP
and MySQL using package installers such
as http://php-osx.liip.ch/ and Homebrew
(http://brew.sh/). But for beginners, I recom-
mend using an all-in-one installer such as
n
XAMPP (www.apachefriends.org)
n
AMPPS (www.ampps.com)
n
Bitnami (www.bitnami.com), which also
partners with XAMPP
n
MAMP (www.mamp.info)
Not only are these installers relatively
foolproof, but they also won’t leave you
scrambling when an operating system
update overwrites your Apache configura-
tion file. For this appendix, I’ll use XAMPP,
which runs on Mac OS X 10.6 and later.
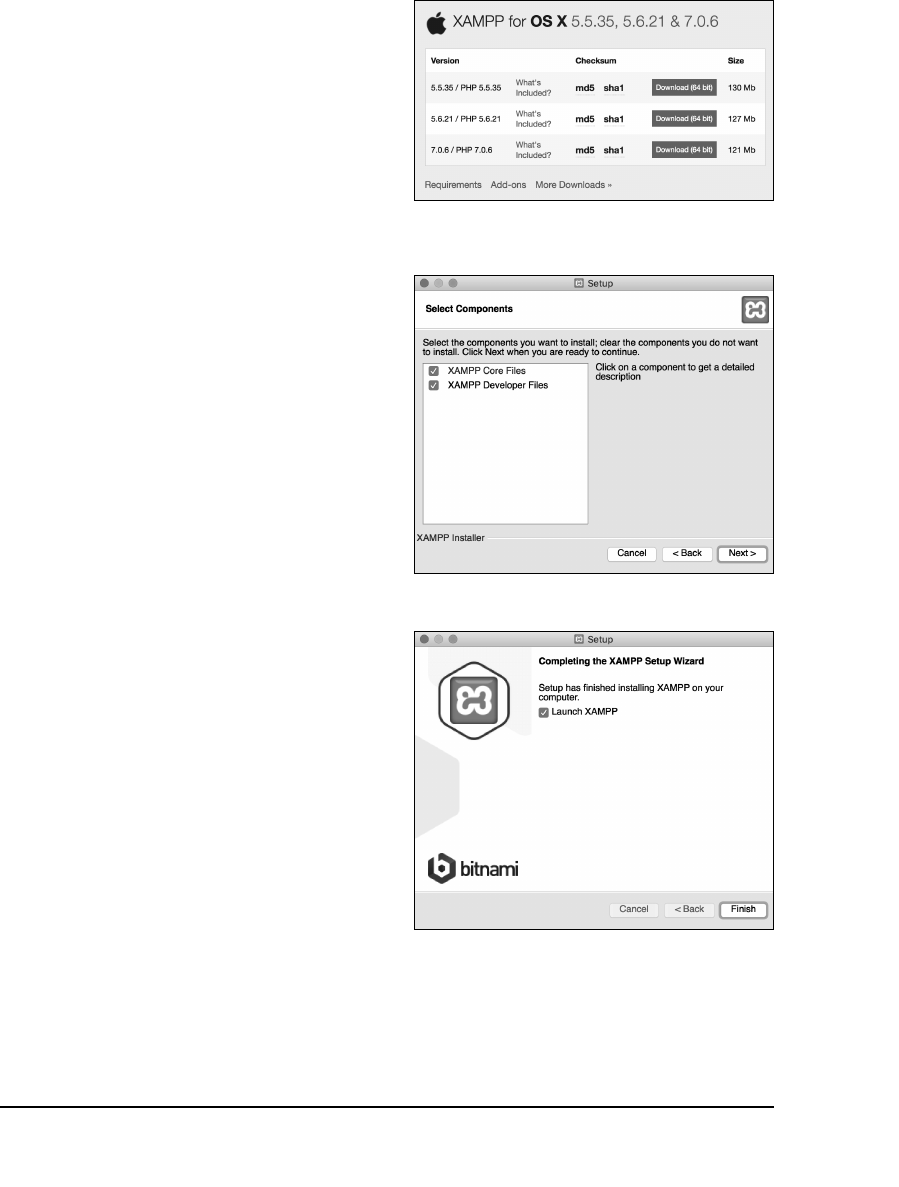
ptg18144795
434 Appendix A
To install XAMPP on Mac OS X:
1. Download the latest release of
XAMPP for Mac OS X from
www.apachefriends.org A.
I suggest you grab the latest version
of PHP available, although you’ll be
fine with this book’s content if you use
a PHP 5 version instead.
2. On your computer, double-click the
downloaded file to mount the disc image.
3. In the mounted disk image, double-
click the package installer to begin the
installation process.
4. When prompted B, install all the
components.
You’ll see only two, broad options;
install both.
5. After the installation process has done
its thing C, opt to launch XAMPP.
6. To start, stop, and configure XAMPP,
use the XAMPP Control Panel D.
Apache has to be running for every
chapter in this book. MySQL must be
running for Chapters 12 and 13. You
probably won’t ever need the FTP
application, because you can just move
your files directly.
7. Immediately set a password for the root
MySQL user.
How you do this is explained in the
“Managing MySQL Users” section later
in this appendix.
A From the Apache Friends website, grab the
latest installer for Mac OS X.
B The XAMPP components that can be installed.
C The installation of XAMPP is complete!
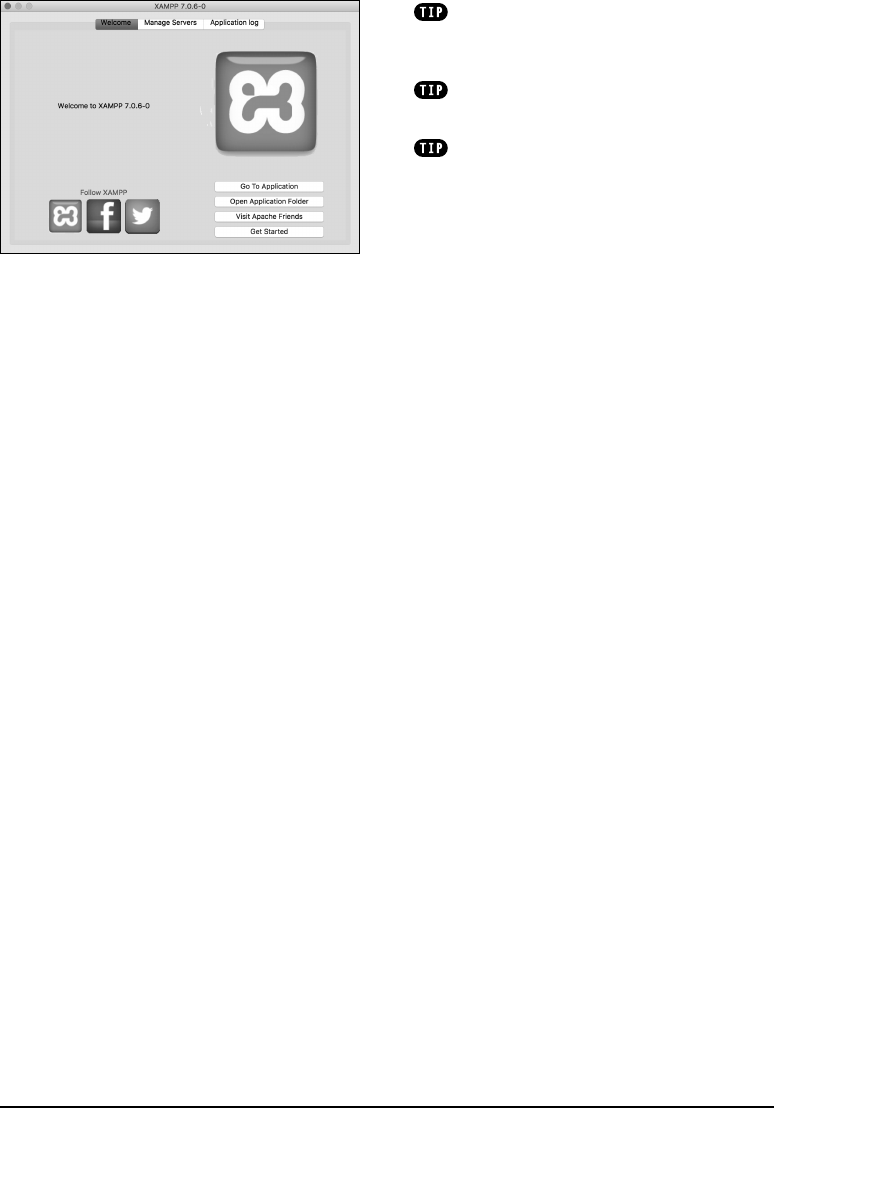
ptg18144795
Installation and Configuration 435
See the “Configuring PHP” section to
learn how to configure PHP by editing the
php.ini
file.
Whenever you restart your computer,
you’ll need to restart the XAMPP services.
Your web root directory—where your
PHP scripts should be placed in order to test
them—is the
htdocs
folder in the directory
where XAMPP was installed. This would be
/Applications/XAMPP/xamppfiles/
htdocs
.
D The XAMPP Control Panel, used to manage the
software.
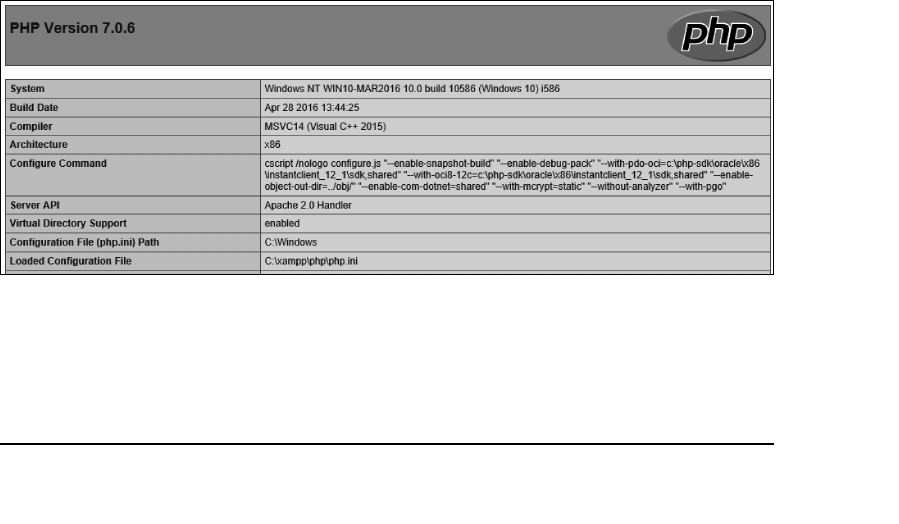
ptg18144795
436 Appendix A
Configuring PHP
One of the benefits of installing PHP on
your own computer is that you can config-
ure it however you prefer. How PHP runs
is determined by the
php.ini
file, which is
normally created when PHP is installed.
Two of the most important settings you
may want to consider adjusting are
display_errors
and
error_reporting
(both are discussed in Chapter 3, “HTML
Forms and PHP”). To change any setting,
open the PHP configuration file, edit it
as needed, then save it and restart the web
server.
To alter PHP’s configuration:
1. In your browser, execute a script that
invokes the
phpinfo()
function A.
The
phpinfo()
function, discussed in
Chapter 1, “Getting Started with PHP,”
reveals oodles of information about the
PHP installation.
A Some of the output from calling the
phpinfo()
function.
2. In the browser’s output, search for
Loaded Configuration File
.
The value next to this text is the loca-
tion of the active configuration file. This
will be something like
C:\xampp\php\
php.ini
or
/Applications/XAMPP/
xamppfiles/etc/php.ini
.
If there is no value for the
Loaded
Configuration File
, your server has no
active
php.ini
file. This is highly
uncommon, but you’d need to download
the PHP source code, from www.php.net,
to find a sample configuration file.
3. Open the
php.ini
file in any text editor.
4. Change the settings as you wish.
Depending on your operating system,
you may need to be an administrator or
enter a password to make changes to
this file.
Many instructions are included in the file.
Lines are commented out (made inactive)
by preceding them with a semicolon.
5. Save the
php.ini
file.

ptg18144795
Installation and Configuration 437
6. Restart your web server.
You don’t need to restart the entire
computer, just the web server (e.g.,
Apache). In XAMPP, simply click Stop
and then Start for Apache.
You can also use the
phpinfo()
function
to confirm that your configuration changes
have taken effect.
If you edit the
php.ini
file and restart
the web server but your changes don’t take
effect, make sure you’re editing the proper
php.ini
file (you may have more than one on
your computer).
Enabling Mail
The
mail()
function works only if the
computer running PHP has access to
sendmail or another mail server. One
way to enable the
mail()
function is
to set the
smtp
value in the
php.ini
file (for Windows only). This approach
works if, for example, your Internet
provider has an SMTP address you can
use. Unfortunately, you can’t use this
value if your ISP’s SMTP server requires
authentication.
For Windows, a number of free SMTP
servers, such as Mercury, are available.
It’s installed along with XAMPP, or you
can install it yourself if you’re not using
XAMPP.
Mac OS X comes with a mail server
installed—postfix and/or sendmail—that
needs to be enabled. Search Google for
instructions on manually enabling your
mail server on Mac OS X.
Alternatively, you can search some of
the PHP code libraries to learn how
to use an SMTP server that requires
authentication.

ptg18144795
438 Appendix A
MySQL Interfaces
In Chapters 12 and 13, a PHP script will be
used to interact with a MySQL database.
As I explain in Chapter 12, being able to
interact with MySQL independent of your
PHP scripts is the most valuable debugging
tool there is. Knowing how to use a sepa-
rate MySQL interface is therefore critical
information. I’ll quickly introduce the two
most common options.
Using the MySQL client
The MySQL software comes with an impor-
tant tool known as the MySQL
client
. This
application provides a simple interface for
communicating with the MySQL server. It’s a
command-line tool that must be accessed
using the Terminal application on Linux and
Mac OS X or through the command (DOS)
prompt on Windows.
To use the MySQL client:
1. Make sure the MySQL server is running.
If you’re using XAMPP on Windows, you
can start MySQL there and then skip
ahead to Step 3.
2. Find the MySQL
bin
directory.
To connect to the client, you’ll need
to know where it’s located. The MySQL
client is found within the
bin
directory for
your installation (
bin
is short for “binary,”
which is to say an executable). I’ll run
through the common possibilities.
If you installed MySQL yourself, the
client’s location depends on where you
installed the software, but it’s most likely
C:\mysql\bin\mysql
(Windows)
or
/usr/local/mysql/bin/mysql
(Mac
OS X and Unix)
Using Semicolons
Within the MySQL client, a semicolon
indicates the completion of a statement
to be executed. This allows you to write
a complicated command or SQL query
over multiply lines, and MySQL won’t
attempt to run that command until it
meets a semicolon. This is only a require-
ment within the MySQL client, though.
Queries run through PHP scripts or php-
MyAdmin do not need to be terminated
by semicolons. And you don’t need to
use a semicolon after
exit
to leave the
MySQL client.
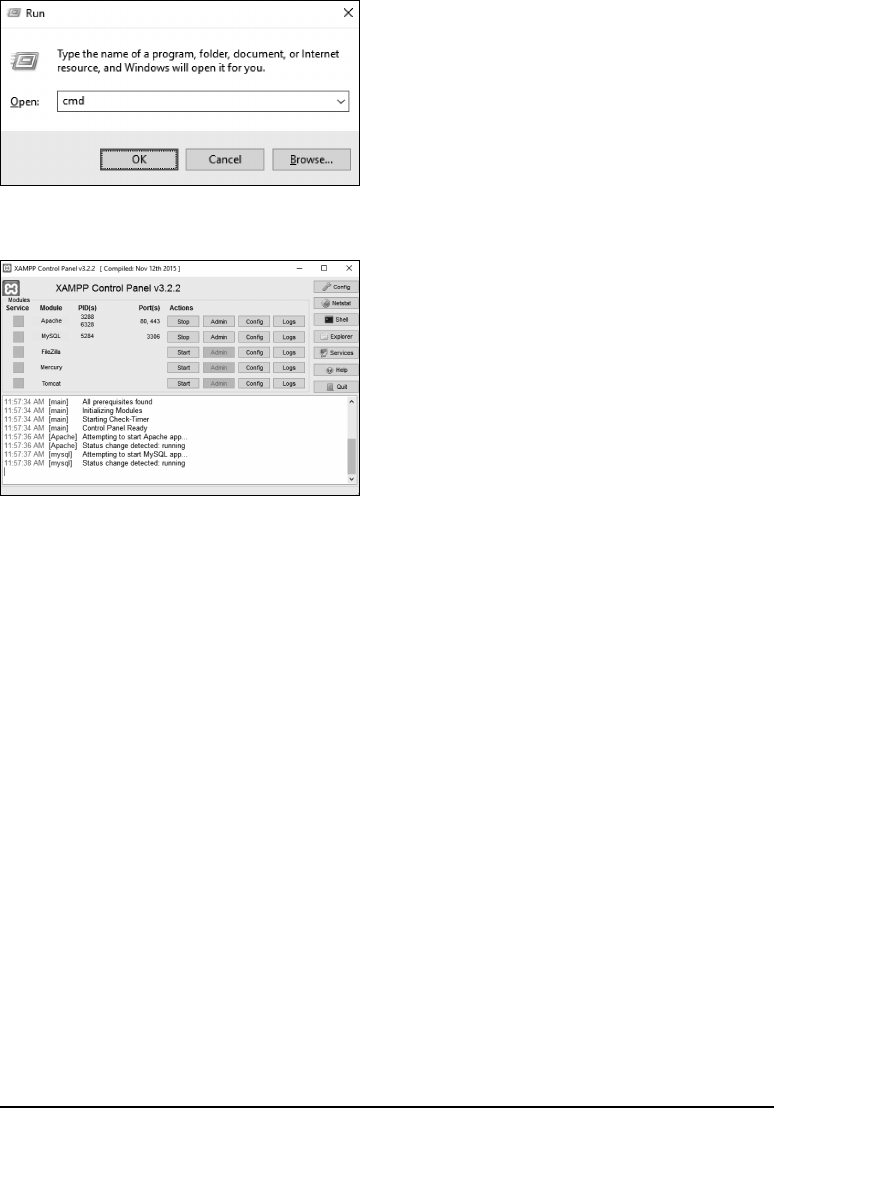
ptg18144795
Installation and Configuration 439
If you used XAMPP on Windows, it’s
C:\xampp\mysql\bin\mysql
(assum-
ing you installed XAMPP in
C:\
). If you
installed XAMPP on Mac OS X, it’s
/Applications/XAMPP/xamppfiles/bin
.
3. Access a command prompt.
On Mac OS X and Unix, you can accom-
plish this by running the Terminal appli-
cation. On Mac OS X, it’s found within
the
/Applications/Utilities
folder.
On Windows, press Command+R to
open the Run dialog, and at the prompt,
type
cmd
and press Enter or click OK A.
If you’re using XAMPP on Windows,
click the Shell button in the Control
Panel B to access a command prompt.
4. Attempt to connect to the MySQL server.
To connect, enter the pathname identi-
fied in Step 2 plus
-u
username
-p
.
So, the command might be
C:\mysql\bin\mysql
-u
username
-p
(Windows)
or
/usr/local/mysql/bin/mysql
➝
-u
username
-p
(Unix and Mac OS X)
or
/Applications/XAMPP/xamppfiles/
➝
bin/mysql
-u
username
-p
(Mac OS X)
For XAMPP on Windows, you can just
use
mysql
-u
username
-p
(assuming
you clicked the Shell button in Step 3).
Replace
username
with the username
you want to use. If you haven’t yet
created any other users, this will be
root
(root is the supreme MySQL user).
If you haven’t yet established a root
user password (the default behavior for
XAMPP), you can omit the
-p
flag.
continues on next page
A Use the Run dialog to access a console
window on Windows.
B The Shell button in the XAMPP Control Panel
takes you straight to a command prompt.

ptg18144795
440 Appendix A
5. Enter the password at the prompt C.
The password requested is the MySQL
password for the user named during the
connection. You’ll see this prompt only
if you used the
-p
option in Step 4.
If you installed MAMP on Mac OS X, the
password for the root user will be root.
If you installed XAMPP on Windows, no
password is set initially.
6. List the available databases D:
SHOW DATABASES;
The
SHOW
DATABASES
command is a
SQL query that lists every database
hosted on that MySQL installation that
the connected user can see.
C Successfully accessing the MySQL client on Windows.
D After a fresh MySQL installation, there
will only be a couple of databases.
7. Exit the MySQL client.
To do so, type
exit
or
quit
.
If you see a Can’t connect to local MySQL
server through socket… error message, it nor-
mally means MySQL isn’t running.
The MySQL client is one of the best tools
for debugging PHP scripts that work with
MySQL. You can use the MySQL client to check
user permissions and to run queries outside of
the PHP script.
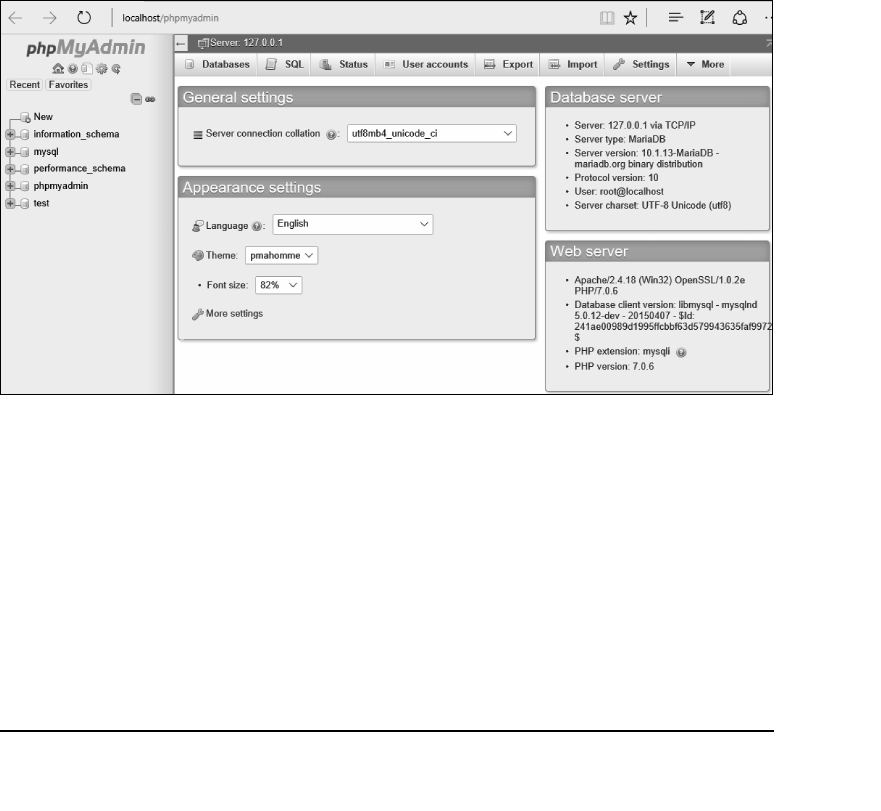
ptg18144795
Installation and Configuration 441
Using phpMyAdmin
phpMyAdmin (www.phpmyadmin.net) is a
web-based interface for interacting with
a MySQL server, allowing you to create
tables, import and export records, and much
more, without having to use a command-
line interface. It is arguably the most popular
web software written in PHP, as every
PHP hosting company provides it. In fact,
the all-in-one XAMPP installer includes it
too. phpMyAdmin is well documented and
easy to use, but I’ll highlight a couple of
quick points.
E The phpMyAdmin front page.
To use phpMyAdmin:
1. Access phpMyAdmin in your
browser E.
When using XAMPP, phpMyAdmin is
available at http://localhost/phpmyadmin/.
On Windows, you can also get to this
page by clicking the MySQL admin link
in the Control Panel.
2. Click a database name in the left
column to select that database.
continues on next page
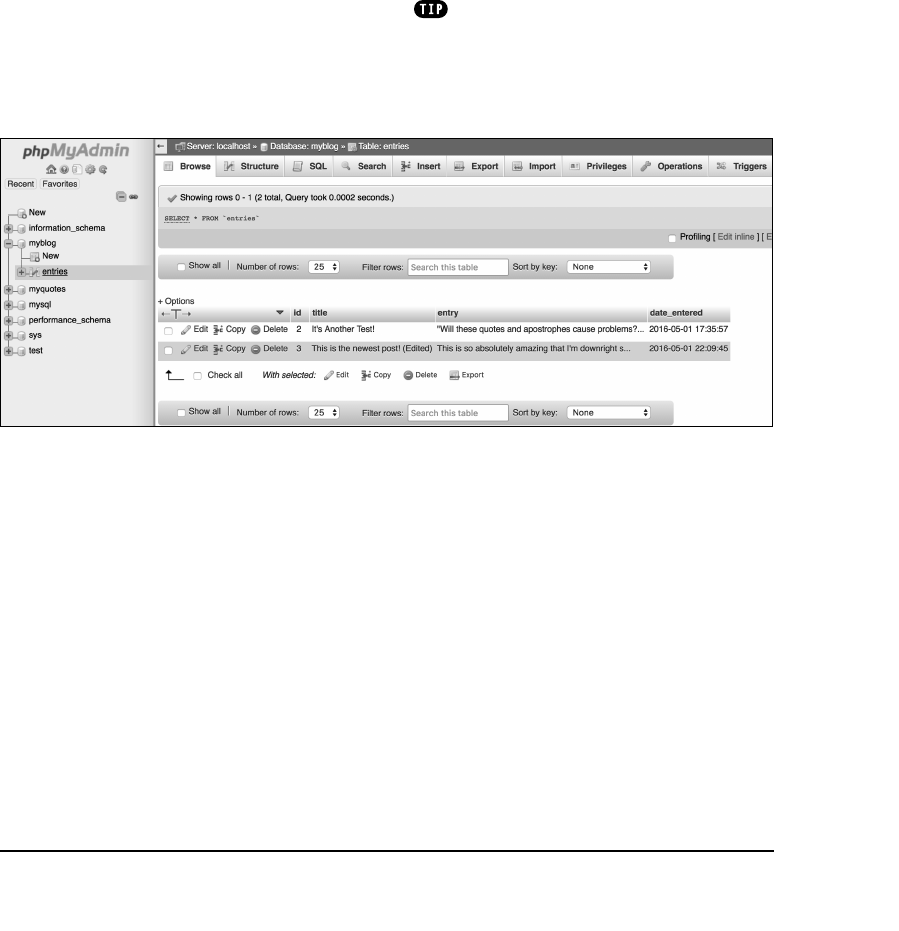
ptg18144795
442 Appendix A
3. Click a table name in the left column to
select that table F.
You don’t always have to select a table,
but by doing so you can simplify some
tasks.
4. Use the tabs and links (on the right side
of the page) to perform common tasks.
For the most part, the tabs and links are
shortcuts to common SQL commands.
For example, the Browse tab performs a
SELECT
query and the Insert tab creates
a form for adding new records.
F Selecting a database or a table, from the left column, changes the options on the right side of the page.
5. Use the SQL tab to execute any
SQL command.
You can alternatively use the SQL
Query Window, linked just above the
list of database or table names. Using
either interface, you can test queries
that your PHP scripts are using,
without the added complication of
the script itself.
Many other clients are available for inter-
acting with a MySQL database, but the MySQL
command-line client and phpMyAdmin are the
two most common.
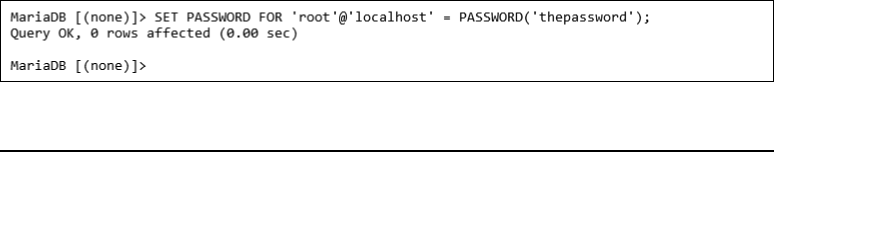
ptg18144795
Installation and Configuration 443
Managing
MySQL Users
Once you’ve successfully installed MySQL,
you can begin creating MySQL users. A
MySQL user is a fundamental security con-
cept, limiting access to, and influence over,
stored data. Just to clarify, your databases
can have several different users, just as
your operating system might. But MySQL
users are different from operating system
users. While learning PHP and MySQL on
your own computer, you don’t necessarily
need to create new users, but live produc-
tion sites need to have dedicated MySQL
users with appropriate permissions.
The initial MySQL installation comes with
one user (named
root
) with no password
set. At the very least, you should create
a new, secure password for the root user
after installing MySQL.
After that, you can create other users with
more limited permissions. As a rule, you
shouldn’t use the root user for normal,
day-to-day operations.
While you’re creating new users, you’ll also
see how to create new databases, which
will be necessary for Chapters 12 and 13.
Setting the root user password
When you install MySQL, no value—or no
secure password—is established for the
root user. This is certainly a security risk
that should be remedied before you begin
to use the server (because the root user
has unlimited powers).
A Updating the root user’s password using SQL within the MySQL client.
You can set any user’s password using
either phpMyAdmin or the MySQL client,
as long as the MySQL server is running.
If MySQL isn’t currently running, start it now
using the steps outlined earlier in
this appendix.
You must be connected to MySQL as the
root user in order to be able to change the
root user’s password.
To assign a password to the root
user via the MySQL client:
1. Connect to the MySQL client.
See the set of steps in “To use the
MySQL client” for detailed instructions.
2. Enter the following command, replacing
thepassword
with the password you
want to use A:
SET PASSWORD FOR
➝
'root'@'localhost' =
➝
PASSWORD('thepassword');
Keep in mind that passwords in
MySQL are case-sensitive, so
Kazan
and
kazan
aren’t interchangeable.
The term
PASSWORD
that precedes the
actual quoted password tells MySQL
to encrypt that string using the MySQL
PASSWORD()
function. You cannot have
a space between
PASSWORD
and the
opening parenthesis.
continues on next page
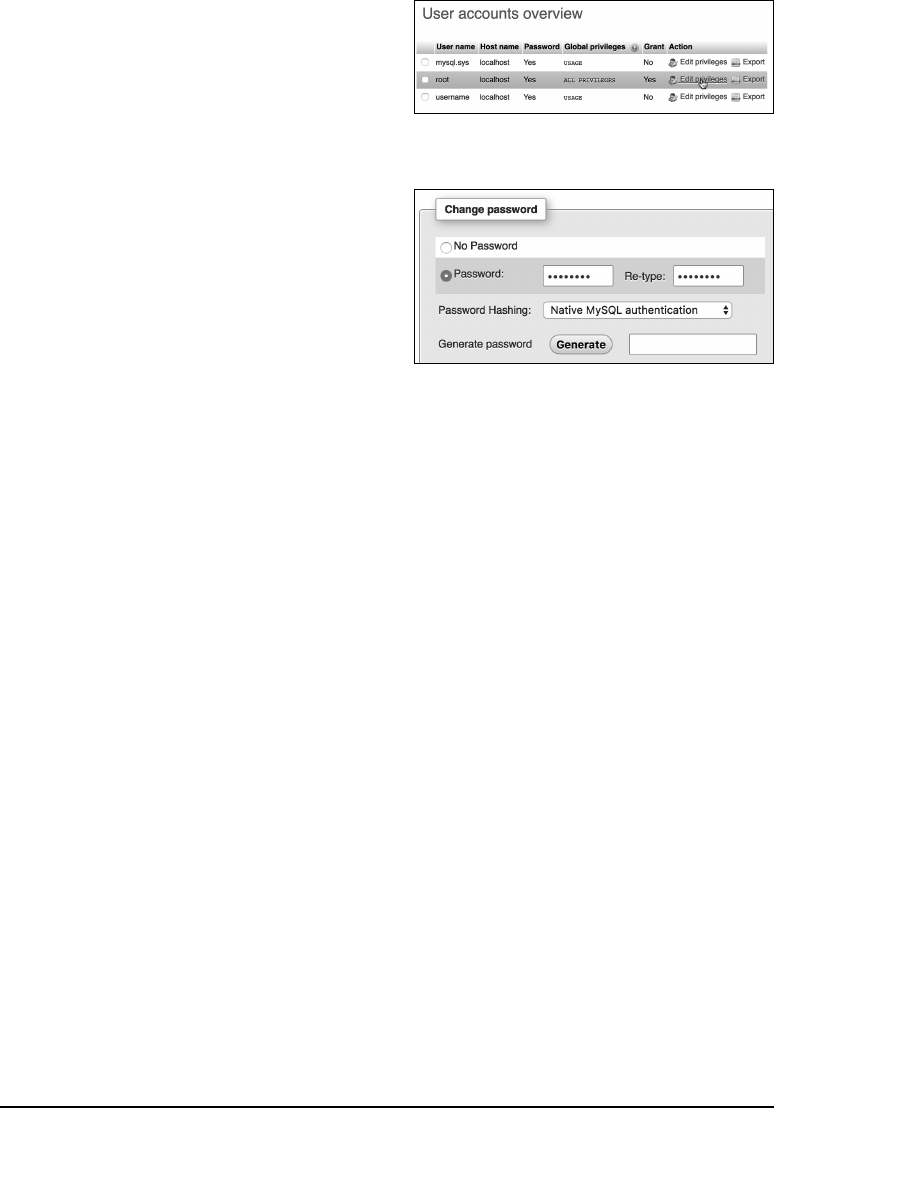
ptg18144795
444 Appendix A
3. Exit the MySQL client:
exit
4. Test the new password by logging in to
the MySQL client again.
Now that a password has been estab-
lished, you need to add the
-p
flag to
the connection command. You’ll see
an Enter password prompt, where you
enter the just-created password.
To assign a password to the
root user via phpMyAdmin:
1. Open phpMyAdmin in your browser.
See the set of steps in the section
“To use phpMyAdmin” for detailed
instructions.
2. On the home page, click the User
accounts tab.
You can always click the home icon,
in the upper-left corner, to get to the
phpMyAdmin home page.
3. In the list of users, click the
Edit
Privileges
icon on the root user’s
row B.
4. On the next page, click
Change
Password
.
5. Use the Change Password form C,
found further down the resulting page,
to change the password.
B The list of MySQL users, as shown in
phpMyAdmin.
C The form for updating a MySQL user’s
password within phpMyAdmin.

ptg18144795
Installation and Configuration 445
6. Change the root user’s password in
phpMyAdmin’s configuration file, if
necessary.
The result of changing the root user’s
password will likely be that phpMyAdmin
is denied access to the MySQL server.
This is because phpMyAdmin, on a local
server, normally connects to MySQL as
the root user, with the root user’s pass-
word hard-coded into a configuration
file. After following Steps 1–4, find the
config.inc.php
file in the phpMyAdmin
directory—likely
/Applications/XAMPP/
xamppfiles/phpmyadmin
(Mac OS X
with XAMPP) or
C:\xampp\phpMyAdmin
(Windows with XAMPP). Open that file
in any text editor or IDE and change this
next line to use the new password:
$cfg['Servers'][$i]['password'] =
➝
'thepassword';
Then save the file, and reload phpMy-
Admin in your browser.
Creating a database, users,
and privileges
After you have MySQL successfully up
and running, and after you’ve established
a password for the root user, you can add
other users. This is commonly done as part
of creating new databases: To improve
the security of your databases, you should
always create new users to access your
databases rather than using the root user
at all times.
To create a database, simply run a
CREATE
DATABASE
command:
CREATE DATABASE database_name
The database name can contain numbers,
letters, a dollar sign, and an underscore,
but not spaces. You can run this command
only if you are connected as a user with
CREATE
DATABASE
permissions.
The MySQL privileges system was
designed to ensure proper authority for
certain commands on specific databases.
This technology is how a web host, for
example, can let several users access sev-
eral databases without concern. Each user
in the MySQL system can have specific
capabilities on specific databases from
specific hosts (computers). The root user—
the MySQL root user, not the system’s—has
the most power and is used to create
subusers, although subusers can be given
rootlike powers (inadvisably so).

ptg18144795
446 Appendix A
When a user attempts to do something
with the MySQL server, MySQL first
checks to see if the user has permission
to connect to the server at all (based on
the username, the user’s host, the user’s
password, and the information in the
mysql
database’s
user
table). Second, MySQL
checks to see if the user has permission
to run the specific SQL statement on the
specific databases—for example, to select
data, insert data, or create a new table.
Table A.1 lists most of the various privileges
you can set on a user-by-user basis.
You can set users and privileges in MySQL
in a handful of ways, but I’ll start by dis-
cussing the
GRANT
command. The syntax
goes like this:
GRANT privileges ON database.*
➝
TO 'username'@'hostname'
➝
IDENTIFIED BY 'password'
For the
privileges
aspect of this state-
ment, you can list specific privileges from
Table A.1, or you can allow for all of them
by using
ALL
(which isn’t prudent). The
database.*
part of the statement speci-
fies which database and tables the user
can work on. You can name specific tables
using the
database.tablename
syntax or
allow for every database with
*.*
(again,
not prudent). Finally, you can specify the
username, hostname, and a password.
The username has a maximum length of
32 characters (as of MySQL 5.7.8; it was 16
in earlier versions). When you’re creating
a username, be sure to avoid spaces—use
the underscore instead, and note that user-
names are case-sensitive.
TABLE A.1 MySQL Privileges
PRIVILEGE ALLOWS
SELECT
Read rows from tables.
INSERT
Add new rows of data
to tables.
UPDATE
Alter existing data in tables.
DELETE
Remove existing data from
tables.
INDEX
Create and drop indexes
in tables.
ALTER
Modify the structure of
a table.
CREATE
Create new tables or
databases.
DROP
Delete existing tables
or databases.
RELOAD
Reload the grant tables
(and therefore enact user
changes).
SHUTDOWN
Stop the MySQL server.
PROCESS
View and stop existing
MySQL processes.
FILE
Import data into tables from
text files.
GRANT
Create new users.
REVOKE
Remove users’ permissions.
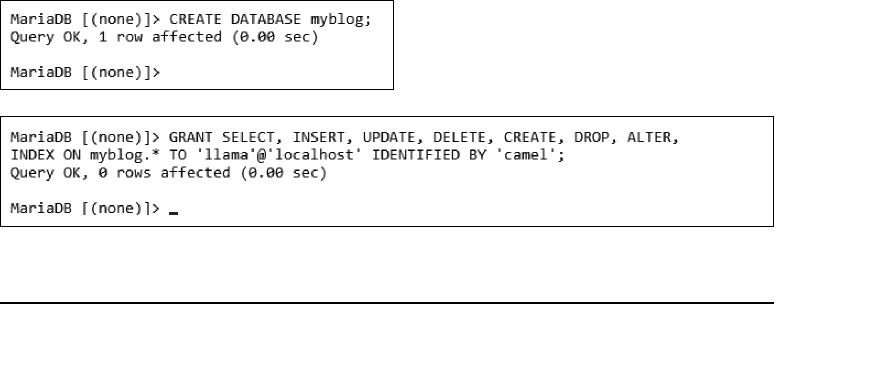
ptg18144795
Installation and Configuration 447
The hostname is the computer from which
the user is allowed to connect. This could be
a domain name, such as www.example.com,
or an IP address. Normally,
localhost
is
specified as the hostname, meaning that
the MySQL user must be connecting from
the same computer that the MySQL data-
base is running on. To allow for any host,
use the hostname wildcard character (
%
):
GRANT privileges ON database.* TO
➝
'username'@'%' IDENTIFIED BY
➝
'password'
But that is also not recommended. When
it comes to creating users, it’s best to be
explicit and confining.
The password has no length limit but is
also case-sensitive. The passwords are
encrypted in the MySQL database, mean-
ing they can’t be recovered in a plain
text format. Omitting the
IDENTIFIED
BY
'password'
clause results in that user not
being required to enter a password (which,
once again, should be avoided).
As an example of this process, you’ll
create two new users with specific privi-
leges on a new database named
myblog
.
Keep in mind that you can grant permis-
sions only to users on existing databases.
This next sequence will also show how to
create a database.
D Creating a new database.
E Creating an administrative-level user for a single database.
To create new users using GRANT:
1. Log in to the MySQL client as a
root user.
Use the steps already explained to do
this. You must be logged in as a user
capable of creating databases and
other users.
2. Create a new database D:
CREATE DATABASE myblog;
This particular database will be used
in Chapter 12.
3. Create a user with administrative-level
privileges on the
myblog
database E:
GRANT SELECT, INSERT, UPDATE,
➝
DELETE, CREATE, DROP, ALTER,
➝
INDEX ON myblog.* TO 'llama'@
➝
'localhost' IDENTIFIED BY
➝
'camel';
This user,
llama
, can create tables, alter
tables, insert data, update data, and
so forth, on the temp database. This
essentially includes every administrative-
level capability aside from creating new
users. Be certain to use a password—
perhaps more clever than the one used
here.
continues on next page
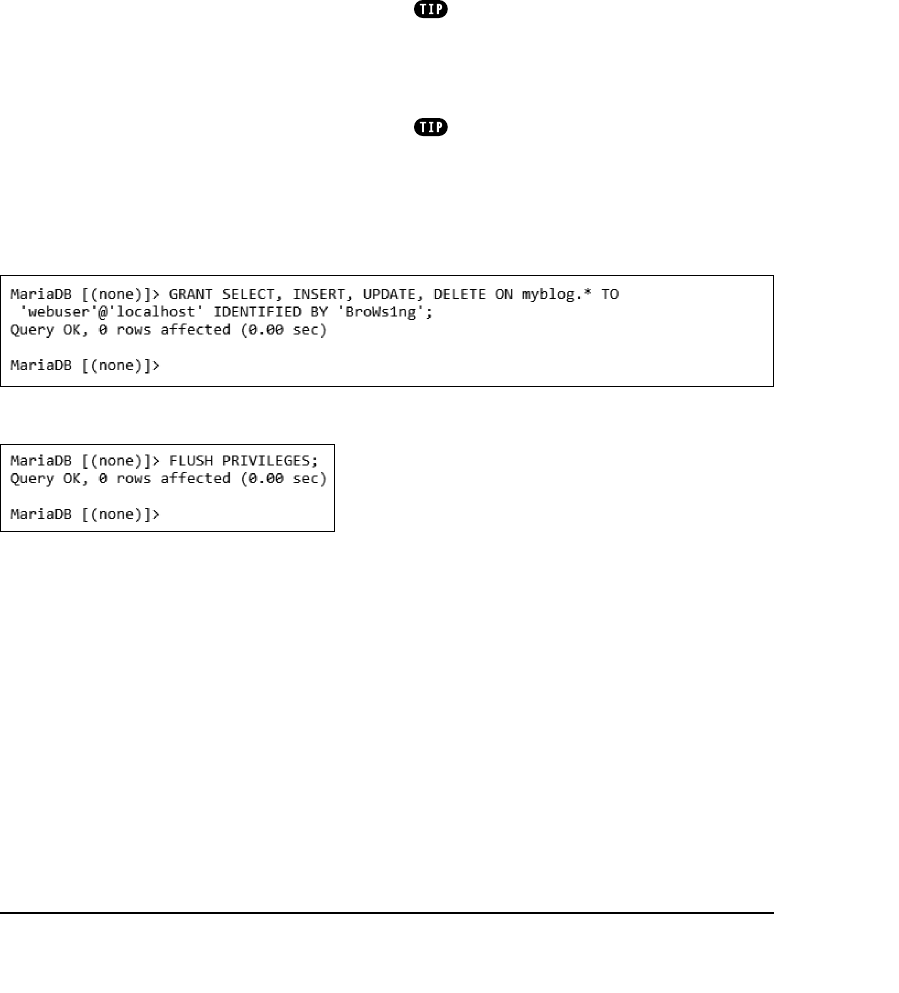
ptg18144795
448 Appendix A
4. Create a user with basic access to the
database F:
GRANT SELECT, INSERT, UPDATE,
➝
DELETE ON myblog.* TO 'webuser'@
➝
'localhost' IDENTIFIED BY
➝
'BroWs1ng';
Now the generic
webuser
can browse
through records (
SELECT
from tables)
as well as add, edit, and delete them,
but this user can’t alter the structure of
the database. When you’re establish-
ing users and privileges, work your way
from the bottom up, allowing the bare
minimum of access at all times.
5. Apply the changes G:
FLUSH PRIVILEGES;
F This user has more restricted rights to the same database.
G Don’t forget this step before you try to access
MySQL using the newly created users.
The changes just made won’t take effect
until you’ve told MySQL to reset the list
of acceptable users and privileges, which
is what this command does. Forgetting
this step and then being unable to
access the database using the newly
created users is a common mistake.
Any database whose name begins with
test_ can be modified by any user who has
permission to connect to MySQL. Therefore,
be careful not to create a database named this
way unless it truly is experimental.
The
REVOKE
command removes users
and permissions.

ptg18144795
This book was written to give beginning
PHP programmers a good foundation on
which to base their learning. A few topics
have been either omitted or glossed over,
because the book focuses on covering
the absolute fundamentals. This appendix
lists a number of useful resources, briefly
discusses where to obtain more informa-
tion for databases and some uncovered
topics, and includes a few tables, both old
and new.
Along with those sites included here, you
should check out the book’s companion
website at www.LarryUllman.com. There
you’ll find all of the book’s code, a support
forum, an errata page, and more.
B
Resources
and Next Steps
The PHP Manual
All PHP programmers should familiarize
themselves with, and possibly acquire,
some version of the PHP manual before
beginning to work with the language. The
manual is available from the official PHP
site—www.php.net/docs.php—as well as
from a number of other locations.
You can download the manual in nearly
a dozen languages in different formats.
The official website also has an anno-
tated version of the manual available at
www.php.net/manual/en/ (in English),
where users have added helpful notes
and comments. If you’re having problems
with a particular function, reading the
manual’s page for that function will likely
provide an answer.
A trick pointed out in Chapter 1, “Getting
Started with PHP,” is that you can quickly
access the documentation page for
any specific function by going to
www.php.net/
functionname
. For example,
the page for the
number_format()
function is www.php.net/number_format.

ptg18144795
450 Appendix B
Database Resources
Which database resources will be most
useful to you depends, obviously, on
which database management system
(DBMS) you’re using. The most common
database used with PHP is probably
MySQL, but PHP supports all the standard
database applications.
To learn more about using MySQL,
begin with the official MySQL website
(www.mysql.com). You can download the
MySQL manual to use as a reference
while you work.
If you’re using MySQL, don’t forget to
download and install phpMyAdmin
(www.phpmyadmin.net). Written in PHP,
this is an invaluable tool for working with
a database and much more approachable
for beginners than some other interfaces.
Another area of database resources you
should delve into is SQL. Websites discuss-
ing SQL, the language used by every
database application, include the following:
n
SQL Course (www.sqlcourse.com)
n
A Gentle Introduction to SQL
(www.sqlzoo.net)
n
W3Schools’ SQL Tutorial
(www.w3schools.com/sql/)
n
SQL.org (www.sql.org)
(All of the above are a bit dated in appear-
ance, but the content still applies.)
My
PHP and MySQL for Dynamic Web
Sites: Visual QuickPro Guide
(Peachpit
Press, 2012) also discusses SQL and MySQL
in much greater detail than this book.

ptg18144795
Resources and Next Steps 451
Top 10 Frequently
Asked Questions
(or Problems)
Debugging is a valuable skill that takes
time and experience to fully develop. But
rather than send you off on that journey
ill-equipped, I’ve included the 10 most
frequently seen problems in PHP scripts,
along with the most likely causes. First,
though, here are five of my best pieces
of advice when it comes to debugging a
problem:
n
Know what version of PHP
you’re running.
Some problems are specific to a version
of PHP. Use the
phpinfo()
function
to test the version in use whenever
you use a server for the first time. Also
make sure you know what version of
MySQL you’re using, if applicable; the
operating system; and the web server
(e.g., Apache 2.4).
n
Run all PHP scripts through a URL.
If you don’t run a PHP script through a
URL—and this includes the submission of
a form to a PHP script—the web server
will not handle the request, meaning
that PHP will never execute the code.
n
Trust the error message!
Many beginners have more difficulty
than they should in solving a problem
because they don’t pay attention to
the error message they see. Although
some of PHP’s error messages are cryptic
and a few can even be misleading, if
PHP says there’s a problem on line 22,
the problem is probably on line 22. With
a parse error, maybe the actual problem
was a missing semicolon on line 21.
n
Avoid “trying” things to fix
a problem!
If you’re not sure what’s causing the
problem and what the proper fix is,
avoid trying random things as a solu-
tion. You’ll likely create new issues
this way and only further confuse the
original problem.
n
Take a break!
The best piece of advice I can offer is
to step away from the computer and
take a break. I’ve solved many, many
problems this way. Sometimes a clear
head is what you need.
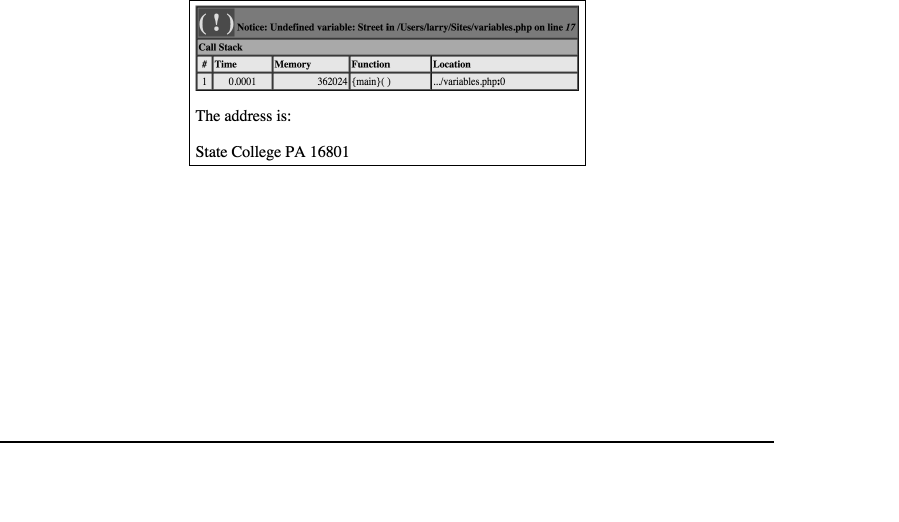
ptg18144795
452 Appendix B
Moving on, here are the top 10 likely prob-
lems you’ll encounter in PHP:
n
Blank pages
If you see a blank screen in your browser
after submitting a form or loading a PHP
script, it’s most likely because an error
occurred that terminated the execu-
tion of the page. First check the HTML
source code to see if it’s an HTML prob-
lem. Then turn on
display_errors
in
your
php.ini
configuration file or PHP
script to see what PHP problem could
be occurring.
n
Undefined variable or undefined index
error A
These errors occur when error report-
ing is set on its highest level, and they
may or may not indicate a problem.
Check the spelling of each variable or
array index to make sure it’s correct.
Then make sure you initialize variables
prior to referring to them. Also make
sure, of course, that variables that
should have a value actually do!
A Errors complaining about undefined variables or
indexes often come from spelling or capitalization
mistakes.
n
Variables that don’t have a value
Perhaps you referred to a variable by
the wrong name. Double-check your
capitalization and spelling of variable
names, and then be certain to use
$_GET
,
$_POST
,
$_COOKIE
, and
$_SESSION
as appropriate. If need be,
use the
print_r()
function to see the
value of any variable.
n
Call to undefined function… error
Such an error message means you’re
attempting to use a function that PHP
doesn’t have. This problem can be
caused by a misspelling of a function
name, failure to define your own func-
tion before calling it, or using a function
that’s not available in your version of
PHP. Check your spelling and the PHP
manual for a non-user-defined function
to find the problem.
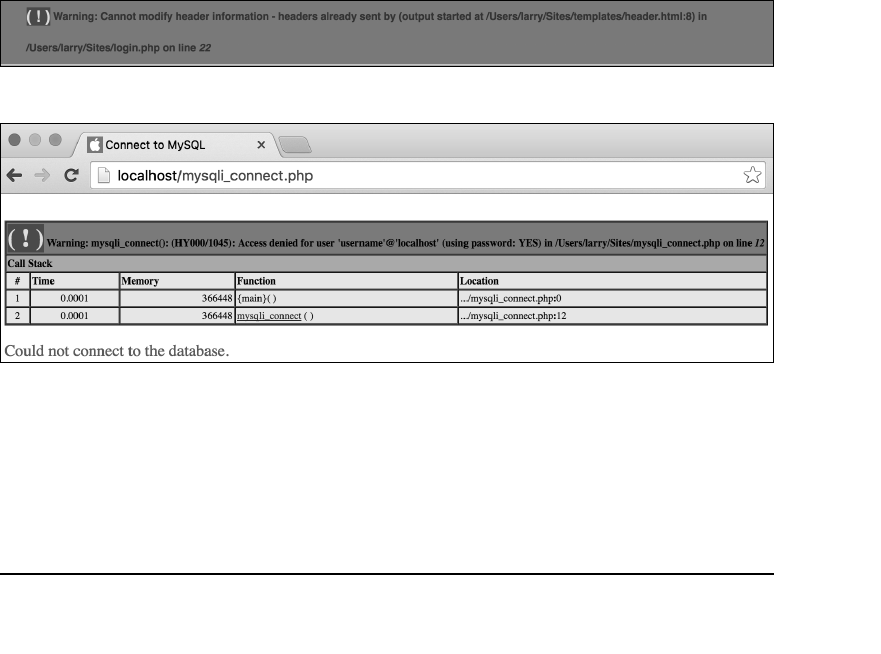
ptg18144795
Resources and Next Steps 453
n
Headers already sent error B
This error message indicates that
you’ve used an HTTP header-related
function—
header()
,
setcookie()
, or
session_start()
—after the browser
has already received HTML or even
a blank space. Double-check what
occurs in a script before you call any
of these functions. You can also use
output buffering to prevent these errors
from occurring.
n
Access denied
error C
If you see this message while attempting
to work with a database, then the user-
name, password, and host combination
you’re using doesn’t have permission to
access the database. This isn’t normally
a PHP issue. Confirm the values that are
being used, and attempt to connect to
B Some functions create
headers already sent
errors if called at the wrong time.
C If the MySQL access information is incorrect, you’ll see a message saying that database access has been
denied.
the database using a different interface
(such as the MySQL client).
n
Supplied argument is not a valid
MySQL result resource error
This is another database-related error
message. The message means that a
query result is being used inappropri-
ately. Most frequently, this is because
you’re trying to fetch rows from a
query that didn’t return any records,
commonly due to badly formed SQL.
To solve this problem, print out the
query being run, and test it using
another tool (such as the MySQL
client or phpMyAdmin). Also check that
you’ve been consistent with your vari-
able names.
continues on next page

ptg18144795
454 Appendix B
n
Preset HTML form values are cut off
You must put the value attribute of an
HTML form input within double quota-
tion marks. If you fail to do so, only the
part of the value up to the first space
will be set as that input’s value.
n
Conditionals or loops behave
unpredictably
These logical errors are quite common.
Check that you haven’t used the wrong
operator (such as
=
instead of
==
) and
that you refer to the proper variables.
Then use
print
statements to let you
know what the script is doing.
n
Parse errors D
Parse errors are the most ubiquitous
problems you’ll deal with. Even the
most seasoned PHP programmer sees
them occasionally. Check that every
statement concludes with a semicolon
and that all quotation marks, parenthe-
ses, braces, and brackets are evenly
paired. If you still can’t find the parse
error, comment out large sections of the
script using the
/*
and
*/
characters.
Uncomment a section at a time until you
see the parse error again. Then you’ll
know where in the script the problem is
(or most likely is).
D Parse errors are all too common and prevent
scripts from executing.

ptg18144795
Resources and Next Steps 455
Next Steps
This book will get you started using PHP,
but you might want to investigate a few
topics further. Before taking on more topics,
however, you should get more experience.
If you need a good library of problems
to work through, check out Project Euler
(https://projecteuler.net/archives).
Security
Web servers, operating systems, data-
bases, and PHP security are all topics that
merit their own books. Although this book
demonstrates writing secure web applica-
tions, there’s always room for you to learn
more in this area. Start by checking out
these sites:
n
A Study in Scarlett
(www.securereality.com.au/
studyinscarlett/)
This is an article about writing secure
PHP code. It’s old but still has funda-
mental concepts.
n
The Open Web Application Security
Project (www.owasp.org)
This is a standard resource for
web security, and its Top Ten
list (www.owasp.org/index.php/
Category:OWASP_Top_Ten_Project)
is a must-read.
You should also read the relevant sections
of the PHP manual and the manual for the
database you’re using. Searching the Inter-
net for
PHP
and
security
will turn up many
interesting articles as well. Pay attention to
the dates of articles you read, though, so
you do not pick up outdated habits!
Object-oriented programming
The subject of objects and object-oriented
programming (OOP) is not covered in this
book for two reasons:
n
It’s well beyond the scope of a begin-
ner’s guide.
n
You won’t be restricted as to what
you can do in PHP by not understand-
ing objects.
When you decide you want to learn the
subject, you can search the PHP sites for
tutorials, check out a framework (see the
next section of this appendix), or read
my
PHP Advanced and Object-Oriented
Programming: Visual QuickPro Guide
(Peachpit Press, 2013). I dedicate around
150 pages of that book just to OOP (and
there are still aspects of OOP that I didn’t
get to)!
Frameworks
A framework is an established library of
code that you can use to develop sophisti-
cated web applications. By reusing some-
one else’s proven code, you can quickly
build parts or all of a website.
There are many PHP frameworks available,
starting with the Zend Framework (http://
framework.zend.com). This framework was
created by some of the key people behind
PHP and is well documented.
My personal favorite PHP framework, as of
this writing, is Yii (www.yiiframework.com).
I write about Yii extensively on my site.
Many developers are fans of Laravel (https://
laravel.com/), which you ought to consider.

ptg18144795
456 Appendix B
This book’s esteemed technical
editor, Paul Reinheimer, is a big fan of
microframeworks
, such as Slim
(www.slimframework.com).
Many people love frameworks and what
they offer. On the other hand, it does take
some time to learn how to use a frame-
work, and customizing the framework’s
behavior can be daunting.
JavaScript
JavaScript is a client-side technology that
runs in the browser. It can be used to add
various dynamic features to a website, from
simple eye candy to interactive menus and
forms. Because it runs within the browser,
JavaScript provides some functionality that
PHP cannot. And, like PHP, JavaScript is
relatively easy to learn and use. For more,
see
n
JavaScript.com (www.javascript.com)
n
Mozilla Developer Network
(https://developer.mozilla.org/en-US/
docs/Web/JavaScript)
n
W3School’s JavaScript pages
(www.w3schools.com/js/)
I highly recommend you consider learning
jQuery (www.jquery.com) to help you with
your JavaScript needs. jQuery is a JavaScript
framework that’s easy to use, powerful, and
pretty well documented. It’s on the verge
of being overly used, but it’s a great and
reliable way to get started with JavaScript.
Other books
It is my hope that after reading this book
you’ll be interested in learning more about
PHP and web development in general.
Although I could recommend books by
other writers, there’s an inherent conflict
there and my opinion as a rival writer
would not be the same as yours as a
reader. So, instead, I’ll just quickly highlight
a couple of my other books and how they
compare to this one.
PHP and MySQL for Dynamic Web Sites:
Visual QuickPro Guide, Fourth Edition
(Peachpit Press, 2012) is kind of a compan-
ion to this book. There is some overlap in
content, particularly in the early chapters,
but the examples are different, and it
goes at a faster pace. MySQL and SQL in
particular get a lot more coverage, and
there are three different example chapters:
a multilingual forum, a user registration and
login system, and an e-commerce setup.
My
PHP Advanced and Object-Oriented
Programming: Visual QuickPro Guide,
Third Edition
(Peachpit Press, 2013) is kind
of a companion to the PHP and MySQL
book just mentioned. This book is much
more advanced, spending a lot of time on
topics such as OOP. It’s not intended to be
read as linearly as this one, but rather each
chapter focuses on a specific topic.
My book
Effortless E-Commerce with PHP
and MySQL
(New Riders, 2014) covers
everything you need to know to create
fully functioning e-commerce sites. The
book uses two specific examples for doing
so, and incorporates two different payment
systems. Complete comfort with PHP and
MySQL is assumed, however.
Finally, my
Modern JavaScript: Develop
and Design
(New Riders, 2012) teaches
you this very important programming lan-
guage using today’s modern techniques.
There’s even a chapter dedicated to using
PHP and JavaScript together!
ptg18144795
Resources and Next Steps 457
Tables
This book has a handful of tables scattered
about, the three most important of which
are reprinted here as a convenient refer-
ence. You’ll also find one new table that
lists operator precedence (Table B.1). This
partial list goes from highest to lowest (for
example, multiplication takes precedence
over addition).
Table B.2 lists PHP’s main operators and
their types. It’s most important to remem-
ber that a single equals sign (=) assigns
a value to a variable, whereas two equals
signs (= =) are used together to check
for equality.
TABLE B.1 Operator Precedence
++ --
!
* / %
+ - .
< <= > >=
== != === !== <=>
&&
||
= += -= *= /= .= %=
and
xor
or
TABLE B.2 PHP’s Operators
Operator Usage Type
+
Addition Arithmetic
-
Subtraction Arithmetic
*
Multiplication Arithmetic
/
Division Arithmetic
%
Modulus
(remainder of
a division)
Arithmetic
++
Incrementation Arithmetic
--
Decrementation Arithmetic
=
Assigns a value
to a variable Assignment
==
Equality Comparison
!=
Inequality Comparison
<
Less than Comparison
>
Greater than Comparison
<=
Less than or
equal to Comparison
>=
Greater than
or equal to Comparison
!
Negation Logical
AND
And Logical
&&
And Logical
OR
Or Logical
||
Or Logical
XOR
Exclusive or Logical
<=>
Null coalescing Logical
.
Concatenation String
.=
Concatenates
to the value of
a variable
Combined
concatenation
and assignment
+=
Adds to the
value of a
variable
Combined
arithmetic and
assignment
-=
Subtracts from
the value of
a variable
Combined
arithmetic and
assignment
ptg18144795
458 Appendix B
The various formats for the
date()
function may be one of the hardest things
to remember. Keep Table B.3 nearby when
you’re using the
date()
function.
TABLE B.3 Date() Function Formatting
Character Meaning Example
Y Year as 4 digits 2017
y Year as 2 digits 17
L Is it a leap year? 1 (for yes)
n Month as 1 or 2 digits 2
m Month as 2 digits 02
F Month February
M Month as 3 letters Feb
j Day of the month as 1 or 2 digits 8
d Day of the month as 2 digits 08
l (lowercase L) Day of the week Monday
D Day of the week as 3 letters Mon
w Day of the week as a single digit 0 (Sunday)
z Day of the year: 0 to 365 189
t Number of days in the month 31
S English ordinal suffix for a day, as 2 characters rd as in 3rd
g Hour; 12-hour format as 1 or 2 digits 6
G Hour; 24-hour format as 1 or 2 digits 18
h Hour; 12-hour format as 2 digits 06
H Hour; 24-hour format as 2 digits 18
i Minutes 45
s Seconds 18
u Microseconds 1234
a am or pm am
A AM or PM PM
U Seconds since the epoch 1154523600
e Timezone UTC
I (capital i) Is it daylight savings? 1 (for yes)
O Difference from GMT +0600

ptg18144795
Index 459
Index
Numbers
0666
, explained, 302
0777
permissions, 330
Symbols
//
, using with comments, 24
/*
and
*/
, using with comments, 24, 26
/=
assignment operator, 89
+=
assignment operator, 89, 457
-=
assignment operator, 89, 457
*=
assignment operator, 89
#
, using with comments, 24
?>
tag, 9
<?
and
?>
short tags, 9
<!--
and
-->
, using with comments, 25
+
(addition) operator, 79, 135, 457
&
(ampersand), using with forms, 68
&&
(and) logical operator, 135, 139, 457
*
(assignment) operator, 89, 135
\
(backslash), using with strings, 39
&
(bitwise) operator, 310
[]
(brackets), using with keys in arrays, 161
{}
(braces)
versus parentheses (
()
), 172
using with conditionals, 143
using with
if
conditional, 125
.
(concatenation) operator, 97, 135, 457
--
(decrement) operator, 88–89, 135, 457
/
(division) operator, 79, 135, 457
$
(dollar sign)
preceding variables with, 36, 58
printing, 82
\\
(double backslashes), using with absolute
paths, 329
"
(double quotation marks)
effect of, 44–47
parse error generated by, 170
versus single quotation marks (
'
), 169
using with constants, 207
using with
print
, 17, 21
using with strings, 39
'
'
(empty string), using with functions, 284
/
(equality) operator, 135
==
(equality) operator, 135, 457
=
(equals sign), using with variables, 41
>
(greater than) operator, 135, 457
>=
(greater than or equal to) operator,
135,457
++
(increment) operator, 88–89, 135, 457
!=
(inequality) operator, 457
%
(inequality) operator, 135
<
(less than) operator, 135, 457
<=
(less than or equal to) operator, 135, 457
%
(modulus) operator, 135, 457
*
(multiplication) operator, 79, 135, 457
!
(negation) logical operator, 135, 457
??
(null coalescing) logical operator,
135, 143
<=>
(null coalescing) logical operator,
135,143
|
|
(or) logical operator, 135, 139, 457
..
(parent folder), 303
()
(parentheses)
versus braces (
{}
), 172
using in calculations, 86–87
using with conditionals, 143
|
(pipe), explained, 67
;
(semicolon)
error related to, 65
using in MySQL client, 438
using with
print
command, 15

ptg18144795
460 Index
'
(single quotation marks)
using, 44
versus double quotation marks (
"
), 169
<=>
(spaceship) operator, 135, 138, 457
-
(subtraction) operator, 79, 135, 457
_
(underscore)
using with forms, 51
using with functions, 270
using with variables, 37
A
absolute paths, 203, 303, 329
access to pages, denying and
troubleshooting, 405, 453
action
attribute, including in forms, 50,
53, 57
add_entry.php
document
creating, 361–365
opening, 368
add_quote.php
document
creating, 306–309, 405–408
opening, 311–312
addition (
+
) operator, 79, 135, 457
addslashes()
function, 370
administrator. See
is_administrator()
function
Adobe Dreamweaver, 4
alphabetical sort, performing on
arrays, 184
ALTER
privileges, 446
ALTER
SQL command, 346
AM or PM, formatting with
date()
function,
211, 458
am or pm, formatting with
date()
function,
211, 458
ampersand (
&
), using with forms, 68
AMPPS website, 428, 433
And (
&&
) logical operator, 135, 139, 457
AND
logical operator, 135, 139, 457
Apache, 10
Aptana Studio, 4
arguments
passing, 277
setting default values, 282–284
using with functions, 276–281
arithmetic, performing, 79–82
arithmetic operators, 89, 135, 457
array elements
accessing, 161, 163, 170–172, 177
adding, 167–168
deleting, 166
entering, 165
pointing to, 173
array()
function, 162–163
array values, printing, 171–172
arrays. See also multidimensional arrays
adding items to, 166–169
creating, 162–165
creating from HTML forms, 186–190
deleting, 166
explained, 160
indexes and keys in, 161
merging, 169
parse errors, 170
printing, 164
versus scalar variable types, 160
sorting, 178–181
syntactical rules, 161
transforming between strings, 182–185
using, 40
asort()
functions, using with arrays,
178–180
.aspx
extension, 9
assignment operator, 89, 135
associative arrays, 40
Atom, 4
B
backslash (
\
), using with strings, 39
basename()
function, 329
binary digits, 310
birth year, creating input for, 123
Bitnami website, 428, 433
bitwise (
&
), 310
blank pages, troubleshooting, 452
<body>
section, creating, 5
$books
multidimensional array, 174–176
books.php
document, creating, 174–176,
208–209
bool
type, 281
Boolean TRUE and FALSE, 121, 125, 131, 139,
395. See also
false
value

ptg18144795
Index 461
control structures
comparison operators, 135–138
default action, 132
die
language construct, 150
else
statement, 132–134
elseif
statement, 144–147
HTML form for, 122–124
if
conditional, 125–127
logical operators, 138–143
for
loop, 152–156
switch
conditional, 148–151
validation functions, 128–131
while
loop, 156
$_COOKIE
array, 251
cookie data, retrieving with PHP, 251–253
cookies
adding parameters to, 254–256
checking for presence of, 395
comparing to sessions, 260–261
creating, 246–250
data limitation, 250
debugging, 244
deleting, 257–259
encoding values of, 253
expiration
value, 254–255
explained, 244–245
httponly
argument, 255
path
and
domain
arguments, 254–256
reading from, 251–253
security issues, 245, 252, 255
sending, 247–250
setting expiration date, 255–256
testing safety of, 250
transmitting and receiving, 245
using tabs and newlines with, 252
using to identify administrators, 393
copying files on servers, 324
count()
function, using with arrays, 167
CREATE
DATABASE
command, 445, 447
CREATE
privileges, 446
CREATE
SQL command, 346
CREATE
TABLE
SQL command, 356–357
create_table.php
document, creating,
357–359
creating documents, 4
CSS (Cascading Style Sheets)
basics, 3
font size and color, 251
braces (
{})
versus parentheses (
()
), 172
using with conditionals, 143
using with
if
conditional, 125
brackets (
[]
), using with keys in arrays, 161
break
language construct, 148
buffer size, setting, 236
C
calculations, performing, 76–78
calculator1.php
document
creating, 286–289
opening, 293
calculator.html
script, creating, 76–78
camel-hump and camel-case
conventions,37
case-sensitive searches, performing, 117
character set, setting for database, 392
characters, escaping, 62
checkboxes
confirming, 142
creating for HTML form, 124
presetting status of, 227
closing tag, adding, 5
combined operators, 457
comments, adding to scripts, 24–26
comparison operators, 135–138, 457
concatenating strings, 97–100
concatenation (
,
) operator, 97, 135, 457
conditionals. See also nesting conditionals
best practices, 143
explained, 121
nesting, 139
troubleshooting, 454
using functions in, 131
configuration changes, confirming, 437
configuring PHP, 436–437
constants. See also predefined constants
benefits, 210
header.html
file, 209
naming, 210
printing, 209–210
and superglobal arrays, 294
using, 207–210
control panel
creating for directory, 326–329
viewing file permissions in, 301

ptg18144795
462 Index
DELETE
privileges, 446
DELETE
query, running on databases,
376–381
DELETE
SQL command, 346
delete_entry.php
script, writing, 376–381
delete_quote.php
document, creating,
418–421
deleting
arrays and array elements, 166
cookies, 257–259
data in databases, 376–381
files, 324
quotes, 418–421
sessions, 266–267
delineated format, explained, 338
denying access to pages, 405
deprecated function, explained, 20
die()
and
exit()
functions, 354
directories. See also web root directory
creating, 330–337
displaying contents of, 326–327
navigating, 325–329
permissions, 302
directory control panel, creating,
326–329
dirname()
function, 329
display_errors
setting
using, 63–64
using with cost calculator, 80
using in debugging, 28
division (
/
) operator, 79, 135, 457
documents, creating, 4
dollar sign (
$
)
preceding variables with, 36, 58
printing, 82
double backslashes (
\\
), using with absolute
paths, 329
double quotation marks (
"
)
effect of, 44–47
parse error generated by, 170
versus single quotation marks (
'
), 169
using with
print
, 17, 21
using with strings, 39
double-precision floating-point numbers, 38
doubles, 38
DROP
SQL command, 346, 446
drop-down menu, creating for HTML
form,124
css
folder, creating, 204
CSS templates, 200. See also templates
CSV (comma-separated values) format, 338
customize.php
document
creating, 247–250
opening, 255
Cut and Paste, using with templates, 199
D
database connections, making, 348–351
database information, best practices, 351
databases. See also MySQL databases;
query data
connection code, 359, 392
defined, 346
deleting data in, 376–381
inserting data into, 360–365
permissions, 352
resources, 450
retrieving data from, 371–375
updating data in, 382–387
date and time functions
table, 458
working with, 211–213
date()
and
time()
functions
table, 458
using, 211–213, 254
using with sessions, 265
DateTime
class, 213
day pull-down menu, creating, 272
daylight savings, formatting with
date()
function, 211, 458
days, formatting with
date()
function,
211,458
$dbc
conditional, 348, 359
DBMS (database management system),
345,347
debugging
PHP scripts, 440
steps, 27–28
decrement (
--
) operator, 88–89, 135, 457
decrementing numbers, 88–89
decrypting data, 112
default argument values, 282–284
default
case, using with
switch
conditional,151
DELETE
FROM
tablename
query, 381

ptg18144795
Index 463
related to
header()
call, 233
require()
function, 201
setcookie()
function, 246
trusting, 28, 451
unassigned value, 72
undefined function call, 275
Undefined variable, 43
error reporting, 65–67
error suppression operator, 354
error_reporting
levels and constants,
65–67
event.html
document, creating, 186–187
event.php
document, creating, 188–190
everyone permission, 298, 301
exclusive or (
XOR
) logical operator, 139
execute permission, 298
exit()
and
die()
functions, 237, 354
explode()
function
and
fgets()
, 338
using with arrays, 182, 184
external files. See also file extensions
benefits, 206
closing PHP tag, 206
using, 201–206
writing to, 306–309
F
FALSE and TRUE, 121
false
value, 19. See also Boolean TRUE
andFALSE
fclose()
function, 305
feedback.html
document
creating, 51
opening, 56
feof()
function, 338
fgetcsv()
function, 338, 342
fgets()
function, 338, 348
file error codes, 317
file extensions. See also external files
being aware of, 9
and included files, 206
file()
function, 313, 338
file navigation, 203
file paths, 303
file permissions, 298–302, 352
FILE
privileges, 446
file uploads, handling, 316–324
E
Edit menu, accessing for templates, 199
edit_entry.php
document, creating,
383–387
edit_quote.php
document, creating,
412–417
else
statement, 132–134
elseif
statement, 144–147
email, sending, 228–232
email address
creating inputs for, 123
validating, 129
empty()
function, 128, 131
empty string (
'
'
), using with functions, 284.
See also strings
encoding
explained, 5
external files, 206
encrypting
data, 112
passwords, 337
ENTRIES table, columns in, 356
equality (
/
and
==
) operator, 135, 457
equals sign (
=
), using with variables, 41
error codes for files, 317
Error
level, 65
error messages. See also parse errors;
troubleshooting
Add a Blog Entry, 364
arguments, 277
connection attempt refused, 10
Could not connect to the database, 350
Could not create the table, 358
Delete an Entry, 381
displaying in scripts, 63–64
double quotation marks (
"
), 21
email address and password, 402
foreach
loop, 176
functions, 275
header()
call, 233
include()
function, 201
nonexisting variables, 61
Not Found, 14
output buffering, 233
permission denied, 299
for registration results, 142
related to color selection, 147
related to external files, 201, 206

ptg18144795
464 Index
sending to pages manually, 68–72
validating, 128–131
form methods, choosing, 54–57
form submission, determining, 214–215
form
tags, 50
creating, 122
using with functions, 274
formatting numbers, 83–85
forms. See HTML forms
forums, 96
frameworks, 455–456
function
keyword, 271
function_exists()
function, 275
functions. See also PHP functions;
undefined functions; user-defined
functions
accessing, 281
arguments, 276–281
with arguments and value, 287
best practice, 275
calling without arguments, 282
creating and calling, 272–275
default argument values, 282–285
defining with parameters, 276–277
design theory, 295
error related to, 65
invoking, 271
looking up definitions of, 18–20
naming conventions, 270
return
statement, 285
returning values, 285–289
syntax, 275–276
user-defined syntax, 270–271, 275
using spaces with, 85
using within conditionals, 131
functions.php
script
code, 397
creating, 394–395
fwrite()
function, 305, 348
G
garbage collection, 267
A Gentle Introduction to SQL website, 450
$_GET
and
$_POST
, 55–62, 68
$_GET
array, 161
GET method, using with HTTP headers, 240
getrandmax()
function, explained, 91
FILE_APPEND
constant, 303–304
file_exists()
function, 300
file_get_contents()
function, 313
fileatime()
function, 329
filemtime()
function, 328
filename()
function, 325
fileperms()
function, 329
files. See also saving documents and scripts
copying on servers, 324
deleting, 324
locking, 310–312
organizing, 204
reading from, 313–315
reading incrementally, 338–342
writing to, 303–309
$_FILES
array, elements of, 317
filesize()
function, 328
filter()
function, 131
finfo_file()
function, 329
firewalls, 429
first name, checking entry of, 223
flag variable, creating for sticky form, 222
float
type, 281
floating-point numbers, 38
flock()
lock types, 310
folders and files, organizing, 204
font size and color, setting in CSS, 251
footer, adding to template, 197
footer file, creating for template, 200
footer.html
document
creating, 398–399
opening, 212
fopen()
function, 305, 348
for
loop, 152–156
using with functions, 272
using with numerically indexed arrays, 172
foreach
loop
error generated by, 176, 189
using with array elements, 170–172
using with directory control panel, 328
using with functions, 272
using with multidimensional arrays, 177
form data. See also HTML forms; sticky
forms
accessing, 62
displaying, 62
processing, 217
receiving in PHP, 58–62

ptg18144795
Index 465
hidden input, checking for, 219
home page, creating, 422–425
hours, formatting with
date()
function,
211,458
HTML (Hypertext Markup Language)
current version, 2
resources, 6
sending to browsers, 21–23
syntax, 2
HTML comments, accessing, 26
.html
extension, 9
HTML forms. See also form data; sticky
forms
control structures, 122–124
for cookies, 249
creating, 50–53
creating arrays from, 186–190
displaying and handling, 214, 216–219
event.php
page, 187–190
handling, 59–61
handling with PHP, 214–219
hidden type of input in, 62
making sticky, 220–227
for numbers, 76–78
radio-button value, 62
re-displaying, 219
for strings, 94–96
for strings and arrays, 183–185
HTML pages
creating, 4–6
example, 6
versus PHP scripts, 7
viewing source, 23
HTML source code, checking, 28
HTML tags
addressing in PHP, 106–107
using PHP functions with, 104–107
</html>
tag, adding, 5
HTML5, 2
htmlentities()
function, 384–385
htmlspecialchars()
function, 328
HTTP (Hypertext Transfer Protocol), 237
HTTP headers, manipulating, 237–240
I
id
primary key, 387, 391
if
conditional, 121, 125–127, 140
Git version control software, 11
glob()
function, 329
global
statement, 290–294
GMT difference, formatting with date()
function, 211–212, 458
GRANT
privileges, 446–448
greater than (
>
) operator, 135, 457
greater than or equal to (
>=
) operator,
135,457
$greeting
variable, 97
grocery list array, 160
H
handle_form.php
document
creating, 59
opening, 66
handle_post.php
document
creating, 79–82, 98–99
opening, 84, 86, 88, 101, 106, 109, 115, 118
handle_reg.php
document
creating, 126–127
opening, 129, 132, 136, 140, 145, 149
hash, 40
<head>
tag, creating, 5
header file, creating for template, 198–199,
203
header()
function
and HTTP headers, 237–240
and output buffering, 233
using
exit
with, 150
header lines, creating, 4
header.html
document
creating, 396–397
opening, 209, 234
headers already sent error, troubleshooting,
453
headers_sent()
function, 240
Hello,
World!
greeting, sending to browser,
2, 16–17
hello1.php
document
creating, 16–17
opening, 21
hello2.php
document
creating, 21-22
opening, 25
hello.html
script, creating, 69–70
hidden extensions, being aware of, 9

ptg18144795
466 Index
K
keyboard shortcuts
Cut and Paste, 199
Edit menu, 199
ksort()
functions, using with arrays,
178–180
L
language constructs, 150
languages. See multilingual
web pages
Laravel PHP framework, 455
leap year, formatting, 458
legacy file writing, 305
less than (
<
) operator, 135, 457
less than or equal to (
<=
) operator,
135, 457
linking strings, 100
links
using to pass values, 68–69
using with multiple values, 72
list()
function
using with array elements, 189
using with functions, 288
list_dir.php
document, creating,
326–329
list_dir.php
script, 325
list.html
document, creating, 183
list.php
document, creating,
184–185
local variables, 97, 290
locking files, 310–312
$
loggedin
variable, 339, 341
logical operators, 135, 138–143, 457
login form, displaying, 218–219
login page
HTTP headers added to, 240
purpose of, 216–217
login.php
document
creating, 216–219, 266–267,
338–342, 400–404
opening, 238, 262
loops
nesting, 156
troubleshooting, 454
ltrim()
function, 119
if-else
conditional, 132–134, 143
if-elseif
conditionals, simplifying,
148–150
if-elseif-else
conditional, 144–147
IIS (Internet Information Server), 10
implode()
function, using with arrays,
182,184
include()
function
failure of, 201
and parentheses (
()
), 206
using with constants, 207
using with external files, 202
increment (
++
) operator, 88–89,
135, 457
index errors, troubleshooting, 452
INDEX
privileges, 446
indexed arrays, 40, 165
index.php
document, creating,
202–205, 423–425
inequality (
%
) operator, 135
inequality (
!=
) operator, 457
ini_set()
function, 263
INSERT
INTO
tablename
SQL command,
360,363
INSERT
privileges, 446
INSERT
SQL command, 346
installation
on Mac OS X, 433–435
on Windows, 428–432
int
type, 281
integers, 38
invalid MySQL argument error,
troubleshooting, 453
is_administrator()
function,
394, 406
is_array
conditional, 189
is_dir()
function, 325
is_file()
function, 325
is_numeric()
function, 128, 131
is_readable()
function, 315
isset()
function, 128, 131
J
JavaScript, 105, 456
join()
function, 185
JQuery website, 456

ptg18144795
Index 467
MySQL databases. See also databases;
tables
apostrophes (
'
) in form data, 370
connecting to, 348–351
creating, 445, 447
creating tables, 355–359
error handling, 352–354
inserting records into, 365
localhost
value, 351
myblog, 349
queries and query results, 347
sending SQL statements to, 346
support in PHP, 346
username and password values, 349
MySQL users
creating, 445–448
privileges, 445–448
root user password, 443–445
mysqli_affected_rows()
function, 380, 387
mysqli_connect.php
document
creating, 348–350, 392
opening, 353
mysqli_error()
function, 352–354
mysqli_fetch_array()
function, 371–372,
375
mysqli_num_rows()
function, 375, 387
mysqli_query()
function, 346, 357, 371, 379
mysqli_real_escape_string()
function,
367–370, 383, 385, 387
N
name
value, using to print greetings, 70–72
$name
variable, creating via concatenation, 99
names, concatenating, 100
natsort()
functions, using with strings, 181
navigating
directories, 325–329
files, 203
negation (
!
) logical operator, 135, 457
nesting conditionals, 139, 217–218. See also
conditionals
nesting loops, 156
newlines (
\n
)
converting to breaks, 101–103, 107
using, 22
using with cookies, 22, 252
Nginx, 10
M
Mac OS X
Get Info panel, 302
installation on, 433–435
installing XAMPP on, 434–435
Magic Quotes, 62
mail()
function, 228–230, 232, 437
make_date_menus()
function, 274
make_text_input()
function, 279, 295
MAMP website, 433
MariaDB, installation by XAMPP, 429
math. See arithmetic
memory allocation, error related to, 65
menus.php
document, creating, 272–274
merging arrays, 169
messages, printing, 16
meta
tags, using for encoding, 5
method
attribute, using with forms, 54–57
microseconds, formatting with
date()
function, 211
microseconds parameters, formatting with
date()
function, 458
minutes, formatting with
date()
function, 211
modulus (
%
) operator, 135, 457
money_format()
function, using with
numbers, 85
month pull-down menu, creating, 272
month values, formatting, 458
monthly payment, calculating, 81
months, formatting with
date()
function, 211
move_uploaded_file()
function, 317,
319–320
Mozilla Developer Network website, 456
mtrand()
function, using, 90–91
multidimensional arrays, creating, 40,
173–177. See also arrays
multilingual forums, 96
multilingual web pages, creating, 5
multiplication (
*
) operator, 79, 135, 457
myblog database, 349
myquotes database, 390
MySQL client
debugging PHP scripts, 440
using, 438–440
using semicolon (
;
) in, 438
on Windows, 440
MySQL database management system
(DBMS), 345

ptg18144795
468 Index
P
pages. See HTML pages
parameters, defining functions with,
276–277
parent folder (
..
), 303
parentheses (
()
)
versus braces (
{}
), 172
using in calculations, 86–87
using with conditionals, 143
Parse
error
level, 65
parse errors. See also error messages;
troubleshooting
avoiding, 170
double quotation marks (
"
), 58
receiving, 43
troubleshooting, 454
password values, validating, 136–137
password_hash()
function, 112, 337
password_verify()
function, 337
passwords
encrypting, 337
entering in HTML form, 123
managing, 124
validating, 130, 224
permissions, 298–302, 309, 352
PHP
configuring, 436–437
configuring for file uploads, 318–319
PHP code, storing, 236
.php
extension, 9
PHP functions, using with HTML tags,
104–107. See also functions
PHP manual, using, 18–20, 449
PHP scripts
accessing, 14
adding comments to, 24–26
creating, 8, 70–71
debugging, 28, 440
executing, 9
versus HTML pages, 7
requesting, 215
running through URLs, 451
testing, 12–14
testing in browsers, 12–14
<?php
tag, 8
PHP version, verifying, 451
phpinfo()
function, 8–9, 436
nl2br()
function
looking up, 19
using concatenation with, 100
using with newlines, 102
nobody permission, 302
Not Found response, receiving, 14
Notice
error level, 65
NULL
, using with functions, 284
null coalescing (
??
) logical operator, 135, 143
null coalescing (
<=>
) logical operator, 457
number_format()
function, using, 83–85
numbers. See also random numbers
creating HTML form for, 76–78
formatting, 83–85
incrementing and decrementing, 88–89
types of, 38
valid and invalid, 38
numeric indexes
setting, 165
using
for
loop with, 172
O
ob_clean()
function, 234, 236
ob_end_flush()
function, 234–237
ob_flush()
function, 236
ob_get_contents()
function, 236
ob_get_length()
function, 236
ob_start()
function, invoking, 233–234
octal format, 302
$okay
variable, using with control structures,
126–127, 129–130
OOP (object-oriented programming), 455
The Open Web Application Security Project
website, 455
operator precedence table, 457
operators
for arithmetic, 79
table, 457
or (
|
|
) logical operator, 135, 139, 457
OR
logical operator, 135, 139, 457
ORDER
BY
RAND()
clause, 424
ordinal suffix, 458
organizing files and folders, 204
others permission, 301
output buffering, 233–236, 250
owner of file, explained, 298

ptg18144795
Index 469
printing messages, 16
$problem
variable
creating, 222
using, 224
using with databases, 362, 364
PROCESS
privileges, 446
Project Euler, 455
pull-down menus
creating, 272–274
preselecting, 227
Q
query data, securing, 366–770. See also
databases
quotation marks (
"
). See double quotation
marks (
"
); single quotation marks (
'
)
using with constants, 207
quotes
adding, 304, 405–408
deleting, 418–421
editing, 412–417
listing, 409–411
storing in text file, 306–307
quotes.php
script, creating, 45
q uo te s.t x t
file
creating, 300
opening, 300
R
radio buttons, presetting status of, 227
RAND()
function, 424
rand()
function, using, 90–91
random numbers, 90–91. See also numbers
random.php
document, creating, 90–91
read permission, 298, 301–302
readfile()
function, 315
reading
from files, 313–315
files incrementally, 338–342
register.html
directory, 122, 130
register.html
document
creating, 122–124
opening, 153
register.php
script, 331–337
creating, 331–337
opening, 229
phpinfo.php
document, creating, 8–9
php.ini
file
editing, 437
saving, 436
session settings, 263
phpMyAdmin, using, 347, 441–442
PhpStorm, 4
pipe (
|
), explained, 67
$_POST
and
$_GET
, 58–62, 68
POST and GET, using with
method
attribute,
54–57
$_POST
array, 161
$_POST
elements, using with cost
calculator,80
postfix mail server, 437
posting.html
document, creating, 94–96
precedence
managing, 86–87
table, 457
predefined constants, 210. See also
constants
predefined variables, printing, 33–35. See
also variables
predefined.php
document, creating, 33
preset HTML form values cut off error,
troubleshooting, 454
primary keys, 365, 387
print
language construct, using, 15–16, 21,
32–33
print
statement
control variables, 129–130
forms, 61
HTML form tags, 274
str_ireplace()
and
trim()
, 118–119
substrings, 115–116
urlencode()
function, 109–111
variables, 41
printf()
function, using with numbers, 85
printing
$
(dollar sign), 82
arrays, 164
constants, 209–210
greetings, 70–71
multidimensional arrays, 176
predefined variables, 33–35
results from cost calculator, 81–82
values of arrays, 171–172
values of constants, 207

ptg18144795
470 Index
handle_post.php
, 99
handle_reg.php
, 127, 130
header.html
, 199, 209, 397
hello1.php
, 17
hello2.php
, 22
hello3.php
, 26
hello.html
, 70
hello.php
, 71
index.php
, 204
list_dir.php
, 329
list.html
, 183
list.php
, 185
login.php
, 262, 342, 403
logout.php
, 267, 404
menus.php
, 274
mysqli_connect.php
, 350, 392
phpinfo.php
, 9
php.ini
, 436
posting.html
, 96, 103, 107
predefined.php
, 34
quotes.php
, 47
random.php
, 91
register.html
, 138
register.php
, 155, 337
reset.php
, 259
soups1.php
, 164
soups2.php
, 168
sticky2.php
, 284
template.html
, 197
upload_file.php
, 324
use rs.t x t
, 330
variables.php
, 43
view_entries.php
, 375
view_quote.php
, 314–315
view_quotes.php
, 417
welcome.html
file, 6
welcome.php
, 240, 265
scalar variable types
versus arrays, 160
using
print
with, 41
scripts. See PHP scripts
seconds, formatting, 211, 458
securing query data, 366–370
security, resources, 455
security issues, related to cookies, 245
SELECT
privileges, 446
SELECT
query, 371, 373–374
SELECT
SQL command, 346
registration form
error message in, 231
making sticky, 220–227
registration page, creating, 122–124
registration script, creating for directory,
331–332
relative paths, 203, 303
RELOAD
privileges, 446
require()
function
failure of, 201
and parentheses (
()
), 206
using with constants, 207
required
attribute, using with forms, 50, 52
reset.php
script, creating, 258–259
resources, books, 456
$result
reference, using with databases,
371–372
return
statement
using with functions, 285
and variable scope, 290
REVOKE
privileges, 446, 448
rmdir()
function, 337
round()
function, using with numbers,
83,85
rsort()
functions, using with arrays, 178, 180
rtrim()
function, 119
S
safe mode, running PHP in, 309
sales cost calculator, creating, 79–82
Save As feature, 6
saving documents and scripts, 6, 132, 417.
See also files
add_entry.php
, 365
add_quote.php
, 309, 408
books.php
, 176
calculator1.php
, 289, 294
calculator.html
, 78, 85, 87–88
create_table.php
, 359
delete_entry.php
, 381
edit_entry.php
, 386
event.php
, 190
feedback.html
, 53
footer.html
, 213, 399
functions.php
, 395
handle_calc.php
, 81
handle_form.php
, 61, 64, 67

ptg18144795
Index 471
sort.php
document, creating, 179–181
$soups
array, 163
soups1.php
document
creating, 163–164
opening, 167
soups2.php
document, creating, 167
soups3.php
document, creating, 171–172
spaceship (
<=>
) operator, 135, 138, 457
spacing of HTML code, displaying, 22
sprintf()
function, using with numbers, 85
SQL (Structured Query Language), features
of, 346–347
SQL commands, 346
SQL Course website, 450
SQL statements, sending to MySQL, 346
SQL.org website, 450
square brackets (
[]
), using with keys in
arrays, 161
sticky forms, 220–221. See also form data;
HTML forms
sticky text inputs, creating, 278–281
sticky1.php
document
creating, 278–281
opening, 283
str_ireplace()
, using with
trim()
, 118–119
string case, adjusting, 117
string
type, 281
strings. See also empty string (
'
'
);
substrings
checking formats of, 116
comparing, 113
concatenating, 97–100
counting backward in, 114
creating HTML form for, 94–96
encoding and decoding, 108–112
encrypting and decrypting, 112
indexed position of characters in, 114
linking, 100
performing case-sensitive searches, 117
replacing parts of, 117–119
transforming between arrays, 182–185
using, 39
strip_tags()
function, 104, 107
stripslashes()
function, using with Magic
Quotes, 62
strtok()
function, 113
strtolower()
function, 218
A Study in Scarlett website, 455
semicolon (
;
)
error related to, 65
using in MySQL client, 438
using with
print
command, 15
sending email, 228–232
sendmail server, 437
$_SERVER
variable, 32–35, 58
servers. See also web server applications
configuring to send email, 232
setting time zones for, 213
using SFTP with, 10–11
$_SESSION
array, 261, 264
session data
destroying, 267
storing, 265
Session ID (
SID
) constant, 263
session variables, accessing, 264–265
session_name()
function, 263
session_set_cookie_params()
function,
263
session_start()
function, 233, 264, 266
sessions
comparing to cookies, 260–261
creating, 261–263
deleting, 266–267
explained, 260
security issues, 265
storing values in, 263
verifying variables, 265
setcookie()
function, 233, 246–250,
257–259
SFTP (Secure File Transfer Protocol), using,
10–11
sha1()
function, 335, 337
short array syntax, using, 162
short tags, 9
shuffle()
function, using with arrays, 178
SHUTDOWN
privileges, 446
single quotation marks (
'
)
versus double quotation marks (
"
), 169
using, 44
site structure, 203. See also website project
$size
variable, using with default values,
283
sizeof()
function, using with arrays, 169
Slim microframework website, 456
SMTP servers, 437
sorting arrays, 178–181

ptg18144795
472 Index
trim()
function
using in comparisons, 138
using with strings, 117–119
troubleshooting. See also error messages;
parse errors
access denied, 453
advice, 451
blank pages, 452
calls to undefined functions, 452
conditionals and loops, 454
headers already sent, 453
invalid MySQL argument, 453
parse errors, 454
preset HTML form values cut off, 454
undefined variable and index
errors, 452
variables without values, 452
TRUE and FALSE, 121, 395
true
value, 19. See also Boolean TRUE and
FALSE
TRUNCATE
TABLE
tablename
query, 381
types, declaring, 289
U
uasort()
functions, using with arrays, 181
undefined functions, troubleshooting calls
to, 452. See also functions
Undefined index notice, 170
Undefined offset notice, 170
Undefined variable error, 43
underscore (
_
)
forms, 51
functions, 270
variables, 37
unlink()
function, 324
UPDATE
privileges, 446
UPDATE
SQL command, 346, 382–387
upload_file.php
document, creating,
319–324
uploaded files, renaming, 324
uploads
folder, creating, 318
urlencode()
function, 108–112
“user,” defining, 299
user-defined functions, 270–271, 275, 278,
288, 393–395. See also functions
username, using on registration
pages, 124
Sublime Text, 4
submit button, creating for HTML
form, 124
substrings, finding, 113–116. See also strings
subtraction (
-
) operator, 79, 135, 457
superglobals and constants, 161, 294
switch
conditional, 121, 148–151
T
tab (
\t
), using with cookies, 252
tables. See also MySQL databases
creating, 355–360
primary keys, 355
using primary keys in, 387
tags. See HTML tags
tax rate, calculating, 81
$tax
variable, 293
template.html
document
creating, 195–197
opening, 198, 200
templates. See also CSS templates
creating, 194
footer file, 200
header file, 198–199
layout model, 195–197
website project, 396–399
testing
PHP scripts, 12–14
safety of sending cookies, 250
text, sending to browsers, 15–17
text area, presetting value of, 227
text file, creating for file permissions,
299–300
text input type, checking, 138
textarea
form element
adding to forms, 53
using with newlines, 101–102
time()
and
date()
functions
table, 458
using, 211–213, 254
using with sessions, 265
time zones
formatting with
date()
function,
211–212, 458
setting for servers, 213
tokens, substrings as, 113
Transmit FTP application, 301

ptg18144795
Index 473
W
W3Schools
JavaScript pages, 456
SQL Tutorial website, 450
WAMP website, 428
Warning
error level
web pages. See HTML pages
web root directory, 298. See also directories
web server applications, 10. See also servers
website project. See also site structure
adding quotes, 405–408
administrator, 390
creating home page, 422–425
database connection, 392
deleting quotes, 418–421
denying access, 405
editing quotes, 412–417
file organization and structure, 391
footer.html
document, 398
identifying goals of, 390
listing quotes, 409–411
logging in, 400–403
logging out, 404
myquotes database, 390
security, 390
template, 396–399
user-defined function, 393–395
websites
Adobe Dreamweaver, 4
AMPPS, 428, 433
Apache, 10
Aptana Studio, 4
Atom, 4
Bitnami, 428, 433
Git version control software, 11
IIS (Internet Information Server), 10
JavaScript resources, 456
MAMP, 433
Nginx, 10
PHP frameworks, 455–456
PHP manual, 18
PhpStorm, 4
Project Euler, 455
security resources, 455
SQL resources, 450
Sublime Text, 4
WAMP, 428
Windows installers, 428
XAMPP, 428, 433
users
folder, creating, 330
use rs.t x t
script, 339–340
UTF-8 encoding, 5–6
V
validating, passwords, 224
validation functions, 128–131
value types, declaring, 289
values, assigning to variables, 135
$var
variable, 291
var_dump()
function, using with
arrays, 165
variable errors, troubleshooting, 452
variable names, case sensitivity of, 36
variable scope
explained, 290–292
global
statement, 293–294
variables. See also predefined variables
accessing, 42–43
arrays, 40
assigning values to, 135
avoiding referring to, 131
documenting purpose of, 37
error related to, 65
explained, 32
incrementing values of, 88–89
minimizing bugs, 37
naming conventions, 37
numbers, 38
referring to, 37
scalar and nonscalar, 41
strings, 39
syntax, 36–37
types of, 38–40
valid and invalid, 37
validating, 147
values, 41–43
warnings related to, 37
variables.php
document, creating, 42–43
version control software, 11
view_blog.php
document, 386–387
view_entries.php
document, creating,
372–375
view_quotes.php
document, creating,
314–315, 409–411
view_settings.php
document, creating,
251–253

ptg18144795
474 Index
welcome.html
file, saving, 6
welcome.php
document, creating, 238–240,
264–265
while
loop, 152, 156, 338
white space, using, 22
whole numbers, 38
Windows
installation on, 428–432
installing XAMPP on, 430–432
wordwrap()
function, 107
write permission, 298, 301–302
writeable directory, creating, 318–319
writing to files, 303–309
X
XAMPP
command prompt, 439
files installed by, 429, 433
and firewalls, 429
installing on Mac OS X, 434–435
installing on Windows, 430–432
MariaDB, 429
website, 428, 433
XOR
(exclusive or) logical operator, 135, 139,
457
XSS (cross-site scripting) attacks, 105
Y
year pull-down menu, creating, 272
year values
formatting, 211, 458
validating, 136–137, 141
Yii PHP framework, 455
