PTWUsers Manual
User Manual: Pdf
Open the PDF directly: View PDF ![]() .
.
Page Count: 72

Fortescue Training
Solomon Isolation Database
User’s Manual
10/08/2017
Version 1.0.0.4
"Training Manual Title"
Page 2 of 72
Document Number_Rev No.
Rport
Disclaimer:
This document is protected by copyright, no part of this document may be reproduced or adapted without
the consent of the originator/company owner, all rights are reserved. This document is “uncontrolled when
printed”, refer to electronic copy for up to date version.
Fortescue Permit To Work User’s Manual
"[Document
Number]"
Revision Number
0
Click here to enter a date.
Status
DRAFT
Author
Cong Nguyen
Signature
Click here to enter a date.
Checked
First Name Surname Here
Signature
Click here to enter a date.
Approved
First Name Surname Here
Signature
Click here to enter a date.
Confidentiality
FORTESCUE STAFF &
CONTRACTORS
Publish on Extranet
Yes
No
Review Date
Click here to enter a date.
Revision History (to be completed for each version retained by Document Control)
Author
Checker
Approver
Rev
No.
Status
Issued Date
Initial/Surname
Initial/Surname
Initial/Surname
Choose
an item.
Click here to
enter a date.

3 | P a g e
TABLE OF CONTENTS
1. INTRODUCTION ............................................................................................................ 5
1.1 PURPOSE ........................................................................................................... 5
1.2 APPLICATION OVERVIEW ................................................................................ 5
2. INSTALLATION .............................................................................................................. 6
2.1 Installation Guideline ........................................................................................ 6
3. SOFTWARE LAYOUT .................................................................................................... 8
3.1 Software layout .................................................................................................. 8
4. BREAKDOWN EVENT ................................................................................................... 9
4.1 Create a new Breakdown Event ........................................................................ 9
4.2 Create New Isolation Statement ..................................................................... 10
4.3 Creating a Permit To Work .............................................................................. 12
4.4 Send Permit to Outlook ................................................................................... 15
4.5 Printing ............................................................................................................. 16
4.5.1 Print Isolation Statement ...................................................................... 16
4.5.2 Print Multiple Statements ..................................................................... 17
4.5.3 Print Permit To Work ............................................................................ 20
5. SHUTDOWN EVENT .................................................................................................... 22
5.1 Create Shutdown Event .................................................................................. 22
5.2 WORK ORDERS ............................................................................................... 23
5.2.1 Create New Work Order ....................................................................... 23
5.2.2 Import Work Orders from Excel Spreadsheet ....................................... 24
5.2.3 Update Work Orders ............................................................................ 28
5.2.4 Delete Work Orders ............................................................................. 30
5.2.5 Import Work Orders from SAP & Microsoft Project ............................... 31
5.3 WORK PACKS .................................................................................................. 38
5.3.1 Create New Work Pack ........................................................................ 38
5.3.2 Create New SIR ................................................................................... 41
5.3.3 Create New Permit To Work ................................................................ 44
5.3.4 Merging Work Packs ............................................................................ 46

4 | P a g e
5.3.5 Work Pack Shortcuts............................................................................ 47
5.4 ISOLATION STATEMENTS .............................................................................. 47
5.4.1 Create New Isolation Statement ........................................................... 47
5.4.2 Print Isolation Statement ...................................................................... 49
5.4.3 Print Multiple Statements ..................................................................... 50
5.4.4 Print Lock Box Cover ........................................................................... 54
5.5 SPECIFIC ISOLATION REQUIREMENTS ........................................................ 55
5.5.1 Create new SIR .................................................................................... 55
5.6 PERMIT TO WORK ........................................................................................... 57
5.6.1 Create New Permit to Work .................................................................. 57
5.7 REPORTS ......................................................................................................... 60
5.7.1 Isolation Matrix ..................................................................................... 60
5.7.2 Permit Matrix ........................................................................................ 61
5.7.3 General Reports ................................................................................... 61
6. TEMPLATES EVENT ................................................................................................... 62
6.1 Create New Template Event ............................................................................ 62
7. ADMINISTRATION ....................................................................................................... 63
7.1 Add new Isolation Point .................................................................................. 63
7.2 Verify Isolation Points ..................................................................................... 64
7.3 Add Photo to Isolation Points ......................................................................... 66
7.4 Update Isolation Point Details ........................................................................ 68
7.5 Duplicate Isolation Tag ................................................................................... 70
7.6 Add New Lock Box .......................................................................................... 71

5 | P a g e
1. INTRODUCTION
1.1 PURPOSE
This document contains general information that will be useful to know before using Solomon
Isolation Database Application.
1.2 APPLICATION OVERVIEW
Solomon Isolation Database is a software program that is used to generate Isolation
Statements, Specific Isolation Requirements, Permit to Work in alignment with FMG Standard
and Procedure.
MAJOR FEATURES
Generate Isolation Statements
Generate Specific Isolation Requirements (SIR)
Generate Permit To Work
For further information please refer to Document 100-PR-SA-1003 (Permit to Work Procedure)
6 | P a g e
2. INSTALLATION
2.1 Installation Guideline
The following procedure will step you through the installation process.
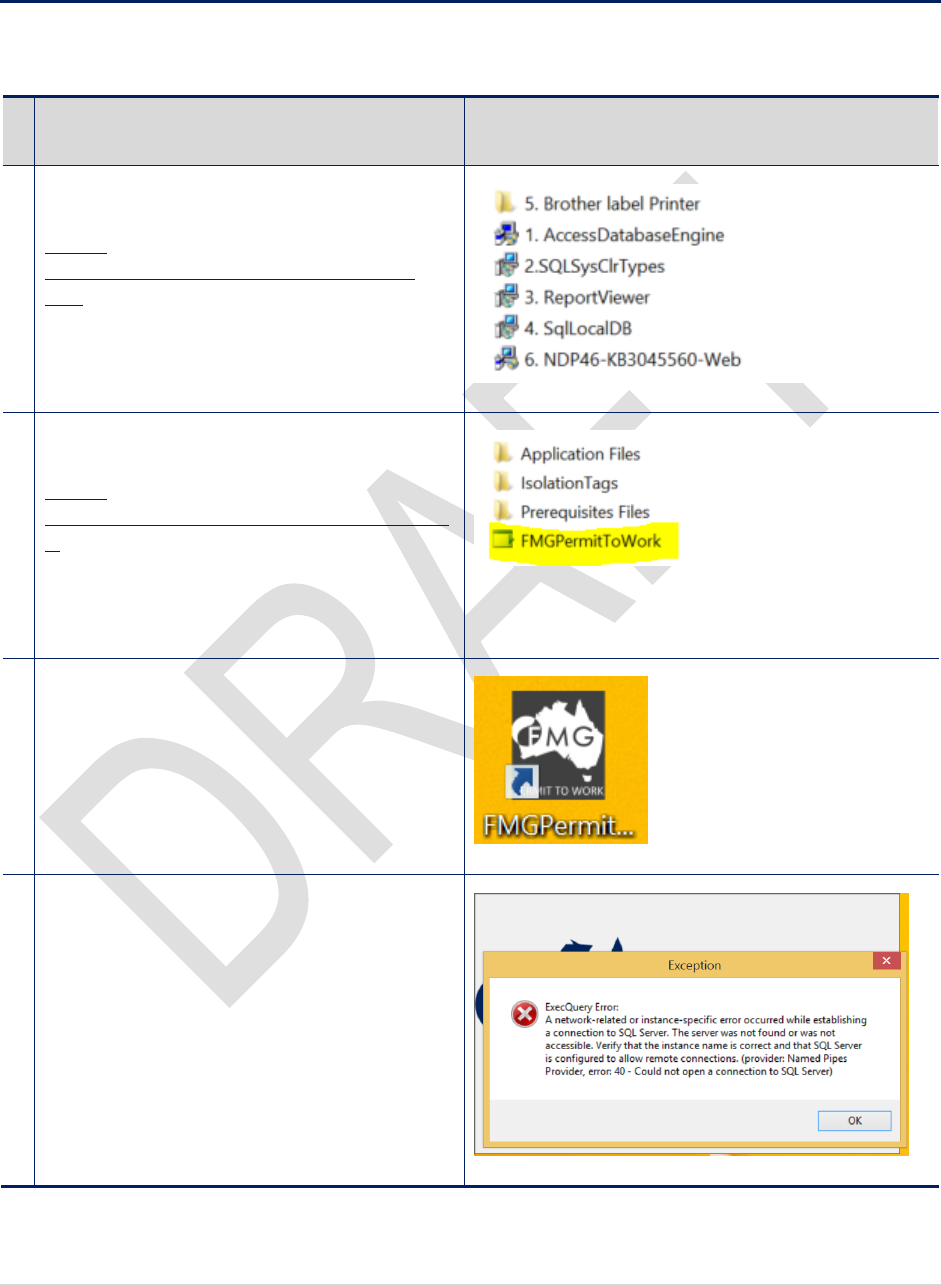
Instruction
1
Install all the pre-requisites files located in:
J:\Cong
Nguyen\PermitToWorkDatabase\Prerequisites
Files
Once all files have been installed, restart the
computer and proceed to the next step
2
Install FMGPermitToWork Application
J:\Cong
Nguyen\PermitToWorkDatabase\FMGPermitToWo
rk
Once the application is installed, proceed to the
next step
3
Run FMGPermitToWork from your Desktop
4
When FMGPermitToWork initialises for the first
time, the following error dialog will appears. Click
OK to acknowledge.
7 | P a g e
Instruction
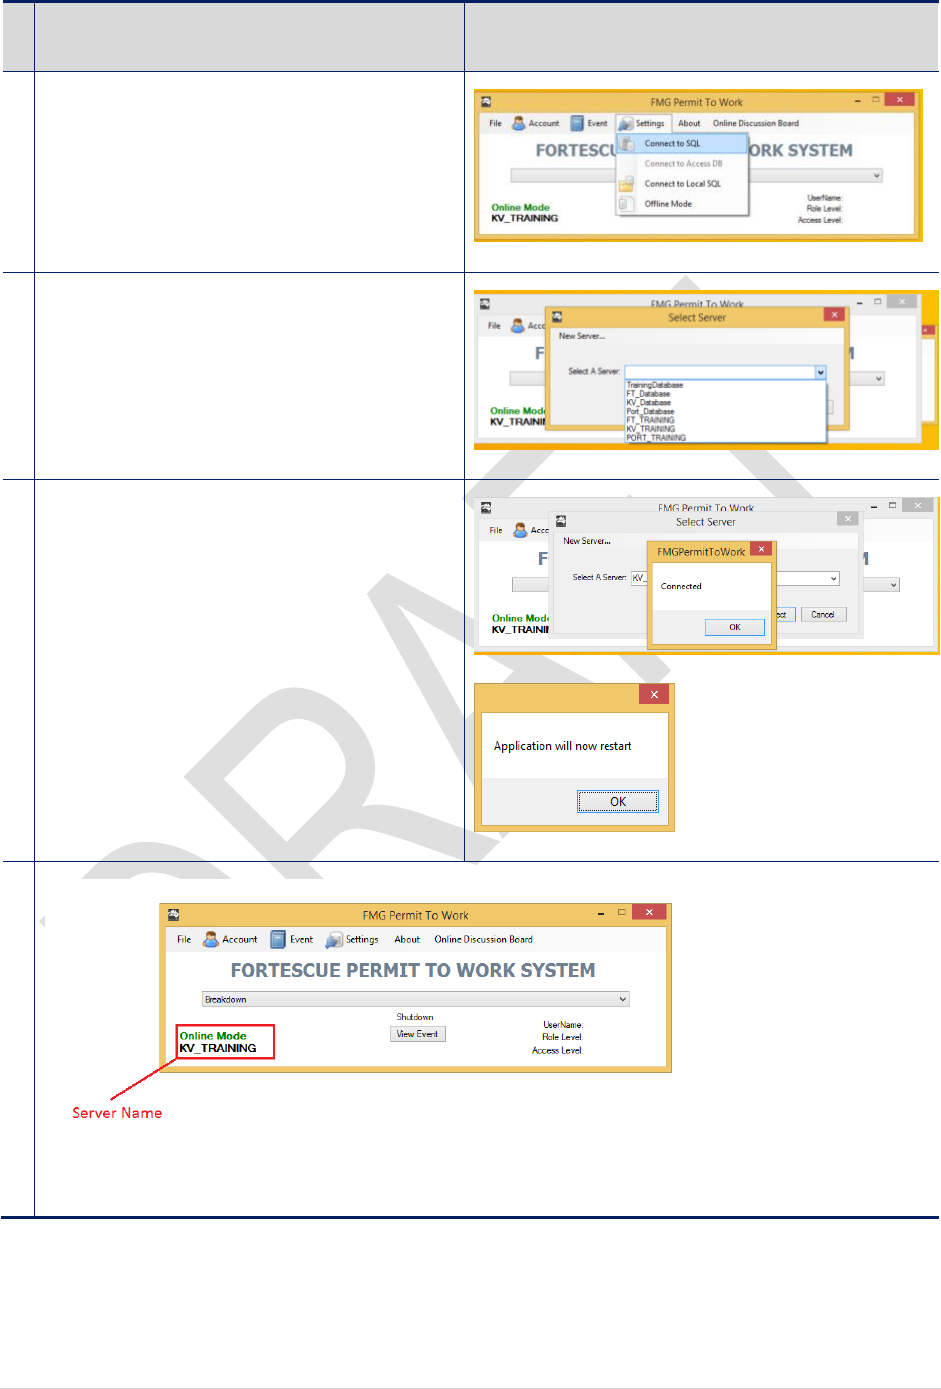
5
Select Settings > Connect to SQL
6
A new dialog will appears. Select a Server then
click Connect to continue
7
The Application will self-restart
8
The Application is now connected to KV_TRAINING database
END OF PROCEDURE

8 | P a g e
3. SOFTWARE LAYOUT
3.1 Software layout
FMGPermitToWork consists of 3 types of working events: Breakdown, Shutdown and
Templates. Below are the main differences:
Breakdown Event
Shutdown Event
Templates
Isolation Statements
No lockbox numbering
restriction. Different
Isolation Statements can
be allocate to the same
Lock Box
Each Statement has a
unique Lock Box
Lock Boxes are not
required
SIR
Not applicable in this mode
SIR are generated from
Work Packs
TSIR Isolation Points are
referenced to Isolation
Statements’ Lockbox
Work Packs not required.
Isolation Points don’t have
Lock Box Number
Permit to Work
Work Permits are
generated from Isolation
Statement
Work Orders are not
required
Work Permits are
generated from TSIR
N/A
Other Features
Outlook Integration
Shutdown Planning Tools
N/A
9 | P a g e
4. BREAKDOWN EVENT
4.1 Create a new Breakdown Event
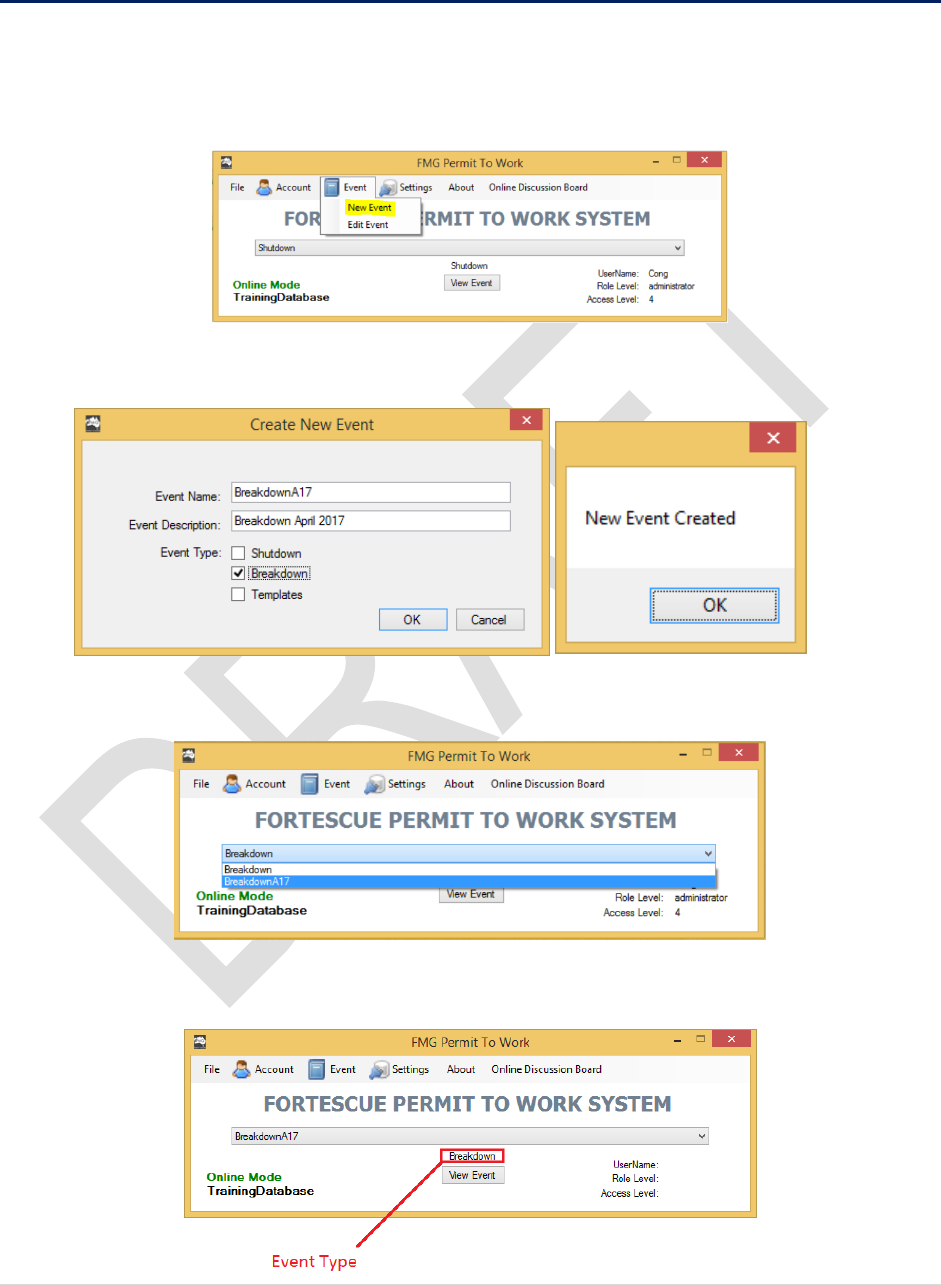
1. From the Main Screen. Login in with your credentials
2. Click on Event > New Event to create a new Event
3. Type in the Event Name, its Description and select an Event Type. Click OK to proceed.
4. From the Main Screen, Select “BreakdownA17” Event
5. Click View Event to view the event details
10 | P a g e
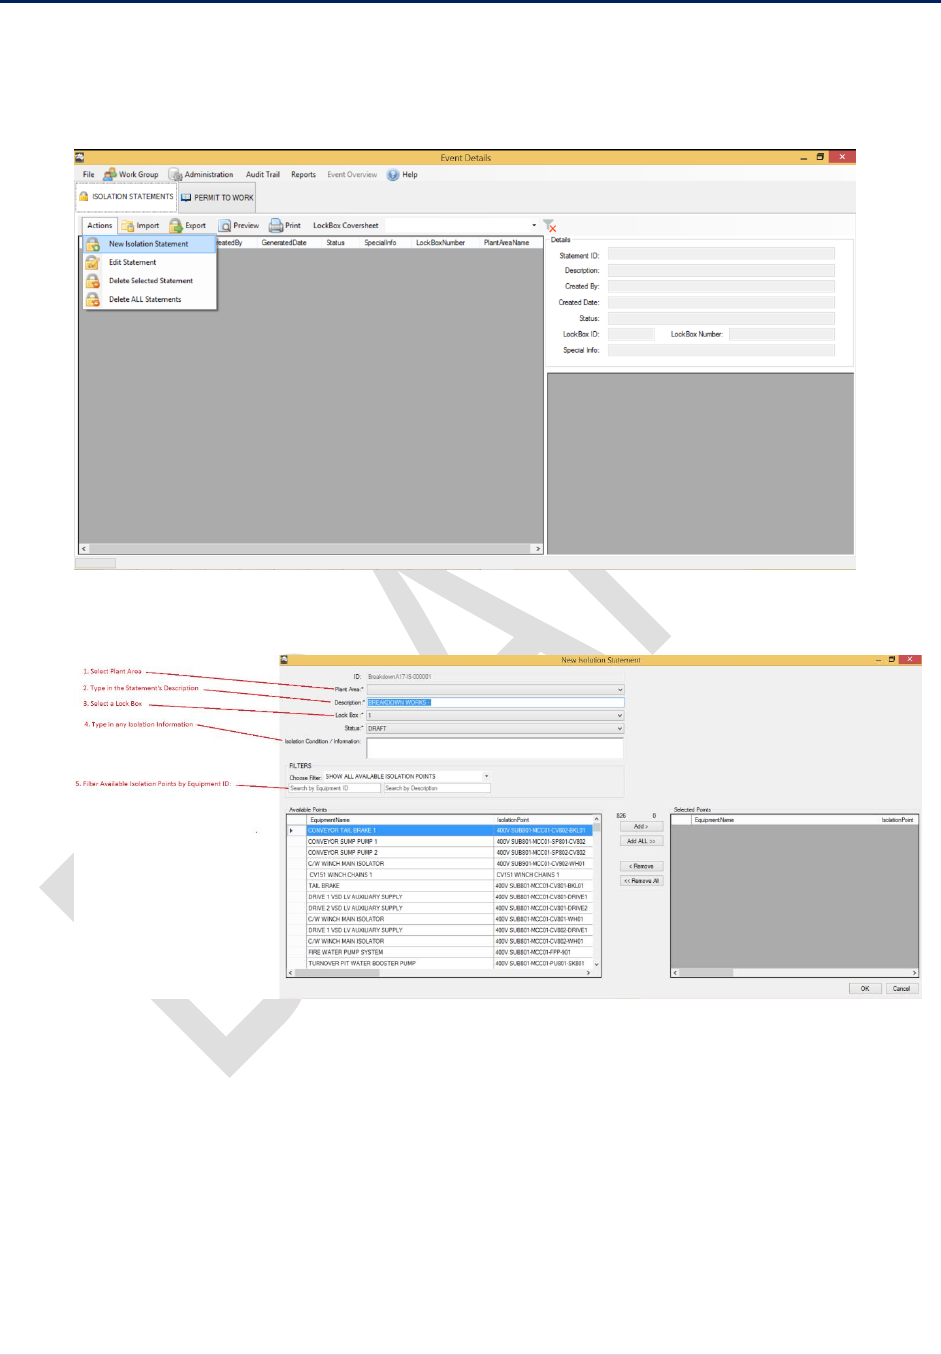
4.2 Create New Isolation Statement
1. From the Event Details Screen.
Select ISOLATION STATEMENTS > Actions > New Isolation Statement
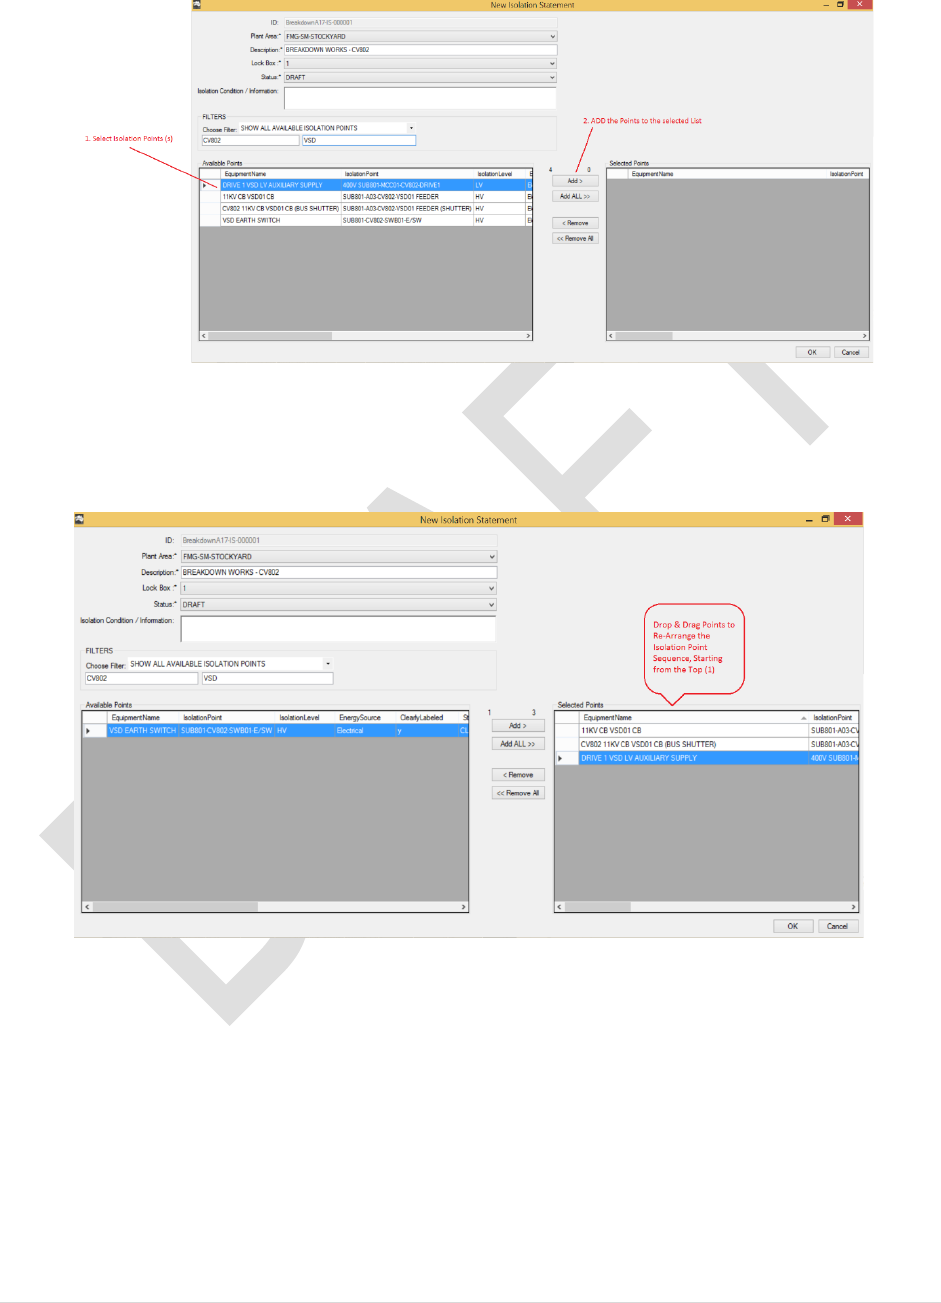
2. A new form will appears. Fill in all the required Fields:
11 | P a g e
3. Filter the Isolation Points by Equipment ID or Description. Multiple points can be
added to the list at the same time:
4. Sort the Isolation Points by clicking on header, or drop and drag to a specific position
in the list. The Isolation Sequence appears on the statement starts from top to bottom
(1,2,3…)
5. Click OK to Create this statement

12 | P a g e
6. The new statement is now listed in the Event Details page. Double click on the item to
Preview
7. To Edit the statement. Highlight the item on the list, Select Actions > Edit Statement
End of Procedure
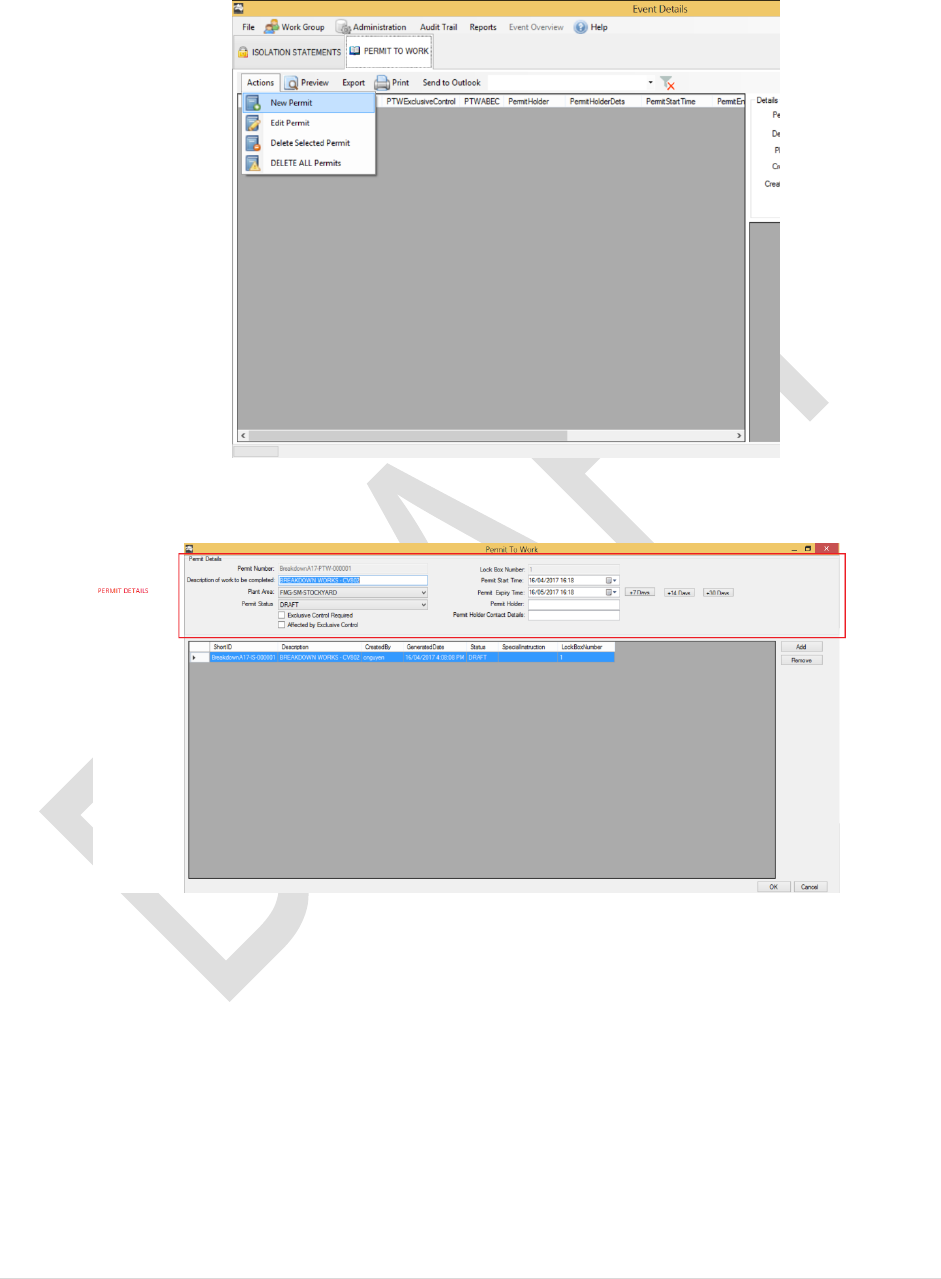
4.3 Creating a Permit To Work
Permit to Work Statements may be created in several ways:
1. On the ISOLATION STATEMENT list
a. Select an isolation Statement
b. Right-click > New Permit
13 | P a g e
2. Or PERMIT TO WORK > Actions > New Permit
3. Fill in the Permit Details section, where applicable:
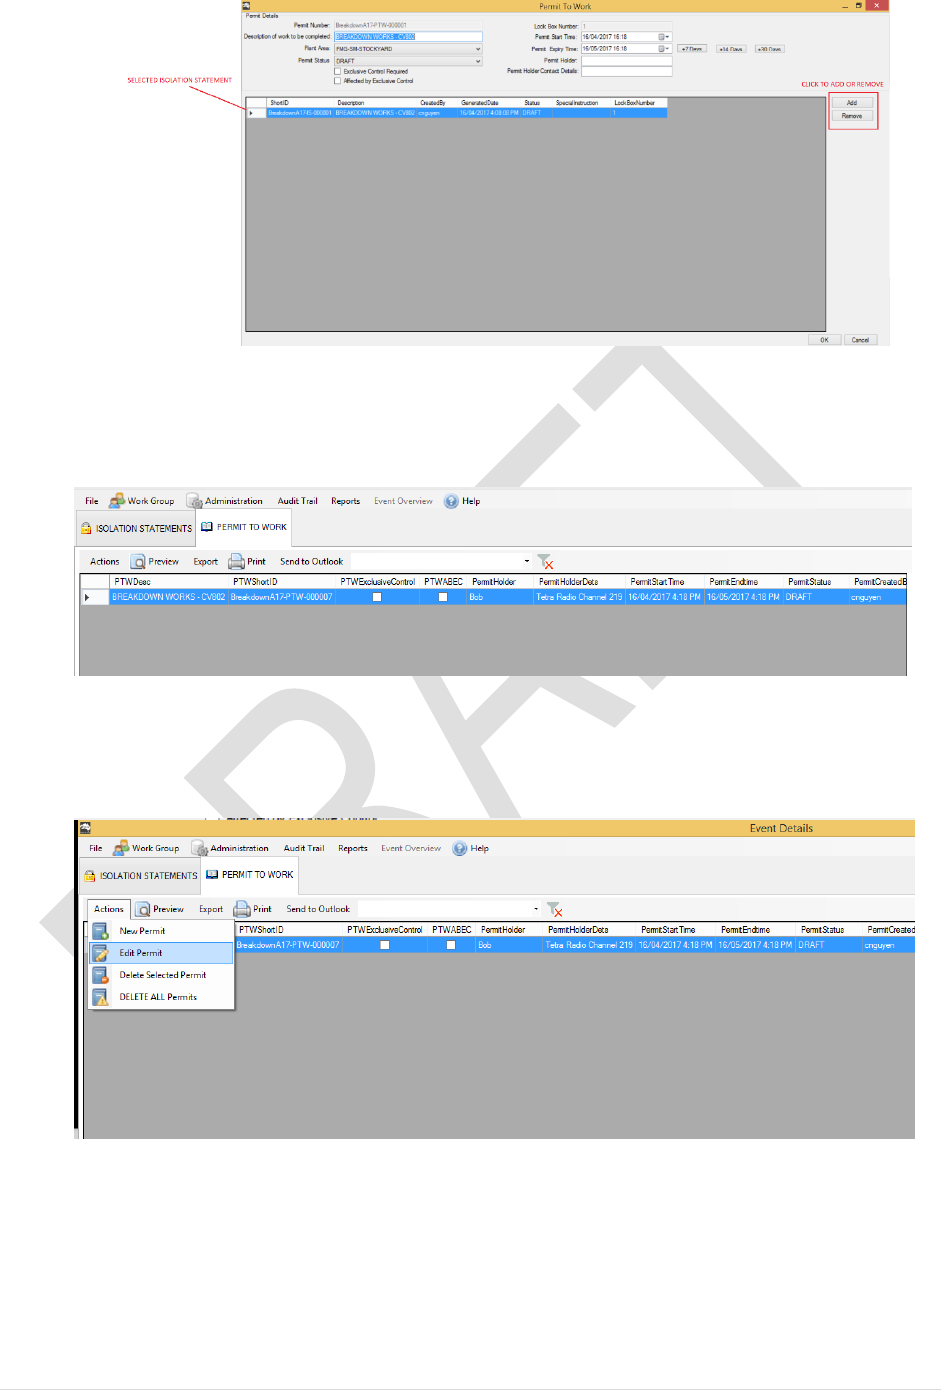
4. Add or Remove the Isolation Statement associate with this Permit:
14 | P a g e
5. Click OK to proceed to the next step
6. New Permit is now listed on the Event Details Page > PERMIT TO WORK:
7. Double click the permit to preview
8. Permit can be altered by selecting PERMIT TO WORK > Actions > Edit Permit
End of Procedure
15 | P a g e
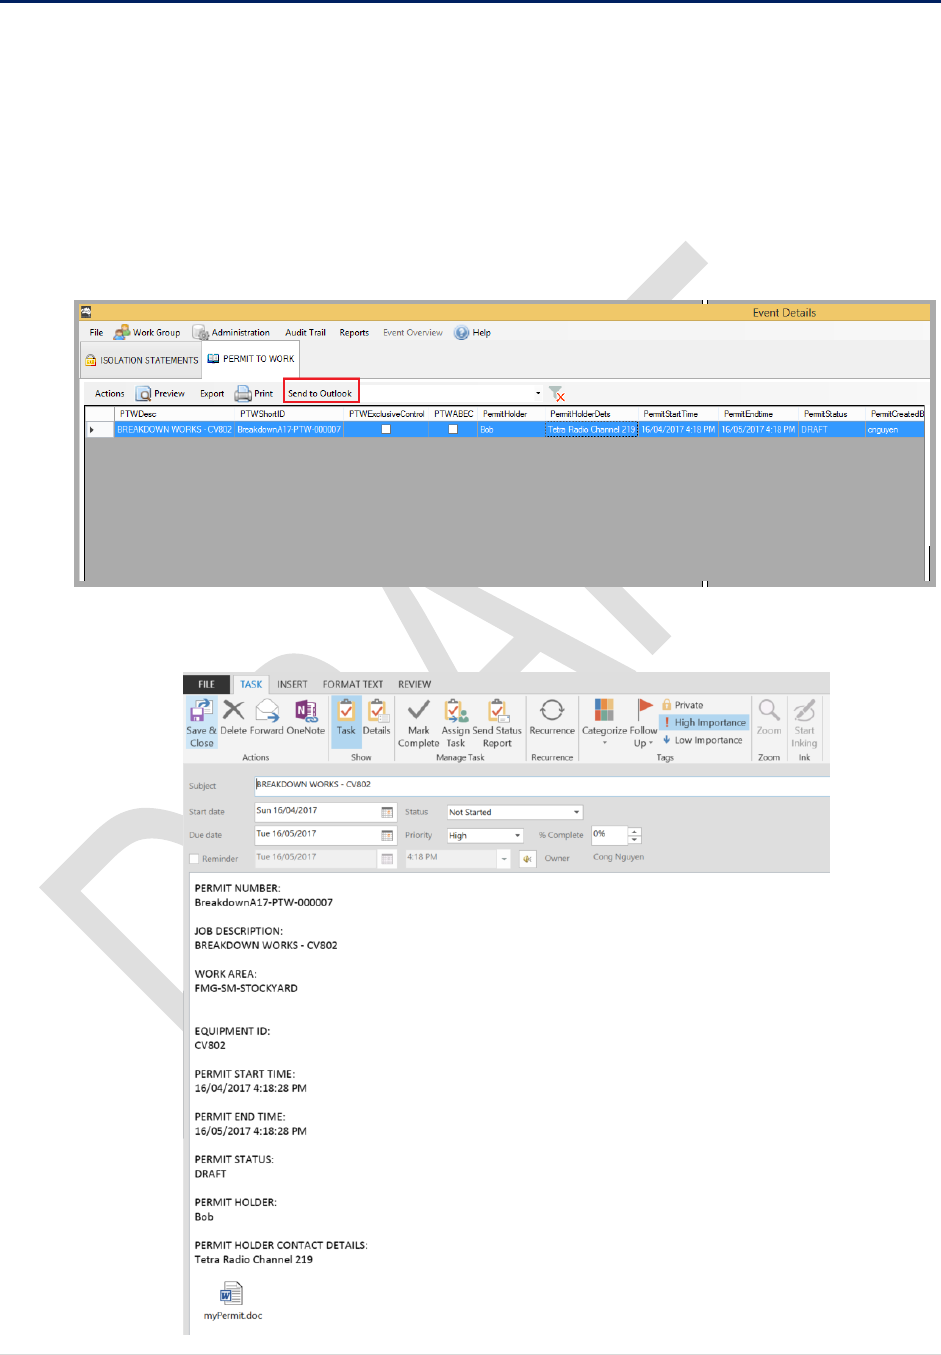
4.4 Send Permit to Outlook
When isolation statement and Work Permits are generated, Permit Coordinator can choose to
issue a copy of the permit to Central Control Room Operator to notify the upcoming isolations.
This will ensure the plant shutdown is in a controlled and timely manner. CCR can then set up
to quickly bring the plant back online once requested work is complete:
1. From Event Details Page, select a permit on the list then
PERMIT TO WORK > SEND TO OUTLOOK
2. A new Task will be generated on your Outlook, along with the isolation details:
16 | P a g e
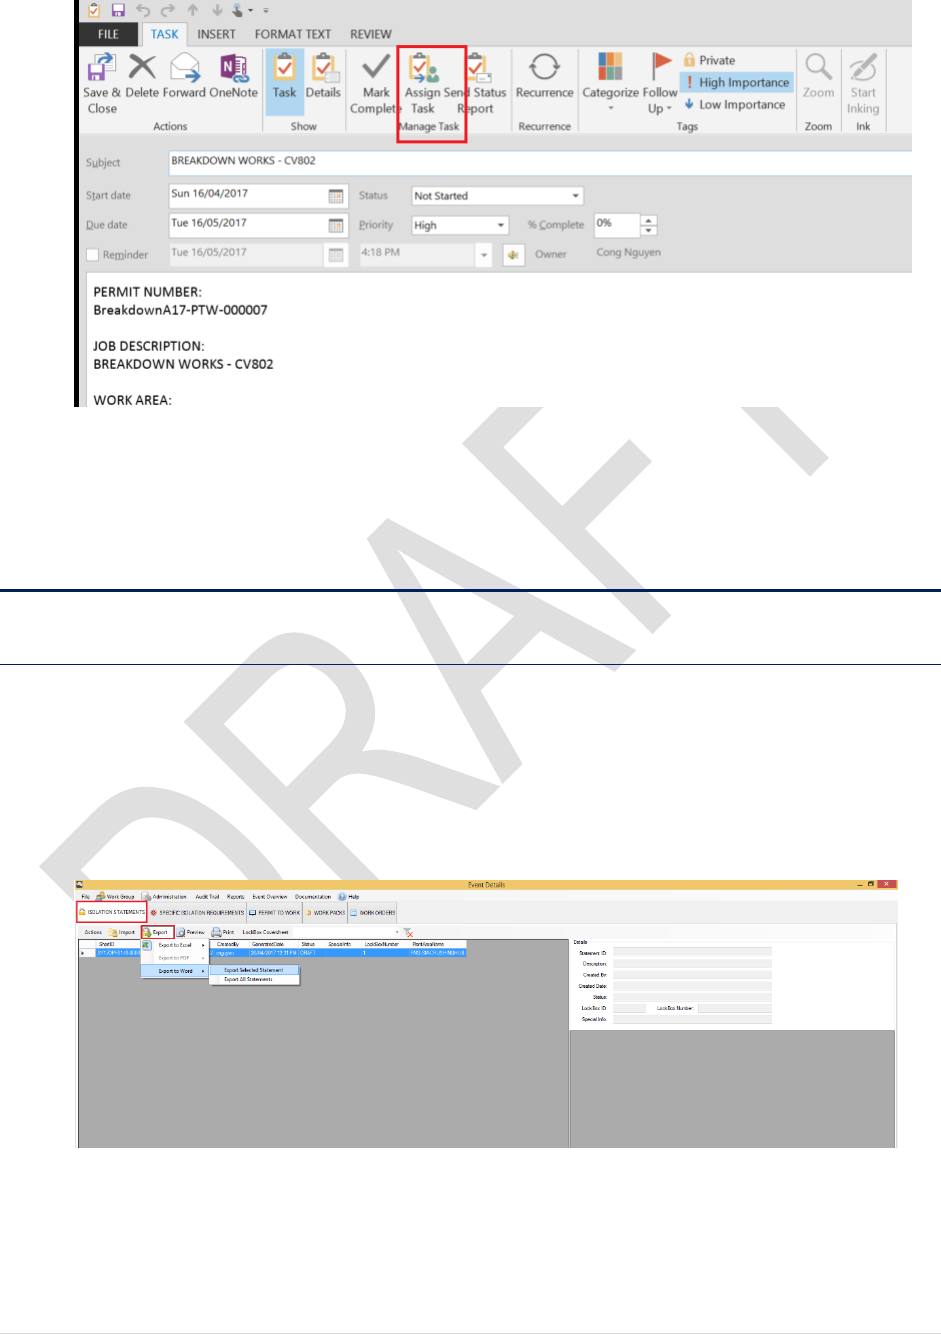
3. On the ribbon, Select Assign Task
4. Type in the recipient’s email address and click SEND
End of Procedure
4.5 Printing
4.5.1 Print Isolation Statement
The best way to print an Isolation Statement is to export it to Microsoft Word Document format
then print:
1. On the Event Details Page. Select ISOLATION STATEMENT tab.
2. Click on EXPORT > Export to Word > Export Selected Statement
3. Choose the destination folder then click on Save to proceed
17 | P a g e
4. Click Yes to view the file.
End of Procedure
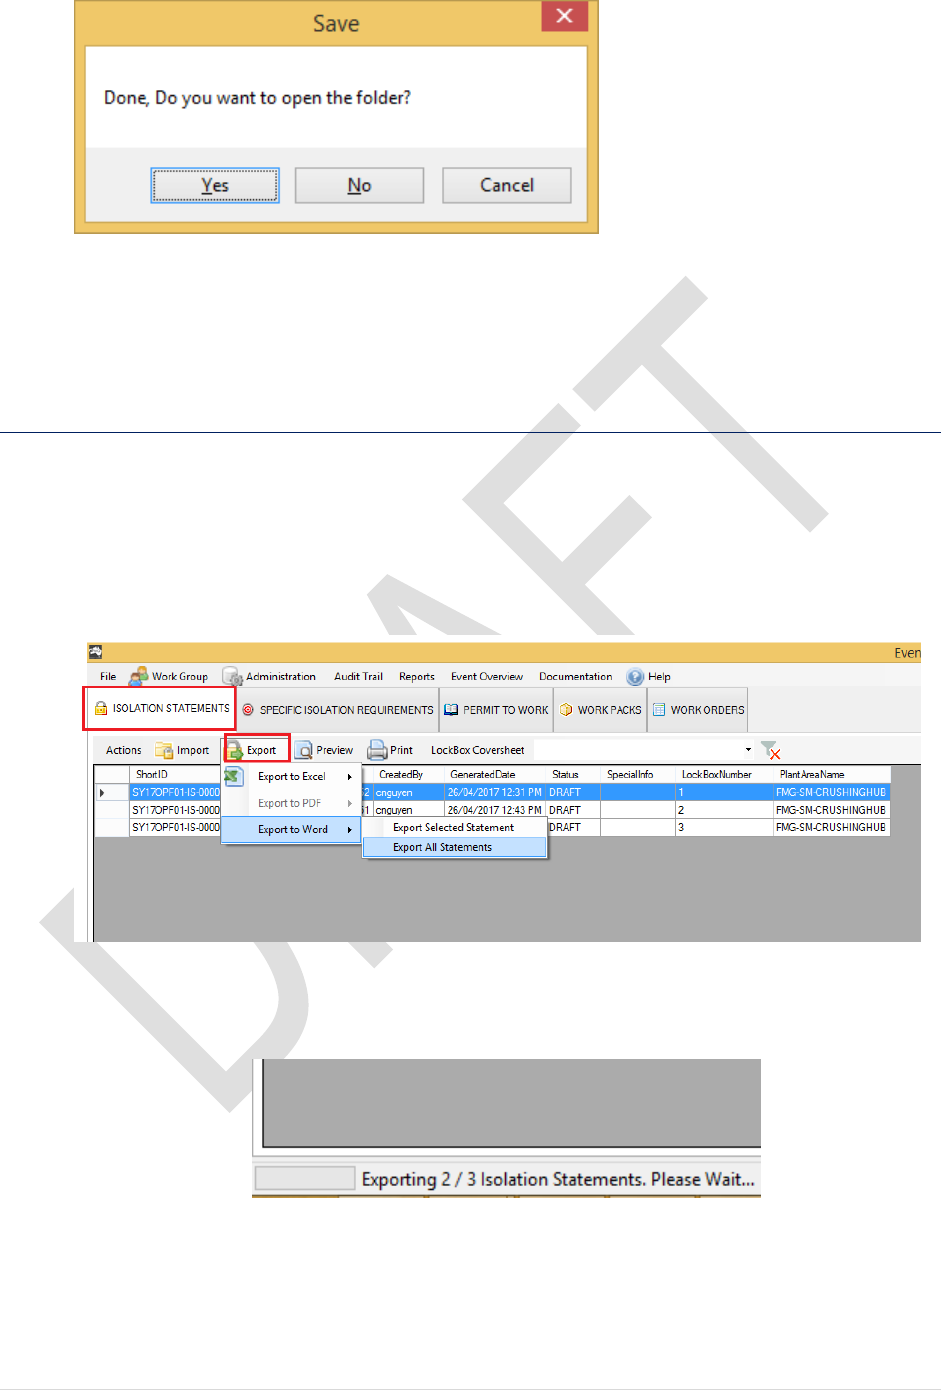
4.5.2 Print Multiple Statements
To print multiple isolation statements
1. Select ISOLATION STATEMENT tab
2. Click on Export > Export to Word > Export All Statements
3. Navigate to the folder then click on Save. Note: this progress will take sometime to
generate all statement. The status is displayed on the left bottom corner of the screen:
4. Once export is completed. Click Yes to view your files or No to close.
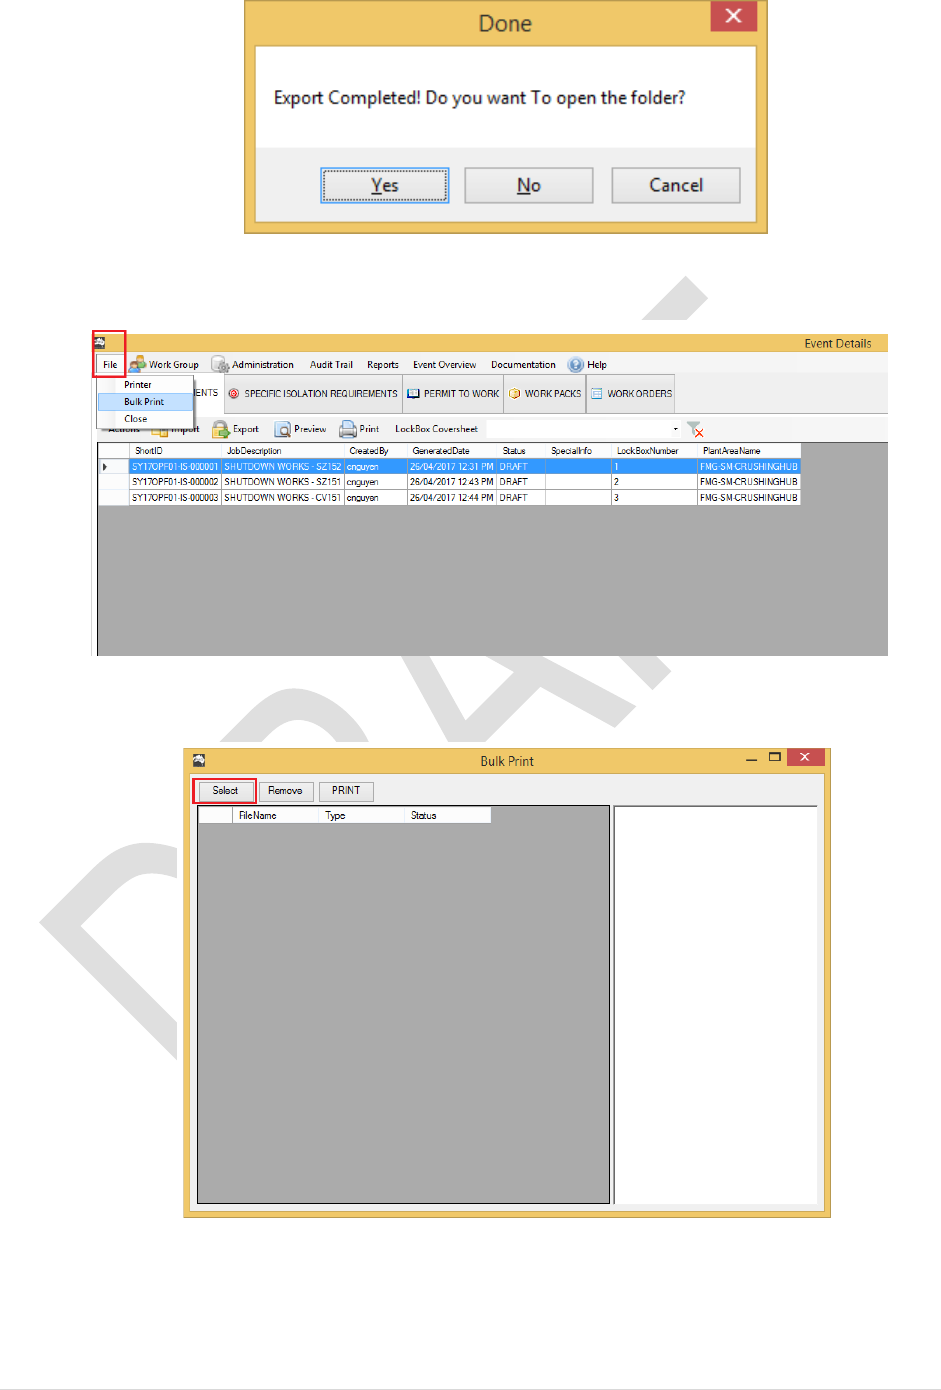
18 | P a g e
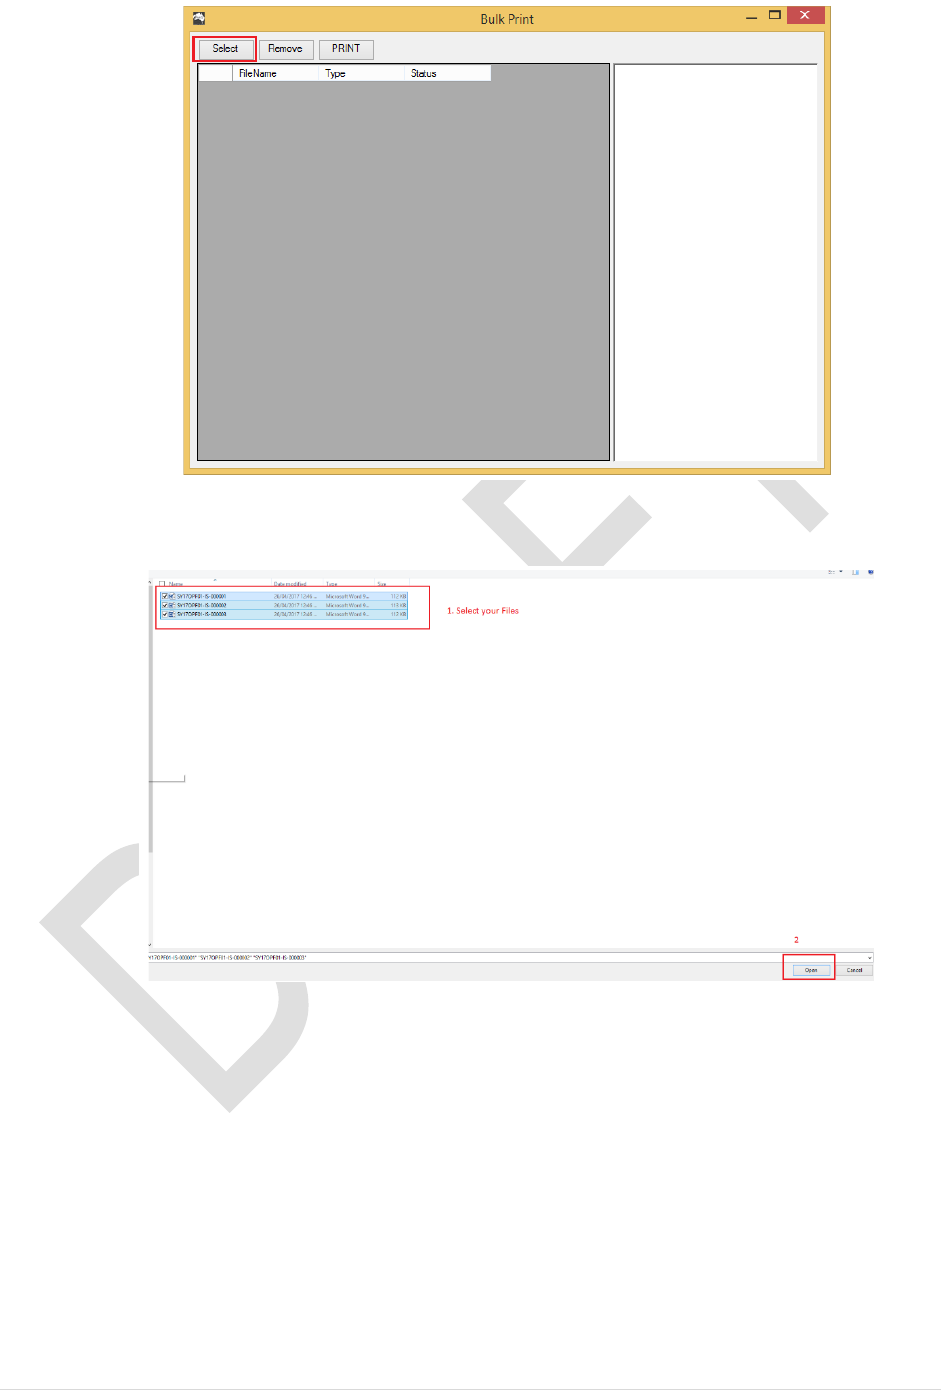
5. To Print Multiple statement. Select File > Bulk Print
6. A new dialog will popup. Click on Select
7. Select the files you wish to print. Then click on Open to proceed
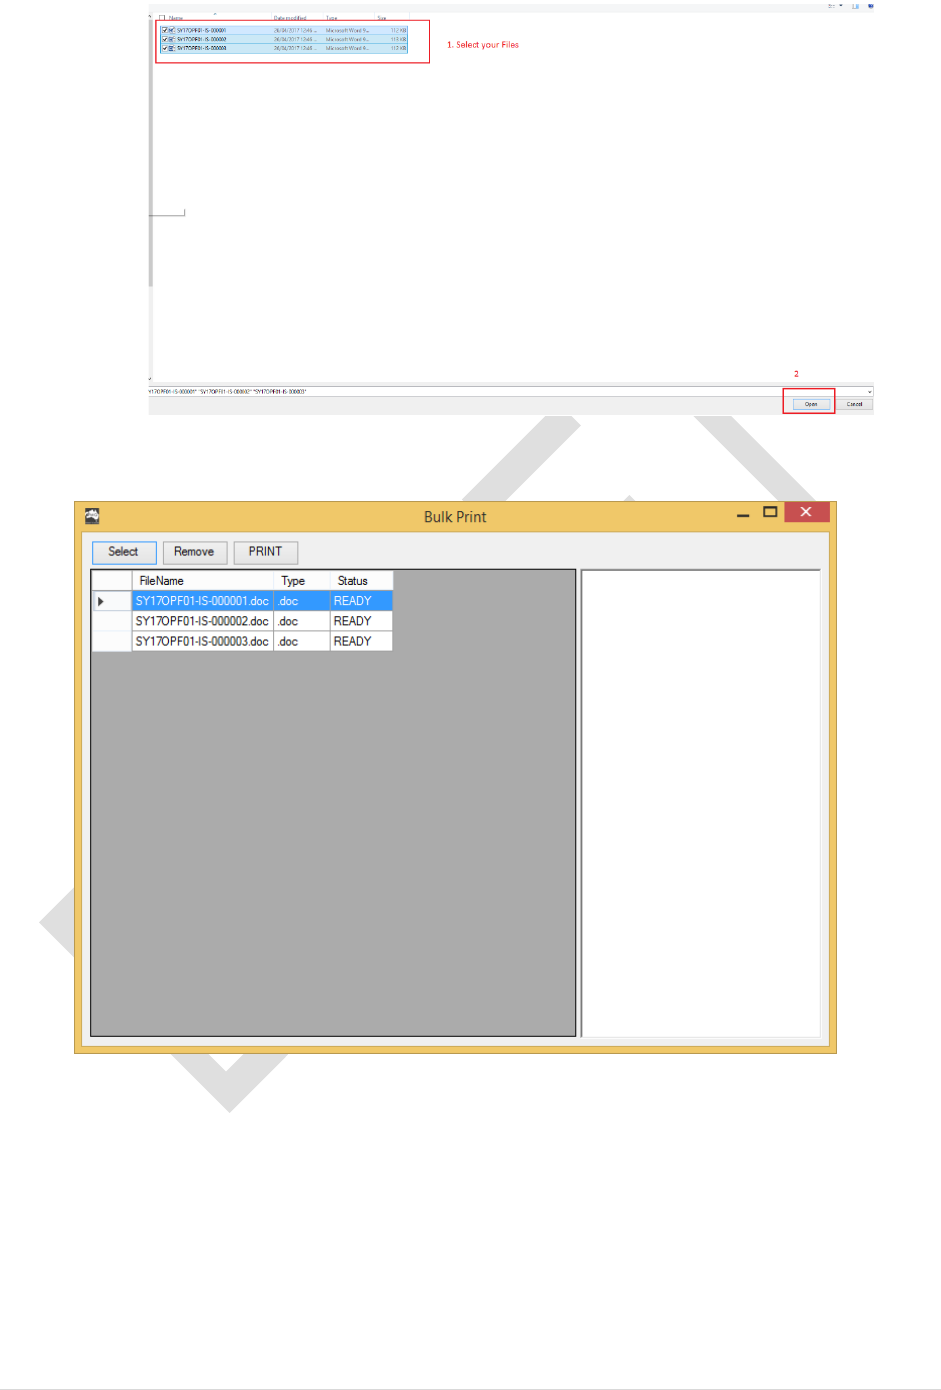
19 | P a g e
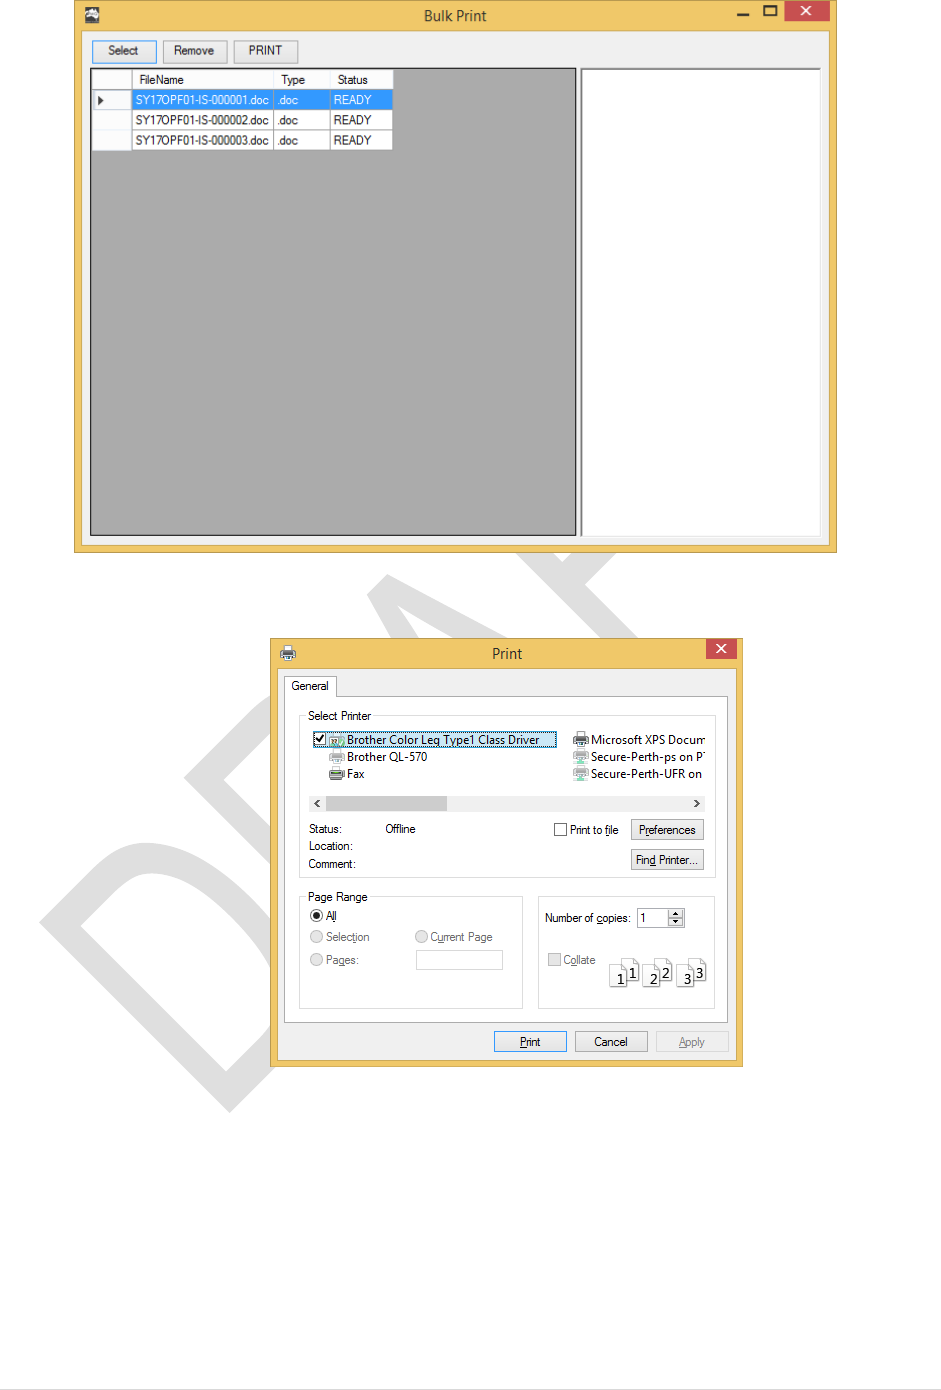
8. Your selected files are now added to the list. Click Print to proceed
9. Select a printer then Print

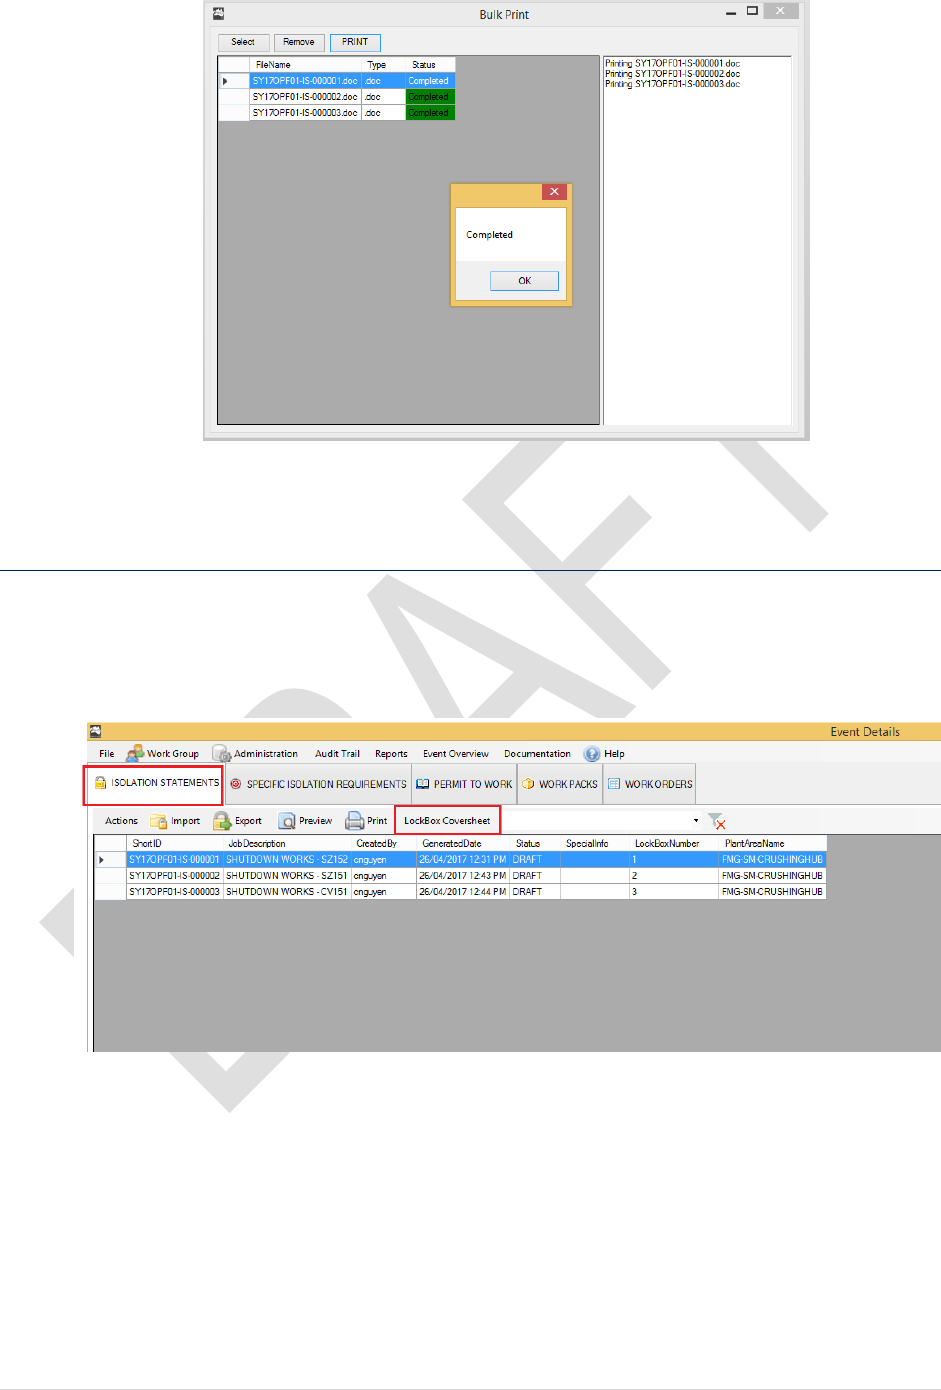
20 | P a g e
End of Procedure
4.5.3 Print Permit To Work
1. From the Event Details page. Click on PERMIT TO WORK tab > Export > Selected
PTW

21 | P a g e
2. Repeat the previous steps to export and print documents.
End of Procedure
22 | P a g e
5. SHUTDOWN EVENT
5.1 Create Shutdown Event
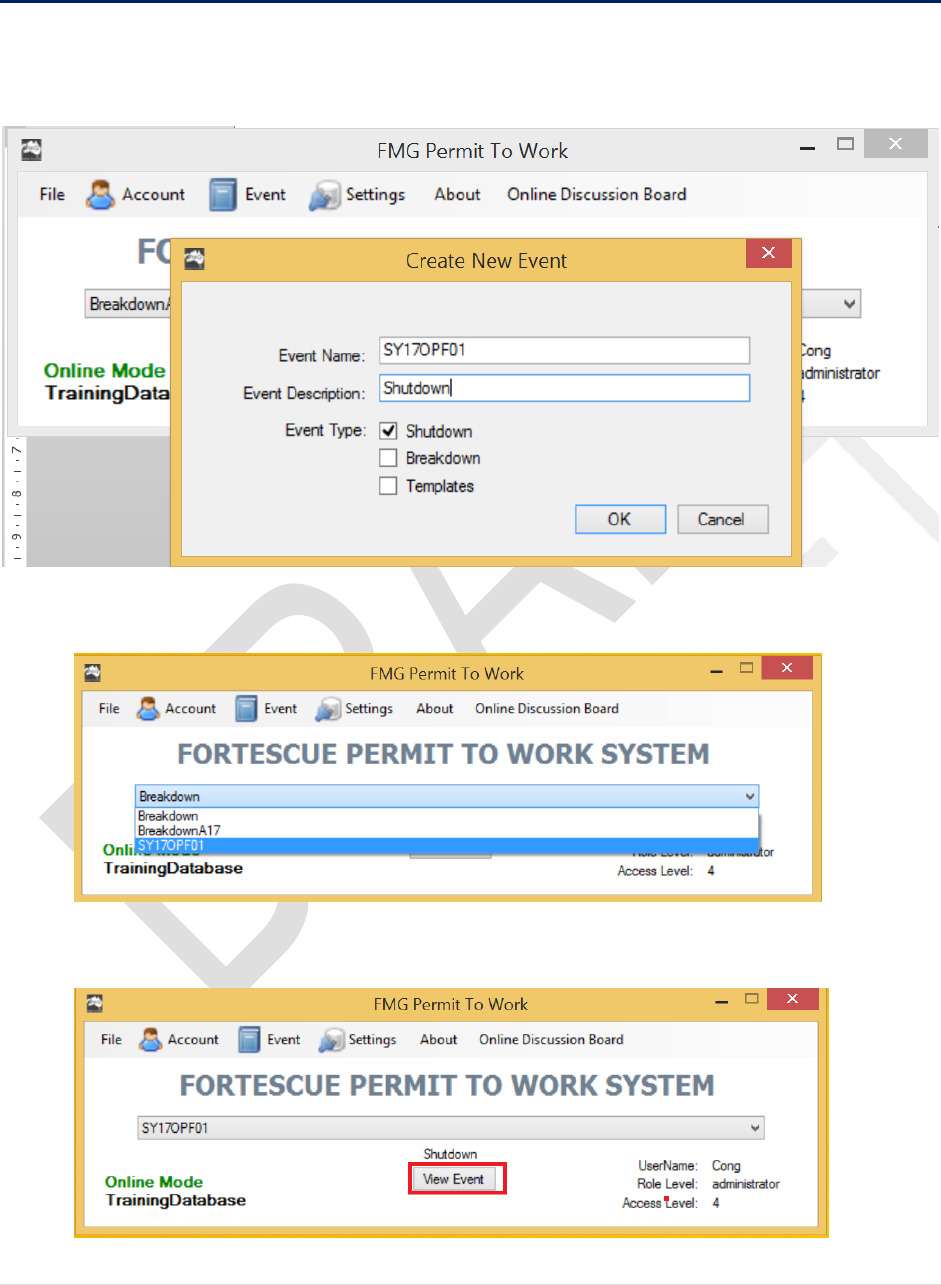
1. From the Main Login Page. Click Event > New Event. Enter the name of the event,
Event description and Select Shutdown
2. From the Main Page select this event from the drop down list
3. Click View Event to continue
23 | P a g e
End of Procedure
5.2 WORK ORDERS
5.2.1 Create New Work Order
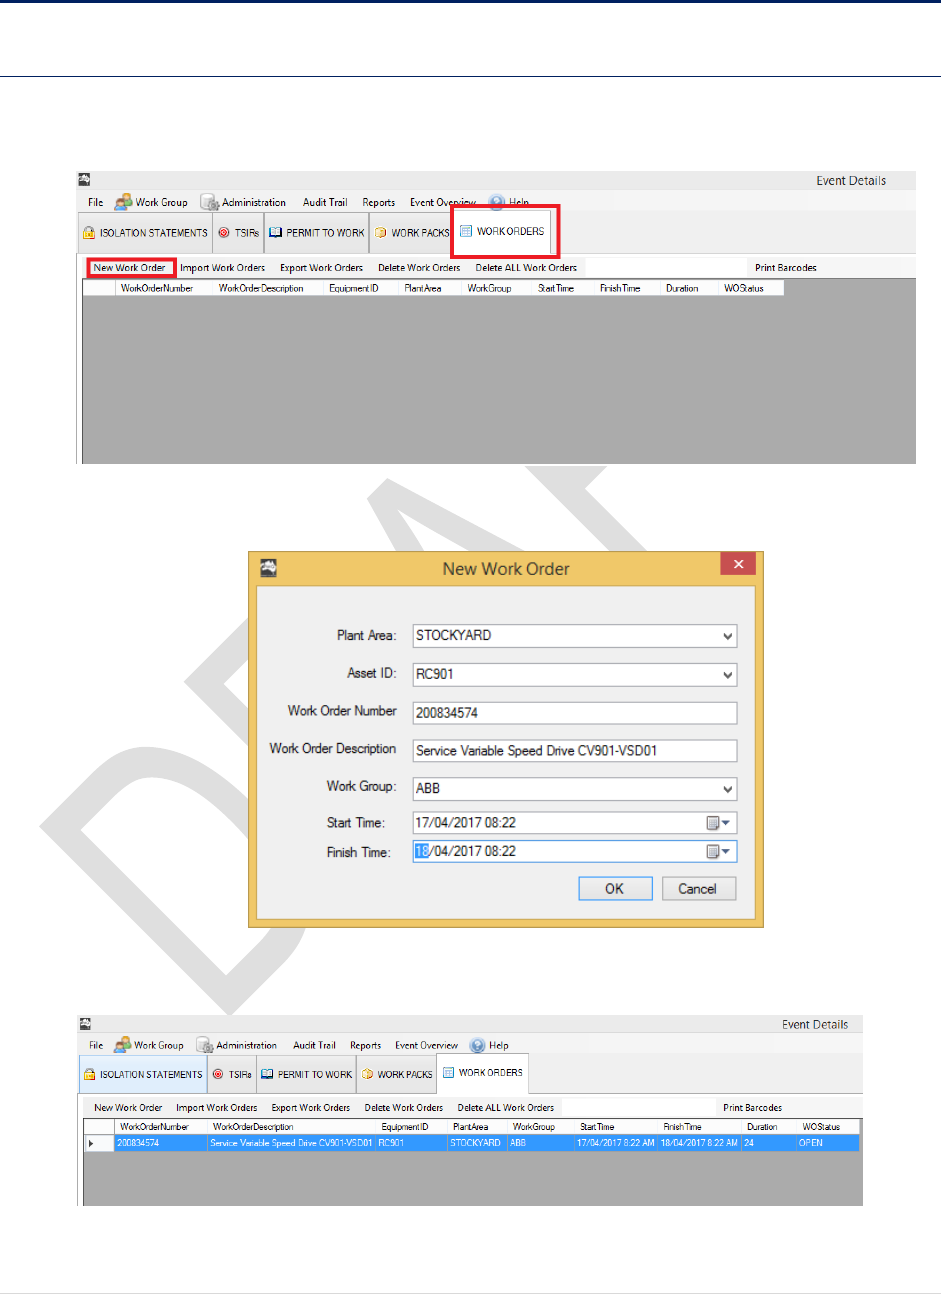
1. From the Event Details Page. Click on the WORK ORDERS tab > New Work Order
2. Enter the Work Order Details. Click OK to proceed
3. Work Orders is now appear on the Work Order list:
End of Procedure
24 | P a g e
5.2.2 Import Work Orders from Excel Spreadsheet
Work Orders can be imported into the database in several ways:
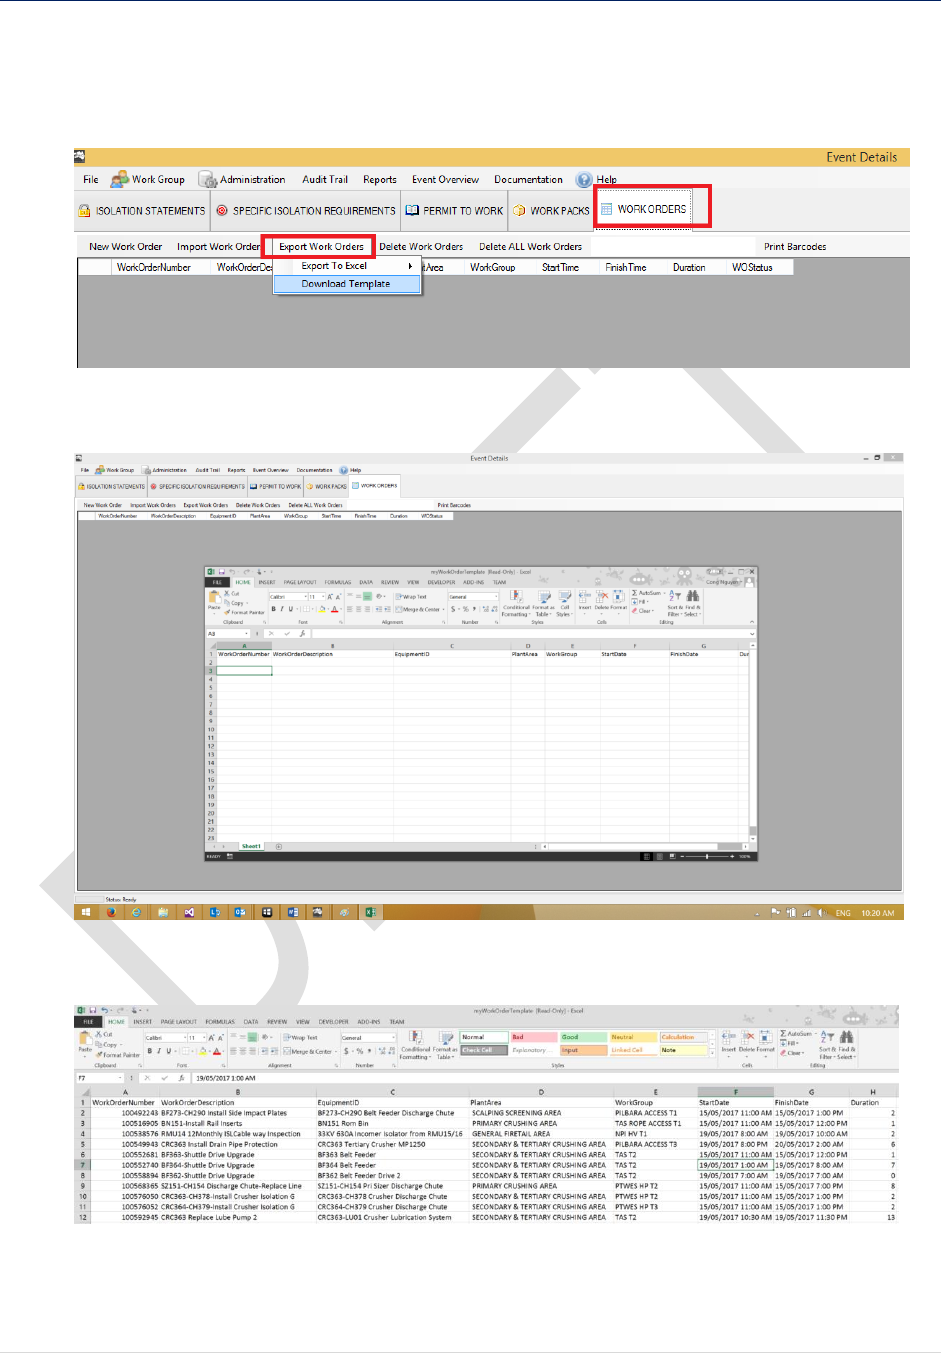
1. Select WORK ORDERS > Export Work Orders > Download Template
2. A new Excel file will pop up.
3. Fill in the data as per the template.
4. Save the Excel spreadsheet to your computer. We will import this spreadsheet in the
next steps:
25 | P a g e
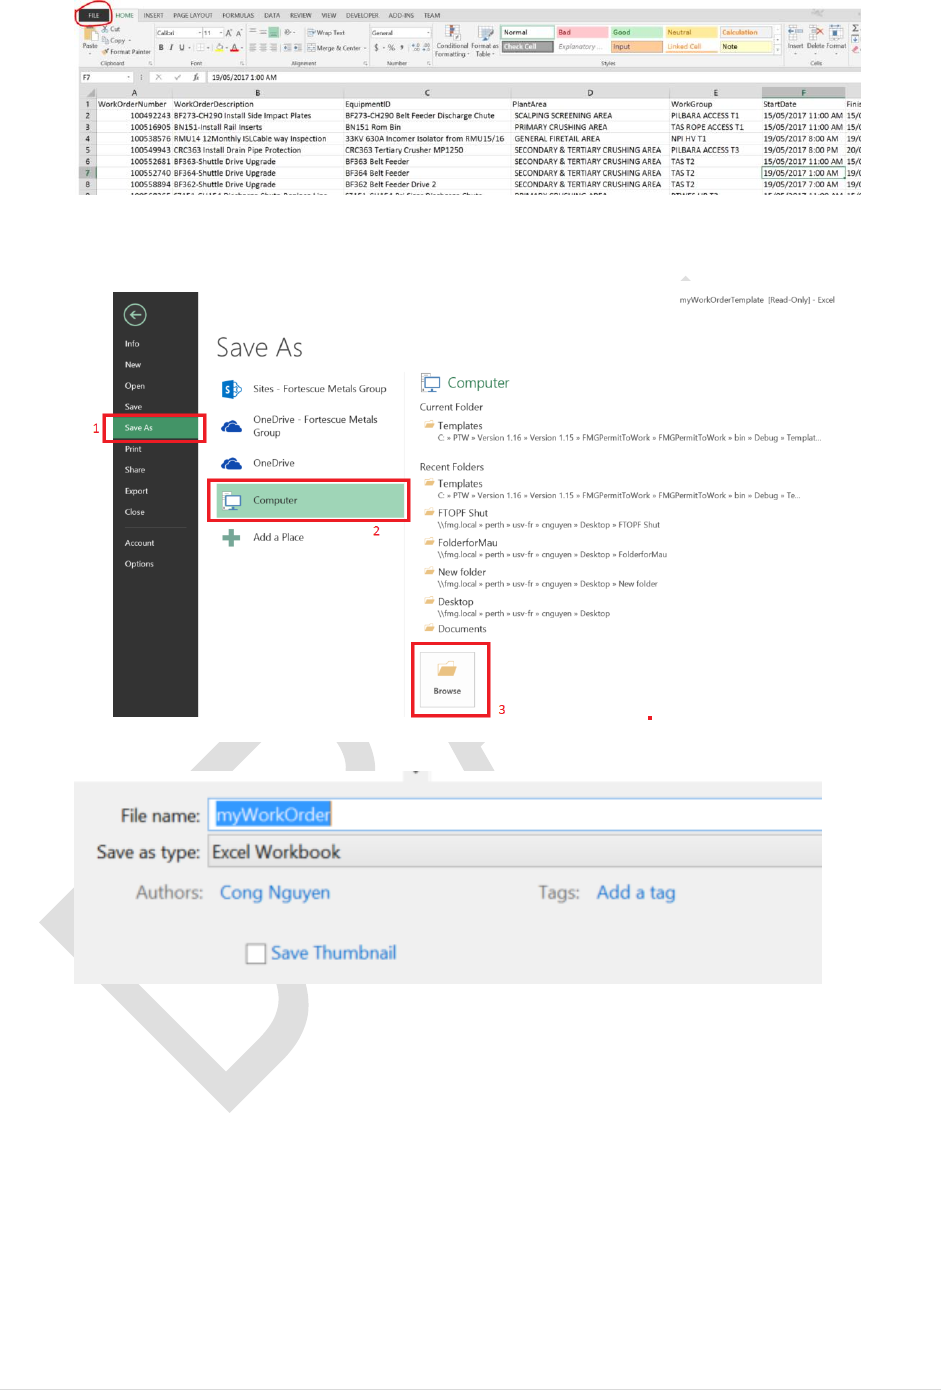
File > Save As > Computer > Browse
In this example, I will save this Excel Spreadsheet as “myWorkOrder” on my Desktop
5. Back to the FMGPermitToWork.
Select WORK ORDERS > IMPORT WORK ORDERS > Import From Excel File
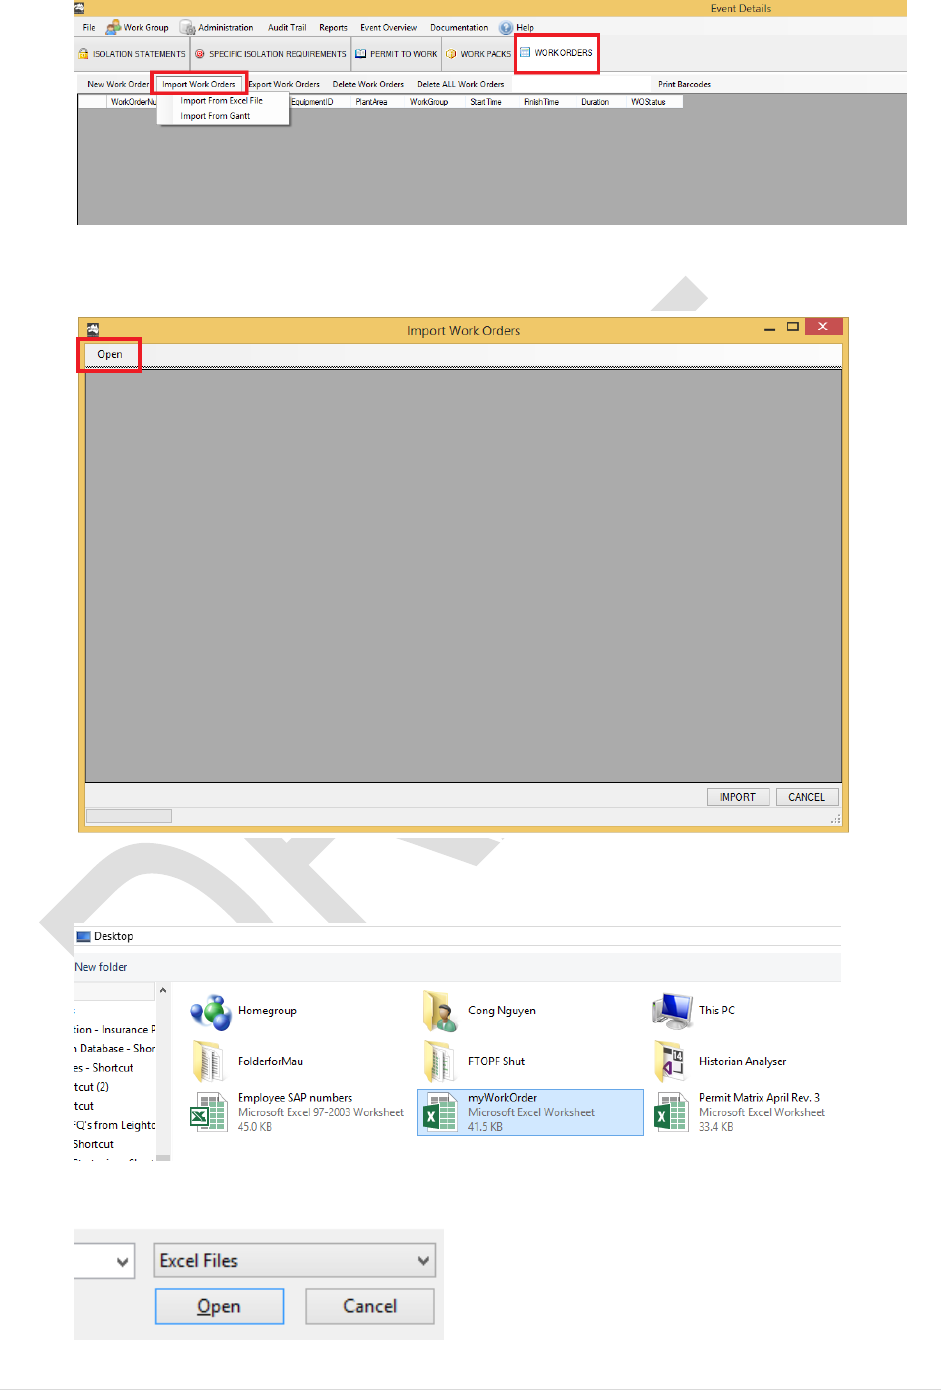
26 | P a g e
6. A new window will pop up. Click on Open
Select the Excel Spreadsheet that you saved in the previous step:
27 | P a g e
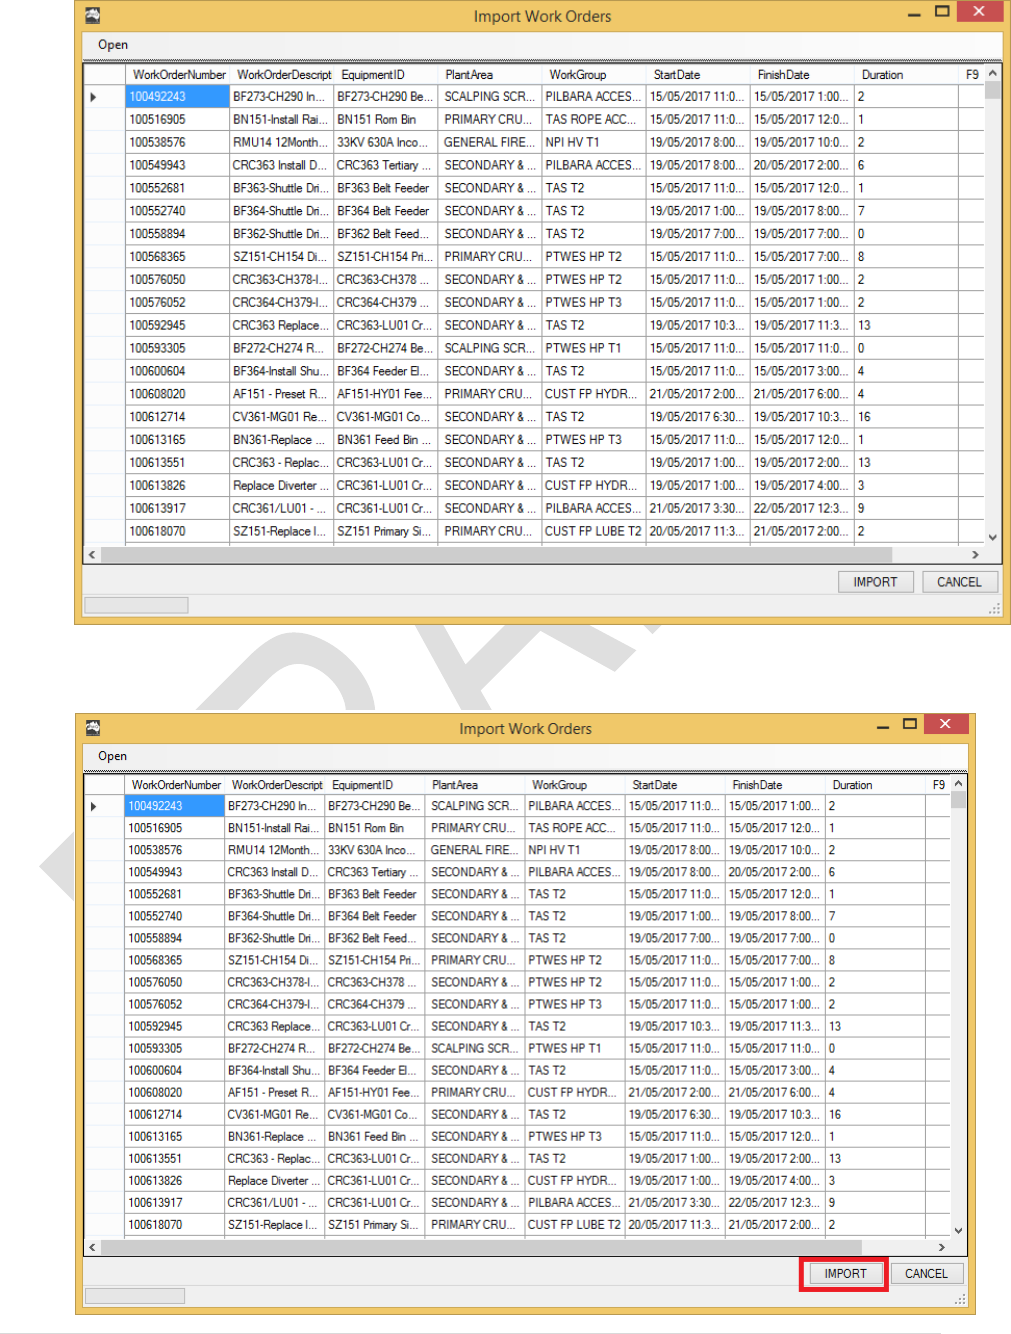
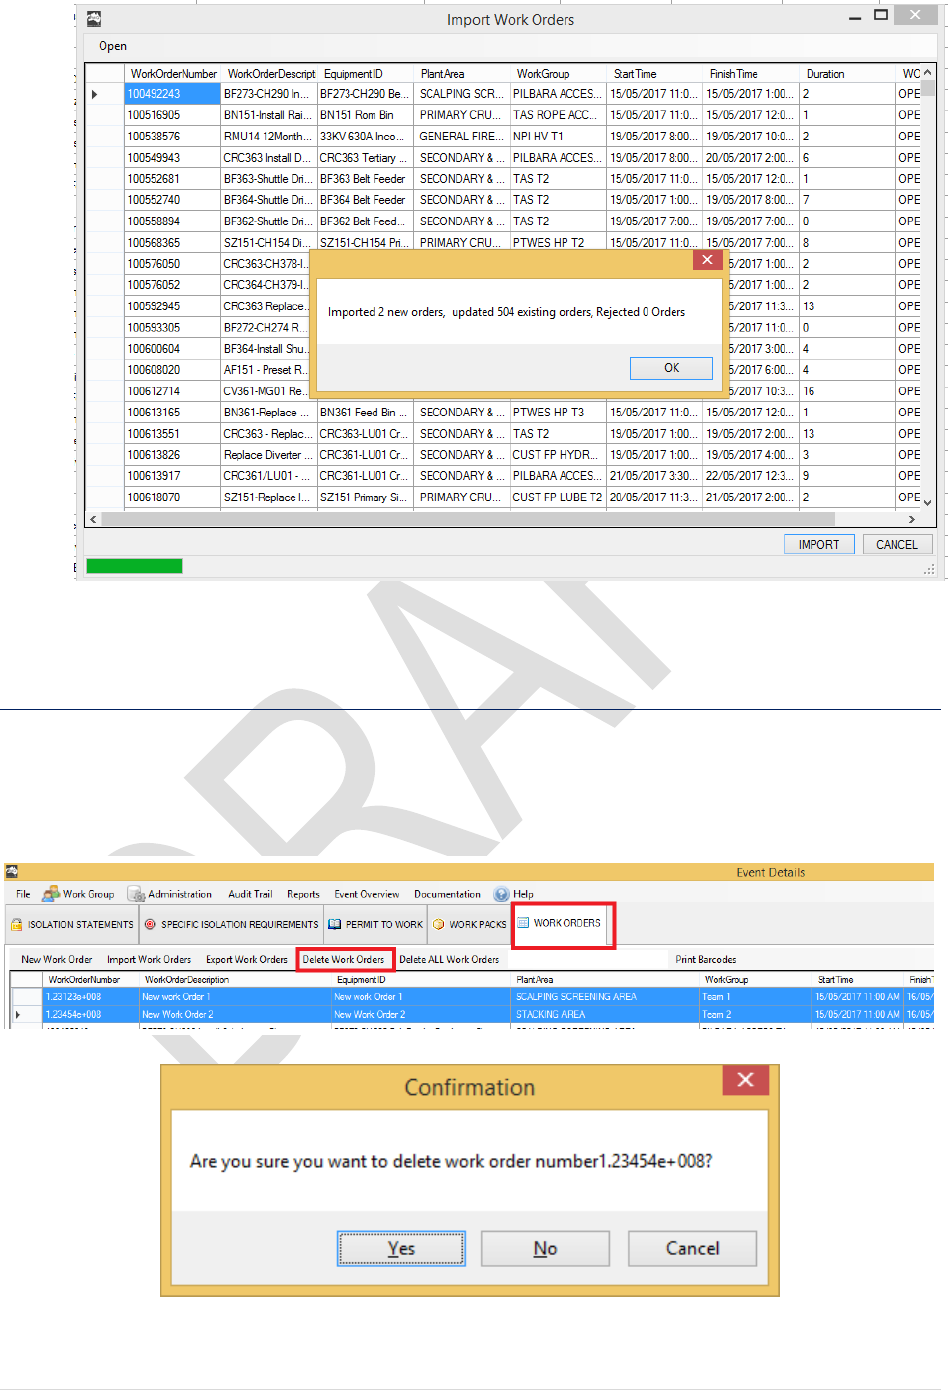
7. Now your pop up window will display the preview data:
8. Click IMPORT
28 | P a g e
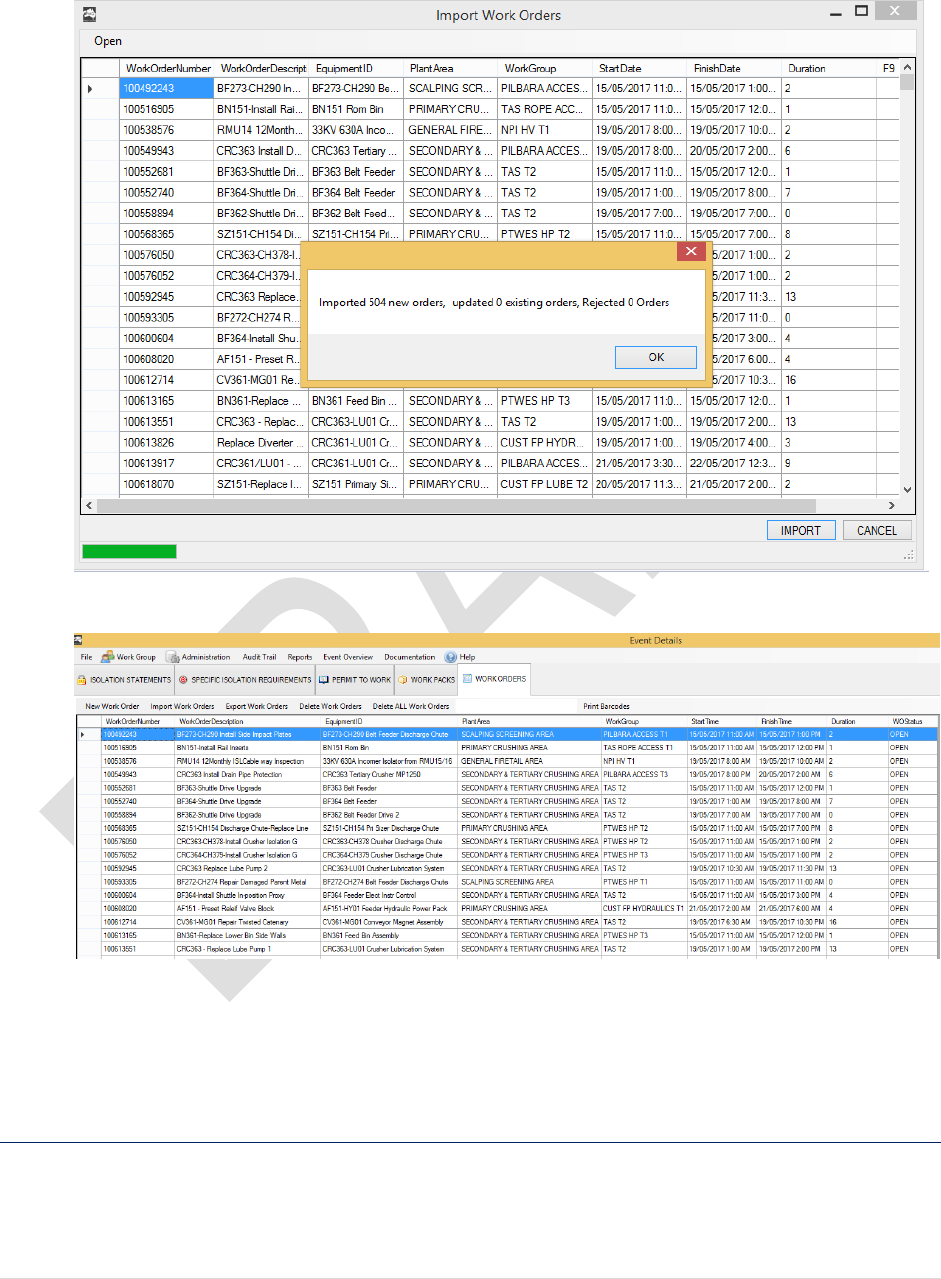
9. The software will import the data into the database:
Event details View:
End of Procedure
5.2.3 Update Work Orders
As the shut gantt changes, you may need to update the work order details such as start / end
time, adding new work orders, remove work orders from gantt, etc. To update and adding new
work orders:
29 | P a g e
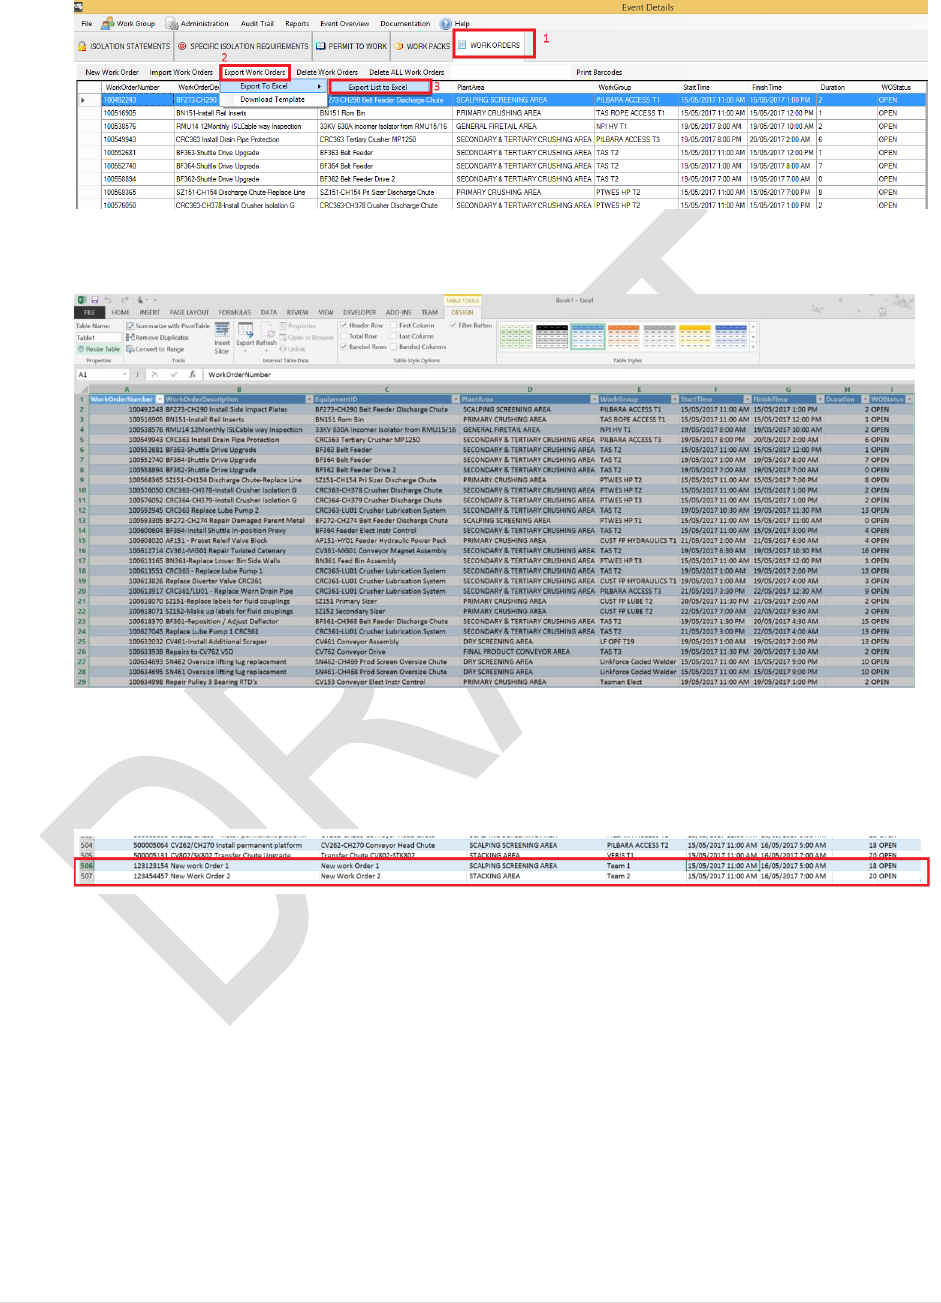
1. From your Event Details Form, select WORK ORDERS > Export Work Orders >
Export List to Excel
The software will copy all the work orders into a new spreadsheet:
2. Update your data in this spreadsheet, or adding new work orders
In this example, I will add 2 new work orders to the list:
Save and close excel to your desktop once all changes have been made
3. Back to the FMGPermitToWork
Select WORK ORDERS > IMPORT WORK ORDERS > IMPORT FROM EXCEL File
Repeat the previous steps to import the work orders:
30 | P a g e
End of Procedure
5.2.4 Delete Work Orders
To delete Work orders from the database, highlight the work orders from the list then
1. WORK ORDERS > Delete Work Orders
2. Click Yes to proceed.
31 | P a g e
End of Procedure
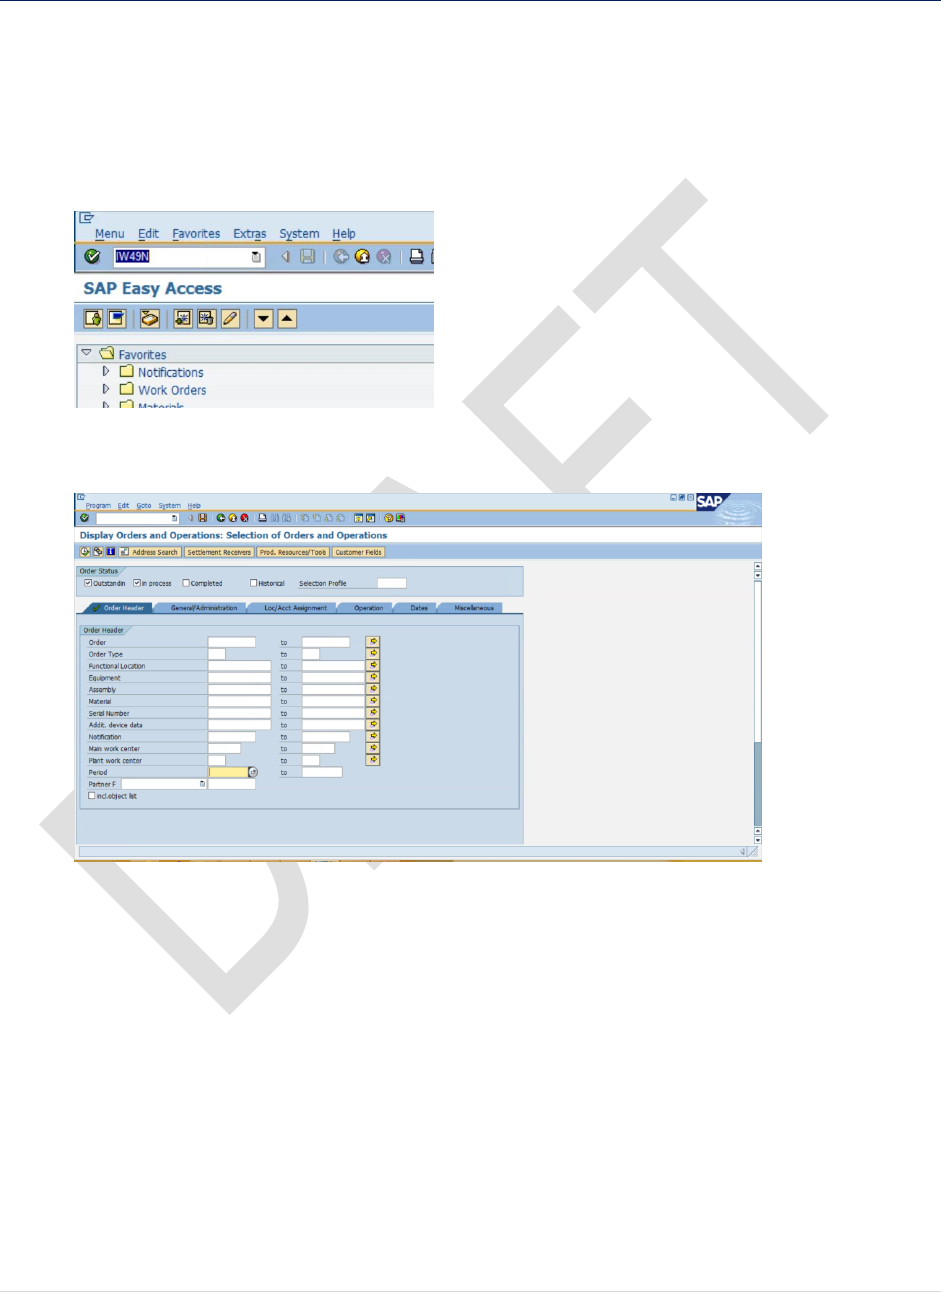
5.2.5 Import Work Orders from SAP & Microsoft Project
This method is recommended for major shutdown where shutdown gantt (Microsoft Project) is
available. The program requires 2 pieces of information: SAP Work Orders details (IW49N or
IW38) and Microsoft Project.
1. Log into your SAP and enter IW49N:
2. On the Order Header tab, clear the Period information:
32 | P a g e
3. Click on General / Administration and Key in your Shutdown Revision. For example:
KV17OP07:
4. Click on to run the query
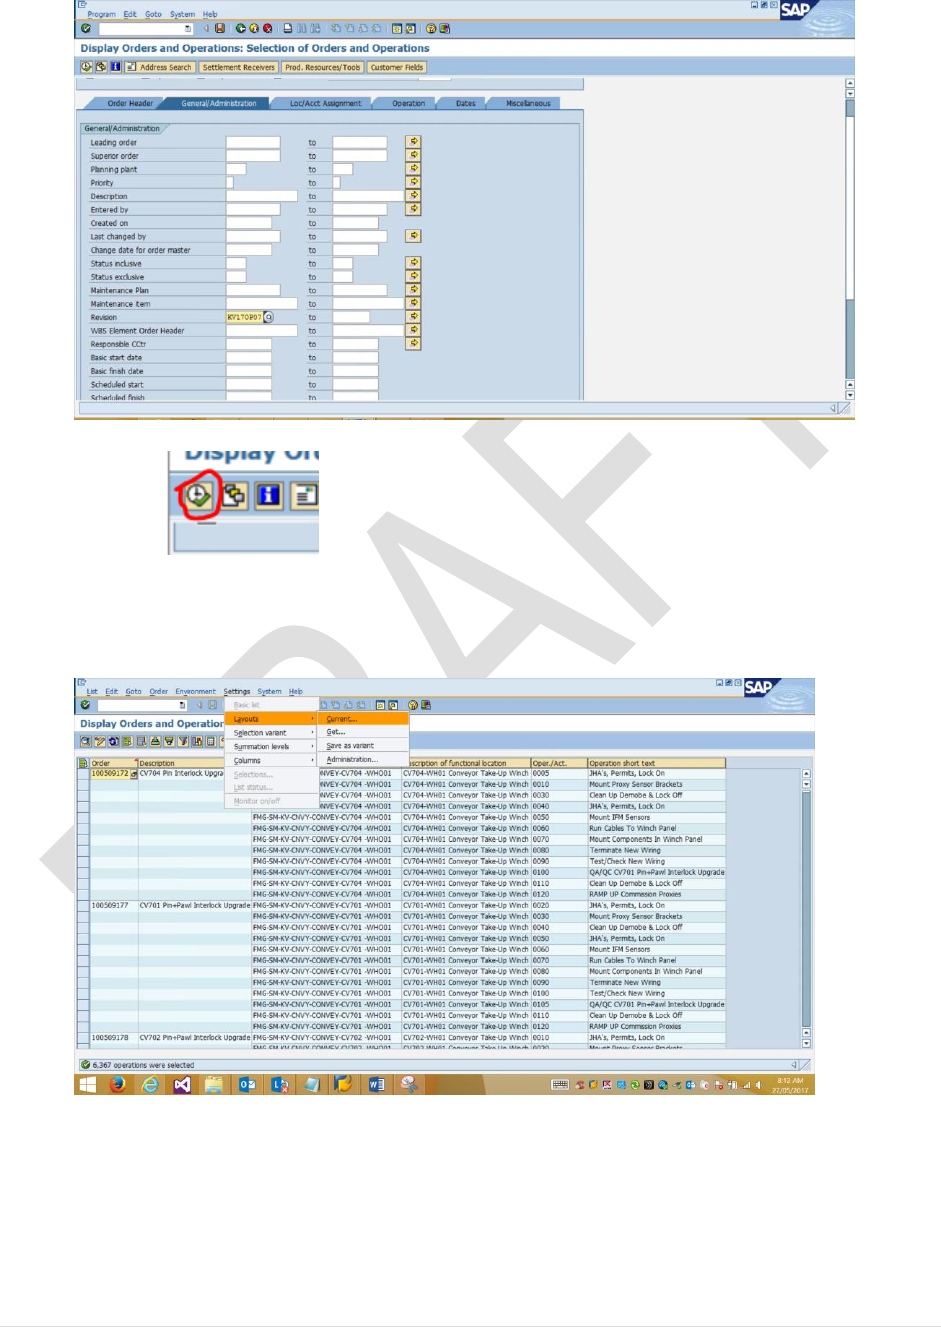
5. Select Settings > Layouts > Current
6. Select the following columns:
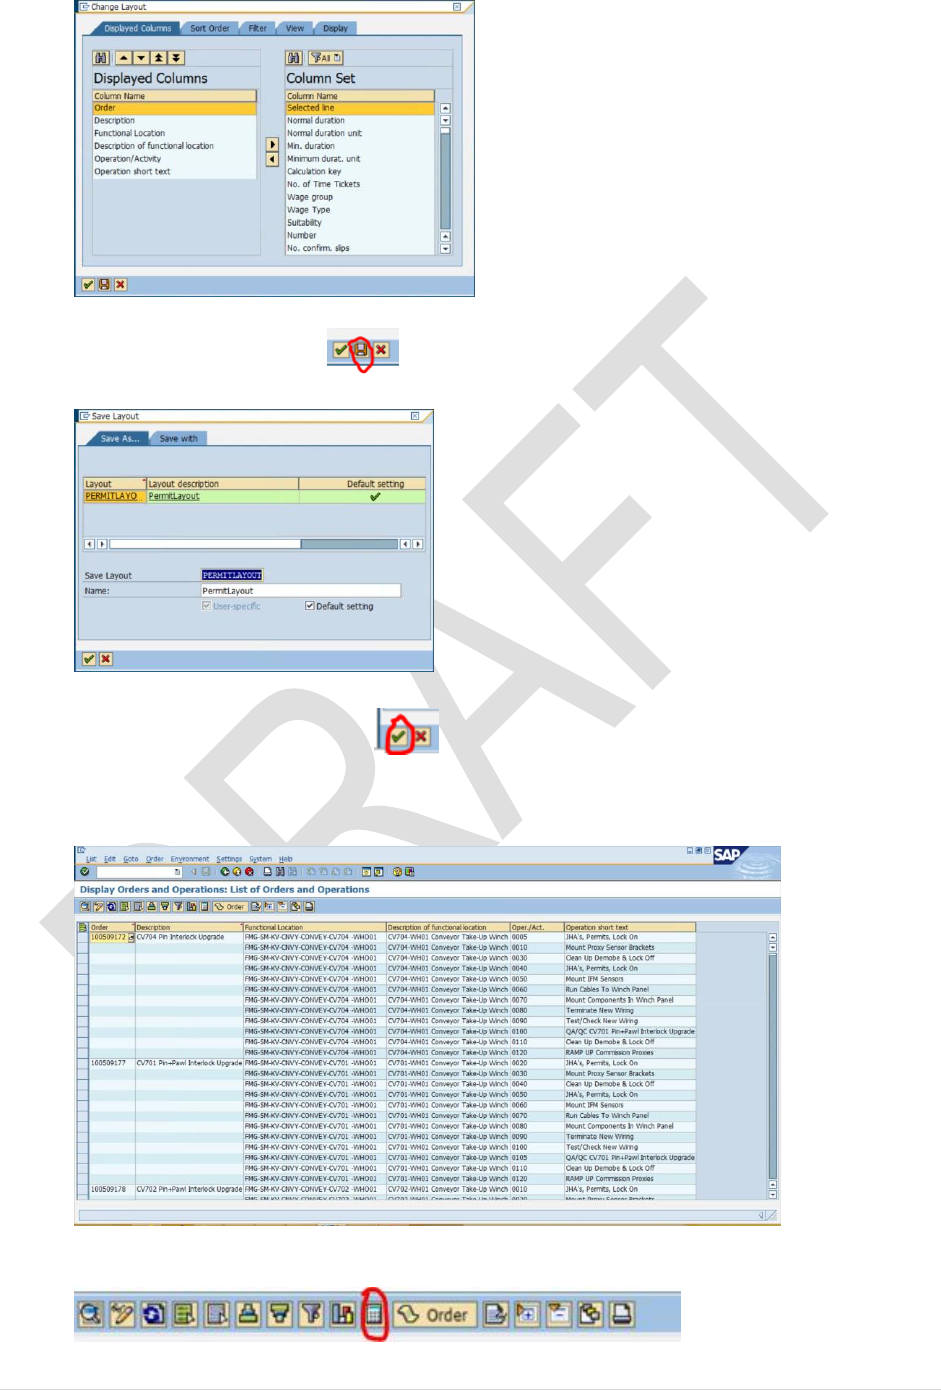
33 | P a g e
7. Click on the Save symbol to save this layout:
]
8. Click on green tick to continue :
9. Your screen will now displays the work order details:
10. Click on the Spreadsheet symbol to save the list

34 | P a g e
11. Follow the prompts
10. Save your excel export to a folder.
11. In this example we will call it DDMMYYYY Week 5 Churn
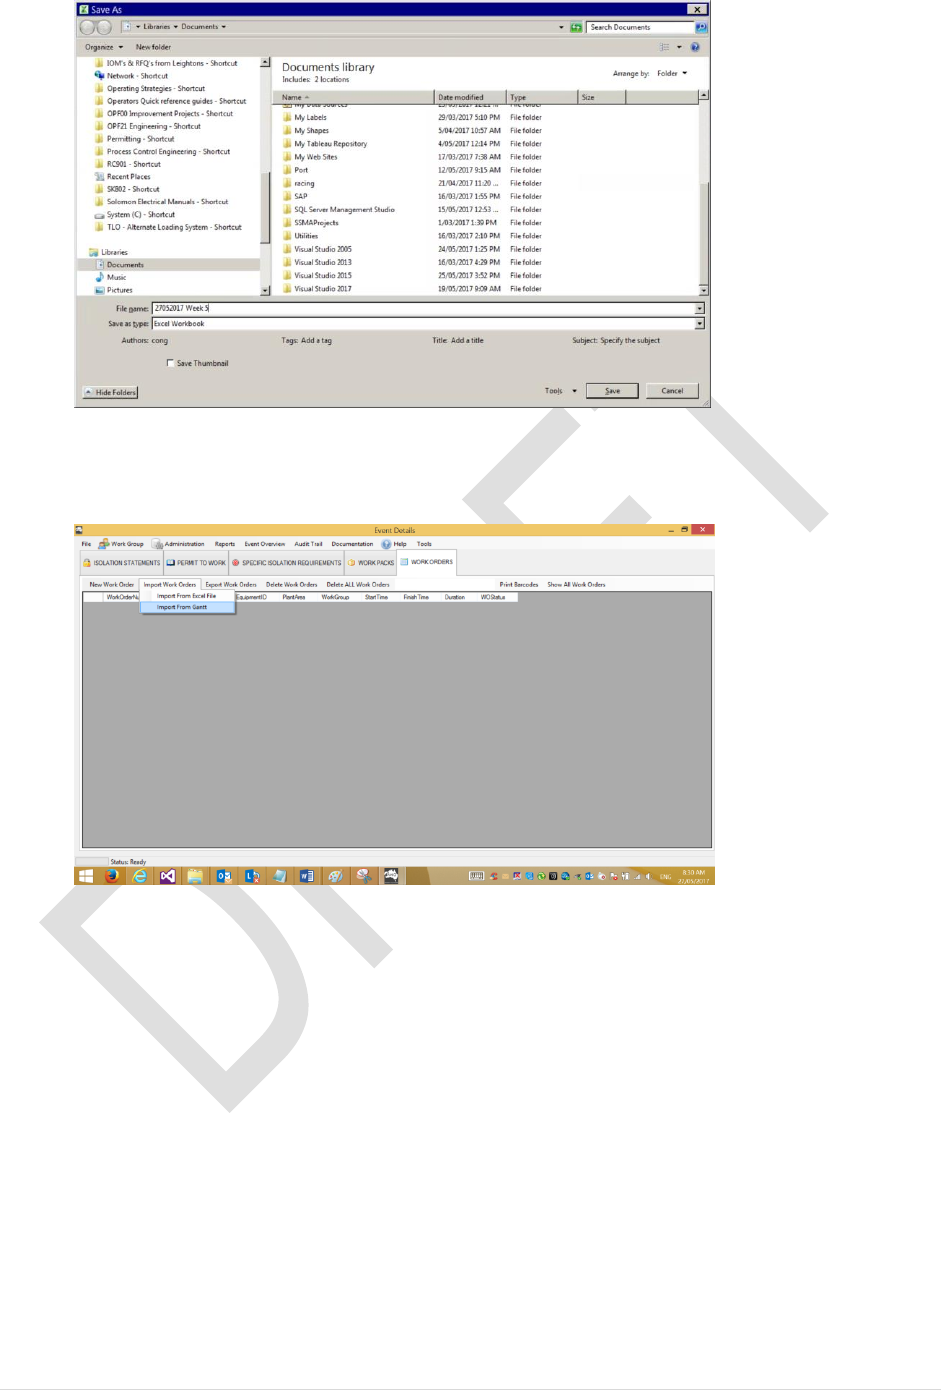
35 | P a g e
12. Now switch to the Permit to Work Database. Select Work Orders > Import Work
Orders > Import from Gantt
13. Click on Select Data Source
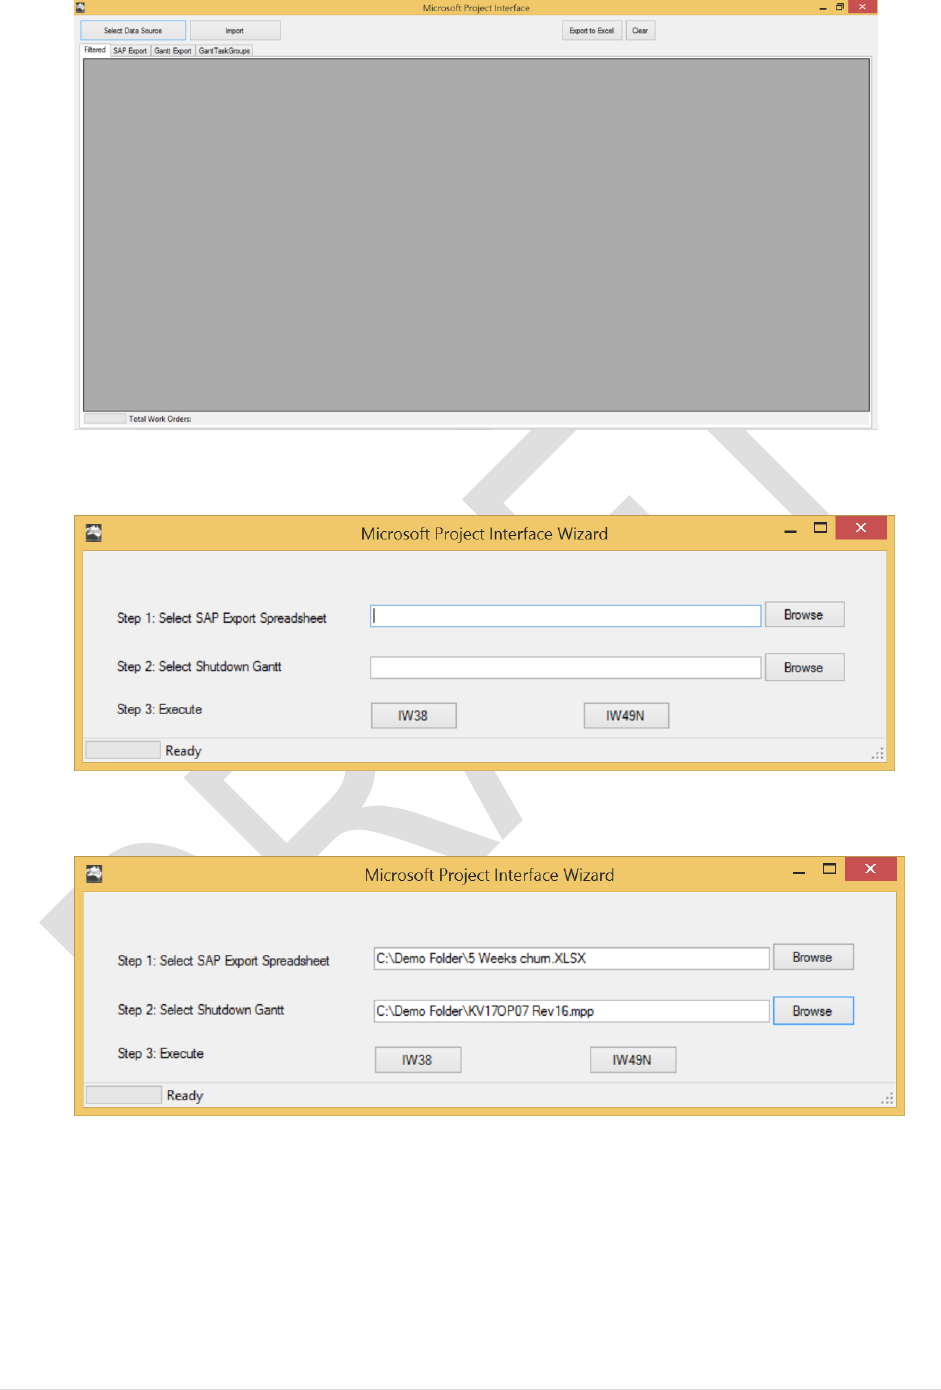
36 | P a g e
14. Step 1: Click Browse and point it at the excel file you just saved:
15. Step 2: Select the Shutdown Gantt. Click Browse and select the latest shutdown Gantt
16. IMPORTANT: Ensure your excel file is closed
17. Click on IW49N to run the script, this will take a few minutes to process.
37 | P a g e
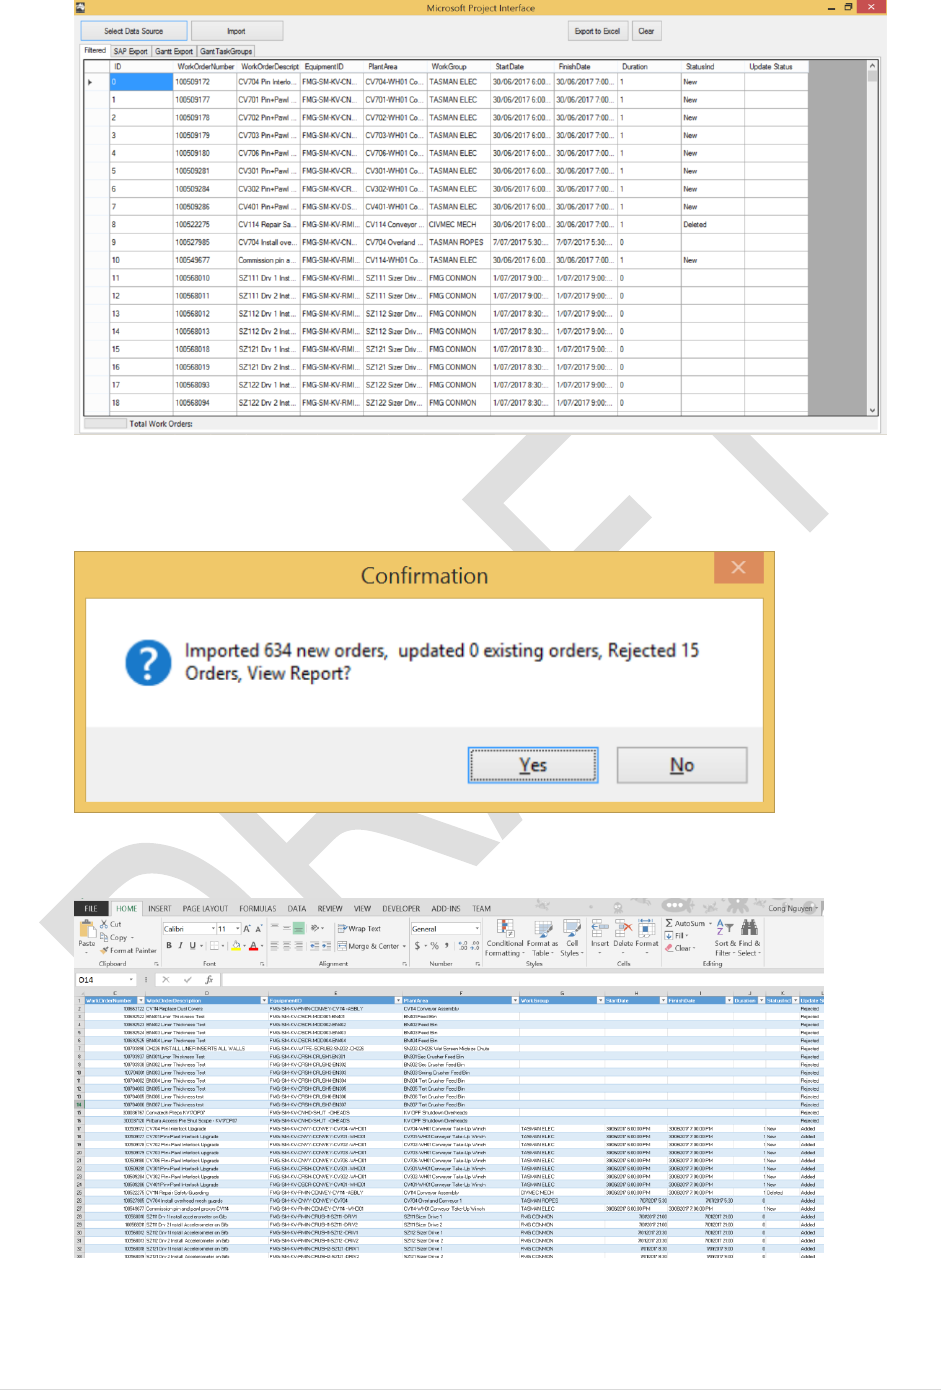
18. Click on IMPORT to import the preview to the database. Please note the system will
reject any work orders that doesn’t have a Work Group assigned to them.
19. Click on View Report to view the list
END OF PROCEDURE
38 | P a g e
5.3 WORK PACKS
5.3.1 Create New Work Pack
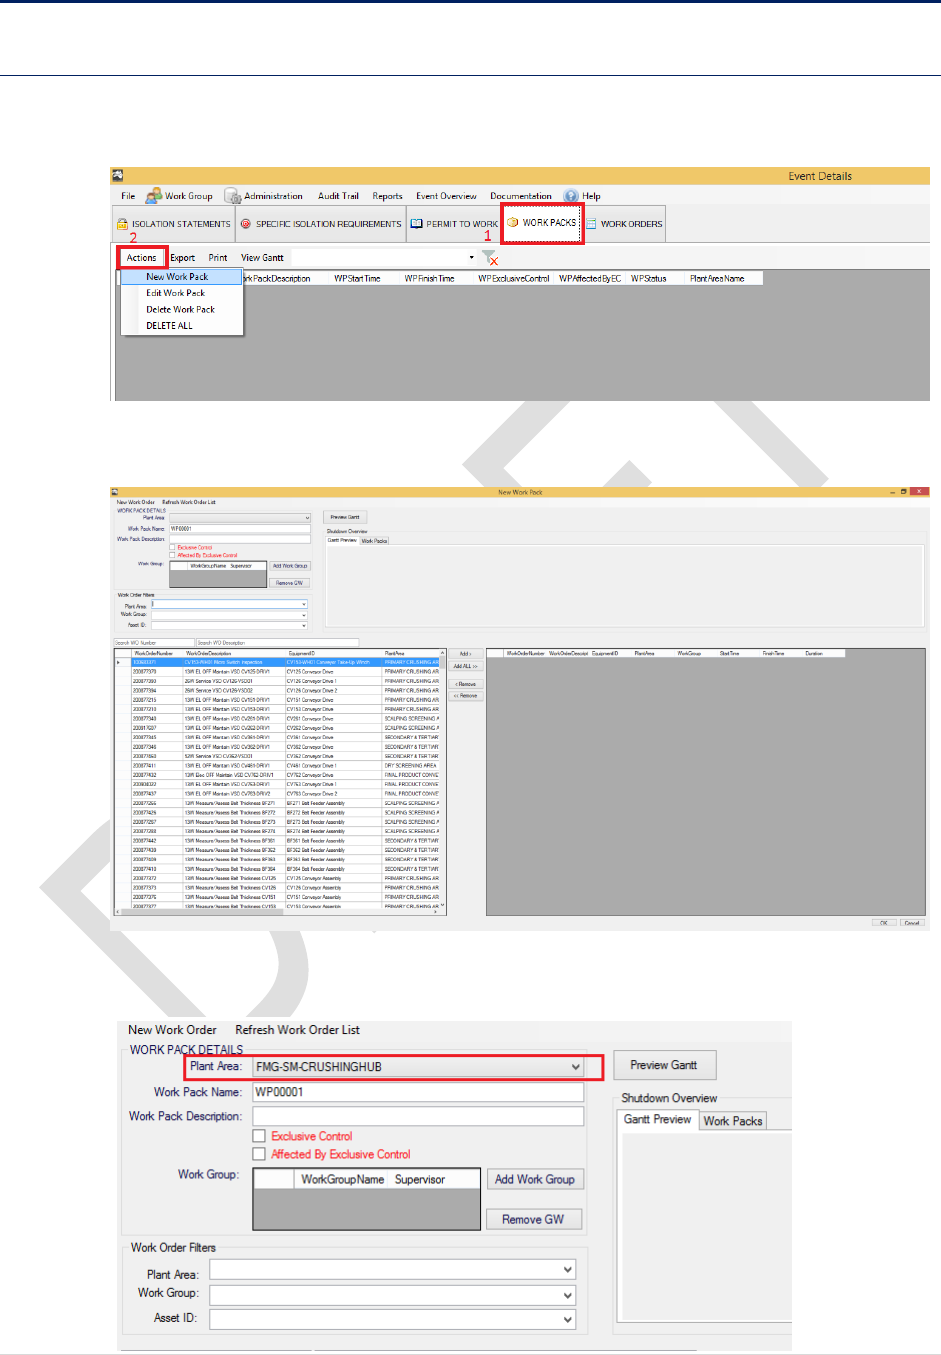
1. From the Event Details Form, Select WORK PACKS > Actions > New Work Pack
2. New Work Pack form will pop up:
3. Select the Plant Area from the drop list:
39 | P a g e
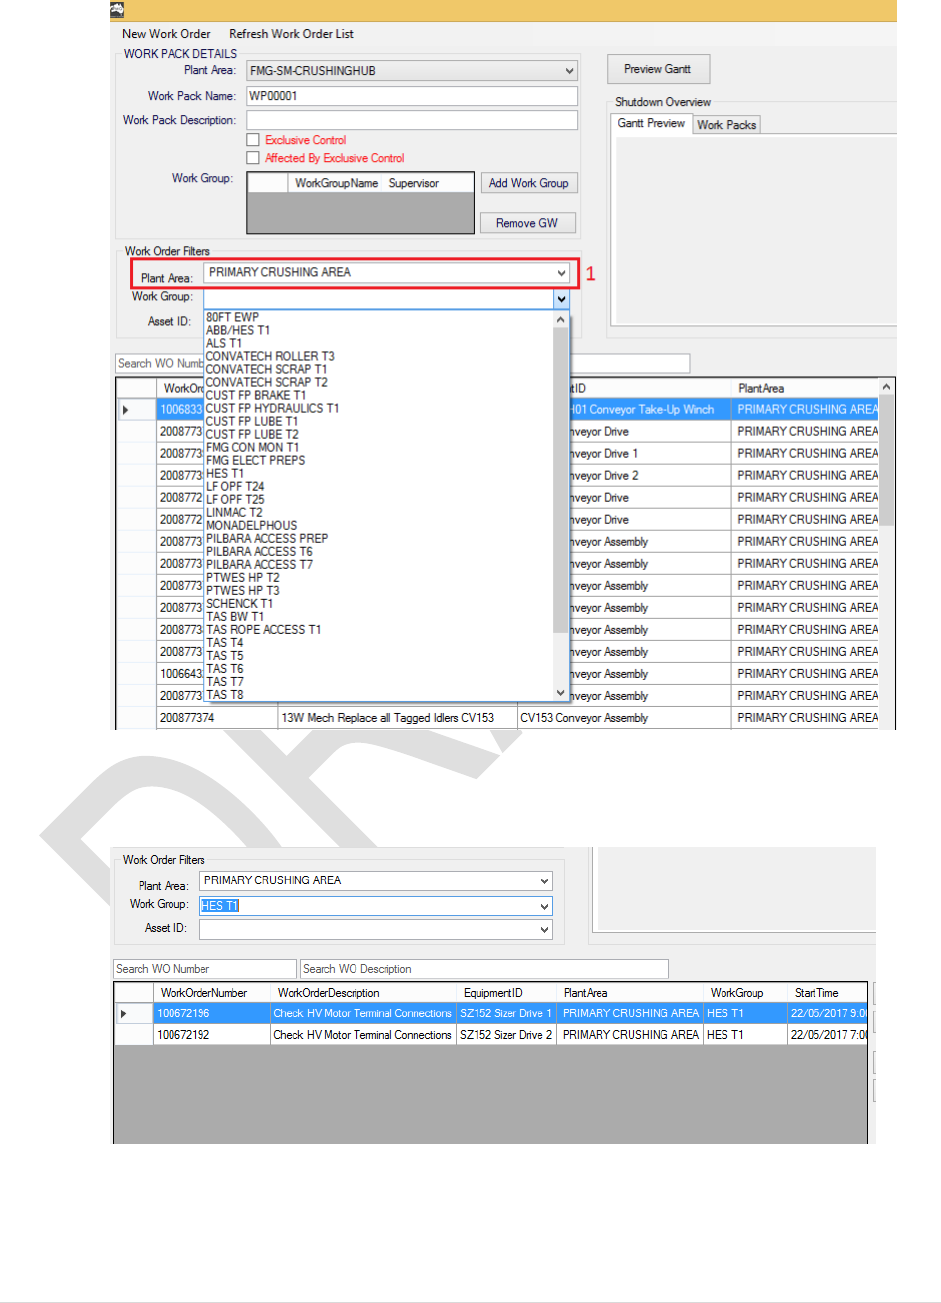
4. In the Work Order Filters, select the Plant Area filter. This will narrow down Work
Group and Asset ID filters:
5. Select Work Group to filter down the work orders. In this example, I will select HES
T1:
6. Select the Work Orders then click on ADD to select
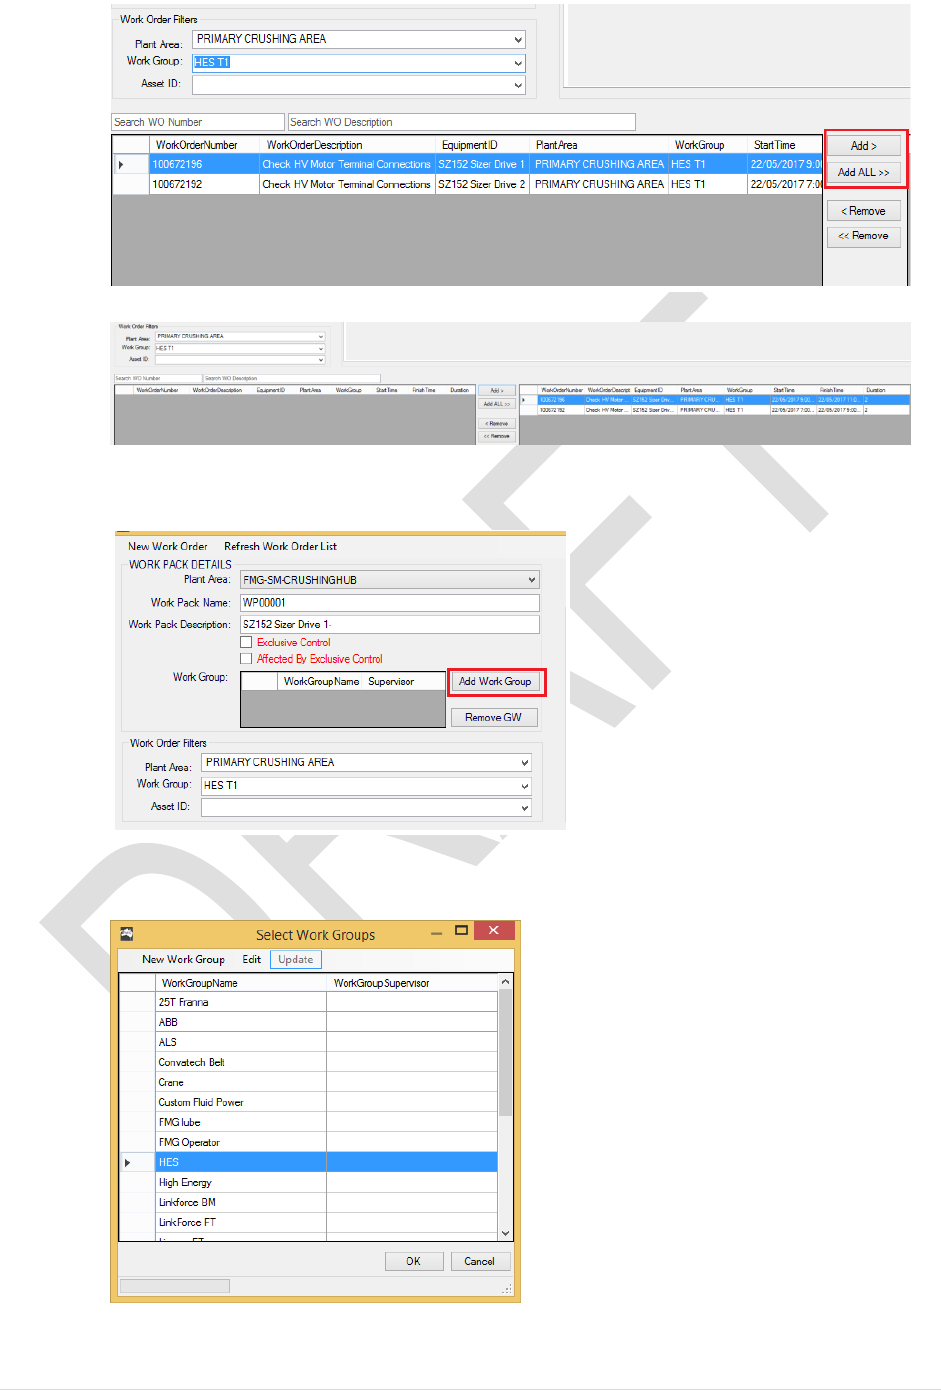
40 | P a g e
7. On the Work Pack Details, click Add Work Group
8. Select the Work Group from the list. Click OK to proceed
41 | P a g e
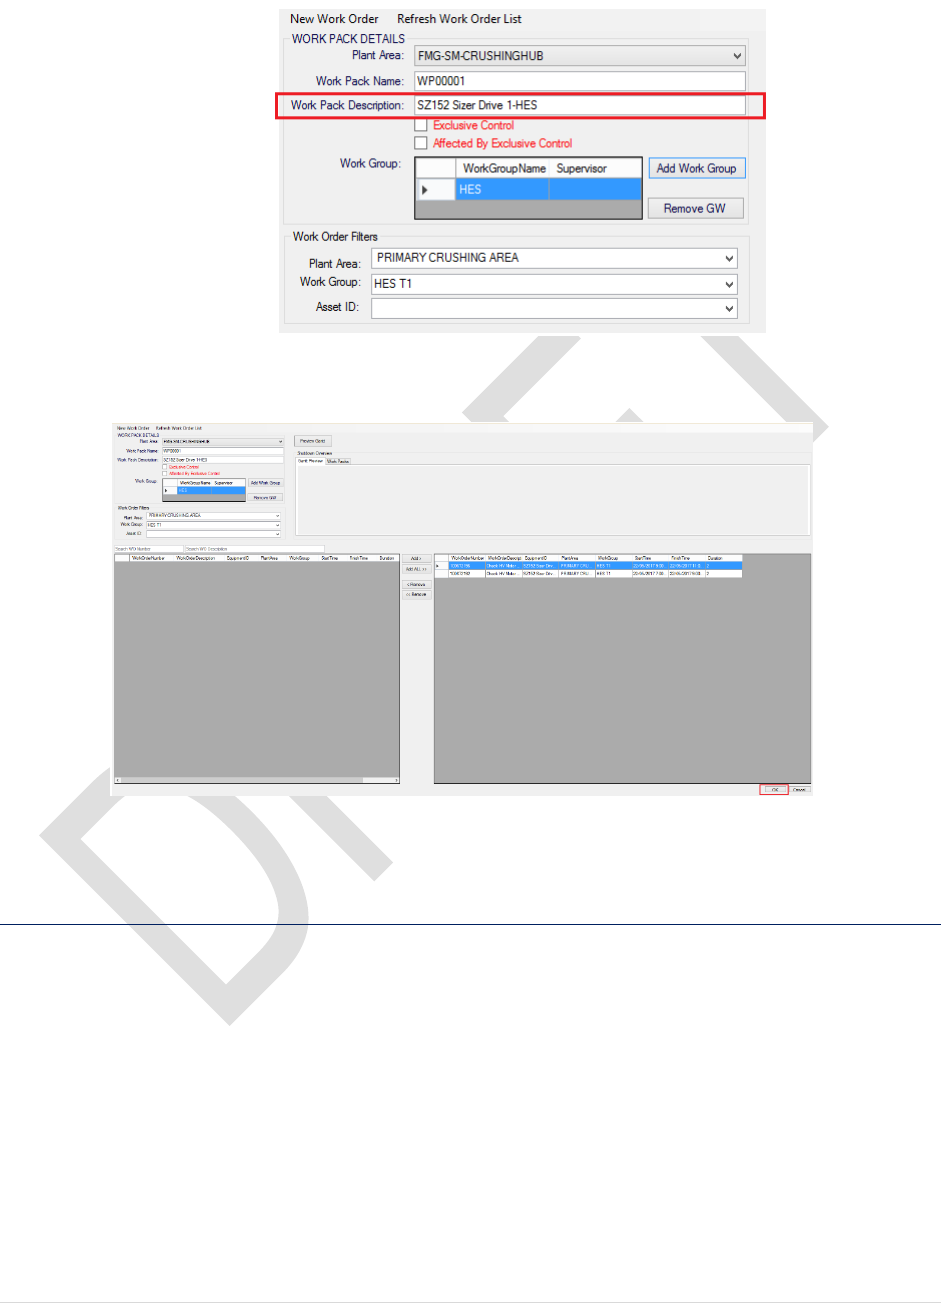
9. Once work group(s) is selected, the work pack description will be auto generated.
Change the description where suits.
10. Click OK to proceed
End of Procedure
5.3.2 Create New SIR
Once the Work Pack is created, you can create a new Specific Isolation Requirements for this
newly created Work Pack:
1. From the Event Details, select the Work Pack then Right-click then New SIR
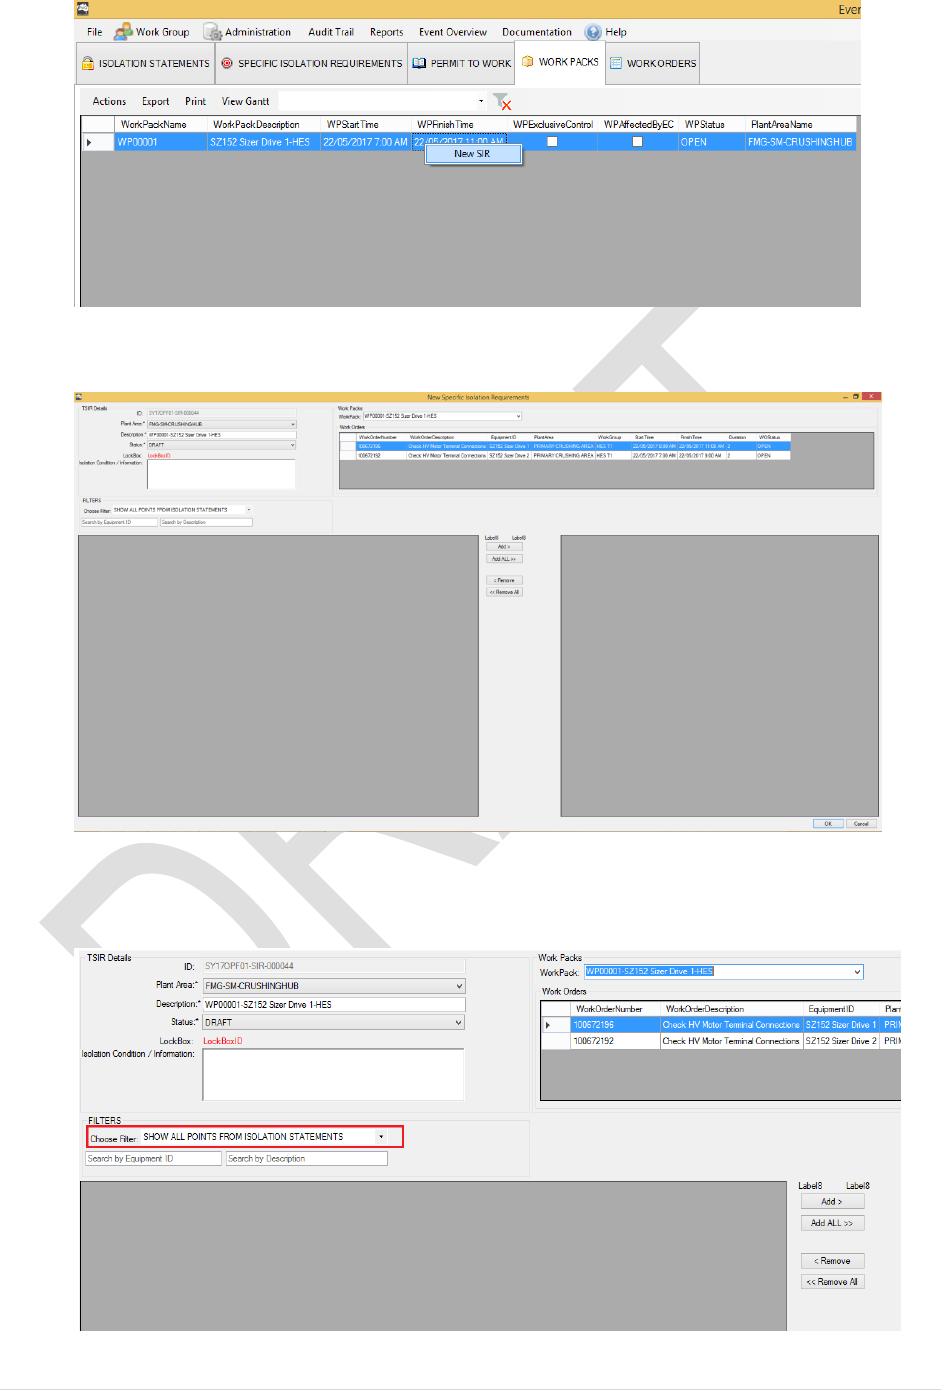
42 | P a g e
2. New SIR Form will pop up
3. Select the Isolation Points for this SIR. You can choose to filter the points from Isolation
Statements OR show all Points:
4. In this example, I will choose to filter all the points:
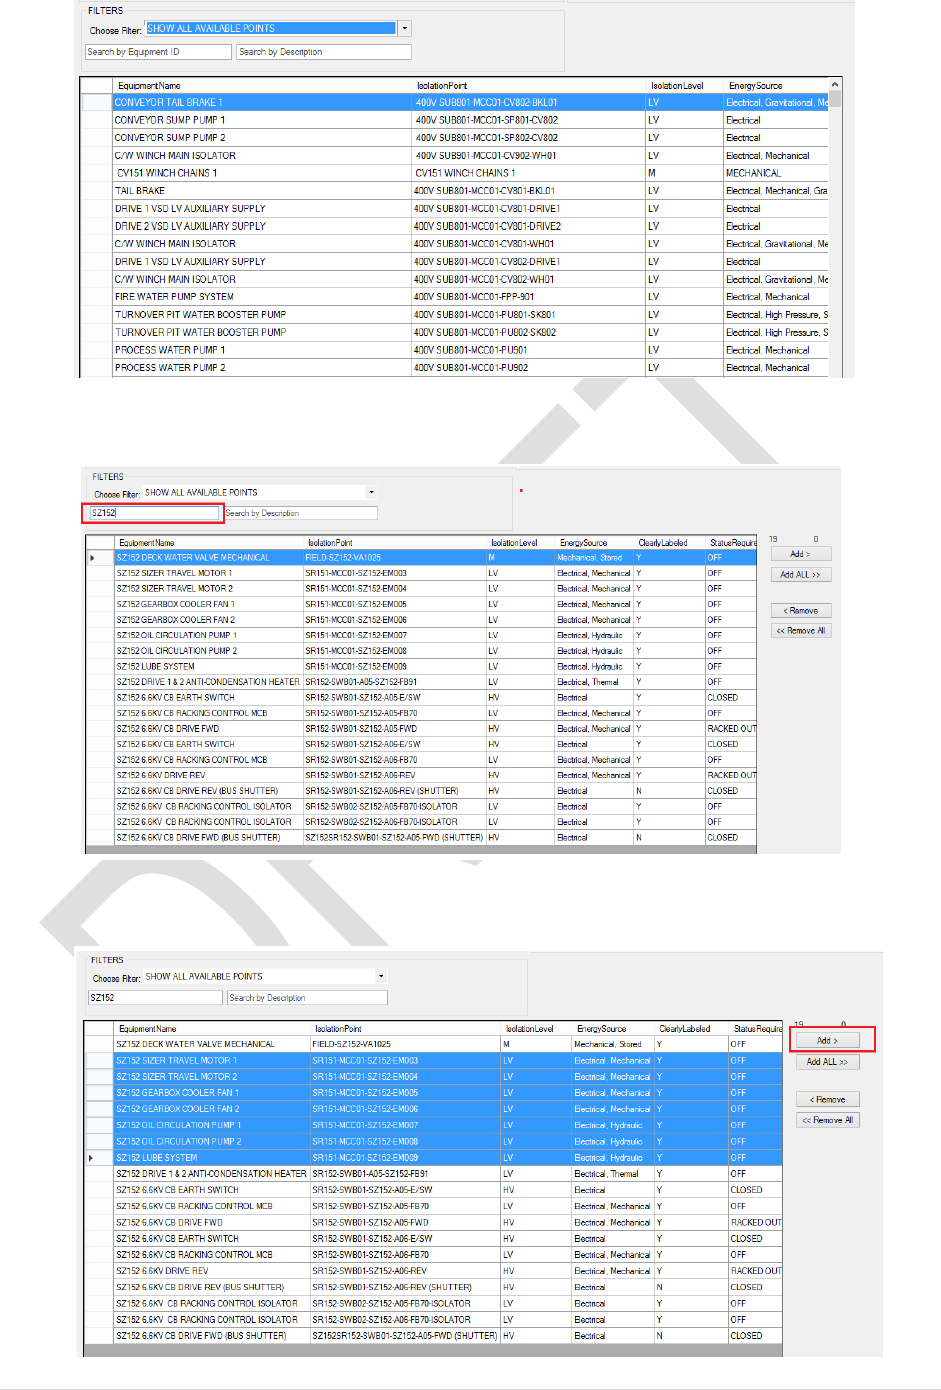
43 | P a g e
5. Type in the Asset ID to narrow the list further down:
6. Highlight the points which you want to select then click ADD
44 | P a g e
7. Once you are happy with the selected SIR points for the work orders displayed at the top
in the work order list. Select OK
End of Procedure
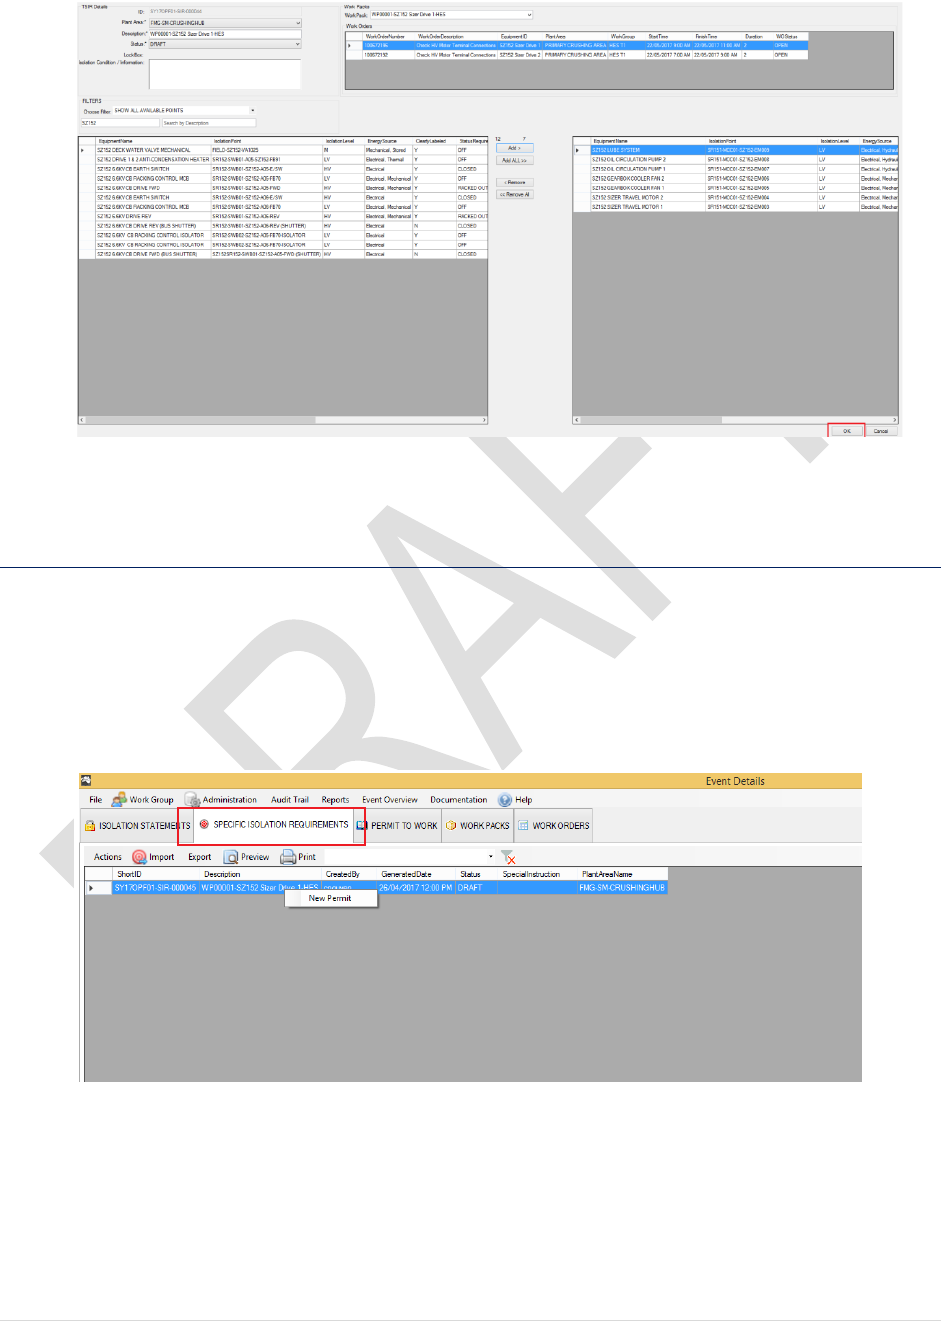
5.3.3 Create New Permit To Work
After SIR is created, you may now generate a Permit to Work for this SIR / Work Pack:
1. From the Event Details Form, click on SPECIFIC ISOLATION REQUIREMENTS tab
2. Select the SIR from the list, Right-click then select New Permit
3. New Permit Form will popup:
45 | P a g e
4. Here you can specify new Permit Start Time / End Time, and Permit Holder details if
available:
5. Click OK to complete
End of Procedure

46 | P a g e
5.3.4 Merging Work Packs
Quick Merging Work Packs will allow user to merge the work orders from 2 or more
Work Packs together. For example:
Merging WP0001 with WP0002 and WP0003 will:
Transfer WP0002 & WP0003’s Work Orders into WP0001
Delete WP0002 & WP0003
Delete WP0002 & WP0003’s SIR (if any exists)
Delete WP0002 & WP0003’s PTW (if any exists)
1. Select the Work Packs you wish to Merge by holding down the Ctrl Key:
2. Right Click and Select “Merge Selected Work Packs”
3. Click Yes to Confirm
End of Procedure
47 | P a g e
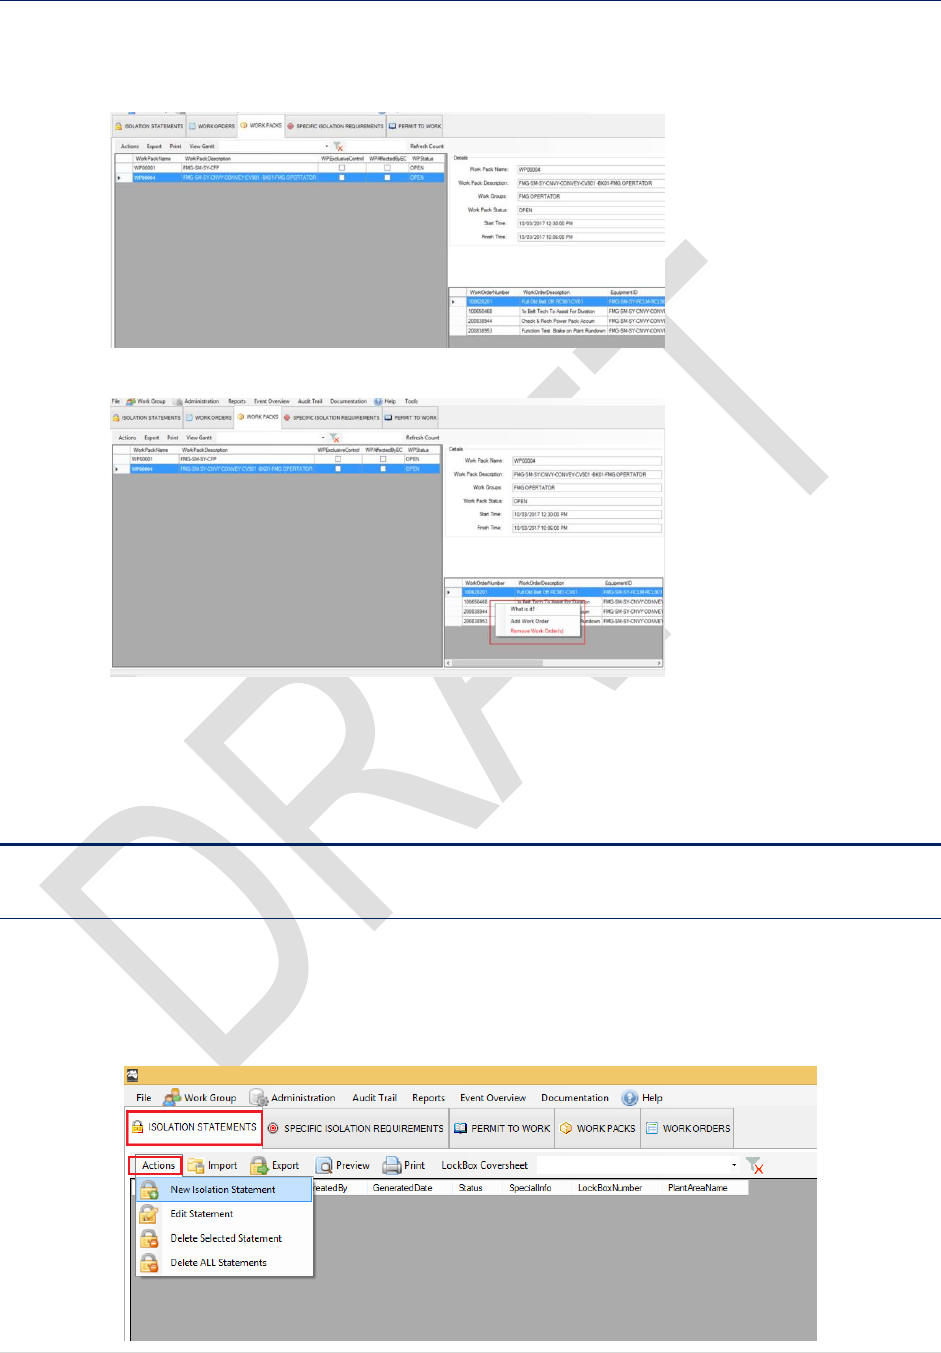
5.3.5 Work Pack Shortcuts
To quickly add or remove work orders from Work Pack:
a. Select a Work Pack. Right click on the Work Order list
b. Right-click on the Work Order list
c. Select Add Work Order or Remove Work Orders
End of Procedure.
5.4 ISOLATION STATEMENTS
5.4.1 Create New Isolation Statement
1. Select ISOLATION STATEMENTS tab.
2. Click on Actions > New Isolation Statement

48 | P a g e
3. A new isolation Statement Form will pop up.
a. Choose the Plant Area from the list
b. Type in the Description
c. Select a Lock Box for this statement
4. Choose the Isolation Points from the list. You can further narrow down the list by type in
the Equipment ID or description. Note: you can also choose to show ONLY THE
MISSING POINTS FROM SIR
5. Select the point(s) then click Add to select
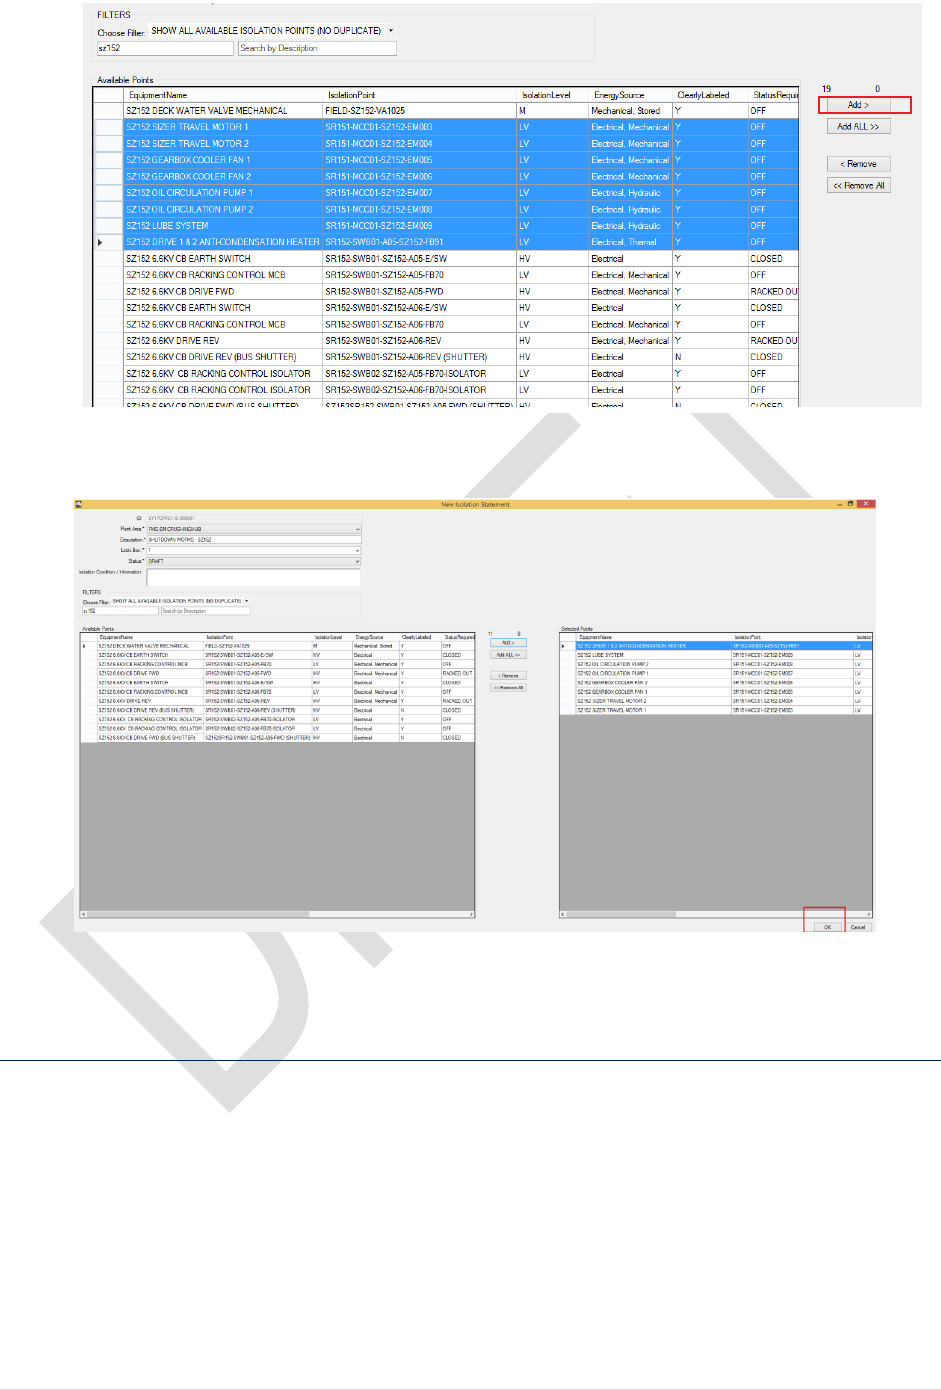
49 | P a g e
6. Click OK to create this statement
End of Procedure
5.4.2 Print Isolation Statement
The best way to print an Isolation Statement is to export it to Microsoft Word Document format
then print:
5. On the Event Details Page. Select ISOLATION STATEMENT tab.
6. Click on EXPORT > Export to Word > Export Selected Statement
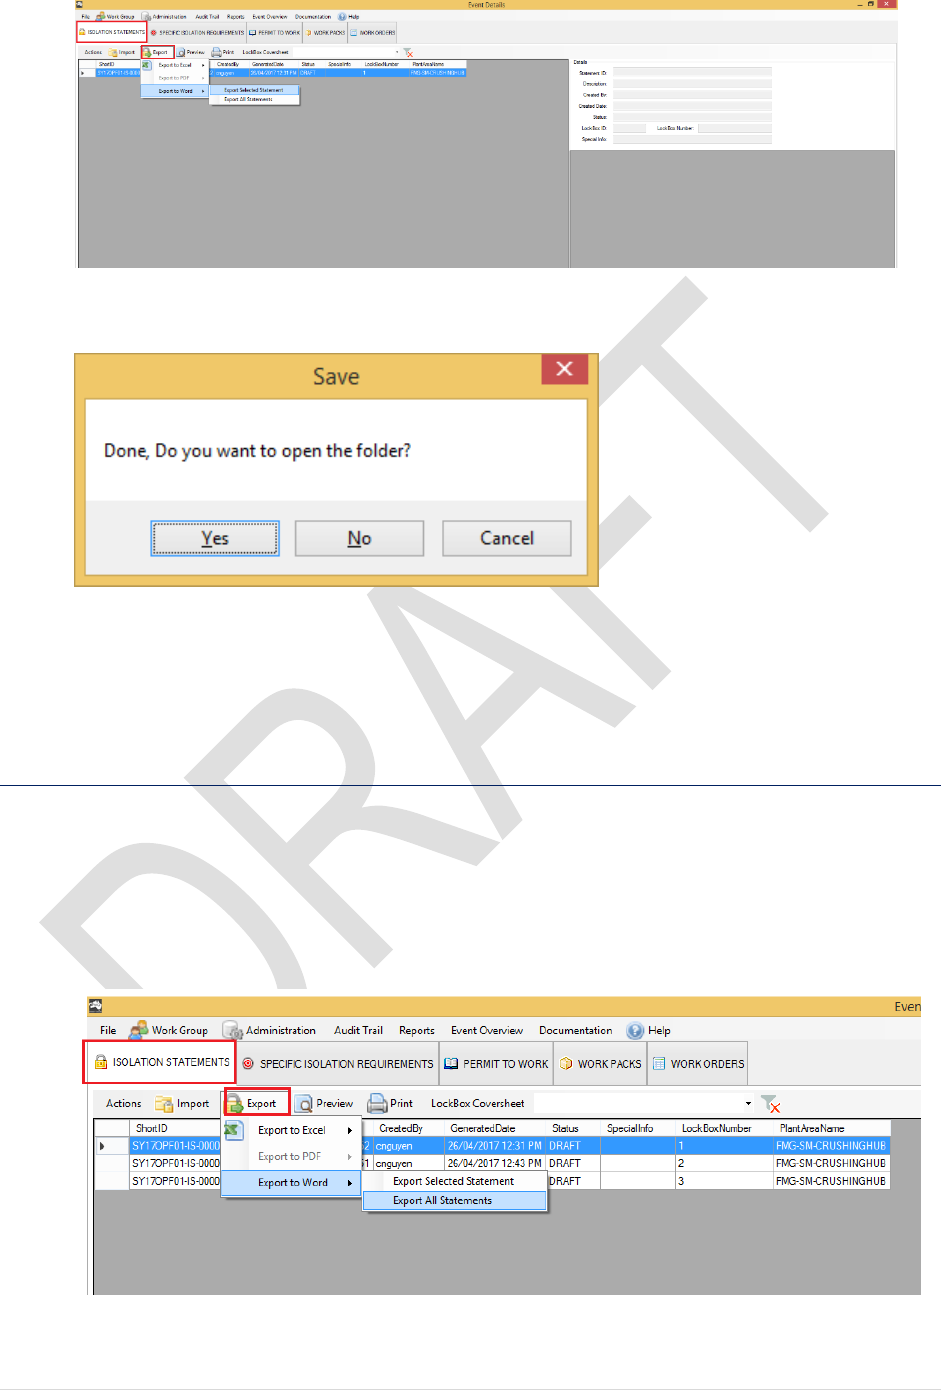
50 | P a g e
7. Choose the destination folder then click on Save to proceed
8. Click Yes to view the file.
End of Procedure
5.4.3 Print Multiple Statements
To print multiple isolation statements
10. Select ISOLATION STATEMENT tab
11. Click on Export > Export to Word > Export All Statements
12. Navigate to the folder then click on Save. Note: this progress will take sometime to
generate all statement. The status is displayed on the left bottom corner of the screen:
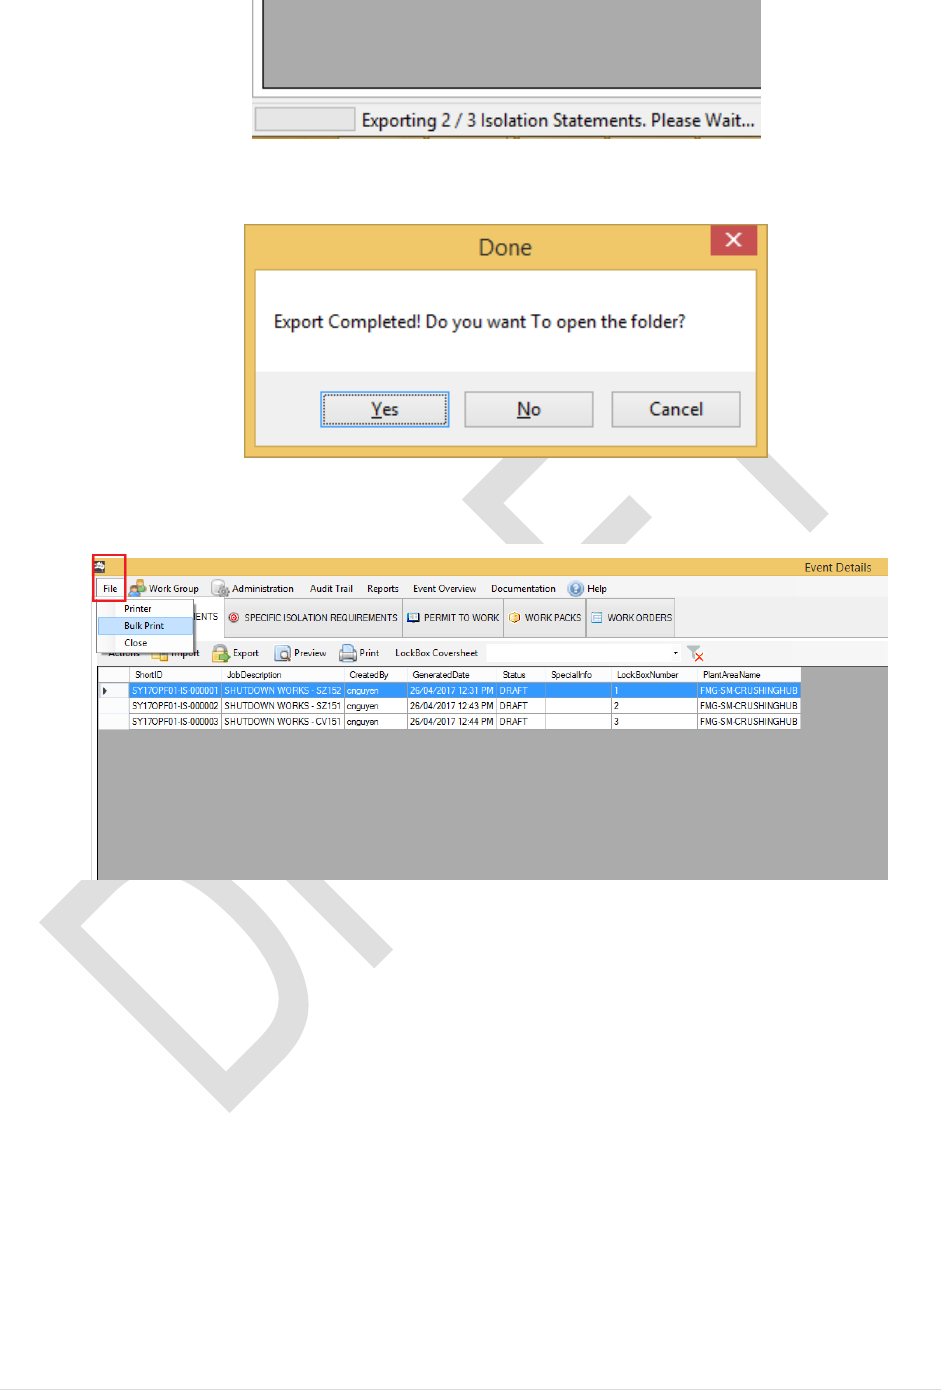
51 | P a g e
13. Once export is completed. Click Yes to view your files or No to close.
14. To Print Multiple statement. Select File > Bulk Print
15. A new dialog will popup. Click on Select
52 | P a g e
16. Select the files you wish to print. Then click on Open to proceed
17. Your selected files are now added to the list. Click Print to proceed
53 | P a g e
18. Select a printer then Print
54 | P a g e
End of Procedure
5.4.4 Print Lock Box Cover
Lock Box Coversheets may be printed from the program:
1. From the Event Details Page, Select Isolation Statements tab > Lockbox Coversheet
2. New window will popup
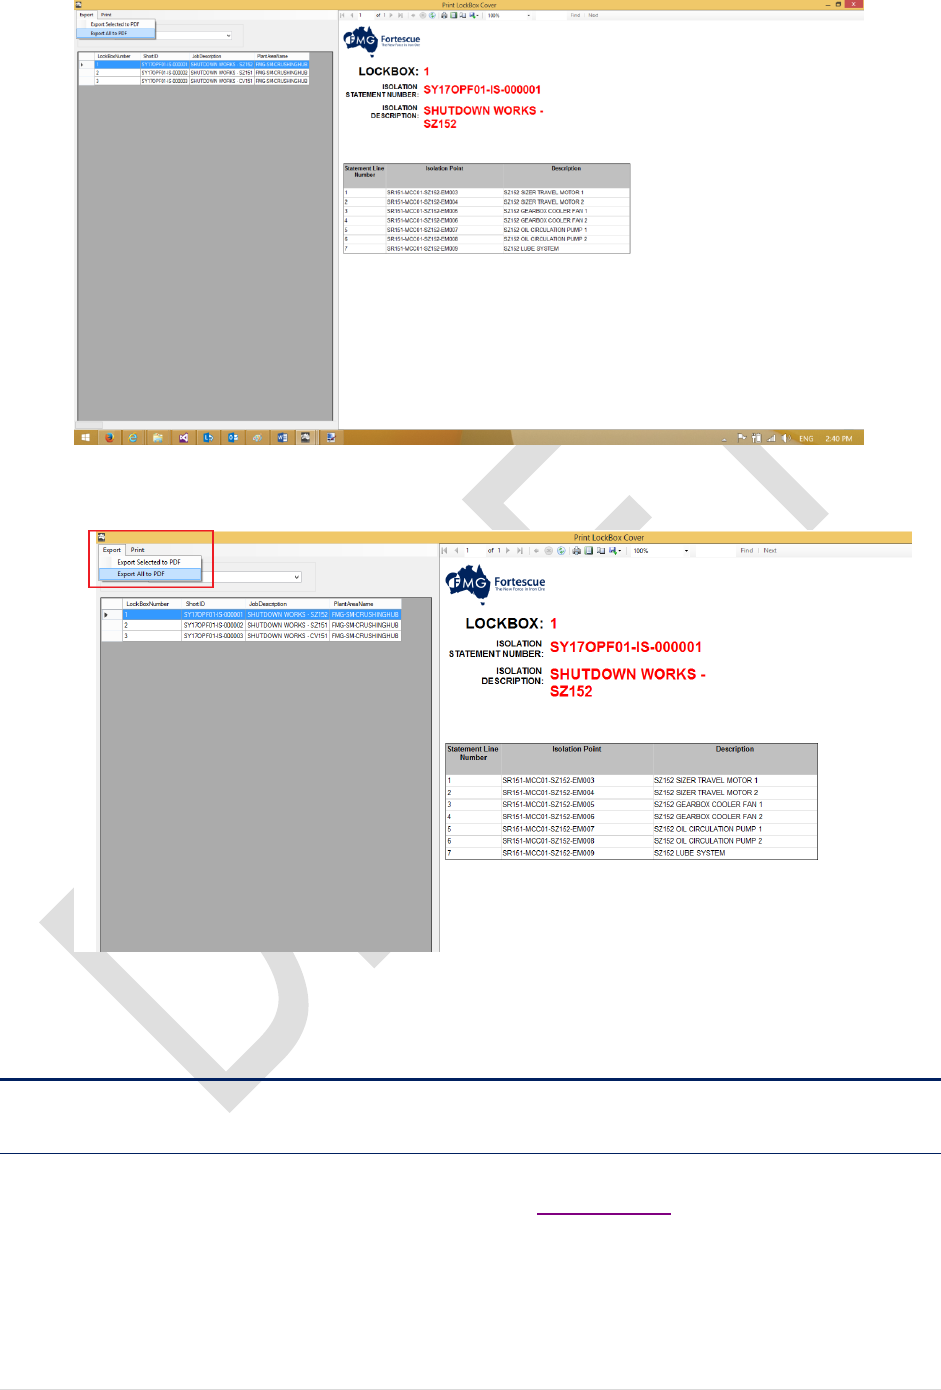
55 | P a g e
3. Select the screen cover you would like to print or save them all to PDF File then Print:
End of Procedure
5.5 SPECIFIC ISOLATION REQUIREMENTS
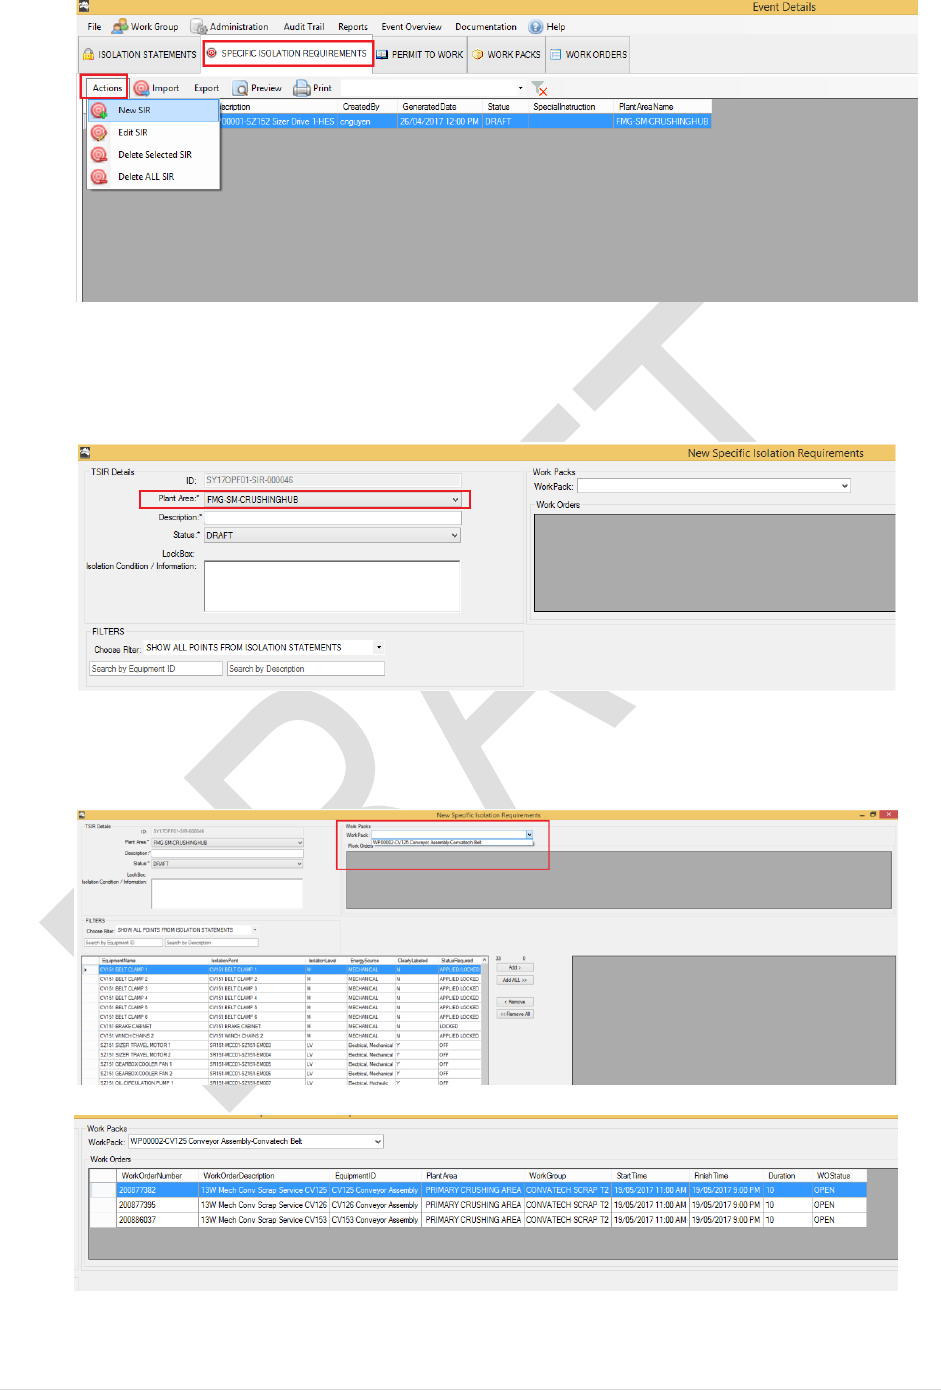
5.5.1 Create new SIR
To create a new SIR from a WorkPack, please refer to Chapter 5.3.2
1. From The Event Details. Select SPECIFIC ISOLATION REQUIREMENTS tab >
Actions > New SIR
56 | P a g e
Please note: you will need to create a new Work Pack before creating new SIR.
2. Select the Plant Area from the list
3. Select the available work pack for this SIR. This will populates all the work orders details
belong to the work pack
4. Select the Isolation Points for the SIR
57 | P a g e
5. Click OK to proceed.
End of Procedure
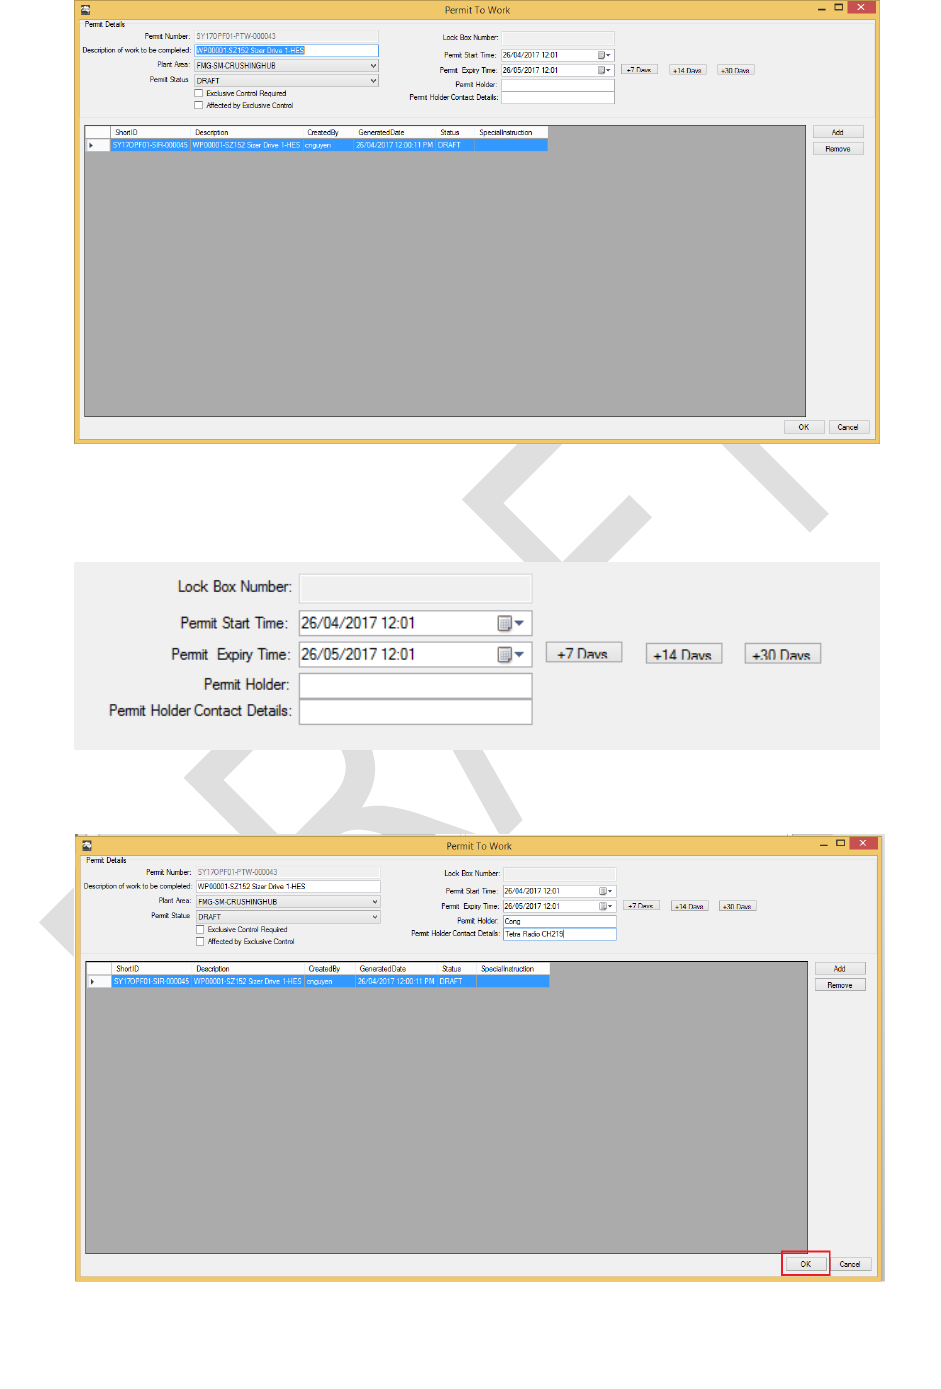
5.6 PERMIT TO WORK
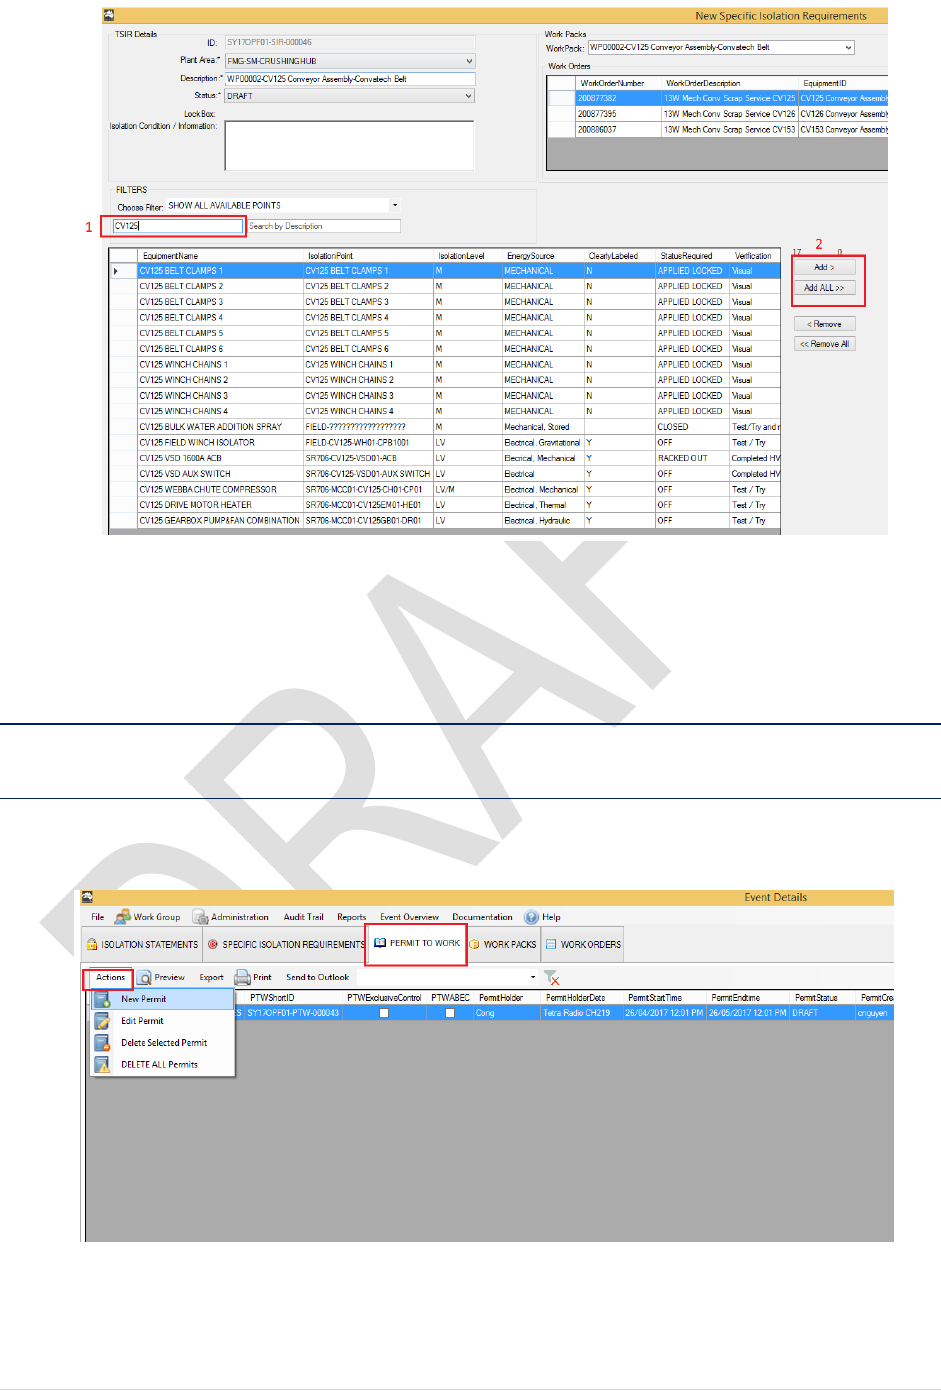
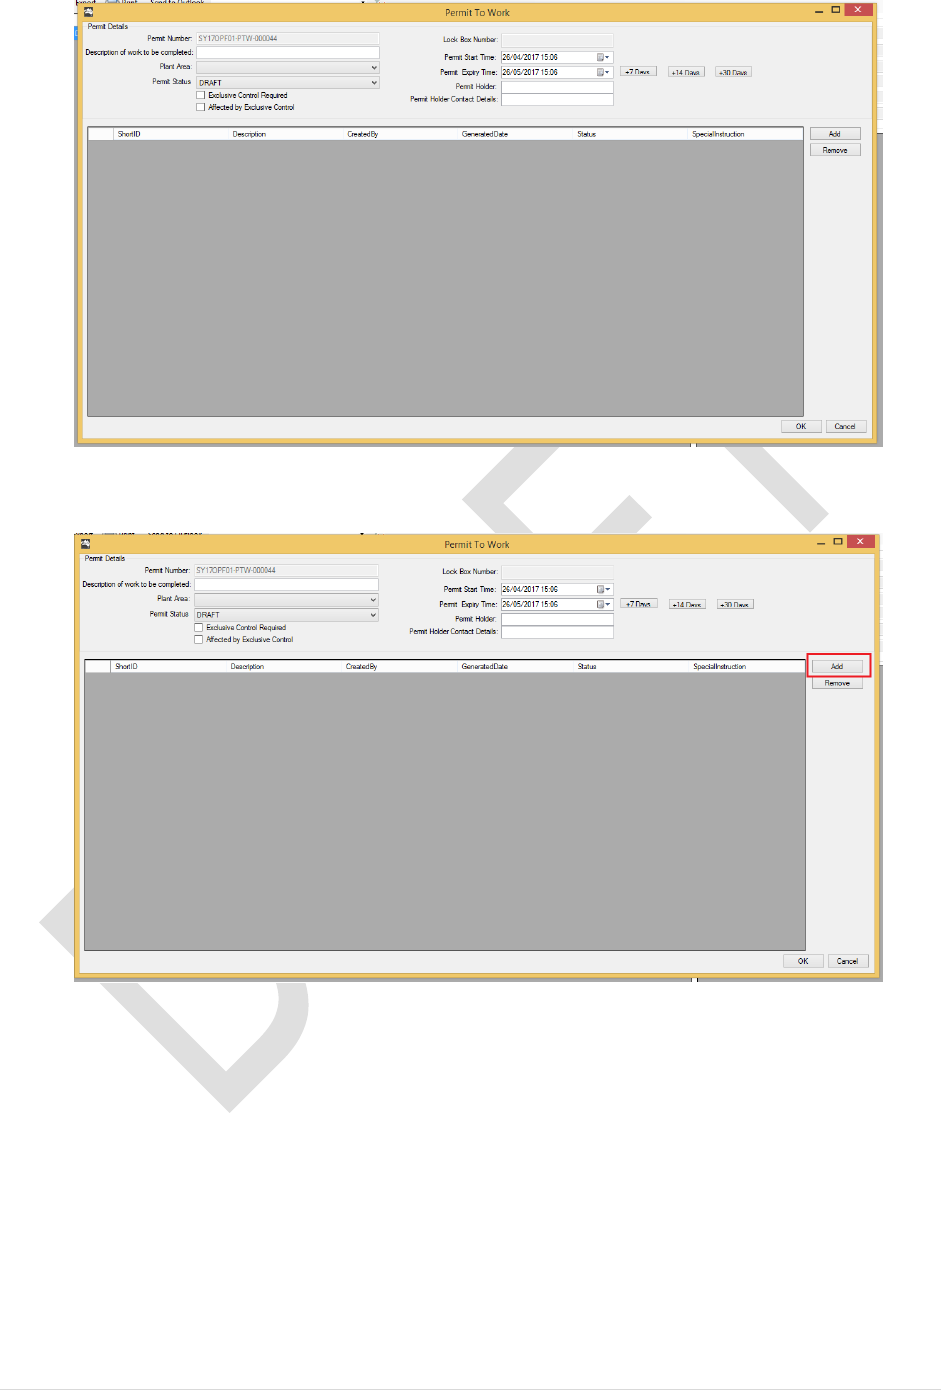
5.6.1 Create New Permit to Work
1. From the Event Details. Select PERMIT TO WORK tab > Actions > New Permit
2. A new Permit to Work Form will pop up
58 | P a g e
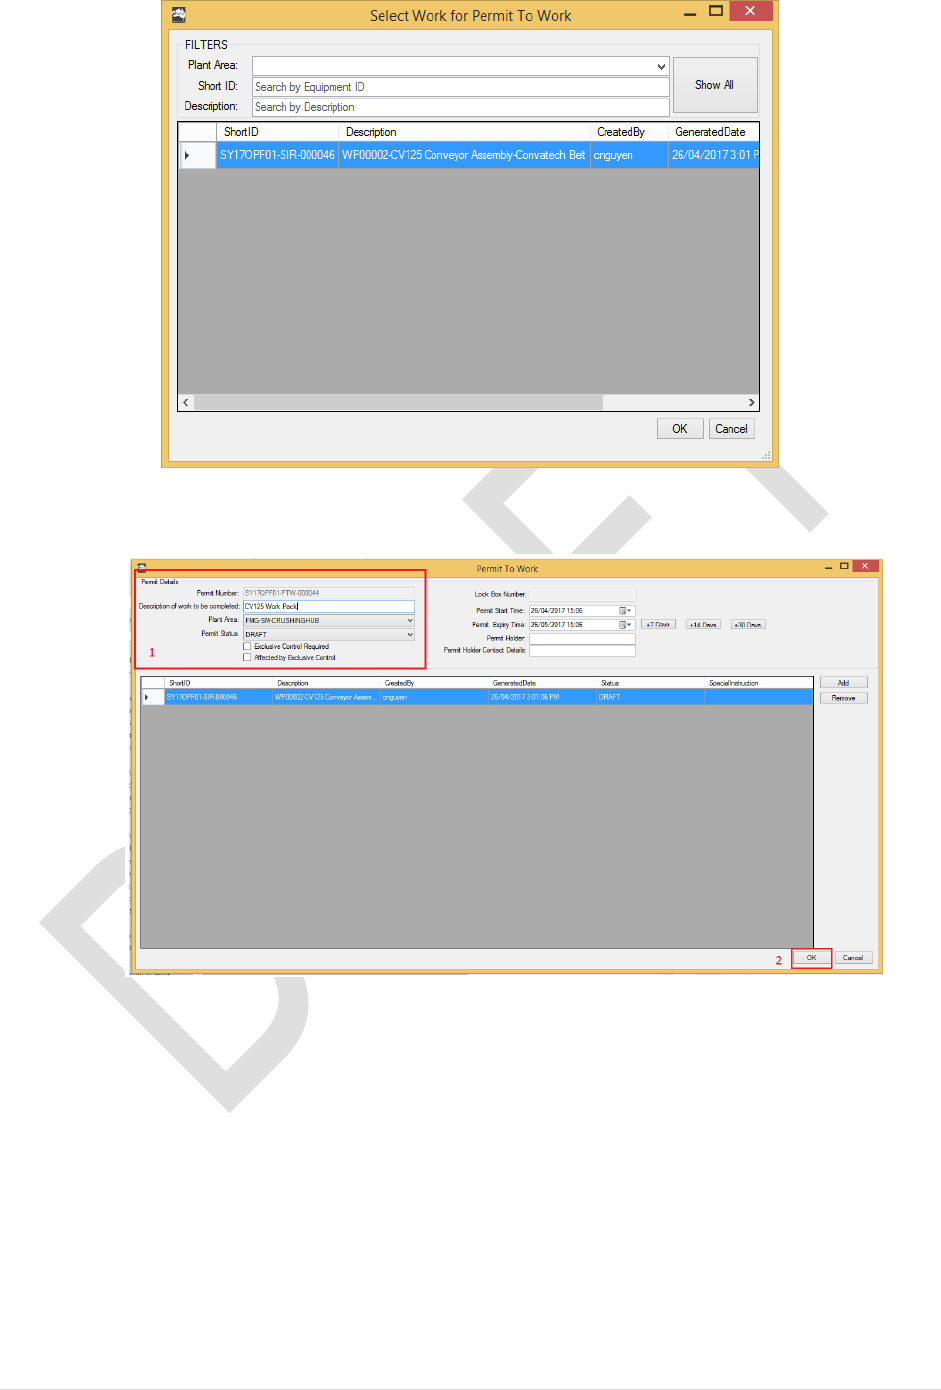
3. Click Add
4. Select a SIR. Then click OK
59 | P a g e
5. Fill in the Permit Details Section. Click OK to proceed
End of Procedure
60 | P a g e
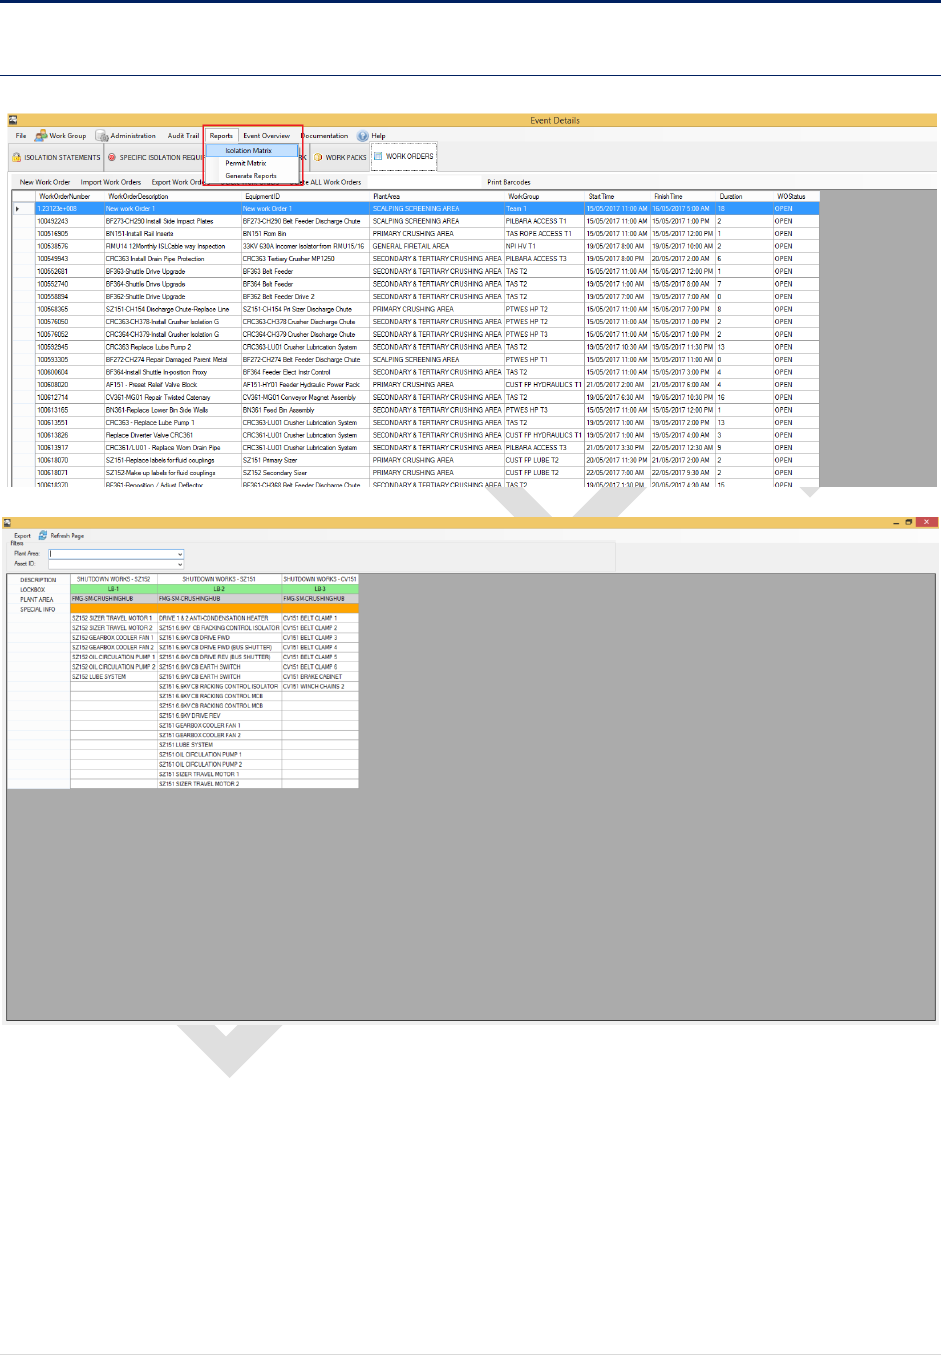
5.7 REPORTS
5.7.1 Isolation Matrix
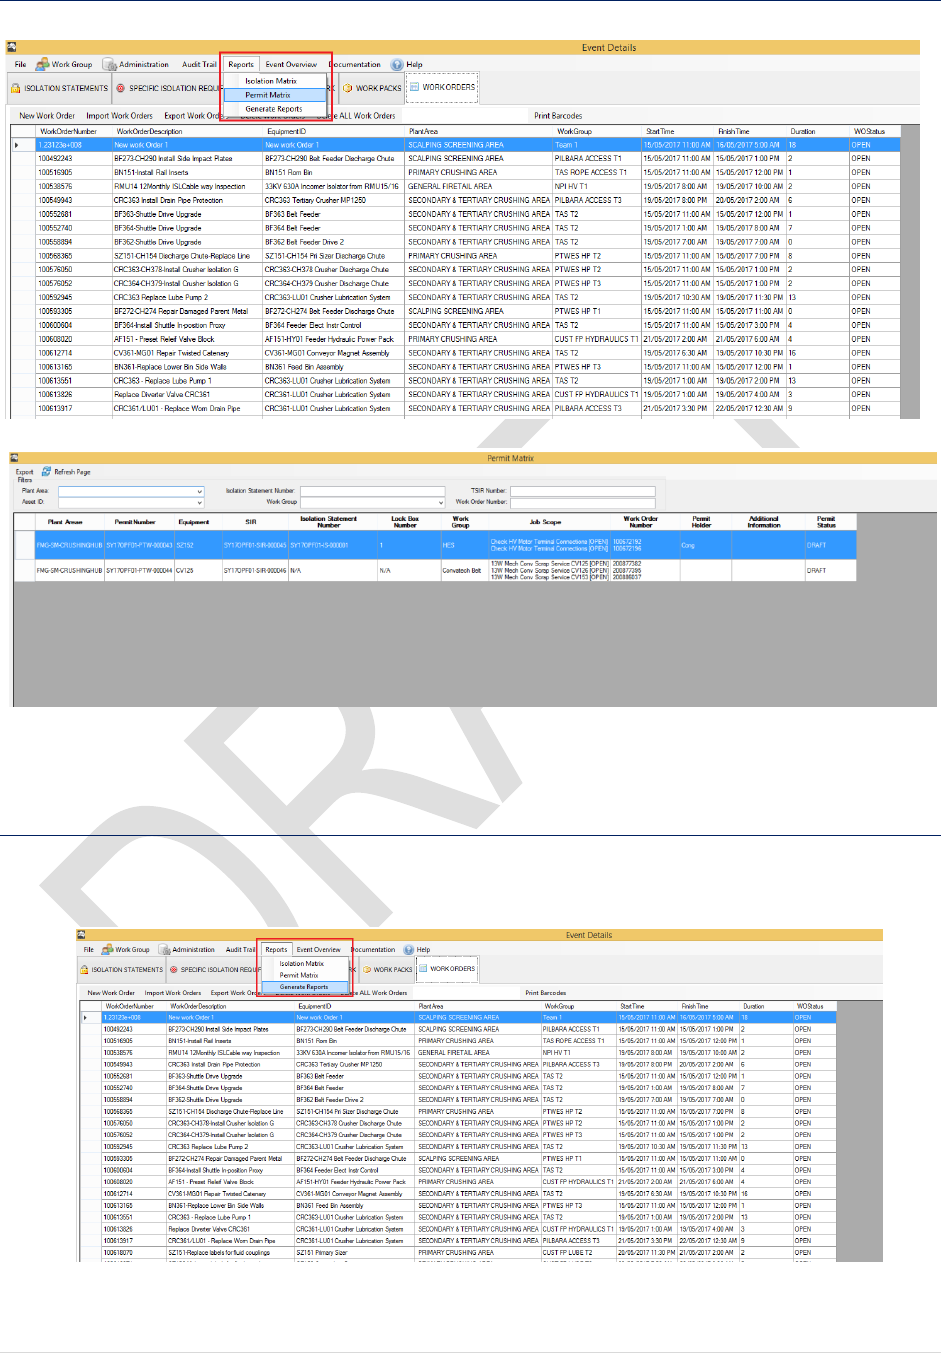
61 | P a g e
5.7.2 Permit Matrix
5.7.3 General Reports
1. From the Event Details page. Click Reports > Generate Reports
62 | P a g e
2. Select the type of report you want to view by selecting from the drop down list
3. Click Print Preview.
End of Procedure
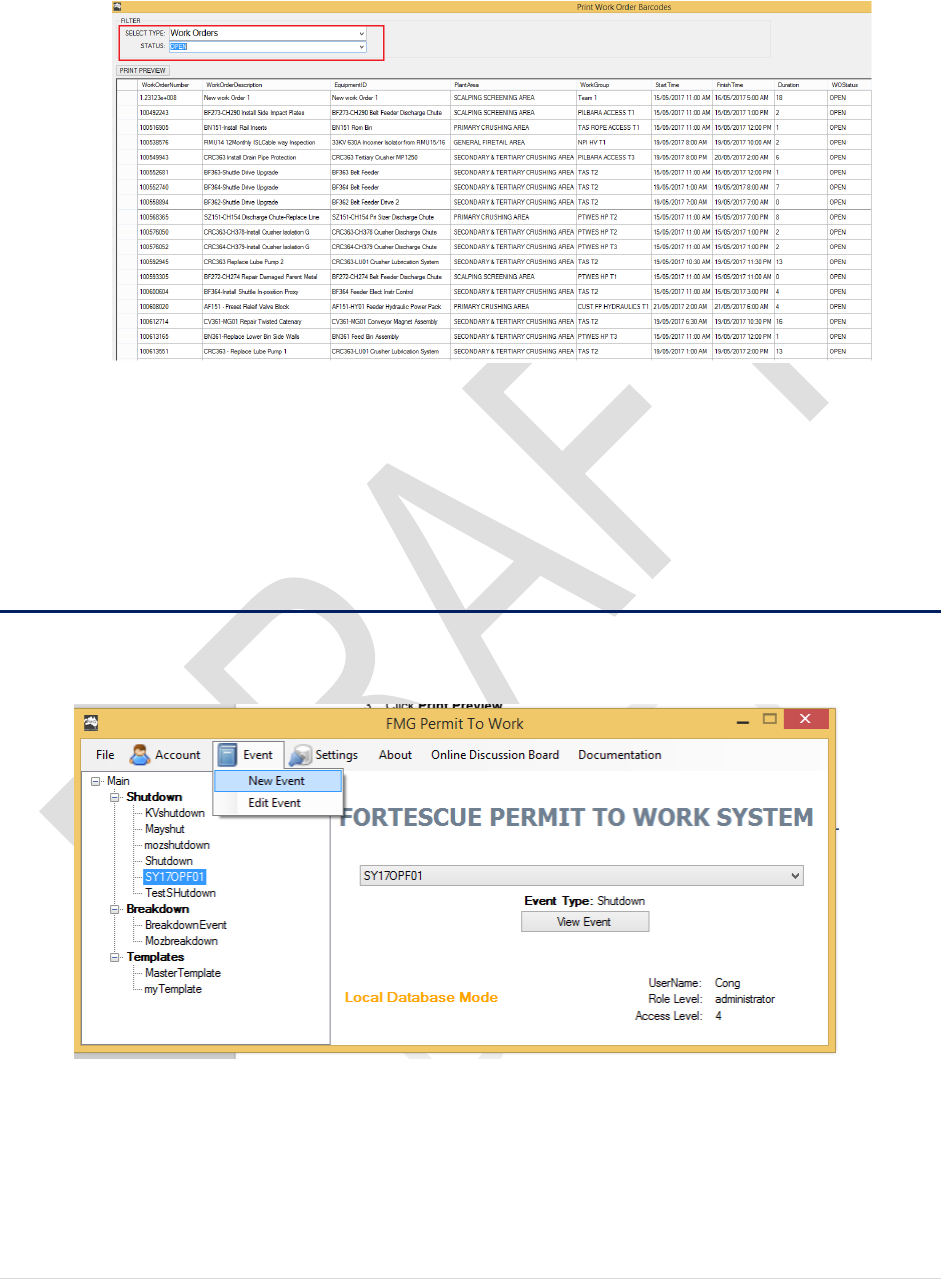
6. TEMPLATES EVENT
6.1 Create New Template Event
1. From the Main Login Screen. Select Event > New Event
2. Enter the Event’s name and select Templates
63 | P a g e
3. Select the newly created event from the drop down list and Click on View Event to
continue
End of Procedure
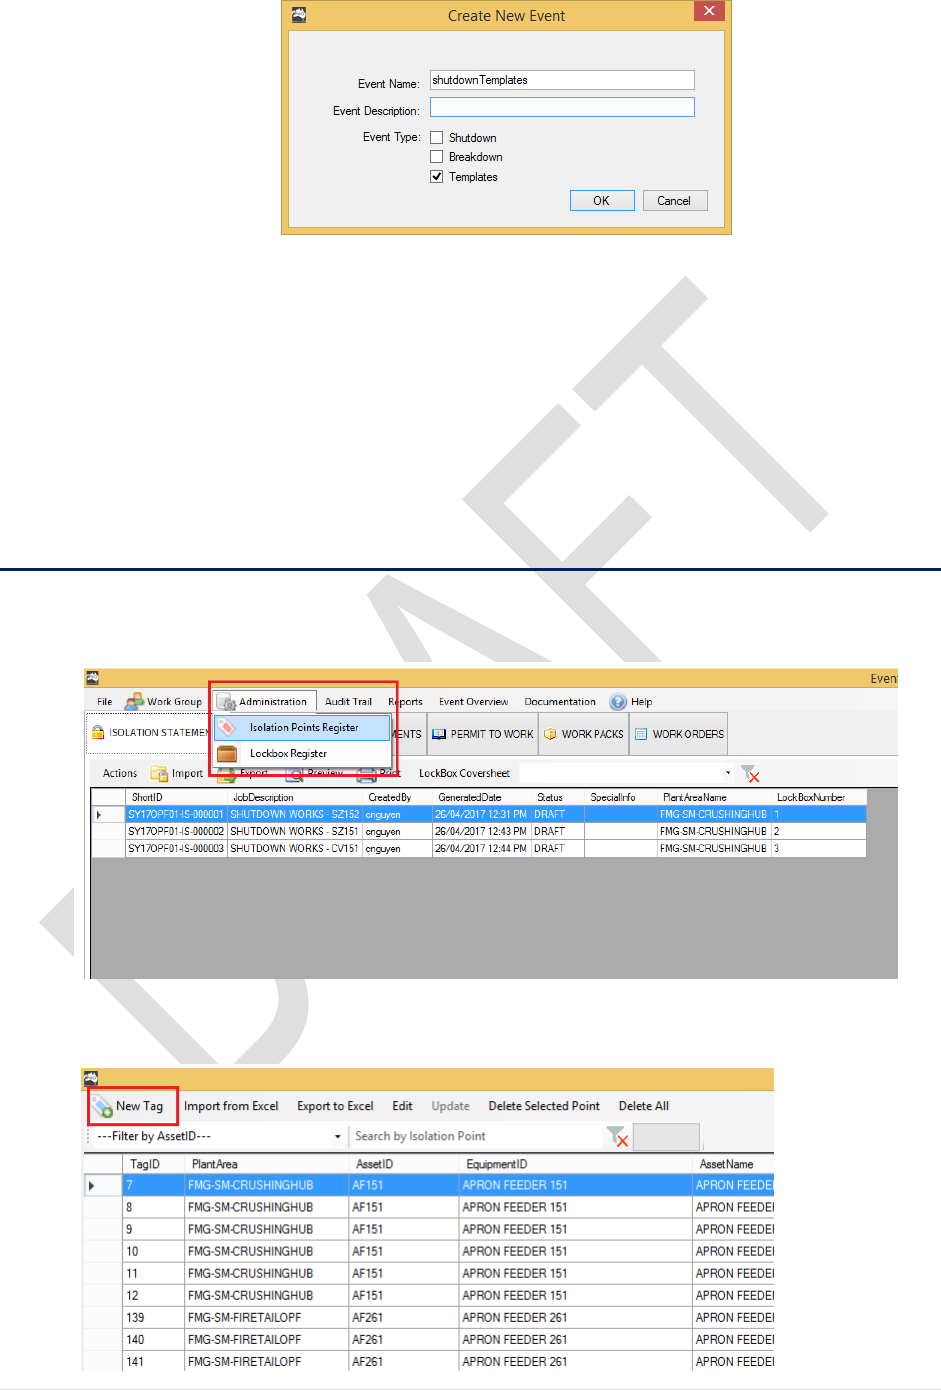
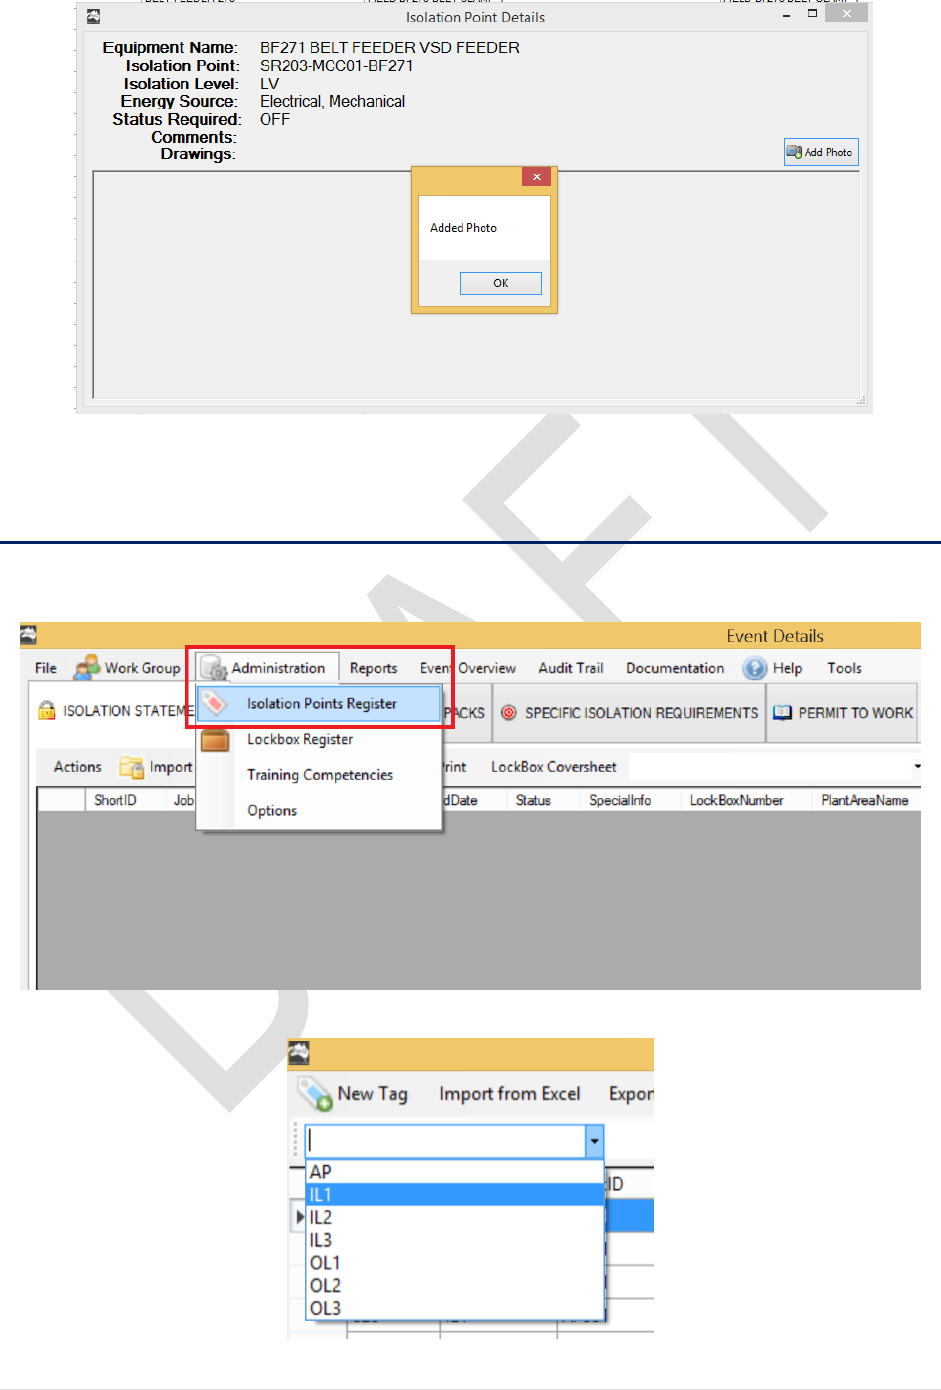
7. ADMINISTRATION
7.1 Add new Isolation Point
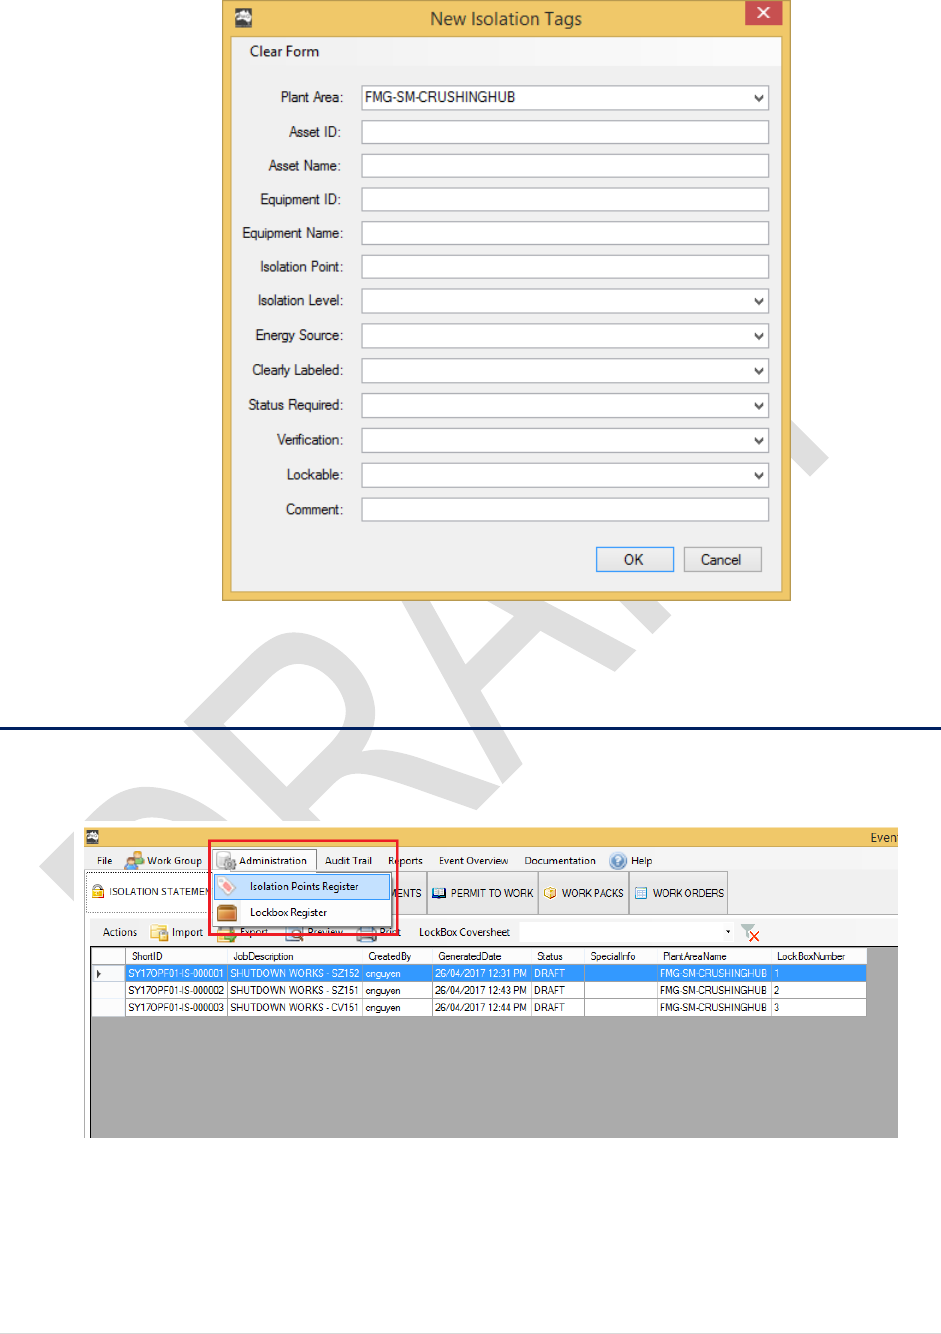
1. From the Event Details page. Click on Administration > Isolation Points Register
2. A new Tag Register Form will popup. Click on New Tag
64 | P a g e
3. Enter the Tag Details. Click OK to proceed
End of Procedure
7.2 Verify Isolation Points
1. From Event Details page. Click Administration > Isolation Points Register
2. Use the horizontal scroll bar tool to scroll the page to the right

65 | P a g e
3. Click on Edit
4. The page will go into Edit Mode
5. Click on the checkbox for the points to be verified. This will auto populates the time and
user’s name
66 | P a g e
6. Click Update to make the change
End of Procedure
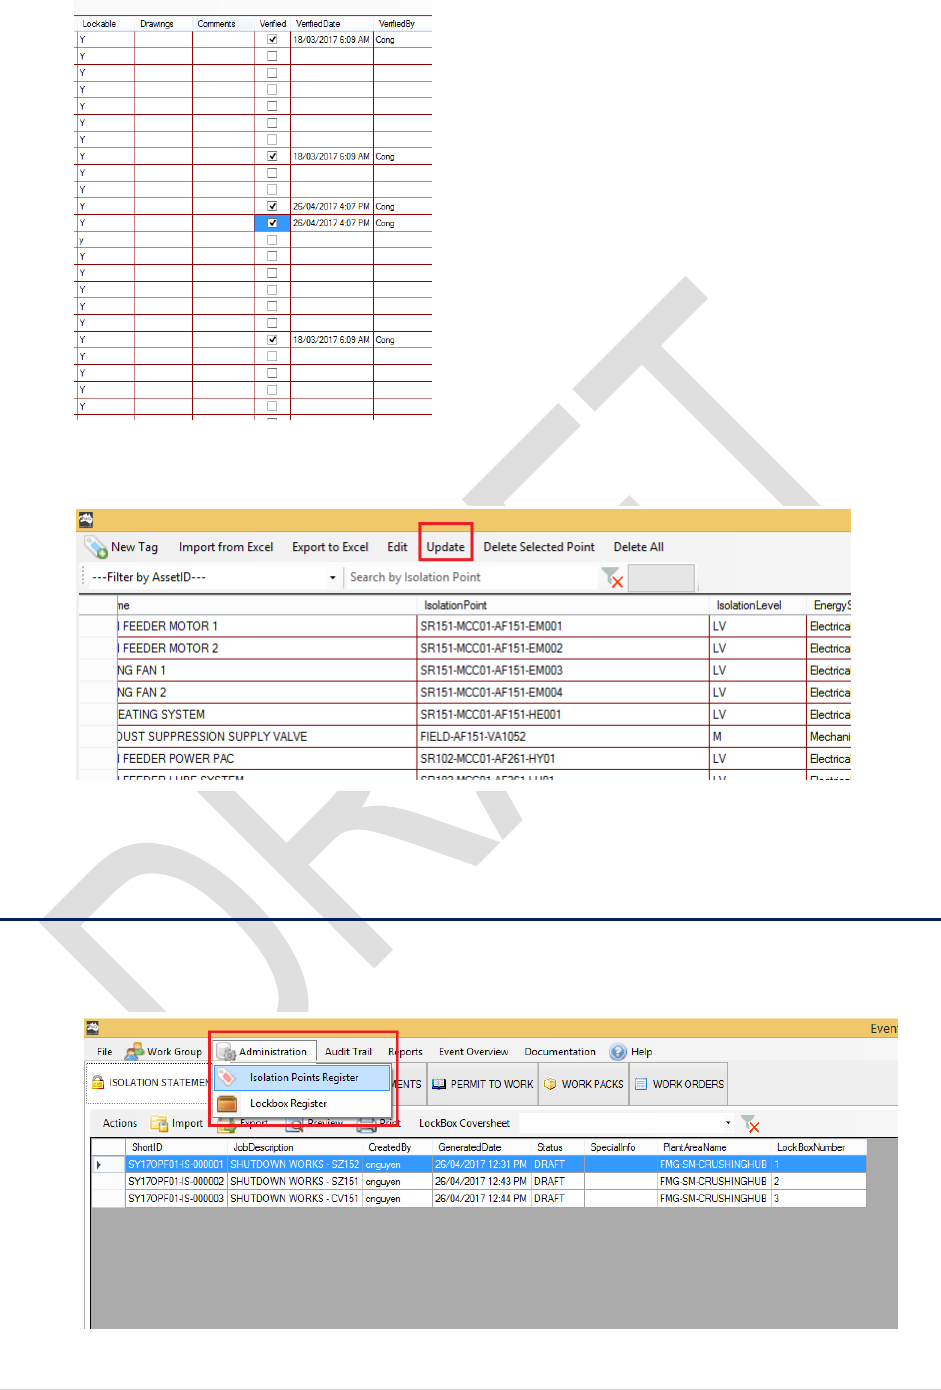
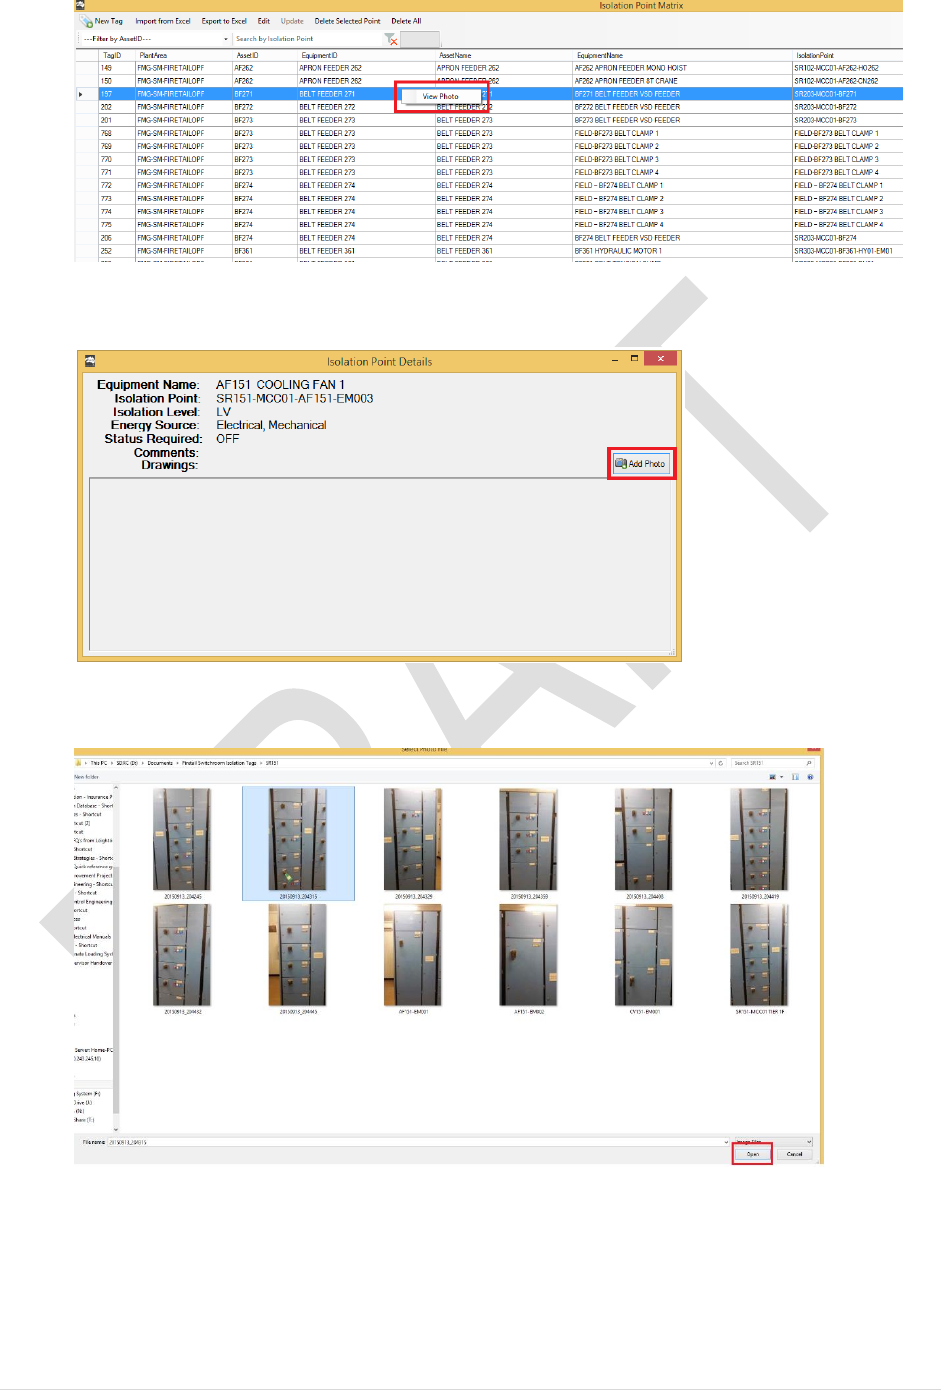
7.3 Add Photo to Isolation Points
1. From Event Details page. Click Administration > Isolation Points Register
2. Right-click a selected point > View Photo
67 | P a g e
3. A New window will pop up. Click Add Photo
4. Select a Photo Then Click OPEN button located at the bottom right corner
68 | P a g e
End of Procedure
7.4 Update Isolation Point Details
1. Open an Event, Click on Administration > Isolation Points Register
2. Select the Plant Area from the drop down list
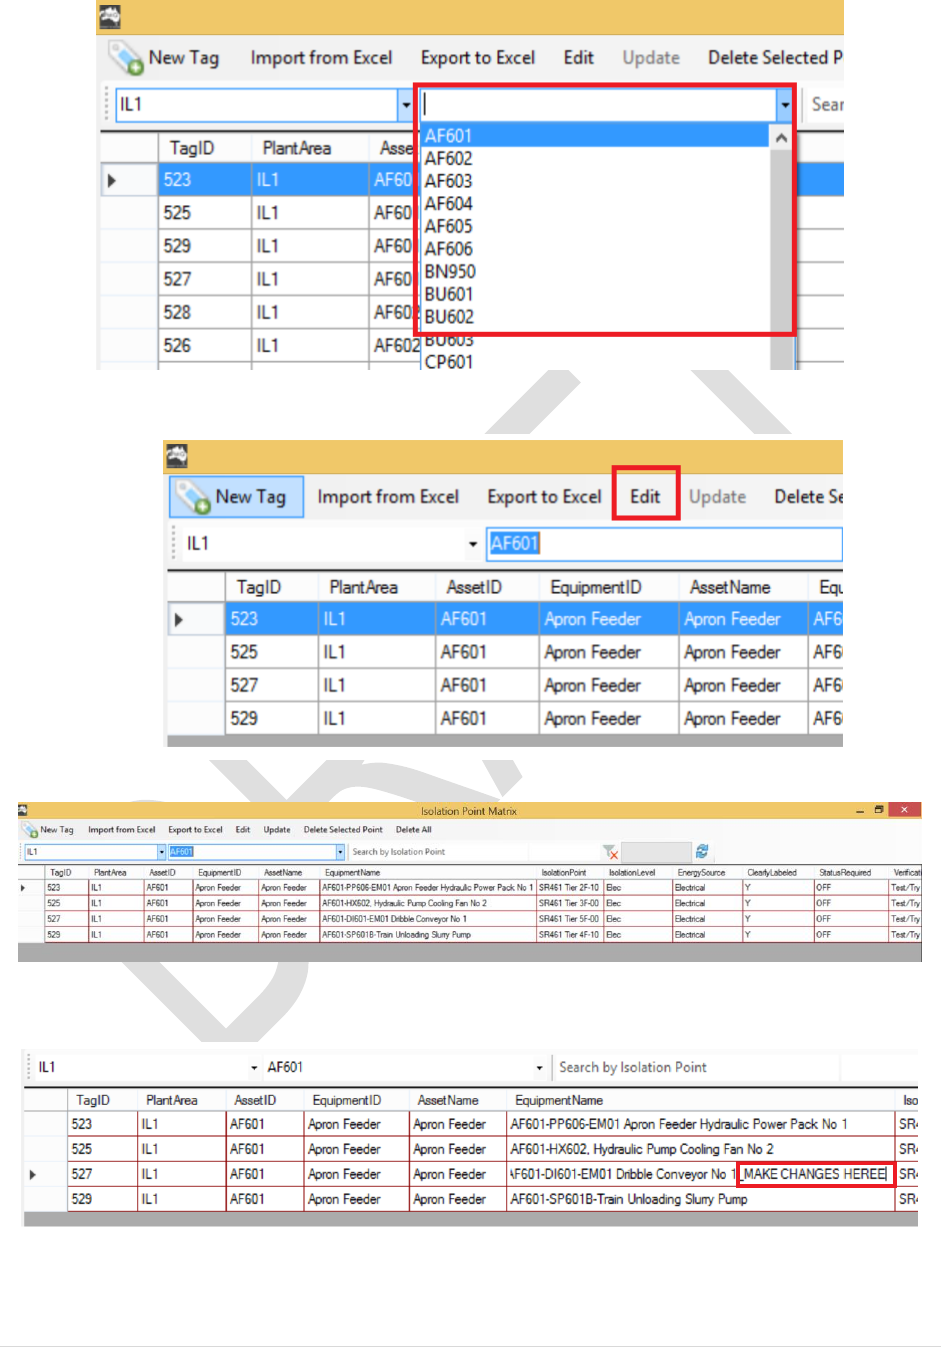
69 | P a g e
3. Select an Asset ID to drill down the list further:
4. Click on Edit
5. The grid will be coloured in RED to indicate that you are now in Edit Mode
6. Double-click the cell and type in the change:
7. Click Update to make the change
70 | P a g e
End OF PROCEDURE
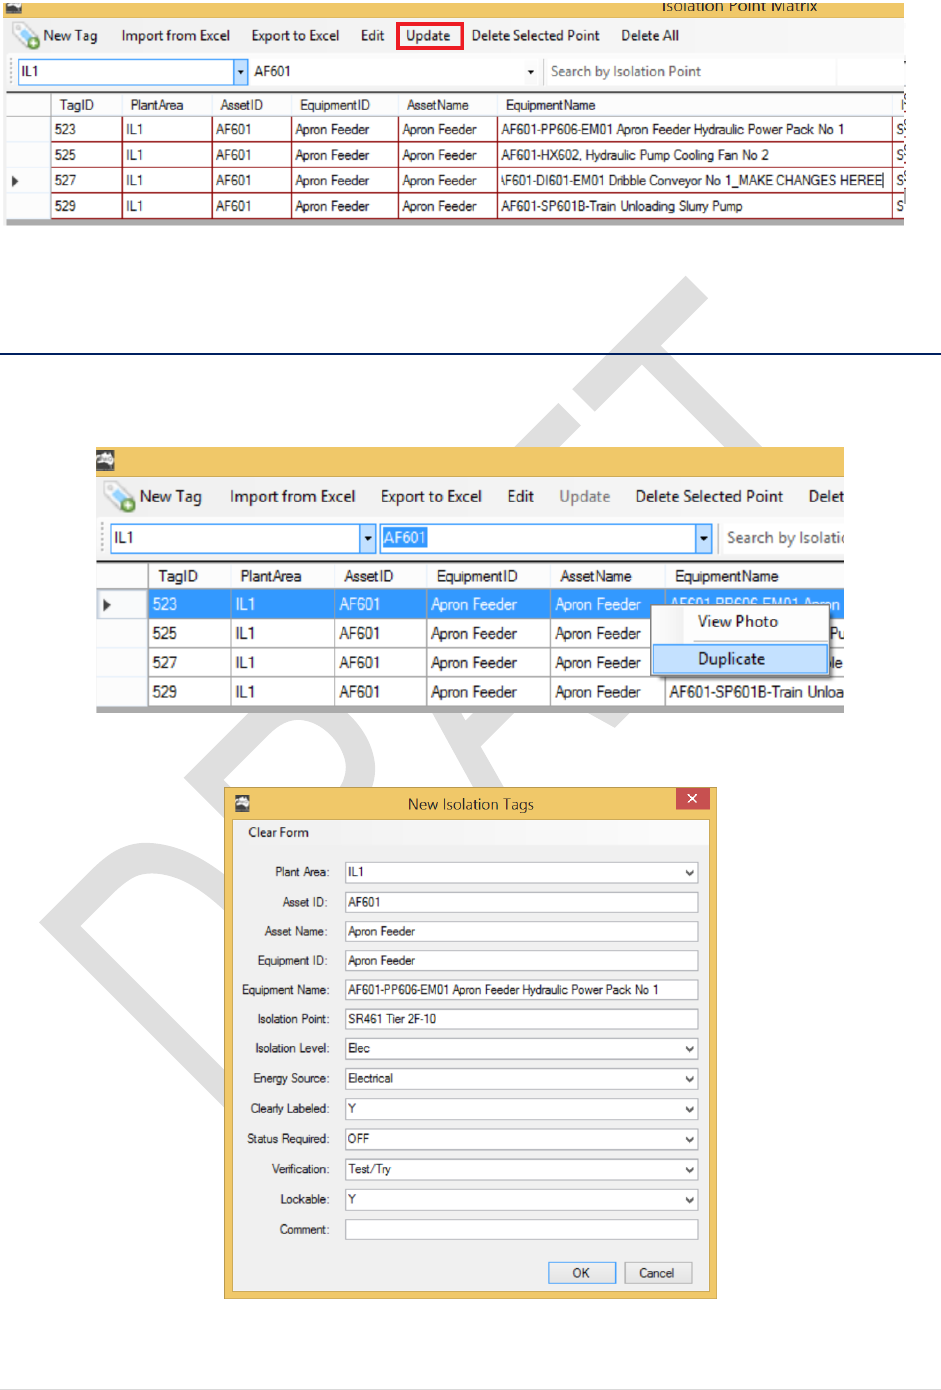
7.5 Duplicate Isolation Tag
1. To duplicate a Tag, Right-click a point. Select Duplicate
2. New form will pop up, fill in the details and click OK
71 | P a g e
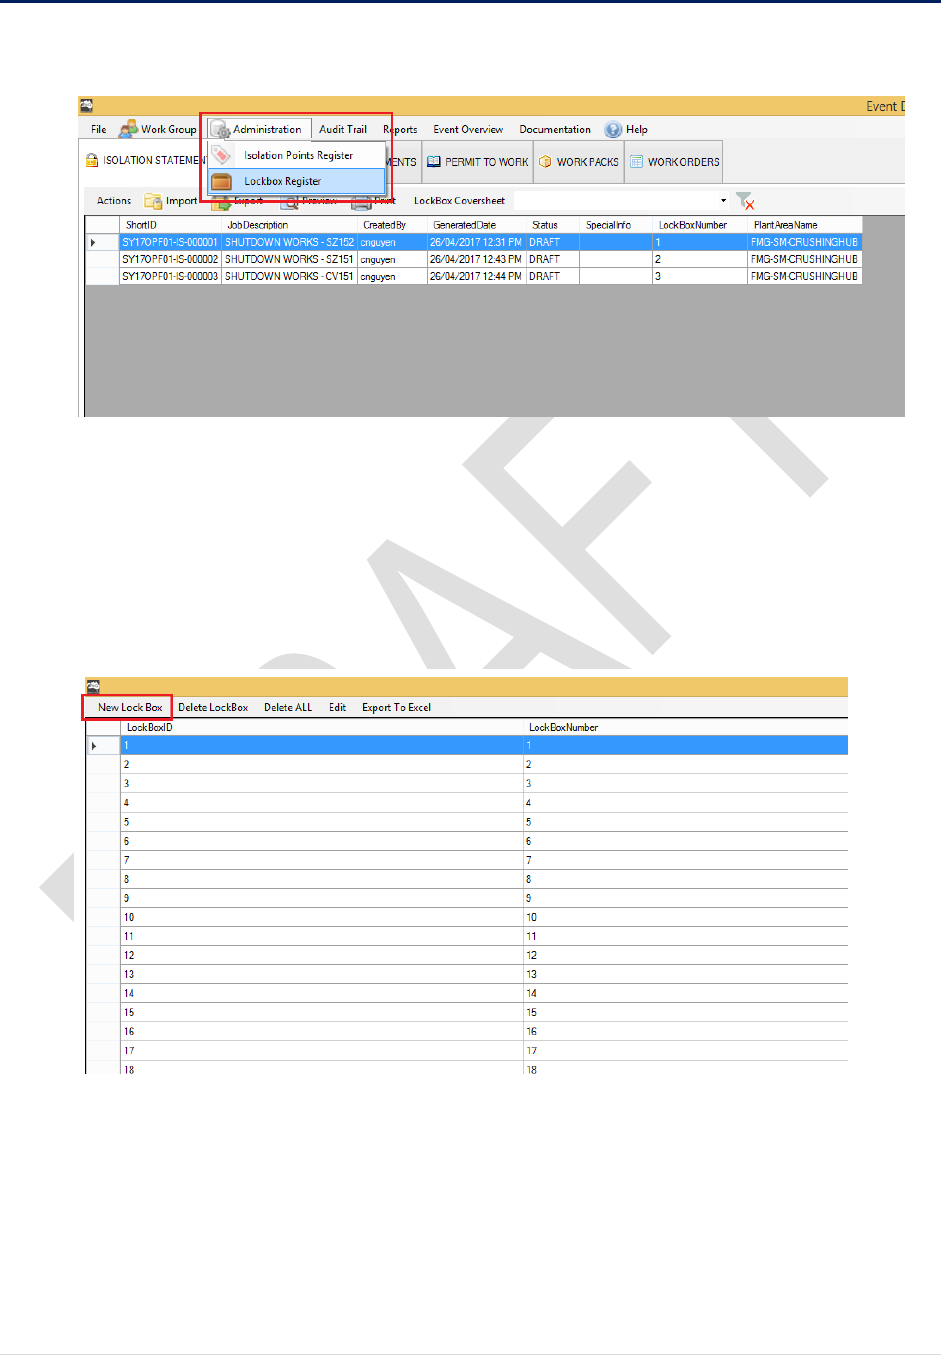
7.6 Add New Lock Box
1. From the Event Details Window. Click on Administration > Lockbox Register
2. Right-click an isolation Point > View Photo
3. A New window will popup. Click on New Lock Box
4. Enter the Lock box details. Click SAVE to proceed
72 | P a g e
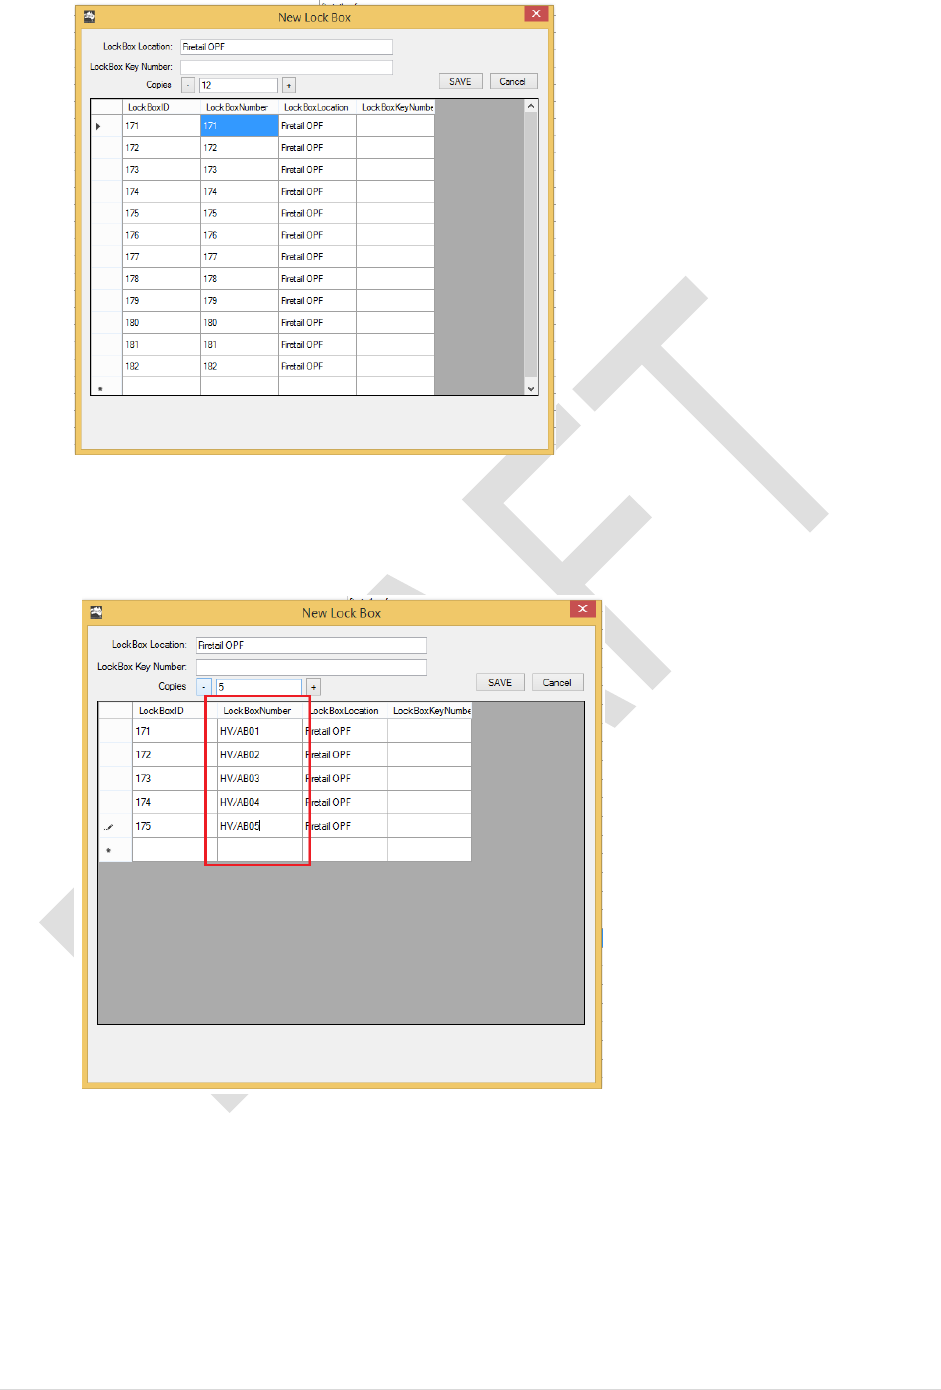
Note: you may also add custom lockbox names for example:
Double click on the LockBoxNumber Cell to edit
End of Procedure
