Painless Docker Basic Edition: A Practical Guide To Master And Its Ecosystem Based On Real World Examples Edition Real%
User Manual: Pdf
Open the PDF directly: View PDF ![]() .
.
Page Count: 375 [warning: Documents this large are best viewed by clicking the View PDF Link!]
- Introduction
- Preface
- Chapter I - Introduction To Docker & Containers
- Chapter II - Installation & Configuration
- Chapter III - Basic Concepts
- Chapter IV - Advanced Concepts
- Chapter V - Working With Docker Images
- Chapter VI - Working With Docker Containers
- Chapter VII - Working With Docker Machine
- Chapter VIII - Docker Networking
- Chapter IX - Composing Services Using Compose
- Chapter X - Docker Logging
- Chapter XI - Docker Debugging And Troubleshooting
- Chapter XII - Orchestration - Docker Swarm
- Chapter XIII - Orchestration - Kubernetes
- Chapter XIV - Orchestration - Rancher/Cattle
- Chapter XV - Docker API
- Chapter XVI - Docker Security
- Chapter XVII - Docker, Containerd & Standalone Runtimes Architecture
- Final Words

Table of Contents
1. Introduction 1.1
2. Preface 1.2
3. Chapter I - Introduction To Docker & Containers 1.3
4. Chapter II - Installation & Configuration 1.4
5. Chapter III - Basic Concepts 1.5
6. Chapter IV - Advanced Concepts 1.6
7. Chapter V - Working With Docker Images 1.7
8. Chapter VI - Working With Docker Containers 1.8
9. Chapter VII - Working With Docker Machine 1.9
10. Chapter VIII - Docker Networking 1.10
11. Chapter IX - Composing Services Using Compose 1.11
12. Chapter X - Docker Logging 1.12
13. Chapter XI - Docker Debugging And Troubleshooting 1.13
14. Chapter XII - Orchestration - Docker Swarm 1.14
15. Chapter XIII - Orchestration - Kubernetes 1.15
16. Chapter XIV - Orchestration - Rancher/Cattle 1.16
17. Chapter XV - Docker API 1.17
18. Chapter XVI - Docker Security 1.18
19. Chapter XVII - Docker, Containerd & Standalone Runtimes Architecture 1.19
20. Final Words 1.20

Painless Docker
About The Author
Aymen is a Cloud & Software Architect, Entrepreneur, Author, CEO of Eralabs, A DevOps & Cloud Consulting
Company and Founder of DevOpsLinks Community.
He has been using Docker since the word Docker was just a buzz. He worked on web development, system
engineering, infrastructure & architecture for companies and startups. He is interested in Docker, Cloud Computing,
the DevOps philosophy, the lean programming and the tools/methodologies.
You can find Aymen on Twitter.
Don't forget to join DevOpsLinks & Shipped newsletters and the community Job Board JobsForDevOps. You can
also follow this course Twitter account for future updates.
Wishing you a pleasant reading.
Disclaimer
Docker and the Docker logo are trademarks or registered trademarks of Docker, Inc. in the United States and/or
other countries.
Preface
Docker is an amazing tool, may be you have tried using or testing it or may be you started using it in some or all of
your production servers but managing and optimizing it can be complex very quickly, if you don't understand some
basic and advanced concepts that I am trying to explain in this book.
The fact that the ecosystem of containers is rapidly changing is also a constraint to stability and a source of
confusion for many operation engineers and developers.
Most of the examples that can be found in some blog posts and tutorials are -in many cases- promoting Docker or
giving tiny examples, managing and orchestrating Docker is more complicated, especially with high-availability
constraints.
This containerization technology is changing the way system engineering, development and release management are
working since years, so it requires all of your attention because it will be one of the pillars of future IT technologies
if it is not actually the case.
At Google, everything runs in a container. According to The Register, two billion containers are launched every
week. Google has been running containers since years, when containerization technologies were not yet
democratized and this is one of the secrets of the performance and ops smoothness of Google search engine and all
of its other services.
Some years ago, I was in doubt about Docker usage, I played with Docker in testing machines and I decided later to
use it in production. I have never regretted my choice, some months ago I created a self-service in my startup for
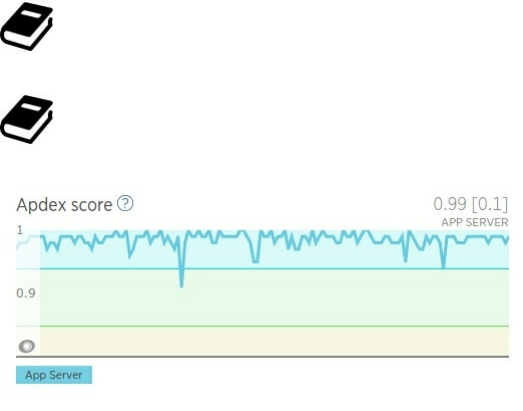
developers : an internal scalable PaaS - that was awesome ! I gained more than 14x on some production metrics and
I realized my goal of having a service with SLA and Appdex score of 99%.
Appdex (Application Performance Index) is an open standard that defines a standardized method to report,
benchmark, and track application performance.
SLA (Service Level Agreement) is a contract between a service provider (either internal or external) and the
end user that defines the level of service expected from the service provider.
It was not just the usage of Docker, this would be too easy, it was a list of todo things, like moving to micro-services
and service-oriented architectures, changing the application and the infrastructure architecture, continuous
integration ..etc But Docker was one of the most important things on my checklist, because it smoothed the whole
stack's operations and transormation, helped me out in the continuous integration and the automation of routine task
and it was a good platform to create our own internal PaaS.
Some years ago, computers had a central processing unit and a main memory hosted in a main machine, then come
mainframes whose were inspired from the latter technology. Just after that, IT had a new born called virtual
machines. The revolution was in the fact that a computer hardware using a hypervisor, allows a single machine to
act as if it where many machines. Virtual machines were almost run in on-premise servers, but since the emergence
of cloud technologies, VMs have been moved to the cloud, so instead of having to invest heavily in data centers and
physical servers, one can use the same virtual machine in the infrastructure of servers providers and benefit from the
'pay-as-you-go' cloud advantage.
Over the years, requirements change and new problems appears, that's why solutions also tends to change and new
technologies emerge.
Nowadays, with the fast democratization of software development and cloud infrastructures, new problems appears
and containers are being largely adopted since they offer suitable solutions.
A good example of the arising problems is supporting software environment in an identical environment to the
production when developing.Weird things happen when your development and testing environments are not the
same, same thing for the production environments. In this particular case, you should provide and distribute this
environment to your R&D and QA teams.
But running a Node.js application that has 1 MB of dependencies plus the 20MB Node.js runtime in a Ubuntu 14.04
VM will take you up to 1.75 GB. It's better to distribute a small container image than 1G of unused libraries..
Containers contains only the OS libraries and Node.js dependencies, so rather than starting with everything
included, you can start with minimum and then add dependencies so that the same Node.js application will be 22
times smaller! When using optimized containers, you could run more applications per host.
Containers are a problem solver and one of the most sophisticated and adopted containers solutions is Docker.

To Whom Is This Book Addressed ?
To developers, system administrators, QA engineers, operation engineers, architects and anyone faced to work in
one of these environments in collaboration with the other or simply in an environment that requires knowledge in
development, integration and system administration.
The most common idea is that developers think they are here to serve the machines by writing code and
applications, systems administrators think that machines should works for them simply by making them happy
(maintenance, optimization ..etc ).
Moreover, within the same company there is generally some tension between the two teams:
System administrators accuse developers to write code that consumes memory, does not meet system
security standards or not adapted to available machines configuration.
Developers accuse system administrators to be lazy, to lack innovation and to be seriously uncool!
No more mutual accusations, now with the evolution of software development, infrastructure and Agile engineering,
the concept of DevOps was born.
DevOps is more a philosophy and a culture than a job (even if some of the positions I occupied were called
"DevOps"). By admitting this, this job seeks closer collaboration and a combination of different roles involved in
software development such as the role of developer, responsible for operations and responsible of quality assurance.
The software must be produced at a frenetic pace while at the same time the developing in cascade seems to have
reached its limits.
If you are a fan of service-oriented architectures, automation and the collaboration culture
if you are a system engineer, a release manager or an IT administrator working on DevOps, SysOps
or WebOps
If you are a developer seeking to join the new movement
This book is addressed to you. Docker one the most used tools in DevOps environments.
And if you are new to Docker ecosystem and no matter what your Docker level is, through this book, you will firstly
learn the basics of Docker (installation, configuration, Docker CLI ..etc) and then move easily to more complicated
things like using Docker in your development, testing and live environments.
You will also see how to write your own Docker API wrapper and then master Docker ecosystem, form
orchestration, continuous integration to configuration management and much more.
I believe in learning led by practical real-world examples and you ill be guided through all of this book by tested
examples.
How To Properly Enjoy This Book
This book contains technical explanations and shows in each case an example of a command or a configuration to
follow. The only explanation gives you a general idea and the code that follows gives you convenience and help you
to practice what you are reading. Preferably, you should always look both parts for a maximum of understanding.
Like any new tool or programming language you learned, it is normal to find difficulties and confusions in the
beginning, perhaps even after. If you are not used to learn new technologies, you can even have a modest
understanding while being in an advanced stage of this book. Do not worry, everyone has passed at least once by
this kind of situations.
At the beginning you could try to make a diagonal reading while focusing on the basic concepts, then you could try
the first practical manipulation on your server or using your laptop and occasionally come back to this book for
further reading on a about a specific subject or concept.
This book is not an encyclopedia but sets out the most important parts to learn and even to master Docker and its
fast-growing ecosystem. If you find words or concepts that you are not comfortable with, just try to take your time
and do your own on-line research.
Learning can be serial so understanding a topic require the understanding of an other one, do not lose patience : You
will go through chapters with good examples of explained and practical use cases.
Through the examples, try to showcase your acquired understanding, and, no, it will not hurt to go back to previous
chapters if you are unsure or in doubt.
Finally, try to be pragmatic and have an open mind if you encounter a problem. The resolution begins by asking the
right questions.

Conventions Used In This Book
Basically, this is a technical book where you will find commands (Docker commands) and code (YAML, Python
..etc).
Commands and code are written in a different format.
Example :
docker run hello-world
This book uses italic font for technical words such as libraries, modules, languages names. The goal
is to get your attention when you are reading and help you identify them.
You will find two icons, I have tried to be as simple as possible so I have chosen not to use too many
symbols, you will only find:
To highlight useful and important information.
To highlight a warning or a cautionary advice.
Some containers/services/networks identifiers are long to be well formatted, you will find for example some ids in
this format 4..d , e..3 : instead of writing all of the string : 4lrmlrazrlm4213lkrnalknra125009hla94l1419u14N14d , I only use
the first and the last character, which gives 4..d .

How To Contribute And Support This Book ?
This work will be always a work in progress but it does not mean that it is not a complete learning resource - writing
a perfect book is impossible on the contrary of iterative and continuous improvement.
I am an adopter of the lean philosophy so the book will be continuously improved in function of many criteria but
the most important one is your feedback.
I imagine that some readers do not know how "Lean publishing" works. I'll try to explain briefly:
Say, the book is 25% complete, if you pay for it at this stage, you will pay the price of the 25% but get all of the
updates until 100%.
Another point, lean publishing for me is not about money, I refused several interesting offers from known publishers
because I want to be free from restrictions and DRM ..etc
If you have any suggestion or if you encountered a problem, it would be better to use a tracking system for issues
and recommendations about this book, I recommend using this github repository.
You can find me on Twitter or you can use my blog contact page if you would like to get in touch.
This book is not perfect, so you can find typo, punctuation errors or missing words.
Contrariwise every line of the used code, configurations and commands was tested before.
If you enjoyed reading Painless Docker and would like to support it, your testimonials will be more than welcome,
send me an email, if you need a development/testing server to manipulate Docker, I recommend using Digital
Ocean, you can also show your support by using this link to sign up.
If you wan to join more than 1000 developers, SRE engineers, sysadmins and IT experts, you can subscribe to a
DevOpsLinks community and you will be invited to join our newsletter and join out team chat.

Chapter I - Introduction To Docker & Containers
o ^__^
o (oo)\_______
(__)\ )\/\
||----w |
|| ||
What Are Containers
"Containers are the new virtualization." : This is what pushed me to adopt containers, I have been always curious
about the virtualization techniques and types and containers are - for me - a technology that brings together two of
my favorite fields: system design and software engineering.
Container like Docker is the technology that allows you to isolate, build, package, ship and run an application.
A container makes it easy to move an application between development, testing, staging and production
environments.
Containers exist since years now, it is not a new revolutionary technology: The real value it gives is not the
technology itself but getting people to agree on something. In the other hand, it is experiencing a rebirth with easy-
to-manage containerization tools like Docker.
Containers Types
The popularity of Docker made some people think that it is the only container technology but there are many others.
Let's enumerate most of them.
System administrators will be more knowledgeable about the following technologies but this book is not just for
Linux specialists, operation engineers and system architects, it is also addressed to developers and software
architects.
The following list is ordered from the least to the most recent technology.
Chroot Jail
Historically, the first container was the chroot.
Chroot is a system call for nix OSs that changes the root directory of the current running process and their children.
The process running in a chroot jail will not know about the real filesystem root directory.
A program that is run in such environment cannot access files and commands outside that environmental directory
tree. This modified environment is called a chroot jail.
FreeBSD Jails
The FreeBSD jail mechanism is an implementation of OS-level virtualization.
A FreeBSD-based operating system could be partitioned into several independent jails. While chroot jail restricts
processes to a particular filesystem view, the FreeBSD is an OS-level virtualization: A jail restricting the activities of
a process with respect to the rest of the system. Jailed processes are "sandboxed".
Linux-VServer
Linux-VServer is a virtual private server using OS-level virtualization capabilities that was added to the Linux
Kernel.
Linux-VServer technology has many advantages but its networking is based on isolation, not virtualization which
prevents each virtual server from creating its own internal routing policy.
Solaris Containers
Solaris Containers are an OS-level virtualization technology for x86 and SPARC systems. A Solaris Container is a
combination of system resource controls and the boundary separation provided by zones.
Zones are the equivalent of completely isolated virtual servers within a single OS instance. System administrators
place multiple sets of application services onto one system and place each into isolated Sloaris Container.
OpenVZ
Open Virtuozzo or OpenVZ is also OS-level virtualization technology for Linux. OpenVZ allows system
administrators to run multiple isolated OS instances (containers), virtual private servers or virtual environments.

Process Containers
Engineers at Google (primarily Paul Menage and Rohit Seth) started the work on this feature in 2006 under the
name "Process Containers". It was then called cgroups (Control Groups). We will see more details about cgroups
later in this book.
LXC
Linux Containers or LXC is an OS-level virtualization technology that allows running multiple isolated Linux
systems (containers) on a control host using a single Linux kernel. LXC provides a virtual environment that has its
own process and network space. It relies on cgroups (Process Containers).
The difference between Docker and LXC is detailed later in this book.
Warden
Warden used LXC at its initial stage and was later on replaced with a CloudFoundry implementation. It provides
isolation to any other system than Linux that support isolation.
LMCTFY
Let Me Contain That For You or LMCTFY is the Open Source version of Google’s container stack, which provides
Linux application containers.
Google engineers have been collaborating with Docker over libcontainer and porting the core lmctfy concepts and
abstractions to libcontainer.
The project is not actively being developed, in future the core of lmctfy will be replaced by libcontainer.
Docker
This is what we are going to discover in this book.
RKT
CoreOs started building a container called rkt (pronounce Rocket).
CoreOs is designing rkt following the original premise of containers that Docker introduced but with more focus on:
Composable ecosystem
Security
A different image distribution philosophy
Openness
rkt is Pod-native which means that its basic unit of execution is a pod, linking together resources and user
applications in a self-contained environment.
Introduction To Docker
Docker is a containerization tool with a rich ecosystem that was conceived to help you develop, deploy and run any
application, anywhere.
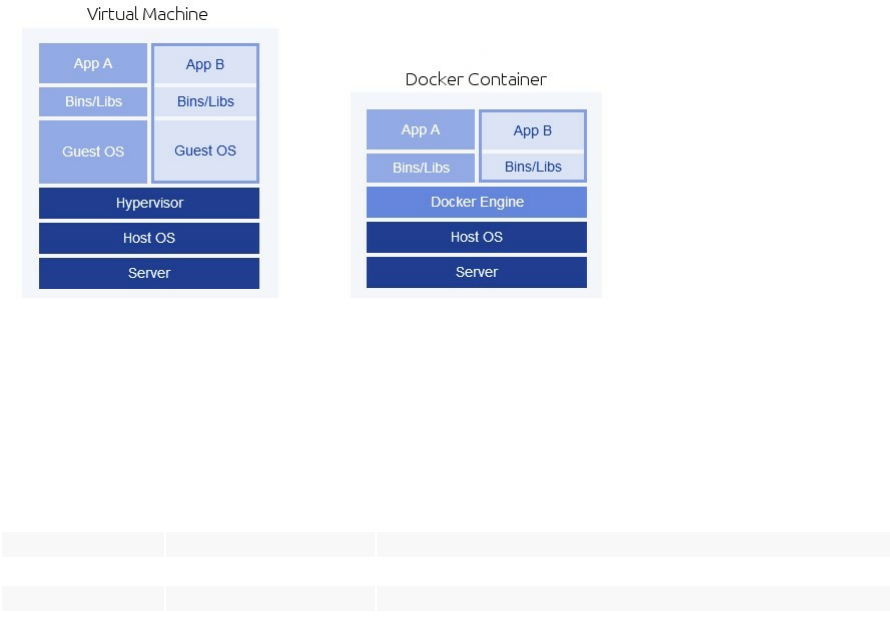
Unlike a traditional virtual machine, Docker container share the resources of the host machine without needing an
intermediary (a hypervisor) and therefore you don't need to install an operating system. It contains the application
and its dependencies, but works in an isolated and autonomous way.
In other words, instead of a hypervisor with a guest operating system on top, Docker uses its engine and containers
on top.
Most of us used to use virtual machines, so why containers and Docker are taking an important part of today
infrastructures ?
This table explains briefly the difference and the advantages of using Docker over a VM:
VM Docker
Size Small CoreOs = 1.2GB A Busybox container = 2.5 MB
Startup Time Measured in minutes An optimized Docker container, will run in less that a second
Integration Difficult More open to be integrated to other tools
Dependency Hell Frustration Docker fixes this
Versionning No Yes
Docker is a process isolation tool that used LXC (an operating-system-level virtualization method for running
multiple isolated Linux systems (containers) on a control host using a single Linux Kernel) until the version 0.9.
The basic difference between LXC and VMs is that with LXC there is only one instance of Linux Kernel running.
For curious readers, LXC was replaced by Docker own libcontainer library written in the Go programming
language.
So, a Docker container isolate your application running in a host OS, the latter can run many other containers. Using
Docker and its ecosystem, you can easily manage a cluster of containers, stop, start and pause multiple applications,
scale them, take snapshots of running containers, link multiple services running Docker, manage containers and
clusters using APIs on top of them, automate tasks, create applications' watchdogs and many other features that are
complicated without containers.
Using this book, you will learn how to use all of these features and more.

What Is The Relation Between The Host OS And Docker
In a simple phrase, the host OS and the container share the same Kernel.
If you are running Ubuntu as a host, container's Kernel is going to use the same Kernel as Ubuntu system, but you
can use CentOs or any other OS image inside your container. That is why the main difference between a virtual
machine and a Docker container is the absence of an intermediary part between the Kernel and the guest, Docker
takes place directly within your host's Kernel.
You are probably saying "If Docker's using the host Kernel, why should I install an OS within my container ?".
You are right, in some cases you can use Docker's scratch image, which is an explicitly empty image, especially for
building images from scratch. This is useful for containers that contain only a single binary and whatever it requires,
such as the "hello-world" container that we are going to use in the next section.
So Docker is a process isolation environment and not an OS isolation environment (like virtual machines), you can,
as said, use a container without an OS. But imagine you want to run an Nginx or an Apache container, you can run
the server's binary, but you will need to access the file system in order to configure nginx.conf, apache.conf,
httpd.conf ..etc or the available/enabled sites configurations.
In this case, if you run a containers without an OS, you will need to map folders from the container to the host like
the /etc directory (since configuration files are under /etc).
You can actually do it but you will lose the change management feature that docker containers offers: So every
change within the container file system will be also mapped to the host file system and even if you map them on
different folders, things could become complex with advanced production/development scenarios and environments.
Therefore, amongst other reasons, Docker containers running an OS are used for portability and change
management.
In the examples explained in this book, we often rely on official images that can be found in the official Docker hub,
we will also create some custom images.

What Does Docker Add To LXC Tools ?
LXC owes its origin to the development of cgroups and namespaces in the Linux kernel. One of the most asked
questions on the net about Docker is the difference between Docker and VMs but also the difference between
Docker and LXC.
This question was asked in Stackoverflow and I am sharing the response of Solomon Hykes (the creator of Docker)
pusblished under CC BY-SA 3.0 license:
Docker is not a replacement for LXC. LXC refers to capabilities of the Linux Kernel (specifically namespaces and
control groups) which allow sandboxing processes from one another, and controlling their resource allocations.
On top of this low-level foundation of Kernel features, Docker offers a high-level tool with several powerful
functionalities:
Portable deployment across machines
Docker defines a format for bundling an application and all its dependencies into a single object which can be
transferred to any docker-enabled machine, and executed there with the guarantee that the execution environment
exposed to the application will be the same. LXC implements process sandboxing, which is an important pre-
requisite for portable deployment, but that alone is not enough for portable deployment. If you sent me a copy of
your application installed in a custom LXC configuration, it would almost certainly not run on my machine the way
it does on yours, because it is tied to your machine's specific configuration: networking, storage, logging, distro, etc.
Docker defines an abstraction for these machine-specific settings, so that the exact same Docker container can run -
unchanged - on many different machines, with many different configurations.
Application-centric
Docker is optimized for the deployment of applications, as opposed to machines. This is reflected in its API, user
interface, design philosophy and documentation. By contrast, the LXC helper scripts focus on containers as
lightweight machines - basically servers that boot faster and need less ram. We think there's more to containers than
just that.
Automatic build
Docker includes a tool for developers to automatically assemble a container from their source code, with full control
over application dependencies, build tools, packaging etc. They are free to use make, Maven, Chef, Puppet,
SaltStack, Debian packages, RPMS, source tarballs, or any combination of the above, regardless of the
configuration of the machines.
Versioning
Docker includes git-like capabilities for tracking successive versions of a container, inspecting the diff between
versions, committing new versions, rolling back etc. The history also includes how a container was assembled and
by whom, so you get full traceability from the production server all the way back to the upstream developer. Docker
also implements incremental uploads and downloads, similar to git pull , so new versions of a container can be
transferred by only sending diffs.
Component re-use
Any container can be used as an "base image" to create more specialized components. This can be done manually or
as part of an automated build. For example you can prepare the ideal Python environment, and use it as a base for 10
different applications. Your ideal PostgreSQL setup can be re-used for all your future projects. And so on.

Sharing
Docker has access to a public registry (https://registry.hub.docker.com/) where thousands of people have uploaded
useful containers: anything from Redis, Couchdb, PostgreSQL to IRC bouncers to Rails app servers to Hadoop to
base images for various distros. The registry also includes an official "standard library" of useful containers
maintained by the Docker team. The registry itself is open-source, so anyone can deploy their own registry to store
and transfer private containers, for internal server deployments for example.
Tool ecosystem
Docker defines an API for automating and customizing the creation and deployment of containers. There are a huge
number of tools integrating with Docker to extend its capabilities. PaaS-like deployment (Dokku, Deis, Flynn),
multi-node orchestration (Maestro, Salt, Mesos, OpenStack Nova), management dashboards (Docker-UI, OpenStack
horizon, Shipyard), configuration management (chef, puppet), continuous integration (jenkins, strider, travis), etc.
Docker is rapidly establishing itself as the standard for container-based tooling.

Docker Use Cases
Docker has many use cases and advantages:
Versionning & Fast Deployment
Docker registry (or Docker Hub) could be considered as a version control system for a given application. Rollbacks
and updates are easier this way.
Just like Github, BitBucket or any other Git system, you can use tags to tag your images versions. Imagine you can
tag differently a container with each application release, it will be easier to deploy and rollback to the n-1 release.

As you may already know, Git-like systems gives you commit identifiers like 2.1-3-xxxxxx , these are not tags, you
can also use your Git system to tag you code, but for deployment you will need to download these tags or their
artifacts.
If your fellow developers are working on an application with thousands of packages dependencies like JavaScript
apps (using the package.json), you may be facing a deployment of an application with very small files to download
or update with probably some new configurations. A single Docker image with your new code, already builded and
tested and configurations will be easier and faster to ship and deploy.
Tagging is done with docker tag command, these tags are the base for the commit. Docker versionning and tagging
system is working also in this way.
Distribution & Collaboration
If you would like to share images and containers, Docker allows this social feature so that anyone can contribute to a
public (or private) image.
Individuals and communities can collaborate and share images. Users can also vote for images. In Docker Hub, you
can find trusted (official) and community images.
Some images have a continuous build and security scan feature to keep them up-to-date.
Multi Tenancy & High Availability
Using the right tools from the ecosystem, it is easier to run many instances of the same application in the same
server with Docker than the "main stream" way.
Using a proxy, a service discovery and a scheduling tool, you can start a second server (or more) and load-balance
your traffic between the cluster nodes where your containers are "living".
CI/CD
Docker is used in production systems but it is considered as a tool to run the same application in developer's
laptop/server. Docker may move from development to QA to production without being changed. If you would like
to be as close as possible to production, then Docker is a good solution.
Since it solves the problem of "it works on my machine", it is important to highlight this use case. Most problems in
software development and operations are due to the differences between development and production environments.
If your R&D team use the same image that QA team will test against and the same environment will be pushed to
live servers, it is sure that a great part of the problems (dev vs ops) will disappear.
There are many DevOps topologies in the software industry now and "container-centric" (or "container-based")
topology is one of them.
This topology makes both Ops and Dev teams share more responsabilities in common, which is a DevOps approach
to blur the boundaries between teams and encourage the co-creation.
Isolation & The Dependency Hell
Dockerizing an application is also isolating it into a separate environment.
Imagine you have to run two APIs with two different languages or running them with the same language but with
different versions.
You may need two incompatible versions of the same language, each API is running one of them, for example
Python 2 and Python 3.
If the two apps are dockerized, you don't need to install nothing on your host machine, just Docker, every version
will run in an isolated environment.
Since I start running Docker in production, most of my apps were dockerized, I stopped using the host system
package manager since that time, every new application or middleware were installed inside the container.
Docker simplifies the system packages management and eliminates the "dependency hell" by its isolation feature.
Using The Ecosystem
You can use Docker with multiple external tools like configuration management tools, orchestration tools, file
storage technologies, filesystem types, logging softwares, monitoring tools, self-healing tools ..etc
On the other hand, even with all the benefits of Docker, it is not always the best solution to use, there are always
exceptions.

Chapter II - Installation & Configuration
o ^__^
o (oo)\_______
(__)\ )\/\
||----w |
|| ||
In Painless Docker book, we are going to use a Docker version superior or equal to the 1.12.
I used to use previous stable version like 1.11, but a new important feature which is the Swarm Mode was introduced
in version 1.12. Swarm orchestration technology is directly integrated into Docker and just before it was an add-on.
I am a GNU/Linux user, but for Windows and Mac users, Docker unveiled with the same version, the first full
desktop editions of the software for development on Mac and Windows machines.
There are many other interesting features, enhancements and simplifications in the version 1.12 of Docker, you can
find the whole list in Docker github repository.
If you are completely new to Docker, you will not get all of the new following features, but you will be able to
understand them as you go along with this book.
The most important new features in Docker 1.12 are about the Swarm Mode:
Built-in Virtual-IP based internal and ingress load-balancing using IPVS
Routing Mesh using ingress overlay network
New swarm command to manage swarms with these subcommands:
init ,
join ,
join-token ,
leave ,
update
New service command to manage swarm-wide services with create , inspect , update , rm , ps
subcommands
New node command to manage nodes with accept , promote , demote , inspect , update , ps , ls and rm
subcommands
New stack and deploy commands to manage and deploy multi-service applications
Add support for local and global volume scopes (analogous to network scopes)
Other important features in Docker were introduced in preceding versions like the multi-build support in the version
v17.05.0-ce.
When writing this book, I used Ubuntu 16.04 server edition with a 64 bit architecture as my main operating system,
but you will see how to install Docker in other OSs like Windows and MacOS.
For other Linux distributions users, things are not really different, except the package manager (apt/aptitude) that
you should replace by your own one - we are going to explain the installation for other distributions like CentOs.

Requirements & Compatibility
Docker itself does not need many resources so a little RAM could help you install and run Docker engine. But
running containers depends on what are you running exactly, in the case you are running a Mysql or a busy
MongoDB inside a container, you will need more memory than running a small Nodejs or Python application .
Docker requires a 64 bit Kernel.
For developers using Windows or Mac, you have the choice to use Docker Toolbox or native Docker. Native Docker
is for sure faster but you still have the choice.
If you will use Docker Toolbox:
Mac users: Your Mac must be running OS X 10.8 "Mountain Lion" or newer to run Docker.
Windows users: Your machine must have a 64-bit operating system running Windows 7 or higher. You should
have an enabled virtualization.
If you prefer Docker for Mac as it is mentioned in the official Docker website:
Your Mac must be a 2010 or newer model, with Intel’s hardware support for memory management unit (MMU)
virtualization; i.e., Extended Page Tables (EPT) OS X 10.10.3 Yosemite or newer
You must have at least 4GB of RAM
You must have VirtualBox prior to version 4.3.30 must NOT be installed (it is incompatible with Docker for
Mac : uninstall the older version of VirtualBox and re-try the install if you already missed this).
And if you prefer Docker for Windows:
Your machine should have a 64bit Windows 10 Pro, Enterprise and Education (1511 November update, Build
10586 or later).
The Hyper-V package must be enabled and if it will be installed by Docker for Windows installer, it will enable
it for you

Installing Docker On Linux
Docker is supported by all Linux distributions satisfying the requirements, but not with all of the versions and this is
due to compatibility of Docker with old Kernel versions.
Kernels older than 3.10 will not support Docker and can cause data loss or any other bugs.
Check your Kernel by typing:
uname -r
Docker recommends making an upgrade, a dist upgrade and having the latest Kernel version for your servers before
using it in production.
Ubuntu
For Ubuntu, only those versions are supported to run and manage containers:
Ubuntu Xenial 16.04 (LTS)
Ubuntu Wily 15.10
Ubuntu Trusty 14.04 (LTS)
Ubuntu Precise 12.04 (LTS)
Update your package manager, add the apt key & Docker list then type the update command.
sudo apt-get update
sudo apt-get install apt-transport-https ca-certificates
sudo apt-key adv --keyserver hkp://p80.pool.sks-keyservers.net:80 --recv-keys 58118E89F3A912897C070ADBF76221572C52609D
echo "deb https://apt.dockerproject.org/repo ubuntu-trusty main"|tee -a /etc/apt/sources.list.d/docker.list
sudo apt-get update
Purge the old lxc-docker if you were using it before and install the new Docker Engine:
sudo apt-get purge lxc-docker
sudo apt-get install docker-engine
If you need to run Docker without root rights (with your actual user), run the following commands:
sudo groupadd docker
sudo usermod -aG docker $USER
If everything was ok, then running this command will create a container that will print a Hello World message than
exits without errors:
docker run hello-world
There is a good explanation about how Docker works in the output, if you have not noticed it, here it is:
Hello from Docker!
This message shows that your installation appears to be working correctly.

To generate this message, Docker took the following steps:
1. The Docker client contacted the Docker daemon.
2. The Docker daemon pulled the "hello-world" image from the Docker Hub.
3. The Docker daemon created a new container from that image which runs the
executable that produces the output you are currently reading.
4. The Docker daemon streamed that output to the Docker client, which sent it
to your terminal.
CentOS
Docker runs only on CentOS 7.X. Same installation may apply to other EL7 distributions (but they are not supported
by Docker)
Add the yum repo.
sudo tee /etc/yum.repos.d/docker.repo <<-'EOF'
[dockerrepo]
name=Docker Repository
baseurl=https://yum.dockerproject.org/repo/main/centos/7/
enabled=1
gpgcheck=1
gpgkey=https://yum.dockerproject.org/gpg
EOF
Install Docker:
sudo yum install docker-engine
Start its service:
sudo service docker start
Set the daemon to run at system boot:
sudo chkconfig docker on
Test the Hello World image:
docker run hello-world
If you see a similar output to the following one, than your installation is fine:
Unable to find image 'hello-world:latest' locally
latest: Pulling from library/hello-world
c04b14da8d14: Pull complete
Digest: sha256:0256e8a36e2070f7bf2d0b0763dbabdd67798512411de4cdcf9431a1feb60fd9
Status: Downloaded newer image for hello-world:latest
Hello from Docker!
This message shows that your installation appears to be working correctly.
To generate this message, Docker took the following steps:
1. The Docker client contacted the Docker daemon.
2. The Docker daemon pulled the "hello-world" image from the Docker Hub.
3. The Docker daemon created a new container from that image which runs the
executable that produces the output you are currently reading.
4. The Docker daemon streamed that output to the Docker client, which sent it
to your terminal.

To try something more ambitious, you can run an Ubuntu container with:
$ docker run -it ubuntu bash
Share images, automate workflows, and more with a free *Docker Hub* account:
https://hub.docker.com
For more examples and ideas, visit:
https://docs.docker.com/engine/userguide/
Now if you would like to create a Docker group and add your current user to it in order to avoid running command
with sudo privileges :
sudo groupadd docker
sudo usermod -aG docker $USER
Verify your work by running the hello-world container without sudo.
Debian
Only:
Debian testing stretch (64-bit)
Debian 8.0 Jessie (64-bit)
Debian 7.7 Wheezy (64-bit) (backports required)
are supported.
We are going to use the installation for Weezy. In order to install Docker on Jessie (8.0), change the entry for
backports and source.list entry to Jessie.
First of all, enable backports:
sudo su
echo "deb http://http.debian.net/debian wheezy-backports main"|tee -a /etc/apt/sources.list.d/backports.list
apt-get update
Purge other Docker versions if you have already used them:
``` bash
apt-get purge "lxc-docker*"
apt-get purge "docker.io*"
and update you package manager:
apt-get update
Install apt-transport-https and ca-certificates
apt-get install apt-transport-https ca-certificates
Add the GPG key.
apt-key adv --keyserver hkp://p80.pool.sks-keyservers.net:80 --recv-keys 58118E89F3A912897C070ADBF76221572C52609D
Add the repository:

echo "deb https://apt.dockerproject.org/repo debian-wheezy main"|tee -a /etc/apt/sources.list.d/docker.list
apt-get update
And install Docker:
apt-get install docker-engine
Start the service
service docker start
Run the Hello World container in order to check if everything is good:
sudo docker run hello-world
You will have a similar output to the following, if Docker is installed without problems:
Unable to find image 'hello-world:latest' locally
latest: Pulling from library/hello-world
c04b14da8d14: Pull complete
Digest: sha256:0256e8a36e2070f7bf2d0b0763dbabdd67798512411de4cdcf9431a1feb60fd9
Status: Downloaded newer image for hello-world:latest
Hello from Docker!
This message shows that your installation appears to be working correctly.
To generate this message, Docker took the following steps:
1. The Docker client contacted the Docker daemon.
2. The Docker daemon pulled the "hello-world" image from the Docker Hub.
3. The Docker daemon created a new container from that image which runs the
executable that produces the output you are currently reading.
4. The Docker daemon streamed that output to the Docker client, which sent it
to your terminal.
To try something more ambitious, you can run an Ubuntu container with:
$ docker run -it ubuntu bash
Share images, automate workflows, and more with a free *Docker Hub* account:
https://hub.docker.com
For more examples and ideas, visit:
https://docs.docker.com/engine/userguide/
Now, in order to use your current user (not root user) to manage and run Docker, add the docker group if it does not
already exist.
exit # Exit from sudo user
sudo groupadd docker
Add your preferred user to this group:
sudo gpasswd -a ${USER} docker
Restart the Docker daemon.
sudo service docker restart
Test the Hello World container to check if your current user have right to execute Docker commands.

Docker Toolbox
Few months ago, installing Docker for my developers using MacOs and Windows was a pain. Now the new Docker
Toolbox have made things easier. Docker Toolbox is quick and easy installer that will setup a full Docker
environment. The installation includes Docker, Machine, Compose, Kitematic, and VirtualBox.
Docker Toolbox could be downloaded from Docker's wesbite.
Using this tool you will be able to work with:
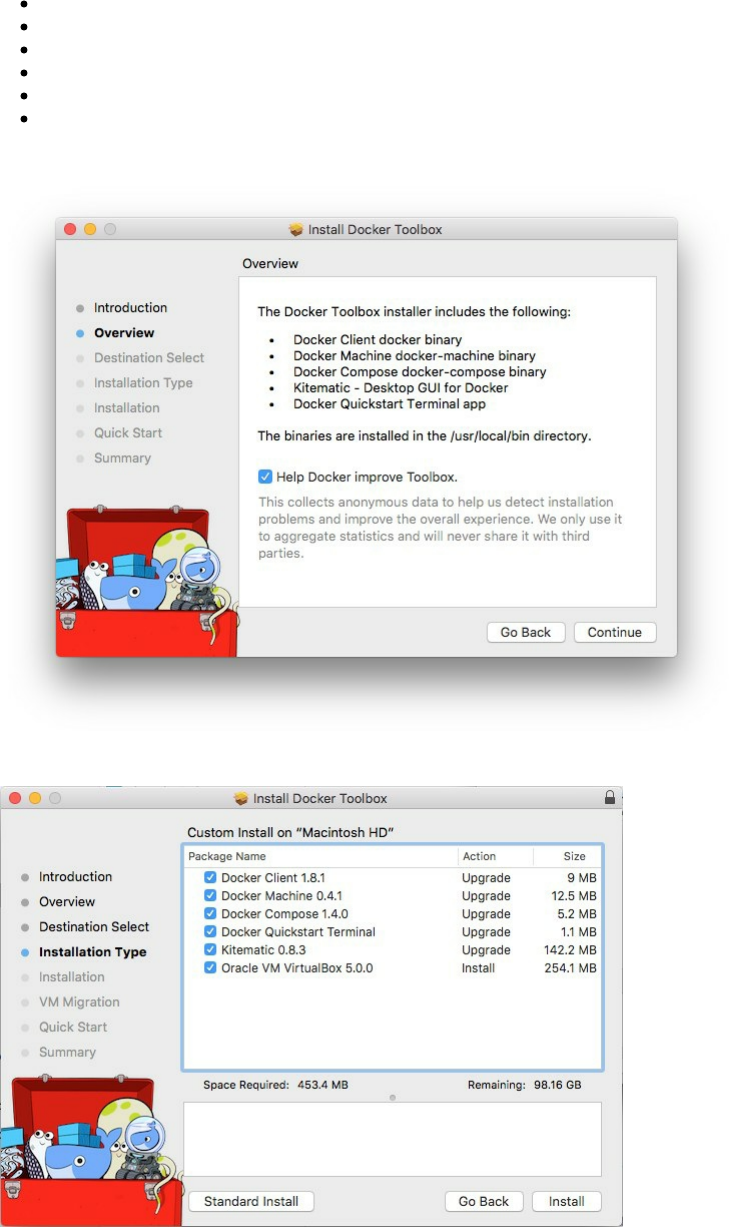
docker-machine commands
docker commands
docker-compose commands
The Docker GUI (Kitematic)
a shell preconfigured for a Docker command-line environment
and Oracle VirtualBox
The installation is quite easy:
This is a screenshot for Docker
If you would like a default installation press "Next" to accept all and then click on Install. If you are running
Windows, make sure you allow the installer to make the necessary changes.
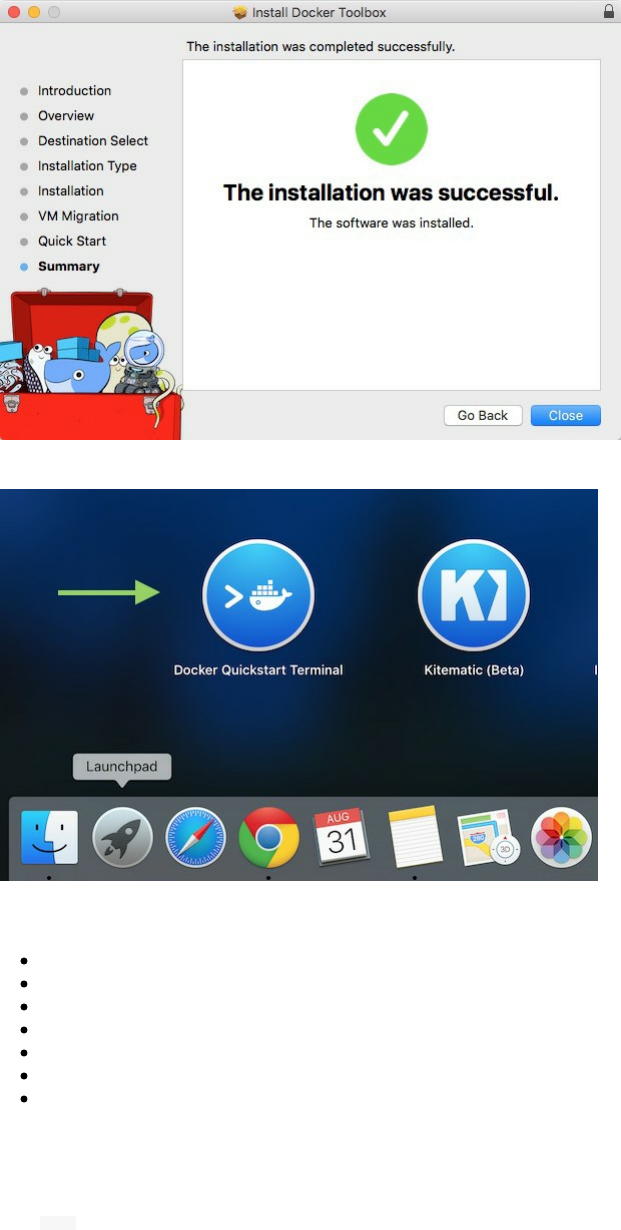
Now that you finished the installation, on the application folder, click on "Docker Quickstart Terminal".
Mac users, type the following command in order to :
Create a machine dev...
Create a VirtualBox VM...
Create SSH key...
Start the VirtualBox VM...
Start the VM...
Start the machine dev
Set the environment variables for machine dev
Windows users you can also follow the following instructions, since there are common commands between the two
OSs.
bash '/Applications/Docker Quickstart Terminal.app/Contents/Resources/Scripts/start.sh'
Running the following command will show you how to connect Docker to this machine:

docker-machine env dev
Now for testing, use the Hello World container:
docker run hello-world
You will probably see this message:
Unable to find image 'hello-world:latest' locally
This is not an error but Docker is saying that the image Hello World will not be used from your local disk but it will
be pulled from Docker Hub.
latest: Pulling from library/hello-world
535020c3e8ad: Pull complete
af340544ed62: Pull complete
Digest: sha256:a68868bfe696c00866942e8f5ca39e3e31b79c1e50feaee4ce5e28df2f051d5c
Status: Downloaded newer image for hello-world:latest
Hello from Docker.
This message shows that your installation appears to be working correctly.
If you are using Windows, it is actually not very different.
Click on the "Docker Quickstart Terminal" icon, if your operating system displays a prompt to allow VirtualBox,
choose yes and a terminal will show on your screen.
To test if Docker is working, type:
docker run hello-world
You will see the following message:
Hello from Docker.
You may also notice the explanation of how Docker is working on your local machine.
To generate this message ("Hello World" message), Docker took the following steps:
- The *Docker Engine CLI* client contacted the *Docker Engine daemon*.
- The *Docker Engine daemon* pulled the *hello-
world* image from the *Docker Hub*. (Assuming it was not already locally available.)
- The *Docker Engine daemon* created a new container from that image which runs the executable that produces the output you are currently reading.
- The *Docker Engine daemon* streamed that output to the *Docker Engine CLI* client, which sent it to your terminal.
After the installation, you can also start using the GUI or the command line, click on the create button to create a
Hello World container just to make sure if everything is OK.
Docker Toolbox is a very good tool for every developer but you may need more performance with larger projects in
your local development. Docker for Mac and Docker for Windows are native for each OS.
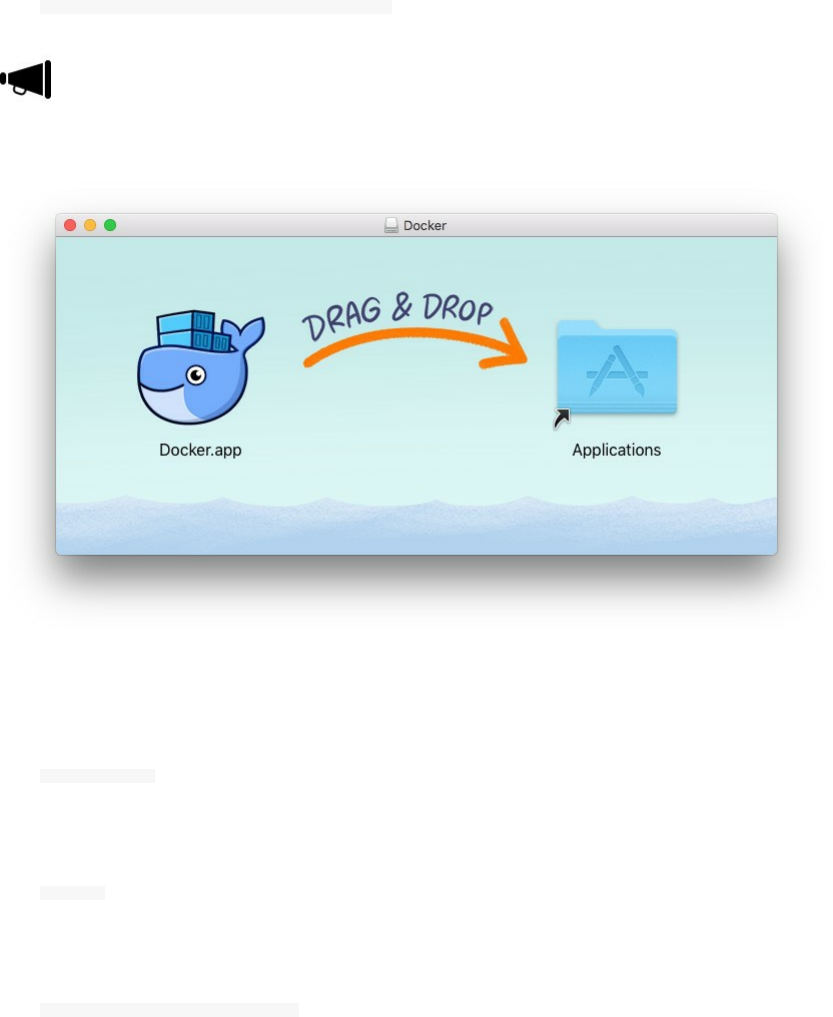
Docker For Mac
Use the following link to download the .dmg file and install the native Docker.
https://download.docker.com/mac/stable/Docker.dmg
To use native Docker, get back to the requirements section and make sure of your system configuration.
After the installation, drag and drop Docker.app to your Applications folder and start Docker from your applications
list.
You will a whale icon on your status bar and when you click on it, you can see a list of choices and you can also
click on About Docker to verify if you are using the right version.
If you prefer using the CLI, open your terminal and type:
docker --version
or
docker -v
If you installed Docker 1.12, you will see:
Docker version 1.12.0, build 8eab29e
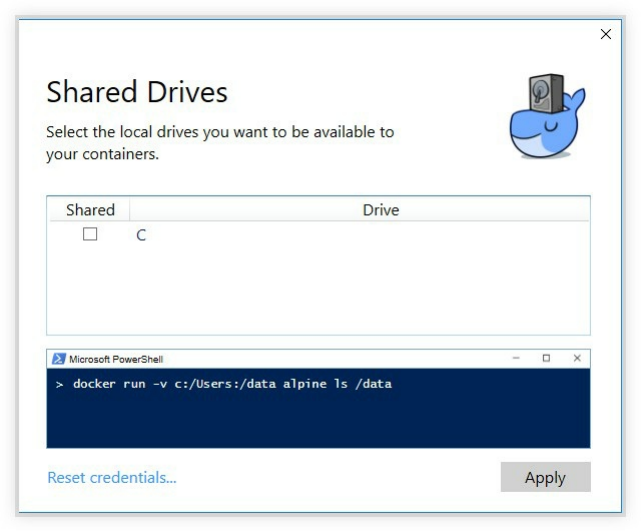
If you go to Docker.app preferences, you can find some configurations, but one of the most important ones are
sharing drivers.
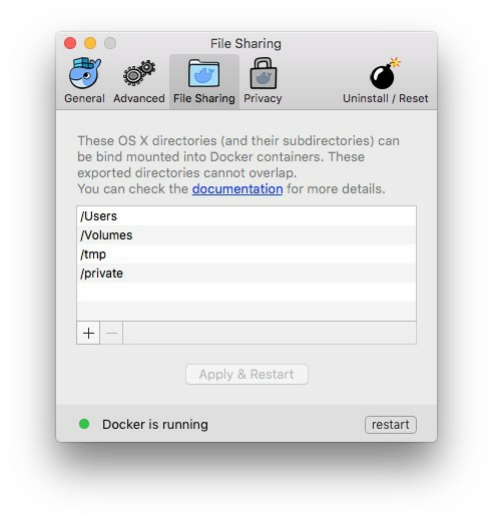
In many cases, your containers running in your local machines can use a file system mounted to a folder in your
host, we will not need this for the moment but you should remember later in this book that if you mount a container
to a local folder, you should get back to this step and share the concerned files, directories, users or volumes on your
local system with your containers.
Docker For Windows
Use the following link to download the .msi file and install the native Docker.
https://download.docker.com/win/stable/InstallDocker.msi
Same thing for Windows: To use native Docker, get back to the requirements section and make sure of your
system configuration.
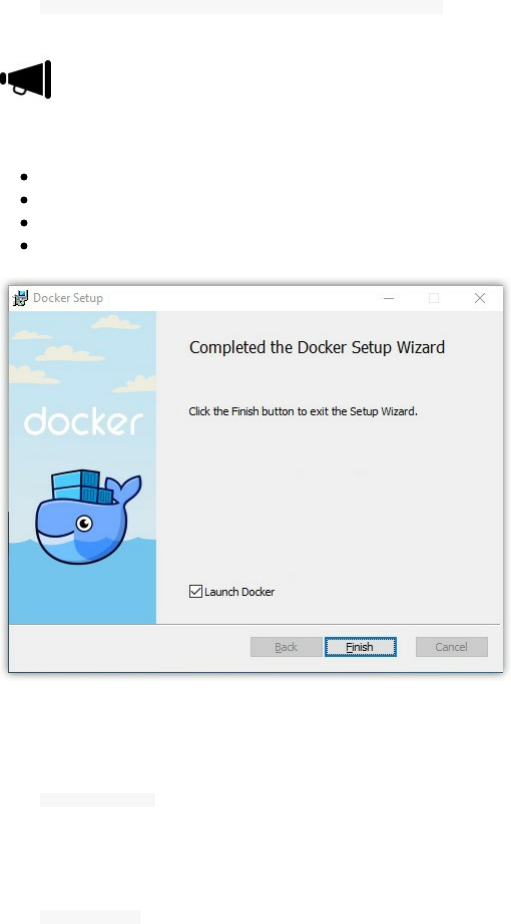
Double-click InstallDocker.msi and run the installer
Follow the installation wizard
Authorize Docker if you were asked for that by your system
Click Finish to start Docker
If everything was OK, you will get a popup with a success message.
Now open cmd.exe (or PowerShell) and type
docker --version
or
docker version
If your containers running on your local development environment may need in many cases (that we will see in this
book) to access to your file system, folders, files or drives. This is the case when you mount a folder inside the
Docker container to your host file system. We will see many examples of this type so you should remember to get
back here and make the right configurations if mounting a directory or a file will be needed later in this book.

Docker Experimental Features
Even if Docker has a stable version that can be safely used in production environments, many features are still in
development and you may need to plan for your future projects using Docker, so in this case, you will need to test
some of these features.
I have been testing Docker Swarm Mode since it was experimental and I needed to evaluate this feature in order to
prepare the adequate architecture, servers and adopt development and integration work flows to the coming changes.
You may find some instability and bugs using the experimental installation packages which is normal.
Docker Experimental Features For Mac And Windows
For native Docker running on both systems, to evaluate the experimental features, you need to download the beta
channel installation packages.
For Mac:
https://download.docker.com/mac/beta/Docker.dmg
For Windows
https://download.docker.com/win/beta/InstallDocker.msi
Docker Experimental Features For Linux
Running the following command will install the experimental version of Docker:
You should have curl installed
curl -sSL https://experimental.docker.com/ | sh
Genrally curl | bash is not a good security practice even if the transport is over HTTPS. Content can be
modified on the server.
You can download the script, read it and execute it:
wget https://experimental.docker.com/
Or you can get one of the following binaries in function of your system architecture:
https://experimental.docker.com/builds/Linux/i386/docker-latest.tgz
https://experimental.docker.com/builds/Linux/x86_64/docker-latest.tgz

For the remainder of the installation :
tar -xvzf docker-latest.tgz
mv docker/* /usr/bin/
sudo dockerd &

Removing Docker
Let's take Ubuntu as an example.
Purge the Docker Engine:
sudo apt-get purge docker-engine
sudo apt-get autoremove --purge docker-engine
sudo apt-get autoclean
This is enough in most cases, but to remove all of Docker's files, follow the next steps.
If you wish to remove all the images, containers and volumes:
sudo rm -rf /var/lib/docker
Then remove docker from apparmor.d:
sudo rm /etc/apparmor.d/docker
Then remove docker group:
sudo groupdel docker
You have successfully deleted completely docker.

Docker Hub
Docker Hub is a cloud registry service for Docker.
Docker allows to package artifacts/code and configurations into a single image. These images can be reusable by
you, your colleague or even your customer. If you would like to share your code you will generally use a git
repository like Github or Bitbucket.
You can also run your own Gitlab that will allows you to have your own private on-premise Git repositories.
Things are very similar with Docker, you can use a cloud-based solution to share your images like Docker Hub or
use your own Hub (a private Docker registry).
Docker Hub is a public Docker repository, but if you want to use a cloud-based solution while keeping your
images private, the paid version of Docker Hub allows you to have privates repositories.
Docker Hub allows you to
Access to community, official, and private image libraries
Have public or paid private image repositories to where you can push your images and from where your could
pull them to your servers
Create and build new images with different tags when the source code inside your container changes
Create and configure webhooks and trigger actions after a successful push to a repository
Create workgroups and manage access to your private images
Integrate with GitHub and Bitbucket

Basically Docker Hub could be a component of your dev-test pipeline automation.
In order to use Docker Hub, go to the following link and create an account:
https://hub.docker.com/
If you would like to test if your account is enabled, type
docker login

Login with your Docker ID to push and pull images from Docker Hub. If you don't have a Docker ID, head
over to https://hub.docker.com to create one.
Now, go to Docker Hub website and create a public repository. We will see how to send a running container as an
image to Docker Hub and for the same reason we are going to use a sample app genrally used by Docker for demos,
called vote (that you can also find on Docker official Github repository).
Vote application is a Python webapp that lets you vote between two options, it uses a Redis queue to collects new
votes, .NET worker which consumes votes and stores them in a Postgres database backed by a Docker volume and a
Node.Js webapp which shows the results of the voting in real time.
I consider that you created a working account on Docker Hub, typed the login command and entered the right
password.
If have a starting level with Docker, you may not understand all of the next commands but the goal of this section is
just to demonstrate how a Docker Registry works (In this case, the used Docker Registry is a cloud-based one built
by Docker, and as said, it is called Docker Hub).
When you type the following command, Docker will search if it has the image locally, otherwise it will check if it is
on Docker Hub:
docker run -d -it -p 80:80 instavote/vote
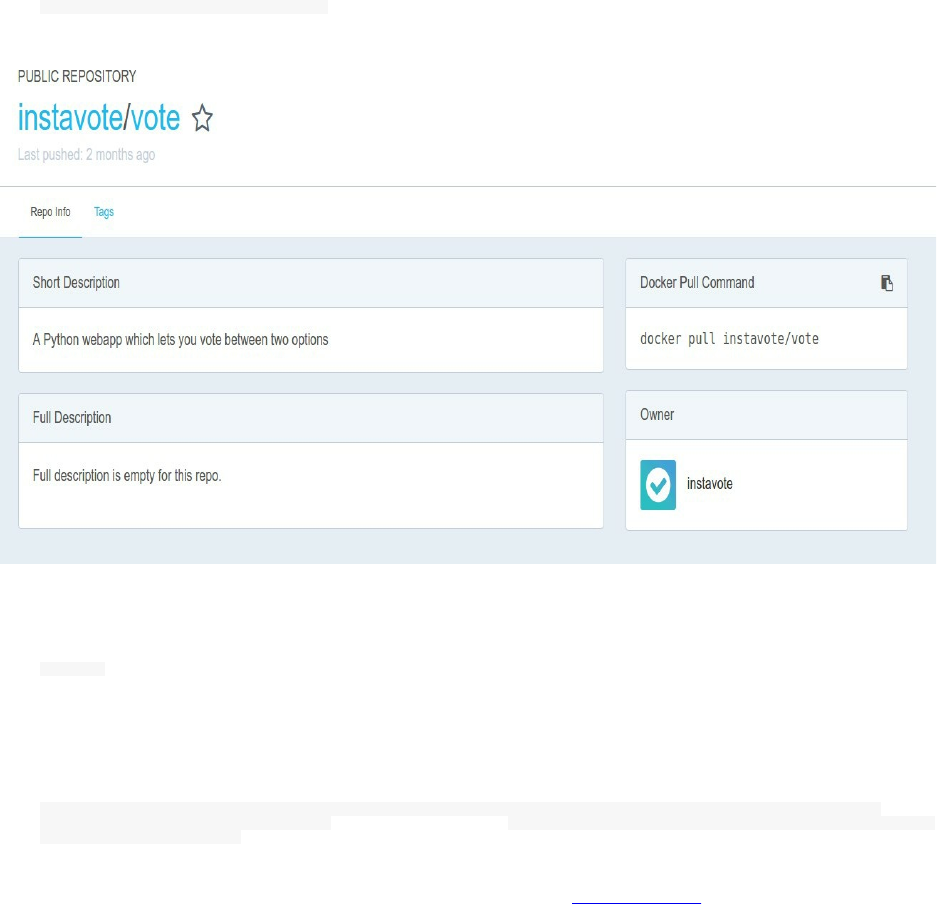
You can find the image here:
https://hub.docker.com/r/instavote/vote/
Now type this command to show the running container. This is the equivalent of ps command in Linux systems for
Docker:
docker ps
You can see here that the nauseous_albattani container (a name given automatically by Docker), is running the vote
application pulled from instavote/vote repository.
CONTAINER ID IMAGE COMMAND CREATED STATUS PORTS NAMES
136422f45b02 instavote/vote "gunicorn app:app -b " 8 minutes ago Up 8 minutes 0.0.0.0:80-
>80/tcp nauseous_albattani
The container id is : 136422f45b02 and the application is reachable via http://0.0.0.0:80

Just like using git, we are going to commit and push the image to our Docker Hub repository. No need to create a
new repository, the commit/push can be used in a lazy mode, it will create it for you.
Commit:
docker commit -m "Painless Docker first commit" -a "Aymen El Amri" 136422f45b02 eon01/painlessdocker.com_voteapp:v1
sha256:bf2a7905742d85cca806eefa8618a6f09a00c3802b6f918cb965b22a94e7578a
And push:
docker push eon01/painlessdocker.com_voteapp:v1
The push refers to a repository [docker.io/eon01/painlessdocker.com_voteapp]
1f31ef805ed1: Mounted from eon01/painless_docker_vote_app
3c58cbbfa0a8: Mounted from eon01/painless_docker_vote_app
02e23fb0be8d: Mounted from eon01/painless_docker_vote_app
f485a8fdd8bd: Mounted from eon01/painless_docker_vote_app
1f1dc3de0e7d: Mounted from eon01/painless_docker_vote_app
797c28e44049: Mounted from eon01/painless_docker_vote_app
77f08abee8bf: Mounted from eon01/painless_docker_vote_app
v1: digest: sha256:658750e57d51df53b24bf0f5a7bc6d52e3b03ce710a312362b99b530442a089f size: 1781
Change eon01 by your username.
Notice that a new repository is added automatically to my Docker Hub dashboard:

Now you can pull the same image with the latest tag:
docker pull eon01/painlessdocker.com_voteapp
Or with a specific tag:
docker pull eon01/painlessdocker.com_voteapp:v1
In our case, the v1 is the latest version, so the result of the two above commands will be the same image pulled to
your local image.

Docker Registry
Docker Registry is a scalable server side application conceived to be an on-premise Docker Hub. Just like Docker
Hub, it helps you push, pull and distribute your images.
The software powering Docker Registry is open-source under Apache license. Docker Registry could be also a
cloud-based solution, because Docker's commercial offer called Docker Trusted Registry is cloud-based.
Docker Registry could be run using Docker. A Docker image for the Docker Registry is available here:
https://hub.docker.com/_/registry/
It is easy to create a registry, just pull and run the image like this:
docker run -d -p 5000:5000 --name registry registry:2.5.0
Let's test it : We will pull an image from Docker Hub, tag and push it to our own registry .
docker pull ubuntu
docker tag ubuntu localhost:5000/myfirstimage
docker push localhost:5000/myfirstimage
docker pull localhost:5000/myfirstimage
Deploying Docker Registry On Amazon Web Services
You need to have:
An Amazon Web Services account
The good IAM privileges
Your aws CLI configured
Type:
aws configure
Type your credentials, choose your region and your preferred output format:
AWS Access Key ID [None]: ******************
AWS Secret Access Key [None]: ***********************
Default region name [None]: eu-west-1
Default output format [None]: json
Create an EBS disk (Elastic Block Store), specify the region you are using and the availability zone.
aws ec2 create-volume --size 80 --region eu-west-1 --availability-zone eu-west-1a --volume-type standard
You should have an similar output to the following one:

{
"AvailabilityZone": "eu-west-1a",
"Encrypted": false,
"VolumeType": "standard",
"VolumeId": "vol-xxxxxx",
"State": "creating",
"SnapshotId": "",
"CreateTime": "2016-10-14T15:29:35.400Z",
"Size": 80
}
Keep the output, because we are going to use the volume id later.
Our choice for the volume type was 'standard' and you must choose your preferred volume type and it is mainly
about the iops.
The following table could help:
IOPS Use Case
Magnetic Up to 100 IOPS/volume Little access
GP Up to 3000 IOPS/volume Larger access needs, suitable for the majority of classic cases
PIOPS Up to 4000 IOPS/volume High speed access
Start an EC2 instance:
aws ec2 run-instances --image-id ami-xxxxxxxx --count 1 --instance-type t1.medium --key-name MyKeyPair --security-group-
ids sg-xxxxxxxx --subnet-id subnet-xxxxxxxx
Replace your image id, instance type, key name, security group ids and subnet id with your proper values.
On the output look for the instance id because we are going to use it.
{
"OwnerId": "xxxxxxxx",
"ReservationId": "r-xxxxxxx",
"Groups": [
{
[..]
}
],
"Instances": [
{
"InstanceId": "i-5203422c",
[..]
}
aws ec2 attach-volume --volume-id vol-xxxxxxxxxxx --instance-id i-xxxxxxxx --device /dev/sdf
Now that the volume is attached, you should check your volumes in the EC2 instance with a df -kh and you will see
your new attached instance.
In this example, let's say the attached EBS has the following device name /dev/xvdf . Create a folder and a new file
system upon the volume:
sudo mkfs -t ext4 /dev/xvdf
mkdir /data
Make sure you get the right device name for the new attached volume.
Now go to the fstab configuration file:

/etc/fstab
and add :
``` bash
/dev/xvdf /data ext4 defaults 1 1
Now mount the volume by typing :
mount -a
You should have Docker installed in order to run a private Docker registry.
The next step is running the registry:
docker run -d -p 80:5000 --restart=always -v /data:/var/lib/registry registry:2
If you type docker ps , you should see the registry running:
CONTAINER ID IMAGE COMMAND CREATED STATUS PORTS
bb6201f63cc5 registry:2 "/entrypoint.sh /etc/" 21 hours Up About 1h 0.0.0.0:80->5000/tcp
Now you should create an ELB but first create its Security Group (expose port 443).
Create the ELB using AWS CLI or AWS Console and redirect traffic to the EC2 port number 80. You can get the ELB
DNS since we are going to use it to push and pull images.
Opening port 443 is needed since the Docker Registry needs it to send and receive data, that's why we used ELB
since the latter has integrated certificate management and SSL decryption.
It is also used to build a highly available system.
Now let's test it by pushing an image:
docker pull hello-world
docker tag hello-world load_balancer_dns/hello-world:1
docker push load_balancer_dns/hello-world
docker pull load_balancer_dns/hello-world
If you don't want to use ELB, you should bring your own certificates and run:
docker run -d -p 5000:5000 --restart=always --name registry \
-v `pwd`/certs:/certs \
-v /data:/var/lib/registry \
-e REGISTRY_HTTP_TLS_CERTIFICATE=/certs/domain.crt \
-e REGISTRY_HTTP_TLS_KEY=/certs/domain.key \
registry:2
Another option to use is to run storage on AWS S3:
docker run \
-e SETTINGS_FLAVOR=s3 \
-e AWS_BUCKET=my_bucket \
-e STORAGE_PATH=/data \
-e AWS_REGION="eu-west-1"
-e AWS_KEY=*********** \
-e AWS_SECRET=*********** \
-e SEARCH_BACKEND=sqlalchemy \
-p 80:5000 \

registry
In this case, you should not forget to add a policy for S3 that allows the Docker Registry to read and write your
images to S3.
Deploying Docker Registry On Azure
Using Azure, we are going to deploy the same Docker Registry using Azure Storage service.
You will also need a configured Azure CLI.
We need to create a storage account using the Azure CLI:
azure storage account create -l "North Europe" <storage_account_name>
Change <storage_account_name> by your proper value.
Now we need to list the storage account keys to use one of them later:
azure storage account keys list <storage_account_name>
Run:
docker run -d -p 80:5000 \
-e REGISTRY_STORAGE=azure \
-e REGISTRY_STORAGE_AZURE_ACCOUNTNAME="<storage_account_name>" \
-e REGISTRY_STORAGE_AZURE_ACCOUNTKEY="<storage_key>" \
-e REGISTRY_STORAGE_AZURE_CONTAINER="registry" \
--name=registry \
registry:2
If the port 80 is closed on your Azure virtual machine, you should open it:
azure vm endpoint create <machine-name> 80 80
Configuring security for the Docker Registry is not covered in this part.

Docker Store
Docker Store is a Docker inc product and it is designed to provide a scalable self-service system for ISVs to publish
and distribute trusted and enterprise-ready content
It provides a publishing process that includes:
security scanning
component inventory
The open-source license usage
Image construction guidelines
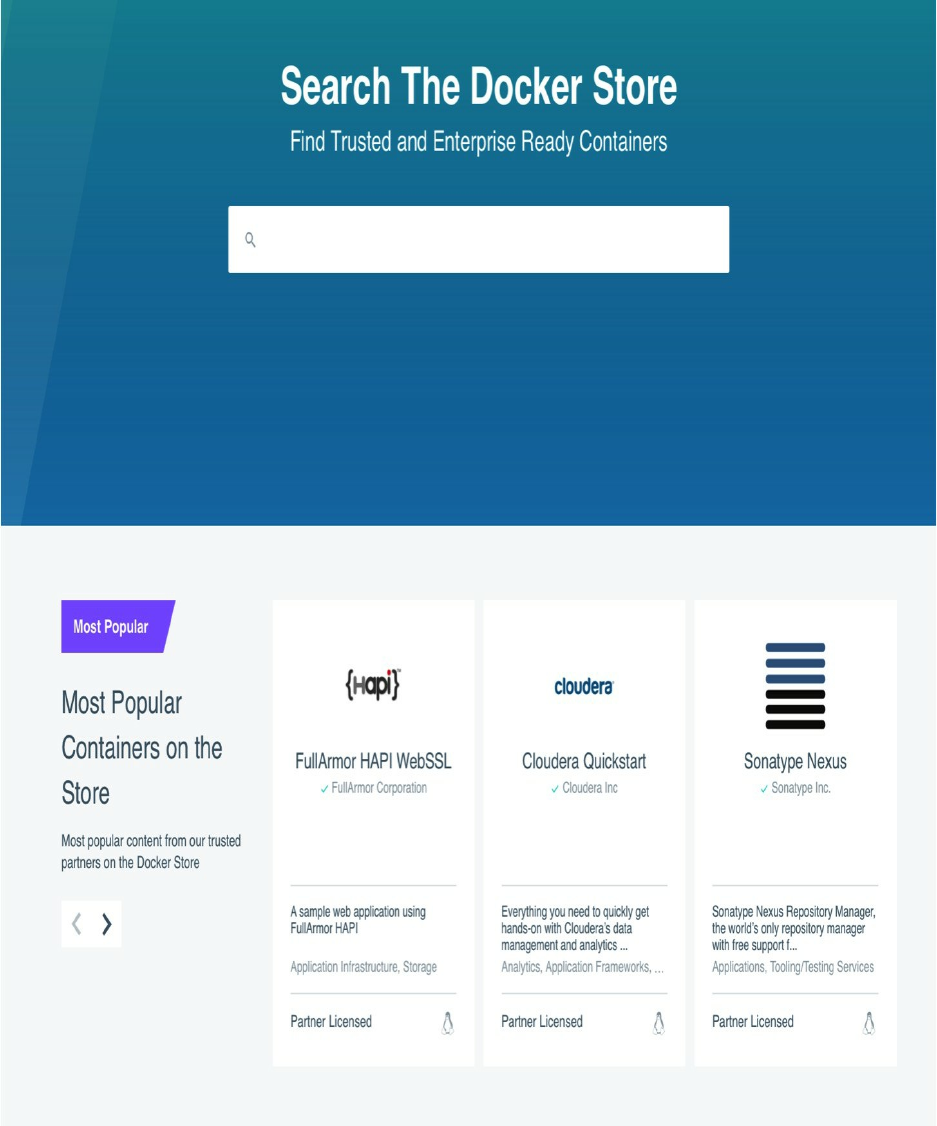
In other words, it is an official marketplace with workflows to create and distribute content were you can find free
and commercial images.

Chapter III - Basic Concepts
o ^__^
o (oo)\_______
(__)\ )\/\
||----w |
|| ||

Hello World, Hello Docker
Through the following chapters, you will learn how to manipulate Docker containers (create, run, delete, update,
scale ..etc).
But to ensure a better understanding of some concepts, we need to learn at least how to run a Hello World container.
We have already seen this, but as a reminder, and to be sure that your installation was good, we will run the Hello
World container again:
docker run --rm -it hello-world
You can see a brief explanation of how Docker has created the container on the command output:
To generate this message, Docker took the following steps:
1. The Docker client contacted the Docker daemon.
2. The Docker daemon pulled the "hello-world" image from the Docker Hub.
3. The Docker daemon created a new container from that image which runs the
executable that produces the output you are currently reading.
4. The Docker daemon streamed that output to the Docker client, which sent it
to your terminal.
This gives a good explanation of how Docker created a container and it will be a waste of energy to re-explain this
in my own words, albeit Docker uses more energy to do the same task :-)

General Information About Docker
Docker is a very active project and its code is frequently changing, to understand many concepts about this
technology, I have been following the project on Github and browsing its issues when I had problems and especially
when I found bugs.
Therefore, it is important to know the version you are using in your production servers. docker -v will give you the
version and the build number you are using.
Example:
Docker version 1.12.2, build bb80604
You can get other general information about the server/client version, the architecture, the Go version ..etc. Use
docker version to get the latter information. Example:
Client:
Version: 1.12.2
API version: 1.24
Go version: go1.6.3
Git commit: bb80604
Built: Tue Oct 11 18:19:35 2016
OS/Arch: linux/amd64
Server:
Version: 1.12.2
API version: 1.24
Go version: go1.6.3
Git commit: bb80604
Built: Tue Oct 11 18:19:35 2016
OS/Arch: linux/amd64

Docker Help
You can view the Docker help using the command line:
docker --help
You will get a list of
options like:
--config=~/.docker Location of client config files
-D, --debug Enable debug mode
-H, --host=[] Daemon socket(s) to connect to
-h, --help Print usage
-l, --log-level=info Set the logging level
--tls Use TLS; implied by --tlsverify
--tlscacert=~/.docker/ca.pem Trust certs signed only by this CA
--tlscert=~/.docker/cert.pem Path to TLS certificate file
--tlskey=~/.docker/key.pem Path to TLS key file
--tlsverify Use TLS and verify the remote
-v, --version Print version information and quit
commands like:
attach Attach to a running container
build Build an image from a Dockerfile
commit Create a new image from a container's changes
cp Copy files/folders between a container and the local filesystem
create Create a new container
diff Inspect changes on a container's filesystem
If you need more help about a specific command like cp or rmi, you need to type:
docker cp --help
docker rmi --help
In some cases, you may get "the command third level" of help like:
docker swarm init --help

Docker Events
To start this section, let's run a MariaDB container and list Docker Events. For this manipulation, you can use
terminator to split your screen into two and notice in the same time the events output while typing the following
command:
docker run --name mariadb -e MYSQL_ROOT_PASSWORD=password -v /data/db:/var/lib/mysql -d mariadb
Unable to find image 'mariadb:latest' locally
latest: Pulling from library/mariadb
386a066cd84a: Already exists
827c8d62b332: Pull complete
de135f87677c: Pull complete
05822f26ca6e: Pull complete
ad65f56a251e: Pull complete
d71752ae05f3: Pull complete
87cb39e409d0: Pull complete
8e300615ba09: Pull complete
411bb8b40c58: Pull complete
f38e00663fa6: Pull complete
fb7471e9a58d: Pull complete
2d1b7d9d1b69: Pull complete
Digest: sha256:6..c
Status: Downloaded newer image for mariadb:latest
0..7
The events launched by the last command are:
docker events
2016-12-09T00:54:51.827303500+01:00 image pull mariadb:latest (name=mariadb)
2016-12-09T00:54:52.000498892+01:00 container create 0..7 (image=mariadb, name=mariadb)
2016-12-09T00:54:52.137792817+01:00 network connect 8..d (container=0..7, name=bridge, type=bridge)
2016-12-09T00:54:52.550648364+01:00 container start 0..7 (image=mariadb, name=mariadb)
Explicitly:
image pull : The image is pulled from the public repository by it identifier Mariadb.
container create : The container is created from the pulled image and it was given a Docker identifier
0..7 . At this stage the container is not running yet
network connect : The container is attached to a network called bridge having the identifier 8..d .
At this stage the container is not running yet
container start : The container at this stage is running on your host system with the same identifier
0..7

This is the full list of Docker events (44) that can be reported by images, containers, networks, plugins, volumes and
Docker daemon:
- attach
- commit
- copy
- create
- destroy
- detach
- die
- exec_create
- exec_detach
- exec_start
- export
- health_status
- kill
- oom
- pause
- rename
- resize
- restart
- start
- stop
- top
- unpause
- update
- delete
- import
- load
- pull
- push
- save
- tag
- untag
- install
- enable
- disable
- remove
- create
- mount
- unmount
- destroy
- create
- connect
- disconnect
- destroy
- reload
Using Docker API To List Events

There is a chapter about Docker API that will help you discover it in more details, but there is no harm to start using
it now.
You can, in fact, use it to see Docker Events while manipulating containers, images, networks .. etc.
Install curl and type curl --unix-socket /var/run/docker.sock http:/events then open another terminal window (or a new
tab) and type docker pull mariadb , docker rmi -f mariadb to remove the pulled image then docker pull mariadb to pull it
again.
These are the 3 events reported by the 3 commands typed above:
Action = Pulling and image that already exists in the host:
{
"status":"pull",
"id":"mariadb:latest",
"Type":"image",
"Action":"pull",
"Actor": {
"ID":"mariadb:latest",
"Attributes": {
"name":"mariadb"
}
},
"time":1481381043,
"timeNano":1481381043157632493
}
Action = Removing it:
{
"status":"untag",
"id":"sha256:0..c",
"Type":"image",
"Action":"untag",
"Actor" {
"ID":"sha256:0..c",
"Attributes" {
"name":"sha256:0..c"
}
},
"time":1481381060,
"timeNano":1481381060026443422
}
Action = Pulling the same image again from a distant repository:
{
"status":"pull",
"id":"mariadb:latest",
"Type":"image",
"Action":"pull",
"Actor":{
"ID":"mariadb:latest",
"Attributes":{
"name":"mariadb"
}
},
"time":1481381069,
"timeNano":1481381069629194420
}
Each event has a status (pull, untag for removing the image ..etc), a resource identifier (id) with its Type (image,
container, network ..) and other information like:
Actor,

time
and timeNano
You can use DoMonit (a Docker API wrapper) that I created for this book to discover Docker API.
Docker API is detailed in a separate chapter.
To test DoMonit, you can create a folder and install a Python virtual environment:
virtualenv DoMonit/
New python executable in /home/eon01/DoMonit/bin/python
Installing setuptools, pip, wheel...done.
cd DoMonit
Clone the repository:
git clone https://github.com/eon01/DoMonit.git
Cloning into 'DoMonit'...
remote: Counting objects: 237, done.
remote: Compressing objects: 100% (19/19), done.
remote: Total 237 (delta 9), reused 0 (delta 0), pack-reused 218
Receiving objects: 100% (237/237), 106.14 KiB | 113.00 KiB/s, done.
Resolving deltas: 100% (128/128), done.
Checking connectivity... done.
List the files inside the created folder:
ls -l
total 24
drwxr-xr-x 2 eon01 sudo 4096 Dec 11 14:46 bin
drwxr-xr-x 6 eon01 sudo 4096 Dec 11 14:46 DoMonit
drwxr-xr-x 2 eon01 sudo 4096 Dec 11 14:45 include
drwxr-xr-x 3 eon01 sudo 4096 Dec 11 14:45 lib
drwxr-xr-x 2 eon01 sudo 4096 Dec 11 14:45 local
-rw-r--r-- 1 eon01 sudo 60 Dec 11 14:46 pip-selfcheck.json
Activate the execution environment:
. bin/activate
Install the requirements:
pip install -r DoMonit/requirements.txt
Collecting pathlib==1.0.1 (from -r DoMonit/requirements.txt (line 1))
/home/eon01/DoMonit/local/lib/python2.7/site-packages/pip/_vendor/requests/packages/urllib3/util/ssl_.py:318:
SNIMissingWarning: An HTTPS request has been made, but the SNI (Subject Name Indication) extension to TLS is not available on this platform.
This may cause the server to present an incorrect TLS certificate, which can cause validation failures.
You can upgrade to a newer version of Python to solve this.
For more information, see https://urllib3.readthedocs.io/en/latest/security.html#snimissingwarning.
SNIMissingWarning
/home/eon01/DoMonit/local/lib/python2.7/site-packages/pip/_vendor/requests/packages/urllib3/util/ssl_.py:122:
InsecurePlatformWarning:
A true SSLContext object is not available.
This prevents urllib3 from configuring SSL appropriately and may cause certain SSL connections to fail.
You can upgrade to a newer version of Python to solve this.
For more information, see https://urllib3.readthedocs.io/en/latest/security.html#insecureplatformwarning.
InsecurePlatformWarning
Collecting PyYAML==3.11 (from -r DoMonit/requirements.txt (line 2))

Collecting requests==2.10.0 (from -r DoMonit/requirements.txt (line 3))
Using cached requests-2.10.0-py2.py3-none-any.whl
Collecting requests-unixsocket==0.1.5 (from -r DoMonit/requirements.txt (line 4))
Collecting simplejson==3.8.2 (from -r DoMonit/requirements.txt (line 5))
Collecting urllib3==1.16 (from -r DoMonit/requirements.txt (line 6))
Using cached urllib3-1.16-py2.py3-none-any.whl
Installing collected packages: pathlib, PyYAML, requests, urllib3, requests-unixsocket, simplejson
Successfully installed PyYAML-3.11 pathlib-1.0.1 requests-2.10.0 requests-unixsocket-0.1.5 simplejson-3.8.2 urllib3-1.16
and start streaming the events using:
python DoMonit/events_test.py
On another terminal, create a network and notice the output of the executed program:
docker network create test1
6d517f8251736446874e14bafeb08c76cdc6d8219537b1ed1af64984bb3590b2
The output should be something like:
{
"Type": "network",
"Action": "create",
"Actor": {
"ID": "6d517f8251736446874e14bafeb08c76cdc6d8219537b1ed1af64984bb3590b2",
"Attributes": {
"name": "test1",
"type": "bridge"
}
},
"time": 1481464270,
"timeNano": 1481464270716590446
}
This program called the Docker Events API:
curl --unix-socket /var/run/docker.sock http:/events
Let's get back to Docker Events command since we haven't seen yet the options used to stream events.
Docker Events supports the following filters (using in most cases the name or the id of the resource):
container=<name/id>
event=<action>
image=<tag/id>
plugin=<name/id>
label=<key> / label=<key>=<value>
type=<container/image/volume/network/daemon>
volume=<name/id>
network=<name/id>
daemon=<name/id>
Examples:
docker events --filter 'event=start'
docker events --filter 'image=mariadb'

docker events --filter 'container=781567cd25632'
docker events --filter 'container=781567cd25632' --filter 'event=stop'
docker events --filter 'type=volume'
In the next sections we are going to see what each Docker component (volumes, containers ..etc) reports as an event.
Monitoring A Container Using Docker Events
Note that we are always using the container of MariaDB database that we can create like this:
docker run --name mariadb -e MYSQL_ROOT_PASSWORD=password -v /data/db:/var/lib/mysql -d mariadb
If you haven't created the container yet, do it.
Based on the examples of Docker Events given above, we are going to create a small monitoring script to send us an
email if MariaDB containers reports a stop event.
We are going to listen to a file in /tmp and send an email as soon as we read a line.
tail -f /tmp/events | while read line; do echo "$line" | mail -s subject "amri.aymen@gmail.com"; done
Yes, this is my real email address if you would like to stay in touch !
Using the Docker Events command, we can redirect all the logs to a file (in this case we will use /tmp/events ).
docker events --filter 'event=stop' --filter 'container=mariadb' > /tmp/events
If you have already created the container, you can test this simple monitoring system using :
docker stop mariadb
docker start mariadb
This is what you should get by email:
{
"Type":"network",
"Action":"connect",
"Actor":{
"ID":"7b64910a4b7b6b2b90245db1c7a1d8330fb1d0db9237da8c64378c0ad7745e9e",
"Attributes":{
"container":"9..d",
"name":"bridge",
"type":"bridge"
}
},
"time":1481466943,
"timeNano":1481466943153467120
}{
"Type":"network",
"Action":"connect",
"Actor":{
"ID":"7b64910a4b7b6b2b90245db1c7a1d8330fb1d0db9237da8c64378c0ad7745e9e",
"Attributes":{
"container":"9..d",
"name":"bridge",
"type":"bridge"
}
},

"time":1481466943,
"timeNano":1481466943153467120
}{
"status":"start",
"id":"9..d",
"from":"mariadb",
"Type":"container",
"Action":"start",
"Actor":{
"ID":"9..d",
"Attributes":{
"image":"mariadb",
"name":"mariadb"
}
},
"time":1481466943,
"timeNano":1481466943266967807
}{
"s TAG IMAGE ID CREATED SIZE
hello-world tatus":"start",
"id":"9..d",
"from":"mariadb",
"Type":"container",
"Action":"start",
"Actor":{
"ID":"9..d",
"Attributes":{
"image":"mariadb",
"name":"mariadb"
}
},
"time":1481466943,
"timeNano":1481466943266967807
}{
"status":"kill",
"id":"9..d",
"from":"mariadb",
"Type":"container",
"Action":"kill",
"Actor":{
"ID":"9..d",
"Attributes":{
"image":"mariadb",
"name":"mariadb",
"signal":"15"
}
},
"time":1481466945,
"timeNano":1481466945523301735
}{
"status":"kill",
"id":"9..d",
"from":"mariadb",
"Type":"container",
"Action":"kill",
"Actor":{
"ID":"9..d",
"Attributes":{
"image":"mariadb",
"name":"mariadb",
"signal":"15"
}
},
"time":1481466945,
"timeNano":1481466945523301735
}{
"status":"die",
"id":"9..d",
"from":"mariadb",
"Type":"container",
"Action":"die",
"Actor":{
"ID":"9..d",
"Attributes":{
"exitCode":"0",
"image":"mariadb",
"name":"mariadb"
}
},
"time":1481466948,
"timeNano":1481466948241703985
}{
"status":"die",
"id":"9..d",
"from":"mariadb",
"Type":"container",
"Action":"die",
"Actor":{
"ID":"9..d",
"Attributes":{
"exitCode":"0",
"image":"mariadb",

"name":"mariadb"
}
},
"time":1481466948,
"timeNano":1481466948241703985
}{
"Type":"network",
"Action":"disconnect",
"Actor":{
"ID":"7b64910a4b7b6b2b90245db1c7a1d8330fb1d0db9237da8c64378c0ad7745e9e",
"Attributes":{
"container":"9..d",
"name":"bridge",
"type":"bridge"
}
},
"time":1481466948,
"timeNano":1481466948357530397
}{
"Type":"network",
"Action":"disconnect",
"Actor":{
"ID":"7b64910a4b7b6b2b90245db1c7a1d8330fb1d0db9237da8c64378c0ad7745e9e",
"Attributes":{
"container":"9..d",
"name":"bridge",
"type":"bridge"
}
},
"time":1481466948,
"timeNano":1481466948357530397
}{
"status":"stop",
"id":"9..d",
"from":"mariadb",
"Type":"container",
"Action":"stop",
"Actor":{
"ID":"9..d",
"Attributes":{
"image":"mariadb",
"name":"mariadb"
}
},
"time":1481466948,
"timeNano":1481466948398153788
}2016-12-11T15:35:48.398153788+01:00{
"status":"stop",
"id":"9..d",
"from":"mariadb",
"Type":"container",
"Action":"stop",
"Actor":{
"ID":"9..d",
"Attributes":{
"image":"mariadb",
"name":"mariadb"
}
},
"time":1481466948,
"timeNano":1481466948398153788
}
This is a simple example for sure ! But it could give you ideas to probably create a home-made event
alerting/monitoring system using simple Bash commands.
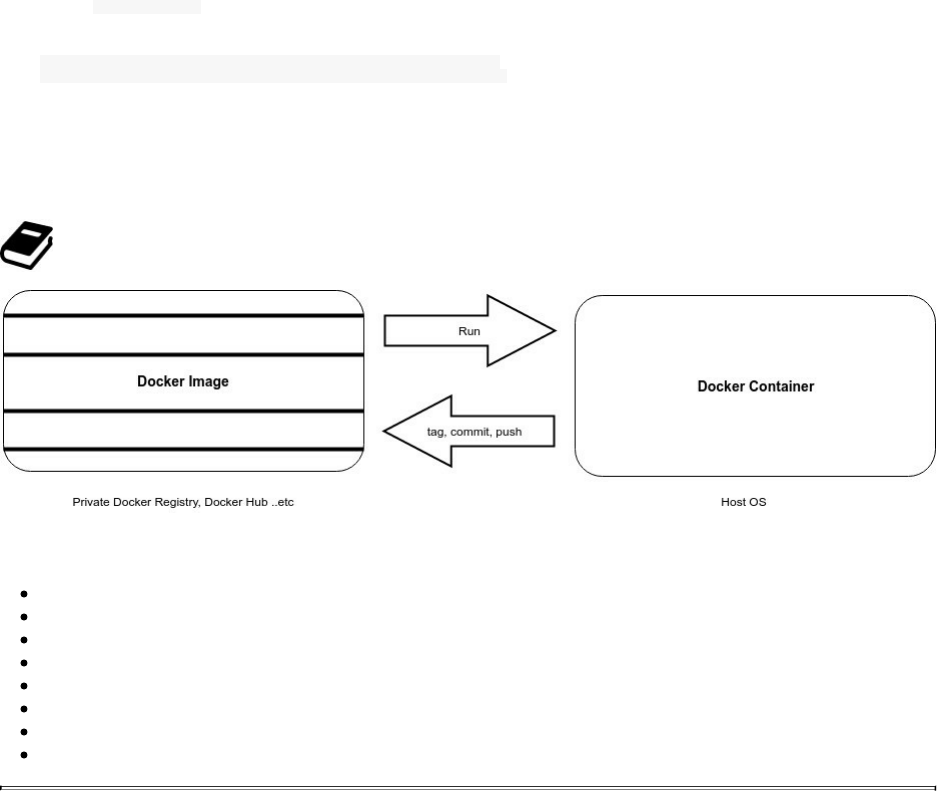
Docker Images
If you type docker images , you will see that you have the hello-world image, even if its container is not running:
REPOSITORY TAG IMAGE ID CREATED SIZE
hello-world latest c54a2cc56cbb 6 months ago 1.848 kB
An image has a tag (latest), an id (c54a2cc56cbb), a creation date (3 months ago) and a size (1.848 kB).
Images are generally stored in a registry unless it is an image from scratch that you created using the tar method and
didn't push to any of the public or private registires.
Registries are to Docker images what git is to code.
Docker images responds to the following Docker Events:
delete,
import,
load,
pull,
push,
save,
tag,
untag

Docker Containers
Docker is a containerization software that solves many problems in the modern IT like it is said in the introduction
of this book.
A container is basically an image that is running in your host OS. The important thing to remember is that there is a
big difference between containers and VMs and that's why Docker is so darn popular:
Containers use shared operating systems while VMs emulate in a different way the hardware.
The command to create a container is docker create followed by options, image name, command to execute at the
container creation and its arguments.
Other commands are used to start, pause, stop, run and delete containers and we are going to see these commands
and more in another chapter.
Keep in mind that a container have a life cycle with different phases that responds to the defined events :
attach
commit
copy
create
destroy
detach
die
exec_create
exec_detach
exec_start
export
health_status
kill
oom
pause
rename
resize
restart
start
stop
top
unpause
update

Docker Volumes
We still using the example of MariaDB:
docker run --name mariadb -e MYSQL_ROOT_PASSWORD=password -v /data/db:/var/lib/mysql -d mariadb
In the docker run command we are using to create a dockerized database, we are using the -v flag to mount a
volume. The mounted volume inside the container is pointing on /var/lib/mysql which is the Mysql data directory
where we can find databases data and other Mysql data.
Without logging inside the container, you can see the data directory mapped to the host in the /data/db directory:
ls -l /data/db/
total 110632
-rw-rw---- 1 999 999 16384 Dec 11 21:27 aria_log.00000001
-rw-rw---- 1 999 999 52 Dec 11 21:27 aria_log_control
-rw-rw---- 1 999 999 12582912 Dec 11 21:27 ibdata1
-rw-rw---- 1 999 999 50331648 Dec 11 21:27 ib_logfile0
-rw-rw---- 1 999 999 50331648 Dec 11 21:27 ib_logfile1
drwx------ 2 999 999 4096 Dec 11 21:27 mysql
drwx------ 2 999 999 4096 Dec 11 21:27 performance_schema
You can create the same volume without mapping it to the host filesystem:
docker run --name mariadb -e MYSQL_ROOT_PASSWORD=password -v /var/lib/mysql -d mariadb
In this way you can't access the files of your MariaDB databases from the host machine.
Nope ! In reality, you can. Docker volumes can be found in:
/var/lib/docker/volumes/
You can see a list of volumes identifiers:
ls -lrth /var/lib/docker/volumes/
3..e
3..7
5..0
b..2
b..7
metadata.db
One of the above identifiers is the volume that was created using the command:
docker run --name mariadb -e MYSQL_ROOT_PASSWORD=password -v /var/lib/mysql -d mariadb
Docker has a helpful command to inspect a container called docker inspect .
We are going to see it in details later but we will use it in order to identify the Docker volumes attached to our
running container.
docker inspect -f '{{ (index .Mounts 0).Source }}' mariadb

It should output one of the ids above:
/var/lib/docker/volumes/b..2/_data
The Docker inspect command lets you have several information about a container (or an image). It returns generally
a json containing all of the information but using the -f or the --format flag, you can filter an attribute. docker inspect
-f '{{ (index .Mounts 0).Source }}' mariadb will shows the first element of a json dictionary referenced by its name
Mounts.
This is the part of the json output containing the information about the mounts:
"Mounts": [
{
"Name": "b..2",
"Source": "/var/lib/docker/volumes/b..2/_data",
"Destination": "/var/lib/mysql",
"Driver": "local",
"Mode": "",
"RW": true,
"Propagation": ""
}
],
Now, you can understand why the used format '{{ (index .Mounts 0).Source }}' will shows
/var/lib/docker/volumes/b..2/_data .
Keep in mind that the host directory /var/lib/docker/volumes/b..2/_data depends on the host that's why creating
a volume using Dockerfile does not allow mounting a volume on the host filesystem.
Data Volumes
Data volumes are different from the previous volumes created to host MariaDB databases. They are separate
containers, dedicated to storing data, they are persistent, they can be shared between containers, they can be used as
a backup, a restore point or to used in data migration.
For the same container (MariaDB), we are going to create a volumes in a separate container:
docker run --name mariadb_storage -v /var/lib/mysql -it -d busybox
Now let's run the MariaDB container without creating a new volumes but using the previously created data
container:
docker run --name mariadb -e MYSQL_ROOT_PASSWORD=password --volumes-from mariadb_storage -d mariadb
Notice the usage of --volumes-from mariadb_storage that will attach the data container as a volume to the MariaDB
container.
In the same way, we can inspect the data container:
docker inspect -f '{{ (index .Mounts 0).Source }}' mariadb_storage
Say we have this as an output:

/var/lib/docker/volumes/f..9/_data
This means that the latter directory will contains all of our databases files:
You can check it by typing:
ls -l /var/lib/docker/volumes/f..9/_data
total 110656
-rw-rw---- 1 999 999 16384 Dec 11 22:23 aria_log.00000001
-rw-rw---- 1 999 999 52 Dec 11 22:23 aria_log_control
-rw-rw---- 1 999 999 12582912 Dec 11 22:23 ibdata1
-rw-rw---- 1 999 999 50331648 Dec 11 22:23 ib_logfile0
-rw-rw---- 1 999 999 50331648 Dec 11 22:23 ib_logfile1
-rw-rw---- 1 999 999 0 Dec 11 22:23 multi-master.info
drwx------ 2 999 999 4096 Dec 11 22:23 mysql
drwx------ 2 999 999 4096 Dec 11 22:23 performance_schema
-rw-rw---- 1 999 999 24576 Dec 11 22:23 tc.log
Now that we have a separate volume container, we can create 3 or more MariaDB containers using the same
volume:
docker run \
--name mariadb1 \
-e MYSQL_ROOT_PASSWORD=password \
--volumes-from mariadb_storage \
-d mariadb \
&& \
docker run \
--name mariadb2 \
-e MYSQL_ROOT_PASSWORD=password \
--volumes-from mariadb_storage \
-d mariadb \
&& \
docker run \
--name mariadb3 \
-e MYSQL_ROOT_PASSWORD=password \
--volumes-from mariadb_storage \
-d mariadb
f0ff0622ea755c266e069a42a2a627380042c8f1a3464521dd0fb16ef3257534
0c10ea5ec23a3057de30dc4f97e485349ac7b0a335a98e1c3deece56f3594964
128e66ffa823e3156fb28b48f45e3234d235949508780f1c1cef8c38ed5bfb0b
Now, you can see all of our 4 containers:
docker ps
CONTAINER ID IMAGE COMMAND PORTS NAMES
049824509c18 mariadb "docker-entrypoint.sh" 3306/tcp mariadb1
128e66ffa823 mariadb "docker-entrypoint.sh" 3306/tcp mariadb3
0c10ea5ec23a mariadb "docker-entrypoint.sh" 3306/tcp mariadb2
03808f86ba9b busybox "sh" mariadb_storage
Sharing a data volume between three MariaDB Docker instances in this example is just for testing and
learning purpose, it is not production-ready.
We can in fact manage to have multiple containers sharing same volumes. However, the fact that it is possible to do,
does not simply means that it is safe to do it. Multiple containers writing to a single shared volume may cause data
corruption or a high level application problem like consumer/producer problems.
Now you can type again docker ps and I am pretty sure that only one MariaDB will be running, the others will stop.
If you want more explanation about this, you can find MariaDB logs of the stopped container and you will notice
that mysqld could not get an exclusive lock and that the latter could be used by another process and that's what
actually happening.

[ERROR] mysqld: Got error 'Could not get an exclusive lock; file is probably in use by another process' when trying to use aria control file '/var/lib/mysql/aria_log_control'
Other logs are showing the same problem:
2016-12-11 22:02:25 140419388524480 [ERROR] InnoDB: Can't open './ibdata1'
2016-12-11 22:02:25 140419388524480 [ERROR] InnoDB: Could not open or create
the system tablespace. If you tried to add new data files to the system tablespace,
and it failed here, you should now edit innodb_data_file_path in my.cnf back to what it was,
and remove the new ibdata files InnoDB created in this failed attempt.
InnoDB only wrote those files full of zeros, but did not yet use them in any way.
But be careful: do not remove old data files which contain your precious data!
2016-12-11 22:02:25 140419388524480 [ERROR] Plugin 'InnoDB' init function returned error.
2016-12-11 22:02:25 140419388524480 [ERROR] Plugin 'InnoDB' registration as a STORAGE ENGINE failed.
2016-12-11 22:02:25 140419388524480 [ERROR] mysqld: Can't lock aria control file
'/var/lib/mysql/aria_log_control' for exclusive use, error: 11. Will retry for 30 seconds
2016-12-11 22:02:56 140419388524480 [ERROR] mysqld: Got error 'Could not get an exclusive lock;
file is probably in use by another process' when trying to use aria control file '/var/lib/mysql/aria_log_control'
2016-12-11 22:02:56 140419388524480 [ERROR] Plugin 'Aria' init function returned error.
2016-12-11 22:02:56 140419388524480 [ERROR] Plugin 'Aria' registration as a STORAGE ENGINE failed.
2016-12-11 22:02:56 140419388524480 [Note] Plugin 'FEEDBACK' is disabled.
2016-12-11 22:02:56 140419388524480 [ERROR] Unknown/unsupported storage engine: InnoDB
2016-12-11 22:02:56 140419388524480 [ERROR] Aborting
Make sure your applications are designed to write to shared data containers.
Executing docker rm -f mariadb will remove the container from the host but if you type ls -l
/var/lib/docker/volumes/f..9/_data you can still find your data on the host machine and you can check that the Docker
volume container is always running independently from removed container.
Cleaning Docker Dangling Containers
You can find yourself in the situation where some volumes are not used (or referenced) by any container, we call
this type of volumes "dangling volumes" or "orphaned". To see your orphaned volumes, type:
docker volume ls -qf dangling=true
3..e
3..7
5..0
b..2
b..7
The fastest way to cleanup your host from these volumes is to run:
docker volume ls -qf dangling=true | xargs -r docker volume rm
Docker Volumes Events
Docker volumes report the following events: create, mount, unmount, destroy.

Docker Networks
Like a VM, a container can be part of one or many networks.
You may have noticed - just after the installation of Docker - that you have a new network interface on your host
machine:
ifconfig
docker0 Link encap:Ethernet HWaddr 02:42:ef:e0:98:84
inet addr:172.17.0.1 Bcast:0.0.0.0 Mask:255.255.0.0
UP BROADCAST MULTICAST MTU:1500 Metric:1
RX packets:5 errors:0 dropped:0 overruns:0 frame:0
TX packets:0 errors:0 dropped:0 overruns:0 carrier:0
collisions:0 txqueuelen:0
RX bytes:356 (356.0 B) TX bytes:0 (0.0 B)
And if you type docker network ls you can see the list of the default 3 networks.
NETWORK ID NAME DRIVER SCOPE
2aaea08714ba bridge bridge local
608a539ce1e3 host host local
ede46dbb22d7 none null local
Docker Networks Types
When you typed docker network ls you had 3 default networks implemented in Docker:
NETWORK ID NAME DRIVER SCOPE
2aaea08714ba bridge bridge local
608a539ce1e3 host host local
ede46dbb22d7 none null local
bridge (driver: bridge)
none (driver: null)
host (driver: host)
Bridge Networks
The bridge network is one of the host network interfaces (docker0). It is what you see when you type ifconfig .
All Docker containers are connected to this network unless you add --network flag to the container.
Let's verify this by creating a Docker container and inspecting the default network (bridge):
docker run --name mariadb_storage -v /var/lib/mysql -it -d busybox
Let's inspect the bridge network:

docker network inspect bridge
[
{
"Name": "bridge",
"Id": "2aaea08714ba2e3927334e8d0044afeb85f68ec0a0624ae7ab1f81d976b49292",
"Scope": "local",
"Driver": "bridge",
"EnableIPv6": false,
"IPAM": {
"Driver": "default",
"Options": null,
"Config": [
{
"Subnet": "172.17.0.0/16",
"Gateway": "172.17.0.1"
}
]
},
"Internal": false,
"Containers": {
"3c9afd0c72eb4738750ad1b83d38587a1c47636429e5f67c5deec5ec5dfa3210": {
"Name": "mariadb_storage",
"EndpointID": "ed47ef978ed78c5677c81a11d439d0af19a54f0620387794db1061807e39c2b7",
"MacAddress": "02:42:ac:11:00:02",
"IPv4Address": "172.17.0.2/16",
"IPv6Address": ""
}
},
"Options": {
"com.docker.network.bridge.default_bridge": "true",
"com.docker.network.bridge.enable_icc": "true",
"com.docker.network.bridge.enable_ip_masquerade": "true",
"com.docker.network.bridge.host_binding_ipv4": "0.0.0.0",
"com.docker.network.bridge.name": "docker0",
"com.docker.network.driver.mtu": "1500"
},
"Labels": {}
}
]
We can see that the mariadb_storage data container is living inside the bridge network.
Now, if you create a new network db_network:
docker network create db_network
Then create a Docker container attached to the same network (db_network):
docker run --name mariadb -e MYSQL_ROOT_PASSWORD=password --network db_network -d mariadb
If you inspect the default bridge network, you will notice that there is no containers attached to it or at least the
newly created container is not attached to it:
docker network inspect bridge
[
{
"Name": "bridge",
"Id": "2aaea08714ba2e3927334e8d0044afeb85f68ec0a0624ae7ab1f81d976b49292",
"Scope": "local",
"Driver": "bridge",
"EnableIPv6": false,
"IPAM": {
"Driver": "default",
"Options": null,
"Config": [
{
"Subnet": "172.17.0.0/16",
"Gateway": "172.17.0.1"
}
]
},
"Internal": false,
"Containers": {},

"Options": {
"com.docker.network.bridge.default_bridge": "true",
"com.docker.network.bridge.enable_icc": "true",
"com.docker.network.bridge.enable_ip_masquerade": "true",
"com.docker.network.bridge.host_binding_ipv4": "0.0.0.0",
"com.docker.network.bridge.name": "docker0",
"com.docker.network.driver.mtu": "1500"
},
"Labels": {}
}
]
And if you inspect the new network, you can see that mariadb container is running in this network (db_network).
docker network inspect db_network
[
{
"Name": "db_network",
"Id": "ec809d635d4ad22f852a2419032812cb7c9361e8bb0111815dc79a34fee30668",
"Scope": "local",
"Driver": "bridge",
"EnableIPv6": false,
"IPAM": {
"Driver": "default",
"Options": {},
"Config": [
{
"Subnet": "172.18.0.0/16",
"Gateway": "172.18.0.1/16"
}
]
},
"Internal": false,
"Containers": {
"3ddfbc0f03f4a574480d842330add4169f834cfcde96e52956ee34164629dd52": {
"Name": "mariadb",
"EndpointID": "0efca766ec11f7442399a4c81b6e79db825eeb81736db1760820fe61f24b9805",
"MacAddress": "02:42:ac:12:00:02",
"IPv4Address": "172.18.0.2/16",
"IPv6Address": ""
}
},
"Options": {},
"Labels": {}
}
]
This network has 172.18.0.0/16 as a subnet and the container address is 172.18.0.2. In all cases, if you create a
network without specifying its type, it will have bridge as a default type.
Overlay Networks
Generally, overlay network is a network that is built on top of another network. For your information, VoIP, VPN,
CDNs are overlay networks.
Docker uses also overlay networks, precisely in Swarm mode where you can create this type of networks on a
manager node. While you can do this to managed containers (Swarm mode or using an external key-value store),
unmanaged containers can not be part of an overlay network.
Docker overlay networks allows creating a multi-host network.
To create a network called database_network
docker network create --driver overlay --subnet 10.0.9.0/32 database_network
This will shows an error message, telling you that there is an error response from daemon that failed to allocate
gateway.
Since overlay networks will only work in Swarm mode, you should run your Docker engine in this mode before
creating the network:

docker swarm init --advertise-addr 127.0.0.1
Swarm mode is probably the easiest way to create and manage overlay networks, but you can use external
components like Consul, Etcd or ZooKeeper because overlay networks require a valid key-value store service.
Using Swarm Mode
Docker Swarm is the mode where you are using the built-in container orchestrator implemented in Docker engine
since its version 1.12.
We are going to see in detail Docker Swarm mode and Docker orchestration but for the networking part, it is
important to define briefly the orchestration.
Container Orchestration allows users to coordinate containers in the cloud running a multi-container environment.
Say you are deploying a web application, with an orchestrator you can define a service for your web app, deploy its
container and scale it to 10 or 20 instance, create a network and attach your different containers to it and consider all
of the web application containers as single entity from an deploying, availability, scaling and networking point of
view.
To start working with Swarm mode you need at least the version 1.12. Initialize the Swarm cluster and don't forget
to put your machine IP instead of 192.168.0.47 :
docker swarm init --advertise-addr 192.168.0.47
You will notice an information message similar to the following one:
Swarm initialized: current node (0kgtmbz5flwv4te3cxewdi1u5) is now a manager.
To add a worker to this swarm, run the following command:
docker swarm join \
--token SWMTKN-1-1re2072eii1walbueysk8yk14cqnmgltnf4vyuhmjli2od2quk-8qc8iewqzmlvp1igp63xyftua \
192.168.0.47:2377
To add a manager to this swarm, run 'docker swarm join-token manager' and follow the instructions.
In this part of the book, since we are focusing on networking rather than the Swarm mode, we are going to use a
single node.
Now that the Swarm mode is activated, we can create a new network that we call webapps_network:
docker network create --driver overlay --subnet 10.0.9.0/16 --opt encrypted webapps_network
Let's check if our network using docker network ls :
NETWORK ID NAME DRIVER SCOPE
1wdbz5gldym1 webapp_network overlay swarm
If you inspect the network by typing docker inspect webapp_network you will be able to see different information about
webapp_network like its name, its id, its IPv6 status, the containers using it, some configurations like the subnet, the
gateway and the scope which is swarm.
[
{
"Name": "webapp_network",
"Id": "1wdbz5gldym121beq4ftdttgg",
"Scope": "swarm",

"Driver": "overlay",
"EnableIPv6": false,
"IPAM": {
"Driver": "default",
"Options": null,
"Config": [
{
"Subnet": "10.0.9.0/16",
"Gateway": "10.0.0.1"
}
]
},
"Internal": false,
"Containers": null,
"Options": {
"com.docker.network.driver.overlay.vxlanid_list": "257",
"encrypted": ""
},
"Labels": null
}
]
After learning how to use and manage Docker Swarm mode you will be able to create services and containers and
attach them to a network but for the moment let's just continue exploring briefly the networking part.
In our example, we are considering that the service webapp_service was created and that we are running 3 instances
of webapp_container.
If we type the same command to inspect we will notice that the 3 Docker instances are included now:
[
{
"Name": "webapp_network",
"Id": "2tb6djzmq4x4u5ey3h2e74y9e",
"Scope": "swarm",
"Driver": "overlay",
"EnableIPv6": false,
"IPAM": {
"Driver": "default",
"Options": null,
"Config": [
{
"Subnet": "10.0.9.0/16",
"Gateway": "10.0.0.2"
}
]
},
"Internal": false,
"Containers": {
"ab364a18eb272533e6bda88a0c705004df4b7974e64ad63c36fd3061a716f613": {
"Name": "webapp.3.3fmrpa3cd7y6b4ol33x7m413v",
"EndpointID": "e6980c952db5aa7b6995bc853d5ab82668a4692af98540feef1aa58a4e8fd282",
"MacAddress": "02:42:0a:00:00:06",
"IPv4Address": "10.0.0.6/16",
"IPv6Address": ""
},
"c5628fcfcf6a5f0e5a49ddfe20b141591c95f01c45a37262ee93e8ad3e3cff7e": {
"Name": "webapp.2.dckgxiffiay2kk7t2n149rpnj",
"EndpointID": "ce05566b0110f448018ccdaed4aa21b402ae659efa2adff3102492ee6c04fce8",
"MacAddress": "02:42:0a:00:00:05",
"IPv4Address": "10.0.0.5/16",
"IPv6Address": ""
},
"f0a7b5201e84c010616e6033fee7d245af7063922c61941cfc01f9edd0be7226": {
"Name": "webapp.1.73m1914qlcj8agxf5lkhzb7se",
"EndpointID": "1dce8dd253b818f8b0ba129a59328fed427da91d86126a1267ac7855666ec434",
"MacAddress": "02:42:0a:00:00:04",
"IPv4Address": "10.0.0.4/16",
"IPv6Address": ""
}
},
"Options": {
"com.docker.network.driver.overlay.vxlanid_list": "258",
"encrypted": ""
},
"Labels": {}
}
]
Let's make some experiments to better discover networking in Swarm mode.
If we execute the Linux command route to see the default

If we execute traceroute google.com from inside one of the containers, this is a sample output:
traceroute to google.com (216.58.209.238), 30 hops max, 46 byte packets
1 172.19.0.1 (172.19.0.1) 0.003 ms 0.012 ms 0.004 ms
2 192.168.3.1 (192.168.3.1) 2.535 ms 0.481 ms 0.609 ms
3 192.168.1.1 (192.168.1.1) 2.228 ms 1.442 ms 1.826 ms
4 80.10.234.169 (80.10.234.169) 10.377 ms 5.951 ms 17.026 ms
[...]
11 par10s29-in-f14.1e100.net (216.58.209.238) 4.723 ms 3.428 ms 4.191 ms
To go outside and reach the Internet, the first hop was 172.19.0.1 . If you type ifconfig in your host machine, you
can find that this address is allocated to docker_gwbridge interface that we are going to see later in this section.
docker_gwbridge Link encap:Ethernet HWaddr 02:42:d2:fd:fd:dc
inet addr:172.19.0.1 Bcast:0.0.0.0 Mask:255.255.0.0
UP BROADCAST RUNNING MULTICAST MTU:1500 Metric:1
RX packets:7334 errors:0 dropped:0 overruns:0 frame:0
TX packets:3843 errors:0 dropped:0 overruns:0 carrier:0
collisions:0 txqueuelen:0
RX bytes:595520 (595.5 KB) TX bytes:358648 (358.6 KB)
The containers provisioned in docker swarm mode can be accessed in service discovery in two ways:
Via Virtual IP (VIP) and routed through the docker swarm ingress overlay network.
Or via a DNS round robbin (DNSRR)
Because VIP is not on the ingress overlay network, you need to create a user-defined overlay network in order to use
VIP or DNSRR.
Natively, Docker Engine in its Swarm mode supports overlay networks so you don't need an external key-value store
and container-to-container networking is enabled.
The eth0 interface represents the container interface that is connected to the overlay network. So if you create an
overlay network, you will have those VIP associated to it. eth1 interface represents the container interface that is
connected to the docker_gwbridge network, for external connectivity outside of container cluster.
Using External Key/Value Store
Our choice for this part will be Consul, a service discovery and configuration manager for distributed systems
implementing a key/value storage.
To use Consul 0.7.1, you should download it:
cd /tmp
wget https://releases.hashicorp.com/consul/0.7.1/consul_0.7.1_linux_amd64.zip
unzip consul_0.7.1_linux_amd64.zip
chmod +x consul
mv consul /usr/bin/consul
Create the configuration directory for Consul:
mkdir -p /etc/consul.d/

If you want to install the the web UI download it and unzip:
cd /tmp
wget https://releases.hashicorp.com/consul/0.7.1/consul_0.7.1_web_ui.zip
mkdir -p /opt/consul
cd /opt/consul
unzip /tmp/consul_0.6.0_web_ui.zip
Now you can run a Consul agent:
consul agent \
-server \
-bootstrap-expect 1 \
-data-dir /tmp/consul \
-node=agent-one \
-bind=192.168.0.47 \
-client=0.0.0.0 \
-config-dir /etc/consul.d \
-ui-dir /opt/consul-ui
Change the options values by your own ones, where:
-bootstrap-expect=0 Sets server to expect bootstrap mode.
-bind=0.0.0.0 Sets the bind address for cluster communication
-client=127.0.0.1 Sets the address to bind for client access.
This includes RPC, DNS, HTTP and HTTPS (if configured)
-node=hostname Name of this node. Must be unique in the cluster
-config-dir=foo Path to a directory to read configuration files
from. This will read every file ending in ".json"
as configuration in this directory in alphabetical
order. This can be specified multiple times.
-ui-dir=path Path to directory containing the Web UI resources
You can use other options like:
-bootstrap Sets server to bootstrap mode
-advertise=addr Sets the advertise address to use
-atlas=org/name Sets the Atlas infrastructure name, enables SCADA.
-atlas-join Enables auto-joining the Atlas cluster
-atlas-token=token Provides the Atlas API token
-atlas-endpoint=1.2.3.4 The address of the endpoint for Atlas integration.
-http-port=8500 Sets the HTTP API port to listen on
-config-file=foo Path to a JSON file to read configuration from.
This can be specified multiple times.
-data-dir=path Path to a data directory to store agent state
-recursor=1.2.3.4 Address of an upstream DNS server.
Can be specified multiple times.
-dc=east-aws Datacenter of the agent
-encrypt=key Provides the gossip encryption key
-join=1.2.3.4 Address of an agent to join at start time.
Can be specified multiple times.
-join-wan=1.2.3.4 Address of an agent to join -wan at start time.
Can be specified multiple times.
-retry-join=1.2.3.4 Address of an agent to join at start time with
retries enabled. Can be specified multiple times.
-retry-interval=30s Time to wait between join attempts.
-retry-max=0 Maximum number of join attempts. Defaults to 0, which
will retry indefinitely.
-retry-join-wan=1.2.3.4 Address of an agent to join -wan at start time with
retries enabled. Can be specified multiple times.
-retry-interval-wan=30s Time to wait between join -wan attempts.
-retry-max-wan=0 Maximum number of join -wan attempts. Defaults to 0, which
will retry indefinitely.
-log-level=info Log level of the agent.
-protocol=N Sets the protocol version. Defaults to latest.
-rejoin Ignores a previous leave and attempts to rejoin the cluster.
-server Switches agent to server mode.
-syslog Enables logging to syslog
-pid-file=path Path to file to store agent PID
You can see the execution logs on your terminal:

==> WARNING: BootstrapExpect Mode is specified as 1; this is the same as Bootstrap mode.
==> WARNING: Bootstrap mode enabled! Do not enable unless necessary
==> Starting Consul agent...
==> Starting Consul agent RPC...
==> Consul agent running!
Node name: 'agent-one'
Datacenter: 'dc1'
Server: true (bootstrap: true)
Client Addr: 0.0.0.0 (HTTP: 8500, HTTPS: -1, DNS: 8600, RPC: 8400)
Cluster Addr: 192.168.0.47 (LAN: 8301, WAN: 8302)
Gossip encrypt: false, RPC-TLS: false, TLS-Incoming: false
Atlas: <disabled>
==> Log data will now stream in as it occurs:
2016/12/17 18:50:55 [INFO] raft: Node at 192.168.0.47:8300 [Follower] entering Follower state
2016/12/17 18:50:55 [INFO] serf: EventMemberJoin: agent-one 192.168.0.47
2016/12/17 18:50:55 [INFO] consul: adding LAN server agent-one (Addr: 192.168.0.47:8300) (DC: dc1)
2016/12/17 18:50:55 [INFO] serf: EventMemberJoin: agent-one.dc1 192.168.0.47
2016/12/17 18:50:55 [ERR] agent: failed to sync remote state: No cluster leader
2016/12/17 18:50:55 [INFO] consul: adding WAN server agent-one.dc1 (Addr: 192.168.0.47:8300) (DC: dc1)
2016/12/17 18:50:56 [WARN] raft: Heartbeat timeout reached, starting election
2016/12/17 18:50:56 [INFO] raft: Node at 192.168.0.47:8300 [Candidate] entering Candidate state
2016/12/17 18:50:56 [INFO] raft: Election won. Tally: 1
2016/12/17 18:50:56 [INFO] raft: Node at 192.168.0.47:8300 [Leader] entering Leader state
2016/12/17 18:50:56 [INFO] consul: cluster leadership acquired
2016/12/17 18:50:56 [INFO] consul: New leader elected: agent-one
2016/12/17 18:50:56 [INFO] raft: Disabling EnableSingleNode (bootstrap)
2016/12/17 18:50:56 [INFO] consul: member 'agent-one' joined, marking health alive
2016/12/17 18:50:56 [INFO] agent: Synced service 'consul'
You can check Consul nodes by typing consul members :
Node Address Status Type Build Protocol DC
agent-one 192.168.0.47:8301 alive server 0.6.0 2 dc1
Now go to your Docker configuration file: /etc/default/docker and add the following line with the good
configurations:
DOCKER_OPTS="--cluster-store=consul://192.168.0.47:8500 --cluster-advertise=192.168.0.47:4000"
Restart Docker:
service docker restart
And create an overlay network:
docker network create --driver overlay --subnet=10.0.1.0/24 databases_network
Check if the network was created:
docker network ls
NETWORK ID NAME DRIVER SCOPE
6d6484687002 databases_network overlay global
If you inspect the recently created network using docker network inspect databases_network , you will have something
similar to the following output:
[
{

"Name": "databases_network",
"Id": "6d64846870029d114bb8638f492af7fc9b5c87c2facb67890b0f40187b73ac87",
"Scope": "global",
"Driver": "overlay",
"EnableIPv6": false,
"IPAM": {
"Driver": "default",
"Options": {},
"Config": [
{
"Subnet": "10.0.1.0/24"
}
]
},
"Internal": false,
"Containers": {},
"Options": {},
"Labels": {}
}
]
Notice that the network Scope is now global :
"Scope": "global",
If you compare it to the other network created using the Swarm mode, you will notice that the scope changed from
swarm to global.
Docker Networks Events
Docker networks system reports the following events: create, connect, disconnect, destroy.

Docker Daemon & Architecture
Docker Daemon
Like the init daemon, cron daemon crond, dhcp daemon dhcpd, Docker has its own daemon dockerd.
To list Docker daemons, list all Linux daemons:
ps -U0 -o 'tty,pid,comm' | grep ^?
And grep Docker on the output:
ps -U0 -o 'tty,pid,comm' | grep ^?|grep -i dockerd
? 2779 dockerd
Note that you may see docker-containe or any other short version of docker-containerd-shim .
If you are already running Docker, when you type dockerd you will have a similar error message to this :
FATA[0000] Error starting daemon: pid file found, ensure docker is not running or delete /var/run/docker.pid
Now let's stop Docker service docker stop and run is daemon directly using dockerd command. Running the Docker
daemon command using dockerd is a good debugging tool, as you may see, you will have the running traces right on
your terminal screen:
INFO[0000] libcontainerd: new containerd process, pid: 19717
WARN[0000] containerd: low RLIMIT_NOFILE changing to max current=1024 max=4096
INFO[0001] [graphdriver] using prior storage driver "aufs"
INFO[0003] Graph migration to content-addressability took 0.63 seconds
WARN[0003] Your kernel does not support swap memory limit.
WARN[0003] mountpoint for pids not found
INFO[0003] Loading containers: start.
INFO[0003] Firewalld running: false
INFO[0004] Removing stale sandbox ingress_sbox (ingress-sbox)
INFO[0004] Default bridge (docker0) is assigned with an IP address 172.17.0.0/16. \
Daemon option --bip can be used to set a preferred IP address
INFO[0004] Loading containers: done.
INFO[0004] Listening for local connections addr=/var/lib/docker/swarm/control.sock proto=unix
INFO[0004] Listening for connections addr=[::]:2377 proto=tcp
INFO[0004] 61c88d41fce85c57 became follower at term 12
INFO[0004] newRaft 61c88d41fce85c57 [peers: [], term: 12, commit: 290, applied: 0, lastindex: 290, lastterm: 12]
INFO[0004] 61c88d41fce85c57 is starting a new election at term 12
INFO[0004] 61c88d41fce85c57 became candidate at term 13
INFO[0004] 61c88d41fce85c57 received vote from 61c88d41fce85c57 at term 13
INFO[0004] 61c88d41fce85c57 became leader at term 13
INFO[0004] raft.node: 61c88d41fce85c57 elected leader 61c88d41fce85c57 at term 13
INFO[0004] Initializing Libnetwork Agent Listen-Addr=0.0.0.0 Local-addr=192.168.0.47 Adv-addr=192.168.0.47 Remote-addr =
INFO[0004] Daemon has completed initialization
INFO[0004] Initializing Libnetwork Agent Listen-Addr=0.0.0.0 Local-addr=192.168.0.47 Adv-addr=192.168.0.47 Remote-addr =
INFO[0004] Docker daemon commit=7392c3b graphdriver=aufs version=1.12.5
INFO[0004] Gossip cluster hostname eonSpider-3e64aecb2dd5
INFO[0004] API listen on /var/run/docker.sock
INFO[0004] No non-localhost DNS nameservers are left in resolv.conf. Using default external servers :
[nameserver 8.8.8.8 nameserver 8.8.4.4]
INFO[0004] IPv6 enabled; Adding default IPv6 external servers :
[nameserver 2001:4860:4860::8888 nameserver 2001:4860:4860::8844]
INFO[0000] Firewalld running: false
Now if you create or remove containers for example, you will see that Docker daemon connects you (Docker client)
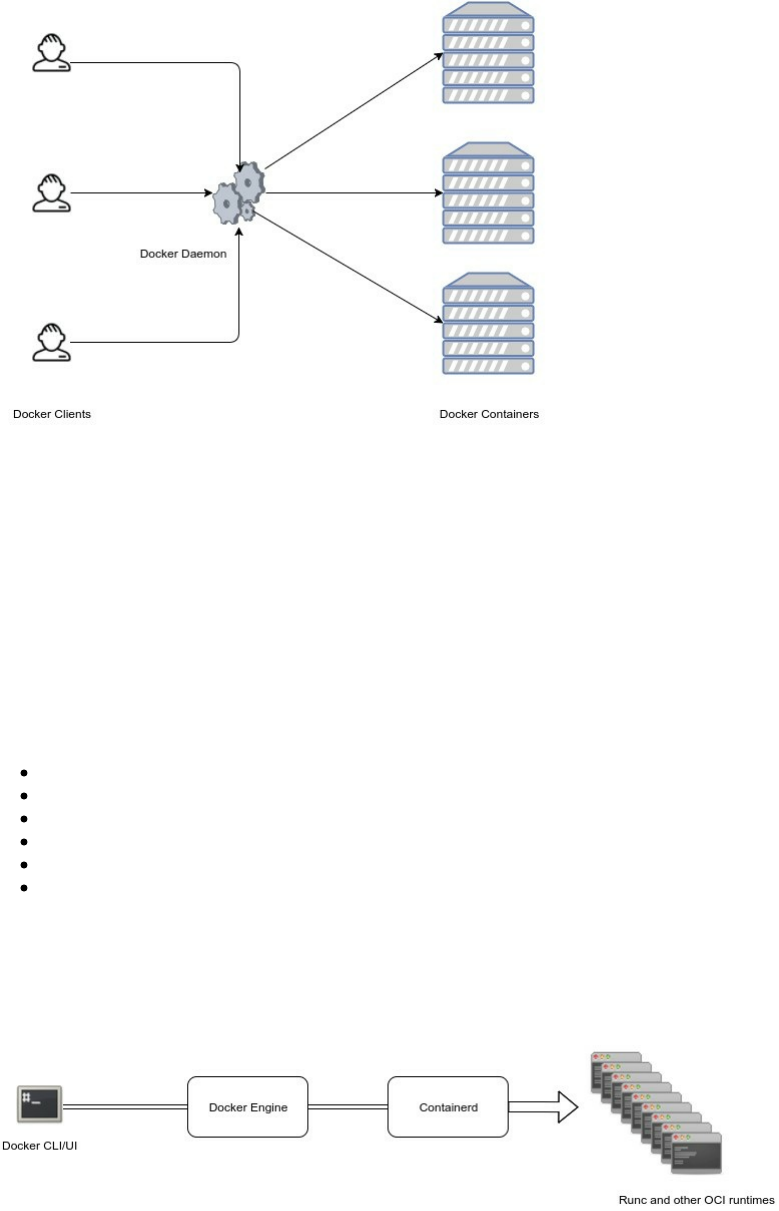
to Docker containers.
This is how Docker daemon communicate with the rest of Docker modules:
Containerd
Containerd is one of the recent projects in the Docker ecosystem and its purpose is breaking up more modularity to
Docker architecture and more neutrality visà-vis the other industry actors (Cloud providers and other orchestrator
services).
According to Solomon Hykes, containerd is already deployed on millions of machines since April 2016 when it was
included in Docker 1.11. The announced roadmap to extend containerd get its input from the cloud providers and
actors like Alibaba Cloud, AWS, Google, IBM, Microsoft, and other active members of the container ecosystem.
More Docker engine functionality will be added to containerd so that containerd 1.0 will provide all the core
primitives you need to manage containers with parity on Linux and Windows hosts:
Container execution and supervision
Image distribution
Network Interfaces Management
Local storage
Native plumbing level API
Full OCI support, including the extended OCI image specification
To build, ship and run containerized applications, you may continue to use Docker but if you are looking for
specialized components you could consider containerd.
Docker Engine 1.11 was the first release built on runC (a runtime based on Open Container Intiative technology)
and containerd.

Formed in June 2015, the Open Container Initiative (OCI) aims to establish common standards for software
containers in order to avoid a potential fragmentation and divisions inside the container ecosystem.
It contains two specifications:
runtime-spec: The runtime specification
image-spec: The image specification
The runtime specification outlines how to run a filesystem bundle that is unpacked on disk:
A standardized container bundle should contain the needed information and configurations to load and run a
container in a config.json file residing in the root of the bundle directory.
A standardized container bundle should contain a directory representing the root filesystem of the container.
Generally this directory has a conventional name like rootfs.
You can see the json file if you export and extract an image. In the following example, we are going to use busybox
image.
mkdir my_container
cd my_container
mkdir rootfs
docker export $(docker create busybox) | tar -C rootfs -xvf -
Now we have an extracted busybox image inside of rootfs directory.
tree -d my_container/
my_container/
└── rootfs
├── bin
├── dev
│ ├── pts
│ └── shm
├── etc
├── home
├── proc
├── root
├── sys
├── tmp
├── usr
│ └── sbin
└── var
├── spool
│ └── mail
└── www
We can generate the config.json file:
docker-runc spec
You could also use runC to generate your json file:
runc spec
This is the generated configuration file (config.json):
{
"ociVersion": "1.0.0-rc2-dev",
"platform": {
"os": "linux",
"arch": "amd64"
},

"process": {
"terminal": true,
"consoleSize": {
"height": 0,
"width": 0
},
"user": {
"uid": 0,
"gid": 0
},
"args": [
"sh"
],
"env": [
"PATH=/usr/local/sbin:/usr/local/bin:/usr/sbin:/usr/bin:/sbin:/bin",
"TERM=xterm"
],
"cwd": "/",
"capabilities": [
"CAP_AUDIT_WRITE",
"CAP_KILL",
"CAP_NET_BIND_SERVICE"
],
"rlimits": [
{
"type": "RLIMIT_NOFILE",
"hard": 1024,
"soft": 1024
}
],
"noNewPrivileges": true
},
"root": {
"path": "rootfs",
"readonly": true
},
"hostname": "runc",
"mounts": [
{
"destination": "/proc",
"type": "proc",
"source": "proc"
},
{
"destination": "/dev",
"type": "tmpfs",
"source": "tmpfs",
"options": [
"nosuid",
"strictatime",
"mode=755",
"size=65536k"
]
},
{
"destination": "/dev/pts",
"type": "devpts",
"source": "devpts",
"options": [
"nosuid",
"noexec",
"newinstance",
"ptmxmode=0666",
"mode=0620",
"gid=5"
]
},
{
"destination": "/dev/shm",
"type": "tmpfs",
"source": "shm",
"options": [
"nosuid",
"noexec",
"nodev",
"mode=1777",
"size=65536k"
]
},
{
"destination": "/dev/mqueue",
"type": "mqueue",
"source": "mqueue",
"options": [
"nosuid",
"noexec",
"nodev"
]
},
{
"destination": "/sys",
"type": "sysfs",

"source": "sysfs",
"options": [
"nosuid",
"noexec",
"nodev",
"ro"
]
},
{
"destination": "/sys/fs/cgroup",
"type": "cgroup",
"source": "cgroup",
"options": [
"nosuid",
"noexec",
"nodev",
"relatime",
"ro"
]
}
],
"hooks": {},
"linux": {
"resources": {
"devices": [
{
"allow": false,
"access": "rwm"
}
]
},
"namespaces": [
{
"type": "pid"
},
{
"type": "network"
},
{
"type": "ipc"
},
{
"type": "uts"
},
{
"type": "mount"
}
],
"maskedPaths": [
"/proc/kcore",
"/proc/latency_stats",
"/proc/timer_list",
"/proc/timer_stats",
"/proc/sched_debug",
"/sys/firmware"
],
"readonlyPaths": [
"/proc/asound",
"/proc/bus",
"/proc/fs",
"/proc/irq",
"/proc/sys",
"/proc/sysrq-trigger"
]
}
}
Now you can edit any of the configurations listed above and run again a container without even using Docker, just
runC:
runc run container-name
Note that you should install runC first in order to use it. sudo apt install runc for Ubuntu 16.04. You could
also install it from sources:
mkdir -p ~/golang/src/github.com/opencontainers/
cd ~/golang/src/github.com/opencontainers/
git clone https://github.com/opencontainers/runc
cd ./runc
make

sudo make install
runC, a standalone containers runtime, is at its full spec, it allows you to spin containers, interact with them, and
manage their lifecycle and that's why containers built with one engine (like Docker) can run on another engine.
Containers are started as a child process of runC and can be embedded into various other systems without having to
run a daemon (Docker Daemon).
runC is built on libcontainer which is the same container library powering a Docker engine installation. Prior to the
version 1.11, Docker engine was used to manage volumes, networks, containers, images etc.. Now, the Docker
architecture is broken into four components: Docker engine, containerd, containerd-shm and runC. The binaries are
respectively called docker, docker-containerd, docker-containerd-shim, and docker-runc.
To run a container, Docker engine creates the image, pass it to containerd. containerd calls containerd-shim that
uses runC to run the container. Then, containerd-shim allows the runtimes (runC in this case) to exit after it starts
the container : This way we can run daemon-less containers because we are not having to have the long running
runtime processes for containers.
Currently, the creation of a container is handled by runc (via containerd) but it is possible to use another
binary (instead of runC) that expose the same command line interface of Docker and accepting an OCI bundle.
You can see the different runtimes that you have on your host by typing:
docker info|grep -i runtime
Since I am using the default runtime, this is what I should get as an output:
Runtimes: runc
Default Runtime: runc
To add another runtime, you should follow this command:
docker daemon --add-runtime "<runtime-name>=<runtime-path>"
Example:
docker daemon --add-runtime "oci=/usr/local/sbin/runc"
There is only one containerd-shim by process and it manages the STDIO FIFO and keeps it open for the container in
case containerd or Docker dies.
It is also in charge of reporting the container's exit status to a higher level like Docker.
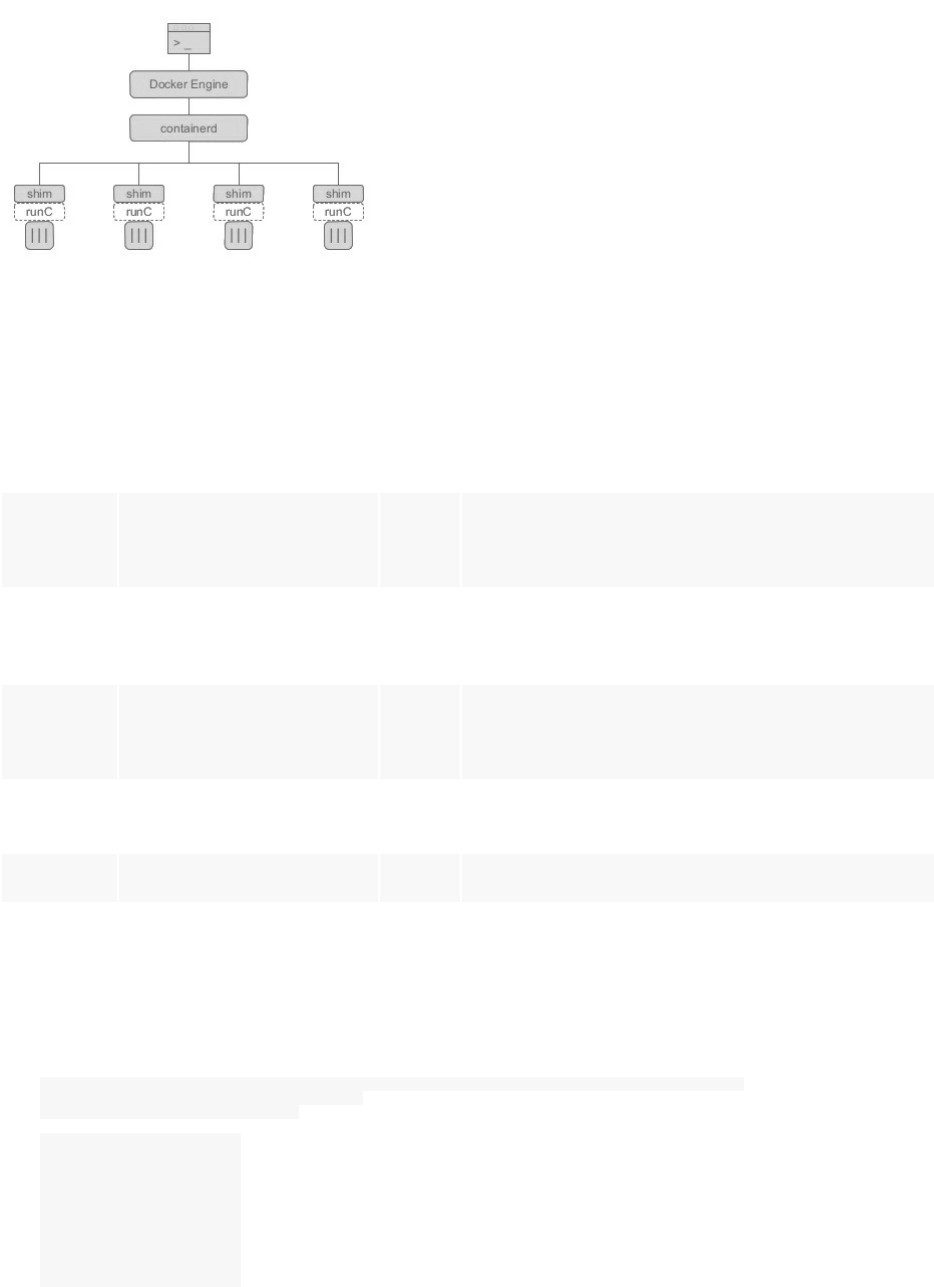
Container runtime, lifecycle support and the execution (create, start, stop, pause, resume, exec, signal & delete) are
some features implemented in Containerd. Some others are managed by other components of Docker (volumes,
logging ..etc). Here is a table from the Containerd Github repository that lists the different features and tell if they
are in or out of scope.
Name Description In/Out Reason
execution
Provide an extensible
execution layer for executing a
container
in Create,start, stop pause, resume exec, signal, delete
cow
filesystem
Built in functionality for
overlay, aufs, and other copy
on write filesystems for
containers
in
distribution
Having the ability to push and
pull images as well as
operations on images as a first
class api object
in containerd will fully support the management and
retrieval of images
low-level
networking
drivers
Providing network
functionality to containers
along with configuring their
network namespaces
in
Network support will be added via interface and network
namespace operations, not service discovery and service
abstractions.
build Building images as a first
class API out
Build is a higher level tooling feature and can be
implemented in many different ways on top of
containerd
volumes Volume management for
external data out The api supports mounts, binds, etc where all volumes
type systems can be built on top of.
logging Persisting container logs out
Logging can be build on top of containerd because the
container’s STDIO will be provided to the clients and they
can persist any way they see fit. There is no io copying of
container STDIO in containerd.
If we run a container:
docker run --name mariadb -e MYSQL_ROOT_PASSWORD=password -v /data/lists:/var/lib/mysql -d mariadb
Unable to find image 'mariadb:latest' locally
latest: Pulling from library/mariadb
75a822cd7888: Pull complete
b8d5846e536a: Pull complete
b75e9152a170: Pull complete
832e6b030496: Pull complete
034e06b5514d: Pull complete
374292b6cca5: Pull complete
d2a2cf5c3400: Pull complete
f75e0958527b: Pull complete
1826247c7258: Pull complete
68b5724d9fdd: Pull complete
d56c5e7c652e: Pull complete

b5d709749ac4: Pull complete
Digest: sha256:0ce9f13b5c5d235397252570acd0286a0a03472a22b7f0384fce09e65c680d13
Status: Downloaded newer image for mariadb:latest
db5218c494190c11a2fcc9627ea1371935d7021e86b5f652221bdac1cf182843
If you type ps aux you can notice the docker-containerd-shim process relative to this container running with
db5218c494190c11a2fcc9627ea1371935d7021e86b5f652221bdac1cf182843
/var/run/docker/libcontainerd/db5218c494190c11a2fcc9627ea1371935d7021e86b5f652221bdac1cf182843
and runC binary ( docker-runc ) as parameters:
docker-containerd-shim \
db5218c494190c11a2fcc9627ea1371935d7021e86b5f652221bdac1cf182843 \
/var/run/docker/libcontainerd/db5218c494190c11a2fcc9627ea1371935d7021e86b5f652221bdac1cf182843 \
docker-runc
db5218c494190c11a2fcc9627ea1371935d7021e86b5f652221bdac1cf182843 is the id of the container that you can see at the
end of the container creation.
ls -l /var/run/docker/libcontainerd/db5218c494190c11a2fcc9627ea1371935d7021e86b5f652221bdac1cf182843
total 4
-rw-r--r-- 1 root root 3653 Dec 27 22:21 config.json
prwx------ 1 root root 0 Dec 27 22:21 init-stderr
prwx------ 1 root root 0 Dec 27 22:21 init-stdin
prwx------ 1 root root 0 Dec 27 22:21 init-stdout
Docker Daemon Events
Docker daemon reports the following event: reload.

Docker Plugins
Even if they are not widely used, but Docker plugins are an interesting feature because it extends Docker by third-
party plugins like network or storage plugins. Docker plugins run out of Docker processes and expose a webhook-
like functionality which the Docker daemon uses to send HTTP POST requests in order the plugins acts as Docker
Events.
Let's take Flocker as an example.
Flocker is an open-source container data volume orchestrator for dockerized applications. Flocker gives Ops teams
the tools they need to run containerized stateful services like databases in production, since it provides a tool that
migrates data along with containers as they change hosts.
The standard way to run a volume container is :
docker run --name my_volume_container_1 -v /data -it -d busybox
But if you want to use Flocker plugin, you should run it like this:
docker run --name my_volume_container_2 -v /data -it --volume-driver=flocker -d busybox
Docker community is one of the most active communities during 2016 and the value of plugins is to allow these
Docker developers to contribute in a growing ecosystem.
Another known plugin is developed by Weave Net which integrates with Weave Scope so you can see how
containers are connected. Using Weave Flux works you can automate request routing in order to turn containers into
microservices.
We have seen how to use a storage plugin and it is something that looks like:
docker run -v <volume_name>:<mountpoint> --volume-driver=<plugin_name> <..> <image>
Network plugins has a different usage, you create the network first of all:
docker network create -d <plugin_name> <network_name>
Then you use it:
docker run --net=<networkname> <..> <image>
You can use some commands to manage Docker plugins, but they are all experimental and may change before it
becomes generally available.
To use the following commands, you should install the experimental version of Docker.
docker plugin ls
docker plugin enable
docker plugin disable
docker plugin inspect
docker plugin install
docker plugin rm

Overview Of Available Plugins
This is an inexhaustive overview of available plugins, that you can also find in the official documentation:
Contiv Networking An open source network plugin to provide infrastructure and security policies for
a multi-tenant micro services deployment, while providing an integration to physical network for
non-container workload. Contiv Networking implements the remote driver and IPAM APIs available
in Docker 1.9 onwards.
Kuryr Network Plugin A network plugin is developed as part of the OpenStack Kuryr project and
implements the Docker networking (libnetwork) remote driver API by utilizing Neutron, the
OpenStack networking service. It includes an IPAM driver as well.
Weave Network Plugin A network plugin that creates a virtual network that connects your Docker
containers - across multiple hosts or clouds and enables automatic discovery of applications. Weave
networks are resilient, partition tolerant, secure and work in partially connected networks, and other
adverse environments - all configured with delightful simplicity.
Azure File Storage plugin Lets you mount Microsoft Azure File Storage shares to Docker containers
as volumes using the SMB 3.0 protocol. Learn more.
Blockbridge plugin A volume plugin that provides access to an extensible set of container-based
persistent storage options. It supports single and multi-host Docker environments with features that
include tenant isolation, automated provisioning, encryption, secure deletion, snapshots and QoS.
Contiv Volume Plugin An open source volume plugin that provides multi-tenant, persistent,
distributed storage with intent based consumption. It has support for Ceph and NFS.
Convoy plugin A volume plugin for a variety of storage back-ends including device mapper and
NFS. It’s a simple standalone executable written in Go and provides the framework to support
vendor-specific extensions such as snapshots, backups and restore.
DRBD plugin A volume plugin that provides highly available storage replicated by
DRBD. Data written to the docker volume is replicated in a cluster of DRBD nodes.
Flocker plugin A volume plugin that provides multi-host portable volumes for Docker, enabling you
to run databases and other stateful containers and move them around across a cluster of machines.
gce-docker plugin A volume plugin able to attach, format and mount Google Compute persistent-
disks.
GlusterFS plugin A volume plugin that provides multi-host volumes management for Docker using
GlusterFS.
Horcrux Volume Plugin A volume plugin that allows on-demand, version controlled access to your
data. Horcrux is an open-source plugin, written in Go, and supports SCP, Minio and Amazon S3.
HPE 3Par Volume Plugin A volume plugin that supports HPE 3Par and StoreVirtual iSCSI storage
arrays.
IPFS Volume Plugin An open source volume plugin that allows using an ipfs filesystem as a volume.
Keywhiz plugin A plugin that provides credentials and secret management using Keywhiz as a central
repository.
Local Persist Plugin A volume plugin that extends the default local driver’s functionality by
allowing you specify a mountpoint anywhere on the host, which enables the files to always persist,
even if the volume is removed via docker volume rm .
NetApp Plugin (nDVP) A volume plugin that provides direct integration with the Docker ecosystem
for the NetApp storage portfolio. The nDVP package supports the provisioning and management of

storage resources from the storage platform to Docker hosts, with a robust framework for adding
additional platforms in the future.
Netshare plugin A volume plugin that provides volume management for NFS 3/4, AWS EFS and
CIFS file systems.
OpenStorage Plugin A cluster-aware volume plugin that provides volume management for file and
block storage solutions. It implements a vendor neutral specification for implementing extensions
such as CoS, encryption, and snapshots. It has example drivers based on FUSE, NFS, NBD and EBS
to name a few.
Portworx Volume Plugin A volume plugin that turns any server into a scale-out converged
compute/storage node, providing container granular storage and highly available volumes across any
node, using a shared-nothing storage backend that works with any docker scheduler.
Quobyte Volume Plugin A volume plugin that connects Docker to Quobyte’s data center file system,
a general-purpose scalable and fault-tolerant storage platform.
REX-Ray plugin A volume plugin which is written in Go and provides advanced storage
functionality for many platforms including VirtualBox, EC2, Google Compute Engine, OpenStack,
and EMC.
Virtuozzo Storage and Ploop plugin A volume plugin with support for Virtuozzo Storage distributed
cloud file system as well as ploop devices.
VMware vSphere Storage Plugin Docker Volume Driver for vSphere enables customers to address
persistent storage requirements for Docker containers in vSphere environments.
Twistlock AuthZ Broker A basic extendable authorization plugin that runs directly on the host or
inside a container. This plugin allows you to define user policies that it evaluates during
authorization. Basic authorization is provided if Docker daemon is started with the –tlsverify flag
(username is extracted from the certificate common name).
Docker Plugins Events
Docker plugins report the following events: install, enable, disable, remove.

Docker Philosophy
Docker is a new way to build, ship & run differently but easier than "traditional" ways. This isn't just related to the
technology but also to the philosophy.
Build Ship & Run
Visualization is a useful technology to run different OSs on a single bare-metal server but containers go further, they
decouple applications and software from the underlying OS and could be used to create a self-service of an
application or a PaaS. Docker is development-oriented and user friendly it could be used in DevOps pipelines in
order to develop, test and run applications.
On the same way Docker allows DevOps teams to have a local development environment similar to production
easily, just build and ship.
After finishing his tests, the developer could publish the container using Docker machine.
In the developer-driven era, cloud infrastructures, IoT, mobile devices and other technologies are innovating each
day, it is really important from a DevOps view to reduce the complexity of software production, quality, stability
and scalability by integrating containers as wrappers to standardize runtime systems.
Docker Is Single Process
A container can be single or multiprocess. While other containerization allows containers to run multiple processes
(lxc), Docker restricts containers to run as a single process and if you would like to run n processes for your
application , you should run n Docker containers.
In reality, you can run multiple processes, since Docker has an instruction called ENTRYPOINT that starts a
program, you can set the ENTRYPOINT to execute a script and run as many programs as you want, but it is not
completely aligned with Docker philosophy.
Building an application based on a single-process containers is efficient to create microservices architectures,
develop PaaS (platform as a service), create FaaS (function as a service) platforms, serverless computing or event-
based programming..
We a going to learn about building microservices applications using Docker later in this book. Briefly, it is an
approach to implement distributed architectures where services are independent processes that communicate with
each other over a network.
Docker Is Stateless
A Docker container consists of a series of a series of layers created previously in an image, once the image becomes
a container, these layers become read-only layers.
Once a modification happens in the container by a process, a diff is made and Docker notices the difference
between a container's layer and the matched images's layer but only when you type
docker commit <container id>
In this case a new image will be created with the last modifications but if you delete the container, the diff will
disappear.

Docker does not support a persistent storage but if you want to keep your storage persistent, you should use Docker
volumes and mount your files in the host filesystem, and in this case your code will be a part of a volume not a
container.
Docker is stateless, if any change happens in a running container, and new and different image could be created and
this is one of its strengths because you can do a fast and an easy rollback anytime.
Docker Is Portable
I created some public images that I pushed to my public Docker Hub, like eon01/vote, eon01/nginx-static - these
images were pulled more than 5k times. I created both of them using my laptop and all of the people who pulled
them used them as containers in different enviroments: bare-metal servers, desktops, laptops, virtual machines .. etc
all of these containers was built in a machine and run in the same way in thousands of other machines.

Chapter IV - Advanced Concepts
o ^__^
o (oo)\_______
(__)\ )\/\
||----w |
|| ||

Namespaces
According to Linux man pages, namespace wraps a global system resource in an abstraction that makes it appear to
the processes within the namespace that they have their own isolated instance of the global resource. Changes to the
global resource are visible to other processes that are members of the namespace, but are invisible to other
processes. One use of namespaces is to implement containers.
| Namespace | Constant | Isolates |
|------------|------------------|-------------------------------------|
| Cgroup | CLONE_NEWCGROUP | Cgroup root directory |
| IPC | CLONE_NEWIPC | System V IPC, POSIX message queues |
| Network | CLONE_NEWNET | Network devices, stacks, ports, etc.|
| Mount | CLONE_NEWNS | Mount points |
| PID | CLONE_NEWPID | Process IDs |
| User | CLONE_NEWUSER | User and group IDs |
| UTS | CLONE_NEWUTS | Hostname and NIS domain name |
Namespaces are the first form of isolation where a process running in a container A can not see or affect another
process running in a container B even if both processes are running in the same host machine.
Kernel namespaces allows a single host to have multiple:
Network devices
IP addresses
Routing rules
Netfilter rules
Timewait buckets
Bind buckets
Routing cache
etc ..
Every Docker container will have its own IP address and will see other docker containers as hosts connected to the
same "switch".
Control Groups (cgroups)
According to Wikipedia, cgroups or control groups is a Linux kernel feature that limits, accounts for, and isolates the
resource usage (CPU, memory, disk I/O, network, etc.) of a collection of processes.
This feature was introduced by engineers at Google in 2006 under the name "process containers". In late 2007, the
nomenclature changed to "control groups" to avoid confusion caused by multiple meanings of the term "container"
in the Linux kernel context, and the control groups functionality was merged into the Linux kernel mainline in kernel
version 2.6.24, which was released in January 2008.
Control Groups are also used by Docker not only to implement resource accounting and isolate its usage but
because they provide many useful metrics that help ensure that each container gets enough memory, CPU, disk I/O,
memory cache, CPU cache ..etc.
Control Groups provides also a level of security because using the feature ensure that a single container will not
bring down the host OS by exhausting its resources.
Public and private PaaS are also making use of cgroups in order to guarantee a stable service with no downtimes
when an application exhaust CPU, memory or any other critical resource. Other software and containers
technologies use cgroups like LXC, libvirt, systemd, Open Grid Scheduler and lmctfy.

Linux Capabilities
Unix was designed to run two categories of processes :
privileged processes, with the user id 0 which is the root user.
unprivileged processes where the user id is different from zero.
If you are familiar with Linux, you can find all of users ids when you type:
ps -eo uid
Every process in a UNIX has an owner (designed by its UID) and a group owner (identified by a GID). When Unix
starts a process, its GID is set to the GID of its parent process. The main purpose of this schema is performing
permission checks.
While privileged processes bypass all kernel permission checks, all the other processes are subject to a permission
check ( the Unix-like system Kernel make the permission check based on the UID and the GID of the non root
process.
Starting with Kernel 2.2, Linux divides the privileges into distinct units that we call capabilities. Capabilities can be
independently enabled and disabled, which is a great security and permission management feature. A process can
have CAP_NET_RAW capability while it is denied to use the CAP_NET_ADMIN capability. This is just an example
explaining how capabilities works. You can find the complete list of the other capabilities in Linux manpage:
man capabilities
By default, Docker starts containers with a limited list of capabilities so that containers will not use a real root
privileges and the root user within the container will not access all of the privileges of a real root user.
This is the list of the capabilities used by a default Docker installation :
s.Process.Capabilities = []string{
"CAP_CHOWN",
"CAP_DAC_OVERRIDE",
"CAP_FSETID",
"CAP_FOWNER",
"CAP_MKNOD",
"CAP_NET_RAW",
"CAP_SETGID",
"CAP_SETUID",
"CAP_SETFCAP",
"CAP_SETPCAP",
"CAP_NET_BIND_SERVICE",
"CAP_SYS_CHROOT",
"CAP_KILL",
"CAP_AUDIT_WRITE",
}
You can find the same list in Docker source code on github

Secure Computing Mode (seccomp)
Since Kernel version 2.6.12, Linux allows a process to make a one-way transition into a "secure" state where it
cannot make any system calls to an open file descriptors (fd).
Only exit(), sigreturn(), read() and write() system calls are allowed, any other call made by a process with a "secure"
state will beget its termination : the Kernel will send him a SIGKILL. This is the sandboxing mechanism in Linux
Kernel based on seccomp Kernel's feature.
Docker allows using seccomp to restrict the actions available within a container and restrict your application's
access.
To use the seccomp feature, Kernel should be configured with CONFIG_SECCOMP enabled and Docker should be
built with seccomp .
If you would like to check if your Kernel has seccomp activated, type:
cat /boot/config-`uname -r` | grep CONFIG_SECCOMP=
If it is activated, yous should see this:
CONFIG_SECCOMP=y
Docker uses seccomp profiles, which are configurations that disable around 44 system calls out of 300+. You can
find the default profile in the official repository.
You can choose a specific seccomp profile when running a container by adding the following options to the Docker
run command:
--security-opt seccomp=/path/to/seccomp/profile.json
The following table can be found in Docker official repository and it represents some of the blocked syscalls.
Syscall Description
acct Accounting syscall which could let containers disable their own resource limits or process
accounting. Also gated by CAP_SYS_PACCT .
add_key Prevent containers from using the kernel keyring, which is not namespaced.
adjtimex Similar to clock_settime and settimeofday , time/date is not namespaced.
bpf Deny loading potentially persistent bpf programs into kernel, already gated by
CAP_SYS_ADMIN .
clock_adjtime Time/date is not namespaced.
clock_settime Time/date is not namespaced.
clone Deny cloning new namespaces. Also gated by CAP_SYS_ADMIN for CLONE_* flags, except
CLONE_USERNS .
create_module Deny manipulation and functions on kernel modules.
delete_module Deny manipulation and functions on kernel modules. Also gated by CAP_SYS_MODULE .
finit_module Deny manipulation and functions on kernel modules. Also gated by CAP_SYS_MODULE .
get_kernel_syms Deny retrieval of exported kernel and module symbols.
get_mempolicy Syscall that modifies kernel memory and NUMA settings. Already gated by CAP_SYS_NICE .
init_module Deny manipulation and functions on kernel modules. Also gated by CAP_SYS_MODULE .

ioperm Prevent containers from modifying kernel I/O privilege levels. Already gated by
CAP_SYS_RAWIO .
iopl Prevent containers from modifying kernel I/O privilege levels. Already gated by
CAP_SYS_RAWIO .
kcmp Restrict process inspection capabilities, already blocked by dropping CAP_PTRACE .
kexec_file_load Sister syscall of kexec_load that does the same thing, slightly different arguments.
kexec_load Deny loading a new kernel for later execution.
keyctl Prevent containers from using the kernel keyring, which is not namespaced.
lookup_dcookie Tracing/profiling syscall, which could leak a lot of information on the host.
mbind Syscall that modifies kernel memory and NUMA settings. Already gated by CAP_SYS_NICE .
mount Deny mounting, already gated by CAP_SYS_ADMIN .
move_pages Syscall that modifies kernel memory and NUMA settings.
name_to_handle_at Sister syscall to open_by_handle_at . Already gated by CAP_SYS_NICE .
nfsservctl Deny interaction with the kernel nfs daemon.
open_by_handle_at Cause of an old container breakout. Also gated by CAP_DAC_READ_SEARCH .
perf_event_open Tracing/profiling syscall, which could leak a lot of information on the host.
personality Prevent container from enabling BSD emulation. Not inherently dangerous, but poorly tested,
potential for a lot of kernel vulns.
pivot_root Deny pivot_root , should be privileged operation.
process_vm_readv Restrict process inspection capabilities, already blocked by dropping CAP_PTRACE .
process_vm_writev Restrict process inspection capabilities, already blocked by dropping CAP_PTRACE .
ptrace Tracing/profiling syscall, which could leak a lot of information on the host. Already blocked
by dropping CAP_PTRACE .
query_module Deny manipulation and functions on kernel modules.
quotactl Quota syscall which could let containers disable their own resource limits or process
accounting. Also gated by CAP_SYS_ADMIN .
reboot Don't let containers reboot the host. Also gated by CAP_SYS_BOOT .
request_key Prevent containers from using the kernel keyring, which is not namespaced.
set_mempolicy Syscall that modifies kernel memory and NUMA settings. Already gated by CAP_SYS_NICE .
setns Deny associating a thread with a namespace. Also gated by CAP_SYS_ADMIN .
settimeofday Time/date is not namespaced. Also gated by CAP_SYS_TIME .
stime Time/date is not namespaced. Also gated by CAP_SYS_TIME .
swapon Deny start/stop swapping to file/device. Also gated by CAP_SYS_ADMIN .
swapoff Deny start/stop swapping to file/device. Also gated by CAP_SYS_ADMIN .
sysfs Obsolete syscall.
_sysctl Obsolete, replaced by /proc/sys.
umount Should be a privileged operation. Also gated by CAP_SYS_ADMIN .
umount2 Should be a privileged operation.
unshare Deny cloning new namespaces for processes. Also gated by CAP_SYS_ADMIN , with the exception
of unshare --user .
uselib Older syscall related to shared libraries, unused for a long time.
userfaultfd Userspace page fault handling, largely needed for process migration.
ustat Obsolete syscall.
vm86 In kernel x86 real mode virtual machine. Also gated by CAP_SYS_ADMIN .
vm86old In kernel x86 real mode virtual machine. Also gated by CAP_SYS_ADMIN .
If you would like to run a container without the default seccomp profile defined below, you can run:
docker run --rm -it --security-opt seccomp=unconfined hello-world

If you are using a distribution that does not support seccomp profiles, like Ubuntu 14.04, you will have the
following error : docker: Error response from daemon: Linux seccomp: seccomp profiles are not supported on this daemon, you
cannot specify a custom seccomp profile.

Application Armor (Apparmor)
Application Armor is a Linux Kernel security module. It allows the Linux administrator to restrict programs'
capabilities with per-program profiles.
In other words, this is a tool to lock applications by limiting their access to the only resources they are supposed to
use without disturbing neither their execution nor their performance.
Profiles can allow capabilities like raw socket, network access, read, write or execute files. This functionality was
added to Linux to complete the Discretionary Access Control (DAC) model. The Mandatory Access Control (MAC)
was then introduced.
You can check your Apparmor status by typing:
sudo apparmor_status
You will see a similar output to the following one, if it is activated:
apparmor module is loaded.
19 profiles are loaded.
18 profiles are in enforce mode.
/sbin/dhclient
/usr/bin/evince
/usr/bin/evince-previewer
/usr/bin/evince-previewer//sanitized_helper
/usr/bin/evince-thumbnailer
/usr/bin/evince-thumbnailer//sanitized_helper
/usr/bin/evince//sanitized_helper
/usr/bin/lxc-start
/usr/lib/NetworkManager/nm-dhcp-client.action
/usr/lib/connman/scripts/dhclient-script
/usr/sbin/cups-browsed
/usr/sbin/mysqld
/usr/sbin/ntpd
/usr/sbin/tcpdump
docker-default
lxc-container-default
lxc-container-default-with-mounting
lxc-container-default-with-nesting
1 profiles are in complain mode.
/usr/sbin/sssd
8 processes have profiles defined.
8 processes are in enforce mode.
/sbin/dhclient (1815)
/usr/sbin/cups-browsed (1697)
/usr/sbin/ntpd (3363)
docker-default (3214)
docker-default (3380)
docker-default (3381)
docker-default (3382)
docker-default (3390)
0 processes are in complain mode.
0 processes are unconfined but have a profile defined.
You can see in the list above that Docker profile is active and it is called docker-default . It is the default profile so
when you run a container, the following command is explicitly executed :
docker run --rm -it --security-opt apparmor=docker-default hello-world
The default profile is the following:
#include <tunables/global>
profile docker-default flags=(attach_disconnected,mediate_deleted) {

#include <abstractions/base>
network,
capability,
file,
umount,
deny @{PROC}/{*,**^[0-9*],sys/kernel/shm*} wkx,
deny @{PROC}/sysrq-trigger rwklx,
deny @{PROC}/mem rwklx,
deny @{PROC}/kmem rwklx,
deny @{PROC}/kcore rwklx,
deny mount,
deny /sys/[^f]*/** wklx,
deny /sys/f[^s]*/** wklx,
deny /sys/fs/[^c]*/** wklx,
deny /sys/fs/c[^g]*/** wklx,
deny /sys/fs/cg[^r]*/** wklx,
deny /sys/firmware/efi/efivars/** rwklx,
deny /sys/kernel/security/** rwklx,
}
You can confine containers using Apparmor but not the programs running inside a container. If you are
running Nginx under a container profile to protect the host, you will not be able to confine the Nginx with a different
profile to protect the container.
Apparmor is used since Linux Kernel since version 2.6.36 release.

Docker Union Filesystem
A Docker image is built of layers. UnionFS is the technology that allows that.
Union Filesystem or UnionFS is a filesystem service used in Linux, FreeBSD and NetBSD. It allows a set of files
and directories to form a single filesystem by grouping them in a single branch. Any Docker image is in reality a set
of layered filesystems superposed, one over the other.
UnionFS layers are transparently overlaid and form a coherent file system that we call branches. They may be either
read-only or read-write file systems.
Docker uses UnionFS in order to avoid duplicating a branch. The boot filesystem (bootfs) for example is one of the
branches that are used in many containers and it resembles the typical Unix boot filesystem. It is used in Ubuntu,
Debian, CentOs and many other containers.
When a container is started, Docker mounts a filesystem on top of any layers below and make it writable. So any
change is applied only to this layer. If you want to modify a file, it will be moved from the read-only layer below
into the read-write layer at the top.
Let's start a container and see its filesystem layers.
docker create -it redis
You can notice that Docker is downloading different layers in the output:
latest: Pulling from library/redis
6a5a5368e0c2: Pull complete
2f1103ce5ca9: Pull complete
086a40c85e01: Pull complete
9a5e9d112ec4: Pull complete
dadc4b601bb4: Pull complete
b8066982e7a1: Pull complete
2bcdfa1b63bf: Pull complete
Digest: sha256:38e873a0db859d0aa8ab6bae7bcb03c1bb65d2ad120346a09613084b49185912
Status: Downloaded newer image for redis:latest
6ab94a06bc0263110b973174d65cbc6ebd6d9fc637526b2c9dd3eac3c3bcf032
`docker create creates a writable container layer over the specified image hello-world in the last case) and
prepares it for running a command. It is similar to docker run -d except the container will not start running.
When running the last command, you will have an id that will be printed on your terminal. It is the id of the prepared
container.
6ab94a06bc0263110b973174d65cbc6ebd6d9fc637526b2c9dd3eac3c3bcf032
The container is ready, let's start it:
docker start 0eeab42751ff0172f845b9cb737c966471be9f10282cf1684519bc7f5da80170
The command docker start creates a process space around the UnionFS block.
We can't have more than one process space per container.

A docker ps will show that the container is running:
CONTAINER ID IMAGE COMMAND PORTS NAMES
6ab94a06bc02 redis "docker-entrypoint.sh" 6379/tcp trusting_carson
If you would like to see the layers, then type:
ls -l /var/lib/docker/aufs/layers
Layers of the same images will have a name that starts with the container id 6ab94a06bc02 .
We haven't seen yet the concept of Dockerfile, but don't worry if it is the first time you saw it. For the moment, let's
just limit our understanding to the explanation figuring in the official documentation:
Docker can build images automatically by reading the instructions from a Dockerfile. A Dockerfile is a text
document that contains all the commands a user could call on the command line to assemble an image. Using
Docker build users can create an automated build that executes several command-line instructions in
succession.
In general, when writing a Dockerfile, every line in this file will create an additional layer.
FROM busybox # This is a layer
MAINTAINER Aymen El Amri # This is a layer
RUN ls # This is a layer
Let's build this image:
docker build .
The id of the build, on the output for this example was
7f49abaf7a69
In other words, a layer is a change in an image.
So the second advantage of using UnionFS and the layered filesystem is the isolation of modifications : Any change
that happens to the running container will be initialized once the containers is restarted. The bootfs layer is one of
the layers that users will not interact with.
To sum up, when Docker mounts the rootfs, it starts as a read-only system, as in a traditional Linux boot, but then,
instead of changing the file system to the read-write mode, Docker takes advantage of a union mount to add a read-
write filesystem over the first read-only filesystem. There may be multiple read-only file systems layered on top of
each other. These file systems are called layers.
Docker supports a number of different union file systems. The next chapter about images will reinforce your
understanding about this.
Storage Drivers
OverlayFS, AUFS, VFS or Device Mapper are some storage technologies that are compatible with Docker. They are
easily "pluggable" to Docker and we call them storage drivers. Every technology has its own specificities and
choosing one depends on your technical requirements and criteria (like stability, maintenance, backup, speed,
hardware ..etc)
When we started running an image, Docker used a mechanism called copy-on-write (CoW).
CoW is a standard Unix pattern that provides a single shared copy of some data until it is modified. In general, CoW
is an implicit sharing of resources used to implement a copy operation on modifiable resources.
// define x
std::string x("Hello");
// x and y use the same buffer
std::string y = x;
// now y uses a different buffer while x still uses the same old buffer
y += ", World!";
In storage, CoW is used as an underlying mechanism to create snapshots like it is the case for for logical volume
management done by ZFS, AUFS .. etc
In a CoW algorithm, the original storage is never modified and when a write operation is requested it is
automatically redirected to a new storage (the original one is not modified). This redirection is called Redirect-on-
write or ROW
When a write request is made, all the data is copied into a new storage resource. We call this second step Copy-on-
write" or COW.
You have probably seen blog posts about one storage drivers being better than others or some post mortems. Keep in
mind that there is no technology better than the other, every technology has its pro and it cons.
OverlayFS
OverlayFS is a filesystem service for Linux that implements a union mount for other file systems. In the commit
453552c8384929d8ae04dcf1c6954435c0111da0 of Docker, OverlayFS was added to Docker by @alexlarsson from
Redhat. In the signature, the commit was described as:
Each container/image can have a "root" subdirectory which is a plain filesystem hierarchy, or they can use
overlayfs.
If they use overlayfs there is a "upper" directory and a "lower-id" file, as well as "merged" and "work"
directories. The "upper" directory has the upper layer of the overlay, and "lower-id" contains the id of the
parent whose "root" directory shall be used as the lower layer in the overlay. The overlay itself is mounted in
the "merged" directory, and the "work" dir is needed for overlayfs to work.

When a overlay layer is created there are two cases, either the parent has a "root" dir, then we start out with a
empty "upper" directory overlaid on the parents root. This is typically the case with the init layer of a container
which is based on an image. If there is no "root" in the parent, we inherit the lower-id from the parent and start
by making a copy if the parents "upper" dir. This is typically the case for a container layer which copies its
parent -init upper layer.
Additionally we also have a custom implementation of ApplyLayer which makes a recursive copy of the parent
"root" layer using hardlinks to share file data, and then applies the layer on top of that. This means all chile
images share file (but not directory) data with the parent.
Overlay2 was added to Docker in the pull #22126
Pro
OverlayFS is similar to aufs but it is supported and was merged into the mainline Linux kernel since version 3.18.
Like aufs it enables shared memory between containers using the same shared libraries (in the same disk). The
advantage of using OverlayFS is the fact that it is on a continued development. It is simpler than aufs and in most
cases faster.
Since its version 1.12, Docker provides overlay2 storage driver which is more efficient than overlay. The version 2
of OverlayFS is compatible with Kernel 4.0 and later.
Many users had issues with OverlayFS because they run out of inode and this problem was solved by Overlay2.
Testing shows that there is a significant reduction in the number of used inode used, this result is available
especially for images having multiple layers. This is clearly solving the problem of inode usage.
Cons
Mainly, the inode exhaustion problems. It is a serious problem that was fixed by OverlayFS 2.
Some other issues but the majority of these problems were fixed in the version 2. If you are planning to use
OverlaFS use OverlayFS 2 instead.
On the other hand, Overlay2 is a young codebase and Docker 1.12 is the first release offering Overlay2 and logically

some other bugs will be discovered in the future so it is a system to use with vigilance.
AUFS
aufs (short for advanced multi-layered unification filesystem) is Union Filesystem that existed in Docker since the
beginning. It was developed to improve reliability and performance. It introduced some new concepts, like writable
branch balancing. In its manpage, aufs is described as a stackable unification filesystem such as Unionfs, which
unifies several directories and provides a merged single directory.
In the early days, aufs was entirely re-designed and re-implemented Unionfs Version 1.x series.
After many original ideas, approaches and improvements, it becomes totally different from Unionfs while keeping
the basic features.
Pro
aufs is one of the most popular drivers for Docker. It is stable and used by many distributions like Knoppix, Ubuntu
10.04, Gentoo Linux 12.0 and Puppy Linux live CDs distributions. aufs help different containers to share memory
pages if they are loading the same shared libraries from the same layer.
The longest existing and possibly the most tested graphdriver backend for Docker. Reasonably performant and
stable for wide range of use cases, even though it is only available on Ubuntu and Debian Kernels (as noted below),
there has been significant use of these two distributions with Docker allowing for lots of airtime for the aufs driver
to be tested in a broad set of environments. Enables shared memory pages for different containers loading the same
shared libraries from the same layer (because they are the same inode on disk).
Cons
aufs was rejected for merging into mainline Linux. Its code was criticized for being "dense, unreadable, and
uncommented".
Aufs consists of about 20,000 lines of dense, unreadable, uncommented code, as opposed to around 10,000 for
Unionfs and 3,000 for union mounts and 60,000 for all of the VFS. The aufs code is generally something that
one does not want to look at. source
Instead, OverlayFS was merged in the Linux kernel.
Btrfs
Btrfs is a modern CoW filesystem for Linux.
The philosophy behind Btrfs is to implement advanced features while focusing on fault tolerance and easy
administration. Btrfs is developed at multiple companies and licensed under the GPL. The name stands for "B TRee
File System" so it is easier and probably acceptable to pronounce "B-Tree FS" instead of b-t-r-fs, but the real
pronunciation is "Butter FS".
Btrfs has native features named subvolumes and snapshots providing together CoW-like features.
It actually consists of three types of on-disk structures:
block headers,
keys,
and items
currently defined as follows:

struct btrfs_header {
u8 csum[32];
u8 fsid[16];
__le64 blocknr;
__le64 flags;
u8 chunk_tree_uid[16];
__le64 generation;
__le64 owner;
__le32 nritems;
u8 level;
}
struct btrfs_disk_key {
__le64 objectid;
u8 type;
__le64 offset;
}
struct btrfs_item {
struct btrfs_disk_key key;
__le32 offset;
__le32 size;
}
Btrfs was added to Docker in this commit by Alex Larsson from Red Hat.
Pro
Btrfs was introduced in the mainline Linux kernel in 2007 and was used for some few years and it was used by Linus
Torvalds as his root file system on one of his laptops. When Btrfs was released it was optimized compared to old-
school filesystems. According to the official wiki, this filesystem has the following features:
Extent based file storage
2^64 byte == 16 EiB maximum file size (practical limit is 8 EiB due to Linux VFS)
Space-efficient packing of small files
Space-efficient indexed directories
Dynamic inode allocation
Writable snapshots, read-only snapshots
Subvolumes (separate internal filesystem roots)
Checksums on data and metadata (crc32c)
Compression (zlib and LZO)
Integrated multiple device support
File Striping
File Mirroring
File Striping+Mirroring
Single and Dual Parity implementations (experimental, not production-ready)
SSD (flash storage) awareness (TRIM/Discard for reporting free blocks for reuse) and optimizations (e.g.
avoiding unnecessary seek optimizations, sending writes in clusters, even if they are from unrelated files. This
results in larger write operations and faster write throughput)
Efficient incremental backup
Background scrub process for finding and repairing errors of files with redundant copies
Online filesystem defragmentation
Offline filesystem check
In-place conversion of existing ext3/4 file systems
Seed devices. Create a (readonly) filesystem that acts as a template to seed other Btrfs filesystems. The original
filesystem and devices are included as a readonly starting point for the new filesystem. - - Using copy on write,
all modifications are stored on different devices; the original is unchanged.
Subvolume-aware quota support
Send/receive of subvolume changes
Efficient incremental filesystem mirroring
Batch, or out-of-band deduplication (happens after writes, not during)

Cons
Btrfs hasn't been a real choice for many Linux distributions and this fact made of Btrf a technology without much
testing and bug hunting.
Device Mapper
The device mapper is a framework provided by the Linux kernel (Kernel-based framework) to map physical block
devices to virtual block devices which is a higer-level abstraction. LVM2, software RAIDs and dm-crypt disk
encryption are targets of this technology. It also offers other features like file system snapshots. Device Mapper
algorithm works at the block level and not the file level:
The device mapper driver stores every image and container on a separate virtual device that are provisioned CoW
snapshot devices. We call this thin provision or thip.
Pro
It was tested and use by many communities unlike other filesystems.
Many projects and Linux features are built on top of the device mapper:
LVM2 – logical volume manager for the Linux kernel
dm-crypt – mapping target that provides volume encryption
dm-cache – mapping target that allows creation of hybrid volumes
dm-log-writes – mapping target that uses two devices, passing through the first device and logging the write
operations performed to it on the second device
dm-verity – validates the data blocks contained in a file system against a list of cryptographic hash values,
developed as part of the Chromium OS project
dmraid – provides access to "fake" RAID configurations via the device mapper
DM Multipath – provides I/O failover and load-balancing of block devices within the Linux kernel
Linux version of TrueCrypt
DRBD (Distributed Replicated Block Device)
kpartx – utility called from hotplug upon device maps creation and deletion
EVMS (deprecated)
cryptsetup – utility used to conveniently setup disk encryption based on dm-crypt
And of course Docker that uses device mapper to create copy-on-write storage for software containers.
Cons
If you would like to get device mapper storage driver performance, you should consider doing some configurations
and you should not run "loopback" mode in production.
You should try 15 steps explained in Docker official documentation, in order to use devicemapper driver in the
direct-lvm mode.
I have never used it but I saw some feedback from users having problems with its usage.

ZFS
This filesystem was first merged into the Docker engine in May 2015 and was available since Docker 1.7 release.
ZFS and Docker/go-zfs wrapper requires the installation of zfs-utils or zfs (e.g Ubuntu 16.04).
ZFS or Zettabyte File System is a combined file system and logical volume manager created at Sun Microsystems. It
was used by OpenSolaris since 2005.
Pro
ZFS is a native filesystem to Solaris, OpenSolaris, OpenIndiana, illumos, Joyent SmartOS, OmniOS, FreeBSD,
Debian GNU/kFreeBSD systems, NetBSD ans OSv.
ZFS is a killer-app for Solaris, as it allows straightforward administration of disks and pool of disks while giving
performance and integrity. It protects data against "silent error" of the disk ( caused by firmware bugs or even
hardware malfunctions like bad cables..etc ).
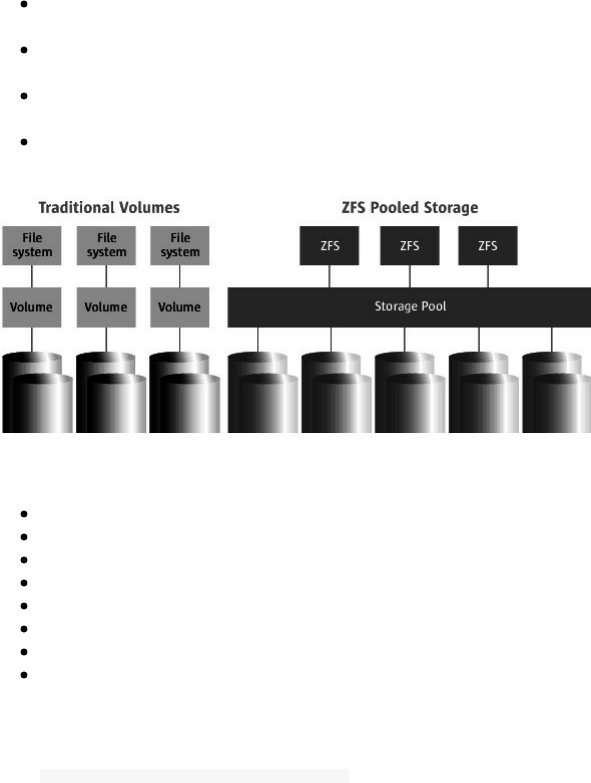
According to Sun Microsystems official website, ZFS meets the needs of a file system for everything from desktops
to data centers and offers:
Simple administration : ZFS automates and consolidates complicated storage administration concepts, reducing
administrative overhead by 80 percent.
Provable data integrity : ZFS protects all data with 64-bit checksums that detect and correct silent data
corruption.
Unlimited scalability : As the world's first 128-bit file system, ZFS offers 16 billion billion times the capacity of
32- or 64-bit systems.
Blazing performance : ZFS is based on a transactional object model that removes most of the traditional
constraints on the order of issuing I/Os, which results in huge performance gains.
It achieves its performance through a number of techniques:
Dynamic striping across all devices to maximize throughput
Copy-on-write design makes most disk writes sequential
Multiple block sizes, automatically chosen to match workload
Explicit I/O priority with deadline scheduling
Globally optimal I/O sorting and aggregation
Multiple independent prefetch streams with automatic length and stride detection
Unlimited, instantaneous read/write snapshots
Parallel, constant-time directory operations
Creating a new zpool is needed to use zfs :
sudo zpool create -f zpool-docker /dev/xvdb
Cons
The ZFS license is incompatible with Linux license, so Linux does not have a ZFS implementation and not every OS
can use ZFS (e.g Windows).
It takes some learning to use, so if you are using it as your main filesystem you will probably need some knowledge
about it. zfs lacks inode sharing for shared libraries between containers, but in reality it is not the only driver not
implementing this.
VFS
vfs simply stand for Virtual File System which is the abstraction layer on top of a concrete physical filesystem but it
does not use Union File System and CoW and that is why it is used by developers for debugging only.

You can find Docker volumes using vfs in /var/lib/docker/vfs/dir .
Pro
To test Docker engine, VFS is very useful since it is simpler to validate tests using this simple FS. This filesystem is
helpful to run Docker in Docker (dind). The official Docker image uses vfs as the default filesystem.
--storage-driver=vfs
vfs is the only driver which is guaranteed to work regardless of the underlying filesystem in the case of Docker in
Docker but it could be very slow and inefficient. Running Docker in Docker will be detailed later in this book.
Cons
It is not recommended at all to run VFS on production since it is not intended to be used with Docker production
clusters.
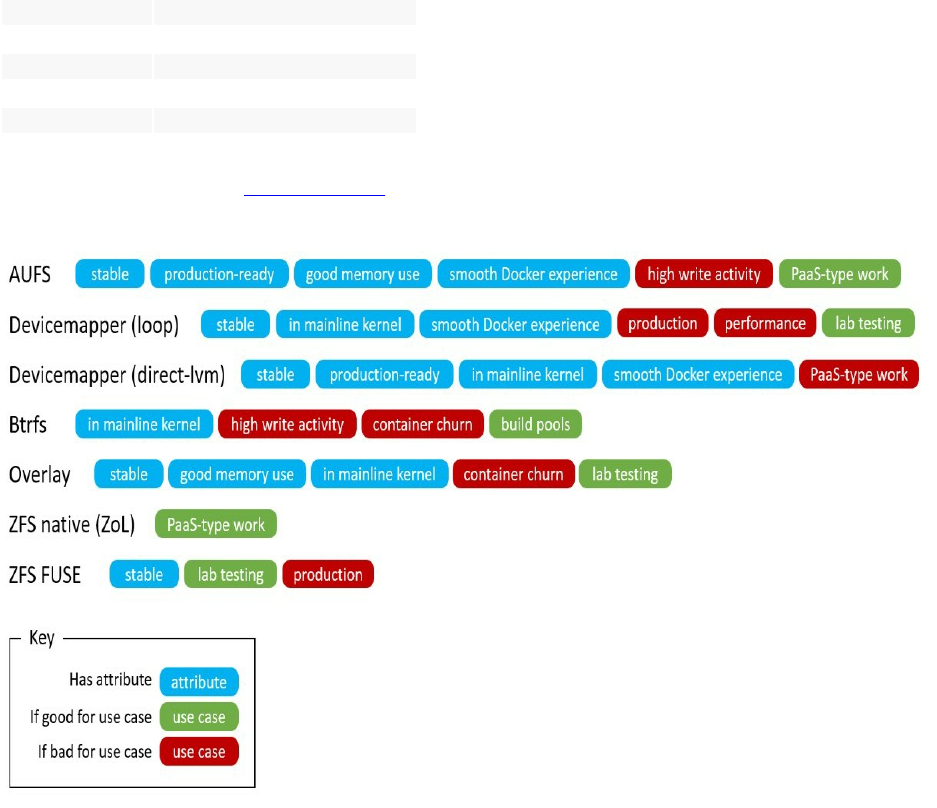
What Storage Driver To Choose
Your choice of the storage driver could not based on only pros and cons of each filesystem but there are other choice
criteria. For example, overlayFS and overlay2 can not be used on the top of a btrfs.
In general, some of these storage drivers can operate on top of different backing filesystems (host filesystem) but not
all. These table explains the common usage of each storage driver:
Storage Driver Commonly Used On Top Of
overlay xfs & ext4
overlay2 xfs & ext4
aufs xfs & ext4
btrfs btrfs
devicemapper direct-lvm
zfs zfs
vfs debugging
Docker community created a practical diagram that shows simply the strength and the weakness of some storage
drivers and their best use case.
Finally, there is no storage driver adapted to all use cases, there is no "ultimate choice" to make but it depends on
your use case. If you don't know what to choose exactly go for aufs or Overlay2.

Chapter V - Working With Docker Images
o ^__^
o (oo)\_______
(__)\ )\/\
||----w |
|| ||

Managing Docker Images
Images, Intermediate Images & Dangling Images
If you are running Docker on your laptop or your server, you can see a list of the images that Docker used or uses by
typing:
docker images
You will have a similar list:
REPOSITORY TAG IMAGE ID CREATED SIZE
<none> none 57ce8f25dd63 2 days ago 229.7 MB
scratch latest f02aa3980a99 2 days ago 0 B
xenial latest 7a409243b212 2 days ago 229.7 MB
<none> none 149b13361203 2 days ago 12.96 MB
Images with are untagged images.
You can print a custom output where you choose to view the ID and the size of the image:
docker images --format "{{.ID}}: {{.Size}}"
Or to view the repository:
docker images --format "{{.ID}}: {{.Repository}}"
In many cases, we just need to get IDs:
docker images -q
If you want to list all of them, then type:
docker images -a
or
docker images --all
In this list you will see all of the images even the intermediate ones.
REPOSITORY TAG IMAGE ID SIZE
my_app latest 7f49abaf7a69 1.093 MB
<none> <none> afe4509e17bc 225.6 MB

All of the <none>:<none> are intermediate images.
<none>:<none> images will grow exponentially with the numbers of images you download.
As you know each docker image is composed of layers with a parent-child hierarchical relationship .
These intermediate layers are a result of caching build operations which decrease disk usage and speed up builds.
Every build step is cached, that's why you may experienced some disk space problems after using Docker for a
while.
All docker layers are stored in /var/lib/docker/graph called the graph database.
Some of the intermediary images are not tagged, they are called dangling images.
docker images --filter "dangling=true"
Other filters may be used:
- label=<key> or label=<key>=<value>
- before=(<image-name>[:tag]|<image-id>|<image@digest>)
- since=(<image-name>[:tag]|<image-id>|<image@digest>)
Finding Images
If you type :
docker search ubuntu
you will get a list of images called Ubuntu that people shared publicly in the Docker Hub (hub.docker.com).
NAME DESCRIPTION STARS OFFICIAL AUTOMATED
ubuntu Ubuntu is a Debian-based Linux operating s... 4958 [OK]
ubuntu-upstart Upstart is an event-based replacement for ... 67 [OK]
rastasheep/ubuntu-sshd Dockerized SSH service, built on top of of... 47 [OK]
ubuntu-debootstrap debootstrap --variant=minbase --components... 28 [OK]
torusware/speedus-ubuntuAlways updated official Ubuntu docker imag... 27 [OK]
consol/ubuntu-xfce-vnc Ubuntu container with "headless" VNC sessi... 26 [OK]
ioft/armhf-ubuntu ABR] Ubuntu Docker images for the ARMv7(a... 19 [OK]
nickistre/ubuntu-lamp LAMP server on Ubuntu 10 [OK]
nuagebec/ubuntu Simple always updated Ubuntu docker images... 9 [OK]
nimmis/ubuntu This is a docker images different LTS vers... 5 [OK]
maxexcloo/ubuntu Base image built on Ubuntu with init, Supe... 2 [OK]
jordi/ubuntu Ubuntu Base Image 1 [OK]
admiringworm/ubuntu Base ubuntu images based on the official u... 1 [OK]
darksheer/ubuntu Base Ubuntu Image -- Updated hourly 1 [OK]
lynxtp/ubuntu https://github.com/lynxtp/docker-ubuntu 0 [OK]
datenbetrieb/ubuntu custom flavor of the official ubuntu base ... 0 [OK]
teamrock/ubuntu TeamRock's Ubuntu image configured with AW... 0 [OK]
labengine/ubuntu Images base ubuntu 0 [OK]
esycat/ubuntu Ubuntu LTS 0 [OK]
ustclug/ubuntu ubuntu image for docker with USTC mirror 0 [OK]
widerplan/ubuntu Our basic Ubuntu images. 0 [OK]
konstruktoid/ubuntu Ubuntu base image 0 [OK]
vcatechnology/ubuntu A Ubuntu image that is updated daily 0 [OK]
webhippie/ubuntu Docker images for ubuntu 0 [OK]
As you can notice, there are images having automated builds while others don't have this feature activated. An
automated builds allow your image to be up-to-date with changes on your private and public git (Github or
Bitbucket) code.

Notice that if you type the search command you will get only 25 image and if you want more, you could use the --
limit option:
docker search --limit 100 mongodb
NAME DESCRIPTION STARS OFFICIAL AUTOMATED
mongo MongoDB document databases provide high av... 2616 [OK]
tutum/mongodb MongoDB Docker image – listens in port 2... 166 [OK]
frodenas/mongodb A Docker Image for MongoDB 12 [OK]
agaveapi/mongodb-sync Docker image that regularly backs up and/o... 7 [OK]
sameersbn/mongodb 6 [OK]
bitnami/mongodb Bitnami MongoDB Docker Image 5 [OK]
waitingkuo/mongodb MongoDB 2.4.9 4 [OK]
tobilg/mongodb-marathon A Docker image to start a dynamic MongoDB ... 4 [OK]
appelgriebsch/mongodb Configurable MongoDB container based on Al... 3 [OK]
azukiapp/mongodb Docker image to run MongoDB by Azuki - htt... 3 [OK]
tianon/mongodb-mms https://mms.mongodb.com/ 2 [OK]
cpuguy83/mongodb 2 [OK]
zokeber/mongodb MongoDB Dockerfile in CentOS 7 2 [OK]
triply/mongodb Extension of official mongodb image that a... 1 [OK]
hairmare/mongodb MongoDB on Gentoo 1 [OK]
networld/mongodb Networld PaaS MongoDB image in default ins... 1 [OK]
jetlabs/mongodb Build MongoDB 3 image 1 [OK]
mattselph/ubuntu-mongodb Ubuntu 14.04 LTS with Mongodb 2.6.4 1 [OK]
oliverwehn/mongodb Out-of-the-box app-ready MongoDB server wi... 1 [OK]
gorniv/mongodb MongoDB Docker image 1 [OK]
vaibhavtodi/mongodb A MongoDB Docker image on Ubuntu 14.04.3. ... 1 [OK]
tozd/meteor-mongodb MongoDB server image for Meteor applications. 1 [OK]
ncarlier/mongodb MongoDB Docker image based on debian. 1 [OK]
pulp/mongodb 1 [OK]
ulboralabs/alpine-mongodb Docker Alpine Mongodb 1 [OK]
mminke/mongodb Mongo db image which downloads the databas... 1 [OK]
kardasz/mongodb MongoDB 0 [OK]
tcaxias/mongodb Percona's MongoDB on Debian. Storage Engin... 0 [OK]
whatwedo/mongodb 0 [OK]
guttertec/mongodb MongoDB is a free and open-source cross-pl... 0 [OK]
peerlibrary/mongodb 0 [OK]
jecklgamis/mongodb mongodb 0 [OK]
unzeroun/mongodb Mongodb image 0 [OK]
falinux/mongodb mongodb docker image. 0 [OK]
hysoftware/mongodb Docker mongodb image for hysoftware.net 0 [OK]
birdhouse/mongodb Docker image for MongoDB used in Birdhouse. 0 [OK]
airdock/mongodb 0 [OK]
bitergia/mongodb MongoDB Docker image (deprecated) 0 [OK]
tianon/mongodb-server 0 [OK]
andreynpetrov/mongodb mongodb 0 [OK]
lukaszm/mongodb MongoDB 0 [OK]
radiantwf/mongodb MongoDB Enterprise Docker image 0 [OK]
luca3m/mongodb-example Sample mongodb app 0 [OK]
derdiedasjojo/mongodb mongodb cluster prepared 0 [OK]
faboulaye/mongodb Mongodb container 0 [OK]
tcloud/mongodb mongodb 0 [OK]
omallo/mongodb MongoDB image build 0 [OK]
romeoz/docker-mongodb MongoDB container image which can be linke... 0 [OK]
denmojo/mongodb A simple mongodb container that can be lin... 0 [OK]
pl31/debian-mongodb mongodb from debian packages 0 [OK]
kievechua/mongodb Based on Tutum's Mongodb with official image 0 [OK]
apiaryio/base-dev-mongodb WARNING: to be replaced by apiaryio/mongodb 0 [OK]
babim/mongodb docker-mongodb 0 [OK]
blkpark/mongodb mongodb 0 [OK]
partlab/ubuntu-mongodb Docker image to run an out of the box Mong... 0 [OK]
jbanetwork/mongodb mongodb 0 [OK]
baselibrary/mongodb ThoughtWorks Docker Image: mongodb 0 [OK]
glnds/mongodb CentOS 7 / MongoDB 3 0 [OK]
hpess/mongodb 0 [OK]
hope/mongodb MongoDB image 0 [OK]
recteurlp/mongodb Fedora DockerFile for MongoDB 0 [OK]
docker search --limit 100 mongodb|wc -l
101
To refine your search, you can filter it using the --filter option.
Let's search for the best Mongodb images according to the community (images with more than 5 stars):
docker search --filter=stars=5 mongo

Tutum, Frodenas and Bitnami have the most popular Mongodb images:
NAME DESCRIPTION STARS OFFICIAL AUTOMATED
tutum/mongodb MongoDB.. 166 [OK]
frodenas/mongodb A Docker.. 12 [OK]
bitnami/mongodb Bitnami.. 5 [OK]
Images could be official or not, just like any Open Source project, Docker public images are made by anyone who
may have access to the Docker Hub so consider double-checking images before using them in your production
servers.
Official images could be filtered in this way:
docker search --filter=is-official=true mongo
NAME DESCRIPTION STARS OFFICIAL AUTOMATED
mongo MongoDB document databases provide high av... 2616 [OK]
mongo-express Web-based MongoDB admin interface, written... 89 [OK]
Filter output based on these conditions:
stars=
is-automated=(true|false)
is-official=(true|false)
The images you can find are even public images or your own private images stored in Docker Hub. In the next
section we will use a private registry.
Finding Private Images
If you have a private registry, you can use the Docker API:
curl -X GET http://localhost:5000/v1/search?q=ubuntu
Or use Docker client:
docker search localhost:5000/ubuntu
In the last example, I am using a local private registry without any SSL encryption, change localhost by your
secure remote server domain or IP address.
Pulling Images
If you want to pull the latest tag of an image, say Ubuntu, you just need to type:
docker pull ubuntu
But Ubuntu image has many tags like: devel, 16.10, 14.04, trusty ..etc

You can find all of the tags here: https://hub.docker.com/r/library/ubuntu/tags/
To pull the development image, type:
docker pull ubuntu:devel
You will see the tagged image in your download:
devel: Pulling from library/ubuntu
8e21f82d32cf: Pulling fs layer
54d6ba364cfb: Pulling fs layer
451f851c9d9f: Pulling fs layer
55e763f0d444: Waiting
b112a925308f: Waiting
Removing Images
Simply type:
docker rmi $(docker images -q)
We can also safely remove only dangling images by typing:
docker rmi $(docker images -f "dangling=true" -q)

Creating New Images Using Dockerfile
The Dockerfile is the file that Docker reads in order to build images. It is a simple text file with a specific
instructional language to assemble the different layers of an image.
You can find below a list of the different instructions that could be used to create an image and then we will see how
to build the image using Dockerfile.
FROM
In the Dockerfile, the first line should start with this instruction.
This is not widely used but when we want to build multiple images, we can have multiple FROM instruction in the
same Dockerfile.
FROM <image>:<tag>
Example:
FROM ubuntu:14.04
If the tag is not specified then Docker will download the latest tagged image.
MAINTAINER
The maintainer is not really an instruction but it indicates the name, email or website of the image maintainer. It is
the equivalent of author in code documentations.
MAINTAINER <nam>
Example:
MAINTAINER Aymen EL Amri - @eon01
RUN
You can run commands (like Linux CLI commands) or executables.
RUN <command>
or
RUN ["<executable>", "<param>", "<param1>", ... ,"<paramN>"]

The first run block will run a command just like any other Linux command using /bin/sh -c shell. Windows
commands are executed using cmd /S /C shell.
Examples:
RUN ls -l
During the build process, you will see the output of the command:
Step 4 : RUN ls -l
---> Running in b3e87d26c09a
total 64
drwxr-xr-x 2 root root 4096 Oct 6 07:47 bin
drwxr-xr-x 2 root root 4096 Apr 10 2014 boot
drwxr-xr-x 5 root root 360 Nov 3 21:55 dev
drwxr-xr-x 64 root root 4096 Nov 3 21:55 etc
drwxr-xr-x 2 root root 4096 Apr 10 2014 home
drwxr-xr-x 12 root root 4096 Oct 6 07:47 lib
drwxr-xr-x 2 root root 4096 Oct 6 07:47 lib64
drwxr-xr-x 2 root root 4096 Oct 6 07:46 media
drwxr-xr-x 2 root root 4096 Apr 10 2014 mnt
drwxr-xr-x 2 root root 4096 Oct 6 07:46 opt
dr-xr-xr-x 267 root root 0 Nov 3 21:55 proc
drwx------ 2 root root 4096 Oct 6 07:47 root
drwxr-xr-x 8 root root 4096 Oct 13 21:13 run
drwxr-xr-x 2 root root 4096 Oct 13 21:13 sbin
drwxr-xr-x 2 root root 4096 Oct 6 07:46 srv
dr-xr-xr-x 13 root root 0 Nov 3 21:54 sys
drwxrwxrwt 2 root root 4096 Oct 6 07:47 tmp
drwxr-xr-x 11 root root 4096 Oct 13 21:13 usr
drwxr-xr-x 13 root root 4096 Oct 13 21:13 var
The same command could be called like this:
RUN ["/bin/sh", "-c", "ls", "-l"]
The latter is called the exec from.
CMD
CMD command helps you to identify which executable should be run when a container is started from your image.
Like the run command, you can use the shell from:
CMD <command> <param1> <param2> .. <param2>
The exec from:
CMD ["<executable>", "<param>", "<param1>", ... ,"<paramN>"]
or as a default parameter to ENTRYPOINT instruction (explained later):
CMD [<"param1">,<"param2"> .. <"paramN">]
Using CMD, the same instruction (that we used in RUN) will be run but not during the build, it will be executed
during the execution of the container.
Example:
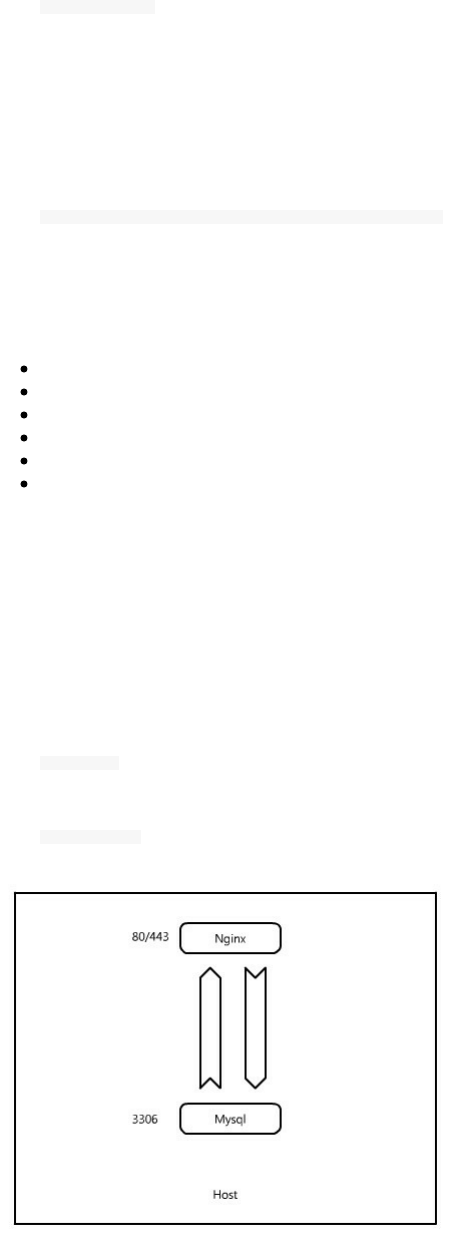
CMD ["ls", "-l"]
LABEL
The LABEL instruction is useful in case you want to add metadata to a given image.
LABEL <key1>=<value1> <key2>=<value2> .. <keyN>=<valueN>
Labels are key-value pairs.
Not only Docker's images can have labels but also:
Docker containers
Docker daemons
Docker volumes
Docker networks (and Swarm networks)
Docker Swarm nodes
Docker Swarm services
EXPOSE
When running an application or a service inside a Docker container, it is obvious that this service needs to listen and
send its data to the outside. Imagine we a php/Mysql web application in a host. We created two two containers, a
Mysql container and a webserver container, say Apache.
At this stage, neither the DB server cannot communicate with the web server and the web server can not request a
database. In addition, both servers are not accessible from the outside of the host.
EXPOSE 3306
EXPOSE 80, 443
Now if we would like opening the ports 80 and 443 so that Nginx can be reached from outside the host, we can use

the same instruction with the -p or -P flag.
-p publish a range of ports or the and -P publish all of the exposed ports. You can expose one port number and
publish it externally under another number.
We are going to see this later in this book but keep in mind that exposing ports in the Dockerfile is not mapping
ports to host's network interfaces.
To expose a list of ports, say 3000, 3001, 3002, .., 3999, 4000, you can use this:
EXPOSE 3000-4000
ENV
The ENV is an instruction that sets environment variables. It is the equivalent of Linux:
export variable=value
ENV works with <key>/<value> pair. You can use ENV instruction in two manners:
ENV variable1 This is value1
ENV variable2 This is value2
or like this:
ENV variable1="this is value1" variable2="this is value2"
If you are used to Dockerfile and building your own imafes, you may have seen this:
ENV DEBIAN_FRONTEND noninteractive
This is discouraged because the environment variable persists after the build.
However, you can set it via ARG ( ARG instruction is explained later in this section).

ARG DEBIAN_FRONTEND=noninteractive
ADD
As its name may indicate, the ADD instruction will add files from the host to the guest.
ADD is part of Docker from the beginning and supports a few additional tricks (compared to COPY) beyond simply
copying files.
ADD has two forms:
ADD <src>... <dest>
And if your path contains whitespaces, you may use this form:
ADD ["<src>",... "<dest>"]
You can use some tricks like the * operator:
ADD /var/www/* /var/www/
Or the ? operator to replace a character. If we want to copy all of the following files:
-rwxrwxrwx 1 eon01 sudo 11474 Nov 3 00:50 chapter1
-rwxrwxrwx 1 eon01 sudo 35163 Nov 3 00:50 chapter2
-rwxrwxrwx 1 root root 5233 Nov 3 00:50 chapter3
-rwxrwxrwx 1 eon01 sudo 22411 Nov 3 00:50 chapter4
-rwxr-xr-x 1 eon01 sudo 13550 Nov 6 02:26 chapter5
-rwxrwxrwx 1 eon01 sudo 3235 Nov 6 01:15 chapter6
-rwxrwxrwx 1 eon01 sudo 395 Nov 3 00:51 chapter7
-rwxrwxrwx 1 eon01 sudo 466 Nov 3 00:51 chapter8
-rwxrwxrwx 1 eon01 sudo 272 Nov 3 00:51 chapter9
We can use this:
ADD /home/eon01/painlessdocker/chapter? /var/www
Using Docker ADD, you can use download files from links.
ADD https://github.com/eon01/PainlessDocker/blob/master/README.md /var/www/index.html
This instruction will copy the html file called README.md to index.html under /var/www
Docker's ADD will not discover the URL for files, you should not use something like https://github.com
The ADD instruction will recognize formats like gzip, bzip2 or xz.. So if the is a local tar archive is is directly
unpacked as a directory ( tar -x ).
We haven't seen WORKDIR yet but keep in mind the following point. If we would like to copy index.html to
/var/www/painlessdocker/ we should do this:
ADD index.html /var/www/painlessdocker/

But, if our WORKDIR instruction referenced /var/www/ as out work directory, we can use the following instruction:
ADD index.html painlessdocker/
This form that uses an absolute path in the directory will not work:
ADD ../index.html /var/www/
COPY
Like the ADD instruction, the COPY instruction have two forms:
COPY <src>... <dest>
and
COPY ["<src>",... "<dest>"]
The second form is used for files path with spaces.
COPY ["/home/eon01/Painless Docker.html", "/var/www/index.html"]
You can use some tricks like the * operator:
COPY /var/www/* /var/www/
Or the ? operator to replace a character. If we want to add all of the following files:
-rwxrwxrwx 1 eon01 sudo 11474 Nov 3 00:50 chapter1
-rwxrwxrwx 1 eon01 sudo 35163 Nov 3 00:50 chapter2
-rwxrwxrwx 1 root root 5233 Nov 3 00:50 chapter3
-rwxrwxrwx 1 eon01 sudo 22411 Nov 3 00:50 chapter4
-rwxr-xr-x 1 eon01 sudo 13550 Nov 6 02:26 chapter5
-rwxrwxrwx 1 eon01 sudo 3235 Nov 6 01:15 chapter6
-rwxrwxrwx 1 eon01 sudo 395 Nov 3 00:51 chapter7
-rwxrwxrwx 1 eon01 sudo 466 Nov 3 00:51 chapter8
-rwxrwxrwx 1 eon01 sudo 272 Nov 3 00:51 chapter9
We can use this:
COPY /home/eon01/painlessdocker/chapter? /var/www
If we would like to copy index.html to /var/www/painlessdocker/ we should do this:
COPY index.html /var/www/painlessdocker/
But, if our WORKDIR instruction referenced /var/www/ as out work directory, we can use the following instruction:

COPY index.html painlessdocker/
This form that uses an absolute path in the directory will not work:
COPY ../index.html /var/www/
Unlike the ADD instruction, the COPY instruction will not work with archive files and URLs.
ENTRYPOINT
A question that you may ask is what happens when a container starts ?
Imagine we have a tiny Python server that the container should start, the ENTRYPOINT should be :
python -m SimpleHTTPServer
Or a Node.js application to run it inside the container:
node app.js
The ENTRYPOINT is what helps us to start a server in this case or to execute a command in the general case.
That's why we need the ENTRYPOINT instruction.
Whenever we start a Docker container, declaring what command should be executed is important. Otherwise the
container will shutdown.
In the general case, the ENTRYPOINT is declared in the Dockerfile.
This instruction has two forms.
The exec form is the preferred one:
ENTRYPOINT [<"executable">, <"param1">, <"param2">.... <"paramN">]
The second one is the shell from:
ENTRYPOINT <command> <param1> <param2> .. <paramN>
Example:
ENTRYPOINT ["node", "app.js"]
Let's take the example of a simple *Python* application.
``` python
print("Hello World")

We want the container to run the Python script as an ENTRYPOINT.
Now that we know some instructions like FROM, COPY and ENTRYPOINT, we can create a Dockerfile just using
those instructions.
echo "print('Hello World')" > app.py
touch Dockerfile
This is the content of the Dockerfile:
FROM python:2.7
COPY app.py .
ENTRYPOINT python app.py
Reading this Dockerfile, we understand that:
The image will be downloaded from Docker Hub python:2.7
The file app.py will be copied inside the container
The command python app.py will be executed when the container upstarts.
We haven't seen that yet in Painless Docker but this is the process of building and running the command ( we are
going to see the build and the run commands will be detailed later in this book.).
The build:
docker build .
Sending build context to Docker daemon 3.072 kB
Step 1 : FROM python:2.7
---> d0614bfb3c4e
Step 2 : COPY app.py .
---> Using cache
---> 6659a70e1775
Step 3 : ENTRYPOINT python app.py
---> Using cache
---> 236e1648a508
Successfully built 236e1648a508
The run:
docker run 236e1648a508
Hello World
Notice that the Python script was executed just after running the container.
VOLUME
The VOLUME instruction creates an external mount point from an internal directory. Any external volume mounted
using this instruction could be used by another Docker container.
We can use this form:
VOLUME[<"Directory">]
This form

VOLUME <Directory1> <Directory2> .. <DirectoryN>
Or a JSON array.
But why ?
Docker containers are ephemeral so to keep the data persistent even through container restarts, stops
or disappear.
By default, a Docker container does not share its data with the host, volumes allow the host to access
to the container data.
By default, two containers even running in the same host cannot share data so sharing files between a
container in the form of a docker volume will allow other containers to access its data.
Setting up the permission or the ownership of a volume should be done before the VOLUMES instruction in th
Dockerfile.
For example, this form of setting up the owner is wrong.
VOLUME /app
ADD app.py /app/
RUN chown -R foo:foo /app
However the following Dockerfile has a good syntax:
RUN mkdir /app
ADD app.py /app/
RUN chown -R foo:foo /app
VOLUME /app
A good scenario to use Docker volumes is databases containers, where data is mounted outside the container. This
allows making an easy backup to the database.
USER
When running a command you may need doing it using another user (not the default user which is the Root user).
This is when the USER instruction shall be used.
USER is used like this:
USER <user>
So, Root is the default user and Docker has a full access to the host system. You may consider USER as a security
option to consider.
Normally an image should never use the Root user but another user that you choose using the instruction USER.
Example:
USER my_user
Sometimes, you need to run a command using Root, you can simply switch between different users:

USER root
RUN <a command that should be run under Root>
USER my_user
The USER instruction applies to RUN, CMD and ENTRYPOINT instructions so that any command run by one of
these instructions is attributed to the chosen user.
WORKDIR
WORKDIR is use this way:
WORKDIR <Directory>
This instruction sets the a working directory so that any of the following commands: RUN, CMD, ENTRYPOINT,
COPY & ADD will be executed in this directory.
Example:
To copy index.html to /var/www , you may write this:
ADD index.html /var/www
Note that if the WORKDIR does not exist, it will be created.
ARG
If you want to assign a value to a variable but just during the build, you can use the ARG instruction.
The syntax is :
ARG <argument name>[=<its default value>]
or
ARG <argument name>
You can declare variables that you can use during the build with docker build command that we are going to see
later.
Example:
ARG time
You can also set the value of the arguments (variables) in the Dockerfile.
ARG time=3s

ONBUILD
Software should be built automatically that's why Docker has the ONBUILD instruction. It is a trigger instruction
executed when the image is used as the base image for another build.
ONBUILD <Docker Instruction>
The trigger will be executed in the context of the downstream build, as if it had been inserted immediately after the
FROM instruction in the downstream Dockerfile.
The ONBUILD instruction is available in Docker since its version 0.8.
Let's dive int details. First of all, let's define what a child image is :
If the image A contains an ONBUILD instruction and if imageB uses the imageA as its base image in order to add
other instructions (and layers) upon it then imageB is a child image of imageA.
This is the imageA Dockerfile
FROM ubuntu:16.04
ONBUILD RUN echo "I will be automatically executed only in the child image"
THis is the imageB Dockerfile
FROM imageA
If you build the imageA based on Ubuntu 16.04, the ONBUILD instruction will not run the RUN echo "<..>" . But
when you build the imageB, the same instruction will be run just after the execution of the FROM instruction.
This is an example of the imageB build output where we see the message printed automatically:
Uploading context 4.51 kB
Uploading context
Step 0 : FROM imageA
# Executing 1 build triggers
Step onbuild-0 : RUN echo "I will be automatically executed only in the child imager"
---> Running in acefe7b39c5
I will be automatically executed only in the child image
STOPSIGNAL
The STOPSIGNAL instruction let you set the system call signal that will be sent to the container to exit.
STOPSINGAL <signal>
This signal can be a valid unsigned number like 9 or a signal name like SIGNAME, SIGKILL, SIGINT ..etc
SIGTERM is the default in Docker and it is and equivalent to running kill <pid> .
In the following example, let's change it by SIGINT ( the same signal sent when pressing ctrl-C ):
FROM ubuntu/16:04
STOPSIGNAL SIGINT

HEALTHCHECK
The HEALTHCHECK instruction is one of the useful instruction I have been using since the version 1.12.
It has two forms. Either to check a container health by running a command inside the container:
HEALTHCHECK [OPTIONS] CMD <command>
or to disable any healthcheck ( all healthchecks inherited from the base image will be disabled ).
HEALTHCHECK NONE
There are 3 options that we can use before the CMD command.
--interval=<interval duration>
The healthcheck will be executed every unit of time. The default interval duration is 30s.
--timeout=<timeout duration>
The default timeout duration is 30s. The healthcheck will be timeout after unit of time.
--retries=N
The default number of retries is 3. The healthcheck could be failed but no more than times.
An example of a Docker healthcheck that will run every 1 minute with a check that does not take longer than 3
seconds before it will be considered as failed if the same check will be repeated for more than 3 time :
HEALTHCHECK --interval=1m --timeout=3s CMD curl -f http://localhost/ || exit 1
SHELL
When using Docker, the default shell that executes all of the commands is "/bin/sh -c". This means that CMD ls -l
will be in reality run inside the container like this:
/bin/sh -c ls -l
The default shell for Windows is:
cmd /S /C
SHELL instruction must be written in JSON form in the Dockerfile.
SHELL [<"executable">, <"parameters">]

This instruction could be interesting for Windows users to choose between cmd and powershell.
Example:
SHELL ["powershell", "-command"]
SHELL ["cmd", "/S"", "/C"]
In nix you can of course work with bash, zsh, csh, tcsh* ..etc for example:
SHELL ["/bin/bash", "-c"]
ENTRYPOINT VS CMD
Both CMD and ENTRYPOINT instructions allows us to define a command that will be executed once a container
starts.
Back to the CMD instruction: We have seen that the CMD could be a default parameter to ENTRYPOINT
instruction when we use this from :
CMD [<"param1">,<"param2"> .. <"paramN">]
This is a simple Dockerfile:
FROM python:2.7
COPY app.py .
ENTRYPOINT python app.py
You may say that the Dockerfile could be written like this:
FROM python:2.7
COPY app.py .
ENTRYPOINT ["python"]
CMD ["app.py"]
Good guess .. But when you will run the container it will show you an error.
The CMD command in this from should be called like this:
FROM python:2.7
COPY app.py .
ENTRYPOINT ["/usr/bin/python"]
CMD ["app.py"]
As a conclusion,
ENTRYPOINT python app.py
could be called like this
ENTRYPOINT ["/usr/bin/python"]
CMD ["app.py"]

CMD and ENTRYPOINT could be used alone or together but in all cases, you should use one of them at least.
Using neither CMD not ENTRYPOINT will fail the execution of the container.
You can find almost the same table in the official Docker documentation, but this is the best way to understand all of
the possibilities:
No
ENTRYPOINT
ENTRYPOINT entrypoint_exec
entrypoint_param1
ENTRYPOINT
[“entrypoint_exec”,
“entrypoint_param1”]
No CMD Will generate an
error
/bin/sh -c entrypoint_exec
entrypoint_param1
entrypoint_exec
entrypoint_param1
CMD
[“cmd_exec”,
“cmd_param1”]
cmd_exec
cmd_param1
/bin/sh -c entrypoint_exec
entrypoint_param1 cmd_exec
cmd_param1
entrypoint_exec
entrypoint_param1 cmd_exec
cmd_param1
CMD
[“cmd_param1”,
“cmd_param2”]
cmd_param1
cmd_param2
/bin/sh -c entrypoint_exec
entrypoint_param1 cmd_param1
cmd_param2
entrypoint_exec
entrypoint_param1 cmd_param1
cmd_param2
CMD cmd_exec
cmd_param1
/bin/sh -c
cmd_exec
cmd_param1
/bin/sh -c entrypoint_exec
entrypoint_param1 /bin/sh -c cmd_exec
cmd_param1
entrypoint_exec
entrypoint_param1 /bin/sh -c
cmd_exec cmd_param1

Building Images
The Base Image
Probably the smallest Dockerfile (not the smallest image) is the following one:
FROM <image>
Docker needs an image to run : no image, no container.
The base image is an image which you add layers on the top of it to create another image containing your
application. As seen in the last chapter, an image is a set of layers and the FROM <image> is the necessary layer to
create the image.
Using www.imagelayers.io we can visualize an image online. Let's take te example of tutum/hello-world that you can
find on Docker Hub website just by concatenating:
https://hub.docker.com/r/
and
tutum/hello-world
which mean:
https://hub.docker.com/r/tutum/hello-world/
The Dockerfile of this image is the following:
FROM alpine
MAINTAINER support@tutum.co
RUN apk --update add nginx php-fpm && \
mkdir -p /var/log/nginx && \
touch /var/log/nginx/access.log && \
mkdir -p /tmp/nginx && \
echo "clear_env = no" >> /etc/php/php-fpm.conf
ADD www /www
ADD nginx.conf /etc/nginx/
EXPOSE 80
CMD php-fpm -d variables_order="EGPCS" && (tail -F /var/log/nginx/access.log &) && exec nginx -g "daemon off;"
The base image of this simple application is Alpine.
This image of 18 MiB has:
7 unique layers
an average layer of 3 MiB
its largest layer is 13 MB
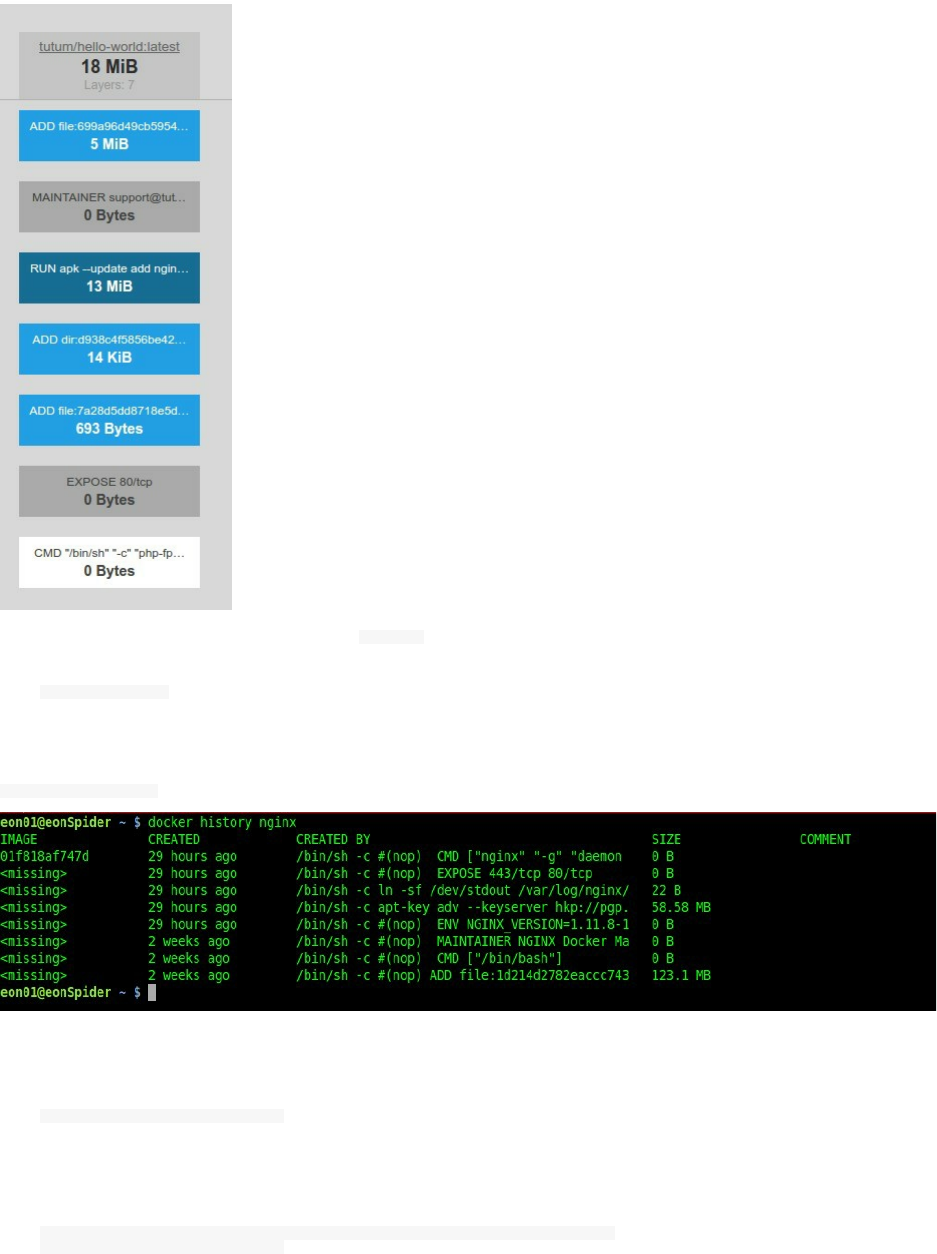
Let's take another image and use the Docker history command to see its layers
docker pull nginx
This will pull the latest nginx image from the Docker Hub.
docker history nginx will show the different layers of nginx :
Docker history command show you the history of an image and it s different layers. You can see more information
with human readable output about an image by using :
docker history --no-trunc -H nginx
with:
-H, --human Print sizes and dates in human readable format (default true)
--no-trunc Don't truncate output
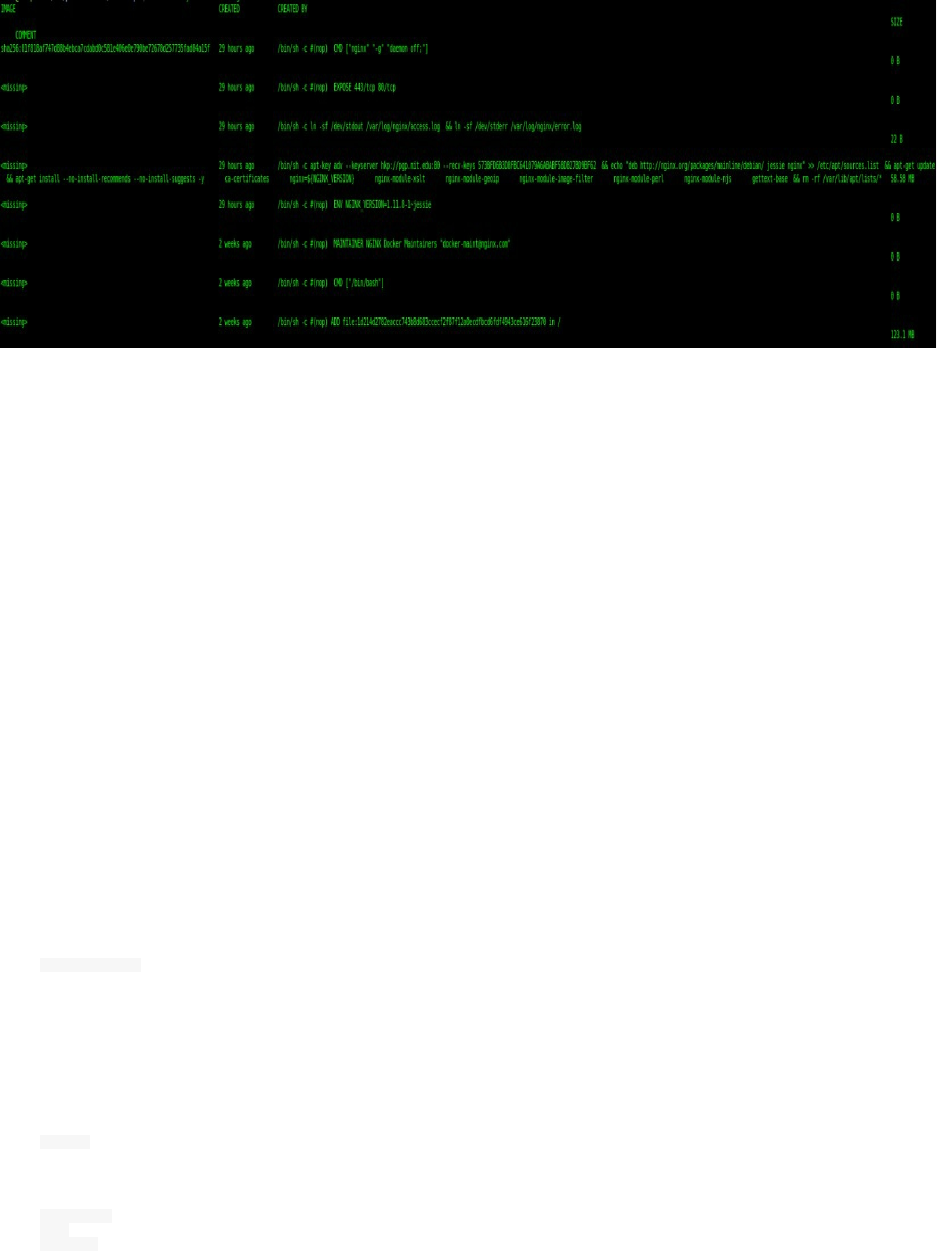
Let's take a look at the output:
Dockerfile
The Dockerfile is a kind of a script file with different instructive commands and arguments that describe how you
image base image will be at the end of the build. It is possible to run an image directly without building it (like a
public or a private image from Docker Hub or a private repository), but if you want to have your own specific
images and if you want to organize your deployments while distributing the same image to developers and QA
teams, creating a Dockerfile for your application is a good point to start.
The first rule: A Dockerfile should start with the FROM instruction which explains that nothing could be done
without having a base image. The syntax to create a Dockerfile is quite simple and explicit since they should be
followed to the letter. If you need to execute more things than the Docker instructions permit, than you can just RUN
nix commands or use shell scripts with CMD and ENTRYPOINT*.
We wen through the different instructions and the differences between them, you should be able to create Dockerfile
just using this, but we are going to see more examples later like creating micro images for Python and Node.js or
like in the Mongodb example.
Creating An Image Build Using Dockerfile
So we have seen the different instructions that can help us create a Dockerfile. Now in order to have a complete
image, we should build it.
The command to build a Docker image is:
docker build .
The '.' is indicating that the Dockerfile is in the same directory where you are running the build command which is
the context.
The context are simply your local files.
ls -l .
Dockerfile
app/
scripts/

The context is the directory and all the subdirectories where you execute the docker build command.
If you are executing the build from a different directory you can use -f:
docker build -f /path/to/the/Dockerfile/TheDockerfile /path/to/the/context/
Example:
If your Dockerfile is under /tmp and your files are in the /app directory, the command should be:
docker build -f /tmp/Dockerfile /app
Optimizing Docker Images
You can find many images of the same application in the Internet but not all of them are optimized , they can be
really big, they may take time to build or to send through network and of course your deployment time could
increase.
Layers are actually what decides the size of a Docker image and optimizing your Docker clusters start from
optimizing the layers of your image.
This image has three layers:
FROM ubuntu
RUN apt-get update -y
RUN apt-get install python -y
While this one has only two layers:
FROM ubuntu
RUN apt-get update -y && apt-get install python -y
Both images are installing Python in a Ubuntu docker image.
Docker images can get really big. Many are over 1G in size. How do they get so big? Do they really need to be this
big? Can we make them smaller without sacrificing functionality?
Tagging Images
Like git, Docker has the ability to tag specific points in history as being important.
Before using private Docker registry or Docker Hub, you should first use docker login information.
Docker Hub:
docker login
Login with your Docker ID to push and pull images from Docker Hub. If you don't have a Docker ID, head over to https://hub.docker.com to create one.
Username (eon01):
Password:
Login Succeeded
Private registry:

docker login https://localhost:5000
Username: admin
Password:
Login Succeeded
Typically Docker developers use the tagging functionality to mark a release or a version. In this section, you’ll learn
how to list images tags and how to create new tags.
When you type docker images you can get a list of the images you have on your laptop/server.
REPOSITORY TAG IMAGE ID CREATED SIZE
mongo latest c5185a594064 5 days ago 342.7 MB
alpine latest baa5d63471ea 5 weeks ago 4.803 MB
docker/whalesay latest fb434121fc77 4 hours ago 247 MB
hello-world latest 91c95931e552 5 weeks ago 910 B
You can notice in the output of the latter command that every image has a unique id but also a tag.
docker images|awk {'print $3'}|tail -n +2
c5185a594064
baa5d63471ea
fb434121fc77
91c95931e552
If you would like to download the same images, you should pull them with the right tags:
docker pull mongo:latest
docker pull alpine:latest
docker pull docker/whalesay:latest
docker pull hello-world:latest
As you can see in the docker images output, the id of the Alpine image is baa5d63471ea . We are going to use this to
give the image a new tag using the following syntax:
docker tag <image id> <docker username>/<image name>:<tag>
You can also use
docker tag <image>:<tag> <docker username>/<image name>:<tag>
Example:
docker tag baa5d63471ea alpine:me
Now when you list your images, you will notice both of the last and original tags are listed:
alpine latest baa5d63471ea 5 weeks ago 4.803 MB
alpine me baa5d63471ea 5 weeks ago 4.803 MB
You can try also:

docker tag mongo:latest mongo:0.1
Then list your images and you will find the new mongo tag:
REPOSITORY TAG IMAGE ID
mongo 0.1 c5185a594064
mongo latest c5185a594064
alpine latest baa5d63471ea
alpine me baa5d63471ea
Like in a simple git flow you can pull, update, commit and push your changes to a remote repository. The commit
operation can happen on a running container, that's why we are going to run the mongo container. In this section, we
haven't seen yet how to run containers in production environments but we are going to use the run command now
and see all of its details later in another chapter.
docker run -it -d -p 27017:21017 --name mongo mongo
Verify Mongodb container is running:
docker ps
CONTAINER ID IMAGE COMMAND PORTS NAMES
d5faf7fd8e4d mongo "/entrypoint.sh mongo" (1) mongo
(1): 27017/tcp, 0.0.0.0:27017->21017/tcp
We will use the container id d5faf7fd8e4d in order to use the commit command, sure we haven't had any changes
made to the running container until now, but this is just a test to show you the basic command usage. Note that we
an change or keep the original tag when committing:
In the following example, the Docker image that the container d5faf7fd8e4d is running will be tagged with a new tag
mongo:0.2 :
docker commit d5faf7fd8e4d mongo:0.2
Type docker images for your verifications and notice the new tag mongo:0.2 :
REPOSITORY TAG IMAGE ID
mongo 0.2 d022237fd80d
localhost:5000/user/mongo 0.1 c5185a594064
mongo 0.1 c5185a594064
mongo latest c5185a594064
localhost:5000/mongo 0.1 c5185a594064
registry latest c9bd19d022f6
alpine latest baa5d63471ea
alpine me baa5d63471ea
A running container could also have some changes while running. Let's take the example of the Mongodb container,
we will add an administrative account to the running Mongodb instance. Log into the container:
docker exec -it mongo bash
Inside your running container, connect to your running database using mongo command:

root@d5faf7fd8e4d:/# mongo
MongoDB shell version: 3.2.11
connecting to: test
Server has startup warnings:
I CONTROL [initandlisten]
I CONTROL [initandlisten] ** WARNING: /sys/kernel/mm/transparent_hugepage/enabled is 'always'.
I CONTROL [initandlisten] ** We suggest setting it to 'never'
I CONTROL [initandlisten]
I CONTROL [initandlisten] ** WARNING: /sys/kernel/mm/transparent_hugepage/defrag is 'always'.
I CONTROL [initandlisten] ** We suggest setting it to 'never'
I CONTROL [initandlisten]
>
Now add a new administrator identified by login root and password 958d12fc49437db0c7baac22541f9b93 with the
administrative role root:
> use admin
switched to db admin
> db.createUser(
... {
... user: "root",
... pwd: "958d12fc49437db0c7baac22541f9b93",
... roles:["root"]
... })
Successfully added user: { "user" : "root", "roles" : [ "root" ] }
> exit
bye
Exit your container:
root@d5faf7fd8e4d:/# exit
exit
Now that we had made important changes to our running container, commit those changes. You can use a private
registry or Docker Hub, but I am going to use my public Docker Hub account in this example:
docker commit d5faf7fd8e4d eon01/mongodb
sha256:269685eeaecdea12ddd453cf98685cad1e6d3c76cccd6eebb05d3646fe496688
After the commit operation, we are sure that our changes are saved, we can push the image:
docker push eon01/mongodb
The push refers to a repository [docker.io/eon01/mongodb]
c01c6c921c0b: Layer already exists
80c558316eec: Layer already exists
031fad254fc0: Layer already exists
ddc5125adfe9: Layer already exists
31b3084f360d: Layer already exists
77e69eeb4171: Layer already exists
718248b95529: Layer already exists
8ba476dc30da: Layer already exists
07c6326a8206: Layer already exists
fe4c16cbf7a4: Layer already exists
latest: digest: sha256:ee50ec95fd490d60796d7782a9348ef824d84110beea4f86ced1ed15a1c8976c size: 2406
Notice the The push refers to a repository [docker.io/eon01/mongodb] . This telling us that you can find this public image
on: https://hub.docker.com/r/eon01/mongodb/

Using Docker Hub we can add a description, a README file, change the image to a private one (paid feature) ..etc
If you execute a pull command on the same remote image, you can notice that nothing will be downloaded because
you already have all of the image layers locally:
docker pull eon01/mongodb
Using default tag: latest
latest: Pulling from eon01/mongodb
Digest: sha256:ee50ec95fd490d60796d7782a9348ef824d84110beea4f86ced1ed15a1c8976c
Status: Image is up to date for eon01/mongodb:latest
We can run it like this:
docker run -it -d -p 27018:27017 --name mongo_container eon01/mongodb
Notice that we used the port mapping 27018:27017 because the first Mongodb container is mapped to the host port
27017 and it is impossible to map two containers to the same local port - same thing for the container name.
We have not seen this detail yet but we will go through all of these details in the next chapter.
docker ps
CONTAINER ID IMAGE COMMAND PORTS NAMES
ff4eccdd6bee eon01/mongodb "/entrypoint.sh mongo" (1) zen_dubinsky
d5faf7fd8e4d mongo "/entrypoint.sh mongo" (2) mongo
3118896db039 registry "/entrypoint.sh /etc/" (3) my_registry

(1): 21017/tcp, 0.0.0.0:27018->27017/tcp (2): 27017/tcp, 0.0.0.0:27017->21017/tcp (3): 0.0.0.0:5000->5000/tcp
If you log into your container:
docker exec -it mongo_container bash
Start Mongodb:
root@db926ae25f1e:/# mongo
MongoDB shell version: 3.2.11
connecting to: test
Server has startup warnings:
I CONTROL [initandlisten]
I CONTROL [initandlisten] ** WARNING: /sys/kernel/mm/transparent_hugepage/enabled is 'always'.
I CONTROL [initandlisten] ** We suggest setting it to 'never'
I CONTROL [initandlisten]
I CONTROL [initandlisten] ** WARNING: /sys/kernel/mm/transparent_hugepage/defrag is 'always'.
I CONTROL [initandlisten] ** We suggest setting it to 'never'
I CONTROL [initandlisten]
List users:
> use admin
switched to db admin
> db.getUsers()
[
{
"_id" : "admin.root",
"user" : "root",
"db" : "admin",
"roles" : [
{
"role" : "root",
"db" : "admin"
}
]
}
]
>
You can see that the changes you made are already stored in the container.
In the same way, you can add other changes, commit, tag (if you need it) and push to your Docker Hub or private
registry.
This is what we have done until now: we had an image mongo that we created from a build (we are going to see the
Dockerfile later in this chapter), run the container, made some changes and push it to a repository.
Your Private Registry
If you are using a private Docker repository, just add your host domain/IP like this:
docker tag <image>:<tag> <registry host>/<image name>:<tag>
Example:

docker tag mongo:latest localhost:5000/mongo:0.1
Let's run a simple local private registry to test this:
docker run -d -p 5000:5000 --name my_registry registry
Unable to find image 'registry:latest' locally
latest: Pulling from library/registry
3690ec4760f9: Already exists
930045f1e8fb: Pull complete
feeaa90cbdbc: Pull complete
61f85310d350: Pull complete
b6082c239858: Pull complete
Digest: sha256:1152291c7f93a4ea2ddc95e46d142c31e743b6dd70e194af9e6ebe530f782c17
Status: Downloaded newer image for registry:latest
3118896db039c26a74127031eefd42264e310d7cdc435e126fa8630bf8ee8c60
Verify that you are really running this with docker ps :
CONTAINER ID IMAGE COMMAND CREATED STATUS PORTS NAMES
3118896db039 registry "/entrypoint.sh /etc/" 2 minutes ago Up 2 minutes 0.0.0.0:5000-
>5000/tcp my_registry
Tag your image with your private URL:
docker tag mongo:latest localhost:5000/mongo:0.1
Check your new tag with the docker images command:
REPOSITORY TAG IMAGE ID
localhost:5000/mongo 0.1 c5185a594064
mongo 0.1 c5185a594064
mongo latest c5185a594064
registry latest c9bd19d022f6
alpine latest baa5d63471ea
alpine me baa5d63471ea
Note that if you are testing private Docker registry, your default username/password are admin/admin.

Optimizing Images
You are probably used to Ubuntu (or any other major distribution) so you will may be use Ubuntu on your Docker
container. Ostensibly, your image is fine, it is using a stable distribution and your are just running Ubuntu inside
your container.
FROM ubuntu
ADD app /var/www/
CMD ["start.sh"]
The problem is that you don't really need a complete OS, you installed all Ubuntu files but you are not going to use
them, your container does not need all of them.
When you build an image, generally you will configure CMD or ENTRYPOINT or both of them with something
that will be executed at the container startup. So the only processes that will be running inside the container is the
ENRYPOINT command, and all processes that it spawns, all of the other OS processes will not run. And I am not
sure you will need them.
This is a part of the output of ps aux of my current Ubuntu system:
USER PID %CPU %MEM VSZ RSS TTY STAT START TIME COMMAND
root 1 0.0 0.0 34172 3980 ? Ss 00:36 0:02 /sbin/init
root 2 0.0 0.0 0 0 ? S 00:36 0:00 [kthreadd]
root 3 0.0 0.0 0 0 ? S 00:36 0:00 [ksoftirqd/0]
root 5 0.0 0.0 0 0 ? S< 00:36 0:00 [kworker/0:0H]
root 7 0.0 0.0 0 0 ? S 00:36 0:55 [rcu_sched]
root 8 0.0 0.0 0 0 ? S 00:36 0:17 [rcuos/0]
root 9 0.0 0.0 0 0 ? S 00:36 0:15 [rcuos/1]
root 10 0.0 0.0 0 0 ? S 00:36 0:17 [rcuos/2]
root 11 0.0 0.0 0 0 ? S 00:36 0:12 [rcuos/3]
root 12 0.0 0.0 0 0 ? S 00:36 0:00 [rcuos/4]
root 13 0.0 0.0 0 0 ? S 00:36 0:00 [rcuos/5]
root 14 0.0 0.0 0 0 ? S 00:36 0:00 [rcuos/6]
root 15 0.0 0.0 0 0 ? S 00:36 0:00 [rcuos/7]
root 16 0.0 0.0 0 0 ? S 00:36 0:00 [rcu_bh]
root 17 0.0 0.0 0 0 ? S 00:36 0:00 [rcuob/0]
root 18 0.0 0.0 0 0 ? S 00:36 0:00 [rcuob/1]
root 19 0.0 0.0 0 0 ? S 00:36 0:00 [rcuob/2]
root 20 0.0 0.0 0 0 ? S 00:36 0:00 [rcuob/3]
root 21 0.0 0.0 0 0 ? S 00:36 0:00 [rcuob/4]
root 22 0.0 0.0 0 0 ? S 00:36 0:00 [rcuob/5]
root 23 0.0 0.0 0 0 ? S 00:36 0:00 [rcuob/6]
root 24 0.0 0.0 0 0 ? S 00:36 0:00 [rcuob/7]
root 25 0.0 0.0 0 0 ? S 00:36 0:00 [migration/0]
root 26 0.0 0.0 0 0 ? S 00:36 0:00 [watchdog/0]
root 27 0.0 0.0 0 0 ? S 00:36 0:00 [watchdog/1]
root 28 0.0 0.0 0 0 ? S 00:36 0:00 [migration/1]
root 29 0.0 0.0 0 0 ? S 00:36 0:00 [ksoftirqd/1]
root 31 0.0 0.0 0 0 ? S< 00:36 0:00 [kworker/1:0H]
root 32 0.0 0.0 0 0 ? S 00:36 0:00 [watchdog/2]
root 33 0.0 0.0 0 0 ? S 00:36 0:00 [migration/2]
root 34 0.0 0.0 0 0 ? S 00:36 0:00 [ksoftirqd/2]
root 36 0.0 0.0 0 0 ? S< 00:36 0:00 [kworker/2:0H]
root 37 0.0 0.0 0 0 ? S 00:36 0:00 [watchdog/3]
root 38 0.0 0.0 0 0 ? S 00:36 0:00 [migration/3]
root 39 0.0 0.0 0 0 ? S 00:36 0:00 [ksoftirqd/3]
root 41 0.0 0.0 0 0 ? S< 00:36 0:00 [kworker/3:0H]
root 42 0.0 0.0 0 0 ? S< 00:36 0:00 [khelper]
root 43 0.0 0.0 0 0 ? S 00:36 0:00 [kdevtmpfs]
root 44 0.0 0.0 0 0 ? S< 00:36 0:00 [netns]
root 45 0.0 0.0 0 0 ? S 00:36 0:00 [khungtaskd]
root 46 0.0 0.0 0 0 ? S< 00:36 0:00 [writeback]
root 47 0.0 0.0 0 0 ? SN 00:36 0:00 [ksmd]
root 48 0.0 0.0 0 0 ? SN 00:36 0:20 [khugepaged]
root 49 0.0 0.0 0 0 ? S< 00:36 0:00 [crypto]
root 50 0.0 0.0 0 0 ? S< 00:36 0:00 [kintegrityd]
root 51 0.0 0.0 0 0 ? S< 00:36 0:00 [bioset]
root 52 0.0 0.0 0 0 ? S< 00:36 0:00 [kblockd]
root 53 0.0 0.0 0 0 ? S< 00:36 0:00 [ata_sff]
root 54 0.0 0.0 0 0 ? S 00:36 0:00 [khubd]
root 55 0.0 0.0 0 0 ? S< 00:36 0:00 [md]
root 56 0.0 0.0 0 0 ? S< 00:36 0:00 [devfreq_wq]
root 60 0.0 0.0 0 0 ? S 00:36 0:10 [kswapd0]
root 61 0.0 0.0 0 0 ? S 00:36 0:00 [fsnotify_mark]
root 62 0.0 0.0 0 0 ? S 00:36 0:00 [ecryptfs-kthrea]

root 74 0.0 0.0 0 0 ? S< 00:36 0:00 [kthrotld]
root 75 0.0 0.0 0 0 ? S< 00:36 0:00 [acpi_thermal_pm]
root 77 0.0 0.0 0 0 ? S< 00:36 0:00 [ipv6_addrconf]
root 99 0.0 0.0 0 0 ? S< 00:36 0:00 [deferwq]
root 100 0.0 0.0 0 0 ? S< 00:36 0:00 [charger_manager]
root 108 0.0 0.0 0 0 ? S 00:36 0:03 [kworker/3:1]
root 149 0.0 0.0 0 0 ? S< 00:36 0:00 [kpsmoused]
root 166 0.0 0.0 0 0 ? S 00:36 0:00 [scsi_eh_0]
root 168 0.0 0.0 0 0 ? S< 00:36 0:00 [scsi_tmf_0]
root 169 0.0 0.0 0 0 ? S 00:36 0:00 [scsi_eh_1]
root 170 0.0 0.0 0 0 ? S< 00:36 0:00 [scsi_tmf_1]
root 171 0.0 0.0 0 0 ? S 00:36 0:00 [scsi_eh_2]
root 172 0.0 0.0 0 0 ? S< 00:36 0:00 [scsi_tmf_2]
root 173 0.0 0.0 0 0 ? S 00:36 0:00 [scsi_eh_3]
root 174 0.0 0.0 0 0 ? S< 00:36 0:00 [scsi_tmf_3]
root 252 0.0 0.0 0 0 ? S< 00:36 0:00 [kworker/1:1H]
root 253 0.0 0.0 0 0 ? S 00:36 0:01 [jbd2/sda1-8]
root 254 0.0 0.0 0 0 ? S< 00:36 0:00 [ext4-rsv-conver]
root 256 0.0 0.0 0 0 ? S< 00:36 0:00 [kworker/0:1H]
root 293 0.0 0.0 28948 2080 ? S 00:36 0:00 mountall --daemon
root 471 0.0 0.0 0 0 ? S< 00:36 0:00 [kworker/2:1H]
root 509 0.0 0.0 0 0 ? S 00:36 0:06 [jbd2/sda3-8]
root 510 0.0 0.0 0 0 ? S< 00:36 0:00 [ext4-rsv-conver]
root 540 0.0 0.0 19480 1448 ? S 00:36 0:00 upstart-udev-bridge --daemon
root 547 0.0 0.0 52116 2244 ? Ss 00:36 0:00 /lib/systemd/systemd-udevd --daemon
root 595 0.0 0.0 0 0 ? S< 00:36 0:00 [ktpacpid]
root 622 0.0 0.0 0 0 ? S< 00:36 0:00 [kmemstick]
root 623 0.0 0.0 0 0 ? S< 00:36 0:00 [hd-audio1]
Look at all of these system processes, why should they be running inside a container ? This is the output of a
running container running PHP FPM image :
USER PID %CPU %MEM VSZ RSS TTY STAT COMMAND
root 1 0.0 0.0 113464 1084 ? Ss php-fpm: master process (/usr/local/etc/php-fpm.conf)
www-data 6 0.0 0.0 113464 1044 ? S php-fpm: pool www
www-data 7 0.0 0.0 113464 1064 ? S php-fpm: pool www
root 8 0.0 0.0 20228 3188 ? Ss bash
root 14 0.0 0.0 17500 2076 ? R ps aux
You can see that the only running processes are php-fpm processes and the other processes spawned by php.
If we type use Docker history command to see the CMD command, we can notice that the only process run is php-
fpm:
docker history --human --no-trunc php:7-fpm|grep -i cmd
sha256:1..3 5 weeks ago /bin/sh -c #(nop) CMD ["php-fpm"]
Another inconvenient of using Ubuntu in this case is the size of the image, you will:
increase your build time
increase your deployment time
increase the development time
Using a minimal image will reduce all of this.
You don't also need the init system of an operating system since inside Docker you don't have access to all of the
Kernel resources. If you would like to use a "full" operating system, you are adding problems to your problem list.
This is the case for many other OSs used inside Docker like Centos or Debian unless they are optimized to run
Docker and follow its philosophy.
From Scratch
Actually, the smallest image that we can find in the official Docker Hub is the scratch image.
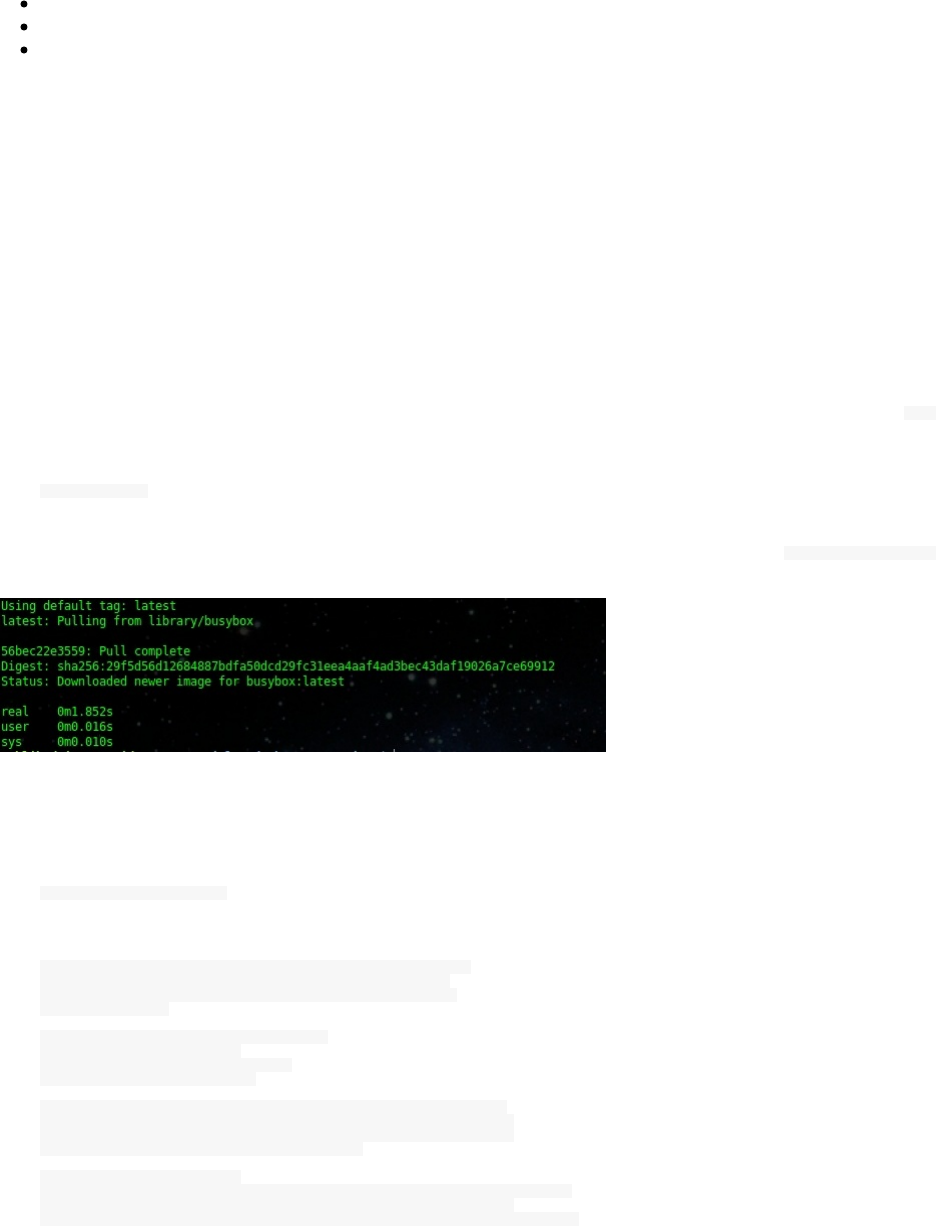
Even if you can find this image Docker’s Hub, you can’t:
pull it,
run it
tag any image with the same name ("scratch")
But you can still use it as a reference to an image in the FROM instruction.
The scratch image is small, fast, secure and bugless.
Busybox
According to Wikipedia:
It runs in a variety of POSIX environments such as Linux, Android, and FreeBSD, although many of the tools
it provides are designed to work with interfaces provided by the Linux kernel. It was specifically created for
embedded operating systems with very limited resources. The authors dubbed it "The Swiss Army knife of
Embedded Linux", as the single executable replaces basic functions of more than 300 common commands. It is
released as free software under the terms of the GNU General Public License v2.
BusyBox is software that provides several stripped-down Unix tools in a single executable file so that the ls
command (as an example) could be run this way:
/bin/busybox ls
Busybox is the winner of the smallest images (2.5 MB) that we can use with Docker. Executing a docker pull busybox
will take almost 1 second.
With the advantage of the very minimal size comes some cons : Busybox does not have neither a package manager
nor a gcc compiler.
You can run the busybox executable from Docker to see the the list of the binaries it includes :
docker run busybox busybox
BusyBox v1.25.1 (2016-10-07 18:17:00 UTC) multi-call binary.
BusyBox is copyrighted by many authors between 1998-2015.
Licensed under GPLv2. See source distribution for detailed
copyright notices.
Usage: busybox [function [arguments]...]
or: busybox --list[-full]
or: busybox --install [-s] [DIR]
or: function [arguments]...
BusyBox is a multi-call binary that combines many common Unix
utilities into a single executable. Most people will create a
link to busybox for each function they wish to use and BusyBox
will act like whatever it was invoked as.
Currently defined functions:
[, [[, acpid, add-shell, addgroup, adduser, adjtimex, ar, arp, arping,
ash, awk, base64, basename, beep, blkdiscard, blkid, blockdev,
bootchartd, brctl, bunzip2, bzcat, bzip2, cal, cat, catv, chat, chattr,

chgrp, chmod, chown, chpasswd, chpst, chroot, chrt, chvt, cksum, clear,
cmp, comm, conspy, cp, cpio, crond, crontab, cryptpw, cttyhack, cut,
date, dc, dd, deallocvt, delgroup, deluser, depmod, devmem, df,
dhcprelay, diff, dirname, dmesg, dnsd, dnsdomainname, dos2unix, du,
dumpkmap, dumpleases, echo, ed, egrep, eject, env, envdir, envuidgid,
ether-wake, expand, expr, fakeidentd, false, fatattr, fbset, fbsplash,
fdflush, fdformat, fdisk, fgconsole, fgrep, find, findfs, flock, fold,
free, freeramdisk, fsck, fsck.minix, fstrim, fsync, ftpd, ftpget,
ftpput, fuser, getopt, getty, grep, groups, gunzip, gzip, halt, hd,
hdparm, head, hexdump, hostid, hostname, httpd, hush, hwclock,
i2cdetect, i2cdump, i2cget, i2cset, id, ifconfig, ifdown, ifenslave,
ifplugd, ifup, inetd, init, insmod, install, ionice, iostat, ip,
ipaddr, ipcalc, ipcrm, ipcs, iplink, iproute, iprule, iptunnel,
kbd_mode, kill, killall, killall5, klogd, last, less, linux32, linux64,
linuxrc, ln, loadfont, loadkmap, logger, login, logname, logread,
losetup, lpd, lpq, lpr, ls, lsattr, lsmod, lsof, lspci, lsusb, lzcat,
lzma, lzop, lzopcat, makedevs, makemime, man, md5sum, mdev, mesg,
microcom, mkdir, mkdosfs, mke2fs, mkfifo, mkfs.ext2, mkfs.minix,
mkfs.vfat, mknod, mkpasswd, mkswap, mktemp, modinfo, modprobe, more,
mount, mountpoint, mpstat, mt, mv, nameif, nanddump, nandwrite,
nbd-client, nc, netstat, nice, nmeter, nohup, nsenter, nslookup, ntpd,
od, openvt, passwd, patch, pgrep, pidof, ping, ping6, pipe_progress,
pivot_root, pkill, pmap, popmaildir, poweroff, powertop, printenv,
printf, ps, pscan, pstree, pwd, pwdx, raidautorun, rdate, rdev,
readahead, readlink, readprofile, realpath, reboot, reformime,
remove-shell, renice, reset, resize, rev, rm, rmdir, rmmod, route, rpm,
rpm2cpio, rtcwake, run-parts, runlevel, runsv, runsvdir, rx, script,
scriptreplay, sed, sendmail, seq, setarch, setconsole, setfont,
setkeycodes, setlogcons, setserial, setsid, setuidgid, sh, sha1sum,
sha256sum, sha3sum, sha512sum, showkey, shuf, slattach, sleep, smemcap,
softlimit, sort, split, start-stop-daemon, stat, strings, stty, su,
sulogin, sum, sv, svlogd, swapoff, swapon, switch_root, sync, sysctl,
syslogd, tac, tail, tar, tcpsvd, tee, telnet, telnetd, test, tftp,
tftpd, time, timeout, top, touch, tr, traceroute, traceroute6, true,
truncate, tty, ttysize, tunctl, ubiattach, ubidetach, ubimkvol,
ubirename, ubirmvol, ubirsvol, ubiupdatevol, udhcpc, udhcpd, udpsvd,
uevent, umount, uname, unexpand, uniq, unix2dos, unlink, unlzma,
unlzop, unshare, unxz, unzip, uptime, users, usleep, uudecode,
uuencode, vconfig, vi, vlock, volname, wall, watch, watchdog, wc, wget,
which, who, whoami, whois, xargs, xz, xzcat, yes, zcat, zcip
So there is no real package manager for this tiny distribution which is a pain, Alpine is a very good alternative, if
you need a package manager.
Alpine Linux
FROM alpine
Let's build it and see if it is working with just a -one-line Dockerfile.
docker build .
It is a working image, you can see the output:
Sending build context to Docker daemon 2.048 kB
Step 1 : FROM alpine
latest: Pulling from library/alpine
3690ec4760f9: Pull complete
Digest: sha256:1354db23ff5478120c980eca1611a51c9f2b88b61f24283ee8200bf9a54f2e5c
Status: Downloaded newer image for alpine:latest
---> baa5d63471ea
Successfully built baa5d63471ea
Alpine Linux is a security-oriented, lightweight Linux distribution based on musl libc and busybox.
Alpine Linux is very popular with Docker images since it is only 5.5MB and includes a package manager with many
packages.
Alpine Linux is suitable to run micro containers. The idea behind containers is also to allow the distribution of

packages easily, using images like Alpine is helpful for this case.
Phusion Baseimage
Phusion Baseimage or Baseimage-docker consumes 6 MB RAM, it is a special Docker image that is configured for
correct use within Docker containers and it is based on Ubuntu.
According to its authors it has the following feature:
Modifications for Docker-friendliness.
Administration tools that are especially useful in the context of Docker.
Mechanisms for easily running multiple processes, without violating the Docker philosophy.
You can use it as a base for your own Docker images.
Baseimage-docker is composed of :
Component Why is it included? / Remarks
Ubuntu 16.04
LTS The base system.
A correct init
process
Main article: Docker and the PID 1 zombie reaping problem. According to the Unix process
model, the init process -- PID 1 -- inherits all orphaned child processes and must [reap them]
(https://en.wikipedia.org/wiki/Wait(system_call)). Most Docker containers do not have an init
process that does this correctly, and as a result their containers become filled with zombie
processes over time. Furthermore, docker stop sends SIGTERM to the init process, which is then
supposed to stop all services. Unfortunately most init systems don't do this correctly within
Docker since they're built for hardware shutdowns instead. This causes processes to be hard killed
with SIGKILL, which doesn't give them a chance to correctly deinitialize things. This can cause
file corruption. Baseimage-docker comes with an init process /sbin/my_init that performs both
of these tasks correctly.
Fixes APT
incompatibilities
with Docker
See https://github.com/dotcloud/docker/issues/1024 .
syslog-ng
A syslog daemon is necessary so that many services - including the kernel itself - can correctly
log to /var/log/syslog. If no syslog daemon is running, a lot of important messages are silently
swallowed. Only listens locally. All syslog messages are forwarded to "docker logs".
logrotate Rotates and compresses logs on a regular basis.
SSH server
Allows you to easily login to your container to inspect or administer things. _SSH is disabled by
default and is only one of the methods provided by baseimage-docker for this purpose. The other
method is through docker exec. SSH is also provided as an alternative because docker exec
comes with several caveats. Password and challenge-response authentication are disabled by
default. Only key authentication is allowed.
cron The cron daemon must be running for cron jobs to work.
runit
Replaces Ubuntu's Upstart. Used for service supervision and management. Much easier to use
than SysV init and supports restarting daemons when they crash. Much easier to use and more
lightweight than Upstart.
setuser A tool for running a command as another user. Easier to use than su , has a smaller attack vector
than sudo , and unlike chpst this tool sets $HOME correctly. Available as /sbin/setuser .
source: https://github.com/phusion/baseimage-docker/blob/master/README.md
We are going to see how to use this image, but you can find more detailed information in the official github
repository.
The same team created a base image for running Ruby, Python, Node.js and Meteor web apps called passenger-

docker.
Running The Init System
In order to use this special init system, use the CMD instruction:
FROM phusion/baseimage:<VERSION>
CMD ["/sbin/my_init"]
Adding Additional Daemons
To add additional daemons, write a shell script which runs it and add it to the following directory:
/etc/service/
Let's take the same example used in the official documentation: memcached.
echo "#!/bin/sh" > /etc/service/memcached
echo "exec /sbin/setuser memcache /usr/bin/memcached >>/var/log/memcached.log 2>&1" >> /etc/service/memcached
chmod +x /etc/service/memcached
And in your Dockerfile:
FROM phusion/baseimage:<VERSION>
CMD ["/sbin/my_init"]
RUN mkdir /etc/service/memcached
ADD memcached.sh /etc/service/memcached/run
Running Scripts At A Container Startup
You should also create a small script and add it to /etc/my_init.d/
echo "#!/bin/sh" > /script.sh
date > /script.sh
In the Dockerfile add the script under the /etc/my_init.d directory:
RUN mkdir -p /etc/my_init.d
ADD script.sh /etc/my_init.d/script.sh
Creating Environment Variables
While you can use default Docker commands and instructions to work with these variables, you can use the
/etc /container_environment

folder to store the variables that could be used inside your container :
RUN echo LOGIN my_login > /etc/container_environment/username
If you log inside your container, you can verify that the username has been set as an environment variable:
echo $LOGIN
my_login
Building A MongoDB Image Using An Optimized Base Image
In this example we are going to use a known the phusion/baseimage which is based on Ubuntu. As said, the authors
of this image describe it as "A minimal Ubuntu base image modified for Docker-friendliness". This image only
consumes 6 MB RAM and is much powerful than Busybox or Alpine
A Docker image should start by the FROM instruction:
FROM phusion/baseimage
You can then add your name and/or email:
MAINTAINER Aymen El Amri - eon01.com - <amri.aymen@gmail.com>
Update the system
RUN apt-get update
Add the installation prerequisites:
RUN apt-key adv --keyserver hkp://keyserver.ubuntu.com:80 --recv 7F0CEB10
RUN echo 'deb http://downloads-distro.mongodb.org/repo/ubuntu-upstart dist 10gen' | tee /etc/apt/sources.list.d/mongodb.list
Then install Mongodb and don't forget to remove the unused files:
RUN apt-get update
RUN apt-get install -y mongodb-10gen && rm -rf /var/lib/apt/lists/*
Create the Mongodb data directory and tell Docker that the port 27017 could be used by another container:
RUN mkdir -p /data/db
EXPOSE 27017
To start Mongodb, we are going to use the command /usr/bin/mongod --port 27017 , that's why the Dockerfile will
contains the following two lines:
CMD ["--port 27017"]
ENTRYPOINT usr/bin/mongod

The final Dockerfile is:
FROM phusion/baseimage
MAINTAINER Aymen El Amri - eon01.com - <amri.aymen@gmail.com>
RUN apt-get update
RUN apt-key adv --keyserver hkp://keyserver.ubuntu.com:80 --recv 7F0CEB10
RUN echo 'deb http://downloads-distro.mongodb.org/repo/ubuntu-upstart dist 10gen' | tee /etc/apt/sources.list.d/mongodb.list
RUN apt-get update
RUN apt-get install -y mongodb-10gen
RUN mkdir -p /data/db
EXPOSE 27017
CMD ["--port 27017"]
ENTRYPOINT usr/bin/mongod
Creating A Python Application Micro Image
As said Busybox combines tiny versions of many common UNIX utilities into a single small executable. To run a
Python application we need Python already installed but without a package manager, we are going to use Static-
Python: A fork of cpython that supports building a static interpreter and true standalone executables.
We are going to get the executables from here.
wget https://github.com/pts/staticpython/raw/master/release/python3.2-static
The executable is only 5,7M:
Connecting to raw.githubusercontent.com (raw.githubusercontent.com)|151.101.16.133|:443... connected.
HTTP request sent, awaiting response... 200 OK
Length: 5930789 (5,7M) [application/octet-stream]
Saving to: ‘python3.2-static’
As a Python application, we are going to run this small script:
cat app.py
print("This is Python !")
So we have 3 files:
ls -l code/chapter5_staticpython/example1
total 5800
-rw-r--r-- 1 eon01 sudo 26 Nov 12 18:05 app.py
-rw-r--r-- 1 eon01 sudo 159 Nov 12 18:28 Dockerfile
-rw-r--r-- 1 eon01 sudo 5930789 Nov 12 18:05 python3.2-static
We should add the Python executable and he app.py into the container. Then execute the script:
FROM busybox
ADD app.py python3.2-static /
RUN chmod +x /python3.2-static
CMD ["/python3.2-static", "/app.py"]
Another different approach to cerate an image is to integrate the wget inside the Dockerfile. The Python application
could be also downloaded (or pulled from a git repository) directly from inside the image.
FROM busybox
RUN busybox wget <url of the executable> && busybox wget <url of the python file>

RUN chmod +x /python3.2-static
ENTRYPOINT ["/python3.2-static", "/app.py"]
Creating A Node.js Application Micro Image
Let's create a simple Node.js application using one of the smallest possible images in order to run a really micro
container.
We have seen that Alpine is a good OS for a base image. Note that apk is the Alpine package manager.
This is the Dockerfile:
FROM alpine
RUN apk update && apk upgrade
RUN apk add nodejs
WORKDIR /usr/src/app
ADD app.js .
CMD [ "node", "app.js" ]
The Node.js script that we are going to run is in app.js
console.log("********** Hello World **********");
Put the js file in the same directory as the Dockerfile and build the image using docker build . .
The image (with the upgrades) has 5 MB as you can see:
Sending build context to Docker daemon 3.072 kB
Step 1 : FROM alpine
---> baa5d63471ea
Step 2 : RUN apk update && apk upgrade
---> Running in 0a8bb4d3be05
fetch http://dl-cdn.alpinelinux.org/alpine/v3.4/main/x86_64/APKINDEX.tar.gz
fetch http://dl-cdn.alpinelinux.org/alpine/v3.4/community/x86_64/APKINDEX.tar.gz
v3.4.5-31-g7d74397 [http://dl-cdn.alpinelinux.org/alpine/v3.4/main]
v3.4.4-21-g75fc217 [http://dl-cdn.alpinelinux.org/alpine/v3.4/community]
OK: 5975 distinct packages available
(1/3) Upgrading musl (1.1.14-r12 -> 1.1.14-r14)
(2/3) Upgrading busybox (1.24.2-r11 -> 1.24.2-r12)
Executing busybox-1.24.2-r12.post-upgrade
(3/3) Upgrading musl-utils (1.1.14-r12 -> 1.1.14-r14)
Executing busybox-1.24.2-r12.trigger
OK: 5 MiB in 11 packages

Creating Your Own Docker Base Image
Building your own Docker image is possible.
As said, a Docker Images is a read-only layer, it never changes but in order to make it writable, the Union File
System should add a read-write file system over the read-only file system.
The base image we are going to build is one of the type of images that has no parents. There are two ways to create a
base image.
Using Tar
A base image is a working Linux OS like Ubuntu, Debian .. etc Creating a base image using tar may be different
from a distribution to another. Let's see how to create a Debian based distribution.
We can use debootstrap: is used to fetch the required Debian packages to build the base system.
First of all, if you haven't installed it yet, use your package manager to download the package:
apt-get install debootstrap
This is the man description of this package:
DESCRIPTION
debootstrap bootstraps a basic Debian system of SUITE into TARGET from MIRROR by running SCRIPT. MIRROR can be an http:// or https:// URL, a file:/// URL, or an ssh:/// URL.
The SUITE may be a release code name (eg, sid, jessie, wheezy) or a symbolic name (eg, unstable, testing, stable, oldstable)
Notice that file:/ URLs are translated to file:/// (correct scheme as described in RFC1738 for local filenames), and file:// will not work.
ssh ://USER@HOST/PATH URLs are retrieved using scp; use of ssh-agent or similar is strongly recommended.
Debootstrap can be used to install Debian in a system without using an installation disk but can also be used to run a different Debian flavor in a chroot environment. This way you can create a full (minimal) Debian installation which can be used for testing purposes (see the EXAMPLES section). If you are looking for a chroot system to build packages please take a look at pbuilder.
At this step, we will create an image based on Ubuntu 16.04 Xenial.
sudo debootstrap xenial xenial > /dev/null
Once it is finished you can check you Ubuntu image files:
ls xenial/
bin boot dev etc home lib lib64 media mnt opt proc root run sbin srv sys tmp usr var
Let's create an archive to import it later by Docker import command:
sudo tar -C xenial/ -c . | sudo docker import - xenial
The import command creates a new filesystem image from the contents of a tarball It is used this way:
docker import [OPTIONS] file|URL|- [REPOSITORY[:TAG]]

The possible options are: -c and -m .
-c or --change <value> is used to apply Dockerfile instruction to the created image. -m or --message <string> is
used to set a commit message for imported image.
You can run the container with the base image you had created :
docker run xenial
But since the container has no command to run at its startup, you will have a similar error to this one:
docker: Error response from daemon: No command specified.
See 'docker run --help'.
You can try for example a command to run like date (just for the testing purpose):
docker run xenial date
Or you can verify the distribution of the created base image's OS:
docker run trusty cat /etc/lsb-release
If you are not familiar yet with the run command, we are going to see a chapter about running containers.
This is just a dirty verification of the integrity image.
You may use the local xenial bas image that you have just created in a Dockerfile:
FROM xenial
RUN ls
Sending build context to Docker daemon 252.9 MB
Step 1 : FROM xenial
---> 7a409243b212
Step 2 : RUN ls
---> Running in 5f544041222a
bin
boot
dev
etc
home
lib
lib64
media
mnt
opt
proc
root
run
sbin
srv
sys
tmp
usr
var
---> 57ce8f25dd63
Removing intermediate container 5f544041222a
Successfully built 57ce8f25dd63

Using Scratch
You don't need in reality to create the scratch image because it already exists, but let's see how to create one.
Actually, a scratch image is an image that was created using an empty tar archive.
tar cv --files-from /dev/null | docker import - scratch
You can see an example in the Docker library Github repository:
FROM scratch
COPY hello /
CMD ["/hello"]
This image uses an executable called hello that you can download here:
wget https://github.com/docker-library/hello-world/raw/master/hello-world/hello

Chapter VI - Working With Docker Containers
o ^__^
o (oo)\_______
(__)\ )\/\
||----w |
|| ||

Creating A Container
To create a container, simply run:
docker create <options> <image> <command> <args>
A simple example to start using this command is running:
docker create hello-world
Verify that the container was created by typing:
docker ps -a
or
docker ps --all
Docker will pick a random name for your container if you did not explicitly specify a name.
CONTAINER ID IMAGE COMMAND CREATED NAMES
ff330cd5505c hello-world "/hello" 2 minutes ago elegant_cori
You can set a name:
docker create --name hello-world-container hello-world
e..8
Verify the creation of the container:
docker ps -a
CONTAINER ID IMAGE COMMAND CREATED STATUS NAMES
e490edeef083 hello-world "/hello" 24 seconds ago Created hello-world-container
ff330cd5505c hello-world "/hello" 3 minutes ago Created elegant_cori
The docker create uses the specified image and add a new writable layer to creates the container and waits for the
specified command to run inside the created container. You may notice that docker create is generally used with -
it options where:
-i or --interactive To keep STDIN open even if not attached
-t or --tty To allocate a pseudo-TTY
Other options may be used like:

-p or --publish value To publish a container's port(s) to the host
-v or --volume value To bind mount a volume.
--dns value To set custom DNS servers (default [])
-e or --env value To set environment variables (default [])
-l or --label value To set meta data on a container (default [])
-m or --memory string To set a memory limit
--no-healthcheck To disable any container-specified HEALTHCHECK
--volume-driver string To set the volume driver for the container
--volumes-from value To mount volumes from the specified container(s) (default [])
-w or --workdir string To set the working directory inside the container
Example:
docker create --name web_server -it -v /etc/nginx/sites-enabled:/etc/nginx/sites-enabled -p 8080:80 nginx
Unable to find image 'nginx:latest' locally
latest: Pulling from library/nginx
75a822cd7888: Pull complete
0aefb9dc4a57: Pull complete
046e44ee6057: Pull complete
Digest: sha256:fab482910aae9630c93bd24fc6fcecb9f9f792c24a8974f5e46d8ad625ac2357
Status: Downloaded newer image for nginx:latest
e..4
You can see the other used options in the official Docker documentation but the most used ones are listed above.
docker create is similar to docker run -d but the container is never started until you make it explicitly using docker
start <container_id> which is e..4 in the last example.

Starting And Restarting A Container
We still use the nginx container example that we created using docker create --name web_server -it -v /etc/nginx/sites-
enabled:/etc/nginx/sites-enabled -p 8080:80 nginx that have e..4 as in id.
We can use the id with the start command to start the created container:
docker start e..4
You can check if the container is running using docker ps :
CONTAINER ID IMAGE COMMAND CREATED PORTS NAMES
e70fbc6e867a nginx "nginx -g 'daemon off" 8 minutes ago 443/tcp, 0.0.0.0:8080->80/tcp web_server
The start command is used like this:
docker start <options> <container_1> .. <container_n>
Where options could be:
-a or --attach To attach STDOUT/STDERR and forward signals
--detach-keys string To override the key sequence for detaching a container
--help To print usage
-i or --interactive To attach container's STDIN
You can start multiple containers using one command:
docker start e..4 e..8
Same as start command, you can restart a container using the restart command:
Nginx container:
docker restart e..4
e..4
hello-world container:
docker restart e..8
e..8
If you want to see the different configurations of a stopped or a running container, say the nginx container that has
the id e..4, you can go to /var/lib/docker/containers/e..4 where you will find these files:
/var/lib/docker/containers/e..4/
├── config.v2.json
├── e..4-json.log
├── hostconfig.json
├── hostname
├── hosts
├── resolv.conf

├── resolv.conf.hash
└── shm
This is the config.v2.json configuration file (the original one is not really formatted but compressed):
{
"StreamConfig":{
},
"State":{
"Running":true,
"Paused":false,
"Restarting":false,
"OOMKilled":false,
"RemovalInProgress":false,
"Dead":false,
"Pid":18722,
"StartedAt":"2017-01-02T23:37:03.770516537Z",
"FinishedAt":"2017-01-02T23:37:02.408427125Z",
"Health":null
},
"ID":"e..4",
"Created":"2017-01-02T23:00:06.494810718Z",
"Managed":false,
"Path":"nginx",
"Args":[
"-g",
"daemon off;"
],
"Config":{
"Hostname":"e70fbc6e867a",
"Domainname":"",
"User":"",
"AttachStdin":true,
"AttachStdout":true,
"AttachStderr":true,
"ExposedPorts":{
"443/tcp":{
},
"80/tcp":{
}
},
"Tty":true,
"OpenStdin":true,
"StdinOnce":true,
"Env":[
"PATH=/usr/local/sbin:/usr/local/bin:/usr/sbin:/usr/bin:/sbin:/bin",
"NGINX_VERSION=1.11.8-1~jessie"
],
"Cmd":[
"nginx",
"-g",
"daemon off;"
],
"Image":"nginx",
"Volumes":null,
"WorkingDir":"",
"Entrypoint":null,
"OnBuild":null,
"Labels":{
}
},
"Image":"sha256:0..f",
"NetworkSettings":{
"Bridge":"",
"SandboxID":"e..c",
"HairpinMode":false,
"LinkLocalIPv6Address":"",
"LinkLocalIPv6PrefixLen":0,
"Networks":{
"bridge":{
"IPAMConfig":null,
"Links":null,
"Aliases":null,
"NetworkID":"a..b",
"EndpointID":"f..e",
"Gateway":"172.17.0.1",
"IPAddress":"172.17.0.2",
"IPPrefixLen":16,
"IPv6Gateway":"",
"GlobalIPv6Address":"",
"GlobalIPv6PrefixLen":0,
"MacAddress":"02:42:ac:11:00:02"
}
},

"Service":null,
"Ports":{
"443/tcp":null,
"80/tcp":[
{
"HostIp":"0.0.0.0",
"HostPort":"8080"
}
]
},
"SandboxKey":"/var/run/docker/netns/eeb3ec8d995d",
"SecondaryIPAddresses":null,
"SecondaryIPv6Addresses":null,
"IsAnonymousEndpoint":false
},
"LogPath":"/var/lib/docker/containers/e..4/e..4-json.log",
"Name":"/web_server",
"Driver":"aufs",
"MountLabel":"",
"ProcessLabel":"",
"RestartCount":0,
"HasBeenStartedBefore":false,
"HasBeenManuallyStopped":false,
"MountPoints":{
"/etc/nginx/sites-enabled":{
"Source":"/etc/nginx/sites-enabled",
"Destination":"/etc/nginx/sites-enabled",
"RW":true,
"Name":"",
"Driver":"",
"Relabel":"",
"Propagation":"rprivate",
"Named":false,
"ID":""
}
},
"AppArmorProfile":"",
"HostnamePath":"/var/lib/docker/containers/e..4/hostname",
"HostsPath":"/var/lib/docker/containers/e..4/hosts",
"ShmPath":"/var/lib/docker/containers/e..4/shm",
"ResolvConfPath":"/var/lib/docker/containers/e..4/resolv.conf",
"SeccompProfile":"",
"NoNewPrivileges":false
}
Information used by Containerd could be used - as you have seen in the previous chapters - are in
/var/run/docker/libcontainerd/e..4/config.json

Pausing And Unpausing A Container
To unpause the Nginx container use:
docker pause e..4
You can verify the STATUS of the container using docker ps :
CONTAINER ID IMAGE COMMAND STATUS PORTS
e70fbc6e867a nginx "nginx -g 'daemon off" Up About a minute (**Paused**) 443/tcp, 0.0.0.0:8080->80/tcp
To get the container back, use the unpause command:
docker unpause e..4
This is the output of ps aux|grep docker-containerd-shim when the container was paused:
root 5620 0.0 0.0 282896 5512 ? Sl 01:48 0:00 docker-containerd-
shim e..4 /var/run/docker/libcontainerd/e..4 docker-runc
And this is the same command output when the container was unpaused:
root 5620 0.0 0.0 282896 5512 ? Sl 01:48 0:00 docker-containerd-
shim e..4 /var/run/docker/libcontainerd/e..4 docker-runc
After pausing a container, Docker uses the cgroups freezer to suspend all processes in the Nginx container, you can
check the different configurations in relation with the container freezed status in /sys/fs/cgroup/freezer/docker
├── cgroup.clone_children
├── cgroup.procs
├── e..4
│ ├── cgroup.clone_children
│ ├── cgroup.procs
│ ├── freezer.parent_freezing
│ ├── freezer.self_freezing
│ ├── freezer.state
│ ├── notify_on_release
│ └── tasks
├── freezer.parent_freezing
├── freezer.self_freezing
├── freezer.state
├── notify_on_release
└── tasks
The running tasks could be found here /sys/fs/cgroup/freezer/docker/e..4/tasks .
cat /sys/fs/cgroup/freezer/docker/e..4/tasks
5637
5662
Now if you type, docker top e..4 , you will see the PID of the freezed tasks:
UID PID PPID C STIME TTY TIME CMD
root 5637 5620 0 01:48 pts/11 00:00:00 nginx: master process nginx -g daemon off;
dnsmasq 5662 5637 0 01:48 pts/11 00:00:00 nginx: worker process

So, cgroup freezer creates some files.
freezer.state (read-write) : When read, returns the effective state of the cgroup "THAWED", "FREEZING" or
"FROZEN"
freezer.self_freezing (read-only) : Shows the self-state. 0 if the self-state is THAWED; otherwise, 1
freezer.parent_freezing (read-only) : Shows the parent-state. 0 if none of the cgroup's ancestors is frozen;
otherwise, 1

Stopping A Container
Using Docker Stop
You can use the stop command in the following way to stop one or multiple containers:
docker stop <options> <container_1> .. <container_2>
Example:
We create a container first using docker run -it -d --name my_container busybox and to stop it using the --time you can
use the following command:
docker stop --time 20 my_container
The last command will wait 20 seconds before killing the container. The default number of seconds is 10, so
executing docker stop my_container will wait 10 seconds.
Executing docker stop command will ask nicely top stop the container and in the case when it does not comply
within 10 seconds it will be killed but ungracefully.
Stopping a container is sending a SIGTERM signal to the root process (PID 1) in the container but if the process and
if it has not exited within the timeout period (10 second) a SIGKILL signal will be sent.
Using Docker Kill
Docker kill could be used in this way:
docker kill <options> <container_1> .. <container_n>
Docker kill does not exit gracefully the container process does not have any sort of timeout period and send a
SIGKILL to terminate the container process by default.
Docker kill is like sending a Linux signal kill -9 but you can choose a different signal to send like SIGINT ot
SIGTERM:
docker kill --signal=SIGINT my_container
docker kill --signal=SIGTERM my_container
Using Docker rm -f
To remove one or multiple containers you can use docker rm command.
docker rm <options> <container_1> .. <container_n>
Say we are running this container:

docker run -it -d --name my_container busybox
When checking its status, we can see that it is up:
docker ps
CONTAINER ID IMAGE COMMAND CREATED STATUS PORTS NAMES
ec53b9228910 busybox "sh" 1 seconds ago Up 1 seconds my_container
Docker engine can not remove a container while it is running, you can verify this by typing:
docker rm my_container
using the short id:
docker rm ec53b9228910
or the long id:
docker rm e..8
You will have a similar output to this one:
Error response from daemon: You cannot remove a running container e..8. Stop the container before attempting removal or use -
f
Removing a container is different from stopping it and you should add the -f or the --force option, in order to
force removing and then stopping it.
docker rm -f my_container
Adding the --force command is like sending a SIGKILL signal to the container process and it is also an alternative
to executing two commands:
docker stop my_container
docker rm my_container
The final option for stopping a running container is to use the --force or -f flag in conjunction with the docker rm
command.
Using docker rm command with -f option will not only stop a running container but erases all of its traces.
Using this option will not stop and remove the container gracefully.

Docker Signals
https://blog.confirm.ch/sending-signals-docker-container/
By default executing docker kill command will send a SIGKILL signal to the container's main process. If you want
to send another signal like SIGTERM, SIGHUP, SIGUSR1, SIGUSR2 you should use the -s kk or the --signal ```
options followed by the signal name. Note that you can send the same signal to multiple containers.
docker kill <container_1> .. <container_2>
or
docker kill --signal <signal_name> <container_1> .. <container_2>
I will use the SIGHUP signal that will tell the Docker container main process to reload its configuration and to do
this we have three different approaches:
The first one is sending a signal to the container's pid
The second option is to execute the kill command inside the container
The third way to do it is using docker kill command
kill -SIGHUP <container_pid>
docker exec <container_name_or_id> kill -SIGHUP 1 (the main process has always 1 as pid)
docker kill --signal=HUP <container_name_or_id>
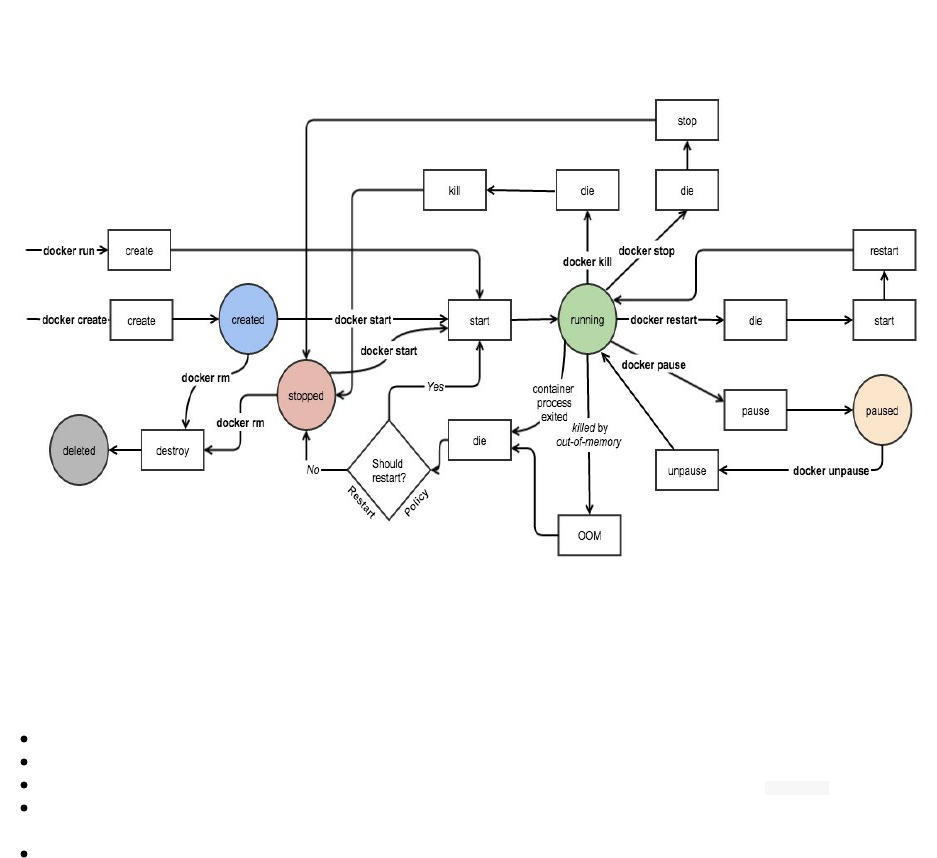
Container Life Cycle
The following diagrams is taken from the official Docker documentation and I have not found a more clear
explanation than using the same diagram of Docker states.
Through this chapter and the previous parts of this book, we have seen how to create, run, pause, unpause, stop and
kill Docker containers. The Docker CLI allows us to communicate and send events to Docker engine in order to
manage Docker containers and their state.
A container could be in one of the different statuses:
Created: The image is pulled and the container is configured to run but not running yet.
Running: Docker create a new RW layer in top of an the pulled image and starts running the container.
Paused: Docker container is paused but ready to run again without any restart, just run the unpause command.
Stopped: The container is stopped and not running. You should start another new container, if you want to run
the same application.
Deleted: A container could not be removed unless it is stopped. In this status, there is no container at all
(neither in the disk, nor in the memory of the host machine).

Running Docker In Docker
In short, it is not recommended to run Docker in Docker. If you are curious about the details:
Probably some people tried this for fun but it could be a real use case, you may have a continuous integration server
running in a Docker container and it should - at the same time - run and spin containers: You could be using Docker
to run Jenkins for example and need to run some Docker containers inside the container running Jenkins.
This scenario could create many problems but most of them could be resolved by bind-mounting the Docker
container socket into already running Jenkins container (which is different from running a Docker container inside
another one).
With Docker in Docker, you could have some problems like the incompatibility between internel and external
containers' security profiles: To resolve this kind of dysfunctions, the outer container should run with extra
privileges ( --privileged=true ) but keep in mind that in the same time, this does not cooperate well with Linux
Security Modules (LSM).
When you run a container inside a Jenkins container, you will run a CoW filesystem (like AUFS or Devicemapper)
at the top of another CoW filesystem, while what you want to run is a CoW filesystem (guest container) on the top of
a normal filesystem (like EXT3 or EXT4). This could create errors in your internal Docker filesystem.
The author of the feature that made possible for Docker to run inside a Docker container, Jérôme Petazzoni wrote a
blog post explaining why you should not run Docker in Docker. The alternative is to expose the Docker socket to
your Jenkins container, by binding /var/run/docker.sock using the -v flag but his solution is not also reliable in the
latest version since Docker Engine is no longer distributed.
Using Docker API is the good solution in this case, you can also use a wrapper like:
Dockerode: https://github.com/apocas/dockerode
Docker-py: https://github.com/docker/docker-py
DoMonit: https://github.com/eon01/DoMonit
In all cases, I don't recommend using Docker in Docker unless you really need to run it in this way or you are
knowledgeable about Docker.

Spotify's Docker Garbage Collector
This tool developed by Spotify allows you to clean your host from :
Containers that exited more than an hour ago are removed.
Images that do not belong to any remaining container after that are removed.
As it is explained in the Git repository of docker-gc:
Although docker normally prevents removal of images that are in use by containers, we take extra care to not
remove any image tags (e.g., ubuntu:14.04, busybox, etc) that are in use by containers. A naive docker rmi
$(docker images -q) will leave images stripped of all tags, forcing docker to re-pull the repositories when starting
new containers even though the images themselves are still on disk.
The easiest way to run the garbage collector is using its Docker container:
docker run --rm -v /var/run/docker.sock:/var/run/docker.sock -v /etc:/etc spotify/docker-gc
[2016-11-04T16:26:32] [INFO] : Container running /dreamy_feynman
[2016-11-04T16:26:32] [INFO] : Container not running /nauseous_gates
[2016-11-04T16:26:32] [INFO] : Container not running /cranky_leakey
[2016-11-04T16:26:33] [INFO] : Container not running /small_fermat
[2016-11-04T16:26:33] [INFO] : Container not running /elated_bose
[2016-11-04T16:26:33] [INFO] : Container not running /sad_goldberg
[2016-11-04T16:26:33] [INFO] : Container not running /gigantic_banach
[2016-11-04T16:26:33] [INFO] : Container not running /small_payne
[2016-11-04T16:26:33] [INFO] : Container not running /reverent_jennings
[2016-11-04T16:26:33] [INFO] : Container not running /kickass_brahmagupta
[2016-11-04T16:26:33] [INFO] : Container not running /silly_fermat
[2016-11-04T16:26:33] [INFO] : Container not running /dreamy_jang
[..etc]
This is pretty useful when it is run with a cron:
* 1 * * * docker run --rm -v /var/run/docker.sock:/var/run/docker.sock -v /etc:/etc spotify/docker-gc

Using A Volume From Another Container
tree
.
├── data
│ ├── app.js
│ └── Dockerfile
└── nodejs
└── Dockerfile
#cat data/Dockerfile
FROM alpine
ADD . /code
VOLUME /code
CMD ["tail", "-f","/dev/null"]
cat data/app.js
// Load the http module to create an http server.
var http = require('http');
// Configure our HTTP server to respond with Hello World to all requests.
var server = http.createServer(function (request, response) {
response.writeHead(200, {"Content-Type": "text/plain"});
response.end("Hello World\n");
});
// Listen on port 8000, IP defaults to 127.0.0.1
server.listen(8000);
// Put a friendly message on the terminal
console.log("Server running at http://127.0.0.1:8000/");
cat nodejs/Dockerfile
FROM node
VOLUME /code
WORKDIR /code
CMD ["node", "app.js"]
docker build -t my_data . docker build -t my_nodejs .
docker run -it -d --name my_data my_data docker run -it --volumes-from my_data --name my_nodejs my_nodejs

Performing A Docker Backup
Using the --volume-from flag, it is possible to backup data from inside a Docker container. Say we want to create a
Mysql container and we want to run a some databases backup.
Normally we should run this command to start a Mysql container:
docker run --name my_db -e MYSQL_ROOT_PASSWORD=my_secret -d mysql
When we want explicitly declare a volume for our Mysql data, we can run this command instead:
docker run --name my_db -e MYSQL_ROOT_PASSWORD=my_secret -d -v /var/lib/mysql mysql
Now we can run another container:
docker run --rm --volumes-from my_db -v $(pwd):/backup ubuntu tar cvf /backup/backup.tar /var/lib/mysql mysql
This command launches a new container and mounts the volume from the my_db container. It then mounts a local
directory /backup and backs up the contents of the my_db volume to a .TAR file within the /backup directory.
In order to do the restore, you should run:
Create a new container:
docker run -v /var/lib/mysql --name my_db_2 ubuntu /bin/bash
Un-tar the backup file in the new container`s data volume:
docker run --rm --volumes-from my_db_2 -v $(pwd):/backup ubuntu bash -c "cd /var/lib/mysql && tar xvf /backup/backup.tar --
strip 1"

Chapter VII - Working With Docker Machine
o ^__^
o (oo)\_______
(__)\ )\/\
||----w |
|| ||
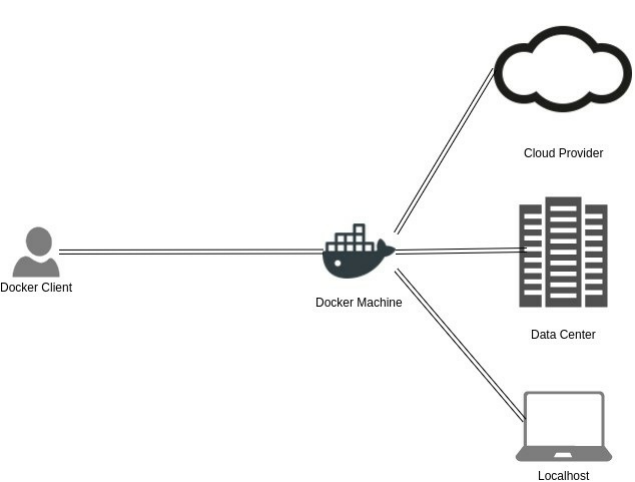
What Is Docker Machine & When Should I Use It ?
Docker Machine is a Docker tool that let you use and install Docker Engine on different Docker hosts.
Docker Machine is useful when it comes to creating and managing Docker using a local virtual machine. We can
create as many as Docker hosts as we want, we are not limited to a single host (localhost). We can create several
Docker hosts on our local host, in a private server or a cloud providers like AWS or Azure.
If you have an old laptop or desktop system, you are more probably unable to use the Docker "normal" installation
(Docker Engine). Many Windows and MacOS users are using Docker Machine instead of Docker.
Since Docker Machine can create provisioned virtual machines in different cloud providers like EC2 instances for
AWS, it could be used to provision Docker hosts on a remote system (your laptop, or your integration server ..etc).

Installation
*nix
Installing Docker Machine can be done using these 3 commands:
sudo apt-get install virtualbox
curl -L https://github.com/docker/machine/releases/download/v0.10.0/docker-machine-`uname -s`-`uname -m` >/tmp/docker-
machine
chmod +x /tmp/docker-machine
sudo cp /tmp/docker-machine /usr/local/bin/docker-machine
You can also add the auto-completion feature using:
curl -
L https://raw.githubusercontent.com/docker/docker/master/contrib/completion/bash/docker > /etc/bash_completion.d/docker
MacOS
If you are using a MacOS, you can install Docker Machine using the following commands:
curl -L https://github.com/docker/machine/releases/download/v0.10.0/docker-machine-`uname -s`-`uname -
m` >/usr/local/bin/docker-machine && \
chmod +x /usr/local/bin/docker-machine
To install the command completion, use:
curl -L https://raw.githubusercontent.com/docker/docker/master/contrib/completion/bash/docker > `brew --
prefix`/etc/bash_completion.d/docker
A lightweight virtualization solution for MacOS called Hyperkit is used with Docker Machine, this why you you
should have these requirements:
OS X 10.10.3 Yosemite or later
a 2010 or later Mac (i.e. a CPU that supports EPT)
Oracle Virtualbox driver will be used to create local machines because there is no docker-machine create driver for
HyperKit but you can still use HyperKit and VirtualBox on the same system.
Windows
Windows users should git bash:
if [[ ! -d "$HOME/bin" ]]; then mkdir -p "$HOME/bin"; fi
curl -L https://github.com/docker/machine/releases/download/v0.10.0/docker-machine-Windows-x86_64.exe > "$HOME/bin/docker-
machine.exe"
chmod +x "$HOME/bin/docker-machine.exe"
Because Hyper-V is not compatible with Oracle VirtualBox and because Docker for Windows uses Microsoft Hyper-
V for virtualization, it is not possible to run the two platforms at the same time, but you can still use Docker Machine
for your local VMs using Hyper-V driver.

Using Docker Machine Locally
Creating Docker Machines
You can use Docker Machine to start a public cloud instance like AWS or DO but you can also use it to start a local
VirtualBox virtual machine. Creating a machine is done using the docker create command:
docker-machine create -d virtualbox default
First time running this command, your local machine will
Search in cache for the image:
(default) Image cache directory does not exist, creating it at /root/.docker/machine/cache...
Download the Boot2Docker ISO
(default) No default Boot2Docker ISO found locally, downloading the latest release...
(default) Latest release for github.com/boot2docker/boot2docker is v17.04.0-ce
(default) Downloading /root/.docker/machine/cache/boot2docker.iso from https://github.com/boot2docker...
(default) 0%....10%....20%....30%....40%....50%....60%....70%....80%....90%....100%
Creating machine...
(default) Copying /root/.docker/machine/cache/boot2docker.iso to /root/.docker/machi...
Create the VirtualBox VM with its configurations (network, ssh ..etc):
(default) Creating VirtualBox VM...
(default) Creating SSH key...
(default) Starting the VM...
(default) Check network to re-create if needed...
(default) Found a new host-only adapter: "vboxnet0"
(default) Waiting for an IP...
Waiting for machine to be running, this may take a few minutes...
Detecting operating system of created instance...
Waiting for SSH to be available...
Detecting the provisioner...
Provisioning with boot2docker...
Connecting Docker Machines To Your Shell
To see how to connect your Docker Client to the Docker Engine running on this virtual machine, run: ̀ docker-machine
env default ̀ :
export DOCKER_TLS_VERIFY="1"
export DOCKER_HOST="tcp://192.168.99.100:2376"
export DOCKER_CERT_PATH="/root/.docker/machine/machines/default"
export DOCKER_MACHINE_NAME="default"
# Run this command to configure your shell:
# eval $(docker-machine env default)
If your machine has a different name then you should use it instead of default.
docker machine env <machine_name>

To connect a shell to the created machine and set environment variables for the current shell that the Docker client
will read you need to type the following command and execute it each time you open a new shell or restart your
machine. Type:
eval $(docker-machine env default)
In general:
eval $(docker-machine env <machine_name>)
Working With Multiple Docker Machines
You can see the created machine using docker-machine ls :
NAME ACTIVE DRIVER STATE URL SWARM DOCKER ERRORS
default - virtualbox Running tcp://192.168.99.100:2376 v17.04.0-ce
Let's create two machines host1 and host2:
docker-machine create --driver virtualbox host1 && docker-machine create --driver virtualbox host2
Let's get the IP addresses of these two machines:
docker-machine ip host1 && docker-machine ip host2
In my case, the two machines have the following IPs:
192.168.99.100
192.168.99.101
We would like to create two Apache web servers, one in the first machine and the other in the second machine.
In order to do this, connect the first to your shell:
eval $(docker-machine env host1)
Create the first web server:
docker run -it -p 8000:80 --name httpd1 -d httpd
Connect the second machine:
eval $(docker-machine env host2)
Then create the second web server:

docker run -it -p 8000:80 --name httpd2 -d httpd
You may notice that both containers have the same host port but this is not a problem. When we connected our shell
to the first machine, the first web server was created inside the first machine and the second web server container
was created just after connecting the shell to the second machine.
In our case every container is deployed inside a different machine, that is why we can have the same host port 8000.
You can see the active machine by typing: docker-machine active .
Getting More Information About Docker Machines
Until now we created default, host1 and host2 machines.
We can see the status of our machines using docker-machine status :
docker-machine status host1
Running
docker-machine status host2
Running
If we want more information about driver name, authentication settings, engine information or swarm data, we can
use the inspect command. As an example, you can use docker-machine inspect host1 and you will get a similar json:
{
"ConfigVersion": 3,
"Driver": {
"IPAddress": "192.168.99.100",
"MachineName": "host1",
"SSHUser": "docker",
"SSHPort": 46718,
"SSHKeyPath": "/home/eon01/.docker/machine/machines/host1/id_rsa",
"StorePath": "/home/eon01/.docker/machine",
"SwarmMaster": false,
"SwarmHost": "tcp://0.0.0.0:3376",
"SwarmDiscovery": "",
"VBoxManager": {},
"HostInterfaces": {},
"CPU": 1,
"Memory": 1024,
"DiskSize": 20000,
"NatNicType": "82540EM",
"Boot2DockerURL": "",
"Boot2DockerImportVM": "",
"HostDNSResolver": false,
"HostOnlyCIDR": "192.168.99.1/24",
"HostOnlyNicType": "82540EM",
"HostOnlyPromiscMode": "deny",
"UIType": "headless",
"HostOnlyNoDHCP": false,
"NoShare": false,
"DNSProxy": true,
"NoVTXCheck": false,
"ShareFolder": ""
},
"DriverName": "virtualbox",
"HostOptions": {
"Driver": "",
"Memory": 0,
"Disk": 0,
"EngineOptions": {
"ArbitraryFlags": [],
"Dns": null,
"GraphDir": "",
"Env": [],
"Ipv6": false,
"InsecureRegistry": [],
"Labels": [],
"LogLevel": "",
"StorageDriver": "",
"SelinuxEnabled": false,

"TlsVerify": true,
"RegistryMirror": [],
"InstallURL": "https://get.docker.com"
},
"SwarmOptions": {
"IsSwarm": false,
"Address": "",
"Discovery": "",
"Agent": false,
"Master": false,
"Host": "tcp://0.0.0.0:3376",
"Image": "swarm:latest",
"Strategy": "spread",
"Heartbeat": 0,
"Overcommit": 0,
"ArbitraryFlags": [],
"ArbitraryJoinFlags": [],
"Env": null,
"IsExperimental": false
},
"AuthOptions": {
"CertDir": "/home/eon01/.docker/machine/certs",
"CaCertPath": "/home/eon01/.docker/machine/certs/ca.pem",
"CaPrivateKeyPath": "/home/eon01/.docker/machine/certs/ca-key.pem",
"CaCertRemotePath": "",
"ServerCertPath": "/home/eon01/.docker/machine/machines/host1/server.pem",
"ServerKeyPath": "/home/eon01/.docker/machine/machines/host1/server-key.pem",
"ClientKeyPath": "/home/eon01/.docker/machine/certs/key.pem",
"ServerCertRemotePath": "",
"ServerKeyRemotePath": "",
"ClientCertPath": "/home/eon01/.docker/machine/certs/cert.pem",
"ServerCertSANs": [],
"StorePath": "/home/eon01/.docker/machine/machines/host1"
}
},
"Name": "host1"
}
Starting, Stopping, Restarting & Killing Machines
Docker Machine allows users to create, stop, start, delete machines using command that are quite similar to Docker
Engine commands.
Let's do some operations to see how this work, restart host1:
docker-machine restart host1
If you execute this, you will see this message or a similar one:
Restarted machines may have new IP addresses. You may need to re-run the `docker-machine env` command.
Like it is said in the message above, Docker Machine don't necessarily give static IPs to a new machine. If it
restarts, you should docker-machine env host1 again and yous should connect it to yur shell again eval $(docker-machine
env host1) .
This is the same case when you stop and start a machine:
docker-machine stop host1
docker-machine start host1
You can abruptly force stopping host1 by typing :
docker-machine kill host1
To completely remove a machine (host1) execute this command:

docker-machine rm host1
or
docker-machine rm --force -y host1
The second command will remove the machine without prompting for confirmation.
Upgrading Docker Machines
Check your Docker Machine version by typing:
docker-machine version
Example:
docker-machine version
docker-machine version 0.10.0, build 76ed2a6
In order to see the version of a running machine (host1), type:
docker-machine version host1
You can upgrade it by typing
docker-machine upgrade host1
This operation will stop, upgrade and restart host1 with a new IP address:
Upgrading docker...
Stopping machine to do the upgrade...
Upgrading machine "host1"...
Copying /home/eon01/.docker/machine/cache/boot2docker.iso to /home/eon01/.docker/machine/machines/host1/boot2docker.iso...
Starting machine back up...
(host1) Check network to re-create if needed...
(host1) Waiting for an IP...
Restarting docker...

Using Docker Machine With External Providers
Docker Machine could be used locally using a generic or VirtualBox drivers or on some cloud providers like :
Amazon Web Services
Microsoft Azure
Digital Ocean
Exoscale
Google Compute Engine
Microsoft Hyper-V
OpenStack
Rackspace
IBM Softlayer
VMware vCloud Air
VMware Fusion
VMware vSphere
Create Machines On Amazon Web Services
First thing to have when using AWS are the credentials that are generally saved in ~/.aws/credentials . You can use
different AWS profiles by providing access-key and secret-key as arguments in the Docker Machine command.
We want to create a Docker Machine using AWS EC2 driver while choosing Ubuntu AMI, eu-west-1 as a region, eu-
west-1b as a zone, the security group,
docker-machine create --driver amazonec2 \
--amazonec2-access-key **************************** \
--amazonec2-secret-key ********************* \
--amazonec2-ami ami-a8d2d7e \
--amazonec2-region eu-west-1 \
--amazonec2-vpc-id vpc-f65c4212 \
--amazonec2-zone b \
--amazonec2-subnet-id subnet-a1991bcd \
--amazonec2-security-group live_eon01_ec2_sg \
--amazonec2-tags Name,aws-host-1 \
--amazonec2-instance-type t2.micro \
--amazonec2-ssh-keypath /home/eon01/.ssh/id_rsa \
aws-host-1
If you don't need a public IP address you can use this option:
--amazonec2-private-address-only
You can also add other options to the last command like --amazonec2-monitoring to enable CloudWatch monitoring or
--amazonec2-use-ebs-optimized-instance to create an EBS optimized instance.
If the machine creation fails and you want to start a new machine with the same name you should manually
remove the keypair created for aws-host-1.
What I generally do is also force removing the machine (if it is safe to do, of course, otherwise be sure to backup
your data):

docker-machine rm --force -y aws-host-1 && aws ec2 delete-key-pair --profile me --region eu-west-1 --key-name aws-host-1
You can use your own configurations, choose more or less options, like for example the default Access/Secret Keys,
the default Instance Type, Security Group ..etc:
docker-machine create -d amazonec2 \
--amazonec2-region eu-west-1 \
--amazonec2-ssh-keypath /home/eon01/.ssh/id_rsa \
aws-host-1
We are going to use the first command create command. The latter operation will:
Run some pre-create checks
Start the EC2 instance
Detect some EC2 system configurations
Provision the machine with ubuntu(systemd)
Install Docker
Copy certs to the local machine directory
Copy certs to the remote machine
Setup Docker configuration on the remote daemon
Verify of Docker is up and running on the remote machine
Running pre-create checks...
Creating machine...
(aws-host-1) Launching instance...
Waiting for machine to be running, this may take a few minutes...
Detecting operating system of created instance...
Waiting for SSH to be available...
Detecting the provisioner...
Provisioning with ubuntu(systemd)...
Installing Docker...
Copying certs to the local machine directory...
Copying certs to the remote machine...
Setting Docker configuration on the remote daemon...
Checking connection to Docker...
Docker is up and running!
To see how to connect your Docker Client to the Docker Engine running on this virtual machine, run: docker-machine env aws-
host-1
Let's now connect Docker Client to the Remote Docker Engine:
eval $(docker-machine env aws-host-1)
Let's verify if the created machine is connected to the local Docker Client:
docker-machine active
We should see the name of the EC2 machine here:
aws-host-1
Creating A Docker Swarm Cluster Using Docker Machine
In this part we are going to demonstrate how to create a Swarm cluster using Docker Machine (1 manager + 1
worker). In order to do this we can follow these steps:

Create the first machine using awscloud driver. This EC2 instance will be a manager.
docker-machine create --driver amazonec2 \
--amazonec2-access-key **************************** \
--amazonec2-secret-key ********************* \
--amazonec2-ami ami-a8d2d7e \
--amazonec2-region eu-west-1 \
--amazonec2-vpc-id vpc-f65c4212 \
--amazonec2-zone b \
--amazonec2-subnet-id subnet-a1991bcd \
--amazonec2-security-group live_eon01_ec2_sg \
--amazonec2-tags Name,aws-host-1 \
--amazonec2-instance-type t2.micro \
--amazonec2-ssh-keypath /home/eon01/.ssh/id_rsa \
aws-host-1
Connect it to the local Docker Client
eval $(docker-machine env aws-host-1)
Initialize the Swarm:
docker swarm init
Copy the generated command in order to use it in the second machine
Create the second machine. This EC2 instance is the worker:
docker-machine create --driver amazonec2 \
--amazonec2-access-key **************************** \
--amazonec2-secret-key ********************* \
--amazonec2-ami ami-a8d2d7e \
--amazonec2-region eu-west-1 \
--amazonec2-vpc-id vpc-f65c4212 \
--amazonec2-zone b \
--amazonec2-subnet-id subnet-a1991bcd \
--amazonec2-security-group live_eon01_ec2_sg \
--amazonec2-tags Name,aws-host-2 \
--amazonec2-instance-type t2.micro \
--amazonec2-ssh-keypath /home/eon01/.ssh/id_rsa \
aws-host-2
Connect it to the local Docker Client
eval $(docker-machine env aws-host-2)
Make this machine join the manager:
docker swarm join \
--token SWMTKN-1-*********************** \
172.32.1.13:2377
Now if you run a Docker service, it will be deployed to the Swarm cluster. We are going the same infinite image that
I created for Docker Swarm chapter:

service create --name infinite_service eon01/infinite
If you run this directly without connecting the manager to the Docker Client, you will get this error Error response
from daemon: This node is not a swarm manager. Worker nodes can't be used to view or modify cluster state. Please run this command
on a manager node or promote the current node to a manager. which is normal, because you are connected to the worker.
Now, we should get back to the manager machine:
eval $(docker-machine env aws-host-1)
Create a new service :
service create --name infinite_service eon01/infinite
In order to verify that the cluster is working and that both of EC2 created machines are receiving containers, I scaled
the service up to 50 containers docker service scale infinite_service=50 , then I checked the containers living in each
machine using docker ps , each server was hosting 25 instance.
If you would like to automate the creation of Docker Swarm clusters using Docker Machine, you can use these
commands:
docker $(docker-machine config aws-host-1) swarm init --listen-addr $(docker-machine ip aws-host-1):2377
docker $(docker-machine config aws-host-2) swarm join $(docker-machine ip aws-host-1):2377 --listen-addr $(docker-
machine ip aws-host-2):2377
Using docker-machine config <machine> will avoid changing each time from aws-host-1 to aws-host-2, since the output
of this command is similar to the following:
--tlsverify
--tlscacert="/home/eon01/.docker/machine/machines/aws-host-1/ca.pem"
--tlscert="/home/eon01/.docker/machine/machines/aws-host-1/cert.pem"
--tlskey="/home/eon01/.docker/machine/machines/aws-host-1/key.pem"
-H=tcp://54.229.238.222:2376
The latter configuration will "override" the Docker Daemon default configurations and run a container suing
different TLS parameters and a different tcp socket.
The output of the other embedded command ( docker-machine ip <machine> ) is the IP address of an EC2 machine.
Create Machines On DigitalOcean
The first step is generating a token, login to your DigitalOcean account and generate a new Token:

The second step is to grab the list of images used to provision DO virtual machines. You should execute an API call
curl -X GET "https://api.digitalocean.com/v2/images" -
H "Authorization: Bearer ed98d5c230b121ce7f4807a369c5dd1ae8cfcdf87da444ec3ffd50de45c60cd5"
You will get a JSON:
Example: If you want to use CoreOs 1353.4.0 (beta), you should look at :
{
"id": 23857817,
"name": "1353.4.0 (beta)",
"distribution": "CoreOS",
"slug": "coreos-beta",
"public": true,
"regions": [
"nyc1",
"sfo1",
"nyc2",
"ams2",
"sgp1",
"lon1",
"nyc3",
"ams3",
"fra1",
"tor1",
"sfo2",
"blr1"
],
"created_at": "2017-04-01T01:56:28Z",
"min_disk_size": 20,
"type": "snapshot",
"size_gigabytes": 0.33
}
We need also to get a list of DO regions:
curl -X GET "https://api.digitalocean.com/v2/regions" -
H "Authorization: Bearer ed98d5c230b121ce7f4807a369c5dd1ae8cfcdf87da444ec3ffd50de45c60cd5"

In order to get a formatted JSON output, you can add a Python command:
curl -X GET "https://api.digitalocean.com/v2/regions" -
H "Authorization: Bearer ed98d5c230b121ce7f4807a369c5dd1ae8cfcdf87da444ec3ffd50de45c60cd5" | python -m json.tool
This is the output of regions list:
{
"links": {},
"meta": {
"total": 12
},
"regions": [
{
"available": true,
"features": [
"private_networking",
"backups",
"ipv6",
"metadata",
"install_agent",
"storage"
],
"name": "New York 1",
"sizes": [
"512mb",
"1gb",
"2gb",
"4gb",
"8gb",
"16gb",
"32gb",
"48gb",
"64gb"
],
"slug": "nyc1"
},
{
"available": true,
"features": [
"private_networking",
"backups",
"ipv6",
"metadata",
"install_agent"
],
"name": "San Francisco 1",
"sizes": [
"512mb",
"1gb",
"2gb",
"4gb",
"8gb",
"16gb",
"32gb",
"48gb",
"64gb"
],
"slug": "sfo1"
},
{
"available": true,
"features": [
"private_networking",
"backups",
"ipv6",
"metadata",
"install_agent"
],
"name": "New York 2",
"sizes": [
"512mb",
"1gb",
"2gb",
"4gb",
"8gb",
"16gb",
"32gb",
"48gb",
"64gb"
],
"slug": "nyc2"
},
{
"available": true,

"features": [
"private_networking",
"backups",
"ipv6",
"metadata",
"install_agent"
],
"name": "Amsterdam 2",
"sizes": [
"512mb",
"1gb",
"2gb",
"4gb",
"8gb",
"16gb",
"32gb",
"48gb",
"64gb"
],
"slug": "ams2"
},
.
.
.
.
{
"available": true,
"features": [
"private_networking",
"backups",
"ipv6",
"metadata",
"install_agent"
],
"name": "Bangalore 1",
"sizes": [
"512mb",
"1gb",
"2gb",
"4gb",
"8gb",
"16gb",
"32gb",
"48gb",
"64gb"
],
"slug": "blr1"
}
]
}
We are going to use the "San Fransisco 1" region.
I am a user of DigitalOcean so I had already my SSH key registered. In order to use with Docker Machine, I should
find its fingerprint. In order to this, it depends on your ssh-keygen version, but one of these commands should work
for you:
ssh-keygen -lf /path/to/ssh/key
ssh-keygen -E md5 -lf /path/to/ssh/key
Create the machine:
docker-machine create \
--driver digitalocean \
--digitalocean-access-token=ed98d5c230b121ce7f4807a369c5dd1ae8cfcdf87da444ec3ffd50de45c60cd5 \
--digitalocean-region="sfo1" \
--digitalocean-ssh-key-fingerprint="3c:b1:dd:eg:c9:31:23:4e:13:81:6d:15:5d:e7:32:2d" \
do-host-1
This command will be
Running pre-create checks
Creating SSH key
Assuming Digital Ocean private SSH is located at ~/.ssh/id_rsa

Creating Digital Ocean Droplet
Waiting for IP address to be assigned to the Droplet
Waiting for machine to be running, this may take a few minutes
Detecting operating system of created instance
Waiting for SSH to be available
Detecting the provisioner
Provisioning with ubuntu(systemd)
Installing Docker
Copying certs to the local machine directory
Copying certs to the remote machine
Setting Docker configuration on the remote daemon
Checking connection to Docker
You can add other options like the SSH user name, the image you would like to use .. etc. Example:
docker-machine create \
--driver digitalocean \
--digitalocean-access-token=<access_token> \
--digitalocean-region="<regions>" \
--digitalocean-ssh-key-fingerprint="<fingerprint>" \
--digitalocean-ssh-user="<user_id>" \
--digitalocean-image="<image_id>" \
<node_name>
Other configurations are possible like:
--digitalocean-size
--digitalocean-ipv6
--digitalocean-private-networking
--digitalocean-backups
--digitalocean-userdata
--digitalocean-ssh-port
If you want to remove the created machine locally and from DO, you should use this command:
docker-machine rm --force -y do-host-1
Like already done, if you want to connect to connect to the remote Docker, type:
eval $(docker-machine env do-host-1)
Now you can create Docker containers in your laptop and see them running in the DO server.

Chapter VIII - Docker Networking
o ^__^
o (oo)\_______
(__)\ )\/\
||----w |
|| ||

Single Host Vs Multi Host Networking
There two different ways of doing networking in Docker:
Networking in a single host
Networking in a cluster of two ore more hosts
Single Host Networking
By default, any Docker container or host will get an IP address that will give it the possibility to communicate with
other containers in the same host or with the host machine. It is possible - as we are going to see - that a Docker
container finds another container by its name, since the IP address could be assigned dynamically at the container
start up, a name is more efficient to find a running container.
Containers in a single host, could also communicate and reach the outside world.
Create a simple container:
docker run -it -d --name my_container busybox
And test if you can ping Google:
docker exec -it my_container ping -w3 google.com
PING google.com (216.58.204.142): 56 data bytes
64 bytes from 216.58.204.142: seq=1 ttl=48 time=2.811 ms
--- google.com ping statistics ---
3 packets transmitted, 1 packets received, 66% packet loss
round-trip min/avg/max = 2.811/2.811/2.811 ms
Now if you inspect the container using docker inspect my_container you will be able to see its network configuration
and its IP address:
"NetworkSettings": {
"Bridge": "",
"SandboxID": "555a60eaffdb4b740f7b869bac61859ecca1e39be95ee5856ca28019509e4255",
"HairpinMode": false,
"LinkLocalIPv6Address": "",
"LinkLocalIPv6PrefixLen": 0,
"Ports": {},
"SandboxKey": "/var/run/docker/netns/555a60eaffdb",
"SecondaryIPAddresses": null,
"SecondaryIPv6Addresses": null,
"EndpointID": "20b1b218462e6771155de75788f53b731bbff12019d977aefa7094f57275887d",
"Gateway": "172.17.0.1",
"GlobalIPv6Address": "",
"GlobalIPv6PrefixLen": 0,
"IPAddress": "172.17.0.2",
"IPPrefixLen": 16,
"IPv6Gateway": "",
"MacAddress": "02:42:ac:11:00:02",
"Networks": {
"bridge": {
"IPAMConfig": null,
"Links": null,
"Aliases": null,
"NetworkID": "2094b393faacbb1cc049f1f136437b1cce6fc41abc304cf2c1ae558a62c5ee2e",
"EndpointID": "20b1b218462e6771155de75788f53b731bbff12019d977aefa7094f57275887d",
"Gateway": "172.17.0.1",
"IPAddress": "172.17.0.2",
"IPPrefixLen": 16,

"IPv6Gateway": "",
"GlobalIPv6Address": "",
"GlobalIPv6PrefixLen": 0,
"MacAddress": "02:42:ac:11:00:02"
}
}
}
my_container has the IP address 172.17.0.2 that the host could reach:
ping -w1 172.17.0.2
PING 172.17.0.2 (172.17.0.2) 56(84) bytes of data.
64 bytes from 172.17.0.2: icmp_seq=1 ttl=64 time=0.050 ms
64 bytes from 172.17.0.2: icmp_seq=2 ttl=64 time=0.045 ms
--- 172.17.0.2 ping statistics ---
2 packets transmitted, 2 received, 0% packet loss, time 999ms
rtt min/avg/max/mdev = 0.045/0.047/0.050/0.007 ms
If you run a web server, your users must reach the port 80 (or 443) of your server, in this case an nginx container, for
example, should be reached at its port 80 (or 443) and it is done through port forwarding that connects it to the host
machine and then an external network (Internet in our case).
Let's create the web server container, forward the port host port 8080 to the container port 80 and test how it
responds:
docker run -d -p 8080:80 --name my_web_server nginx
Ngninx should reply if your port 8080 is not used by other applications:
curl http://0.0.0.0:8080
<!DOCTYPE html>
<html>
<head>
<title>Welcome to nginx!</title>
<style>
body {
width: 35em;
margin: 0 auto;
font-family: Tahoma, Verdana, Arial, sans-serif;
}
</style>
</head>
<body>
<h1>Welcome to nginx!</h1>
<p>If you see this page, the nginx web server is successfully installed and
working. Further configuration is required.</p>
<p>For online documentation and support please refer to
<a href="http://nginx.org/">nginx.org</a>.<br/>
Commercial support is available at
<a href="http://nginx.com/">nginx.com</a>.</p>
<p><em>Thank you for using nginx.</em></p>
</body>
</html>
In a single host, containers are able to see each other, to see the external world (if they are not running in isolated
networks) and they can receive traffic from an external network.
Multi Host Networking
An application could be run using many containers with a load balancer, these containers could be spread across
multiple hosts. Networking in multi host environments is entirely different from single host environments.
Containers even spread across servers should be able to communicate together, this is where service discovery plays
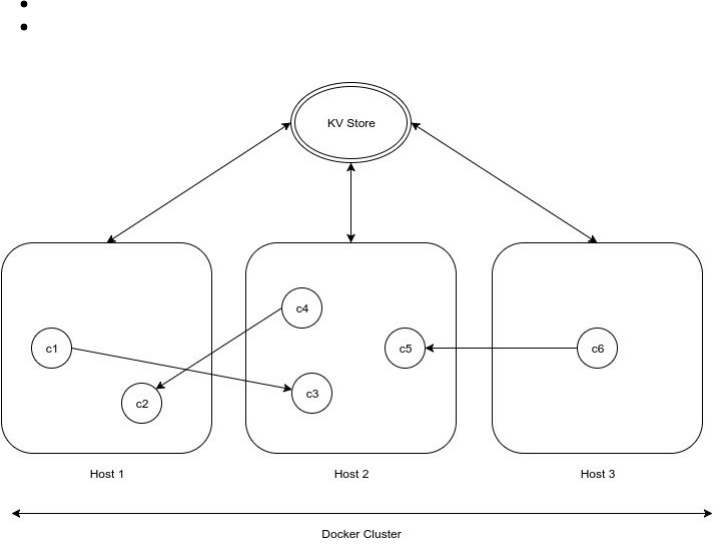
an important role in networking. Service discovery allows you to request a container name and get its IP address
back.
Docker comes with a default network driver called overlay that we are going to see later in this chapter.
If you would like to operate in the multi host mode, you have two options:
Using Docker engine in swarm mode
Running a cluster of hosts using a key value store (like Zookeeper, etcd or Consul) that allows the service
discovery
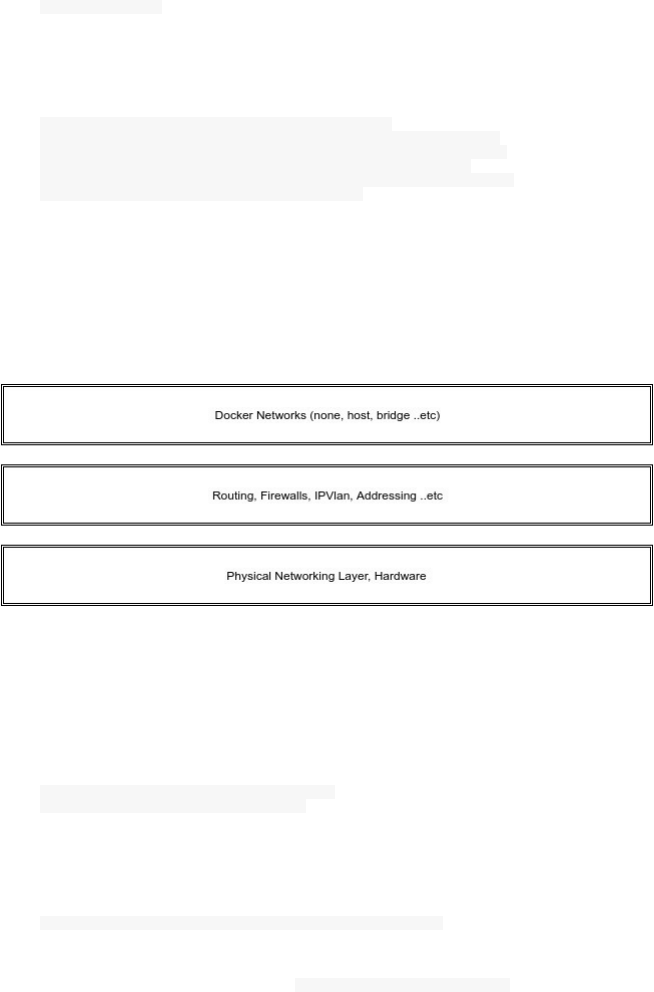
Docker Networks
Docker Default Networks
The networking is one of the most important parts in building Docker clusters and microservices.
The first thing to know about networking in Docker is listing the different networks that Docker engine uses:
docker network ls
You should get the list of your Docker networks at least those who are pre-defined networks:
NETWORK ID NAME DRIVER SCOPE
e5ff619d25f5 bridge bridge local
98d44bf13233 docker_gwbridge bridge local
608a539ce1e3 host host local
8sm2anzzfa0i ingress overlay swarm
ede46dbb22d7 none null local
none, host and bridge are the names of default networks that you can find in any Docker installation running a
single host. The activation of the swarm mode creates another default (or predefined) network called ingress.
Clearly, these networks are not physical networks, they are emulated networks that abstracts hardware and of course
they are in built and managed in higher levels that the physical layer and this one of properties of software-defined
networking.
None Network
The network called none using the null driver is a predefined network that isolates a container in a way it can neither
connect to outisde not communicate with other containers in the same host.
NETWORK ID NAME DRIVER SCOPE
ede46dbb22d7 none null local
Let's verify this by running a busybox container in this network:
docker run --net=none -it -d --name my_container busybox
If you inspect the created container docker inspect my_container , you can see the different network configuration of
this container and you will notice that is attached to null network with the id

ede46dbb22d7f3ab2dc95b11228de06e2d27e240a3f651bc2f6fd3ea0c4a2ca7. The container does not have any
gateway.
"NetworkSettings": {
"Bridge": "",
"SandboxID": "566b9a74d37c7f47e02d769b79e168df437a5b23ee030fc199d99f7d94b353b7",
"HairpinMode": false,
"LinkLocalIPv6Address": "",
"LinkLocalIPv6PrefixLen": 0,
"Ports": {},
"SandboxKey": "/var/run/docker/netns/566b9a74d37c",
"SecondaryIPAddresses": null,
"SecondaryIPv6Addresses": null,
"EndpointID": "",
"Gateway": "",
"GlobalIPv6Address": "",
"GlobalIPv6PrefixLen": 0,
"IPAddress": "",
"IPPrefixLen": 0,
"IPv6Gateway": "",
"MacAddress": "",
"Networks": {
"none": {
"IPAMConfig": null,
"Links": null,
"Aliases": null,
"NetworkID": "ede46dbb22d7f3ab2dc95b11228de06e2d27e240a3f651bc2f6fd3ea0c4a2ca7",
"EndpointID": "b42debd75af122d113c202ad373d46e0b08d32e9ef6e9361e49515045ae6288d",
"Gateway": "",
"IPAddress": "",
"IPPrefixLen": 0,
"IPv6Gateway": "",
"GlobalIPv6Address": "",
"GlobalIPv6PrefixLen": 0,
"MacAddress": ""
}
}
}
Since my_container is attached to none network, it will not have any access to external and internal connections,
let's log into the container and check the network configuration:
docker exec -it my_container sh
Once you are logged inside the container, type ifconfig and you will notice that there is no other interface apart the
loopback interface.
/ # ifconfig
lo Link encap:Local Loopback
inet addr:127.0.0.1 Mask:255.0.0.0
inet6 addr: ::1/128 Scope:Host
UP LOOPBACK RUNNING MTU:65536 Metric:1
RX packets:0 errors:0 dropped:0 overruns:0 frame:0
TX packets:0 errors:0 dropped:0 overruns:0 carrier:0
collisions:0 txqueuelen:0
RX bytes:0 (0.0 B) TX bytes:0 (0.0 B)
If you ping or traceroute an external IP or domain name, you will not be able to do it:
/ # traceroute painlessdocker.com
traceroute: bad address 'painlessdocker.com'
/ # ping painlessdocker.com
ping: bad address 'painlessdocker.com'
Doing the same thing with the loopback address 127.0.0.1 will work:
/ # ping -c 1 127.0.0.1
PING 127.0.0.1 (127.0.0.1): 56 data bytes
64 bytes from 127.0.0.1: seq=0 ttl=64 time=0.085 ms

--- 127.0.0.1 ping statistics ---
1 packets transmitted, 1 packets received, 0% packet loss
round-trip min/avg/max = 0.085/0.085/0.085 ms
The last tests confirm that any container attached to the null network does not know about the outside networks and
no host from outside could access to my_container.
If you want to see the different configurations of this network, type docker network inspect none :
[
{
"Name": "none",
"Id": "ede46dbb22d7f3ab2dc95b11228de06e2d27e240a3f651bc2f6fd3ea0c4a2ca7",
"Scope": "local",
"Driver": "null",
"EnableIPv6": false,
"IPAM": {
"Driver": "default",
"Options": null,
"Config": []
},
"Internal": false,
"Containers": {
"69806d9de46c2959d4d20f99660e7d58d7c35c1e0b33511f0b85a395b696786f": {
"Name": "my_container",
"EndpointID": "b42debd75af122d113c202ad373d46e0b08d32e9ef6e9361e49515045ae6288d",
"MacAddress": "",
"IPv4Address": "",
"IPv6Address": ""
}
},
"Options": {},
"Labels": {}
}
]
Docker Host Network
If you want a container to run with a similar networking configuration to the host machine, then you should use the
host network.
NETWORK ID NAME DRIVER SCOPE
608a539ce1e3 host host local
To see the configuration of this network, type docker inspect network host :
[
{
"Name": "host",
"Id": "608a539ce1e3e3b97964c6a2fe06eb0e0a9b539e659025fbd101b24e327d8da6",
"Scope": "local",
"Driver": "host",
"EnableIPv6": false,
"IPAM": {
"Driver": "default",
"Options": null,
"Config": []
},
"Internal": false,
"Containers": {},
"Options": {},
"Labels": {}
}
]
Let's run a web server using nginx and use this network:

docker run -d -p 80 nginx
Verify the output of docker ps :
CONTAINER ID IMAGE COMMAND PORTS NAMES
d0df14bf80a0 nginx "nginx -g 'daemon off" 443/tcp, 0.0.0.0:32769->80/tcp stoic_montalcini
69806d9de46c busybox "sh" my_container
Notice that we are using only the port 80, since we added the -p flag ( -p 80 ) that made the port 80 accessible
from the host at port 32769 (that Docker chose automatically) . We could have used an external binding to port 80
that we choose manually, say port 8080, in this case the command to run this container will be:
docker run -d -p 8080:80 nginx
In all cases, the port 80 of the container will be accessible either from the port 32769 or the port 8080 (in the second
case) but in both cases, the IP address will be the same as the host IP ( 127.0.0.1 or 0.0.0.0 ).
Let's verify it by running curl -I http://0.0.0.0:32768 to see whether the server response will be 200 or not:
HTTP/1.1 200 OK
Connection: Keep-Alive
Keep-Alive: timeout=20
Date: Sat, 07 Jan 2017 20:49:02 GMT
Content-Type: text/html
So when running curl -I http://0.0.0.0:23768 , nginx will reply with a 200 response. This is the content of the page:
curl http://0.0.0.0:32768
<html><head><title>Index of /</title></head><body><h1>Index of /</h1><hr /><ol><li><strong><a href='/../'>..</a>/</strong>
<br /><small>modified: Sat, 07 Jan 2017 20:38:03 GMT<br />directory - 4.00 kbyte<br /><br /></small></li></ol><hr /></body>
</html>
Bridge Network
This is the default containers network, any network that runs without the --net flag will be attached automatically
to this network. Two Docker containers running in this network could see each other.
To create two containers, type:
docker run -it -d --name my_container_1 busybox
docker run -it -d --name my_container_2 busybox
These containers will be attached to the bridge network, if you type docker network inspect bridge , you will notice
that they are and what IP addresses the will have:
[
{
"Name": "bridge",
"Id": "e5ff619d25f5dfa2e9b4fe95db8136b74fa61b588fb6141b7d9678adafd155a7",
"Scope": "local",
"Driver": "bridge",
"EnableIPv6": false,
"IPAM": {
"Driver": "default",
"Options": null,
"Config": [
{

"Subnet": "172.17.0.0/16",
"Gateway": "172.17.0.1"
}
]
},
"Internal": false,
"Containers": {
"1172afcb3363f36248701aaa0ba9c1080ebc94db6a168f188f6ba98907e22102": {
"Name": "my_container_1",
"EndpointID": "b8f4741fb2008b70b60a0375446653f820fcaf6b1d8279c1b7d0abbb5775aeaf",
"MacAddress": "02:42:ac:11:00:04",
"IPv4Address": "172.17.0.4/16",
"IPv6Address": ""
},
"6895aa358faea0226ba646544056c34063a0ef5b83d10e68500936d0a397bb7b": {
"Name": "my_container_2",
"EndpointID": "2d3c6c8ca175c0ecb35459dcd941c0456fbcbf8fcce4885aa48eb06b9cff19b8",
"MacAddress": "02:42:ac:11:00:05",
"IPv4Address": "172.17.0.5/16",
"IPv6Address": ""
}
},
"Options": {
"com.docker.network.bridge.default_bridge": "true",
"com.docker.network.bridge.enable_icc": "true",
"com.docker.network.bridge.enable_ip_masquerade": "true",
"com.docker.network.bridge.host_binding_ipv4": "0.0.0.0",
"com.docker.network.bridge.name": "docker0",
"com.docker.network.driver.mtu": "1500"
},
"Labels": {}
}
]
my_container_1 has the IP address 172.17.0.4/16
my_container_2 has the IP address 172.17.0.5/16
From any of the created containers, say my_container_1 you could see the other container, just type docker exec -it
my_container_1 ping 172.17.0.5 to ping the my_container_2 from my_container_1:
docker exec -it my_container_1 ping 172.17.0.5
PING 172.17.0.5 (172.17.0.5): 56 data bytes
64 bytes from 172.17.0.5: seq=0 ttl=64 time=0.156 ms
64 bytes from 172.17.0.5: seq=1 ttl=64 time=0.071 ms
The containers running in the bridge network could see each other by IP address, let's see if it is possible to ping
using the container name:
docker exec -it my_container_1 ping my_container_2
ping: bad address 'my_container_2'
As you see, it is not possible for Docker to associate a container name to an IP and this is not possible
because we do not run any discovery service. Creating a user-defined network could solve this problem.
docker_gwbridge Network
When you create a swarm cluster or join one, Docker will create by default a network called docker_gwbridge that
will be used to connect different containers from different hosts. These hosts are part of the swarm cluster.
In general, this network provides the containers not having an access to external networks with connectivity.
docker network ls
NETWORK ID NAME DRIVER SCOPE

98d44bf13233 docker_gwbridge bridge local
Running overlay networks always need the docker_gwbridge.
Software Defined & Multi Host Networks
This type of networks, in opposite to the default networks, does not come with a fresh Docker installation , but
should be created by the user. The simplest way to create a new network is:
docker network create my_network
For more general use, this is the command to use:
docker network create <options> <network>
Bridge Networks
You can use many network drivers like bridge or overlay, you may also need to set up a IP range or a subnet for
your network or you will probably need to setup your own gateway. Type docker network create --help for more
options and configurations:
--aux-address value Auxiliary IPv4 or IPv6 addresses used by Network driver (default map[])
-d or --driver string Driver to manage the Network (default "bridge")
--gateway value IPv4 or IPv6 Gateway for the master subnet (default [])
--help Print usage
--internal Restrict external access to the network
--ip-range value Allocate container ip from a sub-range (default [])
--ipam-driver string IP Address Management Driver (default "default")
--ipam-opt value Set IPAM driver specific options (default map[])
--ipv6 Enable IPv6 networking
--label value Set metadata on a network (default [])
-o or --opt value Set driver specific options (default map[])
--subnet value Subnet in CIDR format that represents a network segment (default [])
In order to use the Docker service discovery, let's create a second bridge network:
docker network create --driver bridge my_bridge_network
To see the new network, type:
docker network ls
NETWORK ID NAME DRIVER SCOPE
5555cd178f99 my_bridge_network bridge local
my_container_1 and my_container_2 are running in the default bridge network, we want them attached to the new
network, we should type:
docker network connect my_bridge_network my_container_1
docker network connect my_bridge_network my_container_2

Now, the service discovery is working and both a Docker container could access another one by its name.
docker exec -it my_container_1 ping my_container_2
PING my_container_2 (172.18.0.3): 56 data bytes
64 bytes from 172.18.0.3: seq=0 ttl=64 time=0.120 ms
64 bytes from 172.18.0.3: seq=1 ttl=64 time=0.081 ms
Docker containers running in a user-defined bridge network could see each other by their containers' names.
Let's create a more personalized network with a specified subnet, gateway and IP range and let's also change the
behavior of networking in this network by decreasing the size of the largest network layer protocol data unit that can
be communicated in a single network transaction, or what we call MTU (Maximum Transmission Unit):
docker network create -d bridge \
--subnet=192.168.0.0/16 \
--gateway=192.168.0.100 \
--ip-range=192.168.1.0/24 \
--opt "com.docker.network.driver.mtu"="1000"
my_personalized_network
You can change other options using the --opt or -o flag like:
com.docker.network.bridge.name : bridge name to be used when creating the Linux bridge
com.docker.network.bridge.enable_ip_masquerade : Enable IP masquerading
com.docker.network.bridge.enable_icc : Enable or Disable Inter Container Connectivity
com.docker.network.bridge.host_binding_ipv4 : Default IP when binding container ports
For any newly created bridge network, an interface is created in the container, just type ifconfig inside the
container to see them:
Let's connect my_container_1 to my_personalized_network:
docker network connect my_personalised_network my_container_1
Executing ifconfig inside this container ( docker exec -it my_container_1 ifconfig ) will show us two things:
This container is running inside more than a container because it was connected to my_bridge_network and
now we connected it to my_personalized_network.
The MTU changed to 1000.
eth0 Link encap:Ethernet HWaddr 02:42:AC:11:00:04
inet addr:172.17.0.4 Bcast:0.0.0.0 Mask:255.255.0.0
inet6 addr: fe80::42:acff:fe11:4/64 Scope:Link
UP BROADCAST RUNNING MULTICAST MTU:1500 Metric:1
RX packets:194 errors:0 dropped:0 overruns:0 frame:0
TX packets:21 errors:0 dropped:0 overruns:0 carrier:0
collisions:0 txqueuelen:0
RX bytes:34549 (33.7 KiB) TX bytes:1410 (1.3 KiB)
eth1 Link encap:Ethernet HWaddr 02:42:C0:A8:01:00
inet addr:192.168.1.0 Bcast:0.0.0.0 Mask:255.255.0.0
UP BROADCAST RUNNING MULTICAST MTU:1000 Metric:1
RX packets:1 errors:0 dropped:0 overruns:0 frame:0
TX packets:0 errors:0 dropped:0 overruns:0 carrier:0
collisions:0 txqueuelen:0
RX bytes:87 (87.0 B) TX bytes:0 (0.0 B)
lo Link encap:Local Loopback
inet addr:127.0.0.1 Mask:255.0.0.0
inet6 addr: ::1/128 Scope:Host
UP LOOPBACK RUNNING MTU:65536 Metric:1
RX packets:16 errors:0 dropped:0 overruns:0 frame:0
TX packets:16 errors:0 dropped:0 overruns:0 carrier:0

collisions:0 txqueuelen:0
RX bytes:1240 (1.2 KiB) TX bytes:1240 (1.2 KiB)
docker run supports only one network, bur docker network connect could be used after the container creation to
add it to many networks.
By default, two containers living in the same host but in different networks will not see each other. Docker
daemon runs a tiny DNS server that allows user-defined networks to make service discovery.
docker_gwbridge Network
You can create new docker_gwbridge networks using docker network create command.
Example:
docker network create --subnet 172.3.0.0/16 \
--opt com.docker.network.bridge.name=another_docker_gwbridge \
--opt com.docker.network.bridge.enable_icc=false \
--opt com.docker.network.bridge.enable_ip_masquerade=true \
another_docker_gwbridge
Overlay Networks
Overlay networks are used in multi host environments (like the swarm mode of Docker). You can create an overlay
network using docker network create command but after the activation of swarm mode:
docker swarm init
docker network create --driver overlay --subnet 10.0.9.0/24 my_network
This is the configuration of the latter network:
[
{
"Name": "my_network",
"Id": "2g3i0zdldo4adfqisvqjn6gpt",
"Scope": "swarm",
"Driver": "overlay",
"EnableIPv6": false,
"IPAM": {
"Driver": "default",
"Options": null,
"Config": [
{
"Subnet": "10.0.9.0/24",
"Gateway": "10.0.9.1"
}
]
},
"Internal": false,
"Containers": null,
"Options": {
"com.docker.network.driver.overlay.vxlanid_list": "257"
},
"Labels": null
}
]
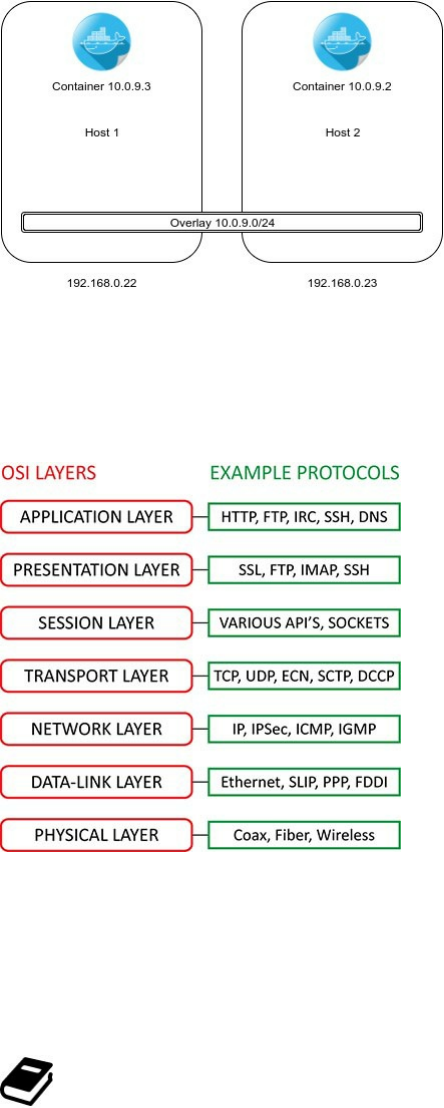
Say we have two hosts in a Docker cluster (having 192.168.10.22 and 192.168.10.23 as IP addresses) , the different
containers attached to the latter overlay network will have dynamically allocated IP addresses in the network subnet
10.0.9.0/24.
VXLAN (Virtual Extensible LAN) - according to Wikipedia - is a network virtualization technology that attempts to
improve the scalability problems associated with large cloud computing deployments.
It uses a VLAN-like encapsulation technique to encapsulate MAC-based OSI layer 2 Ethernet frames within layer 4
UDP packets, using 4789 as the default destination UDP port number.
To better understand the context, this diagram illustrates the 7 layers of the OSI model:
VXLAN endpoints, which terminate VXLAN tunnels and may be both virtual or physical switch ports, are known as
VXLAN tunnel endpoints (VTEPs).
VXLAN is an evolution of efforts to standardize on an overlay encapsulation protocol. It increases scalability up to
16 million logical networks and allows for layer 2 adjacency across IP networks.
Open vSwitch is an example of a software-based virtual network switch that supports VXLAN overlay networks.
The network driver overlay works on the VXLAN tunnels (connecting VTEPs) and need a key/value store.
A VTEP has two logical interfaces: an uplink and a downlink where the uplink is acting like a tunnel endpoint
having an IP address to receive sent VXLAN frames.
Flannel

Kubernetes does away with port-mapping and assigns a unique IP address to each pod and this works well in Google
Compute but for some other cloud providers a host can not get an entire subnet, this is why Flannel solves this
problem and creates an overlay mesh network that provision each host with a subnet: Each pod (if you are using
Kubernetes) or container has a unique and routable IP inside the cluster.
According to CoreOs creators, Kubernetes and then Flannel works great with CoreOS to distribute a workload
across a cluster.
Flannel was designed to use with Kubernetes but it could be used as a generic overlay network driver to create
software-defined overlay networks since it supports VXLAN, AWS VPC, and the default layer 2 UDP overlay
network.
Flannel uses etcd to store the network configuration (VMs subnets,hosts' IPs etc ..) and among other back-ends it
uses UDP and a TUN device in order to encapsulate an IP fragment in a UDP packet. The latter transports some
information like the MAC, the outer IP, the inner IP and the playload.
Note that the IP fragmentation is a process that happens in the Internet Protocol (IP) in order to fragment or
breaks the sent datagrams into smaller pieces (called generally fragments). This way, the formed packets could pass
through a link with a smaller maximum transmission unit (MTU) than the original UDP datagram size. And of
course the fragments are reassembled by the receiving host.
This schema taken from the official Github repository explains well how Flannel networking works in general:
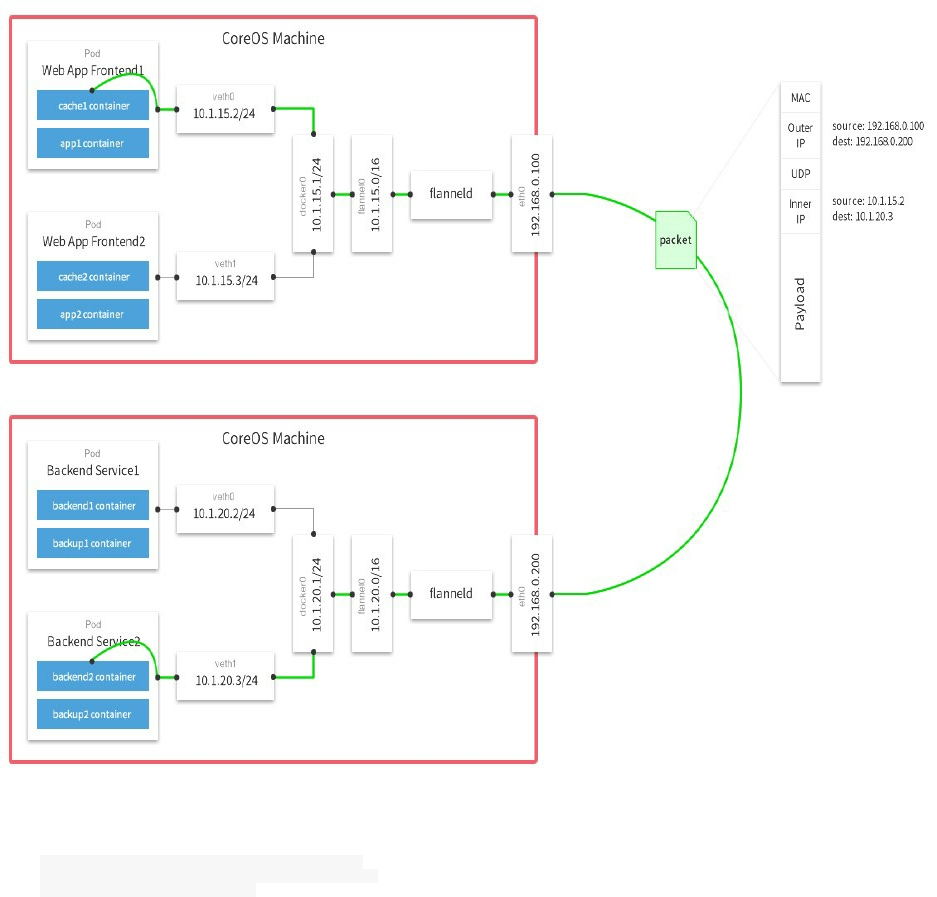
To install Fannel you need to build it from source:
sudo apt-get install linux-libc-dev golang gc
git clone https://github.com/coreos/flannel.git
cd flannel; make dist/flanneld
Weave
Weaveworks created Weave (or Weave Net) which is a virtual network that connects Docker containers deployed
across multiple hosts.
In order to install Weave:
sudo curl -L git.io/weave -o /usr/local/bin/weave
sudo chmod a+x /usr/local/bin/weave
Now just type weave to download weaveworks/weaveexec Docker image and see the help:
Usage:
weave --help | help
setup
version
weave launch <same arguments as 'weave launch-router'>
launch-router [--password <pass>] [--trusted-subnets <cidr>,...]
[--host <ip_address>]
[--name <mac>] [--nickname <nickname>]
[--no-restart] [--resume] [--no-discovery] [--no-dns]
[--ipalloc-init <mode>]
[--ipalloc-range <cidr> [--ipalloc-default-subnet <cidr>]]
[--log-level=debug|info|warning|error]
<peer> ...
launch-proxy [-H <endpoint>] [--without-dns] [--no-multicast-route]
[--no-rewrite-hosts] [--no-default-ipalloc] [--no-restart]
[--hostname-from-label <labelkey>]
[--hostname-match <regexp>]
[--hostname-replacement <replacement>]
[--rewrite-inspect]
[--log-level=debug|info|warning|error]
launch-plugin [--no-restart] [--no-multicast-route]
[--log-level=debug|info|warning|error]
weave prime
weave env [--restore]
config
dns-args
weave connect [--replace] [<peer> ...]
forget <peer> ...
weave run [--without-dns] [--no-rewrite-hosts] [--no-multicast-route]
[<addr> ...] <docker run args> ...

start [<addr> ...] <container_id>
attach [<addr> ...] <container_id>
detach [<addr> ...] <container_id>
restart <container_id>
weave expose [<addr> ...] [-h <fqdn>]
hide [<addr> ...]
weave dns-add [<ip_address> ...] <container_id> [-h <fqdn>] |
<ip_address> ... -h <fqdn>
dns-remove [<ip_address> ...] <container_id> [-h <fqdn>] |
<ip_address> ... -h <fqdn>
dns-lookup <unqualified_name>
weave status [targets | connections | peers | dns | ipam]
report [-f <format>]
ps [<container_id> ...]
weave stop
stop-router
stop-proxy
stop-plugin
weave reset [--force]
rmpeer <peer_id> ...
where <peer> = <ip_address_or_fqdn>[:<port>]
<cidr> = <ip_address>/<routing_prefix_length>
<addr> = [ip:]<cidr> | net:<cidr> | net:default
<endpoint> = [tcp://][<ip_address>]:<port> | [unix://]/path/to/socket
<peer_id> = <nickname> | <weave internal peer ID>
<mode> = consensus[=<count>] | seed=<mac>,... | observer
Start Weave router:
weave launch
After typing the latter command, you will notice that some other Docker images are pulled, it's alright, Weave needs
weavedb and weaveplugin:
Unable to find image 'weaveworks/weavedb:latest' locally
latest: Pulling from weaveworks/weavedb
1266eb846caf: Pulling fs layer
1266eb846caf: Download complete
1266eb846caf: Pull complete
Digest: sha256:c43f5767a1644196e97edce6208b0c43780c81a2279e3421791b06806ca41e5f
Status: Downloaded newer image for weaveworks/weavedb:latest
Unable to find image 'weaveworks/weave:1.8.2' locally
1.8.2: Pulling from weaveworks/weave
e110a4a17941: Already exists
199ab7eb2ba4: Already exists
8c419735a809: Already exists
1888d0f92b68: Already exists
f4d1c90c86a4: Already exists
1d6a7435ac59: Already exists
7372f3ee9e8b: Already exists
17004cbabd74: Already exists
b8e5c537a426: Already exists
4e295f039ae0: Pulling fs layer
d67a003dc85f: Pulling fs layer
2a84c77046e7: Pulling fs layer
d67a003dc85f: Download complete
2a84c77046e7: Verifying Checksum
2a84c77046e7: Download complete
4e295f039ae0: Verifying Checksum
4e295f039ae0: Download complete
4e295f039ae0: Pull complete
d67a003dc85f: Pull complete
2a84c77046e7: Pull complete
Digest: sha256:7a9ec1daa3b9022843fd18986f1bd5c44911bc9f9f40ba9b4d23b1c72c51c127
Status: Downloaded newer image for weaveworks/weave:1.8.2
Unable to find image 'weaveworks/plugin:1.8.2' locally
1.8.2: Pulling from weaveworks/plugin
e110a4a17941: Already exists
199ab7eb2ba4: Already exists
8c419735a809: Already exists
1888d0f92b68: Already exists
f4d1c90c86a4: Already exists
1d6a7435ac59: Already exists
7372f3ee9e8b: Already exists
17004cbabd74: Already exists
b8e5c537a426: Already exists

4e295f039ae0: Already exists
d67a003dc85f: Already exists
2a84c77046e7: Already exists
2b57c438a07b: Pulling fs layer
2b57c438a07b: Verifying Checksum
2b57c438a07b: Download complete
2b57c438a07b: Pull complete
Digest: sha256:3a38cec968bff6ebc4b1823673378b14d52ef750dec89e3513fe78119d07fdf2
Status: Downloaded newer image for weaveworks/plugin:1.8.2
Let's create a subnet for the host:
weave expose 10.10.0.1/16
And inspect the output of brctl show command as well as the newly created interface:
bridge name bridge id STP enabled interfaces
br-0ebcbf638b08 8000.0242a98e8f09 no
br-5555cd178f99 8000.0242d38260e6 no
br-da47f0537ffa 8000.024261465302 no
docker0 8000.02422492c7fe no
docker_gwbridge 8000.0242e5db7cff no veth6e6c262
lxcbr0 8000.000000000000 no
weave 8000.26eea4e57577 no vethwe-bridge
ifconfig weave
weave Link encap:Ethernet HWaddr 26:ee:a4:e5:75:77
inet addr:10.10.0.1 Bcast:0.0.0.0 Mask:255.255.0.0
UP BROADCAST RUNNING MULTICAST MTU:1410 Metric:1
RX packets:0 errors:0 dropped:0 overruns:0 frame:0
TX packets:67 errors:0 dropped:0 overruns:0 carrier:0
collisions:0 txqueuelen:0
RX bytes:0 (0.0 B) TX bytes:10738 (10.7 KB)
You can use ifdown weave to stop the created interface.
brctl is used to set up, maintain, and inspect the ethernet bridge configuration in the Linux Kernel.
If you want more information about Weave running in your host, type weave status :
Version: 1.8.2 (up to date; next check at 2017/01/16 01:16:44)
Service: router
Protocol: weave 1..2
Name: 26:ee:a4:e5:75:77(eonSpider)
Encryption: disabled
PeerDiscovery: enabled
Targets: 0
Connections: 0
Peers: 1
TrustedSubnets: none
Service: ipam
Status: idle
Range: 10.32.0.0/12
DefaultSubnet: 10.32.0.0/12
Service: dns
Domain: weave.local.
Upstream: 127.0.1.1
TTL: 1
Entries: 0
Service: proxy
Address: unix:///var/run/weave/weave.sock
Service: plugin
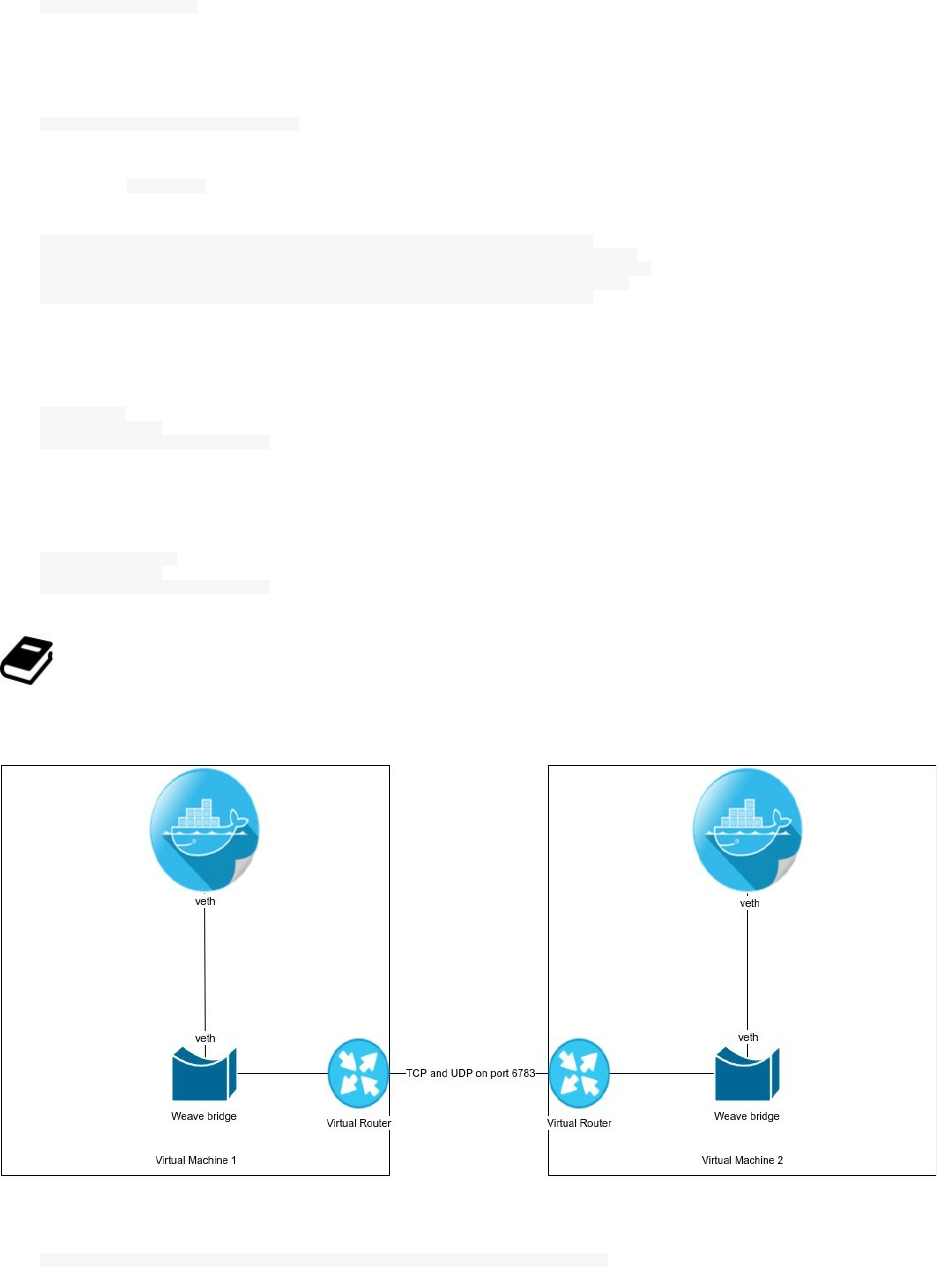
DriverName: weave
Now you can start a container directly from Weave CLI:
weave run 10.2.0.2/16 -it -d busybox
When you type docker ps you will see the last created container as well as Weave containers:
CONTAINER ID IMAGE COMMAND NAMES
0bedd8bf148a busybox "sh" sick_raman
575aee35ec8d weaveworks/plugin:1.8.2 "/home/weave/plugin" weaveplugin
9e7a5a87b137 weaveworks/weaveexec:1.8.2 "/home/weave/weavepro" weaveproxy
0edc17ad4a49 weaveworks/weave:1.8.2 "/home/weave/weaver -" weave
To connect two containers in two distinct hosts using Weave, launch these commands in the first host ($HOST1):
weave launch
eval $(weave env)
docker run --name c1 -ti busybox
and in the second host, tell $HOST2 to peer with Weave already started on $HOST1:
weave launch $HOST1
eval $(weave env)
docker run --name c2 -ti busybox
$HOST1 is the IP address of the first host.
The following image explains how a simple communication between two containers living in two distinct hosts can
communicate:
In order to automate the discovery process in a Swarm cluster, start by having the Swarm token:
curl -X POST https://discovery-stage.hub.docker.com/v1/clusters && echo -e "\n"

This is my token, you should of course get a different one:
10fd726a3e5341f86fb90658208e564a
If you haven't already launched weave, do it:
weave launch
Now download the discovery script:
curl -O https://raw.githubusercontent.com/weaveworks/discovery/master/discovery && chmod a+x discovery
The script will be downloaded to the current directory, you should move it to a directory like /usr/bin if you
want to use as a system executable.
Do you remember your token ? You will use it here:
discovery join --advertise-router token://10fd726a3e5341f86fb90658208e564a
Until now, we are working in $HOST1. Go to $HOST2 and repeat the same commands:
weave launch
curl -O http://git.io/vmW3z && chmod a+x discovery
discovery join --advertise-router token://10fd726a3e5341f86fb90658208e564a
Both Weave routers should be and should stay connected.
This is how you can use the discovery command:
Weave Discovery
discovery join [--advertise=ADDR]
[--advertise-external]
[--advertise-router]
[--weave=ADDR[:PORT]] <URL>
where <URL> = backend://path
<ADDR> = host|IP
To leave a cluster, you should use the following command in the host that you want to leave the cluster:
discovery leave
If you are using a KV store like etcd, you can also consider using it:
discovery join etcd://some/path
These are the important steps to use Weave service discovery, it is quite similar to Swarm CLI. We are going to see
Swarm in details in some next parts of this book and you will be able to better understand the discovery.
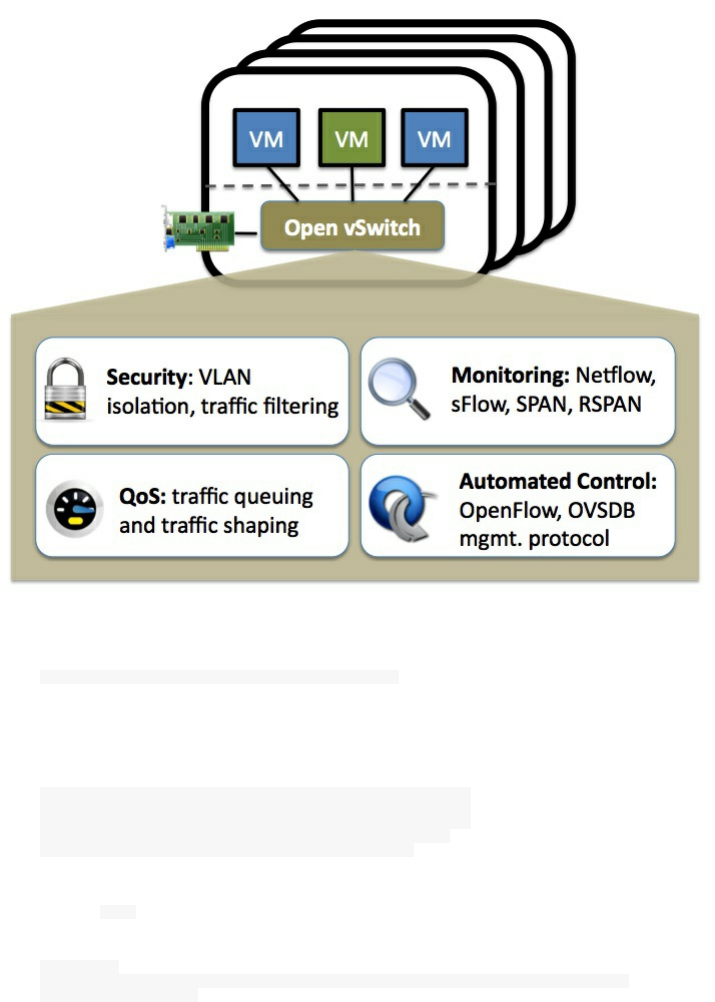
Open vSwitch
Licensed under the open source Apache 2.0 license, the multilayer virtual switch Open vSwitch is designed to enable
massive network automation through programmatic extension, while still supporting standard management
interfaces and protocols (e.g. NetFlow, sFlow, IPFIX, RSPAN, CLI, LACP, 802.1ag).
Open vSwitch is also designed to support distribution across multiple physical servers similar to VMware's
vNetwork distributed vswitch or Cisco's Nexus 1000V.
In order to connect containers in multiple hosts, you need to install OpenvSwitch in all hosts:
apt-get install -y openvswitch-switch bridge-utils
You may need some dependencies:
sudo apt-get install -y build-essential fakeroot debhelper \
autoconf automake bzip2 libssl-dev \
openssl graphviz python-all procps \
python-qt4 python-zopeinterface \
python-twisted-conch libtool
Then install ovs utility:
cd /usr/bin
wget https://raw.githubusercontent.com/openvswitch/ovs/master/utilities/ovs-docker
chmod a+rwx ovs-docker
Single Host

We start by creating an OVS bridge called ovs-br1:
ovs-vsctl add-br ovs-br1
Then we activate it and give it an IP and a netmask:
ifconfig ovs-br1 173.17.0.1 netmask 255.255.255.0 up
Verify your new interface configuration by typing:
ifconfig ovs-br1
ovs-br1 Link encap:Ethernet HWaddr e6:58:8f:58:89:43
inet addr:173.17.0.1 Bcast:173.17.0.255 Mask:255.255.255.0
inet6 addr: fe80::e458:8fff:fe58:8943/64 Scope:Link
UP BROADCAST RUNNING MULTICAST MTU:1500 Metric:1
RX packets:0 errors:0 dropped:0 overruns:0 frame:0
TX packets:8 errors:0 dropped:0 overruns:0 carrier:0
collisions:0 txqueuelen:1
RX bytes:0 (0.0 B) TX bytes:648 (648.0 B)
Let's create two containers:
docker run -it --name mycontainer1 -d busybox
docker run -it --name mycontainer2 -d busybox
And connect them to the bridge:
ovs-docker add-port ovs-br1 eth1 mycontainer1 --ipaddress=173.16.0.2/24
ovs-docker add-port ovs-br1 eth1 mycontainer2 --ipaddress=173.16.0.3/24
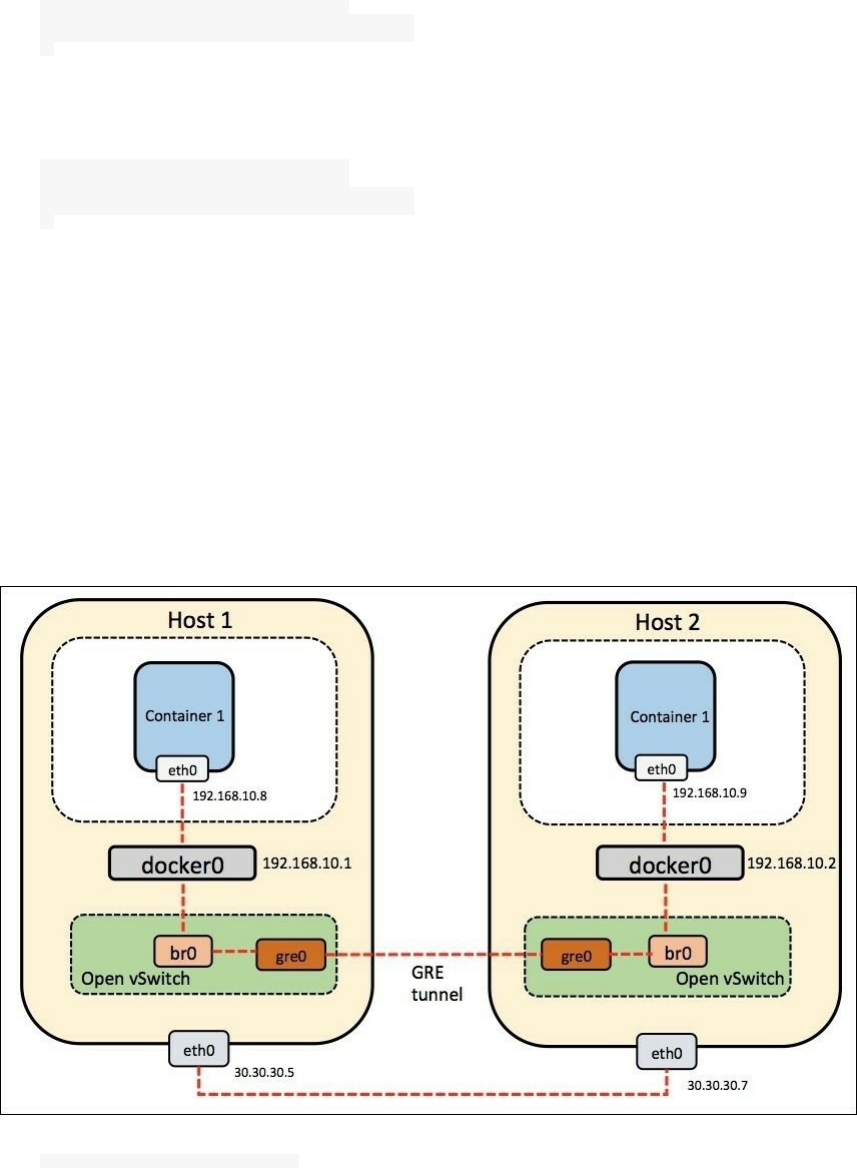
You can now ping the second container from the first one:
PING 173.16.0.3 (173.16.0.3): 56 data bytes
64 bytes from 173.16.0.3: seq=0 ttl=64 time=0.338 ms
64 bytes from 173.16.0.3: seq=1 ttl=64 time=0.061 ms
^C
Do the same thing from the second container:
docker exec -i mycontainer2 ping 173.16.0.2
PING 173.16.0.2 (173.16.0.2): 56 data bytes
64 bytes from 173.16.0.2: seq=0 ttl=64 time=0.067 ms
64 bytes from 173.16.0.2: seq=1 ttl=64 time=0.077 ms
^C
Multi Host
One can ask oneself, why can't we use regular Linux bridges ? I will use the official FAQ of Open vSwitch to answer
this:
Q: Why would I use Open vSwitch instead of the Linux bridge? A: Open vSwitch is specially designed to make
it easier to manage VM network configuration and monitor state spread across many physical hosts in dynamic
virtualized environments. Please see [WHY-OVS.md] for a more detailed description of how Open vSwitch
relates to the Linux Bridge
Create two hosts (Host1 and Host2) accessible to each other.
For this example, we have two VMs and of course, openvswitch-switch, Docker and ovs-docker tool should be
installed in both hosts.
wget -qO- https://get.docker.com/|sh

apt-get install openvswitch-switch bridge-utils openvswitch-common
On Host1: Create a new ovs bridge and a veth pair, set them to up then create the tunnel between Host1 and Host2.
Make sure to change <Host2_IP> by the real IP of Host2.
ovs-vsctl add-br br-int
ip link add veth0 type veth peer name veth1
ovs-vsctl add-port br-int veth1
brctl addif docker0 veth0
ip link set veth1 up
ip link set veth0 up
ovs-vsctl add-port br-int gre0 -- set interface gre0 type=gre options:remote_ip=<Host2_IP>
On Host2: Do the same thing, create a new ovs bridge and a veth pair, set them to up then create the tunnel between
Host1 and Host2. Make sure to change <Host1_IP> by the real IP of Host1.
ovs-vsctl add-br br-int
ip link add veth0 type veth peer name veth1
ovs-vsctl add-port br-int veth1
brctl addif docker0 veth0
ip link set veth1 up
ip link set veth0 up
ovs-vsctl add-port br-int gre0 -- set interface gre0 type=gre options:remote_ip=<Host1_IP>
You can see the created bridge on each host by typing ovs-vsctl show .
On Host1:
0aaba889-1d8c-4db2-b783-d7a203853d44
Bridge br-int
Port "veth1"
Interface "veth1"
Port br-int
Interface br-int
type: internal
Port "gre0"
Interface "gre0"
type: gre
options: {remote_ip="<Host2_IP>"}
ovs_version: "2.5.0"
On Host2:
7e782730-8990-4786-b2b0-efef7721665b
Bridge br-int
Port "veth1"
Interface "veth1"
Port "gre0"
Interface "gre0"
type: gre
options: {remote_ip="<Host2_IP>"}
Port br-int
Interface br-int
type: internal
ovs_version: "2.5.0"
and are of course changed by their real values. You can also use brctl show command for more information.
Now, create a container in Host1:
docker run -it --name container1 -d busybox
View its IP address:

docker inspect --format '{{.NetworkSettings.IPAddress}}' container1
On Host2, do the same thing
docker run -it --name container1 -d busybox
docker inspect --format '{{.NetworkSettings.IPAddress}}' container1
You will notice that both containers have the same IP address 172.17.0.2 , this could create a conflict in the cluster,
so we are going to create a second container. The latter will have a different IP:
docker run -it --name container2 -d busybox
docker inspect --format '{{.NetworkSettings.IPAddress}}' container2
From the container1 in Host1, ping container2 in Host2:
docker exec -it container1 ping -c 2 172.17.0.3
PING 172.17.0.3 (172.17.0.3): 56 data bytes
64 bytes from 172.17.0.3: seq=0 ttl=64 time=0.985 ms
64 bytes from 172.17.0.3: seq=1 ttl=64 time=0.963 ms
--- 172.17.0.3 ping statistics ---
2 packets transmitted, 2 packets received, 0% packet loss
round-trip min/avg/max = 0.963/0.974/0.985 ms
From container2 in Host2, ping the container1 in Host1, but before this remove the container1 in the same host
(Host2) in order to be sure that we are pinging the right container (container1 in Host1):
docker rm -f container1
docker exec -it container2 ping -c 2 172.17.0.2
PING 172.17.0.2 (172.17.0.2): 56 data bytes
64 bytes from 172.17.0.2: seq=0 ttl=64 time=1.475 ms
64 bytes from 172.17.0.2: seq=1 ttl=64 time=1.139 ms
--- 172.17.0.2 ping statistics ---
2 packets transmitted, 2 packets received, 0% packet loss
round-trip min/avg/max = 1.139/1.307/1.475 ms
Now you have seen how can we connect two containers on different hosts using Open vSwitch.
To go beyond that, you may notice that both docker0 interface has the same IP address which is 172.17.0.1:
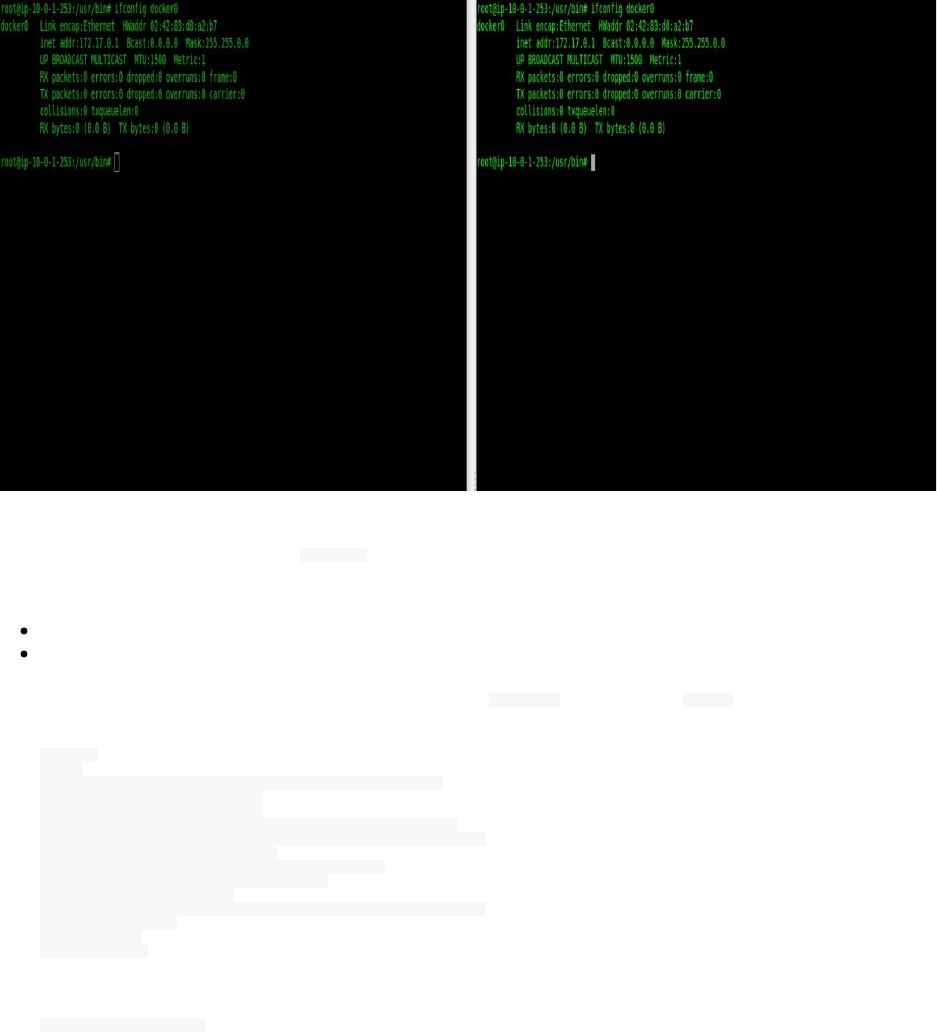
This similarity could create confusion within a multihost network.
This is why we are going to remove docker0 bridge interface and create a new one with different subnets. You are
free to make any choice of private IP addresses, I am going to use this:
Host1 : 192.168.10.1/16
Host2 : 192.168.11.1/16
In order to change an IP address of an interface, you can use ifconfig command and brctl command.
ifconfig
Usage:
ifconfig [-a] [-v] [-s] <interface> [[<AF>] <address>]
[add <address>[/<prefixlen>]]
[del <address>[/<prefixlen>]]
[[-]broadcast [<address>]] [[-]pointopoint [<address>]]
[netmask <address>] [dstaddr <address>] [tunnel <address>]
[outfill <NN>] [keepalive <NN>]
[hw <HW> <address>] [metric <NN>] [mtu <NN>]
[[-]trailers] [[-]arp] [[-]allmulti]
[multicast] [[-]promisc]
[mem_start <NN>] [io_addr <NN>] [irq <NN>] [media <type>]
[txqueuelen <NN>]
[[-]dynamic]
[up|down] ...
Usage: brctl [commands]
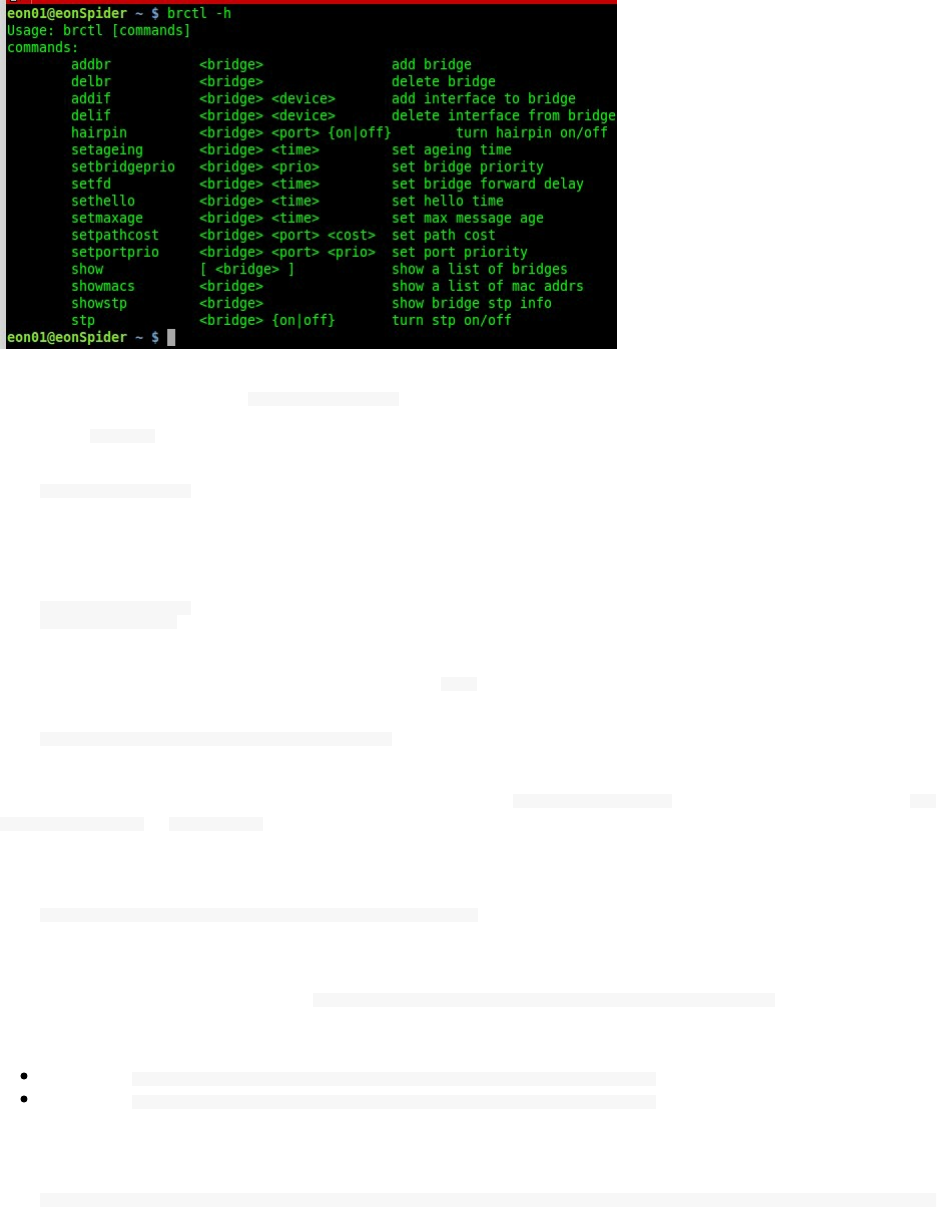
This is a practical example but before that make sure your firewall rules will not stop you doing the next steps, make
also sure that you stop Docker service docker stop :
Deactivate docker0 by bringing it down:
ifconfig docker0 down
Delete the bridge and create a new one having the same interface name:
brctl delbr docker0
brctl addbr docker0
Bring it up while assigning it a new address and a new mtu :
sudo ifconfig docker0 192.168.10.1/16 mtu 1400 up
The last change will not be persistent unless you add it to /etc/default/docker configuration file and add --
bip=192.168.10.1/16 to DOCKER_OPTS .
Example:
DOCKER_OPTS="--dns 8.8.8.8 --dns 8.8.4.4 --bip=10.11.12.1/24"
If you are using Ubuntu/Debian, you can use a script that I found in a Github gist and tested, it will do this
automatically for you,I forked it here: https://gist.github.com/eon01/b7fbfa3309ed4f514bc742045ce9b5a2 , you can use it this
way:
Example1: wget http://bit.ly/2kHIbVc && bash configure_docker0.sh 192.168.10.1/16
Example2: wget http://bit.ly/2kHIbVc && bash configure_docker0.sh 192.168.11.1/16
For formatting reasons, I used bit.ly to shorten the url, this is the real url :
https://gist.githubusercontent.com/eon01/b7fbfa3309ed4f514bc742045ce9b5a2/raw/7bb94c774510505196151c5d787ce865140ace9c/configure_docker0.sh
To use this script:

Make sure you choose the network you want to use instead of the networks used in the examples
Make sure you are using Debian/Ubuntu
This script must be run with your root user
Docker must be stopped
Change will happen after starting Docker
Project Calico
Calico provides a different approach since it uses the layer 3 to provide the virtual networking feature. It includes
pre-integration with Kubernetes and Mesos (as a CNI network plugin), Docker (as a libnetwork plugin) and
OpenStack (as a Neutron plugin). It supports many public and private cloud like AWS, GCE.
Almost all of the other networking solutions (like Weave and Fannel) encapsulate layer 2 traffic into a higher level
to build an overlay network while the primary operating mode of project Calico requires no encapsulation.
Based on the same scalable IP network principles as the Internet, Calico leverages the existing Linux Kernel
forwarding engine without the need for virtual switches or overlays. Each host propagates workload reachability
information (routes) to the rest of the data center – either directly in small scale deployments or via infrastructure
route reflectors to reach Internet level scales in large deployments.
Like it is described in the official documentation of the project, Calico simplifies the network topology, removing
multiple encapsulation and de-encapsulation which gives some strengths to this networking system:
Smaller packet sizes mean that there is reduction in possible packet fragmentation.
There is a reduction in CPU cycles handling the encap and de-encap.
Easier to interpret packets, and therefore easier to troubleshoot.
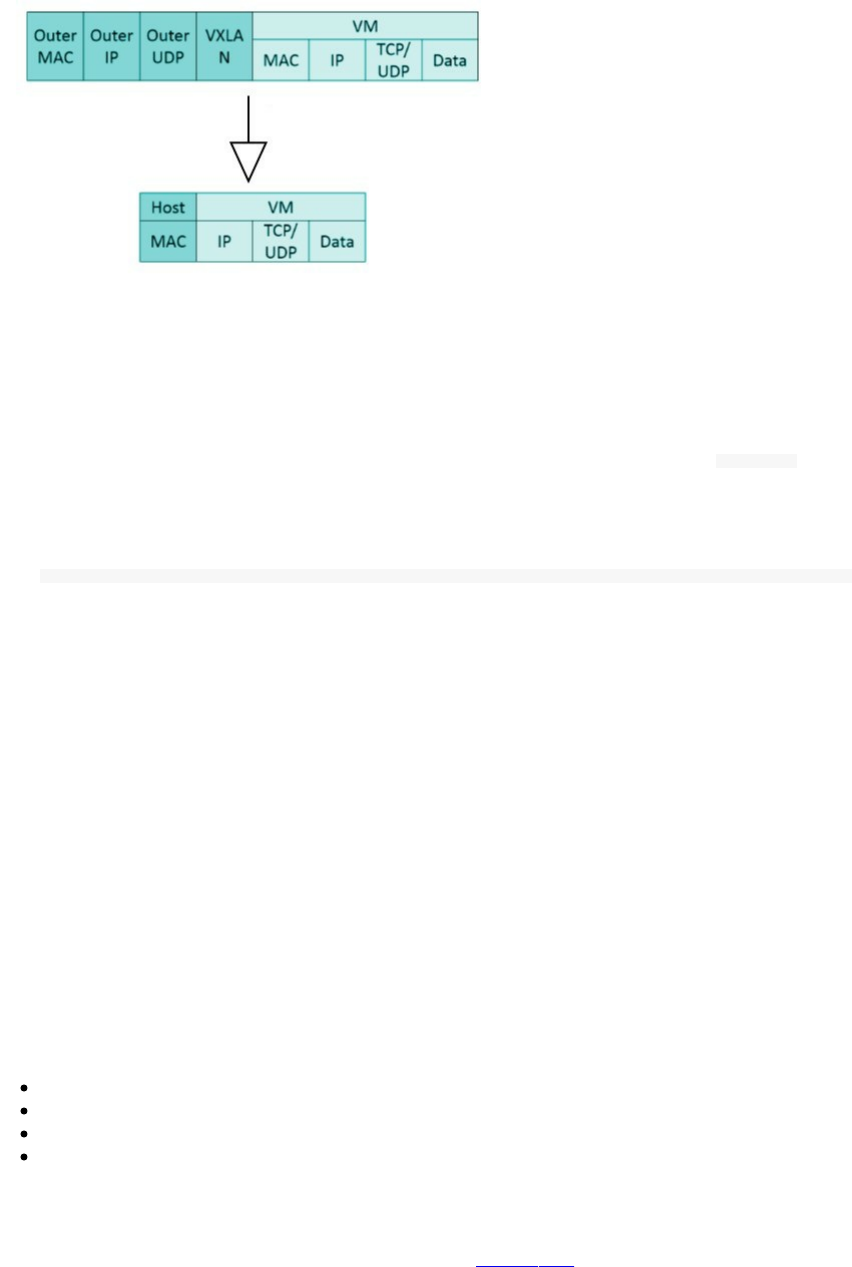
Project Calico is most compatible with data centers where you have control over the physical network fabric.
Pipework
Pipework is a Software-Defined Networking tools for LXC that lets you connect together containers in arbitrarily
complex scenarios. It uses cgroups and namespace, works with containers created with lxc-start (plain LXC) and
with Docker.
In order to install it, you can execute the installation script from its Github repository :
sudo bash -c "curl https://raw.githubusercontent.com/jpetazzo/pipework/master/pipework > /usr/local/bin/pipework"
Since its creation, Docker is allowing more complex scenarios, and Pipework is becoming obsolete. Given the
Docker, Inc., acquisition of SocketPlane and the introduction of the Overlay Driver, you better use Docker Swarm
built-in orchestration unless you have very specific needs.
OpenVPN
Using OpenVPN, you can create virtual private networks (VPNs), you can use a VPN network to connect different
VMs in the same data center or a multi-cloud VMs in order to connect distributed containers. This connection will be
of course secure (TLS).
Service Discovery
Etcd
etcd is a distributed, key-value store for shared configuration and service discovery, with features like:
A user-facing API (gRPC)
Automatic TLS with optional client cert authentication
Rapidity (Benchmarked 10,000 writes/sec according to CoreOS)
Properly distributed using Raft
etcd is written in Go and uses the Raft consensus algorithm to manage a highly-available replicated log. It is a
production-ready software widely used with tools like Kubernetes, fleet, locksmith, vulcand, Doorman.
In order to rapidly setup use etcd on AWS, you can use the official AMI
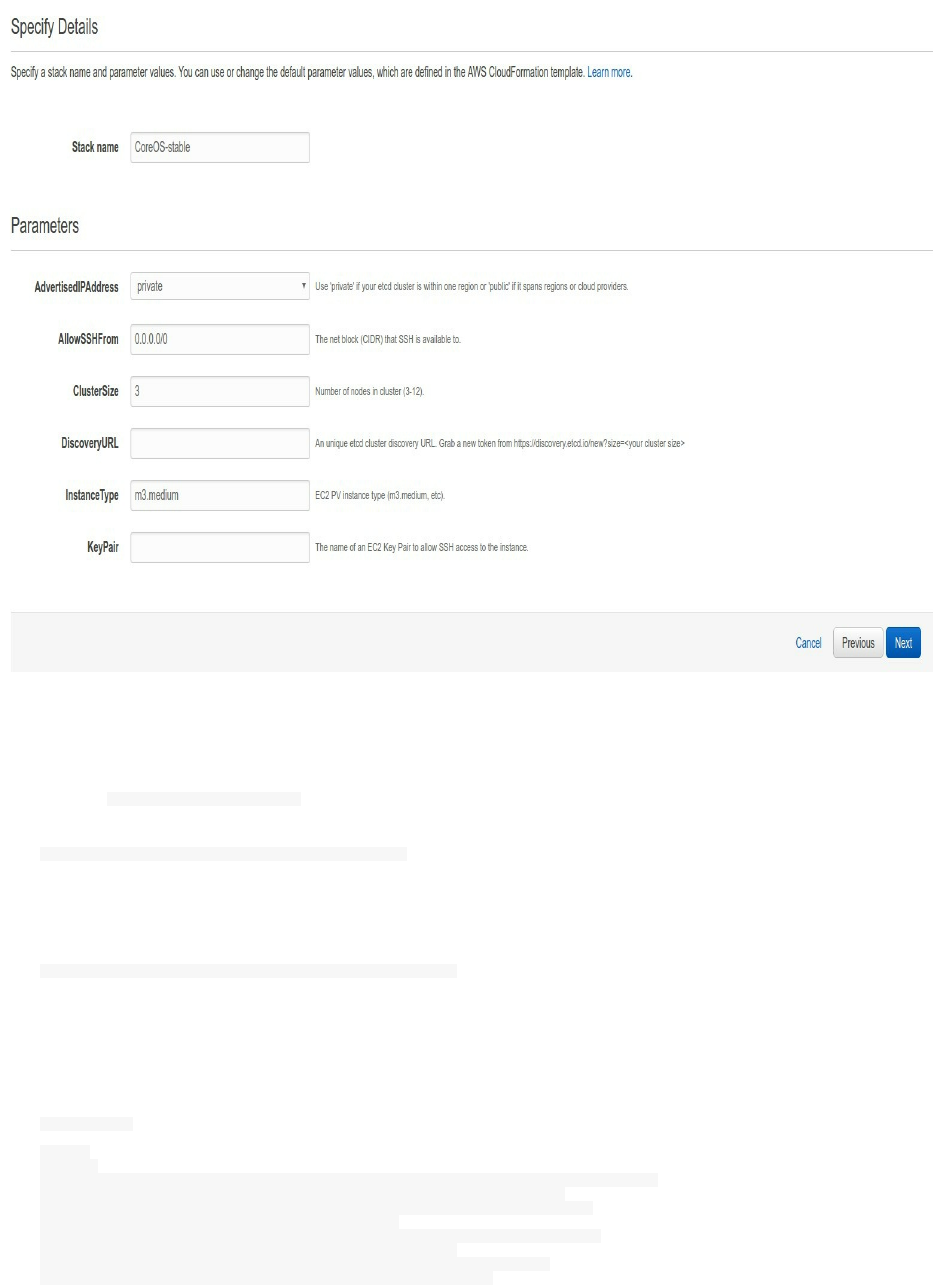
To test etcd, you can create a CoreOS cluster (with 3 machines) and for simplicity sake, I am going to use Digital
Ocean.
The first thing to do here before having a new CoreOS cluster is is generating a new discovery URL. You can do
this by using https://discovery.etcd.io url. This will print a new discovery url:
curl -w "\n" "https://discovery.etcd.io/new?size=3"
This is my discovery url :
https://discovery.etcd.io/d9fe2c6051e8204e2fa730ccc815e76b
We are going to use this url in the cloud-config configuration.
You should change the discovery url by your own generated url:
#cloud-config
coreos:
etcd2:
# generate a new token for each unique cluster from https://discovery.etcd.io/new:
discovery: https://discovery.etcd.io/d9fe2c6051e8204e2fa730ccc815e76b
# multi-region deployments, multi-cloud deployments, and Droplets without
# private networking need to use $public_ipv4:
advertise-client-urls: http://$private_ipv4:2379,http://$private_ipv4:4001
initial-advertise-peer-urls: http://$private_ipv4:2380
# listen on the official ports 2379, 2380 and one legacy port 4001:
listen-client-urls: http://0.0.0.0:2379,http://0.0.0.0:4001
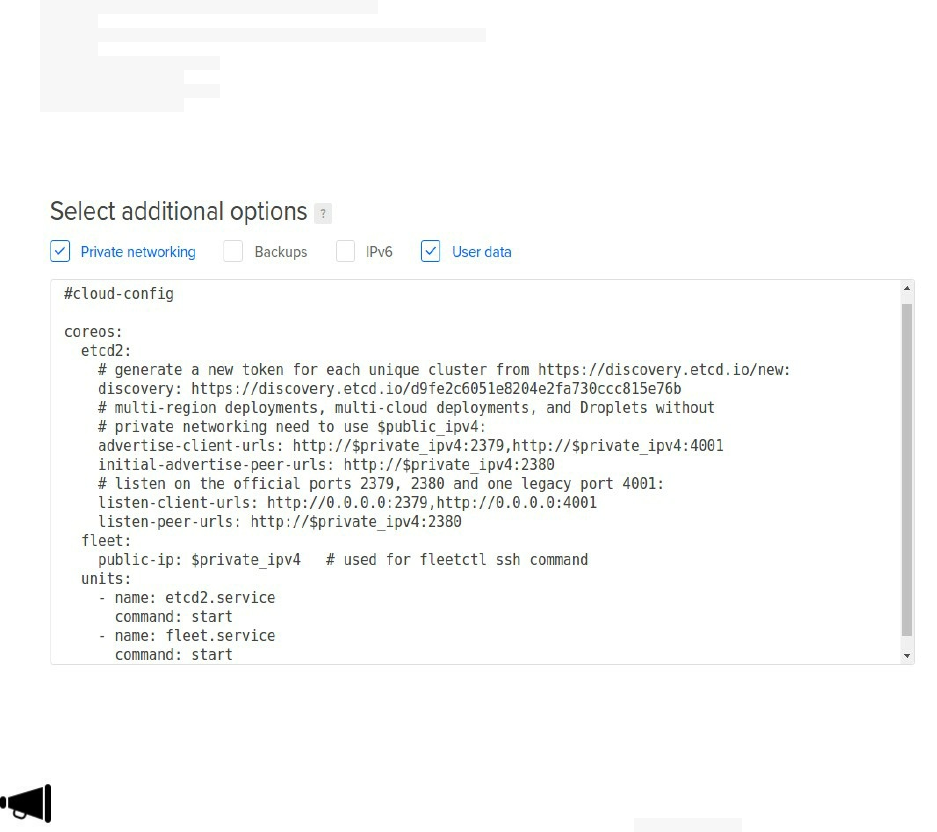
listen-peer-urls: http://$private_ipv4:2380
fleet:
public-ip: $private_ipv4 # used for fleetctl ssh command
units:
- name: etcd2.service
command: start
- name: fleet.service
command: start
When creating your 3 CoreOS VMs make sure to activate private networking and pasting your cloud-config
configuration.
The cloud-config will not work for you if you forget to add the first line #cloud-config
Create your 3 machines:
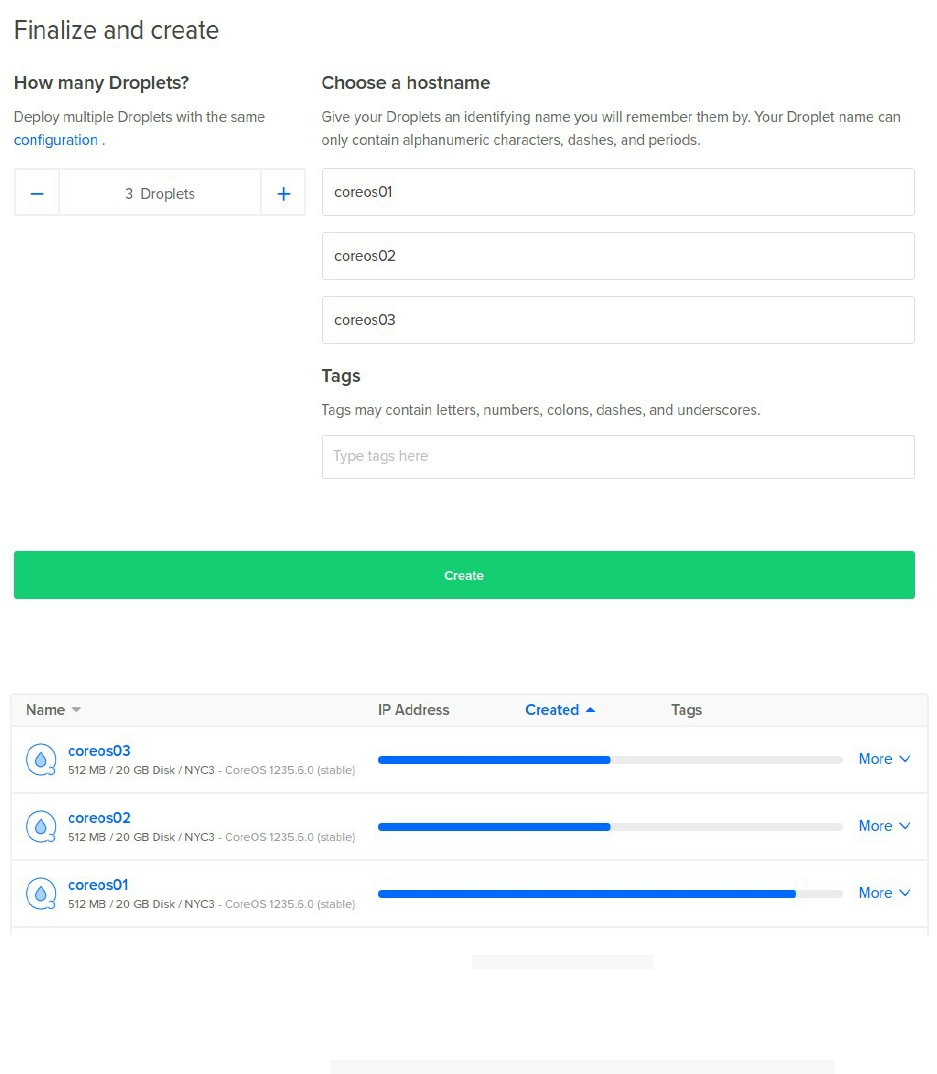
Go get a cup of coffee unless you created small VMs:
Log to one of the created machines, now you can type fleetctl list-machines in order to see all of the created
machines.
If you want another machine to join the same cluster, you can use the same cloud-config file again and your machine
will join the cluster automatically.
You can find the discovery url by typing grep DISCOVERY /run/systemd/system/etcd2.service.d/20-cloudinit.conf
etcd is written in the Go language and developed by CoreOS team.
Consul
Consul is a tool for service discovery and configuration that runs on Linux, Mac OS X, FreeBSD, Solaris, and
Windows. Consul is distributed, highly available, and extremely scalable.
It provides several key features:

Service Discovery - Consul makes it easy for services to register themselves and to discover other services via
a DNS or HTTP interface. External services such as SaaS providers can also be registered.
Health Checking - Health Checking enables Consul to quickly alert operators about any issues in a cluster. The
integration with service discovery prevents routing traffic to unhealthy hosts and enables service level circuit
breakers.
Key/Value Storage - A flexible key/value store enables storing dynamic configuration, feature flagging,
coordination, leader election and more. The simple HTTP API makes it easy to use anywhere.
Multi-Datacenter - Consul is built to be datacenter aware, and can support any number of regions without
complex configuration.
For simplicity sake, I will use a Docker container to run Consul:
docker run -p 8400:8400 -p 8500:8500 \
> -p 8600:53/udp -h consul_s progrium/consul -server -bootstrap
Unable to find image 'progrium/consul:latest' locally
latest: Pulling from progrium/consul
c862d82a67a2: Pull complete
0e7f3c08384e: Pull complete
0e221e32327a: Pull complete
09a952464e47: Pull complete
60a1b927414d: Pull complete
4c9f46b5ccce: Pull complete
417d86672aa4: Pull complete
b0d47ad24447: Pull complete
fd5300bd53f0: Pull complete
a3ed95caeb02: Pull complete
d023b445076e: Pull complete
ba8851f89e33: Pull complete
5d1cefca2a28: Pull complete
Digest: sha256:8cc8023462905929df9a79ff67ee435a36848ce7a10f18d6d0faba9306b97274
Status: Downloaded newer image for progrium/consul:latest
==> WARNING: Bootstrap mode enabled! Do not enable unless necessary
==> WARNING: It is highly recommended to set GOMAXPROCS higher than 1
==> Starting raft data migration...
==> Starting Consul agent...
==> Starting Consul agent RPC...
==> Consul agent running!
Node name: 'consul_s'
Datacenter: 'dc1'
Server: true (bootstrap: true)
Client Addr: 0.0.0.0 (HTTP: 8500, HTTPS: -1, DNS: 53, RPC: 8400)
Cluster Addr: 172.17.0.3 (LAN: 8301, WAN: 8302)
Gossip encrypt: false, RPC-TLS: false, TLS-Incoming: false
Atlas: <disabled>
==> Log data will now stream in as it occurs:
2017/01/29 01:02:23 [INFO] serf: EventMemberJoin: consul_s 172.17.0.3
2017/01/29 01:02:23 [INFO] serf: EventMemberJoin: consul_s.dc1 172.17.0.3
2017/01/29 01:02:23 [INFO] raft: Node at 172.17.0.3:8300 [Follower] entering Follower state
2017/01/29 01:02:23 [INFO] consul: adding server consul_s (Addr: 172.17.0.3:8300) (DC: dc1)
2017/01/29 01:02:23 [INFO] consul: adding server consul_s.dc1 (Addr: 172.17.0.3:8300) (DC: dc1)
2017/01/29 01:02:23 [ERR] agent: failed to sync remote state: No cluster leader
2017/01/29 01:02:25 [WARN] raft: Heartbeat timeout reached, starting election
2017/01/29 01:02:25 [INFO] raft: Node at 172.17.0.3:8300 [Candidate] entering Candidate state
2017/01/29 01:02:25 [INFO] raft: Election won. Tally: 1
2017/01/29 01:02:25 [INFO] raft: Node at 172.17.0.3:8300 [Leader] entering Leader state
2017/01/29 01:02:25 [INFO] consul: cluster leadership acquired
2017/01/29 01:02:25 [INFO] consul: New leader elected: consul_s
2017/01/29 01:02:25 [INFO] raft: Disabling EnableSingleNode (bootstrap)
2017/01/29 01:02:25 [INFO] consul: member 'consul_s' joined, marking health alive
2017/01/29 01:02:25 [INFO] agent: Synced service 'consul'
You can see that
Now a Docker Consul container is running and maps the ports 8500 for the HTTP API and 8600 for the DNS
endpoint.
CONTAINER ID IMAGE COMMAND PORTS
40d56ae6d179 progrium/consul "/bin/start -serve..." (1)
(1): 53/tcp, 0.0.0.0:8400->8400/tcp, 8300-8302/tcp, 8301-8302/udp, 0.0.0.0:8500->8500/tcp, 0.0.0.0:8600->53/udp

You can use the HTTP endpoint to show a list of connected nodes:
curl localhost:8500/v1/catalog/nodes
[{"Node":"consul_s","Address":"172.17.0.3"}]
In order to use the DNS endpoint try dig @0.0.0.0 -p 8600 node1.node.consul .
; <<>> DiG 9.9.5-3ubuntu0.10-Ubuntu <<>> @0.0.0.0 -p 8600 consul_s
; (1 server found)
;; global options: +cmd
;; Got answer:
;; ->>HEADER<<- opcode: QUERY, status: NXDOMAIN, id: 22307
;; flags: qr rd ra ad; QUERY: 1, ANSWER: 0, AUTHORITY: 1, ADDITIONAL: 1
;; OPT PSEUDOSECTION:
; EDNS: version: 0, flags:; udp: 512
;; QUESTION SECTION:
;consul_s. IN A
Consul could be used from a GUI, you can give it a try at http://0.0.0.0:8500/ (if you are running the container on
you localhost).
You can use Consul with different options like:
Using a service definition with Consul
Example for 1 service:
{
"service": {
"name": "redis",
"tags": ["primary"],
"address": "",
"port": 8000,
"enableTagOverride": false,
"checks": [
{
"script": "/usr/local/bin/check_redis.py",
"interval": "10s"
}
]
}
}

For more than 1 service, just use services instead of service :
{
"services": [
{
"id": "red0",
"name": "redis",
"tags": [
"primary"
],
"address": "",
"port": 6000,
"checks": [
{
"script": "/bin/check_redis -p 6000",
"interval": "5s",
"ttl": "20s"
}
]
},
{
"id": "red1",
"name": "redis",
"tags": [
"delayed",
"secondary"
],
"address": "",
"port": 7000,
"checks": [
{
"script": "/bin/check_redis -p 7000",
"interval": "30s",
"ttl": "60s"
}
]
},
...
]
}
You can use tools like traefik or fabio as a Consul backend
If you want to use fabio, you should:
Install it, you can also use Docker: docker pull magiconair/fabio
Register your service in consul
Register a health check in consul
Register one urlprefix- tag per host/path prefix it serves, e.g.: urlprefix-/css , urlprefix-i.com/static , urlprefix-
mysite.com/
An example:
{
"service": {
"name": "foobar",
"tags": ["urlprefix-/foo, urlprefix-/bar"],
"address": "",
"port": 8000,
"enableTagOverride": false,
"checks": [
{
"id": "api",
"name": "HTTP API on port 5000",
"http": "http://localhost:5000/health",
"interval": "2s",
"timeout": "1s"
}
]
}
}
Start fabio without a configuration file (a consul agent should run on localhost:8500 ).
Watch fabio logs
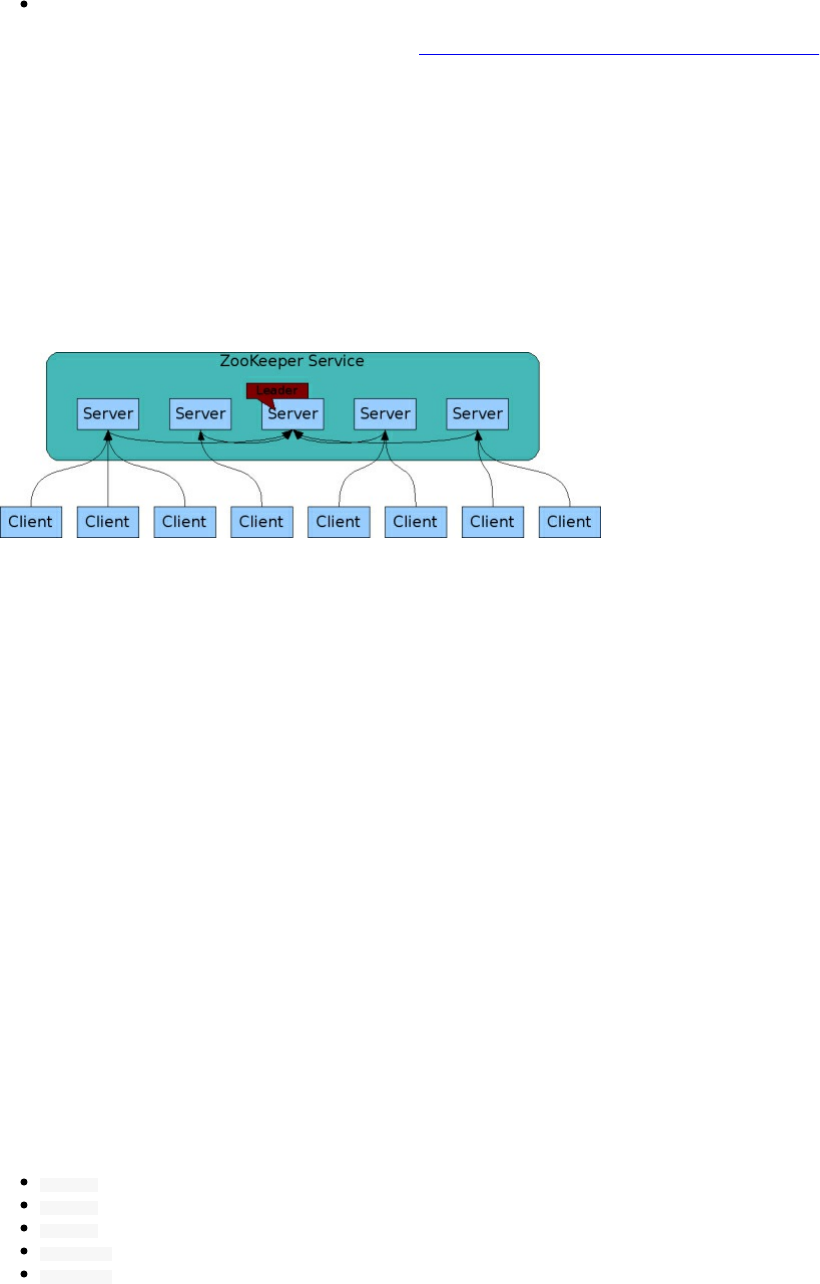
Send all your HTTP traffic to fabio on port 9999
This is a good video that explains how fabio works: https://www.youtube.com/watch?v=gvxxu0PLevs
Finally, you can write your own process that registers the service through the HTTP API
ZooKeeper
ZooKeeper (or ZK) is a centralized service for configuration management with distributed synchronization
capabilities. ZK organizes its data in a hierarchy of znodes .
It exposes a simple set of primitives that distributed applications can build upon to implement higher level services
for synchronization, configuration maintenance, and groups and naming. It is designed to be easy to program to, and
uses a data model styled after the familiar directory tree structure of file systems. It runs in Java and has bindings for
both Java and C.
From the official documentation, the ZooKeeper implementation is described a putting a premium on high
performance, highly available, strictly ordered access. The performance aspects of ZooKeeper means it can be used
in large, distributed systems. The reliability aspects keep it from being a single point of failure. The strict ordering
means that sophisticated synchronization primitives can be implemented at the client.
It allows distributed processes to coordinate with each other through a shared hierarchal namespace which is
organized similarly to a standard file system. The name space consists of data registers - called znodes, in
ZooKeeper parlance - and these are similar to files and directories. Unlike a typical file system, which is designed
for storage, ZooKeeper data is kept in-memory, which means ZooKeeper can achieve high throughput and low
latency numbers.
Like the distributed processes it coordinates, ZooKeeper itself is intended to be replicated over a sets of hosts called
an ensemble.
The servers that make up the ZooKeeper service must all know about each other. They maintain an in-memory
image of state, along with a transaction logs and snapshots in a persistent store. As long as a majority of the servers
are available, the ZooKeeper service will be available.
Clients connect to a single ZooKeeper server. The client maintains a TCP connection through which it sends
requests, gets responses, gets watch events, and sends heart beats. If the TCP connection to the server breaks, the
client will connect to a different server.
ZooKeeper stamps each update with a number that reflects the order of all ZooKeeper transactions. Subsequent
operations can use the order to implement higher-level abstractions, such as synchronization primitives. It is
especially fast in "read-dominant" workloads. ZooKeeper applications run on thousands of machines, and it
performs best where reads are more common than writes, at ratios of around 10:1.
Its API, support mainly these operations:
create : creates a node at a location in the tree
delete : deletes a node
exists : tests if a node exists at a location
get data : reads the data from a node
set data : writes data to a node

get children : retrieves a list of children of a node
sync : waits for data to be propagated
Load Balancers
Nginx
Nginx can integrate with some service discovery tools like etcd/confd. Nginx is a popular web server, reverse proxy
and load balancer and the advantage of using Nginx is the community behind it and its very good performance.
A simple configuration, would be creating the right Nginx upstream that can redirect traffic to the Docker containers
is a cluster, for example a Swarm cluster. Example: We want to run an API deployed using Docker Swarm, the
service is mapped to port 8080:
docker service create --name api --replicas 20 --publish 8080:80 my/api:2.3
We now that the API service is mapped to port 8080 in the leader node. We can create a simple Nginx configuration
file:
server {
listen 80;
location / {
proxy_pass http://api;
}
}
upstream api {
server <node0 private IP>:8080;
}
This file will be used to run an Nginx load balancer:
docker service create --name my_load_balancer --mount type=bind,source=/data/,target=/etc/nginx/conf.d --publish 80:80 nginx
Nginx could be integrated with Consul, Registrator and Consul-template.
Consul will be used as the service discovery tool
Registrator will be used to automatically register the new started services to Consul
Consul-template will be used to automatically recreate the HAProxy configuration from a given template
Adding and removing a node from Nginx configuration is not a good solution. Here is a simple configuration of
Nginx that works with Consul:
upstream frontend { {{range service "app.frontend"}}
server {{.Address}};{{end}}
}
HAProxy
HAProxy is a very common, high-performance load balancing software that could be used as a load balancer set up
in front of a Docker cluster.
You can for example, integrate it with Consul, Registrator and Consul-template.

Consul will be used as the service discovery tool https://github.com/hashicorp/consul
Registrator will be used to automatically register the new started services to Consul
https://github.com/gliderlabs/registrator
Consul-template will be used to automatically recreate the HAProxy configuration from a given template
https://github.com/hashicorp/consul-template
Like Nginx proxy balancer, adding and removing nodes from HAProxy could be done using Consul Template:
backend frontend
balance roundrobin{{range "app.frontend"}}
service {{.ID}} {{.Address}}:{{.Port}}{{end}}
You may also consider using HAProxy with Docker Swarm mode. You can use the dockerfile/haproxy to run
HAProxy:
docker run -d -p 80:80 -v <override-dir>:/haproxy-override dockerfile/haproxy
where <override-dir> is an absolute path of a directory that could contain:
haproxy.cfg : custom config file (replace /dev/log with 127.0.0.1 , and comment out daemon)
errors/ : custom error responses
This is an example of HAProxy configuration:
global
debug
defaults
log global
mode http
timeout connect 5000
timeout client 5000
timeout server 5000
listen http_proxy :8443
mode tcp
balance roundrobin
server server1 docker:8000 check
server server2 docker:8001 check
Traefik
Traefik is a HTTP reverse proxy and load balancer made to deploy microservices. It supports several backends like
Docker, Swarm, Mesos/Marathon, Consul, Etcd, Zookeeper, BoltDB, Rest API, file...etc Its configuration could be
automatically and dynamically managed.
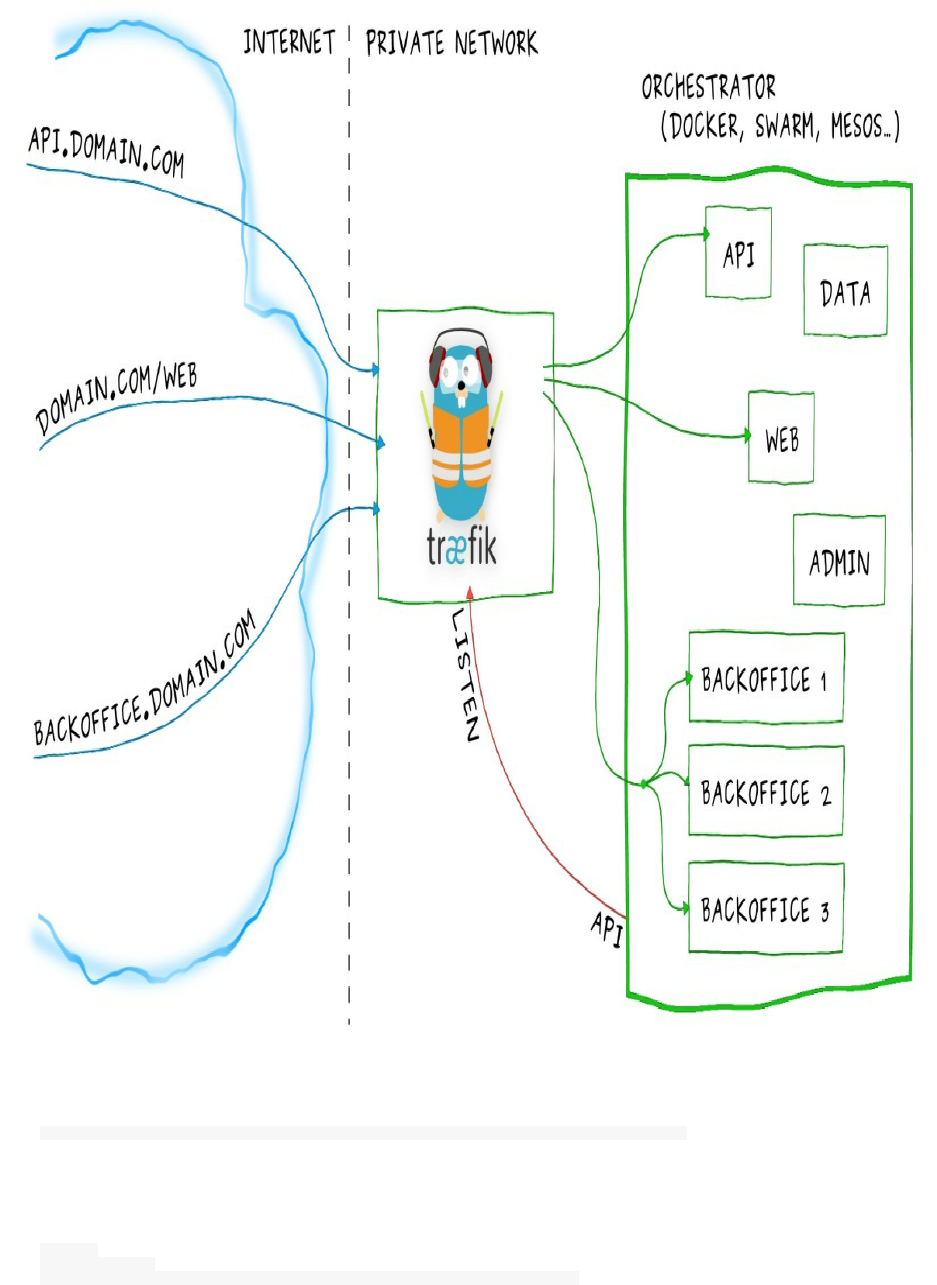
You can run a Docker container to deploy Traefik:
docker run -d -p 8080:8080 -p 80:80 -v $PWD/traefik.toml:/etc/traefik/traefik.toml traefik
Or Docker Compose:
traefik:
image: traefik
command: --web --docker --docker.domain=docker.localhost --logLevel=DEBUG

ports:
- "80:80"
- "8080:8080"
volumes:
- /var/run/docker.sock:/var/run/docker.sock
- /dev/null:/traefik.toml
This is the official example that you can test and follow to understand how Traefik in running:
Create docker-compose.yml file:
traefik:
image: traefik
command: --web --docker --docker.domain=docker.localhost --logLevel=DEBUG
ports:
- "80:80"
- "8080:8080"
volumes:
- /var/run/docker.sock:/var/run/docker.sock
- /dev/null:/traefik.toml
whoami1:
image: emilevauge/whoami
labels:
- "traefik.backend=whoami"
- "traefik.frontend.rule=Host:whoami.docker.localhost"
whoami2:
image: emilevauge/whoami
labels:
- "traefik.backend=whoami"
- "traefik.frontend.rule=Host:whoami.docker.localhost"
Run it:
docker-compose up -d
Now you can test the load balancing using curl:
curl -H Host:whoami.docker.localhost http://127.0.0.1
curl -H Host:whoami.docker.localhost http://127.0.0.1
Kube-Proxy
Kube-Proxy is one of the components of Kubernetes. On each Kubernetes node, Kube-Proxy allows us to do simple
TCP,UDP stream forwarding or round robin TCP,UDP forwarding across a set of backends. Service cluster IPs and
ports are currently found through Docker-links-based service that specifies ports opened by the service proxy.
Vulcand
Vulcand is a programmatic extendable proxy for microservices and API management. It is inspired by Hystrix and
powers Mailgun microservices infrastructure.
It uses Etcd as a configuration backend. Has an API and a CLI and supports canary deploys, realtime metrics and
resiliency.
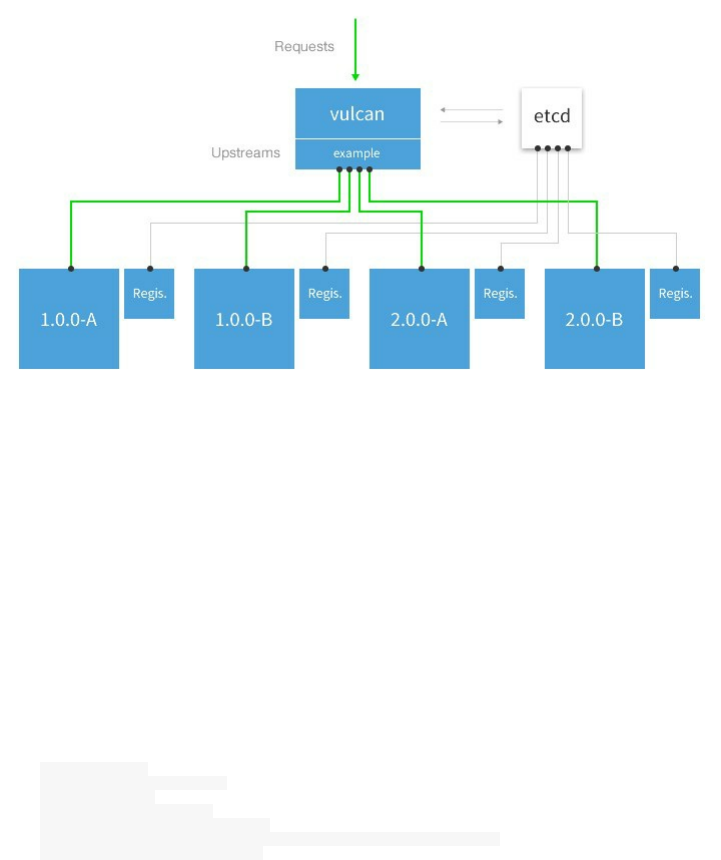
Moxy
Moxy is a reverse load balancer that could be automatically configured to discover services deployed on Apache
Mesos and Marathon.
servicerouter.py
Marathon's servicerouter.py is a replacement for the haproxy-marathon-bridge. It reads Marathon task information
and generates HAProxy configuration. It supports advanced functions like sticky sessions, HTTP to HTTPS
redirection, SSL offloading, VHost support and templating. It is implemented in Python.
You can run the official Docker image to deploy it:
docker run -d \
--name="servicerouter" \
--net="host" \
--ulimit nofile=8204 \
--volume="/dev/log:/dev/log" \
--volume="/tmp/ca-bundle.pem:/etc/ssl/mesosphere.com.pem:ro" \
uzyexe/marathon-servicerouter

Chapter IX - Composing Services Using Compose
o ^__^
o (oo)\_______
(__)\ )\/\
||----w |
|| ||
What Is Docker Compose
We have seen how to run containers but individually, say we want to run a LAMP/LEMP stack, at this case, we
should a php container then start the webserver container and make the link between them. Using Docker Compose,
it is possible to run a multi-container application using a declarative YAML file (Compose file). Using a single
command, we can start multiple containers that run all of our services (a LAMP or LEMP stack in this case).

Installing Docker Compose
Docker Compose comes in a separate binary file, even if you already installed Docker, you should install Compose.
Docker Compose For Mac And Windows
If you're a Mac or Windows user, the best way to install Compose and keep it up-to-date is Docker for Mac and
Windows. Docker for Mac and Windows will automatically install the latest version of Docker Engine for you. You
can use on of these links:
Docker Community Edition for Mac: https://store.docker.com/editions/community/docker-ce-desktop-mac
Docker Community Edition for Windows: https://store.docker.com/editions/community/docker-ce-desktop-
windows
Docker For Linux
In order to install Docker for Linux, download Compose binary and move it the binaries path:
curl -L https://github.com/docker/compose/releases/download/1.13.0/docker-compose-`uname -s`-`uname -
m` > /usr/local/bin/docker-compose
chmod +x /usr/local/bin/docker-compose
You can get a different version by changing 1.13.0 by the right version. The Compose file format has a version that
could be compatible with a Docker Engine version. For example, Compose version 3.0 – 3.2 is 1.13.0+ compatible.

Running Wordpress Using Docker Compose
One of the advantage of Docker Compose is the fact that a Compose file could be shared and distributed, creating an
application that uses several services and components could be done using a single Compose command.
This is what most users running Wordpress with Compose are using:
version: '3'
services:
db:
image: mysql:5.7
volumes:
- db_data:/var/lib/mysql
restart: always
environment:
MYSQL_ROOT_PASSWORD: mypassword
MYSQL_DATABASE: wordpress
MYSQL_USER: user
MYSQL_PASSWORD: mypassword
wordpress:
depends_on:
- db
image: wordpress:latest
ports:
- "8000:80"
restart: always
environment:
WORDPRESS_DB_HOST: db:3306
WORDPRESS_DB_USER: myuser
WORDPRESS_DB_PASSWORD: mypassword
volumes:
db_data:
The above content should goes into a file called docker-compose.yml . This is the file tree we are using :
Running_Wordpress_Using_Docker_Compose/
└── docker-compose.yml
Now type cd Running_Wordpress_Using_Docker_Compose and run docker-compose up . After downloading and running the
different services, you can go to http://127.0.0.1:8000 in order to see a running Wordpress.
When running the docker-compose up command, you should absolutely be inside the folder containing the
docker-compose file.
What we have actually run in the docker-compose.yml file is the equivalent of running two commands:
docker run --name db \
-e MYSQL_ROOT_PASSWORD=mypassword \
-e MYSQL_DATABASE=wordpress \
-e MYSQL_USER=user \
-e MYSQL_PASSWORD=mypassword \
-d mysql:5.7
docker run --name wordpress \
--link db:mysql \
-p 8080:80 \
-e WORDPRESS_DB_USER=myuser \
-e WORDPRESS_DB_PASSWORD=mypassword \
-d wordpress:latest

Running LEMP Using Docker Compose
We are going to use the Compose version 3. After downloading and installing Docker Compose, create a new folder
and a new file called docker-compose.yml :
mkdir Running_LEMP_Using_Docker_Compose
cd LEMP_Using_Docker_Compose
vi docker-compose.yml
Inside the Compose file, start by mentioning the version:
version: '3'
Now add the first service:
web:
We will use Nginx with the latest image, so our service will look like this:
web:
image: nginx:latest
And to declare port mapping, the file becomes:
version: '3'
services:
web:
image: nginx:latest
ports:
- "8000:80"
We are going to declare 3 volumes:
code: where we are going to put the php files
configs: where the Nginx configuration files go
scripts: where the script to start at the service startup goes
version: '3'
services:
web:
image: nginx:latest
ports:
- "8000:80"
volumes:
- ./code:/code
- ./configs/site.conf:/etc/nginx/conf.d/default.conf
- ./scripts:/scripts
Let's create a PHP file where we will use the phpinfo() funtion:
mkdir code

cd code
echo "<? echo phpinfo();" > index.php
We named Nginx configuration file to site.conf and this is its content:
server {
index index.php;
server_name php-docker.local;
error_log /var/log/nginx/error.log;
access_log /var/log/nginx/access.log;
root /code;
location ~ \.php$ {
try_files $uri =404;
fastcgi_split_path_info ^(.+\.php)(/.+)$;
fastcgi_pass php:9000;
fastcgi_index index.php;
include fastcgi_params;
fastcgi_param SCRIPT_FILENAME $document_root$fastcgi_script_name;
fastcgi_param PATH_INFO $fastcgi_path_info;
}
}
You should creae the folder configs and the file/content above should goes inside this folder
Now create another floder called scripts and add a new script file, we are going to name it start_services.sh :
#!/usr/bin/env bash
chown -R www-data:www-data /code
nginx
for (( ; ; ))
do
sleep 1d
done
This script will be the entrypoint to the Nginx container, you can customize it depending on your needs, but don't
forget to execute chmod +x scripts/start_services.sh .
This is the structure of our folder:
.
├── code
│ └── index.php
├── configs
│ └── site.conf
├── docker-compose.yml
└── scripts
└── start_services.sh
This is our new docker-compose file:
version: '3'
services:
web:
image: nginx:latest
ports:
- "8000:80"
volumes:
- ./code:/code
- ./configs/site.conf:/etc/nginx/conf.d/default.conf
- ./scripts:/scripts
links:
- php
entrypoint: ./scripts/start_services.sh
restart: always
Now that web service is linked to the php service, let's add the remainder of the Compose file:

version: '3'
services:
web:
image: nginx:latest
ports:
- "8000:80"
volumes:
- ./code:/code
- ./configs/site.conf:/etc/nginx/conf.d/default.conf
- ./scripts:/scripts
links:
- php
entrypoint: ./scripts/start_services.sh
restart: always
php:
image: php:7-fpm
volumes:
- ./code:/code
restart: always
expose:
- 9000
Now we simply need to run a single command to start the webserver with the PHP backend:
docker-compose up
You should see something like this:
Creating network "runninglempusingdockercompose_default" with the default driver
Creating runninglempusingdockercompose_php_1 ...
Creating runninglempusingdockercompose_php_1 ... done
Creating runninglempusingdockercompose_web_1 ...
Creating runninglempusingdockercompose_web_1 ... done
Attaching to runninglempusingdockercompose_php_1, runninglempusingdockercompose_web_1
Now you can open your browser and visit http://127.0.0.1:8000 .
Something helpful that we can use is sending the Nginx access logs to a remote log server/service. I am going to use
AWS cloudwatch service, but you can configure your own service/server like syslog or fluentd ..etc
version: '3'
services:
web:
image: nginx:latest
ports:
- "8000:80"
volumes:
- ./code:/code
- ./configs/site.conf:/etc/nginx/conf.d/default.conf
- ./scripts:/scripts
links:
- php
entrypoint: ./scripts/start_services.sh
restart: always
logging:
driver: "awslogs"
options:
awslogs-group: "dev"
awslogs-stream: "web_logs"
php:
image: php:7-fpm
volumes:
- ./code:/code
restart: always
expose:
- 9000
logging:
driver: "awslogs"
options:
awslogs-group: "dev"
awslogs-stream: "php_logs"

If you want to run this LEMP Docker stack as a daemon, you should use: docker-compose up -d .
If you want to pause the stack use docker-compose pause .
If you want to unpause the stack use docker-compose unpause .
If you want to stop the stack use docker-compose down .

Scaling Docker Compose
Using Docker Compose it is possible to scale a running service. Say we need 5 PHP containers that should run
behind our webserver. The command docker-compose scale php=5 will start 4 other containers running the same service
(PHP) and since the Nginx service in linked to the PHP one, all of the containers of the latter service can be seen by
Nginx container.
You may say, why we haven't scaled the Nginx bottle neck. As you can see in the Compose file, there is a mapping
between the port 8000 (external/host) and the port 80 (internal/container), the host has a single port 8000 and
creating a new container running the Nginx service will try to use the same external port and cause a conflict, so it is
not possible to scale a service using port mapping with Docker Compose.
Docker Compose Use Cases
I used Docker Compose in production but it was not a critical application. Docker Compose is mainly created for
testing and development purposes. When developing an application, having an isolated environment is crucial.
Docker Compose create this environment for a developer so adding, removing, modifying the version of a software
or a middleware is easy wand will not create any dependency or multi-version problems.
Docker Compose is a good way to share stacks between users and teams, e.g. sharing the production stack with
developers using different development configurations could be done using Docker Compose.
It is also useful to run tests by providing the environment to run them, after running them, the container could be
destroyed.

Chapter X - Docker Logging
o ^__^
o (oo)\_______
(__)\ )\/\
||----w |
|| ||

Docker Native Logging
When you start a container running a web application, a web server or any other application, sooner or later, you
will need to view your application logs. Let's see an example to view the access logs of a webserver.
Run an Nginx container:
docker run -it -p 8000:80 -d --name webserver nginx
Then visit localhost at port 8000 or execute this command:
curl http://0.0.0.0:8000
Now when you type docker logs webserver you can see the last lines of the access log:
172.17.0.1 - - [27/May/2017:21:33:59 +0000] "GET / HTTP/1.1" 200 612 "-" "curl/7.47.0" "-"
The last command will view the log file and exits. If you want to execute the equivalent of tail -f command on a
Docker container, add the -f flag:
docker logs -f webserver
or
docker logs --follow webserver
In order to tail the last 10 lines and exit you can execute docker logs --tail 10 webserver . You can also use the --since
flag that takes a string and shows logs since timestamp (e.g. 2013-01-02T13:23:37) or relative (e.g. 42m for 42
minutes):
docker logs --since 42s webserver
If you want to print the timestamp use the -t flag:
docker logs --since 2h -t webserver
docker logs -f -t webserver
The docker logs command uses the output of STDOUT and STDERR

Adding New Logs
The docker logs command uses the output of STDOUT and STDERR. When we run an Nginx container, the access
logs and the remainder of Nginx logs like error logs are redirected respectively to STDOUT and STDERR. Let's
examine the official Nginx Dockerfile in order to see how this was done:
#
# Nginx Dockerfile
#
# https://github.com/dockerfile/nginx
#
# Pull base image.
FROM dockerfile/ubuntu
# Install Nginx.
RUN \
add-apt-repository -y ppa:nginx/stable && \
apt-get update && \
apt-get install -y nginx && \
rm -rf /var/lib/apt/lists/* && \
echo "\ndaemon off;" >> /etc/nginx/nginx.conf && \
chown -R www-data:www-data /var/lib/nginx
# Define mountable directories.
VOLUME ["/etc/nginx/sites-enabled", "/etc/nginx/certs", "/etc/nginx/conf.d", "/var/log/nginx", "/var/www/html"]
# Define working directory.
WORKDIR /etc/nginx
# Define default command.
CMD ["nginx"]
# Expose ports.
EXPOSE 80
EXPOSE 443
We are certainly looking fot this line echo "\ndaemon off;" >> /etc/nginx/nginx.conf && \ . When running Nginx with
daemon off; configuration, Nginx will run in foreground and everything will be redirected to the screen (STDOUT).
For Apache Dockerfile, if we examine it we will notice that the container execute a script file at its startups. The
content of this script is:
#!/bin/bash
set -e
# Apache gets grumpy about PID files pre-existing
rm -f /usr/local/apache2/logs/httpd.pid
exec httpd -DFOREGROUND
The -DFOREGROUND option will allow Docker to get Apache logs.
What if we have custom log files ? Say we have our application write into a file called app.log inside the logs
folder.
./logs/app.log
In this case, you need to redirect the app.log content to the STDOUT or STDERR:
FROM ..
..
RUN ln -sf /dev/stdout logs/app.log
RUN ln -sf /dev/stderr logs/app-errors.log
..etc

Docker Logging Drivers
Docker can interface with other logging services like AWS cloudwatch, Fluentd, syslog ..etc and send all of the logs
to the remote servic. When you use a logging driver, the native docker logs <container> become deactivated. These
are the supported logging drivers:
syslog: Writes logging messages to the syslog facility. The syslog daemon must be running on the host
machine.
journald: Writes log messages to journald. The journald daemon must be running on the host machine.
gelf: Writes log messages to a Graylog Extended Log Format (GELF) endpoint such as Graylog or Logstash.
fluentd: Writes log messages to fluentd (forward input). The fluentd daemon must be running on the host
machine.
awslogs: Writes log messages to Amazon CloudWatch Logs.
splunk: Writes log messages to splunk using the HTTP Event Collector.
etwlogs: Writes log messages as Event Tracing for Windows (ETW) events. Only available on Windows
platforms.
gcplogs: Writes log messages to Google Cloud Platform (GCP) Logging.

Using Fluentd Log Driver
First thing that we need to do is installing Fluentd in the host that will collect the logs. If your package manager is
RPM, you can use curl -L https://toolbelt.treasuredata.com/sh/install-redhat-td-agent2.sh | sh
If you are using Ubuntu or Debian:
For Xenial,
curl -L https://toolbelt.treasuredata.com/sh/install-ubuntu-xenial-td-agent2.sh | sh
For Trusty,
curl -L https://toolbelt.treasuredata.com/sh/install-ubuntu-trusty-td-agent2.sh | sh
For Precise,
curl -L https://toolbelt.treasuredata.com/sh/install-ubuntu-precise-td-agent2.sh | sh
For Lucid,
curl -L https://toolbelt.treasuredata.com/sh/install-ubuntu-lucid-td-agent2.sh | sh
For Debian Jessie,
curl -L https://toolbelt.treasuredata.com/sh/install-debian-jessie-td-agent2.sh | sh
For Debian Wheezy,
curl -L https://toolbelt.treasuredata.com/sh/install-debian-wheezy-td-agent2.sh | sh
For Debian Squeeze,
curl -L https://toolbelt.treasuredata.com/sh/install-debian-squeeze-td-agent2.sh | sh
In order to use Fluentd, create the configuration file, we are going to name it docker.conf .
<source>
type forward
port 24224
bind 0.0.0.0
</source>
<match *.*>
type stdout
</match>
You should now start fluentd with the configuration file after adapting it to your needs:

fluentd -c docker.conf
> 2015-09-01 15:07:12 -0600 [info]: reading config file path="docker.conf"
> 2015-09-01 15:07:12 -0600 [info]: starting fluentd-0.12.15
> 2015-09-01 15:07:12 -0600 [info]: gem 'fluent-plugin-mongo' version '0.7.10'
> 2015-09-01 15:07:12 -0600 [info]: gem 'fluentd' version '0.12.15'
> 2015-09-01 15:07:12 -0600 [info]: adding match pattern="*.*" type="stdout"
> 2015-09-01 15:07:12 -0600 [info]: adding source type="forward"
> 2015-09-01 15:07:12 -0600 [info]: using configuration file: <ROOT>
> <source>
> @type forward
> port 24224
> bind 0.0.0.0
> </source>
> <match docker.*>
> @type stdout
< </match>
> </ROOT>
> 2015-09-01 15:07:12 -0600 [info]: listening fluent socket on 0.0.0.0:24224
It is also possible to run Fluentd in a Docker container:
docker run -it -p 24224:24224 -v docker.conf:/fluentd/etc/docker.conf -e FLUENTD_CONF=docker.conf fluent/fluentd:latest
Now run
docker run --log-driver=fluentd ubuntu echo "Hello Fluentd!"
Fluentd could be on a different remote host and in this case you should add --log-opt followed by the host address:
docker run --log-driver=fluentd --log-opt fluentd-address=192.168.1.10:24225 ubuntu echo "..."
If you are using multiple log types/files, you can tag each container/service with a different tag using fluentd-tag .
docker run --log-driver=fluentd --log-opt fluentd-tag=docker.{{.ID}} ubuntu echo "..."

Using AWS CloudWatch Log Driver
Amazon CloudWatch is a monitoring service for AWS cloud resources and the applications you run on AWS. You
can use Amazon CloudWatch to collect and track metrics, collect and monitor log files, set alarms, and automatically
react to changes in your AWS resources. AWS CloudWatch can also be used in collecting and centralizing Docker
logs.
In order to use CloudWatch, you need to allow the used user to execute these actions:
logs:CreateLogGroup
logs:CreateLogStream
logs:PutLogEvents
logs:DescribeLogStreams
e.g:
{
"Version": "2012-10-17",
"Statement": [
{
"Effect": "Allow",
"Action": [
"logs:CreateLogGroup",
"logs:CreateLogStream",
"logs:PutLogEvents",
"logs:DescribeLogStreams"
],
"Resource": [
"arn:aws:logs:*:*:*"
]
}
]
}
You need now to go to your AWS console, go to CloudWatch service then create a log group, call it my-group . Click
on the created group and create a new stream, call it my-stream .
The awslogs logging driver sends your Docker logs to a specific region so you could use the awslogs-region log
option or the AWS_REGION environment variable to set the region. You should use the same region where you created
the log group/stream.
docker run --log-driver=awslogs --log-opt awslogs-region=us-east-1 ubuntu echo "..."
In order to add the logs group/stream, execute:
docker run --log-driver=awslogs --log-opt awslogs-region=us-east-1 --log-opt awslogs-group=my-group --log-opt awslogs-
stream my-stream
You can configure the default logging driver by passing the --log-driver option to the Docker daemon:
dockerd --log-driver=awslogs

Chapter XI - Docker Debugging And Troubleshooting
o ^__^
o (oo)\_______
(__)\ )\/\
||----w |
|| ||

Docker Daemon Logs
When there is a problem, one of the first things for many of you is checking the Docker Daemon logs. Docker logs
are accessible in different ways and this depends on your system:
OSX - ~/Library/Containers/com.docker.docker/Data/com.docker.driver.amd64-linux/log/docker.log
Debian - /var/log/daemon.log
CentOS - Run /var/log/daemon.log | grep docker
CoreOS - Run journalctl -u docker.service
Ubuntu upstart - /var/log/upstart/docker.log
Ubuntu systemd - Run journalctl -u docker.service command
Fedora - Run journalctl -u docker.service
Red Hat Enterprise Linux Server - Run /var/log/messages | grep docker
OpenSuSE - Run journalctl -u docker.service
Boot2Docker - /var/log/docker.log
Windows - AppData\Local
Another way of troubleshooting the daemon is running it in foreground:
dockerd
If you are already running Docker you should stop it and start the daemon.
sudo dockerd
> INFO[0000] libcontainerd: new containerd process, pid: 9898
> WARN[0000] containerd: low RLIMIT_NOFILE changing to max current=1024 max=65536
> WARN[0001] failed to rename /var/lib/docker/tmp for background deletion: %!s(<nil>). Deleting synchronously
> INFO[0001] [graphdriver] using prior storage driver: aufs
> INFO[0001] Graph migration to content-addressability took 0.00 seconds
> WARN[0001] Your kernel does not support swap memory limit
> WARN[0001] Your kernel does not support cgroup rt period
> WARN[0001] Your kernel does not support cgroup rt runtime
> INFO[0001] Loading containers: start.
> INFO[0002] Default bridge (docker0) is assigned with an IP address 172.17.0.0/16. Daemon option --
bip can be used to set a preferred IP address
> INFO[0002] No non-
localhost DNS nameservers are left in resolv.conf. Using default external servers: [nameserver 8.8.8.8 nameserver 8.8.4.4]
> INFO[0002] IPv6 enabled; Adding default IPv6 external servers: [nameserver 2001:4860:4860::8888 nameserver 2001:4860:4860::8844]
> INFO[0002] No non-
localhost DNS nameservers are left in resolv.conf. Using default external servers: [nameserver 8.8.8.8 nameserver 8.8.4.4]
> INFO[0002] IPv6 enabled; Adding default IPv6 external servers: [nameserver 2001:4860:4860::8888 nameserver 2001:4860:4860::8844]
> WARN[0002] Failed to allocate and map port 8000-8000: Bind for 0.0.0.0:8000 failed: port is already allocated
> WARN[0002] failed to cleanup ipc mounts:
> failed to umount /var/lib/docker/containers/d929a0878ea9282cd3eeb1ed65c1a6448e0a9da67b1dce2dba305c746ecc2371/shm: invalid argument
> ERRO[0002] Failed to start container d929a0878ea9282cd3eeb1ed65c1a6448e0a9da67b1dce2dba305c746ecc2371: driver failed programming external connectivity on endpoint d929a0878ea9_lemp_web_1 > (c890920376e611a5509d105d269da8927bab6e2dfd39822c1cadd6bfd9b58c5a): Bind for 0.0.0.0:8000 failed: port is already allocated

Docker Debugging
In order to do that, set the debug key to true in the daemon.json file. Generally, you will find this file under
/etc/docker . You may need to create this file, if it does not yet exist.
{
"debug": true
}
Possible values are debug , info , warn , error , fatal .
Now send a HUP signal to the daemon to cause it to reload its configuration: sudo kill -SIGHUP $(pidof dockerd) or
execute service docker stop && dockerd :
You will be able to see all of the actions that Docker is doing:
DEBU[0012] Registering routers
DEBU[0012] Registering GET, /containers/{name:.*}/checkpoints
DEBU[0012] Registering POST, /containers/{name:.*}/checkpoints
DEBU[0012] Registering DELETE, /containers/{name}/checkpoints/{checkpoint}
DEBU[0012] Registering HEAD, /containers/{name:.*}/archive
DEBU[0012] Registering GET, /containers/json
DEBU[0012] Registering GET, /containers/{name:.*}/export
DEBU[0012] Registering GET, /containers/{name:.*}/changes
DEBU[0012] Registering GET, /containers/{name:.*}/json
DEBU[0012] Registering GET, /containers/{name:.*}/top
DEBU[0012] Registering GET, /containers/{name:.*}/logs
DEBU[0012] Registering GET, /containers/{name:.*}/stats
DEBU[0012] Registering GET, /containers/{name:.*}/attach/ws
DEBU[0012] Registering GET, /exec/{id:.*}/json
DEBU[0012] Registering GET, /containers/{name:.*}/archive
DEBU[0012] Registering POST, /containers/create
DEBU[0012] Registering POST, /containers/{name:.*}/kill
DEBU[0012] Registering POST, /containers/{name:.*}/pause
DEBU[0012] Registering POST, /containers/{name:.*}/unpause
DEBU[0012] Registering POST, /containers/{name:.*}/restart
DEBU[0012] Registering POST, /containers/{name:.*}/start
DEBU[0012] Registering POST, /containers/{name:.*}/stop
DEBU[0012] Registering POST, /containers/{name:.*}/wait
DEBU[0012] Registering POST, /containers/{name:.*}/resize
DEBU[0012] Registering POST, /containers/{name:.*}/attach
DEBU[0012] Registering POST, /containers/{name:.*}/copy
DEBU[0012] Registering POST, /containers/{name:.*}/exec
DEBU[0012] Registering POST, /exec/{name:.*}/start
DEBU[0012] Registering POST, /exec/{name:.*}/resize
DEBU[0012] Registering POST, /containers/{name:.*}/rename
DEBU[0012] Registering POST, /containers/{name:.*}/update
DEBU[0012] Registering POST, /containers/prune
DEBU[0012] Registering PUT, /containers/{name:.*}/archive
DEBU[0012] Registering DELETE, /containers/{name:.*}
DEBU[0012] Registering GET, /images/json
DEBU[0012] Registering GET, /images/search
DEBU[0012] Registering GET, /images/get
DEBU[0012] Registering GET, /images/{name:.*}/get
DEBU[0012] Registering GET, /images/{name:.*}/history
DEBU[0012] Registering GET, /images/{name:.*}/json
DEBU[0012] Name To resolve: php.
DEBU[0012] Registering POST, /commit
DEBU[0012] Query php.[1] from 127.0.0.1:53704, forwarding to udp:127.0.1.1
DEBU[0012] Registering POST, /images/load
DEBU[0012] Registering POST, /images/create
DEBU[0012] Registering POST, /images/{name:.*}/push
DEBU[0012] Registering POST, /images/{name:.*}/tag
DEBU[0012] Registering POST, /images/prune
DEBU[0012] Registering DELETE, /images/{name:.*}
DEBU[0012] Registering OPTIONS, /{anyroute:.*}
DEBU[0012] Registering GET, /_ping
DEBU[0012] Registering GET, /events
DEBU[0012] Registering GET, /info
DEBU[0012] Registering GET, /version
DEBU[0012] Registering GET, /system/df
DEBU[0012] Registering POST, /auth
DEBU[0012] Registering GET, /volumes
DEBU[0012] Registering GET, /volumes/{name:.*}

DEBU[0012] Registering POST, /volumes/create
DEBU[0012] Registering POST, /volumes/prune
DEBU[0012] Registering DELETE, /volumes/{name:.*}
DEBU[0012] Registering POST, /build
DEBU[0012] Registering POST, /swarm/init
DEBU[0012] Registering POST, /swarm/join
DEBU[0012] Registering POST, /swarm/leave
DEBU[0012] Registering GET, /swarm
DEBU[0012] Registering GET, /swarm/unlockkey
DEBU[0012] Registering POST, /swarm/update
DEBU[0012] Registering POST, /swarm/unlock
DEBU[0012] Registering GET, /services
DEBU[0012] Registering GET, /services/{id}
DEBU[0012] Registering POST, /services/create
DEBU[0012] Registering POST, /services/{id}/update
DEBU[0012] Registering DELETE, /services/{id}
DEBU[0012] Registering GET, /services/{id}/logs
DEBU[0012] Registering GET, /nodes
DEBU[0012] Registering GET, /nodes/{id}
DEBU[0012] Registering DELETE, /nodes/{id}
DEBU[0012] Registering POST, /nodes/{id}/update
DEBU[0012] Registering GET, /tasks
DEBU[0012] Registering GET, /tasks/{id}
DEBU[0012] Registering GET, /tasks/{id}/logs
DEBU[0012] Registering GET, /secrets
DEBU[0012] Registering POST, /secrets/create
DEBU[0012] Registering DELETE, /secrets/{id}
DEBU[0012] Registering GET, /secrets/{id}
DEBU[0012] Registering POST, /secrets/{id}/update
DEBU[0012] Registering GET, /plugins
DEBU[0012] Registering GET, /plugins/{name:.*}/json
DEBU[0012] Registering GET, /plugins/privileges
DEBU[0012] Registering DELETE, /plugins/{name:.*}
DEBU[0012] Registering POST, /plugins/{name:.*}/enable
DEBU[0012] Registering POST, /plugins/{name:.*}/disable
DEBU[0012] Registering POST, /plugins/pull
DEBU[0012] Registering POST, /plugins/{name:.*}/push
DEBU[0012] Registering POST, /plugins/{name:.*}/upgrade
DEBU[0012] Registering POST, /plugins/{name:.*}/set
DEBU[0012] Registering POST, /plugins/create
DEBU[0012] Registering GET, /networks
DEBU[0012] Registering GET, /networks/
DEBU[0012] Registering GET, /networks/{id:.+}
DEBU[0012] Registering POST, /networks/create
DEBU[0012] Registering POST, /networks/{id:.*}/connect
DEBU[0012] Registering POST, /networks/{id:.*}/disconnect
DEBU[0012] Registering POST, /networks/prune
DEBU[0012] Registering DELETE, /networks/{id:.*}

Checking Docker Status
Checking if Docker is running can be done using service docker status or any other alternative way like ps aux|grep
docker , ps -ef |grep docker ..etc It is also possible to use any other Docker command like docker info command in
order to see of Docker responds or not. In the negative case, your terminal will show something like
Cannot connect to the Docker daemon at unix:///var/run/docker.sock. Is the docker daemon running?
You can use other ways depending on your system tools like systemctl is-active docker .

Debugging Containers
Whether you are using standalone Docker containers or managed services, it is possible to inspect the details of a
service or a container.
docker service inspect <service>
docker inspect <container>
Let's inspect this container docker run -it -p 8000:80 -d --name webserver nginx using docker inspect webserver command.
These are the list of information the Docker inspect command will give us:
[
{
"Id": "3..9",
"Created": "2017-05-27T23:58:20.848318438Z",
"Path": "nginx",
"Args": [
"-g",
"daemon off;"
],
"State": {
"Status": "running",
"Running": true,
"Paused": false,
"Restarting": false,
"OOMKilled": false,
"Dead": false,
"Pid": 13730,
"ExitCode": 0,
"Error": "",
"StartedAt": "2017-05-27T23:58:21.257901373Z",
"FinishedAt": "0001-01-01T00:00:00Z"
},
"Image": "sha256:3..7",
"ResolvConfPath": "/var/lib/docker/containers/3..9/resolv.conf",
"HostnamePath": "/var/lib/docker/containers/3..9/hostname",
"HostsPath": "/var/lib/docker/containers/3..9/hosts",
"LogPath": "/var/lib/docker/containers/3..9/3..9-json.log",
"Name": "/webserver",
"RestartCount": 0,
"Driver": "aufs",
"MountLabel": "",
"ProcessLabel": "",
"AppArmorProfile": "docker-default",
"ExecIDs": null,
"HostConfig": {
"Binds": null,
"ContainerIDFile": "",
"LogConfig": {
"Type": "json-file",
"Config": {}
},
"NetworkMode": "default",
"PortBindings": {
"80/tcp": [
{
"HostIp": "",
"HostPort": "8000"
}
]
},
"RestartPolicy": {
"Name": "no",
"MaximumRetryCount": 0
},
"AutoRemove": false,
"VolumeDriver": "",
"VolumesFrom": null,
"CapAdd": null,
"CapDrop": null,
"Dns": [],
"DnsOptions": [],
"DnsSearch": [],
"ExtraHosts": null,
"GroupAdd": null,
"IpcMode": "",
"Cgroup": "",
"Links": null,
"OomScoreAdj": 0,

"PidMode": "",
"Privileged": false,
"PublishAllPorts": false,
"ReadonlyRootfs": false,
"SecurityOpt": null,
"UTSMode": "",
"UsernsMode": "",
"ShmSize": 67108864,
"Runtime": "runc",
"ConsoleSize": [
0,
0
],
"Isolation": "",
"CpuShares": 0,
"Memory": 0,
"NanoCpus": 0,
"CgroupParent": "",
"BlkioWeight": 0,
"BlkioWeightDevice": null,
"BlkioDeviceReadBps": null,
"BlkioDeviceWriteBps": null,
"BlkioDeviceReadIOps": null,
"BlkioDeviceWriteIOps": null,
"CpuPeriod": 0,
"CpuQuota": 0,
"CpuRealtimePeriod": 0,
"CpuRealtimeRuntime": 0,
"CpusetCpus": "",
"CpusetMems": "",
"Devices": [],
"DeviceCgroupRules": null,
"DiskQuota": 0,
"KernelMemory": 0,
"MemoryReservation": 0,
"MemorySwap": 0,
"MemorySwappiness": -1,
"OomKillDisable": false,
"PidsLimit": 0,
"Ulimits": null,
"CpuCount": 0,
"CpuPercent": 0,
"IOMaximumIOps": 0,
"IOMaximumBandwidth": 0
},
"GraphDriver": {
"Data": null,
"Name": "aufs"
},
"Mounts": [],
"Config": {
"Hostname": "37068ac691fb",
"Domainname": "",
"User": "",
"AttachStdin": false,
"AttachStdout": false,
"AttachStderr": false,
"ExposedPorts": {
"80/tcp": {}
},
"Tty": true,
"OpenStdin": true,
"StdinOnce": false,
"Env": [
"PATH=/usr/local/sbin:/usr/local/bin:/usr/sbin:/usr/bin:/sbin:/bin",
"NGINX_VERSION=1.13.0-1~stretch",
"NJS_VERSION=1.13.0.0.1.10-1~stretch"
],
"Cmd": [
"nginx",
"-g",
"daemon off;"
],
"ArgsEscaped": true,
"Image": "nginx",
"Volumes": null,
"WorkingDir": "",
"Entrypoint": null,
"OnBuild": null,
"Labels": {},
"StopSignal": "SIGQUIT"
},
"NetworkSettings": {
"Bridge": "",
"SandboxID": "4..0",
"HairpinMode": false,
"LinkLocalIPv6Address": "",
"LinkLocalIPv6PrefixLen": 0,
"Ports": {
"80/tcp": [
{
"HostIp": "0.0.0.0",

"HostPort": "8000"
}
]
},
"SandboxKey": "/var/run/docker/netns/4a0ab4faeb4e",
"SecondaryIPAddresses": null,
"SecondaryIPv6Addresses": null,
"EndpointID": "8..b",
"Gateway": "172.17.0.1",
"GlobalIPv6Address": "",
"GlobalIPv6PrefixLen": 0,
"IPAddress": "172.17.0.2",
"IPPrefixLen": 16,
"IPv6Gateway": "",
"MacAddress": "02:42:ac:11:00:02",
"Networks": {
"bridge": {
"IPAMConfig": null,
"Links": null,
"Aliases": null,
"NetworkID": "b..b",
"EndpointID": "8..b",
"Gateway": "172.17.0.1",
"IPAddress": "172.17.0.2",
"IPPrefixLen": 16,
"IPv6Gateway": "",
"GlobalIPv6Address": "",
"GlobalIPv6PrefixLen": 0,
"MacAddress": "02:42:ac:11:00:02"
}
}
}
}
]
It is possible to get a single element like for example, the IP address:
docker inspect --format='{{range .NetworkSettings.Networks}}{{.IPAddress}}{{end}}' webserver
Or the port binding list:
docker inspect --format='{{range $p, $conf := .NetworkSettings.Ports}} {{$p}} -
> {{(index $conf 0).HostPort}} {{end}}' webserver
Another way of debugging containers is executing debug commands inside the container like docker exec -it
webserver ps aux or docker exec -it webserver cat /etc/resolv.conf ..etc
Using docker stats and docker events commands could give you also some information when debugging.

Troubleshooting Docker Using Sysdig
Sysdig is a Linux system exploration and troubleshooting tool with support for containers.
To install Sysdig automatically in one step, simply run the following command. This is the recommended
installation method.
curl -s https://s3.amazonaws.com/download.draios.com/stable/install-sysdig | sudo bash
Then add your username to the same group as sysdig:
groupadd sysdig
usermod -aG sysdig $USER
Use visudo to edit the sudo-config. Add the line %sysdig ALL= /path/to/sysdig and save. The path is most likely
/usr/local/bin/sysdig , but you can make sure by running which sysdig.
Sysdig is an open source project and it can be used to get information about
Networking
Containers
Application
Disk I/O
Processes and CPU usage
Performance and Errors
Security
Tracing
Debugging containers is also debugging the host, so sysdig can be used to make a general troubleshooting. What
does interest us in this part is the container-related commands.
In order to list the running containers with their resource usage
sudo csysdig -vcontainers
Listing all of the processes with container context can be done using
sudo csysdig -pc
To view the CPU usage of the processes running inside the my_container container, use:
sudo sysdig -pc -c topprocs_cpu container.name=my_container
Bandwidth can be monitored using:

sudo sysdig -pc -c topprocs_net container.name=my_container
Processes using most network bandwidth can be checked using:
sudo sysdig -pc -c topprocs_net container.name=my_container
To view the top network connections:
sudo sysdig -pc -c topconns container.name=my_container
Top used files consuming I/O bytes could be checkeck using:
sudo sysdig -pc -c topfiles_bytes container.name=my_container
And to show all the interactive commands executed inside the my_container container, use:
sudo sysdig -pc -c spy_users container.name=my_container

Chapter XII - Orchestration - Docker Swarm
o ^__^
o (oo)\_______
(__)\ )\/\
||----w |
|| ||
Docker Swarm
Docker Swarm is the solution that Docker inc developed to create an orchestration tool like Google's Kubernetes. It
provides native clustering capabilities to turn a group of Docker engines into a single, virtual Docker Engine.
Distributed applications requires compute resources that are also distributed and that's why Docker Swarm was
introduced. You can use it to manage pooled resources in order to scale out an application as if it was running on a
single, huge computer.
Before Docker engine 1.12, Docker Swarm should be integrated with a kv store and a service discovery tool but after
this version, Docker Swarm integrated these tools and it can be used without having the need to use other tools.

Swarm Features
Docker has a continuous active development and it is changing a lot, Swarm mode introduced many new feature that
solved many problems. Like it is described in its official website, Docker Swarm serves the standard Docker API, so
any tool which already communicates with a Docker daemon can use Docker Swarm to transparently scale to
multiple hosts: Dokku, Docker Compose, Krane, Flynn, Deis, DockerUI, Shipyard, Drone, Jenkins and of course the
Docker client itself. Includes ability to pull from private repositories or Docker public Hub as well.
Swarm mode is a built-in native solution to Docker, you can use Docker Networking, Volumes and plugins through
their respective Docker commands via this mode.
Its scheduler has useful filters like node tags, affinity and strategies like spread, binpack ..etc These filters assign
containers to the underlying nodes to optimize performance and resource utilization.
Swarm is production ready and according to Docker inc it is tested to scale up to 1,000 nodes and fifty thousand
50,000 containers with no performance degradation in spinning up incremental containers onto the node cluster.
A test stress done by Docker to spin up 1,000 nodes, 30,000 containers managed by 1 Swarm manager gave these
results:
Percentile API Response Time Scheduling Delay
50th 150ms 230ms
90th 200ms 250ms
99th 360ms 400ms
During this test, Consul was used as a discovery backend, every node hosted 30 containers (1,000 nodes), the
manager was an EC2 m4.xlarge (4 CPUs, 16GB RAM) machine and nodes were EC2 t2.micro (1 CPU, 1 GB RAM)
machines and container images were using ubuntu 14.04.

Here is what was published in the blog post introducing the results:
We wanted to stress test a single Swarm manager, to see how capable it would be, so we used one Swarm
manager to manage all our nodes. We placed fifty containers per node. Commands were run 1,000 times
against Swarm and and we generated percentiles for 1) API Response time and 2) Scheduling delay. We found
that we were able to scale up to 1,000 nodes running 30,000 containers. 99% of the time each container took
less than half a second to launch. There was no noticeable difference in the launch time of the 1st and 30,000th
container. We used docker info to measure API response time, and then used docker run -dit ubuntu bash to
measure scheduling delay.
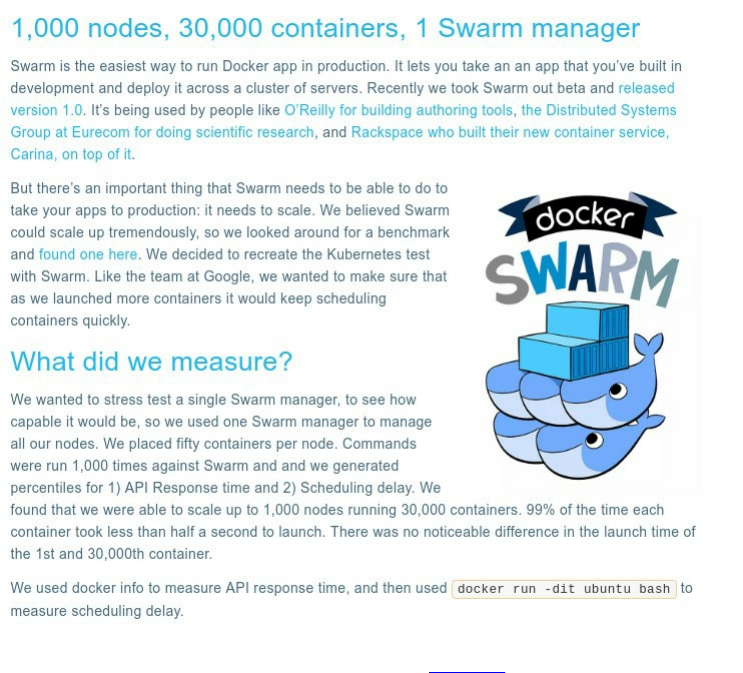

To achieve such a bug number of nodes, Docker ensure a highly available Swarm Manager. You can create multiple
Swarm masters and specify policies on leader election in case the primary master experiences a failure.
Swarm comes with a built-in scheduler, but you can easily plugin the Mesos or Kubernetes backend while still using
the Docker client. To find nodes in your cluster, Docker Swarm can use either a hosted discovery service, static file,
etcd, consul and zookeeper.

Installation
Nothing different from the default Docker installation, since the Swarm mode is a built-in feature, you need just to
install Docker:
curl -fsSL https://get.docker.com/ | sh
You can use docker -v to see the installed version, in all cases if it is greater than 1.12, you should have the Swarm
feature integrated in Docker engine.
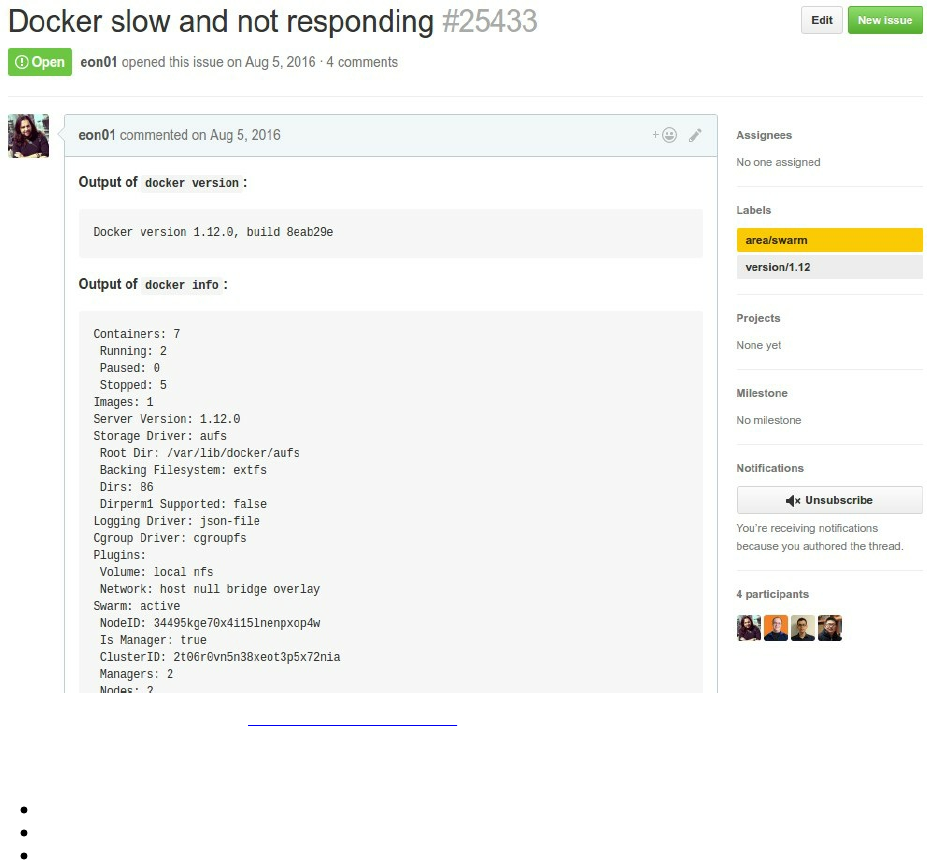
The Raft Consensus Algorithm , Swarm Managers & Best
Practices
In a Docker cluster, you should have at least one manager. One of the things that I was missing when I started
experimenting Docker is that the number of managers should not be equal to 2. Then I understood that 1 manager or
3 managers is better. In fact, when running with two managers, you double the chance of a manager failure.
Swarm manager nodes use the Raft Consensus Algorithm to manage the swarm state.
Raft achieves consensus via an elected leader. A server in a raft cluster is either:
a leader
a candidate
or a follower
The leader is responsible for log replication to the followers. Using heartbeat messages, the leader regularly informs
the followers of its existence.
Each follower has a timeout in which it expects the heartbeat from the leader. The timeout is reset on receiving the
heartbeat (it is typically between 150 and 300ms). In the case when no heartbeat is received, the follower changes its
status to candidate and starts a new leader election. The election starts by increasing the term counter and sending a
RequestVote message to all other servers that will vote (only once) for the first candidate that sends them this
RequestVote message.

Three scenarios are possible in the last case:
If the candidate receives a message from a leader with a term number equal to or larger than the current term,
then its election is defeated and the candidate changes into a follower.
If a candidate receives a majority of votes, then it becomes the new leader.
If neither happens, a new leader election starts after a timeout.
Raft tolerates up to (N-1)/2 failures and requires a majority or quorum (also called a majority of managers) of
(N/2)+1 members to agree on values proposed to the cluster.
Raft will not tolerate the case when among 5 Managers, 3 nodes are unavailable, the system will not process any
more requests.
In all cases, you should maintain an odd number of managers in the swarm to support manager node failures, it
ensures higher chance for the quorum availability.
Number Of Nodes (N) Quorom Majority (N/2)+1 Fault Tolerance (N-1)/2
1 1 0
2 2 0
3 2 1
4 3 1
5 3 2
6 4 2
You don't really need to know how Raft works, but you need to know that having an odd number of managers is a
must. You need also to know, that in order to maximize the availability of your nodes, you should think about
distributing manager nodes across a minimum of 3 availability-zones. You may have less managers and one
availability zone, it will work fine but you minimize the probability of teloreating data centers problems. If you will
deploy high-available fault-tolerant system, this table describes how you should make the repartition of managers
across 3 availability zones:
Number of Node Managers Repartition Of Managers Across 3 Availability Zones
3 1-1-1
5 2-2-1
7 3-2-2
9 3-3-3
11 4-4-3
Another thing to know is that a node running as a swarm manager is not different than a non-manager node (a
worker) so it is fine to have a swarm cluster with only managers, without any worker. In fact, manager nodes by
default acts like a worker nodes. Swarm scheduler can assign tasks to a manager node. If you have a small swarm
cluster, managers could be assigned to execute tasks with lower risk.
You can also restrict the role of a manager in order to acting only as a manager and not a worker. Draining managers
nodes, make them unavailable as worker nodes:
docker node update --availability drain <node_id>
It is may be evident but you should assign a static IP to each of your Swarm managers, a worker in contrast could
have dynamic IP (since it will be discovered) but workers and managers - in all cases - should be able to
communicate together over network.
The following ports must be available:

TCP port 2377 for cluster management communications
TCP and UDP port 7946 for communication among nodes
TCP and UDP port 4789 for overlay network traffic

Creating Swarm Managers & Workers
In order to create a manger, you should have Docker installed in the node, then use the swarm initialization
command:
docker swarm init --advertise-addr <node_ip|interface>[:port]
If you want to customize your security, you can use these options:
--cert-expiry duration Validity period for node certificates (ns|us|ms|s|m|h) (default 2160h0m0s)
--external-ca external-ca Specifications of one or more certificate signing endpoints
Other options can be used to changer the heartbeat duration, the number of log entries between Raft snapshots or the
task history retention limit.
--autolock Enable manager autolocking (requiring an unlock key to start a stopped manager)
--dispatcher-heartbeat duration Dispatcher heartbeat period (ns|us|ms|s|m|h) (default 5s)
--max-snapshots uint Number of additional Raft snapshots to retain
--snapshot-interval uint Number of log entries between Raft snapshots (default 10000)
--task-history-limit int Task history retention limit (default 5)
When losing the quorum, you can use the following option to bring back the failed node online.
--force-new-cluster Force create a new cluster from current state
Example:
Say our eth0 interface has 138.197.35.0 as an IP address.
To create a cluster with a first manager, type:
docker swarm init --force-new-cluster --advertise-addr 138.197.35.0
This will show an instruction to execute a command in order to add a worker:
Swarm initialized: current node (vhvebboq9fp4j62w83dujxzjr) is now a manager.
To add a worker to this swarm, run the following command:
docker swarm join \
--token SWMTKN-1-5b54vz0sie1li0ijr0epkhyjvmbbh2pg746skh8ba5674g1p6x-cmgrvib1disaeq08x8a5ln7zo \
138.197.35.0:2377
To add a manager to this swarm, run 'docker swarm join-token manager' and follow the instructions.
If you want to add a worker to this cluster, create a new server and execute:
docker swarm join --token SWMTKN-1-5b54vz0sie1li0ijr0epkhyjvmbbh2pg746skh8ba5674g1p6x-
cmgrvib1disaeq08x8a5ln7zo 138.197.35.0:2377
You should of course have the port 2377 open. But, if you want to add a new manager, you should execute the
follwing command:
docker swarm join-token manager

Docker will generate a new command that you can execute in a second manager:
docker swarm join --token SWMTKN-1-5b54vz0sie1li0ijr0epkhyjvmbbh2pg746skh8ba5674g1p6x-
354t5zlz0re5kh1jqcliofecs 138.197.35.0:2377
Now you can get a list of all the available workers and managers in you cluster by typing:
docker node ls
I have a single node in my cluster and of course it is a manager, what I see is the following result:
ID HOSTNAME STATUS AVAILABILITY MANAGER STATUS
vhvebboq9fp4j62w83dujxzjr * swarm-1 Ready Active Leader

Deploying Services
Creating A Container
Nothing is really different from what your learned before, you should create an image, build it, create a container,
tag it, commit it, push it ..etc then you can use your image to create the container.
For the sake of simplicity, I created a container based on Alpine Linux that will execute and infinite loop.
This is the Dockerfile:
FROM alpine
ENTRYPOINT tail -f /dev/null
I built it:
docker build -t eon01/infinite .
Sending build context to Docker daemon 11.78 kB
Step 1/2 : FROM alpine
latest: Pulling from library/alpine
0a8490d0dfd3: Pull complete
Digest: sha256:dfbd4a3a8ebca874ebd2474f044a0b33600d4523d03b0df76e5c5986cb02d7e8
Status: Downloaded newer image for alpine:latest
---> 88e169ea8f46
Step 2/2 : ENTRYPOINT tail -f /dev/null
---> Running in 986f0fd1f5f9
---> d1400705c370
Removing intermediate container 986f0fd1f5f9
Successfully built d1400705c370
Run it:
docker run -it --name infinite -d eon01/infinite
fc476e6f8312492b2fd9cb620c8eaf5115c2e18a52d95160849436087dec2b68
And it should keep running because of the infinite tail -f /dev/null :
docker ps
CONTAINER ID IMAGE COMMAND CREATED STATUS PORTS NAMES
fc476e6f8312 eon01/infinite "/bin/sh -
c 'tail ..." 3 seconds ago Up 2 seconds infinite
You can use this image directly from my public Docker Hub:
docker run -it --name infinite -d eon01/infinite
But this is not actually how we use Swarm. The common usage of Swarm is creating services first before thinking in
term of containers.
Creating & Configuring Swarm Services

In order to create a service you can use the docker service create command.
docker service create <options> <image> <command> <args>
This command can be used with multiple options like:
--dns to set custom DNS servers
-e or --env to set a list of environment variables
--env-file to read in a file of environment variables
--health-cmd to set a health check command
--log-driver and --log-opt to set logging driver and driver options
-p or --publish to publish a port as a node port
--replicas to control the number of running tasks of a given service
--with-registry-auth to send registry authentication details to swarm agents
--mode to select if the service should be replicated or global
--network to attach a service to a network
--endpoint-mode to choose between vip or dnsrr
And other options that you may have used in the previous sections of this book like -w or --workdir , -u or --
user , -t or --tty , --dns-option or --dns-search ..etc
Here is an example:
docker service create --name infinite_service eon01/infinite
After creating the new service, you can check using docker ps command, that you have two containers, the first one
that you created using docker run command and the other one created by default when creating the Swarm service.
CONTAINER ID IMAGE COMMAND STATUS NAMES
cf265656d24a eon01/infinite "/bin/sh -c 'tail ..." Up 10 hours (unhealthy) infinite
982687e9d979 eon01/infinite@sha256:e53.. "/bin/sh -c 'tail ..." Up 10 hours infinite_service.1.eq..
We do not really need the first "unmanaged" container, remove it using docker rm -f infinite .

Scaling Docker Containers
After we created infinite_service, you will notice that there is one container running. One of the Swarm features is
the creation of scalable services and easy to scale. One command will allow us to scale a running service.
This is the running container that the service infinite_service created. By default a service will start 1 container:
a2f13154e772 eon01/infinite "/bin/sh -c 'tail ..." infinite_service.1.
In order to scale infinite_service we can use the docker service scale command:
To scale up to 2 containers:
root@swarm-1:~# docker service scale infinite_service=2
infinite_service scaled to 2
To run 100 containers :
root@swarm-1:~# docker service scale infinite_service=100
infinite_service scaled to 100
Scaling to 100 container (or may be less or more - this depends really on your application and architecture) is
not always the Solution to your performance problems. I always make tests to choose what is the best scale to have.
Scaling up to 100 containers may make some performance regressions happens since you will be spending more
time on networking and/or service name resolution ..etc. So be sure to know the scale rate in production using load
and networking tests.
In order to see your containers you may use docker ps , but I prefer using an alternative command to show the
containers per service:
docker service ps infinite_service
ID NAME IMAGE NODE DESIRED CURRENT STATE
bfvu50gte1gd infinite_service.1 eon01/infinite:latest swarm-1 Running Running 9 minutes ago
mope64fq4q1x infinite_service.2 eon01/infinite:latest swarm-1 Running Running 5 minutes ago
k8fv6qk2ez8c infinite_service.3 eon01/infinite:latest swarm-1 Running Running 5 minutes ago
e7luxqzwtb66 infinite_service.4 eon01/infinite:latest swarm-1 Running Running 5 minutes ago
pryz06z8prbz infinite_service.5 eon01/infinite:latest swarm-1 Running Running 5 minutes ago
kvfpi2ajbie3 infinite_service.6 eon01/infinite:latest swarm-1 Running Running 3 minutes ago
e3i6q69ighth infinite_service.7 eon01/infinite:latest swarm-1 Running Running 3 minutes ago
yqzq8rfne0wh infinite_service.8 eon01/infinite:latest swarm-1 Running Running 3 minutes ago
iwrcuuz4lh7i infinite_service.9 eon01/infinite:latest swarm-1 Running Running 3 minutes ago
ytpfh7u5w69b infinite_service.10 eon01/infinite:latest swarm-1 Running Running 3 minutes ago
so5am191gsmm infinite_service.11 eon01/infinite:latest swarm-1 Running Running 3 minutes ago
.
.
.
47tt3jgx6wjt infinite_service.66 eon01/infinite:latest swarm-1 Running Running 3 minutes ago
87bmjq1p9w7a infinite_service.67 eon01/infinite:latest swarm-1 Running Running 3 minutes ago
xuket5mmp4uw infinite_service.68 eon01/infinite:latest swarm-1 Running Running 3 minutes ago
tpsy9hllzxz4 infinite_service.69 eon01/infinite:latest swarm-1 Running Running 3 minutes ago
eyfzgknxem9f infinite_service.70 eon01/infinite:latest swarm-1 Running Running 3 minutes ago
m6z044ym12kt infinite_service.71 eon01/infinite:latest swarm-1 Running Running 3 minutes ago
lvr69efjkh1y infinite_service.72 eon01/infinite:latest swarm-1 Running Running 3 minutes ago
o56fj14cwkjg infinite_service.73 eon01/infinite:latest swarm-1 Running Running 4 minutes ago
gwjs8et91a0z infinite_service.74 eon01/infinite:latest swarm-1 Running Running 3 minutes ago
vh5te7refgjh infinite_service.75 eon01/infinite:latest swarm-1 Running Running 3 minutes ago
c8xwnlconcfb infinite_service.76 eon01/infinite:latest swarm-1 Running Running 3 minutes ago
j724xf8y0hut infinite_service.77 eon01/infinite:latest swarm-1 Running Running 3 minutes ago
xgmoeyz777sf infinite_service.78 eon01/infinite:latest swarm-1 Running Running 3 minutes ago

e1wcnr6uj8tc infinite_service.79 eon01/infinite:latest swarm-1 Running Running 3 minutes ago
qxm4cqk8rynd infinite_service.80 eon01/infinite:latest swarm-1 Running Running 3 minutes ago
74c9jkn4sdam infinite_service.81 eon01/infinite:latest swarm-1 Running Running 3 minutes ago
07xzshv893x9 infinite_service.82 eon01/infinite:latest swarm-1 Running Running 3 minutes ago
twvbe48cx4wl infinite_service.83 eon01/infinite:latest swarm-1 Running Running 4 minutes ago
jhftjr6f14b0 infinite_service.84 eon01/infinite:latest swarm-1 Running Running 4 minutes ago
qgbnv32oe9yk infinite_service.85 eon01/infinite:latest swarm-1 Running Running 4 minutes ago
b689gaghcxzd infinite_service.86 eon01/infinite:latest swarm-1 Running Running 3 minutes ago
zo7mu3zw6rw6 infinite_service.87 eon01/infinite:latest swarm-1 Running Running 4 minutes ago
xt1p06nvzzi9 infinite_service.88 eon01/infinite:latest swarm-1 Running Running 3 minutes ago
kw57wh4thsei infinite_service.89 eon01/infinite:latest swarm-1 Running Running 4 minutes ago
qdws30214xr2 infinite_service.90 eon01/infinite:latest swarm-1 Running Running 3 minutes ago
rprasrpkksnf infinite_service.91 eon01/infinite:latest swarm-1 Running Running 3 minutes ago
4894dp78376t infinite_service.92 eon01/infinite:latest swarm-1 Running Running 4 minutes ago
4s6k9hxqwbrr infinite_service.93 eon01/infinite:latest swarm-1 Running Running 4 minutes ago
rct9syhyztuv infinite_service.94 eon01/infinite:latest swarm-1 Running Running 4 minutes ago
b391cod0r2wz infinite_service.95 eon01/infinite:latest swarm-1 Running Running 3 minutes ago
xr7z5l1x14va infinite_service.96 eon01/infinite:latest swarm-1 Running Running 3 minutes ago
rruxgcoaxmjr infinite_service.97 eon01/infinite:latest swarm-1 Running Running 4 minutes ago
tascvsbjidtp infinite_service.98 eon01/infinite:latest swarm-1 Running Running 3 minutes ago
oazgbooulfne infinite_service.99 eon01/infinite:latest swarm-1 Running Running 3 minutes ago
kc7d5xmcvxvy infinite_service.100 eon01/infinite:latest swarm-1 Running Running 3 minutes ago
Note that containers names are numbered and contains the service name : infinite_service.1, infinite_service.10,
infinite_service.100 The last command will give you more information about containers, information like the desired
state and the current state will give you helpful information about your containers.
The desired-state could take the values:
running
shutdown
accepted
A container current state could be:
running
shutdown
assigned
preparing
You have also the choice to scale you services when starting them using docker service create command:
docker service create --name infinite_service --replicas 10 eon01/infinite
infinite_service is a replicated service. Global is another type. In Swarm service could be replicated or global. If
you have used Docker without Swarm, you may notice that Swarm moved Docker from a transactional approach
(operations made directly on containers) to abstraction (there are services and containers and a container is the
"physical" representation of a service and it obeys to Docker distribution strategy when the cluster contains more
than 1 node). We are going to see the difference between the two modes later in this chapter.

Replicated VS Global
Replicated services are distributed by Swarm manager(s) in the form of a specific number of replica tasks among the
nodes. The scale is defined by the user and if it is not defined, it will be 1 by default. We scaled infinite_service to
10, if we have 5 nodes, it is not nece
Global services, are run as one task in every node of the Swarm cluster.
To create a global service, you should use a similar command to this one:
docker service create --name infinite_service --mode global eon01/infinite
By default services are replicated. So using:
docker service create --name infinite_service --mode replicated eon01/infinite
is like using:
docker service create --name infinite_service eon01/infinite
You can scale replicated services but it is not allowed to scale global services:
docker service create --name infinite_service --mode global eon01/infinite
docker service scale infinite_service=2
infinite_service: scale can only be used with replicated mode

Creating & Configuring Swarm Networks
As seen in the networking chapter, Docker has some default built-in networks:
bridge that allow the communication between physical or virtual network interfaces in the host's system.
docker_gwbridge that allows the containers to have external connectivity outside of their cluster. By default
every container is connected to this network.
host that allows containers to have a similar networking configuration to the host.
ingress that exposes containers externally available to the swarm based on a port mapping model
none that helps to create a container-specific network
docker network ls
NETWORK ID NAME DRIVER SCOPE
f97187f3cbf9 bridge bridge local
3a0e460df3be docker_gwbridge bridge local
09493ae999c4 host host local
czm3d1slqjxz ingress overlay swarm
31dffc9464fd none null local
You can of course create your own bridge network, your own gateway ..etc but since we are using the networking
features built in Docker by default, we are not going to create more networks other than default ones, because we
may need some overlay networks. If we want to create a multi-host networking stack, we need overlay networks.
Creating an overlay network, will make it only available to the nodes attached to our Swarm cluster.
Docker overlay networks are not available to unmanaged containers even if they are living inside a Swarm
node.
By default the nodes encrypt and authenticate information they exchange via gossip using the AES algorithm in
GCM mode but you can add another encryption layer to an overlay network
When using Swarm mode built-in discovery, you don't need to expose service-specific ports to make the
service available to other services on the same overlay network. Swarm will do the job for you.
We can create an overlay network using docker network create command. Here is the simplest example:
docker network create -d overlay infinite_net
or
docker network create --driver overlay infinite_net
Let's update the command to create the previous service in order to attach it to this network. Remove the service and
re-create it:
docker service rm infinite_service
docker service create --name infinite_service --network infinite_net eon01/infinite
A Docker service could be connected to two networks, let's test this:
docker network create -d overlay infinite_net_2
docker service rm infinite_service

docker service create --name infinite_service --network infinite_net --network infinite_net_2 eon01/infinite
Note that you can connect or disconnect a container to a given network using:
docker network connect <network_name> <container_id|container_name>
docker network disconnect <network_name> <container_id|container_name>
If you want to remove the network called infinite_net_2 , you can use docker network rm infinite_net_2 , but in reality
you will not be able to do it because you had already attached the service infinite_service to this network.
You can not remove a network being used by a service.
For this test, I was using Digital Ocean but for other tests I used some AWS EC2 machines and I had a problem with
the DNS. My solution was to add the option --dns :
docker service rm infinite_service
docker service create --name infinite_service --network infinite_net --dns 8.8.8.8 --dns 8.8.4.4 eon01/infinite
Sometimes, you create multiple networks and play with them but later you may forget to delete the unused ones.
Docker allows you to remove them, you should just type docker network prune .

Inter-Services Communication & Discovery
Let's create two new services attached to two different networks:
docker service rm infinite_service
docker network create -d overlay net_1
docker network create -d overlay net_2
docker service create --name service_1 --network net_1 eon01/infinite
docker service create --name service_2 --network net_2 eon01/infinite
Every service has 1 running container:
CONTAINER ID IMAGE COMMAND NAMES
dcfb1cc4a2a3 eon01/infinite "/bin/sh -c 'tail ..." service_2.1.ilz36bzvph6wbve28wdxzgn08
1c09cbbae151 eon01/infinite "/bin/sh -c 'tail ..." service_1.1.whz2slvqigmzp2ebh0ku68tft
dcfb1cc4a2a3 & 1c09cbbae151 are the ids of our containers.
If you type docker service inspect service_1 , you will see the network configuration where the network is net_1 and
the endpoint is in vip mode:
"Networks": [
{
"Target": "net_1"
}
],
"EndpointSpec": {
"Mode": "vip"
}
VIP is a container load balancing mode and we are going to see later the difference between VIP-based load
balancing and DNS-based load balancing.
Note that you can specify the CIDR of your user-defined networks.
Example:
docker network create -d overlay --subnet=192.168.1.0/24 net_1
docker network create -d overlay --subnet=192.168.2.0/24 net_2
Let's re-create the two same services where every one of them will be attached to a different network.
docker service rm service_1 service_2
docker service create --name service_1 --network net_1 eon01/infinite
docker service create --name service_2 --network net_2 eon01/infinite
Let's see what we have on our cluster:
docker ps
CONTAINER ID IMAGE COMMAND NAMES
c0a751e49756 eon01/infinite@sha256: "/bin/sh -c 'tail ..." service_2.1.
8fda59787b76 eon01/infinite@sha256: "/bin/sh -c 'tail ..." service_1.1.

To see if service_1 and service_2 could establish a communication, we are doing here a simple test using ping
command:
service_2 can ping service_1:
docker exec -it c0a751e49756 ping -c 2 service_2
PING service_2 (10.0.3.2): 56 data bytes
64 bytes from 10.0.3.2: seq=0 ttl=64 time=0.091 ms
64 bytes from 10.0.3.2: seq=1 ttl=64 time=0.138 ms
--- service_2 ping statistics ---
2 packets transmitted, 2 packets received, 0% packet loss
round-trip min/avg/max = 0.091/0.114/0.138 ms
service_1 can ping service_2:
docker exec -it 8fda59787b76 ping -c 2 service_1
PING service_1 (10.0.2.2): 56 data bytes
64 bytes from 10.0.2.2: seq=0 ttl=64 time=0.160 ms
64 bytes from 10.0.2.2: seq=1 ttl=64 time=0.179 ms
--- service_1 ping statistics ---
2 packets transmitted, 2 packets received, 0% packet loss
round-trip min/avg/max = 0.160/0.169/0.179 ms
We can see that both services can communicate with each other.
When you create a service using Swarm, you should give it a name and it is going to be resolved by Docker like we
have seen for our two services. There is a mapping between the subnet/IP of a service and its name.
For example: If in the same Docker Swarm cluster, you have php service called php_client that should call a Python
API service called python_api running on port 8000, you can connect from your php code to the API service using a
code similar to this one:
$response = file_get_contents('http://python_api/path/to/api/call?param=x');
$response = json_decode($response);
The container/service will resolve python_api/ for php to allow it to connect to the API.
Within a swarm cluster, containers can call and request data from other containers using their service's built-in DNS
resolution that can find appropriate distant IP and port automatically. If you call a service (from outside or inside the
cluster), you are in reality requesting one of the containers of this service.
If a service is scaled to 2 or more containers, there is a load balancing algorithm that will redirect the traffic to a
given container. If a container is down (generally because its entry process is not running, it will be cut from traffic
and the load balancer will not redirect traffic to this container. Requests going to a service's containers would be
round-robin load-balanced and it will work even if you did not forward any ports when you created your docker
service.
Docker service discovery uses iptables and IPVS features of Linux Kernel.
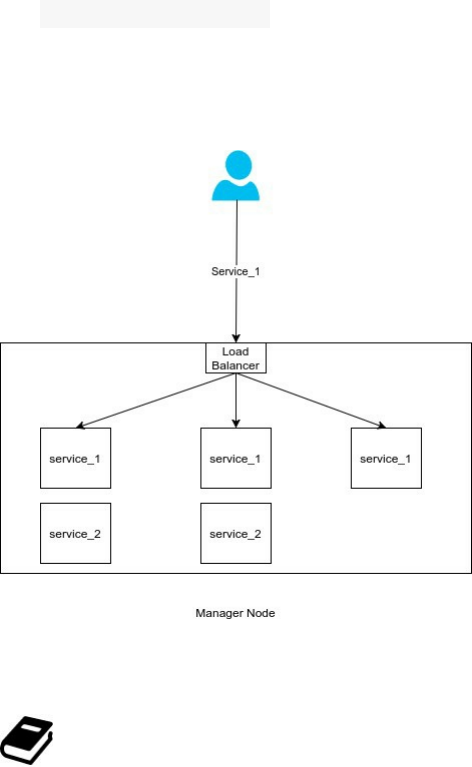
VIP vs DNS Based Load Balancing
Since Docker 1.12 was released, two important services were added to the default installation: Service discovery and
load balancing.
Load balancing uses also iptables and IPVS features of Linux Kernel.
IPVS (IP Virtual Server) implements transport-layer load balancing inside the Linux kernel, so called Layer-4
switching. IPVS running on a host acts as a load balancer at the front of a cluster of real servers, it can direct
requests for TCP/UDP based services to the real servers, and makes services of the real servers to appear as a virtual
service on a single IP address.
Docker service discovery and load balancing uses iptables and IPVS features of Linux kernel. Iptables is a packet
filtering technology available in Linux kernel. Iptables can be used to classify, modify and take decisions based on
the packet content. IPvS is a transport level load balancer available in the Linux kernel.
docker service scale service_1=3
docker service scale service_2=2
We scaled our services: service_1 to 3 containers and service_2 to 2 containers. But when a client will request the
service_1, his request will be routed to a single container and the built-in load balancer will be responsible for
routing the request.
If we a cluster of 3 nodes: 2 worker nodes and a managed, containers will be distributed across these nodes and the
load balancing algorithm will keep working the same way and balancing traffic to other nodes in the cluster (not just
within the same machine).
Only managers will load-balance the traffic to services' containers.
This schema shows how a swam manager can distribute traffic to itself and the other worker nodes in the same
cluster.
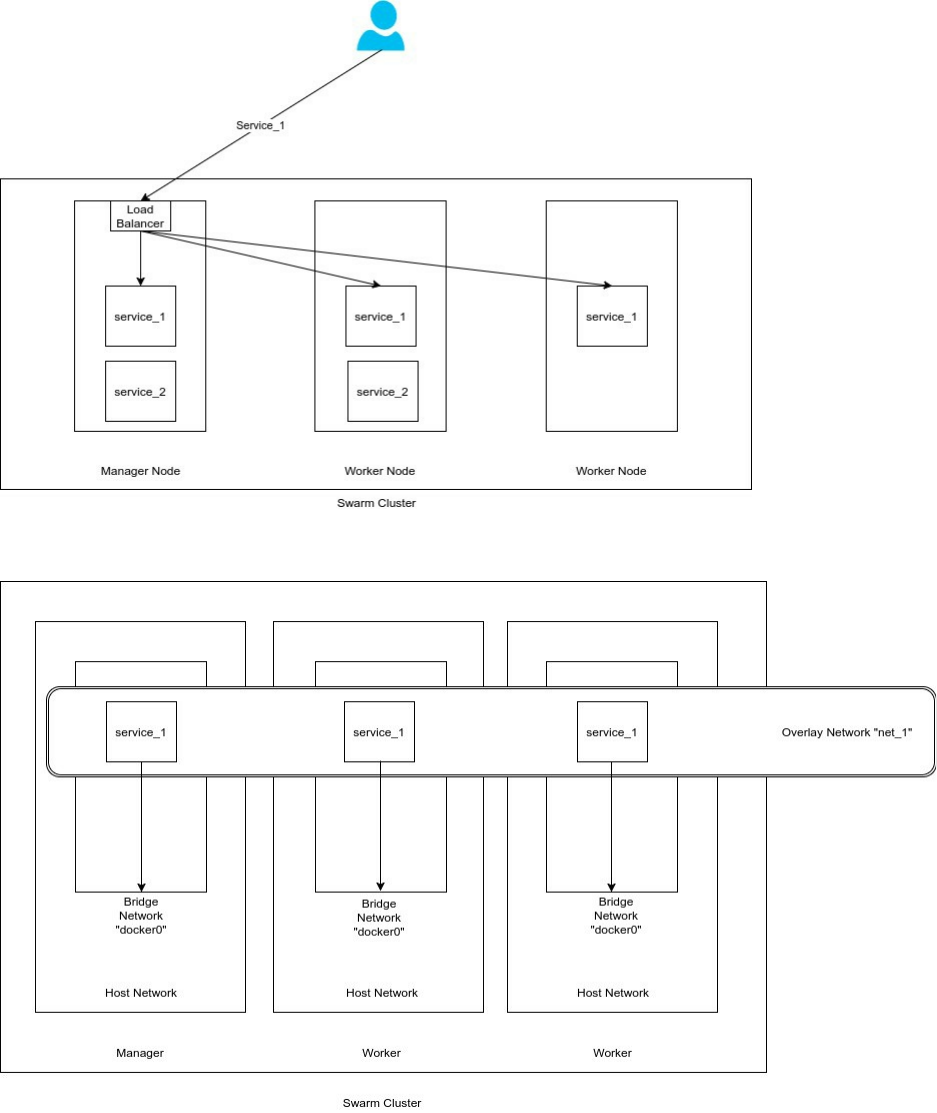
Previously, when we created our two services, we attached service_1 to net_1 and service_2 to net_2, that's why all
of the three nodes recognize the 2 overlay networks:
DNS Load Balancing
Docker engine comes with an embedded DNS server, if service_1 has 3 running containers, when you request it, the
DNS will return the list of container's IPs without a particular order and your request will be redirected to the frist IP
in the list.

You can specify the DNS mode in a Swarm explicitly using --endpoint-mode . Let's re-create our two services using
the same option and add the service_1 to the network net_2:
docker service rm service_1 service_2
docker service create --name service_1 --network net_1 --network net_2 --endpoint-mode dnsrr eon01/infinite
docker service create --name service_2 --network net_2 --endpoint-mode dnsrr eon01/infinite
docker service inspect service_1
You can notice the DNS mode (dnsrr):
"EndpointSpec": {
"Mode": "dnsrr"
}
The DNS load balancing uses the Round Robin algorithm, we are going to see a example of how it works. To see
this, let's scale service_1 to two instances and try to ping it from a container running service_2:
docker service scale service_1=2
Using docker ps you can identify the id of the container running service_2. Let's ping service_1 from this container:
docker exec -it 8b9d83c20454 ping -c 1 service_1
PING service_1 (10.0.3.2): 56 data bytes
64 bytes from 10.0.3.2: seq=0 ttl=64 time=0.272 ms
And try it again:
docker exec -it 8b9d83c20454 ping -c 20 service_1
PING service_1 (10.0.3.3): 56 data bytes
64 bytes from 10.0.3.3: seq=0 ttl=64 time=0.266 ms
We can notice that service_1 replied in the first ping with 10.0.3.2 and in the second one with another IP address
10.0.3.3. Docker containers running service_1 have two differnet adresses and the internal load balancer will route
traffic to both of them using a Round Robin balancing method:
docker inspect 75dc68288a2e|grep -i ipv4
"IPv4Address": "10.0.2.3"
docker inspect 91ab0b66aa3a|grep -i ipv4
"IPv4Address": "10.0.2.2"
At this moment, Docker DNS load balancing may have some issues distributing the traffic to scaled services, you
may read this blog post if you are interested to know the effect of RFC3484 on DNS Round Robin balancing. If you
experienced some problems using this feature, you may use the other alternatives like weave, consul, registrator, or
the VIP mode that we are going to see together in the following part of this chapter.
VIP Load Balancing
Starting from 1.12.0 release, Docker added the VIP in-built support for service load balancing using the previously
explained IPVS. The DNS name of the service is mapped to a VIP (Virtual IP).

Using the VIP load balancing, each service will have a single static IP that maps to multiple running containers, if
one ore more containers disappear, the associated IP will not change as long as the service is up.
Let's see how this mode works. Create a new service_1 with two containers using the VIP load balancing and the
service_2:
docker service rm service_1 ; docker service create --name service_1 --network net_1 --network net_2 --replicas 2 --
endpoint-mode vip eon01/infinite
docker service rm service_2 ; docker service create --name service_2 --network net_2 --endpoint-mode vip eon01/infinite
Using docker ps get the id of the container running service_2 and ping service_1 from that container:
docker exec -it 77a783cfde4f ping -c 1 service_1
PING service_1 (10.0.3.2): 56 data bytes
64 bytes from 10.0.3.2: seq=0 ttl=64 time=0.111 ms
You can try it again and again, but the service_1 will always have the same IP: 10.0.3.2.
As said, this is done using Linux Kernel iptables (for firewall rules and ipvs (for load balacing) and we are going to
use the nsenter command:
Using docker ps , get the id of one of the running service_1 containers, then use this command docker inspect
<id>|grep -i sandbox in order to find the network namespace.
docker inspect 3877e31787f8|grep -i sandbox
"SandboxID": "f3886fa3028fc42364d7a157b467216abcf466ef8a72efbf69ff11a294addea7",
"SandboxKey": "/var/run/docker/netns/f3886fa3028f",
Now go to /var/run/docker/netns/ and execute the nsenter command with the network f3886fa3028f :
cd /var/run/docker/netns/
nsenter --net=f3886fa3028f sh
Now type:
iptables -nvL -t mangle
You may see something similar to this output:
Chain PREROUTING (policy ACCEPT 0 packets, 0 bytes)
pkts bytes target prot opt in out source destination
Chain INPUT (policy ACCEPT 0 packets, 0 bytes)
pkts bytes target prot opt in out source destination
Chain FORWARD (policy ACCEPT 0 packets, 0 bytes)
pkts bytes target prot opt in out source destination
Chain OUTPUT (policy ACCEPT 0 packets, 0 bytes)
pkts bytes target prot opt in out source destination
0 0 MARK all -- * * 0.0.0.0/0 10.0.2.2 MARK set 0x107
0 0 MARK all -- * * 0.0.0.0/0 10.0.3.2 MARK set 0x108
Chain POSTROUTING (policy ACCEPT 0 packets, 0 bytes)
pkts bytes target prot opt in out source destination
The interesting line for us is :
0 0 MARK all -- * * 0.0.0.0/0 10.0.3.2 MARK set 0x108
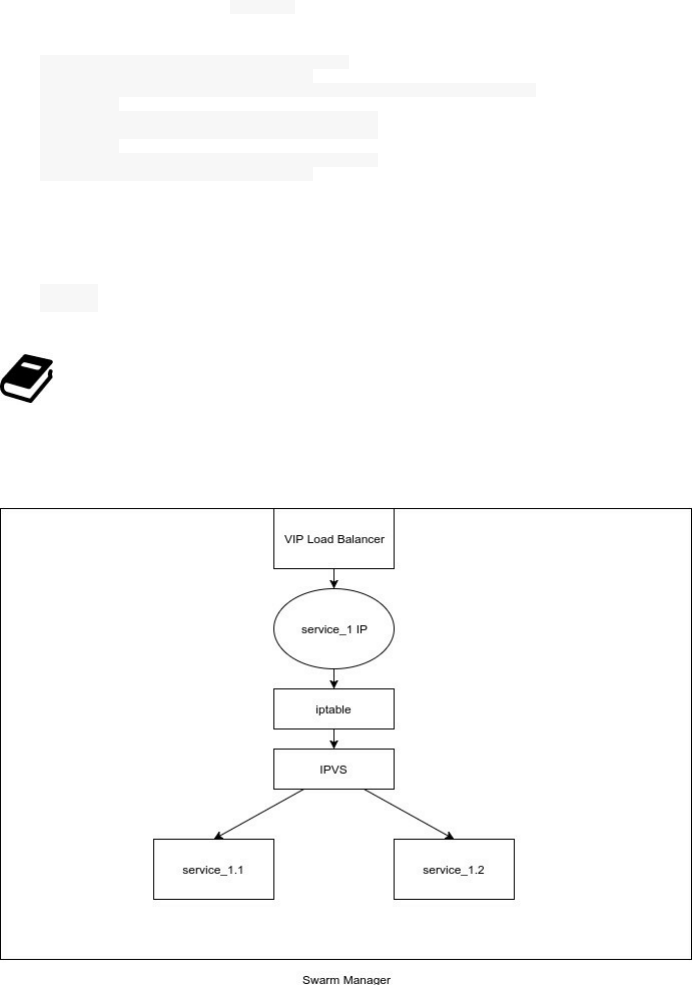
As you may see, any request of the IP 10.0.3.2, which is the IP of our service is marked by 0x108 (which is 264 in
decimal).
If in the same CLI, you type ipvsadm , you will see something like this:
IP Virtual Server version 1.2.1 (size=4096)
Prot LocalAddress:Port Scheduler Flags
-> RemoteAddress:Port Forward Weight ActiveConn InActConn
FWM 263 rr
-> 10.0.2.3:0 Masq 1 0 0
-> 10.0.2.4:0 Masq 1 0 0
FWM 264 rr
-> 10.0.3.3:0 Masq 1 0 0
-> 10.0.3.4:0 Masq 1 0 0
The 264 entry (0x108 in hexa) contains the IPs of the two containers running service_1:
10.0.3.3
10.0.3.4
Mangling or packet mangling is a modification applied to network packets in a packet-based network
interface before and/or after routing.
Now if we kill all of the containers running service_1 and ping again, we still have the same VIP address.
As a conclusion, using only 10.0.3.2, the VIP mode will load-balance traffic between 10.0.3.3 and 10.0.3.4.

Updating Services
On of the important features in Docker Swarm is the possibility to apply rolling updates on running containers. This
is done by updating the service. As we have seen, one can scale a service while it is running without having
interruptions:
docker service scale service_1=20
We can also, apply updates on the running image and this could be useful for developers and ops engineers to
upgrade an application. In the following example, we are going to upgrade service_1 from one version to another:
docker service update --image eon01/infinite:0.1 service_1
After applying these updates, you can monitor its status using the inspect command docker service inspect service_1 :
"UpdateStatus": {
"State": "updating",
"StartedAt": "2017-02-19T00:41:30.326692292Z",
"CompletedAt": "1970-01-01T00:00:00Z",
"Message": "update in progress"
}
If the update is finished, the status will change:
"UpdateStatus": {
"State": "completed",
"StartedAt": "2017-02-19T00:41:30.326692292Z",
"CompletedAt": "2017-02-19T00:42:02.636303087Z",
"Message": "update completed"
}
If an error happens, you will see something like this:
"UpdateStatus": {
"State": "paused",
"StartedAt": "2017-02-19T00:41:30.326692292Z",
"Message": "update paused due to failure or early termination of task 1p7eth457h8ndf0ui9s0q951b"
}
In this case, just typing docker service update service_1 will restart the service.
If you need to go back to the previous image, you can run:
docker service update --rollback service_1
You can update DNS:
docker service update --dns-add 8.8.8.8 service_1
Change the host name:
docker service update --hostname host_1 service_1

This will change containers' hostnames to host_1:
docker exec -it d86832832991 hostname
host_1
docker exec -it 5362c0d7cc91 hostname
host_1
You can update other configurations and options like:
--args string Service command args
--constraint-add list Add or update a placement constraint (default [])
--constraint-rm list Remove a constraint (default [])
--container-label-add list Add or update a container label (default [])
--container-label-rm list Remove a container label by its key (default [])
--dns-option-add list Add or update a DNS option (default [])
--dns-option-rm list Remove a DNS option (default [])
--dns-rm list Remove a custom DNS server (default [])
--dns-search-add list Add or update a custom DNS search domain (default [])
--dns-search-rm list Remove a DNS search domain (default [])
--endpoint-mode string Endpoint mode (vip or dnsrr)
--env-add list Add or update an environment variable (default [])
--env-rm list Remove an environment variable (default [])
--group-add list Add an additional supplementary user group to the container (default [])
--group-rm list Remove a previously added supplementary user group from the container (default [])
--health-cmd string Command to run to check health
--health-interval duration Time between running the check (ns|us|ms|s|m|h)
--health-retries int Consecutive failures needed to report unhealthy
--health-timeout duration Maximum time to allow one check to run (ns|us|ms|s|m|h)
--host-add list Add or update a custom host-to-IP mapping (host:ip) (default [])
--host-rm list Remove a custom host-to-IP mapping (host:ip) (default [])
--label-add list Add or update a service label (default [])
--label-rm list Remove a label by its key (default [])
--limit-cpu decimal Limit CPUs (default 0.000)
--limit-memory bytes Limit Memory (default 0 B)
--log-driver string Logging driver for service
--log-opt list Logging driver options (default [])
--mount-add mount Add or update a mount on a service
--mount-rm list Remove a mount by its target path (default [])
--no-healthcheck Disable any container-specified HEALTHCHECK
--publish-add port Add or update a published port
--publish-rm port Remove a published port by its target port
--reserve-cpu decimal Reserve CPUs (default 0.000)
--reserve-memory bytes Reserve Memory (default 0 B)
--restart-condition string Restart when condition is met (none, on-failure, or any)
--restart-delay duration Delay between restart attempts (ns|us|ms|s|m|h)
--restart-max-attempts uint Maximum number of restarts before giving up
--restart-window duration Window used to evaluate the restart policy (ns|us|ms|s|m|h)
--secret-add secret Add or update a secret on a service
--secret-rm list Remove a secret (default [])
--stop-grace-period duration Time to wait before force killing a container (ns|us|ms|s|m|h)
--tty, -t Allocate a pseudo-TTY
--update-delay duration Delay between updates (ns|us|ms|s|m|h) (default 0s)
--update-failure-action string Action on update failure (pause|continue) (default "pause")
--update-max-failure-ratio float Failure rate to tolerate during an update
--update-monitor duration Duration after each task update to monitor for failure (ns|us|ms|s|m|h) (default 0s)
--update-parallelism uint Maximum number of tasks updated simultaneously (0 to update all at once) (default 1)
--user, -u string Username or UID (format: <name|uid>[:<group|gid>])
--with-registry-auth Send registry authentication details to swarm agents
--workdir, -w string Working directory inside the container
If you need to force an update even if no changes require it, you can use --force .

Locking & Unlocking Swarm
This feature is compatible with Docker 1.13 and higher since it is based on the Docker secrets feature.
By default, all of the Raft logs used by Swarm managers are encrypted, you can also use TLS based communications
between nodes in order to protect the Swarm cluster from external malicious access. In both cases (Raft logs
encryption and TLS communication), Swarm use keys (1 key per case) and these keys are stored in the memory of
each manager but you have the possibility to get these keys using the autolock feature.
When you start a manager, it is started by default without autolock:
docker swarm init --autolock=false
By default Docker generates a key and store it on disk, so that managers can restart automatically without a human
intervention. But if you want to lock the Swarm, you should use a similar command to this one :
docker swarm init --autolock=true
This command will generate a worker token then a locking/unlocking key that could be used later to unlock a
manager in order to start a stopped manager, to restart Docker or restore the swarm from a backup.
The generated key should be saved manually in a safe place.
In the case you get the ownership of the key, your Swarm manager will no longer be able to restart without your
intervention, since providing the key is now your responsibility. If you want to give back this responsibility to
Docker, you can do it using:
docker swarm update --autolock=false
Typing this command will disable the encryption of both keys, they are stored unencrypted on disk.
While disabling the lock feature, other Docker managers may be down and will not be able to change their
statuses from locked to unlocked, so they will still need the lock key. So keep them stored in a safe place.
Note that you can lock an already created service using the update command:
docker swarm update --autolock=false
And in order to unlock a Swarm, you may use docker swarm unlock and enter your unlock key.

Swarm Backup
A Swarm manager stores the state of the cluster, its logs and the keys used to encrypt the Raft logs in
/var/lib/docker/swarm/ :
ls -lrth /var/lib/docker/swarm/
total 20K
drwxr-xr-x 2 root root 4.0K Feb 7 00:01 worker
drwxr-xr-x 2 root root 4.0K Feb 7 00:01 certificates
drwx------ 4 root root 4.0K Feb 7 00:01 raft
-rw------- 1 root root 108 Feb 18 17:03 docker-state.json
-rw------- 1 root root 68 Feb 18 17:03 state.json
In order to restore an auto-locked Swarm, you will absolutely need these keys and make the backup from any of
your cluster managers.
Unlock key, retrieve it and store it in a safe location or read-lock your swarm to protect its encryption key then make
you backup, it is better if you stop Docker on the manager you are using because data could change during the
backup.
cp -r /var/lib/docker/swarm/ /backup
Now you can start your manager.
Save these files in a safe place and before that make sure to have valid files, sometimes files may be corrupted. The
best way to check if a file is corrupted or not is to read it or to check its checksum and compare it to a valid file.
cksum <my_file>

Swarm Disaster Recovery
Unless you are experimenting and learning you can do this safely of your test servers but beware to have a valid
backup of you are trying to do it on a production server.
Follow the steps enumerated in the previous section Swarm Backup, make sure your files are not corrupted and save
them to a safe place.
In order to make a disaster recovery, create a new Swarm, shut down Docker on the machine where the swarm will
be recovered and remove the files inside /var/lib/docker/swarm , then copy your backup files inside.
If everything is ok, you can start a new Swarm using the following command:
docker swarm init --force-new-cluster
You can add new managers and workers for now.
If your node uses an encryption key (with autolock enabled), it will be the same of your old recovered one and you
can not change it unless your recovery is finished. After finishing the recovery, unlock the Swarm using the old
unlock key then you can create a new key using the key rotation feature.

Swarm Key Rotation
Scheduling a regular key rotation is a best practice. Creating a new key is not complicated, one command to do it:
docker swarm unlock-key --rotate
The previous command will generate a new unlock key and in order to use it to unlock a swarm manager you should
use docker swarm unlock . At this step, the generated key should provided.
Like the first key, the new one should be stored in a safe place. If lost, you will not be able to restart your manager.
The key rotation feature is also used, like we have seen together in the section Swarm Disaster Recovery, in
generating a new key after a Swarm disaster recovery.

Monitoring Swarm Health
HEALTHCHECK is a Docker instruction that tells the engine to test a container in order to check its state and if it is
still working.
Let's see in practice how this works. We are still using the same Swarm that we used trough all of this chapter. Let's
begin by removing the two running services and create a web server service.
docker service rm service_1 service_2
We will use Nginx for our web server:
docker service create --name web_server --replicas 1 -p 80:80 nginx:alpine
Go to your server IP address and check if you have the default Nginx home page.
We are going to use the official image of nginx:alpine to create a new image where we add a health check. This is
the Dockerfile:
FROM nginx:alpine
RUN apk add --no-cache curl
RUN echo "hello world" > /usr/share/nginx/html/index.html
HEALTHCHECK --interval=5s --timeout=5s CMD curl --fail -A "healthcheck-routine" http://localhost:80/ || exit 1
I built, committed and pushed this image to my Docker Hub and you can use it directly. You can also build it by
your own:
docker build -t eon01/nginx_healthcheck_example .
Or run it using this command:
docker run -it --name nginx_healthcheck_example -p 80:80 -d eon01/nginx_healthcheck_example
Make sure your port 80 is not used by another local server. Verify that your container is running using docker ps .
Docker HEALTHCHECK will return the state of the running nginx, if you type this command:
docker inspect --format "{{json .State.Health.Status }}" nginx_healthcheck_example

It will give you the state of your container, normally it should be: healthy. This state is based on the curl check run
by the instruction:
HEALTHCHECK --interval=5s --timeout=5s CMD curl --fail -A "healthcheck-routine" http://localhost:80/ || exit 1
Where :
interval=DURATION (default: 30s). This is the time interval between executing the healthcheck.
timeout=DURATION (default: 30s). If the check does not finish before the timeout, consider it failed.
retries=N (default: 3). How many times to recheck before marking a container as unhealthy.
You can customize your HEALTHCHECK using other configurations like:
HEALTHCHECK --interval=2s --timeout=1s --retries=1 CMD curl --fail -A "healthcheck-
routine" http://localhost:8080/ || exit 1
In both cases, the curl command to verify the check is curl --fail -A "healthcheck-routine" http://localhost:8080/ || exit
1 which tells Docker to monitor the exit code of curl, if Nginx stops serving the index.html page, it will fall into 1
and exits. Docker will restart the container after timeout second(s) for retries times and each interval second(s).
In order to simulate a failure, we are going to move index.html and move it to index.html.orig, the index page will be
unreachable and our HEALTHCHECK will be monitoring this failure.
Type:
docker exec -it nginx_healthcheck_example sh
Inside the container:
cd /usr/share/nginx/html && mv index.html index.html.orig
Now (on your host machine), type watch docker ps , wait some seconds and see the STATUS changing from (healthy)
to (unhealthy). At this step, Docker will restart the container.
The HEALTHCHECK state will log the failure that we simulate and any output from the curl command. If you wan
to debug your container, you can use this command:
docker inspect --format "{{json .State.Health }}" nginx_healthcheck_example
You should be able to see something like these logs:
{
"Status":"unhealthy",
"FailingStreak":77,
"Log":[
{
"Start":"2017-03-07T01:18:35.952544005+01:00",
"End":"2017-03-07T01:18:35.973369673+01:00",
"ExitCode":1,
"Output":" "[...]""
},
{
"Start":"2017-03-07T01:18:40.973509581+01:00",
"End":"2017-03-07T01:18:40.993919955+01:00",
"ExitCode":1,
"Output":" "[...]""
},
{

"Start":"2017-03-07T01:18:45.994059011+01:00",
"End":"2017-03-07T01:18:46.014129303+01:00",
"ExitCode":1,
"Output":" "[...]""
},
{
"Start":"2017-03-07T01:18:51.014382522+01:00",
"End":"2017-03-07T01:18:51.063646337+01:00",
"ExitCode":1,
"Output":" "[...]""
},
{
"Start":"2017-03-07T01:18:56.064089164+01:00",
"End":"2017-03-07T01:18:56.135445869+01:00",
"ExitCode":1,
"Output":" "[...]""
}
]
}
Docker health check is a useful feature, if the container fails health checks or terminates, the task terminates and the
orchestrator creates a new replica task that spawns a new container.

Using Secrets In Swarm Mode
Starting from the version 1.13, Docker users can use Docker Secrets when working in Swarm Mode.
A secret is a blob of data like:
password
SSH/SSL private key and certificates
A secret key that could be stored in your Dockerfile
Sensitive environment data that could be transmitted over a network
Sensitive data in the application source code that could be transmitted over a network
Other data such as the user-name or the name of a database, generic strings or even binary content ( < 500 kb)
..etc
In one of the above cases, Docker Secrets allow you to centrally manage sensitive data and transmit it in a secure
way and only to containers that need access to it. This sensitive data, is encrypted in both rest and transmit.
When you add a secret to a Swarm it is sent to the manager over a TLS connection.
A TLS connection uses the Transport Layer Security protocol that provides privacy and data integrity in containers
inter-communications.
Docker has its built-in certificate authority.
After that, the secret is stored in the Raft log, which is encrypted by default (> 1.13) and when this log is replicated
across all of the other managers, the secret is securely propagated.
If a new node joins the cluster, at the moment when the latter will run a given service, a manager will establish a
TLS connection to the new node and will securely send the service's secret data. A secret is then unencrypted and
mounted into the container in an in-memory file system.
These mounts have /run/secrets/<secret_name> as a target.
In the case when a node is no longer running a service, all of the latter's secrets disappear from the node: The node
will no longer have access to secrets. This process is made by the node itself after having a notification from a
manager.
The Docker Secret is never written to disk on any of the Swarm nodes, instead of disk, a secret is written to the
tmpfs volume and it is not possible to recover it from the Docker CLI but you should actually read it from the
service(s) where it has been injected.
tmpfs is a temporary file storage facility used in many Unix-like OSs. It is intended to appear as a mounted
file system, but stored in RAM instead of a disk.
Creating & Storing Secrets
Let's try some practical examples.
In some of the examples we run a Mysql database using this command:
docker run --name mysql -p 3306:3306 --env MYSQL_ROOT_PASSWORD=password -d mysql

and when we want to create a Swarm we need to run
docker service create --name mysql -p 3306:3306 --env MYSQL_ROOT_PASSWORD=password mysql
With Docker Secrets, the run command will be:
docker service create --name mysql -p 3306:3306 --secret mysql-root-password --
env MYSQL_ROOT_PASSWORD_FILE=/run/secrets/mysqlrootpassword mysql
/run/secrets/mysqlrootpassword is the file where the root password is encrypted. Here is how to create it:
Say our password is simply "password"
After creating your Swarm, open the terminal and type: echo "password"|docker secret create mysqlrootpassword -
You will get the id of the secret. In my case : vbsvaiunxjau6r6isnc3vxcyt
Now you can check the secret file under /run/secrets/ in the Mysql running container: docker exec -it
mysql.1.j9tixgi8pmwa131ux5screqaq ls /run/secrets/mysql-root-password
When I created the Mysql service, it was deployed to a host that I called host_1:
ID NAME IMAGE NODE DESIRED STATE CURRENT STATE ERROR PORTS
j9tixgi8pmwa mysql.1 mysql:latest host_1 Running Running 4 minutes ago
To make a double check, we can type: mysql -h host_1 -uroot -ppassword and we will be connected to the Mysql
container.
In order to see the injected secrets, type:
docker secret ls
e.g.:
ID NAME CREATED UPDATED
wf048or4g6v7gn3v8pmj57vz0 mysqlrootpassword 35 minutes ago 35 minutes ago
Sending Secrets Between Services
In my example, we have two Mysql services running in the same cluster of Swarm nodes, the first database is
mysql_1 running the port 3306 and the second one is mysql_2 and it is running the port 3307. In order to see how we
can send secrets, the first service will share the same password across the cluster in order to be used by the new
service mysql_2 as a root password.
To accomplish this, we need to create an overlay network to which both services will be attached.
docker network create -d overlay mysql_network
Remove the first Mysql service:
docker service rm mysql

Create a new secret:
echo "password"|docker secret create mysql1rootpassword -
Create the first service:
docker service create \
--name mysql_1 \
-p 3306:3306 \
--secret mysql1rootpassword \
--env MYSQL_ROOT_PASSWORD_FILE=/run/secrets/mysql1rootpassword \
--network mysql_network \
mysql
Create the second service:
docker service create \
--name mysql_2 \
-p 3307:3306 \
--secret source=mysql1rootpassword,target=mysql2rootpassword,mode=0400 \
--env MYSQL_ROOT_PASSWORD_FILE=/run/secrets/mysql2rootpassword \
--network mysql_network \
mysql
You may have noticed how using --secret source=mysql1rootpassword,target=mysql2rootpassword creates a new file in the
tmpfs of the containers running mysql_2 service and if not you can check it by logging into one of the containers and
executing cat /run/secrets/mysql2rootpassword .
Sending secrets between services is easy and secure and it is possible in the case when services are accessible to
each other (in our case, both services are in the same network).
Rotating Secrets
The good thing about using Docker Secrets is the modularity and the separation between code and secrets: Changing
a secret does not require changing code. In the other hand, changing secrets is a good security practice. Let's see how
to rotate secrets.
Our password is changing from "password" to "new_password", we create a new secret in this case:
echo "new_password"|docker secret create newmysqlrootpassword -
Remove the first secret:
docker service update --secret-rm mysqlrootpassword mysql_1
Update the first secret by the new one:
docker service update --secret-add source=newmysqlrootpassword,target=mysqlrootpassword mysql_1
Update the second Mysql service (note the combination of two steps in one command):
docker service update --secret-rm mysqlrootpassword --secret-
add source=newmysqlrootpassword,target=mysqlrootpassword,mode=0400 mysql_2

Let's make some verifications: Type docker ps to get the list of containers:
CONTAINER ID IMAGE COMMAND PORTS NAMES
8b305cb625ed mysql:latest "docker-entrypoint..." 3306/tcp mysql_2.1.
a9e64fff8e06 mysql:latest "docker-entrypoint..." 3306/tcp mysql_1.1.
Check the content of the secret file:
docker exec -it mysql_2.1.1piq2o2ascilmjighsq4qxld9 cat /run/secrets/mysqlrootpassword
If you get this new_password then everything was well done in both services.

Chapter XIII - Orchestration - Kubernetes
o ^__^
o (oo)\_______
(__)\ )\/\
||----w |
|| ||
Kubernetes is one of the most know orchestration systems. Kubernetes needs more than a chapter, it needs a book. I
recently created a project called Books For DevOps where you can find several hand curated books, some of them
are about Kubernetes. In this chapter, we are going to see how to deploy and use K8S but some concept definitions is
obligatory before moving to this part.
Introduction
First, let's have a look at the Kubernetes architecture.
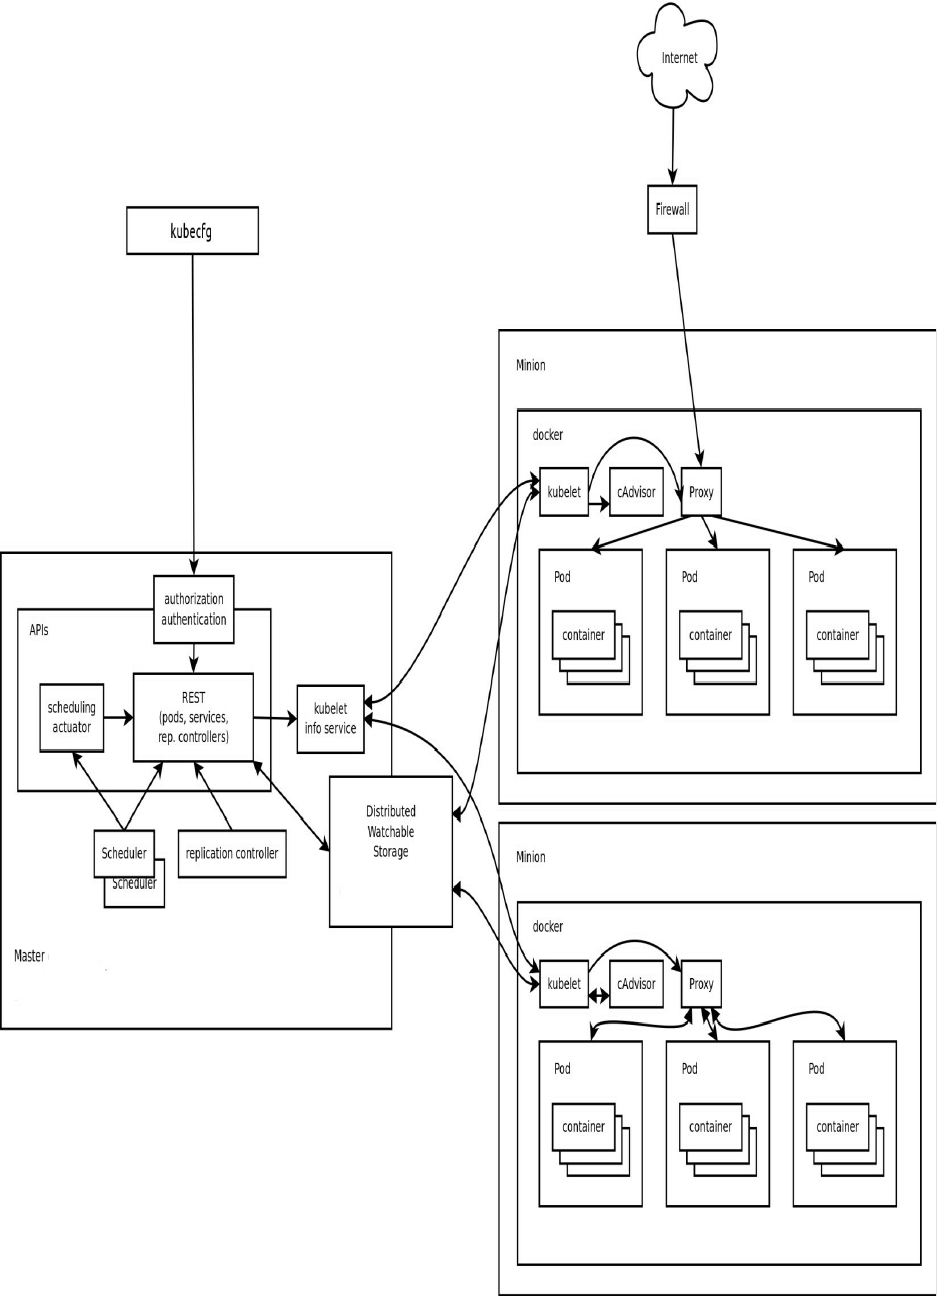

Master Components
In order to schedule and orchestrate a set of containers and services, Kubernetes needs a master. The master
components are the controlling services that operate to manage the cluster and gives administrator an interface to
manage deployment, rollbacks and other operations. These master components can be installed on a single machine
and you can also create a distributed system of master components where multiple machines forms a master.
More specifically, master components are :
Etcd: a distributed key-value store for the critical data of a distributed system
API Server: the main management point of the entire cluster
Controller Manager Service : a daemon that embeds the core control loops shipped with K8S. It enables a non-
terminating loop that regulates the state of the system by watching the shared state of the cluster through the
apiserver and making changes attempting to move the current state towards the desired state (e.g. the
replication controller, endpoints controller, namespace controller, serviceaccounts controller)
Scheduler Service: responsible for assigning workloads to specific nodes in a cluster. It is actually used to read
in a service's operating requirements then analyze the infrastructure environment in order to distribute a work
on the right node(s)
Pods
If Kubernetes is an operating system, then a pod is the process.
A pod is simply a group of one or more containers, the shared storage for those containers, and the different
configurations describing how to run the containers. Two or more containers in the same pod, share an IP address
and port space. They can find each other via localhost and communicate with each other using inter-process
communications (e.g. SystemV semaphores, POSIX shared memory).
Pods serve as unit of deployment, horizontal scaling, and replication. They enable data sharing and communication
among their containers and can be used to host vertically integrated application stacks (e.g. LAMP).
Deployments
With a declarative approach, deployment update pods. Deployment controller will change the actual state to the
desired state when a Deployment object desired state is updated by the user. A Deployment is described using a
YAML file, this is an example of a Deployment that creates a ReplicaSet to bring up 5 Apache Pods:
apiVersion: apps/v1beta1
kind: Deployment
metadata:
name: apache-deployment
spec:
replicas: 5
template:
metadata:
labels:
app: apache
spec:
containers:
- name: apache
image: httpd
ports:
- containerPort: 80
A Deployment supports operations like updating, rollback, checking rollout history, pausing and resuming.

Services
A Kubernetes service is an abstraction of the pod they consistently maintain a well-defined endpoint for pods. A pod
can be placed in a different node, it can also die and get resurrected but Kubernetes has a built-in service discovery
that allows a service to have the same endpoints of changing pods.
K8S Services could be
Internal (e.g. databases and private pods in a more general)
External (e.g. any service that needs an external endpoint with a specific port like Nginx)
Load balanced (e.g. services that are load balanced. Kubernetes can use some cloud providers managed load
balancers like AWS ELB or GCE load balacing service: This feature enables integrating a third-party load
balancer with the Kubernetes.)
Replication Controller
A Replication Controller is responsible for ensuring that a pod or homogeneous group of pods are always up and
reachable. When there are many or too few pods, it will regulate them by killing or starting new pods: a specified
number of pod replicas should be running at any given time.
Replicaset
ReplicaSet is the next-generation Replication Controller. ReplicaSet has a generalized label selector.
Nodes/Minions
A minion is a worker machine that could be a virtual or a bare metal machine that runs pods and are managed by the
Kubernetes master component.
Kubelet
The kubelet is the primary node agent that runs on each minion
The Container Runtime
Each node runs a container runtime. The latter is responsible for downloading images and running containers like
Docker.
Kube Proxy
kube-proxy is a daemon that runs on each minion and acts like a network proxy and load balancer for the services
living in that minion.

A Local Kubernetes Using Minikube
After the last definitions, we can start manipulating K8S, so let's start a local cluster.
Installation
We will proceed for the moment with Minikube. Minikube is a tool that makes it easy to run Kubernetes locally.
Minikube runs a single-node Kubernetes cluster inside a VM on a laptop. It is useful for development since it
packages and configures a Linux VM, the container runtime, and all Kubernetes components and it supports
Kubernetes features such as:
DNS
NodePorts
ConfigMaps and Secrets
Dashboards
Container Runtime: Docker and rkt
Enabling CNI (Container Network Interface)
You can get the installation instructions from the official Minikube repository. I am going to use the Linux
installation.
curl -Lo minikube https://storage.googleapis.com/minikube/releases/v0.18.0/minikube-linux-
amd64 && chmod +x minikube && sudo mv minikube /usr/local/bin/
In order to use it with OS X, you will need xhyve driver, VirtualBox or VMware Fusion installation With Linux you
will need VirtualBox or KVM installation and with Windows VirtualBox or Hyper-V installation is needed.
In allOSs, VT-x/AMD-v virtualization must be enabled in BIOS and kubectl (>1.0) should be installed.
The installation of kubectl depends on your system :
For OS X :
curl -LO https://storage.googleapis.com/kubernetes-release/release/$(curl -s https://storage.googleapis.com/kubernetes-
release/release/stable.txt)/bin/darwin/amd64/kubectl
For Linux :
curl -LO https://storage.googleapis.com/kubernetes-release/release/$(curl -s https://storage.googleapis.com/kubernetes-
release/release/stable.txt)/bin/linux/amd64/kubectl
For Windows users :
curl -LO https://storage.googleapis.com/kubernetes-release/release/$(curl -s https://storage.googleapis.com/kubernetes-
release/release/stable.txt)/bin/windows/amd64/kubectl.exe
After the installation, you should make the kubectl binary executable and move it to your PATH :

chmod +x ./kubectl
sudo mv ./kubectl /usr/local/bin/kubectl
Running Minikube
First command to run to bootstrap a K8S cluster is minikube start .
This command will start a local VM, downloa the Minikube ISO and check if the requirements are satisfied.
Starting VM...
Downloading Minikube ISO
89.51 MB / 89.51 MB [==============================================] 100.00% 0s
If your requirements are not satisfied, you will get an error message.
Example :
Error starting host: Error creating host: Error with pre-
create check: "VBoxManage not found. Make sure VirtualBox is installed and VBoxManage is in the path"
I had a problem first time working with Minikube and the error message was :
Error starting host: Error configuring auth on host: Too many retries waiting for SSH to be available. Last error: Maximum number of retries (60) exceeded
The solution was minikube delete && minikube start . The solution was mentioned in this issue.
Executing minikube delete && minikube start , will :
Delete local Kubernetes cluster
Start local Kubernetes cluster
Start the VM
SSH files into VM
Set up certs
Start cluster components
Connect to cluster
Set up kubeconfig
Kubectl
Kubectl is now configured to use the cluster.
To connect to the target cluster Minikube has already run some commands like:
kubectl config set-cluster default-cluster --server=https://${MASTER_HOST} --certificate-authority=${CA_CERT}
kubectl config set-credentials default-admin --certificate-authority=${CA_CERT} --client-key=${ADMIN_KEY} --client-
certificate=${ADMIN_CERT}
kubectl config set-context default-system --cluster=default-cluster --user=default-admin
kubectl config use-context default-system
In order to make a verification, we can type kubectl get nodes and everything was setup right, we will get a similar
output to the following:

NAME STATUS AGE VERSION
minikube Ready 2h v1.6.0
Let's run Nginx in a container:
kubectl run nginx --image=nginx --port=80 --replicas=1
Now we can type: kubectl get pods to view the group of containers that are deployed together on the same host
(localhost) or simply the pods:
NAME READY STATUS RESTARTS AGE
nginx-158599303-xxf1d 1/1 Running 0 1m
If we were running other pods, it is possible to "filter" the get pods output using:
kubectl get pods --selector="run=nginx" --output=wide
NAME READY STATUS AGE IP NODE
nginx-29nqv 1/1 Running 3h 172.17.0.4 minikube
nginx-g24b3 1/1 Running 3h 172.17.0.5 minikube
Without the --output=wide :
NAME READY STATUS RESTARTS AGE
nginx-158599303-29nqv 1/1 Running 0 3h
nginx-158599303-g24b3 1/1 Running 0 3h
We can also show other options like labels, using kubectl get pods --show-labels :
NAME READY STATUS LABELS
nginx-29nqv 1/1 Running pod-template-hash=158599303,run=nginx
nginx-g24b3 1/1 Running pod-template-hash=158599303,run=nginx
Let's view the deployment list: kubectl get deployments :
NAME DESIRED CURRENT UP-TO-DATE AVAILABLE AGE
nginx 1 1 1 1 22m
We can have more information about the pod, using kubectl get -o json pod nginx-158599303-xxf1d . Don't forget to
always adapt the commands to your specific case, change nginx-158599303-xxf1d by your pod name.
{
"apiVersion": "v1",
"kind": "Pod",
"metadata": {
"annotations": {
"kubernetes.io/created-by":
"{\"kind\":\"SerializedReference\",\"apiVersion\":
\"v1\",\"reference\":{\"kind\":\"ReplicaSet\",
\"namespace\":\"default\",\"name\":\"nginx-158599303\",
\"uid\":\"5a0dc0a9-2aca-11e7-8020-0800275cee00\",
\"apiVersion\":\"extensions\",
\"resourceVersion\":\"9004\"}}\n"
},
"creationTimestamp": "2017-04-26T21:50:24Z",
"generateName": "nginx-158599303-",
"labels": {

"pod-template-hash": "158599303",
"run": "nginx"
},
"name": "nginx-158599303-xxf1d",
"namespace": "default",
"ownerReferences": [
{
"apiVersion": "extensions/v1beta1",
"blockOwnerDeletion": true,
"controller": true,
"kind": "ReplicaSet",
"name": "nginx-158599303",
"uid": "5a0dc0a9-2aca-11e7-8020-0800275cee00"
}
],
"resourceVersion": "9075",
"selfLink": "/api/v1/namespaces/default/pods/nginx-158599303-xxf1d",
"uid": "5a103f82-2aca-11e7-8020-0800275cee00"
},
"spec": {
"containers": [
{
"image": "nginx",
"imagePullPolicy": "Always",
"name": "nginx",
"ports": [
{
"containerPort": 80,
"protocol": "TCP"
}
],
"resources": {},
"terminationMessagePath": "/dev/termination-log",
"terminationMessagePolicy": "File",
"volumeMounts": [
{
"mountPath": "/var/run/secrets/kubernetes.io/serviceaccount",
"name": "default-token-jk2cd",
"readOnly": true
}
]
}
],
"dnsPolicy": "ClusterFirst",
"nodeName": "minikube",
"restartPolicy": "Always",
"schedulerName": "default-scheduler",
"securityContext": {},
"serviceAccount": "default",
"serviceAccountName": "default",
"terminationGracePeriodSeconds": 30,
"volumes": [
{
"name": "default-token-jk2cd",
"secret": {
"defaultMode": 420,
"secretName": "default-token-jk2cd"
}
}
]
},
"status": {
"conditions": [
{
"lastProbeTime": null,
"lastTransitionTime": "2017-04-26T21:50:24Z",
"status": "True",
"type": "Initialized"
},
{
"lastProbeTime": null,
"lastTransitionTime": "2017-04-26T21:51:14Z",
"status": "True",
"type": "Ready"
},
{
"lastProbeTime": null,
"lastTransitionTime": "2017-04-26T21:50:24Z",
"status": "True",
"type": "PodScheduled"
}
],
"containerStatuses": [
{
"containerID": "docker://b..3",
"image": "nginx:latest",
"imageID": "docker://sha256:4..8",
"lastState": {},
"name": "nginx",
"ready": true,
"restartCount": 0,
"state": {

"running": {
"startedAt": "2017-04-26T21:51:13Z"
}
}
}
],
"hostIP": "192.168.99.100",
"phase": "Running",
"podIP": "172.17.0.4",
"qosClass": "BestEffort",
"startTime": "2017-04-26T21:50:24Z"
}
}
This JSON file contains information that can be included in a YAML file, the latter can be used with kubectl
command to create a pod: kubectl create -f pod.yaml .
Let's delete the deployment nginx and create the YAML specifications file that can be used to re-create the pod.
kubectl delete deployments/nginx
Note that you can get a list of deployments, using kubectl get deployments .
apiVersion: extensions/v1beta1
kind: Deployment
metadata:
name: nginx
spec:
replicas: 2
template:
metadata:
labels:
run: nginx
spec:
containers:
- name: nginx
image: nginx
port:
- containerPort: 80
You can find this code in Orchestration_Kubernetes_Running_Minikube.yaml file.
In order to use it, type:
kubectl create -f Orchestration_Kubernetes_Running_Minikube.yaml --record
Using --record flag allows you to record the last command in the annotations of the created resources (in the case of
an update also). This could be useful to see the commands executed in each Deployment with a revision. To
understand this, type:
kubectl describe deployments
And you will get a similar output to this one:
Name: nginx
Namespace: default
CreationTimestamp: Thu, 27 Apr 2017 11:21:43 +0200
Labels: run=nginx
Annotations: deployment.kubernetes.io/revision=1
kubernetes.io/change-cause=kubectl create\
--filename=Orchestration_Kubernetes_Running_Minikube.yaml --record=true
Selector: run=nginx
Replicas: 2 desired | 2 updated | 2 total | 2 available | 0 unavailable
StrategyType: RollingUpdate
MinReadySeconds: 0

RollingUpdateStrategy: 1 max unavailable, 1 max surge
Pod Template:
Labels: run=nginx
Containers:
nginx:
Image: nginx
Port: 80/TCP
Environment: <none>
Mounts: <none>
Volumes: <none>
Conditions:
Type Status Reason
---- ------ ------
Available True MinimumReplicasAvailable
OldReplicaSets: <none>
NewReplicaSet: nginx-158599303 (2/2 replicas created)
Events:
FirstSeen LastSeen Count From SubObjectPath Type Reason Message
--------- -------- ----- ---- ------------- ----- ------ -------
4m 4m 1 deployment-controller Normal ScalingReplicaSet Scaled up replica set nginx to 2
Notice the annotations:
Annotations: deployment.kubernetes.io/revision=1
kubernetes.io/change-cause=kubectl create \
--filename=Orchestration_Kubernetes_Running_Minikube.yaml --record=true
We can get more details about the created Nginx using kubectl describe pods :
Name: nginx-158599303-29nqv
Namespace: default
Node: minikube/192.168.99.100
Start Time: Thu, 27 Apr 2017 11:21:43 +0200
Labels: pod-template-hash=158599303
run=nginx
Annotations:
kubernetes.io/created-by=
{"kind":"SerializedReference","apiVersion":"v1","reference":
{"kind":"ReplicaSet","namespace":"default","name":"nginx-158599303","uid":"xxxxx","a...
Status: Running
IP: 172.17.0.4
Controllers: ReplicaSet/nginx-158599303
Containers:
nginx:
Container ID: docker://xxxx
Image: nginx
Image ID: docker://sha256:xxxx
Port: 80/TCP
State: Running
Started: Thu, 27 Apr 2017 11:22:22 +0200
Ready: True
Restart Count: 0
Environment: <none>
Mounts:
/var/run/secrets/kubernetes.io/serviceaccount from default-token-27fkv (ro)
Conditions:
Type Status
Initialized True
Ready True
PodScheduled True
Volumes:
default-token-27fkv:
Type: Secret (a volume populated by a Secret)
SecretName: default-token-27fkv
Optional: false
QoS Class: BestEffort
Node-Selectors: <none>
Tolerations: <none>
Events:
FirstSeen LastSeen Count Message
--------- -------- ----- -------
23m 23m 1 default-scheduler Successfully assigned nginx-158599303-29nqv to minikube
23m 23m 1 kubelet, minikube pulling image "nginx"
22m 22m 1 kubelet, minikube Successfully pulled image "nginx"
22m 22m 1 kubelet, minikube Created container with id xxxx
22m 22m 1 kubelet, minikube Started container with id xxxx
Name: nginx-158599303-g24b3
Namespace: default
Node: minikube/192.168.99.100
Start Time: Thu, 27 Apr 2017 11:21:43 +0200
Labels: pod-template-hash=158599303

run=nginx
Annotations: kubernetes.io/created-by={"kind":"SerializedReference","apiVersion":"v1","reference":
{"kind":"ReplicaSet","namespace":"default","name":"nginx-158599303","uid":"xxxxx","a...
Status: Running
IP: 172.17.0.5
Controllers: ReplicaSet/nginx-158599303
Containers:
nginx:
Container ID: docker://xxxx
Image: nginx
Image ID: docker://sha256:xxxx
Port: 80/TCP
State: Running
Started: Thu, 27 Apr 2017 11:22:21 +0200
Ready: True
Restart Count: 0
Environment: <none>
Mounts:
/var/run/secrets/kubernetes.io/serviceaccount from default-token-27fkv (ro)
Conditions:
Type Status
Initialized True
Ready True
PodScheduled True
Volumes:
default-token-27fkv:
Type: Secret (a volume populated by a Secret)
SecretName: default-token-27fkv
Optional: false
QoS Class: BestEffort
Node-Selectors: <none>
Tolerations: <none>
Events:
FirstSeen LastSeen Count From Message
--------- -------- ----- ---- -------
23m 23m 1 default-scheduler assigned nginx-158599303-g24b3 to minikube
23m 23m 1 kubelet, minikube pulling image "nginx"
22m 22m 1 kubelet, minikube Successfully pulled image "nginx"
22m 22m 1 kubelet, minikube Created container with id xxxx
22m 22m 1 kubelet, minikube Started container with id xxxx
We can use less verbose commands like kubectl get deployments :
NAME DESIRED CURRENT UP-TO-DATE AVAILABLE AGE
nginx 2 2 2 2 31m
or kubectl get pods :
NAME READY STATUS RESTARTS AGE
nginx-158599303-29nqv 1/1 Running 0 33m
nginx-158599303-g24b3 1/1 Running 0 33m
Now we can create a service object that exposes the last deployment:
kubectl expose deployment nginx --port=80
We can use the same get command used above to show the JSON specefication:
kubectl get -o json service nginx
This is the same spec that we wrote in a YAML file but it is in JSON format:
{
"apiVersion": "v1",
"kind": "Service",
"metadata": {
"creationTimestamp": "2017-04-27T10:10:29Z",
"labels": {
"run": "nginx"
},

"name": "nginx",
"namespace": "default",
"resourceVersion": "4669",
"selfLink": "/api/v1/namespaces/default/services/nginx",
"uid": "bdf36511-2b31-11e7-b29a-080027c0925b"
},
"spec": {
"clusterIP": "10.0.0.234",
"ports": [
{
"port": 80,
"protocol": "TCP",
"targetPort": 80
}
],
"selector": {
"run": "nginx"
},
"sessionAffinity": "None",
"type": "ClusterIP"
},
"status": {
"loadBalancer": {}
}
}
We can get a specefic part of these information using --template= tag with the get scv command.
Example:
kubectl get service nginx --template={{.spec.clusterIP}}
will give you the IP address of the service (nginx)
kubectl get service nginx --template={{.metadata.name}}
will give you the name of the service
etc ..
Another way to view information about a service is using the describe command like kubectl describe service nginx .
An output similar to the following one, will show on your screen:
Name: nginx
Namespace: default
Labels: run=nginx
Annotations: <none>
Selector: run=nginx
Type: ClusterIP
IP: 10.0.0.234
Port: <unset> 80/TCP
Endpoints: 172.17.0.4:80,172.17.0.5:80
Session Affinity: None
Events: <none>
In order to view the ReplicaSet objects, we can use kubectl get replicasets to obtain a list:
NAME DESIRED CURRENT READY AGE
nginx-158599303 2 2 2 3h
Or kubectl describe replicasets to obtain more details:
Name: nginx-158599303
Namespace: default
Selector: pod-template-hash=158599303,run=nginx
Labels: pod-template-hash=158599303
run=nginx
Annotations: deployment.kubernetes.io/desired-replicas=2

deployment.kubernetes.io/max-replicas=3
deployment.kubernetes.io/revision=1
kubernetes.io/change-cause=kubectl create
--filename=Orchestration_Kubernetes_Running_Minikube.yaml
--record=true
Replicas: 2 current / 2 desired
Pods Status: 2 Running / 0 Waiting / 0 Succeeded / 0 Failed
Pod Template:
Labels: pod-template-hash=158599303
run=nginx
Containers:
nginx:
Image: nginx
Port: 80/TCP
Environment: <none>
Mounts: <none>
Volumes: <none>
Events: <none>
In order to scale up the service to 5 instances, we can use this command:
kubectl scale deployments nginx --replicas=5
Let's run another service. It is possible to create a service from a remote YAML file. This is the hello-world service:
apiVersion: apps/v1beta1
kind: Deployment
metadata:
name: hello
spec:
replicas: 7
template:
metadata:
labels:
app: hello
tier: backend
track: stable
spec:
containers:
- name: hello
image: "gcr.io/google-samples/hello-go-gke:1.0"
ports:
- name: http
containerPort: 80
You can find the file here : https://kubernetes.io/docs/tutorials/connecting-apps/hello.yaml and you can use it this way:
kubectl create -f http://k8s.io/docs/tutorials/connecting-apps/hello.yaml
Now the kubectl get pods command, will show :
NAME READY STATUS RESTARTS AGE
hello-1987912066-1tnxq 1/1 Running 0 6m
hello-1987912066-3fwvt 1/1 Running 0 6m
hello-1987912066-503fc 1/1 Running 0 6m
hello-1987912066-7htlm 1/1 Running 0 6m
hello-1987912066-pvbmj 1/1 Running 0 6m
hello-1987912066-qc0xt 1/1 Running 0 6m
hello-1987912066-qvqlr 1/1 Running 0 6m
nginx-158599303-2rgff 1/1 Running 0 31s
nginx-158599303-g24b3 1/1 Running 0 6h
nginx-158599303-jkjm7 1/1 Running 0 39s
nginx-158599303-k0zt3 1/1 Running 0 34s
nginx-158599303-rskx3 1/1 Running 0 37s
Publishing Services & Services Types
Now that we have Minikube & Kubectl and we were able to create services, let's run this service:

kubectl run hello-minikube --image=gcr.io/google_containers/echoserver:1.4 --port=8080
echoserver is a simple application that responds with the HTTP headers it received.
Let's publish the created service:
kubectl expose deployment hello-minikube --type=NodePort
You may have noticed the NodePort option. Kubernetes ServiceTypes allow you to specify what kind of service you
want. The default value is ClusterIP.
ClusterIP exposes the service on a cluster-internal IP so that the service will be reachable only from
within the cluster
NodePort exposes the service on each node's IP at a static port and create a ClusterIP service. The
latter will recieve the trafix routed from the NodePort service. In this type, the NodePort service will
be reachable from outside the cluster suing <NodeIP>:<NodePort> .
LoadBalancer type exposes the service externally using a cloud provider’s load balancer. This could
be limited since Kubernetes load balancing is not implemetend with many cloud vendors. The
NodePort and the ClusterIP services will recieve traffic from the load balancer and they are
automatially created.
ExternalName will map the service to the contents of the externalName field. (e.g.
k8s.painlessdocker.com). ExternalName will return a CNAME record with its value and this feature
requires kube-dns > 1.7.
We considered using the NodePort and in this case Kubernetes master will allocate a port from a configured range
(30000 -> 32767), and each Node will proxy that port into your service. That port will be reported in the service’s
spec.ports[*].nodePort field.
In the case we have multiple Nodes, Kubernetes will use the same port number on every Node.
Now we can use Curl to get the service response, but we don't know the url neither the port and that's why this
command will help us:
minikube service hello-minikube --url
Now we can easily do : curl $(minikube service hello-minikube --url) and we will get something similar to this:
CLIENT VALUES:
client_address=172.17.0.1
command=GET
real path=/
query=nil
request_version=1.1
request_uri=http://192.168.99.100:8080/
SERVER VALUES:
server_version=nginx: 1.10.0 - lua: 10001
HEADERS RECEIVED:
accept=*/*
host=192.168.99.100:30805
user-agent=curl/7.47.0
BODY:
-no body in request-

You can use your browser also !
We can see the IP address and the interface (vboxnet1 in my case and it most probably the same for you ) using
minikube ip and we will notice that the IP is 192.168.99.1 , the broadcast is 192.168.99.255 and the mask is
255.255.255.0 .
Use ifconfig :
vboxnet1 Link encap:Ethernet HWaddr 0a:00:27:00:00:01
inet addr:192.168.99.1 Bcast:192.168.99.255 Mask:255.255.255.0
inet6 addr: fe80::800:27ff:fe00:1/64 Scope:Link
UP BROADCAST RUNNING MULTICAST MTU:1500 Metric:1
RX packets:0 errors:0 dropped:0 overruns:0 frame:0
TX packets:203 errors:0 dropped:0 overruns:0 carrier:0
collisions:0 txqueuelen:1000
RX bytes:0 (0.0 B) TX bytes:40551 (40.5 KB)
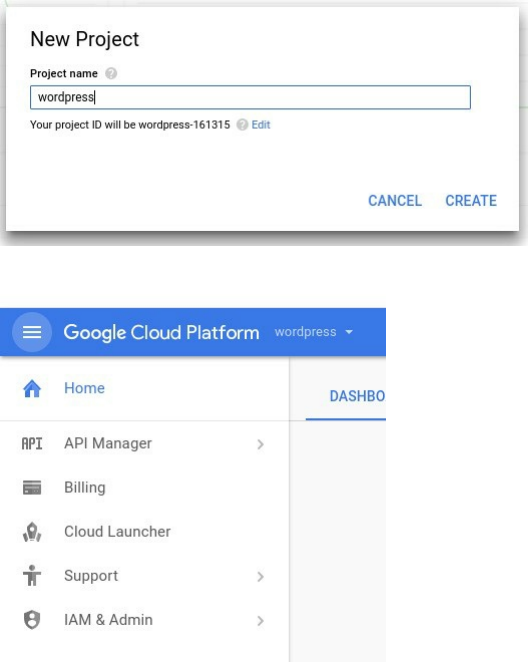
Using Kubernetes With Google Container Engine
Prerequisites
GKE - Google Container Engine is a service managed by Google that makes easy to run containers in Google cloud.
It uses Kubernetes.
In this part, we will run a Wordpress blog in a managed Kubernetes cluster so you need a Google Cloud account and
a project that you can create using GCP UI:
Now go to the project dashboard
Remember the project ID which is a unique name across all Google Cloud projects. It will be referred to later in this
codelab as PROJECT_ID.
Next, you will need to enable billing in the Developers Console in order to use Google Cloud resources like Cloud
Datastore and Cloud Storage. Now go and enable APIs in the API Manager:
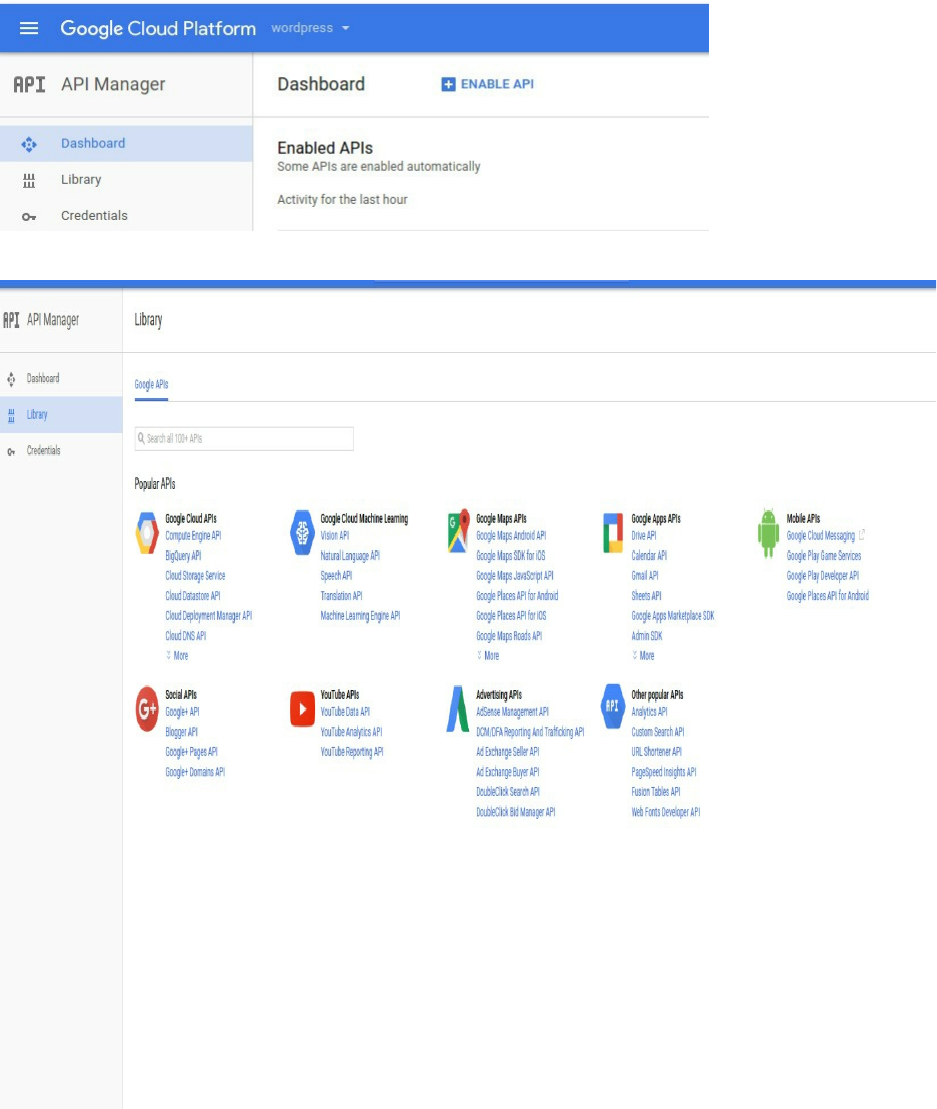
Click on Compute Engine API to enable it:
You must also enable Google Container Engine API
Setting Up The Compute Zone
Start Google Cloud Shell by clicking on the terminal icon (the icon is in the top toolbar). This Shell is connected to a
virtual machine where GCP tools are installed.
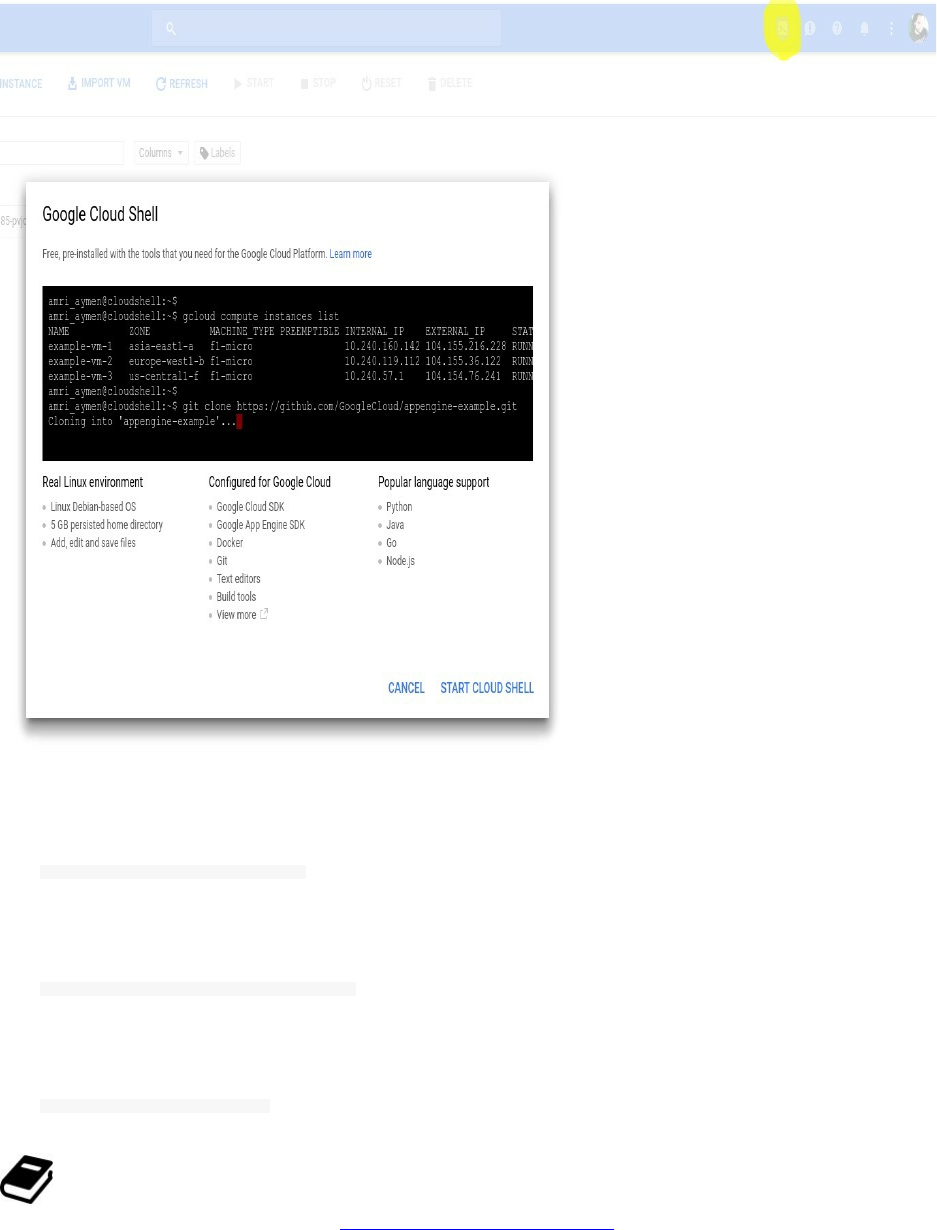
We will be using gcloud command in order to create our cluster but first let's set the compute zone so all of the VMs
of this cluster will be created in the choosed region.
gcloud config set compute/zone <zone>
In our cluster, we are going to choose the us-central1-b zone:
gcloud config set compute/zone us-central1-b
You will get a similar output to this one:
Updated property [compute/zone].
GCP has 3 regions: Americas, Europe & Asia, each regions has some zones. You can use your preferred
region and zone and you will find them in the official Google documentation.

Creating The Cluster
The gcloud command will allow us to create a new cluster, we will call it my-test-node :
gcloud container clusters create my-test-node --num-nodes 1
At the moment when you create the cluster, if you get a warninig like
WARNING: Accessing a Container Engine cluster requires the kubernetes commandline client [kubectl].
Then you should install kubectl component.
gcloud components install kubectl
This command creates a new cluster called "hello-world" with one node (VM). Since we'll only be launching one
container a single node is fine. If you wanted to launch multiple containers you could specify a different number of
nodes when you create the cluster. When launching the cluster
Creating cluster my-test-node ... done
Created [https://container.googleapis.com/v1/projects/wordpress-161315/zones/us-central1-b/clusters/my-test-
node]. kubeconfig entry generated for my-test-node.
NAME ZONE MASTER_VERSION MASTER_IP MACHINE_TYPE NODE_VERSION NUM_NODES STATUS
my-test-node us-central1-b 1.5.3 35.184.199.238 n1-standard-1 1.5.3 1 RUNNING
You can also verify if everything was ok with the cluster launch by listing the instance of your cluster:
gcloud compute instances list
You will get a similar output to this:
NAME ZONE MACHINE_TYPE PREEMPTIBLE INTERNAL_IP EXTERNAL_IP STATUS
gke-my-test-node-default-pool-f295ca85-pvjc us-central1-b n1-standard-1 10.128.0.2 104.198.50.198 RUNNING
Creating The Wordpress Services
Now that our cluster is running, it is time to deploy a Wordpress container to it. We'll be using the tutum/wordpress
image that contains all what we need to run a Wordpress site, including a MySQL database in a single Docker
container.
We are using this Wordpress image just to demonstrate how GKE works but it is not a good practice to run
several processes in the same Docker containers.
Creating Our Pod
Like we said a pod is one or more containers that "travel together", they could be administered together and could
have the same network requirements ..etc.

Let's create the pod using kubectl:
We are always using the same Cloud Shell:
gcloud container clusters get-credentials my-test-node --zone us-central1-b --project wordpress-161315
Remember the project ID: wordpress-161315 .
Now run
kubectl run wordpress --image=tutum/wordpress --port=80
You will get a similar message:
deployment "wordpress" created
This command starts up the Docker image on one of the nodes we have in our cluster and we can see it using the
kubectl CLI:
kubectl get pods
You will see a ready-to-use pod:
NAME READY STATUS RESTARTS AGE
wordpress-2410004867-dkc26 1/1 Running 0 1m
Exposing Wordpress
By default a pod is only accessible to other machines inside the same cluster but in order to use the Wordpress
application, the service needs to be exposed. This will allow external traffic.
In order to expose the pod, we will use the same command that we have already used kubectl expose <..> but this
time we are going to create a load balancer using --type=LoadBalancer flag.
This flag will creates an external IP that the Wordpress pod can use to accept traffic.
kubectl expose pod wordpress-2410004867-dkc26 --name=wordpress --type=LoadBalancer
You will need to replace the pod name wordpress-2410004867-dkc26 with the result you got from kubectl get
pods .
kubectl expose creates

The service
The forwarding rules for the load balancer
The firewall rules that allow external traffic to be sent to the pod.
It may take some minutes to create the load balancer.
Note the value in the load Balancer Ingress field. This is how you can access your container from outside the cluster.
LoadBalancer Ingress: 104.198.26.134
Logging Into Our Cluster Machines
If you are a new GCP, you may wonder if we have access to the VMs of our cluster or not. The response is yes, we
can go the list of VMs:
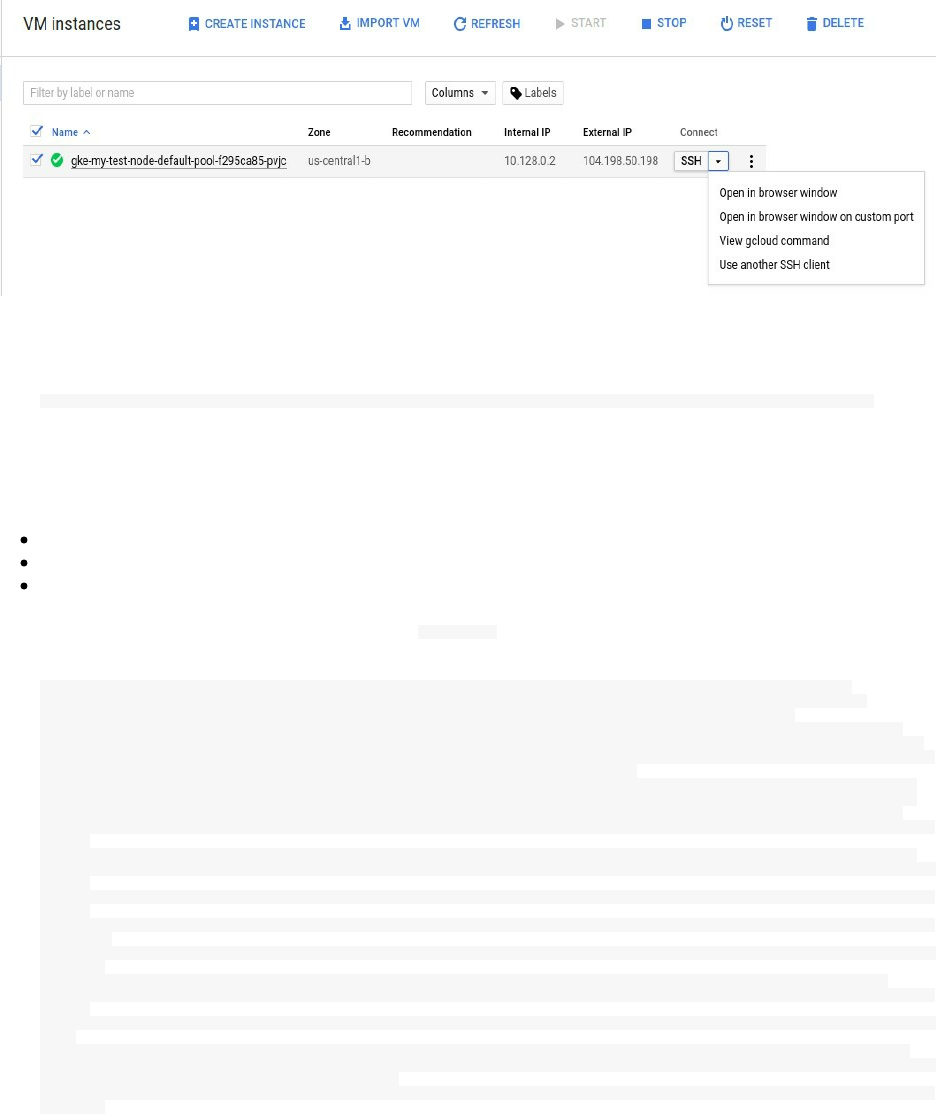
select the browser mode and if you want to access your machine using your console click on view gcloud command
and it will shows something like this:
gcloud compute --project "wordpress-161315" ssh --zone "us-central1-b" "gke-my-test-node-default-pool-f295ca85-pvjc"
If not already generated before, the same command will generate a pair of public and private keys and a known hosts
file :
.ssh/google_compute_engine
.ssh/google_compute_engine.pub
.ssh/google_compute_known_hosts
You can now see the running containers if you type docker ps :
CONTAINER ID IMAGE COMMAND NAMES
56082ad88e0d tutum/wordpress "/run.sh" k8s_wordpress
ef0d27870b4c gcr.io/google_containers/pause-amd64 "/pause" k8s
3fe304b3ec19 gcr.io/google_containers/addon-resizer "/pod_nanny --cpu=80m" k8s_heapster-nanny
f61268d8ca36 gcr.io/google_containers/heapster "/heapster --source=k" k8s_heapster_heapster
cf6d05737632 gcr.io/google_containers/pause-
amd64 "/pause" k8s_POD.d8dbe16c_heapster
0df23fc8a6f5 gcr.io/google_containers/kubedns-amd64 "/kube-dns --domain=c" k8s_kubedns_kube-dns
2579f8dbedf4 gcr.io/google_containers/exechealthz-amd64 "/exechealthz '--cmd=" k8s_healthz_kube-dns
6496a5d33b86 gcr.io/google_containers/pause-amd64 "/pause" k8s_POD_kube-proxy
d33c866c969a gcr.io/google_containers/defaultbackend "/server" k8s_default-http-
backend
5777cbc6bca6 gcr.io/google_containers/kube-dnsmasq-amd64 "/usr/sbin/dnsmasq --" k8s_dnsmasq_kube-dns
eab12f0c765f gcr.io/google_containers/pause-amd64 "/pause" k8s_POD_l7-default-
backend
75f8faef1369 gcr.io/google_containers/fluentd-gcp /bin/sh -c 'rm /lib/" k8s_fluentd-cloud-
logging
dc30769eb75f gcr.io/google_containers/pause-amd64 "/pause" k8s_POD_kube-dns-
autoscaler
13e0c16438a8 gcr.io/google_containers/pause-amd64 "/pause" k8s_POD_kubernetes-
dashboard
5be92530ad6a gcr.io/google_containers/pause-amd64 "/pause" k8s_POD_kube-dns
1e80866c0446 gcr.io/google_containers/pause-amd64 "/pause" k8s_POD_fluentd-cloud-
logging
80d7325ae045 gcr.io/google_containers/kube-proxy "/bin/sh -c 'kube-pro" k8s_kube-proxy_kube-
proxy
c1f0995028cc gcr.io/google_containers/dnsmasq-metrics-amd64 "/dnsmasq-metrics --v" k8s_dnsmasq-metrics
9421a6f0b4d8 gcr.io/google_containers/cluster-proportional-autoscaler-amd64 "/cluster-
proportiona" k8s_autoscaler_kube-dns-autoscaler
0fa05812b004 gcr.io/google_containers/kubernetes-dashboard-amd64 "/dashboard --port=90" k8s_kubernetes-
dashboard
Using an HTTP Proxy to Access the Kubernetes API
In this section we are going to connect kubectl to Google Kubernetes using its remote API.
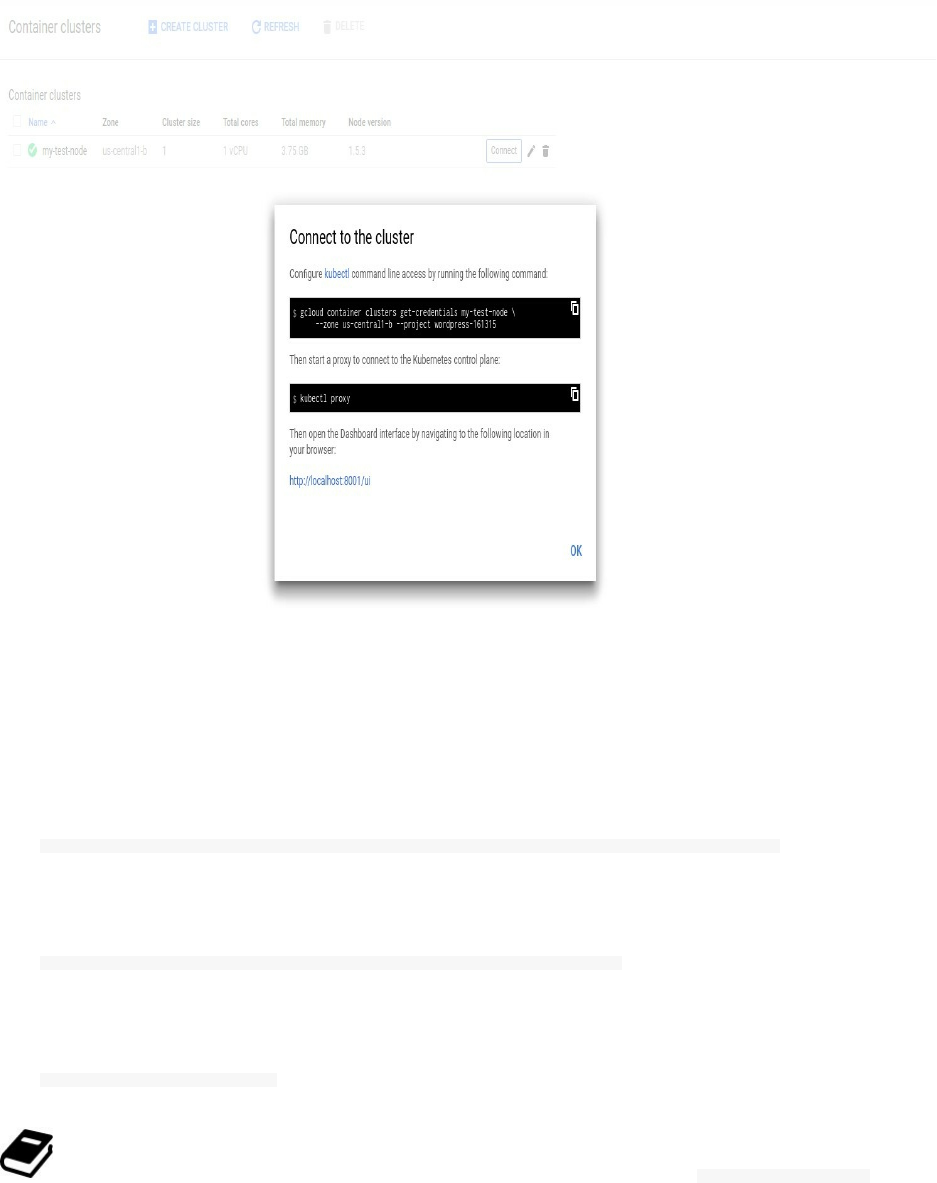
Go to the container engine web page and select connect:
Type the generated command, it should be similar to this one:
gcloud container clusters get-credentials my-test-node --zone us-central1-b --project wordpress-161315
If you get this warning message:
WARNING: Accessing a Container Engine cluster requires the kubernetes commandline
Then you should type:
gcloud components install kubectl
If you get any failure during one of the above or below commands, you can use gcloud info --show-log .
Let's create a HTTP proxy to access the Kubernetes API

kubectl proxy
If you have a similar error to this one error: google: could not find default credentials. See
https://developers.google.com/accounts/docs/application-default-credentials for more information. , you should authenticate to
Google Cloud services using:
gcloud auth application-default login
Then you should type again:
kubectl proxy
You can choose a specific port:
kubectl proxy --port=8081
The default port is 8080. You can now use your localhost to access the Kubernetes proxy UI. You will probably get
this error if you point your browser to the wrong address:
<h3>Unauthorized</h3>
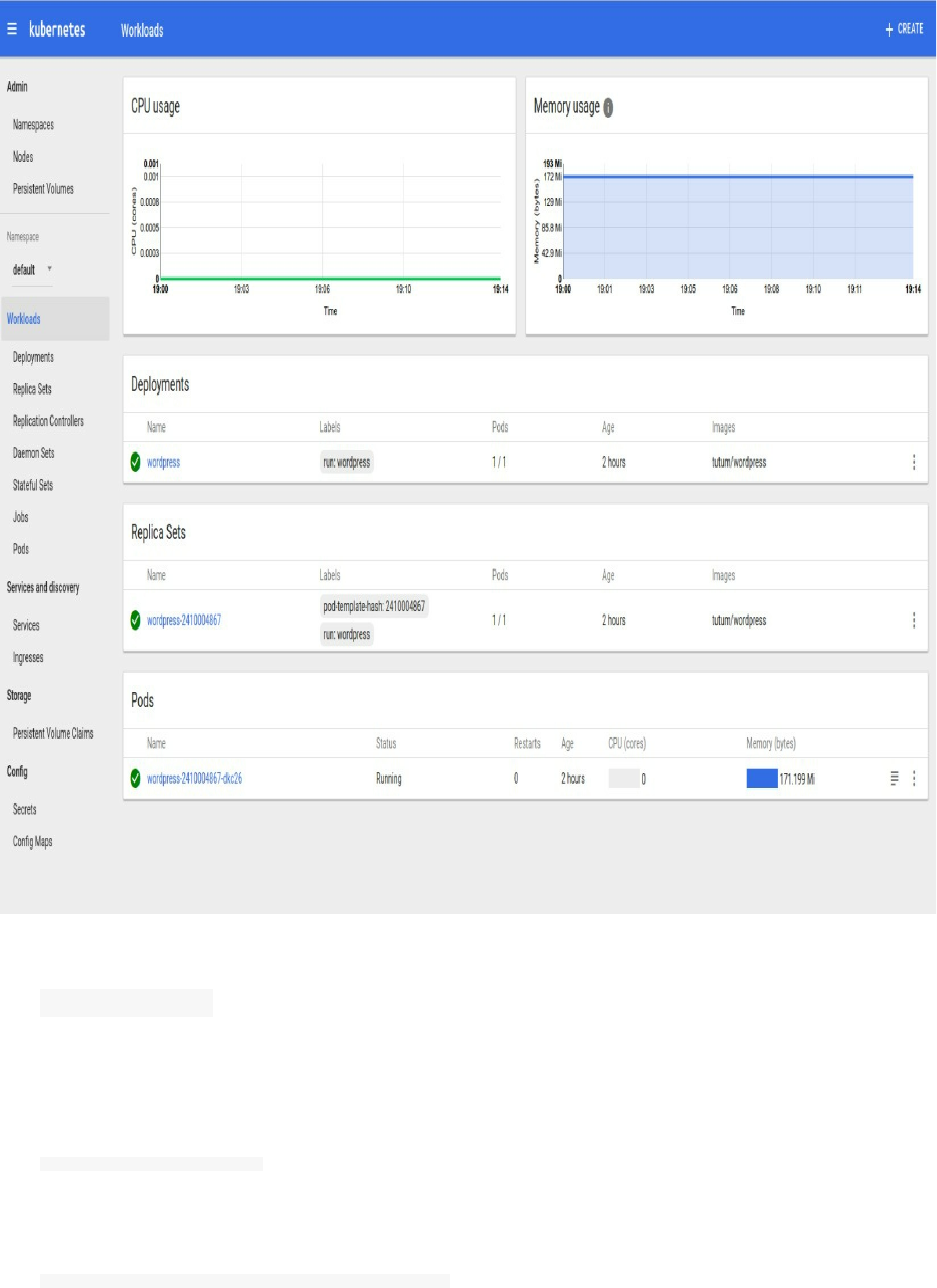
These are the urls you can use:
http://127.0.0.1:8001/ui
http://localhost:8001/ui
Now you can use curl in order to interact with the API:
Get the API versions:
curl http://localhost:8080/api/
Get a list of pods:
curl http://localhost:8080/api/v1/namespaces/default/pods

Inspecting Services
You can see more details about the Wordpress we created using:
kubectl describe services wordpress
In the Cloud Shell console you will get a similar output to this:
Name: wordpress
Namespace: default
Labels: pod-template-hash=2410004867
run=wordpress
Selector: pod-template-hash=2410004867,run=wordpress
Type: LoadBalancer
IP: 10.7.251.61
Port: <unset> 80/TCP
NodePort: <unset> 30795/TCP
Endpoints: 10.4.0.9:80
Session Affinity: None
Events:
FirstSeen LastSeen Count From SubObjectPath Type Reason Message
--------- -------- ----- ---- ------------- -------- ------ -------
8s 8s 1 {service-controller } Normal CreatingLoadBalancer Creating load balancer
Inspecting Nodes
You can describe the different nodes you are using:
kubectl describe nodes
A similar output to this will appear right on your screen:
Name: gke-my-test-node-default-pool-f295ca85-pvjc
Role:
Labels: beta.kubernetes.io/arch=amd64
beta.kubernetes.io/instance-type=n1-standard-1
beta.kubernetes.io/os=linux
cloud.google.com/gke-nodepool=default-pool
failure-domain.beta.kubernetes.io/region=us-central1
failure-domain.beta.kubernetes.io/zone=us-central1-b
kubernetes.io/hostname=gke-my-test-node-default-pool-f295ca85-pvjc
Taints: <none>
CreationTimestamp: Sun, 12 Mar 2017 16:44:47 +0100
Phase:
Conditions:
Type Status LastHeartbeatTime LastTransitionTime Reason Message
---- ------ ----------------- ------------------ ------ -------
NetworkUnavailable False Sun, 12 Mar Sun, 12 Mar RouteCreated RouteController created a route
OutOfDisk False Sun, 12 Mar Sun, 12 Mar KubeletHasSufficientDisk kubelet has sufficient disk space available
MemoryPressure False Sun, 12 Mar Sun, 12 Mar KubeletHasSufficientMemory kubelet has sufficient memory available
DiskPressure False Sun, 12 Mar Sun, 12 Mar KubeletHasNoDiskPressure kubelet has no disk pressure
Ready True Sun, 12 Mar Sun, 12 Mar KubeletReady kubelet is posting ready status. AppArmor enabled
Addresses: 10.128.0.2,104.198.50.198,gke-my-test-node-default-pool-f295ca85-pvjc
Capacity:
alpha.kubernetes.io/nvidia-gpu: 0
cpu: 1
memory: 3788484Ki
pods: 110
Allocatable:
alpha.kubernetes.io/nvidia-gpu: 0
cpu: 1
memory: 3788484Ki
pods: 110
System Info:
Machine ID: 833668693a8ae07719ffda0c786a12fc
System UUID: 83366869-3A8A-E077-19FF-DA0C786A12FC
Boot ID: 528cd889-61b2-476e-ac01-795c51d18cbb
Kernel Version: 4.4.21+
OS Image: Container-Optimized OS from Google
Operating System: linux
Architecture: amd64
Container Runtime Version: docker://1.11.2
Kubelet Version: v1.5.3

Kube-Proxy Version: v1.5.3
PodCIDR: 10.4.0.0/24
ExternalID: 5258581285997695597
Non-terminated Pods: (8 in total)
Namespace Name CPU Requests CPU Limits Memory Requests Memory Limits
--------- ---- ------------ ---------- --------------- -------------
default wordpress 100m (10%) 0 (0%) 0 (0%) 0 (0%)
kube-system fluentd-cloud-logging 100m (10%) 0 (0%) 200Mi (5%) 200Mi (5%)
kube-system heapster- 138m (13%) 138m (13%) 301456Ki (7%) 301456Ki (7%)
kube-system kube-dns- 260m (26%) 0 (0%) 140Mi (3%) 220Mi (5%)
kube-system kube-dns-autoscale 20m (2%) 0 (0%) 10Mi (0%) 0 (0%)
kube-system kube-proxy-gke-my- 100m (10%) 0 (0%) 0 (0%) 0 (0%)
kube-system kubernetes-dashboa 100m (10%) 100m (10%) 50Mi (1%) 50Mi (1%)
kube-system l7-default-backend 10m (1%) 10m (1%) 20Mi (0%) 20Mi (0%)
Allocated resources:
(Total limits may be over 100 percent, i.e., overcommitted.
CPU Requests CPU Limits Memory Requests Memory Limits
------------ ---------- --------------- -------------
828m (82%) 248m (24%) 731536Ki (19%) 803216Ki (21%)
Inspecting Namespaces
You can list the current namespaces in a cluster using:
kubectl get namespaces
The default namespaces on a fresh Kubernetes installation are:
NAME STATUS AGE
default Active 1h
kube-system Active 1h
default is default namespace for objects with no other namespaces
kube-system is the namespace for objects created by the Kubernetes system
You can set the namespace for all the kubectl commands using:
kubectl config set-context $(kubectl config current-context) --namespace=test-namespace
Change test-namespace by your preferred name then check if it was set using:
kubectl config view | grep namespace:
Note that we can find namespaces in the DNS entry created for a service (e.g. service-name.namespace-
name.svc.cluster.local).
<service-name>.<namespace-name>.svc.cluster.local
In the case when a container just uses the service name , it will resolve to the service which is local to a
namespace which is useful to use the same configuration with multiple namespaces like dev, qa, staging,
production..
If you want to reach across namespaces, you need to use the fully qualified domain name (FQDN).

Viewing Kubernetes Configurations
In order to view your configurations, you need to type:
kubectl config view
And it will shows a description of your configuration.
e.g: The configuration of the Wordpress cluster we deployed should look like this:
apiVersion: v1
clusters:
- cluster:
certificate-authority-data: REDACTED
server: https://35.184.192.231
name: gke_wordpress-161315_us-central1-b_my-test-node
contexts:
- context:
cluster: gke_wordpress-161315_us-central1-b_my-test-node
user: gke_wordpress-161315_us-central1-b_my-test-node
name: gke_wordpress-161315_us-central1-b_my-test-node
current-context: gke_wordpress-161315_us-central1-b_my-test-node
kind: Config
preferences: {}
users:
- name: gke_wordpress-161315_us-central1-b_my-test-node
user:
auth-provider:
config:
access-token: xxxxxxxxxxxxxxxxxxxxx
expiry: 2017-03-12T18:13:16.201747726+01:00
name: gcp
This configuration can be accessed using this file
ls ~/.kube/config
If you use multiple kubeconfig files at the same time and want to view merged config then you can still use the
kubectl config view . Say we have two configuration files:
~/.kube/config1
~/.kube/config2
The command will be :
KUBECONFIG=~/.kube/config1:~/.kube/config2 kubectl config view

Using Kubernetes With Amazon Web Services
In order to install and use Kubernetes in AWS, we are going to use a tool called kops (stands for Kubernetes
Operations). It allows to get a production grade Kubernetes cluster from the command line. Deployment is currently
supported on Amazon Web Services but more platforms are planned.
Installing Kops
In order to install Kops you will need a *nix system or OSx.
For OSx user, from Homebrew:
brew update && brew install kops
You can also use this method:
wget https://github.com/kubernetes/kops/releases/download/v1.4.1/kops-darwin-amd64
chmod +x kops-darwin-amd64
mv kops-darwin-amd64 /usr/local/bin/kops
And Linux users should download the binary:
chmod +x kops-linux-amd64
mv kops-linux-amd64 /usr/local/bin/kops
You can install from sources:
go get -d k8s.io/kops
cd ${GOPATH}/src/k8s.io/kops/
git checkout release
make
Windows users need to install a Linux VM or Vagrant.
Prerequisites
We need to setup a user, using the IAM we can create a new user, remember to save its access id/key and give it the
administrator access. You can create your own policy by giving the user only the rights that he needs. We will
proceed for this course with the full administrator access.
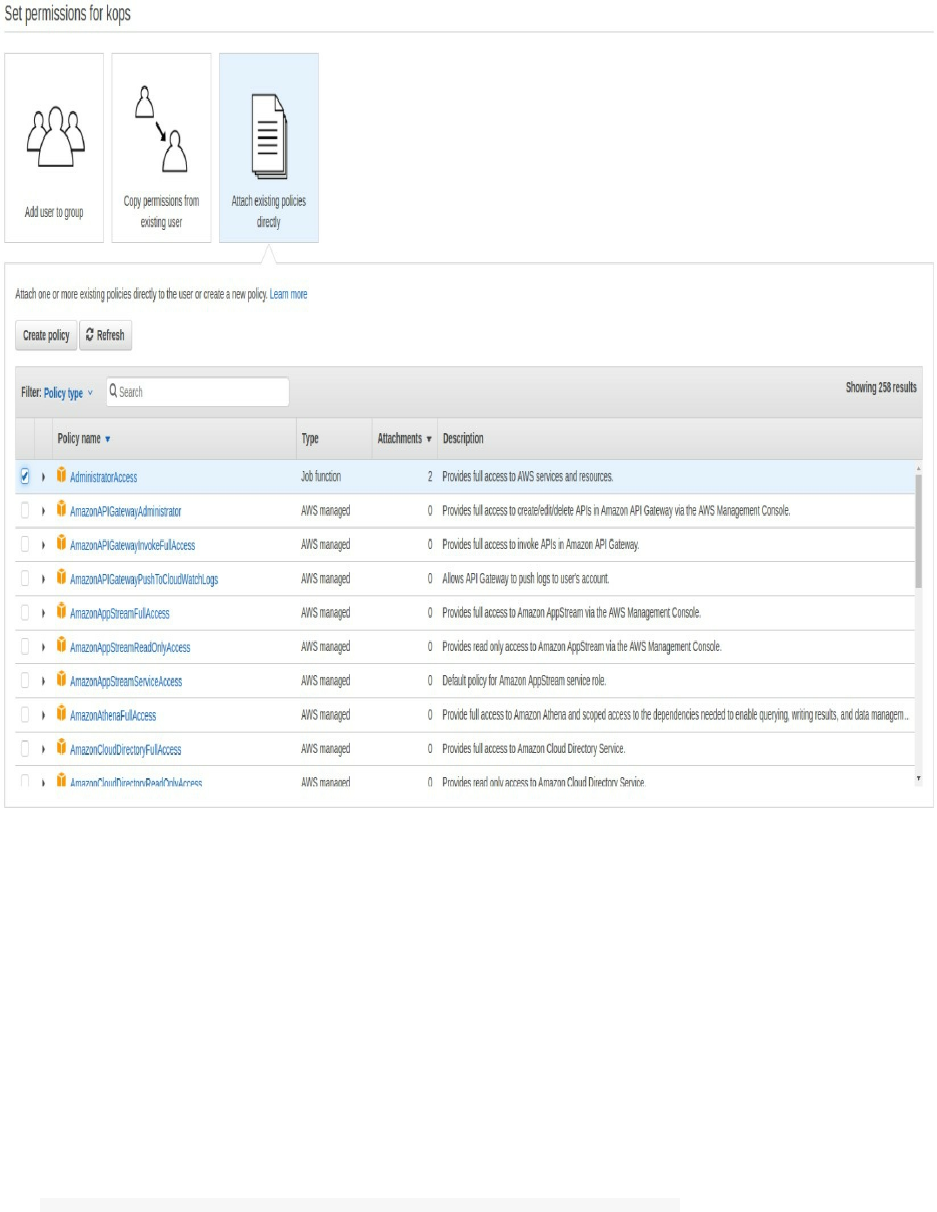
After that we need to setup the DNS. kops uses DNS for discovery inside the cluster and for the clients so that we
can reach the kubernetes API server. The cluster name should be a valid DNS name. This allows us to share our
cluster with its domain. We are going to use Route53 with a subdomain. You should either register a domain or
transfer an existing domain name to Route53 (if you would like to centralize all your domain operations in AWS
Route53).
If you don't want to spend money, you can register a free domain name like .tk.
Note that if you have a registered domain with another registrar (Namecheap, GoDaddy ..etc) and you want to keep
it instead of transferring it, you should setup the generated hosted zone values (NS records) in your original registrar
configuration.
Now create a hosted zone for your domain. You can use the AWS web interface or the AWS CLI. In my case, I
already hosted the domain devopslinks.com in Route53 and I will be using kubernetes.dev.devopslinks.com for the
remainder:
aws route53 create-hosted-zone --name kubernetes.dev.devopslinks.com --caller-reference 1
You should have a similar output to this:

{
"ChangeInfo": {
"Status": "PENDING",
"SubmittedAt": "2017-04-30T21:10:40.362Z",
"Id": "/change/xxxxxxxxxx"
},
"DelegationSet": {
"NameServers": [
"ns-1752.awsdns-27.co.uk",
"ns-1333.awsdns-38.org",
"ns-904.awsdns-49.net",
"ns-102.awsdns-12.com"
]
},
"HostedZone": {
"Name": "kubernetes.dev.devopslinks.com.",
"CallerReference": "1",
"Id": "/hostedzone/xxxxxxxxx",
"Config": {
"PrivateZone": false
},
"ResourceRecordSetCount": 2
},
"Location": "https://route53.amazonaws.com/2013-04-01/hostedzone/Z2AZ80TW24KT5C"
}
Creating a hosted zone is a paid service. You can find more details about Route53 here.
Note the 4 generated name servers :
ns-1752.awsdns-27.co.uk.
ns-1333.awsdns-38.org.
ns-904.awsdns-49.net.
ns-102.awsdns-12.com.
If you have your domain registered elsewhere, say GoDaddy, you should go to GoDaddy web interface, create 4 NS
records with the host kubernetes.dev. and set the one of the name servers to each of the created records.
We also need an S3 bucket.
To manage a cluster kops must keep track of the created clusters, along with their configuration, the keys they are
using and different other configurations. This information is stored in a bucket.
Create the bucket (we will call it kubernetes.dev.devopslinks.com):
aws s3 mb s3://kubernetes.dev.devopslinks.com
At this step, you should have setup the right user, S3 and Route53. We can proceed by typing this command:
kops create cluster \
--name=kubernetes.dev.devopslinks.com \
--state=s3://kubernetes.dev.devopslinks.com \
--zones=eu-west-1a \
--node-count=2 \
--node-size=t2.micro \
--master-size=t2.micro \
--dns-zone=kubernetes.dev.devopslinks.com
You should change adapt this commands to your preferences like the region, the size of the machines, the number of
the machines in a cluster ..etc This command will create the following resources:
EBSVolume
DHCPOptions
Keypair
SSHKey
EBSVolume
VPC

IAMRole
IAMInstanceProfile
SecurityGroup
Subnet
IAMRolePolicy
InternetGateway
SecurityGroupRule
SecurityGroupRule
Route
RouteTableAssociation
AutoscalingGroup
As you can see in the output of the last command:
To list clusters: kops get cluster
To edit this cluster kops edit cluster kubernetes.dev.devopslinks.com
To edit node instance group: kops edit ig --name=kubernetes.dev.devopslinks.com nodes
To edit the master instance group: kops edit ig --name=kubernetes.dev.devopslinks.com master-eu-west-1a
Now we can configure the cluster with:
kops update cluster kubernetes.dev.devopslinks.com --yes --state=s3://kubernetes.dev.devopslinks.com
Don't forget to add --state=s3://kubernetes.dev.devopslinks.com
After launching this command, you can find important configurations in ~/.kube/config file.
Cluster is starting. It should be ready in a few minutes.
As you may see in the output of the last command:
To list nodes: kubectl get nodes --show-labels
To ssh to the master: ssh -i ~/.ssh/id_rsa admin@api.kubernetes.dev.devopslinks.com
To read about installing addons: https://github.com/kubernetes/kops/blob/master/docs/addons.md

Chapter XIV - Orchestration - Rancher/Cattle
o ^__^
o (oo)\_______
(__)\ )\/\
||----w |
|| ||
In the Docker World, the orchestration is the most important part of the ecosystem. Docker Swarm, Kubernetes,
Apache Mesos .. all of these are orchestrators, every one of them has its own philosophy, use cases and architecture.
Rancher is a tool built to simplify Docker orchestration and management. Through this tutorial,we are going to
discover how to use it in order to create a scalable Wordpress application.
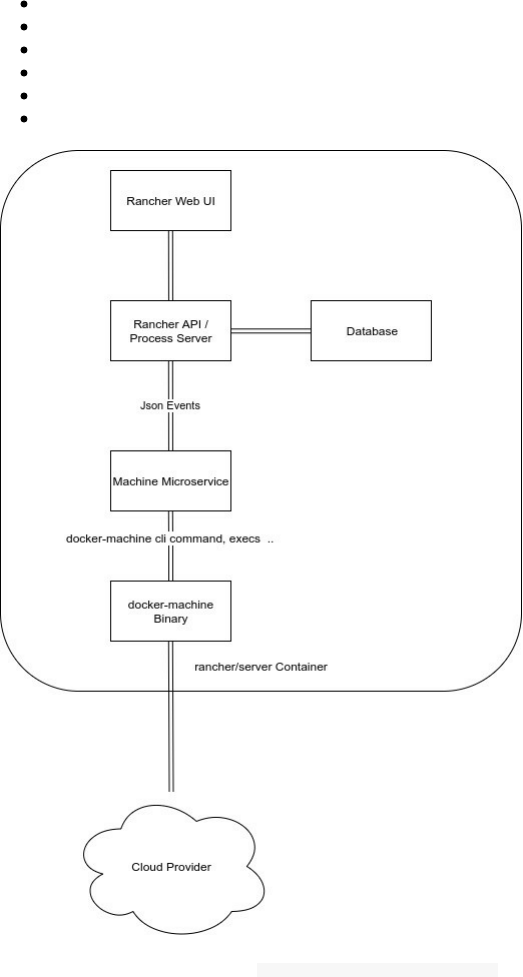
Rancher Architecture
In Rancher, everything (like containers, networks or images ) is an API resource with a process lifecycle.
Containers, images, networks, and accounts are all API resources with their own process lifecycles.
Rancher is built on the top of containers:
A web UI
An API
A server that manage Rancher Agents
A database
A machine microservice
The docker-machine binary
When you run Rancher using docker run rancher/server ... the Rancher API + Rancher Process Server + The
Database + Machine Microservice are processes that live inside this container.
Note that the docker-machine binary is also living in the same container but only runs when it is called by the API.
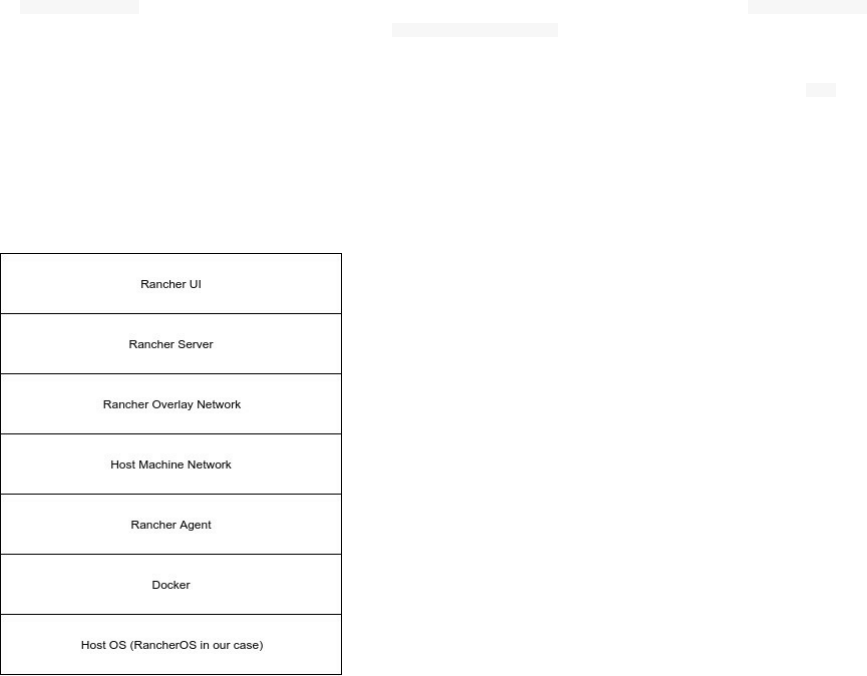
Rancher has also an Agent part that manage the life cycle of containers.
If docker-machine creates a machine successfully, some events are exchanged between the docker-machine and the
microservice. A bootstrap event is created and a docker-machine config command is executed to get the details needed
to connect to the machine’s Docker daemon.
If everything run without problems, the service fires up a Rancher Agent on the machine via `̀ docker run
rancher/agent ... ```.
Rancher Agents open a WebSocket connection to the server in order to establish a 2-way communication. The
Rancher Agent manage its containers and reports every change using the Docker API.
During this tutorial, we are going to use an EC2 machine and this is how a different view of the layers of our
Rancher installation:
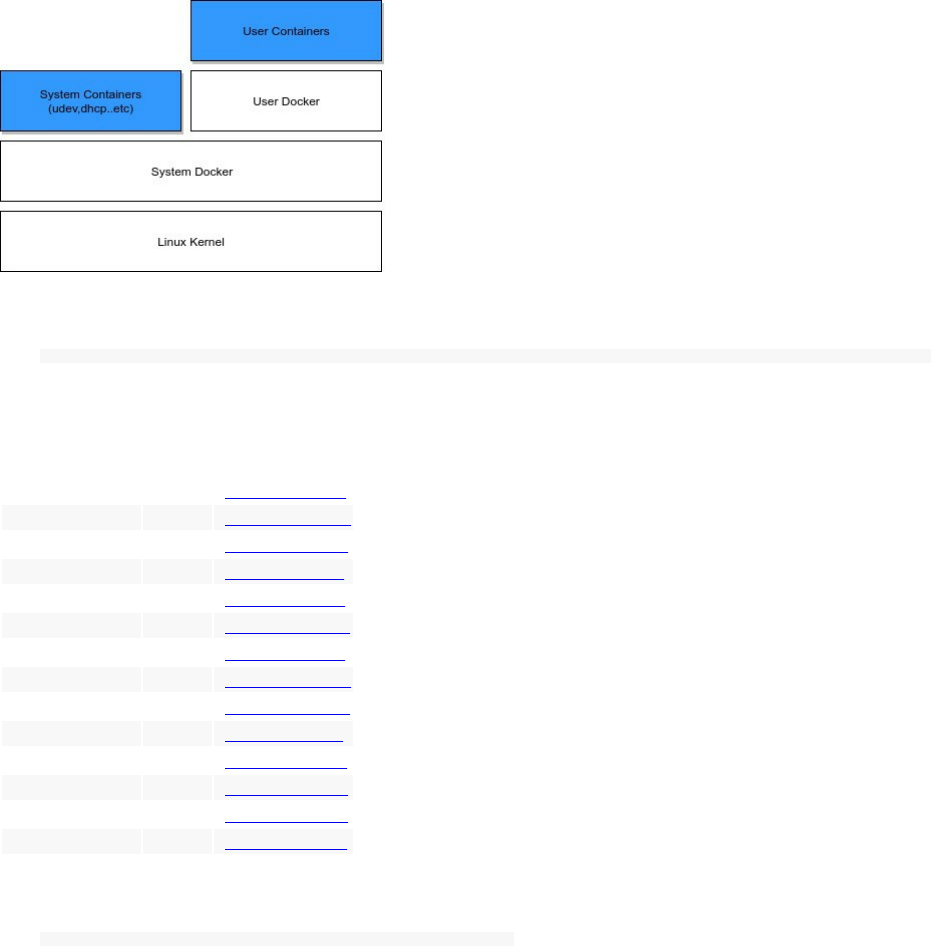
RancherOS
RancherOS is a small distribution released by Rancher team. It is an easy way to run containers at scale in
production, and includes only the services needed to run Docker.
It only includes the latest version of Docker and removes any unneeded library that a "normal" Linux distribution
could have.
In RancherOS, everything is a container, the traditional init system is replaced so that Docker run directly on the
Kernel.
A special component in this system is called User Docker which is the daemon that allow a user (a non-system user)
runs its containers.
We are going to run RancherOS in an EC2 machine using AWS CLI:
aws ec2 run-instances --image-id ami-ID --count 1 --instance-type t2.micro --key-name MySSHKeyName --security-groups sg-name
This is the list of AMI by region:
Region Type AMI
ap-south-1 HVM ami-fd1e6d92
eu-west-2 HVM ami-51776335
eu-west-1 HVM ami-481e232e
ap-northeast-2 HVM ami-c32efdad
ap-northeast-1 HVM ami-33aaf154
sa-east-1 HVM ami-15ed8d79
ca-central-1 HVM ami-e61fa282
ap-southeast-1 HVM ami-63b50900
ap-southeast-2 HVM ami-86b7bbe5
eu-central-1 HVM ami-a71ecfc8
us-east-1 HVM ami-37b00f21
us-east-2 HVM ami-c61632a3
us-west-1 HVM ami-8998c3e9
us-west-2 HVM ami-f6910496
Now you can login to your machine using the AWS common ssh command :
ssh -i "MySSHKeyName" rancher@xxxx.xx-xxxx-x.compute.amazonaws.com
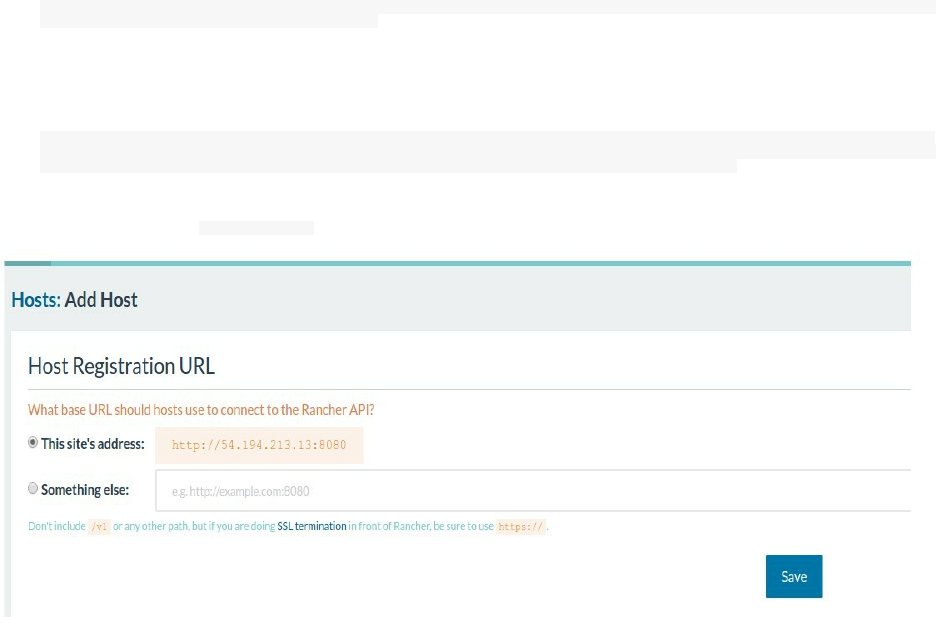
Running Rancher
Since Docker is installed by default, we can start using it directly. Let's start a MariaDB server then use it with
Rancher Server.
docker run --name mariadb -e MYSQL_ROOT_PASSWORD=password -e MYSQL_DATABASE=cattle -e MYSQL_USER=cattle -
e MYSQL_PASSWORD=cattle -p 3306:3306 -d mariadb
Run the Rancher Server and change 172.31.0.190 by your MariaDB IP:
docker run --name rancher_server -p 8080:8080 -e CATTLE_DB_CATTLE_MYSQL_HOST=172.31.0.190 -
e CATTLE_DB_CATTLE_MYSQL_PORT=3306 -e CATTLE_DB_CATTLE_MYSQL_NAME=cattle -e CATTLE_DB_CATTLE_USERNAME=cattle -
e CATTLE_DB_CATTLE_PASSWORD=cattle -v /var/run/docker.sock:/var/run/docker.sock -d rancher/server
Now you can go to your <host_ip>:8080 and add a Linux host with a supported version of Docker:
We are not going to use the public IP address but the private (eth0) one.
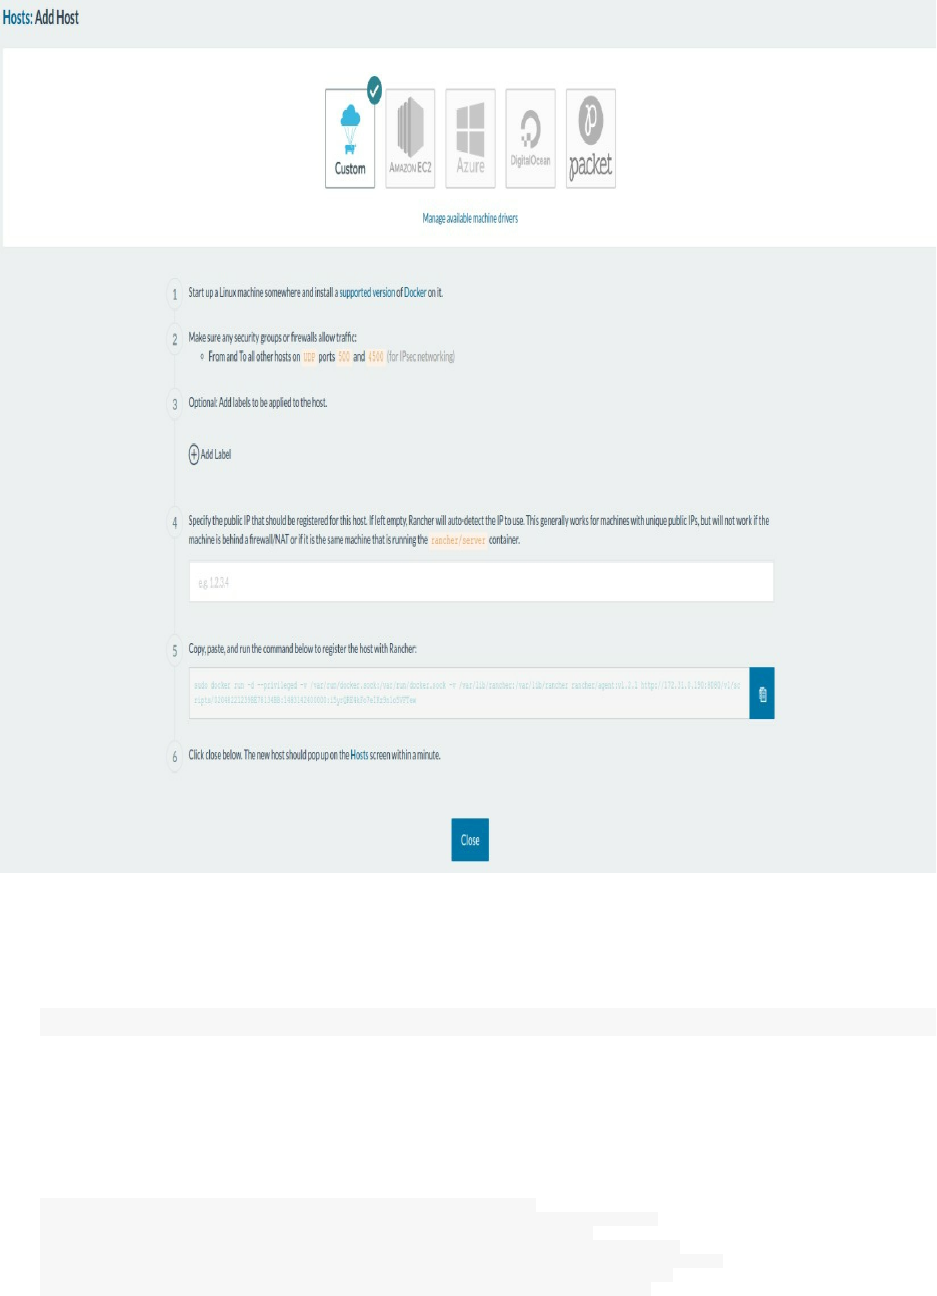
Let’s add a custom host.
A command is given to run on any reachable host in order to let it join the server. At this step, I already created an
EC2 machines (with RancherOS as an operating system) and I am going to use it and run this command:
sudo docker run -d --privileged -v /var/run/docker.sock:/var/run/docker.sock -
v /var/lib/rancher:/var/lib/rancher rancher/agent:v1.2.1 http://172.31.0.190:8080/v1/scripts/02048221239BE78134BB:1483142400000:i5yrQRE4kFo7eIKz9n1o5VFTew
Make sure any Security Groups or firewalls allow traffic from and to all other hosts on UDP ports 500 and 4500.
After the Agent installation, we can notice that some containers are running in each Agent machine like the dns,
healthcheck, network-manager ..:
CONTAINER ID IMAGE COMMAND NAMES
8339a8af3bb8 rancher/net "/rancher-entrypoint." r-ipsec-ipsec-router
95f3d3afdb7c rancher/net:holder "/.r/r /rancher-entry" r-ipsec-ipsec
5643089ca485 rancher/healthcheck "/.r/r /rancher-entry" r-healthcheck-healthcheck
fec564c53f13 rancher/dns "/rancher-entrypoint." r-network-services-metadata-dns
c162c07d07f6 rancher/net "/rancher-entrypoint." r-ipsec-ipsec-cni-driver
0313ff5cb812 rancher/scheduler "/.r/r /rancher-entry" r-scheduler-scheduler

0f6f62a190c7 rancher/network-manager"/rancher-entrypoint." r-network-services-network-manager
ec270864ff07 rancher/metadata "/rancher-entrypoint." r-network-services-metadata
98a78058bc3c rancher/agent "/run.sh run" rancher-agent
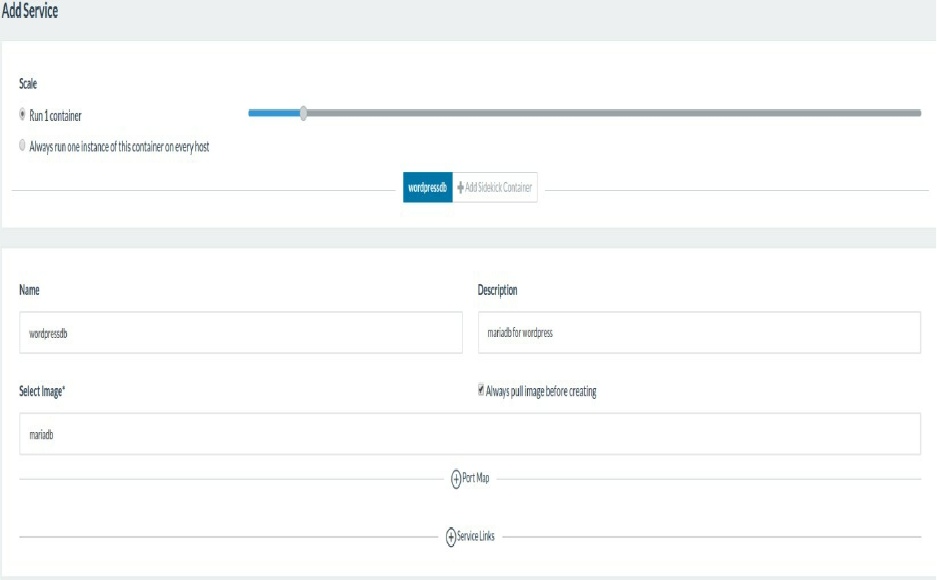
Running A Wordpress Service
If everything is ok, we are going to create a Wordpress service. Go to Stack menu and click User.
Create the MariaDB database, name it wordpressdb (we are going to use it in order to link it to the Wordpress
container)
Then add your environment variables:
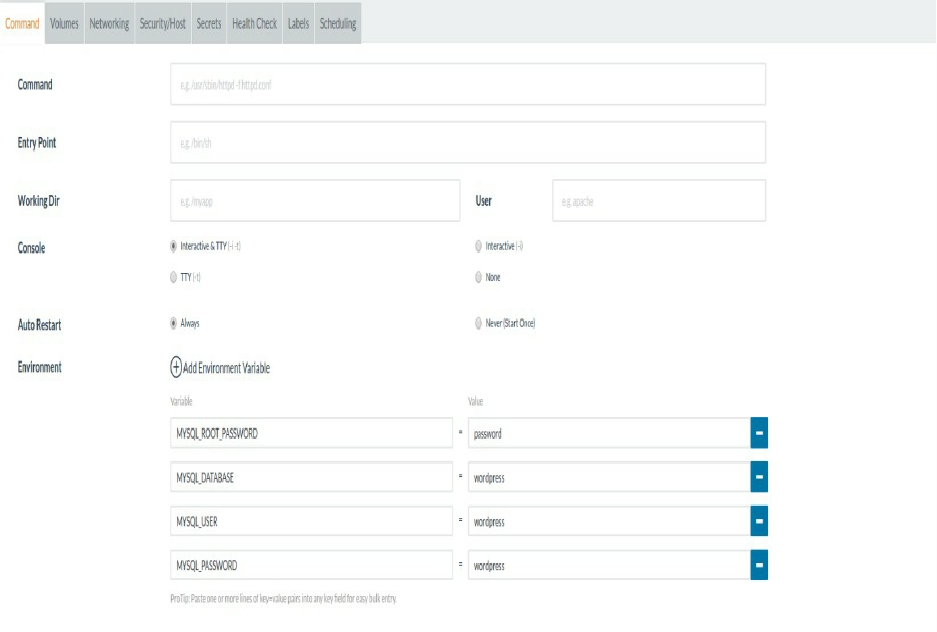
Now, using the same way, create the Wordpress container, map host port 80 to the container port 80 and link the
mariadb container as a mysql instance.

Then add your environment variables:
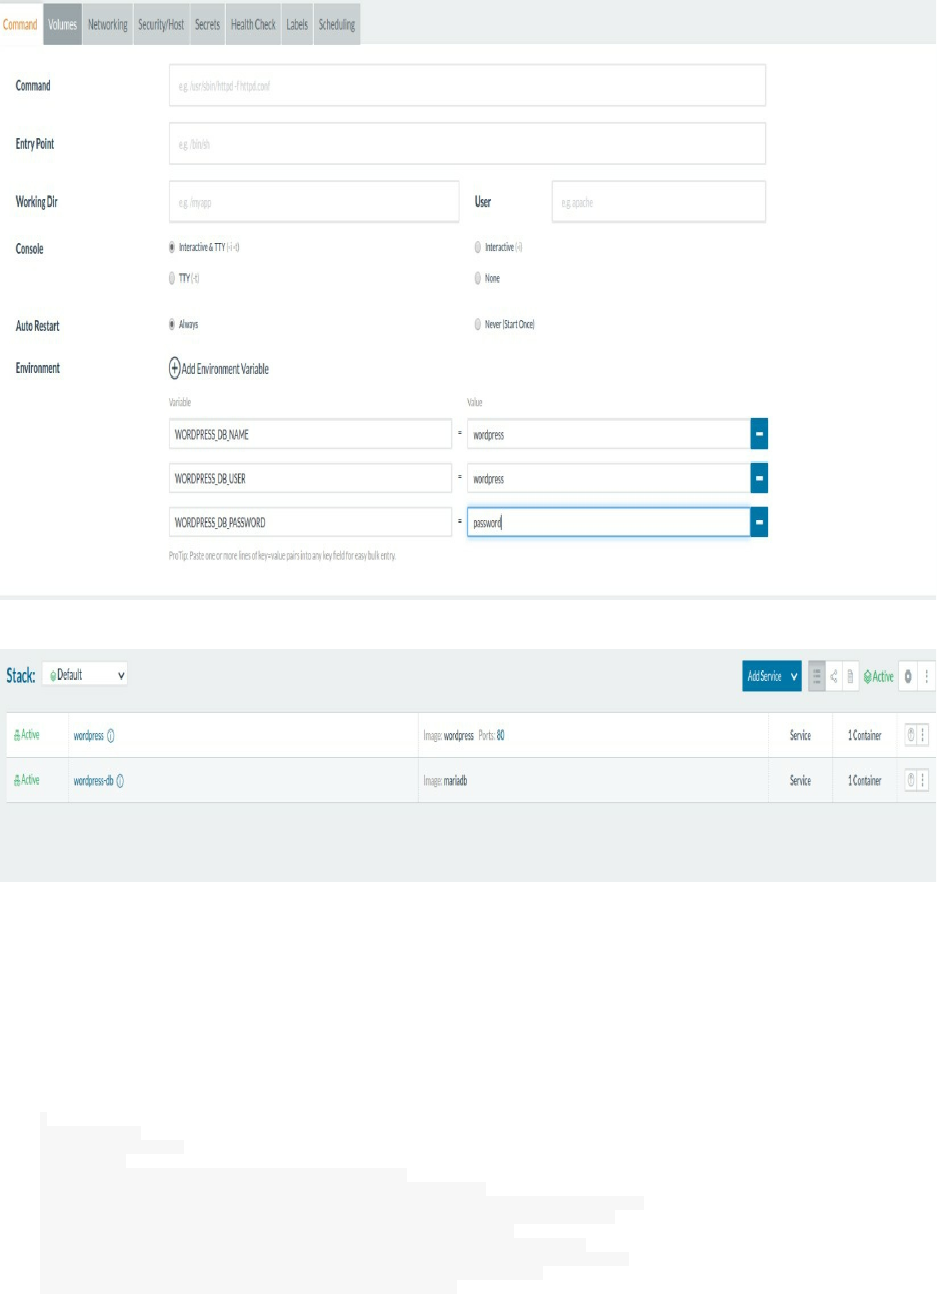
At this step, we can check the running services, use Stack->User then default to see the containers:
What we started is the equivalent of 2 docker commands, one to start the mariadb container and the other one to
start the wordpress container.
You can visit the Wordpress fresh installation using its IP address.
We can see the details of the different configurations a running container could have if you choose the container
from the same view then use the "View in API" menu.
This is an example of the wordpress container:
{
"id":"1s7",
"type":"service",
"links":{
"self":"…/v2-beta/projects/1a5/services/1s7",
"account":"…/v2-beta/projects/1a5/services/1s7/account",
"consumedbyservices":"…/v2-beta/projects/1a5/services/1s7/consumedbyservices",
"consumedservices":"…/v2-beta/projects/1a5/services/1s7/consumedservices",
"instances":"…/v2-beta/projects/1a5/services/1s7/instances",
"networkDrivers":"…/v2-beta/projects/1a5/services/1s7/networkdrivers",
"serviceExposeMaps":"…/v2-beta/projects/1a5/services/1s7/serviceexposemaps",
"serviceLogs":"…/v2-beta/projects/1a5/services/1s7/servicelogs",
"stack":"…/v2-beta/projects/1a5/services/1s7/stack",

"storageDrivers":"…/v2-beta/projects/1a5/services/1s7/storagedrivers",
"containerStats":"…/v2-beta/projects/1a5/services/1s7/containerstats"
},
"actions":{
"upgrade":"…/v2-beta/projects/1a5/services/1s7/?action=upgrade",
"restart":"…/v2-beta/projects/1a5/services/1s7/?action=restart",
"update":"…/v2-beta/projects/1a5/services/1s7/?action=update",
"remove":"…/v2-beta/projects/1a5/services/1s7/?action=remove",
"deactivate":"…/v2-beta/projects/1a5/services/1s7/?action=deactivate",
"removeservicelink":"…/v2-beta/projects/1a5/services/1s7/?action=removeservicelink",
"addservicelink":"…/v2-beta/projects/1a5/services/1s7/?action=addservicelink",
"setservicelinks":"…/v2-beta/projects/1a5/services/1s7/?action=setservicelinks"
},
"baseType":"service",
"name":"wordpress",
"state":"active",
"accountId":"1a5",
"assignServiceIpAddress":false,
"createIndex":1,
"created":"2017-04-04T21:05:53Z",
"createdTS":1491339953000,
"currentScale":1,
"description":"wordpress files",
"externalId":null,
"fqdn":null,
"healthState":"healthy",
"instanceIds":[
"1i14"
],
"kind":"service",
"launchConfig":{
"type":"launchConfig",
"capAdd":[
],
"capDrop":[
],
"dataVolumes":[
],
"dataVolumesFrom":[
],
"devices":[
],
"dns":[
],
"dnsSearch":[
],
"environment":{
"WORDPRESS_DB_NAME":"wordpress",
"WORDPRESS_DB_USER":"wordpress",
"WORDPRESS_DB_PASSWORD":"wordpress"
},
"imageUuid":"docker:wordpress",
"instanceTriggeredStop":"stop",
"kind":"container",
"labels":{
"io.rancher.container.pull_image":"always"
},
"logConfig":{
"type":"logConfig",
"config":{
},
"driver":""
},
"networkMode":"managed",
"ports":[
"80:80/tcp"
],
"privileged":false,
"publishAllPorts":false,
"readOnly":false,
"secrets":[
],
"startOnCreate":true,
"stdinOpen":true,
"system":false,
"tty":true,
"version":"0",
"dataVolumesFromLaunchConfigs":[
],
"vcpu":1
},
"lbConfig":null,

"linkedServices":{
"mysql":"1s6"
},
"metadata":null,
"publicEndpoints":[
{
"type":"publicEndpoint",
"hostId":"1h1",
"instanceId":"1i14",
"ipAddress":"54.246.163.197",
"port":80,
"serviceId":"1s7"
}
],
"removed":null,
"retainIp":null,
"scale":1,
"scalePolicy":null,
"secondaryLaunchConfigs":[
],
"selectorContainer":null,
"selectorLink":null,
"stackId":"1st5",
"startOnCreate":true,
"system":false,
"transitioning":"no",
"transitioningMessage":null,
"transitioningProgress":null,
"upgrade":null,
"uuid":"0b8a8290-0d10-47be-b182-45f1e57e80bc",
"vip":null
}
We can also inspect other services and hosts configurations in the same way.

Cattle: Rancher Container Orchestrator
What we started below is Rancher powered by its own orchestration tool called Cattle. Rancher offers the possibility
to use other orchestration tools like Kubernetes, Docker Swarm or Mesos.
Cattle is a container orchestration and scheduling framework, in its beginning, it was designed as an extension to
Docker Swarm but since Docker Swarm continues to develop, Cattle and Swarm started to diverge. Cattle is used
extensively by Rancher itself to orchestrate infrastructure services as well as setting up, managing, and upgrading
Swarm, Kubernetes, and Mesos clusters.
Cattle application deployments are organized into stacks which can be used to User or Infrastructure stacks. A
Cattle Stack is a collection of Services and the latter is primarily a Docker image with its networking, scalability,
storage, health checks, service discovery links, environment and all of the other confgurations. A Cattle Service
could be a load balancer or an external service. A Stack can be launched using a docker-compose.yml or rancher-
compose.yml file or just start containers like we did for the Wordpress stack.
In addition to this, you can start several applications using an application catalog. More than 50 different apps are
available in the app catalog.
An application is defined by a docker-compose and a rancher-compose file and can be deployed easily with the
default configurations.
Let's take the example of Portainer:
Portainer is a lightweight management UI which allows you to easily manage your Docker host or Swarm
cluster. Portainer is meant to be as simple to deploy as it is to use. It consists of a single container that can run
on any Docker engine (Docker for Linux and Docker for Windows are supported). Portainer allows you to
manage your Docker containers, images, volumes, networks and more ! It is compatible with the standalone
Docker engine and with Docker Swarm.
This is the docker-compose.yml file of Portainer:
portainer:
labels:
io.rancher.sidekicks: ui
io.rancher.container.create_agent: true
io.rancher.container.agent.role: environment
image: rancher/portainer-agent:v0.1.0
volumes:
- /config
ui:
image: portainer/portainer:pr572
command: --no-auth --external-endpoints=/config/config.json --sync-interval=5s -p :80
volumes_from:
- portainer
net: container:portainer
This is its rancher-compose.yml file:
.catalog:
name: "Portainer"
version: "1.11.4"
description: Open-source lightweight management UI for a Docker host or Swarm cluster
minimum_rancher_version: v1.5.0-rc1
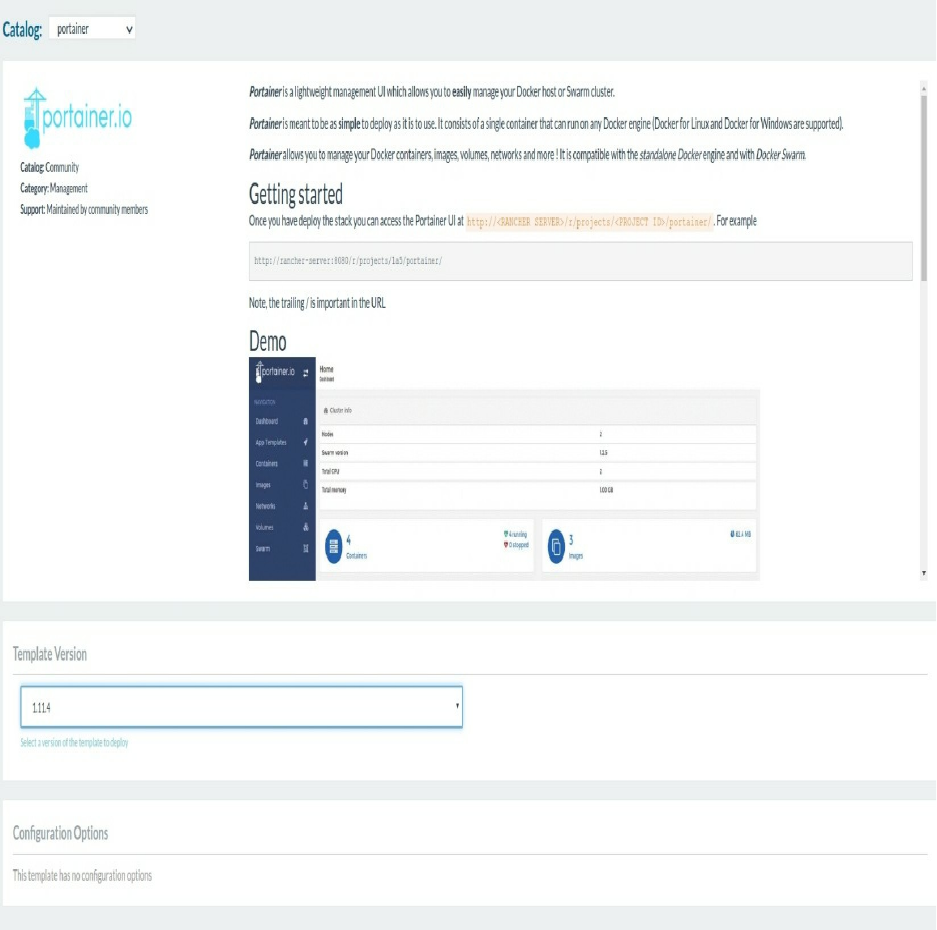
Rancher offers the possibility to start infrastructure Stacks. If you go to Stacks->Infrastructure, you can see a catalog
of tools like Bind9, Portainer, Rancher vxlan ..etc
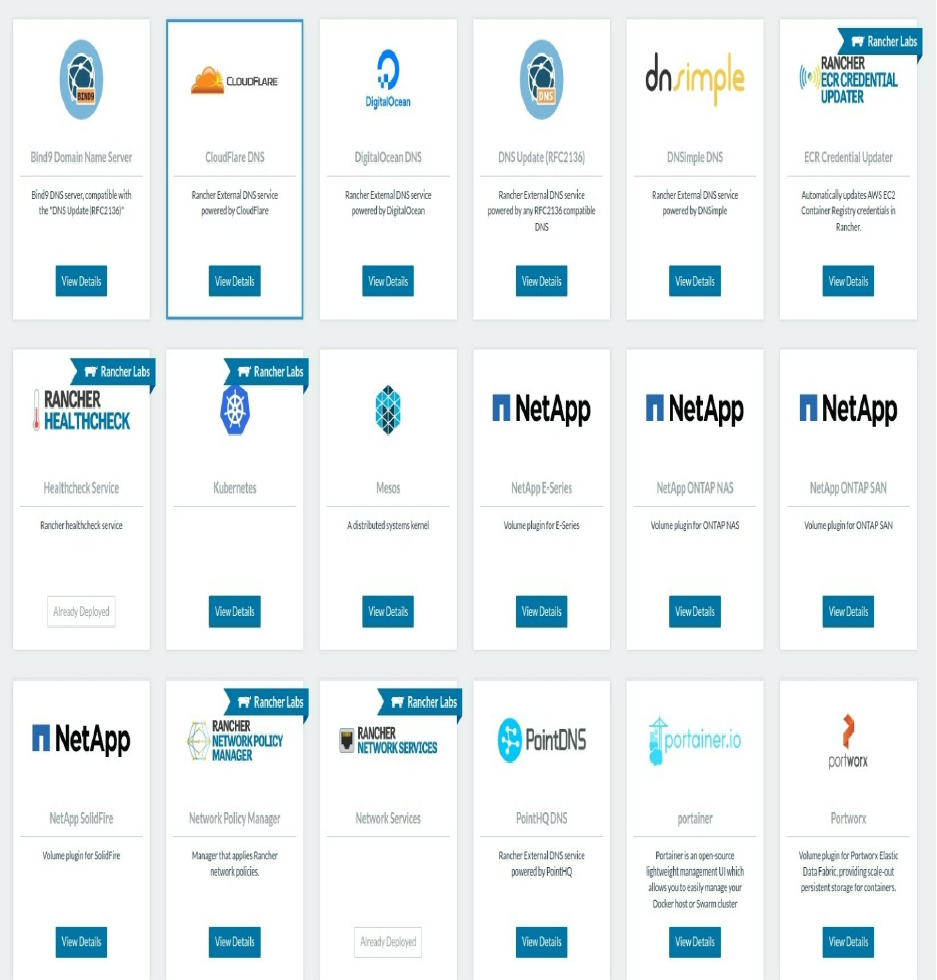
Now we want to scale our Wordpress frontal app in order to handle more traffic. In this case, you should click Stack-
>User then the name of the Stack (it should be the default one if you followed this tutorial as it is). Now click on
Wordpress and scale your app to 3 containers:
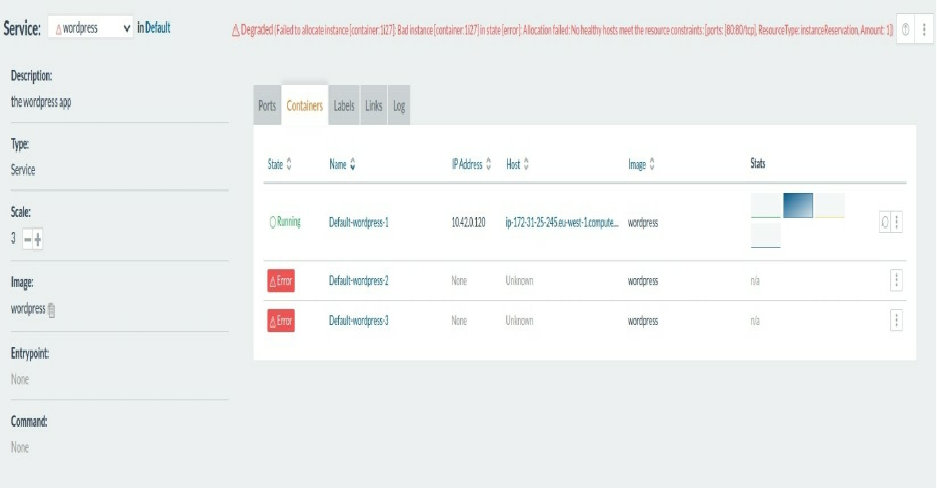
At this step, you should see how Wordpress won't scale the right way.
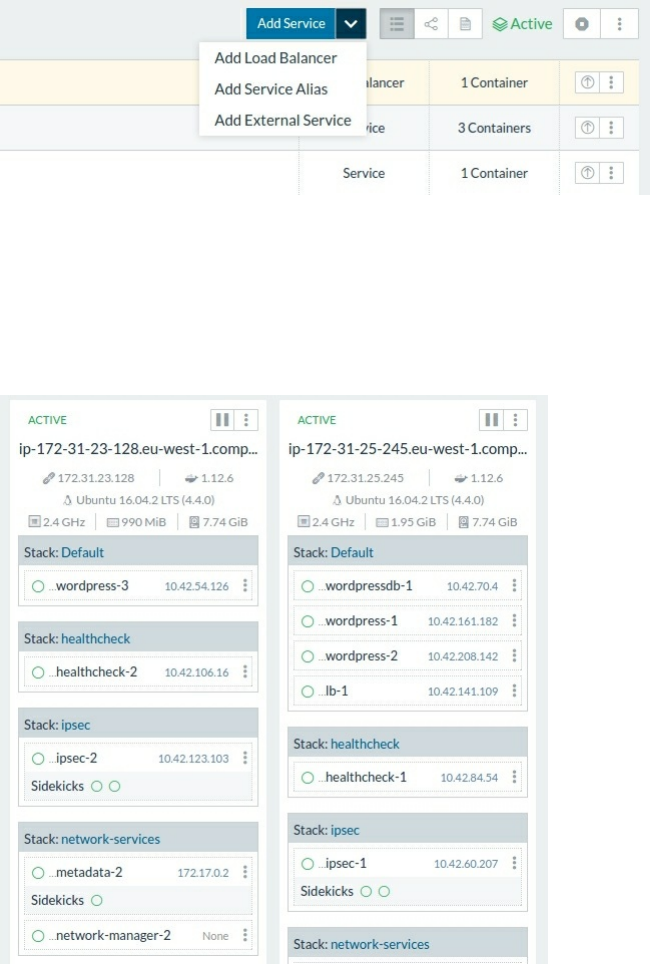
Scaling Wordpress Using Rancher
Before starting this, we should know that scaling a container that already mapped to a host port is impossible, we
have seen this with the latest failed example of Wordpress. To make this work, we should remove the port mapping,
go to the Wordpress service and remove port mapping using the UI. Now let's create a load balancer service. Go to
Stacks->User->Default and add a load balancer:
We know that the Wordpress container will run the service wordpress. So we should choose it as a target, let's also
give the target a port (which is the default port of a wordpress service): We are not using port mapping but
wordpress service listens always on port 80 - this is the same thing as in Docker Swarm. Choose also the request
host, port, path ..etc.
In our case, the Wordpress Stack is running in a single Rancher host, since we added just one. You can add another
host and the same load balacing mechanism will be reproduced on two hosts: the wordpress service containers will
be available on both hosts and the load balancer will auto-discover Wordpress containers in all of Rancher hosts.

Chapter XV - Docker API
o ^__^
o (oo)\_______
(__)\ )\/\
||----w |
|| ||

Exploring Docker API
Docker API is the API served by Docker Engine and it allows to have a full control on Docker. This could be
interesting if you want to build application that use Docker easily. You can see the Engine API version you are
running by typing sudo docker version |grep -i api
The API is usually changed in each release of Docker, so API calls are versioned to ensure that clients don't break.
In order to interact with theis API you should use on of the known SDKs and this will depend on the language you
are using. Here is a list of the know SDKs to use Docker Engine API:
Language Library
C libdocker
C# Docker.DotNet
C++ lasote/docker_client
Dart bwu_docker
Erlang erldocker
Gradle gradle-docker-plugin
Groovy docker-client
Haskell docker-hs
HTML (Web Components) docker-elements
Java docker-client
Java docker-java
NodeJS dockerode
Perl Eixo::Docker
PHP Docker-PHP
Ruby docker-api
Rust docker-rust
Rust shiplift
Scala tugboat
Scala reactive-docker
The following go code creates a container running Alpine as an OS that will print "hello world" then exits:
package main
import (
"io"
"os"
"github.com/moby/moby/client"
"github.com/moby/moby/api/types"
"github.com/moby/moby/api/types/container"
"golang.org/x/net/context"
)
func main() {
ctx := context.Background()
cli, err := client.NewEnvClient()
if err != nil {
panic(err)
}
_, err = cli.ImagePull(ctx, "docker.io/library/alpine", types.ImagePullOptions{})
if err != nil {
panic(err)
}

resp, err := cli.ContainerCreate(ctx, &container.Config{
Image: "alpine",
Cmd: []string{"echo", "hello world"},
}, nil, nil, "")
if err != nil {
panic(err)
}
if err := cli.ContainerStart(ctx, resp.ID, types.ContainerStartOptions{}); err != nil {
panic(err)
}
if _, err = cli.ContainerWait(ctx, resp.ID); err != nil {
panic(err)
}
out, err := cli.ContainerLogs(ctx, resp.ID, types.ContainerLogsOptions{ShowStdout: true})
if err != nil {
panic(err)
}
io.Copy(os.Stdout, out)
}
To do the same thing with Python:
import docker
client = docker.from_env()
print client.containers.run("alpine", ["echo", "hello", "world"])
Docker has an official documentation if you want to use the API.
e.g. To list containers, we can send a GET request to /containers/json , and the reponse will be either 400, 500 and if
"everything is 200 ok", the API will return a JSON:
[
{
"Id": "8dfafdbc3a40",
"Names": [
"/boring_feynman"
],
"Image": "ubuntu:latest",
"ImageID": "d74508fb6632491cea586a1fd7d748dfc5274cd6fdfedee309ecdcbc2bf5cb82",
"Command": "echo 1",
"Created": 1367854155,
"State": "Exited",
"Status": "Exit 0",
"Ports": [
{
"PrivatePort": 2222,
"PublicPort": 3333,
"Type": "tcp"
}
],
"Labels": {
"com.example.vendor": "Acme",
"com.example.license": "GPL",
"com.example.version": "1.0"
},
"SizeRw": 12288,
"SizeRootFs": 0,
"HostConfig": {
"NetworkMode": "default"
},
"NetworkSettings": {
"Networks": {
"bridge": {
"NetworkID": "7ea29fc1412292a2d7bba362f9253545fecdfa8ce9a6e37dd10ba8bee7129812",
"EndpointID": "2cdc4edb1ded3631c81f57966563e5c8525b81121bb3706a9a9a3ae102711f3f",
"Gateway": "172.17.0.1",
"IPAddress": "172.17.0.2",
"IPPrefixLen": 16,
"IPv6Gateway": "",
"GlobalIPv6Address": "",
"GlobalIPv6PrefixLen": 0,
"MacAddress": "02:42:ac:11:00:02"
}
}
},
"Mounts": [
{
"Name": "fac362...80535",

"Source": "/data",
"Destination": "/data",
"Driver": "local",
"Mode": "ro,Z",
"RW": false,
"Propagation": ""
}
]
},
{
"Id": "9cd87474be90",
"Names": [
"/coolName"
],
"Image": "ubuntu:latest",
"ImageID": "d74508fb6632491cea586a1fd7d748dfc5274cd6fdfedee309ecdcbc2bf5cb82",
"Command": "echo 222222",
"Created": 1367854155,
"State": "Exited",
"Status": "Exit 0",
"Ports": [],
"Labels": {},
"SizeRw": 12288,
"SizeRootFs": 0,
"HostConfig": {
"NetworkMode": "default"
},
"NetworkSettings": {
"Networks": {
"bridge": {
"NetworkID": "7ea29fc1412292a2d7bba362f9253545fecdfa8ce9a6e37dd10ba8bee7129812",
"EndpointID": "88eaed7b37b38c2a3f0c4bc796494fdf51b270c2d22656412a2ca5d559a64d7a",
"Gateway": "172.17.0.1",
"IPAddress": "172.17.0.8",
"IPPrefixLen": 16,
"IPv6Gateway": "",
"GlobalIPv6Address": "",
"GlobalIPv6PrefixLen": 0,
"MacAddress": "02:42:ac:11:00:08"
}
}
},
"Mounts": []
},
{
"Id": "3176a2479c92",
"Names": [
"/sleepy_dog"
],
"Image": "ubuntu:latest",
"ImageID": "d74508fb6632491cea586a1fd7d748dfc5274cd6fdfedee309ecdcbc2bf5cb82",
"Command": "echo 3333333333333333",
"Created": 1367854154,
"State": "Exited",
"Status": "Exit 0",
"Ports": [],
"Labels": {},
"SizeRw": 12288,
"SizeRootFs": 0,
"HostConfig": {
"NetworkMode": "default"
},
"NetworkSettings": {
"Networks": {
"bridge": {
"NetworkID": "7ea29fc1412292a2d7bba362f9253545fecdfa8ce9a6e37dd10ba8bee7129812",
"EndpointID": "8b27c041c30326d59cd6e6f510d4f8d1d570a228466f956edf7815508f78e30d",
"Gateway": "172.17.0.1",
"IPAddress": "172.17.0.6",
"IPPrefixLen": 16,
"IPv6Gateway": "",
"GlobalIPv6Address": "",
"GlobalIPv6PrefixLen": 0,
"MacAddress": "02:42:ac:11:00:06"
}
}
},
"Mounts": []
},
{
"Id": "4cb07b47f9fb",
"Names": [
"/running_cat"
],
"Image": "ubuntu:latest",
"ImageID": "d74508fb6632491cea586a1fd7d748dfc5274cd6fdfedee309ecdcbc2bf5cb82",
"Command": "echo 444444444444444444444444444444444",
"Created": 1367854152,
"State": "Exited",
"Status": "Exit 0",
"Ports": [],
"Labels": {},

"SizeRw": 12288,
"SizeRootFs": 0,
"HostConfig": {
"NetworkMode": "default"
},
"NetworkSettings": {
"Networks": {
"bridge": {
"NetworkID": "7ea29fc1412292a2d7bba362f9253545fecdfa8ce9a6e37dd10ba8bee7129812",
"EndpointID": "d91c7b2f0644403d7ef3095985ea0e2370325cd2332ff3a3225c4247328e66e9",
"Gateway": "172.17.0.1",
"IPAddress": "172.17.0.5",
"IPPrefixLen": 16,
"IPv6Gateway": "",
"GlobalIPv6Address": "",
"GlobalIPv6PrefixLen": 0,
"MacAddress": "02:42:ac:11:00:05"
}
}
},
"Mounts": []
}
]

Streaming Containers Logs Using Docker API
Like in all of Painless Docker chapters, our goal is not providing a documentation about Docker or its API, but
giving more practical examples. You can find all of the details about the API in the official documentations. Let's
move to more practical stuff.
In this part of the book we are going to create a central logging system, that will collect every line of log in a given
server and stream it to a web page. Think of it as the docker logs <all_of_my_containers> .
We are going to use Docker API with Python Flask.
Flask is a microframework for Python based on Werkzeug and Jinja 2. Python and Flask is easy to read and
understand, you don't need to be a Python expert to use follow these steps.
For my Flask projects, I usually use a code template that you can find on Github. You need first to install these
packages:
git
python3
python-pip3
python-virtualenv
Now create an isolated Python virtual environment virtualenv -p python3 docker-log-stream .
Go to the created directory cd docker-log-stream .
Activate the virtual environment: . bin/activate
Download the code template from Github: git clone https://github.com/eon01/flasklate.git code
This is the app.py file that we are going to use in order to start our server on port 5000:
#!/usr/bin/env python
# -*- coding: utf-8 -*-
import logging, traceback, configparser, os
from flask import Flask
app = Flask(__name__)
# start configuration parser
parser = configparser.ConfigParser()
parser.read("app.conf")
# reading variables
logger_level = parser.get('logging', 'logger_level', raw = True)
handler_level = parser.get('logging', 'handler_level', raw = True)
log_format = parser.get('logging', 'log_format', raw = True)
log_file = parser.get('logging', 'log_file')
# set logger logging level
logger = logging.getLogger(__name__)
logger.setLevel(eval(logger_level))
# set handler logging level
handler = logging.FileHandler(log_file)
handler.setLevel(eval(handler_level))
# create a logging format
formatter = logging.Formatter(log_format)
handler.setFormatter(formatter)
# add the handlers to the logger
logger.addHandler(handler)
@app.route('/')
def hello_world():

return 'Hello, World!'
if __name__ == '__main__':
# Bind to PORT if defined, otherwise default to 5000.
port = int(os.environ.get('PORT', 5000))
app.run(host='0.0.0.0', port=port)
This file will read configuration variables from app.conf.
In order to test this, we need to install the requirements (dependencies): pip install -r requirements.txt Now we can
start our local web server using python app.py and on another terminal, you can test it using a simple curl: curl
http://0.0.0.0:5000 . If everything is fine, you will get 'Hello, world!' on your screen.
Now we need to install the Docker API for Python, just type pip install docker and hit enter. Docker will be
installed in your local development environment.
In general, we can use Docker for Python this way:
We create a client : client = docker.from_env() and then we can access to a list of methods in the created client:
['__class__', '__delattr__', '__dict__', '__dir__', '__doc__', '__eq__', '__format__', '__ge__', '__getattr__', '__getattribute__', '__gt__', '__hash__', '__init__', '__le__', '__lt__', '__module__', '__ne__', '__new__', '__reduce__', '__reduce_ex__', '__repr__', '__setattr__', '__sizeof__', '__str__', '__subclasshook__', '__weakref__', 'api', 'containers', 'df', 'events', 'from_env', 'images', 'info', 'login', 'networks', 'nodes', 'ping', 'plugins', 'secrets', 'services', 'swarm', 'version', 'volumes']
We are more interested in : 'api', 'containers', 'df', 'events', 'from_env', 'images', 'info', 'login', 'networks', 'nodes',
'ping', 'plugins', 'secrets', 'services', 'swarm', 'version', 'volumes' methods.
As you may see we can get a list of running containers in our host using containers : containers = client.containers() .
In order to go trough all of these containers one by one, we can use:
for container in containers:
# we can execute what we want here for each container
I order to get a container logs, we can use this:
for container in containers:
for line in container.logs(stream=True):
print (line)
We can do a better code by stripping the printed line:
for container in containers:
for line in container.logs(stream=True):
print (line.strip())
Since we can access a container name using container.name we can enhance our program:
for container in containers:
for line in container.logs(stream=True):
log_line = container.name + " : " + line.strip().decode("utf-8")
print (log_line)
In the original code file, change the hello_world function by a new one that we could call stream and add the code to
stream the log files:
#!/usr/bin/env python
# -*- coding: utf-8 -*-
import logging, traceback, configparser, os

from flask import Flask
import docker
app = Flask(__name__)
# start configuration parser
parser = configparser.ConfigParser()
parser.read("app.conf")
# reading variables
logger_level = parser.get('logging', 'logger_level', raw = True)
handler_level = parser.get('logging', 'handler_level', raw = True)
log_format = parser.get('logging', 'log_format', raw = True)
log_file = parser.get('logging', 'log_file')
# set logger logging level
logger = logging.getLogger(__name__)
logger.setLevel(eval(logger_level))
# set handler logging level
handler = logging.FileHandler(log_file)
handler.setLevel(eval(handler_level))
# create a logging format
formatter = logging.Formatter(log_format)
handler.setFormatter(formatter)
# add the handlers to the logger
logger.addHandler(handler)
@app.route('/')
def stream():
client = docker.from_env()
containers = client.containers.list()
for container in containers:
for line in container.logs(stream=True):
log_line = container.name + ":" + line.strip().decode("utf-8")
print (log_line)
if __name__ == '__main__':
# Bind to PORT if defined, otherwise default to 5000.
port = int(os.environ.get('PORT', 5000))
app.run(host='0.0.0.0', port=port)
Now add Docker API to the requirements file: pip freeze > requirements.txt
In order to test this I used a Wordpress stack that I deployed to my machine using this docker-compose file:
version: '3.1'
services:
wordpress:
image: wordpress
ports:
- 8080:80
environment:
WORDPRESS_DB_PASSWORD: passw0rd
mysql:
image: mysql:5.7
environment:
MYSQL_ROOT_PASSWORD: passw0rd
You can start Wordpress docker-compose -f docker-compose.yml up , then start refreshing the index page at:
http://0.0.0.0:8080 . At the same time, after running the Python program using a simple python app.py command, you
should send a GET request to your Python program curl http://0.0.0.0:5000/ .


Chapter XVI - Docker Security
o ^__^
o (oo)\_______
(__)\ )\/\
||----w |
|| ||
Possible Threats
Docker is neither more nor less secured than VMs and the VM vs Docker security discussions are the answers to a
wrong question. Usually security threats are either PEBCAK (Problem Exists Between Chair And Keyboard) or
problems that have existed before.
Discussing the security best practices and checklists is more constructive and productive.
In this chapter, we are going to see what are the know security threats that you should be aware of when using
Docker and introduce good security practices. I am not a security researcher so all of the following parts are based
on my opinions, some researches and experiences.
Kernel Panic & Exploits
As we have seen in the first chapters of this book, one of the differences between Docker and VMs is that a container
share the Kernel with the host system and with the other running containers. If a container causes a Kernel panic,
both hosts and other containers could be taken down. This "direct access" to the Kernel, which is at the same time
one of the strengths of Docker, could cause serious damages.
Container Breakouts & Privilege Escalation
If you start the container X with the user Y, container X will have the same privileges on the host system as the user
Y. This is harmful when a process breaks out the container. In this case, if you were root in the container, you will be
the same on the host.
Container breakout will cause unauthorized access across containers, hosts and even your data centers.
Poisoned Images
It is possible that download and use a Docker image that run malwares (e.g. scanning the network for sensitive data,
downloading malware from a distant host, executing harmful actions .. etc). An attacker can also get access to your
data if you are using his poisoned image.
Denial-of-service Attacks
Like you know, containers share the same Kernel with each other and with the host and in this case any container
monopolizing the Kernel resources will make other containers starve out. Poisoned containers can eat up CPU time,
memory resources, disk IO.. etc and this could lead other containers and even the host system to a crash.
Compromising secrets
A Docker container could contain or send sensitive data. During transit and at rest, the secret data could be viewed
and stolen by an attacker. Microservices architecture have the same security threat but there are always good
solutions for these threats.
Application Level Threats

A container is primarily made to build, ship and run an application and even if the host and the container are
secured, the application layer could open some doors to attackers. e.g.
Flooding the network
Application level DDOS
XSS vulnerabilities and SQL injection
DNS hijacking
Host System Level Treats
If the host system is not up to date, you may have some security threats like: heart-bleed, shell-shock (Bashdoor),
glibc ..etc

Security Best Practices
Security By Design
Like for any other security threat, a system that has been designed from the ground up to be secure is always the best
and first practice. The application layer, the containerization layer, the host system, the software and the cloud
architecture ..etc are all elements of the same running stack and each of them could be a weak link. A system secure
by design will work to limit the damage when a container breakout occurs.
SetUID/SetGID
setuid/setgid binaries run with the privileges of the owner and can sometimes be compromised by an attacker to gain
elevated privileges. To remove the setuid bit, add this line in the Dockerfile:
RUN find / -perm +6000 -type f -exec chmod a-s {} \; || true
Without the || true , we can have errors like:
find: `/proc/18/task/18/fd/5': No such file or directory
find: `/proc/18/task/18/fdinfo/5': No such file or directory
find: `/proc/18/fd/5': No such file or directory
find: `/proc/18/fdinfo/5': No such file or directory
This is a prevention from some privilege escalation threats and it will applied to files like:
/sbin/unix_chkpwd
/usr/bin/chage
/usr/bin/passwd
/usr/bin/mail-touchlock
/usr/bin/mail-unlock
/usr/bin/gpasswd
/usr/bin/crontab
/usr/bin/chfn
/usr/bin/newgrp
/usr/bin/sudo
/usr/bin/wall
/usr/bin/mail-lock
/usr/bin/expiry
/usr/bin/dotlockfile
/usr/bin/chsh
/usr/lib/eject/dmcrypt-get-device
/usr/lib/pt_chown
/bin/ping6
/bin/su
/bin/ping
/bin/umount
/bin/mount
Controlling CPU Usage
An attacker that gains access to a container could make DDoS attacks on the CPU that make other containers starve
out. By default, containers get an equal number of CPU cycles and quotas. This could be modified by changing the
container's CPU period and quota values.
docker run -d --cpu-period 50000 --cpu-quota 5000 ubuntu:16.04

The default CPU CFS (Completely Fair Scheduler) period is 100ms.
The --cpu-period and --cpu-quota flags limit the container's CPU usage.
The default --cpu-quota value is 0 and allows the container to take 100% of a CPU resource for 1 CPU.
The CFS (Completely Fair Scheduler), the default Linux Scheduler used by the kernel handles resource allocation
for executing processes.
When this value is set to 50000 the container is limited to 50% of a CPU resource.
Adjusting --cpu-period and --cpu-quota give the container administrator the control for container's CPU usage in a
multiple CPUs context.
Controlling Memory Usage
With the default setting, container can use 100% of the memory on the host. Choosing a limit for a container is a
security best practice in order to limit risks in the case of a container breakout.
Limiting the max amount of memory a container can use is done using the -m flag. e.g. docker run -m 512m
ubuntu:16.04
Verifying Images
Be careful from downloading 3rd party images. Only use images from automated builds with linked source code or
use official images by pulling the digest to take advantage of checksum validate.
Set Container Filesystem to Read Only
Unless you need to modify files in your container, make the filesystem read only.
docker run --read-only ubuntu:16.04 touch test
If a hacker breaks out a container, the first thing he wants to do is to write the exploit into the application, this way
at its startup, it will start the exploit.
A read-only container will prevent everyone from from definitely leaving an exploit. The exploit will no longer exist
once the application restarts.
Set A User
Don't run your application as root in containers. Users in Docker are not namespaced.
RUN groupadd -r groupname && useradd -r -g groupname username
USER username
Do Not Use Environment Variables To Share Secrets
A sensitive data should not be shared using the ENV instruction otherwise it could be exposed to child processes,
other linked containers, Docker inspection output ..etc

Use Orchestrators Secret managers
Kubernetes or Docker Swarm offer their own secret management tools, if you want to store sensible data or send it
from one service to another then it is recommended to use these tools (e.g. Docker Secret for the Swarm mode)
Do Not Run Containers In The Privileged Mode
When you run a container using the --privileged flag, it gives all the capabilities to the container like accessing all
devices on the host as well as set some configuration in AppArmor or SELinux. The container will have almost all
the same access to the host as a normal process running without a container on the host.
Turn Off Inter-Container Communication
If you don't need inter-container communication on the same host, run containers with --icc=false --iptables in order
enable only communication between containers linked together explicitly. If these flags are not activated
unrestricted network traffic is enabled between all containers on the same host.
docker run -d --icc=files --iptables
Set Volumes To Read-Only
If you don't need to modify files in attached volumes make them read-only.
docker run -v /folder:/folder:ro alpine
Only Install Necessary Packages
Inside the container, install only what you need. Don't install unnecessary packages e.g ssh, cron, man-db ..etc In
order to see what packages are installed in a container, depending on your package manager, run: docker exec
<container_id> rpm -qa or dpkg -l ..etc
Make Sure Docker Is Up To Date
Docker has an active community and security updates are frequent. It is recommended from a security point of view
to always have the latest version in your production environments.
Use Vulnerability Analysis Scanners
Most known ones are the official Docker Cloud security scanner and Clair by CoreOS.
Properly Configure Your Docker Registry Access Control
Vine Docker images were hacked because their private registry was publicly accessible at docker.vineapp.com

Security Through Obscurity
If docker.vineapp.com was 1xoajze313kjaz.vineapp.com , the hacker would not be able to discover the private registry.
Secure And Control Your Code
Even if your hosts and containers are secure, the problem could come from the containerized application: e.g. You
are using PHP and the remote file inclusion/execution configuration is set to active or running system commands
from code is active .. etc
Use Limited Linux Capabilities
When limiting the Linux capabilities of a container, even in the case a hacker gets into the container, the host system
will be protected.
By default, Docker starts containers with a restricted set of capabilities
Use Seccomp
By default a container has around 44 disabled system calls (out of 300+). The 270 calls that still open may be
susceptible to attacks. For a high level of security, you can set Seccomp profiles individually for containers but be
sure to understand each syscall.
docker run --rm -it --security-opt seccomp=default.json hello-world

Chapter XVII - Docker, Containerd & Standalone
Runtimes Architecture
o ^__^
o (oo)\_______
(__)\ )\/\
||----w |
|| ||
The architecture of Docker has evolved many times since its creation. This chapter aims to explain what you
(developers, ops engineers and architects) should know about Containerd integration in Docker architecture. Let’s
start by defining Docker Daemon and then see how it is integrated in the new Docker architecture and Containerd.

Docker Daemon
Like the init has its daemon, cron has crond, dhcp has dhcpd, Docker has its own daemon dockerd. To list Docker
daemons, list all Linux daemons:
ps -U0 -o ‘tty,pid,comm’ | grep ^?
And grep Docker on the output:
ps -U0 -o ‘tty,pid,comm’ | grep ^?|grep -i dockerd
? 2779 dockerd
Notice that you see also docker-containerd-shim. We are going to see this in details later in this chapter. If you are
already running Docker, when you type dockerd you will have a similar error message to this :
FATA[0000] Error starting daemon: pid file found, ensure docker is not running or delete /var/run/docker.pid
Now let’s stop Docker:
service docker stop
and run its daemon directly using dockerd command.
Running the Docker daemon command using dockerd is a good debugging tool, as you may see, you will have the
running traces right on your terminal screen:
INFO[0000] libcontainerd: new containerd process, pid: 19717
WARN[0000] containerd: low RLIMIT_NOFILE changing to max current=1024 max=4096
INFO[0001] [graphdriver] using prior storage driver "aufs"
INFO[0003] Graph migration to content-addressability took 0.63 seconds
WARN[0003] Your kernel does not support swap memory limit.
WARN[0003] mountpoint for pids not found
INFO[0003] Loading containers: start.
INFO[0003] Firewalld running: false
INFO[0004] Removing stale sandbox ingress_sbox (ingress-sbox)
INFO[0004] Default bridge (docker0) is assigned with an IP address 172.17.0.0/16. Daemon option --
bip can be used to set a preferred IP address
INFO[0004] Loading containers: done.
INFO[0004] Listening for local connections addr=/var/lib/docker/swarm/control.sock proto=unix
INFO[0004] Listening for connections addr=[::]:2377 proto=tcp
INFO[0004] 61c88d41fce85c57 became follower at term 12
INFO[0004] newRaft 61c88d41fce85c57 [peers: [], term: 12, commit: 290, applied: 0, lastindex: 290, lastterm: 12]
INFO[0004] 61c88d41fce85c57 is starting a new election at term 12
INFO[0004] 61c88d41fce85c57 became candidate at term 13
INFO[0004] 61c88d41fce85c57 received vote from 61c88d41fce85c57 at term 13
INFO[0004] 61c88d41fce85c57 became leader at term 13
INFO[0004] raft.node: 61c88d41fce85c57 elected leader 61c88d41fce85c57 at term 13
INFO[0004] Initializing Libnetwork Agent Listen-Addr=0.0.0.0 Local-addr=192.168.0.47 Adv-addr=192.168.0.47 Remote-addr =
INFO[0004] Daemon has completed initialization
INFO[0004] Initializing Libnetwork Agent Listen-Addr=0.0.0.0 Local-addr=192.168.0.47 Adv-addr=192.168.0.47 Remote-addr =
INFO[0004] Docker daemon commit=7392c3b graphdriver=aufs version=1.12.5
INFO[0004] Gossip cluster hostname eonSpider-3e64aecb2dd5
INFO[0004] API listen on /var/run/docker.sock
INFO[0004] No non-
localhost DNS nameservers are left in resolv.conf. Using default external servers : [nameserver 8.8.8.8 nameserver 8.8.4.4]
INFO[0004] IPv6 enabled; Adding default IPv6 external servers : [nameserver 2001:4860:4860::8888 nameserver 2001:4860:4860::8844]
INFO[0000] Firewalld running: false
Now if you create or remove containers for example, you will see that Docker daemon connects you (Docker client)
to Docker containers.
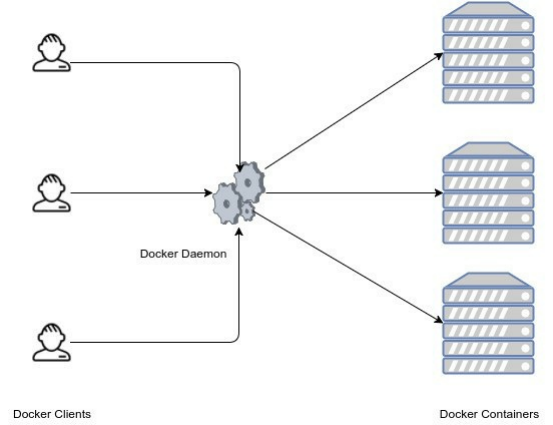
This is the global architecture of Docker :
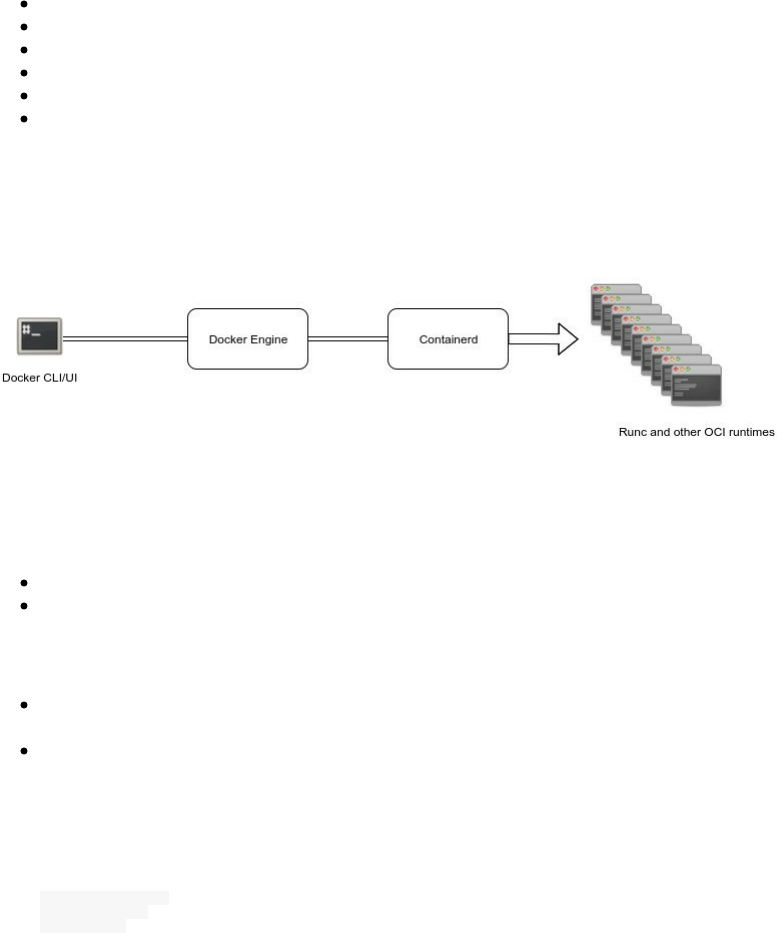
Containerd
Containerd is one of the recent projects in the Docker ecosystem and its purpose is breaking up more modularity to
Docker architecture and more neutrality visà-vis the other industry actors (Cloud providers and other orchestrator
services).
According to Solomon Hykes, containerd is already deployed on millions of machines since April 2016 when it was
included in Docker 1.11. The announced roadmap to extend containerd get its input from the cloud providers and
actors like Alibaba Cloud, AWS, Google, IBM, Microsoft, and other active members of the container ecosystem.
More Docker engine functionality will be added to containerd so that containerd 1.0 will provide all the core
primitives you need to manage containers with parity on Linux and Windows hosts:
Container execution and supervision
Image distribution
Network Interfaces Management
Local storage
Native plumbing level API
Full OCI support, including the extended OCI image specification
To build, ship and run containerized applications, you may continue to use Docker but if you are looking for
specialized components you could consider Containerd.
Docker engine 1.11 was the first release built on runC (a runtime based on Open Container Intiative technology) and
containerd.
Formed in June 2015, the Open Container Initiative (OCI) aims to establish common standards for software
containers in order to avoid a potential fragmentation and divisions inside the container ecosystem.
It contains two specifications:
runtime-spec: The runtime specification
image-spec: The image specification
The runtime specification outlines how to run a filesystem bundle that is unpacked on disk:
A standardized container bundle should contain the needed information and configurations to load and run a
container in a config.json file residing in the root of the bundle directory.
A standardized container bundle should contain a directory representing the root filesystem of the container.
Generally this directory has a conventional name like rootfs.
You can see the json file if you export and extract an image. In the following example, we are going to use busybox
image.
mkdir my_container
cd my_container
mkdir rootfs

docker export $(docker create busybox) | tar -C rootfs -xvf -
Now we have an extracted busybox image inside of rootfs directory.
tree -d my_container/
my_container/
└── rootfs
├── bin
├── dev
│ ├── pts
│ └── shm
├── etc
├── home
├── proc
├── root
├── sys
├── tmp
├── usr
│ └── sbin
└── var
├── spool
│ └── mail
└── www
We can generate the config.json file:
docker-runc spec
This is the generated configuration file (config.json):
{
"ociVersion": "1.0.0-rc2-dev",
"platform": {
"os": "linux",
"arch": "amd64"
},
"process": {
"terminal": true,
"consoleSize": {
"height": 0,
"width": 0
},
"user": {
"uid": 0,
"gid": 0
},
"args": [
"sh"
],
"env": [
"PATH=/usr/local/sbin:/usr/local/bin:/usr/sbin:/usr/bin:/sbin:/bin",
"TERM=xterm"
],
"cwd": "/",
"capabilities": [
"CAP_AUDIT_WRITE",
"CAP_KILL",
"CAP_NET_BIND_SERVICE"
],
"rlimits": [
{
"type": "RLIMIT_NOFILE",
"hard": 1024,
"soft": 1024
}
],
"noNewPrivileges": true
},
"root": {
"path": "rootfs",
"readonly": true
},
"hostname": "runc",
"mounts": [
{
"destination": "/proc",
"type": "proc",
"source": "proc"
},

{
"destination": "/dev",
"type": "tmpfs",
"source": "tmpfs",
"options": [
"nosuid",
"strictatime",
"mode=755",
"size=65536k"
]
},
{
"destination": "/dev/pts",
"type": "devpts",
"source": "devpts",
"options": [
"nosuid",
"noexec",
"newinstance",
"ptmxmode=0666",
"mode=0620",
"gid=5"
]
},
{
"destination": "/dev/shm",
"type": "tmpfs",
"source": "shm",
"options": [
"nosuid",
"noexec",
"nodev",
"mode=1777",
"size=65536k"
]
},
{
"destination": "/dev/mqueue",
"type": "mqueue",
"source": "mqueue",
"options": [
"nosuid",
"noexec",
"nodev"
]
},
{
"destination": "/sys",
"type": "sysfs",
"source": "sysfs",
"options": [
"nosuid",
"noexec",
"nodev",
"ro"
]
},
{
"destination": "/sys/fs/cgroup",
"type": "cgroup",
"source": "cgroup",
"options": [
"nosuid",
"noexec",
"nodev",
"relatime",
"ro"
]
}
],
"hooks": {},
"linux": {
"resources": {
"devices": [
{
"allow": false,
"access": "rwm"
}
]
},
"namespaces": [
{
"type": "pid"
},
{
"type": "network"
},
{
"type": "ipc"
},
{
"type": "uts"

},
{
"type": "mount"
}
],
"maskedPaths": [
"/proc/kcore",
"/proc/latency_stats",
"/proc/timer_list",
"/proc/timer_stats",
"/proc/sched_debug",
"/sys/firmware"
],
"readonlyPaths": [
"/proc/asound",
"/proc/bus",
"/proc/fs",
"/proc/irq",
"/proc/sys",
"/proc/sysrq-trigger"
]
}
}
Now you can edit any of the configurations listed above and run again a container without even using Docker, just
runC:
runc run container-name
Note that you should install runC first in order to use it. For Ubuntu 16.04, you can just type this command:
sudo apt install runc
You could also install it from sources:
mkdir -p ~/golang/src/github.com/opencontainers/
cd ~/golang/src/github.com/opencontainers/
git clone https://github.com/opencontainers/runc
cd ./runc
make
sudo make install
runC, a standalone containers runtime, is at its full spec, it allows you to spin containers, interact with them, and
manage their lifecycle and that’s why containers built with one engine (like Docker) can run on another engine.
Containers are started as a child process of runC and can be embedded into various other systems without having to
run a daemon (Docker Daemon).
runC is built on libcontainer which is the same container library powering a Docker engine installation. Prior to the
version 1.11, Docker engine was used to manage volumes, networks, containers, images etc.. Now, the Docker
architecture is broken into four components: Docker engine, containerd, containerd-shm and runC. The binaries are
respectively called docker, docker-containerd, docker-containerd-shim, and docker-runc.
To run a container, Docker engine creates the image, pass it to containerd. containerd calls containerd-shim that
uses runC to run the container. Then, containerd-shim allows the runtime (runC in this case) to exit after it starts the
container : This way we can run "daemon-less" containers because we are not having to have the long running
runtime processes for containers.
Currently, the creation of a container is handled by runc (via containerd) but it is possible to use another binary
(instead of runC) that expose the same command line interface of Docker and accepting an OCI bundle.
You can see the different runtimes that you have on your host by typing:
docker info|grep -i runtime
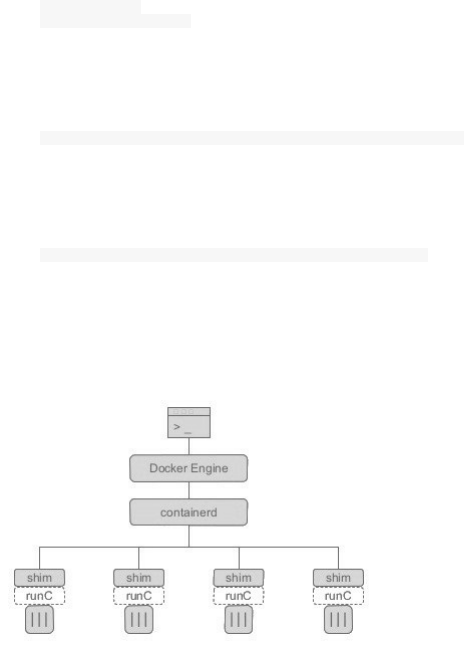
Since I am using the default runtime, this is what I should get as an output:
Runtimes: runc
Default Runtime: runc
To add another runtime, you should follow this command:
docker daemon --add-runtime "<runtime-name>=<runtime-path>"
Example:
docker daemon --add-runtime "oci=/usr/local/sbin/runc"
There is only one containerd-shim by process and it manages the STDIO FIFO and keeps it open for the container in
case containerd or Docker dies. It is also in charge of reporting the container’s exit status to a higher level like
Docker.
Container runtime, lifecycle support and the execution (create, start, stop, pause, resume, exec, signal & delete) are
some features implemented in Containerd. Some others are managed by other components of Docker (volumes,
logging ..etc). Here is a table from the Containerd Github repository that lists the different features and tell if they
are in or out of scope.
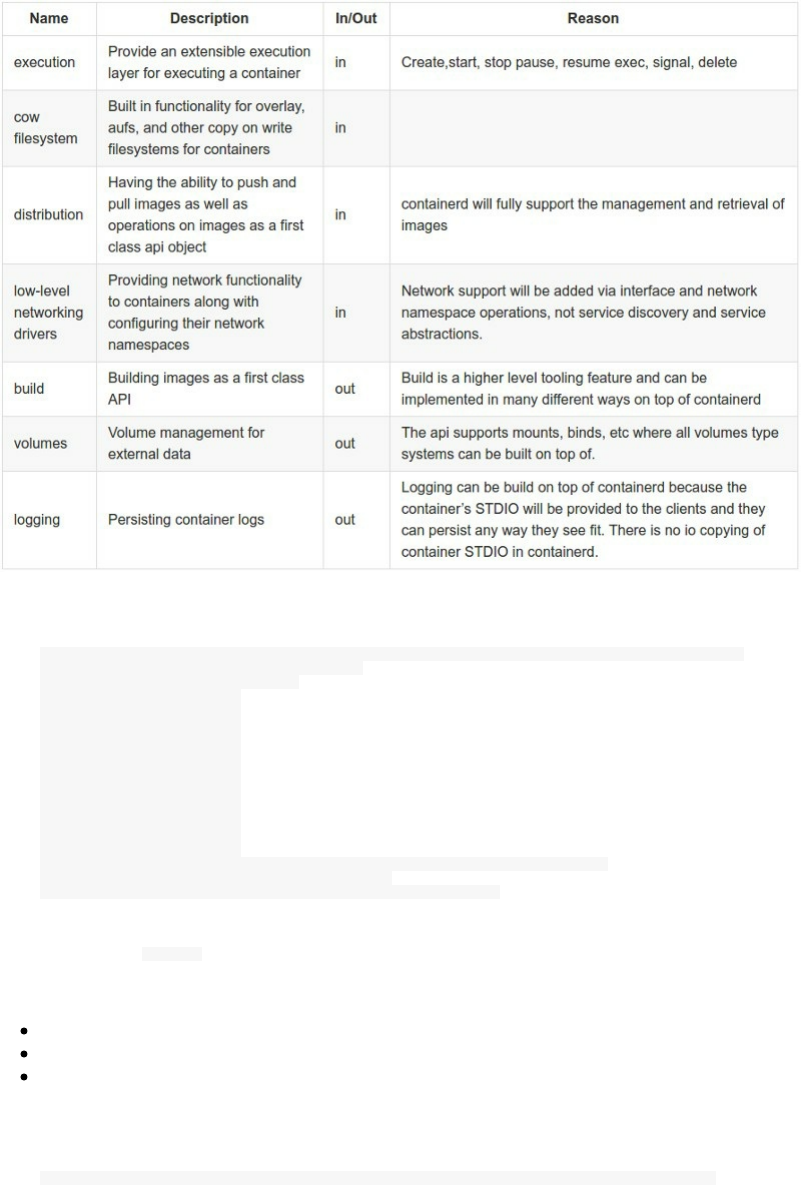
If we run a container:
docker run --name mariadb -e MYSQL_ROOT_PASSWORD=password -v /data/lists:/var/lib/mysql -d mariadb
Unable to find image 'mariadb:latest' locally
latest: Pulling from library/mariadb
75a822cd7888: Pull complete
b8d5846e536a: Pull complete
b75e9152a170: Pull complete
832e6b030496: Pull complete
034e06b5514d: Pull complete
374292b6cca5: Pull complete
d2a2cf5c3400: Pull complete
f75e0958527b: Pull complete
1826247c7258: Pull complete
68b5724d9fdd: Pull complete
d56c5e7c652e: Pull complete
b5d709749ac4: Pull complete
Digest: sha256:0ce9f13b5c5d235397252570acd0286a0a03472a22b7f0384fce09e65c680d13
Status: Downloaded newer image for mariadb:latest
db5218c494190c11a2fcc9627ea1371935d7021e86b5f652221bdac1cf182843
Then if you type ps aux you can notice the docker-containerd-shim process relative to this container running with
the following parameters and arguments:
db5218c494190c11a2fcc9627ea1371935d7021e86b5f652221bdac1cf182843
/var/run/docker/libcontainerd/db5218c494190c11a2fcc9627ea1371935d7021e86b5f652221bdac1cf182843
and runC binary ( docker-runc )
This is the full line with the right format:
docker-containerd-shim <container_id> /var/run/docker/libcontainerd/<container_id> docker-runc
db5218c494190c11a2fcc9627ea1371935d7021e86b5f652221bdac1cf182843 is the id of the container that you can
see at the end of the container creation.

ls -l /var/run/docker/libcontainerd/db5218c494190c11a2fcc9627ea1371935d7021e86b5f652221bdac1cf182843
total 4
-rw-r--r-- 1 root root 3653 Dec 27 22:21 config.json
prwx------ 1 root root 0 Dec 27 22:21 init-stderr
prwx------ 1 root root 0 Dec 27 22:21 init-stdin
prwx------ 1 root root 0 Dec 27 22:21 init-stdout

Final Words
Docker is really a powerful tool not only because it's changin the IT industry but also because it is creating a new
landscape. The futur of the Cloud Computing, the Serveless Computing, the distributed systems, IoT and the
production systems will be using this technology and its ecosystem, so it is good that you went trough this course
and learned important things that you will need for your expertise.
I would like to thank everybody who encouraged me to start working on this, from my family to my friends and of
course my readers. Thanks a lot !
Don't forget to join my newsletter DevOpsLinks, Shipped and the community Job Board JobsForDevOps. You can
follow me on Twitter for future updates.
I hope you have been enjoying this course.
Aymen El Amri.

Table of Contents
Introduction
Preface
Chapter I - Introduction To Docker & Containers
Chapter II - Installation & Configuration
Chapter III - Basic Concepts
Chapter IV - Advanced Concepts
Chapter V - Working With Docker Images
Chapter VI - Working With Docker Containers
Chapter VII - Working With Docker Machine
Chapter VIII - Docker Networking
Chapter IX - Composing Services Using Compose
Chapter X - Docker Logging
Chapter XI - Docker Debugging And Troubleshooting
Chapter XII - Orchestration - Docker Swarm
Chapter XIII - Orchestration - Kubernetes
Chapter XIV - Orchestration - Rancher/Cattle
Chapter XV - Docker API
Chapter XVI - Docker Security
Chapter XVII - Docker, Containerd & Standalone Runtimes Architecture
Final Words
