Pod 1 Guide To Go Live Live..11.17.17
User Manual: Pdf
Open the PDF directly: View PDF ![]() .
.
Page Count: 44
- How to Use This Guide
- Pre Go-Live Checklist for Providers
- 5 Things every Provider Must do for a new Epic Inpatient Admission
- CLINICAL UPDATES
- Code Status Ordering
- Priority-Based Pain Medication
- Phases of Care
- Users can load an order set from the Manage Orders activity, encounters like Prep for Case or Orders Only, or Transfer and Discharge navigators. Orders within order sets already have a Phase of Care assigned to them.
- Search for Individual Orders
- Perioperative Phases of Care
- GI Phases of Care
- Interventional Radiology (IR) Phases of Care
- Interventional Cardiology (CV) Phases of Care
- Discharge Medication Reconciliation Efficiencies
- Completing a CDI Provider Query
- Order Entry Workflows
- Case Request
- How-To Guides
- Go-Live Support Model
- Where to Go for Help With Go-Live Issues
- Resolving Common Go-Live Issues
- How Issues Will Be Prioritized and Resolved
- What to Know In Case Of Downtime
- Appendix

Page 1 of 44
Epic Go-Live Toolkit:
Pod 1 hospitals (AMH, BJSPH, CH, PWH)

Page 2 of 44
TABLE OF CONTENTS
HOW TO USE THIS GUIDE ...................................................................................................................................... 3
PRE GO-LIVE CHECKLIST FOR PROVIDERS ........................................................................................................ 4
5 THINGS EVERY PROVIDER MUST DO FOR A NEW EPIC INPATIENT ADMISSION ......................................... 4
CLINICAL UPDATES ................................................................................................................................................ 4
CODE STATUS ORDERING ................................................................................................................................................ 4
PRIORITY-BASED PAIN MEDICATION................................................................................................................................. 5
PHASES OF CARE ............................................................................................................................................................ 7
DISCHARGE MEDICATION RECONCILIATION EFFICIENCIES ............................................................................................... 12
COMPLETING A CDI PROVIDER QUERY ........................................................................................................................... 14
ORDER ENTRY WORKFLOWS ......................................................................................................................................... 15
CASE REQUEST ............................................................................................................................................................. 16
HOW-TO GUIDES ................................................................................................................................................... 17
HOW TO PREPARE YOUR PHYSICIAN FOR GO-LIVE ......................................................................................................... 17
GO-LIVE SUPPORT MODEL .................................................................................................................................. 21
WHERE TO GO FOR HELP WITH GO-LIVE ISSUES ............................................................................................ 24
RESOLVING COMMON GO-LIVE ISSUES............................................................................................................. 24
SECURITY AND LOGIN .................................................................................................................................................... 24
PRINTING AND PRINT ROUTING ...................................................................................................................................... 25
ACCESSING REPORTS ................................................................................................................................................... 25
CUTOVER, CONVERSION AND DATA ACCESS .................................................................................................................. 25
HOW ISSUES WILL BE PRIORITIZED AND RESOLVED ...................................................................................... 26
CLINICAL CONTENT AND WORKFLOW CHANGE REQUESTS .............................................................................................. 27
HOW YOU WILL GET STATUS UPDATES FOR YOUR ISSUES ............................................................................................. 27
HOW ISSUES WILL BE REPORTED .................................................................................................................................. 28
HOW AND WHEN YOU WILL HEAR ABOUT ISSUES ........................................................................................................... 28
WHAT TO EXPECT AFTER GO-LIVE................................................................................................................................. 29
WHAT TO KNOW IN CASE OF DOWNTIME .......................................................................................................... 30
EPIC DOWNTIME PROCESSES ......................................................................................................................................... 30
APPENDIX .............................................................................................................................................................. 31
M*MODAL ..................................................................................................................................................................... 31
USE EPIC ON YOUR MOBILE DEVICE: HAIKU AND CANTO ................................................................................................ 32
SECURE CHAT ............................................................................................................................................................... 36
BJC REMOTE CONNECTION GUIDE ................................................................................................................................ 36
WUSTL EPIC CITRIX RECEIVER ACCESS ....................................................................................................................... 41

Page 3 of 44
How to Use This Guide
On December 2, Pod 1 hospitals (AMH, BJSPH, CH, and PWH) will go live on Epic. This document is intended as a reference
guide for leadership and hospital staff in preparation for the clinical and operational changes as a result of the upcoming Epic
Go-Live.
You are encouraged to review late-breaking clinical updates with providers and staff to ensure awareness ahead of Go-Live.
Providers and staff should regularly refer to their Learning Home Dashboard for tip sheets and other communication updates
ahead of and during Go-Live. Examples of these topics are included in the Appendix.
Provided in this document are examples of frequently-reported Go-Live issues, how they are communicated to the Command
Center, and the support staff in place to help troubleshoot. Also detailed is what to expect after Go-Live, as providers and staff’s
needs shift from issue resolution to user workflow enhancements.
Thank you for your role and support in ensuring this will be a successful Go-Live.
A message from Rich Liekweg, BJC President
Colleagues,
After months of your hard work, preparation and training, you are now ready to go-live with Epic!
The Epic team has put together this toolkit to help ensure your first few days and weeks after implementation go as smoothly as
possible. You'll also have many other resources, including tip sheets, Super Users, at-the-elbow support, and a well-staffed
command center to make your Go-Live experience a success.
In the flurry of last-minute preparation and activities, please remember why we are making this change to Epic. Having a single,
integrated medical record will help us give our patients the best care possible. Epic will allow better coordination among
providers and has many features to enhance patient safety and convenience – all of which will ultimately help us to advance our
mission of improving the health and well-being of the people and the communities we serve.
Thank you,
Richard J. Liekweg
President, BJC HealthCare

Page 4 of 44
Pre Go-Live Checklist for Providers
Perform the following housekeeping items for each patient prior to Go-Live.
1. Clean up and discontinue unnecessary active orders
2. Ensure each patient has an Assign Patient Status order
3. Discharge Instructions should not be entered on patients expected to be admitted after December 1
4. Do not transfer patients to other floors on December 1 unless for a higher level of care. Hold transfers until December 2
(Go-Live).
5 Things every Provider Must do for a new Epic Inpatient
Admission
1. Reconcile, update and mark as reviewed all allergies, histories, and medications in the Admission Navigator
2. Update and mark as reviewed the Problem List either in the Admission Navigator or the Problem List Activity
3. Review all active orders and co-sign/second sign any outstanding orders in the Orders Activity
4. Review all lab/diagnostic results in either the Chart Review or Results Review Activity
5. Review your In Basket for outstanding items needing your attention
CLINICAL UPDATES
MUST READ before Go-Live!
The following topics were not finalized prior to Provider Training but are essential to know as part of your daily activities. Please
read, understand, and follow the topics below.
Code Status Ordering
Order Entry
Overview: When Epic goes live at your facility, the nomenclature of Code Status will change. In current state at community
hospitals, Code Status is documented by Code 1, 2, & 3. In future state with Epic, Code Status will be documented by Full
Code, Do Not Resuscitate, & Limited Code.
Code Status orders have been included on all Admission/Post-Op order sets, which will allow providers to ensure each patient
has an appropriate Code Status.
Page 5 of 44
Once a Code Status
order has been
selected, the provider
can see an explanation of
the new policy by viewing the Process Instructions (red box on the above screenshot) which can be observed by opening the
order. These Process Instructions will be the same for all 3 Code Status orders.
Priority-Based Pain Medication
Note: This is a significant change from historical workflow!
When Epic goes live at your facility, providers will be required to follow a different process when ordering pain medication. The
BJC Pharmacy and Therapeutics Committee made the decision for providers to order PRN pain medication using a priority-
based (first line, second line, third line) approach as opposed to the current intensity-based (mild, moderate, severe) approach.
Priority-based ordering is gaining in popularity nationally, and has already been successfully implemented at St. Louis
Children’s Hospital. This new ordering approach meets regulatory standards and allows us to promote a consistent strategy for
pain management.
Future state ordering example:
Medication A will be ordered as the “1st line for pain.”
Medication B will be ordered for the “2nd line for pain,” etc.
The first line is given first every time when the patient complains of pain. If insufficient pain control has been achieved,
the second line agent is then given
If the patient’s condition suggests priority based orders will not address the pain, consultation with the provider is
warranted. Consideration should be given to altering the first line PRN medication, or placing the patient on a routine
pain medication rather than only PRN.
Epic will have several standard ordering options using progressive panels of analgesics
- Multi-select scheduled orders and PRN choices
Page 6 of 44
- Some panel selections allow for repeat doses before 2nd line opioid is used
Frequently Asked Questions (FAQ)
• If the patient required more intense therapy last time, should I restart with the 1st line agent again?
– Yes, the 1st line agent should still be given first and the process started again. This allows for de-escalation of
therapy as the patient’s condition improves. If a 2nd or 3rd line PRN agent is consistently utilized, contact the
prescriber to evaluate/validate the sequence in which medications are prescribed.
• What if the patient reports a pain score than seems beyond the 1st line therapy?
– In this case, the provider should be notified to consider changing the ordered medications. The hope is to
minimize this by ordering appropriate 1st line therapy for the patient’s anticipated pain and by encouraging more
use of foundational analgesia with scheduled medications, when appropriate.
• When should 2nd or 3rd line agents be given?
– Moving to successive agents should happen after the patient has received a medication and continues to have
pain on reassessment after the first agent has sufficient time to take effect. For most medications, a
reassessment after 30 minutes should be adequate.
Page 7 of 44
• Will Epic prevent giving the 2nd line medication prior to the 1st line medication?
– The PRN order requires starting with the 1st line medication every time.
– If a patient needs the 2nd line agent outside the parameters of the order, the RN must contact the provider for a
new order.
Phases of Care
Phase of Care is how you can indicate when orders should be carried out in the course of a patient’s care. Assigning a phase
of care to an order or procedure communicates to nursing, pharmacy and other clinicians when the order should be active. It
also drives certain functions behind the scenes in Epic. For example, Epic will automatically discontinue orders with some
phases of care when a patient transfers out of an area. The Phase of Care also defines when an order will become active:
certain orders are active immediately and others are signed and held and need to be released later.
Common Phases of Care
Phases of Care for Perioperative / Procedural Oders
When ordering users place procedural or surgical orders, clinicians have two options for queuing them up:
• Load Orders From an Order Set
Users can load an order set from the Manage Orders activity, encounters like Prep for Case or Orders Only, or
Transfer and Discharge navigators. Orders within order sets already have a Phase of Care assigned to them.
Orders in an order set typically contain the phase of care in the order details.
• Search for Individual Orders
Individual orders can also be placed from these tools. However, orders that are placed outside of an order set are
not automatically assigned a phase of care. If the ordering provider intends for the order to be used in procedural or
surgical areas, a Phase of Care should be manually assigned at order entry. Users can select the Options button and
choose Phase of Care to load a grid allowing Phase of Care
selection. Select the check box for the appropriate phase of care and either sign or sign & hold.
Note: You can click the plus
sign at the top left of the
Phase of Care window to
select additional phases of
Page 8 of 44
care that are not displayed.
Page 9 of 44
Benefits to Phases of Care
• Phases of care makes it easier for downstream clinicians to see when orders are intended to be carried out. Epic will
organize orders by phases of care to make it easier for users to see orders that pertain to their area.
• Some phases of care will cause orders to discontinue automatically when patients leave a care area. For example,
Epic will discontinue orders with a PACU phase of care when the patient is transferred to the floor. This makes order
management easier for nurses downstream.
• Many Phases of Care default to Sign and Hold with the intent to be released by nurses or other staff at the appropriate
time. Note: A Phase of Care should always be assigned as opposed to just signing and holding because downstream
functionality such as auto-discontinuation and routing of medications to the appropriate department depends on it.
Releasing Orders
• Sign and Held orders should be released by the nurse in the receiving department (pre-op would be the periop nurse
and post-op the floor nurse). Release should occur after transfer. Here is a screenshot of the Releaser in the Sign
and Held filter of the Manage Orders activity available to nurses:

Page 10 of 44
When to use Phases of Care
Perioperative Phases of Care
Pre-Admission Testing - Outpatient orders to be performed prior to the procedure during Pre- Admission Testing.
These orders are scheduled in the PAT department and released on patient arrival for an ambulatory encounter
that can occur days to weeks before surgery.
- Default sign behavior is “Sign.”
- Orders auto discontinue after transfer out of Perioperative area.
Preop - Inpatient orders to be performed prior to the procedure, to be released when the patient is in the pre-
procedural area day of surgery.
- Default sign behavior is “Sign & Hold.”
- Orders auto discontinue after transfer out of Perioperative area.
Preop/Floor - Orders to be performed prior to the procedure by the inpatient/preop nurse.
- Default sign behavior is “Sign.”
- Orders auto discontinue after transfer out of Perioperative area.
Intraop - Orders to be performed during the procedure.
- Default sign behavior is “Sign.”
- Orders auto discontinue after transfer out of Perioperative area.
Phase 1 - Orders written by anesthesia provider to be performed during the patient’s immediate post-
procedure/operative care.
- Default sign behavior is “Sign & Hold.”
- Orders auto discontinue after transfer out of Perioperative area.
Phase 1 & Post-op floor - Orders normally written by the surgeon to be performed on the floor, can be started in
PACU.
- Default sign behavior is “Sign & Hold.”
Postop/floor - Orders to be performed after the procedure is done by the inpatient nurse.
- Default sign behavior is “Sign & Hold.”
GI Phases of Care
Preop/floor (GI) - Orders to be performed prior to GI procedure.
- Default sign behavior is “Sign.”
- Orders auto discontinue after transfer out of Procedural area.

Page 11 of 44
Pre-procedure (GI) - Orders to be performed prior to GI procedure.
- Default sign behavior is “Sign & Hold.”
- Orders auto discontinue after transfer out of Procedural area.
Intra-procedure (GI) - Orders to be performed during the GI Procedure.
- Default sign behavior is “Sign.”
- Orders auto discontinue after transfer out of Procedural area.
Recovery (GI) - Orders to be performed during the immediate postop care of the GI procedure
- Default sign behavior is “Sign & Hold.”
- Orders auto discontinue after transfer out of Procedural area.
Interventional Radiology (IR) Phases of Care
Pre-op/Floor (IR) - Orders to be performed prior to the procedure by the inpatient/preop nurse.
- Default sign behavior is “Sign.”
Pre-procedure (IR) - Used for orders to be performed prior to the procedure in interventional radiology
areas.
- Default sign behavior is “Sign & Hold.”
Intra-procedure (IR) - Used for orders to be performed during the procedure (Inter-op) in
Interventional Radiology.
- Default sign behavior is “Sign.”
Recovery (IR) - Used for orders to be performed in Recovery areas for interventional radiology exams.
- Default sign behavior is “Sign & Hold.”
Interventional Cardiology (CV) Phases of Care
Preop/Floor (CV) - Orders to be performed prior to the procedure by the inpatient/preop nurse.
- Default sign behavior is “Sign.”
- Orders auto discontinue after transfer out of Procedural area.
Pre-procedure (CV) - Orders to be performed prior to the procedure in the interventional cardiology areas.
- Default sign behavior is “Sign & Hold.”
- Orders auto discontinue after transfer out of Procedural area.
Page 12 of 44
Intra-procedure (CV) - Orders performed during the procedure, all orders given by MD and received verbally.
- Default sign behavior is “Sign.”
- Orders auto discontinue after transfer out of Procedural area.
Recovery (CV) - Orders to be performed in the recovery area as post procedural care. (this can be two
locations, all outpatients who have received conscious sedation for either Cath/EP will recover in Pre/Post area.
Inpatients will recover in their room).
- Default sign behavior is “Sign & Hold.”
Lessons Learned from Go-Live
• Assigning the correct phase of care helps assure that orders are available to the correct care area. E.g., An
order for a Lab: If no Phase of Care is assigned, the default behavior is Signed, and the order is automatically
released immediately, making it an active order for the patient’s current care area and therefore not available
in the procedural area. If this lab order was meant to be performed in a procedural area, it must have a
procedural area Phase of Care, which will make the default behavior Signed & Held. The order will then be
released by the nurse in the procedural area.
Discharge Medication Reconciliation Efficiencies
Performing a Discharge Medication Reconciliation can be overwhelming especially when you are treating a
patient with a large list of Home Medications. This guide is meant to highlight the tools Epic has to make
Medication Reconciliation quicker and easier for providers. Although you may approach this differently, the
Epic1 recommended workflow is the following.
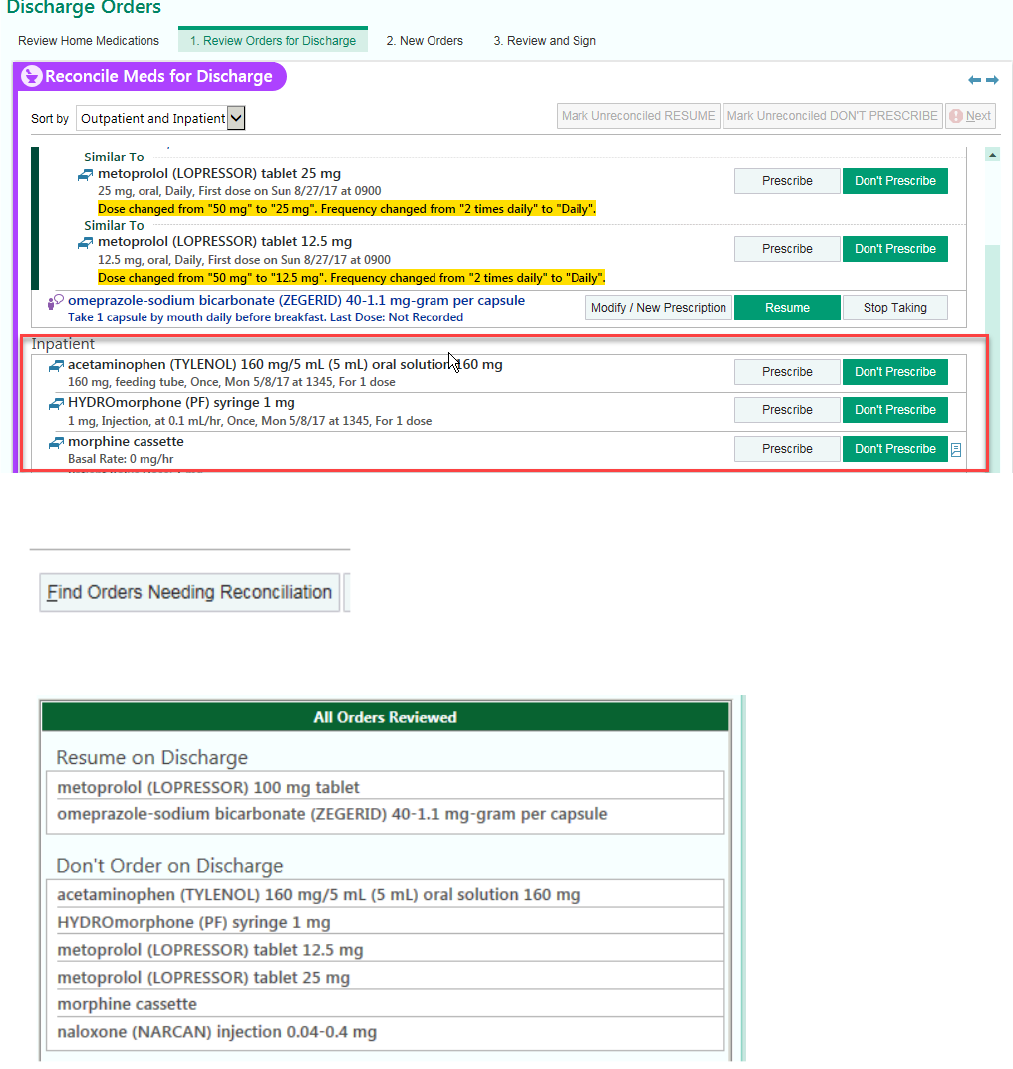
1. Sort the medications by Outpatient and Inpatient. This will organize all outpatient medications for the
patient at the top of the screen with any associated inpatient orders (for example if the patient is on
aspirin as an outpatient and this was continued inpatient the two orders are grouped together).
2. You should work through each outpatient medication and resume the home medication or prescribe
the medication if the patient needs a new Rx. If the sig for the drug is changing you can either modify
the outpatient order or write a new Rx from the inpatient order. Once you either act on the inpatient or
outpatient order for a drug, Epic will automatically stop the other orders to save you clicks.
3. Once you’ve worked through all your outpatient orders, you can manage the isolated inpatient orders.
Most of these orders you will not continue unless they are a new medication you started during this
admission. We recommend going through this list and clicking prescribe on the medications you want
the patient to continue.
4. Once you’ve addressed these medications, you can click the “Mark unreconciled DON’T PRESCRIBE”
to mark all the remaining medications as stopping.
5. We always recommend double checking your work, significant patient safety issues can occur during
medication reconciliation and cause harm to patients.
Page 13 of 44
1. The “Sort By” drop down will allow you to sort your orders in a more meaningful way that makes reconciliation
flow better for you. Available sort options are :
2. The “Mark Unreconciled Resume” button will automatically mark the previous Home Medication as Resume
and will mark the Inpatient version of the Home Medication as Don’t Prescribe that have not yet been
reconciled.
3. The “Mark Unreconciled DON”T PRESCRIBE” button will then mark the rest of the unaddressed Inpatient
orders as Don’t Prescribe.
Page 14 of 44
4. The “Find Orders Needing Reconciliation” button will allow you to quickly find and skip to, any unaddressed
orders.
5. The “Orders Need Reconciliation” banner will remain red until all orders have been reconciled. Once all
orders have been reconciled the banner will change colors to green and say “All Orders Reviewed”.
Completing a CDI Provider Query
1. Click the In Basket tab located under the Epic button
2. Click the Chart Completion folder
3. Click once on the Provider Query message once to display it in the display window
4. Find instructions in the body of the query
5. Jump to the Notes activity
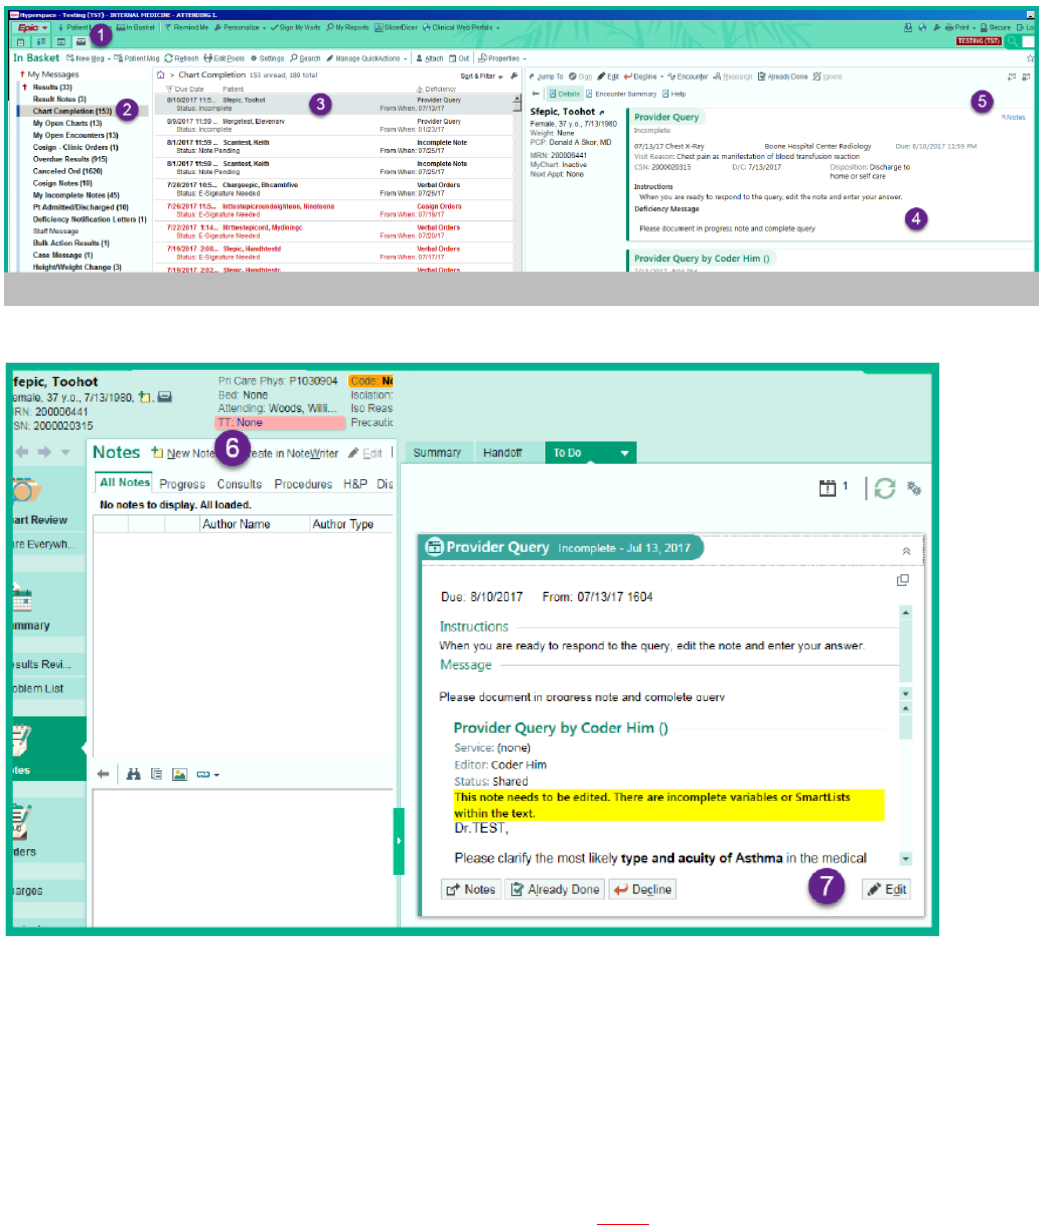
Page 15 of 44
6. Click New Note to create a progress note to document on the patient’s chart
7. After documenting in the record, click the Edit button on the query
8. Press F2 to jump to any wildcards that need to be filled out
9. Click Sign
10. Close the patient’s chart to return to your In Basket
Order Entry Workflows
Orders entered on behalf of the provider, faxed orders, TO/VO Orders
1. If the provider has access to Hyperspace from their office, they are encouraged to enter pre-procedure/direct
admission/diagnostic exam orders into Epic themselves.
2. If the provider chooses not to enter orders themselves, their office staff can do this on their behalf.
• These orders will require Second Sign before they are active. To Second Sign orders, the Provider will
need to go to their In Basket.
• This will require mandatory training in order to provide security access for office staff to enter orders on
the Provider’s behalf
3. If the provider chooses not to enter orders for themselves nor by their staff, then they can fax signed paper
pre-procedure/direct admission orders to the hospital. This method will sunset as staff get trained and
providers become more familiar with Epic. It is still being determined if paper diagnostic exam orders will ever
sunset.
• For faxed/paper orders
Page 16 of 44
• Faxed/paper treatment/care orders will be transcribed by licensed clinical staff into Epic.
• Faxed/paper medication orders will be scanned to the pharmacy for pharmacist transcription or licensed
clinical staff will transcribe into Epic.
* These orders will not require Second Sign
Inpatient Electronic Order Entry Expectation
• Providers will be expected to enter ALL inpatient orders once the patient presents to the hospital.
• This includes Post-Op orders.
• “Telephone/verbal orders with read-back are allowed in defined cases such as emergency situations,
during a surgery/procedure, or when the provider does not have ready access to a computer for system
access. It will be up to each site’s MEC to enforce by each use case.”
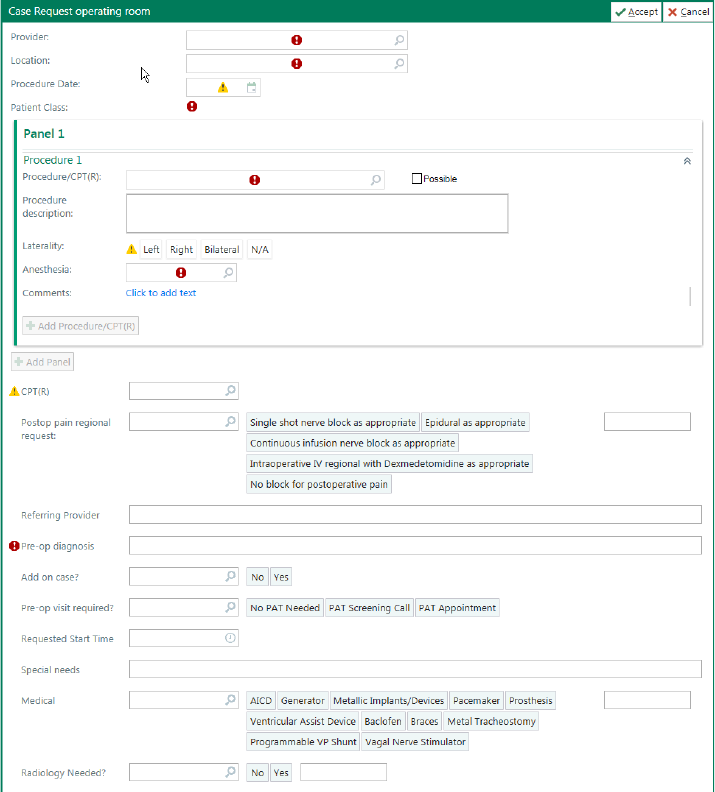
Case Request
Scheduling a patient in a procedural area (OR, GI, Cath Lab, Pain Management)
• The Case Request order transmits the request to perform a specific procedure in a procedural area to the
scheduler.
• Ex: Dr. Bones will order a case request on Susan Smith to perform a Right Hip Arthroplasty in 2
weeks at the MBMC OR.
• The Case Request will also capture the providers preference card when they are entering the desired
procedure.
• If the requested date/time are unavailable, the provider/office will be contacted by the scheduler.

Page 17 of 44
How-To Guides
How to Prepare Your Physician for Go-Live
Our goal is to prepare our physicians for Epic Go-Live and the weeks following. These practical tips are focused on
physician inpatient documentation options in Epic to aid with your transition and fully optimize and integrate Epic into
your practice.
One of the most critical steps in preparing for Go-Live is attending Personalization Labs. Providers are required to
attend for approximately one to two hours in order to complete the following:
o Document in Epic’s production environment
o Verify provider log-in
o Personalize Preference Lists/Order Sets
o Create macros (Epic terms: SmartPhrases, SmartTexts, dot phrases, etc.)
o Customize toolbars and menus
Providers are encouraged to regularly monitor their Learning Home Dashboard for posted tip sheets and other
supplemental information ahead of Go-Live.
Documentation Options
How can physicians document in Epic?
- Epic SmartTools: Documentation tools in Epic that speed up documentation through quicker, personalized
data entry. SmartTools can be used in Epic in any area where the SmartTools toolbar appears. SmartTools
include:
o SmartPhrases – Also referred to as “dot phrases” – typing a period, followed by a few simple
keystrokes, such as “.name” or “.age,” for example, pulls in words, sentences and even paragraphs of
information, making documentation easier. There are many preconfigured SmartPhrases that exist
within Epic, and physicians can also create their own. It’s especially useful to create custom
SmartPhrases for those sentences physicians find themselves typing over and over. SmartPhrases
may also contain SmartLinks, which include discrete data within the patient’s chart. When
summoned with a few keystrokes, SmartLinks can bring in a patient’s name, age, date of birth,
current medications, problem list and more.
o SmartLists – Pick lists embedded within SmartPhrases that allow physicians to make quick
selections based on the context of their documentation.
o SmartText – Text templates for charting that can include text, SmartPhrases, SmartLists, and
SmartLinks. These templates are frequently used to document progress notes. Many preconfigured
SmartTexts are available, and these can also be customized to meet specific physicians’ needs.
- NoteWriter: An activity in Epic that allows physicians to use point-and-click functionality for history of present
illness, review of systems, and physical exam, generating text (and images, if desired) in the progress note.
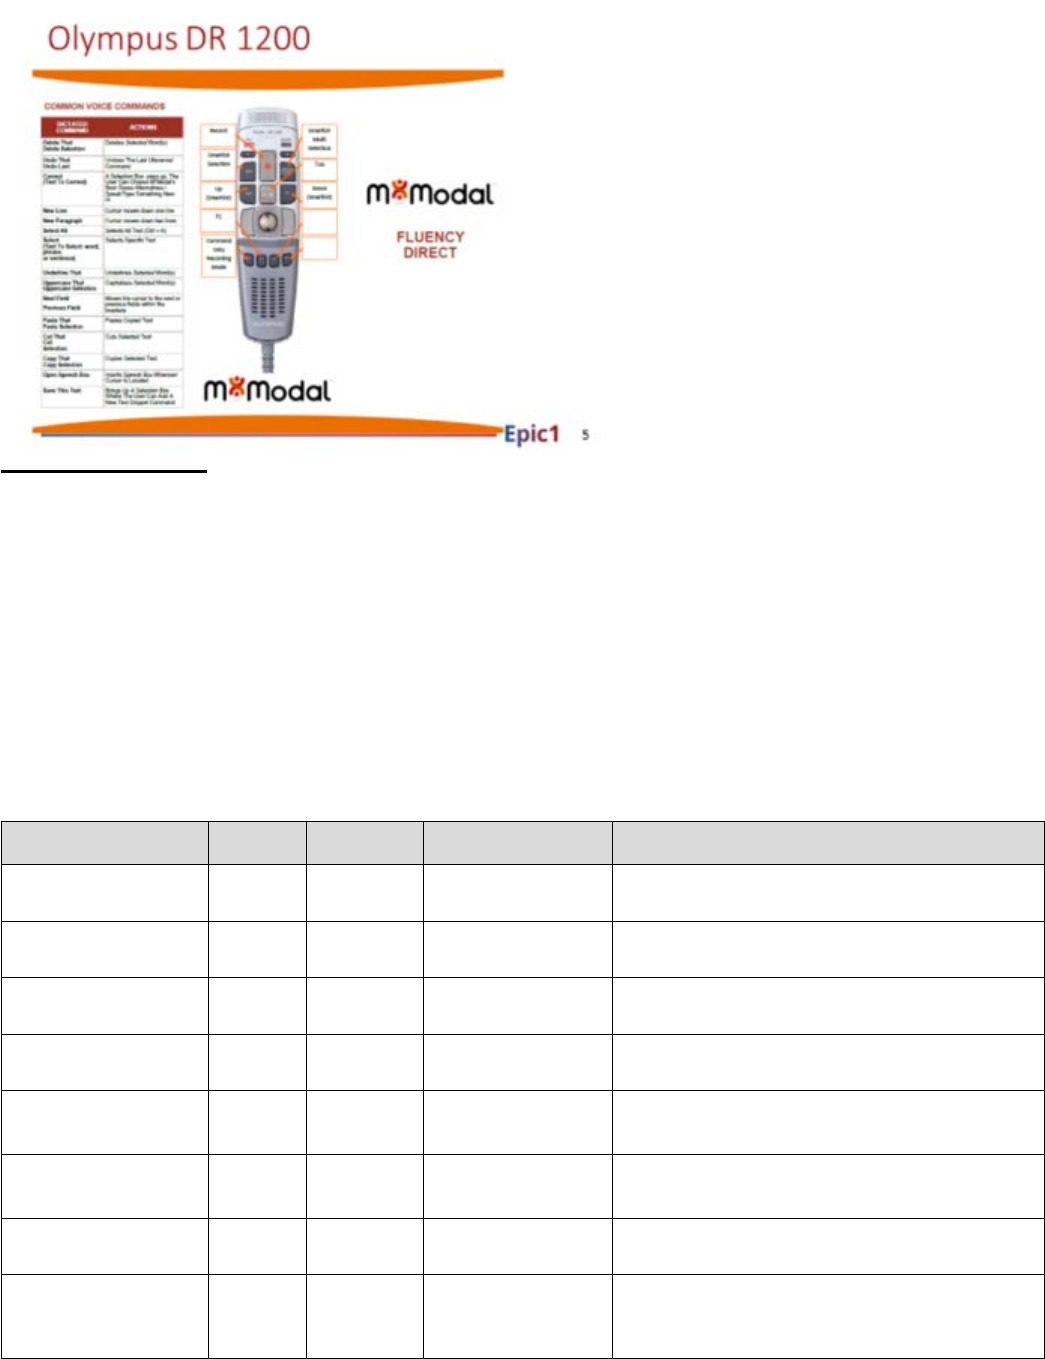
Dictation/Speech to Text Options
What dictation options are available for providers?
- In the effort to streamline clinical documentation, the Epic Program, in concert with BJC and Washington
University School of Medicine (WUSM) leadership, have selected M*Modal Fluency Direct as the system-
wide voice recognition solution to replace Nuance Dragon. Refer to the Appendix for more information on
M*Modal and how to complete training.
Page 18 of 44
Data Conversion Plan
Pod 1 Hospitals’ electronic appointment conversion will take place November 17th and the manual appointment
conversion will take place Novemeber 18th and 19th. At that time, approximately 10,000 appointments from various
applications including Soarian Scheduling, Chartlinks, iPath, etc will be converted from those applications to Epic.
250-300 users from across the organization will be in place during that weekend to perform the backload of
appointments and transcribe orders on the converted appointments. Various application teams, including Ambulatory,
Cadence, Radiant, Cupid, Optime, Security, Training, EIG, IIG, Soarian IT, and Soarian Business team will be
supporting the Appointment Conversion.
What types of clinical data will be available to physicians and other clinicians at Go-Live?
• Prior to Go-Live, both manual and automated data will be moved into Epic. The chart below displays data
converted from NextGen to Epic. In the interim period, for CDR and Epic, we will have real-time interfaces for
diagnostic results, transcription/notes and scanned documents (with the exception of advance directives). We
will do intermittent gap loads for adult and pediatric vitals.
Data Type
Source
Systems
Document
Format
Available at POD 1
Go-Live
Comments/Special Considera
tions
Patient Encounters
CDR
Discrete
1/1/07+
Lab Results
CDR
Discrete
1/1/13+
All discrete Gen Lab, Micro Lab and Pathology Data
Imaging Results
CDR
Text,
Electronic
1/1/13+
Includes all BJC-performed imaging results with
links to the PACS images when available.
Diagnostic Results
CDR
Text,
Electronic
1/1/13+
Includes all approved BJC-performed diagnostic
results
Transcriptions/Notes
CDR
Text,
Electronic,
and Scanned
1/1/13+
Includes all approved document note types
Scanned Documents
(OnBase)
CDR
MPF
Manually
Scanned
CDR: 1/1/13+
M
PF: 1/1/13 –
~12/1/2017
Includes all approved document note types
MPF:
Vitals-Adults
CDR
Discrete
1/1/2013
– 12/1/2017 Ht, Wt, BP, SPO2 and Pulse
Vitals-Peds
Horizon
Clinicals
Discrete
1/1/2013
– 12/1/2017
Child = a patient that was <= 18 yo at the time of
conversion
Ht, Wt, BP, SPO2, Pulse and head circumference
Peds growth chart will be calculated in Epic
Page 19 of 44
Immunization and
Vaccination
Horizon
Clinicals
Discrete
All Active as of
12/1
/2017
History: Medical,
Surgical, Family,
Social
N/A
History was only converted from NextGen
(ambulatory EHR)
Allergies
CDR
Discrete
All Active
Only convert discrete active data
Problems List
N/A
Discrete
All Active as of
12/1
/2017 Problems were only converted from NextGen
(ambulatory EHR)
Ambulatory
Medications
N/A
Medications is only being converted from NextGen
(ambulatory EHR)
Infection Control Flag
CDR
Discrete
All Active
Patient Level infections only
CDR = Clinical Data Repository = ClinDesk
MPF = McKesson Patient Folders (for Advance Directives)
Note:
- Not all ClinDesk data was converted into Epic
- The below table does not include details related to the NextGen data conversion
Historical Data Not Converted
- Current legacy EMR systems will be accessible for view access 3-6 months post Epic Go-Live, with
exceptions to certain specialty systems
- Clinical Desktop will remain available at least through 2020
- Historical data will be archived and accessible to the clinicians and physician
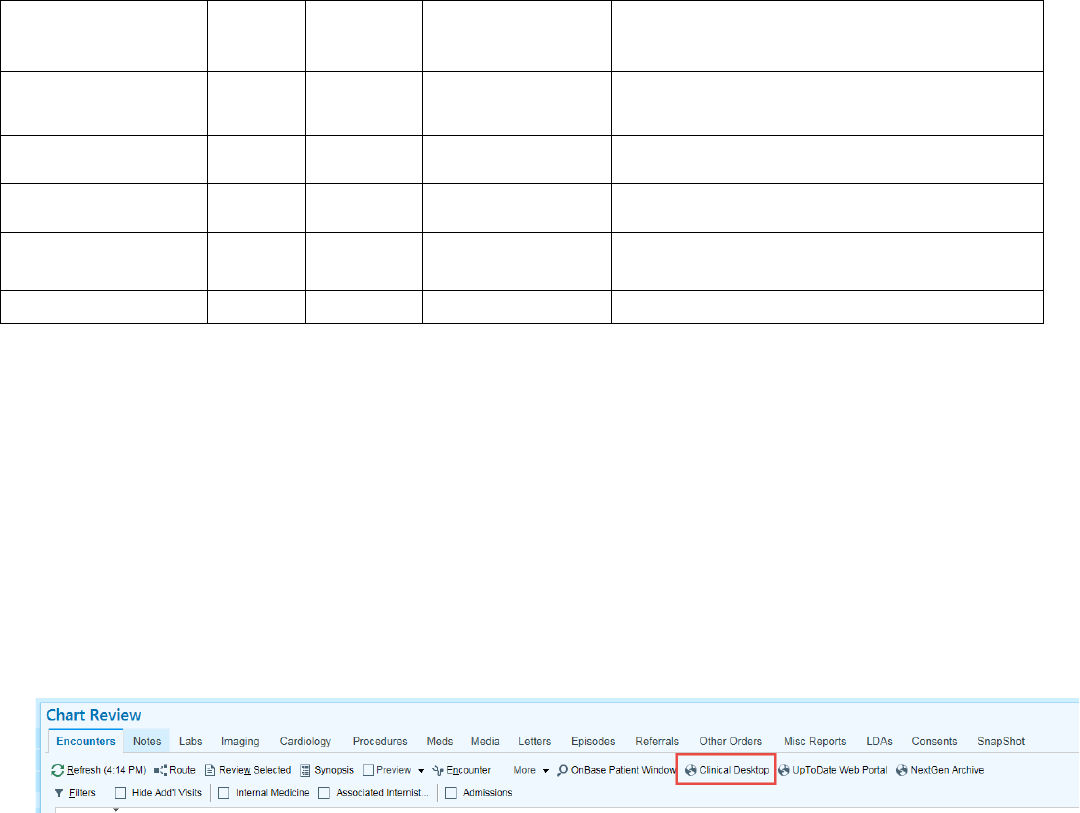
- For data not in scope or that may not be loaded yet, users can access ClinDesk in Chart Review for historical
information:
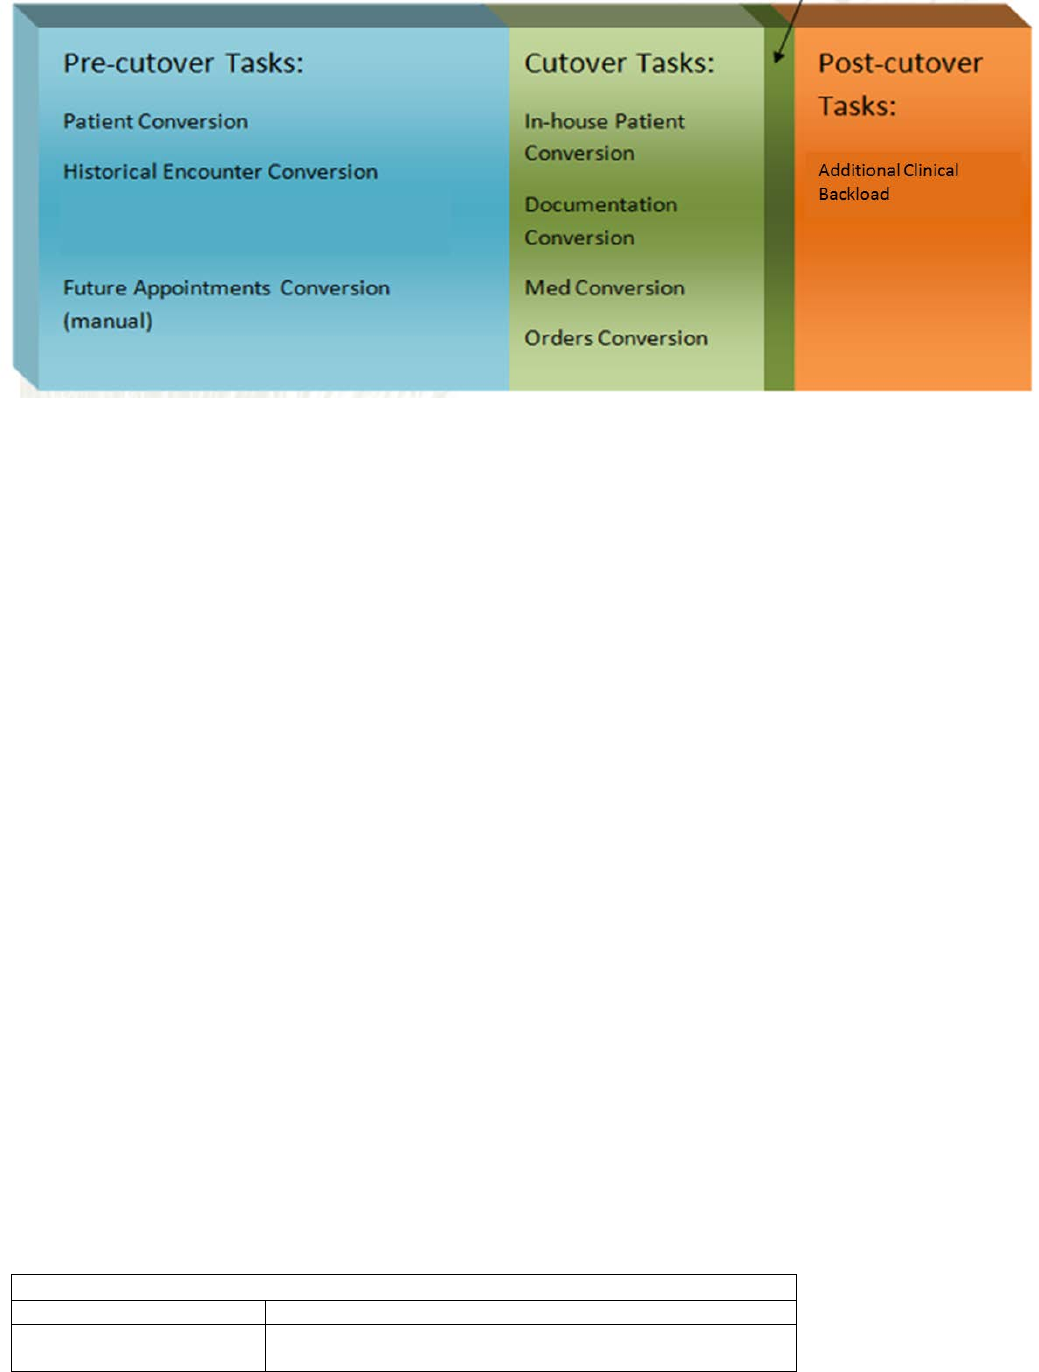
System Backload/Cutover
• Conversion (n.)- Bringing data over from one system to another.
• Cutover (n.) – The period of time it takes to switch users from one system to another.
• Epic-only instant (n.) – the moment when the Epic system is made available to all end users (“end user go-
live”, EOI)
Timeline Strategy
Page 20 of 44
Clinical Backload Logistics
• Reports from HC and HMM for current patients
• Run reports by units (in specified order)
• Catch-up reports throughout the day
• Cutover Navigator
• One-stop-shop for entering backload information
• Documentation of progress to track completion
• Ordering
• Attending physician will be physician for all orders
• Special “Entered During Backload” order source
Post Cutover Clinical Backload
End of Night Shift Checklist
• Confirm and Update Height, Weight, and Allergies
• Enter I&O totals by categories for past 0700-0659
• Acknowledge Orders
• Review and Update Active medication orders
• Entry of Lines, Drains, Airways & Wounds
• Review and Update Code Status
• Update ALL non-medication orders
• OB Mom-Baby Link
• Document medication administration during downtime
• Standard downtime nursing note
First Day shift Checklist
• Complete Nursing Admission Navigator
• FYI flags
• Care Plans
• Patient Education
• OB Result Console (If not in Epic)
• OB Delivery Summary (Limited Scope- NICU baby)
POD 1 HOSPITAL CUTOVER TIMELINE
Timing
Activity
Friday, 12/1
7:00 a.m.
- Clinical backload begins at CH
Page 21 of 44
12:00 p.m.
11:59 p.m.
Saturday, 12/2
12:00 a.m.
- BJSP, PWH, AMH
- Clinical Backload complete
- Downtime and technical cutover begins
Saturday, 12/2
3:00 a.m.
7:00 a.m.
7:00 p.m.
- Epic Go-Live
- First night shift checklist complete
- First day shift checklist complete
Go-Live Support Model
• Out of Staffing Super Users are removed from their current clinical role to fully support Epic during Go-Live. They
are the first line of defense.
• In Staffing Super Users will support ONLY if available and not treating patients. This team will be a critical part of
the ongoing support of Epic in your practice after Go-Live.
• Look for At the Elbow staff and Super User shirts to get the quickest
support.
o Gray – Provider Epic support
o Blue – All Other (non-provider) Epic support
• 552 Super Users for Pod 1 and around 154 contracted.
HOSPITAL
SUPER USERS
ATE
Alton
109
39
Christian
288
64
Progress West
64
23
St. Peters
91
28
• At the Elbow support staff have been identified and trained. They are:
o Support for all practices
• 24/7
• Focused on break fix, system monitoring, KPIs,
training and tip sheets
• 200+ people at peak
End
User
Super User
At the
Elbow
(ATEs)
Support
Command
Center
Facility
Liaisons
• Operational owners & Team Leads
• Rounding on key departments
• Assisting with ensuring support &
operational workflows are being
addressed and prioritized
correctly
• First line of “defense”
• BJC staff from various BJC facilities
• Well versed in BJC Epic workflows
• Will return to their regular role post go-live,
serving as a valuable support resource
• Back up to Super Users
• Epic and contracted Technical field
support
•
Deep technical knowledge of Epic in
general, but less familiar with BJC
specific workflows
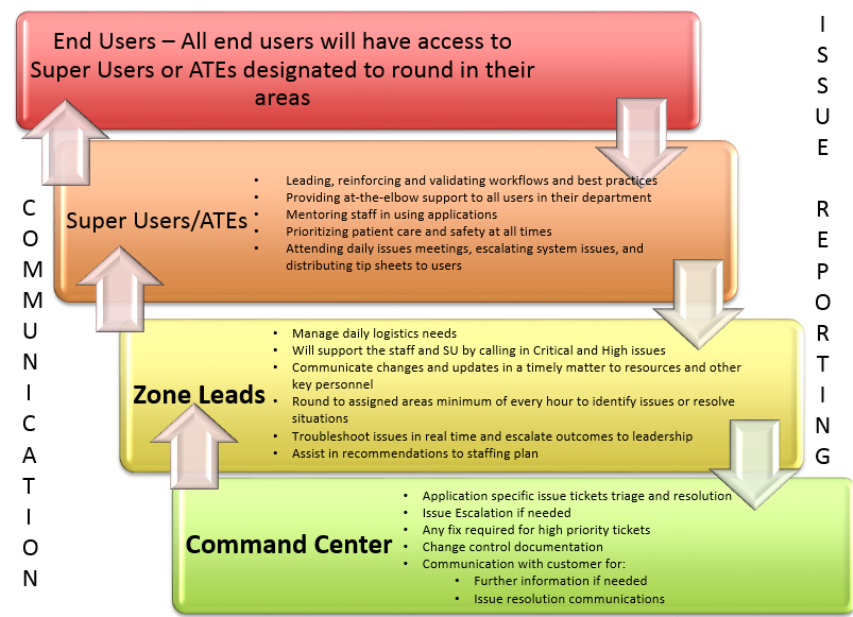
Page 22 of 44
o Frontline support and frontline representative for Epic in your department.
Super User Responsibilities:
o Help end users resolve issues Consult with HCI Epic Support person if unable to resolve end user concerns
o Escalate unresolved issues to the Command Center
• Attend meetings
• Identify trends and communicate with support leadership.
• Communicate, review any post Go-live updates in department
• Document enhancement suggestions
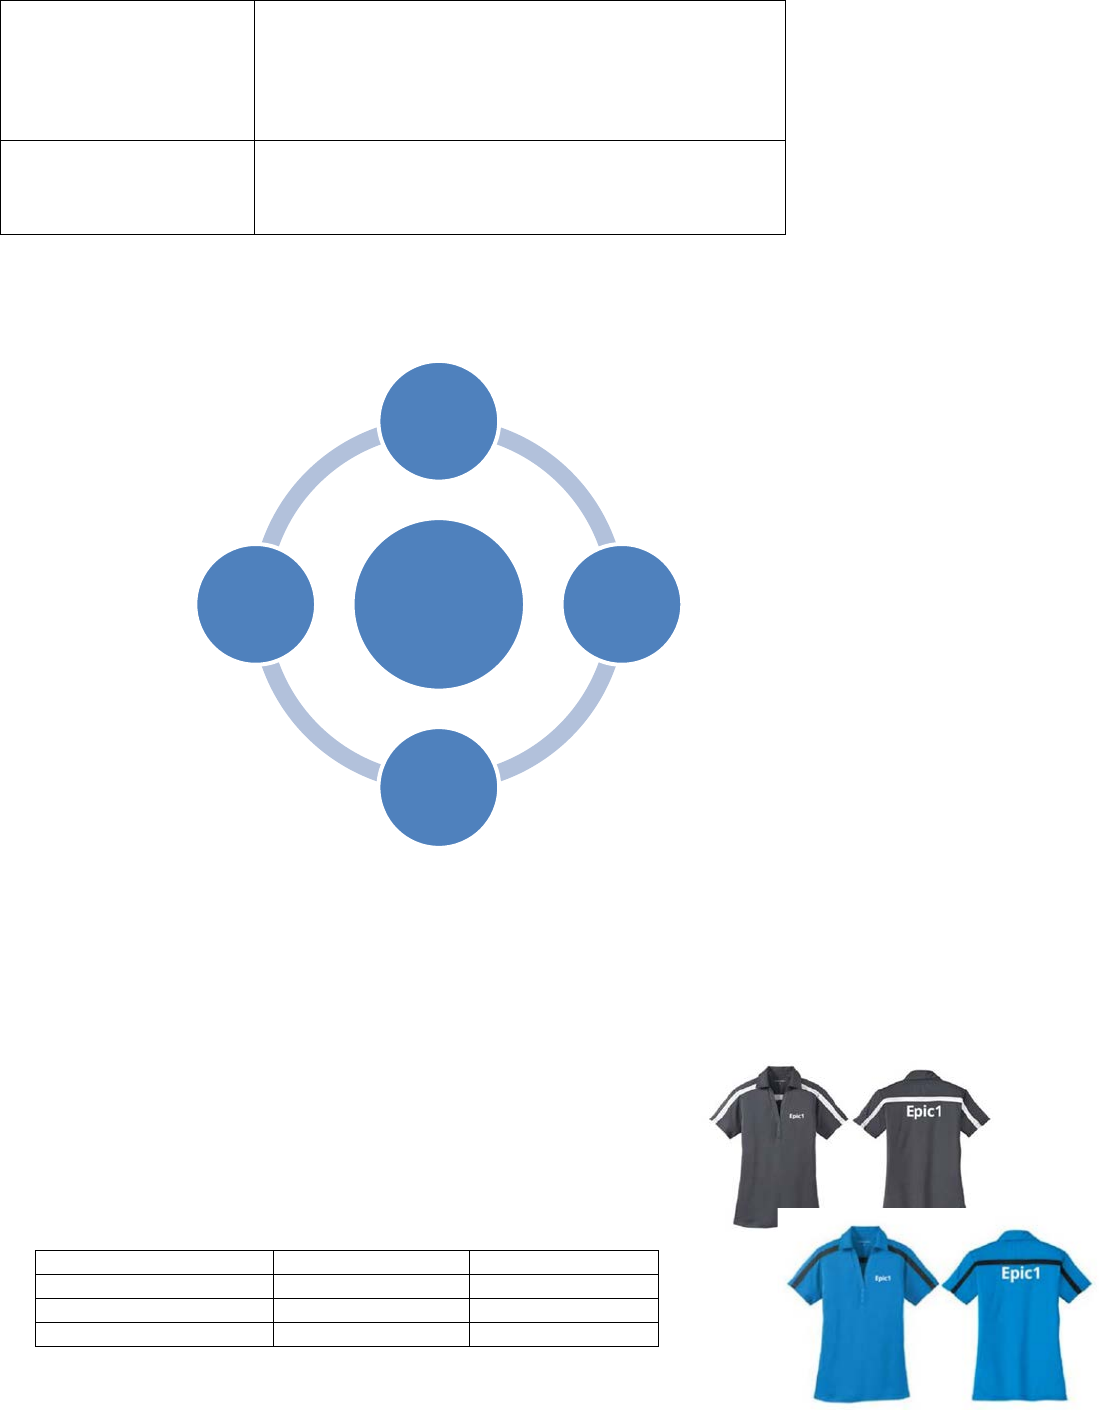
Key Go-Live Support Roles

Page 23 of 44
Pod 1 Command Center
• Members of the Epic1 (formerly HIP team) and Epic teams will work on the intake, prioritization and resolution
of assigned tickets.
• They will appropriately document resolutions and close out requests through communication with users.
Pod 1 Hospital Leadership
• Senior leadership will provide daily support and participate in rounding during the first several weeks of Go-
Live.
Trainers
• Trainers will create/update tip sheets to help address any issues that arise at Go-Live and be available in the
Command Center for “How To” questions.
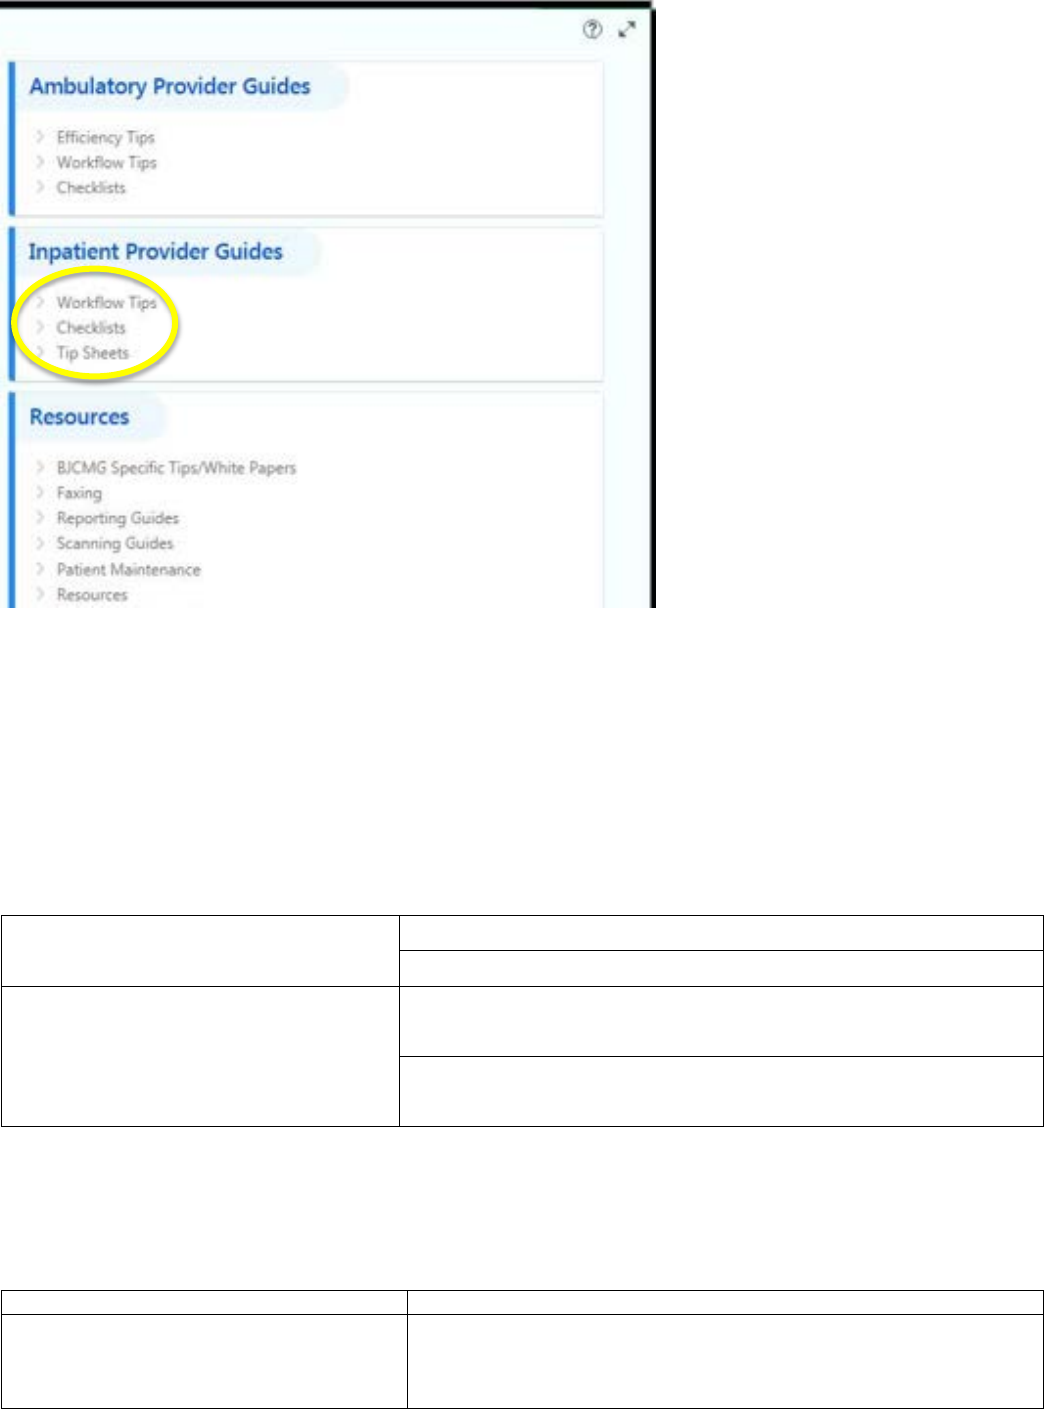
• Remember, all tip sheets will be available through the Learning Home Dashboard within Epic Hyperspace.
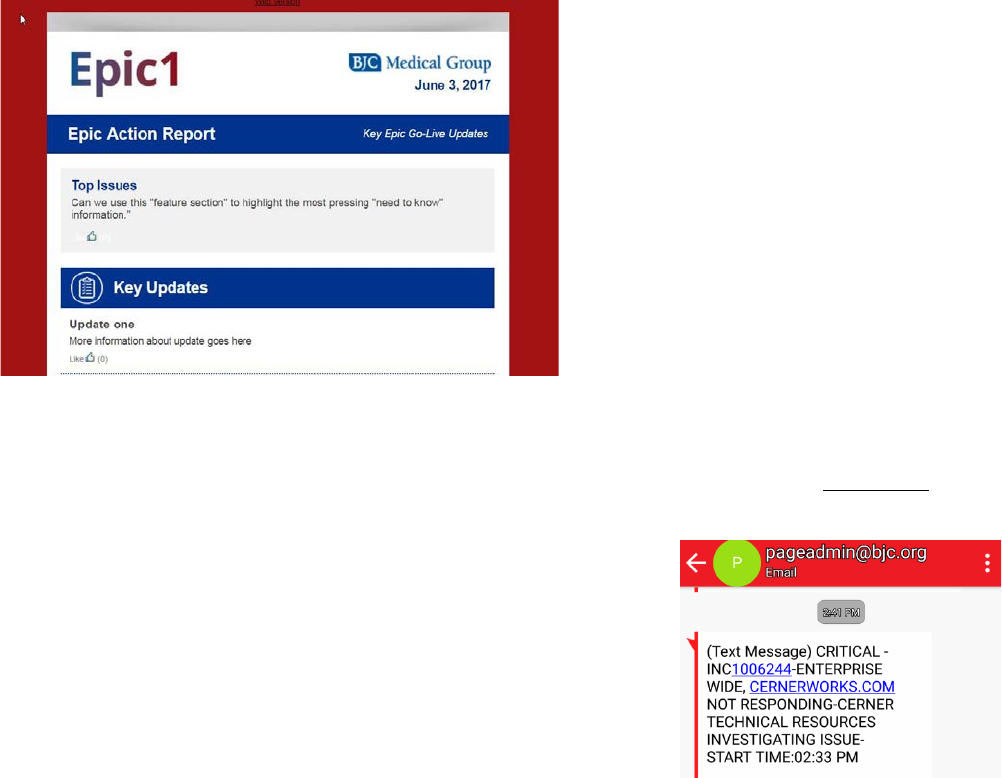
Tip sheets and changes will be communicated through the daily Go-Live newsletter titled “Epic Action
Report.” The Command Center staff will notify all ATE support of new tip sheets so they can assist staff with
retrieval.
Tip sheets are available under each user’s Learning Home Dashboard in Epic. My Dashboards/Learning Home
provides a customized list of tip sheets based on your role.
Instructions:
1. Log in to Epic.
2. You have a My Dashboards/Learning Home tab.
3. Look for the ‘icon below’ for the ‘My Dashboards’ (some call it a pie chart, others call it a pac man tab).
4. Then click on the plus sign + (on the left hand side) and select the Learning Home to access Quick Start Guides
and Tip Sheets.
Clicking on the arrow to the left of Workflow Tips will cascade available tip sheets.
Page 24 of 44
Additional tip sheets will be added during Go-Live and can be found on your Learning Home Dashboard. Support staff
will also receive a copy daily. You can also help troubleshoot and avoid many common issues by taking the simple
steps below.
Where to Go for Help With Go-Live Issues
Please Follow This Four Step Process
Troubleshoot on your own
1. While in Epic, use My Dashboards/Learning Home
2. Reference Go-Live Newsletter for FAQs, reminders and tips.
Get help from Super Users or ATE
3. For immediate resolution or to report an issue, talk to your local
Super User or At-the-Elbow (ATE) Support Team Member
4. If your Super User or ATE is not available, escalate to your
Manager or Director (Zone Lead) assigned to your area.
Resolving Common Go-Live Issues
Security and Login
Issue(s)
Resolution(s)
I can’t log in.
1. NOT COMPLETED TRAINING: You will not have access. Contact
your manager who will call the Command Center for instructions on
completing Epic training.

Page 25 of 44
2. COMPLETED TRAINING: Consult your Super User or At-the-
Elbow (ATE) support and they can call the Command Center to
troubleshoot the issue.
I’m not seeing what I expect when I log in.
1. If you have multiple login departments, be sure you selected the
correct one when you logged in to Epic.
2. Ensure you are in Epic Production and not a Playground version of
Hyperspace.
3. Consult your Super User or ATE support team member. They can
call the Command Center to troubleshoot
Helpful tips for quick resolution:
• Have your BJC-NT or WUSTL ID ready
• If there is someone in your department that appears to have
the correct access, please provide that user’s name
• If the issue is patient specific, please have the patient MRN
available for the staff in the call center
• If the issue is preventing you from doing your job and there is
no available workaround, please inform the person taking the
call
Printing and Print Routing
Issue(s)
Resolution(s)
Something didn’t print where I expected.
• You cannot resolve this issue individually. Consult your Super
User to troubleshoot and resolve.
• Please have the type of document you were trying to print
(prescription, lab, AVS, or consent) ready as well as the desired
printer name for the Super User.
• For assistance with printing your Patient List, refer to the
Appendix section of this document.
Accessing Reports
Issue(s)
Resolution(s)
I can’t find reports.
• Search the Library by selecting the Epic Button>Reports>My
Reports. Then select the Library tab. Enter the topic of the report
you are looking for in the search field.
I want to run/edit a report.
• Select the desired report and click the “Run” or “Edit” icons.
• Some staff members do not have Epic security to edit a report.
Please report this issue to your direct manager or supervisor who
can request and validate the need for your role to be able to edit
a report.
I need to save a report to run regularly.
• Click the star icon to the left of a report name to save it as one of
your favorites that you will see when you access “My Reports.”
Refer to the Learning Home Dashboard for a tip sheet on report types and dashboards.
Cutover, Conversion and Data Access
Issue(s)
Resolution(s)
Some historical patient data is incorrect.
• You should be able to correct most data issues without support.
Physicians should reconcile all converted patient data in Epic
upon first patient encounter and update any data that is not
accurate.

Page 26 of 44
Can I reconcile medications from a
Surescripts interface?
• Yes- This can be done by following the same process you would
use to reconcile information from CareEverywhere.
Where can I find Neurodiagnostic/Sleep lab
results?
• They can be found in the Procedures tab of Chart Review.
How will I review EKGS?
• EKGS will be interfaced into Epic and you will be able to review
them from Chart Review
How Issues Will Be Prioritized and Resolved
How Issues Will Be Prioritized
All issues will be assigned a priority based on data reported from the caller using the criteria listed below. The tickets
are reviewed again by a Call Center Lead who will validate priority and assign to the appropriate Epic1 Team support
group in Service Now.
Critical
• Major systems outages, physical disasters, entire database outages
• High risk to patient safety with no workaround
• Poses a significant financial risk to organization
High
• High risk to patient safety with a workaround
• Staff workflow impacted where staff can’t complete work
• Can’t log in
Medium
• Impact to staff workflow but staff can complete work in the system via a workaround
Low Priority
• Staff request changes to workflow/content/optimization
Command Center leadership will report daily on top issues and priorities via the Daily Go-Live Top 10 at 10 Update.
Pod 1 Hospital leadership has a chance to validate and comment on prioritization during these calls. Top issues are
prioritized using the criteria listed below.
Page 27 of 44
Clinical Content and Workflow Change Requests
In order to provide consistent high quality care across BJC, and to ensure we will be able to maintain our EHR
reliably, BJC system and hospital leaders have committed to maintaining an enterprise implementation of Epic. Over
the last two+ years, hundreds of BJC physicians, nurses, and other clinical staff came together in a carefully
orchestrated process to design our build of Epic. This required a lot of consensus building on the clinical content. BJC
won’t be able to provide significant site-to-site variations in the Epic build. Fortunately Epic provides a wealth of
personalization tools so that providers can have an environment that has been heavily customized to their
preferences within the context of this consistent enterprise build.
Getting used to workflows in Epic (which is different in many ways from how they worked in McKesson), and learning
to use the personalization tools optimally will take time. During site visits to other health systems, we have heard
consistently to minimize changes to clinical content during the Go-Live period, since many changes requested mostly
reflect a lack of familiarity with the Epic environment.
There will be items that were simply overlooked during the build phase that will need correcting quickly during Go-
Live. Every request for change in clinical content (e.g. order sets, documentation templates, clinical workflows) will be
carefully reviewed. We will have BJC patient safety experts in the command center to assess true patient safety
issues. Things that are truly broken, content that was overlooked, and patient safety issues will be addressed as
quickly as possible. However, most request for clinical content change will be flagged for “optimization.” That doesn’t
mean they will wait until Epic has been rolled out across the system. It does mean those issues will be referred to the
appropriate operations or clinical group for assessment to ensure we don’t inadvertently undo the two years of careful
work in designing a truly enterprise EHR.
How You Will Get Status Updates for Your Issues
• Opened: When your issue is reported, you will receive an email notification confirming it has been logged.
• Working: Command Center staff will contact you or your Super User if more information is needed to
troubleshoot and resolve your issue.
• Closed: When your issue is closed, you will receive an automated email notification with brief explanation.
o Reopening: If the same issue continues to occur, you can reopen the problem ticket within 3 days
using the link in the email you received when it was closed.

Page 28 of 44
• Added to Optimization: This issue will be addressed outside of Go-Live resolution as part of Optimization.
You will receive an email notification from ServiceNow.
Widespread issues will be tracked and reported out daily by the Command Center using a daily newsletter titled, “Epic
Action Report.” All end users will receive an electronic copy.
How Issues Will Be Reported
• With operational and project leadership involvement and input
• Executive and operational updates throughout the day:
o At-The-Elbow/Super User huddles
o Application/department huddles (Lab, Radiology, ED,
Pharmacy, OR, Cardiology, Home Health)
o Revenue Cycle huddles
o Executive and leadership updates
o Daily email newsletter
o Ad-hoc communication via email for urgent and widespread issues
How and When You Will Hear About Issues
The following methods of communication will be used to keep you informed of key issues during Go-Live.
Super User/At-The-Elbow Feedback
• At-the-Elbow staff (from the HCI company) will have direct
communication from the Command Center on widespread
and critical issues.
• The onsite support team will be able to assist the staff with
solutions and/or timeline of resolution.
• The Command Center team will report back resolutions to
all users when issues are resolved via ServiceNow (as
shown in image)
o End user may receive a call back
o End user will receive an email from ServiceNow
Daily Newsletter
• Distributed by 6:30 p.m. to Pod 1 end users, support staff, and Epic1 team
• Sent by HSO Communications
• Titled “Epic Action Report” with daily Go-Live issues and updates
Page 29 of 44
Real-Time Updates from Command Center
• Email updates will be sent for urgent updates from the Command Center (email subject line is displayed as
“Important Epic Update”) for issues that have broad impact or need to be communicated immediately.
• Email updates will be sent to end users by HSO Communications.
Text Alerts
• End users signed up for text alerts will receive a text update when a
P1 issue is submitted and resolved
What to Expect After Go-Live
Week 1 (12/2-12/9)
• Thousands of issues with varying criticality will be reported.
• Issues will be prioritized based on impact (see below).
• You will receive communication whether an issue is in progress, resolved, or marked for Optimization.
Week 2 (12/10-12/16)
• Issues will grow in complexity.
• Command Center still staffed appropriately to address “How To” Questions and “Quick Wins.”
Weeks 3-4 (12/17-12/23)
• Your comfort level using Epic will increase and operations will begin to return to normal.
• At-the-Elbow support will be reduced.
• Most critical/immediate issues will have been resolved and the focus will shift to making changes that help
improve and enhance user workflows and efficiencies.
Weeks 4+
• Operations return to normal.
• Please report any issues directly to the Customer Service Center (Help Desk) at 573-815-3801.
Page 30 of 44
What to Know In Case Of Downtime
Epic Downtime Processes
Epic Business Continuity Access (BCA) is Epic’s functionality to ensure access to information that is most critical for
patient care in the event of downtime.
There is a BCA PC in each patient care area
• Identified with red keyboard
• Will run on emergency power
• Connected to a local printer
• Has the BCA PC application installed
• Locally stores pre-defined reports
• Reports can be printed by clinicians to continue patient care
• Outpatient locations typically have one BCA PC per department
• Inpatient locations have one or two BCA PCs per unit
BCA Web
• Read-only environment
• User IDs and passwords the same as Epic
• Secure, web-based utility enabling identified users to log in and access BCA reports during downtime
• Accessible from a workstation that has a browser and a connection to the internal network
• A centralized mechanism to view and print BCA reports without crowding over individual PCs
• Works in conjunction with the regular BCA Reporting functionality
Supports Read-Only (SRO)
• Will be used during the Production Downtime Schedule listed below
• Allows users access to Hyperspace in read-only mode during a production server downtime
• Uses a shadow server, which is near-real-time copy of production (it will only be as up to date as production
when it went down)
• Will be used during planned downtimes when the production server is not available, but the network, server
and power all are unaffected
• Used often times during Epic upgrades

Page 31 of 44
Appendix
M*Modal
As the new voice dictation tool, M*Modal will enable BJC HealthCare and physician partners at WUSM to streamline
clinical documentation workflows across the enterprise and enable clinicians to document directly and accurately in
their current EHR systems using M*Modal’s proprietary Front End Speech Recognition technology.
As each organization begins to migrate to Epic, physicians will be able to easily continue creating complete and
compliant notes using the M*Modal advanced documentation system for a smooth transition as well as optimized
physician efficiency and satisfaction.
Additionally, Providers can download the Fluency Mobile application on their cell phones to quickly dictate important
patient information straight from their mobile device, review audio recording, send to transcription, and review
transcribed document, edit/sign documents and more.
Download this image (PDF, 236 KB)
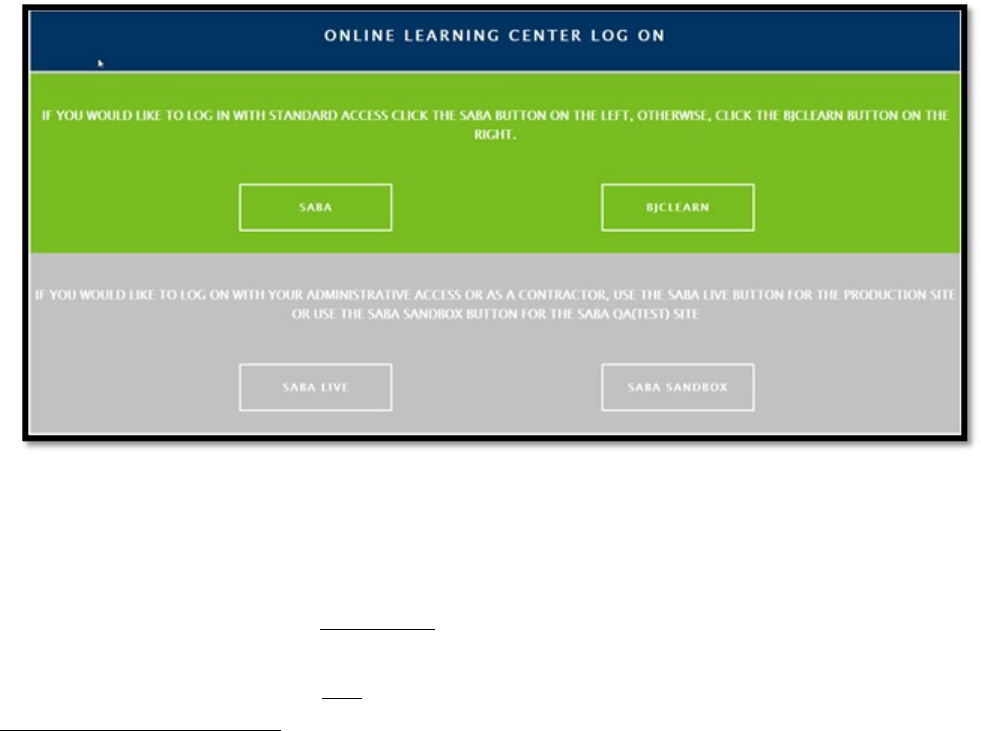
M*Modal classes are now available in Saba (www.bjclearn.org) and began on 11/7/17 for Pod 1 providers.
The M*Modal Fluency Direct class has been added to all provider roles in Saba, but this is an OPTIONAL class and is
NOT required for Epic access. The class has been added to Epic curriculum so providers (and those assisting
providers with registration) do not have to search for this class in Saba. Classroom training is 60 minutes and, while
not required for Epic access, is required for providers who will use M*Modal. The class will also cover use of the
M*Modal appl. MSO and CIS are contacting providers for assistance with signup.
o Helpful hints when registering in Saba:
• After you access Saba, please log into the appropriate site:
• BJC Employees – use the Green Saba button
• Contractors – use the Grey Saba Live button
Page 32 of 44
Use Epic on Your Mobile Device: Haiku and Canto
Haiku: Epic’s mobile application for smartphones. You can view I&O, trending, vitals and results; take pictures; write
orders, and more. Haiku is available for iPhone and Android devices. You can e-scribe with this application.
Canto: Epic’s mobile application for iPad.
Haiku/Canto Mobile Enrollment:
Prerequisites
•
User profile in Epic must be set to allow Haiku/Canto access (based on user role in Epic)
•
(Optional) Users wanting to have AirWatch manage Haiku/Canto updates automatically will need to
enroll in AirWatch.
NOTE: While AirWatch is not required, if you use M*Modal Fluency Direct Mobile Mic for dictation it is strongly
recommended to ensure your device is on the production network. Using the Guest network is unreliable at best
when using the Mobile Mic. The Guest network is sufficient for Haiku/Canto usage, unless you are dictating via
these apps as well.
Meeting these prerequisites will allow you to configure your mobile device to access the BJC Healthcare
and Washington University School of Medicine instance of the Epic Haiku and Epic Canto applications. This
tool will allow you register the following:
•
1 iPad/user with Canto
•
1 iPhone or Android/user with Haiku
If you register a second device of the same type and application, it will replace the existing device and
access on the existing device will be removed.
Configuration
AirWatch will automatically prompt to install Haiku/Canto based on the security group you are added to.
Accept the installation before proceeding with the steps outlined below. Non-AirWatch users will need to
install the app from the App Store or Play Store. NOTE: Canto will only install on an iPad. Haiku can be
installed on an iPad, iPhone, or Android device. To begin configuration, open the app you want to configure
(Haiku or Canto).
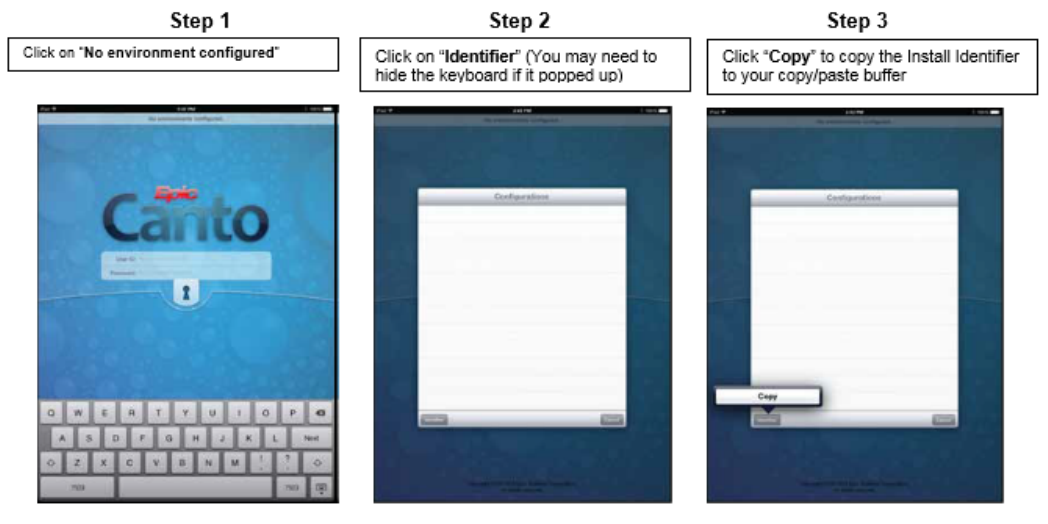
Page 33 of 44
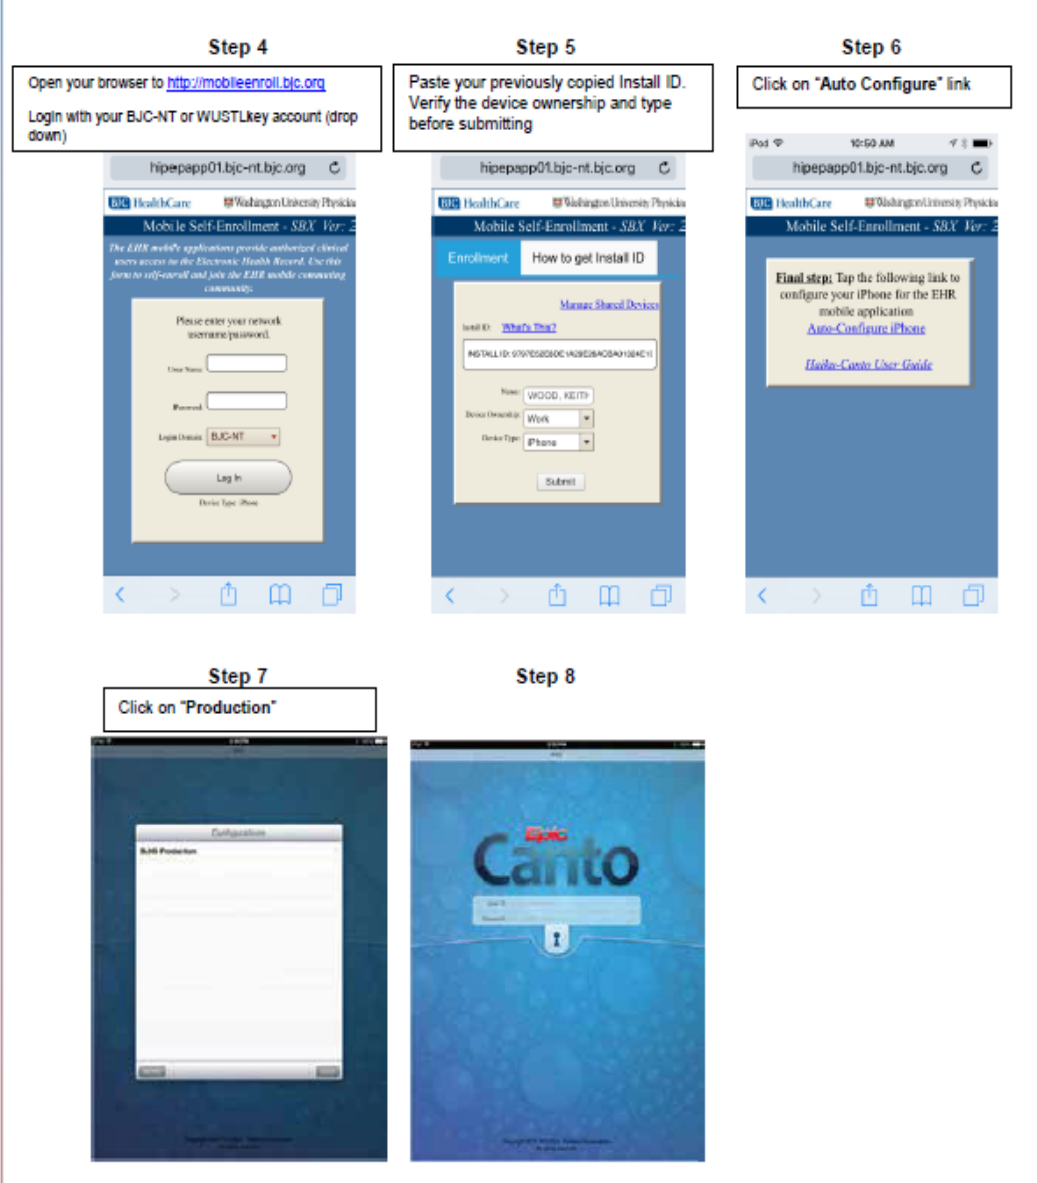
Page 34 of 44
Page 35 of 44
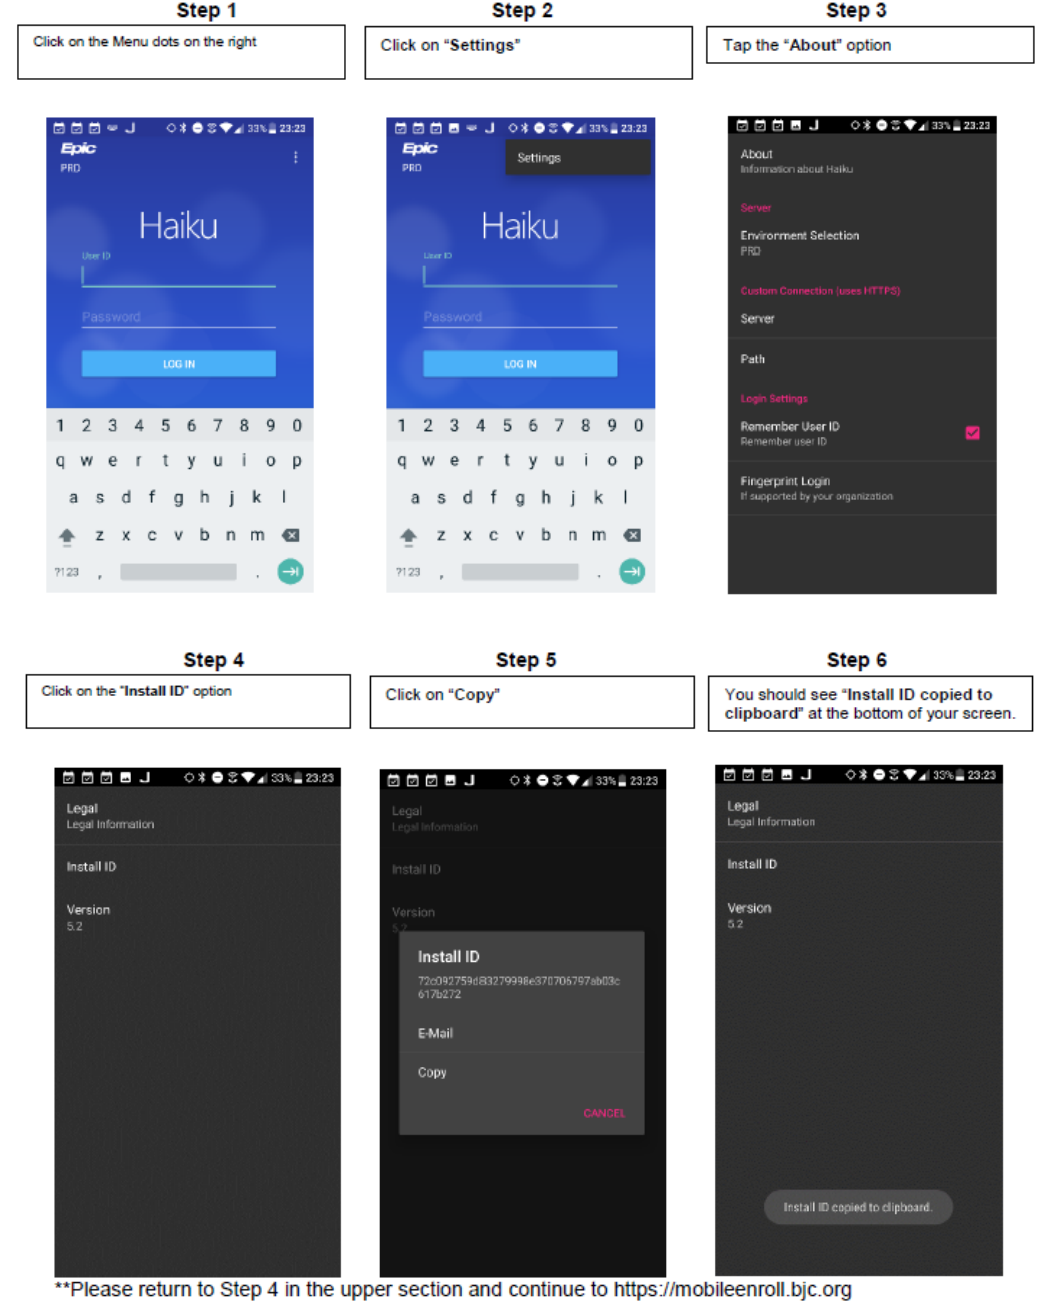
Finding the Install ID on Android Phones
Page 36 of 44
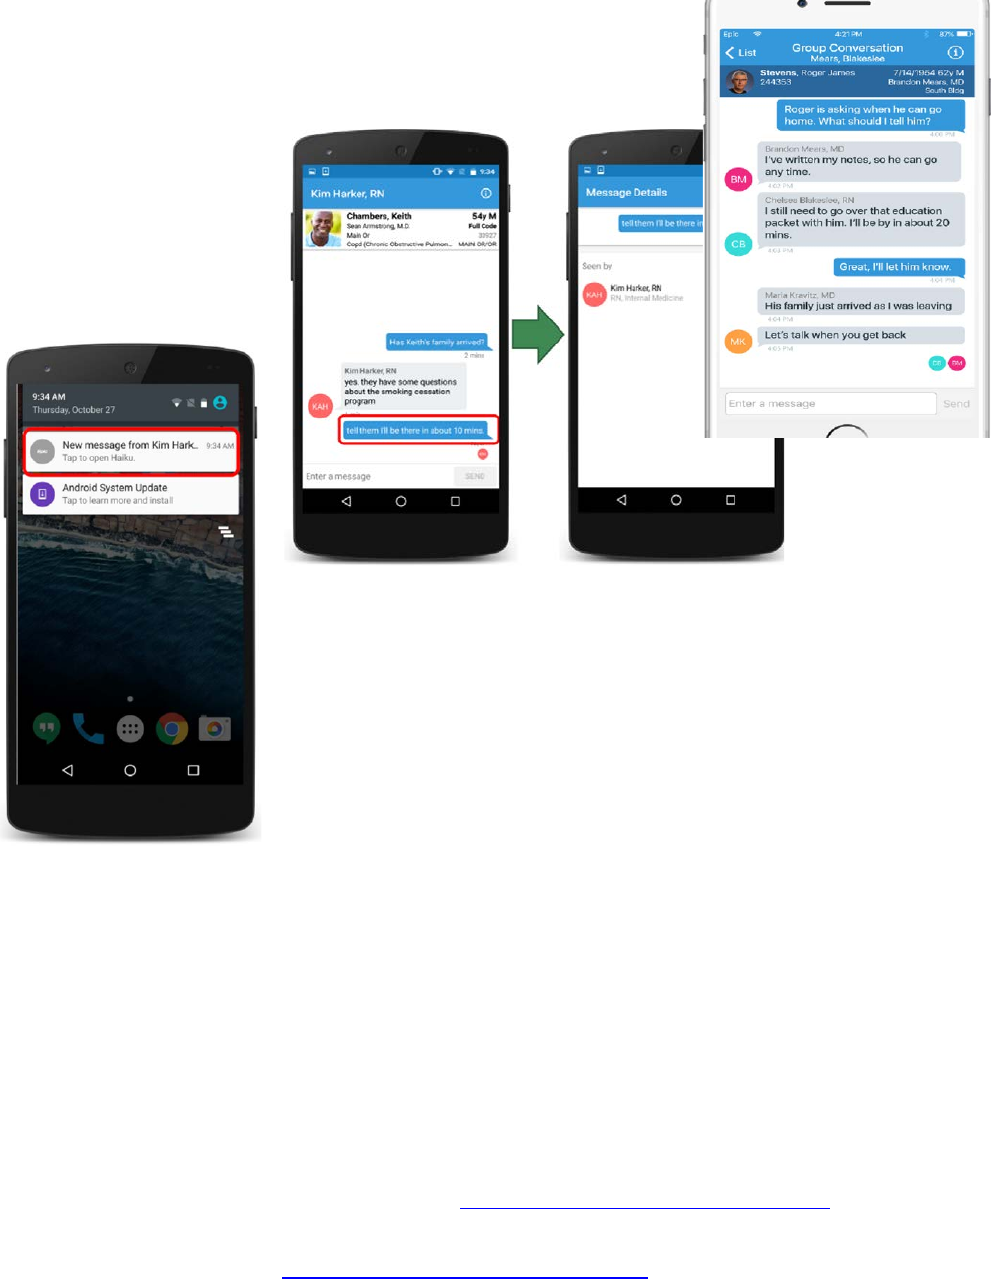
Secure Chat
• Individual and group conversations on Epic’s platform (secure/HIPAA
compliant)
• Patient-specific conversations, linked to the patient’s chart to improve
efficiency, safety
• Integrated contact list
based on Hyperspace
users
• Can be used with Haiku,
Canto, and Rover.
• Messages are
incorporated into the
medical record
BJC Remote Connection Guide
The instructions below guide an Epic User to remote into an Epic Environment using VPN and Citrix. The instructions
assume a BJC/NT account is established, AD Groups are assigned (respective to each environment) and an Epic
account has been built within the environment (if not using a generic account).
Steps (shorthand)
1. Windows (10/7)
a. Log in to VPN
i. If VPN not present, install from https://cloud.app.box.com/v/bjcdownloads
b. Verify Citrix is version 4.7
i. Win – Install new version of Citrix (4.7)
c. In a browser, go to https://epic-portal.et0965.epichosted.com, log in with your BJC-NT or WUSTLkey
account, ad verify you can launch PLY Hyperspace and log in with your training credentials
2. MAC

Page 37 of 44
a. Log in to VPN
i. If VPN not present, install from https://cloud.app.box.com/v/bjcdownloads
b. Verify Citrix is version 12.4
i. Uninstall if new version is present, install older version (12.4)
c. In a browser, go to https://epic-portal.et0965.epichosted.com, log in with your BJC-NT or WUSTLkey
account, and verify you can launch PLY Hyperspace and log in with your training credentials
Steps (detailed)
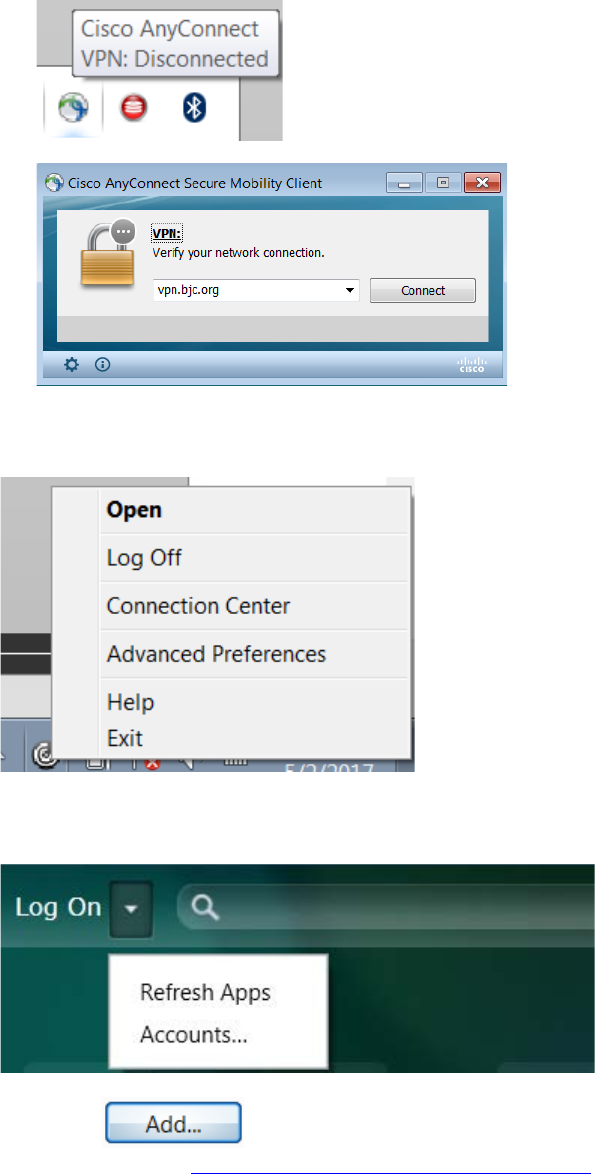
VPN Connection/Request
Before attempting to access Epic through Citrix, you first need to connect to VPN using the VPN-client and either RSA
soft-token or hard-token passphrase.
If you do not have a VPN-client/RSA token, please submit a formal request through the following:
a. If you do not have a RSA Token, please contact CSC Support at 314-362-4700
b. If missing the VPN-client, please install @ https://cloud.app.box.com/v/bjcdownloads
- For MAC – Select “Mac VPN Clients”, then “anyconnect-macosx-4.1.08005****.dmg”
- For Windows – Select “Win64 VPN Heavy Client”, then “vpnclient-winx64****.exe”
c. Once installed, you will find it under your applications list (MAC) or on the taskbar and execute
d. Enter; vpn.bjc.org and “Connect”
e. Next, select Employee_VPN and enter your BJC-NT credentials, then click “OK”
Epic Access Via Offsite “Windows 7/10”
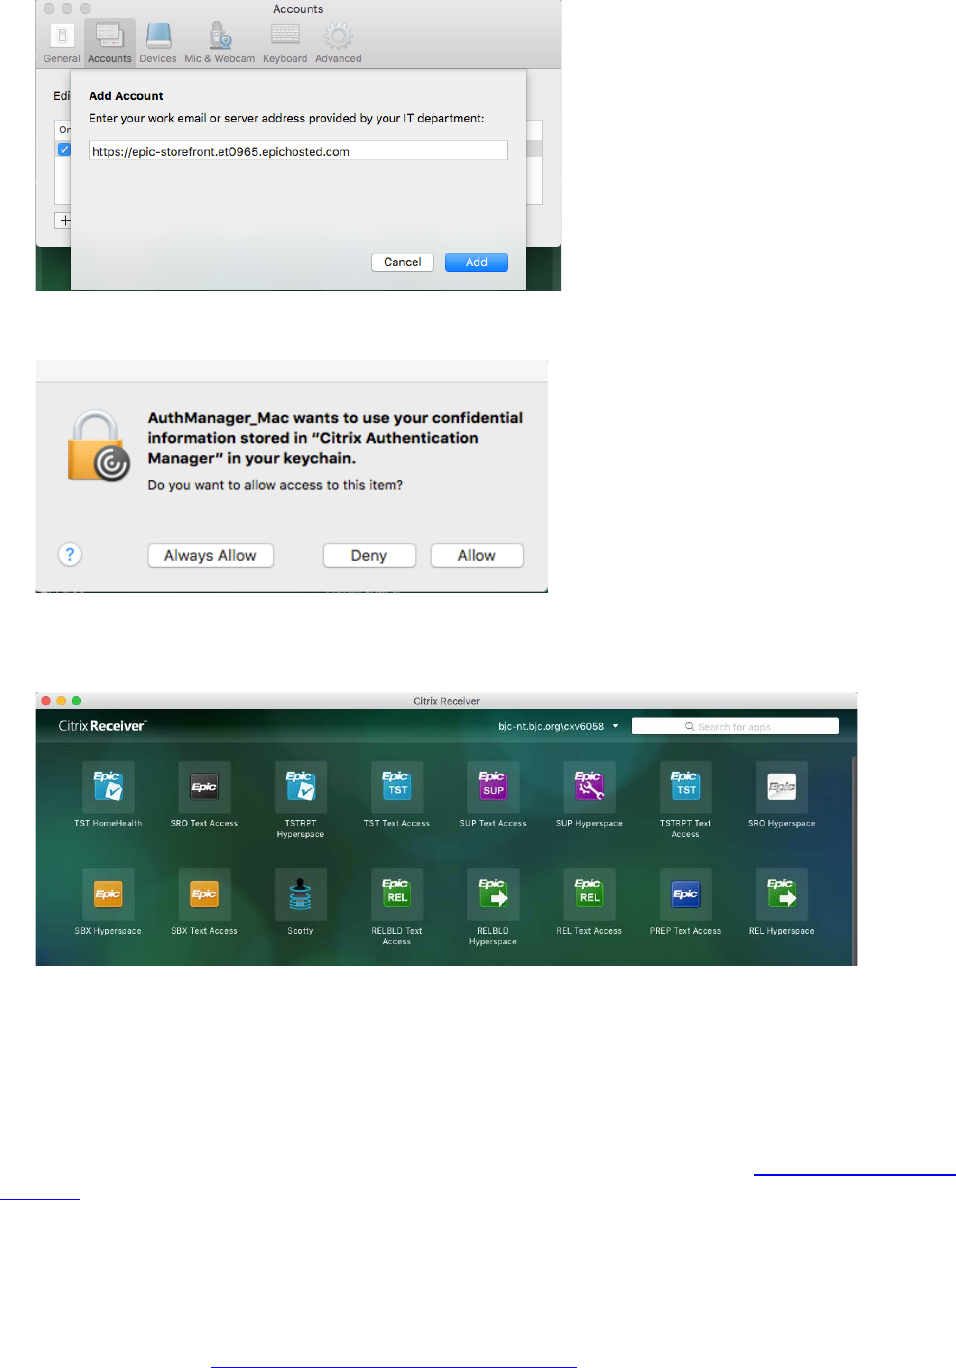
Citrix
- If you have an earlier version of Citrix 4.7, uninstall before continuing
- Connect to Citrix and download version 4.7 for Windows
https://www.citrix.com/downloads/citrix-receiver/windows/receiver-for-windows-latest.html
- Install with admin privileges
VPN
- Connect to BJC VPN using either soft-token or hard-token passphrase
Page 38 of 44
Citrix
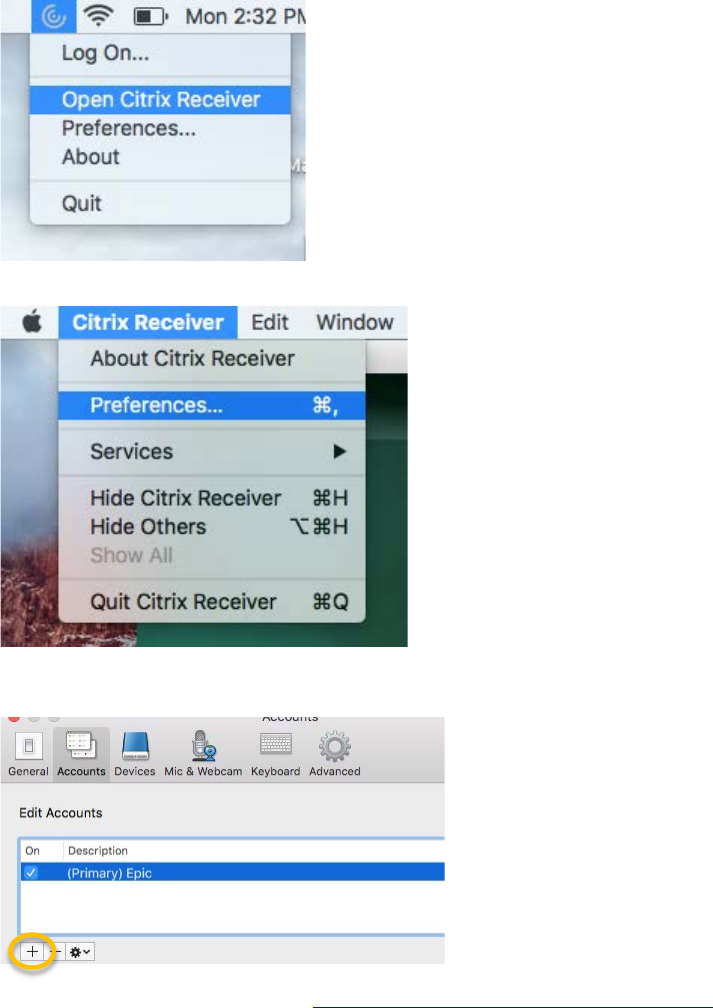
- Next, initiate the Citrix Receiver by clicking on the following icon (usually located at the bottom right on
your taskbar)
- Select “Open”
- Now select the dropdown near “Log On” and select “Accounts”
- Next, Click
- Followed by entering https://epic-storefront.et0965.epichosted.com under the server connection
Page 39 of 44
- You will then be prompted to enter your credentials in. These will be the same as your email; BJC-NT
username and password. For example, cxv9999 and Pa$$word!17
- You should now see either a folder or application within the Portal. Navigate to the correct environment
Epic Access Via Offsite MAC
Citrix
- If you have version 12.5, uninstall before continuing (12.5 will NOT work with Epic)
- Connect to Citrix and download version 12.4 for MAC
https://www.citrix.com/downloads/citrix-receiver/legacy-receiver-for-mac/receiver-for-mac-124.html
- Install with admin privileges
VPN
- Connect to BJC VPN using either soft-token or hard-token passphrase
Page 40 of 44
Citrix
- Next, initiate the Citrix Receiver by clicking on the following icon (usually located at the top right of your
screen)
- Next, click Preferences
- You are now given a list of accounts; click the + sign to add a new account
- Add the following server address: https://epic-storefront.et0965.epichosted.com
Page 41 of 44
- You may receive a key change request after adding the server. Select “Allow”
- The Citrix Receiver should now be loaded with your corresponding Epic environments and may differ
significantly from the screenshot below:
WUSTL Epic Citrix Receiver Access
Requirements
• Citrix Receiver 4.4.3 LTSR or higher required (4.4.3 is the most stable version used with Epic currently)
• WUSTL Key account in an Epic group – currently must request via BJC ServiceNow (https://bjcprod.service-
now.com – search Epic Access Request)
• Until training begins, a Foundation user will be needed to login to Epic applications
Access Steps
Once the above are completed, there are two methods to access the Epic Hyperspace applications. The preferred
method is to use Citrix Receiver which is the first option.
• Using Citrix Receiver
• Using a web storefront: https://epic-portal.et0965.epichosted.com
Citrix Receiver
Page 42 of 44
• Because most WUSTL users are not yet using the ACCOUNTS domain, you will need to specify which
account Citrix Receiver logs in as.
• Double click on the Citrix Receiver icon in your task bar or open from the Start Menu:
• You should be prompted to Add an Account:
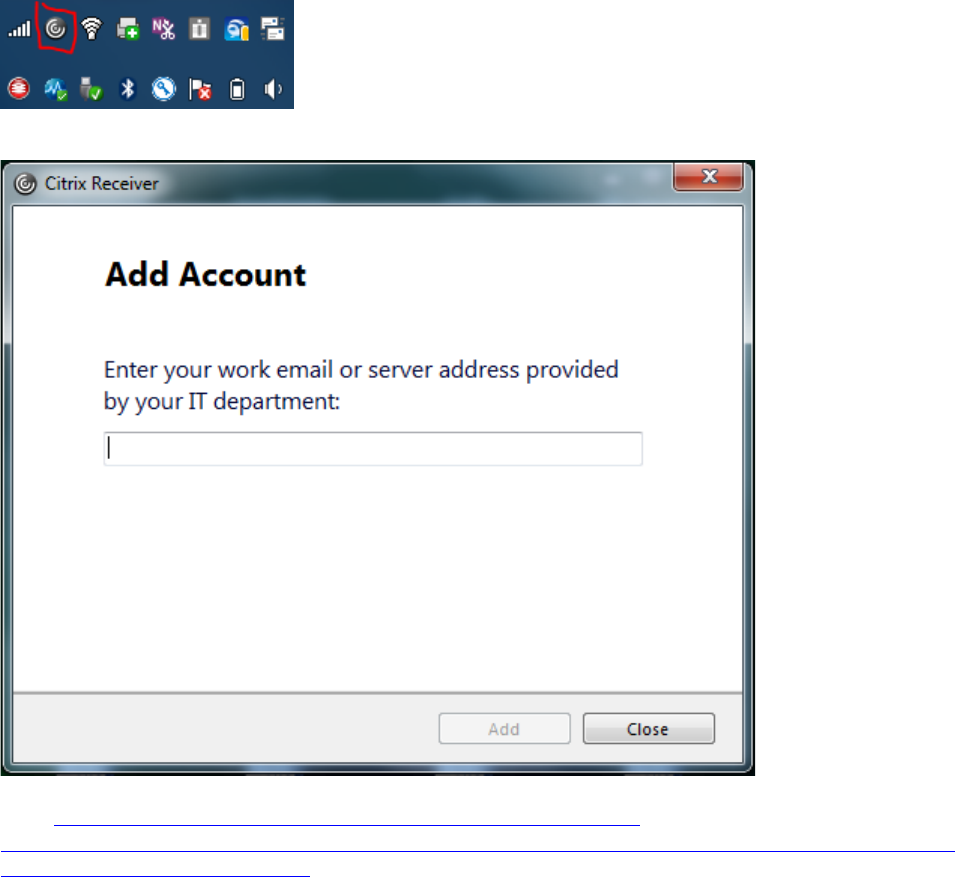
• Enter https://epic-storefront.et0965.epichosted.com/Citrix/Epic/discovery
• You will be prompted for your user name with the screen below. Please type in accounts.ad.wustl.edu\ and
add your WUSTL Key ID after the \
Page 43 of 44
• Enter your WUSTL Key Password at the Prompt
• You also need to make sure your WUSTL Key username is listed at the top of Receiver as shown below:
• At this point, you should see a list of available applications populate within Receiver. Some of these Epic
applications may also automatically populate on the Desktop.
• For the PLY and SBX environments, you should use a provided Foundation user. For POC, TST, PRD, you
should use your WUSTL Key user information.
Page 44 of 44
Web Storefront
• **This is the recommended method if you currently have Citrix Receiver and use Citrix applications
through Receiver**
• Access the link above and login using your WUSTL Key username and password
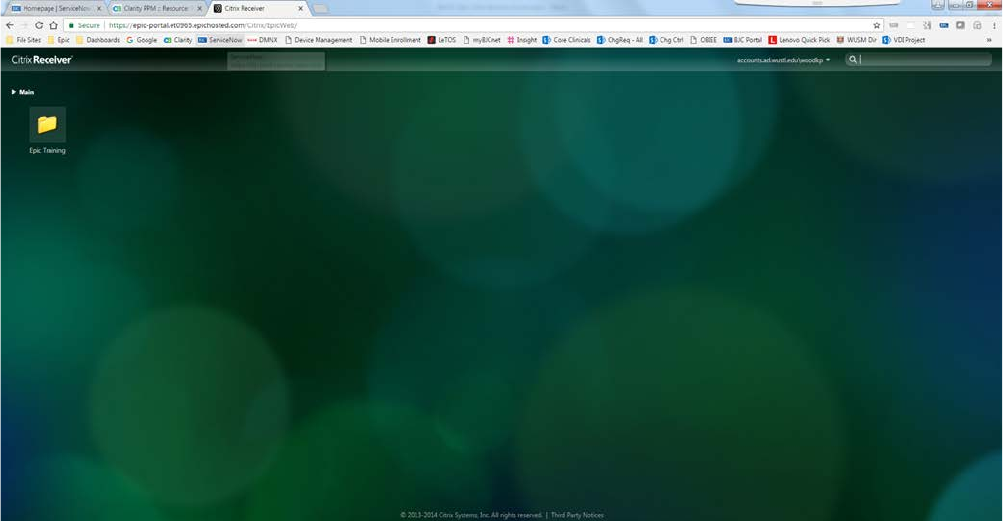
• Upon successful login, you will see the screen below (the number of folders/applications may vary based on
access granted)
• For the PLY and SBX environments, you should use a provided Foundation user. For POC, TST, PRD, you
should use your WUSTL Key user information.
