Polybrush Manual
PolybrushManual
PolybrushManual
PolybrushManual
PolybrushManual
PolybrushManual
User Manual: Pdf
Open the PDF directly: View PDF ![]() .
.
Page Count: 37
Introduction
Polybrush brings several exciting level design tools to the Unity editor: MeshSculpting, VertexColorPainting, and TextureBlending.
Directly in the editor you can sculpt complex shapes, paint in custom lighting or coloring, and blend textures across meshes.
Polybrush is a natural extension of Unity’s famous "what you see is what you get" workflow, and is even compatible with ProBuilder meshes
for the complete in-editor level design solution.
GettingStarted
Important!
Polybrush is for working with meshes, not terrain. Use the Unity Terrain tool for modeling terrains.
If you're just getting started with Polybrush, the QuickStart tutorial is a great way to begin.
For further learning, browse the topic links to the left. If you prefer video tutorials, we've got you covered- every section has a complete video
summary.
INeedHelp!
If you've encountered a bug or other technical issue, please post on the official SupportForum. We respond very quickly, and the
community benefits as well.
For general questions, comments, etc, feel free to email us directly.
OptionalExtras
LeaveaReview
If you like what we are creating, and want to support further development and new ideas, reviews are the single best way to help- thanks very
much! WriteaReviewforPolybrush
RegisteryourPurchase
Optionally, you can "Register" to gain access to our User Toolbox page, where you can access direct download links for all your ProCore
purchases.
Simple send us an email with your original Unity Asset Store reciept (the one with the "OR302..." number), and we'll setup your account,
usually within 24 hours.
StayInformed
If you'd like to keep up-to-date with new tools, contests, sales, and any other news, we have a few options:
1. Twitter : @probuilder3d
2. Facebook: facebook.com/probuilder3d
3. News Page & Newsletter: procore3d.com/news
SpecialThanksto:

QuickStart
Complete Video: Getting Started With Polybrush
First time using Polybrush? Start here for a quick and pain-free overview of the essentials,
plus links to more advanced learning.
QuestionsorConcerns? Please let us know via email or on the forum. We'll be happy
to help!
1)OpenthePolybrushWindow
Quick Video: The Polybrush Window
From the Unity menu bar, choose Tools>Polybrush>PolybrushWindow . This opens
the PolybrushWindow, which you will use for 99% of Polybrush functionality.
2)ChooseaMeshtoEdit
Quick Video: Choosing a Mesh to Edit
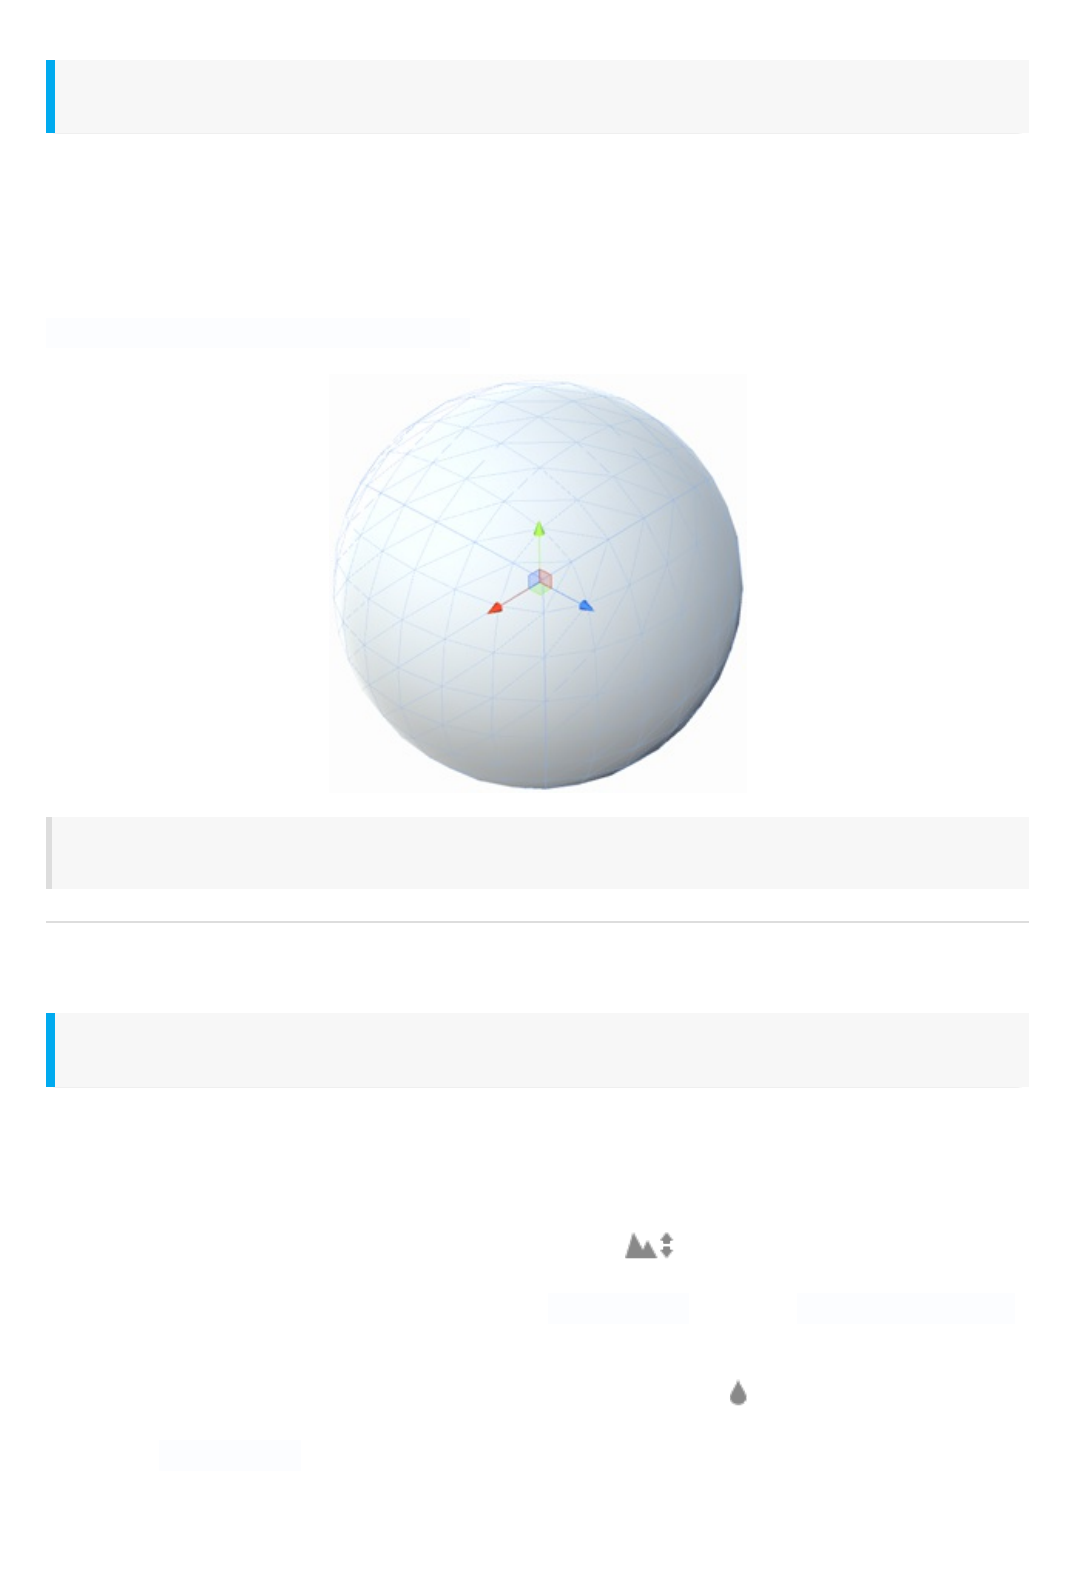
Polybrush will automatically work on any mesh, but for now we'll use a Unity primitve
mesh.
To create a sphere primitive, in the Unity menu bar choose
GameObject>3DObject>Sphere
You can also use ProBuilder meshes for an even more powerful
workflow!
3)SculptYourMesh
Quick Video: Mesh Sculpting and Smoothing
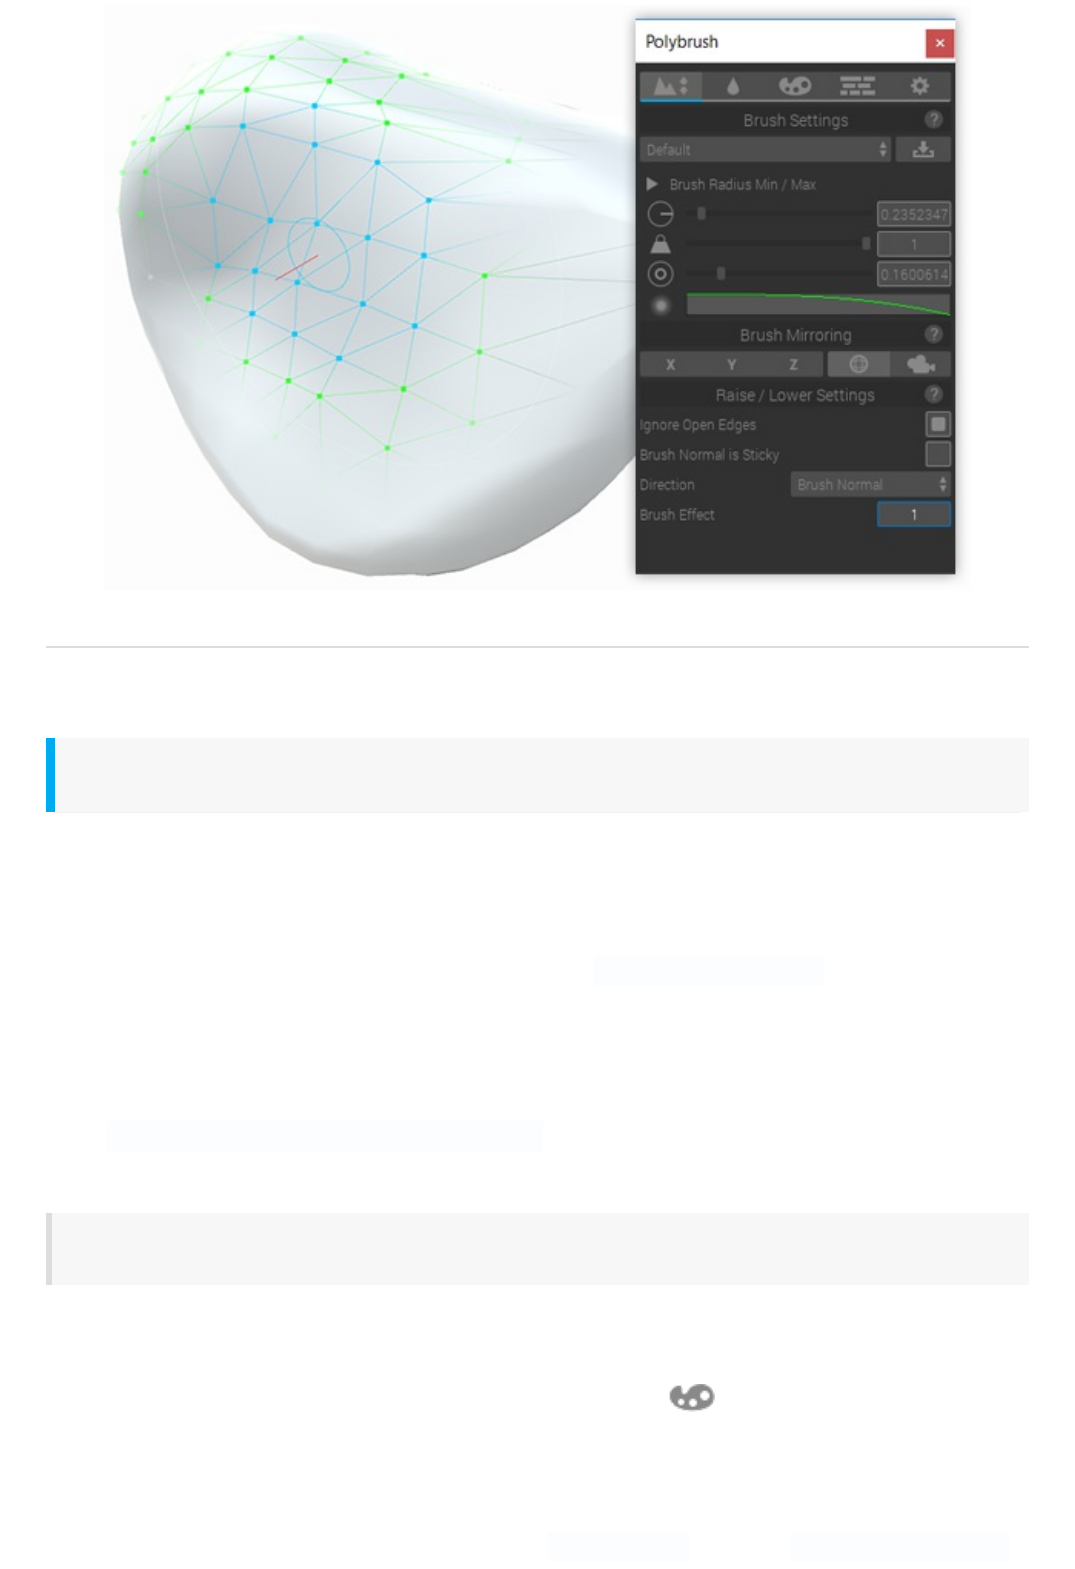
Let's make this sphere look more interesting!
1. The default Unity sphere is only 1 meter across, so let's scale it up about 10x.
2. Activate Push/PullMode by clicking it's icon ( ) in the ModeToolbar.
3. Hover your mouse over the Sphere, and LeftClick to "pull", ShiftLeftClick
to "push" geometry.
4. To smooth out hard edges, activate SmoothingMode ( ) and brush the mesh
with LeftClick .
4)PaintPrettyColors
Quick Video: Painting Vertex Colors
Danger, Danger! The default Unity material won't show VertexColoring, so let's create a
new material that will:
1. In your Project Panel, right-click and choose Create>Material , then give it a
really cool name
2. With the new material selected, look at the top of the Inspector Panel- see that
drop-down labeled "Shader"? Click it, and choose
Polybrush>StandardVertexColor
3. Apply this material to the mesh you'd like to paint
Hey custom shader people! You can use any shader, as long as it
supports vertex colors
Now we're ready to paint vertex colors:
1. Activate ColorPaintingMode by clicking it's icon ( ) in the ModeToolbar.
2. Click to select a color from the ColorPalette buttons at the bottom of the
PolybrushPanel.
3. Hover your mouse over the Sphere, and LeftClick to paint, ShiftLeftClick
to erase.
5)BlendFancyTextures
Quick Video: Texture Blending
TextureBlending requires a special shader- you can create your own, or use ours:
1. In your Project Panel, right-click and choose Create>Material .
2. With the new material selected, look at the top of the Inspector Panel- see that
drop-down labeled "Shader"? Click it, and choose
Polybrush>StandardTextureBlend.
3. Apply this material to the mesh you'd like to paint.
Prefer your custom shader? You can use any shader with Polybrush -
see Writing Texture Blend Shaders for more information.
We can now paint and blend textures on the mesh:
1. Activate TextureBlendingMode by clicking it's icon ( ) in the ModeToolbar.
2. Click on a texture in the bottom of the PolybrushPanel to select it.
3. Hover your mouse over the Sphere, and LeftClick to paint, ShiftLeftClick
to erase the selected texture.
Textureskindlyprovidedbygametextures.com
Summary
Congratulations, you've learned the essentials of Polybrush! You may now ChooseYour
OwnPath:
ThePathofAdventureandDubiousWisdom:
Jump right in and learn the rest as you go. You can always return to these docs or ask us
if you have specific questions. Enjoy!
ThePathofInfiniteWisdom:
Use the handy-dandy topic links (on your left) to jump quickly through these docs.
Whether you skim, read in-depth, or just watch video tutorials, you'll be lvl60 in no time.
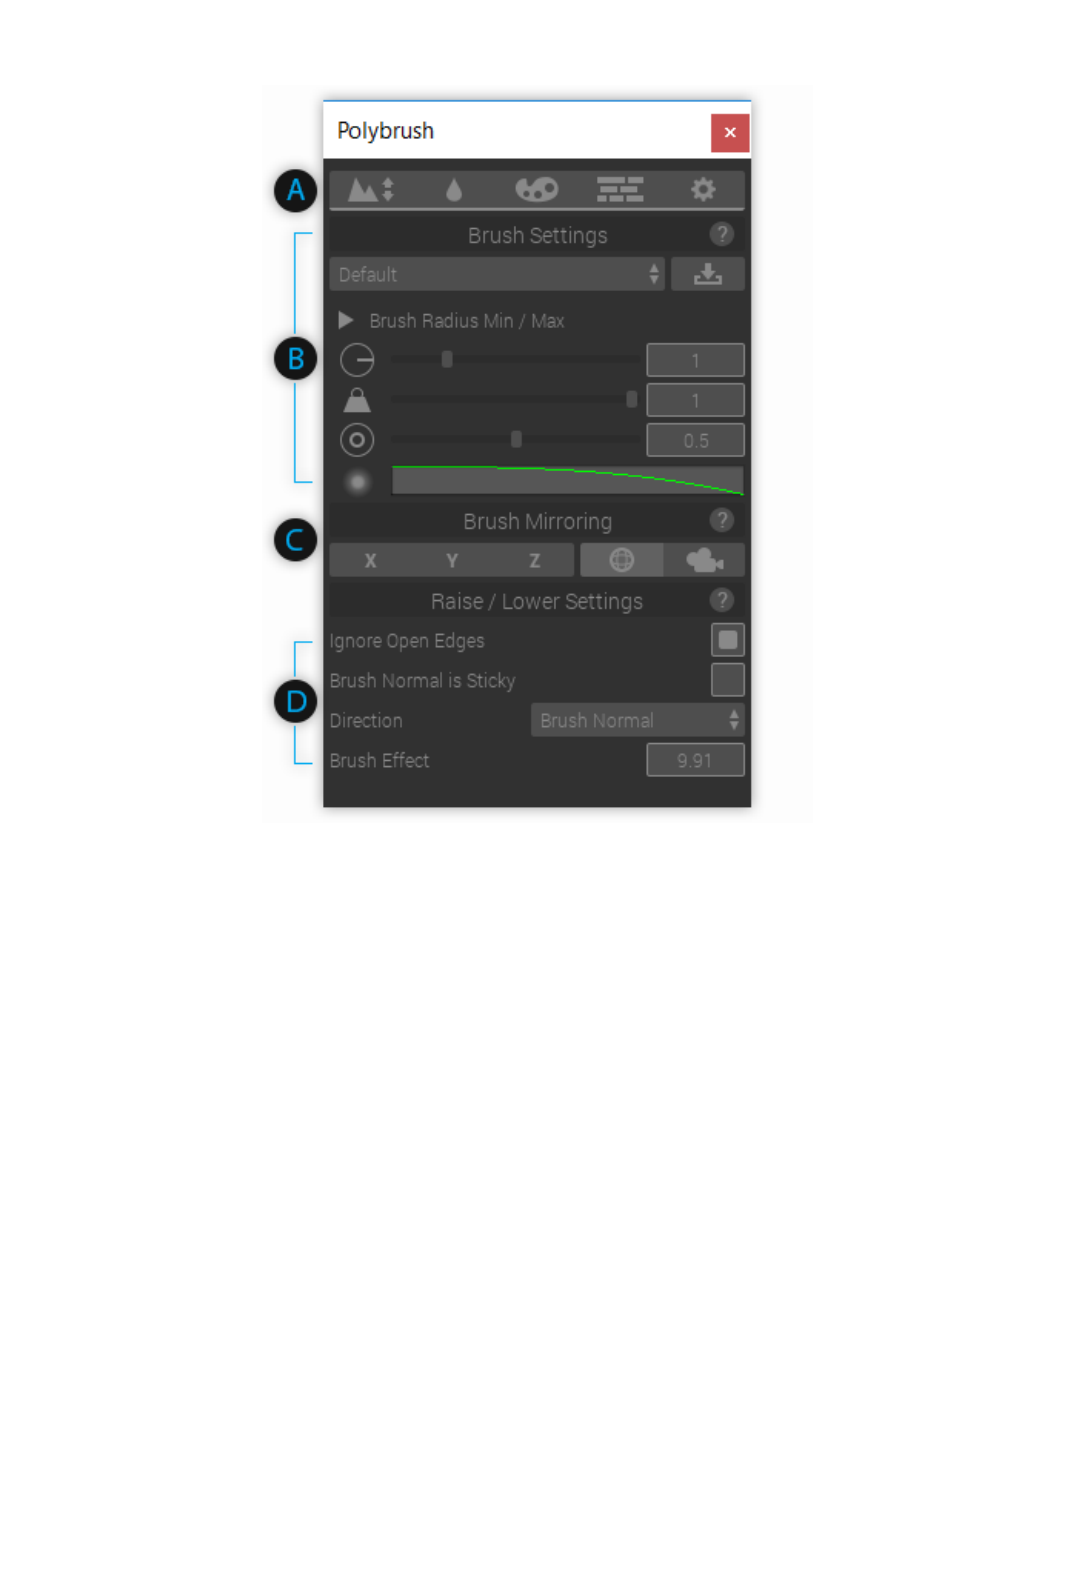
TheInterface
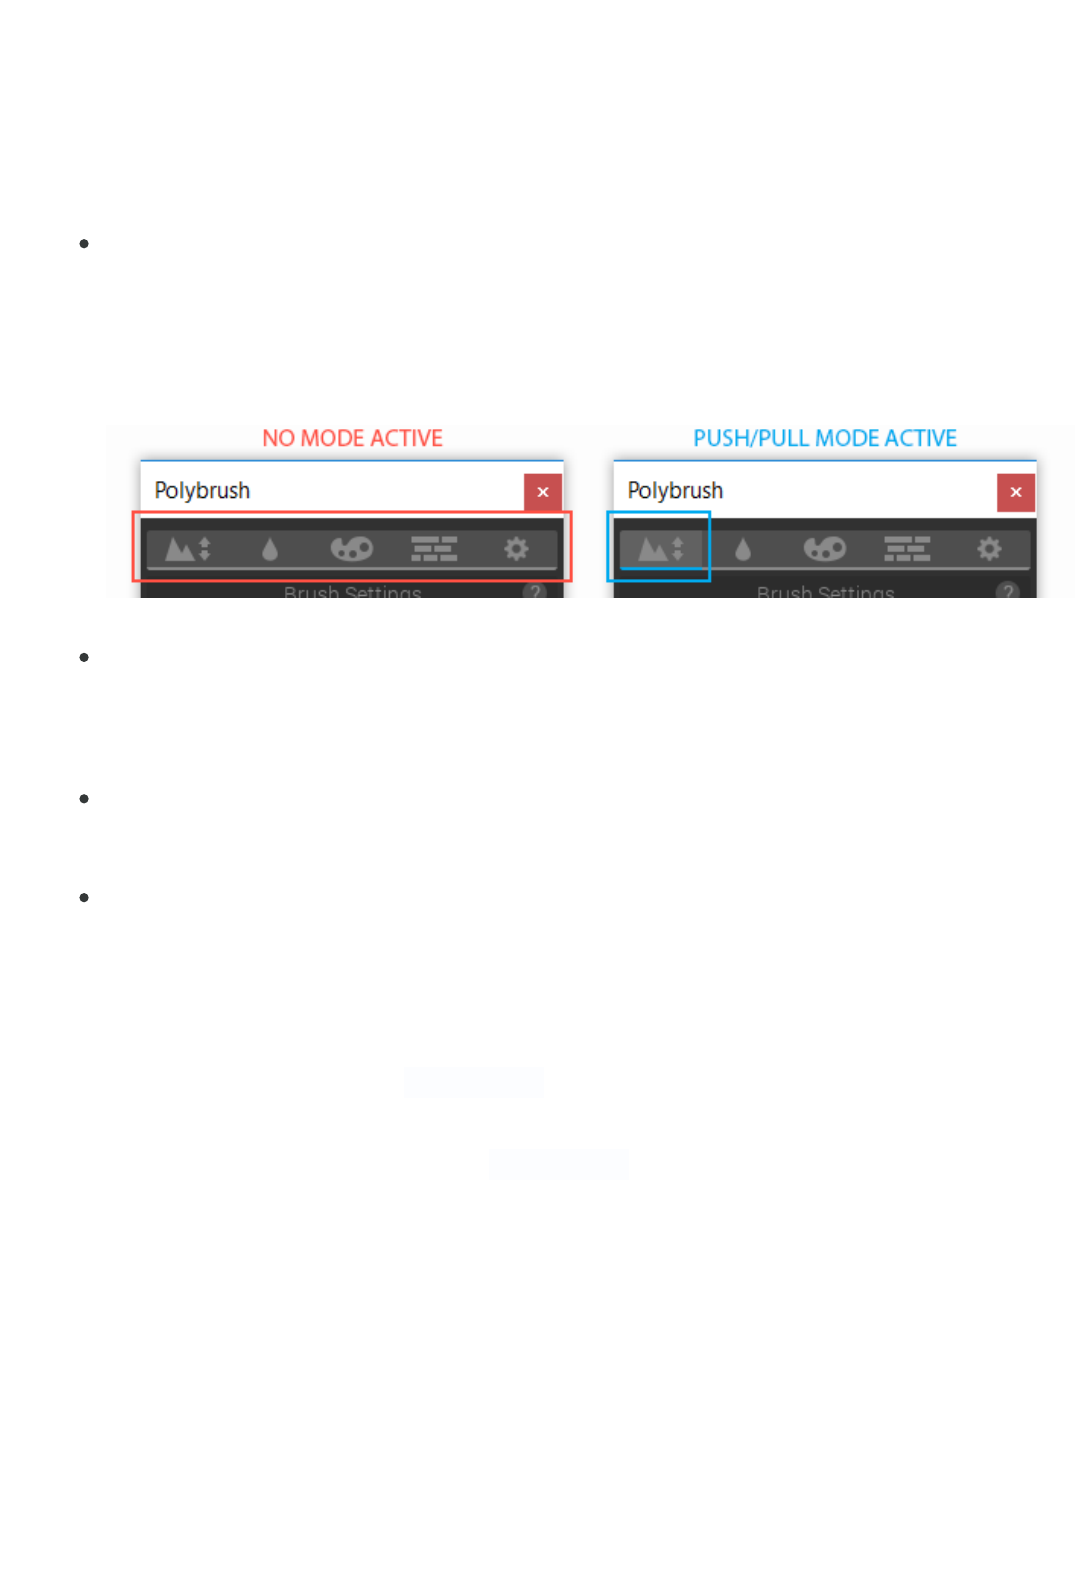
A)ModeToolbar
Sets and displays the active BrushMode. Active mode is indicated by a blue accent line
below it's icon.
Choosing any of Unity's standard tools (Pan, Move, Rotate, Scale) will automatically de-
activate Polybrush.
B)BrushSettings
BrushSettings lets you choose Radius, Falloff, Strength/Opacity, and Falloff Curve.
You may also save and load often used brushes via the BrushPresetselector.
C)BrushMirroring
Chooses the BrushMirroring methods to use with the current brush.
D)ModeSettings

Toolbar
Modes define how a brush interacts with a mesh. Some move vertices around, others
apply values per-vertex (like color).
To enter a BrushMode click on the toolbar button. To exit a BrushMode select the
Move, Rotate, Scale, or GUI tool in the Unity toolbar (or use the W,E,R,T keyboard
shortcut).
You can tell if a BrushMode is on by it's button in the toolbar. The active mode will
appear with a blue accent line:
The available modes are:

Push/Pull
About
The Push/Pull tool moves vertices in positive and negative directions along an axis (determined by the Direction setting).
Usage
Select any mesh object, enter Push/Pull mode, then click and drag while hovering over the selected mesh.
Holding the Shift key while dragging the LeftMouseButton will inverse the movement direction (Up becomes Down, Right becomes left, etc).
The actual movement of vertices will be affected by the current BrushSettings. Check out the Brush Settings page for more information on how.
Settings
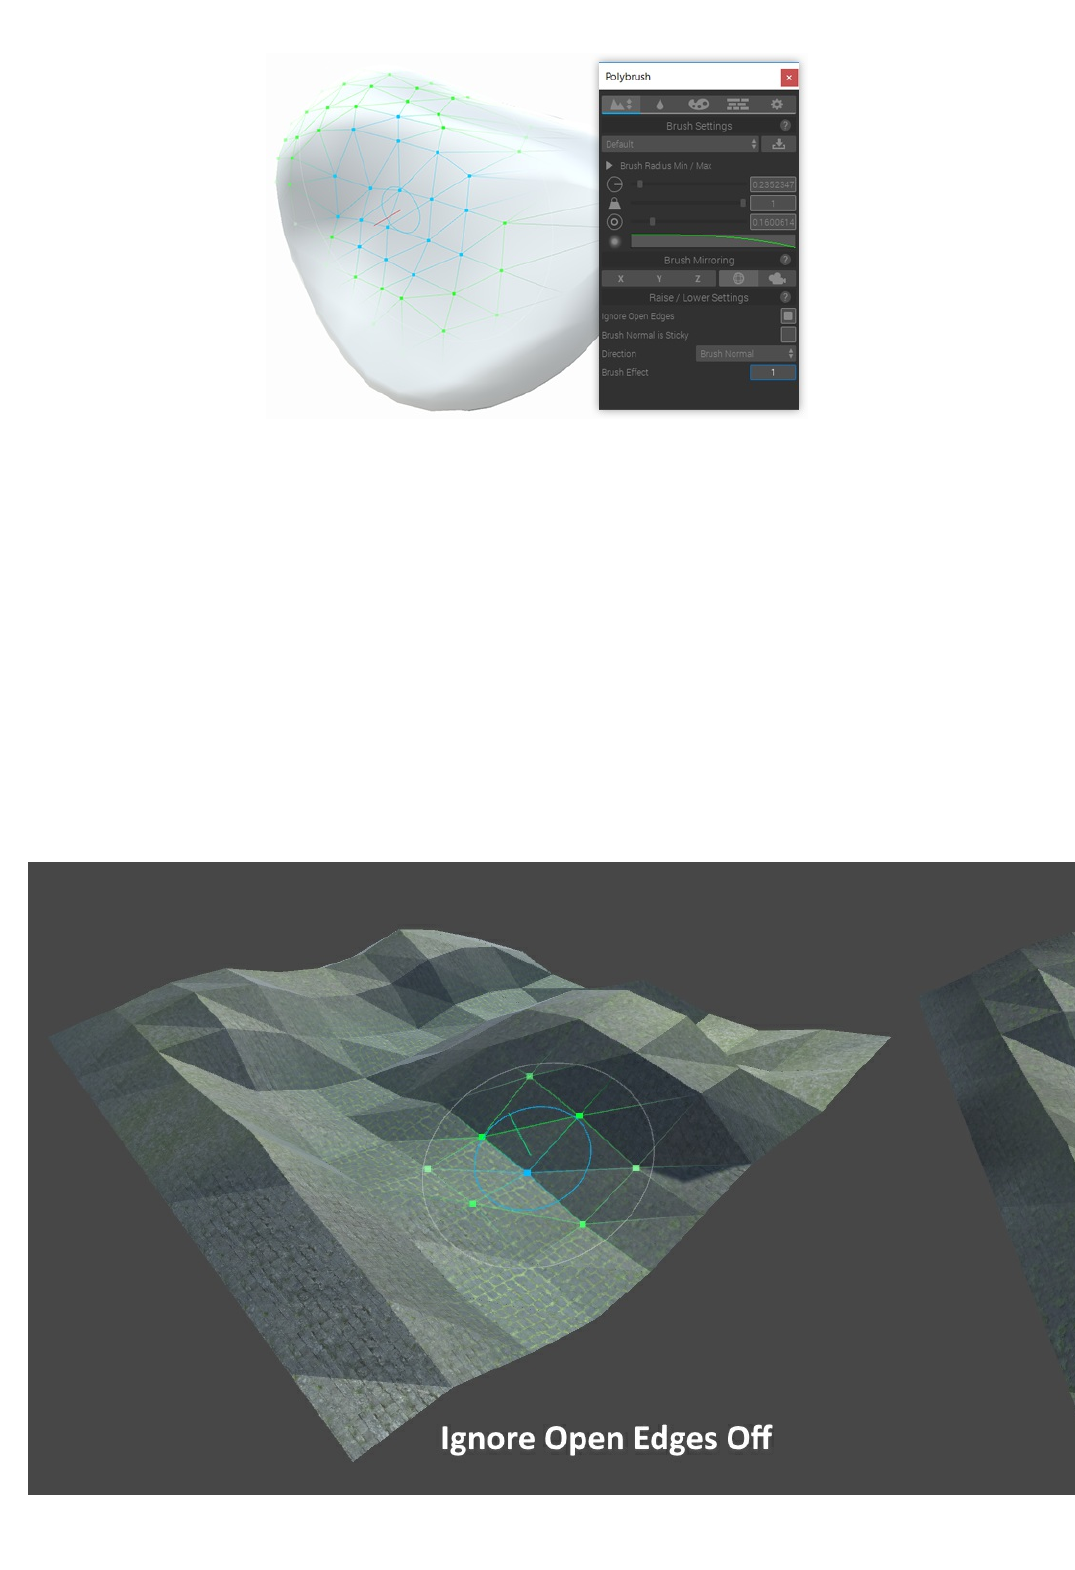
IgnoreOpenEdges
When IgnoreOpenEdges is enabled, any vertices that make up an open edge (eg, an edge that is only a part of one face) will not be affected by
the brush.
BrushNormalisSticky

When the brush direction is set to BrushNormal this locks the vertex movement direction to the axis the brush normal is facing at the time of first
application.
Direction
Direction determines how vertices move. Up, Down, and Forward move vertices along the X, Y, and Z axes respectively. BrushNormal moves
vertices along axis of the brush orientation's up direction. VertexNormal moves vertices along their normals. Use VertexNormal on objects like
spheres where you want the movement to be relative to the direction of the affected vertices.
BrushEffect
This value determines the distance a brush stroke will move vertices in it's path. Higher values mean more movement, smaller values less. Holding
Shift while dragging negates this value (eg, 2 becomes -2).
BrushEffect can be negative, which is handy for carving out river beds or valleys!

Smooth
About
The Smooth tool averages the differences between vertex positions along a axis (set by Direction). Use this mode to make your jagged vertices
more uniform.
Usage
Select any mesh object, enter Push/Pull mode, then click and drag while hovering over the selected mesh.
The actual movement of vertices will be affected by the current BrushSettings. Check out the Brush Settings page for more information on how.
Settings
IgnoreOpenEdges
When IgnoreOpenEdges is enabled, any vertices that make up an open edge (eg, an edge that is only a part of one face) will not be affected by
the brush.

BrushNormalisSticky
When the brush direction is set to BrushNormal this locks the vertex movement direction to the axis the brush normal is facing at the time of first
application.
Direction
Direction determines how vertices move. Up, Down, and Forward move vertices along the X, Y, and Z axes respectively. BrushNormal moves
vertices along axis of the brush orientation's up direction. VertexNormal moves vertices along their normals. Use VertexNormal on objects like
spheres where you want the movement to be relative to the direction of the affected vertices.
In Smooth mode the VertexNormal brush direction behaves slightly differently than you might expect - instead of constraining the movement path
to the normal each vertex position will be averaged with it's neighbors. This is very handy for reducing large gaps in vertex positions and making
your mesh look super-smooth.
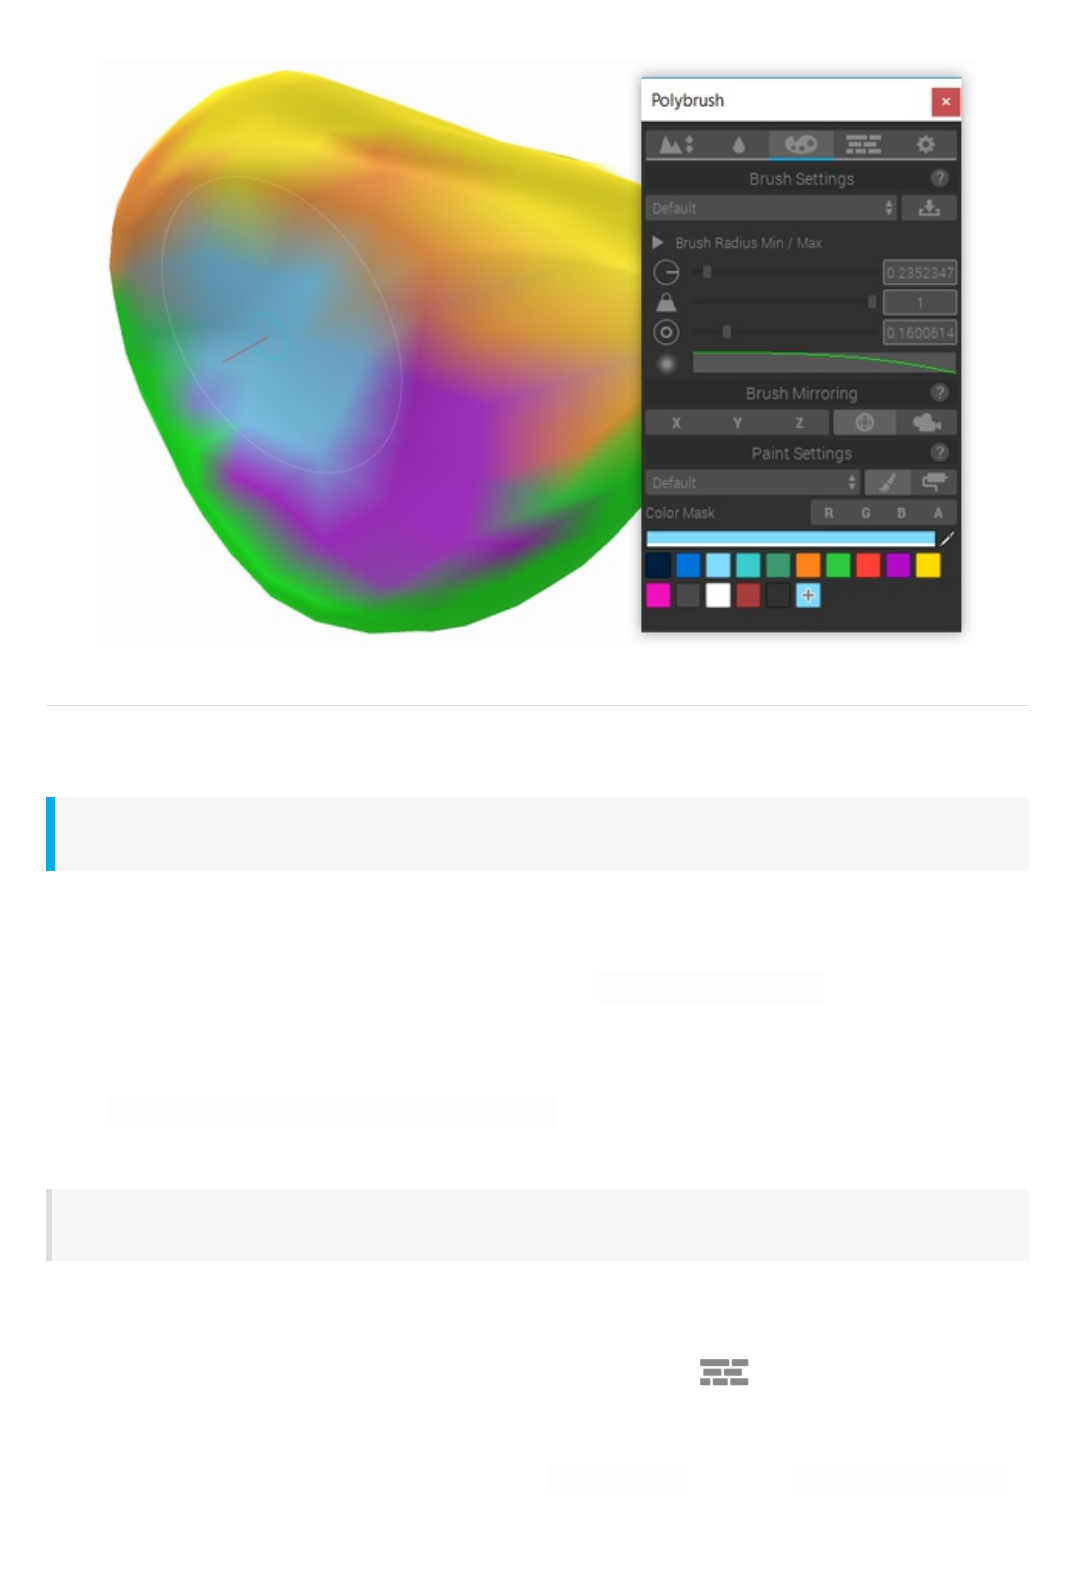
VertexColor
Important!
VertexColor mode requires special shaders to work. If you're not able to paint colors
on a mesh, change the material to ProCore/Polybrush/Material/StandardVertexColor
and try again.
About
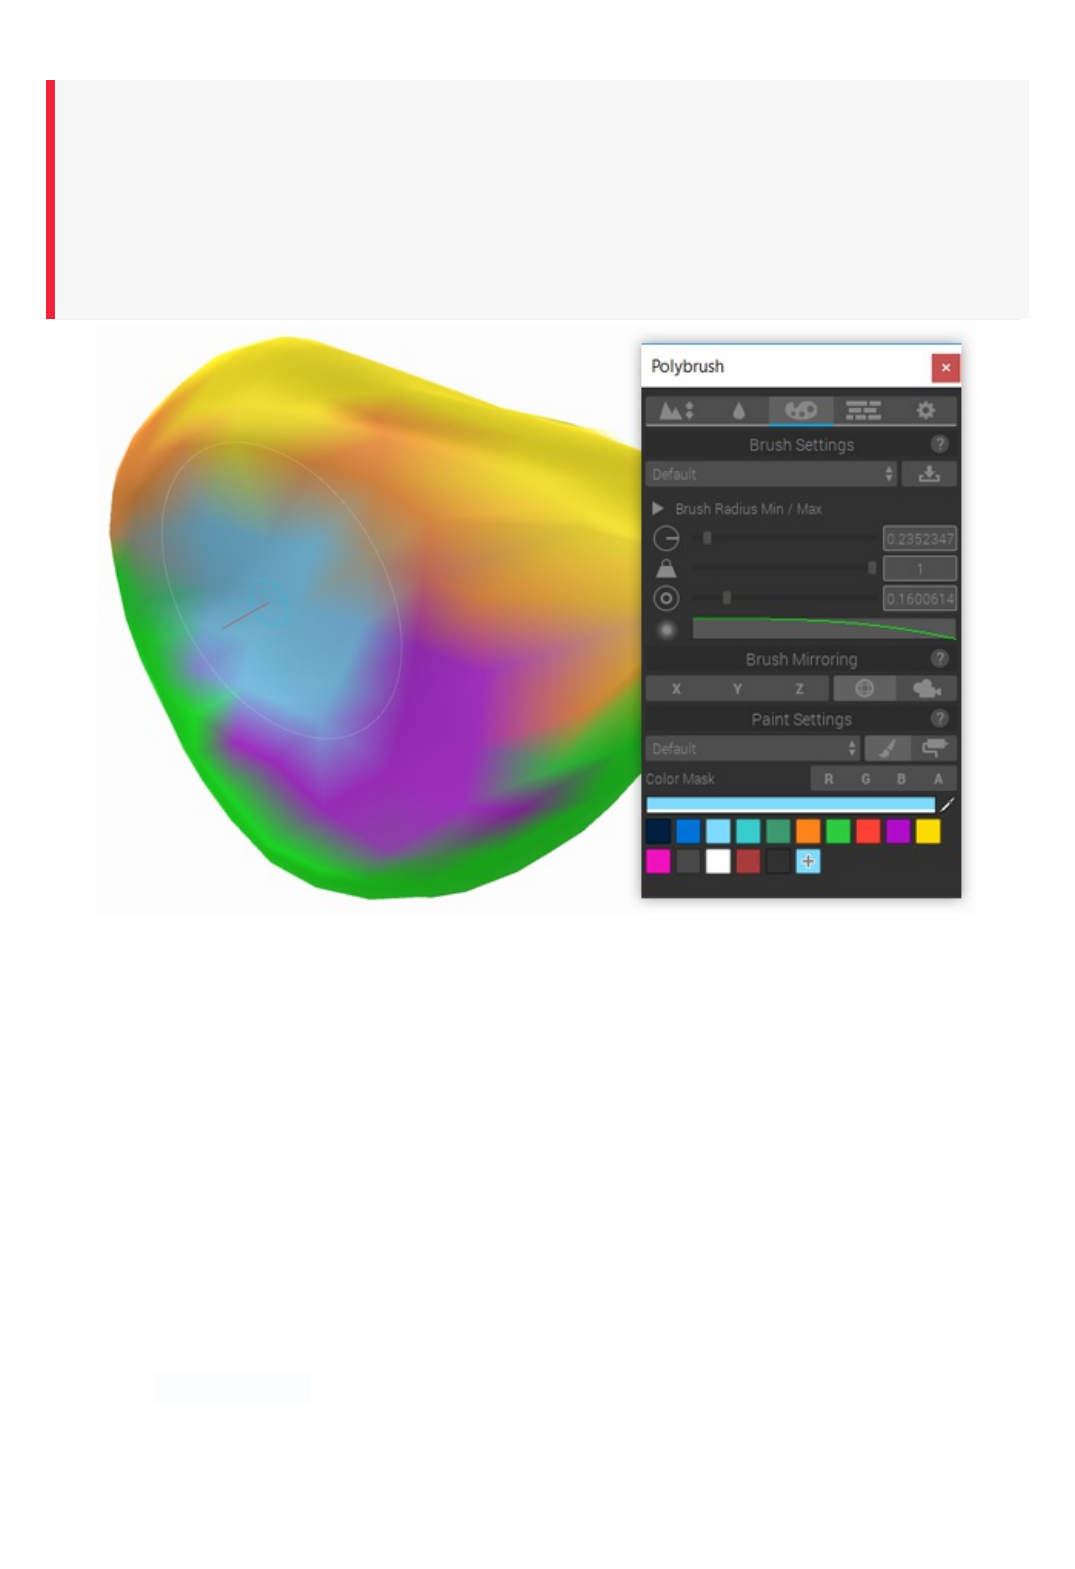
ColorPaint mode enables you to set the vertex colors of a mesh with a brush or paint
bucket. Use the toolbar under PaintSettings to choose between the two modes.
VertexColor mode will only work if the shader a material uses supports vertex colors.
Most default Unity shaders do not support vertex colors! Polybrush will show a warning
when hovering a mesh with an incompatible shader.
Polybrush includes some default materials that support vertex colors. Use one of these
materials if you want to paint colors on a mesh (or alternatively any other shader that
reads the mesh.colors attribute).

Name Description Path
DiffuseVertex
Color
A Legacy Diffuse shader with support for a texture, normal
map, and vertex colors.
ProCore/Polybrush/Materials/Diffuse
VertexColor
Standard
VertexColor
This material behaves similarly to the Standard shader, but with
support for painting vertex colors.
ProCore/Polybrush/Materials/Standard
VertexColor
Usage
Select any mesh object, enter Push/Pull mode, then click and drag while hovering over
the selected mesh.
The actual color applied to vertices will be affected by the current BrushSettings. Check
out the Brush Settings page for more information on how.
Settings
BrushType
Specific to VertexColor and TextureBlend modes is the option to select between the
standard circular brush and a special bucket brush.
PaintBucket will restrict the brush to the triangle (or triangles) touched by the mouse.
BrushColor
BrushColor shows the current brush color. The final color the brush applies also
depends on the BrushStrength and the underlying mesh color.
Toselectanewbrushcolor,eitherclickanelementintheColorPalettelistor
manuallychangetheBrushColorfield.
ColorMask
The ColorMask field allows you to selectively modify color values by channel
(R,G,B,A ). By default the all color channels are affected by the brush. Toggling off
channels tells Polybrush to leave those channel values alone when modifying the mesh.
ColorPalette
The ColorPalette provides quick access to brush colors. You can add, remove, or
change colors in this list at any time. To reset a palette back to the default values, click
SetDefaults below the list view.
To add a new ColorPalette open the Palettes popup and select AddPalette....

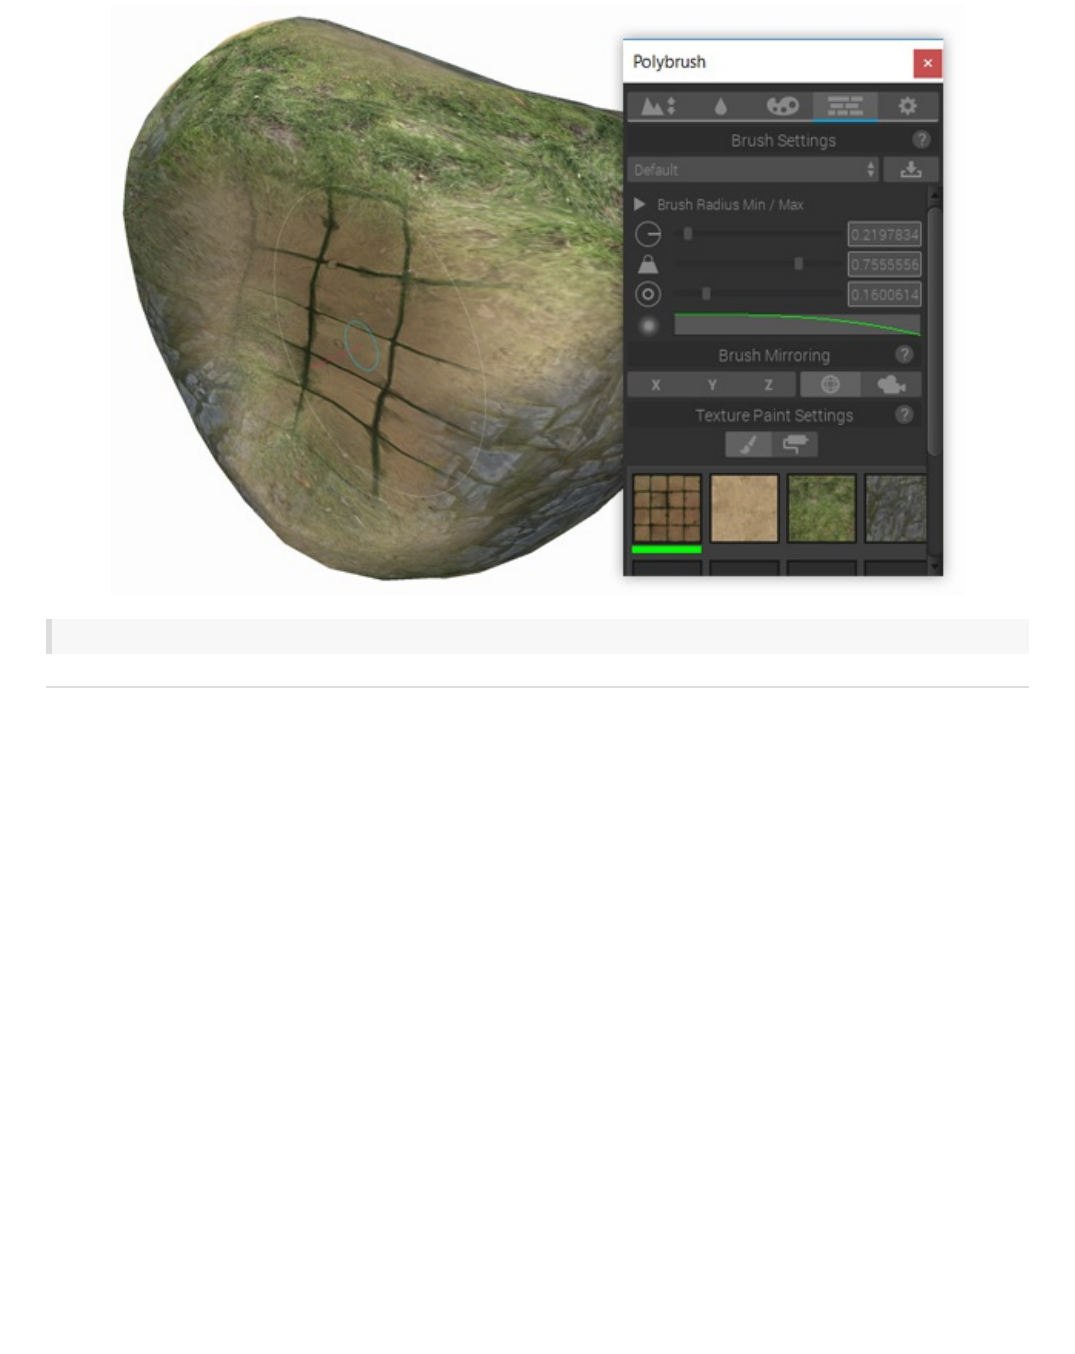
TextureBlend
Important!
TextureBlending mode requires special shaders to work. If you're not able to paint
textures on a mesh, apply one of the included materials (see below for a chart) to your
model and try again.
About
TexturePainting mode is a special interface for texture blending shaders. It applies data
to a mesh using a combination of some or all of the following attributes:
[UV0,UV2,UV3,UV3,Color,Tangent] .
This information is defined by the shader and is just 2 extra lines in your shader code
(more on that later). Polybrush includes a few different blend materials to get you started:

Name Description Path
Standard
TextureBlend
A PBR enabled material with support for blending up to 12
different textures.
ProCore/Polybrush/Materials/Standard
TextureBlend
Standard
TextureBlend
Bump
A PBR enabled material with support for blending up to 4
different textures with normal maps.
ProCore/Polybrush/Materials/Standard
TextureBlendBump
TriPlanar
TextureBlend
A PBR enabled material with support for blending up to 4
textures and automatically projects UV coordinates.
ProCore/Polybrush/Materials/TriPlanar
TextureBlend
TriPlanar
TextureBlend
Legacy
A Blinn-Phong lighting pipeline (legacy) material with support
for blending up to 4 textures and automatically projects UV
coordinates.
ProCore/Polybrush/Materials/TriPlanar
TextureBlendLegacy
UnlitTexture
Blend
A simple unlit material with support for blending up to 6
textures.
ProCore/Polybrush/Materials/Unlit
TextureBlend
If you'd like to write your own texture blending shaders, see the Writing Texture Blending
Shaders document for more information on how that works.
Usage
Select any mesh object with a compatible material, enter TextureBlend mode, then click
and drag while hovering over the selected mesh.
Polybrush will show a warning if the mesh you're hovering doesn't support texture
blending. See Writing Texture Blend Shaders for more detailed information on compatible
shaders. If you're not comfortable writing shaders, you can just use one of Polybrush's
included TextureBlend materials.
Settings
BrushType
Specific to VertexColor and TextureBlend modes is the option to select between the
standard circular brush and a special bucket brush.
PaintBucket will restrict the brush to the triangle (or triangles) touched by the mouse.
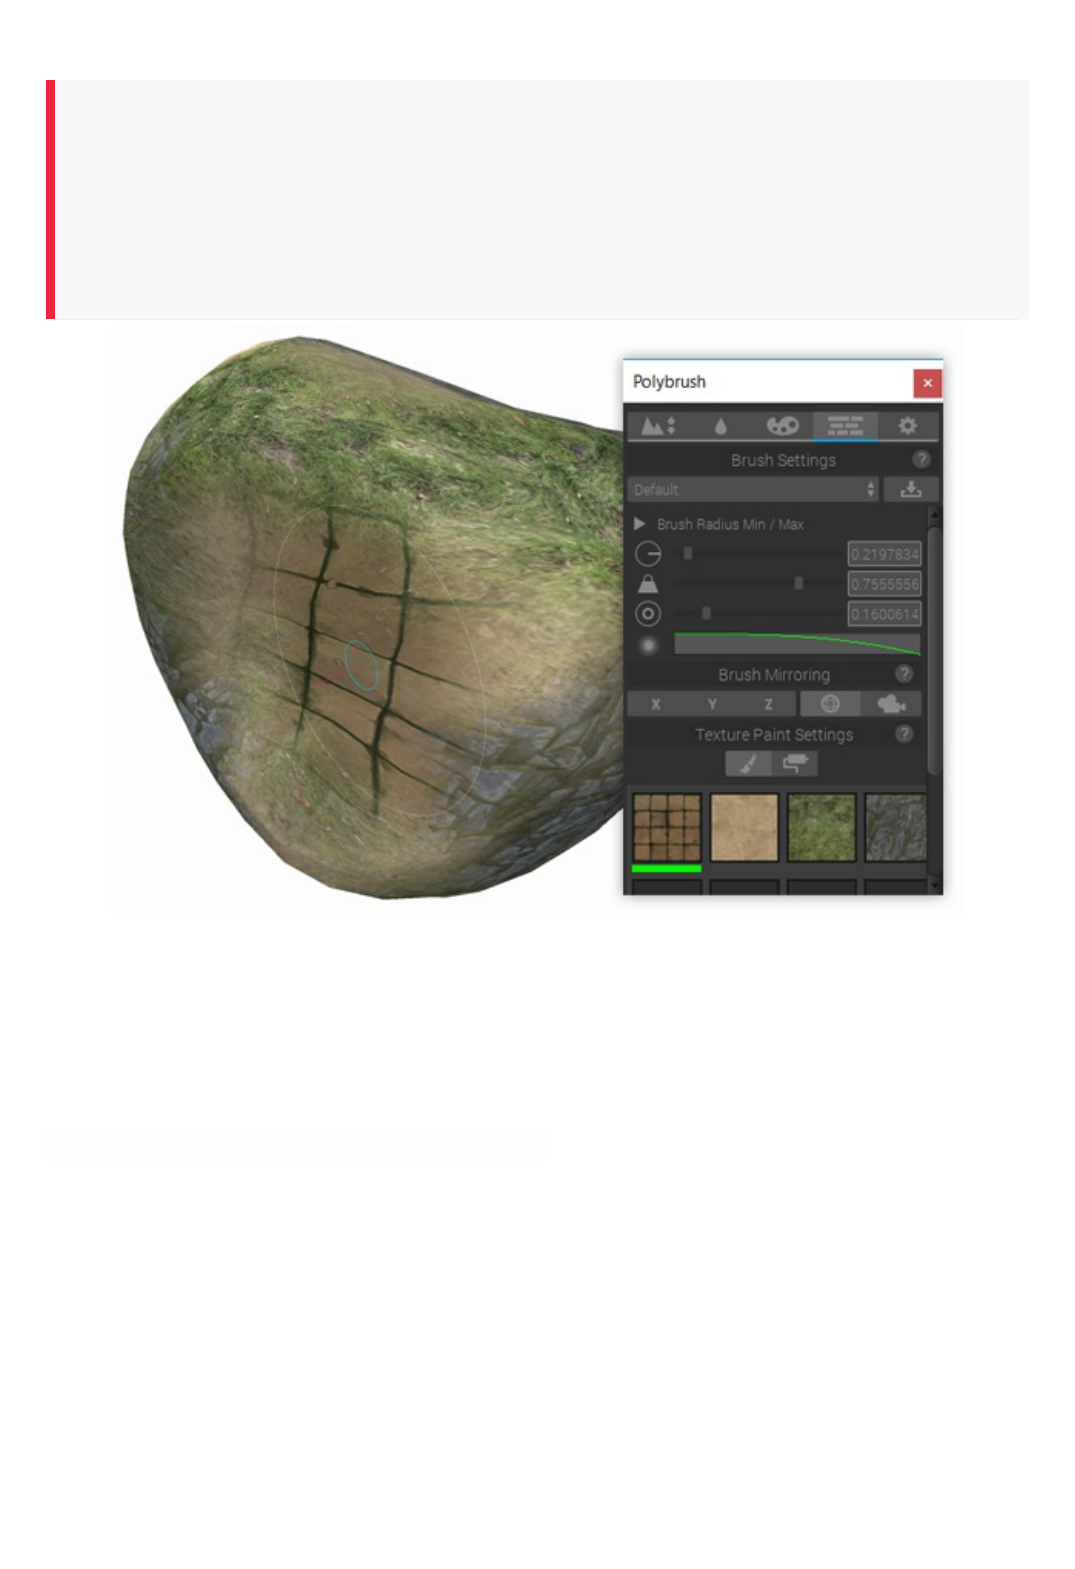
TextureSelection
Polybrush will automatically detect what textures are available per-material and display
them as a selection grid. To select a brush texture, click on one of the textures in the grid.
Your currently selected texture will be shown with a green bar under it's preview.

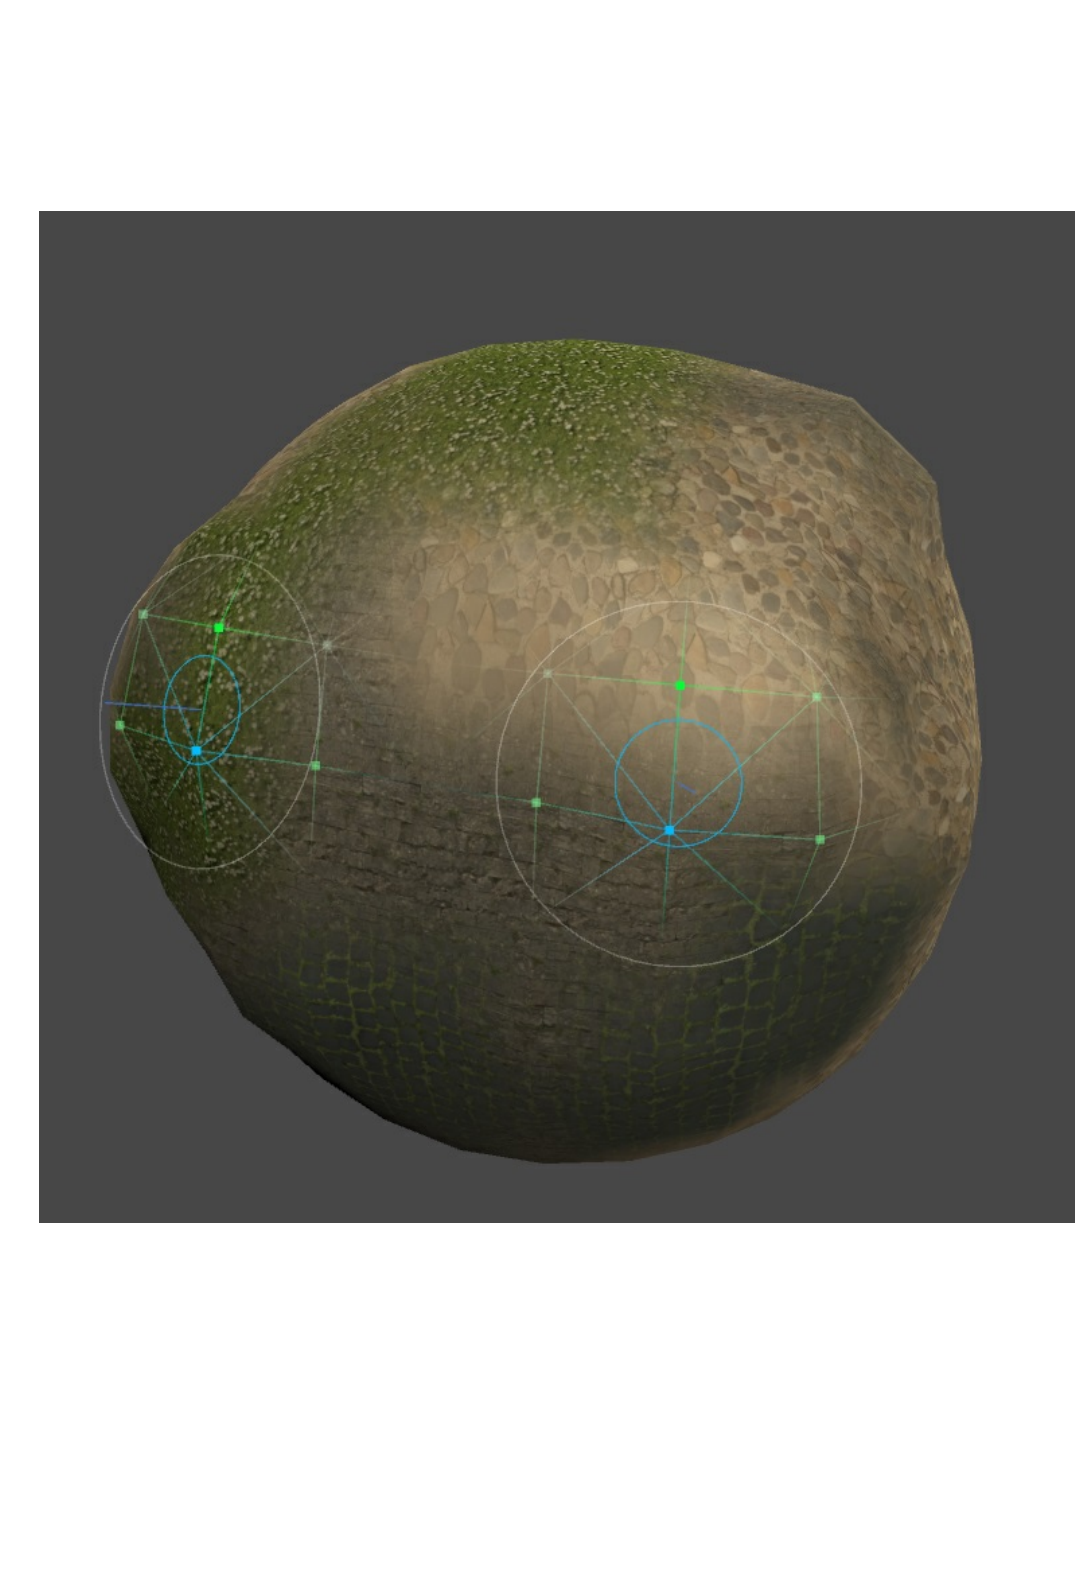
BrushMirroring
Sculpting with a single brush is pretty great, but what if you want to take things to the next level?
BrushMirroring is the answer. You can control up to four brushes in the scene simultaneously using
this feature.
BrushMirroringOptions
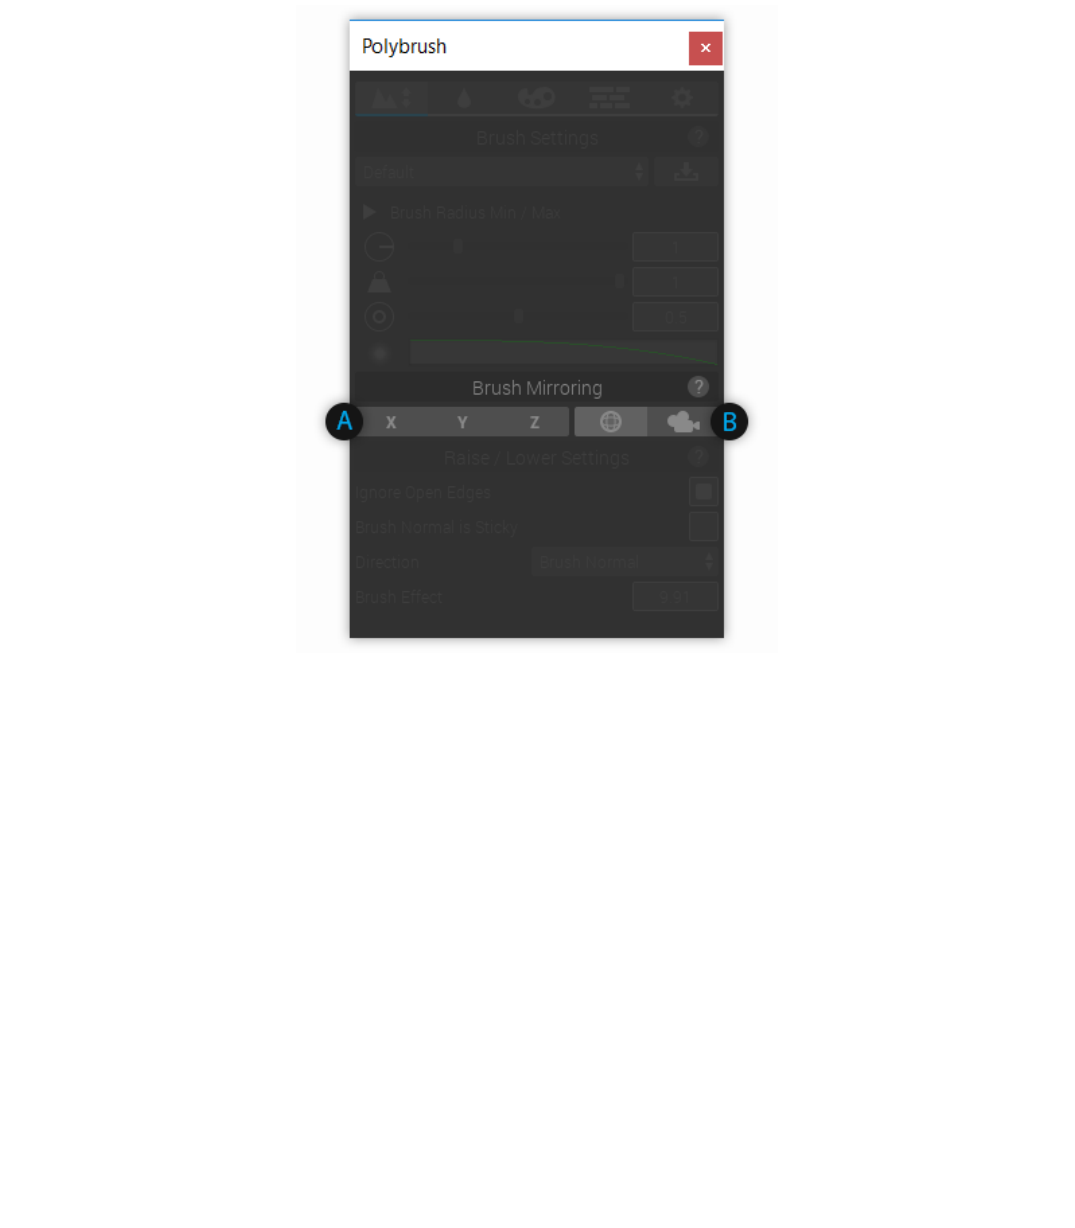
A)MirroringAxis
The first three toggles (A) determine the coordinate space that the axis will be calculated from (X, Y, or
Z).
Anywhere from 0 to all 3 axis can be chosen.
B)MirroringCoordinateSpace
The second toggleset sets the axis to mirror across.
In World the axes are always the same, matching Unity's world coordinates Camera uses the Scene
camera's transform as the coordinate to cast axes.
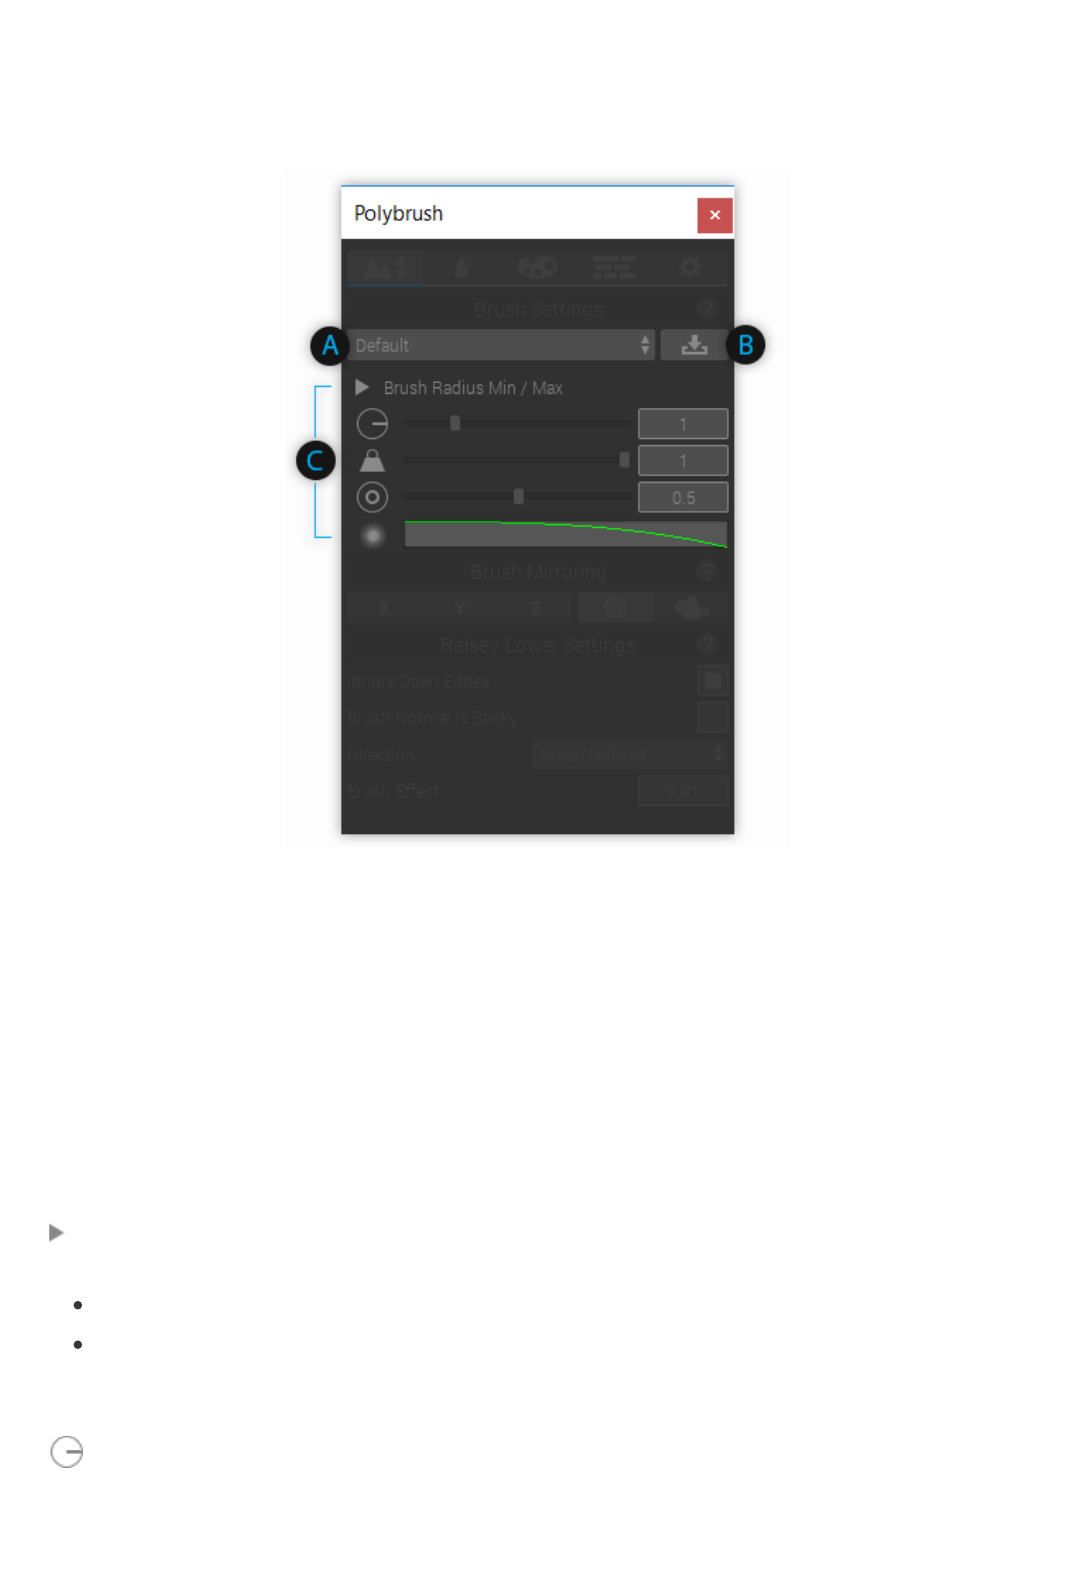
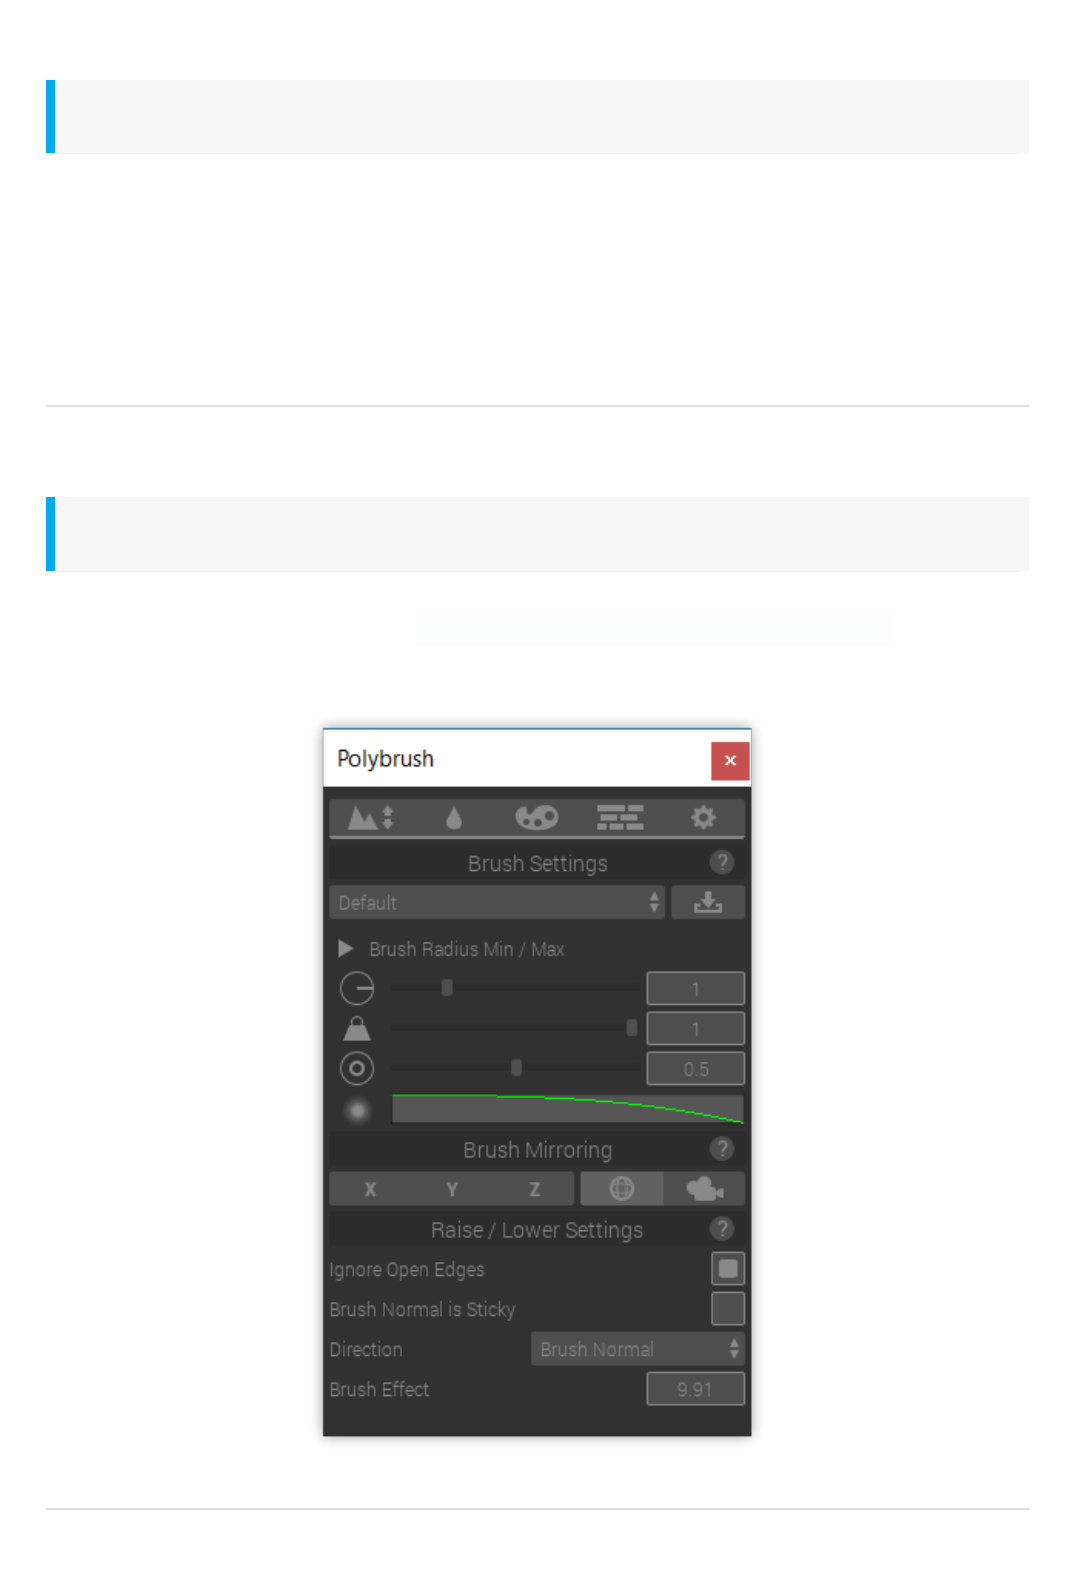
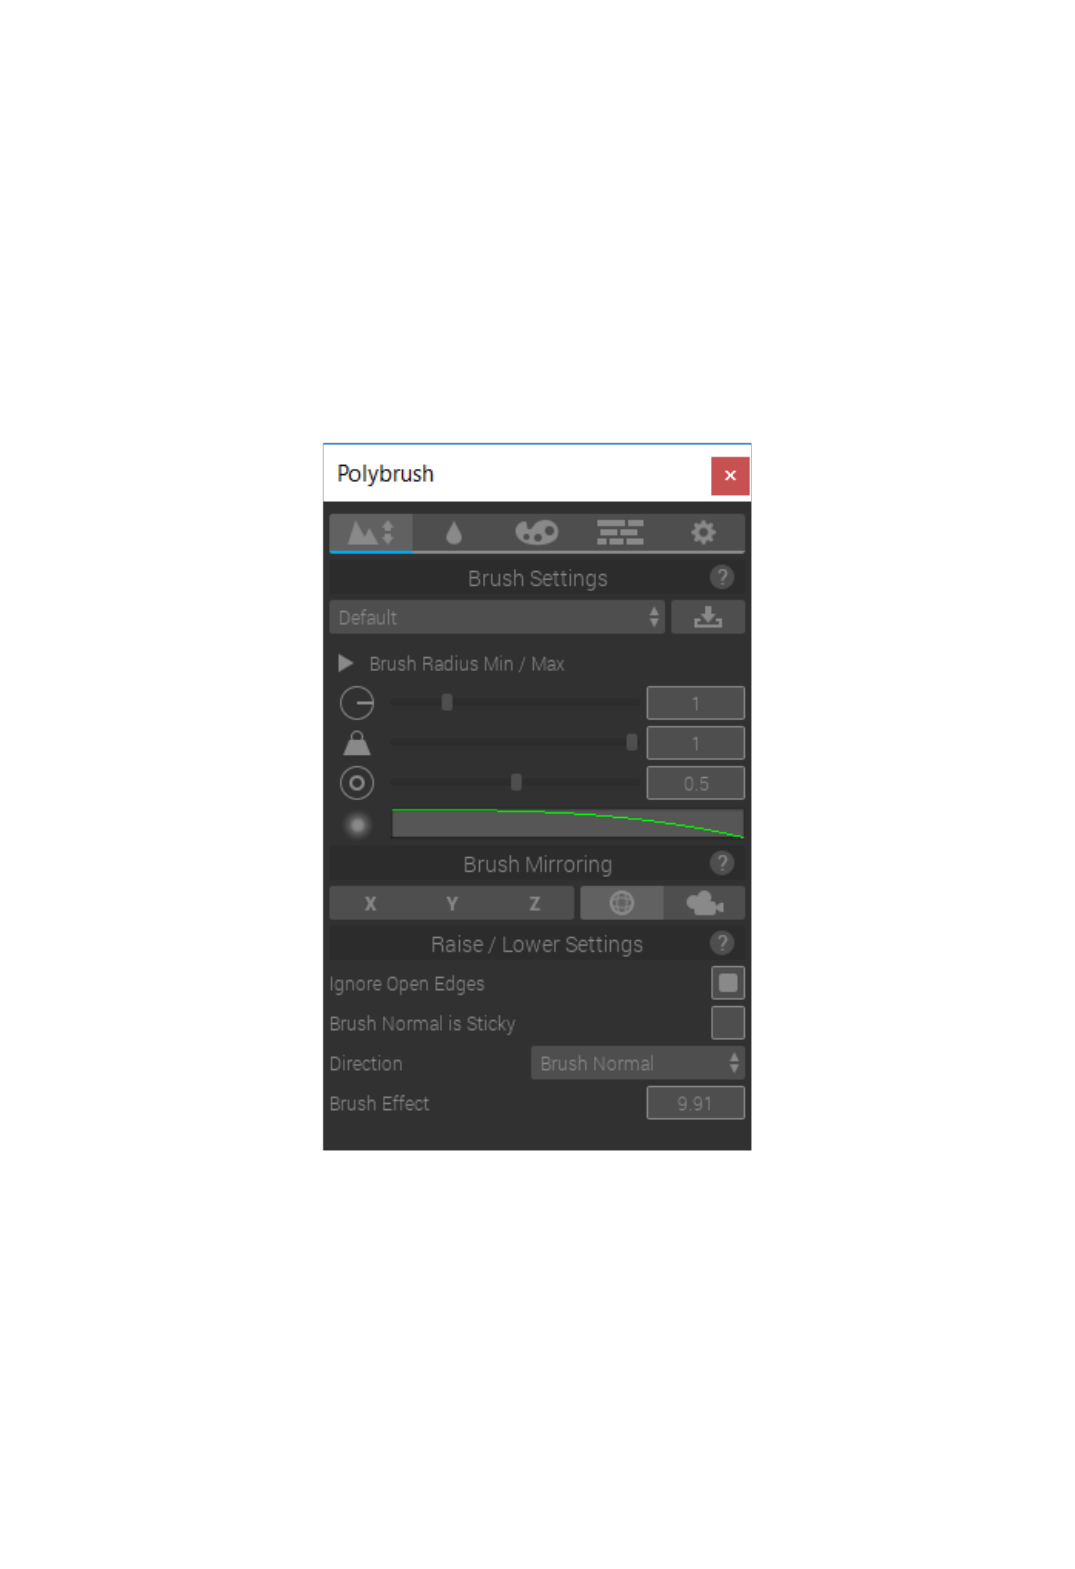
BrushSettings
BrushSettings determines how a brush will affect meshes. In the image below I've used the gear
icon to expand the settings panel, exposing 3 additional settings.
A)BrushPresetSelector
Click this drop-down to choose from saved Brush Presets
B)SaveBrush
Save the current brush settings as a new Preset, or overwrite an existing Preset
C)BrushOptions
Min/MaxValues
Min: This is the minimum value the Radius slider will allow. This value cannot be negative.
Max: This is the maximum value the Radius slider will allow. This value cannot be less than
BrushRadiusMin.
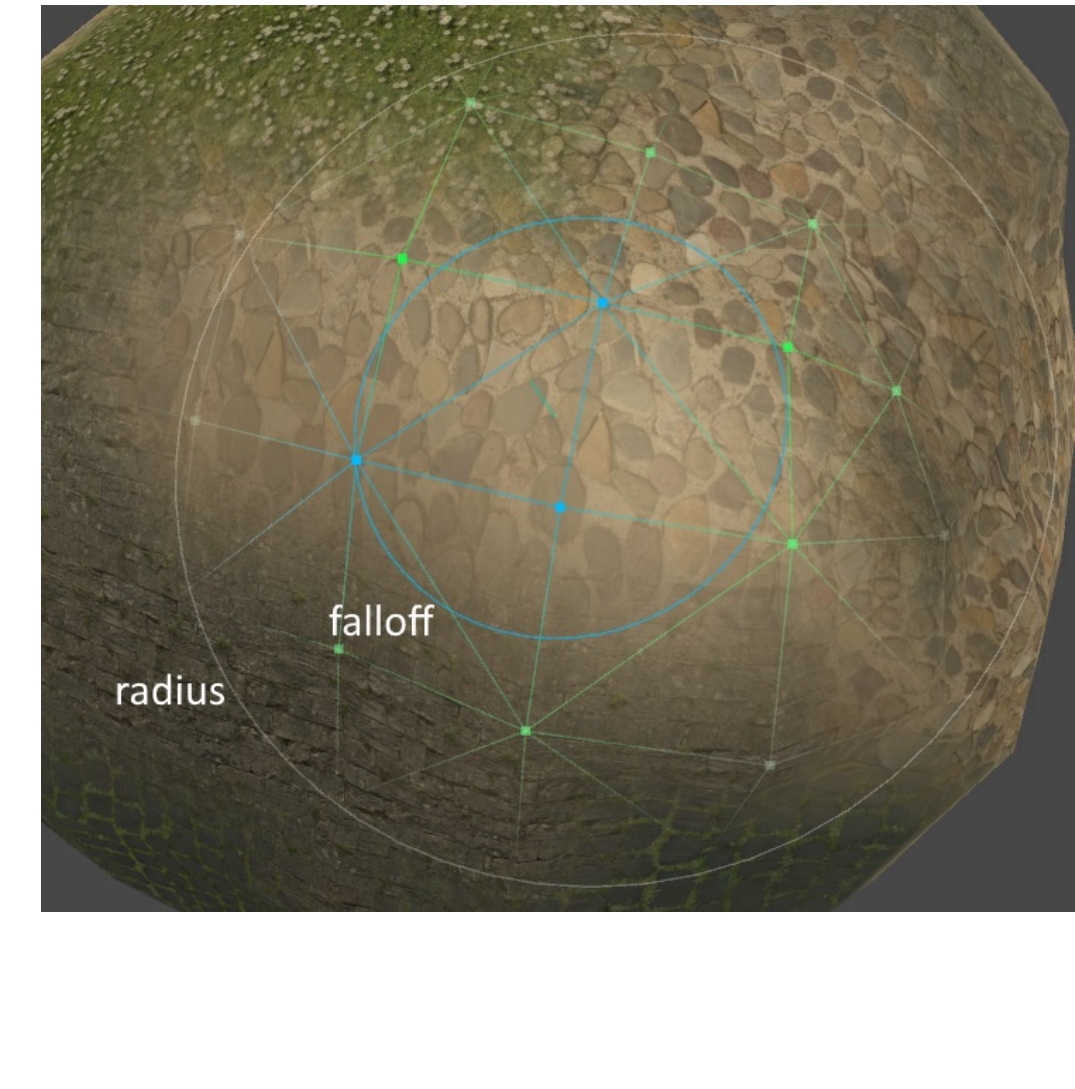
Radius
This value determines how big your brush's entire effective area is. The Radius is shown as the

second colored ring in the scene view.
Shortcut: Control (Command) + Mouse Wheel
Falloff
Falloff is the distance from the center of a brush at which the strength begins to taper to 0. This
value is normalized; 1 means the entire brush gets full strength, 0 means the very center point of a
brush is full strength and the edges are 0.
Shortcut: Shift + Mouse Wheel
Strength
Strength is the effectiveness of this brush. The actual applied strength also depends on the Falloff
setting.
Shortcut: Control (Command) + Shift + Mouse Wheel
FalloffCurve
The falloff curve determines how values between the falloff and radius will be calculated.
SceneGizmoExample

WritingTextureBlendShaders
Constructing a shader that is compatible with Polybrush's TexturePaintMode is very simple. You can either write your code by hand, or use
ShaderForge.
Polybrush will pass texture blending information to the shader using some combination of mesh attributes (ex; via color, tangent, uv0, uv2, etc).
There are two methods for passing information about how a shader uses mesh data:
By defining in shader code which mesh channels to look for data in (UV, Color, etc)
By creating a separate metadata file that stores per-attribute information
If your shader just wants to map Color.R to _Texture1 , Color.G to _Texture2 , etc go with the first option. If your shader has more complex
interactions with attribute information, use the metadata method.
DefiningChannelDatainShaderCode(Legacy)
If your shader simply blends between textures using normalized values set in a mesh array, you can use this method to make the shader compatible
with Polybrush.
1. Somewhere in the shader you must define how many textures are used: defineZ_TEXTURE_CHANNELS8
2. Somewhere in the shader the mesh attributes used must be defined: defineZ_MESH_ATTRIBUTESCOLORUVUV3 The order in which the
mesh attributes are defined also tells Polybrush which Texture inputs belong to which attribute. For example,
defineZ_MESH_ATTRIBUTESUV0UV3UV4 tells Polybrush that the first 4 textures should map to the 4 values in each vertex uv0 property,
the next 4 textures belong to uv3 , and so on.
The available mesh attributes values are UV0,UV2,UV3,UV4,COLOR,TANGENT . Each value should only be used at most once.
Polybrush accesses these statements by searching the shader source, so they may be either provided in a comment or defined.
#defineZ_TEXTURE_CHANNELS8
//isthesameas
//defineZ_TEXTURE_CHANNELS8
Here's what this could look like in shader code (boring bits omitted)
Properties
{
_MainTex("Texture",2D)="white"{}
_Texture1("Texture1",2D)="white"{}
_Texture2("Texture2",2D)="white"{}
_Texture3("Texture3",2D)="white"{}
_Texture4("Texture4",2D)="white"{}
_Texture5("Texture5",2D)="white"{}
}
SubShader
{
Pass
{
//TellPolybrushthatthisshadersupports6texturechannels(Texture,Texture1,soon)
#defineZ_TEXTURE_CHANNELS6
//TellsPolybrushthattheshaderexpectsdataintheuv3anduv4channels
//(4componentsinuv3,2inuv4)
#defineZ_MESH_ATTRIBUTESUV3UV4
structappdata
{
//localposition
float4vertex:POSITION;
//thetexturecoordinate
float2uv:TEXCOORD0;
//float2uv1:TEXCOORD1;//notused(thiswouldbemesh.uv2)
//mesh.uv3data
float4uv2:TEXCOORD2;
//mesh.uv4data
float4uv3:TEXCOORD3;
}
etc...
In this example Polybrush will show 6 textures in the palette and map each texture's strength to mesh.uv.xyzw and mesh.uv3.xy respectively.
Check out the shader z_UnlitTextureBlend.shader for a simple working example.
MetaDataFile
Polybrush can store fine-grained instructions for interpreting mesh data in the form of a metadata file. A metadata file is composed of a shader
reference (pointing to the shader it describes) and a list of z_AttributeLayout entries. Each entry contains all the necessary information about how
a value is used in a shader for Polybrush to work with.
When Polybrush loads a material into TextureMode it will first search for an accompanying ShaderName.pbs.json file, then try to fall back on the
Legacy method (searching for Z_DEFINE_MESH_ATTRIBUTES in shader source).
Creating MetaData
To create a new Polybrush metadata file:
Select the shader you want to work with.
Right click (Option click Mac) the Shader and select Create/Polybrush/ShaderMetaData .
By default Polybrush creates the new file using the name of the selected shader, placing it in the same directory. This is where Polybrush will look
for metadata. To specify a different name or path, in the shader add the following comment:
//Z_SHADER_METADATAMyMetaDataFolder/SomeOtherName.pbs.json
The path provided after Z_SHADER_METADATA is relative to the directory of the shader.
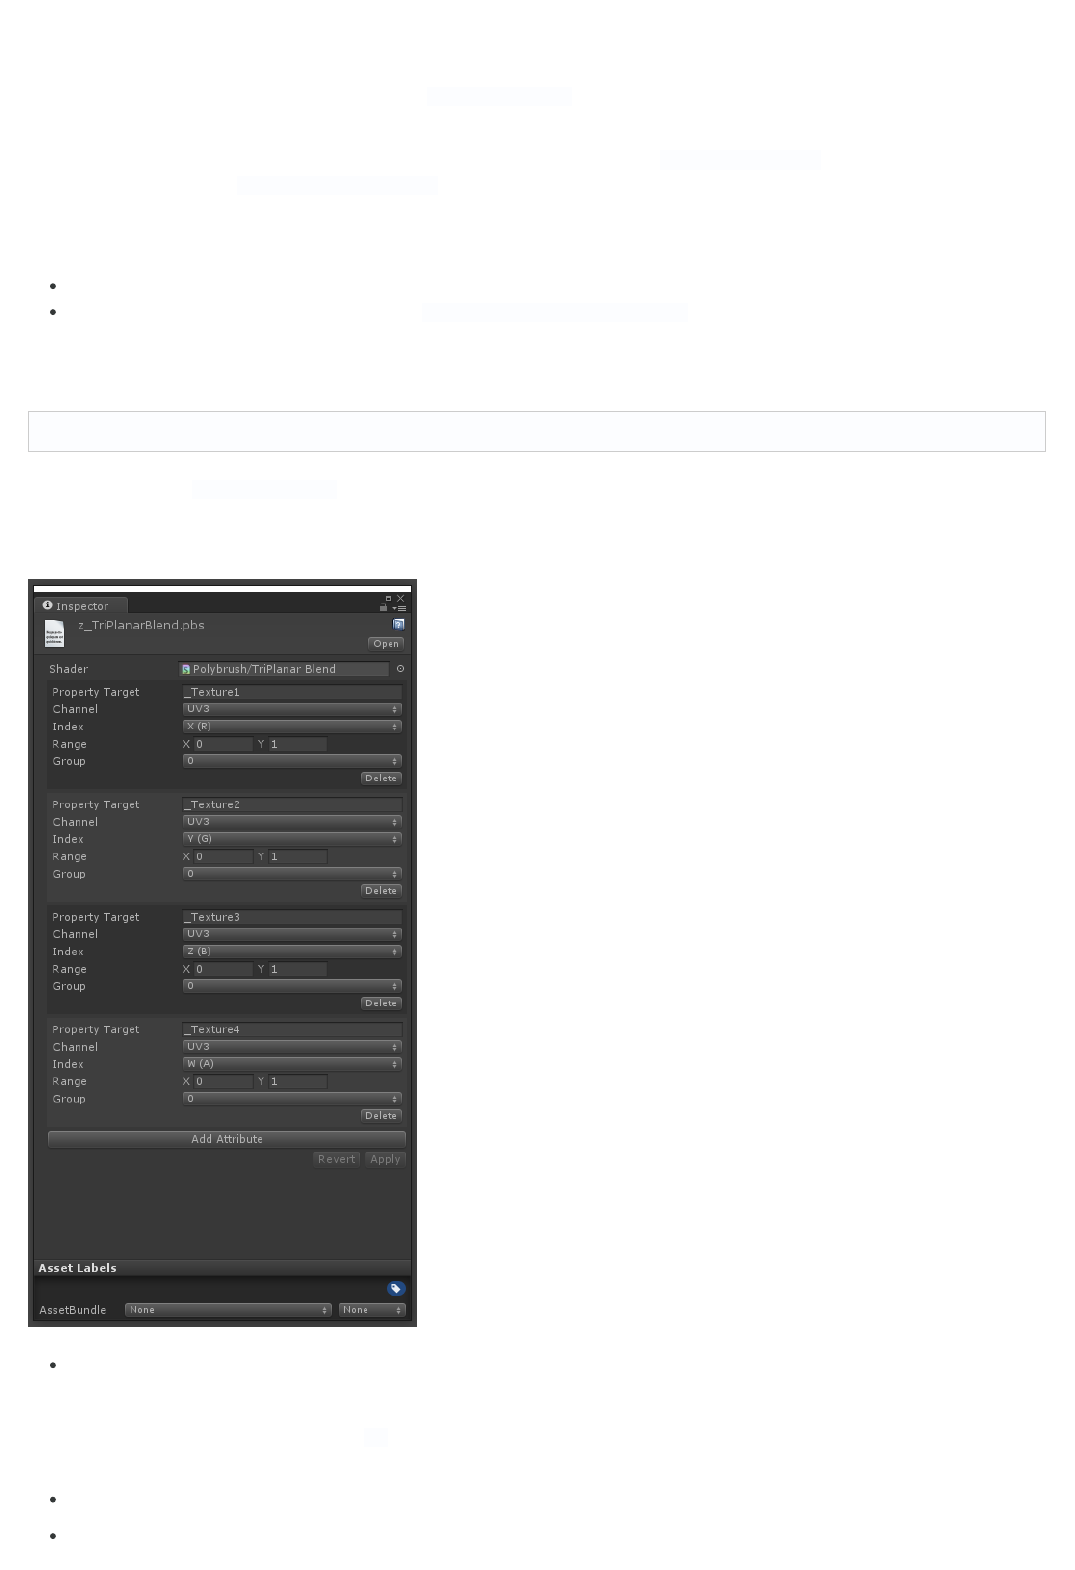
Editing MetaData
Mercifully, you do not have to write this metadata by hand (though you can if you'd like to).
PropertyTarget - The shader property that this attribute will affect.
More complex interactions may not map to a single property, so this field may be either the name of a property, or a simple description.
If the string provided to this field matches a 2D property in the shader, Polybrush will load the material's texture matching this property name.
If it does not match a texture property, this string will be shown as the preview in the texture selection well.
Channel - The mesh channel that this attribute will draw from.
Index - Which component of the channel this attribute receives data from.

Range - The range (x is min, y is max) that this attribute will operate in.
Group - Attributes with matching groups will affect one another when applied. Use NoMask to mark that this attribute will always operate
independently.
How Polybrush Applies Texture Data
When a texture is selected in TextureMode, Polybrush sets a new target value for each attribute matching the selected attributes group. The
selected attribute has its target value set to Range.max, while all other attributes in the group are set to their Range.min value. Polybrush then
applies this new mix of attribute values to the mesh, taking into account brush strength and falloff.
A Simple Example
Say you have a shader with 5 textures; a base texture and 4 blend textures. This shader reads texture blending information from the mesh.color
channel. The final fragment color is built using the following formula:
//samplethetexture
fixed4col1=tex2D(_MainTex,i.uv);
fixed4col2=tex2D(_Texture1,i.uv)*i.color.y;
fixed4col3=tex2D(_Texture2,i.uv)*i.color.z;
fixed4col4=tex2D(_Texture3,i.uv)*i.color.w;
floatsnowMix=i.color.x*((cnoise(i.uv*_SnowTiling)+1)*.5);
fixed4final_color=lerp(lerp(lerp(col1,col2,i.color.y),col3,i.color.z),col4,i.color.w);
final_color=lerp(final_color,_SnowColor,snowMix);
In this case you'll want Polybrush to show 5 entries in the TexturePalette: 4 textures and "Snow". This means the metadata needs 5 entries.
All the texture properties are related, meaning when one value is set to maximum strength the others should be set to minimum strength. To do this,
create each for these attributes with the same group.
The attribute values are set like so:
Property Channel Component Range Group
_MainTex Color G { 1, 0 } 0
_Texture1 Color G { 0, 1 } 0
_Texture2 Color B { 0, 1 } 0
_Texture3 Color A { 0, 1 } 0
Snow Color R { 0, 1 } No Mask
You may have noticed that _MainTex and _Texture1 share a common channel. The reason is that _MainTex is special in that it does not map it's
strength to a single attribute, rather, its strength is determined by the lack of strength in the other texture channels.
To accomplish this, we set _MainTex to use the Color channel and register it to the G field. However, instead of setting the strength from 0 to 1 it
is from 1 to 0. That means when Polybrush applies _MainTex at full strength the Color.G field will be 0, and the Color.B and Color.A fields will
also be 0 (since their min values are 0).
Snow is also a special case. Since it is a generated effect in the shader it does not map to a texture property. Polybrush will display the name
"Snow" for this value. By setting the group to "No Mask" we're telling Polybrush that this value should be modified independent of all other
attributes. That means when you're applying Snow at full strength all other attributes will remain unaffected.
WithShaderForge
Post-Processing
Shaders built with ShaderForge require some additional work to be compatible with Polybrush. Fortunately through some post-processing this
process is extremely simple. In short, Polybrush will automatically listen for changes to any shader with the suffix _SfSrc, then make some changes
to the source code and compile a new shader right next to it (omitting the suffix so you aren't confused).
For example, if you have MyNeatoShaderForgeShader_SfSrc.shader it will be compiled and renamed to MyNeatoShaderForgeShader.shader. Use
this shader in your game (not the suffixed one!).
Similar to writing shader code, you need to define how many textures are used and what mesh attributes data is provided in. Usually this means as
a comment on one of the nodes (right click and select "Edit Comment").
It is required that all ShaderForge shaders have the following two lines present in node comments:
1. defineZ_TEXTURE_CHANNELS8
Where the last number is the number of textures used.
2. defineZ_MESH_ATTRIBUTESUV3UV4
Where the values following Z_MESH_ATTRIBUTES is the mesh properties that are accessed. Available values are
UV0,UV2,UV3,UV4,COLOR,TANGENT .
In addition, shaders must be named with the suffix _SfSrc (ex, MySimpleBlendShader_SfSrc.shader). This lets Polybrush know that this shader
requires some post-processing.
The ShaderSettings/Path must be set to Hidden (ex, Hidden/MyShader). Polybrush will automatically detect this and remove the Hidden part
from the path when compiling the new shader. If you're having issues with black triangles on a mesh, check that the shader has Hidden/ in it's path.
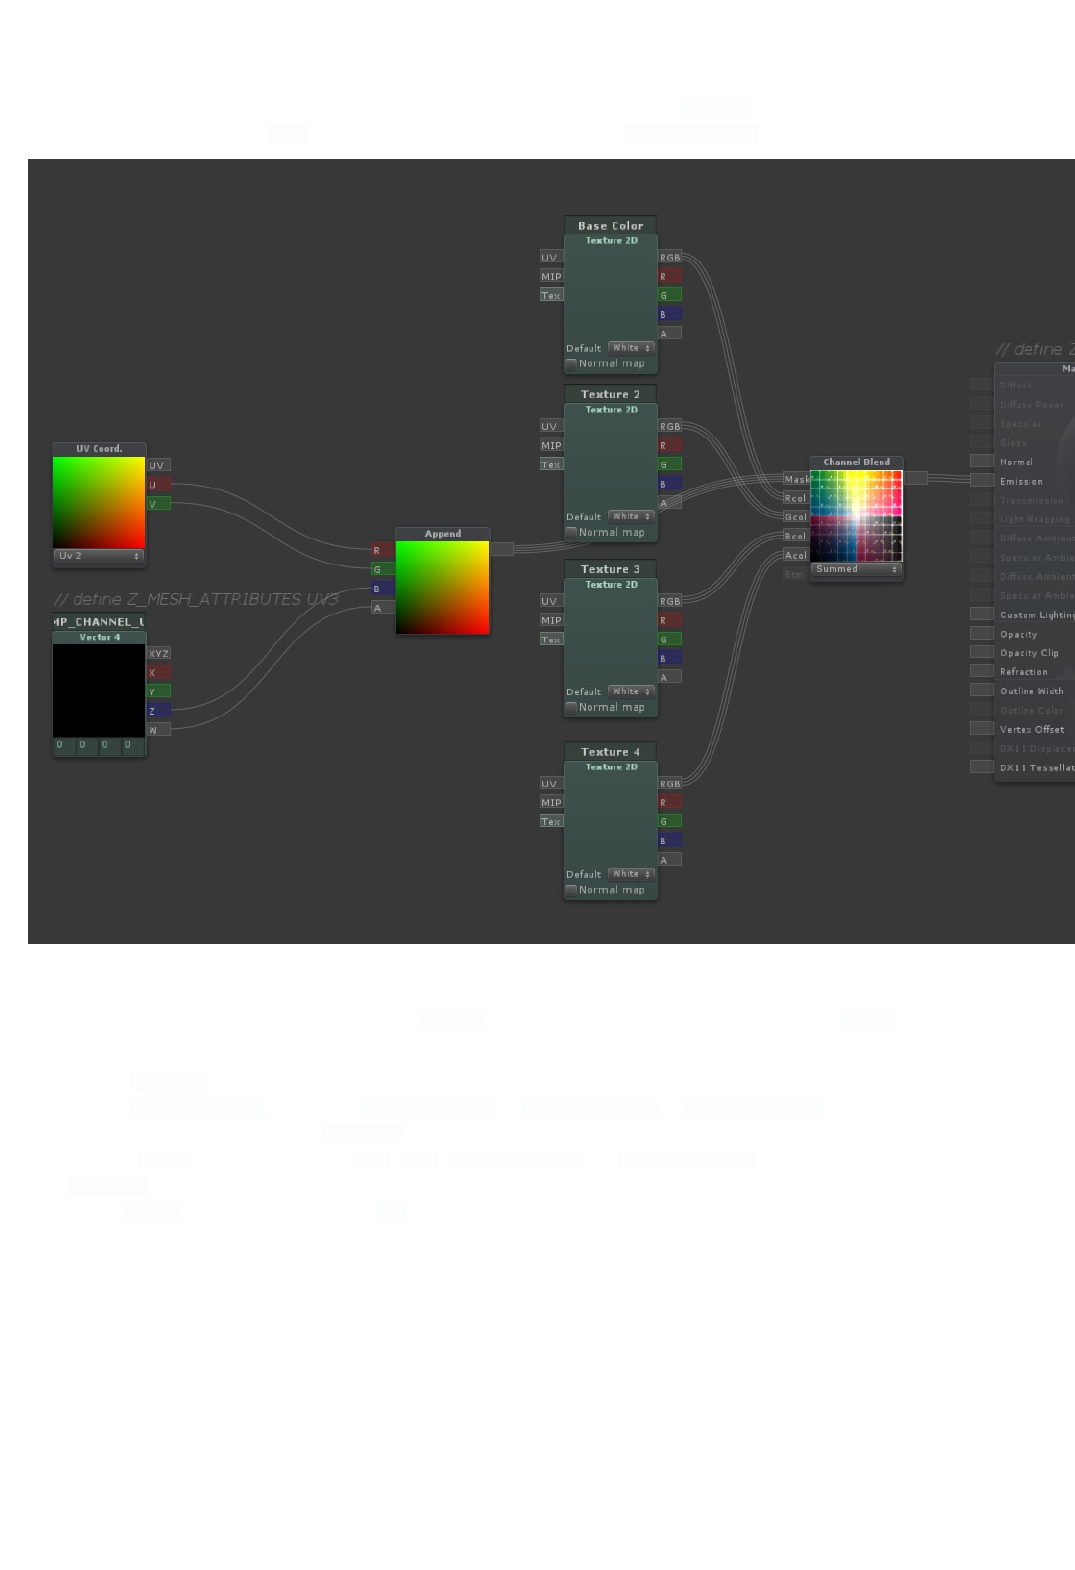
Here is a basic 4 texture blend shader in ShaderForge. This shader blends the 4 textures using mesh.uv3 as input. Note the comments
Z_TEXTURE_CHANNELS4 on the Main node and Z_MESH_ATTRIBUTESUV3 on the Vector4Property node.
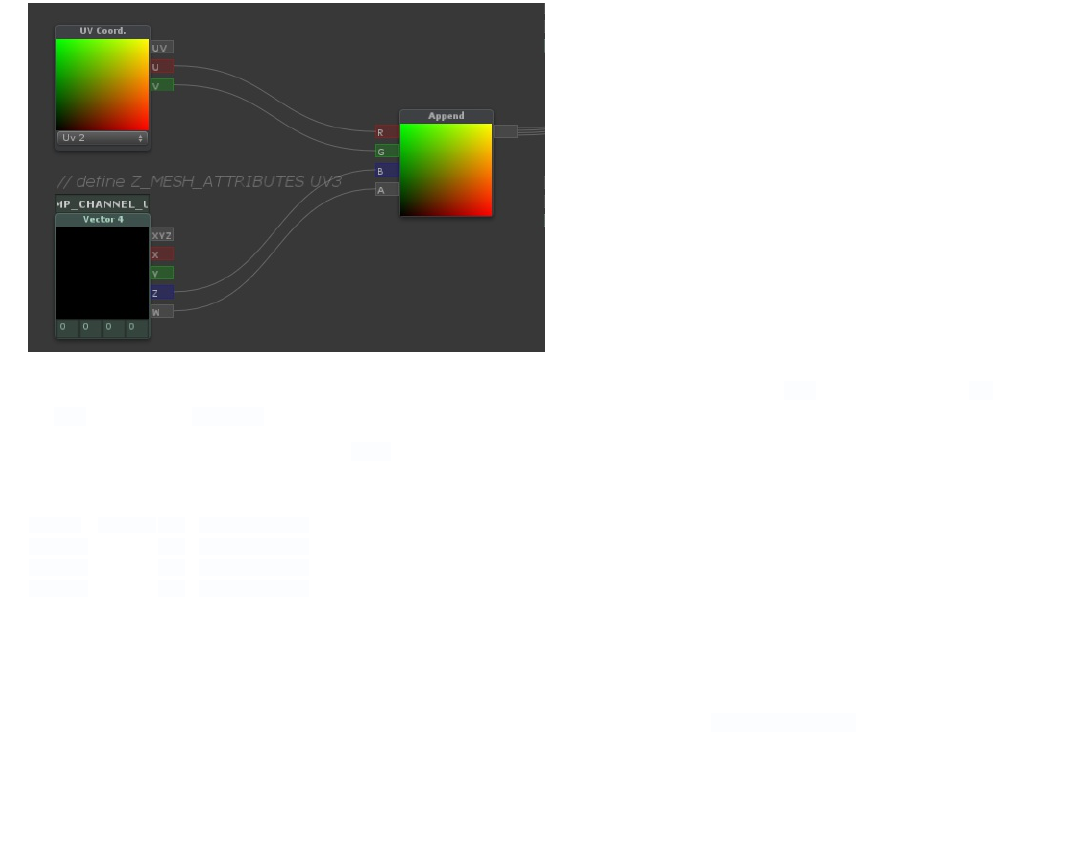
AccessingVector4UVs
Due to a limitation in ShaderForge, accessing UV data as Vector4 types requires some extra work. To read a UV as a fixed4 in graph language,
first
1. Create a UVCoord. node matching the channel you would like to read blend information from.
2. Create a Vector4Property node named TEMP_CHANNEL_UV0 (or TEMP_CHANNEL_UV1 , or TEMP_CHANNEL_UV2 etc, where the final number
matches the channel specified in the UVCoord. node).
3. Create an Append node and connect the uv.u , uv.v , TEMP_CHANNEL_0.z and TEMP_CHANNEL_0.w . It is important that you not swizzle the
UVCoord. input.
4. Use the Append output as though it was the uv0 channel.
In shader code, the texture coordinates are always zero indexed, where in Unity you may be used to seeing the uv0 channel called simply uv and
the uv1 channel called mesh.uv2 .
If you're confused, here's a graph mapping the mesh property to it's shader counterpart.
Mesh Shader Vector4Node
Name
mesh.uv or mesh.uv2 uv0 TEMP_CHANNEL_UV0
mesh.uv2 uv1 TEMP_CHANNEL_UV1
mesh.uv3 uv2 TEMP_CHANNEL_UV2
mesh.uv4 uv3 TEMP_CHANNEL_UV3
F.A.Q.
TexturePaletteDoesn'tMatchWhat'sPainted
Make sure that the properties are listed in the correct order (they will be matched sequentially to the Z_MESH_ATTRIBUTES list).
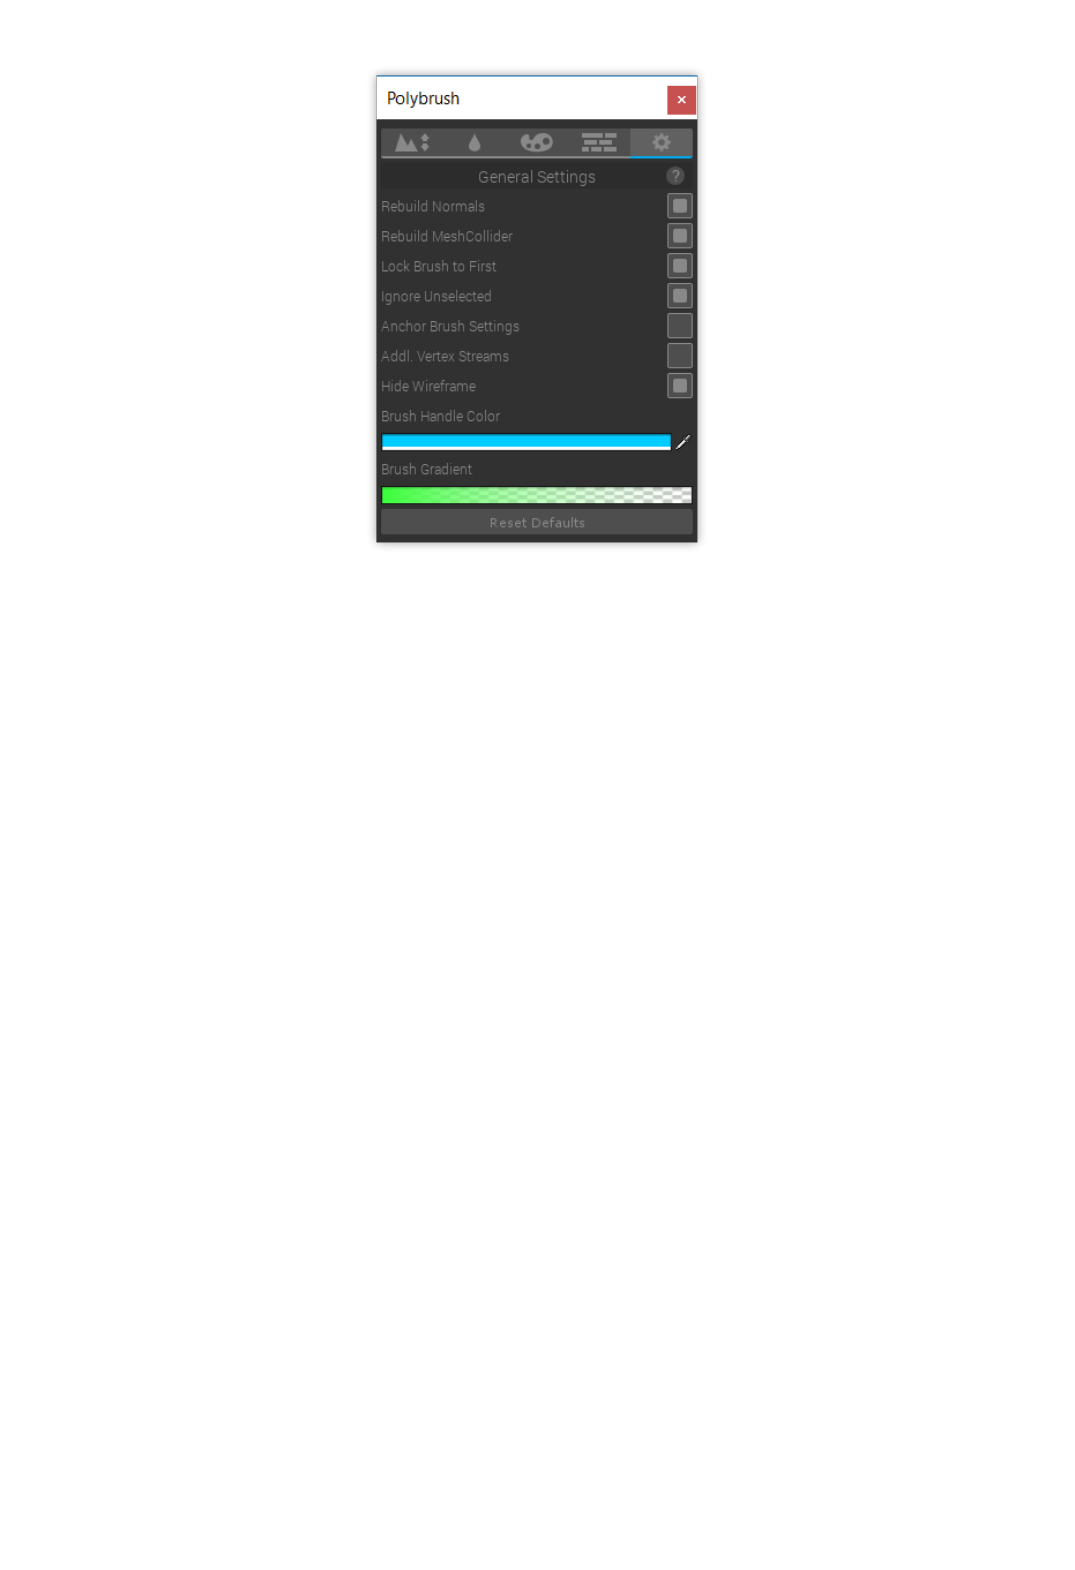
Settings
RebuildNormals
When RebuildNormals is enabled Polybrush will automatically recalculate the mesh normals after a brush has been
applied.
RebuildMeshCollider
When RebuildMeshCollider is enabled Polybrush will automatically recalculate the mesh collider source after a brush
has been applied. If the target object does not have a Mesh Collider this setting is ignored.
LockBrushtoFirst
If LockBrushtoFirst is enabled Polybrush will not let the brush affect any other mesh after a drag has been started.
This is useful for situations where a mesh may be partially obscured by another. For example, where a beach meets the
water: You may want to sculpt the beach terrain without affecting the water, and by default Polybrush will apply to any
selected mesh that the mouse is hovering.
IgnoreUnselected
When IgnoreUnselected is enabled the mouse will always show a brush when hovering a selected mesh, even if another
unselected mesh is obscuring it's view.
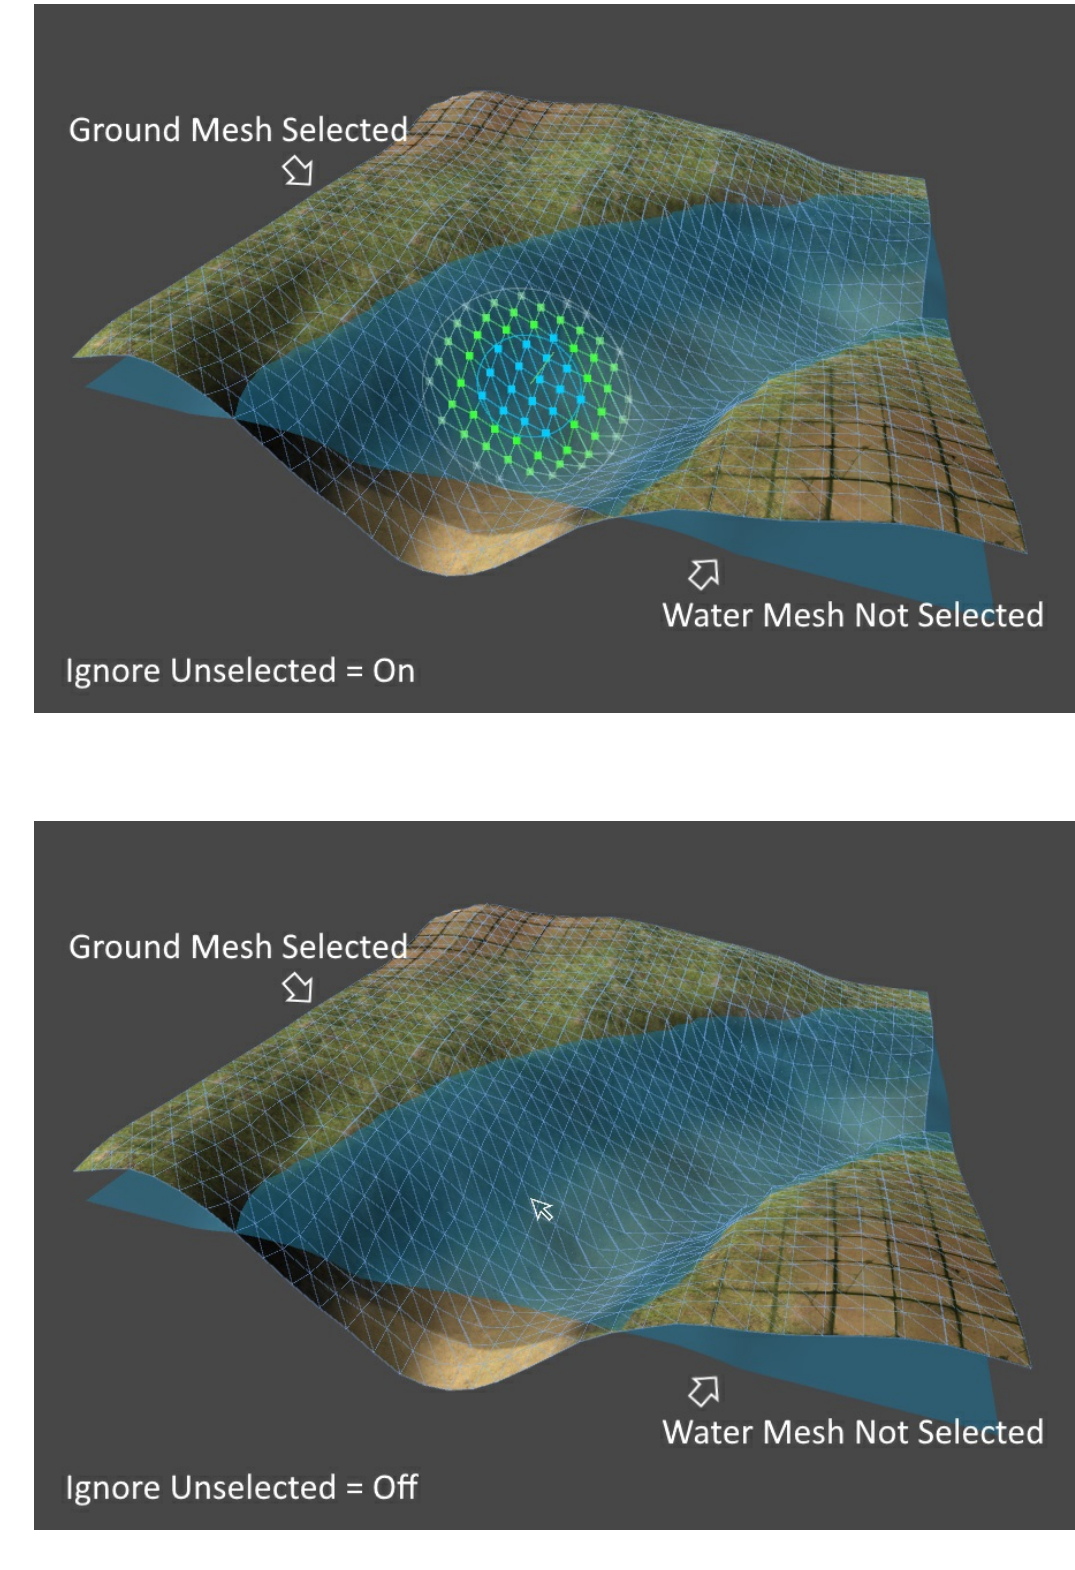
If IgnoreUnselected is off, the mouse will always register the first GameObject it is hovering, which may not be in the
current selection.

When a brush stroke is applied it will always ignore unselected meshes until the drag is complete.
AnchorBrushSettings
When enabled the BrushSettings GUI items will stay locked to the top of the window regardless of where the scroll bar
is.
AdditionalVertexStreams
Additional Vertex Streams is a new feature in Unity that allows an extra mesh to be attached to the MeshRenderer that
will override any duplicate attributes.
This means that instead of Polybrush having to copy and instantiate a copy of any edited mesh, a partial
additionalVertexStream mesh can instead be appended and edited.
Note that once enabled any mesh that has been modified with additionalVertexStreams will always make use of the
stream mesh. Ie, toggling this feauture off will "lock" any edited mesh attributes in. To reset these meshes, simply find the
AdditionalVertexStreams component and click the Delete button. This will clear any changes applied by
additionalVertexStreams .
HideWireframe
When this option is enabled Polybrush will hide the wireframe of the currently hovering mesh object.
BrushHandleColor
This sets the color of the falloff disc in the Scene view, as well as the vertex billboards inside the falloff zone.
BrushGradient
BrushGradient sets the colors used for the vertex sprites outside the falloff zone, from most affected to least.
Troubleshooting/F.A.Q.
Frequently asked questions and troubleshooting tips when working with Polybrush.
BrushIsn'tApplying/Can'tSeeBrushGizmo
First, make sure you have a BrushMode selected (click any of the buttons in the top
toolbar except settings).
This is usually the cause, since Polybrush automatically pops out of BrushModes
when the Unity tool is changed.
Check that you have a GameObject selected, and that the selected GameObject has
a valid mesh. Polybrush only applies brushes to the current selection, and must
have a mesh with a vertex count greater than 3.
Polybrush does not work on Unity Terrain objects. Make sure the GameObject is a
mesh.
Reset the BrushSettings by deleting the ProCore/Polybrush/BrushSettings folder.
Note that this will clear any saved brush presets, so use this only as a last resort!
SaveMeshasAsset
Polybrush adds a new button to MeshFilter components that reference an instanced
mesh (a mesh that isn't saved in the project). The "Save to Asset" button will create a new
mesh asset in your project and point the MeshFilter to that object. This allows the mesh
to be used in Prefabs.
Prefabsaren'tworking
See Save Mesh as Asset.
ColorsorTexturesnotPainting
Vertex colors and texture blending both require special shaders to work. By default,
Unity's Standard shader does not include support for either of these modes. Fortunately,

Polybrush includes a number of prebuilt Materials that work well with these modes:
Name Mode Description Path
DiffuseVertex
Color Color A Legacy Diffuse shader with support for a texture,
normal map, and vertex colors.
ProCore/Polybrush/Materials/Diffuse
VertexColor
Standard
TextureBlend Texture A PBR enabled material with support for blending up to
12 different textures.
ProCore/Polybrush/Materials/Standard
TextureBlend
Standard
TextureBlend
Bump
Texture A PBR enabled material with support for blending up to 4
different textures with normal maps.
ProCore/Polybrush/Materials/Standard
TextureBlendBump
Standard
VertexColor Color This material behaves similarly to the Standard shader,
but with support for painting vertex colors.
ProCore/Polybrush/Materials/Standard
VertexColor
TriPlanar
TextureBlend Texture A PBR enabled material with support for blending up to 4
textures and automatically projects UV coordinates.
ProCore/Polybrush/Materials/TriPlanar
TextureBlend
TriPlanar
TextureBlend
Legacy
Texture
A Blinn-Phong lighting pipeline (legacy) material with
support for blending up to 4 textures and automatically
projects UV coordinates.
ProCore/Polybrush/Materials/TriPlanar
TextureBlendLegacy
UnlitTexture
Blend Texture A simple unlit material with support for blending up to 6
textures.
ProCore/Polybrush/Materials/Unlit
TextureBlend
TexturesnotPainting(withvalidshader)
Occasionally Unity will refuse to update mesh values after a lightmap bake. To fix, open
Window>Lighting>Scene and click the arrow on the Build button in the bottom right
corner then select "Clear Baked Data".
KeyboardShortcutsNotWorking
Unity can sometimes not register keyboard shortcuts when a package is first imported.
The solution to open the Menu item and manually select the shortcut. You should only
need to do this once ever.
LightingSeamsorVertexColor/Textures
Bleeding
For vertex colors and textures to have hard seams (meaning no blending at vertices
between different colored faces) a mesh must have hard edges. Most 3D modeling
applications call this some variation on "Smooth" or "Hard" edges.
This can also affect lighting - if an edge is not smoothed then using the Push/Pull or
Smooth brush tools can exacerbate a lighting seam.
BlackFaces/TrianglesonMesh
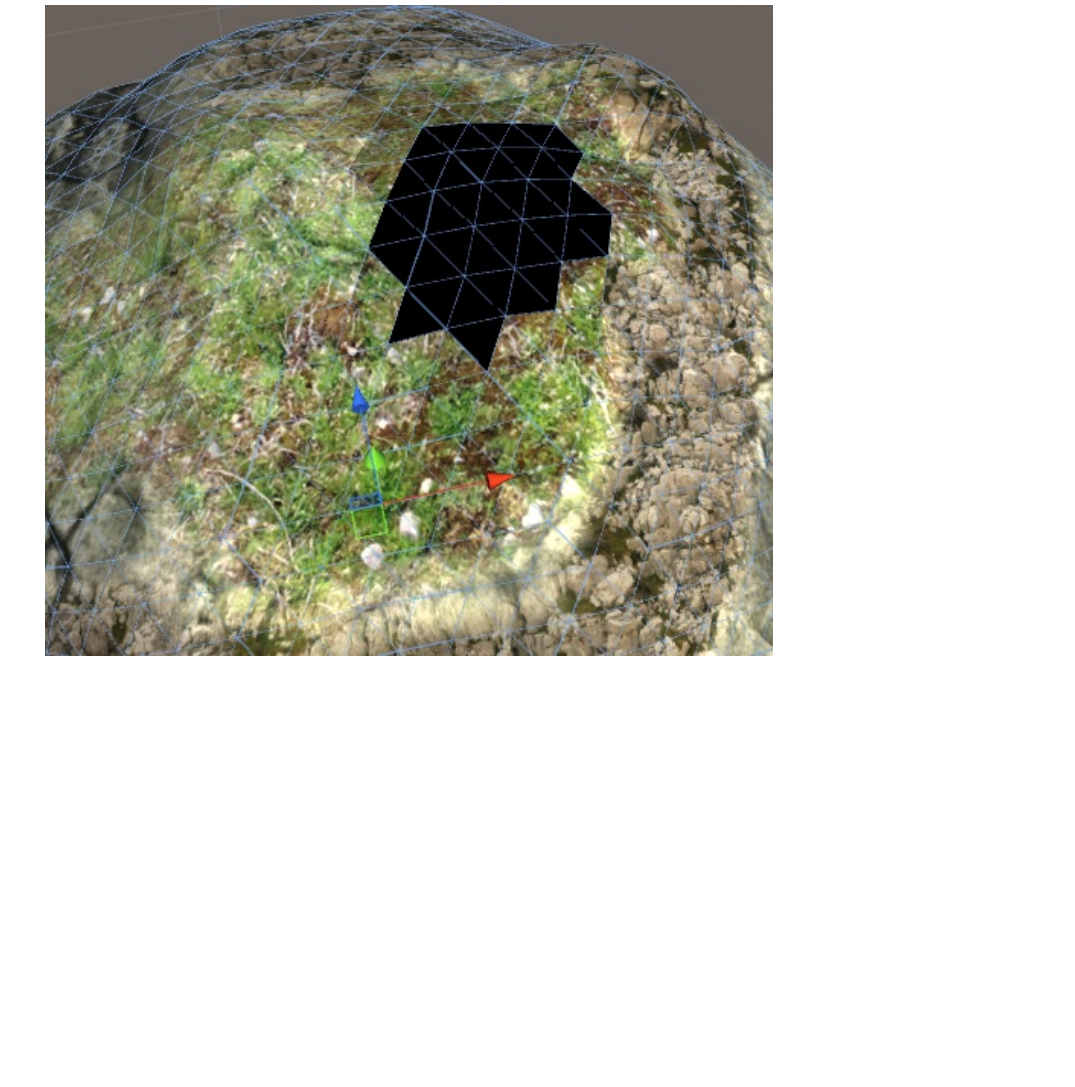
This can happen when a Texture Blending material is in use, but no texture channels have
been applied to the mesh. To fix, open the TextureBlendMode panel and select a
texture, then apply the brush to the affected areas.
In some cases you may also need to use VertexColorMode to paint the entire mesh with
a White color.
