Pop File Guide
Pop_File_Guide
User Manual: Pdf
Open the PDF directly: View PDF ![]() .
.
Page Count: 32

Operation Titanium Tank: A Guide to MvM Wave Writing
Page 1
Introduction:
This is a very brief guide to writing a pop file. It does NOT cover absolutely everything in MvM mission
making by any stretch of the imagination, but it should be enough to get you started. If you have any
questions, ask in our group chat or in our mission making Q&A thread.
This guide assumes you are writing your pop file by hand on a text editor like Notepad++.
Planning:
Before you even open a blank pop file, you need to plan your mission out. Ask yourself these questions:
What kinds of robots do I want to feature (spawn) in each wave?
At what order do I want the robots to spawn in?
How much money do I want to pay out in each wave?
(If the map supports it) Do I want to feature tanks in some of these waves?
Do I want to have infinite support robots in the wave? If so, which robot(s) and when?
Do I want to make my own robots or should I use Valve robots?
What type of objective support bots do I want to feature in this wave? (Note: Engineer bots
require special entity work on the map, so not all maps will support engineers.)
The planning stage varies from person to person, but this is how I would outline a 2 wave mission:
1) Wave 1 ($800 total)
a) ($100) 30 scattergun scouts
b) ($100) 100 demoknights (sporadically across the whole wave)
c) ($200) 2 giant pyros with 4 uber medics each
d) ($100) Infinite support sandman scouts (after scattergun scouts die)
e) ($100) 35 crit soldiers (after the giant pyros finish spawning)
f) ($200) 2 giant heavies (after giant pyros die)
g) (-) 4 objective support spies
h) (-) Sentry busters
2) Wave 2 ($1000 total)
a) ($200) 2 tanks (one on each tank path)
b) ($200) 5 super scouts
c) ($100) 16 crit iron bomber demos
d) ($100) 20 deflector heavies with an uber medic on each
e) ($200) 5 giant soldiers (after the tanks AND giant scouts all die)
f) ($100) Infinite support crit combat medics (after the deflector heavies finish spawning)
g) ($100) 40 pyros on expert AI (after the crit iron bomber demos all die)
h) (-) 2 objective support Sydney sleeper snipers
i) (-) 3 objective support spies
j) (-) Sentry busters
The more detailed your outline is, the easier it will be to write your pop file. Don’t spend too much time
spelling out every detail however as that will slow you down and make your outline messy, but putting
some thought here will make the coding process less obnoxious. The outline is between 70-80% of the
work needed to make an advanced mode mission. The remaining 20% is the actual syntax of pop files.
Operation Titanium Tank: A Guide to MvM Wave Writing
Page 2
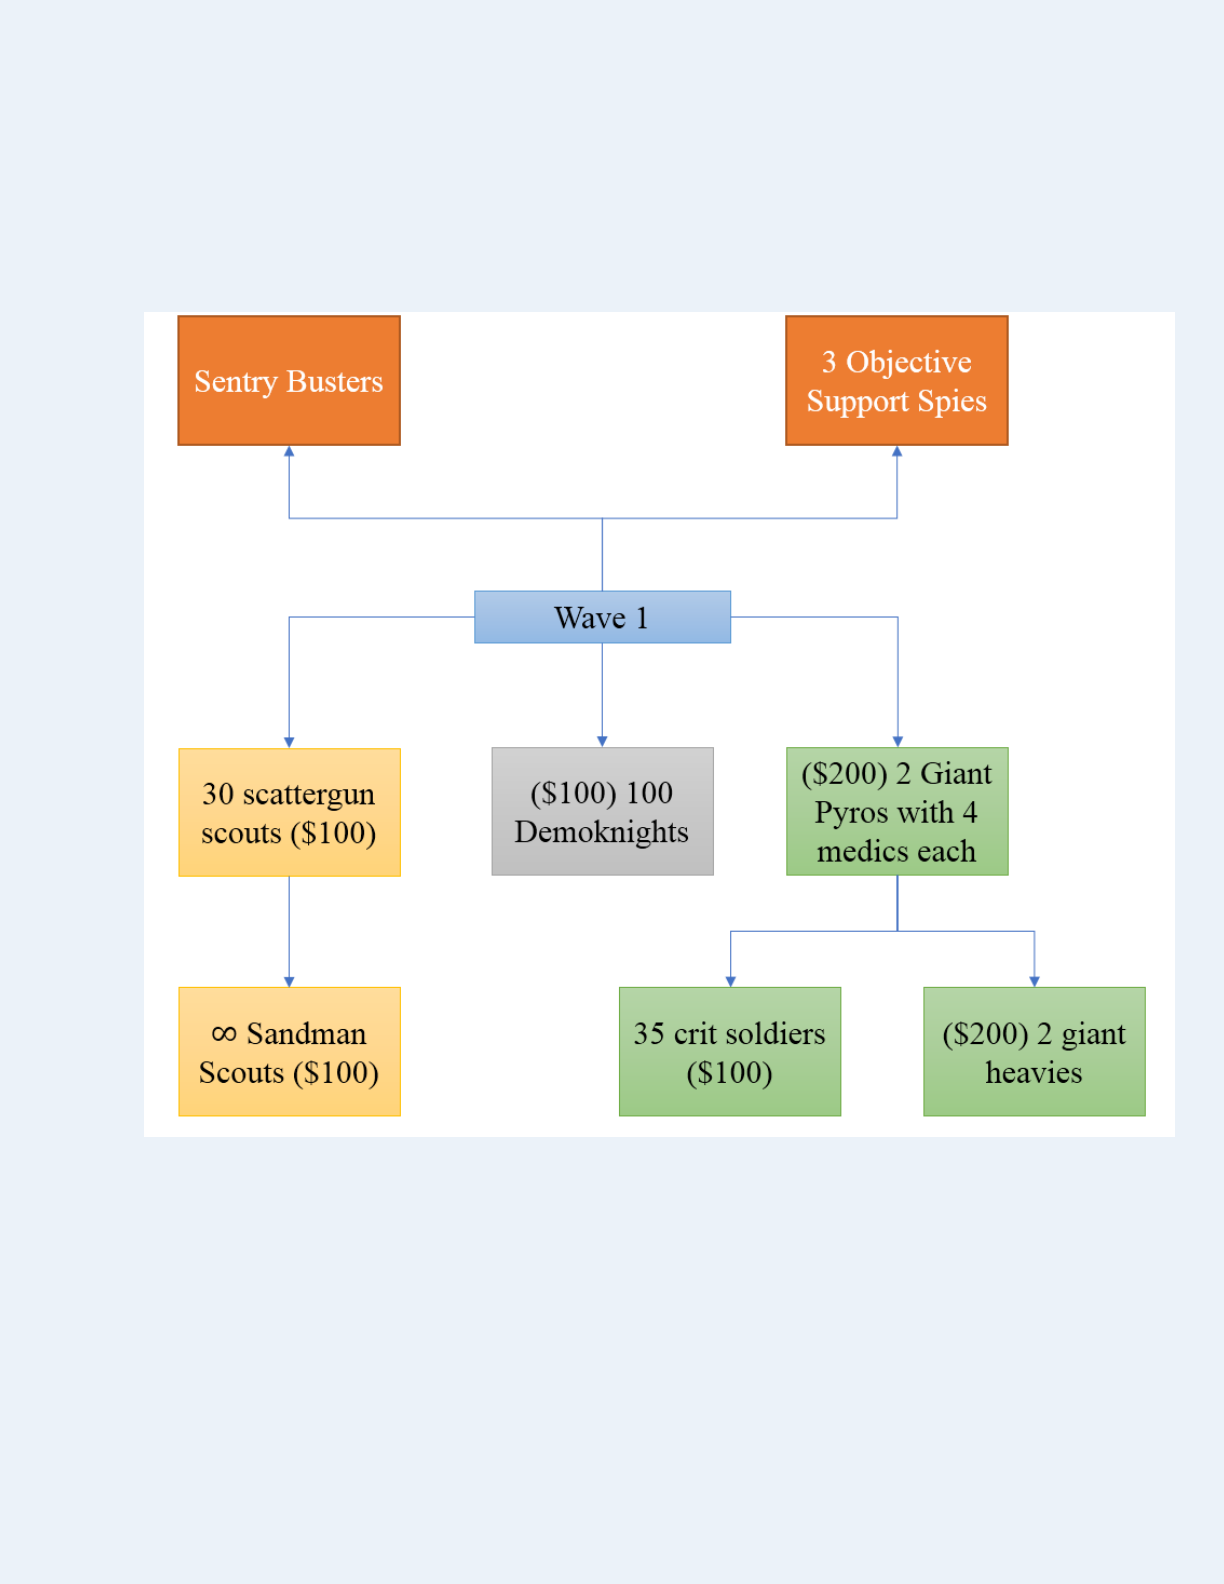
If you’re more of a visual person, your outline may look like this instead. This is more-or-less how the
population manager works – the spawning logic works somewhat like a tree. While the pop file itself
looks quite linear with a bunch of subwaves (“wavespawns”) one after the other, internally the spawning
order will resemble something like this, so thinking about it this way may help you plan your waves.
The outline for wave 1 visually would look something like this:
1) Wave 1 ($800 total)
a. ($100) 30 scattergun scouts
b. ($100) 100 demoknights (sporadically across the whole wave)
c. ($200) 2 giant pyros with 4 uber medics each
d. ($100) Infinite support sandman scouts (after scattergun scouts die)
e. ($100) 35 crit soldiers (after the giant pyros finish spawning)
f. ($200) 2 giant heavies (after giant pyros die)
g. (-) 3 objective support spies
h. (-) Sentry busters
Operation Titanium Tank: A Guide to MvM Wave Writing
Page 3
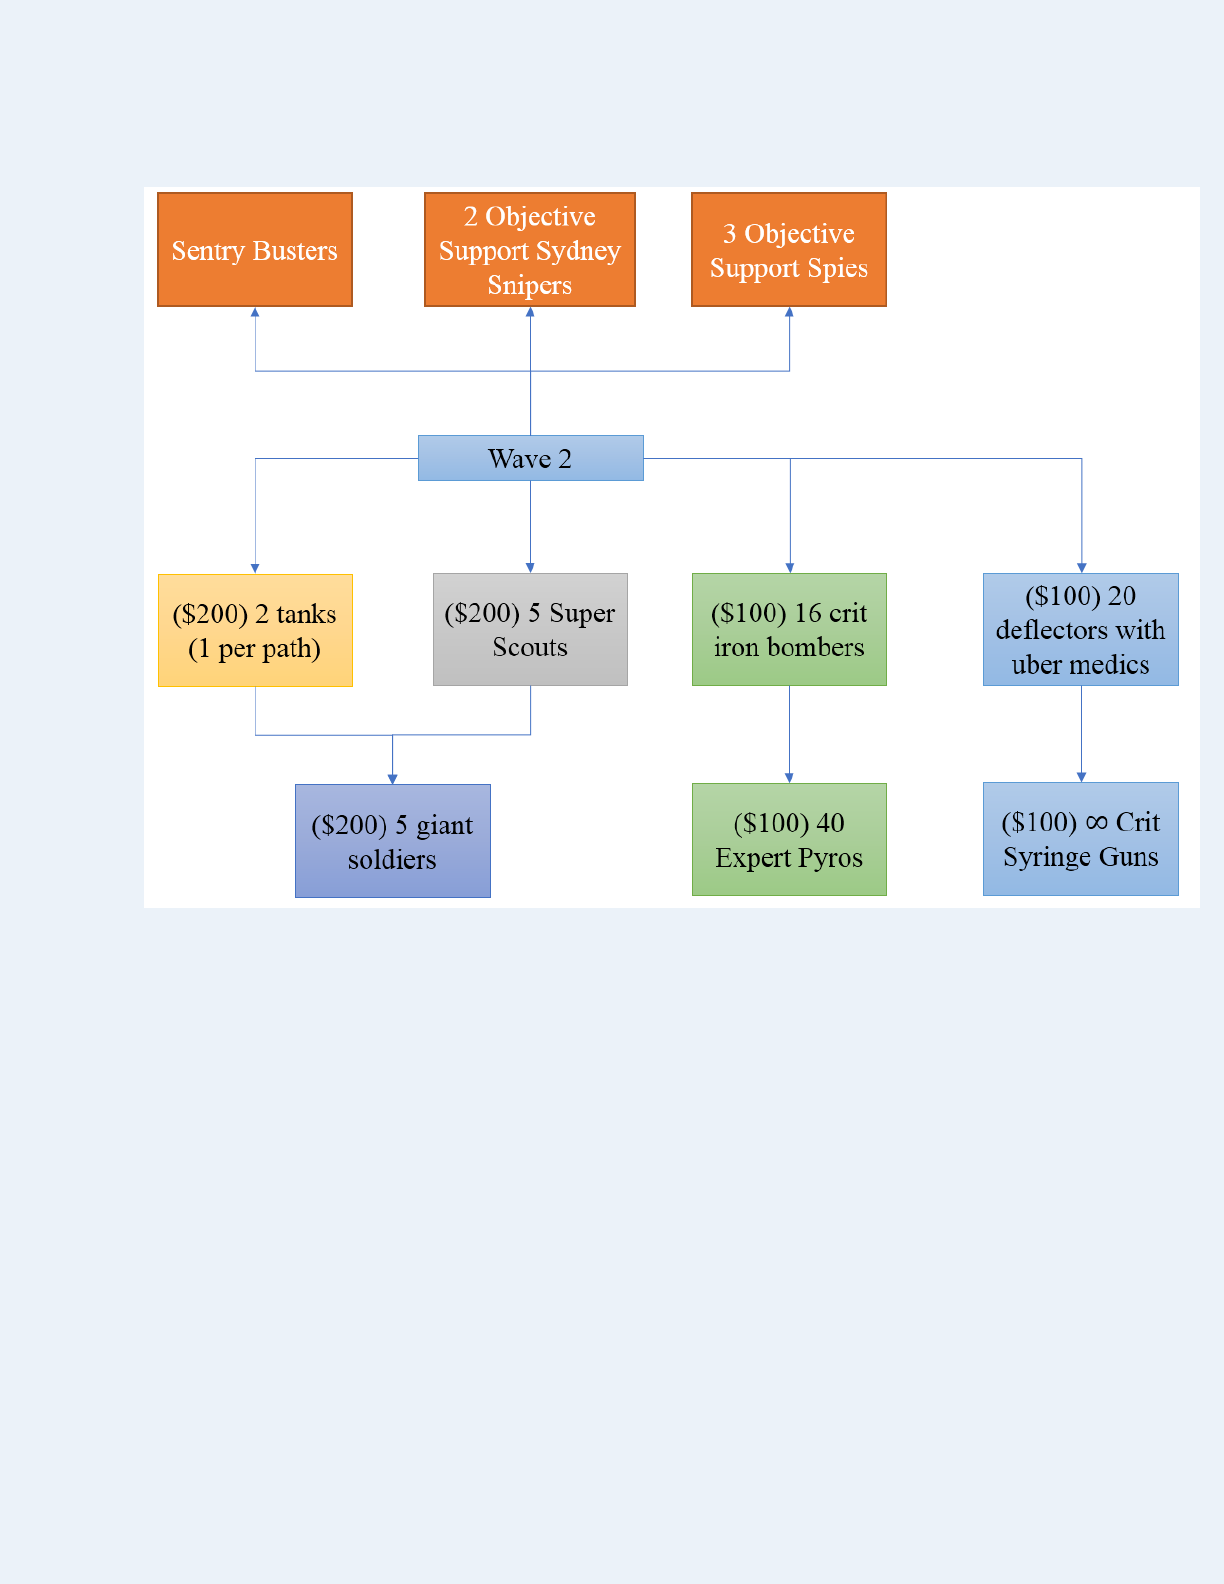
Wave 2 would look something like this:
2) Wave 2 ($1000 total)
a. ($200) 2 tanks (one on each tank path)
b. ($200) 5 super scouts
c. ($100) 16 crit iron bomber demos
d. ($100) 20 deflector heavies with an uber medic on each
e. ($200) 5 giant soldiers (after the tanks AND giant scouts all die)
f. ($100) Infinite support crit combat medics (after the deflector heavies finish spawning)
g. ($100) 40 pyros on expert AI (after the crit iron bomber demos all die)
h. (-) 2 objective support Sydney sleeper snipers
i. (-) 3 objective support spies
j. (-) Sentry busters
Each person has their own way of planning out their waves. Find the approach that works best for you.
Operation Titanium Tank: A Guide to MvM Wave Writing
Page 4
Construction:
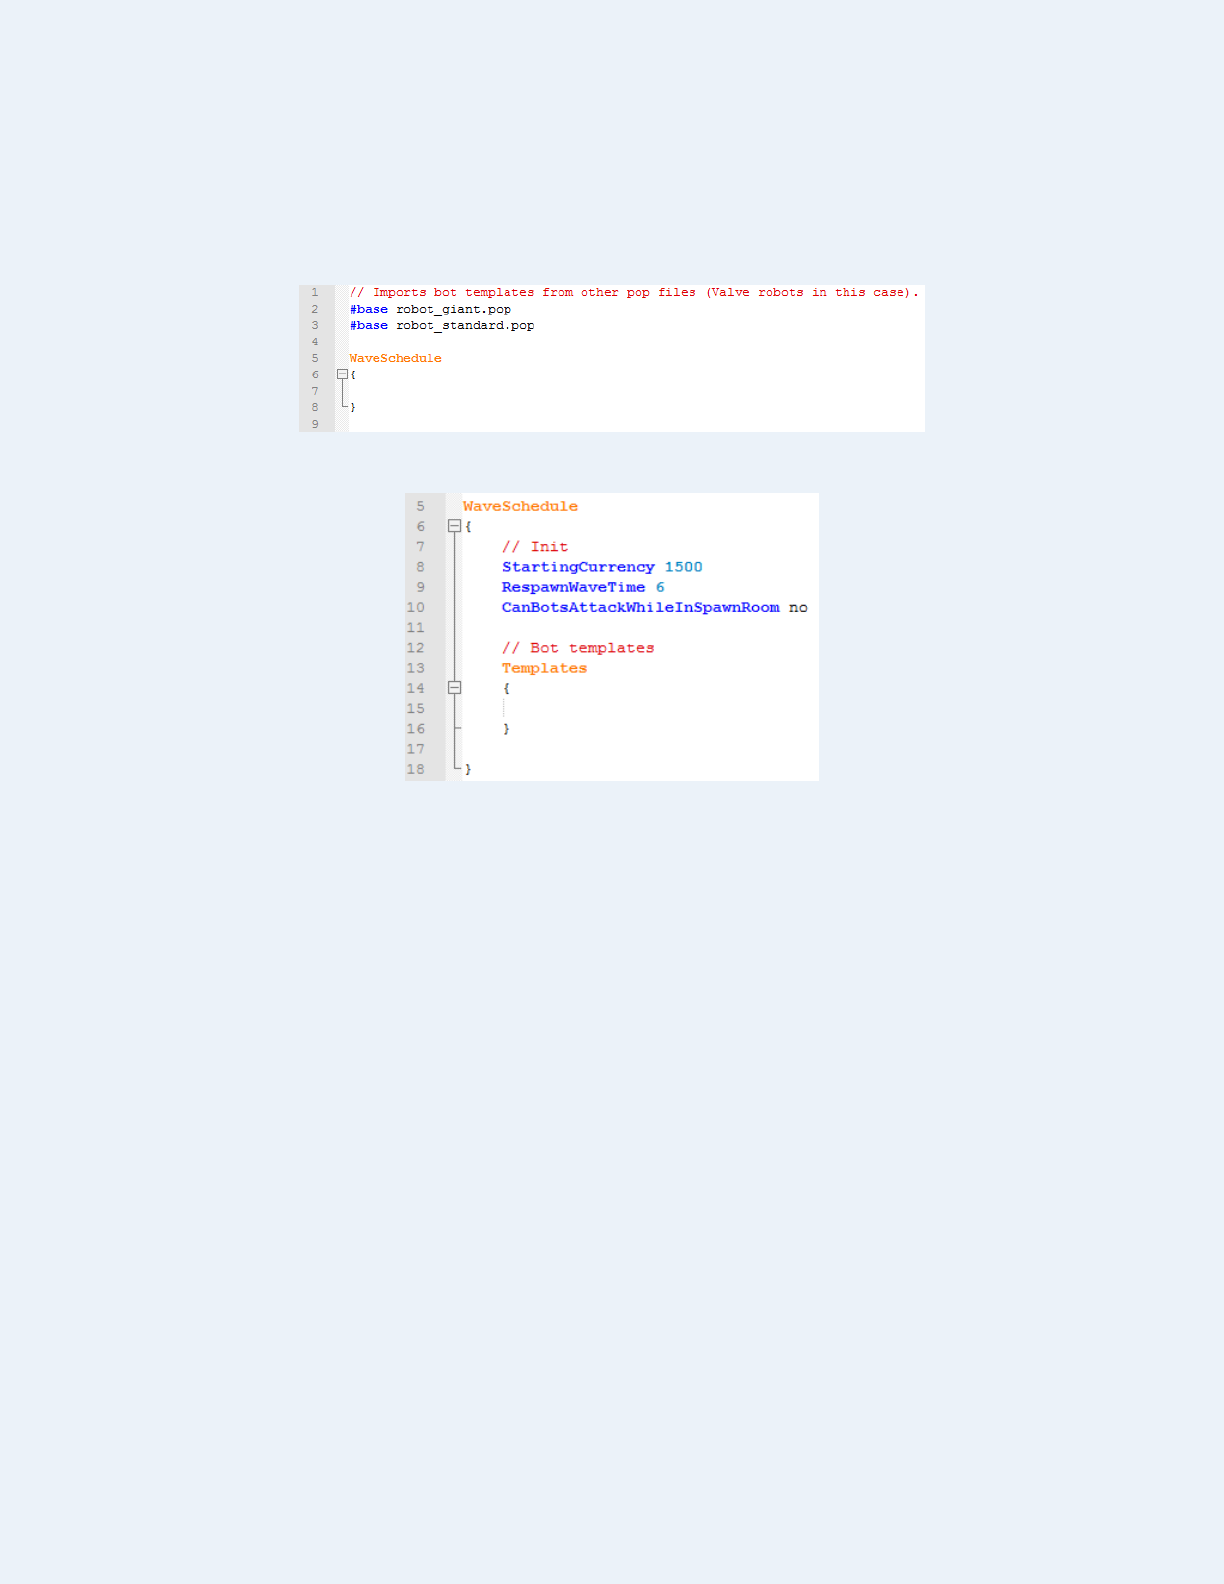
Now that your outline is done, it’s time to start writing your pop file. Without thinking about it, just type
all of this in. (You don’t need to include line 1 – lines that start with a // are comments which are ignored
by the server when it loads your pop file.)
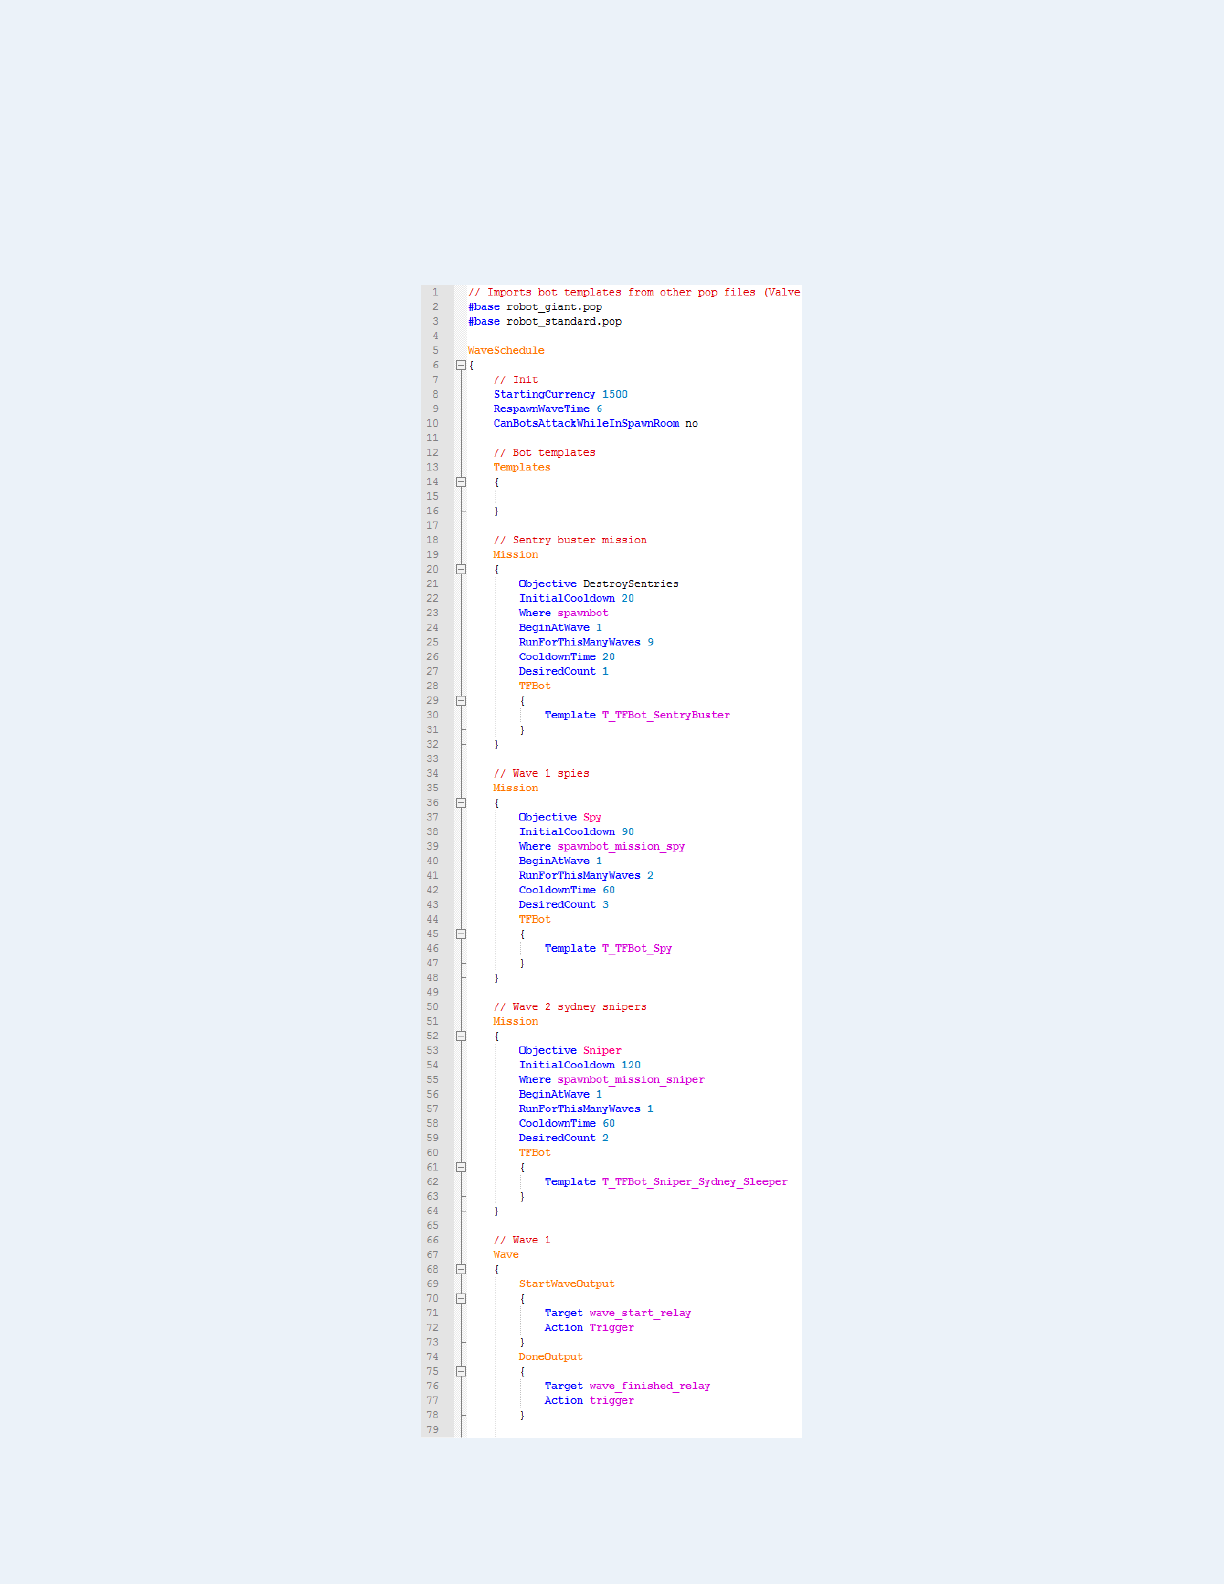
Now inside the WaveSchedule section, add the following: (You do not need to add the comments.)
The StartingCurrency specifies how much money players start off with before they play wave 1. In the
above case, it is $1500 so they will have $1500 to spend on upgrades before they start the mission.
The RespawnWaveTime specifies the amount of time players must wait every time they die to respawn
back into the map. This number increases by 2 for every wave that is completed. In the example, it’s set
to 6, so wave 1 has a 6 sec respawn time, wave 2 has an 8 sec respawn time, etc.
The CanBotsAttackWhileInSpawnRoom is rather self-explanatory – can bots attack while they are in
their spawnroom area? Unless you’re making a gimmick mission or really know what you’re doing, you
almost-always want to leave this as “no”.
The Templates section is where you can put custom robot templates (a bot template is like the DNA of
mvm robots in some sense – it tells the server how to construct the robot and its abilities). We will discuss
this more in detail. If you are only going to use Valve robots, you do not need to include that section.
Now we will include the objective mission robots, like sentry busters, snipers, and spies. These are
“mission” robots, and they are declared under a mission section.
Operation Titanium Tank: A Guide to MvM Wave Writing
Page 5
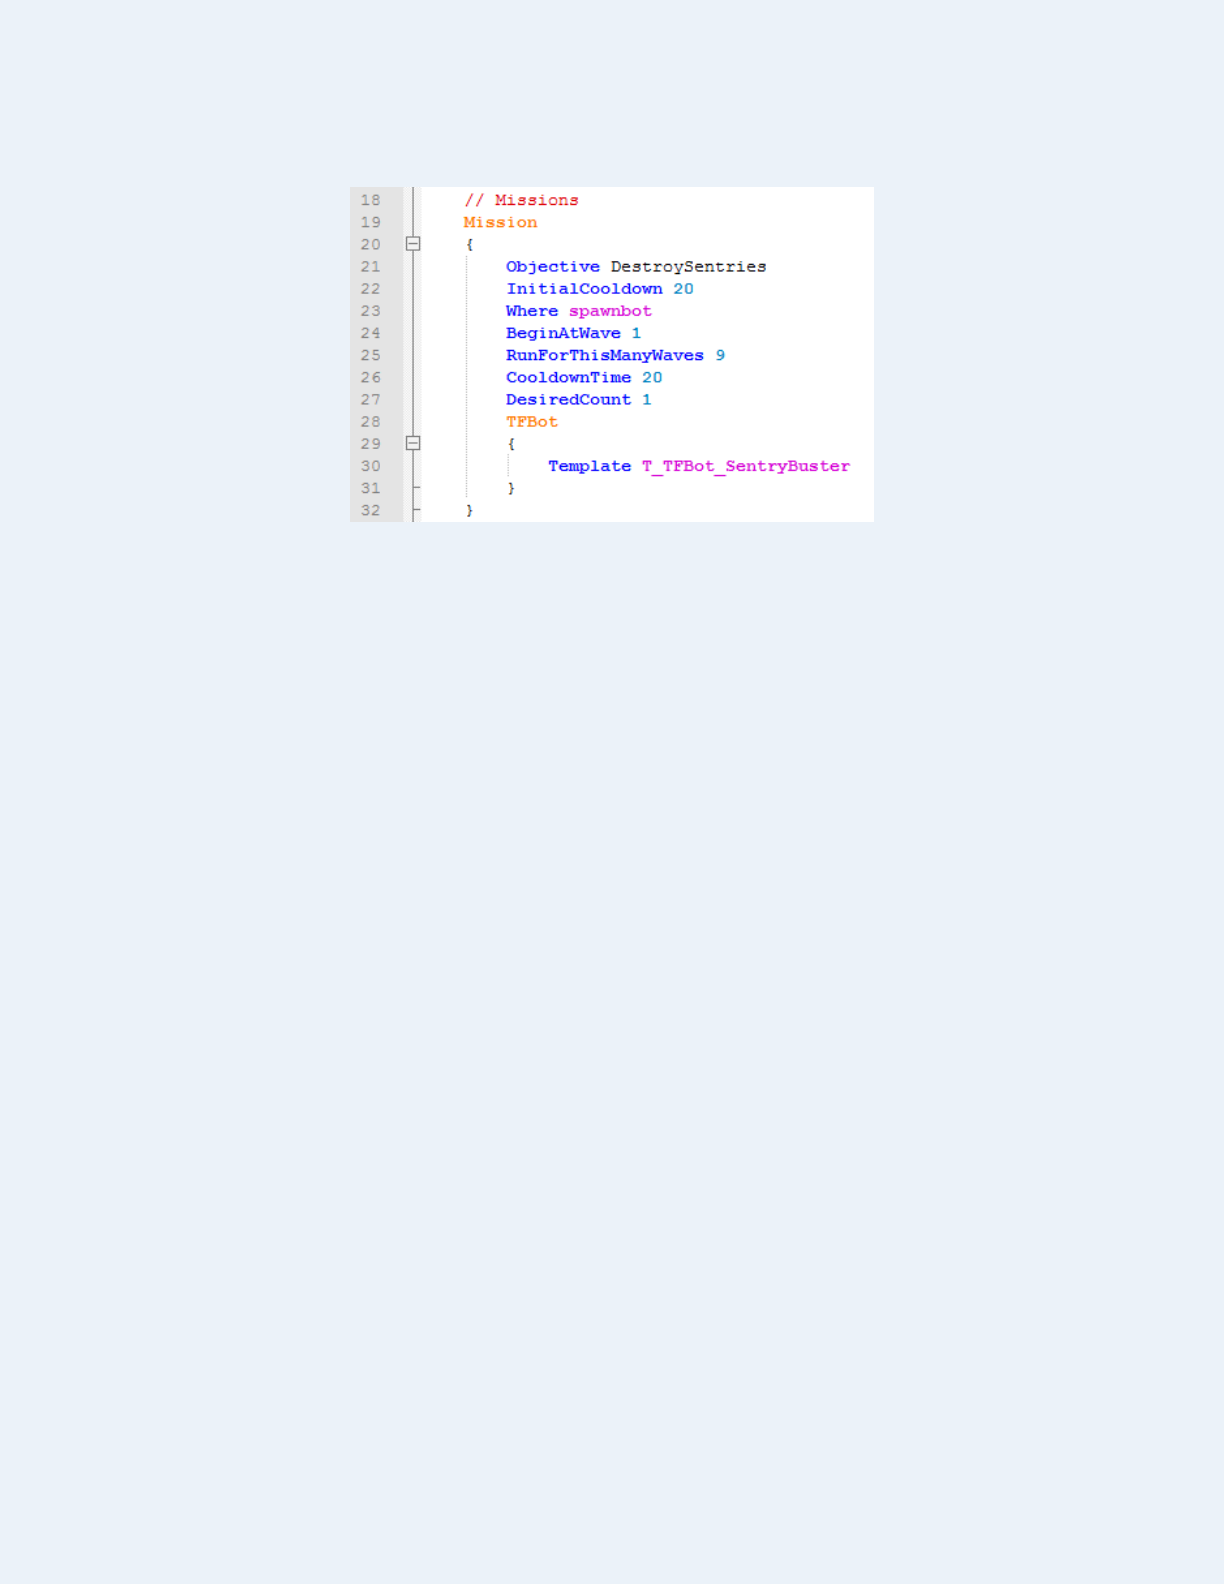
Here is an example for a sentry buster mission:
The Objective tells the bot AI what it should do. In this case, it tells the bot to find sentry guns to destroy.
The InitialCooldown is the cooldown period before this bot can start spawn in. It’s set to 20 seconds, so
the sentry buster will not spawn for 20 seconds after the wave starts.
The Where tells the bot where it should spawn (specifically, which info_player_teamspawn, or more
informally known as a spawn point). The value here should be the name of a valid
info_player_teamspawn entity on the map. You can get the list of spawn point names from either looking
at the map’s pop files or decompiling the map and inspecting the info_player_teamspawn in hammer.
You must provide a valid spawnpoint or else the bots will not spawn.
The BeginAtWave tells the server on which wave the bot is allowed to spawn in. Here it’s set to 1, so the
bot can spawn starting in wave 1.
The RunForThisManyWaves tells the server for how many waves this bot is allowed to appear in as an
objective support bot. Here it’s set to 9, so the bot can spawn in waves 1-9 (inclusive).
The CooldownTime is the cooldown spawn interval time between bot spawns. It’s like the speed cap or
the throttle for bot spawns. A bot cannot spawn more frequently than after this many seconds. In this case,
a sentry buster cannot spawn more often than every 20 seconds.
The DesiredCount is the number of bots to spawn every time after the cooldown timer elapses. Here it’s
set to 1, so only 1 bot will spawn after the cooldown expires. After that bot is killed, it will wait for the
CooldownTime number of seconds before spawning the DesiredCount number of bots again.
The TFBot section has the robot template (the type of robot) that will be spawned when this mission
decides to spawn robots into the map. Here it’s referencing the Valve sentry buster template. Templates
will be discussed more in detail later.
As another example for BeginAtWave and RunForThisManyWaves, if BeginAtWave is 3 and
RunForThisManyWaves is 4, then the mission bot will run for waves 3-6 inclusive. The starting wave
number is whatever BeginAtWave is at, and the ending wave number is:
Starting Wave = BeginAtWave = 3
Ending Wave = BeginAtWave + RunForThisManyWaves – 1 = 3 + 4 – 1 = 6

Operation Titanium Tank: A Guide to MvM Wave Writing
Page 6
Most missions have sentry busters in them or else engineers would have a massive hayday with their
sentry gun, so you will almost-always have the sentry buster mission declaration in every pop file you
make. Now our outline said we want spies on waves 1 & 2 and a Sydney sleeper spy on wave 2, so let’s
toss those in as well:
1) Wave 1 ($800 total)
a. (-) 3 objective support spies
b. (-) Sentry busters
2) Wave 2 ($800 total)
a. (-) 2 objective support Sydney sleeper snipers
b. (-) 3 objective support spies
c. (-) Sentry busters
For the spies, we can declare the wave 1 & 2 spies under one Mission block since they have the exact
same spawning and bot properties. However, if we wanted to change any one bit of the spy mission for
any of the waves, you would need to declare a whole new Mission block, change the BeginAtWave and
RunForThisManyWaves, and tweak whatever else it is that you wanted to change. For example, let’s say
on wave 2 I wanted 45 seconds cooldown instead of 60. I would have to do this instead:

Operation Titanium Tank: A Guide to MvM Wave Writing
Page 7
You will find that the syntax for pop files can sometimes become very wordy and verbose. The more
complicated your mission design is, the more verbose the pop file will be. This has no impact on server
performance or anything like that, but it will make your pop file development a bit longer and tedious.
Pop files are internally keyvalue files, and are parsed by Valve’s keyvalues parser, so describing data in
keyvalues form can sometimes be very lengthy and verbose.
The missions have been added, so now we can start building the actual waves. The order in which waves
are declared in the pop file is the order in which they will appear. The first wave block is thus wave 1, the
second wave block is wave 2, and so on. Here is a section of wave 1 (it’s currently blank):
Operation Titanium Tank: A Guide to MvM Wave Writing
Page 8
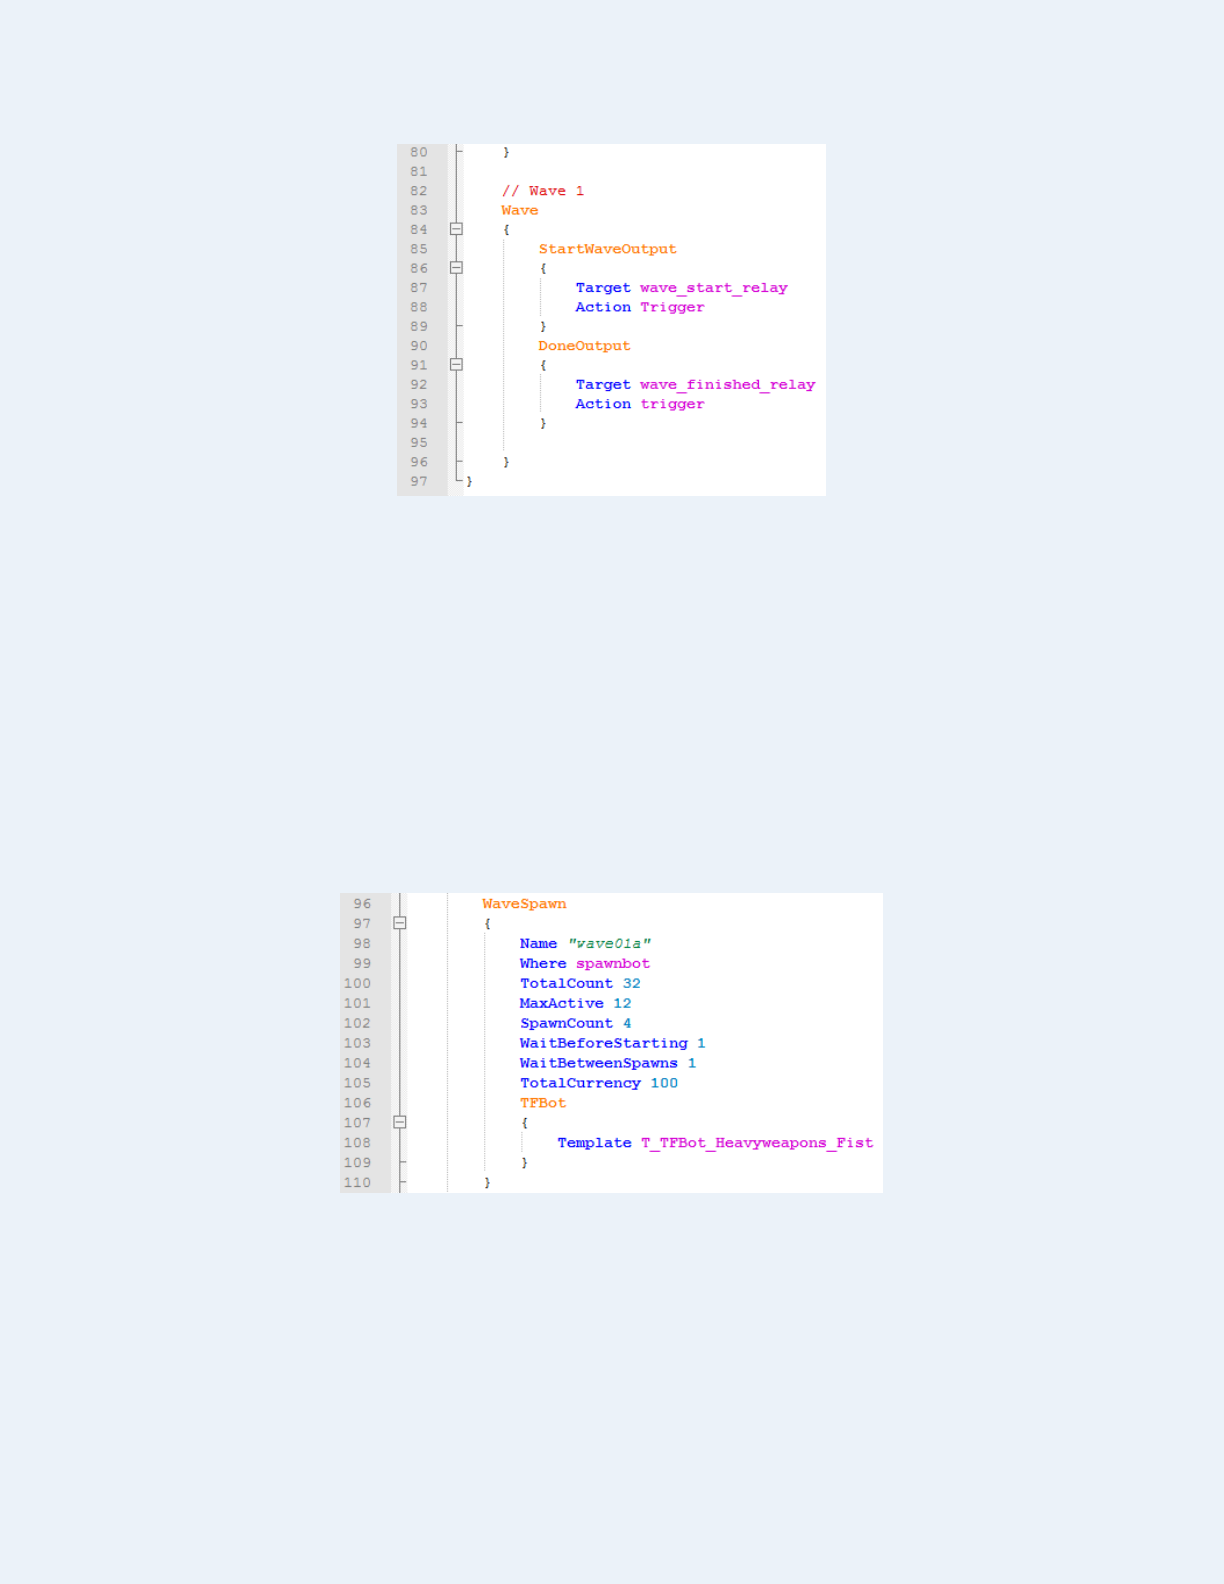
The population manager emits outputs similar to map entity I/O (input/output).
The StartWaveOutput is fired when the wave is first loaded up. The DoneOutput is fired when the
wave is completed. There’s also an InitWaveOutput that some maps may use (like mannhattan).
More often than not, you blindly copy and paste this section from a pop file that came with the map into
your pop file. Otherwise, you have to decompile the map and inspect its entity work to figure out what to
put in there (if anything), which can be annoying and time-consuming.
After you put that preamble in, you can start constructing the meat of your wave. A wave is broken up
into multiple subwaves, or wavespawns. In the outline, each bullet (or block from the flow chart) is a
wavespawn. You can only spawn one type of robot in a wavespawn (with squads and random choice
being exceptions), so your wave is essentially a mishmash of several wavespawns put together.
A wavespawn can look something like this:

Operation Titanium Tank: A Guide to MvM Wave Writing
Page 9
The Name of a wavespawn is used for other wavespawns to reference to it. In general, you want to give
every wavespawn a name except for the ones marked as Support (more on this later). If you do not give a
wavespawn a name, it will still work, but you cannot link other wavespawns to it.
The Where works just like it did in the Mission block – it specifies the name of the spawnpoint
(info_player_teamspawn) the bots in this wavespawn will spawn from. If the map has multiple spawn
areas like bottom/top or left/right spawns, use the name of the info_player_teamspawn that is located in
that area to spawn bots there. You must provide a valid spawnpoint or else the bots will not spawn.
The TotalCount is the number of bots in that wavespawn. The wavespawn will continue to spawn bots
until the TotalCount value is reached, at which point the wavespawn is then disabled (unless if it is
marked as Support 1 – more on this later). The TotalCount values are what appear on the wave HUD.
Here this value is set to 32, so a total of 32 bots will spawn from this wavespawn.
The MaxActive is the maximum number of bots from that wavespawn that can be alive on the map at any
given point in time. If the MaxActive number of bots is alive on the map, the wavespawn will not spawn
more bots in until some of them are killed. This is used to throttle the number of bots alive at once.
Setting this value is key to preventing your mission from being too easy or too hard/spammy. Here the
value is 12, which means no more than 12 bots from this wavespawn can be alive simultaneously.
The SpawnCount is the number of bots that will spawn every time the wavespawn chooses to spawn
more robots in. Here the value is 4, so 4 bots will spawn at a time every time the wavespawn spawns
more robots. If spawning the SpawnCount number of robots would make the number of robots alive
exceed the MaxActive value, the wavespawn will wait until some of those robots are killed before
spawning more. In this case, if 12 bots are already alive, then players must kill at least 4 of them before
the wavespawn spawns in 4 more bots, or else the wavespawn would break the MaxActive limit.
The WaitBeforeStarting is the number of seconds a wavespawn will wait before it spawns its first set of
robots. It is commonly used to give a breather between two wavespawns connected in series. Here the
value is set to 1, so the wavespawn will wait 1 second before it spawns its first set of robots (4 bots in this
case, since the SpawnCount is 4).
The WaitBetweenSpawns is the number of seconds a wavespawn will wait after spawning a set of robots
before spawning more robots. This acts as a breather between bot spawns. Setting this value properly is
key to pacing your mission correctly. Here the value is set to 1, so after a wavespawn spawns robots (4
bots in this case, since the SpawnCount is 4), it will wait 1 second before spawning 4 more robots. If,
after waiting out the WaitBetweenSpawns, spawning more robots would break the MaxActive limit, the
wavespawn will wait longer than its WaitBetweenSpawns value until the number of bots alive decreases
enough for it to spawn more robots.
The TotalCurrency is the total amount of money the bots from this wavespawn will drop. This value is
100, so the 32 (TotalCount) bots will drop a total of $100 of money when they die. This is split more-or-
less evenly across each robot that spawns into the map.
The TFBot section has the robot template (the type of robot) that will be spawned in this wavespawn.
Here it’s referencing a steel gauntlet melee heavy. Templates will be discussed more in detail later.

Operation Titanium Tank: A Guide to MvM Wave Writing
Page 10
Another example of what a wavespawn can look like:
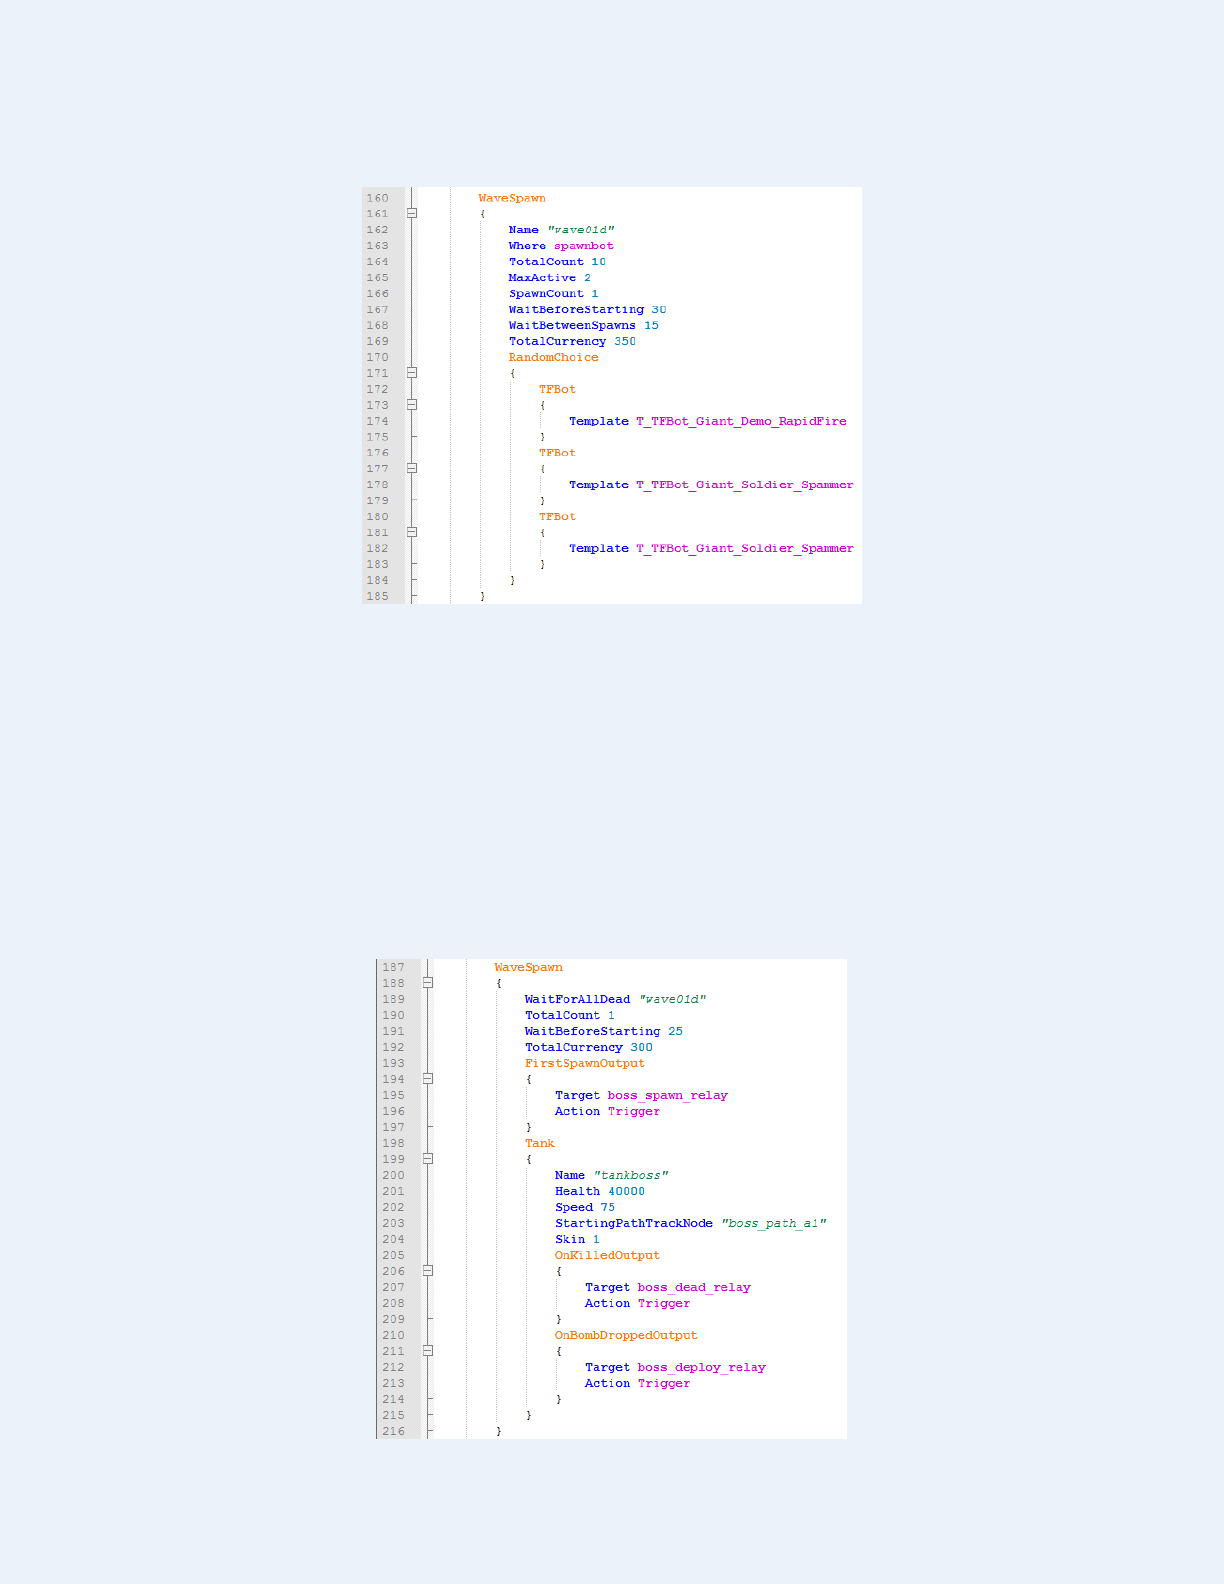
WaitForAllDead links this wavespawn to a previous wavespawn. This wavespawn will not start until the
previous wavespawn’s robots are all dead. In this case, it waits for “wave01a” to be dead. This
wavespawn will not spawn giant deflector heavies until all the steel gauntlet heavies from the previous
wavespawn have been killed.
Here is another wavespawn:
WaitForAllSpawned behaves the same as WaitForAllDead except for one small difference: Instead of
waiting for the previous wavespawns’ robots to be all dead before starting, it waits for the previous
wavespawns’ robots to be all spawned in before starting. In this case, it waits for the giant deflector
heavies in “wave01b” to finish spawning before it spawns the squad of robots.
If this was WaitForAllDead, then this wavespawn will start after the last giant heavy is killed. However,
since this uses WaitForAllSpawned, this wavespawn will start after the last giant heavy spawns, since the
previous wavespawn has finished spawning all of its giant heavies in and has no more robots to spawn.

Operation Titanium Tank: A Guide to MvM Wave Writing
Page 11
Support is a special property. If it’s set to 1, that means once this wavespawn begins spawning robots, it
will never stop spawning bots for the rest of the wave. It is not mandatory to kill all of these robots, but
they are still capable of killing players, moving the bomb, deploying the bomb, etc.
Robots in Support 1 (also known as “infinite support” or “inf support” for short) serve to be a nuisance to
players. These robots should not make up a large chunk of the main robot horde, since players do not like
spending a majority of their time fighting the infinite support robots. The support robots appear on the
right side of the wave HUD above the word “Support” and do not count towards the wave’s progress. The
robots from this wavespawn will drop money in the same manner as non-support wavespawns do, but
once the TotalCurrency amount of money is dropped, additional robots will not drop money.
There is another value that can be passed into Support, known as Support Limited. If the word “Limited”
is provided, this means the wavespawn acts both as a normal wavespawn and an inf support wavespawn.
The robots will appear in the support section of the HUD (like inf support wavespawns), but they will
only spawn up to the specified TotalCount number of robots (like normal wavespawns). Like inf support
wavespawns, it is not mandatory to destroy all these robots to end the wave. To put it simply, Support
Limited behaves like Support 1 except that it doesn’t spawn unlimited bots forever.
The Squad block allows you to bundle robots together into a squad formation. Squads have one robot
designated as the squad leader, and the other robots are the squad members. The first TFBot (robot
template) in the squad is the squad leader; the rest are squad members. In this case, the squad has 1
huntsman sniper and 2 medics in that order, so the squad leader is a huntsman sniper and squad members
are the two medics. Note that you need to add a TFBot for every member you want to add to the squad.
We needed two medic TFBot to tell the server that there are 2 medics in each squad.
The FormationSize in the squad tweaks how closely clustered or spread apart the squad members are
from the squad leader. The larger this number is, the farther away they are from the leader. Similarly, the
smaller this number is, the closer they will be to the leader. This value is often omitted in squads.
The ShouldPreserveSquad decides whether a squad should disintegrate into lone bots or still remain
together as a squad if the squad leader is killed. If the squad leader is killed, naturally the squad is
dissolved and all the squad members leave the squad – they become lone bots as if they spawned from a
normal wavespawn. However, if ShouldPreserveSquad is set to 1, then the bots will still remain in a
squad formation even if the leader is no longer alive. This value is often omitted in squads.
For squads, the TotalCount must be evenly divisible by the number of robots in the squad (the squad
size), or else the wave hud will break or incorrectly report the number of bots remaining. The MaxActive
and SpawnCount do not have to be evenly divisible by the squad size, but for best practice pick numbers
that are evenly divisible by the squad size to avoid bugs.
Operation Titanium Tank: A Guide to MvM Wave Writing
Page 12
Here’s another wavespawn:
This wavespawn features RandomChoice. Every time this wavespawn runs, it will pick a random robot
from the given list of robot templates (TFBot). You can set the probability of a robot template being
picked by adding or removing TFBot sections from within the RandomChoice.
In this wavespawn, we have 1 giant rapidfire demoman and 2 giant spammer soldiers, so there is a 1 in 3
chance (33%) this wavespawn will spawn a giant demoman and a 2 in 3 chance (67%) this wavespawn
will spawn a giant soldier.
You cannot nest Squads inside RandomChoice (i.e. make it pick a random squad) or RandomChoice
inside Squads (i.e. make it pick a random squad member or leader each time). The server will refuse to
load that section of the pop file if it detects Squads or RandomChoice inside each other.
Lastly, here’s a tank wavespawn:
Operation Titanium Tank: A Guide to MvM Wave Writing
Page 13
We have seen the first 4 properties of the wavespawn before. The FirstSpawnOutput section allows the
wavespawn to trigger entity work when the tank first spawns into the map. The Target is the name of the
entity, and Action is the input to send to the entity (similar to StartWaveOutput and DoneOutput for
waves). Usually these reference to logic_relay entities on the map and send the input Trigger. Usually
you just copy and paste this from a pop file that came with the map.
The Tank section creates a tank, similar to how the TFBot section creates a robot.
The Name gives the tank a name. This is not used meaningfully elsewhere in the pop file, but it may have
some special meaning in the map. More often than not, the tank’s name doesn’t mean anything, so feel
free to name it as whatever or even omit this property.
The Health sets the amount of health for the tank. This is rather self-explanatory.
The Speed sets the speed (in HU/s) the tank travels at. Do not set this value too high or else the tank will
glide around the map and get stuck into world geometry. Usually you want to leave this at 75.
The StartingPathTrackNode specifies which path the tank should take. More strictly speaking, it
specifies which path_track entity the tank should spawn on. You can either find this information from the
pop files that ship with the map or decompile the map and inspect the path_track connections on hammer.
The Skin sets the skin on the tank. If set to 1, the tank will use the final skin with the black and white
stripes. Do not specify this value if you want the standard tank skin on the tank.
The OnKilledOutput sends an input to an entity on the map when the tank is killed. Just copy and paste
this from a pop file that came with the map.
The OnBombDroppedOutput sends an input to an entity on the map when the tank deploys its bomb
(this entity is usually a logic_relay that forces victory for the robots team). Again, just copy and paste this
from a pop file that came with the map.
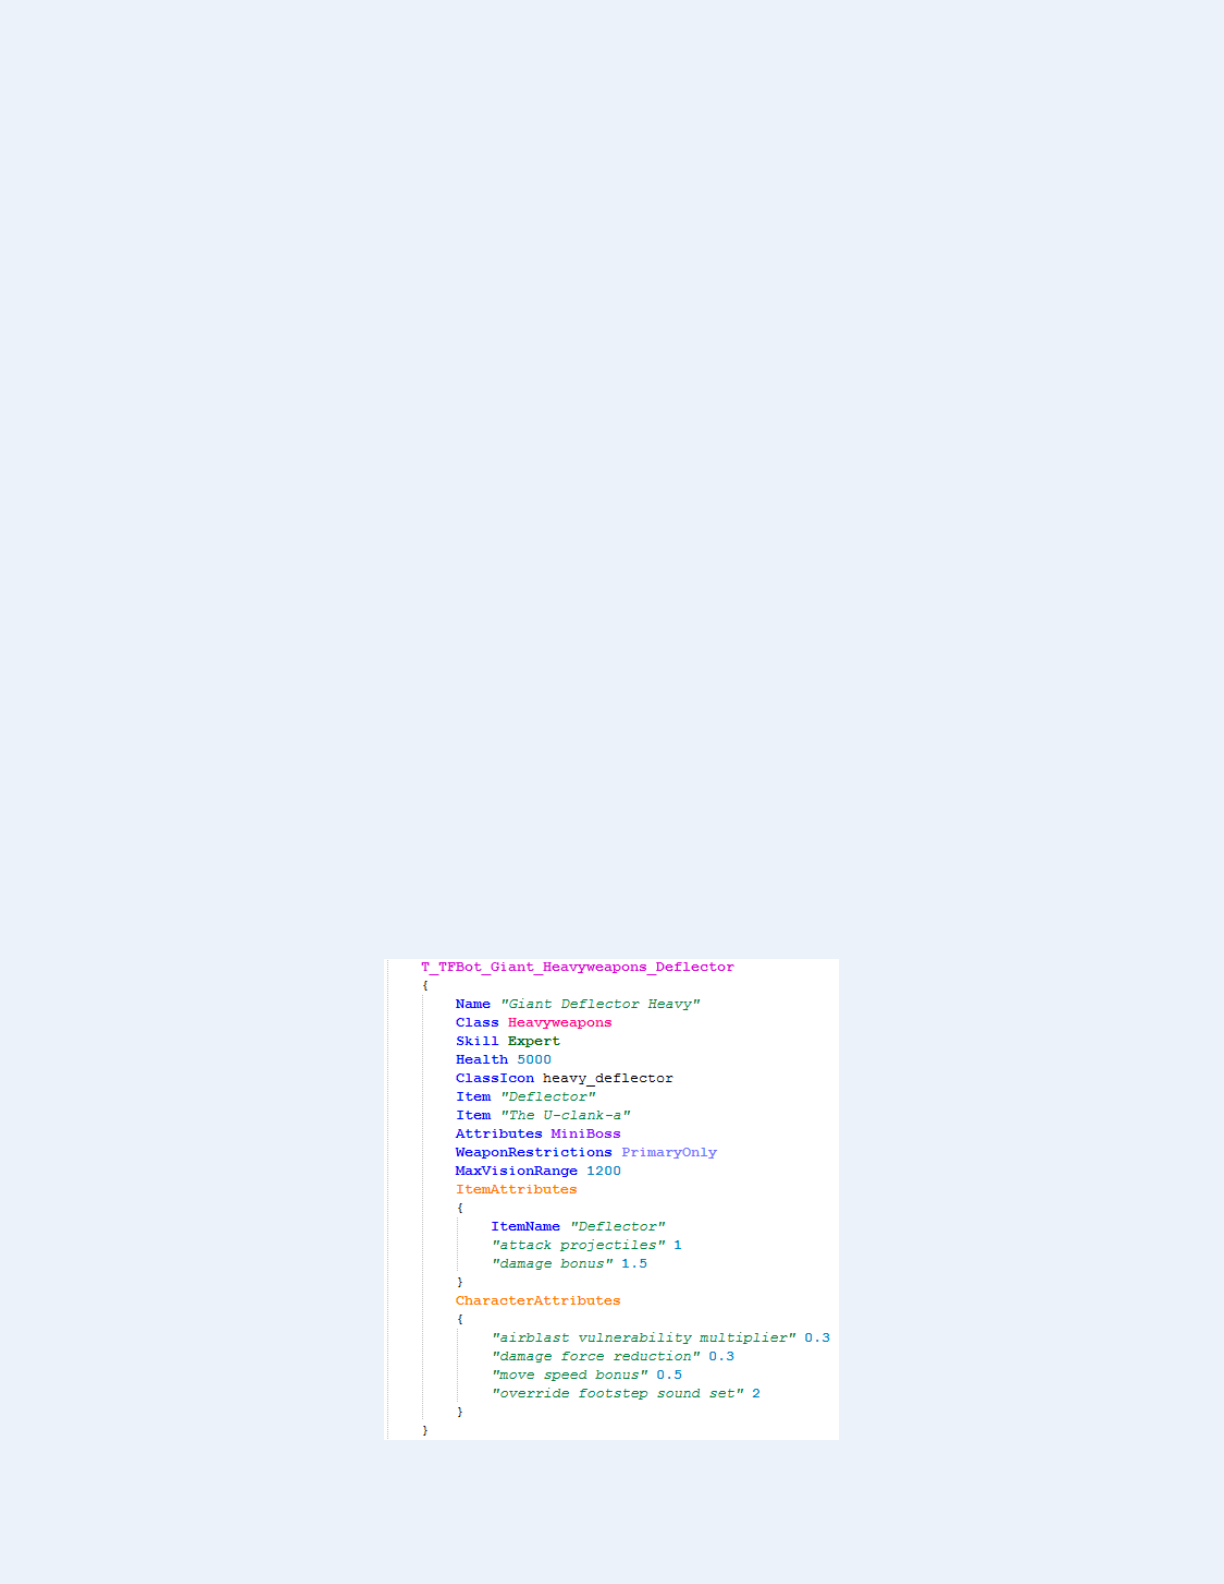
The last important thing about a pop file are the robot templates. So far, we have seen robot templates
named like T_TFBot_Giant_Heavyweapons_Deflector, but where is this information actually stored?

Operation Titanium Tank: A Guide to MvM Wave Writing
Page 14
The templates for Valve robots are stored inside robot_standard.pop, robot_giant.pop, and
robot_gatebot.pop. Have a peek at them to see all the robot template definitions. You can find them
inside tf_scripts_dir.vpk or from downloading this file of all the Valve-made pop files.
The template properties will be explained later, but the two important sections to take note of are
ItemAttributes and CharacterAttributes. Every player, bot and weapon entity on the server has a table that
can house up to 15 attributes. When you buy upgrades at the upgrades station, those upgrades are
attributes that are added to the attributes table on your player entity or your weapon entities. Similarly, the
pop file can add attributes to these tables for the robot or the robot’s weapon themselves.
The ItemAttributes adds attributes to a robot’s weapon. In the above template, 2 attributes are added,
such as a damage bonus. The ItemName specifies the name of the item that should receive those
attributes. You can use an ItemAttributes block for each weapon as you wish, but since robots usually use
only one weapon (primary for most, secondary for medics, melee for spy, or they are weapon restricted),
you will usually use only one ItemAttributes block in a template.
The CharacterAttributes adds attributes to the robot itself. In the above template, 4 attributes are added.
Generally, resistances and player-based effects (like move speed, jump height, etc) should go into
CharacterAttributes, and weapon-specific attributes should go into ItemAttributes. However, it is more-
or-less safe to just throw everything into CharacterAttributes if you want, unless you somehow reach the
15 attribute limit (in which case, you will need to move some of those attributes to the weapons).
You can find all the attributes in the game from items_game.txt. Note that not all attributes are functional
and some of them will require trial and error to figure out how they work, if their name isn’t too obvious.
Some attributes only work on some weapon types and not on others.

Operation Titanium Tank: A Guide to MvM Wave Writing
Page 15
Gatebot templates are more complicated and messier:
Properties of the robot that cannot be changed on the fly, such as the robot’s name and class, are entered
first. Then an EventChangeAttributes block is added, which contains 2 sub-blocks: Default and
RevertGateBotsBehavior. This is essentially 2 bot templates in one that can be flip-flopped between.
The Default section contains bot information and characteristics (i.e. it’s the bot template) when the bots
are on their gatebot AI mode (they don’t pick up bombs and run towards a gate).
The RevertGateBotsBehavior section contains bot information when the bots have successfully captured
all the gates on the map and disable their gatebot AI mode (they behave like normal bots).
Essentially, the Default section is the bot template during the bot’s gatebot AI mode and the
RevertGateBotsBehavior section is the bot template after the bot disables its gatebot AI mode. They both
share the same properties defined outside the EventChangeAttributes section.
Gatebot templates can crash the game if they have invalid syntax, so be careful when working with them.

Operation Titanium Tank: A Guide to MvM Wave Writing
Page 16
Robot templates can be define in three ways. The first way is to reference the template name, as we have
seen earlier:
Another way is to inline the template inside the TFBot section directly, without referencing any premade
templates. This is not recommended unless this robot is featured in one wavespawn only, or else you will
have to copy and paste the bot information every time you want to use it, which will bloat your pop file.
It’s best to define a template for a robot you plan on using more than once.
The third way is to use an existing template but add on to or override some of its properties. The two
TFBot sections in the squad below show this in action:
The first TFBot section adds a tag to the stock giant heavy template. All other properties of the robot are
taken (inherited) from the giant heavy template. This enables you to not have to completely clone a
robot’s template only to add or change one thing about it (unlike the spy Mission example we did earlier).
The second TFBot section overrides the attributes on the medic’s medigun. The template has the uber
duration bonus attribute set to -3, but here it is overridden with a value of 4.

Operation Titanium Tank: A Guide to MvM Wave Writing
Page 17
Taken from the server binary (server_srv.so), here is a full list of functional properties you can use on pop
files (defunct properties are not included here). Properties that start with an asterisk * don’t take a single
value, but are outputs emitted by the population manager that can send an input to a map entity (they need
a Target and an Action to be provided).
>>> Wave:
*StartWaveOutput – Called when the wave has been loaded.
*InitWaveOutput – Called right before StartWaveOutput.
*DoneOutput – Called when the wave has been completed.
>>> WaveSpawn:
TotalCount – The number of bots to spawn in this wavespawn (this is ignored if Support is set to 1).
MaxActive – The maximum number of bots from this wavespawn that can be alive simultaneously.
SpawnCount – The number of bots to spawn in simultaneously every time the wavespawn spawns bots.
WaitBeforeStarting – The number of seconds to wait (time delay) before starting this wavespawn after it
has been given permission to start spawning (e.g. prior wavespawns have finished spawning robots).
WaitBetweenSpawns – Number of seconds to wait after the wavespawn has spawned in robots before it
can spawn more robots (provided the MaxActive isn’t reached).
WaitBetweenSpawnsAfterDeath – If set to 1, the wavespawn will only spawn robots every time the
previous batch is dead.
FirstSpawnWarningSound – Plays a sound to all clients when the first bot in this wavespawn spawns in.
*FirstSpawnOutput – Called when the first bot of the wavespawn spawns in.
LastSpawnWarningSound – Plays a sound to all clients when the last bot in this wavespawn spawns in.
*LastSpawnOutput – Called when the last bot of the wavespawn spawns in.
TotalCurrency – The total amount of money this wavespawn’s robots will drop.
Name – The name of the wavespawn.
Where – Name of the info_player_teamspawn
WaitForAllSpawned – The wavespawn to wait to finish spawning bots before starting this wavespawn.
WaitForAllDead – The wavespawn to wait for its bots to be killed before starting this wavespawn.
Support – Marks a wavespawn as support (can use values “1” or “Limited”).
RandomSpawn – If set to 1, the wavespawn spawns bots on random spawn points on the map. You will
have to specify multiple spawn points (i.e. specify “Where” multiple times) to use this properly.
The most common properties you will use are: Name, Where, TotalCount, MaxActive, SpawnCount,
WaitBeforeStarting, WaitBetweenSpawns, TotalCurrency, WaitForAllSpawned, WaitForAllDead,
and on occasion, Support. The others are rarely or sometimes never used in a majority of pop files.

Operation Titanium Tank: A Guide to MvM Wave Writing
Page 18
>>> WaveSchedule:
StartingCurrency – The amount of money players start the mission with.
RespawnWaveTime – The number of seconds players must wait before they can respawn into the map
every time they are killed.
FixedRespawnWaveTime – If set to 1, then the respawn time for players is set to the value specified by
RespawnWaveTime. Otherwise, the respawn time increases by 2 seconds per wave that is completed.
AddSentryBusterWhenDamageDealtExceeds – Sets the damage threshold (default 3000) on how much
damage a sentry gun must deal to the robots before a sentry buster spawns to chase that sentry gun.
AddSentryBusterWhenKillCountExceeds – Sets the kill threshold (default 15) on the number of robots
a sentry gun must kill before a sentry buster spawns to chase that sentry gun.
CanBotsAttackWhileInSpawnRoom – Allows or forbids bots from attacking while in their spawn area.
IsEndless – If set to 1, the mission will run using the hidden endless MvM mode.
Advanced – If set to 1, the mission will be marked as a difficult mission for achievements and the like.
>>> Mission:
Objective – The objective AI the bot should use.
InitialCooldown – The initial time delay before this objective’s robots are allowed to spawn in. (Works
identically to WaitBeforeStarting for wavespawns).
CooldownTime – The number of seconds to wait between objective robot spawns. (Works identically to
WaitBetweenSpawns for wavespawns.)
BeginAtWave – The wave number that these objective bots should be featured in.
RunForThisManyWaves – The number of waves this objective bot should be featured in, starting from
BeginAtWave. The ending wave number is calculated from BeginAtWave + RunForThisManyWaves – 1.
DesiredCount – The number of bots to spawn in each time the mission spawns bots in. (Works
identically to SpawnCount for wavespawns.)
>>> Valid values for Objective:
Sniper – The bot will use the sniper AI. They will find sniping spots on the map and attempt to snipe
players from those locations.
Spy – The bot will use the spy AI. They will spawn around hidden corners and the like (as determined by
the map’s nav mesh) to ambush and attack players.
Engineer – The bot will use the engineer AI. They will spawn at engineer hint entities on the map and
place buildings on the sentry and teleporter hint entities (if they exist on the map).
DestroySentries – The bot will use the sentry buster AI. They will find a sentry gun dealing plenty of
damage to the bot horde, run up to them and suicide to take out the offending sentry gun.

Operation Titanium Tank: A Guide to MvM Wave Writing
Page 19
>>> Squad:
FormationSize – Sets how far apart or close together the squad members are to its leader.
ShouldPreserveSquad – If set to 1, the squad will maintain its formation even if its leader is killed.
>>> Bot Templates:
Name – Sets the name of the bot. This name will appear on the killfeed when the bot kills or is killed.
Class – The robot’s class (out of the 9 TF2 classes).
Skill – Sets the bot AI level.
Health – The amount of health to set on the robot.
ClassIcon – The name of the icon to use on the wave HUD to represent this robot.
Scale – Sets the size of the robot (giants by default are scaled to 1.75). Do not set this value too high or
else bots may become stuck around corridors or other world geometry not designed for large bots.
WeaponRestrictions – Sets the weapon slot of the weapon the bot is only allowed to use in combat. If
unspecified, most classes will use their primary, medics will use their secondary, spies will use melee.
BehaviorModifiers – Changes the bot’s behavior.
Item – Grants the bot a weapon or cosmetic item. Note that unlike weapons, bots ignore class restrictions
on cosmetics, so it is possible to put a heavy’s hat on, say, a demoman bot.
Attributes – Adds special attributes to the bot (not the same as attributes from items_game.txt).
MaxVisionRange – The maximum distance radius (in HU) that the bots can see players in. Outside of
this range, the bots will not notice players.
ItemAttributes – Adds attributes (from items_game.txt) to the bot’s item. This can be specified multiple
times to add attributes to multiple items (including cosmetics). The limit is 15 attributes.
CharacterAttributes – Adds attributes (from items_game.txt) to the bot itself. The limit is 15 attributes.
TeleportWhere – Used for engineer bots only. Just like Where in wavespawns, this accepts the names
of spawn points (info_player_teamspawn). The spawn points listed in TeleportWhere on the engineer
specify which spawns will spawn bots from the engineer’s teleporter instead of on the map’s spawn point.
AutoJumpMin – The minimum cooldown time before the bot will jump. The bot must possess the
AutoJump attribute to use this feature.
AutoJumpMax - The maximum cooldown time before the bot will jump. The bot must possess the
AutoJump attribute to use this feature.
Valid Skill values (from easiest to hardest): Easy, Normal, Hard, Expert
Valid WeaponRestrictions values: PrimaryOnly, SecondaryOnly, MeleeOnly
Valid Class values: Scout, Soldier, Pyro, Demoman, Heavyweapons, Engineer, Medic, Sniper, Spy

Operation Titanium Tank: A Guide to MvM Wave Writing
Page 20
>>> Valid BehaviorModifiers values:
Mobber – The bot will pick a player and constantly chase them until either the player or the bot is killed.
Push – The bots will initially ignore the bomb and make a run for the hatch first before running back to
the bomb. This is often used for flanking and ambushing bots to sneak up behind the players.
>>> Valid Attributes values:
Aggressive – Acts the same as BehaviorModifiers Mobber.
SupressFire – The bot will not shoot its weapon.
DisableDodge – The bots will not attempt to dodge incoming projectiles from players.
SpawnWithFullCharge – The bot will spawn with a full charge on all meters on its weapons. This
includes phlog charge, banner charge, medigun ubercharge, medic shield charge, etc.
AlwaysCrit – The bot’s weapons are always critboosted. Their icon will also have a sky blue flashing
border on the wave HUD.
IgnoreEnemies – The bots will act blindly towards players and only perform the map objective.
HoldFireUntilFullReload – When the bot’s weapon clip is empty, the bot will not fire its weapon until
its fully reloaded.
AlwaysFireWeapon – The bot will always fire its weapon (as if it’s holding M1 down forever).
TeleportToHint – Used for engineers only. The engineer will teleport on its hint entity instead of
spawning from a map spawn point and walking all the way to its hint entity.
MiniBoss – Marks the bot as a giant. Their icon will appear with a red background on the wave HUD,
their heads will be smaller than their body, and spies cannot one-hit-kill them with a backstab.
UseBossHealthBar – Displays a health bar of the robot’s health for all the players to see, similar to the
health bar tanks display when they spawn on the map.
IgnoreFlag – The bot will ignore the bomb and only harass players or follow specific routes on the map.
AutoJump – The bot will jump randomly. You will need to provide an AutoJumpMin and
AutoJumpMax to the bot template if you use this attribute.
AirChargeOnly – Used for demoman bots with a shield only. The bot will charge only while airborne.
VaccinatorBullets – Used for vaccinator medics only. The medic will use the bullet vaccinator effect
(blue effect) on the vaccinator medigun.
VaccinatorBlast – Used for vaccinator medics only. The medic will use the blast vaccinator effect (green
effect) on the vaccinator medigun.
VaccinatorFire – Used for vaccinator medics only. The medic will use the fire vaccinator effect (red
effect) on the vaccinator medigun.
BulletImmune – The bot is invincible from bullet damage.
BlastImmune – The bot is invincible from blast damage.

Operation Titanium Tank: A Guide to MvM Wave Writing
Page 21
FireImmune – The bot is invincible from fire damage.
Parachute – The bot will attempt to parachute down while airborne. This is commonly used on B.A.S.E.
Jumper soldiers.
ProjectileShield – Used for medics using a medigun only. The bot will deploy the medic’s projectile
shield in front of its healing target when its shield meter is fully charged. You will need to attach the
"generate rage on heal" attribute to the medigun for it to use the medic’s shield. Set this attribute to 1 to
use the small shield, 2 to use the large shield (works similar to the shield upgrade). To change the
duration of the shield, use the “increase buff duration” attribute.
A note about class icons:
The ClassIcon property has a string X in it. When the client receives this information from the server, it
searches for a leaderboard_class_X.vmt file inside tf/materials/hud (or other mounted folders). If
“heavy_deflector” is used (like in T_TFBot_Giant_Heavyweapons_Deflector), the client searches for a
leaderboard_class_heavy_deflector.vmt file to load. Vmt (valve map texture) files typically have an
accompanying vtf (valve texture file) file with it, and the vtf file itself is referenced inside the vmt file.
If you make your own custom bot icon (64 x 64 pixel square image) for a custom robot, and you write
“ClassIcon robot_launcher” in its template on the pop file, make sure the vmt file of your icon is
leaderboard_class_robot_launcher.vmt and that the vmt file references the correct vtf file to load.
>>> Tank:
Health – The amount of health the tank should have. Pretty self-explanatory.
Speed – How fast the tank moves. Don’t set this number too high or else wild behavior may occur.
Name – The name to assign to the tank.
Skin – The skin to use on the tank (values are 0 or 1).
StartingPathTrackNode – The name of the path_track the tank should spawn on.
*OnKilledOutput – Called when the tank is destroyed.
*OnBombDroppedOutput – Called when the tank deploys its bomb.
Operation Titanium Tank: A Guide to MvM Wave Writing
Page 22
Now that we have discussed most of the features in pop files, it’s time to create the two wave mission we
have outlined earlier. We will discuss how to construct the first wave only and leave it as an exercise for
you to construct the second wave on your own. The full pop file is provided at the end of the tutorial.
With the global properties, missions, and wave 1 preamble, your pop file should currently look like this:
Operation Titanium Tank: A Guide to MvM Wave Writing
Page 23
Our outline for wave 1 is: (see page 2 for the graphical outline)
1) Wave 1 ($800 total)
a. ($100) 30 scattergun scouts
b. ($100) 100 demoknights (sporadically across the whole wave)
c. ($200) 2 giant pyros with 4 uber medics each
d. ($100) Infinite support sandman scouts (after scattergun scouts die)
e. ($100) 35 crit soldiers (after the giant pyros finish spawning)
f. ($200) 2 giant heavies (after giant pyros die)
The objective support bots have been omitted since we have put them in the Mission section already. The
first thing we will do is create the first wavespawn, which consists of 30 scattergun scouts. Some of the
properties (TotalCount, TotalCurrency, WaitForAllDead/Spawned, Support) are specified in the outline.
Others (Where, MaxActive, SpawnCount, WaitBeforeStarting, WaitBetweenSpawns) are not mentioned in
the outline. Maybe on your outline you have them specified, but this outline does not.
For the unspecified values, you will have to use some common sense and intuition to decide on sane
numbers to use. After you enter those values in, test your pop file with people and tweak those values
accordingly. There are no hard or fast rules on what values to specify on each of those properties; you
have to look at the wave as a whole and decide if the pacing is too fast/slow, bots are too strong/weak, etc
and adjust the wavespawn(s) accordingly. Sometimes it may be changing a couple of numbers, other
times it may involve tweaking or swapping out bot templates, sometimes wavespawns may be moved
around, other times a whole wavespawn may be added or removed from the wave.
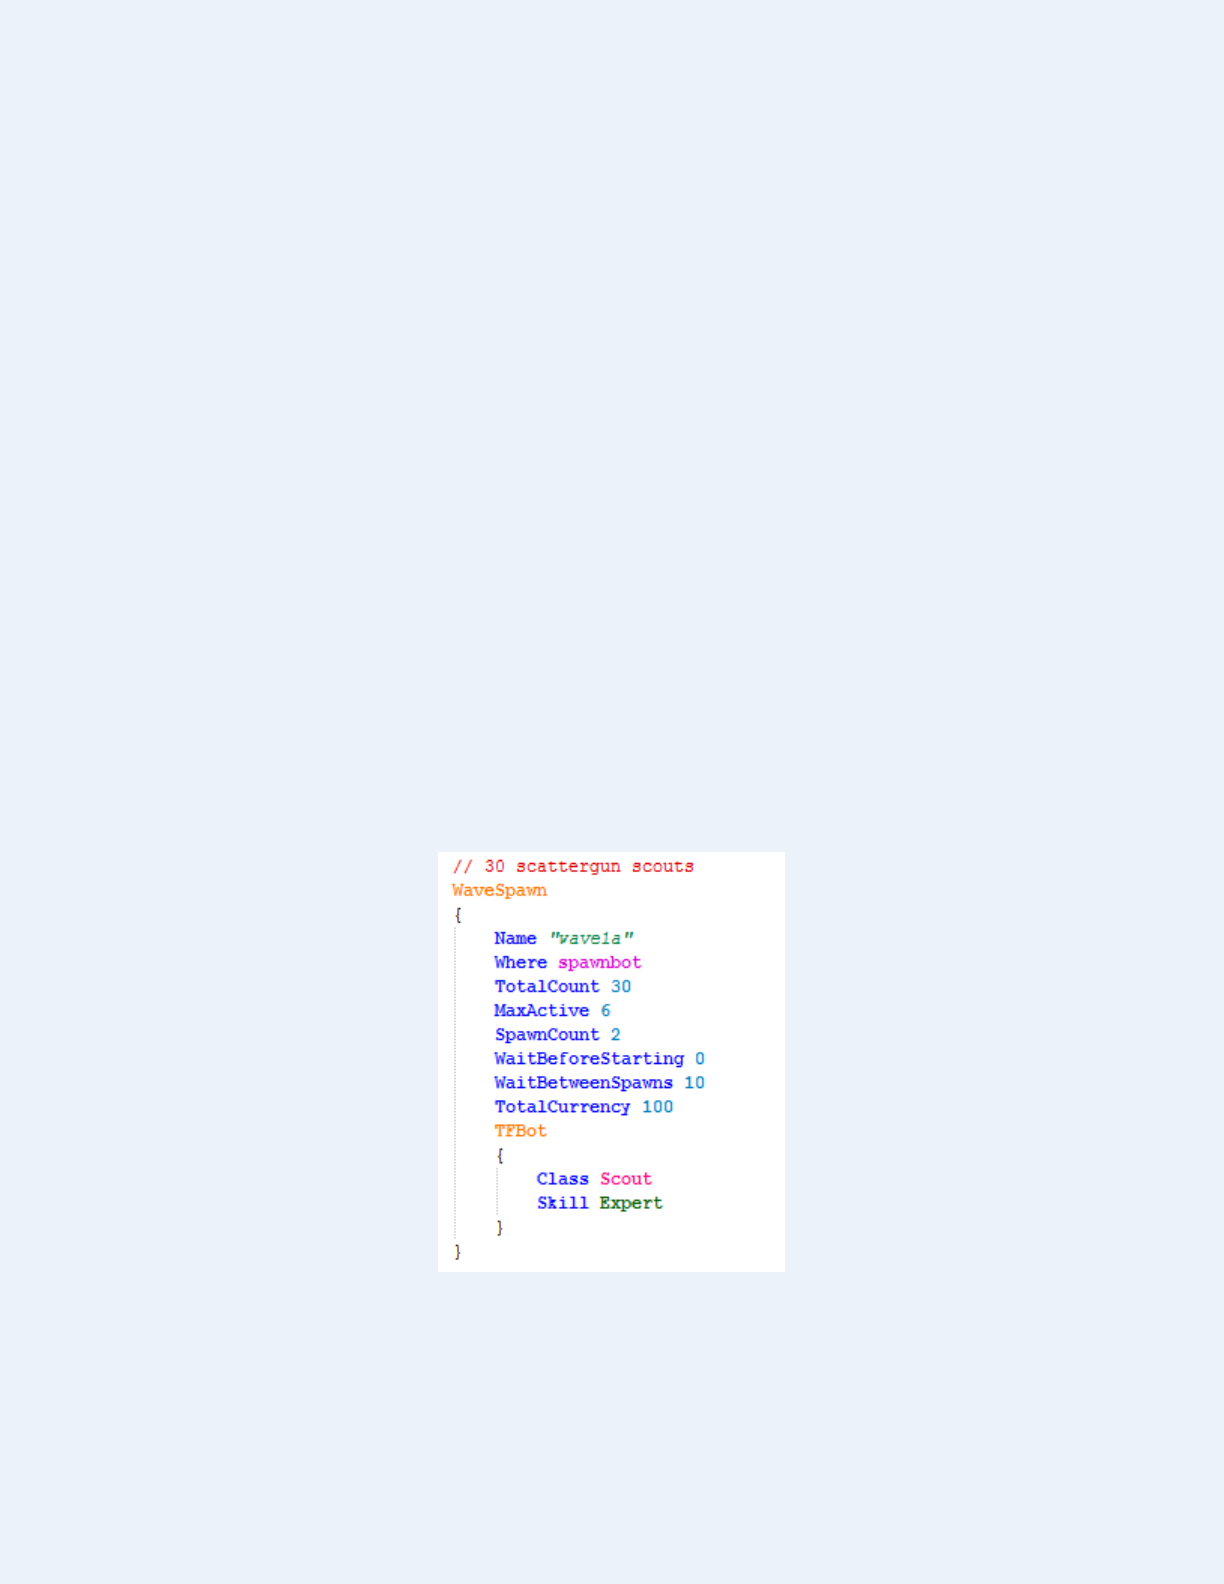
Here is the first wavespawn for this wave. I called it wave1a since it’s in wave 1 and it’s the first
wavespawn of wave 1. You can call your wavespawns whatever you want but if you stick to some
convention that works best for you, it will help you down the road when you tweak your pop file.
I set the MaxActive to be 6 since too many scattergun scouts can be overwhelming bullet spam. The
SpawnCount is 2 so that not too many of them spawn at once, and I only allow 6 of them to be alive at
once. The WaitBeforeStarting is 0 so that right when the wave starts there’s no awkward pause of nothing
spawning in. The WaitBetweenSpawns is 10 to avoid spamming the scattergun scouts in too much. These
decisions are what will help you pick (sane) values to use on the other properties of the wavespawn.

Operation Titanium Tank: A Guide to MvM Wave Writing
Page 24
The next wavespawn asks for 100 demoknights to spawn sporadically throughout the wave, so the
demoknights should have a decent cooldown time between spawns but also spawn enough of them so
they aren’t merely foddler bots.
Since most bot wavespawns share very similar code, I can just copy and paste wave1a’s wavespawn code
right below it and change some numbers and the TFBot template to construct wavespawn wave1b, instead
of typing out everything again. This copypasta technique will allow you to build waves rather quickly.
My wave1b looks like:
Next, my outline asks for 2 giant pyros with 4 medics on each:

Operation Titanium Tank: A Guide to MvM Wave Writing
Page 25
I was still able to copypasta most of the wavespawn, but instead of the TFBot at the bottom I had to put a
Squad in. Otherwise this wavespawn took about 15 seconds to code up.
I needed 2 squads of 1 giant pyro and 4 uber medics, which means there are 10 robots total, so my
TotalCount is 10. My MaxActive is 10 since I want to allow both squads to be out at once if the players
are too slow to kill the first squad. My SpawnCount is 5 since there are 5 members in the squad. I set
WaitBeforeStarting to be 30 since I didn’t want to drop the giant squad immediately on the players (I
wanted it to ramp up with the scatterguns, then the demoknights, and now the giant pyro). I set
WaitBetweenSpawns to 45 since giant robots require more effort to take down so I don’t want to
overwhelm players by spawning them quickly after each other.
These are all design decisions I made in my mind when picking those values. These are not hard rules to
good wave design; there are times where maybe you want to spawn both squads in at once (SpawnCount
10), like on opposite sides of the map or something. Maybe you don’t want the second giant pyro squad to
spawn until the first one is completely destroyed, so you would set MaxActive to 5 and lower the
WaitBetweenSpawns. However, this is the thinking you need to do to fill in those values.
Now my 4th wavespawn wants to spawn infinite support sandman scouts, but only after the scatterguns
are all dead. This wavespawn would look like:
The WaitForAllDead will wait for the bots on wave1a (the scattergun scouts) to die before this
wavespawn starts spawning robots. For Support 1 wavespawns, spawn bots in slowly and in small
quantities (set their MaxActive low as well), or else they will hog a significant number of server slots and
annoy players since support bots spawn forever and don’t count towards the overall wave progress.
There is no name given to this wavespawn since infinite support wavespawns cannot have any child
wavespawns dependent on it (since they never are deactivated; they never finish spawning). If you give a
name to this wavespawn and make other wavespawns wait for it to die or finish spawning, those
dependent wavespawns will never run since the support wavespawn never stops running. For best
practice, do not give support wavespawns a name to avoid hidden bugs with your waves.
The TotalCount decides how much money each robot will drop. Since it’s set to 25, the first 25 robots in
the support wavespawn will drop money at a rate of $4 per robot (since the TotalCurrency is 100). After
the first 25 robots spawn, additional robots will not drop any further money.
The next wavespawn asks for 35 crit soldiers to spawn after the giant pyros finish spawning. It doesn’t
want them to all die before the wavespawn starts – it just wants them to finish spawning. This means we
will be using a WaitForAllSpawned here. This wavespawn looks like:

Operation Titanium Tank: A Guide to MvM Wave Writing
Page 26
This wavespawn will wait for the last giant pyro squad to spawn in before starting. After that, it waits 15
seconds before spawning 4 crit soldiers at a time. It will spawn 4 crit soldiers every 10 seconds so long as
spawning 4 crit soldiers into the map doesn’t break the max limit of 8 crit soldiers alive at a time.
Our last wavespawn is to spawn 2 giant heavies after the giant pyros are dead. Unlike the crit soldier
wavespawn, this one uses a WaitForAllDead since this wavespawn will not start until the giant pyro
squads are destroyed. This wavespawn will look like this:
The MaxActive 1 will only allow 1 giant heavy to be alive at a time. The WaitBeforeStarting of 0 makes
the giant heavy spawn immediately after the last giant pyro squad is destroyed.
After all these wavespawns are defeated, the wave is declared complete and players move on to the next
wave (or the mission ends if there are no additional waves to move on to). There is an outline for wave 2
on page 3. As an exercise, try to build the wavespawns for wave 2 on your own. The solutions can be
found here, which includes the full pop file (the missions, wave 1, and wave 2). Do the coding yourself,
and then compare your work to the solutions to assess how well you understand constructing pop files.

Operation Titanium Tank: A Guide to MvM Wave Writing
Page 27
Testing:
So you outlined your waves and built the bot templates, missions, and wavespawns for all your waves.
Your next step is to test your creation. Although MvM is meant to be played with a team of 5-6 players, it
helps to do some basic testing on your end so that you avoid unnecessarily wasting players’ time with
problems you could have found out and fixed beforehand on your own.
Here are instructions to load your pop file in the game:
1. Navigate to your TF2 folder. You can find it by going to steam, right clicking Team Fortress 2,
click Properties, go to the Local Files tab, and click Browse Local Files…
2. Click on the tf folder, then click on the scripts folder. You should see an items_game.txt file.
3. Create a folder called population. Put your pop file in there. You can put your pop file there and
open it on notepad++ from there for quick updating.
4. Load TF2 and open the console (usually with the ` key).
5. Type “map <mapname>” where the mapname is the name of the MvM map you want to load.
For example: map mvm_dockyard_rc4
6. Once the map loads, pick a class and spawn into the map. You must do this, since the population
manager does not fully initialize until a player spawns into the map.
7. Go back to the console and type in “tf_mvm_popfile <mission_name>” where mission_name is
the file name of your pop file. Example: tf_mvm_popfile mvm_dockyard_rc4_cargo_collapse
(You can omit the mvm_dockyard_rc4 part and simply do tf_mvm_popfile cargo_collapse since
the server will append the map name behind it automatically if it isn’t specified.)
8. Your mission should load. Before you return to the game, check and make sure there are no errors
reported to the console. If there are, you will need to fix them on your pop file.
9. (Optional) If there are no errors, enter the following into your console:
sv_cheats 1 ; tf_bot_flag_kill_on_touch 1 ; host_timescale 10
This will make the game run 10x faster and make bots suicide if they touch the bomb. If tanks
spawn, however, you will need to destroy them yourself or use ent_remove on them. You can
also kill all the bots on the map (so long as they aren’t in their spawnroom) using tf_bot_kill all
Alternatively, use currency_give and addcond commands (with sv_cheats 1) to give yourself
money, crits, uber, and other effects, and play the waves solo from start to finish. In any case,
make sure all the bots spawn on your waves the way you want them to.
10. Test your mission with other players under normal vanilla MvM circumstances. This testing will
give you an idea on the pace of your mission, how balanced it is, how long it takes to finish, and
how fun players perceive your mission to be. Expect to change stuff like WaitBeforeStarting,
WaitBetweenSpawns, TotalCount, MaxActive, SpawnCount often based on testing results.
Operation Titanium Tank: A Guide to MvM Wave Writing
Page 28
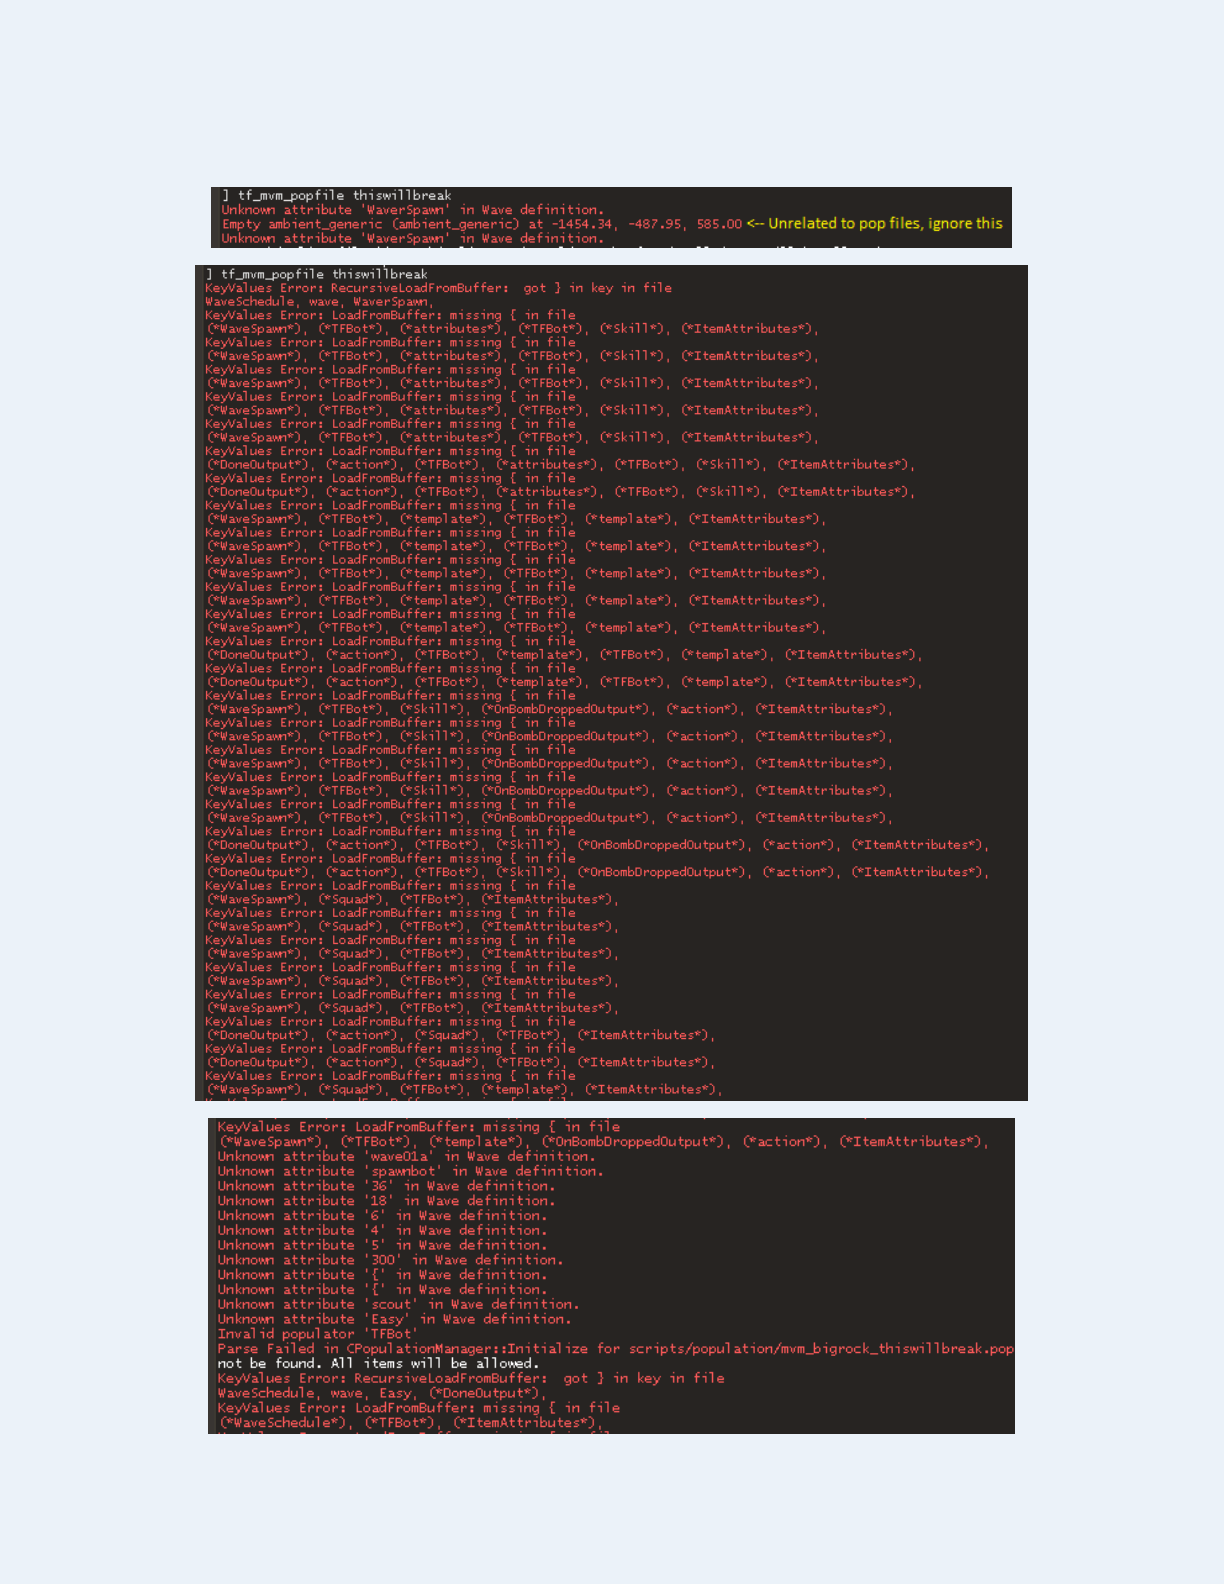
Examples of syntax errors in the console:

Operation Titanium Tank: A Guide to MvM Wave Writing
Page 29
Common Syntax Errors:
The console spew may look scary but the cause of that is usually a minor error. Basically, the keyvalues
parser misunderstood your pop file since you made a mistake in the syntax, and is thus going “wait what
is this?” “this isn’t right?” “what am I looking at” and so on. Common culprits are:
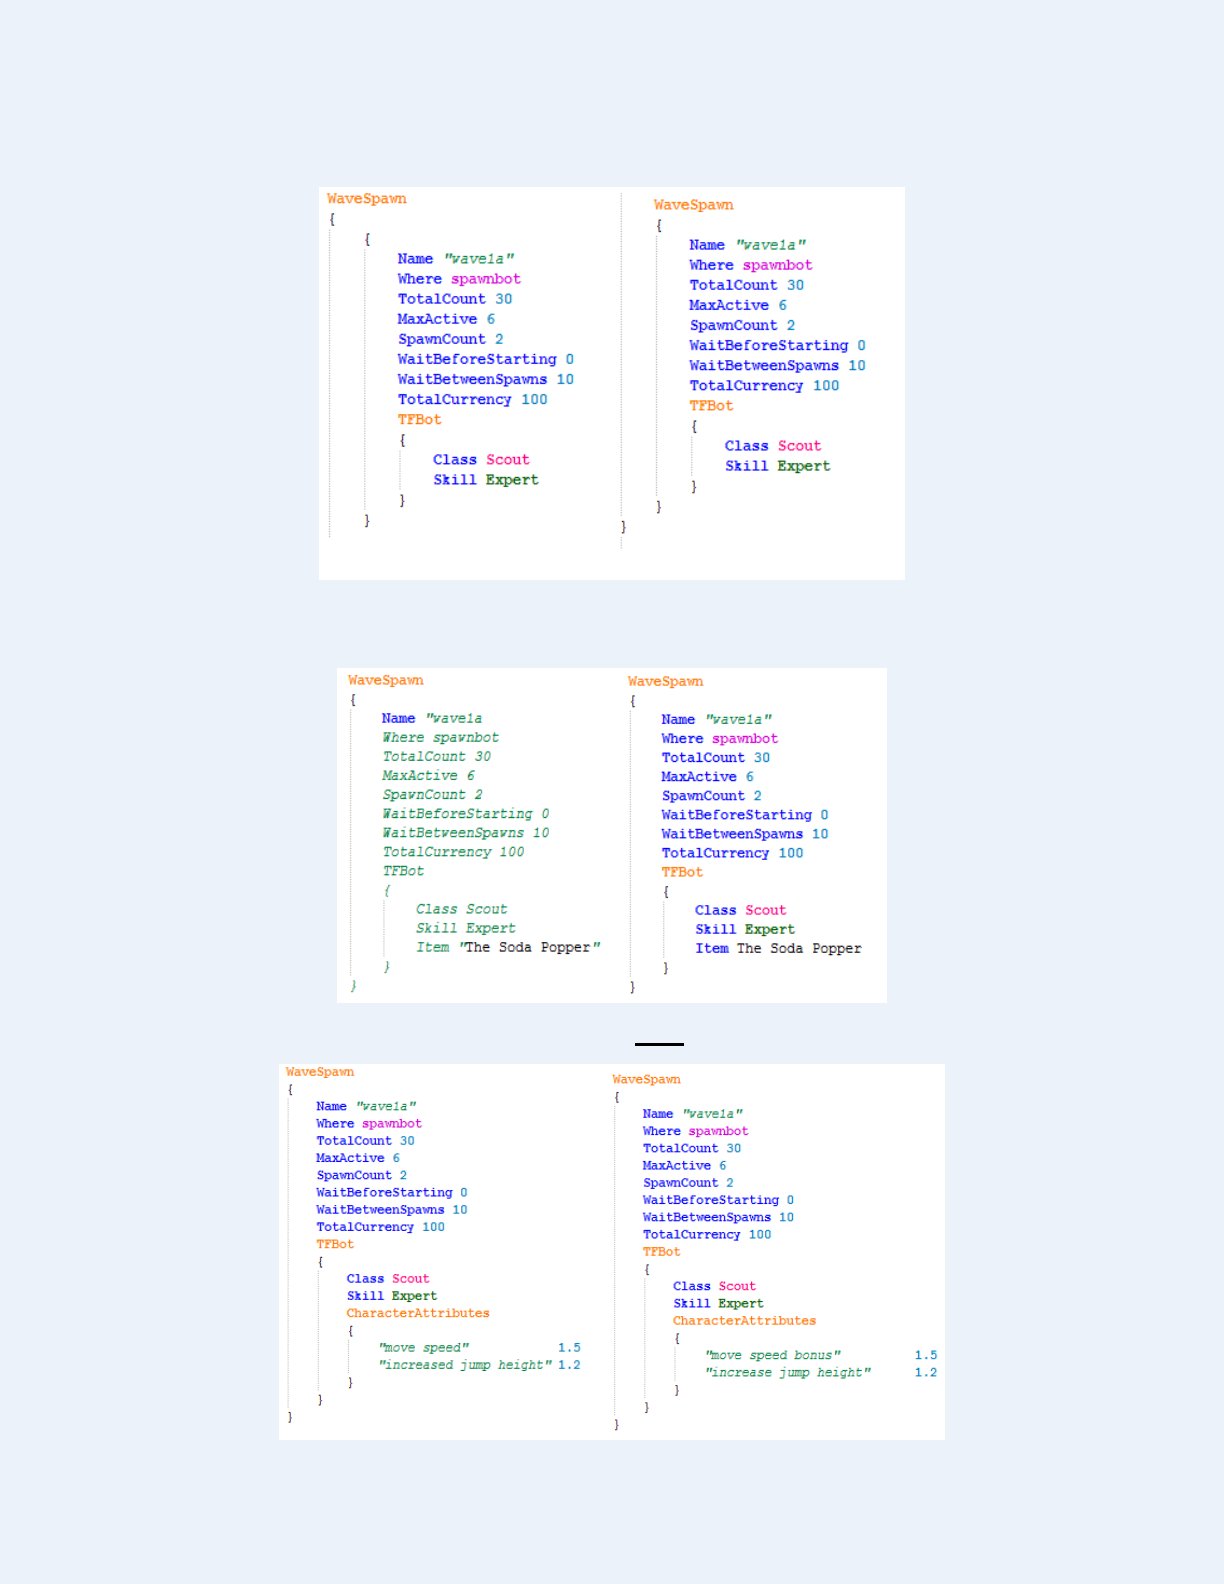
- Forgetting an open or close brace:
- Forgetting to specify a value to a key or removed space between the key-value pair:
- Incorrectly spelling keywords:
Operation Titanium Tank: A Guide to MvM Wave Writing
Page 30
- Too many open or closing braces
- Incorrect number of quotation marks. Quotation marks are mandatory for values that have more than
one word (like “The Soda Popper” below).
- Invalid item or attribute names. They must use the exact spelling as listed in items_game.txt.

Operation Titanium Tank: A Guide to MvM Wave Writing
Page 31
Common Semantic Errors:
- Absolutely make sure the console does not report any keyvalue errors when you load your pop
file. If it does, you must address them first, or else syntax errors may cause some of the strange
behavior mentioned below which will make your debugging even more painful.
- If there is a checkerboard icon on the wave HUD, check your console. If it says “Missing Vgui
material vgui/../hud/leaderboard_class_iconname” then you either misspelled your class icon
name or the icon is not in your game files (it should be placed in tf/materials/hud or
tf/download/materials/hud).
- If the wave hangs up (stops spawning robots, only support bots are spawning, etc) then these are
the possible causes to investigate:
o Check for every WaveSpawn and Mission you specify the Where property (the name of
the spawn point the bots should use). If you do not specify the spawn point name, the
server will not spawn those robots anywhere.
o Check that your SpawnCount is not higher than your MaxActive. If it is, then the
wavespawn will not spawn anything since when it tries to spawn the SpawnCount
number of bots, it exceeds the wavespawn’s MaxActive so it halts.
o The server allocates 22 player slots for bots (it’s like a global MaxActive across all
wavespawns). Similar to the above bug, if there are too many bots out at once, and a
wavespawn needs to spawn more bots but it would break the 22 bot limit (even if it
doesn’t break its own MaxActive limit), it won’t spawn any bots in.
Wavespawns with large SpawnCount values (typically large squads) are prone to getting
trapped by this bug. The most common cause of this is that the infinite support occupies
too many bot slots, so you may need to lower its MaxActive or SpawnCount, or raise its
WaitBetweenSpawns (or do a combination of that).
o Make sure you do not have any wavespawns that have a WaitForAllDead/Spawned on a
Support 1 wavespawn. If you do, the wave will hang up because that child wavespawn
will never begin, since Support 1 wavespawns never are dead and never finish spawning.
- If a wave suddenly finishes despite the wave HUD and wave bar showing many bot icons, you
have a circular reference of wavespawns that are waiting on each other. An example of this is
wavespawn A waits for wavespawn B to finish, wavespawn B waits for wavespawn C to finish,
and wavespawn C waits for wavespawn A. Since all 3 are waiting for each other and none of
them can ever run, the server ignores all 3 wavespawns, which may cause the wave to end early.
- You may load a pop file and see that it features 38 giant pyros, even though your pop file has 3
giant pyros and 35 small pyros. This is because the two pyro templates share the same icon, so the
game adds 3 + 35. The special effects on the wave HUD, like the red background and crit glow,
are shown based on the icon’s bitflags. Since both pyros share the same icon, the giant pyros
assign the red background flag to the icon, which makes all 38 pyros appear giant on the HUD.

Operation Titanium Tank: A Guide to MvM Wave Writing
Page 32
Conclusion:
Pop file writing is not a difficult task, but like all things in life it takes practice to become comfortable at
it. The challenge in designing MvM missions is not so much dealing with the syntax of pop files, but
trying to create balanced, fun, and appropriately long waves.
Playing missions of pre-existing MvM missions (be it Valve or community) can give you inspiration and
ideas on how to make a good MvM mission. Keep in mind that every mission has flaws (including Valve
missions), so the challenge is to also detect the sore spots (bad design decisions) in a mission and avoid
making those errors in your own mission.
For the syntax, if you want more information on what you can do with pop files, look at the in-game
Valve pop files (found inside tf_scripts_dir.vpk) or pop files made by other community members. There
isn’t a whole lot more to the syntax that isn’t covered here; you will find that you will only use 60-70% of
all the features available in pop files in your mission.
The best way to learn pop files is by trial and error. This guide says a lot of things, but the only way to
really learn is to do it yourself. Take the example pop file you made and change some things. Try making
a large squad. Try making your own robot with special attributes. Try fiddling with the numbers (timing,
money dropped, etc). The best way to learn is to try something and see how it changes what happens in
the game. Do that enough times, and eventually all the puzzle pieces will come together to help you make
your own mission. This guide is only good as a quick reference for something but not so much a tutorial.
If you have any questions about wave design, pop file syntax, debugging your mission or need testing for
your mission, feel free to ask in the steam group forums or hop in the group chat.
If you want the syntax highlighter used in the screenshots, check our GitHub repository here. You can
tweak the colors and add keywords by editing the XML file by hand or using the given program.
If there are any mistakes, typos, grammar/punctuation issues or the like, let us know in the group chat and
we’ll correct them. Thanks!
Good luck!
- Hydrogen
Owner of Potato’s MvM Servers
