Power Mouse Manual English Ver0107
User Manual: Pdf Manuals • LXNAV Gliding
Open the PDF directly: View PDF ![]() .
.
Page Count: 18

PowerMouse Version 1.07 April 2018
Page 2 of 18
1 Important Notices 3
1.1 Limited Warranty 3
2 Packing Lists 4
3 Basics 5
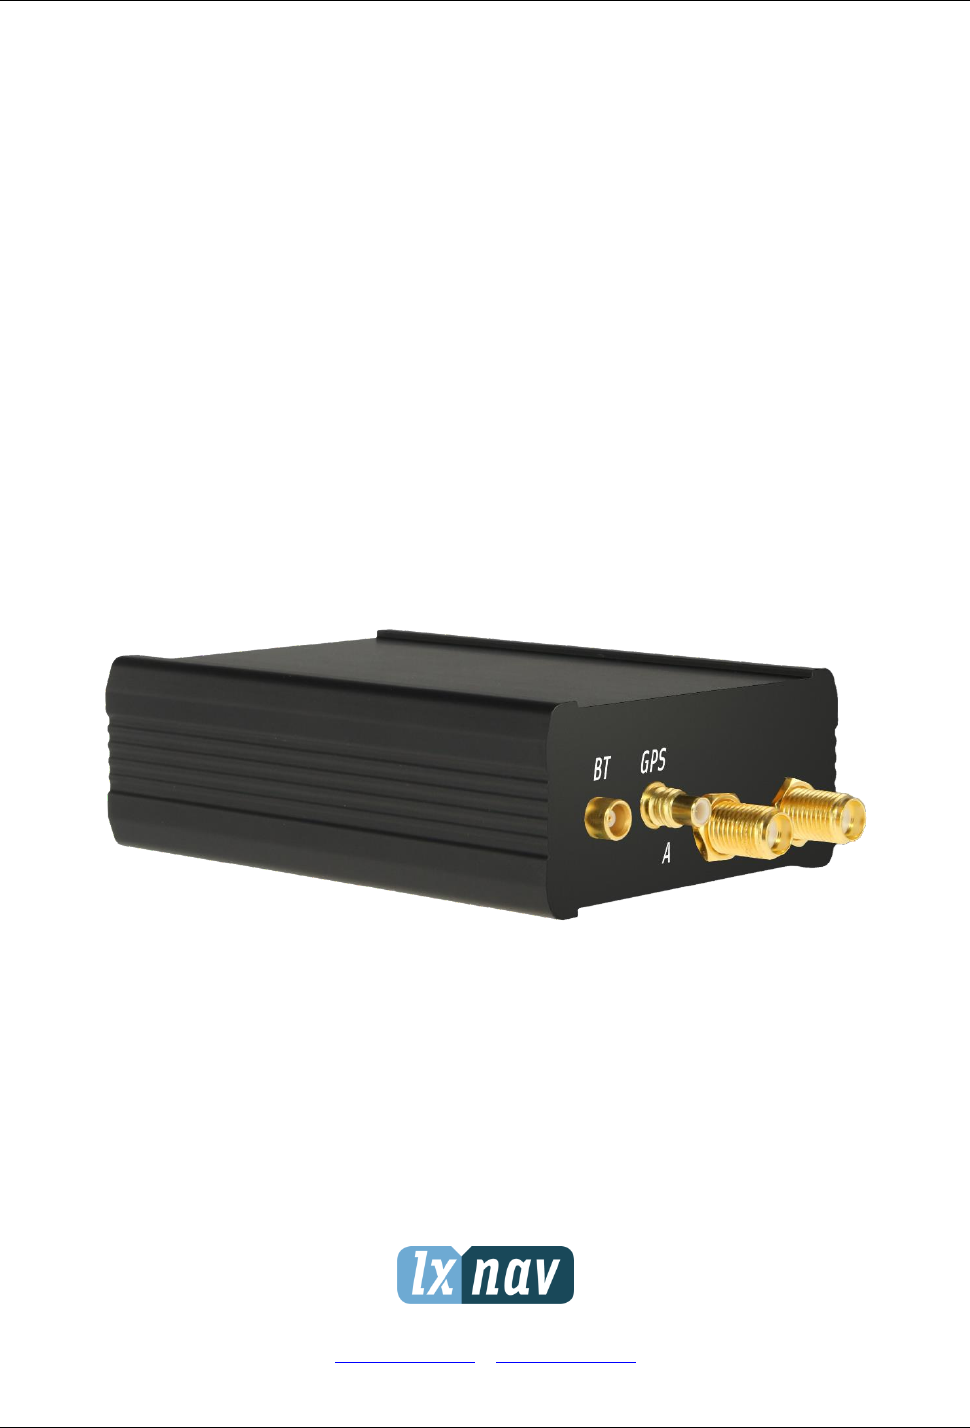
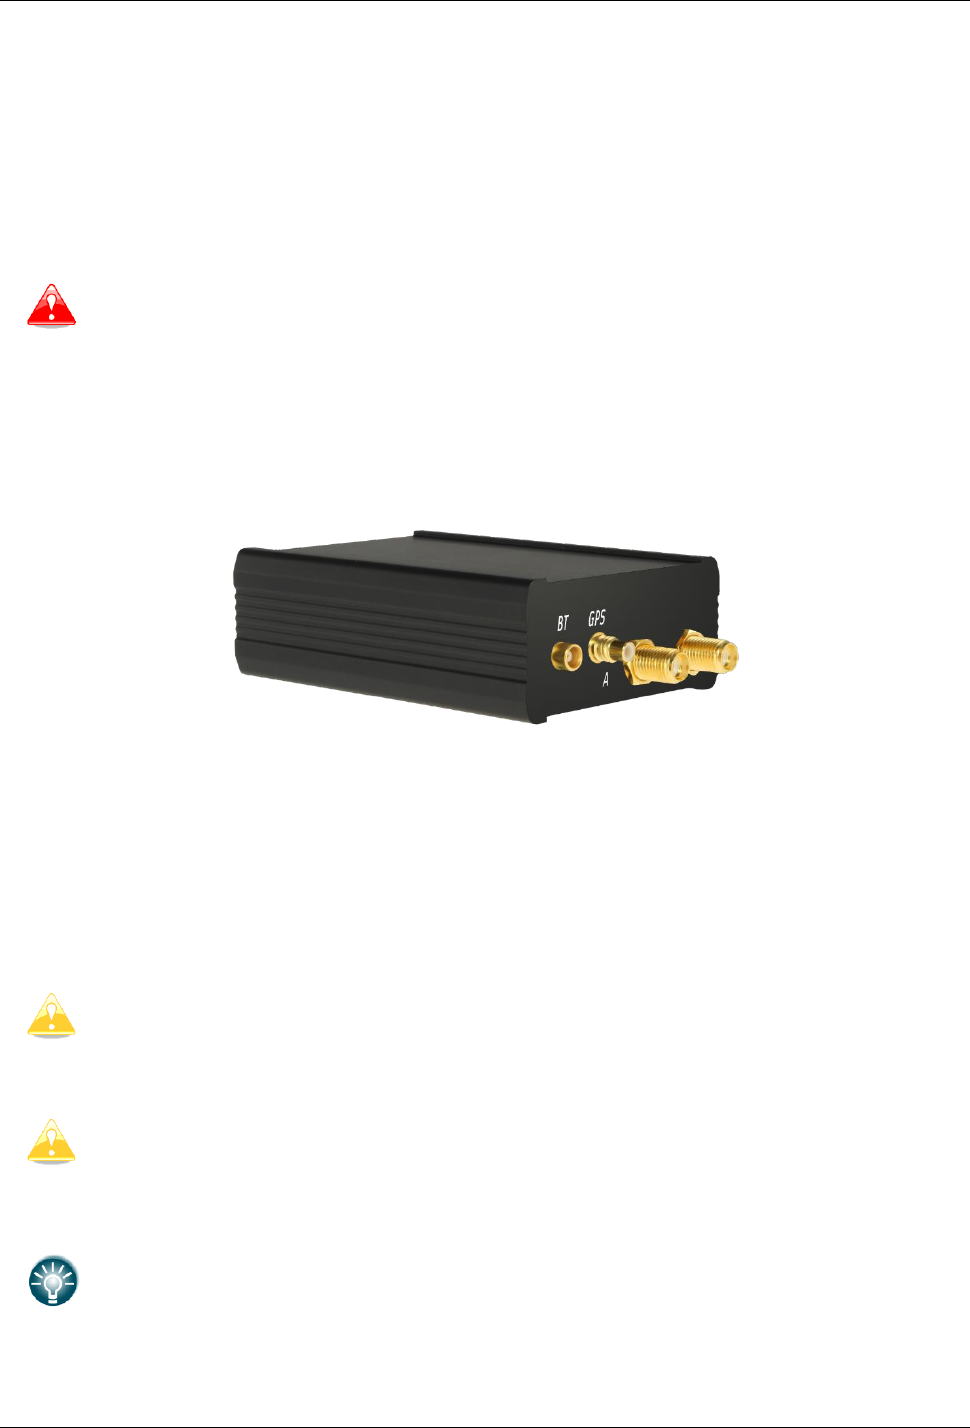
3.1 LXNAV PowerMouse at a Glance 5
3.1.1 LXNAV PowerMouse Features 6
3.1.2 Interfaces 6
3.1.3 Options 6
3.1.4 Technical Data 6
4 System Description 7
4.1 Switching on the Unit 7
4.2 Normal operation 7
4.3 Bluetooth 7
5 Installation 8
5.1 Connecting LXNAV PowerMouse 8
5.2 Connecting Antennas 8
5.3 USB port 9
5.4 Wiring 9
5.4.1.1 PowerMouse PORT1 and PORT2 pinout (RJ45) 9
5.4.1.2 PowerMouse RF connector side description 10
5.4.1.3 PowerMouse – FlarmView 10
5.4.1.4 PowerMouse – FlarmLED 11
5.4.1.5 PowerMouse – FlarmLED – Oudie 11
5.4.1.6 PowerMouse – FlarmView – Sxxx Vario 12
5.4.1.7 PowerMouse – LX9xxx – FlarmView 12
6 Firmware Update 13
6.1 Firmware update via USB port (USB stick) 13
6.2 Change PowerMouse settings 13
6.3 PowerMouse configuration by using FlarmTool 14
6.4 Saving flight on the USB stick 17
7 Revision History 18

PowerMouse Version 1.07 April 2018
Page 3 of 18
1 Important Notices
The LXNAV PowerMouse system is designed for VFR use only as an aid to prudent navigation. All
information is presented for reference only.
Information in this document is subject to change without notice. LXNAV reserves the right to
change or improve their products and to make changes in the content of this material without
obligation to notify any person or organisation of such changes or improvements.
A Yellow triangle is shown for parts of the manual which should be read carefully
and are important for operating the LXNAV PowerMouse system.
Notes with a red triangle describe procedures that are critical and may result in loss
of data or any other critical situation.
A bulb icon is shown when a useful hint is provided to the reader.
1.1 Limited Warranty
This LXNAV PowerMouse product is warranted to be free from defects in materials or workmanship
for two years from the date of purchase. Within this period, LXNAV will, at its sole option, repair or
replace any components that fail in normal use. Such repairs or replacement will be made at no
charge to the customer for parts and labour, the customer shall be responsible for any transportation
cost. This warranty does not cover failures due to abuse, misuse, accident, or unauthorised
alterations or repairs.
THE WARRANTIES AND REMEDIES CONTAINED HEREIN ARE EXCLUSIVE AND IN LIEU OF ALL
OTHER WARRANTIES EXPRESSED OR IMPLIED OR STATUTORY, INCLUDING ANY LIABILITY
ARISING UNDER ANY WARRANTY OF MERCHANTABILITY OR FITNESS FOR A PARTICULAR
PURPOSE, STATUTORY OR OTHERWISE. THIS WARRANTY GIVES YOU SPECIFIC LEGAL RIGHTS,
WHICH MAY VARY FROM STATE TO STATE.
IN NO EVENT SHALL LXNAV BE LIABLE FOR ANY INCIDENTAL, SPECIAL, INDIRECT OR
CONSEQUENTIAL DAMAGES, WHETHER RESULTING FROM THE USE, MISUSE, OR INABILITY TO
USE THIS PRODUCT OR FROM DEFECTS IN THE PRODUCT. Some states do not allow the exclusion
of incidental or consequential damages, so the above limitations may not apply to you. LXNAV
retains the exclusive right to repair or replace the unit or software, or to offer a full refund of the
purchase price, at its sole discretion. SUCH REMEDY SHALL BE YOUR SOLE AND EXCLUSIVE
REMEDY FOR ANY BREACH OF WARRANTY.
To obtain warranty service, contact your local LXNAV dealer or contact LXNAV directly.
April 2018 © 2018 LXNAV. All rights reserved.

PowerMouse Version 1.07 April 2018
Page 4 of 18
2 Packing Lists
• PowerMouse
• Dipole FlarmAntenna
• 2nd Dipole FlarmAntenna is optional
• USB stick
• Flarm power supply cable
• FlarmView/FlarmLED (Optional)

PowerMouse Version 1.07 April 2018
Page 5 of 18
3 Basics
3.1 LXNAV PowerMouse at a Glance
PowerMouse is standalone PowerFlarm® with external GPS antenna, USB socket and internal
Bluetooth module.
It’s a collision avoidance device, designed for gliders as well as for other participants in the air.
FLARM® is in widespread use and features include:
• Display of nearby Flarm traffic with warning visually and acoustically of approaching other
aircraft or fixed obstacles (where database has been installed)
• intelligent motion prediction which minimizes nuisance alarms and supports situational
awareness
• integration with over 50 compatible products by other manufacturers (e.g. PDA moving maps)
through open serial port protocol
• USB socket for easy uploads and downloads, IGC-format flight recording and OLC-approval
• based on award-winning original FLARM® design, endorsed by FAI, IGC/OSTIV and EASA
(AMC Part 21, Part M)
• optional diamond-level IGC-approval with/without engine noise sensor (ENL)
• a typical radio range that can be verified with online radio range analyser
• powerful 72-channel high-precision uBlox NEO8-GPS module
• full compatibility with wide range of Flarm-licensed products
• operation on a license-free radio band, not based on transponder technology
• small size and simple installation
PowerMouse is available in 4 variants:
1. PowerMouse with Flight recorder (Not approved by IGC), with enabled SAR (search and
rescue) function
2. PowerMouse with IGC approved Flight recorder (Up to Diamonds) and SAR function
3. PowerMouse with IGC approved Flight recorder (Up to Diamonds), Engine noise sensor and
SAR function
4. RFB – second Flarm antenna (dual antenna diversity) -available for all versions (Not IGC, IGC
and IGC ENL)

PowerMouse Version 1.07 April 2018
Page 6 of 18
3.1.1 LXNAV PowerMouse Features
• USB stick socket for configuration of Flarm, firmware update or storing IGC flights
• IGC flight recorder (Up to Diamond level)
• Optionally preloaded obstacles (where databases are available) – Obstacles are not any freer
of charge.
• Expandable to all standard Flarm displays
• Designed for FlarmView
• Low current consumption
• Second Flarm antenna
3.1.2 Interfaces
• Two Standard Flarm/IGC port on RJ45 with serial RS232 interface
• USB Port
• Bluetooth
Default baud rate of PowerMouse is set to 19200bps. In case, that you have any
problems with Flarm indicator (FlarmView), please check baud rate setting on it.
3.1.3 Options
One or more external Flarm Displays can be connected (FlarmView/FlarmLED)
3.1.4 Technical Data
• Power input 8-36 V DC
• Consumption 1.02W (85mA @12V) excl. power for USB stick
• Weight 160 g
• 55mm x 90mm x 25mm

PowerMouse Version 1.07 April 2018
Page 7 of 18
4 System Description
4.1 Switching on the Unit
Unit is switched on automatically, when it gets valid power supply from either PORT1 or PORT2 RJ45
connector.
4.2 Normal operation
PowerMouse goes into normal operating mode, when it receives signals from enough GPS satellites.
Then the device becomes visible to and receives data from other FLARM devices.
4.3 Bluetooth
To connect to the PowerMouse via Bluetooth, you must search on a PDA/Smartphone for Bluetooth
enabled devices in range. Click PAIR or CONNECT to connect to the PowerMouse. Device will appear
as LXNAV-FPM-(5-digit serial). Device doesn’t require any pairing password.
Bluetooth is always ON and cannot be configured. Purpose of Bluetooth is to send Flarm objects to
the other Bluetooth device.
PowerMouse Version 1.07 April 2018
Page 8 of 18
5 Installation
PowerMouse can be installed behind the instrument panel.
5.1 Connecting LXNAV PowerMouse
LXNAV PowerMouse is connected to DC power supply using PF POWER 12 VDC cable. Red wire goes
to + positive and blue wire goes to – ground.
External indicator can be connected via a splitter or directly to the other port.
Instrument has no internal fuse. 3A external fuse is required!
5.2 Connecting Antennas
PowerMouse has 4 connectors for different antennas. Two SMA connectors (A and B) are for Flarm
Antennas. GPS connector serves for GPS antenna and BT connector for Bluetooth antenna.
Following Flarm Antennas are available:
• Short Dipole (90°) lambda/4
• Long dipole (90°) lambda/2
• Flat folded dipole
• Classic dipole
• Antenna with ground plate
For better range, Flarm antennas must be positioned vertically.
For additional information about installation you may have a look at:
https://flarm.com/wp-content/uploads/man/FTD-041-Application-Note-FLARM-
Antenna-Installation.pdf
1x Flarm Flat dipole antenna is included in the package.
When you buy RFB option, the second Flat dipole antenna is included as well.
PowerMouse Version 1.07 April 2018
Page 9 of 18
5.3 USB port
USB port serves as a SD card on other Flarm devices (FlarmMouse).
Advantage of the USB is, that you can install PowerMouse behind the panel and connect USB
extension cable to the front panel.
User can use it for:
• Updating PowerMouse
• Changing PowerMouse settings (flarmcfg.txt)
• Downloading flights
USB is active only when the device is powered ON.
5.4 Wiring
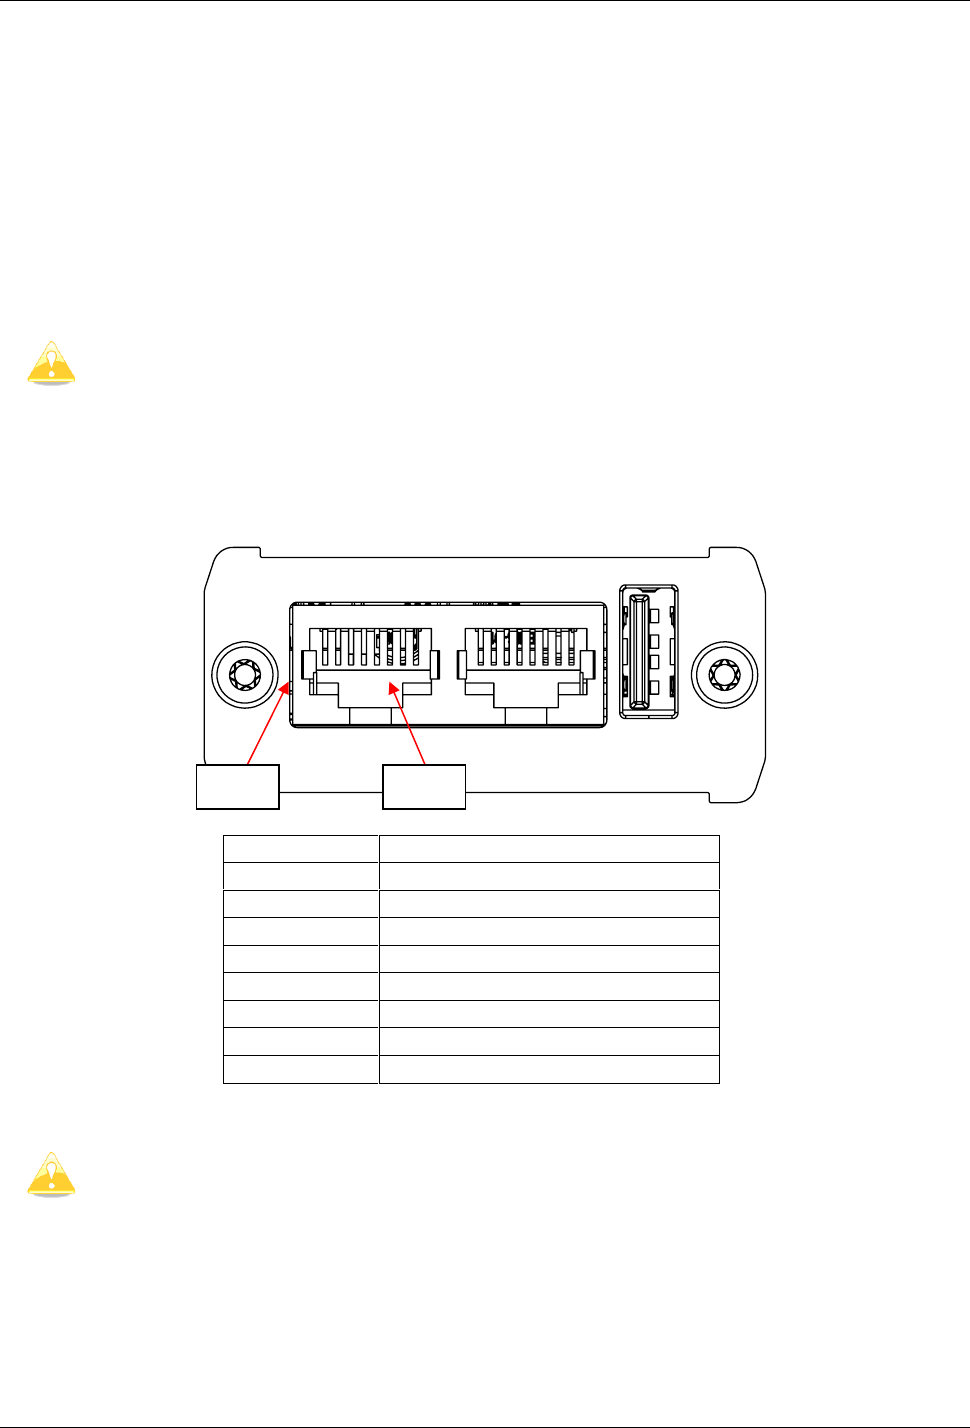
5.4.1.1 PowerMouse PORT1 and PORT2 pinout (RJ45)
Pin number
Description
1
+ Power input
2
+ Power input
3
3.0V Indicator power output
4
Ground
5
Data output (TX)
6
Data input (RX)
7
- Power input
8
- Power input
Pins 1 and 2 of PORT1 and PORT2 are connected together internally.
Pins 7 and 8 of PORT1 and PORT2 are connected together internally.
Pin 8
Pin 1
PowerMouse Version 1.07 April 2018
Page 10 of 18
5.4.1.2 PowerMouse RF connector side description
Connector description
Connector type
Bluetooth Antenna port
MCX
GPS Antenna port
SMC
PowerFLARM Port A
SMA
PowerFLARM Port B
SMA
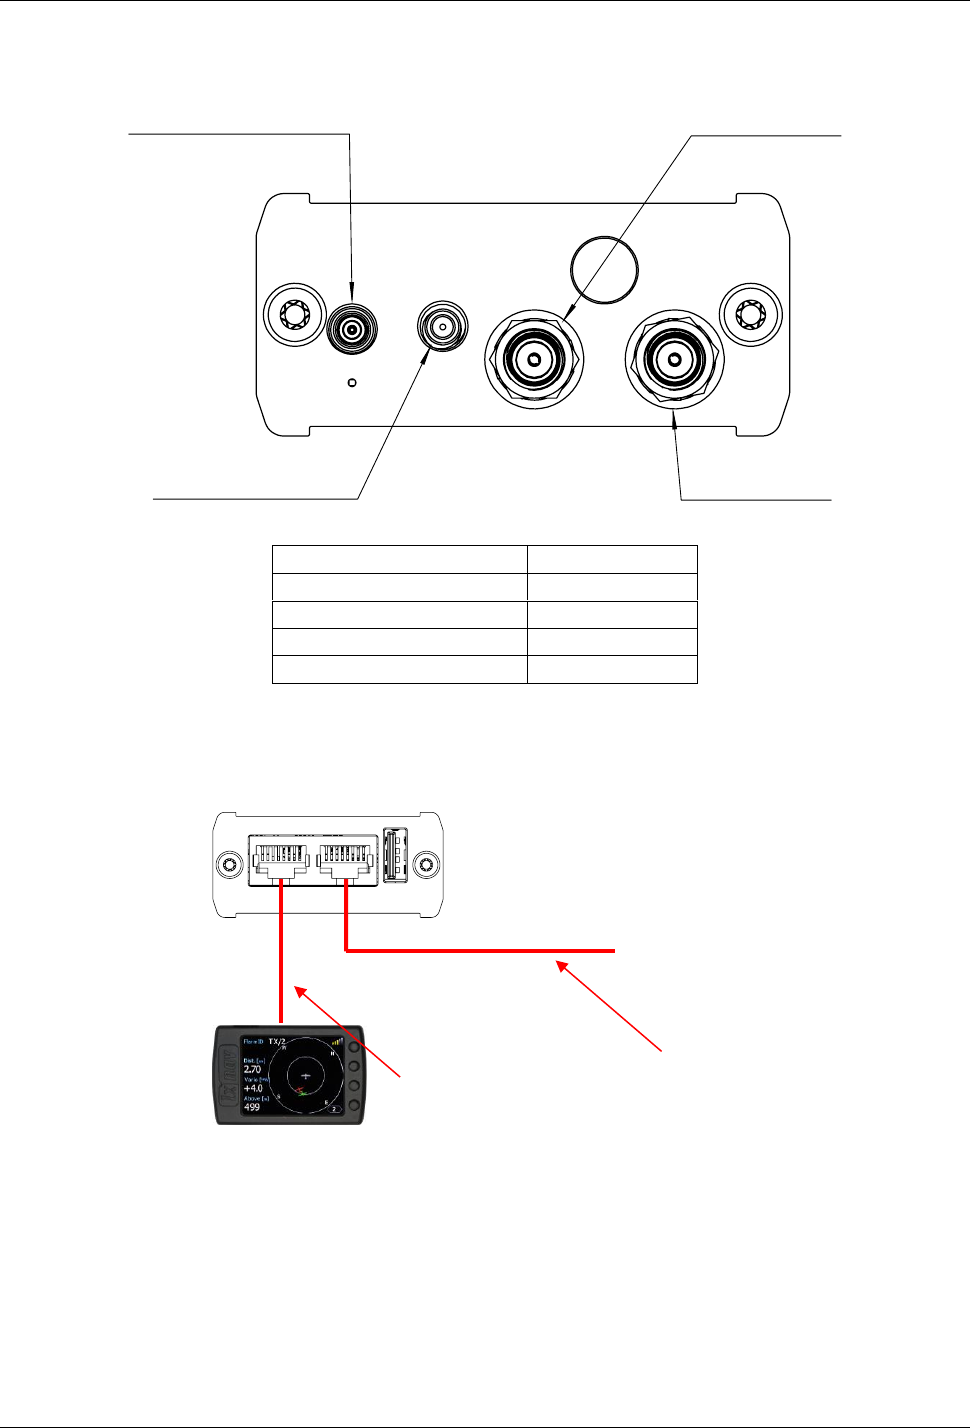
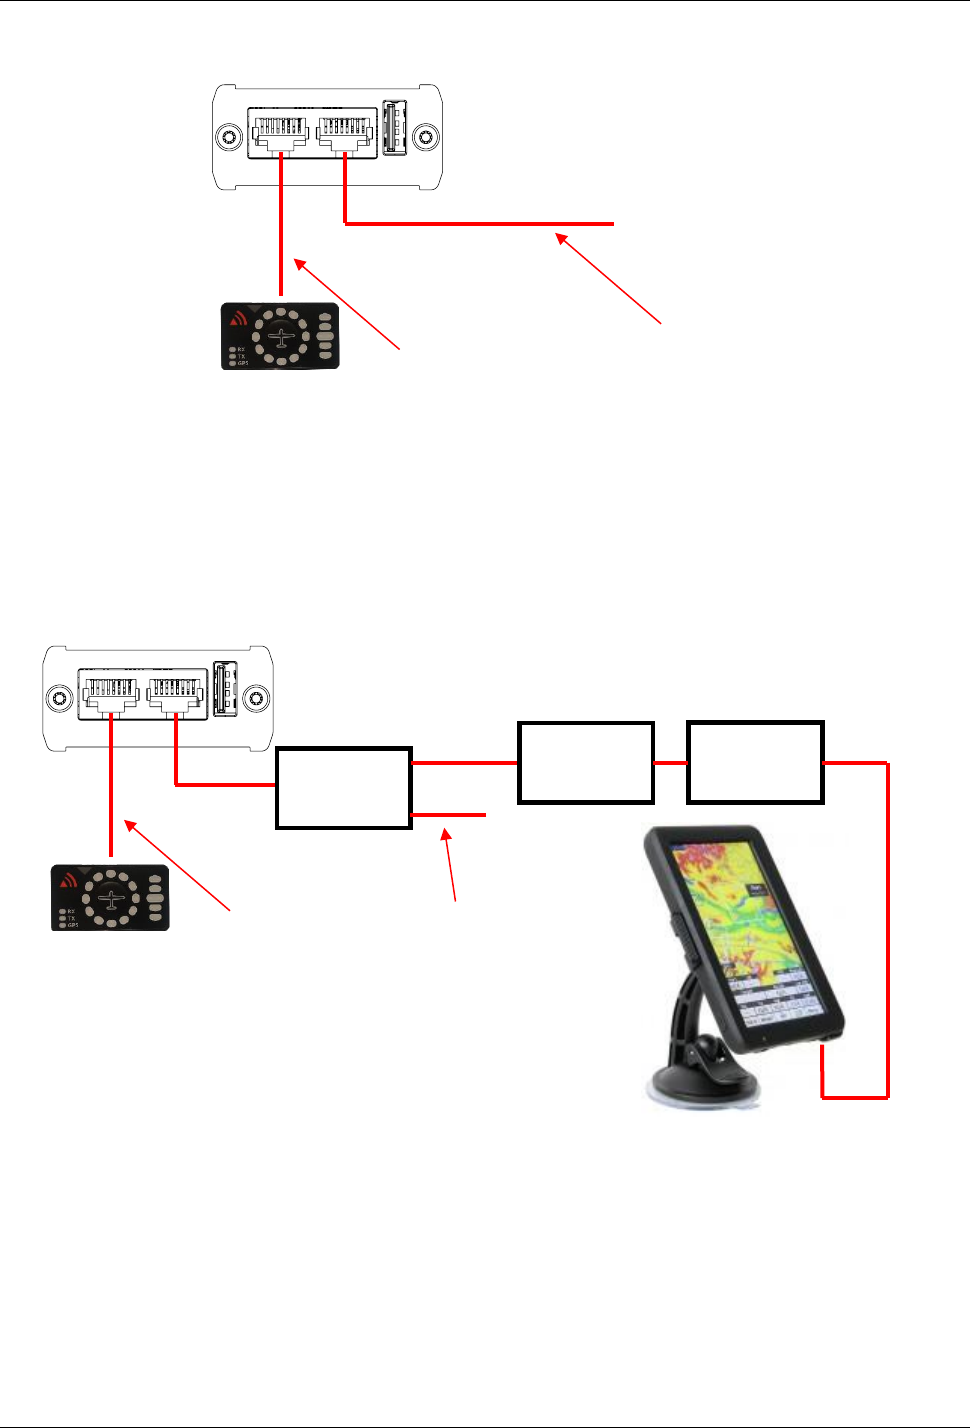
5.4.1.3 PowerMouse – FlarmView
PowerFLARM
Port A
PowerFLARM
Port B
GPS Antenna port
Bluetooth Antenna
port
FlarmView
FlarmView
cable
PF POWER
12VDC cable
PowerMouse Version 1.07 April 2018
Page 11 of 18
5.4.1.4 PowerMouse – FlarmLED
5.4.1.5 PowerMouse – FlarmLED – Oudie
FlarmLED
FlarmView
cable
PF POWER
12VDC cable
FlarmLED
FlarmView
cable
PF POWER
12VDC cable
Flarm
Splitter
RJ gender
changer
Oudie
power
OUDIE
PowerMouse Version 1.07 April 2018
Page 12 of 18
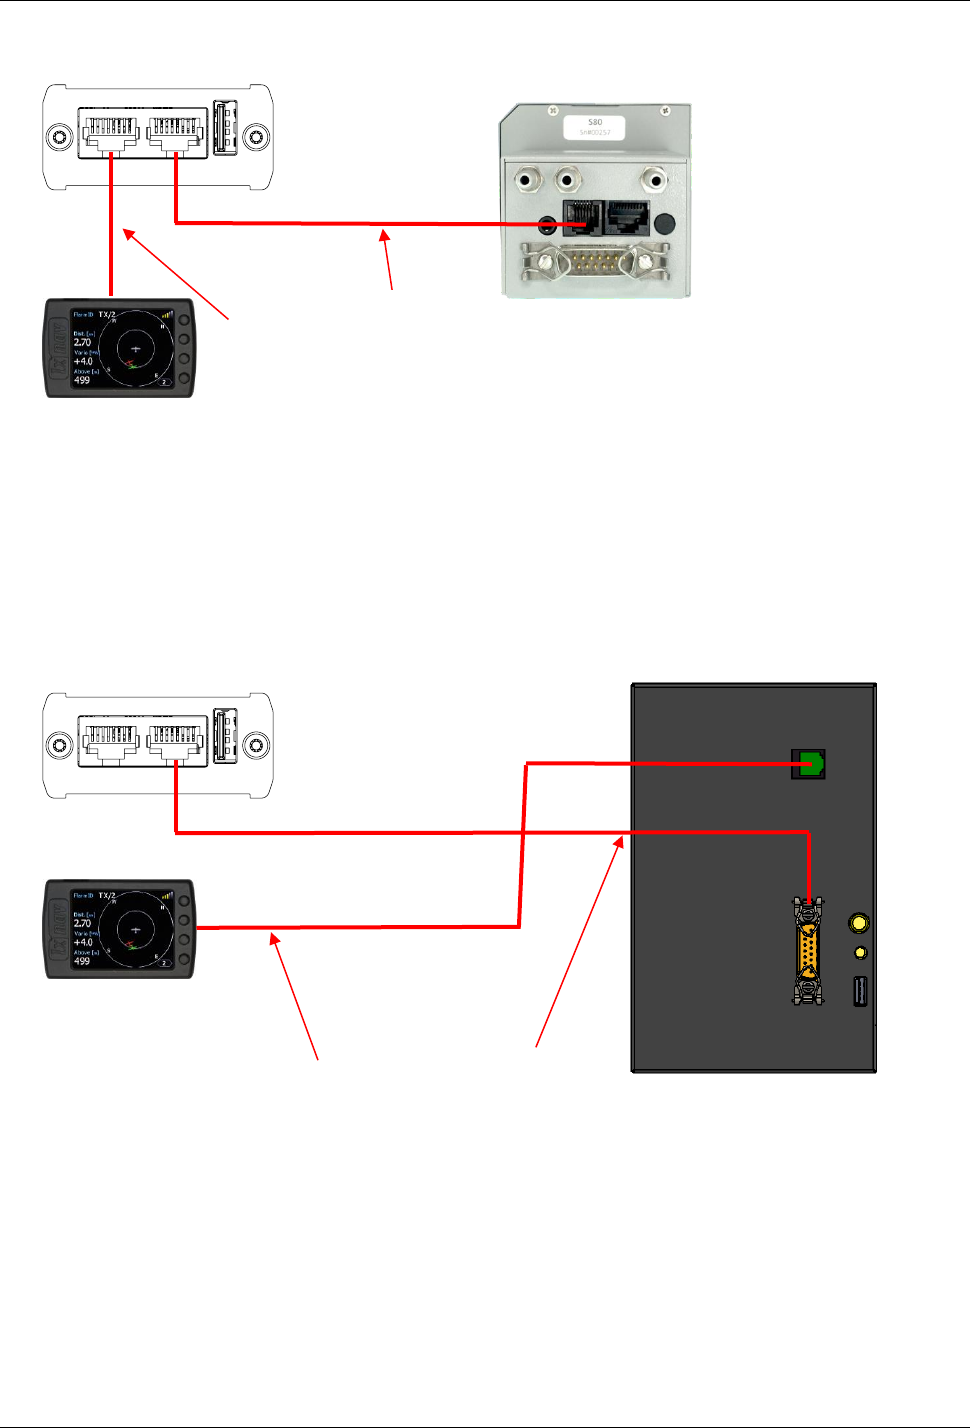
5.4.1.6 PowerMouse – FlarmView – Sxxx Vario
5.4.1.7 PowerMouse – LX9xxx – FlarmView
FlarmView
FlarmView
cable
LX5PF cable
LXxxxx
FlarmView
FlarmView
cable
S7-GPS-PF
GPS port of
S8x/S10x/S7 vario
PowerMouse Version 1.07 April 2018
Page 13 of 18
6 Firmware Update
6.1 Firmware update via USB port (USB stick)
This Method is the easiest one and therefore preferred. The firmware update will be executed, when
the system finds the file named flarm_x*.fw (x= version nr.) on the USB stick root. This file can be
downloaded at www.flarm.com.
Update procedure:
• Switch off the Flarm and insert the USB stick.
• Now switch on the device
• The procedure will start automatically, it takes about one minute.
• When ready, switch off the Flarm
• Please delete the firmware file from the USB stick after the update
Updating the obstacle database:
The firmware update will be executed, when the system finds a file with the extension *.obs. on
the USB stick root. The procedure runs identically to the firmware update and takes a few minutes.
Please delete the obstacle file from the USB stick after the update.
All data must be in the USB stick root directory. Folders and subfolder are not allowed. Names of
the files shall not be changed.
FLARM Tools is used only for Classic FLARM and in not compatible with PowerMouse.
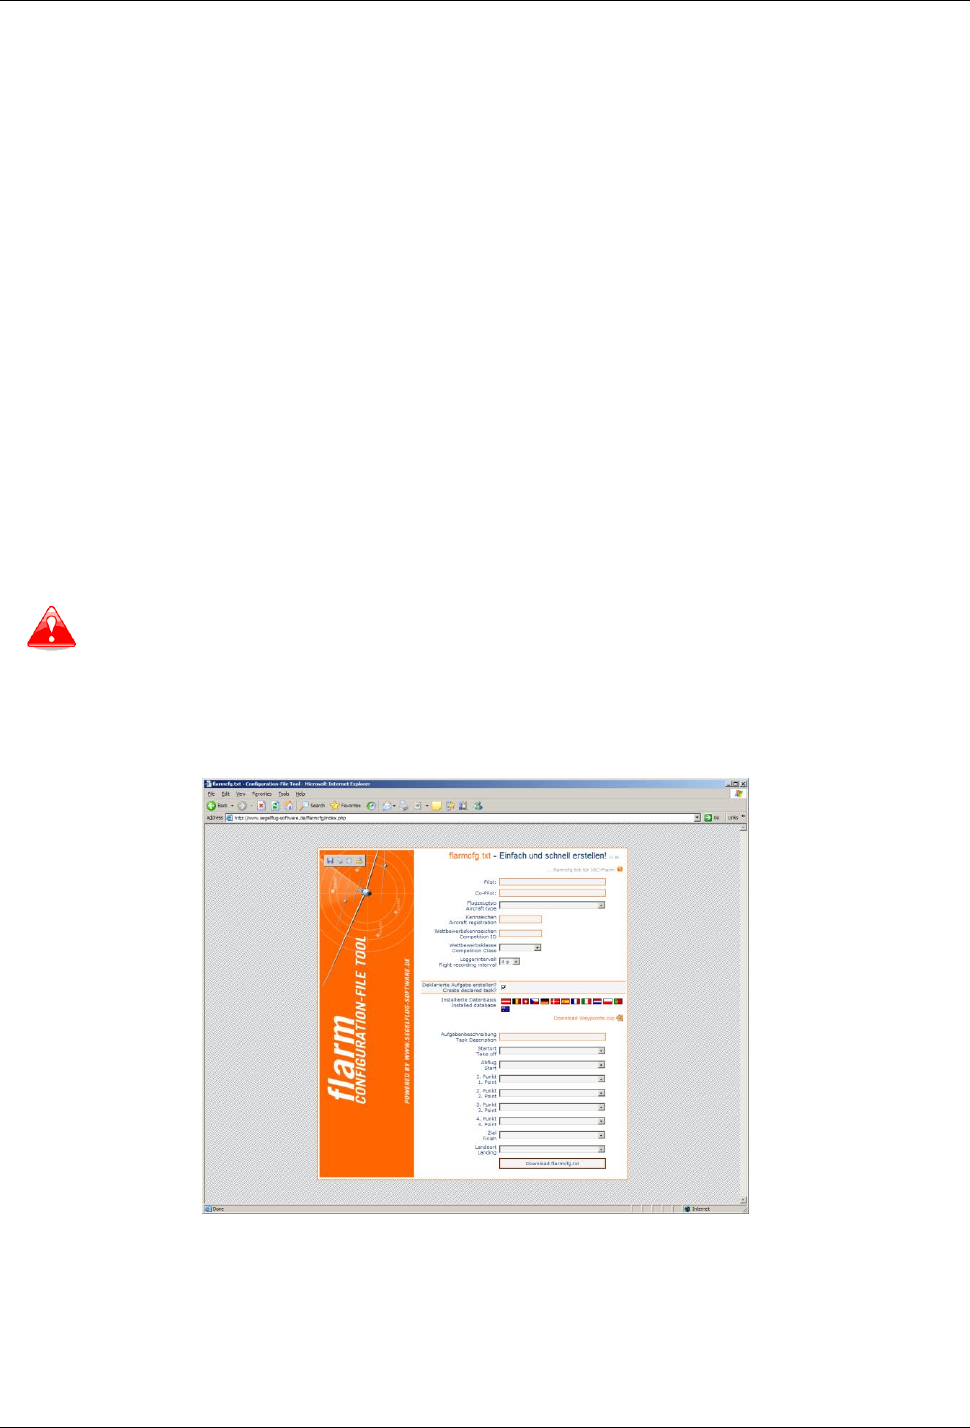
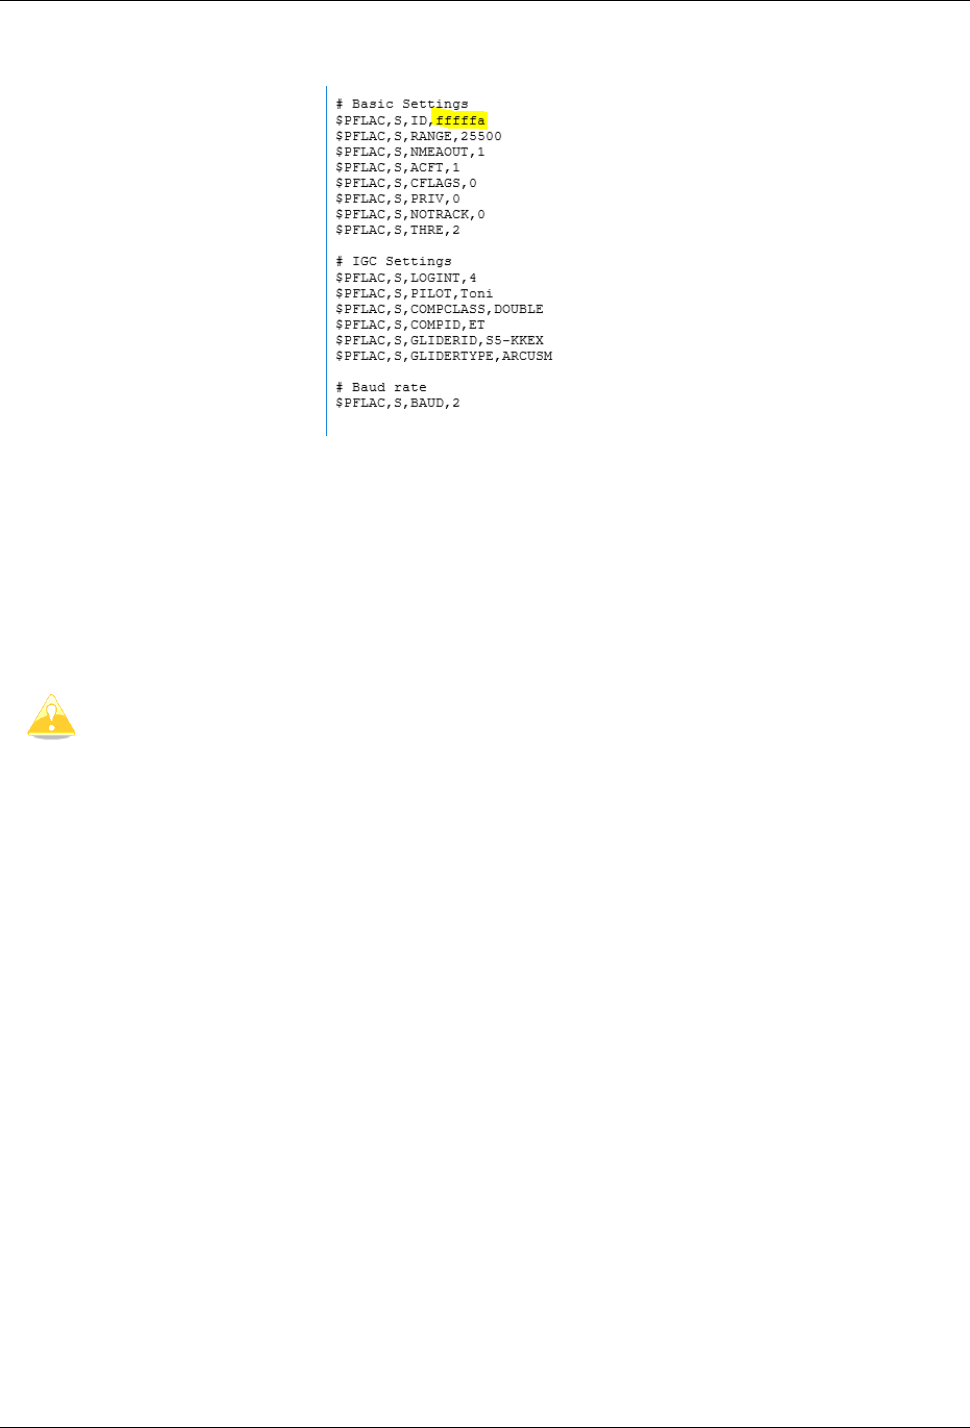
6.2 Change PowerMouse settings
Settings of you PowerMouse and declaration of flights can easily be performed by using a
configuration file, which is read by the Flarm during the boot process (flarmcfg.txt). Some tools for
a simple writing of such configuration files can be found in the web, here one example:
www.segelflug-software.de/flarmcfg/.
The configuration can also be performed with PC programs like SeeYou or PDA solutions like
ConnectME and Pocket StrePla.
PowerMouse Version 1.07 April 2018
Page 15 of 18
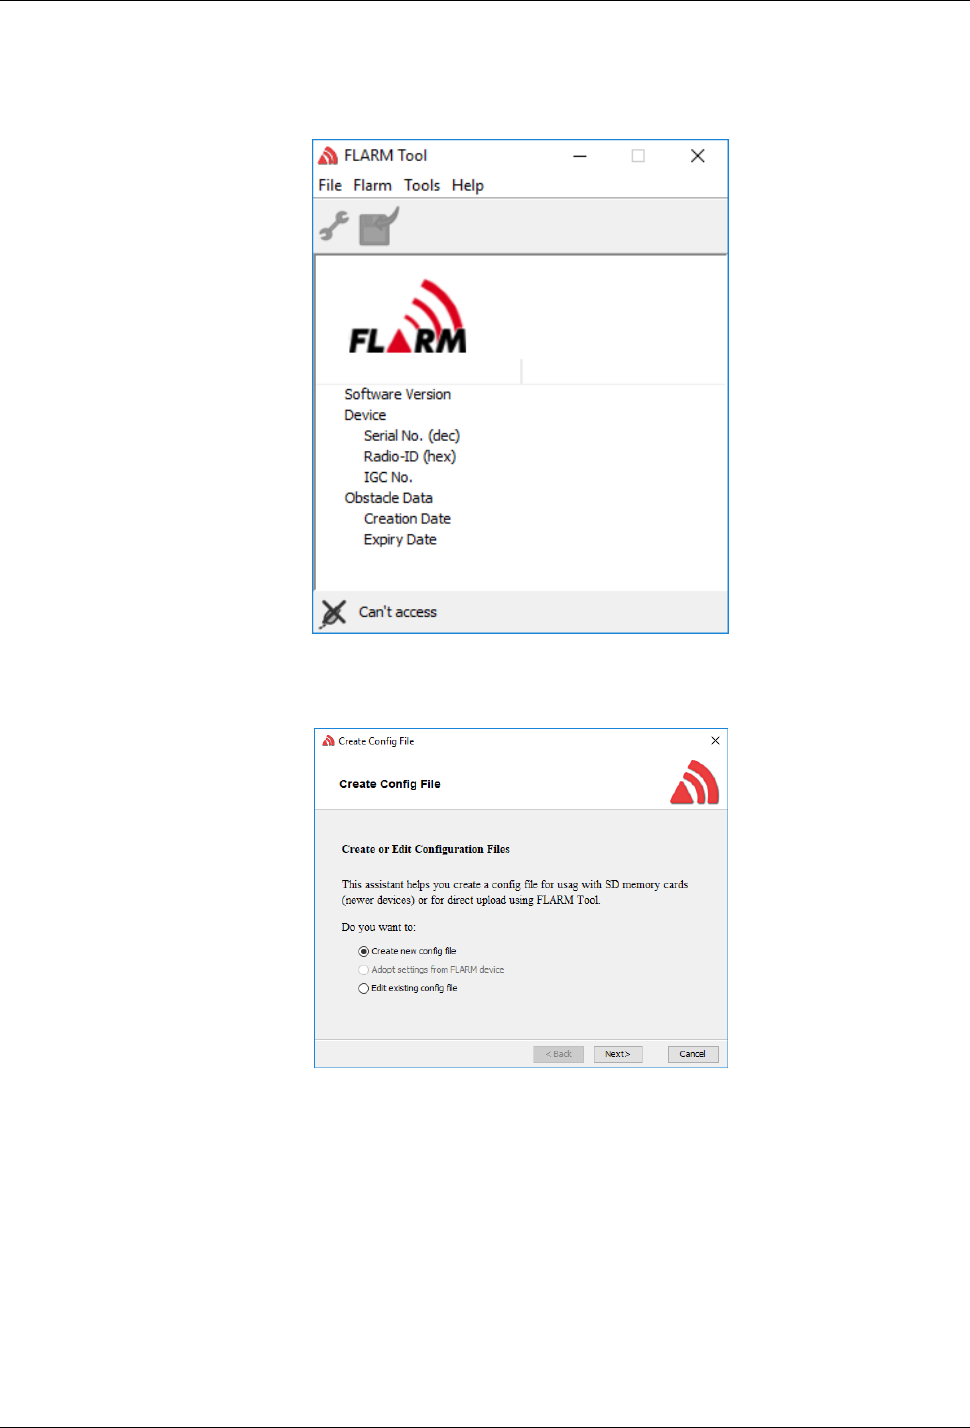
Create Config file:
• Run Flarm Tool
• Click on the button: Tools ->Create Config File
• Create new Config file or Edit existing config file

PowerMouse Version 1.07 April 2018
Page 16 of 18
• Set device settings – Flight Recording
• Set device settings - Advanced settings
ICAO HEX code must be entered in case if you have an ADSB module that
PowerMouse ignores the transponder on board!
PowerMouse Version 1.07 April 2018
Page 17 of 18
• Press Save, which will create a flarmcfg.txt file.
6.4 Saving flight on the USB stick
The last 20 flights will be downloaded at every switching on (only if the USB stick is inserted). If
there are already some of the 20 flights on the USB stick, they will not be downloaded again. That
means: if you have been flying a lot without downloading flights, the download procedure will take
some time, so don’t switch off. To download one flight after landing perform the following procedure:
Wait a 3 minute after landing. Then switch off power for at least 5 sec. Insert the USB stick (in case
it’s not already inside) and switch on again.
The collision avoidance functionality does not depend on the status of the USB stick
(inserted or not)

PowerMouse Version 1.07 April 2018
Page 18 of 18
7 Revision History
November 2017
Initial release of this manual
January 2017
New chapter 3
February 2018
Flarm Tools removed from manual
March 2018
Added chapter 4.3, Updated chapter 5
April 2018
Added chapters 5.2, 6.3
April 2018
Added chapters 5.3, 5.4.1.2
