Training Guide: Programming In HTML5 With JavaScript And CSS3 Ebook Java Script CSS3.Training Guide 2013
Programming%20in%20HTML5%20with%20JavaScript%20and%20CSS3.Training%20Guide%20-%202013
Programming%20in%20HTML5%20with%20JavaScript%20and%20CSS3.Training%20Guide%20-%202013
Programming%20in%20HTML5%20with%20JavaScript%20and%20CSS3.Training%20Guide%20-%202013
Programming%20in%20HTML5%20with%20JavaScript%20and%20CSS3.Training%20Guide%20-%202013
Programming%20in%20HTML5%20with%20JavaScript%20and%20CSS3.Training%20Guide%20-%202013
User Manual: Pdf
Open the PDF directly: View PDF ![]() .
.
Page Count: 681 [warning: Documents this large are best viewed by clicking the View PDF Link!]
- Cover
- Contents at a glance
- Table of Contents
- Introduction
- Chapter 1: Getting started with Visual Studio 2012 and Blend for Visual Studio 2012
- Chapter 2: Getting started with HTML5
- Chapter 3: Getting started with JavaScript
- Chapter 4: Getting started with CSS3
- Chapter 5: More HTML5
- Chapter 6: Essential JavaScript and jQuery
- Before you begin
- Lesson 1: Creating JavaScript objects
- Using object-oriented terminology
- Understanding the JavaScript object-oriented caveat
- Using the JavaScript object literal pattern
- Creating dynamic objects by using the factory pattern
- Creating a class
- Using the prototype property
- Debating the prototype/private compromise
- Implementing namespaces
- Implementing inheritance
- Lesson summary
- Lesson review
- Lesson 2: Working with jQuery
- Practice exercises
- Suggested practice exercises
- Answers
- Chapter 7: Working with forms
- Before you begin
- Lesson 1: Understanding forms
- Understanding web communications
- Submitting form data to the web server
- Sending data when submitting a form
- Using the <label> element
- Specifying the parent forms
- Triggering the form submission
- Serializing the form
- Using the autofocus attribute
- Using data submission constraints
- Using POST or GET
- Lesson summary
- Lesson review
- Lesson 2: Form validation
- Practice exercises
- Suggested practice exercises
- Answers
- Chapter 8: Websites and services
- Chapter 9: Asynchronous operations
- Before you begin
- Lesson 1: Asynchronous operations using jQuery and WinJS
- Using a promise object
- Creating jQuery promise objects by using $.Deferred()
- Handling failure
- Handling completion cleanup
- Subscribing to a completed promise object
- Chaining promises by using the pipe method
- Parallel execution using $.when().then()
- Updating progress
- Conditional asynchronous calls
- Lesson summary
- Lesson review
- Lesson 2: Working with web workers
- Practice exercises
- Suggested practice exercises
- Answers
- Chapter 10: WebSocket communications
- Chapter 11: HTML5 supports multimedia
- Chapter 12: Drawing with HTML5
- Chapter 13: Drag and drop
- Chapter 14: Making your HTML location-aware
- Chapter 15: Local data with web storage
- Chapter 16: Offline web applications
- Index
- About the author
- Objectives mapping
- Survey Page

Training
Guide
Designed to help enterprise administrators develop real-world,
job-role-specic skills—this Training Guide focuses on deploying
and managing core infrastructure services in Windows Server 2012.
Build hands-on expertise through a series of lessons, exercises,
and suggested practices—and help maximize your performance
on the job.
This Microsoft Training Guide:
•Provides in-depth, hands-on training you take at your own pace
•Focuses on job-role-specic expertise for deploying and
managing Windows Server 2012 core services
•Creates a foundation of skills which, along with on-the-job
experience, can be measured by Microsoft Certication exams
such as 70-410
Sharpen your skills. Increase your expertise.
•Plan a migration to Windows Server 2012
•Deploy servers and domain controllers
•Administer Active Directory® and enable advanced features
•Ensure DHCP availability and implement DNSSEC
•Perform network administration
•Deploy and manage Hyper-V® hosts and virtual machines
•Deploy and manage Storage Spaces and iSCSI storage
•Deploy and manage print servers
•Plan, congure, and manage Group Policy
•Automate administrative tasks with Windows PowerShell™
Programming in HTML5 with
JavaScript and CSS3
Programming in HTML5 with
JavaScript and CSS3
About You
This Training Guide will be most useful
to IT professionals who have at least
three years of experience administering
previous versions of Windows Server in
midsize to large environments.
About the Author
Mitch Tulloch is a widely recognized
expert on Windows administration and
has been awarded Microsoft® MVP
status for his contributions supporting
those who deploy and use Microsoft
platforms, products, and solutions. He
is the author of Introducing Windows
Server 2012 and the upcoming
Windows Server 2012 Virtualization
Inside Out.
About the Practices
For most practices, we recommend
using a Hyper-V virtualized
environment. Some practices will
require physical servers.
For system requirements, see the
Introduction.
Preparing for
Microsoft Certication?
Get the ofcial exam-prep guide
for Exam 70-410.
Exam Ref 70-410: Installing and
Conguring Windows Server 2012
ISBN 9780735673168
Glenn Johnson
microsoft.com/mspress
Certication/
Windows Server
0000000 000000
ISBN: 978-0-7356-xxxx-x
90000
U.S.A. $39.99
Canada $41.99
[Recommended]
spine = 1.28”
Programming
in HTML5 with
JavaScript and
CSS3
Glenn Johnson
PUBLISHED BY
Microsoft Press
A Division of Microsoft Corporation
One Microsoft Way
Redmond, Washington 98052-6399
Copyright © 2013 by Glenn Johnson
All rights reserved. No part of the contents of this book may be reproduced or transmitted in any form or by any
means without the written permission of the publisher.
Library of Congress Control Number: 2013933428
ISBN: 978-0-7356-7438-7
Printed and bound in the United States of America.
Second Printing
Microsoft Press books are available through booksellers and distributors worldwide. If you need support related
to this book, email Microsoft Press Book Support at mspinput@microsoft.com. Please tell us what you think of
this book at http://www.microsoft.com/learning/booksurvey.
Microsoft and the trademarks listed at http://www.microsoft.com/about/legal/en/us/IntellectualProperty
/Trademarks/EN-US.aspx are trademarks of the Microsoft group of companies. All other marks are property of
their respective owners.
The example companies, organizations, products, domain names, email addresses, logos, people, places, and
events depicted herein are ctitious. No association with any real company, organization, product, domain name,
email address, logo, person, place, or event is intended or should be inferred.
This book expresses the author’s views and opinions. The information contained in this book is provided without
any express, statutory, or implied warranties. Neither the authors, Microsoft Corporation, nor its resellers, or
distributors will be held liable for any damages caused or alleged to be caused either directly or indirectly by
this book.
Acquisitions Editor: Devon Musgrave
Developmental Editor: Devon Musgrave
Project Editor: Carol Dillingham
Editorial Production: nSight, Inc.
Technical Reviewer: Pierce Bizzaca; Technical Review services provided by Content Master, a member of
CM Group, Ltd.
Copyeditor: Kerin Forsyth
Indexer: Lucie Haskins
Cover: Twist Creative • Seattle
[2013-08-09]

Contents at a glance
Introduction xxi
CHAPTER 1 Getting started with Visual Studio 2012 and Blend
for Visual Studio 2012 1
CHAPTER 2 Getting started with HTML5 29
CHAPTER 3 Getting started with JavaScript 65
CHAPTER 4 Getting started with CSS3 137
CHAPTER 5 More HTML5 205
CHAPTER 6 Essential JavaScript and jQuery 261
CHAPTER 7 Working with forms 311
CHAPTER 8 Websites and services 341
CHAPTER 9 Asynchronous operations 393
CHAPTER 10 WebSocket communications 415
CHAPTER 11 HTML5 supports multimedia 437
CHAPTER 12 Drawing with HTML5 459
CHAPTER 13 Drag and drop 507
CHAPTER 14 Making your HTML location-aware 539
CHAPTER 15 Local data with web storage 555
CHAPTER 16 Ofine web applications 581
Index 621


v
Contents
Introduction xix
Backward compatibility and cross-browser compatibility xx
System requirements xx
Practice exercises xxi
Acknowledgments xxi
Errata and book support xxi
We want to hear from you xxii
Stay in touch xxii
Chapter 1 Getting started with Visual Studio 2012 and Blend
for Visual Studio 2012 4
Lesson 1: Visual Studio 2012 ........................................5
Visual Studio 2012 editions 5
Visual Studio 2012 support for HTML5 6
CSS3 support 7
JavaScript support 7
Exploring Visual Studio Express 2012 for Windows 8 8
Exploring Visual Studio Express 2012 for Web 12
Lesson summary 14
Lesson review 15
Lesson 2: Blend for Visual Studio 2012 ..............................16
Exploring Blend 16
Lesson summary 22
Lesson review 23
Practice exercises ................................................23
What do you think of this book? We want to hear from you!
Microsoft is interested in hearing your feedback so we can continually improve our
books and learning resources for you. To participate in a brief online survey, please visit:
www.microsoft.com/learning/booksurvey/

vi Contents
Exercise 1: Hello World with Visual Studio Express 2012
for Windows 8 24
Exercise 2: Hello World with Visual Studio Express 2012
for Web 25
Exercise 3: Hello World with Blend 27
Suggested practice exercises ......................................28
Answers .........................................................29
Chapter 2 Getting started with HTML5 32
Lesson 1: Introducing HTML5 ......................................32
Understanding HTML, XHTML, and HTML5 33
Introducing semantic markup 34
Working with elements 35
Creating an HTML document 43
Lesson summary 45
Lesson review 46
Lesson 2: Embedding content ......................................47
Embedding HTML by using inline frames 47
Working with hyperlinks 49
Adding images to your HTML document 50
Embedding plug-in content 53
Lesson summary 55
Lesson review 56
Practice exercises ................................................56
Exercise 1: Create a simple website by using Visual Studio
Express for Web 56
Exercise 2: Create additional pages 59
Exercise 3: Embedding Content 61
Suggested practice exercises ......................................64
Answers .........................................................65
Chapter 3 Getting started with JavaScript 65
Lesson 1: Introducing JavaScript ...................................66
Understanding JavaScript 66

viiContents
Understanding the role of data 67
Using statements 71
Working with functions 73
Scoping variables 77
Nesting functions and nested local variable scoping 78
Converting to a different type 78
Conditional programming 80
Implementing code loops 84
Handling errors 87
Lesson summary 88
Lesson review 88
Lesson 2: Writing, testing, and debugging JavaScript .................89
Hello World from JavaScript 90
Using the script tag 100
Handling browsers that don’t support JavaScript 101
Inline JavaScript vs. external JavaScript les 102
Placing your script elements 102
Using the Visual Studio .NET JavaScript debugger 103
Lesson summary 107
Lesson review 107
Lesson 3: Working with objects ...................................108
Working with arrays 108
Accessing DOM objects 112
Lesson summary 120
Lesson review 121
Practice exercises ...............................................121
Exercise 1: Create a calculator webpage 121
Exercise 2: Add the QUnit testing framework 123
Suggested practice exercises .....................................133
Answers ........................................................134
Chapter 4 Getting started with CSS3 137
Lesson 1: Introducing CSS3 .......................................137
Dening and applying a style 139

viii Contents
Adding comments within a style sheet 139
Creating an inline style 140
Creating an embedded style 140
Creating an external style sheet 141
Lesson summary 144
Lesson review 145
Lesson 2: Understanding selectors, specicity, and cascading .........145
Dening selectors 146
Understanding the browser’s built-in styles 159
Extending browser styles with user styles 159
Working with important styles 159
How do styles cascade? 160
Using specicity 161
Understanding inheritance 162
Lesson summary 163
Lesson review 164
Lesson 3: Working with CSS properties .............................165
Working with CSS colors 166
Working with text 173
Working with the CSS box model 175
Setting the border, padding, and margin properties 176
Positioning <div> elements 178
Using the oat property 186
Using the clear property 189
Using the box-sizing property 190
Centering content in the browser window 193
Lesson summary 193
Lesson review 194
Practice exercises ...............................................194
Exercise 1: Add a style sheet to the calculator project 195
Exercise 2: Clean up the web calculator 197
Suggested practice exercises .....................................201
Answers ........................................................202

ixContents
Chapter 5 More HTML5 205
Lesson 1: Thinking HTML5 semantics ..............................205
Why semantic markup? 206
Browser support for HTML5 206
Creating semantic HTML5 documents 207
Creating an HTML5 layout container 207
Controlling format by using the <div> element 213
Adding thematic breaks 213
Annotating content 213
Working with lists 221
Lesson summary 228
Lesson review 229
Lesson 2: Working with tables ....................................229
Table misuse 230
Creating a basic table 230
Adding header cells 231
Styling the table headers 232
Declaring the header, footer, and table body 233
Creating irregular tables 238
Adding a caption to a table 241
Styling columns 241
Lesson summary 242
Lesson review 243
Practice exercises ...............................................243
Exercise 1: Add a page layout to the calculator project 244
Exercise 2: Add styles to the calculator layout 246
Exercise 3: Cleaning up the web calculator 252
Suggested practice exercises .....................................257
Answers ........................................................258
Chapter 6 Essential JavaScript and jQuery 261
Lesson 1: Creating JavaScript objects ..............................262
Using object-oriented terminology 262

xContents
Understanding the JavaScript object-oriented caveat 263
Using the JavaScript object literal pattern 263
Creating dynamic objects by using the factory pattern 265
Creating a class 266
Using the prototype property 271
Debating the prototype/private compromise 274
Implementing namespaces 276
Implementing inheritance 278
Lesson summary 283
Lesson review 284
Lesson 2: Working with jQuery ....................................285
Introducing jQuery 285
Getting started with jQuery 286
Using jQuery 287
Enabling JavaScript and jQuery IntelliSense 291
Creating a jQuery wrapper for a DOM element reference 294
Adding event listeners 295
Triggering event handlers 295
Initializing code when the browser is ready 295
Lesson summary 296
Lesson review 296
Practice exercises ...............................................297
Exercise 1: Create a calculator object 297
Suggested practice exercises .....................................307
Answers ........................................................308
Chapter 7 Working with forms 311
Lesson 1: Understanding forms ...................................311
Understanding web communications 312
Submitting form data to the web server 316
Sending data when submitting a form 316
Using the <label> element 318
Specifying the parent forms 319
Triggering the form submission 319

xiContents
Serializing the form 321
Using the autofocus attribute 321
Using data submission constraints 322
Using POST or GET 322
Lesson summary 323
Lesson review 324
Lesson 2: Form validation ........................................324
Required validation 325
Validating URL input 327
Validating numbers and ranges 329
Styling the validations 330
Lesson summary 330
Lesson review 330
Practice exercises ...............................................331
Exercise 1: Create a Contact Us form 331
Exercise 2: Add validation to the Contact Us form 335
Suggested practice exercises .....................................337
Answers ........................................................338
Chapter 8 Websites and services 341
Lesson 1: Getting started with Node.js .............................341
Installing Node.js 342
Creating Hello World from Node.js 342
Creating a Node.js module 344
Creating a Node.js package 345
Fast forward to express 354
Starting with express 354
Lesson summary 363
Lesson review 363
Lesson 2: Working with web services ..............................364
Introducing web services 364
Creating a RESTful web service by using Node.js 366
Using AJAX to call a web service 368
Cross-origin resource sharing 380

xii Contents
Lesson summary 381
Lesson review 382
Practice exercises ...............................................382
Exercise 1: Create a website to receive data 382
Exercise 2: Create a web service to receive data 386
Suggested practice exercises .....................................390
Answers ........................................................391
Chapter 9 Asynchronous operations 393
Lesson 1: Asynchronous operations using jQuery and WinJS .........393
Using a promise object 394
Creating jQuery promise objects by using $.Deferred() 395
Handling failure 397
Handling completion cleanup 397
Subscribing to a completed promise object 398
Chaining promises by using the pipe method 398
Parallel execution using $.when().then() 400
Updating progress 400
Conditional asynchronous calls 401
Lesson summary 402
Lesson review 403
Lesson 2: Working with web workers ..............................404
Web worker details 404
Lesson summary 405
Lesson review 406
Practice exercises ...............................................406
Exercise 1: Implement asynchronous code execution 406
Suggested practice exercises .....................................412
Answers ........................................................413
Chapter 10 WebSocket communications 415
Lesson 1: Communicating by using WebSocket .....................415
Understanding the WebSocket protocol 416
Dening the WebSocket API 416

xiiiContents
Implementing the WebSocket object 417
Dealing with timeouts 420
Handling connection disconnects 422
Dealing with web farms 422
Using WebSocket libraries 423
Lesson summary 424
Lesson review 424
Practice exercises ...............................................425
Exercise 1: Create a chat server 425
Exercise 2: Create the chat client 429
Suggested practice exercises .....................................435
Answers ........................................................436
Chapter 11 HTML5 supports multimedia 437
Lesson 1: Playing video ..........................................437
Video formats 438
Implementing the <video> element 438
Setting the source 439
Conguring the <video> element 441
Accessing tracks 441
Lesson summary 442
Lesson review 443
Lesson 2: Playing audio ..........................................443
Audio formats 444
The <audio> element 444
Setting the source 445
Conguring the <audio> element 445
Lesson summary 446
Lesson review 446
Lesson 3: Using the HTMLMediaElement object .....................447
Understanding the HTMLMediaElement methods 447
Using HTMLMediaElement properties 447
Subscribing to HTMLMediaElement events 449
Using media control 450

xiv Contents
Lesson summary 451
Lesson review 451
Practice exercises ...............................................452
Exercise 1: Create a webpage that displays video 452
Suggested practice exercises .....................................455
Answers ........................................................456
Chapter 12 Drawing with HTML5 459
Lesson 1: Drawing by using the <canvas> element ..................460
The <canvas> element reference 460
CanvasRenderingContext2D context object reference 460
Implementing the canvas 462
Drawing rectangles 463
Conguring the drawing state 465
Saving and restoring the drawing state 474
Drawing by using paths 475
Drawing text 488
Drawing with images 490
Lesson summary 494
Lesson review 495
Lesson 2: Using scalable vector graphics ...........................495
Using the <svg> element 496
Displaying SVG les by using the <img> element 499
Lesson summary 501
Lesson review 502
Practice exercises ...............................................502
Exercise 1: Create a webpage by using a canvas 502
Suggested practice exercises .....................................505
Answers ........................................................506
Chapter 13 Drag and drop 507
Lesson 1: Dragging and dropping .................................507
Dragging 509
Understanding drag events 510

xvContents
Dropping 511
Using the DataTransfer object 513
Lesson summary 516
Lesson review 516
Lesson 2: Dragging and dropping les .............................517
Using the FileList and File objects 517
Lesson summary 521
Lesson review 521
Practice exercises ...............................................522
Exercise 1: Create a number scramble game 522
Exercise 2: Add drag and drop to the game 526
Exercise 3: Add scramble and winner check 530
Suggested practice exercises .....................................535
Answers ........................................................536
Chapter 14 Making your HTML location-aware 539
Lesson 1: Basic positioning .......................................540
Geolocation object reference 540
Retrieving the current position 541
Handling errors 543
Addressing privacy 544
Specifying options 544
Lesson summary 545
Lesson review 546
Lesson 2: Monitored positioning ..................................546
Where are you now? How about now? 546
Calculating distance between samples 548
Lesson summary 549
Lesson review 549
Practice exercises ...............................................550
Exercise 1: Map your current positions 550
Suggested practice exercises .....................................553
Answers ........................................................554

xvi Contents
Chapter 15 Local data with web storage 555
Lesson 1: Introducing web storage ................................555
Understanding cookies 556
Using the jQuery cookie plug-in 556
Working with cookie limitations 557
Alternatives to cookies prior to HTML5 557
Understanding HTML5 storage 558
Exploring localStorage 560
Using short-term persistence with sessionStorage 562
Anticipating potential performance pitfalls 563
Lesson summary 564
Lesson review 564
Lesson 2: Handling storage events ................................565
Sending notications only to other windows 566
Using the StorageEvent object reference 566
Subscribing to events 567
Using events with sessionStorage 568
Lesson summary 568
Lesson review 568
Practice exercises ...............................................569
Exercise 1: Create a contact book by using localStorage 569
Suggested practice exercises .....................................578
Answers ........................................................579
Lesson 1 579
Lesson 2 580
Chapter 16 Ofine web applications 581
Lesson 1: Working with Web SQL .................................582
Considering the questionable longevity of Web SQL 582
Creating and opening the database 582
Performing schema updates 583
Using transactions 584

xviiContents
Lesson summary 588
Lesson review 589
Lesson 2: Working with IndexedDB ................................589
Using browser-specic code 590
Creating and opening the database 590
Using object stores 591
Using transactions 593
Inserting a new record 594
Updating an existing record 594
Deleting a record 595
Retrieving a record 595
Understanding cursors 596
Dropping a database 599
Lesson summary 599
Lesson review 600
Lesson 3: Working with the FileSystem API .........................600
Assessing browser support 601
Opening the le system 601
Creating and opening a le 602
Writing to a le 602
Reading a le 603
Deleting a le 604
Creating and opening a directory 604
Writing a le to a directory 605
Deleting a directory 605
Lesson summary 606
Lesson review 606
Lesson 4: Working with the ofine application HTTP cache ...........607
Browser support 608
The cache manifest le 608
Updating the cache 609
Understanding events 610

xviii Contents
Lesson summary 610
Lesson review 611
Practice exercises ...............................................611
Exercise 1: Modify a contact book to use IndexedDB 611
Suggested practice exercises .....................................616
Answers ........................................................617
Index 621
What do you think of this book? We want to hear from you!
Microsoft is interested in hearing your feedback so we can continually improve our
books and learning resources for you. To participate in a brief online survey, please visit:
www.microsoft.com/learning/booksurvey/

xix
Introduction
This training guide is designed for information technology (IT) professionals who develop
or plan to develop HTML documents such as webpages or Windows Store applications. It
is assumed that, before you begin using this guide, you are familiar with web development
and common Internet technologies.
This book covers some of the topics and skills that are the subject of the Microsoft cer-
tication exam 70-480. If you are using this book to complement your study materials, you
might nd this information useful. Note that this book is designed to help you in the job role;
it might not cover all exam topics. If you are preparing for the exam, you should use addi-
tional study materials to help bolster your real-world experience. For your reference, a map-
ping of the topics in this book to the exam objectives is included in the back of the book.
By using this training guide, you will learn how to do the following.
Create a project using Visual Studio Express 2012 for Web.
Create a project using Blend for Visual Studio 2012.
Create a project using Visual Studio Express 2012 for Windows 8.
Create an HTML document using semantic markup.
Implement JavaScript functionality with your HTML documents.
Use test-driven development techniques for writing JavaScript code.
Create Cascading Style Sheets (CSS) that visually format your HTML document.
Create HTML tables.
Create JavaScript objects.
Use jQuery to simplify JavaScript programming.
Create HTML forms with validation.
Create a Node.js website and web service.
Call web services from JavaScript.
Perform asynchronous JavaScript operations.
Perform WebSocket communications.
Play audio and video on a webpage.
Draw with an HTML5 canvas.
Use SVG image les.
Perform drag and drop operations.
Make your HTML location aware.
Persist data on the browser client.

xx Introduction
Backward compatibility and cross-browser compatibility
This book does not attempt to cover every difference between every version of every
browser. Such a comprehensive discussion could easily yield a library of books.
Most of the code in this book is written using Internet Explorer 10, which is installed with
Windows 8. In addition, many but not all the code examples were tested using the following
browsers.
Firefox 17.0.1
Google Chrome 23.0.1271.97 m
Opera 12.11
Apple Safari 5.1.7
In most cases, if the other browsers were not compatible, there is a note stating so. This is
especially true in the last chapters because web storage is still relatively new, and the require-
ments are still uid.
The best way to see which features are available among browsers is to visit a website that
is updated when new browser versions are released and HTML5 features are updated. The
website http://caniuse.com is particularly good.
System requirements
The following are the minimum system requirements your computer needs to meet to com-
plete the practice exercises in this book.
Windows 8 or newer. If you want to develop Windows Store applications, you need
Windows 8 on your development computer.
Hardware requirements
This section presents the hardware requirements for using Visual Studio 2012.
1.6 GHz or faster processor
1 GB of RAM (more is always recommended)
10 GB (NTFS) of available hard disk space
5400 RPM hard drive
DirectX 9–capable video card running at 1024 × 768 or higher display resolution.
Internet connectivity
xxiIntroduction
Software requirements
The following software is required to complete the practice exercises.
Visual Studio 2012 Professional, Visual Studio 2012 Premium, or Visual Studio 2012
Ultimate. You must pay for these versions, but in lieu of one of these versions, you can
install the following free express versions.
Visual Studio Express 2012 for Web. Available from http://www.microsoft.com
/visualstudio/eng/downloads#d-express-web.
Visual Studio Express 2012 for Windows 8. This installation also installs Blend for
Visual Studio 2012. Available from http://www.microsoft.com/visualstudio/eng
/downloads#d-express-web.
Practice exercises
This book features practices exercises to reinforce the topics you’ve learned. These
exercises are organized by chapter, and you can download them from http://aka.ms
/TGProgHTML5/les.
Acknowledgments
Thanks go to the following people for making this book a reality.
To Carol Dillingham for your constructive feedback throughout the entire process of
writing this book. Thanks for also having patience while the winter holiday months
were passing, and my desire and ability to write was constantly interrupted.
To Devon Musgrave for providing me the opportunity to write this book.
To Kerin Forsyth for your hard work in making this book consistent with other
Microsoft Press books and helping me with the delivery of this book.
To Pierce Bizzaca for your technical reviewing skills.
To all the other editors and artists who played a role in getting my book to the public,
thank you for your hard work and thanks for making this book venture a positive experience
for me.
Errata and book support
We’ve made every effort to ensure the accuracy of this book and its companion content.
Any errors that have been reported since this book was published are listed on our Microsoft
Press site at Oreilly.com:
http://aka.ms/TGProgHTML5/errata
xxii Introduction
If you nd an error that is not already listed, you can report it to us through the
same page.
If you need additional support, send an email to Microsoft Press Book Support at
mspinput@microsoft.com.
Please note that product support for Microsoft software is not offered through the
preceding addresses.
We want to hear from you
At Microsoft Press, your satisfaction is our top priority and your feedback our most valuable
asset. Please tell us what you think of this book at:
http://aka.ms/tellpress
The survey is short, and we read every one of your comments and ideas. Thanks in
advance for your input!
Stay in touch
Let’s keep the conversation going! We’re on Twitter at http://twitter.com/MicrosoftPress.

1
CHAPTER 1
Getting started with Visual
Studio 2012 and Blend for
Visual Studio 2012
Welcome to the world of HTML5, CSS3, and JavaScript! These technologies, commonly
referred to as simply HTML5, can be used to develop applications for Windows and
the web.
This chapter introduces you to the primary tools you need, Microsoft Visual Studio 2012
and Blend for Visual Studio 2012, which are used in the book’s lessons. Visual Studio 2012
provides exciting new features. The chapters that follow introduce you to many features in
Visual Studio 2012 and Blend.
Lessons in this chapter:
Lesson 1: Visual Studio 2012 2
Lesson 2: Blend for Visual Studio 2012 13
Before you begin
To complete this book, you must have some understanding of web development. This
chapter requires the hardware and software listed in the “System requirements” section in
the book’s Introduction.
REAL WORLD A CAREER OPPORTUNITY
You’re looking for a career in computer programming, but you don’t know what technol-
ogy to pursue. You want to learn a technology you can use at many companies to make
yourself more marketable and to give you the exibility to move between companies.
What technology would you choose to give you this exibility?
The Internet has exploded. Nearly every company has a website, so why not learn the
web technologies?
2 CHAPTER 1 Getting started with Visual Studio 2012 and Blend for Visual Studio 2012
HTML, CSS, and JavaScript are three closely coupled core web technologies that you can
learn to increase your marketability and give you exibility to choose the company for
which you want to work. This is the beginning of your path toward your future career.
Learn these technologies well, and you can expand into other programming technologies
such as Silverlight, Flash, C#, and Visual Basic.
Lesson 1: Visual Studio 2012
Visual Studio 2012 is a highly useful tool for application development. Depending on the
edition of Visual Studio you have, it can provide you with an integrated development environ-
ment (IDE) you can use for the entire project life cycle.
After this lesson, you will be able to:
Identify the available versions of Visual Studio 2012 and the features of each.
Start a project by using Visual Studio Express 2012 for Web.
Start a project by using Visual Studio Express 2012 for Windows 8.
Estimated lesson time: 40 minutes
Visual Studio 2012 editions
The following is a list with short descriptions of the editions of Visual Studio that Microsoft
offers.
Visual Studio Test Professional 2012 Provides team collaboration tools but not a
full development IDE. This is ideal for testers, business analysts, product managers, and
other stakeholders, but this is not an ideal edition for developers.
Visual Studio Professional 2012 Provides a unied development experience that
enables developers to create multitier applications across the web, the cloud, and
devices. This is an ideal edition for a lone developer or a small team of developers who
will be developing a wide range of web, Windows, phone, and cloud applications.
Visual Studio Premium 2012 Provides an integrated application lifecycle manage-
ment (ALM) solution and software development functions to deliver compelling appli-
cations for a unied team of developers, testers, and business analysts.
Visual Studio Ultimate 2012 Provides a comprehensive ALM offering for organiza-
tions developing, distributing, and operating a wide range of highly scalable software
applications and services.
Visual Studio Team Foundation Server Express 2012 Provides the collaboration
hub at the center of the ALM solution that enables small teams of up to ve developers
Lesson 1: Visual Studio 2012 CHAPTER 1 3
to be more agile, collaborate more effectively, and deliver better software more
quickly. Includes source code control, work item tracking, and build automation for
software projects to deliver predictable results. This is free.
Visual Studio Express 2012 for Web Provides the tools and resources to build and
test HTML5, CSS3, ASP.NET, and JavaScript code and to deploy it on web servers or to
the cloud by using Windows Azure. Best of all, it’s free.
Visual Studio Express 2012 for Windows 8 Provides the core tools required to
build Windows Store apps, using XAML and your choice of .NET language or HTML5,
CSS3, and JavaScript. This is also free.
If you use Visual Studio Express 2012 for Web, you can work on web projects only, and you
must choose a .NET language to start with, such as Visual Basic or C#. If you use Visual Studio
Express 2012 for Windows 8, you can work on Windows Store applications only, but you can
start with a JavaScript project, and you don’t need to set up a website to create small applica-
tions. Blend for Visual Studio 2012 also provides the ability to create Windows Store applica-
tions with a JavaScript project.
The Visual Studio Express 2012 products are available free on the Microsoft website. You
should download and install both Visual Studio Express 2012 for Windows 8 and Visual Studio
Express 2012 for Web.
Visual Studio 2012 support for HTML5
Visual Studio .NET 2012 contains a new HTML editor that provides full support for HTML5
elements and snippets. Here is a list of some of the Visual Studio 2012 features that will make
your development experience more enjoyable and productive. The new features will be dem-
onstrated and explained later in this book when appropriate.
Testing You can easily test your webpage, application, or site with a variety of brows-
ers. Beside the Start Debugging button in Visual Studio 2012, you will nd a list of all
installed browsers. Just select the desired browser from the list when you are ready
to test.
Finding the source of rendered markup By using the new Page Inspector feature,
you can quickly nd the source of rendered markup. The Page Inspector renders a
webpage directly within the Visual Studio IDE, so you can choose a rendered element,
and Page Inspector will open the le in which the markup was generated and highlight
the source.
Improved IntelliSense Quickly nd snippets and code elements. In the HTML and
CSS editors, IntelliSense lters the display list as you enter text. This feature shows
strings that match the typed text in their beginning, middle, or end. It also matches
against initial letters. For example, “bw” will match “border-width.”
Reusable Markup You can easily create reusable markup by selecting the markup
and extracting it to a user control.
4 CHAPTER 1 Getting started with Visual Studio 2012 and Blend for Visual Studio 2012
Automatic Renaming When you rename an opening or closing HTML tag, the cor-
responding tag is renamed automatically.
CSS3 support
Visual Studio .NET 2012 provides a new CSS editor that offers full support for CSS3, including
support for cascading style sheets (CSS), hacks, and snippets for vendor-specic extensions
to CSS.
Expandable Sections Use the CSS editor to expand and collapse sections by clicking
the plus or minus sign that is displayed to the left of each style entry.
Hierarchical Indentation The CSS editor displays nested styles in a hierarchical fash-
ion, which makes it much easier to read and understand the styles.
Add Comments You can easily comment and uncomment blocks.
Color Selector The CSS editor now has a color selector like the HTML editor.
JavaScript support
Visual Studio 2012 provides many new features to make the JavaScript developer experi-
ence more enjoyable and productive. The following is a list of some of the new features and
enhancements.
Standards-based Visual Studio 2012 incorporates the JavaScript features of
ECMAScript 5 and the HTML5 document object model (DOM).
Improved IntelliSense You can receive improved IntelliSense information for func-
tions and variables by using new elements supported in triple-slash (///) code com-
ments. New elements include <var> and <signature>. You can also view function
signatures on the right side of the statement completion list.
Improved editor JavaScript Editor implements smart indenting, brace matching, and
outlining as you write code. For example, if you position your cursor to the left of an
open curly brace, the open and closed curly braces are highlighted. This works with
curly braces, square brackets, angle brackets, and parentheses.
Go To Denition To locate function denitions in source code, you just right-click a
function and then click Go To Denition. You can also put the cursor in the function,
and then press the F12 key to open the JavaScript source le at the location in the le
where the function is dened. (This feature isn’t supported for generated les.)
IntelliSense from JavaScript comments The new IntelliSense extensibility mecha-
nism automatically provides IntelliSense when you use standard JavaScript comment
tags (//).
Breakpoints You now have more exibility when setting a breakpoint. When a single
line contains multiple statements, you can now break on a single statement.
Lesson 1: Visual Studio 2012 CHAPTER 1 5
Reference Groups You can control which objects are available in global scope by
using Reference Groups. Reference Groups is congured on the menu bar by navigat-
ing to Tools | Options | Text Editor | JavaScript | IntelliSense | References.
Drag-and-drop references You can drag JavaScript les that have the .js extension
from Solution Explorer to the JavaScript code editor, where they are added as refer-
ences for Visual Studio to use to provide IntelliSense. When adding references by drag-
ging and dropping, they are put at the top of the page in the code editor.
Exploring Visual Studio Express 2012 for Windows 8
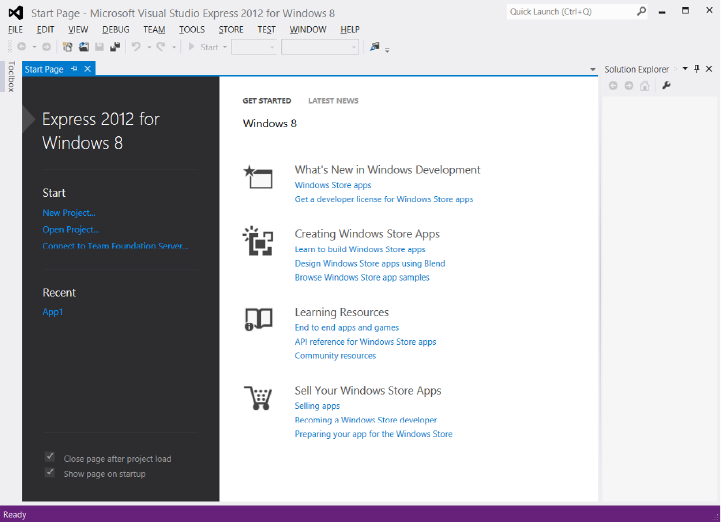
When you start Visual Studio Express 2012 for Windows 8, the Start Page screen is displayed.
Figure 1-1 shows the Start Page screen, which contains helpful information and links to learn-
ing and development resources. On the left side of the Start page are links to create a new
project or open a new project. After you create at least one project, you’ll see shortcut links
to open any of your recent projects.
FIGURE 1-1 Visual Studio Express 2012 for Windows 8 Start page
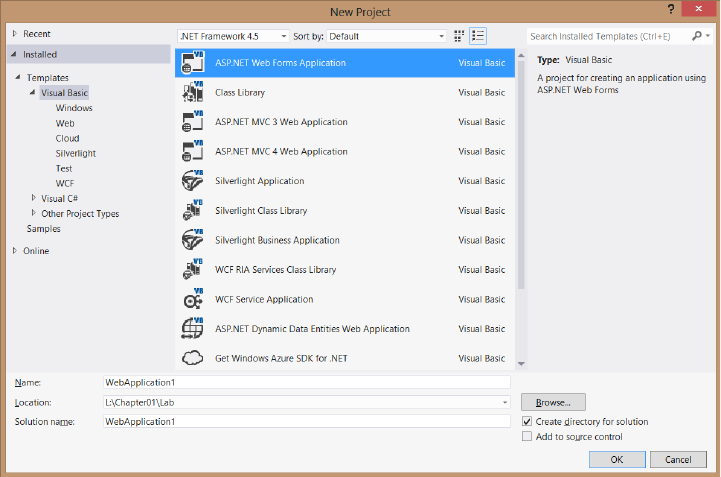
In addition to clicking the New Project link on the Start page, you can start a new project
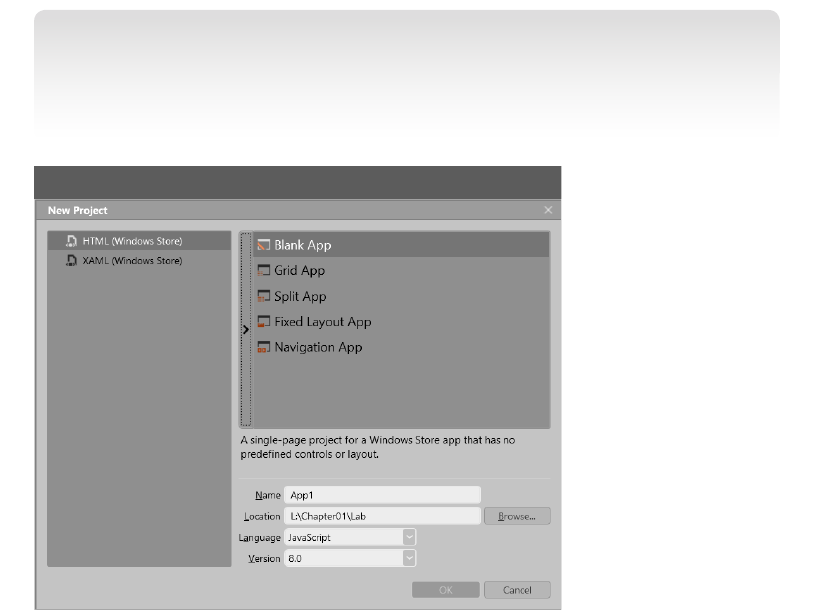
by clicking File and choosing New Project. Figure 1-2 shows the New Project screen, which
displays a list of starting templates from which you can choose to start on your new appli-
cation quickly. You can think of a template as a project on which someone completed the
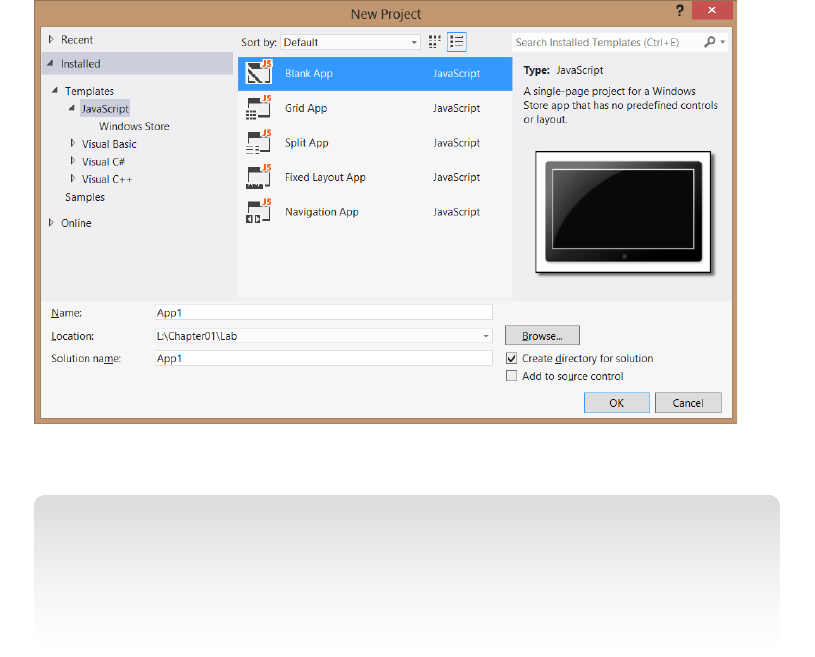
6 CHAPTER 1 Getting started with Visual Studio 2012 and Blend for Visual Studio 2012
mundane tasks that would be common to all applications of that type and then saved as a
framework that you can use to get started.
On the left side of the New Project screen, you can select from recent project templates
that you’ve used or from the complete list of installed templates, or you can go online to
select a template. You’ll nd that the installed templates are divided according to program-
ming language. Figure 1-2 shows the templates that are installed for JavaScript.
FIGURE 1-2 The New Project screen with the JavaScript project templates
NOTE INCLUDED TEMPLATES
In Visual Studio Express 2012 for Windows 8, all the included templates are for creating
Windows 8 Windows Store applications. In Visual Studio Express 2012 for Web, all included
templates are for creating web applications. Remember that you can use HTML5, CSS3, and
JavaScript in Windows Store applications and web applications.
The following are short descriptions of each template.
Blank App This template isn’t quite empty. It provides a single-page project for a
Windows app, but it has no predened controls on the page.
Grid App This template provides an application that contains multiple pages and
enables you to navigate among groups of items.
Split App This template creates a two-page project in which the rst page contains
a group of items, and the second page contains an item list with details of the selected
item to the right of the list.
Lesson 1: Visual Studio 2012 CHAPTER 1 7
Fixed Layout App This template provides a single page with a xed aspect ratio
layout that scales to t the screen.
Navigation App This template provides a single-page application containing con-
trols for navigation.
Selecting a template causes a copy of the template to be opened in the Solution Explorer
window. By default, the Solution Explorer window is on the right side, although windows can
be dragged to any location on the screen. Solution Explorer contains a tree representation of
all projects that are loaded into the current solution.
Under the Solution Explorer window is the Properties window, which is context-sensitive
and contains the properties of the currently selected item. The properties are visible in this
window, and most are also congurable.
On the left side of the screen is the toolbox. By default, the toolbox is a tab that you can
point to to open the window. The toolbox is also context-sensitive, so different tools are avail-
able based on what is being displayed in the center window.
Quick check
You want to create a Windows Store application. Which edition of Visual
Studio 2012 will you use, and is there an operating system requirement for your
system to develop Windows Store application applications?
Quick check answer
You must use Visual Studio Express 2012 for Windows 8 and have Windows 8
installed to develop Windows Store applications.
Examining the Blank App template
When the Blank App template is selected, a new solution containing one project is created.
The new project won’t be totally blank. As shown in Figure 1-3, there are several les and
folders in this new project. At the outset, default.js was created, and it’s currently displayed in
the JavaScript editor window.
The default.js le is in the js folder, which is where you can add your own JavaScript les.
This default.js le currently contains a small amount of code, which Chapter 3, “Getting
started with JavaScript,” revisits in more detail. Here is a general overview of what it does.
The use of function on the third line creates a naming scope for variables and functions in
your application. In the middle of the code are TODO comments that provide a place to put
your own code to be executed when the application is launched or reactivated after being
suspended or when the application is being suspended.
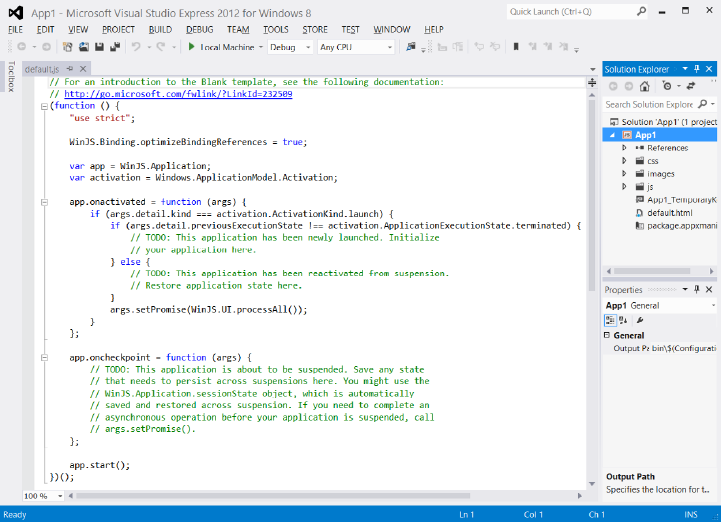
8 CHAPTER 1 Getting started with Visual Studio 2012 and Blend for Visual Studio 2012
FIGURE 1-3 Blank App template with preliminary coding
Blank App also contains other les that you will want to explore. If you open the
default . html le, you’ll see the following HTML.
<!DOCTYPE html>
<html>
<head>
<meta charset="utf-8" />
<title>App1</title>
<!-- WinJS references -->
<link href="//Microsoft.WinJS.1.0/css/ui-dark.css" rel="stylesheet" />
<script src="//Microsoft.WinJS.1.0/js/base.js"></script>
<script src="//Microsoft.WinJS.1.0/js/ui.js"></script>
<!-- App1 references -->
<link href="/css/default.css" rel="stylesheet" />
<script src="/js/default.js"></script>
</head>
<body>
<p>Content goes here</p>
</body>
</html>
The rst line contains <!DOCTYPE html>, which is a declaration to the web browser that
describes the version of HTML in which the page is written. It’s not an HTML element; it’s a

Lesson 1: Visual Studio 2012 CHAPTER 1 9
special instruction. In HTML5, this special instruction must be the rst thing the browser reads
on the page. This instruction is not mandatory, but it is considered a best practice to have it.
Next is the <html> element that consists of the starting tag at the top and ending tag,
</ html>, at the bottom. This is considered the root element of the page, and all other ele-
ments are contained within the html element.
Inside the html element are the head and body elements. The head element typically
contains metadata and page-related instructions. The body element contains content that
will be displayed to the user. In this example, the head element contains a meta element that
describes the character set being used (utf-8), a title that will be displayed in the browser title
bar, links tags that reference CSS les, and script tags that reference JavaScript les. These
references are instructions to the browser to load these les when the page loads. The body
element contains a paragraph element with the message “Content goes here.” This message
appears when the application is executed.
The References folder contains a folder called Windows Library for JavaScript 1.0, which
contains subdirectories that Microsoft provides and maintains. You should not modify les
in this directory structure, but you should explore the les in this folder structure and learn
as much as possible about these les. Of particular importance is the css folder that contains
the ui-dark.css and ui-light.css les. These les set the primary theme for your application to
either a light or dark theme.
MORE INFO LIGHT AND DARK BACKGROUNDS
The default.html le has a reference to the ui-dark.css le. If you run the application, the
application displays the “Content goes here” message on a screen that has a dark back-
ground. If you change the reference to the ui-light.css le, you’ll see a light background.
The css folder contains cascading style sheets for your application. Currently, the
default . html le references a single le called default.css. The CSS le contains instructions for
presenting your HTML le and will be covered in more detail in Chapter 4, “Getting started
with CSS3.”
The images folder contains blank images that are set to the best size for presentation to
the user. You would typically edit these les as part of your nished application.
In the root directory of your application is a le with a .pfx extension that provides a secu-
rity key for deployment and an appmanifest le that contains deployment metadata.
Exploring Visual Studio Express 2012 for Web
When you start Visual Studio Express 2012 for Web, the same Start Page screen is displayed
as shown in Figure 1-1 and described in the previous section. In the installed templates,
you’ll nd that they are divided according to .NET programming language, Visual Basic and
Visual C#. Figure 1-4 shows the templates that are installed for Visual Basic.
10 CHAPTER 1 Getting started with Visual Studio 2012 and Blend for Visual Studio 2012
FIGURE 1-4 The New Project screen with Visual Basic and Visual C# project templates
Your new project might differ based on the software installed on your computer. For
example, the template shown here is the Get Windows Azure SDK For .NET template that was
installed when the Azure SDK was installed.
All these templates are for web-related applications; none of them can be used to cre-
ate a Windows 8 application. Note that none of the templates support the use of JavaScript
as a server-side language, but you can select a Visual Basic or C# web project template and
use client-side (on the browser) JavaScript. Remember that you can use HTML5, CSS3, and
JavaScript as client-side technologies with any of the web application templates.
Under one of the languages, you can click the Web node to see a list of available web
application templates. You can select a template called ASP.NET Empty Web Application to
begin with a nearly empty startup project.
Examining ASP.NET Empty Web Application
After selecting ASP.NET Empty Web Application, a copy of the template is opened in the
Solution Explorer window on the upper right, as shown in Figure 1-5. This window contains
a node for the project (WebApplication1); a node that references the project settings, called
My Project; and a node that references the project’s conguration le, called Web.cong. This
project is almost empty. If you press F5 to build and run the web application, it won’t run. You
must add a webpage to the project rst.
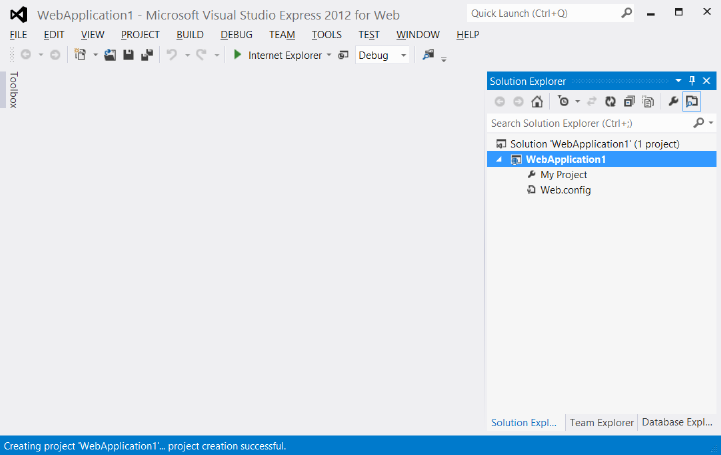
Lesson 1: Visual Studio 2012 CHAPTER 1 11
FIGURE 1-5 Almost empty ASP.NET Empty Web Application
By default, the Solution Explorer window is on the right side. Under the Solution Explorer
window is the Properties window. The Properties window is context-sensitive and contains the
properties of the currently selected item. The properties are visible in this window, and most
are also congurable.
On the left side of the screen is the toolbox. By default, the toolbox is a tab that you can
point to to open the window. The toolbox is also context-sensitive, so different tools are avail-
able based on what is being displayed in the center window.
You can add a webpage to the project by right-clicking the project node
(WebApplication1) and then navigating to Add | New Item | HTML Page. If you name the
page default.html, the web server automatically delivers the page to a browser that navi-
gates to your website but doesn’t specify the name of a webpage to retrieve. After adding
the webpage, you can enter some text, such as a Hello World message, into the body of the
webpage. When you press F5, you see the message in the browser.
Lesson summary
The free editions of Visual Studio 2012 are the Express editions: Visual Studio
Express 2012 for Web and Visual Studio Express 2012 for Windows 8. You can use the
Express editions to work with HTML5, CSS3, and JavaScript.
Use Visual Studio Express 2012 for Web to develop web applications. Use Visual Studio
Express 2012 for Windows 8 to develop Windows 8 applications.
12 CHAPTER 1 Getting started with Visual Studio 2012 and Blend for Visual Studio 2012
Visual Studio Express 2012 for Windows 8 comes with Blend for Visual Studio 2012.
Blend for Visual Studio 2012 drives the user interface design and must be run on
Windows 8 to develop Windows 8 applications.
You can change the style sheet reference from a dark theme to a light theme by
changing the ui-dark.css reference in the default.html le to ui-light.css.
Lesson review
Answer the following questions to test your knowledge of the information in this lesson. You
can nd the answers to these questions and explanations of why each answer choice is correct
or incorrect in the “Answers” section at the end of this chapter.
1. You would like to create a web application by using HTML5, JavaScript, and CSS3.
Which of the following Visual Studio 2012 editions can you use? (Choose all that apply.)
A. Visual Studio Professional 2012
B. Visual Studio Premium 2012
C. Visual Studio Ultimate 2012
D. Visual Studio Express 2012 for Web
E. Visual Studio Express 2012 for Windows 8
2. You would like to create a Windows 8 application by using HTML5, JavaScript, and
CSS3. Which of the following Visual Studio 2012 editions can you use? (Choose all
that apply.)
A. Visual Studio Professional 2012
B. Visual Studio Premium 2012
C. Visual Studio Ultimate 2012
D. Visual Studio Express 2012 for Web
E. Visual Studio Express 2012 for Windows 8
3. You would like to create web applications and Windows 8 Windows Store applications
by using HTML5, JavaScript, and CSS3, but while you’re learning, you don’t want to buy
Visual Studio 2012. Which of the following Visual Studio 2012 editions can you use for
free to accomplish your goal?
A. Visual Studio Professional 2012
B. Visual Studio Premium 2012
C. Visual Studio Ultimate 2012
D. Visual Studio Express 2012 for Web and Visual Studio Express 2012 for Windows 8
Lesson 2: Blend for Visual Studio 2012 CHAPTER 1 13
Lesson 2: Blend for Visual Studio 2012
Blend is included with Visual Studio 2012 Express for Windows 8 and helps you design your
user interface. Blend is a design complement for Visual Studio and does for design what
Visual Studio does for code. The following are some key features of Blend.
Visual design Edit HTML, CSS, and Windows Store controls in a “what you see is
what you get” (WYSIWYG) environment. What you see in Blend is what users will see in
Windows 8.
Interactive mode Design your app by changing states and setting styles. You don’t
need to compile and run continuously. Blend provides the ability to use interactive
mode so the developer can run the application on the design surface until the desired
state is reached. The developer can pause the application and then style the applica-
tion for the new state.
App building Windows Store controls can be dragged and dropped onto the design
surface. After that, just set the properties and styles.
Powerful code generation Blend takes care of all the syntax by generating concise,
reliable, predictable code when you add a style or element to your application.
Debugging Blend offers visual debugging of HTML and CSS. It has a virtual rule
called Winning Properties that shows you how an element obtained its effective style
from the CSS inheritance and cascade.
After this lesson, you will be able to:
Identify the key features of Blend.
Start a project by using Blend.
Estimated lesson time: 25 minutes
Exploring Blend
Blend is an exciting tool for designers and developers who will be using HTML5, CSS3, and
JavaScript to develop Windows 8 applications. Blend also supports the creation of Windows 8
Windows Store applications by using XAML with your choice of .NET programming language.
Figure 1-6 shows the New Project screen, which has the same new project templates as Visual
Studio Express 2012 for Windows 8.
14 CHAPTER 1 Getting started with Visual Studio 2012 and Blend for Visual Studio 2012
NOTE RUN CONSTRAINT FOR BLEND
Blend for Visual Studio 2012 must be run on Windows 8 to develop Windows 8 applica-
tions. If you run Blend for Visual Studio 2012 on Windows 7, you will not be able to develop
Windows 8 applications.
FIGURE 1-6 The Blend New Project screen with the JavaScript project templates
Selecting Blank App creates the same Blank App that was discussed in the previous sec-
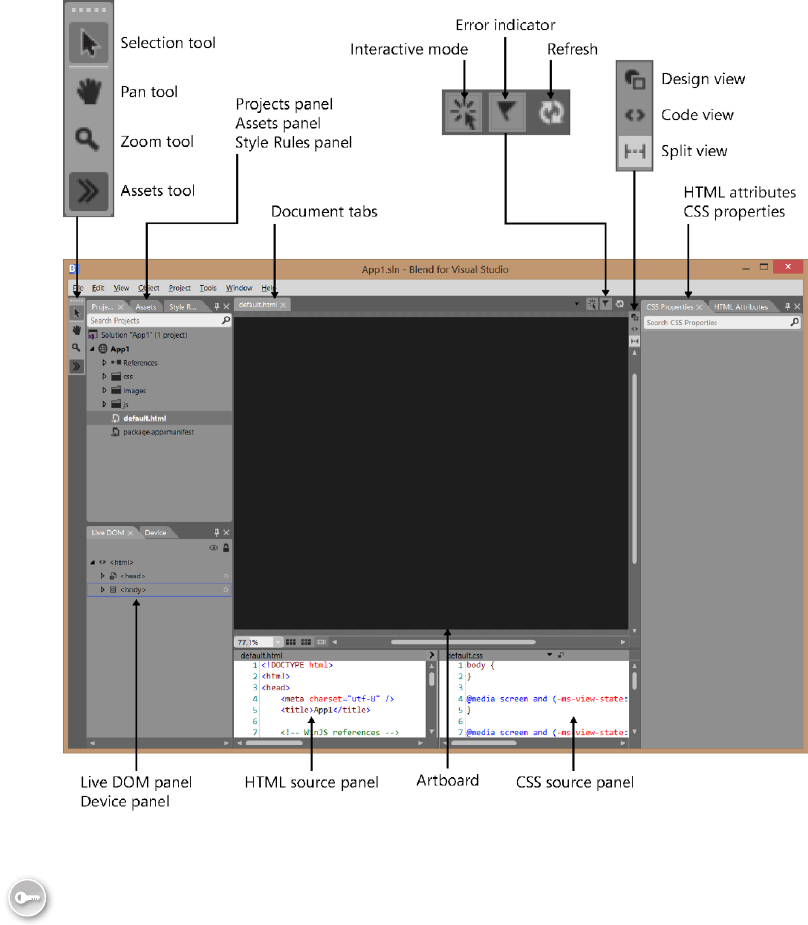
tion. Note the screen layout. Figure 1-7 shows the Blend screen layout. On the left is the Tools
panel, where you can point to each icon to see a tooltip that displays the name of the com-
mand. Just to the right of the Tools panel is a column with two windows, one over the other.
These windows have tabs that can be selected to show more information. The upper-left
window contains the following tabs.
Projects Contains a tree-based representation of your solution, which can contain
many projects, each project containing resources such as les and folders.
Assets Contains a library of resources such as HTML elements, JavaScript controls,
and media that you will use within your application.
Style Rules Contains a list of cascading style sheets that are referenced in your
project.
Under Style Rules is the Live DOM window, which shows a dynamic representation of your
HTML page.
Lesson 2: Blend for Visual Studio 2012 CHAPTER 1 15
FIGURE 1-7 The Blend screen layout
In the middle of the screen is your primary workspace, the artboard. At the top of the
artboard is a tabbed list of documents that are open. By default, this window displays the ren-
dered page. Note that there are buttons in the upper-right corner that can be used to change
the view.
The bottom center displays the default.html and the default.css sources. This makes it easy
for you to change the les and see the rendered output. Also, as you use the other windows
to modify the rendered page, you see the changes reected in these les.
Key
Terms

16 CHAPTER 1 Getting started with Visual Studio 2012 and Blend for Visual Studio 2012
The rightmost window contains the following two tabs.
HTML Attributes Displays the properties for the currently selected HTML element.
You can view or change these settings.
CSS Properties Displays the style settings for the currently selected HTML element.
You can set these properties.
Quick check
You want to be able to design your app by changing states and setting styles.
Which mode provides this feature?
Quick check answer
Interactive mode. You can run the application on the design surface until the
desired state is reached. You can pause the application and then style the appli-
cation for the new state.
Projects panel
The Projects panel provides a le and folder view of the projects in your solution, as shown in
Figure 1-8. You can use this panel to open les for editing by double-clicking the le. You can
also right-click any le or folder to see options such as Copy, Delete, and Rename.
FIGURE 1-8 The Projects panel
Notice the different icons for the solution, project, references, folders, and les and note
that the default.html le is underlined to indicate that it is the startup le when you run the
application. At the top of the Projects panel is a Search Projects text box in which you can
type the name of a le or folder you want to nd. In the project is a virtual folder called
Lesson 2: Blend for Visual Studio 2012 CHAPTER 1 17
References. This is where you add references to CSS and JavaScript. The project also contains
the package.manifest le, which contains all the settings for the project, including the setting
for the Start page.
Assets panel
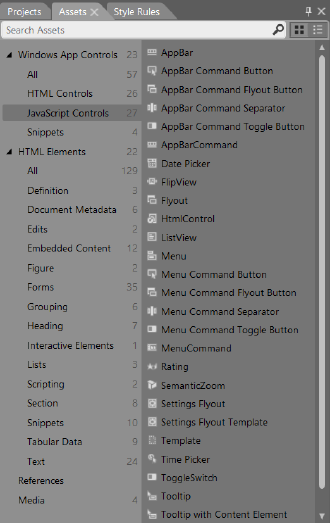
The Assets panel lists all the HTML elements, controls, and media that you can add to an
HTML page that is open in the artboard, as shown in Figure 1-9. Although the Assets panel
lists all the available controls in your Blend project, the most recently used controls appear in
the Tools panel.
FIGURE 1-9 The Assets panel shown when building a Windows Store application with HTML
Open the Assets panel either by clicking the Assets icon at the bottom of the Tools panel
or by clicking Assets in the Windows menu.
Device panel
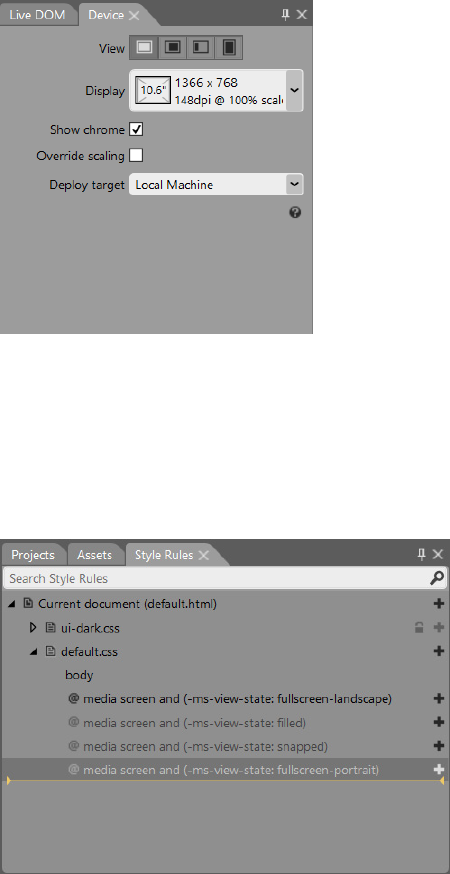
Use the Device panel to congure your display so that you can visualize your application
accurately on a variety of displays, as shown in Figure 1-10. You can select the following dis-
play options for your application.
View The rendering mode when the application is run. Choices are landscape, lled,
snapped, and portrait.
18 CHAPTER 1 Getting started with Visual Studio 2012 and Blend for Visual Studio 2012
Display The display size and resolution at which to render. Use this to simulate ren-
dering on larger or smaller screens to see whether your application renders properly.
Show chrome When selected, shows a simulated tablet screen around the edge of
the application.
Override scaling When selected, emulates the built-in display scaling of the device.
Deploy target The device to which to deploy when the application is run.
FIGURE 1-10 The Device panel
Style Rules panel
The Style Rules panel, shown in Figure 1-11, lists all the style sheets attached to the current
document. Within each style sheet is a list of all the dened styles. In addition, the Style Rules
panel contains a text box in which you can enter search criteria when locating a style.
FIGURE 1-11 The Style Rules panel containing a list of attached style sheets
Lesson 2: Blend for Visual Studio 2012 CHAPTER 1 19
You can click the plus signs on the right side of the panel to add a new style rule at that
location. The yellow line indicates where new styles will be created if a location is not speci-
ed. Style rules that are dimmed are dened but not used in the current document.
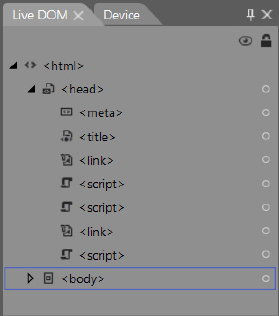
Live DOM panel
The Live DOM panel displays the structure of the current document as a hierarchical repre-
sentation, as shown in Figure 1-12. With the Live DOM panel, you can select elements and
adjust their style rules. The Live DOM view provides automatic updating as the state of the
app changes.
FIGURE 1-12 The Live DOM panel displaying a hierarchical representation of the current document
The Live DOM panel displays nodes by using their ID if an ID is assigned or by using the
tag name if no ID is assigned. You can control the visibility of any node by clicking the eye
icon on the right side of the panel. This can be helpful when you have layers of elements
stacked on top of each other.
As with Visual Studio, you can press F5 to run the application. Blend has many features that
you can learn about by using the built-in help.
Lesson summary
The interactive mode enables you to run the application to build to the desired state
and then pause the application and set the styles of the application based on the cur-
rent state.
The Assets panel contains a list of all available assets in the project.
The Projects panel contains a le and folder view of the projects in the current
solution.
The Style Rules panel contains a list of all style sheets attached to the current
document.

20 CHAPTER 1 Getting started with Visual Studio 2012 and Blend for Visual Studio 2012
The Device panel enables you to run the application by using simulations of different
screen sizes and orientations.
The Live DOM panel enables you to select an element and apply style rules to it.
Lesson review
Answer the following questions to test your knowledge of the information in this lesson. You
can nd the answers to these questions and explanations of why each answer choice is correct
or incorrect in the “Answers” section at the end of this chapter.
1. You would like to create a Windows 8 application by using Blend and HTML5,
JavaScript, and CSS3. Which feature of Blend enables you to pause an application when
it reaches a desired state so you can set the style rules for the page and its controls
while in this state? (Choose all that apply.)
A. Assets panel
B. Projects panel
C. Visual Design
D. Interactive mode
2. On which panel can you see a hierarchically structured view of the DOM?
A. Live DOM
B. Projects
C. Assets
D. Device
3. Which panel can you use to access a list of the HTML elements, controls, and media
that can be added to an HTML page that is open in the artboard?
A. Projects
B. Assets
C. Device
D. Live DOM
Practice exercises
If you encounter a problem completing any of these exercises, the completed projects can be
installed from the Practice Exercises folder that is provided with the companion content.
Practice exercises CHAPTER 1 21
Exercise 1: Hello World with Visual Studio Express 2012 for
Windows 8
In this exercise, you create a simple HTML5 and JavaScript Hello World application by using
Visual Studio Express 2012 for Windows 8. This practice, like all Hello World applications, is
intended to get you started by creating a minimal application. In later exercises, you get more
exposure to Visual Studio. In this exercise, you use HTML5 to display “Hello Visual Studio for
Windows 8” on the screen.
1. If you haven’t installed Visual Studio Express 2012 for Windows 8, do so now. You can
download this from the Microsoft website.
2. Start Visual Studio. Click File and choose New Project to display the New Project dialog
box. Navigate to Installed | Templates | JavaScript | Windows Store. Select Blank App.
3. Set the name of your application to HelloVisualStudioForWin8.
4. Select a location for your application.
5. Set the solution name to HelloVisualStudioForWin8Solution.
6. Be sure to keep the Create Directory For Solution check box selected.
7. Click OK to create your new project.
8. When the application is created, the default.js le is displayed with some template
code.
This code is covered later, and there is no need to alter it now.
9. Open the default.html le.
It contains HTML from the template.
10. To see the default content, press F5 to start debugging the application.
You should see a black screen and, in the upper-left corner, a message stating,
“Content goes here.”
11. Switch back to Visual Studio by pressing Alt+Tab.
The title bar says (Running).
12. Press Shift+F5 to stop debugging.
Shift+F5 works only when Visual Studio has the focus; it does not work when the run-
ning application has the focus.
13. In the default.html le, replace the “Content goes here” message with Hello Visual
Studio for Windows 8.
14. Replace the reference to ui-dark.css with ui-light.css.
Your HTML should look like the following.
<!DOCTYPE html>
<html>
<head>
<meta charset="utf-8" />
<title>HelloWorldForWin8</title>

22 CHAPTER 1 Getting started with Visual Studio 2012 and Blend for Visual Studio 2012
<!-- WinJS references -->
<link href="//Microsoft.WinJS.1.0/css/ui-light.css" rel="stylesheet" />
<script src="//Microsoft.WinJS.1.0/js/base.js"></script>
<script src="//Microsoft.WinJS.1.0/js/ui.js"></script>
<!-- HelloWorld references -->
<link href="/css/default.css" rel="stylesheet" />
<script src="/js/default.js"></script>
</head>
<body>
<p>Hello Visual Studio for Windows 8</p>
</body>
</html>
15. Press F5 to start debugging.
The screen is white because you now reference the ui-light.css le instead of
the ui-dark.css le. The screen also displays Hello Visual Studio For Windows 8.
Congratulations—you have written your rst Windows 8 application by using HTML5
technologies!
Exercise 2: Hello World with Visual Studio Express 2012
for Web
In this exercise, you create a simple HTML5 and JavaScript Hello World application by using
Visual Studio Express 2012 for Web. This practice, like all Hello World applications, is intended
to get you started by creating a minimal application. In later exercises, you get more exposure
to Visual Studio. In this exercise, you create a new project in Visual Studio Express 2012 for
Web and use HTML5 to display “Hello Visual Studio for Web” on the screen.
NOTE NO SERVER CODE IN THIS EXERCISE
You will not be writing any server code in this exercise, so it doesn’t matter whether you
select Visual Basic or Visual C# when starting the new project.
1. If you haven’t installed Visual Studio Express 2012 for Web, do so now. You can down-
load this from the Microsoft website.
2. Start Visual Studio. Click File and choose New Project to display the New Project dialog
box. Navigate to Installed | Templates | Visual Basic | Web. Select the ASP.NET Web
Form Application.
3. Set the name of your application to HelloVisualStudioForWeb.
4. Select a location for your application.
5. Set the solution name to HelloVisualStudioForWeb Solution.
6. Be sure to keep the Create Directory For Solution check box selected.
7. Click OK to create your new project.
Practice exercises CHAPTER 1 23
8. When the application is created, the default.aspx page will be displayed with some
template code.
9. In the Solution Explorer window, build the project by right-clicking the project node
and choosing Build.
10. To see this template’s default content, press F5 to start debugging the application.
You should see a fancy screen with information on how to get started plus other useful
information.
11. Switch back to Visual Studio by pressing Alt+Tab.
The title bar says (Running).
12. Press Shift+F5 to stop debugging.
Note that Shift+F5 works only when Visual Studio has the focus. Shift+F5 does not
work when the running application has the focus.
13. Delete the default.aspx le by right-clicking this le in the Solution Explorer window,
choosing Delete, and then clicking OK.
14. In the Solution Explorer window, add a default.html le by right-clicking the project
node. Click Add and then choose HTML. Name the page default.html.
15. In the default.html le, place the text Hello Visual Studio for Web between the
<body> and </body> tags.
16. In the default.html le, place the text HelloVisualStudioForWeb between the <title>
and </title> tags.
Your HTML should look like the following.
<!DOCTYPE html>
<html xmlns="http://www.w3.org/1999/xhtml">
<head>
<title>HelloVisualStudioForWeb</title>
</head>
<body>
Hello Visual Studio for Web
</body>
</html>
17. In the Solution Explorer window, set the default.html le as the startup le by right-
clicking the default.html le and choosing Set As Start Page.
18. Press F5 to start debugging.
The screen now displays Hello Visual Studio For Web. Congratulations—you have writ-
ten your rst web application using HTML5 technologies!
24 CHAPTER 1 Getting started with Visual Studio 2012 and Blend for Visual Studio 2012
Exercise 3: Hello World with Blend
In this exercise, you create a simple HTML5 and JavaScript Hello World application by using
Blend. This practice, like all Hello World applications, is intended to get you started by creat-
ing a minimal application. In later exercises, you get more exposure to Blend. In this exercise,
you create a new project in Blend and use HTML5 to display “Hello World” on the screen.
1. If you haven’t installed Blend, do so now. Remember that Blend is installed automati-
cally when you install Visual Studio Express 2012 for Windows 8. You can download
this from the Microsoft website.
2. To start Blend, click New Project to display the New Project dialog box. Select the
HTML (Windows Store) category in the left pane and select Blank App in the right
pane.
3. Set the name of your application to HelloBlend.
4. Select a location for your application.
5. Click OK to create your new project.
When the application is created, the default.html le is displayed.
6. To see the default content, press F5 to start debugging the application.
You should see a black screen and, in the upper-left corner, a message stating,
“Content goes here.”
7. Close the running application by pressing Alt+F4.
8. If Blend is not displayed, return to Blend by pressing Alt+Tab.
9. In the default.html le, double-click the “Content Goes Here” message and replace the
text with Hello from Blend.
You see the change in the default.html source view window at the bottom of the
screen.
10. Replace the reference to ui-dark.css with ui-light.css.
Your HTML should look like the following.
<!DOCTYPE html>
<html>
<head>
<meta charset="utf-8" />
<title>HelloBlend</title>
<!-- WinJS references -->
<link href="//Microsoft.WinJS.1.0/css/ui-light.css" rel="stylesheet" />
<script src="//Microsoft.WinJS.1.0/js/base.js"></script>
<script src="//Microsoft.WinJS.1.0/js/ui.js"></script>
<!-- HelloBlend references -->
<link href="/css/default.css" rel="stylesheet" />
<script src="/js/default.js"></script>
</head>
<body>

Suggested practice exercises CHAPTER 1 25
<p>Hello from Blend</p>
</body>
</html>
11. Press F5 to start the application.
Notice that the screen is white because you now reference the ui-light.css le instead
of the ui-dark.css le. The screen now displays Hello From Blend. Congratulations—you
have written a Windows 8 application by using HTML5 technologies with Blend!
Suggested practice exercises
The following additional exercises are designed to give you more opportunities to practice
what you’ve learned and to help you successfully master the lessons presented in this chapter.
Exercise 1 Learn more about Visual Studio Express 2012 for Web by creating new
projects from each of the included project templates. After creating each project, try
adding Hello World and run the application to see how the project looks and behaves.
Exercise 2 Learn more about Visual Studio Express 2012 for Windows 8 by creating
new projects from each of the included project templates. After creating each proj-
ect, try adding Hello World and run the application to see how the project looks and
behaves.
Exercise 3 Learn more about Blend by creating new projects from each of the
included project templates. After creating each project, try adding Hello World and
run the application to see how the project looks and behaves.

26 CHAPTER 1 Getting started with Visual Studio 2012 and Blend for Visual Studio 2012
Answers
This section contains the answers to the lesson review questions in this chapter.
Lesson 1
1. Correct answers: A, B, C, and D
A. Correct: Visual Studio Professional 2012 provides web templates for creating web
applications.
B. Correct: Visual Studio Premium 2012 provides web templates for creating web
applications.
C. Correct: Visual Studio Ultimate 2012 provides web templates for creating web
applications.
D. Correct: Visual Studio Express 2012 for Web provides web templates for creating
web applications only.
E. Incorrect: Visual Studio Express 2012 for Windows 8 provides templates for build-
ing Windows 8 applications only.
2. Correct answers: A, B, C, and E
A. Correct: Visual Studio Professional 2012 provides web templates for creating
Windows 8 applications.
B. Correct: Visual Studio Premium 2012 provides web templates for creating
Windows 8 applications.
C. Correct: Visual Studio Ultimate 2012 provides web templates for creating
Windows 8 applications.
D. Incorrect: Visual Studio Express 2012 for Web provides web templates for creating
web applications only.
E. Correct: Visual Studio Express 2012 for Windows 8 provides templates for building
Windows 8 applications only.
3. Correct answer: D
A. Incorrect: Visual Studio Professional 2012 enables you to create web and
Windows 8 applications, but it is not free.
B. Incorrect: Visual Studio Premium 2012 enables you to create web and Windows 8
applications, but it is not free.
C. Incorrect: Visual Studio Ultimate 2012 enables you to create web and Windows 8
applications, but it is not free.
D. Correct: Visual Studio Express 2012 for Web provides web templates for creating
web applications, and Visual Studio Express 2012 for Windows 8 provides tem-
plates for creating Windows 8 applications. Both are free.

Answers CHAPTER 1 27
Lesson 2
1. Correct answers: C and D
A. Incorrect: The Assets panel enables you to access a list of the HTML elements, con-
trols, and media that can be added to an HTML page that is open in the artboard.
B. Incorrect: The Projects panel provides a le and folder view of the projects in the
current solution.
C. Correct: With Visual Design, what you see in Blend is what users will see in
Windows 8.
D. Correct: Interactive mode enables you to run the application on the design surface
until the desired state is reached. You can pause the application and then style the
application for the new state.
2. Correct answer: A
A. Correct: Live DOM displays the structure of the current document as a hierarchi-
cal representation. You can use the Live DOM panel to select elements and adjust
their style rules.
B. Incorrect: The Projects panel provides a le and folder view of the projects in your
solution.
C. Incorrect: The Assets panel lists all the HTML elements, controls, and media that
you can add to an HTML page that is open in the artboard.
D. Incorrect: The Device panel enables you to congure your display so that you can
visualize your application accurately on a variety of displays.
3. Correct answer: B
A. Incorrect: The Projects panel provides a le and folder view of the projects in your
solution.
B. Correct: The Assets panel lists all the HTML elements, controls, and media that you
can add to an HTML page that is open in the artboard.
C. Incorrect: The Device panel enables you to congure your display so that you can
visualize your application accurately on a variety of displays.
D. Incorrect: The Live DOM panel displays the structure of the current document as
a hierarchical representation. You can use the Live DOM panel to select elements
and adjust their style rules.


29
CHAPTER 2
Getting started with HTML5
Welcome to the world of HTML5, JavaScript, and CSS3! This chapter gets you started
with HTML5. The next chapter does the same with JavaScript, and the following chap-
ter familiarizes you with CSS3.
Now that you’ve installed Visual Studio 2012 and Blend, you’re ready to build your
knowledge foundation by learning some basic HTML. This chapter presents a great deal of
HTML content. Although much of the content in this chapter exists in previous releases of
HTML, all content in this chapter is part of the HTML5 specication.
Lessons in this chapter:
Lesson 1: Introducing HTML5 29
Lesson 2: Embedding content 44
Before you begin
To complete this book, you must have some understanding of web development. This
chapter requires the hardware and software listed in the “System requirements” section in
the book’s Introduction.
Lesson 1: Introducing HTML5
Chapter 1, “Getting Started with Visual Studio 2012 and Blend for Visual Studio 2012,”
presented a very brief overview of the Visual Studio editions and Blend. This was necessary
to introduce you to the tools that will be used in this book. This lesson presents a rather
detailed overview of HTML5 and covers many of the fundamentals of HTML that existed
prior to HTML5 but are still part of the HTML5 specication.
30 CHAPTER 2 Getting started with HTML5
After this lesson, you will be able to:
Understand the history of HTML5.
Create an HTML5 document and add elements and attributes to it.
Add comments to an HTML5 document.
Use special characters in your HTML document.
Estimated lesson time: 30 minutes
Understanding HTML, XHTML, and HTML5
HTML is an acronym for Hypertext Markup Language, which is the language we have used to
create webpages since the rst webpages arrived on the web. HTML roots are from an older
markup language that was used in document publishing, called SGML (Standard Generalized
Markup Language). Like SGML, HTML uses tags to provide formatting features such as
<b>this is bold</b>, which would cause the text within the starting b tag and ending b tag to
render as bolded text. Notice the difference between the rst and second tag; the second tag
has a slash (/) to indicate that it’s an ending tag. Many but not all HTML tags have a matching
end tag. HTML tags such as <br> and <img> did not have ending tags because the <br> just
rendered a line break, and the <img> tag just rendered an image.
One interesting aspect of HTML and its relationship with browsers was that browsers were
designed to be backward compatible and forward compatible. Creating a browser that is
backward compatible is relatively easy because the problem domain is known, but how is
forward compatibility accomplished? Browsers were created to ignore tags that they didn’t
recognize. For example, if a browser came across a <xyz> tag that it didn’t recognize, it
would skip over the tag as though it didn’t exist.
Although HTML served its purpose for quite some time, people wanted more. Another
evolving technology, called XML (eXtensible Markup Language), was becoming popular. XML
looks a lot like HTML because both languages use tags. However, there are several big dif-
ferences. First, XML always requires matching end tags for every tag, although you can use
a shortcut notation to denote a starting tag and ending tag together. Another difference is
that HTML has a very specic set of tag names, and each of these tags denotes a formatting
feature that is to be applied to the rendered webpage. XML doesn’t have a dened set of tag
names, so you create your own tag names, and the tags can represent anything. XML tags are
typically metadata tags: tags that describe the data that is within the tag. Although there are
many other differences, one other large difference is that XML uses XML Schema Denition
(XSD) technology, which validates the format of an XML document to ensure that all aspects
of a document are valid before processing the XML document. HTML’s lack of rigid structure
prevented the creation of a technology such as XSD that could validate HTML documents.
The World Wide Web Consortium, also known as W3C (http://ww.w3c.org), is respon-
sible for developing open standards for the web. The W3C introduced XHTML to solve the
Key
Terms
Key
Terms

Lesson 1: Introducing HTML5 CHAPTER 2 31
problems in HTML, which was up to version 4. XHTML is an XML-based specication that
tightened the HTML specication to make HTML adhere to the XML rules that describe a
well-formed document, such as having a matching end tag for each starting tag. This meant
that XHTML documents could be validated by using XSD les and could be edited by using
XML tools.
Although XHTML solved some problems, other problems still needed a solution. There was
a need for an increasing amount of multimedia on the web. Companies wanted the ashiest
(pun intended) website. Cascading Style Sheets (CSS) provided support for adding styles such
as colors and fonts consistently across a website, but companies wanted more. They wanted
their webpages to be highly interactive, with video and animations. Browsers added program-
mable support by providing JavaScript, but early versions of JavaScript were slow and difcult
to program. The browsers became extensible by providing an application programming
interface (API) that would allow third parties to create plug-ins that could run in the browser’s
environment. One such plug-in is Flash, which has a very large installed base. Flash provides a
development environment that can be used to create a rich user experience. Although third-
party plug-ins solved the immediate need for technology to create ashy websites, there was
still a need for tighter integration of multimedia with the browser, especially on small devices.
HTML5 does not originate from XHTML; HTML5 originates from HTML 4.01. As a rule,
however, applying XHTML rules to your HTML5 will make your webpage more compliant
with a wider variety of browsers and webpage readers, generators, and validators. This book
attempts to be most compliant with the most technologies.
HTML5 represents a reinvented HTML, CSS, and JavaScript in a way that solves the need
for rich, interactive websites that can play audio and video and support animations from
within the browser without the need for plug-ins. HTML5 contains most of the tags from
HTML 4.01, but many of the tags have been redened to be semantic tags.
Introducing semantic markup
HTML5 stresses separating structure, presentation, and behavior, a good practice to adhere
to. Semantic is dened as the study of meaning of linguistic expressions. In the context of
HTML, that means that tags provide meaning to the content in the HTML document. Tags do
not provide presentation; they provide meaning.
HTML tags provide a meaningful structure, but do not provide presentation. Remember
that separation is accomplished by providing structure in your HTML5 document, maintaining
presentation in your CSS3 style sheet, and maintaining behavior in your JavaScript le.
How can you maintain separation when tags such as <b> (bold) and <i> (italic) exist?
After all, these tags have presentation in their denitions. The W3C now denes the <b> tag
as “a span of text offset from its surrounding content without conveying any extra empha-
sis or importance, and for which the conventional typographic presentation is bold text; for
example, keywords in a document abstract, or product names in a review.” The W3C now
denes the <i> tag as “a span of text offset from its surrounding content without conveying
any extra emphasis or importance, and for which the conventional typographic presentation
Key
Terms

32 CHAPTER 2 Getting started with HTML5
is italic text; for example, a taxonomic designation, a technical term, an idiomatic phrase from
another language, a thought, or a ship name.” Do these tags need to render as bold and
italic? Not at all, and the new denitions of these tags attempt to specify this.
Chapter 5, “More HTML5,” revisits the notion of semantic markup. For now, remember that
your HTML tags should be used to provide structure, not presentation. Presentation is the
cascading style sheet’s job.
Working with elements
An element is composed of a beginning tag, an ending tag, and the content between the
tags. Consider the following HTML fragment.
<div>
The quick brown <b>fox</b> jumps over the lazy dog
</div>
In this sample, the <div> tag is just the beginning tag on the rst line. The <div> element
is the complete sample, which includes content that also contains a <b> element. The <b>
element consists of the beginning <b> tag, the content, which is the word “fox,” and the end-
ing </b> tag.
The <div> element creates a section in your document. It’s common to use <div> ele-
ments to denote a section to which you will attach a style. You’ll see many uses of the <div>
element in this book and on most websites.
HTML tag names are not case sensitive. If you’re working on an older webpage, you might
notice that it was written using uppercase tag names. Browsers will treat a <b> tag and a <B>
tag the same.
To comply with as many standards as possible, consider using lowercase tag names for any
webpages you create by convention because the W3C recommends lowercase tag names in
HTML 4.01 and requires lowercase tag names in XHTML. Although HTML5 does not mandate
lowercase tag names, lowercase tag names are recommended.
Element reference
HTML5 has more than 100 dened elements that you can use to create rich webpages and
applications. The W3C denes the following list of these elements with a brief description.
Note that brevity is a substitute for 100 percent accuracy in these descriptions.
<a> Hyperlink
<abbr> Abbreviation
<address> Contact information
<area> Image map region
<article> Independent section
<aside> Auxiliary section
<audio> Audio stream
Key
Terms
Lesson 1: Introducing HTML5 CHAPTER 2 33
<b> Bold text
<base> Document base URI
<bb> Browser button
<bdo> Bi-directional text override
<blockquote> Long quotation
<body> Main content
<br> Line break
<button> Push button control
<canvas> Bitmap canvas
<caption> Table caption
<cite> Citation
<code> Code fragment
<col> Table column
<colgroup> Table column group
<command> Command that a user can invoke
<datagrid> Interactive tree, list, or tabular data
<datalist> Predened control values
<dd> Denition description
<del> Deletion
<details> Additional information
<dfn> Dening instance of a term
<dialog> Conversation
<div> Generic division
<dl> Description list
<dt> Description term
<em> Stress emphasis
<embed> Embedded application
<eldset> Form control group
<gure> A gure with a caption
<footer> Section footer
<form> Form
<h1> Heading level 1
<h2> Heading level 2
<h3> Heading level 3
<h4> Heading level 4
34 CHAPTER 2 Getting started with HTML5
<h5> Heading level 5
<h6> Heading level 6
<head> Document head
<header> Section header
<hr> Separator
<html> Document root
<i> Italic text
<iframe> Inline frame
<img> Image
<input> Form control
<ins> Insertion
<kbd> User input
<label> Form control label
<legend> Explanatory title or caption
<li> List item
<link> Link to resources
<map> Client-side image map
<mark> Marked or highlighted text
<menu> Command menu
<meta> Metadata
<meter> Scalar measurement
<nav> Navigation
<noscript> Alternative content for no script support
<object> Generic embedded resource
<ol> Ordered list
<optgroup> Option group
<option> Selection choice
<output> Output control
<p> Paragraph
<param> Plug-in parameter
<pre> Preformatted text
<progress> Progress of a task
<q> Inline quotation
<rp> Ruby parenthesis
<rt> Ruby text

Lesson 1: Introducing HTML5 CHAPTER 2 35
<ruby> Ruby annotation
<samp> Sample output
<script> Linked or embedded script
<section> Document section
<select> Selection control
<small> Small print
<source> Media resource
<span> Generic inline container
<strong> Strong importance
<style> Embedded style sheet
<sub> Subscript
<sup> Superscript
<table> Table
<tbody> Table body
<td> Table cell
<textarea> Multiline text control
<tfoot> Table footer
<th> Table header cell
<thead> Table head
<time> Date and/or time
<title> Document title
<tr> Table row
<ul> Unordered list
<var> Variable
<video> Video or movie
<wbr> Optionally break up a large word at this element
Many of these elements are discussed in more detail later in this book.
Adding attributes to elements
The begin tag can contain additional data in the form of an attribute. An attribute is a
name=”value” pair in which name is unique within the tag and value is always enclosed within
either single quotes or double quotes. You can add many attributes to the begin tag. You can
also alternate using single quotes and double quotes, which is especially benecial when you
need to embed single or double quotes within the value of the attribute. You can also have
Boolean attributes that contain the attribute name but no value.
Key
Terms
36 CHAPTER 2 Getting started with HTML5
Here is an example of an element that has attributes.
<div id="main" class='mainContent'></div>
In this example, id and class are attributes. The id attribute uniquely identies an element
within an HTML document. The class attribute species a named CSS style that should be
applied to the element.
Working with Boolean attributes
Some attributes are Boolean attributes, which means that the mere presence of the attribute
indicates that an option is set.
Some examples of Boolean attributes are as follows.
checked Used with the check box and option button to indicate selection
selected Used to indicate which option is selected in a drop-down or select list
disabled Used to disable input, text area, button, select, option, or opt group
readonly Used to prevent the user from typing data into a text box, password, or
text area
There are different ways to indicate a Boolean attribute. One way is to use the minimized
form, by which you just add the attribute name into the starting tag but don’t provide a
value. Here is an example of minimized form when setting a check box to selected.
<input type="checkbox" name="fruit" value="Apple" checked />
Another way to indicate a Boolean attribute is to use quoted form, in which you provide
either an empty value or the name of the attribute as its value. Here are examples of both.
<input type="checkbox" name="fruit" value="Apple" checked='' />
<input type="checkbox" name="fruit" value="Apple" checked='checked' />
The latter seems redundant but is usually considered to be the preferred way to represent
the Boolean attribute. If you use jQuery, which is a third-party JavaScript toolset, you’ll nd
that it works best with that redundant example.
Quick check
You are using a <button> element, and you want it to be disabled until some
criteria is met. What is the best way to disable the <button> element when the
page is loaded?
Quick check answer
Write the <button> element using quoted syntax and assign the attribute name
to the attribute as follows.
<button type='button' id='myButton' disabled='disabled'>Button</button>
Key
Terms

Lesson 1: Introducing HTML5 CHAPTER 2 37
HTML5 global attribute reference
HTML5 denes a set of named attributes that can be applied to any HTML5 element. These
elements are called global attributes, and each has a very specic meaning, as follows.
accesskey Enables you to either specify a shortcut key to which to jump or to set
focus to an element. As a rule, you shouldn’t use this because it can cause problems
with other technologies.
class Used with CSS to specify one or more class names for an element.
contenteditable Species that the content within the tag can be edited.
contextmenu User can right-click an element to display a menu. At the time of this
writing, no browser supports this attribute.
dir Enables you to specify left-to-right or right-to-left text direction for the content
in an element.
draggable Species whether an element is draggable.
dropzone Enables you to specify the behavior of the dragged data when it’s
dropped. Data can be copied, moved, or linked.
hidden Species that an element is not relevant.
id Species a unique id for an element.
lang Species the language (English, French, German, and so on) of the element’s
content.
spellcheck Used with the lang attribute to enable you to indicate whether the ele-
ment is to have its spelling and grammar checked.
style Species an inline CSS style for the element.
tabindex Sets the tabbing order of the element.
title Provides extra information about the element.
You’ll see many examples of these global attributes in this book.
Working with self-closing tags
You can represent any element that contains no content as a self-closing tag. A self-closing
tag is a beginning tag and an ending tag in one. You end the starting tag with a space, slash,
and greater-than symbol. For example, the <br> element cannot have any content, so here is
the beginning and ending tag in one: <br />.
In XML, any empty element can be written with a self-closing tag, but in HTML5, this can
cause problems in different browsers. The rule of thumb is to use self-closing tags for tags
that cannot have content, such as the <br /> tag. Empty elements that are capable of hav-
ing content but currently don’t have content should have separate end tags. An example is
<div></div>; there is no content, but the beginning and ending tags still exist.
Key
Terms
38 CHAPTER 2 Getting started with HTML5
NOTE USE THE <SCRIPT> ELEMENT CAREFULLY
When using the <script> element to reference an external JavaScript le, the element will
not have content when used in this context, but you must always include a separate end
tag as follows.
<script src="/Scripts/MyCode.js"></script>
A symptom of incorrect usage of the <script> element is when the browser renders a blank
screen, but you can view the source, and all its content is there.
Quick Check
You want to use the <script> element to include a JavaScript le named MyCode.
js in the scripts folder. What is the proper syntax?
Quick Check Answer:
<script src="/Scripts/MyCode.js"></script>
Working with void elements
Most but not all elements can have content, and the content can include elements with
content. Elements are not required to have content, but some elements cannot have content.
These are called void elements. For example, the <br> tag represents a line break and cannot
have any content.
The following is a list of void elements in HTML5.
<area> Denes a hyperlink area with some text in an image map
<base> Species the document’s base URL or target for all relative URLs in the
document
<br> Represents a line break
<col> Denes the properties of one or more columns within a <colgroup> element
<command> Denes a command that can be invoked by a user
<hr> Species a thematic change in content
<img> Denes an image
<input> Denes a typed data eld that allows the user to edit the data
<link> Denes a relationship between a document and an external resource such as
a cascading style sheet
<keygen> Denes a key-pair generator control for forms that is used to encrypt data
that will be passed to the server
<meta> Denes metadata that describes the HTML document
Key
Terms
Lesson 1: Introducing HTML5 CHAPTER 2 39
<param> Denes a parameter for an object
<source> Denes a multimedia resource for a <video> or <audio> element
<wbr> Optionally breaks up a large word at this element
In earlier versions of HTML, you just used the <br> tag with no ending tag to indicate that
you wanted to start a new line on the webpage. With XHTML, this was a problem because all
beginning tags are required to have matching end tags. HTML5 allows you to use a beginning
tag with no end tag, but a better solution is to use self-closing tags.
Adding expando attributes
Expando attributes are attributes that you dene. Expando attributes are also known as
author-dened attributes or simply as custom attributes. Any time you want to attach data
to an HTML tag, you can just create an attribute with the name of your choice and assign
the data. However, the name you create might conict with either an existing W3C-dened
attribute name or a future W3C-dened attribute name. To ensure that you have no existing
or future naming conict, assign a name that is prexed with “data-“.
Quick check
You have a webpage with a <span> element that contains the customer’s name.
Along with the name, you want to include the customer number on the <span>
element, but you don’t want to display the customer number. How can you
write the <span> element for a customer called Contoso Ltd with customer
number 123?
Quick check answer
Use an expando attribute to hold the customer number as follows.
<span data-customerNumber='123'>Contoso Ltd</span>
Adding comments
You can add comments to your HTML source by using the following syntax.
<!--comment here -->
Comments are not displayed on the rendered browser page but are sent to the browser.
Comments can help document your source.
No spaces are allowed between the <! characters and the -- characters at the beginning
of the comment, but spaces are allowed between the -- characters and the > character at the
end of the comment tag. This seemingly weird behavior means that you cannot have back-
to-back dashes (--) in your comment because this combination causes HTML syntax errors.
In addition, you cannot end a comment with three dashes, such as <!-- and then it hap-
pened---> because this also generates a syntax error.
Key
Terms

40 CHAPTER 2 Getting started with HTML5
Adding conditional comments
Only Internet Explorer recognizes conditional comments, which enable you to add a browser-
specic source that executes if the browser is Internet Explorer but is treated as a comment
by other browsers. You can add conditional comments to your HTML document by using the
following syntax.
<!--[if lte IE 7]> <html class="no-js ie6" lang="en"> <![endif]-->
<!--[if lt IE 7]> <html class="no-js ie6" lang="en"> <![endif]-->
<!--[if IE 8]> <html class="no-js ie8" lang="en"> <![endif]-->
<!--[if gt IE 8]> <html class="no-js" lang="en"> <![endif]-->
<!--[if gte IE 9]> <html class="no-js" lang="en"> <![endif]-->
<!--[if !IE]> --> This is not Internet Explorer!<br /> <!-- <![endif]-->
The rst conditional comment checks whether the browser is Internet Explorer and the
version is earlier than or equal to 7. The next conditional comment checks whether the
browser is Internet Explorer and the version is earlier than 7. The next conditional comment
checks whether the browser is Internet Explorer and the version is 8. The next conditional
comment checks whether the browser is Internet Explorer and the version is later than 8, fol-
lowed by a check to see whether the browser is Internet Explorer and the version is later than
or equal to 9. The last line checks whether the browser is not Internet Explorer. Note that the
syntax of the last line is different from the others.
Creating an HTML document
Now that you’ve seen the various elements and attributes, it’s time to group them in a mean-
ingful way to create an HTML document. The HTML document contains an outer structure,
metadata, and some content.
Basic document structure
Every HTML document should have a basic structure that consists of a <!DOCTYPE html>
declaration, which historically has indicated the version of HTML to the browser. In HTML5,
this indicates to the browser that it should be in no-quirks mode. No-quirks mode causes the
browser to operate in an HTML5-compliant manner. Next is the root <html> element, which
contains the <head> element and the <body> element.
The <head> element contains hidden information such as metadata that describes the
HTML document and instructions. The following is an example of metadata in the <head>
element.
<!DOCTYPE html>
<html>
<head>
<meta charset="utf-8" />
<title>title here</title>
</head>
<body>
content here
Key
Terms
Key
Terms
Lesson 1: Introducing HTML5 CHAPTER 2 41
</body>
</html>
In this example, the <meta> element describes the character set as utf-8, which is an ef-
cient form of unicode in which the English language characters (ASCII) require only a single
byte to be represented, and in which other languages can have characters that are repre-
sented with up to 4 bytes. This is the most common character set used in HTML and XML
documents.
This example also contains a <title> element, which is important because it serves the fol-
lowing purposes.
Displays in the browser toolbar
Provides the default name for the page when it is added to favorites
Displays the title when a search engine displays the page in the search results
The <body> tag contains the displayable contents.
Using special characters (HTML entities)
You might want to display the < and > characters on your webpage, but you’ve seen that the
less-than and greater-than characters dene tags. These characters can be displayed in your
content by using either the entity name or entity number as follows.
&entity_name;
or
&#entity_number;
There are many HTML entities, but Table 1-1 lists the most common HTML entities you will
use in your HTML document.
TABLE 1-1 Reference to common entities
Display Entity Name Entity Number Description
&& & Ampersand
>> > Greater-than sign
<< < Less-than sign
“" " Double quotation
©© © Copyright
®® ® Registered trademark
™™ ™ Trademark
$#160; Nonbreaking space
Key
Terms

42 CHAPTER 2 Getting started with HTML5
NONBREAKING SPACE
If you try to embed a series of spaces into your HTML document, the browser normalizes
contiguous white-space characters (such as spaces, tabs, and line breaks) and renders only a
single space. This is usually a desirable feature because it enables you to format your HTML
source content in a manner that is most readable in source mode while eliminating white-
space in the rendered output.
When you want to display several spaces, you can use the nonbreaking space character.
Nonbreaking space is also known as nonbreak space, nonbreakable space, and hard space. In
addition to preventing the collapse of contiguous whitespace, the nonbreaking space prevents
the automatic line break between words that you want to keep together on the same line.
Consider an HTML document in which you want to display 10 mph, where there is a
space between the number 10 and the mph. You want to ensure that mph will not be sepa-
rated from the number 10 by being moved to the next line. In your HTML document, use
10 mph to keep the number 10 and mph together.
Lesson summary
An element is composed of a starting tag, inner content, and an ending tag.
Browsers ignore tags that are not recognized.
HTML5 originates from HTML 4.01, not from XHTML.
The W3C is responsible for developing open standards for the web.
HTML elements provide structure, CSS style sheets provide presentation, and
JavaScript provides behavior.
Use lowercase tag names.
Attribute values should always be quoted using either single quotes or double quotes.
Boolean attributes are attributes whose mere presence on the starting tag indicates
that the option is set.
HTML5 denes global attributes, which are the set of attributes that can appear on any
HTML5 element.
Self-closing tags are tags whose beginning and ending tags are together to create an
element with no content. Self-closing tags should be used only with elements that can-
not have content.
Void elements cannot have content. They should be created by using self-closing tags.
Expando attributes are attributes that you dene and are also known as author-
dened attributes or custom attributes. Prex these attributes with “data-“.
You can use conditional comments to add a browser-specic source that will work with
Internet Explorer but be treated as a comment by other browsers.
Key
Terms
Lesson 1: Introducing HTML5 CHAPTER 2 43
HTML entities are special characters and can be embedded in your HTML document
by using the ampersand (&), the entity name, and a semicolon (;). You can also use the
ampersand (&), the hash symbol (#), the entity number, and the semicolon (;).
Nonbreaking spaces can be used to render several contiguous spaces. You can also use
nonbreaking spaces to keep two words from being separated by a line break.
The id attribute species a unique identier for an element.
Lesson review
Answer the following questions to test your knowledge of the information in this lesson. You
can nd the answers to these questions and explanations of why each answer choice is correct
or incorrect in the “Answers” section at the end of this chapter.
1. You want to create an expando attribute on several <h3> tags that display vehicles for
sale. The expando attribute will store the VIN (vehicle identication number) of the
vehicle for sale. Which of the following is the most appropriate example of creating the
expando attribute?
A. <h3 vin=’current VIN here’>1965 VW Beetle</h3>
B. <h3 id=’current VIN here’>1965 VW Beetle</h3>
C. <h3 data-vin=’current VIN here’>1965 VW Beetle</h3>
D. <h3 datavin=’current VIN here’>1965 VW Beetle</h3>
2. Which technology is HTML5 preceded by and derived from?
A. HTML 4.01
B. SGML
C. XHTML 1.0
D. XML
3. How should you start each HTML5 document?
A. <html>
B. <head>
C. <title>
D. <!DOCTYPE html>
4. You want to use the disabled Boolean attribute on a text box. How can you accomplish
this? (Choose all that apply.)
A. <input name=’rstName’ type=’text’ disabled />
B. <input name=’rstName’ type=’text’ disabled=’’ />
C. <input name=’rstName’ type=’text’ disabled=’true’ />
D. <input name=’rstName’ type=’text’ disabled=’disabled’ />
44 CHAPTER 2 Getting started with HTML5
Lesson 2: Embedding content
Soon, you will want to embed content in your HTML document. The content might be from
an existing webpage, or you might embed images in your HTML document. You might also
embed Adobe Flash applications. You can embed many interesting elements, and this lesson
covers many of the ways to embed content.
After this lesson, you will be able to:
Embed HTML documents in another HTML document by using inline frames.
Create hyperlinks to remote or local HTML documents.
Add images and image maps to the current HTML5 document.
Embed plug-in content.
Estimated lesson time: 30 minutes
Embedding HTML by using inline frames
You can use the <iframe> element to embed an inline frame that contains an HTML docu-
ment within the current HTML document. This can be useful when you want to create reuse
functionality on your site; for example, when you want to create a common header that will
show on all pages of your website. This can also be useful when you want to include an HTML
page from another website on your page.
The <iframe> element creates a nested browser context into which another HTML
document can be loaded. Loading an HTML document creates a browsing context for that
document. The document that contains an <iframe> is contained within the parent browser
context, where the document that is loaded into the <iframe> element is within the nested
browser context.
You can navigate nested browsing contexts by using the following properties of the win-
dow object.
window.top A WindowProxy object representing the top-level browsing context
window.parent A WindowProxy object representing the parent browsing context
window.frameElement An element that represents the browsing context container
but returns null if there isn’t one
The <iframe> element has a src (source) attribute and a name attribute. The src attribute
can be set to the absolute or relative URL of the HTML document that you want to include, as
shown in the following sample.
<iframe src="menu.html"></iframe>
The name attribute sets the browsing context name, which is useful when you need to
reference the <iframe> element, possibly as the target of a hyperlink, as described in the

Lesson 2: Embedding content CHAPTER 2 45
“Working with hyperlinks” section that follows. A valid browsing context name is any string
with at least one character that does not start with an underscore because the underscore is
used for these special key names: _blank, _self, _parent, and _top.
Sandboxing embedded content
Sandboxing is a means for preventing malware and annoyances such as pop-ups from being
introduced when the content is embedded on your HTML page. The <iframe> element pro-
vides the sandbox attribute for this purpose.
The sandbox attribute places a set of extra restrictions on any content hosted by the
iframe. When the sandbox attribute is set, the content is treated as being from a unique and
potentially dangerous origin. Forms and scripts are disabled, and links are prevented from
targeting other browsing contexts. Consider the following example.
<iframe sandbox src="http://someOtherDomain.net/content">
</iframe>
In the example, the source is referencing potentially hostile content in a different domain.
This content will be affected by all the normal cross-site restrictions. In addition, the content
will have scripting, plug-ins, and forms disabled. The content cannot navigate any frames or
windows other than itself.
The restrictions can be overridden by space-separating any of the following.
allow-forms Enables forms
allow-same-origin Allows the content to be treated as being from the same origin
instead of forcing it into a unique origin
allow-scripts Enables scripts except pop-ups
allow-top-navigation Allows the content to navigate its top-level browsing context
In the following example, allow-same-origin, allow-forms, and allow-scripts are enabled.
On the surface, it might seem that the sandbox is not providing any protection, but the sand-
box still disabling plug-ins and pop-ups.
<iframe sandbox="allow-same-origin allow-forms allow-scripts"
src="http://otherContent.com/content.html"></iframe>
Seamless content embedding
The <iframe> tag has a seamless attribute that indicates that the source content is to appear
as though it’s part of the containing document. This means that the <iframe> element will
not have borders and scrollbars. The seamless attribute is a Boolean attribute, so its presence
on the <iframe> tag indicates that you want this option, but there are three ways to set a
Boolean attribute. Here are three ways to specify seamless embedding of content.
<iframe seamless="seamless" src="http://otherContent.com/content.html"></iframe>
<iframe seamless="" src="http://otherContent.com/content.html"></iframe>
<iframe seamless src="http://otherContent.com/content.html"></iframe>
Key
Terms
46 CHAPTER 2 Getting started with HTML5
At the time of this writing, the seamless attribute is not supported on any browsers, but its
intent is to blend the external content into the current HTML document so the HTML page
does not look like it has embedded content. The alternative is to use CSS to obtain a similar
presentation.
Working with hyperlinks
The <a> element creates a link to an external HTML document (external link) or jumps to
a location in the current HTML document (internal link). The content of the <a> element is
displayed in the browser with the following default appearance.
Unvisited link Underlined and blue
Visited link Underlined and purple
Active link Underlined and red
The <a> element has the href attribute, which you usually use to specify the link destina-
tion. If the link is external, the href can be populated with either a relative or absolute URL as
follows.
<a href="ExpenseReports.html">Expense Report Page</a>
<a href="http://www.contoso.com/SalesReports.html">Sales Report Page</a>
If the link is internal, the href will contain the hash (#) symbol followed by the id of the tag
that you want to jump to. If you use only the hash symbol, clicking the link takes you to the
top of the HTML document. Here are two examples.
<a href="#">Top</a>
<a href="#BillingAddress">Go To Billing Address</a>
Specifying the hyperlink target
When you’re on a webpage and you click a hyperlink to an external resource, the exter-
nal resource opens in the current browser window. If the external link is to a page on your
website, this behavior probably makes sense. If the external link is to a different website, you
might want to open a new browser window. By using the target attribute, you can control the
link behavior by assigning one of the following.
_blank Open in a new browser window
_parent Open in the parent frame or window
_self Open in the current window or frame (default)
_top Open in the topmost frame, thus replacing the contents of the window
<iframe_name> Open in the <iframe> element with matching name attribute
When you have a menu with hyperlinks that shows on every page, you might want to
create an <iframe> element with its name attribute set to content and then set the target
Lesson 2: Embedding content CHAPTER 2 47
of all menu links to be content so the pages load into the <iframe> element as shown in the
following example.
Main Menu<br />
<a href="Calendar.html" target="content">Calendar</a><br />
<a href="HumanResources.html" target="content">Human Resources</a><br />
<a href="ExpenseReports.html" target="content">Expenses</a><br />
<a href="Commissions.html" target="content">Commissions</a><br />
<br />
<iframe name="content"></iframe>
Sending email with hyperlinks
You can use mailto protocol to send email messages. The mailto URL accepts the following
parameters: subject, cc, bcc, and body. The parameters can be entered in any order by adding
a question mark (?) after the email address and separating the parameters with the amper-
sand (&). Some examples of an email hyperlink are as follows.
<!-- basic mailto -->
<a href="mailto:sales@contoso.com">Contact Sales</a>
<!-- add the name, notice that email is wrapped with < and > -->
<a href="mailto:Joe<sales@contoso.com>">Contact Joe in Sales</a>
<!-- multiple recipients comma separated -->
<a href="mailto:sales@contoso.com,service@contoso.com">Contact Sales and Service</a>
<!-- add carbon copy -->
<a href="mailto:sales@contoso.com?cc=service@contoso.com">Contact Sales cc Service</a>
<!-- add blind carbon copy -->
<a href="mailto:sales@contoso.com?bcc=service@contoso.com">Contact Sales</a>
<!-- basic mailto with message -->
<a href="mailto:sales@contoso.com?body=call me.">Contact Sales with call me message</a>
<!-- basic mailto with multi line message -->
<a href="mailto:sales@contoso.com?body=call me.%0AThanks">Contact Sales with multi line
message</a>
<!-- basic mailto with subject and message -->
<a href="mailto:sales@contoso.com?subject=hi&body=call me.">Contact Sales with hi
subject
and call me message</a>
Adding images to your HTML document
When you want to embed an image in your HTML document, use the <img> element. The
<img> element does not have an ending tag; it’s a void element. The <img> element has
required attributes of src (abbreviation for source) and alt (abbreviation for alternate). Use the
48 CHAPTER 2 Getting started with HTML5
src attribute to provide an absolute or relative URL reference to the image that is to be dis-
played. Use the alt attribute to provide alternate text to be displayed when the image is not
available due to slow connection or other mishap. The following is an example of the <img>
element.
<img src="/images/logo.png" alt="logo" />
<img src="http://search.microsoft.com/global/search/en-
us/PublishingImages/bing_logo.png" alt="Bing Logo" />
It’s important to understand that the image is not embedded in the HTML document.
Instead, you provide a reference to the image le. When the browser reads your HTML
document, the browser will reach your <img> element and retrieve the image based on the
src attribute. When the image is retrieved, the browser will merge the image into the nal
rendering that is displayed into the browser window. If the browser cannot display the image,
it will display the alternate text.
Image le types
When using the <img> element, you can supply JPEG (.jpg or .jpeg), GIF (.gif), PNG (.png),
or SVG (.svg) les. The following is a brief description of each le type that should help you
decide which le type to use for your application.
JPG Also known as JPEG, this is best for photographs because it offers high compres-
sion and up to 16.8 million color combinations, but the compression algorithm is lossy,
meaning that you lose detail every time you save the le.
GIF GIF is great to use on small images that have a xed number of colors. GIF also
supports transparent color. GIF uses lossless compression and is best for logos and
worst for photos. GIF also supports the ability to encapsulate multiple images in one
le, which is commonly used to provide animated GIFs.
PNG PNG is a great all-around le type due to its lossless high compression. PNG
les can be 48-bit true color or 16-bit grayscale. PNG not only supports transparent
color but also offers variable transparency. Photos aren’t compressed to be as small
as JPG photos, but being lossless makes it worth the extra size in many scenarios. You
might use PNG as your storage type for photos that you want to edit, but when dis-
playing them on the web, you might want to save the PNG as JPG to achieve the best
compression.
SVG SVG is Scalable Vector Graphics and is great for drawings but not for photos.
SVG images can be scaled up or down without losing detail because the le contains
the instructions to draw the image, as opposed to the other le types that contain a
raster-based image. Raster-based images are composed of color dots that make up the
image. If you need to scale a raster-based image up or down, you will see that in color,
dots are re-sampled, and the image typically ends up looking blocky.

Lesson 2: Embedding content CHAPTER 2 49
Quick check
You are creating several small icons that will be displayed on your webpage.
These icons will render as different shapes and will use transparent color. Each
icon uses a small number of colors. Which would be the best image le type for
this application?
Quick check answer
Use the GIF format because it has transparent color support and because it
requires small numbers of colors.
Creating image links
If you create a hyperlink and the hyperlink’s content is an <img> element, you have created
an image that can be clicked—an image link. Here is an example of an image link.
<a href="Investments.html"><img src="CurrencySymbol.png" /></a>
Creating an image map
You can create a clickable image map on your HTML document by using the <map> element.
It contains <area> elements that dene clickable regions on the image.
The <map> element has a name attribute that must be set. On an <img> element, set the
usemap attribute to the <map> element’s name to create a relationship between the image
and the map.
In the <map> element, you dene <area> elements by using the shape, coords, href, and
alt attributes. The <area> element is a void element, so you use a self-closing tag. The shape
attribute is set to rect, circle, poly, or default, where default is an <area> element whose size
is the same as the image and is triggered if no specic <area> is dened for coordinates
where you clicked.
The coords attribute will contain x and y coordinates where 0, 0 is the top-left corner of
the image. The coords attribute is set according to the shape as follows.
rect x1, y1, x2, and y2 specify the coordinates of the left, top, right, and bottom.
circle x, y, and radius specify the coordinates of the center and the radius.
poly x1, y1, x2, y2,.., xn, and yn specify the coordinates of the edges. The rst and last
coordinate pairs should be the same to close the polygon, but if they aren’t the same,
the browser will add a closing pair.
The href attribute is the same as the href attribute on the <a> element and can be set to
an absolute or relative URL.
The alt attribute is set to alternate text to be displayed and is required when the href attri-
bute is set.
50 CHAPTER 2 Getting started with HTML5
The following is an example of creating an image map with its areas and assigning the
image map to an image.
<img src ="worldmap.gif" width="145" height="126"
alt="World Map" usemap ="#countries" />
<map name="countries">
<area shape="rect" coords="10,15,30,25"
href="USA.html" alt="USA" />
<area shape="circle" coords="95,40,20"
href="China.html" alt="China" />
<area shape="poly" coords="97,76,115,76,113,83,105,90,97,76"
href="Australia.html" alt="Australia" />
<area shape="default" href="InvalidChoice.html" alt="Invalid" />
</map>
Embedding plug-in content
You can use the <object> and <embed> elements to embed content from plugins. Why are
there two tags for the same purpose? The reason is the differences in browsers over the years.
Originally, Netscape created the <embed> tag for Netscape-style plug-ins, and Internet
Explorer added support for the <embed> tag. The <object> tag was added to HTML 4.0 with
the benet of supporting Internet component downloads so that the plug-in could be auto-
matically downloaded and installed.
The <embed> tag
Although the HTML 4.01 specication did not support the <embed> tag, most browsers
continued support due to the installed base and the ease of use. In HTML5, both tags exist.
The <object> tag provides more functionality, whereas the <embed> tag is easier to use. For
example, if you want to play a Flash le, you can use the <embed> tag as follows.
<embed src="myFlashFile.swf" >
</embed>
The <embed> tag has the following attributes.
height Species the height in pixels of the embedded content
src Species the URL of the external le to embed
type Species the MIME type of the embedded content
width Species the width in pixels of the embedded content
For browsers that don’t support the <embed> tag, you can add fallback content into the
element as follows.
<embed src="myFlashFile.swf" >
<a href="/go/getflashplayer/">
<img src=http://www.adobe.com/images/shared/download_buttons/get_flash_player.gif
alt="Get Adobe Flash player" />
</a>
</embed>

Lesson 2: Embedding content CHAPTER 2 51
The <object> tag
The <object> tag embeds an object within an HTML document. You can embed multimedia
such as audio, video, Java applets, ActiveX, PDF, and Flash in your webpages. The <object>
tag contains the following attributes.
data Supplies the URL of the resource to be used by the object
form Indicates one or more form ids to which the object belongs
height Species the height in pixels of the object
name Denes the name of the object
type Denes the MIME type of data specied in the data attribute
usemap Indicates the name of a client-side image map to be used with the object
width Species the width in pixels of the object
IMPORTANT AT A MINIMUM
At a minimum, you must dene either the data or type attribute.
The <object> tag can be used within the <body> element only. You might nd <object>
examples that implement many more attributes than are dened in this list because older
versions of HTML supported other attributes, but HTML5 supports only the attributes that are
listed plus the global attributes.
You can also use the <object> tag to embed another webpage in your HTML document.
The following is an example of using the <object> element to embed a webpage in your
HTML document.
<object id="headerContent" standby="loading header..."
title="loading header..." width="100%" height="15%"
type="text/html" data="Header.aspx"></object>
As a rule, consider using the <iframe> tag when embedding a webpage from another
domain into your HTML document by using sandboxing. It’s made for that purpose, whereas
the <object> tag is a more general-purpose tag. The <object> tag behaves differently with
different browsers, and you might nd that features such as tooltips work only with the
<iframe> tag and not with the <object> tag.
It is possible to embed images and image maps in your HTML document by using the
<object> tag, but you should avoid doing so. It’s best to use the <img> tag to embed images.
The text within the <object> element is alternate text to be displayed for browsers that do
not support the <object> tag.
52 CHAPTER 2 Getting started with HTML5
Passing parameters to an object
Because the <object> tag can represent any object, the <param> tag enables you to pass
data to the object. You can use one or more <param> tags to pass parameters to plug-ins
that have been embedded with the <object> tag. The <param> tags must be before any
alternate text that is within the <object> element.
The <param> tag has a name and a value attribute, and both are required for each
<param> tag. The following is an example of using a <param> tag with an audio le to keep
the audio le from automatically playing when the page is loaded.
<object data="tada.wav">
<param name="autoplay" value="false" />
</object>
Using the object tag to create a browser context
In addition to using the <iframe> tag to create a nested browser context, you can use the
<object> tag, but this is not supported on all browsers, so you should use the <iframe> tag.
Lesson summary
You can use the <iframe> element to provide reuse of HTML by embedding an HTML
document in your current HTML document.
Use the sandbox attribute on the <iframe> tag to help prevent malware and annoy-
ances such as pop-ups from being introduced when the content is embedded in your
HTML page.
Use the seamless attribute on the <iframe> tag to indicate that the source content is to
be rendered to appear as though it’s part of the containing document.
The <a> tag creates a hyperlink to either an external HTML document or an internal
location in the current document. The <a> tag can also be used to send email
messages.
The <img> element is a void element and is used to add an image reference to your
HTML document.
JPG is best for displaying photos on HTML pages due to its compression, GIF is best
for small images with transparency and embedded animations, PNG is best for storage
due to lossless compression during editing sessions, and SVG is best for drawings due
to its vector drawing scalability.
You can create a clickable image map by using the <map> and <area> elements.
You can use the <embed> tag to provide simple content embedding.
You can use the <object> tag to provide content embedding with greater exibility
because it can have nested <param> elements.

Practice exercises CHAPTER 2 53
Lesson review
Answer the following questions to test your knowledge of the information in this lesson. You
can nd the answers to these questions and explanations of why each answer choice is correct
or incorrect in the “Answers” section at the end of this chapter.
1. You want to embed a Flash le called myFlash.swf in your HTML document. Which is
the most appropriate code?
A. <a href=”myFlash.swf” ></a>
B. <iframe src=”myFlash.swf” ></iframe>
C. <img src=”myFlash.swf” />
D. <embed src=”myFlash.swf” ></embed>
2. You want to create a drawing of a machine that Contoso, Ltd., will be selling on its
website. The drawing will be embedded in your HTML document, and you want it to
maintain its quality when resized. Which is the most appropriate le type to use?
A. SVG
B. GIF
C. JPG
D. PNG
Practice exercises
You’ve learned a bit about HTML elements and attributes, and it’s time to create a website. In
Exercise 1, you create a website for a ctitious company, Contoso, Ltd., and add a home page.
In Exercise 2, you add the expense reports, human resources, and main content pages.
If you encounter a problem completing an exercise, the completed projects can be
installed from the Practice Exercises folder that is provided with the companion content.
Exercise 1: Create a simple website by using Visual Studio
Express for Web
In this practice, you create a simple website by using Visual Studio Express 2012 for Web.
The quality of the webpages produced will be less than desirable because CSS hasn’t been
discussed yet. The goal of this practice is to use many of the tags that have been described in
this lesson.
You start by creating an ASP.NET website by using Visual Studio Express 2012 for Web, and
then you add to and modify the home page.
1. If you haven’t installed Visual Studio Express 2012 for Web, do so now. You can down-
load this from the Microsoft website.
54 CHAPTER 2 Getting started with HTML5
2. Start Visual Studio Express 2012 for Web. Navigate to le and choose New Project.
Navigate to Installed | Templates | Visual Basic | Web and select ASP.NET Empty Web
Application.
3. Set the name of your application to ContosoWebSite.
4. Select a location for your application.
5. Set the solution name to ContosoWebSiteSolution.
6. Be sure to keep the Create Directory For Solution check box selected.
7. Click OK to create your new project.
8. When the application is created, click Debug and select Start Debugging. (The shortcut
key is usually F5 but can vary based on your installation settings.)
The ASP.NET Empty Web Application doesn’t include a home page, so an error page is
displayed, showing an HTTP Error 403.14 - Forbidden error. The error page indicates (in
a rather indirect way) that you don’t have a default page on your website, so the web
server tries to display a list of all les in the directory. However, the security settings on
the website will not permit directory browsing to display the directory contents.
9. Close the error page, which should automatically stop debugging. If you need to, you
can stop debugging by clicking Debug and choosing Stop Debugging (or pressing
Shift+F5).
10. Add a home page. In the Solution Explorer window, right-click the ContosoWebSite
project, choose Add, and select HTML Page. Set the name to default.html and
click OK.
The home page is added to your website and contains the following HTML.
<!DOCTYPE html>
<html xmlns="http://www.w3.org/1999/xhtml">
<head>
<title></title>
</head>
<body>
</body>
</html>
11. In the <title> element, set the title to Contoso Ltd. Home Page.
12. In the Solution Explorer window, right-click the project, choose Add, select New Folder,
and name the folder Images.
13. In the Solution Explorer window, right-click the Images folder that you just added,
choose Add, select Existing Item, and select the ContosoLogo.jpg le that is located in
the Chapter02 Resources folder.
14. In the <body> element, add a comment and set the text to Add <img> with Contoso
logo.
The <img> element is covered in Lesson 2.
Practice exercises CHAPTER 2 55
15. Using the <h1> element to create a heading, add the Welcome to Contoso Ltd.
heading to the body after the comment.
16. After the <h1> element, add a comment. Set the comment text to Add <iframe>
here.
The <iframe> element is discussed in Lesson 2. Your default.html page should look like
the following.
<!DOCTYPE html>
<html xmlns="http://www.w3.org/1999/xhtml">
<head>
<title>Contoso Ltd. Home Page</title>
</head>
<body>
<!--Add <img> with Contoso logo-->
<h1>Welcome to Contoso Ltd.</h1>
<!--Add <iframe> here-->
</body>
</html>
17. In the Solution Explorer window, right-click the default.html page and choose Set As
Start Page.
18. Click Debug and choose Start Debugging (F5).
You should see the rendered screen, as shown in Figure 2-1. Using the <h1> element
produced a heading with a large font. Notice that comments are not displayed, but if
you right-click the page and choose View Source, you see the HTML source, which has
the comments. The text in the browser tab contains Contoso Ltd. Home Page, which is
the text that you entered in the <title> element.
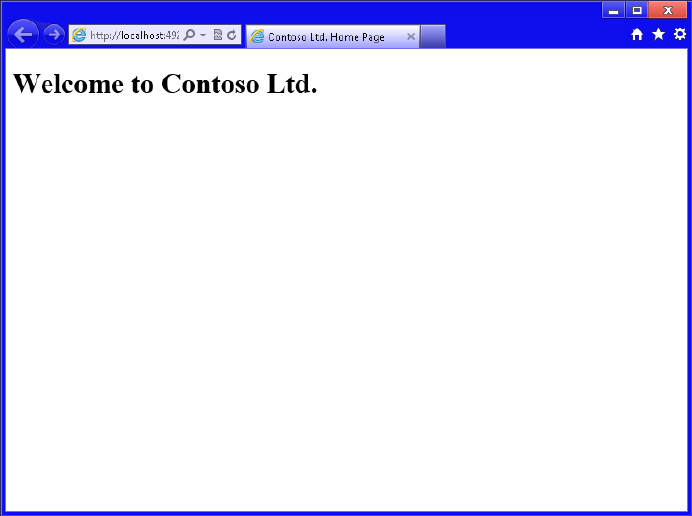
56 CHAPTER 2 Getting started with HTML5
FIGURE 2-1 The Contoso Ltd. website
Exercise 2: Create additional pages
In this exercise, you add pages to the website you created in Exercise 1. If you didn’t per-
form Exercise 1, you can use the les in the Exercise2\LabStart folder to start. You won’t be
able to get to the new pages from the home page yet because you add that functionality in
Exercise 3.
1. In the Solution Explorer window, right-click the project, choose Add, and select HTML
Page. Set the name to MainContent.html and click OK.
The content will be kept simple.
2. In the <body> element of the MainContent.html page, add the following text: Here is
the main content for the home page. Set the title to Main Content.
Your HTML should look like the following.
<!DOCTYPE html>
<html xmlns="http://www.w3.org/1999/xhtml">
<head>
<title>Main Content</title>
</head>
<body>
Here is the main content for the home page.
</body>
</html>
Practice exercises CHAPTER 2 57
3. To view this page, right-click the middle of the source and choose View In Browser
(Internet Explorer).
You should see the rendered screen, as shown in Figure 2-2. Note that almost noth-
ing is on this page. It doesn’t have a heading or logo. In Exercise 3 you combine this
content with the home page to obtain the header and logo.
FIGURE 2-2 The rendered main content page
4. Close the browser window.
5. Add a new HTML le and name it HumanResources.html. In the <body> element,
add the following text: Human Resource content here.
6. Right-click the middle of the source and choose View In Browser (Internet Explorer).
You should see the rendered screen with the text you entered.
7. Add another HTML le and name it ExpenseReports.html. In the <body> element,
add the following text: Expense Report content here.
8. Right-click the middle of the source and choose View In Browser (Internet Explorer).
You should see the rendered screen with the text you entered.
58 CHAPTER 2 Getting started with HTML5
Exercise 3: Embedding Content
You learned about embedding content in Lesson 2; this exercise uses this information to
connect the pages of the Contoso, Ltd., website by embedding the pages in the home page,
using an inline frame.
In this practice, you extend the Contoso, Ltd., website that you created in Exercise 1 by
linking the pages and displaying pages in an inline frame. If you didn’t perform Exercise 1,
you can use the les in the Exercise3Start folder to start.
1. Open the default.html le and locate the comment that states that an <img> tag is
to be added. Add an <img> tag after the comment. Set the src attribute to Images/
ContosoLogo.jpg.
2. Locate the comment that states that an <iframe> tag is to be added. Add an <iframe>
element with a name attribute set to iframeContent and an src attribute set to
MainContent.html.
Your default.html page should look like the following.
<!DOCTYPE html>
<html xmlns="http://www.w3.org/1999/xhtml">
<head>
<title>Contoso Ltd. Home Page</title>
</head>
<body>
<!--Add <img> with Contoso logo-->
<img src="Images/ContosoLogo.jpg" />
<h1>Welcome to Contoso Ltd.</h1>
<!--Add <iframe> here-->
<iframe name="iframeContent" src="MainContent.html"></iframe>
</body>
</html>
3. Click Debug and choose Start Debugging (F5).
You should see the Contoso logo, and the MainContent.html le is now included on
the page. The rendered screen is shown in Figure 2-3.
Practice exercises CHAPTER 2 59
FIGURE 2-3 The rendered home page with the MainContent.html page embedded
4. Stop debugging.
5. On the default.html page, after the <h1> element, add a hyperlink for Human
Resources that references the HumanResources.html le and targets the <iframe> ele-
ment called iframeContent.
6. After the Human Resources hyperlink, add a hyperlink for Expense Reports that
references the ExpenseReports.html le and targets the <iframe> element called
iframeContent.
7. Add a <br /> element after the Expense Reports hyperlink.
The completed default.html le should look like the following.
<!DOCTYPE html>
<html xmlns="http://www.w3.org/1999/xhtml">
<head>
<title>Contoso Ltd. Home Page</title>
</head>
<body>
<!--Add <img> with Contoso logo-->
<img src="Images/ContosoLogo.jpg" />
<h1>Welcome to Contoso Ltd.</h1>
<a href="HumanResources.html" target="iframeContent">Human Resources</a>
<a href="ExpenseReports.html" target="iframeContent">Expense Reports</a>
<br />
<!--Add <iframe> here-->

60 CHAPTER 2 Getting started with HTML5
<iframe name="iframeContent" src="MainContent.html"></iframe>
</body>
</html>
8. In the HumanResources.html and ExpenseReports.html les, add a <br /> tag to the
end of the body text, and then add a hyperlink to the home page that references
MainContent.html.
Note that you don’t need to target the current frame because the default behavior
of the hyperlink is to replace the current page with the new page. The following is an
example of the completed ExpenseReports.html le.
<!DOCTYPE html>
<html xmlns="http://www.w3.org/1999/xhtml">
<head>
<title></title>
</head>
<body>
Expense Reports content here.
<br />
<a href="MainContent.html" >Home</a>
</body>
</html>
9. Click Debug and choose Start Debugging (F5).
You should see the new home page with hyperlinks. If you click the Human Resources
hyperlink, you should see the HumanResources.html content load into the <iframe>
element, as shown in Figure 2-4. In the <iframe> content, you should see a hyper-
link to the home page that you can click to reload the MainContent.html le into the
<iframe> element.
NOTE CLICK REFRESH TO SEE THE HOME HYPERLINK
You might not see the Home hyperlink because the original page might be cached.
Right-click in the <iframe> and click Refresh.
Suggested practice exercises CHAPTER 2 61
FIGURE 2-4 The default.html page shown after clicking the Human Resources hyperlink
Suggested practice exercises
The following additional practices are designed to give you more opportunities to practice
what you’ve learned and to help you successfully master the lessons presented in this chapter.
Exercise 1 Learn more about each of the HTML tags that are part of the HTML5
specication by using each in an HTML document.
Exercise 2 Learn more about embedding content by adding images and image maps
to an HTML document.

62 CHAPTER 2 Getting started with HTML5
Answers
This section contains the answers to the lesson review questions in this chapter.
Lesson 1
1. Correct answer: C
A. Incorrect: Although this example would work today, it’s possible that a vin attri-
bute could be introduced by a future version of HTML that would cause a conict.
B. Incorrect: You cannot use the id attribute as an expando attribute because the id
attribute is already dened by the HTML5 specication to provide a unique identi-
er to an element.
C. Correct: This is a properly dened expando attribute that will not conict with
attributes introduced by future versions of HTML because the attribute name is
prexed with “data-“ as required by the HTML specication.
D. Incorrect: Although this example would work today, it’s possible that a vin attri-
bute could be introduced by a future version of HTML that would cause a conict.
2. Correct answer: A
A. Correct: HTML5 is preceded by and derived from HTML 4.01.
B. Incorrect: Although HTML’s root is SGML, which means that HTML5 is derived
from SGML, HTML5 is preceded by HTML 4.01.
C. Incorrect: Although XHTML 1.0 was released after HTML 4.01, HTML5 does not
inherit from XHTML1.0.
D. Incorrect: Although XHTML1.0 inherits from XML, HTML5 does not.
3. Correct answer: D
A. Incorrect: The <html> element is the root element for your HTML5 document, but
it should be listed after you indicate the document type to the browser.
B. Incorrect: The <head> tag must be contained within the <html> element, so it
cannot be located at the beginning of the HTML5 document.
C. Incorrect: The <title> tag must be contained within the <head> element, so it can-
not be located at the beginning of the HTML5 document.
D. Correct: The <!DOCTYPE html> indicates to the browser that this is an HTML5
document.
4. Correct answers: A, B, and D
A. Correct: The use of disabled by itself, with no value, is the minimized method for
implementing Boolean attributes.
B. Correct: The use of disabled with an empty value is one way to implement Boolean
attributes by using quoted form.

Answers CHAPTER 2 63
C. Incorrect: The use of disabled with a value of true is not an acceptable way to
implement Boolean attributes.
D. Correct: The use of disabled with a value that is the same as the attribute name is
one way to implement Boolean attributes by using quoted form.
Lesson 2
1. Correct answer: D
A. Incorrect: The <a> element creates a hyperlink.
B. Incorrect: The <iframe> element creates an inline frame that references another
HTML document.
C. Incorrect: The <img> element embeds an image in the current HTML document.
D. Correct: The <embed> element embeds an object such as a Flash le in the current
HTML document.
2. Correct answer: A
A. Correct: The SVG le type is used to create Scalable Vector Graphics, which scale
well while maintaining quality.
B. Incorrect: The GIF le type is best for small images with limited colors, but it is
raster-based and does not scale well.
C. Incorrect: The JPG le type is best for photos when millions of colors are used and
high compression is desirable, but it is raster-based and does not scale well.
D. Incorrect: The PNG le type is best for photos when millions of colors are used
and medium no-loss compression is desirable, but it is raster-based and does not
scale well.


65
CHAPTER 3
Getting started with
JavaScript
When you create HTML documents, you’ll almost always add behavior to make the
document more interactive. You might have animations or buttons that perform
various actions. Maybe you need to retrieve data from the server as a user is typing in a text
box. You can use JavaScript to accomplish these tasks because JavaScript is the program-
ming language of the web.
This chapter starts by introducing you to JavaScript and then examines the JavaScript
testing environment and test-driven development (TDD). As soon as you understand what
JavaScript is, you’ll want to start writing some code to see whether it runs the way you think
it should run. You’ll want to test your knowledge. You’ll want to write code for HTML docu-
ments with which you’re working.
By setting up a testing environment, you can write code and test it without requiring the
production HTML document. You want to have as much separation as possible between
your JavaScript code and your HTML document so you can write the JavaScript code inde-
pendently from the HTML document. The sooner you have a testing environment set up,
the sooner you’ll be able to start writing JavaScript code.
Lessons in this chapter:
Lesson 1: Introducing JavaScript 66
Lesson 2: Writing, testing, and debugging JavaScript 89
Lesson 3: Working with objects 108
Before you begin
To complete this book, you must have some understanding of web development. This
chapter requires the hardware and software listed in the “System requirements” section in
the book’s Introduction.
66 CHAPTER 3 Getting started with JavaScript
Lesson 1: Introducing JavaScript
This lesson presents a great deal of the JavaScript language. Although much of the con-
tent exists in previous releases of JavaScript, all content in this chapter is part of the latest
JavaScript specication.
After this lesson, you will be able to:
Dene JavaScript variables.
Create JavaScript statements.
Create function declarations.
Create function expressions.
Convert objects to a different type.
Write conditional statements.
Write looping statements.
Handle errors.
Estimated lesson time: 60 minutes
Understanding JavaScript
JavaScript is not related to Java, although it is a curly-brace language like Java, C#, C++, and
many other programming languages. JavaScript is related to ECMAScript, however. Ecma
International, working with other organizations, created this standardized scripting language
in the ECMA-262 specication and ISO/IEC 16262. The language is widely used for client-side
scripting on the web, and you commonly see several well-known variations of ECMAScript
such as JavaScript, JScript, and ActionScript. The current release is ECMAScript Edition 5.1 and
most common browsers support ECMAScript Edition 5.0 or newer.
JavaScript is untyped, which means that when you create a variable, you don’t need to
specify its type. This might seem like a feature because you declare a variable with the var
keyword and assign a string to the variable, and later, you can assign a number to the same
variable. However, it’s difcult to apply Microsoft IntelliSense to untyped languages. It’s also
difcult to maintain the code because it’s difcult to know the variable’s type. This might
cause you to develop an immediate dislike for the language, but persevere and work with the
language. You’ll be amazed at the power of JavaScript. Although you might never want to
trade in Visual Basic .NET or C#, you’ll nd that the more time you spend with JavaScript, the
more respect you’ll develop for this language.
One way to ease the pain of learning JavaScript is to make sure you are using tools that
can help you. The latest release of Visual Studio 2012 adds more IntelliSense to JavaScript and

Lesson 1: Introducing JavaScript CHAPTER 3 67
adds the JavaScript Console, which can simplify debugging. Search the web for other tools
such as Resharper by JetBrains. This tool has many features that can help you with writing
JavaScript code.
Understanding the role of data
When you want to create a program, you typically nd that the program must access and
manipulate data because data is at the root of all systems. You collect data, manipulate data,
store data, retrieve data, display data, and so on.
The data will be in different forms, but most data can be broken into smaller pieces called
values. JavaScript denes a value type as an object, a primitive value, or a function. A primitive
value is a datum that is represented at its lowest level of the language implementation and, in
JavaScript, is one of the following types: undened, null, Boolean, number, or string. A func-
tion is a callable object, and a function that is a member of an object is called a method.
JavaScript also denes the following built-in objects: the global object, the Object object,
the Function object, the Array object, the String object, the Boolean object, the Number
object, the Math object, the Date object, the RegExp object, the JSON object, and several
variations of Error objects.
Using expressions to produce data
An expression is a piece of code that produces a value. An expression can be a simple value,
or it can contain operands and operators. Mathematical symbols, such as the plus, minus,
divide, and multiply signs, are examples of operators. Numbers are operands. The operators
cause an operation to be executed by using the operands on each side of the operator. Note
that an operand can be a value, or it can be another expression.
Understanding the number type
Numbers are one of the primitive types dened in JavaScript. A numeric value is a member of
the number type and corresponds to a double-precision, 64-bit binary format, IEEE 754 value.
In JavaScript, all numeric values are internally represented as oating point values. The 64-bit
number is divided into three components: the fraction is 52 bits (bits 0 to 51), the exponent is
11 bits (bits 52 to 62), and the sign is a single bit (bit 63).
The highest integer number that can be represented internally is 253, which is
9,007,199,254,740,994. After that, numbers are stored as a fraction times 2exponent. When per-
forming integer calculations, the results are always precise, but when working with fractions,
problems can arise. A calculation such as 0.1 + 0.2 will not result in 0.3 due to the manner
in which fractions are stored. The result will be 0.30000000000000004 because 0.1 and 0.2
cannot easily be stored as a binary fraction value. For situations like this, you might need to
round your results to truncate the fraction to a xed number of decimal places.
Key
Terms
Key
Terms
68 CHAPTER 3 Getting started with JavaScript
SPECIAL VALUES
The number type supports the following special values:
NaN Not a number indicator. Performing any mathematical operation with NaN will
produce a result of NaN.
Innity Represents positive innity when your value exceeds 1.7976931348623157E
+ 10308.
-Innity Represents negative innity when your value exceeds
-1.7976931348623157E + 10308.
undened No value has been assigned.
ARITHMETIC
We need numbers to perform arithmetic operations. Many arithmetic operations, such as
addition, subtraction, multiplication, and division, perform an operation on two numeric
values to produce a resultant numeric value. In JavaScript, you might write an expression to
do something like this:
7 + 3 * 8
This is an expression with operands and operators. The plus sign (+) and multiplication
sign (*) are operators. The numbers are operands. The operators cause an operation to be
executed, using the operands on each side of the operator.
OPERATOR PRECEDENCE
In this expression, you do not add 7 and 3 to get 10 and then multiply 10 by 8 to get 80.
JavaScript supports operator precedence, the assignment of a precedence, or priority, to each
operator. In this expression, the multiplication sign has a higher precedence than the addi-
tion sign, so 3 is rst multiplied by 8 to give 24, and then 7 is added to 24 to get 31, which is
different from the previous result of 80. The addition sign (+) and subtraction sign (–) have the
same precedence. The multiplication sign (*) and division sign (/) have the same precedence,
which is higher than the addition and subtraction signs. If you are working with an expression
in which multiple operators have the same precedence, you just apply the operators from left
to right.
In this example, the plus and multiplication signs are operators. The multiplication sign has
3 and 8 as operands that produce an expression. The plus sign has 7 and the result of 3 times
8 as operands. In the latter case, the second operand is an expression.
In the previous example, what would you do if you actually wanted to add 7 and 3 rst?
You can use parentheses to indicate the order of precedence. Parentheses have the highest
precedence, so the expression within the parentheses will be executed rst. Here is the modi-
ed expression:
(7 + 3) * 8
Lesson 1: Introducing JavaScript CHAPTER 3 69
Thus, you don’t necessarily need to memorize the precedence for each operator because
you can override the precedence order by using parentheses.
MODULO
The modulo (%) operator performs an implied division and returns the remainder. For exam-
ple, 25 % 7 produces a result of 4, which is the remainder after dividing 25 by 7.
Understanding the string type
A string is a collection of characters and is used to represent text. You can create a string
by enclosing in single or double quotes. It doesn’t matter whether you use single or double
quotes as long as the starting and ending delimiters match, as in the following examples:
"Every good boy deserves fudge"
'The quick brown fox jumps over the lazy dog'
'The doctor said "Today is your lucky day!" '
"I'm going to be happy when you give me the news!"
Notice that the third example demonstrates the use of single quotes when you need to
embed double quotes within the string. The fourth example demonstrates the use of double
quotes when you need to embed a single quote within the string. If you need to embed
double or single quotes into the string, you can use the backslash (\) character to escape the
single or double quote, as shown in the following example:
'The doctor said "I\'m pleased to announce that it\'s a girl!" '
"The doctor said \"I'm pleased to announce that it's a girl!\" "
In the rst example, the backslash is used to escape the single quote so it’s not interpreted
as being the end of the string. In the second example, the backslash is used to escape the
double quotes so they aren’t interpreted as being the end of the string.
Some other common escape sequences are \t to embed a tab and \n to embed a new line.
You can also use \uHHHH where HHHH is a 4-digit hexadecimal code to embed a unicode
string.
You can use the plus sign to represent string concatenation. The following is an example in
which several strings are concatenated to produce one large string:
'Hickory Dickory Dock.' + "The mouse ran up the clock." + 'The clock struck one...'
You probably wouldn’t do this because this example could have been easily written as
a single large string, but you might want to continue a string over several lines, like the
following:
'Hickory Dickory Dock.' +
"The mouse ran up the clock." +
'The clock struck one...'
70 CHAPTER 3 Getting started with JavaScript
Using unary operators
When an operator requires two operands, it’s a binary operator. Examples of binary operators
are plus, minus, multiply, divide, and modulo. Some operators, called unary operators, require
only a single operand. One unary operator is the typeof operator, which requires a single
operand and returns a string that indicates the operand’s type, as follows:
typeof 'Hello World'
typeof 19.5
typeof true
In the three examples, the rst example returns ‘string’, the second example returns ‘num-
ber’, and the third example returns ‘Boolean’.
In addition to being binary operators, the plus and minus signs can also be used as unary
operators, as in the following examples:
+23
-49
In these examples, the plus and minus signs are being used as unary operators to specify
the signs of the numbers.
Understanding the Boolean type
The Boolean type can contain the values true and false. Although you can use these values
directly, it’s more common to produce a true or false value by comparing two values, as
shown in the following examples that use the less-than (<) and greater-than (>) signs:
10 < 9
20 > 3
The rst example produces a false value, whereas the second example produces a true
value. The next examples use the less-than-or-equal-to (<=) sign and the greater-than-or-
equal-to (>=) sign:
5 <= 4
7 >= 8
The rst expression evaluates to false, and the second expression evaluates to false. You
can also use the equals (==) and not equals (!=) operators, as shown in the following example:
'Apples' != 'Oranges'
10 == 13 - 3
Both of these expressions evaluate to true.
LOGICAL OPERATORS
JavaScript provides three logical operators: and (&&), or (||), and not (!). These operators can
be used in expressions to produce a Boolean value. The and operator will produce a true
value if both operands evaluate to true; else it produces a false value. The or operator will
produce a true value if either operand evaluates to true; else it produces a false value. The not

Lesson 1: Introducing JavaScript CHAPTER 3 71
operator is a unary operator that will invert the operand, so if the operand evaluates to true,
the result is false, and vice versa. Consider the following examples:
'Apples' == 'Oranges' && 5 > 3
5 > 10 || 4 < 2
3 < 10 && 10 > 8
7 > 5 || 1 > 2
!(7 > 5 || 1 > 2)
The rst example uses the and operator and produces a false result because the rst oper-
and evaluates to false. The second example uses the or operator and produces a false result
because neither operand evaluates to true. The third example uses the and operator and
produces a true result because both operands evaluate to true. The fourth example uses the
or operator and produces a true result because the rst operand (7 > 5) evaluates to true. The
fth example uses the or operator and the not operator. Inside the parentheses, the expres-
sion evaluates to true, but the not operator inverts the true to produce a false result.
SHORT-CIRCUITING OPERATORS
In the previous JavaScript example, the rst line produced a false value because both the
operands did not evaluate to true, but there’s more: because the rst operand evaluated to
false, JavaScript made no attempt to evaluate the second operand. This is known as short-
circuit evaluation. In the fourth example, the result is true because the rst operand evaluated
to true. JavaScript needed only one operand to be true to produce a true result; no time was
wasted evaluating the second operand.
Using statements
In JavaScript, a statement is a command that is terminated with a semicolon. A statement is
different from an expression because an expression just produces a value, and then JavaScript
discards the value. A statement tells the JavaScript host what to do. The host could be the
browser or Windows 8. A statement can be a command to store the result of an expression so
it can be reused in other statements.
Using variables
One way to store the results of an expression is to assign the results to a variable. A variable
is a named reference to a location in memory for storing data. To create a variable, use the
JavaScript keyword var, as in the following example:
var totalCost = 3 * 21.15;
In this example, a variable named totalCost is created, and the result of 3 * 21.15 is
assigned to the totalCost variable. After this variable is created, it can be an operand in other
expressions, such as the following:
var totalCost = 3 * 21.15;
var tax = totalCost * .05;
Key
Terms
72 CHAPTER 3 Getting started with JavaScript
In this example, another statement was added to the statement from the previous exam-
ple. This statement contains an expression that uses the totalCost variable to calculate the tax
and store it in another variable called tax.
Note that you can declare the variable in one statement and initialize it in a different state-
ment, as follows:
var totalCost;
var tax;
totalCost = 3 * 21.15;
tax = totalCost * .05;
This example shows you how you could declare all your variables rst and then initialize
the variables later in the program.
The value you assign to a variable is not permanent; it is called a variable because you can
change it. The following examples modify the totalCost variable:
var totalCost = 3 * 21.15;
totalCost = totalCost * .1;
totalCost *= .1;
The rst example initializes the totalCost variable. The second example reads the value of
totalCost, multiplies the value by .1, and stores the result back into totalCost. This overwrites
the old value with the new value. The third example is a shortcut for the action in the second
example. It uses the *= syntax to indicate that you want to multiply the existing value by .1
and store the result in the same variable:
Rules for naming variables
Every programming language has rules for naming variables, and JavaScript is no exception.
You must adhere to the following rules when naming JavaScript variables.
A variable name can contain numbers, but they cannot begin with a number. Legal
examples are x1, y2, gift4you. Illegal examples are 4YourEyes, 2give, 1ForAll.
Variable names must not contain mathematical or logical operators. Illegal examples
are monday-friday, boxes+bags, cost*5.
Variable names must not contain any punctuation marks of any kind other than the
underscore (_) and dollar sign ($). Legal examples are vehicle_identication, rst_name,
last_name, $cost, total$. Illegal examples are thisDoesn’tWork, begin;end, Many#s.
Variable names must not contain any spaces.
Variable names must not be JavaScript keywords, but they can contain keywords.
Illegal examples are function, char, class, for, var. Legal examples are theFunction, for-
Loop, myVar.
Variable names are case-sensitive. Examples of different-case variables are MyData,
myData, mydata, MYDATA.

Lesson 1: Introducing JavaScript CHAPTER 3 73
Naming variables
When you create a variable, give the variable a name that is descriptive enough that you
don’t need a comment to describe what it is. If you need to add a comment to describe the
variable usage, the comment will be at the declaration only. If you name the variable in a way
that does not require a comment, the meaningful name will be readable throughout your
code. Here are some good and bad examples of variable naming:
//bad examples
var last; //last accessed date
var current; //current vehicle
var changed; //the vehicle make was changed
//good examples
var lastAccessedDate;
var currentVehicle;
var vehicleMakeWasChanged;
Notice the casing that is used in the good examples. The recommended naming conven-
tion for JavaScript variables is to use camel casing, which means you start a variable name
in lowercase and then capitalize the rst letter of each subsequent word that makes up the
variable name.
Although a variable name can contain the dollar sign and the underscore, it’s usually pref-
erable not to use them. The exception is when assigning jQuery objects (discussed in Chapter
6, “Essential JavaScript and jQuery”) to variables, when you might want to begin the variable
name with the dollar sign.
Creating the environment
The collection of all variables and their values is commonly referred to as the environment.
When the environment is created, it contains many standard variables plus the variables you
create.
In a web application, each time a webpage is loaded into the browser, a new environment
is created, and the old environment is destroyed. Any variables that you create are accessible
until a new webpage is loaded.
In a Windows 8 program, an environment is created when the application starts, and the
environment is destroyed when the application ends. A variable is accessible as long as your
program is running.
Working with functions
A function is a grouping of statements that are executed when you call the function.
Functions promote code reuse because you can call the function many times from within
your code. Functions can have parameters, which enable you to pass data into the function.
Functions can also have a return value, so you can return the results of the function to the
caller.
Key
Terms
Key
Terms

74 CHAPTER 3 Getting started with JavaScript
Using function declarations
A function can be declared by using the function keyword and then providing a name (also
known as an identier), the optional list of parameters enclosed in parentheses, and a set of
curly braces with the grouping of statements, as follows:
function Add(x, y) {
return x + y;
}
This is an example of a function declaration, in which the function is called Add and has
two parameters, x and y. The function has a grouping of statements, denoted by the curly
braces (also known as a code block). This function has only one statement, but it could have
many statements.
When you call the function from your code, you are invoking or applying the function. An
example of calling, invoking, or applying the Add function is as follows:
var a = 5;
var b = 10;
var c = Add(a, b);
In this example, three variables are declared. Variables a and b are initialized with data to
be passed as arguments to the Add function. Variable c will contain the return value of the
Add function. The Add function will receive the arguments into its x and y parameters. Finally,
the return statement will add x and y and return the result, which is assigned to variable c.
NOTE DISTINGUISHING “ARGUMENT” AND “PARAMETER”
Many people use the terms “argument” and “parameter” synonymously, but these terms
are different. Arguments represent the values you pass to the function (variables a and b
in the previous example), whereas the parameters represent the values received from the
caller (variables x and y in the previous example).
Function declarations may be called before the function declaration is declared because
the function declarations are resolved when the JavaScript is parsed. The following example
will run properly even though the call to the Add function is before the Add function:
var a = 5;
var b = 10;
var c = Add(a, b);
function Add(x, y) {
return x + y;
}
Lesson 1: Introducing JavaScript CHAPTER 3 75
Using function expressions
A function expression produces a value of type function. You can assign function expressions
to variables or execute them directly. Here is an example of a function expression being cre-
ated and assigned to a variable:
var addFunction = function(x, y){
return x + y;
};
var c = addFunction(5, 10);
First, notice that addFunction is called after the function expression is assigned to the
addFunction variable. If you tried to call addFunction before the assignment of the function
expression to the addFunction variable, an exception would be thrown.
The addFunction variable is of type function, in which the function expression is created by
using the function keyword to create a function with no name (also known as an anonymous
function), and then the function expression is assigned to the variable. An anonymous func-
tion has no name or identier. Although function expressions can be named or anonymous,
it’s considered better to leave the function anonymous to minimize confusion.
Function expressions can be benecial when you want to determine the code conditionally
to be executed at runtime. Here is an example of when you might add two values or subtract
one value from the other:
var myFunction = function(x, y){
return x + y;
};
//lots of code
var c = myFunction(10, 5);
//lots of code
myFunction = function(x, y){
return x - y;
};
//lots of code;
var d = myFunction(10,5);
In this example, variable c will be assigned a value of 15 because myFunction was declared
and assigned code that adds x and y. Variable d is assigned the value of 5 because myFunction
was assigned new code that subtracts y from x.
Deciding which arguments
JavaScript is very loose when passing arguments to functions. If you have too many argu-
ments, JavaScript just discards the extras. If you don’t have enough arguments, the parameter
values for missing arguments will be undened.
The biggest benet of this loose behavior is that you can add parameters to a method that
has already been created and is already being called. The added parameters might provide
extra functionality that can be accessed, but existing callers continue to work.

76 CHAPTER 3 Getting started with JavaScript
The drawback of this loose behavior is that you might inadvertently pass an incorrect
quantity of arguments to the function, and you get no indication of a problem.
Using the browser’s built-in alert, prompt, and conrm functions
When writing web applications, the browser provides the following functions that can present
data to and collect data from the user:
alert Used to display a message to the user in a modal window. The user clicks the
OK button to close the message window. The following code produces the alert win-
dow in Figure 3-1:
alert('Here is an alert');
FIGURE 3-1 The alert window showing a message and an OK button
prompt Used to query the user for input by displaying a modal message prompt and
a text box for the user to enter data into. The text box can be supplied a default value
that allows the user just to press Enter or click the OK button to accept the default
value. The user can close the window by clicking the OK or Cancel button. The prompt
function returns the data that the user typed in the text box. The following code pro-
duces the prompt in Figure 3-2:
var promptResult = prompt('This is a prompt for information', 'default value');
FIGURE 3-2 The prompt window collecting text
conrm Used to query the user for OK or Cancel by displaying a modal message
window. The user can close the window by clicking the OK or Cancel button. The
conrm function returns either true (when the OK button is clicked) or false (when the
Cancel button is clicked):
var confirmResult = confirm('Do you confirm?');

Lesson 1: Introducing JavaScript CHAPTER 3 77
FIGURE 3-3 The confirm window presents a message and OK and Cancel buttons
These built-in functions, and any functions you write, can be overwritten very easily
because the function name is a variable. Consider the following scenario, in which a different
function is assigned to the prompt function:
prompt = function(){
return 'hello again';
};
This code replaces the behavior of the prompt function with a function that always returns
the string, ‘hello again’. The function name is represented by a variable, and you can change
its value dynamically. This is the same for function declarations and function expressions.
Scoping variables
Scoping is the context within a computer program in which a variable name is valid and can
be used to access the variable. Outside the scope of a variable name, the variable’s value
might still be stored and might even be accessible in some way, but the name cannot access
the value.
In JavaScript, there are essentially two scopes, global and local. A variable with a global
scope is accessible from anywhere in the program. A variable with a local scope is accessible
only from within the function in which the variable is dened, so you can think of local scope
as being function scope.
The fact that local scope is limited to a function is very different from many other lan-
guages, in which a new local scope is created for each set of curly braces. This means that in
many other languages, conditional and looping statements that have curly braces also start
a new local context. This is not the case for JavaScript, in which the only local scope is at the
function. Variables that are declared anywhere inside the function will have a local function
scope. To avoid confusion, you should declare all function variables at the top of the function.
NOTE BE CAREFUL NOT TO CREATE GLOBAL VARIABLES IMPLICITLY
If you do not use the var keyword when you declare a variable, the variable is automatically
created, but it will have a global scope. Consider the following code example:
totalCost = 3 * 21.15;
tax = totalCost * 1.05;
Key
Terms

78 CHAPTER 3 Getting started with JavaScript
If this code were inside a function, you might have thought that totalCost and tax would be
automatically created with a local scope, but that’s not the case. As it turns out, totalCost
and tax will always be created with a global scope, and these variables will be accessible
from anywhere in the program. You should always declare variables by using the var
keyword.
Nesting functions and nested local variable scoping
There’s more to local scoping that you need to know. In JavaScript, you can nest function
declarations inside function declarations. JavaScript allows multiple levels of function decla-
ration nesting. Remember that a function produces a local scope, so you can get additional
scopes by using this function-nesting trick.
Nested functions are private to the function in which they are dened. Nested functions
also start their own local context, whereas dened variables are accessible within this function
only. In addition, a nested function can access variables dened in the parent function’s local
context, the grandparent function’s local context, and so on. Here is an example of using a
nested function to get a nested local scope:
function areaOfPizzaSlice(diameter, slicesPerPizza) {
return areaOfPizza(diameter) / slicesPerPizza;
function areaOfPizza(diameter) {
var radius = diameter / 2;
return 3.141592 * radius * radius;
}
}
In this example, the areaOfPizza function is nested in the areaOfPizzaSlice function,
which means that the areaOfPizza function is declared inside the areaOfPizzaSlice function’s
local scope. The areaOfPizza function is not accessible outside the areaOfPizzaSlice func-
tion. The radius variable is declared inside the nested local scope and is accessible only from
within the areaOfPizza function. There are two diameter variables, one in the local scope of
areaOfPizzaSlice and one in the areaOfPizza. When in the areaOfPizza function, the diameter
variable that is dened in that local context is accessible. When in the areaOfPizzaSlice func-
tion, the diameter variable that is dened in that local scope is accessible. The slicesPerPizza
variable is accessible in both functions because parent variables are accessible to the children
as long as they are not hidden by local variables with the same name.
Converting to a different type
In many scenarios, you will want to convert a variable from one type to another. For example,
the prompt function always returns a string, but you have prompted the user to enter a num-
ber. For conversions, you can use the Number and String functions.

Lesson 1: Introducing JavaScript CHAPTER 3 79
Using the Number function
The Number function attempts to convert the object argument that is passed into the func-
tion to a number. If the object argument cannot be converted to a number, a value of NaN
(not a number) is returned.
Consider the following example, in which the user is prompted to enter his or her age, the
age is incremented, and a message is displayed, using the new age:
var age = prompt('Enter age', '');
alert('You will soon be ' + age + 1 + ' years old!');
When you run this code and input a number such as 20, the message displays as You Will
Soon Be 201 Years Old! because age is a string, so the plus sign automatically converts the
number 1 to a string and concatenates to the age, resulting in an age of 201.
By using the Number function, you can convert the age to a number and then add 1, as
shown in the following example:
var age = prompt('Enter age', '');
alert('You will soon be ' + Number(age) + 1 + ' years old!');
If you try to run this code, you get the same age response of 201 years old. What hap-
pened? The rst plus sign has a string on the left side and the Number function on the right.
Although you converted to a number, the rst plus sign automatically converted the number
back to a string and returned the same value of 201.
To solve the problem, put parentheses around the math to ensure that age receives the
proper value before being converted to a string and concatenated as follows:
var age = prompt('Enter age', '');
alert('You will soon be ' + (Number(age) + 1) + ' years old!');
When you run this code, you get a response of You Will Soon Be 21 Years Old! because the
age is converted to a number and incremented before any of the string concatenation occurs.
Quick check
You prompt the user for the year of his or her vehicle and place the result in a
vehicleYear variable. The current year is stored in a currentYear variable. You want
to display a message that states, “Your vehicle is xx years old!” where xx is the
age of the vehicle. What will this line of code be?
Quick check answer
You can use the alert function to display the message and the Number function
to convert the vehicleYear variable to numeric as follows:
alert('Your vehicle is ' + (currentYear - Number(vehicleYear)) + ' years old!');
80 CHAPTER 3 Getting started with JavaScript
Using the String function
The String function attempts to convert the object argument that is passed into the function
into a string. Consider the scenario in which you have two numbers such as 10 and 20, and
you want to concatenate them like strings and display the resulting string of 1020. You might
try the following code:
var x = 10;
var y = 20;
alert(x + y);
This example will display a value of 30 because the plus sign added the values instead of
concatenating them as strings. To solve the problem, you can use the String function to con-
vert the numbers to strings as follows:
var x = 10;
var y = 20;
alert(String(x) + String(y));
This example will display a value of 1020 because the numbers were converted to strings,
and then the plus sign concatenated the values.
Conditional programming
You will often need to execute certain code when an expression evaluates as true and execute
different code when the expression evaluates to false. This is when the if and switch keywords
can help.
Using the if/else keywords
Consider the scenario in which the user is prompted to enter his or her age, one is added to
the age, and a message is displayed. Here is the code that was used earlier when the built-in
prompt function was discussed:
var age = prompt('Enter age', '');
alert('You will soon be ' + (Number(age) + 1) + ' years old!');
What happens if someone enters I Don’t Know for the age? This string is not numeric,
and the displayed message will be You Will Soon Be NaN Years Old, where NaN means Not
a Number. You might want to provide a more specic message when the user input is not a
number. This can be accomplished by using the if/else keywords with a built-in function called
isNaN, as follows:
var age = prompt('Enter age', '');
if(isNaN(age))
alert('You need to enter a valid number');
else
alert('You will soon be ' + (Number(age) + 1) + ' years old!');
Lesson 1: Introducing JavaScript CHAPTER 3 81
The isNaN function accepts one object argument and tests this object to see whether it is
numeric. The isNaN function returns true if the object is not numeric and false if it is numeric.
The if keyword is used with an expression that is surrounded by parentheses and evaluates
to a Boolean value. This expression is used in your code to steer the program ow based on
the result of the isNaN function, which, when true, displays the message, You Need To Enter
A Valid Number. Notice that the if keyword has a corresponding else keyword that is used to
provide an alternate program ow when the if expression evaluates to false. The else keyword
is optional.
The previous example executes a single statement when true and a single statement when
false. If you need to execute multiple statements when true or false, you must surround the
statements with curly braces to indicate that you have a code block to execute as follows:
var age = prompt('Enter age', '');
if(isNaN(age)){
age = 0;
alert('You need to enter a valid number');
}
else {
age = Number(age) + 1;
alert('You will soon be ' + age + ' years old!');
}
As a rule, you should consider using curly braces all the time. This enables a user to add
code into the code block without having to think about whether the curly braces exist.
You can also create chained (also known as cascading) if statements by adding another if
after the else keyword. Here is an example of a cascading if:
var age = prompt('Enter age', '');
if(isNaN(age)){
age = 0;
alert('You need to enter a valid number');
}
else if(Number(age) >= 50) {
age = Number(age) + 1;
alert('You're old! You will soon be ' + age + ' years old!');
}
else if(Number(age) <= 20) {
age = Number(age) + 1;
alert('You're a baby! You will soon be ' + age + ' years old!');
}
else
{
alert('You will soon be ' + (Number(age) + 1) + ' years old!');
}
In this example, the rst conditional test checks to see whether the age is not a number.
The else condition is checking to see whether the age is greater than or equal to 50. The next
else condition is checking to see whether the age is less than or equal to 20. Finally, the last
else condition is just displaying a default message.
82 CHAPTER 3 Getting started with JavaScript
Using the switch keyword
The switch keyword can be used when a single value is to be examined and, based on
its value, there could be several outcomes. Consider the following example that uses the
switch keyword, in which the user is prompted to select a color for the car that he or she is
purchasing:
var carColor = prompt('What color car would you like to buy?', 'white');
switch (carColor) {
case 'red':
alert('Red is a fancy choice!');
break;
case 'black':
alert('Black looks nice, but you need to wash often!');
break;
case 'white':
alert('White is in stock and you get a discount!');
break;
default:
alert('The color:' + carColor + ' is not known.');
break;
};
In this example, the user is prompted to enter a car color and presented with a default
value of white. The switch keyword examines carColor to see whether its value matches any of
the values provided in the cases. If there is a match, the code within the case is executed until
the code reaches either a break or a return keyword. If there is no break or return, the code
continues into the next case or default.
How do you use the switch with numeric ranges? Many people would say that you can’t
work with numeric ranges because the switch is looking for an exact match to a case value,
but there is a trick to solving this problem. Consider the cascading if example, covered earlier,
when the program produced a different message based on the user’s age response. Four
different categories of responses—if the age was not a number, if it was greater than or equal
to 50, if it was less than or equal to 20, or if it was any other number—received four different
messages. The following is a rewrite of the cascading if as a switch:
var age = prompt('Enter your age', '');
age = Number(age);
switch (true) {
case isNaN(age):
age = 0;
alert('You need to enter a valid number');
break;
case (age >= 50):
age = Number(age) + 1;
alert("You're old! You will soon be " + age + " years old!");
break;
case (age <= 20):
age = Number(age) + 1;
Lesson 1: Introducing JavaScript CHAPTER 3 83
alert("You're a baby! You will soon be " + age + " years old!");
break;
default:
alert('You will soon be ' + (Number(age) + 1) + ' years old!');
break;
};
In this example, the trick is to use switch(true), which enables you to use conditional state-
ments with each case that evaluates as true or false.
Determining whether a variable has a value
You will often want to determine whether a variable has a value. You can use the if keyword
to determine this. The if keyword evaluates as true if the variable has a value; it evaluates as
false when the variable is either undened or null. The difference between undened and
null is minimal, but there is a difference. A variable whose value is undened has never been
initialized. A variable whose value is null was explicitly given a value of null, which means that
the variable was explicitly set to have no value. If you compare undened and null by using
the null==undened expression, they will be equal.
Consider the following example, in which you want to determine whether myVar has a
value:
if(myVar){
alert('myVar has a value');
}
else {
alert('myVar does not have a value');
}
If myVar is 0, NaN, empty string, null, or undened, a message is displayed, stating that
myVar does not have a value. If myVar contains any other value, a message is displayed stat-
ing that myVar has a value.
No value coalescing operators
Often, you want to check a variable to see whether it has a value and, if the variable has
a value, use either the variable or a default value. JavaScript offers a rather simple way to
accomplish this: use the || (or) operator.
The following is an example of using the or operator to accomplish this task:
var customer = prompt('Please enter your name');
alert('Hello ' + (customer || 'Valued Customer'));
In this example, if customer has a value, the or operator will be evaluated as true, and the
actual value is returned. Because the or operator is short-circuiting, there is no evaluation of
the second operand. If customer has no value, the or operator returns the second operand,
even if it’s null.
84 CHAPTER 3 Getting started with JavaScript
It’s interesting to note that or operators can be chained, as shown in this example, in which
the user is prompted for a name and then prompted for a company name:
var customer = prompt('Please enter your name');
var companyName = prompt('Please enter your company name');
alert('Hello ' + (customer || companyName || 'Valued Customer'));
In this example, the alert message will contain the value of the rst variable that has a
value or Valued Customer if none of the variables has a value.
The && (and) operator exhibits similar behavior but returns the rst empty value instead
of the rst non-empty value. If all variables have a value, Valued Customer is returned. There
isn’t much real-world value to this behavior, but it is a tool in your JavaScript toolbox.
Determining whether two values have the same type and are equal
When JavaScript evaluates the following expressions, they all evaluate as true:
null == undefined
false == 0;
'' == 0;
'123' == 123
JavaScript attempts to convert the operands to types that are compatible before per-
forming the equality check. However, you might want these expressions to evaluate as false
because the types are different.
To perform a type and equality comparison, JavaScript provides the === and the !===
operators. The following expressions evaluate as false:
null === undefined
false === 0;
'' === 0;
'123' === 123
Implementing code loops
Code loops are an important part of every programming language because many programs
need to repeat a sequence a given number of times or repeat a sequence until some value has
changed. JavaScript gives us the while, do, and for keywords to perform looping operations.
Implementing the while loop
The while keyword can be used to create a loop that accepts a loop expression enclosed
within parentheses. The loop can contain a single statement or a code block that executes as
long as the loop expression evaluates as true. Here is an example of the while loop:
var x = 10;
while(x > 0) {
x--;
alert("The value of x is " + x);
}
Lesson 1: Introducing JavaScript CHAPTER 3 85
In this example, as long as the loop expression evaluates as true, the loop continues. Each
time through the loop, x is decremented, using the x-- statement. After x is decremented, an
alert message is displayed that shows the current value of x. Note that the code block can
execute zero to many times, based on the value of x when the program pointer reaches the
while loop. If x were initialized to zero, the loop would not execute.
Implementing the do loop
The do keyword can be used to create a loop that executes one to many times. The do state-
ment starts with the word “do,” followed by a mandatory set of curly braces containing a code
block that will be executed each time the loop executes, followed by the while keyword and a
loop expression that is enclosed in parentheses.
The most compelling reason to use the do loop is that it executes at least once because
the loop expression is evaluated after the loop executes. It can be difcult to think of a real-
world implementation of this loop, but consider when a login screen needs to be displayed
to collect the user name and password, and the login screen will be redisplayed if the login
credentials are not correct. The following example should provide some clarity to this
implementation:
var retries = 0;
do{
retries++;
showLoginScreen();
} while(!authenticated() && retries < 3);
if(retries==3){
alert('Too many tries');
return;
}
In this example, a retries variable is rst created and initialized to zero. Next, the do loop
executes. Inside the loop’s code block, the retries variable is incremented, and a call is made
to a showLoginScreen function, which will display a login screen that prompts for a user name
and password. After the user enters the appropriate information and closes the login screen,
the loop expression is evaluated. The authenticated function checks the user name and pass-
word and returns true if the user should be authenticated. The loop will continue as long as
the user is not authenticated and the retries count is less than three.
Implementing the for loop
The for loop is typically used when you know how many times the loop will execute, and you
want a loop counter variable. The for loop uses the following syntax:
for (var variable=startvalue; variable < endvalue; variable = variable + increment)
{
code to be executed
}
Within the parentheses are three sections, separated by semicolons. The two semicolons
must exist, even if you leave a section empty. The rst section enables you to declare and
86 CHAPTER 3 Getting started with JavaScript
initialize a loop variable. This section executes once when the program reaches this loop. The
second section is the loop expression, which is called prior to executing the loop code, to
determine whether the loop should execute. If the loop expression evaluates as true, the loop
code executes. The third section is the loop modication section. This is when you might want
to increment (or decrement) the loop variable. This section is executed after the loop code
executes for each loop.
You might use the for loop when you know that you want to loop a specic number of
times and, in the loop code, you want to access a counter variable, as shown in the following
example:
for (var counter = 0; counter < 10; counter++){
alert('The counter is now set to ' + counter);
}
In this example, a counter variable is created with the var keyword. Be careful to use the
var keyword to avoid creating a global variable by mistake. The loop will continue as long as
the counter variable is less than 10. Each time the loop executes, the counter is incremented,
using the counter++ syntax. The counter variable is used in the loop code to display a mes-
sage, but the counter could certainly be used for more elegant tasks.
Breaking out of a loop
As your loop logic becomes complicated, you might nd that you need a way to exit the loop
by using a conditional check within the loop code. For scenarios such as this, you can use the
break keyword to exit the immediate loop. Note that the break keyword will exit only from
the current loop. If you are in a nested loop, you will exit only one level.
In the following scenario, a loop is created to determine whether a number is a prime
number, and the break keyword is used to exit the loop if the number to test is determined
not to be a prime number:
var numberToTest = prompt('Type number here.', '');
var index = 2;
var isPrime = true;
while (index < numberToTest) {
if (numberToTest % index == 0) {
isPrime = false;
break;
}
index++;
}
if (isPrime) {
alert(numberToTest + ' is a prime number');
}
else {
alert(numberToTest + ' is not a prime number because it is divisible by ' + index);
}
In this example, the modulo (%) operator determines whether index can be divided into
the number to test without producing a remainder. If so, the number to test is not a prime

Lesson 1: Introducing JavaScript CHAPTER 3 87
number. As soon as a number is found to be nonprime, there is no need to continue looping,
so the break keyword is used to exit the loop.
Handling errors
When writing code, you always want to make sure that your code does not cause an
exception. An exception is an error that occurs at runtime due to an illegal operation during
execution. You should validate your variables preemptively before performing an operation
that could throw an exception. For example, before you divide one variable (numerator) by
another variable (denominator), verify that the denominator is not zero so you don’t throw a
divide-by-zero exception.
Sometimes, you can’t preemptively check for a potential error. For example, you are read-
ing from a network stream when the network connection is abruptly lost. For situations like
this, you can use the try (try block), catch (catch block), or nally (nally block) keywords.
The try block is used with a code block that contains the code that might fail. You want to
try to execute the code block. The try block requires a catch block, a nally block, or both.
The catch block will have the exception passed to it, so you have access to the exception
within your code. The catch block is automatically executed if the code in the try block throws
an exception. In that case, program execution immediately jumps to the catch block without
executing further statements in the try block.
The nally block is executed after the try block successfully completes or the catch block
completes. The intent of the nally block is to provide a place for cleanup code because the
nally block executes regardless of whether an exception was thrown.
The following code example illustrates the use of try, catch, and nally blocks:
try{
undefinedFunction()
alert('Made it, so undefinedFunction exists')
}
catch(ex){
alert('The following error occurred: ' + ex.message)
}
finally{
alert('Finally block executed')
}
In this example, if the undenedFunction function exists and doesn’t throw an exception,
you get two alerts the rst alert is Made It, So undenedFunction Exists, and the second alert
is Finally Block Executed.
If the undenedFunction function does not exist, an exception is thrown, and you receive
two alerts: the rst alert is The Following Error Occurred, and the second alert is Finally Block
Executed. An exception was thrown because undenedFunction didn’t exist, and the program
immediately jumped to the catch block without executing the rest of the try block.
Key
Terms
88 CHAPTER 3 Getting started with JavaScript
Remember that the nally block always executes either after the try block completes suc-
cessfully or after the catch block executes. If the catch block throws an exception, the nally
block executes before the exception is passed to the calling routine.
Lesson summary
JavaScript is untyped, so when you create a variable, you don’t need to specify its type.
JavaScript denes the following built-in objects: the global object, the Object object,
the Function object, the Array object, the String object, the Boolean object, the
Number object, the Math object, the Date object, the RegExp object, the JSON object,
and several types of Error objects.
In JavaScript, all numeric values are internally represented as oating point values.
The typeof operator is a unary operator that returns a string that indicates the oper-
and’s type.
The && and || operators are short-circuiting operators.
Use camel casing for variable names.
Scoping is the context within a computer program in which a variable name is valid
and can be used to access the variable.
In JavaScript, there are essentially two scopes, global and local, but you can create
nested local scopes by nesting functions.
For no value coalescing, use the || operator.
Use two equal signs (==) to test for equality, and use three equal signs (===) to test for
same type and equality.
The while loop executes zero to many times, and the do loop executes one to many
times.
The for loop executes zero to many times and has a counter variable.
Use the break keyword to exit from the current loop.
Use the try, catch, and nally keywords to handle exceptions.
Lesson review
Answer the following questions to test your knowledge of the information in this lesson. You
can nd the answers to these questions and explanations of why each answer choice is correct
or incorrect in the “Answers” section at the end of this chapter.
1. Your application prompts the user to enter his or her age, which is placed in an age
variable. A user ran the application and entered I Don’t Know for the age. The applica-
tion then multiplies age by two. What is the result?
A. undened
B. null
Lesson 2: Writing, testing, and debugging JavaScript CHAPTER 3 89
C. NaN
D. innity
2. Which of the following represent valid variable declarations? (Choose all that apply.)
A. var switch;
B. var myChar;
C. var $cost;
D. var _total;
E. var 1to1;
F. var tooGood4u;
3. In your application, you want to display a personalized message to the user, if the
user’s name is populated, in the userName variable, but if userName is empty, you
want to use Valued User instead. How can you accomplish this most efciently?
A. var personalized = ‘Hello ‘ + (userName ?? ‘Valued User’);
B. var personalized = ‘Hello ‘ + (userName || ‘Valued User’);
C. var personalized = ‘Hello ‘ + (userName && ‘Valued User’);
D. var personalized = ‘Hello ‘ + (userName + ‘Valued User’);
Lesson 2: Writing, testing, and debugging JavaScript
The previous lesson presented an in-depth introduction to JavaScript, and you’re probably
ready to start writing some code, which is what this lesson explains. It starts with writing
code, using test-driven development practices. Along the way, a new project is created, and
a JavaScript le is added, using the <script> element. Finally, this lesson covers the JavaScript
debugging features in Visual Studio.
When working with a programming language, you’ll probably want to create a Hello
World program so you can see what is required to get a simple program to run. Although a
Hello World program was created previously, it was created by using HTML. This time, you
create a JavaScript version of the Hello World program.
After this lesson, you will be able to:
Describe test-driven development (TDD).
Set up a web application for TDD.
Set up a Windows 8 application for TDD.
Debug JavaScript code.
Estimated lesson time: 45 minutes
90 CHAPTER 3 Getting started with JavaScript
Hello World from JavaScript
There are several ways to write a Hello World program, and they differ primarily in how you
want to display the Hello World message. For example, you can programmatically make the
Hello World text visible or invisible on an HTML page, or you can display an alert message
with Hello World in it. These are good examples, but it would be better if the rst example
started you on the correct way of writing JavaScript code. Try doing the Hello World from a
test-driven perspective.
Writing test-driven code
Test-driven development (TDD) is a great way to write code and learn about code. One of the
benets is that you can write your test without having to write a user interface. It’s also easy
to prototype code. TDD makes it easy to write a bit of code to see whether the code works
the way you expected. Best of all, it’s easy to get started.
There are many add-ins for writing test-driven code, but the choices are relatively few for
test-driven JavaScript code. Probably the most common tool is QUnit, which can be used with
ASP.NET web applications; for Windows 8 applications, a variant to QUnit is QUnit-Metro.
Setting up QUnit with ASP.NET applications
To set up QUnit with an ASP.NET application, you must rst start Visual Studio Express 2012
for Web and create a web application. In this example, the ASP.NET Empty Web Application is
created.
In the Solution Explorer window, right-click the project node and click Manage NuGet
Packages. This displays the Manage NuGet Packages window. NuGet is an open-source
package-management system for the .NET platform that simplies the addition of third-
party libraries into your code. Click the Online node, and then, in the Search Online text box,
type QUnit and click the magnifying glass to perform the search. The results display similar
to Figure 3-4. Keep in mind that your result screen might be different due to the many new
packages that are being released, so be sure to look for the QUnit for ASP.NET MVC package.
Click QUnit For ASP.NET MVC; you should see an Install button. Click the Install button to
install QUnit For ASP.NET MVC into your project. After the package is installed, you should
see a check mark where the Install button was located. Click the Close button to close the
Manage NuGet Packages screen. Note that this QUnit for ASP.NET MVC package works with
both model, view, controller (MVC) applications and ASP.NET web applications, although the
cascading style sheet that is added is not in the standard style sheet location for ASP.NET
applications. (For the time being, we’ll leave the style sheet alone.)
After the QUnit for ASP.NET MVC package has been added, you see a packages.cong le,
which contains a reference to your package. The Scripts folder contains a le called qunit. js,
which contains the QUnit source code. The Content folder contains a qunit.css le, which
contains the cascading style sheet for QUnit.
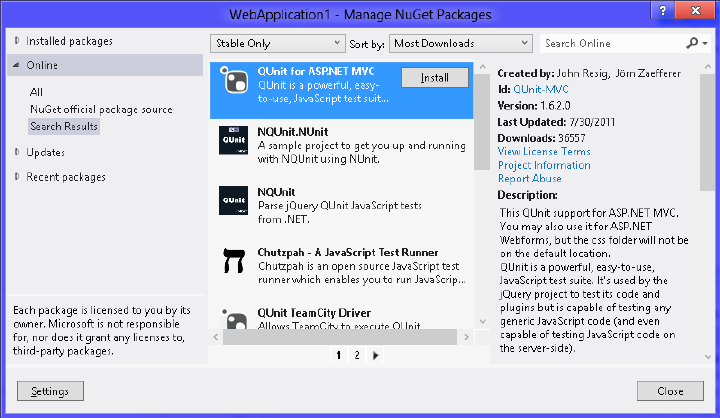
Lesson 2: Writing, testing, and debugging JavaScript CHAPTER 3 91
FIGURE 3-4 The NuGet search results containing QUnit For ASP.NET MVC
Next, add a default.html page by right-clicking the project node (in the Solution Explorer
window) and click Add; choose HTML Page. Name the le default.html and click OK. Make
the default.html le your startup page by right-clicking the default.html le and choosing Set
As Start Page. Modify the default.html le to look like the following example, in which the
inserted lines are in bold:
<!DOCTYPE html>
<html xmlns="http://www.w3.org/1999/xhtml">
<head>
<title></title>
<link rel="stylesheet" type="text/css" href="Content/qunit.css" />
<script type="text/javascript" src="Scripts/qunit.js"></script>
</head>
<body>
<h1 id="qunit-header">QUnit example</h1>
<h2 id="qunit-banner"></h2>
<div id="qunit-testrunner-toolbar"></div>
<h2 id="qunit-userAgent"></h2>
<ol id="qunit-tests"></ol>
<div id="qunit-fixture">test markup, will be hidden</div>
</body>
</html>
The QUnit setup is done, but in this le, you still need to add references to the code that
will be tested and the actual tests. Your code and your tests should be in separate les, so you
will be adding at least two references. Navigating to Debug and choosing Start Debugging
causes the QUnit summary screen to be displayed, as shown in Figure 3-5.
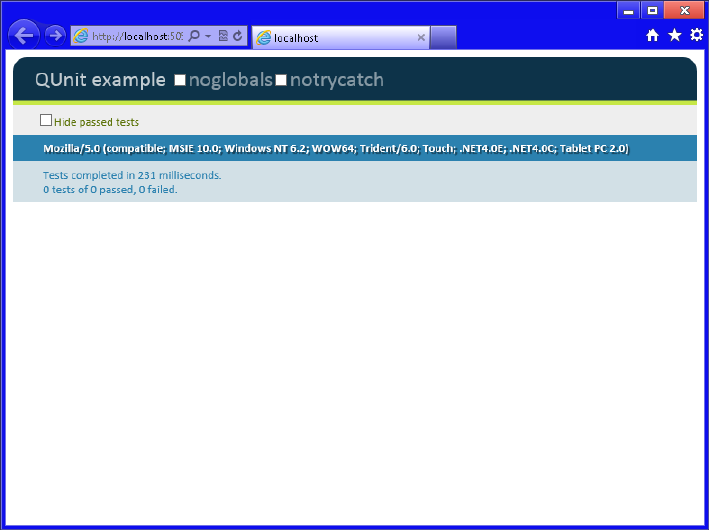
92 CHAPTER 3 Getting started with JavaScript
FIGURE 3-5 The QUnit summary screen showing 0 tests of 0 passed, 0 failed
This screen is showing that no tests have passed and no tests have failed because you have
no tests yet. It’s time to add a Hello World test to the application.
A default.js le and a tests.js le need to be added to the Scripts folder by right-clicking
the Scripts folder and choosing Add. Choose the JavaScript le. Name the le default.js and
click OK. Do the same for the tests.js le.
A reference to these les needs to be added to the default.html le. With the default.html
le open, drag the default.js le out to the source of the default.html le and drop the le
right after the last ending script tag (</script>). Drag the tests.js le out and drop it after the
last ending script tag. Your results should look like the following, in which the inserted lines
are bold:
<!DOCTYPE html>
<html xmlns="http://www.w3.org/1999/xhtml">
<head>
<title></title>
<link rel="stylesheet" type="text/css" href="Content/qunit.css" />
<script src="Scripts/qunit.js"></script>
<script src="Scripts/default.js"></script>
<script src="Scripts/tests.js"></script>
</head>
<body>
<h1 id="qunit-header">QUnit example</h1>

Lesson 2: Writing, testing, and debugging JavaScript CHAPTER 3 93
<h2 id="qunit-banner"></h2>
<div id="qunit-testrunner-toolbar"></div>
<h2 id="qunit-userAgent"></h2>
<ol id="qunit-tests"></ol>
<div id="qunit-fixture">test markup, will be hidden</div>
</body>
</html>
Now write the rst test. When using TDD, always write the test rst, run it to see the test
fail, and then add code to make the test pass. In the tests.js le, add the following test to see
whether a greeting variable contains Hello World:
test("A Hello World Test", 1, function () {
equal(greeting, "Hello World", "Expect greeting of Hello World");
});
Here is an overview of what’s happening with this code. The code is calling a test function,
which is included in the QUnit source code. A function is a block of code that you can call to
perform one or more actions. The test function requires three parameters. The rst parameter
is a freeform description of the test, which is A Hello World Test. The description of the test is
displayed in the QUnit summary screen when you run the tests. The second parameter, which
has a value of one, represents the quantity of assertions that you expect to perform within
the test function. The third parameter is an anonymous function. An anonymous function is
a block of code that has no name and can perform one or more actions. This is where you
add any code to execute, and then you perform assertions to verify that the test is successful.
In this anonymous function, the equal function is being called to see whether the greeting
variable contains Hello World. The equal function takes three parameters. The rst parameter
is the actual value, in this case, the greeting variable. The second parameter is the expected
value, Hello World. The third parameter is a message that you want to display, in this case,
Expect Greeting Of Hello World.
Because you have not created a greeting variable, this test should fail. When you run the
tests (click Debug and choose Start Debugging), you should see the failed test with a red
indicator. Figure 3-6 shows the QUnit summary screen with the failed test.
The test failed with a message that states that “greeting” is undened. Now, to make the
test pass, add the following code, which declares a greeting variable and assigns a value of
Hello World in the default.js le:
var greeting = 'Hello World';
Key
Terms

94 CHAPTER 3 Getting started with JavaScript
FIGURE 3-6 The QUnit summary screen showing a failed test
Save all les by navigating to File and choosing Save All (or Ctrl+Shift+S) and then run the
application again. If you see the same error, try pressing Ctrl+F5 in the browser window to
clear the browser cache. You should see that the test now passes because greeting is dened
and initialized to Hello World. In the QUnit summary screen, you should see a message that
states 1 Tests Of 1 Passed, 0 Failed. If you click the test, you should see the test showing a
green indicator, as shown in Figure 3-7.
As you add more features to your application, just add another test that denes or helps
shape each feature, and then write the code to make the test pass.
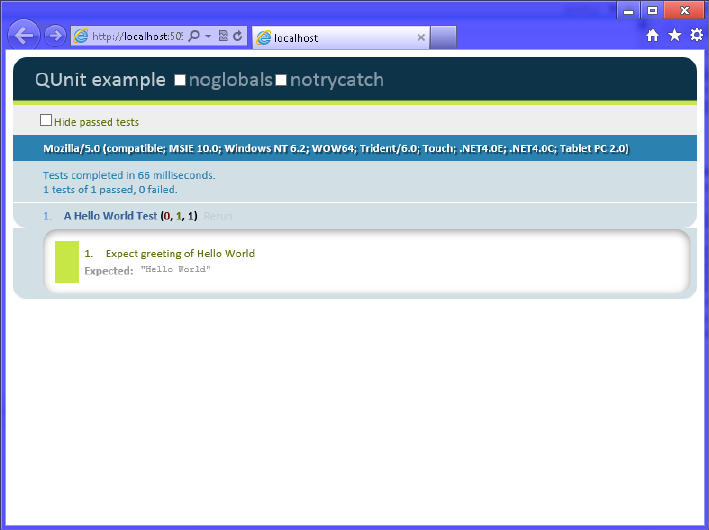
Lesson 2: Writing, testing, and debugging JavaScript CHAPTER 3 95
FIGURE 3-7 QUnit summary screen showing the successful Hello World test
Setting up QUnit-Metro with Windows 8 applications
To set up QUnit with a Windows 8 application, you must rst start Visual Studio Express 2012
for Windows 8 and create a JavaScript | Windows Store application. In this example, Blank App
is created.
In the Solution Explorer window, right-click the project node and click Manage NuGet
Packages. This displays the Manage NuGet Packages window. NuGet is an open-source pack-
age management system for the .NET platform that simplies the addition of third-party
libraries to your code. Click the Online node and then, in the Search Online text box, enter
QUnit-Metro and click the magnifying glass to perform the search. The results display, similar
to Figure 3-8. Your result screen might be different due to the many new packages that are
being released, so be sure to look for the QUnit-Metro package.
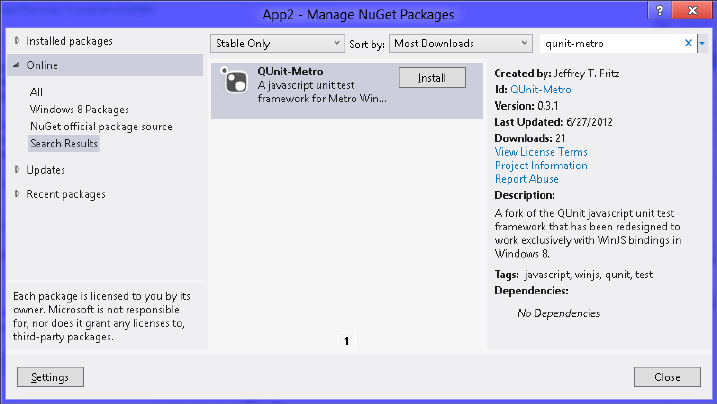
96 CHAPTER 3 Getting started with JavaScript
FIGURE 3-8 The Manage NuGet Packages window
Click the QUnit-Metro package; you should see an Install button. Click the Install button
to install QUnit-Metro in your project. After the package is installed, you should see a check
mark where the Install button was located. Click the Close button to close the Manage NuGet
Packages screen.
After the QUnit-Metro package has been added, you see a packages.cong le that con-
tains a reference to your package. The js folder contains a new le, qunitmetro.js, which con-
tains the QUnit-Metro source code. The css folder contains new cascading style sheets, called
qunitmetro.css, qunitmetro-dark.css, and qunitmetro-light.css. You use the qunitmetro . css
to get the default presentation, but you can add either the qunitmetro-dark.css or the
qunitmetro-light.css le to your test page to make the QUnit-Metro screen look more like a
Windows 8 application.
Blank App already has a default.html page. Modify the default.html le to look like the fol-
lowing example, in which the inserted lines are in bold:
<!DOCTYPE html>
<html>
<head>
<meta charset="utf-8" />
<title>App2</title>
<!-- WinJS references -->
<link href="//Microsoft.WinJS.1.0/css/ui-dark.css" rel="stylesheet" />
<script src="//Microsoft.WinJS.1.0/js/base.js"></script>
<script src="//Microsoft.WinJS.1.0/js/ui.js"></script>
<!-- App2 references -->
<link href="/css/default.css" rel="stylesheet" />
<script src="/js/default.js"></script>
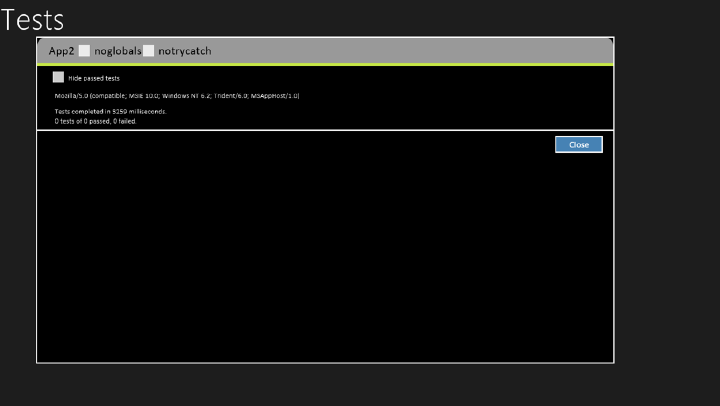
Lesson 2: Writing, testing, and debugging JavaScript CHAPTER 3 97
<!--QUnit-Metro references-->
<link rel="stylesheet" type="text/css" href="css/qunitmetro.css" />
<link rel="stylesheet" type="text/css" href="css/qunitmetro-dark.css" />
<script type="text/javascript" src="js/qunitmetro.js"></script>
</head>
<body>
<h1>Tests</h1>
<div id="appBar" data-win-control="WinJS.UI.AppBar" data-win-options=""></div>
</body>
</html>
The QUnit-Metro setup is done, but in this le, you still need to add a reference to the test
code le. Your code and your tests should be in separate les. You already have a reference
to the default.js le, so you will be adding one more reference. Navigating to Debug and
choosing Start Debugging displays the default.html le. Right-click the screen to display the
application bar at the bottom and click Run Tests. The QUnit summary screen is displayed, as
shown in Figure 3-9.
FIGURE 3-9 The QUnit-Metro summary screen showing no tests run
This screen is showing that no tests have passed and no tests have failed because you have
no tests yet. Now, add a Hello World test to the application.
A tests.js le must be added to the js folder by right-clicking the js folder and navigating to
Add | New Item | JavaScript File. Name the le tests.js and click OK.
Next, a reference to this le must be added to the default.html le. With the default.html
le open, drag the tests.js le out to the source of the default.html le and drop the le right
after the last ending script tag (</script>). Your results should look like the following, in which
the inserted line is bold:
98 CHAPTER 3 Getting started with JavaScript
<!DOCTYPE html>
<html>
<head>
<meta charset="utf-8" />
<title>App2</title>
<!-- WinJS references -->
<link href="//Microsoft.WinJS.1.0/css/ui-dark.css" rel="stylesheet" />
<script src="//Microsoft.WinJS.1.0/js/base.js"></script>
<script src="//Microsoft.WinJS.1.0/js/ui.js"></script>
<!-- App2 references -->
<link href="/css/default.css" rel="stylesheet" />
<script src="/js/default.js"></script>
<!--QUnit-Metro references-->
<link rel="stylesheet" type="text/css" href="css/qunitmetro.css" />
<link rel="stylesheet" type="text/css" href="css/qunitmetro-dark.css" />
<script src="js/qunitmetro.js"></script>
<script src="js/tests.js"></script>
</head>
<body>
<h1>Tests</h1>
<div id="appBar" data-win-control="WinJS.UI.AppBar" data-win-options=""></div>
</body>
</html>
Now you can write the rst test. When using TDD, always write the test rst, run it to see
the test fail, and then add code to make the test pass. In the tests.js le, add the following test
to see whether a greeting variable contains Hello World:
test("A Hello World Test", function () {
equal(greeting, "Hello World", "Expect greeting of Hello World");
});
Here is an overview of what’s happening with this code. The code is calling a test function,
which is included in the QUnit source code and requires two parameters. The rst param-
eter is the name of the test, which is A Hello World Test. The name of the test is displayed in
the QUnit summary screen when you run the tests. The second parameter is an anonymous
function, in which you add any code to execute and then perform assertions to verify that the
test is successful. In this anonymous function, the equal function is called to see whether the
greeting variable contains Hello World. The equal function takes three parameters. The rst
parameter is the actual value, in this case, the greeting variable. The second parameter is the
expected value, Hello World. The third parameter is a message you want to display, in this
case, Expect Greeting Of Hello World.
Because you have not created a greeting variable, this test should fail. When you run the
tests (click Debug, choose Start Debugging, right-click the screen, and choose Run Tests), you
should see the failed test with a red indicator. Figure 3-10 shows the QUnit summary screen
with the failed test.
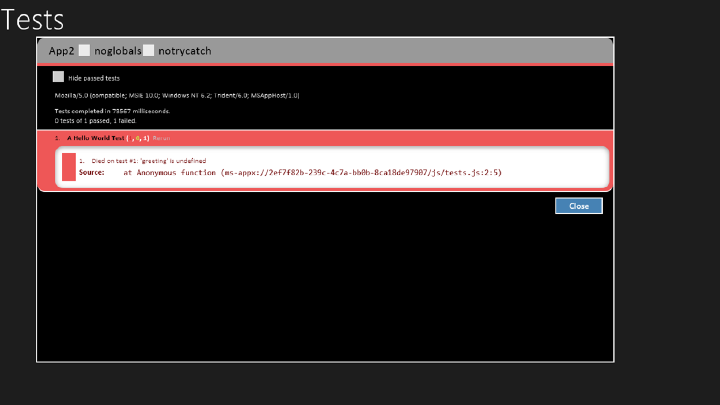
Lesson 2: Writing, testing, and debugging JavaScript CHAPTER 3 99
FIGURE 3-10 The QUnit-Metro summary screen showing the failed test
The test failed with a message that states that greeting is undened. Now, you make the
test pass. In the bottom of the default.js le, add the following code that declares a greeting
variable and assigns a value of Hello World:
var greeting = 'Hello World';
Save all les by clicking File and choosing Save All (or pressing Ctrl+Shift+S) and then run
the application again. You should see that the test now passes because greeting is dened
and initialized to Hello World. In the QUnit-Metro summary screen, you should see a message
that states 1 Tests Of 1 Passed, 0 Failed. If you click the test, you should see a green indicator,
as shown in Figure 3-11.
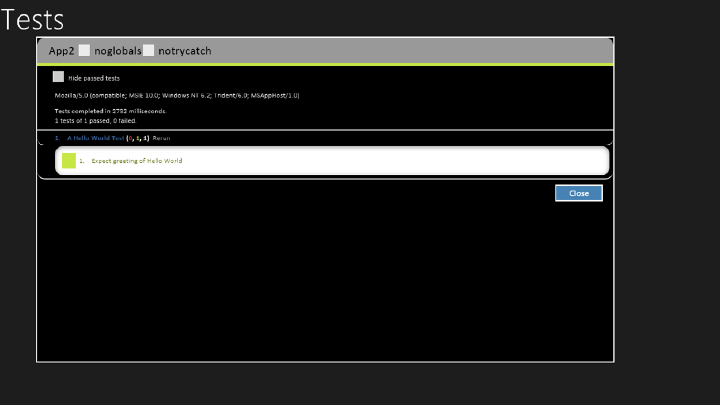
100 CHAPTER 3 Getting started with JavaScript
FIGURE 3-11 The QUnit-Metro summary screen showing the passing test
As you add more features to your application, you add another test that denes or helps
shape each feature, and then write the code to make the test pass.
Using the script tag
In the previous sections, links to JavaScript les were added to HTML documents by dragging
the JavaScript le from the Solution Explorer window and dropping it on the HTML docu-
ment. Upon dropping, a <script> element is added that references the JavaScript le.
The <script> element can dene a JavaScript code block or load an external JavaScript le,
but not both.
The following is an example of using the <script> element to dene a JavaScript code
block within the HTML document:
<script type="text/javascript">
<!--
function Add(x, y) {
return x + y;
}
alert(Add(3, 2));
//-->
</script>
The type attribute species the MIME type, which was required in earlier versions of HTML
but is optional in HTML5.

Lesson 2: Writing, testing, and debugging JavaScript CHAPTER 3 101
Next is the beginning of an HTML comment. Notice that the bottom contains a JavaScript
comment and an HTML end comment. This is the recommended method for dealing with
browsers that don’t support the script element. Without the comment, the browser would just
render the JavaScript source to the screen.
This script denes an add function. An alert is executed that calls the add function and
sends the results to the alert function. Notice that the call to the alert function is not within a
function; this call is inline. As this HTML document is being loaded, the browser reaches the
alert call and, because it’s inline, the alert call is immediately executed.
The following is an example of a <script> element referencing an external JavaScript le:
<script type="text/javascript" src="Scripts/tests.js"></script>
The src attribute references the external JavaScript le. When the src attribute is included,
the content of the <script> element must be empty. It’s important to use an explicit end tag
to prevent problems in some browsers.
For external JavaScript les, the following attributes can also be used:
async A Boolean attribute specifying that the script is executed asynchronously while
the page continues the parsing.
defer A Boolean attribute specifying that the script is executed after the page has
nished parsing.
If async and defer are not present, the script is fetched when the HTML parser reaches the
script element and is executed immediately, before the browser continues parsing the page.
For large HTML documents and large JavaScript les, the result is that the page takes much
longer to render.
NOTE USING ASYNC AND DEFER
Be careful when using async and defer. First, not all browsers support these attributes yet.
Second, when you are loading many external JavaScript les that depend on one another,
using these attributes can change the execution order.
Handling browsers that don’t support JavaScript
In addition to placing HTML comments around script blocks to keep your JavaScript source
from being rendered to the screen when a browser does not support the <script> element,
you can use the <noscript> element to specify alternate content to display. The following is an
example of the <noscript> element:
<script type="text/javascript">
<!--
function Add(x, y) {
return x + y;
}

102 CHAPTER 3 Getting started with JavaScript
alert(Add(3, 2));
//-->
</script>
<noscript>Your browser does not support JavaScript so page functionality will be
significantly reduced.</noscript>
Inline JavaScript vs. external JavaScript les
Placing your JavaScript in the HTML le as inline code is generally undesirable because it lim-
its the amount of reuse you can get from the code. Your goal should be to have unobtrusive
JavaScript—good separation of HTML and JavaScript by placing them in separate les.
Is there any benet of using inline versus external les? As the size of the HTML and
JavaScript code increases, you will see a large performance gain by placing JavaScript in
external les because most browsers cache the JavaScript les.
Quick check
You are creating a webpage that will require a lot of JavaScript code. Is it better
to put all the JavaScript in your HTML le or to put it in a separate JavaScript le?
Quick check answer
It is better to place the JavaScript code in a separate JavaScript le because the
JavaScript le will be cached, and it’s best to provide unobtrusive JavaScript.
Placing your script elements
In many of the HTML documents you examine, you will see that the <script> elements are
typically within the <head> element, primarily because that’s where everyone was told to put
them. The <head> element is for things that should not show on the rendered page, right?
From a performance perspective, it’s unproductive to put <script> elements in the <head>
element because the browser will stop parsing, retrieve the JavaScript le, and execute the
JavaScript before continuing to parse the rest of the HTML document. Nothing has been
displayed yet because the parser is in the <head> element and hasn’t reached the <body>
element. The result is that you see an empty browser window while the JavaScript les are
being loaded.
Put JavaScript script tags at the end of the HTML document unless you have a compelling
reason not to do so.
One such reason for placing a <script> element in the <head> element is that you might
have JavaScript that must exist early so the page can render properly. If so, move as little as
possible to the <head> element to minimize the performance cost. Also, place these exter-
nal references after your style sheet references so the browser attempts to load both at the
same time.
Lesson 2: Writing, testing, and debugging JavaScript CHAPTER 3 103
When placing your <script> elements at the bottom of the HTML document, they should be
just before the </body> tag. This guarantees that the document object model (DOM) has
loaded and is visible to the waiting user. This also means that any elements referenced in the
JavaScript will be present on the page.
Using the Visual Studio .NET JavaScript debugger
The best developers are those who know how to run the debugger. You can learn much
about an application by pausing the execution of an application and exploring the application
variables. If you can step through the application while troubleshooting, you can understand
how the program works and nd problems quickly.
Visual Studio 2012 supports debugging JavaScript better than any previous version of
Visual Studio. This section introduces you to JavaScript debugging.
The previous lesson covered nested functions, and the example was a nested function
to calculate the area of a slice of pizza. If you know the formula for this calculation, you can
calculate the area of an 18-inch pizza and divide by 8 because there will be eight pieces per
pizza. The formula is areaPerPiece = (pi x (pizzaRadius) x (pizzaRadius))/piecesPerPizza. To get
the pizzaRadius, divide the pizzaDiameter (18 inches) by 2 to get a pizzaRadius of 9 inches.
Therefore, the formula is (3.141592 * 9 * 9)/8, which equals 31.808619 square inches. The test
should look like the following:
test('Area of Pizza Slice', 1, function(){
equal(areaOfPizzaSlice(18,8), 31.808619, 'Expected 31.808619');
});
When you run the test, it will fail with the message ‘areaOfPizzaSlice’ is undened, so you
add the areaOfPizzaSlice code as follows:
function areaOfPizzaSlice(diameter, slicesPerPizza) {
return areaOfPizza(diameter) / slicesPerPizza;
function areaOfPizza(diameter) {
var radius = diameter / 2;
return 3.141592 * radius * radius;
}
}
Next, run the test. It should pass. You now have some code that you can step through and
debug.
Setting a breakpoint
You can set a breakpoint in your JavaScript by clicking the line of code and pressing F9 or by
clicking Debug and choosing Toggle Breakpoint. If you set a breakpoint on the second line of
the areaOfPizzaSlice function, you should see a burgundy-colored dot to the left of the line,
and all or part of the line will also be burgundy-colored, depending on where your cursor
was when you set the breakpoint. Figure 3-12 shows the code with the breakpoint set. You
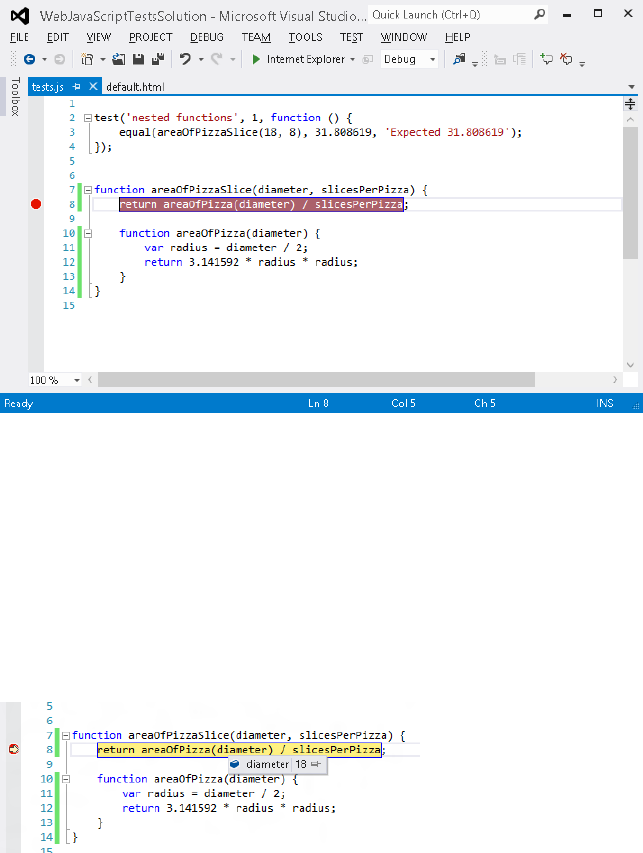
104 CHAPTER 3 Getting started with JavaScript
can also click the gray vertical bar (where the breakpoint is showing in Figure 3-12) to set a
breakpoint.
FIGURE 3-12 Press F9 to set a breakpoint
Now that you have set a breakpoint, if you press F5 (Debug | Start Debugging) to run the
test, you should hit the breakpoint. When you hit the breakpoint, the program pointer is dis-
played in yellow on that line. Now that you’re in break mode, you can examine the variables.
Examining variables
One of the easiest ways to examine variables when in break mode is just to use your mouse
cursor to point to the variable. This causes a ToolTip to display with the variable information,
as shown in Figure 3-13.
FIGURE 3-13 In break mode, pointing to a variable to get its information
In the gure, you can see that the diameter was pointed to, and the tooltip was displayed,
showing its value of 18. If you point to slicesPerPizza, you see a tooltip displaying the value
of 8.
Another way to explore the variables is to view the Locals window, which displays all
variables that are in scope, including the special this variable, which is the current object.
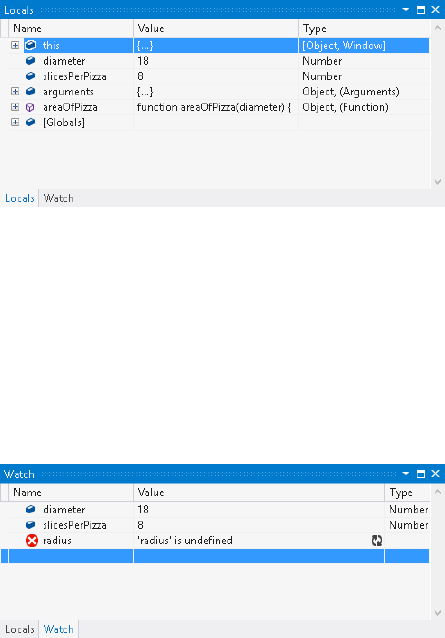
Lesson 2: Writing, testing, and debugging JavaScript CHAPTER 3 105
Normally, when you are in break mode, you see the Locals window on the lower right of the
Visual Studio window. If the Locals window is not visible and you are in break mode, you can
display the Locals window by navigating to Debug | Windows | Locals. You should see the
Locals window, as shown in Figure 3-14.
FIGURE 3-14 The Locals window displaying all variables that are in scope
As a program grows, the Locals window lls with variables that might not interest you, but
you might see several variables you want to keep watching. In Figure 3-14, the Watch tab is
in the lower-left corner. If you click this tab, you see the Watch window. This window enables
you to add the variables that interest you. You can click the empty line, type the name of the
variable, and press Enter, or, in the code window, you can highlight the variable (usually by
double-clicking it) and drag and drop it into the Watch window. Figure 3-15 shows the use of
the Watch window.
FIGURE 3-15 Using the Watch window to add the variables that interest you
Notice in Figure 3-15 that the radius is listed as undened. This is because the program
hasn’t reached the nested function where radius is declared and set.
Stepping through the code
Now that you’re in break mode, you can step through the code by pressing F11 (Debug |
Step Into), F10 (Debug | Step Over), or Shift+F11 (Debug | Step Out). These options are also
on the toolbar. The current line of code returns the area of the pizza slice if you press F10
because stepping over means that you want to execute all the code in the current statement
and then go back to break mode on the next statement.
By pressing F11, you step into the areaOfPizza function. When you’re in the function, press
F11 again to set the radius. You should be able to point to the radius to see that the value
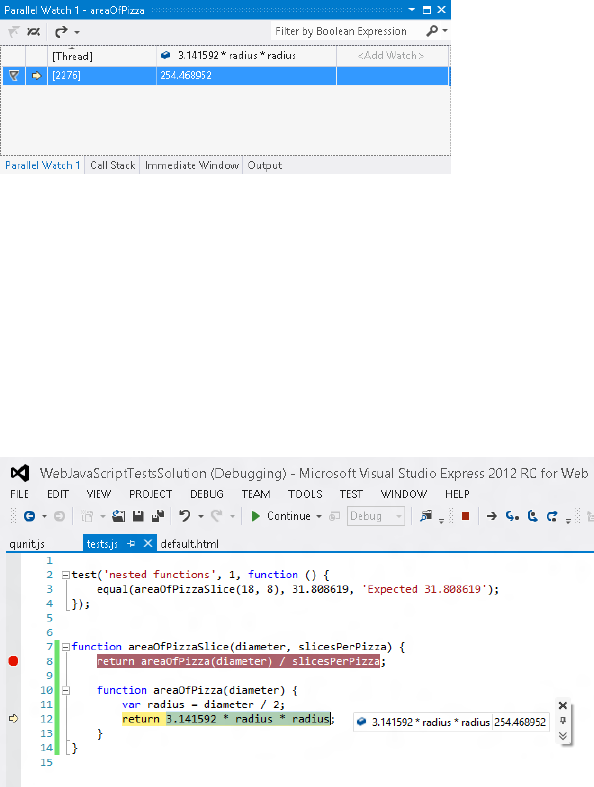
106 CHAPTER 3 Getting started with JavaScript
was set to 9 and, in the Locals window, radius is displaying a value of 9. The color is red, which
indicates that this value has changed since the last time you were in break mode.
If you swipe across 3.141592 * radius * radius and then right-click the selection, you can
add Watch, which adds this expression to the Watch window. You can also add Parallel Watch,
which, in a multithreaded application, displays the Watch expression with its value for each
thread that has a value. Figure 3-16 shows the Parallel Watch window, which is visible after
you add a parallel watch.
FIGURE 3-16 The Parallel Watch window showing the value of the expression for each thread that has a
value
In Figure 3-16, the window is presented as a grid in which the rst row contains the column
headings and each additional row represents a thread with a value. Each expression that’s
added will add another column to the grid.
When right-clicking the expression, you can Pin To Source, which pins a tooltip on the
source window that shows the value of the expression, as shown in Figure 3-17. After pinning,
you can drag the tooltip to anywhere in the code editor, and the value will be at that location
until you click the X in the upper-left corner.
FIGURE 3-17 The Pin To Source option that pins a ToolTip to the code
You can click the chevron symbol (bottom symbol with double v) to add a comment to this
expression, too.
Lesson 2: Writing, testing, and debugging JavaScript CHAPTER 3 107
When you’re ready to run the application at full speed, you can press F5 (Debug |
Continue).
Lesson summary
TDD provides a great way to write code and learn about code.
QUnit can be used to perform TDD with web applications.
QUnit-Metro can be used to perform TDD with Windows 8 applications.
NuGet is an open-source package management system for the .NET platform that
simplies the addition of third-party libraries into your code.
When creating tests, always create a failing test rst, and then add code to make the
test pass.
Always try to keep your JavaScript code separate from your HTML.
For best performance, place the <script> elements at the bottom of the HTML docu-
ment, before the </body> tag.
You can set a breakpoint in your JavaScript by clicking the statement and pressing F9
(Debug | Toggle Breakpoint).
You can step through code by pressing F11 (Debug | Step Into), F10 (Debug | Step
Over), or Shift+F11 (Debug | Step Out).
Lesson review
Answer the following questions to test your knowledge of the information in this lesson. You
can nd the answers to these questions and explanations of why each answer choice is correct
or incorrect in the “Answers” section at the end of this chapter.
1. You are creating a new Windows 8 application, and you want to set up TDD for your
JavaScript code. Which testing framework will you use?
A. QUnit
B. QUnit-Metro
C. Microsoft Test
D. NUnit
2. What are the steps for TDD?
A. Write the passing test, write the code, run the test again to validate that it still
passes.
B. Write the failing test, write the code, run the test again to validate that it passes.
C. Write the code, write the test to validate that it passes, run the test again to vali-
date that it still passes.
D. Write the passing test, write the code, break the code, run the test again to vali-
date that it fails.
108 CHAPTER 3 Getting started with JavaScript
3. Where should your JavaScript code be placed?
A. In the <head> element of your HTML document.
B. Just before the </body> tag.
C. You should always place your JavaScript code in separate les, external to your
HTML document.
D. Inside the <body> element, at the top.
Lesson 3: Working with objects
In this chapter, you’ve seen a lot of JavaScript basics, but some elements haven’t been dis-
cussed. You still need to know how to access existing objects and how to create and use an
array, which is a special JavaScript object. You also need to know how to be notied when
something changes on an object. Creating your own custom objects is covered in Chapter 6,
"Essential JavaScript and jQuery."
This lesson explains arrays, the document object model (DOM), and how you can access
the DOM by using JavaScript. The lesson goes on to describe event notications, which
enable you to subscribe to DOM events.
After this lesson, you will be able to:
Create and modify an array of items.
Navigate the DOM by using JavaScript.
Subscribe to DOM events.
Estimated lesson time: 60 minutes
Working with arrays
An array is a collection object that has a sequence of items you can access and modify. The
array is assigned to a variable, and you can access its items by using its indexer, which is
square brackets ([ ]). Because the collection of items is in one variable, you can easily pass the
array to a function. You can also loop through the items in the array as needed.
Creating and populating an array
There are three ways to create an array. It doesn’t matter which method you choose, although
your choice typically will be based on the array implementation in the program:
Inserting items with the indexer The array is created by using the new keyword,
which creates an instance of the Array object. After the array is created and assigned
to a variable, items are added to the array by using the index number, which is zero-
based. For inserting new items, the index number must be the size of the array.
Key
Terms

Lesson 3: Working with objects CHAPTER 3 109
For example, after the array is created, its size is zero, so zero is used to insert the rst
item. Using this method, items can be added anywhere in the program. Note that if
you use an index number that is higher than the quantity of items that currently exist,
you add empty items to the array. For example, if you currently have only one item
in the array but specify an index number of 2, you will add your item with an index
number of 2, and an empty item will be added at index number 1. The following is an
example of creating the array and adding items:
var pizzaParts = new Array();
pizzaParts[0] = 'pepperoni';
pizzaParts[1] = 'onion';
pizzaParts[2] = 'bacon';
Condensed array The array is created by using the new keyword, which creates an
instance of the Array object, and all items are passed into the Array object’s construc-
tor. The condensed method is convenient, but you need to know all items at the time
you create the array. The following is an example of creating the populated array:
var pizzaParts = new Array('pepperoni', 'onion', 'bacon');
Literal array The array is created by supplying the item list, enclosed in square
brackets. This is very similar to the condensed array; it just requires less typing. The fol-
lowing is an example of the literal array:
var pizzaParts = ['pepperoni', 'onion', 'bacon'];
Accessing the array items
To access the items in the array, use the indexer. Remember that the array is zero-based, and
if you try using a number that’s greater than the quantity of items in the array, a value of
undened is returned. The following example retrieves the onion:
var secondItem = pizzaParts[1];
Modifying the array items
You also use the indexer when you want to modify the items in the array. If you try using a
number that’s greater than the quantity of items in the array, no exception is thrown. Instead,
the item is added to the array, and the array size grows to the number you used plus one. The
following example modies the onion by setting its value to cheese:
pizzaParts[1] = 'cheese';
Understanding array properties
Each piece of data objects can hold is called a property. Some properties are read-only,
whereas others are readable and writeable. The Array object has one property that you’ll use
often, the length property. This property is read-only and returns the quantity of items in
the array. For example, an array with two items returns 2. The length property is useful when
Key
Terms

110 CHAPTER 3 Getting started with JavaScript
looping through the items in the array. The following example code demonstrates the length
property:
for(var i=0; i < pizzaParts.length; i++){
alert(pizzaParts[i]);
}
Using array methods
Objects can have their own functions; each object function is called a method. The Array
object has the following useful methods:
concat Joins two or more arrays and returns a new array with all the items, as shown
in the following example:
var pizzaMeatParts = ['pepperoni', 'ham', 'bacon'];
var pizzaVegetableParts = ['pepper', 'onion'];
var pizzaParts = pizzaMeatParts.concat(pizzaVegetableParts);
indexOf Locates the item in the array and returns its index, as shown in the following
example, in which the baconIndex variable will be set to 2:
var pizzaMeatParts = ['pepperoni', 'ham', 'bacon'];
var baconIndex = pizzaMeatParts.indexOf('bacon');
join Creates a string from the items in the array. The items are comma-delimited by
default, but you can pass an alternate separator. The following assigns a string contain-
ing ‘pepperoni, ham, bacon’ to the meatParts variable:
var pizzaMeatParts = ['pepperoni', 'ham', 'bacon'];
var meatParts = pizzaMeatParts.join();
lastIndexOf Searches from the end of the array for the last item in the array that
meets the search criteria and returns its index, as shown in the following example, in
which the lastHamIndex variable will be set to 3:
var pizzaMeatParts = ['pepperoni', 'ham', 'bacon', 'ham', 'prosciutto'];
var lastHamIndex = pizzaMeatParts.lastIndexOf('ham');
pop Removes and returns the last element of the array. This reduces the length of
the array by one. The following example assigns ‘bacon’ to the lastItem variable:
var pizzaMeatParts = ['pepperoni', 'ham', 'bacon'];
var lastItem = pizzaMeatParts.pop();
push Adds a new item to the end of an array and returns the new length, as shown
in the following example, in which ‘prosciutto’ is added to the end of the array and 4 is
assigned to the newLength variable:
var pizzaMeatParts = ['pepperoni', 'ham', 'bacon'];
var newLength = pizzaMeatParts.push('prosciutto');
Key
Terms
Lesson 3: Working with objects CHAPTER 3 111
reverse Reverses the order of the items in an array and returns a reference (not
a new array) to the reversed array, so the original array is modied. The following
example reverses the order of the array:
var pizzaMeatParts = ['pepperoni', 'ham', 'bacon', 'prosciutto'];
pizzaMeatParts.reverse();
shift Removes and returns the rst item in the array. If no items are in the array, the
return value is undened. The following example removes ‘pepperoni’ from the array
and assigns it to the rstItem variable:
var pizzaMeatParts = ['pepperoni', 'ham', 'bacon'];
var firstItem = pizzaMeatParts.shift();
slice Returns a new array that represents part of the existing array. The slice method
has two parameters: start and end. The start parameter is the index of the rst item to
include in the result. The end parameter is the index of the item that you don’t want
included in the result. In the following example, the mySlice variable will be assigned
‘ham’ and ‘bacon’. Note that ‘meatball’ is not included in the result, and the original
array is not changed:
var pizzaMeatParts = ['pepperoni', 'ham', 'bacon', 'meatball', 'prosciutto'];
var mySlice = pizzaMeatParts.slice(1,3);
sort Sorts the items in an array and returns a reference to the array. The original
array is modied. The following example sorts the array. After sorting, pizzaMeatParts
will contain ‘bacon’, ’ham’, ’meatball’, ’pepperoni’, ’prosciutto’:
var pizzaMeatParts = ['pepperoni', 'ham', 'bacon', 'meatball', 'prosciutto'];
pizzaMeatParts.sort();
splice Adds and removes items from an array and returns the removed items. The
original array is modied to contain the result. The splice method’s rst parameter is
the starting index of where to start adding or deleting. The second parameter indi-
cates how many items to remove. If 0 is passed as the second parameter, no items are
removed. If the second parameter is larger than the quantity of items available for
removal, all items from the starting index to the end of the array are removed. After
the rst two parameters, you can specify as many items as you want to add. The fol-
lowing example removes ‘ham’ and ‘bacon’ from the original array and assigns ‘ham’
and ‘bacon’ to mySlice. In addition, ‘spam’ is inserted in pizzaMeatParts, which results
in pizzaMeatParts containing ‘pepperoni’, ‘spam’, ‘meatball’, ‘prosciutto’:
var pizzaMeatParts = ['pepperoni', 'ham', 'bacon', 'meatball', 'prosciutto'];
var mySlice = pizzaMeatParts.splice(1,2,'spam');
toString All objects have a toString method. For the Array object, toString creates a
string from the items in the array. The items are comma-delimited, but if you want a
112 CHAPTER 3 Getting started with JavaScript
different delimiter, you can use the join method and specify an alternate separator. The
following assigns a string containing ‘pepperoni,ham,bacon’ to the meatParts variable:
var pizzaMeatParts = ['pepperoni', 'ham', 'bacon'];
var meatParts = pizzaMeatParts.toString();
unshift Adds a new item to the beginning of an array and returns the new length, as
shown in the following example, in which ‘prosciutto’ is added to the beginning of the
array and 4 is assigned to the newLength variable:
var pizzaMeatParts = ['pepperoni', 'ham', 'bacon'];
var newLength = pizzaMeatParts.unshift('prosciutto');
valueOf All objects have a valueOf method. For the Array object, valueOf returns the
primitive values of the array as a comma-delimited string, as shown in the following
example, which assigns a string containing ‘pepperoni,ham,bacon’ to the meatParts
variable:
var pizzaMeatParts = ['pepperoni', 'ham', 'bacon'];
var meatParts = pizzaMeatParts.valueOf();
Quick check
You want to retrieve a new array that is part of an existing array. Which array
method should you use?
Quick check answer
Use the slice method.
Accessing DOM objects
When building an application, the primary objects you must access are the objects that make
up the DOM, which represents the HTML document. You need to access the DOM to con-
trol the behavior of your HTML document and to be notied when something happens on
the page.
Navigating the DOM
The DOM represents a hierarchy of objects, forming a model of your HTML document. To
retrieve elements from the DOM, use the built-in document variable, which references the
DOM, and perform one of the search methods.
Some of the search methods return a single element, whereas others return an array of
elements. The methods that return an array return either a live NodeList or a static NodeList.
The live NodeList represents an array of elements that is continuously updated as the DOM
changes, whereas the static NodeList represents a snapshot of elements that doesn’t change
as the DOM changes. From a performance perspective, it takes longer to create the static
Key
Terms
Lesson 3: Working with objects CHAPTER 3 113
NodeList, so consider working with the search methods that return a live NodeList if you want
the best performance. It’s important to understand this difference because it can affect your
choice of search method.
The following is a list of the DOM search methods with a short description and example:
getElementById Returns a reference to the rst object with specied id, as shown in
the following example, which retrieves a reference to the button with the id of btnSave:
var btn = document.getElementById('btnSave');
getElementsByTagName Returns a live NodeList, which is a special array of all ele-
ments with the specied tag name. The live NodeList automatically updates if you add,
delete, or modify elements. The following example returns an array of all images:
var images = document.getElementsByTagName('img');
getElementsByName Returns a live NodeList of all elements with the specied
name. This works well with option buttons when all their options typically have the
same name. The following example retrieves an array of all elements with the name
pizzaSize:
var pizzaSizes = document.getElementsByName('pizzaSize');
getElementsByClass Not supported in Internet Explorer 8 and earlier. Returns a live
NodeList of all elements with the specied CSS class name. CSS classes are examined in
more detail in Chapter 4, “Getting started with CSS3.” This works well when you have
many elements, but you need to group them, possibly to make the elements visible or
hidden. The following example retrieves an array of all elements with the class name
pizzaPart:
var pizzaParts= document.getElementsByClass('pizzaPart');
querySelector Not supported in Internet Explorer 7 and earlier. Accepts a CSS
selector as its parameter. Because CSS is described in detail in Chapter 4, this example
is simplied. The querySelector method returns the rst matched element if one-to-
many exist or null if there is no match. In addition to being supported on the docu-
ment object, the querySelector method exists on the Element object, so you can query
either the entire DOM or just an element’s content. In the following example, the
pound symbol (#) indicates a search for an id. This example returns a reference to the
button whose id is btnSave:
var btn = document.querySelector('#btnSave');
querySelectorAll Not supported on Internet Explorer 7 and earlier. Accepts a CSS
selector as its parameter. Again, because CSS is described in detail in Chapter 4, this
example is simplied. The querySelectorAll method returns a static NodeList of all
elements that match or an empty array if there is no match. In addition to being
supported on the document object, the querySelector method exists on the Element
object, so you can query either the entire DOM or just an element’s content. In the

114 CHAPTER 3 Getting started with JavaScript
following example, the period (.) indicates a search for a CSS class name. This example
returns a reference to the elements whose CSS class name is pizzaPart:
var btn = document.querySelector('.pizzaPart');
Working with events
Events provide the spark to the JavaScript engine. An event takes place at a point in time.
For JavaScript, an event most commonly occurs with user interaction but also occurs when
something changes state, such as a video starting or stopping. For example, the user points to
an image, clicks a button, or tabs from one text box to another. The DOM provides events to
give the developer the ability to subscribe to the event and execute code.
Events are based on the publisher-subscriber design pattern. When an object is created,
the developer of the object can expose, or publish, events related to the object. When the
object is used, the developer can add event handlers for, or subscribe to, the object’s events.
Adding an event handler requires the developer to supply a function that is called when
the event is triggered. When the event is triggered, all the event subscribers are notied by
executing the event handler function.
When an event is triggered, an Event object is passed to the event handler function, which
provides information about the event and what was happening at the time, such as the loca-
tion of the mouse for mouse-related events or the key that was pressed for keyboard events.
Event capturing and event bubbling
If the click event is triggered on a button, and the button is inside a hyperlink, as shown in
Figure 3-18, does the hyperlink automatically trigger a click event? If so, which event is trig-
gered rst (hyperlink click or button click)?
When a child element is nested within a parent element and the child element triggers a
click event, the event is passed down the DOM hierarchy, starting from the document object,
which is denoted in Figure 3-18 as #document. This is called event capturing. After the event
reaches the element that triggered the event, the event is passed back up the hierarchy, which
is called event bubbling. Figure 3-18 shows capturing and bubbling. Passing the event down
and back up the hierarchy gives the developer the opportunity to subscribe on the way down
the DOM (capturing), or on the way up (bubbling). The developer can also cancel the event
propagation.
Refer to Figure 3-18, in which a button is nested within a hyperlink. When the button is
clicked, the capture process takes place where the click event is triggered on the document
object, the html object, the body object, the hyperlink, and, nally, on the button object.
Next, the bubble process takes place where the click event is triggered on the hyperlink
object, the body object, the html object, and, nally, on the document object.
Key
Terms
Key
Terms
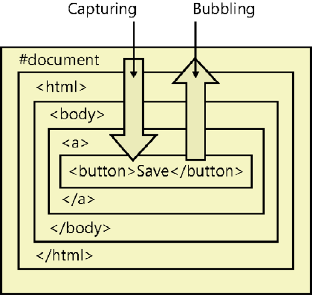
Lesson 3: Working with objects CHAPTER 3 115
FIGURE 3-18 Events captured down and bubbled up the DOM hierarchy
Subscribing to an event
To subscribe to an event, you can use the addEventListener function, which has three param-
eters. The rst parameter is the event to which you want to subscribe. The second parameter
is the function you want to execute when the event is triggered. The third parameter is a
Boolean value to specify when your function will execute, where true indicates to execute on
event capture and false indicates to execute on event bubble. It’s typically preferred to set
this parameter to false. The following is an example of subscribing to the click event of a but-
ton whose id is btnSave when the saveData function is called during the bubbling of the click
event:
var btn = document.getElementById('btnSave');
btn.addEventListener('click', saveData, false);
When you subscribe to an event by calling addEventListener, existing event listeners are
unaffected, meaning that any existing functions that were added will still be executed. In the
previous example, if you execute the second line twice, you add a second call to the saveData
function, and this function will execute twice when you click the button.
The previous example is the preferred way to subscribe to an event because it is the W3C-
specied subscription, and this code would be in your JavaScript le. However, you can also
subscribe to an event by adding an inline subscription to the HTML tag. This is the oldest
way to subscribe to events and is compatible with all browsers. When adding to the HTML
tag, you must add the prex “on” to the event name to create the proper attribute name, as
shown in the following example, which is equivalent to the previous example, in which the
event subscription is added to the bubbling process:
<button id='btnSave' onclick='saveData();' >Save</button>
116 CHAPTER 3 Getting started with JavaScript
A variation of the inline method of subscribing to an event is the traditional subscription,
which enables you to subscribe to an event in your JavaScript code by using the attribute
name, which also adds the event to the bubbling process, as shown in the following example:
var btn = document.getElementById('btnSave');
btn.onclick = saveData;
Unsubscribing from an event
To unsubscribe from an event, use the removeEventListener function, which has the same
three parameters as the addEventListener function. The following is an example of removing
the saveData function from the click event of the button whose id is btnSave:
var btn = document.getElementById('btnSave');
btn.removeEventListener('click', saveData, false);
Canceling event propagation
At any time during the event capture or event bubble process, you might want to stop the
propagation of the event. You might have a global event handler assigned at the document
object on bubbling of the click event and, after you handled the click event specically on a
button, you don’t want the global click event handler to be triggered. To cancel event propa-
gation, use the stopPropagation function on the Event object. The Event object is passed to
your event handler function, as shown in the following example:
var btn = document.getElementById('btnSave');
btn.addEventListener('click', saveData, false);
function saveData(e){
//save the data
e.stopPropagation();
}
In this example, if any capture event handler functions existed, they would still execute.
When the event reaches the button, saveData uses the passed in Event object to call the
stopPropagation function. No bubble event handler functions will execute.
Preventing the default operation
When you click a check box or option button, they have built-in functionality to change their
visual appearance to be selected or cleared. When you click a hyperlink, the built-in function-
ality navigates to the href location. Even if you add a click event for these objects, they still
provide their default behavior. To stop the default behavior, you can call the preventDefault
method on the Event object, as shown in the following example, which stops the navigation
to the href location on the hyperlink:
var hyperlink = document.getElementById('lnkSave');
hyperlink.addEventListener('click', saveData, false);
function saveData(e){
//save the data
e.preventDefault();
}

Lesson 3: Working with objects CHAPTER 3 117
Working with “this”
When working with events, you will frequently want to access the object that caused the
event. In addition, you will want to access the object in a generic way so you can call the same
code from the click event of several buttons.
JavaScript provides the this keyword. The this keyword references the object that caused
the event. More explicitly, the this keyword provides a reference to the owner of the function.
If you assign the function to the click event of a button, the button is the owner of the func-
tion. If you assign the function to another button, that button owns the function when that
button is clicked.
Window event reference
The built-in window variable is an instance of the Window object, which represents the cur-
rent browser window. The Window object has the following events, which can be applied to
the <body> tag by adding the “on” prex:
afterprint Triggered after the document is printed
beforeprint Triggered before the document is printed
beforeonload Triggered before the document loads
blur Triggered when the window loses focus
error Triggered when an error occurs
focus Triggered when the window receives focus
haschange Triggered when the document has changed
load Triggered when the document loads
message Triggered when the message is triggered
ofine Triggered when the document goes ofine
online Triggered when the document comes online
pagehide Triggered when the window is hidden
pageshow Triggered when the window becomes visible
popstate Triggered when the window’s history changes
redo Triggered when the document performs a redo
resize Triggered when the window is resized
storage Triggered when a web storage area is updated
undo Triggered when the document performs an undo
unload Triggered when the user leaves the document
The following is an example of subscribing to a Window event:
window.addEventListener('load', winEvent, false);
function winEvent (e){
alert('Window Load');
}
Key
Terms
118 CHAPTER 3 Getting started with JavaScript
Form event reference
The following events are triggered by actions inside an HTML form. Although these events
apply to all HTML5 elements, they are most common in form elements:
blur Triggered when an element loses focus
change Triggered when an element changes
contextmenu Triggered when a context menu is triggered
focus Triggered when an element receives focus
formchange Triggered when a form changes
forminput Triggered when a form receives user input
input Triggered when an element receives user input
invalid Triggered when an element is invalid
select Triggered when an element is selected
submit Triggered when a form is submitted
The following is an example of subscribing to a form event:
var lastName = document.getElementById('txtLastName');
lastName.addEventListener('focus', gotFocus, false);
function gotFocus (e){
alert('last name has focus');
}
Keyboard event reference
The following events are triggered by the keyboard, and these events apply to all HTML5
elements:
keydown Triggered when a key is pressed
keypress Triggered when a key is pressed and released
keyup Triggered when a key is released
The following is an example of subscribing to a keyboard event. Notice that the keyboard
event object has the which property that contains the char code of the key that was pressed,
and you can convert that to a string as needed:
lastName.addEventListener('keypress', keyGotPressed, false);
function keyGotPressed (e){
var charCode = e.which;
var charStr = String.fromCharCode(charCode);
alert(charStr);
}
Mouse event reference
The following events are triggered by a mouse or similar user actions, and these events apply
to all HTML5 elements:
Lesson 3: Working with objects CHAPTER 3 119
click Triggered on a mouse click
dblclick Triggered on a mouse double-click
drag Triggered when an element is dragged
dragend Triggered at the end of a drag operation
dragenter Triggered when an element has been dragged to a valid drop target
dragleave Triggered when an element leaves a valid drop target
dragover Triggered when an element is being dragged over a valid drop target
dragstart Triggered at the start of a drag operation
drop Triggered when the dragged element is being dropped
mousedown Triggered when a mouse button is pressed
mousemove Triggered when the mouse pointer moves
mouseout Triggered when the mouse pointer moves out of an element
mouseover Triggered when the mouse pointer moves over an element
mouseup Triggered when a mouse button is released
mousewheel Triggered when the mouse wheel is being rotated
scroll Triggered when an element’s scrollbar is being scrolled
The following is an example of subscribing to a mouse event on the lastName text box:
lastName.addEventListener('click', gotClicked, false);
function gotClicked (e){
alert('Got Clicked');
}
Media event reference
The following events are triggered by media such as videos, images, and audio. These events
apply to all HTML5 elements, but are most common in media elements such as <audio>,
<embed>, <img>, <object>, and <video>:
abort Triggered on abort
canplay Triggered when a le is ready to start playing, which is when it has buffered
enough to begin
canplaythrough Triggered when a le can be played all the way to the end without
pausing for buffering
durationchange Triggered when the length of the media changes
emptied Triggered when something bad happens and the le is suddenly unavail-
able, such as when it unexpectedly disconnects
ended Triggered when the media has reached the end, which is a useful event for
messages such as “thanks for listening”
error Triggered when an error occurs while the le is being loaded
120 CHAPTER 3 Getting started with JavaScript
loadeddata Triggered when media data is loaded
loadedmetadata Triggered when metadata (such as dimensions and duration) is
loaded
loadstart Triggered just as the le begins to load before anything is actually loaded
pause Triggered when the media is paused either programmatically or by the user
play Triggered when the media is ready to start playing
playing Triggered when the media actually has started playing
progress Triggered when the browser is in the process of getting the media data
ratechange Triggered each time the playback rate changes, such as when a user
switches to a slow-motion or fast-forward mode
readystatechange Triggered each time the ready state changes when the ready
state tracks the state of the media data
seeked Triggered when the seeking attribute is set to false, indicating that seeking
has ended
seeking Triggered when the seeking attribute is set to true, indicating that seeking is
active
stalled Triggered when the browser is unable to fetch the media data for any reason
suspend Triggered when fetching the media data is stopped before it is completely
loaded for any reason
timeupdate Triggered when the playing position has changed, such as when the
user fast-forwards to a different point in the media
volumechange Triggered each time the volume is changed, which includes setting
the volume to “mute”
waiting Triggered when the media has paused but is expected to resume, such as
when the media pauses to buffer more data
The following is an example of subscribing to a media event on the <video> element:
var video = document.getElementById('video');
video.addEventListener('play', playing, false);
function playing(e) {
alert('Playing');
}
Lesson summary
An array is a collection object that has a sequence of items that you can access and
modify. You can use the indexer to access items in an array. Use the length property on
the array to retrieve the size of the array.
A function that is dened on an object is called a method.

Practice exercises CHAPTER 3 121
The Array object has many methods.
The DOM represents a hierarchy of objects, forming a model of your HTML document.
An event takes place at a point in time.
Events are based on the publisher or subscriber pattern.
To subscribe to an event, you can use the addEventListener function. To cancel event
propagation, use the stopPropagation function on the Event object. To unsubscribe
from an event, use the removeEventListener function. To stop default behavior, call the
preventDefault method on the Event object.
To add an event subscription on an HTML element, add the “on” prex to the event
name to get the name of the attribute you will add to the start tag of the element.
Lesson review
Answer the following questions to test your knowledge of the information in this lesson. You
can nd the answers to these questions and explanations of why each answer choice is correct
or incorrect in the “Answers” section at the end of this chapter.
1. You have two arrays of strings, customers and employees, and you want to combine
them to create a contacts array. Which method would be most suitable for this task?
A. concat
B. join
C. push
D. splice
2. You want to obtain a list of all elements whose tag name is div, and you need to
retrieve this list as quickly as possible. Which function is most appropriate for this task?
A. getElementsByName
B. querySelectorAll
C. getElementsByTagName
D. getElementsByClass
Practice exercises
If you encounter a problem completing any of these exercises, the completed projects can be
installed from the Practice Exercises folder that is provided with the companion content.
Exercise 1: Create a calculator webpage
In this exercise, you practice your JavaScript knowledge by creating a website with a single
webpage that contains a calculator. The webpage itself will be somewhat basic until CSS is
discussed in Chapter 4.
122 CHAPTER 3 Getting started with JavaScript
1. If you haven’t installed Visual Studio Express 2012 for Web, do so now. You can down-
load this from the Microsoft website.
2. Start Visual Studio. Click File and choose New Project. Navigate to Installed | Templates
| Visual Basic or Visual C# | ASP.NET Empty Web Application.
3. Set the name of your application to WebCalculator.
4. Select a location for your applications.
5. Set the solution name to WebCalculatorSolution.
6. Be sure to keep the Create Directory For Solution check box selected.
7. Click OK to create your new project.
When the application is created, you will have an empty project.
8. In the Solution Explorer window, add a home page by right-clicking the project node.
Click Add, and then choose HTML Page. Name the page default.html and click OK.
9. In the Solution Explorer window, right-click the default.html le and choose Set As
Start Page.
10. Open the default.html page and enter Web Calculator into the <title> element.
11. Enter the following HTML into the <body> element to provide a basic user interface
for the calculator:
<input id="txtResult" type="text" readonly="readonly" /><br />
<input id="txtInput" type="text" /><br />
<button id="btn7">7</button>
<button id="btn8">8</button>
<button id="btn9">9</button><br />
<button id="btn4">4</button>
<button id="btn5">5</button>
<button id="btn6">6</button><br />
<button id="btn1">1</button>
<button id="btn2">2</button>
<button id="btn3">3</button><br />
<button id="btnClear">C</button>
<button id="btn0">0</button>
<button id="btnClearEntry">CE</button><br />
<button id="btnPlus">+</button>
<button id="btnMinus">-</button>
12. In the Solution Explorer window, add a JavaScript le for your code by right-
clicking the Scripts folder; click Add and choose JavaScript File. Set name to
CalculatorLibrary . js, and click OK.
13. To see what you have so far, press F5 to start debugging the application. You should
see a white screen with a crude calculator interface, as shown in Figure 3-19.
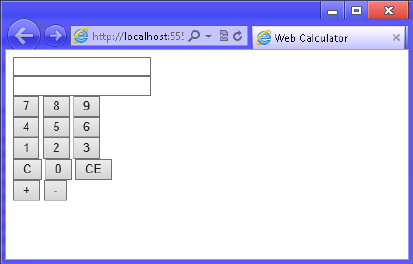
Practice exercises CHAPTER 3 123
FIGURE 3-19 The Web Calculator user interface
14. Switch back to Visual Studio by pressing Alt+Tab. Notice that the title bar says
(Running).
15. Press Shift+F5 to stop debugging. Note that Shift+F5 works only when Visual Studio
has the focus. It does not work when the running application has the focus.
Exercise 2: Add the QUnit testing framework
In this exercise, you continue with the project from Exercise 1 and add the QUnit test frame-
work, which will help you with your JavaScript development for the calculator.
1. Open the project from Exercise 1.
If you didn’t perform Exercise 1, you can use the project located in the Exercise 2 Start
folder.
2. In the Solution Explorer window, add QUnit by right-clicking the WebCalculator node.
Click Manage NuGet Packages, choose Online, and type QUnit in the search box.
Install QUnit for ASP.NET MVC.
3. In the Solution Explorer window, add a JavaScript le for your JavaScript tests by right-
clicking the Scripts folder. Click Add and choose JavaScript File. Set name to tests.js
and click OK.
4. In the Solution Explorer window, add an HTML test page by right-clicking the
WebCalculator project node. Click Add and choose HTML Page. Name the page
CalculatorTests.html and click OK.
5. Add markup in the <head> element of the CalculatorTests.html le that adds refer-
ences to the QUnit.css le, QUnit.js le, CalculatorLibrary.js le, and tests.js le.
6. To complete the QUnit framework setup, add markup in the <body> element for the
QUnit header, banner, toolbar, user agent tests, and xture. Your HTML source should
look like the following:
<!DOCTYPE html>
<html xmlns="http://www.w3.org/1999/xhtml">
<head>
124 CHAPTER 3 Getting started with JavaScript
<title></title>
<link rel="stylesheet" type="text/css" href="Content/qunit.css" />
<script type="text/javascript" src="Scripts/qunit.js"></script>
<script type="text/javascript" src="Scripts/CalculatorLibrary.js"></script>
<script type="text/javascript" src="Scripts/tests.js"></script>
</head>
<body>
<h1 id="qunit-header">QUnit example</h1>
<h2 id="qunit-banner"></h2>
<div id="qunit-testrunner-toolbar"></div>
<h2 id="qunit-userAgent"></h2>
<ol id="qunit-tests"></ol>
<div id="qunit-fixture">
test markup, will be hidden
</div>
</body>
</html>
7. Notice that the <div> element for the QUint xture is a placeholder for HTML markup
that you want to access in your tests, where this markup should not render. Copy the
HTML markup that is in the default.html le and paste it in the QUnit xture.
Your HTML source should now look like the following:
<!DOCTYPE html>
<html xmlns="http://www.w3.org/1999/xhtml">
<head>
<title></title>
<link rel="stylesheet" type="text/css" href="Content/qunit.css" />
<script type="text/javascript" src="Scripts/qunit.js"></script>
<script type="text/javascript" src="Scripts/CalculatorLibrary.js">
</script>
<script type="text/javascript" src="Scripts/tests.js"></script>
</head>
<body>
<h1 id="qunit-header">QUnit example</h1>
<h2 id="qunit-banner"></h2>
<div id="qunit-testrunner-toolbar"></div>
<h2 id="qunit-userAgent"></h2>
<ol id="qunit-tests"></ol>
<div id="qunit-fixture">
test markup, will be hidden
<input id="txtResult" type="text" readonly="readonly" /><br />
<input id="txtInput" type="text" /><br />
<button id="btn7">7</button>
<button id="btn8">8</button>
<button id="btn9">9</button><br />
<button id="btn4">4</button>
<button id="btn5">5</button>
<button id="btn6">6</button><br />
<button id="btn1">1</button>
<button id="btn2">2</button>
<button id="btn3">3</button><br />
<button id="btnClear">C</button>
<button id="btn0">0</button>
Practice exercises CHAPTER 3 125
<button id="btnClearEntry">CE</button><br />
<button id="btnPlus">+</button>
<button id="btnMinus">-</button>
</div>
</body>
</html>
8. Right-click the CalculatorTests.html le and choose Set As Start Page.
It’s time to add the rst test. The goal of the test is to add a 5 in the txtInput text box
when btn5 is clicked. Btn5 is arbitrarily picked, which doesn’t matter because you will
add code to make all the buttons work. The QUnit object has a trigger method event
that can be used to simulate a click on btn5. In the tests.js le, add the following test:
test("Btn5 Click Test", function () {
expect(1);
var btn = document.getElementById('btn5');
QUnit.triggerEvent(btn, "click");
var result = txtInput.value;
var expected = '5';
equal(result, expected, 'Expected value: ' + expected + ' Actual value: ' +
result);
});
In the previous code example, a txtInput variable is being referenced, but the variable
hasn’t been declared.
9. In the CalculatorLibrary.js le, add a statement that declares the variable and an
initialize function that can be called when each test is run but will be called by the
default . html page when it runs the nished code.
10. In the initialize function, add a statement that locates the txtInput text box and assign
the result to the txtInput variable. Your code should look like the following:
var txtInput;
function initialize() {
txtInput = document.getElementById('txtInput');
}
You must modify the tests.js le to call the initialize function as part of a setup function
that will run before each test function. Do this by dening a module at the top of the
tests.
11. Add the following code to the top of the tests.js le:
module('Calculator Test Suite', { setup: function () { initialize(); } });
The rst parameter of the module denition is the name of the module. The second
parameter denes an object that has a setup property. The setup property is assigned
a function expression that calls the initialize function before each test.
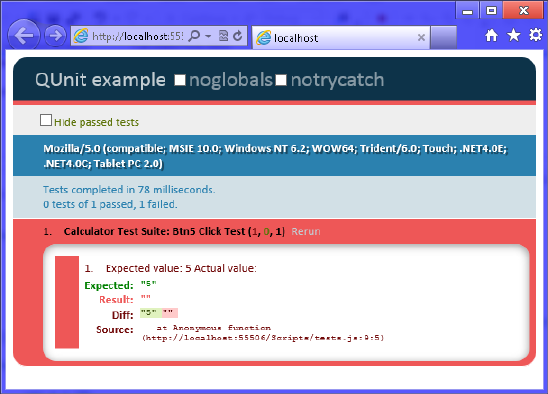
126 CHAPTER 3 Getting started with JavaScript
12. Press F5 to run the test, which should fail, as shown in Figure 3-20, because you don’t
have any code yet. Notice that the failure states that “5” was expected but actual was
“”.
FIGURE 3-20 The failed QUnit test because no code has been added yet
13. In the CalculatorLibrary.js le, add a numberClick function that reads the innerText
(textual content of the element) property of the button that was clicked and appends
the innerText property to the txtInput text box value.
However, if txtInput has a value of zero, you should replace its value with the new value
so you don’t end up with leading zeros in the text box. Your code should look like the
following:
function numberClick() {
txtInput.value = txtInput.value =='0' ?
this.innerText : txtInput.value + this.innerText;
}
14. In the initialize function, add JavaScript code to subscribe to the click event of btn5,
which will call the numberClick function when btn5 is clicked. The code should look like
the following:
document.getElementById('btn5').addEventListener('click', numberClick, false);
15. Press F5 to run the test, which should pass. Click the test to expand it and see the
green indicator, as shown in Figure 3-21.
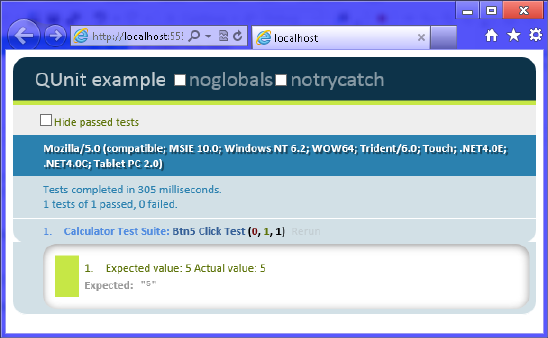
Practice exercises CHAPTER 3 127
FIGURE 3-21 The passing test
16. Modify the test by adding a loop to test all the number buttons. Rename the test to
Button Click Test.
Remember that you are appending to txtInput, so you need to test the last character
to see whether you got the correct result. You should also add another assertion to
the length of the string as you append to txtInput. Don’t forget that you added code
to numberClick to remove leading zeros, and this loop starts by triggering btn0, so
your assertion on the length must take that into account. Your test should look like the
following:
test("Button Click Test", function () {
var buttonQuantity = 10;
expect(buttonQuantity * 2);
for (var i = 0; i < buttonQuantity; i++) {
var btn = document.getElementById('btn' + i);
QUnit.triggerEvent(btn, "click");
var result = txtInput.value[txtInput.value.length-1];
var expected = String(i);
equal(result, expected, 'Expected value: ' + expected +
' Actual value: ' + result);
var expectedLength = i < 2 ? 1 : i;
equal(txtInput.value.length, expectedLength,
'Expected string length: ' + expectedLength +
' Actual value: ' + txtInput.value.length);
}
});
This test sets the buttonQuantity variable to 10, and buttonQuantity calls the expect
function to set the quantity of assertions to expect. There are two assertions per but-
ton. The for loop executes 10 times to obtain a reference to the appropriate button,
trigger the click event, retrieve the result, perform an assertion that checks the last
character of txtInput, and perform an assertion that checks the length of txtInput.
128 CHAPTER 3 Getting started with JavaScript
17. Press F5 to run the test, and all 10 tests will fail. Look closely at each test to understand
why each test failed.
You must add code to subscribe to the click event of the number buttons.
18. Fix the failing tests by adding looping code to the initialize function that subscribes to
the click event of all ten number buttons.
Your code should look like the following:
for (var i = 0; i < 10; i++) {
document.getElementById('btn'+i).addEventListener('click',
numberClick, false);
}
19. Press F5 to run the test, which should pass.
When btnPlus is clicked, the value in txtInput will be added to the value in txtResult.
20. In the tests.js le, add a new test to check btnPlus when it’s clicked.
Your test code should look like the following:
test("Add Test", function () {
expect(1);
txtInput.value = '10';
txtResult.value = '20';
var btnPlus = document.getElementById('btnPlus');
QUnit.triggerEvent(btnPlus, "click");
var expected = '30';
equal(txtResult.value, expected, 'Expected value: ' + expected +
' Actual value: ' + txtResult.value);
});
21. Press F5 to run the test and verify that the test fails because you haven’t subscribed to
the click event of btnPlus.
22. In the initialize function, add code to obtain a reference to the txtResult text box and
assign it to a new global txtResult variable. Add code in the initialize function to sub-
scribe to btnPlus and call the plusClick function. Add the plusClick function with code
to add txtInput to txtResult.
Your code should look like the following:
var txtInput;
var txtResult;
function initialize() {
for (var i = 0; i < 10; i++) {
document.getElementById('btn'+i).addEventListener('click',
numberClick, false);
}
txtInput = document.getElementById('txtInput');
txtResult = document.getElementById('txtResult');
document.getElementById('btnPlus')
.addEventListener('click', plusClick, false);
}
Practice exercises CHAPTER 3 129
function plusClick() {
txtResult.value = Number(txtResult.value) + Number(txtInput.value);
}
23. Press F5 to run the test, which should pass.
When btnMinus is clicked, the value in txtInput will be subtracted from the value in
txtResult.
24. In the tests.js le, add a new test to check btnMinus when it’s clicked.
Your test code should look like the following:
test("Subtract Test", function () {
expect(1);
txtInput.value = '10';
txtResult.value = '20';
var btnMinus = document.getElementById('btnMinus');
QUnit.triggerEvent(btnMinus, "click");
var expected = '10';
equal(txtResult.value, expected, 'Expected value: ' + expected +
' Actual value: ' + txtResult.value);
});
25. Press F5 to run the test and verify that the test fails because you haven’t subscribed to
the click event of btnMinus.
26. In the initialize function, add code to subscribe to btnMinus and call the minusClick
function. Add the minusClick function with code to subtract txtInput from txtResult.
Your code should look like the following:
function initialize() {
for (var i = 0; i < 10; i++) {
document.getElementById('btn'+i).addEventListener('click',
numberClick, false);
}
txtInput = document.getElementById('txtInput');
txtResult = document.getElementById('txtResult');
document.getElementById('btnPlus')
.addEventListener('click', plusClick, false);
document.getElementById('btnMinus')
.addEventListener('click', minusClick, false);
}
function minusClick() {
txtResult.value = Number(txtResult.value) - Number(txtInput.value);
}
27. Press F5 to run the test, which should pass.
When btnClearEntry is clicked, the value in txtInput will be set to zero.
28. In the tests.js le, add a new test to check btnClearEntry when it’s clicked.
Your test code should look like the following:
test("Clear Entry Test", function () {
expect(1);
130 CHAPTER 3 Getting started with JavaScript
txtInput.value = '10';
QUnit.triggerEvent(btnClearEntry, "click");
var expected = '0';
equal(txtInput.value, expected, 'Expected value: ' + expected +
' Actual value: ' + txtInput.value);
});
29. Press F5 to run the test and verify that the test fails because you haven’t subscribed to
the click event of btnClearEntry.
30. In the initialize function, add code to subscribe to btnClearEntry and call the clearEntry
function. Add the clearEntry function with code to reset txtInput to zero.
Your code should look like the following:
function initialize() {
for (var i = 0; i < 10; i++) {
document.getElementById('btn'+i).addEventListener('click', numberClick,
false);
}
txtInput = document.getElementById('txtInput');
txtResult = document.getElementById('txtResult');
document.getElementById('btnPlus')
.addEventListener('click', plusClick, false);
document.getElementById('btnMinus')
.addEventListener('click', minusClick, false);
document.getElementById('btnClearEntry')
.addEventListener('click', clearEntry, false);
}
function clearEntry() {
txtInput.value = '0';
}
31. Press F5 to run the test, which should pass.
When btnClear is clicked, the value in txtInput and txtResult will be set to zero.
32. In the tests.js le, add a new test to check btnClear when it’s clicked.
Your test code should look like the following:
test("Clear Test", function () {
expect(2);
txtInput.value = '10';
txtResult.value = '20';
QUnit.triggerEvent(btnClear, "click");
var expected = '0';
equal(txtInput.value, expected, 'Expected value: ' + expected +
' Actual value: ' + txtInput.value);
equal(txtResult.value, expected, 'Expected value: ' + expected +
' Actual value: ' + txtResult.value);
});
33. Press F5 to run the test and verify that the test fails because you haven’t subscribed to
the click event of btnClear.
Practice exercises CHAPTER 3 131
34. In the initialize function, add code to subscribe to btnClear and call the clear function.
Add the clear function with code to reset txtInput and txtResult to zero.
Your code should look like the following:
function initialize() {
for (var i = 0; i < 10; i++) {
document.getElementById('btn'+i)
.addEventListener('click', numberClick, false);
}
txtInput = document.getElementById('txtInput');
txtResult = document.getElementById('txtResult');
document.getElementById('btnPlus')
.addEventListener('click', plusClick, false);
document.getElementById('btnMinus')
.addEventListener('click', minusClick, false);
document.getElementById('btnClearEntry')
.addEventListener('click', clearEntry, false);
document.getElementById('btnClear')
.addEventListener('click', clear, false);
}
function clear() {
txtInput.value = '0';
txtResult.value = '0';
}
35. Press F5 to run the test, which should pass.
After btnPlus or btnMinus is clicked and the mathematical operation is performed,
txtInput should be reset to zero.
36. In the tests.js le, modify the add test and the subtract test to assert that txtInput was
reset to zero.
Your test code should look like the following:
test("Add Test", function () {
expect(2);
txtInput.value = '10';
txtResult.value = '20';
QUnit.triggerEvent(btnPlus, "click");
var expected = '30';
equal(txtResult.value, expected, 'Expected value: ' + expected +
' Actual value: ' + txtResult.value);
expected = '0';
equal(txtInput.value, expected, 'Expected value: ' + expected +
' Actual value: ' + txtInput.value);
});
test("Subtract Test", function () {
expect(2);
txtInput.value = '10';
txtResult.value = '20';
QUnit.triggerEvent(btnMinus, "click");
132 CHAPTER 3 Getting started with JavaScript
var expected = '10';
equal(txtResult.value, expected, 'Expected value: ' + expected +
' Actual value: ' + txtResult.value);
expected = '0';
equal(txtInput.value, expected, 'Expected value: ' + expected +
' Actual value: ' + txtInput.value);
});
Notice that in these tests, the expect function call is passed a value of two because you
now have two assertions.
37. Press F5 to run the test and verify that the test fails because you haven’t added code to
the plusClick and minusClick functions that will reset txtInput.
38. At the bottom of the plusClick and minusClick functions, call the clearEntry function.
Your code should look like the following:
function plusClick() {
txtResult.value = Number(txtResult.value) + Number(txtInput.value);
clearEntry();
}
function minusClick() {
txtResult.value = Number(txtResult.value) - Number(txtInput.value);
clearEntry();
}
39. Press F5 to run the test, which should pass.
When the application starts, txtInput and txtResult should be initially set to zero.
40. Add a test to the top of tests.js that checks txtInput and txtResult.
Your test code should look like the following:
test("Initialize Test", function () {
expect(2);
txtInput.value = '';
txtResult.value = '';
var expected = '0';
equal(txtInput.value, expected, 'Expected value: ' + expected +
' Actual value: ' + txtInput.value);
equal(txtResult.value, expected, 'Expected value: ' + expected +
' Actual value: ' + txtResult.value);
});
41. Press F5 to run the test and verify that the test fails because you haven’t added code to
the initialize function to initialize txtInput and txtResult.
42. At the bottom of the initialize function, add a call to the clear function to initialize
txtInput and txtResult.
Your code should look like the following:
function initialize() {
for (var i = 0; i < 10; i++) {

Suggested practice exercises CHAPTER 3 133
document.getElementById('btn'+i)
.addEventListener('click', numberClick, false);
}
txtInput = document.getElementById('txtInput');
txtResult = document.getElementById('txtResult');
document.getElementById('btnPlus')
.addEventListener('click', plusClick, false);
document.getElementById('btnMinus')
.addEventListener('click', minusClick, false);
document.getElementById('btnClearEntry')
.addEventListener('click', clearEntry, false);
document.getElementById('btnClear').addEventListener('click', clear, false);
clear();
}
43. Press F5 to run the test, which should pass.
Now that all tests pass, you are almost ready to run the application, but you need to
add code to the default.html le to call the initialize function when the page is loaded.
44. Open the default.html le and add the following inline script block to the bottom of
the <body> element:
<script type="text/javascript">
window.addEventListener('load', initialize, false);
</script>
45. In the Solution Explorer window, set the default.html le as the startup le by right-
clicking the default.html le. Click Set As Start Page.
46. Press F5 to start debugging. Try clicking the number buttons to enter a number and
try the plus and minus buttons, while observing the results. Try clicking the clear entry
button after you enter a number. Try clicking the clear button to see the input and
result clear.
Suggested practice exercises
The following additional exercises are designed to give you more opportunities to practice
what you’ve learned and to help you successfully master the lessons presented in this chapter.
Exercise 1 Learn more about objects and events by adding more functionality to the
calculator. You might consider adding multiplication and division.
Exercise 2 Learn more about QUnit and TDD by adding more tests, and then add the
code to make the tests pass.
Exercise 3 Learn more about event bubbling by adding a <div> element that
encompasses the buttons, and then add a click event to the <div> element so that all
click events bubble to the <div> element.

134 CHAPTER 3 Getting started with JavaScript
Answers
This section contains the answers to the lesson review questions in this chapter.
Lesson 1
1. Correct answer: C
A. Incorrect: The undened value means that the variable has never been initialized.
B. Incorrect: The null value means that the variable was explicitly set to have no
value.
C. Correct: When performing a mathematical operation on a nonnumeric value, NaN
(not a number) will result.
D. Incorrect: The Innity value will result when your value exceeds
1.7976931348623157E + 10308.
2. Correct answers: B, C, D, and F
A. Incorrect: You cannot use a JavaScript keyword for a variable name, and switch is a
JavaScript keyword.
B. Correct: The myChar variable name is valid.
C. Correct: JavaScript allows a variable name to contain the dollar sign, so the $cost
variable name is valid.
D. Correct: JavaScript allows a variable name to contain the underscore, so the _total
variable name is valid.
E. Incorrect: Variable names cannot begin with a number.
F. Correct: Variable names can contain numbers but cannot begin with a number.
3. Correct answer: B
A. Incorrect: The use of ?? causes a syntax error.
B. Correct: The use of || causes Valid User to be displayed if userName has no value.
C. Incorrect: The use of && displays nothing if userName has no value.
D. Incorrect: The use of + causes Valid User to be displayed if userName has no value,
but it also displays the userName and Valid User together when the userName has
a value.
Lesson 2
1. Correct answer: B
A. Incorrect: QUnit is for testing JavaScript for the web, not Windows 8.
B. Correct: QUnit-Metro is a variation of QUint, which supports Windows 8.

Answers CHAPTER 3 135
C. Incorrect: Microsoft Test does not support JavaScript.
D. Incorrect: NUnit does not support JavaScript.
2. Correct answer: B
A. Incorrect: You need to write a failing test rst so you can see the test pass after
you write the code.
B. Correct: You write a failing test and then write code that makes the test pass; then
run the test again to validate that it passes.
C. Incorrect: You should never write code without rst writing a test that fails.
D. Incorrect: If you write a passing test rst, the code cannot be tested for success.
3. Correct answer: C
A. Incorrect: Placing your JavaScript code in the <head> element does not promote
reuse, and inline code might reference elements that are not yet loaded.
B. Incorrect: Placing your JavaScript code in the </body> tag does not promote
reuse.
C. Correct: Placing your JavaScript code in separate les, external to your HTML
document, promotes reuse.
D. Incorrect: Placing your JavaScript code in the <body> element does not promote
reuse, and inline code might reference elements that are not yet loaded.
Lesson 3
1. Correct answer: A
A. Correct: Concat concatenates multiple arrays and produces a resultant array.
B. Incorrect: Join creates a string from the items in the array.
C. Incorrect: Push adds a single item to the end of the array.
D. Incorrect: Splice adds and removes items from an array and produces a resultant
array, but you must add the items one by one, not as an array.
2. Correct answer: C
A. Incorrect: getElementsByName retrieves a live NodeList of elements based on the
element’s name attribute, not on the tag name.
B. Incorrect: querySelectorAll is capable of retrieving the elements by tag name, but
returns a static NodeList, which does not perform as well as functions that return a
live NodeList.
C. Correct: getElementsByTagName retrieves a live NodeList of elements based on
the element’s tag name.
D. Incorrect: getElementsByClass retrieves a live NodeList of elements based on the
CSS class name.


137
CHAPTER 4
Getting started with CSS3
You’ve learned that HTML provides the structure, and JavaScript provides the behavior to
your HTML document. In this chapter, you learn how Cascading Style Sheets (CSS) pro-
vide the presentation to your HTML document. CSS provides the tool to design and create a
great-looking web or Windows 8 application with reusability across all pages.
CSS offers far more choices for rendering a document than are available if you just use
HTML to provide formatting, and CSS is compact and fast. CSS also simplies site updates,
so you can modify the styles to change the look completely of all HTML documents in your
web or Windows 8 application.
This chapter introduces CSS history briey and then discusses CSS selectors and proper-
ties in depth.
Lessons in this chapter:
Lesson 1: Introducing CSS3 137
Lesson 2: Understanding selectors, specicity, and cascading 145
Lesson 3: Working with CSS properties 165
Before you begin
To complete this chapter, you must have some understanding of web development. This
chapter requires the hardware and software listed in the “System requirements” section in
the book’s Introduction.
Lesson 1: Introducing CSS3
The principle of Cascading Style Sheets (CSS) has roots in Standardized Generalized Markup
Language (SGML) from the 1980s. Its goals are to create a consistent look across many web-
pages and to separate structure from presentation so you can provide different style sheets
for printing, browsing, or other scenarios.
The World Wide Web Consortium (W3C) published CSS Level 1 recommendations in
December 1996, and then started working on CSS Level 2. (The word recommendation
means a formal release of the publication.) In May 1998, CSS Level 2 was published, and

138 CHAPTER 4 Getting started with CSS3
the W3C started working on various modules of CSS Level 3 (CSS3). Rather than creating one
large publication for CSS3, the W3C separated CSS3 into modules that could be published
independently.
In 2005, the W3C became stricter with enforcement of the requirements for standards, and
already-published standards such as CSS Level 2 Revision 1 (CSS 2.1), CSS3 Selectors, and CSS3
Text were pulled back from Candidate Recommendation to Working Draft level. It wasn’t until
June 2011 that the CSS 2.1 recommendation was published.
Because CSS3 is modular, the stability of each module differs, and its status differs. More
than 50 modules are published from the W3C’s CSS Working Group. At the time of this writ-
ing, the following four modules have reached recommendation status.
Media Queries Adapts the rendering of HTML documents based on conditions such
as screen resolution and orientation to accommodate different devices such as smart
phones and tablets.
Namespaces XML-based formats that can use namespaces to distinguish multiple
uses of the same element name from one another within the same document. This
publication explains how CSS selectors can be extended to select those elements
based on their namespace and on their local name.
Selectors Level 3 Describes the element selectors used in CSS when selectors are
used to select elements in an HTML or XML document to attach style properties.
Color Species the color-related aspects of CSS, including transparency and the vari-
ous representations of the <color> value type.
CSS 2.1 is included in CSS3 because CSS3 is being designed to be backward compatible
with the CSS 2.1 recommendation. This chapter introduces you to CSS3 by covering many
aspects of CSS 2.1.
Cascading style sheets provide a means to apply a presentation to an HTML structure by
dening how HTML elements are displayed. By using CSS, you can set background and fore-
ground colors, margins, borders, fonts, positions, and much more. You have creative control
of the HTML elements, so you can decide what the elements look like and where they display
on the screen.
If you have worked with a word processing application such as Microsoft Word, you might
have applied a style to change the font size of a word or paragraph. This is similar to CSS, in
which you can apply a style to an element that causes it to render differently. A style is a rule
that describes how to format a specic part of an HTML document. A style sheet is a set of
style rules.
You can create a style and apply it to many elements based on a selector. You use a
selector to locate and select elements based on tag name, class name, ID, and more. You can
create a style that works with images, and you can create a style that works only with hyper-
links. You can also create a named style that you can apply to any element. The reusability is
powerful.
Key
Terms
Key
Terms

Lesson 1: Introducing CSS3 CHAPTER 4 139
Probably the most powerful feature of CSS is cascading. To understand cascading, think
about the browser’s role in resolving the effective style of an element. The browser could
be reading multiple style sheets for an HTML page, in which each style sheet could have
style rules that affect the effective style of the element. As each style is read, it modies the
effective style of the element. Style settings that were applied from one style sheet can be
overwritten by styles that are subsequently evaluated. The effective style cascades from one
style sheet to the next style sheet, possibly being overwritten along the way. Cascading is
explained in more detail in Lesson 2, “Understanding selectors, specicity, and cascading.”
Dening and applying a style
A style rule, or style, is composed of two parts: the selector, which locates the elements in the
HTML document that will be styled, and the declaration block, which contains the formatting
instructions (declarations). Multiple declarations are always separated with a semicolon. A
declaration comprises a CSS property, followed by a colon, followed by a value. The following
is an example of a style rule that locates the <body> element and sets the background color
to white and the font color to gray.
body {
background-color: white;
color: gray;
}
In this example, the selector is body and the declaration block is contained within the curly
braces. There are two declarations, each terminated with a semicolon. The rst declaration
species the CSS background-color property followed by a colon separator and the property
value of white.
Selectors can be much more complex, and declaration blocks can contain many more
declarations, as you see later in this chapter.
Adding comments within a style sheet
You can add comments within a style sheet by using the /* characters to start the comment
and the */ characters to end the comment. Comments may also span multiple lines, as shown
in the following example.
/* This is the style
for the body element */
body {
background-color: white; /* The rgb value is #ffffff */
color: gray; /* This is the font color */
}
Key
Terms
Key
Terms

140 CHAPTER 4 Getting started with CSS3
Creating an inline style
All elements have a global attribute called style that can be used to provide an inline style.
Because an inline style is dened on the element to which you wish to add styling, you don’t
need a selector; you just need to specify the declaration block. The following is an example of
an inline style on the <body> element that sets the background color to white and the font
color to gray.
<body style='background-color: white; color: gray;'>
</body>
In this example, you don’t need an external style sheet because you dened the style on
the actual <body> element. You should try to avoid this technique; it violates the primary
goal of separation between structure and presentation and doesn’t create any reusability
because you will need to copy this style to each HTML document you add to your application.
An advantage of using an inline style is that it always overrides styles that are dened else-
where because the inline styles are specic to the element on which the inline style is dened.
This specicity can solve isolated problems when a style is applied globally in an external style
sheet, but one element needs to be styled differently. Even then, it’s preferable to maintain
separation of structure and presentation, so you should avoid this approach.
Creating an embedded style
Instead of creating inline styles by using the global style attribute, you can use the <style>
element to create an embedded style sheet within your HTML document. You must use CSS
selectors to assign the style denitions to elements on the page. The following is an example
of an embedded style sheet with a style rule that locates the <body> element and sets the
background color to white and the font color to gray.
<!DOCTYPE html>
<html xmlns='http://www.w3.org/1999/xhtml'>
<head>
<title></title>
<style>
body {
background-color: white;
color: gray;
}
</style>
</head>
<body>
</body>
</html>
Notice that the embedded style is located within the <head> element. Within the <style>
element, you can add as many style rules as you need. As a rule, you should not use this
technique, however. Although this technique separates the structure of the body of the HTML
document from the style, it does not provide le separation. It provides reuse within the les,
Key
Terms
Lesson 1: Introducing CSS3 CHAPTER 4 141
but it does not promote reuse across HTML documents. You might use this approach when
you want to have a single, stand-alone HTML document that contains everything needed
to render.
Creating an external style sheet
Instead of creating the same embedded styles in every HTML document, the best approach is
to create an external style sheet le that you can link to all your pages. You can use the <link>
element, as shown in the following example.
<!DOCTYPE html>
<html xmlns='http://www.w3.org/1999/xhtml'>
<head>
<title></title>
<link rel='stylesheet' type='text/css' href='Content/default.css' />
</head>
<body>
</body>
</html>
In this example, the <link> element contains the rel attribute, which species the rela-
tionship between the current HTML document and the external le as a style sheet. The
type attribute species the MIME type of the external le as a text-based cascading style
sheet. The href attribute species the relative location of the external CSS le, which is the
default. css le located in the Content folder. If you want a style rule that locates the <body>
element and sets the background color to white and the font color to gray, you would open
the default.css le and add the following.
body {
background-color: white;
color: gray;
}
A style sheet le can have as many style rules as you need. Using an external style sheet
is considered the best way to implement your styles. You can also link many external style
sheets to an HTML document. For example, your company might create a corporate style
sheet that it expects to be used on all websites that are exposed to the public. In addition to
using the corporate style sheet, you might also create your own style sheet to address specic
needs that your department is working on. In your webpages, you can add a <link> element
for each style sheet.
Using media to specify the target device
The <link> element also has a media attribute that can specify the target device. By using the
media attribute, you can create a CSS le for each device type and link all the CSS les into
your HTML documents. When the HTML document is rendered, the browser determines the
media type and uses the appropriate CSS le. The browser can select only one media type for

142 CHAPTER 4 Getting started with CSS3
the rendering of an HTML document. The following is a list of the media types that are avail-
able for use.
all Renders to all devices
braille Renders to braille tactile feedback devices
embossed Renders to paged braille printers
handheld Renders to handheld devices that typically have small, low-resolution
screens and limited bandwidth
print Renders paged material and documents viewed on screen in print preview
mode
screen Renders to color computer screens
speech Renders to speech synthesizers
tty Renders to media, using a xed-pitch character grid such as teletypes, terminals,
and portable devices with limited display capabilities
tv Renders to television-type devices that typically have low-resolution color screens
with limited ability to scroll and have sound
The following is an example of an HTML document that contains <link> elements for
screen styles and print styles.
<!DOCTYPE html>
<html xmlns='http://www.w3.org/1999/xhtml'>
<head>
<title></title>
<link rel='stylesheet' type='text/css' href='Content/screen.css' media='screen' />
<link rel='stylesheet' type='text/css' href='Content/printer.css' media='print' />
</head>
<body>
</body>
</html>
You can specify a CSS le as being applicable to multiple device types by comma separat-
ing each device type within the quotes.
Quick check
You want to provide a separate style sheet le for styles that are to be used when
a webpage is rendered to the printer. Which media attribute setting should be
set with the <link> element?
Quick check answer
media = ‘print’
Lesson 1: Introducing CSS3 CHAPTER 4 143
Specifying the character encoding of the style sheet
To specify the character encoding of the style sheet text, use the @charset rule at the top of
your style sheet. To be compatible with all browsers, be sure to place this on the rst line of
your CSS le. The following is an example of a CSS le that sets the character set to UTF-8,
which is the most common character set that is usable with Unicode characters.
@charset 'UTF-8';
body {
background-color: white;
color: gray;
}
Note that if your HTML document has a <meta> element that describes the character set
of the HTML document, that setting overrides the @charset setting in the CSS le. The follow-
ing is an example of using the <meta> element in an HTML document.
<html xmlns="http://www.w3.org/1999/xhtml">
<head>
<title></title>
<meta http-equiv='Content-Type' content='text/html;charset=UTF-8' >
<link rel='stylesheet' type='text/css' href='Content/default.css' />
</head>
<body>
</body>
</html>
If all your HTML documents specify the <meta> element with the @charset setting, you
don’t need the @charset rule in the CSS le. If the CSS le will be shared and you want to
ensure that the style sheet character set is correct, you should specify the @charset rule.
Imported style sheets from other style sheets
As your style sheet grows, you will want to break it into smaller, more manageable les. The
@import rule enables you to import a CSS le to the current style sheet. You can specify as
many @import rules as you need, but the @import rules must be at the top of your style
sheet, before any other content except the @charset rule. If you even have a comment above
the @import rules, they will not work properly.
The following is an example of creating a main style sheet le that combines several other
style sheet les.
@charset 'UTF-8';
@import url('/Content/header.css');
@import url('/Content/menu.css');
@import url('/Content/sidebar.css');
@import url('/Content/mainContent.css');
@import url('/Content/footer.css');
body {
background-color: white;
color: gray;
}

144 CHAPTER 4 Getting started with CSS3
You can still have content in the CSS le, as shown in the example, but it must follow the
@import rules. You can also specify the media type for each @import rule, as shown in the
following example that species screen and print types.
@charset 'UTF-8';
@import url('/Content/header.css'); screen
@import url('/Content/menu.css'); screen
@import url('/Content/sidebar.css'); screen
@import url('/Content/mainContent.css');
@import url('/Content/footer.css'); print
body {
background-color: white;
color: gray;
}
Notice that the @import rule for the mainContent.css le is missing the media type, which
means that the default media type of all is applicable, and this CSS le will be used for the
screen and the printer.
Using @font-face rule to import fonts
You might want to use a specic font, but you know that many users will not have that font
on their computer. To solve this problem, you can provide a link to the font so it can be
downloaded and used in your style sheet. The following is an example of specifying the
@ font-face rule to dene the myFont font, which will be loaded from a le on the current
website, Fancy_Light.ttf or Fancy_Light.eot.
@font-face {
font-family: myFont;
src: url('Fancy_Light.ttf'),
url('Fancy_Light.eot'); /* IE9 */
}
Starting with Internet Explorer 9, support was added for Embedded Open Type (.eot) les
only, which Microsoft developed for web use. These font les can be created from exist-
ing TrueType font les by using the Microsoft Web Embedding Fonts Tool (WEFT). Firefox,
Chrome, Safari, and Opera support True Type Files (.ttf) les, so you must specify both le
types to be compatible with most browsers.
NOTE FONT LICENSING
Fonts are intellectual property, just like software, music, and video. Be sure to have the
proper license to use any font with the @font-face rule.
Lesson summary
A style rule, or style, is composed of two parts: the selector and the declaration block.
The selector locates the elements in the HTML document to be styled.

Lesson 2: Understanding selectors, specicity, and cascading CHAPTER 4 145
The declaration block contains the formatting instructions (declarations).
Styles can be inline, embedded, or external.
To maintain separation between structure and presentation, use external style sheets.
Use the media attribute of the <link> element to specify the target device for a
style sheet.
Lesson review
Answer the following questions to test your knowledge of the information in this lesson. You
can nd the answers to these questions and explanations of why each answer choice is correct
or incorrect in the “Answers” section at the end of this chapter.
1. You want to add a comment to your style sheet that says “temporary.” Which is the
proper line to add to the CSS le?
A. //temporary
B. --temporary
C. /* temporary */
D. rem temporary
2. You want to maintain separation between structure and presentation. How do you
create your style rules?
A. Use inline styles.
B. Use embedded styles.
C. Use external style sheets.
D. In the HTML document, specify @import to load style sheets.
3. You want your printer.css style sheet to target printers. How would you set up the style
sheet link?
A. <link rel=’printer’ type=’text/css’ href=’Content/printer.css’ />
B. <link rel=’stylesheet’ type=’text/css’ href=’Content/printer.css’ media=’print’ />
C. <link rel=’stylesheet’ type=’text/css’ href=’Content/printer.css’ />
D. <link rel=’stylesheet’ type=’text/css’ href=’Content/printer.css’ target=’print’ />
Lesson 2: Understanding selectors, specicity, and
cascading
This lesson covers the most important parts of CSS, starting with selectors, which connect
the style rule to your HTML. This lesson then discusses some of the ways you can end up with
multiple style rules for the same HTML and how to determine which selector is most specic.
Finally, this lesson discusses the meaning and value of cascading.

146 CHAPTER 4 Getting started with CSS3
Dening selectors
When dening a selector, you can create element selectors, id selectors, and class selec-
tors. This section examines these common selector types and many of the common selector
variations.
Creating an element type selector
An element type selector is based on the name of the tag. In the previous example, the tag
name (body) is the selector. There is only one <body> element in an HTML document, but
what would happen if the selector were set to button, as shown in the following example?
button {
background-color: white;
color: gray;
}
If your HTML document contains 50 buttons, the style of all 50 buttons would be set. This
is desirable in some scenarios, but in other scenarios, you might have wanted to set the style
on a single button or a subset of buttons.
Creating an id selector
An id selector is based on the id of the element. To set the style on a single button, you can
assign an id to the button and then specify the id as the selector, prexed with the hash (#)
symbol. The following example sets the style on an element whose id is btnSave.
#btnSave {
background-color: white;
color: gray;
}
In this example, it doesn’t matter which type of element is being accessed; all that matters
is that the id is btnSave. Because the id must be unique across the HTML document, using
this approach to set a style limits the reusability on a page, but across webpages, this sets the
style of any element whose id is btnSave.
Creating a class selector
A class selector is a style with a class name of your choice, prexed with the period (.) symbol.
This is also called a named style. The class name can be assigned to any element through the
class attribute. In the following example, a style is created with a class name of myStyle.
.myStyle {
background-color: white;
color: gray;
}
Key
Terms
Key
Terms
Key
Terms

Lesson 2: Understanding selectors, specicity, and cascading CHAPTER 4 147
This style won’t apply to any elements until you specify the class name by using the class
attribute, as shown in the following example.
<!DOCTYPE html>
<html xmlns='http://www.w3.org/1999/xhtml'>
<head>
<title></title>
<link rel='stylesheet' type='text/css' href='Content/default.css' />
</head>
<body>
<input id='txtName' name='txtName' type='text' class='myStyle' />
<button id='btnOk' class='myStyle'>Ok</button>
<button id='btnSave'>Save</button>
<button id='btnCancel' class='myStyle'>Cancel</button>
</body>
</html>
In this example, the class attribute species the myStyle style on the text box and two
of the buttons. Named styles promote reuse because they can be used on any element as
needed.
Using the universal selector
If you want to apply a style to every element, you can use the asterisk (*) symbol. The follow-
ing example applies the style to every element in the HTML document.
* {
background-color: white;
color: gray;
}
You should avoid using the universal selector because of the performance cost.
Using descendant selectors
You might want to change the style of elements only if the elements are descendants of
another element. For example, you might want to remove the underline from hyperlinks if
they are presented in a list item. This can be done by specifying a selector chain, which is a
group of selectors that specify a path to the elements that interest you. The selector chain
species an ancestor element, followed by a space, and then species the descendant ele-
ment, as shown in the following example.
li a {
text-decoration: none;
}
This example removes the underline from every hyperlink that is a descendant of a list
item, regardless of whether the hyperlink is a child, grandchild, or distant descendant. You
can specify a selector chain with many descendant levels to provide a path to the elements
you wish to style. The following demonstrates multiple descendant levels; the underline is
Key
Terms

148 CHAPTER 4 Getting started with CSS3
removed from a hyperlink if it has an ancestor that is a list item, the list item has an ancestor
that is an ordered list, and the ordered list has an ancestor that is a division.
div ol li a {
text-decoration: none;
}
In large HTML documents, using descendant selectors can cause performance problems
due to the amount of searching required. Try to implement a selector that is more specic,
such as the child selector that’s discussed next.
Using child selectors
You might want to change the style of elements only if the elements are direct children of
another element. For example, you might want to remove the underline from hyperlinks if
they are children of a list item. You can do this by specifying a parent element, followed by
a greater-than symbol (>), and then specifying the child element, as shown in the following
example.
li > a {
text-decoration: none;
}
This example removes the underline from hyperlinks that are children of a list item, but it
will not remove the underline of grandchildren or distant descendants. You can specify many
child levels to provide a path to the element you wish to style. The following demonstrates
multiple child levels; the underline is removed from a hyperlink if it has a parent that is a list
item, the list item has a parent that is an ordered list, and the ordered list has a parent that is
a division.
div > ol > li > a {
text-decoration: none;
}
Using pseudo-class and pseudo-element selectors
Styles are generally attached to an element based on locating the element in the document
object model (DOM) tree. Although this usually works ne, sometimes you want to apply a
style to something more granular than an element. How do you assign a style to the rst line
of a paragraph? How do you assign a style to a hyperlink that has been visited?
To access information that is either outside the DOM tree or difcult to access in the DOM
tree, you can use pseudo classes and pseudo elements.
Pseudo classes classify elements based on something other than name, attributes, or
content and, usually, something that cannot be deduced from the DOM tree. Exceptions to
the rule are :rst-child, which can be deduced from the DOM tree, and :lang(), which can
sometimes be deduced from the DOM tree. You can use the pseudo classes anywhere in your
selector chain to help you locate elements when the identied state is true. You can also use
Key
Terms
Lesson 2: Understanding selectors, specicity, and cascading CHAPTER 4 149
pseudo classes at the end of the selector chain to set the style of the element when the iden-
tied state is true. The following is a list of pseudo classes.
:link Denotes an unvisited link where a:link selects all unvisited links.
:visited Denotes visited links where a:visited selects all visited links.
:active Denotes an active link when active means that the mouse button is pressed
down and a:active selects all active links.
:hover Denotes a link the mouse cursor is over when a:hover selects the link the
mouse is over.
:focus Denotes an element that has focus when input:focus selects the input that has
focus.
:checked Denotes an option button or check box element whose checked attribute is
set, where input[type=’checkbox’]:checked selects all check boxes that are selected.
:lang(language) Denotes an element whose lang attribute is set to language when
p:lang(en) selects all paragraphs and the lang attribute starts with en.
:not Provides negation when div:not(“#mainContainer”) selects all <div> elements
except the <div> element whose id is mainContainer.
:nth-child(formula) Selects the nth child of a parent if the formula is an integer
value. For example, li:nthchild(3) selects the third list item. Note that the number is
one-based, not zero-based. This pseudo class is powerful.
You can provide a formula based on an + b when a is cycle count and n is a counter
variable, and b represents the element within the cycle that you want to select. For
example, li:nthchild(10n + 3) selects the third element of every 10 elements, so if a
<ul> element contains 45 <li> elements, elements 3, 13, 23, 33, and 43 will be selected.
You can also use the keywords odd and even to select odd and even child elements.
For example, li:nth-child(odd) selects elements 1, 3, 5, 7, and so on.
:nth-last-child(n) Selects the nth child of a parent if the formula is an integer value.
For example, li:nth-last-child(3) selects the third list item from the end of the list. Note
that the number is one-based, not zero-based.
:only-child Selects elements that are the only child of the parent.
:only-of-type Selects elements that are the only child of the parent and have the
specied type.
:rst-of-type Selects the rst element of the specied type.
Pseudo elements are abstractions of the document tree that provide access to information
that is not directly available in the DOM tree. You cannot group pseudo elements in the same
selector as you can, for example, pseudo classes, in which you might combine a:hover and
a:active as a:hover:active. You cannot use pseudo elements in inline styles. You cannot use
pseudo elements in the selector chain to help you nd other elements such as descendants.

150 CHAPTER 4 Getting started with CSS3
You can use pseudo elements only at the end of the selector chain to set the style of the
pseudo element. The following is a list of pseudo elements.
::rst-line Selects the rst line where p::rst-line selects the rst line of each para-
graph. You can apply a different style to the rst line of a paragraph.
::rst-letter Selects the rst letter where p::rst-letter selects the rst letter of each
paragraph. You can apply a different style to the rst letter of a paragraph. This option
is useful when you want to create a large rst letter.
::before Inserts generated textual content inside the element where
p::before{ content: “Note: “; } inserts “Note: “ into each paragraph directly before the
existing content. In addition to adding the textual content, you can provide a style
for the content when p::before{ content: “Note: “; color: red;} sets the color of “Note: ”
to red.
::after Inserts generated textual content inside each element when p::after{ content:
“Done!“; } inserts “Done!” into each paragraph directly after the existing content. In
addition to adding the textual content, you can provide a style for the textual content
when p::after{ content: “Done!”; color: red;} sets the color of “Done!” to red.
NOTE ONE OR TWO COLONS BEFORE PSEUDO ELEMENTS
CSS3 recommends one colon (:) before pseudo classes and two colons (::) before pseudo
elements as a way to tell the difference between the two. CSS3 also allows one-colon usage
on existing rules to be backward compatible with existing browsers, so most people will
continue to use one colon to be backward compatible with older browsers. All new pseudo
elements are required to have two colons.
Grouping selectors
You can group selectors when you will be applying the same style by separating each selector
with a comma. Consider the following example, in which the two style rules have the same
declaration blocks.
button {
background-color: white;
color: gray;
}
p {
background-color: white;
color: gray;
}
In this scenario, you can condense the two style rules into a single style rule as shown in
the following example, which applies the same style to all button and paragraph elements.
button, p {
background-color: white;

Lesson 2: Understanding selectors, specicity, and cascading CHAPTER 4 151
color: gray;
}
Using subsequent adjacent sibling selectors
An adjacent selector can be used to select an element if it is preceded by a specic element.
The plus (+) sign denotes an adjacent selector. For example, div + h1 selects the <h1> ele-
ment that immediately follows a <div> element.
In the following example, div + h1 set the heading to a background color of yellow if the
heading is preceded by a <div> element as the previous sibling.
div + h1 {
background-color: yellow;
}
Consider the following HTML document, which has two <div> elements and various <h1>
elements.
<!DOCTYPE html>
<html xmlns="http://www.w3.org/1999/xhtml">
<head>
<title></title>
<link href="default.css" rel="stylesheet" />
</head>
<body>
<h1>The h1 child before the first div
</h1>
<div>
some child content
<h1>This is the first h1 child
</h1>
<div>another div here</div>
some text after the div
<h1>This is the second h1 child
</h1>
<h1>This is the third h1 child
</h1>
</div>
some following content
<span>here is a span</span>
<h1>This the first h1 that follows the paragraph
</h1>
<h1>This the second h1 that follows the paragraph
</h1>
<h1>This the third h1 that follows the paragraph
</h1>
</body>
</html>
The rst <div> element has child <h1> elements, but they are children, not adjacent
elements. The adjacent element that follows the rst <div> element is the <span> element,
which means that the rst <div> element does not play a role in changing an <h1> element’s
Key
Terms
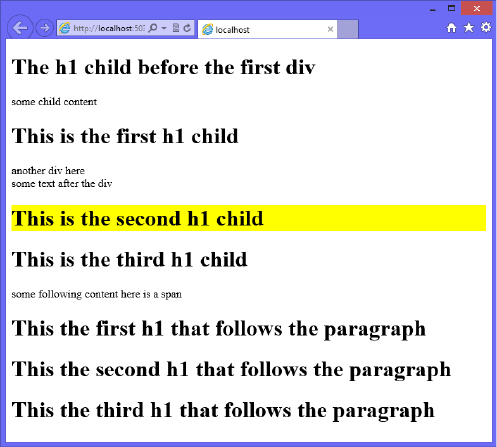
152 CHAPTER 4 Getting started with CSS3
background to yellow. The second <div> element is followed by some textual content, but
the rst element that follows the second <div> element is an <h1> element, so that <h1>
element will have a yellow background. The result is shown in Figure 4-1.
FIGURE 4-1 Only one <h1> element background color set to yellow
Using the subsequent sibling selector
The subsequent sibling selector is similar to the adjacent sibling selector, but its search for the
sibling match doesn’t stop at the rst match. The tilde (~) character denotes the sibling selec-
tor. For example, div ~ h1 selects all <h1> elements that follow a <div> element.
In the following example, div ~ h1 sets the heading to a background color of yellow if the
heading is preceded by a <div> element as a previous sibling.
div ~ h1 {
background-color: yellow;
}
Using the HTML document from the adjacent sibling selector example, the rst <div>
element has child <h1> elements, but they are children, not adjacent elements. The adjacent
element that follows the rst <div> element is the <span> element, but sibling <h1> ele-
ments follow, and their backgrounds are changed to yellow. The second <div> element is
followed by some textual content, and two <h1> elements follow the second <div> element;
they will have a yellow background. Notice that with both <div> elements, there is an <h1>
element before the <div> element, and their background color is not set to yellow because
although they are siblings, they are prior siblings. The result is shown in Figure 4-2.
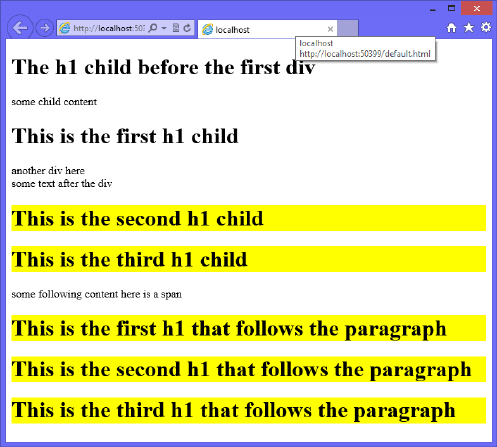
Lesson 2: Understanding selectors, specicity, and cascading CHAPTER 4 153
FIGURE 4-2 All subsequent <h1> elements background color set to yellow
Using an attribute selector
An attribute selector selects elements based on the existence of the specied attribute. For
example, a[title] selects all hyperlinks whose title attribute is dened.
The following example demonstrates the use of an attribute selector to locate all hyper-
links whose href attribute is dened. This example also demonstrates combining the attribute
selector with the :hover pseudo class and the :after pseudo element to display the href in
parentheses when the link is hovered over. Notice the use of the attr( ) function to retrieve the
value of an attribute.
a[href]:hover:after {
content: " (" attr(href) ")";
background-color: yellow;
}
Consider the following HTML document that has is three <a> elements, two of which
dene the href attribute.
<!DOCTYPE html>
<html xmlns="http://www.w3.org/1999/xhtml">
<head>
<title></title>
<link href="default.css" rel="stylesheet" />
</head>
<body>
<a href='http://contoso.com' >Link 1</a><br />
<a>Link 2</a><br />

154 CHAPTER 4 Getting started with CSS3
<a href='http://microsoft.com' >Link 3</a><br />
</body>
</html>
The rst and third <a> elements dene the href attribute, which means that hovering over
either of these causes the hyperlink to be displayed. The result is shown in Figure 4-3.
FIGURE 4-3 Hovering over a link whose href attribute is defined, causing the href value to be displayed
Using an attribute value selector
An attribute value selector selects all elements where the specied attribute has the specied
value. For example, a[href=’http://contoso.com’] selects all hyperlinks where the href attribute
is set to http://contoso.com.
The following example demonstrates the use of the attribute value selector to locate all
hyperlinks that have the href attribute set to http://contoso.com. This example also demon-
strates combining the attribute selector with the :hover pseudo class.
a[href='http://contoso.com']:hover {
background-color: yellow;
}
Consider the following HTML document, which has three <a> elements, one of which has
the href attribute set to http://contoso.com.
<!DOCTYPE html>
<html xmlns="http://www.w3.org/1999/xhtml">
<head>
<title></title>
<link href="default.css" rel="stylesheet" />
</head>
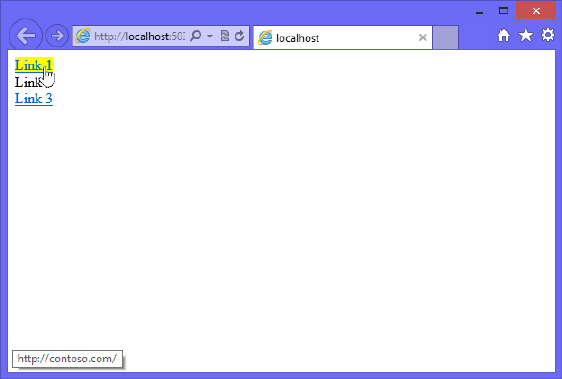
Lesson 2: Understanding selectors, specicity, and cascading CHAPTER 4 155
<body>
<a href='http://contoso.com' >Link 1</a><br />
<a>Link 2</a><br />
<a href='http://www.contoso.com' >Link 3</a><br />
</body>
</html>
The rst <a> element sets the href attribute to http://contoso.com, so hovering over this
link causes the hyperlink to be displayed with a yellow background, as shown in Figure 4-4.
The other hyperlinks remain unaffected.
FIGURE 4-4 Hovering over a link whose href attribute is set to http://contoso.com causes the href value
to be displayed
A potential problem with this approach is that the value must match exactly to work. To
solve this problem, use the attribute contains value selector.
Using the attribute contains value selector
The attribute contains value selector selects all elements that contain the specied attribute
value within the specied attribute. This is similar to the attribute value selector, but it is more
exible because you don’t need to provide an exact match. To specify the attribute contains
value selector, add an asterisk (*) sufx to the attribute name.
The following example demonstrates the use of the attribute contains value selector to
locate all hyperlinks that have an href attribute value that contains contoso.com. This example
also demonstrates combining the attribute selector with the :hover pseudo class.
a[href*='contoso.com']:hover {
background-color: yellow;
}
156 CHAPTER 4 Getting started with CSS3
Consider the following HTML document, which has three <a> elements, one of which sets
the href attribute to http://contoso.com.
<!DOCTYPE html>
<html xmlns="http://www.w3.org/1999/xhtml">
<head>
<title></title>
<link href="default.css" rel="stylesheet" />
</head>
<body>
<a href='http://contoso.com' >Link 1</a><br />
<a href='http://microsoft.com'>Link 2</a><br />
<a href='http://www.contoso.com/default.html' >Link 3</a><br />
</body>
</html>
The rst and third hyperlinks have href attributes that contain contoso.com, so hovering
over these hyperlinks causes the hyperlink to be displayed with a yellow background.
Using the attribute value starts with selector
An attribute value starts with selector selects all elements whose specied attributes value
starts with the specied value. To specify the attribute value starts with selector, add a caret
(^) sufx to the attribute name.
The following example demonstrates the use of the attribute value starts with selector
to locate all hyperlinks that reference external sites by looking for href values that start with
http. This automatically includes hrefs that start with https.
a[href^='http']:hover {
background-color: yellow;
}
Consider the following HTML document that has three <a> elements, one of which sets
the href attribute to http://microsoft.com.
<!DOCTYPE html>
<html xmlns="http://www.w3.org/1999/xhtml">
<head>
<title></title>
<link href="default.css" rel="stylesheet" />
</head>
<body>
<a href='sales/default.html' >Link 1</a><br />
<a href='http://microsoft.com'>Link 2</a><br />
<a href='default.html' >Link 3</a><br />
</body>
</html>
The rst and third hyperlinks have href attributes that don’t start with http, so hover-
ing over these hyperlinks does not cause the hyperlink to be displayed with a yellow back-
ground. Hovering over the second hyperlink does cause the hyperlink to display with a yellow
background.
Lesson 2: Understanding selectors, specicity, and cascading CHAPTER 4 157
Using the attribute value ends with selector
An attribute value ends with selector selects all elements whose specied attributes value ends
with the specied value. To specify the attribute value ends with selector, add a dollar sign ($)
sufx to the attribute name.
The following example demonstrates the use of the attribute value ends with selector to
locate all hyperlinks that reference jpg les.
a[href$='jpg']:hover {
background-color: yellow;
}
Consider the following HTML document that has is three <a> elements, one of which sets
the href attribute to http://microsoft.com.
<!DOCTYPE html>
<html xmlns="http://www.w3.org/1999/xhtml">
<head>
<title></title>
<link href="default.css" rel="stylesheet" />
</head>
<body>
<a href='sales/default.html' >Link 1</a><br />
<a href='logo.jpg'>Link 2</a><br />
<a href='default.html' >Link 3</a><br />
</body>
</html>
The rst and third hyperlinks have href attributes that don’t end with jpg, so hovering
over these hyperlinks does not cause the hyperlink to be displayed with a yellow back-
ground. Hovering over the second hyperlink does cause the hyperlink to display with a yellow
background.
Using the attribute contains value in list selector
An attribute contains value in list selector selects all elements whose specied attribute
contains the specied value when the attribute has a space-delimited list of values and there
is a match to one of the values. This works well with custom attributes when you might want
to specify a list of values in one attribute. For example, you might have a hyperlink that has
a datalinktype attribute that contains a list of values that describe the type of link, such as
secure, externalLink, internalLInk, imageFile, zipFile. When the link is rendered to the browser,
it includes the datalinktype attribute with the appropriate values. You want to add different
styles to the hyperlink based on these values, as follows.
a[data-linktype ~='externalLink'] {
background-color: yellow;
}
a[data-linktype ~='internalLink'] {
background-color: lime;
}
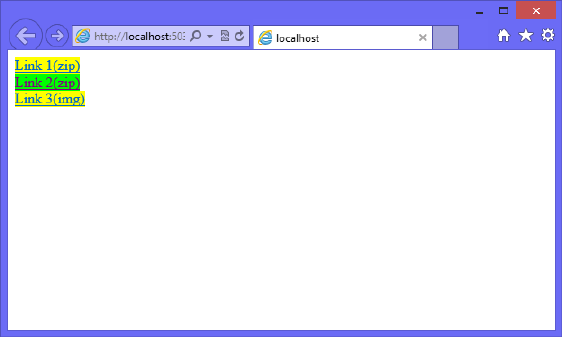
158 CHAPTER 4 Getting started with CSS3
a[data-linktype ~='imageFile']:after {
content: '(img)';
}
a[data-linktype ~='zipFile']:after {
content: '(zip)';
}}
Consider the following HTML document that has three <a> elements where there is a mix
of values and the appropriate styles must be applied based on the datalinktype attribute.
<!DOCTYPE html>
<html xmlns="http://www.w3.org/1999/xhtml">
<head>
<title></title>
<link href="default.css" rel="stylesheet" />
</head>
<body>
<a href='http://contoso.com' data-linktype="externalLink zipFile">Link 1</a><br />
<a href='default.html' data-linktype="internalLink zipFile">Link 2</a><br />
<a href='http://microsoft.com/logo.jpg' data-linktype="externalLink imageFile">Link
3</a><br />
</body>
</html>
The rst and third hyperlinks are external links, so they have a background color of yellow.
The second hyperlink is an internal link, so it has a background color of lime. The rst and
second hyperlinks are links to zip les, so ‘(zip)’ is appended to the content. The third hyper-
link is a link to an image so ‘(img)’ is appended to the content. The rendered HTML document
is shown in Figure 4-5.
FIGURE 4-5 The rendered HTML document showing the different styles based on matching to an item in
the datalinktype attribute
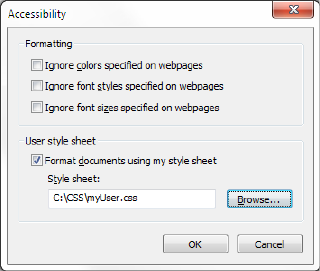
Lesson 2: Understanding selectors, specicity, and cascading CHAPTER 4 159
Understanding the browser’s built-in styles
Even if you don’t dene any styles for your HTML documents, at least one style sheet will be
used to calculate the effective style for the elements within the document. Each browser has
a built-in default style sheet, which is applied to all HTML documents before any other style
sheets are applied.
You cannot access the browser’s style sheet directly, and be aware that there can be differ-
ences among browsers.
Extending browser styles with user styles
You can extend the browser’s styles by adding a user-dened style sheet to the browser.
This is done differently based on the browser. To add a user-dened style sheet in Internet
Explorer, navigate to Tools | Internet Options | General | Accessibility. The Accessibility window
is displayed, as shown in Figure 4-6.
FIGURE 4-6 The user style sheet if set to the myUser.css file
User styles are applicable only to that browser on that computer, so if you launch a differ-
ent browser on the same computer, your user-dened style sheet won’t work. In addition, if
you run the same browser on a different computer, your user-dened style sheet won’t work.
Working with important styles
When you add styles to a user-dened style sheet, the styles typically don’t work because the
user-dened styles are read, and then the HTML document’s styles are read. If the browser
has a style rule setting from the user-dened style sheet, and then the HTML document’s
style sheet reads a different style rule setting, the user-dened style is overridden by the
HTML document’s style sheet. In the example, the problem is that the user might have dif-
culty reading webpage text and want to increase the font size on all webpages.
160 CHAPTER 4 Getting started with CSS3
To solve this problem, in the user-dened style sheet, you can add the “!important” modi-
er after the CSS value to increase its priority. The “!important” modier in the user-dened
style sheet overrides any value from the HTML document’s style sheet, even if the “!impor-
tant” modier is used in the HTML document’s style sheet. This is the most appropriate use of
the “!important” modier.
Although you can use the “!important” modier with your HTML document’s style sheets,
it’s not good practice to do so. It’s equivalent to using a jackhammer on a nish nail.
The following is an example of a user-dened CSS le that overrides the background color
and text color of the body element.
@charset 'UTF-8';
body {
background-color: white !important;
color: black !important;
}
Remember that the user-dened style sheet settings have a lower priority than the HTML
document’s style sheets except when the “!important” modier is used in the user-dened
style sheet. In this case, the user-dened style has the highest priority.
How do styles cascade?
It’s important to understand how styles are resolved by the browser when style rules conict.
The following is the order of precedence the browser uses to calculate the effective style of
an element.
1. Important The browser must determine whether the “!important” modier has been
used. This has the highest priority, so if the “!important” modier is found, it takes
precedence over the specicity or textual order.
2. Specicity The browser determines which rule is most specic and, if the browser
can determine which rule is most specic, there is no need to examine the textual
order.
3. Textual Order The browser determines the textual order of the style rules where the
last style rule in textual order has precedence over prior style rules.
Style rules can be dened in several style sheets, and it’s important to understand these
style sheets, especially their relationship to the textual order. The following list describes the
evaluation order of the various style sheets.
1. Browser’s built-in style sheet
2. User’s normal declarations in the user style sheet
3. Author’s normal declarations in the author style sheet
4. Author’s important declarations in the author style sheet
5. User’s important declarations in the user style sheet

Lesson 2: Understanding selectors, specicity, and cascading CHAPTER 4 161
The author of the page can provide normal style declarations that override the user’s
dened styles, based on the evaluation order. The user can have the nal word by overriding
the author’s declarations by using the “!important” modier. This is probably the best imple-
mentation of the “!important” modier.
Quick check
What is the order of precedence for calculating the effective style of an element?
Quick check answer
(1) Important, (2) Specicity, (3) Textual Order
Using specicity
Probably the most confusing aspect of determining the effective style of an element is deter-
mining the victor of conicting styles when specicity is different among them. The rule with
the most specic selector will prevail, but how do you determine which rule is most specic?
To calculate the selector’s specicity, start by recording three values, known as a, b, and c,
as follows.
a Record the number of id attributes in the selector.
b Record the quantity of class selectors, attributes selectors, and pseudo classes.
c Record the quantity of element names in the selector.
Although pseudo classes are counted, pseudo elements are not counted in the specic-
ity calculation. In addition, if you use the negation pseudo class, the selectors within it are
counted, but the negation pseudo class is not counted. Last, the universal selector (*) is never
included in calculations.
After recording the values of a, b, and c, concatenate the three numbers to form a specic-
ity value so that a has the highest value, then b, and c has the lowest value. Figure 4-7 dem-
onstrates the calculation of various selectors, from the lowest specicity value to the highest
specicity value.
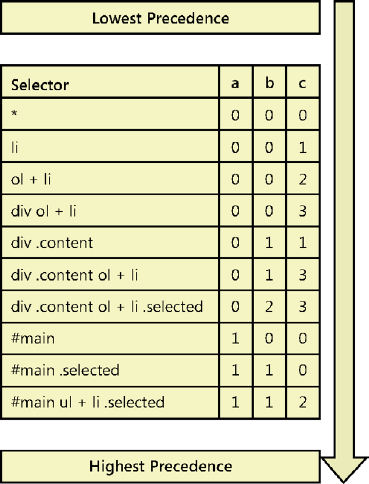
162 CHAPTER 4 Getting started with CSS3
FIGURE 4-7 Specificity value calculation examples, sorted from lowest to highest value
If you have conicting style rules and you calculate the specicity value of each, if the
values are the same, which style rule is used? Textual order becomes the tie breaker. The later
of the style rules will be the effective style.
Understanding inheritance
An element can get its style from a parent element when no other styles are dened that are
more specic, but it’s important to understand that the element only inherits a style from a
parent when no style is dened for the prospective element property. Consider the scenario
in which you want all text in your HTML document to be sized to extra-large. Rather than
dene a style for <input> elements, another style for <div> elements, and so on, you can just
set the font of the <body> element as follows.
body {
font-size: x-large;
}
In this example, all elements within the <body> element inherit the font size, but if an ele-
ment is assigned a font size, the assigned font size overrides the inherited size.
Lesson 2: Understanding selectors, specicity, and cascading CHAPTER 4 163
Using the inherit value
The previous example was rather simple because elements typically have their properties set
to inherit by default. What would you do if you have an element whose background color is
set, but you want to reset the element to inherit from its parent? You could assign the inherit
value to the background color, as shown in the following example.
body {
font-size: x-large;
}
li:nth-child(even) {
font-size: small;
}
li:nth-child(4) {
font-size: inherit;
}
In this example, the <body> element font size is set to extra-large, and all child elements
can inherit this setting. The next style rule selects even-numbered <li> elements and sets the
font size to small. The last style rule resets the font size back to inherit for the fourth child
<li> element.
Lesson summary
A style rule, or style, is composed of two parts: the selector and the declaration block.
The selector locates the elements in the HTML document that will be styled. The decla-
ration block contains the formatting instructions (declarations).
Styles can be inline, embedded, or external.
To maintain separation between structure and presentation, use external style sheets.
Use the media attribute of the <link> element to specify the target device for a style
sheet.
Pseudo classes provide another way to select elements. Pseudo elements provide
access to information that is not available from the DOM. Use two colons (::) to denote
pseudo elements.
Use the “!important” modier with user-dened styles to override author-dened
styles.
Cascading precedence is by importance, specicity, and then textual order.
The evaluation order of style sheets is the browser’s built-in style sheet, the user-
dened style sheet, the author’s normal style sheet, the author’s important style sheet,
and the user’s important style sheet.
Calculating the specicity of a selector is based on three levels of magnitude.
Element styles that are not assigned can inherit their style from a parent element.
164 CHAPTER 4 Getting started with CSS3
Lesson review
Answer the following questions to test your knowledge of the information in this lesson. You
can nd the answers to these questions and explanations of why each answer choice is correct
or incorrect in the “Answers” section at the end of this chapter.
1. You want to set the style of the rst letter of every paragraph in a <div> element
whose id is readingPane. Which style selector is most appropriate?
A. #readingPane p::rst-letter
B. #readingPane::rst-letter
C. #readingPane p:rst-child
D. #readingPane:rst-child
2. The following style sheet rule is dened in Corporate.css.
div p.highlight{
font-size: xx-large;
background-color: yellow;
}
In Department.css, the following style sheet rule is dened.
div p {
background-color: blue;
}
Your HTML document contains the following.
<!DOCTYPE html>
<html xmlns="http://www.w3.org/1999/xhtml">
<head>
<title></title>
<link href="Corporate.css" rel="stylesheet" />
<link href="Department.css" rel="stylesheet" />
</head>
<body>
<div id="readingPane">
<p class='highlight'>
Here is a test to see what the background color of a paragraph
will be blue or yellow.
</p>
</div>
</body>
</html>
What will be the rendered background color of the paragraph?
A. Yellow
B. Blue
C. Transparent
D. White

Lesson 3: Working with CSS properties CHAPTER 4 165
3. The following style sheet rule is dened in Corporate.css.
div p.highlight{
font-size: xx-large;
background-color: yellow;
}
In Department.css, the following style sheet rule is dened.
div p:first-of-type. {
background-color: blue;
}
Your HTML document contains the following.
<!DOCTYPE html>
<html xmlns="http://www.w3.org/1999/xhtml">
<head>
<title></title>
<link href="Corporate.css" rel="stylesheet" />
<link href="Department.css" rel="stylesheet" />
</head>
<body>
<div id="readingPane">
<p class='highlight'>
Here is a test to see what the background color of a paragraph
will be blue or yellow.
</p>
</div>
</body>
</html>
What will be the rendered background color of the paragraph?
A. Yellow
B. Blue
C. Transparent
D. White
Lesson 3: Working with CSS properties
Now that you know how to use CSS selectors, you can work with CSS properties. There are
many CSS properties, and this lesson discusses the basic CSS properties that you need to
know to provide a page layout.
Colors are explained in detail, followed by measurements and the CSS box model.

166 CHAPTER 4 Getting started with CSS3
After this lesson, you will be able to:
Set CSS colors.
Implement a layout by using the CSS box model.
Position <div> elements.
Estimated lesson time: 30 minutes
Working with CSS colors
With CSS, colors can be specied in several ways, such as by color names, RGB color values,
and ARGB color values. You can set the transparency or opacity.
RGB values have been available since the earliest version of CSS. The RGB value is a six-
character eld that represents a two-character hexadecimal value for the amount of red, then
green, and then blue, and is prexed with the pound (#) symbol. A value of 00 (two zeros)
is the minimum value, and ff represents the maximum value for that color. This represents
0–255 in decimal. The following are examples of RGB values.
black #000000
white #ffffff
red #ff0000
green #008000
lime #00ff00
blue #0000ff
yellow #ffff00
gray #808080
An example of setting the background color of an HTML document to yellow is as follows.
body {
background-color: #ffff00;
}
NOTE SHORTCUT FOR SETTING THE VALUE OF COLORS
Instead of representing the RGB value as #rrggbb, you might be able to represent the RGB
value as #rgb. If the two-character codes for red, green, and blue are the same, you can use
a single character for each to reduce the six-character value to a three-character value. For
example, yellow is #ffff00 where the red component’s characters are the same, the green
component’s characters are the same, and the blue component’s characters are the same.
Therefore, yellow can be represented as three-character #ff0. This is a shortcut, and can
only be used to represent the value as three characters. When the browser reads the color
value as three characters, it will expand each character to be two of the same character. A
color of #123 is the same as #112233, not #000123.

Lesson 3: Working with CSS properties CHAPTER 4 167
Most colors can be represented by using this combination of red, green, and blue, but you
don’t need to remember the RGB values if you take advantage of the CSS ability to use color
names when making color assignments to properties. Table 4-1 contains a list of the color
names with their corresponding RGB values.
TABLE 4-1 Color names with corresponding hex and decimal values
Color Name Hex Value Decimal Value
aliceblue #f0f8ff 240,248,255
antiquewhite #faebd7 250,235,215
aqua #00ffff 0,255,255
aquamarine #7fffd4 127,255,212
azure #f0ffff 240,255,255
beige #f5f5dc 245,245,220
bisque #ffe4c4 255,228,196
black #000000 0,0,0
blanchedalmond #ffebcd 255,235,205
blue #0000ff 0,0,255
blueviolet #8a2be2 138,43,226
brown #a52a2a 165,42,42
burlywood #deb887 222,184,135
cadetblue #5f9ea0 95,158,160
chartreuse #7fff00 127,255,0
chocolate #d2691e 210,105,30
coral #ff7f50 255,127,80
cornowerblue #6495ed 100,149,237
cornsilk #fff8dc 255,248,220
crimson #dc143c 220,20,60
cyan #00ffff 0,255,255
darkblue #00008b 0,0,139
darkcyan #008b8b 0,139,139
darkgoldenrod #b8860b 184,134,11
darkgray #a9a9a9 169,169,169
darkgreen #006400 0,100,0
darkgrey #a9a9a9 169,169,169
darkkhaki #bdb76b 189,183,107

168 CHAPTER 4 Getting started with CSS3
Color Name Hex Value Decimal Value
darkmagenta #8b008b 139,0,139
darkolivegreen #556b2f 85,107,47
darkorange #ff8c00 255,140,0
darkorchid #9932cc 153,50,204
darkred #8b0000 139,0,0
darksalmon #e9967a 233,150,122
darkseagreen #8fbc8f 143,188,143
darkslateblue #483d8b 72,61,139
darkslategray #2f4f4f 47,79,79
darkslategrey #2f4f4f 47,79,79
darkturquoise #00ced1 0,206,209
darkviolet #9400d3 148,0,211
deeppink #ff1493 255,20,147
deepskyblue #00bfff 0,191,255
dimgray #696969 105,105,105
dimgrey #696969 105,105,105
dodgerblue #1e90ff 30,144,255
rebrick #b22222 178,34,34
oralwhite #fffaf0 255,250,240
forestgreen #228b22 34,139,34
fuchsia #ff00ff 255,0,255
gainsboro #dcdcdc 220,220,220
ghostwhite #f8f8ff 248,248,255
gold #ffd700 255,215,0
goldenrod #daa520 218,165,32
gray #808080 128,128,128
green #008000 0,128,0
greenyellow #adff2f 173,255,47
grey #808080 128,128,128
honeydew #f0fff0 240,255,240
hotpink #ff69b4 255,105,180
indianred #cd5c5c 205,92,92
indigo #4b0082 75,0,130

Lesson 3: Working with CSS properties CHAPTER 4 169
Color Name Hex Value Decimal Value
ivory #fffff0 255,255,240
khaki #f0e68c 240,230,140
lavender #e6e6fa 230,230,250
lavenderblush #fff0f5 255,240,245
lawngreen #7cfc00 124,252,0
lemonchiffon #fffacd 255,250,205
lightblue #add8e6 173,216,230
lightcoral #f08080 240,128,128
lightcyan #e0ffff 224,255,255
lightgoldenrodyellow #fafad2 250,250,210
lightgray #d3d3d3 211,211,211
lightgreen #90ee90 144,238,144
lightgrey #d3d3d3 211,211,211
lightpink #ffb6c1 255,182,193
lightsalmon #ffa07a 255,160,122
lightseagreen #20b2aa 32,178,170
lightskyblue #87cefa 135,206,250
lightslategray #778899 119,136,153
lightslategrey #778899 119,136,153
lightsteelblue #b0c4de 176,196,222
lightyellow #ffffe0 255,255,224
lime #00ff00 0,255,0
limegreen #32cd32 50,205,50
linen #faf0e6 250,240,230
magenta #ff00ff 255,0,255
maroon #800000 128,0,0
mediumaquamarine #66cdaa 102,205,170
mediumblue #0000cd 0,0,205
mediumorchid #ba55d3 186,85,211
mediumpurple #9370db 147,112,219
mediumseagreen #3cb371 60,179,113
mediumslateblue #7b68ee 123,104,238
mediumspringgreen #00fa9a 0,250,154

170 CHAPTER 4 Getting started with CSS3
Color Name Hex Value Decimal Value
mediumturquoise #48d1cc 72,209,204
mediumvioletred #c71585 199,21,133
midnightblue #191970 25,25,112
mintcream #f5fffa 245,255,250
mistyrose #ffe4e1 255,228,225
moccasin #ffe4b5 255,228,181
navajowhite #ffdead 255,222,173
navy #000080 0,0,128
oldlace #fdf5e6 253,245,230
olive #808000 128,128,0
olivedrab #6b8e23 107,142,35
orange #ffa500 255,165,0
orangered #ff4500 255,69,0
orchid #da70d6 218,112,214
palegoldenrod #eee8aa 238,232,170
palegreen #98fb98 152,251,152
paleturquoise #afeeee 175,238,238
palevioletred #db7093 219,112,147
papayawhip #ffefd5 255,239,213
peachpuff #ffdab9 255,218,185
peru #cd853f 205,133,63
pink #ffc0cb 255,192,203
plum #dda0dd 221,160,221
powderblue #b0e0e6 176,224,230
purple #800080 128,0,128
red #ff0000 255,0,0
rosybrown #bc8f8f 188,143,143
royalblue #4169e1 65,105,225
saddlebrown #8b4513 139,69,19
salmon #fa8072 250,128,114
sandybrown #f4a460 244,164,96
seagreen #2e8b57 46,139,87
seashell #fff5ee 255,245,238

Lesson 3: Working with CSS properties CHAPTER 4 171
Color Name Hex Value Decimal Value
sienna #a0522d 160,82,45
silver #c0c0c0 192,192,192
skyblue #87ceeb 135,206,235
slateblue #6a5acd 106,90,205
slategray #708090 112,128,144
slategrey #708090 112,128,144
snow #fffafa 255,250,250
springgreen #00ff7f 0,255,127
steelblue #4682b4 70,130,180
tan #d2b48c 210,180,140
teal #008080 0,128,128
thistle #d8bfd8 216,191,216
tomato #ff6347 255,99,71
turquoise #40e0d0 64,224,208
violet #ee82ee 238,130,238
wheat #f5deb3 245,222,179
white #ffffff 255,255,255
whitesmoke #f5f5f5 245,245,245
yellow #ffff00 255,255,0
yellowgreen #9acd32 154,205,50
An example of using a color name to set the background color of an HTML document to
yellow is as follows.
body {
background-color: yellow;
}
Using the rgb function
Another way to represent RGB colors is to use the rgb function. This function accepts the
three R, G, and B parameters, either as an integer or as a percentage. If the integer value is
above or below the valid 0–255 range, the value is automatically interpreted as the minimum
or maximum value. The following are examples of the rgb function.
h1 { background-color: rgb(255,0,0); }
h1 { background-color: rgb(-100,500,0); } /*interpreted as 0,255,0 */
h1 { background-color: rgb(20%,150%,0%); } /*interpreted as 20%,100%,0% */
172 CHAPTER 4 Getting started with CSS3
Using transparency
You can set the CSS opacity property to control the amount of transparency an element has.
This is especially useful when content is placed over an image and you still want to see the
image. The opacity must be a value between 0.0 and 1.0, where 0.0 is invisible and 1.0 is
opaque. In the following example, the opacity of an element whose id is mainContent is set so
the element is 50 percent see-through and anything under that element is still visible.
#mainContent {
opacity: .5;
}
Using the rgba function
The rgba function is similar to the rgb function except it has an alpha parameter, which rep-
resents the amount of transparency to use. The alpha parameter value must be between 0.0
and 1.0, where 0.0 is invisible and 1.0 is fully opaque. The following are examples of using the
rgba function.
h1 { background-color: rgba(255,0,0,0.5); }
h1 { background-color: rgba(0,255,0,1); }
h1 { background-color: rgba(20%,50%,0%, 0.2); }
Using the hsl function
Another way to represent a color in CSS3 is to use hue-saturation-lightness (HSL) colors. Like
RGB colors, HSL colors use three numbers, but the numbers are for hue, saturation, and light-
ness. The hue is calculated as an angle of the color circle where red is 0 or 360 (degrees), and
other colors are spread around the circle, as shown in Figure 4-8. As you look at the degrees
in the circle, yellow can be represented as 60, as –240, or even as 420. You can normalize the
value by using the (((x mod 360) + 360) mod 360) formula. The reason for adding 360 and
performing a second modulus is to handle negative values.
The saturation and lightness values are represented in percentages. Saturation is the
amount of color to provide, and lightness is the amount of lightening to provide. It’s easy to
produce matching colors by keeping the hue value the same and adjusting the saturation
and lightness to get the desired colors. Primary colors typically have a saturation value of 100
percent and a lightness value of 50 percent. Some examples of HSL are as follows.
h2 { color: hsl(60, 100%, 50%); } /* yellow */
h2 { color: hsl(120, 100%, 25%); } /* dark green */
h2 { color: hsl(0, 100%, 50%); } /* red */
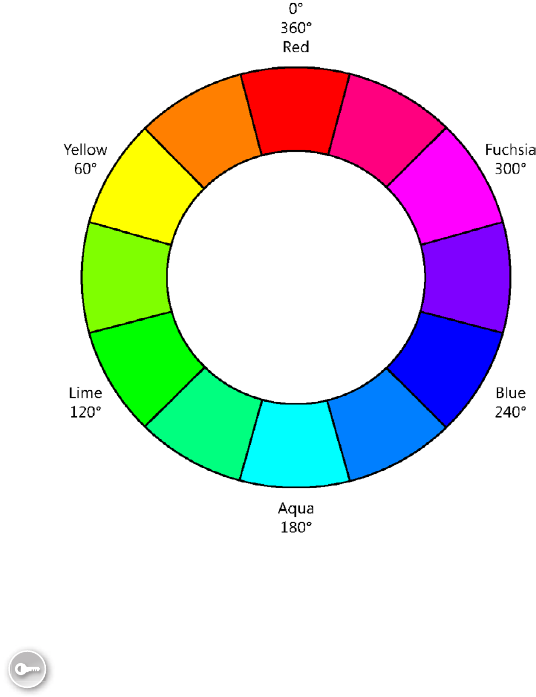
Lesson 3: Working with CSS properties CHAPTER 4 173
FIGURE 4-8 The HSL color wheel
Working with text
Formatting text is one of the most common CSS tasks. You set the font typeface, which is also
known as the font family, such as Times New Roman. You then set the font, which is a specic
member of the typeface, such as Times New Roman 12-point bold.
Font families belong to one of ve groups.
serif Font families with serifs or curls at the top and bottom of characters, such as
Times New Roman
sans serif Font families without serifs, such as Arial
monospace Font families in which all characters have the same width, such as
Courier New
cursive Font families that imitate handwriting, such as Mistral
fantasy Font families that are decorative and used in titles, such as Impact
The most commonly used font families belong to one of three groups: serif, sans serif, or
monospaced. Figure 4-9 shows an example of the three groups.
Key
Terms
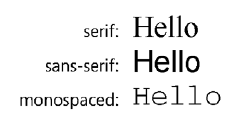
174 CHAPTER 4 Getting started with CSS3
FIGURE 4-9 The serif, sans serif, and monospaced font families
Serif and sans serif font families have characters of proportional width, meaning that char-
acters have different widths, unlike the monospaced font families.
Setting the font-family property
In your style rule, you can use the font-family property to set the typeface of the elements
that match the selector. Be careful when specifying the font family because the one you
specify must exist on the user’s computer. If the font family doesn’t exist, the browser will
use its default font. To be safe, it’s usually best to specify a common font family such as Arial,
Courier New, Georgia, Times New Roman, or Verdana. Arial and Verdana are sans serif fonts
that are easy to read and commonly used.
You can specify a list of font families in your style rule. The browser will attempt to use the
rst font family specied. If the browser doesn’t have the rst font family, it will attempt to
use the second font family, and so on. The following example depicts multiple font families
being specied.
h1 { font-family: arial, verdana, sans-serif; }
h1 { font-family: "times new roman", serif; }
h1 { font-family: "courier new", monospace; }
In this example, the last font family listed is actually the name of the generic group, which
instructs the browser to use a font family from that group if the browser doesn’t have the
other font families that were rst specied.
What other options do you have when you are trying to specify a font family that the user
probably won’t have? In the past, developers would create a GIF image that was a picture
of the text and then use the image on the page. If you do this, you should always populate
the alt attribute with the text. Remember that Lesson 1 covers the use of @font-face, which
enables you to provide a link to the font you want to use.
Specifying the font size
To set the size of the font, you can set the font-size property. Font sizes can be specied by
using absolute units or relative units, and there are many ways to set the size. The absolute
length units are useful when the output environment is known because absolute length units
are xed in relation to one another and anchored to some physical measurement. The follow-
ing is a list of the available measurement units.
em A relative measurement multiplier of the parent element’s computed font size
px An absolute measurement pixel unit, 96 pixels per inch
Lesson 3: Working with CSS properties CHAPTER 4 175
pt An absolute measurement point unit, 72 points per inch
pc An absolute measurement pica unit, 12 points per pica
in An absolute measurement inch unit
mm An absolute measurement millimeter unit
cm An absolute measurement centimeter unit
There is also a set of absolute sizes whose size is controlled by the browser, but the recom-
mended size is 1.2 em from the previous size. These sizes are xx-small, x-small, small, medium,
large, x-large, and xx-large.
Similar to this, there is a set of relative sizes whose size is based on the parent element’s
size. These sizes are larger and smaller.
In addition to all the sizes already covered, you can use percentage values to size your
font, which provides a size that’s relative to the parent element’s computed font size.
Here are some examples of using the various measurement units to set the font-size
property.
h1 { font-size: 12px; }
h1 { font-size: 200%; }
h1 { font-size: 1.2em; }
h1 { font-size: 1in; }
h1 { font-size: 2cm; }
With all these measurement choices, what is the recommended measurement unit to use?
For screen rendering, try to use the em or percentage measurements because these measure-
ments scale well. For printer rendering, consider using any of the absolute font measurements
such as point, pixels, picas, inches, centimeters, or millimeters.
Working with the CSS box model
Creating a nice layout for your webpage requires you to understand the CSS box model,
which denes the spacing around boxes in your HTML document, as shown in Figure 4-10.
The margin is the space outside the border, between the border and the next element. The
padding is the space inside the border, between the border and the content. If the border is
being displayed, the margin and padding settings will have distinct effects. If the border is
not being displayed, it can be difcult to differentiate margin and padding settings.
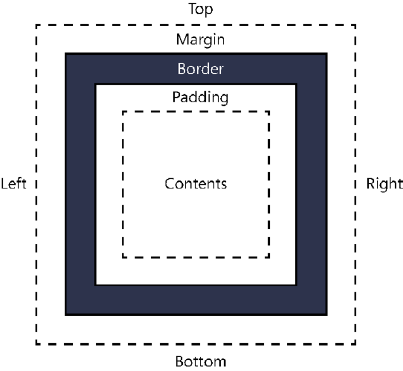
176 CHAPTER 4 Getting started with CSS3
FIGURE 4-10 The CSS box model
Setting the border, padding, and margin properties
You can set the border, padding, and margin easily by assigning a value to the corresponding
property, as shown in the following style sheet rule.
p {
border: 10px;
padding: 25px;
margin: 15px;
background-color: yellow;
border-style: solid;
border-color: green;
}
This style sheet rule sets the border width to 10 pixels on all four sides. The padding is set
to 25 pixels on all four sides, and the margin is set to 15 pixels on all four sides. Now consider
the following HTML document and how the style rule affects its rendering.
<!DOCTYPE html>
<html xmlns="http://www.w3.org/1999/xhtml">
<head>
<title></title>
<link href="default.css" rel="stylesheet" />
</head>
<body>
<p>
this is the third div - Lorem ipsum dolor sit amet, salutandi
conceptam sea cu, eos id legimus percipit argumentum. Habeo
ipsum mandamus sit an, aeterno pertinax vim ad, et cibo
atomorum mea. Ad vis illum porro disputando, ei eligendi
mandamus liberavisse sea. Sea debet comprehensam no, et
blandit officiis eos, ut per ubique abhorreant
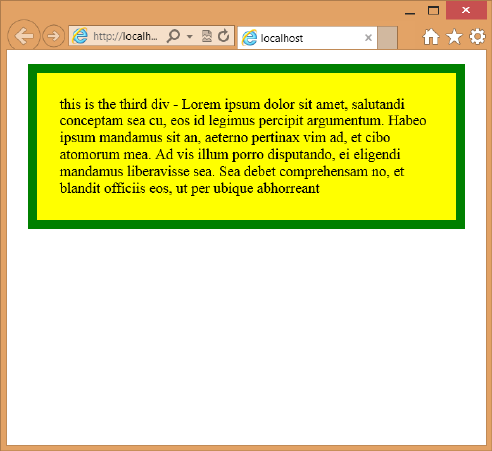
Lesson 3: Working with CSS properties CHAPTER 4 177
</p>
</body>
</html>
Figure 4-11 shows the rendered webpage. Notice the large gap between the text and the
border, which is the padding. The border is rather thick with its width setting of 10 pixels.
Outside the border, there is white space all around the paragraph, which is the margin prop-
erty setting of 15 pixels.
FIGURE 4-11 Controlling the margin, padding, and border properties
In addition to setting each of these properties to a value that controls all four sides, you
can specify each side and the value. For example, you can assign a different value to each side
of the border, as shown in the following style rule.
p {
border-bottom: 10px;
border-right: 5px;
border-left: 1px;
border-top: 0px;
padding: 25px;
margin: 15px;
background-color: yellow;
border-style: solid;
border-color: green;
}
In this example, the top border is not displayed because its width is set to 0 pixels. You can
also add -bottom, -top, -left, and -right to the padding and margin properties. There are also
178 CHAPTER 4 Getting started with CSS3
some shortcuts to specifying the settings for each side. You can set the properties by specify-
ing top, right, bottom, and left by separating each value with a space as follows.
padding: 1px 2px 3px 4px ;
In this example, the top is set to 1 pixel, the right is set to 2 pixels, the bottom is set to 3
pixels, and the left is set to 4 pixels. In addition, if you know that you want the top and bot-
tom to have the same values and the left and right to have the same values, you can assign
the two values so that the rst value is the top and bottom setting, and the second value is
the left and right setting. The following example sets the top and bottom to 5 pixels and the
left and right to 15 pixels.
padding: 5px 15px;
Quick check
From the element outward, describe the box model.
Quick check answer
An element contains content immediately surrounded by the padding, which is
then surrounded by the border, which is then surrounded by the margin.
Positioning <div> elements
The <div> element has been the all-purpose element to use for creating page layouts.
Although there is movement away from using the <div> element in favor of using semantic
markup, the <div> element is still used when style needs to be applied to content that is not
represented with semantic elements.
The <div> element represents a rectangular block of content. Consider the following
HTML document.
<!DOCTYPE html>
<html xmlns="http://www.w3.org/1999/xhtml">
<head>
<title></title>
<link href="default.css" rel="stylesheet" />
</head>
<body>
<div id="div1">
<p>this is the first div</p>
</div>
<div id="div2">
<p>this is the second div</p>
<div id="div3">
<p>
this is the third div - Lorem ipsum dolor sit amet, salutandi
conceptam sea cu, eos id legimus percipit argumentum. Habeo
ipsum mandamus sit an, aeterno pertinax vim ad, et cibo
Key
Terms
Lesson 3: Working with CSS properties CHAPTER 4 179
atomorum mea. Ad vis illum porro disputando, ei eligendi
mandamus liberavisse sea. Sea debet comprehensam no, et
blandit officiis eos, ut per ubique abhorreant
</p>
</div>
<div id="div4">
<p>
this is the fourth div - Ignota impetus sadipscing sed ut,
sed ea alia menandri imperdiet. Te inani suscipiantur duo,
ad mei utroque accusata. Has veri dolores assueverit cu,
ad vocent fuisset expetenda quo. Vim id quot aliquid, ea
iisque gloriatur mei, eos ea ludus graeci melius. Saepe
accusam pericula cu usu, eos at alia everti.
</p>
</div>
<div id="div5">
<p>
this is the fifth div - Ei duo viderer legendos, fastidii
eligendi ad usu, audire accusamus te vel. Ullum referrentur
mei at, qui tota reque neglegentur ne. Ius eu minim
copiosae, malorum antiopam voluptaria te vel, nemore
eruditi fastidii nec te. Eos id prima ridens, prompta
alterum conclusionemque eu duo. Et vis elaboraret quaerendum.
Repudiare interesset his ad, vis facete commune ne.
</p>
</div>
</div>
<div id="div6">
<p>
this is the sixth div
</p>
</div>
</body>
</html>
Notice that the <div> elements with id of div3, div4, and div5 are nested within div2. These
elements contain dummy ller text. The default.css le contains the following style rule.
p {
margin: 0px;
}
div {
border: solid;
border-color: black;
}
#div1 {
background-color: yellow;
}
#div2 {
background-color: cyan;
}
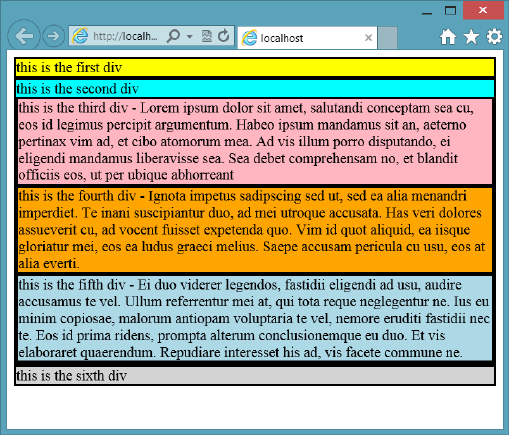
180 CHAPTER 4 Getting started with CSS3
#div3 {
background-color: lightpink;
}
#div4 {
background-color: orange;
}
#div5 {
background-color: lightblue;
}
#div6 {
background-color: lightgray;
}
In the style rules, the <p> element margin is set to 0 pixels to keep the paragraph from
inserting lots of space. Each <div> element background color is set to help differentiate
each element. If you display this page in a browser, you will see something that looks like
Figure 4-12.
FIGURE 4-12 The <div> elements rendering below one another
The default behavior of the <div> element is such that it consumes the entire width of the
screen, which forces the next <div> element to render on the next line. The borders touch
one another, and the text is very close to the borders. You can see how div2 contains div3,
div4, and div5 because the borders are contained within div2’s border.
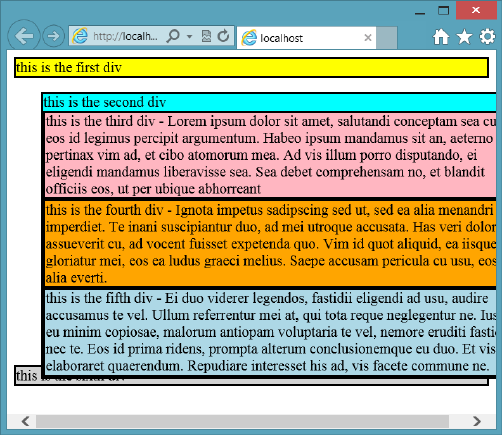
Lesson 3: Working with CSS properties CHAPTER 4 181
The rst thing you might want to do is set the <div> elements to a xed location and size
to help you gain control of the placement of the <div> elements when you are creating your
page layout. Use the position property, which should be set to static, relative, absolute, or
xed as follows.
Using the static position
The element is displayed where it would normally appear in the HTML ow. This is the default
setting and is not usually used except to override settings that might have been applied.
Using the relative position
The element can be offset from where it normally appears in the HTML ow. In this example,
div2 has the following style rule.
#div2 {
background-color: cyan;
position: relative;
top: 15px;
left: 30px;
}
With the top set to 15 pixels, div2 and its contents will be pushed down 15 pixels from its
normal location. The left setting of 30 pixels will push div2 and its contents to the right by 30
pixels. The result is shown in Figure 4-13.
FIGURE 4-13 The use of relative positioning to move div2 and its contents
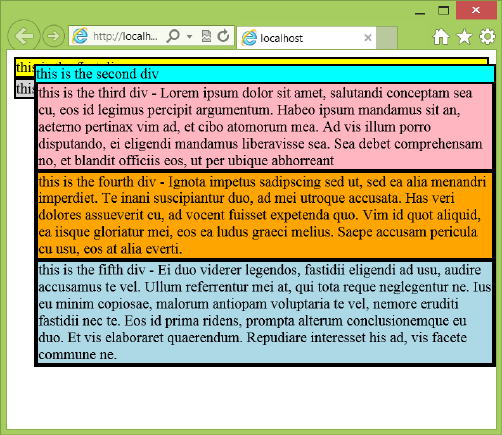
182 CHAPTER 4 Getting started with CSS3
In this example, div2 and its contents maintained the original size and were cut off on the
right side of the screen, and the last <div> element, div6, is still in its original location. The
values for top and left can also be negative to move the element in the opposite direction.
Using the absolute position
The element is removed from the HTML ow and positioned within the rst non-static ele-
ment. If all parent elements are static (the default), then the element is positioned within the
browser window. In this example, div2 has the following style rule, which sets the position to
absolute, and no parent elements are non-static.
#div2 {
background-color: cyan;
position: absolute;
top: 15px;
left: 30px;
}
With the top set to 15 pixels, div2 and its contents will be pushed down 15 pixels, not from
its normal location, but from the top of the browser window. The left setting of 30 pixels will
push div2 and its contents to the right by 30 pixels, also not from its normal location, but
from the left side of the browser window. The result is shown in Figure 4-14.
FIGURE 4-14 The use of absolute positioning to move div2 and its contents
In this example, div2 and its contents maintained the original size, and the last <div> ele-
ment, div6, has moved from its original location and is now under div1 because div2 and its
contents are no longer in the HTML document ow. Because there are no parent elements
that are non-static, the positioning is relative to the browser window.
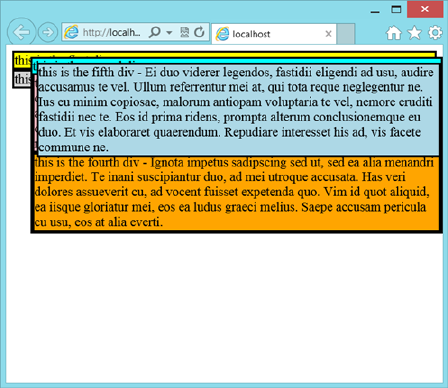
Lesson 3: Working with CSS properties CHAPTER 4 183
Now that div2 is non-static, what would happen if the position of one of its child elements
were set to absolute? For example, suppose div5 has the following style rule.
#div5 {
background-color: lightblue;
position: absolute;
top: 5px;
left: 5px;
}
If div5 had no non-static parent elements, div5 would be positioned in the top-left corner
of the browser window. Because div5 has div2 as a non-static parent, div5 will be positioned
in the top-left corner of div2. The result is shown in Figure 4-15.
FIGURE 4-15 The use of absolute positioning within a non-static element
Notice that div5 is positioned relative to div2, not relative to the browser window. One
of the benets of this approach is that you can easily set up div3, div4, and div5 as columns
within div2 by setting the top, left, right, and width properties for div3, div4, and div5, respec-
tively. Before demonstrating this, what would you do if you wanted div5’s position to be rela-
tive to the browser window? You can use xed positioning instead of absolute positioning.
Using the xed position
The element position is calculated much like it is with absolute positioning, but this is always
in relation to the browser window.
From the previous example, the style rule for div5 is changed to the following.
#div5 {
background-color: lightblue;
position: fixed;
top: 5px;
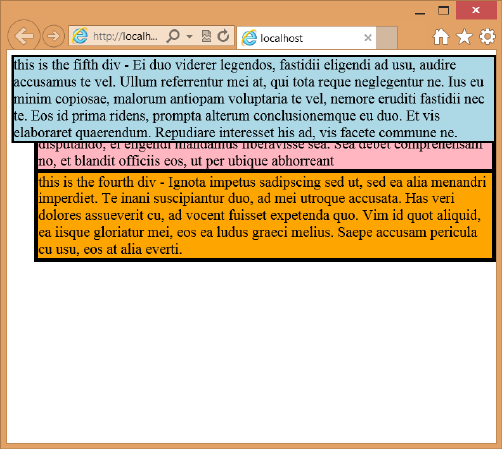
184 CHAPTER 4 Getting started with CSS3
left: 5px;
}
With the position set to xed, div5 is positioned relative to the browser window, as shown
in Figure 4-16.
FIGURE 4-16 Setting the position to fixed to set the positioning relative to the browser window
More absolute positioning
Return now to absolute positioning. You can set the position, size, and location of div3, div4,
and div5. The following is the contents of the default.css le.
p {
margin: 0px;
}
div {
border: solid;
border-color: black;
}
#div1 {
background-color: yellow;
}
#div2 {
background-color: cyan;
position: absolute;
top: 15px;
Lesson 3: Working with CSS properties CHAPTER 4 185
left: 30px;
width: 450px;
height:400px;
}
#div3 {
background-color: lightpink;
position: absolute;
top:0px;
left: 0px;
width: 33%;
height:100%;
}
#div4 {
background-color: orange;
position: absolute;
top:0px;
left:33%;
width:33%;
height:100%;
}
#div5 {
background-color: lightblue;
position: absolute;
top: 0px;
right: 0px;
width:33%;
height:100%;
}
#div6 {
background-color: lightgray;
}
In this example, div2 has an explicit width set to 450 pixels, and its height is set to 400
pixels. The top and left properties of div3 are set to 0 pixels. These settings are relative to
div2. The width of div3, div4, and div5 are set to 33 percent, which is relative to div2’s width.
The height of div3, div4, and div5 are set to 100 percent, which is relative to the height of
div2. The left property of div4 is set to 33 percent instead of 150 pixels, which means that you
can change the width of div2, and the columns will be automatically sized and positioned. The
result is shown in Figure 4-17.
One of the problems with this solution is that the height of div2 is xed at 400 pixels, and
changes to the content of div3, div4, or div5 can result in a large gap at the bottom or clip-
ping of the text at the bottom. This might be acceptable in some scenarios, but div6 is still at
the top. You might want the columns to grow and shrink dynamically and div6 to be placed at
the bottom of the columns, even as the column height changes. The use of the oat property
can solve this problem.
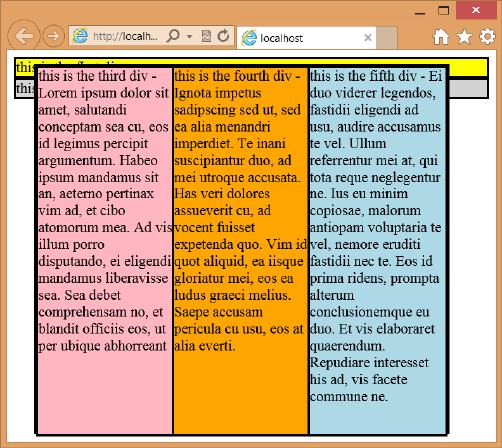
186 CHAPTER 4 Getting started with CSS3
FIGURE 4-17 The use of absolute positioning to create columns
Using the oat property
Absolute positioning can be a bit brittle when using absolute settings. In the previous
example, it would be better if the <div> elements were not removed from the HTML docu-
ment ow but, rather, could be sized and placed side by side to produce columns. If the
<div> elements are not removed from the HTML document ow, div6 will automatically stay
at the bottom.
The oat property can be set to allow an element to oat to the left or right. An element
can be oated only horizontally, not vertically, and will oat as far to the left or right as it can.
Elements after the oating element ow around the oating element. Elements before the
oating element are not affected.
To understand how the oat property works, the same HTML document is used as in pre-
vious examples, and the following is the content of the default.css le.
p {
margin: 0px;
}
div {
border: solid;
border-color: black;
}
#div1 {
background-color: yellow;
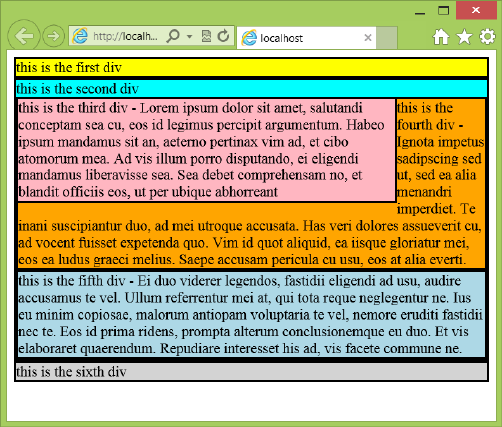
Lesson 3: Working with CSS properties CHAPTER 4 187
}
#div2 {
background-color: cyan;
}
#div3 {
background-color: lightpink;
float: left;
width: 80%;
}
#div4 {
background-color: orange;
}
#div5 {
background-color: lightblue;
}
#div6 {
background-color: lightgray;
}
In this example, the div3 oat property is set to left, and the width is set to 80 percent.
Figure 4-18 shows the rendered page.
FIGURE 4-18 Floating elements with wrapping
In Figure 4-18, div3 width and oat properties are set. The width is set to 80 percent, but
what happens to the leftover 20 percent? In this example, div4 is placed right after div3, so
div4 ows downward until div3 ends. At that point, div4’s width becomes 100 percent. The
188 CHAPTER 4 Getting started with CSS3
net effect is that div4 wraps around div3. This technique is commonly used to insert pictures
in an HTML document so that the text wraps around the image.
When multiple elements’ oat property is set to the same direction, the elements stack
horizontally. This behavior can be used to create columns. In the following example, the oat
property of div3, div4, and div5 is set to left, and their width property is set to 33 percent,
using the following style rules.
p {
margin: 0px;
}
div {
border: solid;
border-color: black;
}
#div1 {
background-color: yellow;
}
#div2 {
background-color: cyan;
}
#div3 {
background-color: lightpink;
float: left;
width: 32%;
}
#div4 {
background-color: orange;
float: left;
width: 32%;
}
#div5 {
background-color: lightblue;
float: left;
width: 32%;
}
#div6 {
background-color: lightgray;
}
The width is set to 32 percent instead of 33 percent because the width setting does not
include the border width, which is defaulting to 2 pixels. The result is shown in Figure 4-19.
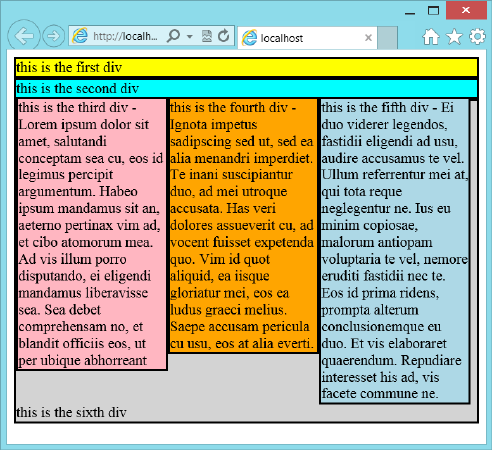
Lesson 3: Working with CSS properties CHAPTER 4 189
FIGURE 4-19 Using the float property to create columns
With all three columns rendering side by side and inside div2, borders use a total of 14
pixels. If the width is set to 33 percent, the last column won’t t and will be pushed under div3
because setting the width to 32 percent causes a sliver to be available on the right side, and
div6 lls the void. How can div6 be styled to show just at the bottom? Use the clear property.
Using the clear property
The clear property instructs the browser to place the clear element after the oating ele-
ments. Set the clear property to both, as shown in the following style rule for div6.
#div6 {
background-color: lightgray;
clear: both;
}
Figure 4-20 shows the rendered page. Notice the location of div6. Using this approach
keeps div6 from consuming space beside the columns.
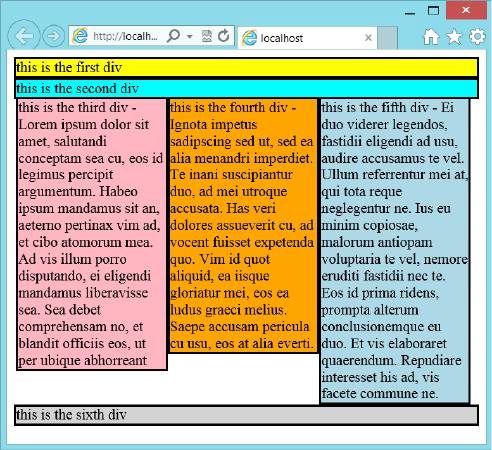
190 CHAPTER 4 Getting started with CSS3
FIGURE 4-20 The clear property set to both
Using the box-sizing property
The previous example looks good except for the space on the right side. Many developers
would play with the width settings on the three columns until they found settings that cause
the third column to line up properly on the right. Remember that the reason for the gap on
the right side is that the width of the columns is set to 32 percent because the width is based
on the content of the element, not including the border.
To solve this problem, you can change the way the browser calculates the width by setting
the box-sizing property on div3, div4, and div5. The box sizing has the following valid values.
content-box The default setting; calculates the width based on the content width
only.
border-box Calculates the width based on the border, padding, and content width.
padding-box Calculates the width based on the padding and content width.
In the following example, the columns’ box sizing is set to border-box, and then the width
of the columns is set to 33 percent, 34 percent, and 33 percent.
p {
margin: 0px;
}
div {
border: solid;
border-color: black;
Lesson 3: Working with CSS properties CHAPTER 4 191
}
#div1 {
background-color: yellow;
}
#div2 {
background-color: cyan;
clear: both;
}
#div3 {
background-color: lightpink;
box-sizing: border-box;
float: left;
width: 33%;
}
#div4 {
background-color: orange;
box-sizing: border-box;
float: left;
width: 34%;
}
#div5 {
background-color: lightblue;
box-sizing: border-box;
float: left;
width: 33%;
}
#div6 {
background-color: lightgray;
clear: both;
}
The rendered output is shown in Figure 4-21.
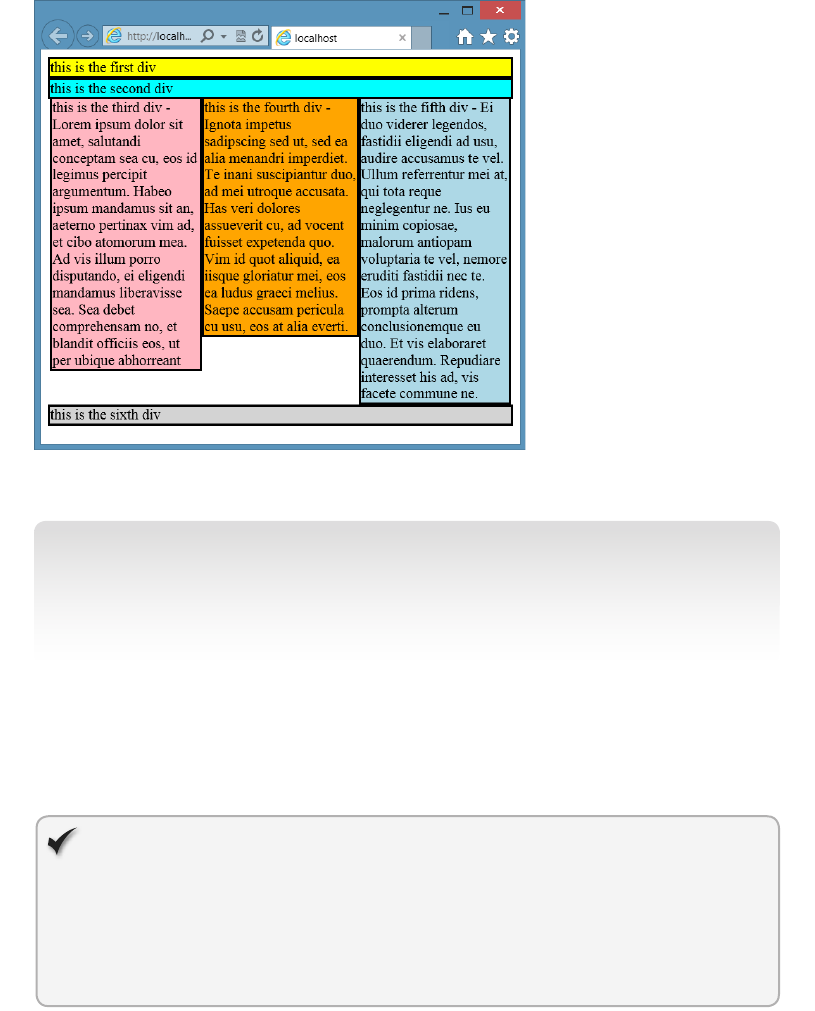
192 CHAPTER 4 Getting started with CSS3
FIGURE 4-21 Using the box-sizing property to control width calculations
NOTE ALTERNATE BROWSER RENDERING
Remember that in many of these examples, different browsers render differently. In this
example, you will need to add the following style rule to x Firefox.
-moz-box-sizing: border-box;
If you look closely at Figure 4-21, you might notice that on the left and right sides of the
columns, there is a very small space. This is because div3, div4, and div5 are inside div2; they
t within the border of div2. If you need these columns to line up exactly with the border of
div2, you can take div3, div4, and div5 out of div2.
Quick check
You want to set the width of an element based on its overall width. What should
the box sizing be set to?
Quick check answer
box-sizing: border-box;
Lesson 3: Working with CSS properties CHAPTER 4 193
Centering content in the browser window
Creating a page layout that looks great in any browser and continues to look good as the
browser window is resized can be a daunting task. A common approach to solving this
problem is to create a <div> element that contains your content and set the <div> to a xed
width, such as 800 pixels.
If you set the width to a xed size, you’ll probably want to center the <div> element in
the browser window. You can do that by setting the left and right margins of the <div> ele-
ment to auto. When both margins are set to auto and the width is set, the browser divides
the excess margin space equally. The result is a centered <div> element. For example, if your
content is in a <div> element whose id is set to “container”, you can add the following style
rule to center the container’s contents.
#container {
width: 600px;
margin-left: auto;
margin-right: auto;
}
The width must be set, or the centering will not work.
Lesson summary
CSS colors can be set using color names; hexadecimal notation; or the rgb, rgba, and
hsl functions.
Use the opacity property to set the transparency.
To format text, set the font-family property and then set the font properties.
Font families that have curls at the top and bottom of characters belong to the serif
font family group. Font families that don’t have curls belong to the sans serif font fam-
ily group. Font families whose characters are all the same width belong to the mono-
spaced font family group. Font families that imitate handwriting belong to the cursive
font family group. Font families that are decorative belong to the fantasy font family
group.
The CSS box model denes element content as surrounded by padding, which is then
surrounded by the border, which is then surrounded by the margin.
You can set all four sides of the margin, padding, and border by providing a single size
to be applied to all sides, or you can set individual sides by adding -top, -bottom, -left,
or -right to the property and assigning a value to each.
The <div> element can be positioned by assigning a value of static, relative, absolute,
or xed to the position property.
The oat property can be used to create columns without removing the <div> element
from HTML ow. This property can also be used to position images so that text ows
around the image.

194 CHAPTER 4 Getting started with CSS3
Use the clear property to indicate when an element is to be positioned clear after the
previous element.
Use the box-sizing property to change the default width calculation from content to
border.
Lesson review
Answer the following questions to test your knowledge of the information in this lesson. You
can nd the answers to these questions and explanations of why each answer choice is correct
or incorrect in the “Answers” section at the end of this chapter.
1. You want to nd three shades of a color to use on parts of your webpage. Which color
function helps you accomplish this task?
A. rgb( )
B. rgba( )
C. hsl( )
D. color( )
2. A font that has curls at the top and bottom of its characters belongs to which font
family group?
A. monospace
B. serif
C. sans serif
D. cursive
E. fantasy
3. You want to position a <div> element in relation to the browser window. Which posi-
tion setting do you use?
A. static
B. relative
C. absolute
D. xed
Practice exercises
If you encounter a problem completing any of these exercises, the completed projects can be
installed from the Practice Exercises folder that is provided with the companion content.
Practice exercises CHAPTER 4 195
Exercise 1: Add a style sheet to the calculator project
In this exercise, you apply your CSS3 knowledge by adding a cascading style sheet to the
WebCalculator project that you created in Chapter 3, “Getting started with JavaScript.” You
add style rules to improve the look of the webpage. The color scheme for this webpage will
be purple-blue, and all colors will have the hue set to 255.
This exercise adds style rules with a minimum of modications to the default.html le. In
the next exercise, you make changes to the default.html le that the style rules can use to n-
ish cleaning up the webpage.
1. Start Visual Studio Express 2012 for Web. Navigate to File | Open Project.
2. Navigate to the solution that you created in Chapter 3 and select the WebCalculator.sln
le. Click Open. You can also navigate to File | Recent Projects and Solutions to select
the solution.
If you didn’t complete the exercises in Chapter 3, you can use the solution in the
Chapter 4 Exercise 1 Start folder.
3. In the Solution Explorer window, right-click the default.html le and choose Set As
Start Page. Press F5 to verify that your home page is displayed.
4. In the Solution Explorer window, add a CSS le by right-clicking the Content folder in
the project and navigating to Add | Style Sheet.
5. Name the page default.css and click OK.
6. Open the default.html page, drag the default.css le from the Solution Explorer win-
dow, and drop it just before the <script> element that loads the CalculatorLibrary.js
le. The <head> element should look like the following.
<head>
<title>Web Calculator</title>
<link href="Content/default.css" rel="stylesheet" />
<script type="text/javascript" src="Scripts/CalculatorLibrary.js"></script>
</head>
7. Open the default.css le and set the body background color with maximum saturation
and half lightening as follows.
body {
background-color: hsl(255,100%,50%);
}
8. Add a style rule that formats the text boxes.
This style sets the height, width, text alignment, padding, and border style as follows.
input {
width: 446px;
height: 35px;
text-align: right;
padding: 10px;
border: inset;
}
196 CHAPTER 4 Getting started with CSS3
9. Add a style rule that formats the buttons.
This style sets the background color, width, height, and border styles as follows.
button {
background-color: hsl(255, 50%, 80%);
width: 150px;
height: 50px;
border: outset;
}
10. Add a style rule that sets the format of the buttons when you hover over a button.
This style sets the background color as follows.
button:hover {
background-color: hsl(255, 50%, 90%);
}
11. Add a style rule that sets the format of the buttons when a button is clicked.
This style sets the background color and the border style as follows.
button:active {
border: inset;
border-width: thick;
border-color: hsl(255, 100%, 100%);
background-color: hsl(255, 50%, 50%);
}
12. Add a style rule that provides common formatting for the buttons and text boxes.
The selector should be for the <input> and the <button> elements and should set the
font family, font size, border width, border color, and margin.
input, button {
font-family: Arial;
font-size: 24pt;
border-width: thick;
border-color: hsl(255, 100%, 100%);
margin: 5px;
}
13. Add a style to the txtResult text box to indicate that this text box is read-only.
The style sets the background color as follows.
#txtResult {
background-color: hsl(255, 50%, 80%);
}
14. To see the results, press F5 to start debugging the application.
You should see a nicer-looking calculator interface, as shown in Figure 4-22.
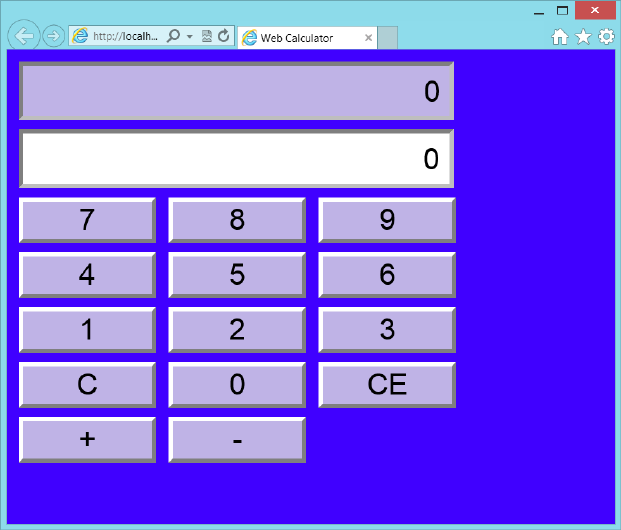
Practice exercises CHAPTER 4 197
FIGURE 4-22 The web calculator user interface
15. Try entering data and clicking the plus and minus buttons.
The calculator should be working.
16. Switch back to Visual Studio by pressing Alt+Tab. Notice that the title bar says
(Running).
17. Press Shift+F5 to stop debugging.
Shift+F5 works only when Visual Studio has the focus, not when the running applica-
tion has the focus.
The only real change on the default.html page was to add the link to the style sheet.
The calculator is left justied in the browser window, and too many settings have abso-
lute values. In the next exercise, you clean up the rest of this webpage.
Exercise 2: Clean up the web calculator
In this exercise, you continue with the project from Exercise 1 and modify the default.html le
to aid in formatting the webpage. You add <div> elements so you can center the calculator
in the browser window. You also implement a read-only CSS class that can be used on any
read-only text box.
198 CHAPTER 4 Getting started with CSS3
1. Open the project from Exercise 1.
If you didn’t perform Exercise 1, you can use the project located in the Exercise 2 Start
folder.
2. Open the default.html le.
3. Surround the inputs and buttons with a <div> element whose id is set to “calculator”.
This <div> element will be used to center the calculator and create a box around it.
The default.html should look like the following.
<!DOCTYPE html>
<html xmlns="http://www.w3.org/1999/xhtml">
<head>
<title>Web Calculator</title>
<link href="Content/default.css" rel="stylesheet" />
<script type="text/javascript" src="Scripts/CalculatorLibrary.js"></script>
</head>
<body>
<div id="calculator">
<input id="txtResult" type="text" readonly="readonly" /><br />
<input id="txtInput" type="text" /><br />
<button id="btn7">7</button>
<button id="btn8">8</button>
<button id="btn9">9</button><br />
<button id="btn4">4</button>
<button id="btn5">5</button>
<button id="btn6">6</button><br />
<button id="btn1">1</button>
<button id="btn2">2</button>
<button id="btn3">3</button><br />
<button id="btnClear">C</button>
<button id="btn0">0</button>
<button id="btnClearEntry">CE</button><br />
<button id="btnPlus">+</button>
<button id="btnMinus">-</button>
</div>
<script type="text/javascript">
window.addEventListener('load', initialize, false);
</script>
</body>
</html>
4. Open the default.css le.
5. Insert, after the body style, a style rule for the <div> element whose id is “calculator”.
Set the style properties to put a border around the calculator. Set a xed height and
width. Center the contents and set the padding as follows.
#calculator {
border: solid;
background-color: hsl(255, 100%, 60%);
width: 500px;
height: 500px;
margin-left: auto;
Practice exercises CHAPTER 4 199
margin-right: auto;
text-align: center;
padding: 10px;
}
Now that you have a box with a xed height and width, you can change the height and
width settings on the input and button elements to be a percentage of the calculator
size.
6. Change the style rules as follows.
input {
width: 85%;
height: 7%;
text-align: right;
padding: 10px;
border: inset;
}
button {
background-color: hsl(255, 50%, 80%);
width: 25%;
height: 10%;
border: outset;
}
Instead of setting the style of txtResult by using its id, it would be better to change the
selector to apply the style to any element whose read-only attribute is set.
7. Change the style rule as follows.
[readonly] {
background-color: hsl(255, 50%, 80%);
}
Your completed default.css le should look like the following.
body {
background-color: hsl(255,100%,50%);
}
#calculator {
border: solid;
background-color: hsl(255, 100%, 60%);
width: 500px;
height: 500px;
margin-left: auto;
margin-right: auto;
text-align: center;
padding: 10px;
}
input {
width: 85%;
height: 7%;
text-align: right;
200 CHAPTER 4 Getting started with CSS3
padding: 10px;
border: inset;
}
button {
background-color: hsl(255, 50%, 80%);
width: 25%;
height: 10%;
border: outset;
}
button:hover {
background-color: hsl(255, 50%, 90%);
}
button:active {
border: inset;
border-width: thick;
border-color: hsl(255, 100%, 100%);
background-color: hsl(255, 50%, 50%);
}
input, button {
font-family: Arial;
font-size: 24pt;
border-width: thick;
border-color: hsl(255, 100%, 100%);
margin: 5px;
}
[readonly] {
background-color: hsl(255, 50%, 80%);
}
8. Press F5 to run the application.
Figure 4-23 shows the completed calculator.
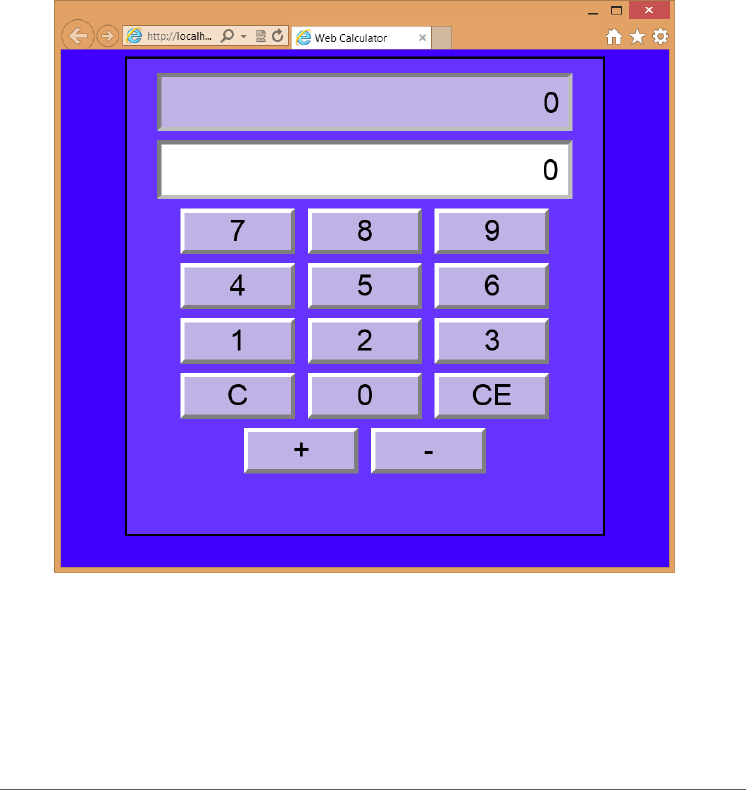
Suggested practice exercises CHAPTER 4 201
FIGURE 4-23 The completed web calculator
9. Try clicking the number buttons to choose numbers and try the plus and minus but-
tons while observing the result. Try clicking the clear-entry button after you enter a
number. Try clicking the clear button to see the input and result clear.
Suggested practice exercises
The following additional exercises are designed to give you more opportunities to practice
what you’ve learned and to help you successfully master the lessons presented in this chapter.
Exercise 1 Learn more about positioning by adding more <div> elements to the
webpage to dene a header and footer for the page. Use CSS style rules to set the
position.
Exercise 2 Learn more about CSS selectors by adding more elements to the page
and try setting the format by selecting the elements without using an id.
Exercise 3 Learn more about colors by changing the color scheme, using RGB values.

202 CHAPTER 4 Getting started with CSS3
Answers
This section contains the answers to the lesson review questions in this chapter.
Lesson 1
1. Correct answer: C
A. Incorrect: //temporary is a comment for programming languages such as C, C++,
and C#, but it’s not applicable in a style sheet.
B. Incorrect: --temporary is a SQL Server comment, not a style sheet comment.
C. Correct: The block comment syntax, /* temporary */, can make an entire block of
text into a comment.
D. Incorrect: rem temporary is a DOS batch le comment, but it’s not applicable to
style sheets.
2. Correct answer: C
A. Incorrect: Inline styles do not provide any separation because they are dened on
the HTML element.
B. Incorrect: Embedded styles provide little separation because they are located in
the HTML <head> element.
C. Correct: External style sheets provide the best separation because the style rules
are in a separate le from the HTML document.
D. Incorrect: The @import statement is used in external style sheets to import styles
into the style sheet. This provides reuse functionality. The @import statement can-
not be used in the HTML document.
3. Correct answer: B
A. Incorrect: The rel attribute species the relationship between the HTML document
and the linked le.
B. Correct: The media attribute is required to specify the style sheet usage.
C. Incorrect: Using the printer.css name has no bearing on the usage of the le.
D. Incorrect: The target attribute typically species the frame the link will target.
Lesson 2
1. Correct answer: A
A. Correct: The rst part of the selector locates the element with id of readingPane
while the second part of the selector locates all paragraph elements, and then
returns the rst letter of each paragraph so the style can be applied to it.

Answers CHAPTER 4 203
B. Incorrect: The rst part of the selector locates the element with id of readingPane
while the second part of the selector returns the rst letter of the <div> element,
but not for each paragraph.
C. Incorrect: The rst part of the selector locates the element with id of readingPane
while the second part of the selector locates all paragraph elements and returns
only the rst paragraph. The style is applied to the entire paragraph.
D. Incorrect: The rst part of the selector locates the element with id of readingPane
while the second part of the selector returns the child of its parent, so the style is
applied to the entire <div> element.
2. Correct answer: A
A. Correct: Specicity is the deciding factor in this example. The specicity value is
0,1,2 in the rst style rule. The specicity value is 0,0,2 in the second style rule. The
rst value is higher; thus, yellow is displayed.
B. Incorrect: Remember that textual order comes into play only when the specicity
values are the same.
C. Incorrect: There are selector matches that would keep the color from being
transparent.
D. Incorrect: There are selector matches that would keep the color from being white.
3. Correct answer: B
A. Incorrect: Remember that if the specicity values are the same, textual order dic-
tates the outcome.
B. Correct: The specicity value for both style rules is 0,1,2, so textual order dictates
the outcome. The Department.css le is linked after the Corporate.css le, so the
style rule in the Department.css le will be applied.
C. Incorrect: There are selector matches that would keep the color from being
transparent.
D. Incorrect: There are selector matches that would keep the color from being white.
Lesson 3
1. Correct answer: C
A. Incorrect: The rgb function requires you to specify varying amounts of red, green,
and blue for each color, so it’s not easy to derive three colors that match.
B. Incorrect: The rgba function is the same as the rgb function, except that you need
to specify the alpha (opacity) value, too.
C. Correct: By using the hsl function, you can set the hue value and then adjust the
saturation and lightening values to derive other matching colors.
D. Incorrect: There is no color function that can be used in a style sheet to generate
a color.

204 CHAPTER 4 Getting started with CSS3
2. Correct answer: B
A. Incorrect: The monospace font family characters are all the same width.
B. Correct: The serif font family characters have serifs (curls) on the top and bottom
of them.
C. Incorrect: The sans serif font family characters do not have serifs (curls) on the top
and bottom of them.
D. Incorrect: The cursive font family characters imitate handwriting.
E. Incorrect: The fantasy font family has decorative characters.
3. Correct answer: D
A. Incorrect: Using static, the element is displayed where it would normally appear in
the HTML ow. This is the default.
B. Incorrect: Using relative, the element is displayed relative to where it would nor-
mally appear in the HTML ow.
C. Incorrect: Using absolute, the element is removed from the HTML ow and
positioned within the rst non-static element. Although this could mean that the
element is positioned within the browser window, it’s not guaranteed.
D. Correct: Using xed, the element is removed from the HTML ow and positioned
within the browser window.

205
CHAPTER 5
More HTML5
The previous chapters covered a lot of material you need to know. Much, but not all, of
the content in the previous chapters existed before the HTML5 technologies came to be.
This chapter provides a transition, moving you from old to new topics. Lesson 1, “Thinking
HTML5 semantics,” discusses many aspects of HTML5 semantics that are primarily new top-
ics. Lesson 2, “Working with tables,” explains tables, which is an older but relevant topic, and
describes added features in HTML5.
Lessons in this chapter:
Lesson 1: Thinking HTML5 semantics 205
Lesson 2: Working with tables 229
Before you begin
To complete this chapter, you must have some understanding of web development. This
chapter requires the hardware and software listed in the “System requirements” section in
the book’s Introduction.
Lesson 1: Thinking HTML5 semantics
The previous chapter covered CSS positioning; all the examples used the <div> element.
The <div> element has been the preferred element to use for positioning content when
creating a page layout.
Many developers have also used the <table> element, but that element is much more
difcult to use, especially to maintain a website. Lesson 2 explains the <table> element but
doesn’t use a <table> element for page layout.
This lesson provides a different approach to creating a page layout; it covers semantic
elements and explains why you should use them.
206 CHAPTER 5 More HTML5
After this lesson, you will be able to:
Create a semantic layout.
Create an HTML5 document.
Annotate content.
Display various forms of semantic content.
Estimated lesson time: 30 minutes
Why semantic markup?
One of the problems with using <div> and <span> elements is that they have little meaning
other than “I need to do something with this content.” For <div> elements, you typically need
to position the content on the page. For <span> elements, you need to apply special format-
ting to the content.
You might be wondering what kind of meaning the <div> and <span> elements can
provide. For <div> elements, it might be better to have an element that represents the page
header and can be positioned. You might want a different element that represents the page
footer and can be positioned.
Are your users reading your HTML source? If the <div> element is the all-purpose tool to
position elements, why use these new semantic elements?
These are good questions and thoughts. In fact, if you search the web for semantic
markup, you’ll see plenty of discussions, some quite heated, about this topic.
Developers have been using <div> elements for page layout, and the developer usually
provides the meaning of each <div> element based on its id or CSS class. The W3C analyzed
thousands of webpages and found the most common id and class names. Rather than start
over, the W3C made these names into new elements. Obvious examples are the <header>
and <footer> elements.
Browser support for HTML5
Your users typically don’t read your HTML source when they browse to your website, but
many machines are reading your HTML source with the goal of interpreting your webpage.
Web crawlers are constantly surng the Internet, reading webpages and building indexed
searchable content that can be used to nd your website. Many people have Nonvisual
Desktop Access (NVDA) devices, which provide an alternate means of viewing, reading, and
processing webpages. Some NVDA devices implement voice synthesis to read webpages to
visually impaired people; others provide a Braille-like interface so the user can read your web-
pages by touch, as shown in Figure 5-1.

Lesson 1: Thinking HTML5 semantics CHAPTER 5 207
NVDA devices need your help to interpret your webpage content properly. They need you
to use meaningful HTML tags that dene the purpose of each element’s contents. Doing so
helps crawlers produce better matches to search queries, and NVDA devices that read your
webpages to users can provide a more meaningful experience. For more information, visit
http://www.nvdaproject.org/.
FIGURE 5-1 The refreshable Braille display
Creating semantic HTML5 documents
Now that you understand the importance of using semantic markup, you might decide that
you’ll never use a <div> or <span> element again. However, you will come across content
that needs to be styled but doesn’t clearly t the meaning of any semantic elements. You can
and should use <div> and <span> elements in these scenarios.
Throughout this book, you will nd many HTML5 tags. As you create your HTML pages,
you will be faced with the sometimes daunting task of providing meaning to your content by
supplying semantic tags. Use semantics carefully so you use an element only for its intended
purpose. If you need a custom element, use the <div> or <span> tag and add a class name or
id that conveys the semantics you desire. Be pragmatic and not too much of a purist.
Creating an HTML5 layout container
The previous chapter showed many examples that demonstrate the use of <div> elements
to provide positioning of content on a webpage. If you were creating a webpage to display
blog posts, you might create a layout container for your page that looks like the example in
Figure 5-2.
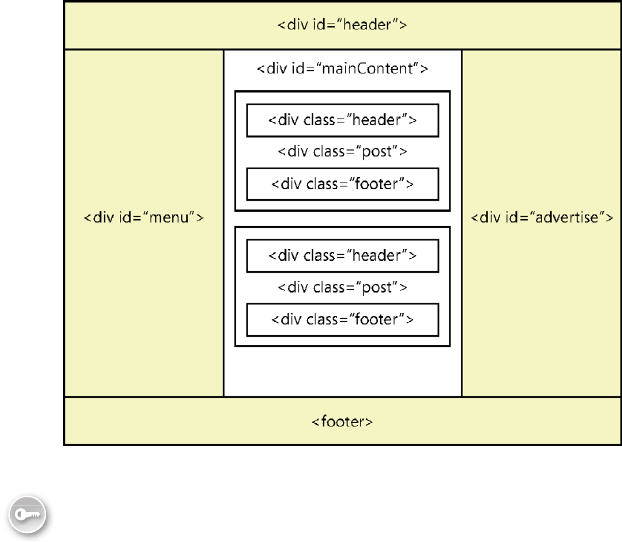
208 CHAPTER 5 More HTML5
FIGURE 5-2 A blog site layout container using <div> elements
A layout container lays out its children in a way that is exible and reusable. For the devel-
oper, the purpose of the <div> elements is easy to understand based on the id and CSS class
names. How can the browser understand the elements? If you want the browser to give the
user the ability to focus automatically on the rst element in the main content when the page
opens, how would you do this? If you want the browser to give the user special quick-launch
buttons for the menu items, how could you accomplish this?
By using HTML5 semantic elements, you can create a layout container that uses elements
that are meaningful to both the developer and the browser. The following are common ele-
ments by which to create an HTML5 layout container.
<header> Denes a section that provides a header. You can use the <header>
element at the top of your HTML document as a page header. You can also use the
<header> element in the <article> element.
<footer> Denes a section that provides a footer. You can use the <footer> element
at the bottom of your HTML document as a page footer. You can also use the <footer>
element in the <article> element.
<nav> Denes a section that houses a block of major navigational links.
<aside> Denes a section of content that is separate from the content the <aside>
element is in. This is typically used for sidebars.
<section> Part of the whole that is typically named with an <h1> to <h6> element
internal element.
Key
Terms
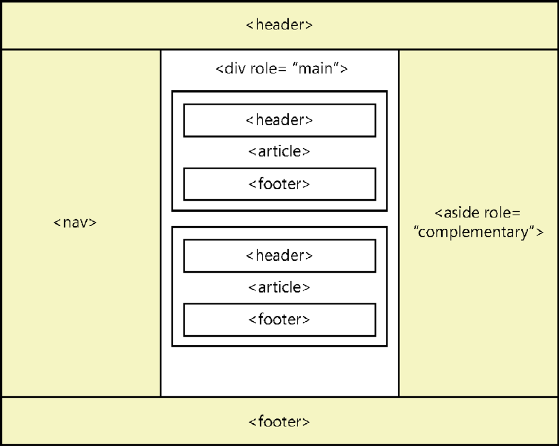
Lesson 1: Thinking HTML5 semantics CHAPTER 5 209
<article> A unit of content that can stand on its own and can be copied to other
locations. A blog post is a good example of an article.
Figure 5-3 shows how these elements might be applied to create a layout container.
FIGURE 5-3 Layout container example, using the new HTML5 elements
In Figure 5-3, all <div> elements have been replaced with the new HTML5 elements.
Using the <header> element
The <header> elements in Figure 5-3 replace the <div id=”header”> elements in Figure 5-2,
which cleans up the page a bit and provides a section meaning to browsers and other
devices. Don’t confuse the HTML5 <header> element that is within a <body> element, which
is visible, with the HTML <head> element for the HTML document, which is invisible.
The <header> element should contain <h1> to <h6>, referred to as an <hn> moving
forward element, containing your visible heading. You can also have other content with
your <header> element, such as company logos and navigational links, as in the following
example.
<header>
<h1>Contoso Ltd.</h1>
<img src="logo.jpg" alt="Company Logo" />
<p>Other supplementary information</p>
</header>
You can have multiple <header> elements in an HTML document. There are multiple
<header> elements within this layout container because each <article> element has a
<header>.
210 CHAPTER 5 More HTML5
The <header> element can also contain the <hgroup> element, which provides the ability
to group one or more <hn> elements within a <header> element, as shown in the following
code example.
<header>
<hgroup>
<h1>Primary Header</h1>
<h2>seconday header</h2>
</hgroup>
<img src='logo.jpg' alt='Company Logo' />
</header>
The <hgroup> is a wrapper for one or more related header elements. The <hgroup>
element can be in a <header> element but doesn’t need to be in a <header> element. The
<hgroup> is most commonly used for subtitles and alternative titles.
The biggest reason for using the <hgroup> element has to do with using HTML5 outliner
tools. If you have an <h1> header element and an <h2> subheader element, and you don’t
use the <hgroup> to connect a header and subheader, the outline treats the <h2> as a sec-
ond level, but you really want the subheading to be ignored. The <hgroup> will expose only
the rst element and hide the other <hn> elements in the <hgroup>.
If your header is just an <hn> and contains no other content, you don’t need a <header>
element. As soon as you have more than a single <hn>, such as <img> elements and <p>
elements, wrap your content in a <header> element. When you have multiple <hn> ele-
ments, such as a header and subheader, wrap the <hn> elements in the <hgroup> element. A
<header> element should not be nested inside a <header> element.
By looking at the difference between Figure 5-2 and Figure 5-3, you can see that the
<header> element replaced the <div id=”header”> element. Be careful, because by default
the <header> element on some browsers does not render as a rectangular block as the
<div> element does. You can x this by adding the following style rule to provide matching
behavior.
header { display:block;}
Using the <footer> element
The <footer> elements in Figure 5-3 replace the <div id=”footer”> elements in Figure 5-2,
which cleans up the page a bit and provides a section meaning to browsers and other
devices.
The <footer> element typically contains information about the section it’s in, such as who
wrote it, copyright information, and links to related documents. The <footer> element is
much like the <header> element except that it typically belongs at the bottom of a section
instead of at the top. Like the <header> element, it can be used many times within an HTML
document to provide ending content for the HTML document and ending content for articles
and sections within the HTML document. The <footer> element should not be nested inside a
<footer> element. The following is an example of a <footer> element.
Lesson 1: Thinking HTML5 semantics CHAPTER 5 211
<footer>
<ul>
<li>Copyright (C) 2012, Contoso Ltd., All rights reserved</li>
<li><a href="default.html">Home</a></li>
</ul>
</footer>
Using the <nav> element
The <nav> element in Figure 5-3 replaces the <div id=”menu”> element in Figure 5-2, which
provides a section meaning to browsers and devices. The <nav> element wraps a group of
major links that are on your page. Menus are the most common candidates for the <nav>
element.
Like menus, footers commonly have groups of links, but you don’t need to use the <nav>
element if you are using the <footer> element, and the <nav> element is not required for
links within your content. You can have many <nav> elements in an HTML document. For
example, in addition to the menu that is normally on the left side or across the top of the
page, you might have a group of links above the footer that link to the next page of blog
posts or to other major areas of your site.
Think of a screen reader when implementing the <nav> element. It will be looking for the
primary navigation area on the webpage so it can present these links to the user as menu
items that have links to other areas within the current website. Links to off-site locations
should not be part of the <nav> element. Footer links to secondary areas of your website also
don’t require a <nav> element.
Using the <aside> element
The <aside> element in Figure 5-3 replaces the <div id=”advertise”> element in Figure 5-2,
which provides a section meaning to browsers and devices.
The <aside> element wraps secondary content when used for sidebars. In many cases, this
is where the advertising and other site-related content goes. In addition, when the <aside>
element is in an article, it should contain content tangentially related to the content within
the article. The use of the <aside> element differs based on the context, as shown in the fol-
lowing example.
<body>
<header>
<h1>Blogging for fun</h1>
</header>
<article>
<h1>Blog of the day</h1>
<p>This is today's blog post. La, la, la, la, la,
la, la, la, la, la, la</p>
<aside>
<!-- Inside the article, so it's related to the article -->
<h1>What's this all about?</h1>
<p>This article talks about la, la...</p>
</aside>

212 CHAPTER 5 More HTML5
</article>
<aside>
<!-- Outside the article, so it's related to the sites -->
<h2>Blog Advertising</h2>
<p>You too can have your own blog...</p>
</aside>
</body>
The two meanings make sense when you consider that an article should be a complete
unit that can be shared.
Using roles
In Figure 5-3, the <aside> element and the <div> element implement the role attribute,
specied by the Web Accessible Initiative (WAI), which species the Accessible Rich Internet
Applications (ARIA) suite, called WAI-ARIA.
WAI-ARIA denes the role class hierarchy and how roles are used to provide specic
meaning to screen readers for accessibility purposes. There are many parent role classes, and
there are child role classes that inherit from role classes. One such parent role class is called
the landmark role class, which represents regions of the page intended as navigational land-
marks. The following are child classes of the landmark role class.
application An area declared as a web application as opposed to a web document.
banner An area on a webpage that has site-specic content, such as site name and
logo, instead of page-specic content; maximum one per webpage, usually header
content.
complementary An area on a webpage that complements the page but still has
meaning if separated from the page.
contentinfo An area that contains information about the parent document such as
copyright notices and links; maximum one per webpage, usually footer content.
form An area on a webpage that contains a collection of input controls for gathering
data to be sent to the web server; search forms should use the search role.
main An area that contains the main content of the document; maximum one per
webpage.
navigation An area that contains navigational links.
search An area on a webpage that contains a collection of input controls for entering
and displaying search information.
You can use these roles to provide meaning to an area of the webpage, but the new
HTML5 elements already provide meaning. However, the HTML5 elements don’t provide a
new element to identify the main content of the webpage. Instead, all known content is not
the main content, and what’s left over must be the main content. Furthermore, the <aside>
element is used as a sidebar, and you might want to provide more meaning. Why not use the
WAI-ARIA role to provide meaning to other developers and to assistive devices? That is what
is illustrated in Figure 5-3.
Key
Terms
Lesson 1: Thinking HTML5 semantics CHAPTER 5 213
Controlling format by using the <div> element
Don’t forget that the <div> element can be placed around content, enabling you to control
its format. The <div> element is invisible and has no meaning, so when using HTML5, it’s gen-
erally better to use a semantic element such as article or section to provide context that has
meaning. If all you need is formatting, the use of the <div> element is perfect.
Adding thematic breaks
Use the <hr /> element to add a thematic break. It is a void element, so it cannot have any
content. You can use the <hr /> element to provide a thematic break when there is a scene
change in a story or to denote a transition to another topic within a section of a reference
book.
Annotating content
When annotating content by using HTML5 elements, be aware that the <b> and <i> ele-
ments that have been around since the beginning are still available but now have new mean-
ing. This section describes the use of the <b> and <i> elements and many other elements
that can be used to annotate content.
Using the <b> element
The <b> element was used to produce bold text, but now elements should have meaning,
not style. To keep the <b> element but also have semantic elements, the meaning needed to
change.
According to the W3C, the <b> element represents a span of text to which attention is
being drawn for utilitarian purposes without conveying any extra importance and with no
implication of an alternate voice or mood, such as keywords in a document abstract; product
names in a review; actionable words in interactive, text-driven software; or an article lede.
Therefore, you can apply any style you want to the <b> element, although keeping the bold
style makes the most sense.
The <b> element is the element of last resort because headings should be denoted with
the <hn> element, emphasized text should be denoted with the <em> element, important
text should be denoted with the <strong> element, and marked or highlighted text should
use the <mark> element. Refrain from using the <b> element except to denote product
names in a review, keywords in a document extract, or an article lede, as shown in the follow-
ing example.
<article>
<h1>PolyWannaWidget Review</h1>
The <b>PolyWannaWidget</b> is the best product
to use for creating crackers from nothing
other than a hammer.
</article>
214 CHAPTER 5 More HTML5
Using the <strong> element
Closely related to the <b> element is the <strong> element, which represents strong impor-
tance for its contents. You can show relative importance by nesting <strong> elements within
<strong> elements. Note that changing the importance of part of the text in a sentence does
not change the meaning of the sentence. The following is an example that is in response to
the question, “Should I take a left turn?”
<p>
You need to turn <strong>right</strong>.
</p>
Note that the default styles for <strong> and <b> elements look the same.
Using the <i> element
The <i> element was used to produce italic text, but like the <b> element, the element
should provide meaning, not style.
According to the W3C, the <i> element represents a span of text that is in an alternate
voice or mood or is otherwise offset from the normal prose in a manner indicating a different
quality of text, such as a taxonomic designation, a technical term, an idiomatic phrase from
another language, a thought, or a ship name in Western texts.
This means that that you can apply any style to the <i> element, although, like the <b>
element, you probably should keep the default style.
The <em> element
Use the <em> element for emphatic stress. Use it to designate text you’d pronounce some-
what differently, with emphasis. The following is an example that is in response to the ques-
tion, “Can you nd a developer?”
<p>
I <em>am</em> a developer.
</p>
Note that the default styles for <em> and <i> elements look the same.
Using the <abbr> element for abbreviations and acronyms
In earlier versions of HTML, you could indicate an acronym by using the <acronym> element,
but in HTML5, the <acronym> element is obsolete. Use the <abbr> element to indicate an
abbreviation or acronym and use the title attribute to provide the full text.
The <abbr> element is an inline element and can be used with <strong> or other inline
elements as necessary. The following is an example of denoting an abbreviation and acronym
by using the <abbr> element.
<p>
The <abbr title='radio detection and ranging'>radar</abbr>
must be repaired <abbr title='as soon as possible'>ASAP</abbr>

Lesson 1: Thinking HTML5 semantics CHAPTER 5 215
by Contoso, <abbr title='Incorporated'>Inc.</abbr>
</p>
Note that the title is not required, especially when you know that everyone will know the
meanings of the abbreviations and acronyms.
The <address> element
Use the <address> element to dene contact information for the author/owner of a docu-
ment. You may include email address, postal address, or any contact address that references
the author/owner of the document.
Be careful to use the <address> element only when referencing the author/owner of the
document. Do not use it for arbitrary address information on your webpage. For example, if
you are displaying your customer’s address on a webpage, it should not be wrapped in an
<address> element.
The following is an example of the use of the <address> element in the footer of a
webpage.
<footer>
Copyright (C) 2012
<address>
Contoso, Inc.
<a href="email:WebMaster@Contoso.com">
WebMaster@Contoso.com
</a>
</address>
</footer>
Quotations and citations
When it’s time to start quoting, you can use the <blockquote> element to create a long, run-
ning quotation and the <q> element for an inline quotation. Both these elements have a cite
attribute that names the source work of the quote.
The <blockquote> element is a block-level element; it can contain almost anything, includ-
ing headers, footers, tables, and paragraphs. The <blockquote> element is a sectioning root,
which means that any <hn> elements within the <blockquote> element will not be included
in an outline of the HTML document. In addition, a single paragraph does not need to be
included in a <p> element.
The <blockquote> and <q> elements have a cite attribute that names the source work,
but as an attribute, this is hidden data. A better approach is to use the <cite> element, which
you can place in the <footer> element of your <blockquote> and <q> elements. The cita-
tion should always contain the name of the work, not the author name. The following is an
example of the <blockquote> element.
<blockquote>
O Romeo, Romeo, wherefore art thou Romeo?<br />
Deny thy father and refuse thy name;<br />
Key
Terms
216 CHAPTER 5 More HTML5
Or if thou wilt not, be but sworn my love<br />
And I'll no longer be a Capulet.<br />
<footer>
<p>
by William Shakespeare,
<cite>Romeo and Juliet</cite> Act 2, scene 2
</p>
</footer>
</blockquote>
The <cite> element contains only the name of the work, not the author or the location
within the work.
When you want to add an inline quotation, use the <q> element instead of using
quotation marks. The browser will insert the quotation marks for you. You can add the cite
attribute to the <q> element, which should contain only the name of the work. Furthermore,
the <q> element can be nested within another <q> element. The following is an example of
the <q> element.
<p>
John said to the audience <q>Sally was crying when she
shouted <q>Leave me alone</q> and then she ran away.</q>
</p>
This example renders the rst quotation by using double quotes and the second quotation
by using single quotes.
Documenting code by using the <code> and <samp> elements
When you’re documenting code and code examples in your HTML document, the <code>
and <samp> elements provide a means for adding semantic meaning to your code and code
output.
When you want to display source code of any type in the HTML document, use the <code>
element, as shown in the following example.
<code class="keepWhiteSpace">
sayHello('Mom');
function sayHello(name)
{
alert('Hello ' + name + '!');
}
</code>
After you run the sample code, you can document the output of the code by using the
<samp> element, as shown in the following example.
<samp class="keepWhiteSpace">
Hello Mom!
</samp>
Remember that the <code> and <samp> elements provide semantic meaning to the
HTML, but they don’t preserve the white space. For example, the preceding sample code will
Lesson 1: Thinking HTML5 semantics CHAPTER 5 217
display on one line, but the keepWhiteSpace class preserves the white space by using the fol-
lowing style rule.
.keepWhiteSpace {
white-space: pre;
}
This style rule is not compatible with all browsers, so you might want to use the <pre> ele-
ment to prevent white space normalization, as described next.
Displaying preformatted content by using the <pre> element
The browser typically normalizes the HTML content by removing extra white space, line feeds,
and paragraphs from the rendered page. You will often need to provide blocks of text where
you want to maintain the existing format when it’s rendered. Use the <pre> element to pre-
vent the normalization of the HTML document, as shown in the following example.
<pre>
<code>
sayHello('Mom');
function sayHello(name)
{
alert('Hello ' + name + '!');
}
</code>
</pre>
In this example, the <code> element provides semantic meaning to the content, and the
<pre> element prevents white-space normalization.
Using the <var> element
The <var> element denotes a variable in a mathematical equation, as shown in the following
example.
<p>
The resistance <var>r</var> of a piece of wire is equal to the voltage <var>v</var>
divided by the current <var>i</var>.
</p>
Using the <br /> and <wbr /> elements
The <br /> and <wbr /> elements are void elements, meaning that they cannot have any con-
tent and provide only a line break in your HTML document.
The <br /> element provides an immediate line break, which continues the document ow
on the next line of the browser.
The <wbr /> element, which is a word break, provides an indication to the browser that it
may insert a line break at this location. The browser decides whether to insert the break.
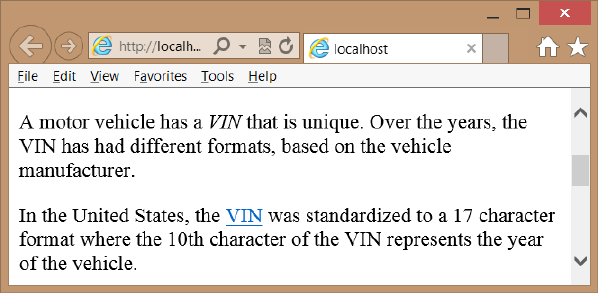
218 CHAPTER 5 More HTML5
Using the <dfn> element to dene a term
The <dfn> element denotes the denition of a term, also known as the dening instance of
the term. The <dfn> element can contain a title attribute, which, if it exists, must contain the
term being dened.
If the <dfn> element contains exactly one element child node and no child text nodes, and
that child element is an <abbr> element with a title attribute, that attribute is the term being
dened.
Consider the following example that uses the <dfn> element with the <abbr> element to
provide a denition.
<p>
A motor vehicle has a <dfn id="vin">
<abbr title="Vehicle Identification Number">VIN</abbr></dfn>
that is unique. Over the years, the
<abbr title="Vehicle Identification Number">VIN</abbr>
has had different formats,
based on the vehicle manufacturer.
</p>
<p>
In the United States, the <a href="#vin">
<abbr title="Vehicle Identification Number">VIN</abbr></a>
was standardized to a 17 character format where
the 10th character of the
<abbr title="Vehicle Identification Number">VIN</abbr>
represents the year of the vehicle.
</p>
In this example, the <dfn> element is used once where the rst instance of VIN is being
presented. Inside the <dfn> element is an <abbr> element, which provides the meaning
of VIN in its title attribute. The default style of the <dfn> element is italic text, as shown in
Figure 5-4. The use of the <a> element provides a hyperlink to the denition.
FIGURE 5-4 The <dfn> element italicizing its text by default

Lesson 1: Thinking HTML5 semantics CHAPTER 5 219
Working with gures
A gure is a unit of content that might have a caption and is referenced from the main docu-
ment. Use the <gure> element to denote a gure that can be one or more photos, one or
more drawings, one or more illustrations, or other content that is referred to as a unit. Use the
<gcaption> element to denote an optional caption.
When using the <gure> element, remember that the gure is related to the main content
of the page, and the gure’s location is not important. This is different from the <aside> ele-
ment, which is more related to the site than to the page’s document. If placement is impor-
tant, don’t use the <gure> element; use the <div> element.
The following example shows the use of the <gure> and <gcaption> elements (bolded)
to display an image that is referred to in the main document of the webpage.
<div role="main">
<p>
The peanut butter and jelly
<abbr title="peanut butter and jelly">PB&J</abbr>
sandwich has been a staple food of many families
due to its health benefits, its cost, and its
wonderful flavor.
</p>
<p>
When assembling a peanut butter and jelly sandwich,
you need to gather all the required materials as
shown in <a href="#figure1">Figure 1</a>.
</p>
<figure id="figure1">
<img src="/pbj.jpg" alt="peanut butter and jelly requirements" />
<figcaption>Figure 1 The PB&J sandwich requirements.</figcaption>
</figure>
</div>
Working with the <summary> and <details> elements
Use the <details> element with the <summary> element to create collapsible details content
under the summary. The <details> and <summary> elements currently work with the Google
Chrome browser only, but more support is expected.
In the <details> element, nest a <summary> element that contains the content that will
always be displayed. The details content is placed inside the <details> element following the
<summary> element. When the page is rendered, only the content of the <summary> ele-
ment is displayed. Clicking the summary content causes the details content to be displayed.
Clicking again causes the details content to be hidden.
<div role="main">
<details>
<summary>Make a peanut butter and jelly sandwich</summary>
<p>
The peanut butter and jelly
<abbr title="peanut butter and jelly">PB&J</abbr>
Key
Terms

220 CHAPTER 5 More HTML5
sandwich has been a staple food of many American families
due to its health benefits, its cost, and its
wonderful flavor.
</p>
<p>
When assembling a peanut butter and jelly sandwich,
you need to gather all the required materials as
shown in <a href="#figure1">Figure 1</a>.
</p>
<figure id="figure1">
<img src="/pbj.jpg" alt="peanut butter and jelly requirements" />
<figcaption>The PB&J sandwich requirements.</figcaption>
</figure>
</details>
</div>
In this example, the previous example content is placed in the <details> element, and the
<summary> element contains a general description of the content. Clicking the summary
content toggles the display of the details.
Understanding other annotations
In addition to the annotation elements already discussed, the following is a list of annotations
you might use in your HTML document.
<s> Denotes strike-out text, text that is no longer valid.
<u> Offsets a span of text without implying a difference of importance. The default
behavior is to underline the text, but this could be accommodated better by using a
span tag with the appropriate style.
<mark> Marks, or highlights, a span of text.
<ins> Indicates inserted text.
<del> Indicates deleted text.
<small> Indicates ne print.
<sub> Indicates subscript.
<sup> Indicates superscript.
<time> Denotes a time of day or a date in the text.
<kbd> Indicates user input.
Using language elements
You might need to provide content that uses characters of Chinese origin, which are called
kanji. These characters are used in Chinese, Japanese, and Korean (CJK) languages. To indicate
the pronunciation of kanji, you can use small phonetic characters, which are commonly called
ruby or furigana. The term “ruby” has English roots from when printers used this term to refer
to small type used for this purpose.
Key
Terms
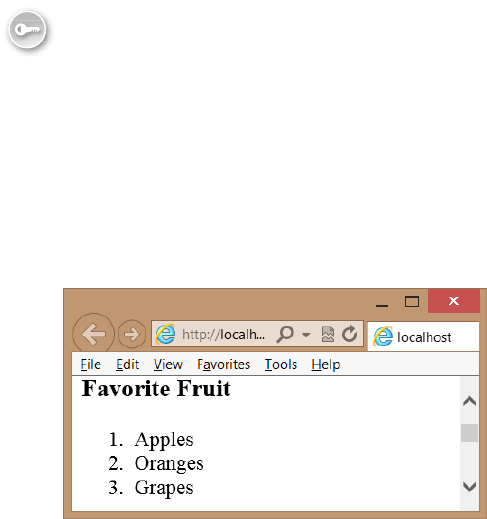
Lesson 1: Thinking HTML5 semantics CHAPTER 5 221
Use the <ruby> element to place a notation above or to the right of characters. Use the
<rt> and <rp> elements with the <ruby> element to place the notation or to place parenthe-
ses around the ruby. Use the <bdo> element to dene the text direction and use the <bdi>
element to isolate a block of text to set the text direction.
Working with lists
HTML5 denes various semantic elements that can be used to create ordered, unordered, and
descriptive lists. All lists have list items, which are implemented by using the <li> element. All
lists support nesting of lists. This section describes each of these lists.
Ordered lists
An ordered list is a numbered list. Use the <ol> element when you want auto-numbering of
the list items. The following example shows three favorite fruits.
<h3>Favorite Fruit</h3>
<ol>
<li>Apples</li>
<li>Oranges</li>
<li>Grapes</li>
</ol>
This list is automatically rendered with numbers beside each fruit list item, as shown in
Figure 5-5.
FIGURE 5-5 The ordered list numbering its items automatically
The <ol> element supports the following attributes.
reversed Reverses the number order to be descending instead of ascending
start Sets the starting number
type Sets the list type; can be “1”, “A”, “a”, or “I”
The reversed attribute currently does not work in most browsers, but you might nd
JavaScript libraries, such as modernizr.js, that emulate that functionality until the feature is
implemented by the browser manufacturer. Even if you set the type to a value such as “A”,
Key
Terms
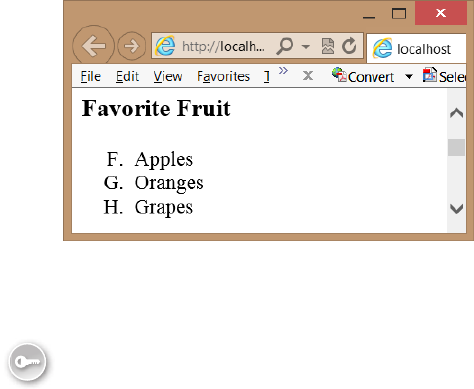
222 CHAPTER 5 More HTML5
you still set the start as a number. The following is an example of the type and start attributes,
using the favorite fruit list.
<h3>Favorite Fruit</h3>
<ol type="A" start="6" >
<li>Apples</li>
<li>Oranges</li>
<li>Grapes</li>
</ol>
Figure 5-6 shows the rendered list. The start value of “6” translates to the letter “F” when
rendered.
FIGURE 5-6 The ordered list with its type and start attributes set
Unordered lists
An unordered list is not auto-numbered. Use the <ul> element to create an unordered list of
items. When the unordered list is rendered, it produces bullet points before each list item, as
shown in the following example that describes the items required to repair a at tire.
<h3>Items required to change a flat tire</h3>
<ul>
<li>A jack</li>
<li>A lug wrench with a socket on one end and a pry bar on the other</li>
<li>A spare tire</li>
</ul>
Each item is rendered with a bullet, and where the text wraps to the next line, the text
aligns itself properly with the text of the previous line, as shown in Figure 5-7.
Key
Terms
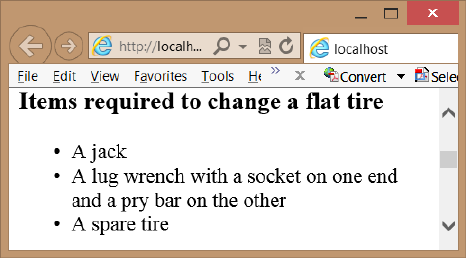
Lesson 1: Thinking HTML5 semantics CHAPTER 5 223
FIGURE 5-7 The unordered list rendering each list item as a bullet
Description lists
Use the <dl> element to create a description list, which consists of zero or more term-
description groupings, also known as name-value or key-value pairs. Each grouping associ-
ates one or more terms or names, which are the contents of <dt> elements, with one or more
descriptions or values, which are the contents of <dd> elements, as shown in the following
example.
<h3>Common Vehicles</h3>
<dl>
<dt>Boat</dt>
<dd>A small vehicle propelled on water by oars, sails, or an engine</dd>
<dt>Car</dt>
<dd>An automobile</dd>
<dd>A passenger vehicle designed for operation on ordinary roads
and typically having four wheels and an engine</dd>
<dt>Bicycle</dt>
<dt>Bike</dt>
<dd>A vehicle with two wheels in tandem, typically propelled by pedals
connected to the rear wheel by a chain, and having handlebars
for steering and a saddlelike seat</dd>
</dl>
In this example, the boat is associated with a single denition. The car is associated with
two denitions. The bicycle and bike are both associated with the same denition. The ren-
dered output is shown in Figure 5-8.
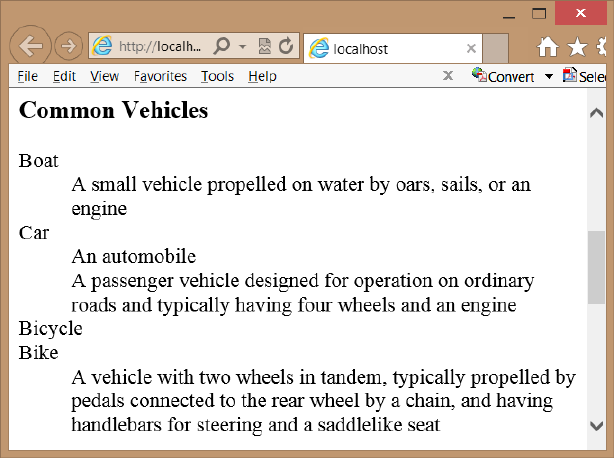
224 CHAPTER 5 More HTML5
FIGURE 5-8 The definition list with its terms and definitions
Custom lists
You can create custom lists by using the CSS3 styles, and you can use the CSS3 counter and
the :before and :after selectors. Consider the following list, which contains nested lists.
<ul class="level1">
<li>Automobiles
<ul class="level2">
<li>BMW
<ul class="level3">
<li>X1</li>
<li>X3</li>
<li>Z4</li>
</ul>
</li>
<li>Chevrolet
<ul class="level3">
<li>Cobalt</li>
<li>Impala</li>
<li>Volt</li>
</ul>
</li>
<li>Ford
<ul class="level3">
<li>Edge</li>
<li>Focus</li>
<li>Mustang</li>
</ul>
</li>
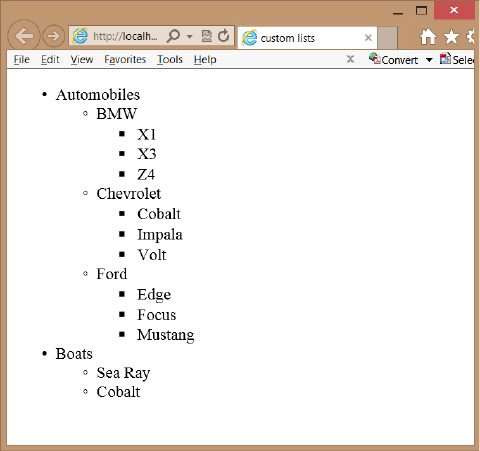
Lesson 1: Thinking HTML5 semantics CHAPTER 5 225
</ul>
</li>
<li>Boats
<ul class="level2">
<li>Sea Ray</li>
<li>Cobalt</li>
</ul>
</li>
</ul>
Figure 5-9 shows the rendered list with the default styles. The bullet shapes change with
each level of nesting, and each level of nesting is automatically indented.
FIGURE 5-9 The rendered output with default styles
In addition to font-related styles and color-related styles, there are also list-related styles
that you can alter to change the presentation of your list. In the rendered example, the
rst-level list-style-type CSS property is set to disc, which displays as a lled-in circle. The
second-level list-style-type is set to circle, and the third-level list-style-type is set to square. In
addition, each of the levels’ list-style-position CSS property is set to outside, which means that
when the text wraps, the rst character of the next line will align with the rst character of the
previous line. If you set the list-style-position to inside, the rst character of the next line will
align with the bullet symbol of the rst line.
In Visual Studio Express 2012 for Web, you can open the CSS le and enter the selector as
follows.
li {
}
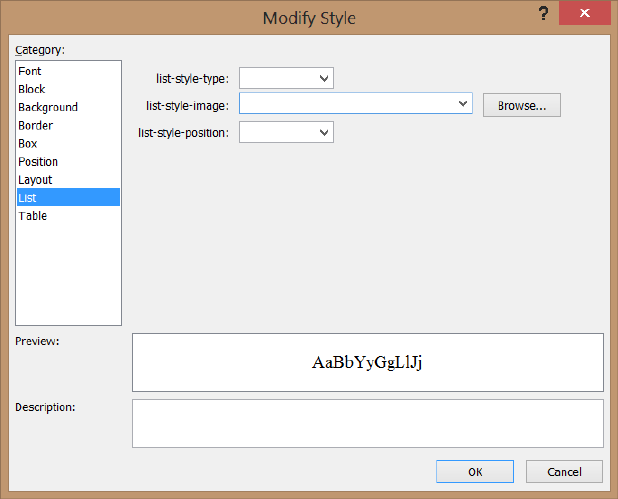
226 CHAPTER 5 More HTML5
After the selector is added, you can right-click the style rule and choose Build Style to dis-
play a menu of styles to apply. Clicking List in the Category menu displays the styles that can
be applied to a list. Figure 5-10 shows the Modify Style window.
FIGURE 5-10 The Modify Style window showing menu-based style settings
By using the Modify Style window, you can easily override the default setting of the
list-style-type and list-style-position. In addition, you can provide a list-style-image when the
bullet symbols are not what you want. In this example, set the list-item-style to none and click
OK. The style sheet now contains the modied style rule as follows.
li {
list-style-type: none;
}
Try rendering the webpage and note that no bullets are displayed. Try many of the other
settings to see how they render.
Instead of using the Modify Style window, you can type the style rules. When you’re typing
the rules, IntelliSense helps reduce the number of keystrokes. When the IntelliSense menu
appears, you can select an item and press the tab key. In the CSS le, insert the following style
rules.
body {
counter-reset: section;
}
Lesson 1: Thinking HTML5 semantics CHAPTER 5 227
ul.level1 > li:before {
counter-increment: section;
content: "Section " counter(section) ". ";
counter-reset: subsection;
}
ul.level2 > li:before {
counter-increment: subsection;
content: counter(section) "(" counter(subsection, lower-alpha) ") - ";
}
ul.level1 > li, ul.level2 > li {
list-style-type: none;
}
ul.level3 > li {
list-style-type: disc;
}
The following is a description of each of the style rules in this example.
The rst style rule resets a user-dened section counter to one when the <body> ele-
ment is styled. The section counter will be set to one only after the page is loaded, but
it will be incremented in a different style rule.
The second style rule is executed when a <li> element that is a child of a <ul> element
with a CSS class of level1 is rendered. It increments the section counter by one. It then
inserts the content property before the <li> element, which outputs the “Section”
string, followed by the value of the section counter and then followed by the ”. “
string. Finally, the rule resets a user-dened subsection counter to one. This style rule
executes twice, before Automobiles and before Boats.
The third style rule is executed when a <li> element that is a child of a <ul> element
with a CSS class of level2 is rendered. It increments the subsection counter by one. It
then inserts the content property before the <li> element, which outputs the value of
the section counter, followed by the “(“ string and then followed by the value of the
subsection counter, but this value is converted to lowercase alpha representation. After
the subsection is rendered, the “) – “ string is rendered. This style rule executes ve
times.
The fourth style rule sets the list-style-type to none for level1 and level2 list items.
The fth style rule sets the list-style-rule to disc for level3 list items.
The rendered output is shown in Figure 5-11. This should give you a good idea of the
capabilities of HTML5 when working with lists.
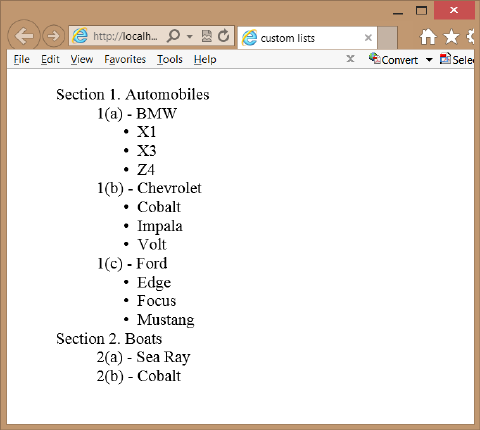
228 CHAPTER 5 More HTML5
FIGURE 5-11 The rendered custom list
Lesson summary
Semantic markup provides meaning to HTML elements to aid devices that consume
HTML content.
Nonvisual Desktop Access (NVDA) devices read and process webpages.
Content that needs to be styled but doesn’t clearly t the meaning of any semantic
elements can be styled by wrapping it with a <div> or <span> element.
The <header> element denes a section that provides a header. The <footer> element
denes a section that provides a footer. The <nav> element denes a section that
houses a block of major navigational links. The <aside> element denes a section of
content that is separate from the content the <aside> element is in. The <section> ele-
ment denes part of the whole and is typically named with an <h1> to <h6> internal
element.
The <article> element is a unit of content that can stand on its own and be copied to
other locations. A blog post is a good example of an article.
The Web Accessible Initiative (WAI) species the Accessible Rich Internet Applications
(ARIA) suite, which is called WAI-ARIA. Use the WAI-ARIA role attribute to provide
meaning to elements that are not semantically dened.
In lieu of the <b> element, use the <strong> element. In lieu of the <i> element, use
the <em> element.
Lesson 2: Working with tables CHAPTER 5 229
Lesson review
Answer the following questions to test your knowledge of the information in this lesson. You
can nd the answers to these questions and explanations of why each answer choice is correct
or incorrect in the “Answers” section at the end of this chapter.
1. You are creating a webpage that will display short stories, and you want the stories to
be shareable on other sites. Which element should each story be wrapped with?
A. <section>
B. <pre>
C. <aside>
D. <article>
2. You want to indicate an important item in your content text. Which element do you use?
A. <b>
B. <em>
C. <strong>
D. <i>
3. You want to identify the author of webpages on your website by providing the author
name and email address in the footer of each page. What is the proper way to do this?
A. <address><a href=”email:author@Contoso.com”>Author Name</a></address>
B. <contact><a href=”email:author@Contoso.com”>Author Name</a></contact>
C. <author><a href=”email:author@Contoso.com”>Author Name</a></author>
D. <name><a href=”email:author@Contoso.com”>Author Name</a></name>
Lesson 2: Working with tables
Tables are the way to lay out data in your HTML document in rows and columns. A table
displays a two-dimensional grid of data. Use the <table> element with the <tr> element to
create table rows and the <td> element to create table details, which are better known as
table cells. This lesson discusses tables in detail.
After this lesson, you will be able to:
Create a basic table.
Add a header and footer to a table.
Create an irregular table.
Access column data.
Apply style rules to table elements.
Estimated lesson time: 30 minutes
230 CHAPTER 5 More HTML5
Table misuse
HTML tables are powerful and, due to their exibility, they are often misused. It’s important
to understand both proper table implementation and where it’s inappropriate to implement
a table.
Over the years, many developers have used the <table> element to create a page layout.
Here are some reasons you should not use the <table> element to create a page layout.
The table will not render until the </table> tag has been read. Webpages should be
written with semantic markup, and the main <div role=”main”> element should be
as close to the top of the HTML document as possible. The <div> element will render
its content as the browser receives it. This enables the user to read the content as it’s
being loaded into the browser.
Using a table forces you into a deeply nested HTML structure that is difcult to
maintain.
Using a table confuses accessibility devices.
Remember that using a <table> element for anything other than tabular layout of data will
be much more difcult to maintain than using <div> elements with positioning.
Creating a basic table
You can create a basic table by using the <table> element to denote the table. Inside the
<table> element, you can add a <tr> element for each row that you require. Inside each <tr>
element, add <td> elements for each cell that you need. The following is a simple table of
vehicle information.
<table>
<tr>
<td>1957</td>
<td>Ford</td>
<td>Thunderbird</td>
</tr>
<tr>
<td>1958</td>
<td>Chevrolet</td>
<td>Impala</td>
</tr>
<tr>
<td>2012</td>
<td>BMW</td>
<td>Z4</td>
</tr>
<tr>
<td>2003</td>
<td>Mazda</td>
<td>Miata</td>
</tr>
</table>
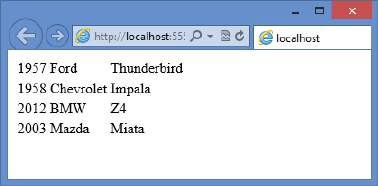
Lesson 2: Working with tables CHAPTER 5 231
Figure 5-12 shows the rendered output as four rows with three columns in each row. It’s
not obvious that there are columns in each row, however, and there is no header or footer.
You might also want to see a border around all cells to make the table more obvious. This
table needs improvement. Would alternating column colors improve it?
FIGURE 5-12 The rendered table with rows and columns
Adding header cells
Use the <th> element instead of the <td> element to display a header. The header can be
horizontal or vertical. For example, you might want a header across the top to label each
column and a header down the left side (in the rst column) to label each row. The following
is the modied table.
<table>
<tr>
<th>Vehicle #</th>
<th>Year</th>
<th>Make</th>
<th>Model</th>
</tr>
<tr>
<th>1</th>
<td>1957</td>
<td>Ford</td>
<td>Thunderbird</td>
</tr>
<tr>
<th>2</th>
<td>1958</td>
<td>Chevrolet</td>
<td>Impala</td>
</tr>
<tr>
<th>3</th>
<td>2012</td>
<td>BMW</td>
<td>Z4</td>
</tr>
<tr>
<th>4</th>
<td>2003</td>

232 CHAPTER 5 More HTML5
<td> Mazda</td>
<td>Miata</td>
</tr>
</table>
The rendered table is shown in Figure 5-13. This revised table now has horizontal and
vertical headers. Notice that the default style of the <th> element is bold.
FIGURE 5-13 The revised table with horizontal and vertical headers
Styling the table headers
Now that you have <th> elements for the headers, add a style to the <th> elements as
follows.
th {
background-color: #BDEAFF;
width: 100px;
}
This adds a pale blue background to all the <th> elements and sets the width of all col-
umns to 100 pixels. What changes can you make to give the horizontal header and vertical
header different styles? The following example can accomplish this task.
th {
background-color: #BDEAFF;
width: 100px;
}
th:only-of-type {
background-color: #FFFF99;
}
The rst style rule sets the color of all <th> elements to a pale blue and sets the width to
100 pixels. The second style rule has a higher priority, so it overrides the rst style rule and
applies a pale yellow color to the vertical header.
Lesson 2: Working with tables CHAPTER 5 233
Declaring the header, footer, and table body
Most browsers automatically wrap all <tr> elements with a <tbody> element to indicate the
body of the table. What would happen if you had a CSS style selector of table > tr? You
wouldn’t get a match because the browser adds the <tbody> element. The selector can be
rewritten as table > tbody > tr instead, or maybe tbody > tr is all you need. It’s good prac-
tice to dene the <tbody> element explicitly in every table.
You might also have multiple rows that are to be used as horizontal headers or footers.
You can use the <thead> element to identify rows that are header rows and use the <tfoot>
element to identify rows that are footer rows. The following is an example of the addition of
the <thead>, <tfoot>, and <tbody> elements.
<table>
<thead>
<tr>
<th>Vehicle #</th>
<th>Year</th>
<th>Make</th>
<th>Model</th>
<th>Price</th>
</tr>
</thead>
<tbody>
<tr>
<th>1</th>
<td>1957</td>
<td>Ford</td>
<td>Thunderbird</td>
<td>14,000</td>
</tr>
<tr>
<th>2</th>
<td>1958</td>
<td>Chevrolet</td>
<td>Impala</td>
<td>3,000</td>
</tr>
<tr>
<th>3</th>
<td>2012</td>
<td>BMW</td>
<td>Z4</td>
<td>40,000</td>
</tr>
<tr>
<th>4</th>
<td>2003</td>
<td>Mazda</td>
<td>Miata</td>
<td>5,000</td>
</tr>
</tbody>
<tfoot>
234 CHAPTER 5 More HTML5
<tr>
<th>Total:</th>
<th></th>
<th></th>
<th></th>
<th>62,000</th>
</tr>
</tfoot>
</table>
In addition to adding structure to the table, you can use the <thead>, <tbody>, and
<tfoot> elements to control the styling of the <th> elements better. Without these elements,
how would you provide a different style to the header and footer? The following style rules
provide an example of such styling.
thead th {
background-color: #BDEAFF;
width: 100px;
}
tbody th {
background-color: #FFFF99;
}
tfoot th {
background-color: #C2FE9A;
}
tfoot th:last-of-type {
text-align: right;
}
td {
text-align: center;
}
td:last-of-type {
text-align: right;
}
The rendered table is shown in Figure 5-14. The following is a description of the style rules
applied.
The rst style rule applies a blue background color to the header and sets the width of
all columns to 100 pixels.
The second style rule applies a yellow background color to the vertical header.
The third style rule applies a green background color to the footer.
The fourth style rule applies right alignment to the price in the footer.
The fth style rule centers the text of all table cells.
The last style rule applies right alignment to the price cells.
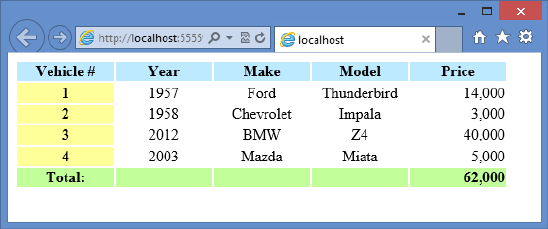
Lesson 2: Working with tables CHAPTER 5 235
FIGURE 5-14 The styled table
Although you can have a maximum of one <thead> element and one <tfoot> element,
you can have many <tbody> elements within a <table> element. The benet of having
multiple <tbody> elements is that you can group rows to apply styles. You can even display
or hide groups of rows by setting the style display property to none (to hide) or by clearing
the display property (to show). The following example extends the previous example by using
multiple <tbody> elements, adding one for Antique Cars and one for Non-Antique Cars.
<!DOCTYPE html>
<html xmlns="http://www.w3.org/1999/xhtml">
<head>
<title>Vehicles</title>
<link href="Content/vehicles.css" rel="stylesheet" />
<script src="Scripts/vehicles.js"></script>
</head>
<body>
<div role="main">
<button id="showAntique">Antique Cars</button>
<button id="showNonAntique">Non-Antique Cars</button>
<table>
<thead>
<tr>
<th>Vehicle #</th>
<th>Year</th>
<th>Make</th>
<th>Model</th>
<th>Price</th>
</tr>
</thead>
<tbody id="antiqueCars">
<tr>
<th>1</th>
<td>1957</td>
<td>Ford</td>
<td>Thunderbird</td>
<td>14,000</td>
</tr>
<tr>
<th>2</th>
<td>1958</td>
236 CHAPTER 5 More HTML5
<td>Chevrolet</td>
<td>Impala</td>
<td>3,000</td>
</tr>
</tbody>
<tbody id="nonAntiqueCars">
<tr>
<th>3</th>
<td>2012</td>
<td>BMW</td>
<td>Z4</td>
<td>40,000</td>
</tr>
<tr>
<th>4</th>
<td>2003</td>
<td>Madza</td>
<td>Miata</td>
<td>5,000</td>
</tr>
</tbody>
<tfoot>
<tr>
<th>Total:</th>
<th></th>
<th></th>
<th></th>
<th>62,000</th>
</tr>
</tfoot>
</table>
</div>
</body>
</html>
<script>
init();
</script>
This example shows the complete HTML document, so you can see the inclusion of the CSS
le and JavaScript le. The HTML has been extended to include two buttons at the top so you
can lter by Antique Cars or Non-Antique Cars. There are two <tbody> elements, each having
an explicit id of antiqueCars and nonAntiqueCars, respectively, and a <script> element at the
bottom that initializes the JavaScript, which will attach event handlers to the click event of the
buttons. The CSS le is slightly modied from the previous example as follows.
thead th {
background-color: #BDEAFF;
width: 100px;
}
tbody th {
background-color: #FFFF99;
Lesson 2: Working with tables CHAPTER 5 237
}
tfoot th {
background-color: #C2FE9A;
}
tfoot th:last-of-type {
text-align: right;
}
td {
text-align: center;
}
td:last-of-type {
text-align: right;
}
.hidden {
display: none;
}
.visible {
display: normal;
}
The CSS le now has the .hidden and .visible selectors. These are used to show or hide the
<tbody> elements, including their contents. The JavaScript le contains the following code.
function init() {
document.getElementById('showAntique').addEventListener('click', showAntiqueCars);
document.getElementById('showNonAntique').addEventListener('click',
showNonAntiqueCars);
}
function showAntiqueCars() {
document.getElementById('antiqueCars').className = "visible";
document.getElementById('nonAntiqueCars').className = "hidden";
}
function showNonAntiqueCars() {
document.getElementById('antiqueCars').className = "hidden";
document.getElementById('nonAntiqueCars').className = "visible";
}
The JavaScript code contains an init function that is called when the HTML document is
loaded. The init function attaches event handlers to the click event of the two buttons. The
additional functions set the CSS class to display or hide the <tbody> elements.
When the webpage is displayed, all vehicles are displayed. Clicking the Antique Cars but-
ton displays the antique cars and hides the non-antique cars. Clicking the Non-Antique Cars
button displays the non-antique cars and hides the antique cars.
238 CHAPTER 5 More HTML5
Creating irregular tables
Tables need to be rectangular to work properly, but you’ll often need to present tables that
don’t contain the same number of cells in each row. In the case of the previous examples,
the footer contained the same number of cells as the other rows, but you only need to have
two cells, one for “Total:” and one for the total price. You might also want to add a column
that indicates Antique Cars versus Non-Antique Cars, but you don’t want a cell on every row
that says “Antique Car” or “Non-Antique Car”. You want to add a single cell that says “Antique
Cars” and is the combined height of all Antique Car rows. You want to add a single cell that
says “Non-Antique Cars” and is the combined height of all Non-Antique Car rows. Use the
rowspan or colspan attributes on the <td> or <th> element to solve this problem.
The colspan attribute tells the browser that a <td> or <th> element should be the size of
multiple horizontal cells. In the previous example, where you want the “Total:” text to span the
footer row, use <th colspan=”4”> as follows.
<tfoot>
<tr>
<th colspan="4">Total:</th>
<th>62,000</th>
</tr>
</tfoot>
The default style for the <th> element is bold and centered. When “Total:” is displayed, it’s
centered within the four cells it spans. The CSS style rule is changed to right-align “Total:” as
follows.
tfoot th {
background-color: #C2FE9A;
}
tfoot th:first-of-type {
text-align: right;
}
tfoot th:last-of-type {
text-align: right;
}
You could just right-align all <th> elements in the footer by eliminating the last two style
rules in this example and adding the text-align style to the rst style rule. The rendered out-
put is shown in Figure 5-15.
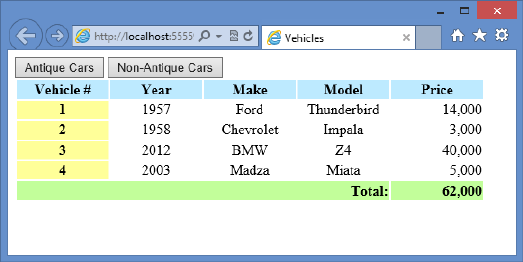
Lesson 2: Working with tables CHAPTER 5 239
FIGURE 5-15 The rendered page with the footer containing only two cells
The rowspan attribute tells the browser that a <td> or <th> element should be the size
of multiple vertical cells. In the previous example, when you want to add a column with only
two cells, use <td rowspan=”n”> where n equals the number of rows to span, in this case, 2.
Remember that adding a column also requires you to add the column to the header and to
modify the colspan attribute in the footer. The following is the modied table.
<table>
<thead>
<tr>
<th>Vehicle #</th>
<th>Category</th>
<th>Year</th>
<th>Make</th>
<th>Model</th>
<th>Price</th>
</tr>
</thead>
<tbody id="antiqueCars">
<tr>
<th>1</th>
<td rowspan="2">Antique</td>
<td>1957</td>
<td>Ford</td>
<td>Thunderbird</td>
<td>14,000</td>
</tr>
<tr>
<th>2</th>
<td>1958</td>
<td>Chevrolet</td>
<td>Impala</td>
<td>3,000</td>
</tr>
</tbody>
<tbody id="nonAntiqueCars">
<tr>
<th>3</th>
<td rowspan="2">Non-Antique</td>
240 CHAPTER 5 More HTML5
<td>2012</td>
<td>BMW</td>
<td>Z4</td>
<td>40,000</td>
</tr>
<tr>
<th>4</th>
<td>2003</td>
<td>Mazda</td>
<td>Miata</td>
<td>5,000</td>
</tr>
</tbody>
<tfoot>
<tr>
<th colspan="5">Total:</th>
<th>62,000</th>
</tr>
</tfoot>
</table>
To help illustrate the rowspan and colspan attributes, a black border is added to the table
cells. The following is the complete CSS le.
table {
border: medium solid #000000;
}
thead th {
background-color: #BDEAFF;
width: 100px;
}
tbody th {
background-color: #FFFF99;
}
tfoot th {
background-color: #C2FE9A;
}
tfoot th:first-of-type {
text-align: right;
}
tfoot th:last-of-type {
text-align: right;
}
td {
text-align: center;
border: thin solid #000000;
}
td:last-of-type {
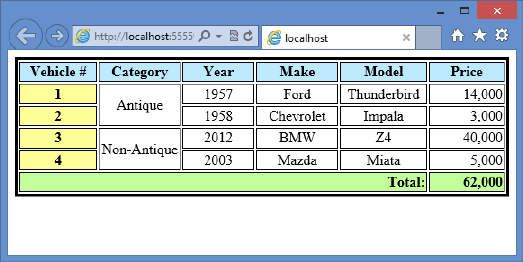
Lesson 2: Working with tables CHAPTER 5 241
text-align: right;
}
th {
border: thin solid #000000;
}
.hidden {
display: none;
}
.visible {
display: normal;
}
The results are displayed in Figure 5-16.
FIGURE 5-16 The rendered page with borders set, clearly showing the rowspan and colspan attributes
Adding a caption to a table
You can use the <caption> element to dene and associate a caption with a table. The default
style of the caption is centered and located above the table. You can use the CSS text-align
and caption-side properties to override the default style. If you use the <caption> element, it
must be the rst element within the <table> element.
Styling columns
Styling columns is a common difculty because tables are row-centric, not column-centric.
It’s relatively easy to apply a style to a row because you can apply a <tr> element to the style,
but there isn’t a <tc> element for a column. Remember that the <td> element represents a
cell, not a column. Columns are actually created implicitly by creating the cells. Use the <col-
group> and <col> elements to style columns.
The <colgroup> element is placed inside the <table> element to dene columns that can
be styled. Remember that styling includes hiding and displaying the columns. Inside the
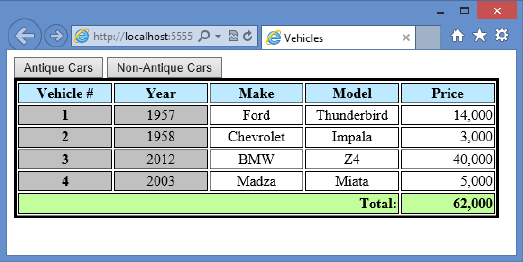
242 CHAPTER 5 More HTML5
<colgroup> element, <col> elements are added for each column to be styled. The <col> ele-
ment has a span attribute that identies multiple columns that will have the same style.
In the previous examples, the <colgroup> and <col> elements can provide a style for the
vertical headers, but this time, you want to apply a style to the rst two columns. You can
dene the columns as follows.
<colgroup>
<col span="2" class="verticalHeader" />
</colgroup>
This example denes the rst two columns to have a style of verticalHeader. The vertical-
Header class is set to apply a gray background color as follows.
.verticalHeader {
background-color: #C0C0C0;
}
In addition, the existing style for the rst column has been removed. Figure 5-17 shows the
rendered webpage.
FIGURE 5-17 Using the <colgroup> and <col> elements to apply a style to multiple columns
Lesson summary
Refrain from using the <table> element for page layout.
A <tr> element creates a table row. A <td> element creates a table cell in a table row.
To identify a header cell, use the <th> element instead of using the <td> element.
Use the <thead> element to specify table rows that comprise the table header. Use the
<tfoot> element to specify table rows that comprise the table footer. Use the <tbody>
element to specify data rows. You can group data rows by specifying many <tbody>
elements.
Use the rowspan and colspan attributes on the <th> and <td> elements to create
irregular tables.

Practice exercises CHAPTER 5 243
Use the <caption> element directly after the <table> element to specify a caption for
your table.
Use the <colgroup> and <col> elements to apply styles to a column.
Lesson review
Answer the following questions to test your knowledge of the information in this lesson. You
can nd the answers to these questions and explanations of why each answer choice is correct
or incorrect in the “Answers” section at the end of this chapter.
1. You are creating a webpage that will be used to display a list of salespeople with their
sales statistics for the years of 2010, 2011, and 2012 in two categories: sales of products
and sales of services. You want to each of the years to be in the horizontal header, and
under each year, you will have a “Products” column and a “Services” column. How will
you dene the element for year 2011?
A. <th>2011</th>
B. <th colspan=”2”>2011</th>
C. <th span=”2”>2011</th>
D. <th style=”2”>2011</th>
2. You want to provide the ability to display or show columns, but you don’t want to add
a style or other marking to each <td> element. How can you accomplish this?
A. Add a <colgroup> element to the <table> element and dene each column by
using a <col> element inside the <colgroup> element.
B. Add an id to each <td> element and provide a unique id for each; use the ids in
your style sheet rules to obtain the desired style.
C. Add a <col> element to the <table> element and dene each column by using a
<id> element inside the <col> element.
D. Add a <hidden> element to the <table> element and dene each column by using
a <col> element inside the <hidden> element.
3. Which element can you add to the <table> element to provide a table caption?
A. <thead>
B. <colgroup>
C. <caption>
D. <th>
Practice exercises
If you encounter a problem completing any of these exercises, the completed projects can be
installed from the Practice Exercises folder that is provided with the companion content.
244 CHAPTER 5 More HTML5
Exercise 1: Add a page layout to the calculator project
In this exercise, you apply your knowledge of semantic markup by adding a page layout to
the WebCalculator project that you worked on in Chapter 4, “Getting started with CSS3,” and
then you add style rules to improve the look of the webpage.
This exercise continues with the goal of adding style rules with a minimum of modica-
tions to the default.html le.
1. Start Visual Studio Express 2012 for Web. Click File, choose Open Project, and then
select the solution you created in Chapter 4.
2. Select the WebCalculator.sln le and click Open. You can also click File, choose Recent
Projects And Solutions, and then select the solution.
If you didn’t complete the exercises in Chapter 4, you can use the solution in the
Chapter 5 Exercise 1 Start folder.
3. In the Solution Explorer window, right-click the default.html le and choose Set As
Start Page. Press F5 to verify that your home page is displayed.
4. Open the default.html page and wrap the <div> element whose id is calculator with a
<div> element, and then set the id to container.
This <div> element will contain the complete page layout.
5. In the container <div> element, insert a <header> element containing an <hgroup>
element with an id of headerText. In the <hgroup> element, insert an <h1> element
containing the text, “Contoso, Ltd.” After the <h1> element, insert an <h2> element
containing the text, “Your success equals our success.”
The header should look like the following.
<header>
<hgroup id="headerText">
<h1>Contoso Ltd.</h1>
<h2>Your success equals our success</h2>
</hgroup>
</header>
6. After the <header> element, insert a <nav> element.
The <nav> element typically contains the primary links on the page, but there are no
other pages in this site.
7. Insert a dummy link to the home page, which is the current page.
This will display on the page to give you an idea of what the <nav> element is used
for. The <nav> element should look like the following.
<nav>
<a href="default.html">Home</a>
</nav>
8. After the <nav> element, wrap the calculator <div> element with a <div> element
whose role is set to main.
Practice exercises CHAPTER 5 245
The main <div> element with the calculator <div> element should look like the
following.
<div role="main">
<div id="calculator">
<input id="txtResult" type="text" readonly="readonly" /><br />
<input id="txtInput" type="text" /><br />
<button id="btn7">7</button>
<button id="btn8">8</button>
<button id="btn9">9</button><br />
<button id="btn4">4</button>
<button id="btn5">5</button>
<button id="btn6">6</button><br />
<button id="btn1">1</button>
<button id="btn2">2</button>
<button id="btn3">3</button><br />
<button id="btnClear">C</button>
<button id="btn0">0</button>
<button id="btnClearEntry">CE</button><br />
<button id="btnPlus">+</button>
<button id="btnMinus">-</button>
</div>
</div>
9. After the main <div> element, insert an <aside> element, which will contain the adver-
tisements. Because there are no advertisements, insert a <p> element with the word
Advertisements so you can see where the <aside> element renders.
The completed <aside> element should look like the following.
<aside>
<p>Advertisements</p>
</aside>
10. After the <aside> element, insert a <footer> element. In the <footer> element, add
a <p> element with the following content: Copyright © 2012, Contoso Ltd., All
rights reserved.
The completed <footer> element should look like the following.
<footer>
<p>
Copyright © 2012, Contoso Ltd., All rights reserved
</p>
</footer>
The following is the complete default.html webpage.
<!DOCTYPE html>
<html xmlns="http://www.w3.org/1999/xhtml">
<head>
<title>Web Calculator</title>
<link href="Content/default.css" rel="stylesheet" />
<script type="text/javascript" src="Scripts/CalculatorLibrary.js"></script>
</head>
<body>
<div id="container">
246 CHAPTER 5 More HTML5
<header>
<hgroup id="headerText">
<h1>Contoso Ltd.</h1>
<h2>Your success equals our success</h2>
</hgroup>
</header>
<nav>
<a href="default.html">Home</a>
</nav>
<div role="main">
<div id="calculator">
<input id="txtResult" type="text" readonly="readonly" /><br />
<input id="txtInput" type="text" /><br />
<button id="btn7">7</button>
<button id="btn8">8</button>
<button id="btn9">9</button><br />
<button id="btn4">4</button>
<button id="btn5">5</button>
<button id="btn6">6</button><br />
<button id="btn1">1</button>
<button id="btn2">2</button>
<button id="btn3">3</button><br />
<button id="btnClear">C</button>
<button id="btn0">0</button>
<button id="btnClearEntry">CE</button><br />
<button id="btnPlus">+</button>
<button id="btnMinus">-</button>
</div>
</div>
<aside>
<p>Advertisements</p>
</aside>
<footer>
<p>
Copyright © 2012, Contoso Ltd., All rights reserved
</p>
</footer>
</div>
<script type="text/javascript">
window.addEventListener('load', initialize, false);
</script>
</body>
</html>
Exercise 2: Add styles to the calculator layout
Now that you have completed the layout container, add and modify styles in the
default. css le.
1. Open the default.css le and, at the top of the le, add a style rule to set the margin
and padding of all elements to 0 pixels.
Your style rule should look like the following.
* { margin : 0; padding : 0; }
Practice exercises CHAPTER 5 247
2. After that style rule, insert another style rule that sets the <aside>, <footer>, <header>,
<hgroup>, and <nav> elements to display as a block to ensure that all browsers render
these elements as blocks.
Your style rule should look like the following.
aside, footer, header, hgroup, nav {
display: block;
}
The current page background color is a dark blue. This background color needs to be
lightened, and the font-family needs to be set to Cambria with a backup font of Times
New Roman and nal fallback of serif font. The font color needs to be set to match
the Contoso standard blue. Your body style rule should be modied to match the
following.
body {
background-color: hsl(255, 95%, 95%);
font-family: Cambria, 'Times New Roman' , serif;
color: #0068AC;
}
3. To add a new folder called Images to the project, right-click the project in the Solution
Explorer window. Click Add, choose New Folder, and name the folder Images.
4. To add the image from the Resource folder, in the Solution Explorer window, right-click
the Images folder that you just added.
5. Click Add, choose Existing Item, and select the ContosoLogo.png le that is located in
the Chapter05 Resources folder.
6. After the body style rule, insert a header style rule that sets the height to 100 pixels
and set the background image to the ContosoLogo.png le.
7. Set the background-repeat to no-repeat and set the top margin to 10 pixels by adding
the header selector with the curly braces, right-clicking in the style rule, and clicking
Build Style. When the Modify Style window is displayed, set the properties.
The completed style rule should look like the following.
header {
height: 100px;
background-image: url('../Images/ContosoLogo.png');
background-repeat: no-repeat;
margin-top: 10px;
}
8. Add a style rule based on the element id equal to headerText. Set the position to abso-
lute, set the top to 0 pixels, and set the left to 80 pixels, which will locate the header
text to the right of the Contoso logo.
9. Set the width to 100 percent and set the margin top to 10 pixels as follows.
#headerText {
position: absolute;
248 CHAPTER 5 More HTML5
top: 0px;
left: 80px;
width: 100%;
margin-top: 10px;
}
10. After the headerText style rule, insert a text rule for the <h1> element. Add styles to
set the font size to 64 pixels and set the line height to 55 pixels as follows.
h1 {
font-size: 64px;
line-height: 55px;
}
11. After the h1 style rule, insert a text rule for the <h2> element. Add styles to set the
font size to 18 pixels, set the line height to 20 pixels, and set the font style to italic as
follows.
h2 {
font-size: 18px;
line-height: 20px;
font-style: italic;
}
12. After the h2 style rule, create a style rule for the <nav> element. Set the styles to oat
the <nav> element to the left, set the width to 20 percent, and set the minimum width
to 125 pixels as follows.
nav {
float: left;
width: 20%;
min-width:125px;
}
13. After the nav style rule, add a style rule for the main <div> element. Set the styles to
oat to the left, beside the <nav> element, and set the width to 60 percent as follows.
div[role="main"] {
float: left;
width: 60%;
}
14. After the main div style rule, add a style rule for the <aside> element. Set the styles to
oat to the left, beside the main <div> element, set the width to 20 percent, and set
the minimum width to 125 pixels as follows.
aside {
float: left;
width: 20%;
min-width:125px;
}
Practice exercises CHAPTER 5 249
15. After the aside style rule, add a style rule for the <footer> element. Set the styles to
position the footer clear after the <aside> element, set the width to 100 percent, set
the height to 70 pixels, and set the font size to small as follows.
footer {
clear: both;
width: 100%;
height: 70px;
font-size: small;
}
16. After the footer style rule, add a style rule for the <div> element whose id is container.
The purpose of this style is to ensure that the oat: left styles you’ve added don’t wrap
when the browser window is resized to a small size.
17. Set the minimum width to 800 pixels as follows.
#container {
min-width: 800px;
}
18. In the existing style rule for the calculator <div> element, change the height and width
to 400 pixels as follows.
#calculator {
border: solid;
background-color: hsl(255, 100%, 60%);
width: 400px;
height: 400px;
margin-left: auto;
margin-right: auto;
text-align: center;
padding: 10px;
}
19. In the existing style rule for the input button, change the font size to 20 point as
follows.
input, button {
font-family: Arial;
font-size: 20pt;
border-width: thick;
border-color: hsl(255, 100%, 100%);
margin: 5px;
}
The following is the completed style sheet for your reference.
* { margin : 0; padding : 0; }
aside, footer, header, hgroup, nav {
display: block;
}
250 CHAPTER 5 More HTML5
body {
background-color: hsl(255, 95%, 95%);
font-family: Cambria,'Times New Roman' , serif;
color: #0068AC;
}
header {
height: 100px;
background-image: url('../Images/ContosoLogo.png');
background-repeat: no-repeat;
margin-top: 10px;
}
#headerText {
position: absolute;
top: 0px;
left: 80px;
width: 100%;
margin-top: 10px;
}
h1 {
font-size: 64px;
line-height: 55px;
}
h2 {
font-size: 18px;
line-height: 20px;
font-style: italic;
}
nav {
float: left;
width: 20%;
min-width:125px;
}
div[role="main"] {
float: left;
width: 60%;
}
aside {
float: left;
width: 20%;
min-width:125px;
}
footer {
clear: both;
width: 100%;
height: 70px;
font-size: small;
Practice exercises CHAPTER 5 251
}
#container {
min-width: 800px;
}
#calculator {
border: solid;
background-color: hsl(255, 100%, 60%);
width: 400px;
height: 400px;
margin-left: auto;
margin-right: auto;
text-align: center;
padding: 10px;
}
input {
width: 85%;
height: 7%;
text-align: right;
padding: 10px;
border: inset;
}
button {
background-color: hsl(255, 50%, 80%);
width: 25%;
height: 10%;
border: outset;
}
button:hover {
background-color: hsl(255, 50%, 90%);
}
button:active {
border: inset;
border-width: thick;
border-color: hsl(255, 100%, 100%);
background-color: hsl(255, 50%, 50%);
}
input, button {
font-family: Arial;
font-size: 20pt;
border-width: thick;
border-color: hsl(255, 100%, 100%);
margin: 5px;
}
[readonly] {
background-color: hsl(255, 50%, 80%);
}
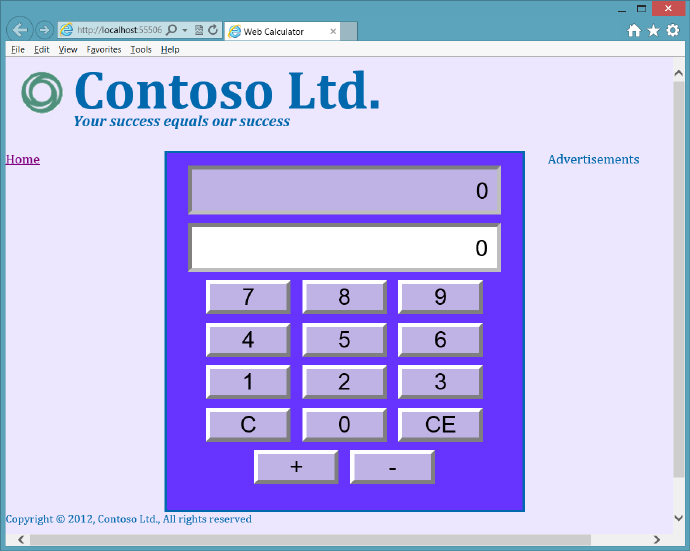
252 CHAPTER 5 More HTML5
20. To see your results, press F5 to start debugging the application.
You should see a nicer-looking calculator interface with a page layout as shown in
Figure 5-18.
FIGURE 5-18 The web calculator with its page layout
Exercise 3: Cleaning up the web calculator
The calculator’s buttons are positioned by keeping them the same size and using <br />
elements for each line of buttons. Although the calculator doesn’t look too bad, the buttons
aren’t in their traditional locations. For example, the clear and clear entry buttons are nor-
mally at the top, whereas the plus and minus buttons are typically on the right. The goal of
this lesson is to reposition the buttons.
In this exercise, you continue with the project from Exercise 2 and modify the default.html
le. The elements of the calculator will be positioned by placing them in a table. There will be
seven rows and four columns.
1. Open the project from Exercise 2.
If you didn’t perform Exercise 2, you can use the project located in the Exercise 2 Start
folder.
2. Open the default.html le.
Practice exercises CHAPTER 5 253
3. Surround the inputs and buttons with a <table> element.
4. Remove all <br /> elements from the default.html le.
5. Surround the txtResult text box with a table cell that spans four columns. Surround the
table cell with a table row.
The table row should look like the following.
<tr>
<td colspan="4">
<input id="txtResult" type="text" readonly="readonly" />
</td>
</tr>
6. With the txtInput text box, repeat the previous step as follows.
<tr>
<td colspan="4">
<input id="txtInput" type="text" />
</td>
</tr>
The next table row will have two empty columns, for future buttons, and then a col-
umn for the clear entry button and another column for the clear button as follows.
<tr>
<td></td>
<td></td>
<td><button id="btnClearEntry">CE</button></td>
<td><button id="btnClear">C</button></td>
</tr>
The next table row will have buttons 7, 8, 9, and the plus button as follows.
<tr>
<td>
<button id="btn7">7</button></td>
<td>
<button id="btn8">8</button></td>
<td>
<button id="btn9">9</button></td>
<td>
<button id="btnPlus">+</button>
</td>
</tr>
The next table row will have buttons 4, 5, 6, and the minus button as follows.
<tr>
<td>
<button id="btn4">4</button>
</td>
<td>
<button id="btn5">5</button>
</td>
<td>
254 CHAPTER 5 More HTML5
<button id="btn6">6</button>
</td>
<td>
<button id="btnMinus">-</button>
</td>
</tr>
The next table row will have buttons 1, 2, and 3 and an empty column as follows.
<tr>
<td>
<button id="btn1">1</button>
</td>
<td>
<button id="btn2">2</button>
</td>
<td>
<button id="btn3">3</button>
</td>
<td>
</td>
</tr>
The last table row will have an empty column, the 0 button, and two more empty
columns as follows.
<tr>
<td></td>
<td>
<button id="btn0">0</button>
</td>
<td></td>
<td></td>
</tr>
The following is the completed main <div> element.
<div role="main">
<div id="calculator">
<table>
<tr>
<td colspan="4">
<input id="txtResult" type="text" readonly="readonly" />
</td>
</tr>
<tr>
<td colspan="4">
<input id="txtInput" type="text" />
</td>
</tr>
<tr>
<td></td>
<td></td>
<td>
<button id="btnClearEntry">CE</button>
</td>
Practice exercises CHAPTER 5 255
<td>
<button id="btnClear">C</button>
</td>
</tr>
<tr>
<td>
<button id="btn7">7</button></td>
<td>
<button id="btn8">8</button></td>
<td>
<button id="btn9">9</button></td>
<td>
<button id="btnPlus">+</button>
</td>
</tr>
<tr>
<td>
<button id="btn4">4</button>
</td>
<td>
<button id="btn5">5</button>
</td>
<td>
<button id="btn6">6</button>
</td>
<td>
<button id="btnMinus">-</button>
</td>
</tr>
<tr>
<td>
<button id="btn1">1</button>
</td>
<td>
<button id="btn2">2</button>
</td>
<td>
<button id="btn3">3</button>
</td>
<td></td>
</tr>
<tr>
<td></td>
<td>
<button id="btn0">0</button>
</td>
<td></td>
<td></td>
</tr>
</table>
</div>
</div>
256 CHAPTER 5 More HTML5
7. Now that the default.html le is completed, modify the style sheet by opening the
default.css le and, at the bottom, adding the table selector and setting the width to
100 percent as follows.
table {
width: 100%;
}
8. Add a td selector and set the width to 25 percent as follows.
td {
width: 25%;
}
9. Locate the existing button selector. Change the width to 90 percent as follows.
button {
background-color: hsl(255, 50%, 80%);
width: 90%;
height: 10%;
border: outset;
}
10. Locate the existing input selector. Change the padding to 5 pixels as follows.
input {
width: 85%;
height: 7%;
text-align: right;
padding: 5px;
border: inset;
}
11. Press F5 to run the application.
Figure 5-19 shows the completed calculator.
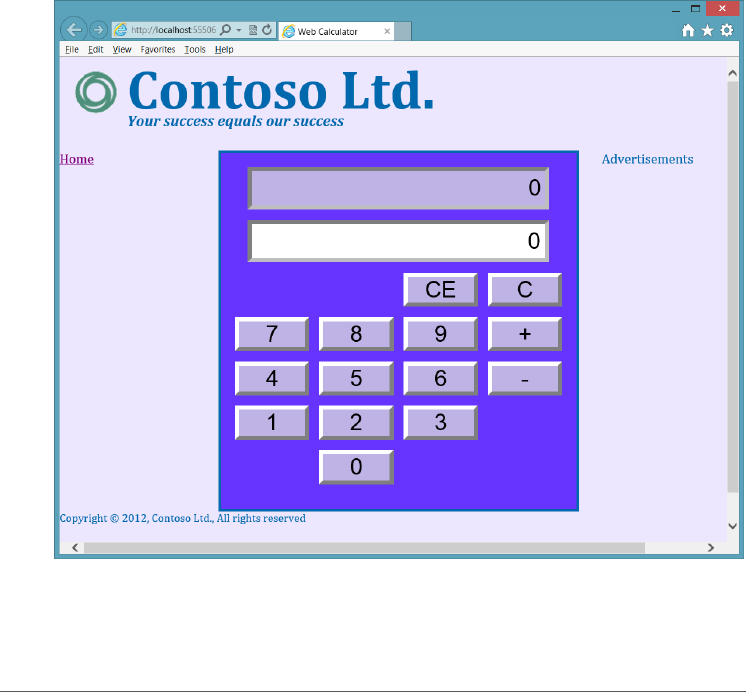
Suggested practice exercises CHAPTER 5 257
FIGURE 5-19 The completed calculator
Suggested practice exercises
The following additional exercises are designed to give you more opportunities to practice
what you’ve learned and to help you successfully master the lessons presented in this chapter.
Exercise 1 Learn more about semantic markup by adding additional sections to your
webpage.
Exercise 2 Learn more about tables by adding more rows and cells to the table to
hold future buttons.

258 CHAPTER 5 More HTML5
Answers
This section contains the answers to the lesson review questions in this chapter.
Lesson 1
1. Correct answer: D
A. Incorrect: The <section> element denotes a part of something.
B. Incorrect: The <pre> element displays preformatted content.
C. Incorrect: The <aside> element displays content that is related to the site.
D. Correct: An article wraps stand-alone items that can be shared.
2. Correct answer: C
A. Incorrect: You should refrain from using the <b> element.
B. Incorrect: The <em> element indicates emphatic stress but not necessarily
importance.
C. Correct: The <strong> element indicates importance.
D. Incorrect: You should refrain from using the <i> element.
3. Correct answer: A
A. Correct: The <address> element provides contact information for the author of
the webpage.
B. Incorrect: The <contact> element is not valid.
C. Incorrect: The <author>element is not valid.
D. Incorrect: The <name> element is not valid.
Lesson 2
1. Correct answer: B
A. Incorrect: The column needs to span two columns.
B. Correct: The column needs the colspan=”2” attribute to span the Products and
Services columns.
C. Incorrect: The span attribute is used with the <col> element but not with the <th>
element.
D. Incorrect: The style attribute cannot be used to cause spanning across two
columns.
2. Correct answer: A
A. Correct: You can assign styles to the <col> element, which will apply the style to
the corresponding table column.
B. Incorrect: Adding an id to each <td> element does not satisfy the criteria.

Answers CHAPTER 5 259
C. Incorrect: The <col> element must be inside a <colgroup> element.
D. Incorrect: The <hidden> element is not valid.
3. Correct answer: C
A. Incorrect: The <thead> element species heading rows.
B. Incorrect: The <colgroup> element species columns.
C. Correct: The <caption> element adds a caption to the top of a table.
D. Incorrect: The <th> element species header cells.


261
CHAPTER 6
Essential JavaScript and
jQuery
The exibility of JavaScript is amazing. In the previous chapters, you learned how to add
JavaScript code to your webpage to provide dynamic changes to the page when an
event is triggered.
One of the biggest difculties with webpage development is the differences among
different browsers, but this book is primarily focused on HTML5, CSS3, and JavaScript
(ECMAScript5.1). A completely separate book could be written that deals just with the dif-
ferences among browsers and browser versions.
In this chapter, you learn how to create objects, which are an important aspect of
JavaScript. You use objects to create entities, which are passed to and from the server, and
to encapsulate functionality that you want to modularize. You also need to extend objects
that others have created.
This chapter also introduces jQuery, the answer to writing browser-compatible code.
Although jQuery doesn’t solve all browser-compatibility issues, it does solve most of the
day-to-day issues that you encounter among browsers. In addition, jQuery is fun and easy
to use.
Lessons in this chapter:
Lesson 1: Creating JavaScript objects 262
Lesson 2: Working with jQuery 285
Before you begin
To complete this book, you must have some understanding of web development. This
chapter requires the hardware and software listed in the “System requirements” section in
the book’s Introduction.
262 CHAPTER 6 Essential JavaScript and jQuery
Lesson 1: Creating JavaScript objects
In JavaScript, everything is an object. Strings, numbers, and functions are all objects. You have
learned how to create functions, so you already have exposure to creating objects, as you see
in this lesson.
After this lesson, you will be able to:
Understand basic object-oriented terminology.
Create JavaScript objects.
Estimated lesson time: 20 minutes
Using object-oriented terminology
In many object-oriented languages, when you want to create objects, you start by creating
a class, which is a blueprint for an object. Like a blueprint for a house, the blueprint isn’t the
house; it’s the instructions that dene the type of object that you will be constructing, which
is the house. By using a house blueprint, you can create, or construct, many houses that are
based on the blueprint. Each house is an object of type house, also known as an instance of
the house type.
The developer writes the class, which is then used to construct objects. In a baseball appli-
cation, you might create a Player (classes are normally capitalized) class that has properties
for rst and last name, batting average, error count, and so on. When you create your team,
you might use the Player class to create nine Player objects, each having its own properties.
Each time you construct a Player object, memory is allocated to hold the data for the player,
and each piece of data is a property, which has a name and a value.
The three pillars of object-oriented programming are encapsulation, inheritance, and
polymorphism. Encapsulation means that you hide all details except those that are required
to communicate with your object in order to simplify the object for anyone using the object.
Inheritance means that you can create an “is a” relationship between two classes, in which the
child class automatically inherits everything that is in the parent class. Polymorphism means
that you can execute a function on the parent class, but the behavior changes (morphs)
because your child class has a function that overrides the function in the parent class.
The parent class is also known as the base class, the super class, or the generalized class.
The child class is also known as the derived class, the subclass, or the specialized class. Because
it’s easy to think of actual children inheriting from parents, the terms parent and child are
usually used, but you should remember the other terms for these classes to communicate
effectively with others about object-oriented programming.
In object-oriented programming, objects can have data implemented as properties and
behaviors implemented as methods. A property is essentially a variable that is dened on
Key
Terms
Key
Terms
Key
Terms
Key
Terms

Lesson 1: Creating JavaScript objects CHAPTER 6 263
an object and owned by the object. A method is a function that is dened on an object and
owned by the object.
Understanding the JavaScript object-oriented caveat
JavaScript is a very exible language. You can create objects, but the relationship between the
JavaScript language and class-based, object-oriented programming is not direct. The most
glaring example is that there is no class keyword in JavaScript. If you’re familiar with class-
based, object-oriented programming, you’ll be struggling to nd the “class.”
JavaScript is a prototype-based, object-oriented programming language. In JavaScript,
everything is an object, and you either create a new object from nothing, or you create an
object from a clone of an existing object, known as a prototype.
Conceptually, you can simulate class creation by using a function. Class-based, object-
oriented purists dislike the idea of a function being used to simulate a class. Keep an open
mind as patterns are presented. This lesson should give you what you need to accomplish
your tasks.
The problem you typically encounter is nding one correct solution for all scenarios. As
you read on, you’ll nd that achieving proper encapsulation of private data requires you to
create copies of the functions that can access the private data for each object instance, which
consumes memory. If you don’t want to create copies of the method for each object instance,
the data needs to be publicly exposed, thus losing the benets of encapsulation, by which
you hide object details that users shouldn’t need to see.
The general consensus of this issue of encapsulation versus wasteful memory consump-
tion is that most people would rather expose the data to minimize memory consumption. Try
to understand the benets and drawbacks of each pattern when deciding which option to
implement in your scenario.
Using the JavaScript object literal pattern
Probably the simplest way to create an object in JavaScript is to use the object literal syntax.
This starts with a set of curly braces to indicate an object. Inside the curly braces is a comma-
separated list of name/value pairs to dene each property. Object literals create an object
from nothing, so these objects contain precisely what you assign to them and nothing more.
No prototype object is associated with the created object. The following example demon-
strates the creation of two objects that represent vehicles.
var car1 = {
year: 2000,
make: 'Ford',
model: 'Fusion',
getInfo: function () {
return 'Vehicle: ' + this.year + ' ' + this.make + ' ' + this.model;
}
};
Key
Terms
264 CHAPTER 6 Essential JavaScript and jQuery
var car2 = {
year: 2010,
make: 'BMW',
model: 'Z4',
getInfo: function () {
return 'Vehicle: ' + this.year + ' ' + this.make + ' ' + this.model;
}
};
In this example, public properties are created for year, make, model, and getInfo. The get-
Info property doesn’t contain data; it references an anonymous function instead, so getInfo
is a method. The method uses the this keyword to access the data. Remember that the this
keyword references the object that owns the code where the this keyword is. In this case, the
object is being created. If the this keyword were omitted, the code would look in the global
namespace for year, make, and model.
To test this code, the following QUnit test checks to see whether each object contains the
data that is expected.
test("Object Literal Test", function () {
expect(2);
var expected = 'Vehicle: 2000 Ford Fusion';
var actual = car1.getInfo();
equal(actual, expected, 'Expected value: ' + expected +
' Actual value: ' + actual);
var expected = 'Vehicle: 2010 BMW Z4';
var actual = car2.getInfo();
equal(actual, expected, 'Expected value: ' + expected +
' Actual value: ' + actual);
});
This test performs an assertion by using the car1 variable and then performs another
assertion by using the car2 variable. The successful test is shown in Figure 6-1.
If you want to dene an array of items and assign it to a property, you can use square
brackets as shown in the following example.
var car1 = {
year: 2000,
make: 'Ford',
model: 'Fusion',
re pairs: ['re pair1', 'r epair2', 'r epair3'],
getInfo: function () {
return 'Vehicle: ' + this.year + ' ' + this.make + ' ' + this.model;
}
};
Because this is one of the easiest ways to create an object, you’ll probably use it to gather
data to send to other code. In this example, two instances of a type Object are created, and
properties are dynamically added to each instance. This does not create a Vehicle type.
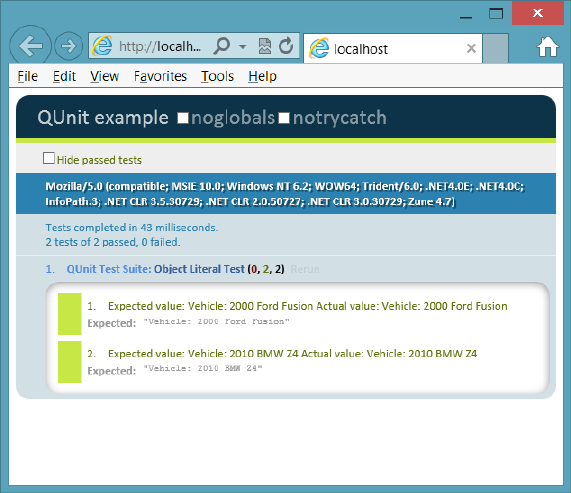
Lesson 1: Creating JavaScript objects CHAPTER 6 265
FIGURE 6-1 The JavaScript object literal test
Creating dynamic objects by using the factory pattern
In addition to using the JavaScript literal object syntax, JavaScript has an Object type, and you
can use it to create an object programmatically. Object has a prototype object that is cloned
when you use the new keyword to create a new Object instance. The prototype object has the
following inherited methods.
constructor The function that is called to initialize a new object
hasOwnProperty Returns a Boolean indicator of whether the current object has the
specied property
isPrototypeOf Returns a Boolean indicator of whether the current object is in the
specied object’s prototype object chain
propertyIsEnumerable Returns true if the object can be enumerated in a for...in
loop
toLocalString Converts a date to a string value based on the current local
toString Returns the string representation of the current object
valueOf Returns the value of the current object converted to its most meaningful
primitive value

266 CHAPTER 6 Essential JavaScript and jQuery
After the object is created, you can dynamically add properties to it that hold the data and
reference functions. You can wrap this code in a function that returns the object as shown in
the following code example.
function getVehicle(theYear, theMake, theModel) {
var vehicle = new Object();
vehicle.year = theYear;
vehicle.make = theMake;
vehicle.model = theModel;
vehicle.getInfo = function () {
return 'Vehicle: ' + this.year + ' ' + this.make + ' ' + this.model;
};
return vehicle;
}
This code takes advantage of JavaScript’s dynamic nature to add year, make, model, and
getInfo to the object and then returns the object. Placing this code in a function makes it easy
to call the getVehicle function to get a new object. The encapsulation of the code to create an
object is commonly referred to as using the factory pattern. Can you create multiple instances
of vehicle? You can create multiple instances of Object and add properties dynamically to
each instance, but the actual type is Object, not vehicle. The following QUnit test demon-
strates the creation of multiple instances.
test("Create Instances Test Using Factory Pattern", function () {
expect(2);
var car1 = getVehicle(2000, 'Ford', 'Fusion');
var car2 = getVehicle(2010, 'BMW', 'Z4');
var expected = 'Vehicle: 2000 Ford Fusion';
var actual = car1.getInfo();
equal(actual, expected, 'Expected value: ' + expected +
' Actual value: ' + actual);
var expected = 'Vehicle: 2010 BMW Z4';
var actual = car2.getInfo();
equal(actual, expected, 'Expected value: ' + expected +
' Actual value: ' + actual);
});
This might be all you need when you are gathering some data to put into an object struc-
ture and pass to some other code or service. Although the getVehicle function encapsulates
the object creation, the properties are all public. This can be desirable in some scenarios, but
if you want the data to be private, this approach won’t work. Like when using the literal object
syntax, you might encounter the problem that every vehicle’s type is Object, and you might
want to create a Vehicle class to have a named Vehicle type.
Creating a class
There is no class keyword in JavaScript, but you can simulate a class by starting with a func-
tion, which is actually the constructor function of the object. Consider the following function.
function Vehicle(theYear, theMake, theModel) {
year = theYear;
Key
Terms
Lesson 1: Creating JavaScript objects CHAPTER 6 267
make = theMake;
model = theModel;
getInfo = function () {
return 'Vehicle: ' + year + ' ' + make + ' ' + model;
};
}
There are several problems with this code. All the variables are dened without the var
keyword, so year, make, model, and getInfo are automatically dened in the global scope and
are accessible from anywhere. The following is a passing QUnit test that initializes Vehicle and
calls the getInfo method to retrieve the data.
test("Function Test", function () {
expect(2);
Vehicle(2000, 'Ford', 'Fusion');
var expected = 'Vehicle: 2000 Ford Fusion';
var actual = getInfo();
equal(actual, expected, 'Expected value: ' + expected +
' Actual value: ' + actual);
expected = 2000;
actual = year;
equal(actual, expected, 'Expected value: ' + expected +
' Actual value: ' + actual);
});
The Vehicle function accepts three parameters and doesn’t return anything. Instead, it is
setting global variables, and there is no provision for multiple instances. To prove that global
variables are being set, the second assertion is checking to see whether there is a global vari-
able named year that equals 2,000. This assertion succeeds, which proves that the data is not
encapsulated, and there is only one copy of the data. For example, the following QUnit test
fails.
test("Failing Function Test", function () {
expect(1);
Vehicle(2000, 'Ford', 'Fusion');
Vehicle(2010, 'BMW', 'Z4');
var expected = 'Vehicle: 2000 Ford Fusion';
var actual = getInfo();
equal(actual, expected, 'Expected value: ' + expected +
' Actual value: ' + actual);
expected = 2000;
actual = year;
equal(actual, expected, 'Expected value: ' + expected +
' Actual value: ' + actual);
});
Figure 6-2 shows the failures. The problem is that year, make, and model of the second
vehicle replaced year, make, and model of the rst vehicle. The variable getInfo was also
replaced, but instead of holding data, it holds a reference to the function code. The getInfo
variable’s value was replaced with new function code; it just happened to be the same code.
Once again, there is no encapsulation.
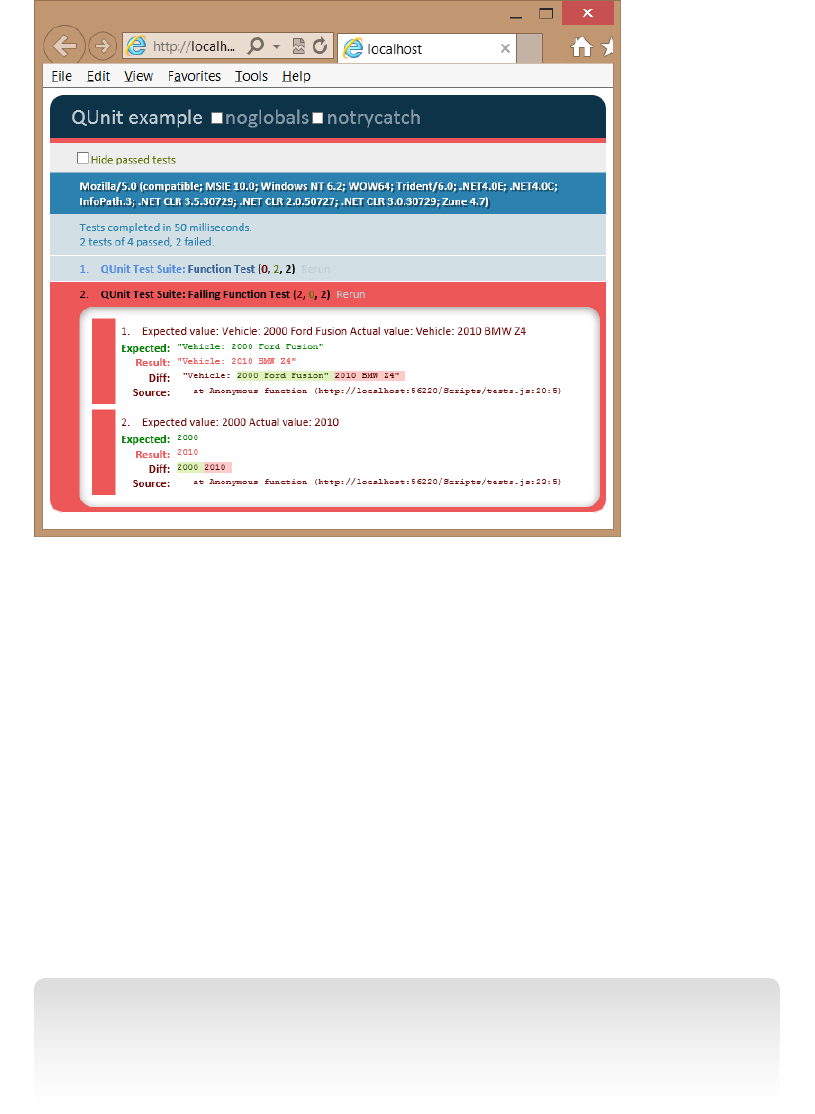
268 CHAPTER 6 Essential JavaScript and jQuery
FIGURE 6-2 The failing test assertions after a second vehicle is used
To solve the problem, you want to implement encapsulation. Then you need to create
objects, each with its own data. To implement encapsulation, use the var keyword for the
year, make, and model. This will make these variables private to the function. Notice that the
var keyword is not used with getInfo because the getInfo variable needs to be public to be
called from outside the object, but you don’t want the getInfo variable to be global. Assign
getInfo to the current object by using the this keyword. The result is a class that encapsulates
the data and exposes getInfo to retrieve the data in a controlled way as follows.
function Vehicle(theYear, theMake, theModel) {
var year = theYear;
var make = theMake;
var model = theModel;
this.getInfo = function () {
return 'Vehicle: ' + year + ' ' + make + ' ' + model;
};
}
IMPORTANT PRIVATE DATA ISN’T SECURE
In object-oriented programming, private data is not intended to be secure. Private data
provides encapsulation so the details can be hidden; the user sees only what is necessary
and isn’t bogged down in the details.

Lesson 1: Creating JavaScript objects CHAPTER 6 269
Remember that the this keyword references the object that owns the current code. The
way the test is currently written, the this keyword references the global object, and getInfo
will still be a global variable. To solve the problem, the new keyword must be used to create
an object from this class, as shown in the modied test code.
test("Encapsulation Test", function () {
expect(2);
var car1 = new Vehicle(2000, 'Ford', 'Fusion');
var car2 = new Vehicle(2010, 'BMW', 'Z4');
var expected = 'Vehicle: 2000 Ford Fusion';
var actual = car1.getInfo();
equal(actual, expected, 'Expected value: ' + expected +
' Actual value: ' + actual);
expected = 2000;
actual = year;
equal(actual, expected, 'Expected value: ' + expected +
' Actual value: ' + actual);
});
Notice that a new variable is dened, car1, and it is assigned the object that is created by
using the new keyword. After that, another new variable is dened, car2, and it is assigned the
second Vehicle object created by using the new keyword. Two instances of the Vehicle class
are being created, which means that two Vehicle objects are being constructed. Each instance
has its own data and its own copy of the getInfo method. The getInfo method is public but
has access to the private data. A method that is public but has access to private data is called
a privileged method.
Figure 6-3 shows the test results. Notice that the rst assertion passed, which proves that
there are separate object instances, each having its own data. The second assertion failed. The
failure message states that the year is undened, which proves that the year is not directly
accessible from the test, which is in the global namespace. Instead, year, in addition to make
and model, is encapsulated in the object.
You have now created a class and constructed objects from the class, but there’s more
to cover in the Vehicle function that is being used as a class. The Vehicle function is known
as a constructor function. The new keyword created an object and executed the constructor
function to initialize the object by creating the year, make, and model private variables and
the public getInfo variable. Each instance has these four variables, and memory is allocated
for them. That’s what you want for the data, but is that what you want for the getInfo variable
that references a function? The answer is that it depends on what you are trying to accom-
plish with your code.
Key
Terms
Key
Terms
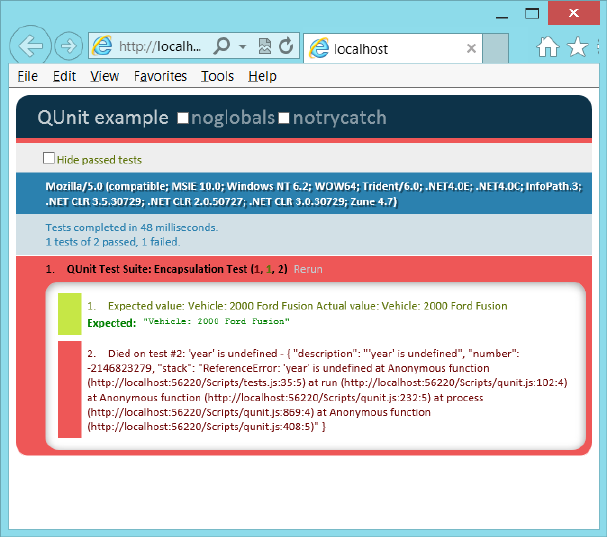
270 CHAPTER 6 Essential JavaScript and jQuery
FIGURE 6-3 Successful first assertion and failed second assertion
Consider the following test code that creates two Vehicle objects, but then replaces the
code in getInfo of the rst Vehicle object with different code. Does this replace the code in
the second Vehicle object?
test("Function Replacement Test", function () {
expect(2);
var car1 = new Vehicle(2000, 'Ford', 'Fusion');
var car2 = new Vehicle(2010, 'BMW', 'Z4');
car1.getInfo = function () {
return 'This is a Car';
};
var expected = 'This is a Car';
var actual = car1.getInfo();
equal(actual, expected, 'Expected value: ' + expected +
' Actual value: ' + actual);
var expected = 'This is a Car';
var actual = car2.getInfo();
equal(actual, expected, 'Expected value: ' + expected +
' Actual value: ' + actual);
});
The test result is shown in Figure 6-4. The rst assertion succeeded, which proves that the
function was successfully replaced on the rst Vehicle object. The second assertion failed,
which proves that the second Vehicle object’s getInfo function was not replaced. Is that what
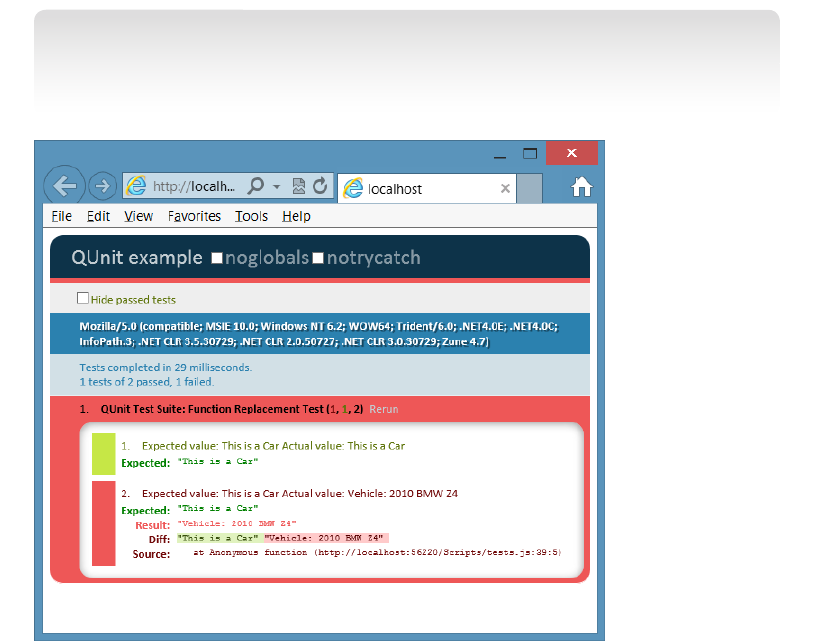
Lesson 1: Creating JavaScript objects CHAPTER 6 271
you expected? Is that what you wanted? You can see that in some scenarios, this behavior is
desirable, but in other scenarios, you might have wanted to replace the function across all
objects. To do this, you use the prototype pattern.
NOTE ACCESS TO PRIVATE DATA
In the example, the replacement function cannot access the private data because the
replacement is executed externally to the Vehicle.
FIGURE 6-4 Successful first assertion, proving that the function was replaced; failed second assertion,
proving that the second Vehicle’s function was not replaced
Using the prototype property
In JavaScript, everything, including the function, is an Object type, which has a prototype
property. The prototype itself is an object containing properties and methods that should be
available to all instances of the type you’re working with. However, this prototype is typi-
cally specied externally to the constructor function, so the prototype doesn’t have access to
private variables. Therefore, you must expose the data for the prototype to work. The follow-
ing is an example of using the prototype property to create a single getInfo method that is
shared across all instances.
function Vehicle(theYear, theMake, theModel) {
this.year = theYear;
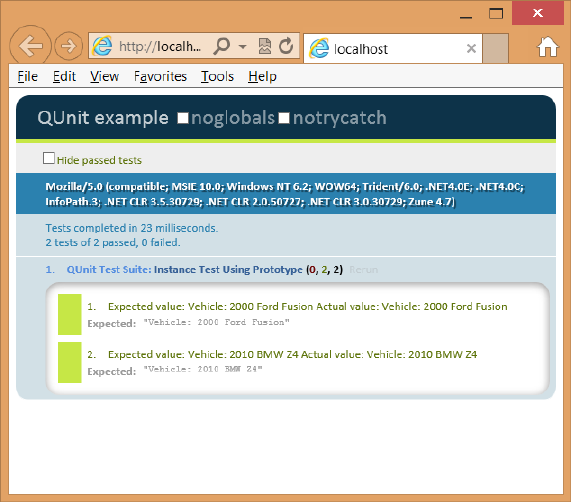
272 CHAPTER 6 Essential JavaScript and jQuery
this.make = theMake;
this.model = theModel;
}
Vehicle.prototype.getInfo = function () {
return 'Vehicle: ' + this.year + ' ' + this.make + ' ' + this.model;
}
By using this class and the prototype, you can write the following test to ensure that each
instance has its own data and that the getInfo function works properly.
test("Instance Test Using Prototype", function () {
expect(2);
var car1 = new Vehicle(2000, 'Ford', 'Fusion');
var car2 = new Vehicle(2010, 'BMW', 'Z4');
var expected = 'Vehicle: 2000 Ford Fusion';
var actual = car1.getInfo();
equal(actual, expected, 'Expected value: ' + expected +
' Actual value: ' + actual);
var expected = 'Vehicle: 2010 BMW Z4';
var actual = car2.getInfo();
equal(actual, expected, 'Expected value: ' + expected +
' Actual value: ' + actual);
});
In this test, two instances of the Vehicle class are created, each having different data. The
rst assertion calls getInfo on car1 and veries that the proper result is returned. The second
assertion calls getInfo on car2 and veries that the proper result is returned. The result is
shown in Figure 6-5.
FIGURE 6-5 The modified class using the prototype property to create the getInfo function
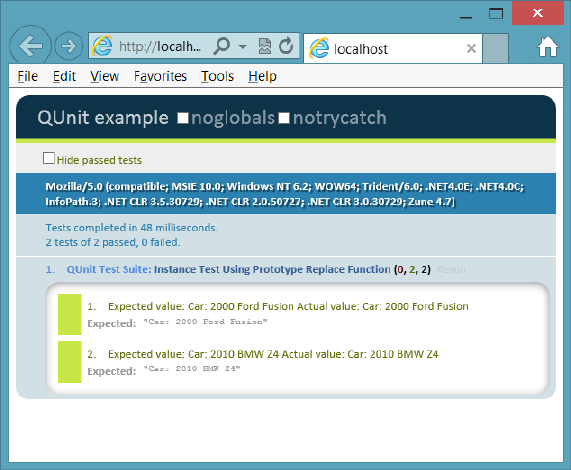
Lesson 1: Creating JavaScript objects CHAPTER 6 273
Now that you have a functioning class, change the prototype to see whether it can be
changed across all instances.
test("Instance Test Using Prototype Replace Function", function () {
expect(2);
var car1 = new Vehicle(2000, 'Ford', 'Fusion');
var car2 = new Vehicle(2010, 'BMW', 'Z4');
Vehicle.prototype.getInfo = function () {
return 'Car: ' + this.year + ' ' + this.make + ' ' + this.model;
}
var expected = 'Car: 2000 Ford Fusion';
var actual = car1.getInfo();
equal(actual, expected, 'Expected value: ' + expected +
' Actual value: ' + actual);
var expected = 'Car: 2010 BMW Z4';
var actual = car2.getInfo();
equal(actual, expected, 'Expected value: ' + expected +
' Actual value: ' + actual);
});
This test creates two Vehicle instances and then changes getInfo. Next, the two assertions
are modied to check both instances to see whether they are using the updated getInfo. The
result is shown in Figure 6-6.
FIGURE 6-6 The modification of the getInfo prototype affected all instances
You might use the prototype property when creating functions that will be shared across
all instances, but remember that the prototype is dened externally to the constructor
function, so all properties must be public when using the this keyword. If you don’t need to

274 CHAPTER 6 Essential JavaScript and jQuery
replace individual instance functions and you don’t mind making your data public, the proto-
type is efcient.
Quick check
You want to add a method to all instances of Vehicle. How do you do this?
Quick check answer
Add the method by using the Vehicle object’s prototype method.
Debating the prototype/private compromise
You’ve learned the primary patterns for creating a JavaScript object, but there can be a com-
promise in which you can have private data that is readable by creating a method for retriev-
ing the data, also known as a getter, which has no setter, a method for setting the value. This
would require you to write a function that is copied for each object, but you should keep the
function as small as possible, as shown in the following code example.
function Vehicle(theYear, theMake, theModel) {
var year = theYear;
var make = theMake;
var model = theModel;
this.getYear = function () { return year; };
this.getMake = function () { return make; };
this.getModel = function () { return model; };
}
Vehicle.prototype.getInfo = function () {
return 'Vehicle: ' + this.getYear() +
' ' + this.getMake() +
' ' + this.getModel();
}
The QUnit test for this code creates two instances of Vehicle and, for each assertion,
executes the getInfo method of each object and checks for the proper value. The test is as
follows.
test("Instance Test Using Prototype and getters", function () {
expect(2);
var car1 = new Vehicle(2000, 'Ford', 'Fusion');
var car2 = new Vehicle(2010, 'BMW', 'Z4');
var expected = 'Vehicle: 2000 Ford Fusion';
var actual = car1.getInfo();
equal(actual, expected, 'Expected value: ' + expected +
' Actual value: ' + actual);
var expected = 'Vehicle: 2010 BMW Z4';
var actual = car2.getInfo();
equal(actual, expected, 'Expected value: ' + expected +
' Actual value: ' + actual);
});

Lesson 1: Creating JavaScript objects CHAPTER 6 275
This test is successful, so replace the getInfo method and add more tests. The following
test code does this.
test("Instance Test Using Prototype and getters", function () {
expect(4);
var car1 = new Vehicle(2000, 'Ford', 'Fusion');
var car2 = new Vehicle(2010, 'BMW', 'Z4');
var expected = 'Vehicle: 2000 Ford Fusion';
var actual = car1.getInfo();
equal(actual, expected, 'Expected value: ' + expected +
' Actual value: ' + actual);
var expected = 'Vehicle: 2010 BMW Z4';
var actual = car2.getInfo();
equal(actual, expected, 'Expected value: ' + expected +
' Actual value: ' + actual);
Vehicle.prototype.getInfo = function () {
return 'Car Year: ' + this.getYear()
+ ' Make: ' + this.getMake()
+ ' Model: ' + this.getModel();
};
var expected = 'Car Year: 2000 Make: Ford Model: Fusion';
var actual = car1.getInfo();
equal(actual, expected, 'Expected value: ' + expected +
' Actual value: ' + actual);
var expected = 'Car Year: 2010 Make: BMW Model: Z4';
var actual = car2.getInfo();
equal(actual, expected, 'Expected value: ' + expected +
' Actual value: ' + actual);
});
The test result is shown in Figure 6-7. You can replace the getInfo method and, because
the data is exposed as read-only, it’s available to be used in the new method. In addition, the
privileged getters are small, which minimizes the amount of memory consumed when each
instance has a copy of the method. Remember to create only getter methods as needed and
to keep them small and concise.
Quick check
How can you expose private data as read-only?
Quick check answer
Add a getter method that retrieves the data but cannot change the data.
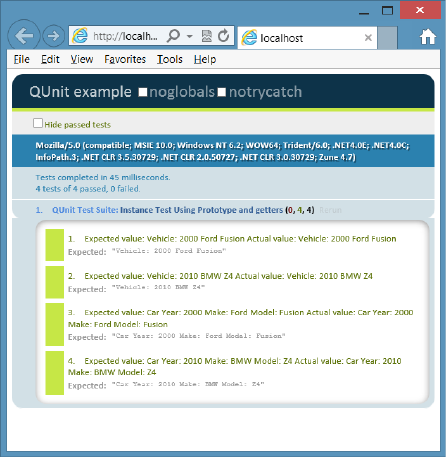
276 CHAPTER 6 Essential JavaScript and jQuery
FIGURE 6-7 The use of getters to expose read-only data as a good compromise
Implementing namespaces
One problem to watch for is the pollution of the global namespace. As your program gets
larger and libraries are added, more entries are added to the global object. How can you
minimize this global namespace pollution?
JavaScript doesn’t have a namespace keyword, but you can implement the equivalent of a
namespace by using techniques that are similar to those used to create objects. Consider the
following code sample.
var vehicleCount = 5;
var vehicles = new Array();
function Car() { }
function Truck() { }
var repair = {
description: 'changed spark plugs',
cost: 100
};
This code sample places ve entries in the global namespace, and as the application grows,
this global namespace pollution also grows. You can implement the namespace pattern to
solve the problem. The following example shows the creation of an object that contains the
ve items from the previous example.
Lesson 1: Creating JavaScript objects CHAPTER 6 277
var myApp = {};
myApp.vehicleCount = 5;
myApp.vehicles = new Array();
myApp.Car = function () { }
myApp.Truck = function () { }
myApp.repair = {
description: 'changed spark plugs',
cost: 100
};
In this sample, myApp is the only entry in the global namespace. It represents the name of
the application and its root namespace. Notice that object literal syntax is used to create an
empty object and assign it to myApp. Everything else is added to the object. Sub-namespaces
can also be created and assigned to myApp.
You can see that a namespace was created by creating an object. Although only one entry
is made in the global namespace, all the members of myApp are globally accessible. In addi-
tion, if you create a namespace for your application, and your application has many JavaScript
les, you might want to have logic to create the namespace object only if it hasn’t been
created. In the following example, the code for myApp is modied to create the namespace
object if it doesn’t already exist. This code uses the OR operator to create a new object if
myApp does not have a value.
var myApp = myApp || {};
You can use the object techniques already dened in this lesson to make some members
of the namespace private and some public. The difference is that the namespace is a single-
ton object, so you create a single instance for the namespace. You don’t need to worry about
functions dened in the constructor function consuming additional memory for each instance
because there is only one instance. Here is an example of the use of an immediately invoked
function expression (IIFE) to create the myApp namespace in which Car and Truck are public,
but vehicleCount, vehicles, and repair are private.
(function () {
this.myApp = this.myApp || {};
var ns = this.myApp;
var vehicleCount = 5;
var vehicles = new Array();
ns.Car = function () { }
ns.Truck = function () { }
var repair = {
description: 'changed spark plugs',
cost: 100
};
}());

278 CHAPTER 6 Essential JavaScript and jQuery
An IIFE (pronounced iffy) is an anonymous function expression that has a set of parenthe-
ses at the end of it, which indicates that you want to execute the function. The anonymous
function expression is wrapped in parentheses to tell the JavaScript interpreter that the func-
tion isn’t only being dened; it’s also being executed when the le is loaded.
In this IIFE, the rst line creates the myApp namespace if it doesn’t already exist, which
represents the singleton object that is used as the namespace. Next, an ns variable (for
namespace) is created as an alias to the namespace to save typing within the IIFE, so ns can
be used in place of this.myApp. After that, the private members of the namespace are dened
by using the var keyword. Car and Truck are public, so they are prexed with ns.
If you’re wondering how you would create a sub-namespace under myApp, the following
example shows how you can add a billing namespace under the myApp namespace.
(function () {
this.myApp = this.myApp || {};
var rootNs = this.myApp;
rootNs.billing = rootNs.billing || {};
var ns = rootNs.billing;
var taxRate = .05;
ns.Invoice = function () { };
}());
This example also implements an IIFE to create the namespace. First, the myApp
namespace is created if it doesn’t already exist and is assigned to a local rootNs variable to
save typing inside the namespace. Next, the billing namespace is created and assigned to the
local ns variable to save typing inside the namespace. Finally, the private taxRate property is
dened while the public Invoice is dened.
Implementing inheritance
JavaScript provides the ability to implement inheritance, which is useful when you can dene
the relationship between two objects as an “is a” relationship. For example, an apple is a
fruit, an employee is a person, and a piano is an instrument. You look for “is a” relationships
because they provide an opportunity to implement code reuse. If you have several types of
vehicles, you can create Vehicle with the common vehicle traits dened in it. After Vehicle is
created, you can create each vehicle type and inherit from Vehicle so you don’t need dupli-
cate code in each vehicle type.
As an example of inheritance, start by dening the base class. Using the Vehicle example,
the following is an example of a Vehicle base class.
var Vehicle = (function () {
function Vehicle(year, make, model) {
this.year = year;
this.make = make;
this.model = model;
}
Key
Terms
Lesson 1: Creating JavaScript objects CHAPTER 6 279
Vehicle.prototype.getInfo = function () {
return this.year + ' ' + this.make + ' ' + this.model;
};
Vehicle.prototype.startEngine = function () {
return 'Vroom';
};
return Vehicle;
})();
This class is wrapped in an IIFE. The wrapper encapsulates the function and the Vehicle
prototype. There is no attempt to make the data private. The code works as follows.
When the code is loaded into the browser, the IIFE is immediately invoked.
A nested function called Vehicle is dened in the IIFE.
The Vehicle function’s prototype denes getInfo and startEngine functions that are on
every instance of Vehicle.
A reference to the Vehicle function is returned, which is assigned to the Vehicle
variable.
This is a great way to create a class, and all future class examples use this pattern. To create
Vehicle objects, you use the new keyword with the Vehicle variable. The following test creates
an instance of Vehicle and tests the getInfo and startEngine methods.
test('Vehicle Inheritance Test', function () {
expect(2);
var v = new Vehicle(2012, 'Toyota', 'Rav4');
var actual = v.getInfo();
var expected = '2012 Toyota Rav4';
equal(actual, expected, 'Expected value: ' + expected +
' Actual value: ' + actual);
var actual = v.startEngine();
var expected = 'Vroom';
equal(actual, expected, 'Expected value: ' + expected +
' Actual value: ' + actual);
});
Now that you have a Vehicle parent class with three properties and two methods, you can
create child classes for Car and Boat that inherit from Vehicle. Start by writing an IIFE but, this
time, pass Vehicle into the IIFE as follows.
var Car = (function (parent) {
})(Vehicle);
Because Vehicle in this example is the Vehicle variable, not the Vehicle function, Car needs
to be dened after Vehicle. Vehicle is passed into the IIFE and is available inside the IIFE as
parent. Next, the function for Car can be added inside the IIFE. Inside the function, add any
additional properties, such as wheelQuantity, and initialize to four. In the function, call the
parent class’s constructor for Car to allocate memory slots for the year, make, and model.
To call the parent constructor function, use a call method that exists on the Function object,
280 CHAPTER 6 Essential JavaScript and jQuery
which accepts a parameter for the this object, and parameters for the parameters on the
function being called, as follows.
var Car = (function (parent) {
function Car(year, make, model) {
parent.call(this, year, make, model);
this.wheelQuantity = 4;
}
return Car;
})(Vehicle);
Notice how this example used the call method to modify the this object; the this object is
the Car object, so the call to the parent constructor function creates year, make, and model
on the Car object. The Function object has another method, apply, that does the same thing,
but the extra parameters are passed as an array instead of as a comma-delimited list.
Next, the inheritance must be set up. You might think that you’ve already set up inheri-
tance because the previous example calls the parent class’s constructor, and the year, make,
and model are created on Car, but getInfo and startEngine were not inherited. The inheri-
tance is accomplished by changing the Car prototype object to be a new Vehicle object.
Remember that the prototype is the object that is cloned to create the new object. By default,
the prototype is of type Object. After the new Vehicle is assigned to the prototype, the con-
structor of that Vehicle is changed to be the Car constructor as follows.
var Car = (function (parent) {
Car.prototype = new Vehicle();
Car.prototype.constructor = Car;
function Car(year, make, model) {
parent.call(this, year, make, model);
this.wheelQuantity = 4;
}
return Car;
})(Vehicle);
Finally, you can add more methods into Car. In this example, the getInfo method is added,
which replaces the Vehicle getInfo method. The new getInfo gets some code reuse by calling
the existing getInfo method on the parent Vehicle object’s prototype. However, you must use
the call method and pass the this object as follows.
var Car = (function (parent) {
Car.prototype = new Vehicle();
Car.prototype.constructor = Car;
function Car(year, make, model) {
parent.call(this, year, make, model);
this.wheelQuantity = 4;
}
Car.prototype.getInfo = function () {
return 'Vehicle Type: Car ' + parent.prototype.getInfo.call(this);
};
return Car;
})(Vehicle);
Lesson 1: Creating JavaScript objects CHAPTER 6 281
This completes Car, and Boat is similar except that Boat has a propellerBladeQuantity,
which is initialized to three, instead of the wheelQuantity property. In addition, getInfo
returns the vehicle type of Boat and calls the Vehicle getInfo method as follows.
var Boat = (function (parent) {
Boat.prototype = new Vehicle();
Boat.prototype.constructor = Boat;
function Boat(year, make, model) {
parent.call(this, year, make, model);
this.propellerBladeQuantity = 3;
}
Boat.prototype.getInfo = function () {
return 'Vehicle Type: Boat ' + parent.prototype.getInfo.call(this);
};
return Boat;
})(Vehicle);
In addition to the Vehicle tests already presented, you need to verify the following for the
child classes.
Car and Boat have the inherited year, make, and model properties.
Car has its wheelQuantity property and it's set.
Boat has its propellerBladeQuantity and it's set.
Car and Boat return the proper value from the replaced getInfo method.
Car and Boat return the proper value from the inherited startEngine method.
The following are the Car and Boat tests.
test('Car Inheritance Test', function () {
expect(6);
var c = new Car(2012, 'Toyota', 'Rav4');
var actual = c.year;
var expected = 2012;
equal(actual, expected, 'Expected value: ' + expected +
' Actual value: ' + actual);
var actual = c.make;
var expected = 'Toyota';
equal(actual, expected, 'Expected value: ' + expected +
' Actual value: ' + actual);
var actual = c.model;
var expected = 'Rav4';
equal(actual, expected, 'Expected value: ' + expected +
' Actual value: ' + actual);
var actual = c.wheelQuantity;
var expected = 4;
equal(actual, expected, 'Expected value: ' + expected +
' Actual value: ' + actual);
var actual = c.getInfo();
var expected = 'Vehicle Type: Car 2012 Toyota Rav4';
equal(actual, expected, 'Expected value: ' + expected +
' Actual value: ' + actual);
282 CHAPTER 6 Essential JavaScript and jQuery
var actual = c.startEngine();
var expected = 'Vroom';
equal(actual, expected, 'Expected value: ' + expected +
' Actual value: ' + actual);
});
test('Boat Inheritance Test', function () {
expect(6);
var b = new Boat(1994, 'Sea Ray', 'Signature 200');
var actual = b.year;
var expected = 1994;
equal(actual, expected, 'Expected value: ' + expected +
' Actual value: ' + actual);
var actual = b.make;
var expected = 'Sea Ray';
equal(actual, expected, 'Expected value: ' + expected +
' Actual value: ' + actual);
var actual = b.model;
var expected = 'Signature 200';
equal(actual, expected, 'Expected value: ' + expected +
' Actual value: ' + actual);
var actual = b.propellerBladeQuantity;
var expected = 3;
equal(actual, expected, 'Expected value: ' + expected +
' Actual value: ' + actual);
var actual = b.getInfo();
var expected = 'Vehicle Type: Boat 1994 Sea Ray Signature 200';
equal(actual, expected, 'Expected value: ' + expected +
' Actual value: ' + actual);
var actual = b.startEngine();
var expected = 'Vroom';
equal(actual, expected, 'Expected value: ' + expected +
' Actual value: ' + actual);
});
Figure 6-8 shows the test output. All tests have passed.
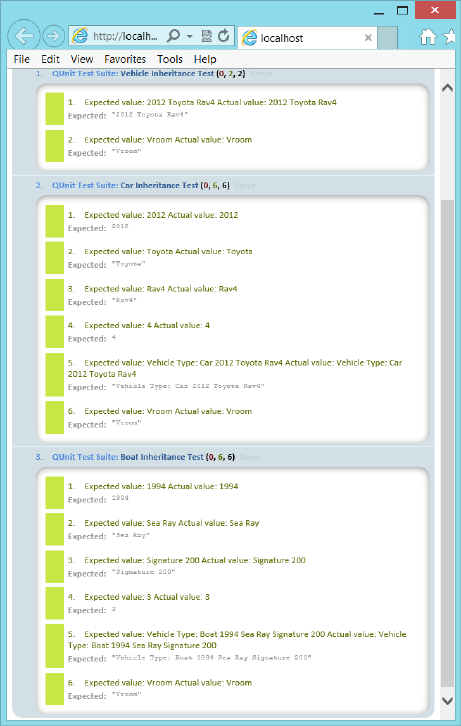
Lesson 1: Creating JavaScript objects CHAPTER 6 283
FIGURE 6-8 The passing inheritance tests
Lesson summary
A class is a blueprint for an object in which an object is an instance of a class.
The three pillars of object-oriented programming are encapsulation, inheritance, and
polymorphism.
The class from which you inherit is called the parent, base, super, or generalized class.
The class that is derived from the parent is called the child, derived, sub, or specialized
class. You can implement inheritance by replacing the Child class prototype with a new
instance of the parent and replacing its constructor with the Child class constructor
function.
284 CHAPTER 6 Essential JavaScript and jQuery
JavaScript is a prototype-based, object-oriented programming language. A prototype
is the object used to create a new instance.
The literal pattern can be used to create an object by using curly braces to create the
object. The factory pattern can be used to create a dynamic object.
JavaScript does not have a class keyword, but you can simulate a class by dening a
function.
Creating private members is possible but usually involves creating privileged getter
methods that can be memory consuming.
The new keyword constructs an object instance.
The function is an object. The function that simulates a class is called the constructor
function.
Namespaces can be created by using an immediately invoked function
expression (IIFE).
Lesson review
Answer the following questions to test your knowledge of the information in this lesson. You
can nd the answers to these questions and explanations of why each answer choice is correct
or incorrect in the “Answers” section at the end of this chapter.
1. What is the blueprint for an object called?
A. property
B. method
C. class
D. event
2. What does JavaScript use as a starting object when constructing a new object?
A. prototype
B. property
C. class
D. event
3. How is inheritance supported in JavaScript?
A. You replace the prototype of the child object with a new instance of the parent
object and then replace the prototype constructor with the child constructor.
B. You call the createChild method on the parent object.
C. You call the setParent method on the child object.
D. JavaScript does not support inheritance.
Lesson 2: Working with jQuery CHAPTER 6 285
Lesson 2: Working with jQuery
This lesson introduces jQuery, which is very well documented at http://jquery.com. Subsequent
chapters take advantage of jQuery whenever possible to minimize typing and benet from
jQuery’s cross browser–compatible helper functions.
After this lesson, you will be able to:
Explain the benets of using jQuery.
Use jQuery to select DOM elements.
Use jQuery to modify the DOM.
Use jQuery to set styles.
Estimated lesson time: 30 minutes
Introducing jQuery
jQuery is a library of helper functions that are cross browser–compatible. If you feel comfort-
able working with JavaScript, you might think that you don’t need jQuery, but you do. You
can minimize the amount of browser-specic code you must write by using jQuery, an open-
source add-in that provides an easy, browser-agnostic means for writing JavaScript.
jQuery is written in JavaScript, so it is JavaScript. You can read the jQuery source code to
understand how jQuery works. Probably millions of developers use jQuery. It’s easy to use, it’s
stable, it’s fully documented, and it works well with other frameworks. The following is a list of
the categories of functionality jQuery provides.
Ajax Methods that provide synchronous and asynchronous calls to the server
Attributes Methods that get and set attributes of document object model (DOM)
elements
Callbacks object An object that provides many methods for managing callbacks
Core Methods that provide core jQuery functionality
CSS Methods that get and set CSS-related properties
Data Methods that assist with associating arbitrary data with DOM elements
Deferred object A chainable object that can register multiple callbacks into call-
back queues and relay the success or failure state of any synchronous or asynchronous
functions
Dimensions Helper methods for retrieving and setting DOM element dimensions
Effects Animation techniques that can be added to your webpage
Events Methods that provide the ability to register code to execute when the user
interacts with the browser
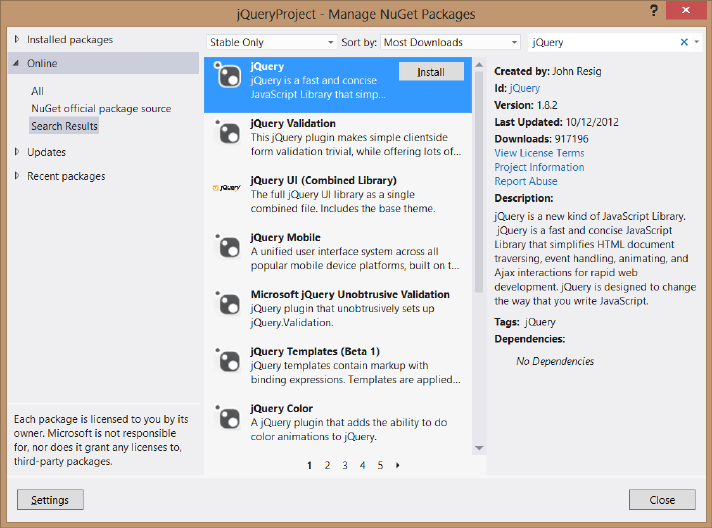
286 CHAPTER 6 Essential JavaScript and jQuery
Forms Methods that provide functionality when working with form controls
Offset Methods for positioning DOM elements
Selectors Methods that provide the ability to access DOM elements by using CSS
selectors
Traversing Methods that provide the ability to traverse the DOM
Utilities Utility methods
This lesson only scratches the surface of jQuery’s capabilities, but subsequent lessons use
jQuery whenever possible.
Getting started with jQuery
To get started with jQuery, add the jQuery library to your project. In this example, the QUnit
testing framework has already been added to an empty web project, and it will demonstrate
jQuery capabilities. You can add jQuery by either downloading the library from http://jQuery
.com or adding the library from NuGet. To add it from NuGet, open your project and, in the
Project menu, click Manage NuGet Packages. In the Search Online text box, type jQuery and
press Enter. You should see a screen that is similar to that shown in Figure 6-9.
FIGURE 6-9 The NuGet package manager
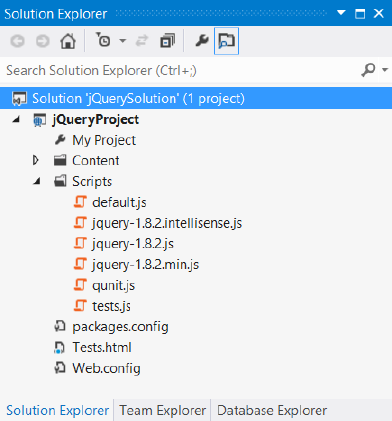
Lesson 2: Working with jQuery CHAPTER 6 287
After locating jQuery, click the Install button. The installation will start and, in a moment,
you’ll see a green check box on jQuery, indicating that the installation has completed suc-
cessfully. Click the Close button and look at the Solution Explorer window, as shown in
Figure 6-10. If your project didn’t have a Scripts folder, a Scripts folder was added. Inside the
Scripts folder, you’ll nd the latest release of jQuery. There is a le for IntelliSense and a com-
plete jQuery library le. Finally, there is a minimized version of jQuery, which is the le you
use at production time to minimize bandwidth usage.
FIGURE 6-10 The completed installation of jQuery
Using jQuery
You’re probably still trying to understand what jQuery is and how you benet from using it,
so the rst feature to learn is how to use jQuery to locate an element or a group of elements.
First, the jQuery library must be referenced on the page on which you will be using it. In this
rst example, the basic QUnit Test.html le is used, and the jQuery library is added so that the
le contains the following HTML.
<!DOCTYPE html>
<html xmlns="http://www.w3.org/1999/xhtml">
<head>
<title></title>
<link rel="stylesheet" type="text/css" href="Content/qunit.css" />
<script type="text/javascript" src="Scripts/qunit.js"></script>
<script src="Scripts/jquery-1.8.2.js"></script>
<script type="text/javascript" src="Scripts/default.js"></script>
<script type="text/javascript" src="Scripts/tests.js"></script>
</head>
<body>
288 CHAPTER 6 Essential JavaScript and jQuery
<h1 id="qunit-header">QUnit example</h1>
<h2 id="qunit-banner"></h2>
<div id="qunit-testrunner-toolbar"></div>
<h2 id="qunit-userAgent"></h2>
<ol id="qunit-tests"></ol>
<div id="qunit-fixture">
test markup, will be hidden
<input id="txtInput" type="text" /><br />
<input id="txtResult" type="text" /><br />
</div>
</body>
</html>
In the Solution Explorer window, the Test.html le has been set as the startup page by
right-clicking the le and choosing Set As Start Page.
In the default.js le, the following code sets a reference to the txtInput and txtResult text
boxes and then calls the clear function to initialize the two text boxes to ‘0’.
var txtInput;
var txtResult;
function initialize() {
txtInput = document.getElementById('txtInput');
txtResult = document.getElementById('txtResult');
clear();
}
function clear() {
txtInput.value = '0';
txtResult.value = '0';
}
The tests.js le contains a simple test of the initialize method. When the test is run, the two
assertions pass. The following is the tests.js le contents.
module('QUnit Test Suite', { setup: function () { initialize(); } });
test("Initialize Test", function () {
expect(2);
var expected = '0';
equal(txtInput.value, expected, 'Expected value: ' + expected +
' Actual value: ' + txtInput.value);
equal(txtResult.value, expected, 'Expected value: ' + expected +
' Actual value: ' + txtResult.value);
});
Now that the test is passing, change some code to use jQuery. The jQuery library code is in
the jQuery namespace, but this namespace also has an alias of $ (dollar sign) and can be used
as follows.
jQuery.someFeature
$.someFeature
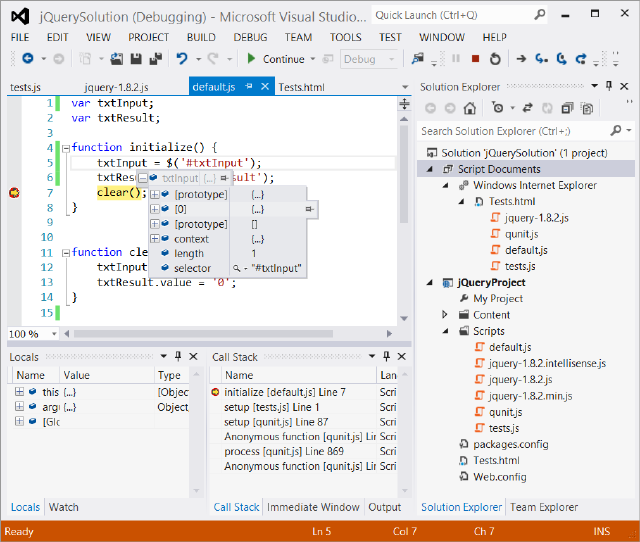
Lesson 2: Working with jQuery CHAPTER 6 289
You can use either of these names to access the library features, so in the interest of mini-
mizing keystrokes, use the dollar sign. First, change the code inside the initialize function of
the default.js le. The code to locate elements can be rewritten to use jQuery and CSS selec-
tors as follows.
function initialize() {
txtInput = $('#txtInput');
txtResult = $('#txtResult');
clear();
}
This code uses the CSS selector to retrieve the elements that match. In this example, there
is only one match for each of the jQuery selectors. The hash (#) symbol indicates that you
want to search for the id of the element. When the statement is executed, the txtInput vari-
able will contain a jQuery object, which is a wrapper object that contains the results. This is
different from the original code, in which the txtInput variable contained a direct reference to
the DOM element. The wrapper object has an array of elements that match the search criteria
or has no elements if there is no match. Even if the query doesn’t match any elements, txtIn-
put still contains the wrapper object, but no elements would be in the results.
When a breakpoint is added to the code after the two statements are executed, you can
debug the code and explore the jQuery wrapper, as shown in Figure 6-11.
FIGURE 6-11 The jQuery wrapper object for txtInput with one element

290 CHAPTER 6 Essential JavaScript and jQuery
In Figure 6-11, notice there is an array element (shown as [0]), and the length property is
set to 1. This is how you can verify the result of the query. Element 0 is a direct reference to
the txtInput DOM element.
When you run the test, it will pass but not for the correct reason; txtInput and txtResult
reference the jQuery wrapper, not the actual DOM element. When the value property is set
to ‘0’, a new property is dynamically created on the jQuery object and set to ‘0’. However, the
intent of this query is to set the text box value to ‘0’. To correct this problem, you can use the
val method on the jQuery object. The val method gets or sets the value property of a form
control that has a value property. The following is the modied test code.
module('QUnit Test Suite', { setup: function () { initialize(); } });
test("Initialize Test", function () {
expect(2);
var expected = '0';
equal(txtInput.val(), expected, 'Expected value: ' + expected +
' Actual value: ' + txtInput.val());
equal(txtResult.val(), expected, 'Expected value: ' + expected +
' Actual value: ' + txtResult.val());
});
After the four changes are made to the test, running the test shows that test assertions fail
because value properties on the DOM elements are not being set. To x the problem, modify
the code in the clear function to set the value by using jQuery’s val method. The following is
the completed code.
var txtInput;
var txtResult;
function initialize() {
txtInput = $('#txtInput');
txtResult = $('#txtResult');
clear();
}
function clear() {
txtIn put.val('0');
txtResult.val('0');
}
IMPORTANT REFRESH YOUR SCREEN
HTML documents and JavaScript les are normally cached by the browser, so you might
not see changes you made by just running the webpage. To refresh, press Ctrl+F5 after the
screen is displayed.
This code is complete, the tests pass, and the text boxes are populated with ‘0’. It’s impor-
tant for you to use the jQuery object whenever possible so you can benet from the cross

Lesson 2: Working with jQuery CHAPTER 6 291
browser–compatible features that jQuery has. If you need to reference the DOM object from
the jQuery wrapper, you can do it as follows.
var domElement = $('#txtInput')[0];
Don’t forget that you can put this code inside a conditional statement that checks the
length property to see whether an element exists before attempting to access element 0 of
the result.
var domElement;
if($('#txtInput').length > 0){
domElement = $('#txtInput')[0];
}
Enabling JavaScript and jQuery IntelliSense
When learning a new language or library, it’s always good to have some help to keep you
from getting stuck on every statement you write. When you installed jQuery, an IntelliSense
le was added, but it is not yet being used. For example, in the default.js le, if you type a
jQuery expression that includes a selector and then press the Period key, you would like to
see a valid list of available methods and properties. Before setting up IntelliSense, Figure 6-12
shows an example of what you see in the IntelliSense window when you type in a jQuery
expression with a selector and press Period.
FIGURE 6-12 The IntelliSense window when not properly set up for jQuery
292 CHAPTER 6 Essential JavaScript and jQuery
All the IntelliSense suggestions have a yellow warning triangle, and a message is displayed
that states, “IntelliSense was unable to determine an accurate completion list for this expres-
sion. The provided list contains all identiers in the le.”
To activate IntelliSense, you must set a reference to the jQuery le (not the IntelliSense le)
in every JavaScript le that requires IntelliSense. The following is an example of the default.js
le with the reference set.
/// <reference path="jquery-1.8.2.js" />
var txtInput;
var txtResult;
function initialize() {
txtInput = $('#txtInput');
txtResult = $('#txtResult');
clear();
}
function clear() {
txtInput.val('0');
txtResult.val('0');
}
This reference was added by just dragging and dropping the jquery-1.8.2.js le to the top
of the le. You can imagine that this can become a problem because you add many librar-
ies and have hundreds of JavaScript les in a project. You might also want to benet from
IntelliSense in HTML les. To solve the problem, Microsoft has provided the ability to create
a reference list and then just add the reference list to the top of the JavaScript les. You do
so by adding a _references.js JavaScript le to your Scripts folder and then referencing that
le in your JavaScript les. Even though you need to add the reference to the _references.js
le to all your JavaScript les, when you add another library, you need to add it only to the
_references.js le.
Why do you need the special name and why does it need to be in the Scripts folder when
you need to reference the le explicitly? If you use a le called _references.js that is located
in the Scripts folder, you automatically have a reference to this le in your HTML pages,
although you still need to add the reference to your JavaScript les. The following is the con-
tents of the _references.js le.
/// <reference path="jquery-1.8.2.js" />
/// <reference path="qunit.js" />
Visual Studio automatically locates the associated IntelliSense le, if one exists with the
same name as the library, in the libraryName.intellisense.js format. In addition to using
IntelliSense les if they exist, Visual Studio looks at all referenced libraries and provides
default IntelliSense.
var txtResult;
function initialize() {
txtInput = $('#txtInput');
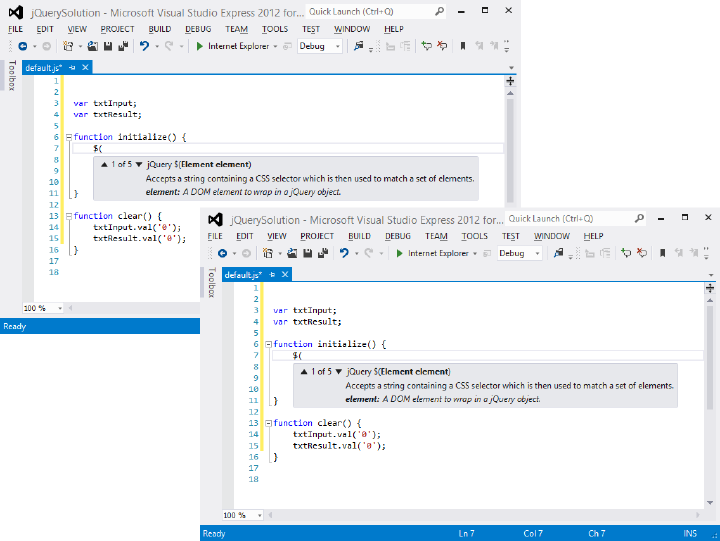
Lesson 2: Working with jQuery CHAPTER 6 293
txtResult = $('#txtResult');
clear();
}
function clear() {
txtInput.val('0');
txtResult.val('0');
}
After adding the reference, if you type a jQuery expression, you activate IntelliSense as
soon as you enter the dollar sign and the opening parenthesis, as shown in Figure 6-13.
FIGURE 6-13 The jQuery IntelliSense providing help as you type
Notice in Figure 6-13 that after you nish typing the selector and you press Period, you are
provided with a valid list of properties and methods for the jQuery wrapper object.
What happens if you are in the clear function and type txtInput and press period? Did
IntelliSense make sense? You get an IntelliSense response that is similar to that in Figure 6-12.
Simply put, don’t activate IntelliSense; txtInput and txtResult are global variables that can be
set to anything anywhere in your application, so Visual Studio can’t possibly provide accurate
IntelliSense. However, if you try typing txtInput and press Period at the bottom of the initial-
ize function, you get proper IntelliSense that’s similar to that in Figure 6-13. The difference is
that Visual Studio is examining your code and knows that you just assigned a jQuery object to

294 CHAPTER 6 Essential JavaScript and jQuery
txtInput, so proper IntelliSense can be provided. To take advantage of IntelliSense, the global
variables are eliminated, as shown in the following, modied default.js le.
function initialize() {
clear();
}
function clear() {
$('#txtInput').val('0');
$('#txtResult').val('0');
}
This code is much smaller without the global variables, but the test is now failing because
the test still references the global variables. To x the test, replace the global variable refer-
ences as follows.
module('QUnit Test Suite', { setup: function () { initialize(); } });
test("Initialize Test", function () {
expect(2);
var expected = '0';
equal($('#txtInput').val(), expected, 'Expected value: ' + expected +
' Actual value: ' + $('#txtInput').val());
equal($('#txtResult').val(), expected, 'Expected value: ' + expected +
' Actual value: ' + $('#txtResult').val());
});
When the test is run, it passes.
Quick check
You want to save time when writing JavaScript code. Which library can you use
to accomplish this goal?
Quick check answer
Use the jQuery library.
Creating a jQuery wrapper for a DOM element reference
You’ve seen how the use of CSS selectors create a jQuery result, which is a wrapper around
zero to many DOM elements that match the selector. You can also create a jQuery wrapper
from a DOM element reference, as shown in the following examples.
var doc = $(document);
var innerText = $(this).text();
The rst expression wraps the document object and assigns the result to a doc variable so
you can use jQuery’s methods with the document object. The second expression wraps the
this object, which is a DOM element being passed to an event listener. After wrapping the
Lesson 2: Working with jQuery CHAPTER 6 295
this object, the jQuery text method retrieves the inner text of the element and assigns it to an
innerText variable.
Adding event listeners
In HTML5, you can use the addEventListener function to subscribe to an event. If you want a
browser-independent way to add an event listener, you can use the jQuery .on method. There
is also a corresponding .off method to remove an event listener. The .on method can be used
as follows.
$('#btnSubmit').on('click', myFunction);
In this example, a button whose id is btnSubmit is located, using jQuery and the .on
method to add a call to the user-dened myFunction function to the click event of the but-
ton. To remove the event listener, use the same code but replace the .on with .off as follows.
$('#btnSubmit').off('click', myFunction);
Triggering event handlers
When you need to trigger the event handlers by using code, you’ll nd that jQuery can
help. Probably the most common reason to trigger event handlers by using code is to test
your code. Using jQuery’s trigger or the triggerHandler method causes the handler code to
execute.
The trigger method causes the default behavior of the control to execute, whereas the
triggerHandler method does not. For example, executing the trigger method on a submit
button causes the submit action to take place in addition to executing your event handler
code. Another difference is that the trigger method executes for all elements matched in the
jQuery selector, whereas the triggerHandler method executes for only the rst element. The
following is an example of triggering the event handler code for the click event on a submit
button.
$('#btnSubmit').triggerHandler('click');
Initializing code when the browser is ready
You will often need to execute initialization code after the HTML document is loaded and
ready, and jQuery executes with a browser-independent way to execute code when the docu-
ment is loaded as follows.
<script>
$(document).ready(function () {
initialize();
});
</script>
296 CHAPTER 6 Essential JavaScript and jQuery
It’s best to place this at the bottom of your HTML document and call an initialize function
that contains all initialization code.
Lesson summary
Download jQuery from http://jQuery.com or install it from the NuGet package
manager.
The jQuery library is in a jQuery namespace and is aliased as a dollar sign ($).
Use the $(selector) syntax to locate document object model (DOM) elements. The
result of $(selector) is a jQuery wrapper object containing zero to many DOM elements
that match the selector. You can use the length property to nd out whether there are
any matches to the selector.
Use jQuery’s val method to get or set the value of a DOM element that has a value
property.
To enable IntelliSense, create a _references.js le in the Scripts folder and add library
references to this le. In your JavaScript les, add a reference to the _references.js le.
Use jQuery’s .on and .off methods to add and remove event listeners.
Use the $(document).ready(function(){ initialize( ); }); expression to add initialization
code.
Lesson review
Answer the following questions to test your knowledge of the information in this lesson. You
can nd the answers to these questions and explanations of why each answer choice is correct
or incorrect in the “Answers” section at the end of this chapter.
1. You want to locate all the elements on your webpage that are assigned the CSS class
name Hidden. Which jQuery statement can you use?
A. var hidden = $ (‘#Hidden’);
B. var hidden = $ (‘.Hidden’);
C. var hidden = $ (‘Hidden’);
D. var hidden = $(‘class=Hidden’);
2. You are interested in writing event-driven JavaScript code that will work on most
browsers without writing browser-specic code. How can you accomplish this?
A. Use the jQuery library to help.
B. Use only JavaScript statements that are the same across all browsers.
C. Do not use any JavaScript.
D. It’s impossible to write event-driven JavaScript code that is not browser-specic.

Practice exercises CHAPTER 6 297
3. You are interested in locating all <p> elements on your webpage, so your statement is
var paragraphs = $(‘p’). Which line of code would conrm whether at least one ele-
ment is found?
A. if( paragraphs.exists)
B. if( paragraphs==null)
C. if( paragraphs.length)
D. if( paragraphs.count > 0)
Practice exercises
If you encounter a problem completing any of these exercises, the completed projects can be
installed from the Practice Exercises folder that is provided with the companion content.
Exercise 1: Create a calculator object
In this exercise, you apply your JavaScript object-oriented programming knowledge by
modifying the calculator you’ve been using to have a calculator object in the calculatorLibrary
namespace and changing JavaScript code to use jQuery when necessary.
1. Start Visual Studio Express 2012 for Web. Click File and choose Open Project.
Navigate to the solution you created in Chapter 5, “More HTML,” and select the
webCalculator.sln le. Click Open.
If you didn’t complete the exercises in Chapter 5, you can use the solution in the
Chapter 6 Exercise 1 Start folder.
2. In the Solution Explorer window, right-click the CalculatorTests.html le and choose Set
As Start Page. Press F5 to verify that your test runs and passes.
3. In the Solution Explorer window, add jQuery to the project by right-clicking the project
node. Choose Manage NuGet Packages. Type jQuery in the search online text box and
click the search button. Click the Install button on the jQuery result.
4. Add a le to the Scripts folder called _references.js and, in the le, add a reference to
jQuery, QUnit, and the CalculatorLibrary.
Your le should look like the following.
/// <reference path="jquery-1.8.2.js" />
/// <reference path="qunit.js" />
/// <reference path="CalculatorLibrary.js" />
5. Open the CalculatorLibrary.js le and add a reference to the _references.js le.
6. Create the calculatorLibrary namespace by surrounding the existing code in the
CalculatorLIbrary.js le with an immediately invoked function expression (IIFE). In the
IIFE, create an alias to calculatorNamespace called ns, which will save you from typing
the complete namespace while you’re in the IIFE.
298 CHAPTER 6 Essential JavaScript and jQuery
Your code should look like the following.
/// <reference path="_references.js" />
(function () {
this.calculatorNamespace = this.calculatorNamespace || {};
var ns = this.calculatorNamespace;
//existing code here....
})();
7. Remove the variables that reference txtInput and txtResult because jQuery will be used
to access these DOM elements as needed.
The initialize function will remain in the namespace.
8. Surround the numberClick, plusClick, minusClick, clearEntry, and clear functions with
an IIFE that is assigned to a Calculator property in calculatorNamespace.
Your code should look like the following.
ns.Calculator = (function () {
function numberClick() {
txtInput.value = txtInput.value == '0' ?
this.innerText : txtInput.value + this.innerText;
}
function plusClick() {
txtResult.value = Number(txtResult.value) + Number(txtInput.value);
clearEntry();
}
function minusClick() {
txtResult.value = Number(txtResult.value) - Number(txtInput.value);
clearEntry();
}
function clearEntry() {
txtInput.value = '0';
}
function clear() {
txtInput.value = '0';
txtResult.value = '0';
}
}());
9. Add a Calculator function inside the IIFE, which will be the constructor function. There
is no code for the constructor at this time. At the bottom of the IIFE, add code to
return this constructor function. Try this on your own, but if you have a problem, the
sample code is shown in step 10.
Practice exercises CHAPTER 6 299
10. Modify the numberClick, plusClick, minusClick, clearEntry, and clear functions to dene
these functions on the Calculator prototype.
The CalculatorLibrary.js should look like the following.
/// <reference path="_references.js" />
(function () {
this.calculatorNamespace = this.calculatorNamespace || {};
var ns = this.calculatorNamespace;
function initialize() {
for (var i = 0; i < 10; i++) {
document.getElementById('btn' + i)
.addEventListener('click', numberClick, false);
}
txtInput = document.getElementById('txtInput');
txtResult = document.getElementById('txtResult');
document.getElementById('btnPlus')
.addEventListener('click', plusClick, false);
document.getElementById('btnMinus')
.addEventListener('click', minusClick, false);
document.getElementById('btnClearEntry')
.addEventListener('click', clearEntry, false);
document.getElementById('btnClear')
.addEventListener('click', clear, false);
clear();
}
ns.Calculator = (function () {
function Calculator() {
}
Calculator.prototype.numberClick = function () {
txtInput.value = txtInput.value == '0' ?
this.innerText : txtInput.value + this.innerText;
};
Calculator.prototype.plusClick = function () {
txtResult.value = Number(txtResult.value) + Number(txtInput.value);
clearEntry();
};
Calculator.prototype.minusClick = function () {
txtResult.value = Number(txtResult.value) - Number(txtInput.value);
clearEntry();
};
Calculator.prototype.clearEntry = function () {
txtInput.value = '0';
};
Calculator.prototype.clear = function () {
300 CHAPTER 6 Essential JavaScript and jQuery
txtInput.value = '0';
txtResult.value = '0';
};
return Calculator;
}());
})();
11. In the initialize function, create a calculator variable and assign a new Calculator object
to it. Be sure to use the namespace when creating the new Calculator object.
The state should look like the following.
var calculator = new ns.Calculator();
12. Convert the loop that adds event listeners to each of the number buttons to a single
jQuery statement based on nding all button elements that have an id that starts with
btnNumber.
The statement should look like the following.
$('button[id^="btnNumber"]').on('click', calculator.numberClick);
To make the code work in this step, change the ids on the number buttons.
13. Open the default.html le and replace the number button ids with btnNumberX where
X is the number on the button.
14. Open the CalculatorTests.html le and replace the number button ids with btnNum-
berX where X is the number on the button.
15. In the CalculatorLibrary.js le, locate the initialize function and delete the statements
that set txtInput and txtResult.
16. Convert the code that adds event listeners to btnPlus, btnMinus, btnClearEntry, and
btnClear to use jQuery.
The completed initialize function should look like the following.
function initialize() {
var calculator = new ns.Calculator();
$('button[id^="btnNumber"]').on('click', calculator.numberClick);
$('#btnPlus').on('click', calculator.plusClick);
$('#btnMinus').on('click', calculator.minusClick);
$('#btnClearEntry').on('click', calculator.clearEntry);
$('#btnClear').on('click', calculator.clear);
clear();
}
17. Convert the numberClick method to use jQuery.
You can use the jQuery text method to retrieve the inner text. The completed method
should look like the following.
Calculator.prototype.numberClick = function () {
$('#txtInput').val($('#txtInput').val() == '0' ?
Practice exercises CHAPTER 6 301
$(this).text() : $('#txtInput').val() + $(this).text());
};
18. Convert the plusClick method to use jQuery.
You must call the clearEntry method, but you can’t use the this keyword to call
clearEntry because the clicked button is referenced by this. Because there is only one
copy of the clearEntry method, and it’s on the prototype, call the clearEntry method
from the Calculator prototype. Your code should look like the following.
Calculator.prototype.plusClick = function () {
$('#txtResult').val(Number($('#txtResult').val()) +
Number($('#txtInput').val()));
Calculator.prototype.clearEntry();
};
19. Convert the minusClick method to use jQuery.
Your code should look like the following.
Calculator.prototype.minusClick = function () {
$('#txtResult').val(Number($('#txtResult').val()) -
Number($('#txtInput').val()));
Calculator.prototype.clearEntry();
};
20. Convert the clearEntry method and the clear method to use jQuery.
The completed CalculatorLibrary.js le should look like the following.
/// <reference path="_references.js" />
(function () {
this.calculatorNamespace = this.calculatorNamespace || {};
var ns = this.calculatorNamespace;
ns.initialize = function () {
var calculator = new ns.Calculator();
$('button[id^="btnNumber"]').on('click', calculator.numberClick);
$('#btnPlus').on('click', calculator.plusClick);
$('#btnMinus').on('click', calculator.minusClick);
$('#btnClearEntry').on('click', calculator.clearEntry);
$('#btnClear').on('click', calculator.clear);
calculator.clear();
}
ns.Calculator = (function () {
function Calculator() {
}
Calculator.prototype.numberClick = function () {
$('#txtInput').val($('#txtInput').val() == '0' ?
$(this).text() : $('#txtInput').val() + $(this).text());
};
302 CHAPTER 6 Essential JavaScript and jQuery
Calculator.prototype.plusClick = function () {
$('#txtResult').val(Number($('#txtResult').val()) +
Number($('#txtInput').val()));
Calculator.prototype.clearEntry();
};
Calculator.prototype.minusClick = function () {
$('#txtResult').val(Number($('#txtResult').val()) -
Number($('#txtInput').val()));
Calculator.prototype.clearEntry();
};
Calculator.prototype.clearEntry = function () {
$('#txtInput').val('0');
};
Calculator.prototype.clear = function () {
$('#txtInput').val('0');
$('#txtResult').val('0');
};
return Calculator;
}());
})();
21. Open the default.html le and add a reference to the jQuery library.
Be sure to add the reference before the reference to the CalculatorLibrary.js le
because that le uses jQuery. Don’t forget that you can drag and drop the le to create
the reference. The <head> element should look like the following.
<head>
<title>web Calculator</title>
<link href="Content/default.css" rel="stylesheet" />
<script src="Scripts/jquery-1.8.2.js"></script>
<script type="text/javascript" src="Scripts/CalculatorLibrary.js"></script>
</head>
22. At the bottom of the default.html le, change the code so that the initialize function in
calculatorNamespace is executed when the document is ready.
The completed default.html le should look like the following.
<!DOCTYPE html>
<html xmlns="http://www.w3.org/1999/xhtml">
<head>
<title>web Calculator</title>
<link href="Content/default.css" rel="stylesheet" />
<script src="Scripts/jquery-1.8.2.js"></script>
<script type="text/javascript" src="Scripts/CalculatorLibrary.js"></script>
</head>
<body>
<div id="container">
<header>
<hgroup id="headerText">
Practice exercises CHAPTER 6 303
<h1>Contoso Ltd.</h1>
<h2>Your success equals our success</h2>
</hgroup>
</header>
<nav>
<a href="default.html">Home</a>
</nav>
<div role="main">
<div id="calculator">
<table>
<tr>
<td colspan="4">
<input id="txtResult" type="text"
readonly="readonly" />
</td>
</tr>
<tr>
<td colspan="4">
<input id="txtInput" type="text" />
</td>
</tr>
<tr>
<td></td>
<td></td>
<td>
<button id="btnClearEntry">CE</button>
</td>
<td>
<button id="btnClear">C</button>
</td>
</tr>
<tr>
<td>
<button id="btnNumber7">7</button></td>
<td>
<button id="btnNumber8">8</button></td>
<td>
<button id="btnNumber9">9</button></td>
<td>
<button id="btnPlus">+</button>
</td>
</tr>
<tr>
<td>
<button id="btnNumber4">4</button>
</td>
<td>
<button id="btnNumber5">5</button>
</td>
<td>
<button id="btnNumber6">6</button>
</td>
<td>
<button id="btnMinus">-</button>
</td>
304 CHAPTER 6 Essential JavaScript and jQuery
</tr>
<tr>
<td>
<button id="btnNumber1">1</button>
</td>
<td>
<button id="btnNumber2">2</button>
</td>
<td>
<button id="btnNumber3">3</button>
</td>
<td></td>
</tr>
<tr>
<td></td>
<td>
<button id="btnNumber0">0</button>
</td>
<td></td>
<td></td>
</tr>
</table>
</div>
</div>
<aside>
<p>Advertisements</p>
</aside>
<footer>
<p>
Copyright © 2012, Contoso Ltd., All rights reserved
</p>
</footer>
</div>
<script type="text/javascript">
$(document).ready(function () {
calculatorNamespace.initialize();
});
</script>
</body>
</html>
You must modify the tests to use jQuery.
23. Open the CalculatorTests.html le and add a reference to the jQuery library.
The completed CalculatorTests.html le should look like the following.
<!DOCTYPE html>
<html xmlns="http://www.w3.org/1999/xhtml">
<head>
<title></title>
<link rel="stylesheet" type="text/css" href="Content/qunit.css" />
<script type="text/javascript" src="Scripts/qunit.js"></script>
<script src="Scripts/jquery-1.8.2.js"></script>
<script type="text/javascript" src="Scripts/CalculatorLibrary.js"></script>
<script type="text/javascript" src="Scripts/tests.js"></script>
Practice exercises CHAPTER 6 305
</head>
<body>
<h1 id="qunit-header">QUnit example</h1>
<h2 id="qunit-banner"></h2>
<div id="qunit-testrunner-toolbar"></div>
<h2 id="qunit-userAgent"></h2>
<ol id="qunit-tests"></ol>
<div id="qunit-fixture">
test markup, will be hidden
<input id="txtResult" type="text" readonly="readonly" /><br />
<input id="txtInput" type="text" /><br />
<button id="btnNumber7">7</button>
<button id="btnNumber8">8</button>
<button id="btnNumber9">9</button><br />
<button id="btnNumber4">4</button>
<button id="btnNumber5">5</button>
<button id="btnNumber6">6</button><br />
<button id="btnNumber1">1</button>
<button id="btnNumber2">2</button>
<button id="btnNumber3">3</button><br />
<button id="btnClear">C</button>
<button id="btnNumber0">0</button>
<button id="btnClearEntry">CE</button><br />
<button id="btnPlus">+</button>
<button id="btnMinus">-</button>
</div>
</body>
</html>
You must modify the tests.js le to use jQuery, calculatorNamespace, and the
Calculator object.
24. Open the tests.js le.
25. In the tests.js le, add a reference to the _references.js le and modify the module
function to call calculatorLibrary.initialize( ) as follows.
/// <reference path="_references.js" />
module('Calculator Test Suite', {
setup: function () {
calculatorNamespace.initialize();
}
});
26. Modify the Initialize Test.
You don’t need to set txtInput and txtResult because the initialize method calls the
clear method to set these text boxes.
27. Modify the rest of the method to use jQuery and run the test to see it pass.
The completed Initialize Test should look like the following.
test("Initialize Test", function () {
expect(2);
var expected = '0';
equal($('#txtInput').val(), expected, 'Expected value: ' + expected +
306 CHAPTER 6 Essential JavaScript and jQuery
' Actual value: ' + $('#txtInput').val());
equal($('#txtResult').val(), expected, 'Expected value: ' + expected +
' Actual value: ' + $('#txtResult').val());
});
28. Modify the Button Click Test to use jQuery. Run the test to see it pass. Use jQuery’s
triggerHandler method to test each button.
Your code should look like the following.
test("Button Click Test", function () {
var buttonQuantity = 10;
expect(buttonQuantity * 2);
for (var i = 0; i < buttonQuantity; i++) {
$('#btnNumber' + i).triggerHandler('click');
var result = $('#txtInput').val()[$('#txtInput').val().length - 1];
var expected = String(i);
equal(result, expected, 'Expected value: ' + expected +
' Actual value: ' + result);
var expectedLength = i < 2 ? 1 : i;
equal($('#txtInput').val().length, expectedLength,
'Expected string length: ' + expectedLength +
' Actual value: ' + $('#txtInput').val().length);
}
});
29. Modify the Add Test to use jQuery. Run the test to see it pass.
Your code should look like the following.
test("Add Test", function () {
expect(2);
$('#txtInput').val('10');
$('#txtResult').val('20');
$('#btnPlus').triggerHandler('click');
var expected = '30';
equal($('#txtResult').val(), expected, 'Expected value: ' + expected +
' Actual value: ' + $('#txtResult').val());
expected = '0';
equal($('#txtInput').val(), expected, 'Expected value: ' + expected +
' Actual value: ' + $('#txtInput').val());
});
30. Modify the Subtract Test to use jQuery. Run the test to see it pass.
Your code should look like the following.
test("Subtract Test", function () {
expect(2);
$('#txtInput').val('10');
$('#txtResult').val('20');
$('#btnMinus').triggerHandler('click');
var expected = '10';
equal($('#txtResult').val(), expected, 'Expected value: ' + expected +
' Actual value: ' + $('#txtResult').val());
expected = '0';

Suggested practice exercises CHAPTER 6 307
equal($('#txtInput').val(), expected, 'Expected value: ' + expected +
' Actual value: ' + $('#txtInput').val());
});
31. Modify the Clear Entry Test to use jQuery. Run the test to see it pass.
Your code should look like the following.
test("Clear Entry Test", function () {
expect(1);
$('#txtInput').val('10');
$('#btnClearEntry').triggerHandler('click');
var expected = '0';
equal($('#txtInput').val(), expected, 'Expected value: ' + expected +
' Actual value: ' + $('#txtInput').val());
});
32. Modify the Clear Test to use jQuery. Run the test to see it pass.
Your code should look like the following.
test("Clear Test", function () {
expect(2);
$('#txtInput').val('10');
$('#txtResult').val('20');
$('#btnClear').triggerHandler('click');
var expected = '0';
equal($('#txtInput').val(), expected, 'Expected value: ' + expected +
' Actual value: ' + $('#txtInput').val());
equal($('#txtResult').val(), expected, 'Expected value: ' + expected +
' Actual value: ' + $('#txtResult').val());
});
At this point, you should be able to run all the tests, and they should all pass.
33. Right-click the default.html le and choose Set As Start Page. To see that your calcula-
tor still works, press F5 to start debugging the application.
34. Try entering data and clicking the plus and minus signs.
You might need to refresh your screen, but the calculator should be working.
Suggested practice exercises
The following additional exercises are designed to give you more opportunities to practice
what you’ve learned and to help you successfully master the lessons presented in this chapter.
Exercise 1 Learn more about JavaScript objects by adding more features to the cal-
culator that you created in the practice exercise.
Exercise 2 Learn more about jQuery by exploring the jQuery site at
http://jQuery.com.

308 CHAPTER 6 Essential JavaScript and jQuery
Answers
This section contains the answers to the lesson review questions in this chapter.
Lesson 1
1. Correct answer: C
A. Incorrect: A property is a variable that’s dened on an object.
B. Incorrect: A method is a function that’s dened on an object.
C. Correct: A class is a blueprint for an object.
D. Incorrect: An event takes place from external input, usually from user input.
2. Correct answer: A
A. Correct: The prototype is the starting object that is cloned when creating a new
object.
B. Incorrect: A property is a variable that’s dened on an object.
C. Incorrect: A class is a blueprint for an object.
D. Incorrect: An event takes place from external input, usually from user input.
3. Correct answer: A
A. Correct: You replace the prototype of the child object with a new instance of
the parent object and then replace the prototype constructor with the child
constructor.
B. Incorrect: The createChild method is not a valid method.
C. Incorrect: The setParent method is not a valid method.
D. Incorrect: JavaScript does support inheritance by replacing the prototype of the
child object with a new instance of the parent object and then replacing the proto-
type constructor with the child constructor.
Lesson 2
1. Correct answer: B
A. Incorrect: The use of the hash (#) symbol in the CSS selector indicates that you
want to locate an element based on its id.
B. Correct: The use of the period (.) in the CSS selector indicates that you want to
locate the elements that match the CSS class name.
C. Incorrect: Supplying a name for a CSS selector indicates that you want to locate
the elements that have that tag name.
D. Incorrect: The var hidden = $(‘class=Hidden’); syntax is invalid.

Answers CHAPTER 6 309
2. Correct answer: A
A. Correct: Using jQuery will help you create event-driven, browser-independent
code.
B. Incorrect: The code for creating and subscribing to events is browser-specic.
C. Incorrect: You need to use JavaScript to write event-driven code.
D. Incorrect: Use the jQuery library to write browser-independent code.
3. Correct answer: C
A. Incorrect: jQuery does not have an exists property.
B. Incorrect: Even if no elements are found, jQuery will return a wrapper object.
C. Correct: If no elements are found, the length property will be 0, which converts to
a Boolean false.
D. Incorrect: jQuery does not have a count property.


311
CHAPTER 7
Working with forms
The previous chapters cover much basic information regarding HTML document creation
and manipulation. Not explained yet is how to get information back to the server. For
this, you need to understand how forms work and how to create them. This chapter pro-
vides the information you need to accomplish these tasks.
Lessons in this chapter:
Lesson 1: Understanding forms 311
Lesson 2: Form validation 324
Before you begin
To complete this book, you must have some understanding of web development. This
chapter requires the hardware and software listed in the “System requirements” section in
the book’s Introduction.
Lesson 1: Understanding forms
A form is responsible for collecting data and sending it somewhere. In most cases, the
data is sent back to the server for processing. Because server-side processing hasn’t been
explained yet, you will send the data to an email address instead. This is not a recom-
mended practice; in fact, you should never do this because it exposes your email address to
the public. However, this technique provides an intermediate step in helping you under-
stand the browser side of forms before server-side processing is discussed.
To understand how forms work, you need a basic understanding of how HTTP protocol
works. This lesson provides the necessary introduction to HTTP protocol and then discusses
form implementation.
312 CHAPTER 7 Working with forms
After this lesson, you will be able to:
Understand basic HTTP protocol actions.
Understand how data is sent to the server.
Estimated lesson time: 20 minutes
Understanding web communications
It’s important to understand the roles of the server, browser, and HTTP to develop web appli-
cations. When web communication occurs, the sequence can be generalized into the follow-
ing steps:
1. The user browses to a website, which causes the browser to initiate a request for a web
server resource.
2. HTTP protocol sends a GET request to the web server.
3. The web server processes the request.
4. The web server sends a response to the web browser, also by using HTTP protocol.
5. The browser processes the response, causing a webpage to display.
6. The user enters data into a form on the webpage and clicks a Submit button that
causes the data to be sent back to the web server.
7. HTTP protocol posts the data back to the server.
8. The web server processes the data.
9. The web server sends the response back to the browser through the HTTP protocol.
10. The web browser processes the response, displaying the webpage.
The web server
Web servers originally were responsible for only receiving and handling requests from the
browsers through HTTP. The web server handled the request and sent a response back to the
web browser, and then the web server closed the connection and released all resources that
were involved in the request. Releasing all resources was paramount because the web server
needed to handle thousands of requests per minute. The original webpages were simple,
static HTML pages. The web environment was considered to be stateless because no data was
held at the web server between web browser requests, and the connection was closed after
the response, as shown in Figure 7-1.
Key
Terms
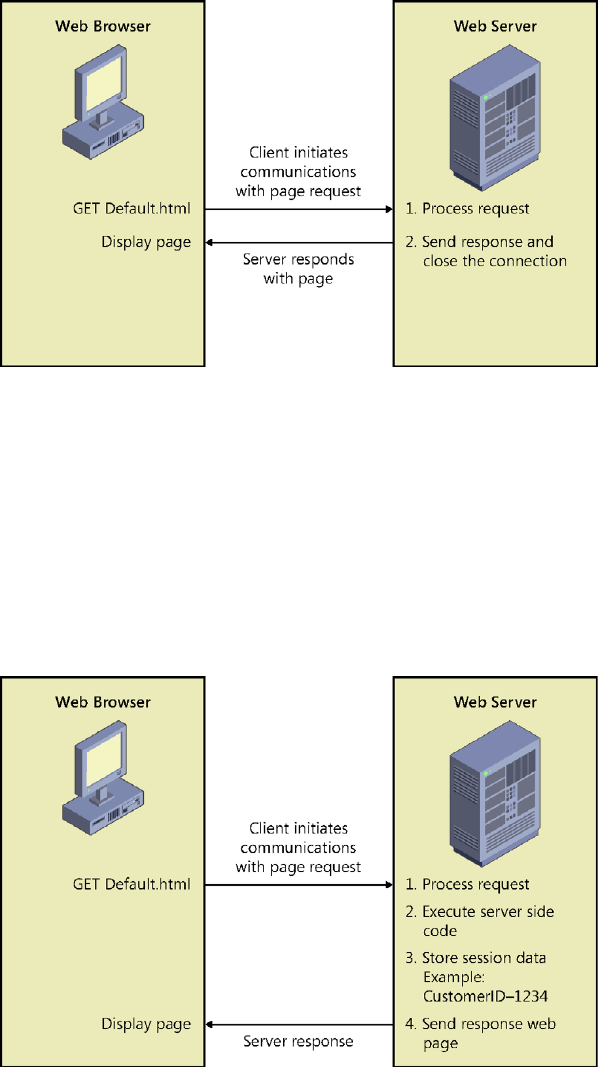
Lesson 1: Understanding forms CHAPTER 7 313
FIGURE 7-1 The request/response model of the stateless model
Web servers now deliver services that go far beyond the original web servers. Now web
servers also handle requests for pages that contain code that will execute at the server and
respond with the results of code execution, as shown in Figure 7-2. Web servers now hold
state (data) between webpage requests, so the developer can connect many pages to form a
web application. Most websites are now set up as web applications containing many web-
pages. The idea of a web server delivering a single page to the web browser and then closing
the connection is outdated. Web servers now implement “keep alive” features for connections
that make the web servers hold the connections to the web browsers open for a period of
time with anticipation of additional page requests from a web browser.
FIGURE 7-2 Web servers maintaining connections and holding state across page requests

314 CHAPTER 7 Working with forms
The web browser
The web browser provides a platform-independent means of displaying webpages that were
written with HTML. HTML was designed to render within any operating system while placing
no constraint on the window size. HTML was designed to ow, wrapping text as necessary to
t in the browser window. The web browser also displays images and responds to hyperlinks.
When a webpage request is sent to the web server, the result is displayed in the web browser
by clearing the browser screen and displaying the new webpage.
Although the web browser’s role is just to present data and collect data, new client-side
technologies are emerging every day that enable web browsers to be more robust, so it’s
simpler to develop a webpage while improving the user’s experience. Technologies such as
Asynchronous JavaScript and XML (AJAX) enable the web browsers to talk to the web servers
without clearing the existing webpages from the browser window.
Understanding HTTP protocol basics
HTTP (Hypertext Transfer Protocol) is the protocol of the web. HTTP protocol is a text-based
protocol, so text commands are sent to the server. By using a network sniffer program, you
can see the commands sent and the responses received. Microsoft Internet Explorer has a
built-in network sniffer that is part of the developer tools and that you can access by pressing
the F12 function key, which displays the developer tools window. Figure 7-3 shows the devel-
oper tools window after capturing some network trafc.
FIGURE 7-3 The developer tools window showing network traffic
This window displays all the trafc when navigating to a website and has the following
columns.
URL The address of the resource being accessed, which might be a relative address
or an absolute address
Method The HTTP command being sent to the server
Result A numeric result code
Type The MIME (Multipurpose Internet Mail Extensions) type of the resource being
accessed

Lesson 1: Understanding forms CHAPTER 7 315
Received The quantity of bytes transferred
Taken The time taken for the request
Initiator The trigger of the request
Timings A sequential timing chart that conveys a timeline of the requests
When the user types http://gjtt.com to navigate to this site, the rst entry shows that the
result code of the request is 302, which is an indicator of a redirect. In this case, the redirect
was to http://www.gjtt.com/Pages/default.aspx. There are many HTTP return codes, which are
divided into categories based on the rst of the three digits in the return code. The following
describes the categories of return status codes.
1xx Informational message
2xx Success
3xx Redirect
4xx Client error
5xx Server error
The second request is for the http://www.gjtt.com/Pages/default.aspx page, which returns a
result code of 200, indicating success. When the resulting HTML is returned from this request,
the HTML contains links to style sheets, which are consequently requested by the browser.
The HTML also contains images that are requested.
Understanding the HTTP method
The HTTP method, which is also known as the HTTP verb, represents the command being sent
to the server. In Figure 7-3, all requests to the server used the GET method, which is used to
request a resource. The following is a list of the valid method values.
OPTIONS A request for information about the communication options available. This
method enables the browser to determine the options and requirements associated
with a resource without retrieving it.
GET A request to retrieve a resource such as an HTML le or an image le.
HEAD Operates like the GET method except that the server does not return a mes-
sage body in the response. The HEAD method retrieves metadata about a resource.
POST Request for the server to accept the data being sent from the client to modify
existing server data.
PUT Request for the server to accept the data being sent from the client to insert
new server data.
DELETE Request for the server to delete a specic resource.
TRACE Invokes a remote, application-layer loopback of the request message, which
enables the client to see what the server is receiving. This is typically used for testing or
diagnostic information.
Key
Terms

316 CHAPTER 7 Working with forms
CONNECT Used with a proxy that can switch dynamically to being a tunnel.
DEBUG Not dened in the HTTP/1.1 specication; starts ASP.NET debugging. Informs
Visual Studio 2012 of the process to which the debugger will attach.
When you browse to a webpage, the GET method is used to retrieve the page from the
server. If the webpage contains a form for collecting data from the user and the data is
submitted to the server, the browser will execute the POST method and pass the data to the
server. In Chapter 8, “Websites and services,” you see how you can use GET, POST, PUT, and
DELETE to perform create, retrieve, update, and delete (CRUD) operations, which you might
use when modifying data.
Submitting form data to the web server
You can use the HTML <form> element to create a web form that collects data and sends the
data to the web server or to another location such as an email address. A typical use of the
<form> element is as follows.
<form method="post" action="getCustomer.aspx" >
Enter Customer ID:
<input type="text" name="Id" />
<input type="submit" value="Get Customer" />
</form>
This form prompts the user to enter a customer ID, displays a text box that collects the
desired customer ID, and displays a submit button that initiates the sending of data to the
web server. The method of the form indicates the HTTP method to use when sending the
data to the server. The action is either an absolute or relative URL of the resource that will
receive the data.
Sending data when submitting a form
Not all elements can send data when the Submit button is clicked. For simplicity, the elements
that can send data upon submission will be referred to as form submission elements. There are
many new input types with HTML5. If the browser doesn’t recognize the input type, it will fall
back to treating the input as a text box. The following is a list of the form submission ele-
ments available in HTML5.
<textarea> A multiline text input control. The cols attribute indicates the desired
width of the <textarea> based on the quantity of columns you want. The <textarea>
element has a maxlength attribute that can be set to constrain the quantity of char-
acters the <textarea> will accept. You can also set a placeholder attribute to provide a
small hint to the user until text is entered. The wrap attribute can be set to soft or hard.
Setting to soft (the default) does not insert linefeeds in the posted data. Setting to
hard inserts linefeeds based on the cols attribute setting.
<select> A drop-down list containing <option> elements, which are the list items.
The <select> element has a multiple attribute that species that you want to allow
Key
Terms
Lesson 1: Understanding forms CHAPTER 7 317
multiple selections. The multiple attribute is a Boolean attribute. You can change the
<select> element from a drop-down list to a list by setting the size attribute to the
quantity of items that should be displayed as a list. If the size is smaller than the quan-
tity of items in the list, the list displays a scroll bar. The <option> element has a selected
attribute to indicate that the option is selected. The selected attribute is a Boolean
attribute. You can use jQuery to locate all selected <option> elements by using the
following selector.
$('option:selected')
<button> A clickable button that can have HTML content, such as an <img> ele-
ment, and can be congured as a submit button by using the type attribute, which can
be set to button (default), reset, or submit.
<input type=’button’> A clickable button that displays a text prompt.
<input type=’checkbox’> A check box. In addition to having a value attribute, the
check box has a checked attribute that is readable and settable. The checked attribute
is a Boolean attribute. You can use jQuery to locate all selected check boxes by using
the following selector.
$('input[type=checkbox]:checked')
<input type=’color’> A color picker.
<input type=’date’> A date-only control (no time).
<input type=’datetime’> A date and time control based on the UTC time zone.
<input type=’datetime-local’> A date and time control (no time zone).
<input type=’email’> An email address eld.
<input type=’le’> A le-select eld and a Browse button for uploading les.
<input type=’hidden’> A hidden input eld. Use the hidden input eld when you
want to send data that is calculated from JavaScript to the server. The JavaScript code
can get and set the value as needed. Never store secrets in this element because this
element is intended to be hidden and not intended to be secure. It’s very easy to see
this element by viewing the webpage source.
<input type=’image’> An image submit button.
<input type=’month’> A month and year control.
<input type=’number’> A numeric eld.
<input type=’password’> A password eld in which the characters are masked.
<input type=’radio’> An option button. In addition to having a value attribute, the
option button has a checked attribute that is readable and settable. The checked attri-
bute is a Boolean attribute. You can use jQuery to locate all selected option buttons by
using the following selector.
$('input[type=radio]:checked')
318 CHAPTER 7 Working with forms
<input type=’range’> A control for entering a numeric value when the exact value
is not important. On newer browsers, this renders as a slider control and is commonly
referred to as a slider control. This control has a value attribute, which is the current
slider value. The min attribute is the minimum settable value (default is 0). The max
attribute is the maximum settable value (default is 100). The step attribute denes the
granularity of the value, which is the amount of change the value will have as the slider
moves (default is 1). The step attribute must be an int unless the min value is set to a
non-int value.
<input type=’reset’> A button that resets all form values to default values; note
that this does not send data when the form is submitted.
<input type=’search’> A text eld for entering a search string.
<input type=’submit’> A submit button.
<input type=’tel’> A telephone number eld.
<input type=’text’> A single-line text eld whose default width is 20 characters.
This is the default if the type attribute is not supplied.
<input type=’time’> A control for entering a time (no time zone).
<input type=’url’> A URL eld.
<input type=’week’> A week and year control (no time zone).
Using the <label> element
The <label> element can be used for labels that help the user identify the form submission
element. Consider the following HTML form.
<form method="post" action="getCustomer.aspx" >
Enter Customer ID:
<input type="text" name="Id" />
<input type="submit" value="Get Customer" />
</form>
In this form, “Enter Customer ID:” can be placed inside a <label> element as follows.
<form method="post" action="getCustomer.aspx" >
<label for="Id">Enter Customer ID:</label>
<input type="text" name="Id" />
<input type="submit" value="Get Customer" />
</form>
When the text is placed in a <label> element, the user sees no difference. When the user
clicks the label text, the Id element gets the focus. This provides better functionality for
mouse users or tablet users. Notice that the label has a for attribute, which must contain the
id of the element that will receive the focus when the user clicks the text.
Lesson 1: Understanding forms CHAPTER 7 319
Another interesting benet from using the label is that you can assign style rules to the
<label> element. The following is a typical style rule for the <label> element.
label {
clear: both;
display: block;
float: left;
width: 125px;
}
This style displays the <label> element as a block instead of inline and clears previous
blocks. The style is set to oat left and be 125 pixels wide. If you have several inputs, you can
line up the inputs vertically by using the <label> element and setting its width.
Specifying the parent forms
Previous releases of HTML required the form submission element to be in a form to submit
its data. This could become a problem when form submission elements are scattered over a
webpage and more than one form is on the page. With HTML5, the form submission ele-
ments have a form attribute that can be set to the id of one or more <form> elements, and
the form submission elements no longer need to be inside a <form> element. The exibility
of a form submission element belonging to more than one <form> element is especially use-
ful. Firefox, Opera, Chrome, and Safari implement the form attribute, but as of this writing,
Internet Explorer 10 does not.
Triggering the form submission
Triggering the form submission causes the browser to gather its associated form submission
element data and send it to the URI specied in the action attribute of the form, using the
form’s specied HTTP method. To trigger the submission of a form, you can use any of the
following elements.
<button type='submit' name='submitButton' >Submit</button>
<input type='submit' name='submitButton' value='Submit' />
<input type='image' src='/images/submit.gif' alt='Submit' />
In addition, you can use JavaScript to submit a form by executing jQuery’s submit method
on the form element. Consider the following HTML document that contains a <form> ele-
ment whose id is myForm.
<!DOCTYPE html>
<html xmlns="http://www.w3.org/1999/xhtml">
<head>
<title></title>
<script src="Scripts/jquery-1.8.2.js"></script>
<script src="Scripts/default.js"></script>
</head>
<body>
<form id="myForm">
Favorite Car:

320 CHAPTER 7 Working with forms
<select name="favoriteCar">
<option>Ford Fiesta</option>
<option value="Chevy">Chevrolet</option>
<option>BMW</option>
</select><br />
Comment:
<input type="text" name="comment" />
</form>
<button id="myButton">Click Me</button>
</body>
</html>
The form contains a drop-down list of three <option> elements. Each <option> element
has displayed text content. In addition, the <option> element can have a value attribute. If
the value attribute is not set, the value defaults to match the text content. The form also con-
tains a text box for the user to enter a comment. The HTML document has reference to the
default.js le that contains the following code.
/// <reference path="_references.js" />
$(document).ready(function () {
$('#myButton').on('click', submitTheForm);
});
function submitTheForm() {
$('#myForm').submit();
}
This code attaches the submitTheForm function to the click event of the <button> element
whose id is myButton. The <button> element is not inside the form, and its type attribute is
not set to submit. In this scenario, the <button> element is programmed to call the submit-
TheForm function, which calls the jQuery submit method to submit the form.
In the example code, the <form> element has only an id, so the method attribute will
default to GET, and the action attribute will default to the same URL as the page. If the user
selects Ford Fiesta, types This is Bob’s car! in the comment text box, and clicks the button,
you’ll see the URL change, as shown in Figure 7-4.
FIGURE 7-4 The URL changing when the button is clicked
The URL now includes the QueryString, which is everything after the question mark (?). The
QueryString contains the following.
favoriteCar=Ford+Fiesta&comment=This+is+Bob%27s+car%21

Lesson 1: Understanding forms CHAPTER 7 321
The QueryString is a list of name value pairs that are URI encoded. Spaces become plus
signs (+), the apostrophe becomes %27, and the exclamation point becomes %21. The separa-
tor between each name and value is the equal sign (=), whereas the separator between each
name value pair is the ampersand (&).
Quick check
How can you use the URL to send data to the server?
Quick check answer
Add a question mark (?) to the URL after the webpage name and then include
the QueryString.
Serializing the form
If you want to create the same string of URI-encoded name value pairs to use in your code,
you can use the jQuery serialize method. This method converts the form data to a URI-
encoded list of name value pairs. This could be useful when you want to post data program-
matically to the server. The serialize method looks like this.
var formData = $('#myForm').serialize();
If you are working with the URI-encoded data and you want to decode the data, you can
use either the decodeURI function to decode a complete URI or the decodeURIComponent
function to decode a QueryString. For example, you can use the following code sample to
serialize the form data and then decode the data.
var formData = $('#myForm').serialize();
var data = decodeURIComponent(formData);
Using the autofocus attribute
When an HTML form is displayed, the default focus behavior is that no control has focus. In
the past, developers have added JavaScript to set the focus to a specic control when the
page is loaded and ready. The following is an example of using jQuery to set the focus to the
text box whose name attribute is comment.
$(document).ready(function () {
$('input[name="comment"]').focus();
});
HTML5 introduces the autofocus attribute to form controls. The autofocus attribute is a
Boolean attribute and can be set for the comment as follows.
<input type="text" name="comment" autofocus="autofocus"/>
322 CHAPTER 7 Working with forms
Using data submission constraints
To send data, each form submission element must meet specic constraints as described in
the following list.
The form submission element must have its name attribute set.
The form submission element must have its value set.
The form submission element must be dened within a <form> element, but HTML5
describes the ability to assign an id to the form and then reference the form’s id on a
form submission element by using the form attribute. This is not supported by Internet
Explorer 10 and earlier.
The form submission element must not be disabled, but it is permissible for the form
submission element to be hidden by using a CSS style such as display: none.
If a form has more than one submit button, only the submit button that is activated
will submit its value.
Check boxes must be selected for their value to be sent.
Option buttons must be selected for their value to be sent.
The <select> elements must have an <option> element set to selected for its value to
be sent.
File selection elds must have at least one le selected.
Reset buttons never send data when the form is submitted.
Object elements must have the declare attribute set.
It’s interesting to note that a form submission element does not need to have an id for its
data to be sent upon submission, and the name attribute does not need to be unique. If you
have multiple form submission elements with the same name, they will submit as an array.
Using POST or GET
There are two HTTP methods that can be used to submit the form data back to the web
server: GET and POST. When the GET method is used, the QueryString containing the data is
appended to the URL. The QueryString is a collection of URI-encoded key=value statements,
separated by ampersand (&) characters, which can be passed to the web server by concat-
enating a question mark (?) to the end of the URL and then concatenating the QueryString as
follows.
http://www.contoso.com/getProduct.aspx?productId=123&color=blue
In this example, a GET request is made to the web server for a webpage called getProduct
.aspx on the root of the website. The le extension of the webpage will not be .html because
you need to send the data to a page that supports server-side processing such as an .aspx
page. The QueryString contains the data that follows the question mark (?).

Lesson 1: Understanding forms CHAPTER 7 323
An advantage of using the GET verb is that you can see and modify the complete URL
and QueryString in the address bar of the web browser as needed. However, depending on
the scenario, this could also be a disadvantage. The complete URL and QueryString are easy
to save or send as a unit. For example, you can bookmark a webpage containing data that is
included in the QueryString.
One disadvantage of using the GET method is that the QueryString is limited in size by the
web browser and web server you use. For example, when using Internet Explorer and Internet
Information Server (IIS), the limit is 1,024 characters. Another consideration is that you might
not want to allow a user to type the URL and QueryString directly into the address bar with-
out navigating through other webpages rst.
When you use the POST method to submit data back to the web server, the data is placed
in the message body instead of being concatenated to the URL. This makes the data invisible,
at least to the typical user. Using the POST method removes the size constraint on the data.
You could post megabytes of data; although it will work, sending that much data across the
Internet can cause other problems, primarily bandwidth-related, such as timeout errors and
performance problems.
The POST method does not allow the user just to type the data into the QueryString
because this data is hidden in the message body. For most scenarios, consider using the POST
method to send data to the web server.
Sending data back to the server is often referred to as a PostBack to the server when the
POST method is used.
Lesson summary
HTTP protocol is a text-based protocol that sends a method, or verb, to indicate the
type of request being made. Common methods are GET and POST. GET is typically
used to retrieve a resource; POST is typically used to update a resource.
Web servers reply to requests and send a three-digit status code in which 1xx is infor-
mation, 2xx is success, 3xx is redirect, 4xx is client error, and 5xx is server error.
Data can be submitted to the web server by adding a <form> element with form sub-
mission elements. Form submission elements are <textarea>, <select>, <input>, and
<button>.
Use a <button type=’submit’>, <input type=’submit’>, or <input type=’image’> to
submit a form.
The jQuery serialize function converts form data to a URI-encoded list of name-value
pairs.
The decodeURIComponent can be used to decode a QueryString.
The autofocus attribute sets the focus when the page is loaded.
Key
Terms

324 CHAPTER 7 Working with forms
Lesson review
Answer the following questions to test your knowledge of the information in this lesson. You
can nd the answers to these questions and explanations of why each answer choice is correct
or incorrect in the “Answers” section at the end of this chapter.
1. You are creating a webpage that will collect data and send it to a server. Which ele-
ment must you implement to be able to send data to the server?
A. <nav>
B. <form>
C. <textarea>
D. <div>
2. When you retrieve a webpage from the server that contains Customer information, you
want to be able to specify the id of the Customer within the URL. What can you use to
provide the id?
A. the PostBack
B. the QueryString
C. the domain name
D. a label
3. You have serialized the form data that has an <input type=”email”> element. You
want to deserialize the data to see the email address as entered. Which function can
you use?
A. decodeURIComponent
B. deserialize
C. submit
D. deserializeEmail
Lesson 2: Form validation
When writing a web application, the root of all mishap is user input. If you didn’t need to col-
lect data from a user, you would probably have a secure web application, but a web applica-
tion that collects no data is probably not useful. As soon as you need to collect user data, you
open the door to your application, so you need to make sure that user input is secure. To do
so, provide input validation at the server. Validation at the server is secure and ensures data
integrity.
The problem with input validation at the server is that a round trip has to be made to
the server to do the validation, and the time to make the round trip can be annoying to the
user. To manage this problem, you can provide input validation at the browser. However,
if you provide validation at the browser, you need validation at the server. The problem
Lesson 2: Form validation CHAPTER 7 325
with validation at the browser is that browser validation is easy for an attacker to bypass.
Therefore, you must provide server-side validation for security and client-side validation to
minimize the time users must wait to nd out that there is an input error. This lesson discusses
client-side validation that is available in HTML5.
After this lesson, you will be able to:
Understand HTML5 form validation.
Apply HTML5 form validation.
Estimated lesson time: 20 minutes
Required validation
Probably the simplest type of form validation is the required attribute on most form submis-
sion elements. The required attribute is a Boolean attribute that requires the user to enter
data before submitting to the server. Consider the following form.
<form id="myForm">
Favorite Car:
<select name="favoriteCar" required="required">
<option>Ford Fiesta</option>
<option value="Chevy">Chevrolet</option>
<option>BMW</option>
</select><br />
Comment:
<input type="text" name="comment" required="required"/><br />
Email:
<input type="email" name="email" required="required"/><br />
<button type="submit" name="submit">Submit</button>
</form>
In this form, all the form submission elements have required attributes. When the page
is displayed, there is no indication of required elds. If the user immediately clicks the
Submit button, the browser cancels the submission, and the result is displayed, as shown
in Figure 7-5. The <select> element doesn’t have the red border because the rst option is
selected by default.
Browsers display validation errors differently. For example, the message in Chrome and
Firefox is, “Please ll out this eld,” and the message in Chrome is prexed with an icon.
Opera and Internet Explorer have the same message, “This is a required eld,” but instead of
a red border, the background of the message is red. You can provide CSS styles rules to suit
your needs.
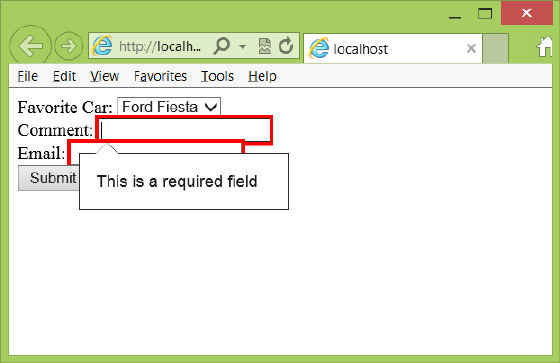
326 CHAPTER 7 Working with forms
FIGURE 7-5 The empty required fields with red borders and the required message displayed
One of the reasons HTML5 has new input types for email, URL, date, and so on, is that vali-
dation can be automatically applied based on the type. In the previous example, the <input
type=”email”> element automatically provides extra validation in an attempt to ensure that
a valid email address is entered. The extra validation is different based on the browser. You’ll
typically nd that browsers only look for *@* to be valid, but that might change.
You can also provide a placeholder attribute on most form submission elements, which
provides a prompt in the eld until the user enters the rst character. In the past, this required
a lot of extra code. The following adds the placeholder to the previous form example.
<form id="myForm">
Favorite Car:
<select name="favoriteCar" required="required">
<option>Ford Fiesta</option>
<option value="Chevy">Chevrolet</option>
<option>BMW</option>
</select><br />
Comment:
<input type="text" name="comment"
required="required" placeholder="enter a comment"/><br />
Email:
<input type="email" name="email"
required="required" placeholder="give me your email"/><br />
<button type="submit" name="submit">Submit</button>
</form>
When the form is displayed, the comment and email address display the placeholder text if
they are empty. The result is shown in Figure 7-6.
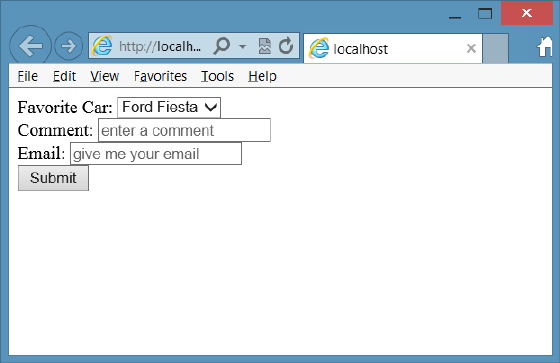
Lesson 2: Form validation CHAPTER 7 327
FIGURE 7-6 The placeholder text displayed until user inputs data
Validating URL input
The <input type=”url”> element validates a URL by adding the required attribute and optional
placeholder. In addition, you can add the pattern attribute to provide a JavaScript regular
expression to ne-tune the required input. Consider the following form.
<form id="myForm">
website:
<input type="url" name="website"
required="required" pattern="https?://.+" />
<button type="submit" name="submit">Submit</button>
</form>
The pattern states that the URL must start with http. The letter s is followed with a ques-
tion mark (?), which means that the letter s is optional. After that, the colon and two slashes
(://) are required. The period and plus sign combination means that you must provide one to
many characters. The last part could be ne-tuned to require at least one period or to set a
limit on the number of characters.
When the page is displayed and the user enters abc, validation fails with the message
shown in Figure 7-7.
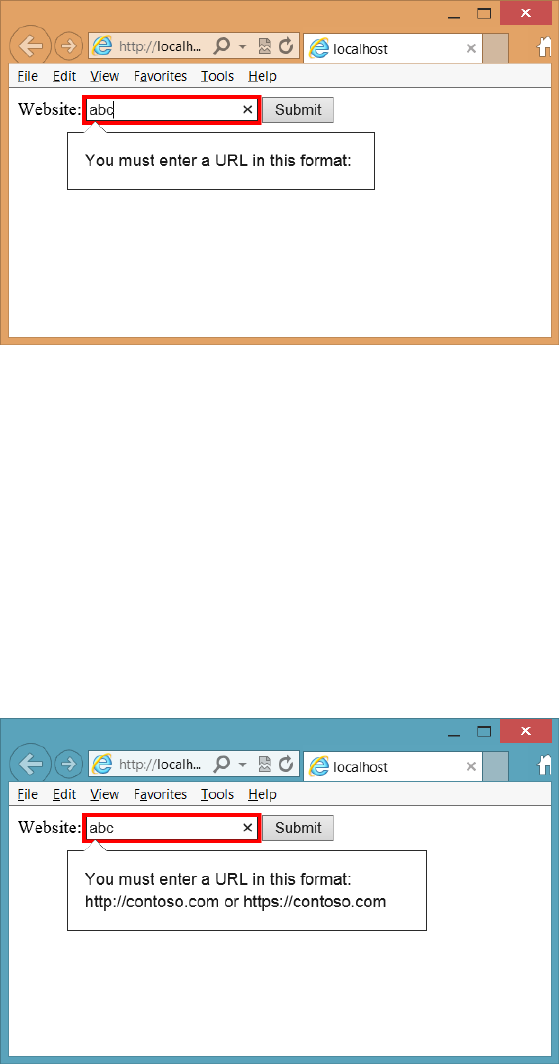
328 CHAPTER 7 Working with forms
FIGURE 7-7 URL validation fails with incomplete message
The validation message is incomplete. To implement the pattern attribute properly, you
must provide a title attribute that gives a hint to the user about what is required. The title will
be displayed in the validation failure message. The following is the modied <form> element.
<form id="myForm">
website:
<input type="url" name="website"
title="http://contoso.com or https://contoso.com"
required="required" pattern="https?://.+" />
<button type="submit" name="submit">Submit</button>
</form>
After the title attribute is supplied and the user enters invalid data, the new validation
error message is displayed, as shown in Figure 7-8.
FIGURE 7-8 The URL validation message with the title supplied
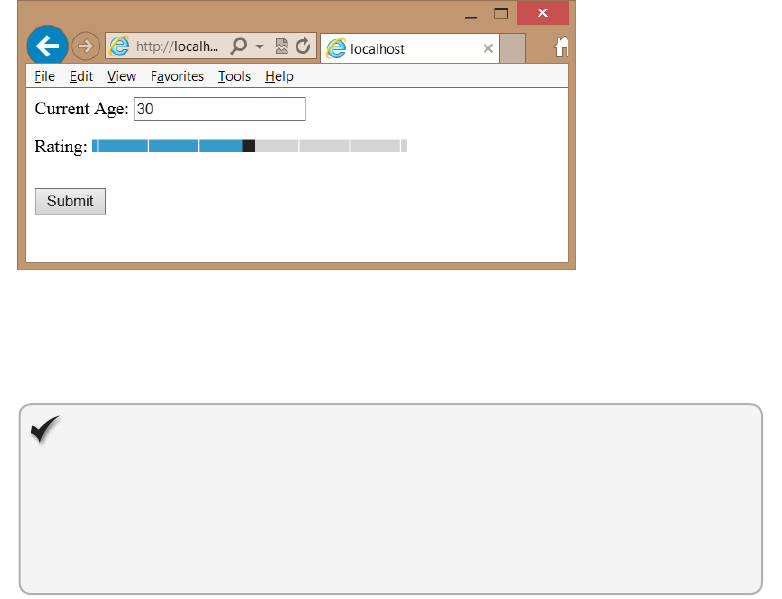
Lesson 2: Form validation CHAPTER 7 329
Validating numbers and ranges
Use the <input type=”number”> and <input type=”range”> elements to accept numeric
values. Both of these elements accept min, max, and step parameter attributes. The step
attribute defaults to one if omitted. Consider the following <form> element that contains the
number and range inputs.
<form id="myForm">
Current Age:
<input type="number" name="age"
min="18" max="99" value="30"
required="required" /><br />
Rating:
<input type="range" name="rating"
min="1" max="7" value="4" /><br />
<button type="submit" name="submit">Submit</button>
</form>
Figure 7-9 shows the rendered page. The user must enter a value in the number input, but
the range input renders as a slider. If you don’t include the required attribute on the number
input, you can leave the eld empty, but if you provide a value, it must be within the min and
max value attributes.
FIGURE 7-9 The rendered number and range inputs
The range input renders differently on different browsers. In addition, Internet Explorer
displays a pop-up message as the slider is operated; other browsers currently don’t.
Quick check
Which control is used to create a slider?
Quick check answer
Use the <input type=”range”> element with the proper min, max, and value
attributes.
330 CHAPTER 7 Working with forms
Styling the validations
You can apply style rules to valid and invalid input by implementing style rules on the :valid,
:invalid, :required, and :optional pseudo classes. The following is an example of setting the
pseudo classes to control the look of the webpage.
:valid {
border:solid lime;
font-weight:normal;
}
:invalid {
border:solid red;
font-weight:bold;
}
:required{
background-color:Yellow;
}
:optional{
background-color:LightGray;
}
The :valid and :invalid pseudo classes are opposites. When the form submission element’s
value is determined to be invalid, it matches the :invalid selector, and when the form submis-
sion element’s value is determined to be valid, it matches the :valid selector. If a form sub-
mission element has the required attribute, it matches the :required selector, and if the form
submission element does not have the required attribute, it matches the :optional selector.
Lesson summary
Use the required attribute to specify that input is required.
Browsers render validation errors differently.
The placeholder attribute provides prompting text to the user when the eld is empty.
To create a slider, use the <input type=”range”> element.
You can provide alternate style rules to validation elements by implementing style
rules on the :valid, :invalid, :required, and :optional pseudo classes.
Lesson review
Answer the following questions to test your knowledge of the information in this lesson. You
can nd the answers to these questions and explanations of why each answer choice is correct
or incorrect in the “Answers” section at the end of this chapter.
1. You are creating a webpage that prompts for a new user’s prole information. The pro-
le page requires the user to provide a user name, and if no user name is provided, the
user will not be able to submit the page to the server. Which attribute must be placed
on the user name text box to enforce this requirement?
A. enforced
B. mandatory

Practice exercises CHAPTER 7 331
C. required
D. user name
2. When you want to send form data to the server to update data in the database, which
HTTP method should you specify of the <form> element?
A. POST
B. GET
C. CONNECT
D. SEND
3. If you want to add a slider control to a webpage, which element do you use?
A. <input type=”slider” name=”myslider” />
B. <input type=”number” name=”myslider” />
C. <input type=”submit” name=”myslider” />
D. <input type=”range” name=”myslider” />
Practice exercises
If you encounter a problem completing any of these exercises, the completed projects can be
installed from the Practice Exercises folder that is provided with the companion content.
Exercise 1: Create a Contact Us form
In this exercise, you apply your HTML5 form and form validation knowledge by creating a
Contact Us page for the calculator application in the previous chapter. The webpage will
prompt the user for rst and last name, email address, and nature of the communications. All
the elds will be required.
1. Start Visual Studio Express 2012 for Web. Click FILE and choose Open Project. Navigate
to the solution you created in Chapter 6, “Essential JavaScript and jQuery.” Select the
WebCalculator.sln le and click Open.
If you didn’t complete the exercises in Chapter 6, you can use the solution in the
Chapter 7 Exercise 1 Start folder.
2. In the Solution Explorer window, right-click the default.html le and choose Set As
Start Page. Press F5 to verify that your home page is displayed.
3. In the Solution Explorer window, copy the default.html page to a new HTML le by
right-clicking the default.html le and choosing Copy. Right-click the WebCalculator
project node and choose Paste.
This creates a le named Copy of default.html.
4. Right-click the new le and choose Rename.
5. Name the new le ContactUs.html and press Enter.
332 CHAPTER 7 Working with forms
6. Open the ContactUs.html page and delete the <div id=”calculator”> element and its
content. Delete the <script> element that references the CalculatorLibrary.js le and
the script block at the bottom that calls the initialize function.
The ContactUs.html page should look like the following.
<!DOCTYPE html>
<html xmlns="http://www.w3.org/1999/xhtml">
<head>
<title>web Calculator</title>
<link href="Content/default.css" rel="stylesheet" />
<script src="Scripts/jquery-1.8.2.js"></script>
</head>
<body>
<div id="container">
<header>
<hgroup id="headerText">
<h1>Contoso Ltd.</h1>
<h2>Your success equals our success</h2>
</hgroup>
</header>
<nav>
<a href="default.html">Home</a>
</nav>
<div role="main">
</div>
<aside>
<p>Advertisements</p>
</aside>
<footer>
<p>
Copyright © 2012, Contoso Ltd., All rights reserved
</p>
</footer>
</div>
</body>
</html>
7. Change content of the <title> element to Contact Us.
8. Inside the <div role=”main”> element, add a new <div> element and set its id to
ContactUs.
9. Inside the new <div> element, add a <form> element. Set the name of the form to
ContactForm. Set the method to GET.
Setting the method to GET enables you to see when the form is actually submitted
because you see the form data in the QueryString in the URL. The main content should
look like the following.
<div id="ContactUs">
<form name="ContactForm" method="get">
</form>
</div>
Practice exercises CHAPTER 7 333
10. Add a <div> element containing a <label> element and an <input type=”text”> ele-
ment for rstName, lastName, emailAddress, and message. Be sure to assign the id and
the name attributes of each form submission element.
The form should look the like the following.
<form name="ContactForm" method="get">
<div>
<label for="firstName">First Name:</label>
<input type="text" id="firstName" name="firstName" />
</div>
<div>
<label for="lastName">Last Name:</label>
<input type="text" id="lastName" name="lastName" />
</div>
<div>
<label for="email">Email Address:</label>
<input type="text" id="email" name="email" />
</div>
<div>
<label for="message">Message:</label>
<input type="text" id="message" name="message" />
</div>
<div>
<button type="submit" id="submit" name="submit" >Submit</button>
</div>
</form>
11. Open the default.css le and, at the bottom of the le, add a style rule for the <label>
element that clears the previous elements and displays as a block that is oated left.
Set the width to 125 pixels and set the height to 12 pixels. Set vertical alignment to
bottom and padding to 10 pixels.
Your style should look like the following.
label {
clear: both;
display: block;
float: left;
width: 125px;
height: 12px;
vertical-align: bottom;
padding: 10px;
}
12. Add another style rule to the bottom of the default.css le for <input> elements, but
only for <input> elements that are inside a <form> element. Set the width to 200 pix-
els. Set the border width to medium and the border color to hsl(255, 100%, 100%). Set
the height to 12 pixels and set text alignment to left and vertical alignment to top. Set
the font family to Arial and the font size to 12 point.
Your style should look like the following.
form input {
width: 200px;
334 CHAPTER 7 Working with forms
border-width: medium;
border-color: hsl(255, 100%, 100%);
height: 12px;
text-align: left;
vertical-align: top;
font-family: Arial;
font-size: 12pt;
}
13. Add another style rule to the bottom of the default.css le for <button> elements, but
only for <button> elements that are inside a <form> element. Set the width to 100
pixels. Set the border width to medium and the border color to hsl(255, 100%, 100%).
Set the vertical alignment to top. Set the font family to Arial and the font size to 12
point. Set the top and bottom margins to 10 pixels. Set the left and right margins to 50
percent.
Your style should look like the following.
form button {
width: 100px;
border-width: medium;
border-color: hsl(255, 100%, 100%);
vertical-align: top;
font-family: Arial;
font-size: 12pt;
margin-top: 10px;
margin-right: 50%;
margin-bottom: 10px;
margin-left: 50%;
}
The last thing you must do is add a hyperlink on the main page that references the
ContactUs.html le.
14. Open the default.html le.
15. In the <nav> section, add a <br /> element and then add the hyperlink to reference
the ContactUs.html le.
Your <nav> section should look like the following.
<nav>
<a href="default.html">Home</a><br />
<a href="ContactUs.html">Contact Us</a>
</nav>
16. Press F5 to run to run the application. Click the Contact Us link to display the
ContactUs.html page. Without entering any data, click the Submit button.
Notice that the URL has changed, and the QueryString is displayed after the page
name. Notice also that the name of each element is shown, but there is no data
because you clicked the Submit button without entering any data. The URL looks like
the following.
http://localhost:55506/ContactUs.html?firstName=&lastName=&email=&message=&submit=
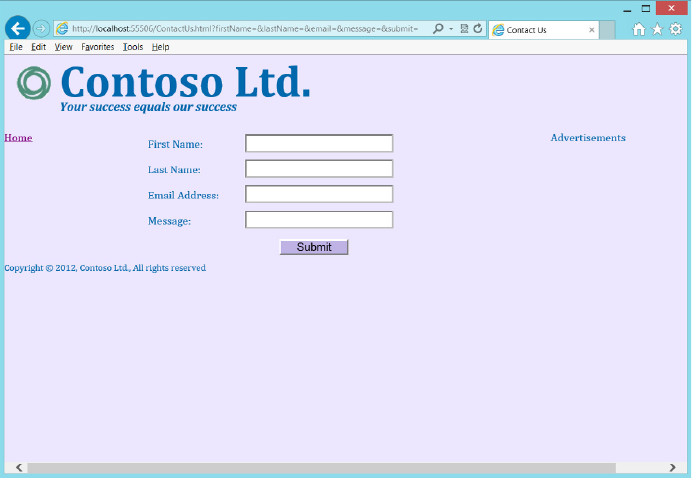
Practice exercises CHAPTER 7 335
Figure 7-10 shows the ContactUs.html page. When you see the QueryString, it means
that the Submit button worked. Currently, the data isn’t being processed at a server.
That will come in the next chapter. For now, you want to limit the ability of the Submit
button so it doesn’t operate until data is entered in all elds.
FIGURE 7-10 The ContactUs.html page
Exercise 2: Add validation to the Contact Us form
In this exercise, you continue with the project from Exercise 1 and modify the ContactUs.html
le to clean up the webpage and add validation to it.
1. Open the project from Exercise 1.
If you didn’t perform Exercise 1, you can use the project located in the Exercise 2 Start
folder.
2. Open the ContactUs.html le.
3. Add the required attribute to the rstName, lastName, email, and message elds.
4. Replace the type attribute on the email eld with type=”email”, which will provide
added validation of the email address.
5. Change the message to a <textarea> element.
Your completed form should look like the following.
<form name="ContactForm" method="get">
<div>
336 CHAPTER 7 Working with forms
<label for="firstName">First Name:</label>
<input type="text" id="firstName" name="firstName" required="required"/>
</div>
<div>
<label for="lastName">Last Name:</label>
<input type="text" id="lastName" name="lastName" required="required"/>
</div>
<div>
<label for="email">Email Address:</label>
<input type="email" id="email" name="email" required="required"/>
</div>
<div>
<label for="message">Message:</label>
<textarea id="message" name="message" required="required"></textarea>
</div>
<div>
<button type="submit" id="submit" name="submit">Submit</button>
</div>
</form>
6. Add a style for the <textarea> element.
The new style should look like the following.
form textarea {
font-family: Arial;
font-size: 20pt;
margin: 5px;
width: 210px;
border-width: medium;
border-color: hsl(255, 100%, 100%);
height: 100px;
text-align: left;
vertical-align: top;
font-family: Arial;
font-size: 12pt;
}
7. Press F5 to run the application. Don’t enter any data; just click the Submit button.
If your browser supports validation, you will see the validation errors, as shown in
Figure 7-11.

Suggested practice exercises CHAPTER 7 337
FIGURE 7-11 The completed page with validation error
Notice that after clicking the Submit button, the URL hasn’t changed because no
attempt was made to send the data to the server. If you enter data in all the elds and
click the Submit button, you’ll see the QueryString with its data.
Suggested practice exercises
The following additional exercises are designed to give you more opportunities to practice
what you’ve learned and to help you successfully master the lessons presented in this chapter.
Exercise 1 Learn more about positioning by adding more <div> elements to the
webpage to dene a header and footer for the page. Use CSS style rules to set the
position.
Exercise 2 Add more elements to the page and try setting the format by selecting
the elements without using an id.
Exercise 3 Change the color scheme of the page by using RGB values.

338 CHAPTER 7 Working with forms
Answers
This section contains the answers to the lesson review questions in this chapter.
Lesson 1
1. Correct answer: B
A. Incorrect: The <nav> element denes a menu section on your html page.
B. Correct: The <form> element is required to submit data back to the server.
C. Incorrect: The <textarea> element collects free-form text data.
D. Incorrect: The <div> element is a general-purpose element.
2. Correct answer: B
A. Incorrect: The PostBack data is not visible to you.
B. Correct: The QueryString is in the URL.
C. Incorrect: The domain name references the website, so assigning the id of the
Customer to the domain name will cause a different website to be referenced.
D. Incorrect: A label does not send its content to the server.
3. Correct answer: A
A. Correct: The decodeURIComponent function can deserialize the QueryString.
B. Incorrect: Although jQuery has a serialize function, it has no deserialize function.
C. Incorrect: Although jQuery has a submit function, it serializes the form and sends
the data to the server.
D. Incorrect: There is no deserializeEmail function.
Lesson 2
1. Correct answer: C
A. Incorrect: There is no enforced attribute.
B. Incorrect: There is no mandatory attribute.
C. Correct: The required attribute indicates a required eld.
D. Incorrect: There is no user name attribute.
2. Correct answer: A
A. Correct: Using the POST method is generally preferred for sending updates to the
server.
B. Incorrect: Using the GET method is generally preferred for retrieving data from
the server.
C. Incorrect: The CONNECT method is used to establish a tunneled connection.
D. Incorrect: There is no SEND method.

Answers CHAPTER 7 339
3. Correct answer: D
A. Incorrect: There is no slider type.
B. Incorrect: The number type accepts numbers and displays them in a text box.
C. Incorrect: The submit type creates a submit button.
D. Correct: The range type renders as a slider.


341
CHAPTER 8
Websites and services
The previous chapters have presented many things you can do at the browser, but you
can also do things at the server. When using Microsoft technologies, it’s typical to create
a website by using Visual Studio .NET, which uses ASP.NET or model, view, controller (MVC)
technologies that are programmed using Visual Basic .NET or C#. These technologies and
languages are outside the scope of this book, but can you learn to create a form without
creating a website to process the form?
This book is about HTML5, CSS3, and JavaScript; this chapter covers web services, using
JavaScript on the web server, which is possible by using Node.js, a platform built on the
Google Chrome JavaScript runtime.
Lessons in this chapter:
Lesson 1: Getting started with Node.js 341
Lesson 2: Working with web services 364
Before you begin
To complete this book, you must have some understanding of web development. This
chapter requires the hardware and software listed in the “System requirements” section in
the book’s Introduction.
Lesson 1: Getting started with Node.js
The Node.js platform is built on the Google Chrome JavaScript runtime for easily building
fast, scalable network applications. The platform implements an event-driven, non-blocking
I/O model and is lightweight and efcient. This platform is perfect for data-intensive, real-
time applications that run across distributed devices.
Using Node.js, you can write JavaScript that executes on the back-end server. Node.js
interprets and executes your JavaScript by using Google’s V8 virtual machine, which is the
same runtime environment for JavaScript that Google Chrome uses.

342 CHAPTER 8 Websites and services
After this lesson, you will be able to:
Install Node.js.
Create a Node.js webpage.
Estimated lesson time: 20 minutes
Installing Node.js
To install Node.js on your computer, download the version for your machine from http://
nodejs.org/download/ and run the installer. For typical Windows-based, 64-bit comput-
ers at the time of this writing, this is the node-v0.8.14-x64.msi le. The installation requires
accepting the licensing agreements. By default, the Node.js les install to the C:\Program
Files\nodejs\ folder. You’ll nd the node.exe le in the installation folder, which is the primary
executable for Node.js. You will also nd a folder for node modules; this folder contains npm,
the node package manager. You use npm to install modules in Node.js.
The Node.js installer adds the Node.js and npm folder locations to the path environment
setting so you can open the command prompt window easily and run the program.
Creating Hello World from Node.js
After the installation completes, you can create your rst Node.js website by opening the
command prompt and using your favorite text editor. Create a le called HelloWorld.js con-
taining the following.
var http = require('http');
http.createServer(function (request, response) {
response.writeHead(200, {'Content-Type': 'text/plain'});
response.end('Hello World from Node.js!\n');
console.log('Handled request');
}).listen(8080, 'localhost');
console.log('Server running at http://localhost:8080/');
This is JavaScript! The rst line of code states that the http module needs to be loaded. The
http module is a core built-in, low-level module that is highly optimized for performance.
The next line uses the http module to create a server object. The createServer func-
tion accepts a single parameter that is an anonymous function and has request object and
response object parameters. Inside the function, you include all the code to run your website
or, better yet, to make calls to other functions that handle your website. This example does
nothing with the request object, but it uses the response object to write an HTTP header in
which 200 means success, and the content type tells the browser that the content is plain text.
The next line ends the response with the Hello World message and, nally, a message is sent
to the console window, stating that a request was handled.
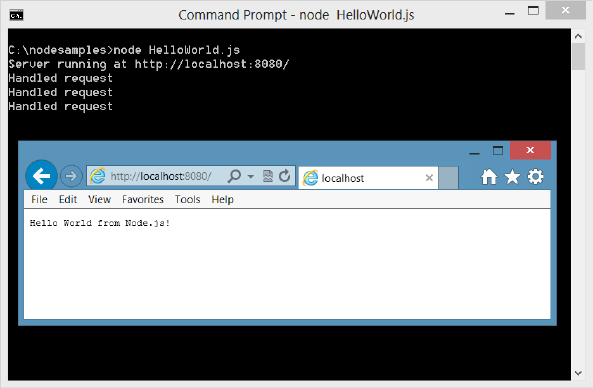
Lesson 1: Getting started with Node.js CHAPTER 8 343
When the createServer function is executed, a server object is returned. The server object
calls the listen function, in which port 8080 is specied as the port to listen on, and the IP
address is set to localhost, which is 127.0.0.1. As long as you have an operating network
adapter installed on your computer, this web server should start listening for incoming web
requests.
The last statement uses the console object to write a message to the screen to let you
know that the server is waiting for requests.
After you save this le, run the following from the command prompt to start running your
web server.
Node HelloWorld.js
Leave the command prompt open and open the browser. Navigate to the following URL.
http://localhost:8080/
When the request is received, a response is sent, and a message is logged to the console
window, as shown in Figure 8-1.
FIGURE 8-1 The running HelloWorld website responding with a message
Congratulations! You have installed Node.js and written your rst Node.js website. To stop
running, you don’t need to close the command prompt window; you can just press Ctrl+C to
cancel.
Of course, the next thing you want to do is process the request data to produce a response
based on the request. For that, you can require the url module, which provides help for pars-
ing the QueryString. The url object has a parse method that accepts the actual URL, and the
second parameter is a ag by which passing a value of true parses the QueryString. The fol-
lowing code reads the name from the QueryString and creates a personalized response.
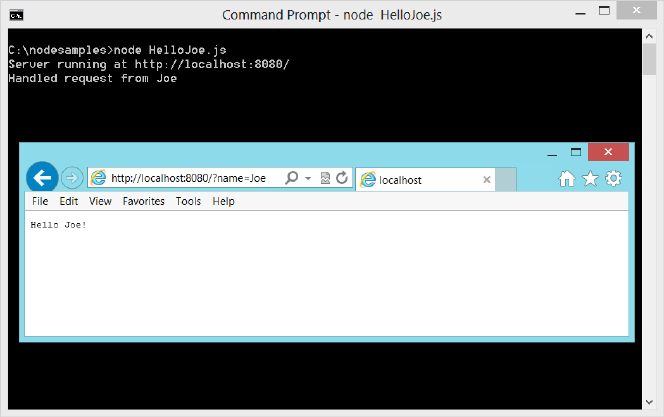
344 CHAPTER 8 Websites and services
var http = require('http');
var url = req uire('url');
http.createServer(function (request, response) {
var url_parts = url.parse(request.url, true);
response.writeHead(200, {'Content-Type': 'text/plain'});
response.end('Hello ' + url_parts.query.name + '!\n');
console.log('Handled request from ' + url_parts.query.name);
}).listen(8080, 'localhost');
console.log('Server running at http://localhost:8080/');
This application was saved to hello_joe.js. Run the application and then launch the
browser. Navigate to the following URL.
http://localhost:8080/?name=Joe
When the request is received, a response is sent, and a message is logged to the console
window, as shown in Figure 8-2. Try different names and notice that you get a personalized
response.
FIGURE 8-2 Creating a personalized response with Node.js
Creating a Node.js module
In the previous examples, you used the require function to load modules, which provide code
reuse when adding functionality to Node.js. You can create your own module by wrapping
your code in a function and exporting it so it can be called from other code, as follows.
var http = require('http');
var url = require('url');
function start(){

Lesson 1: Getting started with Node.js CHAPTER 8 345
http.createServer(function (request, response) {
var url_parts = url.parse(request.url, true);
response.writeHead(200, {'Content-Type': 'text/plain'});
response.end('Hello ' + url_parts.query.name + '!\n');
console.log('Handled request from ' + url_parts.query.name);
}).listen(8080, 'localhost');
console.log('Server running at http://localhost:8080/');
}
exports.start = start;
In this example, the existing code has been wrapped with a start function. At the bottom
of the le, the start function is assigned to a start property on the exports object. The code is
saved to a hello.js le, and the module is created.
You use the new module just as you use other modules, by using the require function.
Create an index.js le and enter the following code to use your module.
var hello = require('./hello.js');
hello.start();
In this example, the module name is “./hello.js”. Notice that a relative path to the le is
used. The require function returns an object that is assigned to the hello variable, and then
the start method is executed.
After saving the le, you can run the code by executing the following at the command
prompt.
node index.js
This code works the same as the hello_joe.js code except that this code uses your new
module.
Creating a Node.js package
A Node.js package, also known as an application, is a collection of modules with a manifest
that describes the package and its dependencies and can be publicly and privately published
for you and others to use. After you publish your package, you can use the node package
manager (npm) to install a package. The package can be installed in a single application
you’re creating or globally for use with many applications.
In this example, a call_counter.js module will be created, which will produce a console mes-
sage whenever its count_call function is executed. A simple_math.js module will be created,
which will contain an add function and a subtract function. An advanced_math.js module will
be created, which will contain multiply, divide, and Fibonacci functions. All the math functions
will be usable by other applications, but the call counter will remain private to the package,
so that each math function will call the count_call function. Although all these functions could
be placed in a single module, this example demonstrates the use of multiple modules.
These modules will be packaged so they can be published. After the package is published,
you and others can install the package and use it in other applications.
Key
Terms
346 CHAPTER 8 Websites and services
The following is a typical folder structure for creating a package. You start by creating a
root folder for your package.
\packageName
\bin
main.js
\lib
module1.js
module2.js
package.json
README.md
Inside the package root folder, you have a package.json le, which is the manifest le. You
also need a README.md le containing enough help to get the user started. In addition, you
need a bin folder and a lib folder. The bin folder contains the entry point to your package; the
lib folder contains the modules.
In this example, the package root folder is created at C:\node_samples\math_example;
math_example is the package name.
In the lib folder, the rst module is created, called call_counter.js, which has the following
code.
var internal_call_counter=0;
function count_call(){
++internal_call_counter;
console.log('You have made ' + internal_call_counter + ' calls!');
}
module.exports = count_call;
It looks like the internal_call_counter variable and the count_call function are polluting the
global namespace, but this module code will be wrapped so that neither will be in the global
namespace. You can dene what is available when a user uses the require(‘call_counter’)
function by assigning something to module.exports. In this case, the only exported function is
count_call, but you can specify multiple functions by wrapping them in an object, as you’ll see
in the simple_math.js and advanced_math.js modules.
The next module created in the lib folder is simple_math.js, which has the following code.
var call_counter = require('./call_counter');
function add(x, y){
call_counter();
return x + y;
}
function subtract(x, y){
call_counter();
return x - y;
}
Lesson 1: Getting started with Node.js CHAPTER 8 347
module.exports = {
addition: add,
subtraction: subtract
}
In the simple_math.js le, the require function references the call_counter.js module. The
use of the ‘./call_counter’ syntax indicates that this is a local module in the current folder as
opposed to a package. The reference is assigned to the call_counter variable. The add and
subtract functions call the call_counter variable, which references the count_call function. This
module exports two functions, so an object is created to provide access to these functions. In
this case, the addition method references the add function, whereas the subtraction method
references the subtract function. It’s more typical for the method name to be the same as the
function name, but this example demonstrates that they can be different.
The next module created in the lib folder is advanced_math.js, which has the following
code.
var call_counter = require('./call_counter');
function multiply(x, y){
call_counter();
return x * y;
}
function divide(x, y){
call_counter();
return x / y;
}
function fibo(count) {
call_counter();
return private_fibo(count)
}
function private_fibo(count, counter, first, second) {
if (count == 0) return 0;
if (counter == undefined) {
counter = 1
first = 1;
second = 2;
}
result = first + second;
if (counter == count) return result;
private_fibo(count, ++counter, second, result)
return result;
}
module.exports = {
multiplication: multiply,
division: divide,
fibonacci : fibo
}

348 CHAPTER 8 Websites and services
In the advanced_math.js le, the require function also references the call_counter.js mod-
ule. The multiply, divide, and bo functions call the call_counter variable, which references the
count_call function. The advanced_math.js module exports three functions, so an object is
created to provide access to these functions.
The bo function calls the private_bo function, a recursive function that calls itself until
the count and counter are equal. The private_bo function is not exported, so it will be acces-
sible only from the bo function that is exported.
Creating an aggregate module
After the modules are created, you might want to expose a single object with the items that
are exported across all the modules. Exposing a single object makes it easier for your pack-
age users to access the features of your package. This is the entry point module, which is an
aggregate of the other modules in your package.
In the bin folder, create a main.js module that contains the following code.
var path = require('path');
var fs = require('fs');
var lib = path.join(path.dirname(fs.realpathSync(__filename)), '../lib');
var simple = require(lib + '/simple_math.js');
var advanced = require(lib + '/advanced_math.js');
module.exports = {
addition: simple.addition,
subtraction: simple.subtraction,
multiplication: advanced.multiplication,
division: advanced.division,
fibonacci: advanced.fibonacci
}
This module rst references two built-in node.js packages, path and fs. These packages are
helpers that get the path to the lib folder. Next, references to simple_math.js and advanced_
math.js are created using this path to the lib. The call_counter.js module is not referenced
because the package uses it but does not expose it. Finally, module.exports is assigned an
object in which the functions that were exposed on simple_math.js and advanced_math.js are
now exported by the package.
Creating the README.md le
The README.md le contains enough help to get the user started with your package. The
le extension of .md denotes a Markdown le. A Markdown le is a simple way of providing
formatting on a text document so it can be displayed nicely as text or in a browser. A quick
search on the web for markdown language will yield numerous articles and free Markdown
editors, such as MarkdownPad, as shown in Figure 8-3. The contents of the README.md le
are as follows.
math_example package
====================
Key
Terms
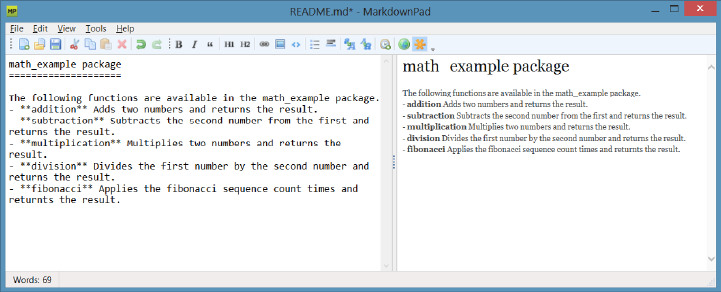
Lesson 1: Getting started with Node.js CHAPTER 8 349
The following functions are available in the math_example package.
- **addition** Adds two numbers and returns the result.
- **subtraction** Subtracts the second number from the first and returns the result.
- **multiplication** Multiplies two numbers and returns the result.
- **division** Divides the first number by the second number and returns the result.
- **fibonacci** Applies the fibonacci sequence count times and returns the result.
The formatting is very readable. When it’s rendered to HTML, it’s also very readable, as
shown in the live view window in Figure 8-3.
FIGURE 8-3 Editing the README.md file using MarkdownPad
Creating the package.json le
The package.json le is the manifest for your package. This le contains the metadata that
describes your package. You can create this le manually, but an easier way to create the le
is to type the following command.
npm init
When you run this command, it leads you through a series of prompts, and then the le is
created for you. You can always edit the le later if needed.
As the le extension implies, this le is written in JSON, which is JavaScript Object
Notation. The following is the package.json le for math_example.
{
"name": "math_example",
"version": "0.0.0",
"description": "An example of creating a package",
"main": "bin/main.js",
"scripts": {
"test": "echo \"Error: no test specified\" && exit 1"
},
"repository": "",
"keywords": [
"math",
"example",
350 CHAPTER 8 Websites and services
"addition",
"subtraction",
"multiplication",
"division",
"fibonacci"
],
"author": "Glenn Johnson",
"license": "BSD"
}
You can provide test scripts in your package so users can install your package and run the
tests on their computers.
You can specify a git repository URL. Git is one of the best source control managers, and
if you’re not using any kind of source control, this might be a good time to learn about git at
http://git-scm.com/. If your package has dependencies, they would also be listed in the pack-
age.json le.
Publishing the package
You now have a package with a folder structure that looks like the following.
\packageName
\bin
main.js
\lib
advanced_math.js
call_counter.js
simple_math.js
package.json
README.md
Publishing a package makes the package available to all users for use in their applications.
You use npm to publish to the npm registry, and then you use npm to search for packages
and install your package.
Before you can publish a node.js package, you must create an account by which to publish
all your packages. Use npm to create the account by executing the following command.
npm adduser
Follow the prompts for a user name (lowercase), password, and email address. After you’ve
entered all the required information, npm contacts registry.npmjs.org to create your account.
Validation of account currently is not required, so anyone can create an account and put bad
code into the registry; therefore, when you install an unknown package from the npm regis-
try, beware!
Now that you have an account, you can publish to the npm registry. Open the command
prompt window and change from your current directory to the root directory of the package,
where the package.json le is located. Enter the following command to publish the package.
npm publish
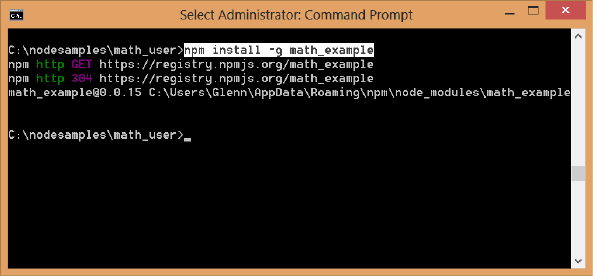
Lesson 1: Getting started with Node.js CHAPTER 8 351
You see npm sending HTTP GET and PUT methods until the publishing is complete. If you
have no errors, the package should be published and immediately available for everyone
to use.
Installing and using the package
Now that your package is published, you can install it and use it. You can install the package
globally, or you can install it locally to the application you’re creating. Installing the pack-
age globally gives all applications the same version of the package so that when you update
the global package with a new version, all applications get the new version. If you install the
package locally to the application, you reinstall the package for each application. You can
update the package for one application, and you don’t need to worry about updating the
package for all applications. The global option is typically more appealing to most people,
but often you don’t want to be forced into regression testing for all applications when you
update the package. This choice is about having control to update when needed versus the
convenience of updating all at once.
In this example, a new application, math_user, is created, so this folder is created under the
node_samples folder.
To install the package locally, use the command prompt window to navigate to the folder
that contains your application and enter the following command.
npm install math_example
This creates a node_modules subdirectory; in the folder that contains your application is a
folder for the installed package with all its les.
To install the package globally, type the following command.
npm install -g math_example
Figure 8-4 shows the screen after executing this command. The last line shows the folder
location in which the package was installed.
FIGURE 8-4 The successful global package install
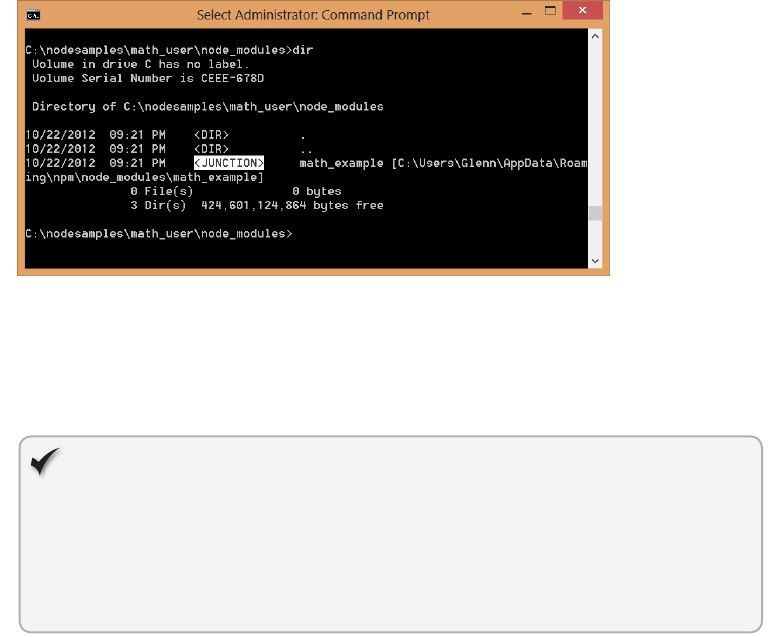
352 CHAPTER 8 Websites and services
After the package is globally installed, create a link to the global install from each applica-
tion that will use the global package. To accomplish this, navigate to the root folder of your
application and enter the following command.
npm link math_example
In this example, the command was executed in the math_user folder. After the command is
executed, you see that a folder called node_modules exists. If you navigate to that folder and
look at the contents of the directory, you’ll see that a math_example junction exists, as shown
in Figure 8-5.
FIGURE 8-5 The npm link command showing a junction to the global install
A junction is a route to the global install. It behaves like a folder. You can change from the
node_modules folder to that folder by using the cd math_example command, and you can
change back to the node_modules folder by using the cd .. command.
Quick check
How do you install a package named contoso for local use?
Quick check answer
Use the following command.
npm install contoso
Now that you have installed the math_example package, write some code that accesses
the math_example package. In the math_user folder, create a JavaScript le called main.js and
enter the following code.
var math_example = require('math_example');
var result = 0;
console.log();
result = math_example.addition(5,10);
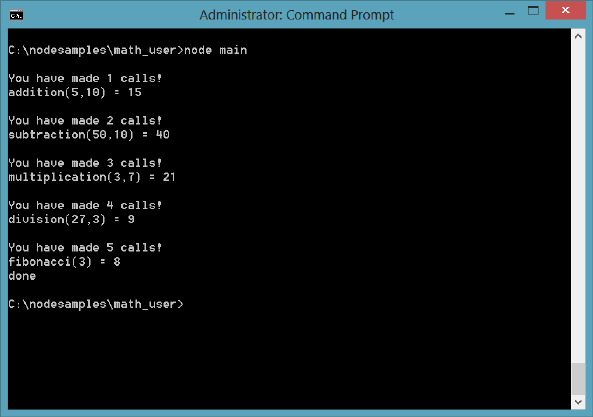
Lesson 1: Getting started with Node.js CHAPTER 8 353
console.log('addition(5,10) = ' + result);
console.log();
result = math_example.subtraction(50,10);
console.log('subtraction(50,10) = ' + result);
console.log();
result = math_example.multiplication(3,7);
console.log('multiplication(3,7) = ' + result);
console.log();
result = math_example.division(27,3);
console.log('division(27,3) = ' + result);
console.log();
result = math_example.fibonacci(3);
console.log('fibonacci(3) = ' + result);
console.log('done');
This code sets a reference to the math_example package. The code executes a small test of
each of the exported functions. Run the code by executing the following command.
node main
The result is shown in Figure 8-6. Each function returns a result, and then the result is
displayed.
FIGURE 8-6 The result of executing node main

354 CHAPTER 8 Websites and services
Uninstalling a package
Uninstall a local package by executing the following command from the root folder of the
application.
npm uninstall math_example
To uninstall a global package, execute the following command.
npm uninstall -g math_example
Fast forward to express
Although it is relatively easy to create a Hello module with Node.js, much more work is
necessary if you intend to create a complete web framework. For example, when a request is
received at the server for a resource such as a webpage or a web service, you typically need
to route the request to get the proper resource. You might also want to implement sessions
to hold data between each request. What about authentication? It doesn’t make sense for
you to create this framework when you can install a more streamlined framework. The express
web application framework for node.js is available at http://expressjs.com/. You can install
express by using the previously mentioned npm install command, or you can read the next
section to learn how to install express from a dependency list.
This framework is also referred to as expressjs or simply express. In this book, it will be
referred to as express. The express framework provides a thin layer of features over Node.js,
where performance is maintained.
Starting with express
To begin using express, you must install Node.js rst, and then you create a folder for your
web application. In this example, the folder is the following.
C:\node_samples\HelloExpress
Next, you set up a dependency on express, so you need the current version number of
express. Execute the following command to get the version information.
npm info express version
At the time of this writing, the version is 3.0.0. You need this version number when you add
the dependency to the package.json le.
To create the package.json le in the HelloExpress folder, navigate to that folder, execute
the following command, and follow the prompts.
npm init
The following is the completed package.json.
{
"name": "HelloExpress",
Key
Terms
Lesson 1: Getting started with Node.js CHAPTER 8 355
"version": "0.0.0",
"description": "A simple Web site",
"main": "index.js",
"scripts": {
"test": "echo \"Error: no test specified\" && exit 1"
},
"repository": "",
"author": "Glenn Johnson",
"license": "BSD"
}
Open the le with a text editor and add the dependency to express as follows.
{
"name": "HelloExpress",
"version": "0.0.0",
"description": "A simple Web site",
"main": "index.js",
"scripts": {
"test": "echo \"Error: no test specified\" && exit 1"
},
"repository": "",
"author": "Glenn Johnson",
"license": "BSD”,
“private”: true,
“dependencies”: {
“express”: “3.0.0”
}
}
The version number could have been set to “3.x” to retrieve the latest of version 3, and
private is set to true, which indicates that this application will be used only locally. If you don’t
supply the private indicator, you might get a message from your rewall provider stating that
the website is running with limited functionality.
Now that you have the dependency to express congured, you can use npm to install all
dependencies by executing the following command.
npm install
This installs express and all its dependencies into the node_modules folder. You can verify
that express is installed by executing the following command.
npm ls
This command provides a list of packages installed for this application. You see that
express is installed, but many other packages are also installed, as shown in Figure 8-7.
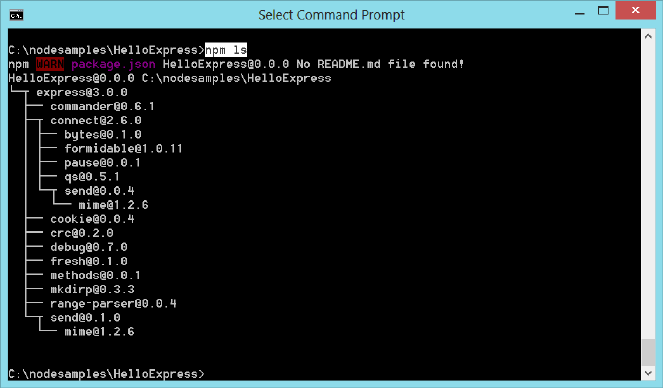
356 CHAPTER 8 Websites and services
FIGURE 8-7 Installing express, which also installs its dependencies
Using Visual Studio 2012 Express for Web
You can use Visual Studio 2012 Express for Web as your editor and le manager for a Node. js
folder structure by opening Visual Studio 2012 Express for Web, clicking File, and choosing
Open Web Site. Select the HelloExpress folder and click Open. Visual Studio opens the folder
structure for your use. If you click the Save All button, you nd that Visual Studio creates a
solution le (.sln) that contains the settings, so you can easily use the .sln le to reopen the
solution.
You can continue to use your favorite text editor to work with the Node.js les, and you
still must keep a command prompt window open to run the Node.js application.
Creating a Hello web application with express
You have now installed express, so create a web application. In the HelloExpress folder, create
an app.js le and add the following to the le.
var express = require('express');
var app = express();
This code sets a reference to the express package that you installed and then creates an
express application object and assigns it to the app variable. This object provides many time-
saving features rather than creating everything from the beginning in Node.js.
Express provides the ability to dene routes by using app.Method() syntax, in which
Method is the HTTP method, or verb. The following code is added to the app.js le, which
denes a route that matches a request by using the GET method and relative URL of “/”. Upon
match, the code is programmed to deliver a Hello World message to the user.
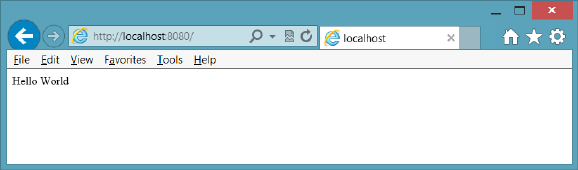
Lesson 1: Getting started with Node.js CHAPTER 8 357
app.get('/', function(request, response){
response.send('Hello World');
});
The request and response objects are the same objects that Node.js provides. The last bit
of code to add is the statements that are required to listen for a request as follows.
var port = 8080;
app.listen(port);
console.log('Listening on port: ' + port);
Your completed app.js le should look like the following.
var express = require('express');
var app = express();
app.get('/', function (request, response) {
response.send('Hello World');
});
var port = 8080;
app.listen(port);
console.log('Listening on port: ' + port);
Save and run the following command to start the web server.
node app
When the application is started, you see a message stating that the application is listening
on port 8080. Open the browser and enter the following URL.
http://localhost:8080/
This request is routed to the function that handles the request, and Hello World is sent to
the response, as shown in Figure 8-8.
FIGURE 8-8 The express application responding to a page request
Adding a webpage to the application
Instead of writing JavaScript to render every page, you can create HTML pages that can be
retrieved automatically with a minimum of code. In the app.js le, replace the app.get state-
ment with the following.
app.use(express.static(__dirname + '/public'));
358 CHAPTER 8 Websites and services
This statement starts with app.use, which mounts a path from which to serve les. In the
app.use function, express.static species the location of static les. In this case, you need to
create a public folder within your application.
After creating the public folder, create an HTML le in the public folder called HelloForm.
html containing the following.
<!DOCTYPE html>
<html xmlns="http://www.w3.org/1999/xhtml">
<head>
<title></title>
</head>
<body>
<form method="get" action="/SubmitHello">
Enter Name: <input type="text" name="userName" />
<input type="submit" value="Submit" />
</form>
</body>
</html>
This HTML le contains a <form> element, and its method attribute is set to GET, whereas
the action attribute is set to /SubmitHello. This means that you need a resource called /
SubmitHello at the server that can handle the data passed to the server in the QueryString.
In the app.js le, add the following code after the app.use statement.
app.get('/SubmitHello', function (request, response) {
response.writeHead(200, { 'Content-Type': 'text/html' });
response.write('Hello ' + request.query.userName + '!<br />');
response.end('Have a great day!');
console.log('Handled request from ' + request.query.userName);
});
This code is similar to the original app.get statement except that the SubmitHello resource
is specied, and the QueryString is accessible by using request.query. The following is the
completed app.js le.
var express = require('express');
var app = express();
app.use(express.static(__dirname + '/public'));
app.get('/SubmitHello', function (request, response) {
response.writeHead(200, { 'Content-Type': 'text/html' });
response.write('Hello ' + request.query.userName + '!<br />');
response.end('Have a great day!');
console.log('Handled request from ' + request.query.userName);
});
var port = 8080;
app.listen(port);
console.log('Listening on port: ' + port);
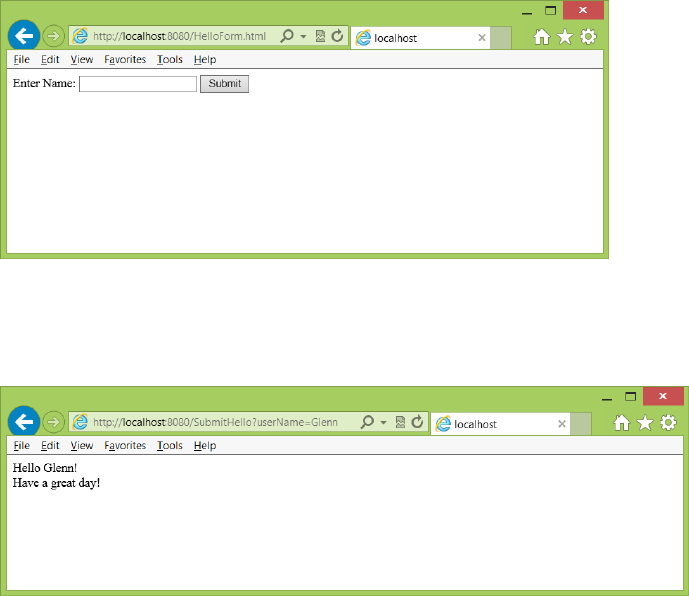
Lesson 1: Getting started with Node.js CHAPTER 8 359
The response has a writeHead method to write headers. There is also a write method to
write HTML to the browser. Finally, you can use the end method to send the last bit of HTML
to the browser and close the connection.
In the command prompt window, run the application by executing the following
command.
node app
After the application is running, open the browser and enter the following URL.
http://localhost:8080/HelloForm.html
You see the webpage, as shown in Figure 8-9.
FIGURE 8-9 The HelloForm.html webpage retrieved
Entering a name in the text box and clicking the Submit button presents the form data to
the server. The QueryString is processed, and the result is displayed, as shown in Figure 8-10.
FIGURE 8-10 The result displayed
In this example, when you click the Submit button, the URL changes to the following.
http://localhost:8080/SubmitHello?userName=Glenn
The routing in the app.js le matches the resource of SubmitHello and then executes the
code associated with the resource. In the code, userName is retrieved from the QueryString.
360 CHAPTER 8 Websites and services
Did you notice that the URL to get the HelloForm.html page was the following?
http://localhost:8080/HelloForm.html
You didn’t need to provide the word “public” in the URL because the app.use function
didn’t specify a resource folder for the URL. The app.use specied the location of the les
only, so the URL path is the root of the website (\). You can specify the URL path explicitly by
inserting the path in front of the original argument, as shown in the following example.
app.use('/forms', express.static(__dirname + '/public'));
After making this change, run the application again. This time, enter the following URL in
the browser.
http://localhost:8080/Forms/HelloForm.html
If you try the original URL, you might still see the form because it’s cached. If so, refresh
your browser screen, and you no longer can retrieve the HelloForm.html from the original
URL.
Parsing posted form data
The previous examples demonstrated the ability to use Node.js to serve a webpage and pro-
cess the QueryString data by using the GET method, but in the previous chapter, you learned
that in addition to being able to attach data to the URL through the QueryString, you can put
data in the message body by using the POST method.
In this section, you learn to process the postback data by using a formidable package. This
package provides helper methods that simplify posted data retrieval.
Copy the HelloForm.html le to a new le called HelloPost.html in the same public folder.
Modify the HTML in the HelloPost.html by changing the <form> element’s method attribute
to post and changing the action attribute to SubmitHelloPost. The completed HelloPost.html
le should look like the following.
<!DOCTYPE html>
<html xmlns="http://www.w3.org/1999/xhtml">
<head>
<title></title>
</head>
<body>
<form method=”post” action=”/SubmitHelloPost”>
Enter Name: <input type="text" name="userName" />
<input type="submit" value="Submit" />
</form>
</body>
</html>
Because the method attribute is set to POST, the processing of the data is different, which
is why a new action is provided. In the meantime, the existing HTML page continues to
operate.
Lesson 1: Getting started with Node.js CHAPTER 8 361
In the command prompt window, execute the following npm command to retrieve infor-
mation about the formidable package.
npm info formidable
At the time of this writing, the latest version is 1.0.10, but you can also use a wild card to
specify the version in the package.json le in which you must specify this dependency. The
following is the modied package.json le.
{
"name": "HelloExpress",
"version": "0.0.0",
"description": "A simple Web site",
"main": "index.js",
"scripts": {
"test": "echo \"Error: no test specified\" && exit 1"
},
"repository": "",
"author": "Glenn Johnson",
"license": "BSD",
"private": true,
"dependencies": {
“formidable”: “1.x”,
"express": "3.0.0"
}
}
The addition of formidable version 1.x retrieves the latest release of version 1.
In the command prompt window, install the formidable package by entering the following
npm command.
npm install
This command reads the package.json le and installs the dependent packages. You now
have the formidable package installed locally, so update the app.js le to process post-
back data. At the top of the app.js le, add the following code to reference the formidable
package.
var formidable = require('formidable');
Next, process the posted data. Instead of adding an app.get function call, add an app.
post function call. In the call, you must create an instance of the formidable package’s
IncomingForm object and assign it to a form variable. You then must use the form variable
elds and display a message to the user. The completed app.js le with the app.post function
should look like the following.
var express = require('express');
var app = express();
var formidable = require('formidable');
app.use('/forms', express.static(__dirname + '/public'));
app.post('/SubmitHelloPost', function (request, response) {
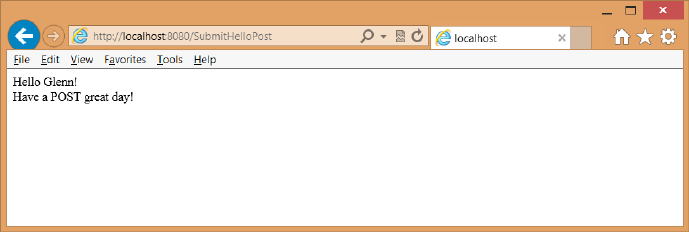
362 CHAPTER 8 Websites and services
if (request.method.toLowerCase() == 'post') {
// parse form data
var form = new formidable.IncomingForm();
form.parse(request, function (err, fields) {
response.writeHead(200, { 'Content-Type': 'text/html' });
response.write('Hello ' + fields.userName + '!<br />');
response.end('Have a POST great day!');
console.log('Handled request from ' + fields.userName);
});
}
});
app.get('/SubmitHello', function (request, response) {
response.writeHead(200, { 'Content-Type': 'text/html' });
response.write('Hello ' + request.query.userName + '!<br />');
response.end('Have a great day!');
console.log('Handled request from ' + request.query.userName);
});
var port = 8080;
app.listen(port);
console.log('Listening on port: ' + port);
Run the application and then enter the following in the browser URL.
http://localhost:8080/Forms/HelloPost.html
Enter a name in the text box and click Submit. You should see the result displayed in the
browser window, as shown in Figure 8-11.
FIGURE 8-11 The posted form data processed and displayed
There is no QueryString, and the URL clearly shows that the posted data was sent to the
SubmitHelloPost. In earlier examples, the GET method was used to show you how it works.
Remember that you should always send data back to the server by using the POST method.

Lesson 1: Getting started with Node.js CHAPTER 8 363
Quick check
What does the following command accomplish?
npm install
Quick check answer
This command reads the local package.json le and installs all dependent pack-
ages that are referenced.
Lesson summary
Node.js provides a server-side way of creating websites that are JavaScript-based.
A module is a shareable le that promotes reuse.
A package is a shareable set of modules that promote reuse and is published for you
and others to use.
Use node package manager (npm) to manage packages.
Use the express package to create a website easily.
Lesson review
Answer the following questions to test your knowledge of the information in this lesson. You
can nd the answers to these questions and explanations of why each answer choice is correct
or incorrect in the “Answers” section at the end of this chapter.
1. What can you publish by using npm?
A. A JavaScript le
B. A module
C. A JavaScript class
D. A package
2. What scoping can a package have? (Choose all that apply.)
A. Local
B. Grouped
C. Named
D. Global
3. Why would you install the express package?
A. Simplify website creation
B. Provide session management
C. Simplify retrieval of static content
D. All of the above
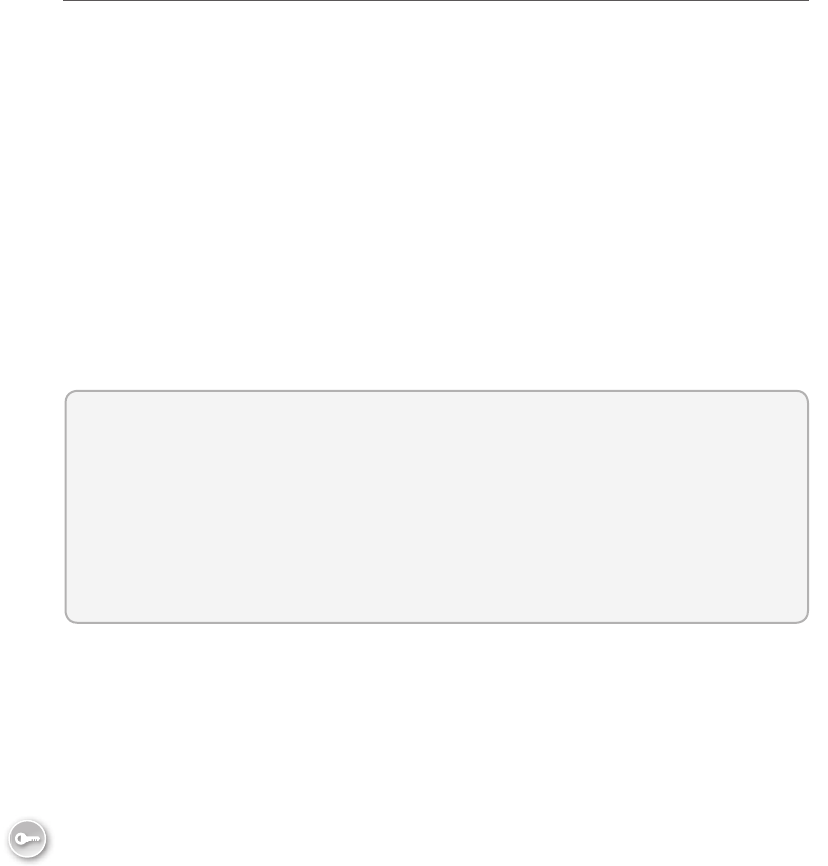
364 CHAPTER 8 Websites and services
Lesson 2: Working with web services
In the previous lesson, you saw how you can create a website that can serve webpages
and provide HTML responses to requests. One problem with the website scenario is that
posting form data causes a response that repaints the page with the HTML result. If the
HTML response looks like the existing page, you waste bandwidth and resources to repaint
the page.
Web services provide the ability to send data to the server and receive data back from
the server without requiring a repaint of the browser screen. There are various types of web
services, and this lesson helps you understand them. You also use Node.js to create a web
service.
To send requests to a web service from your webpage, you will be using AJAX, which
stands for Asynchronous JavaScript and XML. Using AJAX, you can write JavaScript that asyn-
chronously calls the server and processes the result. While this is happening, the user’s screen
doesn’t lock up or freeze while waiting for the call to the server to complete.
After this lesson, you will be able to:
Explain the difference between websites and web services.
Understand the differences between web service types.
Create a Node.js web service.
Use AJAX to call a web service.
Estimated lesson time: 30 minutes
Introducing web services
A web service provides communications between a web server and a client. The client can be
a web browser, another web service, a cell phone, or any machine that can communicate with
the web service. A client needs the ability to assemble a request, send the request to the web
service, and then receive the response and parse it.
As web services become more pervasive, developers can create applications by just piec-
ing together web services. This is known as creating mashups.
There are two major classes of web services. The rst is called Representational State
Transfer (REST), in which the primary purpose of the service is to manipulate web resources
by using a uniform set of stateless operations. The second is arbitrary web services, in which
the service might expose an arbitrary set of operations. An example implementation of REST
web service is called WEB API; an example of an arbitrary set of operations is the Microsoft
Windows Communication Foundation (WCF).
Key
Terms
Lesson 2: Working with web services CHAPTER 8 365
Understanding Representational State Transfer (REST)
REST attempts to use the standard operations of HTTP (or similar protocols) by mapping cre-
ate, retrieve, update, and delete (CRUD) operations to HTTP methods so that GET retrieves
data or performs an operation that does not change server-side data. POST updates data but
can retrieve data when complex parameter values need to be sent to the server. PUT inserts
new data, and DELETE deletes data. REST focuses on interacting with stateless resources
rather than on messages or operations. Clean URLs are tightly associated with the REST con-
cept. Because the method infers a verb, the URL should describe the entity as a noun. Here
are some examples of REST URLs.
Retrieve customer number ve The number ve is part of the URL and not part of
the QueryString. The routing mechanism in the server would need to parse this cor-
rectly. Because this is retrieving data, the HTTP method would be set to GET. You can
POST to this location to update or DELETE to this URL to delete the customer.
http://localhost:8080/Customer/5
Retrieve vehicle with a Vehicle Identication Number (VIN) of ABC123 The VIN
is in the QueryString. Once again, the HTTP method is set to GET.
http://localhost:8080/Vehicle?VIN=ABC123
Retrieve all orders The HTTP method is set to GET, and there is no parameter. A PUT
to this URL adds an order.
http://localhost:8080/Orders
Insert customer The HTTP method is set to PUT, and the postback data is in the
request body, so you don’t see the data in the URL or QueryString. The following is the
URL and the postback data.
http://localhost:8080/Customers
name=ACME&Address=123+Bumblebee+Lane
To work around the problem when many rewalls don’t allow PUT and DELETE methods,
you can specify a verb in your QueryString or postback data. You should not change the URL
to contain the method because that breaks the RESTful interface, which species that the URL
must be a reference to an entity or entity collection. Here are a couple of examples of placing
the verb in the data.
Delete vehicle with a Vehicle Identication Number (VIN) of ABC123 The VIN is
in the QueryString. The HTTP method is set to GET to get past the rewall.
http://localhost:8080/Vehicle?verb=DELETE&VIN=ABC123
Insert customer The HTTP method is set to POST, and the postback data is in the
request body, so you don’t see the data in the URL or QueryString. The verb is set to
PUT in the data. The following is the URL and the postback data.
http://localhost:8080/Customers
varb=PUT&name=ACME&Address=123+Bumblebee+Lane
366 CHAPTER 8 Websites and services
You can implement security by using HTTPS protocol to encrypt the communications and
basic authentication to require a user name and password to access resources.
The biggest benets of using REST are that it is easy to connect to; it is lightweight and
thin, so it doesn’t consume many resources; and it is fast. In addition, REST does not need to
use verbose XML when sending and receiving data. Many developers prefer to send data to
the server as name=value pairs that are URI encoded (same as sending form data through
POST or GET). When receiving data from the server, developers typically like to use JSON
(JavaScript Object Notation) due to its compact size.
One of the biggest drawbacks to using REST is that some browsers support only GET
and POST methods, whereas many rewalls allow passage of only GET and POST methods.
Because of this problem, many developers create APIs that are similar to REST (are RESTful)
when compatibility is maintained with browsers and rewalls and only GET and POST are
used.
Understanding arbitrary web services
Arbitrary web services are also known as big web services. Arbitrary web services such as
Windows Communication Foundation (WCF) don’t attempt to map aspects of the proto-
col to operations because the exposed operations might be more arbitrary than providing
simple REST operations. Arbitrary web services are more focused on the ability to offer more
functionality such as message routing and various means of security that can provide partial
message encryption and various forms of authentication.
Arbitrary web services typically have an interface format that enables the client to read
and parse the information. This information enables the client to make calls to the web
service immediately. One of the more common API formats is Web Services Description
Language (WSDL), by which a WSDL document that fully describes the exposed operations
can be retrieved from the web service.
Arbitrary web services require the client to assemble a request, or message, by using a
specially formatted XML message called a Simple Object Access Protocol (SOAP) message.
The web service is not required to communicate over HTTP protocol, and it’s quite common
to use HTTP protocol or for the web service to strip away the HTTP protocol layer and just use
TCP protocol for better performance.
Creating a RESTful web service by using Node.js
The following describes creating a RESTful web service by using Node.js to expose the
math_example package that was created in Lesson 1 as a RESTful service. In this example,
GET, POST, PUT, and DELETE demonstrate that they can be used. In a real application, math
operations would typically use the GET method on a Math entity, and the operation would be
passed as a data parameter. For example, the following would be a more appropriate RESTful
implementation of performing addition of two numbers.
http://localhost:8080/Math?operation=addition&x=10&y=45
Lesson 2: Working with web services CHAPTER 8 367
In this example, a math_service folder is created under the node_samples folder, and the
following package.json le is created.
{
"name": "math_service",
"version": "0.0.0",
"description": "A simple Web service",
"main": "index.js",
"scripts": {
"test": "echo \"Error: no test specified\" && exit 1"
},
"repository": "",
"author": "Glenn Johnson",
"license": "BSD",
"private": true,
"dependencies": {
"formidable": "1.x",
"express": "3.0.0",
"math_example": "0.x"
}
}
In this example, there are three dependencies. After you create this le and save it, you
can open a command prompt window, navigate to the math_service folder, and execute the
following command to install the dependencies from npm.
npm install
After the installation completes, you can use these packages. In the math_service folder,
create an app.js le and add references to these packages as follows.
var express = require('express');
var app = express();
var formidable = require('formidable');
var math = require('math_example');
After setting up the package references, create a public folder under the math_service
folder and use the app object to mount the public folder as the root of the website. The pub-
lic folder will house webpages. The code should look like the following.
app.use(express.static(__dirname + '/public'));
In this example, the operations will be part of the URL, so the addition operation is created
by adding the following code.
app.get('/addition', function (request, response) {
var x = Number(request.query.x),
y = Number(request.query.y),
result = math.addition(x, y);
response.writeHead(200, { 'Content-Type': 'application/json' });
response.end('{ "result": ' + result + '}');
console.log('Handled addition request for x=' + x + ' : y=' + y);
});
368 CHAPTER 8 Websites and services
The addition operation uses the GET method as signied by the app.get function call. This
creates a route by which a GET request that matches addition executes the code block. In the
code block, three variables (x, y, and result) are declared and initialized. The x and y param-
eters are retrieved from the QueryString and converted to numbers. Next, the result is popu-
lated by executing the addition method on the math object with x and y. Finally, the response
object is used to write the status code in which 200 is a success, and the content type is set to
return a JSON result. The response object is then used to write the JSON object.
In this example, the JSON object is represented by curly braces. One property is called
result, and its value is set to the result of the addition method call.
At the end of the le, add the following code to start the web service.
var port = 8080;
app.listen(port);
console.log('Listening on port: ' + port);
After saving the app.js le, you can start the web service by executing the following
command.
node app
To test this, you can use the browser, but depending on the browser you use, you might
need to click through several prompts to view the results. Here is the URL.
http://localhost:8080/addition?x=5&y=10
When you nally see the result, it should look like the following.
{ "result": 15}
The code in this example is similar to the code on the math_user website; however, that
site returned HTML, albeit crude HTML, whereas this example returned a JSON object. This is
your web service, but how can you call it from a webpage and use the return object? This is
when AJAX comes into play.
Using AJAX to call a web service
Use AJAX to create asynchronous calls to web services. AJAX is JavaScript. You can think of it
as being advanced JavaScript. Instead of designing a submit button to post the data back to
the server and then watching the screen be repainted, JavaScript calls back to the server and
processes the result without causing a complete repaint of the screen.
Create and consider the following Math.html webpage that is created in the public folder
of math_service.
<!DOCTYPE html>
<html xmlns="http://www.w3.org/1999/xhtml">
<head>
<title></title>
<script type="text/javascript" src="/scripts/jquery-1.8.2.min.js"></script>
<script type="text/javascript" src="/scripts/default.js"></script>

Lesson 2: Working with web services CHAPTER 8 369
</head>
<body>
<form id="mathForm">
Enter X:<input type="text" id="x" /><br />
Enter Y:<input type="text" id="y" /><br />
Result: <span id="result"></span><br />
<button id="btnAdd" type="button">Add</button>
</form>
</body>
</html>
Under the public folder, create a scripts folder and a default.js JavaScript le to con-
tain your code. Add the jQuery library to this folder. You can get the jQuery library from
http://jquery.com if you don’t already have it.
NOTE VERIFY THE JQUERY VERSION
Although jQuery is a fairly stable and mature product, it is still being updated. Be sure that
your script tag references the version of jQuery that you installed.
The Math.html le contains the basic HTML user interface elements needed to collect data
from the user and display a result. In this example, the <form> element isn’t needed because
the form will never be submitted. The <form> element is used only as a means of grouping
the form controls. If the form will be used to submit data to the server, the name attributes of
the form submission elements must be set. In this example, JavaScript and jQuery will be used
to access these elements and make the AJAX call.
Using XMLHttpRequest
The primary object that makes an AJAX call is XMLHttpRequest. As the name implies, this
object certainly can be used to send and receive XML data, but it can also be used to send
and receive other data. In its simplest form, you can use this object as follows.
var xmlhttp=new XMLHttpRequest();
xmlhttp.open("GET","/addition?x=5&y=10",false);
xmlhttp.send();
var xmlDoc=xmlhttp.responseXML;
The rst line creates a new XMLHttpRequest object and assigns it to the xmlhttp variable.
The next line sets up the request to use the GET method with a relative URL of /addition
and QueryString of x=5&y=10. The last parameter (false) indicates whether the operation
is to be performed asynchronously when false means that operation is synchronous. The
open method does not communicate to the server; it just sets up the request. The xmlhttp.
send method call communicates to the server. Because the communication in this example is
synchronous, JavaScript execution will not advance to the next line of code until the com-
munication is completed. The next line sets the xmlDoc variable to the xmlhttp.responseXML
property. From there, you can parse the XML as part of processing the results.
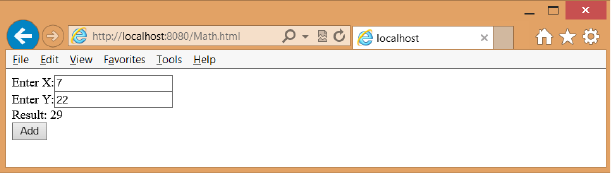
370 CHAPTER 8 Websites and services
In the math web service, the result is not XML; it’s JSON, so the last line of code needs to
change. In addition to having a responseXML property, the XMLHttpRequest object has a
response property that is a string. The response string needs to be converted to an object,
and the JSON.parse method can accomplish the task. In addition, the URL must be pieced
together by taking the values from text boxes to build this QueryString. The following code
can be added to the default.js le to make the AJAX call.
$(document).ready(function () {
$('#btnAdd').on('click', addNumbers)
});
function addNumbers() {
var x = document.getElementById('x').value;
var y = document.getElementById('y').value;
var result = document.getElementById('result');
var xmlhttp = new XMLHttpRequest();
xmlhttp.open("GET", "/addition?x=" + x + "&y=" + y , false);
xmlhttp.send();
var jsonObject = JSON.parse(xmlhttp.response);
result.innerHTML = jsonObject.result;
}
The rst part of this code uses jQuery and adds the subscription to the btnAdd button
after the document is ready. This causes the addNumbers function to execute when the but-
ton is clicked.
The addNumbers function doesn’t use jQuery yet. First, the x and y values are extracted
from the <input> elements. The result variable is set to reference the <span> element whose
id is result. The XMLHttpRequest object is created, and then the open method is executed
with a constructed QueryString. The send method is executed, and the response is parsed to
create an object. Finally, the innerHTML for the result <span> element is populated with the
result property value from the server. To test this page, rst execute the following command
to start the web service.
node app
After the web service is running, open the browser and enter the following URL.
http://localhost:8080/Math.html
Enter values in X and Y and click the Add button. You should see the result as shown in
Figure 8-12.
FIGURE 8-12 The AJAX call displaying the proper result
Lesson 2: Working with web services CHAPTER 8 371
Now that the code is operational, you might want to execute the AJAX call asynchronously.
You can do this by locating the open method call and changing the false to true. However,
because that setting causes a thread to be created and the send method to be called, the
code won’t wait for the result to be returned. Instead, the program continues to the next
line of code, where it attempts to process the result even though the result might not have
arrived from the server. To handle the asynchronous call, you must subscribe to the onready-
stateschange event, which is triggered whenever the state of XMLHttpRequest changes. If the
ready state changes to 4, the call has completed, but you must also test the HTTP status code
to ensure that no error has occurred by verifying that the return code is 200. The following is
the modied addNumber function that correctly handles the asynchronous call.
function addNumbers() {
var x = document.getElementById('x').value;
var y = document.getElementById('y').value;
var result = document.getElementById('result');
var xmlhttp = new XMLHttpRequest();
xmlhttp.onreadystatechange = function () {
if (xmlhttp.readyState == 4 && xmlhttp.status == 200) {
var jsonObject = JSON.parse(xmlhttp.response);
result.innerHTML = jsonObject.result;
}
}
xmlhttp.open("GET", "/addition?x=" + x + "&y=" + y , true);
xmlhttp.send();
}
You might be wondering what the number 4 means. The following is a list of the
readyState codes.
0 Uninitialized The open method has not been called yet.
1 Loading The send method has not been called yet.
2 Loaded The send method has been called; headers and status are available.
3 Interactive Downloading; the response properties hold the partial data.
4 Completed All operations are nished.
As these values show, you need to subscribe to the onreadystatechange event before you
call the open method.
Handling progress
If the server provides progress events, you can subscribe to the progress event at the browser.
You can add an event listener to subscribe to the progress event and execute code each time
the event is triggered, as shown in the following code.
function addNumbers() {
var x = document.getElementById('x').value;
var y = document.getElementById('y').value;
var result = document.getElementById('result');
var xmlhttp = new XMLHttpRequest();
xmlhttp.onreadystatechange = function () {
372 CHAPTER 8 Websites and services
if (xmlhttp.readyState == 4 && xmlhttp.status == 200) {
var jsonObject = JSON.parse(xmlhttp.response);
result.innerHTML = jsonObject.result;
}
}
xmlhttp.addEventListener(“progress”, updateProgress, false);
xmlhttp.open("GET", "/addition?x=" + x + "&y=" + y , true);
xmlhttp.send();
}
function updateProgress(evt) {
if (evt.lengthComputable) {
var percentComplete = evt.loaded / evt.total;
//display percenComplete
} else {
// Need total size to compute progress
}
}
The server must provide a value for both the loaded property and the total property for
this to work properly. The progress event might be most useful when loading a large amount
of data to the browser or loading a large le.
Handling errors
If an error occurs, the HTTP status code will be something other than 200. You can also sub-
scribe to the error and abort events, as shown in the following code example.
function addNumbers() {
var x = document.getElementById('x').value;
var y = document.getElementById('y').value;
var result = document.getElementById('result');
var xmlhttp = new XMLHttpRequest();
xmlhttp.onreadystatechange = function () {
if (xmlhttp.readyState == 4 && xmlhttp.status == 200) {
var jsonObject = JSON.parse(xmlhttp.response);
result.innerHTML = jsonObject.result;
}
}
xmlhttp.addEventListener("progress", updateProgress, false);
xmlhttp.addEventListener(“error”, failed, false);
xmlhttp.addEventListener(“abort”, canceled, false);
xmlhttp.open("GET", "/addition?x=" + x + "&y=" + y , true);
xmlhttp.send();
}
function transferFailed(evt) {
alert(“An error occurred”);
}
function canceled(evt) {
alert(“canceled by the user”);
}
Lesson 2: Working with web services CHAPTER 8 373
Now that you know about the XMLHttpRequest object, be aware that browsers might
implement this object differently. Therefore, rather than write a large amount of code to deal
with differences, use one of the jQuery wrappers for XMLHttpRequest.
Using jQuery XMLHttpRequest wrappers
You can use jQuery to simplify AJAX calls and be browser independent. The jQuery meth-
ods can be executed synchronously or asynchronously. The following is a list of the available
jQuery methods; remember that the jQuery object is aliased to the dollar sign ($) to save typ-
ing so many characters. Where there is no dollar sign, the method can be executed on jQuery
objects that are referenced with a selector.
$.ajax() Low-level interface to perform an AJAX request
.ajaxComplete() Global AJAX event handler to register a handler to be called when
AJAX requests complete
.ajaxError() Global AJAX event handler to register a handler to be called when AJAX
requests complete with an error
$.ajaxPrelter() Low-level interface that handles custom AJAX options before each
request is sent and before $.ajax() processes the requests
.ajaxSend() Global AJAX event handler that you use to attach a function to be
executed before an AJAX request is sent
$.ajaxSetup() Low-level interface that sets default values for future AJAX requests
.ajaxStart() Global AJAX event handler to register a handler to be called when the
rst AJAX request begins
.ajaxStop() Global AJAX event handler to register a handler to be called when all
AJAX requests have completed
.ajaxSuccess() Global AJAX event handler to attach a function to be executed when-
ever an AJAX request completes successfully
$.get() Shorthand method to load data from the server by using an HTTP GET
request
$.getJSON() Shorthand method to load JSON-encoded data from the server by
using a GET HTTP request
$.getScript() Shorthand method to load a JavaScript le from the server by using a
GET HTTP request and then execute it
.load() Shorthand method to load data from the server and place the returned
HTML in the matched element
$.param() Helper method to create a serialized representation of an array or object,
suitable for use in a URL query string or an AJAX request
$.post() Shorthand method to load data from the server by using an HTTP POST
request

374 CHAPTER 8 Websites and services
.serialize() Helper method to encode a set of form elements as a string for
submission
.serializeArray() Helper method to encode a set of form elements as an array of
names and values
Some of these methods are discussed in later chapters, but you can get more information
at http://jquery.com.
The $.ajax() method is a wrapper for the XMLHttpRequest object that provides a browser-
independent way to write your AJAX call. The $.ajax() method accepts an object parameter
that contains all the settings for the AJAX call. The following code example is a replacement
for the addNumber function.
function addNumbers() {
var x = $('#x').val();
var y = $('#y').val();
var data = { "x": x, "y": y };
$.ajax({
url: '/addition',
data: data,
type: 'GET',
cache: false,
dataType: 'json',
success: function (data) {
$('#result').html(data.result);
}
});
}
In this example, jQuery retrieves the values of x and y. A data variable object is then cre-
ated to hold x and y. The $.ajax() call is executed next; it takes an object argument with all
the settings for the call. In this example, the object is created inline. The url property is set,
and the data is set to the data object created in the previous statement. The type property
is the HTTP method, which supports GET, POST, PUT, and DELETE, but remember that many
rewalls block PUT and DELETE. The cache property is set to false to indicate that the result
should not be cached. The dataType property denes the type of data you expect to receive
from the server and can be set to ‘json’, ‘xml’, ‘html’, ‘script’, ‘jsonp’, or ‘text’.
NOTE CROSS-DOMAIN ACCESS BY USING JSONP
Using JSONP provides cross-domain access to an existing JSON API by wrapping a JSON
payload in a function call. This is considered obsolete; the replacement is to use cross-
origin resource sharing (CORS). CORS is described later in this lesson.
The last property, success, is set to a function to execute when the call returns successful.
This could be a function name that contains the code or, as shown in the example, this could
be an anonymous function with the code. This code runs asynchronously like the previous
XMLHttpRequest code.
Lesson 2: Working with web services CHAPTER 8 375
You can use a more concise way to write this code with the $.get() method instead or, bet-
ter yet, use the $.getJSON() method, as shown in the following example.
function addNumbers() {
var x = $('#x').val();
var y = $('#y').val();
var data = { "x": x, "y": y };
$.getJSON('/addition', data, function (data) {
$('#result').html(data.result);
});
}
The size of the addNumbers function has dropped substantially! This is a good time to
implement the other math functions. For the implementation of the other functions, the
HTML page has buttons added as follows.
<!DOCTYPE html>
<html xmlns="http://www.w3.org/1999/xhtml">
<head>
<title></title>
<script type="text/javascript" src="/scripts/jquery-1.8.2.min.js"></script>
<script type="text/javascript" src="/scripts/default.js"></script>
</head>
<body>
<form id="mathForm">
Enter X:<input type="text" id="x" /><br />
Enter Y:<input type="text" id="y" /><br />
Result: <span id="result"></span><br />
<button id="btnAdd" type="button">Add</button>
<button id=”btnSubtract” type=”button”>Subtract</button>
<button id=”btnMultiplication” type=”button”>Multiplication</button>
<button id=”btnDivision” type=”button”>Division</button>
</form>
</body>
</html>
At the top of the default.js le, code is added to subscribe to the button click events for
the new buttons, as shown in the following code example.
$(document).ready(function () {
$('#btnAdd').on('click', addNumbers)
$('#btnSubtract').on('click', subtractNumbers)
$('#btnM ultiplicatio n').on('click', m ultiply Nu mbers)
$('#btnDivision').on('click', divideNumbers)
});
For the subtractNumbers function, you can use the $.post() method where the HTTP POST
method is required. For the multiplyNumbers function where the HTTP PUT method will be
used, and for the divideNumbers function where an HTTP DELETE method will be used, the
$.ajax() method will be called. The following code example demonstrates these functions, but
they won’t work until the app.js le is updated to accept these calls.
function subtractNumbers() {
var x = $('#x').val();
376 CHAPTER 8 Websites and services
var y = $('#y').val();
var data = { "x": x, "y": y };
$.post('/subtraction', data, function (data) {
$('#result').html(data.result);
}, 'json');
}
function multiplyNumbers() {
var x = $('#x').val();
var y = $('#y').val();
var data = { "x": x, "y": y };
$.ajax({
url: '/multiply',
data: data,
type: 'PUT',
dataType: 'json',
cache: false,
success: function (data) {
$('#result').html(data.result);
}
});
}
function divideNumbers() {
var x = $('#x').val();
var y = $('#y').val();
var data = { "x": x, "y": y };
$.ajax({
url: '/divide',
data: data,
type: 'DELETE',
dataType: 'json',
cache: false,
success: function (data) {
$('#result').html(data.result);
}
});
}
The following is the completed app.js le that shows the routing for the subtraction, multi-
ply, and divide requests.
var express = require('express');
var app = express();
var formidable = require('formidable');
var math = require('math_example');
app.use(express.static(__dirname + '/public'));
app.get('/addition', function (request, response) {
var x = Number(request.query.x),
y = Number(request.query.y),
result = math.addition(x, y);
response.writeHead(200, { 'Content-Type': 'application/json' });
Lesson 2: Working with web services CHAPTER 8 377
response.end('{ "result": ' + result + '}');
console.log('Handled addition request for x=' + x + ' : y=' + y);
});
app.post('/subtraction', function (request, response) {
var form = new formidable.IncomingForm();
form.parse(request, function (err, fields) {
var x = Number(fields.x),
y = Number(fields.y),
result = math.subtraction(x, y);
response.writeHead(200, { 'Content-Type': 'application/json' });
response.end('{ "result": ' + result + '}');
console.log('Handled subtraction request for x=' + x + ' : y=' + y);
});
});
app.put('/multiply', function (request, response) {
var form = new formidable.IncomingForm();
form.parse(request, function (err, fields) {
var x = Number(fields.x),
y = Number(fields.y),
result = math.multiplication(x, y);
response.writeHead(200, { 'Content-Type': 'application/json' });
response.end('{ "result": ' + result + '}');
console.log('Handled multiplication request for x=' + x + ' : y=' + y);
});
});
app.delete('/divide', function (request, response) {
var form = new formidable.IncomingForm();
form.parse(request, function (err, fields) {
var x = Number(fields.x),
y = Number(fields.y),
result = math.division(x, y);
response.writeHead(200, { 'Content-Type': 'application/json' });
response.end('{ "result": ' + result + '}');
console.log('Handled division request for x=' + x + ' : y=' + y);
});
});
var port = 8080;
app.listen(port);
console.log('Listening on port: ' + port);
Using jQuery promises
You can see that jQuery simplies the AJAX calls. All these functions execute the same code
when successful, and you might want to refactor this code to call a common function. You
might also be working with a large application that calls addNumbers from multiple func-
tions, but you want different code to execute on success. There is no code to deal with errors.
You also might want to execute cleanup code regardless of whether the AJAX call is successful
or failed. Most important, you might want to execute another AJAX call after the rst AJAX
call is successful. You can use promises to accomplish this.
378 CHAPTER 8 Websites and services
When you use jQuery to execute an AJAX call, a promise object is returned. Think of a
promise as being a promise to do work. The promise object enables you to register a call-
back method to execute when the AJAX call is successful, has failed, is progressing, and has
completed. The promise object has the following methods that you can use to register called
functions.
always() Add handlers to be called when the AJAX call has completed, regardless of
whether it was successful
done() Add handlers to be called when the AJAX call is successful
fail() Add handlers to be called when the AJAX call has failed
progress() Add handlers to be called when the AJAX call generates progress
notications
The following code demonstrates the refactoring of the addNumbers function to use the
promise that’s returned from the AJAX call.
function addNumbers() {
var data = getFormData();
serverAddition(data).done(displayResult);
}
function getFormData() {
var x = $('#x').val();
var y = $('#y').val();
return { "x": x, "y": y };
}
function serverAddition(data) {
return $.getJSON('/addition', data);
}
function displayResult(serverData) {
$('#result').html(serverData.result);
}
So what happened here? It looks like the code grew in size, and in some respects, it did,
but the code got cleaner, too. The serverAddition function handles the AJAX call to the server
but does not attempt to handle the results. Instead, the serverAddition function returns a
promise object, and the caller can decide how to handle the result.
The addNumbers function is responsible for collecting the data to pass to the serverAddi-
tion function and deciding how to process the result. To collect the data, a call is made to the
getFormData function that collects the data and creates an object that can be used for the
AJAX call. The data object is passed to the serverAddition function. The returned promise is
used by chaining a call to the done method. The done method requires a function param-
eter, which can be an anonymous function as in the previous examples, or you can pass the
name of a function as in the example where the displayResult function is specied. Creating
a specic function enables the other functions to call the displayResult function, which helps
promote code reuse. The following is the default.js le after refactoring the other functions.
Lesson 2: Working with web services CHAPTER 8 379
$(document).ready(function () {
$('#btnAdd').on('click', addNumbers)
$('#btnSubtract').on('click', subtractNumbers)
$('#btnMultiplication').on('click', multiplyNumbers)
$('#btnDivision').on('click', divideNumbers)
});
function addNumbers() {
var data = getFormData();
serverAddition(data).done(displayResult);
}
function getFormData() {
var x = $('#x').val();
var y = $('#y').val();
return { "x": x, "y": y };
}
function serverAddition(data) {
return $.getJSON('/addition', data);
}
function displayResult(serverData) {
$('#result').html(serverData.result);
}
function subtractNumbers() {
var data = getFormData();
serverSubtraction(data).done(displayResult);
}
function serverSubtraction(data) {
return $.post('/subtraction', data, 'json');
}
function multiplyNumbers() {
var data = getFormData();
serverMultiplication(data).done(displayResult);
}
function serverMultiplication(data) {
return $.ajax({
url: '/multiply',
data: data,
type: 'PUT',
dataType: 'json',
cache: false
});
}
function divideNumbers() {
var data = getFormData();
serverDivision(data).done(displayResult);
}

380 CHAPTER 8 Websites and services
function serverDivision(data) {
return $.ajax({
url: '/divide',
data: data,
type: 'DELETE',
dataType: 'json',
cache: false
});
}
If you display the webpage and enter numbers for x and y, you should see proper return
values until you try to divide by zero. In JavaScript, dividing by zero doesn’t throw an excep-
tion; it returns innity. The conversion to a JSON object will, however, throw a parse error, so
no value is displayed.
To solve this problem, a displayError function is added, and the promise’s fail method is
used to subscribe to the failure of the AJAX call, as shown in the following code example.
function divideNumbers() {
var data = getFormData();
serverDivision(data).done(displayResult).f ai l(d is pl ay E r r o r);
}
function displayError(serverData, error) {
var value = 'No result';
if ('result' in serverData) value = serverData.result;
$('#result').html(value + ' - ' + error);
}
The fail method is chained to the serverDivision call after the done method call. In addi-
tion, the displayError function determines whether serverData has a result property by using
the in keyword. If the result property exists, its value will be displayed. This function has a
second parameter, called error, that identies the source of the error. Both of these items are
concatenated and displayed.
Cross-origin resource sharing
In the previous examples, the Math.html webpage came from the same website that con-
tained the web service, and the URL for the web service requests was a relative URL on the
site. If the Math.html page had AJAX called, and it contained URLs to access web services on
other websites, the AJAX call would fail because this represents a potential cross-site script-
ing (XSS) attack. There are ways to allow cross-site AJAX calls, the most common of which is
cross-origin resource sharing (CORS). CORS is a browser specication that denes ways for a
web server to allow its resources to be accessed by a webpage from a different domain. CORS
provides a compromise by which you can congure access across domains instead of allowing
everyone access or denying everyone access.
You implement CORS on the web server by sending the Access-Control-Allow-Origin
header when the web service is accessed. Here is an example of the header.
Access-Control-Allow-Origin: *
Key
Terms

Lesson 2: Working with web services CHAPTER 8 381
This example allows anyone to access the web service, but that could open the site for XSS
attacks from malicious websites. It’s generally preferred to list the allowed sites explicitly, as
follows.
Access-Control-Allow-Origin: http://contoso.com:8080 http://www.adventure-works.com/
Quick check
You have a web service that provides read-only access to data. You want to
expose this web service so it can be called from any other website. What header
would you return?
Quick check answer
Use the following header.
Access-Control-Allow-Origin: *
Lesson summary
Web services provide the ability to send data to the server and receive data back from
the server without requiring a repaint of the browser screen.
AJAX, which stands for Asynchronous JavaScript and XML, enables you to write
JavaScript that asynchronously calls the server and processes the result.
Piecing multiple web services together to create an application is called a mashup.
Representational State Transfer (REST) is implemented by manipulating web resources,
using a uniform set of stateless operations. REST attempts to use the standard opera-
tions of HTTP (or similar protocols) by mapping CRUD (create, retrieve, update, and
delete) operations to HTTP methods.
Arbitrary web services expose an arbitrary set of operations and are known as big web
services. They typically use specially formatted XML messages called SOAP (Simple
Object Access Protocol) messages. The primary object that makes an AJAX call is
XMLHttpRequest.
You can use jQuery to create browser-independent asynchronous calls to the server.
JQuery has a promise object you can use to register functions to execute when the
AJAX call is progressing, is successful, has failed, or has completed. A promise object is
returned from all AJAX calls.
Cross-origin resource sharing (CORS) can be implemented at the server to allow
browsers to make calls to the web service from other domains.

382 CHAPTER 8 Websites and services
Lesson review
Answer the following questions to test your knowledge of the information in this lesson. You
can nd the answers to these questions and explanations of why each answer choice is correct
or incorrect in the “Answers” section at the end of this chapter.
1. You want to create a REST service for your internal web service and use the HTTP verbs
that match CRUD operations. You know the browser your users will be using is compat-
ible, and the rewall will not be a problem. What are the HTTP verbs that match with
CRUD (in order)?
A. CREATE, POST, GET, DELETE
B. GET, RETRIEVE, UPDATE, DELETE
C. PUT, GET, POST, DELETE
D. POST, GET, UPDATE, DELETE
2. What is the primary object used to make an asynchronous AJAX call that returns a
JSON result?
A. XMLHttpRequest
B. AjaxRequest
C. JsonResponse
D. AjaxAsync
3. You want to use jQuery to make an AJAX call that will use the HTTP POST method.
Which jQuery method can you use?
A. $.post()
B. $.getJSON()
C. $.get()
D. $.param()
Practice exercises
If you encounter a problem completing any of these exercises, the completed projects can be
installed from the Practice Exercises folder that is provided with the companion content.
Exercise 1: Create a website to receive data
In this exercise, you apply your website, web service, and Node.js knowledge by creating a
website that receives postback data from the ContactUs.html page of the WebCalculator
project that you modied in the previous chapter. You create the website in a folder separate
from your WebCalculator solution and then copy the WebCalculator project to a subdirec-
tory of the website. In this scenario, Node.js can still serve pages from the WebCalculator
Practice exercises CHAPTER 8 383
project. From the Node.js perspective, all the les are in its website, but you can still open the
WebCalculator solution in Visual Studio as needed.
1. If you haven’t done so yet, install Node.js from http://nodejs.org/.
2. Open the command prompt window.
3. Create a folder for the new website.
This requires you to navigate to the location and then create the folder. For example,
the following commands navigate to the Practice Exercises folder on the root of the
C drive, create a new ContosoWeb folder, and then navigate to the new folder.
C:
cd \Practice Exercises
md ContosoWeb
cd ContosoWeb
4. In the Resources folder, nd the WebCalculator solution. Copy the solution and paste it
into the ContosoWeb folder.
5. In the ContosoWeb folder, create a package.json le by typing the following command.
npm init
This command starts the wizard. Enter the following.
name: ContosoWeb
version: 0.0.0
description: Contoso Web Site
main: index.js
keywords: Contoso, WebCalculator
author: your name
license: BSD
6. Open the package.json le and add a dependency on the express and formidable
packages, as shown in the following modied package.json le.
{
"name": "ContosoWeb",
"version": "0.0.0",
"description": "Contoso Web Site",
"main": "index.js",
"scripts": {
"test": "echo \"Error: no test specified\" && exit 1"
},
"repository": "",
"keywords": [
"Contoso",
"WebCalculator"
],
"author": "Glenn Johnson",
"license": "BSD",
“dependencies”: {
384 CHAPTER 8 Websites and services
“formidable”: “1.x”,
“express”: “3.0.0”
}
}
7. Install the dependent packages by typing the following command.
npm install
8. Open Visual Studio Express 2012 for Web. Click File and choose Open Web Site; select
the ContosoWeb folder.
9. In the Contoso website folder, create an index.js le and add a reference to the express
and formidable packages as follows.
var express = require('express');
var app = express();
var formidable = require('formidable');
10. Add a statement to map static requests to the WebSolution/WebCalculator folder as
follows.
app.use(express.static(__dirname + '/WebCalculatorSolution/WebCalculator'));
11. Add code to redirect the user to the default.html page if the URL does not include a
le name, as follows.
app.get('/', function (request, response) {
response.redirect('default.html');
});
12. Add code to listen on port 8080 and log a message to the console stating this.
The index.js le should look like the following.
var express = require('express');
var app = express();
var formidable = require('formidable');
app.use(express.static(__dirname + '/WebCalculatorSolution/WebCalculator'));
app.get('/', function (request, response) {
response.redirect('default.html');
});
var port = 8080;
app.listen(port);
console.log('Listening on port: ' + port);
13. Test your work by running the website and using the following command in the com-
mand prompt window.
node index
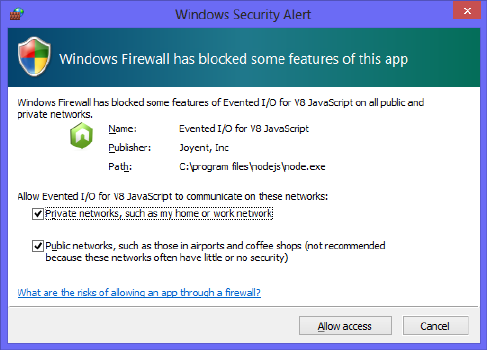
Practice exercises CHAPTER 8 385
14. If you see a pop-up prompt stating that Windows Firewall has blocked some features,
as shown in Figure 8-13, make sure both check boxes are selected and click the Allow
Access button to continue.
FIGURE 8-13 Accepting both options when prompted
15. After starting the website, open the web browser and type http://localhost:8080 to
see the Contoso home page.
Be sure to clear the cache for the page by pressing Ctrl+F5. You should see the
Contoso home page and be able to click the link for the ContactUs page to see that
page.
16. Modify the index.js le so that a POST to /ContactMessage returns a thank you mes-
sage to the customer and logs a small message to the console window as follows.
app.post('/ContactMessage', function (request, response) {
var form = new formidable.IncomingForm();
form.parse(request, function (err, fields) {
var lastName = fields.lastName,
firstName = fields.firstName,
email = fields.email,
message = fields.message;
response.writeHead(200, { 'Content-Type': 'text/html' });
response.write('Thank you, ' + firstName + ' ' + lastName + '<br/>');
response.write('We will contact you at ' + email + '<br/>');
response.end('Your message: ' + message + '<br />');
console.log('Handled request for ' + firstName + ' ' + lastName);
});
});
17. In Visual Studio, open the ContactUs.html page and change the <form> element to
POST to the /ContactMessage URL.
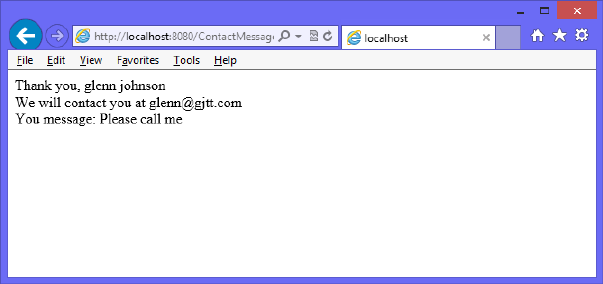
386 CHAPTER 8 Websites and services
The modied <form> element should look like the following.
<form name="ContactForm" method="post" action="/ContactMessage">
18. Stop and start the website and then open the browser and navigate to the ContactUs.
html page. Be sure to refresh the cache by pressing Ctrl+F5.
19. Enter data into the form and click the Submit button.
You should see the response in the browser window, as shown in Figure 8-14.
FIGURE 8-14 The processed form
Wouldn’t it be nice to put the message on the page without repainting the page?
Exercise 2: Create a web service to receive data
In this exercise, you modify the existing website from Exercise 1 by adding a web service to
accept the data and return a response that is displayed on the ContactUs.html page.
1. Stop running Node.js if it’s running.
2. Open the index.js le. Create a copy of the app.post() function that you created in
Exercise 1. Modify the copy so that it will be the web service and accessible by using
the /ContactService-relative URL. Modify the code so that a JSON object is returned
with a result property that contains the same message that was on the webpage
response from Exercise 1. Modify the message logged to the console so that you can
tell the difference between handling a page postback and a web service post.
The completed index.js le should look like the following.
var express = require('express');
var app = express();
var formidable = require('formidable');
app.use(express.static(__dirname + '/WebCalculatorSolution/WebCalculator'));
app.get('/', function (request, response) {
response.redirect('default.html');
Practice exercises CHAPTER 8 387
});
app.post('/ContactMessage', function (request, response) {
var form = new formidable.IncomingForm();
form.parse(request, function (err, fields) {
var lastName = fields.lastName,
firstName = fields.firstName,
email = fields.email,
message = fields.message;
response.writeHead(200, { 'Content-Type': 'text/html' });
response.write('Thank you, ' + firstName + ' ' + lastName + '<br/>');
response.write('We will contact you at ' + email + '<br/>');
response.end('You message: ' + message + '<br />');
console.log('Handled request for ' + firstName + ' ' + lastName);
});
});
app.post('/ContactService', function (request, response) {
var form = new formidable.IncomingForm();
form.parse(request, function (err, fields) {
var lastName = fields.lastName,
firstName = fields.firstName,
email = fields.email,
message = fields.message,
result = 'Thank you, ' + firstName + ' ' + lastName + '<br/>'
+ 'We will contact you at ' + email + '<br/>'
+ 'You message: ' + message + '<br />';
response.writeHead(200, { 'Content-Type': 'application/json' });
response.end('{ "result": "' + result + '"}');
console.log('Handled service request for ' + firstName + ' ' + lastName);
});
});
var port = 8080;
app.listen(port);
console.log('Listening on port: ' + port);
3. Using Visual Studio, locate the scripts folder that contains the Calculator library.js le.
Right-click the scripts folder and add a new JavaScript le called ContactUs.js.
4. Open the ContactUs.html le and add <script> elements for jQuery and the new
ContactUs.js le.
5. Change the type attribute of the submit button from submit to button.
6. Add a <div> element after the end of the <form> element and set its id to result.
The following is the completed ContactUs.html page.
<!DOCTYPE html>
<html xmlns="http://www.w3.org/1999/xhtml">
<head>
<title>Contact Us</title>
<link href="Content/default.css" rel="stylesheet" />
388 CHAPTER 8 Websites and services
<script src=”Scripts/jquery-1.8.2.js”></script>
<script src=”Scripts/ContactUs.js”></script>
</head>
<body>
<div id="container">
<header>
<hgroup id="headerText">
<h1>Contoso Ltd.</h1>
<h2>Your success equals our success</h2>
</hgroup>
</header>
<nav>
<a href="default.html">Home</a>
</nav>
<div role="main">
<div id="ContactUs">
<form name="ContactForm" method="post" action="/ContactMessage">
<div>
<label for="firstName">First Name:</label>
<input type="text" id="firstName" name="firstName"
required="required" />
</div>
<div>
<label for="lastName">Last Name:</label>
<input type="text" id="lastName" name="lastName"
required="required" />
</div>
<div>
<label for="email">Email Address:</label>
<input type="email" id="email" name="email"
required="required" />
</div>
<div>
<label for="message">Message:</label>
<textarea id="message" name="message"
required="required"></textarea>
</div>
<div>
<button type=”button” id=”submit”
name=”submit”>Submit</button>
</div>
</form>
<div id=”result”></div>
</div>
</div>
<aside>
<p>Advertisements</p>
</aside>
<footer>
<p>
Copyright © 2012, Contoso Ltd., All rights reserved
</p>
</footer>
</div>
</body>
</html>
Practice exercises CHAPTER 8 389
7. In the ContactUs.js le, add a callServer function that uses jQuery to make an AJAX
call that posts the data to the /ContactService URL and puts the result into the <div
id=”result”> element.
Your code should look like the following.
function callServer() {
var data = $('#ContactForm').serialize();
$.post('/ContactService', data, function (returnObject) {
$('#result').html(returnObject.result);
},'json');
}
8. In the ContactUs.js le, add a reference to jQuery and add a $(document).ready() func-
tion with a call to subscribe to the click event of the submit button so that clicking the
submit button executes the callServer function.
The completed ContactUs.js le should look like the following.
/// <reference path="jquery-1.8.2.js" />
$(document).ready(function () {
$('#submit').on('click', callServer);
});
function callServer() {
var data = $('form[name="ContactForm"]').serialize();
$.post('/ContactService', data, function (returnObject) {
$('#result').html(returnObject.result);
}, 'json');
}
9. Stop and start ContosoWeb.
10. In the browser, navigate to the ContactUs.html page.
11. Press Ctrl+F5 to ensure that you have the latest version of the le.
12. Enter data in the form and click the Submit button.
Instead of seeing a new page, you should see the result on the same page, as shown in
Figure 8-15.
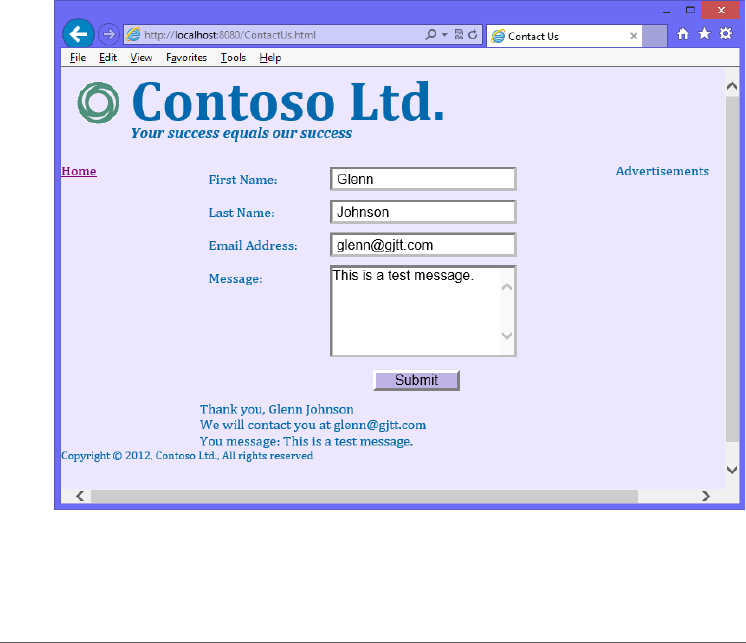
390 CHAPTER 8 Websites and services
FIGURE 8-15 The submitted form displaying a message on the same page
Suggested practice exercises
The following additional exercises are designed to give you more opportunities to practice
what you’ve learned and to help you successfully master the lessons presented in this chapter.
Exercise 1 Learn more about Node.js by creating a web service that has more
functionality.
Exercise 2 Learn more about web services by creating a web service in Visual Studio
.NET using your choice of .NET language.

Answers CHAPTER 8 391
Answers
This section contains the answers to the lesson review questions in this chapter.
Lesson 1
1. Correct answer: D
A. Incorrect: You can’t publish a JavaScript le by itself because you need to include a
manifest, which is the package.json le.
B. Incorrect: A module is a le, and you can’t publish a module by itself because you
need to include a manifest, which is the package.json le.
C. Incorrect: A le or module can contain classes, but the manifest, which is the pack-
age.json le, is required.
D. Correct: The package contains a package.json manifest and the modules you want
to publish.
2. Correct answers: A and D
A. Correct: A package can be installed locally.
B. Incorrect: Grouped is not a valid scope.
C. Incorrect: Named is not a valid scope.
D. Correct: A package can be installed globally.
3. Correct answer: D
A. Incorrect: The express package, also known as expressjs, simplies website creation
but does more.
B. Incorrect: The express package provides session management but does more.
C. Incorrect: The express package simplies retrieval of static content but does more.
D. Correct: The express package simplies website creation, provides session man-
agement, and simplies retrieval of static content.
Lesson 2
1. Correct answer: C
A. Incorrect: CREATE is not an HTTP method.
B. Incorrect: RETRIEVE and UPDATE are not HTTP methods.
C. Correct: PUT is for create, GET is for retrieve, POST is for update, and DELETE is for
delete.
D. Incorrect: UPDATE is not an HTTP method.

392 CHAPTER 8 Websites and services
2. Correct answer: A
A. Correct: XMLHttpRequest is used to make AJAX calls.
B. Incorrect: AjaxRequest is not a valid object.
C. Incorrect: JsonResponse is not valid object.
D. Incorrect: AjaxAsync is not a valid object.
3. Correct answer: A
A. Correct: $.post() is used to POST.
B. Incorrect: $.getJSON() uses the HTTP GET method.
C. Incorrect: $.get() uses the HTTP GET method.
D. Incorrect: $.param() sets parameters and does not call the server.

393
CHAPTER 9
Asynchronous operations
Have you ever run an application and had the screen freeze when you clicked a button?
You waited until its operation completed, and then the application started working
again. Have you seen this behavior on webpages? You know that the problem is due to
long-running operations, but shouldn’t there be a better way to write this code?
The answer to these questions is to implement long-running operations as asynchronous
operations because these operations are currently synchronous operations. Synchronous
code has one sequential execution path, and when the long-running code is executing,
nothing else can be accomplished. What’s needed is another execution path so that the
long-running code can execute on one execution path while the user interface is responsive
on another execution path; this is what asynchronous operations do.
This chapter explores asynchronous operations, using jQuery and web workers.
Lessons in this chapter:
Lesson 1: Asynchronous operations using jQuery and WinJS 393
Lesson 2: Working with web workers 404
Before you begin
To complete this book, you must have some understanding of web development. This
chapter requires the hardware and software listed in the “System requirements” section in
the book’s Introduction.
Lesson 1: Asynchronous operations using jQuery and
WinJS
An asynchronous operation is executed on a thread that is different from the main thread,
a thread being a separate execution path. The previous chapter provided a brief introduc-
tion to asynchronous programming when executing AJAX calls to the server. In addition to
jQuery’s support for using AJAX calls, you might want to perform local asynchronous calls
for operations that are time consuming. For example, if you are performing animations by
using jQuery, you’ll nd that jQuery animations are performed asynchronously.
Key
Terms
394 CHAPTER 9 Asynchronous operations
This lesson focuses on jQuery’s deferred and promise objects for controlling execution of
asynchronous execution.
After this lesson, you will be able to:
Describe asynchrony, using jQuery.
Implement asynchronous operations by using the promise object.
Estimated lesson time: 20 minutes
Using a promise object
The pattern for working with asynchrony is to use a promise object. The promise (also known
as a future or deferred) object provides a mechanism to schedule work to be done on a value
that might not yet be computed. The promise object can be in one of three states: pend-
ing, resolved, or rejected. It starts in the pending state, moves to either resolved or rejected,
and then does not change. The benet is that it enables you to write non-blocking logic that
executes asynchronously without having to write a lot of synchronization and plumbing code.
CommonJS, which denes a specication for using JavaScript everywhere, denes the
Promise/A specication that many JavaScript technologies implement. The promise object
is implemented in WinJS and jQuery. After you understand the concept of a promise object,
you’ll nd that it’s easy to implement using any technology.
Consider the following synchronous code example that uses the XMLHttpRequest object
to make an AJAX call.
function fetchAjaxSync(url) {
var xhr = new XMLHttpRequest();
xhr.open(url, "GET", false);
xhr.send();
if (xhr.status == 200) {
return xhr;
}
throw new Error(xhr.statusText);
}
In this example, passing a value of false to the open method causes the code to run syn-
chronously. When the send method is called, the program waits until the result is available
and then proceeds to the next line of code, where the returned status is checked to deter-
mine whether an error occurred. In this example, the result can just be returned to the caller
that is waiting for the operation to complete. It’s as though the caller is pulling the result from
the fetchAjaxSync function.
The code block is compact, easy to read, and simple. In this example, the AJAX call takes
30 seconds to complete, and other code cannot run. The result is that the screen appears
to lock up until the AJAX call has completed. This is the case for providing an asynchronous
programming model. The following code illustrates the rewrite.
Key
Terms
Lesson 1: Asynchronous operations using jQuery and WinJS CHAPTER 9 395
function fetchAjaxAsync(url, callback, errorCallback) {
var xhr = new XMLHttpRequest();
xhr.onreadystatechange = function() {
if (xhr.readyState == 4) {
if (xhr.status == 200) {
processResult();
}
else {
errorCallback(new Error(xhr.statusText));
}
}
}
xhr.open(url, "GET", true);
xhr.send();
}
In this example, passing a true value to the open method indicates that asynchrony is best.
In addition, the onreadystatechanged event is assigned a function that executes whenever
the XMLHttpRequest object changes state. When the state has a value of 4, the operation is
complete and the status is checked for an error. Because this is an asynchronous operation,
the program doesn’t wait when it calls the send method. Instead, the program proceeds to
the next line and exits the fetchAjaxAsync function. When the result is available, a call to the
processResult function is made, and the result is passed. It’s as though the asynchronous call
is pushing the result to the code that will process it.
This code block is certainly larger than the synchronous code block. It’s also a bit harder to
read, but the benet is that there is no blocking, so the program remains fast and uid.
When you have code that needs to chain several asynchronous calls, so each call must
complete before the next call starts, you want to create an asynchronous call to a sequence
of calls. This gets difcult quickly. Currently, the fetchAjaxAsync function is somewhat generic;
you pass in the parameters and get a result. However, if you want to chain additional calls,
you might need to modify this code to make it more specic to the task you’re trying to
accomplish. The promise object helps solve these problems and allows operations to chain
easily.
Creating jQuery promise objects by using $.Deferred()
You can create a promise object by using the $.Deferred method. It seems a bit strange that
the method name is not called $.Promise(), but $.Deferred() returns a deferred object that
wraps the promise object with the functionality to control the promise object, as shown in
Figure 9-1. The creator of the promise object controls the state of it by calling one of the
methods on the deferred object. The methods that end with “with” pass data to the promise
object’s subscribers. The creator of the deferred object can execute the promise method on
the deferred object to get the promise object, which is read-only. Code that references the
promise object can subscribe to state changes on that object but cannot modify its state.
For example, calling the done method on the promise object enables you to pass a function
containing code that executes when the promise object is resolved (completed).
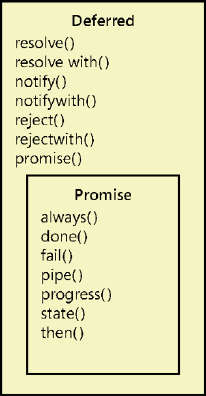
396 CHAPTER 9 Asynchronous operations
FIGURE 9-1 The Deferred and Promise objects
The following is an example of using the $.Deferred() method to set a timeout that a user
can subscribe to by using the methods on the promise object.
function timeoutAsync(milliseconds) {
var deferred = $.Deferred();
setTimeout(function () { deferred.resolve(); }, milliseconds);
return deferred.promise();
}
In this code example, the function name ends with Async as a convention to help the
developer understand that an asynchronous call is being made in this function. A deferred
object is created by using the $.Deferred method and assigned to the deferred variable.
Next, the JavaScript global function setTimeout is called, which has a function parameter
and a timeout milliseconds parameter. The function parameter contains the code to execute
when the timer expires. No application-specic code is in the function. Instead, the resolve
method is called on the deferred object to indicate the completion of the timer. Calling the
resolve method on the deferred object changes the state of the promise object to resolved
and executes all code that was attached to the promise object by using the done method.
In addition to the resolve method, you can call the reject method to indicate a failure of the
asynchronous function. The following is an example of the use of the timeoutAsync function.
function abcAsync() {
var promise = timeoutAsync(2000);
promise.done(function () { alert('done!') });
return promise;
}
In this example, the function name also ends with Async to indicate that it’s asynchronous.
It’s important to keep this convention and always return a promise object that the called
Lesson 1: Asynchronous operations using jQuery and WinJS CHAPTER 9 397
function can use to add more code to execute on completion or that the caller can use to
check the state of the promise. The timeoutAsync function is called, which performs the time-
out action but doesn’t execute application-specic code. Next, the application-specic code is
added to the promise object by calling the done method on the promise object and passing
the code. When you subscribe to the promise object by using the done method, your code
is executed upon successful completion (resolved, not rejected). Finally, the promise object is
returned to the caller.
When this code is executed, there is a two-second delay, and then a pop-up is displayed
with the message, “done!”
You can call the done method multiple times to add more code to be executed upon
successful completion. The order in which you add the code is how the code will execute. In
addition, the code is guaranteed to execute only once because you cannot change the state
after it’s been changed to resolved or failed.
Handling failure
You can execute code upon failure of the asynchronous call by subscribing to the promise
object and using the fail method. The following example demonstrates the use of the fail
method to execute code upon failure, which is the rejected state.
function abcAsync() {
var promise = timeoutAsync(2000);
promise.done(function () { alert('done!') });
promise.fail(function () { alert('failed!') });
return promise;
}
Handling completion cleanup
In addition to subscribing to success or failure, you can add code to execute when the asyn-
chronous call has completed, regardless of success or failure. Subscribe to the promise object
by using the always method. The following example demonstrates the use of the always
method.
function abcAsync() {
var promise = timeoutAsync(2000);
promise.always(function () { alert('always!') });
promise.done(function () { alert('done!') });
promise.fail(function () { alert('failed!') });
return promise;
}
Behind the scenes is a done collection of functions and a failed collection of functions.
One of the collections of functions is executed upon the change from pending to either
resolved or rejected. When you use the always method to add code to execute upon comple-
tion, your function is added to the done and failed collections. In this example, you see the
398 CHAPTER 9 Asynchronous operations
“always!” message before the “done!” or “failed!” message because the always subscription is
before the others. If the always subscription is the last subscription, it will execute last.
Subscribing to a completed promise object
It’s useful to know that you can subscribe to the promise object even after it’s been resolved.
This immediately executes the function you pass to the done method. Consider the following
example in which two promise objects are used to chain actions together, and the completion
of secondPromise adds a function to rstPromise, which has already completed.
function abcAsync() {
var firstPromise = timeoutAsync(2000);
firstPromise.done(function () {
var secondPromise = timeoutAsync(3000);
secondPromise.done(function () {
firstPromise.done(function () { alert('done!') });
});
});
return firstPromise;
}
In this example, after 2 seconds, the rstPromise object completes, which starts a new
timeout, thus creating the secondPromise object. After 3 seconds (5 seconds from the start of
the function), the secondPromise object completes, which adds a function to the rstPromise
object. Because the rstPromise object has already completed, the function is executed
immediately. Existing subscriptions are not re-executed because the subscriber functions are
guaranteed to execute only once.
Chaining promises by using the pipe method
There is a problem with the previous code example in that abcAsync is returning the rst-
Promise object. That is a problem because the abcAsync object should return a promise
object that indicates the completion of all code within the function. In this case, when rst-
Promise is complete, code is still executing that’s represented by the secondPromise object.
It would be conceptually correct to try to return the secondPromise object, but the second-
Promise object isn’t even created for 2 seconds.
Did you also notice that chaining the second asynchronous operation required you to nest
the second operation inside the successful completion code of the rst asynchronous opera-
tion? When you need to chain three, four, or more operations, you can get caught up in nest-
ing several levels and creating unmanageable code, as the following example demonstrates.
function abcAsync() {
var firstPromise = timeoutAsync(2000);
firstPromise.done(function () {
var secondPromise = timeoutAsync(3000);
secondPromise.done(function () {
var thirdPromise = timeoutAsync(1000);
Lesson 1: Asynchronous operations using jQuery and WinJS CHAPTER 9 399
thirdPromise.done(function () {
var fourthPromise = timeoutAsync(1234);
fourthPromise.done(function () {
firstPromise.done(function () { alert('done!') });
});
});
});
});
return firstPromise;
}
To solve the problem, implement chaining by using the pipe function on the promise
object. The following code is a rewrite of the previous example by using the pipe function to
eliminate nesting.
function abcAsync() {
var firstPromise = timeoutAsync(2000);
var secondPromise = firstPromise.pipe(function () {
return timeoutAsync(3000);
});
var thirdPromise = secondPromise.pipe(function () {
return timeoutAsync(1000);
});
var fourthPromise = thirdPromise.pipe(function () {
return timeoutAsync(1234);
});
fourthPromise.done(function () {
firstPromise.done(function () { alert('done!') });
});
return fourthPromise;
}
In this example, the fourthPromise object is correctly returned so the caller can know when
all code is completed. The calling function can also call the done, fail, or always methods on
the returned promise object to add code to execute upon completion.
In the nested example is a 6-second delay before the fourthPromise object is created. Even
if the fourthPromise variable were in scope, this would be a problem for the calling code that
might want to subscribe to the returned promise object immediately, which will be null.
The pipe method immediately creates a promise object that can be subscribed to and
properly returned to the caller. This is interesting because timeoutAsync(1234) still isn’t called
for 6 seconds, and that call was creating the fourthPromise object. The pipe method created
a proxy object and returned it, but after 6 seconds, the call to timeoutAsync(1234) created a
promise object, which was then attached to the original proxy object.
There’s more to this story, however. If the rst asynchronous call fails, the failure is auto-
matically passed to the piped promise object in the chain. You don’t require extra code to
deal with this. You can subscribe to the fail of the fourthPromise object, and you will auto-
matically be notied if any asynchronous call in the chain failed.

400 CHAPTER 9 Asynchronous operations
Quick check
You want to chain several asynchronous calls together. Which promise method
will you use?
Quick check answer
Use the pipe method on the promise object.
Parallel execution using $.when().then()
The previous examples exhibited chained operations by which each operation waits for the
previous operation to complete before starting. For example, the previous example took
7.234 seconds to complete. Sometimes this is necessary, but you might want to run the opera-
tions simultaneously. If you execute each operation in parallel, how can you know that all four
operations completed?
You can use the $.when() method to indicate completion of multiple asynchronous opera-
tions. The $.when() method is non-blocking, so it’s usually used with a deferred object. In the
following example, the previous example is rewritten to run all four operations in parallel.
function abcAsync() {
var deferred = $.Deferred();
var firstPromise = timeoutAsync(2000);
var secondPromise = timeoutAsync(3000);
var thirdPromise = timeoutAsync(1000);
var fourthPromise = timeoutAsync(1234);
$.when(firstPromise, secondPromise, thirdPromise, fourthPromise)
.then(function () { alert('done!'); deferred.resolve(); },
function () { deferred.reject(); });
return deferred.promise();
}
The $.when() method accepts promise parameters and monitors for all to complete. If
a parameter is not a promise object, it is immediately considered to be completed. The
$.when() method creates its own promise that is passed to the then() method, which rst
accepts a function to be executed upon success and then accepts a function to be executed
upon failure. Not shown here is that the then() method also accepts a third function param-
eter to be executed when the progress changes.
Updating progress
The deferred object can also notify its promise object when progress has changed. It does
this by executing the notify method of the deferred object when you want to update the
progress.
The promise object has a progress method that accepts a function called when the notify
method is executed.
Lesson 1: Asynchronous operations using jQuery and WinJS CHAPTER 9 401
The following example is a rewrite of the previous example; the deferred object noties its
subscribers of progress change.
function abcAsync() {
var deferred = $.Deferred();
var count = 0;
var firstPromise = timeoutAsync(2000);
var secondPromise = timeoutAsync(3000);
var thirdPromise = timeoutAsync(1000);
var fourthPromise = timeoutAsync(1234);
firstPromise.always(function () { deferred.notify( ++count); });
secondPromise.always(function () { deferred.notify(++count); });
thirdPromise.always(function () { deferred.notify(++count); });
fourthPromise.always(function () { deferred.notify(++count); });
$.when(firstPromise, secondPromise, thirdPromise, fourthPromise)
.then(function () { alert('done!'); deferred.resolve(); },
function () { deferred.reject(); });
return deferred.promise();
}
In this example, the count variable is initialized to zero, and then, upon completion of each
asynchronous call, the count variable is incremented. The following code calls the abcAsync
function and displays the progress.
function runAbcAsync() {
var promise = abcAsync();
promise.progress(function (msg) { alert(msg); });
return promise;
}
In this example, as the progress is updated, a pop-up is displayed with the numeric value.
The asynchronous calls can complete in any order.
Conditional asynchronous calls
Sometimes, you need to make an asynchronous call conditionally. In the case of chained
operations in which a middle operation is conditionally executed, you need a way to splice
in (or out) the operation. Consider the following example, in which the third asynchronous
operation is conditionally executed.
function abcAsync(includeThird) {
var firstPromise = timeoutAsync(2000);
var secondPromise = firstPromise.pipe(function () {
return timeoutAsync(3000);
});
var thirdPromise = includeThird ? secondPromise.pipe(function () {
return timeoutAsync(1000);
}) : secondPromise;
var fourthPromise = thirdPromise.pipe(function () {
return timeoutAsync(1234);
});
fourthPromise.done(function () {
firstPromise.done(function () { alert('done!') });

402 CHAPTER 9 Asynchronous operations
});
return fourthPromise;
}
In this example, the includeThird variable is passed into the abcAsync function and is
used to determine whether the third asynchronous function should be called. If includeThird
is false, the thirdPromise variable still needs to be assigned a promise to chain the fourth
asynchronous call, so secondPromise is assigned directly to the thirdPromise variable. This
maintains the chain of operations.
When making parallel asynchronous calls, conditionally calling the third operation is done
differently, as shown in the following example.
function abcAsync(includeThird) {
var deferred = $.Deferred();
var firstPromise = timeoutAsync(2000);
var secondPromise = timeoutAsync(3000);
var thirdPromise = includeThird ? timeoutAsync(1000) : $.when();
var fourthPromise = timeoutAsync(1234);
$.when(firstPromise, secondPromise, thirdPromise, fourthPromise)
.then(function () { alert('done!'); deferred.resolve(); },
function () { deferred.reject(); });
return deferred.promise();
}
In this example, if includeThird is true, the third asynchronous call is executed and assigned
to the thirdPromise variable. If includeThird is false, $.when() is assigned to the thirdPromise
variable. Remember that $.when() is used at the bottom of the function to indicate that all
asynchronous operations have completed, which creates a new promise that is passed to the
then() method. If you call $.when() with no parameters, a new promise object is created with
its status set to resolved.
NOTE USE THE $.when() METHOD
When you need to create a promise object whose state is resolved, use the $.when()
method.
Lesson summary
The deferred object is a wrapper for the promise object. The deferred object provides
control of the promise object, which is read-only.
The promise object has the done, fail, always, and progress methods that accept
a function parameter, which enables you to subscribe to state change. The then()
method on the promise object enables you to subscribe to done, fail, and progress.
The subscription functions execute a maximum of one time.
The state method can be used to get the current state of the promise object.
The promise object’s pipe method chains asynchronous operations.
Lesson 1: Asynchronous operations using jQuery and WinJS CHAPTER 9 403
The deferred object’s resolve and resolvewith methods indicate successful completion.
The deferred object’s reject and rejectwith methods indicate a failed operation. The
deferred object’s notify and notifywith methods update the progress.
The name of all functions that perform asynchronous calls should end with Async, and
these functions should always return a promise object.
Use the $.when() method to monitor the completion of many parallel asynchronous
calls. Use the $.when() method with no parameters to create a resolved promise object.
Chained and parallel asynchronous operations automatically pass failure and progress
to the end of the chain.
Lesson review
Answer the following questions to test your knowledge of the information in this lesson. You
can nd the answers to these questions and explanations of why each answer choice is correct
or incorrect in the “Answers” section at the end of this chapter.
1. Which method chains asynchronous operations?
A. pipe()
B. done()
C. resolve()
D. always()
2. Which method creates a resolved promise object?
A. resolve()
B. done()
C. $.when()
D. $.Deferred().
3. Which method do you call to subscribe to the successful completion of an asynchro-
nous operation?
A. done
B. always
C. complete
D. success
4. Which method do you call on the deferred object to indicate a change in progress?
A. progress
B. notify
C. done
D. resolve
404 CHAPTER 9 Asynchronous operations
Lesson 2: Working with web workers
Another way to perform asynchronous operations is to use web workers. Web workers are
useful for execution of a script le in a background task. The worker can send messages to the
spawning task by posting messages to an event handler specied by the creator. Messages
can be any object that can be serialized. The worker thread doesn’t block the user interface
thread, so the UI remains fast and uid.
After this lesson, you will be able to:
Describe web workers.
Implement asynchronous operations by using the web worker.
Estimated lesson time: 20 minutes
Web worker details
Web workers’ state is isolated from the webpage. When messages are posted to and from the
web worker, the message object is serialized. This creates a copy of the message, so the web
worker and the creator never reference the same object. Web workers also lack synchroniza-
tion locks, critical sections, semaphores, or mutexes. They don’t have access to the document
object model (DOM), so if you need to access the DOM, the web worker must post a mes-
sage back to the creator, and the creator must process the message and access the DOM as
needed.
It’s common to start a web worker, which creates its own event loop and waits for further
input. This is similar to a service, which starts and waits for input and doesn’t terminate after
processing input.
Consider the following HTML page that accepts input and has a button that sends the
input to a web worker. The web worker responds once for each character in the message sent,
returning the uppercase of the letter.
<!DOCTYPE html>
<html xmlns="http://www.w3.org/1999/xhtml">
<head>
<title></title>
<script src="Scripts/jquery-1.8.2.js"></script>
<script src="default.js"></script>
</head>
<body>
<input type="text" id="message" value="Enter message here" /><br />
<button id="btnSend" type="button">Send Message</button><br />
<div id="result"></div>
</body>
</html>
Lesson 2: Working with web workers CHAPTER 9 405
This HTML page has a reference to jQuery and a default.js le. The default.js le has code
to create a new web worker by calling the Worker() constructor and passing the URI of a
script to execute. You can receive notications from the web worker by setting the onmessage
and the onerror properties to an event handler function, as shown in the following example.
/// <reference path="Scripts/jquery-1.8.2.js" />
var worker = new Worker('myWork.js');
worker.onmessage = function (e) {
$('#result').append(e.data + '<br />');
}
worker.onerror = function (e) {
$('#result').append('Error: ' + e.data + '<br />');
}
$('document').ready(function () {
$('#btnSend').on('click', function () {
worker.postMessage($('#message').val());
});
});
The web worker code is in the myWork.js le. This example also shows the subscription to
btnSend, which retrieves the value from the message and posts the message to the worker.
The myWork.js le contains the following code.
self.onmessage = function (e) {
for (c in e.data) {
postMessage(e.data[c].toUpperCase());
}
}
This code subscribes to the onmessage event. In this example, when a message is received
from the creator, this code loops through each character, converts it to uppercase, and sends
the uppercased character back to the creator.
You can stop a web worker by calling the worker.terminate() method from the creator or
calling the close() method inside the worker itself.
Quick check
You want to perform an asynchronous operation in your browser code. Which
object can you use?
Quick check answer
Use the worker object.
Lesson summary
A web worker provides asynchronous code execution.
Communication to and from the web worker is accomplished by using the postMes-
sage method.

406 CHAPTER 9 Asynchronous operations
The postMessage method accepts a serializable object.
The web worker does not have access to DOM elements.
Lesson review
Answer the following questions to test your knowledge of the information in this lesson. You
can nd the answers to these questions and explanations of why each answer choice is correct
or incorrect in the “Answers” section at the end of this chapter.
1. In the web worker code, you want the asynchronous code to update the DOM. Which
method can you use?
A. updateDom().
B. workerUpdate().
C. dom().
D. You cannot update the DOM from within the asynchronous code.
2. Which object can be used when the web worker and the creator need to reference the
same object?
A. Mutex.
B. Semaphore.
C. Closure.
D. The web worker and the creator cannot reference the same object.
Practice exercises
If you encounter a problem completing any of these exercises, the completed projects can be
installed from the Practice Exercises folder that is provided with the companion content.
Exercise 1: Implement asynchronous code execution
In this exercise, you practice your asynchronous code execution skills by creating a web appli-
cation that uses the promise object to perform animations when displaying a message.
The implementation of the custom message box starts with a <div> element that cov-
ers the screen so a user cannot click anywhere else on the screen when the message box is
displayed. The cover has transparency so the user can still see the screen.
Over the cover is a completely transparent <div> element for the overall message box. This
<div> element also covers the screen. This is required to center the message content. Nested
inside the message box is another <div> element that holds the message content, which is
centered by setting the left and right margins to auto on the message content.
You can animate the message box display and use promise objects to sequence the
animations.
Practice exercises CHAPTER 9 407
1. Start Visual Studio. Click File and choose New Project. Navigate to Installed | Templates
| Visual Basic or Visual C# | ASP.NET Empty Web Application.
2. Set the name of your application to AnimationExample.
3. Select a location for your application.
4. Set the solution name to AnimationExampleSolution.
5. Be sure to keep the Create Directory For Solution check box selected.
6. Click OK to create your new project.
When the application is created, you will have an empty project.
7. To add a home page, right-click the AnimationExample project in the Solution Explorer
window, choose Add, select HTML Page, and name it default.html.
8. To set it as the start page, right-click the new default.html page in Solution Explorer
and click Set As Start Page.
9. Add a reference to jQuery by right-clicking the project node. Click Manage NuGet
Packages. Type jQuery in the search text box. Click the Install button on the jQuery
result.
10. In the Solution Explorer window, right-click the Scripts folder and add a JavaScript le
called default.js.
11. In the Solution Explorer window, right-click the AnimationExample project, choose
Add, select New Folder, and name it Content. In the Content folder, add a default.css
style sheet le.
12. In the default.html le, reference the default.css, jquery-1.8.2.js, and default.js les by
dragging the les from the Solution Explorer window and dropping them after the
<title> element.
Remember that you should use the version of jQuery that you installed using the
NuGet Package Manager. Your <head> element should look like the following.
<head>
<title></title>
<link href="Content/default.css" rel="stylesheet" />
<script src="Scripts/jquery-1.8.2.js"></script>
<script src="Scripts/default.js"></script>
</head>
13. Add a <div> element that covers the screen with its id attribute set to cover.
14. Add a <div> element that displays the message and sets its id attribute to messageBox.
The <body> element should look like the following.
<body>
<div id="cover">
</div>
<div id="messageBox">
</div>
</body>
408 CHAPTER 9 Asynchronous operations
15. Add a <div> element inside the messageBox <div> element and set its id attribute to
messageContent.
16. Add a <div> element inside the messageContent <div> element and set its id to
message.
The <body> element should look like the following.
<body>
<div id="cover">
</div>
<div id="messageBox">
<div id="messageContent">
<div id="message"> </div>
</div>
</div>
</body>
17. After the message <div> element, add a <br /> element and then add a <button>
element, which will be used to test the custom message box, and set its id attribute to
btnShowMessage.
Your default.html page should look like the following.
<!DOCTYPE html>
<html xmlns="http://www.w3.org/1999/xhtml">
<head>
<title></title>
<link href="Content/default.css" rel="stylesheet" />
<script src="Scripts/jquery-1.8.2.js"></script>
<script src="Scripts/default.js"></script>
</head>
<body>
<div id="cover">
</div>
<div id="messageBox">
<div id="messageContent">
<div id="message"> </div>
<br />
<button type="button" id="messageOk">OK</button>
</div>
</div>
<button type="button" id="btnShowMessage">Show Message</button>
</body>
</html>
18. In the default.css le, add a style rule for the cover element.
This element will not be displayed by default. Its size should be the entire screen. Its
Z-Index should be higher than anything on the page except the cover that is set in the
next step. Its background color should be set to black. Your style should look like the
following.
#cover {
display: none;
Practice exercises CHAPTER 9 409
position: absolute;
background-color: black;
z-index:100;
top: 0px;
left: 0px;
width: 100%;
height: 100%;
}
19. Add a style rule for the messageBox element.
This element will not be displayed by default. Its size should be the entire screen. Its
Z-Index should be higher than anything on the page, including the cover that you just
set. Your style should look like the following.
#messageBox {
display: none;
position: absolute;
top: 0px;
left: 0px;
width: 100%;
height: 100%;
z-index: 101;
}
20. Add a style rule for the messageContent element.
This element will not be displayed by default. Its size should be 30 percent wide and
30 percent tall. It will be centered by setting the left and right margins to auto. Its
top margin will be 100 pixels from the top. Its border style will be set to solid, and its
border width will be set to 1 pixel. Its padding will be set to 10 pixels. Your style should
look like the following.
#messageContent {
border-style: solid;
border-width: 1px;
display: none;
position: relative;
margin: 100px auto auto auto;
background-color: yellow;
width: 30%;
height: 30%;
padding: 10px;
}
21. In the default.js le, add a reference to the jQuery library. Add a milliseconds variable
by which to set the duration of the animations and set it to 1,000. Add an opacity vari-
able by which to set the opacity of the cover and set it to 0.5, as shown in the following
code example.
/// <reference path="jquery-1.8.2.js" />
var milliseconds = 1000;
var opacity = 0.5;
410 CHAPTER 9 Asynchronous operations
22. To provide an animated fade-in of the cover element, create a displayCoverAsync func-
tion and add code to fade to the value of the previously dened opacity value. Return
the promise object as follows.
function displayCoverAsync() {
return $('#cover').fadeTo(milliseconds, opacity).promise();
}
23. To set the message and provide an animated slide down from the top of the screen of
the message content, add a showMessageContentAsync function. In the function, add
code to set the HTML of the message element, add code to show the messageBox ele-
ment, and, nally, add code to slide the messageContent element down from the top,
using the millisecond variable as the duration, as follows.
function showMessageContentAsync(message) {
$('#message').html(message);
$('#messageBox').show();
return $('#messageContent').slideDown(milliseconds).promise();
}
24. Add a showMessageAsync function that has a message parameter.
This function will call the displayCoverAsync and set a coverPromise variable to the
returned promise object.
25. Add code that calls showMessageContentAsync after the displayCoverAsync has com-
pleted. Return a promise that identies the completion of all asynchronous calls in the
function.
Your code should look like the following.
function showMessageAsync(message) {
var coverPromise = displayCoverAsync();
var messagePromise = coverPromise.pipe(function () {
return showMessageContentAsync(message);
});
return messagePromise;
}
26. When btnShowMessage is clicked, it will show a message using the current time. Add
a getTime function that returns the current time. Add a displayTimeAsync function
that creates a message by calling the getTime function and then calls the showMessa-
geAsync function.
Your code should look like the following.
function displayTimeAsync() {
var message = 'The time is now ' + getTime();
return showMessageAsync(message);
}
function getTime() {
var dateTime = new Date();
var hours = dateTime.getHours();
var minutes = dateTime.getMinutes();
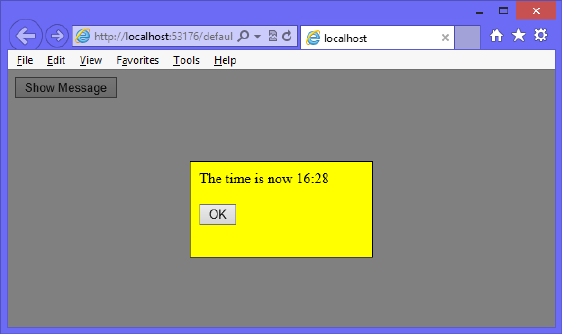
Practice exercises CHAPTER 9 411
return hours + ':' + (minutes < 10 ? '0' + minutes : minutes);
}
27. Add code that executes when the document is ready.
This code will subscribe to the click event of the btnShowMessage button and call the
displayTimeAsync function, as follows.
$(document).ready(function () {
$('#btnShowMessage').click(displayTimeAsync);
});
28. Press F5 to run the application. Click the Show Message button.
You should see the animated cover that fades in, and then you should see the message
window slide down from the top of the screen. The nal screen is shown in Figure 9-2.
FIGURE 9-2 The screen after the animation stops
Notice that although the Show Message button is still visible, you can’t click it now
because the cover is over the button. Furthermore, the OK button isn’t programmed
to close the message window. When you click the OK button, the message window
should slide back up and disappear, and the cover should fade out. The Show Message
button should be clickable.
29. Stop running the application.
30. Add a hideMessageContentAsync function. In the function, add code to slide the mes-
sageContent element up to the top of the screen. Assign the created promise to a new
promise variable and add code to hide the messageBox element. Add code to return
the promise, as follows.
function hideMessageContentAsync(message) {
var promise = $('#messageContent').slideUp(milliseconds).promise();
promise.done(function () { $('#messageBox').hide(); });
return promise;
}

412 CHAPTER 9 Asynchronous operations
31. Add a hideCoverAsync function. In the function, add code to fade out the cover ele-
ment and return the promise object, as follows.
function hideCoverAsync() {
return $('#cover').fadeOut(milliseconds).promise();
}
32. Add a hideMessageAsync function that calls the hideMessageContentAsync func-
tion and assigns the returned promise to a messagePromise variable. Add code to call
the hideCoverAsync function when messagePromise has completed and assign the
returned promise to a coverPromise variable. Return coverPromise as shown in the fol-
lowing code example.
function hideMessageAsync() {
var messagePromise = hideMessageContentAsync();
var coverPromise = messagePromise.pipe(function () {
return hideCoverAsync();
});
return coverPromise;
}
33. Modify the existing document-ready code to subscribe to the click event of the mes-
sageOk button and call the hideMessageAsync function as follows.
$(document).ready(function () {
$('#btnShowMessage').click(displayTimeAsync);
$('#messageOk').click(hideMessageAsync);
});
34. Run the application.
When you click the Show Message button, the animated message is displayed. When
you click the OK button, the message is removed from the screen by sliding up to the
top of the screen, and then the cover fades out.
Suggested practice exercises
The following additional exercises are designed to give you more opportunities to practice
what you’ve learned and to help you successfully master the lessons presented in this chapter.
Exercise 1 Learn more about asynchronous operations by writing more code that
makes asynchronous calls to web services.
Exercise 2 Learn more about web workers by writing an application that has a web
worker that performs client-side code.

Answers CHAPTER 9 413
Answers
This section contains the answers to the lesson review questions in this chapter.
Lesson 1
1. Correct answer: A
A. Correct: Use the pipe method to chain asynchronous operations because it pro-
vides access to progress, failure, success, and complete.
B. Incorrect: The done method executes code when completed but does not provide
access to failure, progress, and complete.
C. Incorrect: The resolve method indicates success but is not used for chaining.
D. Incorrect: The always method executes on completion regardless of success or
failure. This method does not provide access to progress, success, or failure.
2. Correct answer: C
A. Incorrect: The resolve method resolves an existing promise object, but it doesn’t
create a new resolved promise object.
B. Incorrect: The done method executes code upon success of a promise object, but
it does not create a resolved promise object.
C. Correct: The $.when() method creates a resolved promise object.
D. Incorrect: The $.Deferred() method creates an unresolved promise object.
3. Correct answer: A
A. Correct: The done method executes code upon successful completion.
B. Incorrect: The alway method executes code regardless of success or failure.
C. Incorrect: The complete method does not exist.
D. Incorrect: The success method does not exist.
4. Correct answer: B
A. Incorrect: The progress method executes code when progress has changed; it does
not to indicate a change in progress.
B. Correct: The notify method indicates a change in progress.
C. Incorrect: The done method executes code when completed but does not indicate
a change in progress.
D. Incorrect: The resolve method indicates success, not a change in progress.

414 CHAPTER 9 Asynchronous operations
Lesson 2
1. Correct answer: D
A. Incorrect: There is no updateDom() method.
B. Incorrect: There is no workerUpdate() method.
C. Incorrect: There is no dom() method.
D. Correct: The web worker cannot modify the DOM.
2. Correct answer: D
A. Incorrect: There is no JavaScript Mutex object.
B. Incorrect: There is no JavaScript Semaphore object.
C. Incorrect: There is no JavaScript Closure object.
D. Correct: The web worker cannot access the same object, and objects passed to
the web worker from the creator are serialized to produce a copy of the object the
web worker will access.

415
CHAPTER 10
WebSocket communications
This book has covered AJAX and web services, which provide a means to communicate to
the server from the browser client. This chapter is about initiating communications from
the browser to the server or from the server to the browser. If the server can send messages
to the browser, the browser doesn’t need to poll the server for status information.
An example of two-way communications is a chat room application by which the server
can notify many browsers that a message was received from a browser. Many games send
data to a server, and the server controls data being sent back to the clients. Another exam-
ple is when you initiate an asynchronous operation at the server, and the server provides
status update messages to the browser. This chapter explores bidirectional communications,
using WebSocket.
Lesson in this chapter:
Lesson 1: Communicating by using WebSocket 415
Before you begin
To complete this book, you must have some understanding of web development. This
chapter requires the hardware and software listed in the “System requirements” section in
the book’s Introduction.
Lesson 1: Communicating by using WebSocket
The WebSocket protocol is a web technology that provides full-duplex communications
over a single TCP connection. The WebSocket application programming interface (API)
is currently in working draft status by the World Wide Web Consortium (W3C), but the
WebSocket protocol has been standardized by the Internet Engineering Task Force (IETF)
as RFC 6455.
WebSocket replaces the long polling concept. With long polling, the client sends a
request to the server, and if the server has information with which to respond, it responds.
If the server doesn’t have information with which to respond, the server keeps the connec-
tion open and doesn’t respond until it has data. When the client receives the data, it sends
another request to the server, and the sequence repeats itself. The benet of long polling is
Key
Terms
416 CHAPTER 10 WebSocket communications
that the client is waiting for data, and the server has an open connection. When data is ready,
it’s sent immediately, which results in decreased latency. One problem with this concept is
that connections can time out, which requires the creation of a new connection.
After this lesson, you will be able to:
Describe the WebSocket protocol.
Describe and implement the WebSocket object.
Estimated lesson time: 20 minutes
Understanding the WebSocket protocol
The WebSocket protocol provides a standardized way for the server to send content to the
browser without being solicited by the client and to allow messages to be passed back and
forth while keeping the connection open. A two-way (bidirectional), ongoing conversation
can take place between a browser and the server.
The WebSocket protocol is designed to be implemented in web browsers and web servers,
but any client or server application can use it. The protocol is an independent, TCP-based
protocol. Its only relationship to HTTP is that its handshake is interpreted by HTTP servers as a
request to switch to WebSocket protocol. Each frame of WebSocket protocol has only 2 bytes
of overhead, and there are no headers. The light weight of the WebSocket protocol enables
more interaction between a browser and a website. This performance makes the WebSocket
protocol an easy choice for communicating when it’s necessary to deliver live content and
create real-time games.
Dening the WebSocket API
The W3C is responsible for dening the WebSocket API; as mentioned, the API is in work-
ing draft status at the time of this writing. This means that the W3C could make many more
changes before the API becomes a recommendation. However, the latest versions of Internet
Explorer, Google Chrome, Firefox, Opera, and Safari support WebSocket.
At the heart of the WebSocket API is the WebSocket object, which is dened on the win-
dow object. You can easily test whether this object exists to determine whether the browser
supports WebSocket. The WebSocket object contains the following members.
WebSocket constructor A method that requires a URL argument and can optionally
accept additional parameters to dene the sub-protocol that you’ll use, such as chat or
rpc. The client and the server are typically matched to use the same protocol.
close A method that closes WebSocket.
send A method that sends data to the server.
Lesson 1: Communicating by using WebSocket CHAPTER 10 417
binaryType A property that indicates the binary data format the onmessage event
receives.
bufferedAmount A property containing the number of data bytes queued using the
send method.
extensions A property that indicates the extensions the server selected.
onclose An event property that’s called when the socket is closed.
onerror An event property that’’s called when there is an error.
onmessage An event property that’s called when a message is received.
onopen An event property that’s called when WebSocket establishes a connection.
protocol A property that indicates the protocol that the server selected.
readyState A property that indicates the state of the WebSocket connection.
url A property that indicates the current URL of the WebSocket object.
Implementing the WebSocket object
WebSocket protocol communications typically use TCP port number 80, so environments that
block non-standard Internet connections by using a rewall will still pass WebSocket packets.
In the following example, a webpage is created that calls the WebSocket.org echo server,
which will return the message passed to it. Consider the following webpage that contains a
text box for entering a message and a button to send the message to a server; all output is
appended to the <div> element whose id is divOutput.
<!DOCTYPE html>
<html xmlns="http://www.w3.org/1999/xhtml">
<head>
<title></title>
<script src="Scripts/jquery-1.8.2.js"></script>
<script src="Scripts/default.js"></script>
</head>
<body>
<h2>WebSocket Test</h2>
Enter Message: <input type="text" id="txtMessage" />
<button type="button" id="btnSend">Send</button><br />
<div id="divOutput"></div>
</body>
</html>
Whereas an HTTP URL begins with http:// or https:// for secure HTTP, the WebSocket URL
begins with ws:// or wss:// for secure WebSocket protocol. In the browser code, you create a
WebSocket object and congure the onopen, onmessage, onerror, and onclose events. Call
the send method to send a message, and the onmessage event triggers if there is a response.
The default.js le contains the following.
/// <reference path="_references.js" />
var wsUri = 'ws://echo.websocket.org/';
418 CHAPTER 10 WebSocket communications
var webSocket;
$(document).ready(function () {
if (checkSupported()) {
connect();
$('#btnSend').click(doSend);
}
});
function writeOutput(message) {
var output = $("#divOutput");
output.html(output.html() + '<br />' + message);
}
function checkSupported() {
if (window.WebSocket) {
writeOutput('WebSockets supported!');
return true;
}
else {
writeOutput('WebSockets NOT supported');
$('#btnSend').attr('disabled', 'disabled');
return false;
}
}
function connect() {
webSocket = new WebSocket(wsUri);
webSocket.onopen = function (evt) { onOpen(evt) };
webSocket.onclose = function (evt) { onClose(evt) };
webSocket.onmessage = function (evt) { onMessage(evt) };
webSocket.onerror = function (evt) { onError(evt) };
}
function doSend() {
if (webSocket.readyState != webSocket.OPEN)
{
writeOutput("NOT OPEN: " + $('#txtMessage').val());
return;
}
writeOutput("SENT: " + $('#txtMessage').val());
webSocket.send($('#txtMessage').val());
}
function onOpen(evt) {
writeOutput("CONNECTED");
}
function onClose(evt) {
writeOutput("DISCONNECTED");
}
function onMessage(evt) {
writeOutput('RESPONSE: ' + evt.data);
}

Lesson 1: Communicating by using WebSocket CHAPTER 10 419
function onError(evt) {
writeOutput('ERROR: ' + evt.data);
}
In this example, wsUri is set to the WebSocket.org echo server, which echoes messages
sent to it. The ready function calls the checkSupported function to see whether WebSocket
is supported. This is accomplished by checking whether the window object has a WebSocket
object. If WebSocket is supported, the connect function is called.
The connect function instantiates WebSocket. The constructor accepts a URI argument.
Creating the WebSocket object automatically initiates communications to the URI to attempt
to open the connection asynchronously. The connect function also subscribes to the onopen,
onclose, onmessage, and onerror events. It’s important to subscribe to these events imme-
diately because the connection might open quickly, and you want to ensure that you are
subscribed to the onopen event as soon as possible so you don’t miss the event.
Quick check
Can you create a WebSocket object and call the open method when you want to
open a WebSocket connection?
Quick check answer
No, there is no open method on the WebSocket object. When you instantiate the
WebSocket object, it automatically attempts to open asynchronously.
The doSend function sends a message to the server. Before sending the message, this
function checks the readyState property of the WebSocket object. The readyState property
contains one of the following values.
CONNECTING = 0 Connection is not yet open.
OPEN = 1 Connection is open and ready to communicate.
CLOSING = 2 Connection is in the process of closing.
CLOSED = 3 Connection is closed or couldn’t be opened.
The readyState property will be set to one of the numeric values, but you can use the con-
stants as shown in the doSend function that tests for webSocket.OPEN. If WebSocket is not
open, a message is displayed, and the function returns without sending. If WebSocket is open,
a message is displayed, and the message is sent using the send method.
When a message is received from the server, the onMessage function is called, and the
event object is passed. The data property of the event object contains the message.
When an error is received, the onError function is called, and the event object is passed.
An error can come from the server or be generated when either the client cannot connect
to the server or the connection is timed out. Depending on the error, the event object might
pass the cause on the data property. You might also nd that the data property is undened,
especially in a timeout scenario.
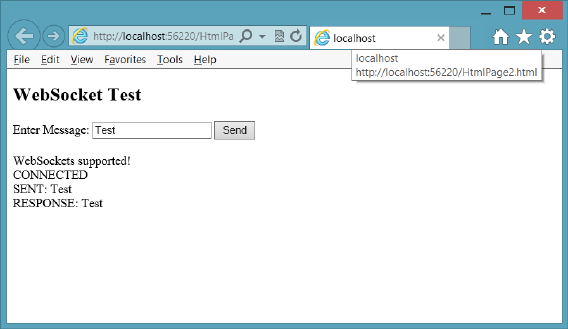
420 CHAPTER 10 WebSocket communications
When the webpage is displayed using Internet Explorer 10, a message is displayed stating,
WebSockets Supported! The CONNECTED message is displayed when the connection is open.
If a message is entered and the Send button is clicked, the message is sent to the server, and
the response is displayed, as shown in Figure 10-1.
FIGURE 10-1 The completed WebSocket test page
Dealing with timeouts
One of the problems you might encounter is that the server might time out your connection
after a period of inactivity. You might also have rewalls between your browser and the server
that can time out your connection. In many cases, an error is triggered without an associated
message. You can identify timeout errors by not triggering any activity for up to 20 minutes.
You might see that you consistently get timeouts after only 30 seconds. Although it’s rela-
tively new, the W3C draft for WebSocket does not address timeouts.
One way of dealing with timeouts is to send an empty message to the server periodically.
The completed default.js le provides an example of periodically sending an empty message,
as follows.
/// <reference path="_references.js" />
var wsUri = 'ws://echo.websocket.org/';
var webSocket;
var timerId = 0;
$(document).ready(function () {
if (checkSupported()) {
connect();
$('#btnSend').click(doSend);
}
});
Lesson 1: Communicating by using WebSocket CHAPTER 10 421
function writeOutput(message) {
var output = $("#divOutput");
output.html(output.html() + '<br />' + message);
}
function checkSupported() {
if (window.WebSocket) {
writeOutput('WebSockets supported!');
return true;
}
else {
writeOutput('WebSockets NOT supported');
$('#btnSend').attr('disabled', 'disabled');
return false;
}
}
function connect() {
webSocket = new WebSocket(wsUri);
webSocket.onopen = function (evt) { onOpen(evt) };
webSocket.onclose = function (evt) { onClose(evt) };
webSocket.onmessage = function (evt) { onMessage(evt) };
webSocket.onerror = function (evt) { onError(evt) };
}
function keepAlive() {
var timeout = 15000;
if (webSocket.readyState == webSocket.OPEN) {
w e b S o c ke t.s e n d (‘’);
}
timerId = setTimeout(keepAlive, timeout);
}
function cancelKeepAlive() {
if (timerId) {
cancelTimeout(timerId);
}
}
function doSend() {
if (webSocket.readyState != webSocket.OPEN)
{
writeOutput("NOT OPEN: " + $('#txtMessage').val());
return;
}
writeOutput("SENT: " + $('#txtMessage').val());
webSocket.send($('#txtMessage').val());
}
function onOpen(evt) {
writeOutput("CONNECTED");
ke e pAlive( );
}

422 CHAPTER 10 WebSocket communications
function onClose(evt) {
c a n celK ee p Aliv e();
writeOutput("DISCONNECTED");
}
function onMessage(evt) {
writeOutput('RESPONSE: ' + evt.data);
}
function onError(evt) {
writeOutput('ERROR: ' + evt.data);
}
In this example, the bold code was added. At the top is the declaration of the timerId.
A keepAlive function has been added that sends an empty message every 15 seconds. The
keepAlive function is called when the onOpen function is executed and is recursive; it doesn’t
stop until the timer is cancelled by using the timerId. A cancelKeepAlive function has been
added to cancel the looping of the keepAlive function, and it’s called when the onClose func-
tion is called.
Handling connection disconnects
In addition to providing the keepAlive capability, you might also need to deal with connec-
tions that close due to network errors. This can require you to call the connect function from
within the onClose function. Depending on your application, this could cause problems at
the server when the server doesn’t recognize that the new connection belongs to an existing
client. Your application might need to handle this by forcing the client to send an identica-
tion message. Keep in mind that the messages are in the format that you dictate, so you can
dene your own messaging strategy for your application.
Dealing with web farms
Sometimes, when pushing your WebSocket application to production, you need your applica-
tion to run in a web farm, when multiple servers handle incoming requests. These requests
are typically load balanced to provide the best performance. How can you have an open con-
nection to a server and still have load balancing?
When there are multiple web servers, you can implement sticky servers, by which the client
continuously goes to the same server it originally went to. This takes care of the open connec-
tion problem. You can share state across multiple web servers by using one of the many prod-
ucts that handle this problem, such as Redis (remote dictionary service) and the Microsoft
App Fabric Caching Service.
Just remember to test your web farm environment early for compatibility and problems
because you will surely need to adjust for this environment.
Key
Terms

Lesson 1: Communicating by using WebSocket CHAPTER 10 423
Quick check
Do the WebSocket protocol and WebSocket API provide native support for load
balancing in a web farm?
Quick check answer
No, there is no native support for web farm load balancing with WebSocket
protocol and the WebSocket object.
Using WebSocket libraries
Dealing with timeouts, dropped connections, incompatible browsers, and web farms can be
a daunting task. Wouldn’t it be much better to have a library that can handle this task for
you in a consistent manner? It turns out that there are libraries to help you, but you need
to understand that these are client and server libraries; you use the library at the client and
server. The following is a short list of libraries that can help solve some of these problems.
Because WebSocket is not yet a recommendation, and these are relatively new products, this
list should get you started, but do some web searching for the latest releases of these and
other products.
SignalR
SignalR is a Microsoft library for ASP.NET developers. It is meant to be implemented on an
ASP.NET website, using a .NET language such as C# or Visual Basic. The client code is still
JavaScript, however.
SignalR simplies the addition of real-time web functionality to your applications. It uses
WebSocket when it’s available but gracefully falls back to techniques such as long polling
when WebSocket is not available. The best part is that you don’t need to change your code
for this transition. You might have clients that support WebSocket and clients that don’t; the
clients work well together even if they don’t support WebSocket.
SignalR also provides connection events to which you can subscribe for connection
management. SignalR is so easy to use that you should consider this if you are working on an
ASP.NET website. SignalR can also work on the Windows Azure cloud. You must provide state
management for SignalR to share data between servers, but it is doable.
Socket.IO
Socket.IO is a WebSocket library created by Guillermo Rauch, CTO and cofounder of
LearnBoost; developer and inventor of Socket.IO, Engine.IO, and codestre.am; JSConf.ar cura-
tor; open-source enthusiast; and blogger.
424 CHAPTER 10 WebSocket communications
Socket.IO has a client-side and server-side library; the client side uses JavaScript, and the
server side is JavaScript for use with Node.js. It uses feature detection to decide whether the
connection will be established with WebSocket, AJAX long polling, or Flash polling, which is
yet another way to implement polling but requires Flash at the browser.
The Socket.IO library is easy to use and is used in the exercises to create a chat server.
Lesson summary
The WebSocket protocol provides a standardized way for the server to send content to
the browser without being solicited by the client, and it allows messages to be passed
back and forth while keeping the connection open.
The WebSocket object contains methods to send data and close the connection.
The WebSocket object contains the following events: onclose, onmessage, onerror, and
onopen.
You can check the readyState property on the WebSocket object to obtain the state of
the connection.
Use ws:// for WebSocket protocol or wss:// for secure WebSocket protocol.
Timeouts, dropped connections, web farm implementations, and browser incompat-
ibility are problems you must resolve when implementing WebSocket.
Lesson review
Answer the following questions to test your knowledge of the information in this lesson. You
can nd the answers to these questions and explanations of why each answer choice is correct
or incorrect in the “Answers” section at the end of this chapter.
1. When working with the WebSocket object, which event can be used to retrieve the
data that was received from the server?
A. onopen
B. onclose
C. onmessage
D. onerror
2. Which library would you use if you are creating a Node.js website and want to write
browser-independent code that uses WebSocket?
A. SignalR
B. Socket.IO
C. FarmSockets
D. AgnosticSocket

Practice exercises CHAPTER 10 425
3. You want to ensure that the WebSocket connection is not disconnected as a result of
inactivity. How can you accomplish this?
A. Add code to the onclose event to reopen the connection when it’s closed.
B. Add code to send an empty message periodically before the connection is closed.
C. Set the keepAlive property on the WebSocket object to true.
D. Create a new WebSocket object each time you send a message.
Practice exercises
If you encounter a problem completing any of these exercises, the completed projects can be
installed from the Practice Exercises folder that is provided with the companion content.
Exercise 1: Create a chat server
In this exercise, you apply your WebSocket knowledge by creating a chat server web applica-
tion. Although you won’t use the WebSocket object directly, you will use the Socket.IO library,
which provides a WebSocket wrapper that simplies client and server communications.
In this exercise, you create the chat server. You won’t be able to test this server effectively
until you complete Exercise 2, in which you create the HTML page.
1. If you haven’t done so yet, install Node.js from http://nodejs.org/.
2. Open the command prompt window.
3. Create a folder for the new website.
You must navigate to the location and then create the folder. For example, the follow-
ing commands navigate to the node_samples folder on the root of the C drive, create a
new chat_service folder, and then navigate to the new folder.
C:
cd \node_samples
md chat_service
cd chat_service
4. In the chat_service folder, create a package.json le by typing the following command.
npm init
This command starts the wizard. Enter the following. (Press Enter to accept default
values for elds not shown.)
Name: chat_service
Version: 0.0.0
Description: A simple chat service
Entry Point: app.js
426 CHAPTER 10 WebSocket communications
Author: your name
License: BSD
5. Open the package.json le and add a dependency on the express and formidable
packages as shown in the following modied package.json le.
{
"name": "chat_service",
"version": "0.0.0",
"description": "A simple chat service",
"main": "app.js",
"scripts": {
"test": "echo \"Error: no test specified\" && exit 1"
},
"repository": "",
"author": "Glenn Johnson",
"license": "BSD",
“private”: true,
“dependencies”: {
“express”: “3.0.x”,
“socket.io”: “0.9.x”
}
}
6. Install the dependent packages by typing the following command.
npm install
7. Open Visual Studio Express 2012 for Web. Click File and choose Open Web Site; select
the chat_service folder.
8. In the chat_service website folder, create an app.js le and add a reference to the
express, http, and socket.io packages. Call the listen method as follows.
var express = require('express')
, app = express()
, http = require('http')
, server = http.createServer(app)
, io = require('socket.io').listen(server);
In this code, you are using the http object to create a server based on the express
object. After that, you are using the socket.io object to call the listen method and pass-
ing the server object to indicate the server that will be listening.
9. In the Solution Explorer window, right-click the chat_service node, click Add, and
choose New Folder. Name the folder public.
10. In the app.js le, add a statement to map static requests to the /public folder as
follows.
app.use(express.static(__dirname + '/public'));
Practice exercises CHAPTER 10 427
11. Add a statement to map a request for the root to the index.html le (to be created in
Exercise 2) as follows.
app.get('/', function (req, res) {
res.sendfile(__dirname + '/public/index.html');
});
The index.html le is the main chat page.
12. Add code to redirect the user to the default.html page if the URL does not include a
le name, as follows.
app.get('/', function (request, response) {
response.redirect('default.html');
});
13. Add a statement to create a usernames variable and initialize it as an empty object, as
follows.
var usernames = {};
14. Add code to subscribe to the socket.io events as follows.
io.sockets.on('connection', function (socket) {
socket.on('sendchat', function (data) {
io.sockets.emit('updatechat', socket.username, data);
});
socket.on('adduser', function(username){
socket.username = username;
usernames[username] = username;
socket.emit('updatechat', 'SERVER', 'you have connected');
socket.broadcast.emit('updatechat', 'SERVER'
, username + ' has connected');
io.sockets.emit('updateusers', usernames);
});
socket.on('disconnect', function(){
delete usernames[socket.username];
io.sockets.emit('updateusers', usernames);
socket.broadcast.emit('updatechat', 'SERVER'
, socket.username + ' has disconnected');
});
});
The rst line of this code subscribes to the connection event and executes an anony-
mous function. The anonymous function code accepts a socket parameter, which is
the object that represents the newly created user connection. Inside the anonymous
function, subscriptions are created to the sendchat, adduser, and disconnect events.
The sendchat and adduser events are developer-dened.
The sendchat event is triggered when a message is received from a chat client. This
code uses the io.sockets object to broadcast the message to all chat clients.
428 CHAPTER 10 WebSocket communications
The adduser event is triggered after the client makes a connection. It adds the
username to the usernames collection and then uses the socket object to call the
updatechat event on the current client to indicate to the user that the connection is
successful. The socket.broadcast object sends a message indicating that the current
client is connected. This message is broadcast to all clients except the current client.
Finally, the io.sockets.emit event broadcasts an updated user list to all clients.
The disconnect event deletes the user from the usernames list and broadcasts the
usernames to all clients. The socket.broadcast object broadcasts a disconnect message
to all clients except the current client.
15. Add code to listen on port 8080 and log a message to the console stating this.
The app.js le should look like the following.
var express = require('express')
, app = express()
, http = require('http')
, server = http.createServer(app)
, io = require('socket.io').listen(server);
app.use(express.static(__dirname + '/public'));
app.get('/', function (req, res) {
res.sendfile(__dirname + '/public/index.html');
});
var usernames = {};
io.sockets.on('connection', function (socket) {
socket.on('sendchat', function (data) {
io.sockets.emit('updatechat', socket.username, data);
});
socket.on('adduser', function(username){
socket.username = username;
usernames[username] = username;
socket.emit('updatechat', 'SERVER', 'you have connected');
socket.broadcast.emit('updatechat', 'SERVER'
, username + ' has connected');
io.sockets.emit('updateusers', usernames);
});
socket.on('disconnect', function(){
delete usernames[socket.username];
io.sockets.emit('updateusers', usernames);
socket.broadcast.emit('updatechat', 'SERVER'
, socket.username + ' has disconnected');
});
});
var port = 8080;
server.listen(port);
console.log('Listening on port: ' + port);
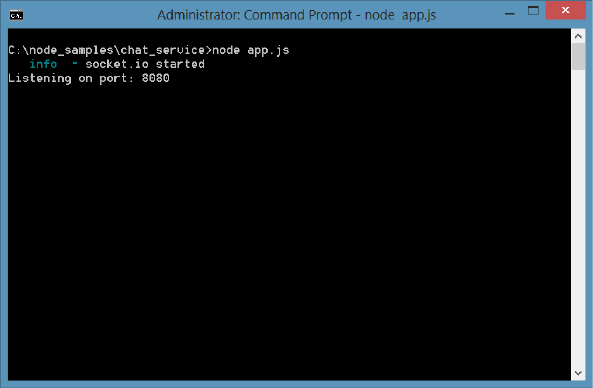
Practice exercises CHAPTER 10 429
16. Test your work by running the website, using the following command in the command
prompt window.
node app.js
You should see the listening message, as shown in Figure 10-2.
FIGURE 10-2 The running chat service
Exercise 2: Create the chat client
In this exercise, you continue with the chat service from Exercise 1 and add the chat client
code. When you’re nished with this exercise, you will have a functional chat application.
1. Open the client website, which is different from Exercise 1. Open Visual Studio
Express 2012 for Web. Click File, choose Open Web Site, and select the public folder
under the chat_service.
2. In the Solution Explorer window, right-click the public node, choose Add, and then
select HTML Page. Name the le Index.html and click OK.
3. In the Solution Explorer window, right-click the public node. Click Add, choose Style
Sheet, and name the le default.css. Click OK.
4. In the Solution Explorer window, right-click the public node, choose Add, select New
Folder, name the folder Scripts, and click OK.
5. In the Solution Explorer window, right-click the Scripts folder, choose Add, select
JavaScript File, name the le default.js, and click OK.
6. Add the jQuery library by right-clicking the public node. Choose Manage NuGet
Packages, select Online, and type jQuery in the search box.
You should see jQuery, as shown in Figure 10-3.
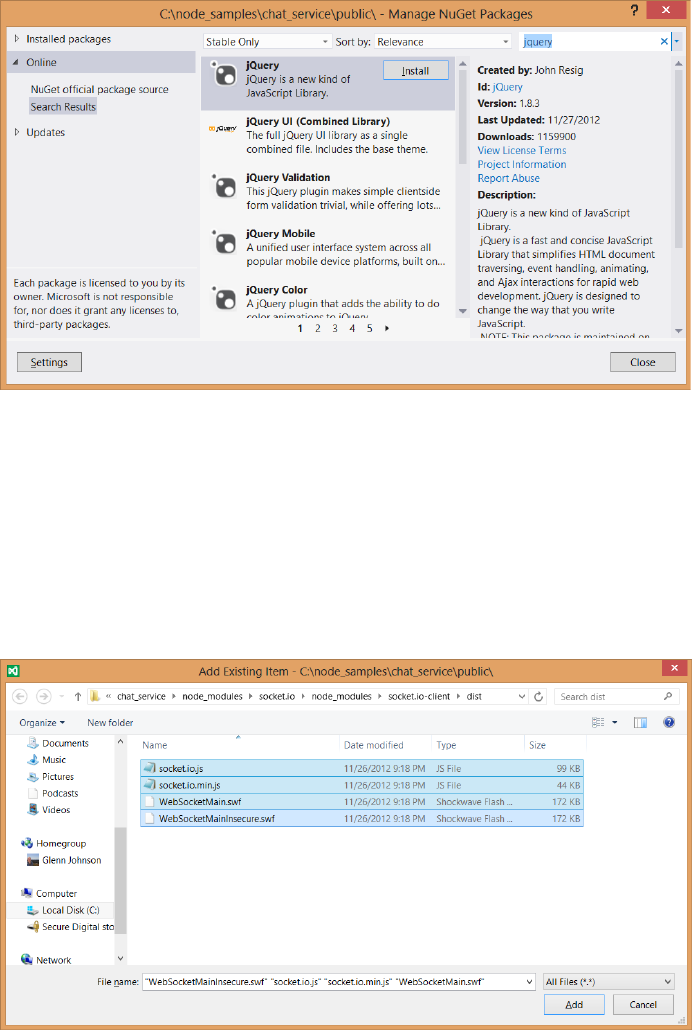
430 CHAPTER 10 WebSocket communications
7. Click Install to install jQuery.
FIGURE 10-3 The NuGet Window with jQuery selected
Add the socket.io client les. These les were automatically downloaded to your com-
puter during Exercise 1 when you executed npm install.
8. In the Solution Explorer window, right-click the Scripts folder, choose Add,
and select Existing Item. Navigate to the chat_service folder and then to the
node_ modules\socket.io\node_modules\socket.io-client\dist folder.
9. In the le type drop-down list, select All Files (*.*) and then select the four les that are
now showing in the folder, as shown in Figure 10-4.
FIGURE 10-4 The socket.io client files that need to be added to the website
Practice exercises CHAPTER 10 431
Now that you have all the les you need, it’s time to add your code.
10. In the Index.html le, add references to the default style sheet, jquery, socket.io.js, and
default.js le.
The <head> element should look like the following.
<head>
<title></title>
<link href="default.css" rel="stylesheet" />
<script src="scripts/jquery-1.8.3.js"></script>
<script src="scripts/socket.io.js"></script>
<script src="scripts/default.js"></script>
</head>
11. In the <body> element, add a <div> element for the user list and a <div> element for
the conversation.
The <body> element should contain the following.
<div class="userContainer" >
<h2>Users</h2>
<div id="users"></div>
</div>
<div class="conversationContainer">
<input id="data" />
<input type="button" id="datasend" value="send" />
<div id="conversation"></div>
</div>
12. Open the default.css le and add the following style rules.
.userContainer {
float: left;
width: 200px;
border-right: 1px solid black;
height: 300px;
padding: 10px;
overflow: auto;
}
.conversationContainer {
float: left;
width: 400px;
height: 300px;
overflow: auto;
padding: 10px;
}
#data {
width: 250px;
}
432 CHAPTER 10 WebSocket communications
13. Open the default.js le. To get IntelliSense, from the Solution Explorer window, drag
the jquery-1.8.3.js le and drop it at the top of the default.js le to add a reference to
the jQuery library as follows.
/// <reference path="jquery-1.8.3.js" />
14. Declare a socket variable. Subscribe to the ready event of the document. In this code,
use the io object to connect to the chat service and assign the result to the socket
variable.
15. Subscribe to the connect, updatechat, and updateusers events of the socket.
16. Finally, subscribe to the click event of the datasend button and the keypress event of
the data text box, as follows.
var socket;
$(document).ready(function () {
socket = io.connect('http://localhost:8080');
socket.on('connect', addUser);
socket.on('updatechat', processMessage);
socket.on('updateusers', updateUserList);
$('#datasend').click(sendMessage);
$('#data').keypress(processEnterPress);
});
This code is subscribing to the events, which execute functions that are not yet created.
You add these functions next.
17. Add the addUser function, which calls the emit method on the socket to call the
adduser method on the chat server.
The result of the pop-up prompt for the username is also passed. The addUser func-
tion should look like the following.
function addUser() {
socket.emit('adduser', prompt("What's your name?"));
}
18. Add the processMessage function.
This function is called when the chat service sends a message. The username and data
are passed to this function.
19. Use jQuery to create a jQuery object with the response and insert the message after
the conversation <div> element.
The processMessage function should look like the following.
function processMessage(username, data) {
$('<b>' + username + ':</b> ' + data + '<br />')
.insertAfter($('#conversation'));
}
Practice exercises CHAPTER 10 433
20. Add the updateUserList function.
This function is called when the chat service sends an updated user list.
21. Add code to clear the existing user list and repopulate the list.
The updateUserList function should look like the following.
function updateUserList(data) {
$('#users').empty();
$.each(data, function (key, value) {
$('#users').append('<div>' + key + '</div>');
});
}
22. Add the sendMessage function.
This function is called to send a message to the chat service. The sendMessage func-
tion should look like the following.
function sendMessage() {
var message = $('#data').val();
$('#data').val('');
socket.emit('sendchat', message);
$('#data').focus();
}
23. Add the processEnterPress function.
This function is called when the user presses the Enter key. The processEnterPress func-
tion should look like the following.
function processEnterPress(e) {
if (e.which == 13) {
e.preventDefault();
$(this).blur();
$('#datasend').focus().click();
}
}
24. Review the code.
The completed default.js le is as follows.
/// <reference path="jquery-1.8.2.js" />
var socket;
$(document).ready(function () {
socket = io.connect('http://localhost:8080');
socket.on('connect', addUser);
socket.on('updatechat', processMessage);
socket.on('updateusers', updateUserList);
$('#datasend').click(sendMessage);
$('#data').keypress(processEnterPress);
});
434 CHAPTER 10 WebSocket communications
function addUser() {
socket.emit('adduser', prompt("What's your name?"));
}
function processMessage(username, data) {
$('<b>' + username + ':</b> ' + data + '<br />')
.insertAfter($('#conversation'));
}
function updateUserList(data) {
$('#users').empty();
$.each(data, function (key, value) {
$('#users').append('<div>' + key + '</div>');
});
}
function sendMessage() {
var message = $('#data').val();
$('#data').val('');
socket.emit('sendchat', message);
$('#data').focus();
}
function processEnterPress(e) {
if (e.which == 13) {
e.preventDefault();
$(this).blur();
$('#datasend').focus().click();
}
}
25. To start chat_service, open a command prompt window. Navigate to the chat_service
folder. Type the following command.
node app.js
26. Open a browser.
27. Navigate to http://localhost:8080, where you should see the chat page.
You should get a pop-up prompt for your username.
28. Enter a name and click OK.
29. Open another browser window and repeat the previous step.
As you type your message, you should see it displayed in both windows, as shown in
Figure 10-5.

Suggested practice exercises CHAPTER 10 435
FIGURE 10-5 The chat client in action
Suggested practice exercises
The following additional exercises are designed to give you more opportunities to practice
what you’ve learned and to help you successfully master the lessons presented in this chapter.
Exercise 1 Learn more about WebSocket by writing more code that implements the
WebSocket object directly.
Exercise 2 Learn more about WebSocket by writing a sketch application by which
multiple users can draw shapes on a common drawing surface.

436 CHAPTER 10 WebSocket communications
Answers
This section contains the answers to the lesson review questions in this chapter.
Lesson 1
1. Correct answer: C
A. Incorrect: The onopen event is triggered when the connection is opened.
B. Incorrect: The onclose event is triggered when the connection is closed.
C. Correct: The onmessage event is triggered when data is received.
D. Incorrect: The onerror event is triggered when an error is thrown.
2. Correct answer: B
A. Incorrect: SignalR does not work with Node.js websites.
B. Correct: The Socket.IO library works with Node.js to provide a browser-
independent library for WebSocket communications.
C. Incorrect: FarmSockets does not exist.
D. Incorrect: AgnosticSocket does not exist.
3. Correct answer: B
A. Incorrect: If you wait until the connection is closed, you will need to create a new
WebSocket object.
B. Correct: You can add code to send empty messages periodically.
C. Incorrect: There is no keepAlive property on the WebSocket object.
D. Incorrect: If you create a new WebSocket object each time you send a message,
the server will think that new browsers are communicating with it.

437
CHAPTER 11
HTML5 supports multimedia
One of the most popular features of HTML5 is its support for multimedia. In the past, you
needed to load a plug-in to play video or audio. Probably the most popular multimedia
plug-in is Flash. This chapter examines the HTML5 support for playing audio and video.
Lessons in this chapter:
Lesson 1: Playing video 437
Lesson 2: Playing audio 443
Lesson 3: Using the HTMLMediaElement object 447
Before you begin
To complete this book, you must have some understanding of web development. This
chapter requires the hardware and software listed in the “System requirements” section in
the book’s Introduction.
Lesson 1: Playing video
The World Wide Web Consortium (W3C) introduced the video element for the purpose of
playing videos and movies. The intent was to offer a standard way to play video on the web
without requiring plug-ins. This goal has been circumvented by lack of agreement about
which video formats should be supported in web browsers.
Currently, the W3C does not specify which video formats browsers should support.
Browsers can decide which format they want to support, so the developer must provide
formats that are available across most browsers.
After this lesson, you will be able to:
Describe the common video formats available on the Internet.
Implement the <video> element.
Estimated lesson time: 20 minutes

438 CHAPTER 11 HTML5 supports multimedia
Video formats
The W3C is trying to come up with a video format that can be specied for all browsers to
support as a minimum. Having a minimum of one format that is common across browsers
would simplify the developer’s job as long as the format provided good compression and
quality and was royalty free. There are many formats; the following list describes the most
popular formats.
Ogg/Theora (.ogv extension) At one point, W3C specied the Ogg/Theora format,
which appears to be a format that is royalty free without patent issues. Then the W3C
removed the Ogg/Theora from the specications because of the possibility of litiga-
tion. This format is supported by the Firefox, Chrome, and Opera browsers.
WebM/VP8 (.webm extension) Google acquired the WebM/VP8 format when it
bought On2 Technology. According to Google ofcials, WebM works well on even
lower-power devices, including netbooks and handhelds. WebM will be available
under a royalty-free Berkeley Software Distribution (BSD) open-source license. The
WebM/VP8 video format is supported by the Firefox, Chrome, Opera, and Android
browsers. In addition, Internet Explorer 9+ will support this format when the VP8 codec
is installed. The current release of the VP8 codec is available here: https://tools.google
.com/dlpage/webmmf/.
MPEG-4/H.264 (.mp4 extension) This format is an evolution of previous formats
that was intended to create a standard capable of providing good video quality at
substantially lower bit rates than previous standards. The MPEG-4/H.264 format has
patented technologies, but MPEG LA, which is a private organization in charge of
administrating the patents, announced that the H.264-encoded Internet video that is
free to end users will never be charged royalties. MPEG-4/H.264 is supported by the
Internet Explorer, Chrome, and Safari browsers, but Chrome has announced its intent
to remove support for MPEG-4/H.264 in the near future.
MPEG-4/H.264 is the most common format for most video-editing software. It also pro-
vides the best performance when comparing data-stream size to picture quality, although
the difference is not great enough to make a decision based solely on performance. Many
existing mobile devices have MPEG-4/H.264 hardware decoders, which provide better perfor-
mance, and there are too many of these mobile devices to ignore. The result is that it could
take a long time for browser makers and the W3C to agree on a single format for the web.
Implementing the <video> element
The <video> element is used to play video. The following is a sample implementation of the
<video> element.
<video width="320" height="240" controls="controls">
<source src="movie.mp4" />
You need a browser that supports HTML5!
</video>
Lesson 1: Playing video CHAPTER 11 439
In this example, the <video> element size is set to 320 pixels by 240 pixels. The controls
attribute provides controls to start and stop the video, to view and set the video cursor loca-
tion, and to maximize and restore the video size on the screen. The <video> element contains
a <source> element that describes the video source as .mp4. The <video> element also con-
tains text that is displayed on browsers that don’t support the <video> element.
Setting the source
The <source> element species a video source. At a minimum, you need to set the src attri-
bute to the URL of the video. You should also include more than one <source> element to
provide many sources so the browser can choose the most appropriate video codec. In the
following example, the same movie has been rendered for each of the three most popular
formats.
<video controls="controls" height="480">
<source src="eagle.webm" type='video/webm; codecs="vorbis, vp8"' />
<source src="eagle.ogv" type='video/ogg; codecs="theora, vorbis"' />
<source src="eagle.mp4" type='video/mp4; codecs="avc1.42E01E, mp4a.40.2"' />
</video>
When the developer provides multiple formats, the browser can choose the format it
can use to display the video, which provides the most compatible experience to users. The
position of the <source> elements is important because a browser starts looking at the top
and stops when it nds a le that it can display. The recommended order is to start with the
.webm le because it’s royalty free and open source, and it’s becoming more popular. Next,
use the .ogv le because it is also royalty free, but the quality is not as good as the .webm le.
Finally, use the .mp4 format for browsers that don’t support .webm or .ogv les.
The type attribute includes both the MIME type and the codecs. Although the type
attribute isn’t usually required, the browser can use it to help choose the proper video le to
display.
The availability of multiple video les requires the developer to transcode videos to
multiple formats. You can nd web utilities at such websites as Firefogg.org that transcode a
video from one format to another, as shown in Figure 11-1.
To use the Firefogg website, you must be running Firefox and have installed the Firefogg
plug-in. This plain website produces good-quality transcoded videos.
If you prefer to use an application that you can download and install on your computer,
you might like the Miro Video Converter. This is a stand-alone utility that enables you to con-
vert one le type to another. The Miro Video Converter is shown in Figure 11-2.
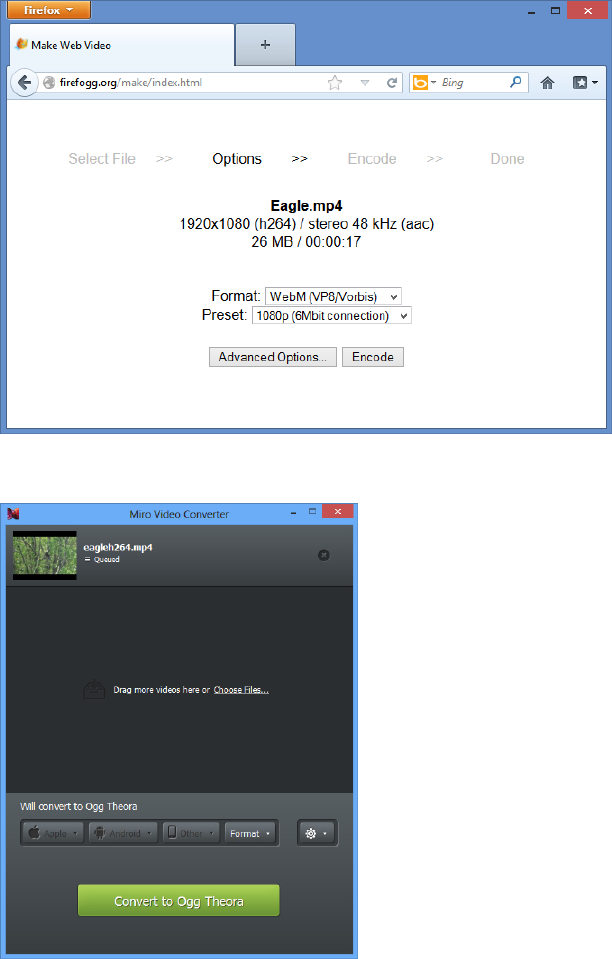
440 CHAPTER 11 HTML5 supports multimedia
FIGURE 11-1 The Firefogg screen prompting for .webm or .ogv file type
FIGURE 11-2 The Miro Video Converter
You might nd that the Miro Video Converter produces low-quality videos. It seems as
though the .ogv les are very choppy, and the site doesn’t offer many conversion options.

Lesson 1: Playing video CHAPTER 11 441
Conguring the <video> element
The <video> element can be congured to provide the behavior you need for your webpage.
The following is the list of attributes you can use to congure the <video> element to suit
your needs.
autoplay Species that video starts playing immediately.
controls Species that the play/pause button, video cursor, and maximize be
displayed.
height Indicates the height in pixels of the rendered <video> element.
loop Species that the video will repeat when it has reached the end of its stream.
muted Species that the audio is silent.
poster Species that the URL of an image is to be shown when the video is not
playing.
preload Species how the video should be loaded when the page loads. It can be set
to auto, metadata, or none. The auto setting starts loading the video when the page
loads. The metadata setting loads only the metadata, and the none setting doesn’t
load anything.
src Species the URL of the video.
width Indicates the width in pixels of the rendered <video> element.
Quick check
You want an image to be displayed when the video is not running. Which prop-
erty should you set to the URL of an image to be displayed?
Quick check answer
Set the poster property to the URL of an image.
Accessing tracks
The W3C has developed a new standard, called WebVTT (Web Video Text Tracks), that
provides the ability to display captions on the video; all browsers implementing the <track>
element will support it. The WebVTT le format is simple and easily readable by browsers and
developers. It’s based on a popular subtitling format called SubRip Text (SRT). If you already
have your content in SRT format, converters are available on the web to convert to the
WebVTT format.
A less-used standard called Timed Text Markup Language (TTML) is an XML-based format
that is more verbose than WebVTT. TTML is outside the scope of this book.
442 CHAPTER 11 HTML5 supports multimedia
Using the WebVTT format
WebVTT format is very simple. The le starts with a declaration of the WebVTT le, a line is
skipped, and a cue is dened. The cue is composed of a timespan on the rst line, and the
caption follows on the next line or lines. After that, a new line separator is provided, and the
next cue is dened. The following is a WebVTT le.
WEBVTT FILE
00:00:07.500 --> 00:00:08.750
He's fidgety.
00:00:09.000 --> 00:00:12.000
There he goes!!!
You can include comments by using the word NOTE followed by a space or a new line, as
shown in the following example.
WEBVTT FILE
00:00:07.500 --> 00:00:08.750
He's fidgety.
NOTE I think the timing should be adjusted to span to the end of the video
00:00:09.000 --> 00:00:12.000
There he goes!!!
The WebVTT format is evolving and provides for other features that are not currently
supported on most browsers. One such feature is the ability to put an ID on a cue so you can
assign a CSS format to the cue. You can also add elements within the caption and provide CSS
styles for the elements.
Adding support for WebVTT to IIS Express
If you try to use WebVTT les on a website that is hosted by IIS Express, you might nd that
IIS Express won’t serve a .vtt le because it serves only known le types. You can add support
for .vtt les by executing the following commands.
cd “C:\Program Files\IIS Express"
appcmd set config /section:staticContent /+[fileExtension='.vtt',mimeType='text/vtt']
When you enter the second command, you should get a message stating that the changes
were applied.
Lesson summary
The <video> element is new in HTML5.
The most common video formats for the web are .ogg/Theora, WebM/VP8, and
MPEG-4/H.264.
When implementing the <video> element, at a minimum you must provide a video
source.

Lesson 2: Playing audio CHAPTER 11 443
It’s best to provide multiple video sources to be compatible with most browsers.
Use the autoplay attribute to start playing immediately.
Use the poster attribute to specify an image to display when not playing the video.
You can provide captions in WebVTT or TTML format.
Lesson review
Answer the following questions to test your knowledge of the information in this lesson. You
can nd the answers to these questions and explanations of why each answer choice is correct
or incorrect in the “Answers” section at the end of this chapter.
1. You want to include a video on your webpage that has an .avi le extension. If you sup-
ply the codec information, what will be displayed in browsers that support the <video>
element but don’t have the codec?
A. The browser will show the <video> element, but will not play the video.
B. The browser will automatically download the codec and play the video.
C. The browser will display the contents of the <video> element.
D. The browser will automatically download a version of the browser that supports
the codec.
2. You don’t want to supply an .ogg video because you nd that the .ogg format is
choppy and low quality. What other video formats can you include to be compatible
with most browsers? (Choose all that apply.)
A. .webm
B. .avi
C. .mpg
D. .mp4
E. .mjpg
3. The W3C standardized using which format for video?
A. .webm
B. .avi
C. .mpg
D. .mp4
E. No standard has been selected.
Lesson 2: Playing audio
The W3C introduced the <audio> element for the purpose of playing music and sounds. Like
the introduction of the <video> element, the intent was to offer a standard way to play multi-
media on the web without requiring plug-ins.
444 CHAPTER 11 HTML5 supports multimedia
Much of the content in this lesson is similar to that of the <video> element; they both
inherit from the HTMLMediaElement. The most notable difference is that the <video>
element consumes more screen space to display video.
After this lesson, you will be able to:
Describe the common audio formats available on the Internet.
Implement the <audio> element.
Estimated lesson time: 20 minutes
Audio formats
The W3C does not specify which audio formats browsers should support, but the battle over
formats is not as competitive as for the video formats. The W3C is trying to decide on an
audio format that can be specied for all browsers to support as a minimum. There are many
audio formats, but the following are the most common.
Ogg/Vorbis (.oga, .ogg extention) This format appears to be royalty free without
patent issues. It’s supported by the Firefox, Chrome, and Opera browsers and has a
MIME type of audio/ogg and a codec of vorbis.
MP3 (.mp3 extension) This format is pervasive because it’s a common format for
much of the music media. It’s supported by the Safari, Chrome, and Internet Explorer
browsers and has a MIME type of audio/mpeg and a codec of .mp3.
MP4 (.mp4, .mp4a, .aac extension) This format is primarily used by Apple. In spite
of this format’s high quality AAC or AAC+ codec, the MP3 format is still more preva-
lent. This format is supported on the Internet Explorer and Safari browsers and has a
MIME type of audio/mp4; mp4a.40.5 is the codec value.
WAV (.wav extension) This format is also pervasive and is usually used for audio
fragments, or snippets, such as ring tones and sounds. It’s supported by the Firefox,
Chrome, and Opera browsers and has a MIME type of audio/wav and a codec of 1 (the
number one).
The <audio> element
The <audio> element is used to play audio. The following is a sample implementation of the
<audio> element.
<audio controls="controls">
<source src="song.mp3" />
You need a browser that supports HTML5!
</audio>
Lesson 2: Playing audio CHAPTER 11 445
In this example, the <audio> element is congured with the controls attribute, which pro-
vides controls to start and stop the audio, to view and set the audio cursor location, and to
set the volume. The <audio> element contains a <source> element that describes the audio
source as .mp3. The <audio> element also contains text that is displayed on browsers that
don’t support the <audio> element.
One characteristic of audio is that the developer might play multiple audio les at the
same time. Although this is common in games, most browsers can’t handle playing multiple
audio les at the same time.
Setting the source
The <source> element species an audio source. At a minimum, you need to set the src
attribute to the URL of the audio. You should also include more than one <source> element
to provide many sources so the browser can choose the most appropriate audio codec. In the
following example, the same sound has been rendered for each of the three most popular
formats.
<audio id="audio" controls="controls">
<source src="media/kittycat.oga" type='audio/ogg; codecs="vorbis"' />
<source src="media/kittycat.wav" type='audio/wav; codecs="1"' />
<source src="media/kittycat.mp3" type='audio/mpeg; codecs="mp3"' />
</audio>
By providing multiple formats, the browser can choose the format that displays the audio,
which provides the most compatible experience to users. As mentioned earlier, the position
of the <source> elements is important because a browser starts looking at the top and stops
when it nds a le it can display. The recommended order is to start with the .oga le because
it’s royalty free, open source, and becoming more popular for the web. Next, use the .wav le,
because it is also quite popular. Finally, use the .mp3 for browsers that don’t support .oga and
.wav les.
The type attribute includes both the MIME type and the codecs. Although the type
attribute isn’t usually required, the browser can use it to help choose the proper audio le to
display.
Conguring the <audio> element
The <audio> element can be congured to provide the behavior you need for your webpage.
The following is the list of attributes you can use to congure the <audio> element to suit
your needs.
autoplay Species that audio starts playing immediately.
controls Species that the play/pause button, audio cursor, and maximize are
displayed.
loop Species that the audio repeats when it has reached the end of its stream.

446 CHAPTER 11 HTML5 supports multimedia
preload Species how the audio should be loaded when the page loads. It can be set
to auto, metadata, or none. The auto setting starts loading the audio when the page
loads. The metadata setting loads only the metadata, and the none setting doesn’t
load anything.
src Species the URL of the audio.
Quick check
You want to repeat the audio continuously when it completes. Which attribute
must you set?
Quick check answer
Set the loop attribute as follows.
<audio loop='loop'>
Lesson summary
The <audio> element is new in HTML5.
The most common audio formats for the web are .ogg/Vorbis, .mp3, and .wav.
When implementing the <audio> element, at a minimum you must provide an audio
source.
It’s best to provide multiple audio sources to be compatible with most browsers.
Use the autoplay attribute to start playing immediately.
Lesson review
Answer the following questions to test your knowledge of the information in this lesson. You
can nd the answers to these questions and explanations of why each answer choice is correct
or incorrect in the “Answers” section at the end of this chapter.
1. You want to supply an audio le using a format that is compatible with the Internet
Explorer, Safari, and Chrome browsers. Which audio formats can you include to be
compatible with most browsers? (Choose all that apply.)
A. .mp4
B. .wav
C. .mp3
D. .oga
2. You don’t want to supply an .mp3 format because you are concerned about potentially
paying royalties. What other audio formats can you include to be compatible with
most browsers? (Choose all that apply.)
Lesson 3: Using the HTMLMediaElement object CHAPTER 11 447
A. .mp4
B. .wav
C. .h264
D. .oga
Lesson 3: Using the HTMLMediaElement object
The <audio> and <video> elements inherit from an HTMLMediaElement object, so they
inherit the properties, methods, and events that are dened on the HTMLMediaElement
object.
After this lesson, you will be able to:
Describe the HTMLMediaElement object.
Subscribe to the HTMLMediaElement events.
Control media.
Estimated lesson time: 20 minutes
Understanding the HTMLMediaElement methods
You can use the members of the HTMLMediaElement object to control the video and audio
playback. You can also get notications of status changes. The following is a list of the
<video> element methods.
addTextTrack() Adds a new text track to the audio or video
canPlayType() Determines whether the browser can play the specied audio or
video type
load() Reloads the audio or video
play() Plays the audio or video
pause() Pauses the currently playing audio or video
Using HTMLMediaElement properties
In addition to the methods that enable you to control playback, you can use many properties
to view or set the state of the <audio> or <video> element. The following is a list of all the
properties.
audioTracks Gets a reference to the AudioTrackList object that has the available
audio tracks
autoplay Sets or gets the indicator that determines whether the audio or video
should start playing when it’s loaded
448 CHAPTER 11 HTML5 supports multimedia
buffered Gets a reference to the TimeRanges object that represents the buffered
parts of the audio or video
controller Gets a reference to the MediaController object representing the current
media controller of the audio or video
controls Sets or gets the indicator that determines whether the audio or video
should display playback controls to the user
crossOrigin Sets or gets the CORS settings of the audio or video
currentSrc Gets the URL of the current audio or video
currentTime Sets or gets the current playback position in seconds
defaultMuted Sets or gets the indicator that determines whether the audio or video
is muted by default
defaultPlaybackRate Sets or gets the default speed of the audio or video playback
duration Gets the length in seconds of the current audio or video
ended Gets the indicator that determines whether the playback of the audio or video
has ended
error Gets a reference to a MediaError object representing the error state of the
audio or video
loop Sets or gets an indicator that determines whether the audio or video should
automatically restart when it reaches the end of the stream
mediaGroup Sets or gets the group to which the audio or video belongs, which is
used to link multiple audio or video elements
muted Sets or gets an indicator that determines whether the audio or video is muted
networkState Gets a reference to the current network state of the audio or video
paused Sets or gets an indicator that determines whether the audio or video is
paused
playbackRate Sets or gets the speed of the audio or video playback
played Gets a reference to a TimeRanges object that represents the played parts of
the audio or video
preload Sets or gets an indicator that determines whether the audio or video should
be loaded when the page loads
readyState Gets an indicator of the current ready state of the audio or video
seekable Gets a reference to a TimeRanges object that represents the seekable parts
of the audio or video
seeking Gets an indicator that determines whether the user is currently seeking in
the audio or video
src Sets or gets the current source of the audio or video
startDate Gets a Date object representing the current time offset
Lesson 3: Using the HTMLMediaElement object CHAPTER 11 449
textTracks Gets a reference to a TextTrackList object that represents the available
text tracks
videoTracks Gets a reference to a VideoTrackList object that represents the available
video tracks
volume Sets or gets the volume of the audio or video
Subscribing to HTMLMediaElement events
In addition to the methods and properties of HTMLMediaElement, the following is a list of the
events that you can subscribe to.
onabort Triggers on abort
oncanplay Triggers when a le has been buffered enough to start playing
oncanplaythrough Triggers when a le can be played all the way to the end without
pausing for buffering
ondurationchange Triggers when the length of the media changes
onemptied Triggers when an error occurs and the le is suddenly unavailable
onended Triggers when the media has reached the end of the stream
onerror Triggers when an error occurs as the le is being loaded
onloadeddata Triggers when media data is loaded
onloadedmetadata Triggers when metadata such as duration and dimensions are
loaded
onloadstart Triggers when the le begins to load but before anything is actually
loaded
onpause Triggers when the media is paused
onplay Triggers when the media starts playing
onplaying Triggers when the media actually has started playing
onprogress Triggers when the browser is retrieving the media
onratechange Triggers each time the playback rate changes
onreadystatechange Triggers each time the ready state changes
onseeked Triggers to indicate that seeking has ended
onseeking Triggers to indicate that seeking is active
onstalled Triggers when the browser is unable to retrieve the media
onsuspend Triggers when media retrieval stops prior to being completely loaded
ontimeupdate Triggers when the playing position has changed
onvolumechange Triggers each time the volume or mute is changed
onwaiting Triggers when the media has paused but is expected to resume
450 CHAPTER 11 HTML5 supports multimedia
Using media control
Given that HTMLMediaElement has many methods, properties, and events, you can provide
custom controls for the media or a custom means to start and stop the media playback. The
following is a small example of using the methods, properties, and events. Consider the fol-
lowing HTML document.
<!DOCTYPE html>
<html xmlns="http://www.w3.org/1999/xhtml">
<head>
<title></title>
<link href="default.css" rel="stylesheet" />
<script src="Scripts/jquery-1.8.3.js"></script>
<script src="Scripts/default.js"></script>
</head>
<body>
<video id="media" height="480">
<source src="eagle.webm" type='video/webm; codecs="vorbis, vp8"' />
<source src="eagle.ogv" type='video/ogg; codecs="theora, vorbis"' />
<source src="eagle.mp4" type='video/mp4; codecs="avc1.42E01E, mp4a.40.2"' />
<track id="englishtrack" kind="subtitles" src="captions.vtt"
srclang="en" label="English" default="" />
</video>
<br />
<button type="button" id="play">Play</button>
</body>
</html>
This document contains a reference to the jQuery library and the default.js le. It also con-
tains a <video> element whose id attribute is set to media, and the controls attribute is not
set. There are <source> elements for the .webm, .ogv, and .mp4 video les. A caption le is in
WebVTT format. Under the <video> element is a <button> element whose id is set to play.
Because the controls attribute is not set, the <video> element doesn’t display the built-in
controls such as play/pause, the position indicator, and the full-screen button. Sometimes,
you might not want to allow the user to maximize the video, so turning off the controls is
appropriate. If so, you must provide your own play/pause button, as shown in the following
default.js le.
/// <reference path="jquery-1.8.3.js" />
$(document).ready(function () {
$(‘#play').on(‘click', playStop);
$(‘#media').on(‘play', function () { $(‘#play').html(‘Pause'); });
$(‘#media').on(‘pause', function () { $(‘#play').html(‘Play'); });
});
function playStop() {
var media = $(‘#media')[0];
if (media.paused) {
media.play();
}
else {
media.pause();
Lesson 3: Using the HTMLMediaElement object CHAPTER 11 451
}
}
In the default.js le, the document ready method is added with the code to subscribe to
the events. The click event on the play button executes the playStop function. The playStop
function gets a reference to the media element and then uses the paused property to deter-
mine whether to play or pause the video by executing the play or pause method.
When the play button is pressed, the text on the play button changes from Play to Pause
because the play event is triggered on the media element. When the play button is pressed
again, the play button text changes from Pause to Play because the pause event is triggered
on the play button. This is accomplished by subscribing to the play and pause events in the
document ready function.
Lesson summary
The <video> and <audio> elements inherit from the HTMLMediaElement object.
Use the play() method to start playing the media and the pause() method to pause the
playing media.
The paused property can be used to determine whether the media is playing.
The onplay and the onpause events can be subscribed to and provide notications
when the media is played or paused.
Lesson review
Answer the following questions to test your knowledge of the information in this lesson. You
can nd the answers to these questions and explanations of why each answer choice is correct
or incorrect in the “Answers” section at the end of this chapter.
1. The <video> and <audio> elements inherit from which object?
A. HTMLMediaElement
B. MediaElement
C. MultiMediaElement
D. the Multimedia object
2. If you want your media to repeat continuously, which property would you set to true?
A. preload
B. readyState
C. seekable
D. loop
3. You want to trigger some code when the media is loaded. Which event should you
subscribe to?
A. onstalled
B. onseeked

452 CHAPTER 11 HTML5 supports multimedia
C. onplay
D. onloadeddata
Practice exercises
If you encounter a problem completing any of these exercises, the completed projects can be
installed from the Practice Exercises folder that is provided with the companion content.
Exercise 1: Create a webpage that displays video
In this exercise, you apply your knowledge of the <video> element by creating a web applica-
tion that displays video.
At Contoso Ltd., you have been asked to create a prototype webpage that displays video
using the <video> element. The webpage needs to display video to the Firefox, Internet
Explorer, and Chrome browsers at a minimum, but you want to reach as many browsers as
possible.
You know that you need to convert your .mp4 le to other formats, but you also want to
identify the le type the browser used so you can determine the le types that provide the
most browser coverage.
1. Start Visual Studio Express 2012 for Web. Create an ASP.NET Empty Web Application
project and name it MultimediaPrototype.
2. Add a new folder, Media, to the project.
3. Add the Eagle video les. Right-click the Media folder, choose Add, and select Existing
Item. Locate the Resource folder and select the three Eagle video les.
4. Add an HTML le to the project. Name it VideoPage.html.
5. Add a CSS le to the project. Name it default.css.
6. Add a new folder, Scripts, to the project.
7. Right-click the Scripts folder and add a new JavaScript default.js le.
8. Add a reference to the jQuery library by right-clicking the project node; choose
Manage NuGet Packages. Click Online and type jQuery in the search criteria. When
the jQuery library displays, click the Install button.
9. In the VideoPage.html le, add a reference to the default.css, jQuery library, and
default.js les.
10. Title your page Video Prototype.
Your HTML page should look like the following.
<!DOCTYPE html>
<html xmlns="http://www.w3.org/1999/xhtml">
<head>
<title>Video Prototype</title>
<link href="default.css" rel="stylesheet" />
Practice exercises CHAPTER 11 453
<script src="Scripts/jquery-1.8.3.js"></script>
<script src="Scripts/default.js"></script>
</head>
<body>
</body>
</html>
11. In the <body> element, add a <div> element whose id is container.
12. In the container, add a <video> element whose id is media. Add the controls attribute
to display the basic video controls. After the <video> element, add a break, and then
add a <span> element whose id is message.
Your container should look like the following.
<div id="container">
<video id="media" controls="controls">
</video>
<br />
<span id='message'></span>
</div>
13. In the <video> element, add sources for each of the Eagle video les. Be sure that the
rst video le is the .webm le, following by the .ogv le, followed by the .mp4 le.
14. After the <source> elements are added, add a message stating that the user needs an
HTML5 browser.
Your <video> element should look like the following.
<video id="media" controls="controls">
<source src="media/eagle.webm" type='video/webm; codecs="vorbis, vp8"' />
<source src="media/eagle.ogv" type='video/ogg; codecs="theora, vorbis"' />
<source src="media/eagle.mp4" type='video/mp4; codecs="avc1.42E01E, mp4a.40.2"'
/>
You need an HTML5 compatible browser.
</video>
15. In the default.css le, set the background color of the <body> element to a very light
yellow.
16. Add a style rule for the container. This style should set the background color to light
blue, set the border to groove, set the width to 900 pixels, and set the height to 600
pixels. Set the left and right margins to auto. Set the text-align to center and set the
padding to 20 pixels.
The completed default.css le should look like the following.
body {
background-color: #FFFFCC;
}
#container {
background-color: #99CCFF;
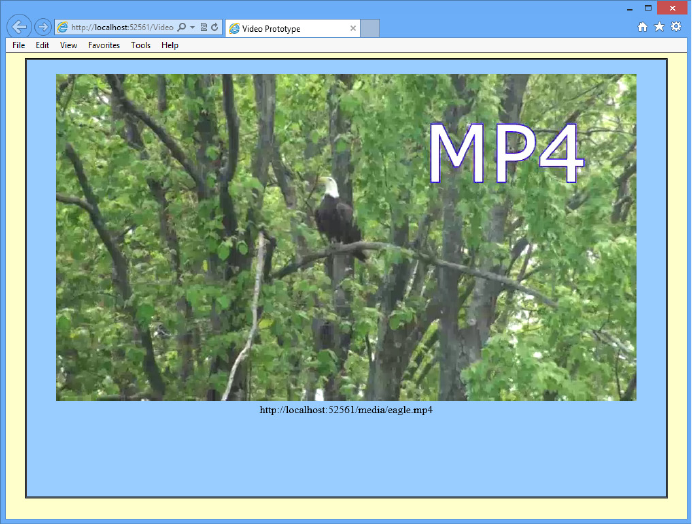
454 CHAPTER 11 HTML5 supports multimedia
border-style: groove;
width: 900px;
height: 600px;
margin-right: auto;
margin-left: auto;
text-align:center;
padding: 20px;
}
17. To know which source was selected by the browser (although this will be apparent
when you play the video), add code to the default.js le to display the current source
when the video is played.
Your code should look like the following.
/// <reference path="jquery-1.8.3.js" />
$(document).ready(function () {
$(‘#media').on(‘play', function () {
$(‘#message').html($(‘#media')[0].currentSrc);
});
});
18. In Solution Explorer, right-click the VideoPage.html le and choose Set As Start Page.
19. Test your work by running the website by pressing F5.
You should see the VideoPage.html page as shown in Figure 11-3.
FIGURE 11-3 The running video page

Suggested practice exercises CHAPTER 11 455
Suggested practice exercises
The following additional exercises are designed to give you more opportunities to practice
what you’ve learned and to help you successfully master the lessons presented in this chapter.
Exercise 1 Learn more about video and audio by creating a web application that
offers the ability to play from a list of les.
Exercise 2 Learn more about video and audio by writing a web application that uses
many of the properties, methods, and events of the <video> and <audio> elements.

456 CHAPTER 11 HTML5 supports multimedia
Answers
This section contains the answers to the lesson review questions in this chapter.
Lesson 1
1. Correct answer: A
A. Correct: The browser must support the codec that is specied but does not
attempt to download the specied codec automatically.
B. Incorrect: The browser does not attempt to download codecs automatically.
C. Incorrect: The browser only displays the contents of the <video> element if the
browser doesn’t support the <video> element.
D. Incorrect: The browser does not attempt to download a browser that is
compatible.
2. Correct answers: A and D
A. Correct: The .webm format is becoming popular on the latest browsers.
B. Incorrect: The .avi format is not compatible with most browsers.
C. Incorrect: The .mpg format is not compatible with most browsers.
D. Correct: The .mp4 format is compatible with Safari and Internet Explorer.
E. Incorrect: The .mjpg format is not compatible with most browsers.
3. Correct answer: E
A. Incorrect: The .webm format is becoming popular but has not been selected as a
standard.
B. Incorrect: The .avi format is not compatible with most browsers.
C. Incorrect: The .mpg format is not compatible with most browsers.
D. Incorrect: The .mp4 format is compatible with Safari and Internet Explorer but has
not been selected as a standard.
E. Correct: The W3C has not selected a standard format.
Lesson 2
1. Correct answer: C
A. Incorrect: .The .mp4 format is not compatible with Chrome.
B. Incorrect: The .wav format is not compatible with Internet Explorer.
C. Correct: The .mp3 format is compatible with Internet Explorer, Safari, and Chrome.
D. Incorrect: The .oga format is not compatible with Internet Explorer.

Answers CHAPTER 11 457
2. Correct answers: A, B, and D
A. Correct: The .mp4 format is becoming popular on the latest browsers.
B. Correct: The .wav format is compatible with most browsers.
C. Incorrect: The .h264 format is a video format.
D. Correct: The .oga format is compatible with most browsers.
Lesson 3
1. Correct answer: A
A. Correct: The <video> and <audio> elements inherit from the HTMLMediaElement
object.
B. Incorrect: The MediaElement object does not exist.
C. Incorrect: The MultiMediaElement object does not exist.
D. Incorrect: The Multimedia object does not exist.
2. Correct answer: D
A. Incorrect: The preload property is used to indicate whether you want to preload
the data.
B. Incorrect: The readyState property is used to identify the current state of the
media.
C. Incorrect: The seekable property is used to indicate whether the media can be
seeked.
D. Correct: The loop property is used to indicate that you want to repeat the media
continuously when it reaches its end of stream.
3. Correct answer: D
A. Incorrect: The onstalled event triggers when the browser is unable to retrieve the
media.
B. Incorrect: The onseeked event triggers when seeking has ended, after you per-
form a seek operation.
C. Incorrect: The onplay event triggers when the media starts playing.
D. Correct: The onloadeddata event triggers when the media is loaded.


459
CHAPTER 12
Drawing with HTML5
In the past, the most common method for drawing on a webpage was by using Adobe
Flash. As the quest to create browsers that don’t require plug-ins to display multimedia
continues, a large gap in functionality has been lled with the ability to draw in HTML5 by
using the <canvas> element and to create and display Scalable Vector Graphics (SVG) by
using the <svg> element.
Although Adobe Flash still provides more functionality than the <canvas> element, you
might nd that the <canvas> element is all you need and that you don’t need to add a
third-party product to your application.
SVG is a language by which to dene two-dimensional graphics in XML, and the XML can
be rendered by the browser by using the <svg> element. Although you could learn SVG and
write SVG graphics, you will likely use an image editor to create SVG images and then use
them in your web application. The benet is that the images are scalable.
This chapter presents the <canvas> element and demonstrates drawing on the canvas.
This is not an all-inclusive tutorial on this element, however; its power could easily ll its
own book. The chapter then presents the <svg> element from an implementation perspec-
tive rather than from a drawing perspective.
Lessons in this chapter:
Lesson 1: Drawing by using the <canvas> element 460
Lesson 2: Using scalable vector graphics 495
Before you begin
To complete this book, you must have some understanding of web development. This
chapter requires the hardware and software listed in the “System requirements” section in
the book’s Introduction.
460 CHAPTER 12 Drawing with HTML5
Lesson 1: Drawing by using the <canvas> element
The only signicant attributes that the <canvas> element has are the height and width attri-
butes. The content that you place in the <canvas> element is displayed if the browser doesn’t
support the canvas element. The following is an example of a simple implementation of this
element, informing the user that a browser that supports HTML5 is required. This content is
displayed only if the browser doesn’t support the <canvas> element.
<canvas id="myCanvas" width="800" height="600">
You need a browser that supports HTML5!
</canvas>
For the subsequent examples, the following style is applied to the <canvas> element
because it is invisible by default.
canvas {
border: 1px solid black;
}
After this lesson, you will be able to:
Describe the <canvas> element.
Congure the drawing state.
Draw with paths.
Draw text and images.
Estimated lesson time: 20 minutes
The <canvas> element reference
The <canvas> element exposes an abundance of functionality through its canvas context,
which is accessible using JavaScript. This element provides the following members.
height Property that sets or gets the height of the canvas
width Property that sets or gets the width of the canvas
getContext() Method that accepts a parameter of 2d and returns a
CanvasRenderingContext2D object that represents the canvas context
toDataUrl() Method that creates a URL that can be used with an element that
requires an image URL, such as the <img> element
CanvasRenderingContext2D context object reference
The <canvas> element is simply a graphics container; the context object that is returned from
the getContext method is used to draw on the canvas. The following is a list of the context
object’s members. Many of these methods and properties are used in this lesson.
Lesson 1: Drawing by using the <canvas> element CHAPTER 12 461
addColorStop() Method to set the colors and stop positions in a gradient object
arc() Method to create an arc/curve
arcTo() Method to create an arc/curve between two tangents
beginPath() Method to start a path or reset the current path
bezierCurveTo() Method to create a cubic Bézier curve
clearRect() Method to clear a given rectangle
clip() Method to clip a region of any shape and size from the original canvas
closePath() Method to create a path from the current point back to the starting
point
createImageData() Method to create a new, blank ImageData object
createLinearGradient() Method to create a linear gradient
createPattern() Method to repeat a specied element in a specied direction
createRadialGradient() Method to create a radial/circular gradient
data Property that gets an ImageData object that contains the image data
drawImage() Method to draw an image, canvas, or video onto the canvas
ll() Method to ll the drawing path
llRect() Method to draw a lled rectangle
llStyle Property that sets or gets the color, gradient, or pattern used to ll the
drawing
llText() Method to draw lled text on the canvas
font Property that sets or gets the font properties for text content
getImageData() Method to get an ImageData object that copies the pixel data for
the specied rectangle on a canvas
globalAlpha Property that sets or gets the current alpha or transparency value of
the drawing
globalCompositeOperation Property that sets or gets how a new image is drawn
onto an existing image
isPointInPath() Method that returns true if the specied point is in the current path
lineCap Property that sets or gets the style of the end caps for a line
lineJoin Property that sets or gets the type of corner to create when two lines meet
lineTo() Method that adds a new point and creates a line from that point to the last
specied point in the canvas
lineWidth Property that sets or gets the current line width
measureText() Method that gets an object that contains the width of the specied
text
miterLimit Property that sets or gets the maximum miter length

462 CHAPTER 12 Drawing with HTML5
moveTo() Method that moves the path to the specied point in the canvas without
creating a line
putImageData() Method that puts the image data from a specied ImageData
object back onto the canvas
quadraticCurveTo() Method that creates a quadratic Bézier curve
rect() Method that creates a rectangle
restore() Method that pops the previously saved context state from the stack
rotate() Method that rotates the current drawing
save() Method that pushes the state of the current context onto a stack
scale() Method that scales the current drawing bigger or smaller
setTransform() Method that resets the current transform to the identity matrix and
then calls the transform() method
shadowBlur Property that sets or gets the blur level setting to use for shadows
shadowColor Property that sets or gets the color setting to use for shadows
shadowOffsetX Property that sets or gets the horizontal distance setting of the
shadow from the shape
shadowOffsetY Property that sets or gets the vertical distance setting of the shadow
from the shape
stroke() Method to draw the path you have dened
strokeRect() Method to draw a rectangle without ll
strokeStyle Property that sets or gets the color, gradient, or pattern used for strokes
strokeText() Method that draws text on the canvas without ll
textAlign Property that sets or gets the alignment setting for text content
textBaseline Property that sets or gets the text baseline setting used when drawing
text
transform() Method that replaces the transformation matrix setting for the drawing
translate() Method that remaps the (0, 0) position on the canvas
Implementing the canvas
When working with the canvas object, you must get a reference to the canvas context. This
can be accomplished by using the getContext method, which accepts a parameter. Currently,
the only value for the parameter is 2d when using Internet Explorer, but Firefox and Chrome
support an experimental-webgl parameter, which supports three-dimensional drawing.
Expect to see this technology evolve over time.
This lesson focuses on the more mature 2d parameter, which returns a
CanvasRenderingContext2D object. This object will be referred to as the context object. The
following example demonstrates the creation of the context object.
Key
Terms

Lesson 1: Drawing by using the <canvas> element CHAPTER 12 463
$(document).ready(function () {
drawSomething();
});
function drawSomething() {
var canvas = document.getElementById('myCanvas');
var ctx = canvas.getContext('2d');
ctx.fillRect(10, 50, 100, 200);
}
In this example, canvas is a reference to the <canvas> element whose id is myCanvas. After
that, ctx is set to reference the context object, with which you can start drawing. The coor-
dinates of the drawing surface are represented as x, y where 0, 0 is the upper-left corner of
the canvas.
Quick check
What is the proper parameter to pass to the getContext method on the canvas
to create two-dimensional drawings?
Quick check answer
2d
Drawing rectangles
The methods for creating rectangles accept four parameters. The rst two parameters are the
x and y locations of the upper-left corner of the rectangle. The last two parameters represent
the width and height of the rectangle. You can create rectangles by using one of the follow-
ing methods.
clearRect(x, y, w, h) Clear the specied rectangular area.
llRect(x, y, w, h) Draw a lled rectangular area.
strokeRect(x, y, w, h) Draw an unlled rectangular area.
The following code example demonstrates the use of these methods to create rectangles.
$(document).ready(function () {
drawSomething();
});
function drawSomething() {
var canvas = document.getElementById('myCanvas')
, ctx = canvas.getContext('2d')
, offset = 15
, clearOffset = 30
, pushDownOffset = 10
, height = 50
, width = 100
, count = 4

464 CHAPTER 12 Drawing with HTML5
, i = 0;
for (i = 0; i < count; i++) {
ctx.fillRect(i * (offset + width) + offset, offset, width, height);
ctx.clearRect(i * (offset + width) + (clearOffset / 2) + offset,
offset + (clearOffset / 2) + pushDownOffset,
width - clearOffset, height - clearOffset)
ctx.strokeRect(i * (offset + width) + offset,
(2 * offset) + height, width, height);
}
}
In this example, the llRect method is used to create four lled rectangles. Each of the
rectangles is spaced horizontally by the offset amount. Next, the clearRect method is used to
clear a rectangular area that is inside the lled-in area created by the llRect method. Finally,
the strokeRect method is used to create a second row of rectangles, but these rectangles are
not lled in. The result is shown in Figure 12-1.
FIGURE 12-1 Drawing rectangles on the canvas
You can see that the drawing on the canvas does indeed require knowledge of JavaScript
and the canvas context object.
Lesson 1: Drawing by using the <canvas> element CHAPTER 12 465
Conguring the drawing state
In the previous example, what is the ll color when calling llRect? What is the line thickness
and color when calling strokeRect? The canvas context has properties that you can set before
you call any of the drawing methods. After you change a property, the new value is used for
subsequent drawing statements.
Setting llStyle
Use the llStyle property to specify how you want to ll shapes. You can set llStyle to one of
the following values.
CSS color Creates a solid color ll based on a valid CSS color value such as black, red,
or #00FF00. The following is an example of setting llStyle by using a CSS color value.
function drawUsingCssColor() {
var canvas = document.getElementById('myCanvas')
, ctx = canvas.getContext('2d')
, offset = 10
, size = 50;
ctx.fillStyle = "red";
ctx.fillRect(offset + (0 * (offset + size)), offset, size, size);
ctx.fillRect(offset + (1 * (offset + size)), offset, size, size);
ctx.fillStyle = "#00FF00";
ctx.fillRect(offset + (2 * (offset + size)), offset, size, size);
ctx.fillRect(offset + (3 * (offset + size)), offset, size, size);
ctx.fillStyle = "rgba(0, 0, 255, 0.25)";
ctx.fillRect(offset + (4 * (offset + size)), offset, size, size);
ctx.fillRect(offset + (5 * (offset + size)), offset, size, size);
}
In this example, llStyle is set to “red”, and two rectangles are created. Next, llStyle is
set to green, using “#00FF00”, and two rectangles are created. Finally, llStyle is set to
blue with opacity of 25 percent, using “rgba(0,0,255,0.25)”, and two rectangles are cre-
ated. The results are shown in Figure 12-2.
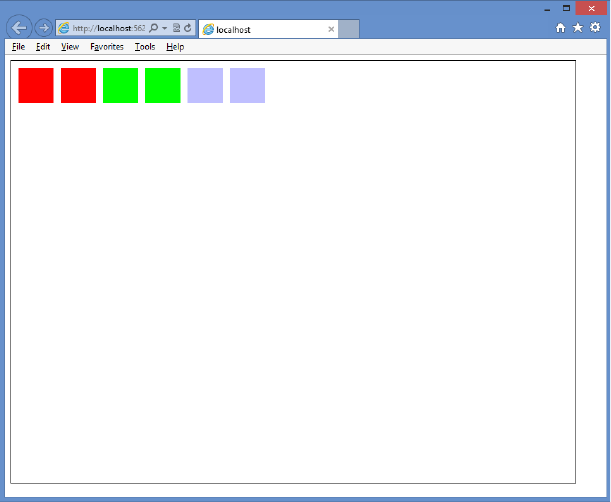
466 CHAPTER 12 Drawing with HTML5
FIGURE 12-2 The rendered rectangles, using CSS color values
Gradient A CanvasGradient object that is created by the context’s
createLinearGradient or createRadialGradient method to create a gradient ll.
The createLinearGradient method accepts the x and y values of two points that are
used to create a linear gradient, for example, createLinearGradient(x0, y0, x1, y1).
The createRadialGradient accepts the x and y center and the radius of two circles, for
example, createRadialGradient(x0, y0, r0, x1, y1, r1).
After the gradient object is created, call its addColorStop method to specify that a
color is set at a location on the gradient. The addColorStop function takes two param-
eters; the rst parameter is the location, which is a value between 0 and 1 where 0 is
the beginning of the gradient and 1 is the end of the gradient, and the second param-
eter is the color value.
The following is an example of setting llStyle, using a gradient value.
function drawGradient() {
var canvas = document.getElementById('myCanvas')
, ctx = canvas.getContext('2d')
, x0 = 0
, y0 = 0
, r0 = 0
, x1 = 200
, y1 = 0
, r1 = 100
, width = 300
Lesson 1: Drawing by using the <canvas> element CHAPTER 12 467
, height = 50
, offset = 10;
gradient = ctx.createLinearGradient(x0, y0, x1, y1);
addColorStops(gradient);
ctx.fillStyle = gradient;
ctx.fillRect(10, 0 * (height + offset), width, height);
ctx.fillRect(100, 1 * (height + offset), width, height);
y1 = 300;
gradient = ctx.createLinearGradient(x0, y0, x1, y1);
addColorStops(gradient);
ctx.fillStyle = gradient;
ctx.fillRect(10, 2 * (height + offset), width, height);
ctx.fillRect(100, 3 * (height + offset), width, height);
x0 = x1 = width / 2;
y0 = y1 = 4 * (height + offset) + (height / 2);
gradient = ctx.createRadialGradient(x0, y0, r0, x1, y1, r1);
addColorStops(gradient);
ctx.fillStyle = gradient;
ctx.fillRect(10, 4 * (height + offset), width, height);
ctx.fillRect(100, 5 * (height + offset), width, height);
y0 = 5 * (height + offset) + (height / 2);
y1 = y0 + 100;
gradient = ctx.createRadialGradient(x0, y0, r0, x1, y1, r1);
addColorStops(gradient);
ctx.fillStyle = gradient;
ctx.fillRect(10, 6 * (height + offset), width, height);
ctx.fillRect(100, 7 * (height + offset), width, height);
}
function addColorStops(gradient) {
gradient.addColorStop(“0", “magenta");
gradient.addColorStop(“.25", “blue");
gradient.addColorStop(“.50", “green");
gradient.addColorStop(“.75", “yellow");
gradient.addColorStop(“1.0", “red");
}
When this example code is executed, it produces the result shown in Figure 12-3.
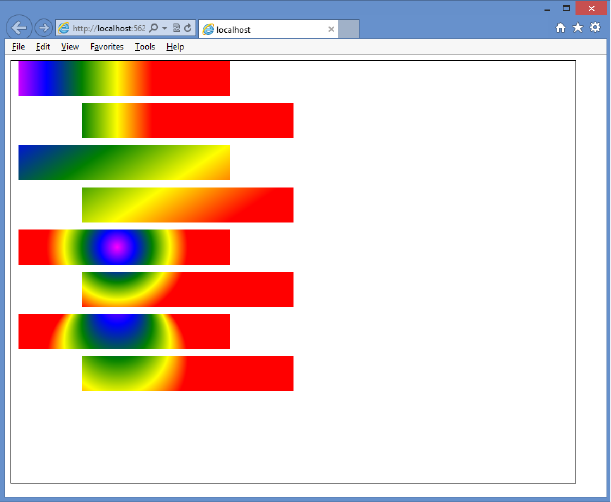
468 CHAPTER 12 Drawing with HTML5
FIGURE 12-3 Creating and assigning gradients to the fillStyle property
This example code displays two rectangles for each test, in which the second rectangle
is offset from the rst rectangle, so you can see how the gradient is rendered relative
to the canvas, not to the rectangle.
The rst pair of rectangles demonstrates a horizontal linear gradient when y0 and y1
are equal.
The second pair of rectangles shows what happens when y1 is different from y0. In this
example, if you draw a line from x0, y0 to x1, y1, the line will be angled downward. The
gradient is rendered along this line and displays as a diagonal linear gradient.
The third pair of rectangles illustrates the radial gradient when x0=x1 and y0=y1, but
r0 is set to zero when r1 is set to 100. Because both points are the same, the radial gra-
dient is circular. Because r0 is zero, the gradient starts in the center. The gradient ends
at r1, which is set to 100.
The last pair of rectangles shows what happens when the two points are not the same.
In this case, x0 and x1 are the same, but y0 and y1 are different, which produces a non-
circular gradient.
Pattern A CanvasPattern object that is created by using the context’s createPattern
method and creates a pattern ll. The createPattern method takes an image parameter
and a direction parameter. The image is a reference to an <img> element, and the
direction is a string containing no-repeat, repeat-x, repeat-y, or repeat.

Lesson 1: Drawing by using the <canvas> element CHAPTER 12 469
Figure 12-4 shows a small image with a rectangle and a circle. This image has a trans-
parent background, and there is no border around the edge of the image.
FIGURE 12-4 Image used to create a repeating pattern
By using the image in Figure 12-4, the following code creates a pattern that is assigned
to the llStyle property.
function drawPattern() {
var canvas = document.getElementById('myCanvas')
, ctx = canvas.getContext('2d');
// create new image object to use as pattern
var img = new Image();
img.src = 'images/pattern.gif';
img.onload = function () {
// create pattern
var ptrn = ctx.createPattern(img, 'repeat');
ctx.fillStyle = ptrn;
ctx.fillRect(0, 0, 400, 400);
}
}
In this example, instead of creating an <img> element, the image is dynamically created,
and its source (src) is set to the pattern.gif le. Next, the onload event of the image is sub-
scribed to that creates the pattern on the canvas after the pattern.gif le is loaded. The result
is shown in Figure 12-5.
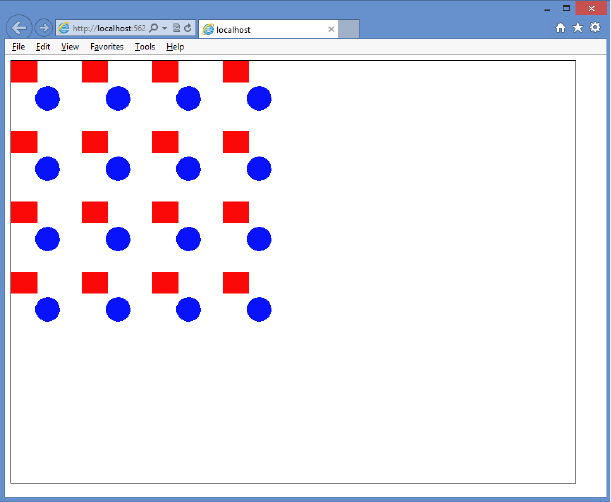
470 CHAPTER 12 Drawing with HTML5
FIGURE 12-5 The pattern repeated within the rectangular area
Setting lineWidth
The lineWidth property species the thickness of any line you draw. The following code
example draws rectangles by using different lineWidth settings.
function drawLineWidth() {
var canvas = document.getElementById('myCanvas')
, ctx = canvas.getContext('2d')
, offset = 40
, width = 5
, height = 5
, lineWidth = 1
, i = 0
, centerX = canvas.width / 2
, centerY = canvas.height / 2;
for (i = 1; i < 15; i++) {
ctx.lineWidth = i;
ctx.strokeRect(centerX - (width / 2) - (i * offset / 2),
centerY - (height / 2) - (i * offset / 2),
width + (i * offset), height + (i * offset));
}
}
In this example, lineWidth is changed on each iteration of the for loop; the drawn rect-
angle starts small and gets larger with each iteration. The result is shown in Figure 12-6.
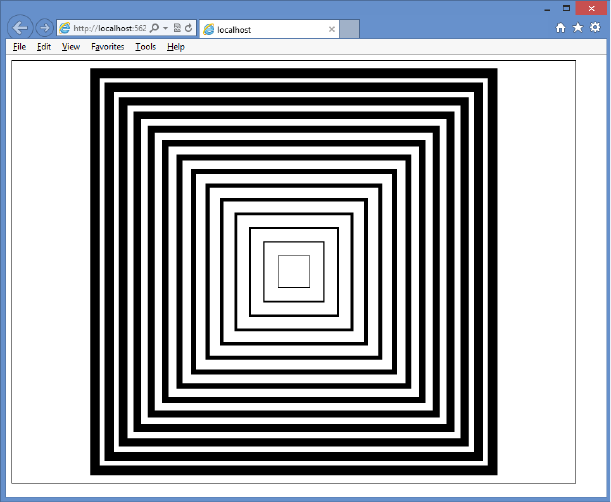
Lesson 1: Drawing by using the <canvas> element CHAPTER 12 471
FIGURE 12-6 The lineWidth, increased on each iteration of the for loop
Setting lineJoin
The lineJoin property species the way lines that join each other are drawn. You can set the
lineJoin property to round, bevel, or miter. The default value is miter. The difference between
these settings is most noticeable with thicker lines.
The following code demonstrates the creation of three rectangles that have different
lineJoin settings.
function drawLineJoin() {
var canvas = document.getElementById('myCanvas')
, ctx = canvas.getContext('2d');
ctx.lineWidth = 20;
ctx.lineJoin = 'round';
ctx.strokeRect(20, 20, 50, 50);
ctx.lineJoin = 'bevel';
ctx.strokeRect(100, 100, 50, 50);
ctx.lineJoin = 'miter';
ctx.strokeRect(180, 180, 50, 50);
}
In this example, the rst rectangle’s lineJoin property is set to round. This produces a rect-
angle with rounded corners. The second rectangle’s lineJoin property is set to bevel, which

472 CHAPTER 12 Drawing with HTML5
produces a rectangle with beveled corners. Finally, the third rectangle’s lineJoin property is
set to miter, which produces a rectangle with mitered, or pointy, corners. The result is shown
in Figure 12-7.
FIGURE 12-7 The lineJoin property specifying the look of the corners
Setting strokeStyle
The strokeStyle property species the way you want to draw lines. This setting is the same as
the llStyle property described earlier. See the “Setting llStyle” section for more information
regarding the valid settings. The following is an example of the strokeStyle property.
function drawGradientStroke() {
var canvas = document.getElementById('myCanvas')
, ctx = canvas.getContext('2d')
, x0 = 0
, y0 = 0
, r0 = 0
, x1 = 200
, y1 = 0
, r1 = 100
, width = 300
, height = 40
, offset = 25;
ctx.lineWidth = 15;
gradient = ctx.createLinearGradient(x0, y0, x1, y1);
Lesson 1: Drawing by using the <canvas> element CHAPTER 12 473
addColorStops(gradient);
ctx.strokeStyle = gradient;
ctx.strokeRect(10, 0 * (height + offset), width, height);
ctx.strokeRect(100, 1 * (height + offset), width, height);
y1 = 300;
gradient = ctx.createLinearGradient(x0, y0, x1, y1);
addColorStops(gradient);
ctx.strokeStyle = gradient;
ctx.strokeRect(10, 2 * (height + offset), width, height);
ctx.strokeRect(100, 3 * (height + offset), width, height);
x0 = x1 = width / 2;
y0 = y1 = 4 * (height + offset) + (height / 2);
gradient = ctx.createRadialGradient(x0, y0, r0, x1, y1, r1);
addColorStops(gradient);
ctx.strokeStyle = gradient;
ctx.strokeRect(10, 4 * (height + offset), width, height);
ctx.strokeRect(100, 5 * (height + offset), width, height);
y0 = 5 * (height + offset) + (height / 2);
y1 = y0 + 100;
gradient = ctx.createRadialGradient(x0, y0, r0, x1, y1, r1);
addColorStops(gradient);
ctx.strokeStyle = gradient;
ctx.strokeRect(10, 6 * (height + offset), width, height);
ctx.strokeRect(100, 7 * (height + offset), width, height);
}
This example is a modied version of the drawGradient function that was presented as an
example of the llStyle property. The addColorStops function is also dened in that example.
The result is shown in Figure 12-8.
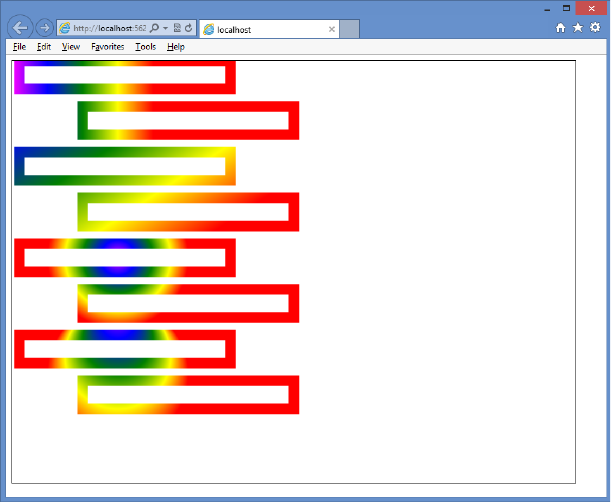
474 CHAPTER 12 Drawing with HTML5
FIGURE 12-8 The strokeStyle property, which accepts the same values as fillStyle
Saving and restoring the drawing state
It is possible to save all the context object properties to a stack, which is a last-in, rst-out
(LIFO) collection. This does not save the actual canvas; just the settings are saved. The save
method saves the current settings, and the restore method restores the settings. The follow-
ing example shows the save and restore methods.
function saveRestore() {
var canvas = document.getElementById('myCanvas')
, ctx = canvas.getContext('2d');
ctx.lineWidth = 20;
ctx.strokeStyle = “green";
ctx.lineJoin = 'round';
ctx.strokeRect(20, 20, 50, 50);
ct x.s ave( );
ctx.lineWidth = 10;
ctx.strokeStyle = “red";
ctx.lineJoin = 'bevel';
ctx.strokeRect(100, 100, 50, 50);
ctx.restore();
ctx.strokeRect(180, 180, 50, 50);
}

Lesson 1: Drawing by using the <canvas> element CHAPTER 12 475
In this example, the lineWidth, strokeStyle, and lineJoin properties are set, and a rectangle
is drawn. The save method is called to save the settings. The settings are modied, and a new
rectangle is drawn with the new settings. Finally, the restore method is called, which pops
(gets and removes) the settings from the stack, and a rectangle is drawn. This rectangle has
the same property settings as the rst rectangle. The result is shown in Figure 12-9.
FIGURE 12-9 Showing how the settings can be saved and restored
You can save many times to create a stack of settings and then restore many times to
empty the stack.
Drawing by using paths
A path is a set of lines that are used to draw shapes. Each line is called a sub-path. Each sub-
path has a start and an end, and the end of one sub-path is typically where the next sub-path
starts. The collection of sub-paths makes a shape.
The sequence for creating a shape is as follows.
1. Start a path by calling the beginPath method.
2. Go to the starting position by calling the moveTo method.
3. Draw sub-paths calling methods such as lineTo and rect.
4. End the path by optionally calling the closePath method.
5. Render the lled shape or outlined shape by calling ll or stroke methods, respectively.
Key
Terms
476 CHAPTER 12 Drawing with HTML5
The examples that follow have a simple webpage with a <canvas> element and references
to canvasPath.css, canvasPath.js, and jquery-1.8.2.js les as follows.
<!DOCTYPE html>
<html xmlns="http://www.w3.org/1999/xhtml">
<head>
<title></title>
<link href="Content/canvasPath.css" rel="stylesheet" />
<script src="Scripts/jquery-1.8.2.js"></script>
<script src="Scripts/canvasPath.js"></script>
</head>
<body>
<canvas id="myCanvas" width="800" height="600">
You need a browser that supports HTML5!
</canvas>
</body>
</html>
The canvasPath.js le is presented in each example. The canvasPath.css le contains the
following style rule.
canvas {
border: 1px solid black;
}
Drawing lines
The easiest path to create is one composed of lines. This is accomplished by using the lineTo
method, which accepts x and y parameters. The following is an example of using lines to cre-
ate shapes that have a yellow outline and green ll.
$(document).ready(function () {
drawLine();
});
function drawLine(){
var canvas = document.getElementById('myCanvas')
, ctx = canvas.getContext('2d');
ctx.fillStyle = 'green';
ctx.strokeStyle = 'yellow';
ctx.lineWidth = 10;
ctx.beginPath();
ctx.moveTo(100, 250);
ctx.lineTo(150, 350);
ctx.lineTo( 50, 350);
ctx.closePath();
ctx.fill();
ctx.beginPath();
ctx.moveTo(150, 250);
ctx.lineTo(250, 250);
ctx.lineTo(200, 350);
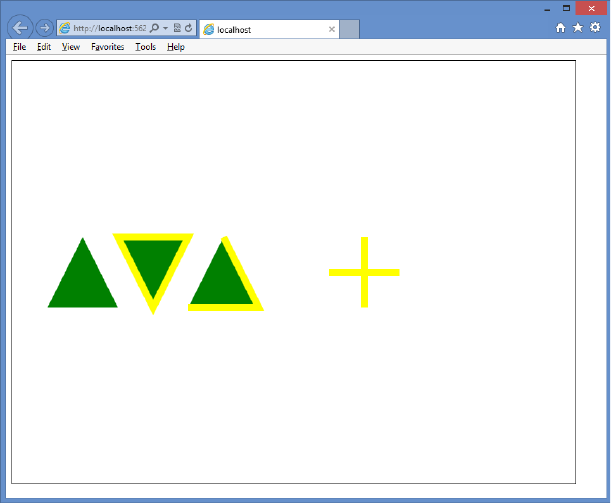
Lesson 1: Drawing by using the <canvas> element CHAPTER 12 477
ctx.closePath();
ctx.fill();
ctx.stroke();
ctx.beginPath();
ctx.moveTo(300, 250);
ctx.lineTo(350, 350);
ctx.lineTo(250, 350);
ctx.fill();
ctx.stroke();
ctx.beginPath();
ctx.moveTo(500, 250);
ctx.lineTo(500, 350);
ctx.moveTo(450, 300);
ctx.lineTo(550, 300)
ctx.fill();
ctx.stroke();
}
This example draws four shapes. The rendered output is shown in Figure 12-10.
FIGURE 12-10 Rendered shapes that are drawn by using the lineTo method
The rst shape is a triangle. It’s created by drawing two lines and then calling the closePath
method, which draws a line from the end back to the start. The ll method is called to ll the
triangle with green. There is no outline because the stroke method was not called.
478 CHAPTER 12 Drawing with HTML5
The second shape is also a triangle and is drawn like the rst triangle, but the stroke
method is called after the ll method is called. The stroke method creates the yellow outline.
The third shape is also a triangle, but this code doesn’t call the closePath method. In this
example, the ll method implicitly calculates the ll area, but because the closePath method
is not called, there is no line from the end to the start; therefore, no outline is rendered from
the end to the start.
The fourth shape is a plus sign. This demonstrates the use of the moveTo method to create
a line that doesn’t start where the previous line ended. The stroke method creates the lines,
but the ll method doesn’t render anything.
Drawing rectangles
You can add rectangles to your path by calling the rect method. Keep in mind that if all you
need to do is draw a rectangle, you can use the llRect and the strokeRect methods, dis-
cussed earlier in this lesson.
The rect method is useful when you are dening a complex shape. Instead of adding many
lineTo calls to draw a rectangle, you just call the rect method. The following is an example of
creating a shape that consists of a triangle and rectangle.
function drawRect() {
var canvas = document.getElementById('myCanvas')
, ctx = canvas.getContext('2d');
ctx.fillStyle = 'green';
ctx.strokeStyle = 'yellow';
ctx.lineWidth = 10;
ctx.beginPath();
ctx.moveTo(100, 300);
ctx.lineTo(150, 250);
ctx.lineTo(200, 300);
ctx.rect(100, 300, 100, 100);
ctx.fill();
ctx.stroke();
}
The rendered output is shown in Figure 12-11. Notice in the rendered output that the
triangle and the rectangle are outlined.
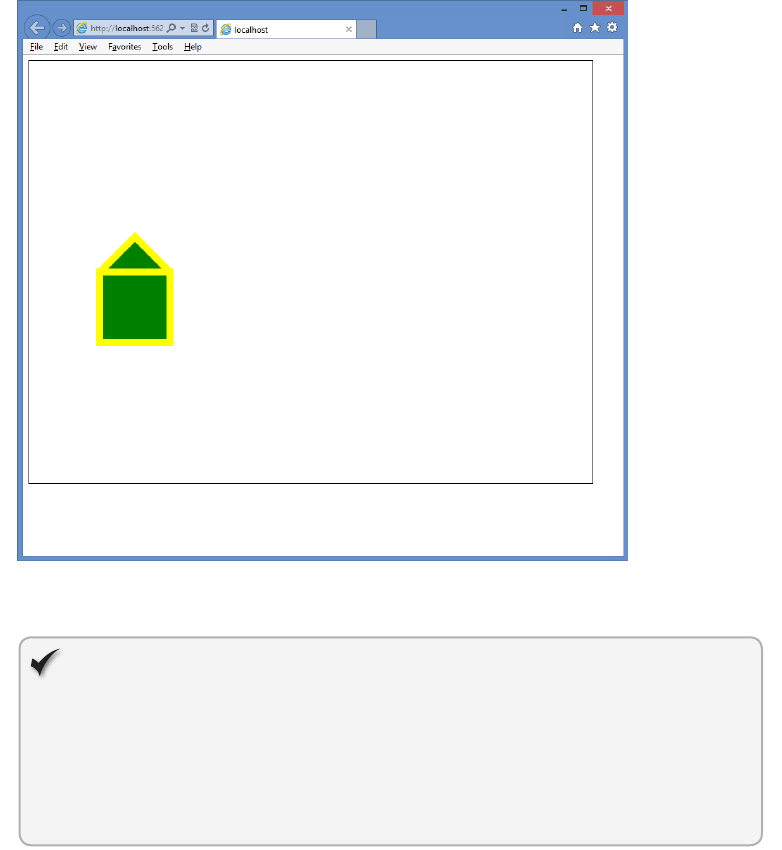
Lesson 1: Drawing by using the <canvas> element CHAPTER 12 479
FIGURE 12-11 The rendered output, using lineTo and rect methods
Quick check
What are the four parameters of the rect method?
Quick check answer
The rst and second parameters are the x and y coordinates of the upper-left
corner of the rectangle. The third parameter is the width, and the fourth param-
eter is the height.
Ordering the ll and the stroke method calls
You might be wondering whether there is a difference between calling ll and then stroke
versus calling stroke and then ll. There is a difference, but before the difference is displayed,
you need to understand how the stroke is rendered.
When stroke is called, the outline is created using the current lineWidth property. Half
of lineWidth is outside the shape, and half is inside the shape. The part of the outline that
is inside the shape overwrites the ll if the stroke method is called after the ll method.
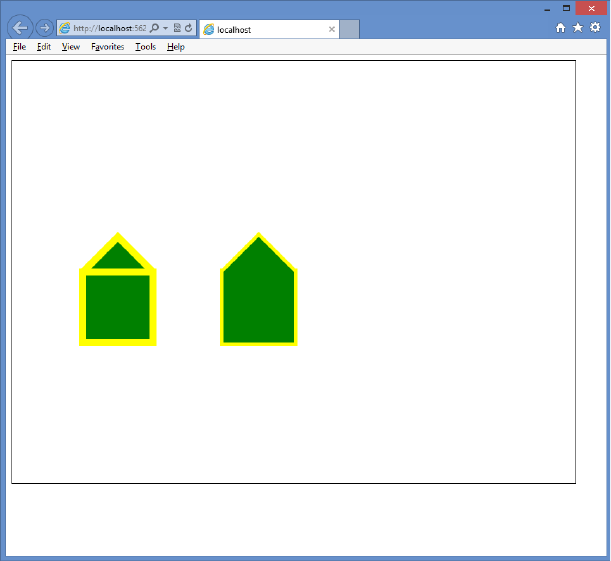
480 CHAPTER 12 Drawing with HTML5
However, if the ll method is called after the stroke method, the ll overwrites the stroke that
is inside the ll area.
Consider the following example that draws two shapes, each consisting of a triangle and
a rectangle. The difference is the order in which the ll method and the stroke method are
called. The rendered output is shown in Figure 12-12.
FIGURE 12-12 Rendered shapes, different due to the order of the fill and stroke execution
function drawRect() {
var canvas = document.getElementById('myCanvas')
, ctx = canvas.getContext('2d');
ctx.fillStyle = 'green';
ctx.strokeStyle = 'yellow';
ctx.lineWidth = 10;
ctx.beginPath();
ctx.moveTo(100, 300);
ctx.lineTo(150, 250);
ctx.lineTo(200, 300);
ctx.rect(100, 300, 100, 100);
ctx.fill();
ctx.stroke();
ctx.beginPath();
Lesson 1: Drawing by using the <canvas> element CHAPTER 12 481
ctx.moveTo(300, 300);
ctx.lineTo(350, 250);
ctx.lineTo(400, 300);
ctx.rect(300, 300, 100, 100);
ctx.stroke();
ctx.fill();
}
The rendered output of the outline of the second shape is narrow compared to the outline
of the rst shape, and the second shape does not have the horizontal line of the triangle.
These differences result from the ll method being called after the stroke method, so the ll
color overwrites any previous color.
Drawing arcs by using the arcTo method
In addition to drawing straight lines, you can draw curved lines by using the arc and the arcTo
methods on the context object.
The arcTo method accepts an x1 and a y1 coordinate that dene a point through which the
arc lines must pass, followed by an x2 and a y2 coordinate that dene the endpoint, followed
by the radius of the arc. Although only two points are provided as parameters, a third point
(x0, y0) is the starting point of the arc. The third point is the ending point of the previous
sub-path.
Drawing an arc by using the arcTo method can be confusing. To understand how arcTo
works, perform the following steps.
1. On a piece of paper, draw a line through (x0, y0) and (x1, y1).
2. Draw a line through (x1, y1) and (x2, y2).
3. On a separate piece of paper, draw a circle of radius r and cut it out.
4. Place the circle on the paper that has the two lines and slide the circle up between the
line that contains (x0, y0) and the line that contains (x2, y2) until it just touches both
lines. The two points where the circle touches the lines are called tangent points, where
t1 is closest to (x0, y0), and t2 is closest to (x2, y2).
5. Draw a line from point (x0, y0) to the rst tangent point on the line from (x0, y0) to
(x1, y1).
6. Draw an arc from that tangent point to the other tangent point on the line from
(x1, y1) to (x2, y2) along the circumference of the circle.
7. The endpoint of arcTo is the second tangent point on the line from (x1, y1) to (x2, y2).
Figure 12-13 shows two examples of the arcTo implementation.
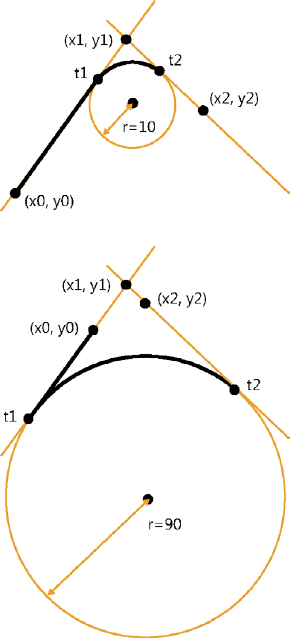
482 CHAPTER 12 Drawing with HTML5
FIGURE 12-13 The arcTo method producing unexpected results if you don’t understand how it works
In the rst example, the radius of the circle is small, so the circle is slid up past x0, y0 and
x2, y2 until it touches the lines. In this example, t1 is between x0, y0 and x1, y1, whereas t2 is
between x1, y1 and x2, y2. There is some distance between x0, y0 and t1, so this arc starts as a
straight line until it reaches t1. At t1, the curve starts until it reaches t2, where the arc ends.
In the second example, the radius is much larger, so the circle is slid up until it touches the
lines, but this time, t1 is outside x0, y1, and t2 is outside x2, y2. There is still some distance
between (x0, y0) and t1, so a straight line is drawn between the two points. At t1, the curve
starts until it reaches t2, where the arc ends.
Consider the following code example that draws two lines and then creates an arc by using
the arcTo method.
function drawArcTo() {
var canvas = document.getElementById('myCanvas')
, ctx = canvas.getContext('2d');
ctx.strokeStyle = 'gray';
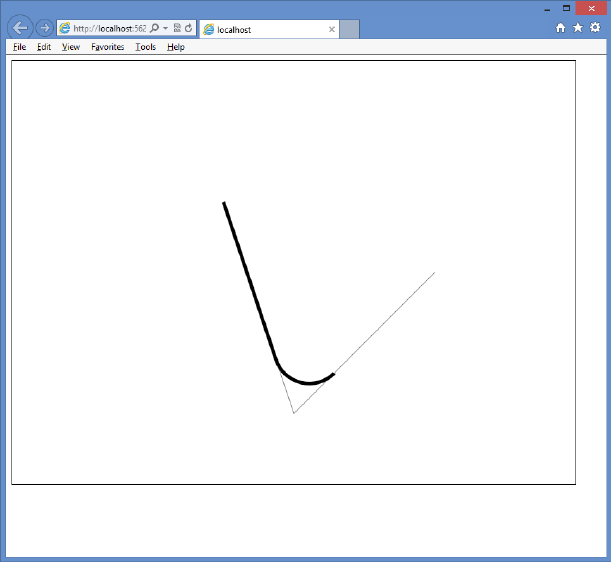
Lesson 1: Drawing by using the <canvas> element CHAPTER 12 483
ctx.lineWidth = 1;
ctx.beginPath();
ctx.moveTo(300, 200);
ctx.lineTo(400, 500);
ctx.lineTo(600, 300);
ctx.stroke();
ctx.strokeStyle = 'black';
ctx.lineWidth = 5;
ctx.beginPath();
ctx.moveTo(300, 200);
ctx.arcTo(400, 500, 600, 300, 50);
ctx.stroke();
}
In this example, the lines are drawn to depict the lines from the previous example. The
lines are gray, and lineWidth is set to 1. The arc is drawn by using the arcTo method. This
starting point is 300, 200, the second point is 400, 500, and the last point is 600, 300. The
radius is set to 50. The rendered output is shown in Figure 12-14.
FIGURE 12-14 The rendered arc when the radius is set to 50
484 CHAPTER 12 Drawing with HTML5
Because the starting point is always the ending point of the previous sub-path (or, in
this case, the moveTo location), the stroke continues from that point until it reaches the rst
tangent, and then the curve starts until it reaches the second tangent, and then the arc is
nished.
In this code example, the points stay the same, but the radius is changed from 50 to 300 as
follows.
function drawArcTo() {
var canvas = document.getElementById('myCanvas')
, ctx = canvas.getContext('2d');
ctx.strokeStyle = 'gray';
ctx.lineWidth = 1;
ctx.beginPath();
ctx.moveTo(300, 200);
ctx.lineTo(400, 500);
ctx.lineTo(600, 300);
ctx.stroke();
ctx.strokeStyle = 'black';
ctx.lineWidth = 5;
ctx.beginPath();
ctx.moveTo(300, 200);
ctx.arcTo(400, 500, 600, 300, 300);
ctx.stroke();
}
The result is shown in Figure 12-15. The radius of the circle has a profound impact on the
rendered arc. In addition, because the circle is slid into the angle that’s formed by the line
x0, y0 is on and the line x2, y2 is on, you can’t possibly create an arc that is greater than 180
degrees because the circle will always touch these lines to create tangents t1 and t2 before
the arc reaches 180 degrees.
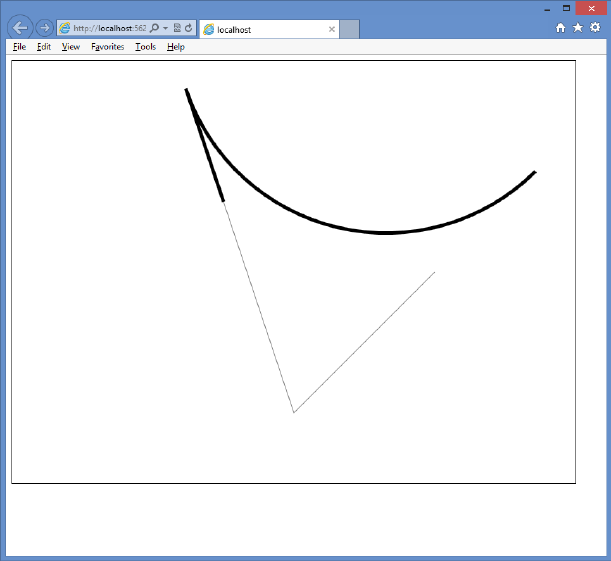
Lesson 1: Drawing by using the <canvas> element CHAPTER 12 485
FIGURE 12-15 Changing the radius changes the arc dramatically
Drawing arcs by using the arc method
The arc method is much simpler to use than the arcTo method. The arc method can be used
to draw a circle or any part of a circle. This is different from the behavior of the arcTo method,
which cannot draw more than half a circle and might produce lines with the arc in an effort to
continue a path without breaking the stroke.
The arc method accepts x and y coordinates as the center of the circle used to draw the
arc, followed by the radius of the circle that the arc will use, followed by the starting angle
and the ending angle. You can add a direction parameter that indicates the direction of the
arc. The following example code shows how to create a circle by using the arc method.
function drawArc() {
var canvas = document.getElementById('myCanvas')
, ctx = canvas.getContext('2d');
ctx.strokeStyle = 'blue';
ctx.fillStyle = 'yellow';
ctx.lineWidth = 5;
ctx.beginPath();
ctx.arc(400, 300, 100, 0, 2 * Math.PI);
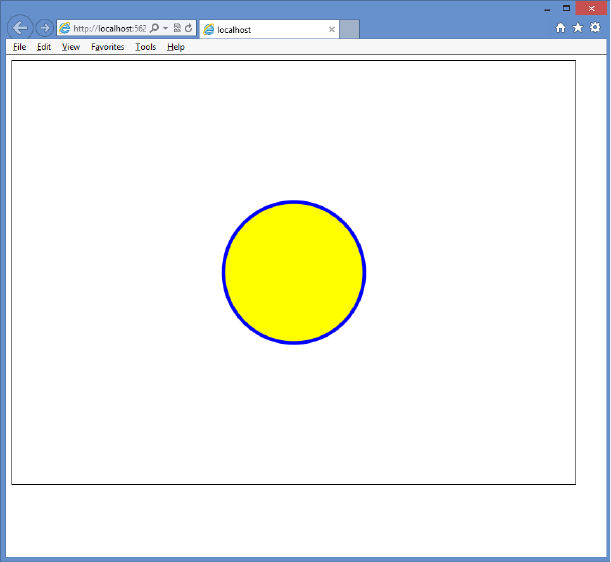
486 CHAPTER 12 Drawing with HTML5
ctx.fill();
ctx.stroke();
}
In this example, the center of the circle is 400, 300, which is the middle of the canvas. The
radius is set to 100. The starting location must be a value between 0 and 6.283185, which is
2 * PI. The ending location must also be a value between 0 and 6.283185. The values 0 and
6.283185 can be used to represent the farthest right-side point of the circle. The value of
3.14159 (PI) is the farthest left-side point of the circle. The uppermost point of the circle is 1.5
* PI, while the lowermost point of the circle is .5 * PI. The rendered canvas is shown in Figure
12-16. The rendered circle has a blue outline and yellow ll.
FIGURE 12-16 Creating a circle by using the arc method
To draw an arc that represents part of the circle, you need valid start and end locations,
and you need to consider the optional direction parameter. By default, the stroke is rendered
clockwise, which means that the direction is set to false. Consider the following example, in
which you provide a start location of 0 and an end location of 1.5 * PI.
function drawArc() {
var canvas = document.getElementById('myCanvas')
, ctx = canvas.getContext('2d');
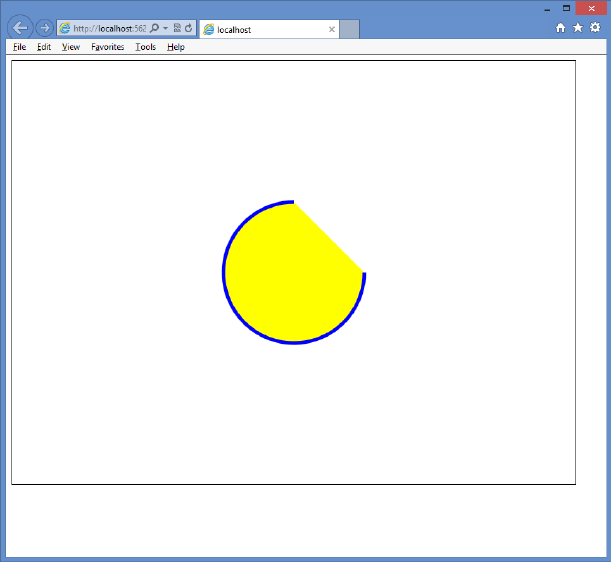
Lesson 1: Drawing by using the <canvas> element CHAPTER 12 487
ctx.strokeStyle = 'blue';
ctx.fillStyle = 'yellow';
ctx.lineWidth = 5;
ctx.beginPath();
ctx.arc(400, 300, 100, 0, 1.5 * Math.PI);
ctx.fill();
ctx.stroke();
}
The rendered arc is shown in Figure 12-17, which shows that three-quarters of the circle is
rendered. Is that what you wanted or expected? If you want to render only the quarter of the
circle that is missing, you have two possible solutions.
FIGURE 12-17 The rendered arc displaying three-quarters of the circle
One solution is to set the start location to 1.5 * Math.PI and the end location to 0. Because
the rendering renders the stroke clockwise, the arc will start rendering at the uppermost
point of the circle and stop at the rightmost point of the circle.
The other solution is to leave the start at 0 and the end at 1.5 * Math.PI but add the
optional direction parameter, passing in a value of true. This causes the stroke rendering to go
counterclockwise, which renders the quarter circle.
488 CHAPTER 12 Drawing with HTML5
Drawing text
You can also draw text on the canvas by using the llText or strokeText method. Support
for drawing text is somewhat basic. Both methods require you to pass the text to be drawn
as the rst parameter, followed by x and y coordinates that specify where the text is drawn.
The exact meaning of the coordinate depends on the value of the textAlign and textBaseline
properties, but the default is that the coordinate is at the lower-left corner of the text that’s
drawn. You can also provide a parameter to indicate the maximum width of the text to be
drawn.
In addition to the methods, the following properties can be set to control the look of the
rendered text.
font Sets the font style, size, and family, delimited by spaces. The style can be nor-
mal, italic, or bold. The size can be a CSS size. The family represents the font family,
which can be a generic font family, such as serif or sans serif, or a specic font family,
such as Arial or Courier.
textAlign Sets the horizontal alignment of the text in relation to the coordinate that
is passed into the llText or strokeText method. Can be start, end, left, right, or center.
Note that start and left are the same, and end and right are the same.
textBaseline Sets the vertical alignment of the text in relation to the coordinate that
is passed into the llText or strokeText method. Can be top, hanging, middle, alpha-
betic, ideographic, or bottom.
The following example code draws a line across the canvas, through its center point
(400, 300). After that, “Hello” is drawn using the coordinate of 400, 300.
function drawText() {
var canvas = document.getElementById('myCanvas')
, ctx = canvas.getContext('2d');
ctx.strokeStyle = 'magenta';
ctx.fillStyle = 'yellow';
ctx.lineWidth = 2;
ctx.font = “bold 100pt TimesNewRoman";
ctx.beginPath();
ctx.moveTo(100, 300);
ctx.lineTo(700, 300);
ctx.stroke();
ctx.strokeStyle = 'blue';
ctx.fillText(“Hello", 400, 300);
ctx.strokeText(“Hello", 400, 300);
}

Lesson 1: Drawing by using the <canvas> element CHAPTER 12 489
The line is drawn as its own path, and then the stroke color is changed to blue, but there is
no need to start a new path because llText and strokeText create their own path. The llText
method automatically lls the text without requiring a call to the ll method. The strokeText
automatically outlines the text; in this case, this text overlies the rendered llText. The result is
shown in Figure 12-18.
FIGURE 12-18 The rendered Hello message showing that the coordinate is at the lower left of the text
The provided coordinate of 400, 300 is at the lower left of the rendered text, which means
that the default value of the textAlign property is start or left, and the default value of the
textBaseline is bottom. If you change the textAlign property to center and change the text-
Baseline to middle, the text will be centered horizontally and vertically within the canvas, as
shown in Figure 12-19.
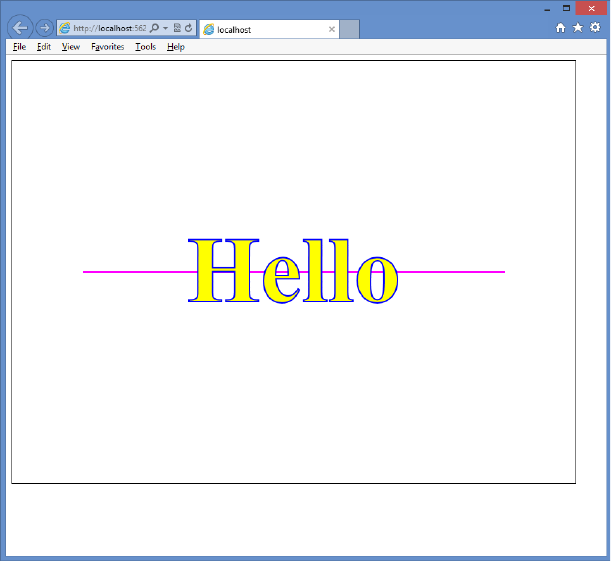
490 CHAPTER 12 Drawing with HTML5
FIGURE 12-19 Changing the textAlign and the textBaseline to center the text within the canvas
Drawing with images
In addition to drawing the many shapes this lesson has covered, you might want to place
images on the canvas. You can do this by drawing the image on the canvas, using the
drawImage method of the context object.
The drawImage method can accept either three or ve arguments. The rst argument is
the source of the image, which can be an <img> or <video> element or another < canvas>
element. When the <video> element is used, a snapshot of the frame that is currently
displayed is used as the image. When passing three arguments to the drawImage method,
the second and third arguments are the x and y coordinates of the upper-left corner of the
image. You can also create the <img> element in your JavaScript, which is great for when the
presentation of the image might be conditional and you don’t want to waste time loading
the image unless it’s required. The following code example demonstrates the creation of the
<img> element dynamically, loading it with a photo of an iceboat. When the image is loaded,
the drawImage method is called, and the image is passed in as the rst argument.
function drawImage() {
var canvas = document.getElementById('myCanvas')
, ctx = canvas.getContext('2d');
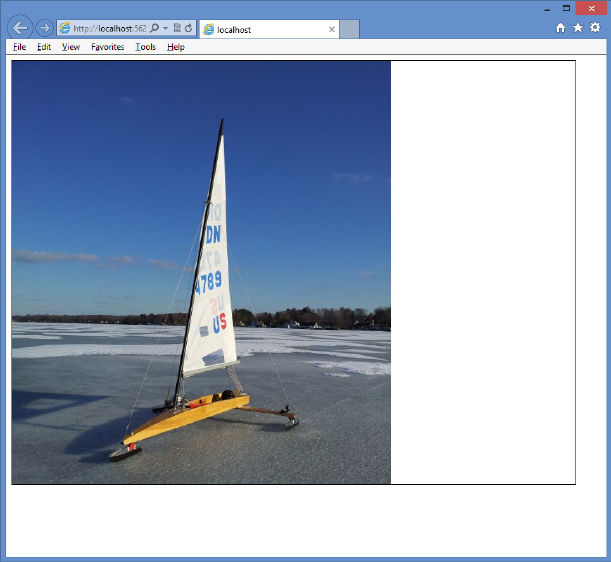
Lesson 1: Drawing by using the <canvas> element CHAPTER 12 491
var img = new Image();
img.src = “images/IceBoat.jpg";
img.onload = function () {
ctx.drawImage(img, 0, 0);
}
}
The results are shown in Figure 12-20. The image is drawn at its native width and height. If
the image is larger than the canvas, it’s clipped. This image is 538 pixels wide and 718 pixels
tall. Because the canvas is 800 pixels wide and 600 pixels tall, the bottom of this image is
clipped.
FIGURE 12-20 The drawn image placed in the upper-left corner of the canvas
You might need to control the size of the drawn image. Specify this with two more argu-
ments when calling the drawImage method, the width and the height. In the following
example, the width is set to 300, and the height is set to 400.
function drawImage() {
var canvas = document.getElementById('myCanvas')
, ctx = canvas.getContext('2d');
var img = new Image();
img.src = “images/IceBoat.jpg";
img.onload = function () {
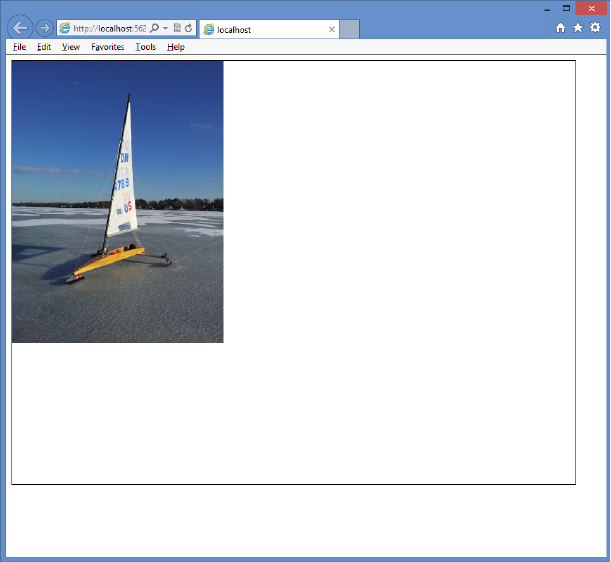
492 CHAPTER 12 Drawing with HTML5
ctx.drawImage(img, 0, 0, 300, 400);
}
}
The result is shown in Figure 12-21. When providing the height and width, you should try
to maintain the proportions of the image to keep the image from being skewed to look very
skinny or very fat.
FIGURE 12-21 The image drawn with a reduced size so it fits within the canvas
Keep in mind that you can draw your image and then overlay other shapes as necessary.
The following code demonstrates this by annotating the image.
function drawImage() {
var canvas = document.getElementById('myCanvas')
, ctx = canvas.getContext('2d');
var img = new Image();
img.src = “images/IceBoat.jpg";
img.onload = function () {
ctx.font = 'bold 24pt Arial';
ctx.drawImage(img, 175, 0, 450, 600);
ctx.strokeStyle = 'black';
ctx.lineWidth = 2;
Lesson 1: Drawing by using the <canvas> element CHAPTER 12 493
ctx.beginPath();
ctx.moveTo(405, 180);
ctx.lineTo(325, 180);
ctx.stroke();
ctx.strokeStyle = 'white';
ctx.lineWidth = 1;
ctx.textAlign = 'right';
ctx.textBaseline = 'middle';
ctx.fillText('Mast', 325, 180);
ctx.strokeText('Mast', 325, 180);
ctx.strokeStyle = 'black';
ctx.lineWidth = 2;
ctx.beginPath();
ctx.moveTo(420, 220);
ctx.lineTo(525, 220);
ctx.stroke();
ctx.strokeStyle = 'white';
ctx.lineWidth = 1;
ctx.textAlign = 'left';
ctx.textBaseline = 'middle';
ctx.fillText('Sail', 525, 220);
ctx.strokeText('Sail', 525, 220);
ctx.strokeStyle = 'black';
ctx.lineWidth = 2;
ctx.beginPath();
ctx.moveTo(420, 360);
ctx.lineTo(500, 360);
ctx.stroke();
ctx.strokeStyle = 'white';
ctx.lineWidth = 1;
ctx.textAlign = 'left';
ctx.textBaseline = 'middle';
ctx.fillText('Boom', 500, 360);
ctx.strokeText('Boom', 500, 360);
}
}
The result is shown in Figure 12-22.
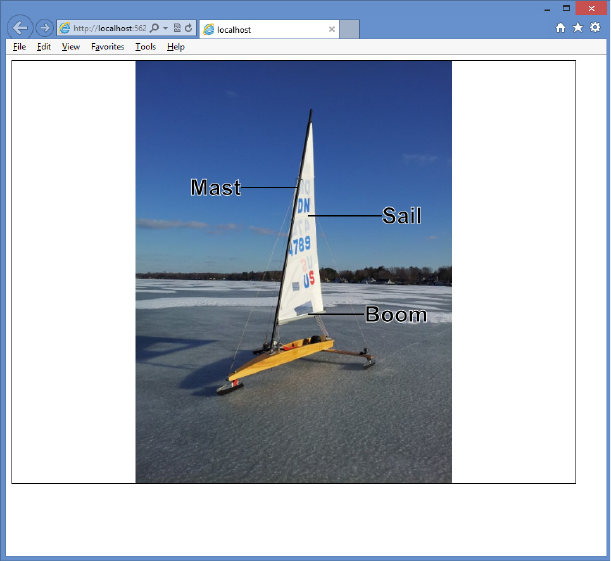
494 CHAPTER 12 Drawing with HTML5
FIGURE 12-22 The annotated image showing that you can mix images and shapes on the canvas
Lesson summary
The <canvas> element is new in HTML5 and provides a drawing context that is acces-
sible using JavaScript.
Use the getContext method on the <canvas> element to get a reference to the context
object.
Use the llRect and strokeRect methods to draw rectangles.
Methods that start with ll are used to ll the shape with the value of the llStyle prop-
erty. The llStyle property can be set to a color, gradient, or pattern.
Methods that begin with stroke create an outline of the shape with the value of the
strokeStyle property. The strokeStyle property can be set to a color, gradient, or
pattern.
The context object’s properties can be pushed onto a stack by using the save method
or popped from the stack by using the restore method.
Use paths to create complex shapes using lines, rectangles, and arcs.
Use the llText and strokeText methods to draw text on the canvas. Use the drawImage
method to draw images on the canvas.

Lesson 1: Drawing by using the <canvas> element CHAPTER 12 495
Lesson review
Answer the following questions to test your knowledge of the information in this lesson. You
can nd the answers to these questions and explanations of why each answer choice is correct
or incorrect in the “Answers” section at the end of this chapter.
1. Which code example can be used to draw a rectangle on a <canvas> element that has
an id of myCanvas?
A. var canvas = document.getElementById(‘myCanvas’);
var ctx = canvas.getContext();
ctx.rectangle(10, 10, 50, 75);
B. var canvas = document.getElementById(‘myCanvas’);
canvas.rectangle(10, 10, 50, 75);
C. var canvas = document.getElementById(‘myCanvas’);
var ctx = canvas.getContext(‘2d’);
ctx.llRect(10, 10, 50, 75);
D. var canvas = document.getElementById(‘myCanvas’);
var ctx = canvas.getContext();
ctx.llRect(10, 10, 50, 75);
2. You want to draw an arc that is approximately three-quarters of a circle. Which method
is the easiest to use to accomplish this task?
A. arcTo()
B. arc()
C. circle()
D. dot()
Lesson 2: Using scalable vector graphics
What is scalable vector graphics (SVG), and why would you want to use it? These are com-
mon questions, especially as everyone becomes aware of SVG due to its inclusion in HTML5.
In Lesson 1, “Drawing by using the <canvas> element,” you learned to draw on a <canvas>
element, using JavaScript. Although you might have used shape-specic methods such as ll-
Rect or arc, the rendering on the canvas is done in a bitmapped manner, meaning that pixels
are commanded to display, and after the shape rendered, the canvas is left with bitmapped
results. In other words, the canvas does not store the fact that you created a rectangle. If the
drawing surface is scaled larger, the canvas only has the pixels to work with, so the result is a
blocky, or pixelated, version of the graphic.
SVG is different from the canvas; with SVG, the commands are stored in a manner that
enables them to be re-executed. If the size of the drawing surface changes, the commands
can be scaled and re-executed for the new drawing to create a new image, based on the SVG
commands. The result is that you see a crisp image regardless of the scale.
496 CHAPTER 12 Drawing with HTML5
Even though SVG renders much better than the canvas, it takes time to scale and re-exe-
cute the commands, so performance is not as good. The canvas is preferable when perfor-
mance is more important.
SVG is XML-based, and you can embed SVG in your HTML page by using the <svg> ele-
ment. The content of the <svg> element contains the XML-based commands that make the
drawing. The <svg> element, plus its content, is part of the document object model (DOM),
so all of the <svg> element and its children are accessible from JavaScript. Events can also be
attached to any of the elements. However, you don’t want to write all the XML that’s required
to create a complex drawing. It’s typically best to use an SVG editor to create the drawing and
then embed the drawing into your webpage.
In this lesson, you learn how to use the <svg> element to embed a drawing in an HTML
page to display simple graphics. In addition, you learn how to use the <img> element to
display .svg les.
After this lesson, you will be able to:
Describe the <svg> element.
Implement the <svg> element.
Display SVG les using the <img> element.
Estimated lesson time: 20 minutes
Using the <svg> element
The <svg> element is a container for the XML-based commands. Using it in your HTML page
enables you to embed your drawing directly into the page. The following is an example of a
basic <svg> element.
<svg width="500" height="300" xmlns="http://www.w3.org/2000/svg">
</svg>
In this example, the width and height are set, and the XML namespace is dened to indi-
cate that this is an SVG drawing.
Creating a path
A path is a sequence of commands that create a complex shape. Use the <path> element,
which has id, ll, and d attributes, to create a path. The ll attribute is passed the color with
which you want to ll the path. The d attribute is for the <path> element’s data, which is
populated with the commands and typically starts with a command to move to the point at
which the drawing of the shape begins. The command to move is m or M. When the low-
ercase command is used, it indicates that the coordinates are relative. When the uppercase
command is used, it indicates that the coordinates are absolute.
Lesson 2: Using scalable vector graphics CHAPTER 12 497
The following is a list of commands that can be used in a path.
M or m Move to a specied coordinate.
L or l Draw a line from the current location to the coordinate specied.
H or h Draw a horizontal line from the current location to the new x value specied
on the same horizontal plane.
V or v Draw a vertical line from the current location to the new y value specied on
the same vertical plane.
A or a Parameters are rx, ry, x-axis-rotation, large-arc, sweep, x, and y. This com-
mand draws an elliptical arc from the current point to the specied coordinate of x, y
with x-radius rx and y-radius ry. The ellipse is rotated x-axis-rotation degrees. If the arc
is less than 180 degrees, large-arc is zero; else it is one. If the arc is greater than 180
degrees, the large-arc is set to 1. If the arc is drawn in the positive direction, the sweep
is set to 1; else the sweep is set to zero.
Q or q Parameters are x1, y1, x, and y. This command draws a quadratic Bézier curve
from the current location to the coordinate specied as x, y by using the control point
specied as x1, y1.
T or t Draw a quadratic Bézier curve from the current point to the coordinate speci-
ed, using the previous Q command’s control point.
C or c Parameters are x1, y1, x2, y2, x, and y. This command draws a cubic Bézier
curve from the current point to the x, y coordinate specied by using control point x1,
y1 for the beginning of the curve and control point x2, y2 for the end of the curve.
S or s Parameters are x2, y2, x, and y. This command draws a cubic Bézier curve from
the current point to the x, y coordinate specied by using the control point from the
previous C command for the beginning of the curve and control point x2, y2 for the
end of the curve.
Z or z Close the path from the current position to the beginning of the path.
The following example draws a car body by using a path that moves to 267, 76 and draws
lines by using the l (lowercase L) command.
<path d="m267 76 l-21 -4 -144 0 -90 47 0 54 11 11 23 0 15 -30 15 -10 30 0 15 10
15 30 220 0 15 -30 15 -10 30 0 15 10 15 30 l25 0 7 -7 -13 -38
-20 -10 -95 -15 z" fill="blue" id="carBody"/>
In this example, the lowercase L was not repeating for each line command, which dem-
onstrates that you can specify the command once, provide parameters, provide parameters
again, and so on. The path ends with the lowercase Z command, which closes the path. The
ll color is set to blue, and the id attribute is set to carBody.
Here are two more paths, which create the front and rear windows of the car.
<path d="m65 105 l40 -25 65 0 0 34 -112 0 z" fill="white" id="rearWindow" />
<path d="m300 105 l-40 -25 -78 0 0 34 122 0 z" fill="white" id="frontWindow" />
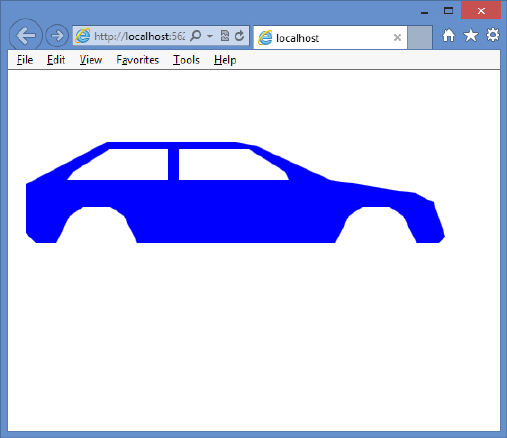
498 CHAPTER 12 Drawing with HTML5
These paths have a ll color of white. The result in Figure 12-23 shows the rendered car
body with its windows.
FIGURE 12-23 The <path> element that is used to create a car body with windows
Drawing circles
You can add circles to an SVG drawing by using the <circle> element, which has r, cx, cy, ll,
and id attributes. The r attribute sets the circle radius. The cx and cy attributes set the circle
center coordinate. The ll attribute sets the color of the circle. The following example adds
two wheels to the vehicle body created in the previous example.
<circle r="35" cy="185" cx="90" fill="black" id="rearWheel" />
<circle r="35" cy="185" cx="400" fill="black" id="frontWheel" />
The completed <svg> element is as follows.
<svg width="500" height="300" xmlns="http://www.w3.org/2000/svg">
<path d="m267 76 l-21 -4 -144 0 -90 47 0 54 11 11 23 0 15 -30 15 -10 30 0
15 10 15 30 220 0 15 -30 15 -10 30 0 15 10 15 30 l25 0 7 -7
-13 -38 -20 -10 -95 -15 z" fill="blue" id="carBody" />
<path d="m65 105 l40 -25 65 0 0 34 -112 0 z" fill="white" id="rearWindow" />
<path d="m300 105 l-40 -25 -78 0 0 34 122 0 z" fill="white" id="frontWindow" />
<circle r="35" cy="185" cx="90" fill="black" id="rearWheel" />
<circle r="35" cy="185" cx="400" fill="black" id="frontWheel" />
</svg>
The completed car is shown in Figure 12-24.
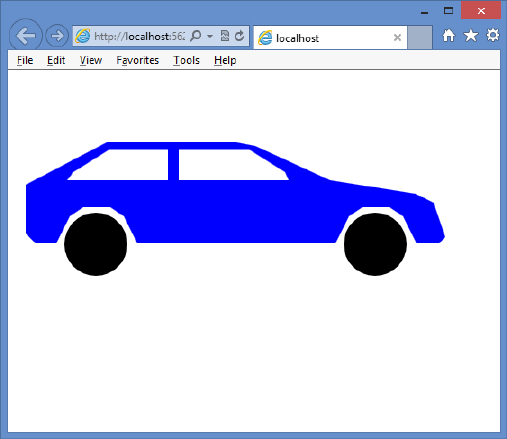
Lesson 2: Using scalable vector graphics CHAPTER 12 499
FIGURE 12-24 The rendered car using <path> and <circle> elements
Displaying SVG les by using the <img> element
You have just seen how you can create SVG images by writing the XML yourself, but you can
use any of the SVG editors, such as svg-edit, which is a browser-based application, available at
http://code.google.com/p/svg-edit/.
If you use an SVG editor, you typically want to externalize the SVG into its own le to make
it easier to work on the drawing rather than embedding the drawing in your HTML page in
an <svg> element. You can do this by using the <img> element and setting the source to the
location of the .svg le. In the following example, the <svg> element is cut from the HTML
page and pasted into a new le called car.svg. In the HTML page, an <img> element is added
with a reference to the car.svg le.
<!DOCTYPE html>
<html xmlns="http://www.w3.org/1999/xhtml">
<head>
<title></title>
<link href="Content/svg.css" rel="stylesheet" />
</head>
<body>
<img src="images/car.svg" />
</body>
</html>
When you display the HTML page, the car is displayed. If you try to resize the page, the
image won’t resize because the settings need to be changed.
500 CHAPTER 12 Drawing with HTML5
Making the SVG scalable
The SVG le currently has the contents from the <svg> element, but you need to make some
changes to make the image scale. First, change the height and width setting to 100 percent
and then add a viewBox attribute to the <svg> element.
The viewBox attribute describes the part of the canvas you want the viewer to see. Even
though the drawing covers the entire computer screen, the gure on your drawing might only
exist in a small part of the drawing. The viewBox attribute enables you to tell the parser to
zoom in on that part to eliminate the extra white space. Set viewBox to get the proper zoom
capabilities when you resize your HTML page.
The viewBox attribute has four parameters: the minimum x coordinate, the minimum y
coordinate, the width, and the height. This enables you to describe the rectangular area to
be displayed. In this example, some white space at the top and bottom of the drawing will be
cropped, so the following is the viewBox attribute setting.
viewBox="0 50 500 175"
This setting crops 50 pixels from the top and limits the viewing height to 175 pixels. The
original width of the drawing was 500 pixels, and there isn’t a lot of white space on the sides,
so it is left as is. The following is the content of the .svg le after the changes are made.
<svg width="100%" height="100%" xmlns="http://www.w3.org/2000/svg"
viewBox="0 50 500 175" >
<path d="m267 76 l-21 -4 -144 0 -90 47 0 54 11 11 23 0 15 -30 15 -10 30 0
15 10 15 30 220 0 15 -30 15 -10 30 0 15 10 15 30 l25 0 7 -7
-13 -38 -20 -10 -95 -15 z" fill="blue" id="carBody" />
<path d="m65 105 l40 -25 65 0 0 34 -112 0 z" fill="white" id="rearWindow" />
<path d="m300 105 l-40 -25 -78 0 0 34 122 0 z" fill="white" id="frontWindow" />
<circle r="35" cy="185" cx="90" fill="black" id="rearWheel" />
<circle r="35" cy="185" cx="400" fill="black" id="frontWheel" />
</svg>
In the svg.css le, the following style rule has been added to resize the <img> element
automatically when the HTML page is resized.
img {
width: 100%;
}
Display the HTML page. You might need to refresh the page to see the change. The <img>
element is now the size of the HTML page, and resizing the page resizes the <img> element,
as shown in Figure 12-25.

Lesson 2: Using scalable vector graphics CHAPTER 12 501
FIGURE 12-25 The <img> element automatically resizing the <svg> element when the HTML page is
resized
Quick check
What is the purpose of the viewBox attribute?
Quick check answer
The viewBox attribute describes the part of the drawing that you want the user
to see.
Lesson summary
The <svg> element is used to create and display scalable vector graphics (SVG).
SVG is XML-based, and the contents of the <svg> element contain the commands that
compose the drawing in XML format. The <svg> element can be placed in an .svg le.
Use the <path> element to create complex shapes. The path contains a list of com-
mands to create a shape. Each command is represented as an uppercase or lowercase
letter. Uppercase indicates that the coordinates are absolute; lowercase indicates that
the coordinates are relative. The <circle> element is used to draw a circle. To include an
external .svg le on an HTML page, use the <img> element and set the src element to
the location of the .svg le.
To make the <svg> element automatically scale when the HTML page is resized, set the
height and width attributes on the <svg> element to 100 percent and add a viewBox
attribute that describes the view area of the drawing. Finally, add a style rule to your
<img> element that sets its width to 100 percent.

502 CHAPTER 12 Drawing with HTML5
Lesson review
Answer the following questions to test your knowledge of the information in this lesson. You
can nd the answers to these questions and explanations of why each answer choice is correct
or incorrect in the “Answers” section at the end of this chapter.
1. The content of the <svg> element is in which format?
A. SGML
B. HTML
C. XHMTL
D. XML
2. On the <svg> element, what attribute provides a window into the drawing and enables
zoom capabilities?
A. zoom
B. window
C. viewBox
D. zoomWindow
Practice exercises
If you encounter a problem completing any of these exercises, the completed projects can be
installed from the Practice Exercises folder that is provided with the companion content.
Exercise 1: Create a webpage by using a canvas
In this exercise, you apply your knowledge of the <canvas> element by creating a web appli-
cation that enables you to take snapshots of a video as it plays.
1. Start Visual Studio Express 2012 for Web. Create an ASP.NET Empty Web Application
project called CanvasSnapshooter.
2. After the project is created, add a new folder, called Media, to the project.
3. Add the IceBoat.mp4 video le. Right-click the Media folder, choose Add, and select
Existing Item. Locate the Resource folder and select the IceBoat.mp4 video le.
4. Add an HTML le to the project. Name the le CanvasPage.html.
5. Add a CSS le to the project. Name the le default.css.
6. Add a new folder, called Scripts, to the project.
7. Right-click the Scripts folder and add a new JavaScript le, called default.js.
8. Add a reference to the jQuery library by right-clicking the project node. Choose
Manage NuGet Packages. Click Online and type jQuery in the search criteria. When
the jQuery library is displayed, click the Install button.
Practice exercises CHAPTER 12 503
9. In the CanvasPage.html le, add a reference to the default.css, jQuery library, and
default.js les.
10. Add the title Canvas Snapshooter to your page. Your HTML page should look like the
following.
<!DOCTYPE html>
<html xmlns="http://www.w3.org/1999/xhtml">
<head>
<title>Canvas Snapshooter</title>
<link href="default.css" rel="stylesheet" />
<script src="Scripts/jquery-1.8.3.js"></script>
<script src="Scripts/default.js"></script>
</head>
<body>
</body>
</html>
11. In the <body> element, add a <video> element whose id is myVideo. Set the src
attribute to the IceBoat.mp4 le. Add the controls attribute to display the basic video
controls. Set the width attribute to 360 and set the height attribute to 240. Inside the
<video> element, add a message for incompatible browsers. After the <video> ele-
ment, add a break.
12. Add a <button> element whose id is btnSnapshot. After the <button> element, add a
break.
13. Add a <canvas> element whose id is myCanvas. Set the width attribute to 360 and set
the height attribute to 240. Inside the <canvas> element, add a message for incompat-
ible browsers. Your HTML page should look like the following.
<!DOCTYPE html>
<html xmlns="http://www.w3.org/1999/xhtml">
<head>
<title></title>
<link href="default.css" rel="stylesheet" />
<script src="Scripts/jquery-1.8.3.js"></script>
<script src="Scripts/default.js"></script>
</head>
<body>
<video id="myVideo" src="media/IceBoat.mp4" controls="controls"
width="360" height="240">
You need a browser that supports HTML5 video!
</video>
<br />
<button id="btnSnapshot" type="button">Snapshot</button>
<br />
<canvas id="myCanvas" width="360" height="240">
You need a browser that supports HTML5 canvas!
</canvas>
</body>
</html>
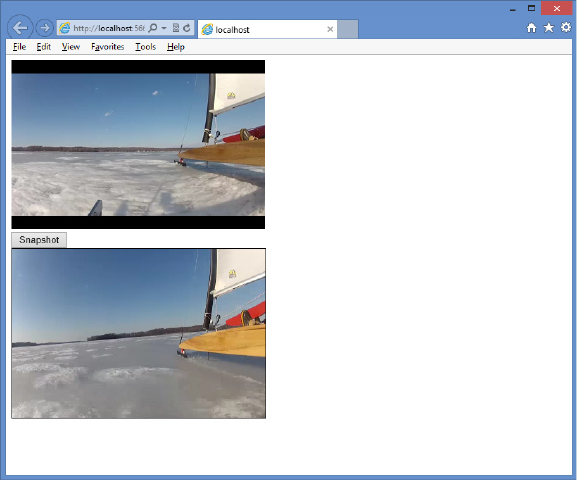
504 CHAPTER 12 Drawing with HTML5
14. In the default.css le, set the border on the canvas as follows.
canvas {
border: 1px solid black;
}
15. In the default.js le, add the document ready function. In the document ready func-
tion, subscribe to the click event of the button. When the button is clicked, call a new
function, drawVideoFrame. Your code should look like the following.
$(document).ready(function () {
$('#btnSnapshot').on('click', drawVideoFrame);
});
16. Add the drawVideoFrame function. In this function, add code to get a reference to
the canvas. Add code to get a reference to the video element. Add code to call the
getContext method on the canvas and, using the context object, call the drawImage
method with the video. Your code should look like the following.
function drawVideoFrame() {
var canvas = document.getElementById('myCanvas');
var video = document.getElementById('myVideo');
canvas.getContext('2d').drawImage(video, 0, 0, 360, 240);
}
17. In Solution Explorer, right-click the CanvasPage.html le and choose Set As Start Page.
18. Test your work by pressing F5 to run the website. You should see the VideoPage.html
page as shown in Figure 12-26.
FIGURE 12-26 The running canvas snapshooter page

Suggested practice exercises CHAPTER 12 505
Suggested practice exercises
The following additional exercises are designed to give you more opportunities to practice
what you’ve learned and to help you successfully master the lessons presented in this chapter.
Exercise 1 Learn more about the <canvas> element by creating a simple game such
as tic-tac-toe that gives the ability to play the game.
Exercise 2 Learn more about the <svg>element by writing a web application that
provides the ability to display .svg les on your disk.

Answers
This section contains the answers to the lesson review questions in this chapter.
Lesson 1
1. Correct answer: C
A. Incorrect: The getContext method requires the 2d parameter, and there is no rectangle
method on the context object.
B. Incorrect: To draw on the canvas, you need to execute the getContext method to get a
reference to a context object, and there is no rectangle method on the canvas object.
C. Correct: This is the correct code, in which a reference to a context object is obtained by
calling the getContext method with the 2d parameter.
D. Incorrect: The getContext method requires the 2d parameter.
2. Correct answer: B
A. Incorrect: The arcTo method typically draws a line and an arc. Although it could accom-
plish the task, it would be very difcult in comparison to the arc method.
B. Correct: Using the arc method is the easiest way to accomplish this task.
C. Incorrect: The circle method does not exist.
D. Incorrect: The dot method does not exist.
Lesson 2
1. Correct answer: D
A. Incorrect: HTML is derived from SGML, but the <svg> element is XML-based.
B. Incorrect: HTML is used for webpages, but the <svg> element is XML-based.
C. Incorrect: XHTML is used for webpages, but the <svg> element is XML-based.
D. Correct: The <svg> element is XML-based.
2. Correct answer: C
A. Incorrect: The zoom attribute does not exist.
B. Incorrect: The window attribute does not exist.
C. Correct: The viewBox attribute provides a window into the drawing and enables zoom
capabilities.
D. Incorrect: The zoomWindow attribute does not exist.

507
CHAPTER 13
Drag and drop
Prior to HTML5, the ability to drag and drop operations was possible with some browsers
but wasn’t compatible across different browsers. You typically implemented drag and
drop by using a third-party library such as jQuery. Drag and drop is a rst-class citizen of
HTML5, which is the rst step toward having a compatible implementation across browsers.
You might still use jQuery for other functionality, but it’s not required for drag and drop.
This chapter shows you how to drag and drop from one location to another on the web-
page and then how to to drag and drop les.
Lessons in this chapter:
Lesson 1: Dragging and dropping 507
Lesson 2: Dragging and dropping les 517
Before you begin
To complete this book, you must have some understanding of web development. This
chapter requires the hardware and software listed in the “System requirements” section in
the book’s Introduction.
Lesson 1: Dragging and dropping
Making drag and drop part of HTML5 means that you can get browser compatibility and
browser integration and, as you’ll see in Lesson 2, “Dragging and dropping les,” you can
achieve integration with the operating system.
After this lesson, you will be able to:
Describe HTML5 drag and drop.
Implement drag and drop using HTML5.
Estimated lesson time: 20 minutes

508 CHAPTER 13 Drag and drop
To illustrate the drag and drop technique, consider the following HTML page, which
denes a large square with three squares inside it.
<!DOCTYPE html>
<html xmlns="http://www.w3.org/1999/xhtml">
<head>
<title></title>
<link href="MicroScramble.css" rel="stylesheet" />
<script src="Scripts/jquery-1.8.3.js"></script>
<script src="Scripts/MicroScramble.js"></script>
</head>
<body>
<div id="container">
<div id="hole1" class="hole"><div id="item1" class="item">1</div></div>
<div id="hole2" class="hole"><div id="item2" class="item">2</div></div>
<div id="hole3" class="hole"><div id="item3" class="item">3</div></div>
<div id="hole4" class="hole"></div>
</div>
</body>
</html>
This HTML document contains a <div> element whose id is called container. Inside the
container are four <div> elements that are holes that can contain an item. The rst three
holes are populated with an item.
The HTML document contains a reference to the MicroScramble.css style sheet, which
contains the following style rules.
#container {
border: solid;
width: 332px;
height: 332px;
margin-right: auto;
margin-left: auto;
}
.hole {
background-color: black;
border: solid;
width: 160px;
height: 160px;
float: left;
}
.item {
font-size: 128px;
font-family: Arial, Helvetica, sans-serif;
width: 140px;
height: 140px;
background-color: #C0C0C0;
color: #FFFFFF;
text-align: center;
-webkit-user-select: none;
-khtml-user-select: none;
-moz-user-select: none;
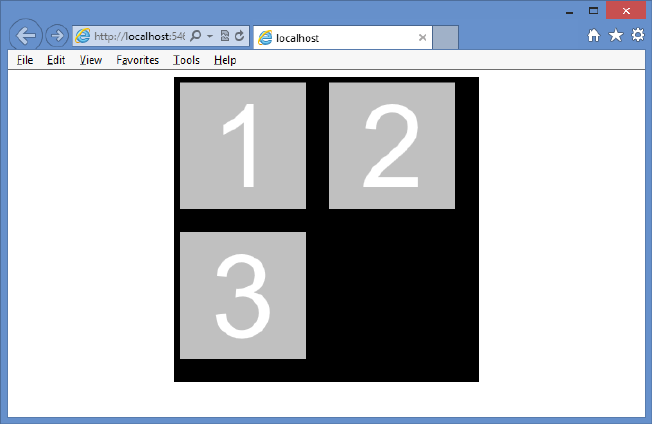
Lesson 1: Dragging and dropping CHAPTER 13 509
-ms-user-select: none;
user-select: none;
}
The rst style rule is for the container, which has a solid border, and the height and width
settings form a square. The setting of the margin-left and margin-right to auto results in the
container being centered.
The next style rule is for the holes. Each hole is a black square. The last style rule is for the
items. An item is a gray square with a number in it. The number is centered and displays in a
large font. Note that the last part of the style rule sets the user-select property to none and
that there are several entries, based on the browser manufacturer. This property is set to none
to keep the user from swiping across the item by mistake and selecting the text, which is the
number. Figure 13-1 shows the rendered webpage.
FIGURE 13-1 The initial HTML page ready for drag and drop functionality
Dragging
To specify to the browser that an element can be dragged, use the draggable attribute, which
has three valid values: true, false, and auto. For most browsers, the auto setting is the default,
which means that the browser decides whether the element should be draggable. For exam-
ple, the <img> element is usually draggable by default, but a <div> element is not draggable
by default. In this sample HTML document, the item is a <div> element, and it’s not drag-
gable by default. After adding the draggable attribute, the container looks like the following.
<div id="container">
<div id="hole1" class="hole">
<div id="item1" draggable="true" class="item">1</div>
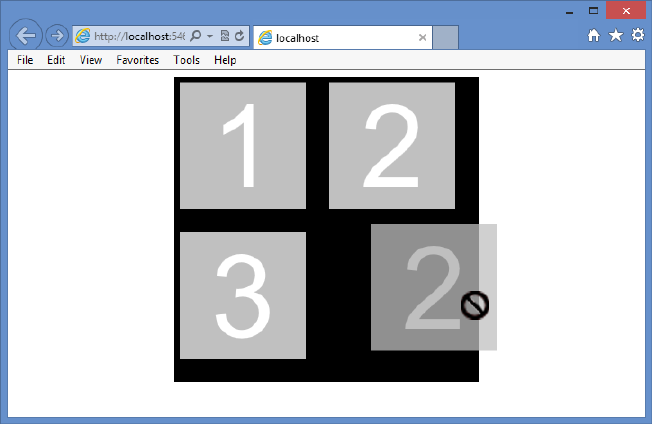
510 CHAPTER 13 Drag and drop
</div>
<div id="hole2" class="hole">
<div id="item2" draggable="true" class="item">2</div>
</div>
<div id="hole3" class="hole">
<div id="item3" draggable="true" class="item">3</div>
</div>
<div id="hole4" class="hole"></div>
</div>
After adding the draggable attribute to the items, you can drag them, as shown in
Figure 13-2.
FIGURE 13-2 The added draggable attribute, allowing the item to be dragged
You can drag an item, but the item contains the no-entry symbol to indicate that the item
cannot be dropped.
Understanding drag events
When dragging and dropping, there are events that are based on the dragged element, and
there are events that are based on the drop target. Using these events, you should be able
to customize the drag and drop operation as needed. The following events are based on the
dragged element.
dragstart Triggers when the drag is started
drag Triggers continuously as the element is being dragged
dragend Triggers when the drag is nished
Lesson 1: Dragging and dropping CHAPTER 13 511
The following code is placed in the MicroScramble.js le and shows the use of the drag-
start and dragend events to change the style of the item being dragged until the dragging
ends.
/// <reference path="jquery-1.8.3.js" />
var $draggedItem;
$(document).ready(function () {
$('.item').on('dragstart', dragging);
$('.item').on('dragend', draggingEnded);
});
function dragging(e) {
$(e.target).addClass('dragging');
$draggedItem = $(e.target);
}
function draggingEnded(e) {
$(e.target).removeClass('dragging');
}
This example uses the document ready function in jQuery to subscribe to the dragstart
and dragend events on all elements that have the CSS class item assigned. The dragging func-
tion adds the dragging CSS class when the dragging starts and then sets the $draggedItem
with the value of the item being dragged. The draggingEnded function removes the dragging
CSS class.
In the MicroScramble.css le, the dragging CSS rule is dened as follows.
.dragging {
background-color: yellow;
}
In this example, the background of the dragged item changes to yellow until the dragging
stops.
Dropping
After dragging, the drop must be made operational. The following events are based on the
drop target.
dragenter Triggers when the drag enters a drop zone
dragover Triggers continuously as the element is dragged over the drop zone
dragleave Triggers when the dragged item leaves a drop zone
drop Triggers when the dragged item is dropped
The dragenter and dragover events default to rejecting dragged items, which is why you
can’t currently drop an item. You can enable dropping by cancelling the default action on
these events.
512 CHAPTER 13 Drag and drop
The drop event removes the dropped item from the document object model (DOM) and
then adds it back to the DOM at the drop zone location. The following code subscribes to the
dragenter, dragover, and drop events.
/// <reference path="jquery-1.8.3.js" />
var $draggedItem;
$(document).ready(function () {
$('.item').on('dragstart', dragging);
$('.item').on('dragend', draggingEnded);
$('.h ole').on('drage nter', preventDefault);
$('.h ole').on('drag over', preve ntDefa ult);
$('.h ole').on('drop', dropIte m);
});
function dragging(e) {
$(e.target).addClass('dragging');
$draggedItem = $(e.target);
}
function draggingEnded(e) {
$(e.target).removeClass('dragging');
}
function preventDefault(e) {
e.preventDefault();
}
function dropItem(e) {
var hole = $(e.target);
if (hole.hasClass('hole') && hole.children().length == 0) {
$draggedItem.detach();
$draggedItem.appendTo($(e.target));
}
}
In this example, the document ready function has added statements to subscribe to drag-
enter, dragover, and drop. Notice that dragenter and dragover call the same preventDefault
function, which prevents the rejection of the dragged items.
The drop event calls the dropItem function. In dropItem, a jQuery object is created from
e.target, which is the drop target, and is assigned to a hole variable. The if statement checks
whether the drop target has the hole CSS class. This is necessary because you might drop
something on top of an item instead of on a hole. When the item is in a hole, the drop event
bubbles up and executes the drop event on the hole. If the drop target is a hole, the code
checks whether there are children; if there is a child, this hole already has an item, and you
shouldn’t be able to drop. If the drop target is a hole with no children, jQuery detaches the
dragged item from the DOM and then appends draggedItem to the drop target. Figure 13-3
shows the item when it is being dragged and when it is dropped.
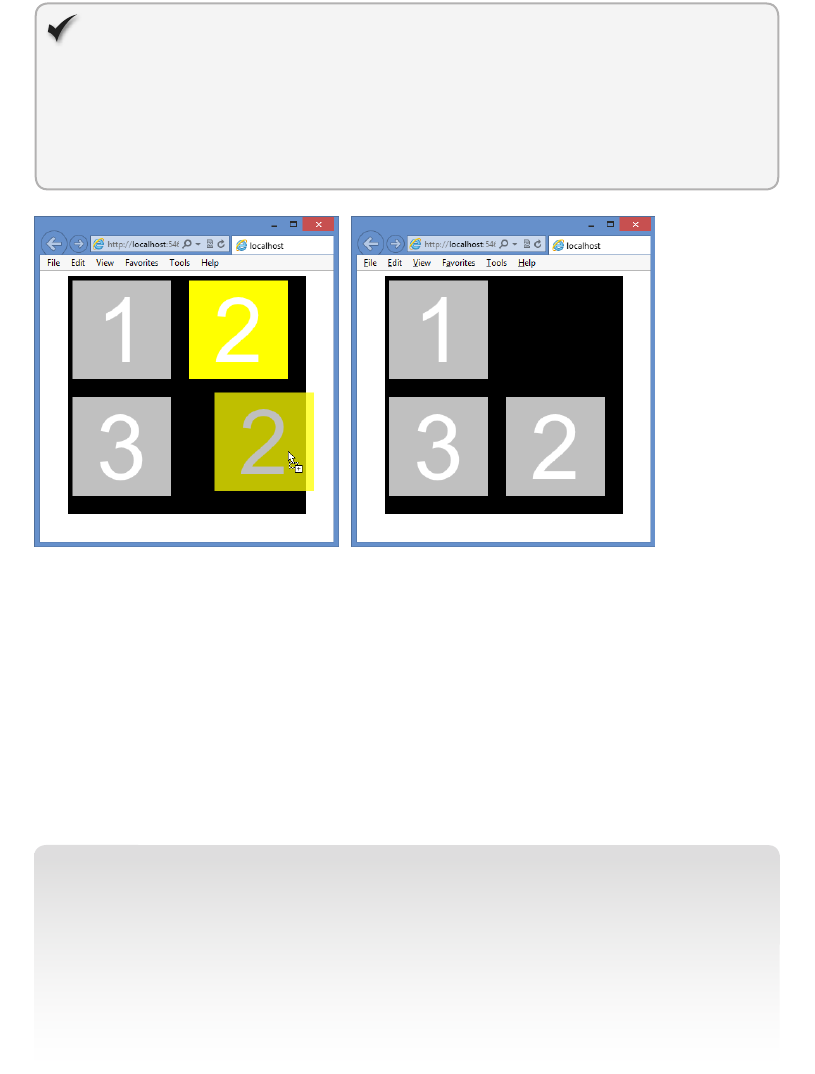
Lesson 1: Dragging and dropping CHAPTER 13 513
Quick check
Which two events’ default operations must be prevented to allow the drop event
to operate?
Quick check answer
The dragenter and dragover events
FIGURE 13-3 The item being dragged and the item after being dropped
Using the DataTransfer object
The previous example demonstrates a complete drag and drop operation, but you can also
use the DataTransfer object to pass data from the dragstart event to the drop event. By using
the DataTransfer object, you don’t need to create a global variable to reference the item
being dragged. Using the DataTransfer object also empowers you to pass any data to the
drop event as long as it can be represented as a string or URL. The DragStart object is refer-
enced as a dataTransfer property on the dragstart event.
NOTE USING THE DATATRANSFER OBJECT WITH JQUERY
If you’re using jQuery to bind events, the dataTransfer property will be missing, but it can
be added by adding the following statement to the document ready function.
jQuery.event.props.push('dataTransfer');
jQuery creates a wrapper object that resembles the original event and copies only the data
from the original object that jQuery needs. This statement tells jQuery to look for the data-
Transfer property on the original object and, if it exists, to copy it to the jQuery wrapper.
514 CHAPTER 13 Drag and drop
You can pass data to the drop event by using the dataTransfer property. The DataTransfer
object has the following members.
clearData() Method that clears the data in the DataTransfer object.
dropeffect Property that gets or sets the type of drag and drop operation and the
cursor type. It can be set to copy, link, move, or none.
effectAllowed Property that gets or sets the allowed operations on the source
element.
les Property that gets a le list of the les being dragged.
getData() Method that gets the data in the DataTransfer object.
setData() Method that sets the data in the DataTransfer object.
types Property that gets a string list of types being sent.
In the following example, the HTML document has an unordered list of cars, from which
you can drag and drop any of the cars to a different unordered list of favorite cars as follows.
<!DOCTYPE html>
<html xmlns="http://www.w3.org/1999/xhtml">
<head>
<title></title>
<script src="Scripts/jquery-1.8.3.js"></script>
<script src="Scripts/CarList.js"></script>
</head>
<body>
<p>What cars do you like?</p>
<ul id="carList">
<li draggable="true" data-value="car,Chevrolet">Chevrolet</li>
<li draggable="true" data-value="car,Ford">Ford</li>
<li draggable="true" data-value="car,BMW">BMW</li>
</ul>
<p>Drop your favorite cars below:</p>
<ul id="favoriteCars" style="min-height:100px;background-color:yellow;">
</ul>
</body>
</html>
There is no CSS le to make the page or the drag and drop operation look neat, but an
inline style is applied to favoriteCars so the user can see a drop area. Each of the cars is drag-
gable and uses data attributes to provide data that will be collected when the dragging starts
and then passed to the drop event. The JavaScript le is similar to the previous example,
which was used to move numbers, but this time, the data is passed to the drop event by using
the DataTransfer object as follows.
/// <reference path="jquery-1.8.3.js" />
$(document).ready(function () {
jQuery.event.props.push('dataTransfer');
$('#carList').on('dragstart', dragging);
$('#favoriteCars').on('dragenter', preventDefault);
$('#favoriteCars').on('dragover', preventDefault);
Lesson 1: Dragging and dropping CHAPTER 13 515
$('#favoriteCars').on('drop', dropItem);
});
function dragging(e) {
var val = e.target.getAttribute('data-value');
e.dataTransfer.setData('text', val);
e.dataTransfer.effectAllowed = 'copy';
}
function preventDefault(e) {
e.preventDefault();
}
function dropItem(e) {
var data = e.dataTransfer.getData('text').split(',');
if (data[0] == 'car') {
var li = document.createElement('li');
li.textContent = data[1];
e.target.appendChild(li);
}
}
In the document ready function, the dataTransfer property is pushed to the collection of
properties that needs to be copied to the jQuery wrapper. The dragging function is called
when the dragging starts. It collects the data from the data-value attribute and assigns it to
the DataTransfer object. The effectAllowed property is set to copy, which changes the mouse
pointer to a pointer with a plus sign under it. If the setting were set to move, the mouse
pointer would be a pointer with a small box under it. If the effectAllowed property were set
to link, the mouse pointer would be a pointer with a shortcut symbol under it.
The dropItem function is called from the drop event. The DataTransfer object is also avail-
able on the drop event through the dataTransfer property. The data is retrieved, split into an
array, and assigned to the data variable. Next, the rst element is tested to see whether it is
a car. If so, a new list item is created, and the car make, which is in data[1], is assigned to the
textContent property of the list item. Finally, the list item is appended to the drop element.
Figure 13-4 shows the nished screen after a car has been dragged and dropped to the
favorite car list.
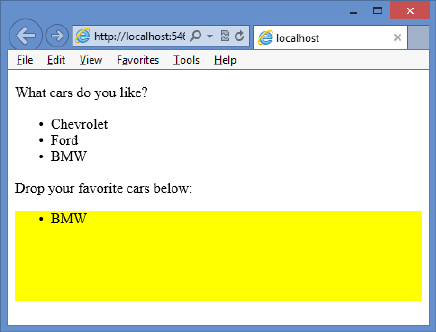
516 CHAPTER 13 Drag and drop
FIGURE 13-4 Completed drag and drop with list items
Lesson summary
The drag and drop functionality in HTML5 will be consistent and compatible across
browsers.
The draggable attribute must be set to true and added to each element that needs to
be draggable.
The dragstart and dragend events can be used to change the style of the element
being dragged.
The dragenter and dragover events must be coded to prevent the default operation
and enable dropping.
The drop event triggers when the item is dropped on a drop target.
The DataTransfer object is used to pass data between the dragstart event and the drop
event.
Lesson review
Answer the following questions to test your knowledge of the information in this lesson. You
can nd the answers to these questions and explanations of why each answer choice is correct
or incorrect in the “Answers” section at the end of this chapter.
1. Which of the following events trigger continuously during a drag and drop operation?
(Choose all that apply.)
A. dragstart
B. drag
C. dragend
D. dragenter
Lesson 2: Dragging and dropping les CHAPTER 13 517
E. dragover
F. dragleave
G. drop
2. Which of the following events are associated with the item being dragged? (Choose all
that apply.)
A. dragstart
B. drag
C. dragend
D. dragenter
E. dragover
F. dragleave
G. drop
3. Using the DataTransfer object, what kind of data can you pass to the drop event?
A. Any valid string, number, date/time, or Boolean value
B. Any URL that is within the same domain as the webpage
C. Any JSON object
D. Any object that can be represented as a string or URL
Lesson 2: Dragging and dropping les
You can drag and drop les by using the File application programming interface (API), which
is also part of HTML5. The File API provides indirect access to les in a tightly controlled
manner.
After this lesson, you will be able to:
Describe HTML5 drag and drop operating system integration.
Implement le drag and drop using HTML5.
Estimated lesson time: 20 minutes
Using the FileList and File objects
When dropping a le, the DataTransfer object returns a FileList object, which is a collection of
File objects that were dropped. The File object has the following properties.
name Property that gets the le name and extension without a path
type Property that gets the MIME type of the le
size Property that gets the le size in bytes
518 CHAPTER 13 Drag and drop
The following HTML document has a <div> element onto which les can be dropped and
a <table> element that is populated with information about the dropped les.
<!DOCTYPE html>
<html xmlns="http://www.w3.org/1999/xhtml">
<head>
<title></title>
<link href="FileDragAndDrop.css" rel="stylesheet" />
<script src="Scripts/jquery-1.8.3.js"></script>
<script src="Scripts/FileDragAndDrop.js"></script>
</head>
<body>
<div id="target">
<p>Drag and drop files here...</p>
</div>
<table id="fileInfo"></table>
</body>
</html>
The FileDragAndDrop.css le contains style rules to size the drag and drop target. This le
also contains style rules to format the le information table as follows.
#target {
border: solid;
height: 150px;
width: 500px;
background-color: yellow;
text-align: center;
}
#fileInfo {
width: 500px;
}
table, th, td {
border-collapse: collapse;
border: 1px solid black;
}
th, td {
padding: 5px;
}
Figure 13-5 shows the webpage. There is no JavaScript yet, so you might think that you
can’t drag and drop any les here, but there is a default behavior for les that are dragged
and dropped. If you drop a le anywhere on the webpage, the le opens in another window.
For example, if you drag and drop a movie onto the webpage, the movie will start playing in
a new window.
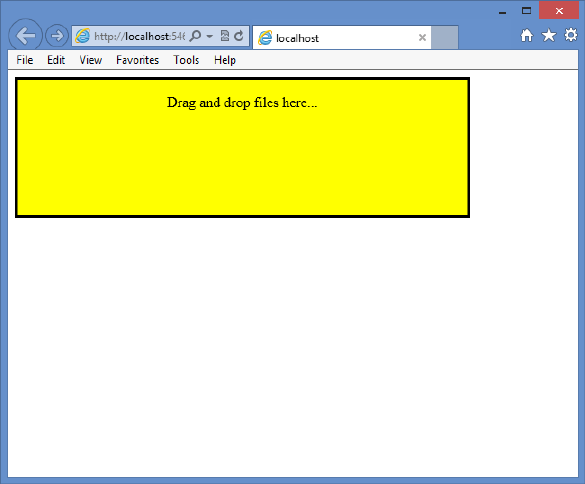
Lesson 2: Dragging and dropping les CHAPTER 13 519
FIGURE 13-5 The webpage with style rules applied
To process the dropped les and display the le information in a table below the drop box,
the following JavaScript is added to the FileDragAndDrop.js le.
/// <reference path="jquery-1.8.3.js" />
$(document).ready(function () {
jQuery.event.props.push('dataTransfer');
$('#target').on('dragenter', preventDefault);
$('#target').on('dragover', preventDefault);
});
function preventDefault(e) {
e.preventDefault();
}
In the document ready function, jQuery is set up to expose the DataTransfer object. The
dragenter and dragover events are then programmed to prevent the default operation that
prevents dropping. When the drop event is added, the dragged le can be dropped.
Next, the drop event is subscribed to, which calls the dropItem function. The dropItem
function retrieves the les collection from the DataTransfer object. The content in the le
information table is overwritten with the header, which also clears any existing informa-
tion that was in the table. Finally, a for loop is used to loop over the les and add a row
of information to the le information table for each le. The following is the completed
JavaScript le.
520 CHAPTER 13 Drag and drop
/// <reference path="jquery-1.8.3.js" />
$(document).ready(function () {
jQuery.event.props.push('dataTransfer');
$('#target').on('dragenter', preventDefault);
$('#target').on('dragover', preventDefault);
$('#target').on('dr op', dro pIte m);
});
function preventDefault(e) {
e.preventDefault();
}
function dropItem(e) {
var files = e.dataTransfer.files
, $table = $('#fileInfo')
, i = 0;
$ta ble.html(
'<thead><tr><th>Name</th><th>Type</th><th>Size</th></tr></thead>');
for (i = 0; i < files.length; i++) {
$('<tr><td>'
+ files[i].name + '</td><td>'
+ files[i].type + '</td><td>'
+ files[i].size + '</td></tr>').appendTo($table);
}
preventDefault(e);
}
Figure 13-6 shows the webpage after several les were dragged and dropped. The le
information table is populated and displayed. The rst column contains the le names (with-
out a path) of the dropped les. The second column contains the le’s MIME type if the type
can be derived. The last column contains the le size in bytes.
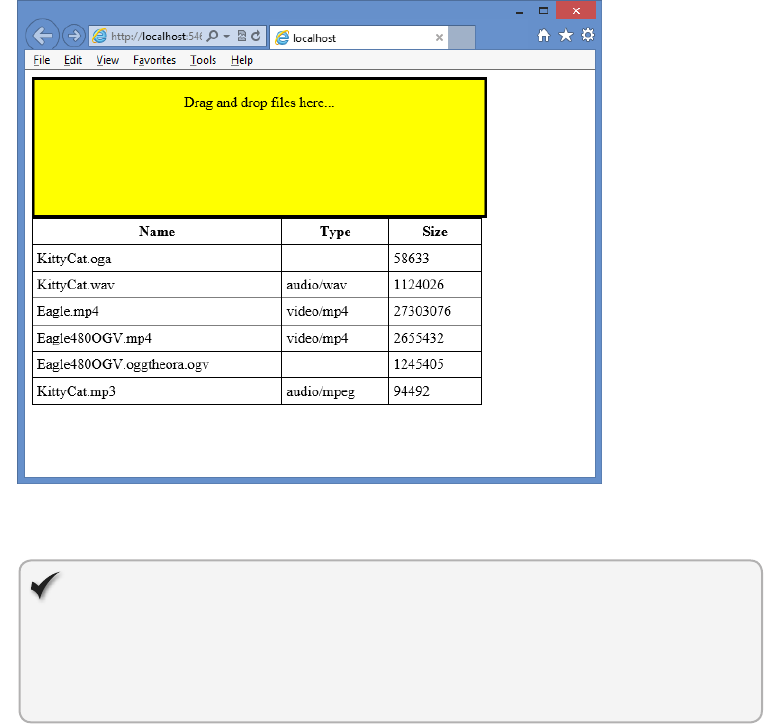
Lesson 2: Dragging and dropping les CHAPTER 13 521
FILE 13-6 The completed webpage after files were dragged and dropped
Quick check
Which object provides access to the dropped les?
Quick check answer
The DataTransfer object
Lesson summary
The File object provides the name, type, and size properties.
To enable dropping of les, the dragenter and dragover events must be programmed
to prevent the default behavior that prevents dropping.
The DataTransfer object provides access to the list of dropped les.
The drop event provides access to the DataTransfer object.
Lesson review
Answer the following questions to test your knowledge of the information in this lesson. You
can nd the answers to these questions and explanations of why each answer choice is correct
or incorrect in the “Answers” section at the end of this chapter.

522 CHAPTER 13 Drag and drop
1. To which events do you need to subscribe to program le drag and drop? (Choose all
that apply.)
A. dragstart
B. drag
C. dragend
D. dragenter
E. dragover
F. dragleave
G. drop
2. Which of the following is not a property on the File object?
A. name
B. path
C. type
D. size
Practice exercises
If you encounter a problem completing any of these exercises, the completed projects can be
installed from the Practice Exercises folder that is provided with the companion content.
Exercise 1: Create a number scramble game
In this exercise, you apply your knowledge of drag and drop by creating a number scramble
game. The game consists of a game board that has four rows and four columns, thus provid-
ing sixteen squares in which a sliding tile that has a number can exist. Fifteen of the squares
are occupied by numbered tiles. This leaves one empty square that can be used to move tiles.
The object is to arrange the tiles in numeric order by dragging tiles to the empty space after
they have been scrambled. The only tiles that can be dragged to the empty space are tiles
horizontally or vertically adjacent to the empty space.
In Exercise 1, you create the game board and the tiles by creating the webpage, the CSS
le, and the rst part of the JavaScript le. In Exercise 2, “Add drag and drop to the game,”
you add the drag and drop functionality.
1. Start Visual Studio Express 2012 for Web. Create an ASP.NET Empty Web Application
project called NumberScramble.
2. Add an HTML le to the project. Name the le default.html.
3. Add a CSS le to the project. Name the le default.css.
4. Add a new folder called Scripts to the project.
5. Right-click the Scripts folder and add a new JavaScript le called default.js.
Practice exercises CHAPTER 13 523
6. Add a reference to the jQuery library by right-clicking the project node and choosing
Manage NuGet Packages. Click Online and type jQuery in the search criteria. When
the jQuery library is displayed, click the Install button.
7. In the default.html le, add a reference to the default.css, jQuery library, and default.js
les.
8. Add the title Number Scramble to your page.
Your HTML page should look like the following.
<!DOCTYPE html>
<html xmlns="http://www.w3.org/1999/xhtml">
<head>
<title>Number Scramble</title>
<link href="default.css" rel="stylesheet" />
<script src="Scripts/jquery-1.8.3.js"></script>
<script src="Scripts/default.js"></script>
</head>
<body>
</body>
</html>
9. In the <body> element, add a <div> element whose id is message. In the <div>
element, add the default message, Refresh to scramble.
10. After the message <div> element, add another <div> element whose id is gameBoard.
The content of the game board is populated from the JavaScript. Your completed
default.html should look like the following.
<!DOCTYPE html>
<html xmlns="http://www.w3.org/1999/xhtml">
<head>
<title>Number Scramble</title>
<link href="default.css" rel="stylesheet" />
<script src="Scripts/jquery-1.8.3.js"></script>
<script src="Scripts/default.js"></script>
</head>
<body>
<div id="message">
Refresh to scramble.
</div>
<div id="gameBoard">
</div>
</body>
</html>
11. In the default.css le, add the following style rules for the game board, the message,
and the squares and tiles that are to be created programmatically.
body {
font-family: Arial, Helvetica, sans-serif;
}
524 CHAPTER 13 Drag and drop
#gameBoard {
width: 345px;
height: 345px;
margin-right: auto;
margin-left: auto;
}
#message {
background-color: black;
font-size: 36px;
color: lime;
text-align: center;
width: 345px;
height: 80px;
margin-right: auto;
margin-left: auto;
}
.tile {
font-size: 64px;
width: 80px;
height: 80px;
background-color: gray;
color: white;
text-align: center;
}
.square {
background-color: black;
border: solid;
width: 80px;
height: 80px;
float: left;
}
.dragged {
background-color: red;
}
12. In the default.js le, add a reference to the jQuery library. Declare a squareCount vari-
able and set it to 16. Declare an emptySquare variable as follows.
/// <reference path="jquery-1.8.3.js" />
var squareCount = 16
var emptySquare;
13. In the default.js le, add the document ready function. In the document ready func-
tion, add a statement to instruct jQuery to copy the dataTransfer property to its event
wrapper when the event has this property. Add a call to a createBoard function and
add a call to an addTiles function.
Practice exercises CHAPTER 13 525
These functions are created next. Your code should look like the following.
/// <reference path="jquery-1.8.3.js" />
var squareCount = 16
var emptySquare;
$(document).ready(function () {
jQuery.event.props.push('dataTransfer');
createBoard();
addTiles();
});
14. Under the document ready function, add a createBoard function. In this function, add
a for loop that loops while the loop variable is less than the squareCount variable. In
the for loop, use jQuery to create a <div> element whose id is square plus the value of
the loop variable. Add a data-square attribute and assign the loop variable’s value. Add
the class attribute and assign the square class. Append the newly created square to the
game board.
Your code should look like the following.
function createBoard() {
for (var i = 0; i < squareCount; i++) {
var $square = $('<div id="square' + i + '" data-square="'
+ i +'" class="square"></div>');
$square.appendTo($('#gameBoard'));
}
}
15. Under the createBoard function, add an addTiles function. In this function, add a state-
ment to assign the value of the squareCount variable minus one to the emptySquare
variable. Add a for loop that loops while the loop variable is less than the emptySquare
value. In the for loop, use jQuery to get a reference to the square that corresponds to
the loop variable. Use jQuery to create a <div> element whose id is tile plus the value
of the loop variable. Add a draggable attribute and set its value to true. Add the class
attribute and assign the tile class. In the content of this <div> element, put the value of
the loop variable plus one. Append the newly created tile to the corresponding square.
Your code should look like the following.
function addTiles() {
emptySquare = squareCount - 1;
for (var i = 0; i < emptySquare; i++) {
var $square = $('#square' + i);
var $tile = $('<div draggable="true" id="tile' + i
+ '" class="tile">' + (i + 1) + '</div>');
$tile.appendTo($square);
}
}
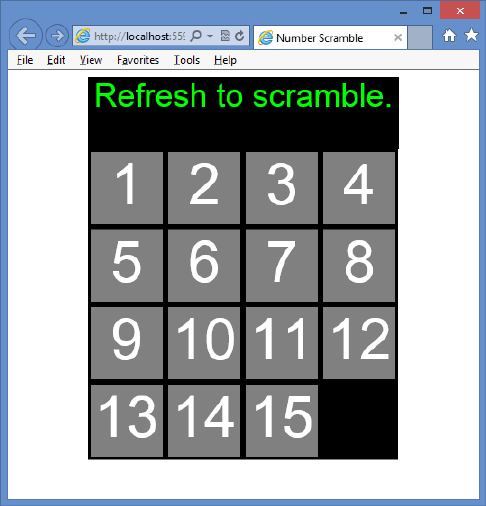
526 CHAPTER 13 Drag and drop
16. In Solution Explorer, right-click the default.html le and choose Set As Start Page.
17. Test your work by pressing F5 to run the website. You should see the default.html page
as shown in Figure 13-7.
FIGURE 13-7 The rendered number scramble page
At this point, you have the default message and the rendered game board with the tiles.
There is no drag and drop functionality, and the numbers don’t scramble.
Exercise 2: Add drag and drop to the game
In this exercise, you apply your knowledge of drag and drop by adding code to the number
scramble game you created in Exercise 1, “Create a number scramble game,” to support drag
and drop functionality.
1. Start Visual Studio Express 2012 for Web. Open the NumberScramble project.
2. In the default.js le, add the following code to the document ready function to sub-
scribe to the dragstart, dragend, dragenter, dragover, and drop events.
$(document).ready(function () {
jQuery.event.props.push('dataTransfer');
createBoard();
addTiles();
$('#g a meBoard').on('dra g start', dragStarte d);
$('#gameBoard').on('dragend', dragEnded);
$('#g a meBoard').on('dra g enter', preventDefault);
Practice exercises CHAPTER 13 527
$('#g a meBoard').on('dra g over', p reve ntDefault);
$('#g a meBoard').on('dro p', dro p);
});
3. At the bottom of the default.js le, add the dragStarted function that takes an e event
parameter. In this function, create a $tile variable that is a jQuery wrapper for e.target.
Use $tile to add the dragged CSS class to the tile. Declare a sourceLocation variable and
assign to it the value of the data-square attribute from the tile’s parent (the square).
The sourceLocation is the square number the tile is in.
4. Assign the string value of sourceLocation to the DataTransfer object and set the
effectAllowed property to move. Your code should look like the following.
function dragStarted(e) {
var $tile = $(e.target)
$tile.addClass('dragged');
var sourceLocation = $tile.parent().data('square');
e.dataTransfer.setData('text', sourceLocation.toString());
e.dataTransfer.effectAllowed = 'move';
}
5. After the dragStarted function, add a dragEnded function. In this function, use jQuery
to remove the dragged CSS class from the tile.
Your code should look like the following.
function dragEnded(e) {
$(e.target).removeClass('dragged');
}
6. Under the dragEnded function, add a preventDefault function that takes an e event
parameter. In this function, add a statement to call the preventDefault method on e.
Your code should look like the following.
function preventDefault(e) {
e.preventDefault();
}
7. Under the preventDefault function, add a drop function that takes an e event parame-
ter. In this function, add a statement to create a jQuery wrapper for e.target and assign
it to a $square variable. Add an if statement to verify that the target of the drop is a
square by checking to see whether $square has the CSS class called square. If so, use
jQuery to add code that reads the data-square attribute $square and place the value in
a destinationLocation variable. Compare the value of emptySquare with the value of the
destination location and, if they are not equal, exit the drop function by using a return
statement.
8. Add code to get the data from the DataTransfer object. Assign it to a sourceLocation
variable and then call the moveTile function that you create next, passing the
sourceLocation variable.
528 CHAPTER 13 Drag and drop
Your code should look like the following.
function drop(e) {
var $square= $(e.target);
if ($square.hasClass('square')) {
var destinationLocation = $square.data('square');
if (emptySquare != destinationLocation) return;
var sourceLocation = Number(e.dataTransfer.getData('text'));
moveTile(sourceLocation);
}
}
9. Under the drop function, add a moveTile function that takes the sourceLocation
parameter. In this function, add a statement to create a distance variable that is set to
the sourceLocation parameter minus the emptySquare value.
10. Add a statement to make the distance a positive value if it’s negative. Compare the
distance to 1 or 4, in which the value of 1 indicates a drop from a horizontally adja-
cent square, and a value of 4 indicates a drop from a vertically adjacent square. If
the distance is equal to 1 or 4, call the swapTileAndEmptySquare function with the
sourceLocation parameter.
Your code should look like the following.
function moveTile(sourceLocation) {
var distance = sourceLocation - emptySquare;
if (distance < 0) distance = -(distance);
if (distance == 1 || distance == 4) {
swapTileAndEmptySquare(sourceLocation);
}
}
11. Under the moveTile function, add a swapTileAndEmptySquare function that takes the
sourceLocation parameter. In this function, use jQuery to retrieve the tile from the tile
at the sourceLocation parameter and assign the value to a $draggedItem variable. Use
jQuery to detach the dragged item from the document object model (DOM). Create
a $target variable and assign the square at the emptySquare location. Use jQuery to
append the dragged item to the target.
12. Assign sourceLocation to emptySquare.
The following is the complete default.js le.
/// <reference path="jquery-1.8.3.js" />
var squareCount = 16
var emptySquare;
$(document).ready(function () {
jQuery.event.props.push('dataTransfer');
createBoard();
addTiles();
$('#gameBoard').on('dragstart', dragStarted);
$('#gameBoard').on('dragend', dragEnded);
Practice exercises CHAPTER 13 529
$('#gameBoard').on('dragenter', preventDefault);
$('#gameBoard').on('dragover', preventDefault);
$('#gameBoard').on('drop', drop);
});
function createBoard() {
for (var i = 0; i < squareCount; i++) {
var $square = $('<div id="square' + i + '" data-square="' + i
+ '" class="square"></div>');
$square.appendTo($('#gameBoard'));
}
}
function addTiles() {
emptySquare = squareCount - 1;
for (var i = 0; i < emptySquare; i++) {
var $square = $('#square' + i);
var $tile = $('<div draggable="true" id="tile' + i
+ '" class="tile">' + (i + 1) + '</div>');
$tile.appendTo($square);
}
}
function dragStarted(e) {
var $tile = $(e.target)
$tile.addClass('dragged');
var sourceLocation = $tile.parent().data('square');
e.dataTransfer.setData('text', sourceLocation.toString());
e.dataTransfer.effectAllowed = 'move';
}
function dragEnded(e) {
$(e.target).removeClass('dragged');
}
function preventDefault(e) {
e.preventDefault();
}
function drop(e) {
var $square = $(e.target);
if ($square.hasClass('square')) {
var destinationLocation = $square.data('square');
if (emptySquare != destinationLocation) return;
var sourceLocation = Number(e.dataTransfer.getData('text'));
moveTile(sourceLocation);
}
}
function moveTile(sourceLocation) {
var distance = sourceLocation - emptySquare;
if (distance < 0) distance = -(distance);
if (distance == 1 || distance == 4) {
swapTileAndEmptySquare(sourceLocation);
}
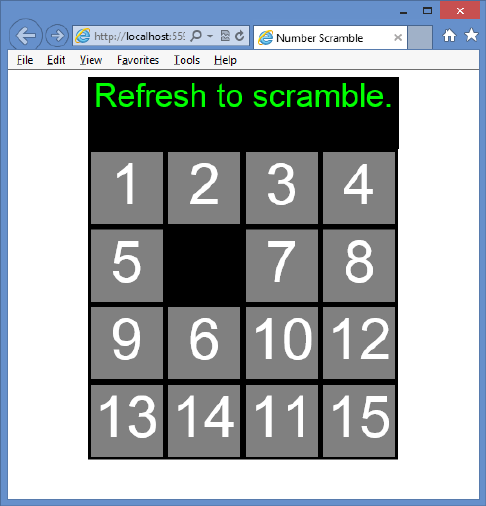
530 CHAPTER 13 Drag and drop
}
function swapTileAndEmptySquare(sourceLocation) {
var $draggedItem = $('#square' + sourceLocation).children();
$draggedItem.detach();
var $target = $('#square' + emptySquare);
$draggedItem.appendTo($target);
emptySquare = sourceLocation;
}
13. Test your work by pressing F5 to run the website.
You should be able to move the tiles by dragging and dropping a tile to the empty
space. The default.html page after moving some tiles is shown in Figure 13-8.
FIGURE 13-8 The rendered number scramble page after moving some tiles
Exercise 3: Add scramble and winner check
In this exercise, you apply your knowledge of drag and drop by adding code to the number
scramble game you created in Exercise 2 to scramble the tiles when the page is rendered and
check for a winner after each drag and drop.
1. Start Visual Studio Express 2012 for Web. Open the NumberScramble project.
2. In the default.js le, add the following code to the document ready function to call a
scramble function that you create next.
Practice exercises CHAPTER 13 531
$(document).ready(function () {
jQuery.event.props.push('dataTransfer');
createBoard();
addTiles();
$('#gameBoard').on('dragstart', dragStarted);
$('#gameBoard').on('dragend', dragEnded);
$('#gameBoard').on('dragenter', preventDefault);
$('#gameBoard').on('dragover', preventDefault);
$('#gameBoard').on('drop', drop);
s c ra m ble();
});
3. At the bottom of the default.js le, add the following scramble function.
function scramble() {
for (var i = 0; i < 128; i++) {
var random = Math.random()
var sourceLocation;
if (random < 0.5) {
var column = emptySquare % 4
if (column == 0 || (random < 0.25 && column != 3)) {
sourceLocation = emptySquare + 1;
}
else {
sourceLocation = emptySquare - 1;
}
}
else {
var row = Math.floor(emptySquare / 4)
if (row == 0 || (random < 0.75 && row != 3)) {
sourceLocation = emptySquare + 4;
}
else {
sourceLocation = emptySquare - 4;
}
}
swapTileAndEmptySquare(sourceLocation);
}
}
The scramble function executes a loop of 128 random movements to scramble the
tiles. Each time the loop executes, a new random number is created, and, based on its
value, an adjacent tile is moved to the empty square.
4. In the drop function, add code to call the checkForWinner function that you create
next.
Your code should look like the following.
function drop(e) {
var $square = $(e.target);
if ($square.hasClass('square')) {
var destinationLocation = $square.data('square');
if (emptySquare != destinationLocation) return;
var sourceLocation = Number(e.dataTransfer.getData('text'));
moveTile(sourceLocation);
532 CHAPTER 13 Drag and drop
checkForWinner();
}
}
5. At the bottom of the default.js le, add a checkForWinner function. In this function,
add a statement to check that the empty square is at the lower-right corner. Add a
loop to retrieve each tile and check its parent square to see whether the tile is in the
correct square. If not, exit the checkForWinner function by using a return statement. If
you make it to the bottom of the function, change the message to “Winner!”
Your code should look like the following.
function checkForWinner() {
if (emptySquare != squareCount - 1) return;
for (var i = 0; i < emptySquare; i++) {
if ($('#tile' + i).parent().attr('id') != 'square' + i) return;
}
$('#message').html('Winner!');
}
The following is the completed default.js le.
/// <reference path="jquery-1.8.3.js" />
var squareCount = 16
var emptySquare;
$(document).ready(function () {
jQuery.event.props.push('dataTransfer');
createBoard();
addTiles();
$('#gameBoard').on('dragstart', dragStarted);
$('#gameBoard').on('dragend', dragEnded);
$('#gameBoard').on('dragenter', preventDefault);
$('#gameBoard').on('dragover', preventDefault);
$('#gameBoard').on('drop', drop);
scramble();
});
function createBoard() {
for (var i = 0; i < squareCount; i++) {
var $square = $('<div id="square' + i + '" data-square="' + i
+ '" class="square"></div>');
$square.appendTo($('#gameBoard'));
}
}
function addTiles() {
emptySquare = squareCount - 1;
for (var i = 0; i < emptySquare; i++) {
var $square = $('#square' + i);
var $tile = $('<div draggable="true" id="tile' + i
+ '" class="tile">' + (i + 1) + '</div>');
$tile.appendTo($square);
}
}
Practice exercises CHAPTER 13 533
function dragStarted(e) {
var $tile = $(e.target)
$tile.addClass('dragged');
var sourceLocation = $tile.parent().data('square');
e.dataTransfer.setData('text', sourceLocation.toString());
e.dataTransfer.effectAllowed = 'move';
}
function dragEnded(e) {
$(e.target).removeClass('dragged');
}
function preventDefault(e) {
e.preventDefault();
}
function drop(e) {
var $square = $(e.target);
if ($square.hasClass('square')) {
var destinationLocation = $square.data('square');
if (emptySquare != destinationLocation) return;
var sourceLocation = Number(e.dataTransfer.getData('text'));
moveTile(sourceLocation);
checkForWinner();
}
}
function moveTile(sourceLocation) {
var distance = sourceLocation - emptySquare;
if (distance < 0) distance = -(distance);
if (distance == 1 || distance == 4) {
swapTileAndEmptySquare(sourceLocation);
}
}
function swapTileAndEmptySquare(sourceLocation) {
var $draggedItem = $('#square' + sourceLocation).children();
$draggedItem.detach();
var $target = $('#square' + emptySquare);
$draggedItem.appendTo($target);
emptySquare = sourceLocation;
}
function scramble() {
for (var i = 0; i < 128; i++) {
var random = Math.random()
var sourceLocation;
if (random < 0.5) {
var column = emptySquare % 4
if (column == 0 || (random < 0.25 && column != 3)) {
sourceLocation = emptySquare + 1;
}
else {
sourceLocation = emptySquare - 1;
}
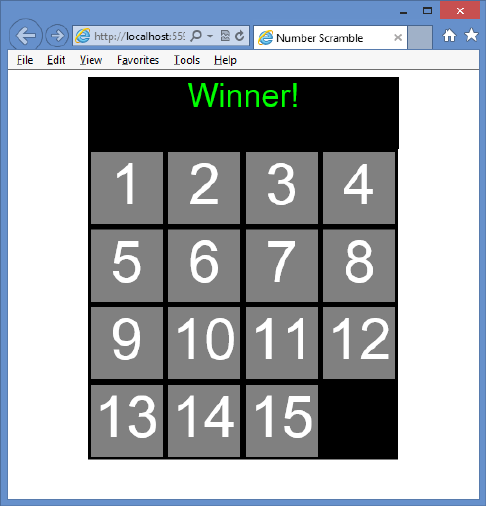
534 CHAPTER 13 Drag and drop
}
else {
var row = Math.floor(emptySquare / 4)
if (row == 0 || (random < 0.75 && row != 3)) {
sourceLocation = emptySquare + 4;
}
else {
sourceLocation = emptySquare - 4;
}
}
swapTileAndEmptySquare(sourceLocation);
}
}
function checkForWinner() {
if (emptySquare != squareCount - 1) return;
for (var i = 0; i < emptySquare; i++) {
if ($('#tile' + i).parent().attr('id') != 'square' + i) return;
}
$('#message').html('Winner!');
}
6. Test your work by pressing F5 to run the website.
When the page is displayed, the tiles should be scrambled. You should be able to move
the tiles by dragging and dropping a tile to the empty space. When you have nished
sorting the tiles, you should see the winning message as shown in Figure 13-9.
FIGURE 13-9 The rendered number scramble page after winning

Suggested practice exercises CHAPTER 13 535
Suggested practice exercises
The following additional exercises are designed to give you more opportunities to practice
what you’ve learned and to help you successfully master the lessons presented in this chapter.
Exercise 1 Learn more about drag and drop by creating an application that enables
the user to make selections by dragging and dropping options.
Exercise 2 Learn more about dragging and dropping les by creating an application
that enables the user to select drag and drop image les that you render on the page.

536 CHAPTER 13 Drag and drop
Answers
This section contains the answers to the lesson review questions in this chapter.
Lesson 1
1. Correct answers: B and E
A. Incorrect: The dragstart event triggers only when you start a drag operation.
B. Correct: The drag event triggers many times while you drag an item.
C. Incorrect: The dragend event triggers only when you end a drag operation.
D. Incorrect: The dragenter event triggers only when you enter a drop target.
E. Correct: The dragover event triggers continuously as you drag an item over a drop
target.
F. Incorrect: The dragleave event triggers only when you leave a drop target.
G. Incorrect: The drop event triggers only when you drop the item being dragged.
2. Correct answers: A, B, and C
A. Correct: The dragstart event triggers in association with the drag item.
B. Correct: The drag event triggers in association with the drag item.
C. Correct: The dragend event triggers in association with the drag item.
D. Incorrect: The dragenter event triggers in association with the drop target.
E. Incorrect: The dragover event triggers in association with the drop target.
F. Incorrect: The dragleave event triggers in association with the drop target.
G. Incorrect: The drop event triggers in association with the drop target.
3. Correct answer: D
A. Incorrect: Although these data types can be passed, you can pass any object that
can be represented as a string or URL.
B. Incorrect: Although URLs can be passed, you can pass any object that can be rep-
resented as a string or URL.
C. Incorrect: Although these data types can be passed, you can pass any object that
can be represented as a string or URL.
D. Correct: You can pass any object that can be represented as a string or URL.

Answers CHAPTER 13 537
Lesson 2
1. Correct answers: D, E, and G
A. Incorrect: No dragstart event is associated with dragging les.
B. Incorrect: No drag event is associated with dragging les.
C. Incorrect: No dragend is associated with dragging les.
D. Correct: The dragenter event triggers when you enter a drop target, and its default
operation must be prevented.
E. Correct: The dragover event triggers continuously as you drag over a drop target,
and its default operation must be prevented.
F. Incorrect: The dragleave triggers only when you leave a drop target, and it is not
required for dropping les.
G. Correct: The drop event triggers only when you drop the item on a drop target,
and it is required to process the dropped les.
2. Correct answer: B
A. Incorrect: The name property exists on the File object.
B. Correct: The path property does not exist on the File object.
C. Incorrect: The type property exists on the File object.
D. Incorrect: The size property exists on the File object.


539
CHAPTER 14
Making your HTML
location-aware
The Geolocation application programming interface (API) provides an interface with
device location information such as latitude and longitude; you can use the Geolocation
API to make your applications location-aware. Imagine creating an application that enables
the user to enter favorite information, such as where to drink coffee or shop for comput-
ers. As the user gets close to a favorite place such as a coffee shop or a computer store, the
device displays a map with the location. Maybe the coffee shop could provide incentives to
motivate the user to stop by for a quick cup of coffee.
The API is generic enough to interface with many underlying location information
sources such as the Global Positioning System (GPS) and locations inferred from network
signals such as IP address, radio frequency identication (RFID), Wi-Fi and Bluetooth MAC
addresses, and cellular IDs and from user input. No guarantee is given that the API returns
the device’s actual location, and the accuracy can vary widely. Increasingly, mobile devices
are shipped with GPS in addition to accelerometer and compass. These sensors can provide
great accuracy to the Geolocation API.
The Geolocation API is being standardized by the Geolocation Working Group, which
is separate from the HTML5 Working Group. Therefore, the Geolocation API is not part
of HTML5, although support for geolocation is being added to browsers in parallel with
HTML5.
The API is designed to enable both one-shot position requests and repeated position
updates. Lesson 1, “Basic positioning,” covers one-shot queries; Lesson 2, “Monitored posi-
tioning,” covers repeated position updates.
Lessons in this chapter:
Lesson 1: Basic positioning 540
Lesson 2: Monitored positioning 546
540 CHAPTER 14 Making your HTML location-aware
Before you begin
To complete this book, you must have some understanding of web development. This chapter
requires the hardware and software listed in the “System requirements” section in the book’s
Introduction.
Lesson 1: Basic positioning
The Geolocation object is accessible by using the navigator.geolocation global variable. Most
browsers support the Geolocation API, and the following code can be used to determine
whether the user’s browser provides support.
function supportsGeolocation() {
return 'geolocation' in navigator;
}
This code checks whether a geolocation property is on the object that’s referenced by the
navigator global variable. If the property exists, it will reference a Geolocation object.
After this lesson, you will be able to:
Understand the Geolocation object.
Retrieve the current position.
Handle positioning errors.
Estimated lesson time: 20 minutes
Geolocation object reference
The Geolocation object has a simple API with the following methods.
getCurrentPosition() Method that accepts a success callback, an error callback, and
options array and calls the success callback with the current position
watchPosition() Method that accepts a success callback, an error callback, and
options array and continuously calls the success callback with the current position
clearWatch() Method that stops continuous calling that was started by using the
watchPosition method
Notice that the getCurrentPosition and watchPosition methods have the same parameters.
The Position object has the following properties.
coords Gets a Coordinates object that contains information about the current
position.
Lesson 1: Basic positioning CHAPTER 14 541
timestamp Gets the time that the Coordinates object was created. The format for
the timestamp is milliseconds since the start of the Unix Epoch and can be converted
to a regular date and time by using the following code.
var dateTime = new Date(timeStamp).toLocaleString();
By focusing on the coords property that gets a Coordinates object, the Coordinates object
contains the following information about the current location.
latitude Gets the latitude in decimal degrees
longitude Gets the longitude in decimal degrees
altitude Gets the height in meters
accuracy Gets the accuracy of the coordinates in meters
altitudeAccuracy Gets the accuracy of the altitude in meters
heading Gets the direction of travel in degrees
speed Gets the speed of travel in meters/second
The device hardware is the determining factor regarding the properties returned. For
example, with a GPS, most properties are populated, but if location is determined by using
your IP address, you might be missing altitude, heading, and speed-related information.
Retrieving the current position
It is easy to retrieve the current position by using the Geolocation object’s getCurrentPosition
method. At a minimum, you need to pass a callback method to receive a Position object,
which has coords and timestamp properties. For the subsequent examples, consider the
following webpage.
<!DOCTYPE html>
<html xmlns="http://www.w3.org/1999/xhtml">
<head>
<title></title>
<link href="GeoLocation.css" rel="stylesheet" />
<script src="Scripts/jquery-1.8.3.js"></script>
<script src="Scripts/GeoLocation.js"></script>
</head>
<body>
<div id="message">
</div>
</body>
</html>
The webpage has a reference to the Geolocation.css style sheet that is currently empty, the
jQuery library, and the Geolocation.js JavaScript le, which is currently empty. The <body>
element contains only a <div> element whose id is message.
The following code example demonstrates a simple call to the getCurrentPosition method.
/// <reference path="jquery-1.8.3.js" />
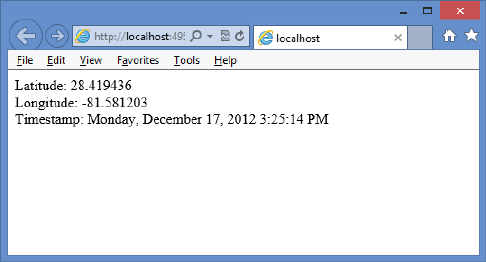
542 CHAPTER 14 Making your HTML location-aware
$(document).ready(function () {
getLocation();
});
function supportsGeolocation() {
return 'geolocation' in navigator;
}
function showMessage(message) {
$('#message').html(message);
}
function getLocation() {
if (supportsGeolocation()) {
navigator.geolocation.getCurrentPosition(showPosition);
}
else {
showMessage("Geolocation is not supported by this browser.");
}
}
function showPosition(position) {
var datetime = new Date(position.timestamp).toLocaleString();
showMessage("Latitude: " + position.coords.latitude + "<br />"
+ "Longitude: " + position.coords.longitude + "<br />"
+ "Timestamp: " + datetime);
}
The document ready function calls the getLocation function. In the getLocation function
an if statement determines whether it should attempt to call the getCurrentPosition method
by calling the supportsGeolocation function. The supportsGeolocation function checks
whether the navigator global variable has a geolocation property.
When the getCurrentPosition method is called, the showPosition function is passed. The
showPosition function is called when the position information has been successfully obtained.
When the showPosition function is called, it’s passed a Position object that contains a coords
and timestamp property. Figure 14-1 shows the rendered result.
FIGURE 14-1 The rendered current position and converted timestamp
Lesson 1: Basic positioning CHAPTER 14 543
Handling errors
You must handle errors when calling methods on the Geolocation object. You handle errors
by adding another callback parameter to the call so that the rst parameter is the success
callback, and the second parameter is the error callback.
The following code demonstrates the use of the error callback when calling the
getCurrentPosition method.
/// <reference path="jquery-1.8.3.js" />
$(document).ready(function () {
getLocation();
});
function supportsGeolocation() {
return 'geolocation' in navigator;
}
function showMessage(message) {
$('#message').html(message);
}
function getLocation() {
if (supportsGeolocation()) {
navigator.geolocation.getCurrentPosition(showPosition, showError);
}
else {
showMessage("Geolocation is not supported by this browser.");
}
}
function showPosition(position) {
var datetime = new Date(position.timestamp).toLocaleString();
showMessage("Latitude: " + position.coords.latitude + "<br />"
+ "Longitude: " + position.coords.longitude + "<br />"
+ "Timestamp: " + datetime);
}
function showError(error) {
switch (error.code) {
case error.PERMISSION_DENIED:
showMessge("User denied Geolocation access request.");
break;
case error.POSITION_UNAVAILABLE:
showMessage("Location information unavailable.");
break;
c a se e r r o r.T I M EO U T:
showMessage("Get user location request timed out.");
break;
case error.UNKNOWN_ERROR:
showMessage("An unknown error occurred.");
break;
}
}
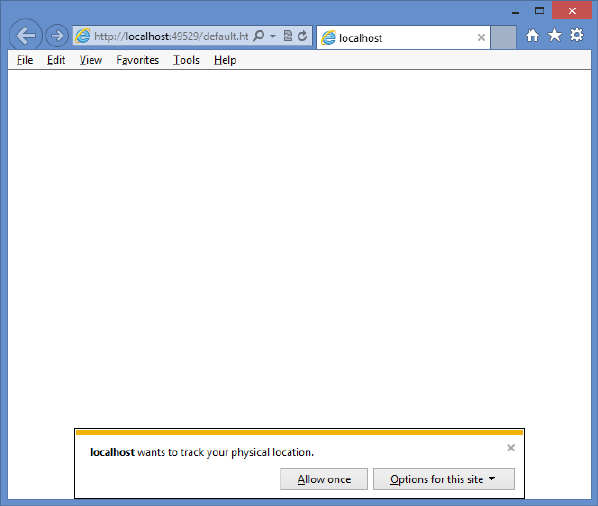
544 CHAPTER 14 Making your HTML location-aware
In this example, the showError function is called if there is an error when calling the
getCurrentPosition method. An error object is passed to the showError function. This example
attempts to determine the cause of the error and display a meaningful message.
Addressing privacy
If a webpage can get your current position, is that an invasion on your privacy? Yes, and you
will receive a prompt that says, “DomainName wants to track your physical location.” At that
point, you can decide whether you want your location to be retrieved once, all the time, or
not at all. Figure 14-2 shows the prompt.
FIGURE 14-2 The request for location tracking
Specifying options
The third parameter that you can pass to the getCurrentPosition method is the options, which
is a PositionOptions object that provides you with the following optional properties.
enableHighAccuracy This species that the best possible result is requested even if
it takes more time. Default is false.
timeout This species the timeout in milliseconds that the browser will wait for a
response. Default is -1, which means there is no timeout.

Lesson 1: Basic positioning CHAPTER 14 545
maximumAge Species that a cached location is acceptable as long as it’s no older
that the specied milliseconds. Default is 0, which means that a cached location is not
used.
The following is an example of passing the options to the getCurrentPosition method.
function getLocation() {
if (supportsGeolocation()) {
var options = {
enableHighAccuracy: true,
timeout: 3000,
maximumAge: 20000
};
navigator.geolocation.getCurrentPosition(showPosition, showError, options);
}
else {
showMessage("Geolocation is not supported by this browser.");
}
}
Quick check
What must you do to prevent sites from retrieving your location without your
knowledge?
Quick check answer
When you visit a site that requests your location, a pop-up is displayed, and you
must grant permission explicitly to the site before your location can be retrieved.
Be careful about selecting Always Allow because it’s easy to forget that you
selected it.
Lesson summary
The Geolocation API provides an interface with device location information.
Depending on the location source, you can receive latitude, longitude, altitude,
heading, speed, and accuracy information.
The Geolocation API is accessible by using the geolocation property on the navigator
global variable.
The Geolocation object has a getCurrentPosition method that is a one-time call to get
the current location.
The getCurrentPosition method takes a success callback, an error callback, and an
options parameter.
546 CHAPTER 14 Making your HTML location-aware
Lesson review
Answer the following questions to test your knowledge of the information in this lesson. You
can nd the answers to these questions and explanations of why each answer choice is correct
or incorrect in the “Answers” section at the end of this chapter.
1. Which method gets your current location once from the Geolocation object?
A. watchPosition()
B. watchLocation()
C. getCurrentPosition()
D. getCurrentLocation()
2. Which of the following is not a valid parameter on the getCurrentPosition method?
A. Error callback function
B. Position options object
C. Success callback function
D. Use GPS only
Lesson 2: Monitored positioning
If you were writing an application that plotted your current location on a map, it would be
more efcient to let the Geolocation API tell you when the location changes than to write
code that continues to poll for the current location. That’s the focus of this lesson.
After this lesson, you will be able to:
Use the Geolocation object to watch the current position.
Calculate the distance between two sample points.
Estimated lesson time: 20 minutes
Where are you now? How about now?
You can use the Geolocation object’s watchPosition method to retrieve continuous position
updates. This method takes the same parameters as the getCurrentPosition method. The dif-
ference is that when you call the watchPosition once, it continues calling the success function
until you call the clearWatch method to stop monitoring your position.
The watchPosition method returns an id, which is passed to the clearWatch method to end
the monitoring. In this example, the webpage is modied with the addition of a button to
start location monitoring and another button to end location monitoring, as follows.
<!DOCTYPE html>
<html xmlns="http://www.w3.org/1999/xhtml">
Lesson 2: Monitored positioning CHAPTER 14 547
<head>
<title></title>
<link href="GeoLocation.css" rel="stylesheet" />
<script src="Scripts/jquery-1.8.3.js"></script>
<script src="Scripts/GeoLocation.js"></script>
</head>
<body>
<div id="message">
</div>
<button id="startMonitoring">Start Monitoring</button>
<button id="stopMonitoring">Stop Monitoring</button>
</body>
</html>
With the added buttons and the change to use the watchPosition method, the following is
the updated JavaScript; the notable changes are in bold.
/// <reference path="jquery-1.8.3.js" />
var watchId = 0;
$(document).ready(function () {
$(‘#startMonitoring’).on(‘click’, getLocation);
$(‘#stop M onitoring’).o n(‘click’, en d Watch);
});
function supportsGeolocation() {
return 'geolocation' in navigator;
}
function showMessage(message) {
$('#message').html(message);
}
function getLocation() {
if (supportsGeolocation()) {
var options = {
enableHighAccuracy: true
};
watchId = navigator.geolocation.watchPosition(showPosition, showError, options);
}
else {
showMessage("Geolocation is not supported by this browser.");
}
}
function endWatch() {
if (watchId != 0) {
navigator.geolocation.clearWatch(watchId);
watchId = 0;
showMessage("Monitoring ended.");
}
}
function showPosition(position) {
548 CHAPTER 14 Making your HTML location-aware
var datetime = new Date(position.timestamp).toLocaleString();
showMessage("Latitude: " + position.coords.latitude + "<br />"
+ "Longitude: " + position.coords.longitude + "<br />"
+ "Timestamp: " + datetime);
}
function showError(error) {
switch (error.code) {
case error.PERMISSION_DENIED:
showMessge("User denied Geolocation access request.");
break;
case error.POSITION_UNAVAILABLE:
showMessage("Location information unavailable.");
break;
case error.TIMEOUT:
showMessage("Get user location request timed out.");
break;
case error.UNKNOWN_ERROR:
showMessage("An unknown error occurred.");
break;
}
}
This code doesn’t require many changes to get the benet of continuous monitoring. The
big change is the addition of the endWatch function that uses the watchId global variable to
stop location monitoring.
Calculating distance between samples
When you’re continuously monitoring the user’s location, you might want to calculate the
distance between samples.
Calculating the distance traveled is relatively easy if you are traveling over a at plane.
Because people are traveling over the earth, you need to use spherical geometry to calcu-
late the distance traveled. There are several formulas for this calculation, based primarily on
accuracy. In addition, all calculations are based on the earth being perfectly round with no
hills and valleys.
This example shows implementation of the haversine formula to calculate the distance.
This formula is a bit more complex than other formulas, such as the spherical law of cosines,
but it provides better accuracy. The following is a getDistance function using the haversine
formula.
function getDistance(lat1, lon1, lat2, lon2) {
var earthRadius = 3959; //miles
var latRadians = getRadians(lat2 - lat1);
var lonRadians = getRadians(lon2 - lon1);
var a = Math.sin(latRadians / 2) * Math.sin(latRadians / 2) +
Math.cos(getRadians(lat1)) * Math.cos(getRadians(lat2)) *
Math.sin(lonRadians / 2) * Math.sin(lonRadians / 2);
var c = 2 * Math.atan2(Math.sqrt(a), Math.sqrt(1 - a));
var distance = earthRadius * c;
Lesson 2: Monitored positioning CHAPTER 14 549
return distance;
}
function getRadians (latlongDistance) {
return latlongDistance * Math.PI / 180;
}
Quick check
Which method monitors your location?
Quick check answer
The watchPosition method
Lesson summary
The watchPosition method monitors your location and takes the same parameters as
the getCurrentPosition method.
The watchPosition method returns an id that is used when you want to stop
monitoring.
The clearWatch method stops monitoring.
The clearWatch method requires a watch id.
Lesson review
Answer the following questions to test your knowledge of the information in this lesson. You
can nd the answers to these questions and explanations of why each answer choice is correct
or incorrect in the “Answers” section at the end of this chapter.
1. Which method continuously monitors your current location from the Geolocation
object?
A. watchPosition()
B. watchLocation()
C. getCurrentPosition()
D. getCurrentLocation()
2. Which of the following formulas can you use to calculate the distance between two
samples?
A. haversine
B. Pythagorean theorem
C. quadratic
D. hyperbolic

550 CHAPTER 14 Making your HTML location-aware
Practice exercises
If you encounter a problem completing any of these exercises, the completed projects can be
installed from the Practice Exercises folder that is provided with the companion content.
Exercise 1: Map your current positions
In this exercise, you apply your knowledge of the Geolocation API by creating a web applica-
tion that retrieves your current location and displays a map with your location. This exercise
uses the Google Maps API because you don’t need an account to use it, but you can also use
the Bing maps API. The Bing API is different and requires you to get a developer account, but
it’s easy to implement.
1. Start Visual Studio Express 2012 for Web. Create an ASP.NET Empty Web Application
project called PositionMapper.
2. Add an HTML le to the project. Name the le default.html.
3. Add a CSS le to the project. Name the le default.css.
4. Add a folder called Scripts to the project.
5. Right-click the Scripts folder and add a new JavaScript le called default.js.
6. Add a reference to the jQuery library by right-clicking the project node. Choose
Manage NuGet Packages. Click Online and type jQuery in the search criteria. When
the jQuery library is displayed, click the Install button.
7. In the default.html le, add a reference to the default.css, jQuery library, and default.js
les.
8. Above the jQuery reference, add the following reference to the Google Maps API.
<script src="http://maps.google.com/maps/api/js?sensor=false"></script>
9. Add a title called Position Mapper to your page.
Your HTML page should look like the following.
<!DOCTYPE html>
<html xmlns="http://www.w3.org/1999/xhtml">
<head>
<title>Position Mapper</title>
<link href="default.css" rel="stylesheet" />
<script src="http://maps.google.com/maps/api/js?sensor=false"></script>
<script src="Scripts/jquery-1.8.3.js"></script>
<script src="Scripts/default.js"></script>
</head>
<body>
</body>
</html>
10. In the <body> element, add a <div> element whose id is map.
Practice exercises CHAPTER 14 551
11. Under the <div> element, add another <div> element whose id is message.
Your HTML page should look like the following.
<!DOCTYPE html>
<html xmlns="http://www.w3.org/1999/xhtml">
<head>
<title>Position Mapper</title>
<link href="default.css" rel="stylesheet" />
<script src="http://maps.google.com/maps/api/js?sensor=false"></script>
<script src="Scripts/jquery-1.8.3.js"></script>
<script src="Scripts/default.js"></script>
</head>
<body>
<div id="map"></div>
<div id="message"></div>
</body>
</html>
12. In the default.css les, add the following style rules to center and size the map and
message.
#map {
width: 800px;
height: 600px;
margin-right: auto;
margin-left: auto;
border: solid;
}
#message {
width: 800px;
height: 50px;
margin-right: auto;
margin-left: auto;
border: solid;
}
13. In the default.js le, add the document ready function. In the document ready func-
tion, call the getLocation function that you create in the next step.
Your code should look like the following.
$(document).ready(function () {
getLocation();
});
14. Add the following code for the getLocation, supportsGeolocation, showMessage, and
showError functions.
This is the same code that was covered in Lesson 1.
function getLocation() {
if (supportsGeolocation()) {
watchId = navigator.geolocation.getCurrentPosition(showPosition
, showError);
}
else {
552 CHAPTER 14 Making your HTML location-aware
showMessage("Geolocation is not supported by this browser.");
}
}
function supportsGeolocation() {
return 'geolocation' in navigator;
}
function showMessage(message) {
$('#message').html(message);
}
function showError(error) {
switch (error.code) {
case error.PERMISSION_DENIED:
showMessage("User denied Geolocation access request.");
break;
case error.POSITION_UNAVAILABLE:
showMessage("Location information unavailable.");
break;
case error.TIMEOUT:
showMessage("Get user location request timed out.");
break;
case error.UNKNOWN_ERROR:
showMessage("An unknown error occurred.");
break;
}
}
15. Add the showPosition function that is called when the getCurrentPosition function call
is successful.
function showPosition(position) {
var mapcanvas = document.getElementById('map');
var coords = new google.maps.LatLng(position.coords.latitude
, position.coords.longitude);
var options = {
zoom: 13,
center: coords,
mapTypeControl: false,
navigationControlOptions: {
style: google.maps.NavigationControlStyle.SMALL
},
mapTypeId: google.maps.MapTypeId.ROADMAP
};
var map = new google.maps.Map(mapcanvas, options);
var marker = new google.maps.Marker({
position: coords,
map: map,
title: "You are here!"
});
}
This is where the mapping takes place. The rst line gets a reference to the <div> ele-
ment for the map and assigns it to the mapcanvas variable. The second statement uses
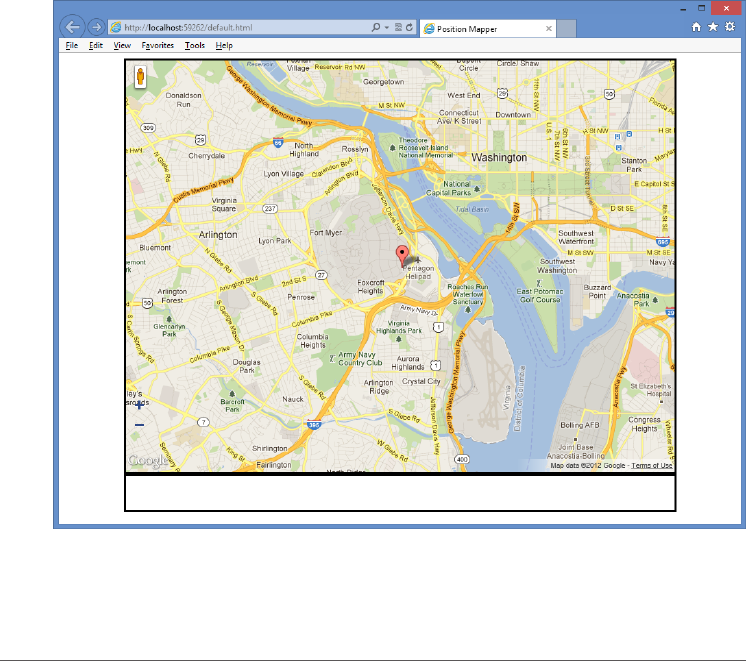
Suggested practice exercises CHAPTER 14 553
the Google API to create a coordinate object based on latitude and longitude, and it’s
assigned to the coords variable. The next statement creates an object with the map
settings and assigns it to the options variable. The Map method in the Google API is
called, which renders the map in the mapcanvas variable and returns a reference to the
map. Finally, the Google API is used to create a marker with the current location.
16. In Solution Explorer, right-click the default.html le and choose Set As Start Page.
17. Test your work by pressing F5 to run the website.
You should see the default.html page as shown in Figure 14-3.
FIGURE 14-3 The Google map with the current location
Suggested practice exercises
The following additional exercises are designed to give you more opportunities to practice
what you’ve learned and to help you successfully master the lessons presented in this chapter.
Exercise 1 Learn more about positioning by creating an application that retrieves the
user’s current location to help nd nearby locations such as gas stations or restaurants.
Exercise 2 Learn more about monitored positioning by writing an application that
monitors your position and displays a trail of your travels on a map.

554 CHAPTER 14 Making your HTML location-aware
Answers
This section contains the answers to the lesson review questions in this chapter.
Lesson 1
1. Correct answer: C
A. Incorrect: The watchPosition() method continuously returns the current location.
B. Incorrect: The watchLocation() method does not exist.
C. Correct: The getCurrentPosition() method retrieves the current location a single
time.
D. Incorrect: The getCurrentLocation() method does not exist.
2. Correct answer: D
A. Incorrect: The error callback function is a valid paramete.
B. Incorrect: The position options object is a valid parameter.
C. Incorrect: The success callback function is a valid parameter.
D. Correct: The use GPS only parameter is not valid.
Lesson 2
1. Correct answer: A
A. Correct: The watchPosition() method continuously returns the current location.
B. Incorrect: The watchLocation() method does not exist.
C. Incorrect: The getCurrentPosition() method retrieves the current location a single
time.
D. Incorrect: The getCurrentLocation() method does not exist.
2. Correct answer: A
A. Correct: The haversine formula calculates spherical distance.
B. Incorrect: You use the Pythagorean theorem to calculate the hypotenuse of a right
triangle.
C. Incorrect: You use the quadratic formula to solve ax2 + bx + c = 0 for x.
D. Incorrect: Hyperbolic functions are analogs of the ordinary trigonometric, or circu-
lar, functions.

555
CHAPTER 15
Local data with web storage
So far, you’ve learned how to take advantage of a wide array of tools to produce applica-
tions that are aesthetically appealing, responsive, and fast. However, your primary means
of data storage has been conned to sending information back to the server, which requires
the application to wait for a round-trip to occur.
To minimize the cost of relying entirely on server-side persistence, most modern brows-
ers now support web storage (also known as DOM storage), a relatively new feature that
enables storing small amounts of user data on the client machine.
This chapter begins with an overview of the two storage mechanisms (localStorage
and sessionStorage) and how they can make dramatic improvements in how user data is
retained. The chapter then examines how the use of storage events can combat complex
problems such as race conditions.
Lessons in this chapter:
Lesson 1: Introducing web storage 555
Lesson 2: Handling storage events 565
Before you begin
To complete this book, you must have some understanding of web development. This chap-
ter requires the hardware and software listed in the “System requirements” section in the
book’s Introduction. Specically, you need a browser (such as Internet Explorer 8 or a newer
version) that can accommodate web storage.
Lesson 1: Introducing web storage
Most web applications rely on some method of data storage, which usually involves a
server-side solution such as a SQL Server database. However, in many scenarios, that might
be excessive, and the ability to store simple, non-sensitive data in your browser would easily
meet your needs.
556 CHAPTER 15 Local data with web storage
After this lesson, you will be able to:
Understand web storage.
Implement the localStorage object.
Estimated lesson time: 20 minutes
Understanding cookies
For years, storing data in the browser could be accomplished by using HTTP cookies, which
have provided a convenient way to store small bits of information. Today, cookies are used
mostly for storing basic user prole information. The following is an example of how cookies
are used.
// setting the cookie value
function setCookie(cookieName, cookieValue, expirationDays) {
var expirationDate = new Date();
expirationDate.setDate(expirationDate.getDate() + expirationDays);
cookieValue = cookieValue + "; expires=" + expirationDate.toUTCString();
document.cookie = cookieName + "=" + cookieValue;
}
// retrieving the cookie value
function getCookie(cookieName)
{
var cookies = document.cookie.split(";");
for (var i = 0; i < cookies.length; i++) {
var cookie = cookies[i];
var index = cookie.indexOf("=");
var key = cookie.substr(0, index);
var val = cookie.substr(index + 1);
if (key == cookieName)
return val;
}
}
// usage
setCookie('firstName', 'Glenn', 1);
var firstName = getCookie('firstName');
Using the jQuery cookie plug-in
The example demonstrates that working with cookies isn’t complicated, but the interface for
doing so leaves much to be desired. To simplify working with cookies, you can use the jQuery.
Cookie plug-in available at https://github.com/carhartl/jquery-cookie. Here is the modied
code example when using the jQuery plug-in.
Lesson 1: Introducing web storage CHAPTER 15 557
$.cookie('firstName', 'Glenn');
var firstName = $.cookie('firstName');
This example shows that the plug-in provides a much simpler interface.
Working with cookie limitations
Cookies will continue to be an effective tool for the foreseeable future, but they have some
drawbacks.
Capacity limitations Cookies are limited to about 4 KB of data, which is not large,
although you can create more than 30 cookies per site. (The actual maximum limit
depends on which browsers you are targeting; the average is between 30 and 50.)
Overhead Every cookie is sent with each HTTP request/response made, regardless of
whether the values are needed. This is often true even for requests for static content
(such images, css les, and js les), which can create heavier-than-necessary HTTP
messages.
Alternatives to cookies prior to HTML5
Because the limitations of cookies were so high, demand was great for more powerful stor-
age capabilities. Some creative alternatives were developed within a few of the more popular
plug-ins.
Flash Player Adobe Flash Player plug-in was one of the earliest to offer a reliable
storage mechanism through its Local Shared Objects function. It comes with the abil-
ity to store much more data than cookies and gives the user the ability to increase or
limit the amount of space allowed for each site. Another extremely useful feature of
Local Shared Objects is its ability to be written by one browser and read by others. For
example, if a user creates a to-do list on a website by using Internet Explorer, that list
can later be accessed by Flash Player running within Firefox.
User Data Internet Explorer has supported an application programming interface
(API), referred to as User Data, since version 5. It provides the ability to store up to
1 MB of information in the form of a key/value pair. Although not as robust as the
HTML5 storage offerings, it can still be a good alternative for applications that are
meant to be Internet Explorer–specic and are required to work in earlier versions such
as Internet Explorer 6 or Internet Explorer 7.
Google Gears A solution that was ahead of its time was Google Gears, which several
high-volume web utilities used, such as YouTube and Gmail. In 2010, however, Google
announced that it is no longer developing new features for Gears. Instead, Google’s
efforts are turned to building on the HTML5 web standards.
Java Applets Another popular open-source solution was Java Applets, which was
another cross browser–friendly way to store information. However, like Flash Player
and Gears, its usage is dropping dramatically in favor of HTML5 alternatives.
558 CHAPTER 15 Local data with web storage
Looking beyond plug-ins
Although the features within these plug-ins provided great answers to the storage problem,
they came with limitations that restricted their usefulness.
Plug-in required The rst hurdle is that the user must not only have the plug-in
installed but also often have the correct plug-in version.
User blocking Because of security and performance concerns, many users install
tools such as Flash blockers, which can require a user to click to enable the plug-in or
even block the plug-in entirely.
Corporate users In some organizations, employees are prohibited from installing
third-party plug-ins to avoid potential security vulnerabilities.
Vendor-specic The biggest drawback to each plug-in option is that it relies on
individual vendors for support and development. If that vendor decides to discontinue
or reduce support, you might have to nd another solution quickly.
Understanding HTML5 storage
Existing solutions leave a lot to be desired; HTML5 breaks new ground with several innova-
tive tools. Each is unique and carries its own set of pros and cons, which this chapter discusses
individually.
Web storage Easily the simplest new form of storage, web storage provides a way to
store key/value pairs of data in a manner that rivals cookies in ease of use. In the next
section, you see that it’s currently the most widely supported option.
Web SQL database For more complex applications, this might be a good alternative
to web storage. It provides the power of a full relational database, including support
for SQL commands, transactions, and performance tuning. Unfortunately, its support is
extremely limited, and it might be left behind in favor of other options.
IndexedDB This tool appears to be a strong candidate for the solution to complex
storage requirements in the future. As a non-relational (NoSQL) database, it provides
simplicity that’s similar to web storage while still accommodating common needs such
as indexing and transactions.
Filesystem API This tool is useful for storing larger data types such as text les,
images, and movies. However, it suffers from a lack of adoption by many of today’s
modern browsers. As of this writing, it’s primarily supported in Chrome only.
Considering security
Although the four storage types have many differences, they also have some striking similari-
ties beyond all being vehicles for storing data on the client’s machine.
One property they all have in common is that the data being stored is tied to the URL
(or, more specically, the origin), which ensures that data can’t be accessed by other sites.
Lesson 1: Introducing web storage CHAPTER 15 559
Therefore, the same host, port, and protocol (for example, HTTP versus HTTPS) must be pro-
vided before a webpage can access data written by another page.
Given data storage that was created using the URL http://www.example.com/area1
/page1.html, consider whether each of the following URLs can access that data storage.
http://www.otherexample.com/area1/page1.html No, different domains
http://store.example.com/area1/page1.html No, different hosts
http://example.com/area1/page1.html No, different hosts
https://www.example.com/area1/page1.html No, different protocol
http://www.example.com:8080/area1/page1.html No, different ports
http://www.example.com/area1/page2.html Yes
http://www.example.com/area2/page1.html Yes
The strict association to the origin is an important consideration when developing sites
that may be hosted on a shared domain. In most cases, it would be better practice to avoid
using web storage entirely if your site will live within a shared domain in the future, because
any sub-site within the domain would be able to access your data.
Using browser support
Many HTML5 features have different levels of implementation and compatibility by the dif-
ferent browser manufacturers, and this is especially true when working with the different
storage options. By far, the most universally supported storage option is web storage. The
following is a summary of browser support.
Web storage
Supported Internet Explorer (v8.0 and newer versions), Firefox (v15.0+),
Chrome (v22.0+), Safari (v5.1+), Safari Mobile (v3.2+), Blackberry (v7.0+),
Android (v2.1+), Opera (v12.0+)
Not supported Opera Mobile
Web SQL
Supported Chrome (v22.0+), Safari (v5.1+), Safari Mobile (v3.2+),
Blackberry (v7.0+), Android (v2.1+), Opera (v12.0+)
Not supported Internet Explorer, Firefox, Opera Mobile
IndexedDB
Supported Internet Explorer (v10.0 and newer versions), Firefox (v15.0+), Chrome
(v23.0+), Blackberry (v10.0+)
Not supported Safari, Safari Mobile, Android, Opera, Opera Mobile
FileSystem API
Supported Chrome (v22.0+), Blackberry (v10.0+)
Not supported Internet Explorer, Firefox, Safari, Safari Mobile, Android, Opera,
Opera Mobile
560 CHAPTER 15 Local data with web storage
This chapter examines the two types of web storage: localStorage and sessionStorage.
Chapter 16, “Ofine web applications,” examines the remaining three storage options in more
depth.
Exploring localStorage
The localStorage global variable is a Storage object. One of the greatest strengths of
localStorage is its simple API for reading and writing key/value pairs of strings. Because it’s
essentially a NoSQL store, it’s easy to use by nature.
Using the localStorage object reference
The following is a list of methods and attributes available on the Storage object as it pertains
to localStorage.
setItem(key, value) Method that stores a value by using the associated key. The fol-
lowing is an example of how you can store the value of a text box in localStorage. The
syntax for setting a value is the same for a new key as for overwriting an existing value.
localStorage.setItem('firstName', $('#firstName').val());
And since it's treated like many other JavaScript dictionaries, you could also set
values using other common syntaxes.
localStorage['firstName'] = $('#firstName').val();
or
localStorage.firstName = $('#firstName').val();
getItem(key) Method of retrieving a value by using the associated key. The following
example retrieves the value for the ‘rstName’ key. If an entry with the specied key
does not exist, null will be returned.
var firstName = localStorage.getItem('firstName');
And like setItem, you also have the ability to use other syntaxes to retrieve
values from the dictionary.
var firstName = localStorage['firstName'];
or
var firstName = localStorage.firstName;
removeItem(key) Method to remove a value from localStorage by using the associ-
ated key. The following example removes the entry with the given key. However, it
does nothing if the key is not present in the collection.
localStorage.removeItem('firstName');
clear() Method to remove all items from storage. If no entries are present, it does
nothing. The following is an example of clearing the localStorage object.
localStorage.clear();
length Property that gets the number of entries currently being stored. The following
example demonstrates the use of the length property.
var itemCount = localStorage.length;

Lesson 1: Introducing web storage CHAPTER 15 561
key(index) Method that nds a key at a given index. The World Wide Web
Consortium (W3C) indicates that if an attempt is made to access a key by using an
index that is out of the range of the collection, null should be returned. However, some
browsers will throw an exception if an out-of-range index is used, so it’s recommended
to check the length before indexing keys.
var key = localStorage.key(1);
Very high browser support
Another benet of localStorage, as seen in the previous section, is that localStorage, in addi-
tion to sessionStorage, is well supported in modern browsers. In fact, it’s the only one of the
four storage options that is consistently supported across desktop and mobile browsers.
Determining whether the user’s browser supports web storage
Although most browsers support web storage, it’s still a good idea to verify that it’s available
in case the user is running an older browser version. If it’s not available, you could experi-
ence a null reference exception the rst time an attempt is made to access localStorage or
sessionStorage. There are several ways to check availability; the following is one example.
function isWebStorageSupported() {
return 'localStorage' in window;
}
if (isWebStorageSupported()) {
localStorage.setItem('firstName', $('#firstName').val());
}
The popular JavaScript library, Modernizr, comes with a method that could do this check
for you.
if (Modernizr.localstorage) {
localStorage.setItem('firstName', $('#firstName').val());
}
Amount of data that can be kept in web storage
The localStorage object provides much more space than was available with older tools.
Modern browsers support a minimum of 5 MB of data, which is substantially more than is
allowed through cookies (which are limited to 4 KB each).
NOTE STORAGE CAPACITY
The 5 MB limit is currently recommended by the W3C, but it’s ultimately up to the browser
vendors to determine how much they will allow. Currently, Internet Explorer supports a
10 MB limit.
562 CHAPTER 15 Local data with web storage
Reaching the storage limit
If the storage limit is reached, or if the user manually turns off storage capabilities, a
QuotaExceededError exception is thrown. The following is an example of how you can use a
try/catch block to keep your application from failing if that happens.
try{
localStorage.setItem('firstName', $('#firstName').val());
}
catch(e) {
// degrade gracefully
}
Storing complex objects
Currently, only string values can be stored in web storage, but sometimes you might need to
store more interesting items such as arrays or JavaScript objects. To accomplish this, you can
take advantage of some of the available JavaScript Object Notation (JSON) utility methods.
The following example creates a JSON object and uses the stringify() method to convert
the value to a string that can then be placed in web storage.
var person = { firstName: 'Glenn', lastName: 'Johnson' };
localStorage.setItem('glenn', JSON.stringify(person));
You can then use the parse() method to deserialize a new instance of the object from the
string representation that was stored in the previous example.
var person = JSON.parse(localStorage.getItem('glenn'));
Don’t forget that a potential drawback to cookies is that they are always included in web
requests and responses, even if you don’t use them. The situation when using web storage is
the opposite; its values are never automatically passed to the server. You can do this yourself
by including values in an AJAX call or by using JavaScript to copy the values into posted form
elements.
Using short-term persistence with sessionStorage
In the previous section, you learned how to use localStorage, which, like cookies, is designed
to retain data across multiple sessions. However, if you want to purge stored information, you
must use the removeItem() or clear() method.
In addition to localStorage, you can use sessionStorage; it is also a Storage object, so the
same methods and properties exist. The difference is that sessionStorage retains data for a
single session only. After the user closes the browser window, records stored are automatically
cleared. This is an important advantage because only a limited amount of space is available.
At their core, both localStorage and sessionStorage are rmly dedicated to their respec-
tive browsing contexts. Because that context for localStorage includes other tabs and win-
dows within the same URL base, its data is shared among all open instances. In contrast,
Lesson 1: Introducing web storage CHAPTER 15 563
sessionStorage has a context that, by design, is extremely conned. It’s limited to a single
browser tab or window. Its data cannot be passed from one tab to the next. However, the
data can be shared among any <iframe> elements that exist on the page.
Quick check
What object type are localStorage and sessionStorage?
Quick check answer
They are Storage objects.
Anticipating potential performance pitfalls
Web storage doesn’t come without a few drawbacks. This section covers some of the pitfalls
of using localStorage and sessionStorage.
Synchronously reading and writing to the hard drive
One of the biggest issues with the Storage object that is used with localStorage and
sessionStorage is that it operates synchronously, which can block the page from rendering
while read/writes occur. The synchronous read/writes are even more costly because they are
committed directly to the client’s hard drive. By itself, that might not be a cause for concern,
but the following activities can make these interactions annoyingly slow for the user.
Indexing services on the client machine
Scanning for viruses
Writing larger amounts of data
Although the amount of time it usually takes to perform these actions is typically too small
to notice, they could lock the browser from rendering while it’s reading and writing values to
the hard disk. With that in mind, it’s a good idea to use web storage for very small amounts of
data and use alternative methods for larger items.
NOTE WHY NOT USE WEB WORKERS TO READ/WRITE ASYNCHRONOUSLY?
Web storage is not available within web workers. If you need to write a value while in web
workers, you must use the postMessage() method to notify the parent thread and allow it
to perform the work instead.
Anticipating slow search capabilities
Because web storage does not have indexing features, searching large data sets can be time
consuming. This usually involves iterating over each item in the list to nd items that match
the search criteria.
564 CHAPTER 15 Local data with web storage
No transaction support
Another benet of other storage options that is missing from web storage is support for
transactions. Although difculties are unlikely in the majority of applications, applications
using web storage can run into problems if a user is modifying the same value in localStorage
within multiple open browser tabs. The result would be a race condition in which the second
tab immediately overwrites the value inserted by the rst tab.
Quick check
You would like to store the user’s name after he authenticates on your site, but
he will need to authenticate again on his next visit, at which time you would
reload his information (including name). Which storage mechanism should
you use?
Quick check answer
sessionStorage. Although you could use localStorage to store the user’s name, it
would be held permanently. Placing it in sessionStorage would purge it auto-
matically after the window is closed.
Lesson summary
Web storage provides you with an easy method for storing key/value pairs of data
without relying on a server.
With nearly universal support across current desktop and mobile browsers, web stor-
age is the most supported form of ofine data storage.
Web storage comes in two forms, which have the same methods.
localStorage Shares data across all windows and tabs within the same origin.
sessionStorage Data is sandboxed to only the current tab or window and is
cleared when closed.
Reads/writes to web storage can be performed only synchronously.
Web storage does not support advanced features such as transactions or indexing.
Only storage for string values is currently supported within web storage, but storage
for more complex objects can be achieved by using the JSON.stringify() and JSON.
parse() utility methods.
Lesson review
Answer the following questions to test your knowledge of the information in this lesson. You
can nd the answers to these questions and explanations of why each answer choice is correct
or incorrect in the “Answers” section at the end of this chapter.

Lesson 2: Handling storage events CHAPTER 15 565
1. Which of the following URLs can access data stored on http://www.example.com
/lesson1/page1.html?
A. http://www2.example.com/lesson1/page1.html
B. http://www.example.com:8081/lesson1/page1.html
C. https://www.example.com/lesson1/page1.html
D. http://www.example.com/lesson2/page1.html
E. http://example.com/lesson1/page1.html
2. What is the web storage limit currently recommended by the World Wide Web
Consortium (W3C)?
A. 4 KB
B. 5 MB
C. 500 MB
D. 10 MB
3. What is the correct syntax for removing all values existing in localStorage?
A. localStorage.clear();
B. localStorage.removeAll();
C. localStorage.abandon();
D. localStorage.reset();
4. Which of the following storage mechanisms has the highest level of cross-browser
support?
A. Web storage
B. Web SQL
C. IndexDB
D. FileSystem API
5. Which of the following features does web storage support?
A. Indexing
B. Transactions
C. Asynchronous read/write
D. Simple key/value pair storage
Lesson 2: Handling storage events
One of the biggest challenges you’ll face when working with web storage is keeping every-
thing in sync when a user has multiple tabs or browser instances open at the same time. For
example, browser tab one might have displayed a value it retrieved from localStorage just

566 CHAPTER 15 Local data with web storage
before that entry was updated in browser tab two. In this scenario, tab one doesn’t know that
the value it displayed has just become stale.
To solve this problem, web storage has a storage event that is raised whenever an entry is
added, updated, or removed. You can subscribe to this event within your application to pro-
vide notication when something has changed and inform you of specic details about those
changes. These events work in both localStorage and sessionStorage.
After this lesson, you will be able to:
Understand the StorageEvent object.
Implement the event handling on the localStorage object.
Estimated lesson time: 20 minutes
Sending notications only to other windows
The W3C recommends that events not be received in the tab (or window) that made the
change when working with storage events. This makes sense because the intent is to allow
other windows to respond when a storage value changes. However, some browsers (such as
later versions of Internet Explorer) have implemented storage events in a way that allows the
source window to receive the notication, too. It is only safe to rely on this implementation if
your application will target those browsers specically.
Using the StorageEvent object reference
Subscribers to the storage event receive a StorageEvent object containing detailed infor-
mation about what has changed. The following is a list of properties included on the
StorageEvent object.
key Gets the key of the record that was added, updated, or removed; will be null or
empty if the event was triggered by the clear() method
oldValue Gets the initial value if the entry was updated or removed; will be null or
empty if a new item was added or the clear() method was invoked
newValue Gets the new value for new and updated entries; will be null or empty if
the event was triggered by either the removeItem() or clear() methods
url Gets the URL of the page on which the storage action was made
storageArea Gets a reference to either the window’s localStorage or sessionStorage
object, depending on which was changed
Many browsers initially began supporting storage events without fully implementing the
properties of the StorageEvent interface specication, so some older browsers might trigger
storage events, but the properties outlined here might be null or empty.
Lesson 2: Handling storage events CHAPTER 15 567
Bubbling and canceling events
Unlike some other types of events, the storage event cannot be canceled from within a
callback; it’s simply a means for informing subscribers when a change occurs. It also does not
bubble up like other events.
Subscribing to events
To begin listening for event notications, add an event handler to the storage event as
follows.
function respondToChange(e) {
alert(e.newValue);
}
window.addEventListener('storage', respondToChange, false);
To trigger this event, perform an operation like the following in a new tab within the same
site.
localStorage.setItem('name', 'Glenn');
Considering Internet Explorer 8 performance with storage events
Storage events are only partially supported in Internet Explorer 8, so if you need to support
that specic browser version, consider these factors.
Only the url property is implemented on the StorageEvent object. The rest of the prop-
erties will return null.
The storage event itself is not triggered on the window object as it is in browsers that
are more current; instead, it is triggered on the document object.
The addEventListener() method is not available, but you can use the attachEvent()
method.
The following example subscribes to storage changes while safeguarding against when
Internet Explorer 8 might be used.
if (window.addEventListener) { // check for IE8
window.addEventListener('storage', respondToChange, false);
} else {
document.attachEvent('onstorage', respondToChange);
}
Binding to storage events by using jQuery
An alternative method to using addEventListener() for your subscriptions is to use the event-
binding features jQuery provides. You have to update your respondToChange() method
because it will now return a different event that actually wraps the raw event you were work-
ing with in the previous example.
function respondToChange(e) {
568 CHAPTER 15 Local data with web storage
alert(e.originalEvent.newValue);
}
$(window).on('storage', respondToChange);
if ('onstorage' in document) // bind to document for IE8
$(document).on('storage', respondToChange);
Using events with sessionStorage
In the previous lesson, you learned that browser context dictates when data can be shared.
Because the context for localStorage includes other tabs and windows, notications are
passed to each open instance. However, sessionStorage gains little benet from events
because its context includes the active tab only. Current browsers have included <iframe>
elements within that context denition, so it is possible to pass notications to and from them
if necessary.
Lesson summary
Other tabs and windows can subscribe to storage events to receive notications when
a change occurs to localStorage.
The StorageEvent object passed to subscribers contains detailed information regarding
what changes were made.
Because sessionStorage data is not shared beyond the current tab or window, others
will not receive notications when a change occurs.
Storage events cannot be canceled and do not bubble up.
Lesson review
Answer the following questions to test your knowledge of the information in this lesson. You
can nd the answers to these questions and explanations of why each answer choice is correct
or incorrect in the “Answers” section at the end of this chapter.
1. Which of the following is not a property of the StorageEvent object?
A. oldValue
B. key
C. changeType
D. storageArea
2. If you modify a value stored in sessionStorage, which of the following could receive
notications of the change (if subscribed)?
A. Another tab opened to a page on the same domain
B. A second browser window open to the same page

Practice exercises CHAPTER 15 569
C. An iframe on the same page whose source is within the same domain
D. The operating system that is hosting the browser
3. Which of the following is the correct way to cancel a storage event?
A. event.returnValue = false;
B. event.preventDefault();
C. event.stopPropagation();
D. Storage events cannot be canceled after they are triggered.
Practice exercises
If you encounter a problem completing any of these exercises, the completed projects can be
installed from the Practice Exercises folder that is provided with the companion content.
Exercise 1: Create a contact book by using localStorage
In this exercise, you practice working with web storage by creating a simple contact list that
is persisted as an array in localStorage. The page will display the complete contact list within a
grid and use a form for adding and editing contacts. The website itself will consist of a single
page; no server-side logic is needed. The HTML and CSS code is already complete, so your
focus is on adding the JavaScript needed to make it work.
1. Open Visual Studio Express 2012 for Web. Click File and choose Open Project. Navigate
to the ContactBook folder under the Exercise1Start folder. Select ContactBook.sln and
click Open.
2. Review the starting default.html le.
This le has a reference to the default.css le, the jQuery le, and the ContactsLibrary.
js le. In the <body> element is a contacts table and a form that includes elds for rst
name, last name, email, and phone number of the contact as follows.
<!DOCTYPE html>
<html xmlns="http://www.w3.org/1999/xhtml">
<head>
<title>Contact Book</title>
<link href="Content/default.css" rel="stylesheet" />
<script src="Scripts/jquery-1.8.3.min.js"></script>
<script src="Scripts/ContactsLibrary.js"></script>
</head>
<body>
<div id="container">
<header>
<hgroup id="headerText">
<h1>Contacts</h1>
</hgroup>
</header>
<div role="main">
570 CHAPTER 15 Local data with web storage
<table id="contacts">
<thead>
<tr>
<th>Email</th>
<th>Name</th>
<th></th>
</tr>
</thead>
<tbody>
</tbody>
</table>
<div id="editContact">
<h2 id="currentAction"></h2>
<div>
<label for="firstName">First Name:</label>
<input type="text" id="firstName" name="firstName" />
</div>
<div>
<label for="lastName">Last Name:</label>
<input type="text" id="lastName" name="lastName" />
</div>
<div>
<label for="email">Email Address:</label>
<input type="email" id="email" name="email" />
</div>
<div>
<label for="phoneNumber">Phone Number:</label>
<input type="text" id="phoneNumber" name="phoneNumber" />
</div>
<div class="buttons">
<button id="btnSave" name="save">Save</button>
</div>
</div>
</div>
</div>
</body>
</html>
3. Review the default.css le.
This le starts by resetting the margin, padding, font size, and font family of all ele-
ments. The semantic markup elements are set as blocks, and then the body element
is formatted. Specic formatting is applied to produce an attractive webpage. The
following is the default.css le.
* {
margin: 0;
padding: 0;
font-size: 12px;
font-family: Arial;
}
aside, footer, header, hgroup, nav {
display: block;
Practice exercises CHAPTER 15 571
}
body {
color: #776E65;
padding: 10px;
}
header {
height: 20px;
background-repeat: no-repeat;
margin-top: 10px;
}
#headerText {
position: absolute;
top: 0px;
width: 100%;
}
h1 {
font-size: 24px;
}
div[role="main"] {
float: left;
width: 60%;
}
#editContact {
background: none repeat scroll 0 0 #F8F8F8;
border: 1px solid #E1E1E1;
width: 400px;
margin-top: 20px;
}
#editContact h2 {
padding-left: 10px;
margin-top: 10px;
font-size: 18px;
width: 200px;
}
#editContact div {
width: 350px;
padding: 10px;
}
#editContact div.buttons {
text-align: center;
}
#editContact label {
width: 150px;
height: 12px;
vertical-align: bottom;
572 CHAPTER 15 Local data with web storage
clear: left;
display: block;
float:left;
}
#editContact input {
width: 150px;
padding: 2px;
}
button {
width: 200px;
margin-top: 10px;
}
#contacts {
width: 400px;
border: 1px solid #E1E1E1;
margin: 0px;
padding: 0px;
}
#contacts thead {
background-color: #e1e1e1;
color: #7C756D;
font-weight: bold;
text-align: left;
}
#contacts tbody tr:nth-child(even) {
background-color: #eee;
}
#contacts th {
border-color: #7C756D;
border-style: none none solid;
border-width: 0 0 1px;
}
#contacts th, #contacts td {
margin: 0px;
padding: 5px 10px;
}
4. Open and review the ContactsLibrary.js le.
This le has a reference to the jQuery library. Following that is a document ready func-
tion that calls the initialize function in the contactsNamespace. Under the document
ready function is the contactsNamespace, which contains a currentRecord variable and
the initialize property, which is assigned an empty function. The ContactsLibrary.js le
is as follows.
/// <reference path="jquery-1.8.3.js" />
$(document).ready(function () {
Practice exercises CHAPTER 15 573
contactsNamespace.initialize();
});
(function () {
this.contactsNamespace = this.contactsNamespace || {};
var ns = this.contactsNamespace;
var currentRecord;
ns.initialize = function () {
};
})();
5. To add code to the ContactsLibrary.js le, add a retrieveFromStorage method that pulls
the contact list from localStorage.
The contact list will be stored as an array of JSON Contact objects, but remember that
localStorage supports only storage of string values, so you must parse the result as an
array. You must also handle occasions when the contacts might not yet exist in storage.
Your code should look like the following.
(function () {
this.contactsNamespace = this.contactsNamespace || {};
var ns = this.contactsNamespace;
var currentRecord;
ns.initialize = function () {
};
function retrieveFromStorage() {
var contactsJSON = localStorage.getItem('contacts');
return contactsJSON ? JSON.parse(contactsJSON) : [];
}
})();
6. Populate the grid by iterating through the results array and creating a row for each
record. Within each row, include three cells: the email address, the full name, and
an edit link that will include a data-key attribute to hold the contact’s index within
the array.
7. If the array is empty, display a “No records available” message. Add a publicly available
display method that pulls items from storage and passes them to a private bindToGrid
method.
Your code should look like the following.
ns.display = function () {
var results = retrieveFromStorage();
bindToGrid(results);
};
function bindToGrid(results) {
574 CHAPTER 15 Local data with web storage
var html = '';
for (var i = 0; i < results.length; i++) {
var contact = results[i];
html += '<tr><td>' + contact.email + '</td>';
html += '<td>' + contact.firstName + ' ' + contact.lastName + '</td>';
html += '<td><a class="edit" href="javascript:void(0)" data-key='
+ i + '>Edit</a></td></tr>';
}
html = html || '<tr><td colspan="3">No records available</td></tr>';
$('#contacts tbody').html(html);
}
You created the edit link for each row; now you create the methods needed to display
the details for the selected row.
Because the method is invoked by clicking the link, you can get the index of the item
by inspecting the data-key attribute on the this object.
8. Use the index to nd the corresponding item in the contacts array and then store the
index and contact object within the currentRecord eld.
You will call a displayCurrentRecord method, which you create in the next step. Your
code should look like the following.
ns.loadContact = function () {
var key = parseInt($(this).attr('data-key'));
var results = retrieveFromStorage();
$('#currentAction').html('Edit Contact');
currentRecord = { key: key, contact: results[key] }
displayCurrentRecord();
};
9. Add the displayCurrentRecord method, which populates the form elds with contact
information as follows.
function displayCurrentRecord() {
var contact = currentRecord.contact;
$('#firstName').val(contact.firstName);
$('#lastName').val(contact.lastName);
$('#email').val(contact.email);
$('#phoneNumber').val(contact.phoneNumber);
}
10. In the bindToGrid method that you created earlier, add the following line to the end of
the method.
This binds the click event of the Edit links to the loadContact method.
$('#contacts a.edit').on('click', ns.loadContact);
11. Update the display method to instantiate an empty default currentRecord object that
is used to add a contact as follows.
ns.display = function () {
$('#currentAction').html('Ad d C ontact');
currentRecord = { key: null, contact: {} };
Practice exercises CHAPTER 15 575
displayCurrentRecord();
var results = retrieveFromStorage();
bindToGrid(results);
};
12. Add the public save method. In this method, create a contact variable and assign the
contact property of currentRecord. Retrieve each of the eld values from the form and
assign them to the contact object as follows.
ns.save = function () {
var contact = currentRecord.contact;
contact.firstName = $('#firstName').val();
contact.lastName = $('#lastName').val();
contact.email = $('#email').val();
contact.phoneNumber = $('#phoneNumber').val();
};
13. Add logic to the end of the save method that either adds the contact to the array if it’s
a new contact or updates the contact if it already exists. Convert the object to a JSON
string and store it in localStorage. Update the page by calling the display method.
The completed save method is as follows.
ns.save = function () {
var contact = currentRecord.contact;
contact.firstName = $('#firstName').val();
contact.lastName = $('#lastName').val();
contact.email = $('#email').val();
contact.phoneNumber = $('#phoneNumber').val();
var results = retrieveFromStorage();
if (currentRecord.key != null) {
results[currentRecord.key] = contact;
}
else {
results.push(contact);
}
localStorage.setItem('contacts', JSON.stringify(results));
ns.display();
};
14. Update the initialize method to bind the save button and invoke the display() method.
ns.initialize = function () {
$('#btnSave').on('click', ns.save);
ns.display();
};
Your JavaScript le should look like the following.
/// <reference path="jquery-1.8.3.js" />
$(document).ready(function () {
contactsNamespace.initialize();
576 CHAPTER 15 Local data with web storage
});
(function () {
this.contactsNamespace = this.contactsNamespace || {};
var ns = this.contactsNamespace;
var currentRecord;
ns.initialize = function () {
$('#btnSave').on('click', ns.save);
ns.display();
};
function retrieveFromStorage() {
var contactsJSON = localStorage.getItem('contacts');
return contactsJSON ? JSON.parse(contactsJSON) : [];
}
ns.display = function () {
$('#currentAction').html('Add Contact');
currentRecord = { key: null, contact: {} };
displayCurrentRecord();
var results = retrieveFromStorage();
bindToGrid(results);
};
function bindToGrid(results) {
var html = '';
for (var i = 0; i < results.length; i++) {
var contact = results[i];
html += '<tr><td>' + contact.email + '</td>';
html += '<td>' + contact.firstName + ' ' + contact.lastName + '</td>';
html += '<td><a class="edit" href="javascript:void(0)" data-key='
+ i + '>Edit</a></td></tr>';
}
html = html || '<tr><td colspan="3">No records available</td></tr>';
$('#contacts tbody').html(html);
$('#contacts a.edit').on('click', ns.loadContact);
}
ns.loadContact = function () {
var key = parseInt($(this).attr('data-key'));
var results = retrieveFromStorage();
$('#currentAction').html('Edit Contact');
currentRecord = { key: key, contact: results[key] }
displayCurrentRecord();
};
function displayCurrentRecord() {
var contact = currentRecord.contact;
$('#firstName').val(contact.firstName);
$('#lastName').val(contact.lastName);
$('#email').val(contact.email);
$('#phoneNumber').val(contact.phoneNumber);
}
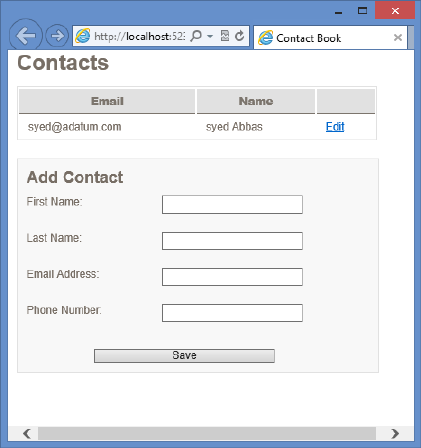
Practice exercises CHAPTER 15 577
ns.save = function () {
var contact = currentRecord.contact;
contact.firstName = $('#firstName').val();
contact.lastName = $('#lastName').val();
contact.email = $('#email').val();
contact.phoneNumber = $('#phoneNumber').val();
var results = retrieveFromStorage();
if (currentRecord.key != null) {
results[currentRecord.key] = contact;
}
else {
results.push(contact);
}
localStorage.setItem('contacts', JSON.stringify(results));
ns.display();
};
})();
15. In the Solution Explorer window, right-click the default.html le and choose Set As
Start Page.
16. Run the website and start adding contacts. Try closing the browser and rerunning the
website to see the persisted contacts.
Figure 15-1 shows the completed webpage with a ctitious contact added.
FIGURE 15-1 The completed contact book

578 CHAPTER 15 Local data with web storage
Suggested practice exercises
The following additional exercises are designed to give you more opportunities to practice
what you’ve learned and to help you successfully master the lessons presented in this chapter.
Exercise 1 Modify the contact list to use sessionStorage instead of localStorage.
Notice that your list is cleared after the browser window is closed.
Exercise 2 Subscribe to the storage event and display an alert message each time a
value is updated. Test this by using a second browser tab.

Answers CHAPTER 15 579
Answers
This section contains the answers to the lesson review questions in this chapter.
Lesson 1
1. Correct answer: D
A. Incorrect: The use of a different host (www2 instead of www) disallows this URL
from access.
B. Incorrect: The port number must match the origin port nmber.
C. Incorrect: Matching protocols must be used. In this answer, https is used rather
than http.
D. Correct: Because this example uses the same origin, it will have access to the same
data storage space.
E. Incorrect: This example does not have a matching host and would not be allowed
access.
2. Correct answer: B
A. Incorrect: The cookie value limit is 4 KB.
B. Correct: The recommended limit is 5 MB, although the browser vendor can deter-
mine the respective limits.
C. Incorrect: If websites could store 500 MB of data on the client machine, drastic
performance degradation would result.
D. Incorrect: Internet Explorer supports 10 MB, but that’s not the recommended limit.
3. Correct answer: A
A. Correct: The clear() method removes all existing key/value pairs existing for the
origin.
B. Incorrect: The removeAll() method does not exist.
C. Incorrect: The abandon() method does not exist.
D. Incorrect: The reset() method does not exist.
4. Correct answer: A
A. Correct: Nearly all modern browsers support web storage (localStorage and
sessionStorage).
B. Incorrect: Some popular browsers (namely Chrome and Safari) support Web SQL,
but neither Internet Explorer nor Firefox supports it yet.
C. Incorrect: Although IndexDB seems to be gaining support ahead of Web SQL, it is
yet to be adopted by Safari or some of the major mobile browsers.
D. Incorrect: With only Chrome as its strongest supporter, FileSystem API is the least
adoption option.

580 CHAPTER 15 Local data with web storage
5. Correct answer: D
A. Incorrect: Web storage does not support indexing.
B. Incorrect: Web storage does not support transactions.
C. Incorrect: Web storage does not support asynchronous processing.
D. Correct: The simple key/value pair storage’s easy-to-use interface is perhaps the
best feature of web storage.
Lesson 2
1. Correct answer: C
A. Incorrect: Storage events have an oldValue property that contains original values
when an entry is updated or removed.
B. Incorrect: Storage events have a key property that contains the name of the entry
being added, updated, or deleted.
C. Correct: There is no property on storage events called changeType.
D. Incorrect: Storage events have a storageArea property that contains either the
localStorage or sessionStorage collection that was changed.
2. Correct answer: C
A. Incorrect: Session storage events do not go beyond the active tab; other tabs
would not be notied when changes occur.
B. Incorrect: Session storage events do not reach outside their current window.
C. Correct: In this case, an iframe could receive change notications.
D. Incorrect: Session storage events do not go beyond the active tab; the operating
system would not be notied when changes occur.
3. Correct answer: D
A. Incorrect: The event.returnValue = false; method is a fairly common way to cancel
many events after they start, but storage events cannot be canceled.
B. Incorrect: The event.preventDefault(); method is another way to cancel many
types of events, but storage events cannot be canceled.
C. Incorrect: Storage events do not bubble up, so the event.stopPropagation();
method would have no effect.
D. Correct: Storage events cannot be canceled after they have been triggered.

581
CHAPTER 16
Ofine web applications
In the preceding chapter, you learned about the most widely used ofine solution, web
storage, but it’s not always the best tool for the job. At times, you might need more
advanced features such as true asynchronous support, indexing for faster searching, or
transactions. Those features are available in the other ofine storage mechanisms.
This chapter begins by looking at one option that provides all the power of a relational
database, Web SQL. An alternative that’s more of an object database, IndexedDB (Indexed
Database), is covered next; it gives you the power of indexing and transactions without the
need to set up a formal relational structure. Although both those solutions are good for
typical data concerns, neither is designed for storage of les (such as images, text les, XML,
or even movies). For that need, this chapter discusses the FileSystem API. Last, you see how
you can make an entire website ofine-friendly with very little effort by using the ofine
application HTTP cache.
As each tool is reviewed, pay attention to the levels of support within today’s modern
browsers because this is an important consideration when deciding whether to adopt the
tool for your next application.
Lessons in this chapter:
Lesson 1: Working with Web SQL 582
Lesson 2: Working with IndexedDB 589
Lesson 3: Working with the FileSystem API 600
Lesson 4: Working with the ofine application HTTP cache 608
Before you begin
To complete this book, you must have some understanding of web development. This chap-
ter requires the hardware and software listed in the “System requirements” section in the
book’s Introduction. Because no current browser supports all ofine features, some of the
examples require different browsers if you want to follow along on your own equipment.
582 CHAPTER 16 Ofine web applications
Lesson 1: Working with Web SQL
Web SQL is arguably one of the most powerful options available to you. It provides a full rela-
tional database that includes many of the features you’ve come to enjoy from the server-side
database offerings.
Most current implementations are built on SQLite, which is one of the most widely
used lightweight database engines. It’s an open-source solution with a vibrant community
backing it.
After this lesson, you will be able to:
Describe the use of Web SQL.
Implement transactions using Web SQL.
Estimated lesson time: 20 minutes
Considering the questionable longevity of Web SQL
Before starting with Web SQL, be aware that the World Wide Web Consortium (W3C) has
stated that Web SQL is no longer on its recommendation track. In 2010, the W3C Web
Applications Working Group announced that it does not intend to maintain the specication.
NOTE DISCONTINUED SUPPORT
For further details regarding the W3C’s decision to discontinue support of the Web SQL
specications, please see its explanation at http://dev.w3.org/html5/webdatabase/.
What this means for Web SQL depends on the browser you’re targeting. Although the
specication is no longer being maintained, some browsers have continued their support.
(See Chapter 15 for a complete list.) Therefore, Web SQL might be a viable option if you’re
building specically for a platform such as iOS for iPad or iPhone. Another common use is in
Google Chrome extensions. If you’re building a browser-agnostic application, consider one of
the other ofine storage solutions.
If you do plan on developing with Web SQL, it might be a good idea to remember what
alternatives are available (such as IndexedDB) and what level of effort might be needed if
other browser vendors decide to move away from it in the future.
Creating and opening the database
In the following sections, examine the syntax used to create or open a database, start a trans-
action, and execute a SQL command. Most of these commands should look very familiar if
you’ve used other relational databases.
Lesson 1: Working with Web SQL CHAPTER 16 583
To start communication with a database, use the openDatabase method, which returns a
Database object. If you attempt to open a database that doesn’t exist, it will be automatically
created for you, so you won’t need to execute any extra steps for new databases. The follow-
ing are the openDatabase parameters.
name The database name, which is case-sensitive. Most characters are allowed; even
an empty string is considered valid.
version Expected version of the database. If an empty string is passed, it’s implied
that whatever version currently exists is ne.
displayName Descriptive name of the database.
estimatedSize Estimated size required for the database. The typical default value is
5 MB; the browser might prompt the user for permission, depending on the size you
specify.
creationCallback If the database does not yet exist and is being created, this call-
back will be invoked. It is optional and not needed for the database to be created and
versioned correctly.
In the following example, a database named Library is created with an estimated size of 5
MB. It returns a Database object that supports transactional operations.
var db = openDatabase('Library', '1.0', 'My library', 5 * 1024 * 1024);
If you’re familiar with traditional database connections, you might be expecting a need to
close a connection. With Web SQL, however, that’s automatically handled, so you don’t have
to close the connection manually.
Performing schema updates
As your application grows, your data requirements change. You might need to add new
tables, drop existing ones, or even change particular columns. The Database object provides
the following hooks for making those changes.
version Property that gets the current schema version
changeVersion Method for performing schema changes between one version and
the next
The changeVersion method contains the following arguments.
oldVersion Schema version you are migrating from
newVersion Schema version you are migrating to
callback Callback method containing schema changes such as adding and dropping
tables
errorCallback Optional; callback method is invoked if an error occurs while the
transaction is being processed
successCallback Optional; callback method is invoked if all statements successfully
execute within the transaction
584 CHAPTER 16 Ofine web applications
Adding a table
You can add an authors table to the Library database created earlier. You need a callback
method that accepts a transaction object, which executes the CREATE TABLE script. The trans-
action object allows multiple actions within it, and it automatically rolls back all changes if any
fail. For now, this example keeps the idea simple by adding just one table.
function migrateDB(transaction) {
transaction.executeSql("CREATE TABLE IF NOT EXISTS authors(" +
"id INTEGER PRIMARY KEY AUTOINCREMENT, " +
"firstName TEXT, "+
"lastName TEXT, " +
"dateCreated TIMESTAMP DEFAULT(datetime('now', 'localtime')))");
}
function onError(error) {
alert("Error code: " + error.code + " Message: " + error.message);
}
function onSuccess() {
alert("Migration complete!");
}
var db = openDatabase('Library', '1.0', 'My library', 5 * 1024 * 1024);
db.changeVersion('1.0' , '2.0', migrateDB, onError, onSuccess);
Later in the chapter, you can read the version property of the Database object to deter-
mine the schema version with which you are working. Note that version updates are applied
asynchronously, so if the following line was placed immediately after the db.changeVersion()
call in the preceding code, it would still display 1.0 because the alert() method would re
before the migrations had a chance to complete.
alert("Current schema: " + db.version);
Now that the migration has been applied, you have a new table in your database with the
following columns.
id Table identier; new records are automatically assigned an id that is one greater
than the id of the last record added.
rstName Text eld for storing a person’s rst name.
lastName Text eld for storing a person’s last name.
dateCreated Time stamp; when a record is rst created, this column defaults to the
current time with the help of the SQLite datetime method. Instead of using its default
mode of GMT, you can indicate that it should use the local time zone.
Using transactions
Now that you have a schema in place, you can use transactions to execute SQL statements. To
do this, the Database object provides the following two methods.
transaction Starts a new transaction that executes SQL statements; allows both read
and write commands
Lesson 1: Working with Web SQL CHAPTER 16 585
readTransaction Works similarly to the transaction method but allows read com-
mands only
Both methods accept the same three parameters.
callback Callback method containing the individual commands that are to be
executed as part of the transaction
errorCallback Optional callback method invoked if an error occurs while the trans-
action is being processed
successCallback Optional callback method invoked if all statements successfully
execute within the transaction
The callback method will receive a transaction object that includes an executeSql method
for performing data changes. It has the following parameters.
sqlStatement The SQL statement string to be executed.
arguments Array of object parameters to be used by the SQL command.
callback Optional callback method invoked after the command is executed. When
data is retrieved, this method includes the collection of selected rows.
errorCallback Optional callback method invoked if an error occurs while the state-
ment is being executed.
In the next section, you see how you can use transactions to execute some of the most
commonly used SQL commands.
Inserting a new record
Now that you have a database and table in place, add a new record. Like creating a new table,
do this by using the executeSql method on the transaction instance.
var db = openDatabase('Library', '2.0', 'My library', 5 * 1024 * 1024);
db.transaction(function(t){
t.executeSql("INSERT INTO authors(firstName, lastName) "
+ " VALUES('Daniel', 'Defoe')");
});
However, in general, it’s a good idea to use SQL parameters when working with dynamic
SQL. The preceding statement can be rewritten to take advantage of an optional second
parameter on the executeSql method, which accepts an array of eld values. Note the use of
question marks to indicate that the value will be populated from the array being passed in.
var firstName = 'Daniel';
var lastName = 'Defoe';
db.transaction(function(t){
t.executeSql("INSERT INTO authors(firstName, lastName) VALUES(?, ?)"
, [firstName, lastName]);
});
You can go a step further by adding a callback to the executeSql method, which enables
you to capture the Id of the newly created row.
586 CHAPTER 16 Ofine web applications
function itemInserted(transaction, results) {
alert("Id: " + results.insertId);
}
var firstName = 'Daniel';
var lastName = 'Defoe';
db.transaction(function(t){
t.executeSql("INSERT INTO authors(firstName, lastName) VALUES(?, ?)"
, [firstName, lastName]
, itemInserted);
});
Updating an existing record
In the following example, the lastName of the author, which has an id of 1, is updated. Besides
the SQL syntax differences, it’s very similar to the code used for adding a new record.
var db = openDatabase('Library', '2.0', 'My library', 5 * 1024 * 1024);
var authorId = 1;
var lastName = 'Smith';
db.transaction(function(t){
t.executeSql("UPDATE authors SET lastName = ? WHERE id = ?"
, [lastName, authorId]);
});
Deleting a record
Removing records is also fairly straightforward. The following example deletes the author
record with an id of 1.
var db = openDatabase('Library', '2.0', 'My library', 5 * 1024 * 1024);
var authorId = 1;
db.transaction(function(t){
t.executeSql("DELETE FROM authors WHERE id = ?", [authorId]);
});
Reading values from the database
Now that you know how to add data to the database, you can read and display those records
back to the user. Create a simple SELECT statement to read all values from the authors table.
When executeSql is called this time, a callback method is passed that accepts a transaction
object and a resultset containing the rows returned from the SQL statement.
As the displayResults method iterates through the rows, it formats the person’s name in a
list item and adds it to an unordered list with an id of items. To access the individual column
values within the row, use dot notation, which reads each as a property on the object.
function displayResults(transaction, results) {
for (var i = 0; i < results.rows.length; i++) {
var item = results.rows.item(i);
$('#items').append('<li>' + item.firstName + " " + item.lastName + '</li>');
}
}
Lesson 1: Working with Web SQL CHAPTER 16 587
var db = openDatabase('Library', '2.0', 'My library', 5 * 1024 * 1024);
db.transaction(function(t){
t.executeSql("SELECT * FROM authors", [], displayResults)
});
Because you are only retrieving data, you just as easily could have used the
readTransaction method instead of the transaction method.
db.readTransaction(function(t){
t.executeSql("SELECT * FROM authors", [], displayResults)
});
Quick check
The following statement has a syntax error in the second step of the transaction
in this migration script (misspelled CREATE as CRATE). What do you expect will
happen because of this migration script?
function migrateDB(transaction) {
transaction.executeSql("CREATE TABLE authors(firstName TEXT)");
transaction.executeSql("CRATE TABLE books(title TEXT)");
}
var db = openDatabase('Library', '1.0', 'My library', 5 * 1024 * 1024);
db.changeVersion('1.0' , '2.0', migrateDB)
Quick check answer
Neither table will be created.
Filtering results
You rarely want to read every row from a database table; most of the time, you need to limit
those results to specic criteria. Because current implementations are based on SQLite, you
have all the power of a mature database engine to help you.
For example, you can add a WHERE clause to return only records with a specic lastName
value, as follows.
var db = openDatabase('Library', '2.0', 'My library', 5 * 1024 * 1024);
var lastName = 'Defoe';
db.transaction(function(t){
t.executeSql("SELECT * FROM authors WHERE lastName = ?", [lastName], displayResults)
});
You might like to nd all authors whose last name starts with the letter D. To do so, use the
LIKE keyword along with the ‘%’ wildcard.
var lastName = 'D%';
db.transaction(function(t){
t.executeSql("SELECT * FROM authors WHERE lastName LIKE ?", [lastName],
588 CHAPTER 16 Ofine web applications
displayResults)
});
Using JOIN commands
Web SQL includes support for traditional JOIN statements (such as INNER JOIN and LEFT
JOIN), which can be used to include columns from multiple tables within a single SELECT
statement.
Assume you added a books table to your library database and would now like to modify
your earlier query to include the title of each book in the results.
var db = openDatabase('Library', '2.0', 'My library', 5 * 1024 * 1024);
var lastName = 'D%';
db.transaction(function(t){
t.executeSql("SELECT a.firstName, a.lastName, b.title " +
"FROM authors a " +
"INNER JOIN books b ON a.id = b.authorId " +
"WHERE a.lastName like ?"
, [lastName]
, displayResults)
});
Aggregating functions
Another useful feature of Web SQL is the ability to group results, which enables the use of
more advanced functions such as COUNT(x), MIN(x), MAX(x), and SUM(x) within your SELECT
statements. For example, the following is a new query that nds the number of books written
by each author.
db.transaction(function(t){
t.executeSql("SELECT a.firstName, a.lastName, COUNT(b.id) AS numOfBooks " +
"FROM authors a " +
"INNER JOIN books b ON a.id = b.authorId " +
"GROUP BY a.id"
, []
, displayResults)
});
Lesson summary
The World Wide Web Consortium (W3C) has stated that the Web SQL specication is
no longer on its recommendation track. It may still be used when targeting specic
platforms that have continued support, but other options such as IndexedDB and web
storage should be considered when possible.
Current browser implementations are based on SQLite, which gives you all the power
of a full relational database.
Database communication is started by calling the openDatabase() command. If the
database does not exist, it will be created automatically.

Lesson 2: Working with IndexedDB CHAPTER 16 589
Schema migration support is available by using the changeVersion() method.
Web SQL supports a common SQL syntax for create, retrieve, update, and delete
(CRUD) operations.
If one statement in a transaction fails, all actions are rolled back.
Lesson review
Answer the following questions to test your knowledge of the information in this lesson. You
can nd the answers to these questions and explanations of why each answer choice is correct
or incorrect in the “Answers” section at the end of this chapter.
1. Which of the following would be a good candidate for Web SQL?
A. Mobile applications built specically for Safari on the iOS platform
B. Mobile applications built for any mobile device
C. Public-facing web applications
D. Mobile applications built specically for Internet Explorer
2. You need to create a new database. Which of the following commands should you use?
A. var db = createDatabase(‘mydb’, ‘1.0’, ‘My database’, 5 * 1024 * 1024);
B. var db = new Database(‘mydb’);
C. var db = initDatabase(‘mydb’, ‘1.0’, ‘My database’, 5 * 1024 * 1024);
D. var db = openDatabase(‘mydb’, ‘1.0’, ‘My database’, 5 * 1024 * 1024);
3. Which of the following will correctly insert a new record, using values passed in as SQL
arguments to an executeSql() call?
A. t.executeSql(“INSERT INTO books(title) VALUES(?)”, [“A Tale of Two Cities”]);
B. t.executeSql(“INSERT INTO books(title) VALUES([0])”, [“A Tale of Two Cities”]);
C. t.executeSql(“INSERT INTO books(title) VALUES([1])”, [“A Tale of Two Cities”]);
D. t.executeSql(“INSERT INTO books(title) VALUES({0})”, [“A Tale of Two Cities”]);
Lesson 2: Working with IndexedDB
So far, you’ve seen two extremes for client-side data storage. Web storage provides a simple
key/value persistence model but lacks some of the features that are important when working
with a database. The other extreme, Web SQL, provides many of the features associated with
a fully functional relational database but brings with it all the manual work required for set-
ting up and maintaining the persistence structure.
IndexedDB provides a compromise between the two alternatives. It’s a key/value database
in which values can range from simple strings to complex object structures. To provide for
fast retrieval and searching, it includes an easy way to create indexes for each of your object
590 CHAPTER 16 Ofine web applications
stores. Much like Web SQL, interfacing with the database is transaction-based and requires
minimal effort.
Because the W3C announced that it will not continue development of the Web SQL speci-
cation, IndexedDB has gained even more support. Although it’s not yet supported by every
major browser, it does have wider adoption than Web SQL.
After this lesson, you will be able to:
Describe the use of IndexedDB.
Understand the use of object stores.
Implement transactions using Web SQL.
Estimated lesson time: 40 minutes
Using browser-specic code
To work with IndexedDB, you need to use methods that might contain browser-specic
prexes because of the continuing development of the specication. To make your examples
cross browser–friendly, include the following x at the top of your scripts to avoid the need to
put browser-specic logic in each of your methods. All subsequent examples will be based on
this code.
window.indexedDB = window.indexedDB || window.mozIndexedDB
|| window.webkitIndexedDB || window.msIndexedDB;
window.IDBTransaction = window.IDBTransaction || window.webkitIDBTransaction;
window.IDBCursor = window.IDBCursor || window.webkitIDBCursor;
window.IDBKeyRange = window.IDBKeyRange || window.webkitIDBKeyRange;
Creating and opening the database
The rst step in working with IndexedDB is to create and open a database. You need to access
the browser’s indexedDB object, which, in the previous example, was assigned to a consistent
variable.
var indexedDB = window.indexedDB;
This indexedDB variable is an IDBFactory object that provides access to your databases
through the open method, which has the following parameters.
name The name of the object store
version Optional; the version of the object store
This method returns an IDBRequest object and begins an asynchronous process of open-
ing a connection. The IDBRequest object includes an onsuccess event that can be subscribed
to, which provides notication when the connection is ready for use. It also includes an
Lesson 2: Working with IndexedDB CHAPTER 16 591
onerror event that can notify your application if an error occurs during an attempt to con-
nect. The following example shows the open method.
var indexedDB = window.indexedDB;
var openRequest = indexedDB.open('Library', 1);
var db;
openRequest.onsuccess = function(response) {
db = openRequest.result;
};
openRequest.onerror = function (response) {
alert("Error code: " + response.target.errorCode);
};
In this example, the open method is called, and, within the onsuccess event handler, the db
variable is assigned a reference to the database object for later use.
Using object stores
In standard relational databases, tables are created that are dened by rigid schemas. Each
table contains a set of columns, each of which has a name and a data type. This doesn’t
allow for much exibility because it requires a lot of work when schema changes are needed.
Therefore, instead of these table structures, IndexedDB uses spaces called object stores, which
are key/value storage areas.
Understanding versioning
Before creating a new object store, you need to understand how IndexedDB handles
versioning.
var openRequest = indexedDB.open('Library', 1);
In this call to open a database connection, a version number is passed as the second
parameter. The request object received contains an onupgradeneeded event that will be trig-
gered if the version requested doesn’t match the current version of the existing database. It
will also be triggered if the database does not yet exist. The onupgradeneeded event will be
red before the onsuccess event.
The onupgradeneeded event is dened by the latest API specication. Earlier versions
handled versioning by a setVersion method on the database object. If you’re targeting older
browser versions, make sure to use the appropriate versioning method.
Within the onupgradeneeded event handler, use the createObjectStore method to allocate
a new storage area. This method requires an object store name and an object containing any
extra parameters to use in conguring the store.
592 CHAPTER 16 Ofine web applications
Using the keypath property
One important property of the parameter object is the keypath. Its purpose is to specify
which property on the value object should be used as the key. This key is then used as the
primary index for stored instances. If the property specied by the keypath does not exist on
the value object, you must use a key generator such as autoIncrement, which creates auto-
incrementing numeric keys for you as follows.
var openRequest = indexedDB.open('Library', 1);
openRequest.onupgradeneeded = function(response) {
response.currentTarget.result.createObjectStore("authors",
{ keypath: 'id', autoIncrement: true });
};
In this example, a new object store called “authors” is created. Notice that you are not
required to identify the properties explicitly or even identify the type of object that will be
stored. However, this example allows IndexedDB to create the keys by setting the autoIncre-
ment property to true. You just as easily could specify a eld on the value object as the key.
You could use the following code example if each author had an email that you would like to
use as the key.
response.currentTarget.result.createObjectStore("authors", { keypath: 'email' });
Adding indexes
Although the key will be the primary index for object stores, you can specify other indexes.
This can provide a performance boost if properties other than the key might be commonly
used in sorting or ltering. To do so, use the createIndex method on the object store, which
has the following parameters.
name The index name.
keyPath Species the property on the value object for which the index will be
created.
optionalParameters Optional parameter that can contain an object with proper-
ties used for advanced index settings. Currently, IndexedDB supports two advanced
settings. The rst is ‘unique’, which when true adds a constraint to the property that
prohibits two records from having the same value. The second property that can be
set is ‘multiEntry’, which indicates how the index should behave when the keyPath is an
array. If set to true, an index entry is created for each value in the array. If set to false, a
single index entry is created for the array as a whole.
The following demonstrates the use of the createIndex method on the object store to a
new, non-unique index for the lastName property of the authors object store.
var openRequest = indexedDB.open('Library', 2);
openRequest.onupgradeneeded = function(response) {
var store = response.currentTarget.transaction.objectStore("authors");
store.createIndex('lastName', 'lastName', { unique: false });
};
Lesson 2: Working with IndexedDB CHAPTER 16 593
The createIndex method is called during a database migration, within the onupgrad-
eneeded event handler, to ensure that the index is created when the version is updated.
Removing indexes
If you decide that an index is no longer needed, you can remove it by creating a database
migration that uses the object store’s deleteIndex() method, as shown in the following
example code.
var openRequest = indexedDB.open('Library', 3);
openRequest.onupgradeneeded = function(response) {
var store = response.currentTarget.transaction.objectStore("authors");
store.deleteIn d ex('lastN a me');
};
Removing object stores
As you probably guessed, the steps to remove an object store are very similar to the steps
for creating one. You create a new migration that uses the database’s deleteObjectStore()
method as follows.
var openRequest = indexedDB.open('Library', 4);
openRequest.onupgradeneeded = function(response) {
response.currentTarget.result.deleteObjectStore("authors");
};
Using transactions
When your object stores are in place, you must use the IDBTransaction object to add or
remove objects. An IDBTransaction object, which is a transaction, is created by using the
transaction method of the database object and takes the following parameters.
objectStoreNames Species the object stores with which the transaction will work. If
only one object store is needed, the parameter can be a single string. If multiple object
stores are needed, pass an array of strings. The following is an example of opening a
transaction for a single object store.
var trans = db.transaction('authors');
Here is an example of opening a transaction for multiple object stores.
var trans = db.transaction(['authors', 'books']);
mode Optional when possible values are readonly and readwrite. If not specied, the
transaction will be defaulted to readonly. If left in readonly mode, multiple transactions
can be run concurrently. The following is an example of a transaction being opened in
readonly mode.
594 CHAPTER 16 Ofine web applications
var trans = db.transaction('authors', 'readonly');
Example of a transaction being opened in readwrite mode.
var trans = db.transaction('authors', 'readwrite');
Inserting a new record
After a transaction instance has been created, you can use it to add a new record. To do so,
you must rst nd the object store to which you would like to add the record. Call the add
method of the object store, which will insert the record asynchronously. The add method
returns a request instance in which you can subscribe to an onsuccess event that provides
notication when the operation is completed. You can then use the request.result property to
obtain the auto-generated id for the new record. You can also subscribe to the onerror event
if the operation fails, as shown in the following example.
var openRequest = indexedDB.open('Library', 1);
var db;
openRequest.onsuccess = function(response) {
db = openRequest.result;
addAuthor();
};
function addAuthor() {
var trans = db.transaction('authors', 'readwrite');
var authors = trans.objectStore("authors");
var request = authors.add({firstName: 'Daniel', lastName: 'Defoe'});
request.onsuccess = function(response) {
alert('New record id: ' + request.result);
};
request.onerror = function(response) { // display error };
}
Updating an existing record
Modifying existing objects is similar to adding a record, but instead of the add method, you
use the put method of the object store. Actually, you could use the put method for both
adding and updating values. The add method, however, can be used for new records only. An
exception is thrown if the add method is called using a key that already exists. The following
code demonstrates the use of the put method.
var openRequest = indexedDB.open('Library', 1);
var db;
openRequest.onsuccess = function(response) {
db = openRequest.result;
updateAuthor();
};
Lesson 2: Working with IndexedDB CHAPTER 16 595
function updateAuthor() {
var trans = db.transaction('authors', 'readwrite');
var authors = trans.objectStore("authors");
var request = authors.put({firstName: 'Bob', lastName: 'Defoe'}, 1);
request.onsuccess = function(response) {
alert('Updated record id: ' + request.result);
};
request.onerror = function(response) { // display error };
}
The preceding example updates the rst and last names of the author record with a
key of 1.
Deleting a record
To remove a stored object, you only need to know its key value, which is passed to the delete
method of the object store.
function deleteAuthor() {
var trans = db.transaction('authors', 'readwrite');
var authors = trans.objectStore("authors");
var request = authors.delete(1);
request.onsuccess = function(response) { // success! };
request.onerror = function(response) { // display error };
}
Retrieving a record
Several methods are available for nding existing records. If you need to nd a specic
record, use the get method of the object store. The only parameter needed to pass to the
method is the key of the object being retrieved. Like other operations, this needs to be done
within a transaction. In the following example, the transaction mode is set to readonly.
var openRequest = indexedDB.open('Library', 1);
var db;
openRequest.onsuccess = function(response) {
db = openRequest.result;
getAuthor();
};
function getAuthor() {
var trans = db.transaction('authors', 'readonly');
var authors = trans.objectStore("authors");
var request = authors.get(1);
request.onsuccess = function(response) {
var author = response.target.result;
alert('Last name: ' + author.lastName);
};
596 CHAPTER 16 Ofine web applications
request.onerror = function(response) { // display error };
}
Understanding cursors
The other approach to nding records is by using cursors. A cursor can be opened by calling
the object store’s openCursor method, which returns a request object and accepts the follow-
ing parameters.
range This parameter allows you to provide a key range to limit records included in
the results.
direction By default, cursors are executed in ascending order. To change the order to
descending, use IDBCursor.PREV.
The following is a simple example that iterates through all records held in the authors
object store.
var openRequest = indexedDB.open('Library', 1);
var db;
openRequest.onsuccess = function(response) {
db = openRequest.result;
findAuthors();
};
function findAuthors() {
var trans = db.transaction('authors', 'readonly');
var authors = trans.objectStore("authors");
var request = authors.openCursor();
request.onsuccess = function(response) {
var cursor = response.target.result;
if (!cursor) {
alert('No records found.');
return;
}
alert('Id: ' + cursor.key + ' Last name: ' + cursor.value.lastName);
cursor.continue();
};
request.onerror = function(response) { // display error };
}
The cursor itself is on the result property of the response of the onsuccess event handler.
If no records are found, the onsuccess event will still re, but the result will be undened (or
null). If records are found, the cursor’s value property will contain the current record. To con-
tinue iterating, invoke the cursor’s continue method, which will trigger the onsuccess event
Lesson 2: Working with IndexedDB CHAPTER 16 597
handler again, this time with the next record in the results. When it reaches the end of the
collection, the onsuccess event will have a null cursor.
Indexing cursors
Cursors can also be created by using an index of an object store. A standard cursor, like the
one in the previous example, can be created by using the openCursor method and will return
the entire object associated to the index value. However, if you only need the corresponding
keys and not the full object, you can use the openKeyCursor method instead.
The following is a modied version of the ndAuthors method, which creates a cursor
against the lastName index instead of going directly against the object store. The sort order
is specied as IDBCursor.PREV, so the authors result is sorted by the last name in descending
order.
function findAuthors() {
var trans = db.transaction('authors', 'readonly');
var authors = trans.objectStore('authors');
var index = authors.index('lastName');
var request = index.openCursor(null, IDBCursor.PREV);
request.onsuccess = function(response) {
var cursor = response.target.result;
if (!cursor) {
alert('No records found.');
return;
}
alert('Index value (lastName): ' + cursor.key
+ ' First name: ' + cursor.value.firstName);
cursor.continue();
};
request.onerror = function(response) { // display error };
}
Applying key range limits
Most of the time, just a subset of an object store is needed instead of the entire contents. To
limit the results, pass an IDBKeyRange value as the rst parameter to the openCursor method.
The following is a list of the various range methods available through the IDBKeyRange
object.
bound The most exible range type is the bound method, by which you specify
upper and lower limits and specify whether the outer bounds should be included in
the results. The bound range method accepts the following parameters.
lower Species the lower bound of the range.
upper Species the upper bound of the range.
598 CHAPTER 16 Ofine web applications
lowerOpen Optional; can be true or false. If true, the lower end of the range is
considered bounded, so the lower bound won’t be included in the results. If false,
it’s considered unbounded, and the lower bound will be included in the results.
upperOpen Optional; can be true or false. If true, the upper bound won’t be
included in the results. If false, it will be included.
For example, consider an index on the lastName property on the authors object store.
Following are some results in scenarios when ranges are applied against that index.
authors content: Daniel Defoe, Herman Melville, Mark Twain, Jules Verne
index.openCursor(IDBKeyRange.bound('Defoe', 'Verne', false, false));
results: Daniel Defoe, Herman Melville, Mark Twain, Jules Verne
index.openCursor(IDBKeyRange.bound('Defoe', 'Verne', false, true));
results: Daniel Defoe, Herman Melville, Mark Twain
index.openCursor(IDBKeyRange.bound('Defoe', 'Verne', true, false));
results: Herman Melville, Mark Twain, Jules Verne
index.openCursor(IDBKeyRange.bound('Defoe', 'Verne', true, true));
results: Herman Melville, Mark Twain
upperBound The upperBound method enables you to limit only the upper side of
the range. The following are parameters of the upperBound method.
upper Species the upper bound of the range.
upperOpen Optional; can be true or false. If true, the upper bound won’t be
included in the results. If false, it will be included.
authors content: Daniel Defoe, Herman Melville, Mark Twain, Jules Verne
index.openCursor(IDBKeyRange.upperBound('Verne', false));
results: Daniel Defoe, Herman Melville, Mark Twain, Jules Verne
index.openCursor(IDBKeyRange.upperBound('Verne', true));
results: Daniel Defoe, Herman Melville, Mark Twain
lowerBound The lowerBound method enables you to limit only the lower end of the
range. The following are parameters of the lowerBound method.
lower Species the lower bound of the range.
lowerOpen Optional; can be true or false. If true, the lower bound won’t be
included in the results. If false, it will be included.
authors content: Daniel Defoe, Herman Melville, Mark Twain, Jules Verne
index.openCursor(IDBKeyRange.lowerBound('Defoe', false));
results: Daniel Defoe, Herman Melville, Mark Twain, Jules Verne
Lesson 2: Working with IndexedDB CHAPTER 16 599
index.openCursor(IDBKeyRange.lowerBound('Defoe', true));
results: Herman Melville, Mark Twain, Jules Verne
only You can restrict to a specic key value rather than to a range by using the only
method. The following is a parameter of the only method.
value The specic key value against which to match.
authors content: Daniel Defoe, Herman Melville, Mark Twain, Jules Verne
index.openCursor(IDBKeyRange.only('Twain'));
results: Mark Twain
Dropping a database
The IDBFactory object that is referenced by the indexedDB object contains a deleteDatabase
method that removes an existing database. This method takes a name parameter and returns
a request object immediately while asynchronously attempting to drop the database, as
shown in the following example.
var dropRequest = indexedDB.deleteDatabase('Library');
dropRequest.onsuccess = function(response) { // success! };
dropRequest.onerror = function (response) { // display error };
If the database doesn’t exist, no action is taken. If another connection to the database is
open, a blocked event will be red by the request object.
Lesson summary
IndexedDB is a key-based object database available in most current browsers.
Databases contain object stores, which are somewhat equivalent to table structures in
a relational database.
Each object store has a designated key path that identies its key.
Instead of a property on the object value, a key can be created through a key genera-
tor such as autoIncrement, which creates a distinct numeric identier as new records
are added.
Indexes can be created for properties other than the key that might be commonly used
for sorting or ltering.
All operations are performed through transactions, which can be read-only or read/
write. Read-only operations can run concurrently.
An object store’s add method can be used only for adding new records, but its put
method can be used for new or existing records. Its delete method removes records.
Cursors nd records in an object store and can be created on either the object store
itself or one of its indexes.

600 CHAPTER 16 Ofine web applications
Lesson review
Answer the following questions to test your knowledge of the information in this lesson. You
can nd the answers to these questions and explanations of why each answer choice is correct
or incorrect in the “Answers” section at the end of this chapter.
1. Which of the following features is not supported by IndexedDB?
A. Transactions
B. Cursors
C. Indexed
D. SQL
2. What is the correct method for creating a transaction that will add a new record?
A. var trans = db.transaction(‘authors’, ‘readonly’);
B. var trans = db.transaction(‘authors’, ‘readwrite’);
C. var trans = db.transaction(‘authors’);
D. var trans = db.createTransaction(‘authors’,’readwrite’);
3. Which object store method retrieves a record by its key value?
A. get(key)
B. nd(key)
C. single(key)
D. rst(key)
Lesson 3: Working with the FileSystem API
So far, you’ve seen several ways to store user data within the browser, and although you could
use solutions such as data URIs to store larger bits of information (images, text les, and so
on), none is really designed for that type of use and would certainly lead to high performance
costs.
HTML5 has a solution: the FileSystem API. By using the FileSystem API, you can create
directories and les within a sandboxed location on the user’s le system, and this opens the
door to a number of new capabilities that were previously limited to desktop applications.
In this lesson, you learn how to use the FileSystem API to perform common tasks such as
creating and reading les. Although the lesson does not cover every available feature, you
should gain a high-level understanding of what this technology offers.

Lesson 3: Working with the FileSystem API CHAPTER 16 601
After this lesson, you will be able to:
Describe the use of the FileSystem API.
Implement the FIleSystem API.
Estimated lesson time: 30 minutes
Assessing browser support
As of this writing, the only major browser supporting the FileSystem API is Chrome, so you
might want to have it installed if you want to follow along with the examples. It is not known
if other browsers are planning to add support in the future.
Because of its limited browser support, the most common applications to take advantage
of the FileSystem API are those targeting Chrome, such as Chrome extensions.
Opening the le system
The JavaScript window object contains a method for making requests to open communica-
tion with the le system. Depending on the version of Chrome you have installed, this can be
either window.requestFileSystem() or window.webkitRequestFileSystem(). To make the follow-
ing examples as compatible as possible, the following snippet is at the top of the subsequent
scripts.
window.requestFileSystem = window.requestFileSystem ||
window.webkitRequestFileSystem;
The requestFileSystem method operates asynchronously and includes success and error
callbacks that provide notication that the application can begin reading and writing les.
The following parameters are accepted.
type This parameter species whether the le system should be temporary or per-
manent. If temporary, you pass TEMPORARY as the argument, and the browser auto-
matically removes the les as it needs space. If you pass PERSISTENT, les are removed
only when requested by the application or user.
size This parameter is an estimation of the size (in bytes) that the application will
need.
successCallback If the request for a le system is successful, this callback is invoked
and includes a FileSystem object as an argument.
errorCallback If the request fails, this callback is invoked and includes a FileError
argument. The error includes a code that indicates why the failure occurred, such as
exceeding quota or discovering security issues.
602 CHAPTER 16 Ofine web applications
Creating and opening a le
To create a le, you must rst have a DirectoryEntry object so you have an allocated place in
which to put the le. The FileSystem argument passed to successCallback includes a special
DirectoryEntry as a property named root, which points to the root of the le system reserved
specically for the application (origin). Later in this lesson, you learn how to create a subdirec-
tory under root. For now, you create a new le in this location.
A DirectoryEntry object has a getFile method that can both create new les and read those
that already exist. The following are the parameters of the getFile method.
path Path to the le being requested. Both relative and absolute paths can be used.
options Allows for two ags, create and exclusive, that indicate how the le should
be opened. If the le doesn’t exist, create must be set to true or an error will be
thrown. If both create and exclusive are set to true, an attempt will be made to create
the le but will throw an error if the le already exists.
successCallback If the le is successfully created or opened, this callback will be
invoked with a FileEntry argument.
errorCallback If the request fails, this callback will be invoked and will include a
FileError argument.
The following example creates a new temporary le called “example.txt” in the root
directory.
window.requestFileSystem(TEMPORARY, 5 * 1024 * 1024, getFile, handleError);
function getFile(fileSystem) {
fileSystem.root.getFile("example.txt", { create: true }, fileOpened, handleError);
}
function fileOpened(fileEntry) {
alert("File opened!");
}
function handleError(error) {
alert(error.code);
}
Writing to a le
When you have access to a FileEntry object, you can create a FileWriter, which persists data
to the opened le. This is done by using its write method, which accepts a binary large object
(BLOB) data parameter.
In the following example, the leOpened method in the previous example is modied to
create a new FileWriter and write a line of text to the opened document. Notice that in the
writeToFile method, you must assign the onwriteend and onerror callbacks before performing
the write action.
Lesson 3: Working with the FileSystem API CHAPTER 16 603
window.requestFileSystem(TEMPORARY, 5 * 1024 * 1024, getFile, handleError);
function getFile(fileSystem) {
fileSystem.root.getFile("example.txt", { create: true }, fileOpened, handleError);
}
function fileOpened(fileEntry) {
fileEntry.createWriter(writeToFile, handleError);
}
function writeToFile(fileWriter) {
fileWriter.onwriteend = function() { alert('Success'); };
fileWriter.onerror = function() { alert('Failed'); };
fileWriter.write(new Blob(['Hello world'], {type: 'text/plain'}));
}
function handleError(error) {
alert(error.code);
}
If you were opening an existing le and wanted to append new data at the end of the le,
you would use the seek method to point the cursor to the end of the le as follows.
function writeToFile(fileWriter) {
fileWriter.onwriteend = function() { alert('Success'); };
fileWriter.onerror = function() { alert('Failed'); };
fileWriter.seek(fileWriter.length);
fileWriter.write(new Blob(['Hello world'], {type: 'text/plain'}));
}
Reading a le
The FileEntry object also has a le method, which makes it return a File object. After you
have a reference to a File object, you can read it by using the FileReader object. Similar to
FileWriter, you must set your onloadend and onerror callbacks before making a read attempt.
The following example uses the readAsText method to read the contents of the le and
store it in a string that can then be accessed in the this.result value within the onloadend
callback.
window.requestFileSystem(TEMPORARY, 5 * 1024 * 1024, getFile, handleError);
function getFile(fileSystem) {
fileSystem.root.getFile("example.txt", { create: true }, fileOpened, handleError);
}
function fileOpened(fileEntry) {
fileEntry.file(readFile, handleError);
}
function readFile(file) {
var fileReader = new FileReader();
fileReader.onloadend = function() { alert(this.result); };
604 CHAPTER 16 Ofine web applications
fileReader.onerror = function() { alert('Failed'); };
fileReader.readAsText(file);
}
function handleError(error) {
alert(error.code);
}
In addition to the readAsText method, the FileReader object contains the readArrayBuffer
and readAsDataURL methods for reading content types other than text.
Deleting a le
The last le operation covered in this section is deleting a le. Like the other operations, this
requires a FileEntry object. Because the FileEntry object inherits from the Entry object, it has
a remove method to remove itself from the le system. It accepts both a successCallback call
and an onError callback, as demonstrated in the following example.
window.requestFileSystem(TEMPORARY, 5 * 1024 * 1024, getFile, handleError);
function getFile(fileSystem) {
fileSystem.root.getFile("example.txt", { create: true }, fileOpened, handleError);
}
function fileOpened(fileEntry) {
fileEntry.remove(fileRemoved, handleError);
}
function fileRemoved() {
alert('Success');
}
function handleError(error) {
alert(error.code);
}
Creating and opening a directory
Working with directories within the FileSystem API is very similar to working with les. For
example, to open or create a le, use the getFile method. To do the same with a directory, use
the getDirectory method.
The following example creates a new directory called “Chapter16”. If it’s created success-
fully, its full path is displayed.
window.requestFileSystem(TEMPORARY, 5 * 1024 * 1024, getDirectory, handleError);
function getDirectory(fileSystem) {
fileSystem.root.getDirectory("Chapter16", { create: true },
directoryOpened, handleError);
}
Lesson 3: Working with the FileSystem API CHAPTER 16 605
function directoryOpened(directoryEntry) {
alert(directoryEntry.fullPath); // will display "/Chapter16"
}
function handleError(error) {
alert(error.code);
}
Writing a le to a directory
You learned to add a le to the root directory of your application’s le system. The following
example writes the le to a new subdirectory.
window.requestFileSystem(TEMPORARY, 5 * 1024 * 1024, getDirectory, handleError);
function getDirectory(fileSystem) {
fileSystem.root.getDirectory("Chapter16", { create: true },
directoryOpened, handleError);
}
function directoryOpened(directoryEntry) {
directoryEntry.getFile("example.txt", { create: true }, fileOpened, handleError);
}
function fileOpened(fileEntry) {
fileEntry.createWriter(writeToFile, handleError);
}
function writeToFile(fileWriter) {
fileWriter.onwriteend = function() { alert('Success'); };
fileWriter.onerror = function() { alert('Failed'); };
fileWriter.seek(fileWriter.length);
fileWriter.write(new Blob(['Hello world'], {type: 'text/plain'}));
}
function handleError(error) {
alert(error.code);
}
Deleting a directory
The DirectoryEntry object also inherits from the Entry object, which provides a remove
method for deleting itself from the le system. However, this method can be used for empty
directories only. An error is thrown if the directory contains other subdirectories or les.
window.requestFileSystem(TEMPORARY, 5 * 1024 * 1024, getDirectory, handleError);
function getDirectory(fileSystem) {
fileSystem.root.getDirectory("Chapter16", { create: true },
directoryOpened, handleError);
}
606 CHAPTER 16 Ofine web applications
function directoryOpened(directoryEntry) {
directoryEntry.remove(directoryRemoved, handleError);
}
function directoryRemoved() {
alert('Success');
}
function handleError(error) {
alert(error.code);
}
To delete a directory forcefully, along with any contents under it in subdirectories and les,
use the removeRecursively method as follows.
function directoryOpened(directoryEntry) {
directoryEntry.removeRecursively(directoryRemoved, handleError);
}
Lesson summary
You can use the File System API to store binary les on the client’s le system.
Chrome is currently the only major browser supporting File System API.
Communication with the le system is initiated through the requestFileSystem method
available on the window object.
File systems can be created by using two modes. The rst, TEMPORARY, allows the
browser to remove the les automatically if space is needed. Only the application or
user can delete contents if the second mode, PERSISTENT, is used.
Files are created and opened by using the getFile method on the DirectoryEntry
object.
A FileWriter is used to write and append to a le.
The FileReader class contains the following methods for reading the contents of a le:
readAsText, readArrayBuffer, and readAsDataURL.
A le can be removed by calling the FileEntry remove method.
Lesson review
Answer the following questions to test your knowledge of the information in this lesson. You
can nd the answers to these questions and explanations of why each answer choice is correct
or incorrect in the “Answers” section at the end of this chapter.
1. Which of the following methods should you use when storing les that are relatively
unimportant and can be removed if the browser is low in available space?
A. window.requestFileSystem(LOW, 5 * 1024 * 1024, getDirectory, handleError);
B. window.requestFileSystem(PERSISTENT, 5 * 1024 * 1024, getDirectory, handleError);
Lesson 4: Working with the ofine application HTTP cache CHAPTER 16 607
C. window.requestFileSystem(SIMPLE, 5 * 1024 * 1024, getDirectory, handleError);
D. window.requestFileSystem(TEMPORARY, 5 * 1024 * 1024, getDirectory,
handleError);
2. Which of the following allows FileWriter to append data to the end of the le?
A. leWriter.seek(leWriter.length);
B. leWriter.seek(leWriter.end);
C. leWriter.moveLast()
D. leWriter.moveToEnd();
3. Which of the following removes a directory that contains existing les?
A. directoryEntry.remove(directoryRemoved, handleError);
B. directoryEntry.removeRecursively(directoryRemoved, handleError);
C. directoryEntry.removeAll(directoryRemoved, handleError);
D. directoryEntry.remove(directoryRemoved, ALL, handleError)
Lesson 4: Working with the ofine application HTTP
cache
You’ve learned about several features that provide the opportunity to store key/value pairs,
structured data elements, objects, and les. However, none of them alone enables your appli-
cation to operate ofine easily. Suppose you have a dynamic web application that gets all its
data from a local IndexedDB instance, but you still need to retrieve items such as CSS les,
JavaScript les, images, and the web page itself. To a degree, you already have this feature
through the browser cache, but it’s always been somewhat unreliable and could not truly
operate without a network connection.
HTML5 delivers an improvement to caching with the application cache, which introduces
the ability to congure how les are cached by including a manifest le. Within this le is a
list of resources to include and exclude from cache and alternate le designations to serve in
some cases.
The application cache works behind the scenes to keep the local cache up to date as the
manifest le is updated. If you lose Internet connection and the browser is taken ofine, it will
automatically switch to serve local les.
After this lesson, you will be able to:
Understand the ofine application HTTP cache.
Implement the ofine application HTTP cache.
Estimated lesson time: 20 minutes
608 CHAPTER 16 Ofine web applications
Browser support
The application cache is now supported in the latest version of all major browsers. Internet
Explorer is the latest to add support with the release of Internet Explorer 10. It’s also sup-
ported in most mobile browsers, which can make it very useful when cellular data services
aren’t available.
The cache manifest le
The application cache hinges on the existence of a manifest le in your web application. The
key to being served correctly is to use the text/cache-manifest content type in the HTTP
response. The le itself can reside anywhere on your web server, such as /home/manifest” or
“/manifest.appcache. If you choose to use a static le reference, you might need to congure
the MIME type in Internet Information Server (IIS) rst or add a mimeMap element to your
application’s web.cong le as follows.
<system.webServer>
<staticContent>
<mimeMap fileExtension=".appcache" mimeType="text/cache-manifest" />
</staticContent>
</system.webServer>
To include the manifest le in your application, it must be referenced by using the manifest
attribute on the page’s <html> element as follows.
<!DOCTYPE html>
<html manifest="manifest.appcache ">
This example references the manifest le by using a relative URL, but you can use an abso-
lute URL as long as it’s part of the same origin, as follows.
<html manifest="http://www.example.com/manifest.appcache ">
Understanding structure
You’ve learned how to reference a manifest le and that it must be served with the text/
cache-manifest content type. The following is what a sample manifest le looks like.
CACHE MANIFEST
# version 1.0
# Explicit cache declarations
CACHE:
/Content/Styles/Site.css
http://ajax.aspnetcdn.com/ajax/jQuery/jquery-1.8.0.js
# The following should not be cached
NETWORK:
/Login/
/API/
# Alternative files

Lesson 4: Working with the ofine application HTTP cache CHAPTER 16 609
FALLBACK:
/Content/Images/Products/ /Content/Images/offline.jpg
There are some important things to point out in this example. First, the top line of the le
must always be the CACHE MANIFEST statement. Comment lines begin with a # symbol and
will be ignored by the browser. Empty lines are also ignored. The le has the following three
sections within it.
CACHE This section contains any items that you want to cache explicitly. The URLs
within it can be fully qualied or relative to the location of the manifest le. You can
also list these les directly under the CACHE MANIFEST header.
NETWORK This section contains white-listed URLs that require a connection. These
les will not be included in the cache, so they will not be available when ofine. In the
sample, the /API/ section of the site is specied because this area contains services that
can only function when a network connection is available.
FALLBACK The last section enables you to specify substitute les that you might not
want cached for whatever reason but would like something to be used in their place.
The URL on the left side is substituted by the one on the right. In this example, all
images in the Products directory should be replaced by a default ofine.jpg image.
Updating the cache
When a change is made to the manifest le, the browser is triggered to download every le
listed within it. It does this asynchronously behind the scenes, so it won’t block the rendering
of the page being displayed.
After the browser caches resources listed in the manifest le, those les are held until one
of the following occurs.
The manifest le is updated.
The user manually clears the cache.
The cache is updated through a developer-created script.
A change to a resource itself doesn’t trigger it to be automatically updated within the
cache, so it can be very easy for the cache become stale. A common practice is to include a
version number or timestamp as a comment line that is updated with each deployment of the
web application as follows.
CACHE MANIFEST
# version 1.0
Quick check
When do you use the FALLBACK section of a manifest le?
Quick check answer
Use the FALLBACK section to specify substitutions for resources in ofine mode.
610 CHAPTER 16 Ofine web applications
Understanding events
In general, the application cache process occurs silently, but the window.applicationCache
object enables you to inject some custom functionality into that workow.
As the browser executes each step in the cache process, it res a series of events on the
applicationCache object. The following is a summary of those events.
checking This is always the rst triggered within the sequence of events. It indicates
that the browser is checking whether the manifest le has been updated or needs to
be downloaded for the rst time.
noupdate If it’s determined that the manifest le hasn’t changed, the noupdate
event will be triggered. No other events will re afterward.
downloading If the browser determines that the le has changed or will be down-
loaded for the rst time, this event will be red as the new les are being downloaded.
progress As the new les are being downloaded, this event will re. It will include
a total attribute reecting the number of les to be downloaded. It will also include a
loaded attribute to indicate the number of les that have been downloaded thus far.
cached This event res after all les have been downloaded for the rst time.
updateReady If an existing cache has been updated, this event will re to inform you
that all les have been downloaded.
obsolete The obsolete event will re if the request for the manifest le results in a
404 or 410 result. Contents of the cache will be deleted.
error Building the cache can fail for a number of reasons, such as an invalid resource
URL listed in the manifest. If the process fails, the error event will re.
The applicationCache object includes an update() method that can be used to start the
caching process programmatically, as follows.
window.applicationCache.update();
After the new cache has been downloaded and the updateReady event has red, you can
call the swapCache method to replace the old cache with the new, as follows.
window.applicationCache.addEventListener('updateready',
function(){ window.applicationCache.swapCache(); }, false );
Lesson summary
The application cache incorporates a manifest le that can be customized for how your
application operates when in an ofine state.
The rst line of a manifest le must contain the CACHE MANIFEST statement.
URLs can be explicitly included in the cache by adding them to the CACHE section of
the le, or they can be added directly underneath the CACHE MANIFEST statement.

Practice exercises CHAPTER 16 611
Items that can operate only when a network connection is present should be listed in
the NETWORK section of the manifest le.
The FALLBACK section of the manifest le provides a place to designate le substitu-
tions when in ofine mode.
It’s a good idea to include a version number in the manifest le. Cached items are not
automatically updated when changed on the server.
Various events are available on the window.applicationCache object that provide noti-
cation so your application can react to cache changes.
Lesson review
Answer the following questions to test your knowledge of the information in this lesson. You
can nd the answers to these questions and explanations of why each answer choice is correct
or incorrect in the “Answers” section at the end of this chapter.
1. Which of the following is a valid statement for the rst line of a manifest le?
A. CACHE
B. CACHE MANIFEST
C. CACHE-MANIFEST
D. CACHE-ALWAYS
2. Which event is red after an existing cache has been updated with new resources?
A. downloading
B. cached
C. updateReady
D. completed
Practice exercises
If you encounter a problem completing any of these exercises, the completed projects can be
installed from the Practice Exercises folder that is provided with the companion content.
Exercise 1: Modify a contact book to use IndexedDB
In the previous chapter’s exercise, you created a contact book that is stored in localStorage. In
this exercise, you modify that website to use IndexedDB. If you haven’t nished the practice
exercise in Chapter 15, “Local data with web storage,” the Practice Exercises for this chapter
include a Visual Studio solution that’s ready for you to use. If you’re using Internet Explorer,
you must have version 10 installed.
1. Open Visual Studio Express 2012 for Web. Click File and choose Open Project. Select
the ContactBook folder in the Exercise1Start folder and then select the ContactBook.
sln le; click Open.
612 CHAPTER 16 Ofine web applications
2. The names of the IndexedDB variables with which you’ll need to work vary across dif-
ferent browsers. Handle those differences by adding the following to the top of the
ContactsLibrary.js le.
window.indexedDB = window.indexedDB || window.mozIndexedDB ||
window.webkitIndexedDB || window.msIndexedDB;
window.IDBTransaction = window.IDBTransaction || window.webkitIDBTransaction;
window.IDBCursor = window.IDBCursor || window.webkitIDBCursor;
3. Prepare to add a database instance that’s accessible to all methods in the namespace
by adding a db variable at the start of the immediately invoked function expression
(IIFE) function.
this.contactsNamespace = this.contactsNamespace || {};
var ns = this.contactsNamespace;
var db;
var currentRecord;
4. Within the initialize method, create the contacts object store and open the database
connection. Instead of just relying on an item’s index within the total resultset, allow
IndexedDB to create an auto-incremented key as follows.
ns.initialize = function () {
$('#btnSave').on('click', ns.save);
var request = indexedDB.open('Chapter16', 1);
request.onupgradeneeded = function (response) {
var options = { keypath: 'id', autoIncrement: true };
response.currentTarget.result.createObjectStore("contacts", options);
};
request.onsuccess = function (response) {
db = request.result;
ns.display();
};
};
5. Convert the remaining methods in the order in which they appear in the JavaScript le,
starting with the save method. Within it, start a readwrite transaction against the con-
tacts store. If updating an existing record, use the put method. If adding a new record,
use the add method.
Notice that this occurs asynchronously.
ns.save = function () {
var contact = currentRecord.contact;
contact.firstName = $('#firstName').val();
contact.lastName = $('#lastName').val();
contact.email = $('#email').val();
contact.phoneNumber = $('#phoneNumber').val();
var trans = db.transaction('contacts', 'readwrite');
var contacts = trans.objectStore("contacts");
var request = currentRecord.key != null
Practice exercises CHAPTER 16 613
? contacts.put(contact, currentRecord.key)
: contacts.add(contact);
request.onsuccess = function (response) {
ns.display();
};
};
Loading the list of contacts requires the use of a cursor to iterate through and build an
array of results. In the previous chapter, the results variable was a simple array of con-
tact records. In contrast, this code creates an array of objects that contain the object’s
key and the contact instance. After the cursor moves past the end of the data set, its
result object will be null.
6. At the result object’s null point, call the bindToGrid method as follows.
ns.display = function () {
$('#currentAction').html('Add Contact');
currentRecord = { key: null, contact: {} };
displayCurrentRecord();
var trans = db.transaction('contacts', 'readonly');
var request = trans.objectStore("contacts").openCursor();
var results = [];
request.onsuccess = function (response) {
var cursor = response.target.result;
if (!cursor) {
bindToGrid(results);
return;
}
results.push({ key: cursor.key, contact: cursor.value });
cursor.continue();
};
};
7. The loadContact method can now be changed to use the object store’s get method to
nd the selected record by its key, as follows.
ns.loadContact = function () {
var key = parseInt($(this).attr('data-key'));
var trans = db.transaction('contacts', 'readonly');
var store = trans.objectStore("contacts");
var request = store.get(key);
request.onsuccess = function (response) {
$('#currentAction').html('Edit C o ntact');
currentRecord = { key: key, contact: response.target.result }
displayCurrentRecord();
};
};
No changes are needed within the displayCurrentRecord method.
614 CHAPTER 16 Ofine web applications
Because the results array that’s passed to the bindToGrid method contains objects that
are slightly more complex, the for loop needs some modications. Remember that
the data key is now the object’s primary key instead of just its index. Your bindToGrid
method should look like the following.
function bindToGrid(results) {
var html = '';
for (var i = 0; i < results.length; i++) {
var key = results[i].key;
var contact = results[i].contact;
html += '<tr><td>' + contact.email + '</td>';
html += '<td>' + contact.firstName + ' ' + contact.lastName + '</td>';
html += '<td><a class="edit" href="javascript:void(0)" data-key='
+ key + '>Edit</a></td></tr>';
}
html = html || '<tr><td colspan="3">No records available</td></tr>';
$('#contacts tbody').html(html);
$('#contacts a.edit').on('click', ns.loadContact);
}
When you nish, the nal JavaScript le should be similar to the following.
/// <reference path="jquery-1.8.3.js" />
window.indexedDB = window.indexedDB || window.mozIndexedDB || window.
webkitIndexedDB || window.msIndexedDB;
window.IDBTransaction = window.IDBTransaction || window.webkitIDBTransaction;
window.IDBCursor = window.IDBCursor || window.webkitIDBCursor;
$(document).ready(function () {
contactsNamespace.initialize();
});
(function () {
this.contactsNamespace = this.contactsNamespace || {};
var ns = this.contactsNamespace;
var db;
var currentRecord;
ns.initialize = function () {
$('#btnSave').on('click', ns.save);
var request = indexedDB.open('Chapter16', 1);
request.onupgradeneeded = function (response) {
var options = { keypath: 'id', autoIncrement: true };
response.currentTarget.result.createObjectStore("contacts", options);
};
request.onsuccess = function (response) {
db = request.result;
ns.display();
};
Practice exercises CHAPTER 16 615
};
function retrieveFromStorage() {
var contactsJSON = localStorage.getItem('contacts');
return contactsJSON ? JSON.parse(contactsJSON) : [];
}
ns.display = function () {
$('#currentAction').html('Add Contact');
currentRecord = { key: null, contact: {} };
displayCurrentRecord();
var trans = db.transaction('contacts', 'readonly');
var request = trans.objectStore("contacts").openCursor();
var results = [];
request.onsuccess = function (response) {
var cursor = response.target.result;
if (!cursor) {
bindToGrid(results);
return;
}
results.push({ key: cursor.key, contact: cursor.value });
cursor.continue();
};
}
function bindToGrid(results) {
var html = '';
for (var i = 0; i < results.length; i++) {
var key = results[i].key;
var contact = results[i].contact;
html += '<tr><td>' + contact.email + '</td>';
html += '<td>' + contact.firstName + ' ' + contact.lastName + '</td>';
html += '<td><a class="edit" href="javascript:void(0)" data-key=' +
key + '>Edit</a></td></tr>';
}
html = html || '<tr><td colspan="3">No records available</td></tr>';
$('#contacts tbody').html(html);
$('#contacts a.edit').on('click', ns.loadContact);
}
ns.loadContact = function () {
var key = parseInt($(this).attr('data-key'));
var trans = db.transaction('contacts', 'readonly');
var store = trans.objectStore("contacts");
var request = store.get(key);
request.onsuccess = function (response) {
$('#currentAction').html('Edit Contact');
currentRecord = { key: key, contact: response.target.result }

616 CHAPTER 16 Ofine web applications
displayCurrentRecord();
};
};
function displayCurrentRecord() {
var contact = currentRecord.contact;
$('#firstName').val(contact.firstName);
$('#lastName').val(contact.lastName);
$('#email').val(contact.email);
$('#phoneNumber').val(contact.phoneNumber);
}
ns.save = function () {
var contact = currentRecord.contact;
contact.firstName = $('#firstName').val();
contact.lastName = $('#lastName').val();
contact.email = $('#email').val();
contact.phoneNumber = $('#phoneNumber').val();
var trans = db.transaction('contacts', 'readwrite');
var contacts = trans.objectStore("contacts");
var request = currentRecord.key != null
? contacts.put(contact, currentRecord.key)
: contacts.add(contact);
request.onsuccess = function (response) {
ns.display();
};
};
})();
8. In the Solution Explorer window, right-click the default.html le and choose Set As
Start Page.
9. Run the website and start adding contacts. Try closing the browser and re-running the
website to see the persisted contacts.
The website behaves the same way as in the previous chapter.
Suggested practice exercises
The following additional exercises are designed to give you more opportunities to practice
what you’ve learned and to help you successfully master the lessons presented in this chapter.
Exercise 1 Add the ability to delete items from the contact book application.
Exercise 2 Convert the contact book application to use Web SQL instead of
IndexedDB. Make sure you use a browser that supports Web SQL, such as Chrome or
Safari.

Answers CHAPTER 16 617
Answers
This section contains the answers to the lesson review questions in this chapter.
Lesson 1
1. Correct answer: A
A. Correct: Because iOS web applications can target Safari’s mobile browser speci-
cally, you can be sure that Web SQL will be available.
B. Incorrect: Not all mobile browsers support Web SQL and therefore should be
avoided.
C. Incorrect: Not all desktop browsers support Web SQL and therefore should be
avoided.
D. Incorrect: Internet Explorer does not support Web SQL.
2. Correct answer: D
A. Incorrect: A createDatabase() command does not exist in Web SQL.
B. Incorrect: A new database cannot be created by instantiating an instance of the
Database class.
C. Incorrect: An initDatabase() command does not exist in Web SQL.
D. Correct: The openDatabase() command is used for both new and existing
databases.
3. Correct answer: A
A. Correct: The question mark is used as a placeholder for SQL arguments being
passed in.
B. Incorrect: No syntax is available for accessing arguments by a zero-based index.
C. Incorrect: No syntax is available for accessing arguments by a one-based index.
D. Incorrect: This form of placeholder is commonly used for string.Format() method
calls in C# but is not valid for Web SQL.
Lesson 2
1. Correct answer: D
A. Incorrect: Transactions are supported by IndexedDB.
B. Incorrect: Cursors are supported by IndexedDB.
C. Incorrect: Indexes are supported by IndexedDB.
D. Correct: The SQL syntax is not supported by IndexedDB.

618 CHAPTER 16 Ofine web applications
2. Correct answer: B
A. Incorrect: An exception is thrown if a write action such as adding a new record is
performed by using a transaction in readonly mode.
B. Correct: Transactions must be in readwrite mode to add a new record.
C. Incorrect: If a transaction mode isn’t specied, it will default to readonly mode.
This would cause an exception to be thrown if an attempt to add a new record is
made.
D. Incorrect: There is no createTransaction function.
3. Correct answer: A
A. Correct: The get() method nds a specic value by using its key.
B. Incorrect: Object stores do not have a nd() method.
C. Incorrect: Object stores do not have a single() method.
D. Incorrect: Object stores do not have a rst() method.
Lesson 3
1. Correct answer: D
A. Incorrect: LOW is not a valid le system mode.
B. Incorrect: Using PERSISTENT mode only will not allow the browser to remove les
if it begins running low in space.
C. Incorrect: SIMPLE is not a valid le system mode.
D. Correct: Using TEMPORARY mode allows the browser to remove les as space is
needed.
2. Correct answer: A
A. Correct: The seek() method moves the cursor to the given location, which in this
case will be the end of the le because you’re passing in the entire le length.
B. Incorrect: To nd the end of the le, you should use the length property.
C. Incorrect: The FileWriter class does not contain a moveLast() method.
D. Incorrect: The FileWriter class does not contain a moveToEnd() method.
3. Correct answer: B
A. Incorrect: The remove method can be used only for directories that are empty. If a
le or subdirectory exists within a directorty, an error will be thrown.
B. Correct: The removeRecursively() method removes the directory and all les and
subdirectories below it.
C. Incorrect: The DirectoryEntry class does not have a removeAll() method.
D. Incorrect: The DirectoryEntry class does not have a remove() method.

Answers CHAPTER 16 619
Lesson 4
1. Correct answer: B
A. Incorrect: CACHE is not a valid statement for the rst line of a manifest le.
B. Correct: The CACHE MANIFEST statement must appear at the top of every mani-
fest le.
C. Incorrect: CACHE-MANIFEST is not a valid statement for the rst line of a manifest
le.
D. Incorrect: CACHE-ALWAYS is not a valid statement for the rst line of a manifest
le.
2. Correct answer: C
A. Incorrect: The downloading event is red as the browser is downloading new
content.
B. Incorrect: The cached event is red for newly created caches only.
C. Correct: The updateReady event tells you when a cache is updated with new
resources.
D. Incorrect: The applicationCache object does not have an available completed
event.


621
Index
Symbols
&& (and) operator, 70–71, 84
+ (addition) operator, 67–68, 70
& (ampersand), 41, 322
* (asterisk) symbol, 147, 155
\\ (backslash) character, 69
^ (caret) symbol, 156
: (colon), 150, 327
© (copyright), 41
/ (division) operator, 67–68, 70
$ (dollar sign), 72–73, 157, 288
" (double quotes), 41, 69
/ (forward slash) character, 337
> (greater-than sign), 41, 148
# (hash) symbol
id selectors and, 146
internal hyperlinks and, 46
jQuery support, 289
in manifest le, 609
in RGB values, 166
< (less-than sign), 41
* (multiplication) operator, 67–68, 70
! (not) logical operator, 70–71
|| (or) logical operator, 70–71
!=== operator, 84
=== operator, 84
() (parentheses), 68–69
. (period) symbol, 146, 327
+ (plus sign), 67–69, 151, 327
? (question mark), 322, 327
® (registered trademark), 41
; (semicolon), 71, 139
' (single quotes), 69
- (subtraction) operator, 67–69
~ (tilde) character, 152
_ (underscore), 45, 72–73
A
<a> element
data-linktype attribute, 157–158
described, 32
<dfn> element and, 218
href attribute, 46, 153–157
target attribute, 46–47
working with hyperlinks, 46–47
<abbr> element, 32, 214–215, 218
abort event, 119
absolute position (<div> element), 182–186
.acc le extension, 444
Access-Control-Allow-Origin header, 380–381
Accessibility window (IE), 159
Accessible Rich Internet Applications (ARIA), 212
accesskey global attribute, 37
<acronym> element, 214
:active pseudo class, 149
addEventListener() function, 115, 295, 567
addition (+) operator, 67–68, 70
<address> element, 32, 215
adjacent selectors, 151–152
Adobe Flash Player, 557

622
arguments to functions, 73–76
ARIA (Accessible Rich Internet Applications), 212
arithmetic operators, 68
array items, 109
array methods, 110–112
Array object
as built-in object, 67
concat() method, 110
creating instance, 108–109
indexOf() method, 110
join() method, 110
lastIndexOf() method, 110
length property, 109–110
pop() method, 110
push() method, 110
reverse() method, 111
shift() method, 111
slice() method, 111
sort() method, 111
splice() method, 111
toString() method, 111–112
unshift() method, 112
valueOf() method, 112
array properties, 109–110
arrays
condensed, 109
creating, 108–109
described, 108
literal, 109
populating, 108–109
artboard (Blend), 15
<article> element, 32, 209
<aside> element
described, 32, 208
<gure> element and, 219
in layout containers, 208, 211–212
role attribute, 212
ASP.NET
Empty Web Application template, 10–11
QUnit tool and, 90–95
::after pseudo element, 150
:after selector, 224
afterprint event, 117
aggregate modules, 348
aggregating functions, 588
AJAX calls to web services
described, 368–369
handling errors, 372–373
handling progress, 371–372
jQuery promises, 377–380, 394–395
jQuery XMLHttpRequest wrappers, 373–377
XMLHttpRequest object, 369–371
alert() function, 76, 79, 101
alt attribute
<area> element, 49
<img> element, 47–48
ampersand (&), 41, 322
and (&&) operator, 70–71, 84
annotating content, 213
APIs (application programming interfaces), 31
App Fabric Caching Service (Microsoft), 422
application class, 212
application programming interfaces (APIs), 31
applicationCache object
swapCache() method, 610
update() method, 610
applications. See ofine web applications; pack-
ages (Node.js)
arbitrary web services, 364, 366
arcs
drawing using arc() method, 485–487
drawing using arcTo() method, 481–485
<area> element
alt attribute, 49
coords attribute, 49
creating image maps, 49–50
described, 32
href attribute, 49
shape attribute, 49
as void element, 38
::after pseudo element

623
lesson summary and review, 446–447, 456–457
author-dened attributes, 39
autofocus Boolean attribute, 321
autoIncrement key generator, 592
autoplay attribute
<audio> element, 445
<video> element, 441
B
<b> element
annotating content, 213–214
described, 31, 33, 213
background-color property (CSS), 139
backslash (\) character, 69
backward compatibility
of browsers, 30
of CSS3, 138
banner class, 212
<base> element, 33, 38
base classes, 262
<bb> element, 33
<bdo> element, 33
::before pseudo element, 150
:before selector, 224
beforeonload event, 117
beforeprint event, 117
Berkeley Software Distribution (BSD) license, 438
big web services, 364, 366
binary operators, 70
Blank App template, 6–9, 14, 96
Blend for Visual Studio 2012
artboard, 15
Assets panel, 14–15, 17
CSS Properties tab, 15–16
described, 13–16
Device panel, 15, 17–18
HTML Attributes tab, 15–16
lesson summary and review, 19–20, 27
SignalR library support, 423
asterisk (*) symbol, 147, 155
async attribute (<script> element), 101
asynchronous operations
conditional calls, 401–402
described, 393
lesson summary and review, 402–403, 405–
406, 413–414
practice exercises, 406–412
promise objects and, 394–402
working with web workers, 404–405, 563
attr() function, 153
attribute contains value in list selector, 157–158
attribute contains value selector, 155–156
attribute selector, 153–154
attribute value ends with selector, 157
attribute value selector, 154–155
attributes
adding to elements, 35–36
author-dened, 39
Boolean, 35–36, 321, 325
custom, 39
described, 35
expando, 39
global, 37
inherit value, 163
retrieving values of, 153
<audio> element
autoplay attribute, 445
conguring, 445–446
controls attribute, 445
described, 32, 443–445
HTMLMediaElement object and, 444, 447
loop attribute, 445–446
preload attribute, 446
<source> element and, 445
src attribute, 446
audio and sounds. See also <audio> element
audio formats, 444
described, 443–444
Blend for Visual Studio 2012

624
browsers
audio formats supported, 444
backward compatibility, 30
built-in functions, 76–77
centering content in window, 193
comments and, 39–40
drag and drop operations, 507, 518
forward compatibility, 30
Geolocation API support, 540
HTML5 support, 206–207
JavaScript considerations, 101–102
nested context, 34
no-quirks mode, 40
special characters and, 41–42
storage mechanisms and, 559–561, 566–567,
590, 601, 608
triggering form submission, 319
User Data API, 557
validation errors, 325
video formats supported, 438
web communications, 312–314
WebSocket support, 416
working with elements, 32
working with styles, 139, 159
BSD (Berkeley Software Distribution) license, 438
built-in browser styles, 159
built-in functions, 76–77
<button> element
described, 33, 317
disabling, 36
triggering form submission, 320
type attribute, 317
C
cache (HTTP). See HTTP cache
CACHE MANIFEST statement, 609
cached event, 610
calculating distances, 548–549
Live DOM panel, 14–15, 19
practice exercises, 24–25
Projects panel, 14–17
Style Rules panel, 14–15, 18–19
Tools panel, 14–15
<blockquote> element
annotating content, 215
cite attribute, 215
described, 33, 215
blur event, 117–118
<body> element
basic document structure, 40–41
described, 9, 33
<object> tag and, 51
working with events, 117
Boolean attributes
described, 35–36, 321, 325
minimized form, 36
quoted form, 36
Boolean object, 67
Boolean primitive type
described, 67, 70
logical operators, 70–71
short-circuit evaluation, 71
border properties (CSS), 176–178
box model (CSS)
border properties, 176–178
described, 175–176
margin properties, 176–178
padding properties, 176–178
box-sizing property (CSS), 190–192
<br> element
annotating content, 217
described, 33, 217
self-closing tags and, 37–38
as void element, 38, 217
breakpoints
setting in JavaScript, 103–104
setting in jQuery, 289
<blockquote> element

625
llText() method, 461, 488–489
font property, 461, 488
getImageData() method, 461
globalAlpha property, 461
globalCompositeOperation property, 461
implementing, 462–463
isPointInPath() method, 461
lineCap property, 461
lineJoin property, 461, 471–472, 474–475
lineTo() method, 461, 475–477
lineWidth property, 461, 470–471, 474–475,
479
measureText() method, 461
miterLimit property, 461
moveTo() method, 462, 475, 478
putImageData() method, 462
quadraticCurveTo() method, 462
rect() method, 462, 475, 478–479
restore() method, 462, 474–475
rotate() method, 462
save() method, 462, 474–475
scale() method, 462
setTransform() method, 462
shadowBlur property, 462
shadowColor property, 462
shadowOffsetX property, 462
shadowOffsetY property, 462
stroke() method, 462, 475, 478–481
strokeRect() method, 462–464, 478
strokeStyle property, 462, 472–475
strokeText() method, 462, 488–489
textAlign property, 462, 488–489
textBaseline property, 462, 488–489
transform() method, 462
translate() method, 462
<caption> element, 33, 241
captions, adding to tables, 241
caret (^) symbol, 156
cascading if statements, 81
call methods, 279–280
calling functions, 74
canplay event, 119
canplaythrough event, 119
<canvas> element
described, 33, 460
drawing with images, 490
getContext() method, 460
height attribute, 460
implementing, 462–463
toDataUrl() method, 460
width attribute, 460
Canvas Pattern object, 468–469
CanvasGradient object, 466–468
CanvasRenderingContext2D object
addColorStop() method, 461, 466–467
arc() method, 461, 481–485
arcTo() method, 461, 485–487
beginPath() method, 461, 475
bezierCurveTo() method, 461
clearRect() method, 461, 463–464
clip() method, 461
closePath() method, 461, 477–478
conguring drawing state, 465–474
createImageData() method, 461
createLinearGradient() method, 461, 466–467
createPattern() method, 461, 468–469
createRadialGradient() method, 461, 466–467
data property, 461
described, 460
drawImage() method, 461, 490–493
drawing arcs, 481–487
drawing rectangles, 463–475, 478–479
drawing text, 488–490
drawing using paths, 475–487
drawing with images, 490–494
endPath() method, 475
ll() method, 461, 475, 477–481
llRect() method, 461, 463–464, 478
llStyle property, 461, 465–470
cascading if statements

626
<code> element, 33, 216–217
code blocks, 74
code loops
breaking out of, 86–87
described, 84
do loop, 85
for loop, 85–86
while loop, 84–85
<col> element
described, 33
styling columns, 241–242
as void element, 38
<colgroup> element, 33, 241–242
colon (:), 150, 327
<color> value type, 138
color names table, 167–171
color selector, 4
colors. See CSS colors
cols attribute (<textarea> element), 316
colspan attribute
<td> element, 238–240
<th> element, 238–240
<command> element, 33, 38
comments
adding, 39
adding conditional, 40
adding within style sheets, 139
in manifest le, 609
TODO, 7
CommonJS, 394
communications
asynchronous, 393–414
web, 312–316
WebSocket, 415–436
complementary class, 212
complex objects, storing, 562
condensed arrays, 109
conditional comments, 40
conditional programming
if/else keywords, 80–81
Cascading Style Sheets. See CSS (Cascading Style
Sheets)
cascading styles, 160–161
case sensitivity
for tags, 32
for variable names, 72
catch block, 87
chained if statements, 81
change event, 118
character encoding, style sheets and, 143
@charset rule, 41, 143
checked Boolean attribute, 36
:checked pseudo class, 149
checking event, 610
child classes, 262
child selectors, 148
Chinese characters, 220–221
<circle> element
cx attribute, 498
cy attribute, 498
described, 498
ll attribute, 498
id attribute, 498
r attribute, 498
circles, drawing, 485–487, 498–499
citations and quotations, 215–216
<cite> element, 33, 215–216
cite attribute
<blockquote> element, 215
<q> element, 215
CJK languages, 220–221
class global attribute, 37
class selectors, 146–147
classes
creating, 266–271
described, 262
<clear> element, 189–190
clear property (CSS), 189–190
click event, 119
cm measurement unit, 175
Cascading Style Sheets

627
coords attribute (<area> element), 49
copyright (©), 41
CORS (cross-origin resource sharing), 380–381
counter variables, 86
cross-origin resource sharing (CORS), 380–381
CRUD operations, 316, 365
CSS box model
border properties, 176–178
described, 175–176
margin properties, 176–178
padding properties, 176–178
CSS (Cascading Style Sheets)
adding comments within style sheets, 139
browser built-in styles, 159
cascading styles, 159–160
creating embedded styles, 140–141
creating external style sheets, 141–144
creating inline styles, 140
dening and applying styles, 139
dening selectors, 146–159
described, 31, 137–139
extending styles, 159
inheritance and, 162–163
lesson summary and review, 144–145, 163–165,
193–194, 202–204
practice exercises, 194–201
specicity in selectors, 161–162
working with important styles, 159–160
CSS colors
described, 166
hsl() function, 172–173
rgb() function, 171
rgba() function, 172
setting llStyle property, 465
setting value of, 166
table of color names and values, 167–171
transparency, 172
CSS properties
box-sizing property, 190–192
centering content in browser window, 193
implementing code loops, 84–87
switch keyword, 82–83
conrm() function, 76
CONNECT method (HTTP), 316
constructor functions, 266–271
constructs, 262
content annotation, 213
content embedding
adding images to HTML documents, 47–50
described, 44
embedding plug-in content, 50–52
using inline frames, 44–46
lesson summary and review, 52–53, 63
practice exercises, 58–61
sandboxing, 45
seamless, 45
working with hyperlinks, 46–47
contenteditable global attribute, 37
contentinfo class, 212
context object. See CanvasRenderingContext2D
object
contextmenu event, 118
contextmenu global attribute, 37
controls attribute
<audio> element, 445
<video> element, 441, 450
cookie plug-in (jQuery), 556–557
cookies
alternatives to, 557–558
described, 556–557
limitations of, 556–557
Coordinates object
accuracy property, 541
altitude property, 541
altitudeAccuracy property, 541
described, 540–541
heading property, 541
latitude property, 541
longitude property, 541
speed property, 541
CSS properties

628
cx attribute (<circle> element), 498
cy attribute (<circle> element), 498
D
d attribute (<path> element), 496
data
described, 67
expressions producing, 67
number types, 67–69
private, 268–271, 274–276
data attribute (<object> element), 51
data-linktype attribute (<a> element), 157–158
Database object
changeVersion() method, 583–584
described, 583
openDatabase() method, 583
readTransaction() method, 585, 587
transaction() method, 584–585, 587
version property, 583–584
<datagrid> element, 33
<datalist> element, 33
DataTransfer object
clearData() method, 514
described, 513–515, 521
dragging and dropping les, 519
dropeffect property, 514
effectAllowed property, 514–515
les property, 514
getData() method, 514
setData() method, 514
types property, 514
Date object, 67
dblclick event, 119
<dd> element, 33, 223
DEBUG method (HTTP), 316
debugging JavaScript code
about, 103
examining variables, 104–105
clear property, 189–190
declaration block and, 139
described, 165
oat property, 186–189
positioning div elements, 178–186
transparency, 172
working with colors, 166–173
working with CSS box model, 175–178
working with text, 173–175
CSS3
adding comments within style sheets, 139
backward compatibility, 138
browser built-in styles, 159
cascading styles, 159–160
creating embedded styles, 140–141
creating external style sheets, 141–144
creating inline styles, 140
dening and applying styles, 139
dening selectors, 146–159
described, 137–139
extending styles, 159
inheritance and, 162–163
specicity in selectors, 161–162
Visual Studio 2012 support, 4
working with important styles, 159–160
CSS3 Color module, 138
CSS3 Media Queries module, 138
CSS3 Namespaces module, 138
CSS3 Selectors Level 3 module, 138
curly braces, 77, 81, 263–264
cursive font families, 173
cursors
applying key range limits, 597–599
described, 596–597
indexing, 597
opening, 596
curved lines, drawing, 481–487
custom attributes, 39
custom lists, 224–228
CSS3

629
disabled Boolean attribute, 36
distances, calculating, 548–549
<div> element
box-sizing property, 190–192
centering content in browser window, 190–192
clear property, 189–190
control format using, 213
described, 32–33, 178
draggable attribute, 509
<gure> element and, 219
oat property, 186–189
historical usage, 206
in layout containers, 208
positioning, 178–186
role attribute, 212
<table> element and, 230
division (/) operator, 67–68, 70
<dl> element, 33, 37, 223–224
do loop, 85
<!DOCTYPE html> instruction, 8–9, 40
document object
about, 112
getElementById() method, 113
getElementsByClass() method, 113
getElementsByName() method, 113
getElementsByTagName() method, 113
querySelector() method, 113
querySelectorAll() method, 113–114
document object model (DOM)
creating jQuery wrappers, 294–295
described, 112
navigating, 112–114
preventing default operation, 116
<script> elements and, 103
this keyword, 117
working with events, 114–120
dollar sign ($), 72–73, 157, 288
DOM (document object model)
creating jQuery wrappers, 294–295
described, 112
setting breakpoints, 103–104
stepping through code, 105–107
declaration block, 139–140
declare attribute (<object> element), 322
default.css le, 15, 141
default.html le
Blend for Visual Studio 2012, 15
QUnit setup, 91
Visual Studio 2012, 8–9, 11
default.js le
Hello World example, 92
jQuery example, 288, 291
location of, 7
media control, 450–451
defer attribute (<script> element), 101
deferred object. See promise object (jQuery)
<del> element, 33, 220
DELETE method (HTTP), 315–316, 365
deleting
directories, 605–606
les, 604
records in object stores, 595
derived classes, 262
descendant selectors, 147–148
description lists, 223–224
<details> element, 33, 219–220
<dfn> element, 33, 218
<dialog> element, 33
dir global attribute, 37
directories
creating, 604–605
deleting, 605–606
opening, 604–605
writing les to, 605
DirectoryEntry object
described, 602
getDirectory() method, 604–605
getFile() method, 602, 604
remove() method, 605
removeRecursively() method, 606
DOM (document object model)

630
drawing lines, 476–478
drawing rectangles, 478–479
ordering ll and stroke method calls, 479–481
drawing with HTML5
conguring drawing state, 465–474
described, 459
drawing arcs, 481–487
drawing rectangles, 463–464
drawing text, 488–490
drawing using paths, 475–487
drawing with images, 490–494
implementing the canvas, 462–463
lesson summary and review, 494–495, 501–
502, 506
practice exercises, 502–505
using <canvas> element, 460, 462–463
using CanvasRenderingContext2D object,
460–494
using scalable vector graphics, 495–501
drawing with images, 490–494
drop event, 119, 511–515
dropItem() function, 512, 515, 519
<dt> element, 33, 223
durationchange event, 119
E
ECMA-262 specication, 66
ECMAScript, 66
element type selectors, 146
elements
adding attributes to, 35–36
adding comments, 39–40
described, 32–35
expando attributes, 39
oating, 186–189
HTML5 global attribute reference, 37
inherit value, 163
inheriting styles, 162–163
navigating, 112–114
preventing default operation, 116
<script> elements and, 103
this keyword, 117
working with events, 114–120
dot notation, 586
double quotes ("), 41, 69
downloading event, 610
drag and drop operation
DataTransfer object, 513–515
described, 507
dragging process, 509–510
File API, 517–521
lesson summary and review, 516–517, 521–522,
536–537
practice exercises, 522–535
technique illustrated, 508–509
drag event, 119, 510
dragend event, 119, 510–511
dragenter event, 119, 511–513
draggable global attribute, 37, 509–510
draggingEnded() function, 511
dragleave event, 119, 511
dragover event, 119, 511–513
dragstart event, 119, 510–511, 513
drawing arcs
using arc() method, 485–487
using arcTo() method, 481–485
drawing circles, 485–487, 498–499
drawing curved lines, 481–487
drawing state
conguring, 465–474
saving and restoring, 474–475
drawing text, 488–490
drawing triangles, 478–481
drawing using paths
creating shapes, 475
described, 475
drawing arcs with arc method, 485–487
drawing arcs with arcTo method, 481–485
dot notation

631
escape sequences, 69
event bubbling, 114–115, 567
event capturing, 114–115
event handlers, 295
event listeners, 295
Event object
described, 114
preventDefault() method, 116
stopPropagation() function, 116
events
bubbling, 114–115, 567
canceling, 567
canceling propagation, 116
described, 114
sessionStorage and, 568
subscribing to, 115–116, 567
triggered by drag and drop operation,
510–513
triggered by form actions, 118
triggered by keyboard, 118
triggered by media, 119–120
triggered by mouse actions, 118–119
triggered by Window object, 117
unsubscribing from, 116
W3C recommendations, 566
exception handling, 87–88
expando attributes, 39
express framework (Node.js)
adding webpage to applications, 357–360
creating Hello web application, 356–357
described, 354
getting started, 354–355
parsing posted form data, 360–362
Visual Studio 2012 Express for Web, 356
expressions
described, 67
function, 75
eXtensible Markup Language (XML), 30–31
external JavaScript les, 102
language, 220–221
nesting, 179, 210
reference list of, 32–35
self-closing tags, 37
tags and, 32
void, 38–39
working with styles, 138–140
else keyword, 80–81
<em> element, 33, 213–214
em measurement unit, 174
email messages, hyperlinks in, 47
<embed> element
described, 33
embedding plug-in content, 50
height attribute, 50
src attribute, 50
type attribute, 50
width attribute, 50
Embedded Open Type (.eot) les, 144
embedded styles, 140–141
embedding content. See content embedding
emptied event, 119
encapsulation
described, 262–263
implementing, 268–269
encrypting web communications, 366
ended event, 119
&entity_name;, 41
&#entity_number;, 41
Entry object, 604–605
environment, creating for variables, 73
.eot (Embedded Open Type) les, 144
error event, 117, 119, 610
error handling
AJAX calling web service example, 372–373
for Geolocation object, 543–544
for JavaScript code, 87–88
for promise objects, 397
QuotaExceededError exception, 562
validation errors, 325
external JavaScript les

632
readAsText() method, 603–604
les
creating, 602
deleting, 604
dragging and dropping, 517–521
opening, 602
reading, 603–604
writing to, 602–603
writing to directories, 605
Filesystem API
browser support, 559, 601
creating and opening directories, 604–605
creating and opening les, 602
deleting directories, 605–606
deleting les, 604
described, 600
lesson summary and review, 606–607, 618
opening le system, 601
reading les, 603–604
as storage mechanism, 558
writing les to directories, 605
writing to les, 602–603
FileWriter object
described, 603–604
write() method, 602
ll attribute
<circle> element, 498
<path> element, 496
nally block, 87
Firefogg website, 439–440
::rst-letter pseudo element, 150
::rst-line pseudo element, 150
:rst-of-type pseudo class, 149
Fixed Layout App template, 7
xed position (<div> element), 183–184
Flash Player (Adobe), 557
oat property (CSS), 186–189
focus event, 117–118
:focus pseudo class, 149
@font-face rule, 144
external style sheets
described, 141
specifying character encoding of, 143
specifying target devices using media, 141–142
using @font-face rule to import fonts, 144
F
F5 function key, 104
F9 function key, 103
F10 function key, 105
F11 function key, 105
F12 function key, 314
factory pattern, 265–266
fantasy font families, 173
<eldset> element, 33
<gcaption> element, 219
<gure> element
annotating content, 219
<aside> element and, 219
described, 33, 219
<div> element and, 219
File API, 517–521
File object
described, 517–521
name property, 517
size property, 517
type property, 517
FileEntry object
deleting les, 604
le() method, 603
reading les, 603
remove() method, 604
writing to les, 602
FileList object, 517–521
FileReader object
described, 603
readArrayBuffer() method, 604
readAsDataURL() method, 604
external style sheets

633
GET method, 322–323
lesson summary and review, 323–324, 330–
331, 338–339
parent, 319
POST method, 322–323
practice exercises, 331–337
sending data when submitting, 316–318
serializing, 321
submitting form data to web servers, 316
triggering submission, 319–321
using <label> element, 318–319
validating, 324–330
web communication and, 312–316
forward compatibility of browsers, 30
forward slash (/) character, 337
fs package, 348
function declarations, 74, 78
function expressions, 75
Function object, 67
functions. See also specic functions
aggregating, 588
arguments to, 73–76
built-in, 76–77
constructor, 266–271
declaring, 74, 78
described, 67, 73
nesting, 78
parameters in, 73–74
return values, 73
furigana phonetic characters, 220–221
future object. See promise object (jQuery)
G
generalized classes, 262
Geolocation API
basic positioning, 540–545
described, 539
lesson summary and review, 545–546, 549, 554
font families, 173–174
font-family property (CSS), 174
font licensing, 144
font-size property (CSS), 174–175
font typeface, 173–174
<footer> element
<cite> element and, 215
described, 33, 208
in layout containers, 208, 210–211
for attribute (<label> element), 318
for loop, 85–86
<form> element
described, 33
required validation, 325–327
submitting data to web servers, 316
triggering form submission, 319
validating numbers and ranges, 329
validating URL input, 327–328
form attribute
form submission elements, 319
<object> element, 51
form class, 212
form submission elements
data submission constraints, 322
described, 316–318
form attribute, 319
placeholder attribute, 326
required attribute, 325
formatting text
controlling with <div> element, 213
CSS properties, 173–175
formchange event, 118
formidable package, 360
forminput event, 118
forms
autofocus attribute, 321
data submission constraints, 322
described, 311–312
events triggered by, 118
Geolocation API

634
H
<h1> element, 33
<h2> element, 33
<h3> element, 33
<h4> element, 33
<h5> element, 34
<h6> element, 34
H.264 (MPEG-4) format, 438
handling errors. See error handling
haschange event, 117
hash (#) symbol
id selectors and, 146
internal hyperlinks and, 46
jQuery support, 289
in manifest le, 609
in RGB values, 166
haversine formula to calculate distances, 548–549
<head> element
described, 9, 34, 40
<script> element and, 102–103
<style> element and, 140
HEAD method (HTTP), 315
<header> element, 34, 208
height attribute
<canvas> element, 460
<embed> element, 50
<object> element, 51
<video> element, 441
Hello World program
creating from JavaScript, 90–99
creating from Node.js, 342–344
creating with express, 356–357
hexadecimal values, color names table, 167–171
<hgroup> element, 210
hidden global attribute, 37
.hidden selector, 237
<hn> element, 209–210, 213
hole variables, 512
:hover pseudo class, 149, 154–155
monitored positioning, 546–549
practice exercises, 550–553
Geolocation object
addressing privacy, 544
basic positioning, 540–545
calculating distance between samples,
548–549
clearWatch() method, 540, 546
getCurrentPosition() method, 540–545
handling errors, 543–544
lesson summary and review, 545–546, 549, 554
monitored positioning, 546–549
practice exercises, 550–553
retrieving current position, 541–542
specifying options, 544–545
watchPosition() method, 540, 546–547, 549
Geolocation Working Group, 539
GET method (HTTP)
CRUD operations and, 316, 365
described, 315, 322–323
REST support, 365–366, 368
Get Windows Azure SDK For .NET template, 10
getDistance() function, 548–549
getter methods, 274–275
GIF le type, 48–49
git source control manager, 350
global attributes, 37
global objects, 67
Global Positioning System (GPS), 539, 541
global scope, 77–78
global variables, 77–78
Go To Denition feature, 4
Google Gears, 557
GPS (Global Positioning System), 539, 541
gradient ll, 466–468
greater-than sign (>), 41, 148
Grid App template, 6
grouping selectors, 150–151
Geolocation object

635
practice exercises, 53–61, 243–257
semantic markup, 31–32, 206
Visual Studio 2012 support, 3–4
working with elements, 32–40
working with lists, 221–228
HTML5 documents
creating semantic, 207
documenting code in, 216–217
normalizing, 217
HTML5 layout containers. See layout containers
HTMLMediaElement object
addTextTrack() method, 447
audioTracks property, 447
autoplay property, 447
buffered property, 448
canPlayType() method, 447
controller property, 448
controls property, 448
crossOrigin property, 448
currentSrc property, 448
currentTime property, 448
defaultMuted property, 448
defaultPlaybackRate property, 448
described, 447
duration property, 448
ended property, 448
error property, 448
inheritance and, 444, 447
lesson summary and review, 451–452
load() method, 447
loop property, 448
media control, 450–451
mediaGroup property, 448
muted property, 448
networkState property, 448
onabort event, 449
oncanplay event, 449
oncanplaythrough event, 449
ondurationchange event, 449
onemptied event, 449
<hr> element
adding thematic breaks, 213
described, 34
as void element, 38
href attribute
<a> element, 46, 153–157
<area> element, 49
<link> element, 141
hsl() function, 172–173
HSL (hue-saturation-lightness), 172–173
HTML (Hypertext Markup Language)
browser support, 314
CSS support, 138
described, 30–32
<html> element
described, 9, 34, 40
manifest attribute, 608
HTML documents
adding images to, 47–50
basic document structure, 40–41
documenting code in, 216–217
embedded styles and, 140–141
embedding webpages in, 51
no-quirks mode, 40
normalizing, 217
special characters, 41–42
HTML entities, 41–42
HTML forms. See forms
HTML5
adding thematic breaks, 213
annotating content, 213–221
browser support, 206–207
controlling format with <div> element, 213
creating layout containers, 207–212
described, 30–31
drawing with, 459–506
embedding content, 44–52
lesson summary and review, 42–43, 52–53,
62–63, 228–229, 242–243, 258–259
named attributes supported, 37
HTMLMediaElement object

636
HTTP() method, 315–316, 322–323
REST web services and, 365–366
return status codes, 315
web servers, 312
WebSocket protocol and, 416
HTTP methods, 315–316, 322–323
http module, 342
HTTP verbs, 315–316, 322–323
HTTPS protocol, 366
hue-saturation-lightness (HSL), 172–173
hyperlinks
creating image links, 49
described, 46
<iframe> element and, 44
sending email with, 47
specifying target, 46–47
styles working with, 138
working with events, 114–115
working with selectors, 153–158
Hypertext Markup Language (HTML)
browser support, 314
CSS support, 138
described, 30–32
Hypertext Transfer Protocol. See HTTP (Hypertext
Transfer Protocol)
I
<i> element, 31–32, 34, 213–214
id attribute
<circle> element, 498
as global attribute, 37
<path> element, 496
<video> element, 450
id selectors, 146
IDBCursor object, 596
IDBDatabase object
createObjectStore() method, 591
deleteObjectStore() method, 593
onended event, 449
onerror event, 449
onloadeddata event, 449
onloadedmetadata event, 449
onloadstart event, 449
onpause event, 449
onplay event, 449
onplaying event, 449
onprogress event, 449
onratechange event, 449
onreadystatechange event, 449
onseeked event, 449
onseeking event, 449
onstalled event, 449
onsuspend event, 449
ontimeupdate event, 449
onvolumechange event, 449
onwaiting event, 449
pause() method, 447
paused property, 448
play() method, 447
playbackRate property, 448
played property, 448
preload property, 448
readyState property, 448
seekable property, 448
seeking property, 448
src property, 448
startDate property, 448
textTracks property, 449
videoTracks property, 449
volume property, 449
HTTP cache
browser support, 608
cache manifest le, 608–609
described, 607
updating, 609
HTTP cookies, 556–557
HTTP (Hypertext Transfer Protocol)
described, 314–315
HTTP cache

637
seamless attribute, 45–46
src attribute, 44
working with hyperlinks, 46–47
IIFE (immediately invoked function expression),
277–279
IIS Express, 442
IIS (Internet Information Server), 323, 608
image maps, 49–50
images
adding to HTML documents, 47–50
drawing with, 490–494
styles working with, 138
<img> element
alt attribute, 47–48
creating image links, 49
creating pattern ll, 468–469
described, 30, 34
drawing with images, 490
embedding content, 47–48, 51
le types supported, 48
src attribute, 47–48
usemap attribute, 49
as void element, 38
immediately invoked function expression (IIFE),
277–279
@import rules, 143–144
importing
fonts, 144
style sheets, 143–144
in layout containers, 208–210
in measurement unit, 175
index numbers (arrays), 108–109
IndexedDB tool
browser support, 559, 590
creating and opening database, 590–591
described, 589–590
lesson summary and review, 599–600, 617–618
object stores, 591–593
practice exercises, 611–616
as storage mechanism, 558
described, 590
mode property, 593
objectStoreNames property, 593
setVersion() method, 591
transaction() method, 593
IDBFactory object
deleteDatabase() method, 599
open() method, 590–591
IDBKeyRange object
bound() method, 597–598
described, 597
lower property, 597–598
lowerBound() method, 598–599
lowerOpen property, 598
only() method, 599
upper property, 597–598
upperBound() method, 598
upperOpen property, 598
IDBObjectStore object
add() method, 594
createIndex() method, 592
delete() method, 595
deleteIndex() method, 593
get() method, 595
keypath property, 592
name property, 592
openCursor() method, 596–597
optionalParameters property, 592
put() method, 594
IDBRequest object, 590
IDBTransaction object, 593
identiers, 74
IETF (Internet Engineering Task Force), 415
if keyword, 80–81, 83
<iframe> element
creating nested browser context, 34
described, 34, 44–46
name attribute, 44–45
<object> tag and, 51
sandbox attribute, 45
IndexedDB tool

638
J
Japanese characters, 220–221
Java Applets, 557
JavaScript. See also jQuery
AJAX and, 368
browser considerations, 101–102
CommonJS support, 394
conditional programming, 80–84
converting to different types, 78–80
creating Hello World program, 90–99
creating objects, 262–283
debugging, 103–107
described, 66, 263
enabling IntelliSense, 291–294
handling errors, 87–88
implementing code loops, 84–87
inline versus external les, 102
lesson summary and review, 88–89, 107–108,
120–121, 134–135
naming variables, 72
nested local variable scoping, 78
nesting functions, 78
practice exercises, 121–133
role of data, 66–71
scoping variables, 77–78
<script> element and, 100–103
Socket.IO library and, 424
testing code, 89–103
as untyped language, 66
using statements, 71–73
Visual Studio 2012 support, 4–5
working with functions, 73–77
writing code, 89–103
JavaScript Console, 67
JavaScript Object Notation (JSON), 349, 366, 374
JavaScript objects
built-in, 67
creating, 263–264
creating classes, 266–271
indexing cursors, 597
inherit value, 163
inheritance
described, 162–163
HTMLMediaElement object and, 444, 447
JavaScript objects and, 262, 278–283
inline frames. See <iframe> element
inline JavaScript code, 102
inline styles, 140
INNER JOIN statement, 588
<input> element
described, 34
form validation and, 326
max attribute, 329
min attribute, 329
pattern attribute, 327–328
step attribute, 329
title attribute, 328
type attribute, 317–318
as void element, 38
input event, 118
<ins> element, 34, 220
installing
Node.js packages, 351–353
Node.js platform, 342
instances, 262
integer numbers, 67
IntelliSense feature
custom lists and, 226
enabling for JavaScript and jQuery, 291–294
HTML5 support, 3
JavaScript support, 4
untyped languages and, 66
Internet Engineering Task Force (IETF), 415
Internet Information Server (IIS), 323, 608
invalid event, 118
:invalid pseudo class, 330
irregular tables, 238–241
isNaN() function, 80–81
ISO/IEC 16262 standard, 66
indexing cursors

639
ajaxSetup() method, 373
ajaxStart() method, 373
ajaxStop() method, 373
ajaxSuccess() method, 373
get() method, 373
getJSON() method, 373, 375
getScript() method, 373
load() method, 373
param() method, 373
post() method, 373, 375
serialize() method, 374
serializeArray() method, 374
text() method, 295
trigger() method, 295
triggerHandler() method, 295
JSON (JavaScript Object Notation), 349, 366, 374
JSON object, 67, 368
junction, 352
K
kanji characters, 220–221
<kbd> element, 34, 220
keepAlive() function, 422
keyboard actions, events triggered by, 118
keydown event, 118
<keygen> element, 38
keypress event, 118
keyup event, 118
Korean characters, 220–221
L
<label> element
for attribute, 318
described, 34, 318
forms and, 318–319
landmark role class, 212
lang global attribute, 37
described, 262–263
factory pattern, 265–266
implementing inheritance, 278–283
implementing namespaces, 276–278
lesson summary and review, 283–284, 308
object literal syntax, 263–265
practice exercises, 297–307
prototype pattern, 271
prototype property, 271–274
JetBrains Resharper tool, 67
JOIN commands (SQL), 588
joining lines, 471–472
JPEG le type, 48
jQuery
adding event listeners, 295
autofocus attribute, 321
binding to storage events, 567–568
categories of functionality, 285–286
cookie plug-in, 556–557
creating wrappers, 294–295
DataTransfer object and, 513, 515, 519
drag and drop operations, 507
enabling IntelliSense, 291–294
getting started with, 286–287
initializing code when browser is ready,
295–296
lesson summary and review, 296–297, 308–309
promise objects, 377–380, 394–402
serialize() method, 321
submit() method, 319–320
triggering event handlers, 295
usage considerations, 287–291
verifying versions, 369
XMLHttpRequest wrappers, 373–377
jQuery object
ajax() method, 373–375
ajaxCompleted() method, 373
ajaxError() method, 373
ajaxPrelter() method, 373
ajaxSend() method, 373
lang global attribute

640
described, 221
description, 223–224
ordered, 221–222
unordered, 222–223
literal arrays, 109
live NodeList, 112–113
load event, 117
loadeddata event, 120
loadedmetadata event, 120
loadstart event, 120
local functions, 77–78
local scope, 77–78
local variables, 77–78
Local window (debugger), 104–105
localStorage global variable, 560–564
location awareness. See Geolocation API
logical operators, 70–72
long polling concept, 415–416
loop attribute
<audio> element, 445–446
<video> element, 441
loops. See code loops
M
mailto protocol, 47
main class, 212
Manage NuGet Packages window, 90–91, 95–96
manifest attribute (<html> element), 608
manifest le
CACHE section, 609
described, 608–609
FALLBACK section, 609
NETWORK section, 609
Node.js package and, 346
updating cache, 609
<map> element
creating image maps, 49–50
described, 34
name attribute, 49
:lang(language) pseudo class, 149
language elements, 220–221
last-in, rst-out (LIFO), 474
layout containers
<article> element in, 209
<aside> element in, 208, 211–212
creating, 207–209
described, 208
<div> element in, 208
<footer> element in, 208, 210–211
<header> element in, 208–210
<nav> element in, 208, 211
<section> element in, 208
using roles, 212
LEFT JOIN statement, 588
<legend> element, 34
less-than sign (<), 41
<li> element, 34
licensing fonts, 144
LIFO (last-in, rst-out), 474
lightness (HSL), 172–173
lines
drawing, 476–478
drawing curved, 481–487
joining, 471–472
setting width for, 470–471
<link> element
described, 34
href attribute, 141
media attribute, 141–142
rel attribute, 141
type attribute, 141
as void element, 38
:link pseudo class, 149
list-item-style property (CSS), 226
list-style-image property (CSS), 226
list-style-position property (CSS), 226
list-style-type property (CSS), 225–226
lists
custom, 224–228
:lang(language) pseudo class

641
mousemove event, 119
mouseout event, 119
mouseover event, 119
mouseup event, 119
mousewheel event, 119
movies. See video and movies
.mp3 le extension, 444–445
MP3 format, 444
.mp4 le extension, 438–439, 444
MP4 format, 444
.mp4a le extension, 444
MPEG-4/H.264 format, 438
multimedia
events triggered by, 119–120
HTMLMediaElement object, 447–452
lesson summary and review, 442–443, 446–
447, 451–452, 456–457
playing audio, 443–447
playing video, 437–443
practice exercises, 452–455
specifying target devices using, 141–142
multiple attribute (<select> element), 316–317
multiplication (*) operator, 67–68, 70
music. See audio and sounds
muted attribute (<video> element), 441
MVC technologies, 341
N
\n escape sequence, 69
name attribute
<iframe> element, 44–45
<map> element, 49
<object> element, 51
named styles, 146–147
namespaces
CSS3 support, 138
JavaScript objects and, 276–278
jQuery, 288
margin properties (CSS), 176–178, 193
<mark> element, 34, 213, 220
Markdown les, 348
MarkdownPad editor, 348
mashups, 364
Math object, 67
mathematical operators, 68, 72
max attribute (<input> element), 329
maxlength attribute (<textarea> element), 316
measurement units, font-size, 174–175
media. See multimedia
media attribute (<link> element), 141–142
<menu> element, 34
message event, 117
<meta> element
@charset setting, 41, 143
described, 34
as void element, 38
<meter> element, 34
methods
array, 110–112
described, 67, 110, 263
getter, 274–275
privileged, 269
setter, 274
Microsoft App Fabric Caching Service, 422
Microsoft Visual Studio 2012. See Visual Studio
2012
Microsoft Web Embedding Fonts Tool (WEFT),
144
min attribute (<input> element), 329
Miro Video Converter, 439–440
mm measurement unit, 175
modernizr.js library, 221
Modify Style window, 226
modulo (%) operator, 69
monospace font families, 173
mouse action, events triggered by, 118
mousedown event, 119
namespaces

642
number primitive type
arithmetic operations, 68
described, 67
operator precedence, 68–69
special values supported, 68
number types, 67–69
numbers, validating in forms, 329
NVDA (Nonvisual Desktop Access) devices,
206–207
O
<object> element
creating nested browser context, 52
data attribute, 51
declare attribute, 322
described, 34, 51
embedding plug-in content, 50–52
form attribute, 51
height attribute, 51
name attribute, 51
<param> tag and, 52
passing parameters to objects, 52
type attribute, 51
usemap attribute, 51
width attribute, 51
object literals, 263–265
Object object
constructor() method, 265
described, 67
hasOwnProperty() method, 265
isPrototypeOf() method, 265
propertyIsEnumerable() method, 265
prototype property, 271–274
toLocalString() method, 265
toString() method, 265
valueOf() method, 265
object-oriented programming
JavaScript caveat, 263
naming variables, 72–73
<nav> element, 34, 208, 211
navigating DOM, 112–114
Navigation App template, 7
navigation class, 212
navigator.geolocation global variable, 540
nesting
elements, 179, 210
functions, 78
operations, 398–399
new keyword, 108, 269
no-quirks mode, 40
no value coalescing operators, 83–84
node package manager (npm), 342
Node.js platform
creating Hello World program, 342–344
creating Node.js module, 344–345
creating Node.js package, 345–354
creating RESTful web service, 366–368
described, 341
express framework, 354–363
installing, 342
lesson summary and review, 363, 391
practice exercises, 382–386, 390
Socket.IO library and, 424
nonbreaking space, 41–42
Nonvisual Desktop Access (NVDA) devices,
206–207
normalizing HTML documents, 217
<noscript> element, 34
not (!) logical operator, 70–71
:not pseudo class, 149
noupdate event, 610
npm (node package manager), 342
:nth-child(formula) pseudo class, 149
NuGet package-management system, 90, 95, 286
null primitive type, 67
Number() function, 78–79
Number object, 67
naming variables

643
oncanplaythrough event, 449
onclose event, 417, 419
ondurationchange event, 449
onemptied event, 449
onended event, 449
onerror event
FileEntry object and, 604
FileReader object and, 603
FileWriter object and, 603
HTMLMediaEvent object and, 449
IDBObjectStore object and, 594
IDBRequest object and, 591
WebSocket object and, 417, 419
online event, 117
onload event, 469
onloadeddata event, 449
onloadedmetadata event, 449
onloadend event, 603
onloadstart event, 449
:only-child pseudo class, 149
:only-of-type pseudo class, 149
onmessage event, 417, 419
onopen event, 417, 419
onpause event, 449
onplay event, 449
onplaying event, 449
onprogress event, 449
onratechange event, 449
onreadystatechange event, 371, 449
onseeked event, 449
onseeking event, 449
onstalled event, 449
onsuccess event, 591, 594
onsuspend event, 449
ontimeupdate event, 449
onupgradeneeded event, 591
onvolumechange event, 449
onwaiting event, 449
onwriteend event, 603
opacity property (CSS), 172
private data and, 268
terminology used, 262–263
object stores
adding indexes, 592–593
deleting records, 595
described, 591
inserting new records, 594
removing, 593
removing indexes, 593
retrieving records, 595–596
understanding cursors, 596–599
updating existing records, 594–595
using transactions, 593–594
versioning and, 591
objects. See also JavaScript objects
accessing DOM objects, 112–120
described, 262
lesson summary and review, 120–121, 135
passing parameters to, 52
types of, 262
working with arrays, 108–112
obsolete event, 610
ofine event, 117
ofine web applications
described, 581
FileSystem API and, 600–606
HTTP cache and, 607–610
IndexedDB tool and, 589–599
lesson summary and review, 588–589, 599–
600, 606–607, 610–611, 617–619
practice exercises, 611–616
Web SQL database and, 582–588
.oga le extension, 444–445
.ogg le extension, 444
Ogg/Theora format, 438
Ogg/Vorbis format, 444
.ogv le extension, 438–439
<ol> element, 34, 221–222
onabort event, 449
oncanplay event, 449
opacity property (CSS)

644
parameters
arguments versus, 74
described, 73–74
handling errors via, 543
passing to objects, 52
parent classes, 262
parent forms, 319
parentheses (), 68–69, 74
<path> element
commands supported in, 496–497
d attribute, 496
described, 496
ll attribute, 496
id attribute, 496
path package, 348
paths
commands supported in, 496–497
creating, 496–498
described, 475, 496
drawing using, 475–487
pattern attribute (<input> element), 327–328
pattern ll, 468–469
pause event, 120
pc measurement unit, 175
performance considerations
POST method, 323
storage mechanisms, 563–564
universal selector, 147
period (.) symbol, 146, 327
.pfx le extension, 9
Pin To Source option, 106
placeholder attribute
form submission elements, 326
<textarea> element, 316
play event, 120
playing event, 120
playStop() function, 451
plug-ins
cookie alternatives, 557
described, 31
operands
binary operators and, 70
described, 67–68
operator precedence, 68–69
<optgroup> element, 34
<option> element
described, 34, 317
selected attribute, 317
triggering form submission, 320
value attribute, 320
:optional pseudo class, 330
OPTIONS method (HTTP), 315
or (||) logical operator, 70–71, 83–84
ordered lists, 221–222
<output> element, 34
P
<p> element, 34
package.json le, 349–350
packages (Node.js)
creating aggregate modules, 348
creating package.json le, 349–350
creating README.md le, 348–349
described, 345–348
installing and using, 351–353
publishing, 350–351
uninstalling, 354
packages.cong le, 96
padding properties (CSS), 176–178
Page Inspector feature, 3
pagehide event, 117
pageshow event, 117
Parallel Watch window (debugger), 106
<param> element
described, 34, 52
<object> element and, 52
as void element, 39
operands

645
described, 377–380, 394–395
done() method, 378, 398–399
fail() method, 378, 397, 399
handling completion cleanup, 397–398
handling failure, 397
parallel execution and, 400
pipe() method, 398–400
progress() method, 378, 400–401
subscribing to completed, 398
then() method, 400, 402
timeouts, 396–397
updating progress, 400–401
when() method, 400, 402
prompt() function, 76–77
properties. See also CSS properties
array, 109–110
described, 109, 262–263
Properties window, 7, 11
prototype pattern, 271, 274–276
prototype property, 271–274
prototypes, 263
pseudo-class selectors, 148–149
pseudo classes, 148–149, 330
pseudo-element selectors, 148–150
pseudo elements, 149–150
pt measurement unit, 175
publisher-subscriber design pattern, 114
publishing packages, 350–351
PUT method (HTTP), 315–316
px measurement unit, 174
Q
<q> element
annotating content, 215–216
cite attribute, 215
described, 34
QueryString
form submissions and, 320–323
Node.js and, 343, 359–360
embedding content from, 50–52
limitations of, 558
plus sign (+), 67–69, 151, 327
PNG le type, 48
polymorphism, 262
popstate event, 117
Position object
coords property, 540–541
timestamp property, 541
PositionOptions object
described, 544
enableHighAccuracy property, 544
maximumAge property, 545
timeout property, 544
POST method (HTTP), 315–316, 322–323, 365–366
poster attribute (<video> element), 441
<pre> element, 34, 217
precedence order
for element styles, 160–161
for operators, 68–69
preformatted content, displaying, 217
preload attribute
<audio> element, 446
<video> element, 441
preventDefault() function, 512
primitive values, 67
private data
JavaScript objects and, 268–271
prototype pattern and, 274–276
privileged methods, 269
<progress> element, 34
progress event, 120, 371, 610
Promise/A specication, 394
promise object (jQuery)
always() method, 378, 397–399
asynchronous operations and, 394–395
chaining promises, 398–400
conditional calls, 401–402
creating, 395–397
Deferred() method, 395–397
QueryString

646
described, 364–366
request/response model
long polling concept, 415
Node.js and, 357
in stateless model, 312–313
require() function, 345
required Boolean attribute, 325
:required pseudo class, 330
Resharper tool, 67
resize event, 117
resource sharing, cross-origin, 380–381
REST (Representational State Transfer) web
services
creating, 366–368
described, 364–366
retries variable, 85–86
return status codes (HTTP), 315
return values (functions), 73
RFC 6455, 415
RFID (radio frequency identication), 539
rgb() function, 171
RGB value, 166–171
rgba() function, 172
role attribute
<aside> element, 212
<div> element, 212
rowspan attribute
<td> element, 238–240
<th> element, 238–240
<rp> element, 34, 221
<rt> element, 34, 221
<ruby> element, 35, 221
ruby phonetic characters, 220–221
S
<s> element, 220
<samp> element, 35, 216–217
sans serif font families, 173–174
REST web services and, 365, 368
question mark (?), 322, 327
QUnit-Metro tool, 95–100
QUnit tool, 90–95, 286
qunitmetro.js le, 96
QuotaExceededError exception, 562
quotations and citations, 215–216
R
r attribute (<circle> element), 498
radio frequency identication (RFID), 539
ranges, validating in forms, 329
ratechange event, 120
Rauch, Guillermo, 423
reading les, 563, 603–604
README.md le, 348–349
readonly Boolean attribute, 36
readystatechange event, 120
rectangles
conguring drawing state, 465–474
drawing, 463–464, 478–479
saving and restoring drawing state, 474–475
setting llStyle property, 465–470
setting lineJoin property, 471–472
setting lineWidth property, 470–471
setting strokeStyle property, 472–474
Redis (remote dictionary service), 422
redo event, 117
Reference Groups feature, 5
refreshing screens, 290
RegExp object, 67
registered trademark (®), 41
rel attribute (<link> element), 141
relative position (<div> element), 181–182
removeEventListener() function, 116
Representational State Transfer (REST) web
services
creating, 366–368
question mark (?)

647
reading values from tables, 586–587
WHERE clause, 587
selected attribute (<option> element), 317
selected Boolean attribute, 36
selector chains, 147
selectors
adjacent, 151–152
attribute, 153–154
attribute contains value, 155–156
attribute contains value in list, 157–158
attribute value, 154–155
attribute value ends with, 157
child, 148
class, 146–147
CSS3 support, 138
custom lists and, 224–226
dening, 146
descendant, 147–148
described, 138–139
element type, 146
grouping, 150–151
id, 146
jQuery-supported, 289
pseudo-class, 148–149
pseudo-element, 148–150
sibling, 151–153
specicity in, 161–162
subsequent, 151–153
universal, 147
self-closing tags, 37
semantic markup, 31–32
semicolon (;), 71, 139
serializing forms, 321
serif font families, 173–174
sessionStorage global variable, 562–564, 568
setter methods, 274
SGML (Standard Generalized Markup Language),
30, 137
shape attribute (<area> element), 49
short-circuit evaluation, 71
sandbox attribute (<iframe> element), 45
sandboxing, 45, 51
saturation (HSL), 172–173
saveData() function, 116
scalable vector graphics (SVG)
described, 459, 495–496
using <img> element, 499–501
using <svg> element, 496–499
schemas
tables and, 591
updating, 583
scoping variables, 77–78
screens, refreshing, 290
<script> element
async attribute, 101
defer attribute, 101
described, 35, 236
placing, 102–103
type attribute, 100
usage considerations, 38, 100–101
scroll event, 119
seamless attribute (<iframe> element), 45–46
search capabilities, 563–564
search class, 212
<section> element, 35, 208
sectioning root, 215
security
Geolocation object and, 544–545
HTTPS protocol and, 366
storage mechanisms and, 558–559
seeked event, 120
seeking event, 120
<select> element
described, 35, 316–317
multiple attribute, 316–317
size attribute, 317
select event, 118
SELECT statement (SQL)
aggregating functions and, 588
JOIN commands and, 588
short-circuit evaluation

648
start() function, 345
stateless model, 312–313
statements, 71
statements, variables and, 71–73
static NodeList, 112–113
static position (<div> element), 181
step attribute (<input> element), 329
stopPropagation() function, 116
storage event, 117
storage mechanisms
browser support, 561
capacity considerations, 561–562
cookie considerations, 556
described, 555
handling storage events, 565–568
HTML5-supported, 558–560
jQuery cookie plug-in, 556–557
lesson summary and review, 564–565, 568–
569, 579–580
localStorage global variable, 560–562
potential performance pitfalls, 563–564
practice exercises, 569–578
sessionStorage global variable, 562–563
storing complex objects, 562
web storage, 555–564
Storage object
clear() method, 560
described, 560, 563
getItem() method, 560
key() method, 561
length property, 560
removeItem() method, 560
setItem() method, 560
StorageEvent object
described, 566
key property, 566
newValue property, 566
oldValue property, 566
storageArea property, 566
url property, 566
sibling selectors, 151–153
SignalR library, 423
Simple Object Access Protocol (SOAP), 366
single quotes ('), 69
size attribute (<select> element), 317
.sln le extension, 356
<small> element, 35, 220
SOAP (Simple Object Access Protocol), 366
Socket.IO library, 423–424
sounds. See audio and sounds
<source> element
described, 35
setting audio source, 445
setting video source, 439–440
src attribute, 439, 445
type attribute, 439, 445
as void element, 39
<span> element
described, 35
expando attributes and, 39
historical usage, 206
special characters (HTML entities), 41–42
specialized classes, 262
specicity (selectors)
calculating, 161–162
in cascading styles, 160
spellcheck global attribute, 37
Split App template, 6
square brackets, 109, 264
src attribute
<audio> element, 446
<embed> element, 50
<iframe> element, 44
<img> element, 47–48
<source> element, 439, 445
<video> element, 441
SRT (SubRip Text), 441
stalled event, 120
Standard Generalized Markup Language (SGML),
30, 137
sibling selectors

649
super classes, 262
suspend event, 120
<svg> element
creating a path, 496–498
described, 496
drawing circles, 498–499
viewBox attribute, 500–501
svg-edit editor, 499
SVG le type, 48, 499–501
SVG (scalable vector graphics)
described, 459, 495–496
using <img> element, 499–501
using <svg> element, 496–499
switch keyword, 82–83
synchronous read/writes, 563
T
\t escape sequence, 69
tabindex global attribute, 37
<table> element
creating tables, 230
described, 35, 205, 229
misuse of, 230
styling columns, 241–242
table headers
creating, 231–232
styling, 232
tables
adding captions, 241
creating, 230–231
creating header cells, 231–232
creating irregular, 238–241
declaring footers, 233–237
declaring headers, 233–237
declaring table body, 233–237
described, 229
lesson summary and review, 242–243, 258–259
misuse of, 230
schemas and, 591
String() function, 78, 80
String object, 67
string primitive type
described, 67, 69
unary operators, 70
<strong> element, 35, 213–214
<style> element, 35, 140
style global attribute, 37, 140
style sheets
adding comments within, 139
browser built-in styles, 159
described, 138
external, 141
imported, 143–144
user-dened, 159
styles
applying, 139
in browsers, 139, 159
cascading, 160–161
creating, 138
dening, 139
described, 138
embedded, 140–141
extending, 159
inheriting, 162–163
inline, 140
named, 146–147
validating input, 330
working with important, 159–160
<sub> element, 35, 220
sub-paths, 475
subclasses, 262
submit event, 118
SubRip Text (SRT), 441
subscribing to events, 115–116, 567
subsequent adjacent sibling selectors, 151–152
subsequent sibling selectors, 152–153
subtraction (-) operator, 67–68, 70
<summary> element, 219–220
<sup> element, 35, 220
tables

650
<th> element
colspan attribute, 238–240
creating header cells, 231–232
described, 35, 231
rowspan attribute, 238–240
<thead> element, 35, 233
thematic breaks, 213
this keyword, 117, 264, 268–269
threads, 393
tilde (~) character, 152
<time> element, 35, 220
Timed Text Markup Language (TTML), 441
timeouts
PositionOptions object, 544
promise object, 396–397
WebSocket object, 420–422
timeupdate event, 120
<title> element, 35, 41
title attribute
as global attribute, 37
<input> element, 328
TODO comments, 7
<tr> element
creating tables, 230
described, 35, 229
styling rows, 241
<tbody> element and, 233
TRACE method (HTTP), 315
<track> element, 441
trademarks, 41
transactions
IndexedDB and, 558
Web SQL databases and, 584–586
web storage and, 564
transparency (color), 172
triangles, drawing, 478–481
TrueType (.ttf) les, 144
try block, 87
.ttf (TrueType) les, 144
TTML (Timed Text Markup Language), 441
styling columns, 241–242
styling rows, 241
styling table headers, 232
in Web SQL databases, 584–588
tags
case sensitivity, 32
described, 30–31
elements and, 32–35
self-closing, 37
semantic markup, 31–32
target attribute (<a> element), 46–47
<tbody> element, 35, 233–237
TCP
arbitrary web services and, 366
WebSocket support, 415–417
<td> element
colspan attribute, 238–240
creating tables, 230
described, 35, 229, 241
rowspan attribute, 238–240
TDD (test-driven development), 90, 93, 98
templates. See also specic templates
described, 5–6
included with Visual Studio Express for Web,
10–11
included with Visual Studio Express for
Windows 8, 6–7
test-driven development (TDD), 90, 93, 98
testing JavaScript code, 89–103
test.js le, 92, 97, 288
text
drawing, 488–490
formatting, 173–175, 213
<textarea> element
cols attribute, 316
described, 35, 316
maxlength attribute, 316
placeholder attribute, 316
wrap attribute, 316
<tfoot> element, 35, 233
tags

651
required validation, 325–327
styling validations, 330
validating numbers and ranges, 329
validating URL input, 327–328
value attribute (<option> element), 320
value types, 67, 138
values
described, 67
determining for variables, 83
determining if same type and equal, 84
retrieving for attributes, 153
return, 73
setting for colors, 166–171
<var> element, 35, 217
variables
assigning function expressions to, 75
case sensitivity, 72
converting to different types, 78–80
counter, 86
creating environment for, 73
described, 71
determining values of, 83
examining in debugger, 104–105
global, 77–78
JavaScript support, 66
local, 77–78
naming, 72–73
retries, 85–86
scoping, 77–78
statements and, 71–73
working with functions, 73–77
Vehicle Identication Number (VIN), 365
versioning, IndexedDB, 591
versions
including information in manifest les, 609
verifying for jQuery, 369
<video> element
autoplay attribute, 441
conguring, 441
controls attribute, 441, 450
type attribute
<button> element, 317
<embed> element, 50
<input> element, 317–318
<link> element, 141
<object> element, 51
<script> element, 100
<source> element, 439, 445
U
<u> element, 220
\u escape sequence, 69
ui-dark.css le, 9
ui-light.css le, 9
<ul> element, 35, 222–223
unary operators, 70
undened primitive type, 67
underscore (_), 45, 72–73
undo event, 117
uninstalling packages, 354
universal selectors, 147
unload event, 117
unordered lists, 222–223
unsubscribing from events, 116
updateReady event, 610
URL input, validating, 327–328
url module, 343
usemap attribute
<img> element, 49
<object> element, 51
User Data API, 557
user-dened style sheets, 159
utf-8 character set, 41
V
:valid pseudo class, 330
validating forms
described, 324–325
<video> element

652
Start Page screen, 5
templates included, 6–9
Visual Studio Premium 2012, 2
Visual Studio Professional 2012, 2
Visual Studio Team Foundation Server Express
2012, 2–3
Visual Studio Test Professional 2012, 2
Visual Studio Ultimate 2012, 2
void elements, 38–39
volumechange event, 120
W
W3C (World Wide Web Consortium)
CSS recommendations, 137–138
event recommendations, 566
multimedia standards, 437–438, 443–444
open standards for web, 30–31
storage capacity, 561
Web SQL support, 582
WebSocket API, 415–417
WebVTT standard, 441–442
WAI-ARIA, 212
WAI (Web Accessible Initiative), 212
waiting event, 120
.wav le extension, 444–445
WAV format, 444
<wbr> element, 35, 39, 217
WCF (Windows Communication Foundation), 366
Web Accessible Initiative (WAI), 212
web browsers. See browsers
web communications
described, 312
encrypting, 366
HTTP() method, 315–316, 322–323
HTTP protocol basics, 314–315
web browsers, 314
web servers, 312–313
Web Embedding Fonts Tool (WEFT), 144
described, 35, 437
drawing with images, 490
height attribute, 441
HTMLMediaElement object and, 444, 447
id attribute, 450
implementing, 438–439
loop attribute, 441
muted attribute, 441
poster attribute, 441
preload attribute, 441
<source> element and, 439–440
src attribute, 441
width attribute, 441
video and movies. See also <video> element
accessing tracks, 441–442
described, 437
lesson summary and review, 442–443, 456
practice exercises, 452–455
setting <source> element, 439–440
video formats, 438
viewBox attribute (<svg> element), 500–501
VIN (Vehicle Identication Number), 365
.visible selector, 237
:visited pseudo class, 149
Visual Studio 2012
CSS3 support, 4
editions supported, 2–3
HTML5 support, 3–4
JavaScript support, 4–5
lesson summary and review, 11–12, 26
practice exercises, 20–25
Visual Studio 2012 Express for Web
described, 3, 9–11
New Project screen, 10
Node.js support, 356
Start Page screen, 9
Visual Studio 2012 Express for Windows 8
described, 3, 5–7
New Project link, 5
New Project screen, 6
video and movies

653
lesson summary and review, 424–425, 436
practice exercises, 425–435
WebSocket libraries, 423–424
WebSocket object
binaryType property, 417
bufferedAmount property, 417
close() method, 416
extensions property, 417
implementing, 417–420
onclose event property, 417
onerror event property, 417
onmessage event property, 417
onopen event property, 417
protocol property, 417
readyState property, 417, 419
send() method, 416–417, 419
url property, 417
WebSocket constructor, 416
WebSocket protocol
dealing with web farms, 422–423
described, 415–416
handling connection disconnects, 422
handling timeouts, 420–422
lesson summary and review, 424–425, 436
practice exercises, 425–435
WebSocket libraries, 423–424
WebVTT (Web Video Text Tracks) standard,
441–442
WEFT (Web Embedding Fonts Tool), 144
WHERE clause (SQL), 587
while loop, 84–85
width attribute
<canvas> element, 460
<embed> element, 50
<object> element, 51
<video> element, 441
window object
events triggered by, 117
frameElement property, 44
parent property, 44
web farms, 422–423
web servers
described, 312–313
submitting form data to, 316
WebSocket protocol, 416
web services. See also Node.js platform
AJAX calling, 368–380
cross-origin resource sharing, 380–381
described, 364–366
lesson summary and review, 381–382, 391–392
practice exercises, 386–390
RESTful, 366–368
Web Services Description Language (WSDL), 366
Web SQL databases
adding tables, 584
aggregating functions, 588
browser support, 559
creating and opening, 582–583
deleting records, 586
executeSql() method, 585–586
ltering results, 587–588
inserting new records, 585–586
JOIN commands, 588
lesson summary and review, 588–589, 617
longevity considerations of, 582
performing schema updates, 583
reading values from, 586–587
as storage mechanism, 558
transactions in, 584–585
updating existing records, 586
web storage. See storage mechanisms
web workers, 404–405, 563
Web.cong le, 10
.webm le extension, 438–439
WebM/VP8 format, 438
WebSocket API
dealing with web farms, 422–423
described, 415–417
handling connection disconnects, 422
handling timeouts, 420–422
window object

654
requestFileSystem() method, 601
top property, 44
webkitRequestFileSystem() method, 601
Windows 8 applications, QUnit-Metro tool and,
95–100
Windows Communication Foundation (WCF), 366
WinJS, 394
worker object
close() method, 405
described, 405
postMessage() method, 563
terminate() method, 405
World Wide Web Consortium. See W3C (World
Wide Web Consortium)
wrap attribute (<textarea> element), 316
writing
to directories, 605
to les, 563, 602–603
JavaScript code, 89–103
WSDL (Web Services Description Language), 366
X
XHTML, 30–32
XML (eXtensible Markup Language), 30–31
XML Schema Denition (XSD), 30
XMLHttpRequest object
described, 369–371
error handling, 372–373
jQuery wrappers, 373–377
open() method, 370
response property, 370
sample code, 394–395
send() method, 370
XSD (XML Schema Denition), 30
XSS attacks, 381
Windows 8 applications, QUnit-Metro tool and

About the author
GLENN JOHNSON is a professional trainer, consultant, and developer whose
experience spans the past 25 years. As a consultant and developer, he has
worked on many large projects, mostly in the insurance industry. Glenn’s
strengths are with Microsoft products such as ASP.NET, Model-View- Controller
(MVC), Silverlight, Windows Presentation Foundation (WPF), Windows
Communication Foundation (WCF), and Microsoft SQL Server using C#, Visual
Basic, and T-SQL. This is yet another of many .NET books that Glenn has
authored. He also develops courseware for and teaches classes in many coun-
tries on HTML5, JavaScript, Microsoft MVC, Microsoft ASP.NET, Visual Basic
.NET, C#, and the .NET Framework.
Glenn holds the following Microsoft certications: MCT, MCPD, MCTS,
MCAD, MCSD, MCDBA, MCP + Site Building, MCSE + Internet, MCP + Internet,
and MCSE. You can nd Glenn’s website at http://GJTT.com.
Training Guide: Programming in HTML5 with
JavaScript and CSS3 and Exam 70-480
This book is designed to help build and advance your job-role expertise. In addition, it covers some
of the topics and skills related to Microsoft Certication Exam 70-480 and might be useful as a
complementary study resource.
Note: This book is not designed to cover all exam topics; see the following chart. If you are
preparing for the exam, use additional materials to help bolster your readiness, in conjunction with
real-world experience.
EXAM OBJECTIVES/SKILLS SEE TOPIC-RELATED COVERAGE HERE
IMPLEMENT AND MANIPULATE DOCUMENT STRUCTURES AND OBJECTS
Create the document structure. Chapters 2 and 5
Write code that interacts with UI controls. Chapters 3, 7, 11, 12, and 13
Apply styling to HTML elements programmatically. Chapter 4
Implement HTML5 APIs. Chapters 10, 14, 15, and 16
Establish the scope of objects and variables. Chapters 3 and 6
Create and implement objects and methods. Chapter 6
IMPLEMENT PROGRAM FLOW
Implement program ow. Chapter 3 and 6
Raise and handle an event. Chapter 3 and 6
Implement exception handling. Chapter 3
Implement a callback. Chapter 3, 6, 8, and 9
Create a web worker process. Chapter 9
ACCESS AND SECURE DATA
Validate user input by using HTML5 elements. Chapter 7
Validate user input by using JavaScript. Chapter 7
Consume data. Chapter 8
Serialize, deserialize, and transmit data. Chapter 7

USE CSS3 IN APPLICATIONS
Style HTML text properties. Chapter 4
Style HTML box properties. Chapter 4
Create a exible content layout. Chapter 4
Create an animated and adaptive UI. Chapter 4
Find elements by using CSS selectors and jQuery. Chapter 4 and 6
Structure a CSS le by using CSS selectors. Chapter 4
For complete information about Exam 70-480, visit http://www.microsoft.com/learning/en/us
/exam.aspx?ID=70-480. In addition, for more information about Microsoft certications, visit
http://www.microsoft.com/learning.

SurvPage_Corp_02.indd 1 5/19/2011 4:18:12 PM
What do
you think of
this book?
We want to hear from you!
To participate in a brief online survey, please visit:
microsoft.com/learning/booksurvey
Tell us how well this book meets your needs—what works effectively, and what we can
do better. Your feedback will help us continually improve our books and learning
resources for you.
Thank you in advance for your input!
