Python 2.6 Text Processing Beginner's Guide (2010)
Python%202.6%20Text%20Processing%20-%20Beginner's%20Guide%20(2010)
User Manual: Pdf
Open the PDF directly: View PDF ![]() .
.
Page Count: 380 [warning: Documents this large are best viewed by clicking the View PDF Link!]
- Cover
- Copyright
- Credits
- About the Author
- About the Reviewer
- Table of Contents
- Preface
- Chapter 1:
Getting Started
- Categorizing types of text data
- Ensuring you have Python installed
- Implementing a simple cipher
- Time for action – implementing a ROT13 encoder
- Time for action – processing as a filter
- Time for action – skipping over markup tags
- Supporting third-party modules
- Time for action – installing SetupTools
- Running a virtual environment
- Time for action – configuring a virtual environment
- Where to get help?
- Summary
- Chapter 2:
Working with the IO System
- Parsing web server logs
- Time for action – generating transfer statistics
- Using objects interchangeably
- Time for action – introducing a new log format
- Accessing files directly
- Time for action – accessing files directly
- Time for action – handling compressed files
- Accessing multiple files
- Time for action – spell-checking HTML content
- Accessing remote files
- Time for action – spell-checking live HTML pages
- Time for action – handling urllib 2 errors
- Handling string IO instances
- Understanding IO in Python 3
- Summary
- Chapter 3:
Python String Services
- Understanding the basics of string object
- Time for action – employee management
- String formatting
- Time for action – customizing log processor output
- Time for action – adding status code data
- Creating templates
- Time for action – displaying warnings on malformed lines
- Calling string object methods
- Time for action – simple manipulation with string methods
- Summary
- Chapter 4:
Text Processing Using the Standard Library
- Reading CSV data
- Time for action – processing Excel formats
- Time for action – CSV and formulas
- Time for action – processing custom CSV formats
- Writing CSV data
- Time for action – creating a spreadsheet of UNIX users
- Modifying application configuration files
- Time for action – adding basic configuration read support
- Time for action – relying on configuration value interpolation
- Time for action – configuration defaults
- Writing configuration data
- Time for action – generating a configuration file
- Reconfiguring our source
- Time for action – creating an egg-based package
- Working with JSON
- Time for action – writing JSON data
- Summary
- Chapter 5: Regular Expressions
- Chapter 6:
Structured Markup
- XML data
- SAX processing
- Time for action – event-driven processing
- Time for action – driving incremental processing
- Time for action – creating a dungeon adventure game
- The Document Object Model
- Time for action – updating our game to use DOM processing
- XPath
- Time for action – using XPath in our adventure
- Reading HTML
- Time for action – displaying links in an HTML page
- Summary
- Chapter 7:
Creating Templates
- Time for action – installing Mako
- Basic Mako usage
- Time for action – loading a simple Mako template
- Time for action – reformatting the date with Python code
- Time for action – defining Mako def tags
- Time for action – converting mail message to use namespaces
- Inheriting from base templates
- Time for action – updating base template
- Time for action – adding another inheritance layer
- Customizing
- Time for action – creating custom Mako tags
- Overviewing alternative approaches
- Summary
- Chapter 8:
Understanding Encodings and i18n
- Understanding basic character encodings
- Unicode
- Encodings in Python
- Time for action – manually decoding
- Time for action – copying Unicode data
- Time for action – fixing our copy application
- The codecs module
- Time for action – changing encodings
- Adopting good practices
- Internationalization and Localization
- Time for action – preparing for multiple languages
- Time for action – providing translations
- Summary
- Chapter 9:
Advanced Output Formats
- Dealing with PDF files using PLATYPUS
- Time for action – installing ReportLab
- Time for action – writing PDF with basic layout and style
- Writing native Excel data
- Time for action – installing xlwt
- Time for action – generating XLS data
- Working with OpenDocument files
- Time for action – installing ODFPy
- Time for action – generating ODT data
- Summary
- Chapter 10: Advanced Parsing and Grammars
- Chapter 11:
Searching and Indexing
- Understanding search complexity
- Time for action – implementing a linear search
- Text indexing
- Time for action – installing Nucular
- Time for action – full text indexing
- Time for action – measuring index benefit
- Time for action – field-qualified indexes
- Time for action – performing advanced Nucular queries
- Indexing and searching other data
- Time for action – indexing Open Office documents
- Other index systems
- Summary
- Appendix A: Looking for Additional Resources
- Appendix B:
Pop Quiz Answers
- Chapter 1: Getting Started
- Chapter 2: Working with the IO System
- Chapter 3: Python String Services
- Chapter 4: Text Processing Using the Standard Library
- Chapter 5: Regular Expressions
- Chapter 6: Structured Markup
- Chapter 7: Creating Templates
- Chapter 8: Understanding Encoding and i18n
- Chapter 9: Advanced Output Formats
- Chapter 11: Searching and Indexing
- Index

Python 2.6 Text Processing
Beginner's Guide
The easiest way to learn how to manipulate text with Python
Je McNeil
BIRMINGHAM - MUMBAI
Python 2.6 Text Processing
Beginner's Guide
Copyright © 2010 Packt Publishing
All rights reserved. No part of this book may be reproduced, stored in a retrieval system,
or transmied in any form or by any means, without the prior wrien permission of the
publisher, except in the case of brief quotaons embedded in crical arcles or reviews.
Every eort has been made in the preparaon of this book to ensure the accuracy of the
informaon presented. However, the informaon contained in this book is sold without
warranty, either express or implied. Neither the author, nor Packt Publishing, and its dealers
and distributors will be held liable for any damages caused or alleged to be caused directly or
indirectly by this book.
Packt Publishing has endeavored to provide trademark informaon about all of the
companies and products menoned in this book by the appropriate use of capitals.
However, Packt Publishing cannot guarantee the accuracy of this informaon.
First published: December 2010
Producon Reference: 1081210
Published by Packt Publishing Ltd.
32 Lincoln Road
Olton
Birmingham, B27 6PA, UK.
ISBN 978-1-849512-12-1
www.packtpub.com
Cover Image by John Quick (john@johnmquick.com)

Credits
Author
Je McNeil
Reviewer
Maurice HT Ling
Acquision Editor
Steven Wilding
Development Editor
Reshma Sundaresan
Technical Editor
Gauri Iyer
Indexer
Tejal Daruwale
Editorial Team Leader
Mithun Sehgal
Project Team Leader
Priya Mukherji
Project Coordinator
Shubhanjan Chaerjee
Proofreader
Jonathan Todd
Graphics
Nilesh R. Mohite
Producon Coordinator
Kruthika Bangera
Cover Work
Kruthika Bangera

About the Author
Je McNeil has been working in the Internet Services industry for over 10 years. He cut
his teeth during the late 90's Internet boom and has been developing soware for Unix and
Unix-avored systems ever since. Je has been a full-me Python developer for the beer
half of that me and has professional experience with a collecon of other languages,
including C, Java, and Perl. He takes an interest in systems administraon and server
automaon problems. Je recently joined Google and has had the pleasure of working with
some very talented individuals.
I'd like to above all thank Julie, Savannah, Phoebe, Maya, and Trixie for
allowing me to lock myself in the oce every night for months. The
Web.com gang and those in the Python community willing to share their
authoring experiences. Finally, Steven Wilding, Reshma Sundaresan,
Shubhanjan Chaerjee, and the rest of the Packt Publishing team for all of
the hard work and guidance.
About the Reviewer
Maurice HT Ling completed his Ph.D. in Bioinformacs and B.Sc(Hons) in Molecular and
Cell Biology from the University of Melbourne where he worked on microarray analysis
and text mining for protein-protein interacons. He is currently an honorary fellow in the
University of Melbourne, Australia. Maurice holds several Chief Editorships, including the
Python papers, Computaonal, and Mathemacal Biology, and Methods and Cases in
Computaonal, Mathemacal and Stascal Biology. In Singapore, he co-founded the Python
User Group (Singapore) and is the co-chair of PyCon Asia-Pacic 2010. In his free me,
Maurice likes to train in the gym, read, and enjoy a good cup of coee. He is also a senior
fellow of the Internaonal Fitness Associaon, USA.

www.PacktPub.com
Support les, eBooks, discount offers and more
You might want to visit www.PacktPub.com for support les and downloads related
to your book.
Did you know that Packt oers eBook versions of every book published, with PDF and ePub
les available? You can upgrade to the eBook version at www.PacktPub.com, and as a print
book customer, you are entled to a discount on the eBook copy. Get in touch with us at
service@packtpub.com for more details.
At www.PacktPub.com, you can also read a collecon of free technical arcles, sign up for a
range of free newsleers, and receive exclusive discounts and oers on Packt books and eBooks.
http://PacktLib.PacktPub.com
Do you need instant soluons to your IT quesons? PacktLib is Packt's online digital book
library. Here, you can access, read, and search across Packt's enre library of books.
Why Subscribe?
Fully searchable across every book published by Packt
Copy and paste, print, and bookmark content
On demand and accessible via web browser
Free Access for Packt account holders
If you have an account with Packt at www.PacktPub.com, you can use this to access
PacktLib today and view nine enrely free books. Simply use your login credenals for
immediate access.

Table of Contents
Preface 1
Chapter 1: Geng Started 7
Categorizing types of text data 8
Providing informaon through markup 8
Meaning through structured formats 9
Understanding freeform content 9
Ensuring you have Python installed 9
Providing support for Python 3 10
Implemenng a simple cipher 10
Time for acon – implemenng a ROT13 encoder 11
Processing structured markup with a lter 15
Time for acon – processing as a lter 15
Time for acon – skipping over markup tags 18
State machines 22
Supporng third-party modules 23
Packaging in a nutshell 23
Time for acon – installing SetupTools 23
Running a virtual environment 25
Conguring virtualenv 25
Time for acon – conguring a virtual environment 25
Where to get help? 28
Summary 28
Chapter 2: Working with the IO System 29
Parsing web server logs 30
Time for acon – generang transfer stascs 31
Using objects interchangeably 35
Time for acon – introducing a new log format 35
Accessing les directly 37

Table of Contents
[ ii ]
Time for acon – accessing les directly 37
Context managers 39
Handling other le types 41
Time for acon – handling compressed les 41
Implemenng le-like objects 42
File object methods 43
Enabling universal newlines 45
Accessing mulple les 45
Time for acon – spell-checking HTML content 46
Simplifying mulple le access 50
Inplace ltering 51
Accessing remote les 52
Time for acon – spell-checking live HTML pages 52
Error handling 55
Time for acon – handling urllib 2 errors 55
Handling string IO instances 57
Understanding IO in Python 3 58
Summary 59
Chapter 3: Python String Services 61
Understanding the basics of string object 61
Dening strings 62
Time for acon – employee management 62
Building non-literal strings 68
String formang 68
Time for acon – customizing log processor output 68
Percent (modulo) formang 74
Mapping key 75
Conversion ags 76
Minimum width 76
Precision 76
Width 77
Conversion type 77
Using the format method approach 78
Time for acon – adding status code data 79
Making use of conversion speciers 83
Creang templates 86
Time for acon – displaying warnings on malformed lines 86
Template syntax 88
Rendering a template 88
Calling string object methods 89
Time for acon – simple manipulaon with string methods 89
Aligning text 92

Table of Contents
[ iii ]
Detecng character classes 92
Casing 93
Searching strings 93
Dealing with lists of strings 94
Treang strings as sequences 95
Summary 96
Chapter 4: Text Processing Using the Standard Library 97
Reading CSV data 98
Time for acon – processing Excel formats 98
Time for acon – CSV and formulas 101
Reading non-Excel data 103
Time for acon – processing custom CSV formats 103
Wring CSV data 106
Time for acon – creang a spreadsheet of UNIX users 106
Modifying applicaon conguraon les 110
Time for acon – adding basic conguraon read support 110
Using value interpolaon 114
Time for acon – relying on conguraon value interpolaon 114
Handling default opons 116
Time for acon – conguraon defaults 116
Wring conguraon data 118
Time for acon – generang a conguraon le 119
Reconguring our source 122
A note on Python 3 122
Time for acon – creang an egg-based package 122
Understanding the setup.py le 131
Working with JSON 132
Time for acon – wring JSON data 132
Encoding data 134
Decoding data 135
Summary 136
Chapter 5: Regular Expressions 137
Simple string matching 138
Time for acon – tesng an HTTP URL 138
Understanding the match funcon 140
Learning basic syntax 140
Detecng repeon 140
Specifying character sets and classes 141
Applying anchors to restrict matches 143
Wrapping it up 144

Table of Contents
[ iv ]
Advanced paern matching 145
Grouping 145
Time for acon – regular expression grouping 146
Using greedy versus non-greedy operators 149
Asserons 150
Performing an 'or' operaon 152
Implemenng Python-specic elements 153
Other search funcons 153
search 153
ndall and nditer 153
split 154
sub 154
Compiled expression objects 155
Dealing with performance issues 156
Parser ags 156
Unicode regular expressions 157
The match object 158
Processing bind zone les 158
Time for acon – reading DNS records 159
Summary 164
Chapter 6: Structured Markup 165
XML data 166
SAX processing 168
Time for acon – event-driven processing 168
Incremental processing 171
Time for acon – driving incremental processing 171
Building an applicaon 172
Time for acon – creang a dungeon adventure game 172
The Document Object Model 176
xml.dom.minidom 176
Time for acon – updang our game to use DOM processing 176
Creang and modifying documents programmacally 183
XPath 185
Accessing XML data using ElementTree 186
Time for acon – using XPath in our adventure 187
Reading HTML 194
Time for acon – displaying links in an HTML page 194
BeaufulSoup 195
Summary 196

Table of Contents
[ v ]
Chapter 7: Creang Templates 197
Time for acon – installing Mako 198
Basic Mako usage 199
Time for acon – loading a simple Mako template 199
Generang a template context 203
Managing execuon with control structures 204
Including Python code 205
Time for acon – reformang the date with Python code 205
Adding funconality with tags 206
Rendering les with %include 206
Generang mulline comments with %doc 207
Documenng Mako with %text 207
Dening funcons with %def 208
Time for acon – dening Mako def tags 208
Imporng %def secons using %namespace 210
Time for acon – converng mail message to use namespaces 210
Filtering output 213
Expression lters 214
Filtering the output of %def blocks 214
Seng default lters 215
Inhering from base templates 215
Time for acon – updang base template 215
Growing the inheritance chain 218
Time for acon – adding another inheritance layer 219
Inhering aributes 221
Customizing 222
Custom tags 222
Time for acon – creang custom Mako tags 223
Customizing lters 226
Overviewing alternave approaches 226
Summary 227
Chapter 8: Understanding Encodings and i18n 229
Understanding basic character encodings 230
ASCII 230
Limitaons of ASCII 231
KOI8-R 232
Unicode 232
Using Unicode with Python 3 233
Understanding Unicode 234
Design goals 234
Organizaonal structure 236
Backwards compability 236

Table of Contents
[ vi ]
Encoding 237
UTF-32 237
UTF-8 237
Encodings in Python 238
Time for acon – manually decoding 239
Reading Unicode 240
Wring Unicode strings 241
Time for acon – copying Unicode data 242
Time for acon – xing our copy applicaon 244
The codecs module 245
Time for acon – changing encodings 245
Adopng good pracces 248
Internaonalizaon and Localizaon 249
Preparing an applicaon for translaon 250
Time for acon – preparing for mulple languages 250
Time for acon – providing translaons 253
Looking for more informaon on internaonalizaon 254
Summary 255
Chapter 9: Advanced Output Formats 257
Dealing with PDF les using PLATYPUS 258
Time for acon – installing ReportLab 258
Generang PDF documents 259
Time for acon – wring PDF with basic layout and style 259
Wring nave Excel data 266
Time for acon – installing xlwt 266
Building XLS documents 267
Time for acon – generang XLS data 267
Working with OpenDocument les 271
Time for acon – installing ODFPy 272
Building an ODT generator 273
Time for acon – generang ODT data 273
Summary 277
Chapter 10: Advanced Parsing and Grammars 279
Dening a language syntax 280
Specifying grammar with Backus-Naur Form 281
Grammar-driven parsing 282
PyParsing 283
Time for acon – installing PyParsing 283
Time for acon – implemenng a calculator 284
Parse acons 287
Time for acon – handling type translaons 287

Table of Contents
[ vii ]
Suppressing parts of a match 289
Time for acon – suppressing porons of a match 289
Processing data using the Natural Language Toolkit 297
Time for acon – installing NLTK 298
NLTK processing examples 298
Removing stems 298
Discovering collocaons 299
Summary 300
Chapter 11: Searching and Indexing 301
Understanding search complexity 302
Time for acon – implemenng a linear search 302
Text indexing 304
Time for acon – installing Nucular 304
An introducon to Nucular 305
Time for acon – full text indexing 307
Time for acon – measuring index benet 310
Scripts provided by Nucular 312
Using XML les 312
Advanced Nucular features 313
Time for acon – eld-qualied indexes 314
Performing an enhanced search 317
Time for acon – performing advanced Nucular queries 317
Indexing and searching other data 320
Time for acon – indexing Open Oce documents 320
Other index systems 325
Apache Lucene 325
ZODB and zc.catalog 325
SQL text indexing 325
Summary 326
Appendix A: Looking for Addional Resources 327
Python resources 328
Unocial documentaon 328
Python enhancement proposals 328
Self-documenng 329
Using other documentaon tools 331
Community resources 332
Following groups and mailing lists 332
Finding a users' group 333
Aending a local Python conference 333
Honorable menon 333
Lucene and Solr 333

Table of Contents
[ viii ]
Generang C-based parsers with GNU Bison 334
Apache Tika 335
Geng started with Python 3 335
Major language changes 336
Print is now a funcon 336
Catching excepons 337
Using metaclasses 338
New reserved words 338
Major library changes 339
Changes to list comprehensions 339
Migrang to Python 3 339
Time for acon – using 2to3 to move to Python 3 340
Summary 342
Appendix B: Pop Quiz Answers 343
Chapter 1: Geng Started 343
ROT 13 Processing Answers 343
Chapter 2: Working with the IO System 344
File-like objects 344
Chapter 3: Python String Services 344
String literals 344
String formang 345
Chapter 4: Text Processing Using the Standard Library 345
CSV handling 345
JSON formang 346
Chapter 5: Regular Expressions 346
Regular expressions 346
Understanding the Pythonisms 346
Chapter 6: Structured Markup 347
SAX processing 347
Chapter 7: Creang Templates 347
Template inheritance 347
Chapter 8: Understanding Encoding and i18n 347
Character encodings 347
Python encodings 348
Internaonalizaon 348
Chapter 9: Advanced Output Formats 348
Creang XLS documents 348
Chapter 11: Searching and Indexing 349
Introducon to Nucular 349
Index 351
Preface
The Python Text Processing Beginner's Guide is intended to provide a gentle, hands-on
introducon to processing, understanding, and generang textual data using the Python
programming language. Care is taken to ensure the content is example-driven, while sll
providing enough background informaon to allow for a solid understanding of the topics
covered.
Throughout the book, we use real world examples such as logle processing and PDF
creaon to help you further understand dierent aspects of text handling. By the me you've
nished, you'll have a solid working knowledge of both structured and unstructured text
data management. We'll also look at praccal indexing and character encodings.
A good deal of supporng informaon is included. We'll touch on packaging, Python IO,
third-party ulies, and some details on working with the Python 3 series releases. We'll
even spend a bit of me porng a small example applicaon to the latest version.
Finally, we do our best to provide a number of high quality external references. While this
book will cover a broad range of topics, we also want to help you dig deeper when necessary.
What this book covers
Chapter 1, Geng Started: This chapter provides an introducon into character and string
data types and how strings are represented using underlying integers. We'll implement a
simple encoding script to illustrate how text can be manipulated at the character level. We
also set up our systems to allow safe third-party library installaon.
Chapter 2, Working with the IO System: Here, you'll learn how to access your data. We cover
Python's IO capabilies in this chapter. We'll learn how to access les locally and remotely.
Finally, we cover how Python's IO layers change in Python 3.
Chapter 3, Python String Services: Covers Python's core string funconality. We look at the
methods of string objects, the core template classes, and Python's various string formang
methods. We introduce the dierences between Unicode and string objects here.

Preface
[ 2 ]
Chapter 4, Test Processing Using the Standard Library: The standard Python distribuon
includes a powerful set of built-in libraries designed to manage textual content. We look
at conguraon le reading and manipulaon, CSV les, and JSON data. We take a bit of a
detour at the end of this chapter to learn how to create your own redistributable Python egg
les.
Chapter 5, Regular Expressions: Looks at Python's regular expression implementaon and
teaches you how to implement them. We look at standardized concepts as well as Python's
extensions. We'll break down a few graphically so that the component parts are easy to piece
together. You'll also learn how to safely use regular expressions with internaonal alphabets.
Chapter 6, Structured Markup: Introduces you to XML and HTML processing. We create an
adventure game using both SAX and DOM approaches. We also look briey at lxml and
ElementTree. HTML parsing is also covered.
Chapter 7, Creang Templates: Using the Mako template language, we'll generate e-mail
and HTML text templates much like the ones that you'll encounter within common web
frameworks. We visit template creaon, inheritance, lters, and custom tag creaon.
Chapter 8, Understanding Encodings and i18n: We provide a look into character encoding
schemes and how they work. For reference, we'll examine ASCII as well as KOI8-R. We also
look into Unicode and its various encoding mechanisms. Finally, we nish up with a quick
look at applicaon internaonalizaon.
Chapter 9, Advanced Output Formats: Provides informaon on how to generate PDF, Excel,
and OpenDocument data. We'll build these document types from scratch using direct Python
API calls relying on third-party libraries.
Chapter 10, Advanced Parsing and Grammars: A look at more advanced text manipulaon
techniques such as those used by programming language designers. We'll use the PyParsing
library to handle some conguraon le management and look into the Python Natural
Language Toolkit.
Chapter 11, Searching and Indexing: A praccal look at full text searching and the benet an
index can provide. We'll use the Nucular system to index a collecon of small text les and
make them quickly searchable.
Appendix A, Looking for Addional Resources: It introduces you to places of interest on the
Internet and some community resources. In this appendix, you will learn to create your own
documentaon and to use Java Lucene based engines. You will also learn about dierences
between Python 2 & Python 3 and to port code to Python 3.

Preface
[ 3 ]
What you need for this book
This book assumes you've an elementary knowledge of the Python programming language,
so we don't provide a tutorial introducon. From a soware angle, you'll simply need a
version of Python (2.6 or later) installed. Each me we require a third-party library, we'll
detail the installaon in text.
Who this book is for
If you are a novice Python developer who is interested in processing text then this book is for
you. You need no experience with text processing, though basic knowledge of Python would
help you to beer understand some of the topics covered by this book. As the content of this
book develops gradually, you will be able to pick up Python while reading.
Conventions
In this book, you will nd several headings appearing frequently.
To give clear instrucons of how to complete a procedure or task, we use:
Time for action – heading
1. Acon 1
2. Acon 2
3. Acon 3
Instrucons oen need some extra explanaon so that they make sense, so they are
followed with:
What just happened?
This heading explains the working of tasks or instrucons that you have just completed.
You will also nd some other learning aids in the book, including:
Pop Quiz – heading
These are short mulple choice quesons intended to help you test your own understanding.
Preface
[ 4 ]
Have a go hero – heading
These set praccal challenges and give you ideas for experimenng with what you have
learned.
You will also nd a number of styles of text that disnguish between dierent kinds of
informaon. Here are some examples of these styles, and explanaons of their meanings.
Code words in text are shown as follows: "First of all, we imported the re module"
A block of code is set as follows:
parser = OptionParser()
parser.add_option('-f', '--file', help="CSV Data File")
opts, args = parser.parse_args()
if not opts.file:
When we wish to draw your aenon to a parcular part of a code block, the relevant lines
or items are set in bold:
def init_game(self):
"""
Process World XML.
"""
self.location = parse(open(self.world)).documentElement
Any command-line input or output is wrien as follows:
(text_processing)$ python render_mail.py thank_you-e.txt
New terms and important words are shown in bold. Words that you see on the screen, in
menus or dialog boxes for example, appear in the text like this: "Any X found in the source
data would simply become an A in the output data.".
Warnings or important notes appear in a box like this.
Tips and tricks appear like this.
Preface
[ 5 ]
Reader feedback
Feedback from our readers is always welcome. Let us know what you think about this
book—what you liked or may have disliked. Reader feedback is important for us to
develop tles that you really get the most out of.
To send us general feedback, simply send an e-mail to feedback@packtpub.com, and
menon the book tle via the subject of your message.
If there is a book that you need and would like to see us publish, please send us a note in the
SUGGEST A TITLE form on www.packtpub.com or e-mail suggest@packtpub.com.
If there is a topic that you have experse in and you are interested in either wring or
contribung to a book, see our author guide on www.packtpub.com/authors.
Customer support
Now that you are the proud owner of a Packt book, we have a number of things to help you
to get the most from your purchase.
Downloading the example code for this book
You can download the example code les for all Packt books you have purchased
from your account at http://www.PacktPub.com. If you purchased this
book elsewhere, you can visit http://www.PacktPub.com/support and
register to have the les e-mailed directly to you.
Errata
Although we have taken every care to ensure the accuracy of our content, mistakes do
happen. If you nd a mistake in one of our books—maybe a mistake in the text or the
code—we would be grateful if you would report this to us. By doing so, you can save other
readers from frustraon and help us improve subsequent versions of this book. If you
nd any errata, please report them by vising http://www.packtpub.com/support,
selecng your book, clicking on the errata submission form link, and entering the details
of your errata. Once your errata are veried, your submission will be accepted and the
errata will be uploaded on our website, or added to any list of exisng errata, under the
Errata secon of that tle. Any exisng errata can be viewed by selecng your tle from
http://www.packtpub.com/support.

Preface
[ 6 ]
Piracy
Piracy of copyright material on the Internet is an ongoing problem across all media. At Packt,
we take the protecon of our copyright and licenses very seriously. If you come across any
illegal copies of our works, in any form, on the Internet, please provide us with the locaon
address or website name immediately so that we can pursue a remedy.
Please contact us at copyright@packtpub.com with a link to the suspected pirated material.
We appreciate your help in protecng our authors, and our ability to bring you valuable
content.
Questions
You can contact us at questions@packtpub.com if you are having a problem with any
aspect of the book, and we will do our best to address it.

1
Getting Started
As computer professionals, we deal with text data every day. Developers and
programmers interact with XML and source code. System administrators
have to process and understand logles. Managers need to understand and
format nancial data and reports. Web designers put in me, hand tuning and
polishing up HTML content. Managing this broad range of formats can seem
like a daunng task, but it's really not that dicult.
This book aims to introduce you, the programmer, to a variety of methods used
to process these data formats. We'll look at approaches ranging from standard
language funcons through more complex third-party modules. Somewhere in
there, we'll cover a ulity that's just the right tool for your specic job. In the
process, we hope to also cover some Python development best pracces.
Where appropriate, we'll look into implementaon details enough to help you
understand the techniques used. Most of the me, though, we'll work as hard
as we can to get you up on your feet and crunching those text les.
You'll nd that Python makes tasks like this quite painless through its clean and
easy-to-understand syntax, vast community, and the available collecon of
addional ulies and modules.
In this chapter, we shall:
Briey introduce the data formats handled in this book
Implement a simple ROT13 translator
Introduce you to basic processing via lter programs
Learn state machine basics

Geng Started
[ 8 ]
Learn how to install supporng libraries and components safely and without
administrave access
Look at where to nd more informaon on introductory topics
Categorizing types of text data
Textual data comes in a variety of formats. For our purposes, we'll categorize text into three
very broad groups. Isolang down into segments helps us to understand the problem a bit
beer, and subsequently choose a parsing approach. Each one of these sweeping groups can
be further broken down into more detailed chunks.
One thing to remember when working your way through the book is that text content isn't
limited to the Lan alphabet. This is especially true when dealing with data acquired via the
Internet. We'll cover some of the techniques and tricks to handling internaonalized data in
Chapter 8, Understanding Encoding and i18n.
Providing information through markup
Structured text includes formats such as XML and HTML. These formats generally consist of
text content surrounded by special symbols or markers that give extra meaning to a le's
contents. These addional tags are usually meant to convey informaon to the processing
applicaon and to arrange informaon in a tree-like structure. Markup allows a developer to
dene his or her own data structure, yet rely on standardized parsers to extract elements.
For example, consider the following contrived HTML document.
<html>
<head>
<title>Hello, World!</title>
</head>
<body>
<p>
Hi there, all of you earthlings.
</p>
<p>
Take us to your leader.
</p>
</body>
</html>
In this example, our document's tle is clearly idened because it is surrounded by opening
and closing <title> and </title> elements.

Chapter 1
[ 9 ]
Note that although the document's tags give each element
a meaning, it's sll up to the applicaon developer to
understand what to do with a title object or a p element.
Noce that while it sll has meaning to us humans, it is also laid out in such a way as to make
it computer friendly. We'll take a deeper look into these formats in Chapter 6, Structured
Markup. Python provides some rich libraries for dealing with these popular formats.
One interesng aspect to these formats is that it's possible to embed references to validaon
rules as well as the actual document structure. This is a nice benet in that we're able to rely
on the parser to perform markup validaon for us. This makes our job much easier as it's
possible to trust that the input structure is valid.
Meaning through structured formats
Text data that falls into this category includes things such as conguraon les, marker
delimited data, e-mail message text, and JavaScript Object Notaon web data. Content
within this second category does not contain explicit markup much like XML and HTML does,
but the structure and formang is required as it conveys meaning and informaon about
the text to the parsing applicaon. For example, consider the format of a Windows INI le
or a Linux system's /etc/hosts le. There are no tags, but the column on the le clearly
means something other than the column on the right.
Python provides a collecon of modules and libraries intended to help us handle popular
formats from this category. We'll look at Python's built-in text services in detail when we get
to Chapter 4, The Standard Library to the Rescue.
Understanding freeform content
This category contains data that does not fall into the previous two groupings. This describes
e-mail message content, leers, book copy, and other unstructured character-based content.
However, this is where we'll largely have to look at building our own processing components.
There are external packages available to us if we wish to perform common funcons. Some
examples include full text searching and more advanced natural language processing.
Ensuring you have Python installed
Our rst order of business is to ensure that you have Python installed. You'll need it in order
to complete most of the examples in this book. We'll be working with Python 2.6 and we
assume that you're using that same version. If there are any drasc dierences in earlier
releases, we'll make a note of them as we go along. All of the examples should sll funcon
properly with Python 2.4 and later versions.

Geng Started
[ 10 ]
If you don't have Python installed, you can download the latest 2.X version from http://
www.python.org. Most Linux distribuons, as well as Mac OS, usually have a version of
Python preinstalled.
At the me of this wring, Python 2.6 was the latest version available, while 2.7 was in an
alpha state.
Providing support for Python 3
The examples in this book are wrien for Python 2. However, wherever possible, we will
provide code that has already been ported to Python 3. You can nd the Python 3 code in
the Python3 directories in the code bundle available on the Packt Publishing FTP site.
Unfortunately, we can't promise that all of the third-party libraries that we'll use will support
Python 3. The Python community is working hard to port popular modules to version 3.0.
However, as the versions are incompable, there is a lot of work remaining. In situaons
where we cannot provide example code, we'll note this.
Implementing a simple cipher
Let's get going early here and implement our rst script to get a feel for what's in store.
A Caesar Cipher is a simple form of cryptography in which each leer of the alphabet is shied
down by a number of leers. They're generally of no cryptographic use when applied alone,
but they do have some valid applicaons when paired with more advanced techniques.
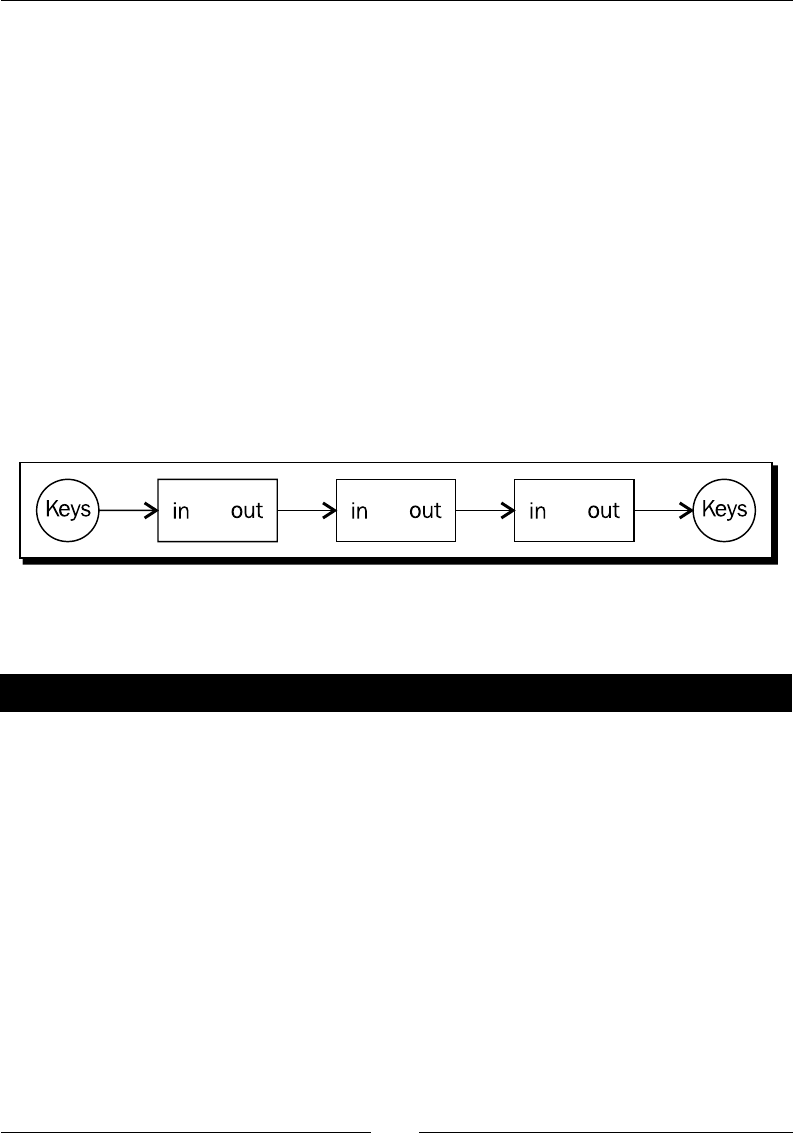
This preceding diagram depicts a cipher with an oset of three. Any X found in the source
data would simply become an A in the output data. Likewise, any A found in the input data
would become a D.

Chapter 1
[ 11 ]
Time for action – implementing a ROT13 encoder
The most popular implementaon of this system is ROT13. As its name suggests, ROT13
shis – or rotates – each leer by 13 spaces to produce an encrypted result. As the English
alphabet has 26 leers, we simply run it a second me on the encrypted text in order to get
back to our original result.
Let's implement a simple version of that algorithm.
1. Start your favorite text editor and create a new Python source le. Save it
as rot13.py.
2. Enter the following code exactly as you see it below and save the le.
import sys
import string
CHAR_MAP = dict(zip(
string.ascii_lowercase,
string.ascii_lowercase[13:26] + string.ascii_lowercase[0:13]
)
)
def rotate13_letter(letter):
"""
Return the 13-char rotation of a letter.
"""
do_upper = False
if letter.isupper():
do_upper = True
letter = letter.lower()
if letter not in CHAR_MAP:
return letter
else:
letter = CHAR_MAP[letter]
if do_upper:
letter = letter.upper()
return letter
if __name__ == '__main__':
for char in sys.argv[1]:
sys.stdout.write(rotate13_letter(char))
sys.stdout.write('\n')
Geng Started
[ 12 ]
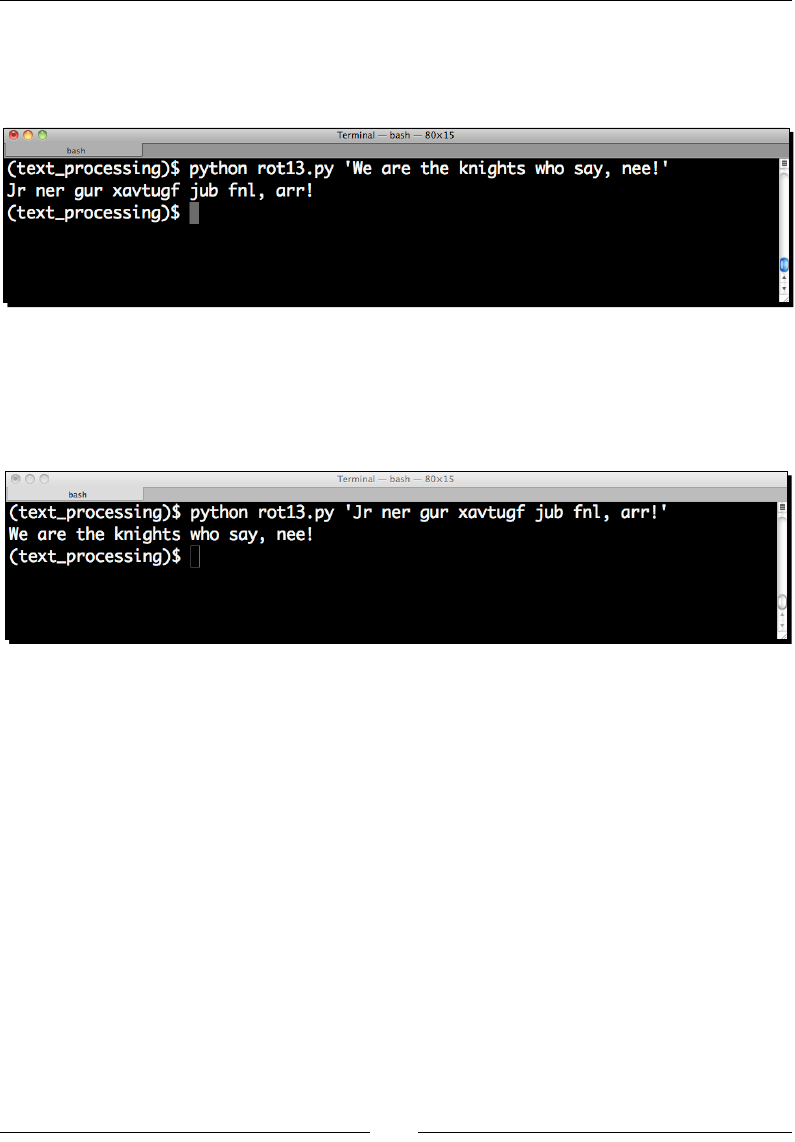
3. Now, from a command line, execute the script as follows. If you've entered all of the
code correctly, you should see the same output.
$ python rot13.py 'We are the knights who say, nee!'
4. Run the script a second me, using the output of the rst run as the new input
string. If everything was entered correctly, the original text should be printed to
the console.
$ python rot13.py 'Dv ziv gsv pmrtsgh dsl hzb, mvv!'
What just happened?
We implemented a simple text-oriented cipher using a collecon of Python's string handling
features. We were able to see it put to use for both encoding and decoding source text.
We saw a lot of stu in this lile example, so you should have a good feel for what can be
accomplished using the standard Python string object.
Following our inial module imports, we dened a diconary named CHAR_MAP, which
gives us a nice and simple way to shi our leers by the required 13 places. The value of a
diconary key is the target leer! We also took advantage of string slicing here. We'll look at
slicing a bit more in later chapters, but it's a convenient way for us to extract a substring from
an exisng string object.

Chapter 1
[ 13 ]
In our translaon funcon rotate13_letter, we checked whether our input character
was uppercase or lowercase and then saved that as a Boolean aribute. We then forced our
input to lowercase for the translaon work. As ROT13 operates on leers alone, we only
performed a rotaon if our input character was a leer of the Lan alphabet. We allowed
other values to simply pass through. We could have just as easily forced our string to a pure
uppercased value.
The last thing we do in our funcon is restore the leer to its proper case, if necessary. This
should familiarize you with upper- and lowercasing of Python ASCII strings.
We're able to change the case of an enre string using this same method; it's not limited to
single characters.
>>> name = 'Ryan Miller'
>>> name.upper()
'RYAN MILLER'
>>> "PLEASE DO NOT SHOUT".lower()
'please do not shout'
>>>
It's worth poinng out here that a single character string is sll a string.
There is not a char type, which you may be familiar with if you're coming
from a dierent language such as C or C++. However, it is possible to
translate between character ASCII codes and back using the ord and chr
built-in methods and a string with a length of one.
Noce how we were able to loop through a string directly using the Python for syntax.
A string object is a standard Python iterable, and we can walk through them detailed as
follows. In pracce, however, this isn't something you'll normally do. In most cases, it makes
sense to rely on exisng libraries.
$ python
Python 2.6.1 (r261:67515, Jul 7 2009, 23:51:51)
[GCC 4.2.1 (Apple Inc. build 5646)] on darwin
Type "help", "copyright", "credits" or "license" for more information.
>>> for char in "Foo":
... print char
...
F
o
o
>>>

Geng Started
[ 14 ]
Finally, you should note that we ended our script with an if statement such as the following:
>>> if__name__ == '__main__'
Python modules all contain an internal __name__ variable that corresponds to the name of
the module. If a module is executed directly from the command line, as is this script, whose
name value is set to __main__, this code only runs if we've executed this script directly. It
will not run if we import this code from a dierent script. You can import the code directly
from the command line and see for yourself.
$ python
Python 2.6.1 (r261:67515, Jul 7 2009, 23:51:51)
[GCC 4.2.1 (Apple Inc. build 5646)] on darwin
Type "help", "copyright", "credits" or "license" for more information.
>>> import rot13
>>> dir(rot13)
['CHAR_MAP', '__builtins__', '__doc__', '__file__', '__name__', '__
package__', 'rotate13_letter', 'string', 'sys']
>>>
Noce how we were able to import our module and see all of the methods and aributes
inside of it, but the driver code did not execute. This is a convenon we'll use throughout the
book in order to help achieve maximum reusability.
Have a go hero – more translation work
Each Python string instance contains a collecon of methods that operate on one or more
characters. You can easily display all of the available methods and aributes by using the dir
method. For example, enter the following command into a Python window. Python responds
by prinng a list of all methods on a string object.
>>> dir("content")
['__add__', '__class__', '__contains__', '__delattr__', '__doc__',
'__eq__', '__format__', '__ge__', '__getattribute__', '__getitem__',
'__getnewargs__', '__getslice__', '__gt__', '__hash__', '__init__', '__
le__', '__len__', '__lt__', '__mod__', '__mul__', '__ne__', '__new__',
'__reduce__', '__reduce_ex__', '__repr__', '__rmod__', '__rmul__', '__
setattr__', '__sizeof__', '__str__', '__subclasshook__', '_formatter_
field_name_split', '_formatter_parser', 'capitalize', 'center', 'count',
'decode', 'encode', 'endswith', 'expandtabs', 'find', 'format', 'index',
'isalnum', 'isalpha', 'isdigit', 'islower', 'isspace', 'istitle',
'isupper', 'join', 'ljust', 'lower', 'lstrip', 'partition', 'replace',
'rfind', 'rindex', 'rjust', 'rpartition', 'rsplit', 'rstrip', 'split',
'splitlines', 'startswith', 'strip', 'swapcase', 'title', 'translate',
'upper', 'zfill']
>>>
Chapter 1
[ 15 ]
Much like the isupper and islower methods discussed previously, we also have an
isspace method. Using this method, in combinaon with your newfound knowledge of
Python strings, update the method we dened previously to translate spaces to underscores
and underscores to spaces.
Processing structured markup with a lter
Our ROT13 applicaon works great for simple one-line strings that we can t on the
command line. However, it wouldn't work very well if we wanted to encode an enre
le, such as the HTML document we took a look at earlier. In order to support larger text
documents, we'll need to change the way we accept input. We'll redesign our applicaon to
work as a lter.
A lter is an applicaon that reads data from its standard input le descriptor and writes to
its standard output le descriptor. This allows users to create command pipelines that allow
mulple ulies to be strung together. If you've ever typed a command such as cat /etc/
hosts | grep mydomain.com, you've set up a pipeline
In many circumstances, data is fed into the pipeline via the keyboard and completes its
journey when a processed result is displayed on the screen.
Time for action – processing as a lter
Let's make the changes required to allow our simple ROT13 processor to work as a
command-line lter. This will allow us to process larger les.
1. Create a new source le and enter the following code. When complete, save the le
as rot13-b.py.
import sys
import string
CHAR_MAP = dict(zip(
string.ascii_lowercase,
string.ascii_lowercase[13:26] + string.ascii_lowercase[0:13]
)
)
def rotate13_letter(letter):
"""

Geng Started
[ 16 ]
Return the 13-char rotation of a letter.
"""
do_upper = False
if letter.isupper():
do_upper = True
letter = letter.lower()
if letter not in CHAR_MAP:
return letter
else:
letter = CHAR_MAP[letter]
if do_upper:
letter = letter.upper()
return letter
if __name__ == '__main__':
for line in sys.stdin:
for char in line:
sys.stdout.write(rotate13_letter(char))
2. Enter the following HTML data into a new text le and save it as sample_page.
html. We'll use this as example input to our updated rot13.py.
<html>
<head>
<title>Hello, World!</title>
</head>
<body>
<p>
Hi there, all of you earthlings.
</p>
<p>
Take us to your leader.
</p>
</body>
</html>
3. Now, run our rot13.py example and provide our HTML document as standard
input data. The exact method used will vary with your operang system. If you've
entered the code successfully, you should simply see a new prompt.
$ cat sample_page.html | python rot13-b.py > rot13.html
$

Chapter 1
[ 17 ]
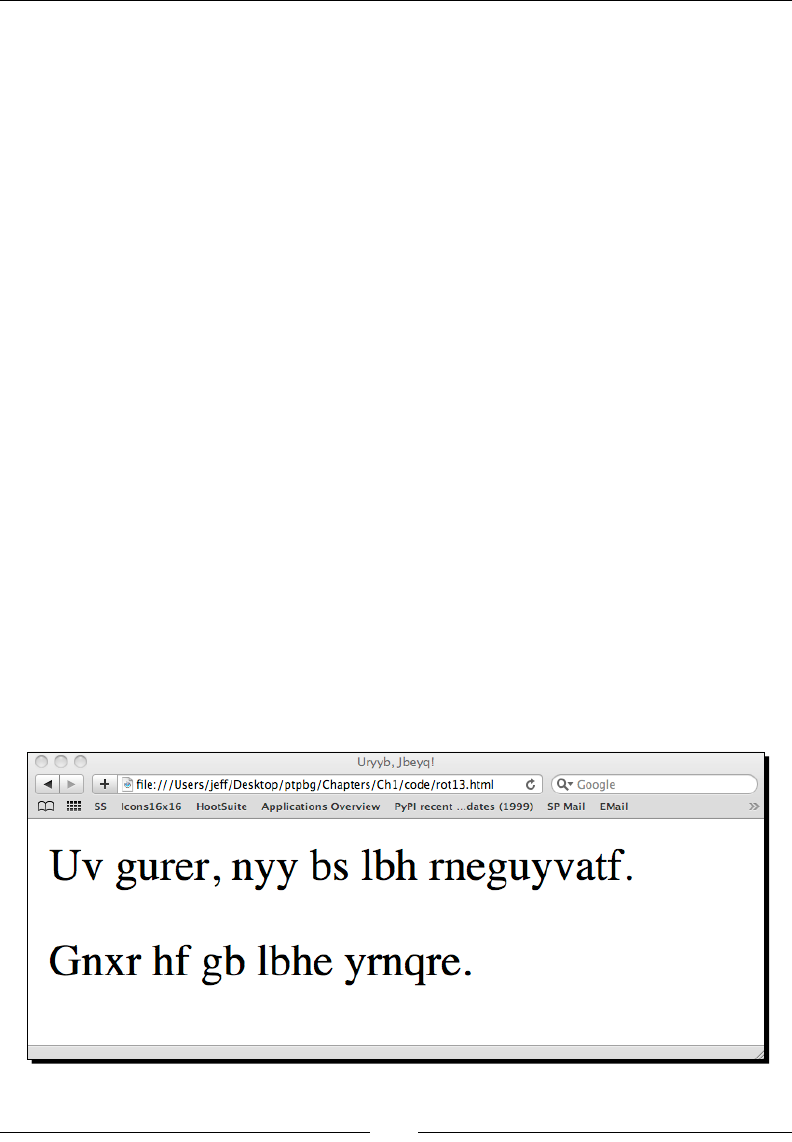
4. The contents of rot13.html should be as follows. If that's not the case, double
back and make sure everything is correct.
<ugzy>
<urnq>
<gvgyr>Uryyb, Jbeyq!</gvgyr>
</urnq>
<obql>
<c>
Uv gurer, nyy bs lbh rneguyvatf.
</c>
<c>
Gnxr hf gb lbhe yrnqre.
</c>
</obql>
</ugzy>
5. Open the translated HTML le using your web browser.
What just happened?
We updated our rot13.py script to read standard input data rather than rely on a
command-line opon. Doing this provides opmal congurability going forward and lets us
feed input of varying length from a collecon of dierent sources. We did this by looping on
each line available on the sys.stdin le stream and calling our translaon funcon. We
wrote each character returned by that funcon to the sys.stdout stream.
Next, we ran our updated script via the command line, using sample_page.html as input.
As expected, the encoded version was printed on our terminal.
As you can see, there is a major problem with our output. We should have a proper page
tle and our content should be broken down into dierent paragraphs.

Geng Started
[ 18 ]
Remember, structured markup text is sprinkled with
tag elements that dene its structure and organizaon.
In this example, we not only translated the text content, we also translated the markup
tags, rendering them meaningless. A web browser would not be able to display this data
properly. We'll need to update our processor code to ignore the tags. We'll do just that
in the next secon.
Time for action – skipping over markup tags
In order to preserve the proper, structured HTML that tags provide, we need to ensure we
don't include them in our rotaon. To do this, we'll keep track of whether or not our input
stream is currently within a tag. If it is, we won't translate our leers.
1. Once again, create a new Python source le and enter the following code. When
you're nished, save the le as rot13-c.py.
import sys
from optparse import OptionParser
import string
CHAR_MAP = dict(zip(
string.ascii_lowercase,
string.ascii_lowercase[13:26] + string.ascii_lowercase[0:13]
)
)
class RotateStream(object):
"""
General purpose ROT13 Translator
A ROT13 translator smart enough to skip
Markup tags if that's what we want.
"""
MARKUP_START = '<'
MARKUP_END = '>'
def __init__(self, skip_tags):
self.skip_tags = skip_tags
def rotate13_letter(self, letter):
"""
Return the 13-char rotation of a letter.
"""
do_upper = False
if letter.isupper():

Chapter 1
[ 19 ]
do_upper = True
letter = letter.lower()
if letter not in CHAR_MAP:
return letter
else:
letter = CHAR_MAP[letter]
if do_upper:
letter = letter.upper()
return letter
def rotate_from_file(self, handle):
"""
Rotate from a file handle.
Takes a file-like object and translates
text from it into ROT13 text.
"""
state_markup = False
for line in handle:
for char in line:
if self.skip_tags:
if state_markup:
# here we're looking for a closing
# '>'
if char == self.MARKUP_END:
state_markup = False
else:
# Not in a markup state, rotate
# unless we're starting a new
# tag
if char == self.MARKUP_START:
state_markup = True
else:
char = self.rotate13_letter(char)
else:
char = self.rotate13_letter(char)
# Make this a generator
yield char
if __name__ == '__main__':
parser = OptionParser()
parser.add_option('-t', '--tags', dest="tags",
help="Ignore Markup Tags", default=False,
Geng Started
[ 20 ]
action="store_true")
options, args = parser.parse_args()
rotator = RotateStream(options.tags)
for letter in rotator.rotate_from_file(sys.stdin):
sys.stdout.write(letter)
2. Run the same example.html le that we created for the last example through the
new processor. This me, be sure to pass a -t command-line opon.
$ cat sample_page.html | python rot13-c.py -t > rot13.html
$
3. If everything was entered correctly, the contents of rot13.html should be exactly
as follows.
<html>
<head>
<title>Uryyb, Jbeyq!</title>
</head>
<body>
<p>
Uv gurer, nyy bs lbh rneguyvatf.
</p>
<p>
Gnxr hf gb lbhe yrnqre.
</p>
</body>
</html>
4. Open the translated le in your web browser.

Chapter 1
[ 21 ]
What just happened?
That was a prey complex example, so let's step through it. We did quite a bit. First, we
moved away from a simple rotate13_letter funcon and wrapped almost all of our
funconality in a Python class named RotateStream. Doing this helps us ensure that our
code will be reusable down the road.
We dene a __init__ method within the class that accepts a single parameter named
skip_tags. The value of this parameter is assigned to the self parameter so we can access
it later from within other methods. If this is a True value, then our parser class will know
that it's not supposed to translate markup tags.
Next, you'll see our familiar rotate13_letter method (it's a method now as it's dened
within a class). The only real dierence here is that in addion to the letter parameter,
we're also requiring the standard self parameter.
Finally, we have our rotate_from_file method. This is where the bulk of our new
funconality was added. Like before, we're iterang through all of the characters available
on a le stream. This me, however, the le stream is passed in as a handle parameter.
This means that we could have just as easily passed in an open le handle rather than the
standard in le handle.
Inside the method, we implement a simple state machine, with two possible states. Our
current state is saved in the state_markup Boolean aribute. We only rely on it if the value
of self.skip_tags set in the __init__ method is True.
1. If state_markup is True, then we're currently within the context of a markup tag
and we're looking for the > character. When it's found, we'll change state_markup
to False. As we're inside a tag, we'll never ask our class to perform a ROT13
operaon.
2. If state_markup is False, then we're parsing standard text. If we come across
the < character, then we're entering a new markup tag. We set the value of state_
markup to True. Finally, if we're not in tag, we'll call rotate13_letter to perform
our ROT13 operaon.
You should also noce some unfamiliar code at the end of the source lisng. We've taken
advantage of the OptionParser class, which is part of the standard library. We've added
a single opon that will allow us to selecvely enable our markup bypass funconality. The
value of this opon is passed into RotateStream's __init__ method.
The nal two lines of the lisng show how we pass the sys.stdin le handle to rotate_
from_file and iterate over the results. The rotate_from_file method has been dened
as a generator funcon. A generator funcon returns values as it processes rather than
waing unl compleon. This method avoids storing all of the result in memory and lowers
overall applicaon memory consumpon.

Geng Started
[ 22 ]
State machines
A state machine is an algorithm that keeps track of an applicaon's internal state. Each
state has a set of available transions and funconality associated with it. In this example,
we were either inside or outside of a tag. Applicaon behavior changed depending on
our current state. For example, if we were inside then we could transion to outside. The
opposite also holds true.
The state machine concept is advanced and won't be covered in detail. However, it is a
major method used when implemenng text-processing machinery. For example, regular
expression engines are generally built on variaons of this model. For more informaon
on state machine implementaon, see the Wikipedia arcle available at http://
en.wikipedia.org/wiki/Finite-state_machine.
Pop Quiz – ROT 13 processing
1. We dene MARKUP_START and MARKUP_END class constants within our
RotateStream class. How might our state machine be aected if these
values were swapped?
2. Is it possible to use ROT13 on a string containing characters found outside of the
English alphabet?
3. What would happen if we embedded > or < signs within our text content or tag
values?
4. In our example, we read our input a line at a me. Can you think of a way to make
this more ecient?
Have a go hero – support multiple input channels
We've briey covered reading data via standard in as well as processing simple
command-line opons. Your job is to integrate the two so that your applicaon will
simply translate a command-line value if one is present before defaulng to standard input.
If you're able to implement this, try extending the opon handling code so that your input
string can be passed in to the rotaon applicaon using a command-line opon.
$python rot13-c.py –s 'myinputstring'
zlvachgfgevat
$

Chapter 1
[ 23 ]
Supporting third-party modules
Now that we've got our rst example out of the way, we're going to take a lile bit of a
detour and learn how to obtain and install third-party modules. This is important, as we'll
install a few throughout the remainder of the book.
The Python community maintains a centralized package repository, termed the Python
Package Index (or PyPI). It is available on the web at http://pypi.python.org. From
there, it is possible to download packages as compressed source distribuons, or in some
cases, pre-packaged Python components. PyPI is also a rich source of informaon. It's a
great place to learn about available third-party applicaons. Links are provided to individual
package documentaon if it's not included directly into the package's PyPI page.
Packaging in a nutshell
There are at least two dierent popular methods of packaging and deploying Python
packages. The distutils package is part of the standard distribuon and provides a
mechanism for building and installing Python soware. Packages that take advantage of the
distutils system are downloaded as a source distribuon and built and installed by a local
user. They are installed by simply creang an addional directory structure within the system
Python directory that matches the package name.
In an eort to make packages more accessible and self-contained, the concept of the
Python Egg was introduced. An egg le is simply a ZIP archive of a package. When an egg is
installed, the ZIP le itself is placed on the Python path, rather than a subdirectory.
Time for action – installing SetupTools
Egg les have largely become the de facto standard in Python packaging. In order to install,
develop, and build egg les, it is necessary to install a third-party tool kit. The most popular
is SetupTools, and this is what we'll be working with throughout this book. The installaon
process is fairly easy to complete and is rather self-contained. Installing SetupTools gives us
access to the easy_install command, which automates the download and installaon of
packages that have been registered with PyPI.
1. Download the installaon script, which is available at http://peak.
telecommunity.com/dist/ez_setup.py. This same script will be
used for all versions of Python.

Geng Started
[ 24 ]
2. As an administrave user, run the ez_setup.py script from the command line. The
SetupTools installaon process will complete. If you've executed the script with the
proper rights, you should see output similar as follows:
# python ez_setup.py
Downloading http://pypi.python.org/packages/2.6/s/setuptools/
setuptools-0.6c11-py2.6.egg
Processing setuptools-0.6c11-py2.6.egg
creating /usr/lib/python2.6/site-packages/setuptools-0.6c11-
py2.6.egg
Extracting setuptools-0.6c11-py2.6.egg to /usr/lib/python2.6/site-
packages
Adding setuptools 0.6c11 to easy-install.pth file
Installing easy_install script to /usr/bin
Installing easy_install-2.6 script to /usr/bin
Installed /usr/lib/python2.6/site-packages/setuptools-0.6c11-
py2.6.egg
Processing dependencies for setuptools==0.6c11
Finished processing dependencies for setuptools==0.6c11
#
What just happened?
We downloaded the SetupTools installaon script and executed it as an administrave
user. By doing so, our system Python environment was congured so that we can install egg
les in the future via the SetupTools easy_install system.
SetupTools does not currently work with Python 3.0. There is, however, an
alternave available via the Distribute project. Distribute is intended to be a
drop-in replacement for SetupTools and will work with either major Python
version. For more informaon, or to download the installer, visit http://
pypi.python.org/pypi/distribute.

Chapter 1
[ 25 ]
Running a virtual environment
Now that we have SetupTools installed, we can install third-party packages by simply
running the easy_install command. This is nice because package dependencies will
automacally be downloaded and installed so we no longer have to do this manually.
However, there's sll one piece missing. Even though we can install these packages easily,
we sll need to retain administrave privileges to do so. Addionally, all of the packages
that we chose to install will be placed in the system's Python library directory, which has
the potenal to cause inconsistencies and problems down the road.. As you've probably
guessed, there's a ulity to address that.
Python 2.6 introduces the concept of a local user package directory. This is
simply an addional locaon found within your user home directory that Python
searches for installed packages. It is possible to install eggs into this locaon via
easy_install with a –user command-line switch. For more informaon,
see http://www.python.org/dev/peps/pep-0370/.
Conguring virtualenv
The virtualenv package, distributed as a Python egg, allows us to create an isolated
Python environment anywhere we wish. The environment comes complete with a bin
directory containing a Python binary, its own installaon of SetupTools, and an instance-
specic library directory. In short, it creates a locaon for us to install and congure Python
without interfering with the system installaon.
Time for action – conguring a virtual environment
Here, we'll enable the virtualenv package, which will illustrate how to install packages
from the PyPI site. We'll also congure our rst environment, which we'll use throughout the
book for the rest of our examples and code illustraons.
1. As a user with administrave privileges, install virtualenv from the system
command line by running easy_install virtualenv. If you have the correct
permissions, your output should be similar to the following.
Searching for virtualenv
Reading http://pypi.python.org/simple/virtualenv/
Reading http://virtualenv.openplans.org
Best match: virtualenv 1.4.5
Downloading http://pypi.python.org/packages/source/v/virtualenv/
virtualenv-1.4.5.tar.gz#md5=d3c621dd9797789fef78442e336df63e
Processing virtualenv-1.4.5.tar.gz

Geng Started
[ 26 ]
Running virtualenv-1.4.5/setup.py -q bdist_egg --dist-dir /tmp/
easy_install-rJXhVC/virtualenv-1.4.5/egg-dist-tmp-AvWcd1
warning: no previously-included files matching '*.*' found under
directory 'docs/_templates'
Adding virtualenv 1.4.5 to easy-install.pth file
Installing virtualenv script to /usr/bin
Installed /usr/lib/python2.6/site-packages/virtualenv-1.4.5-
py2.6.egg
Processing dependencies for virtualenv
Finished processing dependencies for virtualenv
2. Drop administrave privileges as we won't need them any longer. Ensure that you're
within your home directory and create a new virtual instance by running:
$ virtualenv --no-site-packages text_processing
3. Step into the newly created text_processing directory and acvate the
virtual environment. Windows users will do this by simply running the Scripts\
activate applicaon, while Linux users must instead source the script using the
shell's dot operator.
$ . bin/activate
4. If you've done this correctly, you should now see your command-line prompt change
to include the string (text_processing). This serves as a visual cue to remind you
that you're operang within a specic virtual environment.
(text_processing)$ pwd
/home/jmcneil/text_processing
(text_processing)$ which python
/home/jmcneil/text_processing/bin/python
(text_processing)$
5. Finally, deacvate the environment by running the deacvate command. This will
return your shell environment to default. Note that once you've done this, you're
once again working with the system's Python install.
(text_processing)$ deactivate
$ which python
/usr/bin/python
$

Chapter 1
[ 27 ]
If you're running Windows, by default python.exe and easy_install.
exe are not placed on your system %PATH%. You'll need to manually congure
your %PATH% variable to include C:\Python2.6\ and C:\Python2.6\
Scripts. Addional scripts added by easy_install will also be placed in
this directory, so it's worth seng up your %PATH% variable.
What just happened?
We installed the virtualenv package using the easy_install command directly o of
the Python Package index. This is the method we'll use for installing any third-party packages
going forward. You should now be familiar with the easy_install process. Also, note that
for the remainder of the book, we'll operate from within this text_processing virtual
environment. Addional packages are installed using this same technique from within the
connes of our environment.
Aer the install process was completed, we congured and acvated our rst virtual
environment. You saw how to create a new instance via the virtualenv command and
you also learned how to subsequently acvate it using the bin/activate script. Finally, we
showed you how to deacvate your environment and return to your system's default state.
Have a go hero – install your own environment
Now that you know how to set up your own isolated Python environment, you're encouraged
to create a second one and install a collecon of third-party ulies in order to get the hang of
the installaon process.
1. Create a new environment and name it as of your own choice.
2. Point your browser to http://pypi.python.org and select one or more
packages that you nd interesng. Install them via the easy_install command
within your new virtual environment.
Note that you should not require administrave privileges to do this. If you receive an error
about permissions, make certain you've remembered to acvate your new environment.
Deacvate when complete. Some of the packages available for install may require a correctly
congured C-language compiler.

Geng Started
[ 28 ]
Where to get help?
The Python community is a friendly bunch of people. There is a wide range of online
resources you can take advantage of if you nd yourself stuck. Let's take a quick look at
what's out there.
Home site: The Python website, available at http://www.python.org.
Specically, the documentaon secon. The standard library reference is a
wonderful asset and should be something you keep at your ngerps. This site also
contains a wonderful tutorial as well as a complete language specicaon.
Member groups: The comp.lang.python newsgroup. Available via Google
groups as well as an e-mail gateway, this provides a general-purpose locaon to
ask Python-related quesons. A very smart bunch of developers patrol this group;
you're certain to get a quality answer.
Forums: Stack Overow, available at http://www.stackoverflow.com.
Stack overow is a website dedicated to developers. You're welcome to ask your
quesons, as well as answer others' inquires, if you're up to it!
Mailing list: If you have a beginner-level queson, there is a Python tutor mailing
list available o of the Python.org site. This is a great place to ask your beginner
quesons no maer how basic they might be!
Centralized package repository: The Python Package Index at http://pypi.
python.org. Chances are someone has already had to do exactly what it is
you're doing.
If all else fails, you're more than welcome to contact the author via e-mail to questions@
packtpub.com. Every eort will be made to answer your queson, or point you to a freely
available resource where you can nd your resoluon.
Summary
This chapter introduced you to the dierent categories of text that we'll cover in greater
detail throughout the book and provided you with a lile bit of informaon as to how we'll
manage our packaging going forward.
We performed a few low-level text translaons by implemenng a ROT13 encoder and
highlighted the dierences between freeform and structured markup. We'll examine these
categories in much greater detail as we move on. The goal of that exercise was to learn some
byte-level transformaon techniques.
Finally, we touched on a couple of dierent ways to read data into our applicaons. In our
next chapter, we'll spend a great deal of me geng to know the IO system and learning
how you can extract text from a collecon of sources.

2
Working with the IO System
Now that we've covered some basic text-processing methods and introduced
you to some core Python best pracces, it's me we take a look at how to
actually get to your data. Reading some example text from the command line is
an easy process, but geng to real world data can be more dicult. However,
it's important to understand how to do so.
Python provides all of the standard le IO mechanisms you would expect from
any full-featured programming language. Addionally, there is a wide range of
standard library modules included that enable you to access data via various
network services such as HTTP, HTTPS, and FTP.
In this chapter, we'll focus on those methods and systems. We'll look at standard le
funconality, the extended abilies within the standard library, and how these components
can be used interchangeably in many situaons.
As part of our introducon to le input and output, we'll also cover some common
excepon-handling techniques that are especially helpful when dealing with external data.
In this chapter, we shall:
Look at Python's le IO and examine the objects created by the open factory funcon
Understand text-based and raw IO, and how they dier
Examine the urllib and urllib2 modules and detail le access via HTTP and FTP
streams
Handle le IO using Context Managers
Learn about le-like objects and methods to use objects interchangeably for
maximum reuse
Working with the IO System
[ 30 ]
Introduce excepons with a specic focus on idioms specic to le IO and how to
deal with certain error condions
Introduce a web server logle processor, which we'll expand upon throughout
future chapters
Examine ways to deal with mulple les
We'll also spend some me looking at changes to the IO subsystem in future
versions of Python
Parsing web server logs
We're going to introduce a web server log parser in this secon that we'll build upon
throughout the remainder of the book. We're going to start by assuming the logle is in the
standard Apache combined format.
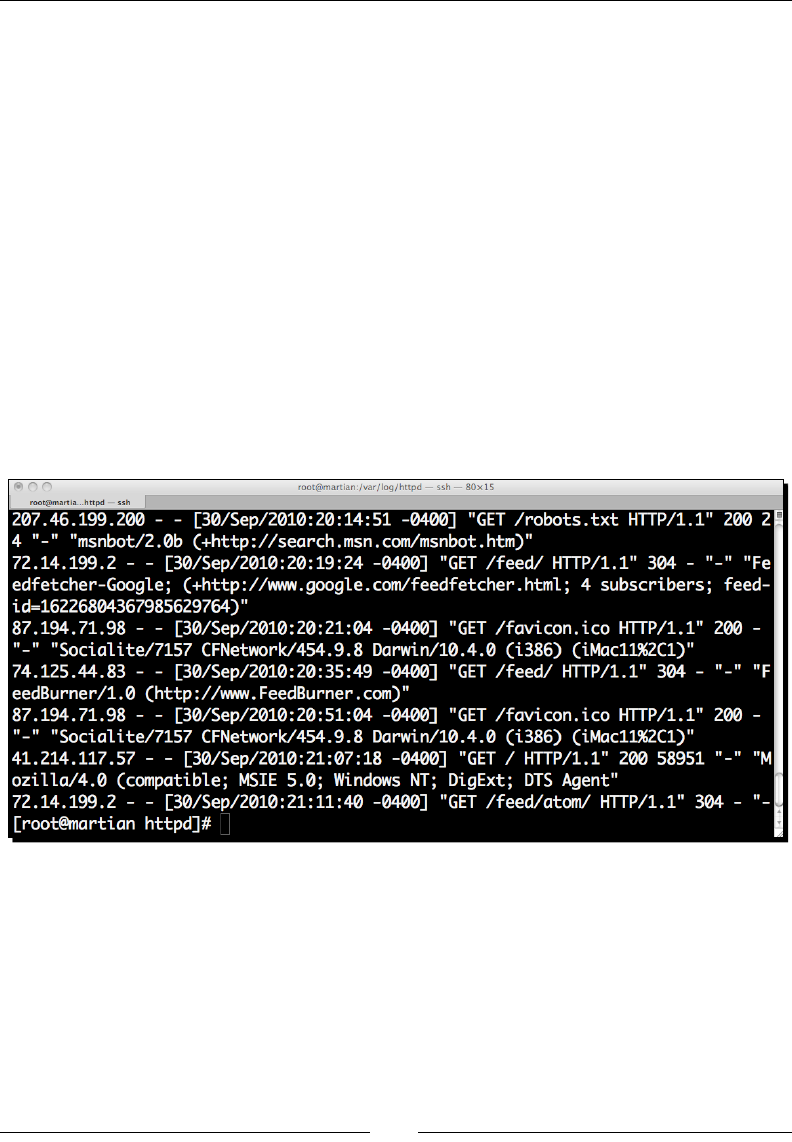
For example, the following line represents an HTTP request for the root directory of a
website. The request is successful, as indicated by the 200 series response code.
In order, the above line contains the remote IP address of the client, the remote identd
name, the authencated username, the server's mestamp, the rst line of the request, the
HTTP response code, the size of the le as returned by the server, the referring page, and
nally the User Agent, or the browser soware running on the end user's computer.
The dashes in the previous screenshot indicate a missing value. This doesn't necessarily
correspond to an error condion. For example, if the page is not password-protected then
there will be no remote user. The dash is a common condion we'll need to handle.

Chapter 2
[ 31 ]
For more informaon on web server log formats and available data points,
please see your web server documentaon. Apache logs were used to write
this book; documentaon for the Apache web server is available at http://
httpd.apache.org/docs/2.2/mod/mod_log_config.html
Time for action – generating transfer statistics
Now, let's start our processor. Inially, we'll build enough funconality to scan our logle
as read via standard input and report les served over a given size. System administrators
may nd ulies such as this useful when aempng to track down abusive users. It's also
generally a good idea to iteravely add funconality to an applicaon in development.
1. First, step into the virtual environment created in Chapter 1, Geng Started and
acvate it so that all of our work is isolated locally. Only the UNIX method is shown
here.
$ cd text_processing/
$ . bin/activate
2. Create an empty Python le and name it logscan.py. Enter the following code:
#!/usr/bin/python
import sys
from optparse import OptionParser
class LogProcessor(object):
"""
Process a combined log format.
This processor handles logfiles in a combined format,
objects that act on the results are passed in to
the init method as a series of methods.
"""
def __init__(self, call_chain=None):
"""
Setup parser.
Save the call chain. Each time we process a log,
we'll run the list of callbacks with the processed
log results.
"""
if call_chain is None:
call_chain = []
self._call_chain = call_chain

Working with the IO System
[ 32 ]
def split(self, line):
"""
Split a logfile.
Initially, we just want size and requested file name, so
we'll split on spaces and pull the data out.
"""
parts = line.split()
return {
'size': 0 if parts[9] == '-' else int(parts[9]),
'file_requested': parts[6]
}
def parse(self, handle):
"""
Parses the logfile.
Returns a dictionary composed of log entry values
for easy data summation.
"""
for line in stream:
fields = self.split(line)
for func in self._call_chain:
func(fields)
class MaxSizeHandler(object):
"""
Check a file's size.
"""
def __init__(self, size):
self.size = size
def process(self, fields):
"""
Looks at each line individually.
Looks at each parsed log line individually and
performs a size calculation. If it's bigger than
our self.size, we just print a warning.
"""
if fields['size'] > self.size:
print >>sys.stderr, \
'Warning: %s exceeeds %d bytes (%d)!' % \
(fields['file_requested'], self.size,
fields['size'])
if __name__ == '__main__':
parser = OptionParser()
parser.add_option('-s', '--size', dest="size",
Chapter 2
[ 33 ]
help="Maximum File Size Allowed",
default=0, type="int")
opts,args = parser.parse_args()
call_chain = []
size_check = MaxSizeHandler(opts.size)
call_chain.append(size_check.process)
processor = LogProcessor(call_chain)
processor.parse(sys.stdin)
3. Now, create a new le and name it example.log. Enter the following mock
logdata. Note that each line begins with 127.0.0.1 and should be entered as such.
127.0.0.1 - - [29/Mar/2010:00:48:05 +0000] "GET /a HTTP/1.1" 200
65383 "-" "Mozilla/4.0 (compatible; MSIE 6.0; Windows NT 5.1; SV1;
.NET CLR 1.1.4322)"
127.0.0.1 - - [29/Mar/2010:00:48:05 +0000] "GET /b HTTP/1.1" 200
22912 "-" "Mozilla/4.0 (compatible; MSIE 6.0; Windows NT 5.1; SV1;
.NET CLR 1.1.4322)"
127.0.0.1 - - [29/Mar/2010:00:48:05 +0000] "GET /c HTTP/1.1" 200
1818212 "-" "Mozilla/4.0 (compatible; MSIE 6.0; Windows NT 5.1;
SV1; .NET CLR 1.1.4322)"
127.0.0.1 - - [29/Mar/2010:00:48:05 +0000] "GET /d HTTP/1.1" 200
888 "-" "Mozilla/4.0 (compatible; MSIE 6.0; Windows NT 5.1; SV1;
.NET CLR 1.1.4322)"
127.0.0.1 - - [29/Mar/2010:00:48:05 +0000] "GET /e HTTP/1.1" 200
38182121 "-" "Mozilla/4.0 (compatible; MSIE 6.0; Windows NT 5.1;
SV1; .NET CLR 1.1.4322)"
4. Now run the logscan.py script by entering the following command. If all code and
data has been entered correctly, you should see the following output.
(text_processing)$ cat example.log | python logscan.py -s 1000
What just happened?
Let's go through the code and look at what's going on. We expanded on concepts from
the rst chapter and introduced quite a few new elements here. It's important that you
understand this example as we'll use it as the foundaon for many of our future exercises.

Working with the IO System
[ 34 ]
First, recognize what should be familiar to you. We've parsed our arguments, ensured that
our main code is only executed when our script is started directly, and we created a couple
of classes that make up our applicaon. We also passed the open le stream to our parse
method, much like we did with our ROT13 example. Simple!
This applicaon is largely composed of two main classes: LogProcessor and
MaxSizeHandler. We split it o like this to ensure we can expand in the future. Perhaps
we'll want to add more checks or handle logles in a dierent format. This approach ensures
that is possible.
The __init__ method of LogProcessor takes a call_chain argument, which defaults to
None. This will contain a list of funcons that we'll call for each line in the logle, passing in
the values parsed out of each line as a diconary.
If you look further into the __init__ method, you'll see the following code:
if call_chain is None:
call_chain = []
self._call_chain = call_chain
This may look peculiar to you. Why wouldn't we simply default call_chain to an empty list
object? The answer is actually rather complex. For now, simply understand that if we do that,
we may accidentally share a copy of call_chain among all instances of our class!
If you're curious as to why using an empty list is a bad idea, have a look
at http://www.ferg.org/projects/python_gotchas.
html#contents_item_6.2. Most of the me, what you actually get is not
what you would expect and subtle bugs slip into your code.
In our split method, we break our logle line up at the space boundary. Obviously, this
doesn't work if we needed some of the elds that contain spaces, but we're not that far yet.
For now, this is an acceptable approach. Note the check for the dash here. It's possible that
the web server may not report a size on each request. Consider the eect of a browser cache
where new data is not transferred over the network if it hasn't changed on the server.
The split method ulizes Python's condional expressions, which rst
appeared in version 2.5. If you're using an earlier version of Python, you'll need
to expand into a tradional if – else block.
Finally, we have our parse method. This method is responsible for translang each line
of the logle into a useable diconary and passing it into each method in our stored
call_chain.

Chapter 2
[ 35 ]
Next, we have our MaxSizeHandler class. This class ought to be rather straighorward. At
inializaon me, we store a maximum le size. When our process method is called as part
of the call_chain run, we simply print a warning if the current le exceeds the threshold.
The script proper should look largely familiar to you. We parse our command-line opons via
the OptionParser class, but this me we introduce type translaon. We create an instance
of MaxSizeHandler and add its process method to our call_chain list. Finally, that list
is used to create a new LogProcessor instance and we call its parse method.
Python methods and funcons are considered to be rst class objects. What
does this mean? Simply put, you can pass them around to methods, assign them
to collecons, and bind them as other aributes just as if they were simple data
types such as integers, strings, and class instances. No wrapper classes required!
Using objects interchangeably
The big take-away from this example is that objects can be designed such that they're
interchangeable. The technical term for this is Polymorphism. This comes into play
throughout the chapter as we look at dierent methods of accessing datales.
Time for action – introducing a new log format
Let's take a closer look at this concept. Let's assume for a second that a colleague heard about
your niy log-processing program and wanted to use it to parse his data. The trouble is that
he's already tried his hand at solving the problem with standard shell ulies and his import
format is slightly dierent. It's simply a list of le names followed by the le size in bytes.
1. Using logscan.py as a template, create a new le named logscan-b.py. The
two les should be exactly the same.
2. Add an addional class directly below LogProcessor as follows.
class ColumnLogProcessor(LogProcessor):
def split(self, line):
parts = line.split()
return {
'size': int(parts[1]),
'file_requested': parts[0]
}
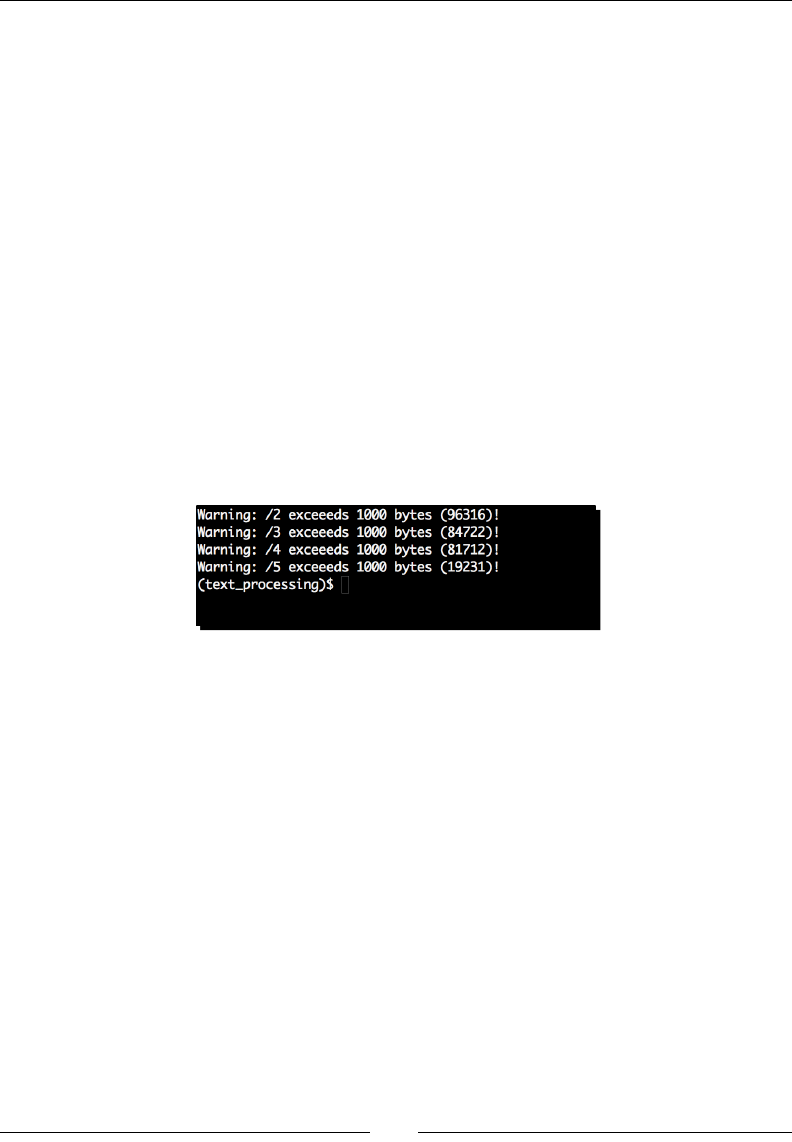
Working with the IO System
[ 36 ]
3. Now, change the line that creates a LogProcessor object. Instead, we want it to
create a ColumnLogProcess object.
call_chain.append(size_check.process)
processor = ColumnLogProcessor(call_chain)
processor.parse(sys.stdin)
processor = ColumnLogProcessor(call_chain)
4. Create a new input le and name it example-b.log. Enter test data exactly as follows.
/1 1000
/2 96316
/3 84722
/4 81712
/5 19231
5. Finally, run the updated source code. If you entered everything correctly, your
output should be as follows.
(text_processing)$ cat example-b.log | python logscan-b.py -s
1000
What just happened?
We added support for a new log input format simply by replacing the parse method of
our log processor. We did this by inhering from LogProcessor and creang a new class,
overriding parse.
There are no addional changes required to support an enrely new format. As long as your
new LogProcessor class implements the required methods and returns the proper values,
it's a piece of cake. Your LogProcessor subclass could have done something much more
elaborate, such as process each line via regular expressions or handle missing elements
gracefully.
Conversely, adding new call_chain methods is just as easy. As long as the funcon in the
list takes a diconary as input, you can add new processing methods as well.

Chapter 2
[ 37 ]
Have a go hero – creating a new processing class
In these examples, we've printed a warning if a le exceeds a threshold. Instead, what if we
wanted to warn if a le was below a given threshold? This might be useful if we thought our
web server was truncang results or returning invalid data. Your job is to add a new handler
class to the call_chain that warns if a le is below a specic size. It should be able to run
side-by-side along with the exisng MaxSizeHandler handler.
Accessing les directly
Up unl now, we've read all of our data via a standard input pipe. This is a perfectly
acceptable and extensible way of handling input. However, Python provides a very simple
mechanism for accessing les directly. There are situaons where direct le access is
preferable. For example, perhaps you're accessing data from within a web applicaon and
using standard IO just isn't possible.
Time for action – accessing les directly
Let's update our LogProcessor so that we can pass a le on the command line rather than
read all of our data via sys.stdin.
1. Create a new le named logscan-c.py, using logscan.py as your template.
We'll be adding le access support to this original "combined format" processor.
2. Update the code in the __name__ == '__main__' secon as follows.
if __name__ == '__main__':
parser = OptionParser()
parser.add_option('-s', '--size', dest="size",
help="Maximum File Size Allowed",
default=0, type="int")
parser.add_option('-f', '--file', dest="file",
help="Path to Web Log File", default="-")
opts,args = parser.parse_args()
call_chain = []
if opts.file == '-':
file_stream = sys.stdin
else:
try:
file_stream = open(opts.file, 'r')
except IOError, e:
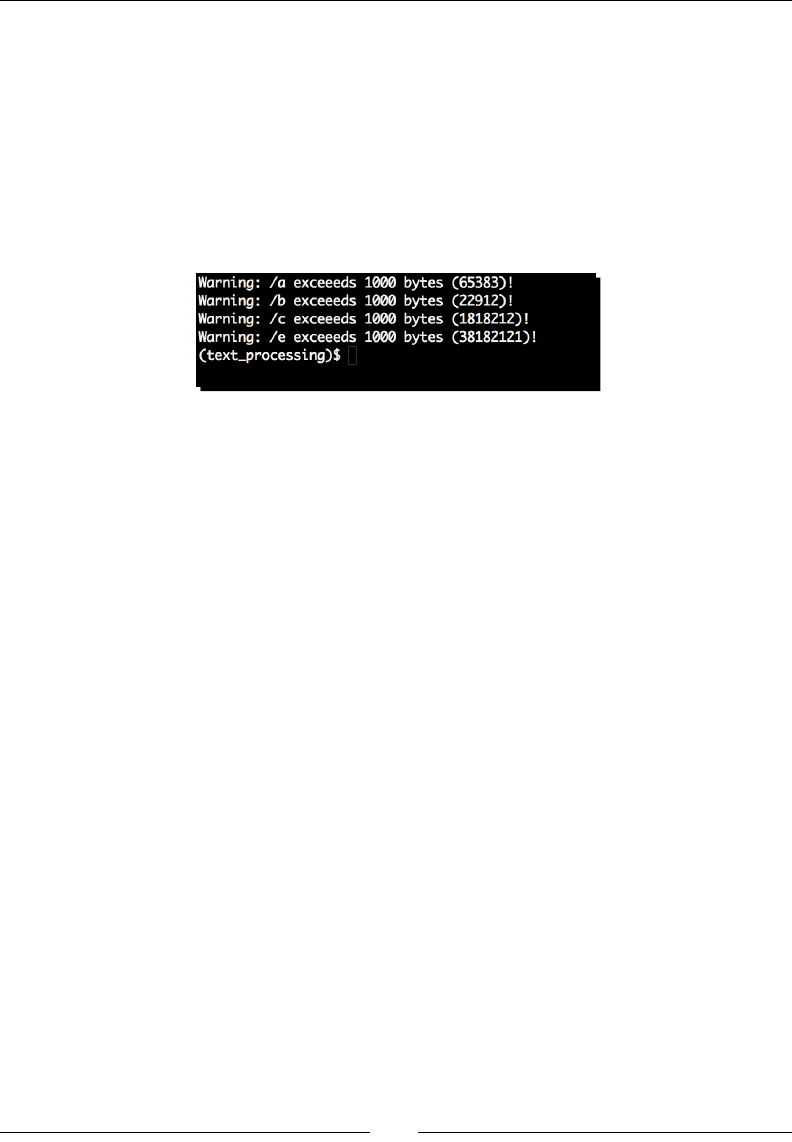
Working with the IO System
[ 38 ]
print >>sys.stderr, str(e)
sys.exit(-1)
size_check = MaxSizeHandler(opts.size)
call_chain.append(size_check.process)
processor = LogProcessor(call_chain)
processor.parse(file_stream)
3. Run the updated applicaon from the command line as follows:
(text_processing)$ python logscan-c.py -s 1000 -f example.log
What just happened?
There are a couple of things here that are new. First, we added a second opon to our
command-line parser. Using a –f or a –file switch, you can now pass in the name of a
logle you wish to parse. We set the default value to a single dash, which signies we should
use sys.stdin as we did in our earlier examples. Using a dash in this manner is common
with command-line-based ulies such as tar and cat.
Next, if an actual le name was passed via our new switch, we're going to open it here via
Python's built-in open funcon. open returns a le object and binds it to the file_stream
aribute. The rst argument to open is the le name; the second is the mode we wish to use.
>>> open('/etc/hosts', 'r')
<open file '/etc/hosts', mode 'r' at 0x10047d250>
>>>
Noce that if a le name wasn't passed in, we simply assign sys.stdin to file_stream.
Both of these objects are considered to be le-like objects. They implement the same set
of core funconality, though the input sources are dierent. This is another example of
polymorphism.
Finally, we've wrapped our open method in a try/except block in order to catch any
excepons that may bubble up from the open funcon. In this example, we are catching
IOErrors only. Any other programming error triggered inside the try block will simply
trigger a stack trace.
Chapter 2
[ 39 ]
The Python excepon hierarchy is described in detail at http://docs.
python.org/library/exceptions.html#exception-hierarchy.
Errors generated during Input/Output operaons generally raise IOError
excepons. You should take some me to familiarize yourself with the layout of
Python's excepon classes.
The open funcon is a built-in factory for python file objects. It is possible to call the file
object directly, but that is discouraged. In later versions of Python, a call to open actually
returns a layered IO object and not just a simple le class.
It's possible to open a le in either text or binary mode. By default, a le is opened using text
mode. To tell Python that you're working with binary data, you simply need to pass a b in
as an addional mode ag. So, if you wanted to open a le for appending binary data, you
would use a ag of ab. Binary mode is only signicant on DOS/Windows systems. When text
data is wrien on a Windows machine, trailing newlines are converted to a newline-carriage
return combinaon. The le object needs to take that into account.
Astute readers should have noced that we never actually closed the le. We simply le it open
and allowed the operang system to reclaim resources when we were nished. While this is
alright for small applicaons like this, we need to be careful to close all les in real applicaons.
Context managers
The with statement has been a Python xture since 2.5. The statement allows the developer
to create a new code block while holding a resource. When the code block exits, the
resource is automacally closed. This is true even if the code block exits in error.
It's also possible to use context managers for other resources as the context
manager protocol is quite extensible.
The following example illustrates the use of a context manager.
Python 2.6.1 (r261:67515, Jul 7 2009, 23:51:51)
[GCC 4.2.1 (Apple Inc. build 5646)] on darwin
Type "help", "copyright", "credits", or "license" for more
information.
>>> with open('/etc/passwd') as f:
... for line in f:
... if line.startswith('root:'):
... print line
...
root:*:0:0:System Administrator:/var/root:/bin/sh
>>> f.read()

Working with the IO System
[ 40 ]
Traceback (most recent call last):
File "<stdin>", line 1, in <module>
ValueError: I/O operation on closed file
>>>
In this example, we opened our system password database and assigned the value returned
by the open funcon to f. While we were in the subsequent block, we were able to perform
le IO as we normally would.
When we exited the block by decreasing the indent, the context manager associated
with the le object ensured the le was automacally closed for us. This is evident by the
excepon raised when we tried to simply read the object outside of the with statement.
Note that while the aribute f is sll a valid object, the underlying le descriptor has already
been closed.
To achieve the same closed-le guarantee without the with statement, we would need to
do something such as the following.
Python 2.6.1 (r261:67515, Jul 7 2009, 23:51:51)
[GCC 4.2.1 (Apple Inc. build 5646)] on darwin
Type "help", "copyright", "credits", or "license" for more
information.
>>> try:
... f = open('/etc/hosts')
... print len(f.read())
... finally:
... try:
... f.close()
... except AttributeError:
... pass
...
345
>>>
Here, the code within the finally block is executed whether or not the proceeding try
block completes successfully. Within our finally block, we've nested yet another try. This
is because if the original open had failed, then f was never bound. Aempng to close it
would result in an AttributeError excepon originang from f.close!
You're encouraged to take advantage of the with statement as it's a wonderful way to avoid
le descriptor leaks within long-running applicaons.

Chapter 2
[ 41 ]
Handling other le types
As we've seen, the Python le-like object is a powerful thing. But, there's more. Let's imagine
for a second that your server logles are compressed in order to save on storage space. We
can make one more simple change to our script so that we have nave support for common
compression formats.
Time for action – handling compressed les
In this example, we'll add support for common compression formats using Python's
standard library.
1. Using the code in logscan-c.py as your starng point, create logscan-d.py.
Add a new funcon just below the MaxSizeHandler class.
def get_stream(path):
"""
Detect compression.
If the file name ends in a compression
suffix, we'll open it using the correct
algorith. If not, we just return a standard
file object.
"""
_open = open
if path.endswith('.gz'):
_open = gzip.open
elif path.endswith('.bz2'):
_open = bz2.open
return _open(path)
2. Within our main secon, update the line that reads open(opts.file) to read
get_stream(opts.file)..
3. At the top of the lisng, ensure that you're imporng the two new compression
modules referenced in get_stream.
import gzip
import bz2
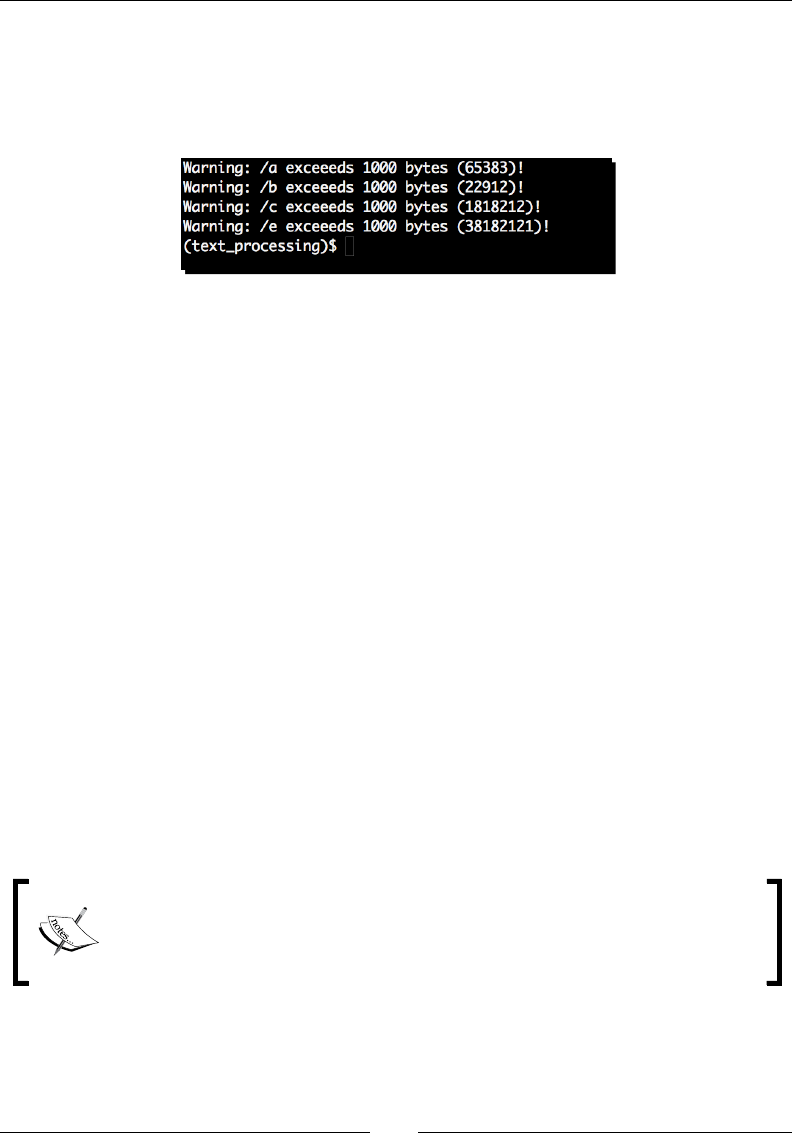
Working with the IO System
[ 42 ]
4. Finally, we can compress our example log using GZIP and run our log scanner as we
have in earlier examples.
(text_processing)$ gzip example.log
(text_processing)$ python logscan-d.py -f example.log.gz -s 1000
What just happened?
In this example, we added support for both GZIP and BZ2 compressed les as supported by
Python's standard library.
The bulk of the new funconality resides in the get_stream funcon we've added. We
look at the le extension provided by the user and make a determinaon as to which open
funcon we want to use. If the le appears to be compressed, we'll use a compression-
specic approach. If the le appears to be plain text, we'll default to the built-in open
funcon we used in our earlier examples.
In order to add our new funconality into the mix, we've replaced our call to open within the
main code to reference our new get_stream funcon.
Implementing le-like objects
As menoned earlier, objects can be used interchangeably as long as they provide the same
set of externally facing methods. This is referred to as implemenng a protocol, or more
commonly, an interface. Languages such as Java, C#, and Objecve-C ulize strict interfaces
that require a developer to implement a minimum set of funconality within a class
Python, on the other hand, does not enforce such restricons. Python's type system is referred
to as Duck Typing. If it looks like a duck and quacks like a duck, then it must be a duck.
While Python itself does not support strict interfaces, there are third-party
libraries available designed to ll that perceived gap. The Zope project is heavily
based on a library-based interface system. For more informaon, see http://
www.zope.org/Products/ZopeInterface.
Probably the most common protocol you'll see within Python code is the le-like object. Not
surprisingly, a le-like object is a Python object designed to "stand in" for a real le object.
The compression streams, as well as the sys.stdin pipe that we looked at earlier, are all
examples of a le-like object.

Chapter 2
[ 43 ]
These objects do not necessarily need to implement all of the methods associated with a
real le object. For example, a read-only object needs to only implement the proper read
methods, and a socket stream doesn't need to implement a seek method.
File object methods
Let's take a closer look at some of the methods found on a standard le object. It's important
to understand le objects as proper IO and data access can dramacally aect the speed
and performance of a data-bound applicaon. This is not an all-inclusive list. To see a
detailed breakdown, visit the http://docs.python.org/library/stdtypes.
html#file-objects.
Objects are free to implement as many of these as they wish, so be prepared to deal with
excepons if you're not certain where your le object is coming from.
close
The close method is responsible for ushing data and closing the underlying le descriptor.
Any aempt to access a le aer it has been closed will result in a ValueError excepon.
This also sets the .closed aribute to True. Note that it is possible to call the close
method more than once without triggering an error.
leno
The fileno method returns the underlying integer le descriptor. Many lower-level IO
funcons (especially those found in the os module) require a standard system-level le
descriptor.
ush
The flush method causes Python to clear the internal I/O buer and force data to disk. This
doesn't perform a disk sync, however, as data may sll simply reside in OS memory.
read
The read method will read data from the le object and return it as a string. If a size
argument is passed in then this method will read that much data from the le object, in
bytes. If the size argument is not passed in then read will go unl EOF is reached.
readline
The readline method will read a single line from a le, retaining the trailing newline
character. A size argument may be passed in, which limits the amount of data that will be
read. If the maximum size is smaller than line length, an incomplete line may be returned.
Each call returns a successive line in a le.
(text_processing)$ python
Python 2.6.1 (r261:67515, Jul 7 2009, 23:51:51)
[GCC 4.2.1 (Apple Inc. build 5646)] on darwin

Working with the IO System
[ 44 ]
Type "help", "copyright", "credits", or "license" for more information.
>>> f = open('/etc/passwd')
>>> f.readline()
'##\n'
>>> f.readline()
'# User Database\n'
>>> f.readline()
'# \n'
>>> f.readline()
'# Note that this file is consulted directly only when the system is
running\n'
>>>
This is a convenient method to extract the rst line of a le; however, there are beer
methods if you wish to simply loop through the context of a text le.
readlines
This method reads each line of a le into a list, unl it reaches EOF. Each element of the list
is one line within a le. As with the readline method, each line retains its trailing new line.
This method is acceptable for smaller les, but can trigger heavy memory use if used on
larger les.
The idiomac way to loop through a text le is to loop on the le object directly, as we've
done in previous examples.
seek
As IO is performed, an oset within the instance is changed accordingly. Subsequent reads (or
writes) will take place at that current locaon. The seek method allows us to manually set that
oset value. To expand upon the read line example from above, let's introduce a seek.
(text_processing)$ python
Python 2.6.1 (r261:67515, Jul 7 2009, 23:51:51)
[GCC 4.2.1 (Apple Inc. build 5646)] on darwin
Type "help", "copyright", "credits", or "license" for more information.
>>> f = open('/etc/passwd')
>>> f.readline()
'##\n'
>>> f.readline()
'# User Database\n'
>>> f.seek(0)
>>> f.readline()
'##\n'
>>> f.readline()
'# User Database\n'
>>>
Chapter 2
[ 45 ]
Noce how the call to seek moves us back to the beginning of the le and we begin reading
the same data a second me. This method is frequently le out of non le-based le-like
objects, or is coded as a null operaon.
tell
This is the counterpart to seek. Calling tell returns the current locaon of the le pointer
as an integer oset.
write
The write method simply takes a source argument and writes it to the open le. It is
not possible to pass in a desired size; the enre string is pushed to disk. If you wish to only
write a poron then you should limit the size via string slicing. A flush or a close may be
required before the data wrien appears on disk. String slicing is covered in our chapter on
Python String Services.
writelines
The writelines method is the counterpart to the readlines method. Given a list or a
sequence of strings, they will be wrien to the le. Newlines are not automacally added
(just as they are not automacally stripped from readlines). This is generally equivalent to
calling write for each element in a list.
Remember that not all of these methods need to be implemented on all le-like
objects. It's up to you to implement what is needed and convey that via proper
documentaon.
Enabling universal newlines
Python ulizes a universal newlines system. Remember that the end-of-line marker varies
by operang system. On Unix and Unix derivaves, a line is marked with a \n terminator. On
Windows systems, a line ends with a \r\n combinaon.
Universal newlines support abstracts that out and presents each end-of-line marker as a \n
to the programmer. To enable this support, append a U to the mode string when calling the
built-in open funcon.
Accessing multiple les
Let's take a lile break from our LogProcessing applicaon and look at Python's
fileinput module. In situaons where you need to open more than one le and iterate
through the connents of each sequenally, this module can be a great help.

Working with the IO System
[ 46 ]
Note that as of the me of wring, the PyEnchant modules were not compable
with Python 3. Therefore, these examples will only work with Python 2.
Time for action – spell-checking HTML content
In this example, we'll build a small applicaon that can be used to check spelling in a
collecon of HTML documents. We'll ulize the PyEnchant library here, which is based
upon the Enchant spell-check system.
1. Step into the virtual environment that we've created for our examples and run the
acvate script for your plaorm.
2. Next, we'll install the pyenchant libraries using the easy_install ulity.
The spell-check system is available on PyPI. Note that you must already have
the Enchant system installed on your workstaon. Ubuntu users can install the
libenchant1c2a library. Windows users should follow the instrucons at http://
www.abisource.com/projects/enchant/. There are binary packages available.
You may also need to install the en_US diconary, which is also covered at the
previous URL.
3. Using easy_install, we'll add the PyEnchant libraries to our virtual
environment.
(text_processing)$ easy_install pyenchant
Searching for pyenchant
Reading http://pypi.python.org/simple/pyenchant/
Reading http://pyenchant.sourceforge.net/
Best match: pyenchant 1.6.1
Downloading http://pypi.python.org/packages/2.6/p/pyenchant/
pyenchant-1.6.1-py2.6.egg#md5=21d991be432cc92781575b42225a6d3e
Processing pyenchant-1.6.1-py2.6.egg
creating /home/jmcneil/text_processing/lib/python2.6/site-
packages/pyenchant-1.6.1-py2.6.egg
Extracting pyenchant-1.6.1-py2.6.egg to /home/jmcneil/text_
processing/lib/python2.6/site-packages
Adding pyenchant 1.6.1 to easy-install.pth file
Installed /home/jmcneil/text_processing/lib/python2.6/site-
packages/pyenchant-1.6.1-py2.6.egg
Processing dependencies for pyenchant
Finished processing dependencies for pyenchant
(text_processing)$

Chapter 2
[ 47 ]
4. Create this rst HTML le and name it index.html. This will be the main page of
our very basic website.
<html>
<head>
<title>Welcome to our home page</title>
</head>
<body>
<h1>Unladen Swallow Spped<h1>
There is an ongoing debate in the Python community regarding
the speed of an unladen swallw. This site aims to settle
that debate.
<ul>
<li><a href="air_speed.html">Air Speed</a>
</ul>
<body>
</html>
Now create this second HTML file and name it air_speed.html, as
referenced in the anchor tag above.
<html>
<head>
<title>Air speed</title>
<head>
<body>
In order to maintain speed, a swallow must flap its wings 32
times per second?
</body>
</html>
</html>
5. Finally, we'll create our code. Create the following le and name it html_
spelling.py. Save it and exit your editor.
import fileinput
import enchant
from enchant.tokenize import get_tokenizer,
from enchant.tokenize import HTMLChunker
__metaclass__ = type
class HTMLSpellChecker:
def __init__(self, lang='en_US'):
"""
Setup tokenizer.
Create a new tokenizer based on lang.
This lets us skip the HTML and only
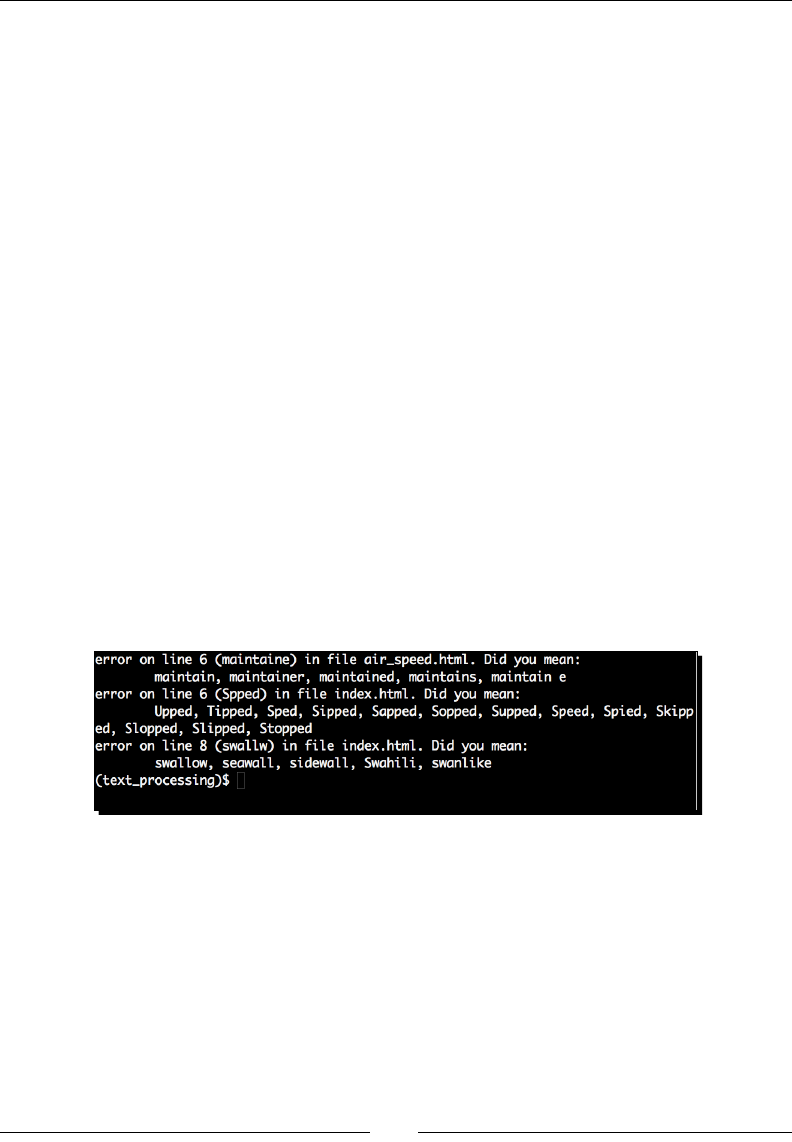
Working with the IO System
[ 48 ]
care about our contents.
"""
self.lang = lang
self._dict = enchant.Dict(self.lang)
self._tk = get_tokenizer(self.lang,
chunkers=(HTMLChunker,))
def __call__(self, line):
for word,off in self._tk(line):
if not self._dict.check(word):
yield word, self._dict.suggest(word)
if __name__ == '__main__':
check = HTMLSpellChecker()
for line in fileinput.input():
for word,suggestions in check(line):
print "error on line %d (%s) in file %s. \
Did you mean one of %s?" % \
(fileinput.filelineno(), word, \
fileinput.filename(),
', '.join(suggestions))
6. Run the last script using the HTML les we created as input on the command line.
If you've entered everything correctly, you should see the following output. Note
we've reformaed here to avoid potenally confusing line-wrapping.
(text_processing)$ python html_spelling.py *.html
What just happened?
We took a look at a few new things in this example, in addion to Python's fileinput
module. Let's step though this example slowly as there's quite a bit going on.
First of all, we imported all of our necessary modules. Following the standards, we rst
imported the modules that are part of the Python standard library, and then we required
third-party packages. In this case, we're using the third-party PyEnchant toolkit.

Chapter 2
[ 49 ]
Next, we bump into something that's probably unfamiliar to you: __metaclass__ = type.
The core Python developers changed the class implementaon (for the beer) before the
release of Python 2.1. We have both new style and old style classes. New style classes must
inherit from the object in some manner, or be explicitly assigned a metaclass of type. This
is a neat lile trick that tells Python to create only new style classes in this module.
Our HTMLSpellChecker class is responsible for performing the spell-check. In the
__init__ method, we create both a diconary (which has no relaon to the built in
dict type) and a tokenizer. We'll use the diconary for both spell-check and to ask for
suggesons if we've found a misspelled word. The tokenizer object will be used to split
each line into its component parts. The chunkers=(HTMLChunker,) argument tells
Enchant that we're working with HTML, and that it should automacally strip markup. The
provided HTMLChunker class saves us some extra work, though we'll cover how to do that
via regular expressions later in the book.
Next, we dene a __call__ method. This method is special as it is executed each me a
Python object is called directly, as if it were a funcon.
(text_processing)$ python
Python 2.6.1 (r261:67515, Jul 7 2009, 23:51:51)
[GCC 4.2.1 (Apple Inc. build 5646)] on darwin
Type "help", "copyright", "credits", or "license" for more information.
>>> class A(object):
... def __call__(self):
... print "A is for Apple"
...
>>> a = A()
>>> a()
A is for Apple
>>> a.__call__()
A is for Apple
>>>
This example illustrates the usage of a __call__ method in detail. Noce how we can
simply treat our object as if it were a funcon. Of course, it's also possible to call the __
call__ method directly.
Within the body of the __call__ method, we tokenize each line, using the tokenizer we
created within __init__. PyEnchant strips out the HTML for us. Each word is then validated
via the diconary. If it is not found, the applicaon will provide a list of suggesons. The
yield keyword marks this method as a generator, so we yield each spelling error and its
suggesons back to our caller.
Now, we get to our main content. The rst line is familiar. We're simply creang an instance
of our HTMLSpellChecker class. The next secon is where we put fileinput to use.

Working with the IO System
[ 50 ]
The call to fileinput.input creates an iterator that transparently chains together all of
the les we passed in on the command line. Helper funcons fileinput.filelineno,
and fileinput.filename give us the current le's line number and the current le's
name, respecvely.
In Python, an iterator is a type of object that implements an interface that
allows the developer to easily iterate through its contents. For more informaon
on iteraon, see http://docs.python.org/library/stdtypes.
html#iterator-types.
You may have noced that we don't actually pass any le names to the fileinput.input
method. The module actually defaults to the values on the command line, and assumes they
are valid paths. If nothing is passed on the command line then the module will fall back to
standard input. It is possible to bypass this behavior and pass in our own list of les.
Simplifying multiple le access
The fileinput module takes a lot of complexity in opening and managing mulple les.
In addion to current le and line number, it's possible to look at things such as absolute
line number among all les and access le object-specic items such as a le's specic
integer descriptor.
Using a classic approach, one would need to open each le manually and iterate through,
retaining overall posion informaon.
As we said previously, it's possible to use fileinput without relying on the value of the
command-line arguments on sys.argv. The fileinput.input funcon takes an oponal
list of les to use read rather than working with the default.
A drawback in using the module-level methods is that we'll be creang a single instance
of fileinput.FileInput under the covers, which holds global state. Doing this ensures
that we cannot have more than one iterator acve at one point of me and that it's not a
thread-safe operaon.
Thankfully, we can easily overcome these limitaons by building our own instance of
fileinput.FileInput rather than relying on the module-convenient funcons.
>>> import fileinput
>>> input = fileinput.FileInput(['/etc/hosts'])
>>> for line in input:
... if line.startswith('127'):
... print line
...
127.0.0.1 localhost
>>>
Chapter 2
[ 51 ]
Each fileinput.FileInput instance contains the same methods available to us at the
module-level, though they all operate on their own separate context and do not interfere
with each other.
Inplace ltering
Finally, the fileinput module contains an inplace lter feature that isn't very widely
ulized. If the fileinput.input funcon is called with an inplace=1 keyword argument,
or if inplace=1 is passed to the fileinput.FileInput constructor, the opened les
are renamed to backup les and standard output is redirected to the original le. Inplace
ltering is disabled when reading from standard input.
For example, take a look at the following snippet of code.
import sys
import fileinput
# Iterate through all lines and replace
# convert everything to uppercase.
for line in fileinput.input(inplace=1, backup='.bak'):
sys.stdout.write(line.upper())
Running this script with a text le on the command line will rst generate a backup of the
text le, ending in a .bak extension. Next, the original le will be overwrien with whatever
is printed as the standard output. Specically, we're simply translang all of the text to
uppercase here.
If you accidentally divide by zero and don't handle the excepon, your desnaon le can be
le in a corrupted state as your applicaon may exit unexpectedly before you write any data
to your le.
When using this approach, ensure you're properly handling excepons as your
le will be opened in write mode and truncated accordingly.
Pop Quiz – le-like objects
1. As we've seen, le-like objects do not necessarily need to implement the enre
standard le object's methods. If an aempt is made to run a method and that
method does not exist, what happens?
2. In what situaon might you be beer o using the readlines method of a le
versus iterang over the le object itself?
3. What happens if you aempt to open a text le and you specify binary mode?
4. What is the dierence between a le object and a le-like object?

Working with the IO System
[ 52 ]
Accessing remote les
We've now had a somewhat complete crash-course in Python I/O. We've covered les,
le-like objects, handling mulple les, wring lter programs, and even modifying les
"inplace" using some slightly esoteric features of the fileinput module.
Python's standard library contains a whole series of modules, which allow you to access data
on remote systems almost as easily as you would access local le. Through the le-like object
protocol, most I/O is transparent once the protocol-level session has been congured and
established.
Time for action – spell-checking live HTML pages
In this example, we'll update our HTML spell-checker so that we can check pages that are
already being served, without requiring local access to the le system. To do this, we'll make
use of the Python urllib2 module.
1. We'll be using html_spelling.py le as our base here, so create a copy of it and
name the le html_spelling-b.py.
2. At the top of the le, update your import statements to include urllib2, and
remove the fileinput module as we'll not take advantage of it in this example.
import urllib2
import enchant
import optparse
3. Now, we'll update our module-level main code and add an opon to accept a URL on
the command-line.
if __name__ == '__main__':
parser = optparse.OptionParser()
parser.add_option('-u', '--url', help="URL to Check")
opts, args = parser.parse_args()
if not opts.url:
parser.error("URL is required")
4. Finally, change the fileinput.input call to reference urllib2.urlopen, add a
line number counter, and polish up the output content.
for line in urllib2.urlopen(opts.url):
lineno = 0
for word,suggestions in check(line):
lineno += 1
print "error on line %d (%s) on page %s. Did you
mean:\n\t%s" % \
(lineno, word, opts.url, ', '.join(suggestions))

Chapter 2
[ 53 ]
5. That should be it. The nal lisng should look like the following code. Noce how
lile we had to change.
import urllib2
import enchant
import optparse
from enchant.tokenize import get_tokenizer
from enchant.tokenize import HTMLChunker
__metaclass__ = type
class HTMLSpellChecker:
def __init__(self, lang='en_US'):
"""
Setup tokenizer.
Create a new tokenizer based on lang.
This lets us skip the HTML and only
care about our contents.
"""
self.lang = lang
self._dict = enchant.Dict(self.lang)
self._tk = get_tokenizer(self.lang,
chunkers=(HTMLChunker,))
def __call__(self, line):
for word,off in self._tk(line):
if not self._dict.check(word):
yield word, self._dict.suggest(word)
if __name__ == '__main__':
parser = optparse.OptionParser()
parser.add_option('-u', '--url', help="URL to Check")
opts, args = parser.parse_args()
if not opts.url:
parser.error("URL is required")
check = HTMLSpellChecker()
for line in urllib2.urlopen(opts.url):
lineno = 0
for word,suggestions in check(line):
lineno += 1
print "error on line %d (%s) on page %s. Did you
mean:\n\t%s" % \
(lineno, word, opts.url, ', '.join(suggestions))
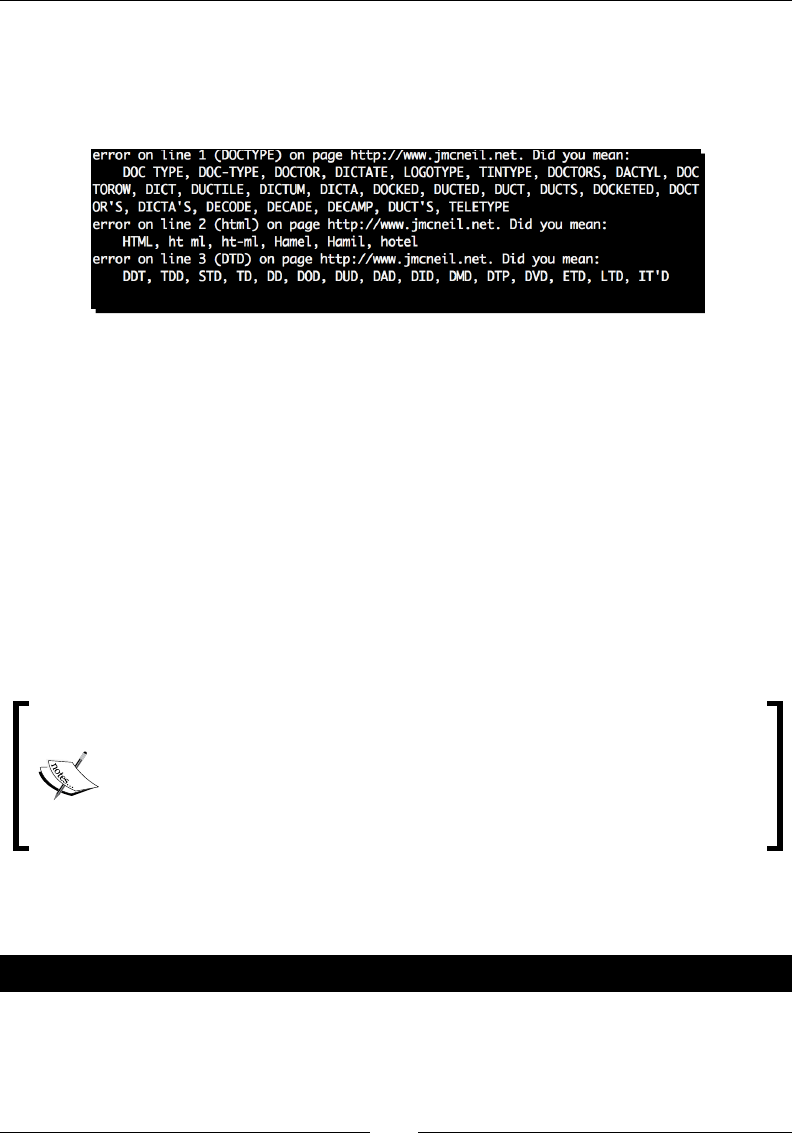
Working with the IO System
[ 54 ]
6. Now, run the applicaon with a URL passed in on the command line. If it was coded
correctly, your output should resemble the following.
(text_processing)$ python html_spelling-b.py --url=http://www.
jmcneil.net
What just happened?
By simply changing a few lines of code, we were able to access a web page and scan for
spelling errors almost exactly as we did when we checked our local les. Of course, you're
seeing a limitaon of our diconary here. Our spell-checker sees words such as DOCTYPE,
DTD, and HTML as misspelled as they do not fall under the en_US category.
We could x this by adding a custom diconary to the spell-checker that includes technical
lingo, but the goal in this example is to introduce I/O with the urllib2 module.
One important thing to note is that the urllib2.urlopen method supports more than just
the HTTP protocol. You can also access les using the secure-sockets layer by simply passing
in an HTTPS URL. It's even possible to access local les by passing a path into the urllib2.
urlopen method.
Yes, there is a urllib module. It is simply named urllib. This newer version
is far more extensible and is recommended. However, it can be a bit tricky to
understand in detail. There is a great reference available out there that describes
some of the intricacies in a simple manner. The document is tled "urllib2: The
Missing Manual" and is available at http://www.voidspace.org.uk/
python/articles/urllib2.shtml.
The urllib2.urlopen can also directly access les via the FTP protocol. It's quite simple;
the URL you pass into urlopen simply needs to begin with ftp://.
Have a go hero – access web logs remotely
As we've covered both web LogProcessing and the urllib2 module supercially, you should
be able to update our earlier LogProcessing applicaon to access les remotely. You don't
need an external account to try this. Remember, URLs beginning with file:// are valid
urllib2.urlopen URLs. You can make this change and test it locally.
Chapter 2
[ 55 ]
Error handling
By now, you may have noced that while we're able to access a range of protocols using this
same mechanism, they all potenally return dierent errors and raise varying excepons.
There are two obvious soluons to this problem: we could catch each individual excepon
explicitly, or simply catch an excepon located at the top of the excepon hierarchy.
Fortunately, we don't need to take either of those sub-opmal approaches. When an internal
error occurs within the urllib2.urlopen funcon, a urllib2.URLError excepon is
raised. This gives us a convenient way to catch relevant excepons while leng unrelated
problems bubble up. Let's take a quick look at an example to solidify the point.
Python's excepon hierarchy is worth geng to know. You can read up
on excepons in detail at http://docs.python.org/library/
exceptions.html.
Time for action – handling urllib 2 errors
In this example, we'll update our HTML spell-checker in order to handle network errors
slightly more gracefully. Whenever you provide ulies and interfaces to your users, you
should present errors in a clean manner (while logging any valid stack traces).
1. We're going to build o html_spelling-b.py, so copy it over and rename it to
html_spelling-c.py.
2. At the top of the le, add import sys. We'll need access to the methods within
the sys module.
3. Update the __name__ == '__main__' secon to include some addional
excepon-handling logic.
if __name__ == '__main__':
parser = optparse.OptionParser()
parser.add_option('-u', '--url', help="URL to Check")
opts, args = parser.parse_args()
if not opts.url:
parser.error("URL is required")
check = HTMLSpellChecker()
try:
source = urllib2.urlopen(opts.url)
except urllib2.URLError, e:
reason = str(e)
try:
reason = str(e.reason)
Working with the IO System
[ 56 ]
except AttributeError:
pass
print >>sys.stderr, "File Download Error: %s" % reason
sys.exit(-1)
for line in urllib2.urlopen(opts.url):
lineno = 0
for word,suggestions in check(line):
lineno += 1
print "error on line %d (%s) on page %s. Did you
mean:\n\t%s" % \
(lineno, word, opts.url, ', '.join(suggestions))
4. You should now be able to execute this code and pass in a pair of invalid URL values,
using dierent protocols. Your output should be similar to the following.
(text_processing)$ python html_spelling-c.html --url=ftp://
localhost
(text_processing)$ python html_spelling-c.html --url=http://www.
jmcneil.net/notfound.html
What just happened?
We made a small update to our main code so that we can beer handle excepons bubbling
up from the urllib2 module.
In our excepon handler's except statement, we do something that might seem slightly
peculiar. First, we bind the value of str(e) to an aribute named reason. Next, we set up
another try/except block and aempt to bind the value of str(e.reason) to that same
reason aribute. Why would we do that?
The explanaon is simple. Some of the excepons bubbling up have a reason aribute,
which provides more informaon. Specically, the FTP errors contain it. We always try to pull
the more specic error. If it doesn't exist, that will raise an AttributeError excepon. We
just ignore it and go with the rst value of reason.

Chapter 2
[ 57 ]
Our method of accessing the reason aribute highlights Python's Duck Typing design again.
It would have been possible for us to check whether a reason aribute existed on our
URLError object before aempng to access it. In other words, we could have ensured our
object adhered to a strict interface. This approach is usually dubbed Look Before You Leap.
Instead, we took the other (and more Python standard) way. We just did it and handled the
fallout in the event of an error. This is somemes referred to as Easier to Ask Forgiveness
than Permission.
Finally, we simply printed out a meaningful error and exited our applicaon. If you had
observed the examples of this chapter, you'd noce that it does not maer which protocol
type we use.
Handling string IO instances
There's one more IO library that we'll take a look at in this chapter – Python's StringIO
module. In many of your applicaons, you're likely to run into a situaon where it would be
convenient to write to a locaon in memory rather than using string operaons or direct IO
to a temporary le.
StringIO handles just this. A StringIO instance is a le-like object that simply appends
wrien data to a locaon in memory.
[GCC 4.2.1 (Apple Inc. build 5646)] on darwin
Type "help", "copyright", "credits", or "license" for more information.
>>> import StringIO
>>> handle = StringIO.StringIO()
>>> handle.write('A')
>>> handle.write('B')
>>> handle.getvalue()
'AB'
>>> handle.seek(0)
>>> handle.write("a")
>>> handle.getvalue()
'aB'
>>>
Looking at the example, you can see that the StringIO instance supports le methods such
as seek and write. By calling getvalue, we're able to retrieve the enre in-memory string
representaon.
There's also a cStringIO module, which implements nearly the same interface and is quite
a bit faster, though there are limitaons on Unicode values and subclassing that should be
understood before using it. For more informaon, see the StringIO library documentaon
available at http://docs.python.org/library/stringio.html.
Working with the IO System
[ 58 ]
The StringIO modules changed a bit between Python 2 and Python 3. Both
the StringIO and the cStringIO modules are gone. Instead, developers
should use io.StringIO for textual data and IO.BytesIO for binary data.
There is no longer a dierenaon between a pure Python implementaon and
the C-level implementaon.
Understanding IO in Python 3
The last thing we'll look at in this chapter is the IO system in Python 3.0. In order to ease
transion, the new IO code has been back-ported to Python 2.6 and is available via the IO
module.
The new IO system introduces a layered approach, almost comparable to Java's IO system.
At the boom lies the IOBase class, which provides commonalies among the IO stream
classes. From there, objects are stacked according to IO type, buering capability, and
read/write support.
While the details look complex, the actual interface to system IO really doesn't change too
much. For example, the io.open call can generally be used the same way. However, there
are some dierences.
Most importantly, binary mode maers. The text will be decoded automacally into Unicode
using the system's locale, or a codec passed. If a le isn't truly text, it shouldn't be opened as
text. Files opened in binary mode now return a dierent object type than les opened in text
mode.
Python 2.6.1 (r261:67515, Jul 7 2009, 23:51:51)
[GCC 4.2.1 (Apple Inc. build 5646)] on darwin
Type "help", "copyright", "credits", or "license" for more information.
>>> import io
>>> io.open('/etc/hosts')
<io.TextIOWrapper object at 0x10049d250>
>>> io.open('/bin/ls', 'rb')
<io.BufferedReader object at 0x10049d210>
>>>

Chapter 2
[ 59 ]
Noce that opening a le in text mode, which is the default mode, returns a
TextIOWrapper object whereas opening a le in binary mode returns a BufferdReader
object. Although it doesn't appear as a subclass of BufferedIOBase, TextIOWrapper
does actually implement buered IO.
The new io.open method is intended to replace the built-in open method as of 3.0. As with
the exisng funcon, it can also be used in a context manager.
For more details on the new Python IO system, see the documentaon available at http://
docs.python.org/release/3.0.1/library/io.html. This covers the new IO system
in detail and underscores some of the changes between major Python releases.
Summary
This chapter served as a crash course on Python IO. The goal here is to ensure that you know
how to actually access your data in order to process it.
We covered quite a bit here and really focused on understanding Python's IO system. Most
textual data you'll process will likely come from local disk les, so understanding this material
is important.
You also learned how to build your own le-like-objects and take advantage of
polymorphism, a powerful object-oriented development aribute. We covered HTTP and
compressed data, but as you've seen, the underlying access methods do not maer when
the exposed interface follows the le-like object protocol.
In the next chapter, we'll examine text handling using Python's built in string funcons.

Python String Services
Python's built-in string services provide all of the text-processing funconality
you would expect from any full-featured programming language. This includes
methods to search, test, and create new string objects from exisng ones.
String objects also provide a C-like format mechanism that allows us to build
new string objects and interpolate them with standard Python values and
user-dened objects. Later versions of Python are built on this concept.
Addionally, the actual string objects provide a rich set of methods and
funcons that may be used to further manipulate textual string data.
In this chapter, we will:
Cover the basics of Python string and Unicode objects so that you'll understand the
similaries and dierences.
Take a detailed look at Python string formang so that you'll understand how to
easily build new strings. We'll look at the older and more common syntax as well as
the newer formats as dened in PEP-3101.
Familiarize yourself with the methods found on the standard Python string objects
as well as the Unicode components.
Dive into built-in string templang. We'll see more examples on templang in more
detail in Chapter 7, Creang Templates.
Understanding the basics of string object
Python supports both Unicode and ASCII-encoded text data. However, in versions of Python
earlier than 3.0, there are two built-in objects to manage text data. The str type holds standard
byte-width characters, while the unicode type exists to deal with wider unicode data.
3

Python String Services
[ 62 ]
All Python string objects are immutable, regardless of encoding type. This generally means
that methods that operate on strings all return new objects and not modied text. The big
excepon to this rule is the StringIO module as covered in Chapter 2, Working with the
IO System. Eding StringIO data via its le-like interface results in manipulaon of the
underlying string content.
Python's built-in string services do not operate on any type of structured data. They deal
with text data at the character-level.
In Python 2.7, a new memoryview module has been introduced. These objects
allow certain C-based data types to expose their contents via a byte-oriented
interface. Strings support this funconality. Generally speaking, however, a
memoryview object shouldn't be used for standard text operaons.
Dening strings
Strings can be dened in a variety of ways, using a variety of dierent quong methods. The
Python interpreter treats string values dierently based on the choice of quotes used. Let's
look at an example that includes a variety of dierent denion approaches.
Time for action – employee management
In this short and rather contrived example, we'll handle some simple employee records and
just print them to the screen. Along the way, however, we'll cover the various dierent ways
a developer can quote and dene string literals. A literal is a value that is explicitly entered,
and not computed.
1. From within our text processing virtual environment, create a new le and name it
string_definitions.py.
2. Enter the following code:
import sys
import re
class BadEmployeeFormat(Exception):
"""Badly formatted employee name"""
def get_employee():
"""
Retrieve user information.
This method simply prompts the user for
an employee's name and his current job
title.
"""
Chapter 3
[ 63 ]
employee = raw_input('Employee Name: ')
role = raw_input("Employee's Role: ")
if not re.match(r'^.+\s.+', employee):
raise BadEmployeeFormat('Full Name Required '
'for records database.' )
return {'name': employee, 'role': role }
if __name__ == '__main__':
employees = []
print 'Enter your employees, EOF to Exit...'
while True:
try:
employees.append(get_employee())
except EOFError:
print
print "Employee Dump"
for number, employee in enumerate(employees):
print 'Emp #%d: %s, %s' % (number+1,
employee['name'], employee['role'])
print u'\N{Copyright Sign}2010, SuperCompany, Inc.'
sys.exit(0)
except BadEmployeeFormat, e:
print >>sys.stderr, 'Error: ' + str(e)
3. Assuming that you've entered the content correctly, run it on the command line.
Your output should be similar to the following:
(text_processing)$ python string_definitions.py

Python String Services
[ 64 ]
What just happened?
Let us go through this example. There are quite a few things to point out.
The very rst thing we do, other than import our required modules, is dene a custom
excepon class named BadEmployeeFormat. We simply have a subclass Exception
and dene a new docstring. Note that no pass keyword is required; the docstring is
essenally the body of our class. We do this because later on in this example, we'll raise this
error if an employee name doesn't match our simple validaon.
Now, note that our docstring is enclosed by triple quotes. As you've probably guessed,
that holds a special meaning. Python strings enclosed in triple quotes preserve line endings
so that mulline strings are represented correctly. Consider the following example.
Python 2.6.1 (r261:67515, Feb 11 2010, 00:51:29)
[GCC 4.2.1 (Apple Inc. build 5646)] on darwin
Type "help", "copyright", "credits", or "license" for more information.
>>> s = """This is a multiline string.
...
... There are many like it, but this one
... is mine.
... """
>>>
>>> print s
This is a multiline string.
There are many like it, but this one
is mine.
>>>
As you can see, the new line values are included. Note that all other values sll require
addional escaping. For example, including a \t will sll translate to a tab character.
Python 2.6.1 (r261:67515, Feb 11 2010, 00:51:29)
[GCC 4.2.1 (Apple Inc. build 5646)] on darwin
Type "help", "copyright", "credits", or "license" for more information.
>>> t = """This still creates a \tab"""
>>> print t
This still creates a ab
>>>
Aer our excepon class, we create a module-level funcon named get_employee that is
responsible for collecng, tesng, and returning employee data. The rst thing you should
noce is another triple quoted docstring. You should note that docstrings do not have
to be triple-quoted, but they do need to be string literals.

Chapter 3
[ 65 ]
The very rst line of code within get_employee calls raw_input, which simply receives a
single line of text via standard input, trimming the trailing newline. The single-quoted string
passed to it serves as the text prompt that the caller will see on the command line.
The very next line includes another call to raw_input, asking for the employee's role.
Noce that this invocaon includes the prompt text in double quotes. Why is that? The
answer is simple. We used an apostrophe in the word "employee's" in order to indicate
ownership. Both double and single quotes serve the same funconal purpose. There is
nothing dierent about them, as in other languages. They're both allowed in order to let you
include one set of quotes within the other without resorng to long sequences of escapes.
As you can see, the following string variables are all the same.
Python 2.6.1 (r261:67515, Feb 11 2010, 00:51:29)
[GCC 4.2.1 (Apple Inc. build 5646)] on darwin
Type "help", "copyright", "credits", or "license" for more information.
>>> single = '"Yes, I\'m a programmer", she said.'
>>> double = "\"Yes, I'm a programmer\", she said."
>>> triple = """Yes, I'm a programmer", she said."""
>>> print single
"Yes, I'm a programmer", she said.
>>> print double
"Yes, I'm a programmer", she said.
>>> print triple
Yes, I'm a programmer", she said.
>>>
The Python convenon is to use single quotes for strings unless there is an override needed
to use a dierent format, so you should also adhere to this whenever possible.
On the next line, we call re.match. This is a very simple regular expression that is used to
validate the employee's name. We're checking to ensure that the input value contained a space
because we want the end-user to supply both the rst and last name. We'd do a much beer
job in a real applicaon (where we would probably ask for both values independently).
The call to re.match includes a single-quoted string, but it's prexed with a single r. That
leading r indicates that we're dening a raw string. A raw string is interpreted as-is, and
escape sequences hold no special meaning. The most common use of raw strings is probably
within regular expressions like this. The following brief example details the dierence
between manual escapes and raw strings.
Python 2.6.1 (r261:67515, Feb 11 2010, 00:51:29)
[GCC 4.2.1 (Apple Inc. build 5646)] on darwin
Type "help", "copyright", "credits", or "license" for more information.
>>> standard = '\n\nOur Data\n\n'
>>> raw = r'\n\nOur Data\n\n'
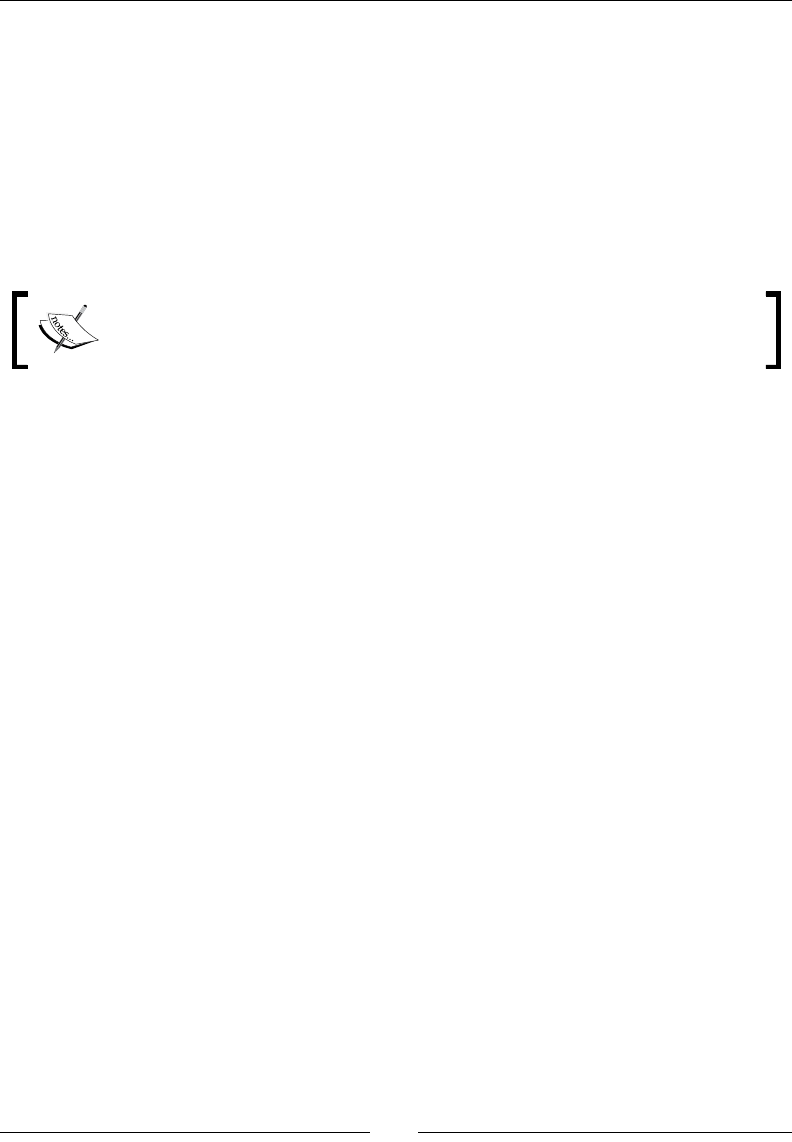
Python String Services
[ 66 ]
>>> print standard
Our Data
>>> print raw
\n\nOur Data\n\n
>>>
Using the standard string syntax, we would have had to include backslashes if we wished
to mute the escape interpretaon, and our string value would have been '\\n\\nOur
Data\\n\\n'. Of course, this is a much more dicult string to read.
Users of the popular Django framework may recognize this syntax. Django uses
regular expressions to express HTTP request-roung rules. By default, these
regular expressions are all contained within raw string denions.
If the regular expression test fails, we'll raise our BadEmployeeFormat excepon that we
dened at the top of this example. Look carefully at the raise statement. Noce that the
string passed into BadEmployeeFormat's __init__ method is actually composed of two
strings. When the Python interpreter encounters string literals separated by white space,
it automacally concatenates them together. This provides a nice way for the developer
to wrap his or her strings neatly without creang long and hard to manage lines. As these
strings were dened within the parenthesis following BadEmployeeFormat, we were able
to include a newline.
Now, within our main secon, we create an innite loop and begin calling get_employee.
We append the result of each successful call onto our employees list. If an excepon is raised
from within get_employee, we might have to take some addional acon.
If EOFError bubbles up then a user has clicked Ctrl + d (Ctrl + z on Windows), indicang that
they have no more data to supply. The raw_input funcon actually raises the excepon;
we just let it percolate up the call stack. The rst thing we do within this handler is print out
some status text we nofy the user that we're dumping our employee list.
Next, we have a for loop that iterates on the results of enumerate(employee).
Enumerate is a convenient funcon that, when given a sequence as an argument, returns
the zero-based loop number as well as the actual value in a tuple, like in this example
snippet:
Python 2.6.1 (r261:67515, Feb 11 2010, 00:51:29)
[GCC 4.2.1 (Apple Inc. build 5646)] on darwin
Type "help", "copyright", "credits", or "license" for more information.
>>> for c,i in enumerate(xrange(2)):
... print "Loop %d, xrange value %d" % (c,i)
...

Chapter 3
[ 67 ]
Loop 0, xrange value 0
Loop 1, xrange value 1
>>>
Each employee's name and role is printed out this way. This connues unl we reach the end
of the list, at which point we're going to print a simple copyright statement.
When our employee applicaon becomes wildly popular, we want to be certain that we're
protected aer all! The copyright line introduces yet another string variant – a Unicode
literal. Unicode strings contain all of the funconality of standard string objects, plus some
encoding specics.
A Unicode literal can be created by prepending any standard string with a single u, much
like we did with the r for raw strings. Addionally, Unicode strings introduce the \N escape
sequence, which allows us to insert a Unicode character by standardized name rather than
literally or by character code.
Python 2.6.1 (r261:67515, Feb 11 2010, 00:51:29)
[GCC 4.2.1 (Apple Inc. build 5646)] on darwin
Type "help", "copyright", "credits", or "license" for more information.
>>> russian_pm = u'\N{CYRILLIC CAPITAL LETTER PE}\N{CYRILLIC SMALL
LETTER U}\N{CYRILLIC SMALL LETTER TE}\N{CYRILLIC SMALL LETTER SHORT
I}\N{CYRILLIC SMALL LETTER EN}'
>>> print russian_pm
Путйн
>>> russian_pm = u'\u041f\u0443\u0442\u0439\u043d'
>>> print russian_pm
Путйн
>>>
As of now, you should understand that Unicode allows us to represent characters outside of
the ASCII range. This includes symbols such as the one we added above as well as alphabets
such as Cyrillic, which at one point would have required its own encoding standard (in fact,
KOI8 is just that). We'll cover Unicode and addional text encodings in much more detail
when we get to Chapter 8, Understanding Encodings and i18n
Finally, we'll catch our BadEmployeeFormat excepon. This indicates that our test regular
expression didn't match. Here, you'll see that we're concatenang a string literal with a
calculated value, so we can't simply place them adjacent within our source lisng. We use
plus-syntax to create a new string, which is a concatenaon of the two.
One important thing to remember is that, although there are three dierent variants of
quotes and raw string modiers, there are only two string types: unicode and str.

Python String Services
[ 68 ]
Building non-literal strings
The majority of the strings you'll create in a manual fashion will be done using literals. In
most other scenarios, text data is generated as the result of a funcon or a method call.
Consider the value returned by sys.stdin.readline. We'll cover some of the common
methods for building strings programmacally as we progress through this chapter.
Python 3.0 eliminates the concept of a separate byte string and Unicode string.
All strings in Python 3.0 are Unicode. Dening a string using the u'content'
approach while running under Py3k will simply result in a SyntaxError
excepon. As there is only one string type, the previously menoned
basestring is no longer valid within Python 3.0, either. A bytes type
replaces the standard string object and is used to represent raw byte data, such
as binary informaon.
Pop Quiz – string literals
1. We've seen where we would use raw strings and we've seen where we would use
Unicode strings. Where might you wish to combine the two? Is it even possible?
2. What do you suppose would happen if you tried to concatenate a Unicode object
and a standard Python string? Here's a hint: what happens when you divide a whole
integer by a oat?
3. Suppose a ZeroDivisionError or an AttributeError is triggered from within
get_employee. What do you suppose would happen?
String formatting
In addion to simply creang plain old strings as we've just covered, Python also lets you
format them using a C sprintf style syntax. Strings in later versions of Python also support
a more advanced format method.
Time for action – customizing log processor output
Let's revisit and extend our web server log processor now. Our rst versions simply printed
text to sys.stdout when informaon was encountered. Let's expand upon that a bit. Using
Python's built-in string formaers, we'll do a beer job at reporng what we nd. In fact, we'll
delegate that responsibility to the classes responsible for evaluang the parsed log data.
We'll also add some addional processing meta-output as well, such as how many
lines we've processed and how long it takes to execute the enre report. This is helpful
informaon as we further extend our log processor.

Chapter 3
[ 69 ]
1. We're going to use logscan-c.py from Chapter 2, Working with the IO System as
our base here, so copy it over and rename it as logscan-e.py.
2. Update the code in logscan-e.py to resemble the following.
import time
import sys
from optparse import OptionParser
class LogProcessor(object):
"""
Process a combined log format.
This processor handles logfiles in a combined format;
objects that act on the results are passed in to
the init method as a series of methods.
"""
def __init__(self, call_chain=None):
"""
Setup parser.
Save the call chain. Each time we process a log,
we'll run the list of callbacks with the processed
log results.
"""
if call_chain is None:
call_chain = []
self._call_chain = call_chain
def split(self, line):
"""
Split a logfile.
Initially we just want size and requested filename, so
we'll split on spaces and pull the data out.
"""
parts = line.split()
return {
'size': 0 if parts[9] == '-' else int(parts[9]),
'file_requested': parts[6]
}
def report(self):
"""
Run report chain.
"""
for c in self._call_chain:
print c.title
print '=' * len(c.title)

Python String Services
[ 70 ]
c.report()
print
def parse(self, handle):
"""
Parses the logfile.
Returns a dictionary composed of log entry values,
for easy data summation.
"""
line_count = 0
for line in handle:
line_count += 1
fields = self.split(line)
for handler in self._call_chain:
getattr(handler, 'process')(fields)
return line_count
class MaxSizeHandler(object):
"""
Check a file's size.
"""
def __init__(self, size):
self.size = size
self.name_size = 0
self.warning_files = set()
@property
def title(self):
return 'Files over %d bytes' % self.size
def process(self, fields):
"""
Looks at each line individually.
Looks at each parsed log line individually and
performs a size calculation. If it's bigger than
our self.size, we just print a warning.
"""
if fields['size'] > self.size:
self.warning_files.add(
(fields['file_requested'], fields['size']))
# We want to keep track of the longest file
# name, for formatting later.
fs = len(fields['file_requested'])
if fs > self.name_size:
self.name_size = fs

Chapter 3
[ 71 ]
def report(self):
"""
Format the Max Size Report.
This method formats the report and prints
it to the console.
"""
for f,s in self.warning_files:
print '%-*s :%d' % (self.name_size, f, s)
if __name__ == '__main__':
parser = OptionParser()
parser.add_option('-s', '--size', dest="size",
help="Maximum File Size Allowed",
default=0, type="int")
parser.add_option('-f', '--file', dest="file",
help="Path to Web Log File", default="-")
opts,args = parser.parse_args()
call_chain = []
if opts.file == '-':
file_stream = sys.stdin
else:
try:
file_stream = open(opts.file)
except IOError, e:
print >>sys.stderr, str(e)
sys.exit(-1)
size_check = MaxSizeHandler(opts.size)
call_chain.append(size_check)
processor = LogProcessor(call_chain)
initial = time.time()
line_count = processor.parse(file_stream)
duration = time.time() - initial
# Ask the processor to display the
# individual reports.
processor.report()
# Print our internal statistics
print "Report Complete!"
print "Elapsed Time: %#.8f seconds" % duration
print "Lines Processed: %d" % line_count
print "Avg. Duration per line: %#.16f seconds" % \
(duration / line_count) if line_count else 0
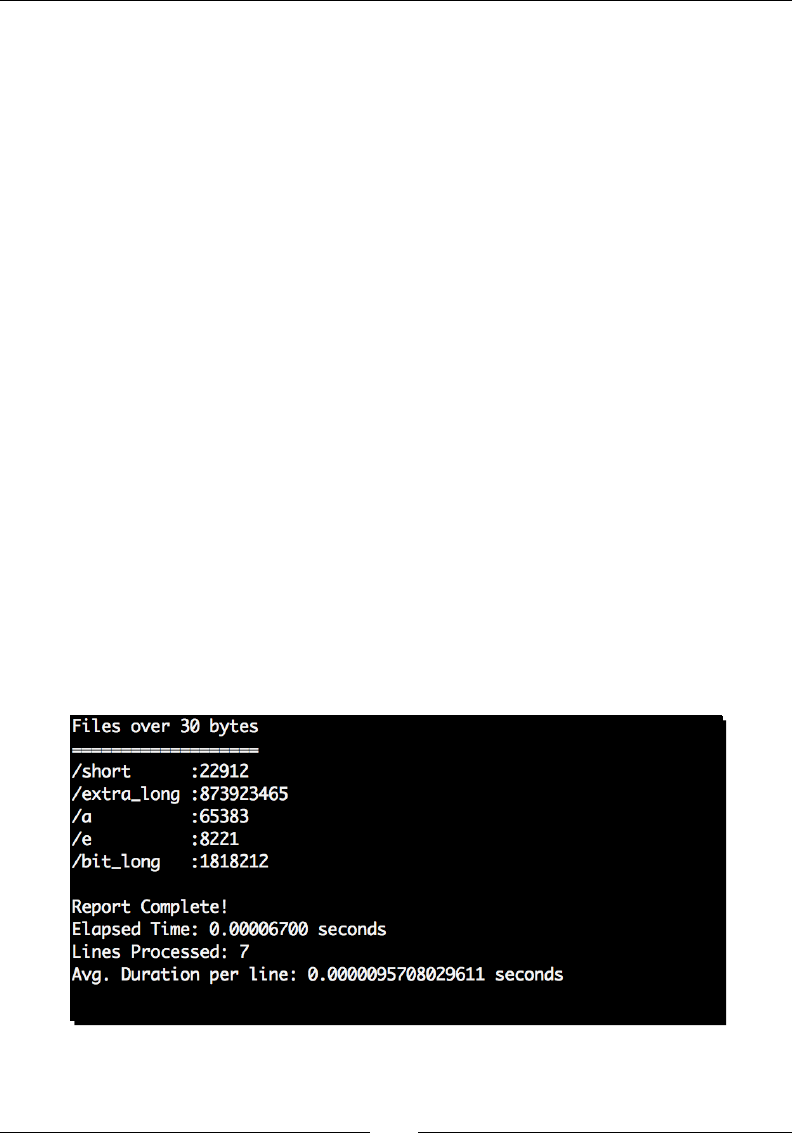
Python String Services
[ 72 ]
3. Now, in order to illustrate what's going on here, create a new le named
example2.log, and enter the following data. Note that each line begins with
127.0.0.1.
127.0.0.1 - - [29/Mar/2010:00:48:05 +0000] "GET /a HTTP/1.1" 200
65383 "-" "Mozilla/4.0 (compatible; MSIE 6.0; Windows NT 5.1; SV1;
.NET CLR 1.1.4322)"
127.0.0.1 - - [29/Mar/2010:00:48:05 +0000] "GET /short HTTP/1.1"
200 22912 "-" "Mozilla/4.0 (compatible; MSIE 6.0; Windows NT 5.1;
SV1; .NET CLR 1.1.4322)"
127.0.0.1 - - [29/Mar/2010:00:48:05 +0000] "GET /bit_long
HTTP/1.1" 200 1818212 "-" "Mozilla/4.0 (compatible; MSIE 6.0;
Windows NT 5.1; SV1; .NET CLR 1.1.4322)"
127.0.0.1 - - [29/Mar/2010:00:48:05 +0000] "GET /extra_long
HTTP/1.1" 200 873923465 "-" "Mozilla/4.0 (compatible; MSIE 6.0;
Windows NT 5.1; SV1; .NET CLR 1.1.4322)"
127.0.0.1 - - [29/Mar/2010:00:48:05 +0000] "GET /e HTTP/1.1" 200
8221 "-" "Mozilla/4.0 (compatible; MSIE 6.0; Windows NT 5.1; SV1;
.NET CLR 1.1.4322)"
127.0.0.1 - - [29/Mar/2010:00:48:05 +0000] "GET /e HTTP/1.1" 200 4
"-" "Mozilla/4.0 (compatible; MSIE 6.0; Windows NT 5.1; SV1; .NET
CLR 1.1.4322)"
127.0.0.1 - - [29/Mar/2010:00:48:05 +0000] "GET /d HTTP/1.1" 200
22 "-" "Mozilla/4.0 (compatible; MSIE 6.0; Windows NT 5.1; SV1;
.NET CLR 1.1.4322)"
4. Now, from within our virtual environment, run this code on the command line. Your
output should be similar as follows:
(text_processing)$ cat example2.log | python logscan-e.py -s 30

Chapter 3
[ 73 ]
What just happened?
We introduced some extended string formang mechanisms and extended our code to be a
lile bit more extensible, which is generally a good pracce.
First of all, we're imporng the time module. We use this to calculate runme and other
things as we move forward. As we introduce new methods of extracng and parsing these
les, it's nice to have a means to measure the performance hit or gain associated with the
change.
We updated the LogProcessor class in a few places. First, we've added a report method.
This method will pull the title o of each log handler dened and display it, followed by
a separator bar. Next, the report method will call each handler class directly and ask it to
print its own report segment.
The parse funcon has been updated to return the number of lines processed for stascs
purposes. We've also replaced our direct call to handle with a dynamic lookup of a
process funcon. This is a great example of Python's dynamic nature and duck-typing at
work. We did this so that we can get at more of the class elds directly in other areas. Simply
passing the parsing funcon around limits what we have access to.
The MaxSizeHandler got an even bigger faceli this me through. We've added instance
level variables name_size and warning_files. The name_size variable keeps track of
the longest lename we've found while warning_files is a set object.
The following three lines dene a Python property:
@property
def title(self):
return 'Files over %d bytes' % self.size
A property is a special object that appears to be an aribute when accessed directly, but
is actually handled by a method under the scenes. When we access c.title from within
LogProcessor, we're actually triggering an instance of MaxSizeHandler's title method.
We've made changes to our process method, too. It now appends a tuple for each le
name/size pair that exceeds our maximum allowed size. Why did we use a set? Simple. If the
same le is accessed mulple mes, we only want to display it once for each size. Python lets
us use tuples as unique values within a set object as they're immutable. As is the nature
of sets, adding the same value mulple mes is a null operaon. A value only exists once
within a set.
Note that sets were available only as an external module up unl 2.6. Prior
to that, it was necessary to 'from sets import set' at the top of your
module. If you're running an earlier version, you'll have to take this precauon.

Python String Services
[ 74 ]
We nish up this revision of the MaxSizeHandler class by updang the longest lename, if
applicable, and dening our report funcon.
If you take a closer look at report, you'll see a line containing a string format that reads '%-
*s :%d' % (self.name_size, f, s). There is a bit of formaer magic included here.
We'll take a closer look at this syntax below, but understand that this line prints a le's name
and corresponding size. It also ensures that each size value lines up in a columnar format, to
the right of the longest lename we've found. We're allong for variaons in lename size
and spacing our sizes accordingly to void a jagged –edge look.
Finally, we hit our main secon. Not a whole lot has changed here. We've added code to
track how long we run and how many lines we've processed as returned by processor.
parse. We've also switched to passing instances of our handler classes to LogProcessor's
__init__ method rather than specic funcons.
At the boom of the main secon, we've introduced another variaon of the formang
expression. Here, we're shoring up some of our decimal formang and using some alternate
formang methods available to us. The '#' in this line alters the way the string is rendered.
Percent (modulo) formatting
This is the oldest method of string format available within Python, and as such, it's the
most popular one. We've been using it throughout the book so far, though this example
introduced some of the more esoteric features.
A percent formaer expression consists of two main parts a format string and a tuple or a
diconary of formang values. Format strings consist of plain text with format specicaons
mixed in it. Format specicaons begin with a percent sign and instruct Python on how to
translate a data value into printed text.
These two main components are then separated via a percent sign, or modulus operator. If
you're formang a string with a single % specier then the use of a tuple is not necessary.
For example, simple string formang expressions usually look like the following:
Python 2.6.1 (r261:67515, Feb 11 2010, 00:51:29)
[GCC 4.2.1 (Apple Inc. build 5646)] on darwin
Type "help", "copyright", "credits", or "license" for more information.
>>> "%d + %d = %d" % (1,2,3)
'1 + 2 = 3'
>>> '%d %% %d = %d' % (5,2,1)
'5 % 2 = 1'
>>> 'I am a %s programmer' % 'python'
'I am a python programmer'
>>>
Chapter 3
[ 75 ]
It is also possible to use a diconary instead of a tuple, if the corresponding key is specied
in parenthesis aer the % operator, like in this example.
Python 2.6.1 (r261:67515, Feb 11 2010, 00:51:29)
[GCC 4.2.1 (Apple Inc. build 5646)] on darwin
Type "help", "copyright", "credits", or "license" for more information.
>>> user = {'uid': 0, 'gid': 0, 'login': 'root'}
>>> 'Logged in as %(login)s with uid %(uid)d and gid %(gid)d' % user
'Logged in as root with uid 0 and gid 0'
>>>
Each formang specicaon consists of a variety of dierent elements, most of which are
usually le out. Here is a diagram detailing all of the available modiers.
This example uses a diconary to provide the mapped values. Let's review each possible
component. Remember that some of the possible values change depending on whether
we've used a diconary or a tuple.
Mapping key
If the mapping key is present then the format conversion expects a diconary aer the dividing
percent sign. The mapping key is quite simply a key into the diconary you'll provide.

Python String Services
[ 76 ]
Conversion ags
These are oponal values that change the way the provided value is displayed. There are a
series of dierent ags available.
Flag Usage
#Dictates that an alternate format should be used. Alternate formats vary by formang
me. For example, using this ag with a oang point ensures that the decimal point is
present, even if not required.
0 If the minimal display width is greater than the value, pad with zero for numeric values.
-The printed value is le-jused in relaon to the padding. The default is to right-jusfy.
<space> Signies that a space should be le aer a posive number.
+Add a sign character. Has a higher precedence than <space>.
In the above example, we specied an alternate format in order to ensure that the decimal is
always present.
Minimum width
If the value to be translated does not meet this minimum length, it will be padded
accordingly. If a * (asterisk) is passed in as opposed to a number, the value will be taken from
the tuple of values.
This is the approach taken in our last example. We programmacally determined the padding
we wanted to use and inserted it into our values tuple while forcing le-juscaon.
Precision
This is valid for oang-point numbers. The precision indicates how many places aer the
decimal to display. In the preceding diagram, we specied four places in the value, but
only requested three in the formang. The following small example details the use of the
precision opon. Note that the value printed versions the value provided.
Python 2.6.1 (r261:67515, Feb 11 2010, 00:51:29)
[GCC 4.2.1 (Apple Inc. build 5646)] on darwin
Type "help", "copyright", "credits", or "license" for more information.
>>> '%.3f' % 3.1415
'3.142'
>>>
As you can see, the value we've supplied is rounded up correctly and printed.

Chapter 3
[ 77 ]
Width
These have no use in Python and do not change the formang at all. They are largely carried
over from C's sprintf funconality. Accepted values are l, L, or h. If they are supplied, they
are simply ignored.
Conversion type
The data type we're converng from. These are generally the same as found in C. However,
the r and the s types are slightly special and we'll cover them below. Here is a list of the
valid conversion formats.
Conversion Descripon
d, i Signed Decimal
o Signed Octal
x Signed hexadecimal in lowercase
X Signed hexadecimal in uppercase
uObsolete – idencal to d
eFloang point exponenal in lowercase
EFloang point exponenal in uppercase
F,f Floang point decimal
gLowercase exponenal if exponent is less than -4, otherwise use decimal format.
GUppercase exponenal if exponent is less than -4, otherwise use decimal format.
c Single character. Can be an integer value or a string of one.
r Object repr value, see below.
s Object str value, see below.
%Literal percent sign.
Using string special methods
If an object has a __str__ method then it is implicitly called whenever an instance of that
object is passed to the str built-in funcon. Accepted pracce is to return human-friendly
string representaon of that object.
Likewise, if an object contains a __repr__ method, passing that object to the repr built-
in should return a Python-friendly representaon of that object. Historically, that means
enough text to recreate the object via eval, but that's not a strict requirement.
Using %s or %r results in the values of __str__ or __repr__ replacing the formang
specicaon. For example, consider the following code.
Python 2.6.1 (r261:67515, Feb 11 2010, 00:51:29)
[GCC 4.2.1 (Apple Inc. build 5646)] on darwin

Python String Services
[ 78 ]
Type "help", "copyright", "credits", or "license" for more information.
>>> class MicroController(object):
... def __init__(self, brand, bits):
... self.brand = brand
... self.bits = bits
... def __str__(self):
... return '%s %s-bit CPU' % (self.brand, self.bits)
...
>>> m = MicroController('WhizBang', 8)
>>> 'my box runs a %s' % m
'my box runs a WhizBang 8-bit CPU'
>>>
This is very convenient while formang strings containing representaons of objects.
Though, in some cases, it can be somewhat misleading.
Python 2.6.1 (r261:67515, Feb 11 2010, 00:51:29)
[GCC 4.2.1 (Apple Inc. build 5646)] on darwin
Type "help", "copyright", "credits", or "license" for more information.
>>> 'I have %s bits' % 8
'I have 8 bits'
>>>
In many languages, an approach like that would simply result in either a syntax error or a
memory-related crash. Python treats it dierently, however, as the result of str(8) is the
string representaon of the number eight.
Have a go hero – make log processing more readable
So, now you should have a prey good grasp of percent string formang. All of the le sizes
outpued in our example above are in pure bytes. That's great for accuracy's sake, but it can
be quite dicult on the eyes.
Update all of the preceding output to display as kilobytes in a decimal form. We don't want
to display decimals beyond two places as that could get just as dicult to read.
Using the format method approach
As of Python 2.6 (and all values of 3.0), the format method has been available to all string
and Unicode objects. This method was introduced to combat exibility restricons in
the percent approach. While this is a much more powerful and exible method of string
formang, it's only available in newer versions of Python. If your code must run on older
distribuons, you're stuck with the classic percent-formang approach.

Chapter 3
[ 79 ]
Instead of marking our format specicaons with percent signs, the format method expects
formang informaon to be enclosed in curly braces.
Python 2.6.1 (r261:67515, Feb 11 2010, 00:51:29)
[GCC 4.2.1 (Apple Inc. build 5646)] on darwin
Type "help", "copyright", "credits", or "license" for more information.
>>> platforms = {'linux': 121, 'windows': 120, 'solaris': 12}
>>> 'We have {0} platforms, Linux: {linux}, Windows: {windows}, and
Solaris: {solaris}'.format(
… 3, **platforms)
'We have 3 platforms, Linux: 121, Windows: 120, and Solaris: 12'
>>>
In the simplest cases, numeric values in curly braces represent posional arguments while
text names represent keyword arguments.
In addion to the new format method found on string objects, Python 2.6 and
above also have a new built-in method – format. This essenally provides a
means to access the features of the string object's format, without requiring
a temporary string. Under the hood, it triggers a call to a formaed object's __
format__ method. For more informaon on the __format__ method, see
http://python.org/dev/peps/pep-3101/.
Time for action – adding status code data
First of all, note that this example won't work if you're using a version of Python less than
2.6. If you fall into that category, you'll have to either upgrade your version, or simply pass
over this secon.
We're going to update our LogProcessor script to report on the collecon of HTTP
response codes found within the logle. We'll simply add an addional handler to process
the parsed data.
1. Using logscan-e.py as a base, create logscan-f.py and add the following
addional import statement:
from collections import defaultdict
2. Now, we're going to change the split method of LogProcessor to also include
HTTP status code informaon.
def split(self, line):
"""
Split a logfile.
Initially, we just want size and requested filename, so

Python String Services
[ 80 ]
we'll split on spaces and pull the data out.
"""
parts = line.split()
return {
'size': 0 if parts[9] == '-' else int(parts[9]),
'file_requested': parts[6],
'status': parts[8]
}
3. Now, directly below the LogProcessor class, add the following new handler class.
class ErrorCodeHandler(object):
"""
Collect Error Code Information.
"""
title = 'Error Code Breakdown'
def __init__(self):
self.error_codes = defaultdict(int)
self.errors = 0
self.lines = 0
def process(self, fields):
"""
Scan each line's data.
Reading each line in, we'll save out the
number of response codes we run into so we
can get a picture of our success rate.
"""
code = fields['status']
self.error_codes[code] += 1
# Assume anything > 400 is
# an HTTP error
self.lines += 1
if int(code) >= 400:
self.errors += 1
def report(self):
"""
Print out Status Summary.
Create the status segment of the
report.
"""
longest_num = sorted(self.error_codes.values())[-1]
longest = len(str(longest_num))
for k,v in self.error_codes.items():
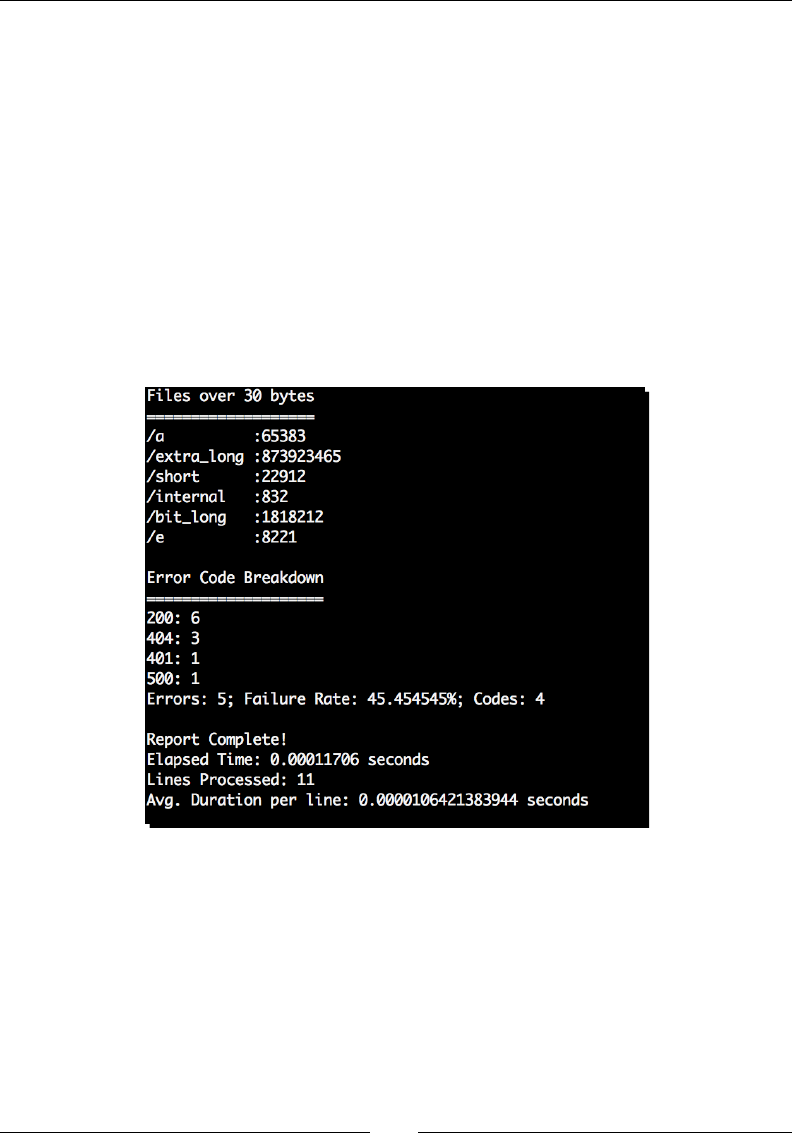
Chapter 3
[ 81 ]
print '{0}: {1:>{2}}'.format(k, v, longest)
# Print summary information
print
'Errors: {0}; Failure Rate: {1:%}; Codes: {2}'.format(
self.errors, float(self.errors)/self.lines,
len(self.error_codes.keys()))
4. Finally, add the following line to the main secon, right below:
call_chain.append(size_check).
call_chain.append(ErrorCodeHandler())
5. Now, run the updated applicaon. Your output should resemble the following:
(text_processing)$ cat example2.log | python logscan-f.py -s 30
What just happened?
Let's take a quick survey of the changes we made to this applicaon. First of all, we imported
defaultdict. This is a rather useful object. It also acts as a diconary. However, if a
referenced key doesn't exist, it calls the funcon supplied and uses its value to seed the
diconary before returning. A standard diconary would simply raise a KeyError, as in the
following example:
Python 2.6.1 (r261:67515, Feb 11 2010, 00:51:29)
[GCC 4.2.1 (Apple Inc. build 5646)] on darwin

Python String Services
[ 82 ]
Type "help", "copyright", "credits", or "license" for more information.
>>> d = {}
>>> d['200'] += 1
Traceback (most recent call last):
File "<stdin>", line 1, in <module>
KeyError: '200'
>>> from collections import defaultdict
>>> d_dict = defaultdict(int)
>>> d_dict['200'] += 1
>>> d_dict
defaultdict(<type 'int'>, {'200': 1})
>>>
Next, we're just updang the parse method to return the eighth eld in each line, which
happens to be the HTTP status code as returned to the client.
In the new handler class, ErrorCodeHandler, we set up three instance-level variables. The
defaultdict object detailed previously, and two counters that represent the number of
errors we've run into as well as the number of lines we've processed.
The process method adds to the defaultdict each me an error is encountered. If a
specic value hasn't been added yet, the diconary defaults (hence its name) to the value of
int(), which will be zero.
The defaultdict type is a useful helper when tallying or extracng informaon from
logles or other unknown sources of data when you're not certain whether a specic
key will exist and want to add it dynamically.
Next, we increase our line number counter. If the error number is greater than 400 then we
also increment our error counter. You should note that we're actually passing the value of
code to the int funcon before doing the comparison. Why is this?
Python is a dynamically-typed language; however, it is sll strictly-typed. For example, a
HTTP code value of '200' is a textual representaon of a number; it is sll a string type.
The value was assigned its type when we extracted it as a substring from a line in a logle,
which itself was read in as a collecon of strings. So, without the explicit conversion, we're
comparing an integer (400) against a string representaon of a number. The result probably
isn't what you would expect.
Python 2.6.1 (r261:67515, Feb 11 2010, 00:51:29)
[GCC 4.2.1 (Apple Inc. build 5646)] on darwin
Type "help", "copyright", "credits", or "license" for more information.
>>> snum = '1000'
>>> snum == 1000
False
>>> int(snum) == 1000
True

Chapter 3
[ 83 ]
This is a common gotcha and has actually been reced in Python 3.0. Aempng to
perform the preceding comparison will result in a TypeError when using Python 3.
>>> '1000' > 1000
Traceback (most recent call last):
File "<stdin>", line 1, in <module>
TypeError: unorderable types: str() > int()
>>>
Within the report method, we next sort the self.error_code diconary values via
the built-in sorted funcon. We take the highest number in that list, via a subscript of -1,
and convert it into a string. We then take the length of that string. We'll use this value for a
formang modier later in this method.
The next secon loops through all of the response codes we've run into thus far and prints
them out to the screen, though it does that via the string format method.
The last thing we do within the report method is display a summary of the error code data
we've collected while processing a logle. Here, we're also using the format method rather
than tradional percent-sign formang.
Finally, within our main secon, we added an instance of ErrorCodeHandler to the call_
chain list that is passed into LogProcessor's __init__ method. This ensures that it will
be included during logle processing.
Making use of conversion speciers
As we menoned earlier, conversion markup is enclosed in curly braces as opposed to the
percent prex as used in standard string formang. In addion to the replacement value,
though, the curly braces also contain all of the same formang informaon (with some new
opons) that the standard methods support.
Let's take another look at that graphical breakdown of a format string, but this me we'll use
the newer format syntax.

Python String Services
[ 84 ]
Noce how the replacement value name or posion is separated from the formang
arguments by a colon. The colon itself holds no other special meaning. This example does
not include all possible combinaons. When using the format method, the # opon is only
valid for integers. Likewise, the precision argument is only valid for oang point values.
Fill
The fill argument allows us to specify which character we should use to pad our string if
the minimum width is less than the actual width of the replacement value. Any character can
be used other than a closing brace, which would signify the end of the format specicaon.
Align
This signies how text should be aligned in relaon to the ll characters if actual width is less
than minimum width.
Flag Usage
<The eld is le-aligned, this is the default alignment.
>The eld is right-aligned.
= This forces the padding to be placed between a sign character and the
value. This is only valid for numeric types.
^ Forces the value to be centered within the available spacing.
Sign
This eld is valid only for numeric types and is used to determine how the sign informaon is
displayed, if at all.
Flag Usage
+Sign data is always displayed.
-Python should only display the sign for negave numbers. This is the
default behavior.
<space> Leading space should be used on posive, while a sign should be used when
the value is negave.
Width
This species the minimum width of the eld. If the actual value is shorter, the result will be
padded according to the alignment rules using the ll character.
Precision
This species the oang-point precision. As menoned previously, this is only valid for
oang-point values. Floang-point numbers are rounded and not simply truncated.

Chapter 3
[ 85 ]
Type
The type eld is the last argument in the format specicaon and details how the value
should be displayed. Unlike standard percent-formang, this is no longer a required eld. If
not specied, a default is used based on the value's type.
There are quite a few new type ags introduced with the format method and some of
the implementaon details are rather complex. For a complete introducon to type elds
for use with the format funcon, see http://docs.python.org/library/string.
html#format-string-syntax.
The following table contains a survey of the available values.
Flag Usage
s String output. This is the default for strings and class instances
b Binary output
d Decimal output
o Octal format
xHexadecimal format using lowercase leers
XHexadecimal format using uppercase leers
nSame as the d ag, though it uses local informaon to display correctly based on
your preferences. This is the default for integers
eExponent (Scienc) Notaon using lowercase leers
EExponent (Scienc) Notaon using uppercase leers
f Fixed point
F Same as the 'f' type
gGeneral format. There is a collecon of rules regarding display for this type. See
the Python documentaon for details. This is the default for oang-point values
G Uppercase version of 'g'
% Percentage. Mulplies a number by 100 and displays in 'f' format, followed by a
percent sign
Have a go hero – updating the le size check to use the format method
Now that you've got a crash course in Python string-formang methods, you should
be able to work with both approaches. Take a few minutes and back up to update the
MaxSizeHandler class to use format methods rather than percent syntax. However, you'll
probably want to create a temporary copy.
You may nd the Python documentaon helpful in addion to the tables included in this
chapter. Formang markup seems to be one area that many developers never really seem to
fully grasp. Take a moment and stand out from the crowd!

Python String Services
[ 86 ]
Creating templates
It's oen said within the Python community that every programmer, at some point,
implements his or her own Python-based template language. The good news, then, is that
we don't have to as so many of them already exist!
There's a large collecon of very powerful third-party templang libraries available for Python.
We'll cover them in more detail (and even write our own) in Chapter 7, Creang Templates.
Python includes an elementary templang class within the string module. The Template
class doesn't provide any advanced features such as code execuon or inherited blocks. In
general, it's a simple way to replace tokens within a text le with Python values.
Time for action – displaying warnings on malformed lines
Up unl now, we've assumed that all of our lines processed are very well-formed and will
never generate excepons. In order to illustrate the use of the Template class, we'll x that
here. Under normal circumstances, it would probably be preferred to simply print an error
just quietly pass by incorrectly formaed lines.
1. Using logscan-f.py as a starng place, create logscan-g.py. We'll use this as
our starng point.
2. At the top of the le, add import string to the list of modules imported.
3. Immediately aer the docstring for LogProcessor, add the following code:
tmpl = string.Template(
'line $line is malformed, raised $exc error: $error')
4. Replace the parse method in LogProcessor with the following new method:
def parse(self, handle):
"""
Parses the logfile.
Returns a dictionary composed of log entry values,
for easy data summation.
"""
line_count = 0
for line in handle:
line_count += 1
try:
fields = self.split(line)
except Exception, e:
print >>sys.stderr, self.tmpl.substitute(
line=line_count,
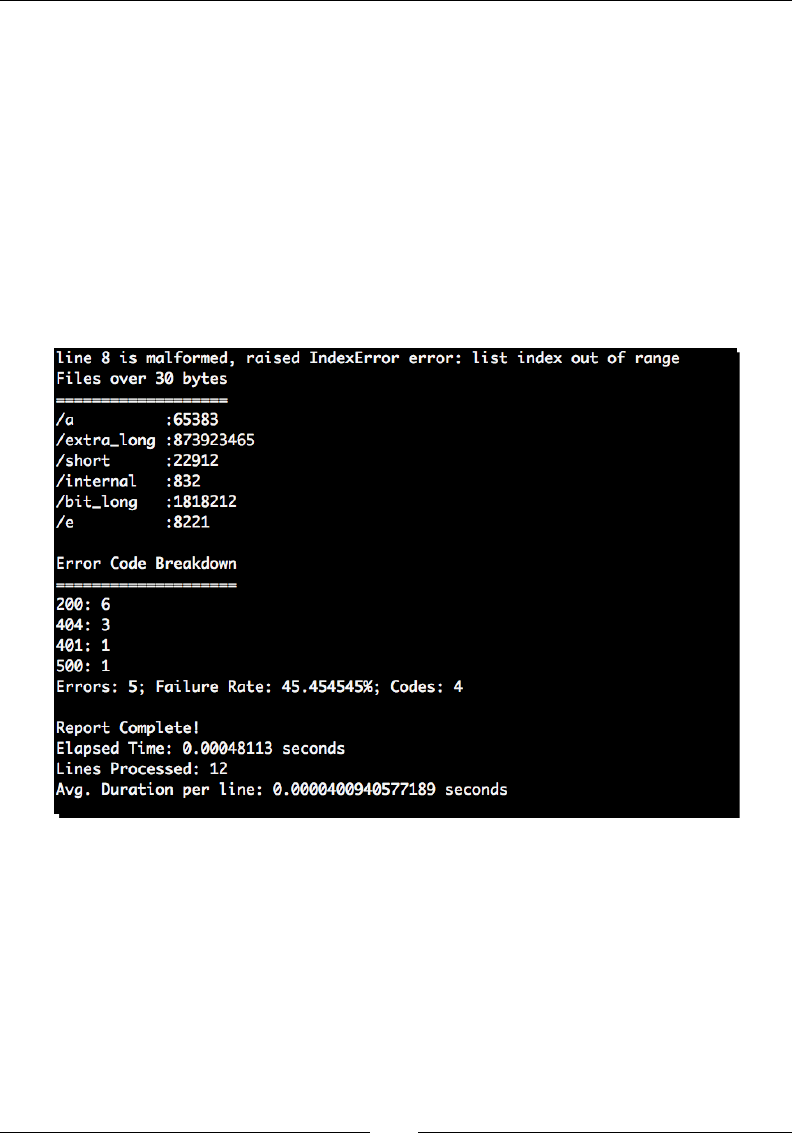
Chapter 3
[ 87 ]
exc=e.__class__.__name__,
error=e)
continue
for handler in self._call_chain:
getattr(handler, 'process')(fields)
return line_count
5. Finally, copy example2.log over and create example3.log. Insert a :q! on line
eight, followed by a newline. This should be the only text on that line.
6. Running the example should produce the following output:
(text_processing)$ cat example3.log | python logscan-g.py -s 30
What just happened?
Aer imporng the required string module, we created a Template object within the
LogProcessor class denion. By adding it where we did, we ensured that it's only created
once. If we had placed it within a method, it would be created each me that specic
method was called.
Next, we updated our parse method to catch any excepons that rise up from within
split. If we happen to catch an error, we populate our template with values describing the
excepon and print the rendered result to the screen via standard error.

Python String Services
[ 88 ]
Template syntax
When we create an instance of Template, we pass in the template string we'll use. The
syntax is fairly straighorward. If we want a value to be replaced, we simply precede it with a
dollar sign. Two $ characters adjacent to each other act as an escape; they are replaced with
a single character in the rendered text.
If the idener we intend to replace is embedded in a longer string, we can surround it with
braces. A small example may clarify this concept.
Python 2.6.1 (r261:67515, Feb 11 2010, 00:51:29)
[GCC 4.2.1 (Apple Inc. build 5646)] on darwin
Type "help", "copyright", "credits", or "license" for more information.
>>> from string import Template
>>> template = Template('${name} has $$${amount} in his ${loc}et')
>>>
Rendering a template
Once we've created a template object, we use it to render a new string by calling either its
substitute or safe_substitute methods.
>>> template.substitute(name='Bill Gates', amount=35000000000,
loc='wall')
'Bill Gates has $35000000000 in his wallet'
>>> template.substitute(name='Joe', amount=10, loc='blank')
'Joe has $10 in his blanket'
>>>
If a template variable is le o, or if a standalone dollar sign is encountered, the
substitute method raises an error. If the safe_substitute alternave is used, errors
are simply ignored and the conversion will not take place. Noce the dierence in both
approaches below:
>>> template.substitute(name='Joe', amount=10)
Traceback (most recent call last):
File "<stdin>", line 1, in <module>
File "/System/Library/Frameworks/Python.framework/Versions/2.6/lib/
python2.6/string.py", line 170, in substitute
return self.pattern.sub(convert, self.template)
File "/System/Library/Frameworks/Python.framework/Versions/2.6/lib/
python2.6/string.py", line 160, in convert
val = mapping[named]
KeyError: 'loc'
>>> template.safe_substitute(name='Joe', amount=10)
'Joe has $10 in his ${loc}et'
>>>
Chapter 3
[ 89 ]
Pop Quiz – string formatting
1. In what situaon might you elect to use the string.Template class versus
tradional string formang?
2. What method might you use to pass a diconary of values into the format method?
3. We know that expressions such as "1" + 2 are invalid. What do you think would be
the result of "1" + "2"?
Calling string object methods
In addion to providing powerful creaon and formang mechanisms, Python string objects
also provide a collecon of useful methods. We've already seen a few of them in our earlier
examples. For example, we called line.split() within our LogProcessor class in order
to separate a text line into pieces, delimited by space characters.
All of these methods are present on both standard byte strings and Unicode
objects. As a general rule, Unicode objects return Unicode while byte string
methods return byte strings.
Time for action – simple manipulation with string methods
In this example, we'll extend our lile employee data-gathering script present earlier in the
chapter. The goal is to illustrate the use of some of the string object methods.
1. Create a new le and name it string_definitions-b.py.
2. Enter the following code:
import sys
class BadEmployeeFormat(Exception):
"""Badly formatted employee name"""
def __init__(self, reason, name):
Exception.__init__(self, reason)
self.name = name
def get_employee():
"""
Retrieve user information.
This method simply prompts the user for
an employee's name and his current job
title.

Python String Services
[ 90 ]
"""
employee = raw_input('Employee Name: ')
role = raw_input("Employee's Role: ")
employee, role = employee.strip(), role.strip()
# Make sure we have a full name
if not employee.count(' '):
raise BadEmployeeFormat('Full Name Required '
'for records database.', employee )
return {'name': employee, 'role': role }
if __name__ == '__main__':
employees = []
failed_entries = []
print 'Enter your employees, EOF to Exit...'
while True:
try:
employees.append(get_employee())
except EOFError:
print
print "Employee Dump"
for number, employee in enumerate(employees):
print 'Emp #%d: %s, %s' % (number+1,
employee['name'], employee['role'].title())
print 'The following entries failed: ' +
', '.join(failed_entries)
print u'\N{Copyright Sign}2010, SuperCompany, Inc.'
sys.exit(0)
except BadEmployeeFormat, e:
failed_entries.append(e.name)
err_msg = 'Error: ' + str(e)
print >>sys.stderr, err_msg.center(len(err_msg)+20,
'*')
3. Run this example from the command line. If you entered it correctly then you should
see output similar to the following:
(text_processing)$ python string_definitions-b.py
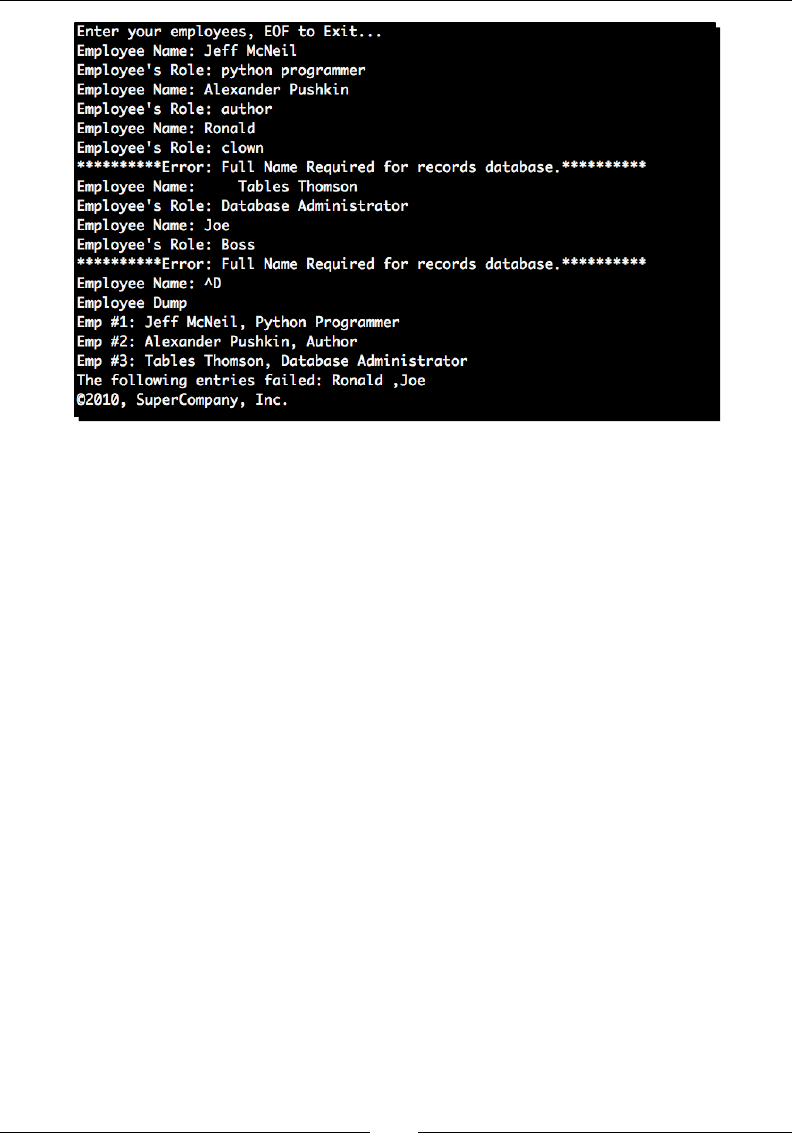
Chapter 3
[ 91 ]
What just happened?
There's not a whole lot extra going on in this new example. We've simply cleaned up our
data a lile bit more and took the liberty of nofying the user which employees were not
successfully entered.
The rst thing you'll noce is that we updated our BadEmployeeFormat excepon to
take an addional argument, the employee name. We do this so we can append the failed
employee's informaon to a list within our main secon.
The next update you'll run into is the employee, role = employee.strip(), role.
strip() line. Each string (employee, role) might have white space on either end. Calling
the strip method trims the string down and removes that spacing. If we wanted to, we could
have passed addional characters into the strip and it would have removed those as well:
Python 2.6.1 (r261:67515, Feb 11 2010, 00:51:29)
[GCC 4.2.1 (Apple Inc. build 5646)] on darwin
Type "help", "copyright", "credits", or "license" for more information.
>>> 'ABC123DEF'.strip('ABCDEF')
'123'
>>>
The strip method removes any of the characters that appear in the argument string if they
appear in the source string.
We've updated our check for a space to simply scan for a single space character rather than
using our regular expression. The downside here, though, is that this check will pass even if
data was entered incorrectly. Consider 'AlexanderPushkin', for example.

Python String Services
[ 92 ]
In the main secon, we've added a failed_entries list. Whenever we catch a
BadEmployeeFormat excepon, we append the name of the employee to this list. When
we receive our EOFError, we join this list via ', '.join(failed_entries). Note that
in Python, join is a method of a string object and not a method of a list or an array data
structure.
Now that we've seen some of them put to use, let's take a closer look at some of the
methods available on string and Unicode objects. However, this isn't a complete survey.
For a detailed descripon of all methods available on Python string objects, see the Python
documentaon.
Aligning text
There are four methods available on string objects that allow you to manage alignment
and juscaon. Those methods are center, ljust, rjust, and zfill. We've seen
the center method used previously. The ljust and rjust methods simply change the
orientaon of a supplied padding character.
Python 2.6.1 (r261:67515, Feb 11 2010, 00:51:29)
[GCC 4.2.1 (Apple Inc. build 5646)] on darwin
Type "help", "copyright", "credits", or "license" for more information.
>>> 'abc'.rjust(5, '*')
'**abc'
>>> 'abc'.ljust(5, '*')
'abc**'
>>> 'abc'.center(5, '*')
'*abc*'
>>>
The zfill method adds zeros to the le of the string object, up to the passed-in minimum
width argument.
Detecting character classes
These methods correspond to a set of standard C character idencaon methods. However,
unlike their C equivalents, it is possible to test all values of a specic string and not just a
single character.
These methods include isalnum, isalpha, isdigit, isspace, istitle, isupper, and
islower. These methods all test the enre string value; if any one character doesn't t the
bill, these methods simply return False.
Python 2.6.1 (r261:67515, Feb 11 2010, 00:51:29)
[GCC 4.2.1 (Apple Inc. build 5646)] on darwin
Type "help", "copyright", "credits", or "license" for more information.

Chapter 3
[ 93 ]
>>> '1'.isdigit()
True
>>> '1f'.isdigit()
False
>>> 'Back to the Future'.istitle()
False
>>> 'Back To The Future'.istitle()
True
>>> 'abc123'.isalnum()
True
>>>
The one method here that might not be clear up front is the istitle method. This returns
True if all words within a string have their rst leer capitalized.
Casing
Strings objects contain four methods for updang capitalizaon: title, capitalize,
upper, and lower. Both the upper and lower methods change casing for an enre string.
The capitalize and title methods are slightly dierent. Have a look at them in acon:
Python 2.6.1 (r261:67515, Feb 11 2010, 00:51:29)
[GCC 4.2.1 (Apple Inc. build 5646)] on darwin
Type "help", "copyright", "credits", or "license" for more information.
>>> position = 'VP of marketing mumbo jumbo'
>>> position.title()
'Vp Of Marketing Mumbo Jumbo'
>>> city = 'buffalo'
>>> city.capitalize()
'Buffalo'
>>>
Noce how the title method returns the string in tle case while the capitalize
method simply capitalizes the rst character of the string.
Searching strings
There are a number of methods associated with string objects that help with searching
and comparison. To check for general quality, simply use the double equal sign comparison
operator.

Python String Services
[ 94 ]
The count, find, index, replace, rfind, rindex, startswith, and endswith
methods all scan a string for the occurrence of a substring. Addionally, it's possible to use
the in keyword to test for a substring's occurrence within a larger string.
Python 2.6.1 (r261:67515, Feb 11 2010, 00:51:29)
[GCC 4.2.1 (Apple Inc. build 5646)] on darwin
Type "help", "copyright", "credits", or "license" for more information.
>>> 'one' in 'Bone Dry'
True
>>> 'one' == 'one'
True
>>>
We've already introduced you to the count method, so we'll skip over that here. find
and index are both similar. When called, both return the oset into a string in which the
substring is found. The dierence, however, is how they'll respond in the event that the test
string isn't present. The find method will simply return a -1. The index method will raise a
ValueError.
Both startswith and endswith test to see whether their respecve end is made up of the
test string passed in.
The replace method allows you to replace a given substring within a larger string with an
oponal upper bound on the number of mes the operaon takes place. In the following
example, noce how only one of the 'string-a' values is replaced:
Python 2.6.1 (r261:67515, Feb 11 2010, 00:51:29)
[GCC 4.2.1 (Apple Inc. build 5646)] on darwin
Type "help", "copyright", "credits", or "license" for more information.
>>> 'trout salmon turkey perch flounder'.replace('turkey', 'shark')
'trout salmon shark perch flounder'
>>> 'string-a string-b string-a'.replace('string-a', 'string', 1)
'string string-b string-a'
>>>
Finally, rfind and rindex are idencal to find and index, except that they'll work from
the end of the string rather than the beginning.
Dealing with lists of strings
There are four methods for dealing with string parts – join, split, partition, and
rpartition. We've already seen them to some extent, but let's take a closer look as they're
commonly-used string methods.

Chapter 3
[ 95 ]
The split method takes a delimiter and an oponal number of max splits. It will return a list
of strings as broken up by the delimiter. If the separator is not found then a single element
list is returned that contains the original string text. The oponal maximum separator limits
on how many mes the split takes place. An example might help solidify its usage:
Python 2.6.1 (r261:67515, Feb 11 2010, 00:51:29)
[GCC 4.2.1 (Apple Inc. build 5646)] on darwin
Type "help", "copyright", "credits", or "license" for more information.
>>> string = 'cheese,mouse,cat,dog'
>>> string.split(',')
['cheese', 'mouse', 'cat', 'dog']
>>> string.split('banana')
['cheese,mouse,cat,dog']
>>> string.split(',', 2)
['cheese', 'mouse', 'cat,dog']
>>>
We've already covered the join method; it places a string together given a list of elements. It
is common to join around an empty string in order to simply concatenate a larger list of values.
Finally, we have partition and rpartition. These methods act much like the split
method, except that they'll return three values - the part before a separator, the separator
itself, and nally the part aer the separator.
Treating strings as sequences
Remember that Python strings can be interpreted as sequences of characters as well. This
means that all common sequence operaons will also work on a string. It's possible to iterate
through a string or break it into pieces using standard slicing syntax.
Python 2.6.1 (r261:67515, Feb 11 2010, 00:51:29)
[GCC 4.2.1 (Apple Inc. build 5646)] on darwin
Type "help", "copyright", "credits", or "license" for more information.
>>> 'abcdefg'[2-5]
'e'
>>> 'abcdefg'[2:5]
'cde'
>>> 'abcdefg'[2:5]
'cde'
>>> for i in 'abcdefg'[2:5]:
... print 'Letter %c' % i
...
Letter c
Letter d
Letter e
>>>

Python String Services
[ 96 ]
This works for both byte strings as well as Unicode strings as Python deals with the
underlying method calls at a character-level, and not a byte-level.
Have a go hero – dive into the string object
We've covered the majority of the string methods here as well as the most common usage
scenarios, but we've not touched on all of them. Addionally, there are opons we've not
touched on.
Open a Python prompt and have a look at all of the methods and aributes available on a
standard string object.
>>> dir('')
['__add__', '__class__', '__contains__', '__delattr__', '__doc__',
'__eq__', '__format__', '__ge__', '__getattribute__', '__getitem__',
'__getnewargs__', '__getslice__', '__gt__', '__hash__', '__init__',
'__le__', '__len__', '__lt__', '__mod__', '__mul__', '__ne__', '__
new__', '__reduce__', '__reduce_ex__', '__repr__', '__rmod__', '__
rmul__', '__setattr__', '__sizeof__', '__str__', '__subclasshook__',
'_formatter_field_name_split', '_formatter_parser', 'capitalize',
'center', 'count', 'decode', 'encode', 'endswith', 'expandtabs',
'find', 'format', 'index', 'isalnum', 'isalpha', 'isdigit', 'islower',
'isspace', 'istitle', 'isupper', 'join', 'ljust', 'lower', 'lstrip',
'partition', 'replace', 'rfind', 'rindex', 'rjust', 'rpartition',
'rsplit', 'rstrip', 'split', 'splitlines', 'startswith', 'strip',
'swapcase', 'title', 'translate', 'upper', 'zfill']
Using the output of dir, as well as the Python documentaon (either online or via pydoc),
spend some me and familiarize yourself with the available funcons. You'll be glad you did!
Summary
We covered a lot of detail in this chapter. Python's string services provide a clean mechanism
for dealing with text data at the character-level. You should now be familiar with built-in
templang, formang, and core string manipulaon. These techniques are valid and should
be considered before many more advanced approaches are evaluated.
Next, we'll leave the string basics behind and step into the standard library for a look at how
to handle some of the more commonly encountered text formats. Python makes processing
standard formats easy!

Text Processing Using the Standard
Library
In addion to its powerful built-in string manipulaon abilies, Python
also ships with an array of standard library modules designed to parse and
manipulate common standardized text formats.
Using the standard library, it's possible to parse INI les, read CSV and related
les, and access common data formats used on the web, such as JSON. In this
chapter, we'll take a look at some of these modules and look at how they can
help us process text data a layer above the string management foundaon.
We'll take a closer look at the following:
CSV, or Comma Separated Values. Python provides a rich mechanism for accessing
and extracng data from this common format commonly used as a spreadsheet
stand-in.
Parse and rely on INI les. We'll look at the standard Conguraon File parsing
classes for our own purposes and as a means to read Microso Windows
conguraons.
We'll parse JSON data as it's oen used as a data delivery mechanism on the
Internet.
Learn how to beer organize our log processing applicaon via modules and
packages in order to make it more extensible going forward.
4
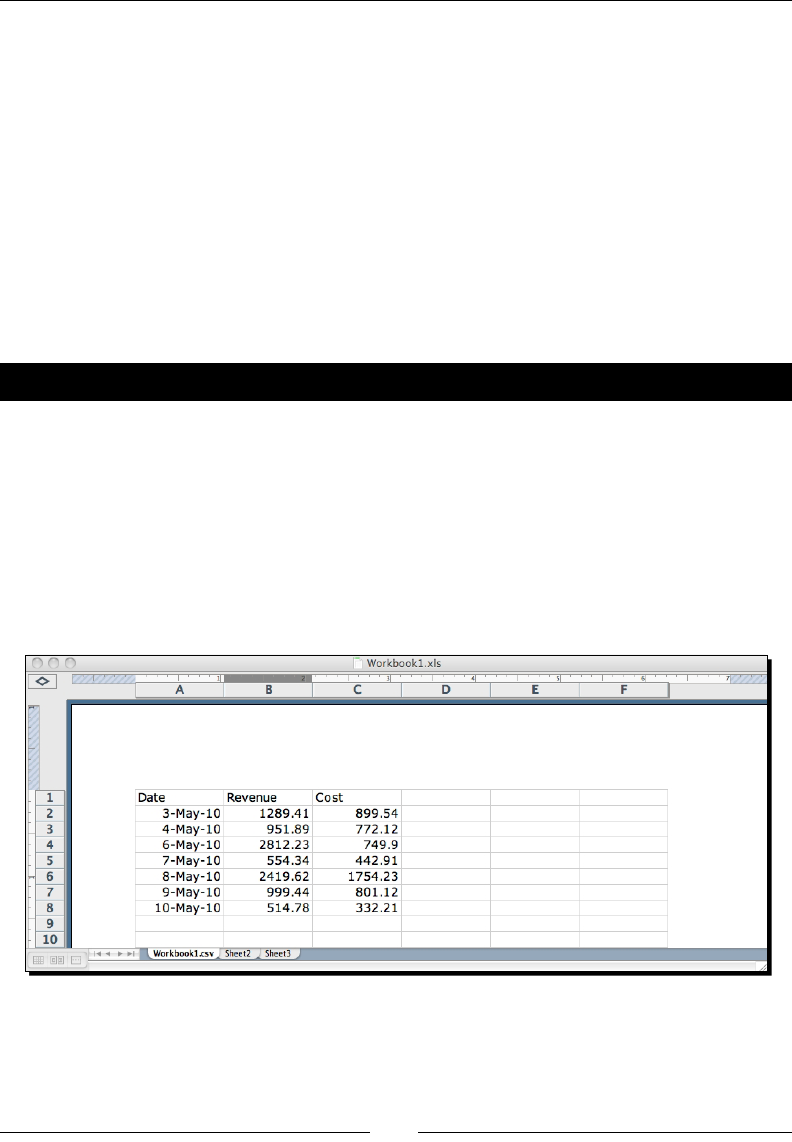
Text Processing Using the Standard Library
[ 98 ]
Reading CSV data
Comma separated values, or CSV, is a generic term that refers to columnar data, which is
simply separated by commas. In fact, in spite of its name, the delimiter may actually be a
dierent character. Other common delimiters include a tab, a space, or a semi-colon.
The major drawback to CSV data is that there is no standardizaon. In some circumstances,
data elements will be quoted. In other circumstances, the wring applicaon may include
column or row headers along with the CSV data. Furthermore, consider the eects of the
various line-endings used by dierent operang systems.
Clearly, it's not just a maer of spling a comma-delimited line. Python's CSV support aims
to work around the formang variaons and provide a standardized interface.
Time for action – processing Excel formats
The csv module provides support for formang dierences by allowing the use of dierent
dialects. Dialects provide details such as which delimiter to use and how to address data
element quong.
In this example, we'll create an Excel spreadsheet and save it as a CSV document. We can
then open that via Python and access all of the elds directly.
1. First, we'll need to create an Excel spreadsheet and build an inial dataset. We'll use
some mock nancial data. Build up a spreadsheet that includes the following data:
2. Now, from the File menu, select Save As. The Save As dialog contains a Format
drop-down. From this dropdown, select CSV (Comma Delimited). Name the
le Workbook1.csv. Note that if you do not have Excel, these sample les are
downloadable from the Packt Publishing FTP Site.
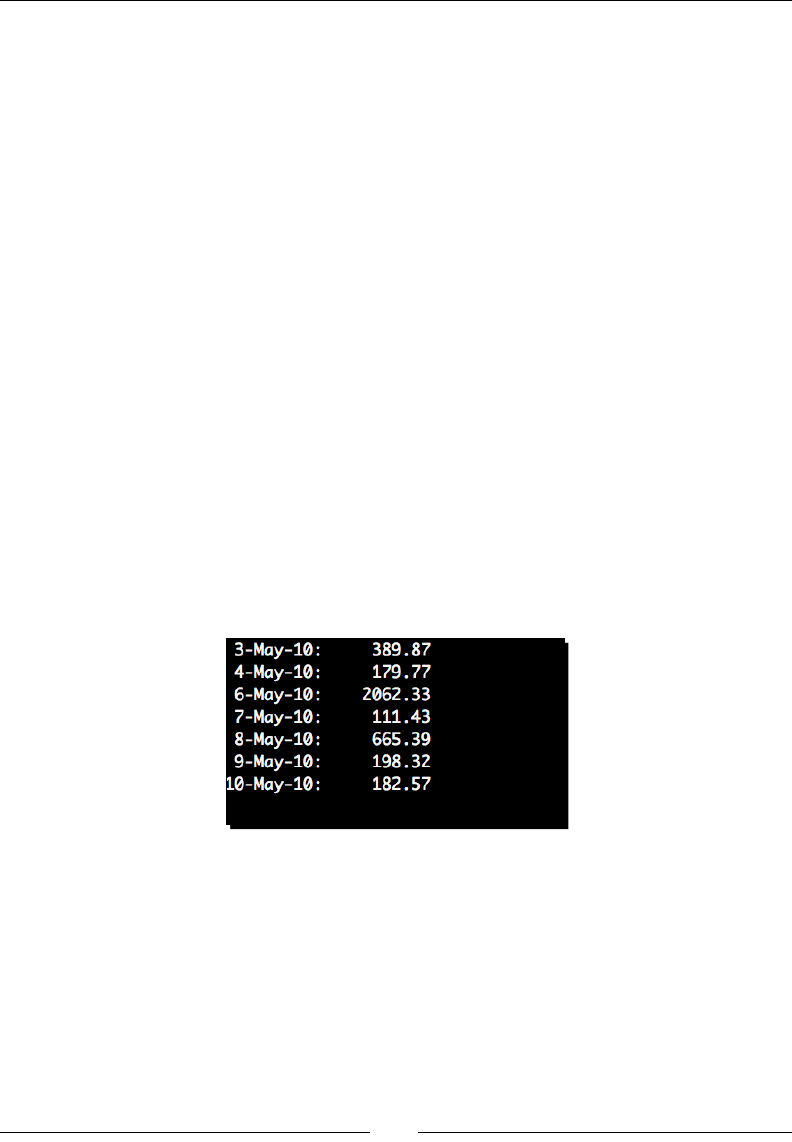
Chapter 4
[ 99 ]
3. Create a new Python le and name it csv_reader.py. Enter the following code:
import csv
import sys
from optparse import OptionParser
def calculate_profit(day):
return float(day['Revenue']) - float(day['Cost'])
if __name__ == '__main__':
parser = OptionParser()
parser.add_option('-f', '--file', help="CSV Data File")
opts, args = parser.parse_args()
if not opts.file:
parser.error('File name is required')
# Create a dict reader from an open file
# handle and iterate through rows.
reader = csv.DictReader(open(opts.file, 'rU'))
for day in reader:
print '%10s: %10.2f' % \
(day['Date'], calculate_profit(day))
4. Running the preceding code should produce the following output, if you've copied it
correctly.
(text_processing)$ python csv_reader.py --file=./Workbook1.csv
What just happened?
Let's walk through the code here. By now, you should be familiar with both the __name__
== '__main__' secon as well as the opon parser. We won't cover that boilerplate stu
any longer.
The rst interesng line is redirect = csv.DictReader(open(opts.file, 'rU')).
There are two things worth poinng out on this line alone. First, we're opening the le
using Universal Newline support. This is because Excel will save the CSV le according to our
plaorm's convenon. We want Python just to hide all of that for us here.

Text Processing Using the Standard Library
[ 100 ]
Secondly, we're creang an instance of csv.DictReader. The basic approach to accessing
CSV data is via the csv.reader method. However, this requires us to access each row via an
array index. The csv.DictReader class uses the rst row in the CSV le (by default) as the
diconary keys. This makes it much easier to access data by name.
If we had used the standard reader, we would have had to parse our data as in the following
small example snippet:
Python 2.6.1 (r261:67515, Feb 11 2010, 00:51:29)
[GCC 4.2.1 (Apple Inc. build 5646)] on darwin
Type "help", "copyright", "credits", or "license" for more information.
>>> import csv
>>> reader = csv.reader(open('Workbook1.csv', 'rU'))
>>> for row in reader:
... print 'Revenue on ' + row[0] + ': ' + row[1]
...
Revenue on Date: Revenue
Revenue on 3-May-10: 1289.41
Revenue on 4-May-10: 951.89
Revenue on 6-May-10: 2812.23
Revenue on 7-May-10: 554.34l
Revenue on 8-May-10: 2419.62
Revenue on 9-May-10: 999.44
Revenue on 10-May-10: 514.78
>>>
As you can see, the diconary approach makes it much easier to handle the processed data.
Next, we iterate through each row in the dataset and print out a prot summary. If you
take a look at the calculate_profit funcon, you'll see how we do this. As menoned
before, Python is not only dynamically-typed, but also strongly-typed once a value has been
created. We have to explicitly create new oang-point types based on the text value in
order to perform our subtracon operaon.
Finally, our print statement uses classic percent-formang and adds a lile bit of padding
in order to keep everything easy to read.
If you were paying aenon, you'll remember we menoned that we need a dialect in order
to process a CSV le. What gives? We didn't specify one, did we? Well, no. Python defaults
to the Excel dialect, which is exactly what we're using in our example.
If you're familiar with Excel, you're probably wondering why we used Python to calculate our
prot rather than leng Excel do it for us. Aer all, that's what a spreadsheet applicaon is for!
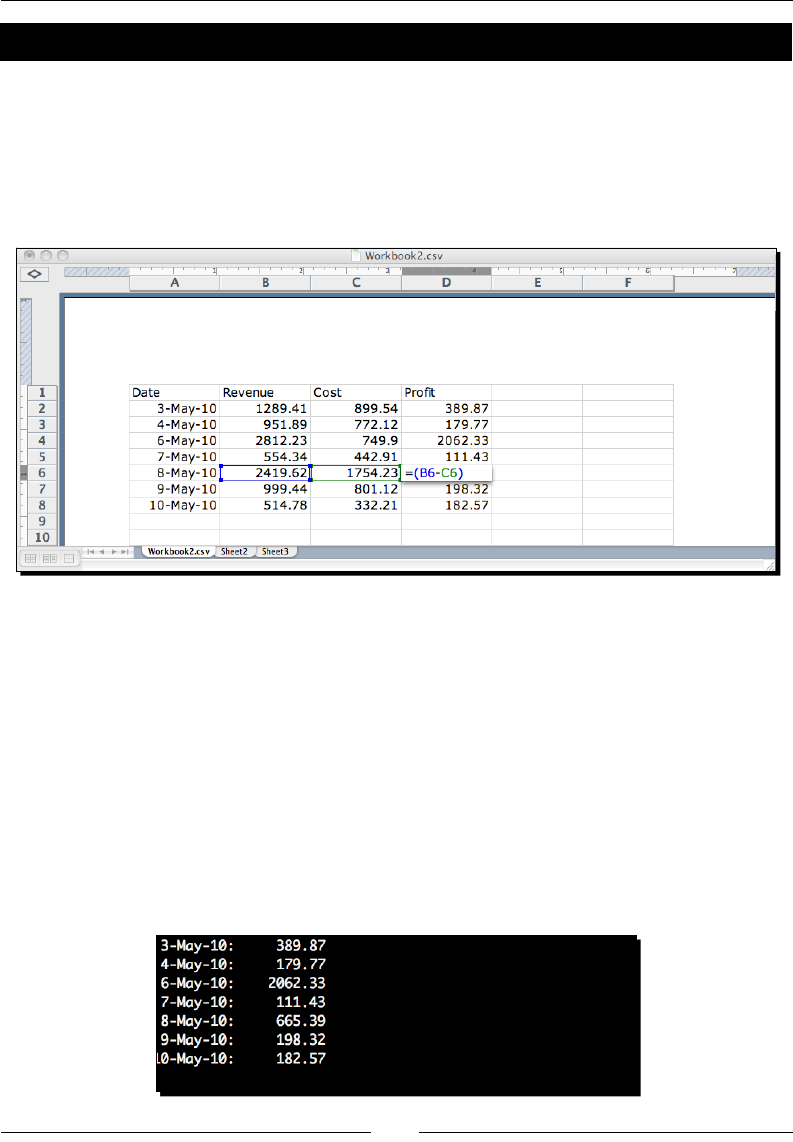
Chapter 4
[ 101 ]
Time for action – CSV and formulas
Let's run though an example and illustrate why we chose to calculate the values ourselves
rather than leng Excel do it.
1. First, open Excel again and add a new column. We're going to name it Prot. The
value of this column should be a simple formula, =(BX-CX), where 'X' is the row
number you're at. Repeat unl your spreadsheet looks like this:
2. Now, like we did with our rst example, save this as Workbook2.csv. You'll need
to accept any warnings that Excel gives you. This document is also available on the
Packt Publishing FTP site.
3. Using csv_reader.py as a starng point, create csv_reader-b.py and modify
the calculate_profit funcon to read as follows.
def calculate_profit(day):
return float(day['Profit'])
4. Running the example using the new CSV input should produce the following results,
if you've entered the code correctly.
(text_processing)$ python csv_reader-b.py --file=Workbook2.csv
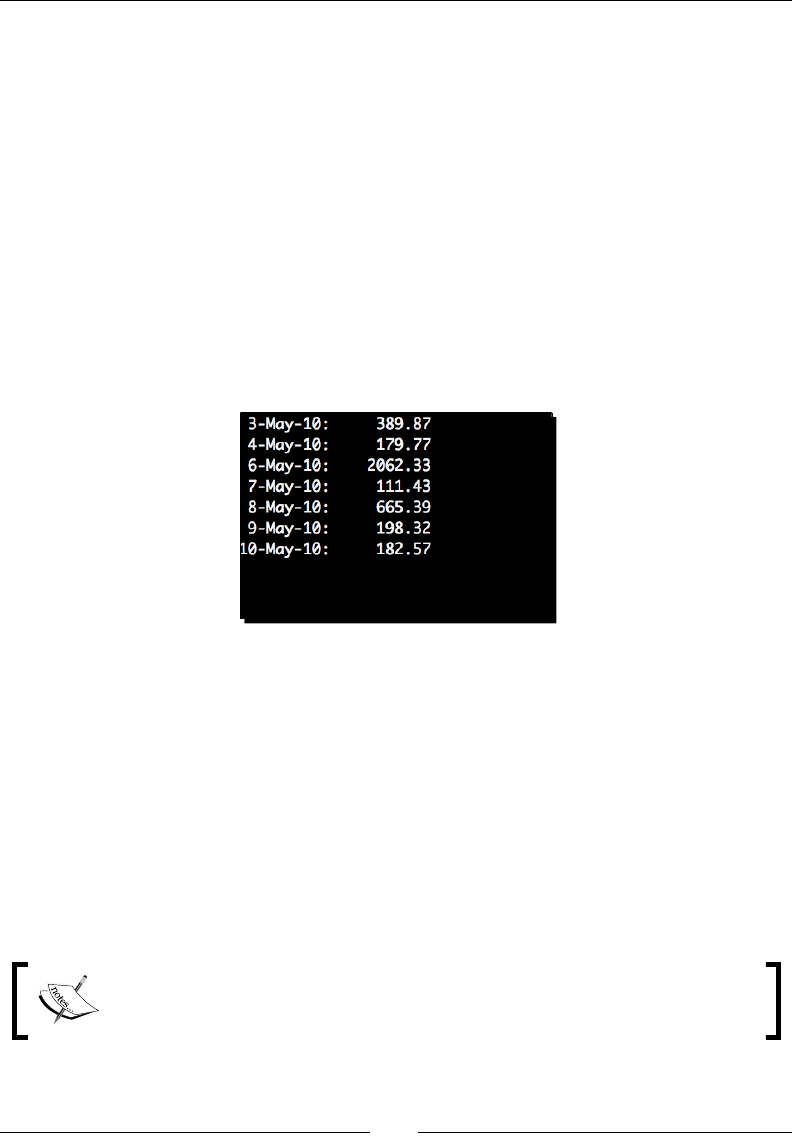
Text Processing Using the Standard Library
[ 102 ]
5. Now, open the Workbook2.csv le in a text editor and add a 1 to every revenue
column to increase net revenue by a visible amount. Save it as Workbook2a.csv.
The updated text le should look like this:
Date,Revenue,Cost,Profit,,
3-May-10,11289.41,899.54,389.87,,
4-May-10,1951.89,772.12,179.77,,
6-May-10,12812.23,749.9,2062.33,,
7-May-10,1554.34,442.91,111.43,,
8-May-10,12419.62,1754.23,665.39,,
9-May-10,1999.44,801.12,198.32,,
10-May-10,1514.78,332.21,182.57,,
6. Finally, let's run the applicaon again, using this new source of input.
(text_processing)$ python csv_reader-b.py --file=Workbook2a.csv
What just happened?
There's not much new code here. We simply updated our calculate_profit funcon to
return the Prot diconary key rather than perform the calculaon. Prey simple.
But, what happened? Why was the output the same for both runs? CSV data generated with
Excel (and probably all spreadsheet tools) does not contain formula informaon. Formula
results are calculated before the data is saved and the target cells receive that value.
The important thing to remember here is that if you're dealing with spreadsheet data,
you cannot rely on formula contents. If an input value to a formula changes outside of the
applicaon, you'll need to perform that calculaon yourself, within Python.
If you have a desire to read and manipulate nave Excel les, the xlrd module
provides that funconality. It is available on the Python Package Index at
http://pypi.python.org/pypi/xlrd/0.7.1.

Chapter 4
[ 103 ]
Reading non-Excel data
Not all CSV data is generated and wrien by Microso Excel. In fact, it's a fairly open and
exible format and is used in a lot of other arenas as well. For example, many shopping-cart
applicaons and online-banking ulies allow end users to export data using this format as
most all spreadsheet applicaons can read it.
In order to read a non-Excel format, we'll need to dene our own CSV dialect, which tells
the parser what to expect as a delimiter, whether values are quoted, and a few other details
as well.
Time for action – processing custom CSV formats
In this example, we'll build a Dialect class that is responsible for interpreng our own
format. We'll use some alternate delimiters and some dierent processing sengs. This is
the general approach you'll use when parsing your own format les.
We're going to process a UNIX style /etc/passwd le in this example. If you're not familiar
with the format, here's a small sample:
root:x:0:0:root:/root:/bin/bash
daemon:x:1:1:daemon:/usr/sbin:/bin/sh
bin:x:2:2:bin:/bin:/bin/sh
sys:x:3:3:sys:/dev:/bin/sh
sync:x:4:65534:sync:/bin:/bin/sync
games:x:5:60:games:/usr/games:/bin/sh
man:x:6:12:man:/var/cache/man:/bin/sh
lp:x:7:7:lp:/var/spool/lpd:/bin/sh
mail:x:8:8:mail:/var/mail:/bin/sh
news:x:9:9:news:/var/spool/news:/bin/sh
uucp:x:10:10:uucp:/var/spool/uucp:/bin/sh
proxy:x:13:13:proxy:/bin:/bin/sh
www-data:x:33:33:www-data:/var/www:/bin/sh
backup:x:34:34:backup:/var/backups:/bin/sh
Each line is a colon-separated list of values. We're only going to concern ourselves with the
rst and the last values - the user's login name and the shell applicaon that is executed
when a login occurs.
If you're following along using a Windows machine, you obviously do not have
an /etc/passwd le. An example le is available on the Packt Publishing FTP
site. These examples will use that le so they match up for all users.

Text Processing Using the Standard Library
[ 104 ]
1. Create a new le named csv_reader-c.py and enter the following code. Note
that this le is based on the csv_reader.py source we created earlier in the
chapter.
import csv
import sys
from optparse import OptionParser
if __name__ == '__main__':
parser = OptionParser()
parser.add_option('-f', '--file', help="CSV Data File")
opts, args = parser.parse_args()
if not opts.file:
parser.error('File name is required')
csv.register_dialect('passwd', delimiter=':',
quoting=csv.QUOTE_NONE)
dict_keys = ('login', 'pwd', 'uid', 'gid',
'comment', 'home', 'shell')
# Create a dict reader from an open file
# handle and iterate through rows.
reader = csv.DictReader(
open(opts.file, 'rU'), fieldnames=dict_keys,
dialect='passwd')
for user in reader:
print '%s logs in with %s' % \
(user['login'], user['shell'])
2. Run the preceding example using an /etc/passwd le as input. We'll use the
example provided, but feel free to use your own if you wish.
(text_processing)$ python csv_translate.py --file=passwd > pwd.csv
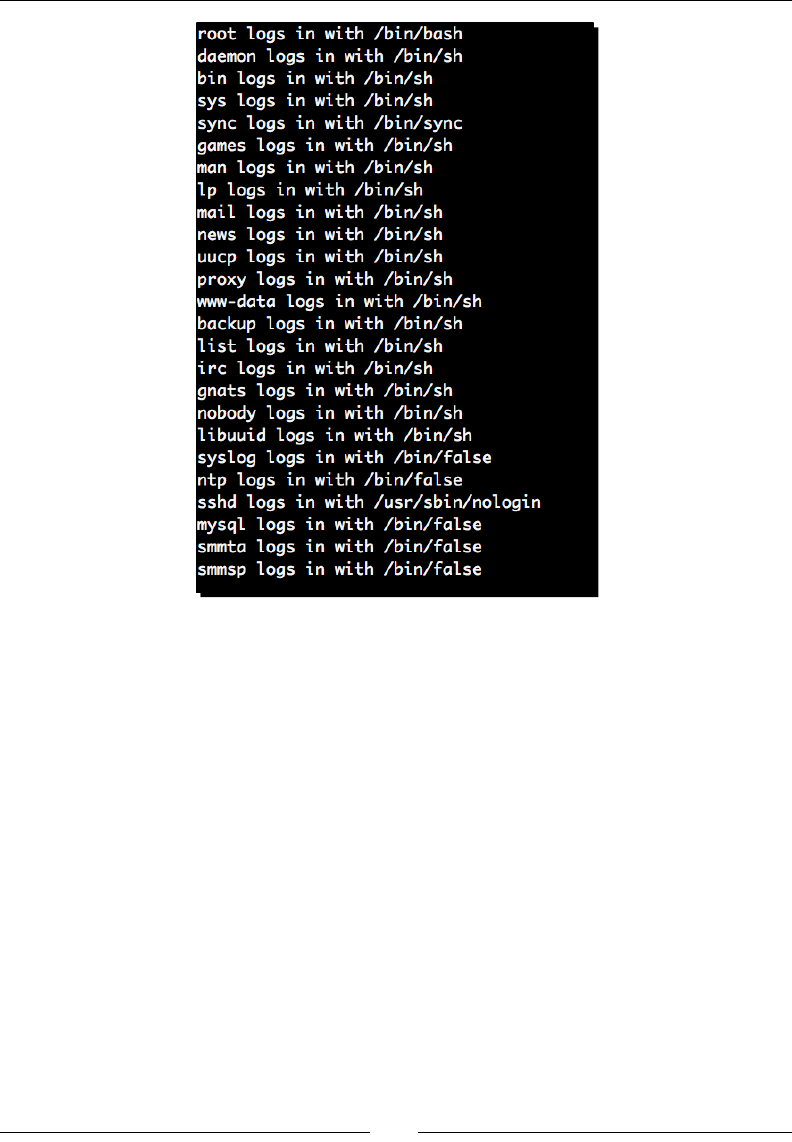
Chapter 4
[ 105 ]
What just happened?
We made a few changes to our csv_reader.py code in order to manage UNIX /etc/
passwd les to illustrate how you would go about processing non-Excel compable formats.
The rst line we'll look at is the call to csv.register_dialect. In this call, we're adding
an enrely new CSV dialect, named passwd. We're seng the delimiter to a single colon and
conguring the system not to expect quotes. This is a convenient way to introduce a new
dialect, but it's not the only way.
If we had a reason to, we could have extended the Dialect class and passed that in instead
of a series of keyword arguments to csv.register_dialect. In most cases, though, you
will do it this way as a Dialect is simply a collecon of processing opons.
Next, we create a tuple of diconary keys. The DictReader uses the rst line of a CSV le
as it's a set of diconary keys by default. As a password le does not contain a header as our
Excel sheets did, we need to explicitly pass in the list of diconary keys to use. They should
be in the order in which they'll be split.

Text Processing Using the Standard Library
[ 106 ]
Finally, we call csv.DictReader again, but this me, we specify the dialect name to use as
well as the diconary keys in the tuple we just created. The remainder of this example simply
prints out a user and her corresponding login shell.
Writing CSV data
We've looked at methods for parsing two dierent dialects of CSV: Excel formats and our
own custom format. Let's wrap up our discussion on CSV by looking at how we would write
out a new le.
Time for action – creating a spreadsheet of UNIX users
We're going to read our UNIX password database using the code we've already developed,
and transform it into an Excel-friendly CSV dialect. We should then be able to open our list of
users in spreadsheet format if we choose.
1. Create a new le and name it csv_translate.py.
2. Enter the following code:
import csv
import sys
from optparse import OptionParser
parser = OptionParser()
parser.add_option('-f', '--file', help="CSV Data File")
opts, args = parser.parse_args()
if not opts.file:
parser.error('File name is required')
csv.register_dialect('passwd', delimiter=':',
quoting=csv.QUOTE_NONE)
dict_keys = ('login', 'pwd', 'uid', 'gid',
'comment', 'home', 'shell')
print ','.join([i.title() for i in dict_keys])
writer = csv.DictWriter(sys.stdout, dict_keys)
# Create a dict reader from an open file
# handle and iterate through rows.
reader = csv.DictReader(
open(opts.file, 'rU'), fieldnames=dict_keys, dialect='passwd')
writer.writerows(reader)
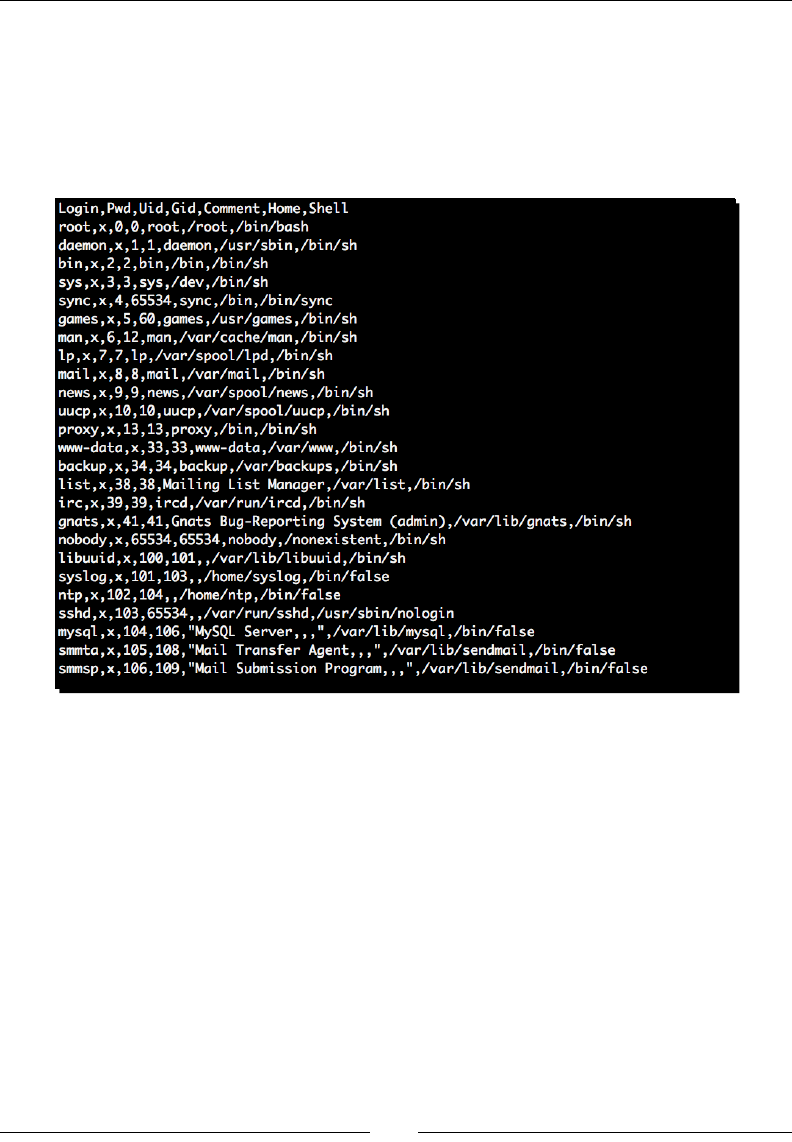
Chapter 4
[ 107 ]
3. Now, run the example using the supplied passwd le as your input. Redirect the
output to a le named passwd.csv.
(text_processing)$ python csv_translate.py --file=passwd > passwd.
csv
4. The contents of the newly created CSV le should be exactly as follows.
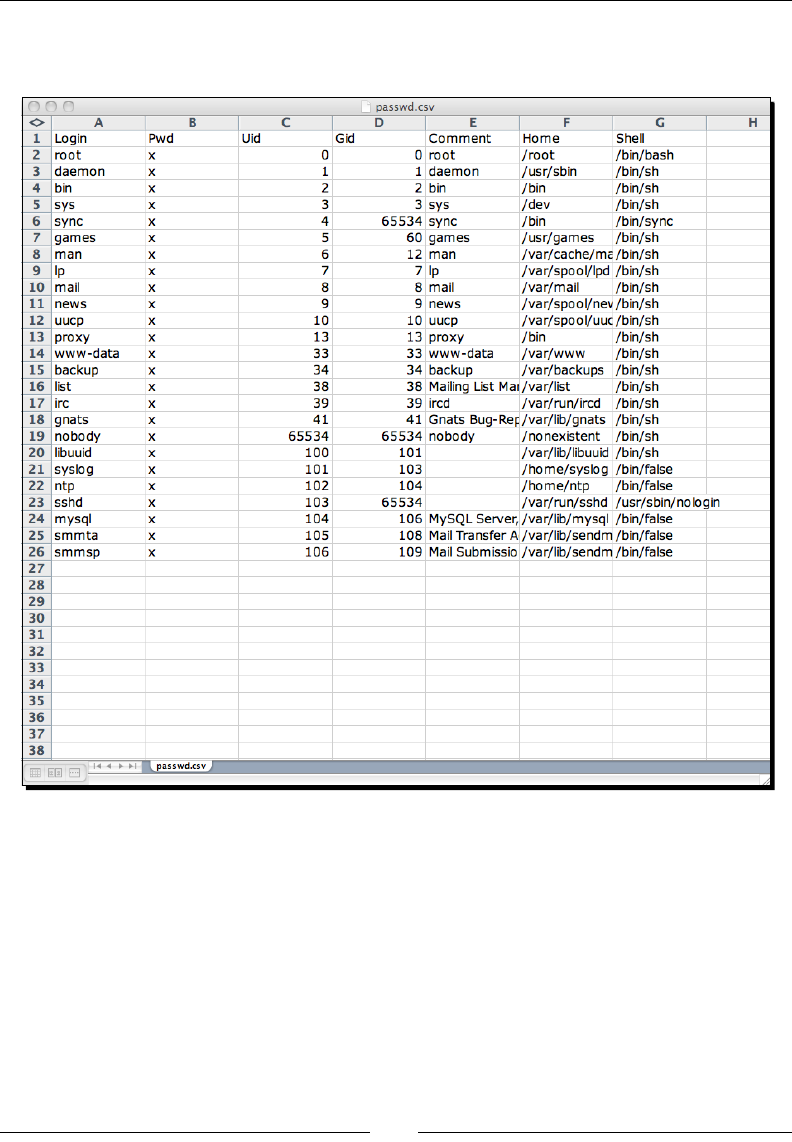
Text Processing Using the Standard Library
[ 108 ]
5. Finally, open the new CSV le in Microso Excel or OpenOce. The rendered
spreadsheet should resemble the following screenshot:
What just happened?
Using two dierent dialects, we read from our password le and wrote Excel-friendly CSV to
our standard output channel.
Lets skip over the boilerplate code again and look at what makes this example actually
work. First, the two lines that appear directly under the dict_key assignment line. We're
doing two important things here. First, we translate the keys we've been using into tle
case via a list comprehension and join them with a comma. Both of these steps use string
object methods covered in the previous chapter. In the same line, we then print this newly
generated value. This serves as the top line of the new CSV.

Chapter 4
[ 109 ]
The next line creates a writer object, which simply takes a le-like object and a list of
diconary keys. Note that the list of keys is required here as Python's diconaries are
unordered. This tells the writer in which order to print the diconary values. The actual write
logic executes much like the following small example:
Python 2.6.1 (r261:67515, Feb 11 2010, 00:51:29)
[GCC 4.2.1 (Apple Inc. build 5646)] on darwin
Type "help", "copyright", "credits", or "license" for more information.
>>> dicts = [{'key1': 'value1', 'key2': 'value2'}, {'key1': 'value1',
'key2': 'value2'}]
>>> key_order = ('key2', 'key1')
>>> for d in dicts:
... print ','.join([d[key] for key in key_order])
...
value2,value1
value2,value1
>>>
Finally, we call writer.writerows(reader) to read all of the data from the source
CSV and print it to the new desnaon. The writerows method of a DictWriter object
expects a sequence of diconaries with the appropriate keys.
Pop Quiz – CSV handling
1. We've described two methods of creang new CSV dialects. What are they? In what
situaons might you choose one over the other?
2. What's the drawback to simply using the split method of the string object for
parsing CSV data? Why isn't this approach reliable?
3. How are formulas executed once a spreadsheet document has been saved in a
text-only CSV format?
Have a go hero – detecting CSV dialects
One aspect of the CSV module we didn't cover here is the csv.Sniffer class. This class
aempts to build a new dialect based on a sample segment of a CSV le. You can read more
about the Sniffer class at http://docs.python.org/library/csv.html.
Given your knowledge of CSV les and how to process them, update the previous code to
automacally detect the CSV dialect in use given our example passwd le. If you're using a
UNIX system, try it on your own passwd le. Does it work? In which situaons do you run
into issues?

Text Processing Using the Standard Library
[ 110 ]
Modifying application conguration les
As you develop applicaons, you're going to want to allow your end users to make
runme changes without updang and eding source code. This is where the need for a
conguraon le comes in.
You've surely dealt with them before as you've set up and managed dierent computer
systems and applicaons. Perhaps you've had to edit one while dening a web server virtual
host, or while conguring drivers or boot preferences.
For the most part, applicaons choose their own conguraon formats and implement their
own parsers, to some degree. Some les contain simple name-value pairs while others build
programming-language-like structures. Sll others implement secons and segment values
even further.
Luckily, Python provides a full-featured conguraon le management module for us, so we
don't have to worry about wring our own error-prone processing logic. As an added benet,
Python's ConfigParser module also supports the generaon of new conguraon les
using Python data structures. This means we can easily write new les as well.
Time for action – adding basic conguration read support
In this example, we'll add some basic conguraon le support into our ever-growing
log-processing applicaon. There are a few values that we've been passing on the
command line that have become somewhat repeve. Let's x that.
1. First, create logscan-h.py, using logscan-g.py as your starng place.
2. Update the import statements at the top of the le to look like this:
import time
import string
import sys
from optparse import OptionParser
from collections import defaultdict
from ConfigParser import SafeConfigParser
from ConfigParser import ParsingError
3. Now, directly below the MaxSizeHandler class, add the following
configuration parser funcon. Note that this is not a part of the
MaxSizeHandler class and should not have a base indent.
def load_config():
"""
Load configuration.

Chapter 4
[ 111 ]
Reads the name of the configuration
of sys.argv and loads our config.
from disk.
"""
parser = OptionParser()
parser.add_option('-c', '--config', dest='config',
help="Configuration File Path")
opts, args = parser.parse_args()
if not opts.config:
parser.error('Configuration File Required')
config_parser = SafeConfigParser()
if not config_parser.read(opts.config):
parser.error('Could not parse configuration')
return config_parser
4. We need to update our __main__ secon to take advantage of our new
conguraon le support. Update your main secon to read as follows:
if __name__ == '__main__':
config = load_config()
input_source = config.get('main', 'input_source')
if input_source == '-':
file_stream = sys.stdin
else:
try:
file_stream = open(input_source)
except IOError, e:
print >>sys.stderr, str(e)
sys.exit(-1)
size_check = MaxSizeHandler(
int(config.get(
'maxsize', 'threshold')
)
)
call_chain = []
call_chain.append(size_check)
call_chain.append(ErrorCodeHandler())
processor = LogProcessor(call_chain)
initial = time.time()
line_count = processor.parse(file_stream)
duration = time.time() - initial
# Ask the processor to display the
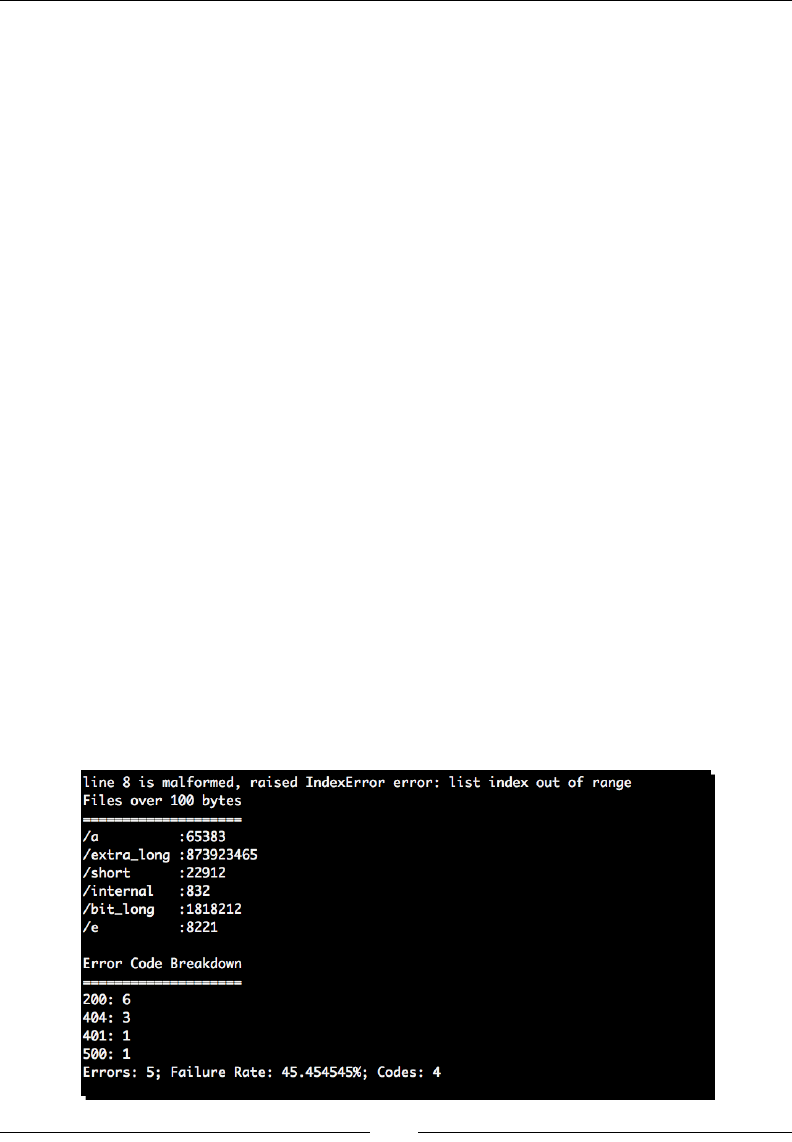
Text Processing Using the Standard Library
[ 112 ]
# individual reports.
processor.report()
if config.getboolean('display', 'show_footer'):
# Print our internal statistics
print "Report Complete!"
print "Elapsed Time: %#.8f seconds" % duration
print "Lines Processed: %d" % line_count
print "Avg. Duration per line: %#.16f seconds" % \
(duration / line_count) if line_count else 0
5. The next thing to do is create a basic conguraon le. Enter the following text into
a le named logscan.cfg:
[main]
# Input filename. This must be either a pathname or a simple
# dash (-), which signifies we'll use standard in.
input_source = example3.log
[maxsize]
# When we hit this threshold, we'll alert for maximum
# file size.
threshold = 100
[display]
# Whether we want to see the final footer calculations or
# not. Sometimes things like this just get in the way.
show_footer = no
6. Now, let's run the example using this conguraon. If you entered everything
correctly, then your output should resemble the following:
(text_processing)$ python logscan-h.py --config=logscan.cfg
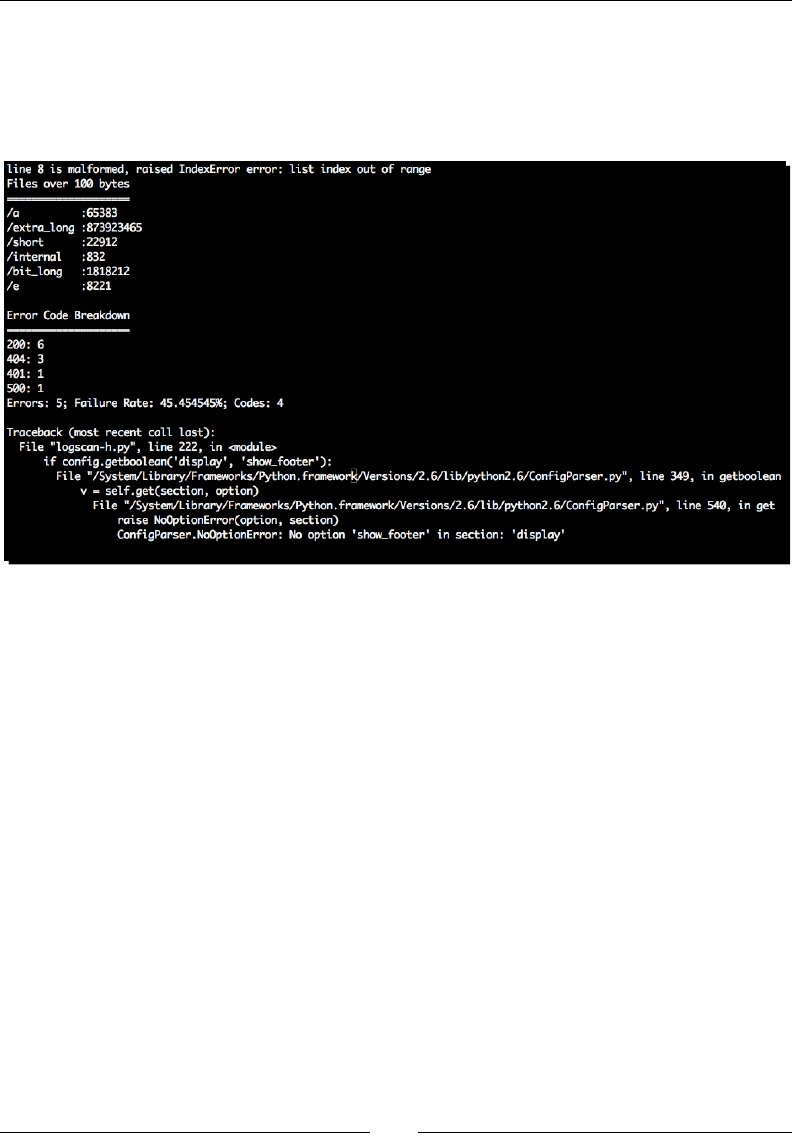
Chapter 4
[ 113 ]
7. Finally, open up the conguraon le and comment out the very last line. It should
begin with show_footer. Run the applicaon again. You should see the following
output:
(text_processing)$ python logscan-h.py --config=logscan.cfg
What just happened?
We opened, scanned, processed, converted, and used elements of an ini-style conguraon
le without having to deal with a single split or white space trim! Let's have a closer look at
how we set everything up.
First o, we updated our import statements to include the needed classes within the
ConfigParser module. In many cases, it's simpler to just import the ConfigParser
module itself rather than individual classes. We did it this way in order to save a bit of space
in the example text.
Next, we added a load_config funcon that is responsible for handling most of the actual
work. The rst thing we do here is parse our command line for a single –c (or –config)
opon, which is the locaon of our le. This opon is required and we'll exit if it's not found
(more on that later).
Next, we instanate a SafeConfigParser class and aempt to make it read the name of the
le we pass in via the command-line opon. If the read doesn't succeed then we exit with a
rather generic error. We return the config_parser object aer we have read our le.

Text Processing Using the Standard Library
[ 114 ]
Skip now to our __main__ secon. The very rst thing we do here is process our
conguraon le via the new funcon. The very next line shows the canonical way for
accessing data, via the get method. The get method takes a conguraon le secon as
well as a value name. This rst access retrieves the input_source value, which is the name
of our logle.
Next, we access the conguraon object again when we create our MaxSizeHandler class.
We pull the threshold size out and pass it to the constructor.
Noce that we have to explicitly convert our data to an integer type. Values read
via conguraon les are typed as strings.
The nal me we access our conguraon object is near the boom when we check the
display secon for the show_footer value. If it's not True, we won't print our familiar footer
text. Here, we use a convenience method available to us, called getboolean. There are a
series of these methods available that automacally handle the data transformaon for us.
The last thing we did was to comment out a conguraon line and run our applicaon. In
doing so, you'll noce that it results in a fatal error! This probably isn't what we want most
of the me. It's possible to avoid this situaon and set reasonable default values.
One nice thing about the SafeConfigParser classes is that they're also able
to read Microso Windows conguraon les directly. However, none of the
ConfigParser classes support value-type prexes found in extended version
INI syntax.
Using value interpolation
One really interesng feature of the ConfigParser module is that it supports conguraon
value interpolaon, or substuon, directly within the conguraon le itself. This is a very
useful feature.
Time for action – relying on conguration value interpolation
For this example, we'll simply update our conguraon le to take advantage of this feature.
There are no Python code changes necessary.
1. First, add a new conguraon value to the [main] secon of logscan.cfg.
The name of the value should be dir and the value should be the full path to the
directory that you're execung examples from.
[main]
# The main directory Where we're running from (or, rather, where
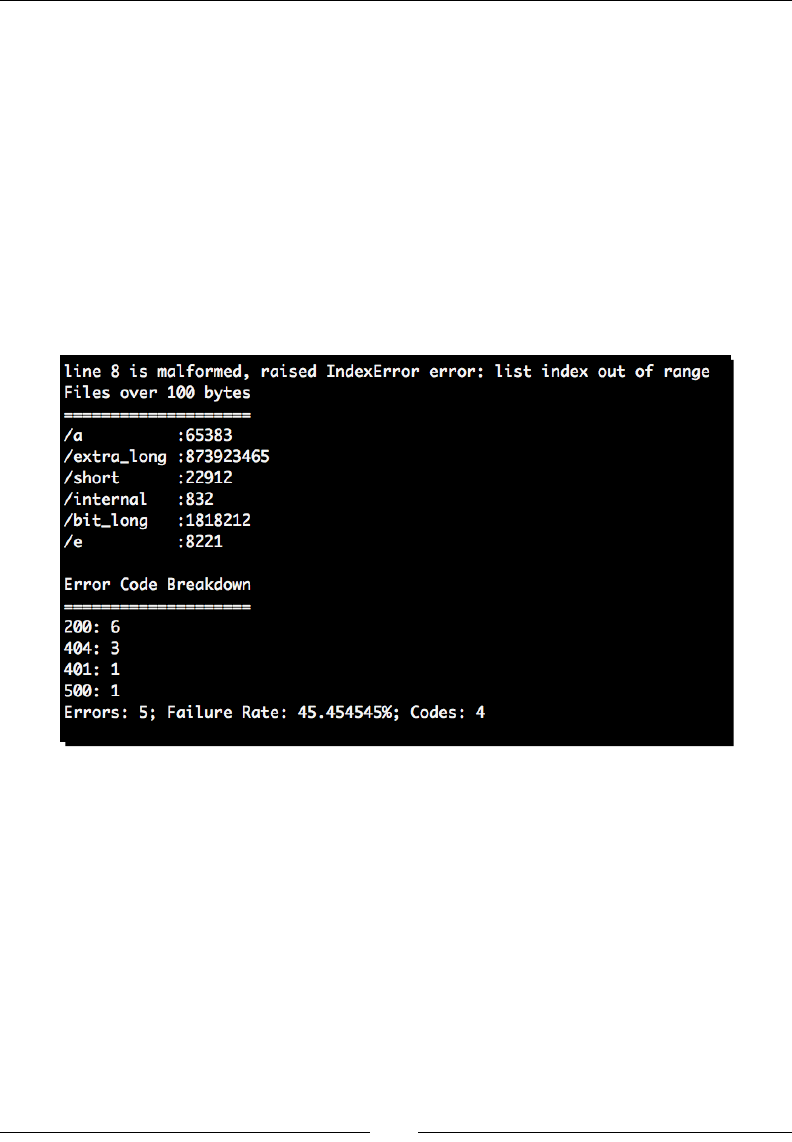
Chapter 4
[ 115 ]
# we store logfiles and write output to)
dir = /Users/jeff/Desktop/ptpbg/Chapters/Ch4
2. Next, you're going to update the input_source conguraon opon to reference
this full path.
# Input filename. This must be either a pathname or a simple
# dash (-), which signifies we'll use standard in.
input_source = %(dir)s/www.log
3. Finally, running this updated example should produce the same output as the
previous execuon did.
(text_processing)$ python logscan-h.py --config=logscan.cfg
What just happened?
We included the value of a configuration opon within a second one by using the
familiar percent syntax. This allows us to build complex conguraon values by relying on
interpolaon and not repeang data.
Order is not signicant. We could have placed the dir value below input_source and the
example would have worked perfectly ne. Values are not retrieved unl they are accessed.
It is possible to access any values within the current secon, or within the special defaults
collecons detailed as follows.
It's also possible to pass addional values to be used or interpolaon in to the method.
This is a convenient way to generate conguraons that depend on the current state of an
applicaon, such as a web-aware script.

Text Processing Using the Standard Library
[ 116 ]
Consider the following conguraon le:
[redirects]
client_history = http://yourdomain.com/%{ip)s/history
Given this snippet, it's easy to imagine a web applicaon, which redirects users to a URL
based on their client IP. As we don't have this informaon at startup me, we can't resolve
the full URL unl a request is actually made. To include the source IP address, we could
modify the way we use the get funcon:
return config.get('redirects', 'client_history',
vars={'ip': client_ip})
Finally, assuming a client IP of 127.0.0.1, our client_history URL would render to
http://yourdomain.com/127.0.0.1/history.
Handling default options
In addion to passing a vars keyword argument to the get method, there are two
other ways you can supply default values for interpolaon: a DEFAULT secon within a
conguraon le, or by passing a diconary of default values into SafeConfigParser
when you create an instance.
Both of these opons are dierent than the keyword argument approach in one big area.
In addion to serving as interpolated values, these elements will be returned verbam if
a conguraon opon referenced with the get funcon doesn't exist within the specied
secon. In eect, it's possible to use these defaults as global conguraon opon defaults
and not simply interpolaon defaults.
Time for action – conguration defaults
In this example, we'll add some defaults to our conguraon. This makes things easy on our
users as they don't have to congure every possible item.
1. As usual, create a new copy of our logscan script. You should base it on logscan-h.
py and name it logscan-i.py.
2. At the top of the le, add import os above the rst import statement.
3. Next, update the load_config method. Replace the line that reads config_
parser = SafeConfigParser() with the following:
# Build config parser and set some
# reasonable defaults.
config_parser = SafeConfigParser(
defaults={
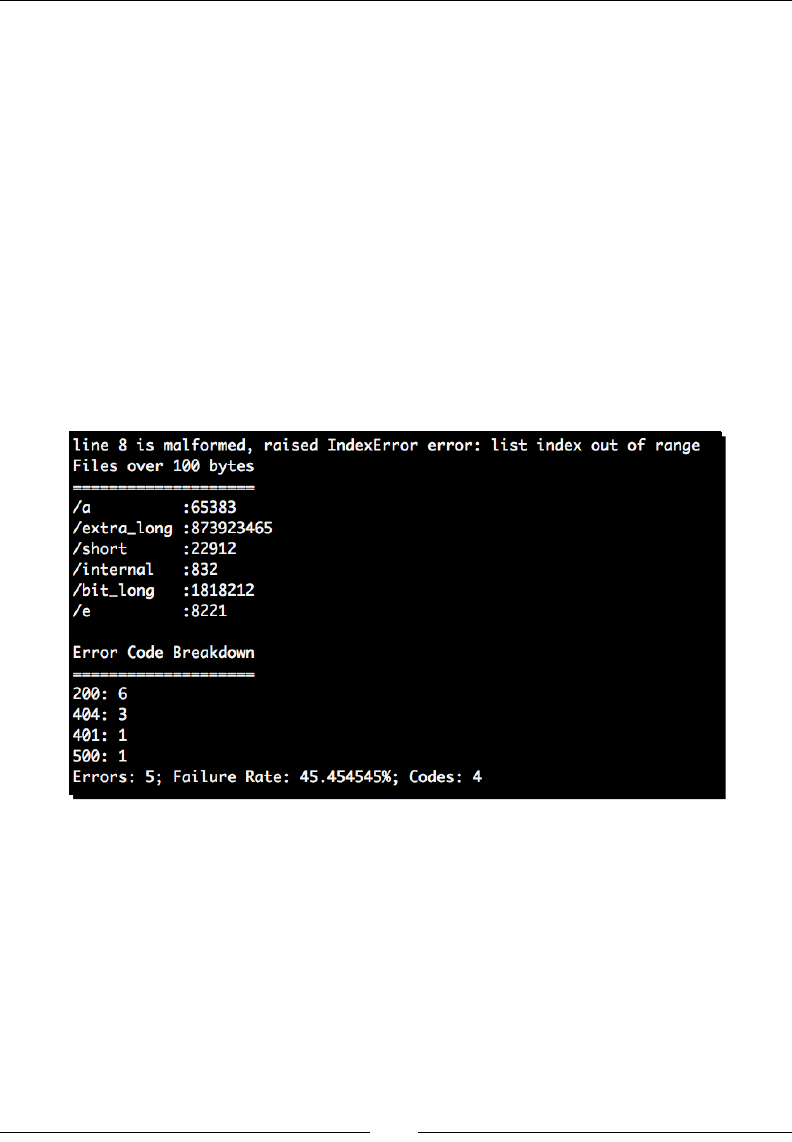
Chapter 4
[ 117 ]
'input_source': '-',
'dir': os.getcwd(),
'threshold': '0',
'show_footer': 'True'
}
)
4. Remove (or comment) the line that denes the current directory within the
logscan.cfg le.
5. Remove or comment out the line that reads show_footer = no within the
conguraon le.
6. Finally, run the updated logscan script. It should run through to compleon without
error.
(text_processing)$ python logscan-i.py --config=logscan.cfg
What just happened?
First, we simply imported the os module as we reference it later in the script when we
determine the current working directory.
Next, jump down to the parse_config funcon and have a look at the changes we've
made to SafeConfigParser. We're passing in a diconary of default opons here. We're
also making things easier on our users by defaulng the dir value to be the current working
directory, which is available via os.getcwd.
Finally, we comment out or remove a required conguraon opon and take the default
value.
Text Processing Using the Standard Library
[ 118 ]
You may have noced that all of the opons we've passed in as default values are string
opons and not nave types where applicable. The reason for this is simple. The shortcut
methods (such as getboolean) expect a text value, which they'll parse in order to handle
the type translaon. If a non-text value is passed in, they'll raise an excepon.
If you wish to use Unicode characters within your conguraon les, you'll need
to use the readfp method of the SafeConfigParser object rather than
the read method. Pass in a le-like object opened with the codecs.open
method rather than the standard built-in open method. More on this when we
get to Chapter 8, Understanding Encoding and i18n. Of course, this is no longer
relevent with Python 3.
Have a go hero – overriding conguration options
The read method of a SafeConfigParser class actually allows you to pass in a sequence
of conguraon les. This is done so that you can provide a system-wide conguraon such
as /etc/myapp.conf, and then a local per-user conguraon le such as ~/.myapp.conf.
Generally, the per-user conguraon is more specic.
When the read funcon is called, it returns a list of successfully processed conguraon
les. Earlier versions of Python simply returned the number of successfully processed
conguraon les.
Now that you know this, update logscan-i.py so that it pulls its defaults out of a separate
conguraon le and then reads a second per-user le, which overrides those defaults.
Writing conguration data
In addion to simply reading and retrieving data from conguraons les, it's possible
to generate or modify exisng les. This provides you with an easy method to save an
applicaon's state for later use in a nice, user-editable format.
Be careful when you edit exisng conguraon les. Comments will not be
preserved. Overwring user-generated comments is not a very user-friendly
thing to do!

Chapter 4
[ 119 ]
Time for action – generating a conguration le
We're going to take a break from our log processing scripts again with this example. Instead,
we're going to put together a skeleton applicaon that stores its command-line opons as
conguraon defaults. This is a useful tacc that can be used to trim down on the number of
required command-line opons your ulies require.
1. First, create a new le and name it default_args.py.
2. Enter the following source code as it appears as follows:
from ConfigParser import SafeConfigParser
from optparse import OptionParser
class OptionState(object):
section = 'cmd_args'
def __init__(self, defaults='defaults.ini'):
self.defaults = defaults
self.parser = SafeConfigParser(
defaults={
'server': '127.0.0.1',
'port': '80',
'login': ''
}
)
self.parser.read(self.defaults)
if not self.parser.has_section(self.section):
self.parser.add_section(self.section)
def get_option(self, option):
"""
Return a default argument.
"""
return self.parser.get(
self.section, option)
def set_option(self, option, value):
"""
Set an option on the parser.
These can be any element, but we coerce
them to string to get full interpolation
support.
"""
self.parser.set(
self.section, option, str(value))
def store(self, options):
Text Processing Using the Standard Library
[ 120 ]
"""
Serialize out our configuration.
"""
for op in options.option_list:
if op.dest:
self.set_option(
op.dest, getattr(opts, op.dest))
# Write new configuration out.
with open(self.defaults, 'w') as f:
self.parser.write(f)
if __name__ == '__main__':
defs = OptionState()
options = OptionParser()
options.add_option('-s', '--server', help="Server Host",
default=defs.get_option('server'))
options.add_option('-p', '--port', help="Server Port",
default=defs.get_option('port'))
options.add_option('-l', '--login', help="Server Login",
default=defs.get_option('login'))
# If this is passed, we'll save our defaults out.
# Notice this always defaults to False!
options.add_option('-d', '--save_defaults',
help="Save Defaults", action='store_true', default=False)
opts, args = options.parse_args()
# Save options
if opts.save_defaults:
defs.store(options)
print 'login %s:%d as %s' % (opts.server, int(opts.port),
opts.login)
3. Run the script as shown in the following screenshot:

Chapter 4
[ 121 ]
4. If you entered the code correctly, you should now have a le named defaults.ini
located within the current working directory. The contents should be similar to the
following:
[DEFAULT]
login =
port = 80
server = 127.0.0.1
[cmd_args]
login = monty
port = 8080
save_defaults = True
server = www.jmcneil.net
What just happened?
The majority of the work here belongs in the OptionState class. The rst thing we do in
the __init__ method is set up a SafeConfigParser. We set some reasonable defaults,
which will wind up also being used as command-line opon defaults. We then read our
conguraon les as we always have.
The next line is new to you, though. We check to see if a cmd_args secon exists within
the processed text le. If one doesn't exist, we add one programmacally. We don't add any
opons at this point, though. We just rely on the defaults as set just before.
The next method should look familiar to you. We're simply reading a conguraon entry out
of a SafeConfigParser object. There's nothing new here.
The set_option method sets the value of an opon passed in to the string representaon
of value. This overrides any defaults that have been set.
Finally, we have the store method. The store method accepts an array of command-line
opons and calls self.set_option for each one. The dest aribute used defaults to the
string value of the long opon name, minus the leading dashes. A desnaon can also be
arbitrarily set via the dest keyword argument on an OptionParser.
Everything is wired up within the __main__ secon. We create an instance of our
OptionState class, which is responsible for generang our command-line defaults. Next,
we use OptionState's get_option method when seng up our command-line opons
instead of passing in stac values. Finally, if a user requested the defaults be stored, we do
that by calling defs.store.
When we look at the newly generated conguraon le, note that it has a DEFAULT secon,
which holds a conguraon le-formaed representaon of the inial diconary. We also
include the secon that we build manually.
Text Processing Using the Standard Library
[ 122 ]
Have a go hero – clearing conguration defaults
We've shown you how to read and write to textual conguraon les using Python's
built-in ConfigParser module. To solidify your knowledge, take a minute and add
a —clear_defaults opon to the default_args.py applicaon. Aside from simply
removing the le, a good place to start might be the remove_section method of the
conguraon parser objects.
Reconguring our source
Unl now, we've been working with at Python source lisngs. This is a perfectly acceptable
way of organizing code when dealing with smaller scripts, but it gets dicult to manage as
projects get bigger.
Let's take a bit of a detour and look at a beer method of source organizaon. We'll use this
approach throughout the rest of the book, where appropriate.
A note on Python 3
The packages outlined in this secon are not fully compable with Python 3. However, both
distribute and virtualenv3 are available. The distribute package provides an API-
compable alternave to SetupTools that works with both current, major Python versions.
The laer package, virtualenv3, is funconally equivalent to virtualenv. If you intend
to follow along using Python 3, you may want to install these packages. More informaon
is available at http://pypi.python.org/pypi/virtualenv3/1.3.4.2 and http://
pypi.python.org/pypi/distribute.
The distribute package provides a mechanism for automacally running the
2to3 ulity in an eort to help developers provide code for both major
versions. We'll cover that tool in the appendix.
Time for action – creating an egg-based package
We're going to create a Python egg-based package. From here, we'll do all of our
development work. We detailed the installaon of SetupTools and Python Eggs in the rst
chapter. Here, we'll learn how to roll our own packages.
1. First, create a new directory and name it text_beginner, and step into it.
2. Now, we're going to create a setup.py le, which will be used to package our
source bundle and handle dependencies. Create a setup.py le with the following
contents:

Chapter 4
[ 123 ]
from setuptools import setup, find_packages
setup(
name='text_beginner',
version='0.1',
description='Text Beginner Package',
author='Your Name',
author_email='Your Email',
install_requires=[],
packages=find_packages(),
include_package_data=True,
zip_safe=False,
entry_points = {
'console_scripts': [
'logscan = logscan.cmd:main'
]
},
)
3. Create a subdirectory, and name it logscan. Create an empty logscan/__
init__.py le. This marks text_beginner/logscan as a Python package.
4. Now, create a new Python le within the logscan directory and name it core.py.
We'll use logscan-i.py as a template.
5. First, let's update our import statements. There are few elements we can strip out
of the module.
"""
This module contains all of our core log processing classes.
"""
import os
import string
import sys
from collections import defaultdict
from ConfigParser import SafeConfigParser
from ConfigParser import ParsingError
6. Next, update the report method of the LogProcessor class that we've been
working with to resemble the following.
def report(self):
"""
Run report chain.
"""
for c in self._call_chain:
c.report()

Text Processing Using the Standard Library
[ 124 ]
7. Introduce the following class to core.py. It will serve as the root object of the
inheritance hierarchy for all of the handlers that we'll dene from here on out.
class BaseHandler(object):
"""
A Base class for all handlers.
Not meant to be instanced directly.
Contains common methods and functions used
within each handler.
"""
def __init__(self, output, format):
self.output = output
self.format = format
def do_text(self, results):
"""Render Text Data"""
print >>self.output, results
def render(self, results):
"""Dispatch the appropriate render routine"""
getattr(self, 'do_%s' % self.format)(results)
self.output.write('\n')
def print_title(self):
"""
Uniform title print method.
"""
print >>self.output, "%s\n" % self.title, \
"=" * len(self.title)
8. Update our ErrorCodeHandler class to look like the following code example:
class ErrorCodeHandler(BaseHandler):
"""
Collect Error Code Information.
"""
title = 'Error Code Breakdown'
def __init__(self, output=sys.stdout, format='text'):
super(ErrorCodeHandler, self).__init__(output, format)
self.error_codes = defaultdict(int)
self.errors = 0
self.lines = 0
def process(self, fields):
"""
Scan each line's data.
Reading each line in, we'll save out the

Chapter 4
[ 125 ]
number of response codes we run into so we
can get a picture of our success rate.
"""
code = fields['status']
self.error_codes[code] += 1
# Assume anything > 400 is
# an HTTP error
self.lines += 1
if int(code) >= 400:
self.errors += 1
def do_text(self, results):
"""
Print out Status Summary.
Create the status segment of the
report.
"""
self.print_title()
longest_num = sorted(results.values())[-1]
longest = len(str(longest_num))
for k,v in results.items():
print >>self.output,
'{0}: {1:>{2}}'.format(k, v, longest)
# Print summary information
print >>self.output,
'Errors: {0}; Failure Rate: {1:%}; Codes: {2}'.format(
self.errors, float(self.errors)/self.lines,
len(results.keys()))
def report(self):
return self.render(self.error_codes)
9. Along with the ErrorCodeHandler class, MaxSizeHandler now needs to be
updated in order to reect base class usage.
class MaxSizeHandler(BaseHandler):
"""
Check a file's size.
"""
def __init__(self, size, output=sys.stdout, format='text'):
super(MaxSizeHandler, self).__init__(output, format)
self.size = size
self.name_size = 0
self.warning_files = set()
@property

Text Processing Using the Standard Library
[ 126 ]
def title(self):
return 'Files over %d bytes' % self.size
def process(self, fields):
"""
Looks at each line individually.
Looks at each parsed log line individually and
performs a size calculation. If it's bigger than
our self.size, we just print a warning.
"""
if fields['size'] > self.size:
self.warning_files.add(
(fields['file_requested'], fields['size']))
# We want to keep track of the longest filename for
formatting later.
fs = len(fields['file_requested'])
if fs > self.name_size:
self.name_size = fs
def do_text(self, result):
"""
Format the Max Size Report.
This method formats the report and prints
it to the console.
"""
self.print_title()
for f,s in result.items():
print >>self.output, '%-*s :%d' %
(self.name_size, f, s)
def report(self):
return self.render(
dict(self.warning_files))
10. Finally, make sure the new module ends with the following two ulity funcons:
def load_config(config_file):
"""
Load configuration.
Reads the name of the configuration
of sys.argv and loads our config.
from disk.
"""
config_parser = SafeConfigParser(
defaults={
'input_source': '-',

Chapter 4
[ 127 ]
'dir': os.getcwd(),
'threshold': '0',
'show_footer': 'True',
'output_format': 'text',
'output_file': '-'
}
)
if not config_parser.read(config_file):
parser.error('Could not parse configuration')
return config_parser
def get_stream(filename, default, mode):
"""
Return a file stream.
If a '-' was passed in then we just
return the default. In any other case,
we return an open file with the specified
mode.
"""
if filename == '-':
return default
else:
return(open(filename, mode))
11. Now, create a le named cmd.py within the logscan directory, and ensure the
contents are as follows:
"""
Command line entry points.
"""
import sys
import time
import optparse
# Our imports
from logscan.core import get_stream
from logscan.core import load_config
from logscan.core import ErrorCodeHandler, MaxSizeHandler
from logscan.core import LogProcessor
def main(arg_list=None):
"""
Log Scanner Main.
We still separate main off. This keeps it possible
to use it from within yet another module, if we

Text Processing Using the Standard Library
[ 128 ]
ever want to do that.
"""
parser = optparse.OptionParser()
parser.add_option('-c', '--config', dest='config',
help="Configuration File Path")
opts, args = parser.parse_args(arg_list)
if not opts.config:
parser.error('Configuration File Required')
# Now we can load the configuration file
config = load_config(opts.config)
file_stream = get_stream(
config.get('main', 'input_source'), sys.stdin, 'r')
output_stream = get_stream(
config.get('main', 'output_file'), sys.stdout, 'w')
output_format = config.get('display', 'output_format')
call_chain = []
# Size Check
call_chain.append(
MaxSizeHandler(
int(config.get(
'maxsize', 'threshold')
), output_stream, output_format)
)
# Error Code Checks
call_chain.append(
ErrorCodeHandler(
output_stream, output_format)
)
# Build a processor object
processor = LogProcessor(call_chain)
initial = time.time()
line_count = processor.parse(file_stream)
duration = time.time() - initial
# Ask the processor to display the
# individual reports.
processor.report()
if config.getboolean('display', 'show_footer'):
# Print our internal statistics, this always
# goes to standard out.
print
print "Report Complete!"
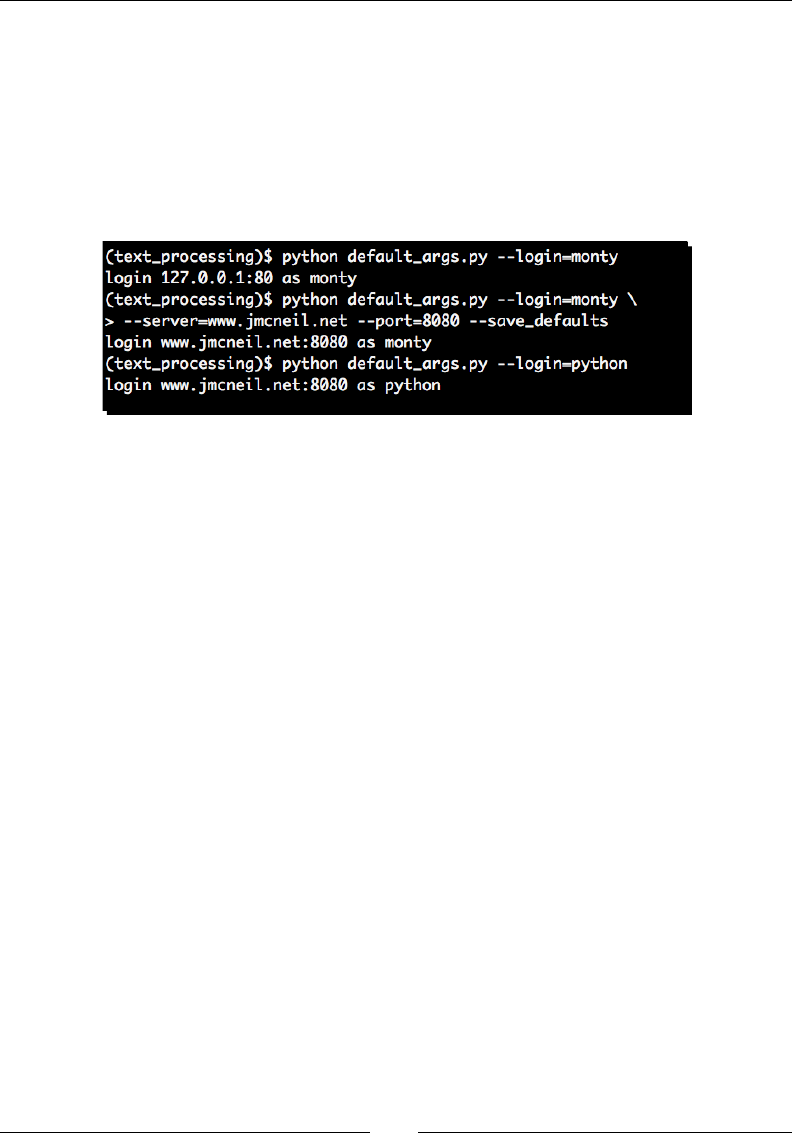
Chapter 4
[ 129 ]
print "Elapsed Time: %#.8f seconds" % duration
print "Lines Processed: %d" % line_count
print "Avg. Duration per line: %#.16f seconds" % \
(duration / line_count) if line_count else 0
12. Now, from within the text_beginner directory, issue a python setup.py
develop command. Your output should resemble the following:
(text_processing)$ python setup.py develop
13. Now, copy the example3.log as well as your conguraon le into the text_
beginner directory. Update your conguraon to read as follows:
[main]
# Input filename. This must be either a pathname or a simple
# dash (-), which signifies we'll use standard in.
#input_source =
#output_file =
[maxsize]
# When we hit this threshold, we'll alert for maximum
# file size.
threshold = 100
[display]
# Whether we want to see the final footer calculations or
# not. Sometimes things like this just get in the way.
show_footer = yes
# Output format desired
output_format = text
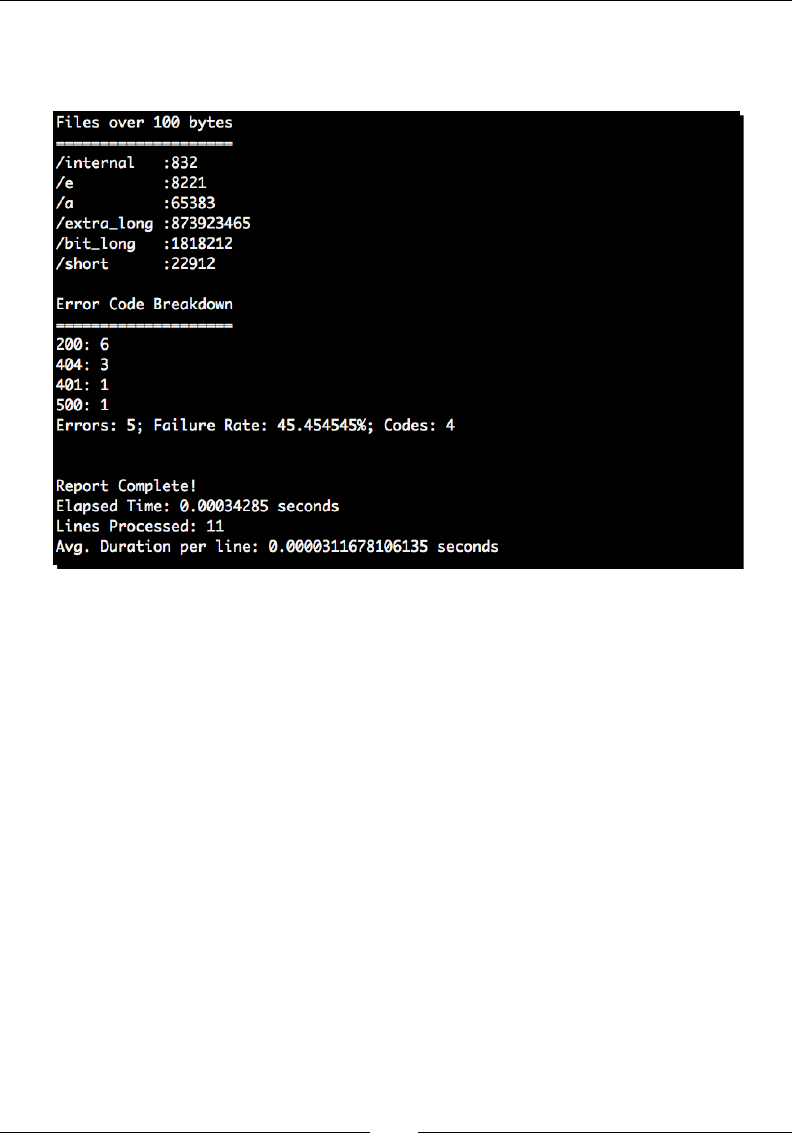
Text Processing Using the Standard Library
[ 130 ]
14. Finally, run the updated command with the proper command-line opons:
(text_processing)$ cat example3.log | logscan --config=logscan.cfg
What just happened?
We recongured our source package to use SetupTools. As it grows larger, this ought to make
it much easier to manage and develop against.
First, we set up a new directory structure. At the very top level, we have the text_
beginner directory. This serves as our development home. All packages we add will go
below here, within their own package directories.
Next, we create a new directory for our logscan applicaon, named logscan. Within this
directory, we've split our source up into two lisngs: cmd.py and core.py. The core.py
contains the enre log processing framework while the cmd.py contains the main method
entry point. You should note that we've even wrapped our main code in its own funcon.
In addion to separang the code into two modules, we made some fairly big changes to the
classes that now live in core.py. Let's go through them.
First, we removed all prinng and spacing code from the LogProcessor class. We did
this so that we can push all formang into the actual Handler classes. This gives us a nice
separaon of concerns between the processing driver and the individual report handlers.

Chapter 4
[ 131 ]
Next, we introduced a class named BaseHandler. BaseHandler saves the desired output
channel as well as the desired report format; more on that in a bit.
Now, take a look at both MaxSizeHandler and ErrorCodeHandler. We've updated them
to inherit from BaseHandler. We've also augmented the __init__ methods such that
they take a desired output format as well as an output le-like object. This provides a wealth
of reuse potenal.
Addionally, we've renamed each report method to do_text, and changed our print
funcons to ensure they're direcng output to the designated output stream. Of course,
both new __init__ parameters have default values, so we don't break compability with
any exisng libraries that may depend on this code.
Our report methods have been updated to simply call self.render, with a diconary of
result values. Here's where our base class comes in. When render is called, it dynamically
looks up for a formang funcon, based on the desired format. That method is called and
passed in the results object. As both handlers now inherit from BaseHandler, we can
simply add do_* methods to the base handler and immediately have new formats available
within all reports!
Our load_config method is slightly dierent now. Instead of reading the command line
within the module, we've pushed that o to the main entry-point funcon. Here, we just
read the conguraon le as requested. We've also added new opons for desired output
channel as well as report format.
Finally, we've added a helper method to return a stream. If a dash is passed in then we'll
return a default value. If anything other than a dash is passed, we'll open the le and return
its open object.
Now, let's take a look at cmd.py.
There's not too much dierent about this code. We've simply encapsulated it all within a main
funcon. Addionally, we're passing in the new conguraon parameters to our handlers.
Understanding the setup.py le
The glue that really es everything together here is the setup.py script. setup.py
simply imports SetupTools methods and calls a method named setup, with some keyword
arguments that further dene our package.
Have a look at the entry_points line. This replaces our need for a __name__ == '__
main__' secon. When we ran our setup.py develop command earlier, SetupTools
automacally generated console script named logscan, which simply invoked the
main funcon of our cmd.py le! What's even beer is that its plaorm-agnosc and
automacally placed in a locaon that's on your system PATH.

Text Processing Using the Standard Library
[ 132 ]
In addion to placing our logscan ulity on our PATH, it also ensured that our working
directory was put on Python's sys.path. This allows us to develop our applicaons without
needing to reinstall an egg distribuon each me or otherwise manipulate our sys.path
variable.
SetupTools is a very in-depth system that we've really only touched the surface
of. For more informaon, see http://peak.telecommunity.com/
DevCenter/setuptools.
Have a go hero – building some eggs!
By simply dening a setup funcon, you've gained access to a wealth of 'python setup.py'
commands. At the command line, run python setup.py –help-commands. Take a minute
to familiarize yourself with what some of these do. Most importantly, look at the bdist_egg
command.
Working with JSON
JSON, or JavaScript Object Notaon, is a popular text-based object representaon format
used to pass data between systems on the Internet. JSON is popular because of its relave
simplicity as compared against tradional markup approaches such as XML. The Python
standard library ships with a json module, which can be used to serialize and de-serialize
standard Python objects to and from JSON format.
As its name suggests, JSON documents follow the same syntax as JavaScript Object code.
Time for action – writing JSON data
Note that this requires Python 2.6. If you're using an earlier version, you'll need to install
the simplejson library that's available via the Python Package Index. simply run easy_
install simplesjson from within your virtual environment.
In this example, we'll update our CSV reader to output a list of UNIX users in our password
le in JSON format.
1. Create a new le named csv_reader-d.py. You can use csv_reader-c.py as a
base, or create an empty le.
2. Update the code in csv_reader-d.py to contain the following:
import csv
import sys
import json

Chapter 4
[ 133 ]
from optparse import OptionParser
if __name__ == '__main__':
parser = OptionParser()
parser.add_option('-f', '--file', help="CSV Data File")
opts, args = parser.parse_args()
if not opts.file:
parser.error('File name is required')
csv.register_dialect('passwd', delimiter=':',
quoting=csv.QUOTE_NONE)
dict_keys = ('login', 'pwd', 'uid', 'gid',
'comment', 'home', 'shell')
# Create a dict reader from an open file
# handle and iterate through rows.
reader = csv.DictReader(
open(opts.file, 'rU'), fieldnames=dict_keys,
dialect='passwd')
# Dump the contents
json.dump(
list(reader), sys.stdout,
sort_keys=True, indent=4)
3. Now, run the example script. If you've entered the code correctly, you should see
the following output. The following screenshot has been truncated to save on space.
Your actual output will be much longer.

Text Processing Using the Standard Library
[ 134 ]
What just happened?
We updated our csv_reader-c.py script to include JSON support. All of this was done in
two lines of Python! Well, four if we count code formang.
First, we simply imported the json module; this does most of the work for us. The only
other change in this code was the addion of a call to json.dump aer we parse the UNIX
password le. We pass in two keyword arguments: sort_keys and indent. This ensures
our output is nice and human readable.
Encoding data
The actual encoding step is handled by the dump funcon, found within the json module.
Given a basic Python type, dump will write JSON-formaed output to the le-like object
given as its rst argument. The following table details how Python types are translated.
Python type JSON result
diconary object
list or a tuple array
basestring subclasses string
Int, oats, and longs number
Boolean True true
Boolean False false
None null
Aempng to translate complex objects such as class instances into JSON encoding will
result in a TypeError excepon. We can also translate Python objects into string data, as
opposed to simply prinng it.
Python 2.6.1 (r261:67515, Feb 11 2010, 00:51:29)
[GCC 4.2.1 (Apple Inc. build 5646)] on darwin
Type "help", "copyright", "credits", or "license" for more information.
>>> import json
>>> json.dumps({'d': {'a': 1}})
'{"d": {"a": 1}}'
>>>
In this lile example, we used the dumps funcon rather than the dump funcon. The
dierence is that while the dump funcon prints its output to the passed-in le object,
dumps simply returns the string representaon to the caller.

Chapter 4
[ 135 ]
Decoding data
JSON decoding is just as easy as the encoding process. Let's load our JSON data back in and
manipulate it programmacally.
(text_processing)$ python csv_reader-d.py -f passwd > users.json
(text_processing)$ python
Python 2.6.1 (r261:67515, Feb 11 2010, 00:51:29)
[GCC 4.2.1 (Apple Inc. build 5646)] on darwin
Type "help", "copyright", "credits", or "license" for more information.
>>> import json
>>> data = json.load(open('users.json'))
>>> for user in data:
... if user['uid'] == '0':
... print user
...
{u'comment': u'root', u'shell': u'/bin/bash', u'uid': u'0', u'pwd':
u'x', u'gid': u'0', u'home': u'/root', u'login': u'root'}
>>>
The json module also includes a loads funcon, which is comparable to the dumps funcon.
Data is loaded in from a source string rather than from a le-like object.
When reading data in from a JSON source, it is coerced into a collecon of Python types. The
following table outlines those types. Note the subtle dierences from the encoding table (for
example, all arrays are coerced into tuples).
JSON type Python result
object dict
array list
string Unicode
number (int) Int or long
number (real) oat
true True
false False
null None

Text Processing Using the Standard Library
[ 136 ]
Pop Quiz – JSON formatting
1. In the preceding decoding example, we compare against the string "0" rather than
the integer value 0. Why is that?
2. Is JSON a good mechanism for object serializaon? Why or why not? Where might
you expect to use JSON data?
3. In addion to being less wordy, why else might JSON make a good text data format
for HTTP transfer?
Have a go hero – translating strings to integers
In the previous example, we le our UID and GID values as strings. While this is one way to
handle the data, it's not exactly 100% correct. Update the csv_reader-d.py le to handle
this conversion. You can either do it directly via iteraon, or implement your own custom
JSON decoder class as outlined at http://docs.python.org/library/json.html.
Summary
We covered a bit in this chapter. Most importantly, we detailed three very common text
formats that Python handles for you. We also took a minute to refactor our log processing
applicaon a bit in order to make it more extensible as we connue to move forward.
You should now be comfortable dealing with JSON, INI format, and CSV le management.
The Python standard library does a great job of abstracng implementaon details out in
order to make manipulaon simple. You should now be able to persist user conguraon,
simplify reporng, and interact with common REST-ful web services!
Our next chapter covers the Swiss army knife of textual data processing—regular expressions.

Regular Expressions
Regular expressions are somemes considered the "Swiss Army Knife" of text
processing. They can be used in place of standard string methods and more
advanced state-machine processing. They oen make for an ecient one-liner,
but they can also be used as a core component of a larger applicaon.
There's a lot to them. Searching, matching, grouping, named groups, look-
aheads, splits, compilaons, and more.
Those of you familiar with the Django framework will recognize them as they are
used in order to route requests to controller methods. It's also common to use
them internally within web applicaons as a means to validate incoming data.
In this chapter, we'll look at the following aspects of regular expression usage.
Basic syntax and special characters. How do you build a regular expression and what
should you expect it to match with?
More advanced processing. Grouping results and performing condional matches
via look-ahead and look-behind asserons. What makes an expression greedy?
Python's implementaon. Elements such as matches versus searches, and regular
expression compilaon and its eect on processing.
What happens when we aempt to use regular expressions to process
internaonalized (non-ASCII) text or look at mulline data?
5

Regular Expressions
[ 138 ]
Simple string matching
Regular expressions are notoriously hard to read, especially if you're not familiar with the
obscure syntax. For that reason, let's start simple and look at some easy regular expressions
at the most basic level. Before we begin, remember that Python raw strings allow us to
include backslashes without the need for addional escaping.
Whenever you dene regular expressions, you should do so using the raw string
syntax.
Time for action – testing an HTTP URL
In this example, we'll check values as they're entered via the command line as a means to
introduce the technology. We'll dive deeper into regular expressions as we move forward.
We'll be scanning URLs to ensure our end users inpued valid data.
1. Create a new le and name it number_regex.py.
2. Enter the following code:
import sys
import re
# Make sure we have a single URL argument.
if len(sys.argv) != 2:
print >>sys.stderr, "URL Required"
sys.exit(-1)
# Easier access.
url = sys.argv[1]
# Ensure we were passed a somewhat valid URL.
# This is a superficial test.
if re.match(r'^https?:/{2}\w.+$', url):
print "This looks valid"
else:
print "This looks invalid"
3. Now, run the example script on the command line a few mes, passing various
dierent values to it on the command line.
(text_processing)$ python url_regex.py http://www.jmcneil.net
This looks valid
(text_processing)$ python url_regex.py http://intranet
This looks valid

Chapter 5
[ 139 ]
(text_processing)$ python url_regex.py http://www.packtpub.com
This looks valid
(text_processing)$ python url_regex.py https://store
This looks valid
(text_processing)$ python url_regex.py httpsstore
This looks invalid
(text_processing)$ python url_regex.py https:??store
This looks invalid
(text_processing)$
What just happened?
We took a look at a very simple paern and introduced you to the plumbing needed to
perform a match test. Let's walk through this lile example, skipping the boilerplate code.
First of all, we imported the re module. The re module, as you probably inferred from the
name, contains all of Python's regular expression support.
Any me you need to work with regular expressions, you'll need to import the
re module.
Next, we read a URL from the command line and bind a temporary aribute, which
makes for cleaner code. Directly below that, you should noce a line that reads
re.match(r'^https?:/{2}\w.+$', url). This line checks to determine whether the
string referenced by the url aribute matches the ^https?:/{2}\w.+$ paern.
If a match is found, we'll print a success message; otherwise, the end user would receive
some negave feedback indicang that the input value is incorrect.
This example leaves out a lot of details regarding HTTP URL formats. If you
were performing validaon on user input, one place to look would be
http://formencode.org/. FormEncode is a HTML form-processing
and data-validaon framework wrien by Ian Bicking.

Regular Expressions
[ 140 ]
Understanding the match function
The most basic method of tesng for a match is via the re.match funcon, as we did in the
previous example. The match funcon takes a regular expression paern and a string value.
For example, consider the following snippet of code:
Python 2.6.1 (r261:67515, Feb 11 2010, 00:51:29)
[GCC 4.2.1 (Apple Inc. build 5646)] on darwin
Type "help", "copyright", "credits", or "license" for more information.
>>> import re
>>> re.match(r'pattern', 'pattern')
<_sre.SRE_Match object at 0x1004811d0>
>>>
Here, we simply passed a regular expression of "paern" and a string literal of "paern" to
the re.match funcon. As they were idencal, the result was a match. The returned Match
object indicates the match was successful. The re.match funcon returns None otherwise.
>>> re.match(r'pattern', 'failure')
>>>
Learning basic syntax
A regular expression is generally a collecon of literal string data and special metacharacters
that represents a paern of text. The simplest regular expression is just literal text that only
matches itself.
In addion to literal text, there are a series of special characters that can be used to
convey addional meaning, such as repeon, sets, wildcards, and anchors. Generally, the
punctuaon characters eld this responsibility.
Detecting repetition
When building up expressions, it's useful to be able to match certain repeang paerns
without needing to duplicate values. It's also benecial to perform condional matches. This
lets us check for content such as "match the leer a, followed by the number one at least
three mes, but no more than seven mes."
For example, the code below does just that:
Python 2.6.1 (r261:67515, Feb 11 2010, 00:51:29)
[GCC 4.2.1 (Apple Inc. build 5646)] on darwin
Type "help", "copyright", "credits", or "license" for more information.
>>> import re
>>> re.match(r'^a1{3,7}$', 'a1111111')
<_sre.SRE_Match object at 0x100481648>

Chapter 5
[ 141 ]
>>> re.match(r'^a1{3,7}$', '1111111')
>>>
If the repeon operator follows a valid regular expression enclosed in parenthesis, it will
perform repeon on that enre expression. For example:
>>> re.match(r'^(a1){3,7}$', 'a1a1a1')
<_sre.SRE_Match object at 0x100493918>
>>> re.match(r'^(a1){3,7}$', 'a11111')
>>>
The following table details all of the special characters that can be used for marking
repeang values within a regular expression.
Special character Meaning
* Matches zero or more instances of the previous character or group.
? Matches zero or one instance of the previous enty.
+ Matches one or more of the previous enty.
{m,n} Matches at least m, but no more than n of the previous enty.
{,n} Matches from zero up to n of the previous enty.
{m,} Matches m or more of the previous enty.
{n} Match exactly n mes.
Specifying character sets and classes
In some circumstances, it's useful to collect groups of characters into a set such that any of
the values in the set will trigger a match. It's also useful to match any character at all. The
dot operator does just that.
A character set is enclosed within standard square brackets. A set denes a series of alternang
(or) enes that will match a given text value. If the rst character within a set is a caret (^)
then a negaon is performed. All characters not dened by that set would then match.
There are a couple of addional interesng set properes.
1. For ranged values, it's possible to specify an enre selecon using a hyphen. For
example, '[0-6a-d]' would match all values between 0 and 6, and a and d.
2. Special characters listed within brackets lose their special meaning. The excepons
to this rule are the hyphen and the closing bracket.
If you need to include a closing bracket or a hyphen within a regular expression, you can
either place them as the rst elements in the set or escape them by preceding them with a
backslash.

Regular Expressions
[ 142 ]
As an example, consider the following snippet, which matches a string containing a
hexadecimal number.
Python 2.6.1 (r261:67515, Feb 11 2010, 00:51:29)
[GCC 4.2.1 (Apple Inc. build 5646)] on darwin
Type "help", "copyright", "credits", or "license" for more information.
>>> import re
>>> re.match(r'^0x[a-f0-9]+$', '0xff')
<_sre.SRE_Match object at 0x100481648>
>>> re.match(r'^0x[a-f0-9]+$', '0x01')
<_sre.SRE_Match object at 0x1004816b0>
>>> re.match(r'^0x[a-f0-9]+$', '0xz')
>>>
In addion to the bracket notaon, Python ships with some predened classes. Generally,
these are leer values prexed with a backslash escape. When they appear within a set,
the set includes all values for which they'll match. The \d escape matches all digit values. It
would have been possible to write the above example in a slightly more compact manner.
>>> re.match(r'^0x[a-f\d]+$', '0x33')
<_sre.SRE_Match object at 0x100481648>
>>> re.match(r'^0x[a-f\d]+$', '0x3f')
<_sre.SRE_Match object at 0x1004816b0>
>>>
The following table outlines all of the character sets and classes available:
Special Character Meaning
[] Indicates a set. A character will match against any values listed inside of
the brackets. Can include classes (escaped leers). Prexing the enre set
with a ^ negates it.
.Wildcard. Matches any character except a new line (with excepons
detailed later in the chapter).
\d Matches a digit. By default, this is [0-9].
\D Matches a non-digit. This is the inverse of \d. By default, this is [^0-9].
\s Matches a white space character.
\S Matches a non-white space character.
\w Matches a word character. By default, this can also be dened as
[0-9a-zA-Z_].
\W The inverse of \w, matching a non-word character.
One thing that should become apparent is that lowercase classes are matches whereas their
uppercase counterparts are the inverse.

Chapter 5
[ 143 ]
Applying anchors to restrict matches
There are mes where it's important that paerns match at a certain posion within a string
of text. Why is this important? Consider a simple number validaon test. If a user enters a
digit, but mistakenly includes a trailing leer, an expression checking for the existence of a
digit alone will pass.
Python 2.6.1 (r261:67515, Feb 11 2010, 00:51:29)
[GCC 4.2.1 (Apple Inc. build 5646)] on darwin
Type "help", "copyright", "credits", or "license" for more information.
>>> import re
>>> re.match(r'\d', '1f')
<_sre.SRE_Match object at 0x1004811d0>
>>>
Well, that's unexpected. The regular expression engine sees the leading '1' and considers it a
match. It disregards the rest of the string as we've not instructed it to do anything else with
it. To x the problem that we have just seen, we need to apply anchors.
>>> re.match(r'^\d$', '6')
<_sre.SRE_Match object at 0x100481648>
>>> re.match(r'^\d$', '6f')
>>>
Now, aempng to sneak in a non-digit character results in no match. By preceding our
expression with a caret (^) and terminang it with a dollar sign ($), we eecvely said
"between the start and the end of this string, there can only be one digit."
Anchors, among various other metacharacters, are considered zero-width matches. Basically,
this means that a match doesn't advance the regular expression engine within the test string.
We're not limited to the either end of a string, either. Here's a collecon of all of the
available anchors provided by Python.
Special character Meaning
^ Matches at the beginning of a string. If the search is performed in
mulline mode, also matches aer each new line.
$Matches at the end of a string. If in mulline mode, also matches just
before a new line.
\A Matches only at the start of a string.
\b Matches at a word boundary.
\B Matches when not at a word boundary.
\Z Matches only at the end of a string.
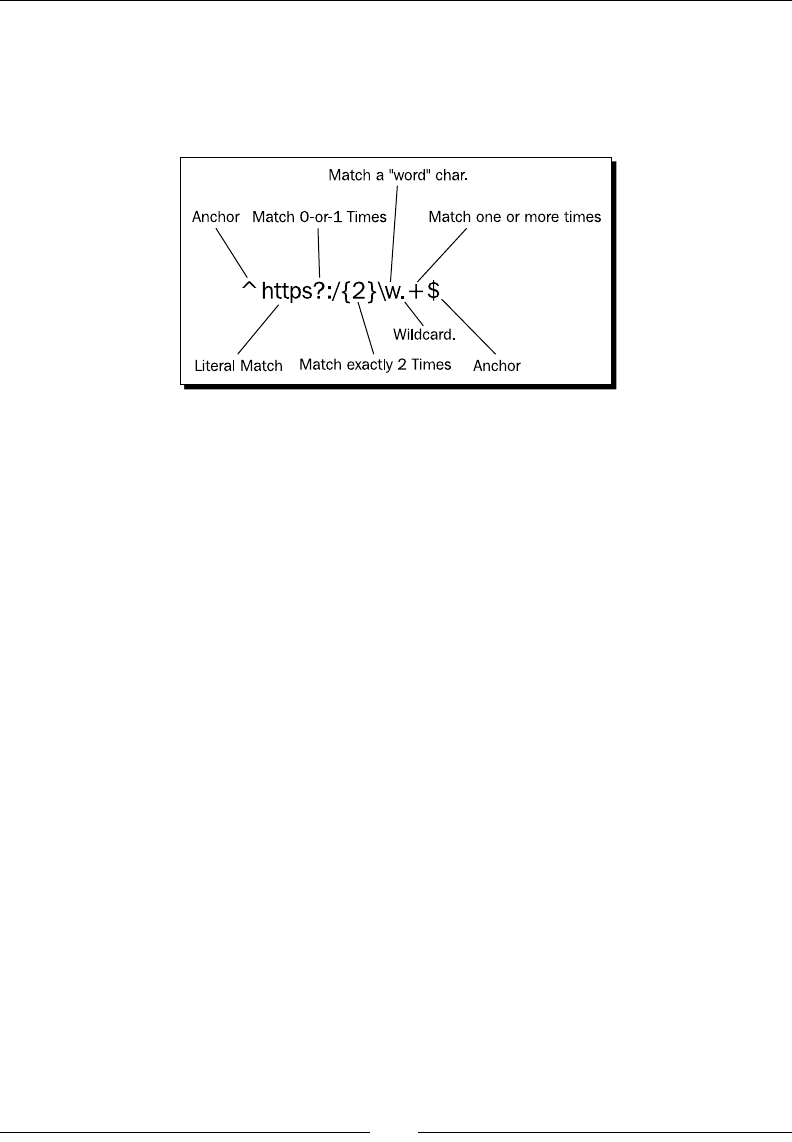
Regular Expressions
[ 144 ]
Wrapping it up
Now that we've covered the basics of regular expression syntax, let's double back and take
a look at the expression we used in our rst example. It might be a bit easier if we break it
down a bit more with a diagram.
Now that we've provided a bit of background, this paern should make sense. We begin the
regular expression with a caret, which matches the beginning of the string. The very next
element is the literal http. As our caret matches the start of a string and must be immediately
followed by http, this is equivalent to saying that our string must start with http.
Next, we include a queson mark aer the s in https. The queson mark states that the
previous enty should be matched either zero, or one me. By default, the evaluaon engine
is looking character-by-character, so the previous enty in this case is simply "s." We do this
so our test passes for both secure and non-secure addresses.
As we advanced forward in our string, the next special term we run into is {2}, and it follows
a simple forward slash. This says that the forward slash should appear exactly two mes.
Now, in the real world, it would probably make more sense to simply type the second slash.
Using the repeon check like this not only requires more typing, but it also causes the
regular expression engine to work harder.
Immediately aer the repeon match, we include a \w. The \w, if you'll remember from the
previous tables, expands to [0-9a-zA-Z_], or any word character. This is to ensure that
our URL doesn't begin with a special character.
The dot character aer the \w matches anything, except a new line. Essenally, we're saying
"match anything else, we don't so much care." The plus sign states that the preceding wild
card should match at least once.
Finally, we're anchoring the end of the string. However, in this example, this isn't really
necessary.

Chapter 5
[ 145 ]
Have a go hero – tidying up our URL test
There are a few intenonal inconsistencies and problems with this regular expression as
designed. To name a few:
1. Properly formaed URLs should only contain a few special characters. Other values
should be URL-encoded using percent escapes. This regular expression doesn't
check for that.
2. It's possible to include newline characters towards the end of the URL, which is
clearly not supported by any browsers!
3. The \w followed by the. + implicitly set a minimum limit of two characters aer the
protocol specicaon. A single leer is perfectly valid.
You guessed it. Using what we've covered thus far, it should be possible for you to backtrack
and update our regular expression in order to x these aws. For more informaon on
what characters are allowed, have a look at http://www.w3schools.com/tags/ref_
urlencode.asp.
Advanced pattern matching
In addion to basic paern matching, regular expressions let us handle some more
advanced situaons as well. It's possible to group characters for purposes of precedence and
reference, perform condional checks based on what exists later, or previously, in a string,
and limit exactly how much of a match actually constutes a match. Don't worry; we'll clarify
that last phrase as we move on. Let's go!
Grouping
When craing a regular expression string, there are generally two reasons you would wish to
group expression components together: enty precedence or to enable access to matched
parts later in your applicaon.

Regular Expressions
[ 146 ]
Time for action – regular expression grouping
In this example, we'll return to our LogProcessing applicaon. Here, we'll update our log split
rounes to divide lines up via a regular expression as opposed to simple string manipulaon.
1. In core.py, add an import re statement to the top of the le. This makes the
regular expression engine available to us.
2. Directly above the __init__ method denion for LogProcessor, add the
following lines of code. These have been split to avoid wrapping.
_re = re.compile(
r'^([\d.]+) (\S+) (\S+) \[([\w/:+ ]+)] "(.+?)" ' \
r'(?P<rcode>\d{3}) (\S+) "(\S+)" "(.+)"')
3. Now, we're going to replace the split method with one that takes advantage of
the new regular expression:
def split(self, line):
"""
Split a logfile.
Uses a simple regular expression to parse out the Apache
logfile
entries.
"""
line = line.strip()
match = re.match(self._re, line)
if not match:
raise ParsingError("Malformed line: " + line)
return {
'size': 0 if match.group(6) == '-'
else int(match.group(6)),
'status': match.group('rcode'),
'file_requested': match.group(5).split()[1]
}
4. Running the logscan applicaon should now produce the same output as it did when
we were using a more basic, split-based approach.
(text_processing)$ cat example3.log | logscan -c logscan.cfg
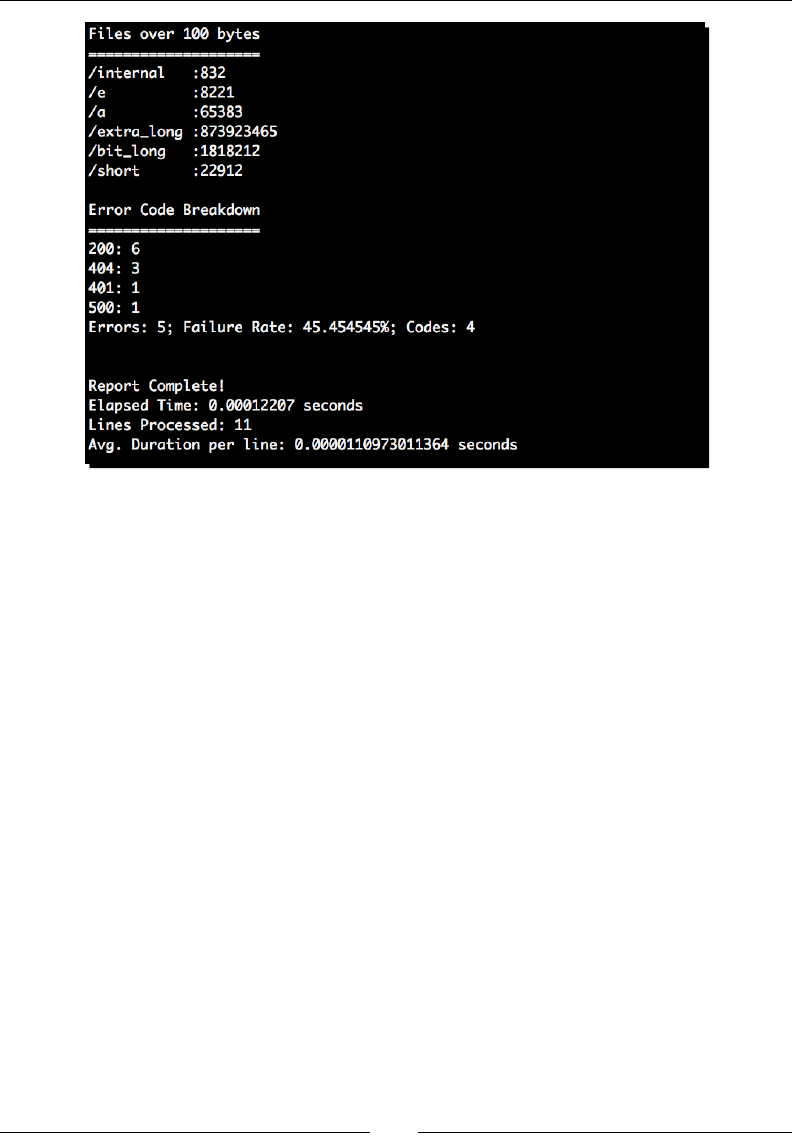
Chapter 5
[ 147 ]
What just happened?
First of all, we imported the re module so that we have access to Python's regular
expression services.
Next, at the LogProcessor class level, we dened a regular expression. Though, this me
we did so via re.compile rather than a simple string. Regular expressions that are used
more than a handful of mes should be "prepared" by running them through re.compile
rst. This eases the load placed on the system by frequently used paerns. The re.compile
funcon returns a SRE_Pattern object that can be passed in just about anywhere you can
pass in a regular expression.
We then replace our split method to take advantage of regular expressions. As you
can see, we simply pass self._re in as opposed to a string-based regular expression. If
we don't have a match, we raise a ParsingError, which bubbles up and generates an
appropriate error message, much like we would see on an invalid split case.
Now, the end of the split method probably looks somewhat peculiar to you. Here, we've
referenced our matched values via group idencaon mechanisms rather than by their
list index into the split results. Regular expression components surrounded by parenthesis
create a group, which can be accessed via the group method on the Match object later
down the road. It's also possible to access a previously matched group from within the same
regular expression. Let's look at a somewhat smaller example.

Regular Expressions
[ 148 ]
>>> match = re.match(r'(0x[0-9a-f]+) (?P<two>\1)', '0xff 0xff')
>>> match.group(1)
'0xff'
>>> match.group(2)
'0xff'
>>> match.group('two')
'0xff'
>>> match.group('failure')
Traceback (most recent call last):
File "<stdin>", line 1, in <module>
IndexError: no such group
>>>
Here, we surround two disnct regular expressions components with parenthesis, (0x[0-
9a-f]+), and (?P<two>\1). The rst regular expression matches a hexadecimal number.
This becomes group ID 1. The second expression matches whatever was found by the rst,
via the use of the \1. The "backslash-one" syntax references the rst match. So, this enre
regular expression only matches when we repeat the same hexadecimal number twice,
separated with a space. The ?P<two> syntax is detailed below.
As you can see, the match is referenced aer-the-fact using the match.group method,
which takes a numeric index as its argument. Using standard regular expressions, you'll need
to refer to a matched group using its index number. However, if you'll look at the second
group, we added a (?P<name>) construct. This is a Python extension that lets us refer to
groupings by name, rather than by numeric group ID. The result is that we can reference
groups of this type by name as opposed to simple numbers.
Finally, if an invalid group ID is passed in, an IndexError excepon is thrown.
The following table outlines the characters used for building groups within a Python
regular expression:
Special character Meaning
(…) Creates a group. The match is then available later in the expression
via \# syntax and via match.group(#) calls.
(?P<name>…) Creates a named-group. Also available later in the match via \#
syntax and match.group(#), as well as match.group(name).
(?P=name) Matches the previously named group name.
(?:…) Matches whatever was within the parenthesis, but is not retrievable
via \# or match.group syntax.

Chapter 5
[ 149 ]
Finally, it's worth poinng out that parenthesis can also be used to alter priority as well. For
example, consider this code.
>>> re.match(r'abc{2}', 'abcc')
<_sre.SRE_Match object at 0x1004818b8>
>>> re.match(r'a(bc){2}', 'abcc')
>>> re.match(r'a(bc){2}', 'abcbc')
<_sre.SRE_Match object at 0x1004937b0>
>>>
Whereas the rst example matches c exactly two mes, the second and third line require us to
repeat bc twice. This changes the meaning of the regular expression from "repeat the previous
character twice" to "repeat the previous match within parenthesis twice." The value within the
group could have been its own complex regular expression, such as a([b-c]){2}.
Have a go hero – updating our stats processor to use named groups
Spend a couple of minutes and update our stascs processor to use named groups rather
than integer-based references. This makes it slightly easier to read the assignment code in
the split method. You do not need to create names for all of the groups, simply the ones
we're actually using will do.
Using greedy versus non-greedy operators
Regular expressions generally like to match as much text as possible before giving up or
yielding to the next token in a paern string. If that behavior is unexpected and not fully
understood, it can be dicult to get your regular expression correct. Let's take a look at a
small code sample to illustrate the point.
Suppose that with your newfound knowledge of regular expressions, you decided to write a
small script to remove the angled brackets surrounding HTML tags. You might be tempted to
do it like this:
>>> match = re.match(r'(?P<tag><.+>)', '<title>Web Page</title>')
>>> match.group('tag')
'<title>Web Page</title>'
>>>
The result is probably not what you expected. The reason we got this result was due to the
fact that regular expressions are greedy by nature. That is, they'll aempt to match as much
as possible. If you look closely, <title> is a match for the supplied regular expression, as is
the enre <title>Web Page</title> string. Both start with an angled-bracket, contain
at least one character, and both end with an angled bracket.

Regular Expressions
[ 150 ]
The x is to insert the queson mark character, or the non-greedy operator, directly aer the
repeon specicaon. So, the following code snippet xes the problem.
>>> match = re.match(r'(?P<tag><.+?>)', '<title>Web Page</title>')
>>> match.group('tag')
'<title>'
>>>
The queson mark changes our meaning from "match as much as you possibly can" to
"match only the minimum required to actually match."
Assertions
In a lot of cases, it's benecial to say, "match this only if this next thing matches." In essence, to
perform a condional match based on what might or might not appear later in a string of text.
This is possible via look-ahead and look-behind asserons. Like anchors, these elements
consume no characters during the match process.
The rst asseron we'll look at is the posive look-ahead. The posive look-ahead will only
match at the current locaon if followed by what's in the asseron. For example:
Python 2.6.1 (r261:67515, Feb 11 2010, 00:51:29)
[GCC 4.2.1 (Apple Inc. build 5646)] on darwin
Type "help", "copyright", "credits", or "license" for more information.
>>> import re
>>> re.match('(Python) (?=Programming)', 'Python Programming').
groups()
('Python',)
>>> re.match('(Python) (?=Programming)', 'Python Snakes')
>>>
Note how there is only one group saved in the rst match. This is because the posive look-
ahead does not consume any characters. To look at it another way, noce how the following
snippet does not match at all:
>>> re.match('^(Python) (?=Programming) Language', 'Python Programming
Language')
>>>
To make for a match, we need to sll check for the "Programming" string, even though we've
specied it in the look-ahead.
>>> re.match('(Python) (?=Programming)Programming Language',
… 'Python Programming Language')
<_sre.SRE_Match object at 0x1004938a0>
>>>

Chapter 5
[ 151 ]
A negave look-ahead asseron will only match if the paern dened in the asseron
doesn't match. Assuming we actually didn't want the programming language, we could alter
our expression as follows:
>>> re.match('(Python) (?!Programming)', 'Python Snake')
>>>
Each look-ahead has a corresponding look-behind. That is, it's also possible to check the
value of an input string immediately leading up to the match in queson. Though unlike look-
ahead asserons, these look-behind checks must be of a xed width. This means that while
we can check for abcd, we could not check for \w{0,4}. Here's a quick example of look-
behinds at work:
<_sre.SRE_Match object at 0x100481648>
>>> re.match('123(?<!abc)456', '123456')
<_sre.SRE_Match object at 0x1004816b0>
>>>
The nal type of asseron we'll look at is condional based on whether a group already
exists or not. This is a rather powerful construct as it's possible to build a somewhat complex
logic directly into a regular expression. Note that doing so, however, is oen done at the
detriment of readability to other programmers. This funconality is new as of Python 2.4.
>>> re.match('^(?P<bracket><)?\w+@\w+\.\w+(?(bracket)>)$',
'<jeff@jmcneil.net')
>>> re.match('^(?P<bracket><)?\w+@\w+\.\w+(?(bracket)>)$',
'<jeff@jmcneil.net>')
<_sre.SRE_Match object at 0x100493918>
>>> re.match('^(?P<bracket><)?\w+@\w+\.\w+(?(bracket)>)$',
'jeff@jmcneil.net')
<_sre.SRE_Match object at 0x1004938a0>
>>>
This example shows general usage. Here, if an e-mail address begins with a bracket then it
must also end with a bracket.

Regular Expressions
[ 152 ]
Here is a summary table of the asseron mechanisms and a descripon of each:
Special character Meaning
(?=…) Performs a look-ahead. Checks whether the paern matches from
the current locaon forward, without consuming any characters.
(?!...) Negave look-ahead. Matches if the paern doesn't match at the
current locaon. Doesn't consume any characters.
(?<=…) Matches if the paern (of a xed width) doesn't match behind
given locaon. Does not move the locaon pointer backwards.
(?<!...) Matches if the paern (also of a xed width) doesn't match
behind the given locaon. As with the posive look-behind, we do
not consume any characters.
(?(name-or-id)
match-exp|fail-exp)
If name or ID exists and has been previously matched, then match
the match-exp. If it has not been matched, match the fail-exp. The
failure regular expression is oponal. Unlike other asseron types,
this does consume characters.
Performing an 'or' operation
In some cases, you may run into a situaon where a posion in your input text may
hold more than one possible value. To test for situaons like this, you can chain regular
expressions together via the '|' operator, which is generally equivalent to an 'or'.
>>> re.match('(abc|123|def|cow)', 'abc').groups()
('abc',)
>>> re.match('(abc|123|def|cow)', '123').groups()
('123',)
>>> re.match('(abc|123|def|cow)', '123cow').groups()
('123',)
>>>
Here, you'll see that we match the rst possible value as evaluated from le to right. We've also
included our alternaon within a group. The regular expressions may be arbitrarily complex.
Pop Quiz – regular expressions
1. In the HTTP LogProcessing regular expression, we used a \S instead of a \d for a few
numeric elds. Why is that the case? Is there another approach? Hint: a value that is
not present is indicated by a single dash (-).
2. Can you think of a use for the (?:…) syntax?
3. Why would you compile a regular expression versus using a string representaon?

Chapter 5
[ 153 ]
Implementing Python-specic elements
Up unl now, most of the regular expression informaon we've covered has been Python-
agnosc (with the excepon of the (?P…) paerns). Now, let's take a look at some of the
more Python-specic elements.
Other search functions
In addion to the re.match funcon we've been using, Python also makes a few other
methods available to us. The big limitaon on the match funcon is that it will only match at
the beginning of a string. Here's a quick survey of the other available methods. We'll outline
the following methods:
search
findall
finditer
split
sub
search
The search funcon will match anywhere within a string and is not limited to the beginning.
While it is possible to construct re.match regular expressions that are equivalent to
re.search in most cases, it's not always enrely praccal.
>>> re.match('[0-9]{4}', atl-linux-8423')
>>> re.search('[0-9]{4}', 'atl-linux-8423')
<_sre.SRE_Match object at 0x1005aa988>
>>>
This example illustrates the dierence given between two machine names. The match
funcon does not begin with a matching paern (and the expression doesn't allow for non-
integer buering), so there is no match. A search, on the other hand, scans the enre string
for a match, regardless of starng point.
ndall and nditer
These are two very useful and very closely related funcons. The findall funcon will
iterate through a given text buer and return all non-overlapping matches in a list. The
finditer method performs the same scan, but returns an iterator. The net result is that
finditer is more memory ecient.

Regular Expressions
[ 154 ]
As a general rule, finditer is more ecient than findall as it doesn't
require the construcon of a new Python list object.
The following snippet of code extracts hash tags from a string and displays their osets:
>>> for i in re.finditer(r'#\w+', 'This post is about #eggs, #ham,
water #buffalo, and #newts'):
... print '%02d-%02d: %s' % (i.start(), i.end(), i.group(0))
...
19-24: #eggs
26-30: #ham
38-46: #buffalo
52-58: #newts
>>>
Also, noce how we've used i.group(0) here. Group zero is another way of referring to
the enre match.
split
The split funcon acts much like the string split funcon we covered in earlier
chapters. Given a regular expression, it separates the given text at each match.
sub
The re.sub funcon is rather powerful. Given a paern, it will search a string and replace
instances that match the paern with a replacement value. The replacement value can
either be a plain string, or a callable (funcon). If a funcon is used, that funcon is in-turn
called with the match object from the corresponding regular expression match. The text that
is found is replaced with the return value of the funcon. The subfuncon works as follows.
>>> domains = {'oldsite.com': 'newsite.com'}
>>> def repl(m):
... return domains.get(m.group(0), m.group(0))
...
>>> re.sub(r'(\w+\.?){2,}', repl, 'newsite.com oldsite.com yoursite.
com')
'newsite.com newsite.com yoursite.com'
>>>
When the given paern matches a domain name, it calls repl. The repl funcon returns
the corresponding value, if one is found in the diconary. If one isn't found, we simply return
what we were passed in.

Chapter 5
[ 155 ]
This isn't an exhausve list of all of the methods and aributes on the
re module. It would be a good idea for you to read up on all of the
details at http://docs.python.org/library/re.html.
Compiled expression objects
We've simply been using the re.match module-level funcon in most situaons as it is
a quick way to execute our test expressions. This works great for small or infrequently
matched paerns. However, compilaon provides for a richer feature set and an inherent
performance boost.
A regular compiled expression object supports all of the same funconality as the at
module-level funcons within the re module. The calling convenon diers slightly, though,
as re.match(pattern, string) becomes regex.match(string). You should also be
aware of the fact that it's possible to pass compiled objects into all of the re module funcons.
In addion, these objects support a few addional methods as they contain state not
available using module-level calls.
Method Descripon
flags Returns the integer value of the ags passed in when the regular
expression object was built.
groups The number of capturing groups in the paern.
groupindex A diconary mapping (?P<name>…) group ideners to group
numbers. This is an empty diconary if no symbolic names were used.
pattern The paern from which the object was compiled.
The match, search, finditer, and findall methods also accept a start posion and
an end posion so that the range of characters they'll aempt to match can be limited. For
example, consider the following snippet of code:
>>> import re
>>> re_obj = re.compile(r'[0-9]+')
>>> address = 'Atlanta, GA 30303'
>>> re_obj.search(address)
<_sre.SRE_Match object at 0x100481648>
>>> re_obj.search(address, 0, 10)
>>>
The second aempt to match fails because we limit the search to the substring between
posions 0 and 10. In this case, Atlanta, G is searched.

Regular Expressions
[ 156 ]
Dealing with performance issues
Using Python's timeit module, we can run a quick performance benchmark for both a
compiled and a standard textual regular expression.
(text_processing)$ python -m timeit -s 'import re; m =
re.compile("^[0-9]{2}-[abcd]{3}")' 'm.match("05-abc")'
1000000 loops, best of 3: 0.491 usec per loop
(text_processing)$ python -m timeit -s 'import re' 're.match("^[0-9]
{2}-[abcd]{3}", "05-abc")'
1000000 loops, best of 3: 1.76 usec per loop
(text_processing)$
In this simple example, we matched two numbers, followed by a dash, and a series of three
leers in a set. As is evident by the preceding output, compilaon reduces the amount of
me required to process this match by more than a factor of three.
You should familiarize yourself with Python's timeit module as you work with
the language. It provides a very simple method to test and evaluate segments of
code for performance comparison, just as we did above. For more informaon,
see http://docs.python.org/library/timeit.html.
Parser ags
The re module exports a number of ags that alter the way the engine processes text. It
is possible to pass a series of ags into a module-level funcon, or as part of the call to
re.compile. Mulple ags should be strung together using the bitwise-or operator (|). Of
course, ags passed in during a compilaon are retained across matches.
Flag Descripon
re.I
re.IGNORECASE
Performs case-insensive matching. When this ag is used, [A-
Z] would also match any lowercase leer of the Lan alphabet
as well.
re.L
re.LOCALE
Makes \w, \W, \b, \B, \s, and \S dependent on the current
locale.
re.M
re.MULTILINE
When this is specied, the ^ character is altered such that it
matches at the beginning of the string and immediately following
any newline. The $ character, in turn, changes such that it
matches at the end of the string and immediately preceding a
newline.
re.S
re.DOTALL
Under normal circumstances, the dot operator matches
everything except a newline. When this is specied, the dot will
also match the newline.

Chapter 5
[ 157 ]
Flag Descripon
re.U
re.UNICODE
Makes \w, \W, \b, \B, \D, \s, and \S dependent on the
Unicode character properes database.
re.X
re.VERBOSE
Using this ag lets you write "prey" regular expressions.
White space is ignored, except when it appears in a character
class or prexed with a non-escaped backslash. Also, when the
line includes a bare #, the remainder of the line is treated as a
comment.
Unicode regular expressions
If you nd yourself wring applicaons for systems that have to work outside of the standard
ASCII character set, there are certain things you should pay aenon to while craing regular
expression paerns.
First and foremost, Unicode regular expressions should always be agged as Unicode. This
means that (in versions of Python prior to 3.0), they should begin with a u character. Unicode
literals should then match as standard ASCII strings do. It is also possible to use a Unicode
escape rather than a symbol. For example:
>>> import re
>>> s = u'оооо ооо ооо'
>>> re.match(ur'\u043eооо.+', s)
<_sre.SRE_Match object at 0x1004816b0>
>>> re.match(r'оооо.+', s)
>>>
Our example string matches perfectly when the expression text is a Unicode object.
However, as expected, it fails when we aempt to pass an ASCII string paern.
Character sets work in a similar fashion:
>>> import re
>>> s = u'оооо ооо ооо'
>>> re.match(ur'[о-о]+', s)
<_sre.SRE_Match object at 0x1004816b0>
Matching words (\w) is slightly more complicated. Remember, by default, the \w class
matches [0-9a-zA-Z_]. If we try to apply it to characters that do not t that range, we
won't match. The trick is to include the re.UNICODE ag as part of our match funcon. This
ensures that Python honors the Unicode database.
>>> import re
>>> s = u'оооо ооо ооо'
>>> re.match(ur'^(\w+).+', s)

Regular Expressions
[ 158 ]
>>>
>>> re.match(ur'^(\w+).+', s, re.UNICODE)
<_sre.SRE_Match object at 0x100492be8>
>>> re.match(ur'^(\w+).+', s, re.UNICODE).group(1)
оооо
>>>
The most important thing to remember if you're tesng or searching non-ASCII data is
that common tests such as [a-zA-Z] for data elements such as a person's name are not
necessarily valid. A good thumb-rule is to sck to the character class escapes (\w, \s) while
including the re.UNICODE ag. This ensures that you'll match where you intend to.
When working through regular expressions that support non-ASCII leers, it's a
good idea to test them oen. A good resource for wide characters is http://
www.translit.ru. You can generate UTF-8 Cyrillic data of any length or
format required. You can also nd complete Unicode escape charts at http://
unicode.org/charts/.
The match object
Till now, we've skimmed over a very important part of Python regular expressions - the
Match object. A Match object is returned each me a match is found in a string that
we've searched. You've seen this in previous examples in lines such as <_sre.SRE_Match
object at 0x100492be8>.
Truthfully, much of the match object has already been covered. For example, we've seen
the group and the groups funcons, which retrieve a matched group or a tuple of all
matched groups as a result of a match operaon. We've also seen usage of the start and
end methods, which return osets into a string corresponding to where a match begins and
where a match ends.
Let's take a look at one more example, though, to solidify the concepts we've touched on
thus far.
Processing bind zone les
One of the most common server packages available on the Internet is BIND. Bind relies on
a series of DNS zone les, which contain query-to-response mappings. Most commonly,
hostname to IP matches.
These zone les are simply at text les saved in a directory. On most UNIX distribuons,
they're located under /var/named. However, Ubuntu in parcular places them under /etc/.

Chapter 5
[ 159 ]
In this example, we'll write a script to extract the MX (Mail Exchanger) records from a DNS
zone conguraon le and display them. MX records are composed of a few elds. Here's a
complete example:
domain.com. 900 IN MX 5 mx1.domain.com.
domain.com. 900 IN MX 10 mx1.domain.com.
This details two MX records for the domain.com domain, each with a me-to-live of 900.
The record class is IN, for Internet, and the corresponding type is MX. The number following
the record type is a weight, or a preference. MX records with a lower preference are
preferred. Higher preference records are only used if the lower preference records are not
accessible. Finally, a server name is specied.
This sounds straighorward unl we throw in a few caveats.
The domain may not be present. If it isn't listed, it should default to the same as the
previous line.
The domain may be @, in which case it should default to the name of the zone.
There's a bit more magic to this; more on that later.
The TTL may be le o. If the TTL is le o, the zone default should be used. A zone
default is specied with a $TTL X line.
If a hostname, either the domain or the MX record value itself, doesn't end with a
trailing period, we should append the name of the current zone to it.
The whole thing can be in uppercase, lowercase, or some random combinaon of
the two.
The class may be le out, in which case it defaults to IN.
Time for action – reading DNS records
Let's implement a regular expression-based soluon that addresses all of these points and
displays sorted MX record values.
1. First, let's create an example zone le. This is also available as example.zone from
the Packt.com FTP site.
$TTL 86400
@ IN SOA ns1.linode.com. domains.siteperceptive.com. (
2010060806
14400
14400
1209600
86400
)

Regular Expressions
[ 160 ]
@ NS ns1.linode.com.
@ NS ns2.linode.com.
@ NS ns3.linode.com.
@ NS ns4.linode.com.
@ NS ns5.linode.com.
jmcneil.net. IN MX 5 alt2.aspmx.l.google.com.
jmcneil.net. IN MX 1 aspmx.l.google.com.
IN MX 10 aspmx2.googlemail.com.
900 IN MX 10 aspmx3.googlemail.com.
900 in mx 10 aspmx4.googlemail.com.
@ 900 IN MX 10 aspmx5.googlemail.com.
@ 900 MX 5 alt1.aspmx.l.google.com.
@ A 127.0.0.1
sandbox IN CNAME jmcneil.net.
www IN CNAME jmcneil.net.
blog IN CNAME jmcneil.net.
2. Now, within the text_beginner package directory, create a subdirectory named
dnszone and create an empty __init__.py within it.
3. Create a le named mx_order.py in that same directory with the following
contents.
import re
import optparse
from collections import namedtuple
# Two differnet lines to make for
# easier fomatting.
ttl_re = r'^(\$TTL\s+(?P<ttl>\d+).*)$'
mx_re = r'^((?P<dom>@|[\w.]+))?\s+(?P<dttl>\d+)?.*MX\s+(?P<wt>\
d+)\s+(?P<tgt>.+).*$'
# This makes it easier to reference our values and
# makes code more readable.
MxRecord = namedtuple('MxRecord', 'wt, dom, dttl, tgt')
# Compile it up. We'll accept either
# one of the previous expressions.
zone_re = re.compile('%s|%s' % (ttl_re, mx_re),
re.MULTILINE | re.IGNORECASE)
def zoneify(zone, record):
"""
Format the record correctly.
"""
if not record or record == '@':
record = zone + '.'

Chapter 5
[ 161 ]
elif not record.endswith('.'):
record = record + '.%s.' % zone
return record
def parse_zone(zone, text):
"""
Parse a zone for MX records.
Iterates through a zone file and pulls
out relevant information.
"""
ttl = None
records = []
for match in zone_re.finditer(open(text).read()):
ngrps = match.groupdict()
if ngrps['ttl']:
ttl = ngrps['ttl']
else:
dom = zoneify(zone, ngrps['dom'])
dttl = ngrps['dttl'] or ttl
tgt = zoneify(zone, ngrps['tgt'])
wt = int(ngrps['wt'])
records.append(
MxRecord(wt, dom, dttl, tgt))
return sorted(records)
def main(arg_list=None):
parser = optparse.OptionParser()
parser.add_option('-z', '--zone', help="Zone Name")
parser.add_option('-f', '--file', help="Zone File")
opts, args = parser.parse_args()
if not opts.zone or not opts.file:
parser.error("zone and file required")
results = parse_zone(opts.zone, opts.file)
print "Mail eXchangers in preference order:"
print
for mx in results:
print "%s %6s %4d %s" % \
(mx.dom, mx.dttl, mx.wt, mx.tgt)
4. Next, we're going to change the entry_points diconary passed into setup()
within setup.py to the following:
entry_points = {
'console_scripts': [
'logscan = logscan.cmd:main',
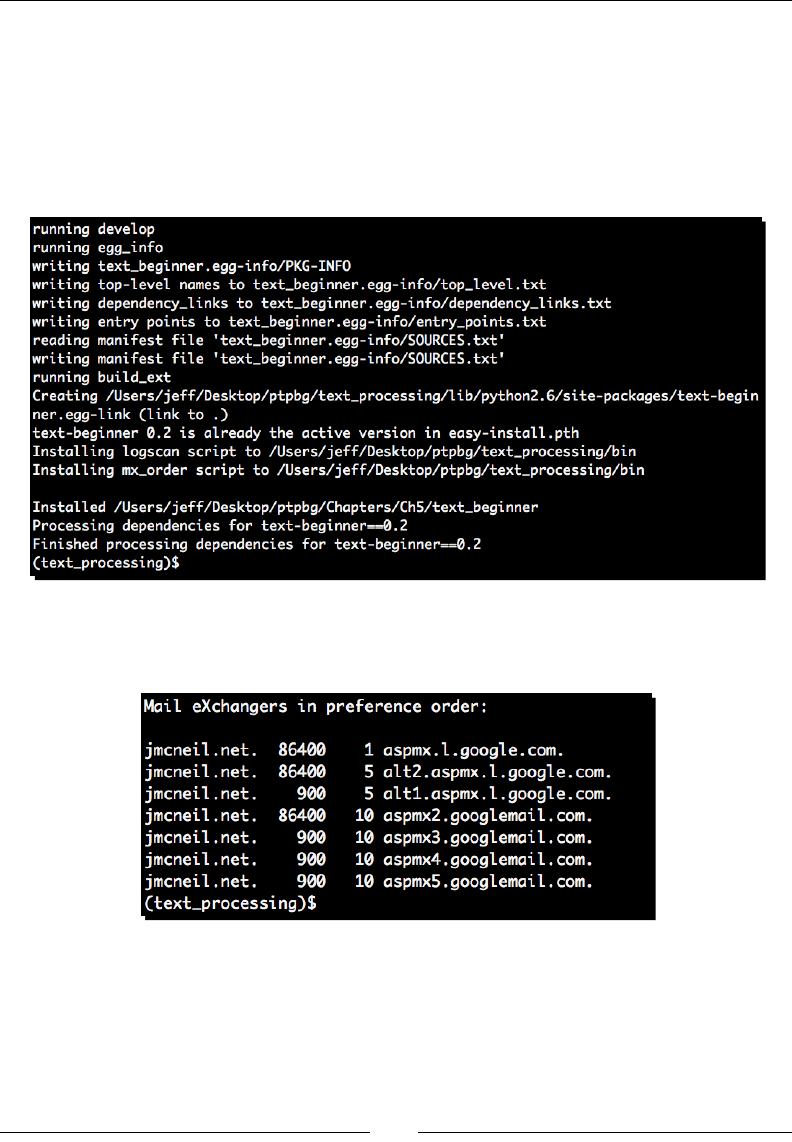
Regular Expressions
[ 162 ]
'mx_order = dnszone.mx_order:main'
]
},
5. Within the package directory, re-run setup.py develop so it picks up the new
entry points.
(text_processing)$ python setup.py develop
6. Finally, let's run the applicaon and check the output.
(text_processing)$ mx_order -z jmcneil.net -f example.zone
What just happened?
We loaded an enre zone le into memory and processed it for mail exchanger records. If we
came across a TTL, we used that as our default. If a per-record TTL was specied, we used
that as it's more specic. Let's step through the code.

Chapter 5
[ 163 ]
The very rst lines, other than our import statements, are the regular expressions we'll
use to process this le. In this case, we dene two and then join them together around
a surrounding | operator. This is to illustrate that it's enrely possible to build regular
expressions dynamically.
Next, we compile the union of both singular regular expressions and bind it to an aribute
named zone_re. Note that we pass two compilaon ags here: re.IGNORECASE and
re.MULTILINE. We're going to search case in a case-insensive manner and we want to
process an enre chunk of data at once, rather than a clean line.
The zoneinfy funcon handles a number of our record-naming requirements. Here, we
append the zone name wherever applicable.
The parse_zone funcon aempts to match our regular expression against every line in the
le read in. Note that because we've specied re.MULTILINE, ^ will match following any
new line and $ will match immediately before one. By default, these only match at the actual
beginning and end of a string, respecvely.
We loop through all of the results and assign a named groups diconary to ngrps.
Here, you'll see something slightly strange. Whereas a standard Python dict will raise a
KeyError if a key used does not exist, this version of a diconary will return None.
If a TTL exists then we pull the value out and use that as our default TTL. Otherwise, we
parse the record as if it's an MX.
Finally, we assign values to a named tuple and sort it. Tuples sort rst based on the rst
element; in this case, the weight. This is exactly the behavior we're aer.
Finally, we wrap the whole thing up in our main funcon, which we've referenced from
setup.py. This is what is called when mx_order is executed on the command line.
The regular expression we used to parse the le is somewhat long; however, we've covered
every element included. At this point, you should be able to piece through it and make sense
of it. However, there are a few things to note:
As we dynamically join the strings together, it's not readily apparent that MX
matches with two empty group matches for the TTL poron of the search. This is
one reason (?P<n>…) naming is helpful posion is a non-issue.
A semicolon begins a comment, and comments are allowed at the end of a line. We
did not account for that here.
If a TTL is not set via $TTL and does not appear in the record itself, the value from
the DNS SOA record is used. We've not touched on SOA processing here.

Regular Expressions
[ 164 ]
For more informaon on BIND and zone le format, check out http://www.
isc.org. The Internet Soware Consorum produces and ships the daemon
and a collecon of revolver tools.
Have a go hero – adding support for $ORIGIN
So, we lied a lile bit when we stated that the name of the zone replaces @ and is appended
to any name without a trailing dot. Strictly speaking, the value of $ORIGIN is used in both of
those situaons. If not set, $ORIGIN defaults to the name of the zone.
Syntaccally speaking, $ORIGIN is dened exactly like a $TTL is dened. The string
"$ORIGIN" appears and is followed immediately by a new DNS name.
Update the preceding code such that if an $ORIGIN name.com appears, subsequent
inserons of the zone name use that rather than what we've passed on the command line.
For bonus points, update the regular expressions used, and the zoneify method to avoid
using the endswith method of the string objects.
Pop Quiz – understanding the Pythonisms
1. What is the major dierence between the match method and the search method?
Where might you prefer one to the other?
2. What's the benet to using finditer over findall?
3. Is there a downside to using Python's named-group feature? Why might you avoid
that approach?
Summary
In this chapter, we looked at both regular expression syntax and the Python-specic
implementaon details. You should have a solid grasp of Python regular expressions and
understand how to implement them.
In this chapter, we broke apart a regular expression graphically in order to help you
understand how the pieces t together. We built on that knowledge to parse HTML data,
BIND zone les, and even internaonalized characters in the Cyrillic alphabet.
Finally, we covered some Python specics. These are non-portable addions on the Python
regular expression implementaon.
Our next chapter moves into the processing of structured text documents such as XML and
HTML. We'll move away from our system-based examples and create a dungeon-crawling
game for a bit of variety.

6
Structured Markup
In this chapter, we'll take a look at XML and its cousin, HTML. We'll concentrate
on Python's built-in markup processing modules that can be found within the
standard library, but we'll also introduce you to a couple of the more common
third-party packages available on the Python package index.
We'll start by looking at some technologies for processing XML documents and
we'll move on into reading HTML data. Throughout the chapter, we'll develop a
simple command-line-based adventure game, which uses an XML document as
a world denion. We'll process our world denion using dierent processing
approaches.
More specically, we'll address the following technologies:
SAX, or event-driven XML processing. Python provides a couple of dierent methods
to perform SAX parsing – standard parse methods and incremental processing.
DOM handling both Python's xml.dom.minidom module and an introducon to
ElementTree.
Creang documents programmacally.
The lxml third-party package, which provides an API much like ElementTree, but
adds addional support for XPath, XSLT, and schema validaon.
A quick look at HTML processing via the HTMLParser module and an introducon
to the BeautifulSoup package.
By the end of this chapter, you should be able to process XML and HTML documents in a
variety of ways based on the needs of your applicaon.

Structured Markup
[ 166 ]
XML data
We'll use the same XML document for the majority of the examples in this chapter. Our
document is fairly basic and does not include namespace or schema elements. Go ahead and
create world00.xml and enter the following content. This XML le is also available from the
Packt Publishing FTP site and can be downloaded.
<?xml version="1.0" encoding="utf-8"?>
<dungeon>
<description>A cold dungeon with no windows and only faint torch
light.</description>
<hallway direction="north">
<description>A hallway leading deeper into the
darkness...</description>
<room direction="east">
<description>
This looks to be an abandoned guard post.
</description>
<chest>
<trap hp="10">
<description>This chest is full of
bats!</description>
</trap>
</chest>
<chest>
<potion hp="10"/>
</chest>
</room>
<room direction="north">
<description>
A wooden cot and a skeleton provide the decor.
</description>
<chest>
<trap hp="15">
<description>This chest is full of poison
fungus!</description>
</trap>
</chest>
<chest>
<potion hp="25"/>
</chest>
<hallway direction="east">
<description>
A long hallway, you hear footsteps to the south.

Chapter 6
[ 167 ]
</description>
<room direction="north">
<description>This one is empty.</description>
</room>
<room direction="south">
<description>This room smells like a
goblin?</description>
<monster kind="goblin" min_dmg="5" max_dmg="25"/>
</room>
</hallway>
</room>
<room direction="west">
<description>
Not much here, though you hear a noise to the
northwest.
</description>
<chest>
<potion hp="25"/>
</chest>
<hallway direction="north">
<description>
There is a faint light at the end of this hall.
</description>
<room direction="west">
<description>You've entered the lair of the
dragon!</description>
<monster kind="dragon" min_dmg="2500"
max_dmg="5000"/>
</room>
<room direction="north">
<description>The air is much drier
here...</description>
<chest>
<potion hp="30"/>
</chest>
<hallway direction="west">
<description>The floor seems to slant
upwards.</description>
<room direction="north">
<description>You've
Escaped!</description>
<exit/>
</room>
</hallway>

Structured Markup
[ 168 ]
</room>
</hallway>
</room>
</hallway>
</dungeon>
Here, we've dened a simple document without any namespace or schema informaon. In
fact, the only non-markup line is the XML version and encoding specicaon found at the top
of the le. Let's look at some basic methods we can use to parse this le.
SAX processing
SAX is the rst of two industry standard approaches available when processing XML
documents. SAX, or Simple API for XML, is an event-driven approach. Our applicaons
will dene handlers, which are triggered whenever the XML processor encounters elements
in the document. Python supplies the xml.sax module, which provides a framework for
SAX-driven processing.
Generally speaking, SAX is a beer approach when dealing with large XML documents as it is
not necessary to load the enre document into memory when processing.
SAX, while generally beer performing, is more dicult for a programmer to
master as it doesn't provide for ready-made XML-driven data structures. That's
up to the developer to create.
Time for action – event-driven processing
In this rst example, we'll use the SAX XML processor in order to format a simple
representaon of the XML elements that make up a document. Based on the current
posion, we'll change our indent level. The goal here is to simply understand the
event-driven mechanism behind SAX processing.
1. Create a le named xml_indent.py and enter the following code:
from xml.sax import make_parser
from xml.sax.handler import ContentHandler
class IndentHandler(ContentHandler):
def __init__(self, *args, **kw):
ContentHandler.__init__(self, *args, **kw)
self.indent = 0
self._factor = 4
self.elements = 0
def startElement(self, name, attrs):
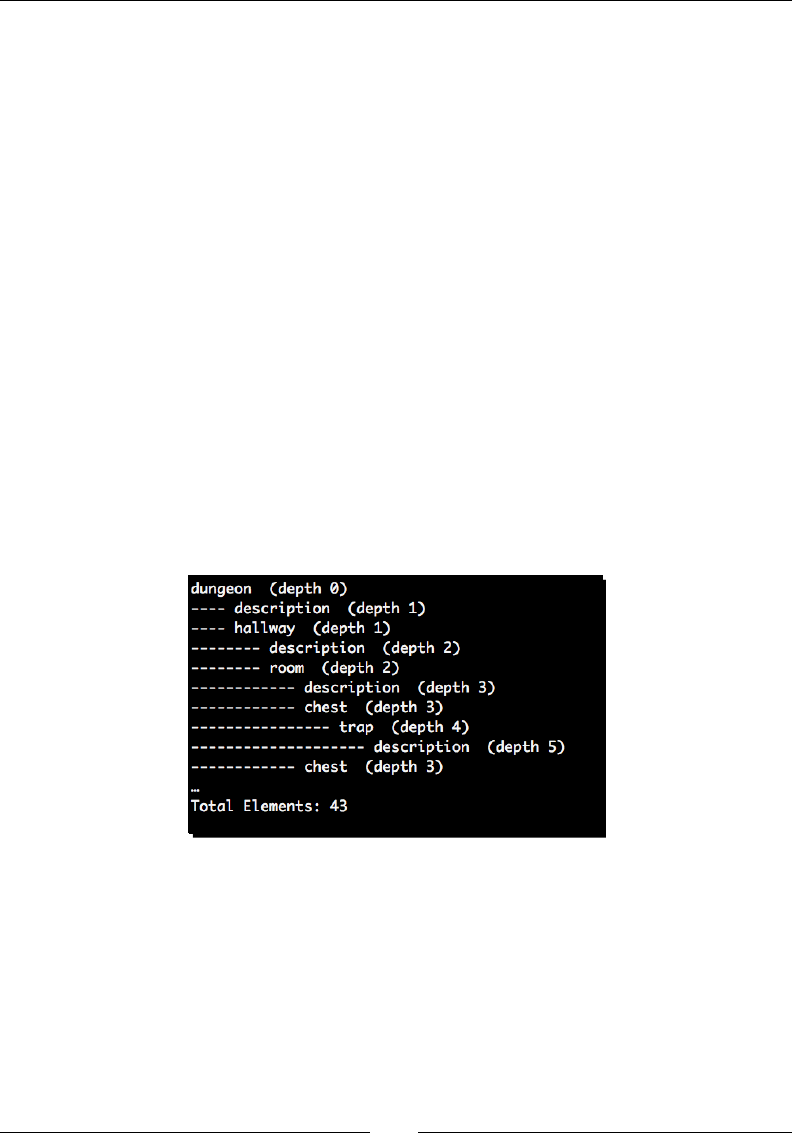
Chapter 6
[ 169 ]
"""
Called when an element is encountered.
"""
if self.indent:
print '-' * (self.indent * self._factor),
print name, " (depth %d)" % self.indent
self.elements += 1
self.indent += 1
def endElement(self, name):
self.indent -= 1
# This enters the XML parsing loop
handler = IndentHandler()
parser = make_parser()
parser.setContentHandler(handler)
parser.parse(open('world00.xml'))
print "Total Elements: %d" % handler.elements
2. Running this test script should generate the following results. In this case, they've
been limited in order to conserve space.
(text_processing)$ python xml_indent.py
What just happened?
The very rst thing we did in this example is import the resources required to support
event-driven XML processing. From xml.sax, we imported the make_parser funcon,
and from xml.sax.handler, we imported the ContentHandler base class.

Structured Markup
[ 170 ]
Next, we dene a subclass of ContentHandler, which we called IndentHandler. This
handler is where all of the work takes place. It's our job to override methods such that we
handle the XML data appropriately. There are a series of methods that may be overridden
here. The following table provides an outline:
Method Descripon
setDocumentLocator Must be passed an instance of xml.sax.xmlreader.
Locator. This provides a mechanism to nd the parser's
current locaon in the le.
startDocument Called at the start of document processing. Not, however,
when the rst (root) element is encountered.
endDocument Called at the end of document processing.
startPrefixMapping Triggered when a prex mapping is encountered.
For example, when a namespace prex (such as
myns:element) is mapped to a URL.
endPrefixMapping Exit scope of URL Prex mapping.
startElement Called on an element open, such as <dungeon>. Also, a
mapping of aributes is passed in.
endElement Called when an element closes, such as </dungeon>.
startElementNS Called when an element is encountered with a disnct
namespace. Namespaces processing must be enabled via the
setFeature method of a parser object.
endElementNS Called when an element with a specic namespace
terminates. As with startElementNS, namespace
processing must be switched on.
characters Called when character data is discovered. This also includes
whitespace and newline data when XML documents are
formaed for reading.
ignorableWhiteSpace Fired when the parser runs into ignorable whitespace.
processingInstruction Nocaon when the XML processing runs into a processing
instrucon.
skippedEntity Alerts your code when an enty is skipped.
In this example, we're going to simply dene a startElement and an endElement
method and we won't bother with namespace-handling.
Whenever an opening element is encountered (such as <room>), our startElement
method is executed by the parser with the name of the element encountered, as well as
a mapping of the aributes associated with it. Following our room example, the mapping
would contain a single key: the direction of the room with respect to where the player is
currently located.

Chapter 6
[ 171 ]
When called, we increase our self_indent aribute, so we know how far over on the
screen to print this element. We also keep a counter, self.elements, to track how many
XML elements we encounter.
Finally, when the corresponding closing tag (</room>) is encountered, we decrement the
value of self._indent by one as to show the relaonship between elements.
The remaining code is responsible for wiring up our processor. First, we create an instance
of our handler and name it handler. Next, we call make_parser, which is located within
xml.sax. The make_parser funcon takes an oponal list of modules to search for a valid
XML SAX parser. If no list is specied, a default ordering is used. In most cases, this is the
correct approach.
Finally, we associate our handler with the parser, and tell the SAX engine to go to work by
calling parser.parser with a le-like object as its only parameter.
The output of our applicaon shows us where in the XML hierarchy each element lies by
varying the degree of indentaon.
Incremental processing
The xml.sax module also allows us to perform incremental processing. This is a useful
technique when dealing with a larger XML document, especially one that we may be
retrieving via a slow network link.
Incremental processing allows us to spoon-feed XML data to our processor as it becomes
available. When all of the data has been downloaded, we simply call a close method. Our
handler callbacks are called as data is fed in, as soon as it's possible.
Time for action – driving incremental processing
In this example, we're simply going to update our previous XML indent code to read data via
an incremental approach.
1. Using xml_indent.py as a template, create a new le and name it xml_
increment.py.
2. Replace all of the code below the IndentHandler class denion with the
following new code.
# This enters the XML parsing loop
handler = IndentHandler()
parser = make_parser()
parser.setContentHandler(handler)
xml_doc = open('world00.xml')

Structured Markup
[ 172 ]
while True:
data = xml_doc.read(10)
if not data:
break
parser.feed(data)
parser.close()
print "Total Elements: %d" % handler.elements
3. Run the example. You should have the same results as in the inial example.
What just happened?
Instead of processing the XML input via the parser.parse method, we added our data
as it was available in 10 character chunks. While this is a slightly contrived example, this is
a very useful approach when dealing with asynchronous frameworks such as Eventlet or
Twisted.
Each call to the parser.feed method made more data available for processing. Data is read
in via xml_doc.read in 10 byte increments. When we read the last line of the le (signied
by the zero-length read), we called parser.close to complete processing.
Note that it is possible to reuse a parser instance in this manner by calling parser.reset.
This resets all states and prepares the same object instances for reuse.
Building an application
When working with event-driven XML processing, any in-memory structure that your
programs require must be built manually. Addionally, state and posion must be
remembered in order to create context needed to build those structures. For example, a
<description> tag might appear just about anywhere, but it's rather meaningless unless it
can be associated with the item it's describing. In order to know this, it's generally required
to know what the parent element is.
Time for action – creating a dungeon adventure game
Here, we're going to look at a small adventure game based on the world00.xml le we
created earlier in the chapter. The goal is to illustrate how we need to handle dierent tags
and a larger, branching XML structure with event-driven processing. You should also noce
that we need to create our own structural classes to maintain a representaon of our world
in memory, rather than allowing the XML system to do that for us.
1. Create a new le and name it sax_explore.py.
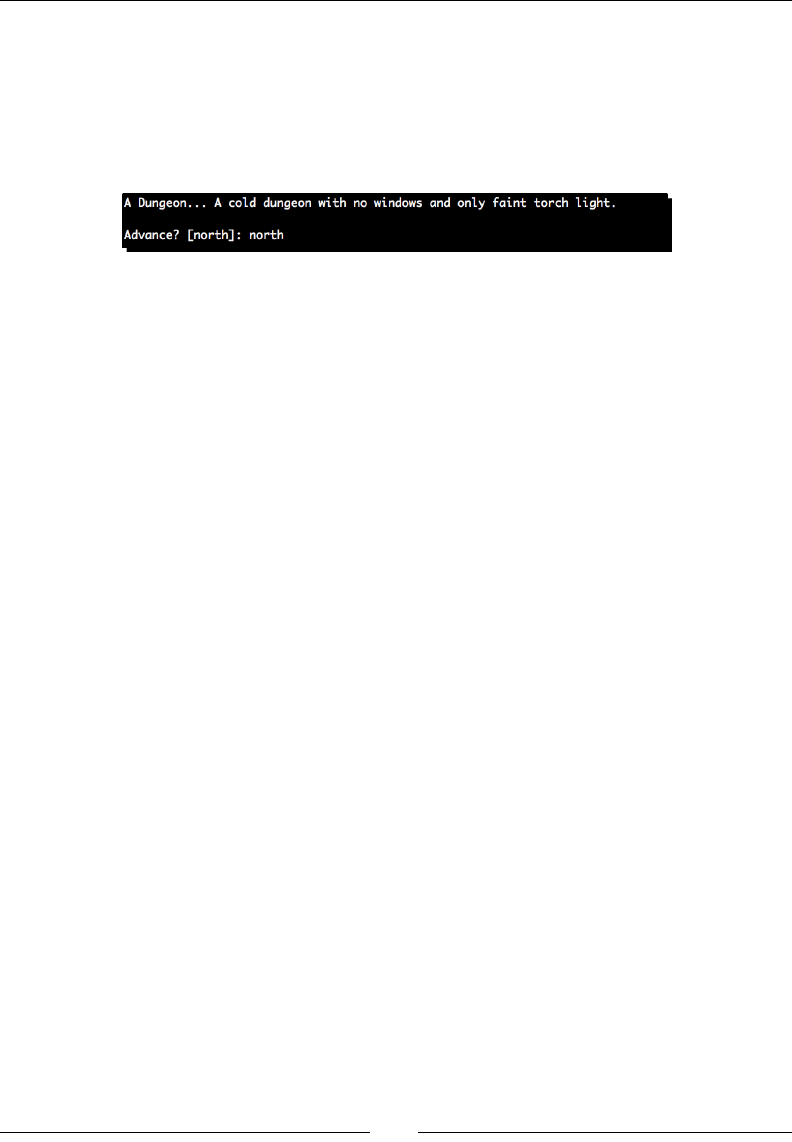
Chapter 6
[ 173 ]
2. This is a rather long example, so we'll not provide the enre lisng here. We're using
the sax_explore.py le from the Packt Publishing code bundle. Save it to your
current directory or enter it into your text editor.
3. Start up the game and play through a few rounds.
(text_processing)$ python sax_explore.py
What just happened?
Quite a lot happened behind the scenes here. Let's take it slowly and walk through the
provided source code. Most of this you should be familiar with.
Excluding imports, the rst 80 lines or so of this example are spent creang classes that
will be used to idenfy elements of the game. We'll create instances of these classes in a
tree-like object graph that we can traverse as our adventure moves us through individual
rooms and hallways. We take advantage of some inheritance here to provide some uniform
__str__ values. Consider the following snippet of code:
class GameElement:
"""A Game Component"""
descr = None
def __str__(self):
return 'A %s... %s' % \
(self.__class__.__name__, self.descr if self.descr else '')
Any classes that inherit from GameElement will automacally gain access to this specic
__str__ implementaon.
Class collecons like this (or more opaque, general types) are common when dealing with
event-driven XML processing.
Of note here are NAV_MAP and HP_MAP. We directly map the name of an XML element to a
class name in order to allow for dynamic creaon of instances, which is detailed later.
NAV_MAP = { 'room': Room, 'hallway': Hallway, 'dungeon': Dungeon }
HP_MAP = { 'trap': Trap, 'potion': Potion }
Next, we dene a somewhat large class named Adventure. Within this new class, we added
an advance method, which really serves as the core of our game here. Upon entering a new
locaon, we print a summary of the current locaon and call self._manage_monster and
self._manage_chests to handle both monsters and chests, respecvely. The last thing
we do in our advance method is dene a list of places that our brave knight can visit. If the
current locaon has a parent aribute set then we add the "back" possibility.

Structured Markup
[ 174 ]
We then call advance again on the desnaon locaon that is selected by the player.
Now, we get to our XML processing class, GameHandler. GameHandler is a subclass of the
ContentHandler class. We took this same approach in our earlier examples.
The majority of the work is done in the startElement method. Our big goal here is to
build our object tree based on informaon we nd in the XML le. When startElement
is called, we try to retrieve our parent element via a method named self._get_parent.
This is a ulity method we've added that pulls the top value o of an instance-level stack
of all currently open elements. We'll use the parent object (if one exists) in various places
throughout startElement.
When processing tree-structured data (such as XML), stacks are a great way to
keep track of current context. As elements are opened, they are pushed on to a
stack structure. Due to the FIFO nature, the top item on the stack is always the
deepest element in the XML tree currently open.
Next, we check and see if our element name is in the NAV_MAP diconary we created earlier.
If we nd it here, this means that it's either a Room or a Hallway. We add the new exisng
desnaon to the parent object via the add_exit method. Elements of this type are eligible
to be passed to the advance method of our Adventure class. This is done by creang
instances of the classes listed in NAV_MAP.
if name in NAV_MAP:
new_object = NAV_MAP[name](parent)
Next, we handle XML objects that cause an increase or a decrease in available hit points.
When we reach zero available hit points, our adventure is over. Both the trap and the
potion element can aect our available hit point pool. As these are only found within
chests, we add a parent.contents aribute poinng to the newly discovered HP modier.
Now, we handle our monsters. Each monster has a set of aributes that dene its kind,
maximum damage, and minimum damage. When a monster hits, a number is randomly
generated between these values. Here, we create that Monster object from the XML data
and assign a parent.monster aribute so we know to perform the monster logic when we
enter a room with a monster present.
We repeat the same type of checks for chest, exit, and descripon elements. When each
type is encountered, we assign the appropriate data to the parent object and instanate a
new internal representaon.
The very last thing we do is append the new object to our self._stack stack. This ensures
the proper parent object is referenced with the next event.

Chapter 6
[ 175 ]
The next method we dene is characters. This is called whenever the XML processor runs
into any text content. There are two common issues here:
1. This data may not be passed in one chunk. The underlying XML processor may only
call this callback mulple mes with segments of text.
2. All character data is included. This means new lines at the end of XML elements and
spaces included to make documents easier for humans to process.
To combat issue number one, we append content to a list each me characters is called.
This ensures that we handle the situaon where we're called more than once. Finally, to
address the second concern, we skip this altogether if a string is enrely space. Any strings
appended are stripped of leading and trailing whitespace as well.
The last method in our handler is endElement. This is called when a closing tag is
encountered. We do two things here. First, we pop the top element o of our self._
stack list. The del keyword is ne here as another reference already exists in our internal
representaon. We're simply removing the reference to the object found in our stack.
Finally, if the closing element is a descripon tag, we join the list together on an empty
string and assign it to the parent's descripon aribute.
And, lastly, we launch our game within our __name__ == '__main__' secon.
Event-driven XML processing is a very detailed subject. We've only scratched
the surface here, though you should know enough to build scripts that take
advantage of these techniques. For more informaon, you should spend some
me and study the Python xml.sax library documentaon available at
http://docs.python.org/library/markup.html.
Pop Quiz – SAX processing
1. What are the benets to SAX? Where might you elect to use this form of XML
handling?
2. What are the negaves?
3. What are two important things to remember when dealing with text data callbacks
and SAX processing?
4. When is startElementNS called versus startElement?

Structured Markup
[ 176 ]
Have a go hero – adding gold
About the only thing worse than being stuck in a dungeon is having no money when you get
out. Take a few minutes to add the concept of gold pieces into our game. To do this, you'll
need to dene a new XML element that can be found within a chest and you'll need to add
the appropriate plumbing within the source.
The Document Object Model
While a SAX parser simply generates events as various elements of an XML document are
encountered, a DOM parser takes it further and denes an in-memory structure detailing
the document. Python provides support for DOM processing via the xml.dom.minidom
module. In addion, there are third-party modules that further enhance Python's DOM
capabilies, such as lxml.
The ElementTree packages also provide a DOM-like interface. We'll look at that approach
when we get into XPath processing.
xml.dom.minidom
Python's standard library includes a minimal DOM implementaon with xml.dom.minidom.
These libraries provide the basic funconality needed to load an XML structure into memory
and provide a set of common methods that can be used to traverse and search the tree. Let's
take a look at an example to clarify.
Time for action – updating our game to use DOM processing
In this example, we'll update our game to use a DOM parser as opposed to a SAX parser. You
should noce how the in-memory structure is built for us and we no longer have to maintain
our own object graph. We'll reuse the same XML document for this example:
1. Copy sax_explore.py over to a new le named dom_explore.py.
2. At the top of the le, update your import statements so they read as follows:
import sys
import random
from xml.dom.minidom import parse
3. Remove all code, with the following excepons: YouDiedError, our __
metaclass__ line, and the __name__ == '__main__' secon.

Chapter 6
[ 177 ]
4. Update the Adventure class to contain the following Python code:
import sys
import random
from xml.dom.minidom import parse
__metaclass__ = type
class YouDiedError(Exception):
"""Our Adventure has ended..."""
# World holds dungeons and information
# regarding our adventure.
class Adventure:
def __init__(self, world, hp=35):
self.location = None
self.hp = hp
self.world = world
def init_game(self):
"""
Process World XML.
"""
self.location = parse(open(self.world)).documentElement
def start_game(self):
"""
Starts the game.
"""
self.advance(self.location)
def _decr_hp(self, change):
"""
Lower HP.
Lower's HP and takes getting killed
into account.
"""
self.hp -= change
print "You have taken %d points of damage!" % change
if self.hp <= 0:
raise YouDiedError("You have expired...")
print "You have %d HP remaining." % self.hp
def _manage_monster(self):
"""
Handle monster hits.
"""
monster = self.get_nodes('monster')

Structured Markup
[ 178 ]
if monster:
monster = monster[0]
print "You've encountered a %s!" % \
monster.getAttribute('kind')
max_dmg = int(monster.getAttribute('max_dmg'))
min_dmg = int(monster.getAttribute('min_dmg'))
self._decr_hp(random.randint(min_dmg, max_dmg))
def _open_chest(self, chest):
"""
Open a treasure chest.
"""
chest.opened = True
modifier = self.get_nodes('trap', chest) or \
self.get_nodes('potion', chest)
if not modifier:
print "This chest is empty..."
else:
modifier = modifier[0]
hp_change = int(modifier.getAttribute('hp'))
if modifier.nodeName == 'trap':
print self.get_description(modifier)
self._decr_hp(hp_change)
else:
print "You've found a potion!"
print "Health restored by %d HP!" % hp_change
self.hp += hp_change
def _manage_chests(self):
"""
Handle Treasure Chests.
"""
chests = self.get_nodes('chest')
if chests:
while True:
closed_chests = [i for i in chests if not
hasattr(i, 'opened')]
if closed_chests:
chest_count = len(closed_chests)
print "There is %d unopened chest(s) here!" %
\
chest_count
choice = raw_input("Open which? [%s, none]: "
% \
', '.join([str(i) for i in

Chapter 6
[ 179 ]
xrange(chest_count)]))
if choice == "none":
break
try:
self._open_chest(
closed_chests[int(choice)])
except (ValueError, IndexError):
pass
# No chests left.
else:
break
def get_nodes(self, name, parent=None):
"""
Search the DOM Tree.
Searches the DOM tree and returns nodes
of a specific name with a given parent.
"""
if not parent:
parent = self.location
return [node for node in parent.getElementsByTagName(name)
if node.parentNode is parent]
def get_description(self, node):
"""
Returns a description for an object.
"""
desc = self.get_nodes('description', node)
if not desc:
return ''
desc = desc[0]
return ''.join(
[n.data.strip() for n in desc.childNodes if
n.nodeType == node.TEXT_NODE])
def advance(self, where):
"""
Move into the next room.
Moves the player into the next room and handles
whatever consequences have been defined in the
dungeon.xml file.
"""
self.location = where
print '%s... %s' % (where.nodeName.title(),
self.get_description(where))

Structured Markup
[ 180 ]
# Exit if this is the end.
if self.get_nodes('exit'):
print "You have won."
sys.exit(0)
# Perform monster logic.
self._manage_monster()
# Perform Chest Logic
self._manage_chests()
# Setup available directions menu.
exits = {}
for i in (self.get_nodes('hallway') +
self.get_nodes('room')):
exits[i.getAttribute('direction')] = i
directions = exits.keys()
if self.location.parentNode:
directions.append('back')
while True:
choice = raw_input("Advance? [%s]: " % \
', '.join(directions))
if choice:
if choice == 'back' and 'back' in directions:
self.advance(self.location.parentNode)
try:
self.advance(exits[choice])
except KeyError:
print "That's a brick wall. Try again."
if __name__ == '__main__':
a = Adventure('world00.xml')
a.init_game()
try:
a.start_game()
except YouDiedError, e:
print str(e)
except (EOFError, KeyboardInterrupt):
print "Until next time..."
5. Finally, run the game as we did in the earlier example.
(text_processing)$ python dom_explore.py
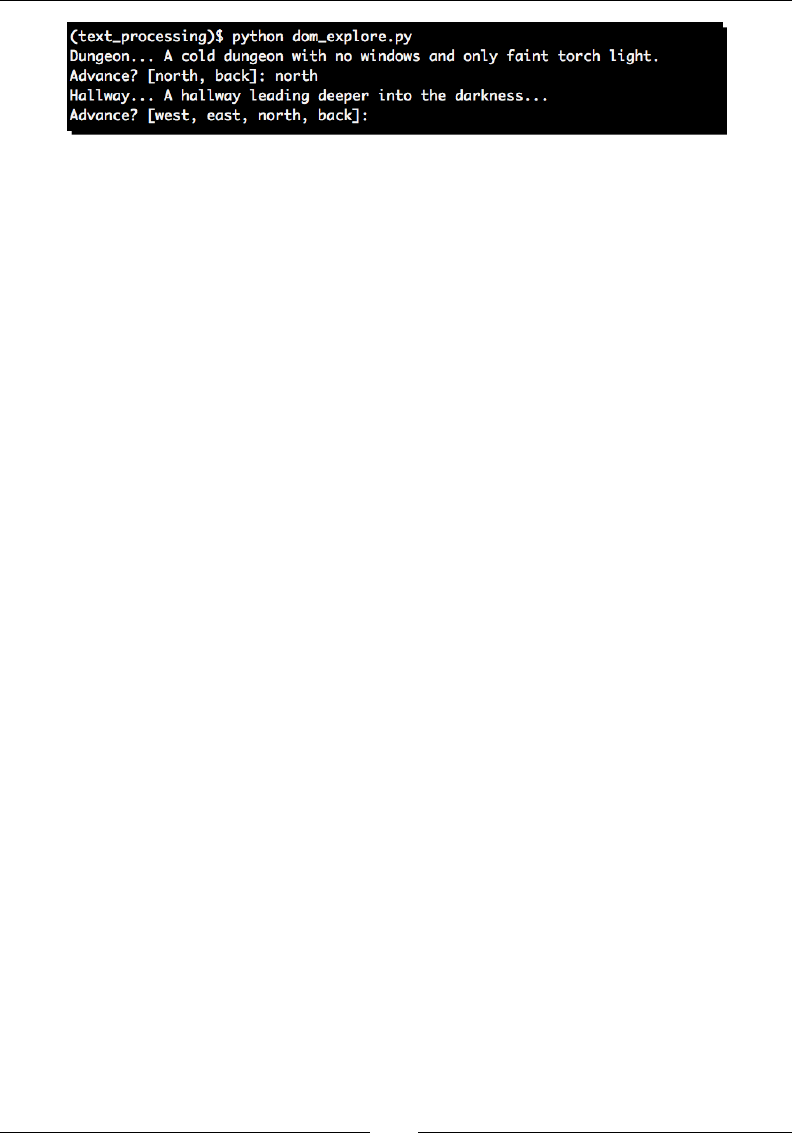
Chapter 6
[ 181 ]
What just happened?
The obvious change is that this example required much less code. This, overall, reads much
cleaner. The reason is that the enre document remains in memory post-processing; we no
longer have to build addional structures to hold the informaon read from XML.
Let's walk through our new Adventure class.
The very rst change you'll see is in init_game. Here, we parse the le and save the
locaon of documentElement into self.location. The parse funcon returns a
Document object. In turn, the documentElement aribute of that Document object is the
root element of the XML le.
Next, our _manage_monster method has changed. As we no longer rely on a monster.
hit method, we simply calculate the damage here. The rst line of this method calls get_
nodes, which is a new method we've added.
def get_nodes(self, name, parent=None):
"""
Search the DOM Tree.
Searches the DOM tree and returns nodes
of a specific name with a given parent.
"""
if not parent:
parent = self.location
return [node for node in parent.getElementsByTagName(name)
if node.parentNode is parent]
The get_nodes method searches the tree, by default at our current locaon in the
dungeon, for elements with a variable name. We're also restricng our result set to include
only those elements that are directly children of the current node.
Now, back in _manage_monster, we perform our damage logic only if a monster was
encountered in the current room. Here, we use the getAttribute method of an xml.
dom.minidom.Node to extract the minimum and maximum damage that this given monster
type may cause.
Our _open_chest method has been changed as well. Here, we pull traps or poons out of
a chest object. The or will ensure that we'll return one or the other. If both are empty lists,
we'll return the empty list that the poon lookup generates.

Structured Markup
[ 182 ]
Here, you'll also see a call to self.get_description. As we're not creang our own
tree-like structure, we pull a descripon element out of the current chest contents if
one exists.
def get_description(self, node):
"""
Returns a description for an object.
"""
desc = self.get_nodes('description', node)
if not desc:
return ''
desc = desc[0]
return ''.join(
[n.data.strip() for n in desc.childNodes if n.nodeType ==
node.TEXT_NODE])
The approach taken is very straighorward. We concatenate the enre child nodes of the
descripon object found by get_nodes if they are type node.TEXT_NODE. In addion to
TEXT_NODE, other valid types are ELEMENT_NODE, ATTRIBUTE_NODE, TEXT_NODE, CDATA_
SECTION_NODE, ENTITY_NODE, PROCESSING_INSTRUCTION_NODE, COMMENT_NODE,
DOCUMENT_NODE, DOCUMENT_TYPE_NODE, and NOTATION_NODE.
Our _manage_chests method is quite similar to our monster management rounes. We
simply pull our chest list using get_nodes. Note that here we're only seng an opened
aribute on the node if we've already opened it. If nodes do not have that aribute then
they can sll be considered closed.
Finally, we have our advance method. There's really not all that much new here that we
haven't already covered in our DOM example. As we can't rely on the __str__ methods of
our own objects, we have to format the locaon descripon manually using the tle case of
the current node's nodeName and the descripon.
Have a go hero – cleaning up the dungeon a bit
In this example, we searched for child nodes by calling getElementsByTagName and
ltering based on the element's parent object. In a large document, it's probably a bit easier
on the system to query for a document's children and lter by node name.
Using the documentaon found at http://docs.python.org/library/xml.dom.
minidom.html, update the above applicaon to work in this fashion.
While you're out there, spend a while familiarizing yourself with the other methods and
opons available in xml.dom.minidom.

Chapter 6
[ 183 ]
You may have also noced that we have a "back" opon available to us when we rst start
up our game when using the DOM parser. This is obviously an error. Update the code such
that we no longer follow a parent link if it's at the top of the document.
The minidom implementaon doesn't support every available DOM feature as
detailed by the specicaon. According to the Python documentaon itself, it's
a DOM 1.0 implementaon with some DOM 2.0 parts included. Specically, XML
namespaces. The DOM level 1 specicaon can be found at http://www.
w3.org/TR/REC-DOM-Level-1/.
Creating and modifying documents programmatically
As xml.dom.minidom allows you to work with objects represenng XML enes, you're
able to manipulate them in memory and serialize them out into a new XML document. Aer
creang a document object, we'll simply build a tree structure by appending various new
nodes to it.
Python 2.6.1 (r261:67515, Feb 11 2010, 00:51:29)
[GCC 4.2.1 (Apple Inc. build 5646)] on darwin
Type "help", "copyright", "credits", or "license" for more information.
>>> from xml.dom.minidom import Document
>>> d = Document()
>>> e = d.createElement('employee')
>>> n = d.createElement('name')
>>> n.appendChild(d.createTextNode('Phoebe Dee'))
<DOM Text node "'Phoebe Dee'">
>>> e.appendChild(n)
<DOM Element: name at 0x100723290>
>>> d.appendChild(e)
<DOM Element: employee at 0x10071ff80>
>>> d.toxml()
'<?xml version="1.0" ?><employee><name>Phoebe Dee</name></employee>'
>>>
Here, we rst created a Document instance. Next, using the createElement and
createTextNode methods of document, we built some new elements. Specically, a root
employee node and a name associated with that employee.
Finally, we ed it all together by calling the appendChild methods of the appropriate Node
instances.

Structured Markup
[ 184 ]
Addionally, we can change the structure of an exisng document via appendChild,
insertBefore, removeChild, and replaceChild. The following snippet illustrates
this point:
>>> s = d.createElement('salary')
>>> s.appendChild(d.createTextNode('$1,292,310.12'))
<DOM Text node "'$1,292,310'...">
>>> e.insertBefore(s, n)
<DOM Element: salary at 0x1004a45a8>
>>> d.toxml()
'<?xml version="1.0" ?><employee><salary>$1,292,310.12</
salary><name>Phoebe Dee</name></employee>'
>>>
We simply created a new element, a salary, and inserted it before the name of a very well
paid employee. The insertBefore method takes the new node and the node in which
we're going to insert before.
The following table outlines some of the methods that are available for use in updang and
serializing DOM-based XML structures. This is not an exhausve list.
Method Object Descripon
createAttribute Document Used to build a new aribute that will
be part of an element.
createCDATASection Document Used to create a new CDATA secon,
which contains characters that might
otherwise cause XML processing
excepons.
createComment Document Builds a new XML comment and escapes
it accordingly.
createDocumentFragment Document Creates a lightweight document. Does
not necessarily need to be well formed.
createElement Document Adds a new XML element
createProcessingInstruction Document Allows the inseron of an XML
Processing Instrucon into a document.
These are idened by <? ?> tags.
toprettyxml Element Returns a string of neatly formaed
XML, rooted at the given node object.
toxml Element Returns a string of XML, rooted at the
given node, minimizing whitespace
usage.

Chapter 6
[ 185 ]
Method Object Descripon
writexml Element Writes an XML document, rooted at the
Node, to a le-like object. Addionally,
formang parameters such as indent
and newline can be passed in.
removeAttribute Element Removes an aribute idened by a
name.
setAttribute Element Sets an aribute value.
normalize Node Joins adjacent text nodes such that they
concatenate into one text element.
createTextNode Document Adds a new text node as outlined
earlier.
appendChild Node Adds a new child element to the node
object.
replaceChild Node Replaces a given child with a new child
node.
removeChild Node Removes a child element from a node.
insertBefore Node Adds a new node before a specied
child node.
Have a go hero – adding multiple dungeons
You should have a prey good feel for the xml.dom.minidom implementaon now. Update
the dom_explore.py le and the world00.xml datale in order to support a world with
mulple dungeons.
XPath
The nal XML topic we'll touch on in this chapter is XPath. XPath provides a means for
directly addressing an XML element, without the need to iterate or search through child
elements. In other words, an XPath expression creates a "path" to a specic XML node.
Structured Markup
[ 186 ]
The xml.dom.minidom package does not support XPath. In order to take advantage of
these two technologies, we'll need to install the third-party lxml package. Use easy_
install to do so.
(text_processing)$ easy_install lxml
Unless you're using a Windows binary egg, you'll need to have libxml2 and libxslt
available on your system. If the build process fails for you, see the lxml installaon
documentaon available at http://codespeak.net/lxml/installation.html.
From here, you can install any needed dependencies.
Accessing XML data using ElementTree
As of Python 2.5, the ElementTree API is part of the standard library. If you are using an
earlier version, it can also be installed via the Python Package Index. ElementTree provides
yet another means to access XML data. The lxml library was implemented such that it
retains API level compability with ElementTree. You should note that ElementTree does
provide elementary level XPath support, but not the full scope.
At the core of the ElementTree system is the Element type. The Element instance
provides a very Python-friendly means to access XML data. Unlike xml.dom.minidom, every
XML tag is represented by an element. Elements themselves then contain aributes, tag
names, text strings, and lists of other elements (children).
Let's take a look at a small snippet of code that helps illustrate the usage of ElementTree.
Python 2.6.1 (r261:67515, Feb 11 2010, 15:47:53)
[GCC 4.2.1 (Apple Inc. build 5646)] on darwin
Type "help", "copyright", "credits" or "license" for more information.

Chapter 6
[ 187 ]
>>> from StringIO import StringIO
>>> from xml.etree.ElementTree import parse
>>> x = StringIO('''<dinner healthy="no">'''
... '''<meat>bacon</meat>'''
... '''<desert>pie</desert>'''
... '''</dinner>''')
>>> etree = parse(x)
>>> dinner = etree.getroot()
>>> dinner.get('healthy')
'no'
>>> dinner[0]
<Element meat at 1004f7ef0>
>>> dinner[1].text
'pie'
>>>
In this snippet, we parse an XML segment and access its various parts. Element objects
support a series of diconary and list-like methods. When accessing using a list context,
the subscripted elements represent the children of that specic node. In contrast, when
diconary-like methods are used (get, items, keys), we're able to access the XML
aributes of the current node.
Time for action – using XPath in our adventure
In this example, we'll update our adventure game to use XPath as its underlying XML
processing technology. This allows us to reduce the code footprint even more while also
introducing the ElementTree compliant API. In addion, we'll move this version into our
working package as we'll revisit it later on in the book.
1. First, we're going to create a directory named adventure below our text_
beginner package and create our __init__.py le.
(text_processing)$ mkdir text_beginner/adventure
(text_processing)$ touch text_beginner/adventure/__init__.py
2. Next, we'll edit our setup.py le to add a new entry point. Update the entry_
points diconary to look like this:
entry_points = {
'console_scripts': [
'logscan = logscan.cmd:main',
'mx_order = dnszone.mx_order:main',
'pydungeon = adventure.xpath_explore:main'
]
},
)
Structured Markup
[ 188 ]
3. Now, run python setup.py develop to create the new console script in a
directory that resides on your shell's search path.
4. Copy dom_explore.py into the adventure directory and save it as xpath_
explore.py. We'll use this as the base for our updates.
5. At the boom of the le, add the following main funcon:
def main():
from optparse import OptionParser
parser = OptionParser()
parser.add_option('-w', '--world',
help='Dungeon Definition XML')
opts, args = parser.parse_args()
if not opts.world:
parser.error("World XML Required")
a = Adventure(opts.world)
a.init_game()
try:
a.start_game()
except YouDiedError, e:
print str(e)
except (EOFError, KeyboardInterrupt):
print "Until next time..."
6. Remove xml.dom.minidom from the import statements at the top and add from
lxml import etree.

Chapter 6
[ 189 ]
7. Update the Adventure class to read as follows:
class Adventure:
def __init__(self, world, hp=35):
self.location = None
self.hp = hp
self.world = world
self.opened = []
def init_game(self):
"""
Process World XML.
"""
self.location = etree.parse(self.world).getroot()
def start_game(self):
"""
Starts the game.
"""
self.advance(self.location)
def _decr_hp(self, change):
"""
Lower HP.
Lower's HP and takes getting killed
into account.
"""
self.hp -= change
print "You have taken %d points of damage!" % change
if self.hp <= 0:
raise YouDiedError("You have expired...")
print "You have %d HP remaining." % self.hp
def _manage_monster(self):
"""
Handle monster hits.
"""
monster = self.get_nodes('monster')
if monster:
monster = monster[0]
print "You've encountered a %s!" % monster.get('kind')
max_dmg = int(monster.get('max_dmg'))
min_dmg = int(monster.get('min_dmg'))
self._decr_hp(random.randint(min_dmg, max_dmg))
def _open_chest(self, chest):
"""

Structured Markup
[ 190 ]
Open a treasure chest.
"""
self.opened.append(chest)
modifier = self.get_nodes('trap', chest) or \
self.get_nodes('potion', chest)
if not modifier:
print "This chest is empty..."
else:
modifier = modifier[0]
hp_change = int(modifier.get('hp'))
if modifier.tag == 'trap':
print self.get_description(modifier)
self._decr_hp(hp_change)
else:
print "You've found a potion!"
print "Health restored by %d HP!" % hp_change
self.hp += hp_change
def _manage_chests(self):
"""
Handle Treasure Chests.
"""
chests = self.get_nodes('chest')
if chests:
while True:
closed_chests = [i for i in chests if
i not in self.opened]
if closed_chests:
chest_count = len(closed_chests)
print "There is %d unopened chest(s) here!" %\
chest_count
choice = raw_input("Open which? [%s, none]: "
% \
', '.join([str(i) for i in
xrange(chest_count)]))
if choice == "none":
break
try:
self._open_chest(closed_
chests[int(choice)])
except (ValueError, IndexError):
pass
# No chests left.
else:

Chapter 6
[ 191 ]
break
def get_nodes(self, name, parent=None):
"""
Search the DOM Tree.
Searches the DOM tree and returns nodes
of a specific name with a given parent.
"""
if parent is None:
parent = self.location
return parent.xpath(name)
def get_description(self, node):
"""
Returns a description for an object.
"""
return ''.join(node.xpath('description/text()')).strip()
@property
def parent(self):
parent = self.location.xpath('..')
return parent[0] if parent else None
def advance(self, where):
"""
Move into the next room.
Moves the player into the next room and handles
whatever consequences have been defined in the
dungeon.xml file.
"""
self.location = where
print '%s... %s' % (where.tag.title(),
self.get_description(where))
# Exit if this is the end.
if self.get_nodes('exit'):
print "You have won."
sys.exit(0)
# Perform monster logic.
self._manage_monster()
# Perform Chest Logic
self._manage_chests()
# Setup available directions menu.
exits = {}
for i in (self.get_nodes('hallway') +
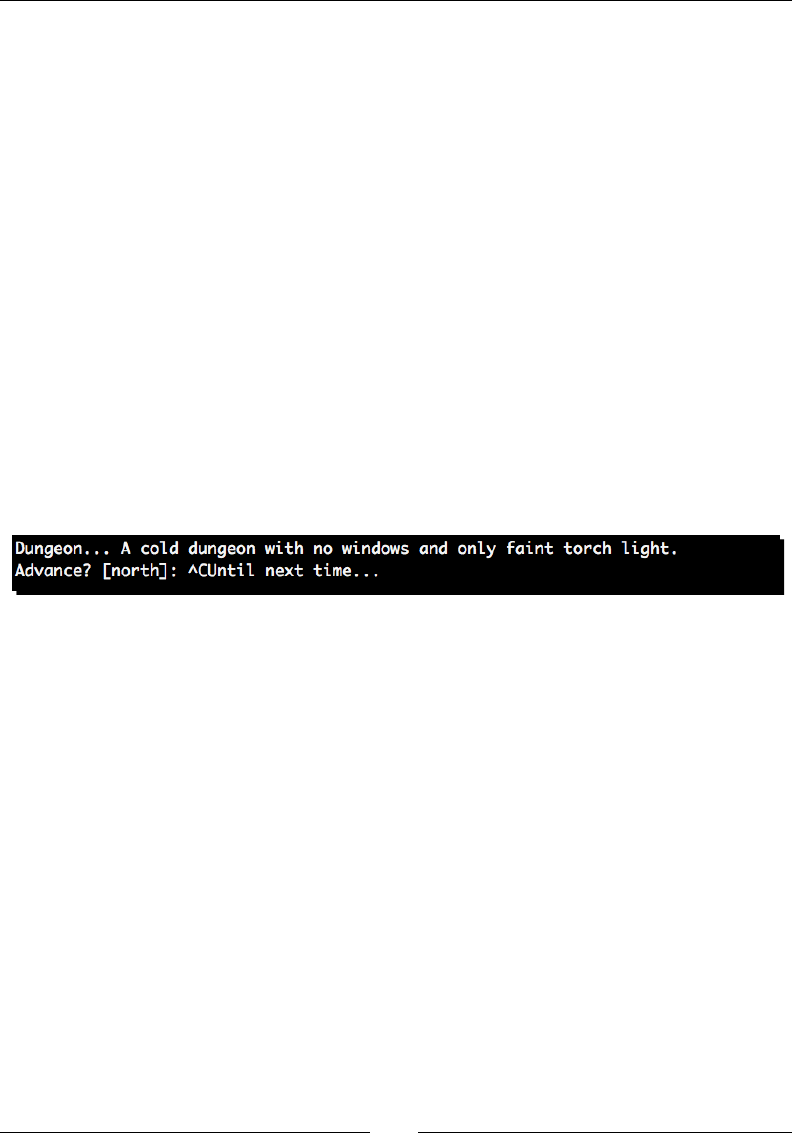
Structured Markup
[ 192 ]
self.get_nodes('room'):
exits[i.get('direction')] = i
directions = exits.keys()
if self.parent is not None:
directions.append('back')
while True:
choice = raw_input("Advance? [%s]: " % \
', '.join(directions))
if choice:
if choice == 'back' and 'back' in directions:
self.advance(self.parent)
try:
self.advance(exits[choice])
except KeyError:
print "That's a brick wall. Try again."
8. Now, run the game via the command line. It should perform exactly as it did in the
previous two examples.
(text_processing)$ pydungeon -w world00.xml
What just happened?
We updated our game to use the ElementTree API with the extended XPath support found
in the lxml package. XPath gives us a very handy method for searching and traversing XML
documents. As usual, let's walk through these changes.
First, we updated our import statements to reect the new XML processing API. We're not
using the ElementTree API directly here; we're using lxml's implementaion.
Now, if you'll jump to the Adventure class, you'll see that we've added a self.opened
aribute in the __init__ method. We do this in order to track our open chests as it's not
possible to assign arbitrary aributes to lxml elements.
Next, in init_game, we pull the root element via the getroot method. This is the same
approach used in our example earlier. It returns an element represenng the root XML tag in
this document.
In all locaons where we are calling getAttribute, we've updated our code to call
element.get.

Chapter 6
[ 193 ]
Now, let's take a look at our get_nodes funcon:
def get_nodes(self, name, parent=None):
"""
Search the DOM Tree.
Searches the DOM tree and returns nodes
of a specific name with a given parent.
"""
if parent is None:
parent = self.location
return parent.xpath(name)
First, we're explicitly tesng whether our parent object is None, rather than relying on the
explicit negave value of None as we did earlier via if parent. Why? The ElementTree
API will warn if we do this. Currently, this syntax returns True only if an element has
children, which can be confusing. Because of this, future releases will be updated to follow
standard semancs.
Next, we simply return parent.xpath(name). This is a much cleaner approach than
iterang through children or checking parent ownership. In XPath syntax, a simple tag name
is the equivalent of saying "give me all of the direct child nodes of this object if they're name
tags." Of course, this could be just about any XPath expression.
We also update our get_description call. The following line now does the majority of the
work, rather than relying on get_nodes:
return ''.join(node.xpath('description/text()')).strip()
Similar to the above expression, this translates to "give me all of the text nodes of child
nodes named descripon where this current node is the parent." As node.xpath will return
a list, we simply join it and strip o the extra formang characters.
The last method that uses XPath expressions directly is the parent method, which is declared
as a @property. We'll return the parent node of the current locaon, if one exists.
Finally, we've made a few updates to our advance method. We're retrieving the tag name
via where.tag.title, as opposed to the nodeName method in our previous example.
Addionally, we've updated our navigaon code to use self.parent.
Much like XML processing, XPath is a very in-depth topic that we've only just
brushed upon here. We've covered usage and API implementaon. For more
details surrounding XPath expression syntax, see http://www.w3schools.
com/XPath/xpath_syntax.asp. It's recommended that you spend quite a
while experimenng with dierent XPath approaches.
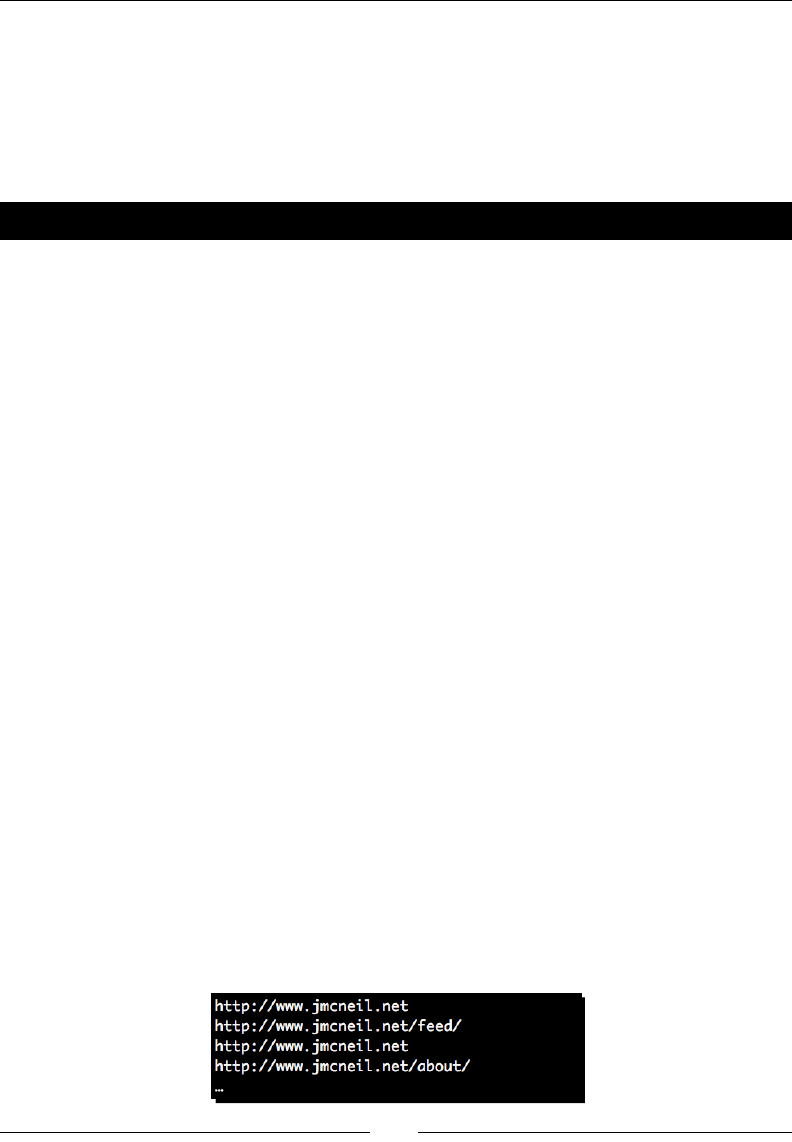
Structured Markup
[ 194 ]
Reading HTML
The Python standard library includes an HTMLParser module, which provides an event-
driven approach to handling HTML text les. Much like the SAX approach to XML processing,
we need to dene a series of callback methods that the parser will invoke when
condions are met.
Time for action – displaying links in an HTML page
In this example, we'll load an HTML page via the urllib2 module and extract all of the link
informaon found within.
1. Create a new le and name it link_scan.py.
2. Enter the following code:
import sys
from HTMLParser import HTMLParser
from urllib2 import urlopen
class LinkDetect(HTMLParser):
def handle_starttag(self, tag, attrs):
if tag == 'a':
try:
print dict(attrs)['href']
except KeyError:
pass
def check_page(url):
link_finder = LinkDetect()
file_obj = urlopen(url)
for line in file_obj:
link_finder.feed(line)
link_finder.close()
if __name__ == '__main__':
check_page(sys.argv[1])
3. Run the script against a web URL. Your output should be similar to the following.
We've stripped some of the output o in order to conserve space.
(text_processing)$ python link_scan.py http://www.jmcneil.net/

Chapter 6
[ 195 ]
What just happened?
Inially, we imported the HTMLParser class from the HTMLParser module. Note that as of
Python 3, the HTMLParser module is now known as htmlparser.
Next, we dene a subclass of HTMLParser. Here, we only include a handle_starttag
method as all of the informaon we need to know about will be included here. We go on to
check the type of tag encountered and print the href value if the tag was an anchor (that
indeed had an href aribute).
The last thing we do, outside of boilerplate, is feed our HTML document to the processor. For
example purposes, we do this line-by-line by iterang over an open le object. Like our SAX
processor, we feed data to the HTMLParser instance in chunks.
In addion to handle_starttag, the following methods are found in the HTMLParser class:
Method Descripon
reset Resets the instance. This causes all unprocessed data to be lost.
feed Sends data into the instance for processing.
close Forces the parser to complete and processes any buered data.
getpos Returns current line number and oset
handle_startendtag This is called when an XHTML-style tag in the form of <BR/>
is encountered. By default, this just calls handle_starttag
followed by handled_endtag.
handle_data Intended to handle arbitrary data. The base class implementaon
does nothing.
handle charref Called to handle character references such as &#ref; the base
class does nothing.
handle_entityref Like handle_charref. Called to process an enty reference
such as & the base class does nothing.
handle_comment Triggered when the parser encounters a comment. Again, the base
class does nothing.
handle_decl Invoked when the parser encounters an SGML declaraon. Base
class does nothing.
handle_pi This method is called when a <?... style processing instrucon
is encountered.
get_starttag_text Returns the text of the most recently encountered start tag.
BeautifulSoup
In theory, HTML processing should be very much like XML processing. Both are structured
documents composed of tags and organized in a tree-like fashion. In pracce, HTML is a
much more problemac text format to manage.

Structured Markup
[ 196 ]
Consider for a moment the wide range of ulies that are used to build HTML documents;
Microso FrontPage, DreamWeaver, various online site builder applicaons, and a good
number of desktop applicaons. Addionally, all web developers aren't made equal.
In short, HTML les are oen broken.
The BeautifulSoup package does a surprisingly wonderful job of handling quirks and
inconsistencies in HTML les. As with lxml, we'll need to install BeautifulSoup using
easy_install. For more informaon regarding BeaufulSoup, see http://www.crummy.
com/software/BeautifulSoup/.
Have a go hero – updating link extractor to use BeautifulSoup
Take a moment to install BeatifulSoup and recode our link scanner. BeautifulSoup
provides a more "DOM-like" interface to HTML data. If you're going to be retrieving data
from live HTML pages, you'll appreciate the simplicity of the API.
Summary
We covered a lot of ground at a high level here. XML is a very detailed topic for which
many books have been wrien. While we went over SAX, DOM, XPath, and the posives
and negaves of each, we le out technologies such as XSLT, XML namespaces, and
DTD documents.
You've learned how to process XML data using Python's XML library modules. We've also
gone over how to manipulate and extract informaon from HTML pages. As you can imagine,
that can be a fairly problemac task. As most web developers know, most HTML isn't very
well formed.
In the next chapter, we'll switch our focus more towards generang documents as we take a
look at dierent approaches and technologies that can be used to create templates.

Creating Templates
In this chapter, we'll switch gears a lile bit and shi from reading and
interpreng textual data to generang it. Templang involves the creaon of
text les, or templates, that contain special markup. When a specialized parser
encounters this markup, it replaces it with a computed value.
In the simplest case, a placeholder is simply swapped for a variable, much
like we saw in string.template earlier in this book. However, there is a
collecon of template libraries available for Python that allow for much more
in-depth processing, for example Mako, Cheetah, and Zope Page Templates.
Templates provide text rendering as well as more advanced funconality such
as program ow control, inheritance, and text output ltering.
In this chapter, we'll look into the following:
Syntax and usage of Mako, a popular third-party templang system available for
Python.
Dene addional tags and lters so we can handle special cases in which we need
our own template-level processing.
Cover template inheritance and common techniques for laying out a template-based
project.
Provide links and references to other Python-based template packages. There are a
lot of them to choose from!
7
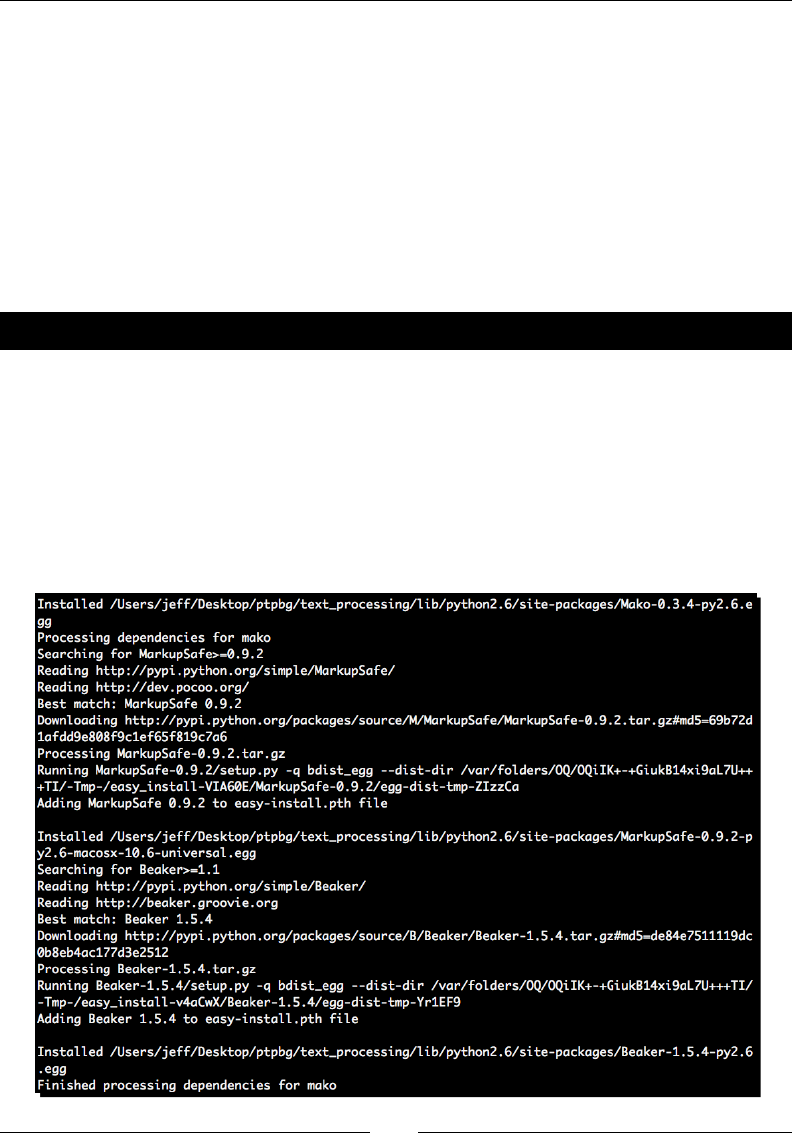
Creang Templates
[ 198 ]
Mako is a very powerful templang system that gives the developer full control over how
output text is rendered. It can be considered a relavely low-level language. One of the nice
things about Mako is that it follows a very Python-like metaphor. For example, code blocks
are referred to as %defs and may be overridden along an inheritance chain. Addionally, it's
possible to generate any kind of text output with Mako. For example, HTML, text, XML, or
ReST markup. It is not restricted to HTML/Web page templang.
One nice thing about Mako is that it doesn't restrict what the developer can do. If the tags
provided just don't cut it, write your own! Or, if it makes sense, drop directly into Python.
Alright, let's dive in and learn how to write our own Mako templates.
Time for action – installing Mako
The rst thing we'll need to do is install the Mako templang system. This can be done via
easy_install. First, ensure you're within your virtual environment and then enter the
following:
(text_processing)$ easy_install mako
The SetupTools system should download and install Mako and any required dependencies it
needs. You should see the output as shown in the next screenshot. We've not included all of
the output, in order to save on page space.

Chapter 7
[ 199 ]
What just happened?
We installed the Mako templang system into your virtual environment. The output will vary
based on your operang system and Python version. At the me of this wring, the most
current version of Mako is 0.3.4.
Basic Mako usage
In learning to use the Mako templang system, there are really two angles to master. First,
the API calls that make the system available to you from within a Python source le, and
secondly, the templang syntax and feature set.
Time for action – loading a simple Mako template
In this example, we'll take a look at a very simple implementaon. We'll load a basic
template and render it accordingly. We'll get into more advanced Mako features as we
progress. Just to nail down the fact that Mako can be used to generate any text document,
we'll create an e-mail template for an imaginary web store instead of a series of HTML pages.
1. First, create a directory named templates. We'll use this to hold our Mako
templates that we create.
2. Enter the following text into templates/thank_you.txt:
Dear ${name},
Your order for $${amount} has gone through and will be shipping
on ${date}. The following items will be included in a single
shipment:
% for item in packing_list:
* ${item['name']}
Quantity: ${item['quantity']}
Description:
${item['descr']}
%if item['used']:
Note:
This is a refurbished item.
%endif
% endfor
As always, let us know if you need any assistance.
High Quality Widgets, Inc.
http://www.highqualitywidgets.com
support@highqualitywidgets.com

Creang Templates
[ 200 ]
3. Next, we'll create a Python le named render_mail.py. This is responsible for
loading the template system and feeding the render process with the required data.
#!/usr/bin/env python
import tempfile
import datetime
import sys
import os
from mako.lookup import TemplateLookup
finder = TemplateLookup(
os.path.join(os.getcwd(), 'templates'),
os.path.join(tempfile.gettempdir(), 'mako_cache'),
output_encoding='utf=8', input_encoding='utf-8')
def render_email(name, amount, date, products,
template='thank_you.txt'):
"""
Render an e-mail message.
Given the needed parameters, we'll render an e-mail
message and return as a string.
"""
tmpl = finder.get_template(template)
return tmpl.render( email=email, name=name,
amount=amount,
date=date, packing_list=products)
if __name__ == '__main__':
# Some Fake Products
products = []
products.append(
{'name': 'Whompster',
'quantity': 2,
'used': False,
'descr': 'A high-quality Whompster'
}
)
products.append(
{'name': 'Blazooper',
'quantity': 1,
'used': True,
'descr': 'Zoops at Blazing Speed'
}
)
# Standard Shipping is 3 days.
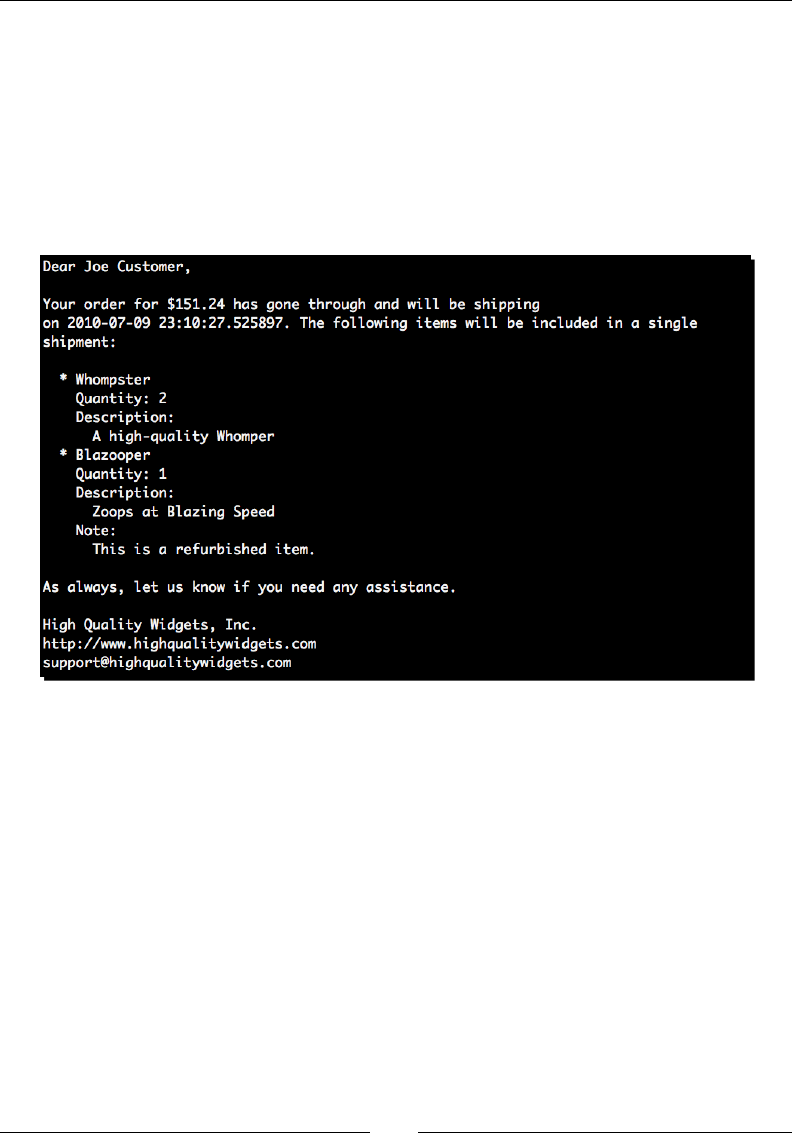
Chapter 7
[ 201 ]
ships_on = datetime.datetime.now() +\
datetime.timedelta(days=3)
print render_email('joe@customer.com', 'Joe Customer', 151.24,
ships_on, products, sys.argv[1])
4. Running the example script should generate a formaed e-mail message that we'll
send o to our imaginary user.
(text_processing)$ python render_mail.py thank_you.txt
What just happened?
You created your rst Mako template. Ignoring for a minute the fact that our date format is
rather unsightly and we're only selling to English-speaking customers paying in dollars, we
have a funconal system here.
Let's step through the Python code rst, and then we'll step back and take a look at the
template we used to generate the message.
At the top of the le, we import our required Python modules. Here, the only Mako-provided
class that we're interested in is TemplateLookup, so we bring that in directly.
Next, we create an instance of our TemplateLookup object. When we do so, we pass in
four arguments.

Creang Templates
[ 202 ]
The rst is a directory that we should search when trying to nd templates. If we wanted to
specify mulple search locaons, we could pass in a list of directory strings rather than just
a single locaon. This is done because it is possible for templates to refer to other templates
internally, and they'll need a mechanism to locate those resources.
Next, we specify a cache directory. When a Mako template is encountered, it is rst
translated into Python code. By specifying a cache locaon, those les are saved to disk.
This is an opmizaon that prevents repeated translaon. If you encounter problems
with templang, it can oen be useful to inspect these generated les by hand in order to
understand what exactly is going on under-the-hood.
Finally, we specify that we're using UTF-8 encoding. With regards to the input encoding, it's
also possible to prex our Mako templates with ## -*- coding: utf-8 -*-. This has
the same eect as our programmac approach.
The rst method we've dened here is render_email. This method takes a series of
arguments and one oponal keyword argument, the template name. We default to
thank_you.txt here for convenience. First, we invoke the template lookup logic via
a call to finder.template, passing it the name of the template le. If a template is
successfully located, a Template object is returned. Otherwise, a mako.exceptions.
TopLevelLookupException is thrown, indicang that the requested template was
not found.
We then call the render method of the Template object. We pass in a series of keyword
arguments that correspond to the names we referenced in the template le itself. A bit more
on that later. The render method returns a string, which is the rendered template content.
The code within the __name__ == '__main__' secon simply sets up our execuon. We
generate a list of fake product details and set up a ship date by adding three days to the
current date representaon. The last line calls render_email and prints the generated
message to the console.
Now, let's break down the template.
The very rst line of our template le contains the string ${name}. This tells the templang
system that it should replace this token with the value of name. The contents between
the braces can be any valid Python expression; the result will be coerced into a string (or
a Unicode object, if that's the output encoding requested). This is referred to as Mako
expression syntax.
For example, ${1 + 2 + 3} would be evaluated to 6, and then appended to the template's
output stream as str(6). This should clarify why our date value was so unsightly; it's
technically equivalent to the following Python code:

Chapter 7
[ 203 ]
Python 2.6.1 (r261:67515, Feb 11 2010, 00:51:29)
[GCC 4.2.1 (Apple Inc. build 5646)] on darwin
Type "help", "copyright", "credits", or "license" for more information.
>>> import datetime
>>> str(datetime.datetime.now())
'2010-07-07 23:20:30.061955'
>>>
The next paragraph contains two addional references to template values. Here, we print the
amount in queson as well as the date. If you recall, the amount is a float object and the
date is an instance of datetime.datetime. The rendered output, as explained previously,
contains the string representaon of these objects.
Next, we run into a Mako for loop.
% for item in packing_list:
...snip…
% endfor
As you can see here, the for statement is preceded by a single percent sign. Like standard
Python code, the for statement ends with a colon. However, indentaon is not signicant
here. In order to terminate the loop, we need to include an endfor token.
The rst line in the loop contains a diconary reference enclosed within braces. This assumes
that the item element, the loop variable, is a valid Python diconary. The indentaon again
is not signicant; we've simply included it for clarity.
The nal interesng line is our if statement. Just like in our for loop, we prex it with a
single percent sign. The statement itself accepts any valid Python if check. In fact, both the
for loop and the if test are translated directly into the temporary Python module.
Generating a template context
When a template is rendered via the render method, Mako creates a template context
for us using the keyword values we passed in to it. Addionally, there are a few built-in
values that will be automacally added. Values that are part of the template context can
be accessed freely from within a template; much like global variables that can be accessed
within a standard Python script. The context also contains the output stream that Mako will
write all of the generated template results to.
Creang Templates
[ 204 ]
In addion to the keyword arguments passed to render, the following also appear on the
context object:
Aribute Descripon
get The context.get method can be used to retrieve a value from
the context diconary directly. This also accepts a default value.
It is also possible to access a context value using diconary syntax
(context[key]).
keys This method returns a list of all of the keys in the context object.
kwargs This aribute contains the keyword arguments originally passed to
the render funcon.
write Allows the template author to write data directly to the template
output stream, rather than implicitly doing so via text content. It is
important to use this method rather than aempt to write to the
output stream itself.
lookup Returns the TemplateLookup object used to locate the current
template.
UNDEFINED When a value is referenced that does not exist in the context, this
value is applied. When its __str__ method is invoked, it raises
a mako.runtime.Undefined excepon that stops template
processing.
Remember, any expressions found within a ${} markup
tag are coerced into string format.
In addion to these, Mako also denes a series of namespaces in the context object that are
useful when dealing with template inheritance. We'll take a deeper look at these later.
Have a go hero – understanding context internals
The context is essenally the namespace in which a template is executed. Understanding the
contents of a context helps you to understand how Mako operates. Update the preceding
example to include a call to the context's keys method, and display the results. What you nd
in there might be somewhat surprising!
Managing execution with control structures
It's possible to include any Python control structure in a Mako template, much like we did
earlier with for and if. Simply prex the statement with a single percent. It doesn't maer
where on the line the percent appears, as long as it is only preceded by white space. Control
structures may be nested.
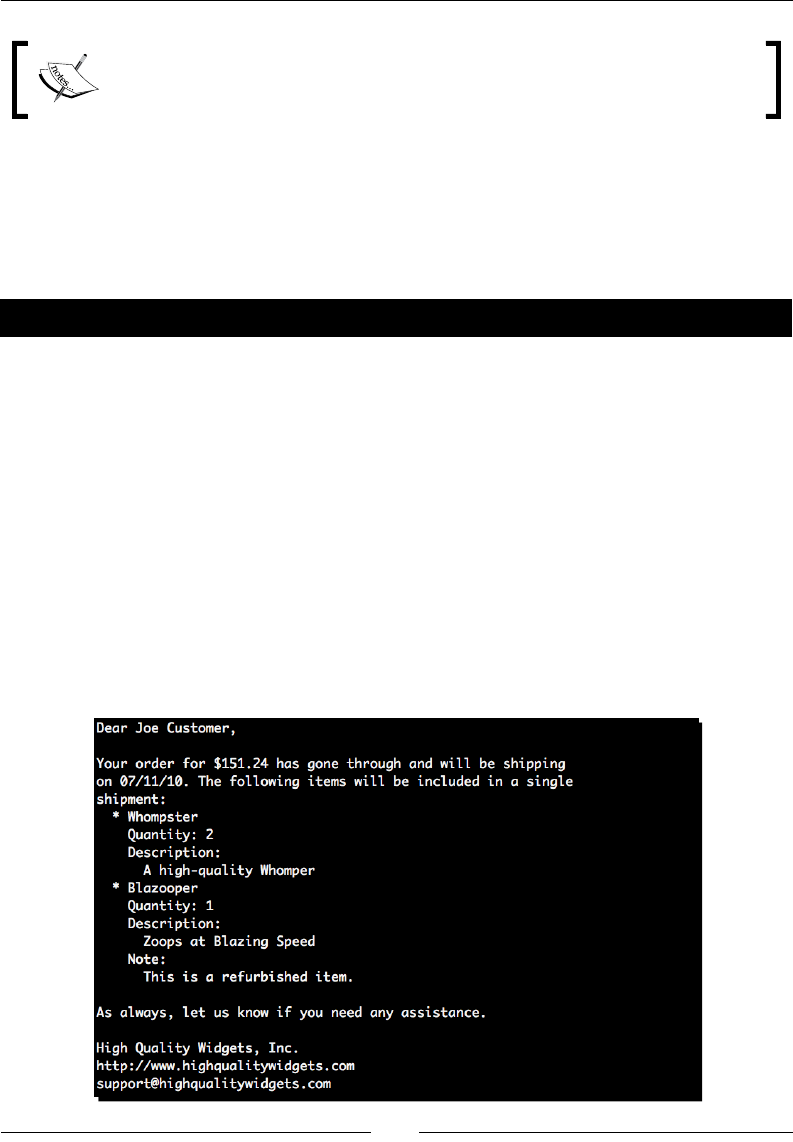
Chapter 7
[ 205 ]
Remember, whenever you include a Python control structure, you need to be
sure you terminate it with a colon, much like you would in a standard Python
script.
Including Python code
In addion to the control structures and expression evaluaon that Mako provides, it's
possible to drop into standard Python code at any me. Let's update our e-mail applicaon
to reformat our date and make it slightly more aracve.
Time for action – reformatting the date with Python code
In this example, we'll look at the standard way of dropping in direct Python code. We'll
reformat our date string via the strftime funcon.
1. Open up the template le we've been working with and add the following code
snippet to the top of the le, somewhere before we reference the date aribute.
Save it as thank_you-b.txt.
<%
shipping_on = date.strftime('%x')
%>
2. Now, update ${date} to read ${shipping_on}.
3. Run the updated script. The revised output should look something like the following:
(text_processing)$ python render_mail.py thank_you-b.txt

Creang Templates
[ 206 ]
What just happened?
We updated our template to rewrite the date format into something a bit more
human-friendly. We also dropped the me from the message as that's not relevant
when reporng a ship date to a customer.
As you can see in the previous example, code that is surrounded by <% and %> tags is
executed as standard Python code. Unlike the control structures, indentaon within these
tags is signicant. It is, however, safe to indent your Python blocks in a manner that's
consistent with the rest of your template. Mako will automacally adjust the indentaon to
match the generated Python modules.
In addion to these block tags, you can also include code within <%! and %>. When these
tags are encountered, code is inserted at the module level of the generated Python code and
executed only once, when the template is rst loaded. This is a good place to sck import
statements or certain funcon denions. If more than one of these blocks occurs within a
template, they will be placed at the top of the generated Python le in the order in which
they appear.
Finally, at any given point in a template, you can call return from within a code block. This
immediately terminates the processing of the template.
Adding functionality with tags
Mako provides a great deal of funconality via a series of tags. Tags resemble XML, but
the name of the tag is prexed with a percent sign. Tags may include body data or may
simply close. For example, <%doc>comment text</%doc> is a valid tag, as is <%include
file="our_header.html"/>.
Let's go through all of the tags that Mako provides. Here, we'll cover the following tags.
include
doc
text
def
Rendering les with %include
The include tag simply renders the template referred to in the tag, using the exisng
context, and inserts the generated text into the original document. The locaons specied by
the TemplateLookup class are searched. Let's take a look at a brief example.
Here, we'll create a pair of template les. The rst one, we'll name index.html. This will be
our main template that references an external enty.

Chapter 7
[ 207 ]
<html>
<%include file="header.html" />
<body>
<h1>Hello, World.</h1>
${id(context.lookup)}
</body>
</html>
Our second template is named header.html. This contains all of the informaon found
within the HTML <head></head> secon.
<head>
<title>${id(context.lookup)}</title>
</head>
Rendering the template generates the following output. Here, we're simply dealing with
ASCII text and using the current working directory as our template lookup locaon.
>>> from mako.lookup import TemplateLookup
>>> t = TemplateLookup('.')
>>> t.get_template('index.html').render()
'<html>\n<head>\n<title>4302139536</title>\n</head>\n\n\n<body>\
n<h1>Hello, World.</h1>\n4302139536\n</body>\n</html>\n'
>>> ^D
Noce that both id values are the same. This is because Mako has used the same
TemplateLookup object to locate all of the template's references. This same approach
is used whenever external template les are referenced.
Generating multiline comments with %doc
This tag allows us to create mulline comments without having to prex each line with a
double hash mark (##).
<%doc>
Long description about this code.
A few more details.
</%doc>
Documenting Mako with %text
This tag suspends Mako's processing unl it is closed. As stated by the Mako documentaon,
its purpose is really to help in documenng Mako itself. Any Mako code found within this tag
is simply returned as plain text. No substuon or evaluaon will take place.

Creang Templates
[ 208 ]
Dening functions with %def
The def tag is probably the most widely used tag in a Mako template hierarchy. The def tag
is used to create a Python funcon that can be called from within a Mako template. These
tags are used to build complex inheritance structures as funcons dened in base templates
can be overridden.
Time for action – dening Mako def tags
In this example, we'll update our line item generaon in our e-mail template to use Mako
def tags rather than handle it within the for loop. We'll introduce you to a few more Mako
concepts along the way.
1. Create a new le within the templates directory named thank_you-c.txt and
enter the following Mako template code:
<%
shipping_on = date.strftime('%x')
%>
Dear ${name},
Your order for $${amount} has gone through and will be shipping
on ${shipping_on}. The following items will be included in a
single
shipment:
% for item in packing_list:
${line_item(item['name'], item['quantity'], item['descr'],
item['used'])} \
% endfor
As always, let us know if you need any assistance.
High Quality Widgets, Inc.
http://www.highqualitywidgets.com
support@highqualitywidgets.com
<%def name="line_item(name, quantity, descr, used)"> \
## Render a Single Line Item
* ${name}
Quantity: ${quantity}
Description:
${descr}
%if used:
Note:
This is a refurbished item.
%endif
</%def>
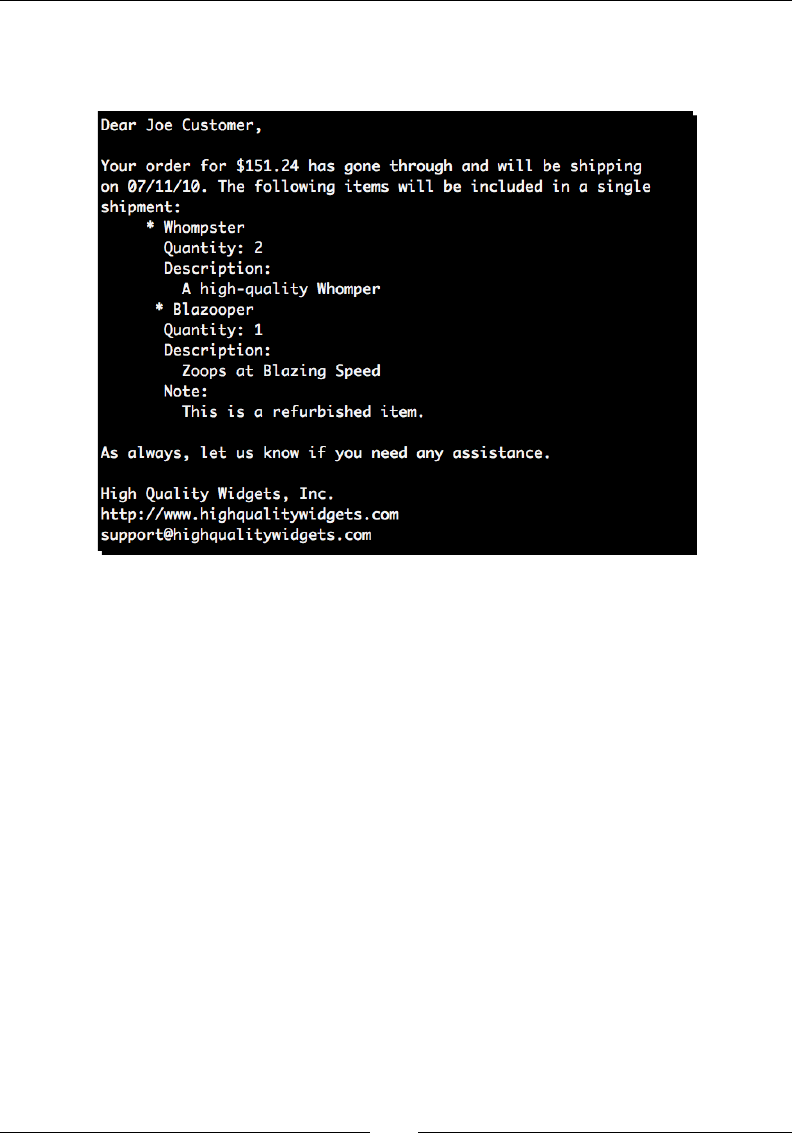
Chapter 7
[ 209 ]
2. Run the example from the command line.
(text_processing)$ python render_mail.py thank_you-c.txt
What just happened?
The rst interesng line in this example template is found within the for loop construct.
Here, you'll see the following:
${line_item(item['name'], item['quantity'], item['descr'],
item['used'])}\
There are no leading spaces and the line is terminated with a backslash. Any leading
white space would transfer directly into our output data. While this is ne for formats
that disregard adjacent spacing (think HTML), it can cause a problem for e-mail message
formang. Thus, we do not indent.
The trailing backslash ensures the newline found at the end of this call is not transferred to
the output buer. A newline, like leading space, is a valid template character.
Next, we have our def itself, which we've included at the boom of the le.
<%def name="line_item(name, quantity, descr, used)"> \

Creang Templates
[ 210 ]
We've included the backslash at the end of this def for the same reason. We do not want
the literal new line transferring to our output buer. The def statement itself is prey
simple. The contents of the name aribute contain a very plain Python method signature,
much like you would see in a standard def statement in a Python source le.
This newly dened funcon is called for each iteraon of our for loop, generang the same
output as our earlier example, with one excepon. As our indentaon within our def is
dierent, we're actually moving our output over a few extra spaces.
Finally, any code that isn't explicitly placed in a def statement is implicitly placed in the body
def. This comes into play with template inheritance, which we'll touch on in a lile bit.
If you wish to use the output of a def block within an expression statement,
you must take some extra precauons. By default, def output is sent to the
output buer on the context object and an empty string is returned. For more
informaon, see the Mako template documentaon on output buering
available at http://www.makotemplates.org/docs/filtering.
html#filtering_buffering.
Have a go hero – formatting whitespace
It's essenal to remember that everything within a template that doesn't hold special
meaning to Mako is transferred to the output buer. This includes new lines aer Mako
direcves and the white space leading up to them.
Update this latest example and ensure the whitespace formang is equal to that in thank_
you-b.txt.
Importing %def sections using %namespace
The namespace tag is Mako's equivalent to the Python import statement. It allows you, as
the template author, to import def secons from another template (or Python source le,
for that maer).
Time for action – converting mail message to use namespaces
In this example, we'll create another template and move our current def into it. Addionally,
we'll move some of the reusable logic out of our main template and into our new le. We
can then access the def blocks within our new template via the namespace tag.
1. Create a new template le within the templates directory and name it base.txt.
Ensure that it has the following content:

Chapter 7
[ 211 ]
<%def name="line_item(name, quantity, descr, used)">\
## Render a Single Line Item
* ${name}
Quantity: ${quantity}
Description:
${descr}
%if used:
Note:
This is a refurbished item.
%endif
</%def>
<%def name="footer()">\
High Quality Widgets, Inc.
http://www.highqualitywidgets.com
support@highqualitywidgets.com
</%def>
2. Now, create a new Python le and name it thank_you-d.py. Enter the following
source code:
<%namespace name="base" file="base.txt"/>\
Dear ${name},
Your order for $${amount} has gone through and will be shipping
on ${date.strftime('%x')}. The following items will be included in
a single
shipment:
% for item in packing_list:
${base.line_item(item['name'], item['quantity'], item['descr'],
item['used'])} \
% endfor
As always, let us know if you need any assistance.
${base.footer()}
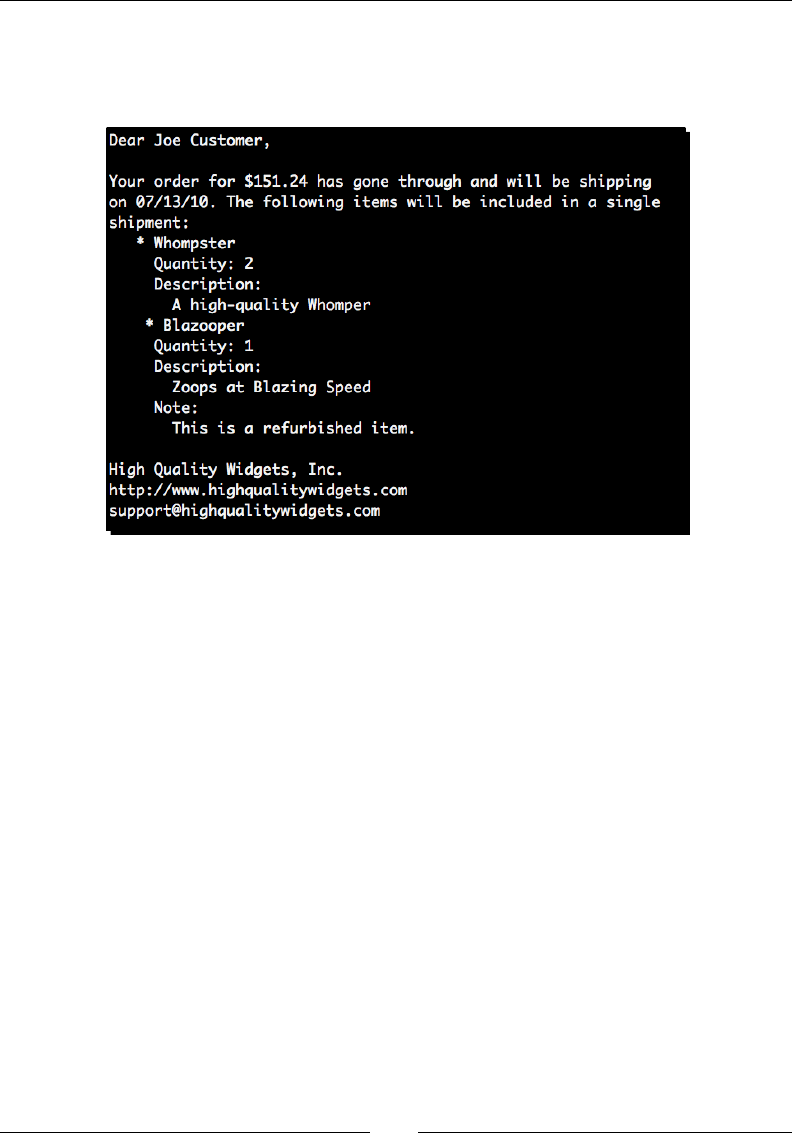
Creang Templates
[ 212 ]
3. Run the new example via the command line as we have with our other templates.
Your output should be similar to the following:
(text_processing)$ python render_mail.py thank_you-d.txt
What just happened?
We separated our templates into two dierent les. First, we moved our exisng line_
item def into base.txt. Next, we moved the code that generates our footer into the
same new le and wrapped it in def statements. Assuming we generate more than one
e-mail message within this project, we might want to share the footer code between
templates.
We also moved our strftime call into ${date.strftime('%x')}. There's really no
reason to keep that in a Python code block.
At the very type of the main template, we added the following line:
<%namespace name="base" file="base.txt"/>\
There are two interesng things here. First, the namespace tag itself. We imported all
funcons from within our base.txt le and assigned them to the base namespace. We
also ended the line with a trailing slash in order to ensure the newline doesn't nd its way
into our output stream again.

Chapter 7
[ 213 ]
Within our for loop that iterates through the packing_list found in the template
context, we've updated our call to line_item to use dot-notaon. Now, we're calling base.
line_item. Addionally, we call base.footer() at the end to generate our footer text.
Base is equivalent to the name we gave our namespace. It could really be any valid Python
idener.
As menoned earlier, the %namespace tag is a lot like the Python import statement.
It's also possible to use it in a few other ways.
Selectively importing def blocks
Instead of using the name aribute, we can change the syntax up a bit and selecvely import
names from a dierent Mako template into our current context; using the import aribute
does this.
<%namespace file="base.txt" import="line_item, footer"/>
Using this syntax, we would not have to qualify our calls to line_item and footer using
the %namespace idener. This is very much similar to using an import statement such as
the following:
Python 2.6.1 (r261:67515, Feb 11 2010, 00:51:29)
[GCC 4.2.1 (Apple Inc. build 5646)] on darwin
Type "help", "copyright", "credits", or "license" for more information.
>>> from sys import platform, exit
>>> platform
'darwin'
>>> exit()
(text_processing)$
Finally, it is possible to specify * as the value for the import statement. This brings all
dened def blocks into the current context.
As with the standard import statement, be careful when using import="*",
as you could simply pollute your namespace with values you won't be using. It's
oen beer to either qualify a namespace with a name, or only selecvely bring
in the funconality you might need.
Filtering output
In a lot of situaons, it's preferable to lter or change content before rendering it to
the output stream. For example, it's desirable to escape HTML tags that may appear in
unexpected places in order to avoid Cross-site scripng aacks on sites that we manage.
Enter the Mako lter. Filters are translaon funcons that may be applied to either an
expression statement, or the output of a def block.

Creang Templates
[ 214 ]
Expression lters
When dealing with an expression statement, lters are applied by appending a list of desired
translaons aer a pipe symbol. For example:
${ " text with <b>html</b> markup..." | h, trim }
The preceding line would cause the string literal to be ltered through the HTML escape lter
and then through the trim funcon. In funcon notaon, this is close to a call such as:
trim(html_escape(" text with <b>html</b> markup..."))
Running that specic string literal through a lter chain results in an output with HTML tags
escaped and leading white space removed:
text with <b>html</b> markup...
Mako provides a series of built-in lters that may be used without any addional
conguraon. The following table provides an overview:
Filter Descripon
uProvides URL escaping.
hHTML escaping. Should be applied whenever strings may contain
non-safe HTML.
xXML escaping.
trim Removes leading/trailing white space. Internally implemented
with string.strip().
entity Replaces applicable strings with HTML enty denions.
unicode Returns a Python Unicode object (or a str in Python 3). This
funcon is applied by default.
decode.<encoding> Decode input into the specied encoding.
nDisable all lters. Only those explicitly listed in the current
expression will be applied.
Filtering the output of %def blocks
If you wish to apply a lter to the result of a %def block, you can specify the list via the lter
aribute.
<%def name="filter_example" filter="h, trim">
text with <b>html</b> markup...
</%def>
The preceding def block would generate the same output as the expression statement when
called from a template. The same lters would be applied.

Chapter 7
[ 215 ]
Setting default lters
When we set up a Mako TemplateLookup object, one of the parameters we can pass in is a
list of default lters that will be applied to each template we render. Simply pass a default_
filters keyword argument with a list of lters you want to apply by default.
lookup = TemplateLookup('.', default_filters=['unicode', 'h'])
Inheriting from base templates
So far, we've covered some very useful ways to maximize code reuse when dealing with
Mako templates. You've learned how to import other les, dene template funcons, and
how to organize those funcons within les and import them using the namespace tag.
This is very useful, but it gets beer. Addionally, the def tag is really at the center of it all.
Mako gives us the ability to inherit from master templates. This lets us maximize reuse and
structure larger documents (and web content) in a hierarchical fashion, where each layer is
further specialized.
Time for action – updating base template
In this example, we'll update our e-mail templates one more me. This me, we'll update
our base template so it contains basic formang informaon.
1. First, let's create a new template and name it top.txt. This will serve as the top of
our inheritance hierarchy. It should contain the following text:
## This first section defines the general layout of our
## messages. Greeting, Body, Footer. This top template
## only defines structural and common data.
${self.greeting()}\
${self.body()}\
${self.footer() | trim}
## Code below here defines global def blocks that all
## of our children may use.
<%def name="footer()">\
High Quality Widgets, Inc.
http://www.highqualitywidgets.com
support@highqualitywidgets.com
</%def>
\
<%def name="greeting()">\
Dear ${name},
</%def>

Creang Templates
[ 216 ]
2. Next, we'll add a new template le and name it thank_you-e.txt. Enter the
following text:
<%inherit file="top.txt"/>
## This code is rendered as our body() def.
## Any code not in a def is part of body()
Your order for $${amount} has gone through and will be shipping
on ${date.strftime('%x')}. The following items will be included in
a single
shipment:
\
% for item in packing_list:
${line_item(item['name'], item['quantity'], item['descr'],
item['used'])} \
% endfor
\
## Code below here implements our individual def sections
## We don't need line item generation globally.
<%def name="line_item(name, quantity, descr, used)"> \
## Render a Single Line Item
* ${name}
Quantity: ${quantity}
Description:
${descr}
%if used:
Note:
This is a refurbished item.
%endif
</%def>
3. Finally, running the example code should produce the same, familiar result as
previous examples.
(text_processing)$ python render_mail.py thank_you-e.txt
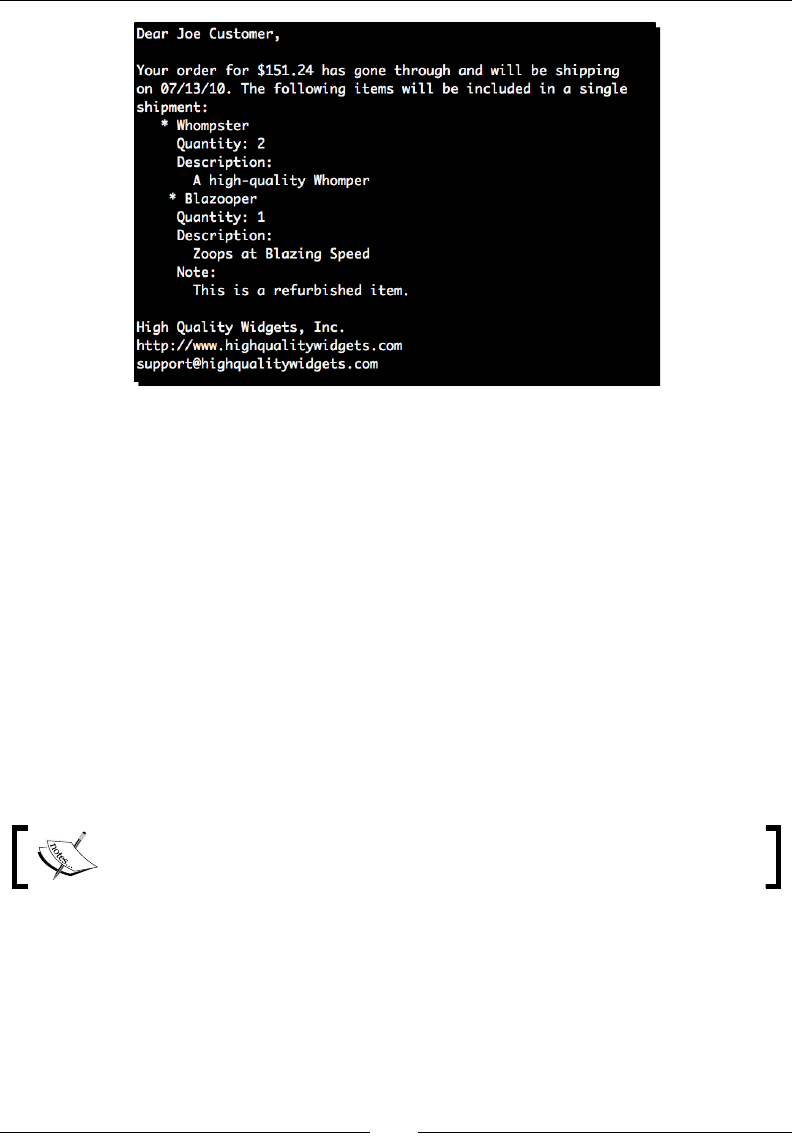
Chapter 7
[ 217 ]
What just happened?
We looked at a very simple inheritance hierarchy consisng of a base template and a child
template. We also snuck in a few other Mako-isms that we'll look at.
First, we dened our base template, named top.txt. Here, we set out the base structure
of our nished document. We did this by calling self.greeting, self.body, and self.
footer at the top of this template. Note that we included backslashes here in order to
leave out the trailing newline following the calls to each method. On the nal call to self.
footer, we introduced the concept of a lter. The results of self.footer are fed to the
trim method, and in turn, the results of that are inserted into the template output stream.
In the rst two calls, we strip the trailing newline. In the nal call, we remove the newline
from the results of self.footer.
Next, we dene two methods - footer and greeting. These methods are responsible for
generang main structures that appear in any message we'll generate.
Remember, any text that's not explicitly part of a def tag will become part of
the body method of a template.
However, we make an explicit call to self.body, but we do not dene a method via the
%def tag. Here, we're explicitly calling that. This lets us decide where we want to place that
body text.
Now, let's take a look at thank_you-e.py. At the very top of the le, you added the
following line:
<%inherit file="top.txt"/>

Creang Templates
[ 218 ]
This line tells Mako that this template inherits from top.txt. Next, we dened the body
of this template. Because none of this text is within a def, it is added to the body method
itself. In this case, it is the introductory paragraph as well as the line items list we created
earlier in the chapter. Finally, we close it all up with our line_item def as it's unique to
this specic message.
Before we look at the applicaon ow here, let's introduce the self namespace. The value
of self is always the most specic (or boom-most) template in the inheritance hierarchy.
This follows right along with the usage of self within a standard Python class library. Referring
to self.<method> executes the rst method encountered in the method resoluon order.
So, with that under our belt, let's step through the rendering process.
1. First, we pass the name thank_you-e.py to the get_template funcon in our
render_mail.py le. We call render on the returned object with our list of
keyword arguments.
2. When the inherit is encountered, Mako jumps to the top-most template and
beings execuon.
3. When we make our call to self.greeting, the most specic template is checked
rst. As we did not dene a greeng method within thank_you-e.py, the next
template in the chain is checked. That just happens to be the top-most template,
top.txt.
4. Next, we make a call to self.body. This is the interesng bit. Even though we did
not explicitly dene a def named body, self.body contains the free text of the
template, which appears at the lowest level. In this case, thank_you-e.py. The
net result? We're choosing in the parent template where we want to insert the body
text of the child template.
5. Finally, we call self.footer, which aer not nding a footer method in thank_
you-e.py, evaluates the footer method in top.txt.
Growing the inheritance chain
Mako inheritance structures are not limited to one level. In fact, it's possible to have many
levels of inheritance. A good example would be a website. It's very common to create a
master template, which contains elements such as CSS links, JavaScript informaon, and
analycs links. Secon-specic templates inherit directly from that and add their own set of
informaon, perhaps navigaon or grid-based layout. Finally, boom-level templates include
the content or the content-generaon specics.

Chapter 7
[ 219 ]
Let's be 100 percent clear. Although Mako lets us build arbitrarily long
inheritance chains, it does not support mulple inheritances as we're not
actually dening object-oriented classes. There is simply no mechanism to
allow for inheritance from two master templates. Mako simply takes the last
%inherit value and uses that.
Time for action – adding another inheritance layer
So, while we've built the ability to generate an e-mail message, we haven't yet added any
header generaon or a place to insert things such as copyright and disclaimer links. These
are all things we'll want to support if we're going to be sending out professional messages.
Let's add another level above our exisng top.txt le that contains this addional
informaon.
1. Add a new template to the templates directory and name it master.txt. Enter
the following Mako template code:
<%doc>\
This file contains all global e-mail data. Things such as
headers, copyright footers, and "almost protocol level"
data should go here.
</%doc>
${self.write_headers()}
${next.body()}\
${self.copyright()}\
\
<%def name="write_headers()">\
From: "High Quality Widgets" <support@highqualitywidgets.com>
To: ${email}
Subject: Your Invoice
</%def>
\
<%def name="copyright()">\
Make sure you read our disclaimer & terms of use:
http://www.highqualitywidgets.com/tos
</%def>
2. Next, we need to update our top.txt le to inherit from the new master.
txt template. Update top.txt to look like the following. Note that we've also
standardized on backslashes here instead of calling the trim lter.
<%inherit file="master.txt"/>\
## This first section defines the general layout of our
## messages. Greeting, Body, Footer. This top template
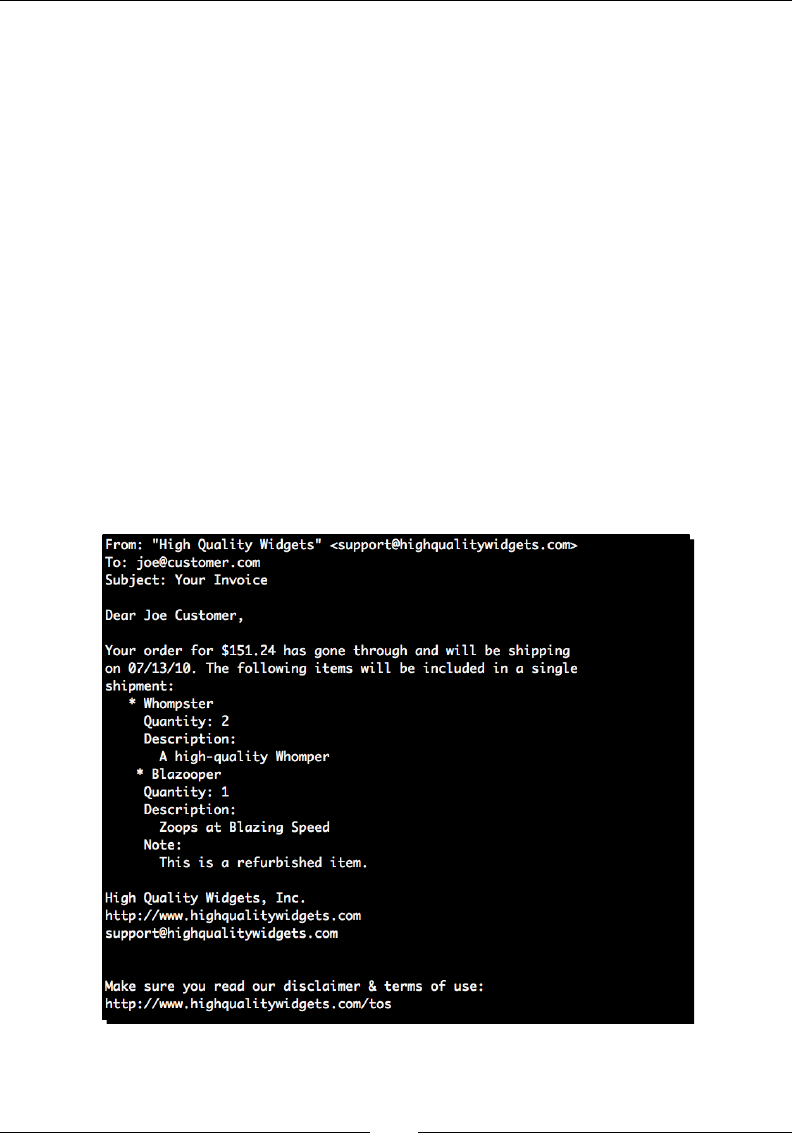
Creang Templates
[ 220 ]
## only defines structural and common data.
\
${self.greeting()}\
${self.body()}\
${self.footer()}\
\
## Code below here defines global def blocks that all
## of our children may use.
<%def name="footer()">\
High Quality Widgets, Inc.
http://www.highqualitywidgets.com
support@highqualitywidgets.com
</%def>
\
<%def name="greeting()">\
Dear ${name},
</%def>
3. Run the example as we have before. Your output should now resemble the following:
(text_processing)$ python render_mail.py thank_you-e.txt

Chapter 7
[ 221 ]
What just happened?
We added an addional layer of inheritance to our e-mail message template chain, leng us
sneak in some standard e-mail headers without modifying our exisng code too much.
The rst thing we did is create our master.txt le. We used a doc tag to include a
mulline comment that outlines what this template is for. Then, in the body secon of our
template, we called self.write_headers, next.body, and nally self.copyright.
Both write_headers and copyright refer to new def blocks that we've dened in this
le. There's really nothing new here; they're called and rendered as always.
The call to body, however, is slightly dierent. Instead of using the self name, we use
next. While self refers to the lowest level template in the chain, next refers to the
next template in the chain. So, in this example, we're wring our headers, asking for the
immediate child to render its body, and then we're rendering our copyright noce.
In our example, next.body is the implicit body funcon in master.txt. Calling this
funcon causes the remainder of the template to render as it did originally.
The only other change we've had to make is to render_email.py. We've moved things
around slightly so that we can pass an e-mail address in as a keyword argument to our
exisng call to render.
In addion to next, you can use parent. The parent aribute refers to the previous
template in the chain. As a rule of thumb, use next or self when you want the top-most
template to determine the layout. Use parent if you want the boom-most template to
determine the layout.
Finally, you have access to the local namespace. The local
namespace aribute references the currently execung
template, without performing inheritance-based lookup.
Inheriting attributes
While Mako lets us inherit def methods, it is not a fully object-oriented system. It is,
however, possible to inherit module-level aributes that are dened in a code block. These
are accessible via the attr aribute. Here's a brief example:
<%!
reply_to = 'sales@site.net'
%>
Please direct replies to ${self.attr.reply_to}

Creang Templates
[ 222 ]
And then, in a second template, we'll override the aribute in a new module-level code
block.
<%!
reply_to = 'support@site.net'
%>
<%inherit file="first_template.txt"/>
The output generated by rendering the second template would be as follows:
Python 2.6.1 (r261:67515, Feb 11 2010, 00:51:29)
[GCC 4.2.1 (Apple Inc. build 5646)] on darwin
Type "help", "copyright", "credits", or "license" for more information.
>>> from mako.lookup import TemplateLookup
>>> lookup = TemplateLookup('.')
>>> lookup.get_template('second_template.txt').render()
'\n\nPlease direct replies to support@site.net\n\n'
>>>
Pop Quiz – inheriting from templates
1. What syntax should you use if you wish to get at the template directly above the
current context? Below?
2. How can you prevent Mako from copying newline characters over onto the template
output stream?
3. How can you inherit module-level variables introduced via <%! %> tags?
4. What namespace should you refer to if you want to access the current template?
Customizing
Mako also allows you to create both custom tags and custom lters. Unlike a lot of other
templang languages, it's possible to create a Mako tag within a Mako template. Of course,
it's possible to create a tag within a Python module directly.
Addionally, we can build our own lters. Filters are really nothing more than a funcon that
takes a string as an input parameter and generates a new string as a result. Much like custom
tags, it's not necessary (though it is possible) to create them in a standalone Python le.
Custom tags
Technically speaking, we're creang a def that supports content and calling it via
<%namespace:defname/> syntax. Then, within the called def, the content within the
custom tags is available as the special caller namespace.

Chapter 7
[ 223 ]
Time for action – creating custom Mako tags
The concept of custom tags and defs-with-content blocks probably seems slightly confusing.
It is a powerful feature, though, so here we'll take a closer look at it. In this example, we'll
create a simple template, which produces an HTML layout.
1. Create a new template and name it page.html. Enter the following Mako template
code:
<%doc>
This def creates the layout for our page. Calling
it generates an entire HTML layout.
</%doc>
<%def name="create_page()">
<html>
<head>
<title>
${caller.title()}
</title>
</head>
<body>
<h1>${caller.header()}</h1>
<hr/>
${caller.body()}
<hr/>
## Inline styles for example purposes.
<div style="font-size: .5em; color: grey;">
${caller.footer()}
</div>
</body>
</html>
</%def>
<%doc>
Calling our create_page def above, using a different
syntax. The inner content becomes the caller namespace
within the above %def tag.
</%doc>
<%self:create_page>
<%def name="title()">Mako Templating</%def>
<%def name="header()">Learn Mako Today!</%def>
<%def name="footer()">
These pages have been placed in the public domain.
You may use them at will.
</%def>
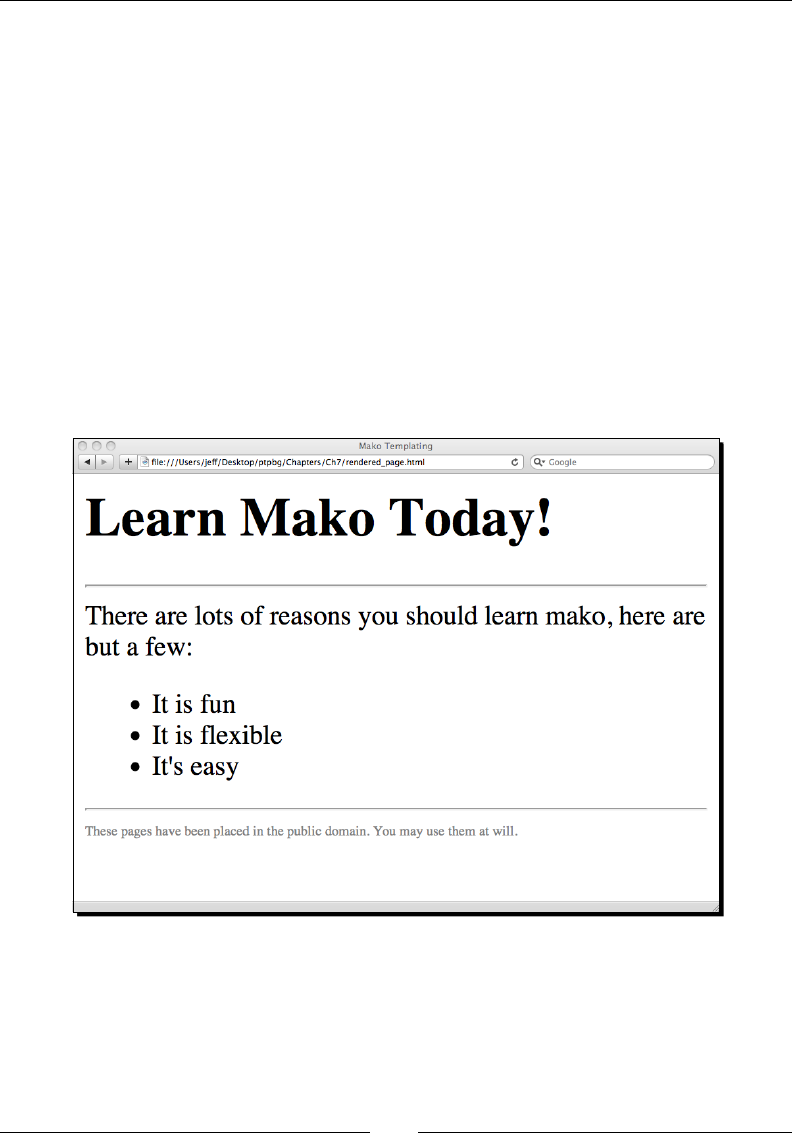
Creang Templates
[ 224 ]
There are lots of reasons you should learn mako,
here are but a few:
<ul>
<li>It is fun</li>
<li>It is flexible</li>
<li>It's easy</li>
</ul>
</%self:create_page>
2. Next, let's render our page. Use the mako-render command and direct output to
your le system.
(text_processing)$ cat page.html | mako-render > rendered_page.html
3. Now, if you open our newly rendered page in a web browser, you should see
something that looks a lot like the following screenshot:
What just happened?
We dened a new HTML template in Mako that relies on a custom tag for generang the
page layout. The tag we dened is self:create_page, though we could have put the tag
under any namespace. Oen, it's easier to separate custom tags like this into standalone
namespace denions.

Chapter 7
[ 225 ]
Our tag is really nothing more than a def statement. However, if you look inside the body of
our create_page def, you'll see that we refer to the caller namespace. As touched on
above, the caller namespace is a namespace that is dened between opening and closing
tags that invoke this specic def. So, caller.title, caller.header, and caller.
footer are addional def blocks that are dened within those open and close tags.
Skipping the doc secon, the next thing we did is to call our def. We invoked the def via a
new syntax, however. Instead of using the dollar-sign expression syntax, we used a tag that
specically references the namespace and the def name. The corresponding def is then
invoked (including any arguments that may be passed), and the body of <%self:create_
page> becomes the caller namespace in the create_page def block. Note that no
layout is dened within the custom tag body.
When we rendered the le, we did so via the mako-render command-line ulity. This is
a command-line ulity supplied by the Mako package that lets us render pages and dump
them to standard out. In this case, we redirected standard out and created a new HTML le.
The contents of the rendered le should look something like this:
<html>
<head>
<title>
Mako Templating
</title>
</head>
<body>
<h1>Learn Mako Today!</h1>
<hr/>
There are lots of reasons you should learn mako,
here are but a few:
<ul>
<li>It is fun</li>
<li>It is flexible</li>
<li>It's easy</li>
</ul>
<hr/>
<div style="font-size: .5em; color: grey;">
These pages have been placed in the public domain.
You may use them at will.
</div>
</body>
</html>

Creang Templates
[ 226 ]
Note the extra whitespace present in a few places. A few empty lines leading up to the
opening tag were also removed in order to conserve trees. This whitespace is present
because we did not use any backslash escapes or trim methods. In this case, that's perfectly
ne. HTML does not render code dierently based on addional whitespace.
Customizing lters
Mako lters are really nothing more than Python funcons that take a string as an argument
and spit a string back out. They can be dened in Python modules and imported in module-
level code blocks, or dened directly within a Mako template.
The following Mako snippet shows a template-based approach to creang a custom lter
funcon:
<%
# A list of sloppy book titles.
books = ['moby dick', 'python text processing']
# A filter that forces title case.
def title_case(in_str):
return in_str.title()
%>
## Iterate through and print book titles.
%for book in books:
<li>${book|title_case}</li>
%endfor
When this template is rendered, the output would look something like the following:
<li>Moby Dick</li>
<li>Python Text Processing</li>
Our lter takes a string, converts it to tle case, and returns that value. This specic lter
is also Unicode safe as we use the methods that are part of the string (or Unicode) object.
There's one other interesng thing going on here. Comments within the code blocks do not
require double comment characters. This should further solidify the fact that this is simply
standard Python code that's moved into the generated module le.
Overviewing alternative approaches
In addion to Mako, there are a number of other Python-templang libraries out there that
perform equally as well. Some follow a more XML-based approach (ZPT), whereas others
use expression-like syntax, but are slightly more restricve in what a template designer can
do (Django templates). The following table provides a list of other available Python template
systems:

Chapter 7
[ 227 ]
Package URL Descripon
ZPT http://www.zope.org Page templates provided with
the Zope applicaon server. XML-
compliant syntax.
Jinja2 http://jinja.pocoo.org/2/ An advanced template system based
on Django templates. Syntax is
similar, though the implementaon
is slightly more restricve.
Cheetah http://www.cheetahtemplate.
org/
A mature and proven template
package. Cheetah has been around
for a long me.
Genshi http://genshi.edgewall.org/ An XML-based template system
that's used with the Trac ckeng
applicaon.
Tempita http://pythonpaste.org/
tempita/
A simple template language used in
Paste Script.
Finally, remember that the string module has its own template capabilies. For situaons
where minimal logic is required and your core funconality is simply replacing tokens, this is
a viable – and very lightweight – approach.
Summary
In this chapter, we covered Mako in detail. However, there are some elements we did not
touch on. It's recommended that you further study the Mako API-level documentaon,
which is available at http://www.makotemplates.org/docs/.
You learned how to create basic templates, dene funcons and create funcon libraries,
and take advantage of template inheritance in order to minimize duplicaon. Along the way,
we took a look at Mako lters and custom tag declaraon.
In the next chapter, we'll look into some of the details behind Unicode, encodings in Python,
and i18n basics.

Understanding Encodings and i18n
In this chapter, we'll look at text-encoding systems, Unicode, and a method for
providing translaons for your Python applicaons.
It's important that you understand the dierences between characters,
encodings, and diering encoding types. Failing to do so can lead to lesser
quality soware that is hard to make available to an internaonal market.
Building a sound foundaon here will help you write high-quality, bug-free
code.
Specically, we'll touch on the following topics:
ASCII and KOI8-R. Two character sets built such that each character representaon
ts into one byte.
Unicode and how it alleviates issues created with mulple 8-bit encoding schemes.
We'll look at both the Unicode system and the encoding of Unicode characters.
The Python codecs module and the basic encode and decode methods of string
objects. This will help you understand how to move text between Unicode and
encoded byte-streams.
Handling translaon marking via the gettext module, and the third-party Babel
extensions.
Understand the common excepons that you'll bump into while dealing with
dierent text encoding types, and how to go about xing them.
We'll learn quite a bit about Unicode and encodings, including how to translate between
them. Finally, we'll wrap up with a short introducon to internaonalizaon and language
localizaons.
8

Understanding Encodings and i18n
[ 230 ]
Finally, note that Python 3 uses Unicode string types by default. In short, strings have
become byte arrays and Unicode objects have become strings. As such, IO will dier slightly.
Understanding basic character encodings
As we all know, computers deal with numbers, not leers, characters, symbols, or other
non-numerical values. Addionally, they deal with these numbers using base-2 systems
as it's much easier to manipulate them using simple on/o logic (a bit can only hold a 1
or a 0 value).
That doesn't help us very much when wanng to record and display text content.
Enter character encodings. Character encodings provide a mechanism to map a numeric
value (a code point) to a corresponding text value.
Let's take a look at some background and highlight a couple of older character encodings
used around the world.
ASCII
ASCII was the rst standardized character-encoding system widely used within the United
States. The original specicaon called for each character to consume seven bits. This
allowed for 128 individual characters. The decision was made to use only seven bits in order
to conserve space. Systems could then use the remaining bit for parity if they so desired.
For example, let's take a look at some elementary Python built-in funcons – ord and chr.
Python 2.6.1 (r261:67515, Feb 11 2010, 00:51:29)
[GCC 4.2.1 (Apple Inc. build 5646)] on darwin
Type "help", "copyright", "credits", or "license" for more information.
>>> s = 'a'
>>> ord(s)
97
>>> chr(97)
'a'
>>>
In this example, we pass the string value 'a' to the ord funcon, which returns its ordinal,
or integer 97. When we pass the value of 97 to the chr funcon, it returns the string 'a'.
So, when dealing with textual data, the integer value 97 is interpreted as a lowercase leer
a. Not surprisingly, the Lan alphabet connues as you might expect:

Chapter 8
[ 231 ]
Lan leer Numeric (ASCII) value
a 97
b98
c 99
X88
Y89
Z 90
Addionally, text representaons of integers are represented the same way. Each number
has a corresponding ASCII value associated with it. Due to the placing of control characters
within various standards, integer text code values do not coincide with the integer value
itself.
Python 2.6.1 (r261:67515, Feb 11 2010, 00:51:29)
[GCC 4.2.1 (Apple Inc. build 5646)] on darwin
Type "help", "copyright", "credits", or "license" for more information.
>>> ord('2')
50
>>> ord('3')
51
>>> chr(40 + 50)
'Z'
>>>
In pracce, this is a non-issue. However, it is something to take note of. Number ranges,
just like character ranges, are connuous. In the preceding example, noce how the ASCII
character 2 corresponds to 50, 3 corresponds to 51, and Z corresponds to 90.
Prior to Python 3, strings were, in general terms, collecons of ASCII values. This stems from
the char value in the C programming language. A single char value is limited to an 8-bit
signed quanty.
Limitations of ASCII
It is common knowledge that everyone on the planet does not speak the same language.
As ASCII only supports a total of 128 dierent character code points, we obviously run into
a limitaon. It's simply not possible to represent all of the possible combinaons of leers,
numbers, and punctuaon.
Various encodings extended the ASCII specicaon to make use of the eighth bit. One of
the more common encodings is Lan-1, or ISO-8859-1. This encoding adds a series of new
characters above the 128 mark that represents various other glyphs that are present in many
Western European languages. It remains backwards-compable with ASCII, however, as the
7-bit values do not change.

Understanding Encodings and i18n
[ 232 ]
KOI8-R
As C-strings limited us to eight bits per character, other regions developed their own
encoding schemes to allow computers to display their nave scripts. KOI8-R is an encoding
scheme that maps 8-bit values to Russian Cyrillic characters.
KOI8-R, however, does not retain the alphabec ordering that ASCII values do. It was
designed such that if one interprets a KOI8-R code and discards the 8th bit, a valid 7-bit ASCII
character is le over. A best-eort aempt was made to keep these weak transliteraons
pronounceable.
For example, given the Russian Cyrllic string книга (book) in KOI8-R, we can produce the
ASCII string KNIGA.
Python 2.6.1 (r261:67515, Feb 11 2010, 00:51:29)
[GCC 4.2.1 (Apple Inc. build 5646)] on darwin
Type "help", "copyright", "credits" or "license" for more information.
>>> koi8 = (203, 206, 201, 199, 193)
>>> ''.join(chr(i^128) for i in koi8)
'KNIGA'
>>>
Here, we rst created a tuple containing the KOI8-R code values associated with our Russian
string. Next, we simply cleared the eighth bit. We're le with a close transliteraon.
It's important to remember why this was done. KOI8-R exists in a world that is
largely 7-bit ASCII. As much of the soware wrien was built to only support this
encoding, organizing Cyrllic leers in this fashion provided a lile extra insurance
that an applicaon would be useable if it didn't handle the full 8-bit KOI8-R
character set. While the display wouldn't be prey, a Russian reader could piece
together the intended meaning.
Unicode
We've only looked at two legacy encodings here and it's already apparent we have a
problem. Consider all of the addional scripts and variaons that exist. We've not touched
any of the Japanese Kanji or variaons on both the Lan and the Cyrillic alphabets. It's just
not possible to t all of the world's characters into a single byte.
The Unicode specicaon, as it currently stands, allows for over one million dierent code
points (1,112,064 to be exact). That's more than enough space to hold all of the world's
current scripts as well as historic characters. Currently, only about 20 percent of the Unicode
space has been assigned.
Let's take a brief overview of Unicode in order to provide a solid understanding of its strengths.

Chapter 8
[ 233 ]
Using Unicode with Python 3
Most of the examples in this chapter are geared towards Python 2. As of Python 3, Unicode
support is mostly transparent. As you'll see below, when working with Unicode les in
Python 2, it's necessary to take that into account and open the le with the correct methods
or decode it aer the fact.
Python 3, however, treats strings as Unicode objects without explicit conversion (unless you
want to handle that piece yourself). Addionally, text les are read as UTF-8 encoded data
unless otherwise specied as binary or of a dierent text-encoding standard.
The Python 3 examples in the code bundle have been modied to work. However, there's not
much addional translaon going on. Let's take a quick look at some code snippets. Keep these
dierences in mind as you work through the chapter if you'll be working with Python 3.
The following snippet shows one way that external data can be treated as Unicode
informaon in Python 2.
Python 2.6.1 (r261:67515, Feb 11 2010, 00:51:29)
[GCC 4.2.1 (Apple Inc. build 5646)] on darwin
Type "help", "copyright", "credits", or "license" for more information.
>>> s = open('/etc/hosts').read()
>>> type(s)
<type 'str'>
>>> u = s.decode('utf-8')
>>> type(u)
<type 'unicode'>
>>>
However, when dealing with Python 3 examples, string objects are now Unicode and the
Unicode object no longer exists.
Python 3.1.2 (r312:79360M, Mar 24 2010, 01:33:18)
[GCC 4.0.1 (Apple Inc. build 5493)] on darwin
Type "help", "copyright", "credits", or "license" for more information.
>>> s = open('/etc/hosts').read()
>>> s.decode('utf-8')
Traceback (most recent call last):
File "<stdin>", line 1, in <module>
AttributeError: 'str' object has no attribute 'decode'
>>>
In this snippet, you can see that there is not a decode method on the Python 3 string object.
This is because the data is already in Unicode format. The rest of this chapter assumes you're
using Python 2, and handles the explicit decoding step.

Understanding Encodings and i18n
[ 234 ]
Understanding Unicode
The Unicode specicaon denes a character representaon and a collecon of encoding
schemes that aim to unify the various encoding mechanisms used around the world. The
inial specicaon called for a 64k possible values, or code points. However, as the designers
quickly determined, more space was needed.
Unicode is not simply an extension of the ASCII standard by an addional 24 bits. This is a
common misconcepon.
The Unicode Consorum acvely develops the Unicode specicaon. The consorum
is composed of organizaons that have a stake in text-processing standards. More
informaon about the Unicode consorum can be found at their website, which is
located at http://www.unicode.org. This site is also a great resource for Unicode
and character-encoding specics.
Design goals
There are a few stated design goals of the Unicode consorum. While you do not need to
understand these in order to perform operaons on Unicode text, knowing them will aid in
your overall understanding.
Universality
The standard should provide for all of the characters needed worldwide. It is intended to be
used as a universal approach to character representaon.
Efciency
Overall implementaon should be simple and ecient. No characters have shi states or
escapes, both of which can alter how a value is interpreted and change the meaning of a
sequence of bytes. All code points exist on an equal foong and there are no special cases.
Characters, not glyphs
The standard deals with logical character code points and has absolutely nothing to do with
onscreen display.
It's important that the dierence between a Unicode character and the graphical
representaon of the character be understood. Unicode simply denes a numeric
representaon of a specic text element. This representaon is the code point. A Unicode
code point contains no informaon regarding the display of the character itself. This is le to
the system and the available font libraries.
For example, the ASCII leer P is dened by the code point U+0050. The following, however,
are all valid glyphs for the leer P:
Chapter 8
[ 235 ]
A glyph is the visual representaon that appears on your screen and is independent of the
Unicode standard.
Semantics
All characters have well-dened semancs. Nothing is implied by name or posion in the
Unicode tables.
Plain text
Unicode characters do not encode or retain informaon such as bold, italics, underling, or
strike-through. This is le to rich-text applicaons, which may use the Unicode character set
as a building block.
Logical order
Characters are ordered logically; this roughly equates to phonec order. Numbers are
ordered with the most signicant digit rst.
Unication
Many wring systems share certain text elements. Examples include common punctuaon
markers such as the exclamaon point and the period. These characters map to the same
code point.
Dynamic composition
It is possible to build new characters by combining characters.
Stability
The Unicode standard is stable between revisions. This means that once characters are
added, they become immutable. Consider what would happen if the code point for 'A' is
suddenly swapped with the code point for 'J'.
Convertibility
Identy is retained such that Unicode values can be translated to and from dierent, exisng
standards. Each character in a localized encoding also has a value in the completed Unicode
specicaon.

Understanding Encodings and i18n
[ 236 ]
Organizational structure
The Unicode code space is broken down into 17 planes. Each plane contains a logical
grouping of characters. Addionally, two of the planes are reserved for private use. The
following table breaks down the set of Unicode planes and details what each is currently
used for:
Plane Range (hex) Descripon
Plane 0: Basic
Mullingual Plane
0000-FFFF Contains all of the currently used scripts. This includes
Lan, Cyrillic, Japanese Kanji, Arabic, and so on.
Plane 1:
Supplementary
Mullingual Plane
10000-1FFFF Contains things such as math symbols and music
notaon.
Plane 2:
Supplementary
Ideographic Plane
20000-2FFFF Addional Asian characters.
Plane 3 – 13:
Unassigned
30000-DFFFF Currently unassigned.
Plane 14:
Supplementary Special
Purpose Plane
E0000-EFFFF Non-graphical characters.
Plane 15-16: Private
Use
F0000-10FFFF Reserved for private organizaonal use.
Planes are further broken down into blocks and allocaon areas, but they are not as reliable
as the direct code point value within a plane.
The vast majority of the characters in use today come out of the Basic Mullingual Plane.
Some of the more esoteric characters, history elements, and some spill-overs exist within the
Supplementary Mullingual Plane.
Finally, as each plane may contain 65,536 code points, the total number of code points
available (the code space) is 1,114,112.
Unicode characters are commonly wrien in the form of U+#, where the number is the code
point value. Characters that fall within the BMP are wrien with four hexadecimal digits.
Characters that extend out of the BMP include the appropriate number.
Backwards compatibility
As menoned previously, the majority of code points corresponding to modern texts are
located within the rst plane, the Basic Mullingual Plane. Interesngly, the values for Lan
alphabet values within the BMP correspond to the same values within ASCII; whereas the
ASCII code point for an upper case 'A' is 65, the Unicode value is U+0041, or 65.
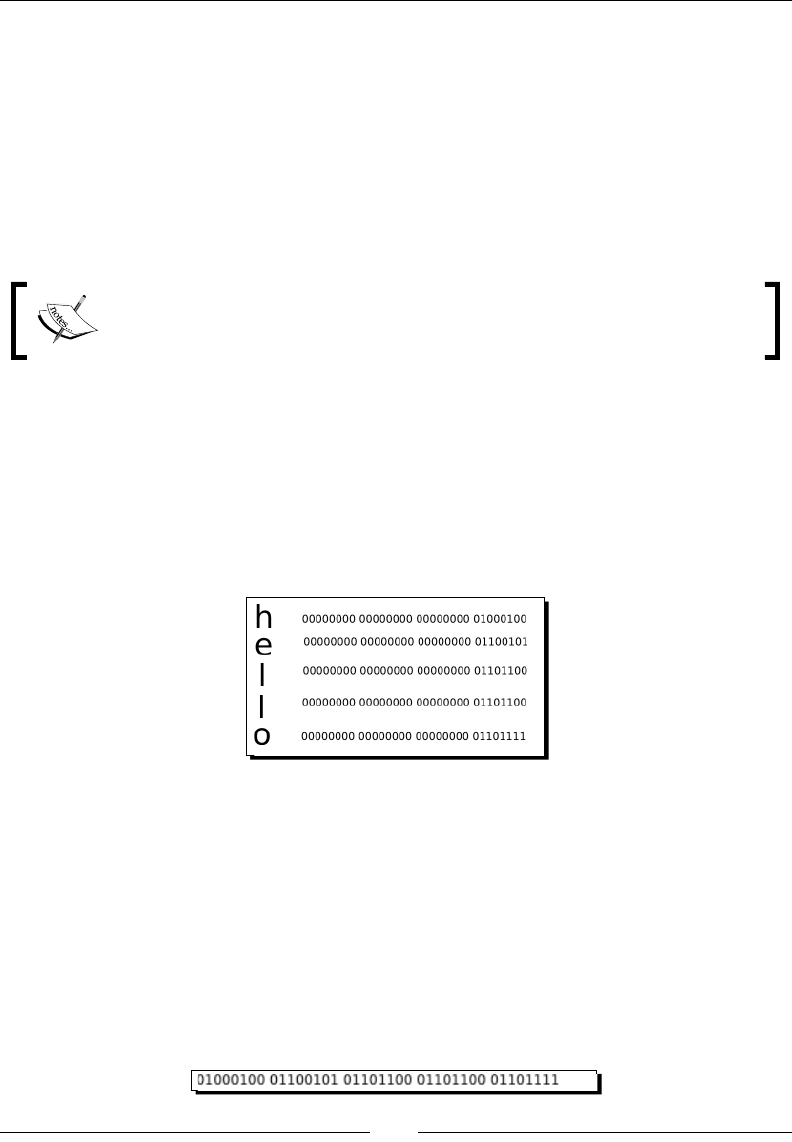
Chapter 8
[ 237 ]
Encoding
The encoding species the format in which Unicode data is transferred or serialized to disk.
It's important to understand that the encoding diers from the code point value, and is
simply a method of data serializaon. The Unicode specicaon denes a series of encoding
formats, known as Unicode Transmission Formats, or UTF standards.
The most basic encoding is UTF-32 while the most widespread avor of Unicode data
encoding is UTF-8. UTF-8 use is common in Internet applicaons as it is backwards
compable with the ASCII standard. We'll take a closer look at both encoding types here.
In certain circumstances, the UCS-# notaon is used. UCS is similar to UTF;
however, it's generally an older standard. Addionally, UCS designaons are by
byte count, rather than the number of bits. For example, UCS-2 requires 16 bits.
UTF-32
This is the most basic of encoding types. UTF-32 is xed-width, meaning that all character
representaons ulize full 32-bits. The result is a very inecient storage of code point
values. This is especially true when dealing with standard ASCII values as they'll require only
one byte per character.
Consider the following UTF-32 encoding of a sample string:
As the preceding example shows, we only require ve bytes of relevant informaon, but we
use up a total of 20. 15 of those bytes are zero-value. That's an awful lot of wasted space.
Addionally, mul-byte encoding schemes such as UTF-32 and UTF-16 also need to deal with
the intricacies of big-endian vs. lile-endian architectures.
UTF-8
The UTF-8 standard is much more compressed. If a character falls within the ASCII range,
UTF-8 only requires one byte to encode that value. The previous example string can then be
encoded as follows:
Understanding Encodings and i18n
[ 238 ]
So, as the Lan alphabet, within the Basic Mullingual Plane, uses the same code point
values as ASCII, and UTF-8 only requires one byte to encode those values, we wind up with
an encoded value that is exactly equal to its ASCII counterpart. In short, if you're using ASCII
characters, there are no ill eects expected in making a switch to UTF-8 Unicode.
A UTF-8 byte that begins with more than one leading value is the rst in a series of that
many bytes. As 32 bits is the maximum, there may be up to four leading ones. A single
leading one signies a connuaon byte. The code point value is the concatenaon of those
bytes, minus the control characters.
By default, Python uses UCS-2, or a 16-bit encoding scheme internally. Though,
it is possible to build a version of Python that uses UCS-4 by passing in the –
enable-unicode=UCS4 switch to the congure script.
Pop Quiz – character encodings
We spent a lot of me going over some theorecal material in this secon as it's important
to understand the dierences between code points, glyphs, and encoding schemes. The
following quesons should help you gauge your knowledge.
1. When KOI8-R was developed, why was it designed in such a way to retain a
transliteraon system between Lan alphabet counterparts?
2. What's the minimum number of bytes used to encode a Unicode code point using
UTF-32-based encoding?
3. What is the dierence between a glyph and a code point?
The Unicode specicaon is long and detailed. If you're
interested in understanding it from the ground up, it is available
online for free, in PDF format. Simply head over to http://
www.unicode.org/standard/standard.html.
Encodings in Python
Python string objects support both an encode and a decode method that is used to
translate between dierent text-encoding types. The process of decoding a string translates
it from one encoding type into a Python Unicode object. The encoding process translates a
string object into a specied encoding type. For our purposes, we'll only look at decoding an
external format into Unicode, and encoding Unicode into an external format.
Chapter 8
[ 239 ]
Time for action – manually decoding
In this example, we'll create a simple le that contains some UTF-8 data that exists outside
of the ASCII range. This ensures that we'll actually have some mul-byte characters. To
generate the test data, point your browser to http://www.translit.ru.
1. First, create a text le and name it russian.txt. Using the previous site, generate
the following text and save the le. The le is also included in a le bundle available
on the Packt FTP site.
Example UTF-8 Multibyte:
Текст
2. Next, enter the following code and save it as utf_coding.py.
#!/usr/bin/python
with open('russian.txt', 'r') as ru:
txt = ru.read()
# Bytes Read
print "Bytes: %d" % len(txt)
# First, we'll decode.
uc = txt.decode('utf-8')
# Chars after decode
print "Chars: %d" % len(uc)
3. Finally, let's run the example code. Your output should be similar to what's seen
here.
(text_processing)$ python utf_coding.py
What just happened?
We handled manual decoding of UTF-8 data. Let's walk through the lile example and
examine what's happened in greater detail.
The rst thing we do here is read in our russian.txt le. There's nothing too extraordinary
here. Aer we read in the contents, we print out the number of characters read. According
to the previous output, we read 37 characters in.
But, wait a minute. Open your text le again and count the number of individual leers you
see. Be sure you account for the new lines and white space. 32? Good.

Understanding Encodings and i18n
[ 240 ]
The reason we have this disconnect is because of the Cyrillic text we've included here.
Remember, the code points for these characters are above the ASCII range, and as such, they'll
require two bytes each. So, the word "Текст" actually eats up ten bytes, as opposed to ve.
Next, we decode the value of our txt data by calling the decode method with an argument
of utf-8. This returns a Python unicode object. To Python, the inial value of txt is simply a
byte stream. We need to specify the type of byte stream, or encoding, when calling decode.
Finally, we see now that our applicaon is prinng the right value. The length of the newly
decoded Unicode string is 32.
Reading Unicode
In versions of Python prior to the 3.0 release, strings are simply a series of bytes. Unicode
values are, as covered earlier in the book, independent objects. So, what happens when we
read in a UTF-8 encoded le via standard IO rounes?
Python 2.6.1 (r261:67515, Feb 11 2010, 00:51:29)
[GCC 4.2.1 (Apple Inc. build 5646)] on darwin
Type "help", "copyright", "credits", or "license" for more information.
>>> t = open('russian.txt').read()
>>> t
'Example UTF-8 Multibyte:\n\xd0\xa2\xd0\xb5\xd0\xba\xd1\x81\xd1\x82\
n\n'
>>>
We get exactly what we should expect: a string that contains simply a collecon of single-
byte character values. As our Lan alphabet text is ASCII-compliant, we see that it is handled
correctly. However, our Cyrillic characters require two bytes apiece. In this example, Python
simply reads in ten single-byte values. Expanding the string into a larger list ought to help
clarify this.
>>> pprint.pprint([i for i in t])
['E',
'x',
'a',
'm',
'p',
'l',
'e',
…removed for brevity…
'i',
'b',
'y',
't',

Chapter 8
[ 241 ]
'e',
':',
'\n',
'\xd0',
'\xa2',
'\xd0',
'\xb5',
'\xd0',
'\xba',
'\xd1',
'\x81',
'\xd1',
'\x82',
'\n',
'\n']
>>>
What we have here, then, is simply a string that contains a sequence of valid UTF-8 encoded
raw data, and not a decoded string. Explicitly decoding the raw byte sequence gives us a
correct unicode object. Note that the Cyrillic leers are printed as valid unicode escape
sequences and are interpreted as mul-byte values (aer all, there are ve escapes here
now, not ten).
>>> t.decode('utf-8')
u'Example UTF-8 Multibyte:\n\u0422\u0435\u043a\u0441\u0442\n\n'
>>>
This represents a hotbed for bugs. Reading a UTF-8 le in and expecng pure
ASCII will not raise an excepon. Aer all, the le simply contains a series of
bytes. Errors bubble up later when you aempt to manipulate the data. Play it
safe. If you may be working with wide characters, ensure you decode them to
Unicode and manipulate the decoded data.
Writing Unicode strings
Now that we've learned how to read and decode data, let's take a look at what happens
when we aempt to write down the decoded values.
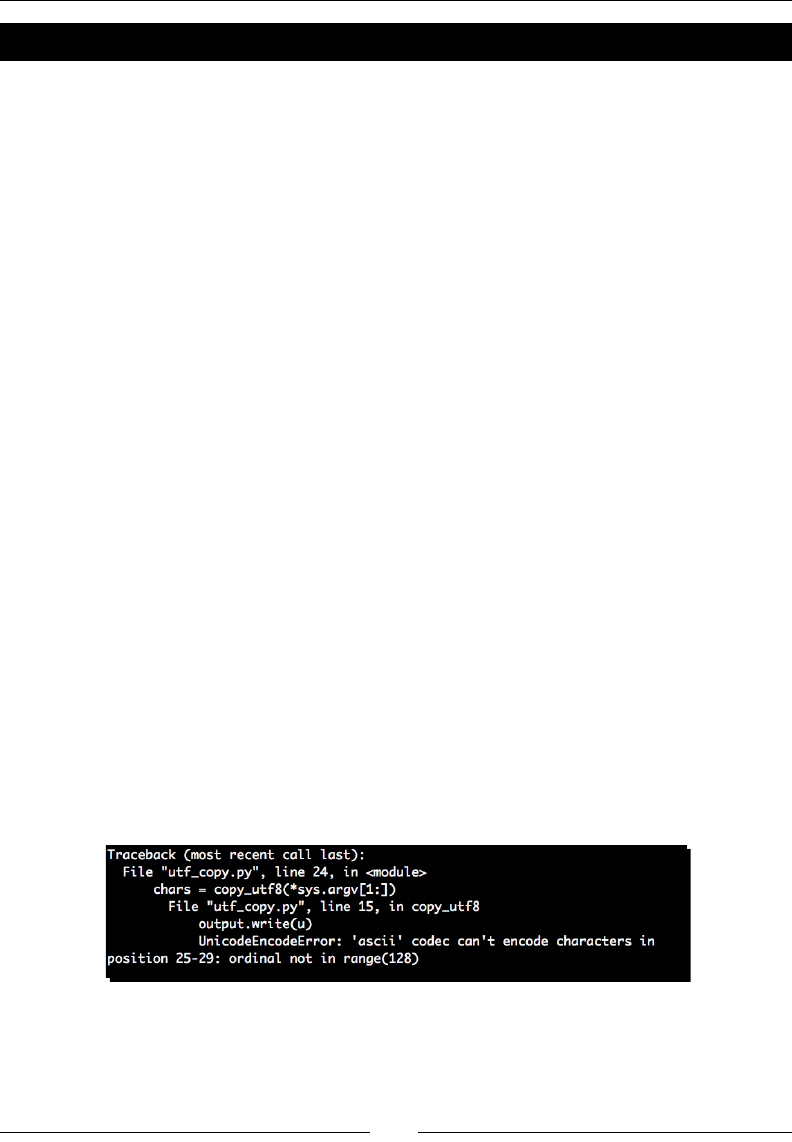
Understanding Encodings and i18n
[ 242 ]
Time for action – copying Unicode data
In this example, we'll extend our earlier utf_reader.py le and add support for le copy.
Note that in a real le copy situaon, our applicaon ought to be content agnosc and
simply copy byte-for-byte.
1. Create a new Python le and name it utf_copy.py. Add the following code:
#!/usr/bin/python
import sys
def copy_utf8(src, dst):
"""
Copy a file.
Copies a file and returns the number
of characters that we've copied.
"""
with open(dst, 'w') as output:
with open(src, 'r') as input:
u = input.read().decode('utf-8')
output.write(u)
return len(u)
if __name__ == '__main__':
if len(sys.argv) != 3:
print >>sys.stderr, "Requires src and dst"
sys.exit(-1)
# Run Copy.
chars = copy_utf8(*sys.argv[1:])
print "%d chars copied" % chars
2. Run the source lisng. Your output should resemble the following.
(text_processing)$ python utf_copy.py russian.txt russian2.txt

Chapter 8
[ 243 ]
What just happened?
There are a lot of things to understand here, mostly within the excepon thrown. As usual,
let's walk through this lisng.
The rst relevant line is input.read().decode('utf-8'). Here, we simply read the
contents of our le and decode the UTF-8 bytes into a Python unicode object. This is much
like our earlier example, just compacted a bit more into one line.
Next, we aempt to write via output.write(u). According to our printed excepon trace,
this is where our error occurs. There is a lot of informaon packed into that traceback. Let's
take a closer look at it.
UnicodeEncodeError: 'ascii' codec can't encode characters in position
25-29: ordinal not in range(128)
First, we see that it is a UnicodeEncodeError. This is the excepon type that Python will
raise should it run into trouble trying to translate from Unicode encodings. It's also one of
the most misunderstood Python excepon types.
Next, the error tells us that the ASCII codec couldn't encode characters. Well, the rst
thing that should sck out here is that we're not dealing with ASCII at all. Why is it that this
happens? It turns out that this is a default.
Python 2.6.1 (r261:67515, Feb 11 2010, 00:51:29)
[GCC 4.2.1 (Apple Inc. build 5646)] on darwin
Type "help", "copyright", "credits", or "license" for more information.
>>> import sys
>>> sys.getdefaultencoding()
'ascii'
>>>
Python uses ASCII as its default-encoding scheme. This is why we're running into trouble with
an ASCII codec. We could change it, but it's more trouble than it's worth.
Finally, this message tells us that characters in posions 25-29 could not be encoded
because the ordinal was not in range(128). So, ve characters could not be encoded.
Of course! Python is having trouble encoding our UTF-8 mul-byte values, which must
begin at posion 25.
Why range(128)? Well, if you'll remember, ASCII only supports 7 bits worth of values.
So, this is Python's way of telling us that the ord() value of these specic characters was
greater than 7 bits can represent.
Python 2.6.1 (r261:67515, Feb 11 2010, 00:51:29)
[GCC 4.2.1 (Apple Inc. build 5646)] on darwin
Type "help", "copyright", "credits", or "license" for more information.
>>> txt = open('russian.txt').read().decode('utf-8')

Understanding Encodings and i18n
[ 244 ]
>>> txt[25]
u'\u0422'
>>> ord(txt[25])
1058
>>> ord(txt[25]) in range(128)
False
>>>
Time for action – xing our copy application
Let's take a quick moment to x our copy applicaon so it correctly handles the wring of
UTF-8 encoded Unicode data.
1. Copy utf_copy.py over and name it utf_copy-a.py. We'll only be making some
small edits.
2. Update the copy_utf8 funcon to read as follows.
def copy_utf8(src, dst):
"""
Copy a file.
Copies a file and returns the number
of characters that we've copied.
"""
with open(dst, 'wb') as output:
with open(src, 'r') as input:
u = input.read().decode('utf-8')
output.write(u.encode('utf-8'))
return len(u)
3. Run the example a second me. Your output should be as follows:
(text_processing)$ python utf_copy-a.py russian.txt russian2.txt
What just happened?
We updated our funcon in two places. First, we modied the le such that it's opened
in binary mode. We did this because we're simply trying to put a string of bytes into a
desnaon le.
Next, we called u.encode('utf-8') within output.write. This extracted a byte stream,
in proper UTF-8 format, from the unicode object. The net result is that Python was able to
simply serialize this byte stream to the desnaon le.

Chapter 8
[ 245 ]
You guessed it; this is another source of bugs. Remember that an operaon
on a byte string and a Unicode object results in a Unicode object. If that
was unexpected, aempng to write that new text to a le will result in a
UnicodeEncodeError.
Pop Quiz – Python encodings
1. When encoding Unicode data into a specic text encoding, what type of object is
returned?
2. Conversely, when decoding a byte stream, which object type should you expect in
return?
3. Why is it important to work with Unicode objects internally and ensure they're only
encoded and decoded when leaving and entering a Python applicaon?
Have a go hero – other encodings
So, take into account two key facts. First, KOI8-R allows for the Lan alphabet as well as
Cyrillic. Second, the encode funcon of a unicode object allows you to pass in an encoding
type. Update our script such that it allows us to save data in KOI8-R encoding if we decided
we wanted to.
The codecs module
Python, true to its baeries included approach, provides a module that simplies dealing
with text IO. The codecs module provides a series of objects and funcons that makes your
job as a programmer much easier.
Now that we've looked at the manual encode and decode methods, let's move on to some
of the higher level approaches available to us.
Time for action – changing encodings
In this example, we'll put together a script that reads a UTF-8 le and writes it out to a new
le in an encoding specied on the command line. This is actually a handy ulity when
tesng encoding types if you're using something other than UTF-8.
1. Create a new le and name it utf_translate.py. Enter the following code:
#!/usr/bin/python
import codecs
import sys

Understanding Encodings and i18n
[ 246 ]
from optparse import OptionParser
def rewrite(src, dst, encoding):
"""
Read a UTF-8 Stream and rewrite.
Reads a UTF-8 stream from standard
in and rewrites it as dst with the
target encoding.
"""
with codecs.open(src, 'r', 'utf-8') as input:
with codecs.open(dst, 'w', encoding) as output:
for line in input:
output.write(line)
if __name__ == '__main__':
parser = OptionParser()
parser.add_option('-s', '--source',
help='File to read from')
parser.add_option('-d', '--destination',
help='Target file for copy')
parser.add_option('-e', '--encoding',
help='Destination Encoding')
opts, args = parser.parse_args()
# check count
if not opts.destination \
or not opts.encoding or not opts.source:
parser.error('options missing')
# check valid encoding
try:
codecs.lookup(opts.encoding)
except LookupError, e:
parser.error(str(e))
# Do the work
rewrite(opts.source,
opts.destination, opts.encoding)
2. Run the above lisng. The script should return immediately without prinng anything.
(text_processing)$ python utf_translate.py -d outfile -e koi8-r
-s russian.txt
(text_processing)$
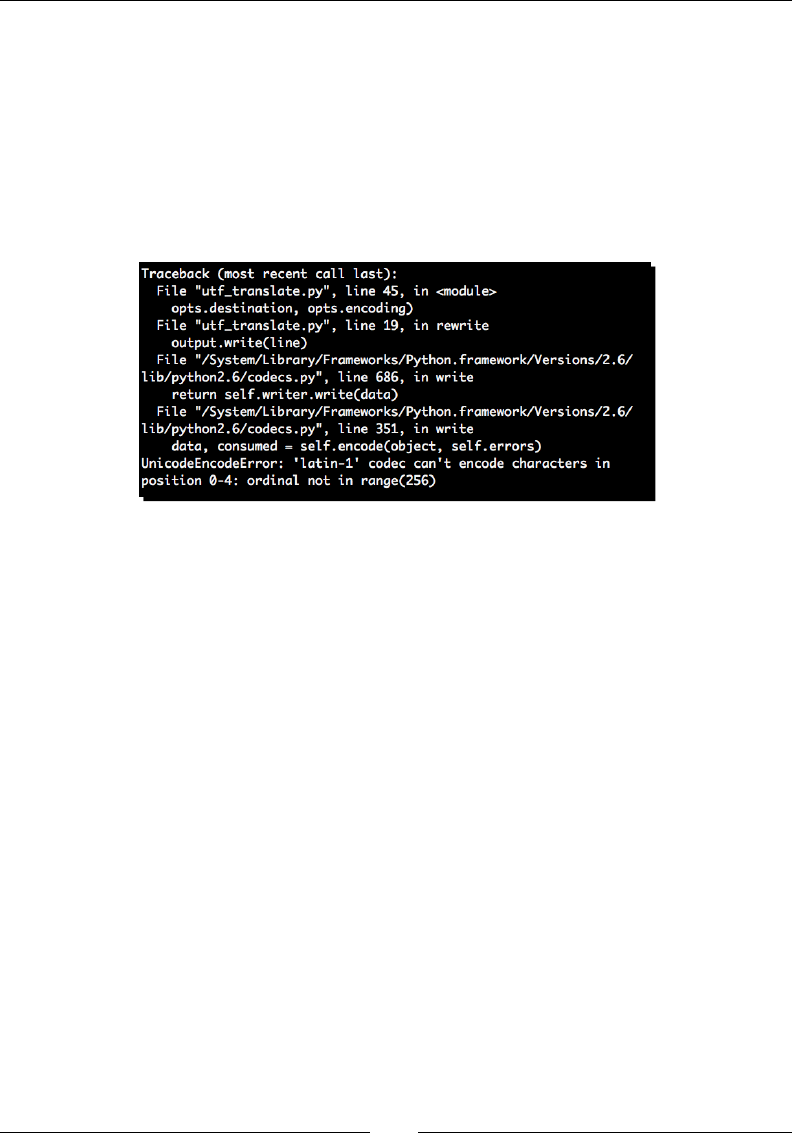
Chapter 8
[ 247 ]
3. Now, take a look at the outfile that was generated by the translaon script.
Example UTF-8 Multibyte:
?????
4. Finally, run the command one last me with an encoding type that doesn't support
either Lan or Cyrllic.
(text_processing)$ python utf_translate.py -d outfile -e iso8859-
1 -s russian.txt
What just happened?
The rst thing we did in this example is import our codecs module. This gives us access to
Python's internal encodings API.
Let's jump down to the __main__ secon. The rst interesng line in this code block is
codecs.lookup(opts.encoding). The lookup funcon in the codecs module allows
us to lookup a codec by name. In this case, we're simply using it as a way to validate that the
desnaon-encoding format is valid. If the codec (encoding) isn't found, this method raises a
LookupError.
The nal line calls our rewrite funcon. Our rewrite funcon relies on codecs.open in
two places. First, it opens the source le with an encoding type of UTF-8. It next opens the
output le, but passes in our user-supplied value as the encoding. We then loop through the
source le and write the desnaon.
The open funcon returns a wrapped le object that transparently handles the encoding
steps for us. This means that when we call input.read, a Unicode object is returned that
has already been decoded. Then, when we call output.write and pass a Unicode object,
the wrapped le transparently encodes the data.
Also note that codecs.open always opens the underlying le in binary mode, even if a text
mode is specied. The built-in open funcon of Python 3.0 and above supports an encodings
parameter, so there is no longer a need to use the codecs.open funcon.
Understanding Encodings and i18n
[ 248 ]
We ran this script twice. The rst run completed successfully, though it may not look that
way due to the series of queson mark characters that have replaced our Cyrillic lisng. The
queson marks, in this scenario, should be interpreted as your terminal unable to display
KOI8-R encoding Cyrillic. The actual byte values are correct.
The second aempt terminated in an excepon. Why? Simple. The lan-1 encoding doesn't
support Cyrillic leers.
There are addional documents on the web that further detail Python's
Unicode and encoding support. A good place to start is the standard library
documentaon for the codecs module, available at http://docs.
python.org/library/codecs.html.
Have a go hero – translating it back
We've succeeded in wring some code to translate between UTF-8 and KOI8-R. However, we
can't translate back! Update our utf8_translate.py le such that we can also supply a
source encoding.
Adopting good practices
When dealing with mulple encodings in Python (or in any language, for that maer), there
are a few guidelines you should follow. Here's a brief list of some of the most important.
1. Test your code completely. Ensure that any automated tests you might have include
characters above the ASCII 7-bit range. Addionally, ensure you add a few mul-byte
values. Use some of the text generaon sites listed as a good place to generate test
data.
2. All internal strings ought to be declared as Unicode. This means that they should be
prexed with a u in Python versions prior to 3.0.
3. When you read data in, decode it to Unicode data. This ensures you do not run into
any unexpected concatenaon or promoon problems.
4. Do not encode into byte data unl you write out your textual data.
5. Remember, a code point is not a character. Rather, an abstract concept. Addionally,
the code point does not dene the glyph on screen.
Overall, Python has very good Unicode support. Understanding it completely will help ensure
that you do not run into common errors.
Chapter 8
[ 249 ]
Internationalization and Localization
The nal thing we'll touch on in this chapter is the process of making Python applicaons
suitable for dierent areas of the world. Internaonalizaon (i18n) can be thought of as
making soware ready for use with dierent languages and locales. Localizaon (L10n) is the
process of conguring it for use within a specic locale.
For example, internaonalizaon would include steps such as marking program text for
translaon, while localizaon would encompass actually providing a translaon and correctly
formang dates and numbers.
We'll be using the Babel package here, which is available on PyPI and can be installed via
easy_install. Before we go any further, take a moment to install Babel into your local
virtual environment.
(text_processing)$ easy_install babel
Once installed, you should be able to run the pybabel script from the command line.
(text_processing)$ pybabel --version
If Babel is installed correctly, it should simply print out the installed version and exit. The
current version at the me of this wring was 0.9.5.
Babel is an extension to the GNU geext support available with the core Python installaon.
It doesn't replace it. Rather, it extends. It provides integraon with SetupTools and a suite of
command-line ulies that can be used to manage translaons.
Understanding Encodings and i18n
[ 250 ]
Preparing an application for translation
The gettext module provides core translaon services for Python applicaons. Two APIs
are exposed – a general implementaon of the GNU services, and a simpler object-oriented
class-based API. The Python documentaon recommends that the class-based API be used;
however, the lower level approach is available if needed.
Generally, the approach used when preparing an applicaon for translaon is fairly simple.
The following steps are rather standard.
1. Strings within an applicaon are marked for translaon using the gettext funcon,
which is usually aliased _ as it's used quite oen.
2. Once strings have been marked, an external program is used to extract them into a
POT le, which serves as a template for a translator.
3. Translaons are generated and saved under directories named for the specic
language (en_US, ru_RU). These les are compiled in order to provide faster access.
4. At run me, the gettext funcon (_) extracts the proper string from the
translaon database, dependant on the currently congured language.
For more informaon on gettext, have a look at the manual, which is
available at http://www.gnu.org/software/gettext/manual/
gettext.html. Addionally, Python provides a fairly full-featured gettext
module, which is described within the standard library documentaon at
http://docs.python.org/library/gettext.html.
Time for action – preparing for multiple languages
In this example, we'll internaonalize our utf_copy.py le we created earlier in the
chapter. This isn't a very large le, but the steps are sll the same. The majority of the work
we need to do is outside of the source code realm.
1. Create a new le named utf_copy-b.py. You should use utf_copy-a.py as a
template as we'll simply make changes to it.
2. Update the script with the following changes:
#!/usr/bin/python
import sys
from gettext import install
# Install the _ function and setup our locale
# directory.
install('utf_copy', 'lang', unicode=True)
def copy_utf8(src, dst):
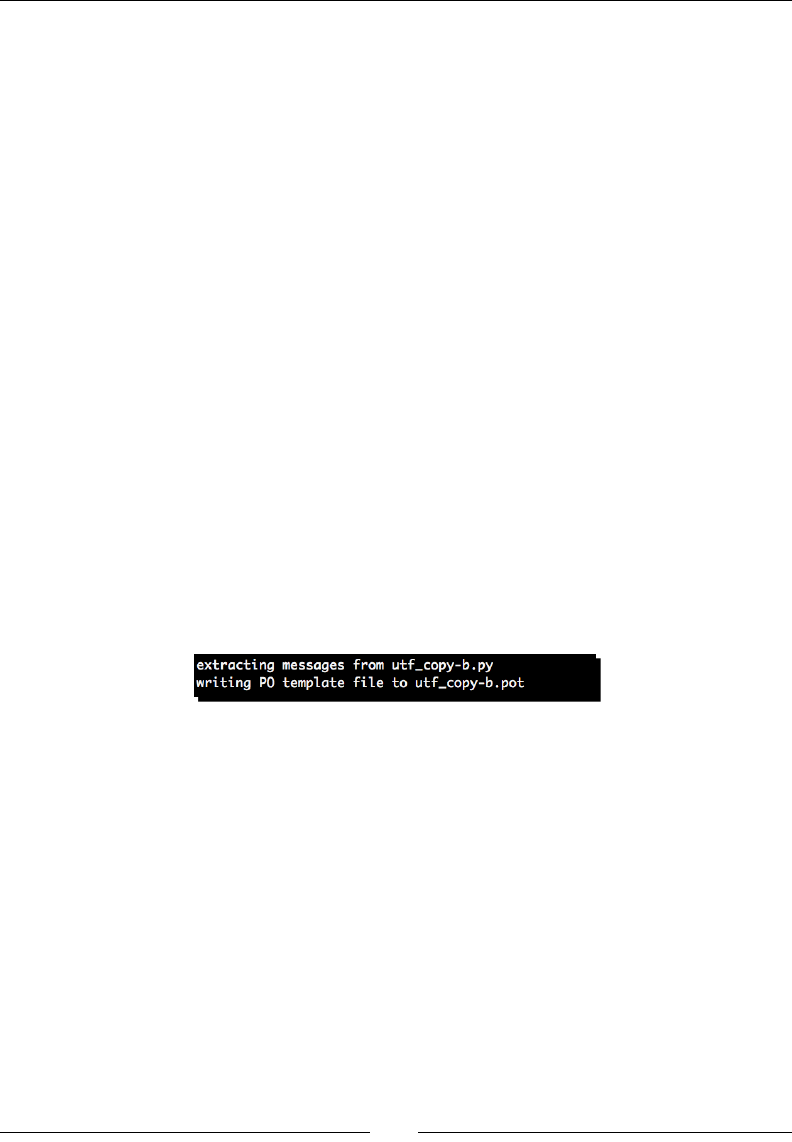
Chapter 8
[ 251 ]
"""
Copy a file.
Copies a file and returns the number
of characters that we've copied.
"""
with open(dst, 'wb') as output:
with open(src, 'r') as input:
u = input.read().decode('utf-8')
output.write(u.encode('utf-8'))
return len(u)
if __name__ == '__main__':
if len(sys.argv) != 3:
print >>sys.stderr, _(u"Requires src and dst")
sys.exit(-1)
# Run Copy.
chars = copy_utf8(*sys.argv[1:])
# NOTE: The 'chars' value may be plural
format_dict = {'chars': chars}
print _(u"%(chars)d chars copied") % format_dict
3. Next, run the following command to prepare a POT le, which is a template for
future translaon.
(text_processing)$ pybabel extract -c 'NOTE:' --output=utf_copy.
pot .
What just happened?
We set up our applicaon to handle mulple languages, though we haven't yet localized it to
a specic region. Let's take a quick walk-through.
The rst thing of interest we did was import the install funcon from the gettext
module. The install funcon does a couple of things for us. First, it installs the _ alias
globally so we do not have to include boilerplate code in each module to make it available.
Next, it sets up our internaonalizaon environment.
install('utf_copy', 'lang', unicode=True)
The rst argument to install sets the name (or domain) of our applicaon. In short,
translaon les will be rst named using this argument. Next, we specify where the
applicaon should look for its translaon database. If this is not specied, the system's
default is used. Finally, we tell the translaon libraries that we're dealing with Unicode text.

Understanding Encodings and i18n
[ 252 ]
Next, we've surrounded our string constants with the _ funcon and ensured that they're
marked as Unicode. This allows us to extract them at development me and performs the
localized lookup at runme.
Finally, we ran the pybabel extract command. This created the POT le, or template, that
translators would use to generate translaons. The contents of the le are as follows.
# Translations template for PROJECT.
# Copyright (C) 2010 ORGANIZATION
# This file is distributed under the same license as the PROJECT
project.
# FIRST AUTHOR <EMAIL@ADDRESS>, 2010.
#
#, fuzzy
msgid ""
msgstr ""
"Project-Id-Version: PROJECT VERSION\n"
"Report-Msgid-Bugs-To: EMAIL@ADDRESS\n"
"POT-Creation-Date: 2010-07-23 22:36-0400\n"
"PO-Revision-Date: YEAR-MO-DA HO:MI+ZONE\n"
"Last-Translator: FULL NAME <EMAIL@ADDRESS>\n"
"Language-Team: LANGUAGE <LL@li.org>\n"
"MIME-Version: 1.0\n"
"Content-Type: text/plain; charset=utf-8\n"
"Content-Transfer-Encoding: 8bit\n"
"Generated-By: Babel 0.9.5\n"
#: utf_copy-b.py:25
msgid "Requires src and dst"
msgstr ""
#. NOTE: The 'chars' value may be plural
#: utf_copy-b.py:36
#, python-format
msgid "%(chars)d chars copied"
msgstr ""
Of special note is the string NOTE: above the last translaon string. We also passed this
on the command line as a –c opon and prexed a comment in our source le with it.
Any comments beginning with the value passed to –c are included as comments to the
translator. This is a handy feature.
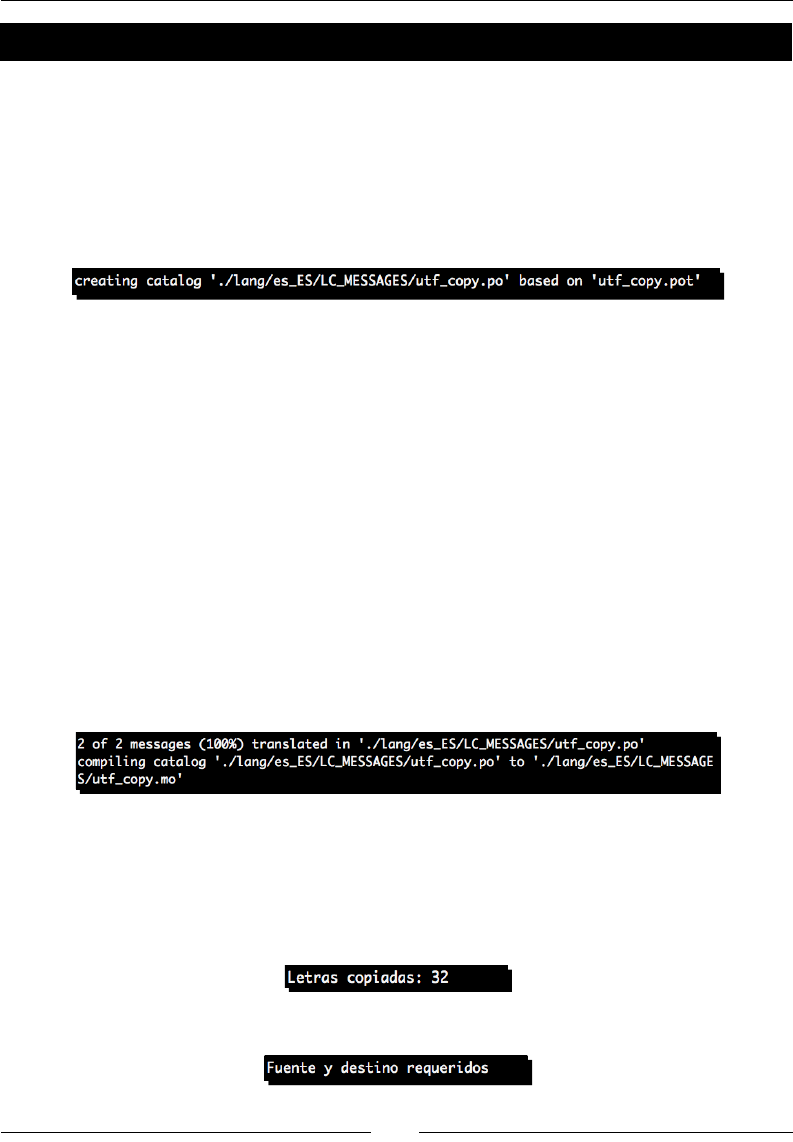
Chapter 8
[ 253 ]
Time for action – providing translations
Here, we'll add a translaon to our applicaon such that users that speak Spanish can easily
read the output.
1. Run the following command in order to create the new translaon le. This should
create the appropriate translaon catalogue.
(text_processing)$ pybabel init -D utf_copy -l es_ES -i utf_copy.
pot -d ./lang
2. Next, edit lang/es_ES/LC_MESSAGES/utf_copy.po and insert the proper
translaon strings. Only relevant parts of the le are shown.
#: utf_copy-b.py:25
msgid "Requires src and dst"
msgstr "Fuente y destino requeridos"
#. NOTE: The 'chars' value may be plural
#: utf_copy-b.py:36
#, python-format
msgid "%(chars)d chars copied"
msgstr "Letras copiadas: %(chars)d"
3. Now, we need to compile our message catalogue. Run the following command in
order to make the translaons useable.
(text_processing)$ pybabel compile -f -d ./lang/ -D utf_copy
--statistics
4. Now, run the copy applicaon again with your preferred language set to es_ES. This
can be done using the following command on a Unix-like system.
(text_processing)$ export LANGUAGE=es_ES
(text_processing)$ python utf_copy-b.py russian.txt russian.txt2
(text_processing)$ python utf_copy-b.py

Understanding Encodings and i18n
[ 254 ]
What just happened?
We nalized localizaon of our applicaon for users set to es_ES (Spanish in Spain).
Noce how we set our LANGUAGE environmental variable accordingly. When our applicaon
runs, Python will read a few environmental variables in order to determine which language
database it should use when rendering the text. LANGUAGE is the rst in that list, followed by
LC_ALL, LC_MESSAGES, and nally, LANG.
Also of interest is the handling of a missing language denion. If we set our language to one
that is not supported by our applicaon, noce how the output is handled.
(text_processing)$ export LANGUAGE=fr_FR
(text_processing)$ python utf_copy-b.py russian.txt russian.txt2
32 chars copied
Our applicaon defaults to the string supplied within the gettext _ funcon.
Looking for more information on internationalization
We've only scratched the surface of internaonalizaon and mulple language support.
There's a world of informaon available that will help you solidify your understanding. Our
example here was meant to be an introducon to the process. You may nd the following
external resources helpful.
1. The Babel documentaon is available at http://babel.edgewall.org/.
However, before reading this, you are strongly encouraged to read the Python
standard library documentaon for gettext.
2. Python's standard library documentaon for the gettext module, available at
http://docs.python.org/library/gettext.html.
3. The Pylons documentaon provides an excellent resource for internaonalizaon
using Babel and methods for extending it into Mako templates. You can read these
pages at http://pylonshq.com/docs/en/1.0/i18n/.
Pop Quiz – internationalization
1. The process of preparing soware to handling mulple locales is called
internaonalizaon, or i18n. What is the process of tailoring a package for a specic
locale?
2. In our example, we used Python's diconary formang syntax in our string rather
than the printf style formang. Why is this the case?
3. What are some common problems programmers may run into while dealing with
mulple translaons?

Chapter 8
[ 255 ]
Summary
In this chapter, we concentrated heavily on encodings and managing them within Python.
This is because misunderstanding these concepts can lead to subtle bugs that only show
up when wide characters are introduced. We also very briey covered mulple-language
support and internaonalizaon.
Specically, we touched legacy text encodings such as ASCII and KOI8-R. We introduced
Unicode and the dierences between code points, character encoding, and display glyphs.
We've covered methods to programmacally convert between dierent encodings. Finally,
we wrapped up with an introducon to i18n where you marked a sample applicaon for
translaon and provided a Spanish string catalog.
In our next chapter, we'll look at ways to enhance text output via a collecon of third-party
packages.

Advanced Output Formats
In this chapter, we'll look at some advanced techniques for generang richer
text formats. Up unl now, we've largely concerned ourselves with plain text
output. Here, we'll shi a lile bit. Instead of outpung plain text, we'll look at
a few commonly used rich formats.
Generally speaking, the approach is usually the same for each of these dierent
technologies. We'll dene a root document entry and add textual elements to
the ow, and they'll render appropriately in our saved document.
Specically, we'll look at how to do the following.
Build simple PDF output using the ReportLab Toolkit's high level PLATYPUS framework.
Generaon of true Microso Excel output using the xlwt module. We covered CSV
in an earlier chapter.
Programmacally create and save OpenDocument les. This is the le format used
by Open Oce and quite a few other applicaons. Microso Word 2007 supports
this format (though not by default).
Open and edit exisng OpenDocument les so that we can use them as templates
sources.
We'll not dive into too much detail with any single approach. Rather, the goal of this chapter
is to teach you the basics such that you can get started and further explore details on your
own. Also, remember that our goal isn't to be prey; it's to present a useable subset of
funconality. In other words, our PDF layouts are ugly!
9
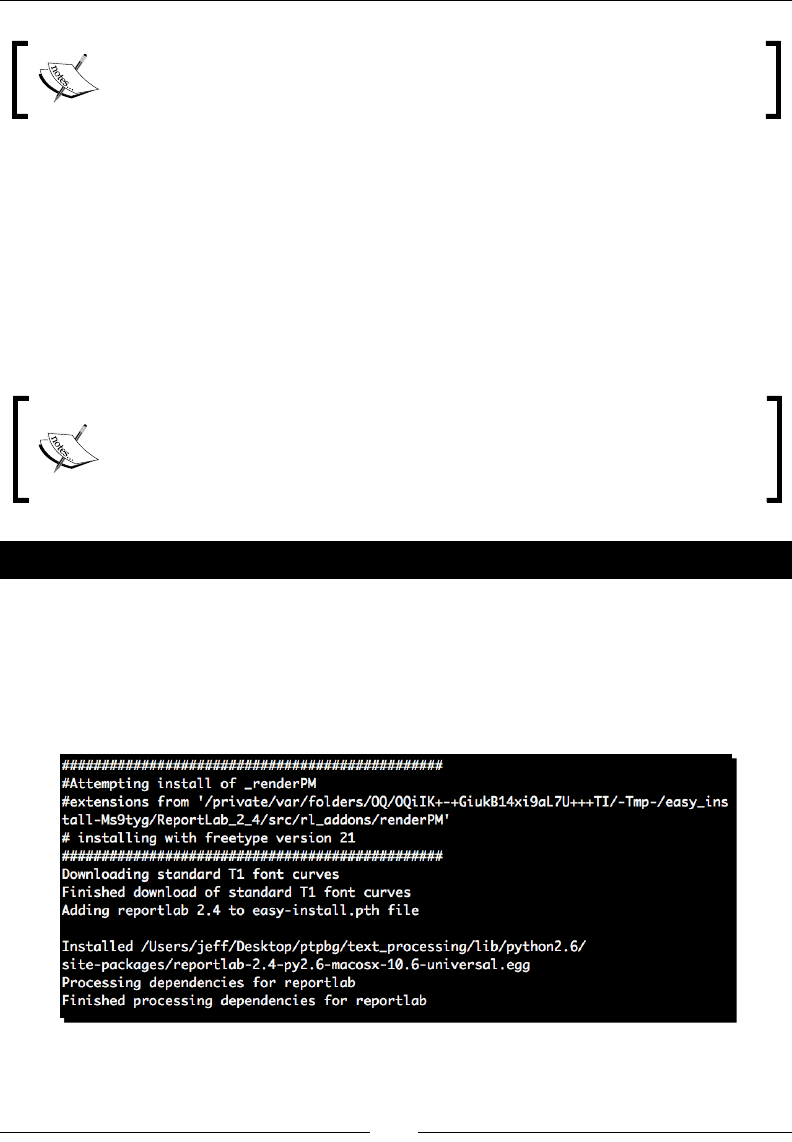
Advanced Output Formats
[ 258 ]
Unfortunately, the third-party packages used in this chapter are not yet
compable with Python 3. Therefore, the examples listed here will only work
with Python 2.6 and 2.7.
Dealing with PDF les using PLATYPUS
The ReportLab framework provides an easy mechanism for dealing with PDF les. It provides
a low-level interface, known as pdfgen, as well as a higher-level interface, known as
PLATYPUS. PLATYPUS is an acronym, which stands for Page Layout and Typography Using
Scripts. While the pdfgen framework is incredibly powerful, we'll focus on the PLATYPUS
system here as it's slightly easier to deal with. We'll sll use some of the lower-level
primives as we create and modify our PLATYPUS rendered styles.
The ReportLab Toolkit is not enrely Open Source. While the pieces we
use here are indeed free to use, other porons of the library fall under a
commercial license. We'll not be looking at any of those components here. For
more informaon, see the ReportLab website, available at http://www.
reportlab.com.
Time for action – installing ReportLab
Like all of the other third-party packages we've installed thus far, the ReportLab Toolkit can
be installed using SetupTools' easy_install command. Go ahead and do that now from
your virtual environment. We've truncated the output that we are about to see in order to
conserve on space. Only the last lines are shown.
(text_processing)$ easy_install reportlab

Chapter 9
[ 259 ]
What just happened?
The ReportLab package was downloaded and installed locally. Note that some plaorms may
require a C compiler in order to complete the installaon process. To verify that the packages
have been installed correctly, let's simply display the version tag.
(text_processing)$ python
Python 2.6.1 (r261:67515, Feb 11 2010, 00:51:29)
[GCC 4.2.1 (Apple Inc. build 5646)] on darwin
Type "help", "copyright", "credits", or "license" for more information.
>>> import reportlab
>>> reportlab.Version
'2.4'
>>>
Generating PDF documents
In order to build a PDF document using PLATYPUS, we'll arrange elements onto a document
template via a ow. The ow is simply a list element that contains our individual document
components. When we nally ask the toolkit to generate our output le, it will merge all of
our individual components together and produce a PDF.
Time for action – writing PDF with basic layout and style
In this example, we'll generate a PDF that contains a set of basic layout and style
mechanisms. First, we'll create a cover page for our document. In a lot of situaons, we want
our rst page to dier from the remainder of our output. We'll then use a dierent format
for the remainder of our document.
1. Create a new Python le and name it pdf_build.py. Copy the following code as it
appears as follows:
import sys
from report lab.PLATYPUS import SimpleDocTemplate, Paragraph
from reportlab.PLATYPUS import Spacer, PageBreak
from reportlab.lib.styles import getSampleStyleSheet
from reportlab.rl_config import defaultPageSize
from reportlab.lib.units import inch
from reportlab.lib import colors
class PDFBuilder(object):
HEIGHT = defaultPageSize[1]
WIDTH = defaultPageSize[0]
def _intro_style(self):
"""Introduction Specific Style"""

Advanced Output Formats
[ 260 ]
style = getSampleStyleSheet()['Normal']
style.fontName = 'Helvetica-Oblique'
style.leftIndent = 64
style.rightIndent = 64
style.borderWidth = 1
style.borderColor = colors.black
style.borderPadding = 10
return style
def __init__(self, filename, title, intro):
self._filename = filename
self._title = title
self._intro = intro
self._style = getSampleStyleSheet()['Normal']
self._style.fontName = 'Helvetica'
def title_page(self, canvas, doc):
"""
Write our title page.
Generates the top page of the deck,
using some special styling.
"""
canvas.saveState()
canvas.setFont('Helvetica-Bold', 18)
canvas.drawCentredString(
self.WIDTH/2.0, self.HEIGHT-180, self._title)
canvas.setFont('Helvetica', 12)
canvas.restoreState()
def std_page(self, canvas, doc):
"""
Write our standard pages.
"""
canvas.saveState()
canvas.setFont('Helvetica', 9)
canvas.drawString(inch, 0.75*inch, "%d" % doc.page)
canvas.restoreState()
def create(self, content):
"""
Creates a PDF.
Saves the PDF named in self._filename.
The content parameter is an iterable; each
line is treated as a standard paragraph.
"""
document = SimpleDocTemplate(self._filename)

Chapter 9
[ 261 ]
flow = [Spacer(1, 2*inch)]
# Set our font and print the intro
# paragraph on the first page.
flow.append(
Paragraph(self._intro, self._intro_style()))
flow.append(PageBreak())
# Additional content
for para in content:
flow.append(
Paragraph(para, self._style))
# Space between paragraphs.
flow.append(Spacer(1, 0.2*inch))
document.build(
flow, onFirstPage=self.title_page,
onLaterPages=self.std_page)
if __name__ == '__main__':
if len(sys.argv) != 5:
print "Usage: %s <output> <title> <intro file> <content
file>" % \
sys.argv[0]
sys.exit(-1)
# Do Stuff
builder = PDFBuilder(
sys.argv[1], sys.argv[2], open(sys.argv[3]).read())
# Generate the rest of the content from a text file
# containing our paragraphs.
builder.create(open(sys.argv[4]))
2. Next, we'll create a text le that will contain the introductory paragraph. We've
placed it in a separate le so it's easier to manipulate. Enter the following into a text
le named intro.txt.
This is an example document that we've created from scratch; it
has no story to tell. It's purpose? To serve as an example.
3. Now, we need to create our PDF content. Let's add one more text le and name
paragraphs.txt. Feel free to create your own content here. Each new line will
start a new paragraph in the resulng PDF. Our test data is as follows.
This is the first paragraph in our document and it really serves
no meaning other than example text.
This is the second paragraph in our document and it really serves
no meaning other than example text.
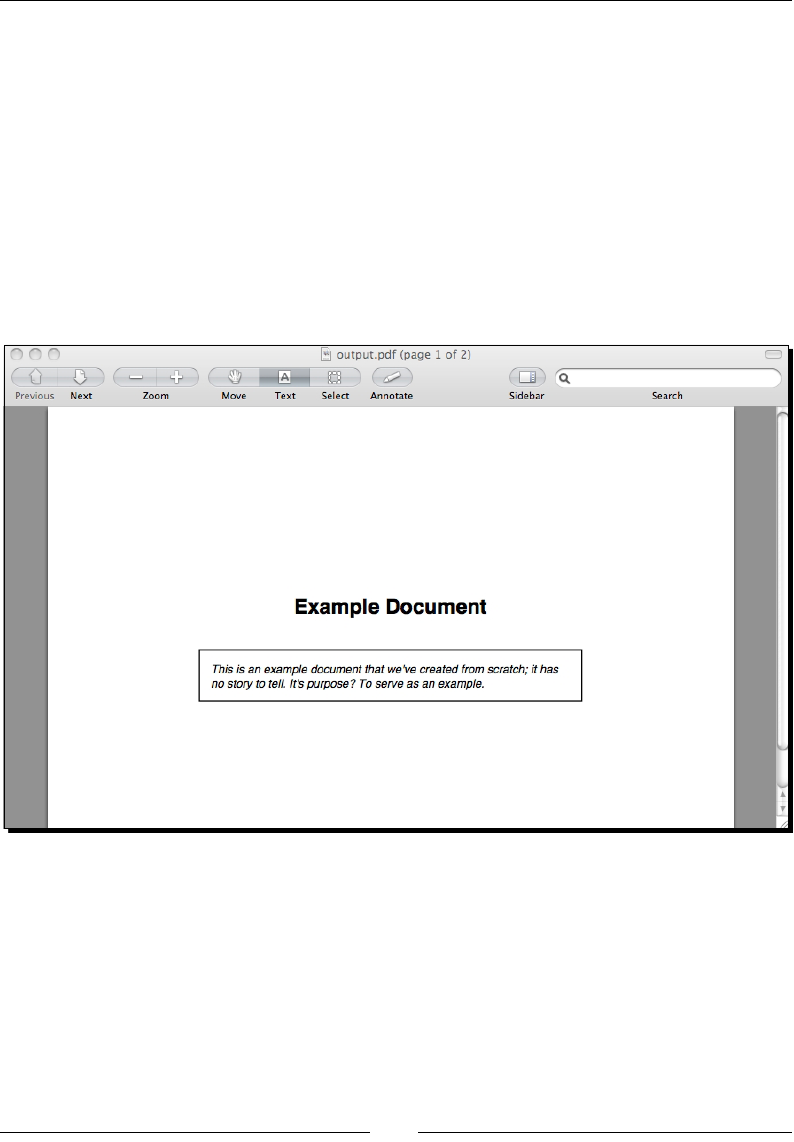
Advanced Output Formats
[ 262 ]
This is the third paragraph in our document and it really serves
no meaning other than example text.
This is the fourth paragraph in our document and it really serves
no meaning other than example text.
This is the final paragraph in our document and it really serves
no meaning other than example text.
4. Now, let's run the PDF generaon script
(text_processing)$ python pdf_build.py output.pdf "Example
Document" intro.txt paragraphs.txt
5. If you view the generated document in a reader, the generated pages should
resemble the following screenshots:
The preceding screenshot displays the clean Title page, which we derive from the command-
line arguments and the contents of the introducon le. The next screenshot contains
document copy, which we also read from a le.
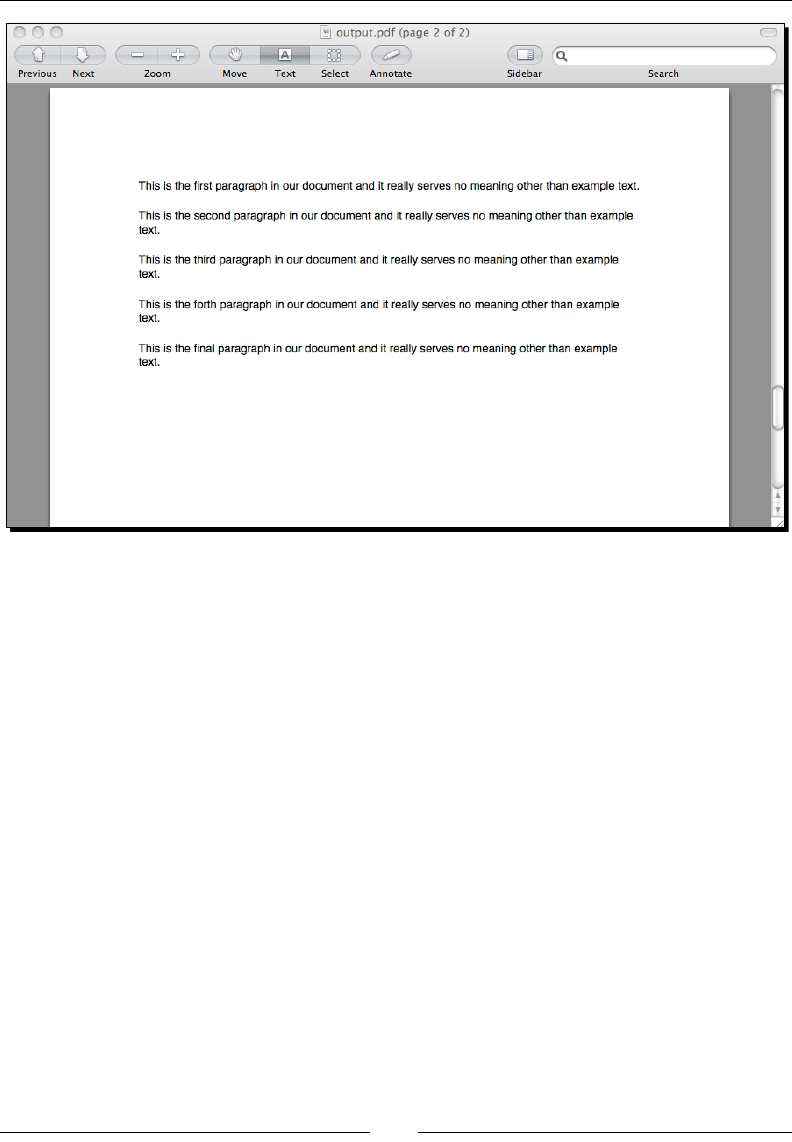
Chapter 9
[ 263 ]
What just happened?
We used the ReportLab Toolkit to generate a basic PDF. In the process, you created two
dierent layouts: one for the inial page and one for subsequent pages. The rst page serves
as our tle page. We printed the document tle and a summary paragraph. The second (and
third, and so on) pages simply contain text data.
At the top of our code, as always, we import the modules and classes that we'll need to run
our script. We import SimpleDocTemplate, Paragraph, Spacer, and Pagebreak from
the PLATYPUS module. These are items that will be added to our document ow.
Next, we bring in getSampleStyleSheet. We use this method to generate a sample, or
template, stylesheet that we can then change as we need. Stylesheets are used to provide
appearance instrucons to Paragraph objects here, much like they would be used in an
HTML document.
The last two lines import the inch size as well as some page size defaults. We'll use these to
beer lay out our content on the page. Note that everything here outside of the rst line is
part of the more general-purpose poron of the toolkit.

Advanced Output Formats
[ 264 ]
The bulk of our work is handled in the PDFBuilder class we've dened. Here, we manage
our styles and hide the PDF generaon logic. The rst thing we do here is assign the default
document height and width to class variables named HEIGHT and WIDTH, respecvely. This is
done to make our code easier to work with and to make for easier inheritance down the road.
The _intro_style method is responsible for generang the paragraph style informaon
that we use for the introductory paragraph that appears in the box. First, we create a new
stylesheet by calling getSampleStyleSheet. Next, we simply change the aributes that
we wish to modify from default.
Style aribute Meaning
fontName Sets the type of font used when drawing text. Here, we use
Helveca-Oblique, which gives us an italic sans-serif.
leftIndent Indent size of the le margin.
rightIndent Indent size of the right margin.
borderWidth Sets a border size. By default, the width is zero, which
results in no border being drawn.
borderColor Assigns the color to the border. The color.black value
is an instance of the ReportLab Color class.
The values in the preceding table dene the style used for the introductory paragraph, which
is dierent from the standard style. Note that this is not an exhausve list; this simply details
the variables that we've changed.
Next we have our __init__ method. In addion to seng variables corresponding to the
arguments passed, we also create a new stylesheet. This me, we simply change the font
used to Helveca (default is Times New Roman). This will be the style we use for default text.
The next two methods, title_page and std_page, dene layout funcons that are called
when the PDF engine generates both the rst and subsequent pages. Let's walk through the
title_page method in order to understand what exactly is happening.
First, we save the current state of the canvas. This is a lower-level concept that is used
throughout the ReportLab Toolkit. We then change the acve font to a bold sans serif at 18
point. Next, we draw a string at a specic locaon in the center of the document. Lastly, we
restore our state as it was before the method was executed.
If you take a quick look at std_page, you'll see that we're actually deciding how to write
the page number. The library isn't taking care of that for us. However, it does help us out by
giving us the current page number in the doc object.

Chapter 9
[ 265 ]
Neither the std_page nor the title_page methods actually lay the text out. They're
called when the pages are rendered to perform annotaons. This means that they can do
things such as write page numbers, draw logos, or insert callout informaon. The actual text
formang is done via the document ow.
The last method we dene is create, which is responsible for driving tle page creaon and
feeding the rest of our data into the toolkit. Here, we create a basic document template via
SimpleDocTemplate. We'll ow all of our components onto this template as we dene them.
Next, we create a list named flow that contains a Spacer instance. The Spacer ensures we
do not begin wring at the top of the PDF document.
We then build a Paragraph containing our introductory text, using the style built in the
self._intro_style method. We append the Paragraph object to our ow and then
force a page break by also appending a PageBreak object.
Next, we iterate through all of the lines passed into the method as content. Each generates a
new Paragraph object with our default style.
Finally, we call the build method of the document template object. We pass it our ow and
two dierent methods to be called - one when building the rst page and one when building
subsequent pages.
Our __main__ secon simply sets up calls to our PDFBuilder class and reads in our text
les for processing.
The ReportLab Toolkit is very heavily documented and is quite easy to work
with. For more informaon, see the documents available at http://www.
reportlab.com/software/opensource/. There is also a code snippets
library that contains some common PDF recipes.
Have a go hero – drawing a logo
The toolkit provides easy mechanisms for including graphics directly into a PDF
document. JPEG images can be included without any addional library support. Using the
documentaon referenced earlier, alter our title_page method such that you include a
logo image below the introductory paragraph.
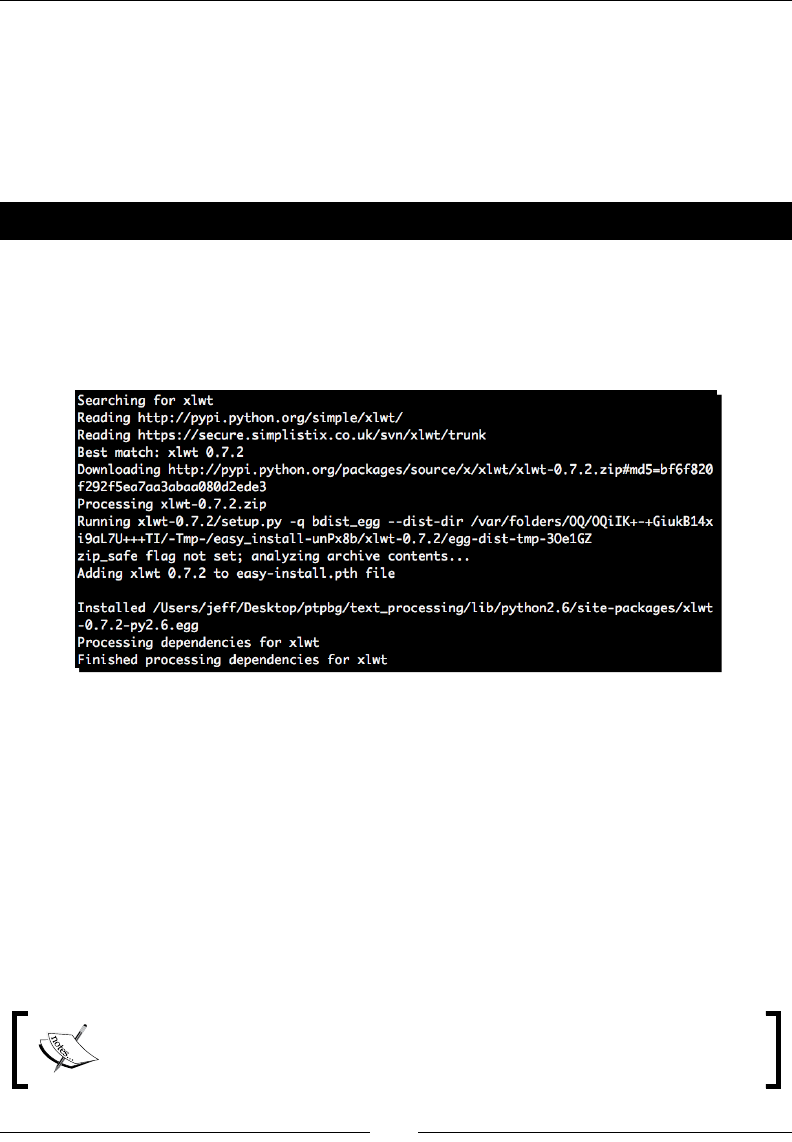
Advanced Output Formats
[ 266 ]
Writing native Excel data
Earlier in this book we looked at wring CSV data, which we were able to open and
manipulate using Microso Excel. Here, we'll look at a more advanced technique that
actually allows us to write actual Excel data (without requiring Microso Windows). To do
this, we'll be using the xlwt package.
Time for action – installing xlwt
Again, like the other third-party modules we've installed thus far, xlwt can be downloaded
and installed via the easy_install system. Acvate your virtual environment and install it
now. Your output should resemble the following:
(text_processing)$ easy_install xlwt
What just happened?
We installed the xlwt packages from the Python Package Index. To ensure your install
worked correctly, start up Python and display the current version of the xlwt libraries.
Python 2.6.1 (r261:67515, Feb 11 2010, 00:51:29)
[GCC 4.2.1 (Apple Inc. build 5646)] on darwin
Type "help", "copyright", "credits", or "license" for more information.
>>> import xlwt
>>> xlwt.__VERSION__
'0.7.2'
>>>
At the me of this wring, the xlwt module supports the generaon of Excel
xls format les, which are compable with Excel 95 – 2003 (and later). MS
Oce 2007 and later ulizes Open Oce XML (OOXML).

Chapter 9
[ 267 ]
Building XLS documents
In this example, we'll build on our CSV examples from Chapter 4, Text Processing Using
the Standard Library. If you'll recall, the rst example from that chapter read in a CSV le
containing revenue and cost numbers. The script output was simply the prot for each set of
inputs. Here, we'll update our approach and generate a spreadsheet using formulas directly.
Time for action – generating XLS data
In this example, we'll reuse the Worksheet1.csv le we created in Chapter 4, Text
Processing Using the Standard Library. Copy that le over to your current directory now.
1. Create a new Python le and name it xls_build.py. Enter the following code as
follows:
import csv
import sys
import xlwt
from xlwt.Utils import rowcol_to_cell
from optparse import OptionParser
def render_header(ws, fields, first_row=0):
"""
Generate an Excel Header.
Builds a header line using different
fonts from the default.
"""
header_style = xlwt.easyxf(
'font: name Helvetica, bold on')
col = 0
for hdr in fields:
ws.write(first_row, col, hdr, header_style)
col += 1
return first_row + 2
if __name__ == '__main__':
parser = OptionParser()
parser.add_option('-f', '--file', help='CSV Data File')
parser.add_option('-o', '--output', help='Output XLS File')
opts, args = parser.parse_args()
if not opts.file or not opts.output:
parser.error('Input source and output XLS required')
# Create a dict reader from an open file
# handle and iterate through rows.
reader = csv.DictReader(open(opts.file, 'rU'))
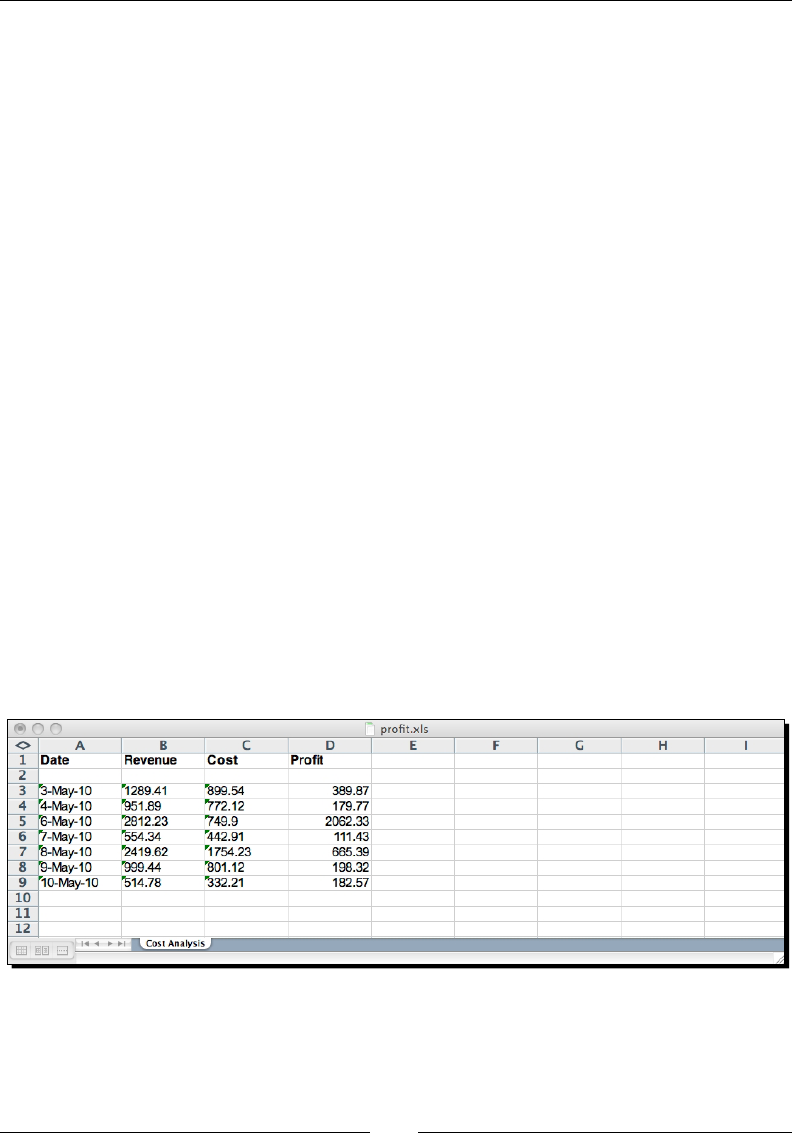
Advanced Output Formats
[ 268 ]
headers = [field for field in reader.fieldnames if field]
headers.append('Profit')
workbook = xlwt.Workbook()
sheet = workbook.add_sheet('Cost Analysis')
# Returns the row that we'll start at
# going forward.
row = render_header(sheet, headers)
for day in reader:
sheet.write(row, 0, day['Date'])
sheet.write(row, 1, day['Revenue'])
sheet.write(row, 2, day['Cost'])
sheet.write(row, 3,
xlwt.Formula('%s-%s' % (rowcol_to_cell(row, 1),
rowcol_to_cell(row, 2))))
row += 1
# Save workbook
workbook.save(opts.output)
2. Now, run the command with the following opons. It should generate a profit.
xls in your current working directory.
(text_processing)$ python ./xls_build.py -f Workbook1.csv -o
profit.xls
3. Opening the newly created profit.xls le. It should resemble the following
screenshot. Yes, there is a problem with the rendered data. We'll clean that up in
just a lile bit.
4. Now, select a revenue value or a cost value and update. Take note of the prot
column and see how it changes as we update our values.

Chapter 9
[ 269 ]
What just happened?
We just updated our example from Chapter 4, Text Processing Using Standard Library so
that it outputs Excel data rather than prinng plain text to standard output! Addionally, we
incorporated the generaon of Excel formulas such that our resulng spreadsheet supports
dynamic prot calculaon. We were able to do all of this with just a few trivial changes to
our exisng script.
Lets take a look at exactly how we did it.
First of all, we imported the required modules. In this case, we brought in the xlwt package
as well as xlwt.Utils.rowcol_to_cell. The former provides the majority of the
funconality while the laer allows us to translate numeric row and column coordinates into
Excel-friendly number + leer locaons.
Now, let's skip down to the __main__ secon and follow our applicaon's execuon path.
We added an addional opon, -o or –output, which contains the desnaon lename for
our new Excel le. We've then updated our parameter checking to ensure both are passed
on the command line.
The next relevant changes occur with the following line of code.
headers = [field for field in reader.fieldnames if field]
Here, we pull all of our headers from the CSV data and strip out anything that doesn't
evaluate to True. Why did we do this? Simple. If any empty cells made their way into our
CSV data, we wouldn't want to include them as empty column headings in our output
document.
Note that we also append the string Profit to our header list. We'll be the corresponding
values in just a bit.
Next, we build our workbook. The xlwt package makes this quite easy. It only takes two
lines to create a workbook and assign the rst worksheet:
workbook = xlwt.Workbook()
sheet = workbook.add_sheet('Cost Analysis')
Here, we're creang a new workbook and then adding a sheet named Cost Analysis to it.
If you look at the screenshot earlier in this chapter, you'll see that this is the name given to
the tab at the boom of the spreadsheet.
Now, we call a funcon we've dened named render_header and pass our sheet object to
it with the list of headers we want to create. Looking at render_header, you'll noce that
we rst create a specic header style using xlwt.easyxf. This factory funcon takes a string
denion of the style to be associated with a cell and returns an appropriate styling object.

Advanced Output Formats
[ 270 ]
Next, we simply iterate through all of our header columns and add them to the document
using ws.write. Here, ws is the worksheet object we passed in to render_header.
One thing to note here is that the write method doesn't accept standard Excel cell names.
Here, we need to pass in integer coordinates. Addionally, the data type of the inserted cell
corresponds to the Python data type wrien. In this case, each value of hdr is a string. The
result? These are all string columns in the nal document.
We return the posion of the rst row with two added. This gives us a good logical place
to start inserng our real data. We allowed the caller to pass in a starng height in order to
provide just a bit more exibly and reuse.
Aer our header has been rendered, we iterate through each row in our parsed CSV data and
write the values to the sheet in order verbam. There's no data translaon happening at all.
Note the xlwt.Formula call. This is where we insert an Excel formula directly into our
generated content. As the formula will be embedded, we need to translate from our numeric
row and column syntax to the Excel syntax. This is done via our call to rowcol_to_cell.
The following snippet shows how this is done:
Python 2.6.1 (r261:67515, Feb 11 2010, 00:51:29)
[GCC 4.2.1 (Apple Inc. build 5646)] on darwin
Type "help", "copyright", "credits", or "license" for more information.
>>> from xlwt.Utils import rowcol_to_cell
>>> rowcol_to_cell(1,6)
'G2'
>>> rowcol_to_cell(0,6)
'G1'
>>>
Finally, we save our new spreadsheet unl the name passed on the command line with the
embedded formula.
For more informaon, see the xlwt documentaon, available at https://
secure.simplistix.co.uk/svn/xlwt/trunk/xlwt/doc/xlwt.
html. This documentaon isn't enrely complete, thus it's probably a good
exercise to spend some me reading the source code if you intend to use xlwt
in a producon scenario. Also, note that xlwt has a read-focused counterpart,
xlrd.

Chapter 9
[ 271 ]
Pop Quiz – creating XLS documents
1. In our example, we menoned that there was a problem with the rendered data. It
turns out our integer columns are being interpreted as text data. Why is this?
2. How might you specify a dierent font or variable font style?
3. What's one benet to using xlwt versus simply generang Excel-friendly CSV les,
like we did in Chapter 4, Text Processing Using the Standard Library?
Working with OpenDocument les
OpenDocument les are generally just ZIP bundles that contain a collecon of XML les,
which dene the document. At the lowest level, it's possible to parse and edit the XML data
directly; however, that requires an intricate knowledge of the relevant schemas and XML
elements. A couple of packages exist that abstract out the implementaon details. Here,
we'll look at the odfpy package.
If you need to dene and generate a large number of ODF les, I also suggest that you look
at the apply.pod framework, which is available at http://appyframework.org/. It
provides an OpenDocument-based templang system that allows you to embed Python
code. It's a lile advanced for our purposes, though.
OpenDocument les are understood by the OpenOce package, as well as Microso Oce
2007 and later. However, it's important to understand that OpenDocument is dierent than
Microso's OXML format (docx, xlsx).
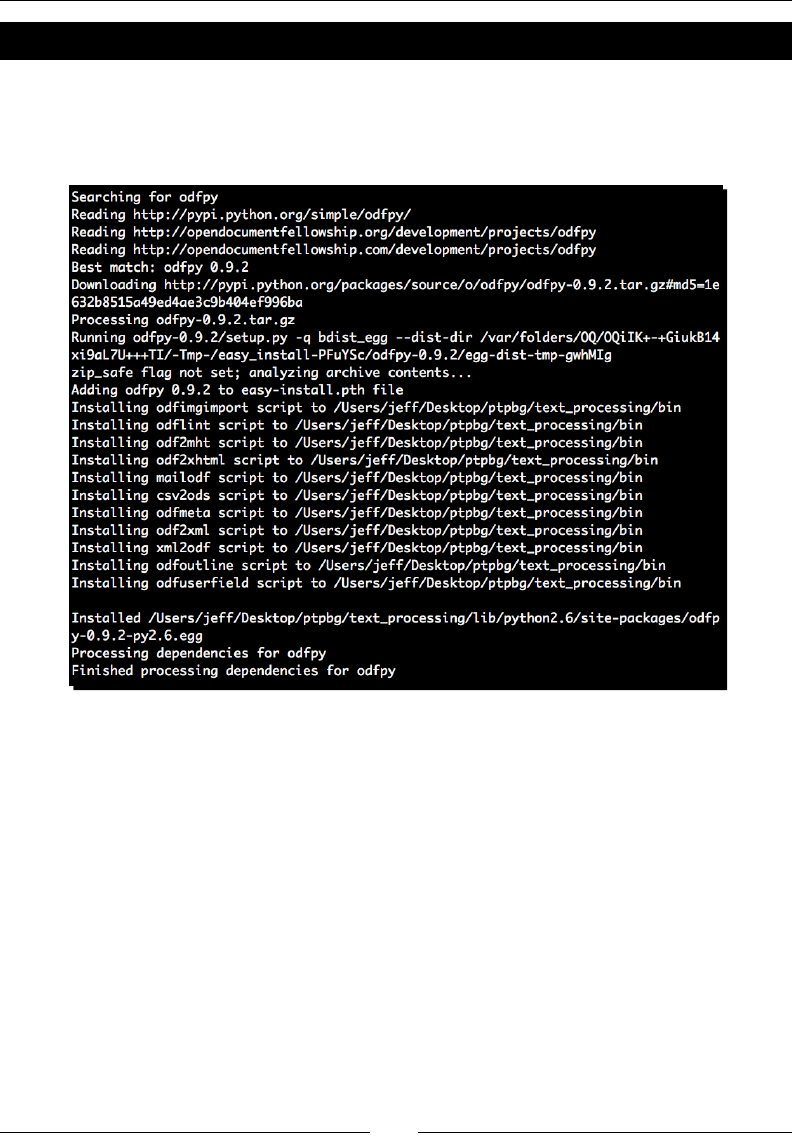
Advanced Output Formats
[ 272 ]
Time for action – installing ODFPy
Again, we'll simply be using easy_install to add this third-party package to our virtual
environment. Go ahead and do this now.
(text_processing)$ easy_install odfpy
What just happened?
Like we did with xslt and ReportlLab, we installed a third-party module. Take a minute to
ensure the ODF libraries are installed correctly. We'll just start up Python and make sure we
can import the top-level package.
Python 2.6.1 (r261:67515, Feb 11 2010, 00:51:29)
[GCC 4.2.1 (Apple Inc. build 5646)] on darwin
Type "help", "copyright", "credits", or "license" for more information.
>>> import odf
>>> dir(odf)
['__builtins__', '__doc__', '__file__', '__loader__', '__name__', '__
package__', '__path__']
>>>
Chapter 9
[ 273 ]
Building an ODT generator
The odfpy package that we're using is a fairly low-level package. It's possible to access the
XML data directly if we so choose, though we won't be doing much of that here. The API
ought to look familiar to you as we've touched on the ElementTree system in Chapter 6,
Structured Markup.
Here, we'll look at how you programmacally build and style an OpenDocument Text le, or
an ODT, for short.
Time for action – generating ODT data
In this example, we'll build a self-documenng Python module. In fact, we'll use Python's
powerful introspecon funconality and the odfpy package to generate a formaed
OpenDocument le that serves as API documentaon!
If you haven't done so yet, take a couple of minutes and ensure you have
OpenOce installed. It is freely available at http://www.openoffice.
org. OpenOce also handles common Microso Oce formats.
1. First, create a new le and name it odf_build.py.
2. Next, either copy over or enter the code as it appears in the ZIP bundle available for
download on the Packt Publishing FTP site. We've le it out here in order to save on
space.
3. Run the code lisng at the command line as follows. A new le named __main__.
odt should appear in the current working directory.
(text_processing)$ python odt_build.py
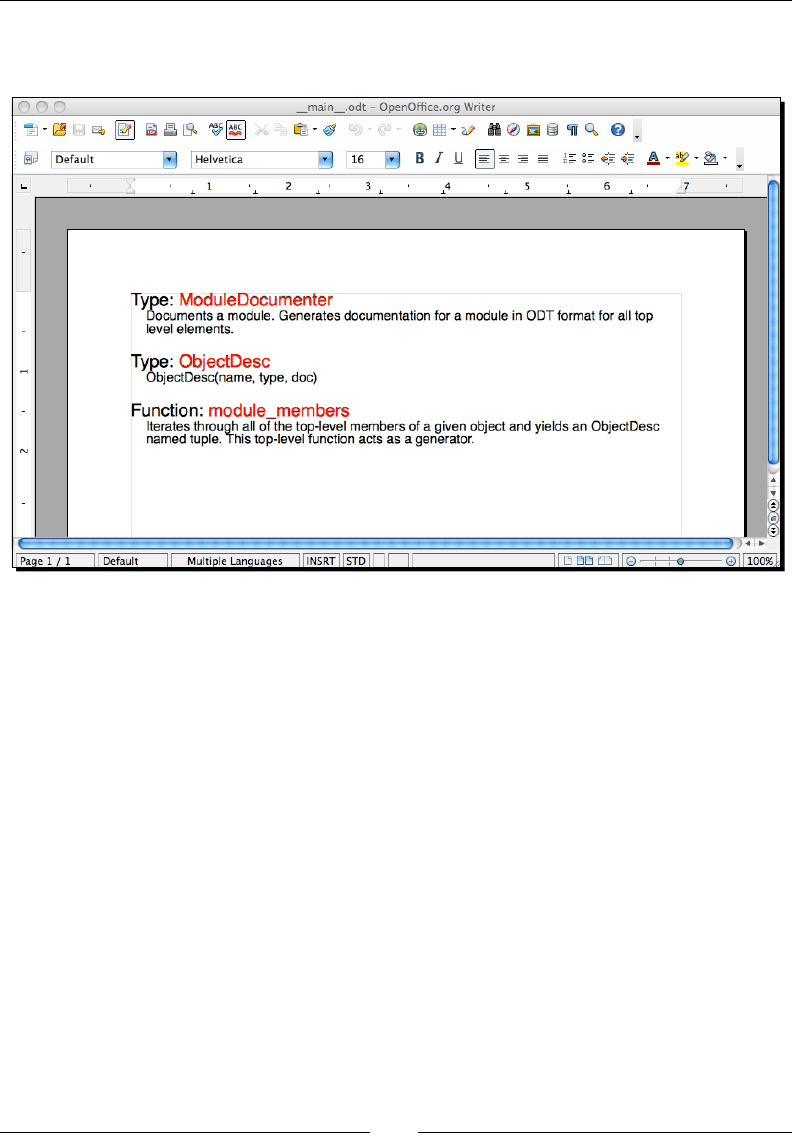
Advanced Output Formats
[ 274 ]
4. Open the new document le in OpenOce Writer. The contents should resemble
the following screenshot:
What just happened?
We used the inspect module to generate a snapshot of the running le. We then used that
informaon to generate an OpenDocument text le documenng the example. Let's step
through and look at the relevant parts.
The rst thing we did was import the required objects. All style informaon comes
from the odf.style module. Here, we imported Style, TextProperties, and
ParagraphProperties. A lile bit more on these in a minute. Next, we imported
OpenDocumentText from odf.opendocument. We're dealing with an OpenDocument text
le, so this is all we'll need.
Lastly, we bring in P and Span. These are much like their HTML counterparts. The P funcon
denes a paragraph class that acts as a single block of content, whereas the Span funcon
denes an inline text snippet that can become part of a larger paragraph.
Next, we dene three styles. Each style is then referenced later when we generate our
document content. As stated earlier, the odfpy module is generally a wrapper around
ElementTree objects, so this approach should feel somewhat familiar to you.

Chapter 9
[ 275 ]
Let's take a closer look at one of the style denions.
DOC_STYLE = Style(name='DOC_STYLE', family='paragraph')
DOC_STYLE.addElement(
TextProperties(
color='#000000', fontsize='12pt', fontfamily='Helvetica'))
DOC_STYLE.addElement(
ParagraphProperties(
marginbottom='16pt', marginleft='14pt'))
Here, we create a Style element and name it DOC_STYLE. It has a family of paragraph.
When we want to apply the style later, we'll need to refer to it by this name. The family
aribute categorizes which type of element it will apply to. If you aempt to apply a style in
a text family to an object created with P, it simply won't apply.
Next, we call addElement twice, each me passing in a new instance of a properties
class. The TextProperties call sets the display informaon for the text rendered within an
element implemenng this style. The ParagraphProperties call sets properes that are
unique to Paragraph generated elements.
The following table outlines the style opons we used for paragraphs and text elements. This
isn't an exhausve list. For more informaon, see the odfpy documentaon that is available
at http://www.osor.eu/projects/odfpy.
Style aribute Family Meaning
color text Sets the color of the text using six-digit hexadecimal
(HTML) notaon.
fontsize text, paragraph Sets the size of the text rendered within the container.
fontfamily paragraph, text Sets the font face used within the container.
margintop,
marginleft,
marginbottom,
marginright,
margin
paragraph Sets the margin.
Just in case you're slightly confused, each of the imported odfpy objects is
a funcon. P, Style, ParagaphProperties. All funcons. Calling them
simply returns an instance of odf.element.Element, which is a lower-level
XML construct.

Advanced Output Formats
[ 276 ]
Now, let's take a very brief tour of our module_members funcon. There's a lile bit
of magic going on here. In short, we introspect a Python module and yield informaon
regarding each top-level funcon and class that it denes. The informaon yielded is
contained in a namedtuple we dened previously. Python has some very powerful
introspecon abilies. For more informaon, point your browser at http://docs.python.
org/library/inspect.html.
Our ModuleDocumentor class does all of the ODT le generaon. In the __init__ method,
we set the output lename, create an empty document object, and call self._add_
styles. If we look at self._add_styles, we see the following three lines:
self.doc.automaticstyles.addElement(TYPE_STYLE)
self.doc.automaticstyles.addElement(NAME_STYLE)
self.doc.automaticstyles.addElement(DOC_STYLE)
In this step, we're adding the global styles we created earlier to our new document object so
they can be referenced by content. Technically, we're simply adding the XML data dened in
the style objects to the generated ODT XML data.
Now, skip on down to the __main__ secon. We create an instance of ModuleDocumenter
and pass it sys.modules['__main__'] and the string __main__. What does this mean?
We're passing in an instance of the currently running module.
The build method of ModuleDocumenter is fairly simple. We iterate through all of the
results yielded by the module_members generator and build our documentaon. As you can
see, we call self.doc.text.AddElement twice, once with the results of self._create_
header and once with the results of the P funcon. Again, the addElement approach
should remind you of some of the XML processing code we examined much earlier.
The _create_header method rst creates a new paragraph element by calling P. Then, it
concatenates two Span elements using two dierent style names: TYPE_STYLE and NAME_
STYLE. This gives our paragraph headings the look seen in the text document screenshot.
We then return the new paragraph.
The underlying XML generated is as follows (though this is not important, it may help with
your overall understanding):
<text:p>
<text:span text:style-name="TYPE_STYLE">Type: </text:span>
<text:span text:style-name="NAME_STYLE">ModuleDocumenter</text:span>
</text:p>
Aer generang the secon header, we build a standalone paragraph, which contains the
contents of each docstring. We simply use a dierent style. In all cases, the text content
was passed into the factory funcon as the value to the text keyword argument.
Chapter 9
[ 277 ]
The XML generated for each docstring resembles the following.
<text:p text:style-name="DOC_STYLE">ObjectDesc(name, type, doc)</
text:p>
Finally, we save our new ODT document by calling self.doc.save. Note that we don't
include a le extension. The save method automacally decides that for us based on the
document type if the second argument is True.
The odfpy package can be somewhat confusing, and the documentaon is
slightly lacking. For more informaon, see the odfpy site at http://odfpy.
forge.osor.eu/. If you're aempng to write more serious OpenDocument
les then reading the OpenDocument standard is very much recommended.
It is available online at http://www.oasis-open.org/committees/
download.php/12572/OpenDocument-v1.0-os.pdf.
Have a go hero – understanding ODF XML les
As we've said, the OpenDocument standard is XML-based. Each ODX le is nothing more
than a ZIP-compressed set of XML les (more accurately, a JAR le). Take a break from the
Python code for a minute and uncompress the example le we created in this chapter. You'll
learn a lot from wading through the contents.
Summary
In this chapter, we took a broad survey of three popular advanced output opons. We
also pointed out external resources should you need to do any in-depth work with
these le types.
Specically, we touched on the building and styling of simple PDF les using the ReportLab
Toolkit, managing nave Excel documents as opposed to CSV, and managing and
manipulang OpenDocument les like the ones used by OpenOce.
As a bit of a bonus, you also learned a bit more about Python's powerful introspecon
abilies as we built a self-documenng applicaon.
In the next chapter we'll look at processing advanced grammars using PyParsing and its
BNF-like notaon.

Advanced Parsing and Grammars
In this chapter, we'll look at how to dene slightly more advanced grammars
using specialized syntax. We'll then learn what it takes to move from a
grammar denion into running source code that can be used to process text
that ts into that dened grammar. As part of the process, we'll rst look at
some theory behind it, and then we'll implement with the handy third-party
PyParsing library. We'll also examine Python's Natural Language Toolkit,
which provides a high quality collecon of libraries for managing human
languages.
The contents in this chapter can be used to expand into much more detailed
text-processing areas. The foundaon laid here, in general terms, is what
programming language designers and language researchers might use. In fact,
if you download a Python source distribuon, you can view Python's grammar
les directly!
We'll specically look at the following points:
Backus-Naur Form (BNF) as it's used to dene context-free grammars, and what
exactly that means.
The dierence between LL and LR parsers.
Using the PyParsing libraries in a simple case, such as processing e-mail address input.
A more advanced peek at PyParsing as we extract informaon from a BIND
conguraon le. We'll also survey some of the common objects used in
conjuncon with PyParsing.
A brief introducon to the Python Natural Language Toolkit (NLTK), which provides
some extended processing capabilies. We'll also look at a couple of interesng
examples.
10

Advanced Parsing and Grammars
[ 280 ]
As we go through this chapter, remember that we're brushing over some of these topics
without going into much detail. That's okay. The goal of this chapter is to speed up your use on
PyParsing and the NLTK such that you can dive deeper into either package when you need to.
Dening a language syntax
Simply put, a grammar denes the syntax of a language. In a tradional language, it presents
a set of rules that cover sentence structure and word organizaon. In English, every sentence
should have both a subject and a predicate. But, how does this relate to processing textual data?
Just as natural languages have grammar rules that must be followed when authoring or
speaking them, text data may also be dened using a dened set of grammacal rules. Just
as an English sentence must include the components menoned previously, we can dene
a non-spoken grammar that states that a number must be followed by an operator, another
number, an equal sign, and then a nal number. So, for example, the following string would
be grammacally correct given those rules:
45+90=145
However, aempng to insert a variable into the mix would not be grammacally correct.
45+x=135
The preceding example is sll mathemacally valid, though it does not follow the grammar
rules laid out. We're interested in grammacal correctness. During parsing, this line should
generate an error. Let's take a minute and break the rst equaon lisng previously down a
bit more by spling it into its component parts.
1. First, we have two terms. In this example, they are 45 and 90.
2. Both terms are separated by a plus sign.
3. The second term is followed by an equal sign.
4. The equal sign is followed by the value of the equaon.
However, does that capture the enre grammacal denion? Well, not really. If we expand
upon the above points, we can come up with a much more complete denion.
1. We have two terms, made up of one or more digits in a series between 0 – 9. There
is no upper bound to the width of the number in each term.
2. We have a plus sign, which is not surrounded by any white space whatsoever.
3. Our second term is followed by an equal sign, which again is not buered by any
white space.
4. Finally, our value following the equal sign is grammacally equivalent to the terms
preceding it.
Chapter 10
[ 281 ]
Specifying grammar with Backus-Naur Form
The preceding numbered list gives us a nice descripon about our example equaon
grammar, but it isn't very computer friendly and can be up for interpretaon. Enter
Backus-Naur Form (in some contexts, you may hear Backus-Normal Form, they are
equivalent). Backus-Naur, or BNF, gives us a method to formally specify the grammar
of a text body, such as a computer programming language.
In a BNF grammar, terms on the le side are dened by terms on the right side. The
combinaon of both terms is considered a producon. A term is considered terminal if it
cannot be expanded any more (such as a literal), or non-terminal if it is an intermediate
value. Finally, BNF-dened grammars are context free. A context-free grammar is one in
which the le side only denes a single term and does not specify a direct ordering. In
contrast, a non-context-free grammar may dene literals and posion – or context – on the
le side of the producon. This denion works for our purposes.
BNF form was originally dened by John Backus and subsequently used by
Peter Naur with the denion of the Algol 60 language. Wikipedia provides a
good landing point for more informaon about BNF grammars at http://
en.wikipedia.org/wiki/Backus–Naur_Form.
So, now that we've blurted out a big long string of vocabulary words, let's take a look at what
our equaon might look like when rewrien as a BNF grammar.
<equation> ::= <number> <op> <number> '=' <number>
<number> ::= <digit> | <digit> <number>
<digit> ::= '0'|'1'|'2'|'3'|'4'|'5'|'6'|'7'|'8'|'9'
<op> ::= '+'
This probably looks familiar to you. If you've ever read an RFC document or a programming
language specicaon, you've probably seen a secon a lot like this. Actual syntax
somemes varies.
Looking at this example, we see that <equation>, <number>, <op>, and <digit> are all
non-terminal. In other words, they should expand into something else. On the other hand,
the plus sign and the list of digits are terminal literals. Once encountered, they cannot be
further expanded. The second line is of special interest. This is a recursive rule. It allows us to
dene a number as a single digit, or a single digit followed by another number. In turn, the
second number may simply be a digit, or a digit followed by another number.

Advanced Parsing and Grammars
[ 282 ]
Extended BNF, or EBNF, is an augmentaon to BNF that provides for repeon
and recursion via extended syntax. It's simply more concise. Any grammar that
is dened in EBNF can be described in BNF as well.
This is the system largely used to dene programming language syntax. There
exists a collecon of ulies known as compiler generators, which generate
source code meant for parsing text following a specic grammar. YACC, for
example, is an acronym for Yet Another Compiler-Compiler. The GNU Bison
project aims to do just this. More informaon is available at http://www.
gnu.org/software/bison/manual/index.html.
Grammar-driven parsing
When parsing an input stream based on a grammar denion, there are generally two
common approaches – LL and LR. Note that while all LL grammars can be parsed as LR, not
all LR grammars can be parsed as LL. An LL parser reads text from Le to Right, and applies
rules using a le-most associaon. An LR parser also reads text from Le to Right; however, it
applies rules using a right-most associaon. Both approaches are top-down and designed to
handle context-free grammar denions. Addionally, parsers are categorized by how many
characters of look-ahead they require to make a decision. An LL(1) parser requires only one
character of input at a me, whereas an LL(k) grammar requires up to k elements of input.
When creang an LL(1) parser, there are a couple of techniques that can be used, the
simplest of which ulizes a state table. In a generic sense, a simple algorithm is as follows:
1. Create tokens for both terminal and non-terminal symbols in our grammar. We'll use
this to compare values as we read them in.
2. Generate a state table, which recognizes which rule we've begun to process and
updates our state accordingly.
3. Read characters from our input source one at a me and compare them against our
current rule. Literals are dropped (match); characters that represent the beginning
of a rule then trigger that rule to expand. The next iteraon again aempts to match
the expanded rule values against the input character.
4. Anything else is a syntax error.
Prey complex, and this is just a simple case! Fortunately, we can implement grammar-based
parsing in Python using the PyParsing library, without the need to worry about intricate
parser details.
Parser implementaon is a science in itself. It's a fundamental part of
programming language design and is worth understanding in greater detail
if you intend to develop a domain-specic language of your own. For more
informaon, Wikipedia provides a wealth of informaon. A good starng point is
http://en.wikipedia.org/wiki/Syntax_analysis.
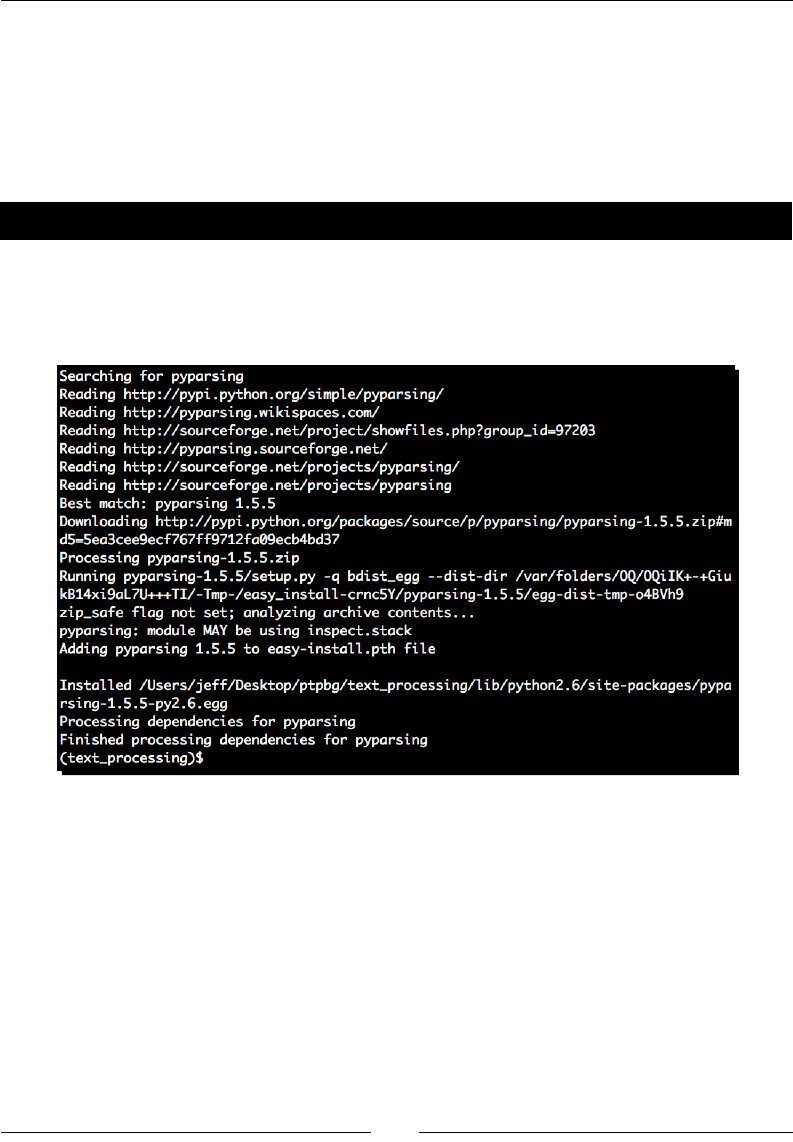
Chapter 10
[ 283 ]
PyParsing
PyParsing is a third-party library that allows the developer to process simple grammars using
nave Python code. The package is quite exible in that it provides mechanisms for simple
parsing, naming results, and assigning acons to matched values. We'll take a closer look at
all of these features here.
Time for action – installing PyParsing
As with other third-party ulies, it can be installed via the easy_install command. Go
ahead and enter your virtual environment and do that now.
(text_processing)$ easy_install pyparsing
What just happened?
Like we've done a few mes before, we installed a third-party module. Let's make sure the
install completed successfully by simply starng our interpreter and checking the package
version.
Python 2.6.1 (r261:67515, Feb 11 2010, 00:51:29)
[GCC 4.2.1 (Apple Inc. build 5646)] on darwin
Type "help", "copyright", "credits", or "license" for more information.
>>> import pyparsing
>>> pyparsing.__version__
'1.5.5'
>>>

Advanced Parsing and Grammars
[ 284 ]
Now, let's look at a smaller snippet to help with your understanding a bit before we get
started. In the following example, we dene a very basic grammar and parse the input string.
Each matched token becomes an element in the returned list.
Python 2.6.1 (r261:67515, Feb 11 2010, 00:51:29)
[GCC 4.2.1 (Apple Inc. build 5646)] on darwin
Type "help", "copyright", "credits", or "license" for more information.
>>> from pyparsing import Word
>>> grammar = Word('flower') + ';'
>>> grammar.parseString("low;")
(['low', ';'], {})
>>>
That's generally all there is to it. We dene a grammar and feed it an input stream. In this
example, our grammar is composed of any word composed of the leers in the string
flower, followed by a semicolon. The library tokenizes the input stream based on our rules
and returns a list of matched tokens. We're then free to process however we wish.
Time for action – implementing a calculator
Given that our BNF example earlier in the chapter allows for simple arithmec, it only makes
sense to extend it and implement a text-based calculator as our rst PyParsing example. In
this example, we'll do just that. We'll only support four basic operaons and will limit our
example to two terms.
1. Create a new le and name it calc.py.
2. Enter the following Python code:
import sys
import operator
from pyparsing import nums, oneOf, Word
from pyparsing import ParseException
# Map math operations to callable functions within
# the operator module.
op_map = {
'*': operator.mul,
'+': operator.add,
'/': operator.div,
'-': operator.sub
}
# define grammar
MATH_GRAMMAR = Word(nums).setResultsName('first_term') + \
oneOf('+ - / *').setResultsName('op') + \

Chapter 10
[ 285 ]
Word(nums).setResultsName('second_term')
def handle_line(line):
"""
Parse a newly read line.
"""
result = MATH_GRAMMAR.parseString(line)
return op_map[result.op](int(result.first_term),
int(result.second_term))
while True:
try:
print handle_line(raw_input('> '))
except ParseException, e:
print >>sys.stderr, \
"Syntax err at position %d: %s" % (e.col, e.line)
3. Run the example and try a few combinaons. Take note of various excepon cases
and syntax errors.
(text_processing)$ python calc.py
What just happened?
First, we imported two modules from the standard library. The sys module gives us access to
the standard error stream. We use the operator module to access simple math funcons.
The operator module provides named funcons for the standard Python operators.
From the pyparsing package, we imported nums, oneOf, and Word. Each of these objects
is used to generate our simple Python-based grammar later in the script, so let's look at each
one in a bit more detail.
The nums object is simply a string containing all of the ASCII representaons of digits 0 – 9.
In other words, nums.isdigit would return True. Next, we have the oneOf object. This
is a funcon that generates an instance of pyparsing.Regex. Lastly, we have the Word
object. This is a class that matches words that are composed of characters passed in during
instance creaon.

Advanced Parsing and Grammars
[ 286 ]
Now, with that background, we introduce the following grammar, which has been simplied
here for discussion:
Word(nums) + oneOf('+ - / *') + Word(nums)
In English, this states that we want a word that is made up of only digits, followed by only
one of the characters in the operator set, followed by another word that is made up of only
digits. The PyParsing library overrides __add__ such that chaining objects together like this
creates a pyparsing.And class. The resulng scan operaon requires that all elements in
its set match.
In this example, we called setResultsName for each element in MATH_GRAMMAR. This lets
us refer to the matched values in a cleaner fashion, rather than relying on messy and error-
prone array indexing. Our rst example snippet returned a simple list. Referencing a larger
return set via indexing would make for some rather ugly Python code!
Now, we can skip to our handle_line funcon. Here, we accept a single parameter, which
is the result of a raw_input call. We pass that value to MATH_GRAMMAR.parseString.
If the text entered by the end user matches the grammar we dened then we perform the
math operaon and return the value.
The parseString method is one of a few dierent approaches towards reading and
handling input text. This method is much like the re.match funcon we covered in an
earlier chapter. It expects the enre input string to match the specied grammar. In addion,
the following driver funcons are available on PyParsing objects:
Method Descripon
parseFile Execute the parse expression on the given le or le name. If this
method is passed a le name as opposed to a le-like object, the le is
opened, read in is enrety, and then parsed.
parseWithTabs By default, parse* methods expand tabs to spaces. This method
overrides that funconality. Note that this doesn't actually take an input
source; rather, it must be called prior to the parse methods to tell the
parser that tabs should not be expanded.
scanString Scans the input string for occurrences of the expressions. This is a
generator that yields a tuple of the form (matched, start pos, end
pos) for each match in the given input string.
searchString Given an input string, this method returns expression matches found
anywhere in the string.
If a parsing error occurs, the parseString method will raise a ParseException. We
catch that in this example and print out some helpful diagnosc informaon to the console.
In addion to the enre input string, the following informaon is also available on this
excepon object.

Chapter 10
[ 287 ]
Aribute Descripon
lineno The line number of the excepon text. This is especially
relevant when parsing using parseFile.
col The column where the parsing error occurred.
markInputLine This method extracts the excepon line from the input
string and marks the locaon of the excepon.
Finally, in our example, we print the calculated value of the excepon text to the screen
(errors are directed to standard error).
Parse actions
In the previous example, we translated our matched terms to integer types by calling the
int factory method directly. While this is technically correct, PyParsing provides a much
cleaner and event-driven way of handling this.
Time for action – handling type translations
Each PyParsing object allows us to set an associated acon that is triggered in the event of a
match by calling the setParseAction method before aempng to scan the input string. In
this example, we'll modify our lile calculator program to handle type translaons that way.
1. Using calc.py as a template, create a new le, and name it calc-b.py.
2. Update the lisng to contain the following code:
import sys
import operator
from pyparsing import nums, oneOf, Word
from pyparsing import ParseException
# Map math operations to callable functions within
# the operator module.
op_map = {
'*': operator.mul,
'+': operator.add,
'/': operator.div,
'-': operator.sub
}
def to_i(s, loc, toks):
"""Translate to int"""
return int(toks[0])
# define grammar
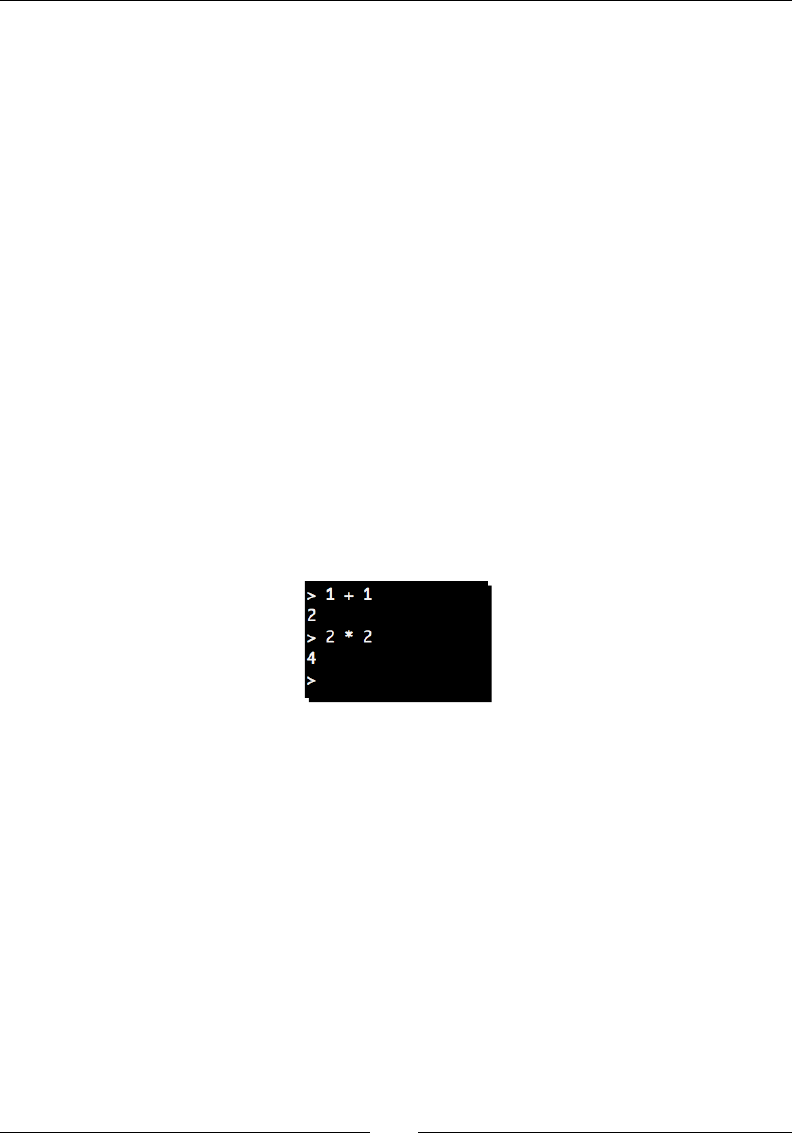
Advanced Parsing and Grammars
[ 288 ]
MATH_GRAMMAR = Word(nums).setResultsName('first_term').
setParseAction(to_i) + \
oneOf('+ - / *').setResultsName('op') + \
Word(nums).setResultsName('second_term').setParseAction(to_i)
def handle_line(line):
"""
Parse a newly read line.
"""
result = MATH_GRAMMAR.parseString(line)
return op_map[result.op](result.first_term,
result.second_term)
while True:
try:
print handle_line(raw_input('> '))
except ParseException, e:
print >>sys.stderr, \
"Syntax err at position %d: %s" % (e.col, e.line)
3. Run the example and evaluate a few arithmec expressions to ensure your changes
work as expected.
(text_processing)$ python calc-b.py
What just happened?
We made a couple of small updates to our applicaon so that our type translaons happen
as our input is parsed, rather than aer the fact. Let's look at what we did.
First, we added our to_i funcon. This serves to transform text representaons of numbers
into integers. When called by the PyParsing engine, it is passed three arguments: the original
string, the locaon of the match, and each individual token in list format. As we're matching
an enre word here, it's safe to translate the value at a zero index.
We're condent this translaon will occur without excepon. In order to trigger the call back in
the rst place, the string must have matched the equivalent of a ^[0-9]+$ regular expression.

Chapter 10
[ 289 ]
Next, we assign the callbacks via setParseAction methods on the PyParsing objects. Each
me a match occurs, our method will be called with the previously-described arguments. As
our to_i funcon returns a value, it is returned when parseString returns rather than
what was originally matched.
Finally, we simply update our handle_line funcon to no longer do the integer translaon
as that's no longer needed.
This is a rather powerful construct as it allows us to translate matched tokens into any
value we'd like. Or, we can simply leave them alone and trigger an unrelated acon, such as
keeping a tally.
Have a go hero – using events to lookup operators
Our operator lookup within handle_line is sll slightly dicult to read. As it's possible
to return any data type we'd like from the callback registered with parseAction, update
the applicaon to return the operator module funcon corresponding to the requested
mathemacal operaon in a more event-driven fashion. In short, do the map lookup in a
registered funcon.
Suppressing parts of a match
In some situaons, you'll want to match based on a somewhat complicated paern, but only
extract a subset for actual use. In many situaons, the inial approach would be to perform
your PyParsing match, but then extract your useable data via string manipulaon. PyParsing
provides a useful suppression mechanism and keeps us from having to do this.
Time for action – suppressing portions of a match
In this example, we'll write a simple grammar for parsing a BIND DNS conguraon le. In
our regular expressions chapter, we learned out to process a zone le. In this example, we'll
extract data from a /etc/named.conf le using PyParsing.
1. First, we'll create some input data. Create a le named named.conf and copy in the
following data. This example leaves o the values found in a named.conf options
secon for brevity.
zone "example01.com" IN {
type master;
file "example01.com.dns";
allow-update { none; };
};
zone "example02.com" IN {
file "example02.com.dns";

Advanced Parsing and Grammars
[ 290 ]
type master;
allow-update { none; };
};
2. Now, create a Python script named conf_parse.py and enter the following code
lisng:
import sys
from pyparsing import Word, Suppress
from pyparsing import And, Or
from pyparsing import Literal, QuotedString
from pyparsing import Optional, alphas
# Some Standard tokens that we'll find in
# a BIND configuration.
stmt_term = Suppress(';')
block_start = Suppress('{')
block_term = Suppress('}') + stmt_term
def in_block(expr):
"""
Sets a config value in a block.
A block, in this case, is a curly-brace
delimited chunk of configuration.
"""
return block_start + expr + block_term
def in_quotes(name):
"""
Puts a string in between quotes.
"""
return QuotedString('"').setResultsName(name)
# Zone type, whether it's a master or a slave zone
# that we're loading.
type_ = Suppress('type') + \
Or((Literal('master'), Literal('slave')
)).setResultsName('type_') + stmt_term
# Zone file itself.
file_ = Suppress('file') + in_quotes("file") + stmt_term
# Where we can receive dynamic updates from.
allowed_from = Or((Literal('none'), Word(alphas + '.')
)).setResultsName('update_from') + stmt_term
# Dynamic update line
allow = Suppress('allow-update') + in_block(allowed_from)
# Body can be in any order, we're not picky
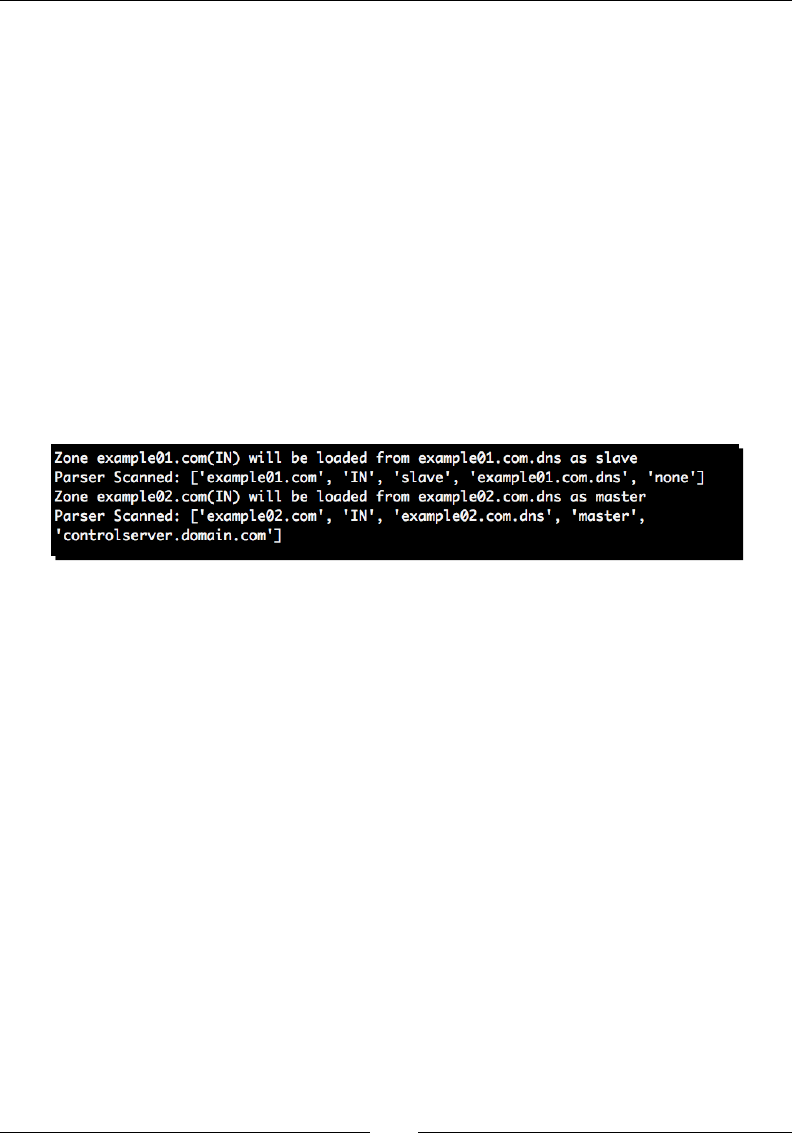
Chapter 10
[ 291 ]
# so long as they all appear.
body = type_ & file_ & allow
# define a zone configuration stanza
zone = Suppress('zone') + in_quotes("zone") + \
Optional('IN', default='IN').setResultsName('class_') +\
in_block(body);
if __name__ == '__main__':
for z in zone.searchString(open(sys.argv[1]).read(),):
print "Zone %s(%s) will be loaded from %s as %s" % \
(z.zone, z.class_, z.file, z.type_)
# For debugging and example purposes
print "Parser Scanned: %s" % z
3. Now, let's run the example at the command line:
(text_processing)$ python conf_parse.py named.conf
What just happened?
Let's look at this from two dierent angles. First, we'll break down the structure of the
conguraon le into a series of logical rules so we can understand how it should be parsed.
Next, we'll look at the code as implemented.
Understanding BIND conguration format
The conguraon le format is fairly straighorward, though a bit complex. The language is
rich and uses braces and semicolons to delineate statements and conguraon stanzas. Given
the preceding snippet, we'll dene our PyParsing grammar using the following guidelines:
1. Each stanza should begin with the literal keyword zone. This marks the beginning of
a standalone zone conguraon.
2. The zone keyword should be followed by a zone name, enclosed in double quotes.
This is the name of the DNS zone that BIND will serve. The name should be followed
by an oponal IN keyword, which is the DNS class.
3. An open curly brace begins the conguraon scope for the zone named in step two.
Points four, ve, and six can occur in any order, but they must be present here in our
example.
Advanced Parsing and Grammars
[ 292 ]
4. The keyword type, followed by slave or master. This dictates whether or not
the zone is a master zone or should be loaded from a master server (yes, we le
something o here).
5. The keyword file, followed by the name of the zone le containing records for this
specic zone. The lename should be in double quotes.
6. The keyword allow-update, followed by the beginning of a new block. The block
should contain either the keyword none or the name of a host that can issue
dynamic updates for this zone. The block should then close.
7. A closing brace, followed by a semicolon. This ends the conguraon scope for a
specic zone.
Now, every logical element (statement) should be ended with a semicolon. This includes
single conguraon direcves as well as end-of-block (}) ideners.
Whitespace is also insignicant in a BIND conguraon le. We should simply
ignore it and use the tokens above. It has no meaning.
Implementing parser
We then put together a script, which does some elementary parsing of our BIND
conguraon le. We don't support the full grammar, but now that we've built out an
example that shouldn't be too dicult to do.
First, we dened some global terms – stmt_term, block_start, and block_term.
However, unlike previous examples, we wrapped our string literals in a Suppress object.
This approach lets us require the tokens for a correct parse, but does not include them in
the list that is returned. Basically, we're ignoring tokens that have no meaning other than
providing for layout. For example, without Suppress, we might expect to see the following:
Python 2.6.1 (r261:67515, Feb 11 2010, 00:51:29)
[GCC 4.2.1 (Apple Inc. build 5646)] on darwin
Type "help", "copyright", "credits", or "license" for more information.
>>> from pyparsing import Word, Suppress
>>> grammar = Word('abc') + ';'
>>> grammar.parseString('a;')
(['a', ';'], {})
>>>
Noce how the results returned include the semicolon. While it's required for syntaccal
correctness (as per our own denion), we don't so much care about it in our results. By
wrapping the literal in a Suppress object, we alter the returned values.
>>> grammar = Word('def') + Suppress(';')
>>> grammar.parseString('f;')

Chapter 10
[ 293 ]
(['f'], {})
>>> grammar.parseString('f')
Traceback (most recent call last):
File "<stdin>", line 1, in <module>
File "/Users/jeff/Desktop/ptpbg/text_processing/lib/python2.6/
site-packages/pyparsing-1.5.5-py2.6.egg/pyparsing.py", line 1100, in
parseString
raise exc
pyparsing.ParseException: Expected ";" (at char 1), (line:1, col:2)
>>>
Here, we see that the semicolon is no longer included in the returned value. However, also
note that if we fail to include it, we run into a ParsingException because we didn't fall in
line with our supplied grammar denion.
Next, we dened a pair of helper funcons, in_block and in_quotes. These funcons
ought to be fairly straighorward. The rst takes an expression and wraps it in our dened
block_start and block_term tokens. The expression can either be a plain text literal
or a PyParsing object set. The in_quotes generates a QuotedString object and gives it
a results name, like we covered earlier. The QuotedString object matches strings in the
form of "test" or "filename.txt". The resulng object already has its quotes stripped
o for us by default.
Next, we dene our conguraon le grammar using PyParsing objects. In order, we dene
our zone type, zone le, allowed update clients, and our allowed update conguraon block.
Finally, we combine all of those as a body using the logical-AND operator. PyParsing overrides
__and__ such that each value is matched, but in any order.
Finally, we build our zone grammar by matching the zone keyword and zone name followed
by the oponal IN. Finally, we match the body by appending the value of in_block(body)
to the object we're building up.
Now, jump down to the __name__ == '__main__' secon. Here, we open our input le
and read it in. We iterate over the results of zone.searchString and print out informaon
regarding the enre zone denions found in the le.
PyParsing objects
We introduced quite a few new objects to the mix in the previous example. Let's take a quick
survey of some of the other parsing classes available within PyParsing. This isn't all-inclusive.
For more informaon, please see the PyParsing API documentaon available at http://
pyparsing.wikispaces.com/Documentation.

Advanced Parsing and Grammars
[ 294 ]
Here, we'll take a quick survey of the following classes.
And
CharsNotIn
Combine
FollowedBy
Keyword
Literal
MatchFirst
NotAny
OneOrMore, ZeroOrMore
Regex
StringStart, StringEnd
White
And
This class requires that all expressions be matched in the given order. Expressions may be
separated by white space. Using the + operator to concatenate expressions results in the
creaon of an And object that includes all of those expressions.
CharsNotIn
This class is responsible for matching words built from characters that are not in a given
sequence. This can be thought of as the negaon of a Word object. For example, consider
the following snippet.
>>> g = pyparsing.CharsNotIn('abcd')
>>> g.parseString('def')
Traceback (most recent call last):
File "<stdin>", line 1, in <module>
File "/Users/jeff/Desktop/ptpbg/text_processing/lib/python2.6/
site-packages/pyparsing-1.5.5-py2.6.egg/pyparsing.py", line 1100, in
parseString
raise exc
pyparsing.ParseException: Expected !W:(abcd) (at char 0), (line:1,
col:1)
>>> g.parseString('xyz')
(['xyz'], {})
>>>
As expected, the result is the opposite that we would expect from a Word object. This is a
useful approach if you're aempng to weed unwanted characters out of a string value.

Chapter 10
[ 295 ]
Combine
This class combines all matched tokens into a single result string. This one is easier explained
with an example rather than a descripon.
>>> g = pyparsing.Combine(pyparsing.Word("flower") + '-' + pyparsing.
Word("power"))
>>> g.parseString('low-rope')
(['low-rope'], {})
>>>
Note that the results include only a single string with a value of low-rope. Without using
the Combine class, the results would be returned as ['low', '-', 'rope'].
FollowedBy
This class performs a look-ahead match. Much like its regular expression cousin of the same
name, it does not advance the parse posion and it returns a null token. This is helpful for
matching condionally.
Keyword
This class matches a specied string as a keyword. A keyword is dened as a string that is
immediately followed by a non-keyword character. So, to reuse our conguraon parser
example, we could have specied our zone type as follows:
>>> k = pyparsing.Keyword('type') + pyparsing.Word(pyparsing.alphas) +
';'
>>> k.parseString('type master;')
(['type', 'master', ';'], {})
Literal
We've used this class in a few places so far. A Literal object denes just that, a string
Literal. In contrast to Word, Literal only matches exactly. Word will match any word
made up of allowed characters. Including a literal string in an expression causes the literal
string to be wrapped by Literal.
MatchFirst
This class requires that at least one expression matches (mulple may be passed as a
sequence into the __init__ method). If more than one match is found, the rst one is
returned. This object may be constructed with the logical | operator as the __or__ special
method is overridden on PyParsing objects.

Advanced Parsing and Grammars
[ 296 ]
NotAny
This class is also a look-ahead operaon. Like FollowedBy, it does not advance parse
locaon within the given input string. It simply ensures the input string does not match at
the current locaon. It does not skip over white space. Also, it may be built using the logical-
NOT operator, '~'.
OneOrMore, ZeroOrMore
Given an expression, these elements match a collecon of expressions. Addionally, if
wrapped in a Group, all of the matches are returned in a sub-list of the return value. Let's
look at a small example here.
>>> g = pyparsing.Group(
… pyparsing.OneOrMore(pyparsing.Literal('a'))) + 'b' + 'c'
>>> g.parseString('aaaaabc')
([(['a', 'a', 'a', 'a', 'a'], {}), 'b', 'c'], {})
>>>
As a was wrapped in a OneOrMore clause, which was in turn wrapped in a Group class, all of
the a values are returned in a single list. The subsequent matches, however, are not. This of
course is not constrained to literals. The expression objects can be of arbitrary complexity.
Regex
This class matches strings that match a given regular expression. It also uses the built-in
Python regular expression engine, so any valid Python regular expression is valid here.
StringStart, StringEnd
Much like ^ and the $ regular expression anchors, StringStart and StringEnd match if
the parser posion is either at the start, or at the end, of the input string.
White
This class matches white space. Normally, PyParsing treats white space as insignicant. Use
this if you need to ensure proper white space layout. By default, new lines, carriage returns,
tabs, and spaces are included. It is possible to override this behavior by passing a ws keyword
argument containing a sequence of valid white space characters.
Debugging
All of these objects inherit from ParserElement. They all may be used as an entry
point into the parser by calling the appropriate methods. Addionally, they all support a
setDebug method, which enables the display of debugging messages generated while
running through paern matching. This is a very useful tool when a dened grammar simply
isn't matching as you understand it should. For example, let's set the debugging ag on a
small example and look at the output generated by the parser.

Chapter 10
[ 297 ]
Python 2.6.1 (r261:67515, Feb 11 2010, 00:51:29)
[GCC 4.2.1 (Apple Inc. build 5646)] on darwin
Type "help", "copyright", "credits", or "license" for more information.
>>> from pyparsing import Word
>>> w = Word("underground") + '-' + Word("party")
>>> w.setDebug()
{{W:(unde...) "-"} W:(part...)}
>>> w.parseString('nerd-art')
Match {W:(unde...) "-" W:(part...)} at loc 0(1,1)
Matched {W:(unde...) "-" W:(part...)} -> ['nerd', '-', 'art']
(['nerd', '-', 'art'], {})
>>>
As you can see, the parser tells us what it's doing so we can follow through. Take a minute to
enable debugging output on our conguraon le parser – it can get quite verbose!
Have a go hero – extending our conguration le parser
The systems administrators out there probably noced a few problems with our BIND
conguraon parser. In fact, we've le out quite a bit. Using the BIND 9 conguraon
reference, which is available at http://www.bind9.net/manual/bind/9.3.2/Bv9ARM.
ch06.html, ensure that we fully support allow-update and the conguraon of a master
server for zone transfers should the congured zone type be a slave. Of course, you're more
than welcome to implement an enre parser if you would like!
Processing data using the Natural Language Toolkit
The Python Natural Language Toolkit (NLTK) is another third-party applicaon used for
processing textual data. The NLTK, however, is geared more towards natural language
understanding. In this context, a natural language is one used every day such as English,
Russian, or French.
In addion to a collecon of parsers, the NLTK includes advanced ulies such as stemming,
tokenizing, and classicaon. Classicaon in this sense means advanced computer-learning
algorithms such as Bayes classiers and k-means clustering.
You're probably already familiar with the Bayesian lters and don't even realize
it! If you've ever trained your mail reader to understand what spam looks like,
you've probably been training a Bayesian system.
Advanced Parsing and Grammars
[ 298 ]
Time for action – installing NLTK
By now, you should know the drill. To install NLTK, you'll simply use the easy_install
ulity as we have previously. Go ahead and do that now. We'll leave o the easy_install
output this me in order to conserve a few addional trees. As an aside, if you receive an
error about a missing yaml module, you'll need to run easy_install pyyaml as well.
Once the install is completed, let's go ahead and import the module and check the version.
This way, we know we installed NLTK correctly.
Python 2.6.1 (r261:67515, Feb 11 2010, 00:51:29)
[GCC 4.2.1 (Apple Inc. build 5646)] on darwin
Type "help", "copyright", "credits", or "license" for more information.
>>> import nltk
>>> nltk.__version__
'2.0b9'
>>>
What just happened?
We installed the most recent version of NLTK from the Python Package index locally into our
virtual environment.
We're running a pre-release of NLTK 2.0 here; your version may be slightly dierent.
However, that shouldn't cause a problem.
NLTK processing examples
We'll look at a couple of small examples here. The Python NLTK has excellent documentaon
available online. If you're interested in natural language processing, reading it is a must. For
more informaon, point your browser to http://www.nltk.org/documentation.
As of the me of wring, Python 3 is not supported
by the NLTK. Examples require Python 2.
Removing stems
Words are oen composed of a stem and a sux. For example, take the word "processed".
The stem of this word is process and it has a –ed sux. The sux indicates a past tense
acon. In this case, the acon of processing has completed (we just used another, catch
that?). We also see this when we make a singular into a plural. For example, when we go
from having one elephant to having 16 elephants.

Chapter 10
[ 299 ]
The problem is further complicated when internaonalizaon makes it into the picture.
While the plurality rules for English are fairly straighorward, that's not always the case.
Russian, for example, changes the sux for plurals based on word gender, case, or even
whether or not the object is alive (and any associated adjecves change, too!).
Fortunately, this is handled relavely easy with NLTK. The following snippet outlines how this
can be handled:
Python 2.6.1 (r261:67515, Feb 11 2010, 00:51:29)
[GCC 4.2.1 (Apple Inc. build 5646)] on darwin
Type "help", "copyright", "credits", or "license" for more information.
>>> from nltk import stem
>>> stemmer = stem.PorterStemmer()
>>> for word in 'The dinosaurs once roamed the earth!'.split():
... stemmer.stem(word)
...
'The'
'dinosaur'
'onc'
'roam'
'the'
'earth!'
Here, we created an instance of the PorterStemmer class and used it to remove suxes
from the words in our example sentence. However, note what happens with the word once.
The response isn't quite what we expected when we pass a word without a sux.
Discovering collocations
A collocaon is a collecon of words that oen appear together. A pairing is a termed
bigram and a triple is referred to as a trigram. Given a segment of text, our goal is to parse
through and discover common, related phrases. The following example uses the raw text of
Mary Shelley's Frankenstein as its input data:
(text_processing)$ python
Python 2.6.1 (r261:67515, Feb 11 2010, 00:51:29)
[GCC 4.2.1 (Apple Inc. build 5646)] on darwin
Type "help", "copyright", "credits", or "license" for more information.
>>> from nltk.collocations import BigramCollocationFinder
>>> from nltk.collocations import BigramAssocMeasures
>>> bigrams = BigramAssocMeasures()
>>> finder = BigramCollocationFinder.from_words(open('monster.txt').
read().split())
>>> finder.nbest(bigrams.pmi, 10)

Advanced Parsing and Grammars
[ 300 ]
[('"\'Great', "God!'"), ('"\'Heaven', 'forbid!'), ('"Compose',
'yourself,"'), ('"Devil,', 'cease;'), ('"Get', 'well--and'), ('"God',
'knows,"'), ('"Justine', 'Moritz!'), ('"Last', 'Thursday'), ('"No,',
'Justine,"'), ('"Poor', 'William!"')]
>>>
In this lile example, we read in the contents of our source and split on white space. This
became our input stream of words. Next, we created a finder based on our word list.
Finally, we found the top bigrams by calling the nbest method of our nder object. If we
wished to look for trigrams, we would use TrigramCollocationFinder instead.
If we want to rene our results, we can limit our results to words that appear a minimum
number of mes as well. This approach may provide for more accurate results depending on
the source data and expected usage.
Summary
In this chapter, we covered some parser basics up front in order to help you understand what
goes into libraries such as PyParsing and NLTK. It's generally not necessary to implement
your own LL or LR parser as there are some very high quality third-party libraries that already
contain high quality implementaons.
We then moved on to our introducon of PyParsing and NLTK. Specically, we went over
grammar denions, parsing terminology, and BNF grammars.
Once we covered some background, we looked at using PyParsing to handle a range of jobs
from a simple calculator to a more complex conguraon le parser. We then moved on to
the Python Natural Language Toolkit.
The next chapter will cover how to search and index textual data. We'll also look at indexing
and accessing text data that isn't in plain text format.

Searching and Indexing
In this chapter, we'll look at two closely related topics: indexing and searching.
Why are they related? Simple. Sure, you can search without an appropriate
index, but you'll quickly run into performance troubles as your dataset
grows beyond a trivial size. If you've ever done any sort of database-driven
development, consider the performance problems you might have run into
when tesng for a value in a non-indexed column.
We'll introduce you to some methods for searching, but more importantly, indexing your
data for more ecient search mes in this chapter. Our concentraon will be on building
an index, which you'll then search against. Specically, we'll dive into the following topics in
some form:
Searching for texts using a straight scan and why this is a poor technique for looking
through large les.
Building full-text indexes using the Nucular third-party package.
We'll cover what's involved with maintaining a text index created with the Nucular
package.
Extended abilies of Nucular such as word proximity and separang data into elds.
Extracng searchable content out of proprietary and non-textual formats such as
Microso Word and Adobe PDF.
Yes, we know Nucular is spelled incorrectly. The ne folks that created and maintain the code
base chose that spelling. If you're interested in learning why they chose it, see their project
website at http://nucular.sourceforge.net/.
11

Searching and Indexing
[ 302 ]
Understanding search complexity
Searching and indexing is one area in which plenty of research has been completed. While
it may seem simple on the surface, it's actually a rather complex problem. For example,
consider the possible runme of even the simplest approach.
The naïve approach one might take when aempng to nd a value in a text collecon
would be to simply iterate through the source data line by line while aempng to nd the
string in each line. Let's take a look at that approach.
Time for action – implementing a linear search
In this example, we'll use a collecon of messages from the comp.lang.python newsgroup
and mailing list. That provides for a nice large dataset spread across mulple les. The
message text les are available on the Packt Publishing site in FTP format.
1. Create a new le and name it text_scan.py. You should then enter the following
code:
#!/usr/bin/env python
import os
import sys
import time
from optparse import OptionParser
class StringNotFoundError(Exception):
"""String was not found"""
def search_dir(dirpath, string):
"""Search a file for a string"""
where = 0
for base_dir, dirs, files in os.walk(dirpath):
for f in files:
open_path = os.path.join(base_dir, f)
with open(open_path) as fhandle:
for line in fhandle:
if string in line:
where += 1
return where, open_path
# if we get here, it wasn't found.
raise StringNotFoundError(
"We didn't see %s at all" % string)
if __name__ == '__main__':
parser = OptionParser()
parser.add_option('-H', '--haystack',
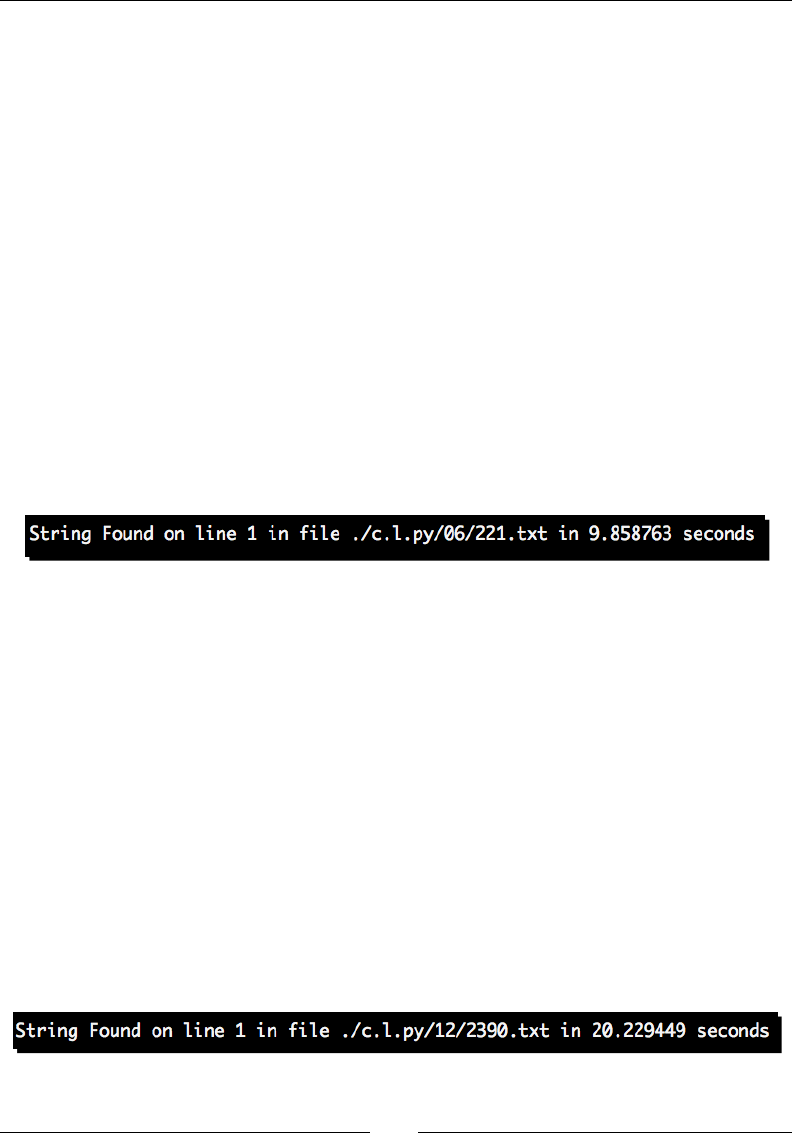
Chapter 11
[ 303 ]
help="Base directory to search")
parser.add_option('-n', '--needle',
help='What to look for')
opts, args = parser.parse_args()
if not opts.needle or not opts.haystack:
parser.error('Needle and haystack required')
try:
start = time.time()
line, path = search_dir(opts.haystack, opts.needle)
print "String Found on line %d in file %s in %f seconds" % \
(line, path, time.time() - start)
except StringNotFoundError, e:
print >>sys.stderr, str(e)
2. Now, let's run the example once in order to test funconality. Enter the command as
follows.
(text_processing)$ python text_scan.py -H ./c.l.py/ -n 'b20845b1-
7113-4768-9868-85e41d690c35'
What just happened?
We implemented a simple method for scanning text for a contained value. This code
shouldn't require much explanaon as we really haven't introduced any new concepts here.
In short, we simply walked through a directory containing all of the messages sent to comp.
lang.python for a period of one year. For each month, we read all of the available posts.
Then, we scanned each post for the given text. In this case, the given text was the message
ID of a message in July.
Now, what do you suppose the major drawback to this method is? If you look at the example
output, you'll see that our match occurs in just about 9.8 seconds. Now, July isn't going to be
the last month searched. Let's update our scan to check for the message ID of a post sent in
December.
(text_processing)$ python text_scan.py -H ./c.l.py/ -n \
'4dc0cfea0912241010k5600206bk21ae97a5c284eb05'
Searching and Indexing
[ 304 ]
Wow! When our match occurs at the midway point, our code completes execuon in less
than ten seconds. That may be acceptable in some circumstances. But, when we search for
a string that occurs near the end of the year, our search takes over 20 seconds. That's more
than twice as long as our rst search. What do you suppose would happen if we had a text
input source 100 mes larger than this? Perhaps 1,000 mes larger?
This is an example of a linear algorithm. The amount of me it takes to complete is a
funcon of the size of the input data and it's directly proporonal. For every byte added, our
search me theorecally increases by the same me period (however small). It should be
clear that this approach is ne when searching small amounts of data, but becomes unusable
when the source text grows (or has to be accessed oen).
Algorithm complexity is really beyond our scope; however, it's an interesng
topic. Usually, complexity is wrien in "big-oh" notaon. Algorithms tend to fall
into buckets such as O(n), O(log n), O(n2), and so on. If you're interested
in reading up on analysis techniques, O'Reilly's Praccal Algorithms in C gives
quite a nice overview on it.
Have a go hero – understanding why this is bad
Take a minute and run a few sample searches on the data and plot the me on a piece of
paper. Along the x-axis, keep track of where your match happened. Along the y-axis, mark
the me. When you connect the dots, you'll see what we mean by linear growth!
Text indexing
Now that we've explained how searching a datasource in a linear fashion can hurt your
applicaon's performance, we'll look at how you can speed it up by adding an index to it.
In this example, we'll use the Nucular libraries. Nucular is a third-party package, which is
installable via easy_install.
Time for action – installing Nucular
Let's go ahead and add the package to your virtual environment now. The following steps
should look familiar to you as we've run through this quite a few mes so far:
(text_processing)$ easy_install nucular
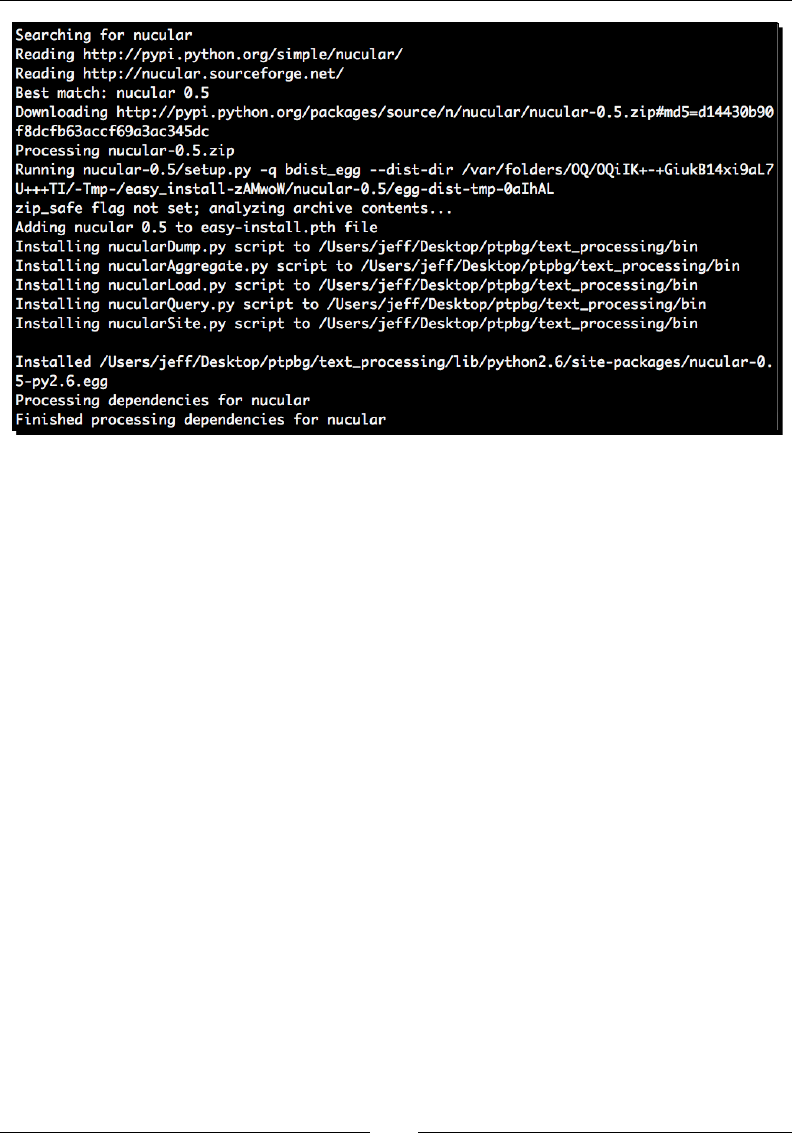
Chapter 11
[ 305 ]
What just happened?
We've installed another third-party module. It should be prey apparent by now that both
SetupTools and Distribute provide a very standard and common method for bundling and
distribung packages.
An introduction to Nucular
Now that you've installed the required frameworks, let's take a minute to look at some basic
usage.
When using Nucular, you'll need to provide an index directory. This directory then becomes
your index database. Index informaon is stored on disk as plain les rather than in a more
complex database structure. The following code creates a simple index directory.
(text_processing)$ python
Python 2.6.1 (r261:67515, Feb 11 2010, 00:51:29)
[GCC 4.2.1 (Apple Inc. build 5646)] on darwin
Type "help", "copyright", "credits", or "license" for more information.
>>> from nucular import Nucular
>>> session = Nucular.Nucular('nuke')
>>> session.create()
In the preceding example, we passed in a directory named nuke, which will become the
locaon of our index database. The object returned is an instance of Nucular.Nucular and
will be the entry point for all of our work with our newly-created text index.
Searching and Indexing
[ 306 ]
Note that the directory specied in the Nucular call does not need to exist; the
framework will create it for us. However, if the directory already exists, Nucular
will not remove contents unless you tell it to.
Now that we have a congured data store and a session object, the next step is to sck some
informaon in there. This is done by creang diconaries that contain the informaon we
wish to make searchable. Let's add some data to our index.
>>> session = Nucular.Nucular('nuke')
>>> dog = {'breed': 'Siberian Husky', 'color': 'White and Grey',
'happy': 'Being Cold'}
>>> dog2 = {'breed': 'Basset Hound', 'color': 'Brown', 'happy':
'sleeping'}
>>> session.indexDictionary('siberian', dog)
>>> session.indexDictionary('basset', dog2)
>>> session.store(lazy=False)
Well, that was prey easy! We simply create a series of diconaries and add an index to
them by calling the indexDictionary method of our session object. However, the last line
is somewhat interesng. We specied a lazy=False keyword argument. By default, new
entries are not visible unl an archive has been aggregated. This may be done directly via
Python, or by the nucularAggregate.py script that was installed into your path when we
ran easy_install.
The aggregaon updates index structures and makes new entries visible. Applicaons that
write frequently would be beer o batching whereas applicaons that write infrequently
can benet from immediate aggregaon.
Waing too long between aggregaons may cause performance problems. Doing
it in real me may also cause performance issues. The trick is to nd a proper
balance, depending on your workload.
Now that we have data in our session, we can begin a search on it using a series of dierent
methods. Let's take a look at a very simple search.
>>> query = session.Query()
>>> query.anyWord('Grey')
>>> query.resultDictionaries()
[{'color': 'White and Grey', 'i': 'siberian', 'breed': 'Siberian
Husky', 'happy': 'Being Cold'}]
>>>

Chapter 11
[ 307 ]
Again, this is a fairly straighorward operaon. The query.anyWord method searches
the index for the appearance of the word in the query, in any eld of the diconaries. If we
wanted to specify mulple words, we could do so by calling query.anyWord mulple mes.
>>> query = session.Query()
>>> query.anyWord('Grey')
>>> query.anyWord('sleeping')
>>> query.resultDictionaries()
[]
>>>
Noce here that the result returned is an empty list. This is because the operaon is a
logical-AND. Both words must be present in a given diconary.
In addion to the anyWord query method, there are a series of other approaches available.
The following table outlines other methods of querying a Nucular index.
Method Descripon
attributeRange Selects values where a specic aribute lies within an alpha range.
attributeWord Matches when a specic word is included within a specic aribute.
matchAttribute Selects entries where the specied aribute exactly matches a value.
prefixAttribute Selects entries where an aribute's value starts with a certain value.
proximateWords Selects entries where a word sequence appears in order near each
other in a given aribute.
Time for action – full text indexing
In this example, we'll create a full text index using Nucular for our large set of data. We'll
use the same comp.lang.python messages as used previously, which are available via the
Packt Publishing FTP site. We'll only index individual months at a me in order to keep our
examples manageable. In aggregate, that gives us over 85,000 les to work with totaling up
to 315 MB of raw text data.
In creang a full text index, we won't separate each message out into its component parts.
All of the text for each message will become a single aribute within each Nucular entry.
1. Create a new le and name it as clp_index.py. We'll use this to generate our
index. Enter the following code:
import os
from optparse import OptionParser
from nucular import Nucular
def index_contents(session, where, persist_every=100):

Searching and Indexing
[ 308 ]
"""Index a directory at a time."""
for c, i in enumerate(os.listdir(where)):
full_path = os.path.join(where, i)
print 'indexing %s' % full_path
session.indexDictionary(
full_path, {'full_text': open(full_path).read()})
# Save it out
session.store(lazy=True)
if not c % persist_every:
print "Aggregating..."
session.aggregateRecent(verbose=False, fast=True)
print "Final Aggregation..."
session.aggregateRecent(verbose=False)
session.moveTransientToBase()
session.cleanUp()
if __name__ == '__main__':
parser = OptionParser()
parser.add_option('-a', '--archive',
help="Nucular Index Directory", default="nuke")
parser.add_option('-p', '--path',
help='Base Directory. All files indexed')
parser.add_option('-i', '--init',
help="Initialize Database", action="store_true",
default=False)
opts, args = parser.parse_args()
if not opts.path:
parser.error("path is required")
# create an instance.
session = Nucular.Nucular(opts.archive)
if opts.init:
session.create()
index_contents(session, opts.path)
2. Next, run the script for the rst directory provided in order to create the index.
To inialize, specify –init for the rst one. This process will take a few minutes,
depending on the speed of your system.
(text_processing)$ python clp_index.py --init -a ./list_history -p
c.l.py/01/
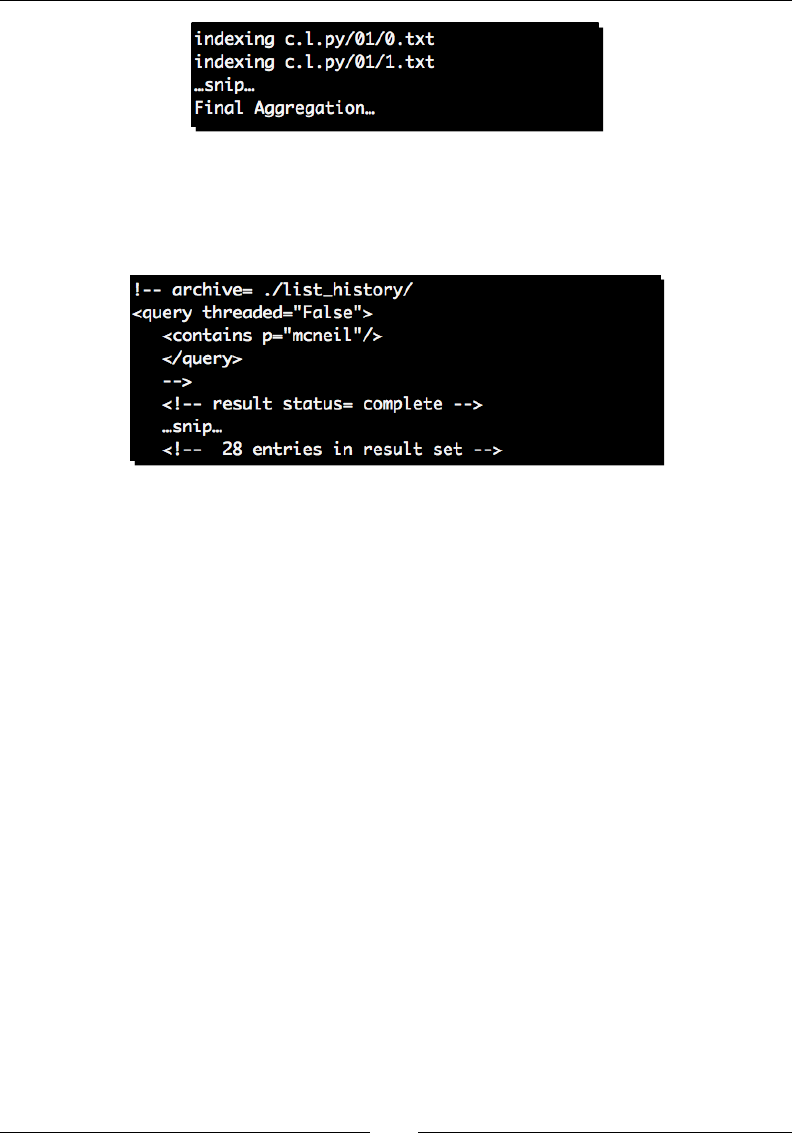
Chapter 11
[ 309 ]
3. Now, we'll run the supplied query script and search the enre index.
(text_processing)$ nucularQuery.py --contains mcneil ./list_
history/
What just happened?
We used the Nucular framework to create a full-text index of the posts sent to comp.lang.
python during the month of January, 2009. Prey simple, isn't it? Let's take a look at how
we did it.
First, we imported the only Nucular module we need, Nucular. Everything else imported
ought to look familiar to you by this me.
Next, we dened an index_contents funcon. If you look at this method, you'll see
that it's quite generic. It simply takes an open Nucular session, a directory locaon, and an
interval in which we should run a Nucular aggregaon. I nd that 100 seems to be a good
aggregaon interval for average e-mail messages or web-page-sized les. This means that
we'll recalculate our on-disk indexes aer every 100 element inserons.
This method iterates through the contents of the directory passed in and indexes each full
document by creang a diconary with a full_text aribute. The full path name to the
le is used as the unique key within the Nucular index itself. When we store the new data to
the session, we do it in a lazy fashion by passing lazy=True. That ensures that we're not
rebuilding indexes on every insert. Finally, for every 100 entries, we run our aggregaon.
Note that we run one nal aggregaon process before returning from the method. We
want to make sure all of our data is visible to other clients before moving on. We also
take this opportunity to clean up and remove some temporary les. Nucular provides
moveTransientToBase and cleanUp session methods that do this for us.

Searching and Indexing
[ 310 ]
Now, skip to the boom of the lisng. Here, we just create an instance of a Nucular session,
inialize it if the correct command-line arguments were passed, and relay processing o to
index_contents.
As we menoned earlier, Nucular ships with some canned Python scripts that allow you
to perform some basic funcons without needing to write any code. Here, we use the
nucularQuery.py script to query the database. Remember how our search mes grew
incrementally when we searched further and further into our monster text document earlier
in the chapter? Let's take a look at the results now.
Time for action – measuring index benet
We'll use the following test script to measure the amount of me taken for each query. The
provided ulies return XML data and we do not want to count the me needed by the
system to structure the document.
1. Create a new Python le and name it search_for.py. Enter the following lisng as
it appears:
import sys
import time
from nucular import Nucular
# create an instance.
session = Nucular.Nucular(sys.argv[1])
query = session.Query()
query.anyWord(sys.argv[2])
start = time.time()
d = query.resultDictionaries()
print "Query Duration: %f" % (time.time() - start)
print "Results: %d" % len(d)
2. Run the example by passing in the search term mcneil, your results should be as
follows.
(text_processing)$ python search_for.py ./list_history/ mcneil
3. Run it a second me with a dierent search term. Let's compare the query duraons.
(text_processing)$ python search_for.py ./list_history/ Perl
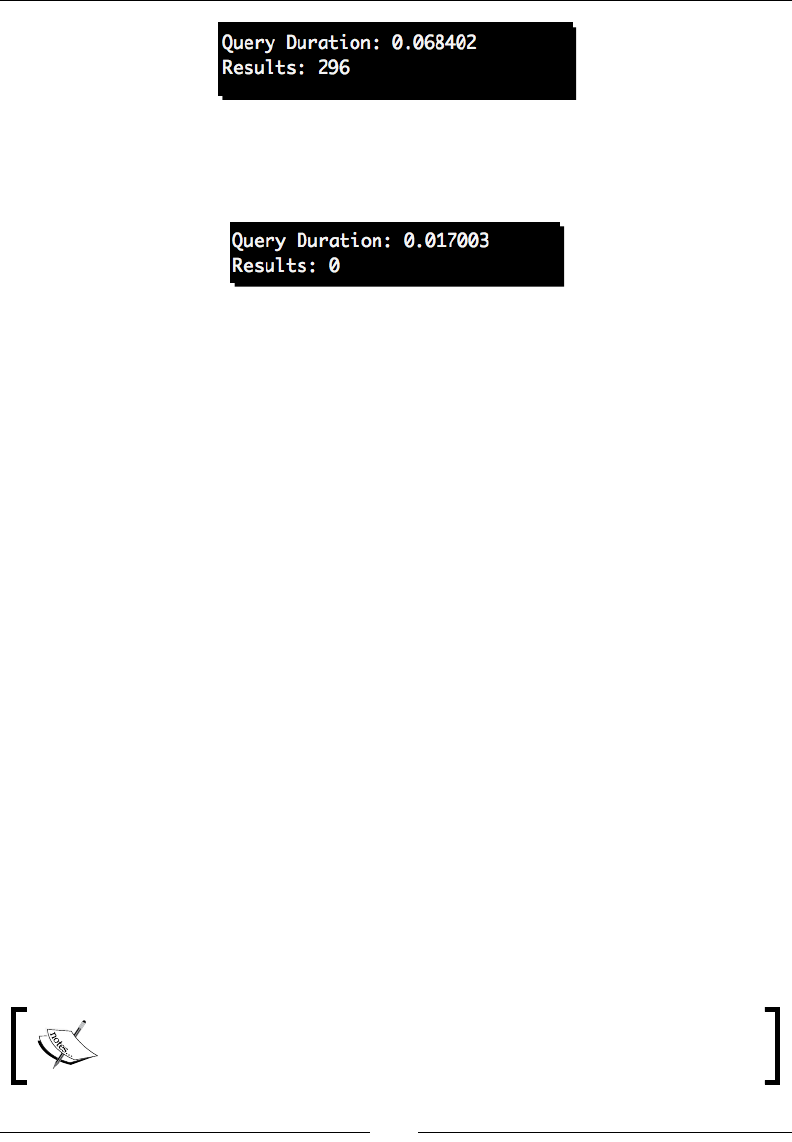
Chapter 11
[ 311 ]
4. Let's go with one more test, just to be sure.
(text_processing)$ python search_for.py ./list_history/ Elephant
What just happened?
We put together a simple query script. Nothing here should be new as we've covered the
basic programmac approach to Nucular earlier in the chapter.
When we ran our benchmark script, each call into Nucular responded in less than a tenth of
a second. That's a dramac increase over what we would expect to see given a linear search.
Just to underscore the benet of our indexing approach, let's look at how long a linear
search would actually take.
Python 2.6.1 (r261:67515, Feb 11 2010, 00:51:29)
[GCC 4.2.1 (Apple Inc. build 5646)] on darwin
Type "help", "copyright", "credits", or "license" for more information.
>>> import os
>>> import time
>>> def f():
... start = time.time()
... for entry in os.listdir('c.l.py/01'):
... if 'mcneil' in open(os.path.join('c.l.py/01', entry)):
... x = True
... return time.time() - start
...
>>> f()
0.27669692039489746
>>>
The indexed version is almost a full 30 mes faster than the linear search, even with this
simple example.
Remember, as the data size grows, the linear search me will grow with it. The
index method will grow logarithmically with the size of the raw data pool, or at
an O(log n) rate.
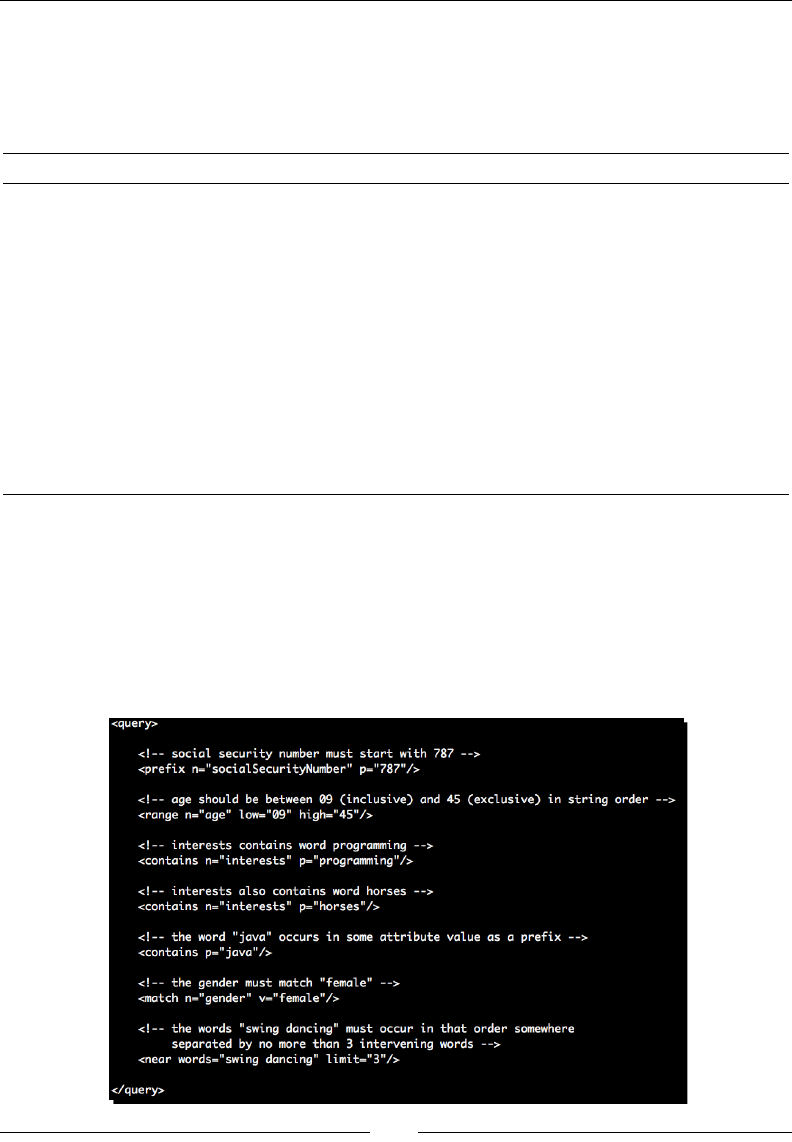
Searching and Indexing
[ 312 ]
Scripts provided by Nucular
As we've menoned a couple of mes so far, Nucular provides a series of scripts that can be
used on the command line. We've used one, but for reference purposes the following table
outlines what's provided and provides a summary as to the funconality it supplies.
Ulity Summary
nucularSite.py When given a directory, it creates a new archive. By default, it will
give an error if the directory is not empty.
nucularAggregate.py This script performs an aggregaon. While the aggregaon is
running, clients may sll search the archive. The ulity also
provides opons that will aect the overall speed and verbosity.
nucularDump.py This will dump the contents of a Nucular archive to XML-format
les. These les may then be used to recreate or recover an
archive at a later point of me.
nucularLoad.py Loads XML datales into a Nucular archive and restores contents.
nucularQuery.py We've used this in passing; however, it provides a full-featured
query syntax that allows you to perform the enre query types
listed earlier in the chapter.
Using XML les
As you may have guessed by now, Nucular provides some extended XML support. In addion
to supplying and dumping data in XML format, it's also possible to dene a search acon
using XML-formaed les. The output of nucularQuery.py –exampleXML gives us the
expected XML format. It's included below.
(text_processing)$ nucularQuery.py --exampleXML

Chapter 11
[ 313 ]
Given that example document, we can construct an XML document that lets us perform the
same queries we have performed earlier in the chapter. This provides a nice mechanism for
saving queries again for later use.
<query>
<!-- Find my c.l.py posts that month //-->
<contains p="mcneil"/>
</query>
Then, nally, running nucularQuery.py with the––xml argument allows us to use this as
input rather than a command-line specicaon.
(text_processing)$ nucularQuery.py --xml mcneil.xml ./list_history/
| head
<!-- archive= ./list_history/
<query threaded="False">
<contains p="mcneil"/>
</query>
-->
<!-- result status= complete -->
<entries>
…snip..
</entries>
<!-- 56 entries in result set -->
Advanced Nucular features
In the last secon, we indexed all of our messages using a full-text approach. That is a valid
opon for lots of data formats. However, it doesn't quite give us a level of granularity we
might need when making more explicit requests. For example, how might we answer the
following queson: what messages included the word API in the subject-line, and discussed
Python and Unicode?
Given our current conguraon, we could ask for all of the messages that contained the
strings we wanted to match and then programmacally search the returned diconary.
However, that's not a very ecient approach.
Of course, as we're talking about it, there's bound to be a beer way to handle it. As our
indexed objects are simply diconaries, the key is to break each eld up into a corresponding
diconary value. Then, we can qualify our searches such that values have to occur within a
specic eld.

Searching and Indexing
[ 314 ]
Also, as we've indexed e-mail messages and newsgroup posngs,
consider the result set we would have if we searched for 'from
python.' Quite a few false posives would be returned if we were
looking for some informaon on the from keyword! We didn't
strip-out any message-control informaon or header data.
Time for action – eld-qualied indexes
In this example, we'll break the Python mailing list messages up into their component parts,
which allow us to provide a more granular result. As these are simply mail messages, we'll
use Python's email module to parse them.
1. Extend the clp_index.py le to include some slightly more enhanced
funconality. First, add the import email statement to the top of the le. Here,
we've renamed it clp_index-a.py.
2. Next, replace the index funcon in our previous example with the code in the
following lisng:
class IndexDirectory(object):
def __init__(self, session, where, persist_every=100):
self.where = where
self.persist_every = persist_every
self.session = session
def index(self):
for c,i in enumerate(os.listdir(self.where)):
full_path = os.path.join(self.where, i)
session.indexDictionary(
full_path, self.build_dict(full_path))
session.store(lazy=True)
if not c % self.persist_every:
session.aggregateRecent(verbose=False, fast=True)
# Run a final aggregation.
session.aggregateRecent(verbose=False)
session.moveTransientToBase()
session.cleanUp()
def build_dict(self, full_path):
raise NotImplementedError("I'm abstract")
class FullTextIndex(IndexDirectory):
def build_dict(self, full_path):
return { 'full_text': open(full_path).read()}

Chapter 11
[ 315 ]
class MessageIndex(IndexDirectory):
def build_dict(self, full_path):
msg = email.message_from_file(open(full_path))
indexable = dict(msg)
indexable['Payload'] = msg.get_payload()
return indexable
_dispatch_table = {'fulltext': FullTextIndex,
'message': MessageIndex}
3. Now, change everything below the nal parser.add_option to read as follows:
parser.add_option('-t', '--type',
help="Index Type",
choices=_dispatch_table.keys())
opts, args = parser.parse_args()
if not opts.path or not opts.type:
parser.error("path and type are required")
# create an instance.
session = Nucular.Nucular(opts.archive)
if opts.init:
session.create()
# Call correct class.
_dispatch_table[opts.type](session, opts.path).index()
4. Finally, we'll run the updated index code and save our more detailed data to disk.
This process is likely to take a few minutes.
(text_processing)$ python clp_index-a.py --archive=list_history2
--path=c.l.py/12/ --init --type=message
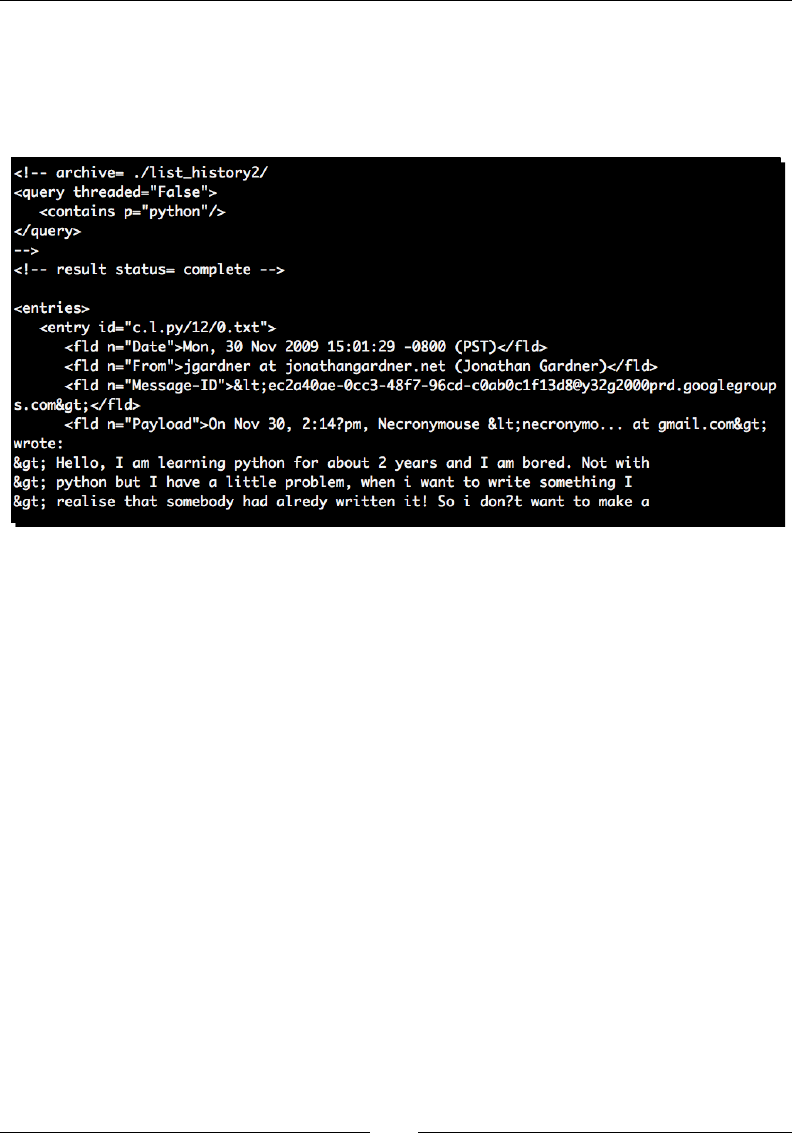
Searching and Indexing
[ 316 ]
5. Now, if we run a generic search against this new index, you should see the following
output.
(text_processing)$ nucularQuery.py --contains Python ./list_
history2/
What just happened?
We implemented a Python script to generate two dierent types of Nucular indexes,
depending on the command-line arguments passed in.
The very rst thing we did was import the email module as we use it to parse the messages
les later in the script.
Next, the rst interesng thing you'll see is the IndexDirectory class. As the only
dierence between our indexing approaches is the data kept in the diconary, we created
this to serve as a base class. All of our logic remains the same; we've just wrapped it in a
class. Though, we did remove some of the status messages.
We did not implement the build_dict method here. In fact, we actually raise a
NotImplementedError if a caller were to aempt to call this method directly. This serves
to indicate that this method is part of our class interface, but is le to subclasses to manage.
Next, you'll see the FullTextIndex class. This is a subclass of IndexDirectory. It simply
does what we did in our previous funcon. It wraps the contents of an enre le within a
diconary. If this class is used then we'll see the same behavior as before.

Chapter 11
[ 317 ]
Next, we have a MessageIndex class. MessageIndex parses an e-mail message using
email.message_from_file and creates a diconary using the results. The Message class
has a diconary-like interface, so we can create a new diconary by simple calling the dict
singleton with the instance of that class. We then add the enre contents of the message
to yet another diconary value by calling msg.get_payload. Finally, we simply return this
diconary.
The last thing you'll see outside of our main secon is a line that looks like the following:
_dispatch_table = {'fulltext': FullTextIndex', 'message':
MessageIndex}
The fulltext and message keys are passed on the command line. Those values are used
as indexes into this table, which provides us with the funconality our user is requesng.
Remember the polymorphism talk we had earlier in the book?
Now, we skip to our main secon. There's really nothing overly interesng going on here.
Note that we pass _dispatch_table.keys() as the value of the choices keyword
argument when building our opons map. Lastly, we use the command-line argument
supplied by the user as our index into the diconary and call our corresponding index
method (though, remember, we don't care which instance we're working with).
Finally, look at the output of nucularQuery.py. You should noce it's slightly dierent
from our previous example. Most importantly, you should see that the data is now separated
by individual eld names rather than one simple blob. For example, we now have addional
XML elements such as <fld n="Date"> and <fld n="From">. As you might assume, fld
is short for "eld" and n is short for "name".
Performing an enhanced search
The separaon into elds is nice, but the real benet becomes apparent when we perform
some addional searches. Let's create a simple applicaon that allows users to query in a
slightly more complex manner.
Time for action – performing advanced Nucular queries
In this example, we'll perform a search against the subject, and then qualify it with a full text
search of the message itself. This provides an introducon to some of the more advanced
porons of Nucular queries.
1. Create a script named field_search.py and enter the code as it appears in the
following lisng:
from optparse import OptionParser
from nucular import Nucular
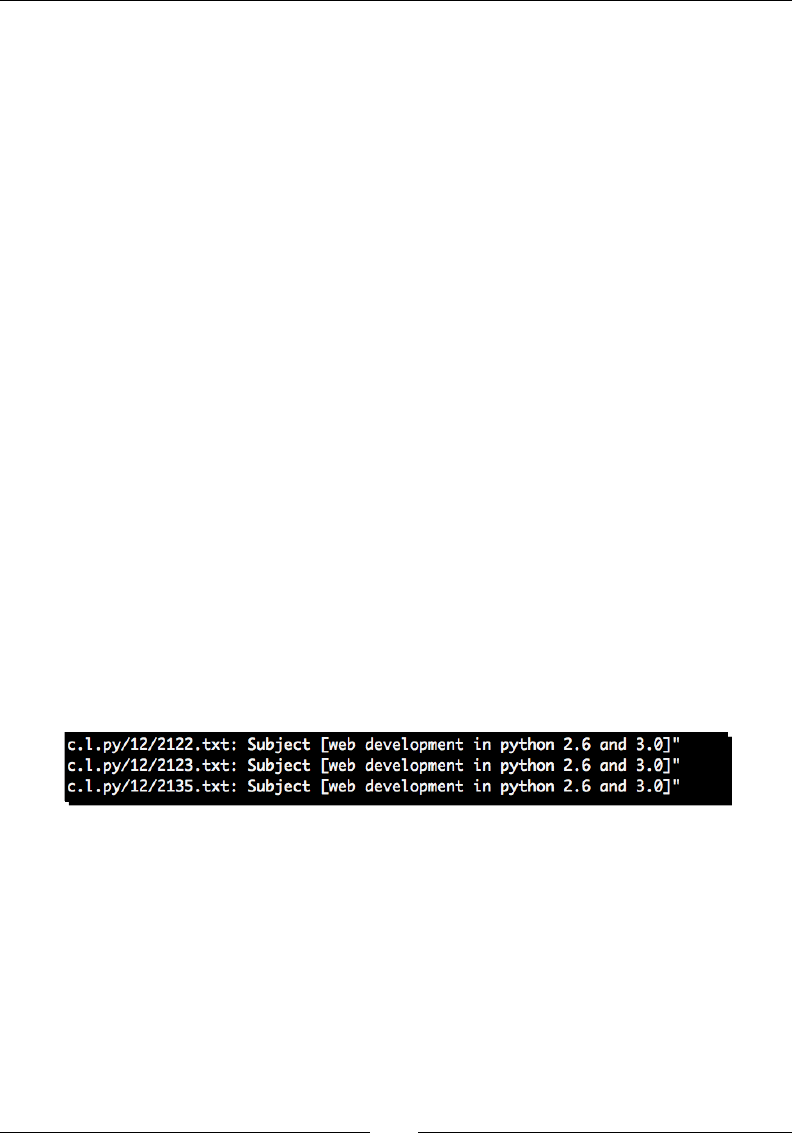
Searching and Indexing
[ 318 ]
MAX_WORDSPACE = 5
if __name__ == '__main__':
parser = OptionParser()
parser.add_option('-a', '--archive',
help="Nucular Index Directory", default="nuke")
parser.add_option('-s', '--subject',
help="Search subjects for this word")
parser.add_option('-p', '--proximate',
help="A proximate search. These words"
"must be within %d words."
"Comma Sep." % MAX_WORDSPACE)
opts, args = parser.parse_args()
if not opts.subject or not opts.proximate:
parser.error('subject and word list required')
# create an instance.
session = Nucular.Nucular(opts.archive)
query = session.Query()
query.attributeWord('Subject', opts.subject)
query.proximateWords(
opts.proximate.split(','), MAX_WORDSPACE)
for d in query.resultDictionaries():
print '%(i)s: Subject [%(Subject)s]"' % d
2. Run the following query from the command line using the new script:
(text_processing)$ python field_search.py --subject='python'
--proximate="mysql,postgres" --archive=list_history2/
3. Now, let's qualify the search a lile bit more and run the query again. Pay aenon
to the output this me.
(text_processing)$ python field_search.py --subject='python' --pro
ximate="mysql,postgres,choices" --archive=list_history2/
Chapter 11
[ 319 ]
What just happened?
We created a script, which lets us perform some more enhanced queries against a Nucular
index by taking advantage of the elded index we created earlier.
Most of this code should be familiar to you, so let's jump down to the boom of the
main secon right away. Here, we call two query funcons, attributeWord and
proximateWords. The rst method allows us to perform the same type of query we saw
in the anyWord method, but restrict it to a specic diconary value. The Subject string
parameter to attributeWords is the diconary key we're interested in for this specic
search.
Why the uppercase Subject? We've used the email module to
parse our message here, and that gives us the uppercase value.
The next method is slightly more interesng. The proximateWords method allows us
to search for a collecon of words (supplied here by separang a comma-separated
command-line value). The caveat? These words have to appear within a designated
number of words of each other. Here, we're using the constant 5.
Our results show this in acon. We asked for any messages with the word python in the
subject. On the rst query, we asked for mysql and postgres in the proximate eld. This
may give us a list of messages in which developers are debang the virtues of both RDBMS
engines from a Python perspecve. But, at the same me, it also limits the results. For
example, if someone had posted release notes into an e-mail message, we might not be
as interested. We're of course assuming the terms would be further separated in a release
notes document.
Next, we added a third word: choices. This results in an empty diconary results list. Note
that the word "choices" does appear in the originally returned results, just not close enough
to its friends to sll count as a match when added to the search criteria.
Pop Quiz – introduction to Nucular
1. What, besides convenience, is the most important reason to use a text-indexing
approach rather than a brute-force linear text scan?
2. Even with an index, what might be a liming factor with respect to query speed?
What might you do to enhance it?
3. What is the simplest method for backing up and restoring a Nucular database?
4. Does Nucular support simultaneous reads and write?

Searching and Indexing
[ 320 ]
Indexing and searching other data
The last thing we'll look at in this chapter is how to index and search data that is textual in
nature, but not stored in a plain text format. We'll look at a simple format in our examples,
but the techniques here apply to other formats as well. Excel, PDF, even comments and
descripons found in UML diagrams, MP3 les, or CAD drawings. If you have the ability to
programmacally extract content from a le then you can use this approach. Note that we've
already done this with plain text messages in our example above!
Time for action – indexing Open Ofce documents
Earlier in the book we looked at generang enhanced output formats. One of the formats we
looked at was Open Oce Writer, which is accessible via the ODFPy framework. Here, we'll
use that same framework to index the contents of an ODF document.
For this example, we've provided an ODF document entled About Python. This is simply
the contents of the ABOUT page on the http://python.org/ website. Also, you should
already have the packages installed (if you've been following along). If you do not have them
installed, you can do so now by using the easy_install odfpy command.
1. Using the contents of the le created in the last example as a template, copy it over
and name it clp_index-b.py.
2. Update the code in the le to resemble the following:
import os
import sys
import email
from odf import opendocument
from optparse import OptionParser
from nucular import Nucular
class NotIndexFriendly(Exception):
"""Given Indexer Won't Support Format"""
class IndexDirectory(object):
def __init__(self, session, where, persist_every=100):
self.where = where
self.persist_every = persist_every
self.session = session
def index(self):
for c,i in enumerate(os.listdir(self.where)):
full_path = os.path.join(self.where, i)
try:
index_target = self.build_dict(full_path)

Chapter 11
[ 321 ]
except NotIndexFriendly, e:
print >>sys.stderr, "we cannot index %s: %s" % \
(full_path, str(e))
continue
session.indexDictionary(full_path, index_target)
session.store(lazy=True)
if not c % self.persist_every:
session.aggregateRecent(verbose=False, fast=True)
# Run a final aggregation.
session.aggregateRecent(verbose=False)
session.moveTransientToBase()
session.cleanUp()
def build_dict(self, full_path):
raise NotImplementedError("I'm abstract")
class FullTextIndex(IndexDirectory):
def load_text(self, path):
return open(path).read()
def _walk_odf(self, element, text=None):
if text is None:
text = []
if element.nodeType == element.TEXT_NODE:
text.append(element.data)
for child in element.childNodes:
self._walk_odf(child, text)
return ''.join(text)
def load_odt(self, path):
return self._walk_odf(
opendocument.load(path).body)
def build_dict(self, full_path):
dispatch = {'.txt': self.load_text,
'.odt': self.load_odt}
# Pull a reader from our dispatch table,
# or none.
reader = dispatch.get(
os.path.splitext(full_path)[-1], None)
if not reader:
raise NotIndexFriendly(
"Not Indexable Type: %s" % full_path)
# Return a full text mesg.
return { 'full_text': reader(full_path)}

Searching and Indexing
[ 322 ]
class MessageIndex(IndexDirectory):
def build_dict(self, full_path):
if not full_path.endswith('.txt'):
raise NotIndexFriendly("Only Text Messages Supported")
msg = email.message_from_file(open(full_path))
indexable = dict(msg)
indexable['Payload'] = msg.get_payload()
return indexable
_dispatch_table = {'fulltext': FullTextIndex,
'message': MessageIndex}
if __name__ == '__main__':
parser = OptionParser()
parser.add_option('-a', '--archive',
help="Nucular Index Directory", default="nuke")
parser.add_option('-p', '--path',
help='Base Directory. All files indexed')
parser.add_option('-i', '--init',
help="Initialize Database", action="store_true",
default=False)
parser.add_option('-t', '--type',
help="Index Type",
choices=_dispatch_table.keys())
opts, args = parser.parse_args()
if not opts.path or not opts.type:
parser.error("path and type are required")
# create an instance.
session = Nucular.Nucular(opts.archive)
if opts.init:
session.create()
# Call correct class.
_dispatch_table[opts.type](session, opts.path).index()
2. Now, copy the Open Oce document into c.l.py/12. We'll index it as part of a
standard full-text index creaon.
3. Run the following command, which will include the new ODT support in the
text index. This command may take a few minutes to complete. If the command
completes successfully, you should see no output.
(text_processing)$ python clp_index-b.py -t message --init
--path=c.l.py/12--archive=./index --type=fulltext
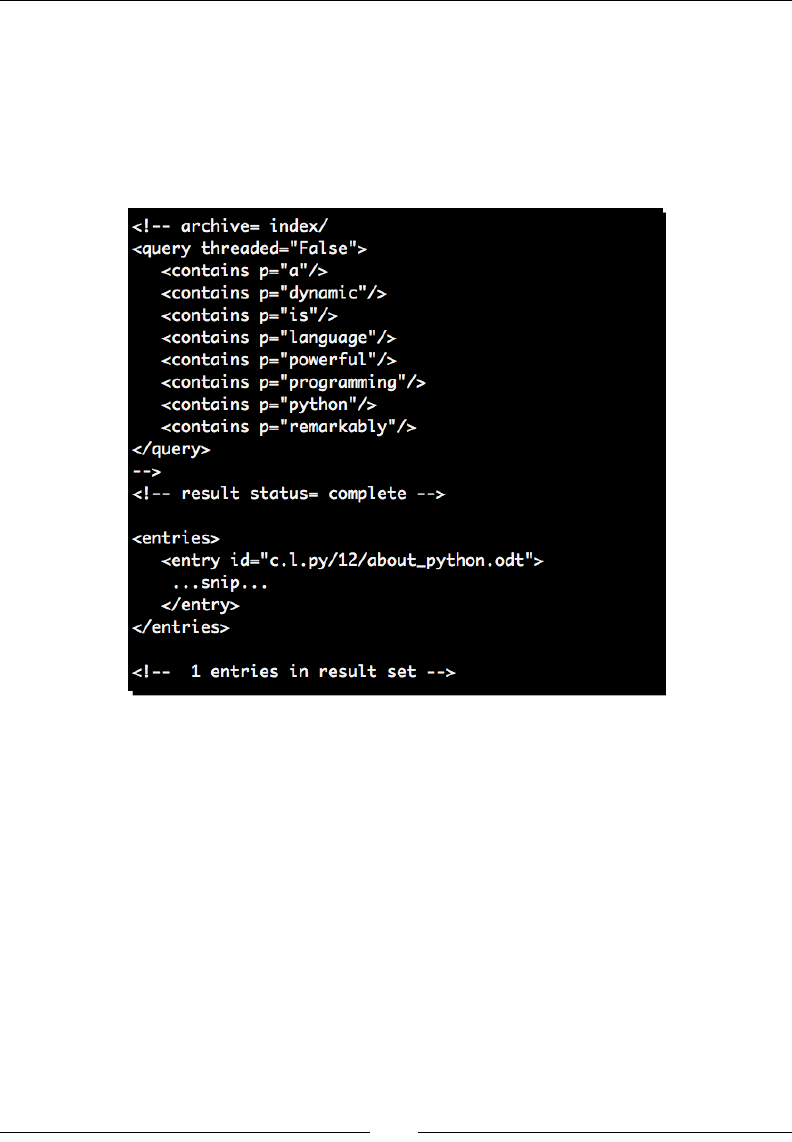
Chapter 11
[ 323 ]
4. Now that we've indexed the data and included our Open Oce document, let's run
another search against the index. This me, we'll look for data appearing in the ODT
le. Run the following command against our newly updated directory. Note that
we've trimmed the output slightly to save on space.
$(text processing)$ nucularQuery.py --contains 'Python is a
remarkably powerful dynamic programming language' index/
What just happened?
We updated our index script to allow indexing of Open Document les. Along the way,
we added some addional le-type checking to ensure we only index the right types. The
approach is rather simple; we just extract the text copy from the document le and pass that
into the indexer. Let's walk through it.
First, we imported the opendocument module from the odf package. This is much like we
did in Chapter 9, Advanced Output Formats. Right below our import statements, we dened
an excepon and named it NotIndexFriendly. This excepon will be triggered from
within our build_dict methods whenever we run into a le type that we cannot handle.
Now, skip down to the index method within IndexDirectory. We've updated this
method to catch NotIndexFriendly and print a warning to sys.stderr. This ensures
that we give mely feedback to our users and connue processing other les. Aer all, we
wouldn't want a stray le in a directory to terminate a long-running index job.

Searching and Indexing
[ 324 ]
We'll come back to our FullTextIndex class in a second. First, jump down to
MessageIndex. In the build_dict method, we've started to raise NotIndexFriendly
if anything other than a plain text document is passed in. Our messages shouldn't be
anything more.
Now, double back to FullTextIndex. We did a few interesng things here. First o, we
separated out our le-reading logic into two dierent methods: load_text and load_odt.
The load_text method does exactly what we were doing in a previous revision. It just
reads text data from disk and passes the raw contents back.
The load_odt method, however, calls opendocument.load with the full path name. This
triggers the opendocument module to parse the le and return an object representaon.
We then pass the .body aribute of that object to self._walk_odf.
If you'll remember, the ODF package relies on XML processing libraries under the hood. So,
the body of the ODT le is the root element of an XML structure. In the self._walk_odf
method, we iterate through the tree and append all text node data into a list. At the end, we
join those values together and return as a string.
Next, we set up another dispatch table within build_dict that calls the appropriate
method, using the le extension as a guide. If we're passed a le that we don't support, we
simply raise NotIndexFriendly and everything connues to work upstream.
Lastly, we ran the Nucular query script with a string found in our test ODF le. Noce how
that le is listed as the result output. The ODF format is now included in our index.
If you wish to add addional formats, you'll simply need to add a method that understands
how to remove markup or binary data from the raw le and return plain text, which the
Nucular indexer can handle.
When dealing with data that isn't plain text (and even data that
is, for that maer), it's usually beer to store a pointer to the le
itself within the index. When a specic entry is a hit, return the
le, or display it. This is a requirement for non-text data.

Chapter 11
[ 325 ]
Other index systems
We used Nucular here, but there are other indexing systems that are available for use that
may suit your needs slightly beer. Nucular was used because it's a pure Python framework
that is quite general purpose; it handles most scenarios wonderfully. Let's take a quick survey
of the alternaves.
Apache Lucene
ZODB and zc.catalog
SQL text indexing
Apache Lucene
The Lucene project provides a server-based indexing system wrien in the Java programming
language. Lucene is a very high performance system that is used by many large organizaons
such as CNet Reviews and Monster.com. While the server implementaon is Java-based,
there are connectors for a wide variety of programming languages, including Python. For more
informaon on Lucene, see http://lucene.apache.org/java/docs/index.html.
ZODB and zc.catalog
The ZODB is an object-oriented database. Unlike tradional RDBMS databases such as
MySQL and Postgres, ZODB allows you to simply persist objects. This makes for an intuive
development experience as there's no more column to aribute mapping required when
persisng object state. This package provides indexing, but also handles more advanced topics
such as stemming, like we tackled in our last chapter. For more informaon, see http://
pypi.python.org/pypi/zc.catalog/1.4.1. Also, the Grok framework, which aims to
simplify the Zope stack, has done a great job with exporng search funconality for use with
the ZODB. This is a great place to start. See http://grok.zope.org/ to get started.
SQL text indexing
Many databases provide full text support. If the data set you're working with is already
persisted to one of these systems then this may be a beer approach. Note that this is not
the same as an SQL index on a frequently used column! Consult your vendor documentaon
for more informaon. If you're using MySQL, you can read up on the feature set at http://
dev.mysql.com/doc/refman/5.1/en/fulltext-search.html.

Searching and Indexing
[ 326 ]
Summary
We covered quite a bit of informaon in this chapter while introducing you to the concepts
of indexing and text-searching. You should understand why keeping indexes is vitally
important if you plan to si through large quanes of textual data.
Specically, we touched on linear searching and how me increases with the amount of
data being scanned. We reced the problem by introducing the Nucular framework, a pure
Python text indexing. Finally, we introduced you to some alternave indexing systems that
may suite your needs beer.
In the last chapter, we'll spend some me showing you where to get help if you need it and
where to look for more informaon. We'll also take a quick look at the standard Python 2 to
Python 3 porng procedure.

Looking for Additional Resources
Here, we'll shi our focus a bit again. Our goal here is to introduce you to places
of interest on the Internet, the Python community, and addional technologies
and resources you may nd useful. We'll also provide a brief introducon into
the dierences between Python 2 and Python 3 to aid in the ongoing transion.
We'll touch on the following elements.
Python mailing lists, groups, documentaon, and community resources. Where can
you go to get help and help others?
Introducon to some other related ulies developed for other languages that you
might nd useful.
Dierences between Python 2 and Python 3 that you'll need to take into account
when working with the later version.
Tips and techniques for porng code to Python 3, including available ulies that
make the transion easier.
We've covered a great deal of technical informaon, with a focus on geng things done.
By now, you should be familiar with structured documents, raw text data, processing
techniques, searching, regular expressions, and a collecon of third-party libraries that make
your life easier. In this chapter, we'll show you how to help yourself, dig up more detailed
informaon, and take part in the wider Python community.
We'll focus on both Python-related resources as well as other text management systems.
In many cases, it is possible to use dierent technologies from Python, so there are many
opons available to you.
A

Looking for Addional Resources
[ 328 ]
We'll nish up by running through Python 3 and showing you how simple the upgrade process
can be by porng a small script we developed earlier in the book using the included ulies.
Python resources
First and foremost, the Python standard documentaon is a wonderful tool and stands to
help you with just about any project. Python is known for its baeries included approach.
In other words, there are a lot of common ulies that reside in the Python standard library
whereas a third-party extension might be required for a dierent language. The main Python
documentaon page can be found at http://docs.python.org.
If you're new to Python then the Python.org tutorial is highly recommended. The tutorial
provides an up-to-date introducon to the language. It is kept in lockstep with major releases
of the language, so you're certain to cover up-to-date material.
Previous versions of both the standard library reference and the ocial tutorial are also
available, so if the version of Python you happen to have on your system is older than the
latest available release, you can access the corresponding documentaon.
Unofcial documentation
Mark Pilgrim's Dive into Python is available online, free of charge, and can be purchased
in paperback format. This serves as a comprehensive guide to the language. The text is
available online at http://www.diveintopython.org. If you're interested in Python 3
specically, Packt Publishing's Python 3 Object Oriented Programming is a great book to add
to your collecon.
If you're not fully familiar with the standard library yet, another good resource is Doug
Hellmann's Python Module of the Week series in which he dives into each standard library
in detail. Doug's series can be found at http://www.doughellmann.com/projects/
PyMOTW/. Familiarizing yourself with the standard library can help you avoid reinvenng the
wheel in your own projects.
Python enhancement proposals
We've referenced a few PEP documents throughout this book, but we haven't gone into
much detail as to what they are. Whenever a core change is made to the language or its
supporng cast (libraries and so on), the change usually goes through a proposal process.
The advocate for change authors a Python Enhancement Proposal, which is then presented
to the appropriate audience for inclusion or dismissal. The PEP index, idened as PEP 0,
can be found at http://www.python.org/dev/peps/. Some of the more string- and
text-related proposals are as follows:
Appendix A
[ 329 ]
http://www.python.org/dev/peps/pep-0292/. PEP292 introduced the
$-formang used in the string.template module.
http://www.python.org/dev/peps/pep-3101/. PEP3101 details the
advanced string formang mechanisms that rely upon the braces syntax.
http://www.python.org/dev/peps/pep-0261/. Extension of Python's
Unicode support behind the Basic Mullingual Plane.
http://www.python.org/dev/peps/pep-0100/. Introducon of Unicode to
the Python programming language.
This, of course, is not an exhausve list. PEPs, while informave, are also geared towards
the language developer. They can be a helpful resource, but they're usually wrien with
language developers in mind.
Throughout this book, we've tried to adhere to Python's PEP8 for style
guidelines. PEP8 provides style rules for Python code specically in the Python
library. However, it's become the community standard. PEP8 can be found at
hp://www.python.org/dev/peps/pep-8/.
Self-documenting
In addion to standard developer documentaon, Python is quite self-documenng. Good
programming pracce dictates that developers specify documentaon strings at class,
method, module, and funcon level. By doing this, they ensure that API documentaon is
always kept up to date.
For an overview of Python's documentaon string standards, see PEP (Python
Enhancement Proposal) 257, which is available at http://www.python.
org/dev/peps/pep-0257/. Note that these are the guidelines Python itself
uses. You're free to invent your own organizaonal guidelines.
Doc strings, of course, translate directly into usable Python documentaon. For example, the
help funcon provides a mechanism for you to display doc string generated content from
within the interacve REPL loop.
Python 2.6.1 (r261:67515, Feb 11 2010, 00:51:29)
[GCC 4.2.1 (Apple Inc. build 5646)] on darwin
Type "help", "copyright", "credits", or "license" for more information.
>>> import os
>>> help(os)
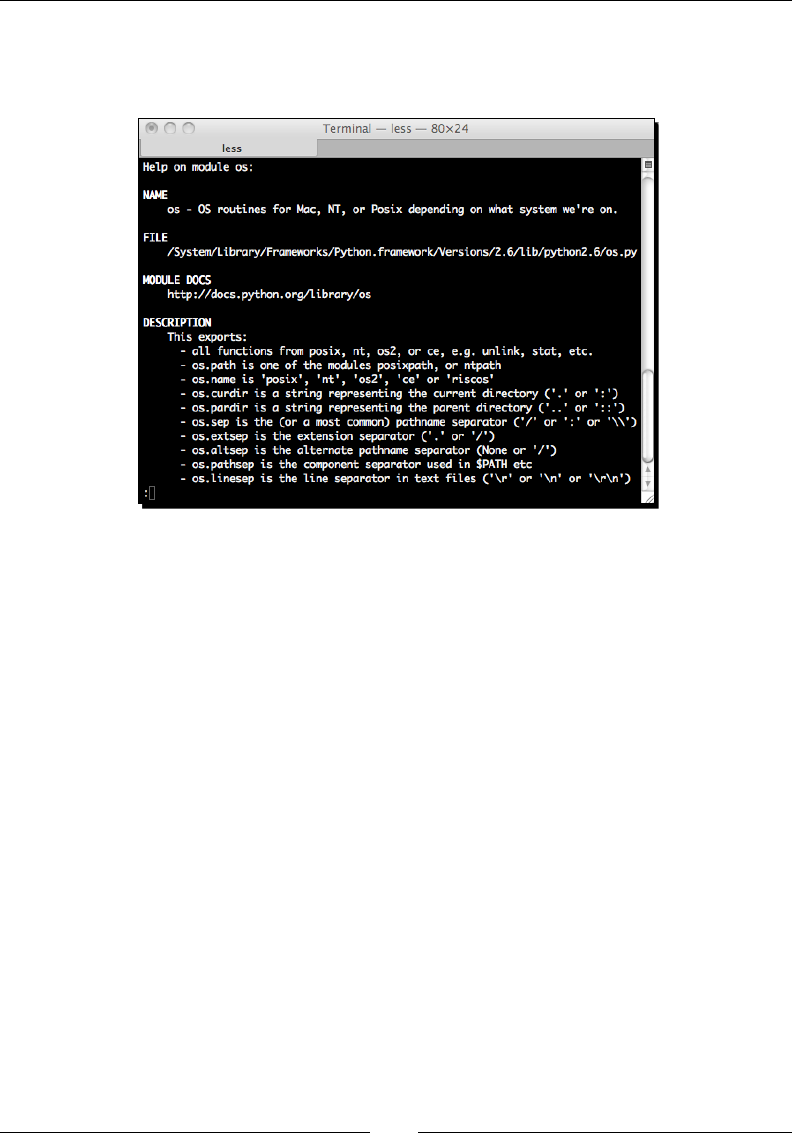
Looking for Addional Resources
[ 330 ]
The preceding example generates a help page that resembles a standard UNIX manual page.
It also provides some extended informaon on the aributes and inheritance hierarchy that
is available via introspecon rounes.
Addionally, most Python installs include the pydoc command, which provides a
command-line method to access the same help data.
Both online help methods are not limited to library documentaon. It is also possible to use
either method to display informaon regarding Python's keywords and topics. For example,
let's look at the following command line:
(text_processing)$ pydoc if
That statement generates output that resembles the following. It may dier depending on
the locaon of your installed Python and the operang system you're using.
Appendix A
[ 331 ]
You may also noce, when you exit the previous screen, that pydoc prints recommended
help topics to the screen. In this case, it will print Related help topics: TRUTHVALUE. This
provides a nice way to introduce you to other topics that are related to the exact search
keyword.
The pydoc script itself also allows you to run a local web server, search by
keyword, generate at HTML output, or search via a graphical interface. Simply
running the command without any arguments will display usage informaon.
Using other documentation tools
In addion to the built-in help and pydoc systems, there are third-party ulies that can be
used to generate more in-depth API documentaon:
The Sphinx documentaon system. This is a more advanced system that allows you
to provide raw documentaon in addion to your documentaon strings. Sphinx can
then be congured to extract source documentaon via sengs. More informaon
is available at http://sphinx.pocoo.org/.
The Doxygen system, available at http://www.stack.nl/~dimitri/doxygen/,
works with a variety of languages and supports a variety of output format. It can
also be used to extract source-based documentaon.
The epydoc package, which is available at http://epydoc.sourceforge.
net/. This package uses a lightweight markup to generate detailed package
documentaon. This is similar to the Javadoc system.

Looking for Addional Resources
[ 332 ]
These are wonderful ulies, though their intent is more to document your own code rather
than view standard Python documentaon.
Community resources
Python comes with a collecon of useful modules and libraries and a world-class community.
There are numerous ways you can interact, both in requesng help and providing guidance.
Let's take a look at the opons.
Following groups and mailing lists
There are mailing lists and groups out there for general Python usage, beginners' quesons,
and special interest groups. Available lists are detailed at http://www.python.org/
community/lists/. Let's outline a few of the more popular ones here.
The comp.lang.python group is the main high-trac Python discussion group.
This is a somewhat high volume group where experienced Python developers
discuss problems, designs, and answer quesons throughout the day. This is a
wonderful resource. It is possible to access this group via Google Groups such that
you don't have to manage the e-mail volume.
The Python-tutor mailing list is designed to be a place for beginners to ask quesons
that may be less-than-welcome on the comp.lang.python group. For example, it's
also a wonderful place to lend your experse and help others learn the technology.
Python-Dev is where development of the Python language takes place. This is not
for quesons related to development in Python; rather, this is for development of
Python.
Python-Help is a rather interesng list. You may send Python-related quesons to
this mailbox and it will be monitored by a set of volunteers. They may, depending on
the experience level, address your queson in private.
The Python Papers Anthology, available at http://www.pythonpapers.org, is
a thorough collecon of industry and academic documents available on the web.
Their goal is to disseminate informaon regarding Python technologies and their
applicaon.
In addion to the standard mailing lists, there is a collecon of Special Interest Groups that
narrows down into yet more specic territory. SIGs are formed to address and maintain a
specic area of Python. Membership is informal. For a list of all of the acve SIGs, see the
main page at http://www.python.org/community/sigs/.

Appendix A
[ 333 ]
Finding a users' group
Python users' groups are local organizaons that are managed by local individuals that share
a common interest in the Python programming language. Generally, users' groups hold
a meeng on a re-occurring schedule and encourage discussion and informaon-sharing
between members. This is a wonderful way to get involved with the Python community,
make friends, and learn about a specic area of the language you may not be familiar with.
There are two resources for nding Python users' groups.
First, http://wiki.python.org/moin/LocalUserGroups, which provides a list of
groups broken down by geographic region. Second, http://www.meetup.com/ is also a
great resource. The http://python.meetup.com/ site provides a lisng of scheduled
Python-related meetups in your local area.
These are also great places to try on your speaking and presentaon skills with a friendly,
tolerant, and eager audience.
Attending a local Python conference
Each year, various large-scale Python conferences are held all over the planet. These are
highly technical events. While vendors are present, the focus is on Python technology
discussion. For informaon about the various Python conferences, see http://www.
pycon.org. These events are packed full of tutorials, sessions, and coding sprints.
Volunteers within the Python community put these conferences together.
Honorable mention
In addion to the Python-based systems we examined throughout the book, there are a
number of other high quality systems out there. While not pure Python, many of them
provide a means to access data or communicate with a server component in a language
agnosc manner. We'll take a look at some of the more common systems here.
Lucene and Solr
We touched on the topic briey in Chapter 11, Searching and Indexing, but didn't go into
very much detail. The Apache Foundaon's Lucene project, located at http://lucene.
apache.org, is the de facto standard in open source indexing and searching.
The core Lucene project is a Java-based collecon that provides le indexing and searching
capabilies, much like the Nucular system we looked at. There is a set of Java libraries
available for use and command-line tools that may be used without much Java knowledge.
Looking for Addional Resources
[ 334 ]
The Lucene project also ships an indexing server named Solr. Solr, on the other hand, is a
full-featured search server that runs on top of a Tomcat (or other compliant) applicaon
container. Solr exports a rich REST-like XML/JSON API and allows you to index and query
against it using any programming language that supports such interacon (Python, of course,
is included).
Some of the highlights include:
Rich document handling, such as Microso Word or rich text documents.
Full text search with hit highlighng, dynamic clustering, and support for database
integraon.
Scalability through replicaon to collecons of other Solr servers in order to
horizontally disperse load.
Spelling suggesons, support for "more documents like this", eld sorng, automac
suggesons, and search results clustering using Carrot2. More informaon about
Carrot2 is available at http://search.carrot2.org/.
A ready-to-use administraon interface that includes informaon such as logging,
cache stascs, and replicaon details.
If you're about to embark upon a project that requires highly scalable search funconality
for a variety of dierent data types, Solr might save you quite a bit of work. The main page is
available at http://lucene.apache.org/solr.
There is a Python version of the Lucene engine, named PyLucene. This, however,
isn't a direct port of the libraries. Rather, it's a wrapper around the exisng Java
funconality. This may or may not be suitable to all Python deployments, so we
chose not to cover it in this book.
One nal note here is that if you're using the Python Java implementaon, you can
access nave Lucene libraries directly from within Python. You can read up on the Java
implementaon at http://www.jython.org.
Generating C-based parsers with GNU Bison
Bison is a parser-generator that can be used to generate C-based parse code using an
annotated context-free grammar. Bison is compable with YACC, so if you're familiar, the
migraon shouldn't be terribly dicult.
Bison allows the developer to dene a le, which contains a prologue, an epilogue, and a
collecon of Bison grammar rules. The general format of a Bison input le is as follows:
Appendix A
[ 335 ]
%{
Prologue
}%
Bison Parsing Declarations
%%
Grammar Rules
%%
Epilogue
As the output of a Bison run is a C source le, the Prologue is generally used for forward
declaraons and prototypes, and the Epilogue is used for addional funcons that may be
used in the processing. A Bison-generated parser must then be compiled and linked in to a
C applicaon. GNU Bison documentaon is available at http://www.gnu.org/software
/bison/.
There is also a Python Lex and Yacc implementaon available at http://www.
dabeaz.com/ply/. Its self-stated goal is to simply mimic the funconality of
standard Lex and Yacc ulies.
Apache Tika
Tika is another Apache Java project. The Tika ulies extract structured data from various
document types. When processing non-plain-text le types, Lucene relies upon the Tika
libraries to extract and normalize data for indexing. Tika is located on the Internet at
http://tika.apache.org/.
This is quite a powerful package. In addion to text extracon, Tika supports EXIF data found
in images, metadata from MP3, and extracon of informaon from FLV Flash videos. While
not callable directly from CPython, Tika supplies command-line ulies that may be used
programmacally via the subprocess module.
Getting started with Python 3
As we've menoned, Python 3 is the next major release of the Python programming
language. As of the me of wring, the most recent version of Python 3 was 3.1.2. Python
3 aims to clean up a lot of the language cru that remained through years of backwards-
compable development. That's the good news. The bad news is that a number of the
changes made to the language are not compable. In other words, your code will break. This
was the rst intenonally backwards-incompable release.

Looking for Addional Resources
[ 336 ]
In this secon, we'll highlight some core dierences between Python 2 and Python 3. We'll
also step through the recommended porng process so you can get a feel as to how to move
your code forward. For an overview of the Python 3 development and porng process, you
should read PEP3000, available at http://www.python.org/dev/peps/pep-3000/.
Python 3 is a rather clean language and the porng process is not terribly
dicult. However, many of the common third-party packages have not yet been
ported. If your applicaons rely on libraries, which are not compable, you may
have to hold o on your upgrade. Or, beer yet, perhaps you could donate some
of your experse and help with the eort!
Major language changes
There are some big changes to Python proper that you'll need to understand when
moving into Python 3. The Python website has an excellent guide to the changes present
in version 3.0. The guide is available at http://docs.python.org/release/3.0.1/
whatsnew/3.0.html. This doesn't cover the latest version; however, it does cover the
larger major version switch. However, we'll survey some of the major syntaccal changes
here. It may also be benecial to read PEP3100, which provides a collecon of changes made
to the language during the upgrade to version 3. It is available at http://www.python.
org/dev/peps/pep-3100/.
Print is now a function
In previous versions, print was a statement. No parentheses were required and you
couldn't pass print around as a rst class object. That changes with Python 3. The following
snippet is valid Python 2 code:
Python 2.6.1 (r261:67515, Feb 11 2010, 00:51:29)
[GCC 4.2.1 (Apple Inc. build 5646)] on darwin
Type "help", "copyright", "credits", or "license" for more information.
>>> f = open('outfile', 'w')
>>> print >>f, "The Output"
>>>
Running the preceding code in a Python 3 loop, however, results in an excepon bubbling up
the call stack and your applicaon terminang. The Python 3 way is as follows.
Python 3.1.2 (r312:79360M, Mar 24 2010, 01:33:18)
[GCC 4.0.1 (Apple Inc. build 5493)] on darwin
Type "help", "copyright", "credits", or "license" for more information.
>>> f = open('outfile', 'w')
>>> print('The Output', file=f)
>>>

Appendix A
[ 337 ]
It will take some me to get used to treang print as a funcon rather than a statement,
but it's worth it. This now allows print to be passed around as a rst class object, on par
with any user-dened wrappers that would have been used previously.
This change is documented in PEP3105, which is available at http://www.python.org/
dev/peps/pep-3105/.
Catching exceptions
Python's syntax for catching excepons has been changed as well. Previously, programmers
would write code similar to the following.
Python 2.6.1 (r261:67515, Feb 11 2010, 00:51:29)
[GCC 4.2.1 (Apple Inc. build 5646)] on darwin
Type "help", "copyright", "credits", or "license" for more information.
>>> try:
... 1/0
... except ZeroDivisionError, e:
... print e
...
integer division or modulo by zero
This is perfectly valid syntax; however, it oen leads to bugs that are not always easy to
discover during development. Consider the following code:
Python 2.6.1 (r261:67515, Feb 11 2010, 00:51:29)
[GCC 4.2.1 (Apple Inc. build 5646)] on darwin
Type "help", "copyright", "credits", or "license" for more information.
>>> try:
... 1/0
... except ZeroDivisionError, OSError:
... print "Got an Error"
...
Got an Error
>>>
What's wrong with this? Exactly. The developer intends to catch either ZeroDivisionError
or OSError. However, that's not how this is treated. Here, we actually assign the value of the
caught ZeroDivisionError object to OSError! To eliminate that problem (and awkward
syntax), the as keyword is now required in this situaon.
Python 3.1.2 (r312:79360M, Mar 24 2010, 01:33:18)
[GCC 4.0.1 (Apple Inc. build 5493)] on darwin
Type "help", "copyright", "credits", or "license" for more information.
>>> try:
... 1/0

Looking for Addional Resources
[ 338 ]
... except (ZeroDivisionError, OSError) as e:
... print(e)
...
int division or modulo by zero
>>>
Aempng to use the syntax in the Python 2 example results in a SyntaxError excepon.
This ensures there is no ambiguity following the except statement.
Excepon changes were proposed in PEP3110. These updates actually made it into the
Python 2 series as well. More informaon is available at http://www.python.org/dev/
peps/pep-3110/.
It is acceptable to use the as keyword for excepon purposes in Python 2.6 as
well. If your code does not need to run on earlier interpreters, you can go right
ahead and use the newer syntax now.
Using metaclasses
Metaclasses are a bit of an advanced topic; however, their syntax is worthy of menon. A
metaclass is essenally a class that is responsible for building a class. Try not to think about
that too hard just yet!
Previous versions of Python enforced a series of rules that would be used to determine what
a class' metaclass would be. Programmers could specify one explicitly by inserng an aribute
named __metaclass__ into the class denion. It was also possible to do this at the module
level, which would cause all dened classes in that module to default to newstyle.
In Python 3, all classes are new style. If you have a need to specify a metaclass, you can now
do so via a keyword style argument within the class denion.
Python 3.1.2 (r312:79360M, Mar 24 2010, 01:33:18)
[GCC 4.0.1 (Apple Inc. build 5493)] on darwin
Type "help", "copyright", "credits", or "license" for more information.
>>> class UselessMetaclassStatement(metaclass=type):
... pass
...
>>>
The above example, while pointless, illustrates the new syntax.
New reserved words
Subsets of Python tokens are now treated as reserved words and cannot be reassigned.
Python 3 adds True, False, None, as, and with. The laer two were reserved as of 2.6
with a warning on None reassignment.

Appendix A
[ 339 ]
Major library changes
As should be expected, a number of modules in the standard library were updated,
added, or removed. Many of them were changed to support proper PEP8-compliant
naming convenons. For example, Queue becomes queue and ConfigParser becomes
configparser. The list of changes is exhausve. For a detailed look, see http://www.
python.org/dev/peps/pep-3108/, which describes all of the updates.
Changes to list comprehensions
Python's list comprehensions are a powerful feature. They've been changed in Python 3 and
generally cleaned up a bit. There are two major changes that you should remember. First,
loop control variables are no longer leaked.
For example, the following is valid in Python 2:
Python 2.6.1 (r261:67515, Feb 11 2010, 00:51:29)
[GCC 4.2.1 (Apple Inc. build 5646)] on darwin
Type "help", "copyright", "credits", or "license" for more information.
>>> [i for i in range(10)]
[0, 1, 2, 3, 4, 5, 6, 7, 8, 9]
>>> i
9
>>>
The above example would result in a NameError under Python 3 when aempng to access
i outside of the list compression proper.
Also, the [i for i in 1,2,3] syntax is no longer valid. Literals like this must now be
enclosed in parenthesis (making them valid tuples). So, the [i for i in (1,2,3)]
should now be used.
Migrating to Python 3
Now, we'll look at the migraon process from Python 2 up to Python 3. It's really not as
dicult as it sounds! The Python 3 distribuon ships with a ulity named 2to3, which
handles the changes we've outlined below, as well as many others. The recommended
update process is as follows:
1. Ensure you have up-to-date unit tests so that you can validate funconality aer
you've made all of the required updates.
2. Under Python 2.6 (or 2.7), run your code with the -3 switch. This enables Python
3-related warnings. Take the me to go through and x them manually.
3. Run the 2to3 ulity on the updated code once it runs cleanly with a -3.
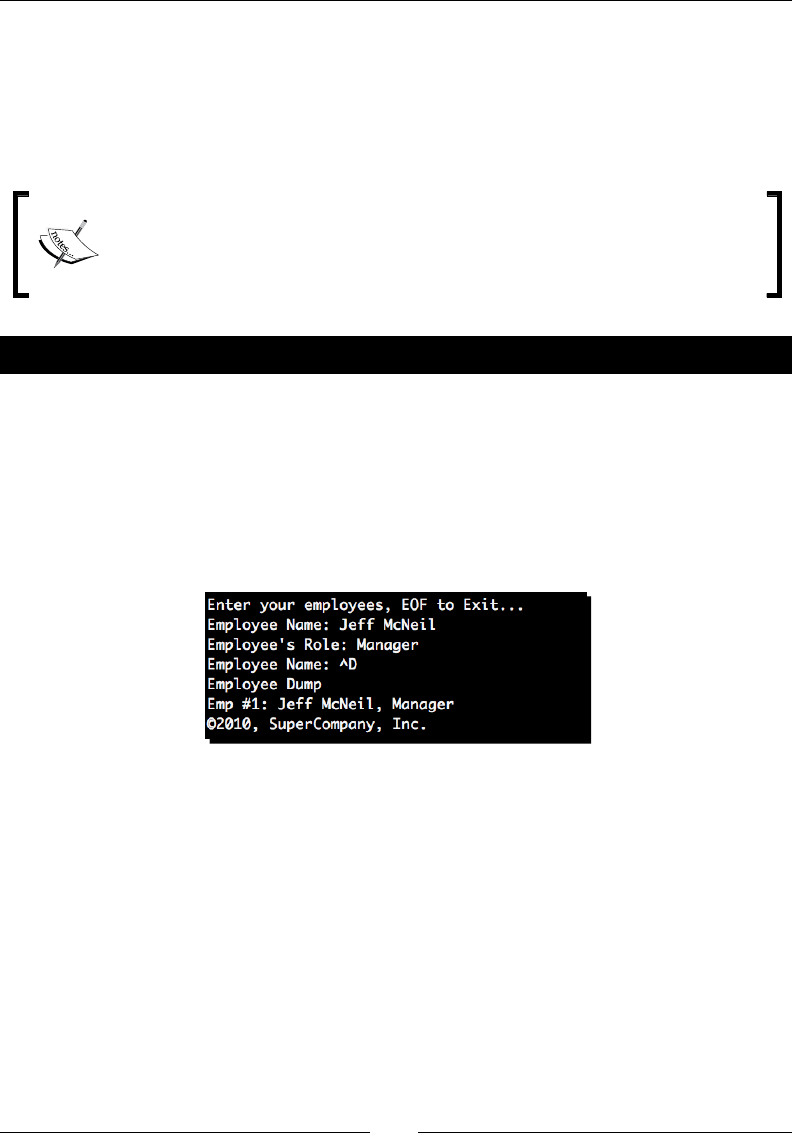
Looking for Addional Resources
[ 340 ]
4. Manually x all of your code unl your unit tests are again passing, as they should
be aer any major update.
For more detailed informaon on the 2to3 ulity, see http://docs.python.org/
release/3.0.1/library/2to3.html. In the following secon, we'll run through the
process with some of our example code.
Unit tests are very important in situaons like this. Having good unit test
coverage ensures that you won't be caught o guard aer a major language
update like this. We'll skip that step here in our example, but they should always
be in place in a producon seng.
Time for action – using 2to3 to move to Python 3
In this example, we'll use the string_definitions.py le we created in Chapter 3,
Python String Services. This is a very simple lile applicaon and includes content that will be
updated by the automated ulity.
First, we'll run the ulity under Python -3 to determine whether there's anything we should
manually handle.
(text_processing)$ python -3 string_definitions.py
The automated process should work nicely. Follow these steps below to complete the update:
1. Run 2to3 on the string_definitions.py le. Examine the output for any
unexpected code changes.
(text_processing)$ 2to3 string_definitions.py
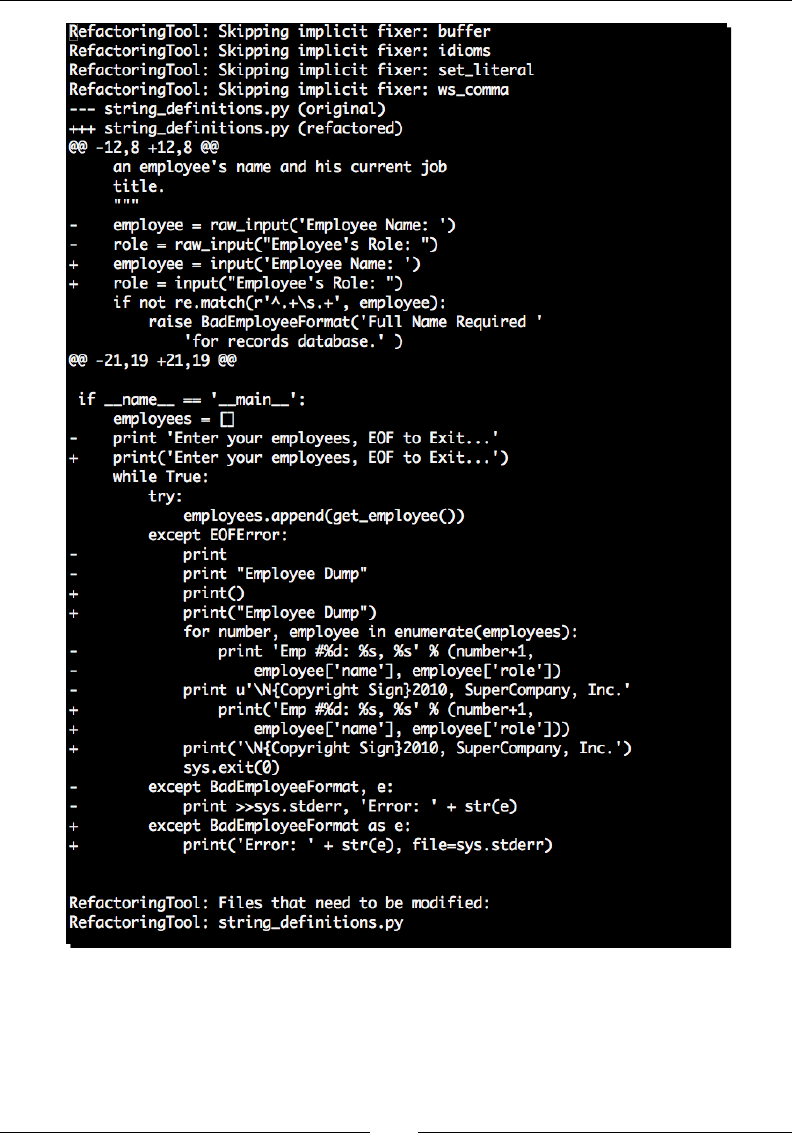
Appendix A
[ 341 ]
2. Now that we've seen what will happen, run the 2to3 script again using the –w
opon, which triggers a write-back to disk. Output should match the output in the
previous step, so we'll not list in here.
(text_processing)$ 2to3 -w string_definitions.py
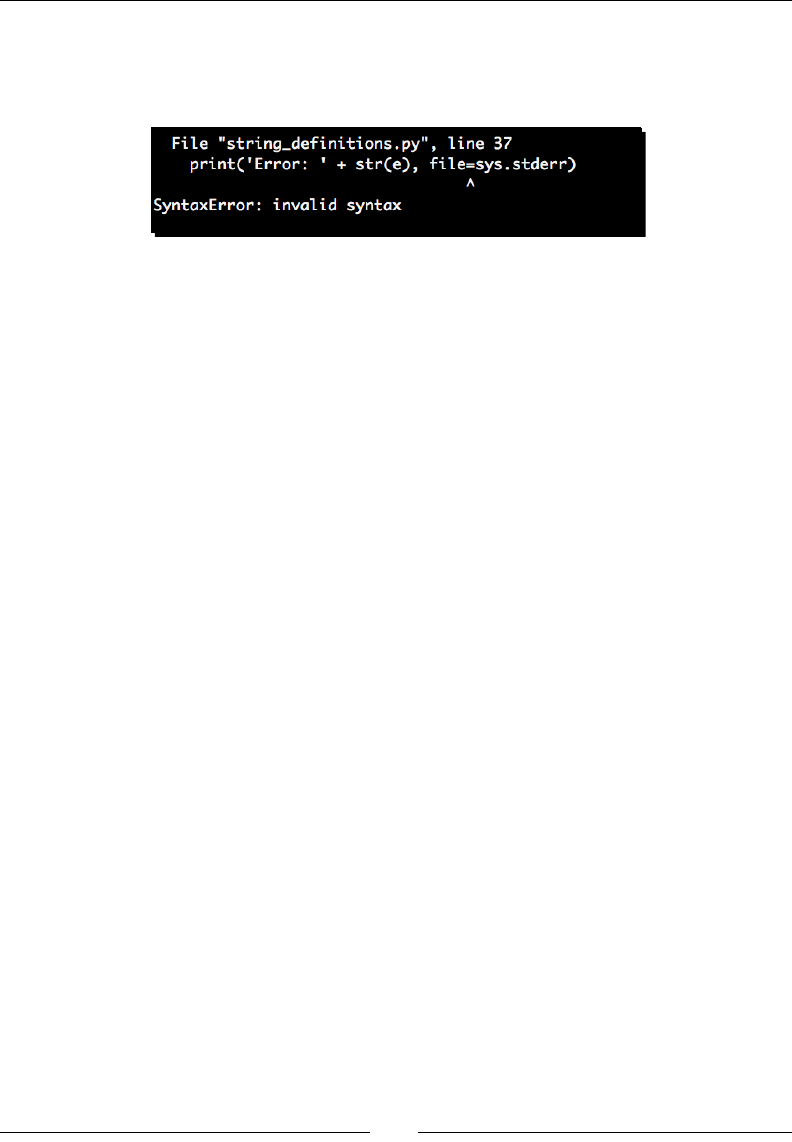
Looking for Addional Resources
[ 342 ]
3. First, let's aempt to run the updated code using Python 2. Your output should look
similar to the following:
(text_processing)$ python string_definitions.py
4. Now, run the new source le with the Python 3 interpreter. It should execute as it
did under Python 2.
(text_processing)$ python3 string_definitions.py
What just happened?
We ran though upgrading a simple Python 2 source le and updated it to Python 3. The rst
thing we did was run the ulity in a read-only mode. This lets us see the upcoming changes
before we commied them to disk. When we were sased with our updates, we wrote
them out by passing the –w switch.
Take a minute to look at the computed diff that 2to3 output. In addion to the changes
we detailed in the previous secon, the script also translated all of the raw_input calls to
input. The resulng le is fully Python 3 compable (though a backup should appear in the
current working directory, just in case).
Summary
In this chapter, we went a lile bit o target from pure text data processing. We covered
sources of documentaon and touched on ways to create your own documentaon. Next,
we spent some me going over community resources and ways you can get involved; either
in person or via groups and mailing lists.
We then spent a lile bit of me on some other applicaons and libraries that you may nd
useful. Specically, the Java Lucene-based engines are very high-quality components.
Finally, we spent some more me on Python 3. Hopefully, you feel comfortable now with
some of the major changes and the process to move your code forward. The most dicult
part of the process is dealing with incompable third-party ulies.

Pop Quiz Answers
Chapter 1: Getting Started
ROT 13 Processing Answers
1 If the values were simply swapped, we would ROT13 encode the tag contents and allow
the text data within the tags to pass through unchanged.
2Technically, yes, as long as the resulng alphabet contains 26 leers. However, this specic
implementaon relies on the ASCII character set as dened in the string module.
3Depending on the current state, we could throw our parser o. This is possible, however,
using more advanced markup techniques that we'll cover later.
4We could update our code to read in raw chunks rather than concern ourselves with line
boundaries.
B

Pop Quiz Answers
[ 344 ]
Chapter 2: Working with the IO System
File-like objects
1 Python will raise an AttributeError excepon. The rst part of any method
execuon is standard aribute lookup. If the method cannot be found, it certainly
cannot be called.
2You might be beer o calling readlines in two situaons. First, for an arbitrarily small
data set. Addionally, if you're planning on randomly accessing various lines within a
le and need to retain those values in memory.
3Absolutely nothing. A le will open correctly regardless of the mode passed in. It's
wring the le that causes issues.
4 A le object represents an actual on-disk le enty. A le-like object behaves like a le,
but the data may come from any arbitrary source.
Chapter 3: Python String Services
String literals
1 Yes, it's possible and the use cases are largely the same. There's one caveat, though:
you must dene such strings using ur'string' and not ru'string'. Remember, a raw string
just aects how it is interpreted, whereas a Unicode string generates an enrely new
data type.
2Strings promote to the "widest" value. For example, Unicode + Unicode is Unicode. At
the same me, Unicode + String is Unicode.
3The excepon would have been handled in the default fashion. Our applicaon would
terminate and Python would print a back trace.

Appendix B
[ 345 ]
String formatting
1Essenally, in places where you're prinng the same string repeatedly, but with
dierent values in constant places. It's also useful when creang longer strings such as
e-mail message content; you can save your template in an external le and access it via
Python's le IO mechanisms.
2If you have an exisng diconary, you can pass it to a string's format method by
prepending it with two asterisks.
Python 2.6.1 (r261:67515, Feb 11 2010, 00:51:29)
[GCC 4.2.1 (Apple Inc. build 5646)] on darwin
Type "help", "copyright", "credits", or "license" for more
information.
>>> d = {'a': 1, 'b': 2}
>>> '{a}/{b} = Half'.format(**d)
'1/2 = Half'
>>>
3The answer in this case is a string representaon of 12. The + operator, when applied to
strings, results in a concatenaon.
Chapter 4: Text Processing Using the Standard Library
CSV handling
1 It's possible to create a subclass of Dialect, or build a new dialect directly via
keyword arguments to the register_dialect funcon of the csv module. It's
generally quicker to use the register_dialect approach. However, supporng
the former simply means dening a few extra aributes. That's useful if you already
have data encapsulated in a class.
2Consider a comma-separated value that contains a comma! The split method will
return two values here instead of one. This is where the quong logic within the csv
module pays o.
3 They're not. Formulas are spreadsheet concepts that do not carry over into plain text.

Pop Quiz Answers
[ 346 ]
JSON formatting
1 This is because we read in a text source to begin with and do not perform any integer
casng or type conversion.
2 Generally speaking, no. There are other methods that can be used for Object
Serializaon, such as the pickle module. Complex structures are not saved out. JSON
is usually best suited for data transfer rather than object serializaon or marshalling.
3 Because of its small size. XML includes a lot of markup and tag structure, whereas JSON
does not.
Chapter 5: Regular Expressions
Regular expressions
1 We need to match either a number or a dash. Another approach would be to use a '|'
and explicitly match either a \d or a literal dash.
2 Consider the (?(name-or-id)yes|no) approach using a group number versus a
group name. This lets us group for precedence without assigning to a numeric group.
3Frequently used regular expressions will perform much beer if pre-compiled. This
way, they do not need to go through the process each me.
Understanding the Pythonisms
1 The match method only matches at the beginning of a string, whereas search will scan
a string for a match. The match method would make more sense when tesng a small,
discrete value such as an HTML form submission whereas search might be preferred
when looking for a "needle in a haystack".
2 The finditer method returns an interator whereas findall is going to return a
list. The former uses less memory than the list construcon.
3 It's a non-standard Python extension. If you wish to use the expression elsewhere
without modicaon, chances are you'll have to update it.

Appendix B
[ 347 ]
Chapter 6: Structured Markup
SAX processing
1SAX can use less memory as the enre XML document is not loaded. It's a good
choice when reading larger documents or when you do not need the enre context.
2Processing is generally more complex, requiring the applicaon developer to keep
state and build her own object hierarchy to represent the XML tree structure.
3 That all text isn't necessarily delivered in one call and that all non-element data is
included. This means all "prey formang" whitespace will be passed into your
callback.
4 The *NS versions are called when operang in Name Space mode, which is turned on
via the appropriate parser.setFeature toggle.
Chapter 7: Creating Templates
Template inheritance
1 To access the next template, reference the next namespace. To access the previous,
reference the parent namespace.
2 Add a backslash right before the new line character appears in the input stream.
3Dene them where needed and refer to them via self.attr.
4 You should use the local namespace to reference the currently execung template.
Chapter 8: Understanding Encoding and i18n
Character encodings
1As many systems only supported 7-bit values, it was an aempt to retain usability in
the event that soware didn't support 8-bit values.
2 32.
3A glyph is the graphical representaon seen on your screen whereas a code point is
an abstract value given to a Unicode character.

Pop Quiz Answers
[ 348 ]
Python encodings
1 When encoding Unicode data, a string object is returned. Note that if you're using
Python 3 then a bytes object is returned.
2 A Unicode object. However, as Python 3 strings are Unicode, you'll receive a string
object for later versions of Python.
3 Not doing so can easily introduce bugs. You can wind up with a UTF encoded string
type, or raise excepons when wring data containing code points higher than 128.
Internationalization
1Localizaon or L10n. Note the capital "L" used.
2Because ordering of words may change in dierent languages. Using this syntax
allows the translator to move the variable and not rely on posioning.
3Plurals, for one. Consider English uses the "s" to signify plural, while Russian ulizes
many endings to indicate plural. Gender, numbers, and tense all provide the same
challenges.
Chapter 9: Advanced Output Formats
Creating XLS documents
1When we wrote our integers to our Excel objects, they were wrien as Python
strings. The typing informaon simply carried over.
2 We could call xlwt.easyxf again and pass in dierent opons. Spend a minute
and play with various font and decoraon opons to gain a feel for what's possible.
3We can embed formulas in nave XLS les.

Appendix B
[ 349 ]
Chapter 11: Searching and Indexing
Introduction to Nucular
1Searching complexity and compleon me. A straight search grows linearly as data
is added whereas most indexes will grow logarithmically.
2Disk IO! Nucular indexes are persisted to disk. Therefore, the faster your disks, the
faster your results.
3 The supplied nucularDump.py and nucularLoad.py les.
4Yes.
Index
Symbols
%defs
about 198
funcons, dening with 208, 209
imporng, with %namespace 210-212
%doc
mulline comments, generang 207
-le switch 38
__init__ method 264
_intro_style method 264
%namespace
%defs, imporng with 210-212
%text
Mako, documenng with 207
A
advanced Nucular features
about 313
eld-qualied indexes 314-316
advanced Nucular queries
performing 317-319
advanced paern matching
about 145
asserons 150
grouping 145-148
allow-update keyword 292
anchors
about 143
applying, for match restricon 143
And class 294
anyWord query method 307
Apache Lucene 325
appendChild method 185
applicaon
building 172-175
applicaon conguraon les
modifying 110-114
updang 114, 115
ASCII
about 230
example 231
limitaons 231
asserons
about 150
examples 150
look-ahead 150
look-behind 150
negave look-ahead 151
posive look-ahead 150
aributeRange method 307
aributes
inhering 221
aributeWord method 307
B
Babel
about 249
installing, on local virtual environment 249
Babel documentaon
URL 254
Babel, installing
on local virtual environment 249
Backus-Naur Form
grammar, specifying with 281, 282
backwards compability, Unicode 236
base templates
inhering from 215
updang 215-218
basic conguraon le support
adding, to log-processing applicaon 110-114

[ 352 ]
BeaufulSoup package 195
big-oh notaon 304
bigram 299
BIND 158
BIND conguraon format 291
Bison
about 334
C-based parsers, generang 334
working 334
borderColor aribute 264
borderWidth aribute 264
built-in funcons, Python
about 230
chr 230
ord 230
C
cache directory 202
Caesar Cipher 10
calculate_prot funcon 100
calculator
implemenng 284, 285
call_chain argument 34
capitalize method 93
C-based parsers
generang, with GNU Bison 334
character classes
detecng 92
character encodings
about 230
ASCII 230, 231
character set
about 141, 142
properes 141
characters method 170
CharsNotIn class 294
char value 231
Cheetah
about 197, 227
URL 227
chr funcon 230
cleanUp method 309
close method 43, 195
codecs module
about 245-247
standard library documentaon, URL 248
col aribute 287
collocaon 299
color aribute 275
Combine class 295
Comma separated values data. See CSV data
community resources
about 332
groups 332, 333
local Python conference 333
mailing lists 332
compiled expression object
about 155
methods 155
comp.lang.python group 332
compressed les
handling 41, 42
CongParser module 110, 113
conguraon data
wring 118
conguraon le
generang 119-121
context free grammar 281
context managers
about 39
example 39
using 40
control structures, Mako 204
conversion ags 76
conversion speciers
align aribute 84
ll argument 84
precision 84
sign aribute 84
type eld 85
using 83, 84
width aribute 84
copy applicaons
xing 244
createAribute method 184
createCDATASecon method 184
createComment method 184
createDocumentFragment method 184
createElement method 184
createProcessingInstrucon method 184
createTextNode method 185
cross-site scripng 213
cryptography 10

[ 353 ]
CSV data
about 98
and formulas 101, 102
drawbacks 98
reading 98, 99
wring 106-108
csv.DictReader class 100
csv module 98
csv.reader method 100
custom CSV formats
processing 103-105
custom tags, Mako
about 222
creang 223-225
Cyrillic 67
D
data
extracng, from le 289
processing, NLTK used 297, 298
date
reformang, with Python code 205, 206
decode method 233, 238
defaultdict object 82
default opons
handling 116, 117
delimiters 98
design goals, Unicode consorum
about 234
characters 234
converbility 235
dynamic composion 235
eciency 234
logical order 235
plain text 235
semancs 235
stability 235
unicaon 235
universality 234
distuls package 23
Django 66
DNS records
reading 159-162
documentaon tools, Python 331
Document Object Model. See DOM
documents
creang 183
modifying 183
DOM 176
DOM parser 176
Doxygen system 331
dungeon adventure game
creang 172-175
updang 176, 180, 181
XPath, used 187-193
E
easy_install command 23, 25, 249, 258
EBNF 282
egg-based package
creang 122-131
egg les 23
ElementTree packages
about 176
XML data, accessing 186, 187
employee management example 62-66
encode method 238
encodings, Python
about 238
good pracces, adopng 248
encoding, Unicode 237
endDocument method 170
endElement method 170
endElementNS method 170
endPrexMapping method 170
enumerate 66
epydoc package 331
error handling 55
event-driven processing 168, 169
excel formats
processing 98-100
Excel spreadsheet
creang 98-100
saving, as CSV document 98-100
Extended BNF. See EBNF
F
feed method 195
eld-qualied indexes 314-316
leinput module 50, 52
le keyword 292
le-like objects
implemenng 42

[ 354 ]
leno method 43
le object methods
about 43
close 43
leno 43
ush 43
read 43
readline 43
readlines 44
seek 44
tell 45
write 45
writelines 45
les
accessing, directly 37-39
data, extracng from 289
ll argument 84
lter
about 15
structured markup, processing 15
lters, Mako
about 214
customizing 226
decode.<encoding> 214
enty 214
h 214
n 214
trim 214
u 214
unicode 214
x 214
ndall funcon 153
nditer method 153
ags method 155
ush method 43
FollowedBy class 295
fonamily aribute 275
fontName aribute 264
fontsize aribute 275
format method
using 78, 79
FormEncode 139
full text index
creang, Nucular used 307-309
FullTextIndex class 316
funcons
dening, with %def 208, 209
G
Genshi
about 227
URL 227
get aribute 204
get_nodes method 181
getpos method 195
getSampleStyleSheet method 263, 264
get_starag_text method 195
geext module 250
glyph 235
grammar
about 280
specifying, with Backus-Naur Form 281, 282
grammar driven parser 282
greedy operators
versus non greedy operators 149, 150
groupindex method 155
grouping 145-148
groups method 155
H
handle charref method 195
handle_comment method 195
handle_data method 195
handle_decl method 195
handle_entyref method 195
handle_pi method 195
handle_startendtag method 195
help funcon 329
HTML
reading 194
HTML content
spell check, performing on 46-50
HTML document
example 8
HTML page
links, displaying on 194, 195
HTMLParser module 194
HTMLSpellChecker class 49
HTTP URL
tesng 138, 139

[ 355 ]
I
ignorableWhiteSpace method 170
include tag 206, 207
incremental processing 171
index_contents funcon 309
indexDiconary method 306
IndexDirectory class 316
indexing
about 302
benets, measuring 310, 311
performing, on Open Oce
documents 320-323
index systems
about 325
Apache Lucene 325
SQL index 325
zc.catalog 325
ZODB 325
informaon
providing, via Markup 8, 9
inheritance layer, Mako
adding 219, 221
inheritance structures, Mako 218
in-place ltering 51
insertBefore method 185
inspect module 274
installaon, Babel
on local virtual environment 249
installaon, Mako 198, 199
installaon, NLTK 298
installaon, Nucular 304, 305
installaon, ODFPy 272
installaon, PyParsing library 283
installaon, ReportLab 258, 259
installaon, SetupTools 23, 24
installaon, xlwt package 266
internaonalizaon (i18n)
about 249
external resources 254
int funcon 82
io.open method 59
IO system 58
J
Java implementaon
URL 334
JavaScript Object Notaon. See JSON
Jinja2
about 227
URL 227
join method 95
JSON 132
JSON data
decoding 135
encoding 134
wring 132, 134
K
keys aribute 204
Keyword class 295
KOI8 67
KOI8-R
about 232
example 232
kwargs aribute 204
L
language changes, Python 3
about 336
excepons, catching 337
library changes 339
list comprehensions changes 339
metaclasses, using 338
new reserved words 338
print funcon 336
language syntax
dening 280
leIndent aribute 264
linear algorithm 304
linear search
implemenng 302-304
lineno aribute 287
line.split() funcon 89
links
displaying, on HTML page 194, 195
list comprehension 108
literal 62
Literal class 295

[ 356 ]
ljust method 92
localizaon (L10n) 249
local Python conference
aending 333
log format
introducing 35, 36
log-processing applicaon
basic conguraon read support,
adding 110-114
LogProcessor class 34, 73
log processor output
customizing 68-73
LogProcessor script
updang 79-83
logscan.py le 31
look-ahead asseron 150
look-behind asseron 150
lookup aribute 204
Lucene project 333
M
mail message
converng, to use namespaces 210-212
Mako
about 198
aributes, inhering 221
control structures 204
custom tags, creang 223-225
documenng, with %text 207
lters, customizing 226
inheritance layer, adding 219, 221
inheritance structures 218
installing 198, 199
tags 206
template context, generang 203, 204
usage 199
mako-render ulity 225
Mako template
loading 199-203
manual decoding, UTF-8 data
about 239
example 239
mapping key 75
margin aribute 275
marginboom aribute 275
marginle aribute 275
marginright aribute 275
margintop aribute 275
markInputLine aribute 287
Markup
informaon, providing 8, 9
markup tags
skipping 18-21
matchAribute method 307
MatchFirst class 295
match funcon 140
match object 158
MaxSizeHandler class 34, 35, 74
memoryview module 62
metacharacters 140
metaclasses
about 338
using 338
ModuleDocumentor class 276
module_members funcon 276
modules, Python
codecs 245-247
moveTransientToBase method 309
mulline comments
generang, with %doc 207
mulple le access
in-place ltering 51
simplifying 50, 51
mulple les
accessing 45
MX (Mail Exchanger) records 159
N
natural languages 280
Natural Language Toolkit. See NLTK
negave look-ahead asseron 151
newlines system
enabling 45
NLTK
about 297
data, processing 297, 298
installing 298
none keyword 292
non-excel data
custom CSV formats, processing 103-105
reading 103
non greedy operators
versus greedy operators 149, 150

[ 357 ]
non-literal strings
building 68
non-terminal 281
normalize method 185
NotAny class 296
NTLK processing examples
collocaons, discovering 299, 300
stems, removing 298
Nucular
about 305
full text index, creang 307-309
installing 304, 305
scripts 312
using 305
XML les, using 312, 313
nucularAggregate.py ulity 312
nucularDump.py ulity 312
nucularLoad.py ulity 312
nucularQuery.py ulity 312
nucularSite.py ulity 312
nums object 285
O
objects
using 35
ODFPy
installing 272
ODFPy, installing 272
odfpy package 271, 273
odf.style module 274
ODF XML les 277
ODT Generator
generang 273-276
oneOf object 285
OneOrMore class 296
online resources, Python 28
OOXML 266
OpenDocument les 271
open funcon 39
OpenOce
URL 273
Open Oce documents
indexing 323
Open Oce XML. See OOXML
operator module 285
OponParser class 35
ord funcon 230
ordinal 230
organizaonal structure, Unicode 236
or operaon
performing 152
P
Page Layout and Typography Using Scripts. See
PLATYPUS
parseFile method 286
parse funcon 34, 73
parser
implemenng 292, 293
parser ags
about 156
re.DOTALL 156
re.I 156
re.IGNORECASE 156
re.L 156
re.LOCALE 156
re.M 156
re.MULTILINE 156
re.S 156
re.U 157
re.UNICODE 157
re.VERBOSE 157
re.X 157
parser implementaon 282
parseString method 286
parseWithTabs method 286
parse_zone funcon 163
parsing classes
about 294
And 294
CharsNotIn 294
Combine 295
FollowedBy 295
Keyword 295
Literal 295
MatchFirst 295
NotAny 296
OneOrMore 296
Regex 296
StringEnd 296
StringStart 296
White 296
ZeroOrMore 296
paern method 155

[ 358 ]
PDFBuilder class 264
PDF les
generang, PLATYPUS used 258, 259, 263
wring, with basic layout 259-265
wring, with style mechanism 259-265
pdfgen framework 258
PEP292 329
PEP3101 329
PEP document 328, 329
percent (modulo) formang, Python
about 74
conversion ags 76
conversion type 77
mapping key 75
maximum width 76
precision 76
width 77
performance issues
dealing with 156
placeholder 197
plane 236
PLATYPUS
about 258
PDF les, generang 258, 259, 263
polymorphism 35
posive look-ahead asseron 150
precision 76
prexAribute method 307
print funcon 336
print statement 100
processingInstrucon method 170
process method 35, 82
producon 281
proximateWords method 307, 319
pybabel script 252
running 249
pydoc command 330
PyEnchant toolkit 48
PyParsing example
calculator, implemenng 284, 285
PyParsing library
about 279, 283
installing 283
modules, imporng from 285
PyParsing object
about 293
methods 286
type translaons, handling 287, 288
PyParsing objects, methods
parseFile 286
parseWithTabs 286
scanString 286
searchString 286
PyPI
about 23, 249
URL 28
Python
documentaon tools 331
CSV data, reading 98, 99
CSV data, wring 106, 107, 108
downloading, URL 10
egg-based package, creang 122-131
percent (modulo) formang 74
resources 328
Python 2 source le
upgrading 340, 341
Python 3
about 233, 335
IO system 58, 59
major language changes 336
migrang to 339, 340
support, providing for 10
Unicode, using with 233
Python applicaons
mulple languages, handling 250, 251
preparing, for translaon 250
translaons, adding 253, 254
Python code
date, reformang 205, 206
Python community 28
Python-Dev 332
Python documentaon
enhancement proposals 328, 329
self documenng 329-331
unocial documentaon 328
Python documentaon page
URL 328
Python Enhancement Proposal.
See PEP document
Python-Help 332
Python Package Index. See PyPI
Python Papers Anthology 332
Python resources
about 328
community resources 332

[ 359 ]
Python-specic elements
implemenng 153
Python template systems
Cheetah 227
Genshi 227
Jinja2 227
Tempita 227
ZPT 227
Python-tutor mailing list 332
R
raw string 65
readline method 43
readlines method 44
read method 43
re.DOTALL ag 156
Regex class 296
regular expressions
about 65, 137, 140
repeon, detecng 140
re.I ag 156
re.IGNORECASE ag 156
re.L ag 156
re.LOCALE ag 156
re.M ag 156
remote les
accessing 52, 54
removeAribute method 185
removeChild method 185
re.MULTILINE ag 156
render_email method 202
render_header funcon 269
replaceChild method 185
ReportLab
installing 258, 259
ReportLab, installing 258, 259
ReportLab website 258
reset method 195
re.S ag 156
re.U ag 157
re.UNICODE ag 157
re.VERBOSE ag 157
re.X ag 157
rightIndent aribute 264
rjust method 92
ROT13 encoder
implemenng 11-13
ROT13 processor
working, as lter 15-17
rotate_from_le method 21
S
SAX 165, 168
scanString method 286
search funcon 153
searching 302
searchString method 286
seek method 44
setAribute method 185
setDebug method
about 296
debugging messages, generang 297
setDocumentLocator method 170
set_opon method 121
setParseAcon method 287
setup.py le 131, 132
SetupTools
about 24
installing 23, 24
SetupTools system 198
Simple API for XML. See SAX
simple cipher
implemenng 10
simple index directory
creang 305, 307
skippedEnty method 170
Solr
about 334
highlights 334
source
reconguring 122
special characters
^ 143
? 141
. 142
( ) 148
(? ) 148
(?!...) 152
(?<!...) 152
(?<= ) 152
(?= ) 152
[] 142
* 141
+ 141

[ 360 ]
$ 143
\A 143
\b 143
\B 143
\d 142
\D 142
{m,} 141
{m,n} 141
{,n} 141
{n} 141
(?(name-or-id)match-exp|fail-exp) 152
(?P<name> ) 148
(?P=name) 148
\s 142
\S 142
\w 142
\W 142
\Z 143
spell check
performing, on HTML content 46-50
performing, on live HTML pages 52, 54
Sphinx documentaon system 331
split funcon 34, 95, 154
spreadsheet
creang, of UNIX users 106-109
sprin style syntax 68
startDocument method 170
startElement method 170
startElementNS method 170
startPrexMapping method 170
state machine 22
std_page method 264
stems
removing 298
StringEnd class 296
string formang 68
StringIO instance
about 57
handling 57
StringIO module 62
string methods
manipulaons, making with 89-92
string objects
about 61, 62
methods 89
str type 61
unicode type 61
strings
about 62
searching 93
treang, as sequences 95, 96
string special methods
using 77, 78
StringStart class 296
str type 61
style aributes
borderColor 264
borderWidth 264
color 275
fonamily 275
fontName 264
fontsize 275
leIndent 264
marginboom 275
marginle 275
marginright 275
margintop 275
rightIndent 264
sub funcon 154
subprocess module 335
sys module 285
T
tags, Mako
about 206
include 206, 207
tell method 45
Tempita
about 227
URL 227
template context
generang 203, 204
TemplateLookup object 201
templates
about 197
creang 86
rendering 88
syntax 88
warnings, displaying on malformed lines 86, 87
templang 197
terminal 281
text
aligning 92

[ 361 ]
text_beginner directory 130
text data
categorizing 8, 9
structured formats 9
third-party modules
supporng 23
Tika
about 335
URL 335
me module 73
tle method 93
tle_page method 264
topreyxml method 184
toxml method 184
transfer stascs
generang 31-34
trigram 299
TrigramCollocaonFinder 300
type keyword 292
type translaons
handling 287, 288
U
UCS 237
UCS-2 238
UNDEFINED aribute 204
Unicode
about 234
backwards compability 236
data, copying 242, 243
encoding 237
organizaonal structure 236
reading 240, 241
using, in Python 3 233
Unicode consorum
about 234
URL 234
Unicode consorum, design goals
about 234
characters 234
converbility 235
dynamic composion 235
eciency 234
logical order 235
plain text 235
semancs 235
stability 235
unicaon 235
universality 234
Unicode data
copying 242, 243
Unicode literal 67
Unicode regular expressions
about 157
example 157
Unicode strings
wring 241-243
Unicode Transmission Formats standards.
See UTF standards
Unicode type 61
urllib 2 errors
handling 55, 56
urllib module 54
UTF-8 237
UTF-8 data
decoding, manually 239
UTF-32 237
UTF standards
about 237
UTF-8 237
UTF-32 237
V
value interpolaon
using 114, 115
values
calculang, example 101, 102
vars keyword 116
virtual environment
conguring 25, 26
running 25
virtualenv package
conguring 25
W
web server log parser
about 30
transfer stascs, generang 31-34
White class 296
with statement 39
Word object 285
write aribute 204

[ 362 ]
writelines method 45
write method 45
writexml method 185
X
XLS documents
building 267-270
xlwt package
about 266, 269
installing 266
xlwt package, installing 266
xlwt.Uls.rowcol_to_cell package 269
XML data
about 166
accessing, ElementTree used 186, 187
example 166-168
xml.dom.minidom package 183, 186
XML les
using 312, 313
xml.sax module 171
XPath
about 185
using, in dungeon adventure game 187-193
Y
YACC 282
Yet Another Compiler-Compiler. See YACC
Z
zc.catalog 325
ZeroOrMore class 296
zll method 92
ZODB 325
zoneinfy funcon 163
zone keyword 291
Zope Page 197
ZPT
about 227
URL 227

Thank you for buying
Python 2.6 Text Processing Beginner's Guide
About Packt Publishing
Packt, pronounced 'packed', published its rst book "Mastering phpMyAdmin for Eecve
MySQL Management" in April 2004 and subsequently connued to specialize in publishing
highly focused books on specic technologies and soluons.
Our books and publicaons share the experiences of your fellow IT professionals in adapng
and customizing today's systems, applicaons, and frameworks. Our soluon based books
give you the knowledge and power to customize the soware and technologies you're
using to get the job done. Packt books are more specic and less general than the IT books
you have seen in the past. Our unique business model allows us to bring you more focused
informaon, giving you more of what you need to know, and less of what you don't.
Packt is a modern, yet unique publishing company, which focuses on producing quality,
cung-edge books for communies of developers, administrators, and newbies alike. For
more informaon, please visit our website: www.packtpub.com.
About Packt Open Source
In 2010, Packt launched two new brands, Packt Open Source and Packt Enterprise, in order
to connue its focus on specializaon. This book is part of the Packt Open Source brand,
home to books published on soware built around Open Source licences, and oering
informaon to anybody from advanced developers to budding web designers. The Open
Source brand also runs Packt's Open Source Royalty Scheme, by which Packt gives a royalty
to each Open Source project about whose soware a book is sold.
Writing for Packt
We welcome all inquiries from people who are interested in authoring. Book proposals
should be sent to author@packtpub.com. If your book idea is sll at an early stage and you
would like to discuss it rst before wring a formal book proposal, contact us; one of our
commissioning editors will get in touch with you.
We're not just looking for published authors; if you have strong technical skills but no wring
experience, our experienced editors can help you develop a wring career, or simply get
some addional reward for your experse.

Python Text Processing with NLTK 2.0 Cookbook
ISBN: 978-1-849513-60-9 Paperback: 272 pages
Use Python's NLTK suite of libraries to maximize your
Natural Language Processing capabilies.
1. Quickly get to grips with Natural Language
Processing – with Text Analysis, Text Mining,
and beyond
2. Learn how machines and crawlers interpret and
process natural languages
3. Easily work with huge amounts of data and learn
how to handle distributed processing
Python Testing: Beginner's Guide
ISBN: 978-1-847198-84-6 Paperback: 256 pages
An easy and convenient approach to tesng your
powerful Python projects
1. Covers everything you need to test your code in
Python
2. Easiest and enjoyable approach to learn Python
tesng
3. Write, execute, and understand the result of tests in
the unit test framework
Please check www.PacktPub.com for information on our titles

MySQL for Python
ISBN: 978-1-849510-18-9 Paperback: 440 pages
Integrate the exibility of Python and the power
of MySQL to boost the producvity of your Python
applicaons
1. Implement the outstanding features of Python's
MySQL library to their full potenal
2. See how to make MySQL take the processing
burden from your programs
3. Learn how to employ Python with MySQL to power
your websites and desktop applicaons
Expert Python Programming
ISBN: 978-1-847194-94-7 Paperback: 372 pages
Best pracces for designing, coding, and distribung
your Python soware
1. Learn Python development best pracces from
an expert, with detailed coverage of naming and
coding convenons
2. Apply object-oriented principles, design paerns,
and advanced syntax tricks
3. Manage your code with distributed version control
Please check www.PacktPub.com for information on our titles
