RAW Help Guide
User Manual: Pdf
Open the PDF directly: View PDF ![]() .
.
Page Count: 10

www.riseatwork.ca
1 of 10
How-to Guide: Navigating through the five phases of RISE@Work
Baseline Phase ............................................................................................................................ 2
Step 1: Familiarize yourself with the program
da
s
hboa
rd ...................................................... 2
Step 2: Log your steps............................................................................................................. 2
Phase 1 ........................................................................................................................................ 3
Step 3: Discover the Phase 1
tool
s .......................................................................................... 3
Step 4: View and use Support
St
r
ategie
s ................................................................................ 4
Step 5: Click on a Support Strategy and “Add Strategy” ....................................................... 5
Step 6: Download the Take a Stand alert
applicati
on ............................................................. 5
Phase 2 ........................................................................................................................................ 6
Step 7: Discover the Phase 2
tool
s .......................................................................................... 6
Step 8: View and use the Action Planning tool ...................................................................... 6
Step 9: View and use the walking Routes tool........................................................................ 7
Phase 3 ........................................................................................................................................ 8
Step 10: Discover the Phase 3
tool
s ........................................................................................ 8
Step 11: View and use Action Planning to overcome barriers ............................................... 8
Step 12: View and use longer walks in the Routes
tool
.......................................................... 9
Phases 4 and 5 ............................................................................................................................. 9
Step 13: Continue to use all of the RISE@Work tools........................................................... 9
www.riseatwork.ca
2 of 10
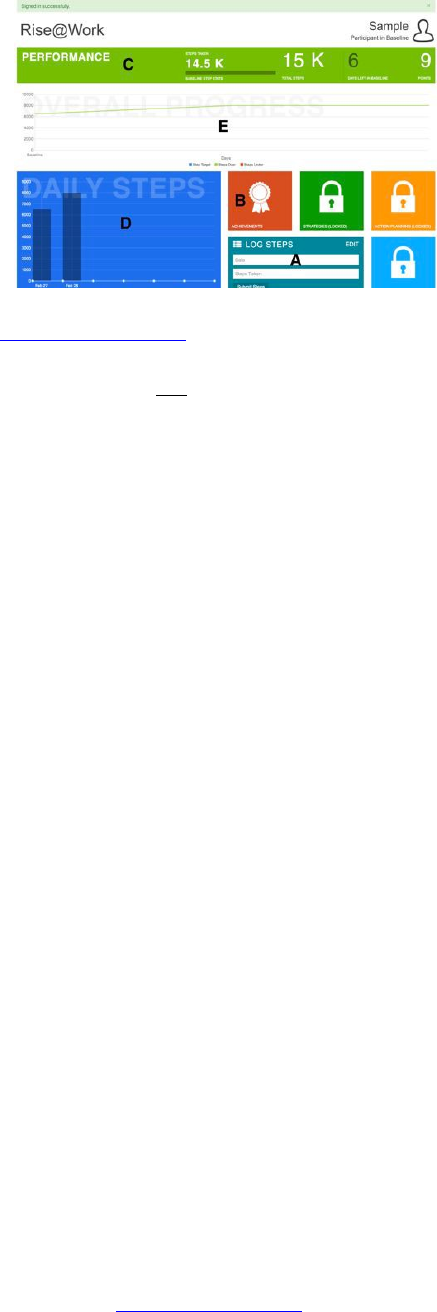
Baseline Phase
Step 1: Familiarize yourself with the program dashboard
Log into your account at www.riseatwork.ca using any of the following Internet browsers:
Google Chrome, Safari, or Firefox. Please note that if you are using Internet Explorer as your
default browser, the web application will not function optimally.
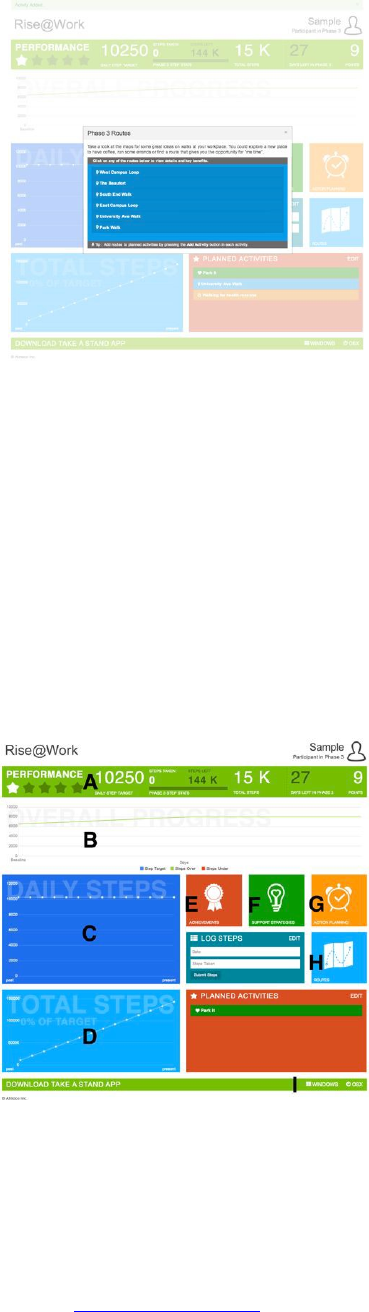
In the Baseline phase, you have access to two tools: Log Steps (A) and Achievements (B). The
Log Steps tool is what you will use to enter your daily steps. The Achievements tool displays all
of the badges that you have earned throughout the study. Badges are awarded for a variety of
activities like reaching step milestones, completing phases, and using the suggested support
strategies.
The green Performance Bar (C) at the top of the screen displays four values: 1) cumulative steps
taken during the present phase (e.g., baseline), 2) total steps taken during the entire study, 3) the
number of days left in the present phase, and 4) the number of points that you have earned during
the entire study. Points are awarded for logging steps on a timely basis. Logging steps on the day
that they are taken will yield the most points.
In Baseline, each time you log your steps, two graphs will provide you with
vi
s
ual repre
s
entati
ons
of your progress: Daily Steps (D), and Overall Progress (E). During the Baseline phase, both
graphs will display the same information.
Step 2: Log your s
te
ps
Using Log Steps (A), select a date and enter the corresponding number of steps you have taken
according to your pedometer. If your steps have been successfully logged, the graphs will update
immediately and a “Steps logged” notification will appear at the top of the screen in green.
Check in once a day at about the same time to log your daily steps. Please stick with your usual
routine. You can quickly glance through the dates and amounts of steps logged by hovering over
the bars in the Daily Steps graph (D).
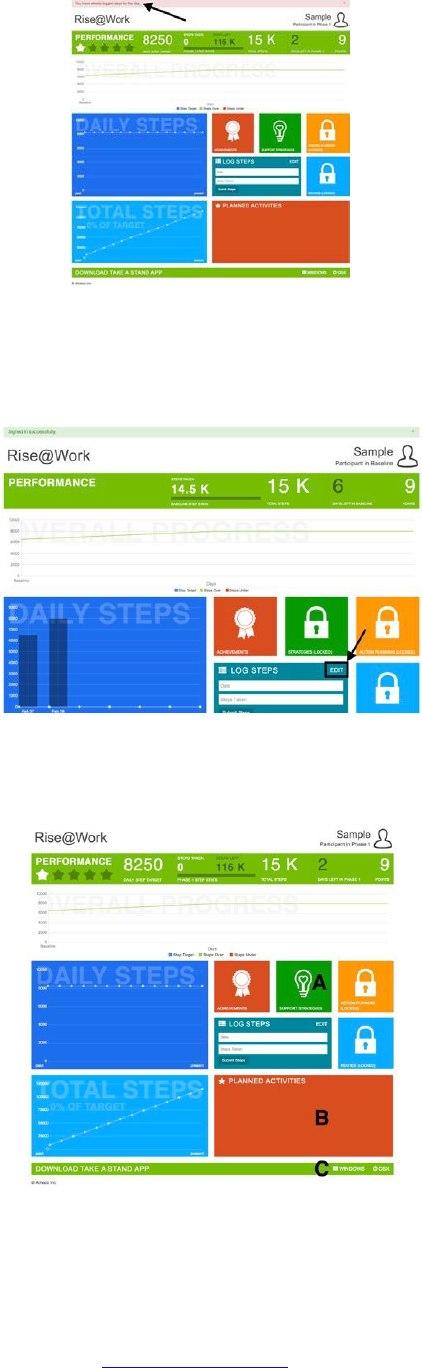
If you try to log steps twice for the same day by mistake, the following notification will appear at
the top of the screen in pink: “You have already logged steps for the day” (see below).
www.riseatwork.ca
3 of 10
Note: If you have entered an incorrect number of steps for the day, you may edit the log by
selecting the “edit” button in the Log Steps tool (see below). An edit screen will appear. After
correcting the number of steps logged on a particular day, click on the “Update” button.
Phase 1
Step 3: Discover the Phase 1 tools
In Phase 1, two new tools have been unlocked – Support Strategies (A) and the Downloads Bar
(C).

www.riseatwork.ca
4 of 10
For Phase 1 and beyond, the three graphs - Daily Steps, Total Steps and Overall Progress - will
display your steps logged in slightly different ways. Monitoring your daily step counts is a great
way to raise awareness of your current activity levels.
Daily Steps will show you the actual steps logged during each day of the current phase with a
white horizontal trend line showing your Phase 1 target of 1000 steps/day over Baseline.
Total Steps displays the total number of steps you have accumulated during the phase. This can
be compared to the white line which represents the number of steps you should have
accumulated each day based on your phase target. For instance, if your Baseline step count was
5000, the white target point on the graph on day 1 of Phase 1 would be 6000. On day 2 of Phase
1 it would be 12,000 steps and so on. If you fall behind on some days, then it is possible to catch
up to your target! The percentage of your phase target that you have achieved is also displayed.
Overall Progress will display all steps logged during the study from Baseline to the current date.
Steps over your target will be displayed in green and steps under your target will be in red.
Step 4: View and use Support S
t
r
ategie
s
Click on Support Strategies (A) to open the tool that provides tips on how to achieve your target
of Baseline plus 1000 steps in Phase 1. Try to integrate some of these ideas into your w
orki
ng
da
y whenever possible.

www.riseatwork.ca
5 of 10
Step 5: Click on a Support Strategy and “Add S
trate
gy”
Click on any of the support strategies in the list to view details and key benefits of adopting a
particular strategy. Click on “Add Strategy” and it will appear in your list of Planned Activities
(B) on the dashboard.
Once you have completed a particular strategy, mark it as complete by selecting it from your list
of Planned Activities (B) and clicking on the “Complete Activity” button. The activity will
disappear from your list, and you will be eligible for earning Strategy achievement badges!
Step 6: Download the Take a Stand alert app
licati
on
In Phase 1, the Downloads Bar (C) is unlocked and you may download the Take a Stand app for
your Windows or Mac operating system on your office computer. Sitting for prolonged periods
of time can be unhealthy. Using this application, you may set up an alert system that will notify
you every 15, 30, 45 or 60 minutes to “Take a break and stand up! Take a few steps.” Taking
regular breaks to stand up and move around throughout the day will help you to reach your goal
of adding 1000 steps/day to your baseline step count.
Please note that depending on the settings on your office computer, you may need to seek help
www.riseatwork.ca
6 of 10
from Information Technology (IT) within your department in order to download and install Take
a Stand.
Phase 2
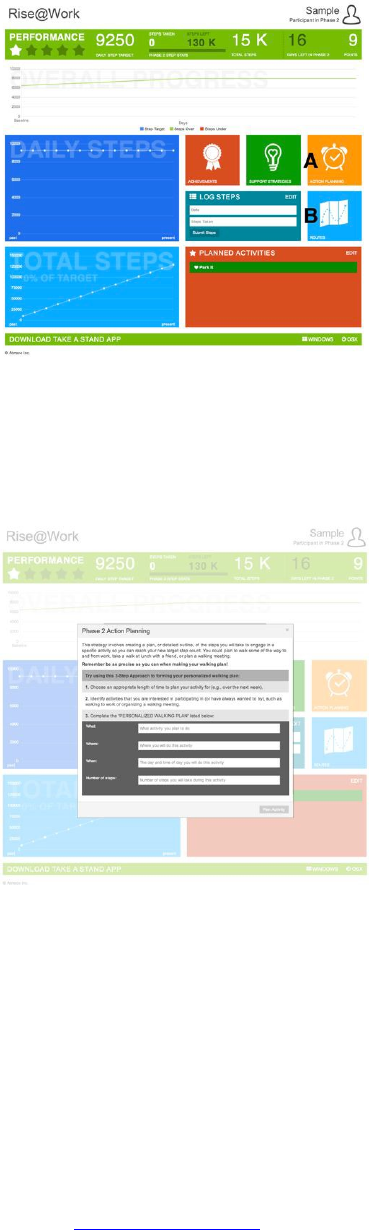
Step 7: Discover the Phase 2 tools
In Phase 2, two more tools have been unlocked – Action Planning (A) and walking Routes (B).
Check out these new tools and continue to use the Take a Stand alert application and Support
Strategies from Phase 1.
Step 8: View and use the Action Planning tool
Click on Action Planning (A) to view the tool that will help you to incorporate shorter planned
walks into your daily routine, and achieve your new Phase 2 step target of 2000 steps/day plus
your Baseline step count. Once you have created your Personalized Walking Plan, click on the
“Plan Activity” button to add it to your list of Planned Activities on the dashboard.
Once you have taken your walk as planned, mark it as complete by selecting it from your list of
Planned Activities and clicking on the “Complete Activity” button. The activity will disappear
from your list, and you will be eligible for earning Planning achievement badges!
www.riseatwork.ca
7 of 10
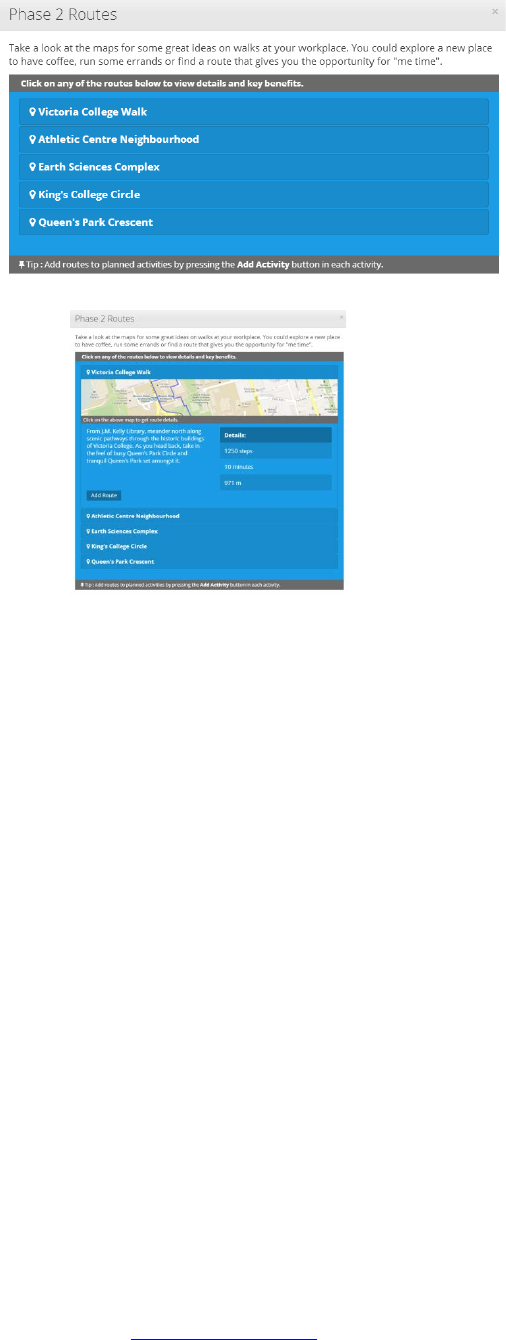
Step 9: View and use the walking Routes tool
Click on Routes (B) to view the tool that provides ideas and links to Google maps for short walks
at your workplace. Click on any of the routes in the list to view details about the walk, including
distance and an approximate number of steps. Click the “Add Activity” button to add a particular
route to your list of Planned Activities on the dashboard.
Once you have taken a walk along the route planned, mark it as complete by selecting it from
your list of Planned Activities and clicking on the “Complete Activity” button. The walking
route will disappear from your list, and you will be eligible for earning achievement badges for
completing walking routes!
www.riseatwork.ca
8 of 10
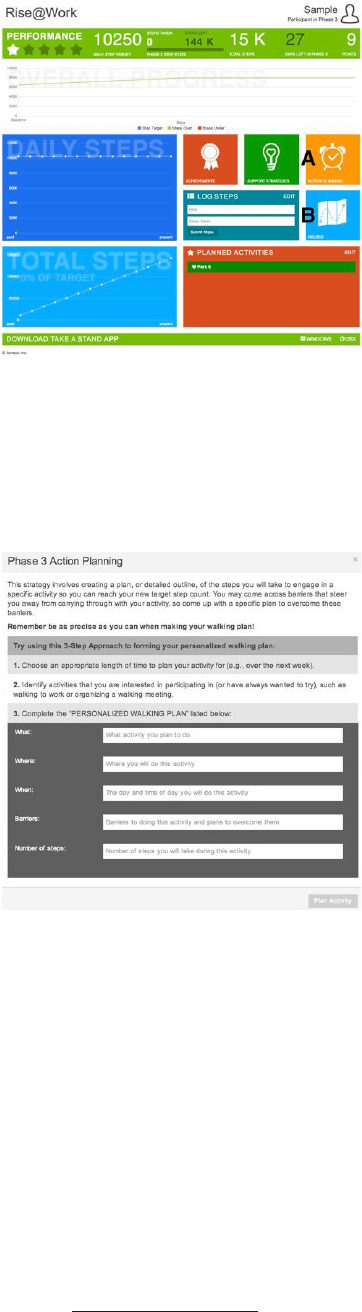
Phase 3
Step 10: Discover the Phase 3 tools
In Phase 3, new features have been added to Action Planning (A) and Routes (B). Continue to
use tools from the previous phases. For Phase 3, the focus is for you to try and plan for longer
walking activities that are more than 10 minutes to reach your new goal of 3000 steps/day over
your Baseline.
Step 11: View and use Action Planning to overcome barriers
Click on Action Planning (A) to view an updated tool that will help you to reach your step target
for Phase 3. A new field, “Barriers” appears in the Personalized Walking Plan and prompts you
to identify a specific barrier that may steer you away from carrying through with your planned
activity and also come up with a plan to overcome this barrier. Similar to Phase 2, create your
Personalized Walking Plan, click on the “Plan Activity” button, and add it to your list of
Planned Activities on the dashboard.
Once you have taken your walk as planned, mark it as complete by selecting it from your list of
Planned Activities and clicking on the “Complete Activity” button. Have a look at your
Achievements to see how many Planning badges you have earned!
www.riseatwork.ca
9 of 10
Step 12: View and use longer walks in the Routes tool
Click on Routes (B) to view an updated tool that provides ideas and links to Google maps for
both short and long walks at your workplace. Similar to Phase 2, click on any of the routes in the
list to view details about the walk, including distance and an approximate number of steps. Click
the “Add Activity” button to add a particular route to your list of Planned Activities on the
dashboard.
Once you have taken a walk along the longer route as planned, mark it as complete by selecting
it from your list of Planned Activities and clicking on the “Complete Activity” button.
Phases 4 and 5
Step 13: Continue to use all of the RISE@Work tools
For Phases 4 and 5, your target is to maintain logging 3000 steps/day over Baseline using a
combination of all of the strategies that you have learned in the RISE@Work program.
Take a look at the indicator in the Performance Bar (A). How many stars are displayed?

www.riseatwork.ca
10 of 10
How do you feel about your progress according to the four graphs: Overall Progress (B), Daily
Steps (C) and Total Steps (D)?
Click on the Achievement Badges (E) tool to remind yourself of how much you have already
accomplished!
Why not try a new Support Strategy (F)? If you have not used this tool in a while, you’ll notice
that a number of new strategies have been added.
Continue to use the Action Planning (G) and Routes (H) tools.
If you haven’t already done so, download the Take a Stand app from the Downloads Bar (I) so
that you remember to “Take a break and stand up! Take a few steps” throughout the day.
Good luck over the final two phases of RISE@Work!
