Robot Studio Guide Tool Design
User Manual: Pdf
Open the PDF directly: View PDF ![]() .
.
Page Count: 52
!
1!
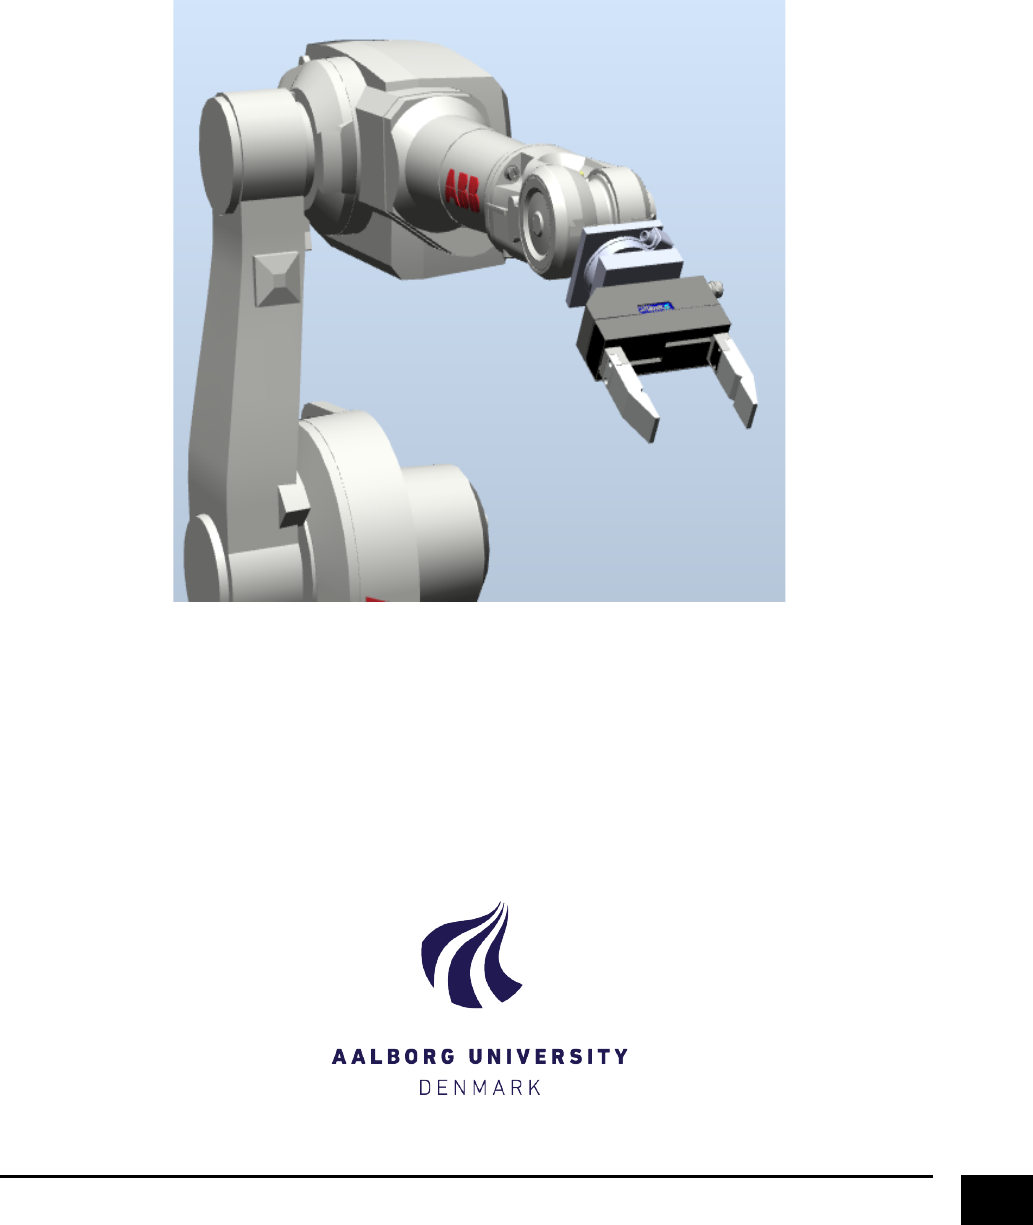
Guide&for&ABB&RobotStudio&
!
This!guide!explains!step-by-step!the!process!of!creating!a!tool!in!RobotStudio!
!
!
!
by#
Michael!Natapon!Hansson!
Department!of!Mechanical!and!Manufacturing!Engineering,!Aalborg!University!
January!2015!
!

!
2!
Content&
Creating!a!Tool!..................................................................................................................................................!3!
Creating!a!CAD!Model!...................................................................................................................................!3!
Importing!the!models!in!RobotStudio!...........................................................................................................!4!
Altering!the!reference!frame!of!your!geometries!.........................................................................................!5!
Creating!a!tool!mechanism!of!your!tool!geometries!...................................................................................!16!
Creating!a!Smart!Component!..........................................................................................................................!25!
Creating!Virtual!Controller!I/O’s!to!control!gripper!........................................................................................!49!
!
!&
!
3!
Creating&a&Tool&
Before!any!tools!can!be!created,!you!will!need!a!geometry,!a!CAD!file!(*.SAT)!or!a!library!(*.rslib),!to!act!as!
the!virtual!representation!of!the!physical!tool.!Since!there!exist!many!different!types!of!tools!that!can!be!
used!in!robot!assignments,!this!guide!will!show!the!basic!steps!of!creating!a!tool!in!RobotStudio.!The!outset!
of!this!guide!is!to!create!a!parallel!gripper!from!a!CAD!file,!but!the!steps!explained!in!this!guide!can!also!be!
used!to!create!other!types!of!grippers!(e.g.!vacuum!gribbers).!!
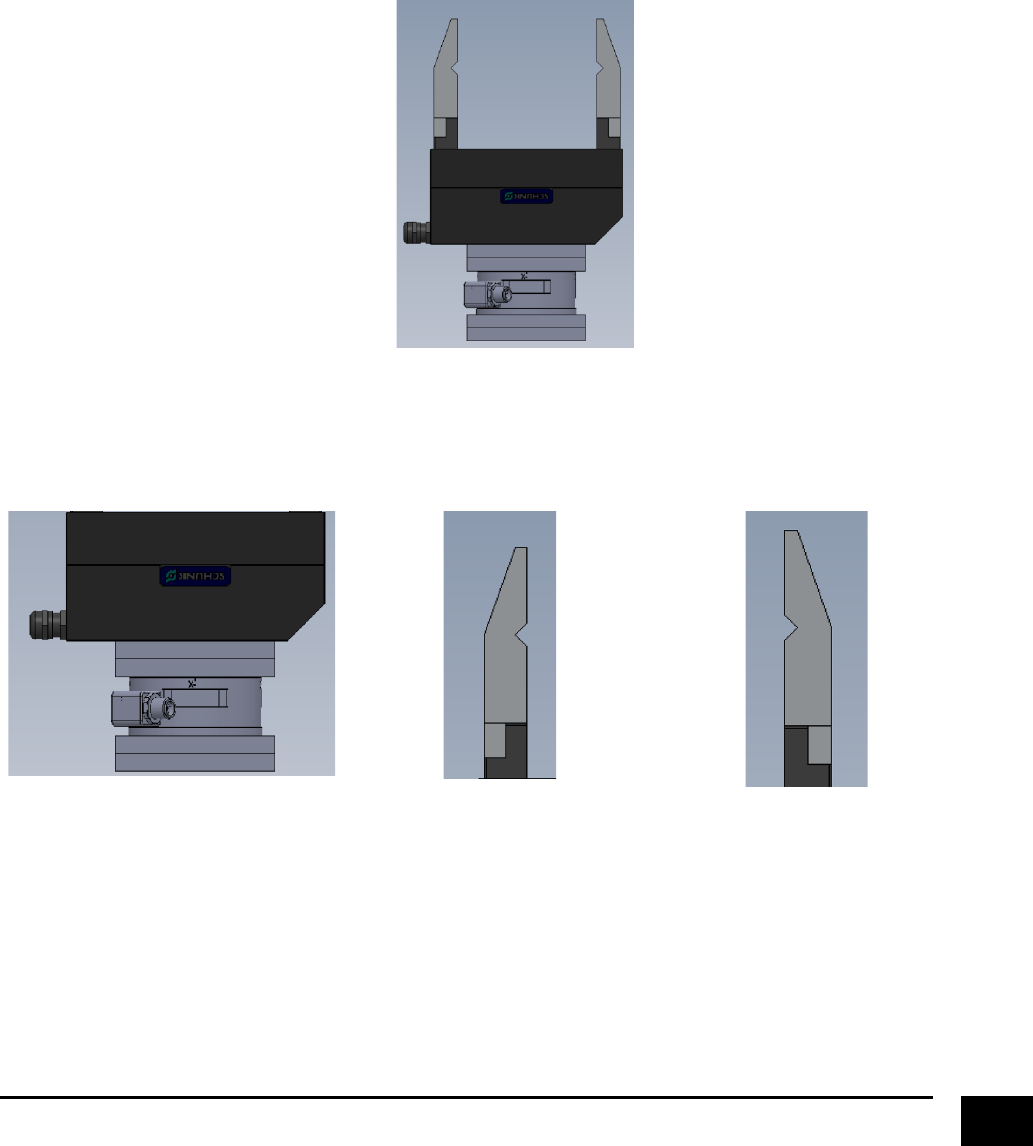
Creating&a&CAD&Model&
Create!your!model!of!the!gripper!in!a!CAD!modelling!software!(e.g.!SolidWorks).!
!
#################Example#of#gripper#
Since!we!are!going!to!make!a!“mechanisme”!in!RobotStudio,!we!need!to!save!all!the!moveable!parts!(the!
jaws)!in!separate!files.!REMEMBER!to!save!the!files!in!the!*.SAT!format,!otherwise!there!may!be!problems!
importing!the!models!in!RobotStudio.!
!
#body.sat#
!
#fingerA.sat#
!
#fingerb.sat#
!
!&
!
4!
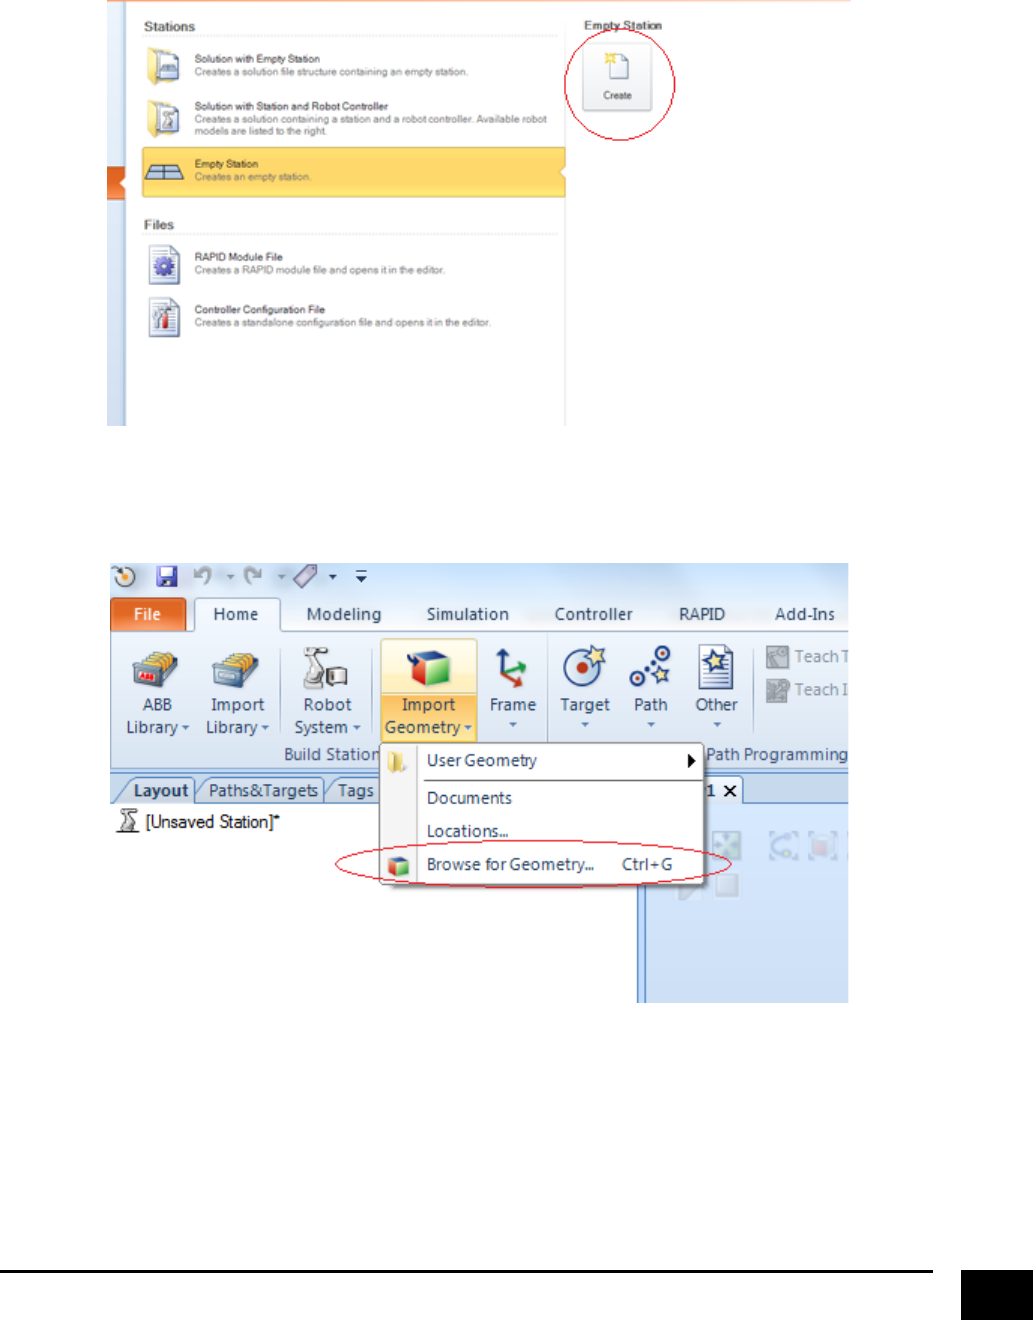
Importing&Models&in&RobotStudio&
When!you!have!made!the!necessary!files!to!represent!your!gripper,!we!need!to!import!them!to!
RobotStudio.!A!good!advice!is!to!create!a!new!station,!dedicated!entirely!to!make!your!tool.!!
!
!
Next,!click!on!the!dropdown!of!the!“Import!Geometry”!button.!Find!all!the!.SAT!files!that!you!have!created!
to!represent!your!tool!and!import!them!to!RobotStudio.!
!
!
!
!
! !
!
5!
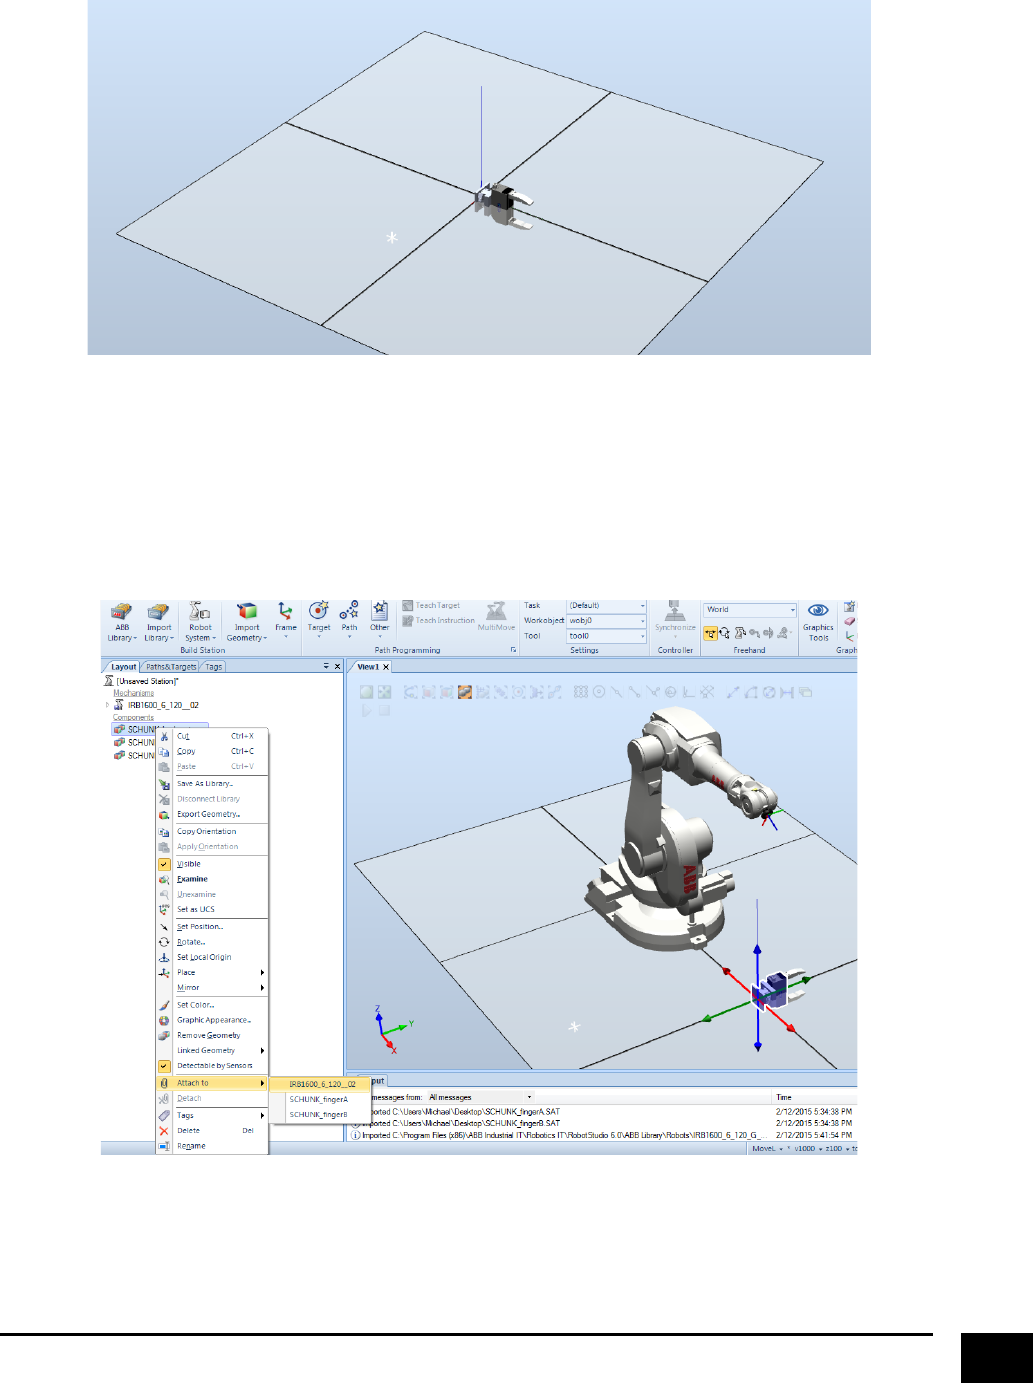
Your!scene!should!look!something!like!this.!
!
!
Altering&the&reference&frame&of&your&geometries&
Depending!on!how!you!have!modelled!your!tool!in!the!CAD!modelling!software!(the!reference!frame!you!
are!using),!your!geometries!may!not!have!the!desired!position!and!orientation,!when!you!attach!it!to!the!
robot.!A!fast!way!to!check!is!to!import!a!robot!and!attach!the!“body”!part!of!your!gripper!to!the!robot.!!
!
!
!
! !
!
6!
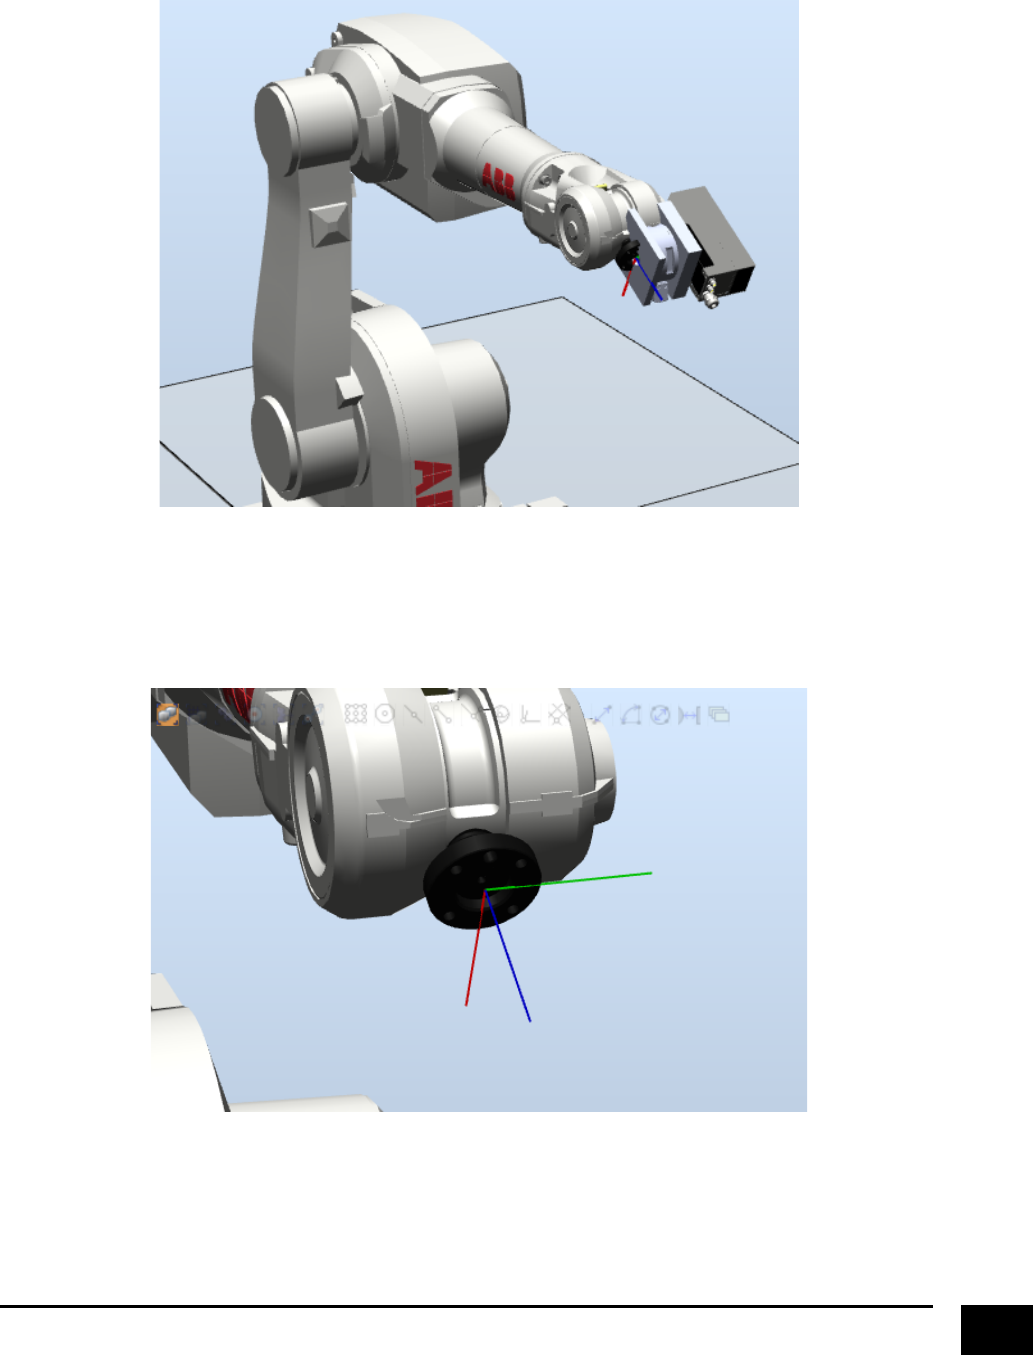
In!this!example,!the!geometries!of!the!gripper!is!not!modelled!in!a!way!that!gives!a!correct!attachment!to!
the!robot.!
!
!
Detach!the!gripper!from!the!robot,!and!take!a!closer!look!on!the!robots!tool!attachment!point.!When!
attaching!a!tool!to!the!robot,!the!gripper!will!be!attached!to!the!robot!according!to!this!frame.!
!
!
!
! !
!
7!
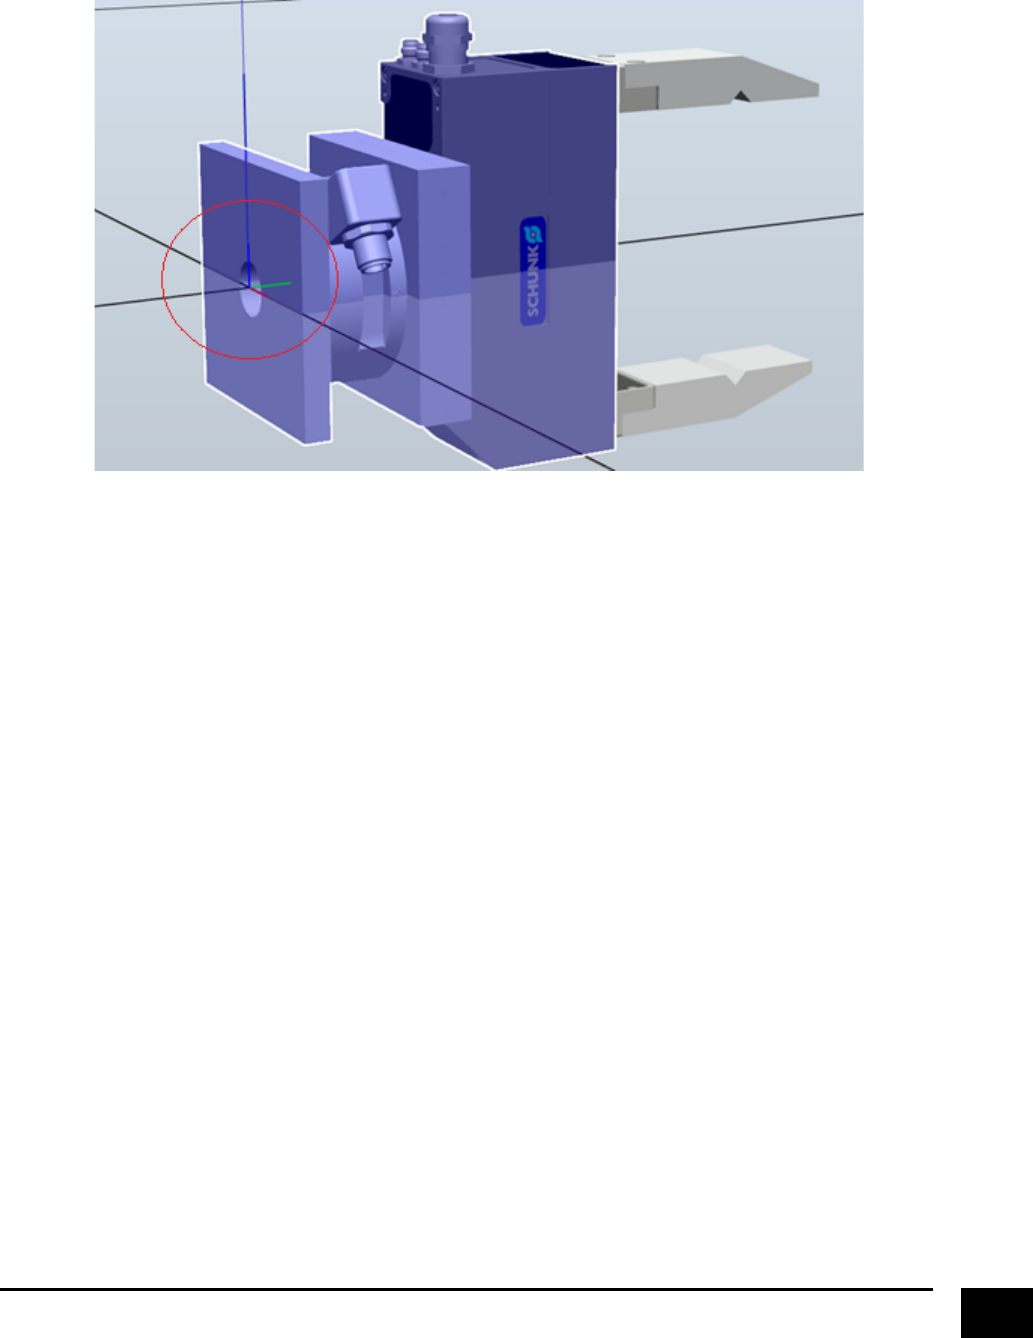
Next,!take!a!look!at!the!frame!of!your!gripper.!
!
!
!
The!reason!that!the!gripper!was!not!correctly!attached!to!the!robot!is!that!the!frame!of!the!gripper!and!the!
frame!of!the!attachment!point!of!the!robot!DO!NOT!MATCH.!So!now!there!is!two!options,!either!you!can!
correct!the!frame!of!the!gripper!trough!the!CAD!modelling!software,!or!you!can!do!it!through!RobotStudio.!
For!this!example,!we!are!going!to!do!it!through!RobotStudio.!
If!you!look!back!on!the!image!where!the!gripper!was!attach!to!the!robot,!you!will!see!that!we!have!to!alter!
the!grippers!frame,!so!that!the!jaws/fingers!are!pointing!up!along!the!z-axis.!Additionally,!it!would!also!be!
nice!if!the!“SCHUNK”!logo!were!pointing!away!from!the!robot,!so!that!it!is!visible.!!
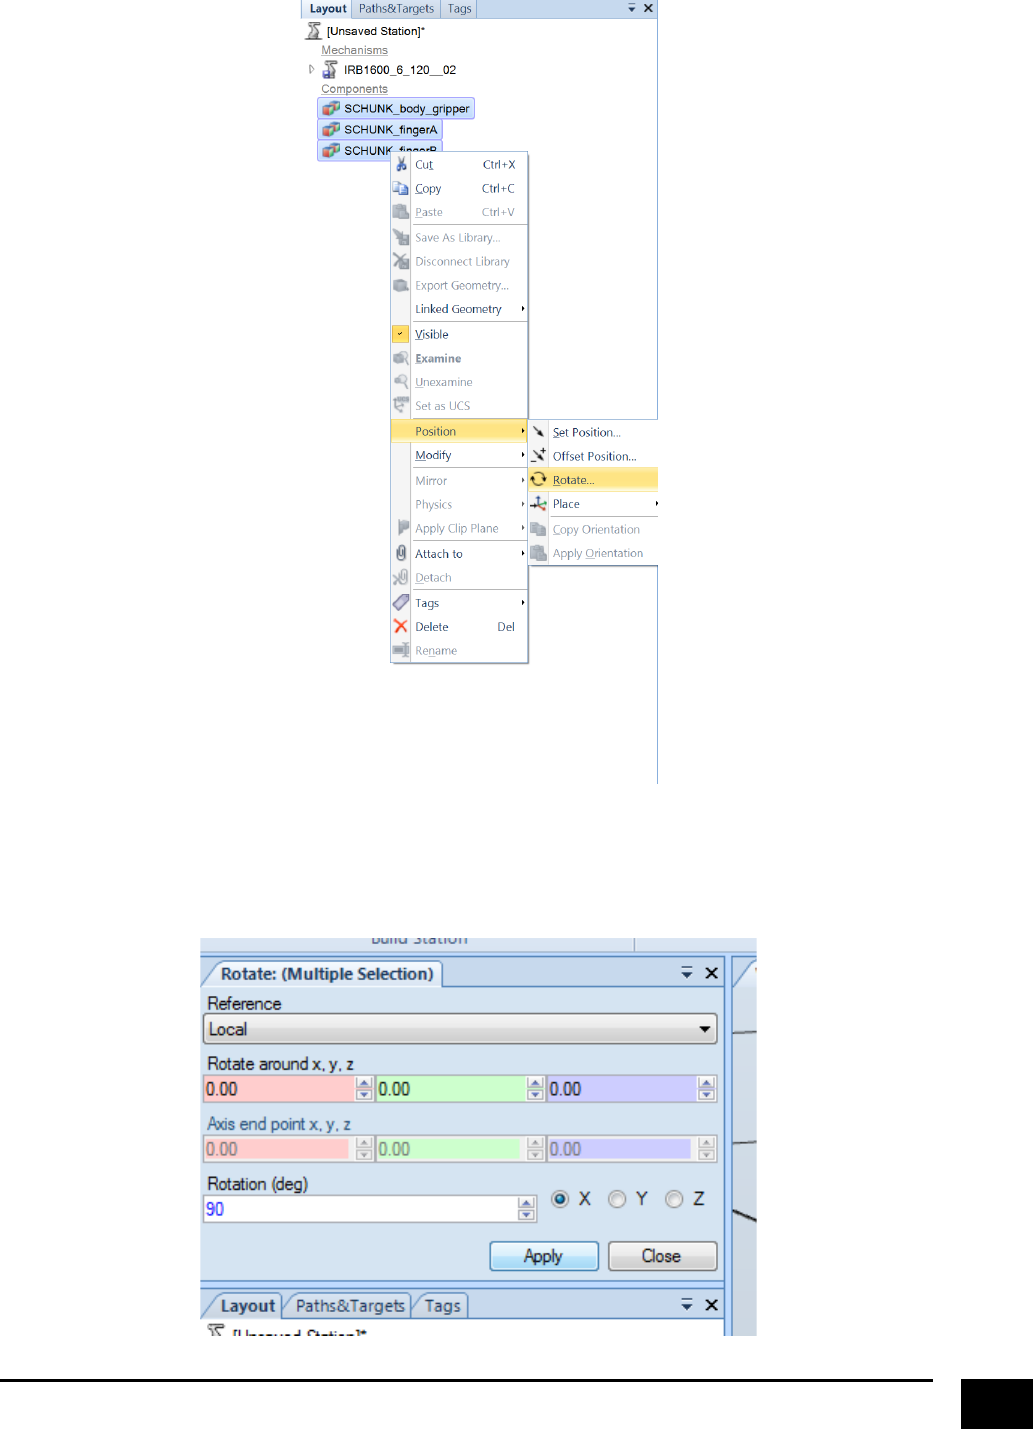
Looking!at!the!image!above,!we!will!have!to!make!the!jaws!point!upwards!in!the!z-direction!by!rotating!the!
gripper!around!the!x-axis.!Start!by!marking!all!of!the!geometries!of!the!gripper,!right!click!on!the!mouse!and!
select!“Rotate”!under!“Position”.!
!
!
8!
!
!
In!the!“Rotate”!window,!select!the!“Local”!reference,!and!rotate!90!degrees!around!the!x-axis.!!
!
!
!
9!
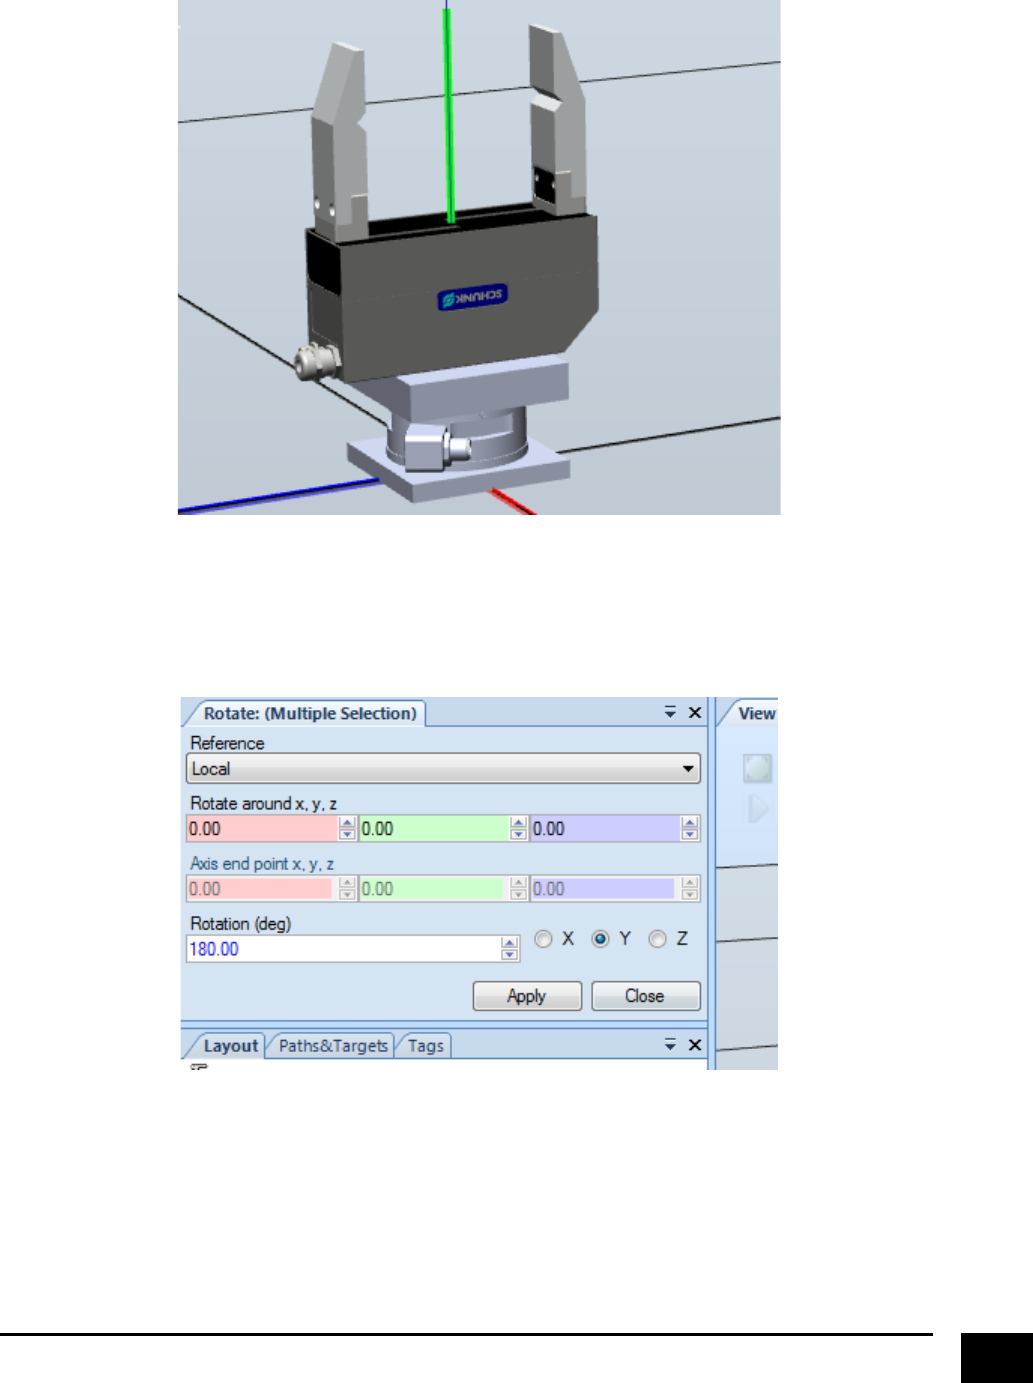
Your!gripper!should!now!look!like!this.!
!
!
To!make!the!“SCHUNK”!logo!visible!when!attach!to!the!robot,!rotate!the!gripper!180!degrees!around!the!y-
axis.!
!
!
! !
!
10!
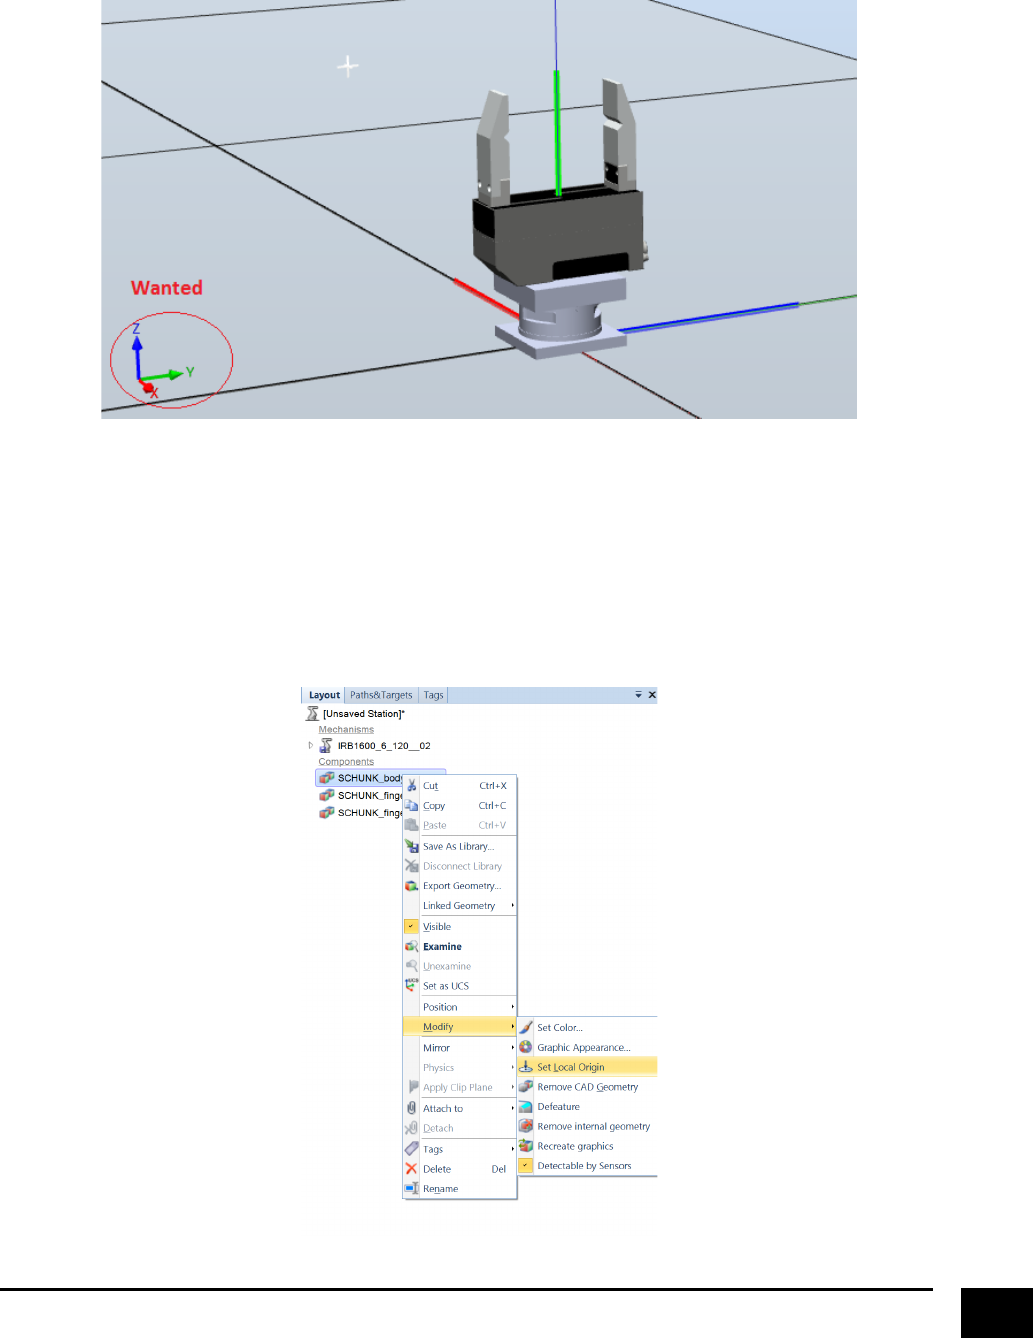
Now!we!have!rotated!the!gripper!so!that!it!has!the!desired!configuration,!and!should!look!like!this.!
!
!
!
But!as!you!can!see!on!the!image!above,!we!have!actually!not!changed!the!reference!frame!of!the!gripper,!
since!we!wanted!the!yaws!to!point!towards!the!z-axis.!The!reason!why!we!have!done!the!rotation!of!the!
gripper!in!this!matter!is!that!it!becomes!much!easier!to!actually!change!the!frame!of!the!gripper,!now!that!
we!have!the!correct!configuration!according!to!the!world!coordinate.!
To!change!the!frame!of!the!gripper,!start!by!marking!the!“body”!geometry!of!the!gripper,!and!click!on!“Set!
Local!Origin”!under!“Modify”.!
!
!
11!
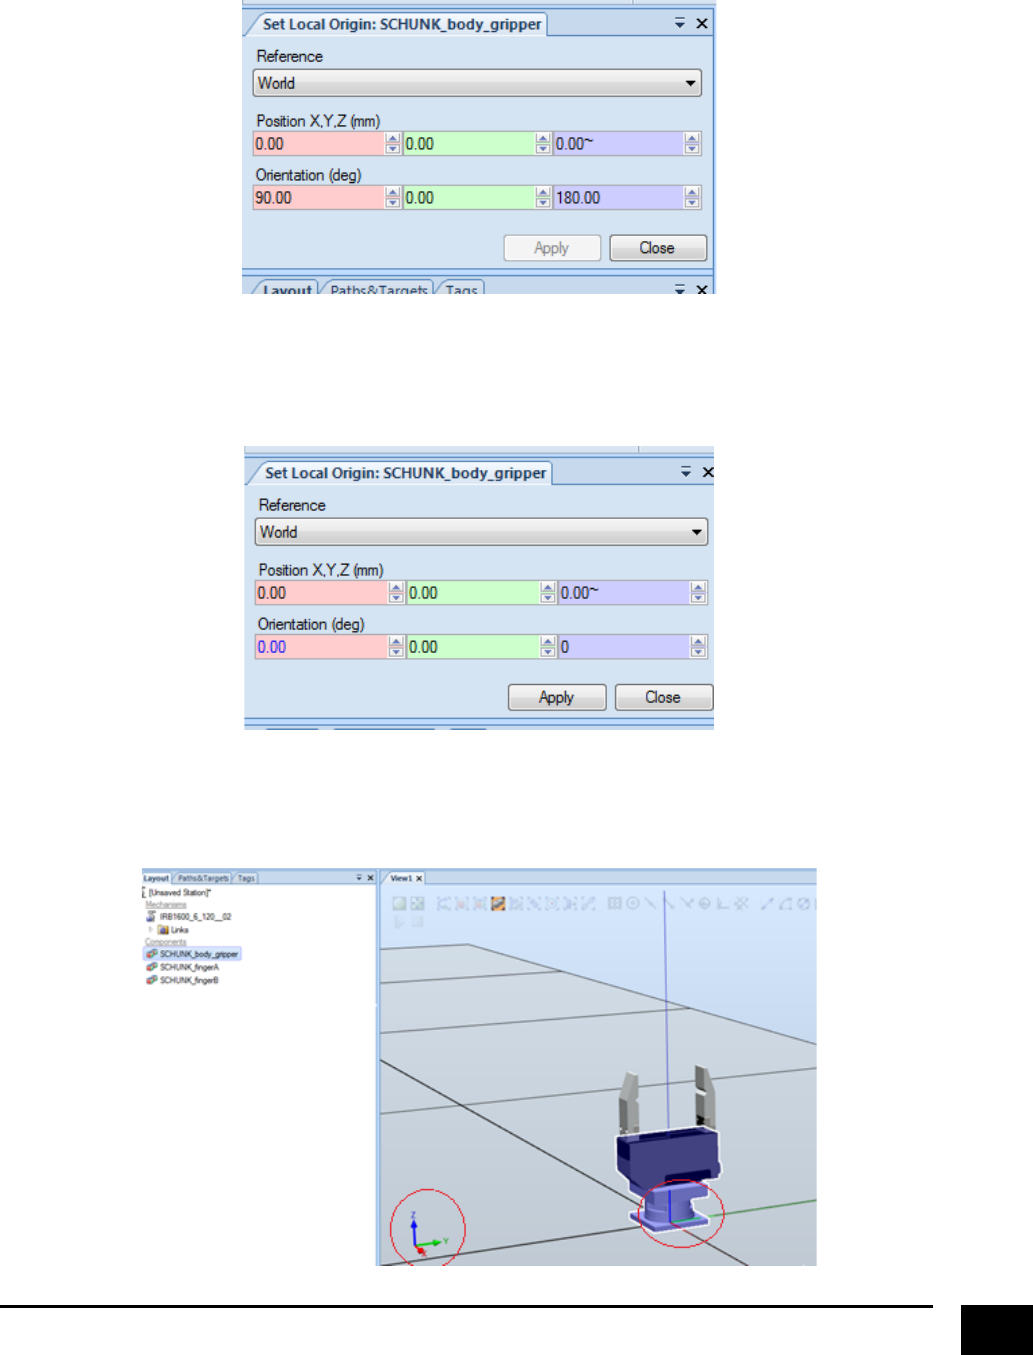
If!you!select!the!“World”!reference,!you!will!see!that!the!frame!of!the!gripper!is!oriented!with!90!degrees!in!
the!x-!and!180!degrees!in!the!z-axis.!
!
!
Just!change!these!values!to!zero!and!apply.!
!
!
You!can!now!see!that!the!frame!of!the!gripper!has!been!altered!and!that!the!jaws!are!pointing!upwards!in!
the!z-axis.!Now!do!the!exact!same!procedure!for!the!rest!of!the!gripper’s!geometries.!
!
!
!
12!
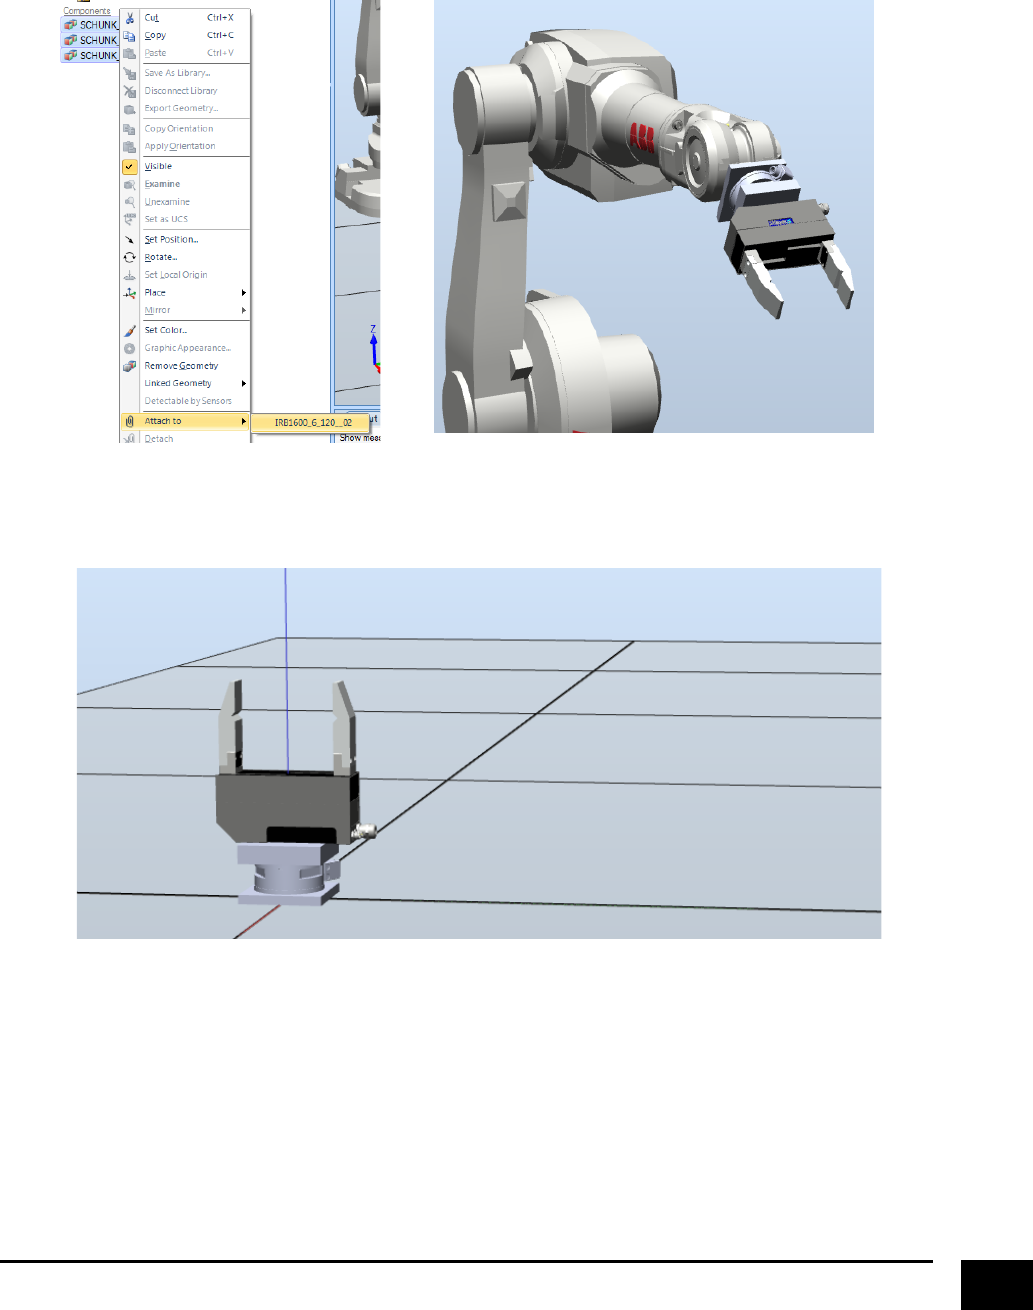
If!we!mark!all!of!the!grippers!geometries!and!attach!them!to!the!robot,!we!will!now!see!that!the!gripper!is!
correctly!attach!to!the!robot!(or!at!least!how!we!want!it!to!be!attached).!
!
!
!
!
Next,!detach!all!the!geometries!of!the!gripper!from!the!robot,!and!delete!your!robot,!so!only!the!tool!is!
represented!in!your!station.!
!
!
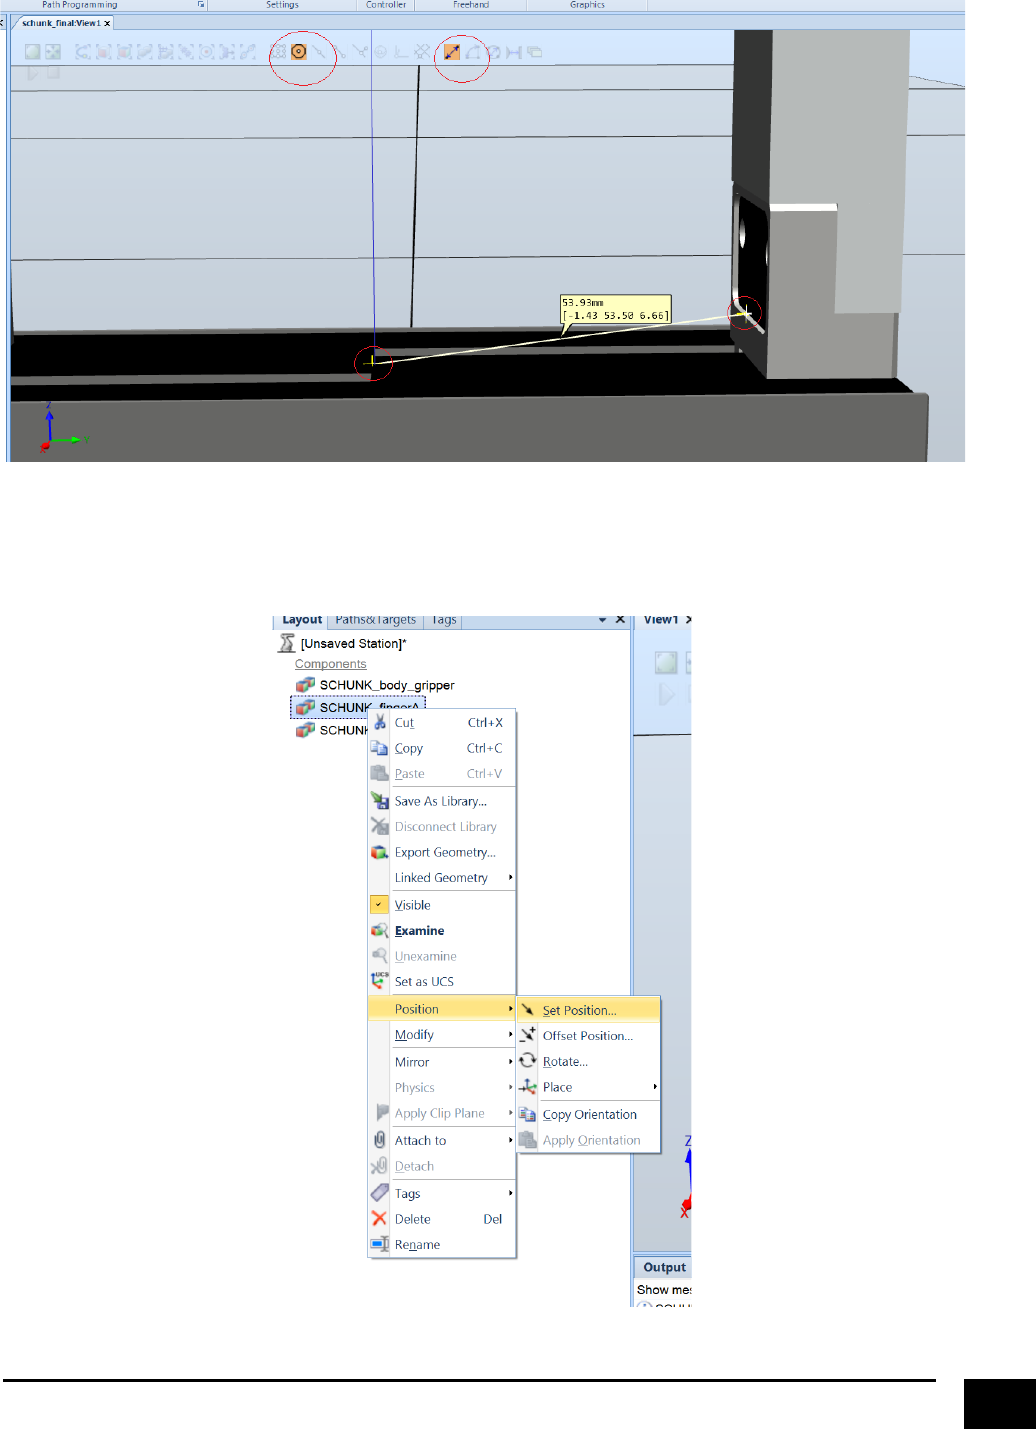
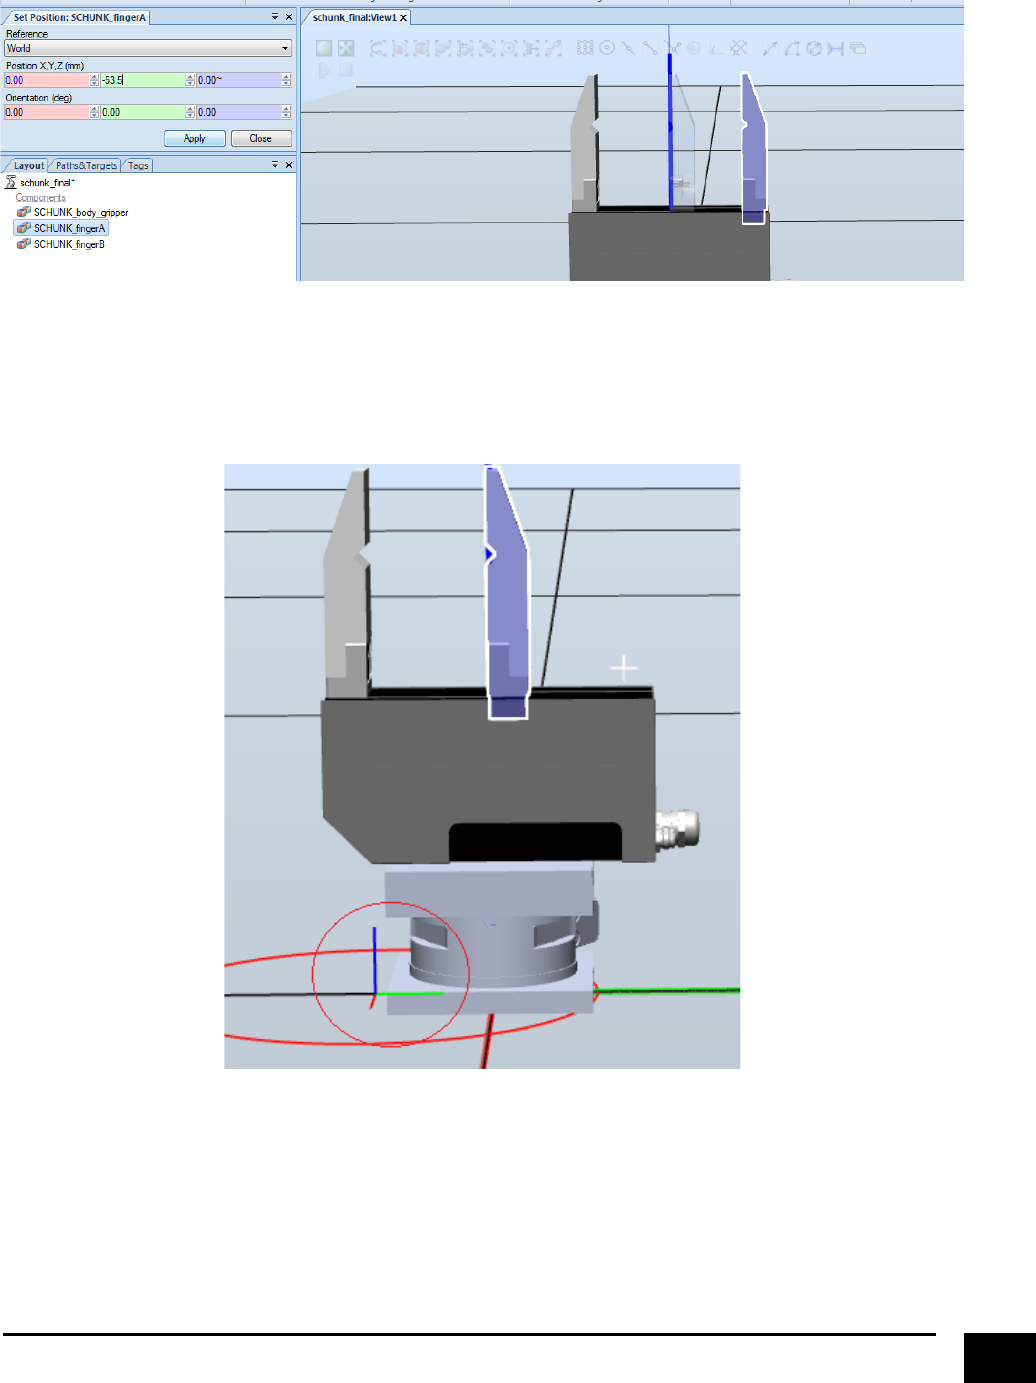
The!last!thing!to!do!is!to!close!the!jaws!of!the!gripper.!The!reason!for!this!is!that!it!will!make!life!so!much!
easier!when!we!are!going!to!make!the!jaws!move!later!on.!The!first!thing!we!have!to!do!is!to!get!an!
indication!of!how!far!we!are!going!to!move!the!jaws!towards!the!center.!Click!on!the!“Snap!Center”!and!
“Point!to!Point”!buttons,!and!measure!the!distance!from!the!center!of!the!gripper!towards!the!closest!part!
of!a!jaw.!We!can!see!that!the!distance!that!we!have!to!move!the!jaw!is!53.5!mm!in!the!y-direction.!
!
13!
!
!
Mark!one!of!the!geometries!for!the!tools!jaw!and!click!“Set!Position”!under!“Position”.!
!
! !
!
14!
Move!the!position!of!the!jaw!so!that!it!reaches!the!center.!
!
!
However,!we!still!want!the!reference!frame!of!the!jaw!to!be!in!the!center!of!the!gripper.!Right!now!we!have!
just!shifted!the!jaw!geometry,!as!seen!in!the!image!below.!
!
!
! !
!
15!
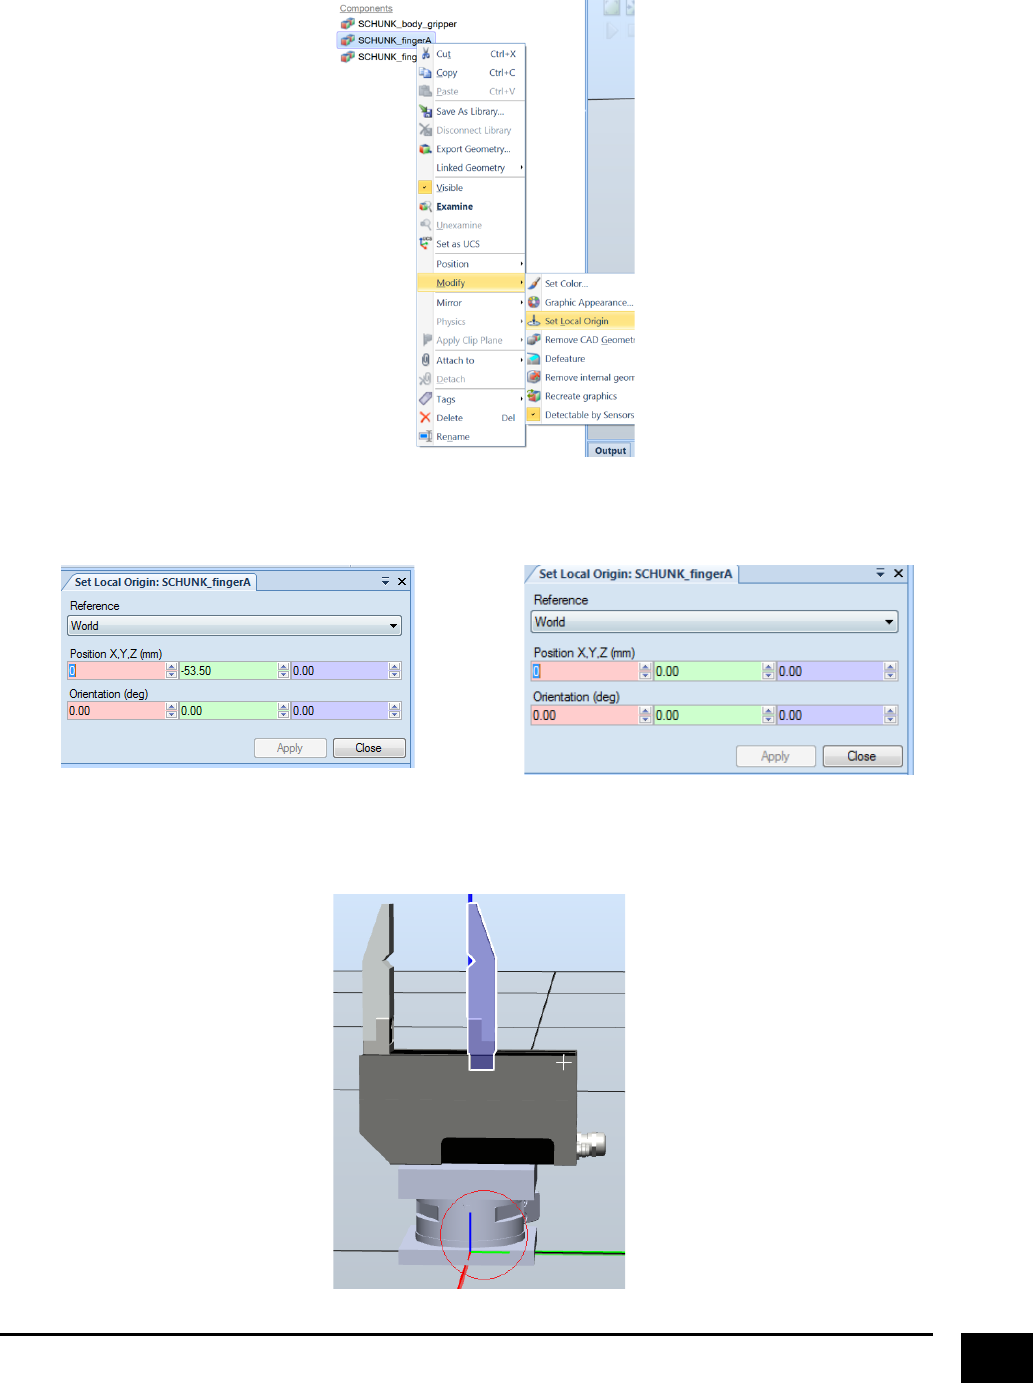
Go!to!“Set!Local!Origin”!
!
!
And!change!the!value!to!zero!
!
!
!
The!reference!frame!will!then!move!back!to!the!centre!of!the!gripper.!Do!the!exact!same!procedure!for!the!
other!jaw.!
! !
!
16!
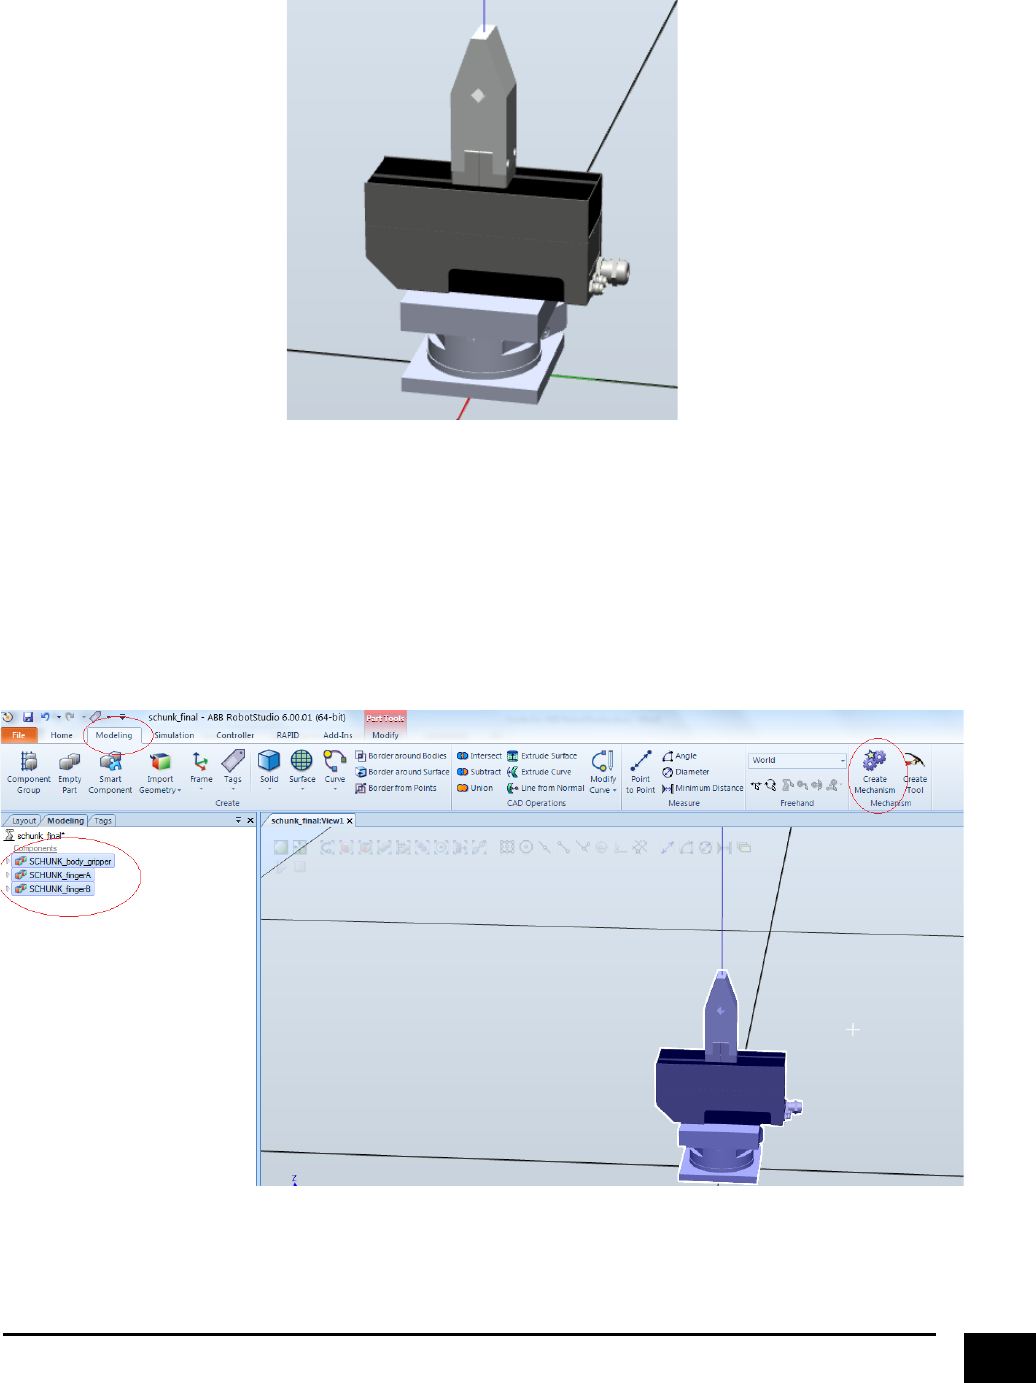
You!will!now!have!a!representation!of!your!tool!that!looks!like!this.!
!
!
!
Creating&a&tool&mechanism&of&your&tool&geometries&&
Right!now,!your!tool!is!actually!nothing!but!a!graphical!representation.!Therefore,!the!next!step!is!to!create!
a!tool!mechanism!of!the!tool!geometries.!Click!on!the!“Modelling”!tap!in!the!top!of!your!screen,!mark!all!of!
your!tool!geometries,!and!click!“Create!Mechanism”.!
!
!
!
! !
!
17!
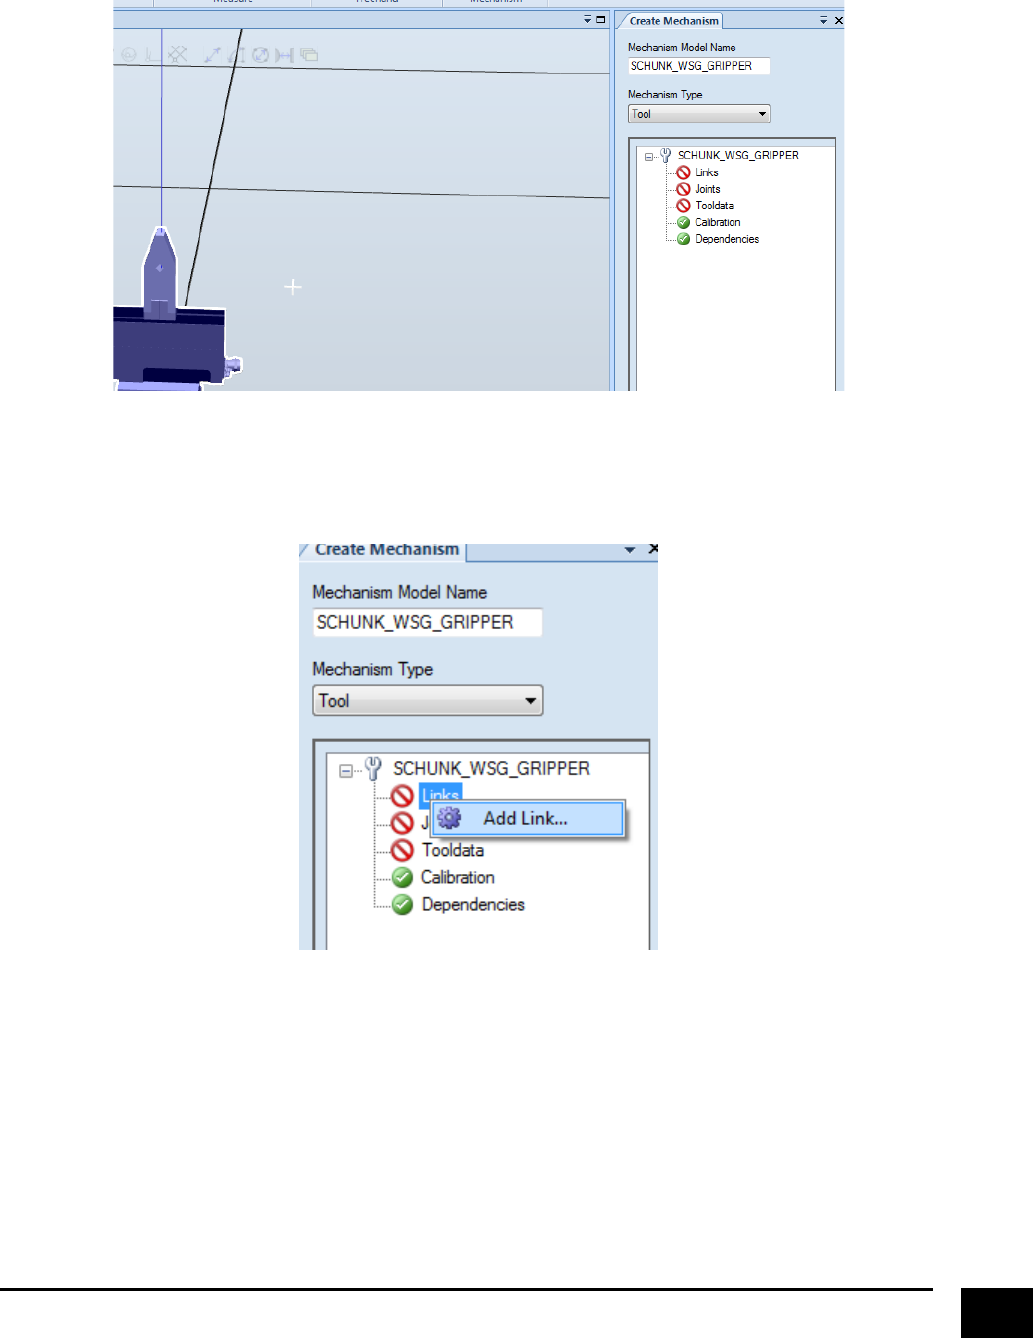
Type!what!you!want!the!tool!to!be!called!and!select!that!you!want!to!create!a!tool!mechanism.!
!
!
!
Right!click!on!“Links”!and!select!“Add!Link”!
!
!
!
! !
!
18!
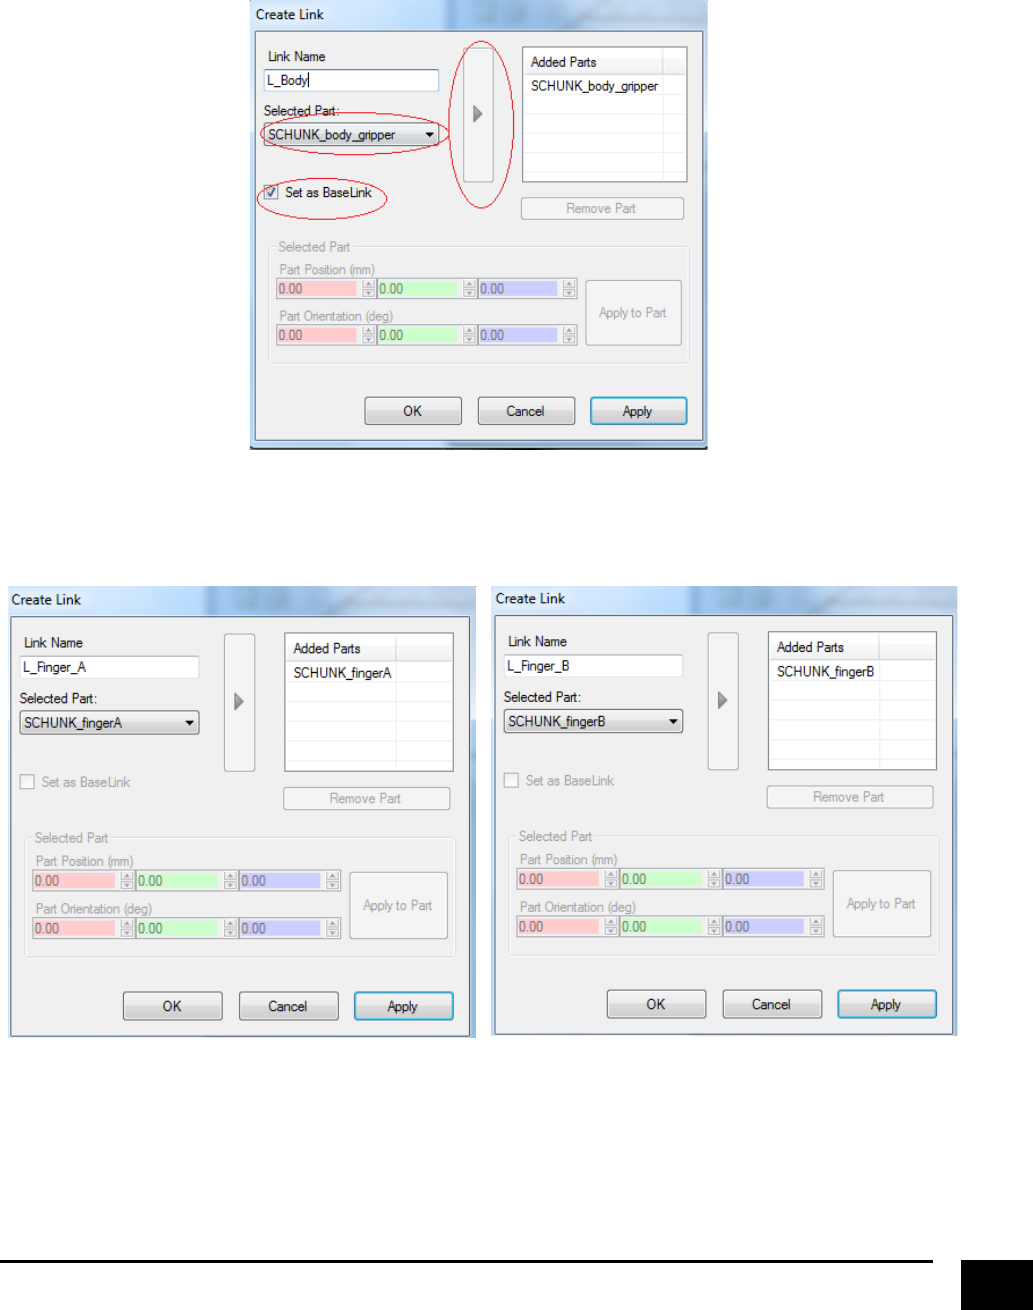
Type!what!you!want!the!link!to!be!named,!select!the!body!part,!set!it!as!Baselink,!press!the!arrow,!and!
press!apply.!!
!
!
!
Continue!to!do!the!same!for!the!jaws.!You!will!see!that!you!cannot!set!them!as!Baselink,!but!then!again,!
you!are!not!supposed!to.!
!
!
!
! !

!
19!
Your!links!should!now!be!defined,!and!it!should!look!like!this.!
!
!
Next,!right!click!“Joints”!and!select!“Add!Joint”!
!
! !
!
20!
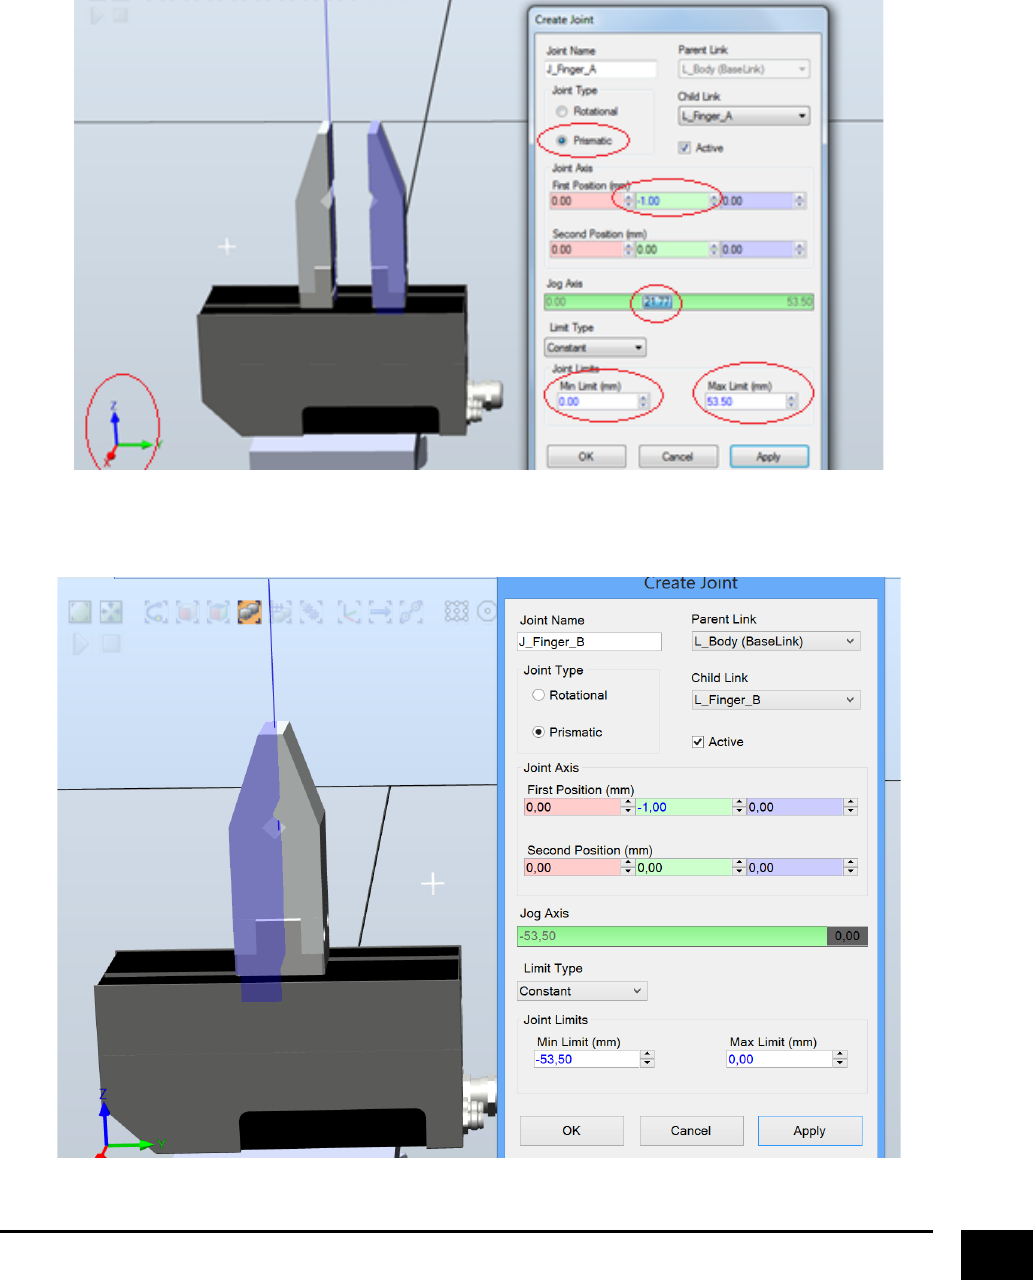
Type!what!you!want!to!call!the!joint,!select!“Prismatic”,!since!we!want!to!create!a!parallel!gripper.!Type!!
“-1”!in!“Joint!Axis”,!this!will!indicate!in!which!direction!we!want!to!move!the!jaw.!We!are!typing!“-1”!
because!we!want!positive!values!when!we!are!going!in!a!“positive”!y-direction.!Set!the!joint!limits!to!“0”,!
and!“53.5”,!and!press!“Apply”.!
!
!
Do!the!same!thing!for!the!other!jaw,!BUT!REMEMBER!to!select!your!baselink!as!“Parent!Link”!
!
!
21!
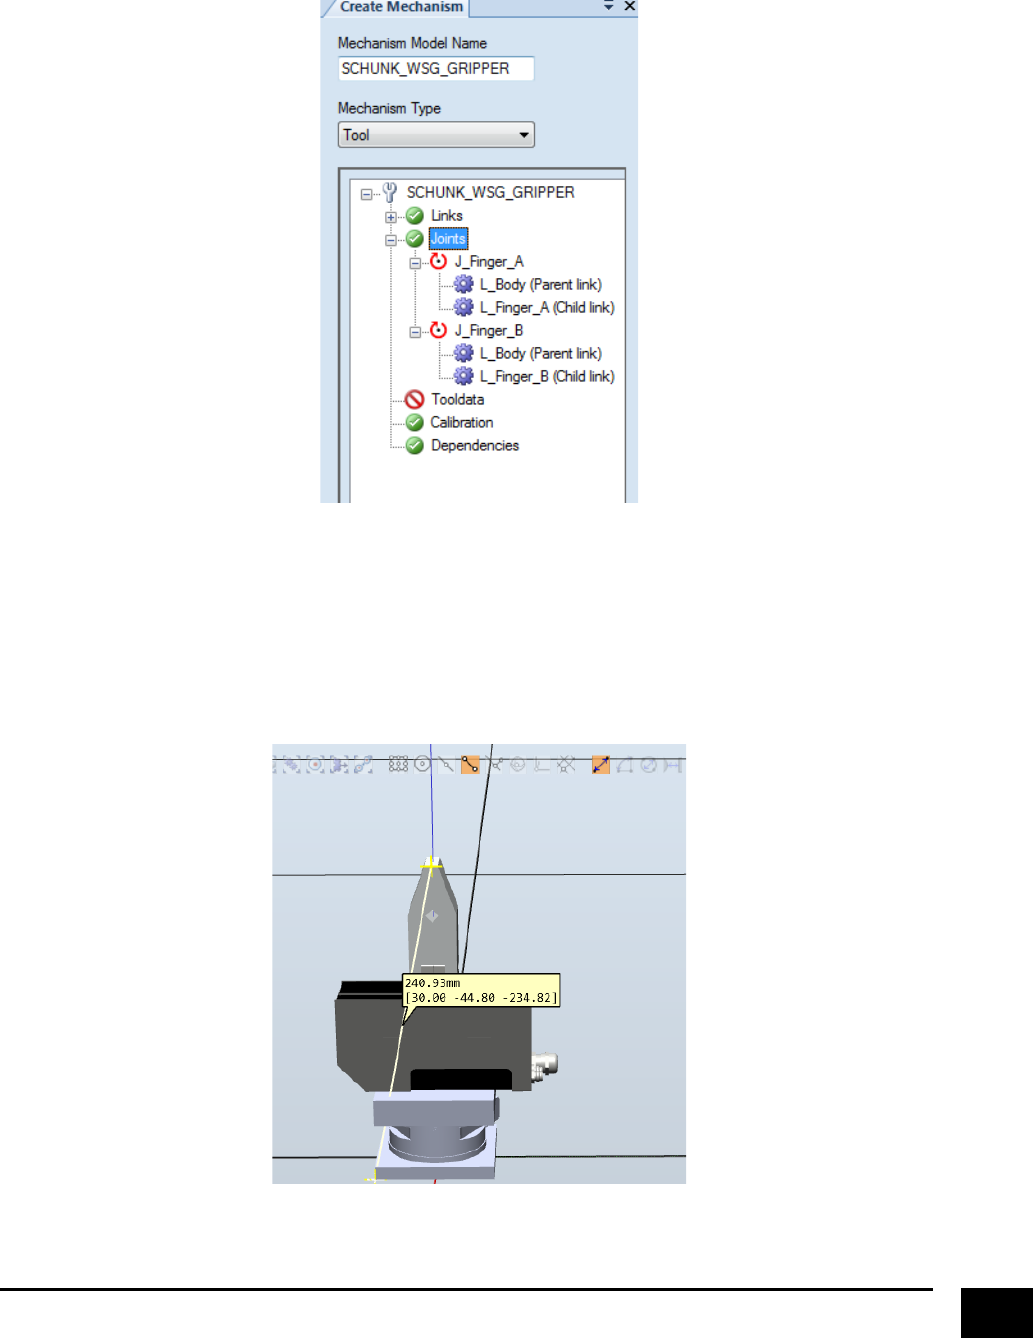
Your!joints!should!now!be!defined,!and!it!should!look!like!this.!
!
!
!
The!last!thing!to!do!is!to!define!the!“Tooldata”,!which!essentially!is!your!tool!frame,!otherwise!known!as!
the!TCP!(Tool!center!point).!Where!to!define!your!TCP!is!entirely!up!to!you,!but!in!this!example!we!are!
going!to!define!it!at!the!tool!tip.!So!first,!we!measure!the!distance!from!the!gripper!frame!to!the!tool!tip.!
We!can!see!that!the!tip!is!allocated!“234.82”!mm!in!the!z-direction.!
!
!
!
!
22!
!Right!click!on!“Tooldata”!and!select!“Add!Tooldata”.!
!
!
!
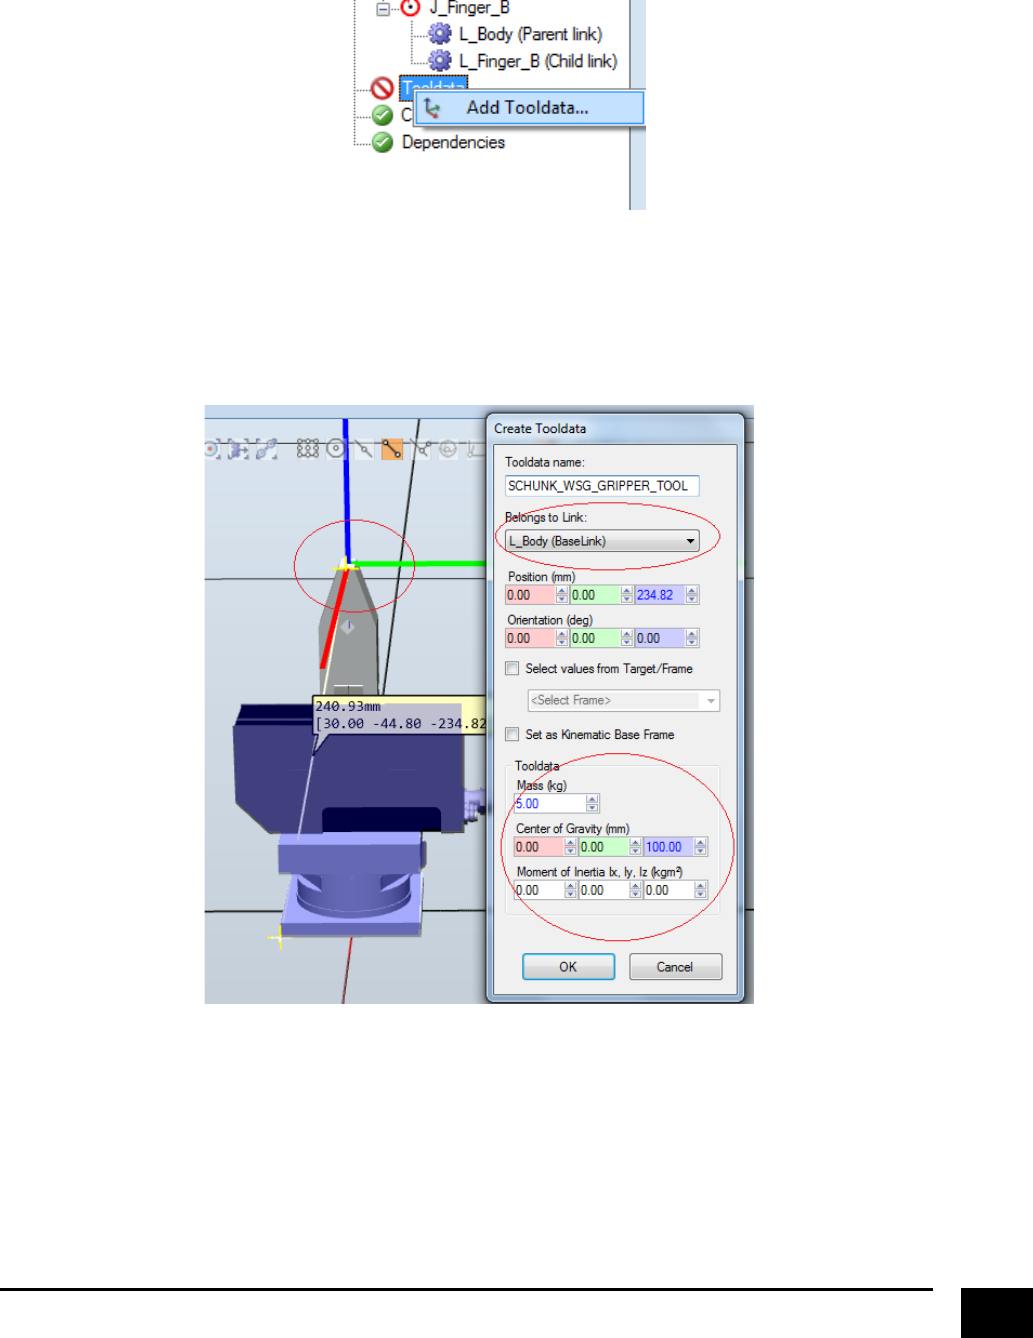
Type!the!name!you!want,!select!that!it!belongs!to!the!BaseLink!(we!don’t!want!our!tool!point!to!move!
whenever!the!jaws!are!moving),!Insert!“234.82”!in!the!z-direction,!and!now!you!will!actually!be!able!to!see!
were!its!going!to!create!the!tool!point.!The!more!information!you!have!of!your!tool,!the!more!“real”!will!the!
simulation!be.!In!this!case,!we!just!type!in!some!numbers!(you!decide).!
!
! !
!
23!
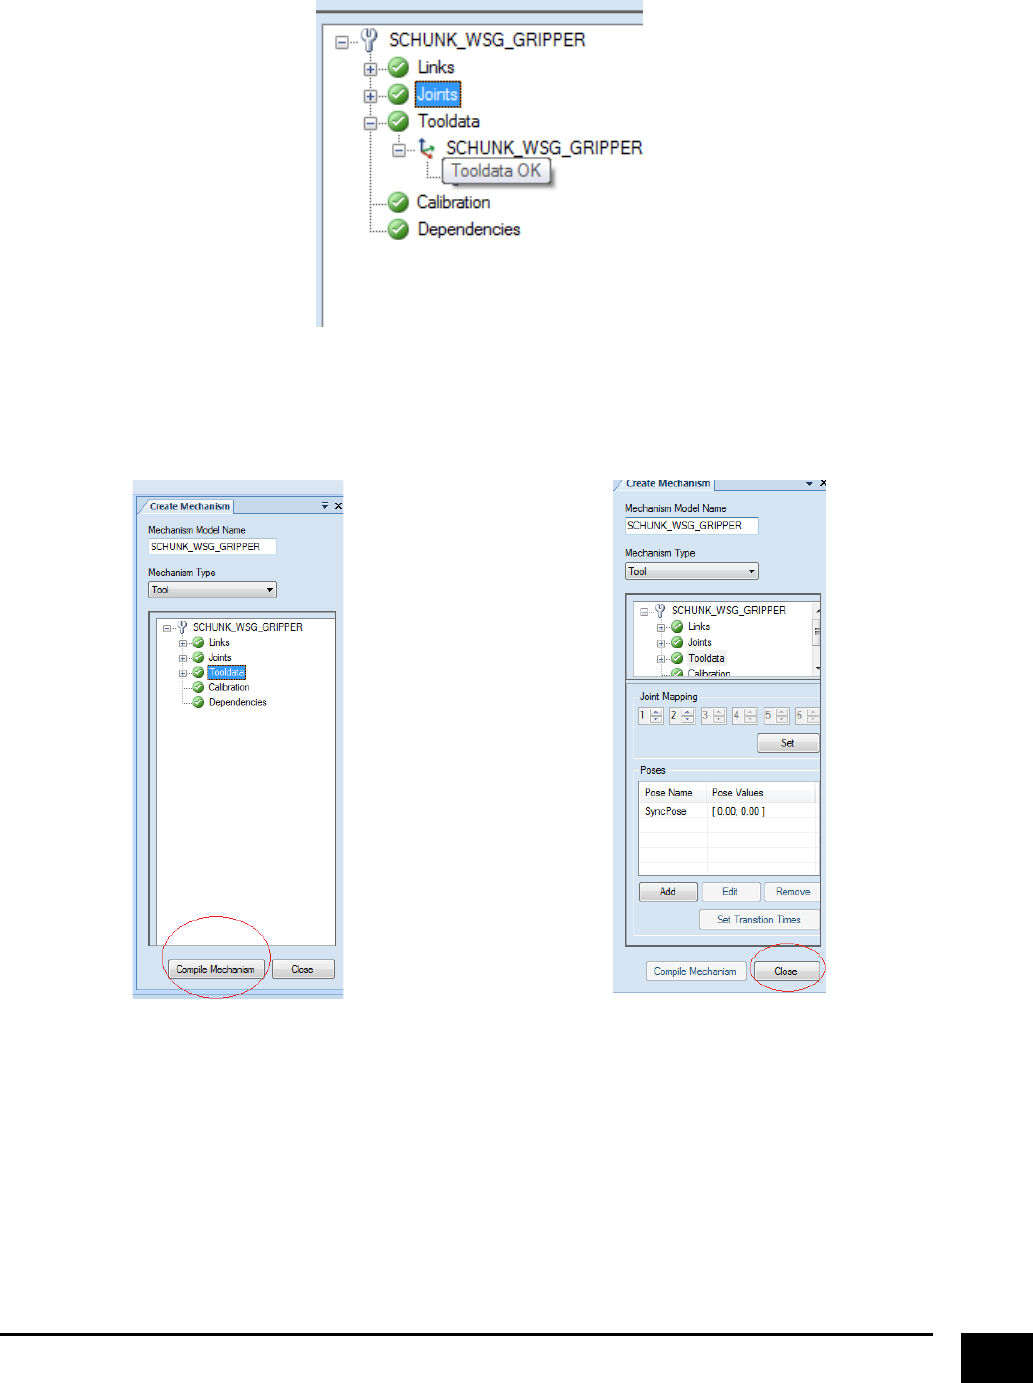
Your!Tooldata!should!now!be!defined,!and!it!should!look!like!this.!
!
!
Click!“Compile!Mechanism”,!and!afterwards!click!close.!!
!
!
!
!
!
! !
!
24!
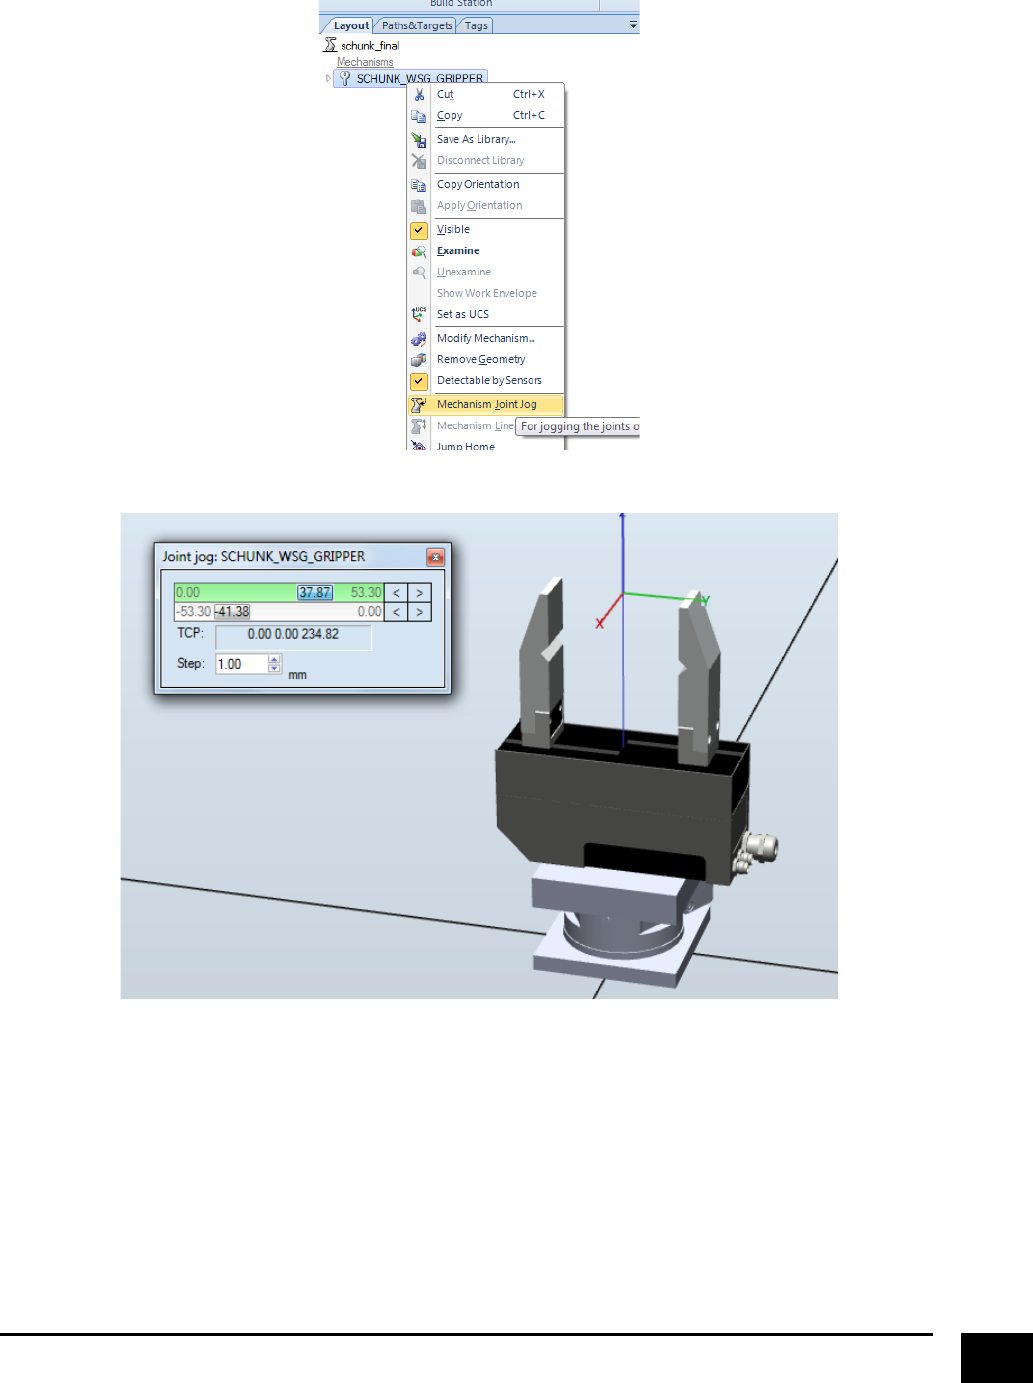
You!have!now!created!tool!mechanism,!feel!free!to!play!with!it.!
!
!
!
! !
!
25!
Creating&a&Smart&Component&
So!now!we!have!successfully!created!a!tool!mechanism,!but!the!gripper!is!at!the!moment!actually!not!able!
to!grasp!objects.!To!accomplish!this!we!have!to!create!some!logic..some!SMART!logic.!In!RobotStudio!smart!
components!are!used!to!add!sensors,!logic!and!actions!to,!among!others,!mechanism.!
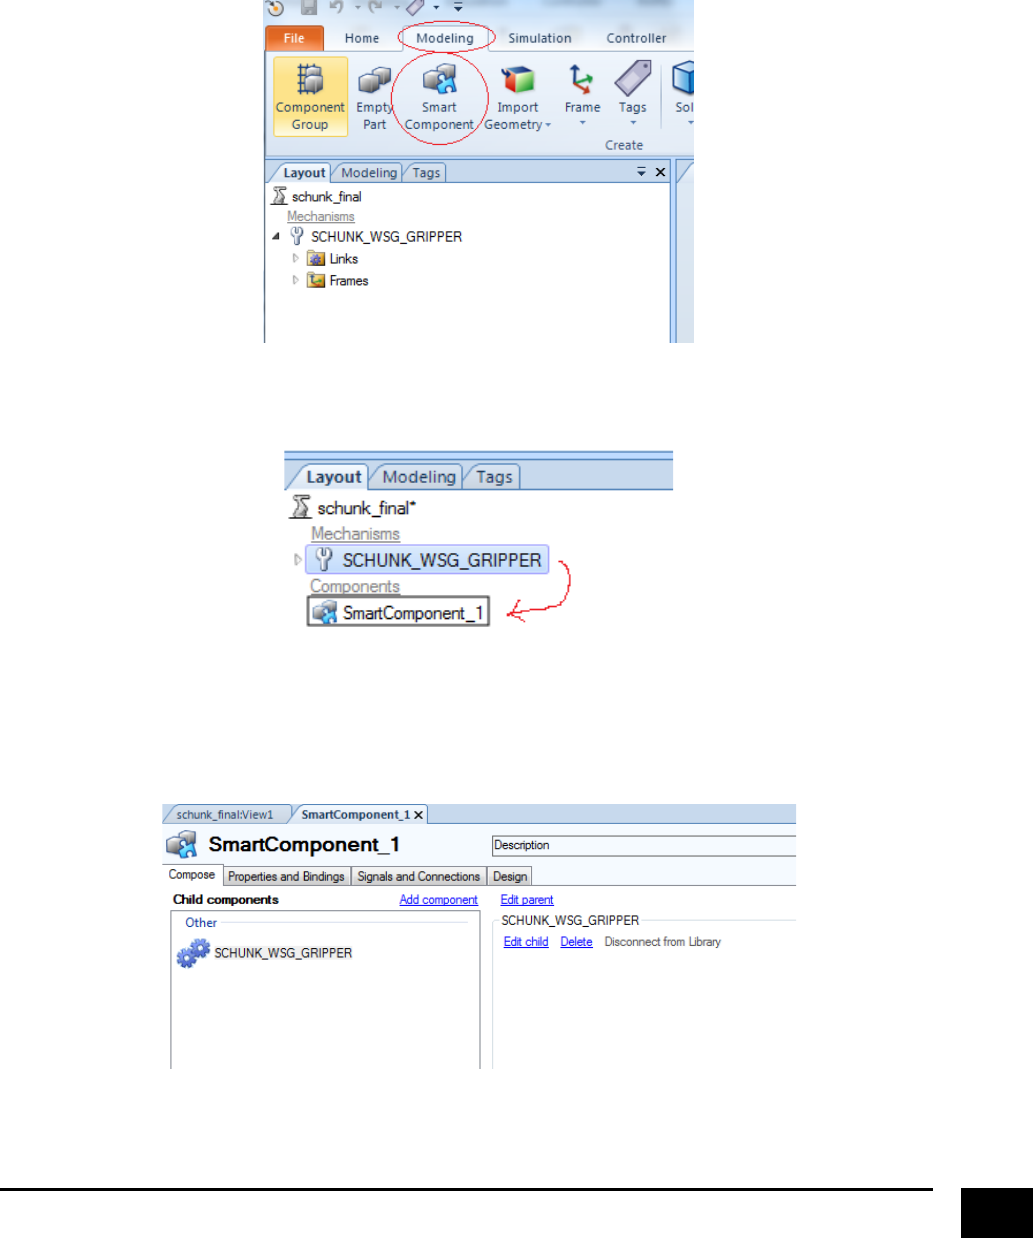
Go!to!“Modelling”!and!click!“Smart!Component”!
!
!
Drag!your!tool!mechanism!to!the!created!smart!component!
!
!
The!smart!component!will!then!look!like!this!
!
! !
!
26!
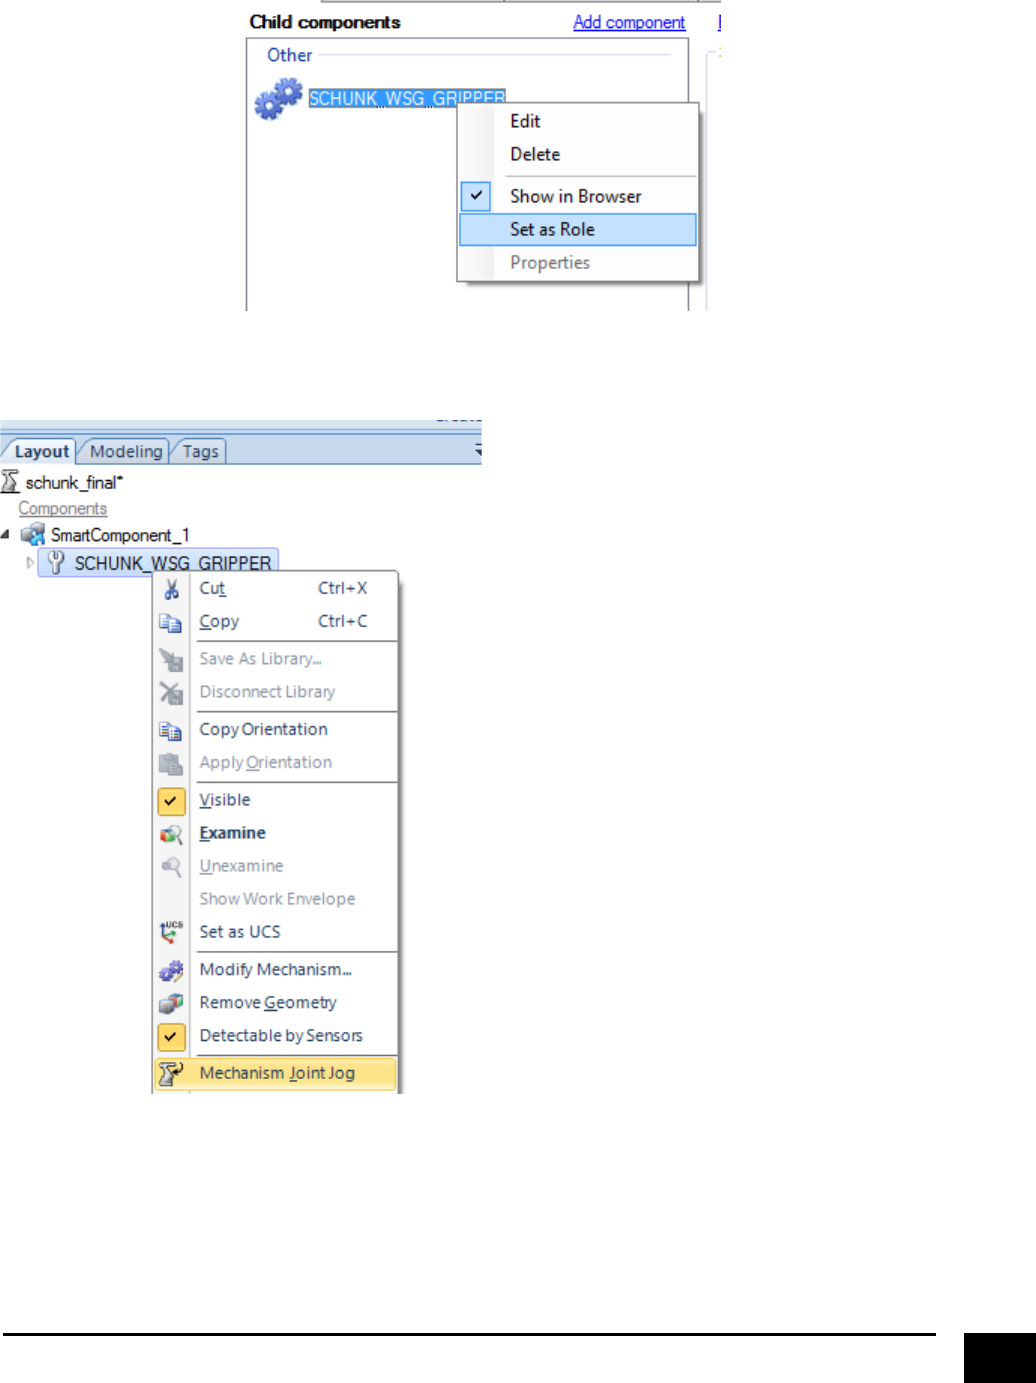
Right!click!on!the!component!and!set!it!as!“Role”.!More!or!less!to!say!that!this!is!our!primary!component.!
!
!
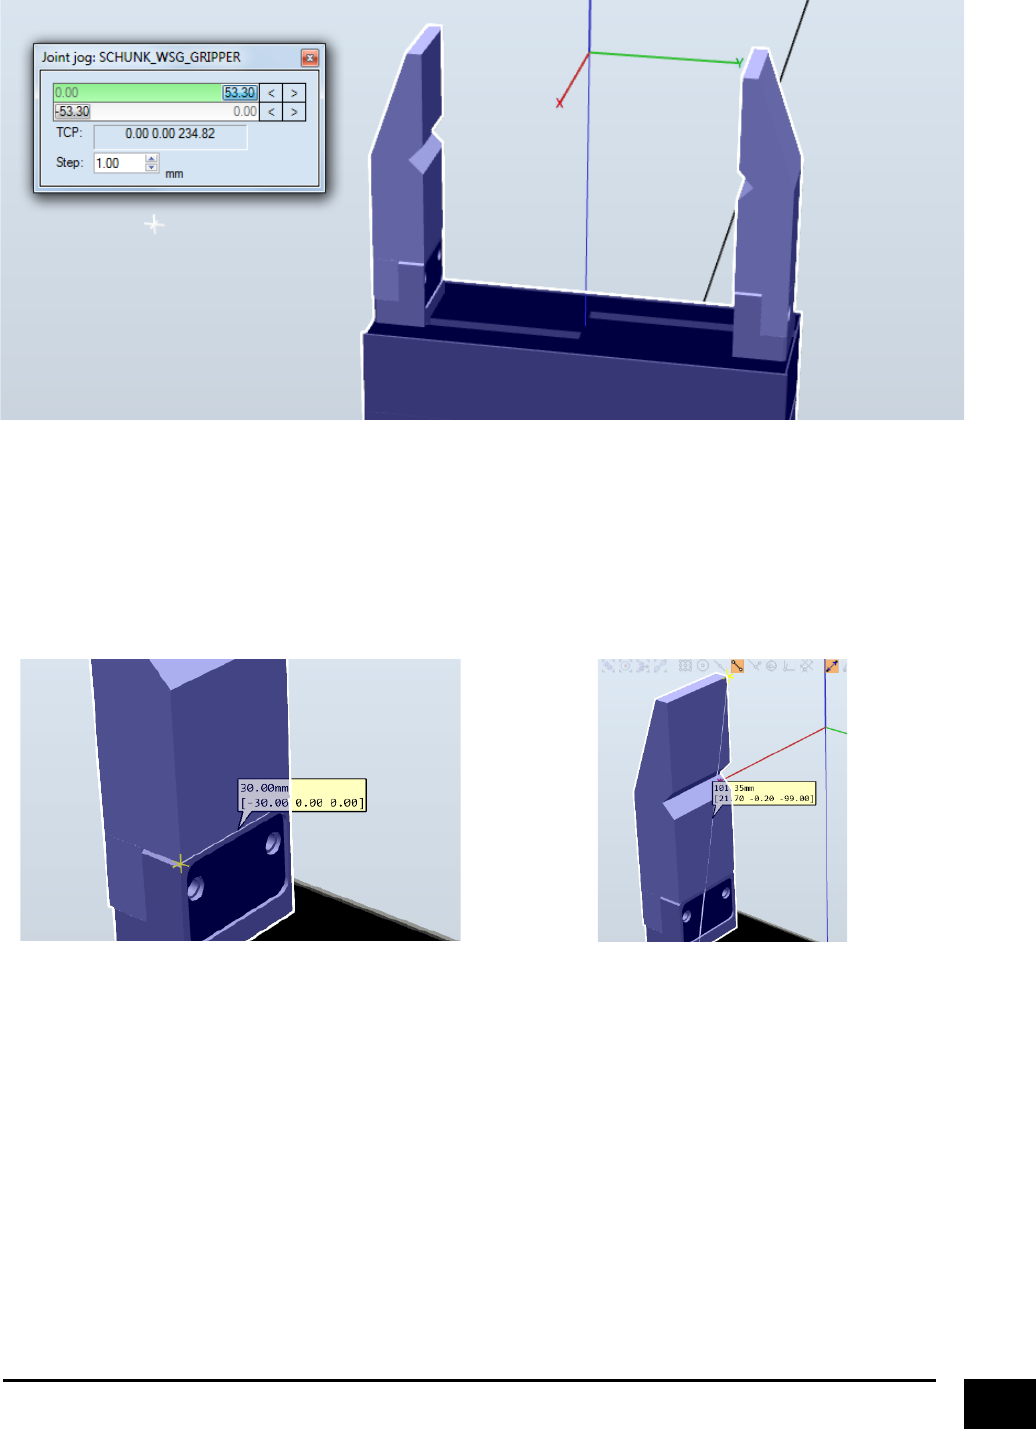
Next!jog!the!jaws,!so!that!the!gripper!is!wide!open.!
!
! !
!
27!
!
!
The!reason!for!opening!the!gripper!is!that!we!want!to!create!sensors!to!detect!if!there!are!any!objects!
touching!the!jaws.!To!do!this,!we!want!an!indication!of!how!big!the!sensors!should!be,!and!is!much!easier!
when!the!jaws!are!accessible!to!measure.!If!you!already!know!the!dimensions!of!your!jaws,!you!of!coarse!
do!not!need!to!measure!them,!but!opening!the!gripper!will!still!be!a!good!thing!for!some!of!the!later!steps.!
Measure!the!width!and!height!of!your!jaws.!In!this!case,!the!width!is!30!mm!and!the!height!is!99!mm.!
!
!
!
! !
!
28!
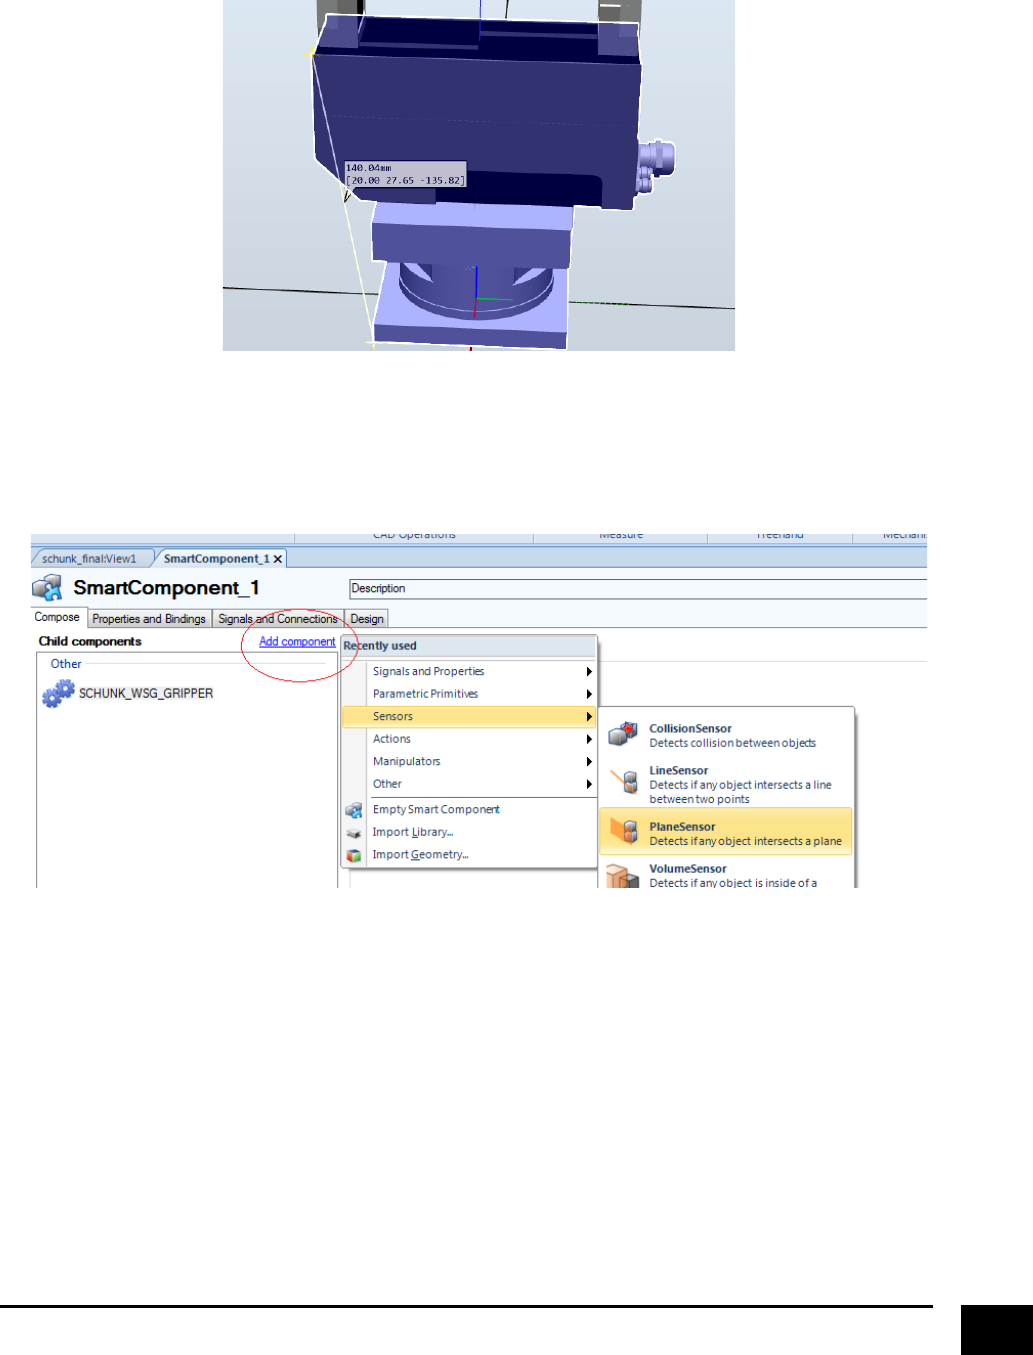
Next,!measure!the!distance!from!the!bottom!of!the!gripper!to!the!surface!where!the!jaws!can!move.!In!this!
case,!135.82!mm!in!the!z-direction.!
!
!
Go!back!to!the!smart!component!view,!click!“Add!component”!and!select!“PlaneSensor”.!!A!sensor!plane!is!
basically!a!sensor!that!can!be!used!to!detect!objects.!!
!
!
!
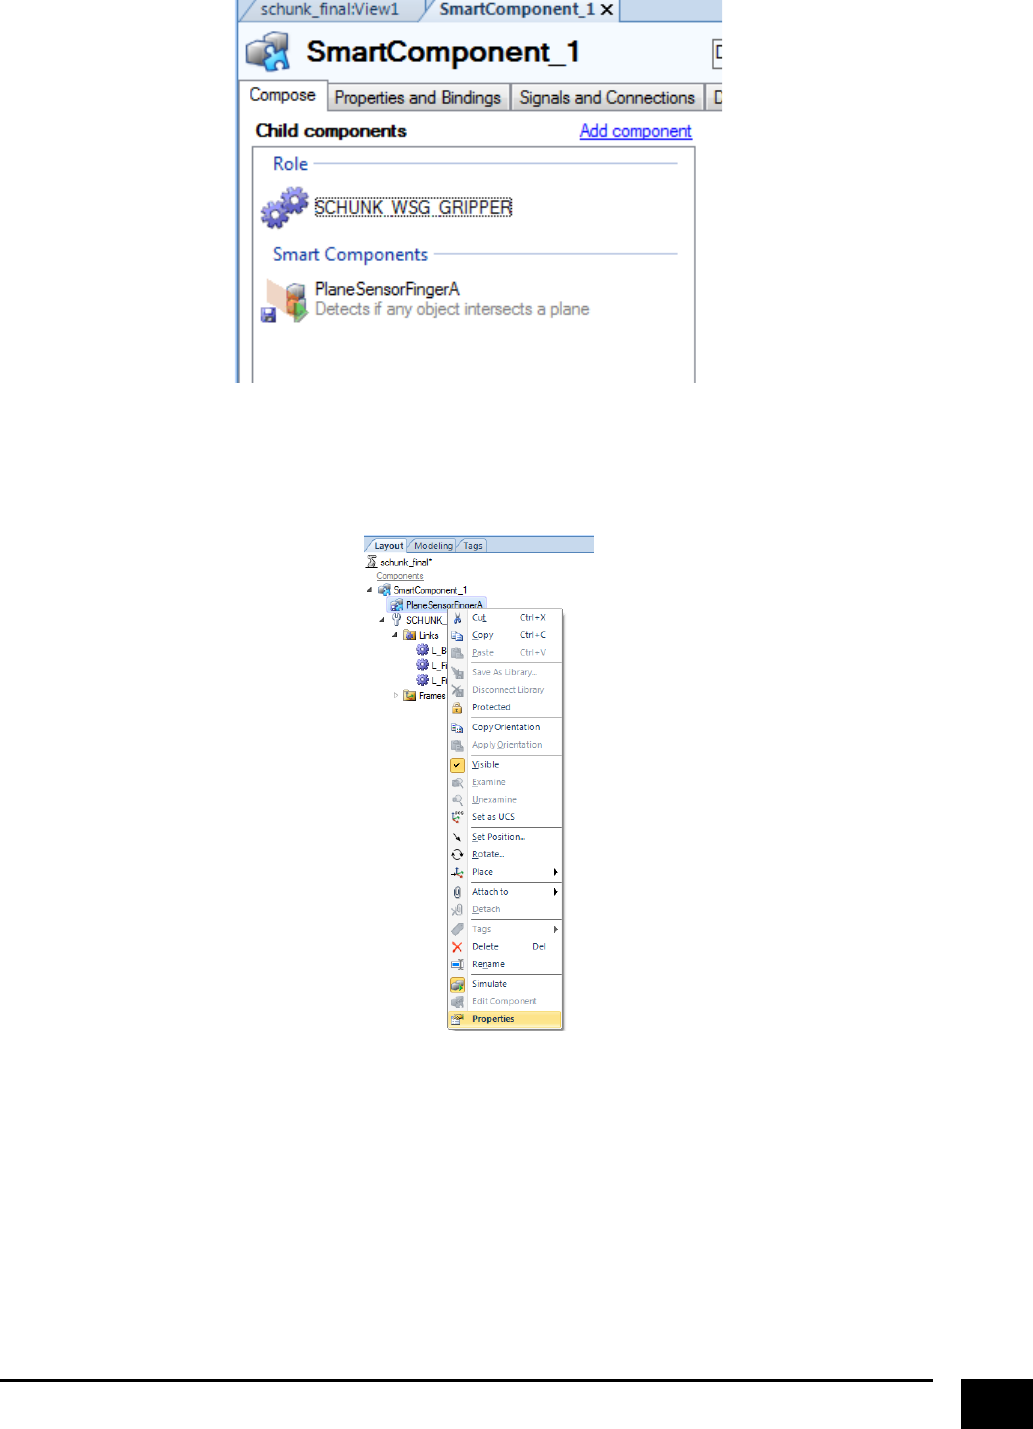
This!will!create!a!plane!sensor!component.!Here!the!sensor!has!been!renamed!to!“PlaneSensorFingerA”,!
since!we!are!going!to!make!two!of!them!(one!for!each!jaw).!!
!
29!
!
!
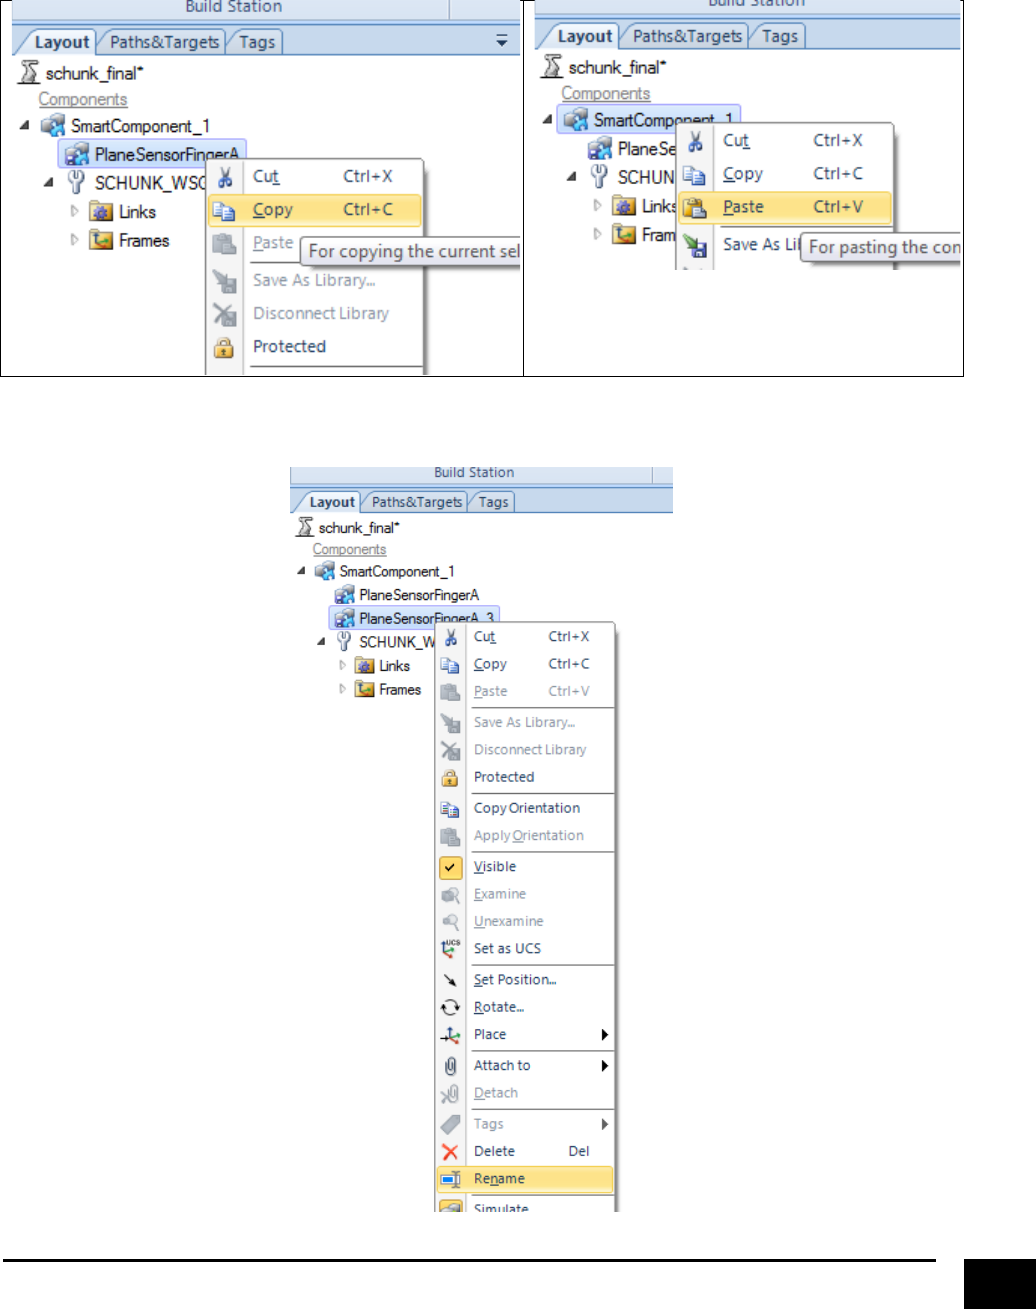
Right!click!on!“PlaneSensorFingerA”!in!the!layout!and!select!“Properties”!
!
!
! !
!
30!
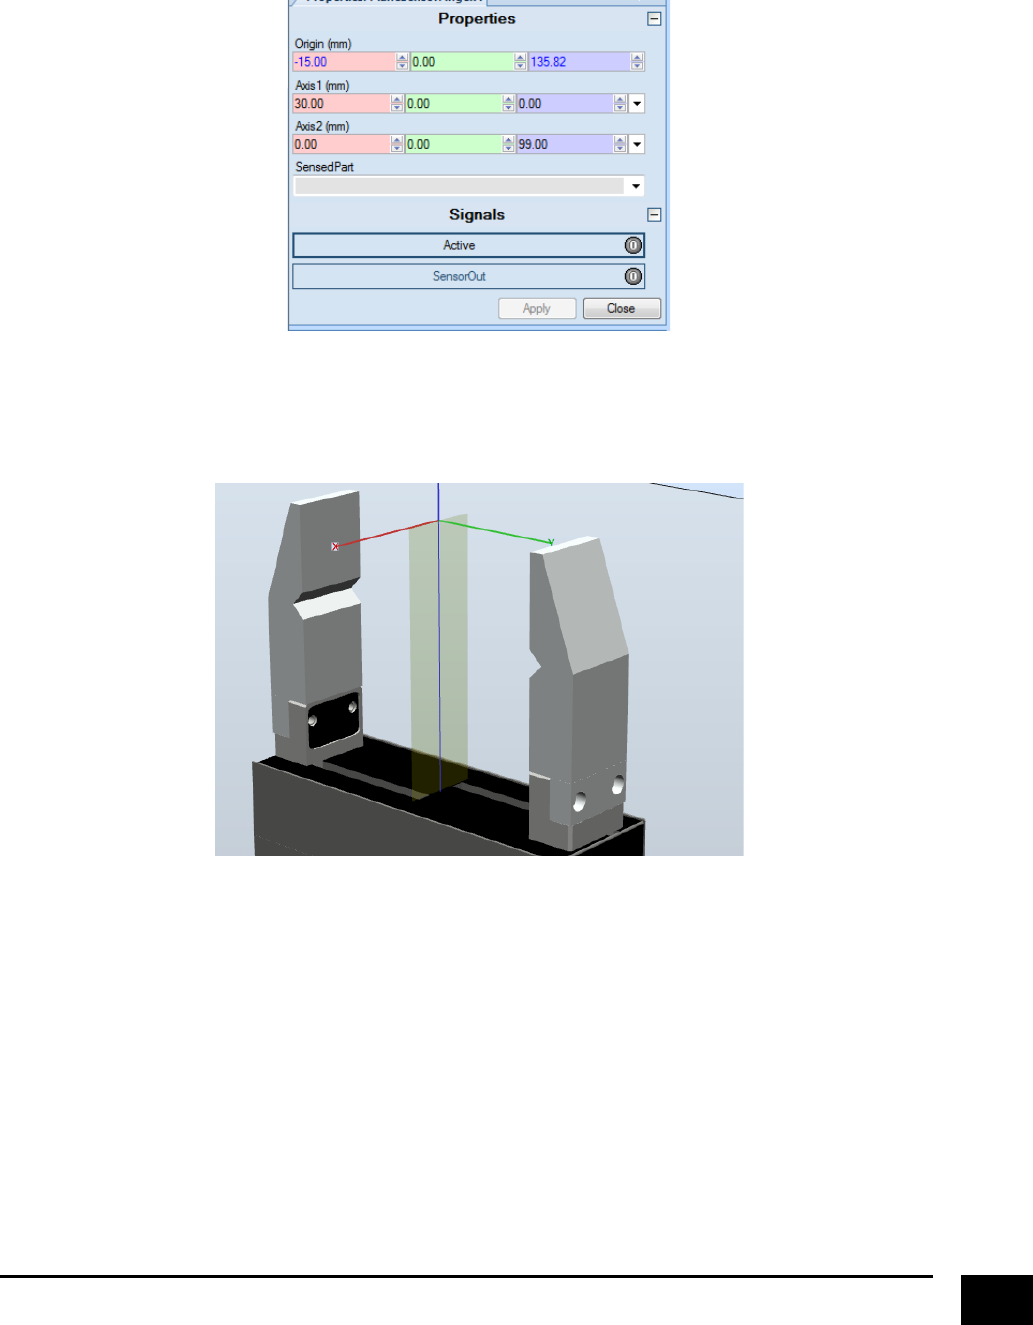
Type!in!the!values!that!you!measured!and!press!apply.!The!reason!for!the!“-15”!in!the!x-direction!is!because!
the!frame!of!the!sensor!plane!has!its!origin!in!(0,0,0).!We!measured!a!width!of!30!mm,!and!want!an!evenly!
distributed!sensor!at!the!jaw.!!
!
!
This!will!create!a!sensor!plane!that!looks!something!like!this.!
!
!
! !
!
31!
Next,!we!will!create!a!sensor!plane!for!the!other!jaw,!but!since!the!jaws!are!identical!we!can!just!create!a!
copy!of!“PlaneSensorFingerA”,!paste!it!in!to!“SmartComponent_1”,!and!rename!it!to!“PlaneSensorFingerB”.!!!
!
!
!
!
!
!
!
32!
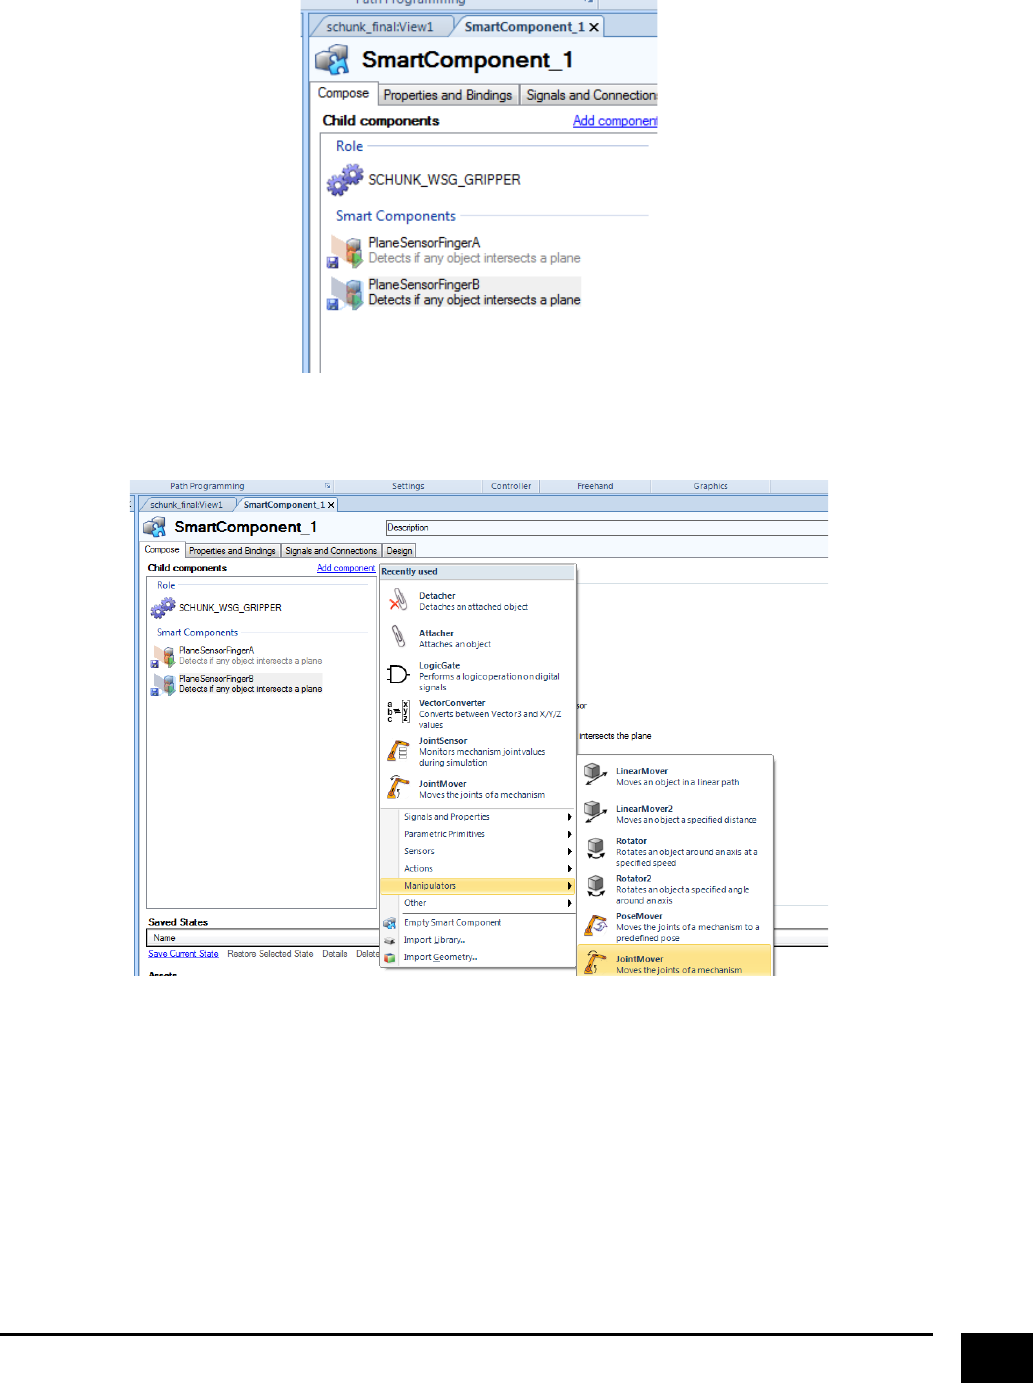
Now!your!smart!component!should!look!like!this.!
!
!
Next,!we!will!add!a!component!called!“JointMover”,!to!actually!be!able!to!move!the!jaws.!
!
! !
!
33!
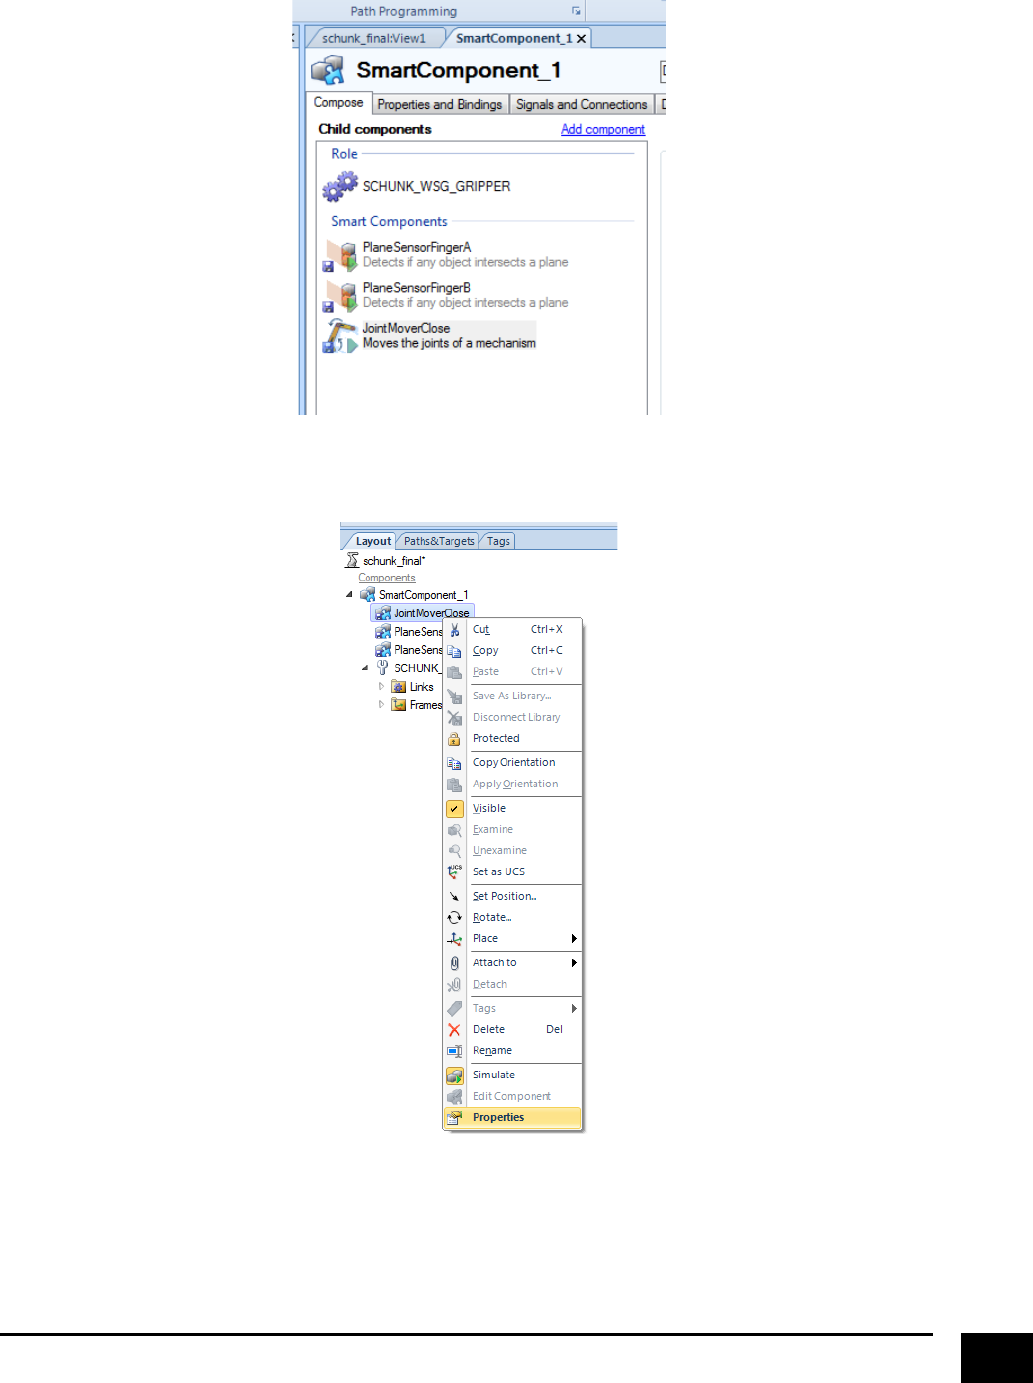
Rename!it!to!“JointMoverClose”,!and!your!smart!component!should!look!like!this.!
!
!
Right!click!on!“JointMoverClose”!and!select!properties.!
!
! !
!
34!
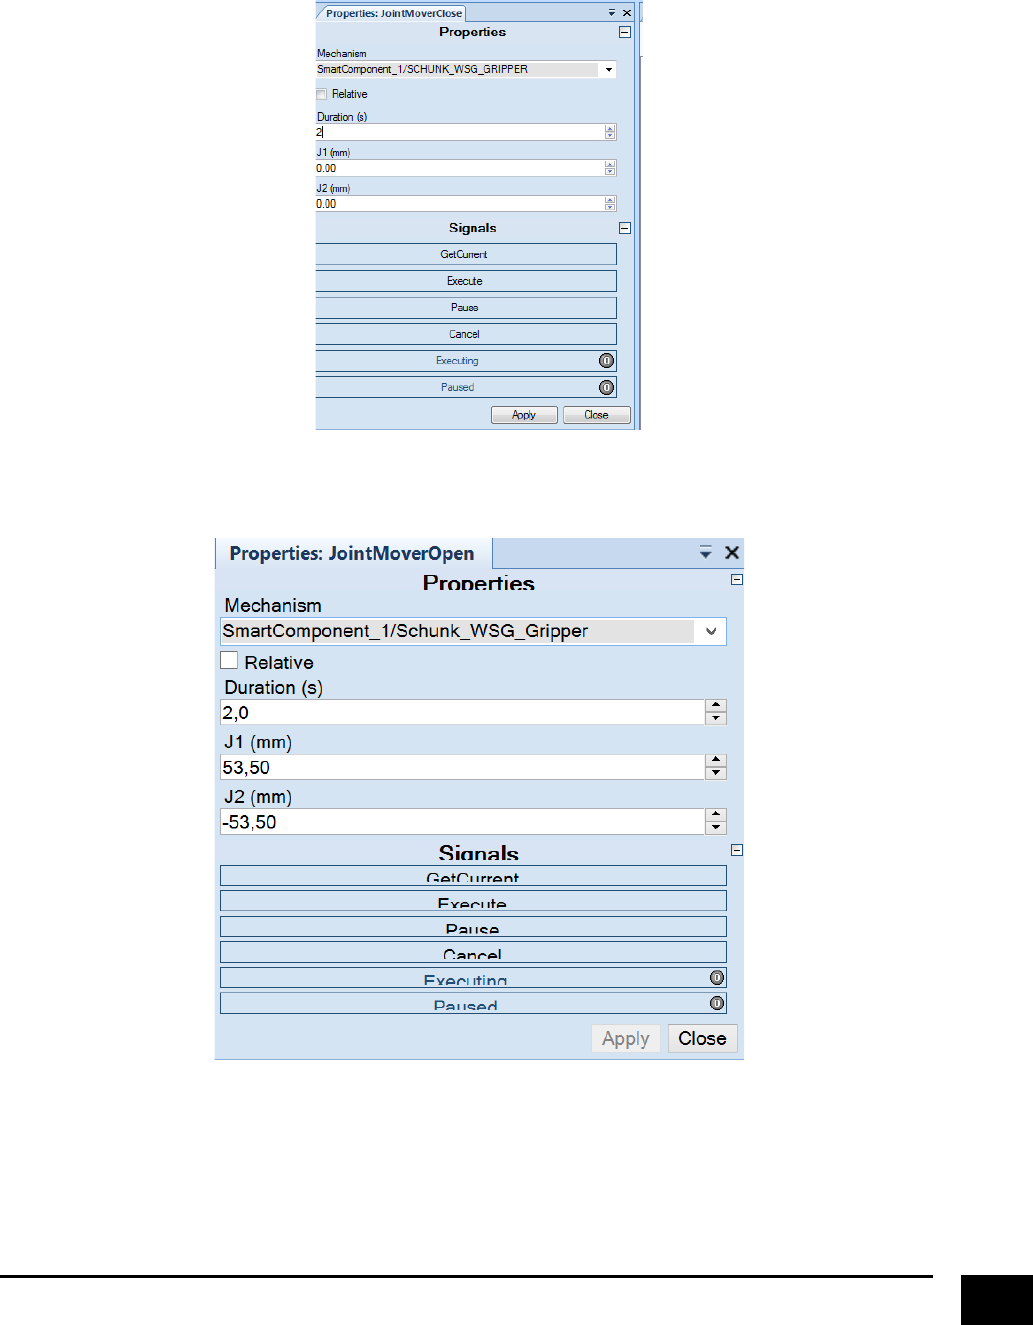
Select!the!“SCHUNK_WSG_GRIPPER”!as!the!mechanism,!specify!how!long!you!want!it!take!to!for!the!
gripper!to!close!(it!can!be!any!number!you!want),!and!press!apply.!J1!and!J2!are!both!set!to!zero,!since!
these!are!the!joint!configuration!to!close!the!gripper.!
!
!
Create!another!“JointMover”!component,!and!rename!this!to!“JointMoverOpen”!and!type!in!these!values.!
!
! !
!
35!
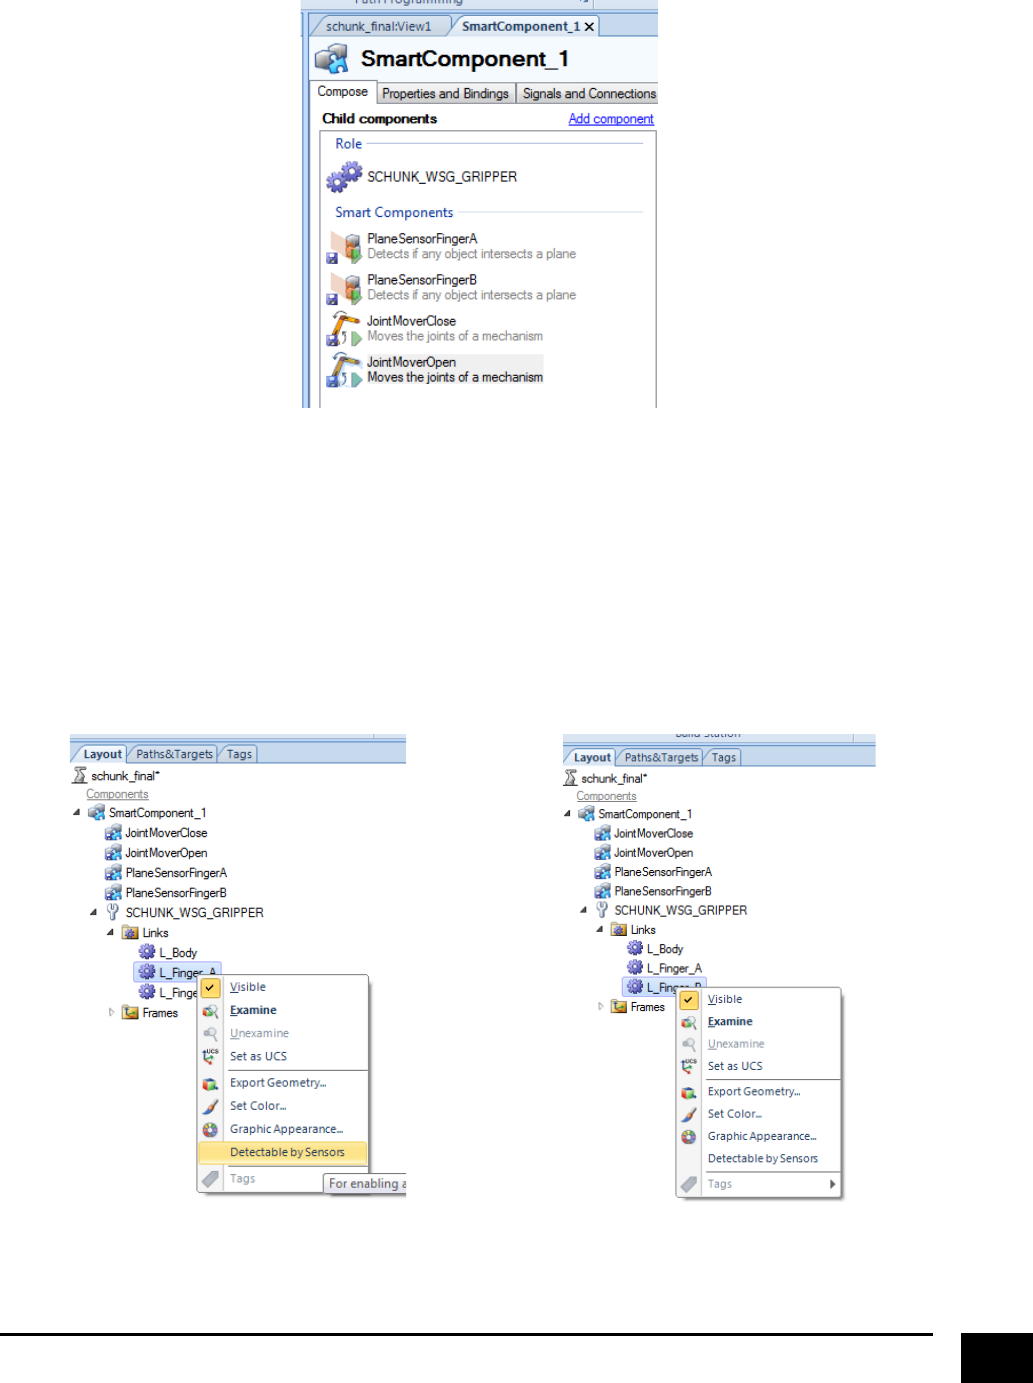
Now!your!smart!component!should!look!like!this.!
!
!
Since!our!sensor!planes!are!going!to!be!added!to!the!surface!of!each!jaw,!they!will!actually!trigger!as!they!
have!detected!an!object,!because!they!will!have!contact!with!the!jaws.!There!are!two!ways!of!handling!this:!
one!way!is!to!move!the!sensor!planes!so!that!they!will!have!an!offset!relative!to!the!jaws,!the!other!way!is!
to!disable!the!jaws!to!be!recognised!by!sensors.!We!are!going!to!choose!the!second!approach,!well!knowing!
that!this!would!mean!that!the!jaws!are!not!recognised!by!any!sensor!that!will!be!placed!in!the!cell.!This!
could!be!a!disadvantage!if!for!example!you!have!some!safety!sensors!that!are!to!detect!if!the!robot!(+!tool)!
is!crossing!a!specific!boundary.!!
You!disable!sensor!recognition!of!the!jaws!like!this.!!
!
!
!
!
!
!
36!
!
!!!!
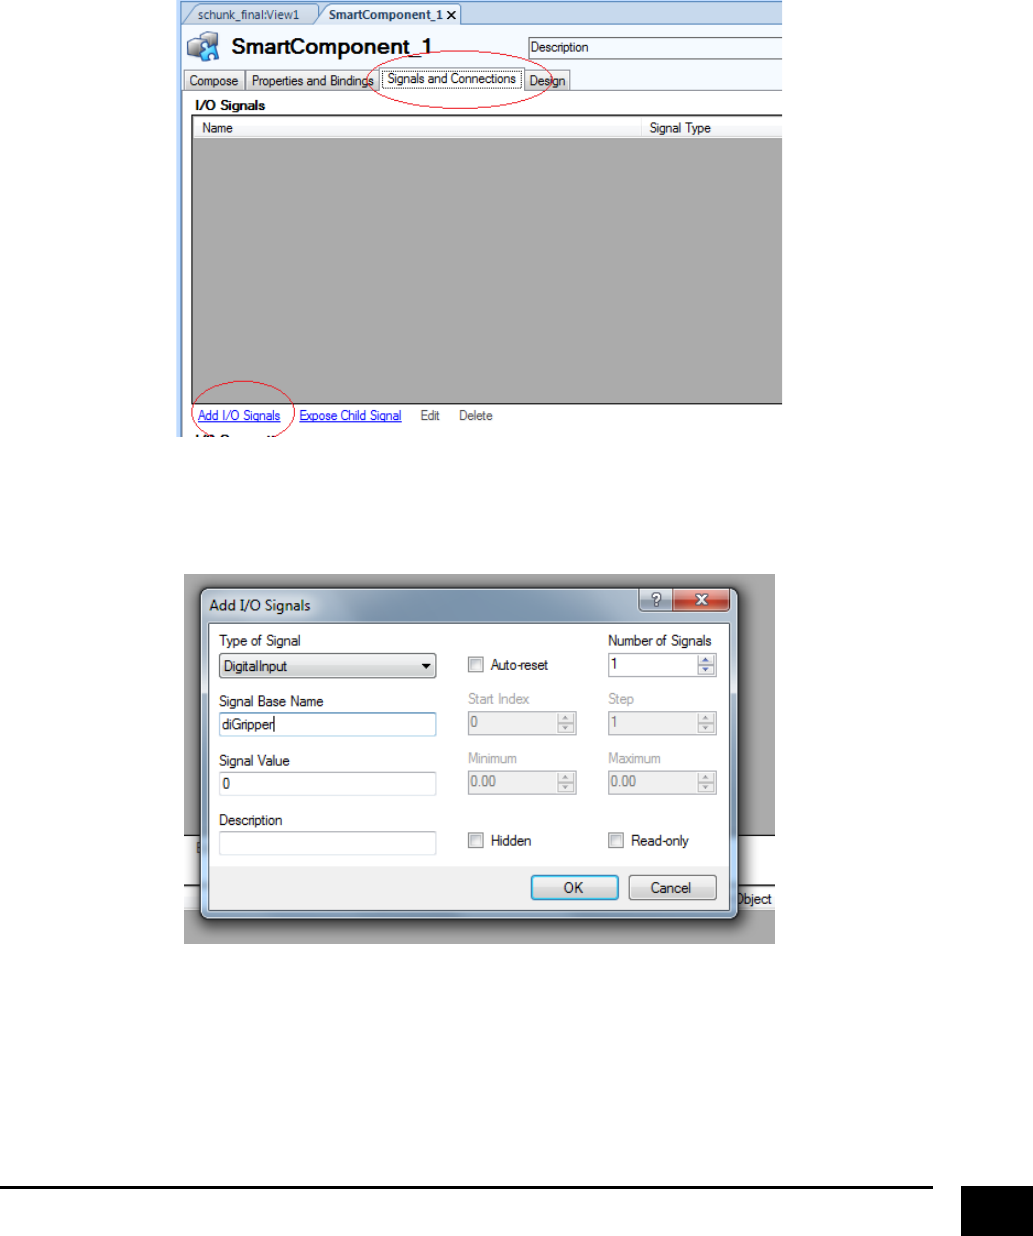
Next!we!will!create!some!I/O!signals!for!our!smart!component,!so!that!we!can!actually!command!the!
gripper!to!grasp!an!object,!and!tell!us!if!it!has!grasped!an!object.!Go!to!“Signals!and!Connections”!in!the!
smart!component!view!and!click!“Add!I/O!signals”.!
!
!
Create!a!digital!input!that!we!will!use!to!command!the!gripper!to!open!and!close,!and!name!it!“diGribber”!
(or!whatever!name!you!want).!
!
! !
!
37!
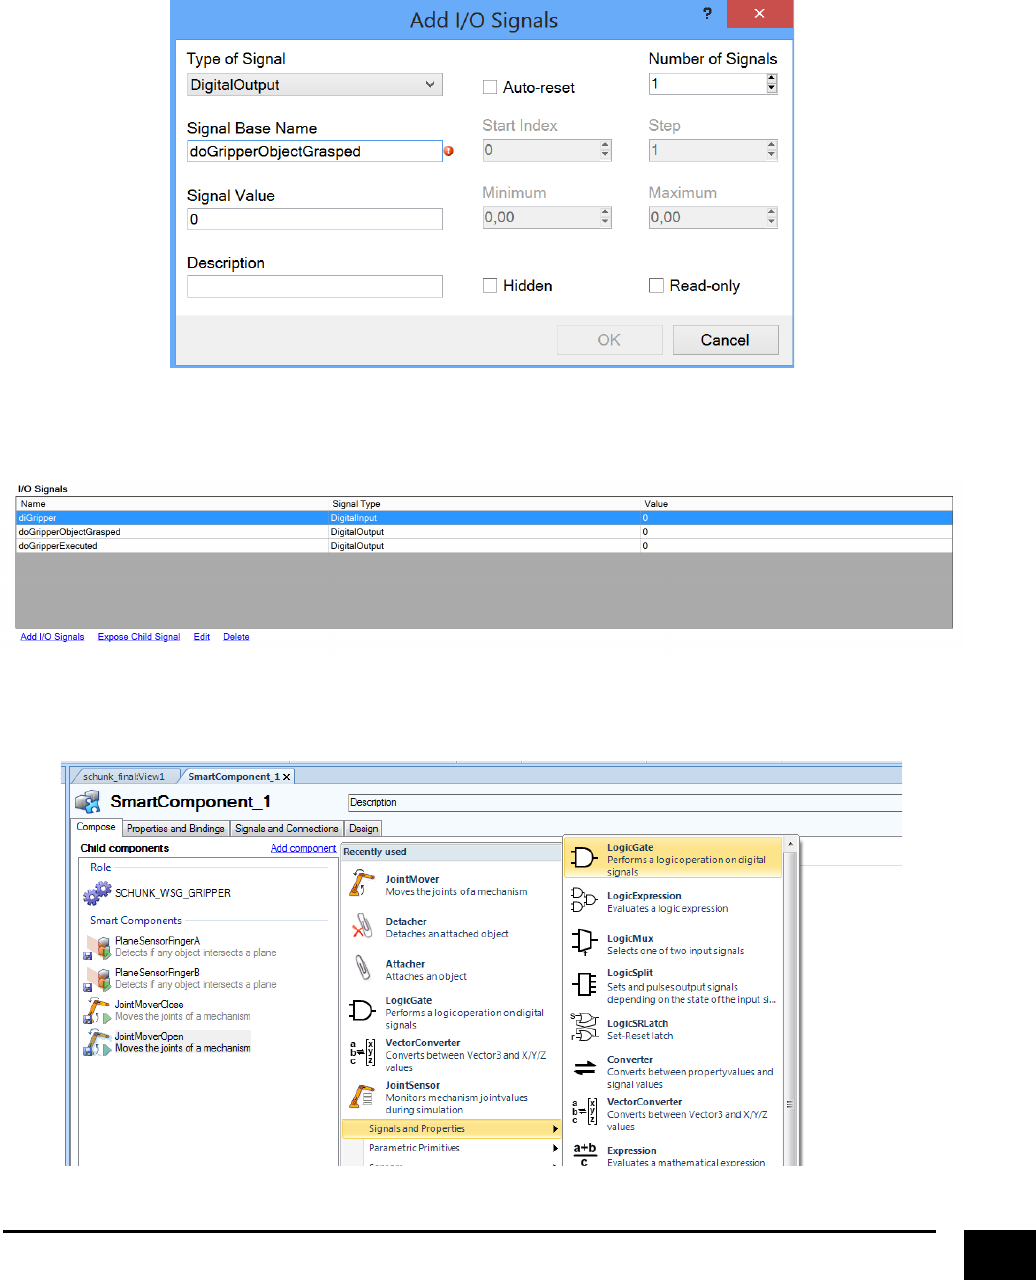
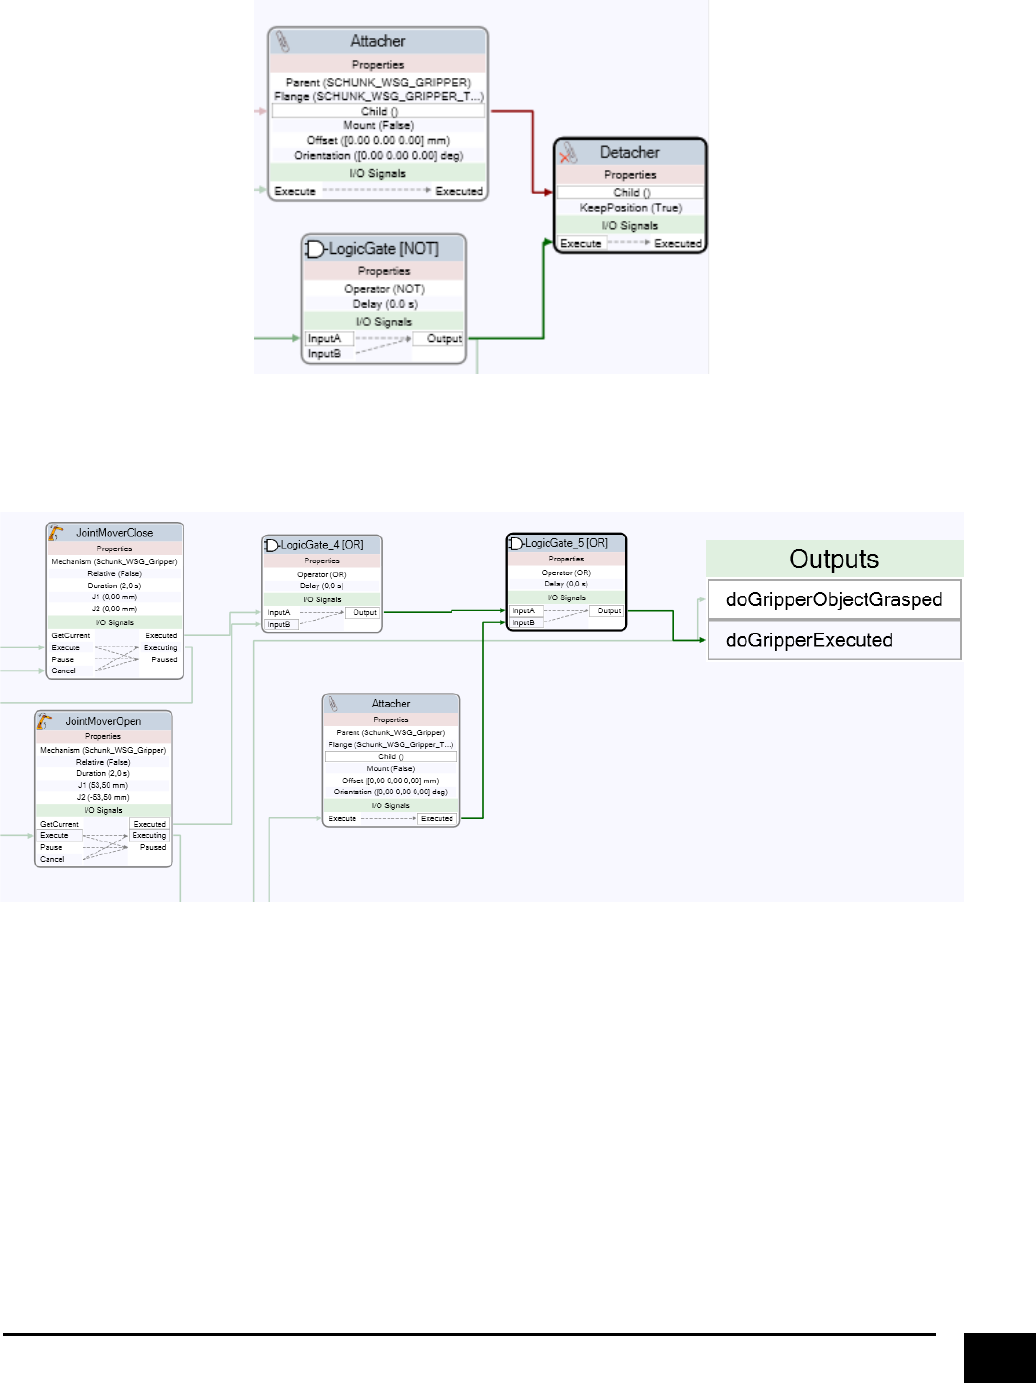
Then!create!two!digital!output;!“!doGripperObjectGrasped”!that!we!will!use!to!validate!if!the!gripper!has!
grasped!an!object,!and!“doGripperExecuted”!that!we!will!use!as!feedback!if!a!gripper!action!has!
been!executed.!
!
!
!
It!should!now!look!like!this.!
!
!
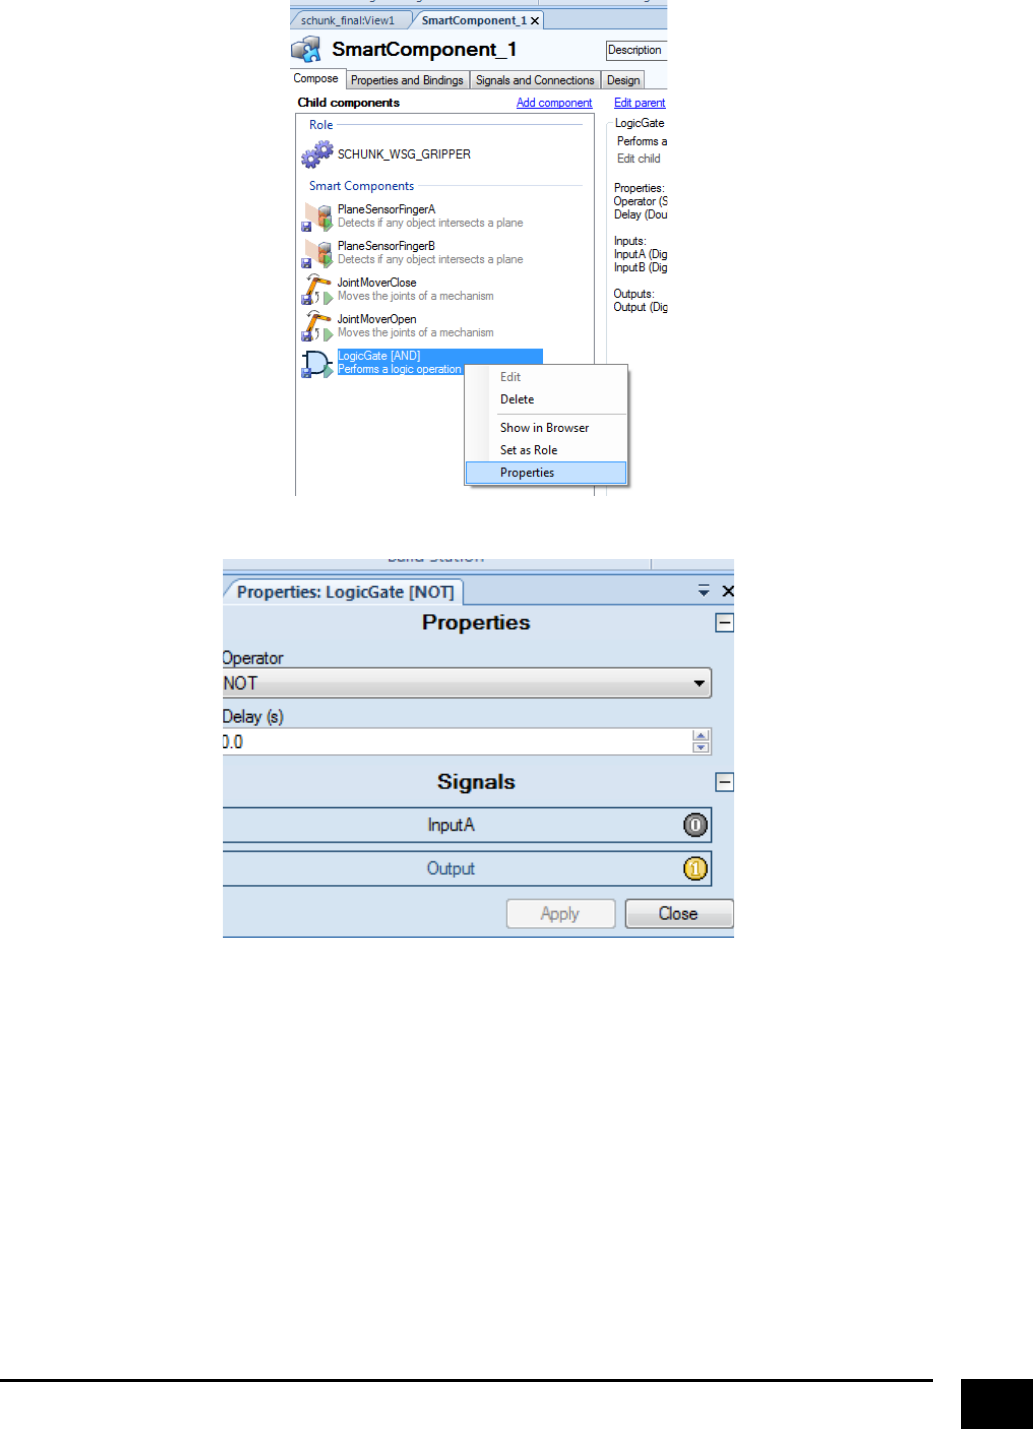
Next,!we!will!create!a!“Not”!logic!gate.!!
!
!
38!
!
!
!
!
!
!
! !
!
39!
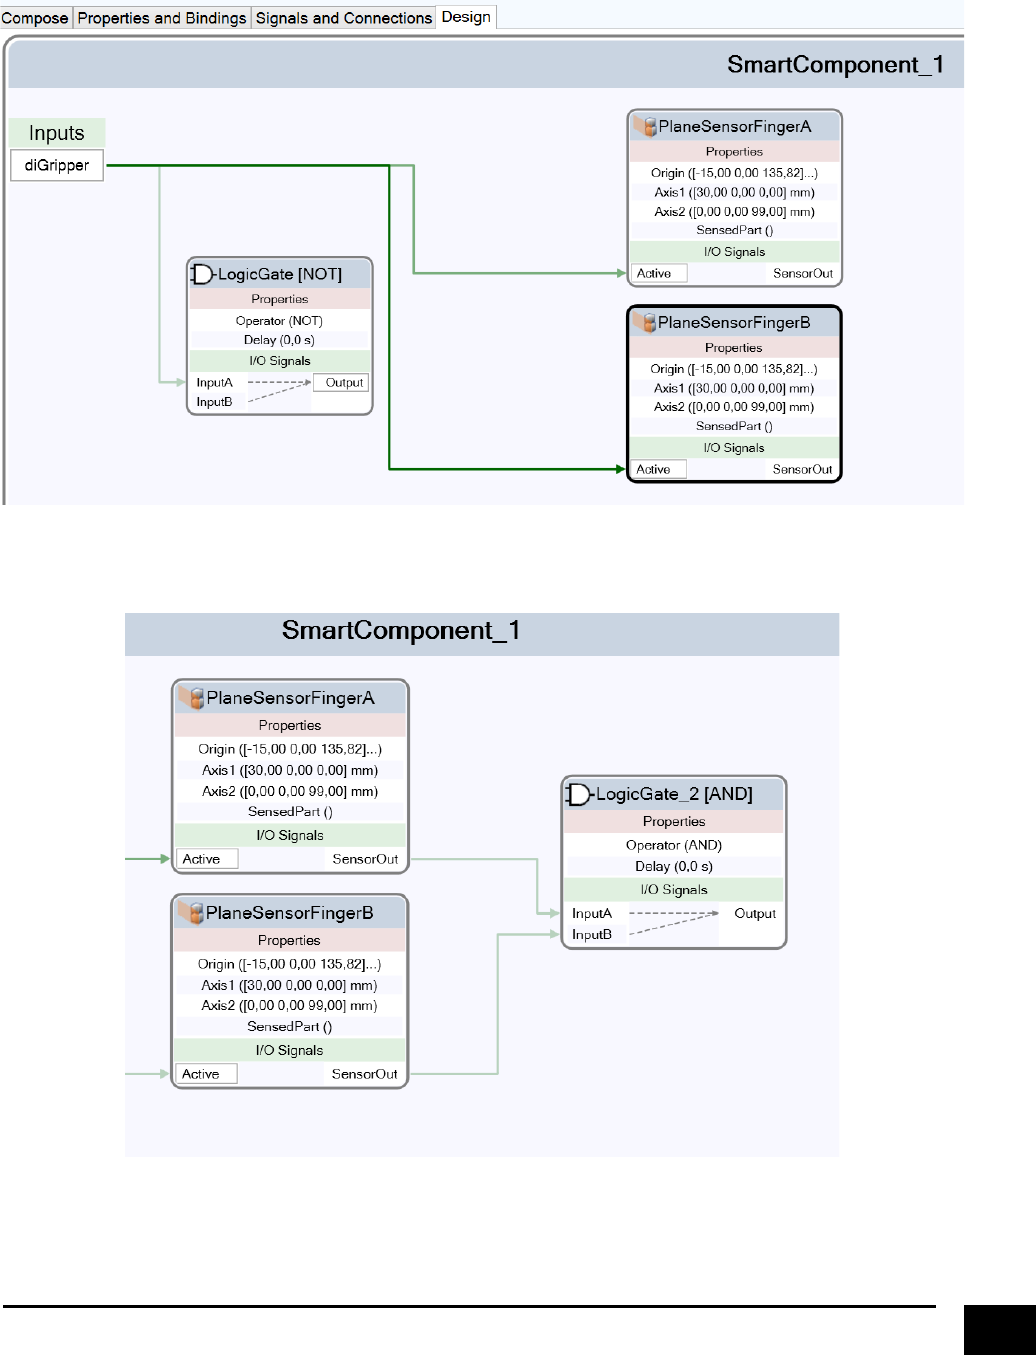
Next,!we!are!going!to!“wire”!the!logic!together!to!achieve!that!the!sensor!planes!will!always!be!active.!Go!
to!“Design”!in!the!smart!component!view!and!drag!the!signals!to!acquire!this!configuration.!!
!
!
Create!another!logic!gate,!this!time!an!“AND”!gate.!Configure!it!like!this.!
!
This!way!we!will!create!a!signal!that!will!give!an!indication!whether!or!not!both!sensors!have!detected!an!
object.!The!output!of!the!gate!will!be!used!to!determine!when!we!will!“grasp”!an!object,!and!to!determine!
if!the!gripper!should!continue!moving!the!jaws.!
!
40!
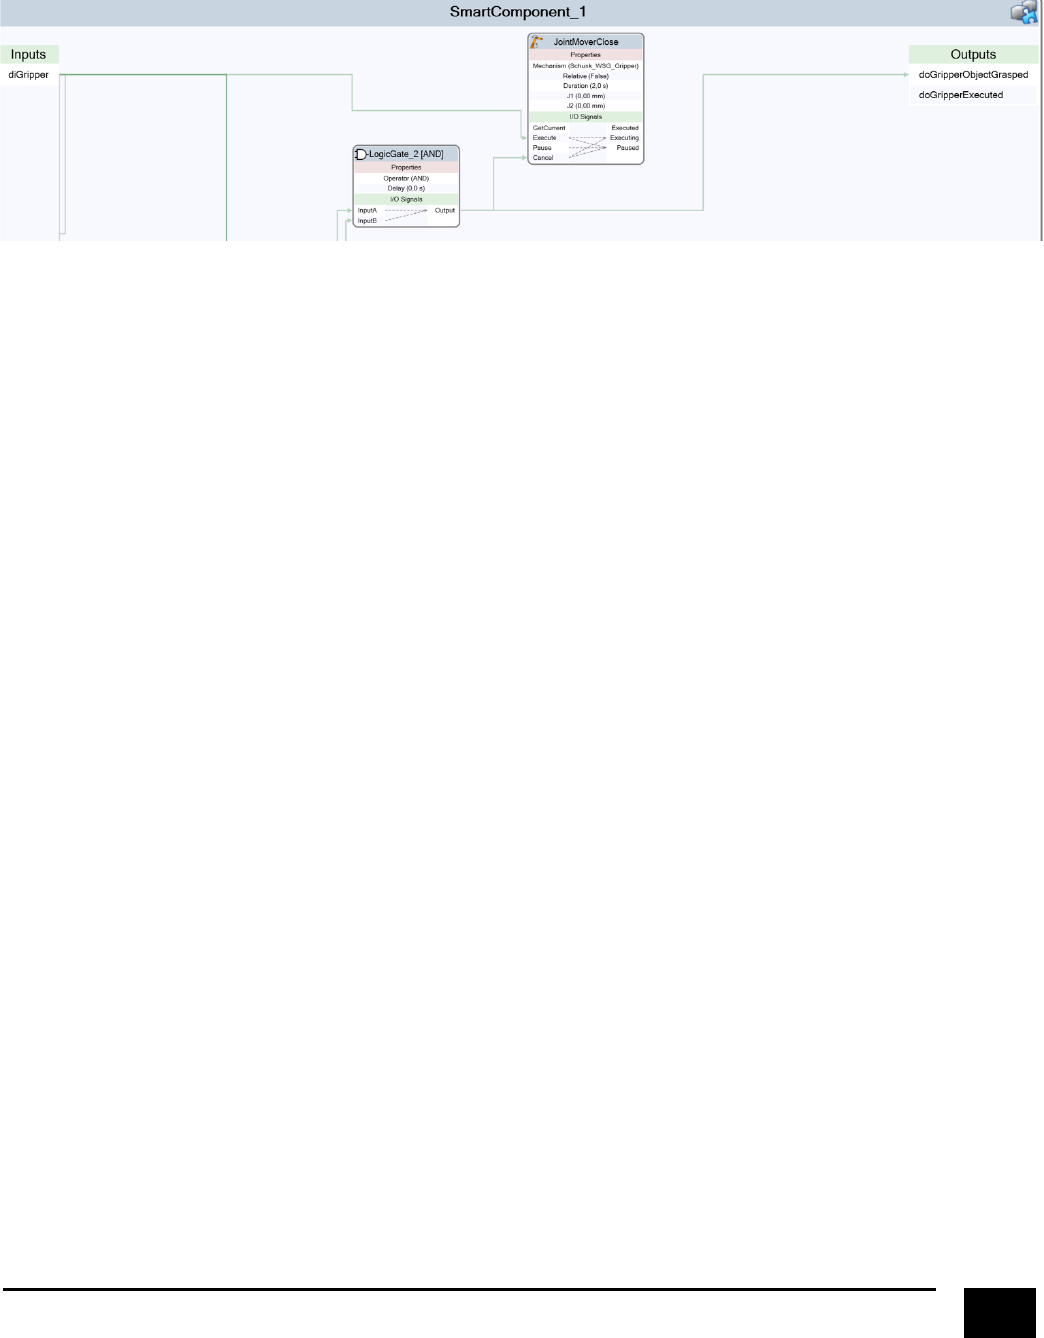
Next,!we!want!to!create!the!logic!for!closing!the!gripper.!!
!
!
!
What!we!have!done!is:!!
If!diGripper!is!“1”,!we!will!start!to!close!the!gripper,!but!only!as!long!as!the!two!sensor!planes!do!not!detect!
any!object,!i.e.!that!the!jaws!are!not!grasping!an!object.!In!other!words,!we!have!made!some!logic!that!
actually!functions!as!a!force!feedback!feature!for!the!gripper.!Furthermore,!if!both!sensor!planes!detect!an!
object,!it!means!that!we!have!contact!with!and!object,!and!therefore!can!give!a!feedback!that!we!have!
“grasped”!an!object.!
!
! !
!
41!
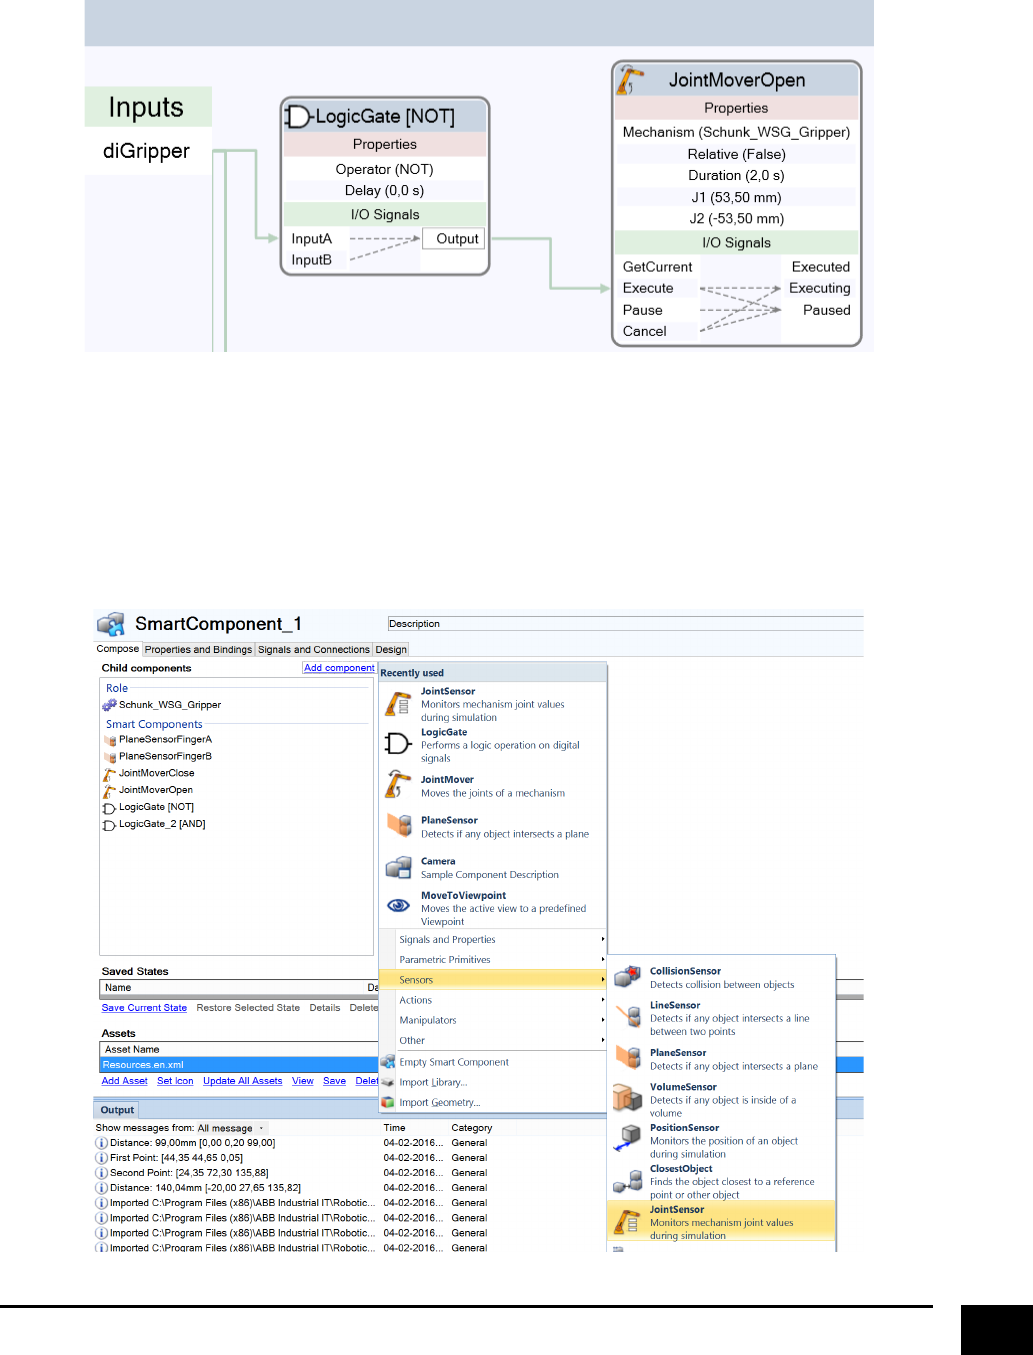
Next,!we!want!to!create!the!logic!for!opening!the!gripper.!Since!we!already!have!the!necessary!
components,!we!just!have!to!link!them!together!like!this.!
!
!
So!if!diGripper!is!“0”,!we!start!to!open!the!gripper.!
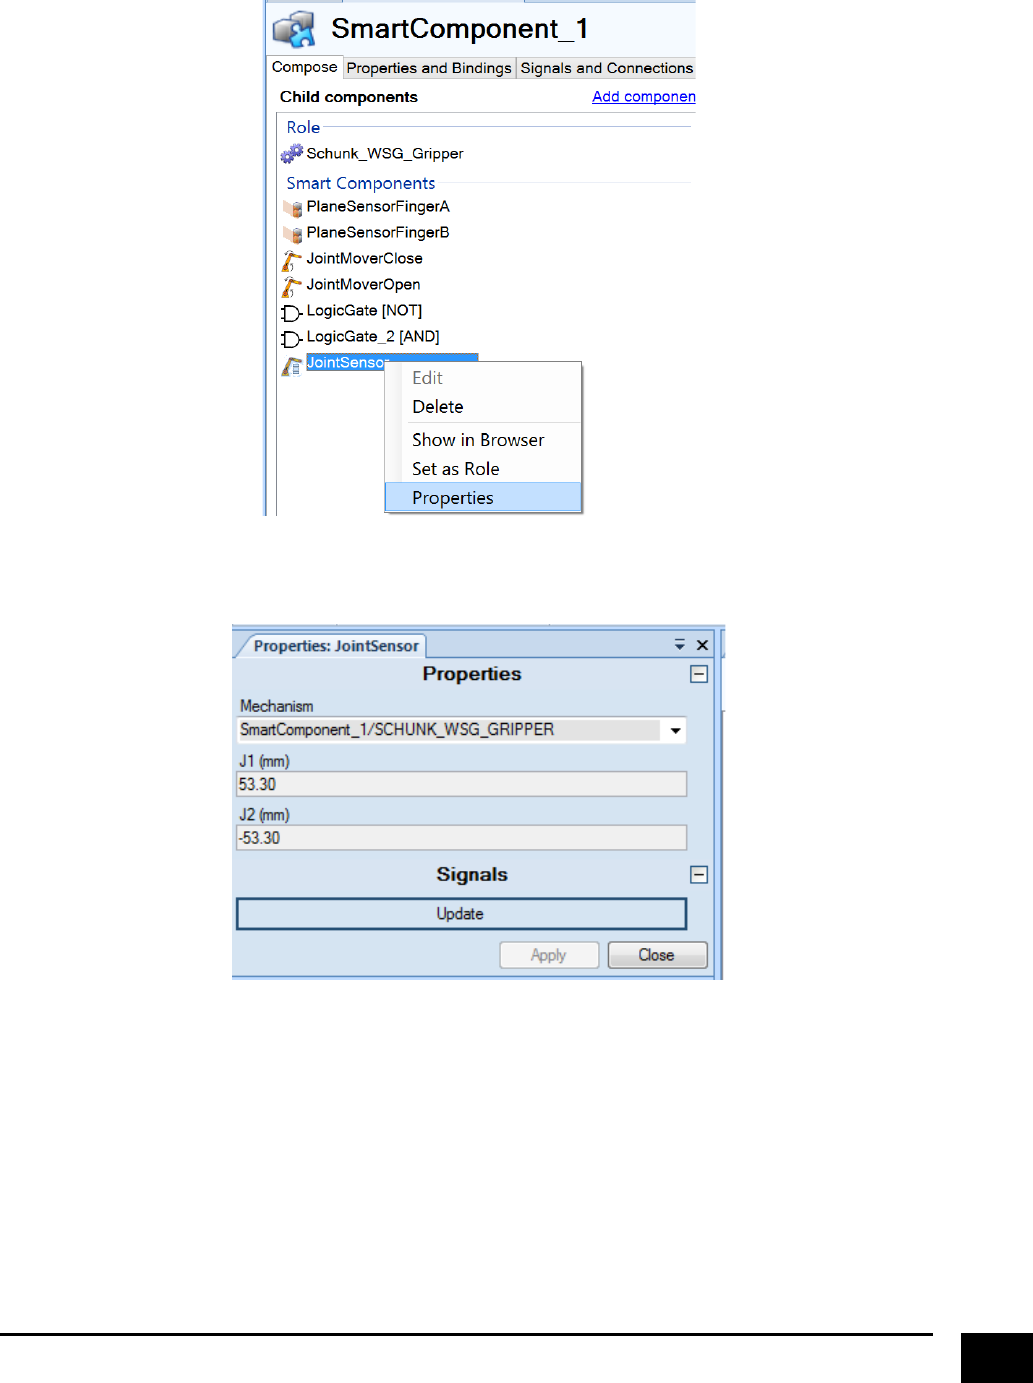
Next,!we!have!to!make!the!sensor!planes!move!together!with!the!jaws,!so!they!are!not!located!in!a!fixed!
position.!The!first!step!to!do!that!is!to!continuously!monitor!the!jaws!position!whenever!they!are!moving.!
Add!a!“JointSensor”!component!like!this.!!!!
!
!
!
42!
Right!click!and!select!properties!
!
!
Choose!the!“SCHUNK_WSG_GRIPPER,!and!will!show!the!current!joint!values!(positions!of!the!jaws).!
!
! !
!
43!
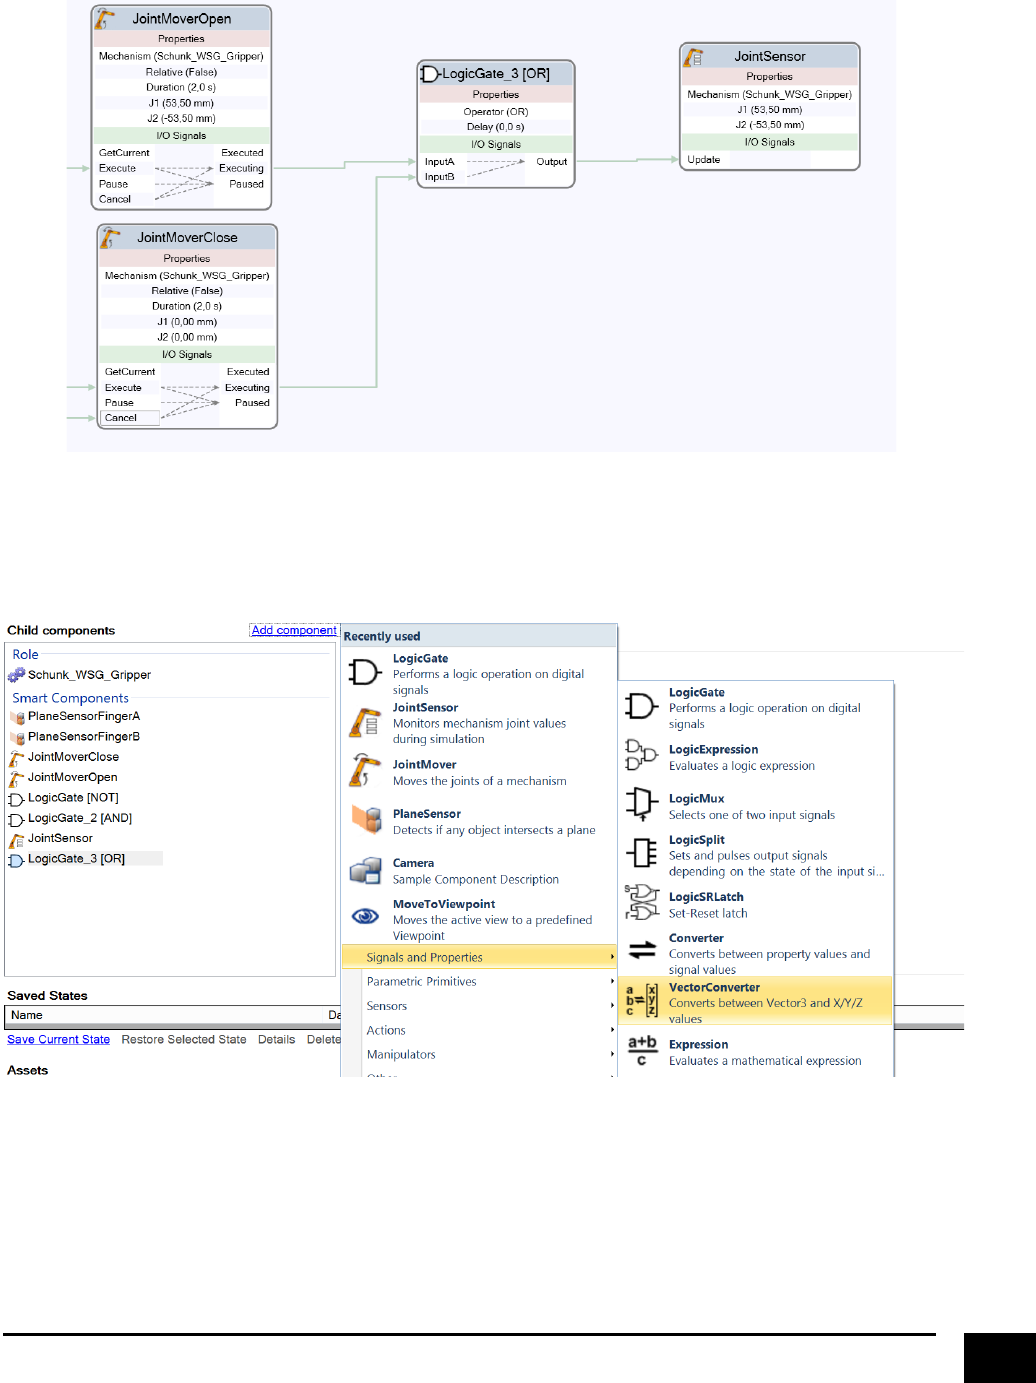
Create!a!new!“OR”!logic!gate,!and!configure!the!joint!sensor!like!this.!
!
!
Next,!we!want!to!use!the!values!from!the!joint!sensor!to!update!the!position!of!the!sensor!planes.!We!will!
first!concentrate!on!updating!“PlaneSensorFingerA”.!The!first!step!is!to!add!TWO!“VectorConverter”!
components.!
!
!
!
!
!
!
44!
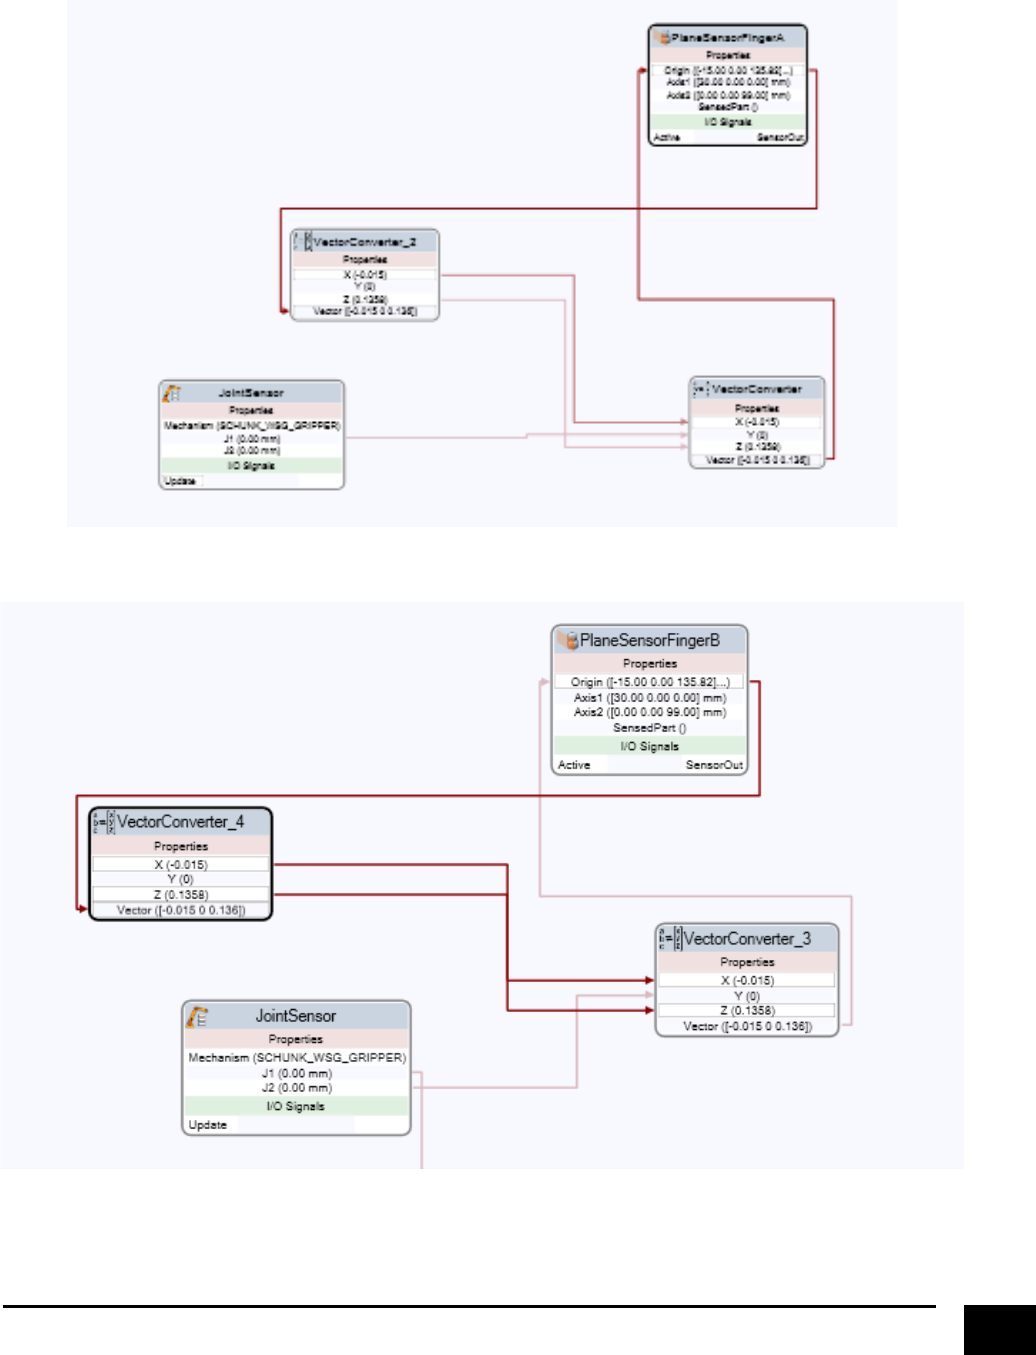
Next,!connect!them!like!this!(IMPORTANT:!the!connection!between!“VectorConverter”!and!
“PlaneSensorFingerA”!should!be!done!as!the!last!step).!
!
Now!do!the!exact!same!thing!with!the!“PlaneSensorFingerB”,!create!TWO!MORE!!“VectorConverter”!
components,!and!connect!them!like!this.
!
!
! !
!
45!
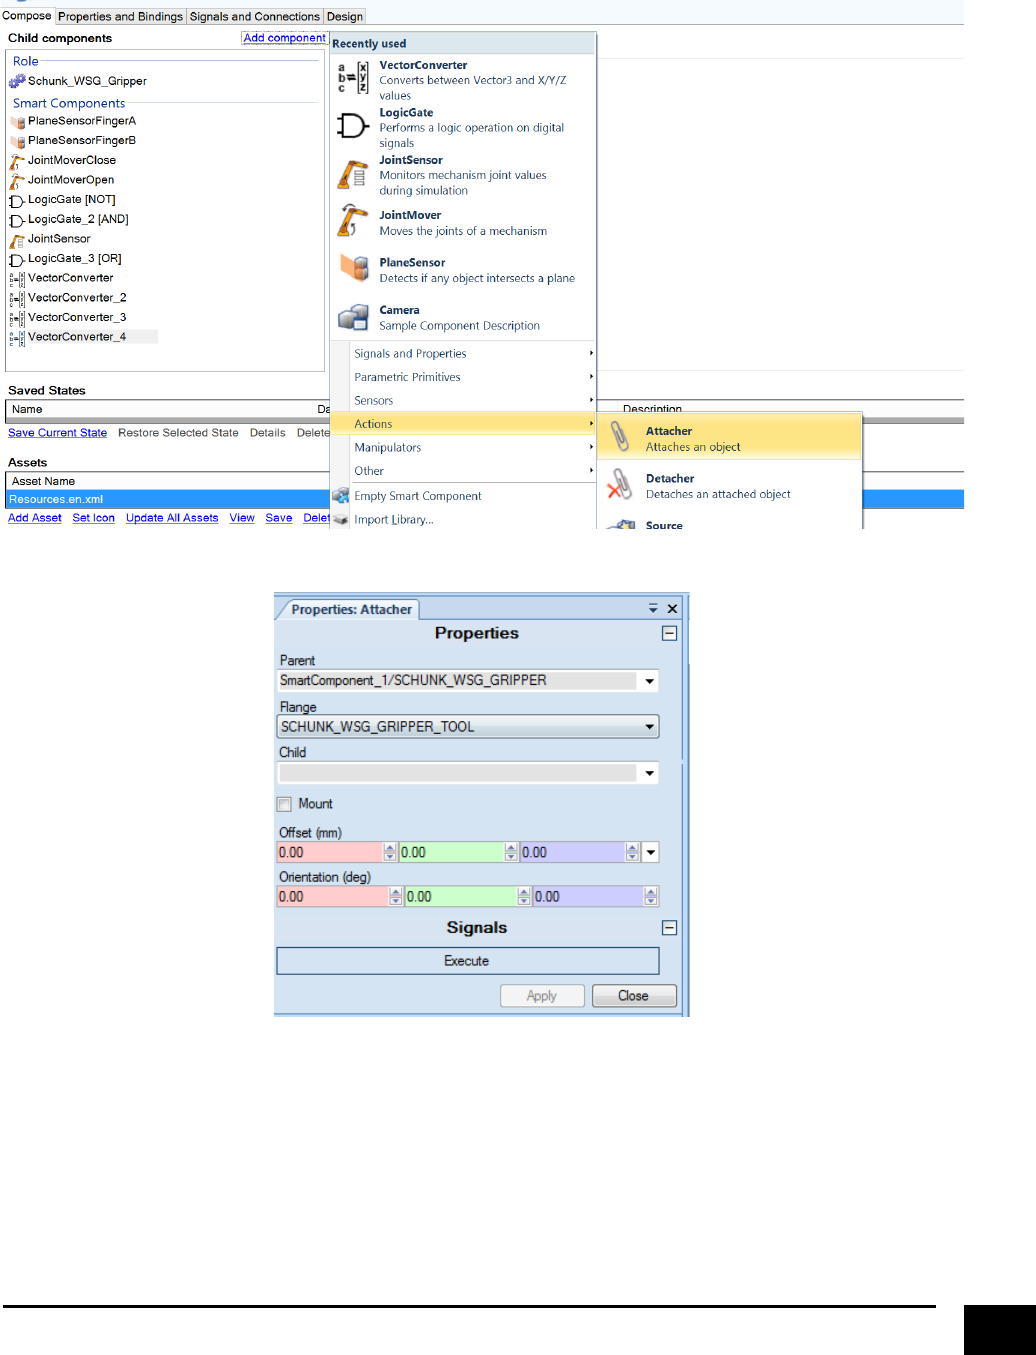
So!far!we!have!created!a!lot!of!logic,!all!with!the!purpose!of!facilitating!the!step…!making!an!object!
graspable!by!the!tool…!and!here!it!comes.!Create!an!“Attacher”!component!like!this.!
!
!
!
!
!
!
!
!
!
46!
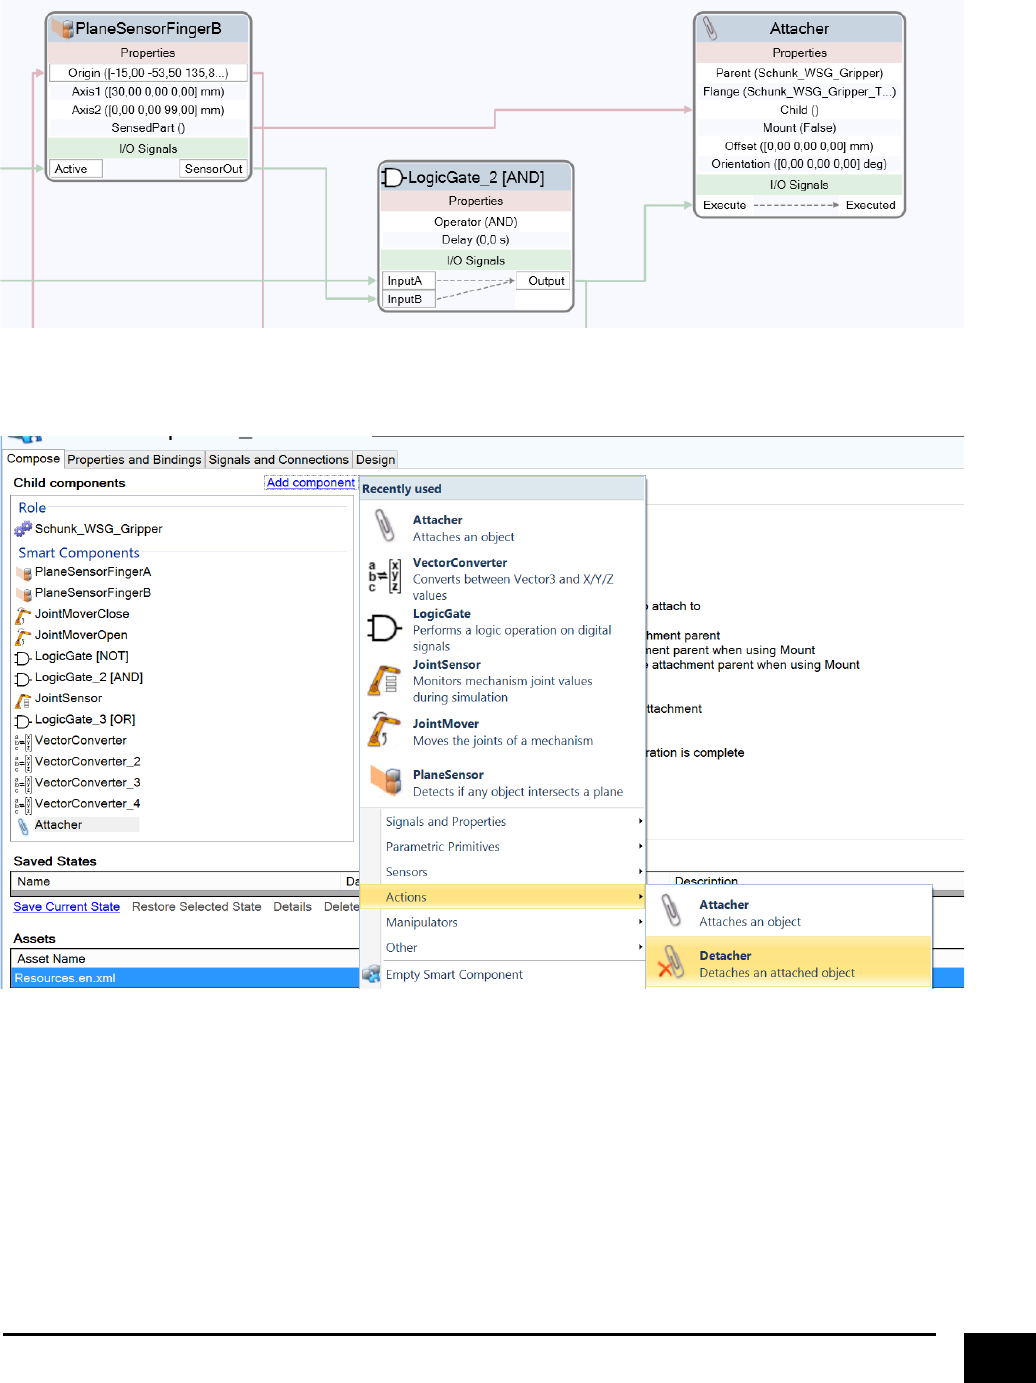
And!setup!the!logic!like!this!
!
!
Next,!create!a!“Detacher”!component!!
!
!
!
!
!
!
!
!
47!
And!set!it!up!like!this!
!
The!last!step!to!do!is!to!make!the!logic!for!indicating!that!a!grasp!action!has!finished.!Create!two!new!“OR”!
logic!gates!and!set!it!up!like!this.!!
!
!
!
! !
!
48!
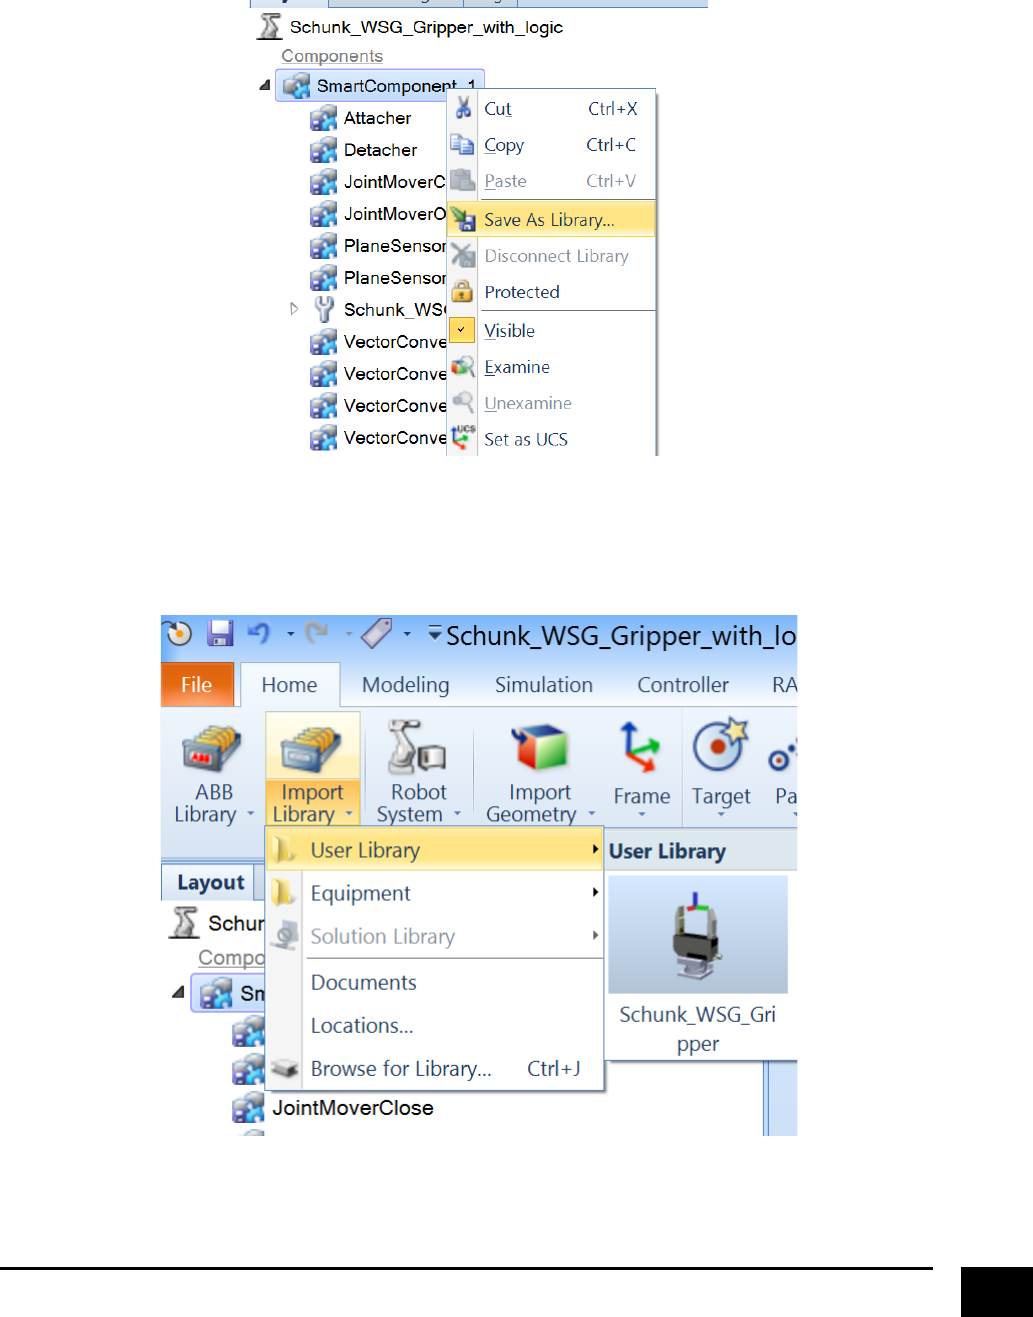
We!are!now!finally!done!with!our!smart!component,!remember!to!save!it!in!its!own!station!file.!In!general,!
if!you!want!to!make!your!created!tools!available!as!a!library!component!(so!it!can!be!used!in!other!
solutions)!just!right!click!on!the!component!save!it!as!library.!!
&
!
If!you!have!saved!it!in!the!path!where!RobotStudio!has!specified!the!location!of!a!user!library!(normally!
something!like!“C:\Users\{name!of!user}\Documents\RobotStudio\Libraries”),!then!it!should!appear!like!
this.!
&
&
!
49!
Creating&Virtual&Controller&I/O’s&to&control&gripper&
!We!are!almost!done!with!the!creation!of!our!tool!in!RobotStudio.!The!last!thing!we!need!to!is!to!learn!how!
to!setup!I/O’s!that!will!enable!us!to!activate/deactivate!the!gripper!directly!from!a!robot!program.!!
So!create!a!new!empty!station,!load!a!robot,!load!the!gripper!(smart!component),!create!a!new!robot!
system!(adding!a!controller).!
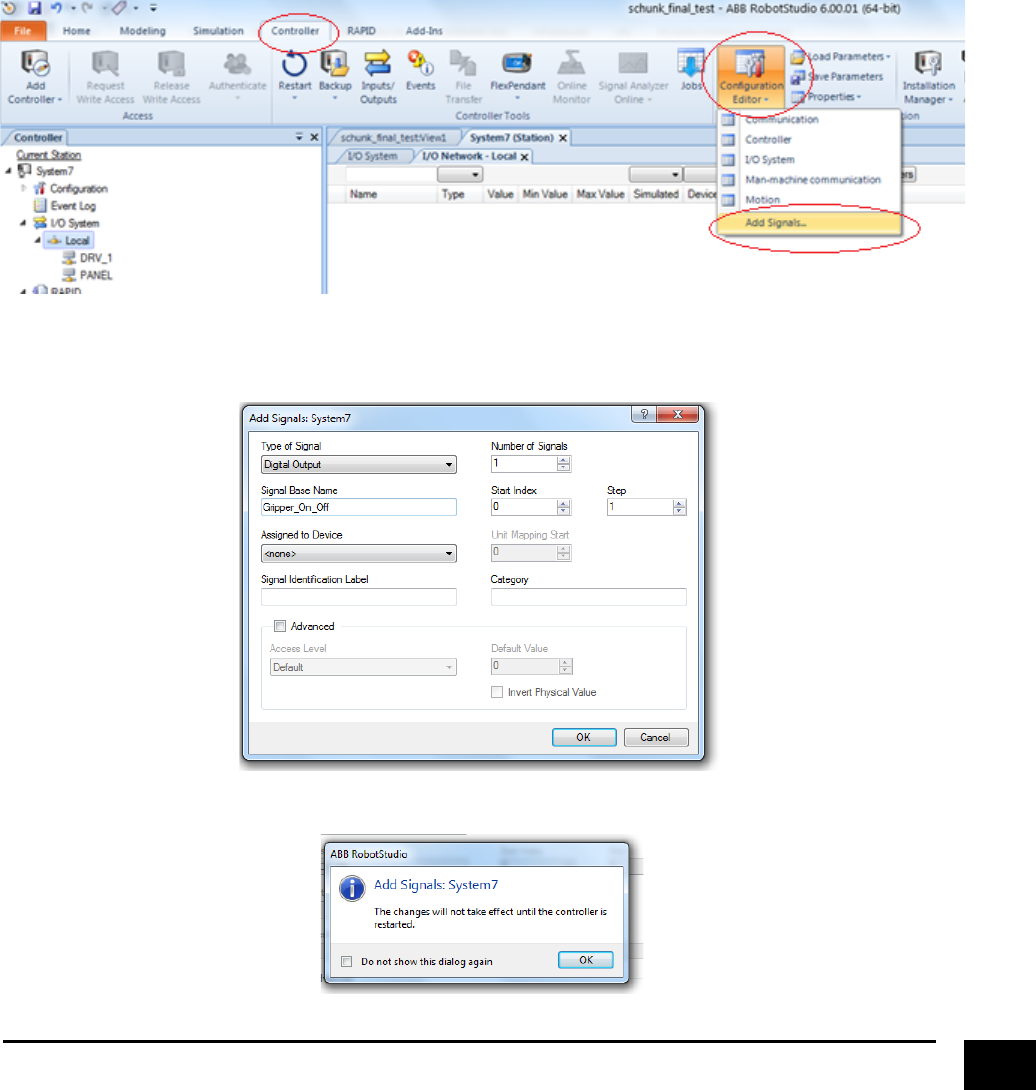
The!first!thing!we!need!to!do!after!we!have!added!a!controller!is!to!create!a!new!I/O!in!the!virtual!
controller,!and!is!done!by!going!to!“Controller”,!click!on!the!dropdown!of!“Configuration!Editor”!and!click!
“Add!Signals”.!
!
!
!
Make!a!digital!output!to!control!the!gripper.!
!
A!message!will!pop!up,!saying!that!you!need!to!restart!the!controller.!
!
!
50!
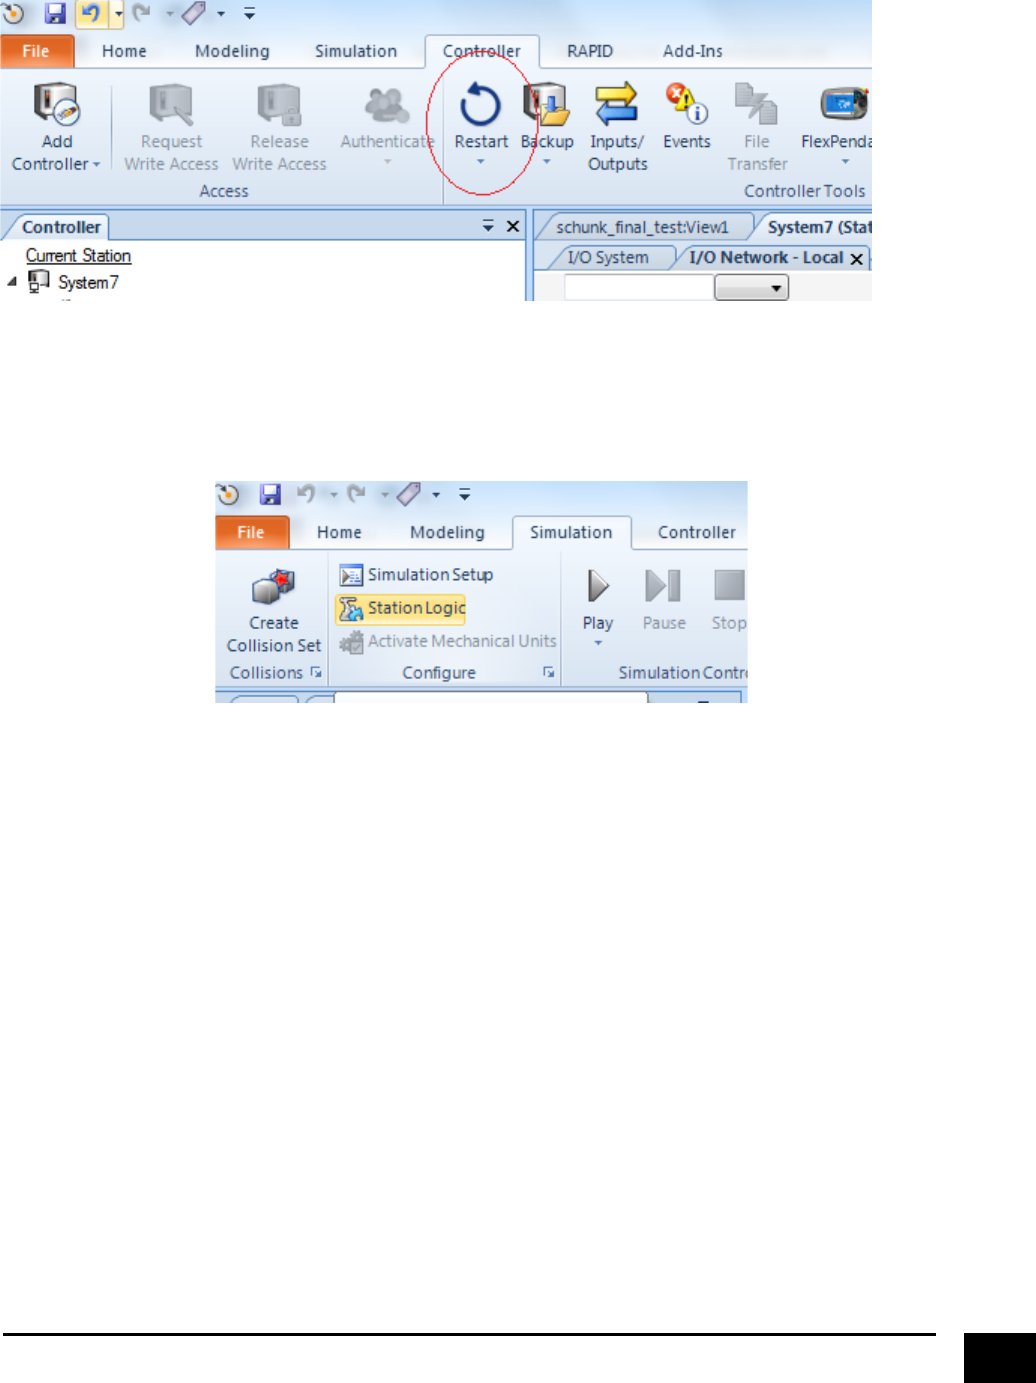
Click!“Restart”!
!
!
!
Next!go!to!“Simulation”!and!click!“Station!Logic”.!Here!we!can!configure!all!logic!that!we!want!to!include!in!
our!simulation!model.!
!
! !
!
51!
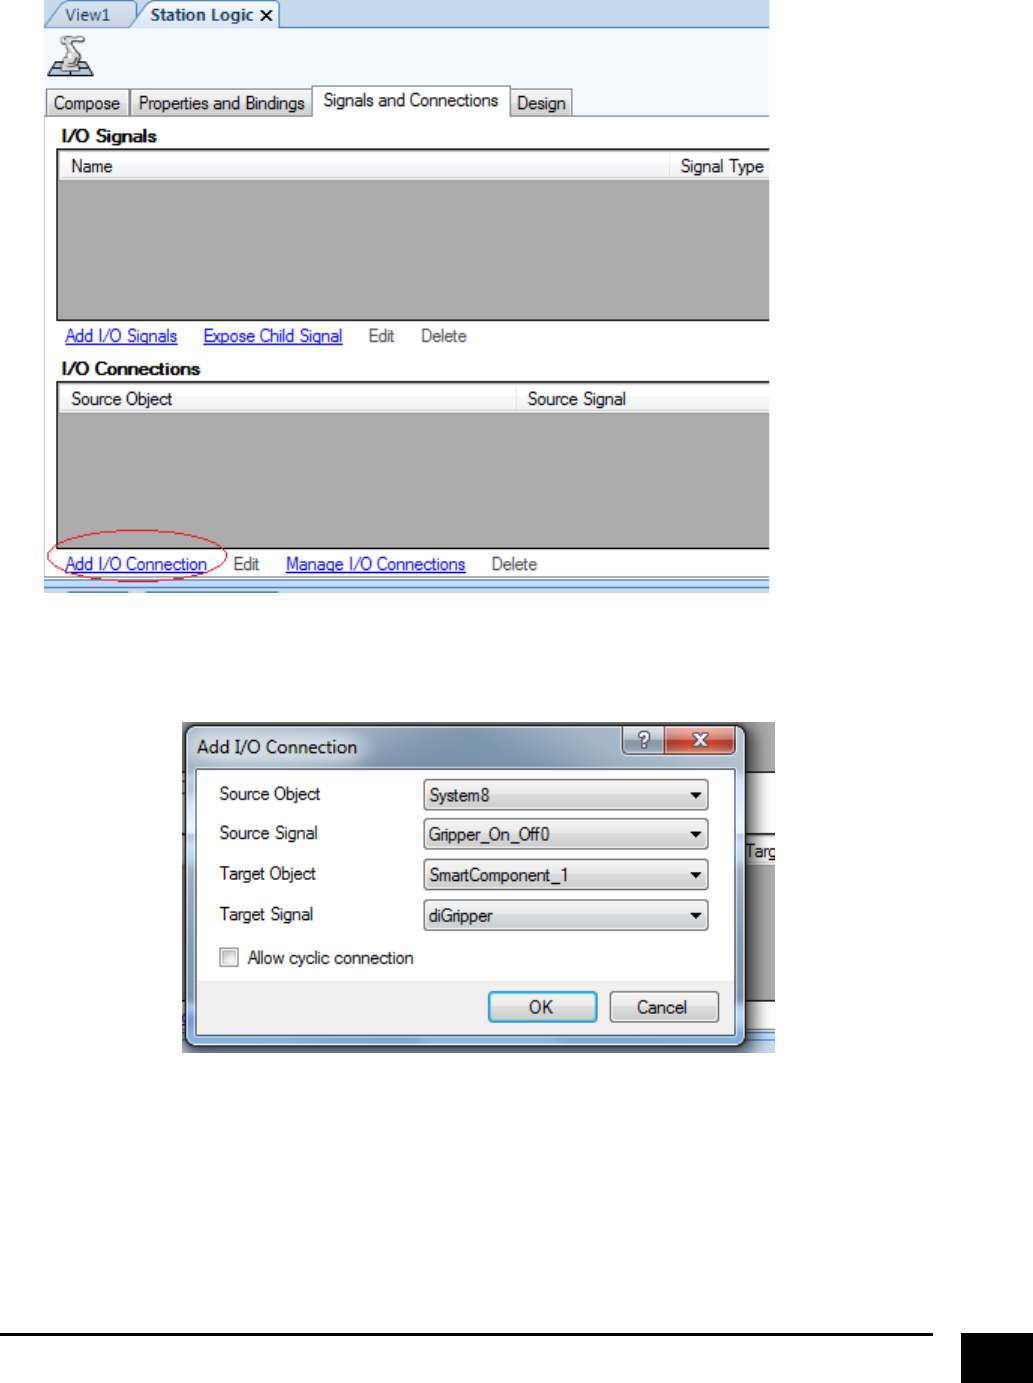
Go!to!“Signals!and!Connections”!and!click!“Add!I/O!Connection”!
!
!
Setup!a!connection!between!the!digital!output!that!we!made!in!the!virtual!controller!and!to!digital!input!of!
the!gripper.!
!
!
! !
!
52!
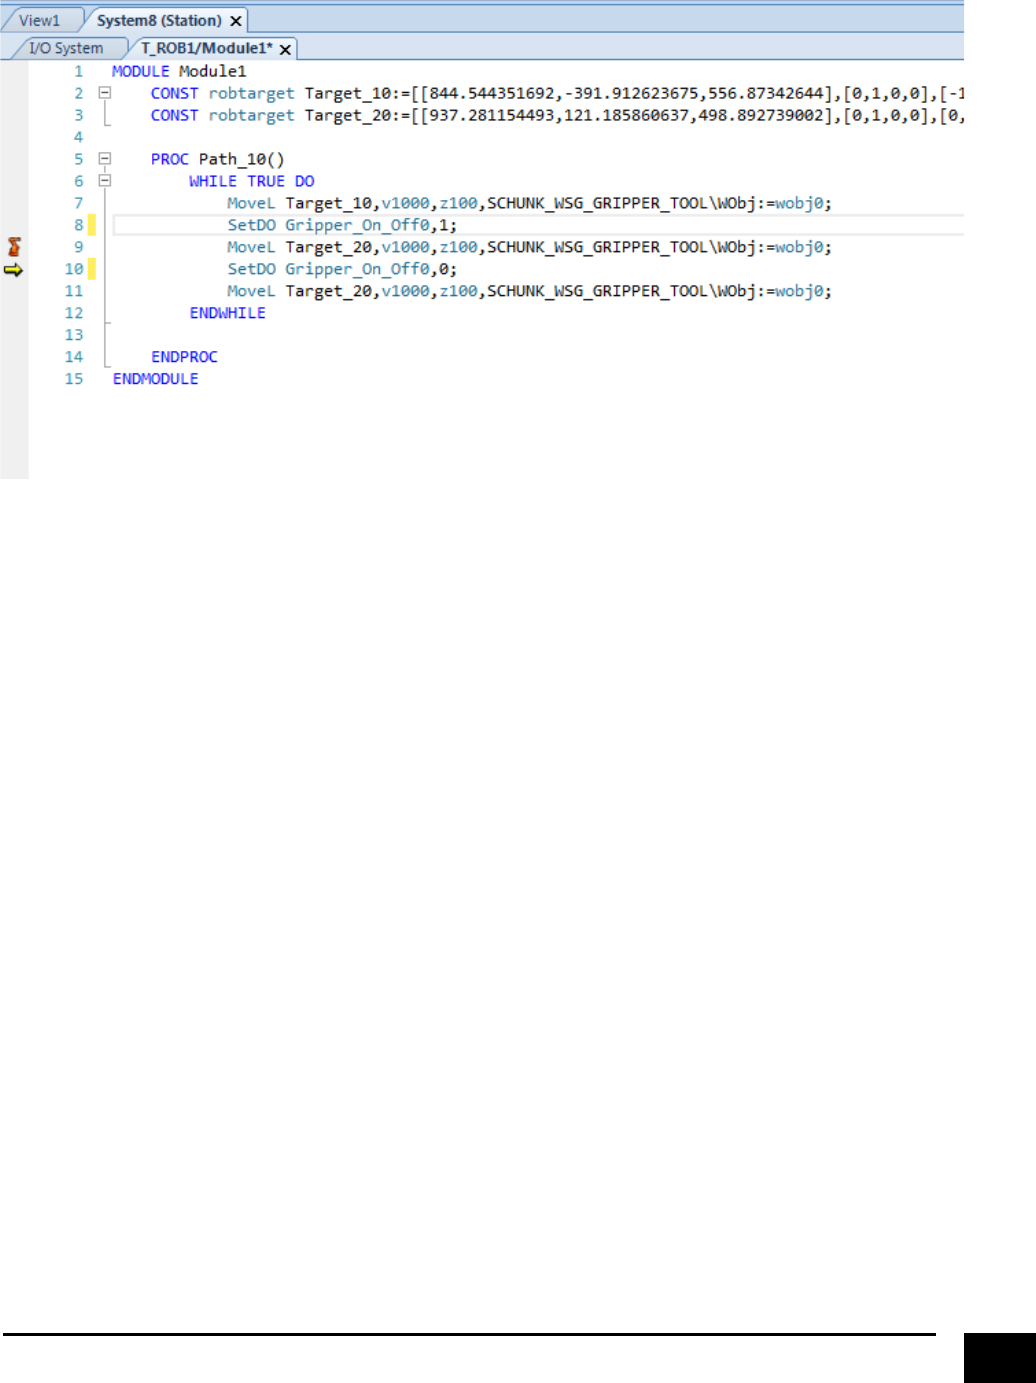
You!will!now!be!able!to!control!the!gripper!from!your!robot!program,!through!the!command!“SetDO”.!
!
!
!
!
!
fin!…!
