EMIS Dashboard Rwanda IECMS RNPPA User Manual
Rwanda_IECMS_RNPPA_UserManual
User Manual: Pdf
Open the PDF directly: View PDF ![]() .
.
Page Count: 126 [warning: Documents this large are best viewed by clicking the View PDF Link!]
- INTRODUCTION
- OVERVIEW
- GENERAL INFORMATION
- EXPERT REPORTS
- STATEMENTS / SUMMONS
- WARRANTS
- EXHIBITS
- INDICTMENT
- NOTES / ATTACHMENTS SECTION
- HISTORY SECTION
- EXPORTING FILES
- SAVING DATA
- REFERENCES
RWANDA NATIONAL PUBLIC
PROSECUTION AUTHORITY
Version 1.0
USER MANUAL
INTEGRATED CRIMINAL JUSTICE INFORMATION SYSTEM OF IRAQ | Personal Information | User Manual
RWANDA IECMS | Rwanda National Public Prosecution Authority | User Manual
TABLE OF CONTENTS
INTRODUCTION .................................................................................................................................................... 8
OVERVIEW ........................................................................................................................................................... 8
GENERAL INFORMATION .................................................................................................................................... 11
MANAGING CASE PARTICIPANTS ........................................................................................................................... 17
Adding a Case Participant Record ............................................................................................................. 17
Browsing among Case Participant Records ............................................................................................... 19
Creating a New Case Participant Record ................................................................................................... 19
Editing Case Participant Records ............................................................................................................... 19
Removing Case Participant Records .......................................................................................................... 20
MANAGING RELATIONSHIP RECORDS ..................................................................................................................... 20
Adding a Relationship Record ................................................................................................................... 20
Removing Relationship Records ................................................................................................................ 21
MANAGING COMMITTED CRIME RECORDS ............................................................................................................. 21
Adding a Committed Crime Record ........................................................................................................... 21
Browsing among Committed Crime Records ............................................................................................. 23
Removing Committed Crime Records ........................................................................................................ 23
MANAGING OFFENCE DATES AND PLACES .............................................................................................................. 23
Adding an Offence Date and Place Record ................................................................................................ 23
Editing Offence Date and Place Records ................................................................................................... 28
Removing Offence Date and Place Records ............................................................................................... 28
MANAGING CASE CLOSURE NOTES ....................................................................................................................... 28
Adding a Case Closure Note Record .......................................................................................................... 29
Editing Case Closure Note Records ............................................................................................................ 31
Viewing Case Closure Note Records .......................................................................................................... 32
Removing Case Closure Note Records ....................................................................................................... 32
MANAGING COURT SUBMISSIONS......................................................................................................................... 32
Adding a Court Submission Record............................................................................................................ 32
Editing Court Submission Records ............................................................................................................. 34
Removing Court Submission Records ........................................................................................................ 35
MANAGING FIRST APPEAL COURT SUBMISSIONS ..................................................................................................... 35
Adding a First Appeal Court Submission Record ........................................................................................ 35
Removing First Appeal Court Submission Record ...................................................................................... 36
MANAGING SUBMISSION PARTIES ......................................................................................................................... 36
Adding a Submission Party Record ............................................................................................................ 36
Removing Submission Party Records ......................................................................................................... 37
MANAGING RELATED TASKS ................................................................................................................................ 37
1

INTEGRATED CRIMINAL JUSTICE INFORMATION SYSTEM OF IRAQ | Personal Information | User Manual
RWANDA IECMS | Rwanda National Public Prosecution Authority | User Manual
Adding a Related Task Record ................................................................................................................... 37
Editing a Related Task Record ................................................................................................................... 38
EXPERT REPORTS ................................................................................................................................................ 39
MANAGING EXPERT REQUESTS / REPORTS ............................................................................................................. 40
Adding an Expert Request / Expert Report Record .................................................................................... 40
Editing Expert Request / Report Records ................................................................................................... 42
Viewing Expert Request / Expert Report Records ...................................................................................... 43
Removing Expert Request / Report Records .............................................................................................. 43
STATEMENTS / SUMMONS ................................................................................................................................. 44
MANAGING PRO-JUSTITIA STATEMENTS ................................................................................................................ 45
Adding a Pro-Justitia Statement Record .................................................................................................... 45
Editing Pro-Justitia Statement Records ..................................................................................................... 49
Viewing Pro-Justitia Statement Records .................................................................................................... 49
Removing Pro-Justitia Statement Records ................................................................................................ 49
MANAGING INTERVIEW QUESTIONS / RESPONSES ................................................................................................... 49
Adding a Question / Response Record....................................................................................................... 50
Editing Question / Response Records ........................................................................................................ 50
Removing Question / Response Records ................................................................................................... 51
MANAGING SUMMONS ...................................................................................................................................... 51
Adding a Summons Record ....................................................................................................................... 51
Editing Summons Records ......................................................................................................................... 53
Viewing Summons Records ....................................................................................................................... 53
Removing Summons Records .................................................................................................................... 54
MANAGING PROVISIONAL RELEASE STATEMENTS .................................................................................................... 54
Adding a Provisional Release Statement Record ....................................................................................... 54
Editing Provisional Release Statement Records ......................................................................................... 56
Viewing Provisional Release Statement Records ....................................................................................... 57
Removing Provisional Release Statement Records .................................................................................... 57
MANAGING SEIZURE STATEMENTS ........................................................................................................................ 57
Adding a Seizure Statement Record .......................................................................................................... 57
Editing Seizure Statement Records ............................................................................................................ 60
Viewing Seizure Statement Records .......................................................................................................... 60
Expanding Seizure Statement Records ...................................................................................................... 60
Removing Seizure Statement Records ....................................................................................................... 60
MANAGING SEIZED ITEMS ................................................................................................................................... 60
Adding a Seized Item Record ..................................................................................................................... 61
Removing a Seized Item Record ................................................................................................................ 61
WARRANTS......................................................................................................................................................... 62
2

INTEGRATED CRIMINAL JUSTICE INFORMATION SYSTEM OF IRAQ | Personal Information | User Manual
RWANDA IECMS | Rwanda National Public Prosecution Authority | User Manual
MANAGING WARRANTS TO APPEAR ...................................................................................................................... 64
Adding a Warrant to Appear Record ......................................................................................................... 64
Editing Warrant to Appear Records .......................................................................................................... 66
Viewing Warrant to Appear Records ......................................................................................................... 67
Removing Warrant to Appear Records ...................................................................................................... 67
MANAGING WARRANTS TO BRING BY FORCE .......................................................................................................... 67
Adding a Warrant to Bring by Force Record .............................................................................................. 67
Editing Warrant to Bring by Force Records ............................................................................................... 69
Viewing Warrant to Bring by Force Records.............................................................................................. 69
Removing Warrant to Bring by Force Records .......................................................................................... 69
MANAGING ARREST WARRANTS ........................................................................................................................... 70
Adding an Arrest Warrant Record ............................................................................................................. 70
Editing Arrest Warrant Records ................................................................................................................ 73
Viewing Arrest Warrant Records ............................................................................................................... 73
Removing Arrest Warrant Records ............................................................................................................ 73
MANAGING SEARCH WARRANTS .......................................................................................................................... 74
Adding a Search Warrant Record .............................................................................................................. 75
Editing Search Warrant Records ............................................................................................................... 77
Viewing Search Warrant Records .............................................................................................................. 78
Removing Search Warrant Records ........................................................................................................... 78
MANAGING INTERNATIONAL ARREST WARRANTS .................................................................................................... 78
Adding an International Arrest Warrant Record ....................................................................................... 78
Editing International Arrest Warrant Records ........................................................................................... 83
Viewing International Arrest Warrant Records ......................................................................................... 84
Removing International Arrest Warrant Records ...................................................................................... 84
MANAGING EXTRACTION WARRANTS .................................................................................................................... 84
Adding an Extraction Warrant Record ...................................................................................................... 84
Editing Extraction Warrant Records .......................................................................................................... 87
Viewing Extraction Warrant Records ........................................................................................................ 88
Removing Extraction Warrant Records ..................................................................................................... 88
EXHIBITS ............................................................................................................................................................. 89
MANAGING EXHIBIT RECOVERY RECORDS .............................................................................................................. 90
Adding an Exhibit Recovery Record ........................................................................................................... 90
Editing Exhibit Recovery Records............................................................................................................... 93
Viewing Exhibit Recovery Records ............................................................................................................. 93
Expanding Exhibit Recovery Records ......................................................................................................... 94
Removing Exhibit Recovery Records .......................................................................................................... 94
MANAGING EXHIBIT ITEMS .................................................................................................................................. 94
Adding an Exhibit Item Record .................................................................................................................. 94
Removing Exhibit Item Records ................................................................................................................. 96
3

INTEGRATED CRIMINAL JUSTICE INFORMATION SYSTEM OF IRAQ | Personal Information | User Manual
RWANDA IECMS | Rwanda National Public Prosecution Authority | User Manual
MANAGING DIAGRAMS ....................................................................................................................................... 96
Adding a Diagram Record ......................................................................................................................... 96
Editing Diagram Records ........................................................................................................................... 99
Viewing Diagram Records ......................................................................................................................... 99
Removing Diagram Records .................................................................................................................... 100
MANAGING SEIZED ITEMS REGISTER ................................................................................................................... 100
Adding a Seized Item Register Record ..................................................................................................... 100
Editing Seized Items Register Records ..................................................................................................... 101
Viewing Seized Items Register Records ................................................................................................... 102
Removing Seized Items Register Records ................................................................................................ 102
MANAGING HANDING OVER STATEMENTS ............................................................................................................ 102
Adding a Handing over Statement Record .............................................................................................. 102
Editing Handing over Statement Records ................................................................................................ 104
Viewing Handing over Statement Records .............................................................................................. 104
Removing Handing over Statement Records ........................................................................................... 104
MANAGING WITNESSES .................................................................................................................................... 105
Adding a Witness Record ........................................................................................................................ 106
Removing Witness Records ..................................................................................................................... 106
INDICTMENT .................................................................................................................................................... 107
MANAGING DEFENDANTS ................................................................................................................................. 109
Adding a Defendant Record .................................................................................................................... 109
Editing Defendant Records ...................................................................................................................... 110
Removing Defendant Records ................................................................................................................. 110
NOTES / ATTACHMENTS SECTION .................................................................................................................... 111
MANAGING COMMENTS / ISSUES ....................................................................................................................... 112
Adding a Comment / Issue Record .......................................................................................................... 112
Editing Comment / Issue Records ............................................................................................................ 113
Expanding Comment / Issue Records ...................................................................................................... 114
Removing Comment / Issue Records ....................................................................................................... 114
MANAGING RELATED USERS .............................................................................................................................. 114
Adding a Related User Record ................................................................................................................. 114
Browsing among Related User Records .................................................................................................. 115
Removing Related User Records .............................................................................................................. 115
MANAGING COMMENT DETAILS ......................................................................................................................... 116
Adding a Comment Details Record .......................................................................................................... 116
Editing Comment Details Records ........................................................................................................... 117
Removing Comment Details Records ...................................................................................................... 117
MANAGING ATTACHMENTS ............................................................................................................................... 117
Adding an Attachment ............................................................................................................................ 118
4

INTEGRATED CRIMINAL JUSTICE INFORMATION SYSTEM OF IRAQ | Personal Information | User Manual
RWANDA IECMS | Rwanda National Public Prosecution Authority | User Manual
Viewing Attachments .............................................................................................................................. 119
Editing Attachments ................................................................................................................................ 119
Removing Attachments ........................................................................................................................... 119
HISTORY SECTION ............................................................................................................................................. 120
COMPARING RNPPA FORM VERSIONS ................................................................................................................ 121
BROWSING AMONG HISTORY RECORDS ............................................................................................................... 122
EXPORTING FILES ............................................................................................................................................. 124
SAVING DATA ................................................................................................................................................... 125
REFERENCES ..................................................................................................................................................... 125
5

INTEGRATED CRIMINAL JUSTICE INFORMATION SYSTEM OF IRAQ | Personal Information | User Manual
RWANDA IECMS | Rwanda National Public Prosecution Authority | User Manual
TABLE OF FIGURES
FIGURE 1: GENERAL INFORMATION SECTION (PART 1) ..................................................................................... 15
FIGURE 2: GENERAL INFORMATION SECTION (PART 2) ..................................................................................... 16
FIGURE 3: CALENDAR ......................................................................................................................................... 17
FIGURE 4: ADDING A CASE PARTICIPANT RECORD ............................................................................................ 18
FIGURE 5: ADDING A RELATIONSHIP RECORD ................................................................................................... 20
FIGURE 6: ADDING A COMMITTED CRIME RECORD .......................................................................................... 22
FIGURE 7: ADDING A DOMESTIC ADDRESS FOR THE OFFENCE ......................................................................... 26
FIGURE 8: ADDING A FOREIGN ADDRESS FOR THE OFFENCE ............................................................................ 28
FIGURE 9: ADDING A CASE CLOSURE NOTE RECORD ......................................................................................... 31
FIGURE 10: ADDING A COURT SUBMISSION RECORD ........................................................................................ 34
FIGURE 11: ADDING A COURT CASE RECORD .................................................................................................... 36
FIGURE 12: ADDING A COURT SUBMISSION PARTY RECORD ............................................................................. 37
FIGURE 13: EXPERT REPORTS SECTION .............................................................................................................. 39
FIGURE 14: ADDING AN EXPERT REQUEST / REPORT RECORD .......................................................................... 42
FIGURE 15: STATEMENTS / SUMMONS SECTION .............................................................................................. 44
FIGURE 16: ADDING A PRO-JUSTITIA STATEMENT RECORD .............................................................................. 46
FIGURE 17: ADDING A QUESTION / RESPONSE RECORD ................................................................................... 50
FIGURE 18: ADDING A SUMMONS RECORD ...................................................................................................... 53
FIGURE 19: ADDING A PROVISIONAL RELEASE STATEMENT RECORD ................................................................ 56
FIGURE 20: ADDING A SEIZURE STATEMENT RECORD ....................................................................................... 59
FIGURE 21: ADDING A SEIZED ITEM RECORD .................................................................................................... 61
FIGURE 22: WARRANTS SECTION ....................................................................................................................... 62
FIGURE 23: ADDING A WARRANT TO APPEAR RECORD ..................................................................................... 66
FIGURE 24: ADDING A WARRANT TO BRING BY FORCE RECORD ....................................................................... 70
FIGURE 25: ADDING AN ARREST WARRANT RECORD ........................................................................................ 74
FIGURE 26: ADDING A SEARCH WARRANT RECORD .......................................................................................... 77
FIGURE 27: ADDING AN INTERNATIONAL ARREST WARRANT RECORD FOR ORDINARY CASES ......................... 81
FIGURE 28: ADDING AN INTERNATIONAL ARREST WARRANT RECORD FOR GENOCIDE CASES ......................... 83
FIGURE 29: ADDING AN EXTRACTION WARRANT RECORD ................................................................................ 87
FIGURE 30: EXHIBITS SECTION ........................................................................................................................... 89
FIGURE 31: ADDING AN EXHIBIT RECOVERY RECORD ........................................................................................ 91
FIGURE 32: ADDING AN EXHIBIT ITEM RECORD ................................................................................................ 96
FIGURE 33: ADDING A DIAGRAM RECORD ......................................................................................................... 97
FIGURE 34: ADDING A SEIZED ITEM REGISTER RECORD .................................................................................. 101
FIGURE 35: ADDING A HANDING OVER STATEMENT RECORD ........................................................................ 105
FIGURE 36: ADDING A WITNESS RECORD ........................................................................................................ 106
FIGURE 37: INDICTMENT SECTION (PART 1) .................................................................................................... 107
6

INTEGRATED CRIMINAL JUSTICE INFORMATION SYSTEM OF IRAQ | Personal Information | User Manual
RWANDA IECMS | Rwanda National Public Prosecution Authority | User Manual
FIGURE 38: INDICTMENT SECTION (PART 2) .................................................................................................... 108
FIGURE 39: ADDING A DEFENDANT RECORD ................................................................................................... 110
FIGURE 40: NOTES / ATTACHMENTS SECTION ................................................................................................ 111
FIGURE 41: ADDING A COMMENT / ISSUE RECORD ........................................................................................ 113
FIGURE 42: ADDING A RELATED USER RECORD ............................................................................................... 116
FIGURE 43: ADDING A COMMENT DETAILS RECORD ....................................................................................... 117
FIGURE 44: UPLOADING A FILE ........................................................................................................................ 118
FIGURE 45: HISTORY SECTION ......................................................................................................................... 120
FIGURE 46: COMPARING TASK FORM VERSIONS ............................................................................................. 122
FIGURE 47: BROWSING AMONG HISTORY RECORDS ....................................................................................... 123
FIGURE 48: SPECIFYING FILE EXPORT DETAILS ................................................................................................. 124
7

INTEGRATED CRIMINAL JUSTICE INFORMATION SYSTEM OF IRAQ | Personal Information | User Manual
RWANDA IECMS | Rwanda National Public Prosecution Authority | User Manual
INTRODUCTION
This document describes the Rwanda National Public Prosecution Authority data entry form in the
Rwanda Integrated Electronic Case Management System (Rwanda IECMS) application developed for
the Justice, Reconciliation, Law and Order Sector (JRLOS) of Rwanda. It provides the necessary
instructions that the user should follow during the data entry process. The document is addressed to
those who will use the Rwanda IECMS application to record information on case proceedings at the
prosecution offices and bureaus.
OVERVIEW
The Integrated Electronic Case Management System for Rwanda (Rwanda IECMS) is an automated
information management system, which is designed within the initiative of modernizing Rwanda’s
Justice, Reconciliation, Law and Order Sector (JRLOS). It is intended to ensure improved access to and
transparency of justice information both for the government institutions and general public.
Moreover, the system aims at facilitating information sharing at key decision points, as well as to
improve efficiency and coordination of the police, prosecution, and court activities in the Republic of
Rwanda. Furthermore, it is intended to replace the paper-based case records and static spreadsheets
and workflows with their computerized counterparts in order to enable full reproduction of cases
along with case proceeding information in the event of loss or physical damage of the case file.
The main objective of Rwanda IECMS is to serve as a centralized and unique database for all justice
sector institutions, including the Rwanda National Police (RNP), National Public Prosecution Authority
(NPPA), Rwanda Judiciary (RJ), and Rwanda Correctional Services (RCS). Also, it is a sector-wide
platform to assist all the officials accessing the system to have an easy and ad-hoc access to the
information required for processing the cases and implementing day-to-day operations. Rwanda
IECMS is intended to help to standardize case record information storage and to streamline current
processes, and, thus, ensure more effective follow-up at different levels. It is also the main database
and data collection and reporting system as it guarantees effective access to the case data, promotes
accountability, and increases public trust and confidence.
Rwanda IECMS consists of the following applications, each dedicated to one justice agency and used
to handle their business processes:
• Rwanda National Police
8

INTEGRATED CRIMINAL JUSTICE INFORMATION SYSTEM OF IRAQ | Personal Information | User Manual
RWANDA IECMS | Rwanda National Public Prosecution Authority | User Manual
• Rwanda National Public Prosecution Authority
• Rwanda Judiciary
• Rwanda Correctional Service
• Civil Litigation Service
The Rwanda National Public Prosecution Authority module within Rwanda IECMS is designed to
extend its functionality to all NPPA institutions at different organizational levels, including the NPPA
Headquarters with all its units and Decentralized NPPA offices (both intermediate and primary). It is
intended to serve as a tool for all users at all organizational structure levels to handle the prosecution
cases, i.e. cases that are brought against persons by legal authorities (along with their information).
In the current design, the Rwanda National Public Prosecution Authority form consists of the following
sections:
• The
General Information
section is used to add and display general information about the
prosecution case. The information to be provided in this section includes the date when the
case was received and filed, reporting prosecution office, name of the chief prosecutor, parties
involved into the case, their legal representatives, crimes committed, etc.
• The
Expert Reports
section is used to store expert reports that contain testimonies of the
investigation team members and subject-matter experts involved into the case investigation.
The information to be provided in this section includes the request date, expert name, expert
job title, name of the requestor, attached expert reports, signed copies of the expert reports,
etc.
• The
Statements / Summons
section is used to display information on the prosecution
statements, such as pro-Justitia statements and summons to appear, that form an inseparable
part of a prosecution record. The information to be provided in this section includes statement
/ summons details and other related information.
• The
Warrants
section is used to provide key information about the authorization documents
of different types – warrants - that empower their bearers to perform a certain act against
another person or entity. The information to be provided in this section includes the warrant
type, issue date, party it is related to, prosecutor, etc.
9
INTEGRATED CRIMINAL JUSTICE INFORMATION SYSTEM OF IRAQ | Personal Information | User Manual
RWANDA IECMS | Rwanda National Public Prosecution Authority | User Manual
• The
Exhibits
section is used for storing and displaying information about physical or
documentary evidence collected by the police during case processing. Examples of exhibit
items may include a weapon allegedly used in the crime in criminal cases or a written contract
in a civil trial. The information on evidence recovery, seized items, as well as handing over
statements is handled in this section as well.
• The
Indictment
section is used to add and display information about the formal accusations
that a person has committed a crime and initiating a prosecutable case. The information to be
provided in this section includes the information on the person who has been officially charged
with committing a crime, case related facts and acts, moral, material, and legal elements of
the offence, the opinion of the prosecution in charge of the case, etc.
• The
Notes / Attachments
section is used to record additional comments and issues related to
the given police case, as well as attach supporting documents and other files. The case
workflow details are also presented in this section.
• The
History
section of is used to view information on access to given case record and the
changes made to it.
The Rwanda IECMS application provides a web-based user interface and requires having a web
browser pre-installed.
10
INTEGRATED CRIMINAL JUSTICE INFORMATION SYSTEM OF IRAQ | Personal Information | User Manual
RWANDA IECMS | Rwanda National Public Prosecution Authority | User Manual
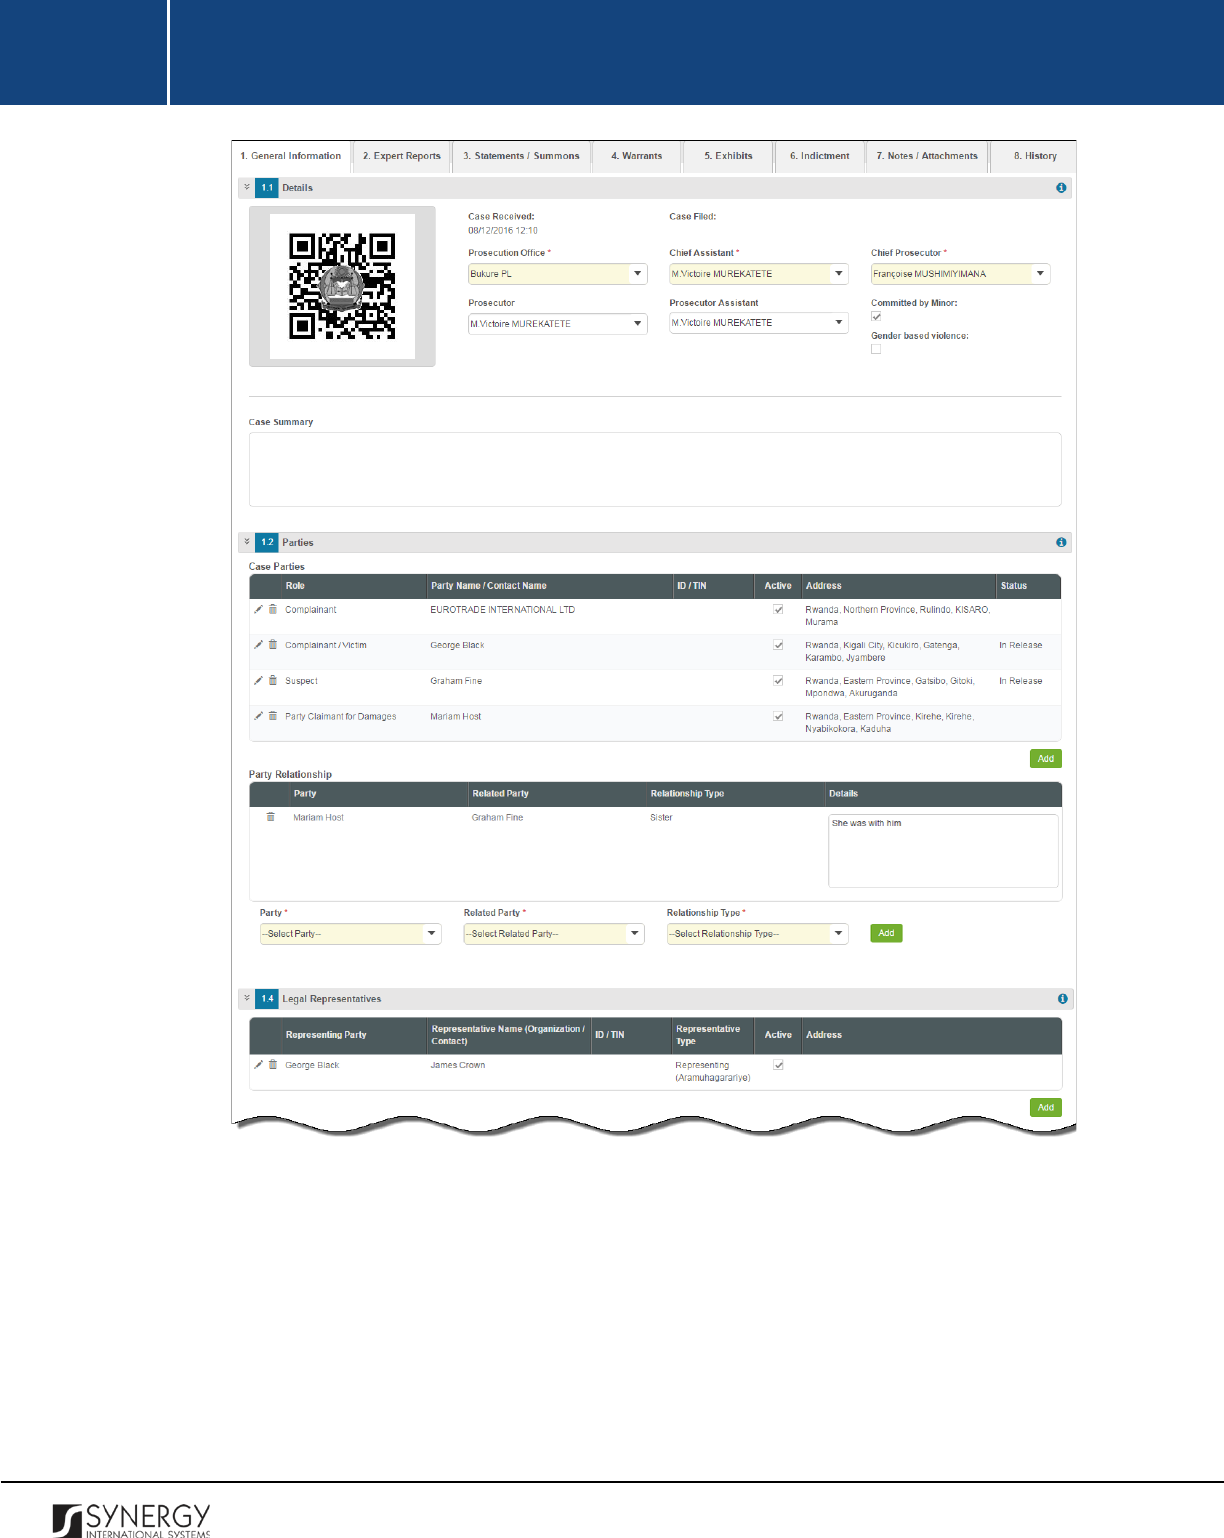
GENERAL INFORMATION
The General Information section of the Rwanda National Public Prosecution Authority form (Figure 1
and Figure 2) is used to add and display general information about the prosecution case. The
information to be provided in this section includes the date when the case was received and filed,
reporting prosecution office, name of the chief prosecutor, parties involved into the case, their legal
representatives, crimes committed, etc.
For more details on what information is requested in the General Information section, refer to the
table below.
Note:
Some fields in this section are mandatory to be filled in. They are marked with an asterisk.
Field Name
Description
Details
Provide the information requested in this field by indicating the
following:
•
QR Code
– displays an automatically generated unique Quick
Response barcode that is produced based on the IECMS
police case ID. When read by an imaging device, it displays the
summary of the police case it is attached to.
•
Case Received
– the information is this field is automatically
generated by the system and shows the date and time when
the case was received for prosecution.
•
Case Filed
–
the information is this field is automatically
generated by the system and shows the date and time when
the case was recorded for court proceedings.
•
Prosecution Office
– indicate
the prosecution office that
handles the case. This field is mandatory. Please, note that if
the list of prosecution offices is long and hard to browse in,
you can make use of the search option. To locate the instance
that you are looking for, you should enter the keyword in the
search box above the drop-down list.
11
INTEGRATED CRIMINAL JUSTICE INFORMATION SYSTEM OF IRAQ | Personal Information | User Manual
RWANDA IECMS | Rwanda National Public Prosecution Authority | User Manual
Note: Selection of a prosecution office will filter the lists in the
Chief Assistant, Chief Prosecutor, Prosecutor, and Prosecutor
Assistant
fields and display only those instances that are
related to the selection.
•
Chief Assistant
– specify the name of the chief assistant
responsible for the prosecution case. This field is mandatory.
Please, note that if the list of chief assistants is long and hard
to browse in, you can make use of the search option. To locate
the instance that you are looking for, you should enter the
keyword in the search box above the drop-down list.
•
Chief Prosecutor –
specify
the name of the chief prosecutor
handling the prosecution case. This field is mandatory. Please,
note that i
f the list of chief prosecutors is long and hard to
browse in, you can make use of the search option. To locate
the instance that you are looking for, you should enter the
keyword in the search box above the drop-down list.
•
Prosecutor
– specify
the name of the prosecutor who
investigates the case. Please, note that if the
list of
prosecutors is long and hard to browse in, you can make use
of the search option. To locate the instance that you are
looking for, you should enter the keyword in the search box
above the drop-down list.
•
Prosecutor Assistant
– indicate the name of
the prosecutor
assistant responsible for the investigation in the case. Please,
note that i
f the list of prosecutor assistants is long and hard
to browse in, you can make use of the search option. To locate
the instance that you are looking for, you shoul
d enter the
keyword in the search box above the drop-down list.
•
Committed by Minor
– select this checkbox if the criminal act
is suspected to be committed by a minor.
•
Gender based violence
– select this checkbox if the criminal
act is a gender-based violence case.
•
Case Summary
–
enter a short overview of the prosecution
case in the form of free text.
12
INTEGRATED CRIMINAL JUSTICE INFORMATION SYSTEM OF IRAQ | Personal Information | User Manual
RWANDA IECMS | Rwanda National Public Prosecution Authority | User Manual
Parties
Provide information about the parties involved in the prosecution
case in different capacities. For more details, see Managing Case
Participants. Moreover, you are requested to identify
what the
relationship between the case participants is. For more details, see
Managing Relationship Records.
Legal Representatives
Provide information about the legal representatives of the parties
involved in the prosecution case. For more details, see Managing
Case Participants.
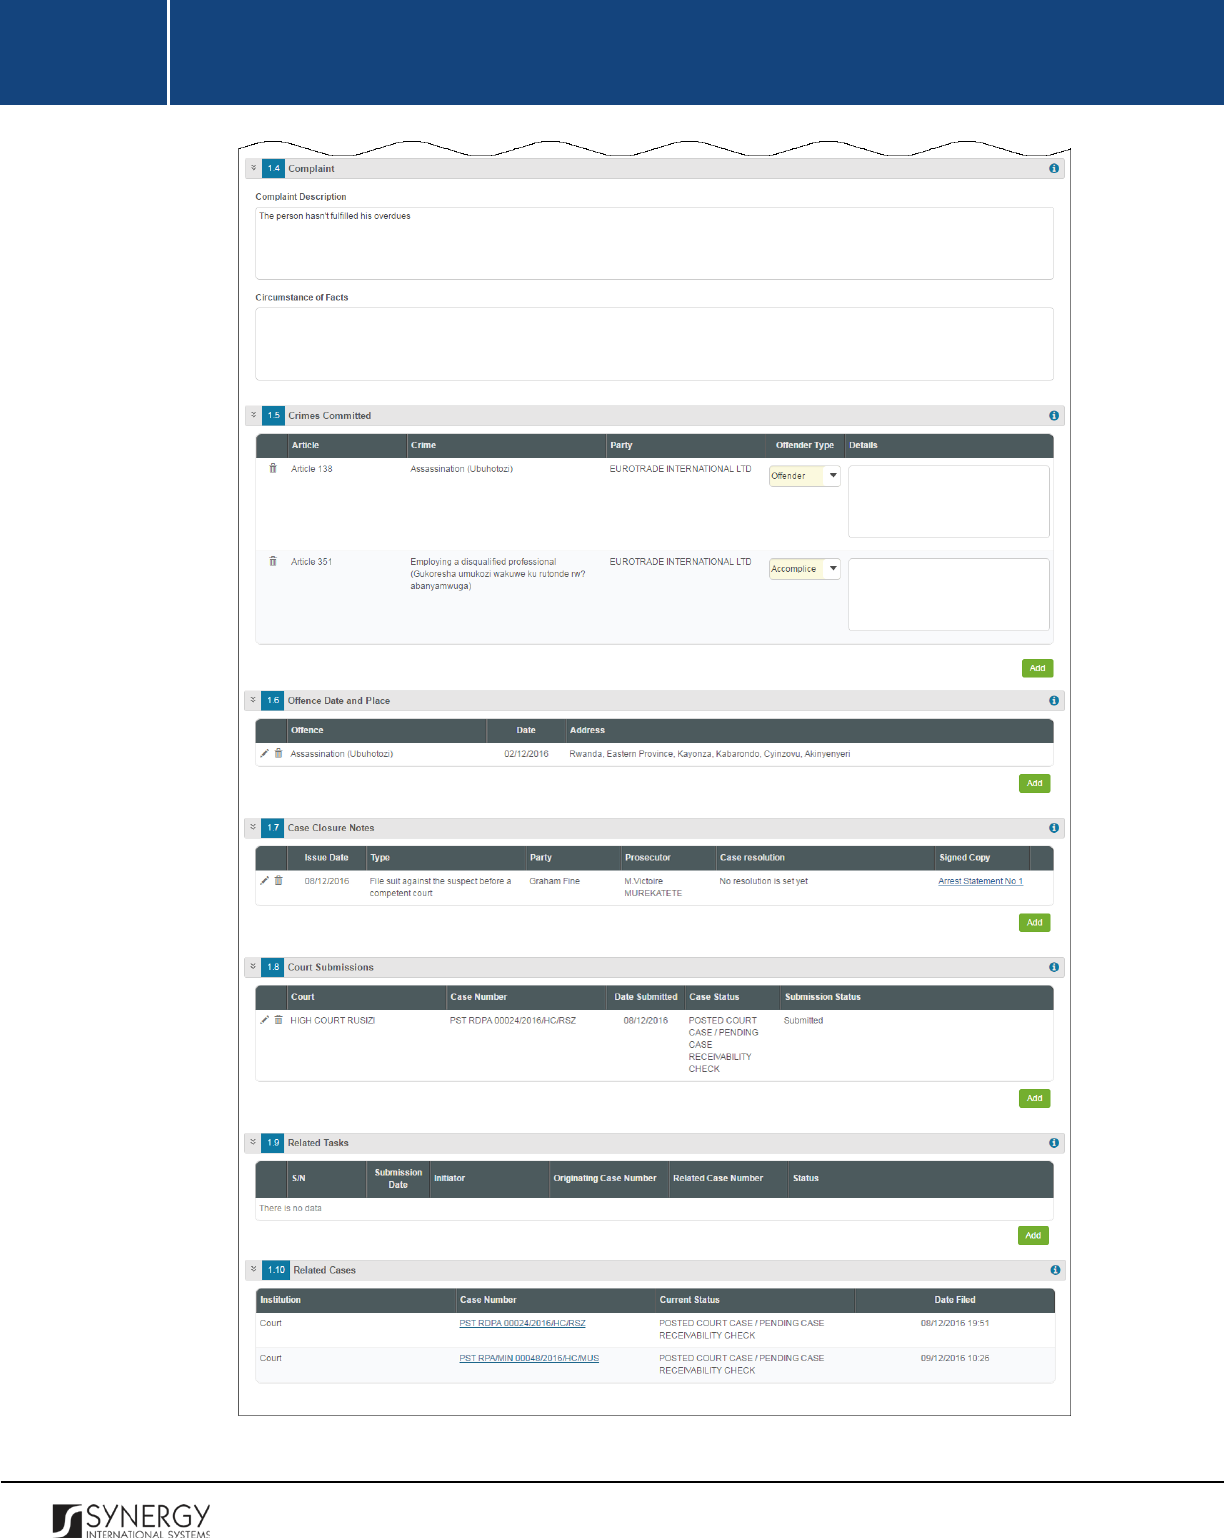
Complaint
Provide a detailed description of the complaint and list the accessory
facts that closely precede or follow it, that depend on it, or that
support or qualify it.
Crimes Committed
List all acts that are encompassed by the case and that are contrary
to the law or legal code. For more details, see Managing Committed
Crime Records.
Offence Date and Place
Provide information about the date when the offence took place, as
well as indicate the place where it occurred. For more details, see
Managing Offence Dates and Places.
Case Closure Notes
List all closure notes related to the prosecution case. For more
details, see Managing Case Closure Notes.
Court Submissions
List all court submission instances that are related to the given
prosecution case. For more details, see
Managing Court
Submissions.
Note:
You may su
bmit court submission records by clicking the
respective
Submit
button in the Court Submissions table. The status
of the respective record will be displayed in the Submission Status
column of the table.
Related Tasks
Record all the tasks that have been originated within the scope of
the given and other related cases. For more details, see Managing
Related Tasks.
13
INTEGRATED CRIMINAL JUSTICE INFORMATION SYSTEM OF IRAQ | Personal Information | User Manual
RWANDA IECMS | Rwanda National Public Prosecution Authority | User Manual
Note: The functionality of recording case related tasks becomes
available upon the first save of the Rwanda National Public
Prosecution Authority form.
Related Cases
This is an automatically generated field that displays information on
other cases (e.g. police, judicial, etc.) related to the given case. The
information displayed in this field for each case includes the case
number, institution, current status, and date.
14
INTEGRATED CRIMINAL JUSTICE INFORMATION SYSTEM OF IRAQ | Personal Information | User Manual
RWANDA IECMS | Rwanda National Public Prosecution Authority | User Manual
Figure 1: General Information Section (Part 1)
15
INTEGRATED CRIMINAL JUSTICE INFORMATION SYSTEM OF IRAQ | Personal Information | User Manual
RWANDA IECMS | Rwanda National Public Prosecution Authority | User Manual
Figure 2: General Information Section (Part 2)
16
INTEGRATED CRIMINAL JUSTICE INFORMATION SYSTEM OF IRAQ | Personal Information | User Manual
RWANDA IECMS | Rwanda National Public Prosecution Authority | User Manual
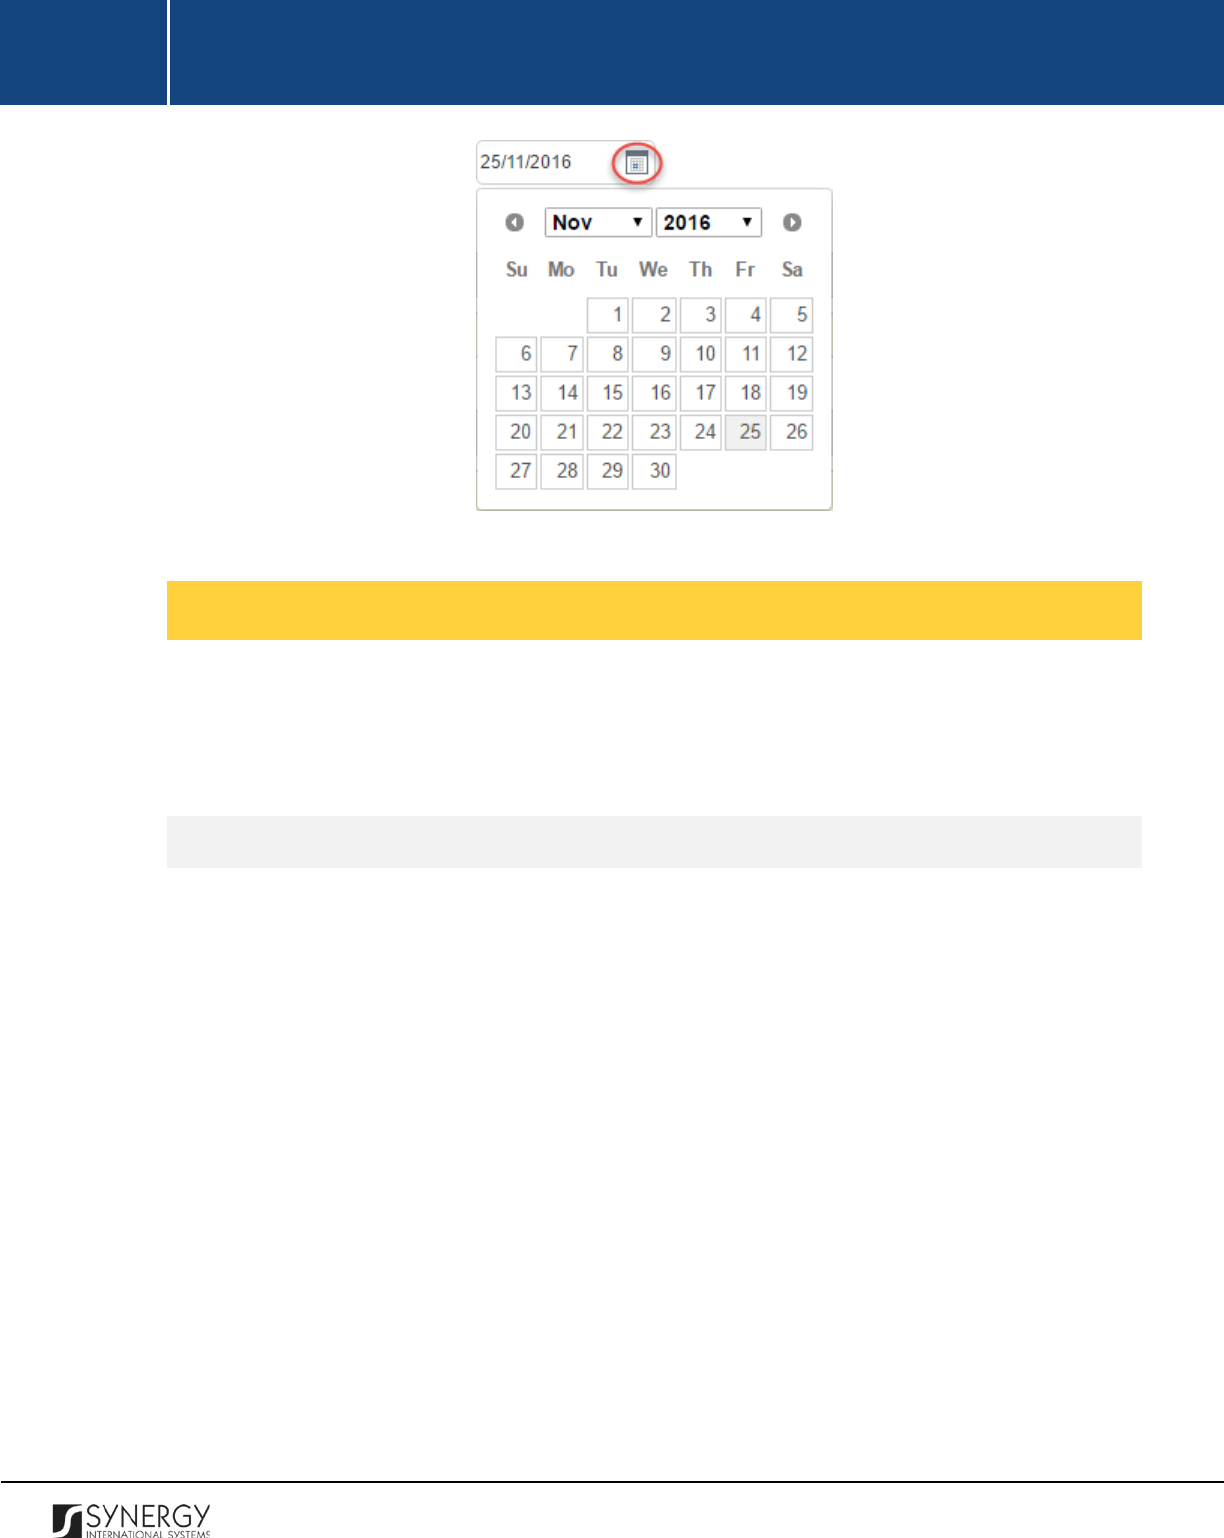
Figure 3: Calendar
Managing Case Participants
This chapter outlines how to select the parties and legal representatives involved in the prosecution
case, as well as how to create new case participant records, edit and remove them. It also describes
how you can browse among the case participant records to find the one that you are looking for.
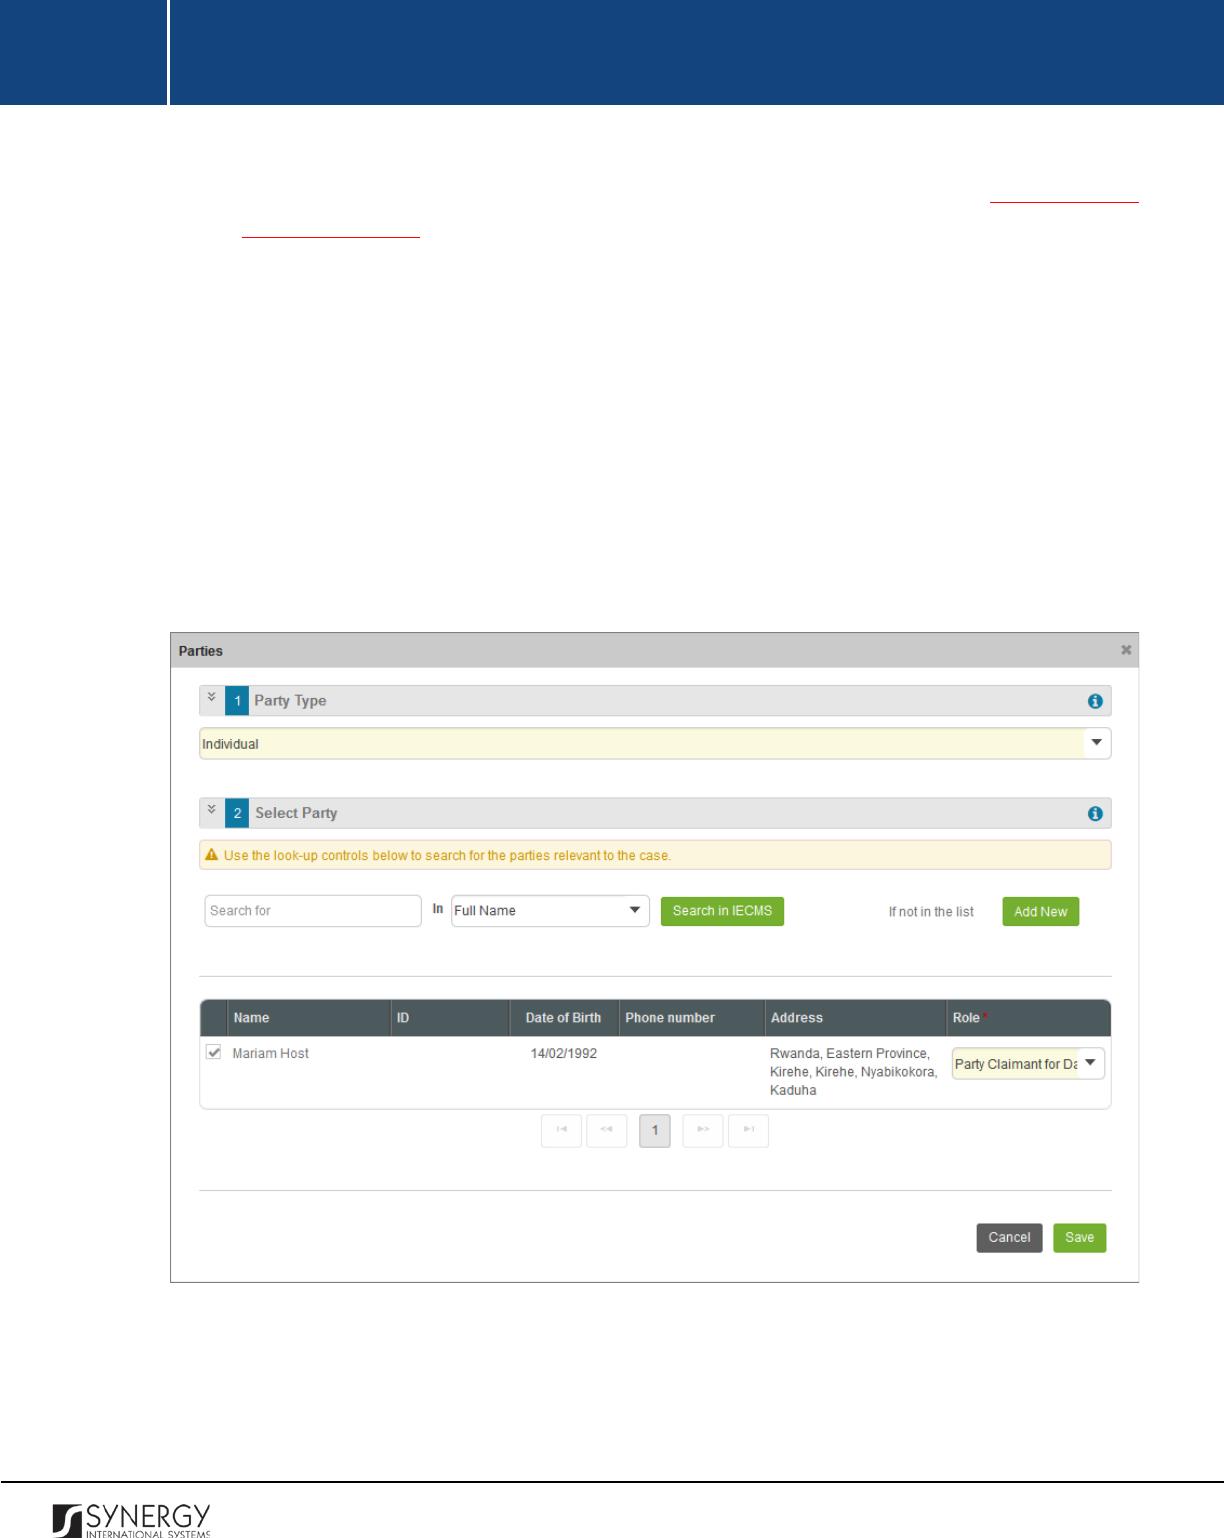
Adding a Case Participant Record
In order to add a case participant record, follow the steps below:
1. Click the
Add
button at the bottom of the Parties / Legal Representatives field. A Parties / Legal
Representative form will open (Figure 4).
2. Indicate the case participant type (Individual or Legal Entity) by selecting the appropriate
instance from the drop-down list.
3. Locate the person or legal entity that will be involved in the given case. This can be done by
using the search mechanism the Parties / Legal Representative form is equipped with. To find
a case participant, enter the participant ID, name or part of the name in the search box and
specify the field to look in.
Note:
For the search mechanism to yield accurate results, please, make sure to enter at least
three symbols (letters and numerals) in the search box.
4. Click the
Search in IECMS
button. The list of all records that match the search criteria will be
displayed in the table below.
17
INTEGRATED CRIMINAL JUSTICE INFORMATION SYSTEM OF IRAQ | Personal Information | User Manual
RWANDA IECMS | Rwanda National Public Prosecution Authority | User Manual
Note:
If the desired party / legal representative cannot be found in the Rwanda IECMS
database, you can create a new case participant record. For more details, see Creating a Case
Participant Record.
5. Select the case participant record that you want to add to the prosecution case by ticking the
checkbox to the left of the record.
6. For each case participant selected, define in what capacity they will act in relation to the given
case.
7. For each legal representative selected, define what party they are going to represent and
whether they are going to represent or assist the selected party. These fields are mandatory.
8. Click the
Save
button. The selected records will be listed in the respective Parties / Legal
Representatives field.
9. In the Parties / Legal Representatives field, define which of the selected records are active by
ticking the corresponding checkbox.
Figure 4: Adding a Case Participant Record
18
INTEGRATED CRIMINAL JUSTICE INFORMATION SYSTEM OF IRAQ | Personal Information | User Manual
RWANDA IECMS | Rwanda National Public Prosecution Authority | User Manual
Browsing among Case Participant Records
In order to ensure fast page loading, the Parties / Legal Representatives table is configured to display
only five records per page. However, you can easily locate the record that you are looking for by
browsing for it.
To browse among the records displayed to you in the Parties / Legal Representatives table, click the
number link of the page you want to navigate to. The
(First)
,
(Previous)
,
(Next)
,
and
(Last)
buttons are used to navigate back and forth through the pages.
Creating a Case Participant Record
In order to create a new case participant record, follow the steps below:
1. Click the
Add New
button in the Parties / Legal Representative form. Depending on the type
of the case participant – individual or legal entity, you will be navigated either to the Individual
or Legal Entity module in Rwanda IECMS where a blank data entry form will open.
2. Fill in the form as it is described in the respective Rwanda IECMS Individual Form User Manual
or Rwanda IECMS Legal Entity Form User Manual in REFERENCES.
3. Save the information input and close the form.
Editing Case Participant Records
In order to edit a party / legal representative record, follow the steps below:
1. Click the
Edit
button to the left of the record that you want to modify. Depending on the
type of the case participant – individual or legal entity, you will be navigated either to the
Individual or Legal Entity module in Rwanda IECMS where the record summary will be
displayed.
2. Click the
Edit
button in the top right corner of the record summary page.
3. Make the required changes in the data displayed as it is described in the respective Rwanda
IECMS Individual Form User Manual or Rwanda IECMS Legal Entity Form User Manual in
REFERENCES.
4. Save the changes made and close the form.
19
INTEGRATED CRIMINAL JUSTICE INFORMATION SYSTEM OF IRAQ | Personal Information | User Manual
RWANDA IECMS | Rwanda National Public Prosecution Authority | User Manual
Removing Case Participant Records
In order to remove a case participant record, click the
(Remove)
button to the left of the record.
Managing Relationship Records
This chapter outlines how to add and remove relationship records.
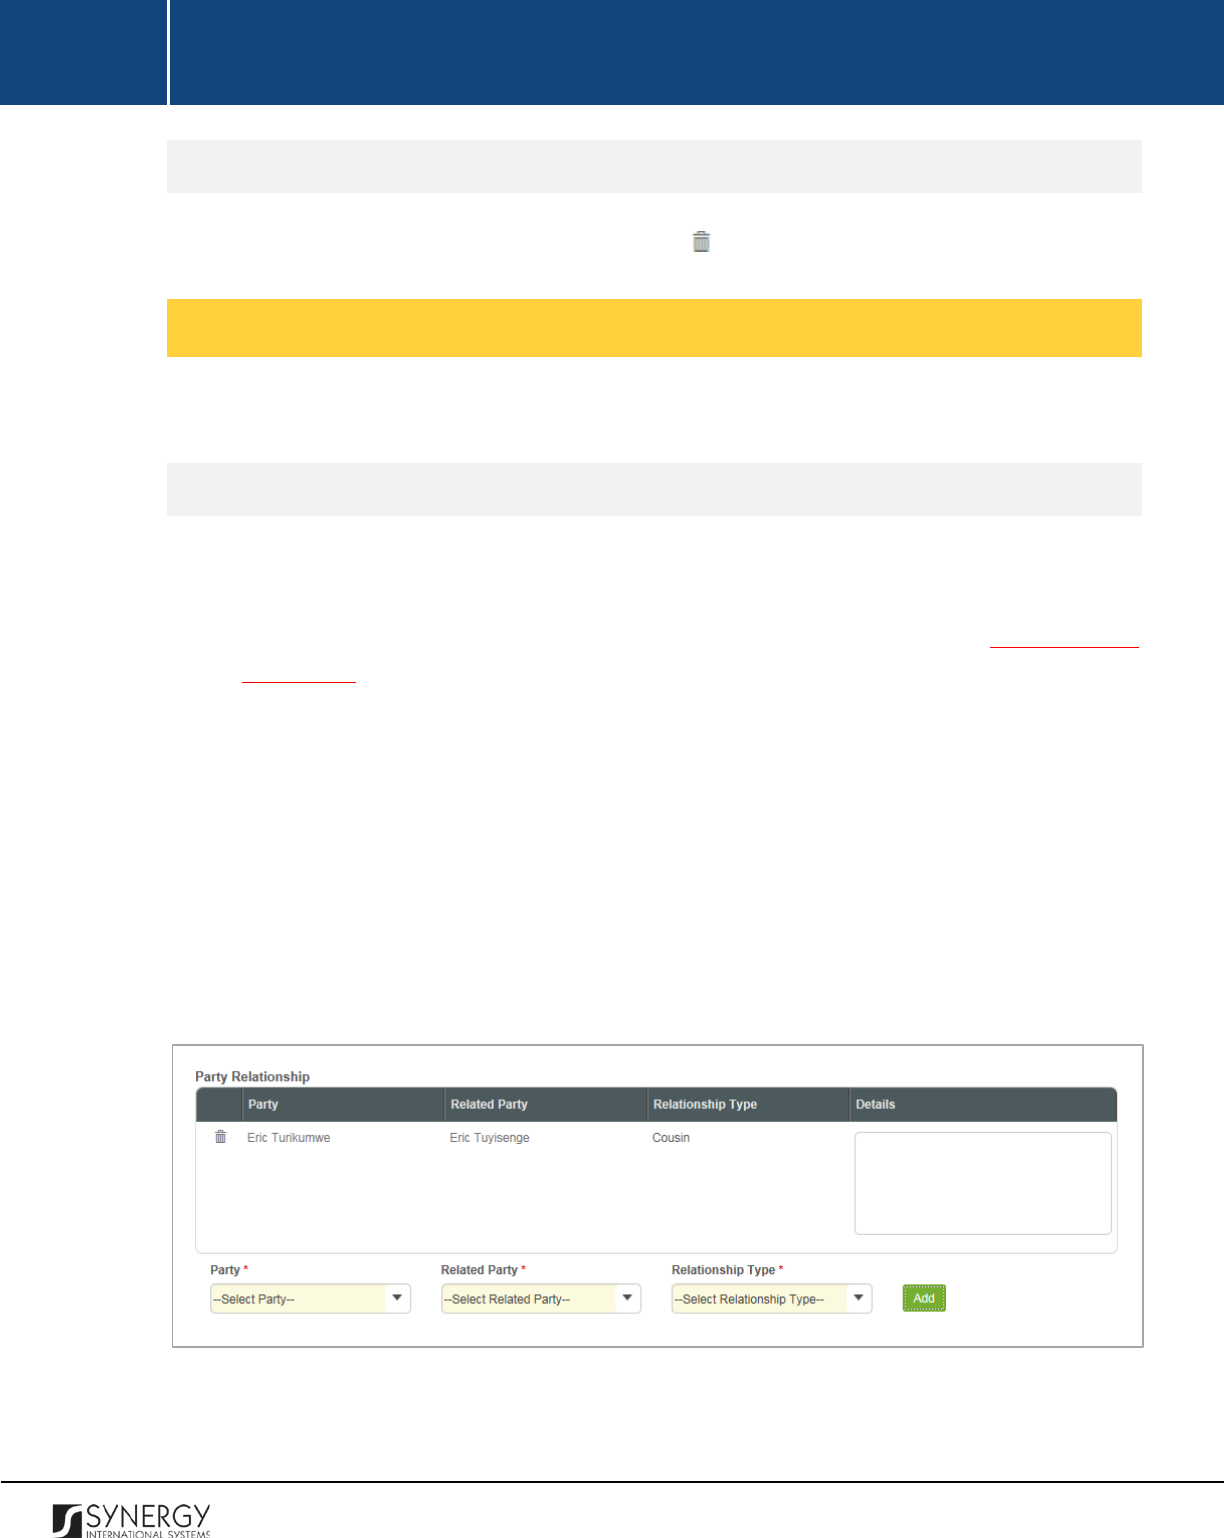
Adding a Relationship Record
In order to add a relationship record, follow the steps below:
1. Select the
Party
from the respective drop-down list. This field is mandatory. Please, note that
the list will contain all parties involved into the case. For more details, see Managing Case
Participants.
2. Select the party the selected case participant is related to from the drop-down list. This field
is mandatory.
3. Indicate what the relationship between the selected parties is. This field is mandatory.
Note:
If the desired option is not listed, select the Other option and specify the relationship
type in the new field that appears.
4. Click the
Add
button to save the information input. The new record will appear in the Party
Relationship table.
5. In the Party Relationship table, provide additional details on the relationship between the
selected case participants.
Figure 5: Adding a Relationship Record
20
INTEGRATED CRIMINAL JUSTICE INFORMATION SYSTEM OF IRAQ | Personal Information | User Manual
RWANDA IECMS | Rwanda National Public Prosecution Authority | User Manual
Removing Relationship Records
In order to remove a relationship record, click the
(Remove)
button to the left of the record.
Managing Committed Crime Records
T This chapter outlines how to add and remove committed crime records. It also describes how you
can browse among the committed crime records to find the one that you are looking for.
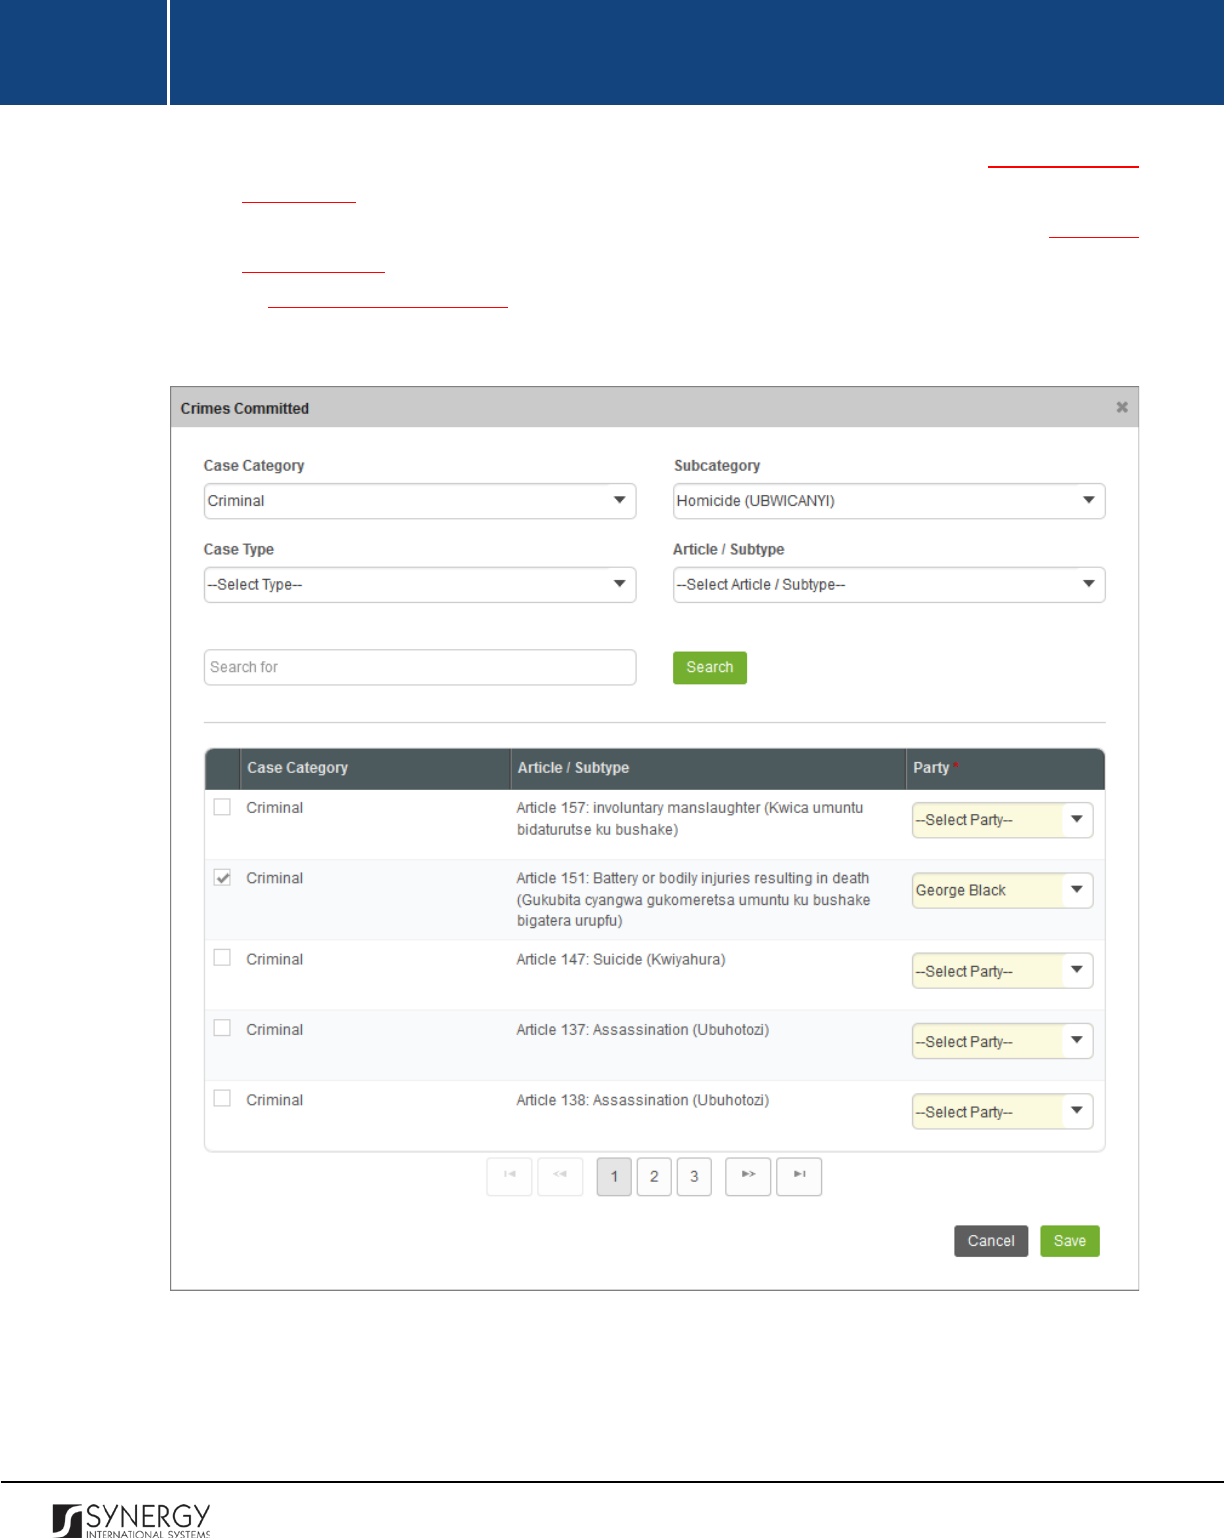
Adding a Committed Crime Record
In order to add a committed crime record, follow the steps below:
1. Click the
Add
button at the bottom of the Crimes Committed field. A Crimes Committed form
will open (Figure 6).
2. Locate the crime or crimes committed. This can be done by using the search mechanism the
Crimes Committed form is equipped with. To find a crime, create filtering criteria that will be
used to find and display all crime records that match the selection. The following criteria are
available:
• Case Category
• Case Type
• Subcategory
• Article / Subtype
Note:
Selection of a case category will filter the lists in the Case Type, Subcategory, and Article
/ Subtype fields and display only those instances that are related to the selected category.
Also, if the lists in the fields are long and hard to browse in, you can make use of the search
option. To locate the instance that you are looking for, you should enter the keyword in the
search box above the drop-down list.
3. Alternatively, you may enter the case category title or any part of it in the search box.
Note:
For the search mechanism to yield accurate results, please, make sure to enter at least
three symbols (letters and numerals) in the search box.
4. Click the
Search
button. The list of all the case categories matching the criteria will be displayed
in the Case Categories table below.
5. For each case category added to the police case, select the case participant responsible for
committing the crime from the drop-down list. This field is mandatory. Please, note that the
21
INTEGRATED CRIMINAL JUSTICE INFORMATION SYSTEM OF IRAQ | Personal Information | User Manual
RWANDA IECMS | Rwanda National Public Prosecution Authority | User Manual
list will contain all parties involved into the case. For more details, see Managing Case
Participants.
6. Click the
Save
button to save the information input. You will be directed back to the GENERAL
INFORMATION section.
7. In GENERAL INFORMATION section, specify the offender type and provide crime particulars
for each crime listed in the Crimes Committed field.
Figure 6: Adding a Committed Crime Record
22
INTEGRATED CRIMINAL JUSTICE INFORMATION SYSTEM OF IRAQ | Personal Information | User Manual
RWANDA IECMS | Rwanda National Public Prosecution Authority | User Manual
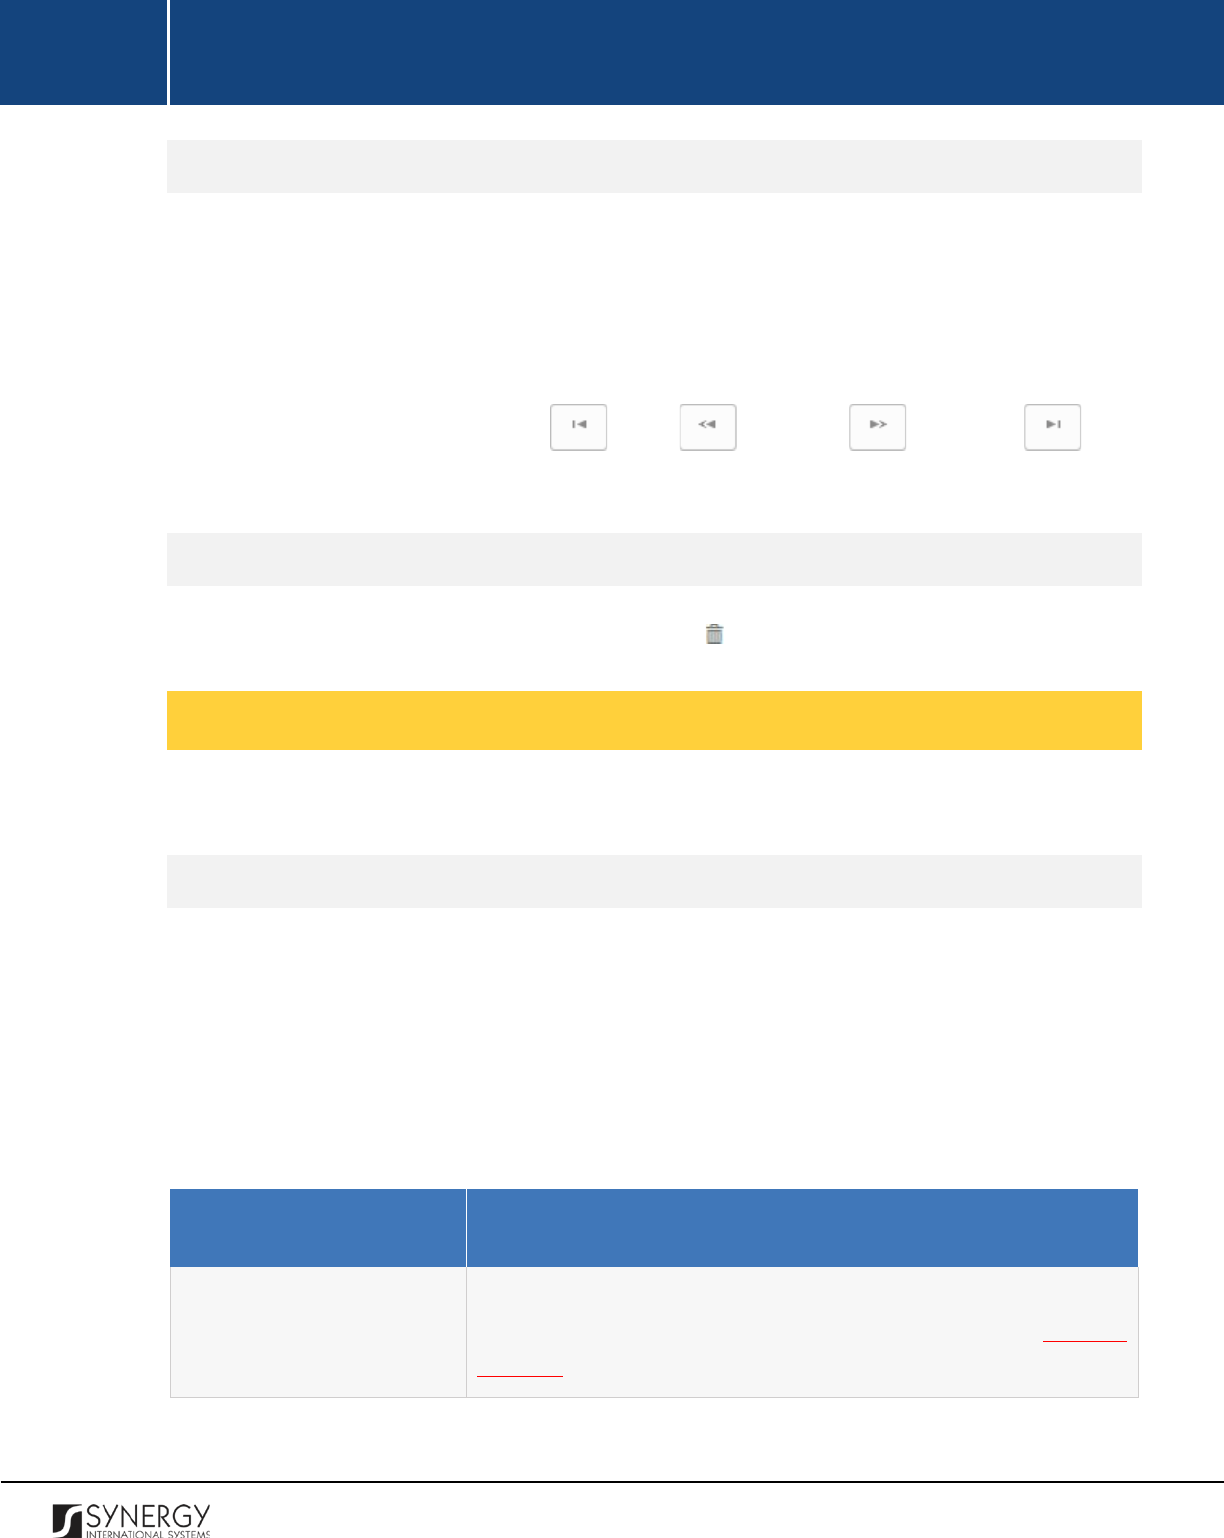
Browsing among Committed Crime Records
In order to ensure fast page loading, the Case Categories table is configured to display only five
records per page. However, you can easily locate the record that you are looking for by browsing for
it.
To browse among the records displayed to you in the Case Categories table, click the number link of
the page you want to navigate to. The
(First)
,
(Previous)
,
(Next)
, and
(Last)
buttons are used to navigate back and forth through the pages.
Removing Committed Crime Records
In order to remove a committed crime record, click the
(Remove)
button to the left of the record.
Managing Offence Dates and Places
This chapter outlines how you can add, edit, and remove offence date and place records.
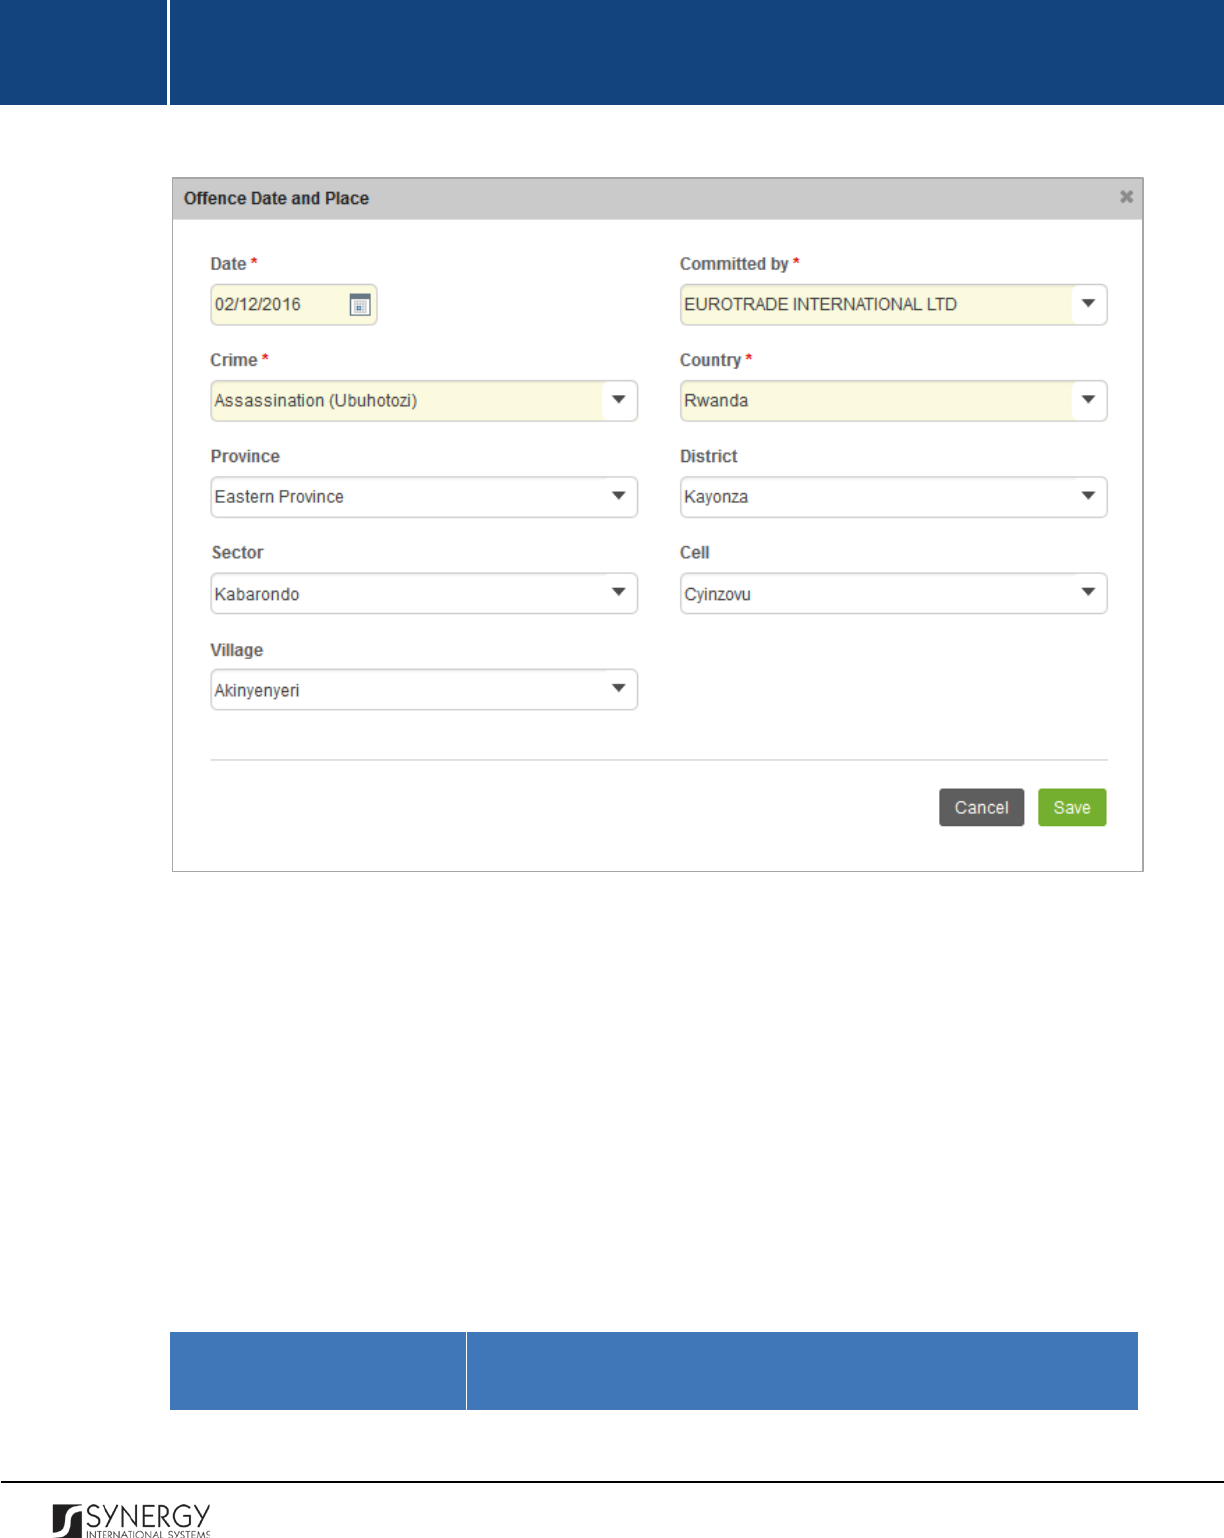
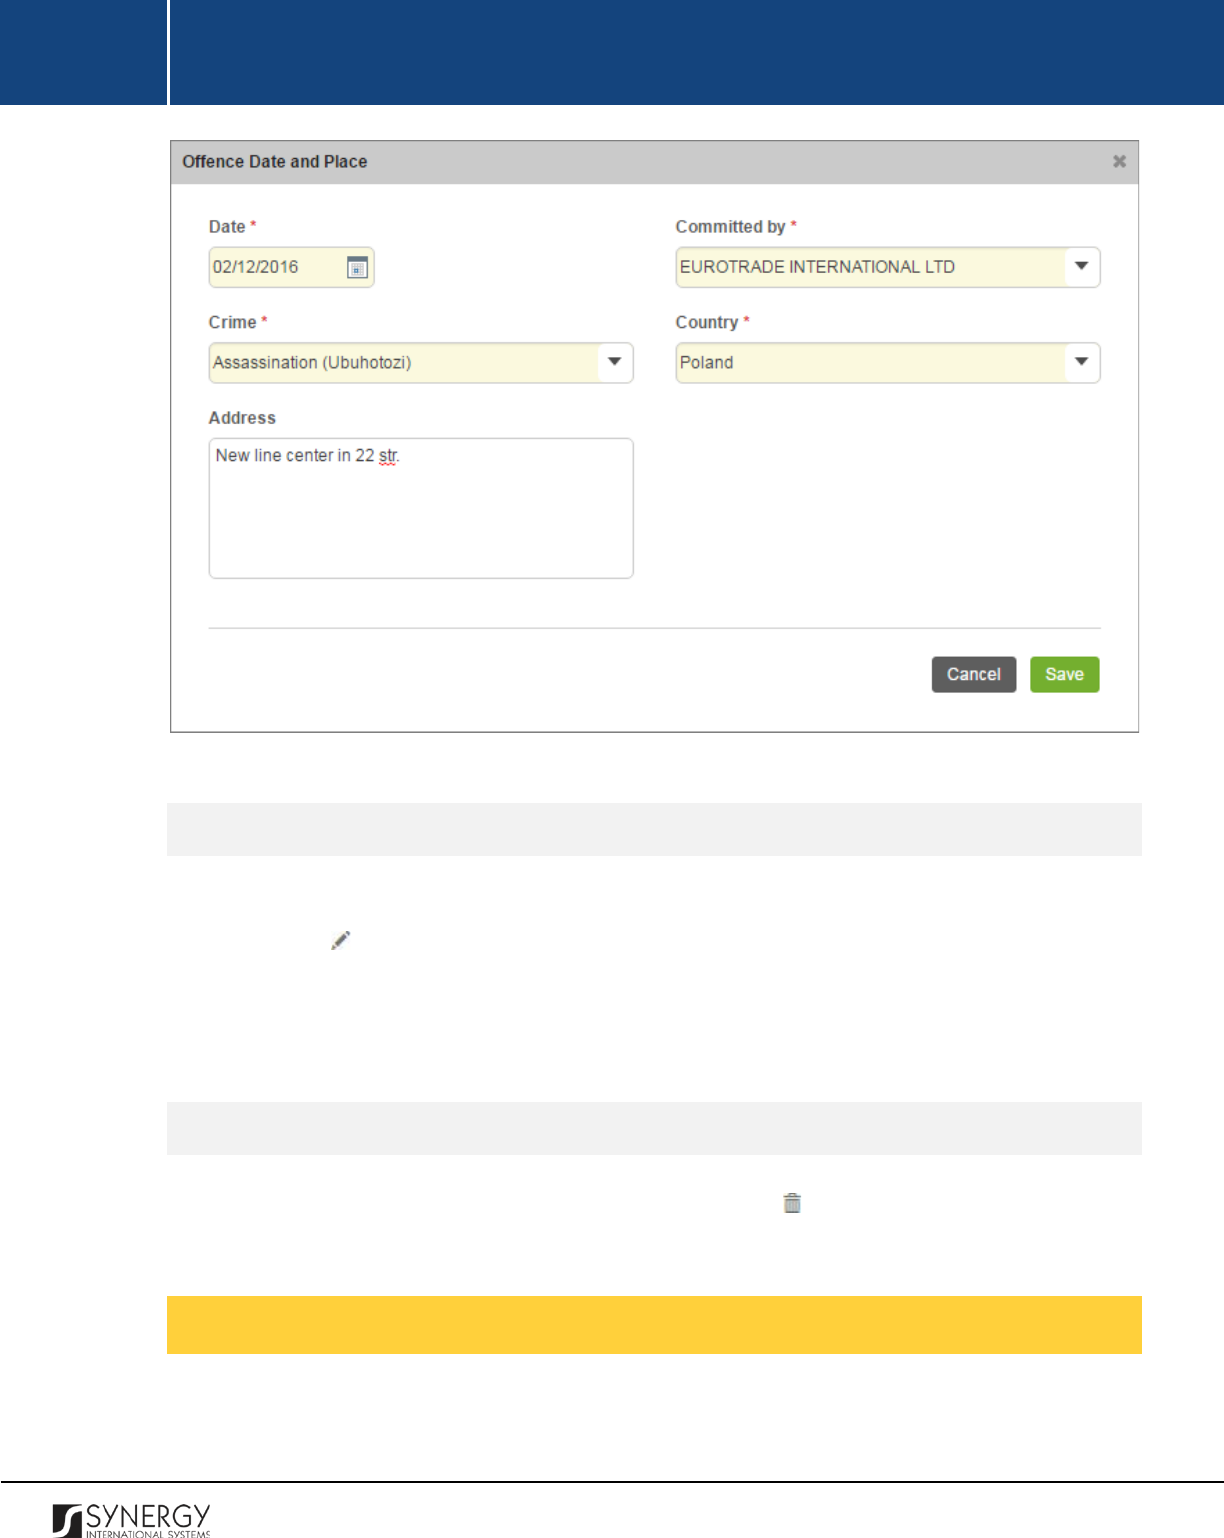
Adding an Offence Date and Place Record
In order to add a record for an offence that took place in Rwanda, follow the steps below:
1. Click the
Add
button at the bottom of the Offence Date and Place field. An Offence Date and
Place form will open (Figure 7).
2. Provide the information requested in the form as described in the table below:
Note:
Some fields in this form are mandatory to be filled in. They are marked with an asterisk.
Field Name
Description
Date
Provide the
Date
when the offence took place.
This field is
mandatory. A calendar popup is available for this field, see Figure 3:
Calendar.
23
INTEGRATED CRIMINAL JUSTICE INFORMATION SYSTEM OF IRAQ | Personal Information | User Manual
RWANDA IECMS | Rwanda National Public Prosecution Authority | User Manual
Committed by
Select the person who committed the offence from the drop-down
list. This field is mandatory. Please, note that the list will contain all
parties involved into the case. For more details, see Managing Case
Participants.
Note:
If the list of parties is long and hard to browse in, you can make
use of the search option. To locate the instance that you are looking
for, you should enter the keyword in the search box above the drop-
down list.
Crime
Select the
Crime
from the drop-down list.
This field is mandatory.
Please, note that he list will contain all the crime types encompassed
by the case. For more details, see
Managing Committed Crime
Records.
Note:
If the list of crime types is long and hard to browse in, you can
make use of the search option. To locate the instance that you are
looking for, you should enter the keyword in the search box above
the drop-down list.
Country
Specify the
Country
where the offence took place.
This field is
mandatory. Please, note that by default, the incident country will be
set to Rwanda. However, you can select a different country. For
countries other than Rwanda, you will be requested to provide the
incident address in the form of free text. For the offences that took
place in Rwanda, you will be asked to make selection or enter
information in the fields displayed.
Note:
If the list of countries is long and hard to browse in, you can
make use of the search option. To locate the instance that you are
looking for, you should enter the keyword in the search box above
the drop-down list.
Province
This field becomes available if the incident country is set to Rwanda
and is used to indicate the
Province
for the offence. Please, note that
selection of a province will filter the list in the District field and
display only those instances that are related to the selected
province.
24
INTEGRATED CRIMINAL JUSTICE INFORMATION SYSTEM OF IRAQ | Personal Information | User Manual
RWANDA IECMS | Rwanda National Public Prosecution Authority | User Manual
Note: If the list of provinces is long and hard to browse in, you can
make use of the search option. To locate the instance that you are
looking for, you should enter the keyword in the search box above
the drop-down list.
District
This field becomes available if the incident country is set to Rwanda
and is used to indicate the
District
for the offence. Please, note that
selection of a district will filter the list in the Sector field and display
only those instances that are related to the selected district.
Note:
If the list of districts is long and hard to browse in, you can
make use of the search option. To locate the instance that you are
looking for, you should enter the keyword in the search box above
the drop-down list.
Sector
This field becomes available if the incident country is set to Rwanda
and is used to indicate the
Sector
for the offence. Please, note that
selection of a sector will filter the list in the Cell field and display only
those instances that are related to the selected sector.
Note:
If the list of sectors is long and hard to browse in, you can
make use of the search option. To locate the instance that you are
looking for, you should enter the keyword in the search box above
the drop-down list.
Cell
This field becomes available if the incident country is set to Rwanda
and is used to select the
Cell
for the offence.
Please, note that
selection of a cell will filter the list in the Village field and display only
those instances that are related to the selected cell.
Note:
If the list of cells is long and hard to browse in, you can make
use of the search option. To locate the instance that you are looking
for, you should enter the keyword in the search box above the drop-
down list.
Village
This field becomes available if the incident country is set to Rwanda
and is used to enter the name of the
Village
for the offence.
3. Click the
Save
button to save the information input. Or, click
Cancel
to terminate the operation.
25
INTEGRATED CRIMINAL JUSTICE INFORMATION SYSTEM OF IRAQ | Personal Information | User Manual
RWANDA IECMS | Rwanda National Public Prosecution Authority | User Manual
Figure 7: Adding a Domestic Address for the Offence
In order to add a record for an offence that took place in a country other than Rwanda, follow the
steps below:
1. Click the
Add
button at the bottom of the Offence Date and Place field. An Offence Date and
Place form will open (Figure 8).
2. Provide the information requested in the form as described in the table below:
Note:
Some fields in this form are mandatory to be filled in. They are marked with an asterisk.
Field Name
Description
26
INTEGRATED CRIMINAL JUSTICE INFORMATION SYSTEM OF IRAQ | Personal Information | User Manual
RWANDA IECMS | Rwanda National Public Prosecution Authority | User Manual
Date
Provide the
Date
when the offence took place.
This field is
mandatory. A calendar popup is available for this field, see Figure 3:
Calendar.
Committed by
Select the person who committed the offence from the drop-down
list. This field is mandatory. Please, note that the list will contain all
parties involved into the case. For more details, see Managing Case
Participants.
Note:
If the list of parties is long and hard to browse in, you can make
use of the search option. To locate the instance that you are looking
for, you should enter the keyword in the search box above the drop-
down list.
Crime
Select the
Crime
from the drop-down list. This field is mandatory.
Please, note that the list will contain all crime types committed by
the case participant selected in the previous field. For more details,
see Managing Committed Crime Records.
Note:
If the list of crime types is long and hard to browse in, you can
make use of the search option. To locate the instance that you are
looking for, you should enter the keyword in the search box above
the drop-down list.
Country
Specify the
Country
where the offence took place from the drop-
down list. This field is mandatory.
Note:
If
the list of countries is long and hard to browse in, you can
make use of the search option. To locate the instance that you are
looking for, you should enter the keyword in the search box above
the drop-down list.
Address
Enter the address where the offence took place.
This field is
mandatory.
3. Click the
Save
button to save the information input. Or, click
Cancel
to terminate the operation.
27
INTEGRATED CRIMINAL JUSTICE INFORMATION SYSTEM OF IRAQ | Personal Information | User Manual
RWANDA IECMS | Rwanda National Public Prosecution Authority | User Manual
Figure 8: Adding a Foreign Address for the Offence
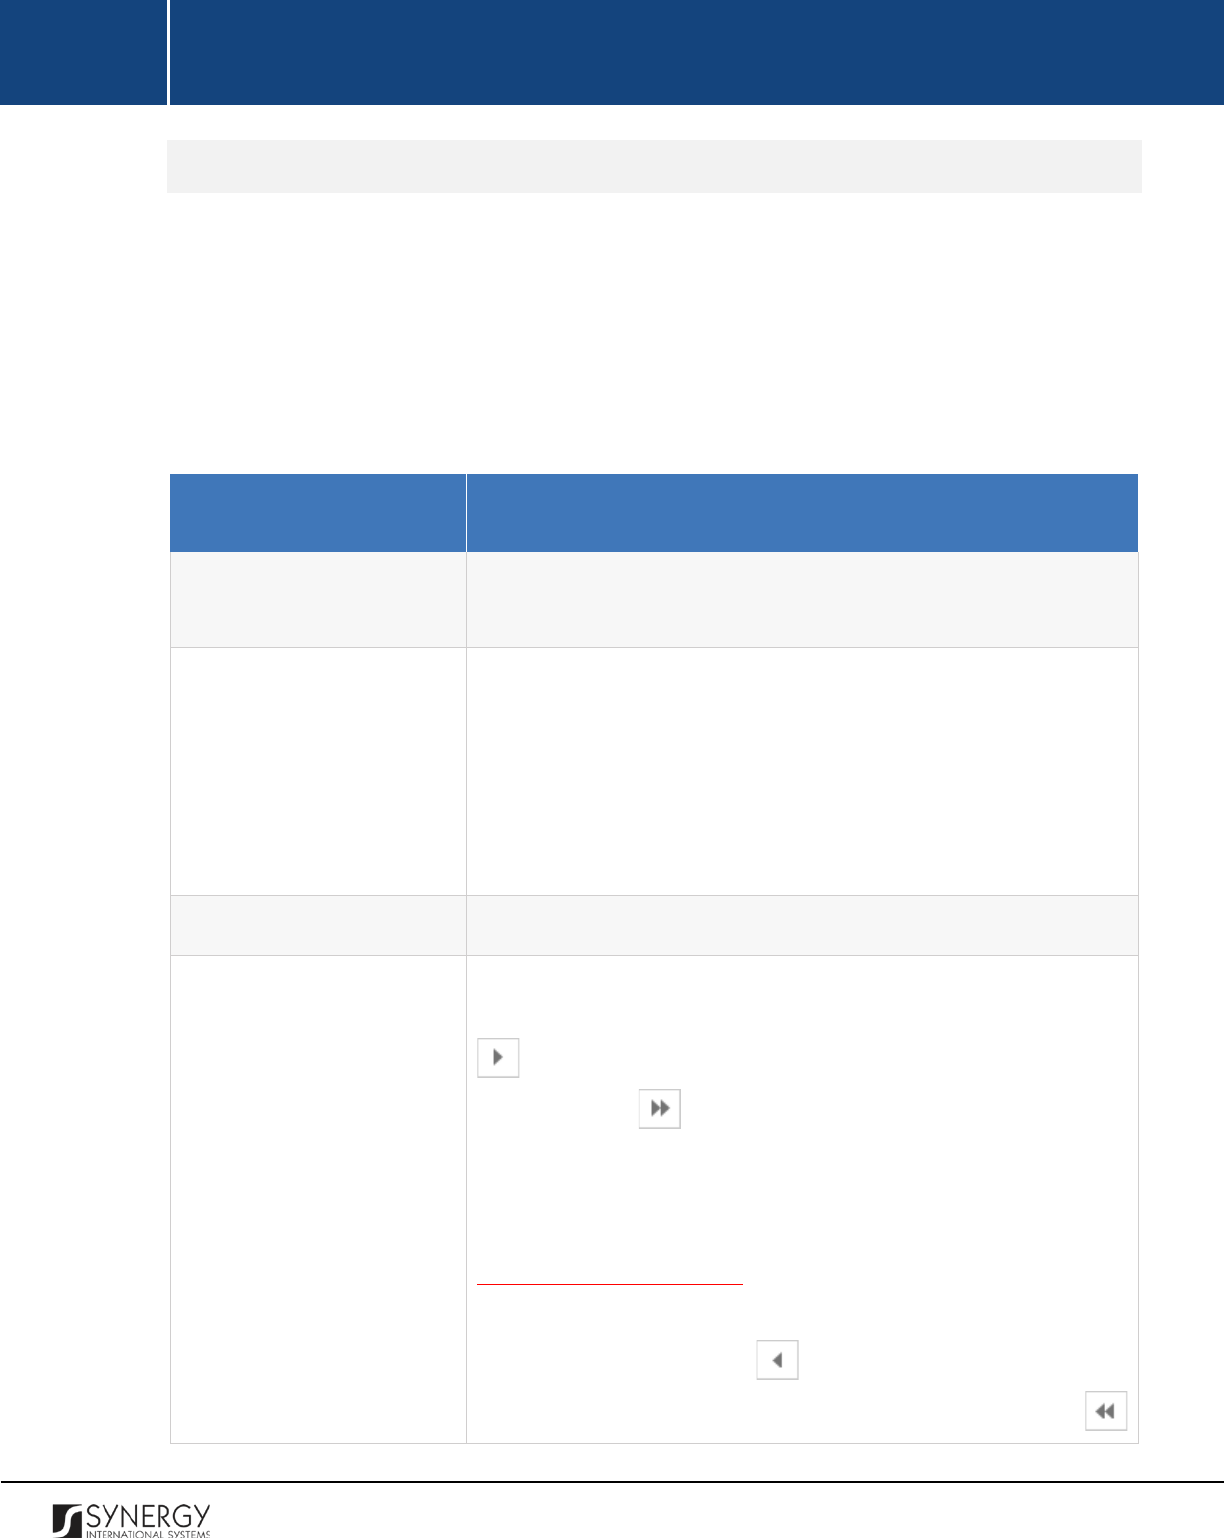
Editing Offence Date and Place Records
In order to edit an offence date and place record, follow the steps below:
1. Click the
(Edit)
button to the left of the record that you want to modify. The Offence Date
and Place form will open.
2. Make the required changes in the data displayed.
3. Click the
Save
button to save the changes made. Or, click
Cancel
to discard them.
Removing Offence Date and Place Records
In order to remove an offence date and place record, click the
(Remove)
button to the left of the
record.
Managing Case Closure Notes
This chapter outlines how you can add, edit, view, and remove case closure note records.
28
INTEGRATED CRIMINAL JUSTICE INFORMATION SYSTEM OF IRAQ | Personal Information | User Manual
RWANDA IECMS | Rwanda National Public Prosecution Authority | User Manual
Adding a Case Closure Note Record
In order to add a case closure note record, follow the steps below:
1. Click the
Add
button at the bottom of the Case Closure Notes field. A Case Closure Notes form
will open (Figure 9).
2. Provide the information requested in the form as described in the table below:
Note:
Some fields in this form are mandatory to be filled in. They are marked with an asterisk.
Field Name
Description
Issue Date
The information in this field is automatically generated by the
system and shows the date when the case closure note was issued
Case Closure Type
Select the type of the case closure from the drop-down list. This field
is mandatory.
Note:
If the list of case closure types is long and hard to browse in,
you can make use of the search option. To locate the instance that
you are looking for, you should enter the keyword in the search box
above the drop-down list.
Case Resolution
Provide details on the
Case
Resolution
. This field is mandatory.
Accused
Specify the accused the case closure note is related to. This can be
done by selecting the case party in the Available list and clicking the
(Add)
button. The selected instance will appear in the Selected
list. Clicking the
(Add All)
button will move all instances from
the Available list to the Selected list.
Note:
The list of case parties will be comprised of the participants
involved into the given prosecution case. For more details, see
Managing Case Participants.
In order to remove a selected party from the list, highlight it in the
Selected list and click the
(Remove)
button. The selected
instance will be removed from the Selected list. Clicking the
29
INTEGRATED CRIMINAL JUSTICE INFORMATION SYSTEM OF IRAQ | Personal Information | User Manual
RWANDA IECMS | Rwanda National Public Prosecution Authority | User Manual
(Remove All) button will move all the instances from the Selected list
to the Available list.
Prosecutor
Select the
Prosecutor
handling the case closure from the drop-down
list. This field is mandatory.
Note:
If the list of prosecutors is long and hard to browse in, you can
make use of the search option. To locate the instance that you are
looking for, you should enter the keyword in the search box above
the drop-down list.
Signed Copy
Attach a
Signed Copy
of the case closure note. For more details, see
Managing Attachments.
Note:
The Date Attached field will automatically be populated with
the date when the attachment was made and will be available once
you upload the respective file.
Validated
Check the accuracy of the information provided by selecting the
Validated
checkbox. Please, note that system validation renders all
the information provided in the form as non-editable.
3. Click the
Save
button to save the information input. Or, click
Cancel
to terminate the operation.
30

INTEGRATED CRIMINAL JUSTICE INFORMATION SYSTEM OF IRAQ | Personal Information | User Manual
RWANDA IECMS | Rwanda National Public Prosecution Authority | User Manual
Figure 9: Adding a Case Closure Note Record
Editing Case Closure Note Records
In order to edit a case closure note record, follow the steps below:
1. Click the
(Edit)
button to the left of the record that you want to modify. The Case Closure
Notes form will open.
2. Make the required changes in the data displayed.
3. Click the
Save
button to save the changes made. Or, click
Cancel
to discard them.
Note:
The possibility of editing record details is available for records that have not been validated yet.
31
INTEGRATED CRIMINAL JUSTICE INFORMATION SYSTEM OF IRAQ | Personal Information | User Manual
RWANDA IECMS | Rwanda National Public Prosecution Authority | User Manual
Viewing Case Closure Note Records
In order to view the details of case closure note records, click the
(View Form)
button to the left of
the record. The record summary will open in a separate window in the non-editable mode.
Note:
The possibility of viewing record details is available for validated records only.
Removing Case Closure Note Records
In order to remove a case closure note record, click the
(Remove)
button to the left of the record.
Managing Court Submissions
This chapter outlines how you can add, edit, and remove court submission records.
Adding a Court Submission Record
In order to add a court submission record, follow the steps below:
1. Click the
Add
button at the bottom of the Court Submissions field. A Court Submissions form
will open (Figure 10).
2. Provide the information requested in the form as described in the table below:
Note:
Some fields in this form are mandatory to be filled in. They are marked with an asterisk.
Field Name
Description
Court Level
Specify the level of the court to which the submission is made. This
field is mandatory. Please, note that selection of a court level will
filter the list in the Court field and display only those instances that
are related to the selected court level.
Note:
If the list of court levels is long and hard to browse in, you can
make
use of the search option. To locate the instance that you are
32
INTEGRATED CRIMINAL JUSTICE INFORMATION SYSTEM OF IRAQ | Personal Information | User Manual
RWANDA IECMS | Rwanda National Public Prosecution Authority | User Manual
looking for, you should enter the keyword in the search box above
the drop-down list.
Court
Select the
Court
that the case is submitted to from the drop-down
list. This field is mandatory. Please, note that selection of a court will
filter the list in the Case Category field
and display only those
instances that are related to the selected court.
Note:
If the list of courts is long and hard to browse in, you can make
use of the search option. To locate the instance that you are looking
for, you should enter the keyword in the search box above the drop-
down list.
Case Category
Select the
Case Category
that best describes the crimes
encompassed by the given case from the drop-down list. This field is
mandatory.
Instance Level
Select the
Instance Level
from the drop-down list.
This field is
mandatory.
Complete Prosecution Case
Specify whether this is a complete prosecution case by selecting the
respective
Yes
or
No
radio button.
Originating Court
This field appears for the First Appeal level court submissions and is
used to record information on the originating court and appealed
case number. For more details, see
Managing First Appeal Court
Submissions.
Parties
List all case
Parties
that are affected by the submission. For more
details, see Managing Submission Parties.
Object of Litigation
Provide a brief description of the object for litigation. This can be
several paragraphs of free text.
Motivation
Provide a brief description on the rationale behind the court
submission.
3. Click the
Save
button to save the information input. Or, click
Cancel
to terminate the operation.
33

INTEGRATED CRIMINAL JUSTICE INFORMATION SYSTEM OF IRAQ | Personal Information | User Manual
RWANDA IECMS | Rwanda National Public Prosecution Authority | User Manual
Figure 10: Adding a Court Submission Record
Editing Court Submission Records
In order to edit a court submission record, follow the steps below:
34
INTEGRATED CRIMINAL JUSTICE INFORMATION SYSTEM OF IRAQ | Personal Information | User Manual
RWANDA IECMS | Rwanda National Public Prosecution Authority | User Manual
1. Click the
(Edit)
button to the left of the record that you want to modify. The Court
Submissions form will open.
2. Make the required changes in that data displayed.
3. Click the
Save
button to save the changes made. Or, click
Cancel
to discard them.
Removing Court Submission Records
In order to remove a court submission record, click the
(Remove)
button to the left of the record.
Managing First Appeal Court Submissions
This chapter outlines how to add and remove first appeal court submission records.
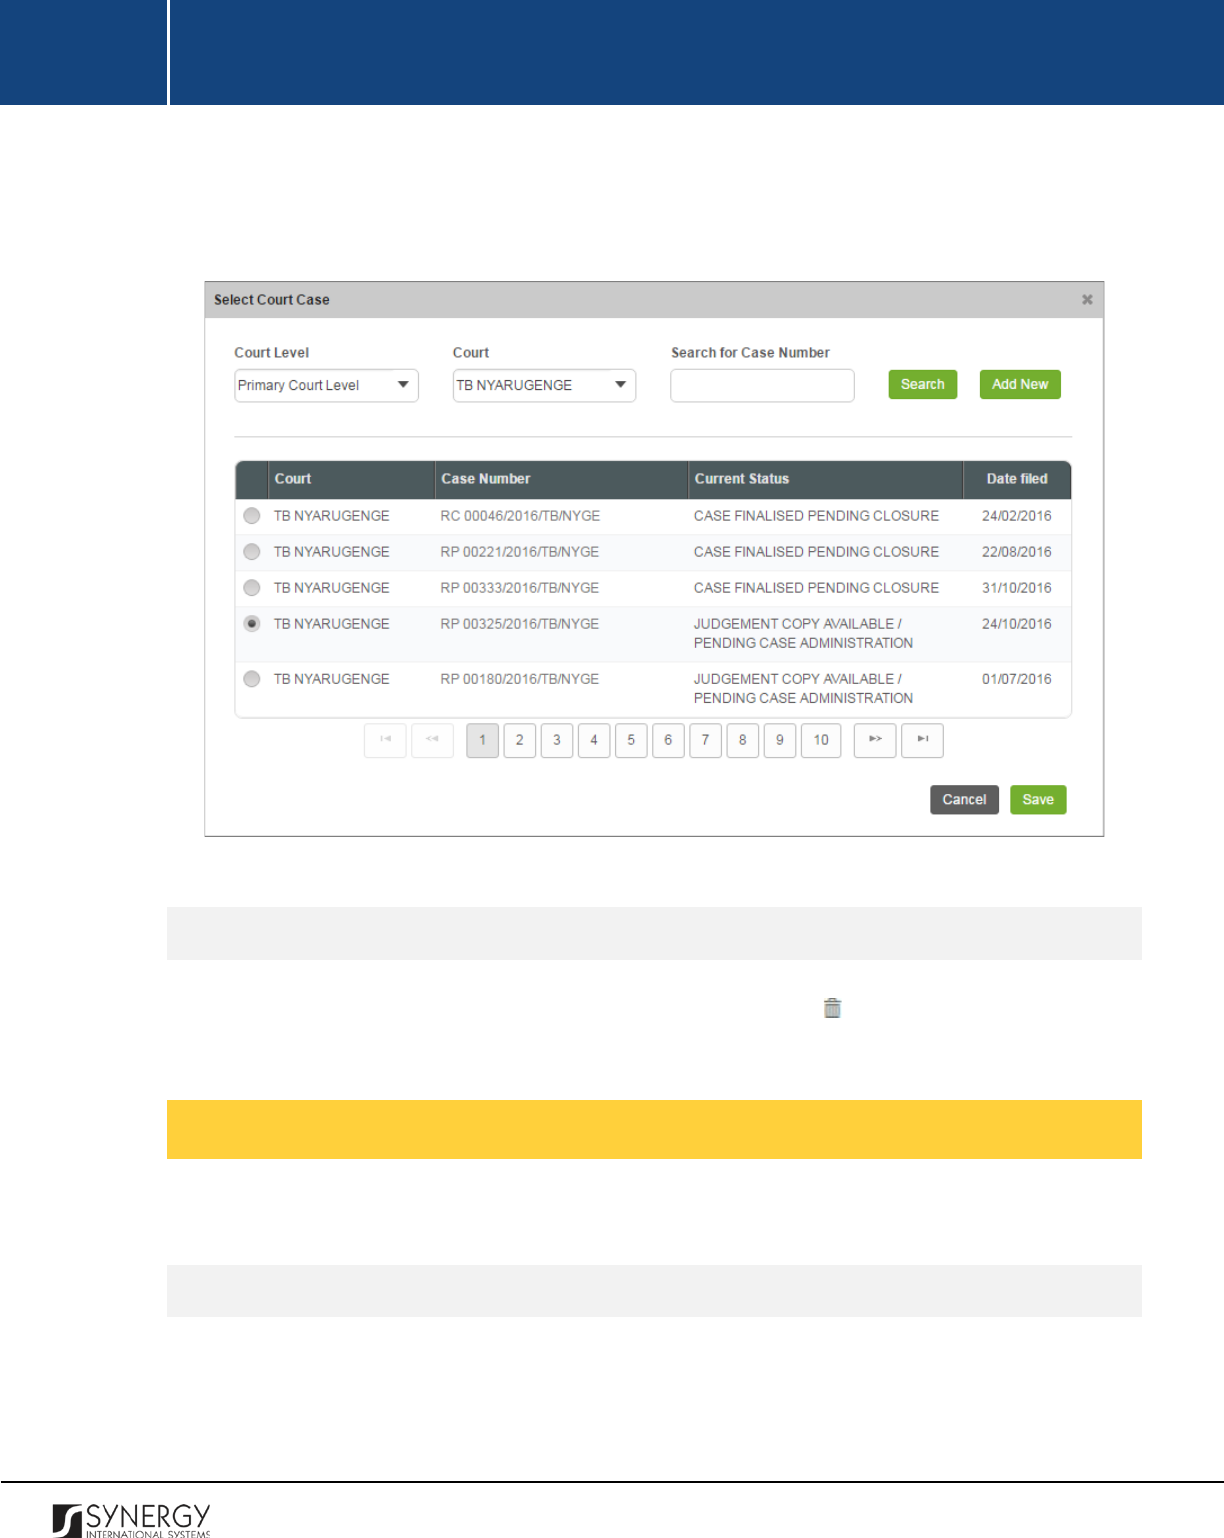
Adding a First Appeal Court Submission Record
In order to add a first appeal court submission record, follow the steps below:
1. Click the
Add
button in the Court Submissions form. A Select Court Case form will appear
(Figure 11).
2. Locate the appealed case related to the court submission. This can be done by using the search
mechanism the Select Court Case form is equipped with. To find an appealed case, create
filtering criteria that will be used to find and display all case records that match the selection.
The following criteria are available:
• Court Level
• Court
Note:
Selection of a court level will filter the list in the Court field and display only those
instances that are related to the selected category. Also, if the lists in the Court Level and Court
fields are long and hard to browse in, you can make use of the search option. To locate the
instance that you are looking for, you should enter the keyword in the search box above the
drop-down list.
3. Alternatively, you may enter the case number or any part of it in the search box.
Note:
For the search mechanism to yield accurate results, please, make sure to enter at least
three symbols (letters and numerals) in the search box.
4. Click the
Search
button. The list of all the case categories matching the criteria will be displayed
in the table below.
35
INTEGRATED CRIMINAL JUSTICE INFORMATION SYSTEM OF IRAQ | Personal Information | User Manual
RWANDA IECMS | Rwanda National Public Prosecution Authority | User Manual
5. Select the appealed case related to the court submission by activating the respective radio
button.
6. Click the
Save
button to save the information input. Or, click
Cancel
to terminate the operation.
Figure 11: Adding a Court Case Record
Removing First Appeal Court Submission Record
In order to remove a first appeal court submission record, click the
(Remove)
button to the left of
the record.
Managing Submission Parties
This chapter outlines how to add and remove submission party records.
Adding a Submission Party Record
In order to add a submission party record, follow the steps below:
36

INTEGRATED CRIMINAL JUSTICE INFORMATION SYSTEM OF IRAQ | Personal Information | User Manual
RWANDA IECMS | Rwanda National Public Prosecution Authority | User Manual
1. Select the case
Party
affected by the court submission from the drop-down list. This field is
mandatory. Please, note that the list will contain all parties involved in the case. For more
details, see Managing Case Participants.
2. Indicate what the subject matter for the court submission is. This field is mandatory.
3. Click the
Add
button to save the information input. The new record will appear in the Parties
table (Figure 12).
Figure 12: Adding a Court Submission Party Record
Removing Submission Party Records
In order to remove a submission party record, click the
(Remove)
button to the left of the record.
Managing Related Tasks
This chapter outlines how to add and edit prosecution case related tasks.
Adding a Related Task Record
In order to add a task record, follow the steps below:
1. Click the
Add
button at the bottom of the Related Tasks field. You will be navigated to the Task
module in Rwanda IECMS where a blank data entry form will open.
2. Fill in the form as it is described in the Rwanda IECMS Task Form User Manual in REFERENCES.
3. Save the information input and close the form.
37
INTEGRATED CRIMINAL JUSTICE INFORMATION SYSTEM OF IRAQ | Personal Information | User Manual
RWANDA IECMS | Rwanda National Public Prosecution Authority | User Manual
Editing a Related Task Record
In order to edit a task record, follow the steps below:
1. Click the
Edit
button on the left of the task record that you want to modify. You will be
directed to the Task module in Rwanda IECMS where the task summary will be displayed.
2. Click the
Edit
button in the top right corner of the task summary page.
3. Make the required changes in the data displayed as it is described in the Rwanda IECMS Task
Form User Manual in REFERENCES.
4. Save the changes made and close the form.
38
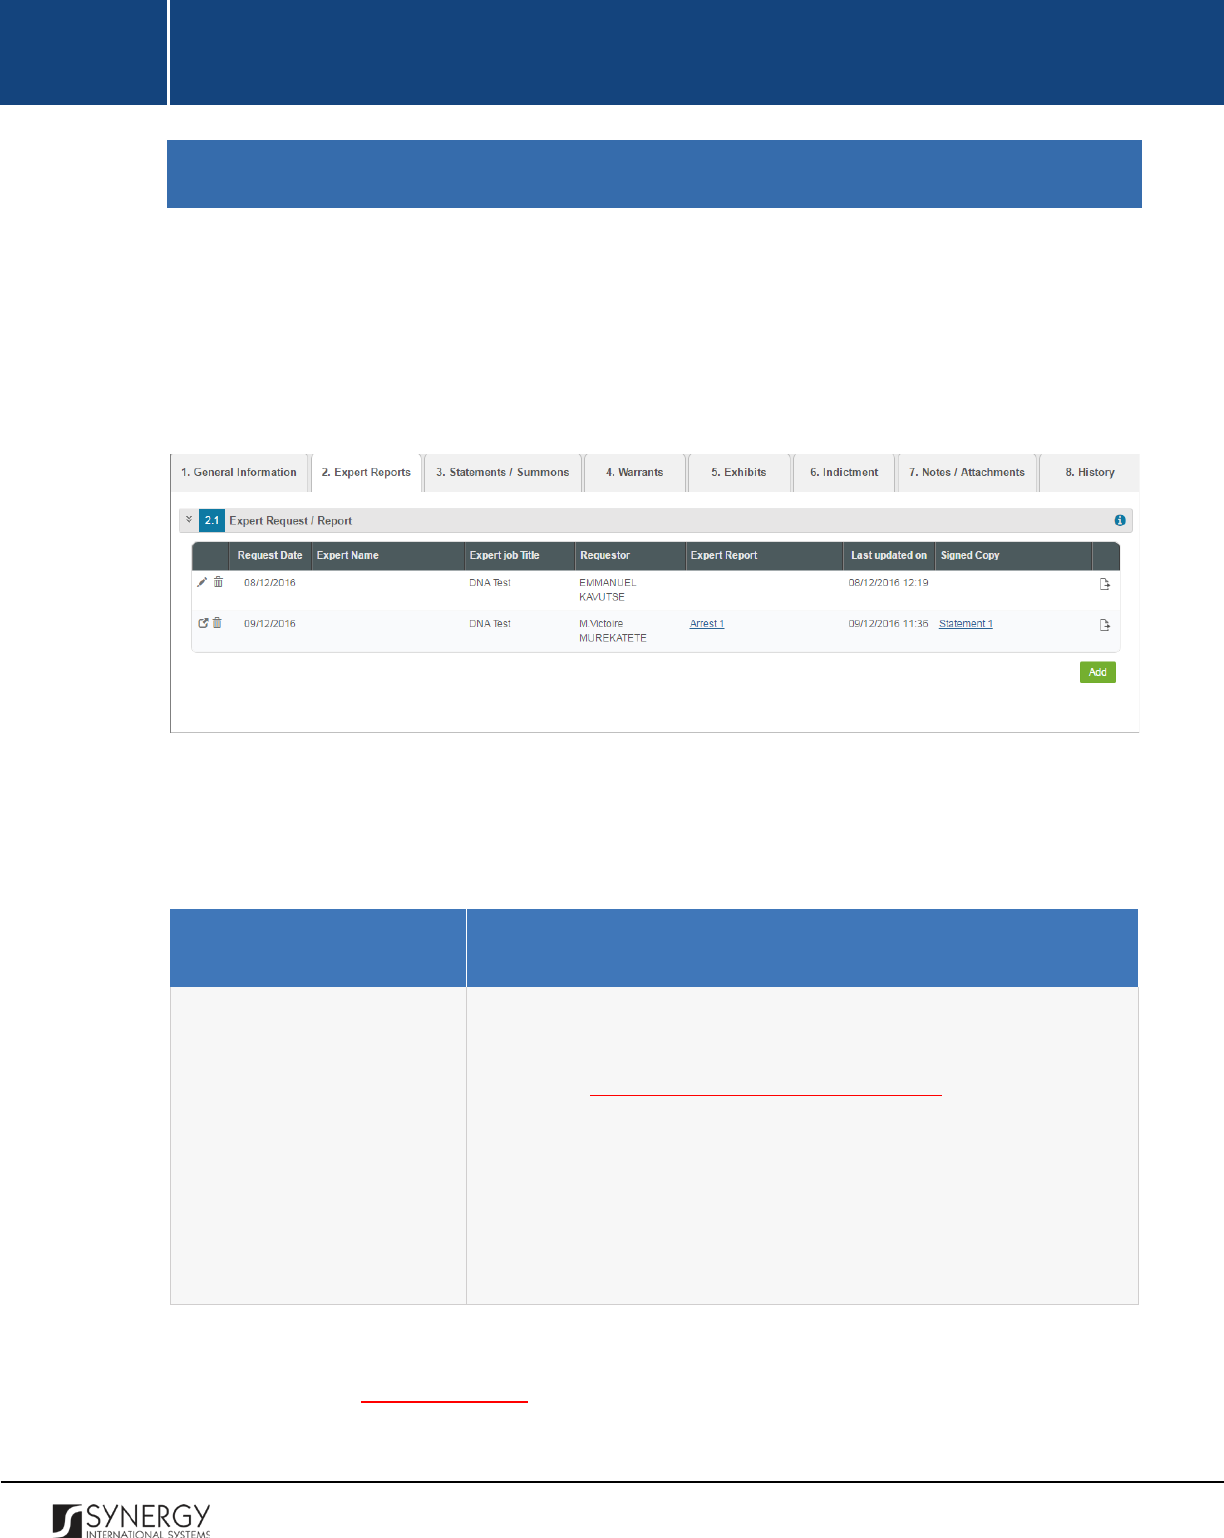
INTEGRATED CRIMINAL JUSTICE INFORMATION SYSTEM OF IRAQ | Personal Information | User Manual
RWANDA IECMS | Rwanda National Public Prosecution Authority | User Manual
EXPERT REPORTS
The Expert Reports section of the Rwanda National Public Prosecution Authority form (Figure 13) s
used to store expert reports that contain testimonies of the investigation team members and subject-
matter experts involved into the case investigation. The information to be provided in this section
includes the request date, expert name, attached expert reports, signed copies of the expert reports,
etc.
Figure 13: Expert Reports Section
For more details on what information is requested in the Expert Reports section, refer to the table
below.
Field Name
Description
Expert Request / Expert
Report
Provide information on the professionals whose subject-matter
expertise is requested during the case investigation.
For more
details, see Managing Expert Requests / Reports.
Note:
In order to ensure ease of record management and better
user experience, the system automatically generates and displays
information on the date and time when am expert request / expert
report record is last modified. This information is displayed in the
Last Updated on column of the Expert Request / Report table.
Note:
The system allows for exporting records displayed in this section. For more details on how to
export records, see EXPORTING FILES.
39

INTEGRATED CRIMINAL JUSTICE INFORMATION SYSTEM OF IRAQ | Personal Information | User Manual
RWANDA IECMS | Rwanda National Public Prosecution Authority | User Manual
Managing Expert Requests / Reports
This chapter outlines how to add expert requests and reports, edit, view, and remove them.
Adding an Expert Request / Expert Report Record
In order to add an expert request / report record, follow the steps below:
1. Click the
Add
button at the bottom of the Expert Request / Report field. An Expert Request /
Report form will open (Figure 14).
2. Provide the information requested in the form as described in the table below:
Note:
Some fields in this section are mandatory to be filled in. They are marked with an asterisk.
Field Name
Description
Request Date
The information in this field is automatically generated by the
system and shows the date when the request for an expert opinion
was placed.
Prosecutor
Select the name of the
Prosecutor
who placed the request from the
drop-down list. This field is mandatory.
Note:
If the list of prosecutors is long and hard to browse in, you can
make use of the search option. To locate the instance that you are
looking for, you should enter the keyword in the search box above
the drop-down list.
Expert Name
Indicate the name of the expert whose advice was requested and
who will submit a report on the investigation findings.
Expert Job Institution
Indicate the institution where the expert works.
Expert Job Title
Indicate the position that the expert occupies in their institution.
Note:
If the list of occupations is long and hard to browse in, you can
make use of the search option. To locate the instance that you are
40
INTEGRATED CRIMINAL JUSTICE INFORMATION SYSTEM OF IRAQ | Personal Information | User Manual
RWANDA IECMS | Rwanda National Public Prosecution Authority | User Manual
looking for, you should enter the keyword in the search box above
the drop-down list.
Summary of Facts
Add a brief description of facts on which professional expertize is
needed.
Tasks Given
Specify the tasks to be carried out by the expert during the case
investigation. This field is mandatory.
Expert Report
Attach a document generated by the expert and offering their
opinion on points of controversy that existed in the prosecution
case. For more details, see Managing Attachments.
Note:
The Date Attached field will automatically be populated with
the date when the attachment was made and will be available once
you upload the respective file.
Signed Copy
Attach a
Signed Copy
of the expert report. For more details, see
Managing Attachments.
Note:
The Date Attached field will automatically be populated with
the date when the attachment was made and will be available once
you upload the respective file.
Validated
Check the accuracy of the information provided by selecting the
Validated
checkbox. Please, note that system validation renders all
the information provided in the form as non-editable.
3. Click the
Save
button to save the information input. Or, click
Cancel
to terminate the operation.
41
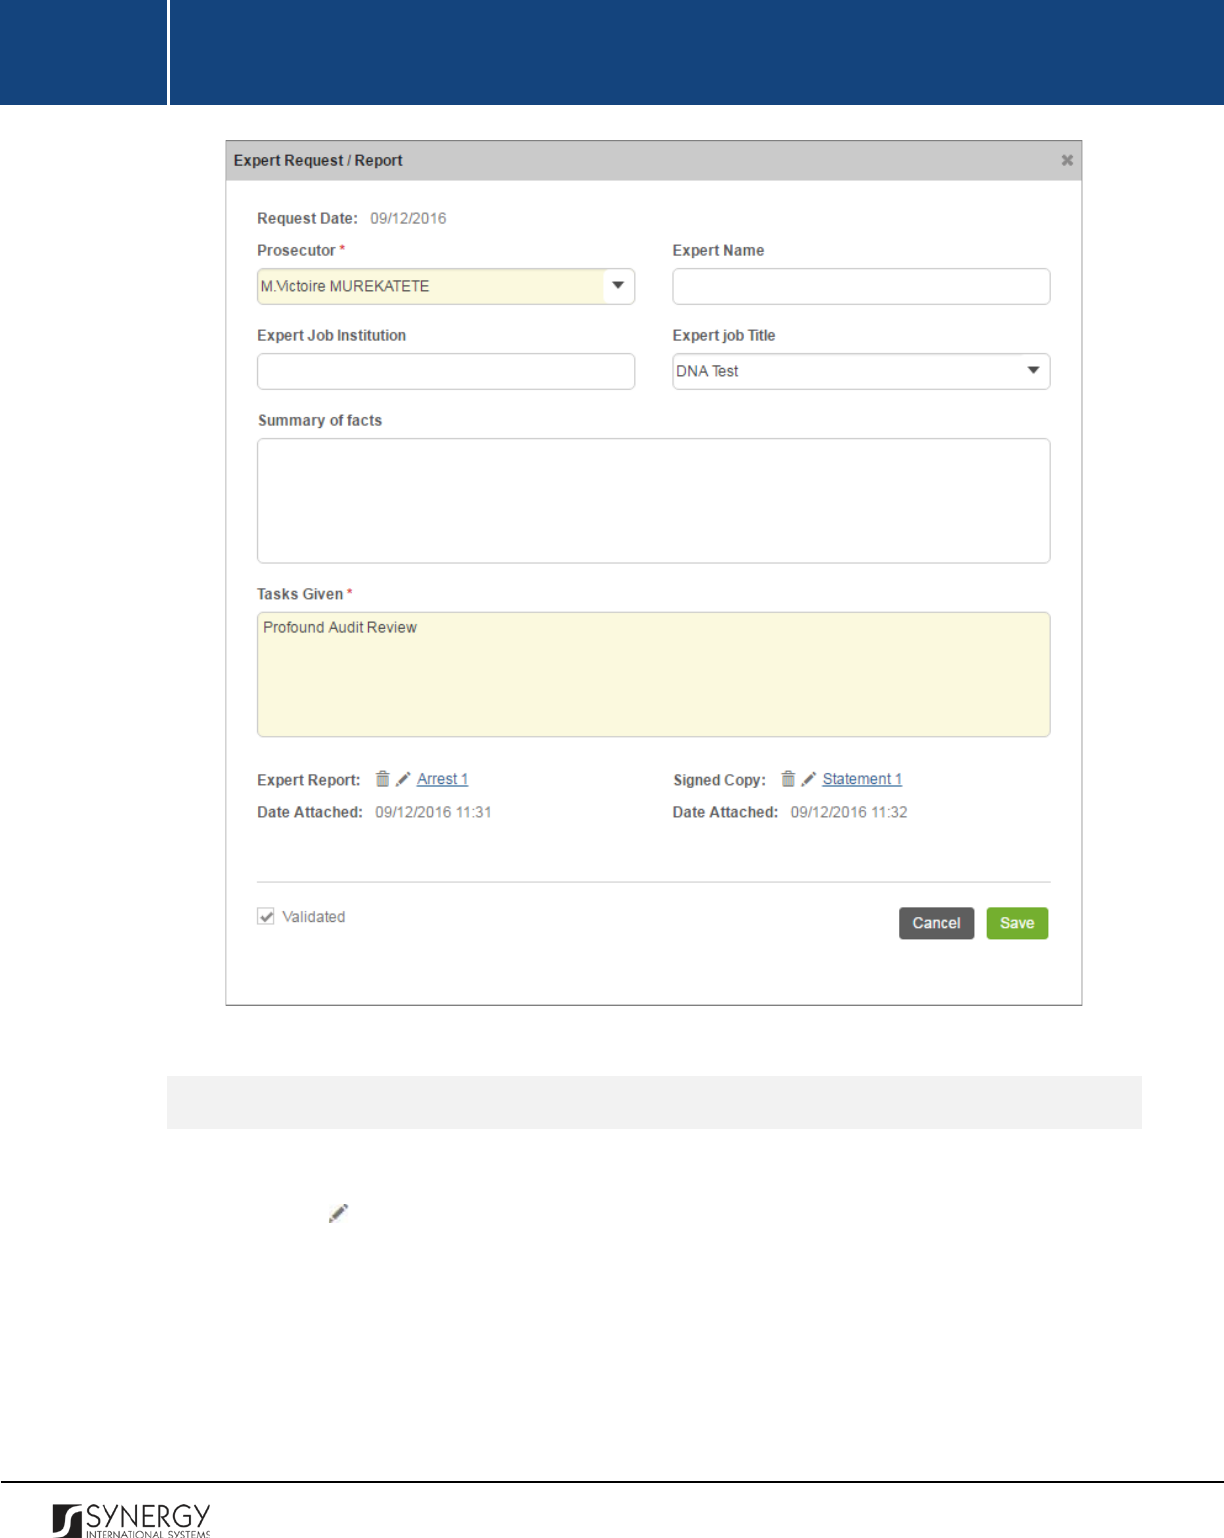
INTEGRATED CRIMINAL JUSTICE INFORMATION SYSTEM OF IRAQ | Personal Information | User Manual
RWANDA IECMS | Rwanda National Public Prosecution Authority | User Manual
Figure 14: Adding an Expert Request / Report Record
Editing Expert Request / Report Records
In order to edit an expert request / report record, follow the steps below:
1. Click the
(Edit)
button to the left of the record that you want to modify. The Expert Request
/ Report form will open.
2. Make the required changes in the data displayed.
3. Click the
Save
button to save the changes made. Or, click
Cancel
to discard them.
Note:
The possibility of editing record details is available for records that have not been validated yet.
42

INTEGRATED CRIMINAL JUSTICE INFORMATION SYSTEM OF IRAQ | Personal Information | User Manual
RWANDA IECMS | Rwanda National Public Prosecution Authority | User Manual
Viewing Expert Request / Expert Report Records
In order to view the details of expert request / expert report records, click the
(View Form)
button
to the left of the record. The record summary will open in a separate window in the non-editable
mode.
Note:
The possibility of viewing record details is available for validated records only.
Removing Expert Request / Report Records
In order to remove an expert request / report record, click the
(Remove)
button to the left of the
record.
43
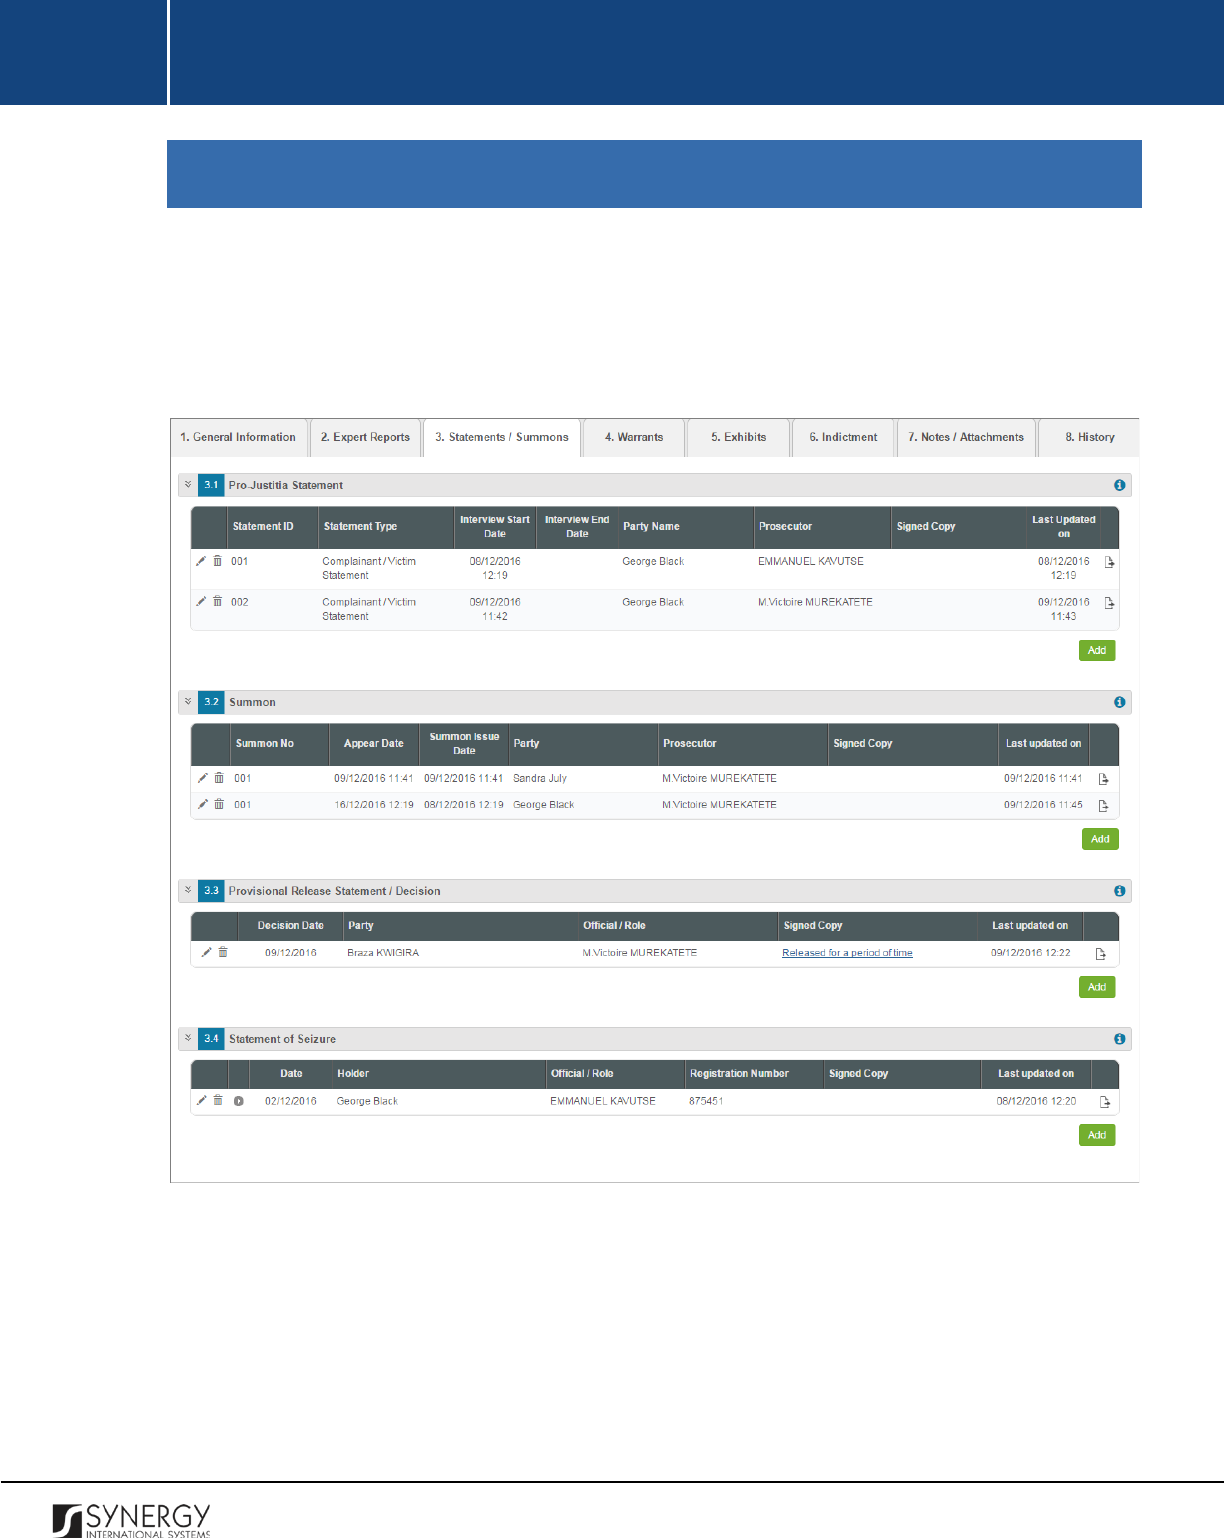
INTEGRATED CRIMINAL JUSTICE INFORMATION SYSTEM OF IRAQ | Personal Information | User Manual
RWANDA IECMS | Rwanda National Public Prosecution Authority | User Manual
STATEMENTS / SUMMONS
The Statements / Summons section of the Rwanda National Public Prosecution Authority form (Figure
15) is used to display information on the statements, such as such as pro-Justitia and arrest
statements, that form an inseparable part of a prosecution record. The information to be provided in
this section includes statement / summons details and other related information.
Figure 15: Statements / Summons Section
For more details on what information is requested in the Statements / Summons section, refer to the
table below.
44
INTEGRATED CRIMINAL JUSTICE INFORMATION SYSTEM OF IRAQ | Personal Information | User Manual
RWANDA IECMS | Rwanda National Public Prosecution Authority | User Manual
Field Name
Description
Pro-Justitia Statement
Provide information on the statements issued to interview the
complainants, suspects, and witnesses within the scope of the given
case. For more details, see Managing Pro-Justitia Statements.
Summon
Provide information about the legal documents requesting a person
to appear at the prosecution office and issued within the scope of
the given case. For more details, see Managing Summons.
Provisional Release
Statement / Decision
Provide information about the legal documents granting provisional
release to a person and issued within the scope of the given case.
For more details, see Managing Provisional Release Statements.
Statement of Seizure
Provide information about the legal documents empowering police
officers to execute search and seizure. For more details, see
Managing Seizure Statements.
Note:
In order to ensure ease of record management and better user experience, the system
automatically generates and displays information on the user who created a record in the Statements
/ Summons section. This information is displayed in the Created by column of the tables listed in this
section. Moreover, the system allows for exporting records from all the fields of this section. For more
details on how to export records, see EXPORTING FILES.
Managing Pro-Justitia Statements
This chapter outlines how to add, edit, view, and remove pro-Justitia statement records.
Adding a Pro-Justitia Statement Record
In order to add a pro-Justitia statement record, follow the steps below:
1. Click the
Add
button at the bottom of the Pro-Justitia Statement field. A Pro-Justitia Statement
form will appear (Figure 16).
45

INTEGRATED CRIMINAL JUSTICE INFORMATION SYSTEM OF IRAQ | Personal Information | User Manual
RWANDA IECMS | Rwanda National Public Prosecution Authority | User Manual
Figure 16: Adding a Pro-Justitia Statement Record
46
INTEGRATED CRIMINAL JUSTICE INFORMATION SYSTEM OF IRAQ | Personal Information | User Manual
RWANDA IECMS | Rwanda National Public Prosecution Authority | User Manual
2. Provide the information requested in the form as described in the table below:
Note:
Some fields in this section are mandatory to be filled in. They are marked with an asterisk.
Field Name
Description
Statement Type
Indicate the type of the statement based on what the capacity of the
interviewee is in relation to the case. This field is mandatory.
Note:
If the list of statement types is long and hard to browse in, you
can make use of the search option. To locate the instance that you
are looking for, you should enter the keyword in the search box
above the drop-down list.
Prosecutor
Select the name of the
Prosecutor
who requested a pro-Justitia
statement from the drop-down list. This field is mandatory.
Note:
If the list of prosecutors is long and hard to browse in, you can
make use of the search option. To locate the instance that you are
looking for, you should enter the keyword in the search box above
the drop-down list.
Interviewee
Select the name of the
Interviewee
from the drop-down list. This
field is mandatory.
Please, note that the list will contain all the
parties that are involved into the case in the capacity dictated by the
selected statement type. For more details on how to add parties to
the police case, see the GENERAL INFORMATION section.
Note:
If the list of interviewees is long and hard to browse in, you
can make use of the search option. To locate the instance that you
are looking for, you should enter the keyword in the search box
above the drop-down list.
Preferred Language
Select the
Preferred Language
of the interview. The following
options are available:
• English
• French
• Kinyarwanda
47
INTEGRATED CRIMINAL JUSTICE INFORMATION SYSTEM OF IRAQ | Personal Information | User Manual
RWANDA IECMS | Rwanda National Public Prosecution Authority | User Manual
•
Other
Please, note that if the Other option is selected, you will be asked to
enter the name of the preferred language in the new field that
appears.
Note:
If the list of languages is long and hard to browse in, you can
make use of the search option. To locate the instance that you are
looking for, you should enter the keyword in the search box above
the drop-down list.
Who Owns
Indicate the assets, such as lands, vehicles, etc.,
that the person
being interviewed owns.
Interview Start Date
The information in this field is automatically generated by the
system and shows the date and time when the interview started.
Interview End Date
The information in
this field is automatically generated by the
system and shows the date and time when the interview was over.
Crime Committed
This is a read-
only field that is automatically generated by the
system and that becomes available when recording suspect
statements. It lists all legal acts and codes that were violated by the
person being interviewed. For more information on how to record
crimes committed by any case participant, see the GENERAL
INFORMATION section.
Offence
Give a brief description of the
Offence
that took place.
Signed Copy
Attach a
Signed Copy
of the pro-Justitia statement. For more details,
see Managing Attachments.
Note:
The Date Attached field will automatically be populated with
the date when the attachment was made and will be available once
you upload the respective file.
Advocate Present
State whether the advocate attended the interview by activating the
respective radio button.
48
INTEGRATED CRIMINAL JUSTICE INFORMATION SYSTEM OF IRAQ | Personal Information | User Manual
RWANDA IECMS | Rwanda National Public Prosecution Authority | User Manual
Q: / R:
Record all the questions (
Q:
) that were asked during the interview
as well as the responses (
R:) to them. For more details, see
Managing Interview Questions / Responses.
Validated
Check the accuracy of the information provided by selecting the
Validated
checkbox. Please, note that system validation renders all
the information provided in the form as non-editable.
3. Click the
Save
button to save the information input. Or, click
Cancel
to terminate the operation.
Editing Pro-Justitia Statement Records
In order to edit a pro-Justitia statement record, follow the steps below:
1. Click the
(Edit)
button to the left of the record that you want to modify. The Pro-Justitia
Statement form will open.
2. Make the required changes in the data displayed.
3. Click the
Save
button to save the changes made. Or, click
Cancel
to discard them.
Note:
The possibility of editing record details is available for records that have not been validated yet.
Viewing Pro-Justitia Statement Records
In order to view the details of pro-Justitia statement records, click the
(View Form)
button to the
left of the record. The record summary will open in a separate window in the non-editable mode.
Note:
The possibility of viewing record details is available for validated records only.
Removing Pro-Justitia Statement Records
In order to remove a pro-Justitia statement record, click the
(Remove)
button to the left of the
record.
Managing Interview Questions / Responses
49
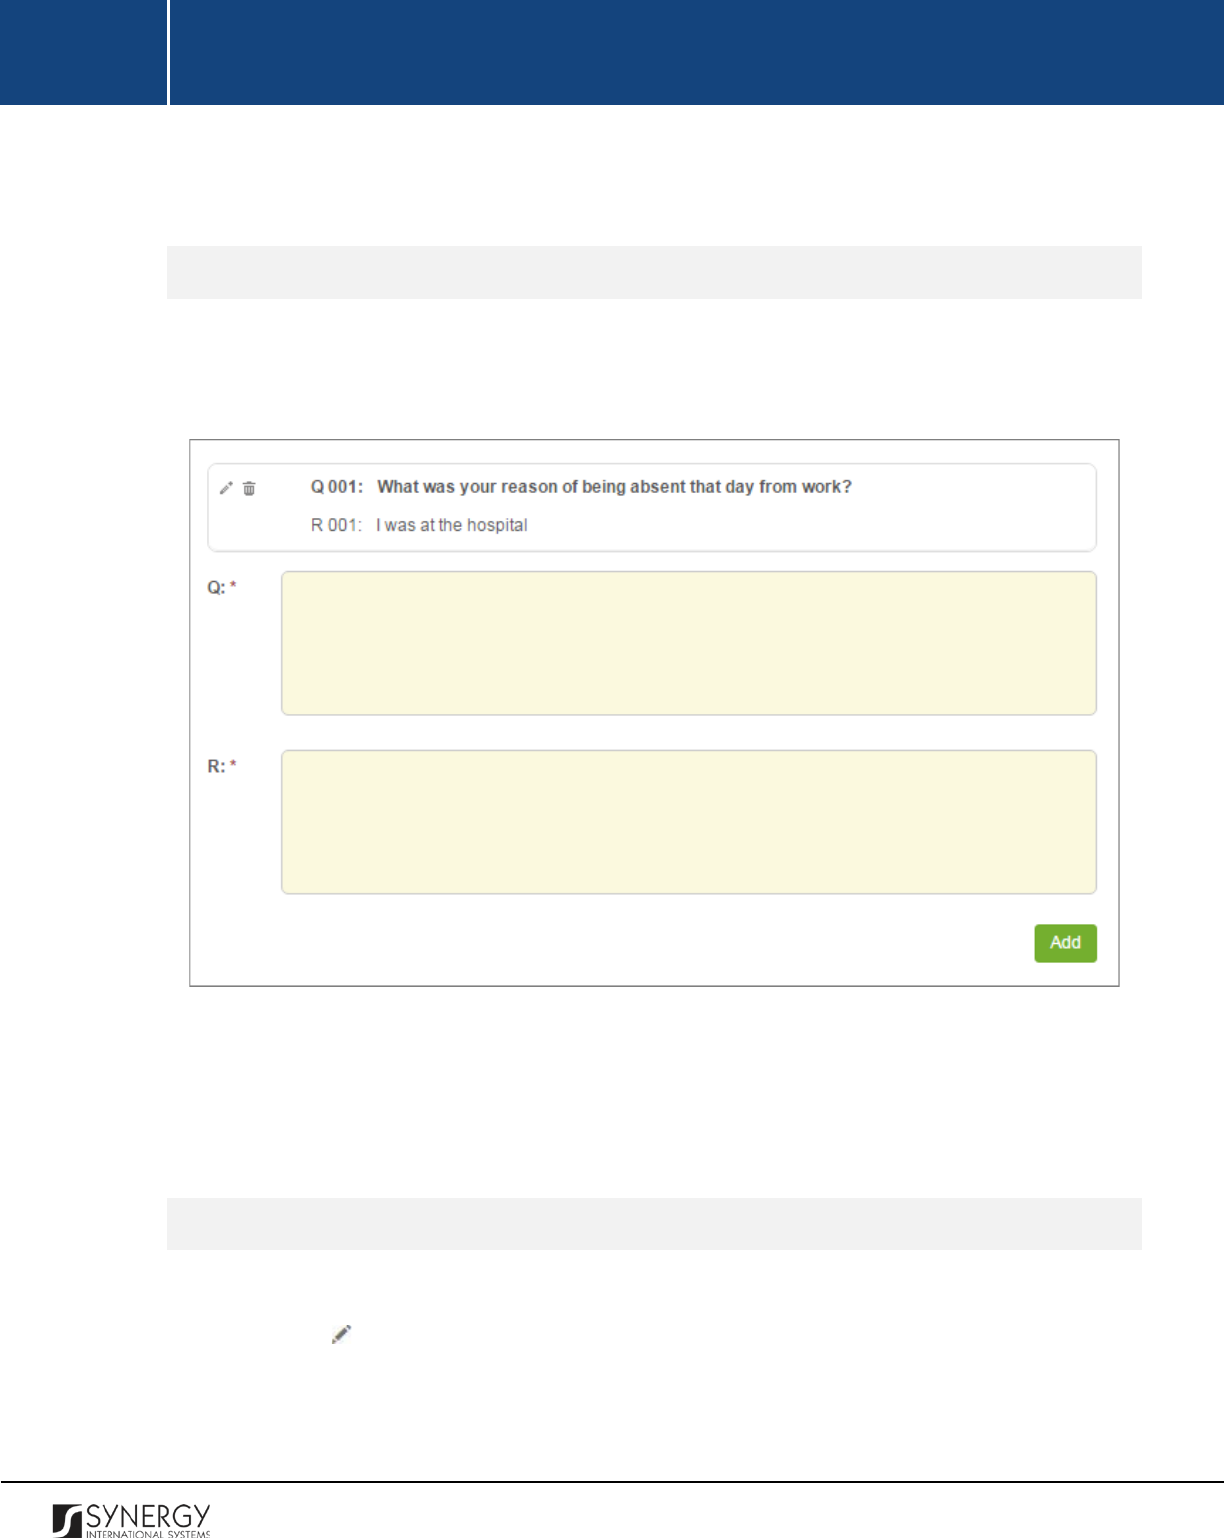
INTEGRATED CRIMINAL JUSTICE INFORMATION SYSTEM OF IRAQ | Personal Information | User Manual
RWANDA IECMS | Rwanda National Public Prosecution Authority | User Manual
This chapter outlines how to add and remove question and response records.
Adding a Question / Response Record
In order to add a question / response record, follow the steps below:
1. Record the question that was asked during the interview. This field is mandatory.
Figure 17: Adding a Question / Response Record
2. Record the response that the interviewee gave to the question asked. This field is mandatory.
3. Click the
Add
button. The new record will appear in the respective table and will be assigned
a sequential number (Figure 17).
Editing Question / Response Records
In order to edit a question / response record, follow the steps below:
1. Click the
(Edit)
button to the left of the record that you want to modify. This will activate
the selected record.
2. Make the required changes in the data displayed.
50
INTEGRATED CRIMINAL JUSTICE INFORMATION SYSTEM OF IRAQ | Personal Information | User Manual
RWANDA IECMS | Rwanda National Public Prosecution Authority | User Manual
3. Click the
(Save)
button to record the changes made. Or, click
(Cancel)
to discard them.
Removing Question / Response Records
In order to remove a question / response record, click the
(Remove)
button to the left of the record.
Managing Summons
This chapter outlines how to add, edit, and remove summons records.
Adding a Summons Record
In order to add a summons record, follow the steps below:
1. Click the
Add
button at the bottom of the Summon field. A Summon form will open (Figure
18).
2. Provide the information requested in the form as described in the table below:
Note:
Some fields in this section are mandatory to be filled in. They are marked with an asterisk.
Field Name
Description
Prosecutor
Select the name of the
Prosecutor
who issued the summons from
the drop-down list. This field is mandatory.
Note:
If the list of prosecutors is long and hard to browse in, you can
make use of the search option. To locate the instance that you are
looking for, you should enter the keyword in the search box above
the drop-down list.
Appear Date
Indicate the
Date
when the respective party should appear at the
prosecution office. A calendar popup is available for this field, see
Figure 3: Calendar.
Apart from indicating the date, the calendar also allows specifying
the time when the extraction took place. Use the
Hour
and
Minute
sliders to set the exact time.
51

INTEGRATED CRIMINAL JUSTICE INFORMATION SYSTEM OF IRAQ | Personal Information | User Manual
RWANDA IECMS | Rwanda National Public Prosecution Authority | User Manual
Summon Issue Date
The information in this field is automatically generated by the
system and shows the date when the summons was issued.
Party
Select the name of the party who was asked to appear at the
prosecution office from the drop-down list. This field is mandatory.
Please, note that the list will contain all parties involved into the case
and specified in the GENERAL INFORMATION section.
Note:
If the list of parties is long and hard to browse in, you can make
use of the search option. To locate the instance that you are looking
for, you should enter the keyword in the search box above the drop-
down list.
Appear Address
The information in this field is automatically generated based on the
Prosecution Office selected in the GENERAL INFORMATION section.
It displays the address of the prosecution office
where the
summoned person should appear. This field is mandatory.
Office Number
Enter the number of the prosecution
office where the summoned
person should appear.
Signed Copy
Attach a signed copy of the summons file. For more details, see
Managing Attachments.
Note:
The Date Attached field will automatically be populated with
the date when the attachment was made and will be available once
you upload the respective file.
Validated
Check the accuracy of the information provided by selecting the
Validated
checkbox. Please, note that system validation renders all
the information provided in the form as non-editable.
3. Click the
Save
button to save the information input. Or, click
Cancel
to terminate the operation.
52
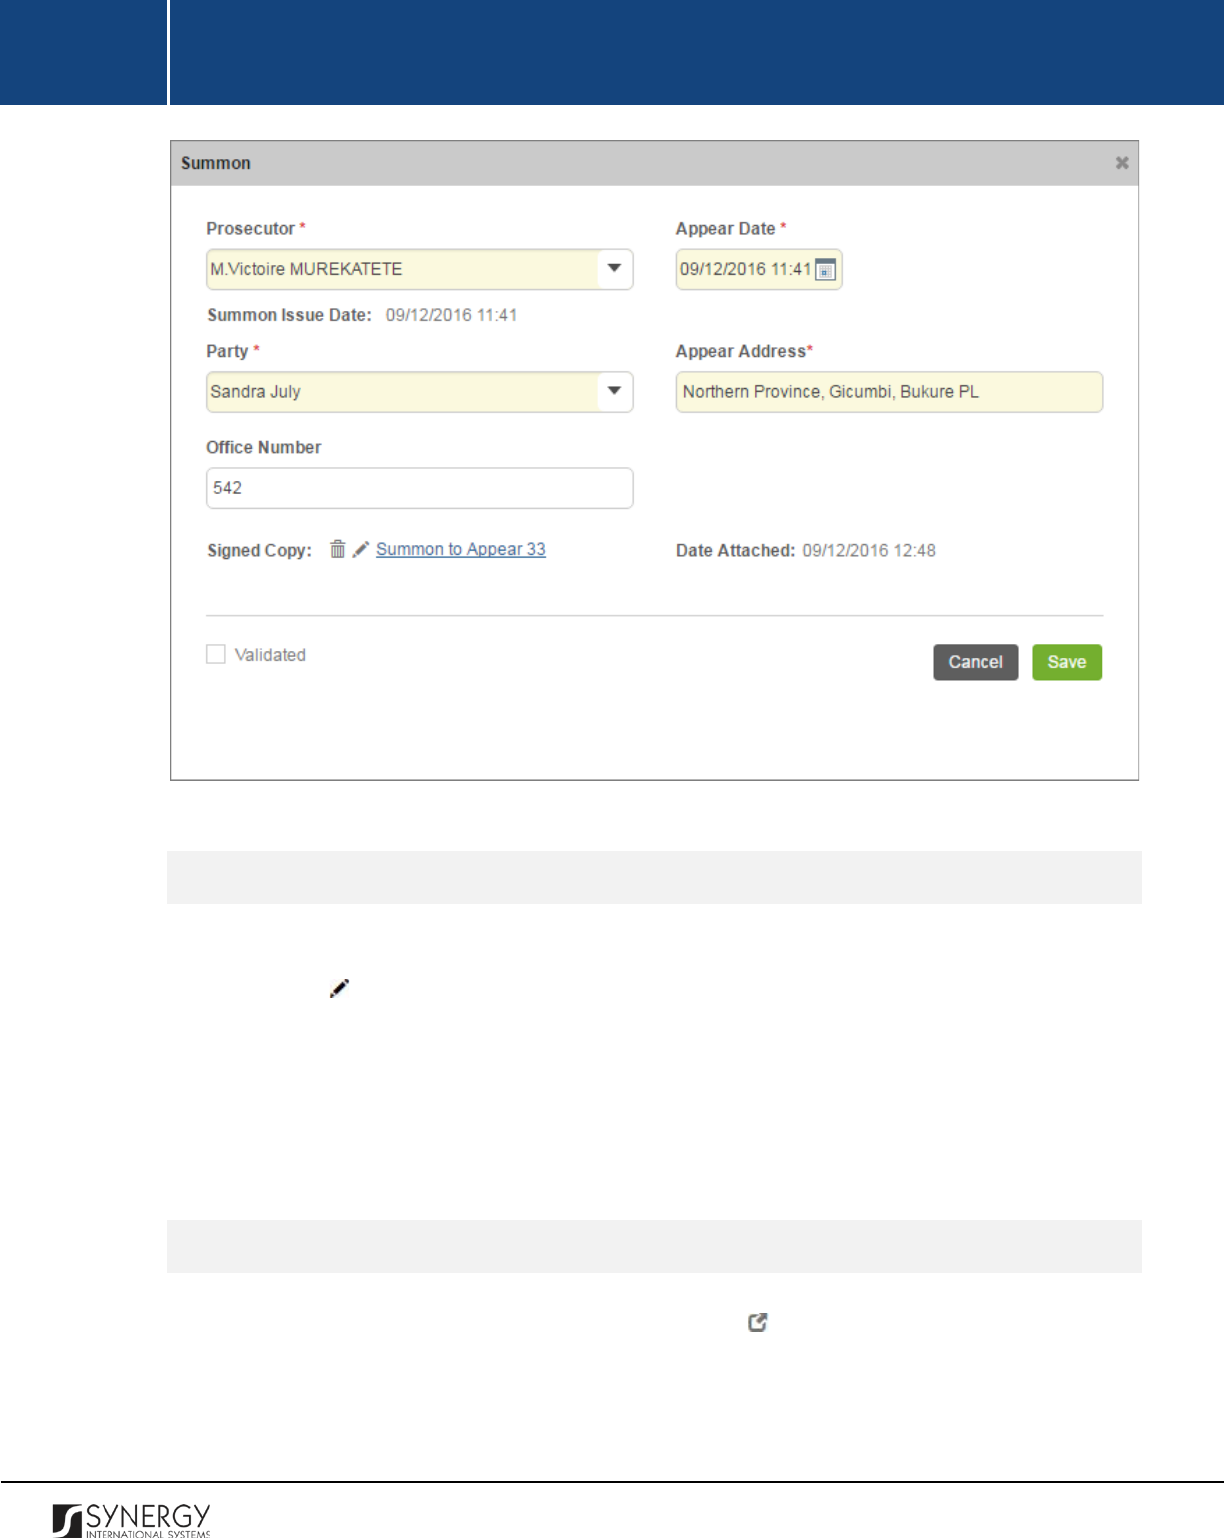
INTEGRATED CRIMINAL JUSTICE INFORMATION SYSTEM OF IRAQ | Personal Information | User Manual
RWANDA IECMS | Rwanda National Public Prosecution Authority | User Manual
Figure 18: Adding a Summons Record
Editing Summons Records
In order to edit a summons record, follow the steps below:
1. Click the
(Edit)
button to the left of the record that you want to modify. The Summon form
will open.
2. Make the required changes in the data displayed.
3. Click the
Save
button to save the changes made. Or, click
Cancel
to discard them.
Note:
The possibility of editing record details is available for records that have not been validated yet.
Viewing Summons Records
In order to view the details of summons records, click the
(View Form)
button to the left of the
record. The record summary will open in a separate window in the non-editable mode.
Note:
The possibility of viewing record details is available for validated records only.
53
INTEGRATED CRIMINAL JUSTICE INFORMATION SYSTEM OF IRAQ | Personal Information | User Manual
RWANDA IECMS | Rwanda National Public Prosecution Authority | User Manual
Removing Summons Records
In order to remove a summons record, click the
(Remove)
button to the left of the record.
Managing Provisional Release Statements
This chapter outlines how to add, edit, view, and remove provisional release statement records.
Adding a Provisional Release Statement Record
In order to add a provisional release statement record, follow the steps below:
1. Click the
Add
button at the bottom of the Provisional Release Statement / Decision field. A
Provisional Release Statement form will open (Figure 19).
2. Provide the information requested in the form as described in the table below:
Note:
Some fields in this section are mandatory to be filled in. They are marked with an asterisk.
Field Name
Description
Decision Date
Indicate the date when the provisional release decision was made.
This field is mandatory. A calendar popup is available for this field,
see Figure 3: Calendar.
Prosecutor
Select the name of the
Prosecutor who issued the provisional
release statement from the drop-down list. This field is mandatory.
Note:
If the list of prosecutors is long and hard to browse in, you can
make use of the search option. To locate the instance that you are
looking for, you should enter the keyword in the search box above
the drop-down list.
Detained at
Indicate the police station the suspect was detained at.
Note:
If the list of police stations is long and hard to browse in, you
can make use of the search option. To locate the instance that you
54
INTEGRATED CRIMINAL JUSTICE INFORMATION SYSTEM OF IRAQ | Personal Information | User Manual
RWANDA IECMS | Rwanda National Public Prosecution Authority | User Manual
are looking for, you should enter the keyword in the search box
above the drop-down list.
Party
Select the name of the party who was released by the provisional
release statement. This field is mandatory. Please, note that the list
will contain all
the detained parties involved into the case and
specified in the GENERAL INFORMATION section.
Note:
If the list of parties is long and hard to browse in, you can make
use of the search option. To locate the instance that you are looking
for, you should enter the keyword in the search box above the drop-
down list.
Condition of Release
Provide a brief description of the
conditions the selected party is
released under. This field is mandatory.
Crime Committed
This is a read-
only field that is automatically generated by the
system and that lists all legal acts and codes that were violated by
the party to be released. For more information on how to record
crimes committed by any case participant, see the GENERAL
INFORMATION section.
Observation
Enter additional observations on the provisional release, if any.
Signed Copy
Attach a
Signed Copy
of the provisional release statement. For more
details, see Managing Attachments.
Note:
The Date Attached field will automatically be populated with
the date when the attachment was made and will be available once
you upload the respective file.
Validated
Check the accuracy of the information provided by selecting the
Validated
checkbox. Please, note that system validation renders all
the information provided in the form as non-editable.
3. Click the
Save
button to save the information input. Or, click
Cancel
to terminate the operation.
55

INTEGRATED CRIMINAL JUSTICE INFORMATION SYSTEM OF IRAQ | Personal Information | User Manual
RWANDA IECMS | Rwanda National Public Prosecution Authority | User Manual
Figure 19: Adding a Provisional Release Statement Record
Editing Provisional Release Statement Records
In order to edit a provisional release statement record, follow the steps below:
1. Click the
(Edit)
button to the left of the record that you want to modify. The Provisional
Release Statement form will open.
2. Make the required changes in the data displayed.
3. Click the
Save
button to save the changes made. Or, click
Cancel
to discard them.
56
INTEGRATED CRIMINAL JUSTICE INFORMATION SYSTEM OF IRAQ | Personal Information | User Manual
RWANDA IECMS | Rwanda National Public Prosecution Authority | User Manual
Note:
The possibility of editing record details is available for records that have not been validated yet.
Viewing Provisional Release Statement Records
In order to view the details of provisional release statement records, click the
(View Form)
button
to the left of the record. The record summary will open in a separate window in the non-editable
mode.
Note:
The possibility of viewing record details is available for validated records only.
Removing Provisional Release Statement Records
In order to remove a provisional release statement record, click the
(Remove)
button to the left of
the record.
Managing Seizure Statements
This chapter outlines how to add, edit, view, and remove seizure statement records. It also describes
how you can expand a seizure statement record to view the items included in it.
Adding a Seizure Statement Record
In order to add a seizure statement record, follow the steps below:
1. Click the
Add
button at the bottom of the Statement of Seizure field. A Statement of Seizure
form will open (Figure 20).
2. Provide the information requested in the form as described in the table below:
Note:
Some fields in this section are mandatory to be filled in. They are marked with an asterisk.
Field Name
Description
Date
Indicate the date when the seizure statement was issued. This field
is mandatory. A calendar popup is available for this field, see Figure
3: Calendar.
57
INTEGRATED CRIMINAL JUSTICE INFORMATION SYSTEM OF IRAQ | Personal Information | User Manual
RWANDA IECMS | Rwanda National Public Prosecution Authority | User Manual
Prosecutor
Select the name of the
Prosecutor
who issued the seizure statement.
This field is mandatory.
Note:
If the list of prosecutors is long and hard to browse in, you can
make use of the search option. To locate the instance that you are
looking for, you should enter the keyword in the search box above
the drop-down list.
Holder
Select the name of the item
Holder
from the drop-down list. This
field is mandatory. Please, note that the list will contain all parties
involved into the case and specified in the GENERAL INFORMATION
section.
Note:
If the list of item holders is long and hard to browse in, you
can make use of the search option. To locate the instance that you
are looking for, you should enter the keyword in the search box
above the drop-down list.
Owner
Select the name of the item
Owner
from the drop-down list. This
field is mandatory. Please, note that the list will contain all parties
involved into the case and specified in the GENERAL INFORMATION
section.
Note:
If the list of item owners is long and hard to browse in, you
can make use of the search option. To locate the instance that you
are looking for, you should enter the keyword i
n the search box
above the drop-down list.
Registration No
Enter a unique registration number assigned to the seized item. This
field is mandatory.
Witness
Provide the name of the
Witness
to the seizure act.
Seized item
List all items that were seized. For more details, see Managing Seized
Items.
Signed Copy
Attach a
Signed Copy
of the search and seizure statement. For more
details, see Managing Attachments.
58
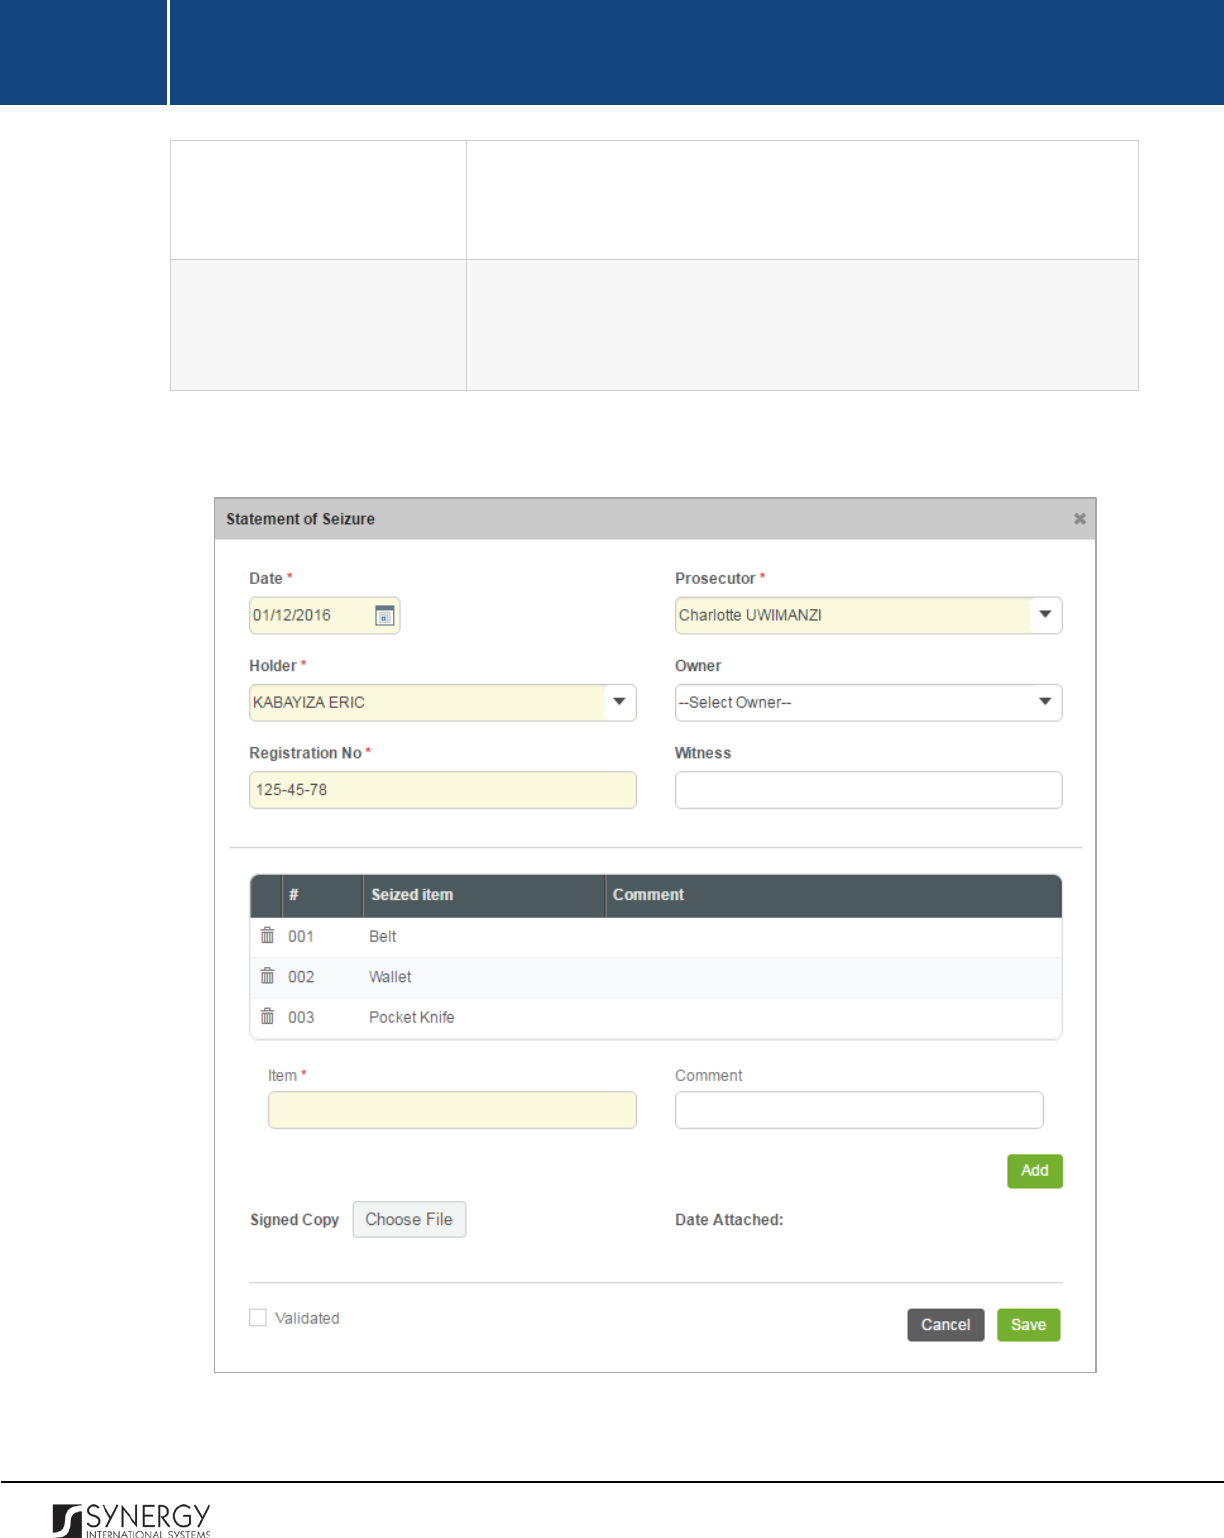
INTEGRATED CRIMINAL JUSTICE INFORMATION SYSTEM OF IRAQ | Personal Information | User Manual
RWANDA IECMS | Rwanda National Public Prosecution Authority | User Manual
Note: The Date Attached field will automatically be populated with
the date when the attachment was made and will be available once
you upload the respective file.
Validated
Check the accuracy of the information provided by selecting the
Validated
checkbox. Please, note that system validation renders all
the information provided in the form as non-editable.
3. Click the
Save
button to save the information input. Or, click
Cancel
to terminate the operation.
Figure 20: Adding a Seizure Statement Record
59
INTEGRATED CRIMINAL JUSTICE INFORMATION SYSTEM OF IRAQ | Personal Information | User Manual
RWANDA IECMS | Rwanda National Public Prosecution Authority | User Manual
Editing Seizure Statement Records
In order to edit a seizure statement record, follow the steps below:
1. Click the
(Edit)
button to the left of the record that you want to modify. The Statement of
Seizure form will open.
2. Make the required changes in the data displayed.
3. Click the
Save
button to save the changes made. Or, click
Cancel
to discard them.
Note:
The possibility of editing record details is available for records that have not been validated yet.
Viewing Seizure Statement Records
In order to view the details of seizure statement records, click the
(View Form)
button to the left of
the record. The record summary will open in a separate window in the non-editable mode.
Note:
The possibility of viewing record details is available for validated records only.
Expanding Seizure Statement Records
You can expand a seizure statement record to view the list of seized items that are included in the
statement. This way, when you select to view additional information on the seized items, you can see
the item ID, name, and other particulars.
To expand a seizure statement record, click the icon to the left of the record. Clicking the icon
will hide the seized item related information.
Removing Seizure Statement Records
In order to remove a seizure statement record, click the
(Remove)
button to the left of the record.
Managing Seized Items
This chapter outlines how to add and remove seized item records.
60
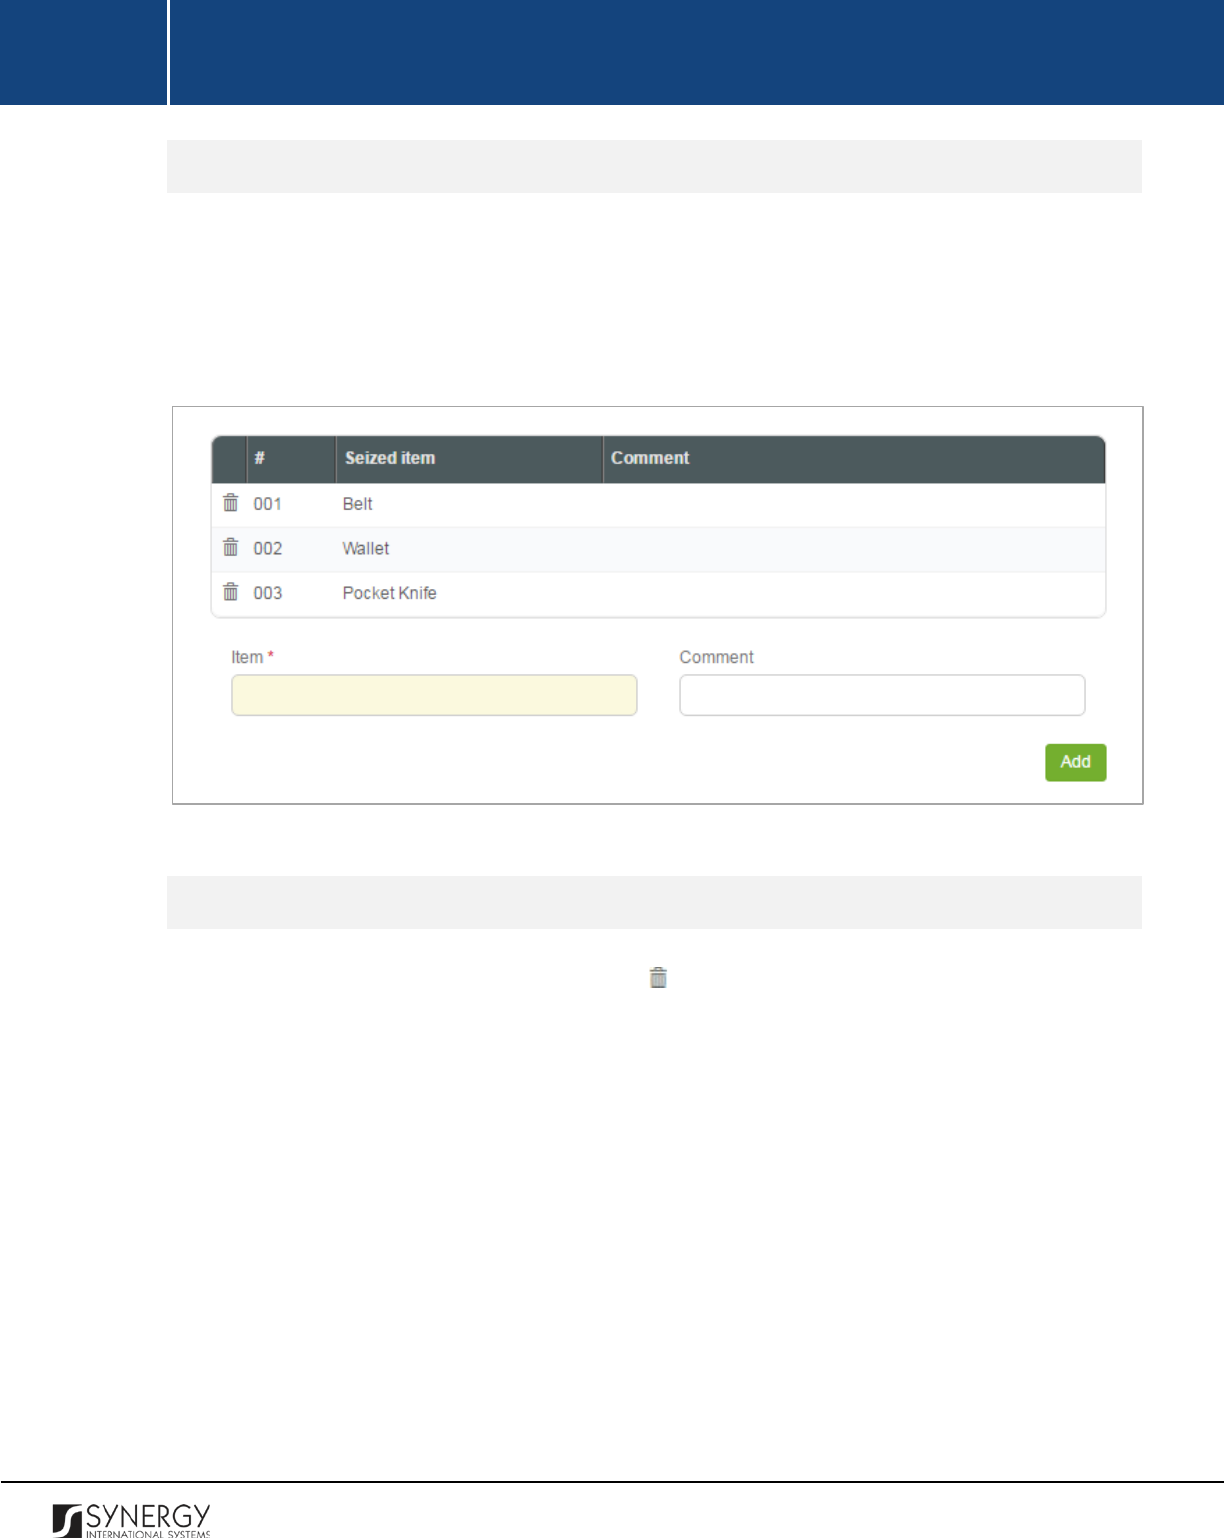
INTEGRATED CRIMINAL JUSTICE INFORMATION SYSTEM OF IRAQ | Personal Information | User Manual
RWANDA IECMS | Rwanda National Public Prosecution Authority | User Manual
Adding a Seized Item Record
In order to add a seized item record, follow the steps below:
1. Enter the name of the item that was seized.
2. Provide additional comments, if necessary.
3. Click the
Add
button. The new record will appear in the Seized Item table (Figure 21).
Figure 21: Adding a Seized Item Record
Removing a Seized Item Record
In order to remove a seized item record, click the
(Remove)
button to the left of the record.
61

INTEGRATED CRIMINAL JUSTICE INFORMATION SYSTEM OF IRAQ | Personal Information | User Manual
RWANDA IECMS | Rwanda National Public Prosecution Authority | User Manual
WARRANTS
The Warrants section of the Rwanda National Public Prosecution Authority form (Figure 22) is used to
provide key information about the authorization documents of different types – warrants - that
empower their bearers to perform a certain act against another person or entity. The information to
be provided in this section includes the warrant type, the issue date, party, prosecutor, etc.
Figure 22: Warrants Section
62
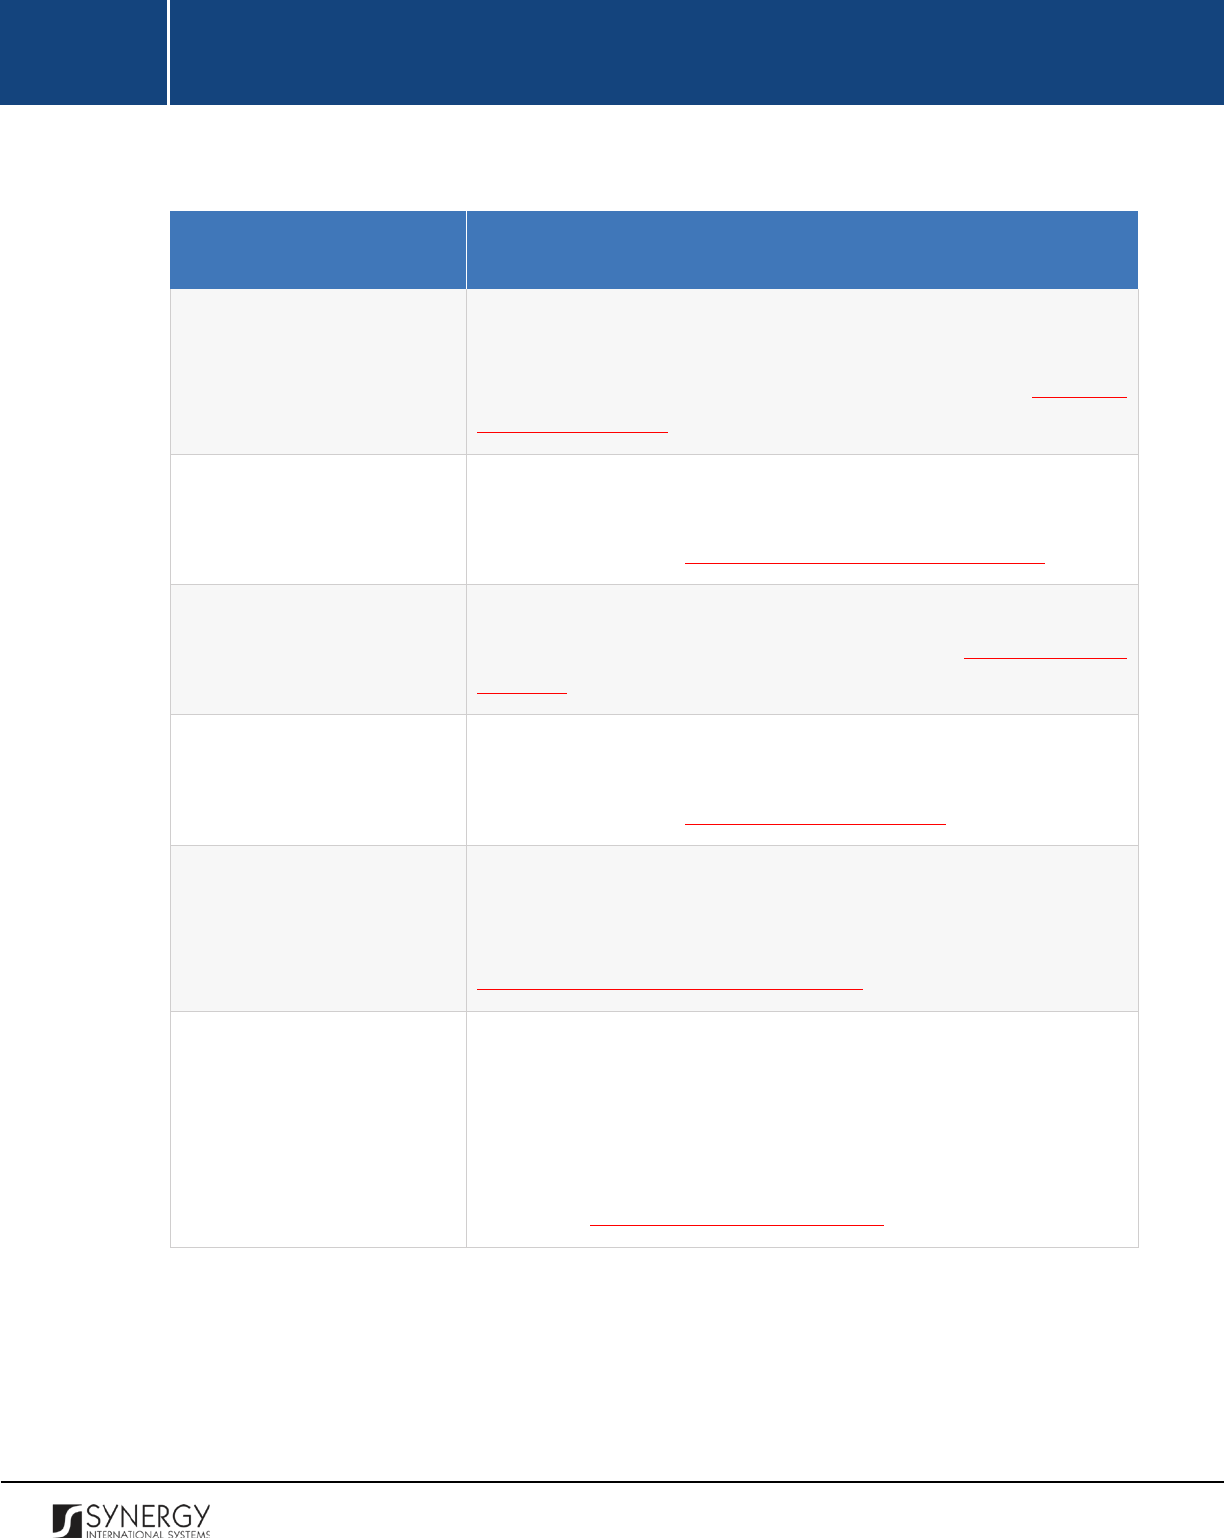
INTEGRATED CRIMINAL JUSTICE INFORMATION SYSTEM OF IRAQ | Personal Information | User Manual
RWANDA IECMS | Rwanda National Public Prosecution Authority | User Manual
For more details on what information is requested in the Warrants section, refer to the table below.
Field Name
Description
Warrant to Appear
Provide information about the legal documents requesting a person
to appear at the prosecution office and issued within the scope of
the given prosecution case. For more details, see Managing
Warrants to Appear.
Warrant to Bring by Force
Provide information about the legal document empowering police
officers to bring the case party to the prosecution office by force.
For more details, see Managing Warrants to Bring by Force.
Arrest Warrant
Provide information about the legal document empowering police
officers to execute arrest. For more details, see
Managing Arrest
Warrants.
Search Warrant
Provide information about the legal document
that have been
prepared and presented to any case party before executing search.
For more details, see Managing Search Warrants.
International Arrest Warrant
List
all legal documents (warrants) that have been prepared and
presented for seeking the arrest or provisional arrest of wanted
persons overseas, with a view to extradition. For more details, see
Managing International Arrest Warrants.
Extraction Warrant
List
all legal documents (warrants) that have been prepared and
presented for seeking the discharge of the person from the
penitential establishment where they are kept or for the release of
a person who has been found guilty or who has pleaded guilty, but
who is deemed not to have been convicted of the offence. For more
details, see Managing Extraction Warrants.
Note:
In order to ensure ease of record management and better user experience, the system
automatically generates and displays information on the date and time when a warrant record is last
modified. This information is displayed in the Last Updated on column of the Warrant table.
63
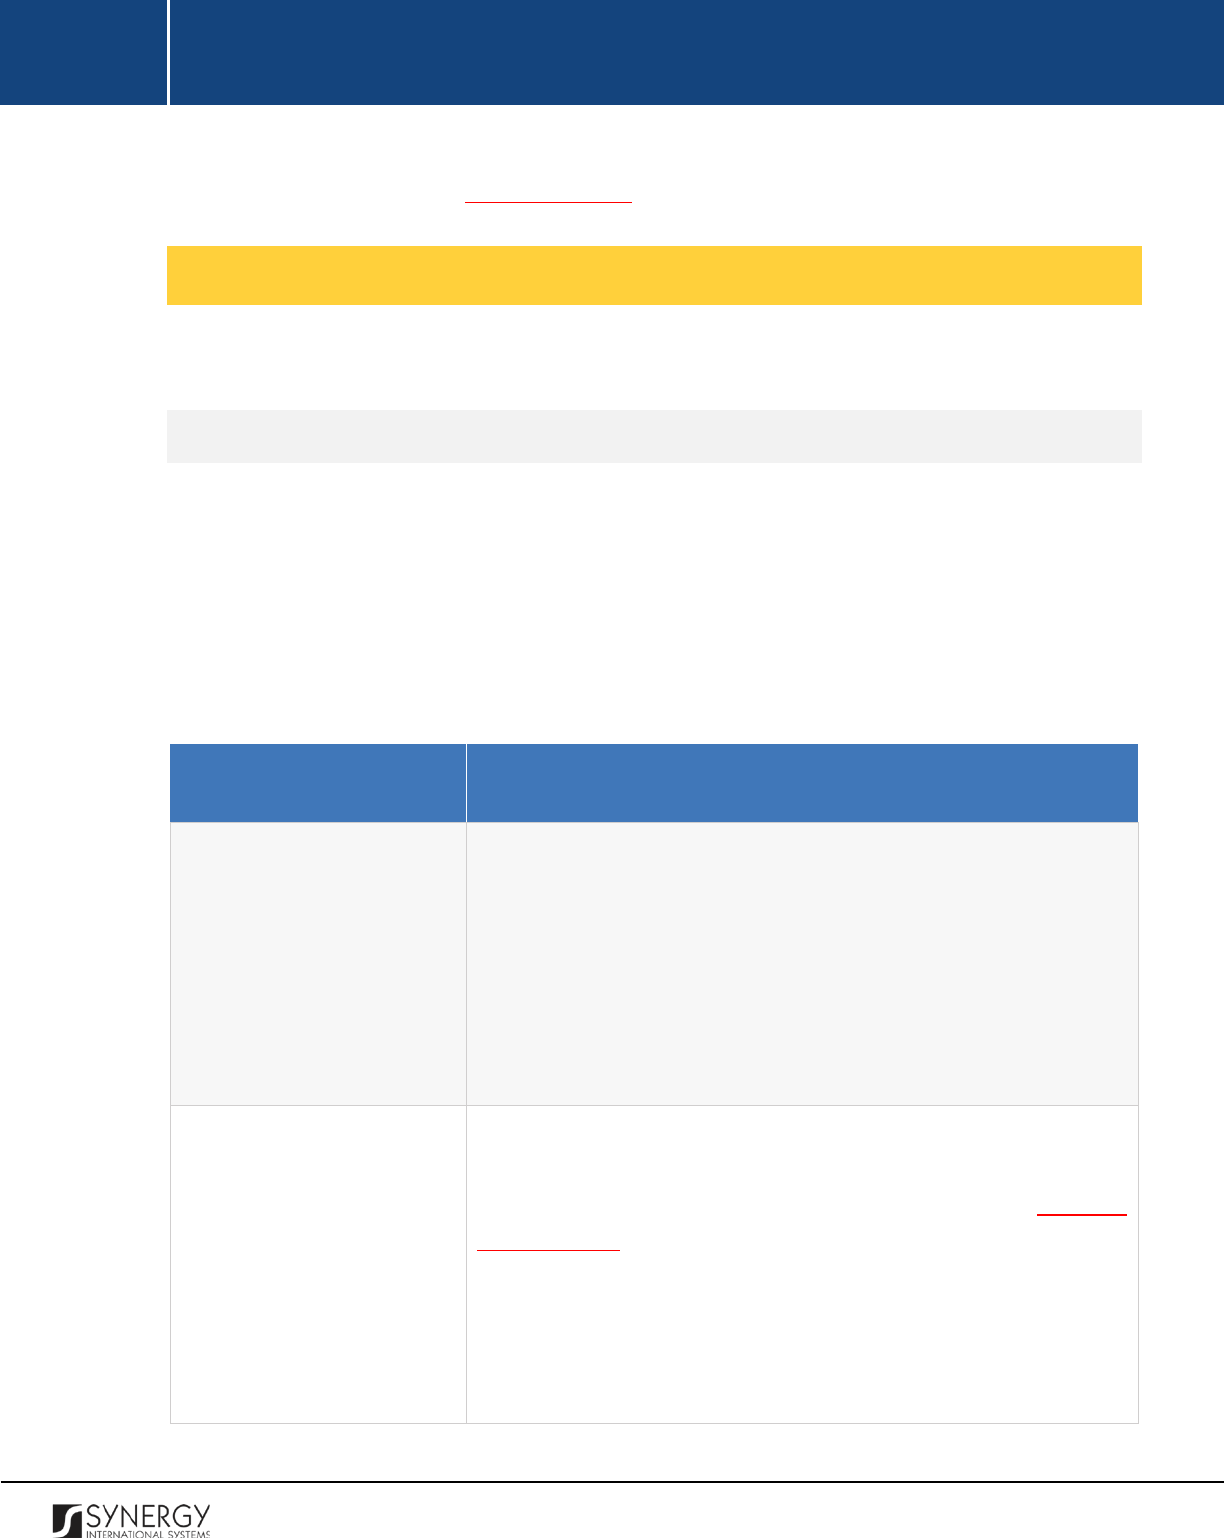
INTEGRATED CRIMINAL JUSTICE INFORMATION SYSTEM OF IRAQ | Personal Information | User Manual
RWANDA IECMS | Rwanda National Public Prosecution Authority | User Manual
Moreover, the system allows for exporting records from all the fields of this section. For more details
on how to export records, see EXPORTING FILES.
Managing Warrants to Appear
This chapter outlines how to add, edit, view, and remove warrant to appear records.
Adding a Warrant to Appear Record
In order to add a warrant to appear record, follow the steps below:
1. Click the
Add
button at the bottom of the Warrant to Appear field. A Warrant to Appear form
will open (Figure 23).
2. Provide the information requested in the form as described in the table below:
Note:
Some fields in this form are mandatory to be filled in. They are marked with an asterisk.
Field Name
Description
Prosecutor
Specify the name of the
Prosecutor
who issued the warrant by
selecting the relevant instance from the drop-down list. This field is
mandatory.
Note:
If the list of prosecutors is long and hard to browse in, you can
make use of the search option. To locate the instance that you are
looking for, you should enter the keyword in the search box above
the drop-down list.
Party
Select the
Party
the warrant was issued to from the drop-down list.
This field is mandatory.
Please, note that the list will contain all
parties involved into the case and specified in the GENERAL
INFORMATION section.
Note:
If the list of parties is long and hard to browse in, you can make
use of the search option. To locate the instance that you are looking
for, you should enter the keyword in the search box above the drop-
down list.
64
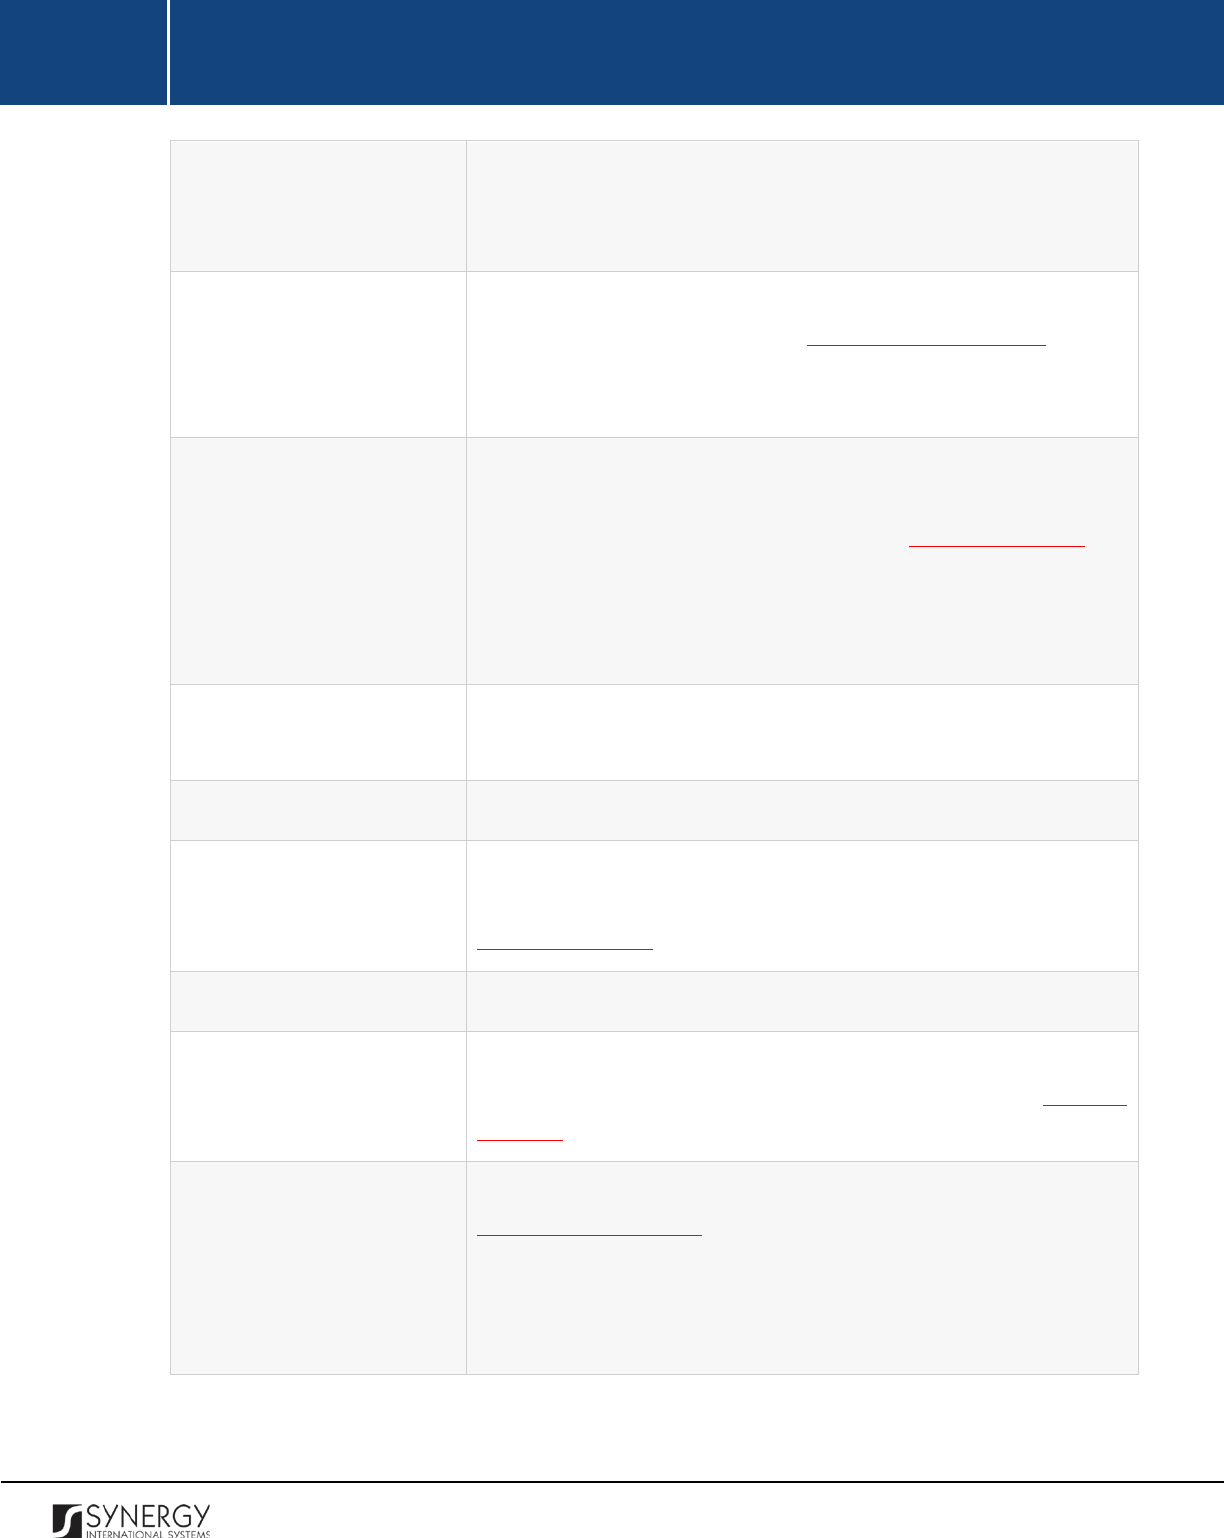
INTEGRATED CRIMINAL JUSTICE INFORMATION SYSTEM OF IRAQ | Personal Information | User Manual
RWANDA IECMS | Rwanda National Public Prosecution Authority | User Manual
Warrant Creation Date
The information in this field is automatically generated by the
system and shows the date when the warrant was recorded in the
system.
Appear Address
The information in this field is automatically generated based on the
Prosecution Office selected in the GENERAL INFORMATION section.
It displays the address of the prosecution office where the case party
included in the warrant should appear. This field is mandatory.
Appear Date / Hour
Indicate the date and time
when the party should appear at the
address indicated in the previous field. This field is mandatory. A
calendar popup is available for this field, see Figure 3: Calendar.
Apart from indicating the date, the calendar also allows specifying
the time when the party should appear at the prosecution office.
Use the
Hour
and
Minute
sliders to set the exact time.
Office Number
Enter the number of the prosecution office where the case party
should appear.
Warrant Delivered by
Enter the name of the person who has delivered the warrant.
Warrant Delivery Date
Indicate the date when the warrant was delivered to the party. This
field is mandatory. A calendar popup is available for this field, see
Figure 3: Calendar.
Warrant Received By
Enter the name of the person who received the warrant.
Warrant Received Date
Indicate the date when the warrant was received.
This field is
mandatory. A calendar popup is available for this field, see Figure 3:
Calendar.
Signed Copy
Upload a
Signed Copy
of the warrant. For more details, see
Managing Attachments.
Note:
The Date Attached field will automatically be populated with
the date when the attachment was made and will be available once
you upload the respective file.
65
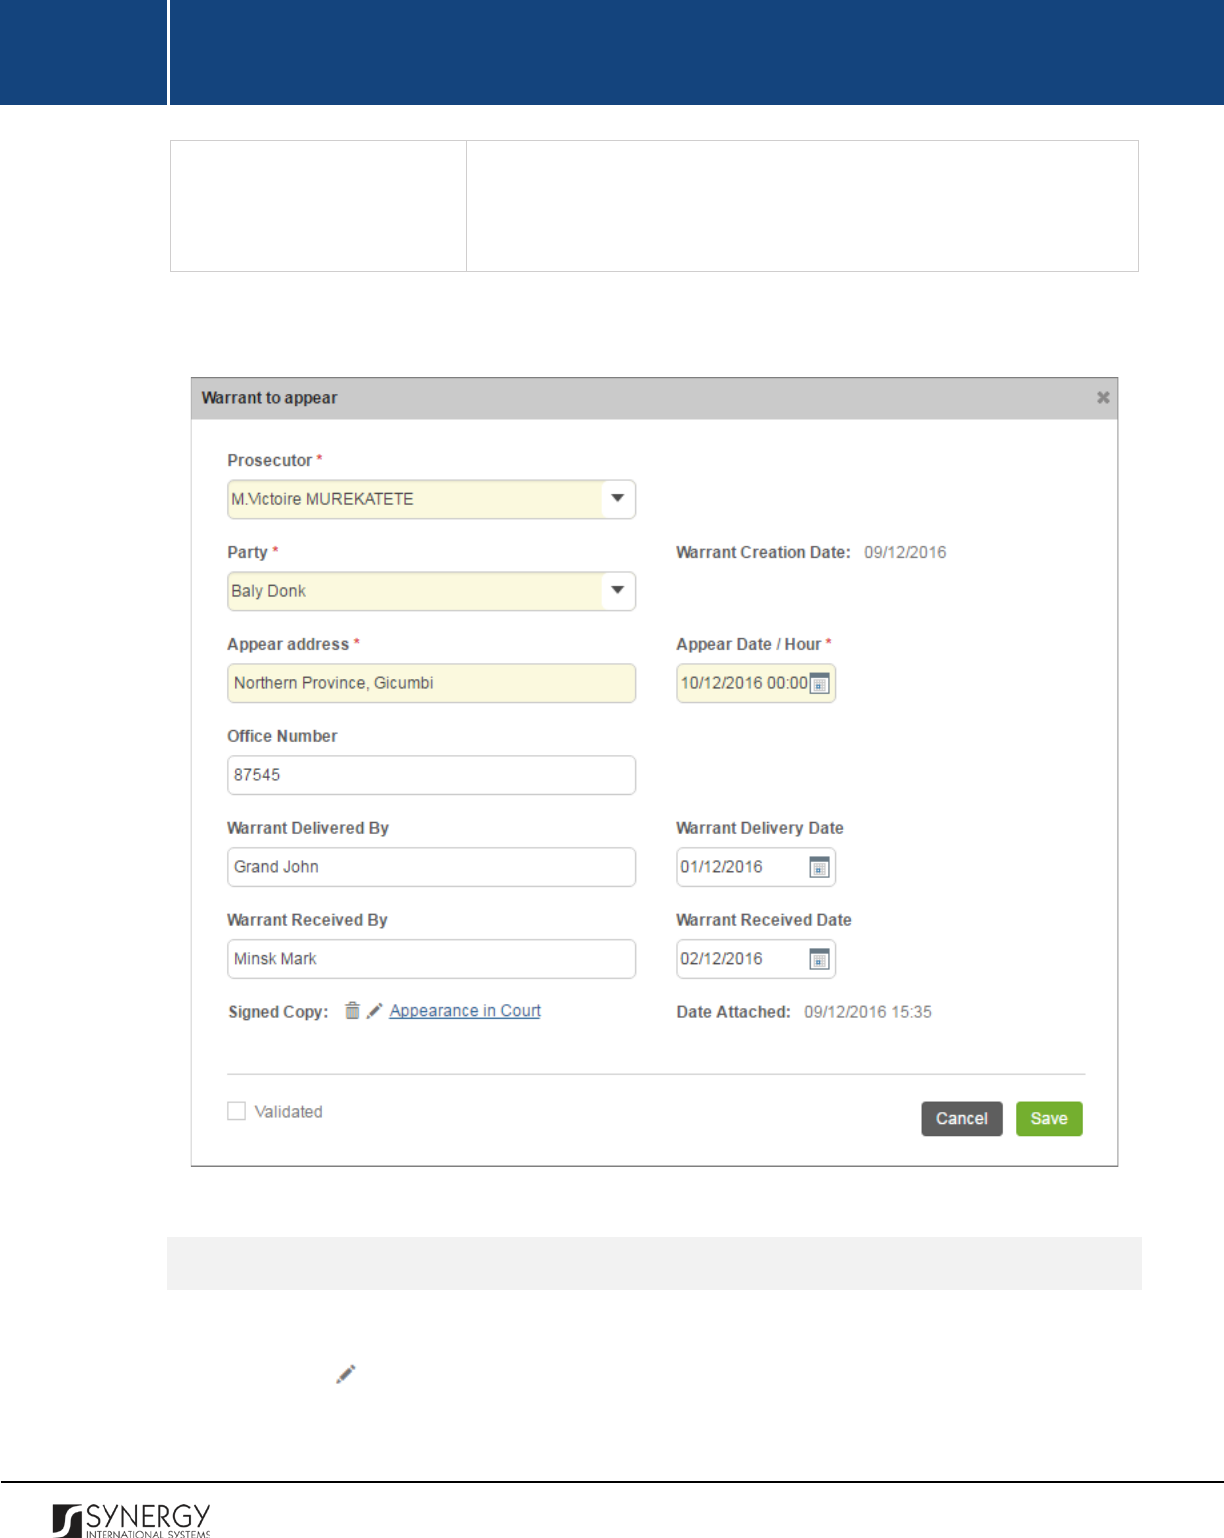
INTEGRATED CRIMINAL JUSTICE INFORMATION SYSTEM OF IRAQ | Personal Information | User Manual
RWANDA IECMS | Rwanda National Public Prosecution Authority | User Manual
Validated
Check the accur
acy of the information provided by selecting the
Validated
checkbox. Please, note that system validation renders all
the information provided in the form as non-editable.
3. Click the
Save
button to save the information input. Or, click
Cancel
to terminate the operation.
Figure 23: Adding a Warrant to Appear Record
Editing Warrant to Appear Records
In order to edit a warrant to appear record, follow the steps below:
1. Click the
(Edit)
button to the left of the record that you want to modify. The Warrant to
Appear form will open.
66
INTEGRATED CRIMINAL JUSTICE INFORMATION SYSTEM OF IRAQ | Personal Information | User Manual
RWANDA IECMS | Rwanda National Public Prosecution Authority | User Manual
2. Make the required changes in the data displayed.
3. Click the
Save
button to save the changes made. Or, click
Cancel
to discard them.
Note:
The possibility of editing record details is available for records that have not been validated yet.
Viewing Warrant to Appear Records
In order to view the details of warrant to appear records, click the
(View Form)
button to the left
of the record. The record summary will open in a separate window in the non-editable mode.
Note:
The possibility of viewing record details is available for validated records only.
Removing Warrant to Appear Records
In order to remove a warrant to appear record, click the
(Remove)
button to the left of the record.
Managing Warrants to Bring by Force
This chapter outlines how to add, edit, view, and remove warrant to bring by force records.
Adding a Warrant to Bring by Force Record
In order to add a warrant to bring by force record, follow the steps below:
1. Click the
Add
button at the bottom of the Warrant to Bring by Force field. A Warrant to Bring
by Force form will open (Figure 24).
2. Provide the information requested in the form as described in the table below:
Note:
Some fields in this section are mandatory to be filled in. They are marked with an asterisk.
67
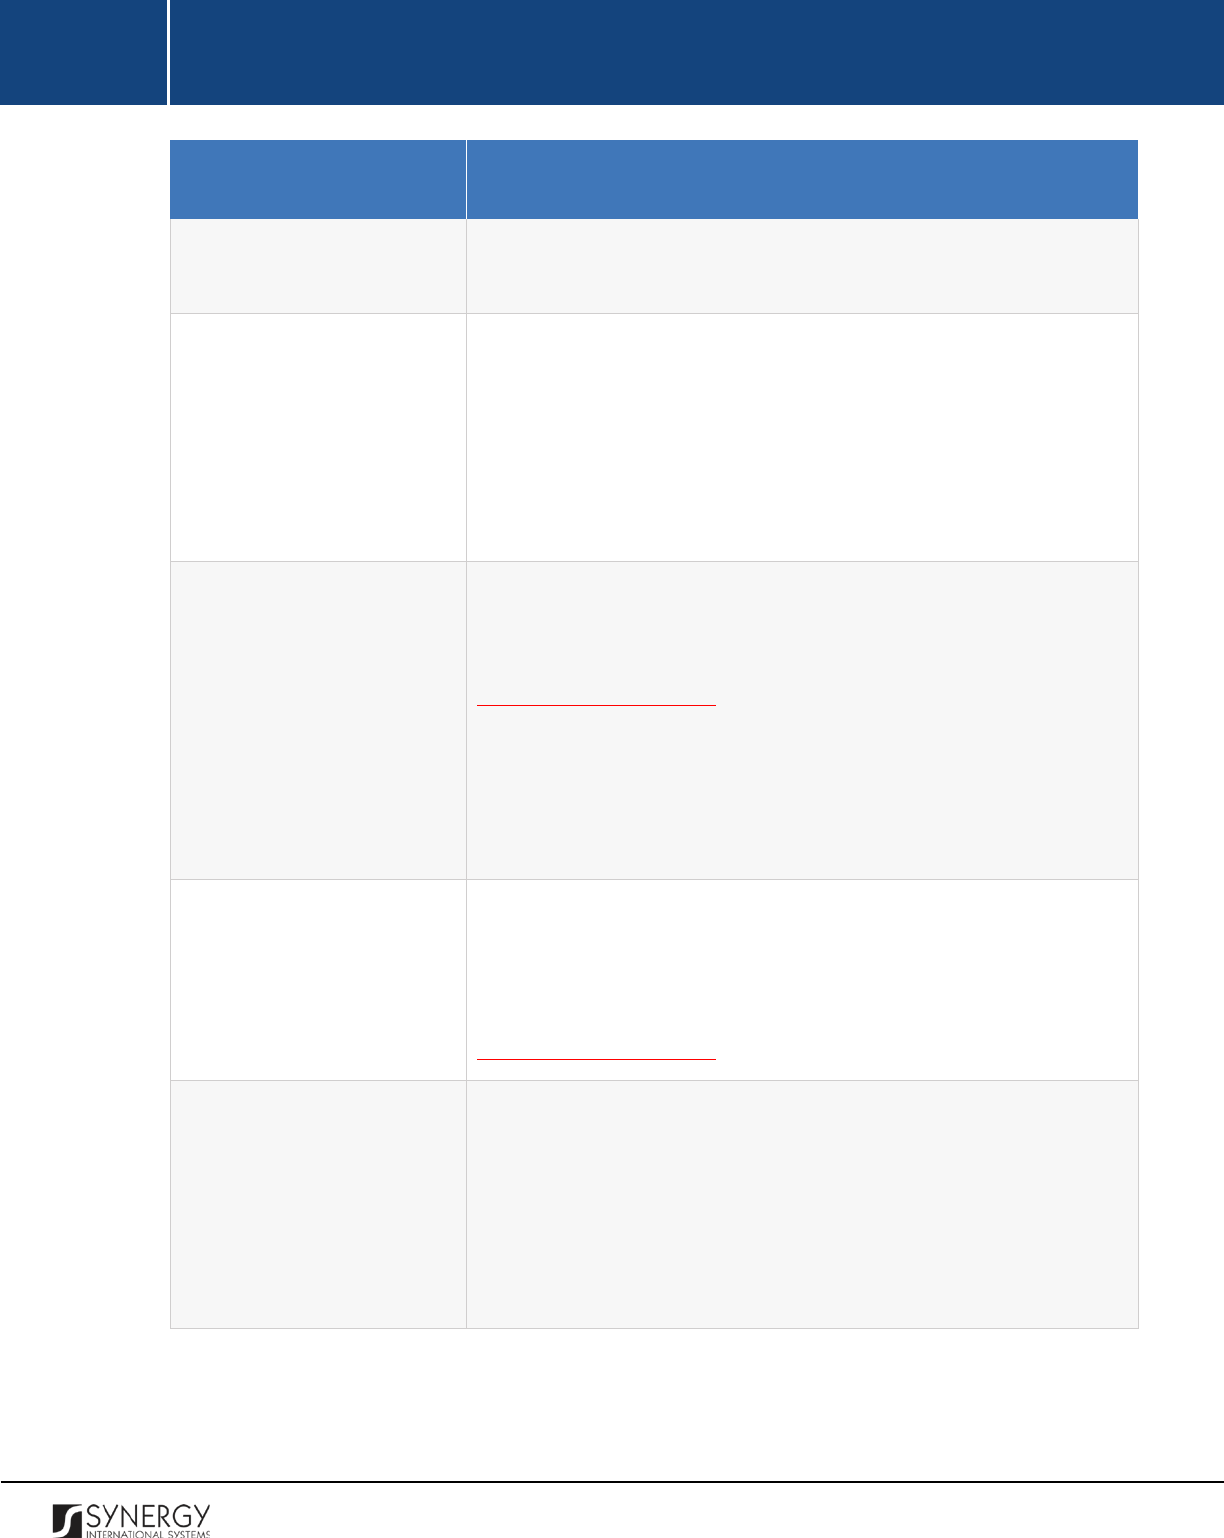
INTEGRATED CRIMINAL JUSTICE INFORMATION SYSTEM OF IRAQ | Personal Information | User Manual
RWANDA IECMS | Rwanda National Public Prosecution Authority | User Manual
Field Name
Description
Issue Date
The information in this field is automatically generated by the
system and shows the date when the warrant was issued.
Prosecutor
Select the name of the
Prosecutor
who issued the warrant from the
drop-down list. This field is mandatory.
Note:
If the list of prosecutors is long and hard to browse in, you can
make use of the search option. To locate the instance that you are
looking for, you should enter the keyword in the search box above
the drop-down list.
Party
Select the name of the party the warrant was issued to
from the
drop-down list. This field is mandatory. Please, note that the list will
contain all parties involved into the case and specified in the
GENERAL INFORMATION section.
Note:
If the list of parties is long and hard to browse in, you can make
use of the search option. To locate the instance that you are looking
for, you should enter the keyword in the search box above the drop-
down list.
Crime Committed
This is a read-
only field that is automatically generated by the
system and that lists all legal acts and codes that were violated by
the case party included in the warrant. For more information on how
to record crimes committed by any case participant, see the
GENERAL INFORMATION section.
Transmitted to
Select the police station the party should be transmitted to from the
drop-down list.
Note:
If the list of police stations is long and hard to browse in, you
can make use of the search option. To locate the instance that you
are looking for, you should enter the keyword in the sea
rch box
above the drop-down list.
68
INTEGRATED CRIMINAL JUSTICE INFORMATION SYSTEM OF IRAQ | Personal Information | User Manual
RWANDA IECMS | Rwanda National Public Prosecution Authority | User Manual
Date Transmitted
Indicate the date when the party was transmitted
to the police
station selected in the previous field. A calendar popup is available
for this field, see Figure 3: Calendar.
Signed Copy
Attach a
Signed Copy
of the warrant to bring by force. For more
details, see Managing Attachments.
Note:
The Date Attached field will automatically be populated with
the date when the attachment was made and will be available once
you upload the respective file.
Validated
Check the accuracy of the information provided by selecting the
Validated
checkbox. Please, note that system validation renders all
the information provided in the form as non-editable.
3. Click the
Save
button to save the information input. Or, click
Cancel
to terminate the operation.
Editing Warrant to Bring by Force Records
In order to edit a warrant to bring by force record, follow the steps below:
1. Click the
(Edit)
button to the left of the record that you want to modify. The Warrant to
Bring by Force form will open.
2. Make the required changes in the data displayed.
3. Click the
Save
button to save the changes made. Or, click
Cancel
to discard them.
Note:
The possibility of editing record details is available for records that have not been validated yet.
Viewing Warrant to Bring by Force Records
In order to view the details of warrant to bring by force records, click the
(View Form)
button to the
left of the record. The record summary will open in a separate window in the non-editable mode.
Note:
The possibility of viewing record details is available for validated records only.
Removing Warrant to Bring by Force Records
69

INTEGRATED CRIMINAL JUSTICE INFORMATION SYSTEM OF IRAQ | Personal Information | User Manual
RWANDA IECMS | Rwanda National Public Prosecution Authority | User Manual
In order to remove a warrant to bring by force record, click the
(Remove)
button to the left of the
record.
Figure 24: Adding a Warrant to Bring by Force Record
Managing Arrest Warrants
This chapter outlines how to add, edit, view, and remove arrest warrant records.
Adding an Arrest Warrant Record
70
INTEGRATED CRIMINAL JUSTICE INFORMATION SYSTEM OF IRAQ | Personal Information | User Manual
RWANDA IECMS | Rwanda National Public Prosecution Authority | User Manual
In order to add an arrest warrant record, follow the steps below:
1. Click the
Add
button at the bottom of the Arrest Warrant field. An Arrest Warrant form will
open (Figure 25).
2. Provide the information requested in the form as described in the table below:
Note:
Some fields in this section are mandatory to be filled in. They are marked with an asterisk.
Field Name
Description
Issue Date
The information in this field is automatically generated by the
system and shows the date when the warrant was issued.
Prosecutor
Select the name of the
Prosecutor who issued the arrest warrant
from the drop-down list. This field is mandatory.
Note:
If the list of prosecutors is long and hard to browse in, you can
make use of the search option. To locate the instance that you are
looking for, you should enter the keyword in the search box above
the drop-down list.
Party
Select the name of the party the warrant was issued to
from the
drop-down list. This field is mandatory. Please, note that the list will
contain all
the detained parties involved into the case and specified
in the GENERAL INFORMATION section.
Note:
If the list of parties is long and hard to browse in, you can make
use of the search option. To locate the instance that you are looking
for, you should enter the keyword in the search box above the drop-
down list.
To be brought to
Select the police station the person included in the warrant be
brought to from the drop-down list.
Note:
If the list of police stations is long and hard to browse in, you
can make use of the search option. To locate the instance that you
are looking for, you should enter t
he keyword in the search box
above the drop-down list.
71
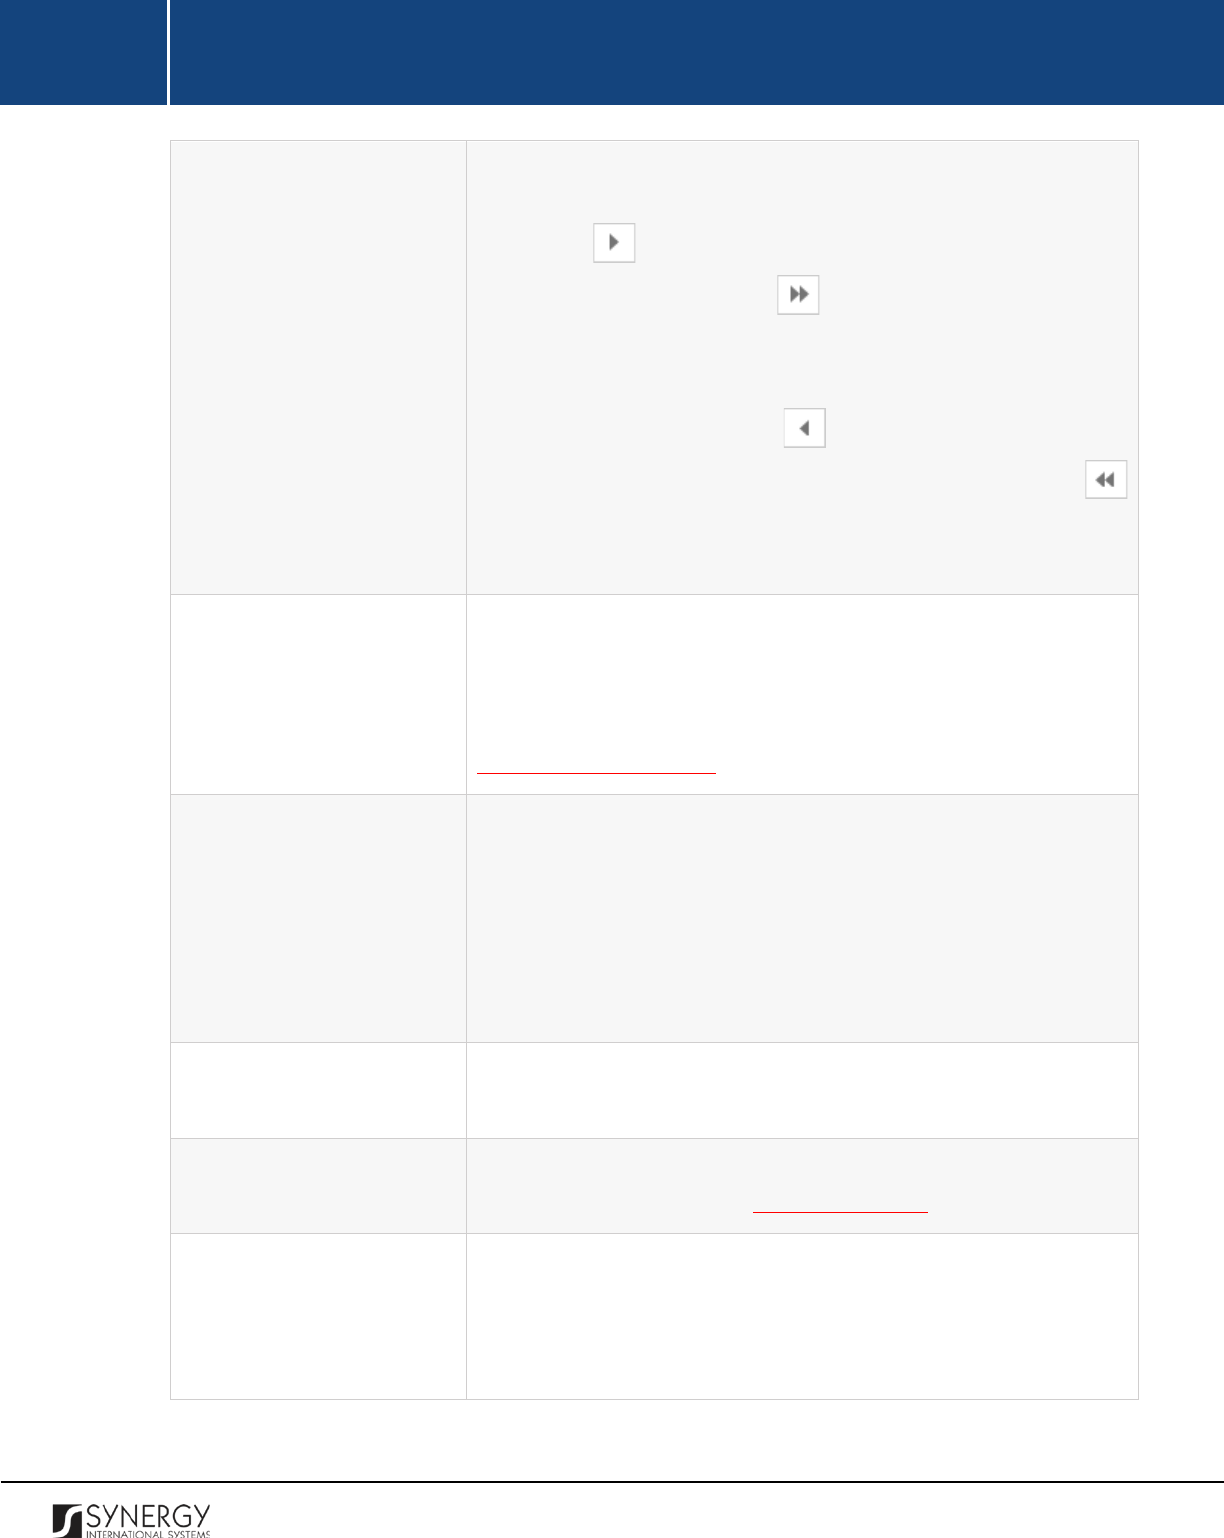
INTEGRATED CRIMINAL JUSTICE INFORMATION SYSTEM OF IRAQ | Personal Information | User Manual
RWANDA IECMS | Rwanda National Public Prosecution Authority | User Manual
Arrest Reasons
Specify the arrest reason that apply to the warrant party. This can
be done by selecting the respective option in the Available list and
clicking the
(Add)
button. The selected instance will appear in
the Selected list. Clicking the
(Add All)
button will move all
instances from the Available list to the Selected list.
In order to remove a selected arrest reason from the list, highlight it
in the Selected list and click the
(Remove)
button. The selected
instance will be removed from the Selected list. Clicking the
(Remove All)
button will move all the instances from the Selected list
to the Available list.
Crime Committed
This is a read-
only field that is automatically generated by the
system and that lists all legal acts and codes that were violated by
the case party included in the warrant. For more information on how
to record crimes committed by any case participant, see the
GENERAL INFORMATION section.
Detained at
Select the police station where the warrant party is detained from
the drop-down list.
Note:
If the list of police stations is long and hard to browse in, you
can make use of the search option. To locate the instance that you
are looking for, you should enter the keyword in the search box
above the drop-down list.
Police Station Commander
Specify the name of the commander in the police station where the
warrant party is detained.
Arrest Date
Indicate the date when the arrest was executed. A calendar popup
is available for this field, see Figure 3: Calendar.
Arrested by JPO
Indicate the name of the Judicial Police Officer who executed the
arrest.
Note:
If the list of JPOs is long and hard to browse in, you can make
use of the search option. To locate the instance that you are looking
72
INTEGRATED CRIMINAL JUSTICE INFORMATION SYSTEM OF IRAQ | Personal Information | User Manual
RWANDA IECMS | Rwanda National Public Prosecution Authority | User Manual
for, you should enter the keyword in the search box above the drop-
down list.
Signed Copy
Attach a
Signed Copy
of the arrest warrant. For more details, see
Managing Attachments.
Note:
The Date Attached field will automatically be populated with
the date when the attachment was made and will be available once
you upload the respective file.
Validated
Check the accuracy of the information provided by selecting the
Validated
checkbox. Please, note that system validation renders all
the information provided in the form as non-editable.
3. Click the
Save
button to save the information input. Or, click
Cancel
to terminate the operation.
Editing Arrest Warrant Records
In order to edit an arrest warrant record, follow the steps below:
1. Click the
(Edit)
button to the left of the record that you want to modify. The Arrest Warrant
form will open.
2. Make the required changes in the data displayed.
3. Click the
Save
button to save the changes made. Or, click
Cancel
to discard them.
Note:
The possibility of editing record details is available for records that have not been validated yet.
Viewing Arrest Warrant Records
In order to view the details of arrest warrant records, click the
(View Form)
button to the left of the
record. The record summary will open in a separate window in the non-editable mode.
Note:
The possibility of viewing record details is available for validated records only.
Removing Arrest Warrant Records
In order to remove an arrest warrant record, click the
(Remove)
button to the left of the record.
73
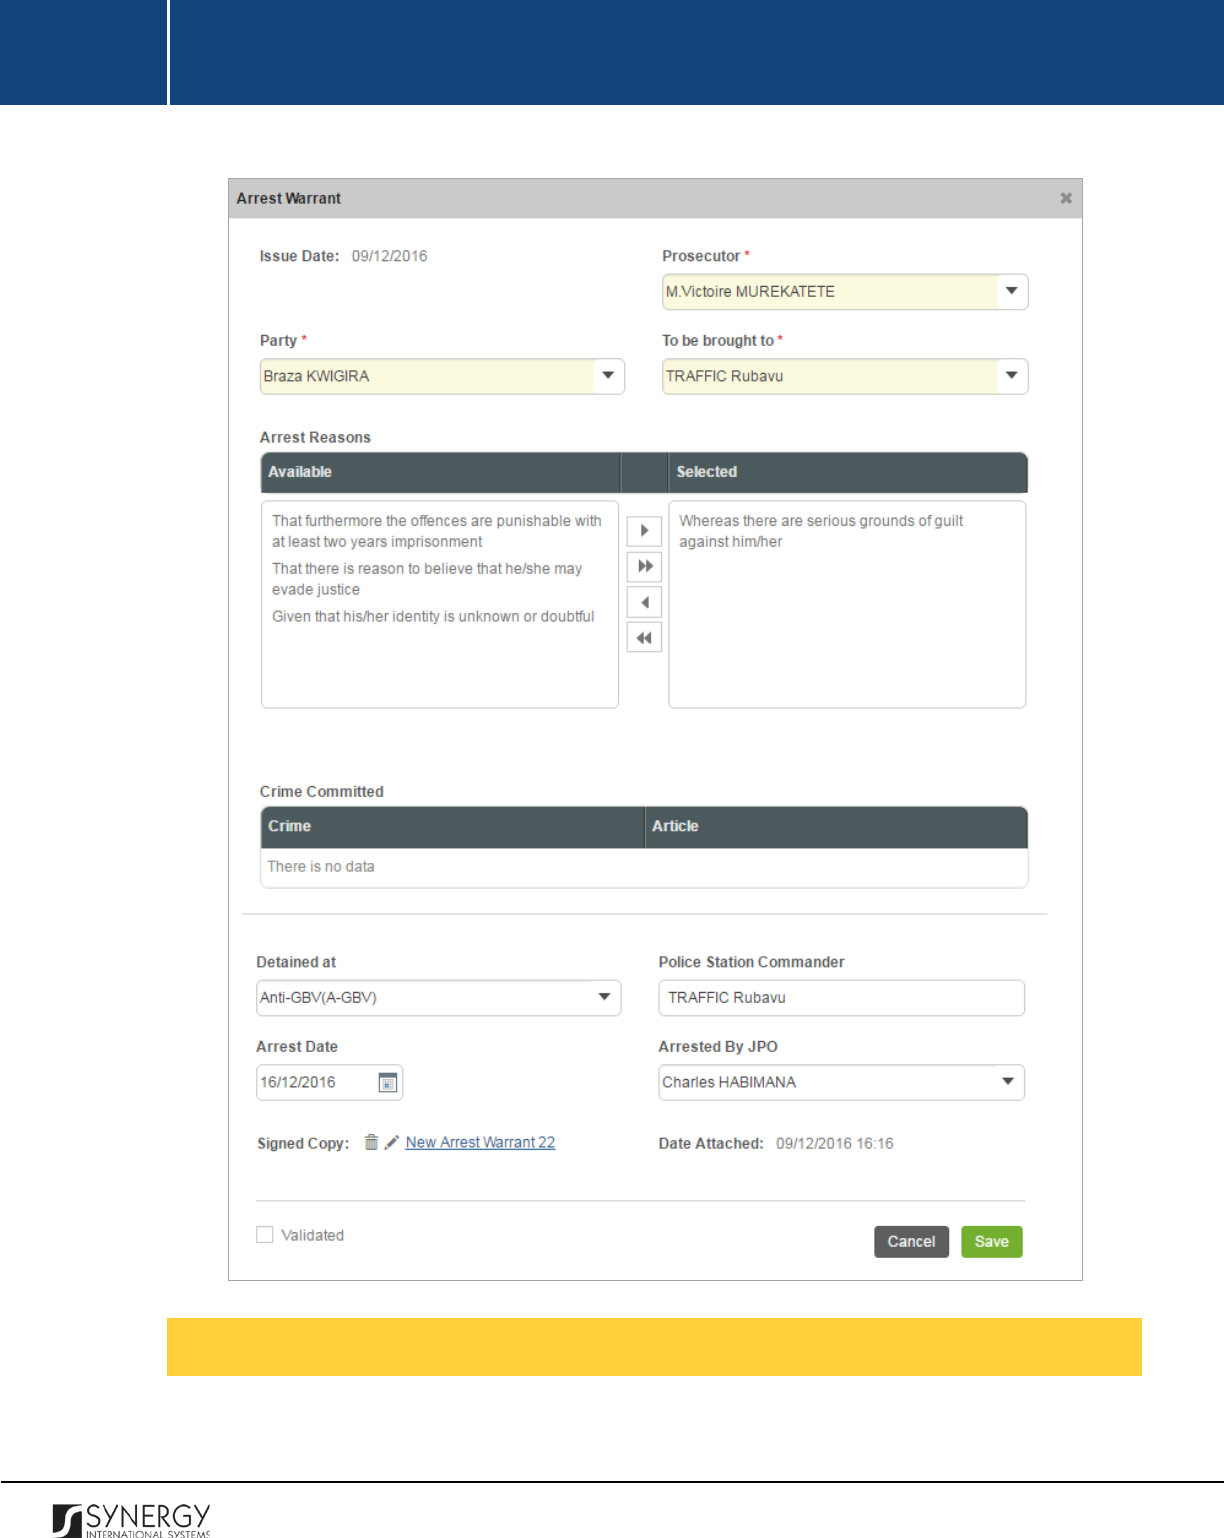
INTEGRATED CRIMINAL JUSTICE INFORMATION SYSTEM OF IRAQ | Personal Information | User Manual
RWANDA IECMS | Rwanda National Public Prosecution Authority | User Manual
Figure 25: Adding an Arrest Warrant Record
Managing Search Warrants
This chapter outlines how to add, edit, view, and remove search warrant records.
74
INTEGRATED CRIMINAL JUSTICE INFORMATION SYSTEM OF IRAQ | Personal Information | User Manual
RWANDA IECMS | Rwanda National Public Prosecution Authority | User Manual
Adding a Search Warrant Record
In order to add a search warrant record, follow the steps below:
1. Click the
Add
button at the bottom of the Search Warrant field. A Search Warrant form will
open (Figure 26).
2. Provide the information requested in the form as described in the table below:
Note:
Some fields in this section are mandatory to be filled in. They are marked with an asterisk.
Field Name
Description
Issue Date
The information in this field is automatically generated by the
system and shows the date when the warrant was issued.
Prosecutor
Select the name of the
Prosecutor
who issued the search warrant
from the drop-down list. This field is mandatory.
Note:
If the list of prosecutors is long and hard to browse in, you can
make use of the search option. To locate the instance that you are
looking for, you should enter the keyword in the search box above
the drop-down list.
Party
Select the name of the party the search warrant was issued to from
the drop-down list. This field is mandatory. Please, note that the list
will contain all parties involved into the case and specified in the
GENERAL INFORMATION section.
Note:
If the list of parties is long and hard to browse in, you can make
use of the search option. To locate the instance that you are looking
for, you should enter the keyword in the search box above the drop-
down list.
Crime Committed
This is a read-
only field that is automatically generated by the
system and that lists all legal acts and codes that were violated as
indicated in the Crime Committed field of the GENERAL
INFORMATION section.
75
INTEGRATED CRIMINAL JUSTICE INFORMATION SYSTEM OF IRAQ | Personal Information | User Manual
RWANDA IECMS | Rwanda National Public Prosecution Authority | User Manual
Party Address
This is a read-
only field that is automatically generated by the
system and that lists all legal acts and codes that were violated by
the case party included in the warrant. For more information on how
to record crimes committed by any case participant, see the
GENERAL INFORMATION section.
Responsible
Select the name of the official responsible for executing search from
the drop-down list.
Note:
If the list of responsible persons is long and hard to browse in,
you can make use of the search option. To locate the instance that
you are looking for, you should enter the keyword in the search box
above the drop-down list.
Search Address
Enter the address to be searched according to the search warrant.
This field is mandatory.
Signed Copy
Attach a
Signed Copy
of the search warrant. For more details, see
Managing Attachments.
Note:
The Date Attached field will automatically be populated with
the date when the attachment was made and will be available once
you upload the respective file.
Validated
Check the accuracy of the information provided by selecting the
Validated
checkbox. Please, note that system validation renders all
the information provided in the form as non-editable.
3. Click the
Save
button to save the information input. Or, click
Cancel
to terminate the operation.
76
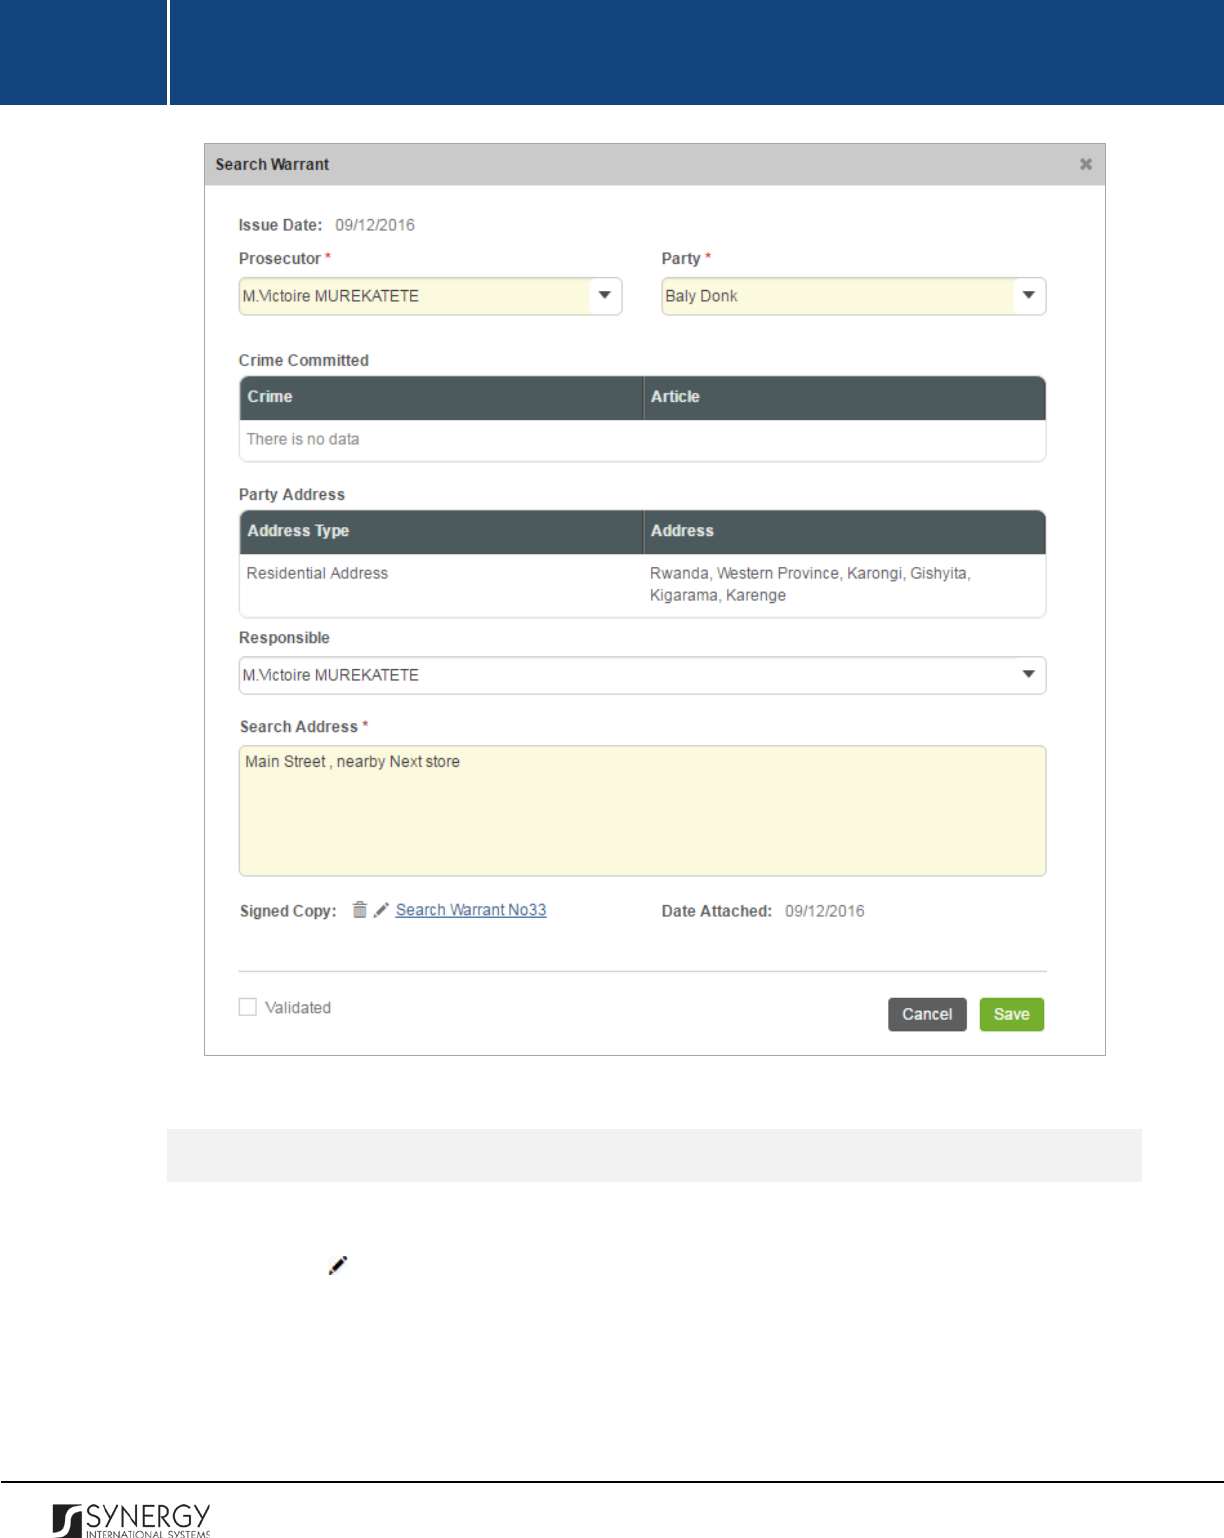
INTEGRATED CRIMINAL JUSTICE INFORMATION SYSTEM OF IRAQ | Personal Information | User Manual
RWANDA IECMS | Rwanda National Public Prosecution Authority | User Manual
Figure 26: Adding a Search Warrant Record
Editing Search Warrant Records
In order to edit a search warrant record, follow the steps below:
1. Click the
(Edit)
button to the left of the record that you want to modify. The Search Warrant
form will open.
2. Make the required changes in the data displayed.
3. Click the
Save
button to save the changes made. Or, click
Cancel
to discard them.
77
INTEGRATED CRIMINAL JUSTICE INFORMATION SYSTEM OF IRAQ | Personal Information | User Manual
RWANDA IECMS | Rwanda National Public Prosecution Authority | User Manual
Note:
The possibility of editing record details is available for records that have not been validated yet.
Viewing Search Warrant Records
In order to view the details of search warrant records, click the
(View Form)
button to the left of
the record. The record summary will open in a separate window in the non-editable mode.
Note:
The possibility of viewing record details is available for validated records only.
Removing Search Warrant Records
In order to remove a search warrant record, click the
(Remove)
button to the left of the record.
Managing International Arrest Warrants
This chapter outlines how to add, edit, view, and remove international arrest warrant records.
Adding an International Arrest Warrant Record
In order to add an international arrest warrant record for ordinary cases, follow the steps below:
1. Click the
Add
button at the bottom of the International Arrest Warrant field. An International
Arrest Warrant form will open (Figure 27).
2. Provide the information requested in the form as described in the table below:
Note:
Some fields in this section are mandatory to be filled in. They are marked with an asterisk.
Field Name
Description
Issue Date
The information in this field is automatically generated by the
system and shows the date when the warrant was issued.
Prosecutor General
Indicate the name of the
Prosecutor General who issued the
international arrest warrant. This field is mandatory.
78

INTEGRATED CRIMINAL JUSTICE INFORMATION SYSTEM OF IRAQ | Personal Information | User Manual
RWANDA IECMS | Rwanda National Public Prosecution Authority | User Manual
Party
Select the name of the party the international arrest warrant was
issued to. This field is mandatory. Please, note that the
list will
contain all suspects
involved into the case and specified in the
GENERAL INFORMATION section.
Note:
If the list of parties is long and hard to browse in, you can make
use of the search option. To locate the instance that you are looking
for, you should enter the keyword in the search box above the drop-
down list.
Warrant Type
Set the
Warrant Type
to Warrant for Ordinary Cases. This field is
mandatory.
Note:
If the list of warrant types is long and hard to browse in, you
can make use of the search option. To locate the instance that you
are looking for, you should enter the keyword in the search box
above the drop-down list.
Employer
Indicate the name of the warrant party employer.
Requested Country
Select the country the arrested person will be requested from. This
field is mandatory.
Note:
If the list of countries is long and hard to browse in, you can
make use of the search option. To locate the instance that you are
looking for, you should enter the keyword in the search box above
the drop-down list.
Company business start date
Indicate the date when the company
where the warrant party is
employed started its business. This field is mandatory. A calendar
popup is available for this field, see Figure 3: Calendar.
Company incorporation
number
Enter the incorporation number of the company where the warrant
party is employed.
Current Country
Select the country where the warrant party is currently residing
from the drop-down list. This field is mandatory.
Note:
If the list of countries is long and hard to browse in, you can
make use of the search option. To locate the instance that you are
79
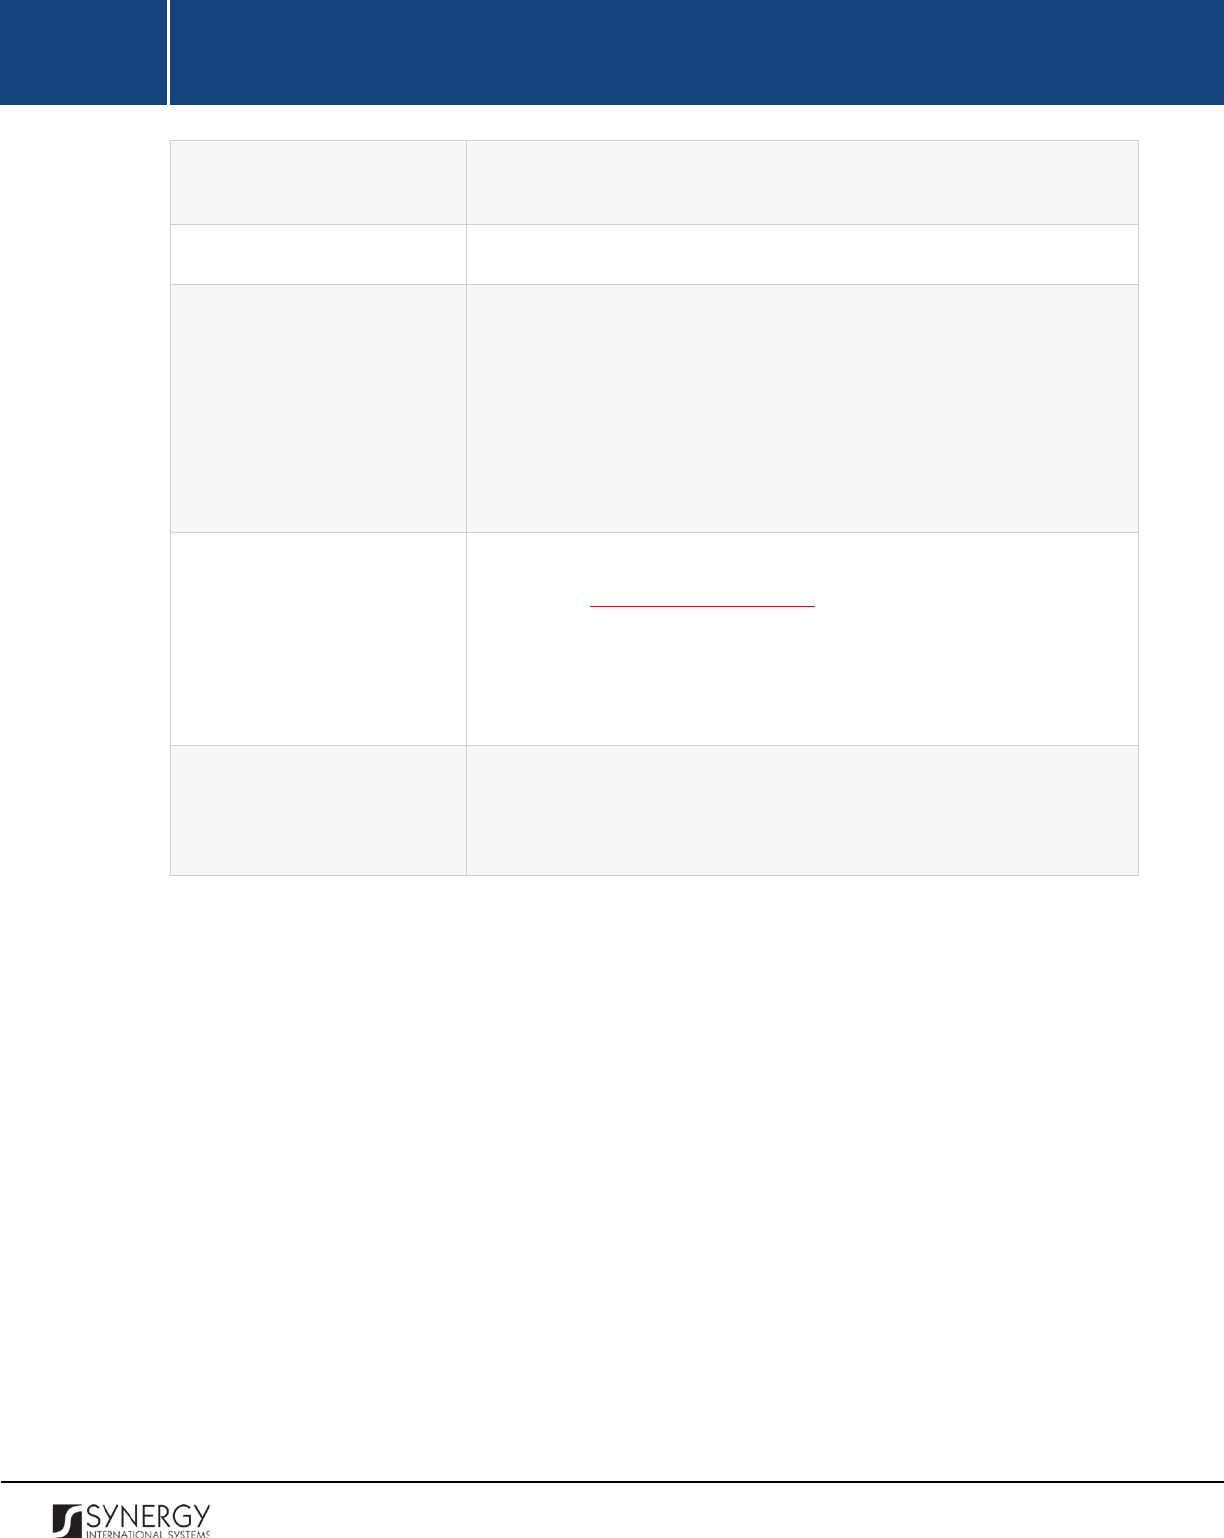
INTEGRATED CRIMINAL JUSTICE INFORMATION SYSTEM OF IRAQ | Personal Information | User Manual
RWANDA IECMS | Rwanda National Public Prosecution Authority | User Manual
looking for, you should enter the keyword in the search box above
the drop-down list.
Current City
Indicate the city where the suspect is currently residing.
Proceeding Country
Select the country where the warrant party must be transported to
from the drop-down list.
Note:
If the list of countries is long and hard to browse in, you can
make use of the search option. To locate the instance that you are
looking for, you should enter the keyword in the search box above
the drop-down list.
Signed Copy
Attach a
Signed Copy
of the international arrest warrant. For more
details, see Managing Attachments.
Note:
The Date Attached field will automatically be populated with
the date when the attachment was made and will be available once
you upload the respective file.
Validated
Check the accuracy of the information provided by selecting the
Validated
checkbox. Please, note that system validation renders all
the information provided in the form as non-editable.
3. Click the
Save
button to save the information input. Or, click
Cancel
to terminate the operation.
80

INTEGRATED CRIMINAL JUSTICE INFORMATION SYSTEM OF IRAQ | Personal Information | User Manual
RWANDA IECMS | Rwanda National Public Prosecution Authority | User Manual
Figure 27: Adding an International Arrest Warrant Record for Ordinary Cases
In order to add an international arrest warrant record for genocide cases, follow the steps below:
1. Click the
Add
button at the bottom of the International Arrest Warrant field. An International
Arrest Warrant form will open (Figure 28).
2. Provide the information requested in the form as described in the table below:
Note:
Some fields in this section are mandatory to be filled in. They are marked with an asterisk.
81
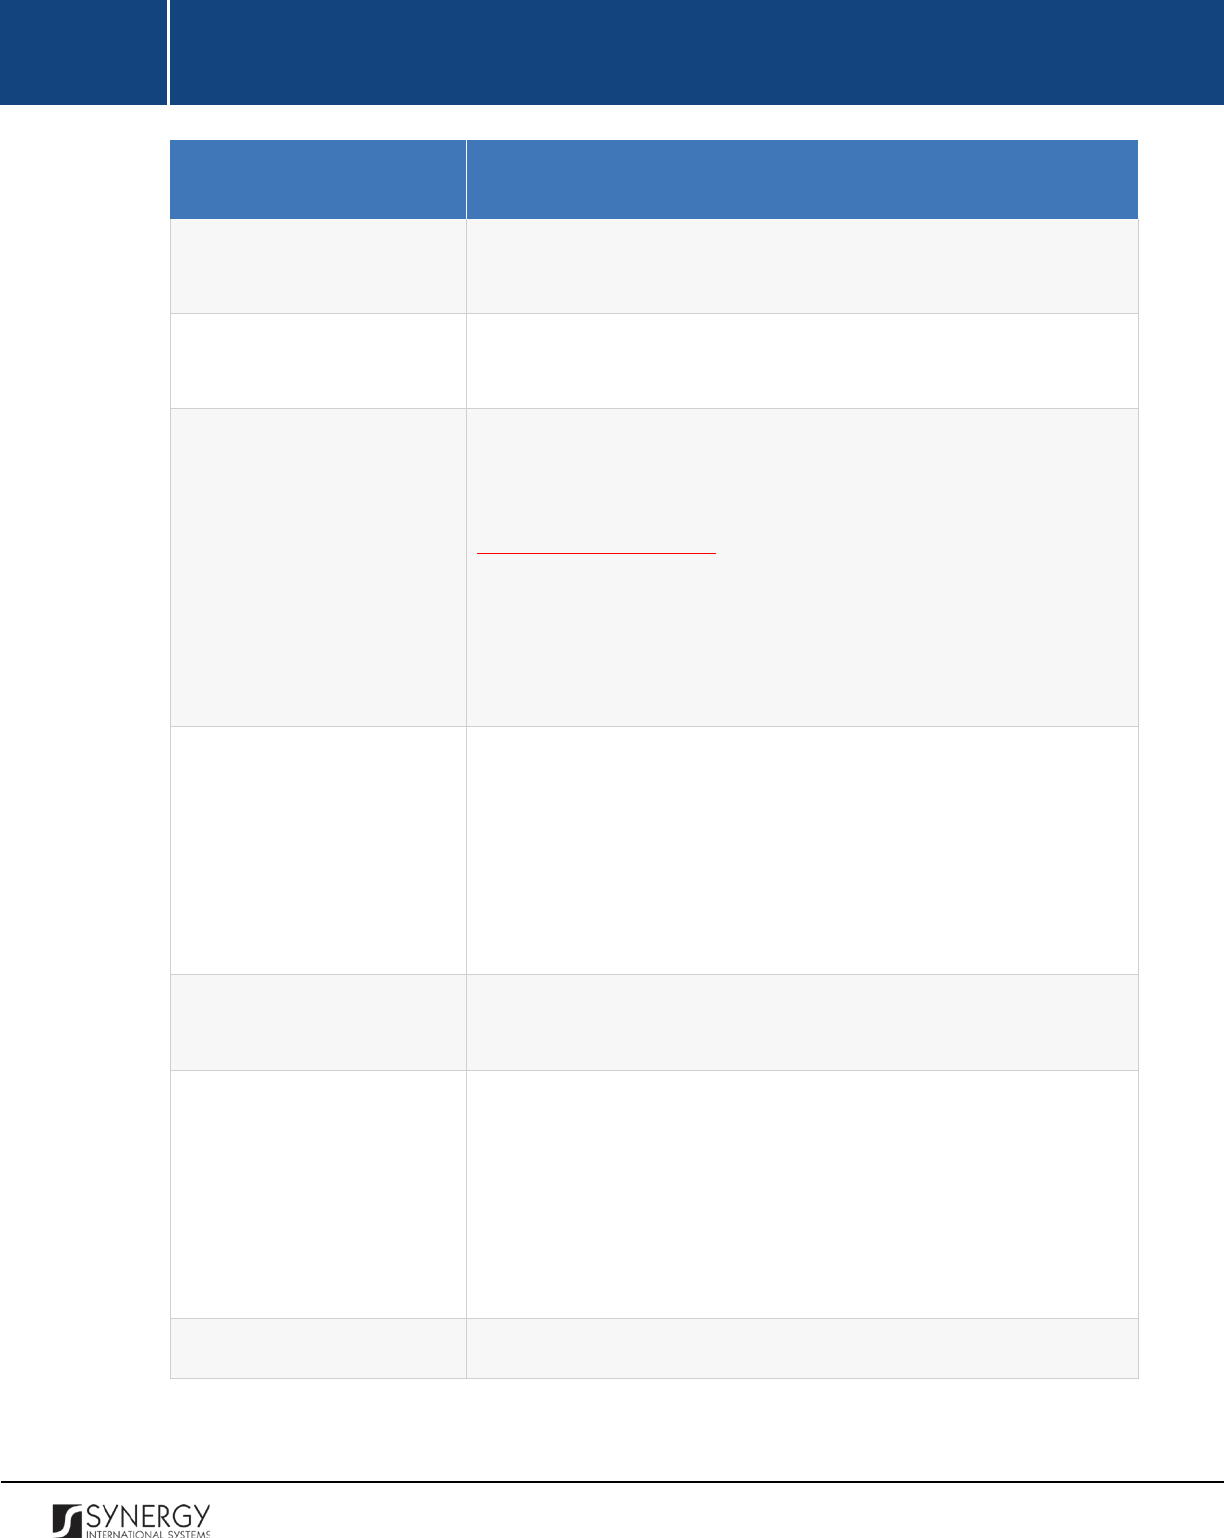
INTEGRATED CRIMINAL JUSTICE INFORMATION SYSTEM OF IRAQ | Personal Information | User Manual
RWANDA IECMS | Rwanda National Public Prosecution Authority | User Manual
Field Name
Description
Issue Date
The information in this field is automatically generated by the
system and shows the date when the warrant was issued.
Prosecutor General
Indicate the name of the
Prosecutor General who issued the
international arrest warrant. This field is mandatory.
Party
Select the name of the party the international arrest warrant was
issued to. This field is mandatory. Please, note that the li
st will
contain all parties involved into the case and specified in the
GENERAL INFORMATION section.
Note:
If the list of parties is long and hard to browse in, you can make
use of the search option. To locate the instance that you are looking
for, you should enter the keyword in the search box above the drop-
down list.
Warrant Type
Set the
Warrant Type
to Warrant for Genocide Cases.
This field is
mandatory.
Note:
If the list of warrant types is long and hard to browse in, you
can make use of the search option. To locate the instance that you
are looking for, you should enter the keyword in the search box
above the drop-down list.
Suspect Actual Address
Indicate the address where the suspect is actually residing
at the
moment.
Current Country
Select the country where the suspect is currently residing from the
drop-down list. This field is mandatory.
Note:
If the list of countries is long and hard to browse in, you can
make use of the search option. To locate the instance that you are
looking for, you should enter the keyword in the search box above
the drop-down list.
Current City
Indicate the city where the suspect is currently residing.
82
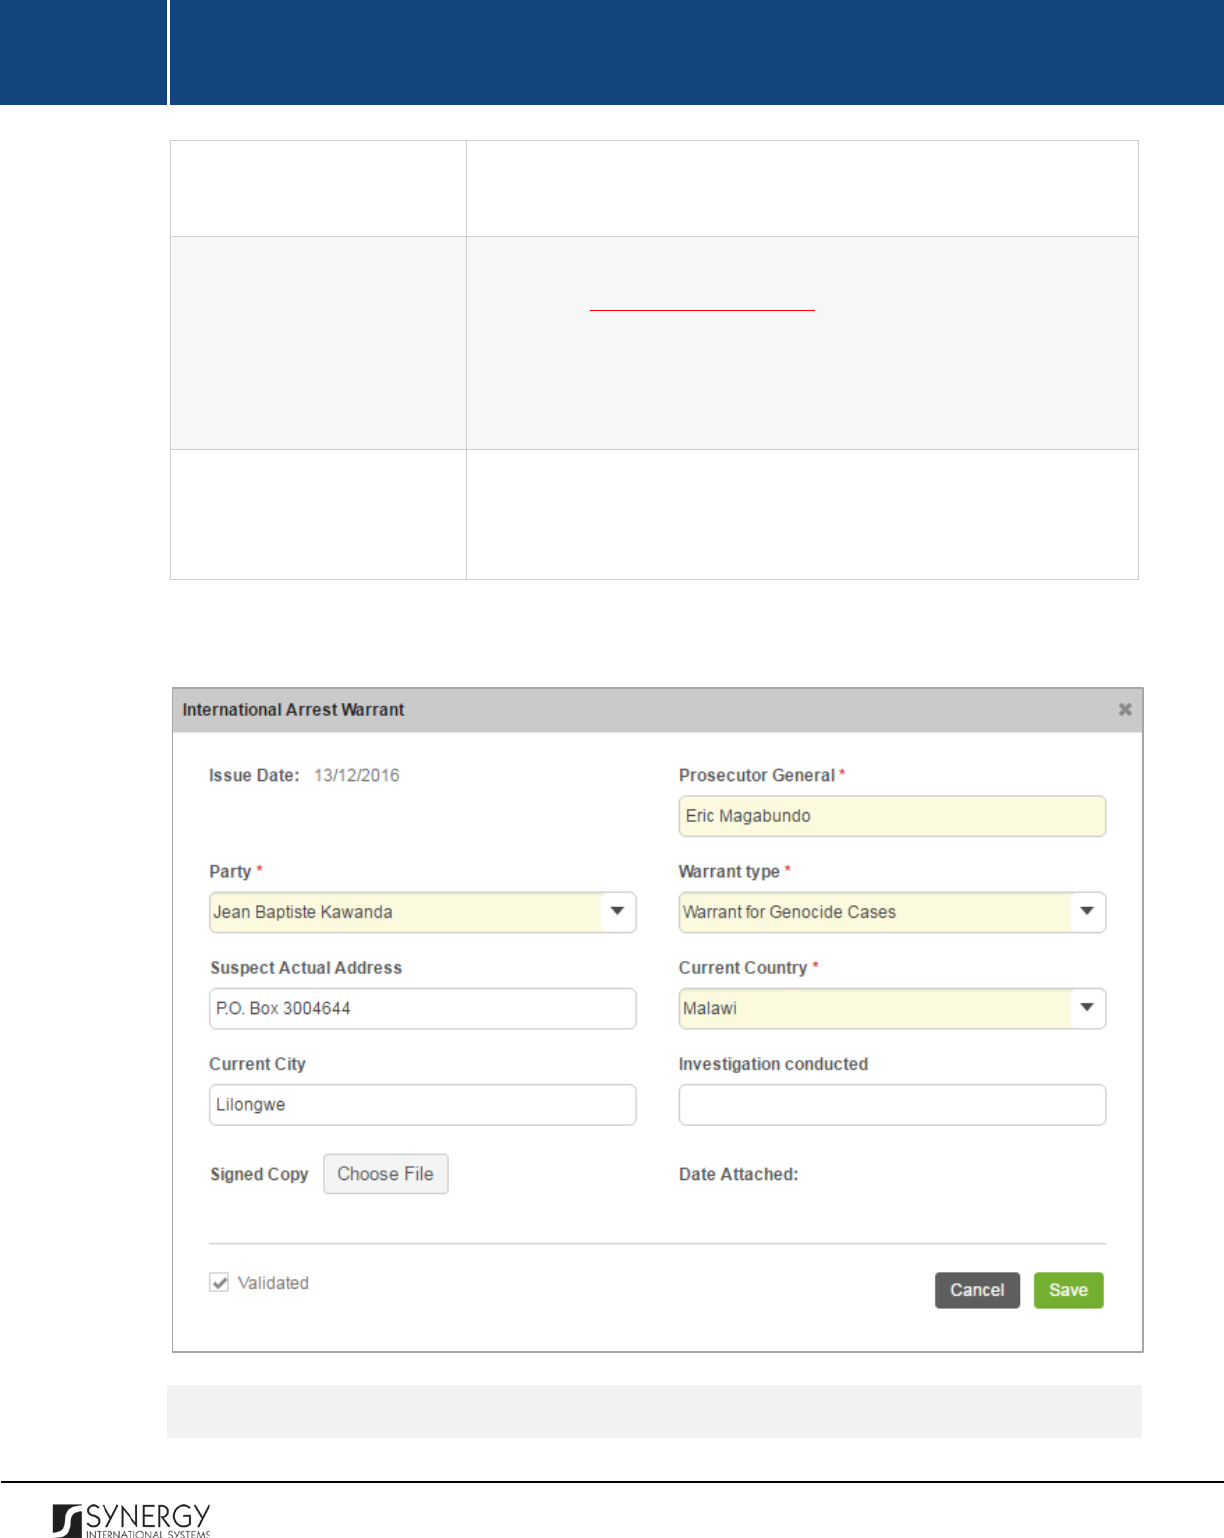
INTEGRATED CRIMINAL JUSTICE INFORMATION SYSTEM OF IRAQ | Personal Information | User Manual
RWANDA IECMS | Rwanda National Public Prosecution Authority | User Manual
Investigation Conducted
Record all details relevant to investigation conduction in relation to
the warrant party.
Signed Copy
Attach a
Signed Copy
of the international arrest warrant. For more
details, see Managing Attachments.
Note:
The Date Attached field will automatically be populated with
the date when the attachment was made and will be available once
you upload the respective file.
Validated
Check the accuracy of the information provided by selecting the
Validated
checkbox. Please, note that system validation renders all
the information provided in the form as non-editable.
3. Click the
Save
button to save the information input. Or, click
Cancel
to terminate the operation.
Figure 28: Adding an International Arrest Warrant Record for Genocide Cases
Editing International Arrest Warrant Records
83

INTEGRATED CRIMINAL JUSTICE INFORMATION SYSTEM OF IRAQ | Personal Information | User Manual
RWANDA IECMS | Rwanda National Public Prosecution Authority | User Manual
In order to edit an international arrest warrant record, follow the steps below:
1. Click the
(Edit)
button to the left of the record that you want to modify. The International
Arrest Warrant form will open.
2. Make the required changes in the data displayed.
3. Click the
Save
button to save the changes made. Or, click
Cancel
to discard them.
Note:
The possibility of editing record details is available for records that have not been validated yet.
Viewing International Arrest Warrant Records
In order to view the details of international arrest warrant records, click the
(View Form)
button to
the left of the record. The record summary will open in a separate window in the non-editable mode.
Note:
The possibility of viewing record details is available for validated records only.
Removing International Arrest Warrant Records
In order to remove an international arrest warrant record, click the
(Remove)
button to the left of
the record.
Managing Extraction Warrants
This chapter outlines how to add, view, edit, and remove extraction warrant records.
Adding an Extraction Warrant Record
In order to add an extraction warrant record, follow the steps below:
1. Click the
Add
button at the bottom of the Extraction Warrant field. An Extraction Warrant
form will open (Figure 29).
2. Provide the information requested in the form as described in the table below:
Note:
Some fields in this section are mandatory to be filled in. They are marked with an asterisk.
84
INTEGRATED CRIMINAL JUSTICE INFORMATION SYSTEM OF IRAQ | Personal Information | User Manual
RWANDA IECMS | Rwanda National Public Prosecution Authority | User Manual
Field Name
Description
Issue Date
The information in this field is automatically generated by the
system and shows the date when the warrant was issued.
Extraction Date and Time
Indicate the date and time when the extraction took place. This field
is mandatory. A calendar popup is available for this field, see Figure
3: Calendar.
Apart from indicating the date, the calendar also allows specifying
the time when the extraction took place. Use the
Hour
and
Minute
sliders to set the exact time.
Prosecutor
Select the name of the
Prosecutor
who issued the extraction warrant
from the drop-down list. This field is mandatory.
Note:
If the list of prosecutors is long and hard to browse in, you can
make use of the search option. To locate the instance that you are
looking for, you should enter the keyword in the search box above
the drop-down list.
Party
Specify the case parties that need to be
extracted from the
penitentiary establishment
. This can be done by selecting the
warrant party in the Available list and clicking the
(Add)
button.
The selected instance will appear in the Selected list. Clicking the
(Add All)
button will move all instances from the Available list
to the Selected list.
Note:
The list of available parties will be comprised of the detainees
that are included in the case and that are specified in the GENERAL
INFORMATION section.
In order to remove a selected party
from the list, highlight it in the
Selected list and click the
(Remove)
button. The selected
instance will be removed from the Selected list. Clicking the
(Remove All)
button will move all the instances from the Selected list
to the Available list.
85
INTEGRATED CRIMINAL JUSTICE INFORMATION SYSTEM OF IRAQ | Personal Information | User Manual
RWANDA IECMS | Rwanda National Public Prosecution Authority | User Manual
Detained in
Specify whether the warrant party is detained in a
Police Custody
or
an
RCS Establishment
.
Please, note that depending on your
selection, you will be asked to indicate either the police station or
the RCS facility where the warrant party is detained in the next field.
Police Custody / RCS Facility
Indicate the police station or RCS facility where the warrant party is
detained. This field is mandatory.
Note:
If the list of police stations / RCS facilities is long and hard to
browse in, you can make use of the search option. To locate the
instance that you are looking for, you should enter the keyword in
the search box above the drop-down list.
Signed Copy
Attach a
Signed Copy
of the extraction warrant. For more details, see
Managing Attachments.
Note:
The Date Attached field will automatically be populated with
the date when the attachment was made and will be available once
you upload the respective file.
Validated
Check the accuracy of the information provided by selecting the
Validated
checkbox. Please, note that system validation renders all
the information provided in the form as non-editable.
3. Click the
Save
button to save the information input. Or, click
Cancel
to terminate the operation.
86

INTEGRATED CRIMINAL JUSTICE INFORMATION SYSTEM OF IRAQ | Personal Information | User Manual
RWANDA IECMS | Rwanda National Public Prosecution Authority | User Manual
Figure 29: Adding an Extraction Warrant Record
Editing Extraction Warrant Records
In order to edit an extraction warrant record, follow the steps below:
1. Click the
(Edit)
button to the left of the record that you want to modify. The Extraction
Warrant form will open.
2. Make the required changes in the data displayed.
3. Click the
Save
button to save the changes made. Or, click
Cancel
to discard them.
87
INTEGRATED CRIMINAL JUSTICE INFORMATION SYSTEM OF IRAQ | Personal Information | User Manual
RWANDA IECMS | Rwanda National Public Prosecution Authority | User Manual
Note:
The possibility of editing record details is available for records that have not been validated yet.
Viewing Extraction Warrant Records
In order to view the details of extraction warrant records, click the
(View Form)
button to the left
of the record. The record summary will open in a separate window in the non-editable mode.
Note:
The possibility of viewing record details is available for validated records only.
Removing Extraction Warrant Records
In order to remove an extraction warrant record, click the
(Remove)
button to the left of the record.
88
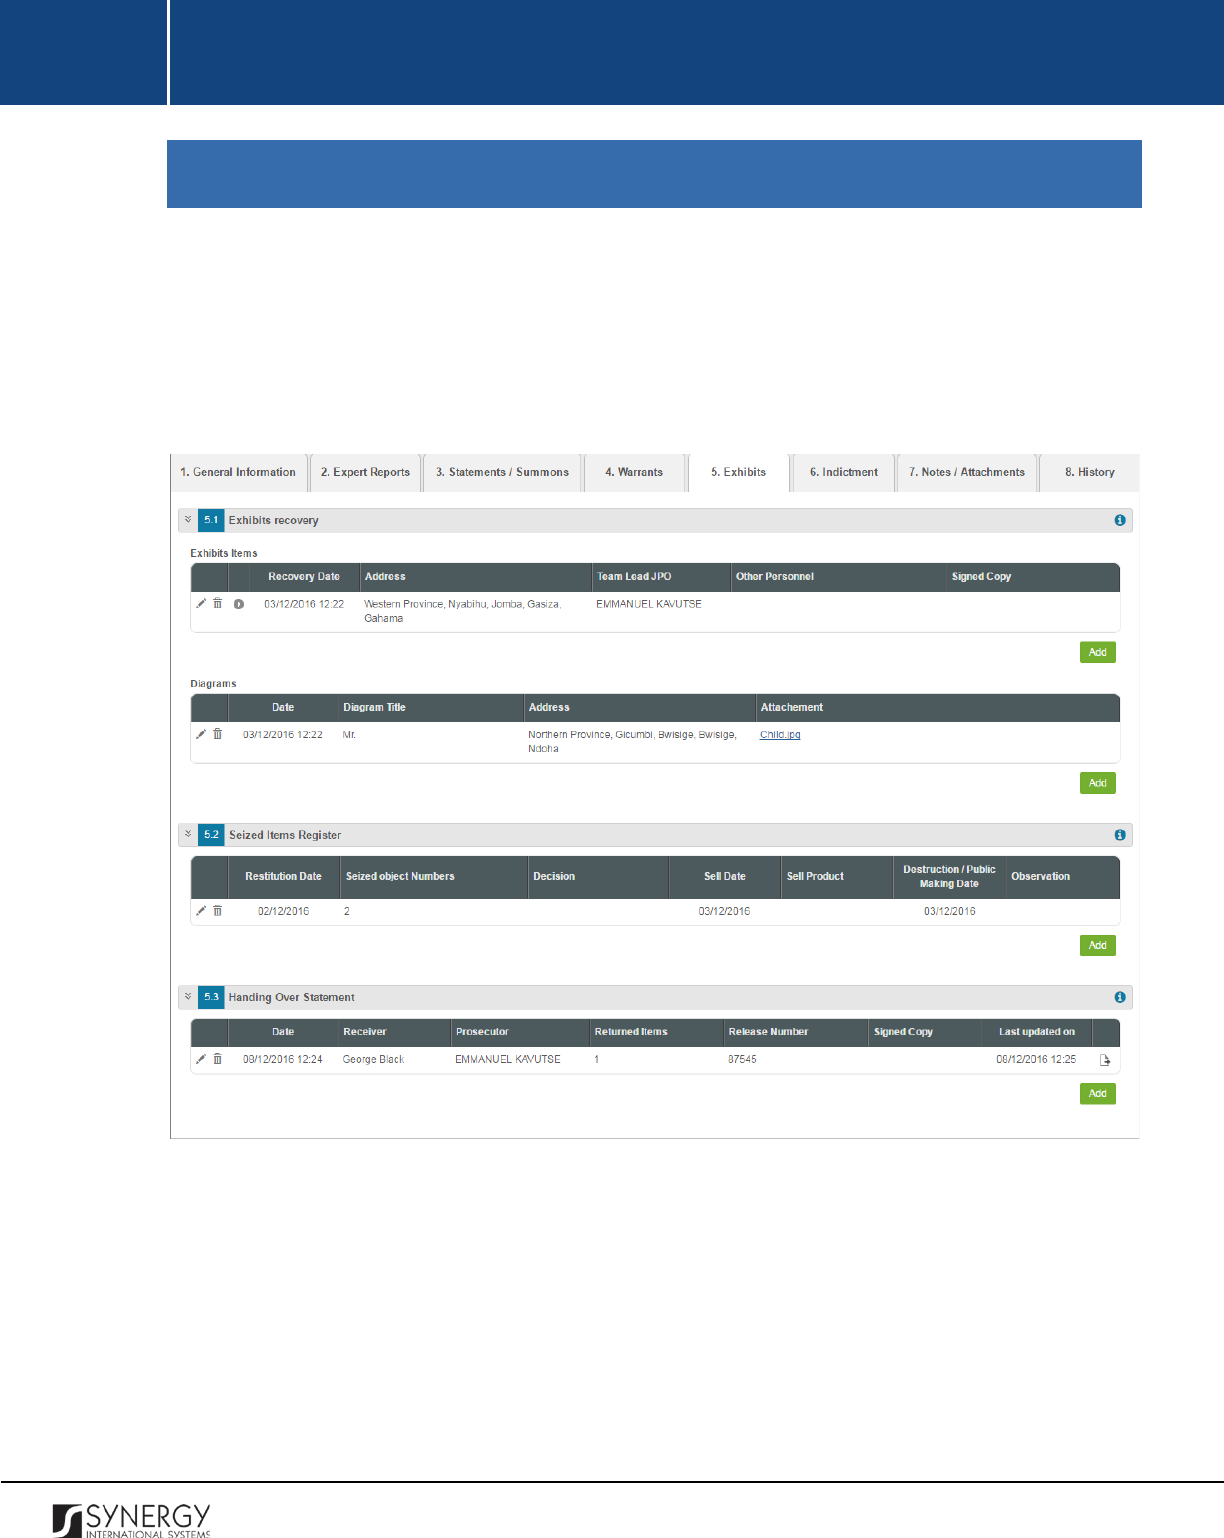
INTEGRATED CRIMINAL JUSTICE INFORMATION SYSTEM OF IRAQ | Personal Information | User Manual
RWANDA IECMS | Rwanda National Public Prosecution Authority | User Manual
EXHIBITS
The Exhibits section of the Rwanda National Public Prosecution Authority from (Figure 30) is used to
store and display information on physical or documentary evidence collected by the police during the
case processing. Examples of exhibit items may include a weapon allegedly used in the crime in
criminal cases or a written contract in a civil trial. Information on exhibit recovery, personal effects,
seized items, as well as return of seized items is also handled in this section.
Figure 30: Exhibits Section
For more details on what information is requested in the Exhibits section, refer to the table below.
89
INTEGRATED CRIMINAL JUSTICE INFORMATION SYSTEM OF IRAQ | Personal Information | User Manual
RWANDA IECMS | Rwanda National Public Prosecution Authority | User Manual
Field Name
Description
Exhibit Recovery
First, provide information about the exhibit items collected during
the case processing. For more details, see
Managing Exhibit
Recovery Records.
Next, attach all diagram files that have been prepared by the police
officers involved into the process of exhibit
recovery. For more
details, see Managing Diagrams.
Seized Items Register
Provide information on the personal effects (i.e. personal
belongings, such as items of clothing, jewelry, etc., normally worn or
carried on a person) of the suspect and their seizure. For more
details, see Managing Seized Items Register.
Handing Over Statement
Record information on return of seized items. For more details, see
Managing Handing over Statements.
Note:
The system allows for exporting records from all the fields of this section. For more details on
how to export records, see EXPORTING FILES.
Managing Exhibit Recovery Records
This chapter outlines how to add, edit, view, and remove exhibit recovery records. It also describes
how you can expand an exhibit recovery record to view the items recovered.
Adding an Exhibit Recovery Record
In order to add an exhibit recovery record, follow the steps below:
1. Click the
Add
button at the bottom of the Exhibits Recovery field. An Exhibit Recovery form will
open (Figure 31).
2. Provide the information requested in the form as described in the table below:
Note:
Some fields in this form are mandatory to be filled in. They are marked with an asterisk.
90
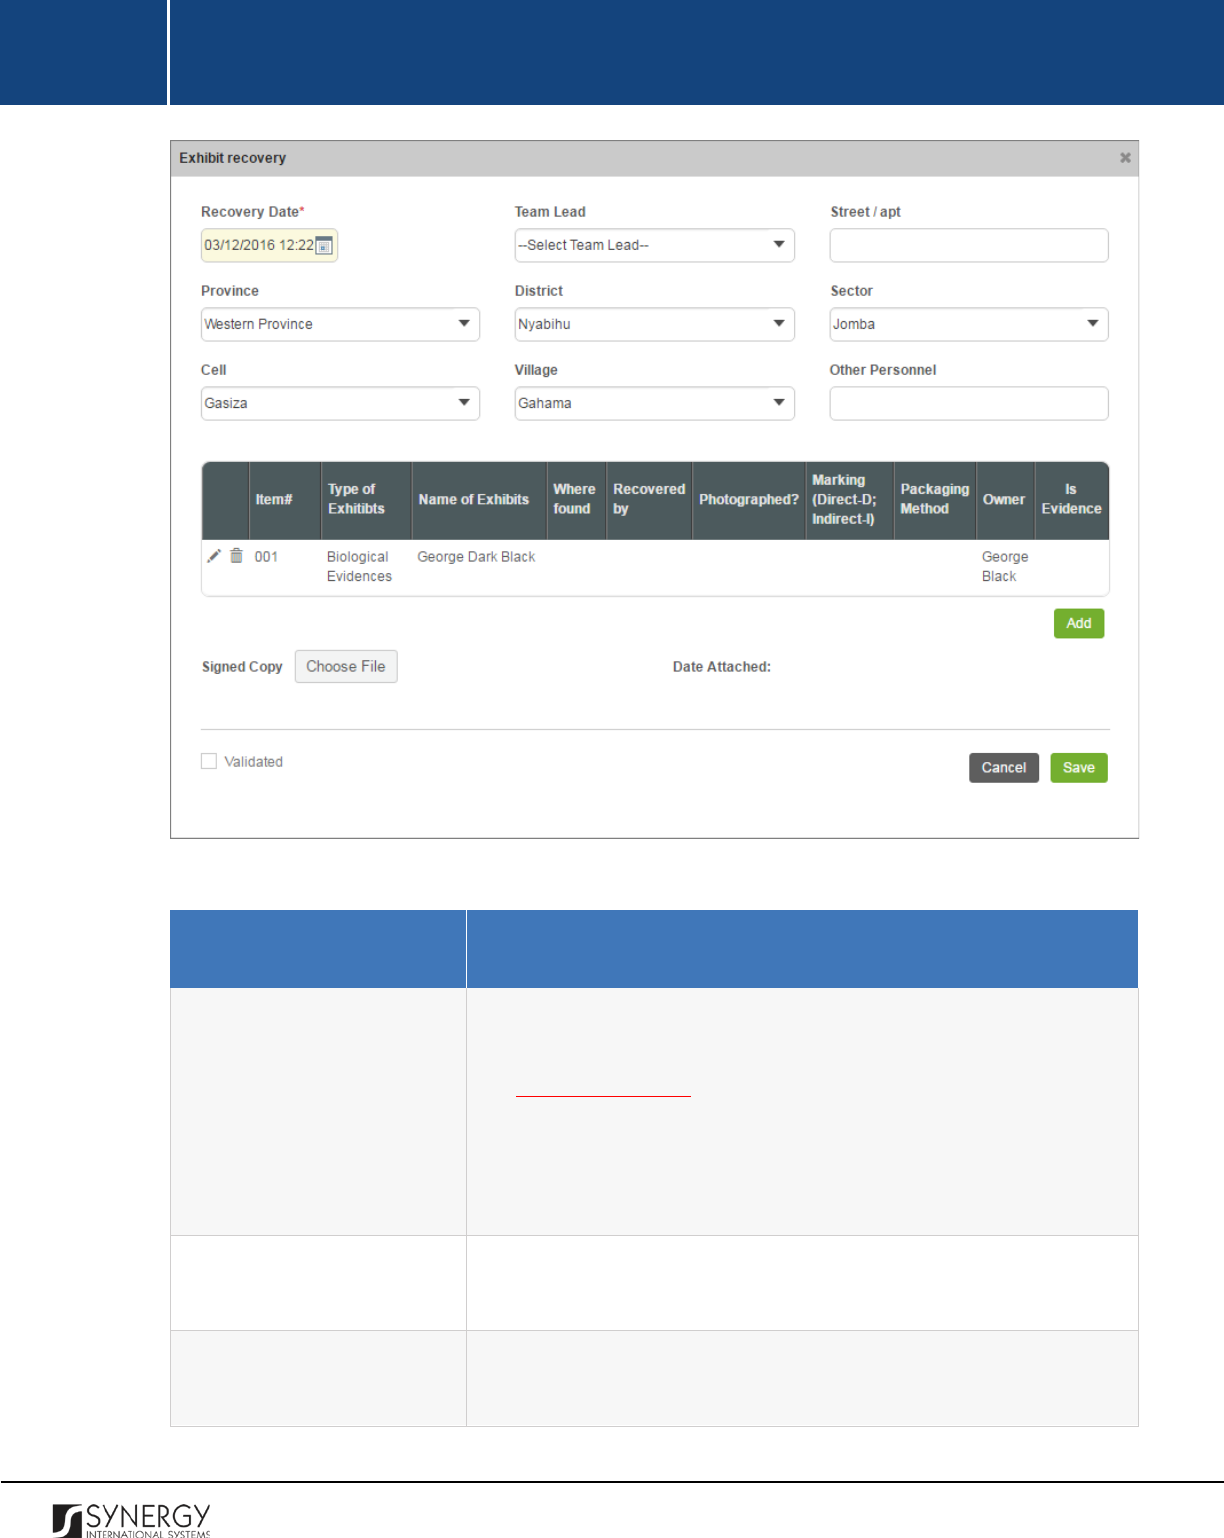
INTEGRATED CRIMINAL JUSTICE INFORMATION SYSTEM OF IRAQ | Personal Information | User Manual
RWANDA IECMS | Rwanda National Public Prosecution Authority | User Manual
Figure 31: Adding an Exhibit Recovery Record
Field Name
Description
Recovery Date
Indicate the date and time when the exhibit recovery took place.
This field is mandatory. A calendar popup is available for this field,
see Figure 3: Calendar.
Apart from indicating the date, the calendar also allows specifying
the time when the recovery took place. Use the
Hour
and
Minute
sliders to set the exact time.
Team Lead
Specify the name of the team lead involved in the exhibit recovery.
This field is mandatory.
Street/Apt
Specify the street
or apartment where the exhibit recovery took
place.
91
INTEGRATED CRIMINAL JUSTICE INFORMATION SYSTEM OF IRAQ | Personal Information | User Manual
RWANDA IECMS | Rwanda National Public Prosecution Authority | User Manual
Province
Indicate the
Province
where the exhibit recovery took place. Please,
note that selection of a province will filter the list in the District field
and display only those instances that are related to the selected
province.
Note:
If the list of provinces is long and hard to browse in, you can
make use of the search option. To locate the instance that you are
looking for, you should enter the keyword in the search box above
the drop-down list.
District
Indicate the
District
where the exhibit recovery took place. Please,
note that selection of a district will filter the list in the Sector field
and display only those instances that are related to the selected
district.
Note:
If the list of districts is long and hard to browse in, you can
make use of the search option. To locate the instance that you are
looking for, you should enter the keyword in the search box above
the drop-down list.
Sector
Indicate the
Sector
where the exhibit recovery took place.
Please,
note that selection of a sector will filter the list in the Cell field and
display only those instances that are related to the selected sector.
Note:
If the list of sectors is long and hard to browse in, you can
make use of the search option. To locate the instance that you are
looking for, you should enter the keyword in the search box above
the drop-down list.
Cell
Indicate the
Cell
where the exhibit recovery took place. Please, note
that selection of a cell will filter the list in the Village field and display
only those instances that are related to the selected cell.
Note:
If the list of cells is long and hard to browse in, you can make
use of the search option. To locate the instance that you are looking
for, you should enter the keyword in the search box above the drop-
down list.
Village
Indicate the
Village
where the exhibit recovery took place.
92
INTEGRATED CRIMINAL JUSTICE INFORMATION SYSTEM OF IRAQ | Personal Information | User Manual
RWANDA IECMS | Rwanda National Public Prosecution Authority | User Manual
Other Personnel
Specify whether
Other Personnel was involved in the exhibit
recovery as well and indicate who they were.
Items
List all exhibit items that were recovered. For more details, see
Managing Exhibit Items.
Signed Copy
Attach a
Signed Copy
of the exhibit recovery act. For more details,
see Managing Attachments.
Note:
The Date Attached field will automatically be populated with
the date when the attachment was made and will be available once
you upload the respective file.
Validated
Check the accuracy of the information provided by selecting the
Validated
checkbox. Please, note that system validation renders all
the information provided in the form as non-editable.
3. Click the
Save
button to save the information input. Or, click
Cancel
to terminate the
Editing Exhibit Recovery Records
In order to edit an existing exhibit recovery record, follow the steps below:
1. Click the
(Edit)
button to the left of the exhibit recovery record that you want to modify.
The Exhibit Recovery form will open.
2. Make the required changes in the data displayed.
3. Click the
Save
button to save the changes made. Or, click
Cancel
to discard them.
Note:
The possibility of editing record details is available for records that have not been validated yet.
Viewing Exhibit Recovery Records
In order to view the details of exhibit recovery records, click the
(View Form)
button to the left of
the record. The record summary will open in a separate window in the non-editable mode.
Note:
The possibility of viewing record details is available for validated records only.
93

INTEGRATED CRIMINAL JUSTICE INFORMATION SYSTEM OF IRAQ | Personal Information | User Manual
RWANDA IECMS | Rwanda National Public Prosecution Authority | User Manual
Expanding Exhibit Recovery Records
You can expand an exhibit recovery record to view the list of seized items that were recovered. This
way, when you select to view additional information on the recovered items, you can see the item ID,
exhibit type, and other particulars.
To expand an exhibit recovery record, click the icon to the left of the record. Clicking the icon will
hide the recovered item related information.
Removing Exhibit Recovery Records
In order to remove an exhibit recovery record, click the
(Remove)
button to the left of the record.
Managing Exhibit Items
This chapter outlines how to add and remove exhibit item records.
Adding an Exhibit Item Record
In order to add an exhibit item record, follow the steps below:
1. Click the
Add
button in the Exhibit Recovery form. An Exhibit Item window will open (Figure
32).
2. Provide the information requested in the form as described in the table below:
Note:
Some fields in this form are mandatory to be filled in. They are marked with an asterisk.
Field Name
Description
Owner
Select the case party the exhibit item belongs to from the drop-
down list. This field is mandatory
. Please, note that the list will
contain all parties involved into the case and specified in the
GENERAL INFORMATION section.
94
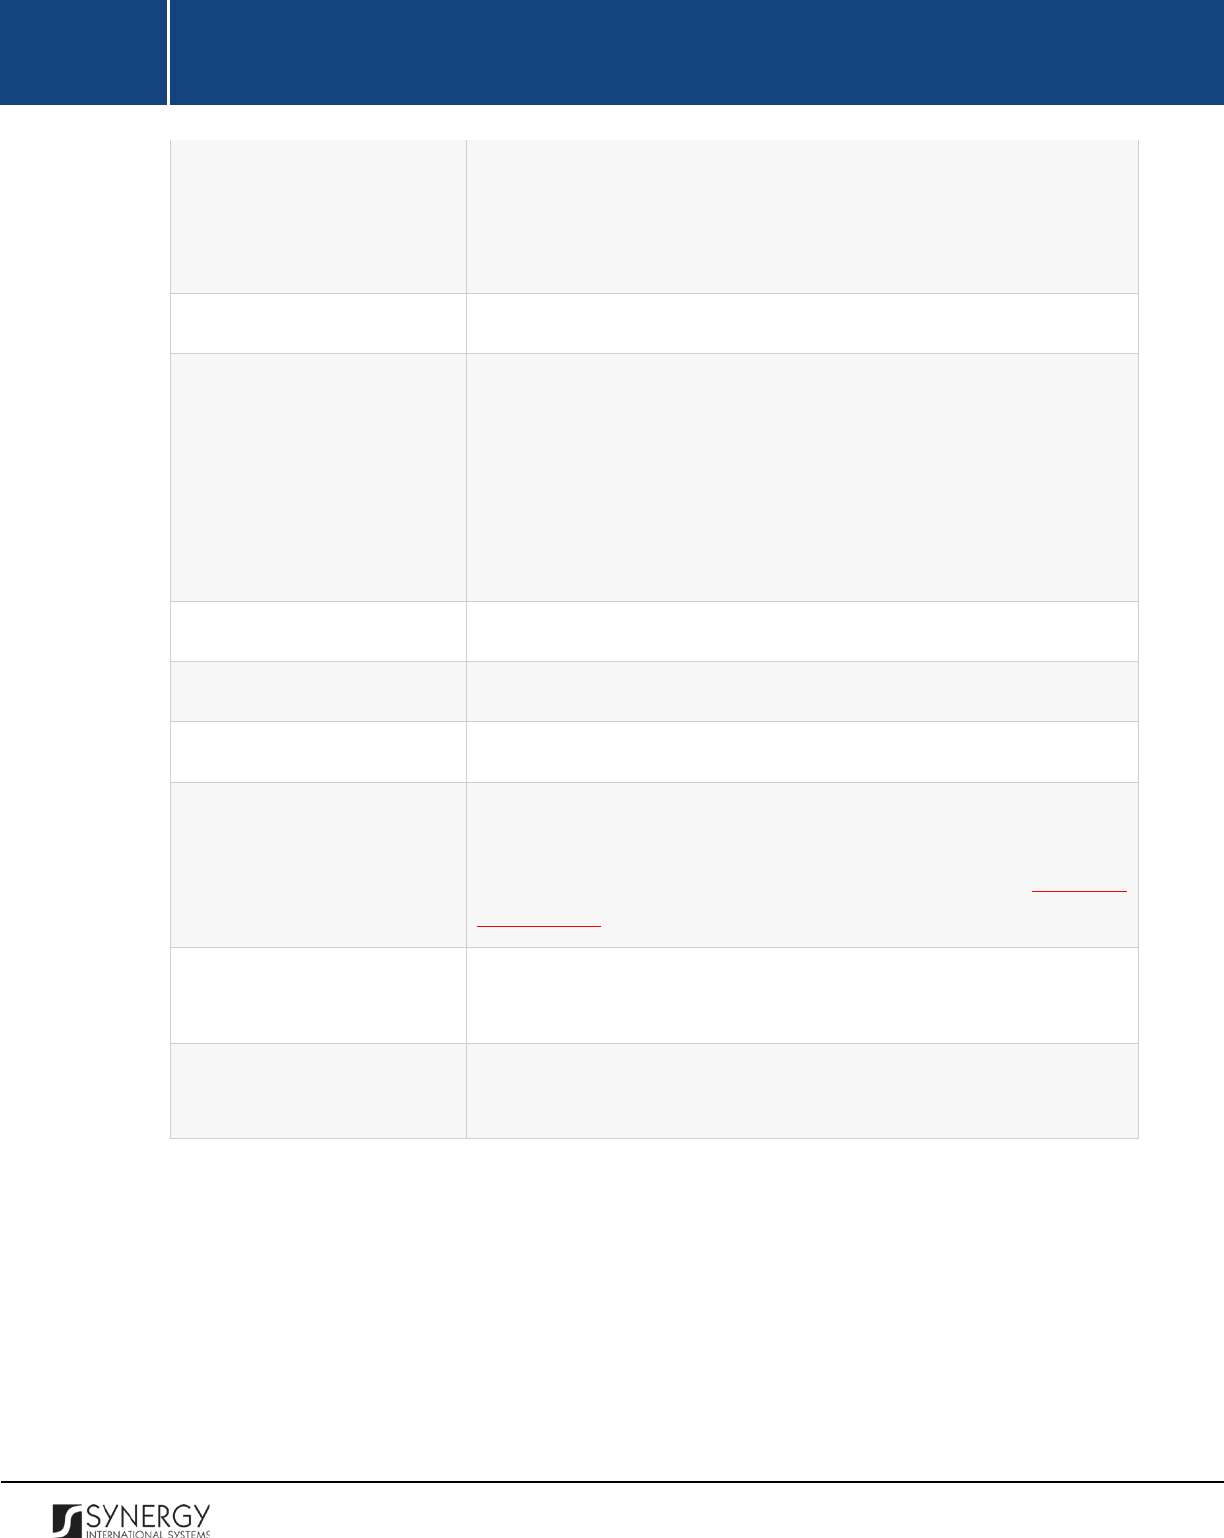
INTEGRATED CRIMINAL JUSTICE INFORMATION SYSTEM OF IRAQ | Personal Information | User Manual
RWANDA IECMS | Rwanda National Public Prosecution Authority | User Manual
Note: If the list of parties is long and hard to browse in, you can make
use of the search option. To locate the instance that you are looking
for, you should enter the keyword in the search box above the drop-
down list.
Exhibit Name
Indicate the name of the exhibit item. This field is mandatory.
Type of Exhibits
Select the
Type of Exhibits
that best describes the item to be
recovered from the drop-down list.
Note:
If the list of exhibit types is long and hard to browse in, you
can make use of the search option. To locate the instance that you
are looking for, you should enter the keyword in the search box
above the drop-down list.
Where Found
Specify the location where the exhibit item was found.
Recovered by
Indicate the person the exhibit item was recovered by.
Packaging Method
Specify the method used for packaging the exhibit item.
Photographed?
Indicate whether the exhibit
item has been photographed by
activating the respective radio button. If the Yes option is selected,
upload the respective image file. For more details, see Managing
Attachments.
Marking (Direct-D; Indirect-I)
Indicate whether the exhibit item has a
Direct-D
or
Indirect-I
marking
by selecting the corresponding radio button.
Is Evidence
Indicate whether the exhibit item serves as an evidence in the case
by selecting the respective checkbox.
3. Click the
Save
button to save the information input. Or, click
Cancel
to terminate the operation.
95
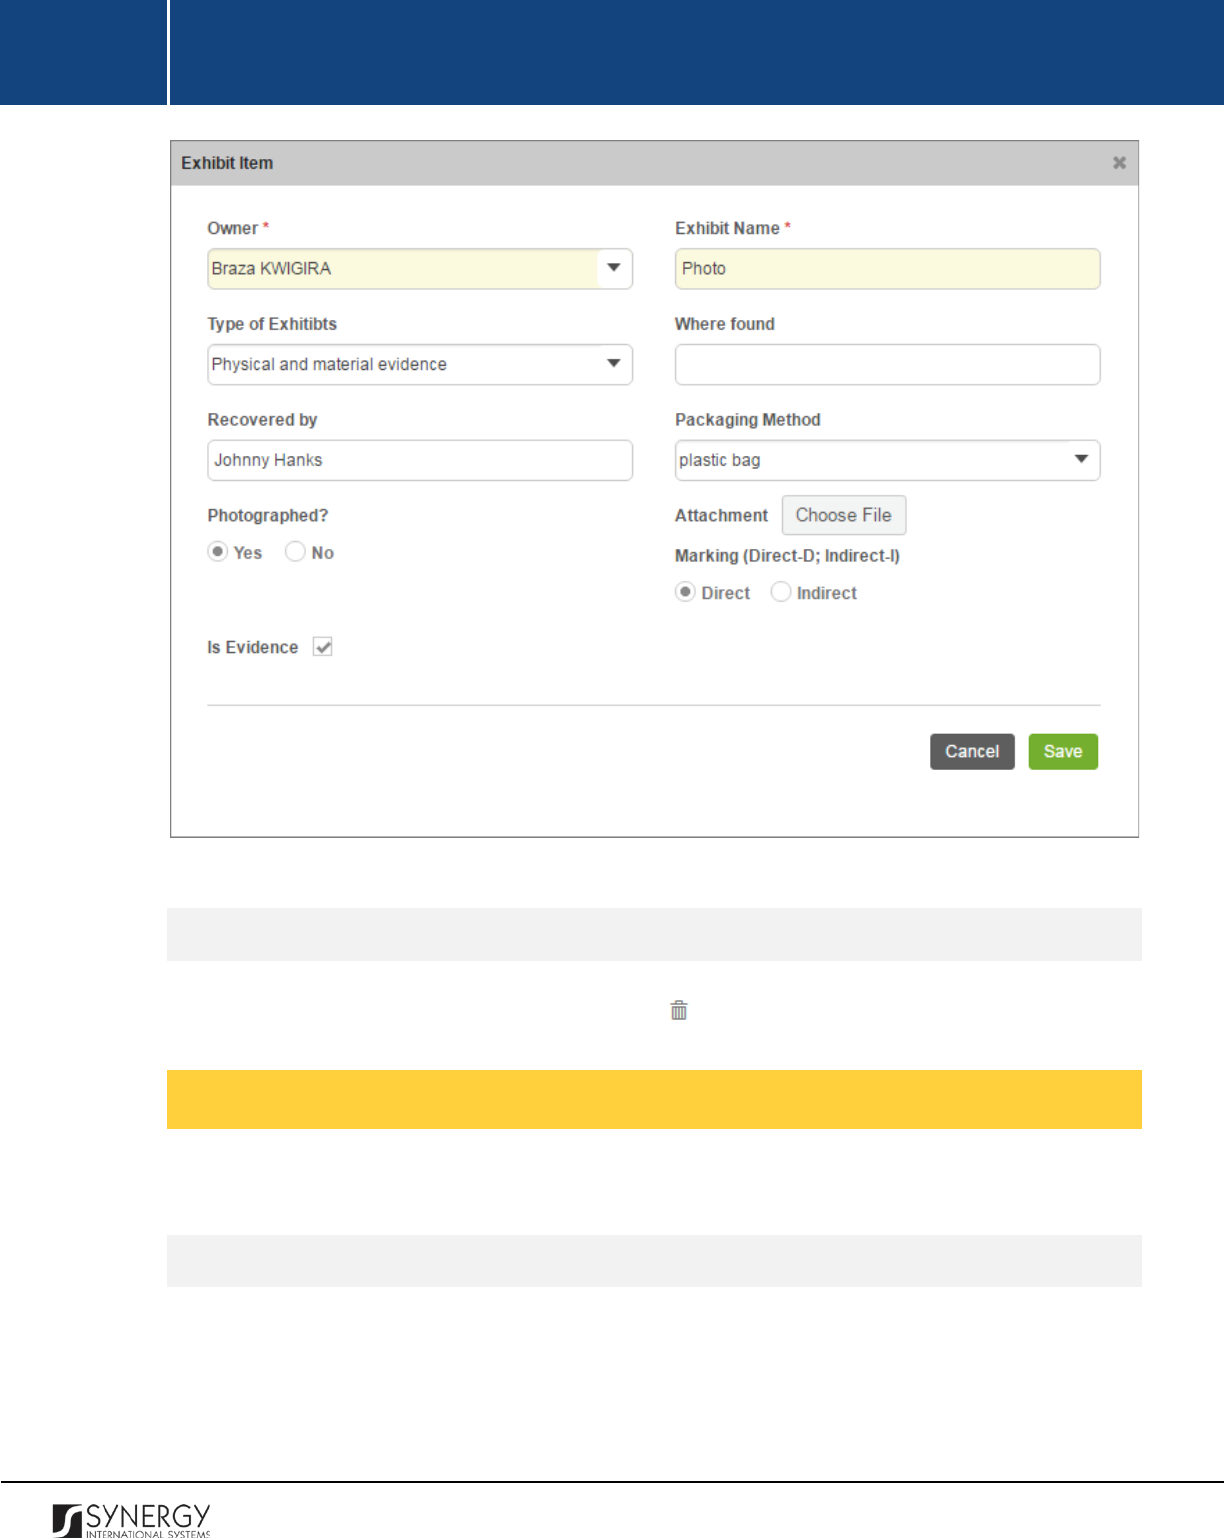
INTEGRATED CRIMINAL JUSTICE INFORMATION SYSTEM OF IRAQ | Personal Information | User Manual
RWANDA IECMS | Rwanda National Public Prosecution Authority | User Manual
Figure 32: Adding an Exhibit Item Record
Removing Exhibit Item Records
In order to remove an exhibit item record, click the
(Remove)
button to the left of the record.
Managing Diagrams
This chapter outlines how to add, edit, view, and remove diagram records.
Adding a Diagram Record
In order to add a diagram record, follow the steps below:
1. Click the
Add
button at the bottom of the Diagrams field. A Diagram form will open (Figure
33).
96
INTEGRATED CRIMINAL JUSTICE INFORMATION SYSTEM OF IRAQ | Personal Information | User Manual
RWANDA IECMS | Rwanda National Public Prosecution Authority | User Manual
Figure 33: Adding a Diagram Record
2. Provide the information requested in the form as described in the table below:
Note:
Some fields in this form are mandatory to be filled in. They are marked with an asterisk.
Field Name
Description
Date
Specify the date and time when the diagram was created. This field
is mandatory. A calendar popup is available for this field, see Figure
3: Calendar.
Apart from indicating the date, the calendar also allows specifying
the time when the diagram was created. Use the
Hour
and
Minute
sliders to set the exact time.
Title
Enter the diagram
Title
. This field is mandatory.
97
INTEGRATED CRIMINAL JUSTICE INFORMATION SYSTEM OF IRAQ | Personal Information | User Manual
RWANDA IECMS | Rwanda National Public Prosecution Authority | User Manual
Province
Select the
Province
the diagram is related to.
Please, note that
selection of a province will filter the list in the District field and
display only those instances that are related to the selected
province.
Note:
If the list of provinces is long and hard to browse in, you can
make use of the search option. To locate the instance that you are
looking for, you should enter the keyword in the search box above
the drop-down list.
District
Select the
District
the diagram is related to.
Please, note that
selection of a district will filter the list in the Sector field and display
only those instances that are related to the selected district.
Note:
If the list of districts is long and hard to browse in, you can
make use of the search option. To locate the instance that you are
looking for, you should enter the keyword in the search box above
the drop-down list.
Sector
Select the
Sector
the diagram is related to.
Please, note that
selection of a sector will filter the list in the Cell field and display only
those instances that are related to the selected sector.
Note:
If the list of sectors is long and hard to browse in, you can
make use of the search option. To locate the instance that you are
looking for, you should enter the keyword in the search box above
the drop-down list.
Cell
Select the
Cell
the diagram is related to. Please, note that selection
of a cell will filter the list in the Village field and display only those
instances that are related to the selected cell.
Note:
If the list of cells is long and hard to browse in, you can make
use of the search option. To locate the instance that you are looking
for, you should enter the keyword in the search box above the drop-
down list.
Village
Select the
Village
the diagram is related to.
Note:
If the list of villages is long and hard to browse in, you can
make use of the search option. To locate the instance that you are
98

INTEGRATED CRIMINAL JUSTICE INFORMATION SYSTEM OF IRAQ | Personal Information | User Manual
RWANDA IECMS | Rwanda National Public Prosecution Authority | User Manual
looking for, you should enter the keyword in the search box above
the drop-down list.
Preparer
Indicate the name of the official who prepared the diagram.
Rank
Select the
Rank
of the diagram preparer from the drop-down list.
Note:
If the list of ranks is long and hard to browse in, you can make
use of the search option. To locate the instance that you are looking
for, you should enter the keyword in the search box above the drop-
down list.
Attachment
Attach diagram related documents and images.
This field is
mandatory. For more details, see Managing Attachments.
Validated
Check the accuracy of the information provided by selecting the
Validated
checkbox. Please, note that system validation renders all
the information provided in the form as non-editable.
3. Click the
Save
button to save the information input. Or, click
Cancel
to terminate the operation.
Editing Diagram Records
In order to edit a diagram record, follow the steps below:
1. Click the
(Edit)
button to the left of the diagram record that you want to modify. The
Diagram form will open.
2. Make the required changes in that data displayed.
3. Click the
Save
button to save the changes made. Or, click
Cancel
to discard them.
Note:
The possibility of editing record details is available for records that have not been validated yet.
Viewing Diagram Records
In order to view the details of diagram records, click the
(View Form)
button to the left of the
record. The record summary will open in a separate window in the non-editable mode.
Note:
The possibility of viewing record details is available for validated records only.
99
INTEGRATED CRIMINAL JUSTICE INFORMATION SYSTEM OF IRAQ | Personal Information | User Manual
RWANDA IECMS | Rwanda National Public Prosecution Authority | User Manual
Removing Diagram Records
In order to remove a diagram record, click the
(Remove)
button to the left of the record.
Managing Seized Items Register
This chapter outlines how to add, edit, view, and remove seized item register records.
Adding a Seized Item Register Record
In order to add a seized item register record, follow the steps below:
1. Click
Add
button at the bottom of the Seized Items Register field. A Seized Items Register form
will open (Figure 34).
2. Provide the information requested in the form as described in the table below:
Note:
Some fields in this form are mandatory to be filled in. They are marked with an asterisk.
Field Name
Description
Restitution Date
Specify the date when the seized item was restituted. A calendar
popup is available for this field, see Figure 3: Calendar.
Destruction / Public Making
Date
Specify the date when the seized item was destructed or made
public. A calendar popup is available for this field, see
Figure 3:
Calendar.
Sell Date
Specify the date when the seized item was sold. A calendar popup is
available for this field, see Figure 3: Calendar.
Decisions
Provide details on the decisions made in relation to the seized items.
Sell Product
Provide details on the product selling.
100

INTEGRATED CRIMINAL JUSTICE INFORMATION SYSTEM OF IRAQ | Personal Information | User Manual
RWANDA IECMS | Rwanda National Public Prosecution Authority | User Manual
Seized Object Numbers
Enter unique numbers assigned to the seized object included in the
register. This field is mandatory.
Observations
Provide observations and other relevant information.
Validated
Check the accuracy of the information provided by selecting the
Validated
checkbox. Please, note that system validation renders all
the information provided in the form as non-editable.
3. Click the
Save
button to save the information input. Or, click
Cancel
to terminate the operation.
Figure 34: Adding a Seized Item Register Record
Editing Seized Items Register Records
101
INTEGRATED CRIMINAL JUSTICE INFORMATION SYSTEM OF IRAQ | Personal Information | User Manual
RWANDA IECMS | Rwanda National Public Prosecution Authority | User Manual
In order to edit a seized items register record, follow the steps below:
1. Click the
(Edit)
button to the left of the seized items register record that you want to
modify. The Seized Items Register form will open.
2. Make the required changes in the data displayed.
3. Click the
Save
button to save the changes made. Or, click
Cancel
to discard them.
Note:
The possibility of editing record details is available for records that have not been validated yet.
Viewing Seized Items Register Records
In order to view the details of seized items register records, click the
(View Form)
button to the left
of the record. The record summary will open in a separate window in the non-editable mode.
Note:
The possibility of viewing record details is available for validated records only.
Removing Seized Items Register Records
In order to remove a seized items register record, click the
(Remove)
button to the left of the
record.
Managing Handing over Statements
This chapter outlines how to add, edit, and remove handing over statement records.
Adding a Handing over Statement Record
In order to add a handing over statement record, follow the steps below:
1. Click the
Add
button at the bottom of the Handing over Statement field. A Handing over
Statement form will open (Figure 35).
2. Provide the information requested in the form as described in the table below.
Note:
Some fields in this form are mandatory to be filled in. They are marked with an asterisk.
102
INTEGRATED CRIMINAL JUSTICE INFORMATION SYSTEM OF IRAQ | Personal Information | User Manual
RWANDA IECMS | Rwanda National Public Prosecution Authority | User Manual
Field Name
Description
Date
The information in this field is automatically generated by the
system and shows the date when the statement was issued.
Prosecutor
Select the name of the
Prosecutor who issued the handing over
statement from the drop-down list. This field is mandatory.
Note:
If the list of prosecutors is long and hard to browse in, you can
make use of the search option. To locate the instance that you are
looking for, you should enter the keyword in the search box above
the drop-down list.
Receiver
Select the name of the person the released items were handed over
to. This field is mandatory. Please, note that the list will contain all
parties involved into the case and specified in the GENERAL
INFORMATION section.
Note:
If the list of receivers is long and hard to browse in, you can
make use of the search option. To locate the instance that you are
looking for, you should enter the keyword in the search box above
the drop-down list.
Release No
Enter an identification number assigned to the release statement.
This field is mandatory.
Receiver Address
This is a read-
only field that is automatically generated by the
system and that displays the receiver’s address as indicated in the
receiver’s personal profile. For more details, see the Rwanda IECMS
Individual Form User Manual in REFERENCES.
Returned Items
List all the items included in the handing over statement. This field
is mandatory.
Witnesses
List all the
Witnesses
to the release act. This field is mandatory. For
more details, see Managing Witnesses.
103
INTEGRATED CRIMINAL JUSTICE INFORMATION SYSTEM OF IRAQ | Personal Information | User Manual
RWANDA IECMS | Rwanda National Public Prosecution Authority | User Manual
Signed Copy
Upload a
Signed Copy
of the seized item handing over statement or
other related document. For more details, see Managing
Attachments.
Note:
The Date Attached field will automatically be populated with
the date when the attachment was made and will be available once
you upload the respective file.
Validated
Check the accuracy of the information provided by selecting the
Validated
checkbox. Please, note that system validation renders all
the information provided in the form as non-editable.
3. Click the
Save
button to save the information input. Or, click
Cancel
to terminate the operation.
Editing Handing over Statement Records
In order to edit a handing over statement record, follow the steps below:
1. Click the
(Edit)
button to the left of the handing over statement record that you want to
modify. The Handing over Statement form will open.
2. Make the required changes in the data displayed.
3. Click the
Save
button to save the changes made. Or, click
Cancel
to discard them.
Note:
The possibility of editing record details is available for records that have not been validated yet.
Viewing Handing over Statement Records
In order to view the details of handing over statement records, click the
(View Form)
button to the
left of the record. The record summary will open in a separate window in the non-editable mode.
Note:
The possibility of viewing record details is available for validated records only.
Removing Handing over Statement Records
104
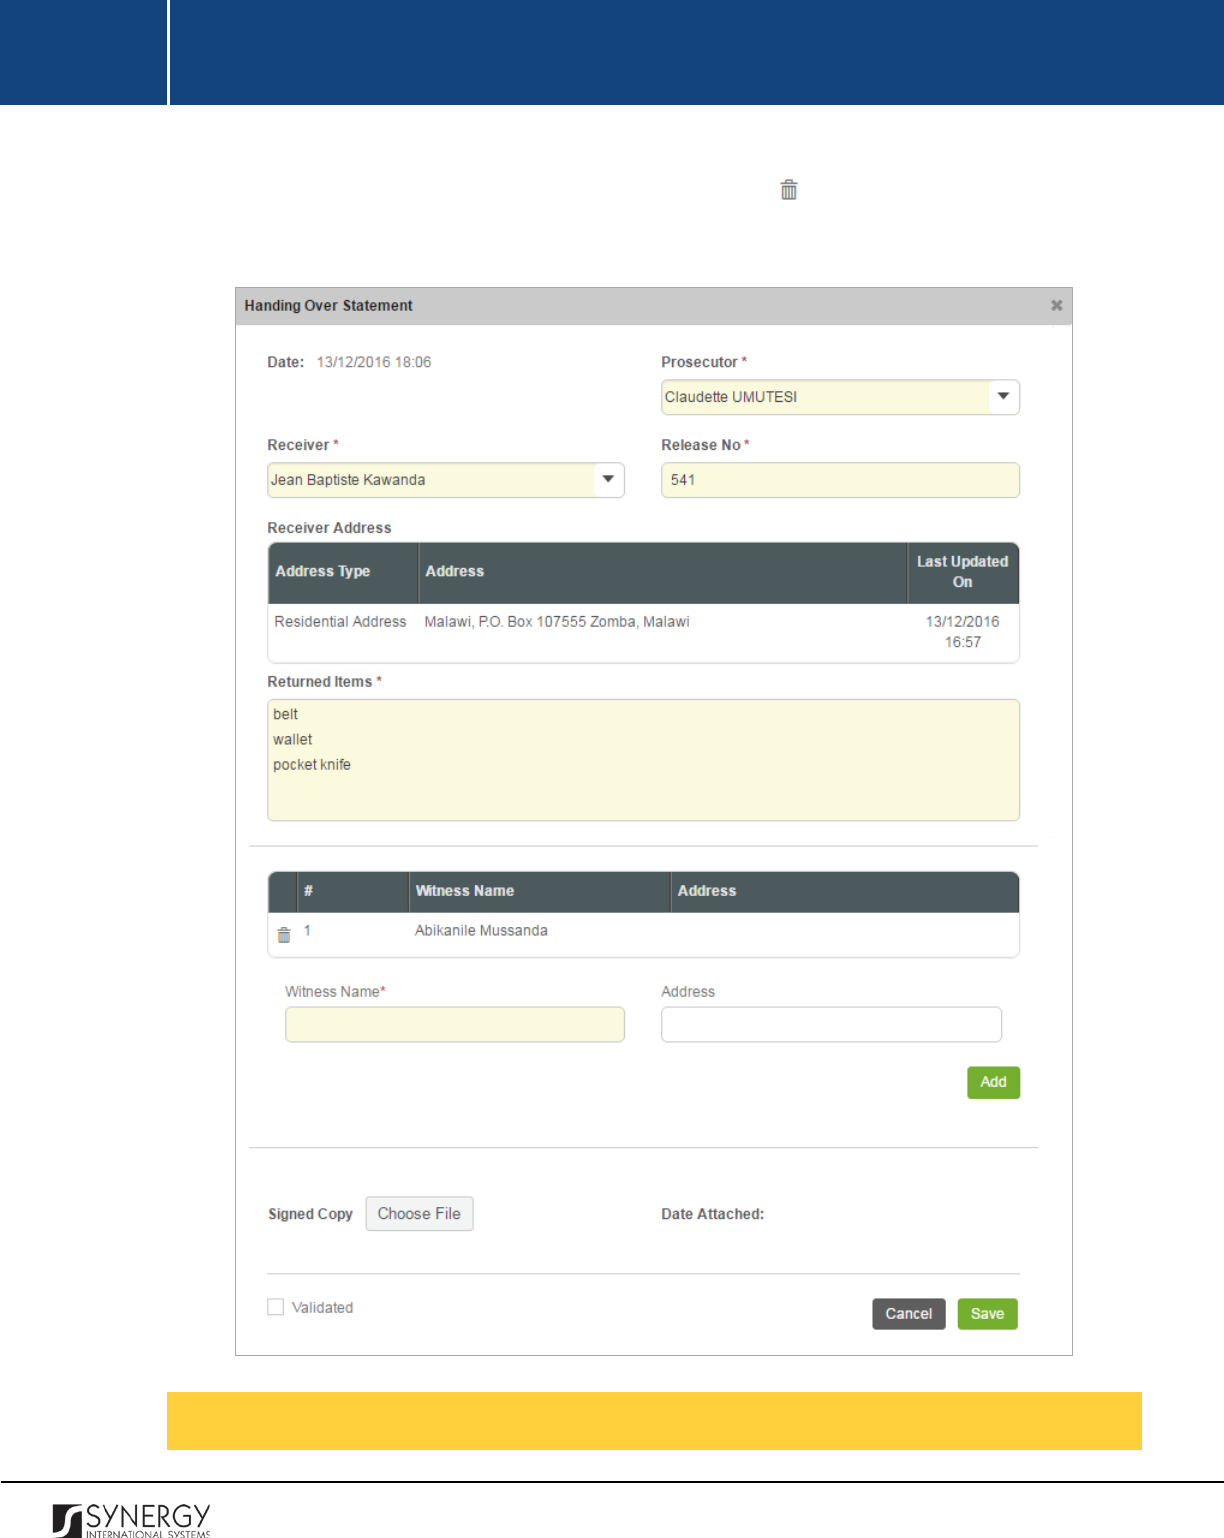
INTEGRATED CRIMINAL JUSTICE INFORMATION SYSTEM OF IRAQ | Personal Information | User Manual
RWANDA IECMS | Rwanda National Public Prosecution Authority | User Manual
In order to remove a handing over statement record, click the
(Remove)
button to the left of the
record.
Figure 35: Adding a Handing Over Statement Record
Managing Witnesses
105
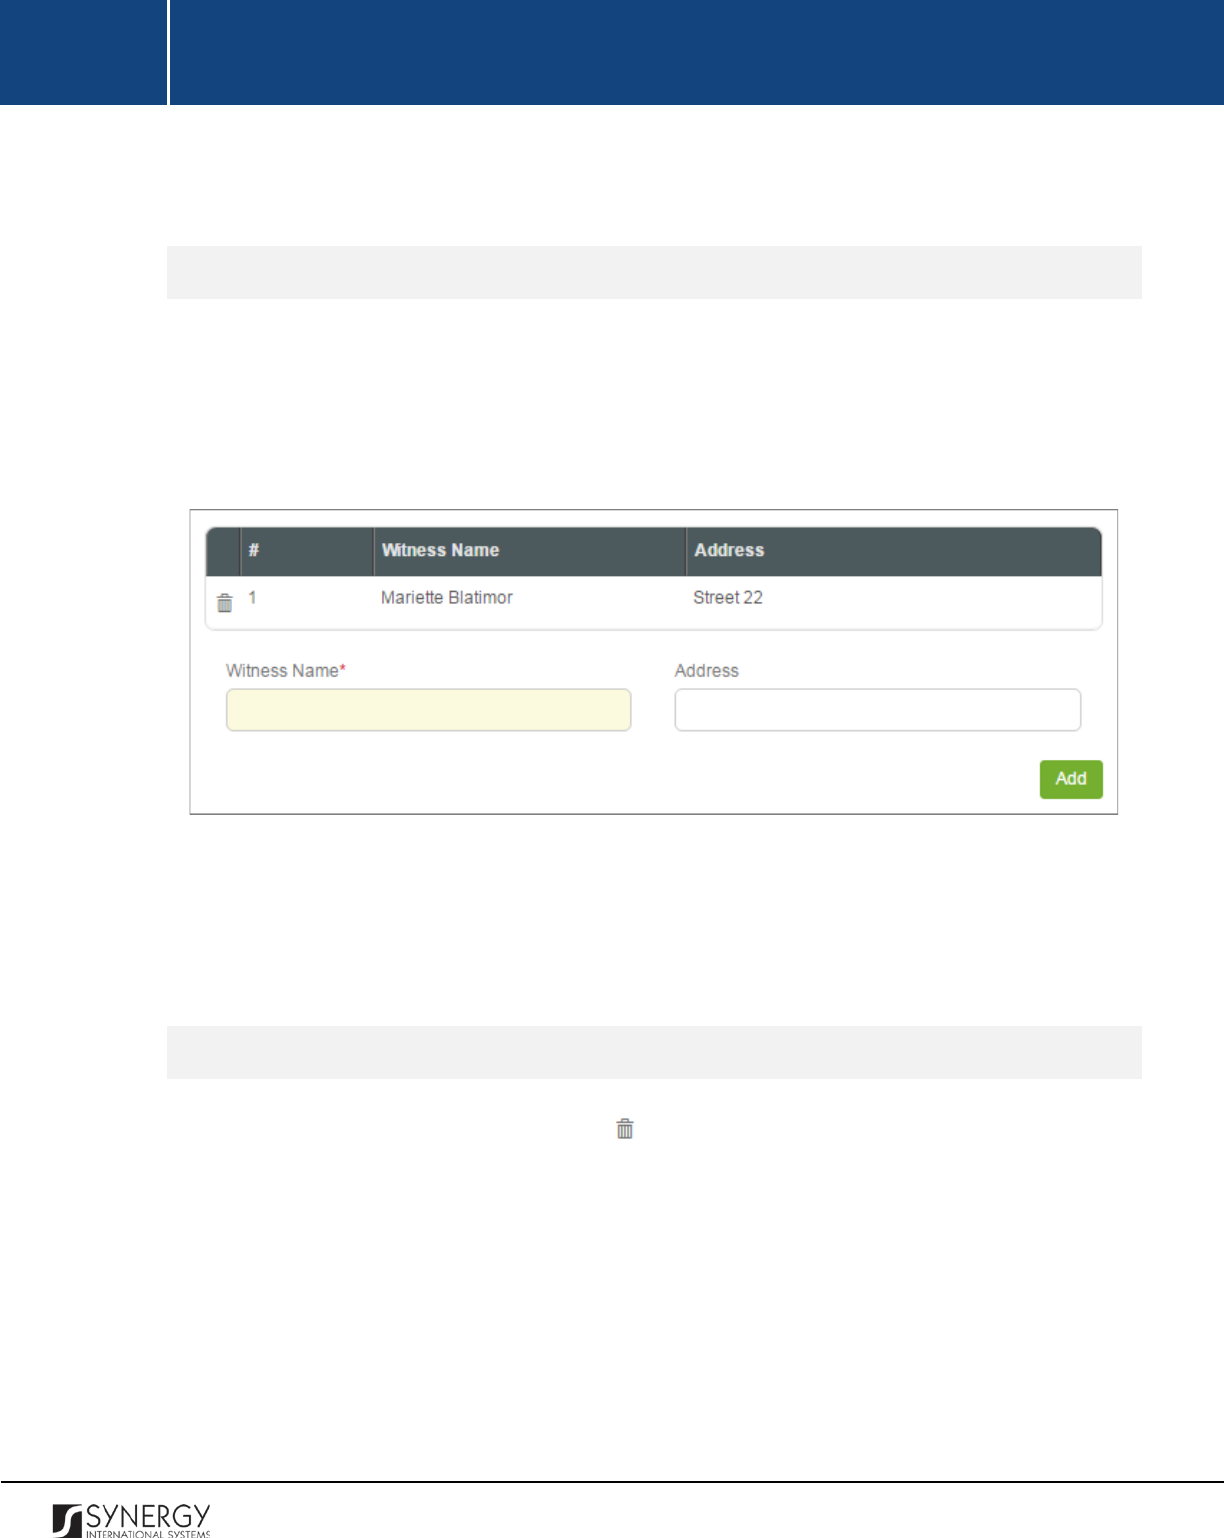
INTEGRATED CRIMINAL JUSTICE INFORMATION SYSTEM OF IRAQ | Personal Information | User Manual
RWANDA IECMS | Rwanda National Public Prosecution Authority | User Manual
This chapter outlines how to add and remove witness records.
Adding a Witness Record
In order to add a witness record, follow the steps below:
1. Enter the name of the witness to the release act
in the respective field. This field is mandatory.
2. Indicate the address where the witness resides.
3. Click the
Add
button. The new record will appear in the Witnesses table (Figure 36).
Figure 36: Adding a Witness Record
Note:
Each witness record will be assigned a unique sequential number that will identify it and be
used for future reference. The identification number will automatically be generated by the system
and displayed in the # column.
Removing Witness Records
In order to remove a witness record, click the
(Remove)
button to the left of the record.
106
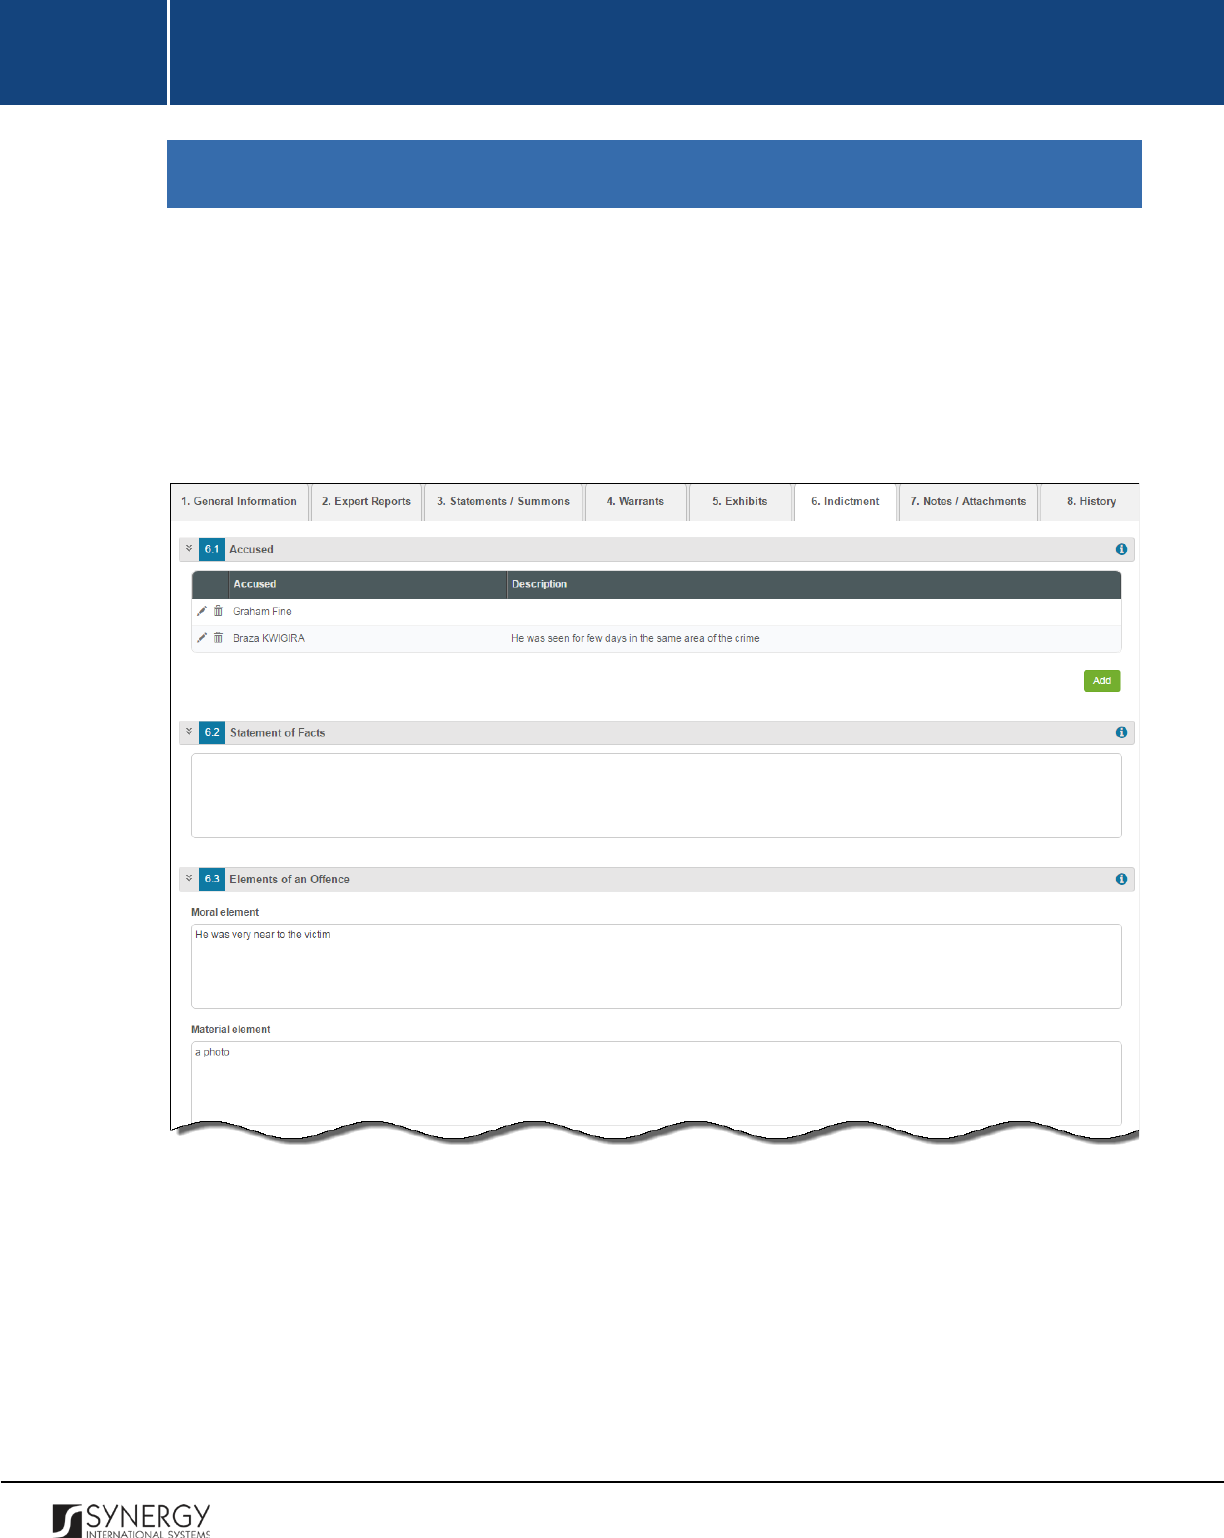
INTEGRATED CRIMINAL JUSTICE INFORMATION SYSTEM OF IRAQ | Personal Information | User Manual
RWANDA IECMS | Rwanda National Public Prosecution Authority | User Manual
INDICTMENT
The Indictment section of the Rwanda National Public Prosecution Authority form (Figure 37 and
Figure 38) is used to add and display information about the formal accusations that a person has
committed a crime and initiating a prosecutable case. The information to be provided in this section
includes the information on the person who has been officially charged with committing a crime, case
related facts and acts, moral, material, and legal elements of the offence, the opinion of the
prosecution in charge of the case, etc.
Figure 37: Indictment Section (Part 1)
107

INTEGRATED CRIMINAL JUSTICE INFORMATION SYSTEM OF IRAQ | Personal Information | User Manual
RWANDA IECMS | Rwanda National Public Prosecution Authority | User Manual
Figure 38: Indictment Section (Part 2)
For more details on what information is requested in the Indictment section, refer to the table below.
Note:
Some fields in this section are mandatory to be filled in. They are marked with an asterisk.
Field Name
Description
Accused
Specify the
information on the person who was officially charged
with committing a crime. For more details, see Managing
Defendants.
Statement of Facts
Indicate the case related facts and acts, including all pertinent facts
for a prosecution case
that resulted in bringing forward the
indictment.
108
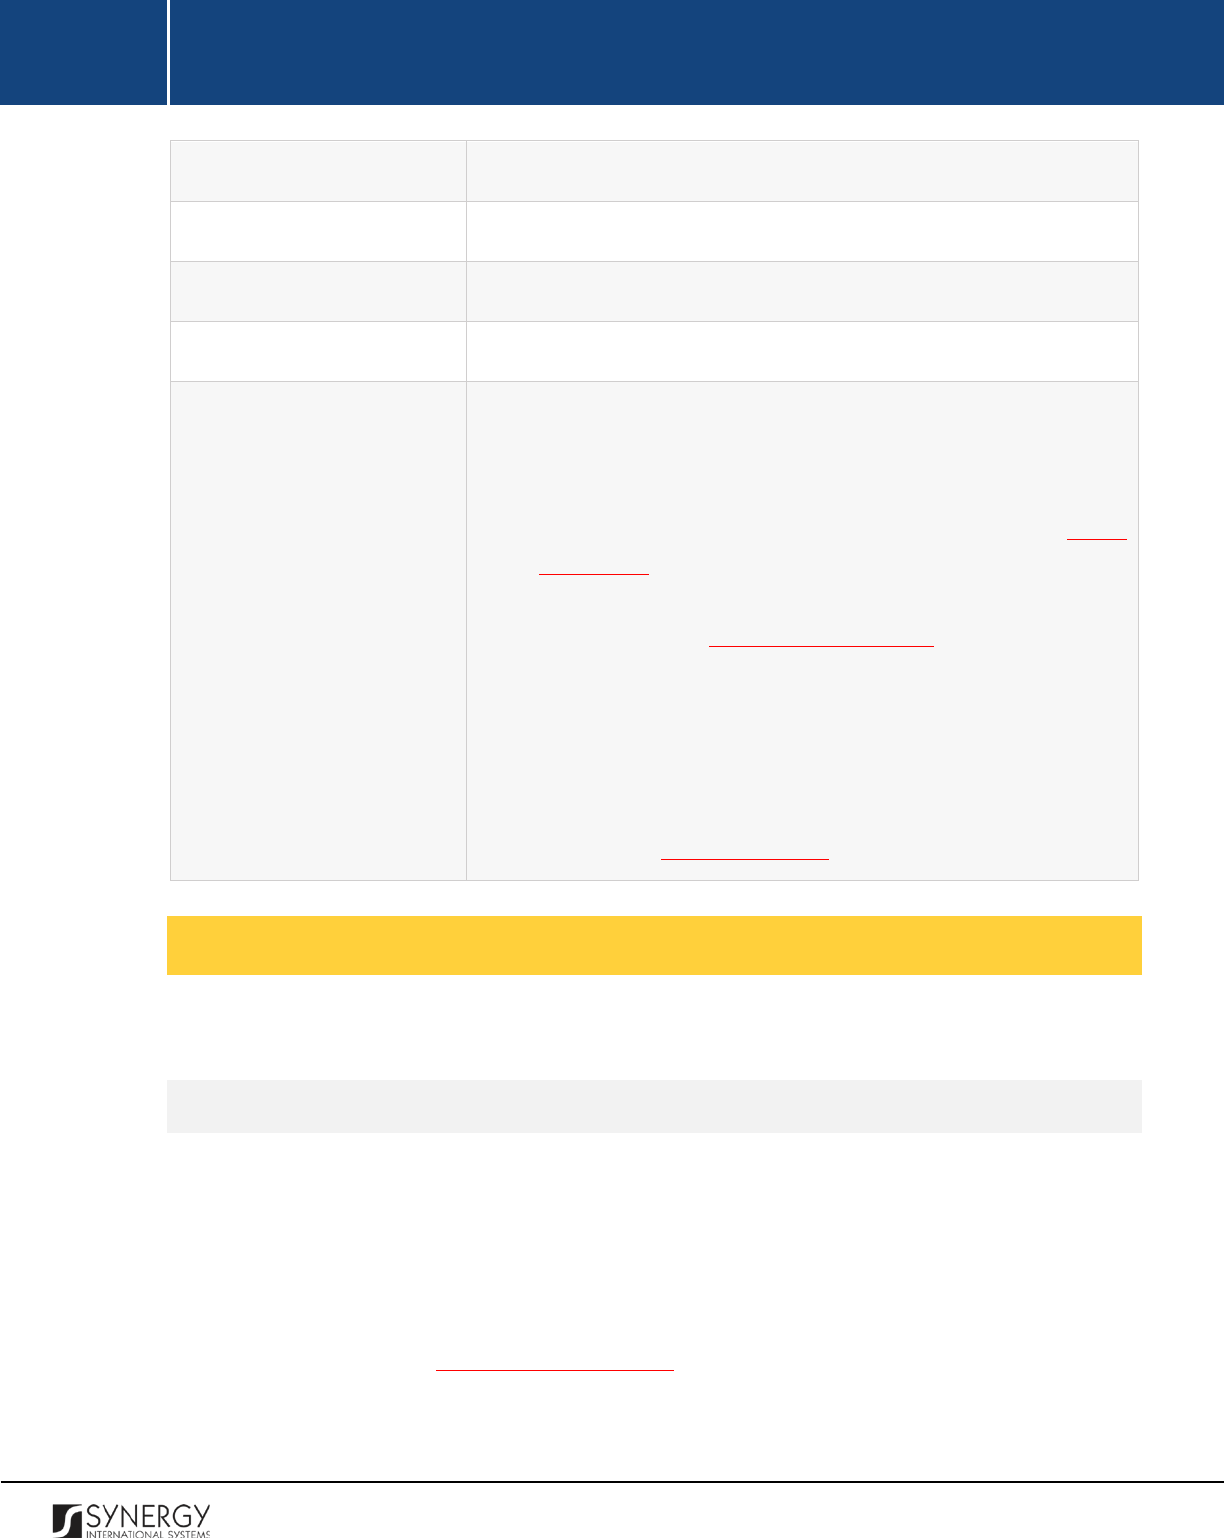
INTEGRATED CRIMINAL JUSTICE INFORMATION SYSTEM OF IRAQ | Personal Information | User Manual
RWANDA IECMS | Rwanda National Public Prosecution Authority | User Manual
Elements of an Offence
State moral, material, and legal elements of the offence.
Evidences
Provide the case evidences collected during the case processing.
The Prosecutor Prayer
Provide the opinion of the prosecutor in charge of the case.
Inventory of the Docket
Specify the inventory of the docket.
Details
Provide the information reques
ted in this field by indicating the
following:
•
Indictment Date
– indicate the date when the indictment took
place. A calendar popup is available for this field, see Figure
3: Calendar.
•
Signed
Copy
– attach a signed copy of the indictment act. For
more details, see Managing Attachments.
•
Date Attached
– this field is automatically populated with the
date when the attachment was made and becomes available
once you upload the respective file.
•
Export
–
export the indictment act into one of the formats
supported by the system. For more details on how to export
records, see EXPORTING FILES.
Managing Defendants
This chapter outlines how you can add, edit, and remove defendant records.
Adding a Defendant Record
In order to add a defendant accused record, follow the steps below:
1. Click the
Add
button at the bottom of the Accused field. An Accused form will appear (Figure
39).
2. Select the party who was officially charged with committing a crime from the drop-down list.
This field is mandatory. Please, note that the list will contain all suspects involved into the case
and specified in the GENERAL INFORMATION section.
109
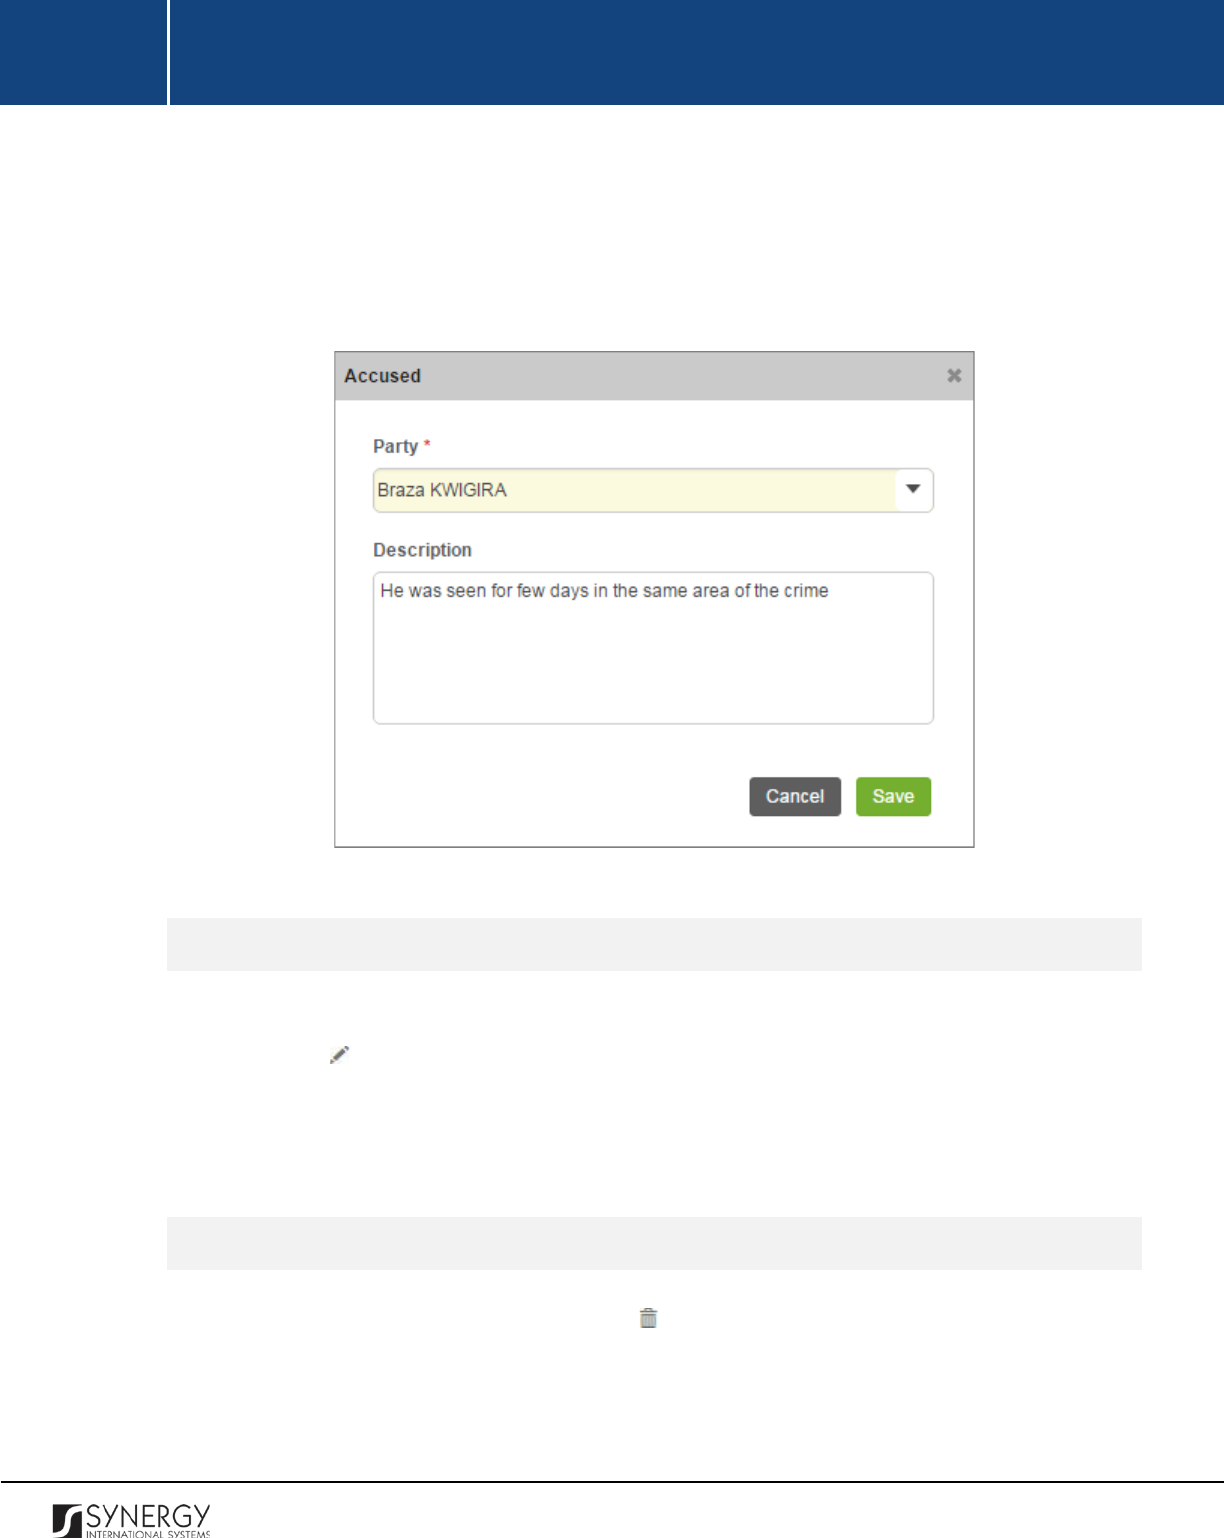
INTEGRATED CRIMINAL JUSTICE INFORMATION SYSTEM OF IRAQ | Personal Information | User Manual
RWANDA IECMS | Rwanda National Public Prosecution Authority | User Manual
Note:
If the list of parties is long and hard to browse in, you can make use of the search option.
To locate the instance that you are looking for, you should enter the keyword in the search
box above the drop-down list.
3. Provide a detailed listing of all charges brought against the defendant.
4. Click the
Save
button to save the information input. Or, click
Cancel
to terminate the operation.
Figure 39: Adding a Defendant Record
Editing Defendant Records
In order to edit a defendant record, follow the steps below:
1. Click the (
Edit)
button to the left of the record that you want to modify. The Accused form
will open.
2. Make the required changes in the data displayed.
3. Click the
Save
button to save the changes made. Or, click
Cancel
to discard them.
Removing Defendant Records
In order to remove a defendant record, click the
(Remove)
button to the left of the record.
110
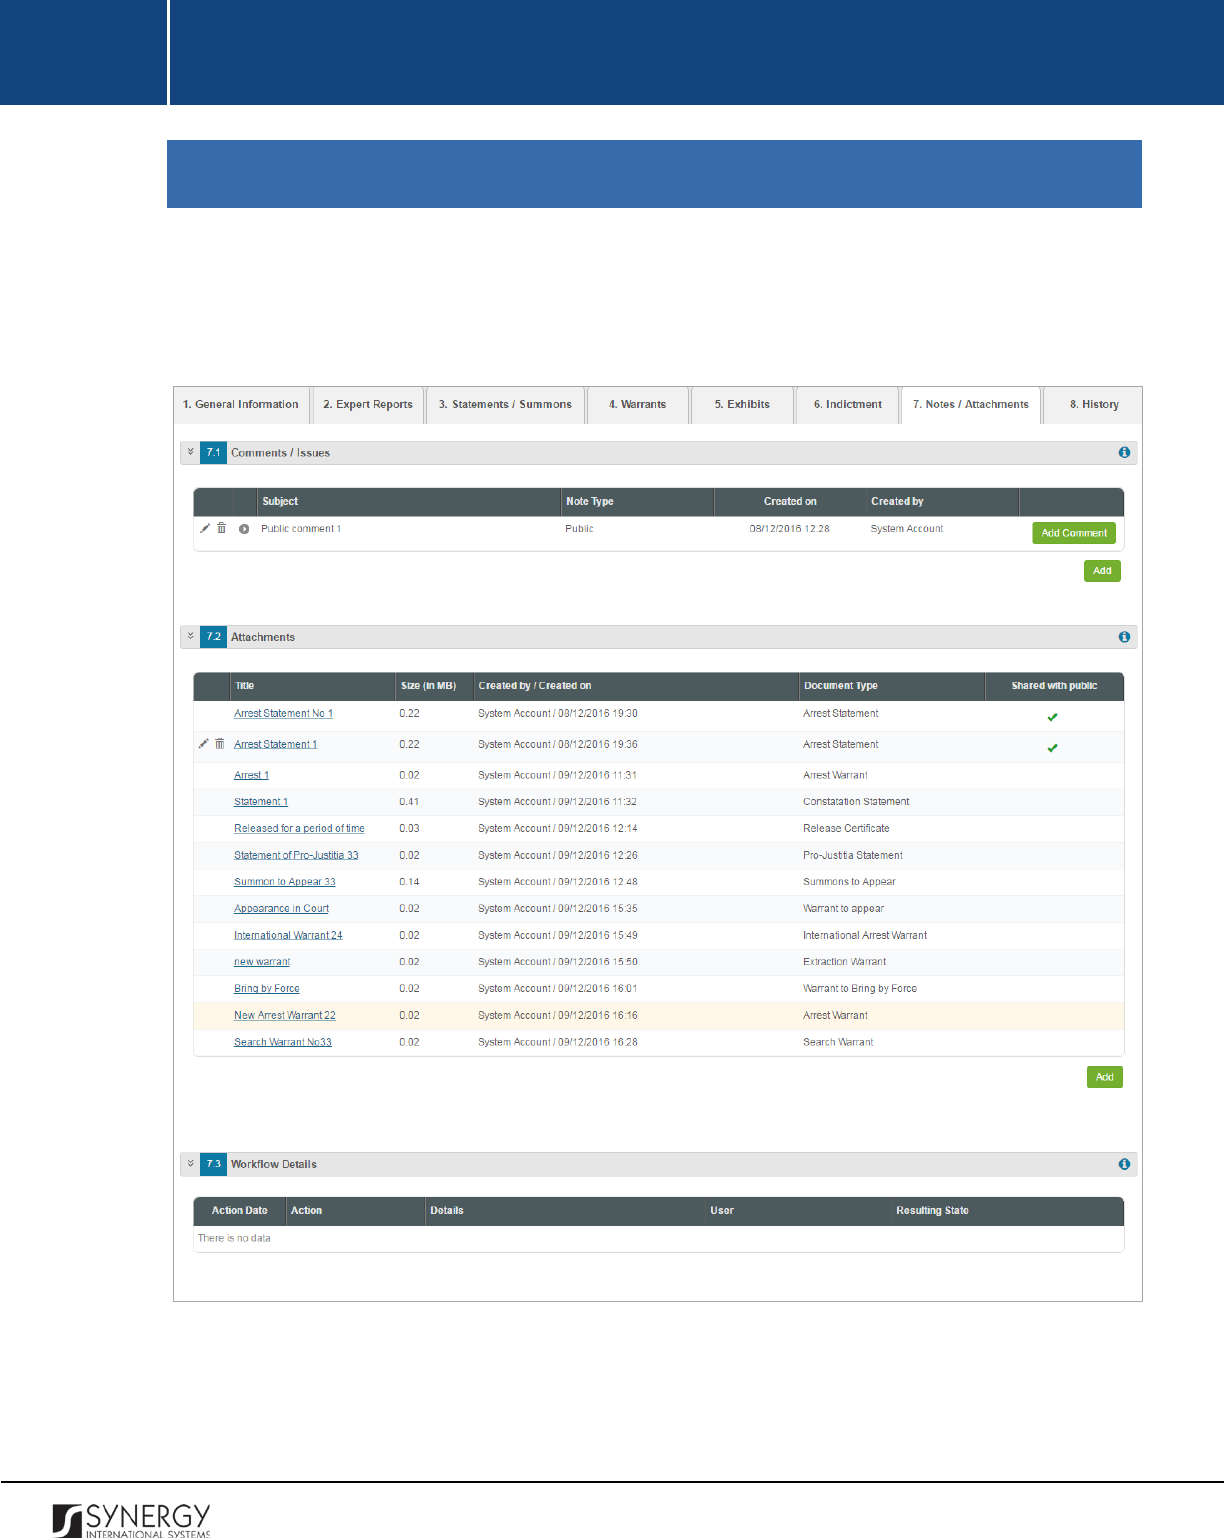
INTEGRATED CRIMINAL JUSTICE INFORMATION SYSTEM OF IRAQ | Personal Information | User Manual
RWANDA IECMS | Rwanda National Public Prosecution Authority | User Manual
NOTES / ATTACHMENTS SECTION
The Notes / Attachments section of the National Public Prosecution Authority form (Figure 40) is used
to record additional comments and issues related to the given police case, as well as attach supporting
documents and other files. The case workflow details are also presented in this section.
Figure 40: Notes / Attachments Section
For more details on what information is requested in the Notes / Attachments section, refer to the
table below.
111

INTEGRATED CRIMINAL JUSTICE INFORMATION SYSTEM OF IRAQ | Personal Information | User Manual
RWANDA IECMS | Rwanda National Public Prosecution Authority | User Manual
Field Name
Description
Comments / Issues
First, provide the prosecution case related comments and issues.
For more details, see Managing Comments / Issues. Then, provide
additional particulars on the comments and issues recorded. For
more details, see Managing Comment Details.
Attachments
Attach any related documents or images. For more details, see
Managing Attachments.
Workflow Details
This field becomes available after saving the Rwanda National Public
prosecution Authority form and p
rovides information about the
actions made to the corresponding form. The information displayed
in this table includes the following:
•
Action Date
– date when the action was taken;
•
Action
– name of the action taken;
•
Details
– details of the action taken;
•
User
– name of the user who performed the action;
•
Resulting
Status
– workflow status of the form, resulting from
the action taken.
Managing Comments / Issues
This chapter outlines how to add, edit, and remove comment and issue records. It also describes how
you can expand a comment / issue record to view its particulars.
Adding a Comment / Issue Record
In order to add a comment / issue record, follow the steps below:
1. Click the
Add
button at the bottom of the Comments / Issues field. A Comments / Issues form
will open (Figure 41).
2. Provide the information requested in the form as described in the table below.
Note:
Some fields in this form are mandatory to be filled in. They are marked with an asterisk.
112

INTEGRATED CRIMINAL JUSTICE INFORMATION SYSTEM OF IRAQ | Personal Information | User Manual
RWANDA IECMS | Rwanda National Public Prosecution Authority | User Manual
Component Name
Description
Note Type
Specify whether the comment is public or private by activating the
respective radio-button. This field is mandatory.
Subject
Enter the note subject. This field is mandatory.
Related Users
This field becomes available is the note types is to Private and is used
to select the users the note will be shared with. For more details,
see Managing Related Users.
3. Click the
Save
button to save the information input. Or, click
Cancel
to terminate the operation.
Figure 41: Adding a Comment / Issue Record
Editing Comment / Issue Records
113
INTEGRATED CRIMINAL JUSTICE INFORMATION SYSTEM OF IRAQ | Personal Information | User Manual
RWANDA IECMS | Rwanda National Public Prosecution Authority | User Manual
In order to edit a comment / issue record, follow the steps below:
1. Click the
(Edit)
button to the left of the record that you want to modify. The Comments /
Issues form will open.
2. Make the required changes in the data displayed.
3. Click the
Save
button to save the changes made. Or, click
Cancel
to discard them.
Expanding Comment / Issue Records
You can expand a comment / issue record to view the issue particulars added for it (see Managing
Comment Details). This way, when you select to view additional information on the comment / issue,
you can see the name of the user who recorded the comment particulars, the date when the
information was recorded in the system, and other details.
To expand a comment / issue record, click the icon to the left of the record. Clicking the icon will
hide the comment / issue related information.
Removing Comment / Issue Records
In order to remove a comment / issue record, click the
(Remove)
button to the left of the record.
Managing Related Users
This chapter outlines how to add and remove related user records.
Adding a Related User Record
In order to add a related user, follow the steps below:
1. Click the
Add
button in the Comments / Issues form. A Comments / Issues Details Users form
will open (Figure 42).
2. Locate the user or users the comment with be shared with. This can be done by using the
search mechanism the Comments / Issues Details Users form is equipped with. To find a user,
create filtering criteria that will be used to find and display all users that match the selection.
The following criteria are available:
114

INTEGRATED CRIMINAL JUSTICE INFORMATION SYSTEM OF IRAQ | Personal Information | User Manual
RWANDA IECMS | Rwanda National Public Prosecution Authority | User Manual
• Level
• Institution Office
• Responsible Role
Note:
Selection of an instance from one drop-down will filter the list in the next field and
display only those instances that are related to the selection. Also, note that if the lists in the
drop-down fields are long and hard to browse in, you can make use of the search option. To
locate the instance that you are looking for, you should enter the keyword in the search box
above the drop-down list.
3. Alternatively, you may enter the user’s name or any part of it in the search box.
Note:
For the search mechanism to yield accurate results, please, make sure to enter at least
three symbols (letters and numerals) in the search box.
4. Click the
Search
button. The list of all users matching the criteria will be displayed in the table
below.
5. Select the user that you want to share the comment with by ticking the checkbox to the left
of the user name.
6. Click the
Save
button to save the information input. Or, click
Cancel
to terminate the operation.
Browsing among Related User Records
In order to ensure fast page loading, the Related Users table is configured to display only five records
per page. However, you can easily locate the record that you are looking for by browsing for it.
To browse among the records displayed to you in the Related Users table, click the number link of the
page you want to navigate to. The
(First)
,
(Previous)
,
(Next)
, and
(Last)
buttons are used to navigate back and forth through the pages.
Removing Related User Records
In order to remove a related user record, click the
(Remove)
button to the left of the record.
115

INTEGRATED CRIMINAL JUSTICE INFORMATION SYSTEM OF IRAQ | Personal Information | User Manual
RWANDA IECMS | Rwanda National Public Prosecution Authority | User Manual
Figure 42: Adding a Related User Record
Managing Comment Details
This chapter outlines how to add, edit, and remove comment details records.
Adding a Comment Details Record
In order to add a comment details records, follow the steps below:
1. Click the
Add Comment
button at the right of the comment for which you want to add the
details. A Comments / Issues Details form will appear (Figure 43).
116

INTEGRATED CRIMINAL JUSTICE INFORMATION SYSTEM OF IRAQ | Personal Information | User Manual
RWANDA IECMS | Rwanda National Public Prosecution Authority | User Manual
2. Provide the comment details in the respective field. This field is mandatory.
3. Attach comment details related documents and images. For more details, see Managing
Attachments.
4. Click the
Save
button to save the information input. Or, click
Cancel
to terminate the operation.
Figure 43: Adding a Comment Details Record
Editing Comment Details Records
In order to edit a comment details record, follow the steps below:
1. Click the
(Edit)
button to the left of the record that you want to modify. The Comments /
Issues Details form will open.
2. Make the required changes in the data displayed.
3. Click the
Save
button to save the changes made. Or, click
Cancel
to discard them.
Removing Comment Details Records
In order to remove a comment details record, click the
(Remove)
button to the left of the record.
Managing Attachments
117
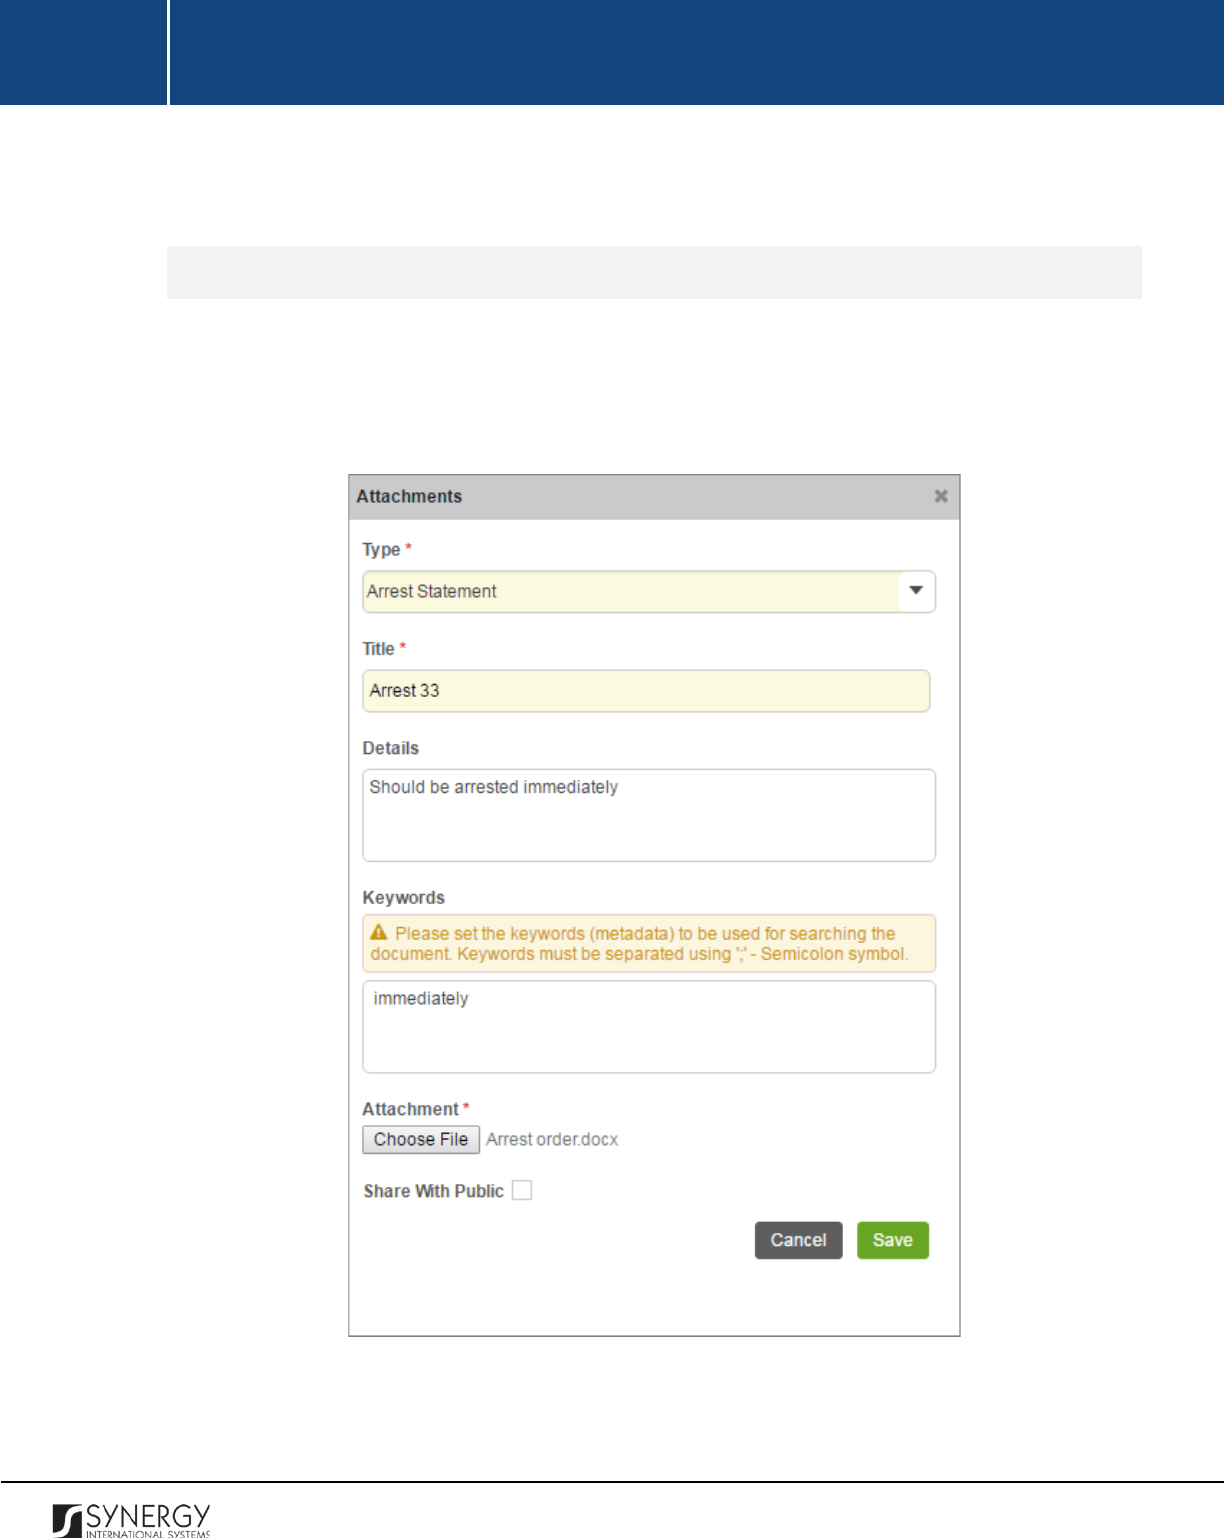
INTEGRATED CRIMINAL JUSTICE INFORMATION SYSTEM OF IRAQ | Personal Information | User Manual
RWANDA IECMS | Rwanda National Public Prosecution Authority | User Manual
This chapter outlines how to attach documents and images, view, edit, and remove them.
Adding an Attachment
In order to attach a document or image, follow the steps below:
1. Click the
Add
button at the bottom of the Attachments field. An Attachments form will appear
(Figure 44).
Figure 44: Uploading a File
2. Select the attachment
Type
from the drop-down list. This field is mandatory.
118
INTEGRATED CRIMINAL JUSTICE INFORMATION SYSTEM OF IRAQ | Personal Information | User Manual
RWANDA IECMS | Rwanda National Public Prosecution Authority | User Manual
Note:
If the list of attachment types is long and hard to browse in, you can make use of the
search option. To locate the instance that you are looking for, you should enter the keyword
in the search box above the drop-down list.
3. Enter the attachment
Title
. This field is mandatory.
4. Provide a brief description of the attachment content in the
Details
field.
5. List all
Keywords
to be used for locating the file attached.
Note:
Please, note that the keywords should be separated with a semicolon symbol (;).
6. Click the
Choose File
button and select a file to upload.
7. Click the
Save
button to upload the selected file. Or, click
Cancel
to terminate the operation.
Note:
If you want the attachment to be available to the parties involved into the given prosecution
case, you may select the
Share With Public
checkbox at the bottom of the Attachments form.
Viewing Attachments
Click the title of the corresponding attachment you want to view. The attached file will be displayed
in your browser or you may download it to your local PC.
Editing Attachments
In order to edit an existing attachment, follow the steps below:
1. Click the
(Edit)
button to the left of the attachment title. The Attachments form will open.
2. Make the required changes in the data displayed.
3. Click the
Save
button to save the changes made. Or, click
Cancel
to discard them.
Removing Attachments
In order to remove an attachment, click the
(Remove)
button to the left of the attachment title.
Note:
Attachments can be deleted only from the section they have been added from.
119
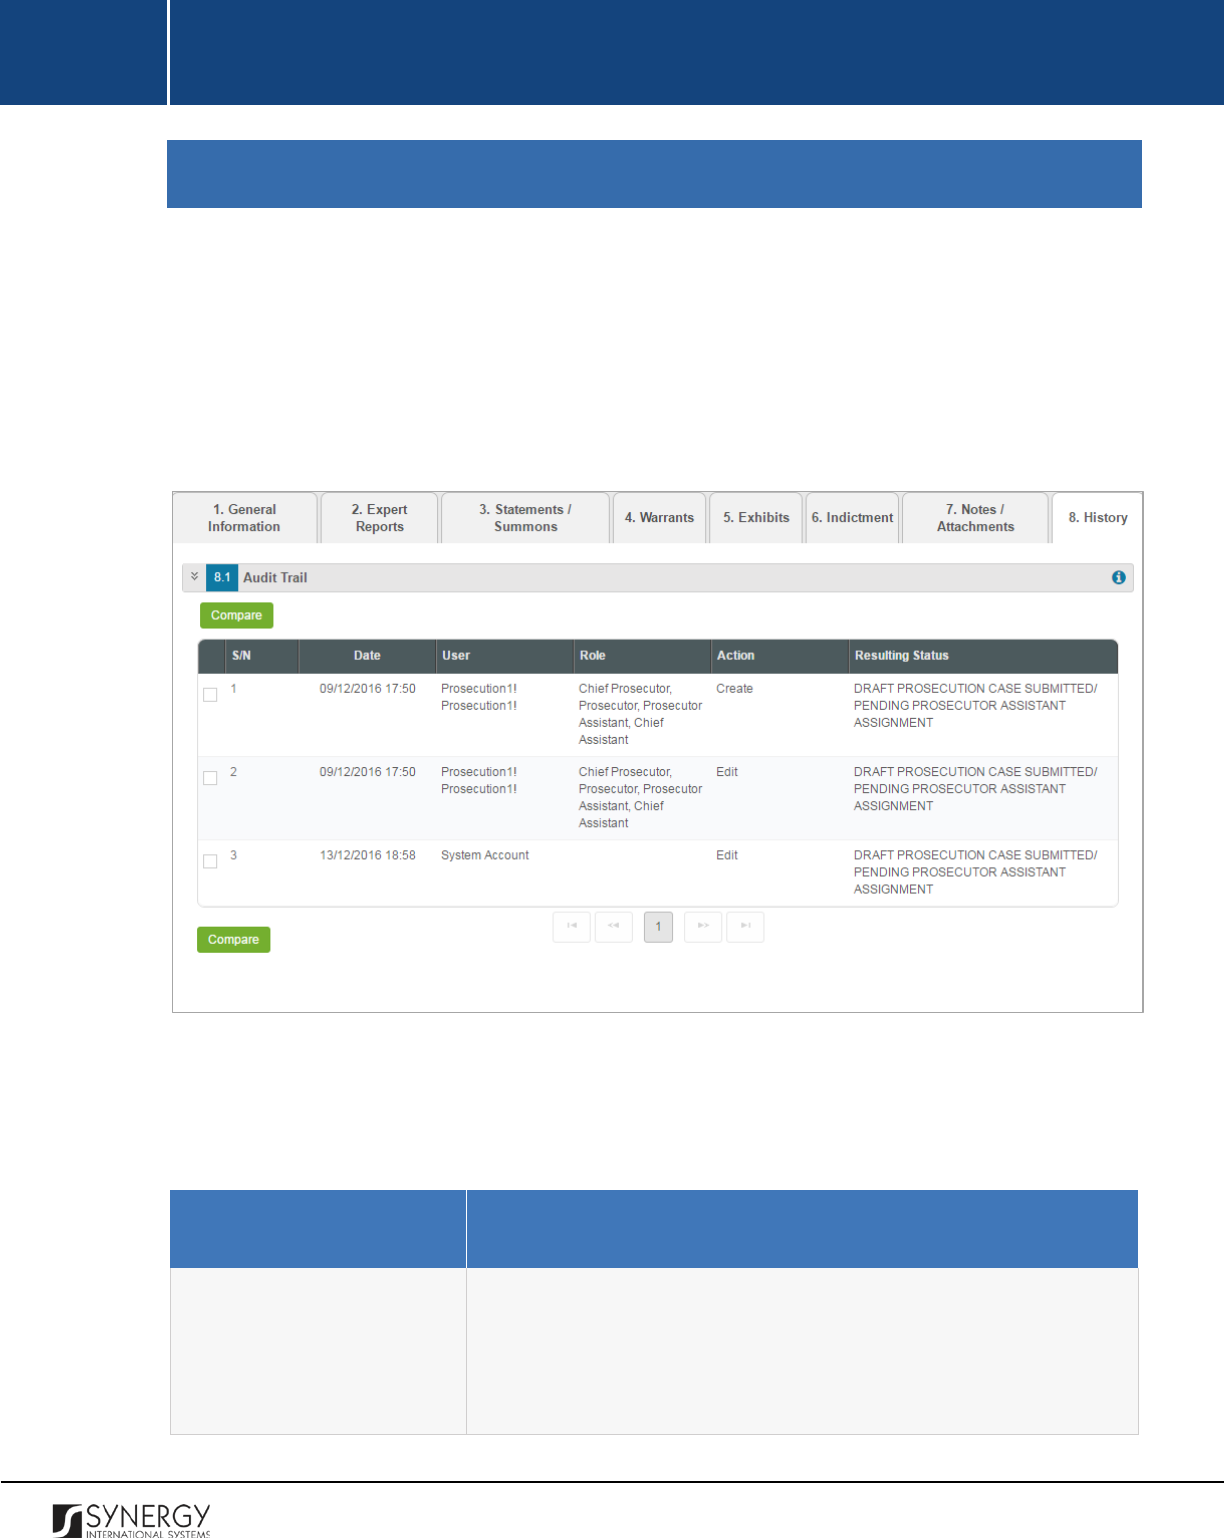
INTEGRATED CRIMINAL JUSTICE INFORMATION SYSTEM OF IRAQ | Personal Information | User Manual
RWANDA IECMS | Rwanda National Public Prosecution Authority | User Manual
HISTORY SECTION
The History section of the Rwanda National Public Prosecution Authority form (Figure 45) stores
historical data about changes made to the Rwanda National Public Prosecution Authority form and is
intended for keeping track of the modifications introduced to the record. Each saved version of the
form provides detailed information about the corresponding record, including its creation and
management history, information on the date/time when modifications were introduced to the form,
the modifier details, etc.
Figure 45: History Section
For more details on what information is stored and can be viewed in the History section, refer to the
table below.
Field Name
Description
Audit Trail
This field provides information about the recent changes made to
the corresponding form. The information displayed in this table
includes the following:
•
S/N
– serial number assigned to the modification;
120
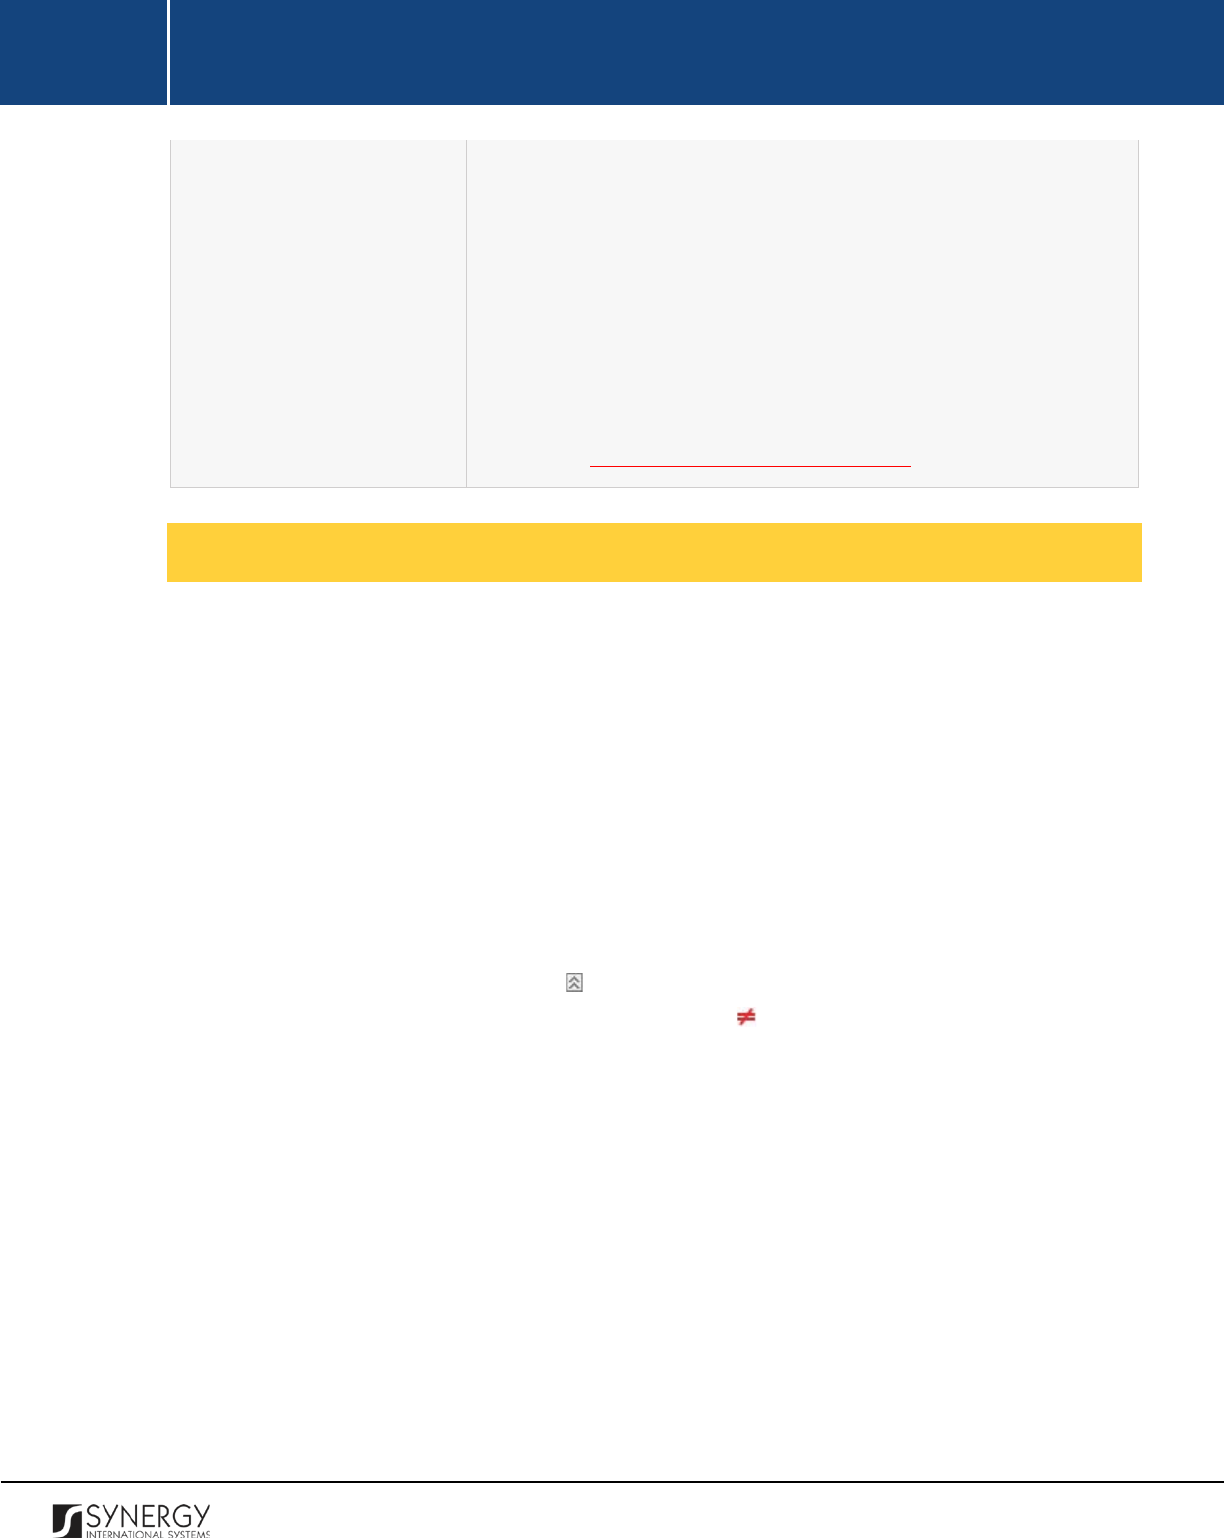
INTEGRATED CRIMINAL JUSTICE INFORMATION SYSTEM OF IRAQ | Personal Information | User Manual
RWANDA IECMS | Rwanda National Public Prosecution Authority | User Manual
• Date – date when the modification was made;
•
User
– name of the user who performed the action;
•
Role
– capacity of the user who performed the action;
•
Action
– description of the action performed;
•
Resulting
Status
– workflow status of the form, resulting from
the action taken.
Note:
The system stores all the previous modified versions of the
task record and makes them available for comparison. For more
details, see Comparing RNPPA Form Versions.
Comparing RNPPA Form Versions
The History section is integrated with an easy-to-use tool for comparing different versions of the
records stored in the system with the aim of detecting and tracking the modifications and updates
made to the recent data. It also provides detailed information about each saved version, including the
creation and management history, modifications date and time, etc.
In order to compare two versions of a case form, follow the steps below:
1. Select the two versions that you want to compare by ticking the checkboxes to the left of the
records.
2. Click the
Compare
button. A new window will appear displaying the selected versions of the
case form (Figure 46).
3. Expand the fields by clicking the sign next to the name of the field to see how the fields
differ in the selected versions. Please note that the sign displayed to the left of the field, as
well as different background and font colors denote the fields that have been modified or
updated.
121
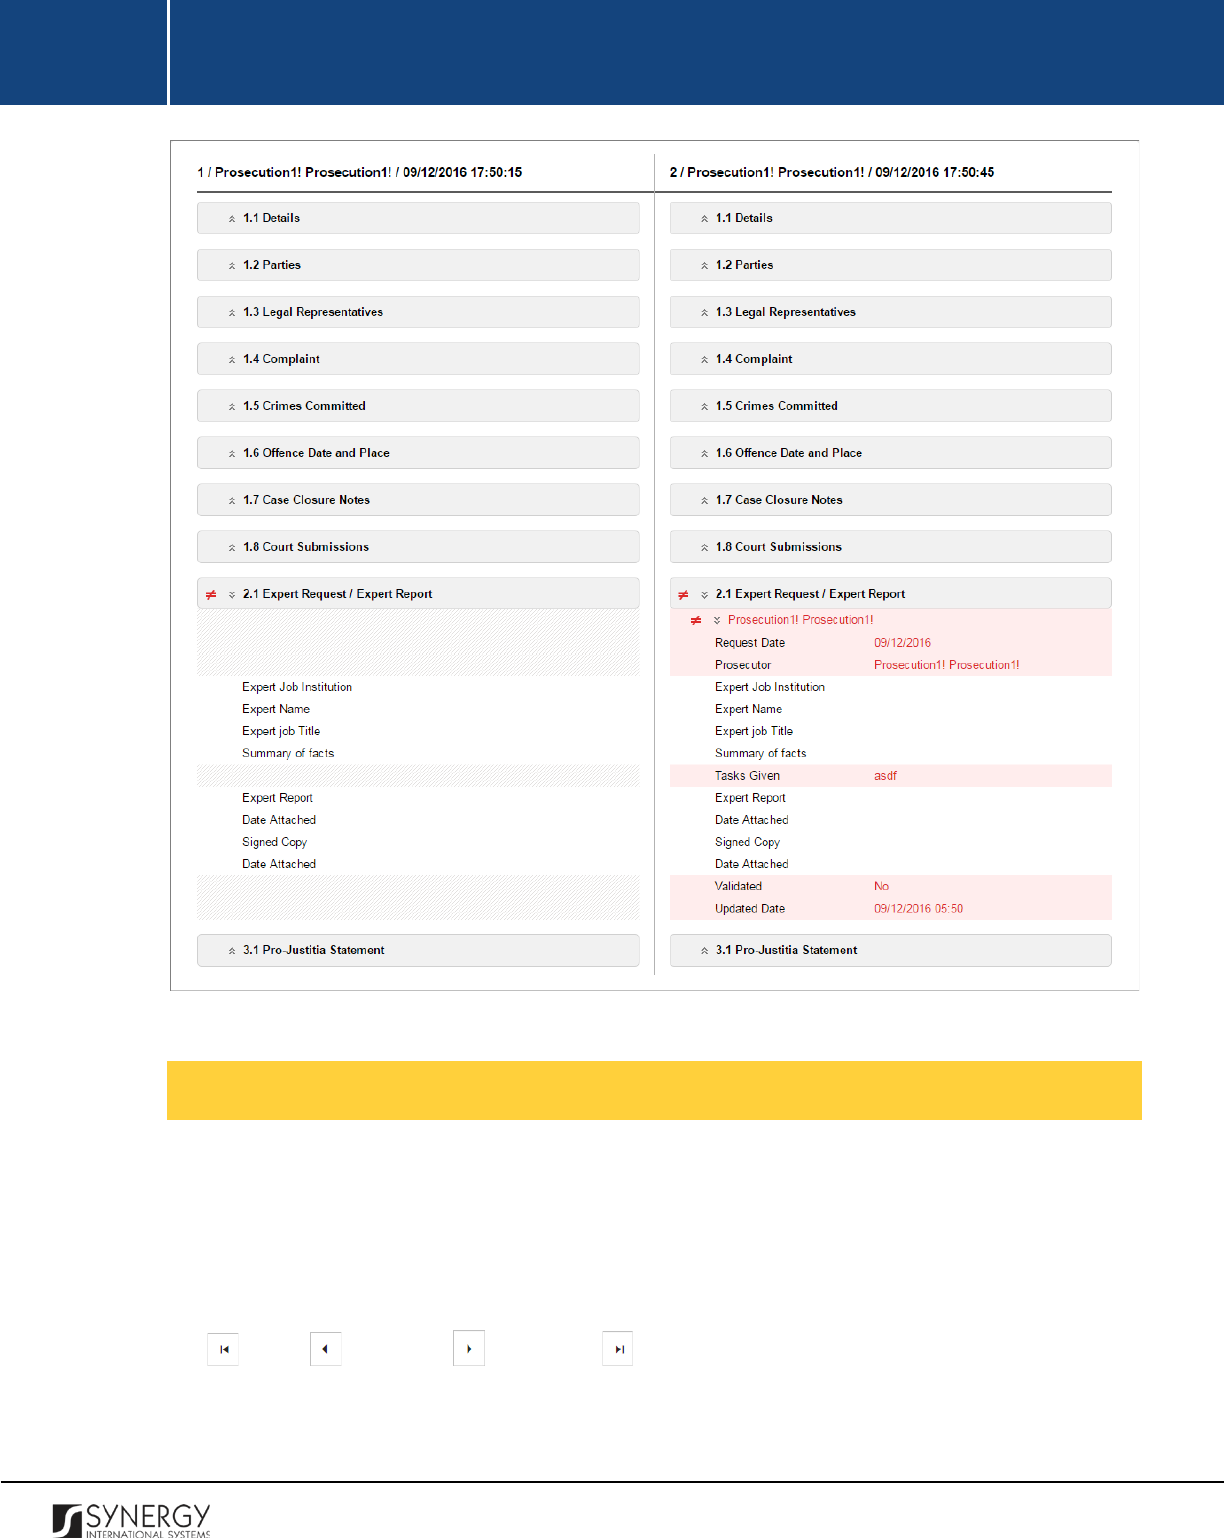
INTEGRATED CRIMINAL JUSTICE INFORMATION SYSTEM OF IRAQ | Personal Information | User Manual
RWANDA IECMS | Rwanda National Public Prosecution Authority | User Manual
Figure 46: Comparing Task Form Versions
Browsing among History Records
The History section of the Task form has been enhanced with the pagination option. This means that
it is enabled with the possibility of splitting the list of records in the field into pages for paged
navigation.
To navigate through the pages, you can use the page numbers at the bottom of the field, as well as
the
(First)
,
(Previous)
,
(Next)
, and
(Last)
arrow buttons.
122
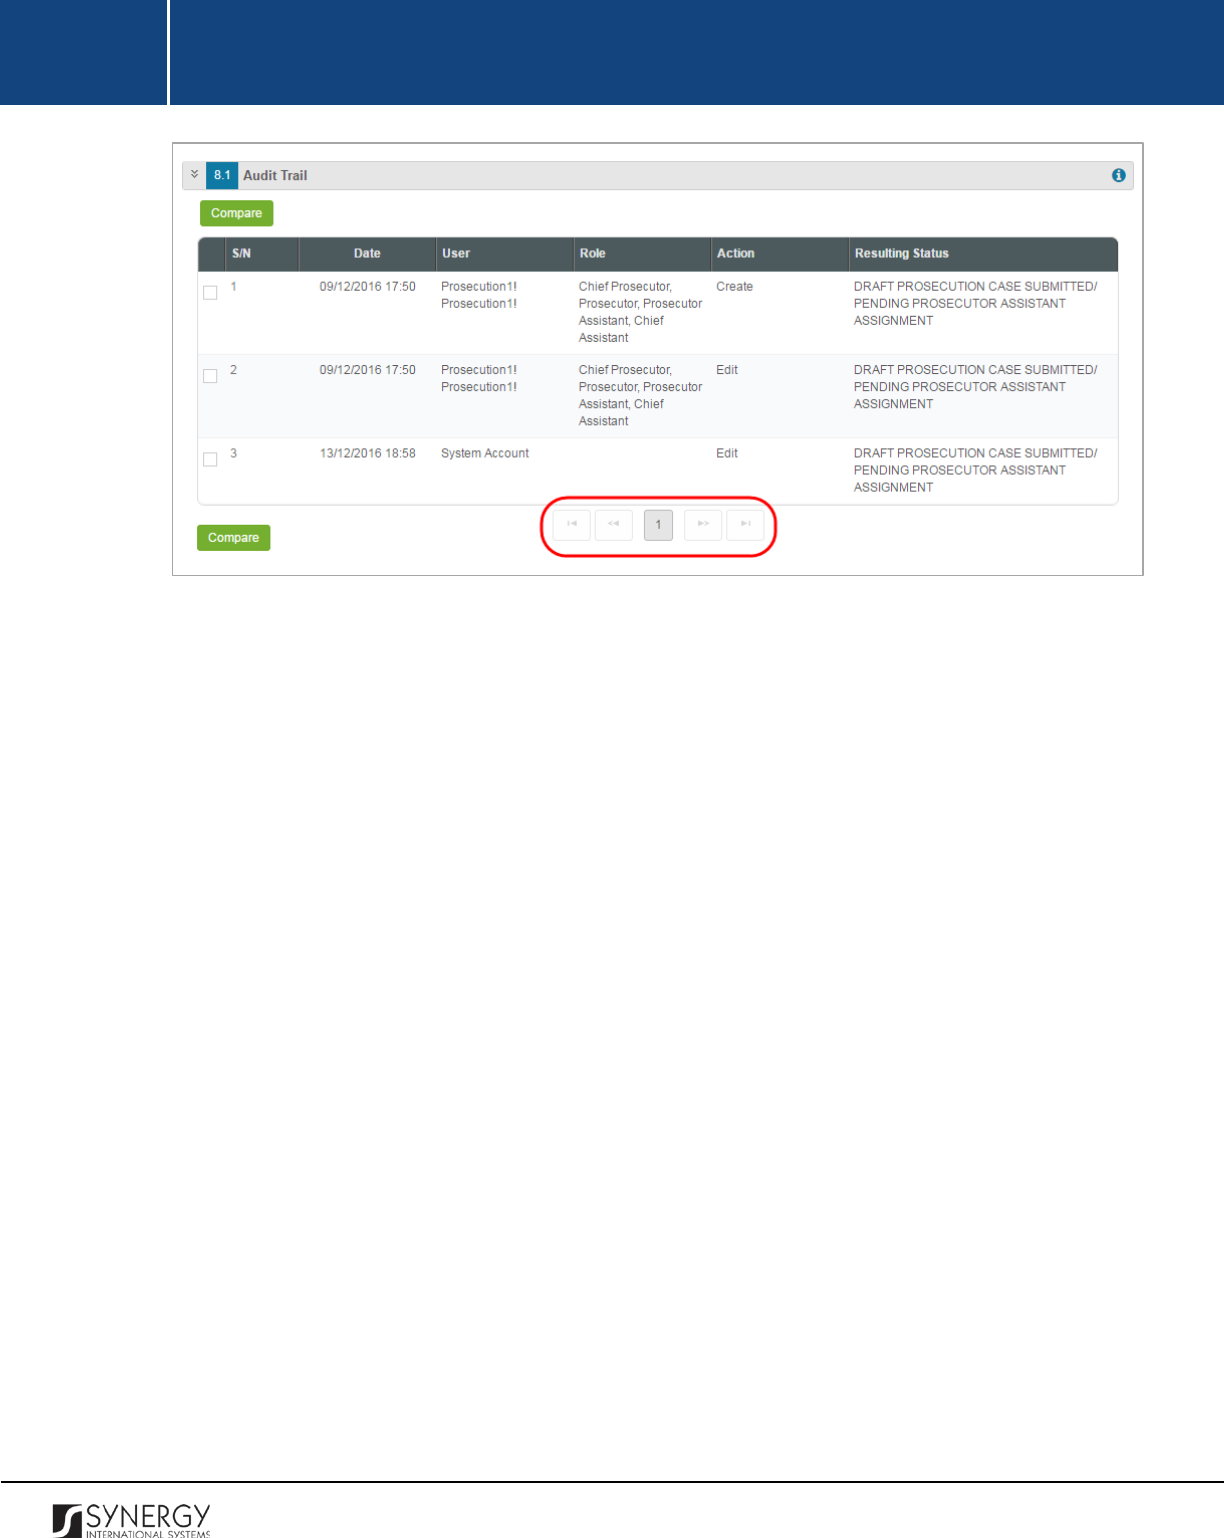
INTEGRATED CRIMINAL JUSTICE INFORMATION SYSTEM OF IRAQ | Personal Information | User Manual
RWANDA IECMS | Rwanda National Public Prosecution Authority | User Manual
Figure 47: Browsing among History Records
123

INTEGRATED CRIMINAL JUSTICE INFORMATION SYSTEM OF IRAQ | Personal Information | User Manual
RWANDA IECMS | Rwanda National Public Prosecution Authority | User Manual
EXPORTING FILES
The system allows exporting the details provided in the appropriate fields of the National Public
Prosecution Authority form.
In order to export the corresponding field details, follow the steps below:
1. Click the
(Export Details)
button in the furthermost right column of the respective field.
The Export Details popup will appear (Figure 48).
Figure 48: Specifying File Export Details
2. Choose the
Format
you want the file to be downloaded in by selecting the respective
PDF
or
WORD
radio button.
3. Select the
Language
you want the file to be downloaded in by selecting the respective
ENG
,
FR
, or
KRW
radio button.
4. Click the
Export
button to proceed. The exported file will be downloaded to your local PC in
accordance with the selected settings - format and language.
124
INTEGRATED CRIMINAL JUSTICE INFORMATION SYSTEM OF IRAQ | Personal Information | User Manual
RWANDA IECMS | Rwanda National Public Prosecution Authority | User Manual
SAVING DATA
When you are finished with the data input or modification, you should save your changes before you
leave the page. Click the
Save
button to save the data entered and to remain in the opened page. Or,
click the
Save and Close
button to save the changes made and navigate away from the Data Entry
screen. Clicking the
Cancel
button will discard any changes made and close the data entry window.
REFERENCES
Please, refer to the following Rwanda IECMS related documents to obtain more information about
the system and how it functions:
• Rwanda IECMS Analytical Interface User Manual
• Rwanda IECMS Portfolio User Manual
• Rwanda IECMS Dashboard User Manual
• Rwanda IECMS Rwanda National Police Application User Manual
• Rwanda IECMS Rwanda Judiciary
Application User Manual
• Rwanda IECMS Rwanda Correctional Service Application User Manual
• Rwanda IECMS Civil Litigation Service Application User Manual
• Rwanda IECMS Task Form User Manual
• Rwanda IECMS Individual Form User Manual
• Rwanda IECMS Legal Entity Form User Manual
• Rwanda IECMS Case Processing Workflow User Manual
• Rwanda IECMS Settings Administrator's Guide
• Rwanda IECMS User Management Administrator's Guide
• Rwanda IECMS Data Management Administrator's Guide
• Rwanda IECMS Workflow Management Administrator's Guide
125
