SCoop User Guide V1.2
SCoop%20user%20guide%20V1.2
SCoop%20user%20guide%20V1.2
SCoop%20user%20guide%20V1.2
SCoop%20user%20guide%20V1.2
User Manual: Pdf
Open the PDF directly: View PDF ![]() .
.
Page Count: 20

Scoop user guide V1.2 (2013/01/10) page 1
Goggle code repository : https://code.google.com/p/arduino-scoop-cooperative-scheduler-arm-avr/
Simple Cooperative Scheduler for Arduino® ARM & AVR Aka « SCoop »
https://code.google.com/p/arduino-scoop-cooperative-scheduler-arm-avr/
Introduction
Yet another library …
This library aims to provide a light and simple environment for creating powerful multi-threaded
programs or easy multi-tasking solutions on the Arduino IDE and with the Arduino or Teensy boards
using AVR or ARM processors.
There are lots of other alternatives from the best RTOS to the simplest “timer” or interrupt libraries
around the World Wide Web. This one fits in between and looks easy to use and powerful enough for
the most of us. It is mainly inspired by the java Thread library and use traditional switching context
mechanism taken from other RTOS like ChibiOS or freeRTOS.
Let’s use it
Here is an example on how to use the SCoop library with a very basic sketch:
#include “SCoop.h” // create an instance of the scheduler called mySCoop
defineTask(Task1) // user definition of task1 object
volatile long count; // force any read/write to memory
void Task1::setup() { count=0; };
void Task1::loop() { sleepSync(1000); count++; };
defineTaskLoop(Task2) // user quick definition of task2 object
{ digitalWrite(13, HIGH); sleep(100); digitalWrite(13,LOW); sleep(100); }
void setup() { Serial.begin(115200); mySCoop.start(); }
void loop() { long oldcount=-1; yield();
if (oldcount!=count) { Serial.print(“seconds spent :”);
Serial.println(count); oldcount=count; } }
The first line just includes the SCoop library definition file in your sketch and creates an instance of the
scheduler object with the predefined name mySCoop which you can use later in your program to control
or monitor the scheduler behavior.
The second section uses a predefine macro called defineTask in order to generate a code header which
will create your own object inheriting from the library class called SCoopTask.
Then the code void Task1::setup() and void Task1::loop() are your own peace of code attached to the
Task1 object which will be executed by the scheduler as if the code was in the original Arduino main
setup() or loop().
The third section uses a predefine macro called defineTaskLoop to declare a Task2 with only a loop()
method, forcing the led to blink every 100ms. The sleep() function replace the usual delay() and enables
the scheduler to control the other task.
Scoop user guide V1.2 (2013/01/10) page 2
Goggle code repository : https://code.google.com/p/arduino-scoop-cooperative-scheduler-arm-avr/
In the main sketch setup(), the instruction mySCoop.start() prepare the scheduler and launch each
individual setup() method for Task2 and then for Task1 (reverse order compared to declaration).
In the main loop() the code is printing any changes to the “count” variable.
You can create as much task objects as you need as long as the microprocessor will have enough
resource to hold them in memory and execute them in an acceptable time for you.
Each Task has its own “stack” context in order to hold local variables and to call other functions while
remembering return address. By default the defineTask macro is creating an array of 150 bytes for each
AVR task or 256 bytes for each ARM tasks, but this can be overridden by adding your own value as a
second parameter to the defineTask macro. Example: defineTask(Task2,200) will provide the task
with 200 byte of dedicated local stack.
It is also possible to create a task without using the defineTask macro, by just creating an instance of the
SCoopTask object and calling a method later in the program to initialize your code and stack.
SCoopTask myTask; … myTask.init(…)
How tasks works in a sketch :
The Cooperative scheduler library is responsible of tasks and events management and is organized
around a very simple function called yield().
This yield keyword (which sounds a bit weird for non-native English speaker) is part of the
Arduino due Scheduler library and has been recently introduced in the standard Arduino
libraires as of build >1.5. It is also part of the pjrc teensy core. Some function like delay() are
using it, and the principal loop() function in the Teensy core is now including a default call to
yield() at the end of user code. yield is also used in java programing and declared in the java
Thread library.
Basically, when your program is in a section of code where you have spare time, just call yield() and this
will eventually go to the scheduler and switch to the next task registered in your sketch.
The scheduler will come back to the original code as soon as the other tasks also call the yield() function.
Otherwise the process is stuck in a task and the scheduler cannot take control back again! This is why
the word Cooperative is important here, compared to other preemptive RTOS.
The big advantage of Cooperative multi-tasking is that all the existing libraries will be working well in a
multi-tasking environment as they will not be interrupted by a preemptive mechanism, as most of the
library does not accept reentrant calls (calling a function again, before it is completed).

Scoop user guide V1.2 (2013/01/10) page 3
Goggle code repository : https://code.google.com/p/arduino-scoop-cooperative-scheduler-arm-avr/
Task Objects in more details:
Defining a task and providing a stack:
The main idea of this library which is illustrated in the example is to consider a task as an object having
its own stack and methods like setup() and loop(), which are inherited from the SCoopTask framework.
To create a task, just use the defineTask or defineTaskRun macro which will generate the header code
for your object.
By default, a stack (an array of bytes) will be created for this object with the number of bytes declared in
the second parameter. If you omit the stack-size parameter, then the array is set to a default value (150
for AVR, 256 for ARM), which is very comfortable for doing some basic computing on couple of local
variables and also to call some Serial.print functions for example.
If your code needs more local variable, or if it is calling a function which needs more space, then
you have to anticipate this by allocating more stack-size in the declaration. Unfortunately there
is no easy way to calculate the maximum stack size needed, but the library contains a method
called stackLeft() which will return the amount of memory in the stack that has not yet been
used at this moment.
Once the task is declared, an object is created and the Arduino environment will automatically call the
object “constructor” at the beginning of the program before entering in the main setup() or loop().
Therefore the object is automatically registered in a list of items that the scheduler will use later to start
and launch each task (or events or timers) one by one.
You can declare a task yourself by instantiating the basic object SCoopTask and then calling the init(…)
method with 3 parameters : address of the stack, size of the stack, address of the function to be called
instead of the loop() method, as in the below example. In that case the defineStack macro can be used
to facilitate the declaration of the stack array with some 8 bytes alignment needed for ARM platform:
SCoopTask myTask;
defineStack(mystack,128)
void mycode() { count+++; }
void setup() { myTask.init(&myStack,sizeof(mystack),&mycode); … }
The call to the init() method can also be grouped with the object declaration like this:
defineStack(mystack,128)
Void mycode() { count+++; }
SCoopTask myTask(&myStack,sizeof(mystack),&mycode); // implicit call to init()
Void setup() { … }

Scoop user guide V1.2 (2013/01/10) page 4
Goggle code repository : https://code.google.com/p/arduino-scoop-cooperative-scheduler-arm-avr/
Starting a task:
Each task defined with the defineTask macro is expected to have its own setup() method. The scheduler
will launch all the setup() of all task registered in the list with the command mySCoop.start(). The latest
task registered will be launched first (reverse order compared to declaration in your sketch).
This command should be placed inside the main setup(). It will also initializes the Scheduler and reset
the variables used for counting time. After this, each task is considered “RUNNABLE” for safely entering
in their specific loop() method.
Running and leaving the task with yield()
Each task defined with the defineTask or defineTaskLoop macro is also expected to have its own loop()
method. The scheduler will launch this method periodically, as part of a whole scheduling process. The
task code inside this loop() can be blocking forever if needed, as long as the yield() (or sleep) method is
called somewhere, sometime.
The mechanism to enter in and to switch out from a task is organized by the scheduler with its yield()
function. Calling the method yield() from a task will most likely switch to the next task in the list and
return to the Scheduler when reaching the last one. Then the Scheduler will launch all pending timers or
event (see later in documentation) and will restart launching the tasks one by one.
Once all the other potential tasks (and timers or events) have been executed, it will give the control back
to the original task as if it was a simple return from the call to the yield() method. The execution just
continues afterward.
It is recommended to systematically call yield() from the main Arduino sketch loop() by using
mySCoop.yield(). This will force the loop to first launch all tasks and pending event/timer before
executing its own loop() code. It is possible to change this behavior by setting a predefine variable called
SCoopYIELDCYCLE to 0 at the beginning of the SCoop.h file, so that the Scheduler is always in control of
the switching mechanisms. With this approach, the main loop() would be considered as a tower of
control for all other piece of code and therefore the code inside the main loop() would have a better
priority of execution as it would be executed between each task switching or event/timer launch.
Remark:
The SCoop library forces a call to yield() at the end of the user’s task loop(). If you implement
your own looping mechanisms (e.g. while(1) { .. } inside the task loop()) then the program has to
call the yield() method (or sleep) time to time somewhere in the loop.
The SCoop library overrides the original Arduino yield() weak function, with the one declared by
the scheduler library called mySCoop.yield(). So you can also use the simple word yield()
everywhere in your program or included files. This also provide a mechanism to hook the
standard Arduino delay() function, which is now calling the yield() function (only as of Arduino
library >1.5) ensuring that the scheduler will be always under control of the whole program.
Scoop user guide V1.2 (2013/01/10) page 5
Goggle code repository : https://code.google.com/p/arduino-scoop-cooperative-scheduler-arm-avr/
Ending a taks ?
Not really, as the library allocates an amount of static memory for the stack, a task is not supposed to
end once started! So it is up to the user to have code for stopping or starting or waiting events within
the task loop(), eventually by using pause() and resume(). (see “Android scheduler” for dynamic tasks)
Method available in your task object:
Within the code of a task object, it is possible to call several methods inherited from the SCoopTask
base object:
sleep(time) : same behavior as the standard delay() function, but the spare time is used to give the
control back to the scheduler immediately or to execute the other pending tasks.
sleepSync(time) : same function as sleep, but the time to sleep is synchronized with the previous call to
a sleep() or sleepSync() function, enabling a strict periodic time handling (“no jitter”).
sleepUntil(Boolean) : just wait the Boolean variable to become true (and then set it to false) and give
the control back to the scheduler in the meantime. It is mandatory to use volatile variable for this flag,
as the status change will come from another task or from the main loop() program itself.
sleepUntil(Boolean,timeOut) : (as of V1.2) same as sleepUntil, but will return anyway after the given
timeOut period. It can be used as a function in an expression and return false in case of timeout.
stackLeft() : return a number of byte never used in the task stack since the task was started.
This function can also be called from the main loop() in the Arduino sketch, outside of the task object
context, by referencing it with the task object itself or with a global pointer:
void printstack(){ SCoopEvent* ptr=SCoopFirstTask; // global library type and variable
while (ptr) { Serial.println(reinterpret_cast<SCoopTask*>(ptr)->stackLeft());
ptr=ptr->pNext; }
Void loop() { printstack(); … or … Serial.println(Task1.stackLeft()); }
Cross task talking and Volatile
Nothing to do with chickens here. Due to compiler optimization, very often a variable is made local or
uses a temporary register. In order to pass information across tasks or to use a variable in a multiple
thread program (e.g one task is writing, the other one is reading), we have to declare the common
variable as volatile, which forces the compiler to read and write them into memory at each access.
To simplify variable declaration, the SCoop library predefines some types for int8,16,32 and uint8,16,32
and Boolean, preceding the original Arduino type name with a “v” and removing the “_t” like:
vui16 mycount; // exact same as volatile uint16_t mycount
vbool OneSecond = false; exact same as volatile Boolean OneSecond
Remark: the “_t” at the end has been removed voluntary but it is agreed to be a deviation to the
traditional type naming convention…
Scoop user guide V1.2 (2013/01/10) page 6
Goggle code repository : https://code.google.com/p/arduino-scoop-cooperative-scheduler-arm-avr/
Timers
The library provides a complementary SCoopTimer object which can be used to create periodic actions
which will be orchestrated by the Scheduler. You can instantiate as many timers as you need and they
can even be declared temporarily as a local object in a function or task. A timer doesn’t need a stack
context as you enter and you leave from a timer in a single atomic yield() operation; they use the normal
stack of the main Arduino sketch. Timers have to be fast as they cannot give control back to scheduler in
any case (the local yield() method is disabled). Timer looks like an MCU timer interrupt, but with the
possibility to call any of your existing function or libraries from them, without risk of system crash…
Defining a Timer:
The specific macro defineTimerRun can be used to declare your own timer object, with 1 or 2
parameters. The first parameter is the name of your object; the second optional is the period of the
timer:
defineTimerRun(myTimer,1000){ ticSecond=true; countSecond++ }
The code of this timer is implicitly attached to myTimer::run() method. It must be fast and non-blocking.
The timer are registered in the same list as for the tasks and therefore will be triggered by the scheduler
during a call to yield(). Once the time elapsed since the last call has reached the defined period, the run()
method is executed once.
If a timer needs time to complete (say some milli-seconds), it is suggested to use a Task instead, with the
sleepSync() function at the very beginning of the loop() method and some calls to yield() or yield(0) in
the blocking or slow section. This code will give the exact same behavior as a timer(1000) definition:
defineTaskLoop(myTimer,100) { sleepSync(1000); ticSecond=true; countSecond++ }
Remark: In this example, we reduce the default stack size by forcing the value 100 with the second
parameter, because the task loop() doesn’t need that much as it doesn’t call any other function and has
no local variables. This is to be experimented case by case.
Starting and monitoring timer:
A call to mySCoop.start() will initialize all the timers registered and will enable them if the time period
was provided as the second parameter of the defineTimerRun macro. If not, then this is up to the
program to initialize this later with a call to the method schedule(time) (see below).
The following methods provide other means to modify or monitor the timers:
schedule(time) : enable the timer and prepare it to be launched every “time” ms
schedule(time, count) : same as schedule(time), adding a maximum number of execution.
getPeriod() : return the value registered for the time period of this timer.
setPeriod() : force a value for the time period.
Scoop user guide V1.2 (2013/01/10) page 7
Goggle code repository : https://code.google.com/p/arduino-scoop-cooperative-scheduler-arm-avr/
getTimeToRun() : return the time in ms before the next execution of the timer run() method.
Other way of declaring timer with predefined macros:
defineTimer(T1,optional period) gives the possibility to declare both a T1::setup() and a T1::run()
method for this object, this is useful if we want to add some setup code inside this object, instead of
writing them in the main setup(): this is not backward compatible with V1.1 as the setup() is now
mandatory! please rework your program to use defineTimerRun() instead, if you do not need setup().
defineTimer(myTimer,1000)
void myTimer::setup() { count=0; }
void myTimer::run() { count++; }
By extension 2 other macros can be used for defining timer class : defineTimerBegin(event[,period]) and
defineTimerEnd(event). See example 2 in the library as a showcase.
Events
The library provides a complementary object SCoopEvent which can be used to handle code to be
executed by the scheduler upon an external event or trigger. As an example, it is possible to trigger an
event from an interrupt (isr, signal) but the corresponding run() code will be executed only by the
scheduler, outside of the interrupt context. This enables to write complex event handling, calling library
function, without the criticality needed for coding hardware interrupts.
Like the SCoopTimer object, the SCoopEvent has no stack context and is expected to be as fast as
possible in order to keep the scheduling fluent. If an event needs lot of time to complete, then it should
be declared as a permanent task, waiting for a volatile flag by using the sleepUntil() method.
Example of event declaration and usage:
defineEventRun(myevent){ Serial.println(“trigger received”); }
isr(pin) { myevent.set(); } // or myevent=true;
The event object has only one public method to set the trigger flag:
set() : set the trigger flag to true. The event will be launched by the scheduler by calling yield().
set(value) : set the trigger value, if false, nothing happen. If true then equivalent to set()
The event trigger flag can also be set directly by an assignment like “myevent=true”, as the library
overloads the standard “=” operator for this object.
defineEvent(event) can be used to define both event::setup() and event::run() , as for timers. This is not
backward compatible with V1.1 ! please use defineEventRun(event) instead, if you do not need setup().
By extension 2 other macros can be used for defining event class : defineEventBegin(event) and
defineEventEnd(event). See example 2 in the library as a showcase.

Scoop user guide V1.2 (2013/01/10) page 8
Goggle code repository : https://code.google.com/p/arduino-scoop-cooperative-scheduler-arm-avr/
Fifo / first in first out new in V1.1
The SCoop library provides a complementary object SCoopFifo and a macro called defineFifo which will
provide nice support to manage first-in first-out buffer, for bytes, integers, long or any type of structure
data below 256 bytes. This can be very usefull to exchange data between task, event or timer and
another task with a producer-consumer or sender-receiver model, in a synchronous way (no
synchronization needed between tasks).
Here is an example on how to declare a fifo buffer of 100 integers and to use it between a timer doing
analog sampling and a task using them for monitoring variation.
defineFifo(analogBuf,int16_t,100)
int16_t A,B;
defineTimer(anaRead,10) // read analog every 10ms
void anaRead::run() { A=analogRead(1); analogBuf.put(&A); }
defineTaskLoop(task1) {
while(analogBuf<32) yield(0); // wait for 32 items in the buffer
int16_t avg=0;
for (int i=0; i<32; i++) { analogBuf.get(&B); avg += B; }
avg /= 32; yield();
Serial.print(“average analog value for 32 samples = “);Serial.println(avg);
}
The SCoopFifo also provides the following methods:
put(& var) : add the value of the variable to the buffer. Return true if the result is successful or false if
the buffer was already full.
putChar(val) putInt(val) putLong(val) can be used to directly add a given value into the buffer, without
needing an intermediate variable.
get(& var) : take the older value from the buffer and store it in the variable passed. Return true if
successful or false if the buffer was empty.
flush() : empty the buffer and return the size of the buffer (number of items) as per declaration.
flushNoAtomic(): same as flush, but doesn’t touch interrupts. Should not be used in conjunction with
ISR.
count() : return the amount of samples available in the buffer.
It is also possible to use the name of the object inside an integer expression which will return the same
value as the method count().

Scoop user guide V1.2 (2013/01/10) page 9
Goggle code repository : https://code.google.com/p/arduino-scoop-cooperative-scheduler-arm-avr/
Virtual timer/delay : SCoopDelay and SCoopDelayus new in V1.2
The SCoop library now use and provides a simple object to facilitate delays or timeout measurements,
with a class named SCoopDelay. This looks a bit like TimerDown (see later in the document).
The object can be declared with or without an auto reload value. If not used, the reload storage variable
will be hopefully automatically removed by the linker. If used then the timer/delay automatically starts.
Typical usage:
SCoopDelay time;
time = 10; while (time) yield(); // this launch yield() during 10ms
SCoopDelay t10seconds(10000);
If (T10seconds.reloaded()) { /* do something every 10 seconds */ }
Methods for SCoopDelay objects:
set(time) : define the starting time for the delay. The delay will then start counting down to 0;
get() : return the value of the delay. if delay is elapsed, the result is 0.
add(time) : add a certain amount of time to the delay
sub(time) : subtract a certain amount of time to the delay
These 4 methods can also be transparently used by directly using the SCoopDelay object in an
expression like x=delay or delay=x or delay+=x or delay-= x. thanks to operator overloading.
elapsed() : return true if the delay is elapsed.
reloaded() : same as elapsed, but automatically restart the delay with the reload value if defined.
setReload(time) : predefine and attach a reload value to the object. Same as if provided during object
declaration.
getReload() : return the value of the reload parameter attached to the object.
reload() : add the reload value to the SCoopDelay object.
initReload() : set the SCoopDelay object with its reload value.
All the value are defined in int32 as defined by the SCDelay_t variable at the beginning of SCoop.h file.
By extension a SCoopDelayus object is also provided by the library, which is the same but using
parameter in micro seconds. The values are int16 for AVR or int32 for ARM, as defined by the micros_t
variable at the beginning of the SCoop.h file.

Scoop user guide V1.2 (2013/01/10) page 10
Goggle code repository : https://code.google.com/p/arduino-scoop-cooperative-scheduler-arm-avr/
Time Counters:
The SCoop library provides 2 powerful objects, totally independent of the scheduler to handle time
counting up and down. The time base for a tic count can be specified from 1ms up to 30seconds (int16).
There are no limitations on the number of timer that can be declared.
TimerUp : will provide an object counting time from 0 to a maximum amount to be defined in the object
declaration (can be 0). Once the maximum is reached, the counter go back to 0 and it is possible to
monitor the rollover event with the rollOver() method in order to start an action. Example:
#include <TimerUp.h>
TimerUp counterMs(0); // do nothing, need further initialization
TimerUp myMillis(1000); // will count up from 0 to 999 every 1ms
TimerUp mySeconds(3600,1000); // will count from 0 to 3599 every 1000ms
…
void loop() {
if (myMillis.rollOver()) { Serial.print(“one more second elapsed”) } }
if (mySeconds.rollOver()) { Serial.print(“one more hour elapsed”) } }
The object can also be used in an expression or in an assignment directly.
TimerUp myTime(1000);
…
void loop() {
if (skip) && (myTime > 500) { mytime = 800; } // will read and force timer
The value set during the declaration for the rollover can be modified later on with the method
setRollOver(timeMax).
TimerDown provides another type of powerful object counting down from a maximum value to 0. Once
the down counting reaches 0, the counter definitely keeps the value 0, until the program force it to
another value: example:
#include <TimerUp.h>
#include <TimerDown.h>
TimerUp tic(100,10) // count up from 0 to 99 every 10ms
TimerDown msLeft(0); // will count down every ms
TimerDown secondsLeft(3600,1000); // count from 3599 to 0 every 1000ms
…
void loop() {
while (secondsLefts) {
if (tic.rollOver()){ msLeft=1000; // restart this counter
Serial.print(secondsLeft); Serial.print(“ seconds and ”);
Serial.print(msLeft);Serial.println(“ms before end”); } }
In addition, the method below can be used for TimerUp and TimerDown objects:
Init(time, timeBase) : initializes the counter with a given timemax and a given time base. As an example
counter.init(5,1000) will initialize the counter (up or down) with the value corresponding to 5 seconds. if
it is a TimerUp then it will count from 0 to 4. If it is a TimerDown, it will count from 5 to 0 .

Scoop user guide V1.2 (2013/01/10) page 11
Goggle code repository : https://code.google.com/p/arduino-scoop-cooperative-scheduler-arm-avr/
set(time) : forces a new value in the counter. This is equal to assigning a value like counter=100;
reset() : just forces the counter to 0. Also clear the rollover flag for TimerUp objects.
get() : return the value of the timer. A timer can also be read directly within an integer expression like
x=counterMs;
pause(time) : the timer will keep its actual value until it is resumed.
resume() : if the timer was paused, then it is resumed and start counting again from this value.
Library compilation option:
It is possible to edit the files named TimerUp.h and TimerDown.h and to change some values in the first
lines, inside the #define statement, which will impact the compilation pre-processing
As an example, the time-base handling can be disabled in order to make the library more compact. Then
the default time base is the millisecond. It is also possible to change the name of the original object class
TimerUp (or TimerDown) by your own object name like for example TimeCounter, if preferred.
It is finally possible to force the method parameter as “int” instead of “long”, but the internal timing
computation remains in 32bits mode. (remark: for ARM, int is still 32bits!)

Scoop user guide V1.2 (2013/01/10) page 12
Goggle code repository : https://code.google.com/p/arduino-scoop-cooperative-scheduler-arm-avr/
Digital Input Output and time filtering
The SCoop library provides a standalone component to define, use and filter digital inputs and outputs
in a comprehensive manner by using the power of objects and the possibilities offered by operator
overloading. The IOFilter.h library is provided mainly in the goal of eliminating bounce or for filtering
and/or counting transition on any inputs, with the benefit of using scheduler orchestration and
synchronous timers. But like for TimerUp and TimerDown, the library can also be used totally
independently of the SCoop scheduler, and then the time filtering becomes asynchronous and depends
on the user code.
Example of usage with SCoop
#include <IOFilter.h>
#include <SCoop.h>
Output led(13);
Input switch1(1);
InputFilter button2(2,150,100); // 150ms before HIGH, 100ms before LOW
defineTimer(debounce,20) // will check all the inputs registered every 20ms
void debounce::setup() { }
void debounce::loop() { IOFilter::checkAll(0); }
…
Void setup() { led = LOW; }
Void loop() { If (button1 || (button2.count==2)) { button2.reset();led=HIGH; }
It is possible to use the same example without the SCoop library, just removing “scoop.h” file and the
“debounce” timer definition. The filtering and counting sequence will then happen asynchronously each
time the button2 inputs is read. The user code can force the filtering to be checked synchronously on a
regular basis by calling the method checkAll() at some place in the program (see explanation below).
Method and class available in the IOFilter.h library:
Input myInput(pin) : define myInput as INPUT and prepare for using digitalRead(pin)
get() : read the instant value of the pin using digitalRead(pin)
myInput can be used in an integer expression (x=myInput)
readAll() : this method is a placeholder not implemented yet and still WIP in this version, but will be
used to force the library to read all inputs object declared and registered in the list, in order to
synchronize input value at a certain time. Then reading the pin with get() or within an integer expression
will return the value memorized by the last readAll() method. This is typically useful in an industrial
process or when developing a program working as a PLC cycle, enabling a programing style like with
Ladder or FBD languages.

Scoop user guide V1.2 (2013/01/10) page 13
Goggle code repository : https://code.google.com/p/arduino-scoop-cooperative-scheduler-arm-avr/
Output myOut(pin) : define myOut as an OUTPUT and prepare for using digitalWrite(pin)
set(value) : basically execute the digitalWrite(pin, value). The value is memorized for further reading.
get() : return the last value wrote on the pin via the set(value) command.
myOut can also be used in an integer expression (x=myOut) or in an assignment (myOut=1)
writeAll() : this method is a placeholder not implemented yet and still WIP in this version, but will be
used to force the library to write all outputs object declared and registered in the list, in order to
synchronize outputs update at a certain time. Then writing the output with set() or by assigning the
object in a expression, will just write the new value in memory, until a user call to writeAll() is made. As
for readAll(), this is typically useful in an industrial process or when developing a program working as a
PLC cycle where inputs are read at the beginning of the cycle, and output written once at the end.
InputFilter myInputF(pin, timeOn, timeOff) : define myInputF as INPUT and prepare for using
digitalRead(pin) with time filtering when input raises to high (timeOn) and when input falls to low
(timeOff). The value will be set to high or low only if the pin is held to this status during the time define
by timeOn or timeOff
get() : return the value of the input, once filtering constrains is applied.
check(): launch a process to verify the input against the time filtering constrains. Also increment the
attached counter if the pin value has changed from low to high since the last call to check().
Remark : the check() method is always launched once when the user code call the get() method, or read
the input within an integer expression. This guarantees a synchronous handling of time changes and
counting event if the scheduler library is not used.
count() : return the number of raising transition on the input, as detected by the check() method.
reset() : reset the counter attached to the input. Des not impact timing check constrains.
checkAll() : launch the check() method for all objects which have been declared and automatically
registered (ptrInputFilter). This method will check first if the time spent since its last call is above the
default threshold of 10ms, to avoid losing time where not needed. This value can be changed at the
beginning of the the IOFilter.h file.
checkAll(time) : provide the same behavior than checkAll(), but the time checker at the beginning of the
routine will use the time parameter given instead of the default one. Using 0 will force the execution of
checkAll() anyway;
remark : checkAll() and checkAll(time) are declared as static and therefore can be called by the user code
without referencing a formal object, just by forcing the scope (IOFilter::checkAll()).
readAll() : placeholder not implemented yet. Same beahavior as readAll() for Input objects.

Scoop user guide V1.2 (2013/01/10) page 14
Goggle code repository : https://code.google.com/p/arduino-scoop-cooperative-scheduler-arm-avr/
InputMem myBit(addr,bit) define myBit as an input returning a 0 or 1 value (low/high) by extracting the
bit from the memory address provided. This is helpful for defining a comprehensive input variable
attached to a bit in memory, for example a “coil” returned by a Modbus protocol an stored at a given
memory address in the RAM area.
get() : return the value of the bit in memory.
The object can also be used in a integer expression (x=myBit) as the library overload the operator.
OutputMem myBit(addr,bit) define myBit as an output corresponding to the bit from the memory
address provided. This is helpful for defining an intermediate output variable, or for defining an output
attached to a memory address stored in the RAM area, like the “coil” object used in Modbus protocol.
set(value) : force the bit to 0 or 1 according to value passed.
get() : return the value of the bit in memory.
The object can also be used in an integer expression (x=myBit or myBit=y) as the library overload the
operator and assignment logic.
Remark: intend is to create the same type of library for Analog inputs and PWM outputs in a later
version of the SCoop framework, under the name IOAnalog.h
Scoop user guide V1.2 (2013/01/10) page 15
Goggle code repository : https://code.google.com/p/arduino-scoop-cooperative-scheduler-arm-avr/
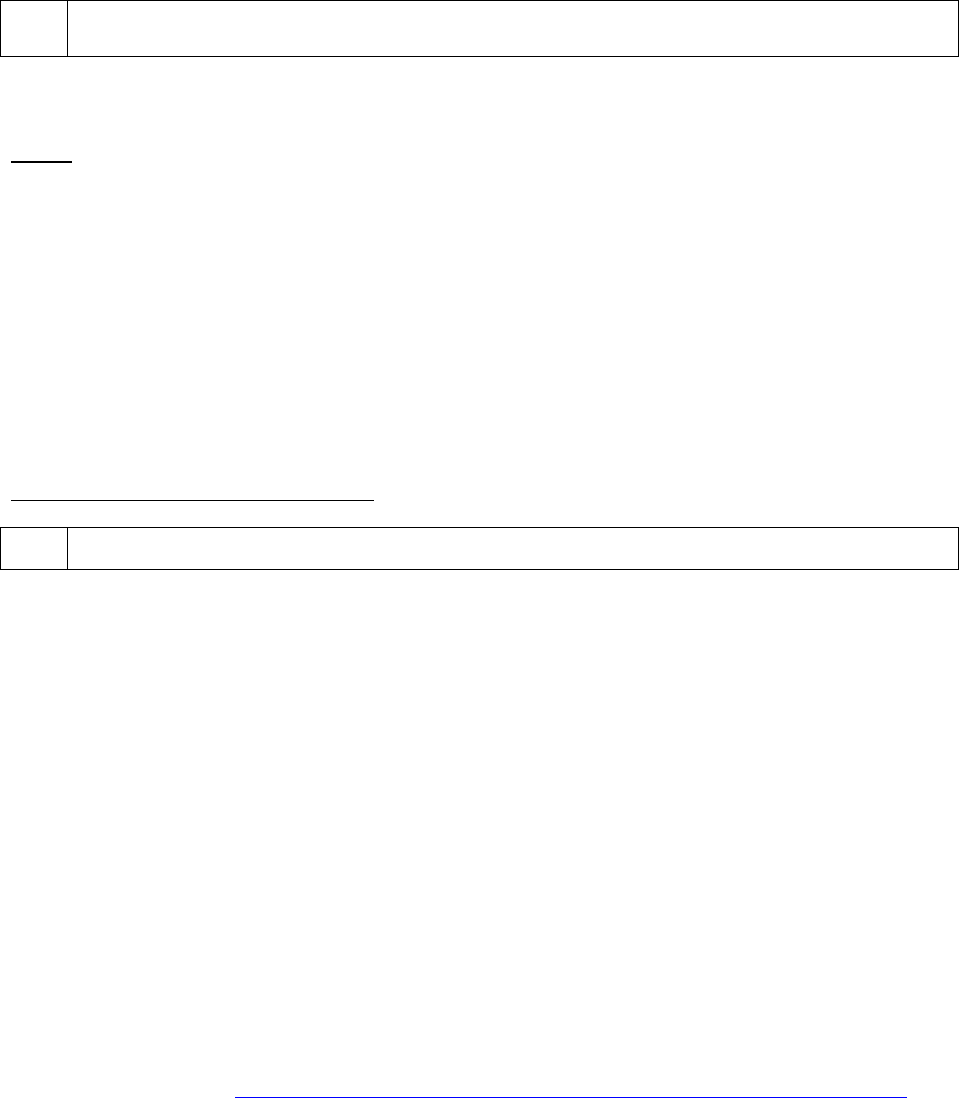
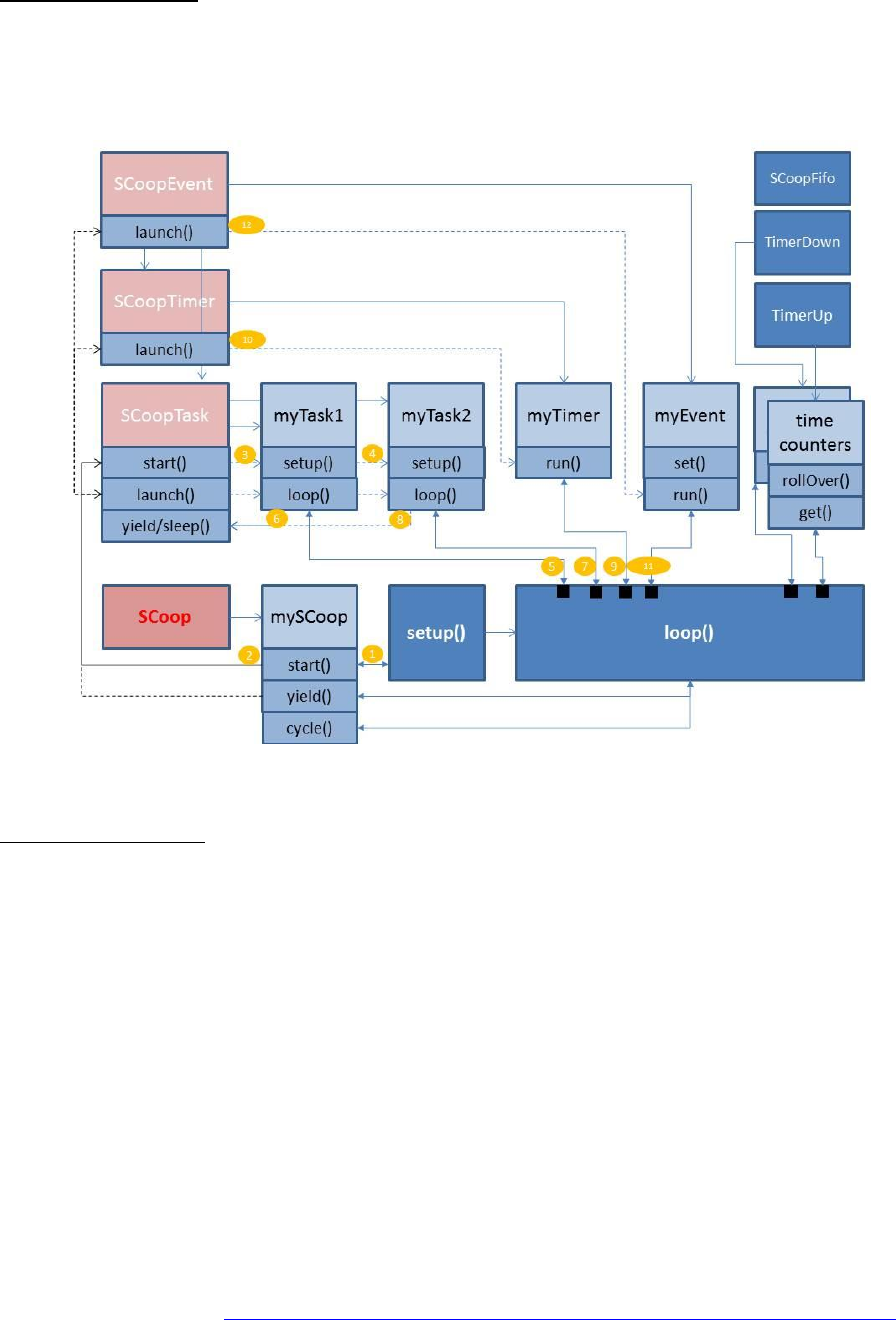
More technical things
This picture represents the objects classes an some instances and how this works together with the
standard setup() and loop() function in the Arduino sketch. This aims to illustrate the explanation given
in previous chapters:
Timing measurements:
With the variable SCoopTIMEREPORT defined at the beginning of the SCoop.h file, the library will
provide additional variables to control time spent in and out of a task.
If the value (N) of the predefined variable is set to 0, then none of these variables are available and the
code of the library is optimized to reduce scheduler overhead time and size. If the value (N) is set to 1, 2,
3 or 4 (up to 7 for ARM), then the 4 variables below will be available in the SCoop and SCoopTask object:
SCoopTask.yieldMicros : gives the total amount of time spent in the task during the N last cycles of the
scheduler.
mySCoop.cycleMicros provides the total time for the whole cycle, including time spent in the main
loop(), for the N last cycles. Dividing these 2 numbers just give the ratio of cpu that has been allocated
and used for the task.

Scoop user guide V1.2 (2013/01/10) page 16
Goggle code repository : https://code.google.com/p/arduino-scoop-cooperative-scheduler-arm-avr/
cycleMicros (once divided by N ) represents the average responsiveness of the scheduler. Any timer or
event will be launched within this time window (unless a task needs more time at the same moment).
SCoopTask.maxYieldMicros provides the maximum value reached by yieldMicros since the scheduler
has started. This can be used to identify if a task is consuming more time than expected, at some point
in time. The variable is accessible in R/W and can be reset by the main sketch.
mySCoop.maxCycleMicros provides the maximum value reached by cycleMicros since the scheduler has
started.
Calling yield() more often will certainly reduce the risk of having a big difference between cycleMicros
and maxCycleMicros.
Remark : It is possible to define the number of cycles used to cumulate time, from 2 (default), 4, 8 or 16
by changing the value of the SCoopTIMEREPORT from 1 to 4, at the beginning of the SCoop.h file. For
AVR platform these variables are only 16bits and might overfilling. For ARM it is possible to cumulate up
to 128 cycles by extending these values to 5, 6 or 7 without any impact on performances.
Quantum as a way to force time spent per taks or % of CPU …
Each task object provides a variable named quantumMicros for defining the amount of time that the
scheduler should spend in this task before switching to another one. This guarantees that the task gets a
certain amount of CPU time to proceed, relatively to the whole cycle time. When the object is initialized,
this variable is set to a default value (SCoopDefaultQuantum) depending on the platform: 200us for
ARM, 400us for AVR. If needed, it is possible to change this value dynamically in the program (example
myTask.quantumMicros = 700;) preferably in a task setup() method. This will impact the default time
spent in this task but also the length of the whole cycle as a consequence. This is a smart way to force a
certain amount of CPU time (“percentage”) to a task. But because the model is Cooperative, this is not
committed.
Remark : When a task is using sleep() or sleepUntil() or sleepSync(), it switches back almost immediately
to the scheduler if the condition is not met. Therefore the time spent in the task is seen as 0 in the
yieldMicros variable, which is not entirely true as the task spent at least the time needed to check its
condition
.
The user program can also force a parameter in micro seconds to SCoopTask::yield(x) that would be
used instead of the quantumMicros for this yield(x) call only. As an example, writing “yield(100)” will
ask the scheduler to check if we have spent already 100uS in this task. If yes, then the scheduler will
switch to next. If not, it will return from the yield(100) immediately. With same behavior, writing
“yield(0)” will just force the scheduler to switch to next task immediately, as the minimum time
verification will always be true.

Scoop user guide V1.2 (2013/01/10) page 17
Goggle code repository : https://code.google.com/p/arduino-scoop-cooperative-scheduler-arm-avr/
mySCoop.start(cycleTime) can also be used (as of V1.2) to override the default task quantumMicros by
dividing the cycleTime provided as a parameter by the number of tasks registered (+1 for main loop).
If the task quantumMicros value is 0, then the SCoop library is optimizing the code, in order to
systematically switch to the next task, without controlling its time spent. This reduce switching time as
the yield() will not call the micros() function to compare with quantumMicros.
This can be achieved by writing mySCoop.Start(0) in the main sketch setup() or by changing the
predefined variable SCoopDefaultQuantum at the beginning of the SCoop.h file.
mySCoop.start(cycleTime,mainLoop) gives the possibility to allocate a specific time to the main loop()
(even 0) . Remark : if mainLoop is not 0, then the scheduler will always adjust the time spent in the main
loop (plus or minus) to try to guarantee a constant cycleTime!
Atomic piece of code:
Because the yield() function is now embedded in many function of the Arduino >1.5 library, it might be
needed to force a piece of code to be “atomic” and not interrupted by the scheduler. Imagine an
example where you setup a chip register with the wire library and you need to wait 3 ms with a delay(3)
before sending a new register. In that case the library provide a 8bits global variable called
mySCoop.Atomic that you just need to increment (mySCoop.Atomic++) at the beginning of the sensitive
code and then decrement (mySCoop.Atomic--) at this end of this code portion.
When the mySCoop.Atomic variable contains a non-null value, then the yield function is just returning.
As of V1.2 a predefined macro SCoopATOMIC { …} (same as yieldATOMIC { … } can be used instead. This
will insert the proper code at the beginning and at the end of the block code declared within brackets.
Re-entrancy protection:
Another case where we want to protect a piece of code is when a function calls yield() (like some in the
Ethernet library) but the function is not re-entrant and must be protected against multiple calls from
other tasks. For this a special macro calls SCoopPROTECT() has been introduced. same as
yieldPROTECT(). Just use this macro at the beginning of the function to protect it and this will insert
automatically some static volatile flag and some code to check if the flag is already set by a previous call.
If so, the code will call yield() until the flag is reset. The flag reset is automatically inserted at the end of
the bloc code in bracket, where the SCoopPROTECT() has been used.
It is possible to use SCoopUNPROTECT() before the end of the block code to reset the flag earlier.

Scoop user guide V1.2 (2013/01/10) page 18
Goggle code repository : https://code.google.com/p/arduino-scoop-cooperative-scheduler-arm-avr/
Performances:
As for a preemptive OS, the performance of the SCoop cooperative scheduler depends on the time
spent in the scheduler routines for checking time and switching tasks context.
SCoop is using optimized code and routine, to spend as less time as possible time in the yield() method.
If the time spent in the task, since the scheduler launched it, has not reached the “quantumMicros”,
then yield() will return as quickly as possible in the task. If the time is over (200us AVR 400us ARM by
default) then the yield() will take much more time to prepare and then switch to the next task.
SCoop is using the standard Arduino micros() function to evaluate the time spent. To grant better
performances on Arduino UNO, a specific 16 bits micros function has been rewritten for AVR, leveraging
most ideas used in the Teensy core. See source code for more info and copyrights.
Another key difference in Cooperative scheduling is the fact that the user code must call yield() quite
often and as soon as there is spare time or a blocking piece of code. This is the only way to guarantee a
smooth switching across tasks, timers and events. Therefore, the relative time spent in the yield()
compared to the other activities is more important than with a preemptive OS, where the switch is
triggered top-down by a periodic interrupt, say every ms. In some case, if a task is doing very simple
things (e.g using sleepUntil()), the yield() might be called very often like every 10us or so, therefore the
total time spent in yield() would be 100 times more than with a preemptive OS! BUT that doesn’t mean
that SCoop is not good. That just means that your task doesn’t need this amount of CPU power and then
transfer it to yield(), so don’t blame SCoop . The concept of time quantum has been introduced just
for that, to make sure we continue executing a task code before switching to another one. That way, the
relative time spent in yield() is reduced, and the task is guaranteed to have a certain amount of CPU
resources, this is important for applications requiring computation like fft or sampling.
To evaluate the overall performance, the SCoop library is provided with an example called
performance1. It shows how much “count” we can do without scheduler, and then with 3 tasks with a
big and a zero quantum. Then we can see how much the time spent in the yield() impacts the number of
count done during 10 seconds. By diving this difference by the number of calls made to yield() (one
every 32 AVR or 128 ARM) we can calculate the avg time spent per yield()…
During 10 seconds
Max number of
count in main
loop() without
scheduler
Time spent in
SCoop yield() to
check
quantumMicros
Time spent in
SCoop yield() for
immediate
switching
For reference:
yield in “Android”
like Arduino DUE
Scheduler.h
PanStamp 328p
3925440
5.48us
31.63us
Arduino Uno 16M
7859200
2.64us
15.64us
Teensy++2
7866560
2.44us
14.96us
8.42us (4.94%)
Teensy 3 ARM
overclock 96Mhz
153239040
1.40us
3.23us
1.57us (16.03%)
Teensy 3 ARM 48M
115360320
1.66us
4.12us
Arduino DUE ARM
tbd
tbd
tbd
tbd

Scoop user guide V1.2 (2013/01/10) page 19
Goggle code repository : https://code.google.com/p/arduino-scoop-cooperative-scheduler-arm-avr/
Object context vs main arduino sketch.
The SCoop library forces user to define a task as an object with its own setup and loop() function which
looks cool but this brings some constrains and limitation when the program becomes big. For a better
readability the task might be spread in multiple function called from the task loop().
void printMyStack() { … }
defineTaskRun(task1){
printMyStack();
x=x+1; sleep(100); }
In this situation, the function which is outside cannot access the methods from the SCoopTask object
like sleep() or stackLeft() (they are not declared as static).
Remark: There is an exception with yield() as the library defines a global yield() which can be used from
everywhere.
To solve this, it is possible to reference the method with the name of the object itself like
task1.sleep(10), but if the function is common to multiple tasks then the code must use a global pointer
mySCoop.Task which always contains a pointer to the task object under execution. So in this case the
function printMyStack() should contain the following type of code:
void printMyStack() {
Serial.println(mySCoop.Task->stackLeft());
mySCoop.Task->sleep(100); }
“Android Scheduler” New in V1.2 –> SchedulerARMAVR.h
The Arduino 1.5 library for Arduino DUE board based on Atmel ARM chip is provided with a Scheduler.h
library which is a very basic scheduler with task context switching involved by a global yield() method.
The original source code comes from the Android team / project and this is why I simply call this library
the “Android Scheduler”. So what ?
The SCoop library is provided with a version of this file which is now compatible with both ARM and
AVR! I have ported the code to AVR by extending the original Scheduler.h library with AVR stack
switching and the result is quite good despite the poor functionalities. Because each user will be
questioning which solution to use, I wanted to transparently provide this file as a possible alternative for
your project. Documenting it in this user guide would be like delivering a hard copy of this guide with a
gold-plated cover, and I will not considering price of gold nowadays and as I’m working in green-it.
This scheduler is very fast but doesn’t check any time quantum or time spent in a task, and this might
then give very worst result for your application. Also the library doesn’t provide any supporting function
for fifo, time measurement or timers and event. But fine, it works. And SCoop can compensate this.

Scoop user guide V1.2 (2013/01/10) page 20
Goggle code repository : https://code.google.com/p/arduino-scoop-cooperative-scheduler-arm-avr/
The nice (-and bad-) thing with this Android Scheduler is the possibility to start a dynamic task on the fly
within the main sketch, just by calling startLoop(myLoop,stackSize) as you could see in the multipleBlink
original example. Then the code will use the standard malloc and free function to allocate the task
object and its stack from the heap. This approach is often considered as risky for small systems with low
memory and very sensitive for non-expert users. The library also gives the possibility for a task to die.
Then the memory is free-d on the fly creating holes in the heap.
Because you will try it and will be pleased with this library, it was important to bring SCoop almost at the
same level and to make it COMPATIBLE so you can move to it now, or later .
When it comes to performance, this is not possible to reach the same result. The best context switch
time on AVR with SCoop is 15us and this is down to 9us with the ported “Android Scheduler”. BUT,
SCoop might be faster at the end, as the basic yield() call will take only 2.5us if the time quantum is not
spent. So don’t be fooled by rough numbers.
That said, I’ve decided to add 2 methods in the SCoop library which gives the exact same possibility to
define dynamic tasks with the same syntax: it is possible to add a task dynamically to the SCoop
scheduler by calling mySCoop.startLoop(myLoop,myStack) or Scheduler.startLoop(myLoop,myStack) and
to kill this task later with a call to SCoopTask::kill() !
In order to keep a pointer to this task, the good way of using this would be:
SCoopTask* ptrAndroid;
ptrAndroid = Scheduler.startLoop(myLoop,256);
mySCoop.start(); // or Scheduler.start();
…
while (1) {
yield();
if (something) ptrAndroid->killMe(); }
Technically this works and you can use only this way to add task to SCoop. But my personal choice is
done . It seems also possible (according to the success with multipleBlink example) to immediately
replace the use of the Android Scheduler in an existing project by just replacing the
#include <Scheduler.h> by #include <SCoop.h>, but this is to be further experienced of course.
One prerequisite is to launch a Scheduler.start() at the end of your main setup() otherwise SCoop will
not start ;). (“Scheduler.” is the same as “mySCoop.” when SCoopANDROIDMODE >= 1)
Last but not least, the kill() will work only if you change the predefined variable SCoopANDROIDMODE to
2 at the beginning of the SCoop.h header file. The reason is that I didn’t want to pollute some piece of
critical code in the main “SCoop::yield()” with the constrains brought by the possibility to kill a task...
After this long 20 pages reading, time for you to experience all of this and to report any feebdback or
bug in the Arduino forum! . Thanks guys.
