SKY MASTER ULTIMATE MANUAL V2.1
SKY%20MASTER%20ULTIMATE%20MANUAL%20v2.1
SKY%20MASTER%20ULTIMATE%20MANUAL%20v2.1
User Manual: Pdf
Open the PDF directly: View PDF ![]() .
.
Page Count: 36
Sky Master ULTIMATE
This is a pack devoted to Sky rendering and Weather simulation. The goal is to emulate as
spectacular skies as possible with dynamic effects that are also focused on performance and
multiple options in order to achieve the best results for each case. The system works in all
platforms, Unity 4 free and Unity 5. Version 1.6.5 and above is Unity 5 native.
Instructions
In order to use the Sky Master system, the user must add the “SkyMasterManager” script to
the gameobject that holds the ground sphere and the Sky Dome. The sky and clouds system
is also available as prefab. The prefab contains all effects and GI setup (the GI script is
disabled by default and can be enabled in the Sun Light Gameobject to activate the GI
system).
The GI Proxy system is included in the Sky Master, and is integrated in the demo scene.
Note: Uninstall GI Proxy first if it is already part of the project and then install Sky Master,
to take full advantage of the latest GI Proxy updates. Always backup the project before
installing new packages.
Sky Master basic parameters
The “SkyMasterManager” script will control the sky coloration and Day/Night cycle and is
the main Manager of the system. The material of the Sky Dome must be applied on the
script in the “Sky mat” parameter.
Sun-moon and sky-cloud materials:
Sun System: The system that holds the sun and moon spheres and lights as children. It also
holds the sun target, which is the spot the sun will turn to as it moves around the globe.
Max-min Sun Intensities (v2.0.1): Define the max sun intensity that will be reached during
the day. Also the minimum for night time.
To min-max intensity speed (v2.0.1): Define the lerp speed from night time to max intensity
value in day time.
Ortho Camera (v2.0.1): Check if an orthographic camera is used, to apply aspect corrections
to the sky shader.
Ortho factor (v2.0.1): The factor of aspect correction.
Shift dawn (v.2.0.1): Shift dawn time (9:00) by an amount (up to 1.5 hour back at 7:30)
Rotation of Sun Y-Z (v.2.0.1): Precision rotation for the sun, complementary to the seasonal
and horizontal factor parameters. Preferable to use for exact placement with angle
reference.
Moon glow (v2.0): Glow of the moon halo at night time
Horizon Adjust (v2.0): Adjust the horizon depth.
Horizon Y (v2.0): Move the ground/horizon line vertically.
Ground color (v2.0): Color of the global ground
Unity 5 (v1.5): Check in order to update the Unity 5 skybox shader properly. Set the proper
material with the Unity 5 shader in the Skybox Mat slot.
Mobile (v1.5): Use with the new in v1.5 mobile cloud shader and prefab, this will color the
clouds by particle and not in the previous shader mode.
Volume-Snow-Lightning-Real-Storm-Flat cloud max particles (v1.5): Set the maximum
particle count for each cloud type, for performance adjustment.
Sun Objects (v2.1): The sun sphere for the main sun (“Sun Obj”) and “Sun obj 2” is for the
definition of the 2ond sun for use in the new Dual Suns system.
Dual Suns Factors (v2.1): The Dual Suns Factors govern the 1st & 2ond sun balance
in the overall intensity of the sky and the 3rd parameter adjusts the 2ond sun size. The
system may also be used to provide a halo for a 2ond moon or a planet.
Moon Object: The moon sphere.
Hero: The player gameobject. Used when local Rain-Snow-Fog effects are enabled.
Weather: Choices for smooth weather transitions. Used with “On Demand” option. Select a
weather type and a smooth transition will begin.
On Demand: Check to enable on demand weather changes, selected by the Weather
parameter.
Sky Material: The material to assign for the sky. This material must have the
“Skymaster/SkyMasterShaderE” Shader applied.
Skybox Mat (v1.5): The material to assign for the skybox mode. This material must have the
“Skymaster/SkyMasterShaderE_SKYBOX” Shader applied for Unity 4 and “Skymaster/
SkyMasterShaderE_SKYBOX U5” for Unity5.
Cloud up material: The material for the upper layer of 3D clouds. This material must have
the “Skymaster/SM_Additive(Soft)LOWCLOUDS” Shader applied.
Cloud down material: The material for the lower layer of 3D clouds. This material must
have the “Particles/VertexLit Blended” Shader applied.
Flat Cloud up material: The material for the upper layer of the flat cloud bed. This material
must have the “Skymaster/SM_Additive(Soft)” Shader applied.
Flat Cloud down material: The material for the lower layer of the flat cloud bed. This
material must have the “Particles/VertexLit Blended” Shader applied.
Cloud Dome Material: The material of the rotating cloud textured dome. This material must
have the “Skymaster/SM_Additive(Soft)LOWCLOUDS” Shader applied.
Star Dome Material: The material of the rotating star textured dome.
Real Cloud up material: The material for the upper layer of the realistic cloud bed. This
material must have the “Particles/Alpha Blended” Shader applied.
Real Cloud down material: The material for the lower layer of the realistic cloud bed. This
material must have the “Particles/Alpha Blended” Shader applied.
Surround Clouds Material: The material for the surround clouds. This material must have
the “Transparent/Diffuse” Shader applied.
Sun Ray Cloud: The gameobject that holds the sun ray particles.
Upper/lower dynamic cloud: Gameobject that holds the Dynamic Cloud particle system.
Upper/lower cloud bed: Gameobject that holds the Cloud Bed particle system.
Upper/lower cloud real: Gameobject that holds the Realistic Cloud particle system.
Upper/lower static cloud: Gameobject that holds the Static Cloud particle system.
Cloud Dome: Gameobject that holds the Dynamic Cloud particle system.
Surround Clouds: Gameobject that holds the Surround Cloud particle system.
Surround clouds Heavy: Gameobject that holds the Surround Cloud Heavy particle system.
This system uses lightning and special lighting effects.
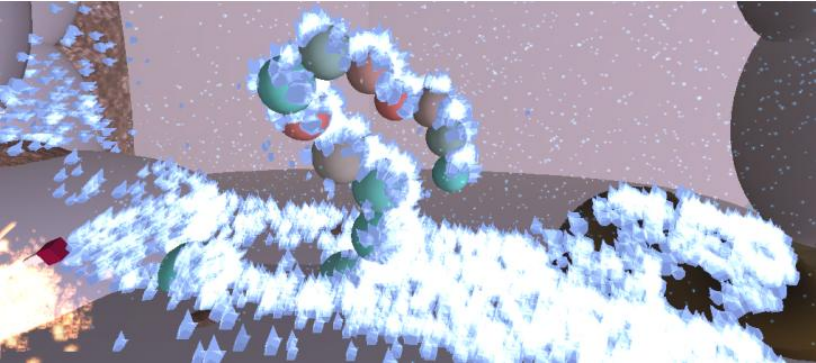
Snow storm Object: Gameobject that holds the Snow Storm particle system.
Snow Storm: Apply snow storm in winter season.
Falling leaves Object: Gameobject that holds the falling leaves particles. Use for Autumn
season (ULTIMATE version system also has Turbulence).
Butterfly object: Gameobject that holds the butterfly emission and dynamics effects
(ULTIMATE version).
Tornado Object: Gameobject that holds the Tornado particle system (plus local force,
turbulence and color manipulators in ULTIMATE version).
Butterfly 3D: Gameobject that holds the 3D Butterflies particle system, that includes spread
of Butterflies and control with turbulence and forces.
Ice spread object: The spray particles linked to the ice pool, use to spray ice on object dring
winter time. The ice will dynamically grow, melt and drip.
Ice system: The particle pool for the mesh ice that sticks to objects in Snow Storms.
Lightning system object: Gameobject that holds the Lightning Clouds particle system.
Lightning Object: Gameobject that holds a system with a single lightning emitter and target.
Star particles Object: Gameobject that holds the Stars particle system. Used at night.
Volcano Object: Gameobject that holds the Volcano system.
Volume Fog Object: Gameobject that holds the volumetric Fog system. It can be local or
region based.
Rain Heavy: The gameobject that holds the Heavy Rain particle system.
Rain Mild: The gameobject that holds the Mild Rain particle system.
Use Fog: Enable the use of fog, per season.
Fog - Snow - Rain - Butterflies local: Check these options to parent the related systems to
the hero transform and let the effect follow the hero around the map. Enable particle
collisions to avoid rain entering buildings.
NOTE: The clouds must have these materials and shaders applied in order to receive proper
changes as the Day/Night cycle changes. The prefab Manager holds all the various cloud
types and systems with the materials assigned propely. It is recommended to use the
prefabs for easy and fast implementation.
Sky shading parameters:
NOTE: These parameters cam be manually adjusted only if the “Auto Cycle Sky” option is
unchecked. The Day/Night cycle will take care of all the required parameter changes for the
proper illumination and sky shading per time of day. The day will start in the time provided
by the editor “Current Time” parameter, which can be pre-adjusted to continue the day
cycle, if one existed in a previous scene.
FExposure: The HDR exposure factor.
F Wave Length: The coloration factor of the sky. 650 nm for red, 570 nm for green, 475 nm
for blue.
Esun: Sun brightness constant.
Kr: Rayleigh scattering constant
Km: Mie scattering constant
G: The Mie phase asymmetry factor
Scale difference: Vary scale factor by this amount.
Alternative scale: Alternate scale modes. Useful for various world scales.
Outer Radius scale over inner: This is the scale of the SkyDome comparing to the ground
sphere.
Fsamples: The samples across the Camera-Vertex vector on the sky shader.
FRayleigh Scale Depth: Use this parameter for sun and scattering effect scaling.
Coloration: Overall coloration brightness of the effect.
Tint Color: Overall tint for the sky effect.
Use ORK: This is an option to enable direct assignment of time in a variable in “ORK
Framework” asset, if available. This will allow time to resume properly after each new scene
is loaded (provided it has the Sky Manager activated).
Use SkyCube: This option is used when we need to assign the Sky Dome to the Unity Sky
box. A special setup is required in this case and is provided in an example scene. The idea is
to render the dome in a separate camera and remove its layer (SkyMaster) from the main
camera. Sky Master will update a cube material using this camera, which can be used for
Skybox directly or for other purposes (reflections etc). This is a Unity Pro only feature. The
material of the skybox must be assigned in the “CUBE material” parameter of the Sky
Manager and must have the “RenderFX/Skybox cubed” Shader applied.
Use SkyBox: This option will make use of a bonus artistic shader (scattering and time of day
does not apply), that can be directly applied to the Unity Sky box. The material of the skybox
must be assigned in the “Sky Material” parameter of the Sky Manager and must have the
“Skybox/Procedural_SkyMaster” Shader applied. Also the material must be assigned to the
Unity Skybox Material in RenderSettings.
Mesh terrain (v1.5): Define the mesh of the terrain in case of a mesh terrain should be used.
Season Change automatic: Change seasons automatically, based on month. Weather effects
will vary automatically in this mode and all necessary systems will be enabled/disabled and
transition smoothly as needed.
Season: The current season. The settings start from Spring, use 1 for Spring, 2 for Summer, 3
for Autumn and 4 for Winter.
Seasonal: Control the left-right displacement from the sun center based on season. This
parameter will constantly affect the sun motion towards a direction.
Horizontal Factor: Control the left-right displacement from the sun center based on month.
This parameter will affect the sun placement only once and at every change of the
parameter.
Horizontal Factor prev: Previous Horizontal Factor value, for debug purposes.
Sun ring factor: Enable ring effect on the sun and control the ring radius.
Sun halo factor: Enhance the halo around the sun.
Sun eclipse factor: Make sun vanish gradually.
Global Scale: Extra scaling factor for the overall sky effect.
Color Parameters – Per Season and Time of Day: Use these colors to alter the pre-defined
colors for the various effects.
Cam follow factor(v1.6): Use this for Unity 5 skybox mode, with zero the sun will change
position when the camera height changes, with one will follow the camera. Other values can
be used to create a latency effect, that can emulate sun diminish according to planet size.
Cam offset (v1.6): Offset to use for initial camera placement, used to adjust the above cam
follow factor. Default is zero vector.
Sun Target: The target the sun will rotate towards as it moves around the globe.
Current Time, Day, Month: The current time from the start of the Sky Manager use.
Days per month: How many days each month includes.
Auto Cycle Sky: This option will adjust all Sky Manager and Sky Shader parameters, based on
time of day and season. Also it will change the cloud Shaders and materials accordingly.
Adjustments will also take place based on season chosen.
Sun, support and moon light: The gameobjects that hold the lights of the three systems.
Speed: The speed of the Day/Night cycle. Increase to make the sun move faster, make time
pass faster in the game and reduce day time in actual time.
Preset: External control of various preset Sky settings, defined in the script.
Test_cubemap: Object to test rendered cubemap when “Use Sky Cube” option is selected.
Cube Material: The material (cube skybox shader) to assign the rendered sky dome to, when
“Use Sky Cube” option is selected.
Sky box Layer: The layer to use for the offscreen rendering of the Sky Dome, when “Use Sky
Cube” option is selected. The Sky Dome must be assigned to this layer and the layer must be
excluded from the main camera. “SkyMaster” layer is pre-defined.
Note (2.1): As of v2.1 the “horizontal factor” is for in game use only and will be zeroed in
game start and zero must also be used in editor.
Note (v2.0): The skybox shader is now not dependent on the placement of the script holder.
Any deviation from the original prefabs must be compensated for this. The new prefabs
place the hero at 0,0,0, instead of 0,10000,0 of the original skydome oriented setup. To use
the Skybox mode, insert the material in skyboxmat slot, check Unity 5 and select a proper
preset (0-3). To use the Skydome system, enable the dome sphere, add material to skymat
slot, check Unity 5 (this changed in 2.0) and select a preset that is made for dome (preset 4).
Note (v2.0): The new preset system allows the control of both Skybox and Skydome in Unity
5 mode. The Unity 5 option must be checked in the Sky Manager script and there are 4
presets ready to use with Skybox mode (0-3) and one for Skydome (4). New presets can be
added in code by searching for “if (preset == 0)” and copying the relevant code, adding a
new preset ID number and values in the parameters. Then the preset can be called with its
ID number at start (if defined on the script) or during gameplay and customized as needed.
Dynamic Chain Lightning Bolt script
Options (Chain Lightning SKYMASTER script):
Target: Dynamic target currently acquired, for debug purposes.
Zigs: Number of lightning particles.
Speed: Speed of lightning procedural creation.
Scale: Scale of the effect.
Start/End light: Light assigned to be used when lighting starts/ends.
Energized: Activated externally to signal a parent has send lighting to this object
Is parent: Check to declare this as the lightning parent node. All child nodes must get
lightning propagated from this node to energize and cast further.
Current depth: filled externally, a non parent must search for targets if lower than
max_depth and re-transmit it minus one.
Max depth: filled externally, a non parent must search for targets if lower than max_depth
and re-transmit.
Max target count: The max number of close by nodes (using the “Conductor” tag) to cast
lightning to.
Random Target: Randomize the target selection, otherwise choose the first one found.
Affect dist: Distance at which to check for targets (Object tagged as “Conductor”)
Change target delay: time after a new target will be searched.
Random delay (v2.0): Randomize target delay
Delay offset (v2.0): Randomize delay, add this amount around target delay parameter
Moving Source (v2.0): Enable if the lightning source is moving
Particle Energy: Define energy of Legacy particle.
Optimize factor: Optimize light use, decrease chance to see a light when the lightning
strikes.
Particle Size: The size of the lightning particles, size lowers in expanding branches.
Branches (v2.0): Enable lightning branching
Branch Offset: The offset of the branches from the main line.
Offset bias: Use to make main lightning line deviate in an exponential way.
Downward speed: Speed at which lightning forms towards the target.
Branch Color: Option to change the color of branches.
Zigs branching divider: The overall particle count is divided with this number to assign the
start position of the first branches in the main line.
Offset noise: Add a real time noise the offset bias parameter.
Reset Noise: Noise limited only around the offset value.
Slow on end: Delay the lightning reach to end point, for extra staying time after it has
reached near the target.
Slow down height: Height from target at which the slow down begins.
Slow divider: The divider of the initial target reach speed, determined by the Downward
speed parameter.
Light delay (v2.0): Define how long light will stay after lightning has reached the target.
Random between two values.
Line on (v2.0): Check to create a line renderer based lightning. A line renderer must be
attached to the gameobject that holds the lightning script.
Line delay (v2.0): Define how long the line will stay after lightning has reached the target.
Random between two values.
Vertex count (v2.0): Define the maximum vertex count of the lightning bolt.
Deviation (v2.0): Define the maximum deviation to use for the lightning shaping.
Line width (v2.0): Start - end width of the line lightning.
Terrain and Foliage Shading
The terrain controller is assigned on a terrain of choice and it will cycle terrain colors and
grass tint based on season. The trees tagged as “SkyMasterTree” will also change color, if the
items uses a compatible with the standard Unity tree material shader.
As of version 1.5, Mesh terrain is also supported and there are options for volumetric scatter
fog shading. Version 2.0 brings a new volumetric fog image effect and control of image effect
fog and sun-moon shafts with presets. The “GlobalFogSkyMaster.cs” and
“SunShaftsSkyMaster.cs” scripts must be attached to the main camera, in order to use the
image effect based scatter volumetric fog and sun beams.
Options (Seasonal Terrain SKYMASTER script):
Gradient holders (v2.1): Define gradient per fog preset. Insert GlobalFogSkyMaster items
that hold specific gradients. These will be used when the relevant fog preset is used.
Stereo Mode (v2.1): Enable stereoscopic mode. (Cardboard required for full function in the
demo - https://developers.google.com/cardboard/unity/download)
Left - Right cameras (v2.1): Left/ right eye cameras for stereo mode. The
GlobalFogSkyMaster and SunShaftsSkyMaster image effects must be manually copied from
the single camera to both the left and right eye cameras and then will be regulated by the
script.
Image effect fog (v2.0): Enable image effect volumetric fog (GlobalFogSkyMaster script must
be attached to the main camera)
Use both fogs (v.2.0.1): Use the new volumetric fog together with the standard Unity fog. A
specific preset is also provided for use with this arrangement.
Image effect shafts (v2.0): Enable image effect sun shafts (SunShaftsSkyMaster script must
be attached to the main camera)
Image effect sky update (v2.0): Reserved for future versions, for fog update directly from
sky parameters.
Fog preset (v2.0): Preset image effect fog parameters, use to define new presets and call
them in various times of day or other conditions.
Update leaf material (v2.0): The new seasonal color update system can work directly on a
provided material, for total control of the effect. Note that the material will change for all
instances that use it, so it is a good practice to use a separate copy of the material for the
seasonal color change use.
Leaf materials (v2.0): Define the materials to change color based on season, they must have
a “_Color” property. In SpeedTree case, define all possible LOD levels of leaves and the
billboard, in order to have a uniform color change for all distances to the camera.
Rays day-night color (v2.0): Define the sun and moon shaft color for the sun shafts image
effect.
Shafts intensity (v2.0): Intensity of the shaft effect.
Mesh Moon (v2.0): Define whether the moon uses a mesh or not. Shafts are regulated for
best effect depending on the case.
Glow moon - sun (v2.0): Enable extra glow to the sun and moon.
Tree A Color: The starting color of trees. Corresponds to Spring time in the demo.
Terrain tint: The starting tint of the ground.
Grass tint: The starting tint of grass.
Enable transition: Start the transition based on season. Allows the control from the
SkyMaster Manager.
Terrain Material (v1.5): Assign the material used on the mesh or Unity terrain, to control the
volumetric scatter fog shader.
Transition speed for tree – terrain-grass: The speed of the transition to the next color.
Mesh terrain (v1.5): Check if mesh terrain is used instead of Unity terrain. The mesh must
also be assigned in the SkyMasterManager script.
Foggy Terrain (v1.5): Use the volumetric sky fog shading. The material must have the
“SMDistFoggyTerrainFP” shader for Unity terrain or the “SM_Foggy_Terrain” shader for
Mesh Terrain.
Fog Sky Update (v1.5): Update fog based on time of day, synchronization with Sky Manager.
Sun Position (v1.5): Use to set sun angle vector manually, if “Fog Sky Update” is not used.
Sky Manager (v1.5): Assign the main SkyMaster Manager script here, to read sky
information from when “Fog Sky Update” is used.
Fog Depth (v1.5): Bring fog closer to the camera.
Reileight(v1.5): Reileigh sky parameter that affects fog rendering.
Mie coefficient (v1.5): Mie sky parameter that affects fog rendering.
Mie directional (v1.5): Mie directional sky parameter that affects fog rendering.
Exposure (v1.5): Exposure parameter for the scatter fog rendering.
Lamda – K (v1.5): Scatter parameters for the fog rendering.
Note (v2.0): The system controls the new image effect volumetric fog with presets that
define most parameters. There is no control over the gradient colors, which will have to be
defined manually in the “GlobalFogSkyMaster.cs” script, which must be attached to the
main camera.
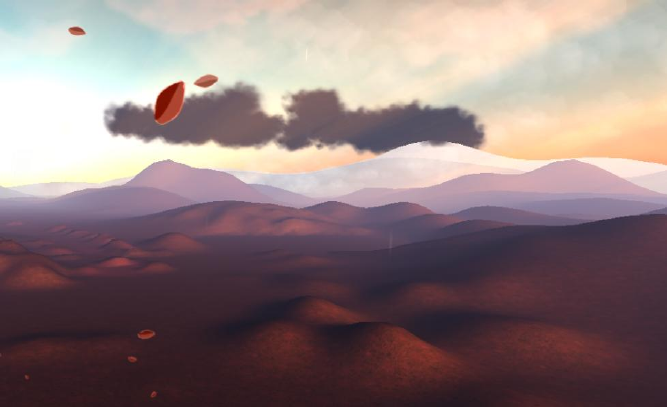
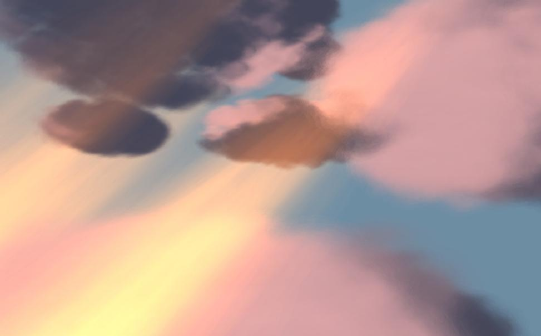
Volumetric cloud-smoke
A special controller script is used to allow the formation and control of volumetric clouds.
The “PlaceParticleSheetOnGround” script will fix particles to the texture sheet individual
textures, it can be used for flowers and particles that need to keep their position and specific
initial texture from the sheet. A variant is also available for non animated particles.
Note that this can be in a prefab, but will only update the proper preview positions in the
editor mode when the OnEnable is activated (when click on the object).
The particle must have the “texture sheet animation” on and the Tile settings must be
inserted in the script as well.
The particle must be set to “World” Simulation Space mode.
Options (Particle Sheet On Ground SKYMASTER script):
Start pos: Shows the registered start position of the system.
Particle Count: How many particles we need emitted.
Nbb: The particle system attached for debug purposes.
Let loose: Make particles inherit the particle system properties, forces etc
Gravity mode: Add a constant force downwards toward the ground.
Tiles X,Y: The number of tiles in the texture sheet.
Y offset: Offset from terrain.
Conform to terrain: Choose whether the particle cloud will follow the terrain.
Gravity speed: Speed at which the particles will try to return to their nominal positions.
External rotation: Use in explicit mode, to provide a specific rotation to the particles, around
Explicit Axis.
Use formation: Use a gradual formation of particles, for cloud wall effects.
Use mesh: Check when using mesh particles (preferably a quad), this mode allows the best
volumetric effect (better lighting and in cloud feeling). Uncheck for billboard based
volumetric clouds. Use for Volumetric fog and clouds.
Use explicit: Use a specific rotation for mesh particles.
Explicit axis: The axis of rotation.
Keep alive: Keep particles alive, for static clouds.
Auto rotate mesh: Check to fix the rotation of mesh particles based on camera placement.
Use for Volumetric fog and clouds.
Use cut off: Cut off for the terrain conform effect. Above this height clouds will stop
following the terrain contour.
Cut off height: The height to use when “Use cut off” is enabled.
Volumetric cloud bed
The Volumetric Cloud Bed is an enhanced volumetric cloud system in v1.2, that is able to
provide a complete moving cloud bed, with volumetric clouds with only one draw call. It also
comes with a dynamic Sun Beam system integrated, that also may use only one draw call, or
more depending on the selected occlusion system for the light beams. The system is ready
to use in the new prefab that is provided with v1.2 (“SkyMaster Earth VOLUME CLOUDS
v.1.5”) and is based on a Legacy Particle System and the “VolumeClouds_SM” script.
Options:
Moon light (v2.0): Enable grab of moon light at night time
Moon light/dark color (v2.0): Highlight and base color of moon light cloud shading
Override initial color (v2.0): Use a different color than the originally defined as base
Override Color(v2.0): Color to override base color with
Day Cycle (v2.0): Assign colors based on day/night cycle
Sky Manager (v2.0): Sky Manager to grab time of day from
Day quarters colors (v2.0): Colors to use for each day quarter
Add shadows (v2.0): Instantiate the shadow system defined in “Shadow_holder” parameter.
The system will instantiate any item besides the pre-defined shadow plane and samples with
lighting instantiation is also included.
Use 2D Check (v1.6): Vector2.Distance calculations for cloud particles lightning instead of
Vector3. Use for enhanced performance.
Max Divider (v1.6): Divide particle calculations across frames, for enhanced performance.
Method (v.1.5): Chose between methods for turbulent cloud motion. Currently there are
three methods supported (Use 1,2 or 3).
Turbulent (v.1.5): Apply turbulent cloud motion in the volumetric cloud bed.
Flatten below (v.1.5): Flatten cloud base.
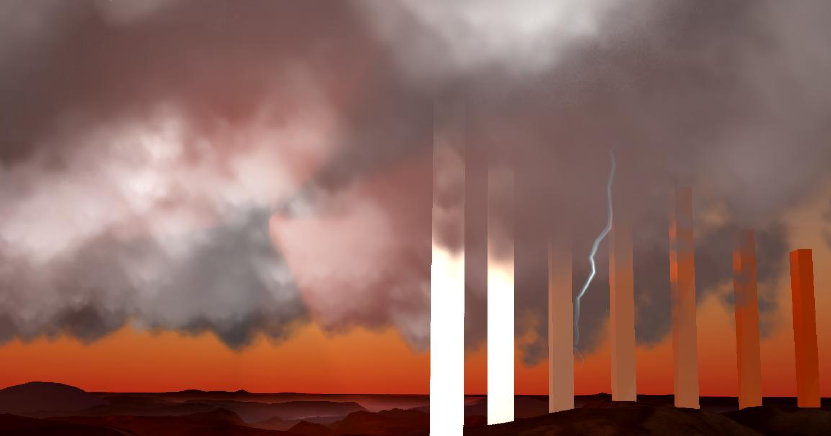
Shaft centers: The centers of the sun shafts. For debug purposes.
Sun Shafts: The transforms of the Sun Beam gameobjects pivots attached to the sun. These
are stretched quads parented to a pivot that recreate beams emitting from the sun.
Beam occlusion: Allow beams to be occluded in various ways. Either by cloud volume (scale
or material based transitions) or colliders (scale based transition). The material based
occlusion fade can be used together with the colliders based occlusion scaling.
Smooth material transition: Smoothly transition to the new material properties that
correspond to the occluded beam.
Shaft scale: For debug purposes. The current beam scale, as changed by occlusion
requirements.
Beam length: The length of the Sun Beam gameobject along the sun’s forward vector. Use
this to calculate properly the lengths of scaled beams during occlusion.
Scale beams: Use scaling occlusion from cloud volume. This cant be used together with
other occlusion methods.
Scale on collision: Raycast towards the Sun Beam forward vector and scale it based on
collisions. Can be used together with Material based occlusion fading.
Offset collision factor: Extra downscaling of the beams from the point of collision (use to
make beams not touch terrain for example, by scaling a bit more towards the sun).
Diminish beams: Smoothly fade out Sun Beams when sun goes below the cut off height
(horizon).
Override Sun: Override sun color and allow night time effects and coloration.
Cut height: Height below which the sun beams get faded out and clouds get darker, for
emulating night time.
Restore on bound: Enable the cloud renew system.
Disable on bound: Disable old particle system when all centers have passed over the bound
length comparing to the cloud system origin.
Bound: Distance of clouds from the cloud system origin to check against, in order to disable
the cloud system and create a new one to renew the clouds. Use a high enough number so
clouds may fade in the distance before become disabled.
Destroy on end: Destroy old particle system when all centers have passed over the bound.
Clone on end: Clone the particle system and create a new instance of the clouds.
Centers and Centers Init: The randomly chosen cloud centers and their saved initial
positions, for debug purposes.
Speed: The cloud motion speed.
Multiplier: Multiple the cloud speed by this amount.
Wind: Axis to move towards using the above speed factors.
Get wind direction: Reserved for next update. Not currently used.
Wind-Rain-Shadow-Lightning holders: Reserved for next update. Not currently used.
Min-max bed corner: Cloud bed min and max bounds.
Cloud bed height: Height of cloud bed.
Main and Sun colors: The dark area color and sun color. Use “grab sun color” variable to get
the Sun color directly from the sun light.
Divider: This parameter determines the cloud number, divides the particle count defined in
the attached Legacy Particle System with the specific number and spreads particles to equal
number of centers.
Sun exposure: Make sun light brighter on the clouds lit front.
Sun transform: The transform of the gameobject holding the sun light.
Update interval: Interval until the next cloud color and motion update.
Color speed: Speed of color lerp when sun moves.
Cloud scale: The initial cloud dimensions, as created by the particle system.
Global cloud scale: The dimension of the whole cloud bed.
Global tint: Extra color control over the cloud coloration.
Variant cloud size: Vary the cloud volume dimensions per cloud randomly, using the specific
bounds.
Cloud min-max scale: The bounds of the random cloud scaling, the initial cloud size as
created by the Particle system is multiplied by a random number between the min and max.
Sorted: Clouds get properly sorted based on distance from camera.
Delay lerp: Used to give a starting time delay until cloud colors are initialized.
Sun distance on: Use color calculations based on sun distance.
Grab sun color: Get the Sun light color from the Sun transform gameobject.
Grab sun intensity: Use color calculations based on sun intensity.
Grab sun angle: Use color calculations based on sun angle to the horizon.
Day light intensity: Normalization factor used when “Grab sun intensity” option is enabled.
Sun angle influence: Influence factor used when “Grab sun angle” option is enabled.
Look at camera: Make sun beams look towards the camera.
Beams camera target offset: Reserved for future updated. Not currently used.
Occlusion sort delay: The Sun Beam occlusion has to sort cloud centers based on sun and
camera, this parameter controls the update rate of this sorting procedure. Use to enhance
performance.
Note: As of version 2.0, the system can be used with a sprite sheet besides the normal single
texture. This opens up all kind of possibilities for varying cloud textures. Define the rows and
columns numbers in the “Particle Renderer” -> “UV Animation” - > “X-Y Tile” fields. The
system will automatically spread the various clouds found in the sheet.
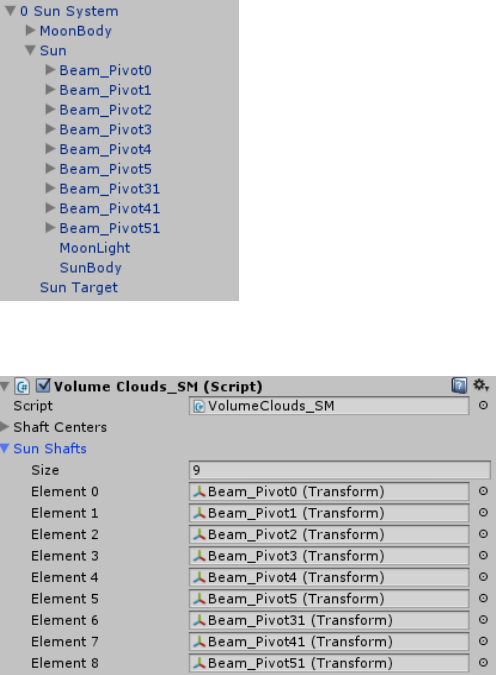
Sun Beams
The Sun Beam setup can be seen in the below image, the Sun Beams are attached to the
main scene Sun object and inserted in the “VolumeClouds_SM” script “Sun_Shafts” variable.
Scene setup:
Script setup (attached to Legacy Particle System):
Each Pivot may hold a number of rays in any arrangement and local rotation, to better cover
the various viewing angles.

Sky Master ULTIMATE – Advanced
particle manipulation and effects
Sky Mater ULTIMATE version contains a lot of advanced techniques and systems to deliver
spectacular effects like sticking ice, dynamic cloud and tornado manipulation and much
more.
Dynamic Attractors-Deflectors and Turbulence-Vortexes.
In order to use the dynamic attractor/deflector class, the user must add the
“AttractParticlesSKYMASTER” script to the gameobject that needs to attract or repel
particles or create turbulence-vortexes on nearby particles systems. Gravity effects are also
available.
Global attract/deflect manipulators
Options:
By default the script will attract near particles. Enable Turbulence to create dynamic
vortexes (Vortex option) and sinusoidal motion.
Turbulence options:
Turbulence: Add Turbulence effect. “Use Exponent” must be disabled.
Turbulence strength: Amplify the effect reach
Turbulence frequency: Adjust the effect frequency
Axis affected: Affect particles with turbulence by axis, add weights for all three axis
Splash effect: Add a splash like effect
Vortex motion: Add dynamic vortexes to recreate turbulent behavior
Vortex count: Control the number of vortexes created dynamically
Vortex life: Control the life of dynamically created vortexes
Vortex angular velocity: The spin each vortex will rotate close particles with. This setting
also applies to Gravity effect.
Vortex scale: The magnitude of the effect. This setting also applies to Gravity effect.
Limit influence: Will limit the effect to near particles only.
Vortex center size: Add a visual representation of the vortex center by adjusting its particle
size
Vortex center color: Color the vortex centers
Show vortex: Show the vortex centers
Coloring options:
Color force: Add color to the particles affected by the script forces
Force color: The color for the above option
Forces options (Gravity – Repel – Attract):
Use exponent: Amplify the global forces effects to cover various world scales and gravity.
Gravity only works in “Use exponent” mode.
Gravity pull: Add gravity effect to particles.
Swirl gravity: Add a swirl effect to gravity mode
Bounce gravity: Add a bounce effect when particles get very close to the attractor, good for
emulating atom like behaviors.
Bounce factor: Amplify the bounce effect.
Affect threshold : The range the effect affects particles
Gravity planar: Planar gravity effect, fix effect in certain axis
Gravity plane: The axis of rotation for planar gravity and radius factor for each axis.
Gravity factor: The gravitational pull amplitude
Dist Factor: Cutoff distance for particle systems. Systems further than this distance will not
be affected even if their individual particles reach the attractor/deflector object.
Enable paint: Paint near the mouse particles in collision surfaces, using the mouse pointer
Affect Distance: Distance from attractor individual particles get affected, keep this number
low to increase performance.
Dampen: Dampen the attract/repel and gravity effects. Use higher values when “Use
exponent” mode is on.
Smooth attraction: When checked particle motion is smoothed, disable for faster or instant
particle attraction
Lerp Velocity: Smoother motion for all effects, but slower.
Repel: Repels near particles
Limit to Y axis: This is the same as adding the “Grass” tag to a particle, but for all particles.
Hit dist: Fine tune painting mode hit distance when mouse is clicked. Use with “Enable
paint” option.
Noise options:
Vary Turbulence: Apply Perlin or Simplex noise to particles.
Perlin enable: Use Perlin noise (Simplex noise is the default).
Splash noise: Create local concentrations of particles.
Noise strength: Affect noise scale
Noise turbulence strength: Affect noise strength
Axis deviation: Apply noise per axis factor.
Splash noise threshold: Control splash effect.
Spiral effect options:
Make moving star: Create rotating trailing star like effects. Affected by Trail options.
Star trail dist: Cutoff distance between the manipulator and scene particle systems
Trail options:
Star trails: Number of circles in the effect
Trail distance: Used for debug purposes
Speed of trail: Rotation speed
Distance of trail: Gradual drop of circle radius
Trail length out : Circle radius
Size of Trail out : Particle size
Distance between trail: Gradual drop of circle radius
Vertical trail separation: Distance between circles
Smooth trail: Smoother trail motion
Optimization and preview options:
Affect by tag: Affect only tagged objects
Tags: Define tags to be affected by the effects.
Exclude tags : Use with Affect by tag off, limit influence to particles with the specified tags.
Affect specific: Affect only the specified particle systems.
Time to update: Update every nth frame, use to increase performance
Multithreaded: Uses multithreading for speed increase
Enable Preview: Enables editor preview of the effects, must click and then select the particle
to see the effect in editor
End life of affected: End particle life right away, affects only particles in influence radius of
the attractor. Use to enable sub emitters instantly based on attractor location and influence
area.
End life: Define particle lifetime to assign when the above option is used. Use a value above
zero to allow a smoother transition.
TIP: Tag objects as "VortexSafe” to stop vortexes effect.
NOTE: For grass there is an extra requirement to tag the grass particles as “Grass”, so
particles are repelled downwards to the y-axis, rather than in the exact opposite direction.
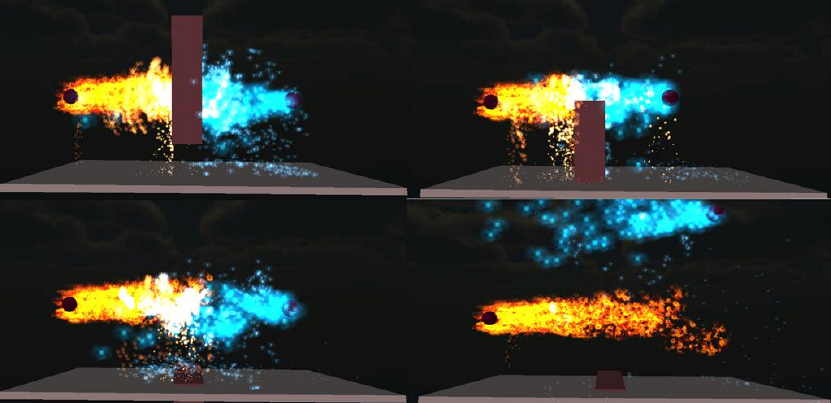
Fire & Ice: Dynamic effects propagation, spraying, collisions,
local overrides, emission control and painting.
Create a particle system to be used a pool for the painted upon collision and propagated
particles. Attach the “ParticlePropagationSKYMASTER” to the particle system.
The collision based positions will be populated by the particles that have the helper collision
script and apply to all objects with collider setup.
Create an item that needs to be painted with particles and add a collider. Tag the item with
“PPaint” and select the particle, then paint on the object with the right mouse button.
Options:
Systems to override: Inherited by the collision script and used locally by the pool particle to
allow local melt/go out effects by close by fire/ice systems. Apply Local Overrides to the
systems that are hit by particle collisions of the linked to the pool particle emitters with the
collision script. Also enables local overrides at the ice/fire pool system, if the other systems
are fire/ice respectively.
Cut off distance: Distance at which painted positions of the system to override will be
affected by the positions of the pool particle. Use to make fire melt ice locally, by near
painted/propagated fire (without using collisions) or fire go out by spread ice. The pool
system must have “Enable melt” and “is_fire” or “is_ice” checked and “Enable overrides”
option checked. The system to over
Reset overrides: Reset all overrides of the pool particle. Use this option to make butterflies
return to their position with gravity, after they have been locally affected and take to the air.
Set gravity to an amount that allows free flight first, then reset overrides and gradually
increase return speed to get a smooth transition back to the original painted/sprayed
positions.
Gameobject mode: Allows the use of gameobjects, together with the particles of the pool
system. Particle renderer may be switched off if only gameobjects are required. This options
requires two more parameters to be defined, an empty gameobject to be used as the pool
for the instantiated gameobjects and the item to be instantiated. Any item can be used and
scripts can control its complexity and variance at the time of instantiation. This option allows
any object, animated, complex and procedural to be used as particle.
Scale by texture: Use in play mode, painted positions will scale according to image grey
scale (experimental feature).
Color by texture: Use in play mode, painted gameobjects will be painted by the texture
colors. This is expensive to use since each color requires a new material and batching is not
possible in this mode.
Grow trees: Make gameobjects grow from smaller scale (experimental feature).
Grow time: Time scale for the transition.
Preview mode: Enable painted gameobject preview in editor.
Particle Count: Max number of gameobject particles allowed.
Gameobj: The item to be instantiated, when gameobject emission is active.
Gravity mode: Enable local gravity towards the initially painted – projected – propagated -
sprayed position for each particle (and gameobject).
Gravity factor: The amount of return speed to be used in Gravity mode.
Y offset: Give an initial offset in Y axis.
X-Z offset factor: Multiply offset for X-Z axis. Use to give small difference to each instance.
Let loose: Allow particles to move away from the painted positions. Gravity mode will
balance them in between the free and original positions.
Parent Object: The empty pool gameobject to be used for gameobject mode.
Angled: For gameobject mode, use a custom angle or wind.
Assign rotation: Use custom rotation angle.
Local rot: Rotation per axis
Wind speed: Assign wind and adjust speed
Follow particles: Make gameobject follow particles.
Remove colliders: Remove and add colliders from instantiated gameobjects.
Look at direction: Make gameobject face the direction of their motion, use for making
creatures look at their direction of movement.
Enable Combine: Use with the new dynamic batching system, allows the dynamic use of
batching when objects move from their positions. It offers extra performance to the static
batching system introduced in v1.6.
Release Gravity: The gravity to be used in local overrides mode. If a particle or gameobject is
overridden due to a close by collision by a disturber system, will change its gravity to this
value. Use to make hit butterflies take to the air locally.
Use stencil: Use an image as painting brush. Otherwise paint with mouse one point per time
(drag is also possible).
Stencil: Image to be used for painting brush.
Tex scale: Scale of the projected brush image (brush size)
Coloration amount: Amount of coloration when “Color by texture” is selected.
Real time painting: Allow painting with the mouse on colliders during play mode. Note that
multiple pools will apply if this is active in all of them at once, so enable only one pool with
this option at any time to get paint from the specific system.
Color effects: Color particles by brush image colors.
Lerp color: Lerp between color of image and of particle system.
Keep color: Keep initial brush color for the whole emission duration.
Propagation: Allow near objects tagged as “Flammable” to receive painted positions from
the pool if near other painted positions. Use to make near object catch fire or freeze.
Brush size: Size of point brush erase area. Use to erase bigger area when not in brush mode.
Erase mode: Erase painted positions, works in editor and play mode. Use with brush or point
painting.
P11: Pool particle, auto assigned when assign the script to the pool. For debug purposes.
Stay time: Time to let painted items stay on scene. If “keep alive” is not active.
Projectors: Gizmos of projectors to use for projecting painted positions.
Min-Max propagation distance: The min and max distances to a painted position at which a
near object will get a propagated position. Use to let fire be propagated at a certain
distance. Also the min distance allows near points to not keep propagating the same fire
forever.
Go random: For projection mode, use randomized array for the projected rays.
Extend: For projection mode, make the projected area wider.
Follow normals: Make mesh particles follow surface normal.
Density dist factor: Use for propagation, min distance to near painted positions to start the
propagation.
Propagation chance factor: Decide propagation rates, higher factor means less chance for
propagation.
Use projection: Use once and disable, get painted position though the projection gizmos
defined in the Gizmos parameter.
Use particle collisions: Inherited by the collisions script. Allows painted positions to be
registered by collisions on any particle system that is linked to the pool and has the collisions
helper script assigned.
Keep alive: Keep particles alive
Grow ice mesh: Use together with Ice Grow script to enable mesh emission on collision.
Variant size: Vary particle size. Must be checked for all size dependent effects.
Random size upper bound: Upper bound for variant size.
Random size lower bound: Lower bound for variant size.
Debug rotation: Assign a starting rotation.
Is Ice: Use to allow fire systems to melt the ice pool particles. “Enable melt” must be on. Use
Variant size to get a smoother looking melting, with size getting smaller gradually. If “keep
alive” is on will not work, unless it is an override with flag = 1 (ice melt flag). Overridden
particles will use the “fast melt speed” parameter. Normal melt uses the “melt speed”
parameter. Also use to signal other particles that the pool is ice (or fire), in order to make
fire go out (or ice melt) if “Enable melt” is enabled in the pools of the “systems to override”
parameter.
Fire: Same use as ice above, for the opposite element.
Butterfly: Use to signal the pool has particles that will take to the air locally, this is checked
in the collisions script, if the collision is close to a painted position with a butterfly and the
disturb particle is linked to the disturber pool (or is locally assigned as disturb particle
without a pool), if the butterfly pool is in the “systems to override” parameter, butterflies
will take to air locally near the collision. Override flag for this behavior is 2.
Enable overrides: Enable local overrides, these are assigned per particle and will give
different properties than the rest of the pool particles. Like a disturbed butterfly can take to
the air, while the rest stay to the ground with a bigger gravity factor, or ice melt faster when
fire collisions happen near than the rest of the pool particles.
Enable melt: Use to allow particles melt away as time passes, with “melt speed”.
Enable freeze-burn: Use to allow gameobjects freeze and burn by ice and fire, respectively.
Max freeze-burn amount: The amount of registered burn or freeze before a gameobject
starts changing color.
Thaw speed: The speed of ice effect go away after freeze.
Freeze speed: The opposite of thaw speed, this governs how fast ice will freeze a
gameobject.
Enable flyaway: This is used during collisions, to determine if the disturb particle will make a
butterfly pool particle take to the air. This can also be set locally to a collision script, if there
is no pool assigned.
Melt speed – Fast melt speed: Speed with which ice melts normally, and speed when
override happens.
Enable local wind: This is used during collisions, to determine if the disturb particle will
make grass behave differently than the rest of the pool.
Is grass: Enable to signal the pool is grass, so can be overridden if a collision enabled particle
with “Enable local wind” hits near.
Override grass angle and speed: Use to locally override grass properties.
Delay: Time to do recalculations.
Optimize: Use above time to optimize speed. Less propagations will happen depending on
time set above.
Use lerp: Use lerp instead of slerp for motion interpolation.
Delay calcs: Delay grass motion calculation by an amount, for speed optimization.
Optimize calcs: Use the above timer to optimize performance.
Relaxed: Allow particles to emit from painted positions.
Draw in sequence: Disable to get particle emit evenly in time and distribution from all
painted positions.
Velocity towards normal: Allow an initial velocity towards the painted surface normal.
Normal velocity: Define velocity strength per axis.
Keep in position factor: Determines how long the particle will remain in the painted position
before emission in relaxed mode.
Keep alive factor: Determines how long the particle will stay alive before lifetime reset.
NOTE: Objects will be painted as long as the pool sizes and max particle size are not
overcome. Then positions must be erased (ice melt etc) to get new positions.
TIP: Increase the particle count to allow more positions to be painted.
TIP: To draw or delete positions, must have the object collider enabled.
TIP: Use rigid bodies on colliders for better and more accurate results.
Collision propagator
Attach the script “ParticleCollisionsSKYMASTER” to a particle spray (or any particle) and link
it to the pool system that holds the particles to appear upon collision.
This script can also be used to provide advanced particle to particle collisions. In this case a
pool particle is not required (but can be used to provide extra effects upon collisions
between particles or with the ground).
Finally collisions may locally override properties of another pool system.
Options:
Particle Pool: Link particle to a pool. Use this option to let particle collisions spread pool
particles on collision. “Enable collisions” must be on in the pool particle. This is not required
in order to use the collisions to locally override another particle pool, or for particle to
particle collisions. If it is assigned, the properties of the pool will be used for the local
overrides. Otherwise options defined locally will be used.
Flame force: Assign a force to apply to rigid bodies hit by the particles. Collisions must be
enabled in the particle system.
Systems to override: Use this if no pool is linked, the collisions will override the assigned
particle pool systems, given the options locally assigned in the script.
Cut off distance: Distance above which collisions will not affect pool systems defined in
“systems to override” locally or in the linked pool system.
Inner particle collisions: Allow particle to particle collisions. This will emit collider objects
and enable colliders on them at specific intervals.
Collider object: Object with collider to use for particle to particle collisions. Object must
have a collider assigned and no mesh shown (unless needed otherwise).
Gameobject Instances: Instances of the colliders for particle to particle collisions. For debug
purposes.
Divide factor: Fraction of particle count for emitted collider objects.
P11: Particle system for collisions, for debug purposes.
End of life: Enable colliders based on factors below, related to the particle life.
Life factor upper-lower: Percent of particle life collider will be enabled on.
Min source distance: Distance of particle from source in order to allow collider enabled.
Is fire: Locally override “systems to override” pool particles if they have “is_ice” and “enable
overrides” enabled.
Is ice: Locally override “systems to override” pool particles if they have “is_fire” and “enable
overrides” enabled.
Enable local wind: Disturb “systems to override” pool particles locally. Pool must have
“is_grass” enabled.
Enable fly away: Disturb “systems to override” pool particles locally. Pool must have
“is_butterfly” enabled.
Override color: Color the pool particles locally, using the “New color” variable.
New color: Color to use for the above option.
Batching (static and dynamic) for gameobject particles.
The new batching system is applied to the instantiated particle gameobjects pool root
(assign “ControlCombineChildrenSKYMASTER” script to the root object). It allows for static
batching as standalone and also dynamic batching can be used when the pool particle has
the “Enable combine” option enabled in the Propagator script.
Options:
Generate triangle strip: Option for mesh combination.
Auto disable: Disable automatically after enabled. Use when an external script needs to
activate and not have to check if the script got disabled. Used in Dynamic Batching by
Propagator script to control the use of the script, so it can be applied only when objects have
moved to maximize performance.
Skip every N frame: Performance control.
Make Active: Set script as active. The script will combine meshes to a single mesh at every
update and recombine.
Self Dynamic Enable: Allow the script to be used to any gameobject pool for dynamic
batching (no need for Propagation script to control it). The script checks for position
changes to activate the re-batching.
Self Dynamic Check Rotation: Dynamically re-batch items when rotation is sensed.
Self Dynamic Check Scale: Dynamically re-batch items when scale is sensed.
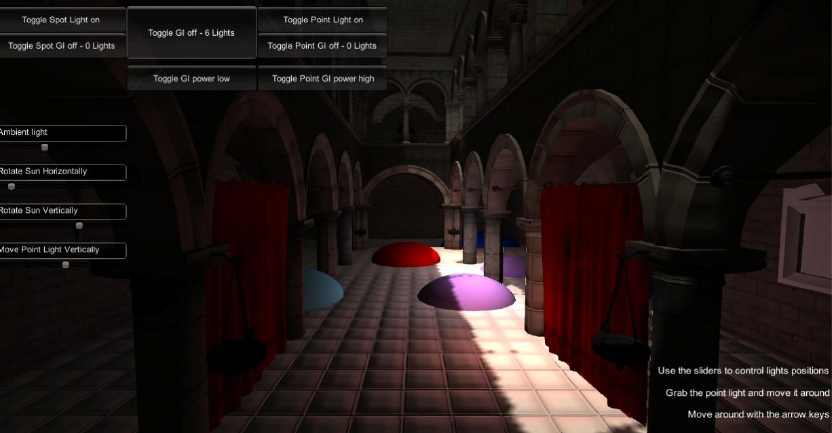
Global Illumination Proxy System
This is a pack devoted to Dynamic Global Illumination approximation through a number of
unique techniques. The goal is to emulate a one bounce GI result with as little overhead as
possible and with easy setup.
Instructions
In order to use the GI Proxy, the user must add the “LightCollisionsPDM” script to the
gameobject that holds the light that will cast Indirect Illumination. All three light types are
supported (point, spot and directional lights).
The point light should always be at the grid mode. The spot light supports non grid mode (it
will be upgraded with grid in later versions).
Global illumination basic setup
The script will start casting point lights depending on the source light and its orientation and
placement in space. The options to control the creation and destruction of the bounce lights
are described below.
Point light options:
Second Bounce (v1.5): Enable 2ond light bounces. These will get their attributes from “Point
Light Radius 2” parameter and will use a proportion of the main light bounce intensity. The
direction of raycasting are determined by the “Hor Directions” and “Ver direction”
parameters.
Not important 2ond (v1.5): Make 2ond bounces render mode “not important”, for extra
performance gain when needed.
Use light sampling: Look at near lights when creating a bounce light, register the target
color required based on ray cast hit surface color and other lights color and assign the lerp
color with the bounced light as initial value for the light color. Then lerp from the mixed
color to the target color. Use when few lights are needed to smooth out color grading.
Sampling distance: Maximum distance to use when looking for near lights for the sampling.
Use grid: Use a grid to ray cast from the source. Use in directional and point lights. The grid
is parallel to the ground in directional light source, expanded in X and Z dimensions.
Max positions: Max number of positions to use in the grid.
Extend X: Scale the grid along the X axis. Use for directional light grid.
Extend Y: Scale the grid along the Y (or Z) axis. Use for directional light grid.
Go random: Randomize grid positions. Use for special effects only.
Horizontal Directions: Use to define grid density for point light source.
Vertical Directions: Use to define grid density for point light source.
Point light radius: Radius around the point light to cast bounce lights.
Point Light Radius 2 (v1.5): Define 2ond bounce lights radius.
Update color distance: Distance at which the color of the already registered bounced lights
(from the point light source) will be updated, by casting a ray from source to each light to
grab a possible surface color change.
Follow mode:
Follow hero: Use to make ray casts follow the hero. Setup the initial position in front of the
initial hero position and set the grid in an area around the hero. The ray casts will always
target the area in front of the hero. Note that the light source has to intersect a surface in
order to create the rays to ray cast with, even though the actual ray cast may be moved
afterwards.
HERO: The hero gameobject.
Hero offset: Offset of grid from the hero position.
Bounce Light creation control:
Divide initial intensity: Amount by which the targeted “Bounce Intensity” for the created
bounce light is divided initially. Use to balance initial light creation intensity depending on
the distance between created lights defined in “Minimum Density Distance” parameter.
Bounce intensity: Target intensity for created Bounce Lights. The speed this intensity is
reached depends on the “Divide initial intensity” and “Appear Speed” parameters.
Bounce Range: Bounce light range.
Degrade speed: Speed at which each a bounce light will degrade until it disappears. The
degrade starts when a light passes over one of the distance checks against last bounced
light, last main ray hit and distances to the light source and the main camera.
Appear Speed: The speed at which a bounced light reaches its target Bounce Intensity.
Min distance to last light: Degrade bounce light if distance to last registered light greater
than this value.
Min distance to source: Degrade bounce light if its distance to the source light is greater
than this value.
Min density distance: The minimum distance to all the already registered bounce lights a
ray cast resulting hit position must have in order to register a new bounce light. Use to
control light density.
Enable follow: Make already registered lights follow the last ray cast hit. Use when grid
option is off or for special effects.
Follow distance: The minimum distance of the bounce light to the ray cast hit to start
following it.
Follow speed: The speed used when following the last ray cast hit position.
Bounce color: Use when “get hit color” option is off to custom color the bounce lights. If
“mix colors” is on, it will mix with the source light color.
Jitter directional: Add jitter to the light position. Use only for special effects and when small
updates are needed in ray casting.
Bound up down: The jitter amount.
HDR drop speed: If the “Appear” parameter is set very high, the intensity of the light may go
beyond the Bounce Intensity parameter. Use this value (must be above 0 to be enabled) to
let the extra intensity drop to the target one. Use to emulate HDR effects.
Get hit color: Bounce light will be colored by the color parameter of the surface hit by the
source light. Note that the material needs to have a “_Color” parameter.
Get texture color: Bounce light will be colored by the color of the texture where the ray
cast hits. Texture must have Read/Write option enabled. Note that the material needs to
have a “_MainTex” parameter, otherwise will revert to the surface color (if it has “_Color”
parameter) and if not to the source light color.
Mix colors: Use to lerp to the ray cast hit color, from the source light (when …) or the
current light color.
Dynamic update colors: For each ray cast hit, check near lights and update their color. Use
to handle dynamic color changes or moving objects.
Color change speed: The speed of color transitions.
Soften color change: Multiply the above speed with delta time.
Use light color: Lerp uses source light color as initial value for bounce lights.
Debug on: Show ray casts that are used to register the bounce lights in the scene.
Debug 2ond (v1.5): Show ray casts that are used to register the 2ond bounce lights in the
scene.
Add only when seen: If a ray cast to the bounce light target position from the camera
returns a hit closer to the camera than the camera-hit point distance, bounce light wont be
registered. Use in order to avoid registering lights that are hidden behind objects in front of
the camera.
Close to camera: Use close to camera check, degrade bounce lights beyond the distance
defined in “Min distance to camera” parameter.
Min distance to camera: Degrade bounce lights beyond this distance, if the above
parameter is used.
Max hit – light distance: Use to make lights follow the source light. Degrade registered
bounce lights beyond that distance to the last ray cast hit.
Give offset: Offset bounce lights from the ray cast hit position.
Placement offset: Offset in Y axis.
Origin at projector: Use the “Projector OBJ” as source light position.
Projector OBJ: Object to use as projector.
Light pool: The gameobject to hold the created bounce lights. Must not be parented to any
object (unless lights are required to follow the rotation of an object or the projector – light
source)
Update every: Seconds between ray cast updates.
Use height cutoff: Avoid light creation above a certain height from the hero. Uses “Floor if
no hero” value if no hero is defined.
Cut off height: The height above which bounce lights do not get created.
Floor if no hero: Floor to check height cut off distance from, if no hero is assigned to the
script.
Jove Lights (v1.5): Enable Jove lights, this will inject a script to every bounce light, that will
disable it and insert a Jove point light in its place. Then this light will be updated by the
injected script based on the changes to the Unity point light. The injected script is named
“Control_Jove_light” and all its commented lines should be enabled in order to work, plus
the Jove namespace should be added in the “using” statements.
Grab sky light (v1.5): Use IBL influence from the sky texture (must be set to “advanced” and
read/write on), sky must have a collider.
Rotate grid (v1.5): Option to rotate the grid based on the Projector or light rotation.
Sky influence (v1.5): The amount of sky color to add to the Global Illumination.
Sky (v1.5): Sky object, the check is done by name, so every other object with the same name
and a collider will contribute to the sky color.
Offset on normal (v1.5): Offset lights along the normal vector of the hit position.
Cut below height (v1.6): Check to disable GI lights after the sun goes down.
Cut height (v1.6): Height in world coordinates of GI source light, below which the GI is
disabled.
TIPS:
There are prefabs to use for a clean setup. Place the required prefab in the scene and
change it based on the scale of the scene.
For the dun light (directional), if hero follow mode is needed (this applies to the sun only),
drag the hero from the scene to the script parameter.
If the hero is instantiated, he must be added through scripting. There is a commented line of
code where the hero should be declared in code, make sure to leave the parameter blank in
the editor, so it gets the hero transform from the code.
For the spot light, the system has to be parented to the hero prefab (or the hero in the
scene) and move it to the desired location on the hero.
The point light prefab can be used in any way, it can be attach to the hero or dragged it with
the Drag Transform script.
Hero mode details:
For the hero follow mode, it is desirable to have the lights hit in front of the hero and play
with the "offset" parameter to define the exact placement.
To see where lights hit, enable the debug option(s) in the script inspector and the "gizmo"
option in the Unity editor, hit play and then go to scene mode and see where raycasts hit
and play with offset until the grid is near or around the hero. Then keep these values, exit
play mode and insert them in the offset parameter in the script, so you can start with the
lights hit in front of your hero, then the raycasts will follow the transform of the hero as he
moves around (make sure the hero follow option is enabled too)
Some more things to consider:
- The raycasts will hit any collider, or pass through objects without colliders, so if you see
lights in the middle of a shadow, it may have passed through a missing collider in the object
that casts the shadow .
- There is a parameter to cut off lights registered way above the hero in Y axis, for example
use this in the atrium scene to cut back the lights that may register in the roof. This
threshold is in relation to the hero, so will cut light above a certain height from the hero,
thus the hero can move in Y axis and the system will still work.
- The sun should also reposition itself to follow the light rotation, this will make sure the
raycasts are directed correctly in relation to the gameobjects in the scene. Take care of the
distance to source parameter in this case, since lights wont register if further away than this
threshold from the source light.
- The hero follow mode main function is to keep the lights hitting in the initial grid in front of
the hero, even if the light rotates, so a rotation will redirect the raycasts always in front of
the hero.