SM26043 LQD Mini Shot M Spec Manual_V2_PRINT Manual V2 PRINT
User Manual: Pdf SM26043 SM26043-LQD MiniShot M-Spec Manual_V2_PRINT
Open the PDF directly: View PDF ![]() .
.
Page Count: 18
USER MANUALUSER MANUAL
MINI SHOT M-SPEC
REFLEX SIGHT MINI SHOT M-SPEC LQD
REFLEX SIGHT
SM26043 SM26043-LQD

While Sightmark’s MAKE YOUR MARK tagline perfectly illustrates our mission to provide
uncompromising accuracy in virtually any environment, to us, those three words mean quite a bit
more.
MAKE YOUR MARK represents our commitment; rst, to those who serve; second, to our Constitutional
right to bear arms, the right ensuring all others remain intact; and nally, every single professional
and recreational shooting enthusiast embracing and sharing our Pro-2nd Amendment lifestyle.
MAKE YOUR MARK also symbolizes our desire to build more than a brand people know they can trust.
It represents our higher calling to build an honorable, unapologetic legacy, truly appreciative of the
fabric of a free society to pass on to future generations. Only accomplishing the latter truly embodies
the gravity of what MAKE YOUR MARK means to us.
In the spirit of gratitude for those who preserve freedom as we know it to be, MAKE YOUR MARK is a
call to action. One we take seriously when it comes to developing products worthy of our brand…
and our lifetime warranty. The same brand countless professionals rely upon for performance in the
best… and most assuredly, worst of times.
ABOUT SIGHTMARK®

FEATURES:
• Locking quick detach mount*
• 100% waterproof and dustproof
• Extremely low power consumption
• Windage and elevation click adjustments
• 3 MOA red dot reticle
• 10 reticle brightness levels
• Ambidextrous digital switch brightness controls
• Steel protective shield
• 12 hour auto shut o
• Advanced, parallax free lens design *
available with the LQD model only
MINI SHOT M-SPEC SERIES
INCLUDED:
• Rubber cover
• Low prole and AR riser mounts
• Batteries
• Limited Lifetime Warranty
1
Designed to be used on shotguns, pistols and AR’s, the compact Mini Shot M-Spec Series is a
rugged reex sight with a 3 MOA red dot reticle. The sight includes both a low prole mount and
a riser mount. Built from durable aluminum housing with a steel protective hood, the Mini M-Spec
features an IP67 waterproof rating, making it ideal for law enforcement missions and hunting in the
elements. The M-Spec also boasts extremely low power consumption technology, 1 MOA windage
and elevation click adjustments, 10 brightness levels, an ambidextrous digital on switch and a 3
MOA reticle with 12 hour auto shut o.
• Rugged, lightweight aluminum alloy housing
• Scratch resistant lens coating

2
Technical Specications: SM26043 SM26043-LQD
Magnication (x) 1 1
Objective (mm) 21x15 21x15
Eye relief Unlimited Unlimited
Coating Fully Multicoated
AR red
Fully Multicoated
AR red
IP Standard (water rating) IP67 - Submergible
to 1m
IP67 - Submergible
to 1m
Reticle 3 MOA dot 3 MOA dot
MOA adjustment (1 click) 1 1
Battery type CR1632 CR1632
Battery life (hour) 300-30,000 300-30,000
Brightness settings 1-10 and “o” 1-10 and “o”
Max recoil (caliber) up to .375 H&H up to .308
Body material Aluminum - 6061 Aluminum - 6061
Mount type Weaver/Picatinny Weaver/Picatinny
Operating temperature (°F) -22 to 122 -22 to 122
Dimensions (in) 1.73x1.14x2.2 1.73x1.14x2.2
Weight (oz) 3 3.4
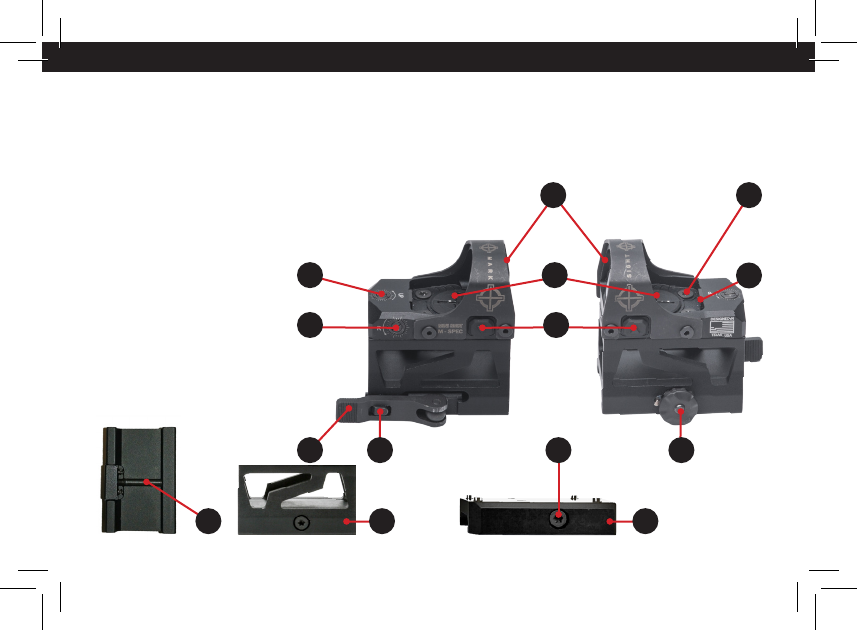
1. Objective lens
2. Elevation adjustment
3. Windage adjustment
4. Battery cap
5. On/o buttons
6. Quick detach lever (SM26043-LQD only)
7. Locking tab (SM26043-LQD only)
8. Tension nut (SM26043-LQD only)
9. Mounting screw (SM26043 only)
10. Assembly screws
11. LED aperture
12. Recoil bolt
13. AR riser mount
14. Low prole mount
DIAGRAM
3
110
11
2 4
3
6
1312
7 9 8
14
5

4
INSTALLING THE BATTERY
ON/OFF ACTIVATION
BRIGHTNESS CONTROLS
The Sightmark Mini Shot M-Spec is powered by a single CR1632 battery. Should the reticle illumina-
tion grow dim or fail to illuminate, the battery needs to be replaced.
To install a new battery:
1. Unscrew the battery cap (4) counterclockwise.
2. Insert the new battery into the battery compartment with the positive side facing up.
3. Screw the battery cap on clockwise until rmly secure. Do not over tighten.
To turn the unit on:
1. Press and release on/o buttons marked with an up or down arrow on the brightness controls (7).
To turn the unit o:
1. Press and hold the down arrow for ve seconds.
Note: The unit will automatically shut o after 12 hours to save battery life.
The Mini Shot M-Spec oers 10 brightness settings. Settings 1 through 3 are best for low light such as dusk
or dark indoor environments. Settings 4 through 7 are best for environments with mid-level brightness
such as normal indoor lighting or cloudy outdoor environment. Settings 8 through 10 are best for very
bright, sunny outdoor environments.
INSTALLING THE BATTERY
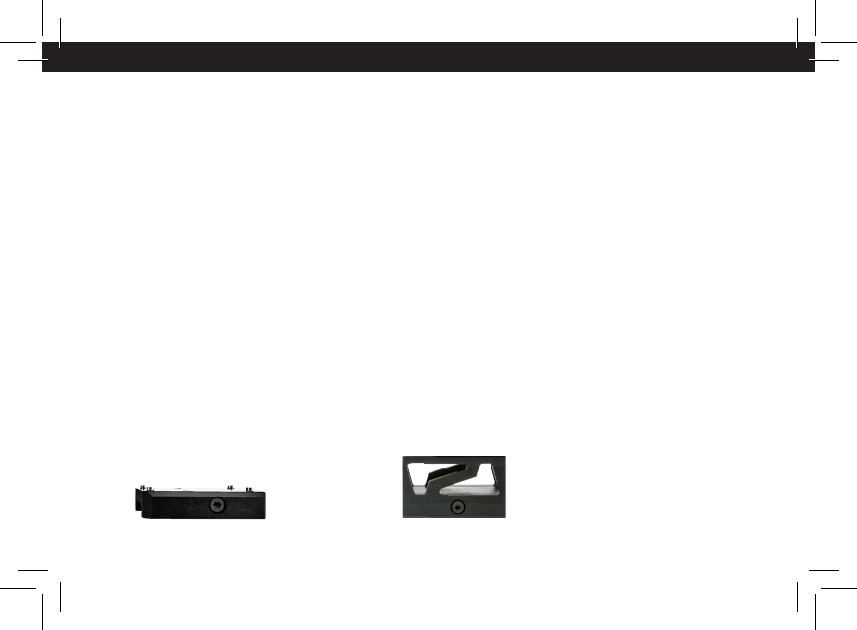
MOUNT TYPE
The Sightmark Mini Sight M-Spec includes a low prole mount (14) and AR riser mount
(13) for absolute co-witness. If mounting on a bolt action hunting rie or shotgun,
the low prole mount (14) is recommended. If mounting on at top AR-15 rie, it is
recommended the AR riser mount (13) be installed for an absolute co-witness with
iron sights.
To remove the base:
1. Use the included torx key to loosen and unscrew the two assembly screws (10) attaching the sight to
the mount.
2. Separate the sight from the mount.
3. Select the desired mount to attach the sight to.
4. For a semi-permanent xture, a small amount of blue Loctite® may be applied to the threading of the
two assembly screws. Tighten and secure the two screws by applying 20 inch pounds of torque. Do
not overtighten.
5
LOW PROFILE MOUNT AR RISER MOUNT
To adjust the brightness:
1. Press the appropriate up or down arrow to adjust the brightness of the dot.
2. To increase brightness press the up arrow.
3. To decrease brightness press the down arrow.
Note: The last brightness setting used prior to deactivation will be the same setting next time the unit is activated.

6
MOUNTING
The Mini Shot M-Spec is designed to mount to both weaver and picatinny rails. For safety, it is best to
have at least three to four inches of eye relief.
To mount SM26043:
1. Loosen the mounting screw (9) on the mount. Attach the Mini Shot M-Spec to the rearm’s rail with
the objective lens (1) facing toward the muzzle.
2. Make sure the recoil bolt (12) is positioned in the groove of the rail and the unit is fully seated on the
rail.
3. Tighten the hex nut to 35 to 45 in/lbs of torque using the included hex wrench. Do not overtighten.
To mount SM26043-LQD:
The Mini Shot M-Spec LQD model includes a locking, quick detach mount. To mount the Mini Shot to a
rearm, position the sight so the objective lens (1) faces the muzzle.
1. To loosen the mount, press forward on the locking tab (7) located on the quick detach lever (6). Once
the tab is pressed forward, open the lever.
2. Attach the Mini Shot to the rearm’s rail. Make sure the recoil bolt (12) is positioned in the groove of
the rail.
3. Make sure the Mini Shot is properly engaged with the rearm’s base and close the lever. Press down
until the lever is engaged in the locked position. A click sound will be heard once locked in position.
4. Check that the weapon sight is tightly secured in position and is not shifting forward or backward. If
the mount is too loose the sight will not hold zero. To prevent this, the mount must be tightened.
5. To adjust tension on the mount, remove the sight from the rearm. Leave the levers in the open posi-
tion and the mount loose.

The Mini Shot M-Spec is compatible with optic ready pistols such as the S&W® M&P® Core® and Glock
® MOS pistols. It can also be installed on specic handgun models with the purchase of Sightmark
pistol mount accessories.
Pistol mount bases include:
• Beretta® for models 92/96/90-TWO
• 1911 Standard
• Glock® with standard frame (1.18” width)
• Sig Sauer® P226
• Springeld® XD models
• Smith & Wesson ® M&P models
• HK® USP
7
6. On the opposite side of the levers are tension nuts (8). To tighten or loosen the mount, rotate the nut.
Clockwise rotation of the tension nut will increase tension in the mount and counterclockwise rota-
tion will decrease tension. Mount the sight to the rail again to conrm the sight is securely mounted.

MOUNTING (CONTINUED)
To install the Mini Shot M-Spec onto a pistol using a Sightmark pistol mount base please read the following
instructions. It is recommended to use a qualied gunsmith to remove the rear sight from your handgun.
Using improper tools or improvised removal methods can damage your pistol.
Once the rear sight is removed:
1. Remove the pistol mount base and dovetail piece from the packaging.
2. Insert the dovetail piece into the slot where the rear sight was installed.
3. Next, the mount base is placed on top of the slide over the dovetail. Secure the two Philips screws by
applying 20 inch pounds of torque. Once tightened the dovetail and baseplate will provide a press t.
For a semi-permanent xture a small amount of blue Loctite® may be applied to the threading of the
two screws.
4. The Mini Shot is then placed on the mount base. The four holes on the bottom of the Mini Shot will
align with the four pins on the mount base.
5. Secure the Mini Shot to the mount base using the two hex screws that were included with your
pistol mount base. Secure the two Philips screws by applying 20 inch pounds of torque. For a semi-
permanent xture a small amount of blue Loctite® may be applied to the threading of the two screws.
OPERATING THE WINDAGE AND ELEVATION ADJUSTMENTS
The Sightmark Mini Shot M-Spec has built-in windage and elevation adjustments (2, 3) with audible
clicks. The Mini Shot has 1 MOA clicks so each click moves the point of impact 1” at 100 yards, ½” at
50 yards, and ¼” at 25 yards.
8

BORESIGHTING and SIGHTING IN
Boresighting and test ring should be performed safely on a ring range. Laser boresights are a quick
and accurate method for sighting in. Below is listed the traditional method of boresighting and works
best when the unit is mounted on a rest.
1. When mounting the sight on a bolt action rie, remove the bolt; or when mounting to a semi-
automatic rie, disassemble the rie until there is a straight line of sight through the bore.
2. Use a target at least twenty yards to fty yards away when sighting in the sight. Look through the
bore of the weapon and locate the bull’s-eye of the target.
3. Sight in the target through the bore and then make windage and elevation adjustments (see
“Operating Windage and Elevation Adjustments” for instructions) to the red dot until the reticle is
centered on the bull’s-eye.
9
In order to make windage and elevation adjustments:
1. Use a athead screwdriver to make adjustments or “clicks”.
2. Turn the adjustments in the appropriate direction needed to change the point-of-impact as indicated
by the “UP” and “R” (left) arrows marked on the adjustments.
3. For elevation adjustment, turn the adjustment counter-clockwise to adjust the bullet’s point of
impact up. Turn the adjustment clockwise to adjust the bullet’s point of impact down. For windage
adjustments, turn the adjustment counter-clockwise to adjust the bullet’s point of impact right. Turn
the adjustment clockwise to adjust the bullet’s point of impact left.

BORESIGHTING and SIGHTING IN (CONTINUED)
To verify the riescope is accurately sighted in, always re a three-shot test group at 50 or 100 yards
preferably using the same ammo manufacturer, grain, and lot number.
4. After ring a group use the center of this grouping and make the necessary amount of adjustments to
the elevation and windage adjustments to move your rearm’s grouping to the center of the target.
5. Again re a three -shot test group to conrm the adjustments. Use the center of the new group to determine
nal adjustments.
MAINTENANCE
Proper maintenance of the Sightmark Mini Shot M-Spec is recommended to ensure longevity. It is
recommended that when the sight becomes dirty that it is wiped down with a dry or slightly damp cloth.
Blow dirt and debris o all optics and then clean lenses with a lens cleaning cloth. To remove oils or dried
water spots, apply a small amount of denatured alcohol to a lens cloth or cotton swab. Clean the surface of
the lens and let dry. Finally use your breath to clean the lens once more. No further maintenance is required.
Do not attempt to disassemble any components of the sight.
STORAGE
Make sure that your Sightmark Mini Shot M-Spec is securely attached to your rie before storing, and be
sure that the reticle illumination is turned o. Cover with the included rubber cover. Remove the battery if
the unit will be stored for an extended period of time.
10

MAINTENANCE
STORAGE
11
WARNING
Before handling the Sightmark Mini Shot M-Spec sight read and understand the contents of your rearm’s
manual, and the Sightmark manual. Follow all standard safety precautions and procedures during rearm
operation, even when the reex sight is not in use.
• Avoid hitting or dropping the unit.
• ALWAYS check that the chamber of your weapon is clear before mounting or dismounting the
reex sight.
• The reticle illumination should be tested during periods of non-use to make sure it is still
operating properly. Failure to follow standard rearm safety precautions and procedures, as
well as the above warnings, is dangerous and may result in serious injury, damage to property,
or death.
TROUBLESHOOTING
Proper authorization is required before shipping any product back to Sightmark. Failure to obtain
authorization could result in your product being returned to the wrong address, lost, or damaged.
Sightmark is not liable for products returned without authorization.
If the Mini Shot does not hold zero:
1. Verify the sight is mounted securely to the rie. If the sight can be shifted in any direction, re-tighten
the mount according to the mounting instructions but do not over tighten. The sight will need to be
re-zeroed afterwards.
2. Be sure to use factory-loaded ammunition of the same bullet type, weight, and, preferably lot number
when sighting in.

The reticle does not illuminate:
1. Check that the battery is in working order and that the polarity of the battery is correct.
2. Check that there is no residue, lm, or corrosion on the battery contacts that may be preventing the reticle
from illuminating.
The reticle is blurry and not in focus:
1. Decrease the brightness level of the reticle. The halo or fuzzy appearance is caused by excess
illumination than is required for the current environment the sight is being used in.
2. Make sure the eyepiece lens is clean and does not have any lm, ngerprints, or debris covering the
surface. Blow o any debris or dirt covering the lens. Use a lens cloth or q-tip dipped in alcohol to
remove any lm or ngerprints.
3. If you are testing the product at a close range, 5 yards or less, to verify its on/o operation the eye will
accommodate and focus either on the sight’s reticle or the target you are observing not both. Test
the product beyond 5 yards and focus your eye on the target, then the reticle and target should be
in focus.
The reticle illumination turns o while ring:
1. Tighten the battery cap with a coin or athead screw driver so the cap is fully seated.
TROUBLESHOOTING (CONTINUED)
12

SIGHTMARK WARRANTY
ADDITIONAL LANGUAGES
Please visit www.sightmark.com for warranty details and information.
Please visit www.sightmark.com for additional languages of this manual. 13

NOTES

NOTES

www.sightmark.com
