SPLNPROC Word 2010 2016 Technical Instructions New
SPLNPROC%20Word%202010-2016%20Technical%20Instructions
SPLNPROC%20Word%202010-2016%20Technical%20Instructions
SPLNPROC%20Word%202010-2016%20Technical%20Instructions
SPLNPROC%20Word%202010-2016%20Technical%20Instructions
SPLNPROC%20Word%202010-2016%20Technical%20Instructions
User Manual: Pdf
Open the PDF directly: View PDF ![]() .
.
Page Count: 9

Instructions for Using the Microsoft Word 2010–2016
Proceedings Paper Template
1 Working with the Document Template
1.1 General Information
The template, splnproc1702.docm, has been designed for authors preparing a paper to
be published in one of Springer’s proceedings series. The template supports Word
2010 and newer. As Word for Mac 2016 does not yet support all features provided in
Word 2010-2016 for Windows, a special template version splnproc1702_mac.docm is
provided for Mac users.
Predefined style formats are available for all the necessary structures to be included
in the manuscript, and these formats can be quickly accessed using a custom ribbon
tab provided with the template.
For a detailed description of how to prepare your text, illustrations, and references,
see the Springer Guidelines for Authors of Proceedings.
Please note that the template is provided as a sample document (.docm),
while earlier versions came in the Microsoft Word template format (.dotm).
Authors who prefer to work with templates in the .dotm format can request this for-
mat from our editorial as well.
1.2 How to Style Your Paper
If you have not yet started to write your paper, simply open the document
splnproc1702.docm and overwrite its sample contents with your data. Use the buttons
of the template’s custom ribbon to format additional elements.
If you use copy & paste to transfer content from another document to the template,
please note that the original formatting of the pasted text will usually be retained. It
will not be automatically adjusted to the template’s predefined styles. In this case
you should select the pasted paragraphs and use the built-in macros to format them
according to the Springer standard.
Finally name the document with your name and a short form of the title (e.g.,
Smith_TitleOfMyPaper.doc).
1.3 Activate the Macros
The activation of the template’s custom ribbon and macros depends on the security
settings on your individual system. If you encounter problems in activating the mac-
ros, please check https://support.office.com/en-us/article/Enable-or-disable-macros-in-
Office-files-12b036f-d140-4e74-b45e-16fed1a7e5c6 or the documentation of the
Microsoft Word version you are using.
2 Using the Microsoft Word 2010–2016 Proceedings Paper Template
2 What the Ribbon’s Commands Do
The ‘Springer Proceedings Macros’ ribbon mainly consists of buttons for the available
style elements in the template. All commands are applied to the highlighted text. If no
text is highlighted, the selected style will be assigned to the paragraph that currently
has the cursor in it.
We recommend that you first enter your text and then click the required button. For
example, if you have just typed your affiliation and you are going to continue with
writing your abstract, do not click ‘Abstract’ before having started a new paragraph.
Otherwise the abstract format will be applied to the address information, where the
cursor is still positioned.
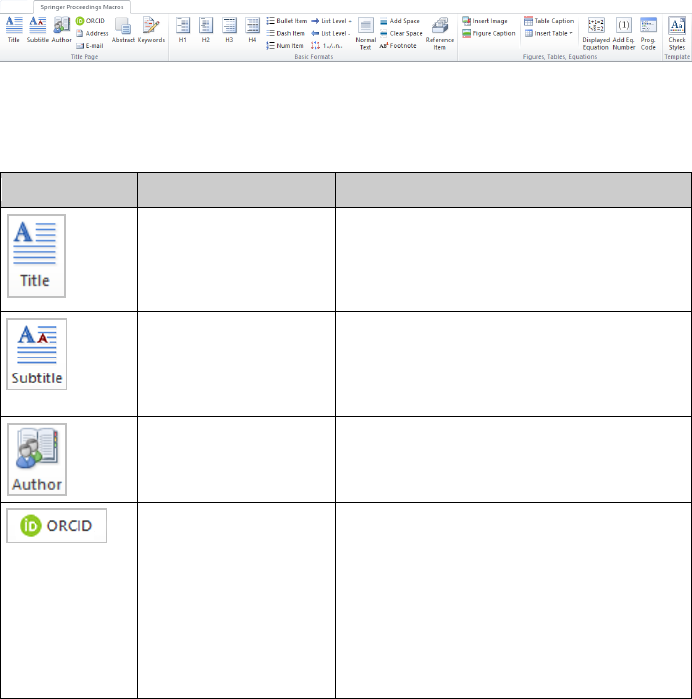
The descriptions below show you how the ribbon buttons work in detail.
Fig. 1. Custom ribbon ‘Springer Proceedings Macros’
2.1 How to Format the Header of Your Paper
Button Effect Description
Formats the
contribution title
This button does not work if more than one
paragraph is selected.
If a subtitle follows the title, the space after
the paragraph is adjusted automatically.
Formats a
contribution subtitle
This button does not work if more than one
paragraph is selected.
The spacing between the title and the subtitle
is adjusted automatically.
Formats the
authors’ names
This button does not work if more than one
paragraph is selected.
Formats ORCID ids The current text selection is formatted as
superscript.
This button also checks for the correct syntax
of the ORCID id ‘[0000-1111-2222-3333]’.
Please note that ORCID ids will not be
printed. In the eBook version, they will be
replaced by a symbol that is hyperlinked to
the related ORCID profile.
Using the Microsoft Word 2010–2016 Proceedings Paper Template 3
Formats affiliation and
address information
This button sets the paragraph format for any
affiliation information including e-mail ad-
dresses and URLs.
The font of e-mail addresses and URLs can
be adjusted by using the ‘Email/URL’ button.
Formats e-mail addresses
and URLs
This button changes the font of the current
text selection to a typewriter font.
If no text is selected, the word next to the
current cursor position is formatted with the
typewriter font.
Formats the abstract In addition to applying the appropriate para-
graph format, the word ‘Abstract’ is added at
the beginning of the first paragraph.
Formats the keywords This button does not work if more than one
paragraph is selected.
The word ‘Keywords’ is added at the begin-
ning of the paragraph if not yet present.
2.2 How to Format Headings
Button Effect Description
Formats a level 1 heading
(numbered section
heading)
If you want to create a heading without a
number, e.g., ‘References’, simply place the
cursor at the beginning of the text and press
the backspace key [←].
Formats a level 2 heading
(numbered subsection
heading)
If you want to create a heading without a
number, simply place the cursor at the be-
ginning of the text and press the backspace
key [←].
Formats a level 3 heading
(bold run-in heading)
If applied to selected text:
The selection is formatted as bold run-in
heading.
If applied to a paragraph:
The first sentence, i.e., up to the first period, is
formatted in bold font style as run-in heading.
If applied to an empty paragraph:
Bold font style is applied to any text then
typed in. Once you have finished the heading,
you should press the ‘Normal Text’ button to
reset the character style to normal text again.

4 Using the Microsoft Word 2010–2016 Proceedings Paper Template
Button Effect Description
Formats a level 4 heading
(italic run-in heading)
If applied to selected text:
The selection is formatted as italic run-in
heading.
If applied to a paragraph:
The first sentence, i.e., up to the first period, is
formatted in italic font style as run-in heading.
If applied to an empty paragraph:
Italic font style is applied to any text then
typed in. Once you have finished the heading,
you should press the ‘Normal Text’ button to
reset the character style to normal text again.
2.3 How to Create Lists
Button Effect Description
Creates an unnumbered
list with bullet items/dash
items on the 1st level
This button applies a complete itemization
scheme with multiple levels.
The only difference between the two buttons
is that one starts with bullets and continues
with dashes on the 2nd level, while the other
starts with dashes and continues with bullets
on the 2nd level.
Use the ‘list level’ buttons to set the levels
and indents for nested lists.
Vertical space will only be added before and
after a list. The spacing is adjusted automati-
cally if you select a complete block of elements
before clicking on one of the list buttons.
Creates a numbered list
with Arabic numerals on
its 1st level
Contains a numbering scheme with multiple
levels. The 2nd level uses alphabetic charac-
ters, the 3rd level uses lower case Roman
numerals, and so on.
Use the ‘list level’ buttons to set the levels
and indents of nested lists.
Vertical space will only be added before and
after a list. The spacing is adjusted automati-
cally if you select a complete block of elements
before clicking on one of the list buttons.
Restarts or continues a
numbered list
Only works for numbered lists.
If more than one paragraph is selected, the
button only applies to the first paragraph.
Using the Microsoft Word 2010–2016 Proceedings Paper Template 5
Increases the level of an
existing numbered or
unnumbered list
(increases the
indentation)
Only works for text that has already been
formatted with one of the ‘Bullet item,’ ‘Dash
item,’ or ‘Num item’ buttons before.
Please only use this button with nested lists.
If you want to create, e.g., a numbered list
with bulleted subitems, you should first select
all items and click on the ‘Num item’ button.
Then select the subitems and hit the ‘Dash
item’ button. Finally, apply ‘List level up’ to
the subitems. The indentation will be shifted
to the next level and the dashes will be con-
verted to bullets since bullets represent the
second level of the ‘Dash item’ list template.
Decreases the level of an
existing numbered or
unnumbered list
(decreases the
indentation)
Only works for text that has already been
formatted with one of the ‘Bullet item,’ ‘Dash
item,’ or ‘Num item’ buttons and has been
shifted to a higher level.
Please only use this button with nested lists.
2.4 How to Format Text and Paragraphs
Button Effect Description
Formats normal text Depending on the current selection, this but-
ton either applies the default font or it applies
the default paragraph format:
If an entire paragraph (or nothing) is selected,
and the underlying format is different from the
standard paragraph format: The standard
paragraph format is applied to the selection.
If an entire paragraph (or nothing) is selected,
and the underlying format is already the
standard paragraph format: The standard
character style is applied to the selection.
If text is selected that does not follow the
default character style: The standard charac-
ter style is applied to the selection.
If text is selected that already follows the
default character style: The standard para-
graph format is applied to the selection.
If you want to apply the standard paragraph
format and remove a nonstandard character
style, simply click on the button twice.
Please note that standard paragraphs are not
indented after headings, captions, lists, etc., but
they have a first-line indent in all other cases.
6 Using the Microsoft Word 2010–2016 Proceedings Paper Template
Button Effect Description
Inserts vertical space This button adds 6 pt (2.1 mm) of vertical
space before the selected paragraph.
Removes space before
and after the current
selection
This button clears any vertical space before
and after the selected text.
If space remains after the button has been
clicked, please check the preceding and/or the
following paragraphs for their settings.
Inserts a footnote This button inserts a footnote at the current
cursor position.
For remarks to the contribution title, the
footnote character is automatically changed
to a symbol (instead of a number).
Formats a reference entry This command helps you format numbered
reference lists.
The hanging indent of the reference items is
automatically adjusted based on the total
number of references.
If you prefer unnumbered references, simply
place the cursor at the beginning of each ref-
erence item and press the backspace key [←]
to remove the number.
2.5 How to Format Special Elements of Your Paper
Button Effect Description
Inserts an image from
an external file
The image is always placed in an empty
paragraph.
If the cursor is not in an empty paragraph
when clicking on this button, a new para-
graph is added after the current one, and
the image is inserted there.
Formats a figure caption In addition to applying the appropriate
paragraph format, ‘Fig. [X]’ is added at
the beginning of the paragraph ([X] is an
automatic counter that is updated whenev-
er the document is opened).
This macro does not work if more than
one paragraph is selected.
If the caption runs over multiple lines the
paragraph alignment is automatically
switched to justified.
Using the Microsoft Word 2010–2016 Proceedings Paper Template 7
Button Effect Description
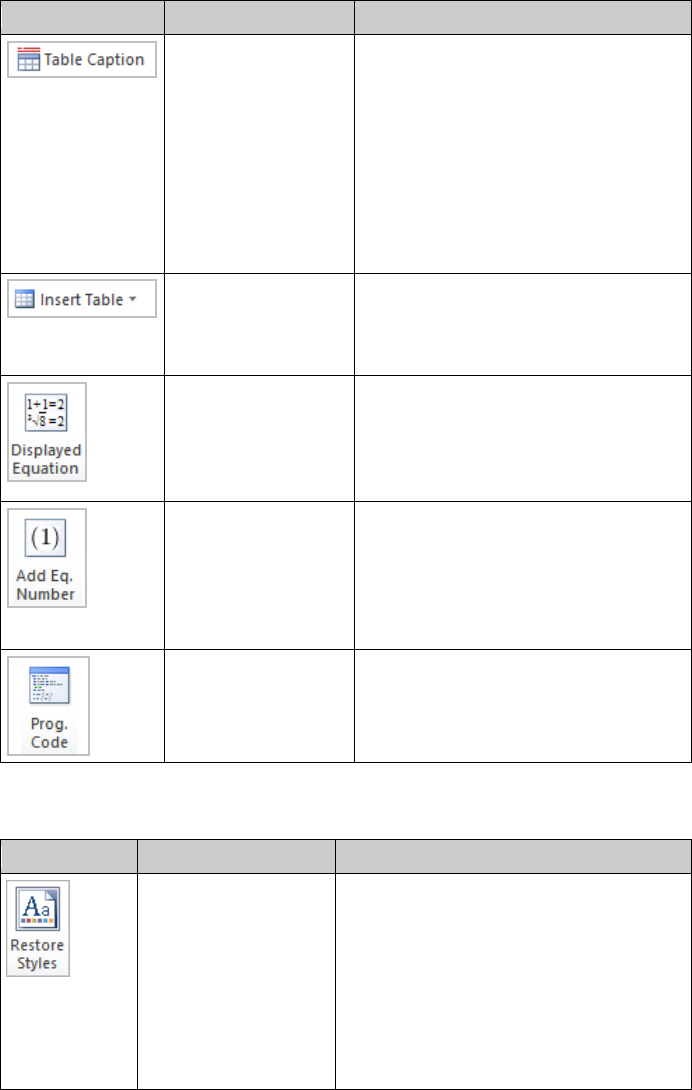
Formats a table caption In addition to applying the appropriate
paragraph format, ‘Table [X]’ is added at
the beginning of the paragraph ([X] is an
automatic counter that is updated whenev-
er the document is opened).
This macro does not work if more than
one paragraph is selected.
If the caption runs over multiple lines, the
paragraph alignment is automatically
switched to justified.
Inserts a table This dropdown button provides the same
functionality as Microsoft Word’s genuine
table button that can be found on the
‘Insert’ ribbon.
Formats a displayed
equation
Displayed equations are always centered
between the text margins.
If you want to align the equal sign in
multiline displays, please use the align-
ment feature of the equation editor.
Adds an equation num-
ber to a displayed equa-
tion
This button only works if the selected
paragraph has already been formatted
with the ‘Equation’ button.
The automatic counter that is inserted in
the right margin is updated whenever the
document is opened.
Formats program list-
ings and command
sequences
Please note that the paragraph format
includes tabulators every 4 mm that can
help you adjust the indentation of code
blocks.
2.6 How to Restore the Template Styles
Button Effect Description
Checks the template and
restores all predefined
styles
If the original template styles were altered or
are not available anymore, you can restore
them by clicking this button. Individual for-
matting will be retained.
Please note that some special spacing, i.e.
between level 1 and level 2 headings or be-
tween unnumbered or numbered items,
might be lost. It can be restored by clicking
the related formatting button(s) again.
8 Using the Microsoft Word 2010–2016 Proceedings Paper Template
3 Frequently Asked Questions
I do not see the ‘Springer Proceedings Macros’ ribbon – what’s the problem?
If you do not see the ‘Springer Proceedings Macros’ ribbon described in this document,
it has probably been deactivated by your current macro security settings.
To read more about the macro security in Microsoft Office and how they are con-
figured, please check the information available at https://support.office.com/en-us/artic-
le/Enable-or-disable-macros-in-Office-files-12b036fd-d140-4e74-b45e-16fed1a7e5c6.
Clicking a formatting button on the ‘Springer Proceedings Macros’ ribbon throws
the error ‘The predefined paragraph/character style … could not be found in the
template’.
The typical reason for this issue is that styles associated with the formatting buttons
were deleted or renamed. You can automatically restore them by clicking the “restore
styles” button (see 2.6).
I have copied text from another document into the template, but it is not or not
fully adjusted to the Springer standard.
There are three possible reasons: First, only formatting styles that already existed in
your original document can be updated by the template. Second, only if those styles
were used in your original document, can adjusting them have a visible effect. Third,
please consider that individual modifications of certain styles are usually retained,
even if the original styles are overwritten by the settings in the template. In all three
cases, you should simply re-apply the appropriate styles using the formatting button
of the ‘Springer Proceedings Macros’ ribbon.
I have formatted a text element by clicking the respective button, but some of
the selected style’s properties were obviously not applied.
There might be a conflict between the underlying paragraph style and some individual
character and paragraph formatting. Most buttons in the ribbon change the underlying
style only and do not generally adjust individual formatting that might be present in
the selected text. Solution: First reset the text formatting by clicking the ‘Normal
Text’ button twice, then apply the desired style.
The automatic numbering of sections and subsections seems to be corrupted.
Please simply apply the H1 and H2 formats to the affected section headings or sub-
section headings once again to correct the numbering.
Using the Microsoft Word 2010–2016 Proceedings Paper Template 9
I would like to use special characters in my text – how should I insert them?
Reformatting running text, in which special characters such as Greek letters have been
entered via the keyboard, can cause these characters to disappear. In order to avoid
this problem, always insert special characters into your document from the menu
point Insert→Symbol. In the Symbol dialog box, select the required character.
March 1, 2017
