Oracle SQL Developer Online Help SQLDeveloper Guide
User Manual: Pdf
Open the PDF directly: View PDF ![]() .
.
Page Count: 156 [warning: Documents this large are best viewed by clicking the View PDF Link!]
- Contents
- Preface
- 1 SQL Developer Concepts and Usage
- 1.1 Installing and Getting Started with SQL Developer
- 1.2 SQL Developer User Interface
- 1.3 Database Objects
- 1.3.1 Database Links (Public and Private)
- 1.3.2 Directories
- 1.3.3 Functions
- 1.3.4 Indexes
- 1.3.5 Materialized Views
- 1.3.6 Materialized View Logs
- 1.3.7 Packages
- 1.3.8 Procedures
- 1.3.9 Recycle Bin
- 1.3.10 Sequences
- 1.3.11 Synonyms (Public and Private)
- 1.3.12 Tables
- 1.3.13 Triggers
- 1.3.14 Types
- 1.3.15 Users (Other Users)
- 1.3.16 Views
- 1.3.17 XML Schemas
- 1.4 Database Connections
- 1.5 Entering and Modifying Data
- 1.6 Running and Debugging Functions and Procedures
- 1.7 Using the SQL Worksheet
- 1.8 Using SQL*Plus
- 1.9 Using Snippets to Insert Code Fragments
- 1.10 Using DB Object Search to Find Database Objects
- 1.11 Reports
- 1.12 SQL Developer Preferences
- 1.13 Location of User-Related Information
- 1.14 Using the Help
- 1.15 For More Information
- 2 Migrating Third-Party Databases
- 2.1 Migration Quick Start
- 2.2 Overview of Migration
- 2.3 Preparing a Migration Plan
- 2.4 Before You Start Migrating: General Information
- 2.5 Before You Start Migrating: Source-Specific Information
- 2.6 Capturing the Source Database
- 2.7 Creating and Customizing the Converted Model
- 2.8 Generating the DDL for the Oracle Schema Objects
- 2.9 Migrating the Data
- 2.10 Testing the Oracle Database
- 2.11 Deploying the Oracle Database
- 2.12 Using Migration Reports
- 2.13 SQL Developer User Interface for Migration
- 3 Tutorial: Creating Objects for a Small Database
- 4 Dialog Boxes for Creating/Editing Objects
- 4.1 Add Extension
- 4.2 Check for Updates
- 4.3 Choose Directory
- 4.4 Create/Edit New Object
- 4.5 Create/Edit/Select Database Connection
- 4.6 Select Connection
- 4.7 Connection Information
- 4.8 No Connection Found
- 4.9 Connection Rename Error
- 4.10 Select Library
- 4.11 Create Library
- 4.12 Excel Import Data
- 4.13 Export/Import Connection Descriptors
- 4.14 Create/Edit Database Link
- 4.15 Create/Edit Index
- 4.16 Create/Edit Materialized View Log
- 4.17 Create PL/SQL Package
- 4.18 Create PL/SQL Subprogram (Function or Procedure)
- 4.19 Create/Edit Sequence
- 4.20 Create SQL File
- 4.21 Create/Edit Synonym
- 4.22 Create Table (quick creation)
- 4.23 Create/Edit Table (with advanced options)
- 4.24 Create Trigger
- 4.25 Create Type (User-Defined)
- 4.26 Create/Edit User
- 4.27 Create/Edit User Defined Report
- 4.28 Create/Edit User Defined Report Folder
- 4.29 Create/Edit View
- 4.30 Create XML Schema
- 4.31 Configure File Type Associations
- 4.32 DDL Panel for Creating or Editing an Object
- 4.33 Debugger - Attach to JPDA
- 4.34 Describe Object Window
- 4.35 Edit Value (Table Column Data)
- 4.36 Enter Bind Values
- 4.37 Export (Selected Objects or Types of Objects)
- 4.38 Export: Advanced Data Filter
- 4.39 Export Error
- 4.40 Export Table Data
- 4.41 External Tools
- 4.42 Create/Edit External Tool
- 4.43 Filter
- 4.44 Insert Macro
- 4.45 Externally Modified Files
- 4.46 Filter Object Types
- 4.47 Filter Schemas
- 4.48 Find/Replace Text
- 4.49 Generate Oracle DDL
- 4.50 Generate Offline Data Move Files
- 4.51 Go to Line Number
- 4.52 Go to Line Number: Error
- 4.53 Load Preset Key Mappings
- 4.54 Modify Value
- 4.55 Data Move Details
- 4.56 Open File
- 4.57 Query Builder
- 4.58 Recent Files
- 4.59 Create Repository
- 4.60 Delete or Truncate Repository
- 4.61 Capture Microsoft Access Exporter XML
- 4.62 Select Current Repository
- 4.63 Run/Debug PL/SQL
- 4.64 Create/Edit Breakpoint
- 4.65 Save/Save As
- 4.66 Save Files
- 4.67 Unable to Save Files
- 4.68 Save Style Settings
- 4.69 Schema Differences
- 4.70 Schema Differences Source or Destination Error
- 4.71 Set Data Mapping
- 4.72 Add/Edit Rule
- 4.73 Set Pause Continue
- 4.74 Sign In (checking for updates)
- 4.75 Single Record View
- 4.76 Save Snippet (User-Defined)
- 4.77 Edit Snippets (User-Defined)
- 4.78 SQL History List
- 4.79 SQL*Plus Location
- 4.80 Unable to Open File
- Index

Oracle® Database
SQL Developer User’s Guide
Release 1.1
B31695-04
September 2007
Provides conceptual and usage information about Oracle
SQL Developer, a graphical tool that enables you to browse,
create, edit, and delete (drop) database objects; run SQL
statements and scripts; edit and debug PL/SQL code;
manipulate and export data; view metadata and data in
third-party databases; and view and create reports.
Oracle Database SQL Developer User’s Guide, Release 1.1
B31695-04
Copyright © 2006, 2007, Oracle. All rights reserved.
Primary Author: Chuck Murray
The Programs (which include both the software and documentation) contain proprietary information; they
are provided under a license agreement containing restrictions on use and disclosure and are also protected
by copyright, patent, and other intellectual and industrial property laws. Reverse engineering, disassembly,
or decompilation of the Programs, except to the extent required to obtain interoperability with other
independently created software or as specified by law, is prohibited.
The information contained in this document is subject to change without notice. If you find any problems in
the documentation, please report them to us in writing. This document is not warranted to be error-free.
Except as may be expressly permitted in your license agreement for these Programs, no part of these
Programs may be reproduced or transmitted in any form or by any means, electronic or mechanical, for any
purpose.
If the Programs are delivered to the United States Government or anyone licensing or using the Programs on
behalf of the United States Government, the following notice is applicable:
U.S. GOVERNMENT RIGHTS Programs, software, databases, and related documentation and technical data
delivered to U.S. Government customers are "commercial computer software" or "commercial technical data"
pursuant to the applicable Federal Acquisition Regulation and agency-specific supplemental regulations. As
such, use, duplication, disclosure, modification, and adaptation of the Programs, including documentation
and technical data, shall be subject to the licensing restrictions set forth in the applicable Oracle license
agreement, and, to the extent applicable, the additional rights set forth in FAR 52.227-19, Commercial
Computer Software--Restricted Rights (June 1987). Oracle USA, Inc., 500 Oracle Parkway, Redwood City, CA
94065.
The Programs are not intended for use in any nuclear, aviation, mass transit, medical, or other inherently
dangerous applications. It shall be the licensee's responsibility to take all appropriate fail-safe, backup,
redundancy and other measures to ensure the safe use of such applications if the Programs are used for such
purposes, and we disclaim liability for any damages caused by such use of the Programs.
Oracle, JD Edwards, PeopleSoft, and Siebel are registered trademarks of Oracle Corporation and/or its
affiliates. Other names may be trademarks of their respective owners.
The Programs may provide links to Web sites and access to content, products, and services from third
parties. Oracle is not responsible for the availability of, or any content provided on, third-party Web sites.
You bear all risks associated with the use of such content. If you choose to purchase any products or services
from a third party, the relationship is directly between you and the third party. Oracle is not responsible for:
(a) the quality of third-party products or services; or (b) fulfilling any of the terms of the agreement with the
third party, including delivery of products or services and warranty obligations related to purchased
products or services. Oracle is not responsible for any loss or damage of any sort that you may incur from
dealing with any third party.

iii
Contents
Preface ................................................................................................................................................................. ix
Audience....................................................................................................................................................... ix
Documentation Accessibility..................................................................................................................... ix
Related Documents ..................................................................................................................................... x
Conventions ................................................................................................................................................. x
Third-Party License Information............................................................................................................... x
1 SQL Developer Concepts and Usage
1.1 Installing and Getting Started with SQL Developer.............................................................. 1-2
1.2 SQL Developer User Interface................................................................................................... 1-2
1.2.1 Menus for SQL Developer.................................................................................................. 1-5
1.3 Database Objects ......................................................................................................................... 1-8
1.3.1 Database Links (Public and Private)................................................................................. 1-8
1.3.2 Directories............................................................................................................................. 1-8
1.3.3 Functions............................................................................................................................... 1-9
1.3.4 Indexes................................................................................................................................... 1-9
1.3.5 Materialized Views.............................................................................................................. 1-9
1.3.6 Materialized View Logs................................................................................................... 1-10
1.3.7 Packages............................................................................................................................. 1-10
1.3.8 Procedures ......................................................................................................................... 1-10
1.3.9 Recycle Bin......................................................................................................................... 1-11
1.3.10 Sequences........................................................................................................................... 1-11
1.3.11 Synonyms (Public and Private) ...................................................................................... 1-11
1.3.12 Tables.................................................................................................................................. 1-11
1.3.13 Triggers .............................................................................................................................. 1-13
1.3.14 Types................................................................................................................................... 1-13
1.3.15 Users (Other Users) .......................................................................................................... 1-13
1.3.16 Views .................................................................................................................................. 1-13
1.3.17 XML Schemas.................................................................................................................... 1-14
1.4 Database Connections ............................................................................................................. 1-14
1.5 Entering and Modifying Data ................................................................................................ 1-15
1.6 Running and Debugging Functions and Procedures ......................................................... 1-16
1.6.1 Remote Debugging........................................................................................................... 1-18
1.7 Using the SQL Worksheet....................................................................................................... 1-19
1.7.1 SQL*Plus Statements Supported and Not Supported in SQL Worksheet................ 1-21
iv
1.7.2 Script Runner..................................................................................................................... 1-22
1.7.3 Execution Plan................................................................................................................... 1-23
1.7.4 Autotrace Pane.................................................................................................................. 1-23
1.7.5 DBMS Output Pane .......................................................................................................... 1-23
1.7.6 OWA Output Pane ........................................................................................................... 1-24
1.8 Using SQL*Plus........................................................................................................................ 1-24
1.9 Using Snippets to Insert Code Fragments............................................................................ 1-24
1.9.1 User-Defined Snippets ..................................................................................................... 1-25
1.10 Using DB Object Search to Find Database Objects.............................................................. 1-25
1.11 Reports....................................................................................................................................... 1-26
1.11.1 About Your Database reports ......................................................................................... 1-27
1.11.2 Database Administration reports................................................................................... 1-27
1.11.3 Table reports...................................................................................................................... 1-28
1.11.4 PL/SQL reports................................................................................................................. 1-29
1.11.5 Security reports ................................................................................................................. 1-30
1.11.6 XML reports....................................................................................................................... 1-30
1.11.7 Jobs reports ........................................................................................................................ 1-30
1.11.8 Streams reports ................................................................................................................. 1-30
1.11.9 All Objects reports ............................................................................................................ 1-31
1.11.10 Data Dictionary reports ................................................................................................... 1-31
1.11.11 User Defined reports ........................................................................................................ 1-31
1.11.11.1 User-Defined Report Example: Chart..................................................................... 1-32
1.11.11.2 User-Defined Report Example: Dynamic HTML.................................................. 1-33
1.12 SQL Developer Preferences.................................................................................................... 1-34
1.12.1 Environment...................................................................................................................... 1-34
1.12.2 Accelerators (Keyboard Shortcuts) ................................................................................ 1-35
1.12.3 Code Editor........................................................................................................................ 1-35
1.12.4 Database............................................................................................................................. 1-37
1.12.5 Debugger............................................................................................................................ 1-39
1.12.6 Documentation.................................................................................................................. 1-40
1.12.7 Extensions .......................................................................................................................... 1-40
1.12.8 File Types ........................................................................................................................... 1-40
1.12.9 Migration............................................................................................................................ 1-40
1.12.10 PL/SQL Compiler............................................................................................................. 1-42
1.12.11 PL/SQL Debugger............................................................................................................ 1-42
1.12.12 SQL*Plus ............................................................................................................................ 1-42
1.12.13 SQL Formatter................................................................................................................... 1-43
1.12.14 Web Browser and Proxy .................................................................................................. 1-43
1.13 Location of User-Related Information .................................................................................. 1-43
1.14 Using the Help.......................................................................................................................... 1-44
1.15 For More Information.............................................................................................................. 1-45
2 Migrating Third-Party Databases
2.1 Migration Quick Start................................................................................................................. 2-2
2.2 Overview of Migration............................................................................................................... 2-3
2.2.1 How Migration Works........................................................................................................ 2-4
2.2.2 Migration Implemented as SQL Developer Extensions................................................. 2-4
v
2.3 Preparing a Migration Plan ....................................................................................................... 2-5
2.3.1 Task 1: Determining the Requirements of the Migration Project ................................. 2-5
2.3.2 Task 2: Estimating Workload............................................................................................. 2-6
2.3.3 Task 3: Analyzing Operational Requirements ................................................................ 2-7
2.3.4 Task 4: Analyzing the Application.................................................................................... 2-8
2.3.5 Task 5: Planning the Migration Project............................................................................. 2-8
2.4 Before You Start Migrating: General Information.................................................................. 2-9
2.4.1 Creating a Database User for the Migration Repository................................................ 2-9
2.4.2 Requirements for Creating the Destination Oracle Objects........................................ 2-10
2.4.3 Using Nonstandard Character Encoding on Windows Systems............................... 2-11
2.5 Before You Start Migrating: Source-Specific Information.................................................. 2-12
2.5.1 Before Migrating From Microsoft SQL Server.............................................................. 2-12
2.5.2 Before Migrating From Microsoft Access...................................................................... 2-13
2.5.2.1 Creating Microsoft Access XML Files..................................................................... 2-15
2.5.3 Before Migrating From MySQL...................................................................................... 2-15
2.6 Capturing the Source Database ............................................................................................. 2-16
2.7 Creating and Customizing the Converted Model............................................................... 2-16
2.7.1 Correcting Errors in the Converted Model................................................................... 2-17
2.7.2 Customizing the Converted Model................................................................................ 2-17
2.7.2.1 Modifying the Properties of a Schema Object....................................................... 2-17
2.7.2.2 Working with Tablespaces....................................................................................... 2-18
2.7.2.3 Changing the Default User Password .................................................................... 2-18
2.8 Generating the DDL for the Oracle Schema Objects........................................................... 2-18
2.9 Migrating the Data................................................................................................................... 2-18
2.9.1 Transferring the Data Offline.......................................................................................... 2-18
2.9.1.1 Creating Data Files From Microsoft SQL Server or Sybase Adaptive Server... 2-19
2.9.1.2 Creating Data Files From Microsoft Access........................................................... 2-19
2.9.1.3 Creating Data Files From MySQL........................................................................... 2-20
2.9.1.4 Populating the Destination Database Using the Data Files................................. 2-20
2.10 Testing the Oracle Database................................................................................................... 2-20
2.10.1 Testing Methodology ....................................................................................................... 2-21
2.10.2 Testing the Oracle Database............................................................................................ 2-22
2.10.2.1 Guidelines for Creating Tests .................................................................................. 2-23
2.10.2.2 Example of a Unit Test Case .................................................................................... 2-24
2.11 Deploying the Oracle Database ............................................................................................. 2-25
2.11.1 Choosing a Rollout Strategy............................................................................................ 2-25
2.11.1.1 Phased Approach ...................................................................................................... 2-25
2.11.1.2 Big Bang Approach ................................................................................................... 2-25
2.11.1.3 Parallel Approach...................................................................................................... 2-25
2.11.2 Deploying the Destination Database ............................................................................. 2-26
2.12 Using Migration Reports ........................................................................................................ 2-27
2.13 SQL Developer User Interface for Migration....................................................................... 2-27
2.13.1 Migration Menu................................................................................................................ 2-29
2.13.2 Other Menus: Migration Items ....................................................................................... 2-29
2.13.3 Migration Preferences ...................................................................................................... 2-30
2.13.4 Migration Log Panes ........................................................................................................ 2-30
2.13.5 Using the Translation Scratch Editor............................................................................. 2-30
vi
3 Tutorial: Creating Objects for a Small Database
3.1 Creating a Table (BOOKS)......................................................................................................... 3-1
3.2 Creating a Table (PATRONS) ................................................................................................... 3-3
3.3 Creating a Table (TRANSACTIONS)....................................................................................... 3-4
3.4 Creating a Sequence.................................................................................................................... 3-6
3.5 Creating a View........................................................................................................................... 3-7
3.6 Creating a PL/SQL Procedure.................................................................................................. 3-7
3.7 Debugging a PL/SQL Procedure ............................................................................................. 3-8
3.8 Using the SQL Worksheet for Queries.................................................................................. 3-10
3.9 Script for Creating and Using the Library Tutorial Objects .............................................. 3-10
4 Dialog Boxes for Creating/Editing Objects
4.1 Add Extension............................................................................................................................. 4-1
4.2 Check for Updates ...................................................................................................................... 4-1
4.3 Choose Directory......................................................................................................................... 4-2
4.4 Create/Edit New Object ............................................................................................................ 4-2
4.5 Create/Edit/Select Database Connection............................................................................... 4-2
4.6 Select Connection........................................................................................................................ 4-4
4.7 Connection Information............................................................................................................. 4-4
4.8 No Connection Found................................................................................................................ 4-4
4.9 Connection Rename Error ......................................................................................................... 4-5
4.10 Select Library............................................................................................................................... 4-5
4.11 Create Library.............................................................................................................................. 4-5
4.12 Excel Import Data ....................................................................................................................... 4-5
4.13 Export/Import Connection Descriptors.................................................................................. 4-6
4.14 Create/Edit Database Link........................................................................................................ 4-6
4.15 Create/Edit Index....................................................................................................................... 4-7
4.16 Create/Edit Materialized View Log......................................................................................... 4-7
4.17 Create PL/SQL Package ............................................................................................................ 4-8
4.18 Create PL/SQL Subprogram (Function or Procedure) ......................................................... 4-9
4.19 Create/Edit Sequence................................................................................................................. 4-9
4.20 Create SQL File......................................................................................................................... 4-10
4.21 Create/Edit Synonym ............................................................................................................. 4-10
4.22 Create Table (quick creation) ................................................................................................. 4-10
4.23 Create/Edit Table (with advanced options)........................................................................ 4-12
4.24 Create Trigger........................................................................................................................... 4-21
4.25 Create Type (User-Defined) ................................................................................................... 4-22
4.26 Create/Edit User...................................................................................................................... 4-22
4.27 Create/Edit User Defined Report.......................................................................................... 4-23
4.28 Create/Edit User Defined Report Folder ............................................................................. 4-24
4.29 Create/Edit View..................................................................................................................... 4-24
4.30 Create XML Schema ................................................................................................................ 4-30
4.31 Configure File Type Associations.......................................................................................... 4-30
4.32 DDL Panel for Creating or Editing an Object...................................................................... 4-30
4.33 Debugger - Attach to JPDA .................................................................................................... 4-30
4.34 Describe Object Window ........................................................................................................ 4-31
4.35 Edit Value (Table Column Data) ........................................................................................... 4-31
vii
4.36 Enter Bind Values .................................................................................................................... 4-31
4.37 Export (Selected Objects or Types of Objects) ..................................................................... 4-31
4.38 Export: Advanced Data Filter ................................................................................................ 4-32
4.39 Export Error .............................................................................................................................. 4-32
4.40 Export Table Data .................................................................................................................... 4-33
4.41 External Tools........................................................................................................................... 4-33
4.42 Create/Edit External Tool ...................................................................................................... 4-34
4.43 Filter ........................................................................................................................................... 4-35
4.44 Insert Macro.............................................................................................................................. 4-35
4.45 Externally Modified Files........................................................................................................ 4-35
4.46 Filter Object Types ................................................................................................................... 4-35
4.47 Filter Schemas........................................................................................................................... 4-36
4.48 Find/Replace Text ................................................................................................................... 4-36
4.49 Generate Oracle DDL .............................................................................................................. 4-36
4.50 Generate Offline Data Move Files ......................................................................................... 4-37
4.51 Go to Line Number.................................................................................................................. 4-37
4.52 Go to Line Number: Error....................................................................................................... 4-37
4.53 Load Preset Key Mappings..................................................................................................... 4-37
4.54 Modify Value............................................................................................................................ 4-37
4.55 Data Move Details.................................................................................................................... 4-38
4.56 Open File ................................................................................................................................... 4-38
4.57 Query Builder........................................................................................................................... 4-38
4.58 Recent Files ............................................................................................................................... 4-39
4.59 Create Repository..................................................................................................................... 4-39
4.60 Delete or Truncate Repository ............................................................................................... 4-39
4.61 Capture Microsoft Access Exporter XML............................................................................. 4-39
4.62 Select Current Repository....................................................................................................... 4-39
4.63 Run/Debug PL/SQL............................................................................................................... 4-40
4.64 Create/Edit Breakpoint........................................................................................................... 4-40
4.65 Save/Save As............................................................................................................................ 4-41
4.66 Save Files................................................................................................................................... 4-41
4.67 Unable to Save Files................................................................................................................. 4-41
4.68 Save Style Settings ................................................................................................................... 4-41
4.69 Schema Differences.................................................................................................................. 4-41
4.70 Schema Differences Source or Destination Error ................................................................ 4-42
4.71 Set Data Mapping .................................................................................................................... 4-42
4.72 Add/Edit Rule.......................................................................................................................... 4-43
4.73 Set Pause Continue .................................................................................................................. 4-43
4.74 Sign In (checking for updates) ............................................................................................... 4-43
4.75 Single Record View.................................................................................................................. 4-43
4.76 Save Snippet (User-Defined).................................................................................................. 4-44
4.77 Edit Snippets (User-Defined) ................................................................................................. 4-44
4.78 SQL History List....................................................................................................................... 4-44
4.79 SQL*Plus Location ................................................................................................................... 4-44
4.80 Unable to Open File................................................................................................................. 4-45
viii

ix
Preface
This guide provides conceptual and usage information about Oracle SQL Developer, a
graphical tool that enables you to browse, create, edit, and delete (drop) database
objects; run SQL statements and scripts; edit and debug PL/SQL code; manipulate and
export data; and view and create reports.
Audience
This guide is intended for those using the Oracle SQL Developer tool.
Documentation Accessibility
Our goal is to make Oracle products, services, and supporting documentation
accessible, with good usability, to the disabled community. To that end, our
documentation includes features that make information available to users of assistive
technology. This documentation is available in HTML format, and contains markup to
facilitate access by the disabled community. Accessibility standards will continue to
evolve over time, and Oracle is actively engaged with other market-leading
technology vendors to address technical obstacles so that our documentation can be
accessible to all of our customers. For more information, visit the Oracle Accessibility
Program Web site at http://www.oracle.com/accessibility/.
Accessibility of Code Examples in Documentation
Screen readers may not always correctly read the code examples in this document. The
conventions for writing code require that closing braces should appear on an
otherwise empty line; however, some screen readers may not always read a line of text
that consists solely of a bracket or brace.
Accessibility of Links to External Web Sites in Documentation
This documentation may contain links to Web sites of other companies or
organizations that Oracle does not own or control. Oracle neither evaluates nor makes
any representations regarding the accessibility of these Web sites.
TTY Access to Oracle Support Services
Oracle provides dedicated Text Telephone (TTY) access to Oracle Support Services
within the United States of America 24 hours a day, 7 days a week. For TTY support,
call 800.446.2398. Outside the United States, call +1.407.458.2479.

x
Related Documents
For information about installing Oracle SQL Developer, see the Oracle Database SQL
Developer Installation Guide.
Oracle error message documentation is only available in HTML. If you only have
access to the Oracle Documentation CD, you can browse the error messages by range.
Once you find the specific range, use your browser's "find in page" feature to locate the
specific message. When connected to the Internet, you can search for a specific error
message using the error message search feature of the Oracle online documentation.
Printed documentation is available for sale in the Oracle Store at
http://oraclestore.oracle.com/
To download free release notes, installation documentation, white papers, or other
collateral, go to the Oracle Technology Network (OTN). You must register online
before using OTN; registration is free and can be done at
http://www.oracle.com/technology/membership
If you already have a user name and password for OTN, then you can go directly to
the documentation section of the OTN Web site at
http://www.oracle.com/technology/documentation
Conventions
The following text conventions are used in this document:
Third-Party License Information
Oracle SQL Developer contains third-party code. Oracle is required to provide the
following notices. Note, however, that the Oracle program license that accompanied
this product determines your right to use the Oracle program, including the
third-party software, and the terms contained in the following notices do not change
those rights.
Apache Regular Expression Package 2.0
Licensed under the Apache License, Version 2.0 (the "License"); you may not use this
file except in compliance with the License. You may obtain a copy of the License at:
http://www.apache.org/licenses/LICENSE-2.0
Unless required by applicable law or agreed to in writing, software distributed under
the License is distributed on an "AS IS" BASIS, WITHOUT WARRANTIES OR
CONDITIONS OF ANY KIND, either express or implied. See the License for the
specific language governing permissions and limitations under the License.
Convention Meaning
boldface Boldface type indicates graphical user interface elements associated
with an action, or terms defined in text or the glossary.
italic Italic type indicates book titles, emphasis, or placeholder variables for
which you supply particular values.
monospace Monospace type indicates commands within a paragraph, URLs, code
in examples, text that appears on the screen, or text that you enter.
xi
Antlr v 2.7.3
http://www.antlr.org/rights.html
OracleAS TopLink uses Antlr for EJB QL parsing. Antlr (ANother Tool for Language
Recognition), is a language tool that provides a framework for constructing
recognizers, compilers, and translators from grammatical descriptions containing C++
or Java actions. The ANTLR parser and translator generator is fully in the public
domain.
JGoodies Looks and Forms
Copyright © 2003 JGoodies Karsten Lentzsch. All rights reserved.
Redistribution and use in source and binary forms, with or without modification, are
permitted provided that the following conditions are met:
■Redistributions of source code must retain the above copyright notice, this list of
conditions and the following disclaimer.
■Redistributions in binary form must reproduce the above copyright notice, this list
of conditions and the following disclaimer in the documentation and/or other
materials provided with the distribution.
■Neither the name of JGoodies Karsten Lentzsch nor the names of its contributors
may be used to endorse or promote products derived from this software without
specific prior written permission.
THIS SOFTWARE IS PROVIDED BY THE COPYRIGHT HOLDERS AND
CONTRIBUTORS "AS IS" AND ANY EXPRESS OR IMPLIED WARRANTIES,
INCLUDING, BUT NOT LIMITED TO, THE IMPLIED WARRANTIES OF
MERCHANTABILITY AND FITNESS FOR A PARTICULAR PURPOSE ARE
DISCLAIMED. IN NO EVENT SHALL THE COPYRIGHT OWNER OR
CONTRIBUTORS BE LIABLE FOR ANY DIRECT, INDIRECT, INCIDENTAL,
SPECIAL, EXEMPLARY, OR CONSEQUENTIAL DAMAGES (INCLUDING, BUT
NOT LIMITED TO, PROCUREMENT OF SUBSTITUTE GOODS OR SERVICES; LOSS
OF USE, DATA, OR PROFITS; OR BUSINESS INTERRUPTION) HOWEVER CAUSED
AND ON ANY THEORY OF LIABILITY, WHETHER IN CONTRACT, STRICT
LIABILITY, OR TORT (INCLUDING NEGLIGENCE OR OTHERWISE) ARISING IN
ANY WAY OUT OF THE USE OF THIS SOFTWARE, EVEN IF ADVISED OF THE
POSSIBILITY OF SUCH DAMAGE.
xii

1
SQL Developer Concepts and Usage 1-1
1 SQL Developer Concepts and Usage
Oracle SQL Developer is a graphical version of SQL*Plus that gives database
developers a convenient way to perform basic tasks. You can browse, create, edit, and
delete (drop) database objects; run SQL statements and scripts; edit and debug
PL/SQL code; manipulate and export data; and view and create reports.
You can connect to any target Oracle database schema using standard Oracle database
authentication. Once connected, you can perform operations on objects in the
database.
You can also connect to schemas for selected third-party (non-Oracle) databases, such
as MySQL, Microsoft SQL Server, and Microsoft Access, and you can view metadata
and data in these databases.
This chapter contains the following major sections:
Section 1.1, "Installing and Getting Started with SQL Developer"
Section 1.2, "SQL Developer User Interface"
Section 1.3, "Database Objects"
Section 1.4, "Database Connections"
Section 1.5, "Entering and Modifying Data"
Section 1.6, "Running and Debugging Functions and Procedures"
Section 1.7, "Using the SQL Worksheet"
Section 1.8, "Using SQL*Plus"
Section 1.9, "Using Snippets to Insert Code Fragments"
Section 1.10, "Using DB Object Search to Find Database Objects"
Section 1.11, "Reports"
Section 1.12, "SQL Developer Preferences"
Section 1.13, "Location of User-Related Information"
Section 1.14, "Using the Help"
Section 1.15, "For More Information"
Chapter 2, "Migrating Third-Party Databases" (if you are using a SQL Developer
version that supports migration)
Chapter 3, "Tutorial: Creating Objects for a Small Database"

Installing and Getting Started with SQL Developer
1-2 Oracle Database SQL Developer User’s Guide
1.1 Installing and Getting Started with SQL Developer
To install and start SQL Developer, you simply download a ZIP file and unzip it into a
desired parent directory or folder, and then type a command or double-click a file
name. You should read the Oracle Database SQL Developer Installation Guide before you
perform the installation. After you have read the installation guide, the basic steps are:
1. Unzip the SQL Developer kit into a directory (folder) of your choice. This
directory location will be referred to as <sqldeveloper_install>.
Unzipping the SQL Developer kit causes a directory named sqldeveloper to be
created under the <sqldeveloper_install> directory. It also causes many files
and folders to be placed in and under that directory.
2. To start SQL Developer, go to the sqldeveloper directory under the
<sqldeveloper_install> directory, and do one of the following:
On Linux and Mac OS X systems, run sh sqldeveloper.sh.
On Windows systems, double-click sqldeveloper.exe.
If you are asked to enter the full pathname for java.exe, click Browse and find
java.exe. For example, on a Windows system the path might have a name similar
to C:\Program Files\Java\jdk1.5.0_06\bin\java.exe.
3. If you want to become familiar with SQL Developer concepts before using the
interface, read the rest of this chapter before proceeding to the next step.
4. Create at least one database connection (or import some previously exported
connections), so that you can view and work with database objects, use the SQL
Worksheet, and use other features.
To create a new database connection, right-click the Connections node in the
Connections navigator, select New Database Connection, and complete the
required entries in the dialog box.
5. If you want to get started quickly with SQL Developer, do the short tutorial in
Chapter 3, "Tutorial: Creating Objects for a Small Database", or work with your
existing database objects.
1.2 SQL Developer User Interface
The SQL Developer window generally uses the left side for navigation to find and
select objects, and the right side to display information about selected objects.
Figure 1–1 shows the main window.
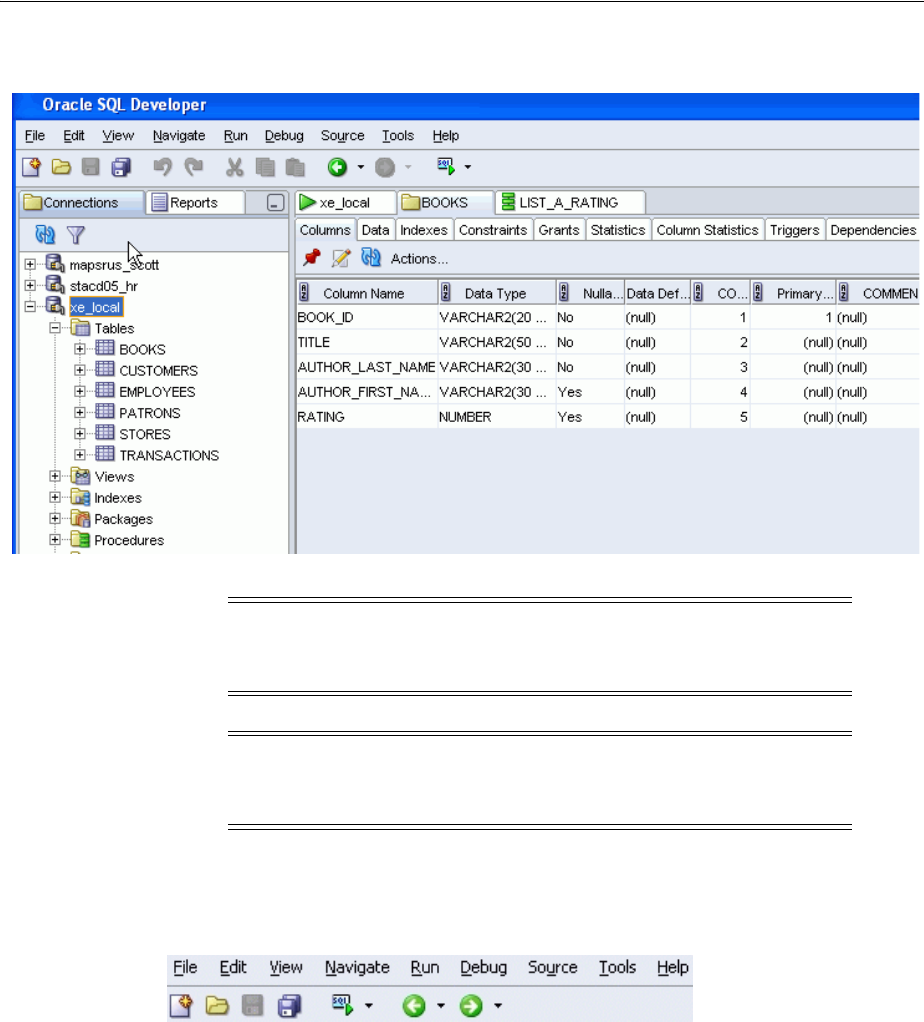
SQL Developer User Interface
SQL Developer Concepts and Usage 1-3
Figure 1–1 SQL Developer Main Window
The menus at the top contain standard entries, plus entries for features specific to SQL
Developer (see Section 1.2.1, "Menus for SQL Developer"), as shown in the following
figure.
You can use shortcut keys to access menus and menu items: for example Alt+F for the
File menu and Alt+E for the Edit menu; or Alt+H, then Alt+S for Help, then Full Text
Search. You can also display the File menu by pressing the F10 key.
Icons under the menus perform the following actions:
■New creates a new a new database object (see Section 4.4, "Create/Edit New
Object").
■Open opens a file (see Section 4.56, "Open File").
■Save saves any changes to the currently selected object.
■Save All saves any changes to all open objects.
Note: This text explains the default interface. However, you can
customize many aspects of the appearance and behavior of SQL
Developer by setting preferences (see Section 1.12).
Note: If you are using a version of SQL Developer that supports
migration of third-party databases to Oracle, see also Section 2.13,
"SQL Developer User Interface for Migration".
SQL Developer User Interface
1-4 Oracle Database SQL Developer User’s Guide
■Open SQL Worksheet opens the SQL Worksheet (see Using the SQL Worksheet).
If you do not use the drop-down arrow to specify the database connection to use,
you are asked to select a connection.
■Back moves to the pane that you most recently visited. (Or use the drop-down
arrow to specify a tab view.)
■Forward moves to the pane after the current one in the list of visited panes. (Or
use the drop-down arrow to specify a tab view.)
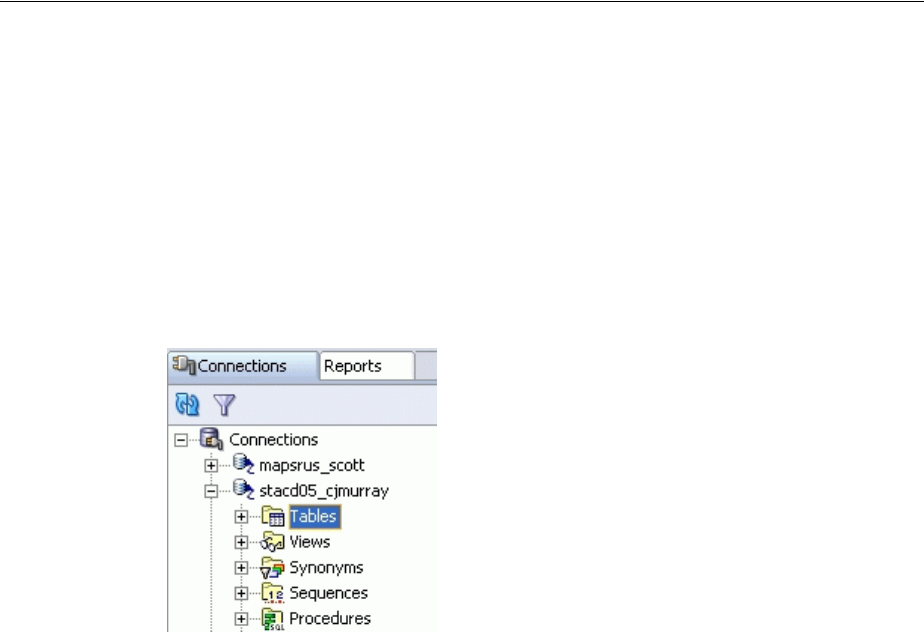
The left side of the SQL Developer window has tabs and panes for the Connections
and Reports navigators, icons for performing actions, and a hierarchical tree display
for the currently selected navigator, as shown in the following figure.
The Connections navigator lists database connections that have been created. To
create a new database connection, import an XML file with connection definitions, or
export or edit current connections, right-click the Connections node and select the
appropriate menu item. (For more information, see Section 1.4, "Database
Connections".)
The Reports navigator lists informative reports provided by SQL Developer, such as a
list of tables without primary keys for each database connection, as well as any
user-defined reports. (For more information, see Section 1.11, "Reports".)
Icons under the Connections tab (above the metadata tree) perform the following
actions on the currently selected object:
■Refresh queries the database for the current details about the selected object (for
example, a connection or just a table).
■Apply Filter restricts the display of objects using a filter that you specify. For
example, you can right-click the Tables node and specify a filter of EM% to see
only tables that start with EM and to have the Tables node label be changed to
Tables (EM%) . To remove the effects of applying a filter, right-click the node and
select Clear Filter.
The metadata tree in the Connections pane displays all the objects (categorized by
object type) accessible to the defined connections. To select an object, expand the
appropriate tree node or nodes, then click the object.
The right side of the SQL Developer window has tabs and panes for objects that you
select or open, as shown in the following figure, which displays information about a
table named BOOKS. (If you hold the mouse pointer over the tab label -- BOOKS in
this figure -- a tooltip displays the object’s owner and the database connection.)
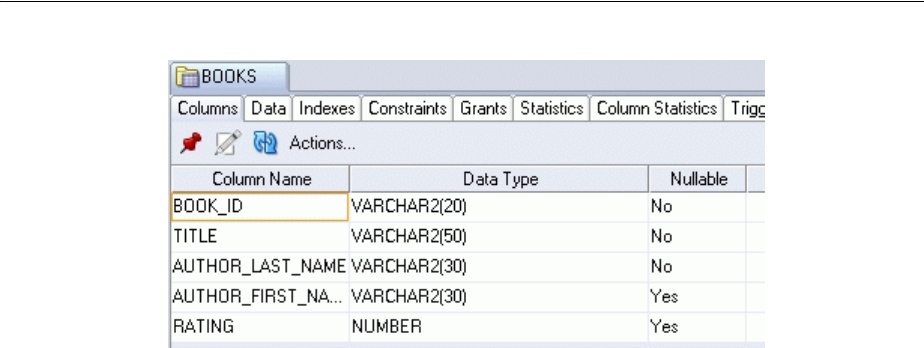
SQL Developer User Interface
SQL Developer Concepts and Usage 1-5
For objects other than subprograms, icons provide the following options:
■Freeze View (the pin) keeps that object’s tab and information in the window when
you click another object in the Connections navigator; a separate tab and display
are created for that other object. If you click the pin again, the object’s display is
available for reuse.
■Edit displays a dialog box for editing the object.
■Refresh updates the display by querying the database for the latest information.
■Actions displays a menu with actions appropriate for the object. The actions are
the same as when you right-click an object of that type in the Connections
navigator, except the Actions menu does not include Edit.
To switch among objects, click the desired tabs; to close a tab, click the X in the tab. If
you make changes to an object and click the X, you are asked if you want to save the
changes.
For tables and views, this information is grouped under tabs, which are labeled near
the top. For example, for tables the tabs are Columns, Data (for seeing and modifying
the data itself), Indexes, Constraints, and so on; and you can click a column heading
under a tab to sort the grid rows by the values in that column. For most objects, the
tabs include SQL, which displays the SQL statement for creating the object.
You can export data from a detail pane or from the results of a SQL Worksheet
operation or a report by using the right-click menu and selecting Export.
The Messages - Log area is used for feedback information as appropriate (for example,
results of an action, or error or warning messages). If this area is not already visible,
you can display is by clicking View and then Log.
The Compiler - Log area is used for any messages displayed as a result of a Compile
or Compile for Debug operation.
1.2.1 Menus for SQL Developer
This topic explains menu items that are specific to SQL Developer.
View menu
Contains options that affect what is displayed in the SQL Developer interface.
Options: New View creates a new tab on the left side showing the hierarchy for only
the selected connection; Freeze View keeps the tab and information in the window
when you click another object in the Connections navigator; a separate tab and display
are created for that other object.

SQL Developer User Interface
1-6 Oracle Database SQL Developer User’s Guide
Connections: Moves the focus to the Connections navigator.
Log: Displays the Messages - Log pane, which can contain errors, warnings, and
informational messages.
Debugger: Displays panes related to debugging (see Section 1.6, "Running and
Debugging Functions and Procedures").
Run Manager: Displays the Run Manager pane, which contains entries for any active
debugging sessions.
Status Bar: Controls the display of the status bar at the bottom of the SQL Developer
window.
Toolbars: Controls the display of the main toolbar (under the SQL Developer menus)
and the Connections navigator toolbar.
Refresh: Updates the current display for any open connections using the current
objects in the affected database or databases.
Reports: Displays the Reports navigator (see Section 1.11, "Reports").
DB Object Search: Displays the DB Object Search pane (see Section 1.10, "Using DB
Object Search to Find Database Objects").
Snippets: Displays snippets (see Section 1.9, "Using Snippets to Insert Code
Fragments").
Navigate menu
Contains options for navigating to panes and in the execution of subprograms.
Back: Moves to the pane that you most recently visited.
Forward: Moves to the pane after the current one in the list of visited panes.
Go to Line: Goes to the specified line number and highlights the line in the editing
window for the selected function or procedure.
Go to Last Edit: Goes to the last line that was edited in the editing window for a
function or procedure.
Go to Recent Files: Displays the Recent Files dialog box, in which you can specify a
function or procedure to go to.
Run menu
Contains options relevant when a function or procedure is selected.
Run [name]: Starts execution of the specified function or procedure.
Execution Profile: Displays the execution profile for the selected function or
procedure.
Debug menu
Contains options relevant when a function or procedure is selected.
Debug [name]: Starts execution of the specified function or procedure in debug mode.
The remaining items on the Debug menu match commands on the debugging toolbar,
which is described in Section 1.6, "Running and Debugging Functions and
Procedures".
Source menu
Contains options for use when editing functions and procedures.

SQL Developer User Interface
SQL Developer Concepts and Usage 1-7
Completion Insight, Smart Completion Insight, and Parameter Insight: Display
pop-up windows that list item as you type and from which you can select an item for
autocompletion. See also the code insight and completion (autocomplete) options for
Code Editor under Section 1.12, "SQL Developer Preferences".
Toggle Line Comments: Inserts and removes comment indicators at the start of
selected code lines.
Indent Block: Moves the selected statements to the right.
Unindent Block: Moves the selected statements to the left.
Tools menu
Invokes SQL Developer tools.
SQL*Plus: Displays a command-line window for entering SQL and SQL*Plus
statements (see Section 1.8, "Using SQL*Plus"). If the location of the SQL*Plus
executable is not stored in your SQL Developer preferences, you are asked to specify
its location.
External Tools: Displays the External Tools dialog box, with information about
user-defined external tools that are integrated with the SQL Developer interface. From
this dialog box can add external tools (see Section 4.42, "Create/Edit External Tool").
The Tools menu also contains items for any user-defined external tools.
Preferences: Enables you to customize the behavior of SQL Developer (see
Section 1.12, "SQL Developer Preferences").
Export DDL (and Data): Enables you to export some or all objects of one or more
object types for a database connection to a file containing SQL statements to create
these objects and optionally to export table data (see the Export (Selected Objects or
Types of Objects) dialog box).
Schema Diff: Enables you to compare two schemas to find differences between objects
of the same type and name (for example, tables named CUSTOMERS) in two different
schemas, and optionally to update the objects in the destination schema to reflect
differences in the source schema (see the Schema Differences dialog box).
SQL Worksheet: Displays a worksheet in which you can enter and execute SQL and
PL/SQL statements using a specified connection (see Section 1.7, "Using the SQL
Worksheet").
Help menu
Displays help about SQL Developer and enables you to check for SQL Developer
updates.
Table of Contents: Displays the table of contents for the help.
Full Text Search: Displays a pane for typing character strings or words to search the
help.
Index: Displays a pane for using index keywords to search the help.
Check for Updates: Checks for any updates to the selected optional SQL Developer
extensions, as well as any mandatory SQL Developer extensions. (If the system you are
using is behind a firewall, see the SQL Developer user preferences for Web Browser
and Proxy.)
About: Displays version-related information about SQL Developer and its
components.

Database Objects
1-8 Oracle Database SQL Developer User’s Guide
1.3 Database Objects
You can create, edit, and delete (drop) most types of objects in an Oracle database by
using the right-click menu in the Connections navigator or by clicking the Actions
button in the detail pane display. For some objects, you can do other operations, as
appropriate for the object type.
You can search for specific objects associated with an Oracle database connection by
clicking View, then DB Object Search. For more information, see Section 1.10, "Using
DB Object Search to Find Database Objects".
If you have connected to any third-party (non-Oracle) databases, such as MySQL,
Microsoft SQL Server, or Microsoft Access, you can view their objects using the
Connections navigator. (For information about connecting to third-party databases, see
the SQL Developer user preferences for Database: Third Party JDBC Drivers.)
1.3.1 Database Links (Public and Private)
A database link is a database object in one database that enables you to access objects
on another database. The other database need not be an Oracle Database system;
however, to access non-Oracle systems you must use Oracle Heterogeneous Services.
After you have created a database link, you can use it to refer to tables and views in
the other database. The Connections navigator has a Database Links node for all
database links (public and private) owned by the user associated with the specified
connection, and a Public Database Links node for all public database links on the
database associated with the connection. For help with specific options in creating a
database link, see Section 4.14, "Create/Edit Database Link".
You can perform the following operations on a database link by right-clicking the
database link name in the Connections navigator and selecting an item from the menu:
■Test: Validates the database link.
■Drop: Deletes the database link.
1.3.2 Directories
A directory object specifies an alias for a directory (called a folder on Windows
systems) on the server file system where external binary file LOBs (BFILEs) and
external table data are located. To create a directory (that is, a directory object), you can
use SQL Developer or the SQL statement CREATE DIRECTORY.
You can use directory names when referring to BFILEs in your PL/SQL code and OCI
calls, rather than hard coding the operating system path name, for management
flexibility. All directories are created in a single namespace and are not owned by an
individual schema. You can secure access to the BFILEs stored within the directory
structure by granting object privileges on the directories to specific users.
Note: The actions available from right-click menus and Actions
buttons depend on the Oracle Database release number for the
specified database connection. If an action mentioned in the text is not
available with a connection, it may be that the feature was not
available in that release of Oracle Database.

Database Objects
SQL Developer Concepts and Usage 1-9
1.3.3 Functions
A function is a type of PL/SQL subprogram, which is a programming object that can
be stored and executed in the database server, and called from other programming
objects or applications. (Functions return a value; procedures do not return a value.)
For help with specific options in creating a PL/SQL subprogram, see Section 4.18,
"Create PL/SQL Subprogram (Function or Procedure)".
You can perform the following operations on a function by right-clicking the function
name in the Connections navigator and selecting an item from the menu:
■Open: Displays the function text so that you can view and edit it.
■Compile: Performs a PL/SQL compilation of the function.
■Compile with Debug: Performs a PL/SQL compilation of the procedure, with
PL/SQL library units compiled for debugging.
■Run: Displays the Run/Debug PL/SQL dialog box, and then executes the function
in normal (not debug) mode.
■Debug: Displays the Run/Debug PL/SQL dialog box, and then executes the
function in debug mode.
■Execution Profile: Displays the execution profile for the procedure.
■Rename: Renames the function.
■Drop: Deletes the function.
1.3.4 Indexes
An index is a database object that contains an entry for each value that appears in the
indexed column(s) of the table or cluster and provides direct, fast access to rows.
Indexes are automatically created on primary key columns; however, you must create
indexes on other columns to gain the benefits of indexing. For help with specific
options in creating an index, see Section 4.15, "Create/Edit Index".
You can perform the following operations on an index by right-clicking the index
name in the Connections navigator and selecting an item from the menu:
■Drop: Deletes the index.
■Rebuild Index: Re-creates the index or one of its partitions or subpartitions. If the
index is unusable, a successful rebuild operation makes the index usable. For a
function-based index, rebuilding also enables the index; however, if the function
on which the index is based does not exist, the rebuild operation fails.
■Rename Index: Changes the name of the index.
■Unusable Index: Prevents the index from being used by Oracle in executing
queries. An unusable index must be rebuilt, or dropped and re-created, before it
can be used again.
■Coalesce Index: Merges the contents of index blocks, where possible, to free blocks
for reuse.
1.3.5 Materialized Views
A materialized view is a database object that contains the results of a query. The FROM
clause of the query can name tables, views, and other materialized views. Collectively
these objects are called master tables (a replication term) or detail tables (a data
warehousing term). This reference uses "master tables" for consistency. The databases

Database Objects
1-10 Oracle Database SQL Developer User’s Guide
containing the master tables are called the master databases. For help with specific
options in creating a materialized view, see Section 4.29, "Create/Edit View", especially
the View Information or Materialized View Properties pane.
1.3.6 Materialized View Logs
A materialized view log is a table associated with the master table of a materialized
view. When DML changes are made to master table data, Oracle Database stores rows
describing those changes in the materialized view log and then uses the materialized
view log to refresh materialized views based on the master table. This process is called
incremental or fast refresh. Without a materialized view log, Oracle Database must
reexecute the materialized view query to refresh the materialized view. This process is
called a complete refresh. Usually, a fast refresh takes less time than a complete refresh.
1.3.7 Packages
A package is an object that contains subprograms, which are programming objects that
can be stored and executed in the database server, and called from other programming
objects or applications. A package can contain functions or procedures, or both. For
help with specific options in creating a package, see Section 4.17, "Create PL/SQL
Package".
You can perform the following operations on a package by right-clicking the package
name in the Connections navigator and selecting an item from the menu:
■New Package Body: Displays a pane in which you can enter text for the package
body.
■Drop: Deletes the package.
1.3.8 Procedures
A procedure is a type of PL/SQL subprogram, which is a programming object that can
be stored and executed in the database server, and called from other programming
objects or applications. (Procedures do not return a value; functions return a value.)
For help with specific options in creating a PL/SQL subprogram, see Section 4.18,
"Create PL/SQL Subprogram (Function or Procedure)".
You can perform the following operations on a procedure by right-clicking the
procedure name in the Connections navigator and selecting an item from the menu:
■Open: Displays the procedure text so that you can view and edit it.
■Compile: Performs a PL/SQL compilation of the procedure.
■Compile with Debug: Performs a PL/SQL compilation of the procedure, with
PL/SQL library units compiled for debugging.
■Run: Displays the Run/Debug PL/SQL dialog box, and then executes the
procedure in normal (not debug) mode.
■Debug: Displays the Run/Debug PL/SQL dialog box, and then executes the
procedure in debug mode.
■Execution Profile: Displays the execution profile for the procedure.
■Drop: Deletes the procedure.
■Compile Dependants: Performs a PL/SQL compilation of the procedure and any
relevant dependent subprograms (see the Dependencies tab).

Database Objects
SQL Developer Concepts and Usage 1-11
1.3.9 Recycle Bin
The Recycle bin (applicable only to Oracle Database Release 10g) holds objects that
have been dropped (deleted). The objects are not actually deleted until a commit
operation is performed. Before the objects are actually deleted, you can "undelete"
them by selecting them in the Recycle bin and selecting Undrop from the right-click
menu.
You can perform the following operations on an object in the Recycle bin by
right-clicking the object name in the Recycle bin in the Connections navigator and
selecting an item from the menu:
■Purge: Removes the object from the Recycle bin and deletes it.
■Flashback to Before Drop: Moves the object from the Recycle bin back to its
appropriate place in the Connections navigator display.
1.3.10 Sequences
Sequences are used to generate unique integers. You can use sequences to
automatically generate primary key values. For help with specific options in creating
and editing a sequence, see Section 4.19, "Create/Edit Sequence".
1.3.11 Synonyms (Public and Private)
Synonyms provide alternative names for tables, views, sequences, procedures, stored
functions, packages, materialized views, Java class database objects, user-defined
object types, or other synonyms. The Connections navigator has a Synonyms node for
all synonyms (public and private) owned by the user associated with the specified
connection, and a Public Synonyms node for all public synonyms on the database
associated with the connection. For help with specific options in creating and editing a
synonym, see Section 4.21, "Create/Edit Synonym".
1.3.12 Tables
Tables are used to hold data. Each table typically has multiple columns that describe
attributes of the database entity associated with the table, and each column has an
associated data type. You can choose from many table creation options and table
organizations (such as partitioned tables, index-organized tables, and external tables),
to meet a variety of enterprise needs. To create a table, you can do either of the
following:
■Create the table quickly by adding columns and specifying frequently used
features. To do this, do not check the Advanced box in the Create Table dialog box.
For help with options for creating a table using this quick approach, see Create
Table (quick creation).
■Create the table by adding columns and selecting from a larger set of features. To
do this, check the Advanced box in the Create Table dialog box. For help with
options for creating a table with advanced features, see Create/Edit Table (with
advanced options).
You can perform the following operations on a table by right-clicking the table name in
the Connections navigator and selecting an item from the menu:
■Edit: Displays the Create Table (quick creation) dialog box.
■Tab l e : Table actions include Rename, Copy (create a copy using a different name),
Drop (delete the table), Truncate (delete existing data without affecting the table
definition), Lock (set the table lock mode: row share, exclusive, and so on),

Database Objects
1-12 Oracle Database SQL Developer User’s Guide
Comment (descriptive comment explaining the use or purpose of the table),
Parallel (change the default degree of parallelism for queries and DML on the
table), No Parallel (specify serial execution), and Count Rows (return the number
of rows).
■Column: Column actions include Comment (descriptive comment about a
column), Add, Drop, and Normalize.
■Constraint: Includes options for adding, dropping, enabling, and disabling
constraints.
■Index: Options include Create (create an index on specified columns), Create Text
(create an Oracle Text index on a column), Create Text (create a function-based
index on a column), and Drop.
■Constraint: Options include Enable or Disable Single, Drop (delete a constraint),
Add Check (add a check constraint), Add Foreign Key, and Add Unique.
■Privileges: If you are connected as a database user with sufficient privileges, you
can Grant or Revoke privileges on the table to other users.
■Statistics: Options include Gather Statistics (compute exact table and column
statistics and store them in the data dictionary) and Validate Structure (verifies the
integrity of each data block and row, and for an index-organized table also
generates the optimal prefix compression count for the primary key index on the
table). Statistics are used by the Oracle Database optimizer to choose the execution
plan for SQL statements that access analyzed objects.
■Storage: Options include Shrink Table (shrink space in a table, for segments in
tablespaces with automatic segment management) and Move Table (to another
tablespace). The Shrink Table options include Compact (only defragments the
segment space and compacts the table rows for subsequent release, but does not
readjust the high water mark and does not release the space immediately) and
Cascade (performs the same operations on all dependent objects of the table,
including secondary indexes on index-organized tables).
■Trigg e r : Options include Create, Create PK from Sequence (create a before-insert
trigger to populate the primary key using values from a specified sequence),
Enable or Disable All, Enable or Disable Single, and Drop (delete the trigger).
■Import Data: Enables you to import data from a Microsoft Excel worksheet.
■Export Data: Enables you to export some or all of the table data to a file or to the
system clipboard, in any of the following formats: XML (XML tags and data), CSV
(comma-separated values including a header row for column identifiers), SQL
Insert (INSERT statements), or SQL Loader (SQL*Loader control file). After you
select a format, the Export Table Data dialog box is displayed.
You can perform the following operations on a column in a table by right-clicking the
column name in the Connections navigator and selecting an item from the menu:
■Rename: Renames the column.
■Drop: Deletes the column (including all data in that column) from the table.
■Comment: Adds a descriptive comment about the column.
■Encrypt (for Oracle Database Release 10.2 and higher, and only if the Transparent
Data Encryption feature is enabled for the database): Displays a dialog box in
which you specify a supported encryption algorithm to be used for encrypting all
data in the column. Current data and subsequently inserted data are encrypted.

Database Objects
SQL Developer Concepts and Usage 1-13
■Decrypt (for Oracle Database Release 10.2 and higher, and only if the Transparent
Data Encryption feature is enabled for the database): Decrypts data in the column
that had been encrypted, and causes data that is subsequently inserted not to be
encrypted.
■Normalize: Creates a new table using the distinct values in the specified column.
You must specify names for the new table and its primary key column, as well as a
sequence name and trigger name.
1.3.13 Triggers
Triggers are stored PL/SQL blocks associated with a table, a schema, or the database,
or anonymous PL/SQL blocks or calls to a procedure implemented in PL/SQL or Java.
Oracle Database automatically executes a trigger when specified conditions occur. For
help with specific options in creating a trigger, see Section 4.24, "Create Trigger".
1.3.14 Types
A data type associates a fixed set of properties with the values that can be used in a
column of a table or in an argument of a procedure or function. These properties cause
Oracle Database to treat values of one data type differently from values of another
data type. Most data types are supplied by Oracle, although users can create data
types.
For help with specific options in creating a user-defined type, see Section 4.25, "Create
Type (User-Defined)".
1.3.15 Users (Other Users)
Database users are accounts through which you can log in to the database. In the
Connections navigator, you can see the Other Users in the database associated with a
connection, but the database objects that you are allowed to see for each user are
determined by the privileges of the database user associated with the current database
connection.
If you are connected as a user with the DBA role, you can create a database user by
right-clicking Other Users and selecting Create User, and you can edit an existing
database user by right-clicking the user under Other Users and selecting Edit User.
For help on options in creating and editing users, see Create/Edit User.
1.3.16 Views
Views are virtual tables (analogous to queries in some database products) that select
data from one or more underlying tables. Oracle Database provides many view
creation options and specialized types of views (such as materialized views, described
in Section 1.3.5, "Materialized Views"), to meet a variety of enterprise needs. For help
with specific options in creating and editing a view, see Create/Edit View.
You can perform the following operations on a view by right-clicking the view name
in the Connections navigator and selecting an item from the menu:
■Edit: Displays the Create/Edit View dialog box.
■Drop: Deletes the view.
■Compile: Recompiles the view, to enable you to locate possible errors before run
time. You may want to recompile a view after altering one of its base tables to
ensure that the change does not affect the view or other objects that depend on it.

Database Connections
1-14 Oracle Database SQL Developer User’s Guide
1.3.17 XML Schemas
XML schemas are schema definitions, written in XML, that describe the structure and
various other semantics of conforming instance XML documents. For conceptual and
usage information about XML schemas, see Oracle XML DB Developer's Guide in the
Oracle Database documentation library.
You can edit an XML schema by right-clicking the XML schema name in the
Connections navigator and selecting Edit from the menu.
1.4 Database Connections
A connection is a SQL Developer object that specifies the necessary information for
connecting to a specific database as a specific user of that database. You must have at
least one database connection (existing, created, or imported) to use SQL Developer.
You can connect to any target Oracle database schema using standard Oracle database
authentication. Once connected, you can perform operations on objects in the
database. You can also connect to schemas for selected third-party (non-Oracle)
databases, such as MySQL, Microsoft SQL Server, and Microsoft Access, and view
metadata and data.
When you start SQL Developer and whenever you display the database connections
dialog box, SQL Developer automatically imports any connections defined in the
tnsnames.ora file on your system, if that file exists. By default, tnsnames.ora is located
in the $ORACLE_HOME/network/admin directory, but it can also be in the directory
specified by the TNS_ADMIN environment variable or registry value or (on Linux
systems) the global configuration directory. On Windows systems, if the tnsnames.ora
file exists but its connections are not being used by SQL Developer, define TNS_
ADMIN as a system environment variable. For information about the tnsnames.ora
file, see the "Local Naming Parameters (tnsnames.ora)" chapter in Oracle Database Net
Services Reference.
You can create additional connections (for example, to connect to the same database
but as different users, or to connect to different databases). Each database connection is
listed in the Connections navigator hierarchy.
To create a new database connection, right-click the Connections node and select New
Database Connection. Use the dialog box to specify information about the connection
(see Section 4.5, "Create/Edit/Select Database Connection").
To edit the information about an existing database connection, right-click the
connection name in the Connections navigator display and select Properties. Use the
dialog box to modify information about the connection (see Section 4.5,
"Create/Edit/Select Database Connection").
To export information about the existing database connections into an XML file that
you can later use for importing connections, right-click Connections in the
Connections navigator display and select Export Connections. Use the dialog box to
specify the connections to be exported (see Section 4.13, "Export/Import Connection
Descriptors").
To import connections that had previously been exported (adding them to any
connections that may already exist in SQL Developer), right-click Connections in the
Connections navigator display and select Import Connections. Use the dialog box to
specify the connections to be imported (see Section 4.13, "Export/Import Connection
Descriptors").
To perform remote debugging if you are using the Sun Microsystem's Java Platform
Debugger Architecture (JPDA) and you would like the debugger to listen so that a

Entering and Modifying Data
SQL Developer Concepts and Usage 1-15
debuggee can attach to the debugger, right-click the connection name in the
Connections navigator display and select Remote Debug. Use the dialog box to
specify remote debugging information (see Section 4.33, "Debugger - Attach to JPDA").
To estimate or compute statistics for objects in a database schema, right-click the
connection name in the Connections navigator display and select Gather Schema
Statistics. Statistics are used to optimize SQL execution.
To have the PL/Scope tool collect data for all identifiers in PL/SQL source programs,
including identifiers in package bodies, right-click the connection name in the
Connections navigator display and select Toggle PL/Scope Identifier Collection. This
toggles the setting between IDENTIFIERS:ALL (affects only the PL/SQL code
compiled after you specify it) and IDENTIFIERS:NONE. PL/Scope is a
compiler-driven tool that collects and organizes data about user-defined identifiers
from PL/SQL source code. For information about using PL/Scope, see Oracle Database
Advanced Application Developer's Guide.
To delete a connection (that is, delete it from SQL Developer, not merely disconnect
from the current connection), right-click the connection name in the Connections
navigator display and select Delete. Deleting a connection does not delete the user
associated with that connection.
To connect using an existing connection, expand its node in the Connections navigator,
or right-click its name and select Connect. A SQL Worksheet window is also opened
for the connection (see Section 1.7, "Using the SQL Worksheet").
To disconnect from the current connection, right-click its name in the Connections
navigator and select Disconnect.
Sharing of Connections
By default, each connection in SQL Developer is shared when possible. For example, if
you open a table in the Connections navigator and two SQL Worksheets using the
same connection, all three panes use one shared connection to the database. In this
example, a commit operation in one SQL Worksheet commits across all three panes. If
you want a dedicated session, you must duplicate your connection and give it another
name. Sessions are shared by name, not connection information, so this new
connection will be kept separate from the original.
Advanced Security for JDBC Connection to the Database
You are encouraged to use Oracle Advanced Security to secure a JDBC connection to
the database. Both the JDBC OCI and the JDBC Thin drivers support at least some of
the Oracle Advanced Security features. If you are using the OCI driver, you can set
relevant parameters in the same way that you would in any Oracle client setting. The
JDBC Thin driver supports the Oracle Advanced Security features through a set of
Java classes included with the JDBC classes in a Java Archive (JAR) file and supports
security parameter settings through Java properties objects.
For more information about using Oracle Advanced Security, see Oracle Database JDBC
Developer's Guide and Reference.
1.5 Entering and Modifying Data
You can use SQL Developer to enter data into tables and to edit and delete existing
table data. To do any of these operations, select the table in the Connections navigator,
then click the Data tab in the table detail display. The following figure shows the Data
pane for a table named BOOKS, with a filter applied to show only books whose rating
is 10, and after the user has clicked in the Title cell for the first book.
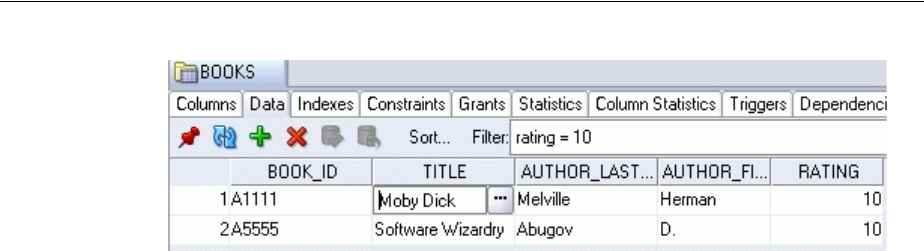
Running and Debugging Functions and Procedures
1-16 Oracle Database SQL Developer User’s Guide
Icons and other controls under the Data tab provide the following options:
■Freeze View (the pin) keeps that object’s tab and information in the window when
you click another object in the Connections navigator; a separate tab and display
are created for that other object. If you click the pin again, the object’s display is
available for reuse.
■Refresh queries the database to update the data display. If a filter is specified, the
refresh operation uses the filter.
■Insert Row adds an empty row after the selected row, for you to enter new data.
■Delete Selected Row(s) marks the selected rows for deletion. The actual deletion
does not occur until you commit changes.
■Commit Changes ends the current transaction and makes permanent all changes
performed in the transaction.
■Rollback Changes undoes any work done in the current transaction.
■Sort displays a dialog box for selecting columns to sort by. For each column, you
can specify ascending or descending order, and you can specify that null values be
displayed first.
■Filter enables you to enter a SQL predicate (WHERE clause text without the
WHERE keyword) for limiting the display of data. For example, to show only
rows where the RATING column value is equal to 10, specify: rating = 10
■Actions displays a menu with actions relevant to the table.
When you enter a cell in the grid, you can directly edit the data for many data types,
and for all data types you can click the ellipsis (...) button to edit the data. For binary
data you cannot edit the data in the cell, but must use the ellipsis button.
In the Data pane for a table or view, you can split the display vertically or horizontally
to see two (or more) parts independently by using the split box (thin blue rectangle),
located to the right of the bottom scroll bar and above the right scroll bar.
In the Data pane, the acceptable format or formats for entering dates may be different
from the date format required by SQL*Plus.
1.6 Running and Debugging Functions and Procedures
You can use SQL Developer to run and debug PL/SQL functions and procedures.
■To run a function or procedure, click its name in the Connections navigator; then
either right-click and select Run, or click the Edit icon and then click the Run icon
above its source listing.
■To debug a function or procedure, click its name in the Connections navigator. If
the procedure in its current form has not already been compiled for debug,

Running and Debugging Functions and Procedures
SQL Developer Concepts and Usage 1-17
right-click and select Compile for Debug. Then click the Edit icon and click the
Debug icon above its source listing.
In both cases, a code editing window is displayed. The following figure shows the
code editing window being used to debug a procedure named LIST_A_RATING2,
which is used for tutorial purposes in Section 3.7, "Debugging a PL/SQL Procedure".
The code editing window has the following tabs:
■The Source tab displays a toolbar and the text of the function or procedure, which
you can edit. You can set and unset breakpoints for debugging by clicking to the
left of the thin vertical line beside each statement with which you want to associate
a breakpoint. (When a breakpoint is set, a red circle is displayed.)
■The Privileges tab displays, for each privilege associated with the function or
procedure, the grantor and grantee, the object name, and whether the grantee can
grant the privilege to other users.
■The Dependencies tab shows any objects that this function or procedure
references, and any objects that reference this function or procedure.
The Source tab toolbar has the icons shown in the following figure.
■Run starts normal execution of the function or procedure, and displays the results
in the Running - Log tab.

Running and Debugging Functions and Procedures
1-18 Oracle Database SQL Developer User’s Guide
■Debug starts execution of the function or procedure in debug mode, and displays
the Debugging - Log tab, which includes the debugging toolbar for controlling the
execution.
■Compile performs a PL/SQL compilation of the function or procedure.
■Compile for Debug performs a PL/SQL compilation of the function or procedure
so that it can be debugged.
The Debugging - Log tab under the code text area contains the debugging toolbar and
informational messages. The debugging toolbar has the icons shown in the following
figure.
■Find Execution Point goes to the next execution point.
■Resume continues execution.
■Step Over bypasses the next method and goes to the next statement after the
method.
■Step Into goes to the first statement in the next method.
■Step Out leaves the current method and goes to the next statement.
■Step to End of Method goes to the last statement of the current method.
■Pause halts execution but does not exit, thus allowing you to resume execution.
■Terminate halts and exits the execution. You cannot resume execution from this
point; instead, to start running or debugging from the beginning of the function or
procedure, click the Run or Debug icon in the Source tab toolbar.
■Garbage Collection removes invalid objects from the cache in favor of more
frequently accessed and more valid objects.
The Breakpoints tab under the code text area displays breakpoints, both
system-defined and user-defined.
The Smart Data tab under the code text area displays information about variables
associated with breakpoints.
The Data tab under the code text area displays information about all variables.
The Watches tab under the code text area displays information about watchpoints.
If the function or procedure to be debugged is on a remote system, see also
Section 1.6.1, "Remote Debugging".
1.6.1 Remote Debugging
To debug a procedure or function for a connection where the database is on a different
host than the one on which you are running SQL Developer, you can perform remote
debugging. Remote debugging involves many of the steps as for local debugging;
however, do the following before you start the remote debugging:
1. Use an Oracle client such as SQL*Plus to issue the debugger connection command.
Whatever client you use, make sure that the session which issues the debugger
connection commands is the same session which executes your PL/SQL program
containing the breakpoints. For example, if the name of the remote system is
remote1, use the following SQL*Plus command to open a TCP/IP connection to
that system and the port for the JDWP session:

Using the SQL Worksheet
SQL Developer Concepts and Usage 1-19
EXEC DBMS_DEBUG_JDWP.CONNECT_TCP('remote1', '4000');
The first parameter is the IP address or host name of the remote system, and the
second parameter is the port number on that remote system on which the
debugger is listening.
2. Right-click the connection for the remote database, select Remote Debug, and
complete the information in the Debugger - Attach to JPDA dialog box.
Then, follow the steps that you would for local debugging (for example, see
Section 3.7, "Debugging a PL/SQL Procedure").
1.7 Using the SQL Worksheet
You can use the SQL Worksheet to enter and execute SQL, PL/SQL, and SQL*Plus
statements. You can specify any actions that can be processed by the database
connection associated with the worksheet, such as creating a table, inserting data,
creating and editing a trigger, selecting data from a table, and saving that data to a file.
You can display a SQL Worksheet by right-clicking a connection in the Connections
navigator and selecting Open SQL Worksheet, by selecting Tools and then SQL
Worksheet, or by clicking the Use SQL Worksheet icon under the menu bar. In the
Select Connection dialog box, select the database connection to use for your work with
the worksheet. You can also use that dialog box to create and edit database
connections. (You have a SQL Worksheet window open automatically when you open
a database connection by enabling the appropriate SQL Developer user preference
under Database Connections.)
The SQL Worksheet has the user interface shown in the following figure:
SQL Worksheet toolbar (under the SQL Worksheet tab): Contains icons for the
following operations:

Using the SQL Worksheet
1-20 Oracle Database SQL Developer User’s Guide
■Execute Statement executes the statement at the mouse pointer in the Enter SQL
Statement box. The SQL statements can include bind variables and substitution
variables of type VARCHAR2 (although in most cases, VARCHAR2 is
automatically converted internally to NUMBER if necessary); a pop-up box is
displayed for entering variable values.
■Run Script executes all statements in the Enter SQL Statement box using the Script
Runner. The SQL statements can include substitution variables (but not bind
variables) of type VARCHAR2 (although in most cases, VARCHAR2 is
automatically converted internally to NUMBER if necessary); a pop-up box is
displayed for entering substitution variable values.
■Commit writes any changes to the database, and ends the transaction; also clears
any output in the Results and Script Output panes.
■Rollback discards any changes without writing them to the database, and ends
the transaction; also clears any output in the Results and Script Output panes.
■Cancel stops the execution of any statements currently being executed.
■SQL History displays a dialog box with information about SQL statements that
you have executed. You can save statements to a file, or append to or overwrite
statements on the worksheet (see Section 4.78, "SQL History List").
■Execute Explain Plan generates the execution plan for the statement (internally
executing the EXPLAIN PLAN statement). To see the execution plan, click the
Explain tab. For more information, see Section 1.7.3, "Execution Plan".
■Autotrace generates trace information for the statement. To see the execution plan,
click the Autotrace tab. For more information, see Section 1.7.3, "Execution Plan".
■Clear erases the statement or statements in the Enter SQL Statement box.
■To the right of these icons is a drop-down list for changing the database
connection to use with the worksheet.
The right-click menu includes the preceding SQL Worksheet toolbar operations, plus
the following operations:
■Open File opens a selected SQL script file in the Enter SQL Statement box.
■Save File saves the contents of the Enter SQL Statement box to a file.
■Print File prints the contents of the Enter SQL Statement box.
■Cut, Copy, Paste, and Select All have the same meanings as for normal text
editing operations.
■Query Builder opens the Query Builder dialog box, where you can create a
SELECT statement by dragging and dropping table and view names and by
graphically specifying columns and other elements of the query.
■Format SQL formats the SQL statement (capitalizing the names of statements,
clauses, keywords, and so on).
■Describe, if the name of a database object is completely selected, displays a
window with tabs and information appropriate for that type of object (see
Section 4.34, "Describe Object Window").
■Save Snippet opens the Save Snippet (User-Defined) dialog box with the selected
text as the snippet text.
Enter SQL Statement: The statement or statements that you intend to execute. For
multiple statements, each non-PL/SQL statement must be terminated with either a
semicolon or (on a new line) a slash (/), and each PL/SQL statement must be

Using the SQL Worksheet
SQL Developer Concepts and Usage 1-21
terminated with a slash (/) on a new line. SQL keywords are automatically
highlighted. To format the statement, right-click in the statement area and select
Format SQL.
You can drag some kinds of objects from the Connections navigator and drop them
into the Enter SQL Statement box:
■If you drag and drop a table or view, a SELECT statement is constructed with all
columns in the table or view. You can then edit the statement, for example,
modifying the column list or adding a WHERE clause.
■If you drag and drop a function or procedure, a snippet-like text block is
constructed for you to edit when including that object in a statement.
Tab s display panes with the following information:
■Results: Displays the results of the most recent Execute Statement operation.
■Explain: Displays the output if you clicked the Explain Execution Plan icon (see
Section 1.7.3, "Execution Plan").
■Script Output: Displays the output if you clicked the Run Script icon (see
Section 1.7.2, "Script Runner").
■DBMS Output: Displays the output of DBMS_OUTPUT package statements (see
Section 1.7.5, "DBMS Output Pane").
■OWA Output: Displays Oracle Web Agent (MOD_PLSQL) output (see
Section 1.7.6, "OWA Output Pane").
1.7.1 SQL*Plus Statements Supported and Not Supported in SQL Worksheet
The SQL Worksheet supports some SQL*Plus statements. SQL*Plus statements must
be interpreted by the SQL Worksheet before being passed to the database; any
SQL*Plus that are not supported by the SQL Worksheet are ignored and not passed to
the database.
The following SQL*Plus statements are supported by the SQL Worksheet:
@
@@
acc[ept]
conn[ect]
cl[ear]
def[ine]
desc[ribe]
doc[ument]
exec[ute]
exit (Stops execution and reinstates the specified connection)
ho[st]
pau[se]
pro[mpt]
quit (Stops execution and reinstates the specified connection)
rem[ark]
set pau[se] {ON | OFF}
sta[rt]
timi[ng]
undef[ine]
whenever
xquery
The following SQL*Plus statements are not supported by the SQL Worksheet:
a[ppend]

Using the SQL Worksheet
1-22 Oracle Database SQL Developer User’s Guide
archive
attr[ibute]
bre[ak]
bti[tle]
c[hange]
col[ulmn]
comp[ute]
copy
del
disc[onnect]
ed[it]
get
help
i[nput]
l[ist]
newpage
oradebug
passw[ord]
print
r[un]
recover
repf[ooter]
reph[eader]
sav[e]
sho[w]
shu[tdown]
spo[ol]
startup
store
tti[tle]
var[iable]
1.7.2 Script Runner
The script runner emulates a limited set of SQL*Plus features. If you do not have
SQL*Plus on your system, you can often enter SQL and SQL*Plus statements and
execute them by clicking the Run Script icon. The Script Output pane displays the
output.
The SQL*Plus features available in the script runner include @, @@, CONNECT, EXIT,
QUIT, UNDEFINE, WHENEVER, and substitution variables. For example, to run a
script named c:\myscripts\mytest.sql, type @c:\myscripts\mytest in the Enter SQL
Statement box, and click the drop-down next to the Execute Statement icon and select
Run Script.
The following considerations apply to using the SQL Developer script runner:
■You cannot use bind variables. (The Execute SQL Statement feature does let you
use bind variables of type VARCHAR2, NUMBER, and DATE.)
■For substitution variables, the syntax &&variable assigns a permanent variable
value, and the syntax &variable assigns a temporary (not stored) variable value.
■For EXIT and QUIT, commit is the default behavior, but you can specify rollback.
In either case, the context is reset: for example, WHENEVER command
information and substitution variable values are cleared.
■DESCRIBE works for most, but not all, object types for which it is supported in
SQL*Plus.
■For SQL*Plus commands that are not supported, a warning message is displayed.

Using the SQL Worksheet
SQL Developer Concepts and Usage 1-23
■SQL*Plus comments are ignored.
If you have SQL*Plus available on your system, you may want to use it instead of the
script runner. To start SQL*Plus from SQL Developer, click Tools and then SQL*Plus.
For information about SQL*Plus, see Section 1.8, "Using SQL*Plus".
1.7.3 Execution Plan
The Execute Explain Plan icon generates the execution plan, which you can see by
clicking the Explain tab. The execution plan is the sequence of operations that will be
performed to execute the statement. An execution plan shows a row source tree with
the hierarchy of operations that make up the statement. For each operation, it shows
the ordering of the tables referenced by the statement, access method for each table
mentioned in the statement, join method for tables affected by join operations in the
statement, and data operations such as filter, sort, or aggregation.
In addition to the row source tree, the plan table displays information about
optimization (such as the cost and cardinality of each operation), partitioning (such as
the set of accessed partitions), and parallel execution (such as the distribution method
of join inputs). For more information, see the chapter about using EXPLAIN PLAN in
Oracle Database Performance Tuning Guide.
1.7.4 Autotrace Pane
The Autotrace pane displays trace-related information when you execute the SQL
statement by clicking the Autotrace icon. Most of the specific information displayed is
determined by the SQL Developer Preferences for Database: Autotrace Parameters.
If you cancel a long-running statement, partial execution statistics are displayed.
This information can help you to identify SQL statements that will benefit from
tuning. For example, you may be able to optimize predicate handling by transitively
adding predicates, rewriting predicates using Boolean algebra principles, moving
predicates around in the execution plan, and so on. For more information about
tracing and autotrace, see the chapter about tuning in SQL*Plus User's Guide and
Reference.
To use the autotrace feature, the database user for the connection must have the
SELECT_CATALOG_ROLE privilege.
1.7.5 DBMS Output Pane
The PL/SQL DBMS_OUTPUT package enables you to send messages from stored
procedures, packages, and triggers. The PUT and PUT_LINE procedures in this
package enable you to place information in a buffer that can be read by another
trigger, procedure, or package. In a separate PL/SQL procedure or anonymous block,
you can display the buffered information by calling the GET_LINE procedure. The
DBMS Output pane is used to display the output of that buffer. This pane contains
icons and other controls for the following operations:
■Enable/Disable DBMS Output: Toggles the SET SERVEROUTPUT setting
between ON and OFF. Setting server output ON checks for any output that is
placed in the DBMS_OUTPUT buffer, and any output is displayed in the pane.
■Clear: Erases the contents of the pane.
■Save: Saves the contents of the pane to a file that you specify.
■Print: Prints the contents of the pane.

Using SQL*Plus
1-24 Oracle Database SQL Developer User’s Guide
■Buffer Size: For databases before Oracle Database 10.2, limits the amount of data
that can be stored in the DBMS_OUTPUT buffer. The buffer size can be between 1
and 1000000 (1 million).
■Poll: The interval (in seconds) at which SQL Developer checks the DBMS_
OUTPUT buffer to see if there is data to print. The poll rate can be between 1 and
15.
1.7.6 OWA Output Pane
OWA (Oracle Web Agent) or MOD_PLSQL is an Apache (Web Server) extension
module that enables you to create dynamic Web pages from PL/SQL packages and
stored procedures. The OWA Output pane enables you to see the HTML output of
MOD_PLSQL actions that have been executed in the SQL Worksheet. This pane
contains icons for the following operations:
■Enable/Disable OWA Output: Enables and disables the checking of the OWA
output buffer and the display of OWA output to the pane.
■Clear: Erases the contents of the pane.
■Save: Saves the contents of the pane to a file that you specify.
■Print: Prints the contents of the pane.
1.8 Using SQL*Plus
You can use the SQL*Plus command-line interface to enter SQL and PL/SQL
statements accessing the database associated with a specified connection. To display
the SQL*Plus command window, from the Tools menu, select SQL*Plus.
To use this feature, the system on which you are using SQL Developer must have an
Oracle home directory or folder, with a SQL*Plus executable under that location. If the
location of the SQL*Plus executable is not already stored in your SQL Developer
preferences, you are asked to specify its location (see Section 4.79, "SQL*Plus
Location").
If you do not have a SQL*Plus executable on your system, you can execute some
SQL*Plus statements using the SQL Worksheet (see Section 1.7.1, "SQL*Plus
Statements Supported and Not Supported in SQL Worksheet"), and you can also use
the SQL Developer script runner feature to emulate a limited set of SQL*Plus features
(see Section 1.7.2, "Script Runner").
1.9 Using Snippets to Insert Code Fragments
Snippets are code fragments, such as SQL functions, Optimizer hints, and
miscellaneous PL/SQL programming techniques. Some snippets are just syntax, and
others are examples. You can insert and edit snippets when you are using the SQL
Worksheet or creating or editing a PL/SQL function or procedure.
To display snippets, from the View menu, select Snippets. In the snippets window (on
the right side), use the drop-down to select a group (such as Aggregate Functions or
Character Functions). In most cases, the fragments in each group do not represent all
available objects in that logical grouping, or all formats and options of each fragment
shown. For complete and detailed information, see the Oracle Database
documentation.
A Snippets button is placed in the right window margin, so that you can display the
snippets window if it becomes hidden.

Using DB Object Search to Find Database Objects
SQL Developer Concepts and Usage 1-25
To insert a snippet into your code in a SQL Worksheet or in a PL/SQL function or
procedure, drag the snippet from the snippets window and drop it into the desired
place in your code; then edit the syntax so that the SQL function is valid in the current
context. To see a brief description of a SQL function in a tooltip, hold the pointer over
the function name.
For example, you could type SELECT and then drag CONCAT(char1, char2) from the
Character Functions group. Then, edit the CONCAT function syntax and type the rest
of the statement, such as in the following:
SELECT CONCAT(title, ' is a book in the library.') FROM books;
1.9.1 User-Defined Snippets
You can create and edit snippets. User-defined snippets are intended mainly to enable
you to supplement the Oracle-supplied snippets, although you are also permitted to
replace an Oracle-supplied snippet with your own version.
When you create a user-defined snippet, you can add it to one of the Oracle-supplied
snippet categories (such as Aggregate Functions) or to a category that you create. If
you add a snippet to an Oracle-supplied category and if your snippet has the same
name as an existing snippet, your snippet definition replaces the existing one. (If you
later upgrade to a new version of SQL Developer and if you choose to preserve your
old settings, your old user-defined snippets will replace any Oracle-supplied snippets
of the same name in the new version of SQL Developer.)
To create a snippet, do any of the following:
■Open the Snippets window and click the Add User Snippets icon.
■Select text for the snippet in the SQL Worksheet window, right-click, and select
Save Snippet.
■Click the Add User Snippet icon in the Edit Snippets (User-Defined) dialog box.
To edit an existing user-defined snippet, click the Edit User Snippets icon in the
Snippets window.
Information about user-defined snippets is stored in a file named UserSnippets.xml
under the directory for user-specific information. For information about the location of
this information, see Section 1.13, "Location of User-Related Information".
1.10 Using DB Object Search to Find Database Objects
You can use the DB Object Search pane to find database objects associated with an
Oracle database connection and to open editing panes to work with those objects. To
move to the Db Object Search pane or to display it if it is not visible, from the View
menu, select DB Object Search.
The following figure shows the DB Object Search pane with results from a search for
all objects associated with a connection named stacd05_hr that start with EMPLOYEE.
(The pane may be displayed on the right side of the SQL Developer window or at the
bottom.)

Reports
1-26 Oracle Database SQL Developer User’s Guide
To find objects for an Oracle connection, click Search, select the connection name, enter
an object name or a string containing one or more wildcard characters, and press the
Enter key. To view or edit one of the objects, double-click its name in the DB Object
Search pane.
You can detach, move, and dock the DB Object Search pane by clicking and holding
the tab, and dragging and positioning the pane.
1.11 Reports
SQL Developer provides many reports about the database and its objects. You can also
create your own user-defined reports. To display reports, click the Reports tab on the
left side of the window (see SQL Developer User Interface). If this tab is not visible,
select View and then Reports.
Individual reports are displayed in tabbed panes on the right side of the window; and
for each report, you can select (in a drop-down control) the database connection for
which to display the report. For reports about objects, the objects shown are only those
visible to the database user associated with the selected database connection, and the
rows are usually ordered by Owner. The detail display pane for a report includes the
following icons at the top:
■Freeze View (the pin) keeps that report in the SQL Developer window when you
click another report in the Reports navigator; a separate tab and detail view pane
are created for that other report. If you click the pin again, the report’s detail view
pane is available for reuse.
■Run Report updates the detail view pane display by querying the database for the
latest information.
■Run Report in SQL Worksheet displays the SQL statement used to retrieve the
information for a report in a SQL Worksheet pane, where you can view, edit, and
run the statement (see Section 1.7, "Using the SQL Worksheet").
The time required to display specific reports will vary, and may be affected by the
number and complexity of objects involved, and by the speed of the network
connection to the database.
For most reports that contain names of database objects, you can double-click the
object name in the report display pane (or right-click the object name and select Go To)
to display that object in a detail view pane, just as if you had selected that object using
the Connections navigator.
To export a report into an XML file that can be imported later, right-click the report
name in the Reports navigator display and select Export. To import a report that had
previously been exported, select the name of the report folder name (such as a
user-defined folder) in which to store the imported report, right-click, and select
Import.

Reports
SQL Developer Concepts and Usage 1-27
You can create a shared report from an exported report by clicking Tools, then
Preferences, and using the Database: User-Defined Extensions pane to add a row with
Type as REPORT and Location specifying the exported XML file. The next time you
restart SQL Developer, the Reports navigator will have a Shared Reports folder
containing that report.
To import connections that had previously been exported (adding them to any
connections that may already exist in SQL Developer), right-click Connections in the
Connections navigator display and select Import Connections. Use the dialog box to
specify the connections to be imported (see Section 4.13, "Export/Import Connection
Descriptors").
Bind Variables for Reports
For some reports, you are prompted for bind variables before the report is generated.
These bind variables enable you to further restrict the output. The default value for all
bind variables is null, which implies no further restrictions. To specify a bind variable,
select the variable name and type an entry in the Value field. Any bind variable values
that you enter are case insensitive, all matches are returned where the value string
appears anywhere in the name of the relevant object type.
Related Topics
SQL Developer Concepts and Usage
SQL Developer User Interface
Using the SQL Worksheet
SQL Developer Concepts and Usage
1.11.1 About Your Database reports
The About Your Database reports list release information about the database
associated with the selected connection. The reports include Version Banner (database
settings) and National Language Support Parameters (NLS_xxx parameter values for
globalization support).
1.11.2 Database Administration reports
Database Administration reports list usage information about system resources. This
information can help you to manage storage, user accounts, and sessions efficiently.
(The user for the database connection must have the DBA role to see most Database
Administration reports.)
Database Parameters: Provide information about all database parameters or only
those parameters that are not set to their default values.
Storage: Provide usage and allocation information for tablespaces and data files.
Sessions: Provide information about sessions, selected and ordered by various criteria.
Cursors: Provide information about cursors, including cursors by session (including
open cursors and cursor details.
All Tables: Contains the reports that are also grouped under Table reports, including
Quality Assurance reports.
Top SQ L : Provide information about SQL statements, selected and ordered by various
criteria. This information might help you to identify SQL statements that are being
executed more often than expected or that are taking more time than expected.

Reports
1-28 Oracle Database SQL Developer User’s Guide
Users: Provide information about database users, selected and ordered by various
criteria. For example, you can find out which users were created most recently, which
user accounts have expired, and which users use object types and how many objects
each owns.
1.11.3 Table reports
Table reports list information about tables owned by the user associated with the
specified connection. This information is not specifically designed to identify problem
areas; however, depending on your resources and requirements, some of the
information might indicate things that you should monitor or address.
For table reports, the owner is the user associated with the database connection.
User Tables: Displays information about either all tables or those tables containing the
string that you specify in the Enter Bind Variables dialog box (uncheck Null in that box
to enter a string).
Columns: For each table, lists each column, its data type, and whether it can contain a
null value.
Datatype Occurrences: For each table owner, lists each data type and how many times
it is used.
Comments for tables and columns: For each table and for each column in each table,
lists the descriptive comments (if any) associated with it. Also includes a report of
tables without comments. If database developers use the COMMENT statement when
creating or modifying tables, this report can provide useful information about the
purposes of tables and columns
Constraints: For each table, lists each associated constraint, including its type (unique
constraint, check constraint, primary key, foreign key) and status (enabled or
disabled).
Enabled Constraints and Disabled Constraints: For each constraint with a status of
enabled or disabled, lists the table name, constraint name, constraint type (unique
constraint, check constraint, primary key, foreign key), and status. A disabled
constraint is not enforced when rows are added or modified; to have a disabled
constraint enforced, you must edit the table and set the status of the constraint to
Enabled (see the appropriate tabs for the Create/Edit Table (with advanced options)
dialog box).
Primary Key Constraints: For primary key constraint, lists information that includes
the owner, the table name, the constraint name, the constraint status (enabled or
disabled), and the column name.
Unique Constraints: For each unique constraint, lists information that includes the
owner, the table name, the constraint name, the constraint status (enabled or disabled),
and the column name.
Foreign Key Constraints: For each foreign key constraint, lists information that
includes the owner, the table name, the constraint name, the column that the constraint
is against, the table that the constraint references, and the constraint in the table that is
referenced.
Check Constraints: For each check constraint, lists information that includes the
owner, the table name, the constraint name, the constraint status (enabled or disabled),
and the constraint specification.
Statistics: For each table, lists statistical information, including when it was last
analyzed, the total number of rows, the average row length, and the table type. In

Reports
SQL Developer Concepts and Usage 1-29
addition, specialized reports order the results by most rows and largest average row
length.
Storage - Tables by Tablespace: For each tablespace, lists the number of tables and the
total number of megabytes currently allocated for the tables.
Storage - Tablespaces: For each table, lists the tablespace for the table and the number
of megabytes currently allocated for the table.
Organization: Specialized reports list information about partitioned tables, clustered
tables, and index-organized tables.
Quality Assurance reports
Quality assurance reports are table reports that identify conditions that are not
technically errors, but that usually indicate flaws in the database design. These flaws
can result in various problems, such as logic errors and the need for additional
application coding to work around the errors, as well as poor performance with
queries at run time.
Tables without Primary Keys: Lists tables that do not have a primary key defined. A
primary key is a column (or set of columns) that uniquely identifies each row in the
table. Although tables are not required to have a primary key, it is strongly
recommended that you create or designate a primary key for each table. Primary key
columns are indexed, which enhances performance with queries, and they are
required to be unique and not null, providing some "automatic" validation of input
data. Primary keys can also be used with foreign keys to provide referential integrity.
Tables without Indexes: Lists tables that do not have any indexes. If a column in a
table has an index defined on it, queries that use the column are usually much faster
and more efficient than if there is no index on the column, especially if there are many
rows in the table and many different data values in the column.
Tables with Unindexed Foreign Keys: Lists any foreign keys that do not have an
associated index. A foreign key is a column (or set of columns) that references a
primary key: that is, each value in the foreign key must match a value in its associated
primary key. Foreign key columns are often joined in queries, and an index usually
improves performance significantly for queries that use a column. If an unindexed
foreign key is used in queries, you may be able to improve run-time performance by
creating an index on that foreign key.
1.11.4 PL/SQL reports
PL/SQL reports list information about PL/SQL packages, function, and procedures,
and about types defined in them.
Program Unit Arguments: For each argument (parameter) in a program unit, lists the
program unit name, the argument position (1, 2, 3, and so on), the argument name,
and whether the argument is input-only (In), output-only (Out), or both input and
output (In/Out).
Unit Line Counts: For each PL/SQL object, lists the number of source code lines. This
information can help you to identify complex objects (for example, to identify code
that may need to be simplified or divided into several objects).
Search Source Code: For each PL/SQL object, lists the source code for each line, and
allows the source to be searched for occurrences of the specified variable.

Reports
1-30 Oracle Database SQL Developer User’s Guide
1.11.5 Security reports
Security reports list information about users that have been granted privileges, and in
some cases about the users that granted the privileges. This information can help you
(or the database administrator if you are not a DBA) to understand possible security
issues and vulnerabilities, and to decide on the appropriate action to take (for
example, revoking certain privileges from users that do not need those privileges).
Object Grants: For each privilege granted on a specific table, lists the user that granted
the privilege, the user to which the privilege was granted, the table, the privilege, and
whether the user to which the privilege was granted can grant that privilege to other
users.
Column Privileges: For each privilege granted on a specific column in a specific table,
lists the user that granted the privilege, the user to which the privilege was granted,
the table, the privilege, and whether the user to which the privilege was granted can
grant that privilege to other users.
Role Privileges: For each granted role, lists the user to which the role was granted, the
role, whether the role was granted with the ADMIN option, and whether the role is
designated as a default role for the user.
System Privileges: For each privilege granted to the user associated with the database
connection, lists the privilege and whether it was granted with the ADMIN option.
Auditing: Lists information about audit policies.
Encryption: Lists information about encrypted columns.
Policies: Lists information about policies.
1.11.6 XML reports
XML reports list information about XML objects.
XML Schemas: For each user that owns any XML objects, lists information about each
object, including the schema URL of the XSD file containing the schema definition.
1.11.7 Jobs reports
Jobs reports list information about jobs running on the database.
Your Jobs: Lists information about each job for which the user associated with the
database connection is the log user, privilege user, or schema user. The information
includes the start time of its last run, current run, and next scheduled run.
All Jobs: Lists information about all jobs running on the database. The information
includes the start time of its last run, current run, and next scheduled run.
1.11.8 Streams reports
Streams reports list information about stream rules.
Your Stream Rules: Lists information about each stream rule for which the user
associated with the database connection is the rule owner or rule set owner. The
information includes stream type and name, rule set owner and name, rule owner and
name, rule set type, streams rule type, and subsetting operation.
All Stream Rules: Lists information about all stream rules. The information includes
stream type and name, rule set owner and name, rule owner and name, rule set type,
streams rule type, and subsetting operation.

Reports
SQL Developer Concepts and Usage 1-31
1.11.9 All Objects reports
All Objects reports list information about objects visible to the user associated with the
database connection.
All Objects: For each object, lists the owner, name, type (table, view, index, and so on),
status (valid or invalid), the date it was created, and the date when the last data
definition language (DDL) operation was performed on it. The Last DDL date can help
you to find if any changes to the object definitions have been made on or after a
specific time.
Invalid Objects: Lists all objects that have a status of invalid.
Object Count by Type: For each type of object associated with a specific owner, lists
the number of objects. This report might help you to identify users that have created
an especially large number of objects, particularly objects of a specific type.
Collection Types: Lists information about for each collection type. The information
includes the type owner, element type name and owner, and type-dependent specific
information.
Dependencies: For each object with references to it, lists information about references
to (uses of) that object.
1.11.10 Data Dictionary reports
Data Dictionary reports list information about the data dictionary views that are
accessible in the database. Examples of data dictionary views are ALL_OBJECTS and
USER_TABLES.
Dictionary Views: Lists each Oracle data dictionary view and (in most cases) a
comment describing its contents or purpose.
Dictionary View Columns: For each Oracle data dictionary view, lists information
about the columns in the view.
1.11.11 User Defined reports
User Defined reports are any reports that are created by SQL Developer users. To
create a user-defined report, right-click the User Defined node under Reports and
select Add Report. A dialog box is displayed in which you specify the report name
and the SQL query to retrieve information for the report (see Section 4.27, "Create/Edit
User Defined Report").
You can organize user-defined reports in folders, and you can create a hierarchy of
folders and subfolders. To create a folder for user-defined reports, right-click the User
Defined node or any folder name under that node and select Add Folder (see
Section 4.28, "Create/Edit User Defined Report Folder").
Information about user-defined reports, including any folders for these reports, is
stored in a file named UserReports.xml under the directory for user-specific
information. For information about the location of this information, see Section 1.13,
"Location of User-Related Information".
For examples of creating user-defined reports, see:
■Section 1.11.11.1, "User-Defined Report Example: Chart"
■Section 1.11.11.2, "User-Defined Report Example: Dynamic HTML"

Reports
1-32 Oracle Database SQL Developer User’s Guide
1.11.11.1 User-Defined Report Example: Chart
This example creates a report displayed as a chart. It uses the definition of the
EMPLOYEES table from the HR schema, which is a supplied sample schema.
Right-click on User Defined Reports and select Add Report. In the Add Report dialog
box, specify a report name; for Style, select Chart; and for SQL, enter the following:
select m.department_id, e.last_name, e.salary
from employees m, employees e
where e.employee_id = m.employee_id
order by 1
The preceding query lists the last name and salary of each employee in each
department, grouping the results by department ID (10, 20, 30, ... 110).
Click the Chart Details tab near the bottom of the box; for Chart Type, select BAR_
VERT_STACK (bar chart, stacked vertically); and click Apply.
Use the Reports navigator to view the newly created user-defined report. For
Connection, specify one that connects to the HR sample schema.
The report is displayed as a chart, part of which is shown in the following illustration.
For example, as you can see, department 50 has mainly employees with the lowest
salaries, and department 90 consists of the three highest-paid employees.
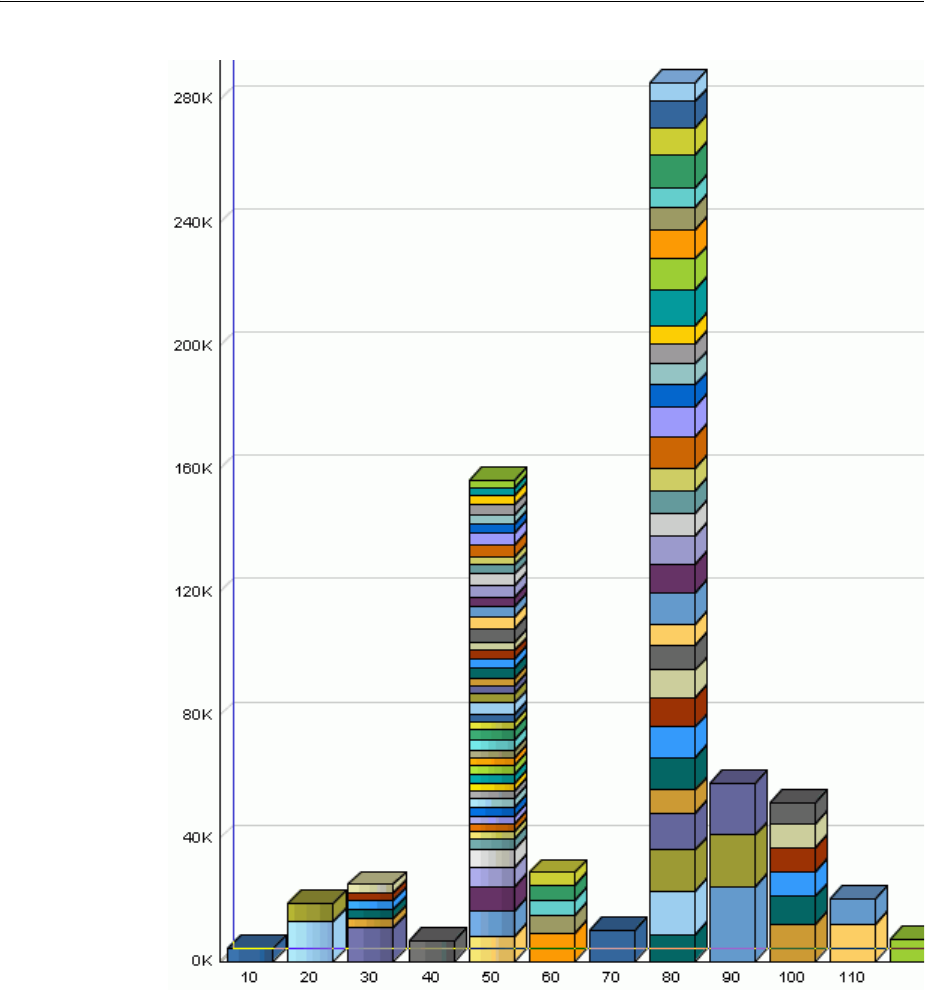
Reports
SQL Developer Concepts and Usage 1-33
1.11.11.2 User-Defined Report Example: Dynamic HTML
This example creates a report using one or more PL/SQL DBMS_OUTPUT statements,
so that the report is displayed as dynamic HTML.
Right-click on User Defined Reports and select Add Report. In the Add Report dialog
box, specify a report name; for Style, select plsql-dbms_output; and for SQL, enter the
following:
begin
dbms_output.put_line ('<H1> This is Level-1 Heading </H1>');
dbms_output.put_line ('<H2> This is a Level-2 Heading </H2>');
dbms_output.put_line ('<p> This is regular paragraph text. </p>');
end;
Click Apply.

SQL Developer Preferences
1-34 Oracle Database SQL Developer User’s Guide
Use the Reports navigator to view the newly created user-defined report. For
Connection, specify any from the list. (This report does not depend on a specific
connection of table.).
The report is displayed as formatted HTML output.
1.12 SQL Developer Preferences
You can customize many aspects of the SQL Developer interface and environment by
modifying SQL Developer preferences according to your preferences and needs. To
modify SQL Developer preferences, select Too l s , then Preferences.
Information about SQL Developer preferences is stored under the directory for
user-specific information. For information about the location of this information, see
Section 1.13, "Location of User-Related Information".
Most preferences are self-explanatory, and this topic explains only those whose
meaning and implications are not obvious. Some preferences involve performance or
system resource trade-offs (for example, enabling a feature that adds execution time),
and other preferences involve only personal aesthetic taste. The preferences are
grouped in the following categories.
1.12.1 Environment
The Environment pane contains options that affect the startup and overall behavior
and appearance of SQL Developer. You can specify that certain operations be
performed automatically at specified times, with the trade-off usually being the extra
time for the operation as opposed to the possibility of problems if the operation is not
performed automatically (for example, if you forget to perform it when you should).
The undo level (number of previous operations that can be undone) and navigation
level (number of open files) values involve slight increases or decreases system
resource usage for higher or lower values.
Automatically Reload Externally Modified Files: If this option is checked, any files
open in SQL Developer that have been modified by an external application are
updated when you switch back to SQL Developer, overwriting any changes that you
might have made. If this option is not checked, changes that you make in SQL
Developer overwrite any changes that might have been made by external applications.
Silently Reload When File Is Unmodified: If this option is checked, you are not asked
if you want to reload files that have been modified externally but not in SQL
Developer. If this option is not checked, you are asked if you want to reload each file
that has been modified externally, regardless of whether it has been modified in SQL
Developer,
Environment: Dockable Windows
The Dockable Windows pane configures the behavior of dockable windows and the
shapes of the four docking areas of SQL Developer: top, bottom, left, and right.
Dockable Windows Always on Top: If this option is checked, dockable windows
always remain visible in front of other windows.
Windows Layout: Click the corner arrows to lengthen or shorten the shape of each
docking area.

SQL Developer Preferences
SQL Developer Concepts and Usage 1-35
Environment: Local History
The Local History pane controls whether information about editing operations on files
opened within SQL Developer is kept. If local history is enabled, you can specify how
long information is retained and the maximum number of revisions for each file.
Environment: Log
The Log pane configures the colors of certain types of log messages and the saving of
log messages to log files.
Save Logs to File: If this option is checked, all output to the Messages - Log window is
saved to log files, where the file name reflects the operation and a timestamp. You are
also asked to specify a Log Directory; and if the specified directory does not already
exist, it is created. Note that if you save log information to files, the number of these
files can become large.
Maximum Log Lines: The maximum number of lines to store in each log file.
1.12.2 Accelerators (Keyboard Shortcuts)
The Accelerators pane enables you to view and customize the accelerator key
mappings (keyboard shortcuts) for SQL Developer.
Category: Select All or a specific category (Code Editor, Database, Debug, Edit, and so
on), to control which actions are displayed.
Actions: The actions for the selected category. When you select an action, any existing
accelerator key mappings are displayed.
Accelerators: Any existing key mappings for the selected action. To remove an existing
key mapping, select it and click Remove.
New Accelerator: The new accelerator key to be associated with the action. Press and
hold the desired modifier key, then press the other key. For example, to associate
Ctrl+J with an action, press and hold the Ctrl key, then press the j key. If any actions
are currently associated with that accelerator key, they are listed in the Current
Assignment box.
Current Assignment: A read-only display of the current action, if any, that is mapped
to the accelerator key that you specified in the New Accelerator box.
Load Preset: Enables you to load a set of predefined key mappings for certain systems
and external editing applications. If you load any preset key mappings that conflict
with changes that you have made, your changes are overwritten.
1.12.3 Code Editor
The Code Editor pane contains general options that affect the appearance and
behavior of SQL Developer when you edit functions, procedures, and packages.
Code Editor: Bookmarks
The Bookmarks pane contains options that determine the persistence and search
behavior for bookmarks that you create when using the code editor.
Code Editor: Caret Behavior
The Caret Behavior pane contains options that determine the shape, color, and
blinking characteristics of the caret (cursor) in the code editor.

SQL Developer Preferences
1-36 Oracle Database SQL Developer User’s Guide
Code Editor: Code Insight
The Code Insight pane contains options for the logical completion (autocomplete
options) of keywords and names while you are coding in the SQL Worksheet.
When you press Ctrl+Space, code insight provides a context-sensitive popup window
that can help you select parameter names. Completion insight provides you with a list
of possible completions at the insertion point that you can use to auto-complete code
you are editing. This list is based on the code context at the insertion point. To exit
code insight at any time, press Esc.
You can enable or disable both completion and parameter insight, as well as set the
time delay for the popup windows.
Code Editor: Code Insight: Completion
The Code Insight: Completion pane contains options for refining the behavior when
matching items are found. For more information, see the explanation for Code Editor:
Code Insight.
Code Editor: Display
The Display pane contains general options for the appearance and behavior of the
code editor.
Text Anti-Aliasing allows smooth-edged characters where possible.
Code Folding Margin allows program blocks in procedures and functions to be
expanded and collapsed in the display.
Visible Right Margin renders a right margin that you can set to control the length of
lines of code.
Automatic Brace Matching controls the highlighting of opening parentheses and
brackets and of blocks when a closing parenthesis or bracket is typed.
Code Editor: Find Options
The Find Options pane determines which options are used by default at SQL
Developer startup for find or find and replace operations. You can choose whether to
use the options in effect from the last SQL Developer session or to use specified
options.
Code Editor: Fonts
The Fonts pane specifies text font options for the code editor.
Display Only Fixed-Width Fonts: If this option is checked, the display of available
font names is restricted to fonts where all characters have the same width.
(Fixed-width fonts are contrasted with proportional-width fonts.)
Code Editor: Line Gutter
The Line Gutter pane specifies options for the line gutter (left margin of the code
editor).
Show Line Numbers: If this option is checked, lines are numbered.
Enable Line Selection by Click-Dragging: If this option is checked, you can select
consecutive lines in the editor by clicking in the gutter and dragging the cursor
without releasing the mouse button.

SQL Developer Preferences
SQL Developer Concepts and Usage 1-37
Code Editor: Printing
The Printing pane specifies options for printing the contents of the code editor. The
Preview pane sample display changes as you select and deselect options.
Code Editor: Printing HTML
The Printing HTML pane specifies options for printing HTML files from the code
editor.
Code Editor: Syntax Colors
The Syntax Colors pane specifies colors for different kinds of syntax elements.
Code Editor: Undo Behavior
The Undo Behavior pane specifies options for the behavior of undo operations
(Ctrl+Z, or Edit, then Undo). Only consecutive edits of the same type are considered; for
example, inserting characters and deleting characters are two different types of
operation.
Allow Navigation-Only Changes to be Undoable: If this option is checked,
navigation actions with the keyboard or mouse can be undone. If this option is not
checked, navigation actions cannot be undone, and only actual changes to the text can
be undone.
1.12.4 Database
The Database pane sets properties for the database connection.
Validate date and time default values: If this option is checked, date and time
validation is used when you open tables.
SQL*Plus Executable: The Windows path or Linux xterm command for the SQL*Plus
executable. If there is no $ORACLE_HOME on your system, there is no SQL*Plus
executable, and you cannot use SQL*Plus with SQL Developer; however, you can still
use many SQL*Plus commands in the SQL Worksheet (see Section 1.7, "Using the SQL
Worksheet", and especially SQL*Plus Statements Supported and Not Supported in
SQL Worksheet).
Default path for storing export: Default path of the directory or folder under which to
store output files when you perform an export operation. To see the current default for
your system, click the Browse button next to this field.
Database: Advanced Parameters
The Advanced Parameters pane specifies options such as the SQL array fetch size and
display options for null values.
Database: Autotrace Parameters
The Autotrace Parameters pane specifies information to be displayed on the Autotrace
pane in the SQL Worksheet.
Database: NLS Parameters
The NLS Parameters pane specifies values for globalization support parameters, such
as the language, territory, sort preference, and date format. These parameter values are
used for SQL Developer session operations, such as for statements executed using the
SQL Worksheet and for the National Language Support Parameters report. Specifying
values in this preferences pane does not apply those values to the underlying database

SQL Developer Preferences
1-38 Oracle Database SQL Developer User’s Guide
itself. To change the database settings, you must change the appropriate initialization
parameters and restart the database.
Note that SQL Developer does not use default values from the current system for
globalization support parameters; instead, SQL Developer, when initially installed, by
default uses parameter values that include the following:
NLS_LANG,"AMERICAN"
NLS_TERR,"AMERICA"
NLS_CHAR,"AL32UTF8"
NLS_SORT,"BINARY"
NLS_CAL,"GREGORIAN"
NLS_DATE_LANG,"AMERICAN"
NLS_DATE_FORM,"DD-MON-RR"
Database: ObjectViewer Parameters
The ObjectViewer Parameters pane specifies whether to freeze object viewer windows,
and display options for the output. The display options will affect the generated DDL
on the SQL tab.
Database: Third Party JDBC Drivers
The Third Party JDBC Drivers pane specifies drivers to be used for connections to
third-party (non-Oracle) databases, such as MySQL or Microsoft SQL Server. (You do
not need to add a driver for connections to Microsoft Access databases.) To add a
driver, click Add Entry and select the path for the driver (for example, C:\Program
Files\MySQL\mysql-connector-java-5.0.4\mysql-connector-java-5.0.
4-bin.jar).
To find a specific third-party JDBC driver, see the Web site for the vendor (for example,
http://www.mysql.com for the MySQL driver).
You must specify a third-party JDBC driver before you can create a database
connection to a third-party database of that associated type. (See the tabs for creating
connections to third-party databases in the Create/Edit/Select Database Connection
dialog box.)
Database: User-Defined Extensions
The User-Defined Extensions pane specifies user-defined extensions that have been
added. You can use this pane to add extensions that are not available through the
Check for Updates feature. (For more information about extensions and checking for
updates, see Section 1.12.7, "Extensions".)
One use of the Database: User-Defined Extensions pane is to create a Shared Reports
folder and to include an exported report under that folder: click Add Row, specify
Type as REPORT, and for Location specify the XML file containing the exported report.
The next time you restart SQL Developer, the Reports navigator will have a Shared
Reports folder containing that report
Database: Worksheet Parameters
Autocommit in SQL Worksheet: If this option is checked, a commit operation is
automatically performed after each INSERT, UPDATE, or DELETE statement executed
using the SQL Worksheet. If this option is not checked, a commit operation is not
performed until you execute a COMMIT statement.
Open a worksheet on connect: If this option is checked, a SQL Worksheet window for
the connection is automatically opened when you open a database connection. If this

SQL Developer Preferences
SQL Developer Concepts and Usage 1-39
option is not checked, you must use the Open SQL Worksheet right-click command or
toolbar icon to open a SQL Worksheet.
Max rows to print in a script: Limits the number of rows displayed.
Default path to look for scripts: The default directory where SQL Developer looks
when you run a script (using @).
Save bind variables to disk on exit: If this option is checked, bind variables that you
enter when running a script are saved on disk for reuse. If you do not want bind
variable values stored on disk (for security or other reasons), be sure not to check this
option.
Database: Worksheet Parameters: General Export Parameters
Custom Export Delimiter: The character to be used as the delimiter when you export
table data in CSV format. This option enables you to use a character other than the
default comma (,) as the CSV delimiter.
1.12.5 Debugger
The Debugger pane contains general options for the SQL Developer debugger. Other
panes contain additional specific kinds of debugger options.
Debugger: Breakpoints
The Breakpoints pane sets the columns to appear in the Breakpoints pane and the
scope of each breakpoint.
Debugger: Breakpoints: Default Actions
The Breakpoints: Default Actions pane sets defaults for actions to occur at breakpoints.
These actions are the same as on the Actions tab in the Create/Edit Breakpoint dialog
box.
Debugger: Data
The Data pane enables you to control the columns to appear in the debugger Data
pane and aspects of how the data is displayed.
Debugger: Inspector
The Inspector pane enables you to control the columns to appear in the debugger
Inspector pane and aspects of how the data is displayed.
Debugger: Smart Data
The Smart Data pane enables you to control the columns to appear in the debugger
Smart Data pane and aspects of how the data is displayed.
Debugger: Stack
The Stack pane enables you to control the columns to appear in the debugger Stack
pane and other options.
Debugger: Watches
The Watches pane enables you to control the columns to appear in the debugger
Watches pane and aspects of how the data is displayed.

SQL Developer Preferences
1-40 Oracle Database SQL Developer User’s Guide
1.12.6 Documentation
The Documentation pane provides options for the display of SQL Developer online
help.
Display in Window: If this option is checked, help is displayed in a separate window.
If this option is not checked, help is displayed in a pane in the SQL Developer User
Interface.
Show Tabs: Controls which tabs appear in the Help Center pane (Table of Contents,
Index, Full Text Search).
1.12.7 Extensions
The Extensions pane determines which optional extensions SQL Developer uses when
it starts. (SQL Developer also uses some mandatory extensions, which users cannot
remove or disable.) If you change any settings, you must exit SQL Developer and
restart it for the new settings to take effect.
Extensions to Use: Controls the specific optional SQL Developer extensions to use at
startup.
Check for Updates: Checks for any updates to the selected optional SQL Developer
extensions, as well as any mandatory extensions. (If the system you are using is behind
a firewall, see the SQL Developer user preferences for Web Browser and Proxy.)
Automatically Check for Updates: If this option is checked, SQL Developer
automatically checks for any updates to the selected optional SQL Developer
extensions and any mandatory extensions at startup.
1.12.8 File Types
The File Types pane determines which file types and extensions will be opened by
default by SQL Developer. The display shows each file extension, the associated file
type, and a check mark if files with that extension are to be opened by SQL Developer
be default, such as when a user double-clicks the file name.
Details area at bottom: You can modify the file type, content type (text or binary), and
whether to open files with this extension automatically by SQL Developer.
To have files with a specific extension be opened by default by SQL Developer, click
the file extension in the list, then check Open with SQL Developer in the Details area.
This overrides any previous application association that may have been in effect for
that file extension.
To add a file extension, click Add and specify the file extension (including the period).
After adding the extension, you can modify its associated information by selecting it
and using the Details area.
1.12.9 Migration
The Migration pane contains options that affect the behavior of SQL Developer when
you migrate schema objects and data from third-party databases to an Oracle
database.
Note: Migration applies only if you are using a version of SQL
Developer that supports migration of third-party databases to Oracle.
Migration support is currently planned for SQL Developer release 1.2.

SQL Developer Preferences
SQL Developer Concepts and Usage 1-41
Default Repository: Migration repository to be used for storing the captured models
and converted models. For information about migrating third-party databases to
Oracle, including how to create a migration repository, see Chapter 2.
Migration: Data Move Options
The Data Move Options pane contains options that affect the behavior when you
migrate data from third-party databases to Oracle Database tables generated by the
migration.
Number of Parallel Data Move Streams: The number of internal connections created
for simultaneous movement of data from the source database to the Oracle tables.
Higher values may shorten the total time required, but will use more database
resources during that time.
Number of Rows to Commit After: During the data move operation, Oracle pauses to
perform an automatic internal commit operation after each number of rows that you
specify are moved from the source database to Oracle tables.
Lower values will cause a successful move operation to take more time; but if a failure
occurs, it is likely that more source records will exist in the Oracle tables and that if the
move operation is resumed, fewer source records will need to be moved. Higher
values will cause a successful move operation to take less time; but if a failure occurs,
it is likely that fewer source records will exist in the Oracle tables and that is the move
operation is resumed, more source records will need to be moved.
Offline: The offline data move options determine the results of files created when you
click Migration, then Generate Scripts, then Generate Data Move Scripts.
Offline Data Script Directory: Default location for scripts for offline data move
operations.
End of Column Delimiter: String to indicate end of column.
End of Row Delimiter: String to indicate end of row.
Migration: Generation Options
The Generation Options pane contains options that determine the results of files
created when you click Migration, then Generate Scripts, then Generate Oracle DDL.
One single file, A file per object, or A file per database: Determines how many files
are created and their relative sizes. Having more files created might be less convenient,
but may allow more flexibility with complex migration scenarios. (See also the
Maximum Number of Lines option.)
Output Directory: Default location in which the files will be created.
Implement ’CREATE’ as ’CREATE OR REPLACE’: Causes CREATE statements in
source database objects to be implemented using CREATE OR REPLACE when the
Oracle syntax allows this.
Generate Comments: Generates comments in the Oracle SQL statements.
Generate Controlling Script: Generates a "master" script for running all the required
files.
Maximum Number of Lines: Sets a maximum number of lines for each file; you then
specify the number.
Migration: Translation Options
The Translation Options pane contains options that relate to conversion of stored
procedures and functions from their source database format to Oracle format.

SQL Developer Preferences
1-42 Oracle Database SQL Developer User’s Guide
Default Source Date Format: Default data format mask for dates in the source data.
Translation Diff Viewer: Several options affect the display when you use the
translation differences viewer feature.
Colors of Levels:
Levels 0 - 3:
Migration: Plugin Preferences: Microsoft SQL Server
The Plugin Preferences: Microsoft SQL Server pane contains options that relate to
conversion of Microsoft SQL Server objects to Oracle.
1.12.10 PL/SQL Compiler
The PL/SQL Compiler pane specifies options for compilation of PL/SQL
subprograms.
Generate PL/SQL Debug Information: If this option is checked, PL/SQL debug
information is included in the compiled code; if this option is not checked, this debug
information is not included. The ability to stop on individual code lines and debugger
access to variables are allowed only in code compiled with debug information
generated.
Types of messages: You can control the display of informational, severe, and
performance-related messages. (The ALL type overrides any individual specifications
for the other types of messages.) For each type of message, you can specify any of the
following:
■No entry (blank): Use any value specified for ALL; and if none is specified, use the
Oracle default.
■Enable: Enable the display of all messages of this category.
■Disable: Disable the display of all messages of this category.
■Error: Enable the display of only error messages of this category.
1.12.11 PL/SQL Debugger
The PL/SQL Debugger pane controls whether the Probe debugger (developed using
the Oracle Probe API) is used to debug PL/SQL.
You should check this option only if you are using a firewall that prevents the database
from connecting to the client, or if the database is on a Java virtual machine where a
recent version of the Java Debug Wire Protocol (JDWP) is not implemented on the
server. Otherwise, leave this option unchecked to use the default debugger.
1.12.12 SQL*Plus
The SQL*Plus pane controls behavior related to SQL*Plus.
SQL*Plus Executable: The Windows path or Linux xterm command for the SQL*Plus
executable. If there is no $ORACLE_HOME on your system, there is no SQL*Plus
executable, and you cannot use SQL*Plus with SQL Developer; however, you can still
use many SQL*Plus commands in the SQL Worksheet (see Section 1.7, "Using the SQL
Worksheet", and especially SQL*Plus Statements Supported and Not Supported in
SQL Worksheet).

Location of User-Related Information
SQL Developer Concepts and Usage 1-43
1.12.13 SQL Formatter
The SQL Formatter pane controls how statements in the SQL Worksheet are formatted
when you click Format SQL. The options include whether to insert space characters or
tab characters when you press the Tab key (and how many characters), uppercase or
lowercase for keywords and identifiers, whether to preserve or eliminate empty lines,
and whether comparable items should be placed or the same line (if there is room) or
on separate lines.
1.12.14 Web Browser and Proxy
The Web Browser and Proxy pane settings are relevant only when you use the Check
for Updates feature (click Help, then Check for Updates), and only if your system is
behind a firewall.
Browser Command Line: To specify a Web browser other than your default browser,
specify the executable file to start that browser. To use your default browser, leave this
field blank.
Use HTTP Proxy Server: Check your Web browser options or preferences for the
appropriate values for these fields.
1.13 Location of User-Related Information
SQL Developer stores user-related information in several places, with the specific
location depending on the operating system and certain environment specifications.
User-related information includes user-defined reports, user-defined snippets, SQL
Worksheet history, and SQL Developer user preferences.
In most cases, your user-related information is stored outside the SQL Developer
installation directory hierarchy, so that it is preserved if you delete that directory and
install a new version. The exception to this is on Windows systems, where SQL
Developer user preferences are stored under the installation directory. To preserve
preferences on Windows systems, use the Check for Updates feature (click Help, then
Check for Updates) to upgrade your system.
The user-related information is stored in or under the following location:
■On Windows systems: the HOME environment variable location, if defined;
otherwise the SQLDEVELOPER_USER_DIR location, if defined; otherwise as
indicated in the following table
■On Linux and Mac OS X systems: the SQLDEVELOPER_USER_DIR location, if
defined; otherwise as indicated in the following table
The following table shows the typical default locations (under a directory or in a file)
for specific types of resources on different operating systems. (Note the period in the
name of any directory or folder named .sqldeveloper.)
Table 1–1 Default Locations for User-Related Information
Resource Type Windows Systems Linux or Mac OS X Systems
User-defined
reports C:\Documents and
Settings\<user-name>\.sqldeveloper\
UserReports.xml
~/.sqldeveloper/UserReports.xml
User-defined
snippets C:\Documents and
Settings\<user-name>\.sqldeveloper\
UserSnippets.xml
~/.sqldeveloper/UserSnippets.xml

Using the Help
1-44 Oracle Database SQL Developer User’s Guide
To specify a nondefault SQLDEVELOPER_USER_DIR location, do either of the
following:
■Set the SQLDEVELOPER_USER_DIR environment variable to specify another
directory path.
■Edit the <sqldeveloper_
install>\sqldeveloper\sqldeveloper\bin\sqldeveloper.conf file
and substitute the desired directory path for SQLDEVELOPER_USER_DIR in the
following line:
SetUserHomeVariable SQLDEVELOPER_USER_DIR
If you want to prevent other users from accessing your user-specific SQL Developer
information, you must ensure that the appropriate permissions are set on the directory
where that information is stored or on a directory above it in the path hierarchy. For
example, on a Windows system you may want to ensure that the sqldeveloper
folder and the <user-name>\.sqldeveloper folder under Documents and
Settings are not shareable; and on a Linux or Mac OS X system you may want to
ensure that the ~/.sqldeveloper directory is not world-readable.
1.14 Using the Help
SQL Developer provides a Help menu and context-sensitive help (click the Help
button or press the F1 key in certain contexts).
By default, help from the Help menu is displayed on the right side of the window,
with the Help Center area on the far right and containing tabs at the bottom. You can
use the Contents, Index, and Search (full-text) tabs or their corresponding Help menu
items. Context-sensitive help is displayed in a separate help window. (To change the
default help behavior, set SQL Developer Documentation preferences.)
For help displayed in the SQL Developer window, you can close individual Help
panes by clicking the X next to their tab names (just as with tabs for tables and other
database objects).
To print a help topic, display it in a Help pane and click the Print icon at the top of the
pane.
The best way to become familiar with the help, and with SQL Developer itself, is
simply to experiment with the Help menu options and the Help button in some dialog
boxes.
SQL history C:\Documents and
Settings\<user-name>\.sqldeveloper\
SqlHistory.xml
~/.sqldeveloper/system/
SQL Worksheet
archive files1C:\Documents and
Settings\<user-name>\.sqldeveloper\
tmp\
~/.sqldeveloper/tmp/
SQL Developer
user preferences <sqldeveloper_
install>\sqldeveloper\sqldeveloper\s
ystem\
~/.sqldeveloper/system/
1SQL Worksheet archive files contain SQL statements that you have entered. These files begin with sqldev
and then have a random number (for example, sqldev14356.sql). If you close SQL Developer with a SQL
Worksheet open that contains statements, you will be prompted to save these files.
Table 1–1 (Cont.) Default Locations for User-Related Information
Resource Type Windows Systems Linux or Mac OS X Systems

For More Information
SQL Developer Concepts and Usage 1-45
1.15 For More Information
For more information about SQL Developer and related topics, you may find the
following resources helpful:
■SQL Developer home page (OTN), which includes links for downloads, a white
papers, tutorials, blogs, a discussion forum, and other sources of information:
http://www.oracle.com/technology/products/database/sql_
developer/
■PL/SQL page on OTN: http://www.oracle.com/technology/tech/pl_
sql/
■Oracle Accessibility site: http://www.oracle.com/accessibility/
■Oracle Corporate site: http://www.oracle.com/
Tip: You can download the online help as a single PDF file from:
http://www.oracle.com/technology/products/database/sql_
developer/pdf/online_help.pdf

For More Information
1-46 Oracle Database SQL Developer User’s Guide

2
Migrating Third-Party Databases 2-1
2 Migrating Third-Party Databases
Migration is the process of copying the schema objects and data from a source
third-party (non-Oracle) database, such as MySQL, Microsoft SQL Server, or Microsoft
Access, to an Oracle database. You can perform the migration in an efficient, largely
automated way: the source schema objects are implemented as Oracle schema objects,
and any related objects (such as sequences and triggers) that are required for the
implementation are automatically created.
Thus, you have two options for working with third-party databases in SQL Developer:
■Creating database connections so that you can view schema objects and data in
these databases
■Migrating these databases to Oracle, to take advantage of the full range of Oracle
Database features and capabilities
This chapter contains the following major sections:
Section 2.1, "Migration Quick Start"
Section 2.2, "Overview of Migration"
Section 2.3, "Preparing a Migration Plan"
Section 2.4, "Before You Start Migrating: General Information"
Section 2.5, "Before You Start Migrating: Source-Specific Information"
Section 2.6, "Capturing the Source Database"
Section 2.7, "Creating and Customizing the Converted Model"
Section 2.8, "Generating the DDL for the Oracle Schema Objects"
Section 2.9, "Migrating the Data"
Section 2.10, "Testing the Oracle Database"
Section 2.11, "Deploying the Oracle Database"
Section 2.12, "Using Migration Reports"
Section 2.13, "SQL Developer User Interface for Migration"
Note: The information about migration applies only if you are using
a version of SQL Developer that supports migration of third-party
databases to Oracle. Migration support is currently planned for SQL
Developer release 1.2.

Migration Quick Start
2-2 Oracle Database SQL Developer User’s Guide
2.1 Migration Quick Start
To migrate a third-party database to Oracle, the basic actions are: prepare for the
migration, create or select a migration repository, capture the source database, convert
the captured database, generate and run DDL for the new Oracle schema objects, and
optionally move data from the source database to the new database. (Some steps after
step 1 can be performed in a different order.)
1. Prepare for the migration by reading the appropriate related topics in Chapter 2,
"Migrating Third-Party Databases".
2. Create a migration repository in a new or existing Oracle connection. You may
find it simple and convenient to create separate Oracle database user and
connection for migration work. Then, select the connection and create the
repository. For example:
a. Create an Oracle user named MIGRATIONS with default tablespace USER
and temporary tablespace TEMP; and grant it at least RESOURCE, CREATE
SESSION, and CREATE VIEW privileges.
b. Create a database connection named Migration_Repository that connects to
the MIGRATIONS user.
c. Right-click the Migration_Repository connection, select Manage Migration
Repository, and create the repository.
3. Create an Oracle user whose schema is to be used as the destination for the objects
to be migrated, or use an existing Oracle user and schema. Grant sufficient
privileges to this user.
For example, if you plan to migrate a Microsoft Access database named sales.mdb,
you might create an Oracle user named SALES, in whose schema the Oracle
database objects will be generated.
4. Create and open an Oracle connection for the schema that you created or selected
in the preceding step.
For example, create an Oracle connection named Sales_Migrated to the schema
associated with user SALES, and connect to it.
5. Create and open a database connection for the third-party database.
For example, create a database connection named Sales_Access to the Microsoft
Access database named sales.mdb, and connect to it.
6. Capture the source schema objects to be migrated. The specific steps depend on
whether you are migrating a Microsoft Access database or another type of
database:
■For Microsoft Access migrations, run the exporter tool: click Migration, then
Microsoft Access Exporter, then the item for your version of Microsoft Access.
Follow the steps for the exporter tool, which has its own online help. Then, in
SQL Developer click Migration, then Capture Exporter XML, and specify the
XML file that you created using the exporter tool.
■For other third-party database migrations, right-click the connection name in
the Connections navigator, and select Capture product-name (for example,
Capture MySQL or Capture Microsoft SQL Server).
After the capture, the Captured Objects navigator displays an expandable node for
the captured objects (for example, sales (Access) for the captured sales.mdb objects,
as shown in the figure in Section 2.13, "SQL Developer User Interface for
Migration").

Overview of Migration
Migrating Third-Party Databases 2-3
7. Convert the captured objects to Oracle-format objects: right-click the appropriate
node in the Captured Objects navigator and select Convert to Oracle, and specify
or accept the defaults for data mappings.
After the conversion, the Converted Models navigator displays an expandable
node for the converted objects (for example, Converted sales (Access)).
8. Generate a SQL*Plus script that creates the DDL statements to create the Oracle
database objects that correspond to the source database objects: right-click the
appropriate node in the Captured Models navigator and select Generate. A SQL
Worksheet window opens containing the SQL*Plus statements.
9. In the SQL Worksheet window that was just opened, select (in the drop-down list
on the right) an Oracle database connection in which to run the script (next step).
Examine the generated SQL*Plus statements, and optionally make any changes.
For example, if the database user to own the generated objects already exists (as it
will if you are following these quick-step instructions), delete or modify the
CREATE USER and related statements.
10. Click the Run Script button in the SQL Worksheet window to run the script.
11. Disconnect from the connection to the Oracle user for the generated objects (for
example, Sales_Migrated), then reconnect to it. In the Connections navigator, you
should now see the new database objects corresponding to the objects in the
third-party database that you migrated.
12. If you want, you can migrate (move) any existing data from the source database to
the Oracle database. You have two options for data migration: online (move the
data now) or offline (move the data later).
■Online data move: Click Migration, then Migrate Data. In the dialog box,
specify the Source Connection, the Target Connection, and the Converted
Model.
■Offline data move: Click Migration, then Script Generation, then Generate
Data Move Scripts; specify the converted model and a directory into which to
generate the files that you will use for unloading the data from the source
database and for importing into Oracle using SQL*Loader.
2.2 Overview of Migration
An Oracle database provides you with better scalability, reliability, increased
performance, and better security than third-party databases. For this reason,
organizations migrate from their current database, such as Microsoft SQL Server and
Microsoft Access, to an Oracle database. Although database migration can be
complicated, SQL Developer enables you to simplify the process of migrating a
third-party database to an Oracle database.
SQL Developer captures information from the source database and displays it in the
captured model, which is a representation of the structure of the source database. This
representation is stored in a migration repository, which is a collection of schema
objects that SQL Developer uses to store migration information.
The information in the repository is used to generate the converted model, which is a
representation of the structure of the destination database as it will be implemented in
the Oracle database. You can then use the information in the captured model and the
converted model to compare database objects, identify conflicts with Oracle reserved
words, and manage the migration progress. When you are ready to migrate, you
generate the Oracle schema objects, and then migrate the data.
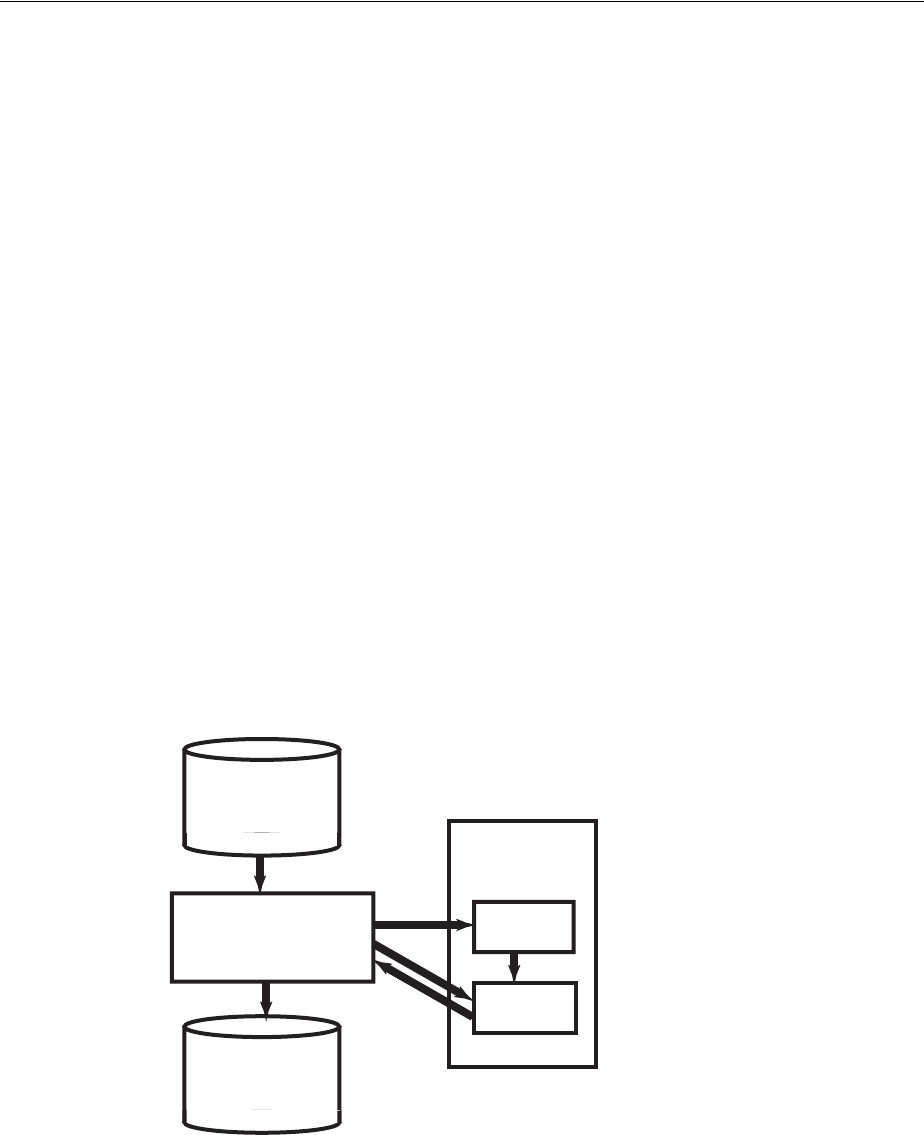
Overview of Migration
2-4 Oracle Database SQL Developer User’s Guide
SQL Developer contains logic to extract data from the data dictionary of the source
database, create the captured model, and convert the captured model to the converted
model.
Using SQL Developer to migrate a third-party database to an Oracle database provides
the following benefits:
■Reduces the effort and risks involved in a migration project
■Enables you to migrate an entire third-party database, including triggers and
stored procedures
■Enables you to see and compare the captured model and converted model and to
customize each if you wish, so that you can control how much automation there is
in the migration process
■Provides feedback about the migration through reports
2.2.1 How Migration Works
The components of SQL Developer work together to migrate a third-party database to
an Oracle database. Figure 2–1, "SQL Developer Migration Architecture" shows how
SQL Developer reads the information from the source database and creates the Oracle
database schema objects. SQL Developer uses the information stored in the migration
repository to migrate to the Oracle schema. You can make changes to the captured
model or the converted model, or both, before migrating. The information in the
converted model is used to complete the migration, that is, to generate the database
objects in the destination Oracle schema.
Figure 2–1 SQL Developer Migration Architecture
2.2.2 Migration Implemented as SQL Developer Extensions
Migration support is implemented in SQL Developer as a set of extensions: one for
Oracle Migration Workbench, and one "plugin" for each supported third-party
database. If you want, you can disable migration support or support for individual
plugins.
To view the installed extensions, and to enable or disable individual extensions, click
Tools, then Preferences, then Extensions.
Source
Database
SQL Developer Captured
Model
Converted
Model
Migration
Repository
Destination
Oracle
Schema

Preparing a Migration Plan
Migrating Third-Party Databases 2-5
2.3 Preparing a Migration Plan
This topic describes the process of how to create a migration project plan. It identifies
the sections to include in the migration plan, describes how to determine what to
include for each section, and explains how to avoid the risks involved in a migration
project. This information includes:
■Task 1: Determining the Requirements of the Migration Project
■Task 2: Estimating Workload
■Task 3: Analyzing Operational Requirements
■Task 4: Analyzing the Application
■Task 5: Planning the Migration Project
2.3.1 Task 1: Determining the Requirements of the Migration Project
In this task, you identify which databases you want to migrate and applications that
access that database. You also evaluate the business requirements and define testing
criteria.
To determine the requirements of the migration project:
1. Define the scope of the project.
There are several choices you must make about the third-party database and
applications that access that database in order to define the scope of the migration
project. To obtain a list of migration issues and dependencies, you should consider
the following
■What third-party databases are you migrating?
–What is the version of the third-party database?
–What is the character set of the third-party database?
■What source applications are affected by migrating the third-party database to
an Oracle database?
–What is the third-party application language?
–What version of the application language are you using?
In the scope of the project, you should have identified the applications you
must migrate. Ensure that you have included all the necessary applications
that are affected by migrating the database
■What types of connectivity issues are involved in migrating to an Oracle
database?
–Do you use connectivity software to connect the applications to the
third-party database? Do you need to modify the connectivity software to
connect the applications to the Oracle database?
–What version of the connectivity software do you use? Can you use this
same version to connect to the Oracle database?
■Are you planning to rewrite the applications or modify the applications to
work with an Oracle database?
2. Use Table 2–1 to determine whether you have a complex or simple source database
environment. Identify the requirements based on the specific scenario.

Preparing a Migration Plan
2-6 Oracle Database SQL Developer User’s Guide
If the migration project is a simple scenario, you may not have to complete all of
the tasks listed in this guide. You make decisions based on your specific
environment. For example, if you have a complex scenario, you may require extra
testing based on the complexity of the application accessing the database.
3. Determine whether the destination database requires additional hardware and
rewriting of backup schedules.
4. Define testing and acceptance criteria.
Define tests to measure the accuracy of the migration. You then use the acceptance
criteria to determine whether the migration was successful. The tests that you
develop from the requirements should also measure stability, evaluate
performance, and test the applications. You must decide how much testing is
necessary before you can deploy the Oracle database and applications into a
production environment.
5. Create a requirements document with a list of requirements for the migration
project.
The requirements document should have clearly defined tasks and number each
specific requirement, breaking these into sub-requirements where necessary.
2.3.2 Task 2: Estimating Workload
In this task, you use SQL Developer to make calculated decisions on the amount of
work that can be automated and how much is manual.
To estimate the workload:
1. Capture the captured model, create the converted model, and migrate to the
destination database.
You can analyze the source database through the captured model and a preview of
the destination database through the converted model. After you have captured
the source database, analyze the captured data contained in the captured model
and the converted model. Ensure the content and structure of the migration
repository is correct and determine how much time the entire process takes.
2. Generate and use reports to evaluate the capture and migration process, categorize
the total number of database objects, and identify the number of objects that can be
converted and migrated automatically.
Table 2–1 Complex and Simple Scenarios
Complex Scenario Simple Scenario
More than one of the following:
■Large database (greater than 25 GB)
■Data warehouse
■Large applications (greater than 100
forms, reports, and batch jobs)
■Database is used by multiple lines of
business
■Distributed deployment
■Large user base (greater than 100)
■High availability requirement (such as
a 24 X 7 X 365 environment)
Contains the following:
■Small database (less than 25 GB)
■Simple online transaction processing
(OLTP)
■Small application (less than 100 forms,
reports, and batch jobs)
■Database is used by one
department
■Centralized deployment
■Small user base (less than 100)
■Average availability (business hours)

Preparing a Migration Plan
Migrating Third-Party Databases 2-7
The Summary, Detailed, and Error and Warnings reports provide information
about the actions that have occurred and record any warnings and errors. They
identify the changes that have been made to the converted model so that you can
evaluate if you should make changes to the applications that access the destination
database.
3. Evaluate and categorize the issues that occurred. The reports can help by
providing information about:
■Tables that did not load when you captured the source database
■Stored procedures, views, and triggers that did not parse when you created
the converted model
■Syntax that requires manual intervention
■Database objects that were not created successfully when you migrated the
destination database
■Data that did not migrate successfully when you migrated the destination
database
4. For each error or warning in reports, evaluate the following:
■Number of times an issue occurred
■Time required to fix the issues, in man hours
■Number of resources required to fix the issue
After you have solved a complex problem, it should be easier and quicker to
resolve the next time you have the same problem.
Use these reports to evaluate each error and determine how long it would take to
rectify. The reports help identify the size of the database that was created.
2.3.3 Task 3: Analyzing Operational Requirements
In this task, you analyze the operational requirements, as follows:
1. Evaluate the operational considerations in migrating the source database to a
destination database. Consider the following questions:
■What backup and recovery changes do you require?
■What downtime is required during the migration?
■Have you met the performance requirements?
■Are you changing the operational time window?
■What effect does the downtime have on the business?
■What training requirements or additional staff considerations are required?
■Is it necessary to have the third-party and the Oracle database running
simultaneously?
2. For each task, determine the resources and time required to complete.
Note: If the scope of the migration project is a complex scenario as
defined in Table 2–1, Oracle recommends that you answer all of
these questions. If you have a simple scenario, determine the
answers to the most appropriate questions.

Preparing a Migration Plan
2-8 Oracle Database SQL Developer User’s Guide
3. Create an initial project plan.
Use the information that you have gathered during the requirements and planning
stage to develop an initial project plan.
2.3.4 Task 4: Analyzing the Application
In this task, you identify the users of the applications that run on the source database,
what hardware it requires, what the application does, and how it interfaces with the
source database. You also analyze the method the application uses to connect to the
database and identify necessary modifications.
To analyze the application:
1. Determine whether changes to the application are required to make them run
effectively on the destination database.
2. If changes are required to the application, determine whether it is more efficient to
rewrite or modify the applications.
If you are rewriting the application to use the Oracle database, consider the
following:
a. Create the necessary project documentation to rewrite the application. For
example, you need a design specification and requirements documentation.
b. Rewrite the application according to the specification.
c. Test the application works against the Oracle database.
If you are modifying the application to use the Oracle database, consider the
following:
a. Identify the number of connections to the database that are in the application
and modify these connections to use the Oracle database.
You may need to change the connection information to use an ODBC or JDBC
connection.
b. Identify the embedded SQL statements that you need to change in the
application before you can test it against the Oracle database.
c. Test the application using the Oracle database.
3. Allocate time and resource to address each issue associated with rewriting or
modifying the application.
4. Update the general requirements document for the project that you created in Task
1.
2.3.5 Task 5: Planning the Migration Project
In this task, you evaluate the unknown variables that the migration project may
contain, such as the difference in the technologies of the source database and the
destination database. During the planning stage, you:
■Estimate the budget constraints of the project
Note: If the migration project is a complex scenario as defined in
Table 2–1, Oracle recommends that you answer all of these
questions. If you have a simple scenario, determine the answers to
the most appropriate questions.

Before You Start Migrating: General Information
Migrating Third-Party Databases 2-9
■Gather information to produce a migration plan
■Estimate how much time the migration project should take
■Calculate how many resources are required to complete and test the migration
To plan a migration project:
1. Define a list of tasks required to successfully complete the migration project
requirements of Task 1.
2. Categorize the list of tasks required to complete the migration project.
You should group these tasks according to your business. This allows you to
schedule and assign resources more accurately.
3. Update and finalize the migration project plan based on the information that you
have obtained from Task 3 and Task 4.
4. Make sure the migration project plan meets the requirements of the migration
project.
The migration plan should include a project description, resources allocated,
training requirements, migration deliverable, general requirements, environment
analysis, risk analysis, application evaluation, and project schedule.
2.4 Before You Start Migrating: General Information
You may need to perform certain tasks before you start migrating a third-party
database to an Oracle database. See the following for more information:
■Section 2.4.1, "Creating a Database User for the Migration Repository"
■Section 2.4.2, "Requirements for Creating the Destination Oracle Objects"
■Section 2.4.3, "Using Nonstandard Character Encoding on Windows Systems"
See also any information specific to the source database that you will be migrating, as
explained in Section 2.5.
2.4.1 Creating a Database User for the Migration Repository
SQL Developer requires a migration repository to migrate a third-party database to an
Oracle database. To use an Oracle database for the migration repository, you must
have access to that database using a database user account. Oracle recommends that
you use a specific user account for migrations, For example, you may want to create a
user named MIGRATIONS, create a database connection to that user, and use that
connection for the migration repository; and if you wish, you can later delete the
MIGRATIONS user to remove all traces of the migration from the database.
When you create a user for migrations, specify the tablespace information as in the
following example, instead of using the defaults for tablespaces:
CREATE USER migrations IDENTIFIED BY password
DEFAULT TABLESAPACE users TEMPORARY TABLESPACE temp,
Do not use a standard account (for example, SYSTEM) for migration.
Note: Oracle recommends that you make a complete backup of
the source database before starting the migration. For more
information about backing up the source database, see the
documentation for that type of database.

Before You Start Migrating: General Information
2-10 Oracle Database SQL Developer User’s Guide
When SQL Developer creates a migration repository, it creates many schema objects
that are intended only for its own use. For example, it creates tables, views, indexes,
packages, and triggers, many with names starting with MD_ and MIGR. You should not
directly modify these objects or any data stored in them.
2.4.2 Requirements for Creating the Destination Oracle Objects
The user associated with the Oracle database connection used to perform the
migration (that is, to run the script containing the generated DDL statements) must
have the following roles and privileges:
Roles
CONNECT WITH ADMIN OPTION
RESOURCE WITH ADMIN OPTION
Privileges
ALTER ANY ROLE
ALTER ANY SEQUENCE
ALTER ANY TABLE
ALTER TABLESPACE
ALTER ANY TRIGGER
COMMENT ANY TABLE
CREATE ANY SEQUENCE
CREATE ANY TABLE
CREATE ANY TRIGGER
CREATE VIEW WITH ADMIN OPTION
CREATE PUBLIC SYNONYM WITH ADMIN OPTION
CREATE ROLE
CREATE TABLESPACE
CREATE USER
DROP ANY SEQUENCE
DROP ANY TABLE
DROP ANY TRIGGER
DROP TABLESPACE
DROP USER
DROP ANY ROLE
GRANT ANY ROLE
INSERT ANY TABLE
SELECT ANY TABLE
UPDATE ANY TABLE
For example, you can create a user called migrations with the minimum required
privileges required to migrate a database by using the following commands:
CREATE USER migrations IDENTIFIED BY password
DEFAULT TABLESAPACE users TEMPORARY TABLESPACE temp;
GRANT CONNECT, RESOURCE, CREATE VIEW, CREATE PUBLIC SYNONYM TO
migrations WITH ADMIN OPTION;
GRANT ALTER ANY ROLE, ALTER ANY SEQUENCE, ALTER ANY TABLE, ALTER TABLESPACE,
ALTER ANY TRIGGER, COMMENT ANY TABLE, CREATE ANY SEQUENCE, CREATE ANY TABLE,
Note: You must grant these privileges directly to a user account.
Granting the privileges to a role, which is subsequently granted to a
user account, does not suffice. You cannot migrate a database as the
user SYS.

Before You Start Migrating: General Information
Migrating Third-Party Databases 2-11
CREATE ANY TRIGGER, CREATE ROLE, CREATE TABLESPACE, CREATE USER, DROP ANY
SEQUENCE, DROP ANY TABLE, DROP ANY TRIGGER, DROP TABLESPACE, DROP USER, DROP ANY
ROLE, GRANT ANY ROLE, INSERT ANY TABLE, SELECT ANY TABLE, UPDATE ANY TABLE TO
migrations;
2.4.3 Using Nonstandard Character Encoding on Windows Systems
If you need to configure SQL Developer to use nonstandard character encoding, such
as for multibyte character sets, on Microsoft Windows systems, follow these steps:
1. Set the JRE file encoding property as follows:
a. Using a text editor, open the SQL Developer startup file by editing the
omwb.bat file located in the OMWB_install_dir/Omwb/bin directory.
b. Add the following information to the start command, before -jar:
-Dfile.encoding="file_encoding"
In the previous line, file_encoding is the required file encoding. For multibyte
Microsoft Access databases, the file encoding should be set to UTF-8, and the
omwb.bat file should look similar to the following:
start ..\jre\bin\javaw -ms30m -mx256m -Dfile.encoding="UTF-8" -jar
..\lib\boot.jar oracle.mtg.migrationUI.MigrationApp
If you are migrating a multibyte Microsoft Access database (for example
Japanese or Chinese), the character set on the target Oracle database instance
should be set to UTF8.
c. Save the file, then exit.
2. Install the appropriate font.properties file for the required file encoding as follows:
a. Make a backup copy of your existing font.properties file in the OMWB_install_
dir/Omwb/jre/lib directory.
b. Download the required Java font.properties file from the following Web site:
http://www.sun.com/
c. Rename the downloaded file to font.properties. For example, rename the
Japanese font.properties file from font.properties.ja to font.properties.
d. Copy the new font.properties file into the OMWB_install_dir/Omwb/jre/lib
directory.
3. If you are performing an offline capture, you must specify delimiter characters in
the offline capture scripts as follows:
a. Using a text editor, open the omwb.properties file located in the OMWB_
install_dir/Omwb/bin directory.
b. Edit or add the following fields:
OFFLINE_CAPTURE_COLUMN_DELIMITER="delimiter_column"
OFFLINE_CAPTURE_ROW_DELIMITER="delimiter_row"
In the previous lines, delimiter_column is your choice of column delimiter and
delimiter_row is your choice of row delimiter.
Note: These delimiter values must correspond to the delimiter
values used in the offline capture scripts.

Before You Start Migrating: Source-Specific Information
2-12 Oracle Database SQL Developer User’s Guide
c. Save the file, then exit.
SQL Developer is now enabled to handle the new character encoding.
2.5 Before You Start Migrating: Source-Specific Information
Depending on the third-party database that you are migrating to an Oracle database,
you may have to configure connection information and install drivers. For more
information about specific third-party database requirements, see the following:
■Section 2.5.1, "Before Migrating From Microsoft SQL Server"
■Section 2.5.2, "Before Migrating From Microsoft Access"
■Section 2.5.3, "Before Migrating From MySQL"
2.5.1 Before Migrating From Microsoft SQL Server
To configure a Microsoft SQL Server database for migration:
1. Ensure that the source database is accessible by the Microsoft SQL Server user that
is used by SQL Developer. This user must have DBA access to the Microsoft SQL
Server database.
2. Ensure that you can connect to the Microsoft SQL Server database from the system
where you have installed SQL Developer.
3. Install the Microsoft SQL Server ODBC driver release 3.70.06.23 or higher is
installed on the same system as SQL Developer, as follows:
The Microsoft SQL Server ODBC driver is shipped with the Microsoft SQL Server
client software. Installation procedures depend on the version of Microsoft SQL
Server. For more information about the Microsoft SQL Server ODBC driver, see the
Microsoft SQL Server specific documentation.
4. Set the Oracle ODBC Data Source as follows:
The Oracle ODBC Data Source is used to set up Data Source Names (DSN). You
can create a DSN at the user or system level.
a. From the Start option, select Settings, then select Control Panel.
The Control Panel window appears.
b. If you are using Microsoft Windows 2000, select the Administrative Tools
icon.
c. Select the Data Source (ODBC) icon.
The ODBC Data Source Administrator dialog appears.
d. From the User DSN tab, click Add.
The Create New Data Source dialog appears.
e. Select SQL Server, then click Finish.
The Create a New Data Source to SQL Server dialog box appears.
f. Type a name for the data source in the Name field.
g. From the drop-down list, select the SQL Server database you want to connect
to or type it in, then click Next.
h. Verify the authenticity of the login ID, then click Next.

Before You Start Migrating: Source-Specific Information
Migrating Third-Party Databases 2-13
i. Review the options, then click Next.
j. Click Next.
k. Click Finish.
The ODBC Microsoft SQL Server Setup page appears.
l. Click the Test Data Source option to ensure that you have set up the ODBC
connection correctly, then click OK.
If the connection fails, return to Step d and modify the connection details.
m. Click OK.
The DSN connection is now created.
2.5.2 Before Migrating From Microsoft Access
To configure a Microsoft Access database for migration:
1. Make backup copies of the database file or files.
2. Ensure that the necessary software (Microsoft Access, Microsoft ODBC driver,
Microsoft Data Access Objects, perhaps other components) is installed on the same
system as SQL Developer.
3. If security is enabled, you should turn it off by copying the contents of the secured
database into a new database, as follows:
SQL Developer does not support the migration of Microsoft Access databases that
have security enabled. By default, SQL Developer uses the name of the Microsoft
Access MDB file as the user name for the destination Oracle user. If you create an
Oracle user in this way, the password is ORACLE.
a. From the File menu in Microsoft Access, select New Database.
b. Select the Blank Database icon, then click OK.
c. In the File New Database option, type a name for the database, then click
Create.
d. From the File menu within the new database, select Get External Data, then
select Import.
e. Select the secured Microsoft Access database that you want to import, then
click Import.
f. From the Import Objects dialog, click Options.
g. Select the Relationships and Definition and Data options.
h. From the Tables tab, choose Select All.
i. Click OK.
All Microsoft Access objects are copied over to the new Microsoft Access
database, except for the security settings.
4. If the application contains linked tables to other Microsoft Access databases,
refresh these links by opening the application in Microsoft Access and performing
the following:
From the Tools menu in Microsoft Access 97, select Add Ins, then select Linked
Table Manager.

Before You Start Migrating: Source-Specific Information
2-14 Oracle Database SQL Developer User’s Guide
From the Tools menu in Microsoft Access 2000, select Database Utilities, then
select Linked Table Manager.
5. Ensure that the Microsoft Access database is not a replica database, but a master
database.
When you use the Exporter for Microsoft Access to export, an error message is
displayed if the database is a replica. SQL Developer does not support the
migration of a replica database.
6. From the Tools menu within Microsoft Access, select Database, then select
Compact Database to compact the Microsoft Access database files.
7. Ensure that the Microsoft Access MDB file is accessible from the system where you
have installed SQL Developer.
8. Use the Oracle Universal Installer to verify that you have the Oracle ODBC driver
installed. If you need to install the driver, it is available on the Oracle Database
Server or Database Client CD. You can also download the Oracle ODBC driver
from the Oracle Technology Network (OTN) Web site:
http://www.oracle.com/technology/software/tech/windows/odbc/
You install the Oracle ODBC driver to allow Microsoft Access forms and reports to
work with the migrated data. Install the Oracle ODBC driver into an Oracle home
directory that contains the Oracle Net Services. You can obtain the Oracle Net
Services from the Oracle Client or Oracle Database CD. You install Oracle Net
Services to obtain the Net Configuration Assistant and Net Manager. These allow
you to create a net configuration in the tnsnames.ora file.
9. Set the Oracle ODBC Data Source in the ODBC Data Source Administrator, as
follows:
a. From the Start option, select Settings, then select Control Panel.
The Control Panel window appears.
b. If you are using Microsoft Windows 2000, select the Administrative Tools
icon.
c. Select the Data Source (ODBC) icon.
The ODBC Data Source Administrator dialog appears
d. From the User DSN tab, click Add.
The Create New Data Source dialog box appears.
Note: SQL Developer supports linked tables to other Microsoft
Access databases. SQL Developer automatically creates a user
schema within the Oracle database for each Microsoft Access
database migrated. However, Oracle recommends that you move
all tables into a single Microsoft Access database to ensure that a
single user schema is created in the destination database.
Note: For more information about installing the networking
products needed to connect to an Oracle database, see the
installation guide for your Oracle Database release.

Before You Start Migrating: Source-Specific Information
Migrating Third-Party Databases 2-15
e. Select the Oracle ODBC Driver from the list of ODBC drivers installed on the
system, then click Finish.
f. In the Data Source Name field, type a name to the ODBC data source.
This data source name is the ODBC Data Source that you must specify in the
Modify Microsoft Access Database dialog box of SQL Developer.
2.5.2.1 Creating Microsoft Access XML Files
To prepare for capturing a Microsoft Access database, you must use the Exporter for
Microsoft Access tool. This tool is packaged as a Microsoft Access MDE file and it
allows you to export the Microsoft Access MDB file to an XML file. If the Microsoft
Access database you select uses linked tables, the schema information for the linked
tables is also exported to the XML file.
To export the Microsoft Access database to an XML file:
1. Click Migration, then Microsoft Access Exporter, then the Run option for the
Microsoft Access release that you are using.
The exporter tool interface is displayed.
2. Follow the instructions in the initial dialog box. For detailed information about
using the exporter tool, click the Help button.
Each Microsoft Access database that you selected is exported to an XML file. The
exporter tool currently does not support creating XML files from secured or replica
databases.
2.5.3 Before Migrating From MySQL
To configure a MySQL database for migration:
1. Install MySQLConnector/J release 3.0 on the system where you have installed
SQL Developer, as follows:
a. Download the MySQLConnector/J API from the MySQL Web site at:
http://www.mysql.com/
b. Extract the mysql-connector-java-3.x.xx-stable.zip file.
c. From the com subdirectory zip the extracted files.
d. Rename the zip file to the following:
mysql-connector-java.zip
Note: If you want to use the data source name (DSN) for multiple
users on the same system, you should create a System DSN instead
of a User DSN.
Note: Do not modify any of the files created by the Exporter.
Note: Ensure that the zip file contains the path information
beginning with the com path name.

Capturing the Source Database
2-16 Oracle Database SQL Developer User’s Guide
e. Copy the mysql-connector-java.zip file to the following directory:
On Windows:, copy to:
OMWB_install_dir\Omwb\drivers
On UNIX, copy to:
OMWB_install_dir/Omwb/drivers
2. Ensure that the MySQL database is accessible by the root user. This user must
have database administrative privileges.
2.6 Capturing the Source Database
Before migrating a third-party database, you must extract information from the
database. This information is a representation of the structure of the source database,
and it is called the captured model. The process of extracting the information from the
database is called capturing the source database.
To capture the source database, do either of the following, depending on the source
database type:
■For Microsoft Access migrations, run the exporter tool: click Migration, then
Microsoft Access Exporter, then the item for your version of Microsoft Access.
Follow the steps for the exporter tool, which has its own online help. Then, in SQL
Developer click Migration, then Capture Exporter XML, and specify the XML file
that you created using the exporter tool.
■For other third-party database migrations, right-click the connection name in the
Connections navigator, and select Capture product-name (for example, Capture
MySQL or Capture Microsoft SQL Server).
After capturing the source database, you can view the source database information in
the captured model in SQL Developer. If necessary, you can modify the captured
model and change data type mappings.
2.7 Creating and Customizing the Converted Model
Before migrating a third-party database, you must create the converted model. The
converted model is a representation of the structure of the destination database. SQL
Developer creates the converted model using the information from the captured
model.
To convert a captured model to a converted model, right-click the appropriate node in
the Captured Objects navigator and select Convert to Oracle, and specify or accept the
defaults for data mappings
To get the best results from the migrated database, you can customize the converted
model to use specific features of Oracle databases, such as multiple tablespaces.
However, if you are not an experienced Oracle database administrator, Oracle
recommends that you proceed directly to migrating the database, as described in
Section 2.8.
Note: Oracle recommends that you do not change the default data
type mappings unless you are an experienced Oracle database
administrator.

Creating and Customizing the Converted Model
Migrating Third-Party Databases 2-17
The following topics describe how to modify the converted model, if this becomes
necessary:
■Section 2.7.1, "Correcting Errors in the Converted Model"
■Section 2.7.2, "Customizing the Converted Model"
2.7.1 Correcting Errors in the Converted Model
If error messages with the prefix Parse Exception are listed in the progress screen,
the associated schema objects do not appear in the converted model. To complete the
converted model:
1. Note the captured model schema object that caused the error.
2. Select that schema object in the captured model.
3. Inspect the properties on the schema object in the captured model for possible
causes of the error.
4. Modify a property of the schema object in the captured model.
For example, you might comment out one line of a stored procedure.
5. From the Object menu, select Parse.
SQL Developer attempts to create the converted model schema object from the
captured model schema object.
A progress screen appears.
6. If the error appears again, repeat steps 2 to 5.
If necessary, comment out all the schema object’s editable properties. This ensures
that a schema object is created in the converted model, and therefore in the
destination database. The migrated schema object will not function as expected,
but acts as a placeholder so that you can create an equivalent Oracle schema object
with the correct functionality.
2.7.2 Customizing the Converted Model
You can customize the converted model to take advantage of Oracle features identified
during the planning phase. For example, you can make the following changes to the
converted model:
■Modifying the Properties of a Schema Object
■Working with Tablespaces
■Changing the Default User Password
2.7.2.1 Modifying the Properties of a Schema Object
To modify properties of a schema object in the converted model, expand the display of
the converted model in the Converted Objects navigator, select the object, and perform
the desired edits using the interface and techniques for that object type (table,
procedure, and so on).
Note: The Parse option is available only after creating the
converted model.

Generating the DDL for the Oracle Schema Objects
2-18 Oracle Database SQL Developer User’s Guide
2.7.2.2 Working with Tablespaces
An Oracle database consists of one or more logical storage units called tablespaces,
which collectively store all of the database's data. For more information about
tablespaces, see the Oracle Concepts guide.
If you are not satisfied with the default tablespace settings in SQL Developer, you may
want to create or rename a tablespace or reassign objects to existing tablespaces.
SQL Developer automatically creates a tablespace when it creates the converted
model. To prevent this functionality, deselect the Automatically Create Tablespaces
During converted model Creation option on the General page of the Options dialog
box.
2.7.2.3 Changing the Default User Password
All users in the converted model are allocated the password oracle because SQL
Developer cannot decrypt passwords from source databases. If you do not change this
password, the password for all users in the destination database will also be oracle.
If you want to change the password for a user, select that user in the converted model
and change the password to the value you require, using the User property sheet.
2.8 Generating the DDL for the Oracle Schema Objects
To generate the DDL statements to create the Oracle schema objects, you must already
have captured the captured model and created the converted model. After you
generate the DDL, you run the DDL statements to cause the objects to be created in the
Oracle database. At this point, the database schema is migrated to Oracle.
After you generate and run the DDL statements to migrate the schema objects, you can
migrate the data from the original source database, as explained in Section 2.9.
2.9 Migrating the Data
After you have generated and run DDL statements to create the Oracle schema objects
for the migrated database, you can migrate (move) any existing data from the source
database to the Oracle database. You have two options for data migration: online
(move the data now) or offline (move the data later).
■Online data move: Click Migration, then Migrate Data. In the dialog box, specify
the Source Connection and Captured Model, and the Target Connection and
Converted Model.
■Offline data move: Click Migration, then Generate Offline Data Move Scripts;
specify the converted model and a directory into which to generate the files that
you will use for unloading the data from the source database and for importing
into Oracle using SQL*Loader.
2.9.1 Transferring the Data Offline
To transfer the data offline, you generate and use scripts to copy data from the source
database to the destination database. During this process you must:
■Use SQL Developer to generate the data unload scripts for the source database and
corresponding data load scripts for the destination database.
■Run the data unload scripts to create data files from the source database using the
appropriate procedure for your source database:
–Creating Data Files From Microsoft SQL Server or Sybase Adaptive Server

Migrating the Data
Migrating Third-Party Databases 2-19
–Creating Data Files From Microsoft Access
–Creating Data Files From MySQL
■Run the data load scripts using SQL*Loader to populate the destination database
with the data from these data files as described in Section 2.9.1.4.
2.9.1.1 Creating Data Files From Microsoft SQL Server or Sybase Adaptive Server
To create data files from a Microsoft SQL Server or Sybase Adaptive Server database:
1. Copy the contents of the directory where SQL Developer generated the data
unload scripts onto the computer where the source database is installed.
2. Edit the BCP extract script to include the name of the source database server.
■On Windows, edit the bcp_extract.bat script to alter the isql lines to
include the appropriate variables
■On UNIX, edit the bcp_extract.sh script to alter the isql lines to include
the appropriate variables, then add the following command:
chmod 755 bcp_extract.sh
The following shows some lines from a sample bcp_extract.bat script:
isql -Usa -P -S<SERVER NAME> -iCreate_View.sql
bcp pubs.dbo].[authors out AUTHORS.dat -c -t "<ec>" -r "<er>" -Usa -P
-S<SERVER NAME>
isql -Usa -P -S<SERVER NAME> -iDrop_View.sql
On Windows and Unix, edit each line to include the correct value for SERVER
NAME. Do not include the angle brackets in the edited version of this file.
3. Run the BCP extract script.
■On Windows, enter:
prompt> bcp_extract.bat
■On UNIX, enter:
./bcp_extract.sh
This script creates the data files in the current directory.
4. Copy the data files to the oracle subdirectory of the directory where SQL
Developer generated the data unload scripts.
2.9.1.2 Creating Data Files From Microsoft Access
To create data files from a Microsoft Access database, use the Exporter for Microsoft
Access tool.
Note: The default delimiters for Sybase Adaptive Server for Linux
x86 do not work using the UTF-8 encoding file. Therefore, if your
LANG variable is set to en_US.UTF-8, you must set the LANG
variable to en_US to default to ISO-8859-1.
Note: For information about how to create data files from a
Microsoft Access database, see online help for the exporter tool.

Testing the Oracle Database
2-20 Oracle Database SQL Developer User’s Guide
2.9.1.3 Creating Data Files From MySQL
To create data files from a MySQL database:
1. Copy the contents of the directory where SQL Developer generated the data
unload scripts onto the computer where the source database is installed.
2. Edit the Dump Extract script to include the correct host, user name, password, and
destination directory for the data files.
■On Windows, edit the dump_extract.bat script
■On UNIX, edit the dump_extract.sh script
The following shows a line from a sample dump_extract.bat script:
mysqldump -h <HOST> -u <USERNAME> -p<PASSWORD> -T <DESTINATION_PATH>
--fields-terminated-by="<ec>" --lines-terminated-by="<er>" CarrierDb
CarrierPlanTb
Edit this line to include the correct values for HOST, USERNAME, PASSWORD,
and DESTINATION PATH. Do not include the angle brackets in the edited version
of this file.
3. Run the Dump Extract script.
■On Windows, enter:
prompt> dump_extract.bat
■On UNIX, enter:
prompt> chmod 755 dump_extract.sh
This script creates the data files in the current directory.
4. Copy the data files to the oracle subdirectory of the directory where SQL
Developer generated the data unload scripts.
2.9.1.4 Populating the Destination Database Using the Data Files
To populate the destination database using the data files, you run the data load scripts
using SQL*Loader:
1. Navigate to the directory where you created the data unload scripts.
2. Copy the contents of the oracle subdirectory to a directory on the computer
where the destination database is installed.
3. Log on to the computer that runs the destination database.
4. Run the SQL Load script.
■On Windows, enter:
prompt> sql_load_script.bat
■On UNIX, enter:
prompt> ./sql_load_script.sh
2.10 Testing the Oracle Database
During the testing phase, you test the application and Oracle database to make sure
that the:

Testing the Oracle Database
Migrating Third-Party Databases 2-21
■Migrated data is complete and accurate
■Applications function in the same way as the source database
■Oracle database producing the same results as the source database
■Applications and Oracle database meet the operational and performance
requirements
You may already have a collection of unit tests and system tests from the original
application that you can use to test the Oracle database. You should run these tests in
the same way that you ran tests against the source database. However, regardless of
added features, you should ensure that the application connects to the Oracle database
and that the SQL statements it issues produces the correct results.
See also the following related topics:
■Section 2.10.1, "Testing Methodology"
■Section 2.10.2, "Testing the Oracle Database"
2.10.1 Testing Methodology
Many constraints shape the style and amount of testing that you perform on a
database. Testing can contain one or all of the following:
■Simple data validation
■Full life cycle of testing addressing individual unit tests
■System and acceptance testing
You should follow a strategy for testing that suits your organization and
circumstances. Your strategy should define the process by which you test the migrated
application and Oracle database. A typical test method is the V-model, which is a
staged approach where each feature of the database creation is mirrored with a testing
phase.
Figure 2–2, "V-model with a Database Migration" shows an example of the V-model
with a database migration scenario:
Figure 2–2 V-model with a Database Migration
Note: The tests that you run against the application vary
depending on the scope of the application. Oracle recommends that
you thoroughly test each SQL statement that is changed in the
application. You should also test the system to make sure that the
application functions the same way as in the third-party database.
Database Migration
Requirements
Integration
Testing
Database/Application
Design
Database Object
Testing
System Acceptance
Testing
Development Phase Testing Phase

Testing the Oracle Database
2-22 Oracle Database SQL Developer User’s Guide
There are several types of tests that you use during the migration process. During the
testing stage, you go through several cycles of testing to enhance the quality of the
database. The test cases you use should make sure that any issues encountered in a
previous version of the Oracle database are not introduced again.
For example, if you have to make changes to the migrated schema based on test
results, you may need to create a new version of the Oracle database schema. In
practice, you use SQL Developer to create a base-line Oracle schema at the start of
testing, and then edit this schema as you progress with testing.
2.10.2 Testing the Oracle Database
Use the test cases to verify that the Oracle database provides the same business logic
results as the source database.
This procedure explains one way of testing the migrated database. Other methods are
available and may be more appropriate to your business requirements.
To test the Oracle database:
1. Create a controlled version of the migrated database.
Oracle recommends that you keep the database migration scripts in a source
control system.
2. Design a set of test cases that you can use to test the Oracle database from unit to
system level. The test cases should:
a. Ensure the following:
–All the users in the source database have migrated successfully
–Privileges and grants for users are correct
–Tables have the correct structure, defaults are functioning correctly, and
errors did not occur during mapping or generation
b. Validate that the data migrated successfully by doing the following:
–Comparing the number of rows in the Oracle database with those in the
source database
–Calculating the sum of numerical columns in the Oracle database and
compare with those in the source database
c. Ensure that the following applies to constraints:
–You cannot enter duplicate primary keys
–Foreign keys prevent you from entering inconsistent data
–Check constraints prevent you from entering invalid data
d. Check that indexes and sequences are created successfully.
Note: Oracle recommends that you track issues that you find
during a testing cycle in an issue tracking system. Track these issues
against the version of the database or application that you are
testing.
Note: Oracle recommends that you define completion criteria so
that you can determine the success of the migration.

Testing the Oracle Database
Migrating Third-Party Databases 2-23
e. Ensure that views migrated successfully by doing the following:
–Comparing the number of rows in the Oracle database with those in the
source database
–Calculating the sum of numerical columns in the Oracle database and
compare with those in the source database
f. Ensure that triggers, procedures, and functions are migrated successfully.
Check that the correct values are returned for triggers and functions.
3. Run the test cases against the migrated database.
4. Create a report that evaluates the test case results.
These reports allow you to evaluate the data to qualify the errors, file problem
reports, and provide a customer with a controlled version of the database.
5. If the tests pass, go to step 7.
If all tests in the test cases pass or contain acceptable errors, the test passes. If
acceptable errors occur, document them in an error report that you can use for
audit purposes.
6. If the test cases fail:
a. Identify the cause of the error.
b. Identify the test cases needed to check the errors.
c. Log an issue on the controlled version of the migrated database code in the
problem report.
d. Add the test case and a description of the problem to the incident tracking
system of your organization, which could be a spreadsheet or bug reporting
system. Aside from the test case, the incident log should include the following:
–Provide a clear, concise description of the incident encountered
–Provide a complete description of the environment, such as platform and
source control version
–Attach the output of the test, if useful
–Indicate the frequency and predictability of the incident
–Provide a sequence of events leading to the incident
–Describe the effect on the current test, diagnostic steps taken, and results
noted
–Describe the persistent after effect, if any
e. Attempt to fix the errors.
f. Return to step 1.
7. Identify acceptance tests that you can use to make sure the Oracle database is an
acceptable quality level.
2.10.2.1 Guidelines for Creating Tests
You may already have a collection of unit tests and system tests from the original
application that you can use to test the Oracle database. However, if you do not have
any unit or system tests, you need to create them. When creating test cases, use the
following guidelines:
■Plan, specify, and execute the test cases, recording the results of the tests.

Testing the Oracle Database
2-24 Oracle Database SQL Developer User’s Guide
The amount of testing you perform is proportional to the time and resources that
are available for the migration project. Typically, the testing phase in a migration
project can take anywhere from 40% to 60% of the effort for the entire project.
■Identify the components that you are testing, the approach to the test design and
the test completion criteria.
■Define each test case so that it is reproducible.
A test that is not reproducible is not acceptable for issue tracking or for an audit
process.
■Divide the source database into functions and procedures and create a test case for
each function or procedure. In the test case, state what you are going to test, define
the testing criteria, and describe the expected results.
■Record the expected result of each test case.
■Verify that the actual results meet the expected results for each test.
■Define test cases that produce negative results as well as those that you expect a
positive result.
2.10.2.2 Example of a Unit Test Case
The following displays a sample unit test plan for Windows:
Name Jane Doe
Module Table Test Emp
Date test completed 20 August 2002
Coverage log file location mwb\database\TableTestEmp
Description This unit test tests that the emp table was migrated
successfully.
Reviewed by John Smith
Task ID Task Description Expected Result Verified (Yes/No)
1 Run the following on the source
database for each table:
select count(*) from emp
Run the following on the
destination database for each
table:
select count(*) from emp
On the source database, the
count(*) produces a number.
In this case, the number is
the number of rows in each
table.
On the destination database,
the count(*) number
corresponds to the number
of rows in the new Oracle
table.
Yes
The number of
rows in each table
is the same in the
source and
destination
databases.
2 Run the following on the source
database for each table:
select sum(salary) from emp
Run the following on the
destination database for each
table:
select sum(salary) from emp
On the source database,
sum(salary) produces a
check sum for the sum of
the data in each table.
On the destination database,
sum(salary) corresponds to
the sum of the salary in the
emp table.
Yes
The sum for each
table is the same
in the source and
destination
databases.

Deploying the Oracle Database
Migrating Third-Party Databases 2-25
2.11 Deploying the Oracle Database
Deploying the migrated and tested Oracle database within a business environment can
be difficult. Therefore, you may need to consider different rollout strategies depending
on your environment. Several rollout strategies are identified for you, but you may use
another approach if that is recommended by your organization.
During the deployment phase, you move the destination database from a
development to a production environment. A group separate from the migration and
testing team, may perform the deployment phase, such as the in-house IT department.
Deployment involves the following:
■Choosing a Rollout Strategy
■Deploying the Destination Database
2.11.1 Choosing a Rollout Strategy
The strategy that you use for migrating a third-party database to an Oracle database
must take into consideration the users and the type of business that may be affected
during the transition period. For example, you may use the Big Bang approach
because you do not have enough systems to run the source database and Oracle
database simultaneously. Otherwise, you may want to use the Phased approach to
make sure that the system is operating in the user environment correctly before it is
released to the general user population. You can use one of the following approaches.
2.11.1.1 Phased Approach
Using the Phased approach, you migrate groups of users at different times. You may
decide to migrate a department or a subset of the complete user-base. The users that
you select should represent a cross-section of the complete user-base. This approach
allows you to profile users as you introduce them to the Oracle database. You can
reconfigure the system so that only selected users are affected by the migration and
unscheduled outages only affect a small percentage of the user population. This
approach may affect the work of the users you migrated. However, because the
number of users is limited, support services are not overloaded with issues.
The Phased approach allows you to debug scalability issues as the number of migrated
users increases. However, using this approach may mean that you must migrate data
to and from legacy systems during the migration process. The application architecture
must support a phased approach.
2.11.1.2 Big Bang Approach
Using the Big Bang approach, you migrate all of the users at the same time. This
approach may cause schedule outages during the time you are removing the old
system, migrating the data, deploying the Oracle system, and testing that the system is
operating correctly. This approach relies on you testing the database on the same scale
as the original database. It has the advantage of minimal data conversion and
synchronization with the original database because that database is switched off. The
disadvantage is that this approach can be labor intensive and disruptive to business
activities due to the switch over period needed to install the Oracle database and
perform the other migration project tasks.
2.11.1.3 Parallel Approach
Using the Parallel approach, you maintain both the source database and destination
Oracle database simultaneously. To ensure that the application behaves the same way

Deploying the Oracle Database
2-26 Oracle Database SQL Developer User’s Guide
in the production environment for the source database and destination database, you
enter data in both databases and analyze the data results. The advantage of this
approach is if problems occur in the destination database, users can continue using the
source database. The disadvantage of the Parallel approach is that running and
maintaining both the source and the destination database may require more resources
and hardware than other approaches.
2.11.2 Deploying the Destination Database
There are several ways to deploy the destination database. The following task is an
example that you should use as a guideline for deploying the destination database.
1. Configure the hardware, if necessary.
In a large scale or complex environment, you must design the disk layout to
correspond with the database design. If you use redundant disks, align them in
stripes that you can increase as the destination database evolves. You must install
and configure the necessary disks, check the memory, and configure the system.
2. Make sure the operating system meets the parameters of the Oracle configuration.
Before installing any Oracle software, make sure that you have modified all
system parameters. For more information about modifying system parameters, see
the relevant installation guide for your platform, such as Solaris Operating
System.
3. Install the Oracle software.
Aside from the Oracle software that allows you to create an Oracle database, you
may need to install ancillary software to support the application, such as Extract
Transformation and Load (ETL) Software for data warehousing.
4. Create the destination database from the source database and migrate the data to
the Oracle database.
There are several ways of putting the destination database into production after
testing it, such as:
■Place the successfully tested database into production. The test system is now
the production system.
■Use Oracle Export to extract the destination database from the successfully
tested database and use Oracle Import to create that database within the
production environment.
■Use the tested migration scripts to create the Oracle database and populate it
with data using SQL*Loader.
5. Perform the final checks on the destination database and applications.
6. Place the destination database into production using one of the rollout strategies.
7. Perform a final audit by doing the following:
■Audit the integrity of the data
Note: If you have a complex scenario as defined in Table 2–1,
Oracle recommends that you complete all of the deployment tasks.
However, if you have a simple scenario, you should choose the
deployment tasks appropriate to your organization.

SQL Developer User Interface for Migration
Migrating Third-Party Databases 2-27
■Audit the validity of the processes, such as back-up and recovery
■Obtain sign-off for the project, if necessary
2.12 Using Migration Reports
Several SQL Developer reports provide information about objects that have been
captured, converted, and generated during operations designed to migrate third-party
databases to Oracle.
2.13 SQL Developer User Interface for Migration
If you are performing database migration, you need to use some migration-specific
features in addition to those described in Section 1.2, "SQL Developer User Interface".
The user interface includes some additional navigator tabs and panes (Captured
Objects and Converted Objects) and a Migration menu, and many smaller changes
throughout the interface. Figure 2–3, "Main Window for a Database Migration" shows
the SQL Developer main window with objects reflecting the migration of a Microsoft
Access application named sales.mdb.
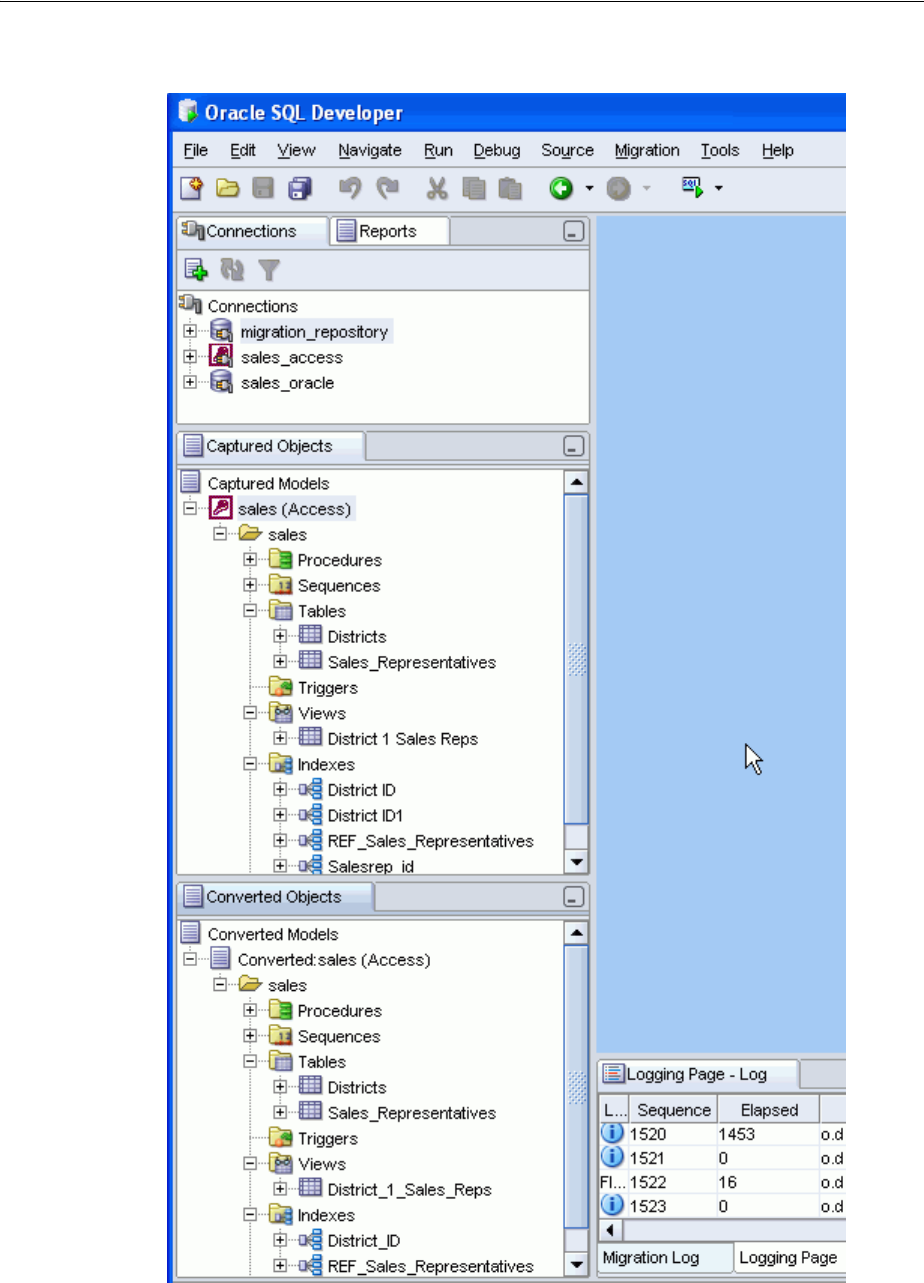
SQL Developer User Interface for Migration
2-28 Oracle Database SQL Developer User’s Guide
Figure 2–3 Main Window for a Database Migration
In this figure:

SQL Developer User Interface for Migration
Migrating Third-Party Databases 2-29
■The Connections navigator shows three database connections: migration_
repository for a connection (to a user named MIGRATION) used for the
migration repository, sales_access connected to a Microsoft Access database
named sales.mdb, and sales_oracle connected to an Oracle user named SALES
whose schema owns the migrated schema objects.
■The Captured Objects navigator shows one captured model, which was created
using an XML file created by the exporter tool for Access applications. (If the
source database is a type other than Microsoft Access, the procedure for creating
the captured model is different: you can generate it directly from the source
database connection.)
■The Converted Objects navigator shows one converted model, which is an Oracle
representation of the source database. The converted model is created from the
captured model, and the converted model is used to generate the schema objects
that you can see using an Oracle database connection (sales_oracle in this figure).
2.13.1 Migration Menu
The Migration menu contains options related to migrating third-party databases to
Oracle.
Show Getting Started Guide: Displays steps for getting started quickly with a
migration.
Repository Management: Enables you to create, delete, or truncate (remove all data
from) a migration repository; select the current migration repository; and disconnect
from the current migration repository (which deactivates the current repository but
does not disconnect from the database).
Microsoft Access Exporter: Contains submenu items from which you specify the
version of the exporter tool to use to create an XML file to be used for creating the
captured model. You can also use the exporter tool to export table data. Specify the
exporter tool version for the version of Access that is on your PC and that was used to
create the .mdb file.
Migrate Data: Displays a dialog box for performing no online migration of table data
from the source database to the Oracle schema.
Script Generation: Generate Oracle DDL displays DDL (data definition language)
statements in a SQL Worksheet window, where you can then run the script to create
the Oracle schema and schema objects; Generate Data Move Scripts displays a dialog
box for specifying the location in which to create files for performing an offline
migration of table data from the source database to the Oracle schema.
Capture Exporter XML (Microsoft Access migrations): Creates a captured model of a
Microsoft Access database from the XML file created by the exporter tool.
Translation Scratch Editor: Displays the translation scratch editor, which is explained
in Section 2.13.5.
2.13.2 Other Menus: Migration Items
The View menu has the following items related to database migration:
■Captured Objects: Displays the Captured Objects navigator.
■Converted Objects: Displays the Converted Objects navigator.
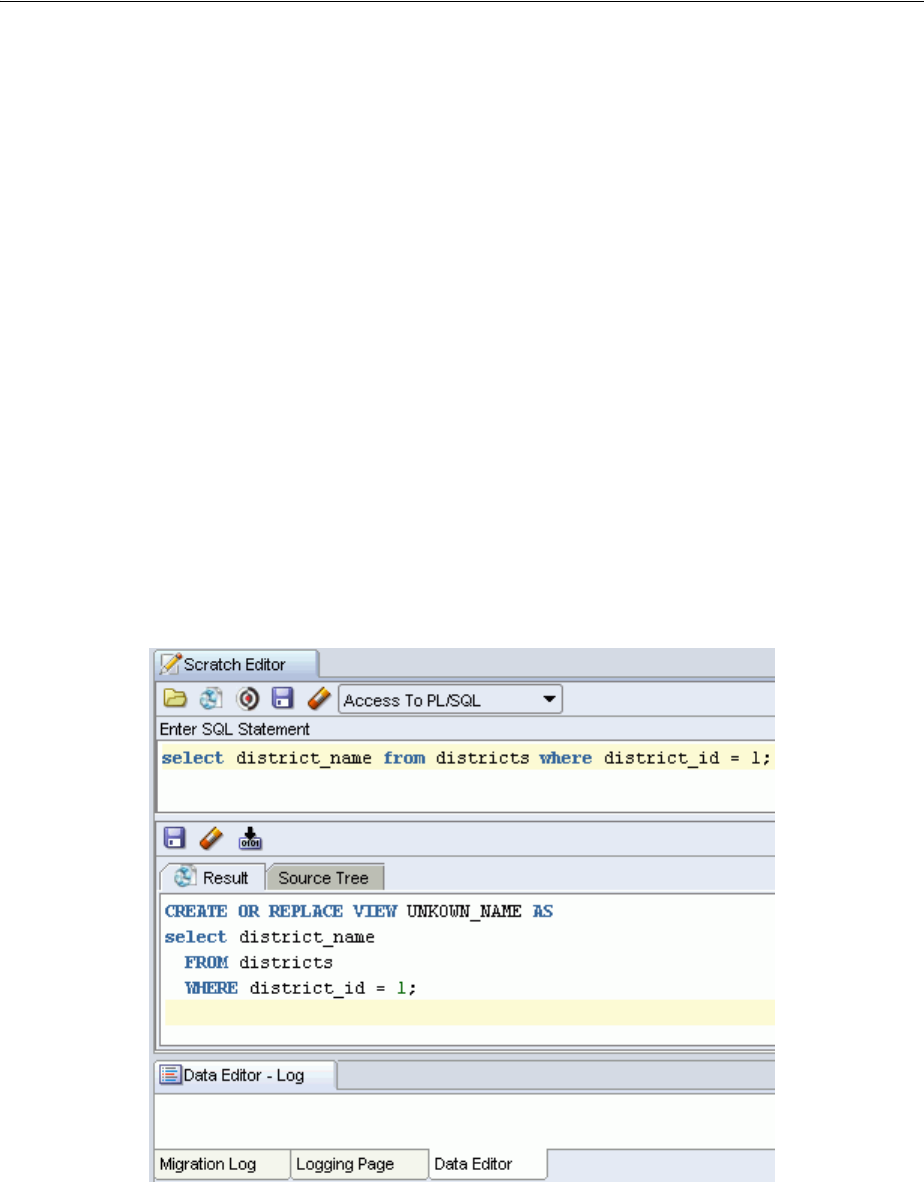
SQL Developer User Interface for Migration
2-30 Oracle Database SQL Developer User’s Guide
2.13.3 Migration Preferences
The SQL Developer user preferences window (displayed by clicking Tools, then
Preferences) contains a Migration pane with several related subpanes, and a
Translation pane with a Translation Preferences subpane.
For information about these preferences, click Help in the pane, or see Section 1.12.9,
"Migration".
2.13.4 Migration Log Panes
Migration Log: Contains errors, warnings, and informational messages relating to
migration operations.
Logging Page: Contains an entry for each migrated-related operation.
Data Editor Log: Contains...
2.13.5 Using the Translation Scratch Editor
You can use the translation scratch editor to enter SQL statements and have them
translated to PL/SQL statements. You can specify translation from T-SQL to PL/SQL
or from Microsoft Access SQL to PL/SQL.
You can display the scratch editor by clicking Migration, then Translation Scratch
Editor. The scratch editor has the interface shown in the following figure:
Scratch Editor toolbar (under the Scratch Editor tab): Contains icons for the following
operations:
■Open lets you open a file with SQL statements to be placed in the Enter SQL
Statement box.

SQL Developer User Interface for Migration
Migrating Third-Party Databases 2-31
■Translate translates the SQL statements according to the type of translation
specified in the drop-down menu, and displays the results in the translated
statements box.
■Translation Dif Viewer displays a read-only pane showing the original and
translated statements. It provides color-coded comparison of the original and
translated SQL, to display semantic similarities between the source and translated
code.
■Save Original SQL File lets you save the original file to a location and name of
your choice.
■Erase All erases the contents of the Enter SQL Statement box.
■A drop-down menu lets you select the type of translation: T-SQL to PL/SQL for
Transact-SQL, or Access to PL/SQL for Microsoft Access.
Enter SQL Statement: The statement or statements to be translated. For multiple
statements, each non-PL/SQL statement must be terminated with either a semicolon
or (on a new line) a slash (/), and each PL/SQL statement must be terminated with a
slash (/) on a new line. SQL keywords are automatically highlighted.
Translated statements toolbar (under Enter SQL Statement): Contains icons for the
following operations on the translated statement or statements:
■Save Generated PL/SQL File lets you save the generated statements to a PL/SQL
script file.
■Erase All erases the generated statements.
■Validate SQL validates the SQL statements.
Tab s display panes with the following information:
■Result: Displays the results of the most recent Translate operation.
■Source Tree: Displays the results in expandable tree format.

SQL Developer User Interface for Migration
2-32 Oracle Database SQL Developer User’s Guide

3
Tutorial: Creating Objects for a Small Database 3-1
3 Tutorial: Creating Objects for a Small
Database
In this tutorial, you will use SQL Developer to create objects for a simplified library
database, which will include tables for books, patrons (people who have library cards),
and transactions (checking a book out, returning a book, and so on).
The tables are deliberately oversimplified for this tutorial. They would not be adequate
for any actual public or organizational library. For example, this library contains only
books (not magazines, journals, or other document formats), and it can contain no
more than one copy of any book.
You will perform the following major steps:
Creating a Table (BOOKS)
Creating a Table (PATRONS)
Creating a Table (TRANSACTIONS)
Creating a Sequence
Creating a View
Creating a PL/SQL Procedure
Debugging a PL/SQL Procedure (optional)
Using the SQL Worksheet for Queries (optional)
Related Topics
Section 3.9, "Script for Creating and Using the Library Tutorial Objects"
Chapter 1, "SQL Developer Concepts and Usage"
Section 1.2, "SQL Developer User Interface"
Section 1.3, "Database Objects"
3.1 Creating a Table (BOOKS)
The BOOKS table contains a row for each book in the library. It includes columns of
character and number types, a primary key, a unique constraint, and a check
constraint. You will use the Create Table dialog box to create the table declaratively;
Note: To delete the objects that you create for this tutorial, you can
use the DROP statements at the beginning of the script in Section 3.9,
"Script for Creating and Using the Library Tutorial Objects".

Creating a Table (BOOKS)
3-2 Oracle Database SQL Developer User’s Guide
the table that you create will be essentially the same as if you had entered the
following statement using the SQL Worksheet:
CREATE TABLE books (
book_id VARCHAR2(20),
title VARCHAR2(50)
CONSTRAINT title_not_null NOT NULL,
author_last_name VARCHAR2(30)
CONSTRAINT last_name_not_null NOT NULL,
author_first_name VARCHAR2(30),
rating NUMBER,
CONSTRAINT books_pk PRIMARY KEY (book_id),
CONSTRAINT rating_1_to_10 CHECK (rating IS NULL OR
(rating >= 1 and rating <= 10)),
CONSTRAINT author_title_unique UNIQUE (author_last_name, title));
To create the BOOKS table, connect to the database as the user in the schema you want
to use for this tutorial. Right-click the Tables node in the schema hierarchy on the left
side, select New Table, and enter the following information. (If a tab or field is not
mentioned, do not enter anything for it. Be sure that the Advanced box is not checked
when you start creating the table.)
For detailed information about the table dialog box and its tabs, see Section 4.22,
"Create Table (quick creation)" and Section 4.23, "Create/Edit Table (with advanced
options)".
Schema: Specify your current schema as the schema in which to create the table.
Name: BOOKS
Create the table columns using the following information. After creating each column
except the last one (rating), click Add Column to add the next column. (If you
accidentally click OK instead of Add Column, right-click the BOOKS table in the
Connections navigator display, select Edit, and continue to add columns.)
After you have entered the last column (rating), check Advanced (next to Schema).
This displays a pane for more table options. For this table, you will use the Unique
Constraints and Check Constraints panes.
Unique Constraints pane
Click Add to add a unique constraint for the table, namely, that the combination of
author_last_name and title must be unique within the table. (This is deliberately
oversimplified, since most major libraries will have allow more than one copy of a
book in their holdings. Also, the combination of last name and title is not always
"foolproof" check for uniqueness, but it is sufficient for this simple scenario.)
Column Name Type Size Other Information and Notes
book_id VARCHAR2 20 Primary Key (Automatically checks Not Null;
an index is also created on the primary key
column. This is the Dewey code or other book
identifier.)
title VARCHAR2 50 Not Null
author_last_name VARCHAR2 30 Not Null
author_first_name VARCHAR2 30
rating NUMBER (Librarian’s personal rating of the book, from 1
(poor) to 10 (great))

Creating a Table (PATRONS)
Tutorial: Creating Objects for a Small Database 3-3
Name: author_title_unique
In Available Columns, double-click TITLE and then AUTHOR_LAST_NAME to move
them to Selected Columns.
Check Constraints pane
Click Add to add a check constraint for the table, namely, that the rating column value
is optional (it can be null), but if a value is specified, it must be a number from 1
through 10. You must enter the condition using SQL syntax that is valid in a CHECK
clause (but do not include the CHECK keyword or enclosing parentheses for the entire
CHECK clause text).
Name: rating_1_to_10
Condition: rating is null or (rating >= 1 and rating <= 10)
Click OK to finish creating the table.
Go to Section 3.2, "Creating a Table (PATRONS)" to create the next table.
3.2 Creating a Table (PATRONS)
The PATRONS table contains a row for each patron who can check books out of the
library (that is, each person who has a library card). It includes an object type
(MDSYS.SDO_GEOMETRY) column. You will use the Create Table dialog box to create
the table declaratively; the table that you create will be essentially the same as if you
had entered the following statement using the SQL Worksheet:
CREATE TABLE patrons (
patron_id NUMBER,
last_name VARCHAR2(30)
CONSTRAINT patron_last_not_null NOT NULL,
first_name VARCHAR2(30),
street_address VARCHAR2(50),
city_state_zip VARCHAR2(50),
location MDSYS.SDO_GEOMETRY,
CONSTRAINT patrons_pk PRIMARY KEY (patron_id));
The use of single city_state_zip column for all that information is not good database
design; it is done here merely to simplify your work in the tutorial.
The location column (Oracle Spatial geometry representing the patron’s geocoded
address) is merely to show the use of a complex (object) type.
To create the PATRONS table, if you are not already connected, connect to the database
as the user for the schema you are using for this tutorial. Right-click the Tables node in
the schema hierarchy on the left side, select New Table, and enter the following
information. (If a tab or field is not mentioned, do not enter anything for it. Be sure
that the Advanced box is not checked when you start creating the table.)
Schema: Specify your current schema as the schema in which to create the table.
Name: PATRONS
Create most of the table columns using the following information. After creating each
column except the city_state_zip column, click Add Column to add the next column.
(If you accidentally click OK instead of Add Column, right-click the PATRONS table in
the Connections navigator display, select Edit, and continue to add columns.)

Creating a Table (TRANSACTIONS)
3-4 Oracle Database SQL Developer User’s Guide
The last column in the table (location) requires a complex data type, for which you
must use the Columns tab with advanced options. Check Advanced (next to Schema).
This displays a pane for selecting more table options.
In the Columns pane, click the city_state_zip column name, and click the Add Column
(+) icon to add the following as the last column in the table.
After you have entered the last column (location), click OK to finish creating the table.
Go to Section 3.3, "Creating a Table (TRANSACTIONS)" to create the next table.
3.3 Creating a Table (TRANSACTIONS)
The TRANSACTIONS table contains a row for each transaction involving a patron and
a book (for example, someone checking a book out or returning a book). It includes
two foreign key columns. You will use the Create Table dialog box to create the table
declaratively; the table that you create will be essentially the same as if you had
entered the following statement using the SQL Worksheet:
CREATE TABLE transactions (
transaction_id NUMBER,
patron_id CONSTRAINT for_key_patron_id
REFERENCES patrons(patron_id),
book_id CONSTRAINT for_key_book_id
REFERENCES books(book_id),
transaction_date DATE
CONSTRAINT tran_date_not_null NOT NULL,
transaction_type NUMBER
CONSTRAINT tran_type_not_null NOT NULL,
CONSTRAINT transactions_pk PRIMARY KEY (transaction_id));
To create the TRANSACTIONS table, if you are not already connected, connect to the
database as the user for the schema you are using for this tutorial. Right-click the
Tables node in the schema hierarchy on the left side, select New Table, and enter the
following information. (If a tab or field is not mentioned, do not enter anything for it.
Be sure that the Advanced box is not checked when you start creating the table.)
Schema: Specify your current schema as the schema in which to create the table.
Name: TRANSACTIONS
Column Name Type Size Other Information and Notes
patron_id NUMBER Primary Key. (Unique patron ID number, with
values to be created using a sequence that you
will create)
last_name VARCHAR2 30 Not Null
first_name VARCHAR2 30
street_address VARCHAR2 30
city_state_zip VARCHAR2 30
Column Name Type Other Information and Notes
location Complex type
Schema: MDSYS
Type: SDO_GEOMETRY
(Oracle Spatial geometry object representing the
patron’s geocoded address)

Creating a Table (TRANSACTIONS)
Tutorial: Creating Objects for a Small Database 3-5
Create the table columns using the following information. After creating each column
except the last one (transaction_type), click Add Column to add the next column. (If
you accidentally click OK instead of Add Column, right-click the TRANSACTIONS
table in the Connections navigator display, select Edit, and continue to add columns.)
After you have entered the last column (transaction_type), check Advanced (next to
Schema). This displays a pane for selecting more table options. For this table, you will
use the Column Sequences and Foreign Keys panes.
Column Sequences pane
You have already specified TRANSACTION_ID as the primary key, and you will use
this pane only to specify that the primary key column values are to be populated
automatically. This convenient approach uses a trigger and a sequence (both created
automatically by SQL Developer), and ensures that each transaction ID value is
unique.
Column: TRANSACTION_ID
Sequence: New Sequence
Trigg e r : TRANSACTIONS_TRG (The default; before-insert trigger will this name will
be created automatically.)
Foreign Keys tab
1. Click Add to create the first of the two foreign keys for the TRANSACTIONS table.
Name: for_key_patron_id
Referenced Schema: Name of the schema containing the table with the primary key or
unique constraint to which this foreign key refers. Use the schema you have been
using for this tutorial.
Referenced Table: PATRONS
Referenced Constraint: PATRONS_PK (The name of the primary key constraint for
the PATRONS table. Be sure that the Referenced Column on PATRONS displayed
value is PATRON_ID.)
Associations: Local Column: PATRON_ID
Associations: Referenced Column on PATRONS: PATRON_ID
2. Click Add to create the second of the two foreign keys for the TRANSACTIONS
table.
Name: for_key_book_id
Column Name Type Size Other Information and Notes
transaction_id NUMBER Primary Key. (Unique transaction ID number,
with values to be created using a trigger and
sequence that will be created automatically)
patron_id NUMBER (Foreign key; must match a patron_id value in
the PATRONS table)
book_id VARCHAR2 20 (Foreign key; must match a book_id value in
the BOOKS table)
transaction_date DATE (Date and time of the transaction)
transaction_type NUMBER (Numeric code indicating the type of
transaction, such as 1 for checking out a book)

Creating a Sequence
3-6 Oracle Database SQL Developer User’s Guide
Referenced Schema: Name of the schema containing the table with the primary key or
unique constraint to which this foreign key refers. Use the schema you have been
using for this tutorial.
Referenced Table: BOOKS
Referenced Constraint: BOOKS_PK (The name of the primary key constraint for the
BOOKS table. Be sure that the Referenced Column on BOOKS displayed value is
BOOK_ID.
Associations: Local Column: BOOK_ID
Associations: Referenced Column on BOOKS: BOOK_ID
3. Click OK to finish creating the table.
You have finished creating all the tables. To create a sequence for use in generating
unique primary key values for the PATRONS table, go to Section 3.4, "Creating a
Sequence".
3.4 Creating a Sequence
Create one sequence object, which will be used in INSERT statements to generate
unique primary key values in the PATRONS table. (You do not need to create a
sequence for the primary key in the TRANSACTIONS table, because you used the
SQL Developer feature that enables automatic population of primary key values for
that table.) You will use the Create Sequence dialog box to create the sequence
declaratively; the sequence that you create will be essentially the same as if you had
entered the following statements using the SQL Worksheet:
CREATE SEQUENCE patron_id_seq
START WITH 100
INCREMENT BY 1;
After creating the sequence, you can use it in INSERT statements to generate unique
numeric values. The following example uses the patron_id_seq sequence in creating a
row for a new patron (library user), assigning her a patron ID that is the next available
value of the patron_id_seq sequence:
INSERT INTO patrons VALUES (patron_id_seq.nextval,
'Smith', 'Jane', '123 Main Street', 'Mytown, MA 01234', null);
To create the sequence, if you are not already connected, connect to the database as the
user for the schema you are using for this tutorial. Right-click the Sequences node in
the schema hierarchy on the left side, select New Sequence, and enter information
using the Create Sequence dialog box.
Schema: Specify your current schema as the schema in which to create the sequence.
Name: patron_id_seq
Increment: 1
Start with: 100
Click OK to finish creating the sequence.
To create a view, go to Section 3.5, "Creating a View".

Creating a PL/SQL Procedure
Tutorial: Creating Objects for a Small Database 3-7
3.5 Creating a View
Create a view that returns information about patrons and their transactions. This view
queries the PATRONS and TRANSACTIONS tables, and returns rows that contain a
patron’s ID, last name, and first name, along with a transaction and the transaction
type. The rows are ordered by patron ID, and by transaction type within patron IDs.
To create the patrons_trans_view view, if you are not already connected, connect to the
database as the user for the schema you are using for this tutorial. Right-click the
Views node in the schema hierarchy on the left side, select New View, and enter the
following information. (If a tab or field is not mentioned, do not enter anything for it.)
Schema: Specify your current schema as the schema in which to create the view.
Name: patrons_trans_view
Entire SQL Query tab
In the Entire SQL Query box, enter (or copy and paste) the following statement:
SELECT p.patron_id,
p.last_name,
p.first_name,
t.transaction_type,
t.transaction_date
FROM patrons p, transactions t
WHERE p.patron_id = t.patron_id
ORDER BY p.patron_id, t.transaction_type
Then click Test Syntax, and ensure that you have not made any syntax errors. If you
made any errors, correct then and click Test Syntax again.
DDL
Review the SQL statement that SQL Developer will use to create the view. If you want
to make any changes, go back to the Entire SQL Query tab and make the changes
there.
If you want to save the CREATE VIEW statement to a SQL script file, click Save and
specify the location and file name.
When you are finished, click OK.
You have finished creating the view. To see the data returned by the view, in the
Connections navigator, expand Views, select PATRONS_TRANS_VIEW, and click the
Data tab.
3.6 Creating a PL/SQL Procedure
Create a procedure that lists all books with a specified rating. You can then call that
procedure with an input parameter (a number from 1 to 10), and the output will be all
the titles of all books with that rating.
To create the procedure, if you are not already connected, connect to the database as
the user for the schema you are using for this tutorial. Right-click the Procedures node
in the schema hierarchy on the left side, select New Procedure, and enter the following
information using the Create PL/SQL Procedure dialog box.
Object Name: list_a_rating
Click OK. A Source window for the new procedure is opened. Enter (or copy and
paste) the following procedure text:

Debugging a PL/SQL Procedure
3-8 Oracle Database SQL Developer User’s Guide
CREATE OR REPLACE
PROCEDURE list_a_rating(in_rating IN NUMBER) AS
matching_title VARCHAR2(50);
TYPE my_cursor IS REF CURSOR;
the_cursor my_cursor;
BEGIN
OPEN the_cursor
FOR 'SELECT title
FROM books
WHERE rating = :in_rating'
USING in_rating;
DBMS_OUTPUT.PUT_LINE('All books with a rating of ' || in_rating || ':');
LOOP
FETCH the_cursor INTO matching_title;
EXIT WHEN the_cursor%NOTFOUND;
DBMS_OUTPUT.PUT_LINE(matching_title);
END LOOP;
CLOSE the_cursor;
END list_a_rating;
This procedure uses a cursor (named the_cursor) to return only rows where the book
has the specified rating (in_rating parameter), and uses a loop to output the title of
each book with that rating.
Click the Save icon to save the procedure.
As a usage example, after creating the procedure named LIST_A_RATING, and after
inserting data into the BOOKS table (for example, using the INSERT statements in
Section 3.9, "Script for Creating and Using the Library Tutorial Objects"), you could use
the following statement to return all books with a rating of 10:
CALL list_a_rating(10);
To run this procedure within SQL Developer after you have inserted the BOOKS table
rows shown in Section 3.9, "Script for Creating and Using the Library Tutorial Objects",
right-click LIST_A_RATING in the Connections navigator hierarchy display and select
Run. In the Run PL/SQL dialog box, change IN_RATING => IN_RATING to IN_
RATING => 10, and click OK. The Log window display will now include the
following output:
All books with a rating of 10:
Moby Dick
Software Wizardry
3.7 Debugging a PL/SQL Procedure
If you want to practice debugging a PL/SQL procedure with SQL Developer, create a
procedure that is like the list_a_rating procedure that you created in Section 3.6,
"Creating a PL/SQL Procedure", but with a logic error. (The coding is also deliberately
inefficient, to allow the display of the rating in a variable.)
To create this procedure, if you are not already connected, connect to the database as
the user for the schema you are using for this tutorial. Right-click the Procedures node
in the schema hierarchy on the left side, select New Procedure, and enter the following
information using the Create PL/SQL Procedure dialog box.
Object Name: list_a_rating2
Click OK. A Source window for the new procedure is opened. Enter (or copy and
paste) the following procedure text:
CREATE OR REPLACE

Debugging a PL/SQL Procedure
Tutorial: Creating Objects for a Small Database 3-9
PROCEDURE list_a_rating2(in_rating IN NUMBER) AS
matching_title VARCHAR2(50);
matching_rating NUMBER;
TYPE my_cursor IS REF CURSOR;
the_cursor my_cursor;
rating_cursor my_cursor;
BEGIN
OPEN the_cursor
FOR 'SELECT title
FROM books
WHERE rating <= :in_rating'
USING in_rating;
OPEN rating_cursor FOR 'SELECT rating FROM books WHERE
rating <= :in_rating' USING in_rating;
DBMS_OUTPUT.PUT_LINE('All books with a rating of ' || in_rating || ':');
LOOP
FETCH the_cursor INTO matching_title;
FETCH rating_cursor INTO matching_rating;
EXIT WHEN the_cursor%NOTFOUND;
DBMS_OUTPUT.PUT_LINE(matching_title);
END LOOP;
CLOSE the_cursor;
CLOSE rating_cursor;
END list_a_rating2;
This procedure contains a logic error in the definition of the_cursor: it selects titles
where the rating is less than or equal to a specified rating, whereas it should select
titles only where the rating is equal to the specified rating.
Click the Save icon to save the procedure.
Assume that you wanted to run this procedure and list all books with a rating of 10.
Right-click LIST_A_RATING2 in the Connections navigator hierarchy display and
select Run. In the Run PL/SQL dialog box, change IN_RATING => IN_RATING to
IN_RATING => 10, and click OK. In the Log window, however, you see unexpected
output: many titles are listed, including some with ratings other than 10. So, you
decide to debug the procedure.
To debug the procedure, follow these steps:
1. Click LIST_A_RATING2 in the Connections navigator, then right-click and select
Compile for Debug.
2. In the code tab, click the Edit icon (pencil and paper graphic).
3. Set two breakpoints by clicking in the left margin (left of the thin vertical line)
beside each of these two lines: FETCH the_cursor INTO matching_title;
and FETCH rating_cursor INTO matching_rating;. (Clicking in the left
margin toggles the setting and unsetting of breakpoints.) This will enable you to
see the values of the matching_title and matching_rating variables as execution
proceeds in debug mode.
4. Click LIST_A_RATING2 in the Connections navigator hierarchy display, and on
the Debug menu, select Debug. Ensure that the line IN_RATING => IN_RATING
has been changed to IN_RATING => 10, and click OK.
5. In the debugging toolbar, click the Resume icon to have execution proceed,
stopping at the next breakpoint; note the display in the Smart Data tab in the
lower right part of the window. Repeatedly click the Resume icon, noticing
especially the value of the rating variable as each row is processed. You will notice
the first incorrect result when you see that the title Get Rich Really Fast is included,

Using the SQL Worksheet for Queries
3-10 Oracle Database SQL Developer User’s Guide
even though its rating is only 1 (obviously less than 10). (See the screen illustration
with debugging information in Section 1.6, "Running and Debugging Functions
and Procedures".)
6. When you have enough information to fix the problem, you can click the
Terminate icon in the debugging toolbar.
From this debugging session, you know that to fix the logic error, you should change
rating <= :in_rating to rating = :in_rating in the definition of the_cursor.
3.8 Using the SQL Worksheet for Queries
You can use the SQL Worksheet to test SQL statements using a database connection. To
display the worksheet, from the Tools menu, select SQL Worksheet. In the Select
Connection dialog box, select the database connection that you used to create the
BOOKS, PATRONS, and TRANSACTIONS tables for the tutorial in Chapter 3,
"Tutorial: Creating Objects for a Small Database".
The SQL Worksheet has the user interface shown in Section 1.7, "Using the SQL
Worksheet".
In the Enter SQL Statement box, enter the following statement (the semicolon is
optional for the SQL Worksheet):
SELECT author_last_name, title FROM books;
Notice the automatic highlighting of SQL keywords (SELECT and FROM in this
example).
Click the Execute SQL Statement icon in the SQL Worksheet toolbar. The results of the
query are displayed on the Results tab under the area in which you entered the SQL
statement.
In the Enter SQL Statement box, enter (or copy and paste) the following statement,
which is the same as the SELECT statement in the view you created in Creating a
View:
SELECT p.patron_id,
p.last_name,
p.first_name,
t.transaction_type,
t.transaction_date
FROM patrons p, transactions t
WHERE p.patron_id = t.patron_id
ORDER BY p.patron_id, t.transaction_type;
Click the Execute SQL Statement icon in the SQL Worksheet toolbar, and view the
results of the query.
Click the Execute Explain Plan icon in the SQL Worksheet toolbar to see the execution
plan (displayed on the Explain tab) that Oracle Database follows to execute the SQL
statement. The information includes the optimizer strategy and the cost of executing
the statement. (For information about how to generate and interpret execution plans,
see Oracle Database Performance Tuning Guide.)
3.9 Script for Creating and Using the Library Tutorial Objects
The following statements create and use the database objects that you have created (or
will create) for the tutorial in Chapter 3, "Tutorial: Creating Objects for a Small

Script for Creating and Using the Library Tutorial Objects
Tutorial: Creating Objects for a Small Database 3-11
Database". You can view these commands to help you understand the library database
objects that are covered in the tutorial.
-- Clean up from any previous tutorial actions.
DROP TABLE transactions;
DROP TABLE books;
DROP TABLE patrons;
DROP SEQUENCE patron_id_seq;
DROP SEQUENCE transactions_seq;
DROP TRIGGER transactions_trg;
DROP VIEW patrons_trans_view;
DROP PROCEDURE list_a_rating;
DROP PROCEDURE list_a_rating2;
set serveroutput on
-- Create objects.
CREATE TABLE books (
book_id VARCHAR2(20),
title VARCHAR2(50)
CONSTRAINT title_not_null NOT NULL,
author_last_name VARCHAR2(30)
CONSTRAINT last_name_not_null NOT NULL,
author_first_name VARCHAR2(30),
rating NUMBER,
CONSTRAINT books_pk PRIMARY KEY (book_id),
CONSTRAINT rating_1_to_10 CHECK (rating IS NULL OR
(rating >= 1 and rating <= 10)),
CONSTRAINT author_title_unique UNIQUE (author_last_name, title));
CREATE TABLE patrons (
patron_id NUMBER,
last_name VARCHAR2(30)
CONSTRAINT patron_last_not_null NOT NULL,
first_name VARCHAR2(30),
street_address VARCHAR2(50),
city_state_zip VARCHAR2(50),
location MDSYS.SDO_GEOMETRY,
CONSTRAINT patrons_pk PRIMARY KEY (patron_id));
CREATE TABLE transactions (
transaction_id NUMBER,
patron_id CONSTRAINT for_key_patron_id
REFERENCES patrons(patron_id),
book_id CONSTRAINT for_key_book_id
REFERENCES books(book_id),
transaction_date DATE
CONSTRAINT tran_date_not_null NOT NULL,
transaction_type NUMBER
CONSTRAINT tran_type_not_null NOT NULL,
CONSTRAINT transactions_pk PRIMARY KEY (transaction_id));
CREATE SEQUENCE patron_id_seq
START WITH 100
INCREMENT BY 1;
-- The sequence for the transaction_id
-- in the tutorial is created automatically,
-- and may have the name TRANSACTIONS_SEQ.
CREATE SEQUENCE transactions_seq

Script for Creating and Using the Library Tutorial Objects
3-12 Oracle Database SQL Developer User’s Guide
START WITH 1
INCREMENT BY 1;
-- The before-insert trigger for transaction ID values
-- in the tutorial is created automatically,
-- and may have the name TRANSACTIONS_TRG.
CREATE OR REPLACE TRIGGER transactions_trg
BEFORE INSERT ON TRANSACTIONS
FOR EACH ROW
BEGIN
SELECT TRANSACTIONS_SEQ.NEXTVAL INTO :NEW.TRANSACTION_ID FROM DUAL;
END;
/
CREATE VIEW patrons_trans_view AS
SELECT p.patron_id,
p.last_name,
p.first_name,
t.transaction_type,
t.transaction_date
FROM patrons p, transactions t
WHERE p.patron_id = t.patron_id
ORDER BY p.patron_id, t.transaction_type;
-- Procedure: List all books that have a specified rating.
CREATE OR REPLACE PROCEDURE list_a_rating(in_rating IN NUMBER) AS
matching_title VARCHAR2(50);
TYPE my_cursor IS REF CURSOR;
the_cursor my_cursor;
BEGIN
OPEN the_cursor
FOR 'SELECT title
FROM books
WHERE rating = :in_rating'
USING in_rating;
DBMS_OUTPUT.PUT_LINE('All books with a rating of ' || in_rating || ':');
LOOP
FETCH the_cursor INTO matching_title;
EXIT WHEN the_cursor%NOTFOUND;
DBMS_OUTPUT.PUT_LINE(matching_title);
END LOOP;
CLOSE the_cursor;
END;
/
show errors;
-- Insert and query data.
INSERT INTO books VALUES ('A1111', 'Moby Dick', 'Melville', 'Herman', 10);
INSERT INTO books VALUES ('A2222', 'Get Rich Really Fast', 'Scammer', 'Ima', 1);
INSERT INTO books VALUES ('A3333', 'Finding Inner Peace', 'Blissford', 'Serenity',
null);
INSERT INTO books VALUES ('A4444', 'Great Mystery Stories', 'Whodunit', 'Rodney',
5);
INSERT INTO books VALUES ('A5555', 'Software Wizardry', 'Abugov', 'D.', 10);
INSERT INTO patrons VALUES (patron_id_seq.nextval,
'Smith', 'Jane', '123 Main Street', 'Mytown, MA 01234', null);
INSERT INTO patrons VALUES (patron_id_seq.nextval,
'Chen', 'William', '16 S. Maple Road', 'Mytown, MA 01234', null);

Script for Creating and Using the Library Tutorial Objects
Tutorial: Creating Objects for a Small Database 3-13
INSERT INTO patrons VALUES (patron_id_seq.nextval,
'Fernandez', 'Maria', '502 Harrison Blvd.', 'Sometown, NH 03078', null);
INSERT INTO patrons VALUES (patron_id_seq.nextval,
'Murphy', 'Sam', '57 Main Street', 'Mytown, MA 01234', null);
INSERT INTO transactions (patron_id, book_id,
transaction_date, transaction_type)
VALUES (100, 'A1111', SYSDATE, 1);
INSERT INTO transactions (patron_id, book_id,
transaction_date, transaction_type)
VALUES (100, 'A2222', SYSDATE, 2);
INSERT INTO transactions (patron_id, book_id,
transaction_date, transaction_type)
VALUES (101, 'A3333', SYSDATE, 3);
INSERT INTO transactions (patron_id, book_id,
transaction_date, transaction_type)
VALUES (101, 'A2222', SYSDATE, 1);
INSERT INTO transactions (patron_id, book_id,
transaction_date, transaction_type)
VALUES (102, 'A3333', SYSDATE, 1);
INSERT INTO transactions (patron_id, book_id,
transaction_date, transaction_type)
VALUES (103, 'A4444', SYSDATE, 2);
INSERT INTO transactions (patron_id, book_id,
transaction_date, transaction_type)
VALUES (100, 'A4444', SYSDATE, 1);
INSERT INTO transactions (patron_id, book_id,
transaction_date, transaction_type)
VALUES (102, 'A2222', SYSDATE, 2);
INSERT INTO transactions (patron_id, book_id,
transaction_date, transaction_type)
VALUES (102, 'A5555', SYSDATE, 1);
INSERT INTO transactions (patron_id, book_id,
transaction_date, transaction_type)
VALUES (101, 'A2222', SYSDATE, 1);
-- Test the view and the procedure.
SELECT * FROM patrons_trans_view;
CALL list_a_rating(10);

Script for Creating and Using the Library Tutorial Objects
3-14 Oracle Database SQL Developer User’s Guide

4
Dialog Boxes for Creating/Editing Objects 4-1
4 Dialog Boxes for Creating/Editing Objects
SQL Developer uses dialog boxes for creating and editing database connections and
objects in the database (tables, views, procedures, and so on). The dialog boxes
sometimes have multiple tabs, each reflecting a logical grouping of properties for that
type of object.
For an explanation of any dialog box or tab, click the Help button or press the F1 key.
The dialog boxes are not presented here in any rigorous order, because the help for
each box is an independent piece of information and is normally seen when you click
Help or press F1 in that box.
4.1 Add Extension
This dialog box is displayed when you click Add in the File Types pane of SQL
Developer Preferences.
Extension: Specify the file extension, including the period (for example, .xyz).
After you click OK, you can select that extension and modify its details, including the
file type, content type, and whether to have files with the extension automatically
opened by SQL Developer.
4.2 Check for Updates
When you click Help and then Check for Updates, you can check for and download
available SQL Developer updates. The following pages may be displayed. (If you have
enabled the SQL Developer preference to check for updates automatically at startup,
and if you click to see available updates at startup, the Updates page is displayed.)
If you are unable to check for updates because your system is behind a firewall, you
may need to set the SQL Developer user preferences for Web Browser and Proxy.
1. Source: Select the source or sources to be checked for available updates: any or all
of some specified online update centers, or a local ZIP file containing an update
bundle.
Note: For all Name fields, any name that you type is automatically
converted to and stored in the database metadata in uppercase, unless
you enclose the name in quotation marks (" "). (Names of database
objects in SQL and PL/SQL statements are not case-sensitive.)
To include lowercase characters, special characters, or spaces in object
names, enclose the name in quotation marks (" ") when you type it.
Example: "My table"

Choose Directory
4-2 Oracle Database SQL Developer User’s Guide
2. Updates: If any updates are available from the selected source or sources, select
those that you want to download.
The Show Upgrades Only option restricts the display to upgrades of currently
installed SQL Developer components. To enable the display of all new and
updated components, whether currently installed or not, uncheck this option.
After you click Next, you may be prompted to enter your Oracle Web Account
user name and password. If you do not have an account, you can click the Sign Up
link.
3. Install Location: Select whether to install the extensions for all users or just for the
current user.
4. Download: If you selected any updates to download, this page displays the
progress of the download operation.
5. Summary: Displays information about the updates that were downloaded. After
you click Finish, you will be asked if you want to install the updates now and
restart SQL Developer.
4.3 Choose Directory
This is a standard box for choosing a directory in which to place files: use Location to
navigate to (double-clicking) the folder in which to save the files, or enter a directory
name. If the directory does not already exist, it is created.
4.4 Create/Edit New Object
Specify the type of object to create. After you click OK, the dialog box for creating that
type of object is displayed.
Filter By: Available Items displays the types of objects that you can create in the
current database connection; All Items displays all types of objects (some of which
may not be available for selection).
Categories: A hierarchical display of categories of objects.
Items: Types of objects that you can create within the selected category.
4.5 Create/Edit/Select Database Connection
The database connection dialog box displays any existing connections. Depending on
the context, you can select a connection to connect to the database, edit the information
about existing connections, or specify information while creating a new connection.
(See Creating and Editing Connections.)
Connection Name: An alias for a connection to the database using the information
that you enter. (The connection name is not stored in the database, and the connection
is not a database object.) Suggestion: Include the database name (SID) and user name
in the connection name. Example: personnel_herman for connecting to the personnel
database as user Herman.
Username: Name of the database user for the connection. This user must have
sufficient privileges to perform the tasks that you want perform while connected to the
database, such as creating, editing, and deleting tables, views, and other objects.
Password: Password associated with the specified database user.

Create/Edit/Select Database Connection
Dialog Boxes for Creating/Editing Objects 4-3
Oracle tab
The following information applies to a connection to an Oracle Database.
Role: The set of privileges to be associated with the connection. For a user that has
been granted the SYSDBA system privilege, you can specify a connection that includes
the privilege.
Basic connection type
Host Name: Host system for the Oracle database.
Port: Listener port.
SID: Database name.
Service Name: Network service name of the database (for a remote database
connection over a secure connection).
TNS connection type
Network Alias: Oracle Net alias for the database. (The list for selecting a network alias
is initially filled from the tnsnames.ora file on your system, if that file exists.)
Connect Identifier: Oracle Net connect identifier.
Advanced connection type
Custom JDBC URL: URL for connecting directly from Java to the database; overrides
any other connection type specification. If you are using TNS or a naming service with
the OCI driver, you must specify this information: Example:
jdbc:oracle:thin:scott/@localhost:1521:orcl
Note that in this example, the "/" is required, and the user will be prompted to enter
the password.
Access tab
For a connection to a Microsoft Access database, click Browse and find the database
(.mdb) file. However, to be able to use the connection, you must first ensure that the
system tables in the database file are readable by SQL Developer, as follows:
1. Open the database (.mdb) file in Microsoft Access.
2. Click Too l s , then Options, and on the View tab ensure that System Objects are
shown.
3. Click Too l s , then Security, and, if necessary, modify the user and group
permissions as follows: select all tables whose names start with Msys, and give the
Admin user at least Read Design and Read Data permission on these tables.
4. Save changes and close the Access database file.
5. Create and test the connection in SQL Developer.
MySQL tab
The following information applies to a connection to a MySQL database.
Note that to connect to a MySQL database, you must first download the appropriate
MySQL connection driver, and then click Tools, then Preferences, and use the SQL
Developer user preference pane for Database: Third Party JDBC Drivers to add the
driver.
Host Name: Host system for the MySQL database.

Select Connection
4-4 Oracle Database SQL Developer User’s Guide
Port: TCP/IP Port on which the MySQL server will listen.
Choose Database: Name of the MySQL database.
Zero Date Handling: Because the MySQL JDBC driver cannot handle the default
0000-00-00 date, specify one of the following options for handling this date: Set to
NULL to set it to a null value, or Round to 0001-01-01 to set it to 0001-01-01.
SQL Server tab
The following information applies to a connection to a Microsoft SQL Server database.
Note that to connect to a Microsoft SQL Server database, you must first download the
appropriate Microsoft SQL Server connection driver, and then click Tools, then
Preferences, and use the SQL Developer user preference pane for Database: Third
Party JDBC Drivers to add the driver.
Host Name: Host system for the Microsoft SQL Server database.
Port: TCP/IP Port on which Microsoft SQL Server will listen.
Retrieve Database: Name of the Microsoft SQL Server database.
Creating and Editing Connections
To create a new connection when no connections exist, enter the connection information
and click Connect. To test the connection before you create it, click Test.
To create a new connection when one or more connections already exist, click New, enter the
connection information, and click Connect. To test the connection before you create it,
click Test.
To edit an existing connection, click in its entry in the Connection Name column, change
any connection information on the left side, and click Connect. To test the connection
before you save changes to it, click Te s t .
4.6 Select Connection
Use this dialog box to select a database connection for use with a specific SQL
Developer feature (for example, the SQL worksheet or the Reports navigator). After
you click OK, the interface for the component is displayed , with the current user the
same as the one specified in the connection.
To create a new database connection, click New; to edit the selected database
connection, click Edit. In both cases, a dialog box for specifying connection
information is displayed (see Section 4.5, "Create/Edit/Select Database Connection").
4.7 Connection Information
Use this dialog box to specify the user name and password for the selected database
connection.
If the specified user name does not exist in the database associated with the
connection, or if the specified password is not the correct one for that user, the
connection is refused.
4.8 No Connection Found
This dialog box is displayed when you attempt to perform an operation that requires a
database connection, but no connection currently exists for that operation. For

Excel Import Data
Dialog Boxes for Creating/Editing Objects 4-5
example, you might have opened a SQL file but not selected a connection, or the
connection might have disconnected.
To select a connection in the SQL Worksheet, click OK to close this dialog box, then
select a connection from the drop-down list in the SQL Worksheet icon bar.
4.9 Connection Rename Error
This dialog box is displayed when you attempt to rename a database connection to a
name that is already used for another connection. For example, you might have
forgotten to enter a new name for the connection that you want to rename.
To rename the connection, click OK to close this dialog box, then specify a unique
connection name.
4.10 Select Library
This dialog box is displayed when you click Browse in the Database pane when setting
SQL Developer Preferences. Use this box to select the library for the specified JDBC
driver class.
4.11 Create Library
This dialog box is displayed when you click New in the Select Library dialog box,
which is displayed when you click Browse in the Database pane when setting SQL
Developer Preferences. Use this box to create the library for the specified JDBC driver
class.
4.12 Excel Import Data
This dialog box is displayed when you right-click a table name in the Connections
navigator and select Import Data, then Excel. It enables you to from an Excel
spreadsheet into the table.
Worksheet: Name of a worksheet in the Microsoft Excel file.
Header row?: If this option is checked, the first row in the selected Microsoft Excel
worksheet is considered a row with text for the column headings. If this option is not
checked, the first row is considered to contain worksheet data.
Data Preview: Displays a read-only preview of the contents of the worksheet.
Columns tab
Available Columns: Lists the Microsoft Excel worksheet columns from which you can
select for import into columns in the table. To select one or more worksheet columns,
use the arrow buttons to move columns from Available to Selected.
Selected Columns: Lists the columns whose data is to be imported into columns in the
database table. To change the order of a selected column in the list for the import
operation, select it and use the up and down arrow buttons.
Data Types tab
Displays information about the data types of the columns to be imported.

Export/Import Connection Descriptors
4-6 Oracle Database SQL Developer User’s Guide
DML tab
This tab contains a read-only display of a SQL statement that will perform the
operation.
To perform the import operation, click Insert.
4.13 Export/Import Connection Descriptors
The Export Connection Descriptors dialog box exports information about one or more
database connections to an XML file. The Import Connection Descriptors dialog box
imports connections that have been exported. Connections that you import are added
to any connections that already exist in SQL Developer.
File Name: Name of the XML file to contain exported information or that contains
information to be imported. Use the Browse button to specify the location.
Connections: Names of connections that you can select for the export or import
operation.
4.14 Create/Edit Database Link
The following information applies to a database link, which is a database object in one
database that enables you to access objects on another database, as explained in
Section 1.3.1, "Database Links (Public and Private)".
Public: If this option is checked, the database link is public (available to all users). If
this option is not checked, the database link is private and is available only to you.
Schema: Database schema in which to create the database link.
Name: Name of the database link. Must be unique within a schema.
Host Name: The service name of a remote database. If you specify only the database
name, Oracle Database implicitly appends the database domain to the connect string
to create a complete service name. Therefore, if the database domain of the remote
database is different from that of the current database, you must specify the complete
service name.
Current User: Creates a current user database link. The current user must be a global
user with a valid account on the remote database. If the database link is used directly,
that is, not from within a stored object, then the current user is the same as the
connected user.
Fixed User: Creates a fixed user database link, for which you specify the user name
and password used to connect to the remote database.
Shared: If this option is checked, a single network connection is used to create a public
database link that can be shared among multiple users. In this case, you must also
specify the Authentication information.
Authentication - User Name and Password: The user name and password on the
target instance. This information authenticates the user to the remote server and is
required for security. The specified user and password must be a valid user and
password on the remote instance.
DDL tab
You can review and save the SQL statement that SQL Developer will use to create the
database link.

Create/Edit Materialized View Log
Dialog Boxes for Creating/Editing Objects 4-7
4.15 Create/Edit Index
The following information applies to an index, which is a database object that contains
an entry for each value that appears in the indexed column(s) of the table or cluster
and provides direct, fast access to rows, as explained in Section 1.3.4, "Indexes".
Schema: Database schema that owns the table associated with the index.
Tab l e : Name of the table associated with the index.
Name: Name of the index. Must be unique within a schema.
Index Type: Normal for a standard Oracle index, in which case you also specify
non-unique, unique, or bitmap, as well as one or more index expressions; or Text for
an Oracle Text index (created with INDEXTYPE IS CTXSYS.CONTEXT), in which case
you specify the column to be indexed.
Non-unique means that the index can contain multiple identical values; Unique
means that no duplicate values are permitted; Bitmap stores rowids associated with a
key value as a bitmap.
Index: A list of index expressions, that is, the table columns or column expressions in
the index. To add an index expression, click the Add Column Expression (+) icon; this
adds a column name here and in Column Expression, where you can edit it. To delete
an index expression, click the Remove Column Expression (X) icon; to move an index
expression up or down in the list, click the Move Column Up and Move Column
Down icons. An index must have at least one index expression.
For example, to create an index on the AUTHOR_LAST_NAME column of the BOOKS
table from the tutorial (see Section 3.1, "Creating a Table (BOOKS)"), click the + icon,
and select AUTHOR_LAST_NAME in Column Name or Expression (next field), which
changes BOOKS to AUTHOR_LAST_NAME in the Index field.
Column Name or Expression: A column name or column expression. A column
expression is an expression built from columns, constants, SQL functions, and
user-defined functions. When you specify a column expression, you create a
function-based index.
Order: ASC for an ascending index (index values sorted in ascending order); DESC for
a descending index (index values sorted in descending order).
4.16 Create/Edit Materialized View Log
User this dialog box to create of edit a materialized view log, which is a table
associated with the master table of a materialized view. For more information, see
Section 1.3.6, "Materialized View Logs".
Schema: Database schema in which to create the materialized view log.
Name: Name of the master table of the materialized view to be associated with this
materialized view log.
Properties tab
Tablespace: Tablespace in which the materialized view log is to be created.
Logging: LOGGING or NOLOGGING, to establish the logging characteristics for the
materialized view log.
Row ID: Yes indicates that the rowid of all rows changed should be recorded in the
materialized view log; No indicates that the rowid of all rows changed should not be
recorded in the materialized view log.

Create PL/SQL Package
4-8 Oracle Database SQL Developer User’s Guide
Primary Key: Yes indicates that the primary key of all rows changed should be
recorded in the materialized view log; No indicates that the primary key of all rows
changed should not be recorded in the materialized view log.
New Values: INCLUDING saves both old and new values for update DML operations
in the materialized view log; EXCLUDING disables the recording of new values in the
materialized view log. If this log is for a table on which you have a single-table
materialized aggregate view, and if you want the materialized view to be eligible for
fast refresh, you must specify INCLUDING.
Cache: For data that will be accessed frequently, CACHE specifies that the blocks
retrieved for this log are placed at the most recently used end of the least recently used
(LRU) list in the buffer cache when a full table scan is performed. This attribute is
useful for small lookup tables. NOCACHE specifies that the blocks are placed at the
least recently used end of the LRU list.
Parallel: If this option is checked, parallel operations will be supported for the
materialized view log.
Object ID: For a log on an object table only: Yes indicates that the system-generated or
user-defined object identifier of every modified row should be recorded in the
materialized view log; No indicates that the system-generated or user-defined object
identifier of every modified row should not be recorded in the materialized view log.
Sequence: Yes indicates that a sequence value providing additional ordering
information should be recorded in the materialized view log; No indicates that a
sequence value providing additional ordering information should not be recorded in
the materialized view log. Sequence numbers (that is, Yes for this option) are necessary
to support fast refresh after some update scenarios.
Available Filter Columns: Additional columns, which are non-primary-key columns
referenced by subquery materialized views, to be recorded in the materialized view
log. To select one or more filter columns, use the arrow buttons to move columns from
Available to Selected.
DDL tab
If you are editing an existing materialized view log or if you have only partially
created a materialized view log, this tab contains a read-only display of a SQL
statement that reflects the current definition of the materialized view log.
To save the SQL statement to a script file, click Save and specify the location and file
name.
4.17 Create PL/SQL Package
Use this dialog box to create a package to contain PL/SQL subprograms (functions or
procedures, or a combination).
Schema: Database schema in which to create the PL/SQL package.
Name: Name of the package. Must be unique within a schema.
Add New Source in Lowercase: If this option is checked, new text is entered in
lowercase regardless of the case in which you type it. This option affects only the
appearance of the code, because PL/SQL is not case sensitive in its execution.
The package is created and is displayed in the Editor window, where you can enter the
details.

Create/Edit Sequence
Dialog Boxes for Creating/Editing Objects 4-9
4.18 Create PL/SQL Subprogram (Function or Procedure)
Use this dialog box to create a PL/SQL subprogram (function or procedure). A
function returns a value; a procedure does not return a value.
Specify the information for the package and for each parameter, then click OK to create
the subprogram and have it displayed in the Editor window, where you can enter the
details.
Schema: Database schema in which to create the PL/SQL subprogram.
Name: Name of the subprogram. Must be unique within a schema.
Add New Source in Lowercase: If this option is checked, new text is entered in
lowercase regardless of the case in which you type it. This option affects only the
appearance of the code, because PL/SQL is not case sensitive in its execution.
Parameters tab
For each parameter in the procedure to be created, specify the following information.
Name: Name of the parameter.
Type: Data type of the parameter.
Mode: IN for input only, OUT for output only, or IN OUT for input and output (that is,
the output is stored in the parameter overwriting its initial input value).
Default Value: Optionally, the default value if the parameter is omitted or specified as
null when the subprogram is called.
To add a parameter, click the Add (+) icon; to delete a parameter, click the Remove (X)
icon; to move a parameter up or down in the list, click the up-arrow or down-arrow
icon.
DDL tab
This tab contains a read-only display of a SQL statement that reflects the current
definition of the subprogram.
4.19 Create/Edit Sequence
The following information applies to a sequence, which is an object from which
multiple users may generate unique integers. You can use sequences to automatically
generate primary key values.
Schema: Database schema in which to create the sequence.
Name: Name of the sequence. Must be unique within a schema.
Increment: Interval between successive numbers in a sequence.
Start with: Starting value of the sequence.
Min value: Lowest possible value for the sequence. The default is 1 for an ascending
sequence and -(10^26) for a descending sequence.
Max value: Highest possible value for the sequence. The default is 10^27 for an
ascending sequence and -1 for a descending sequence.
Cycle: Indicates whether the sequence "wraps around" to reuse numbers after reaching
its maximum value (for an ascending sequence) or its minimum value (for a
descending sequence). If cycling of values is not enabled, the sequence cannot generate
more values after reaching its maximum or minimum value.

Create SQL File
4-10 Oracle Database SQL Developer User’s Guide
Cache and Cache size: If Cache is checked, sequence values are preallocated in cache,
which can improve application performance; Cache size indicates the number of
sequence values preallocated in cache. If Cache is not checked, sequence values are not
preallocated in cache.
Order: Indicates whether sequence numbers are generated in the order in which they
are requested. If no ordering is specified, sequence numbers are not guaranteed to be
in the order in which they were requested.
DDL tab
You can review the SQL statement that SQL Developer will use to create a new
sequence or that reflects any changes you have made to the sequence properties.
4.20 Create SQL File
Use this dialog box to create a SQL script file and to open the file in a SQL Worksheet
for editing.
File Name: Name and extension of the file to be created. The default and
recommended extension is .sql.
Directory Name: Directory path for the file. To specify a directory, you can click
Browse. The default directory is the Location of User-Related Information.
Related Topics
Dialog Boxes for Creating/Editing Objects
4.21 Create/Edit Synonym
The following information applies to a synonym, which is an alternative name for a
table, view, sequence, procedure, stored function, package, materialized view, Java
class database object, user-defined object type, or another synonym.
Public: If this option is checked, the synonym is accessible to all users. (However each
user must have appropriate privileges on the underlying object in order to use the
synonym.) If this option is not checked, the synonym is a private synonym, and is
accessible only within its schema.
Schema: Database schema in which to create the synonym.
Name: Name of the synonym. A private synonym must be unique within its schema; a
public synonym must be unique within the database.
For - Referenced Schema: Schema containing the object or name to which this
synonym refers.
Object Based: Specify the object to which this synonym refers.
Name Based: Enter the name of the object to which this synonym refers.
DDL tab
You can review the SQL statement that SQL Developer will use to create a new
synonym or that reflects any changes you have made to the synonym properties.
4.22 Create Table (quick creation)
This dialog box (if you do not check the Advanced box) creates a new table quickly by
specifying columns and some frequently used features. (If you need to add or change

Create Table (quick creation)
Dialog Boxes for Creating/Editing Objects 4-11
features after you create the table, you can edit the table by clicking the Modify icon
while viewing the table or by right-clicking its name in the Connections navigator and
selecting Properties, which displays the Create/Edit Table (with advanced options)
dialog box.)
To create a new table, the only things you must do are specify the schema and the table
name, add the necessary columns, and click OK. Although it is not required, you
should also specify a primary key.
Advanced: If this option is checked, the dialog box changes to include an extended set
of features for creating the table. For example, you must check this option if you want
to create a partitioned table, an index-organized table, or an external table.
Schema: Database schema in which to create the table.
Name: Name of the table. Must be unique within a schema.
Table tab (quick creation)
Specifies properties for each column in the table.
Columns: Lists the columns currently in the table.
Column Name: Name of the column. Must be unique within the table. Suggestion: For
a new column, replace any default name, such as COLUMN1.
Type: Data type for the column. The drop-down list includes only selected frequently
used data types. To specify any other type for the column, you must use the Columns
panel of the Create/Edit Table (with advanced options) dialog box.
Size: For VARCHAR2 data, the maximum size of the column data; for NUMBER data,
the maximum number of digits.
Not Null: If this option is checked, the column must contain data; you cannot specify
no value or an explicit null value for this column when you insert a row. If this option
is not checked, the column can contain either data or no data.
Primary Key: If this option is checked, the column is the primary key, or part of the
primary key, for the table. The primary key is the column, or set of columns, that
uniquely identifies each row in the table. A primary key column cannot be null.
If you want to have the primary key values automatically populated by a convenient
method that uses a before-insert trigger and a sequence, then before you finish
creating the table, you must check the Advanced box and use the Primary Key tab,
starting with the Populate Primary Key Column field.
To add another column, click Add Column. When you are finished adding columns,
either click OK or click the DDL tab to review the CREATE TABLE statement.
DDL tab (quick creation)
You can review and save the CREATE TABLE statement that SQL Developer will use
to create a new table or that reflects any changes you have made to the table
properties. If you want to make any changes, go back to the Table tab and make the
changes there.
When you are finished, click OK.
Note: To add a column after the currently selected column, click Add
Column; to delete a column, select it and click Remove Column.

Create/Edit Table (with advanced options)
4-12 Oracle Database SQL Developer User’s Guide
4.23 Create/Edit Table (with advanced options)
The table dialog box is used for creating a new table or editing an existing table. The
table properties are grouped under several tabs.
To create a new table, the only things you must do are specify the schema and the table
name, add the necessary columns, and click OK. Although it is not required, you
should also specify a primary key using the Primary Key pane. For other table-related
features, use the appropriate tabs; the order in which you visit tabs usually does not
matter, although you might find it convenient to visit them in the sequence in this
topic. If you are editing an existing table, you can visit the tabs in any order.
If you click OK before you are finished creating or editing the table, right-click the
table name in the Connections navigator, select Edit, and continue creating or editing
the table.
Schema: Database schema in which to create the table.
Name: Name of the table. Must be unique within a schema.
Type: The type of table:
■Normal: A regular database table. It can be partitioned (see Partitioning pane,
Subpartition Templates pane, and Partition Definitions pane).
■External: An external table (see External Table Properties pane).
■Index Organized: An index-organized table (see Index Organized Properties
pane).
■Temporary Table: A temporary table, which is not stored permanently in the
database. The temporary table definition persists in the same way as the definition
of a regular table, but the table segment and any data in the temporary table
persist only for the duration of either the transaction (Transaction option) or the
session (Session option).
Columns pane
Specifies properties for each column in the table.
Columns: Lists the columns currently in the table. To add a column, click the Add
Column (+) icon; to delete a column, select it and click the Remove Column (X) icon; to
move a column up or down in the table definition, select it and use the up-arrow and
down-arrow buttons.
Name: Name of the column. Must be unique within the table. Suggestion: For a new
column, replace any default name, such as COLUMN1.
Datatype: Simple indicates a simple (non-object) data type; Complex indicates an
object type. For a complex type, you must specify the schema and the type name (for
example, MDSYS and SDO_GEOMETRY for the Oracle Spatial geometry type).
Type: Name of the data type. Most of the remaining information depends on the
specific type.
Precision: For numeric data, the precision (total number of significant digits that can
be represented) of the column data.
Note: After you add a column, to add another column, click the Add
Column (+) icon.

Create/Edit Table (with advanced options)
Dialog Boxes for Creating/Editing Objects 4-13
Scale: For numeric data, the scale (number of digits after the decimal point) of the
column data.
Size: For character data, the maximum size of the column data.
Units: For character data, the units represented by the Size: BYTE for bytes or CHAR
for characters. This attribute is important if the database can contain data in Unicode
format, with multiple bytes for each character.
Default: For relevant types, the default value inserted into the column if no value is
specified when a row is inserted.
Cannot be NULL: If this option is checked, the column must contain data; you cannot
specify no value or an explicit null value for this column when you insert a row. If this
option is not checked, the column can contain either data or no data. A primary key
column (see Primary Key pane) cannot be null.
Comment: Optional descriptive comment about the column.
To add another column, click the Add Column (+) icon.
Primary Key pane
Specifies the primary key for the table. The primary key is the column, or set of
columns, that uniquely identifies each row in the table.
An index is automatically created on the primary key.
Name: Name of the constraint to be associated with the primary key definition. Must
be unique within the database.
Enabled: If this option is checked, the primary key constraint is enforced: that is, the
data in the primary key column (or set of columns) must be unique and not null.
Available Columns: Lists the columns that are available to be added to the primary
key definition.
Selected Columns: Lists the columns that are included in the primary key definition.
To add a column to the primary key definition, select it in Available Columns and click
the Add (>) icon; to remove a column from the primary key definition, select it in
Selected Columns and click the Remove (<) icon. To move all columns from available
to selected (or the reverse), use the Add All (>>) or Remove All (<<) icon. To move a
column up or down in the primary key definition, select it in Selected Columns and
use the arrow buttons.
The remaining fields (Populate Primary Key Column through Trigger Name) appear
only when you are creating a table. They are not available when you are editing an
existing table.
Populate Primary Key Column: When you are creating a table, if you want to use a
trigger and a sequence to have a unique value automatically inserted into the primary
key column when you insert a new row, specify the primary key column.
From: An existing sequence that you select, or a new sequence whose name you enter.
(For a new sequence, SQL Developer creates the sequence automatically using the
name that you enter.)
Trigger Name: The name for the before-insert trigger that will be automatically
created. This trigger uses the sequence to generate a new value for the primary key
when a row is inserted. For an example of using this technique, see the tutorial section
Section 3.3, "Creating a Table (TRANSACTIONS)".

Create/Edit Table (with advanced options)
4-14 Oracle Database SQL Developer User’s Guide
Unique Constraints pane
Specifies one or more unique constraints for the table. A unique constraint specifies a
column, or set of columns, whose data values must be unique: each data value must
not be null, and it must not be the same as any other value in the column.
For a multicolumn unique constraint, the combination of values must be unique, and
no column in the constraint definition can have a null value. For example, if you
specify the office_name and city columns for a unique constraint, you could not have
two Sales offices in Chicago, but you could have a Sales office in Chicago and a Sales
office in Atlanta.
Unique Constraints: Lists the unique constraints currently defined on the table. To
add a unique constraint, click the Add button; to delete a unique constraint, select it
and click the Remove button.
Name: Name of the unique constraint. Must be unique within the database.
Enabled: If this option is checked, the unique constraint is enforced.
Available Columns: Lists the columns that are available to be added to the unique
constraint definition.
Selected Columns: Lists the columns that are included in the unique constraint
definition.
To add a column to the unique constraint definition, select it in Available Columns and
click the Add (>) icon; to remove a column from the unique constraint definition,
select it in Selected Columns and click the Remove (<) icon. To move all columns from
available to selected (or the reverse), use the Add All (>>) or Remove All (<<) icon. To
move a column up or down in the unique constraint definition, select it in Selected
Columns and use the arrow buttons.
Foreign Keys pane
Specifies one or more foreign keys for the table. A foreign key specifies a column
("local column"), each of whose data values must match a value in the primary key or
unique constraint of another table.
Foreign Keys: Lists the foreign keys currently defined on the table. To add a foreign
key, click the Add button; to delete a foreign key, select it and click the Remove button.
Name: Name of the foreign key definition. Must be unique within the database.
Enabled: If this option is checked, the foreign key is enforced.
Referenced Schema: Name of the schema containing the table with the primary key or
unique constraint to which this foreign key refers.
Referenced Table: Name of the table with the primary key or unique constraint to
which this foreign key refers.
Referenced Constraint: Name of the primary key or unique constraint to which this
foreign key refers.
Note: After you add a unique constraint, to add another unique
constraint, click the Add button.
Note: After you add a foreign key, to add another foreign key, click
the Add button.

Create/Edit Table (with advanced options)
Dialog Boxes for Creating/Editing Objects 4-15
Associations: Local Column: Lists the column in the currently selected (local) table
that is included in the foreign key definition. For each local column in the foreign key
definition, select the name of a column in the local table.
Associations: Referenced Column on [table]: For each local column, identifies the
column in the other (foreign) table that must have a value matching the value in the
local column.
Check Constraints pane
Specifies one or more check constraints for the table. A check constraint specifies a
condition that must be met when a row is inserted into the table or when an existing
row is modified.
Check Constraints: Lists the check constraints currently defined on the table. To add a
check constraint, click the Add button; to delete a check constraint, select it and click
the Remove button.
Name: Name of the check constraint definition. Must be unique within the database.
Enabled: If this option is checked, the check constraint is enforced.
Condition: Condition that must be met for a row. Can be any valid CHECK clause
(without the CHECK keyword). For example, to indicate that the value in a numeric
column named RATING must be from 1 to 10, you can specify: rating >=1 and
rating <= 10
To add another check constraint, click the Add button.
Indexes pane
Specifies properties for each index on the table.
Indexes: Lists the indexes currently defined on the table. To add an index, click the
Add Index (+) icon; to delete an index, select it and click the Remove Index (X) icon.
Name: Name of the index. Must be unique within the schema.
Index: A list of index expressions, that is, the table columns or column expressions in
the index. To add an index expression, click the Add Column Expression (+) icon; this
adds a column name here and in Column Expression, where you can edit it. To delete
an index expression, click the Remove Column Expression (X) icon; to move an index
expression up or down in the list, click the Move Column Up and Move Column
Down icons. An index must have at least one index expression.
For example, to create an index on the AUTHOR_LAST_NAME column of the BOOKS
table from the tutorial (see Creating a Table (BOOKS)), click the + icon, and select
AUTHOR_LAST_NAME in Column Name or Expression (next field), which changes
BOOKS to AUTHOR_LAST_NAME in the Index field.
Column Name or Expression: A column name or column expression. A column
expression is an expression built from columns, constants, SQL functions, and
Note: After you add a check constraint, to add another check
constraint, click the Add button.
Note: After you add an index, to add another index, click the Add
Index (+) icon.

Create/Edit Table (with advanced options)
4-16 Oracle Database SQL Developer User’s Guide
user-defined functions. When you specify a column expression, you create a
function-based index.
Order: ASC for an ascending index (index values sorted in ascending order); DESC for
a descending index (index values sorted in descending order).
Column Sequences pane
Enables you to specify sequences and before-insert triggers to be used in populating a
column with values. This approach is especially convenient for automatically
populating primary key column values with unique values.
Column: Name of the column for which a sequence and a trigger are to be used to
insert unique values. The data type of the column must be numeric.
Sequence: None causes no sequence to be used; Existing Sequence uses the sequence
that you specify; New Sequence creates a new sequence with a default or specified
name.
Trigg e r : Before-insert trigger that automatically inserts the next value of the specified
sequence into the column when a new row is inserted.
Storage Options pane
Specifies storage options for the table, enabling you to override the default storage
options.
Tablespace: Name of the tablespace for the table.
Pct Free: Percentage of space in each of the data blocks of the table reserved for future
updates to the rows of the table. You can enter a value from 0 through 99.
Pct Used: Minimum percentage of used space that Oracle maintains for each data
block of the table. A block becomes a candidate for row insertions when its used space
falls below the Pct Used value. You can enter a value from 1 through 99.
Extents - Initial: Size of the first extent of the table. Specify K (kilobytes) or M
(megabytes) for the unit associated with the number.
Extents - Next: Size of the next extent to be allocated to the table. Specify K (kilobytes)
or M (megabytes) for the unit associated with the number.
Extents - Min: Minimum number of extents allocated when the table is created.
Extents - Max: Maximum number of extents allocated when the table is created.
Unlimited (if checked) means that there is no maximum (and any specified maximum
is ignored).
Pct Increase: Percentage that each extent grows over the previous extent.
Ini Trans: Number of update transaction entries for which space is initially reserved in
the data block header.
Max Trans: Number of transaction entries that could concurrently use data in a data
block. This parameter has been deprecated. Oracle Database now automatically allows
up to 255 concurrent update transactions for any data block, depending on the
available space in the block.
Free Lists - Lists: Number of free lists for each of the free list groups for the table. The
default and minimum value for this parameter is 1, meaning that each free list group
contains one free list.
Free Lists - List Groups: Number of groups of free lists for the table. The default and
minimum value for this parameter is 1. Oracle uses the instance number of Real
Application Clusters instances to map each instance to one free list group.

Create/Edit Table (with advanced options)
Dialog Boxes for Creating/Editing Objects 4-17
Buffer Pool: <DEFAULT> means to use the Oracle Database default. KEEP means to
put blocks from the segment into the Keep buffer pool; maintaining an appropriately
sized Keep buffer pool lets Oracle retain the database object in memory to avoid I/O
operations. RECYCLE means to put blocks from the segment into the Recycle pool; an
appropriately sized Recycle pool reduces the number of objects whose default pool is
the Recycle pool from taking up unnecessary cache space.
Logging: <DEFAULT> means to use the Oracle Database default. ON means that the
table creation and any subsequent direct loader (SQL*Loader) and direct-path INSERT
operations against the table, partition, or LOB storage are logged in the redo log file.
OFF means that these operations are not logged in the redo log file.
LOB Parameters pane
Specifies storage options for LOB (large object) columns, enabling you to override the
default storage options.
Column: Name of the LOB column.
Store VARRAY as LOB: If this option is checked: If the maximum varray size is less
than 4000 bytes, the database stores the varray as an inline LOB unless you have
disabled storage in row; if the maximum varray size is greater than 4000 bytes or if
you have disabled storage in row, the database stores in the varray as an out-of-line
LOB. If this option is not checked, storage is based on the maximum possible size of
the varray rather than on the actual size of a varray column.
Chunk: The number of bytes to be allocated for LOB manipulation. If the value is not a
multiple of the database block size, then the database rounds up in bytes to the next
multiple. The maximum value is 32768 (32K), which is the largest Oracle Database
block size allowed. The default CHUNK size is one Oracle Database block.
Tablespace: Name of the tablespace for the LOB data.
Buffer Pool: <DEFAULT> means to use the Oracle Database default. KEEP means to
put blocks from the segment into the Keep buffer pool; maintaining an appropriately
sized Keep buffer pool lets Oracle retain the database object in memory to avoid I/O
operations. RECYCLE means to put blocks from the segment into the Recycle pool; an
appropriately sized Recycle pool reduces the number of objects whose default pool is
the Recycle pool from taking up unnecessary cache space.
Pct Version: Specifies the maximum percentage of overall LOB storage space used for
maintaining old versions of the LOB. The default value is 10, meaning that older
versions of the LOB data are not overwritten until they consume 10% of the overall
LOB storage space. You can specify a Pct Version value whether the database is
running in manual mode (where it is the default) or automatic undo mode (where
Retention is the default). You cannot specify both a Pct Version value and the
Retention option.
Retention: If this option is checked, old versions of this LOB column and retained. You
can specify this option only if the database is running in automatic undo mode and if
you do not specify a Pct Version value.
Free Pools: Specifies the number of groups of free lists for the LOB segment, usually
the number of instances in a Real Application Clusters environment or 1 for a
single-instance database. You can specify this option only if the database is running in
automatic undo mode. You cannot specify both a Free Pools value and the Free Lists
fields.
Logging: <DEFAULT> means to use the Oracle Database default. ON means that the
table creation and any subsequent direct loader (SQL*Loader) and direct-path INSERT

Create/Edit Table (with advanced options)
4-18 Oracle Database SQL Developer User’s Guide
operations against the table, partition, or LOB storage are logged in the redo log file.
OFF means that these operations are not logged in the redo log file.
Free Lists - Lists: Number of free lists for each of the free list groups for the table. The
default and minimum value for this parameter is 1, meaning that each free list group
contains one free list.
Free Lists - List Groups: Number of groups of free lists for the table. The default and
minimum value for this parameter is 1. Oracle uses the instance number of Real
Application Clusters instances to map each instance to one free list group.
Extents - Initial: Size of the first extent of the table. Specify K (kilobytes) or M
(megabytes) for the unit associated with the number.
Extents - Next: Size of the next extent to be allocated to the table. Specify K (kilobytes)
or M (megabytes) for the unit associated with the number.
Extents - Min: Minimum number of extents allocated when the table is created.
Extents - Max: Maximum number of extents allocated when the table is created.
Unlimited (if checked) means that there is no maximum (and any specified maximum
is ignored).
Extents - Pct Increase: Percentage that each extent grows over the previous extent.
Partitioning pane
Specifies partitioning options for a partitioned table, which is a table that is organized
into smaller and more manageable pieces called partitions. SQL queries and DML
statements do not need to be modified in order to access partitioned tables; however,
after partitions are defined, DDL statements can access and manipulate individuals
partitions rather than entire tables or indexes. Also, partitioning is entirely transparent
to applications.
Partition By: The type of partitioning: RANGE partitions the table on ranges of values
from the column list (which for an index-organized tablet must be a subset of the
primary key columns of the table); HASH partitions the table using the hash method
(rows assigned to partitions using a hash function on values found in columns
designated as the partitioning key); LIST partitions the table on lists of literal values
from column (useful for controlling how individual rows map to specific partitions).
Available: Lists the columns whose values are available to be used in assigning rows
to partitions.
Selected: Lists the column whose values are to be used in assigning rows to partitions.
To add a column to the partitioning definition, select it in Available Columns and click
the Add (>) icon; to remove a column from the partitioning definition, select it in
Selected Columns and click the Remove (<) icon. To move all columns from available
to selected (or the reverse), use the Add All (>>) or Remove All (<<) icon. To move a
column up or down in the partitioning definition, select it in Selected Columns and
use the arrow buttons.
Subpartition By: The partitioning type to be used to create subpartitions within each
range partition. Use the Available and Selected column lists select and deselect a
column for subpartitioning.
Subpartition Templates pane
Specifies subpartitioning options for a partitioned table. The options depend on the
subpartition type, and might include the following.
Hash Quantity: Hash subpartition quantity.

Create/Edit Table (with advanced options)
Dialog Boxes for Creating/Editing Objects 4-19
Tablespaces: Available and Selected tablespaces for storage of the data in a
subpartition.
Subpartition Templates: Specifications (subpartition templates) to control the
placement of rows in each subpartition. Click the Add (+) icon to add a subpartition
template that is appropriate for the subpartition type.
Subpartition Details: For each subpartition template, specify a name and (if relevant)
a value or set of values that is appropriate for the subpartition type.
Storage: Enables you to specify a tablespace for the subpartition.
Partition Definitions pane
Defines each partition for a partitioned table. The options depend on the partition
type, and might include the following.
Partitions: Specifications to control the placement of rows in each partition. Click the
Add (+) icon to add a partition specification that is appropriate for the partition type.
Partition Details: For each partition specification, specify a name and (if relevant) a
value or set of values that is appropriate for the subpartition type.
Storage: Enables you to specify a tablespace for the partition.
Subpartitions: Enables you to specify subpartition information.
Index Organized Properties pane
Specifies options for an index-organized table, which is a table in which the rows,
both primary key column values and nonkey column values, are maintained in an
index built on the primary key. Index-organized tables are best suited for primary
key-based access and manipulation.
PCTTHRESHOLD: The percentage of space reserved in the index block for an
index-organized table row; must be large enough to hold the primary key. All trailing
columns of a row, starting with the column that causes the specified threshold to be
exceeded, are stored in the overflow segment. PCTTHRESHOLD must be a value from
1 to 50; the default is 50.
Key Compression: If this option is checked, key compression is enabled, which
eliminates repeated occurrence of primary key column values in index-organized
tables. In the box to the right of this field, you can specify the prefix length, which is
the number of prefix columns to compress. (This value can be from 1 to the number of
primary key columns minus 1; the default prefix length is the number of primary key
columns minus 1.)
Include Column: Column at which to divide an index-organized table row into index
and overflow portions. The primary key columns are always stored in the index. The
Include Column can be either the last primary key column or any non-primary-key
column. All non-primary-key columns that follow the Include Column are stored in
the overflow data segment.
Mapping Table: If this option is checked, SQL Developer creates a mapping of local to
physical ROWIDs and store them in a heap-organized table. This mapping is needed
in order to create a bitmap index on the index-organized table. If the index-organized
table is partitioned, then the mapping table is also partitioned and its partitions have
the same name and physical attributes as the base table partitions.
Overflow: Specifications for the overflow segment. The options are the same as for the
Storage Options pane.

Create/Edit Table (with advanced options)
4-20 Oracle Database SQL Developer User’s Guide
External Table Properties pane
Specifies options for an external table, which is a read-only table whose metadata is
stored in the database but whose data in stored outside the database. Among other
capabilities, external tables enable you to query data without first loading it into the
database.
Access Driver: The access driver of the external table. The access driver is the API that
interprets the external data for the database: ORACLE_LOADER or ORACLE_
DATAPUMP. You must specify the ORACLE_DATAPUMP access driver if you specify
the AS subquery clause to unload data from one Oracle database and reload it into the
same database or a different Oracle database.
Access Type: Type of data to be automatically converted during loads and unloads:
BLOB or CLOB.
Default Directory: A default directory object corresponding to a directory on the file
system where the external data sources may reside. The default directory can also be
used by the access driver to store auxiliary files such as error logs.
Project Column: Determines how the access driver validates the rows of an external
table in subsequent queries. ALL processes all column values, regardless of which
columns are selected, and validates only those rows with fully valid column entries. If
any column value would raise an error, such as a data type conversion error, the row is
rejected even if that column was not referenced in the select list. REFERENCED
processes only those columns in the select list.
The ALL setting guarantees consistent result sets. The REFERENCED setting can result
in different numbers of rows returned, depending on the columns referenced in
subsequent queries, but is faster than the ALL setting. If a subsequent query selects all
columns of the external table, then the settings behave identically.
Reject Limit: The number of conversion errors can occur during a query of the
external data before an Oracle Database error is returned and the query is aborted.
Access Parameters: Values to the parameters of the specific access driver for this
external table.
Location Specifications: One or more external data sources. Each is usually a file, but
it need not be. Oracle Database does not interpret this clause; it is up to the access
driver to interpret this information in the context of the external data. Use the Add (+)
icon to add each location specification.
Comment pane
Optional descriptive comment about the table.
DDL pane
You can review and save the CREATE TABLE statement that SQL Developer will use
to create a new table or that reflects any changes you have made to the table
properties. If you want to make any changes, go back to the relevant tabs and make
the changes there.
To save the SQL statement to a script file, click Save and specify the location and file
name.
When you are finished, click OK.

Create Trigger
Dialog Boxes for Creating/Editing Objects 4-21
4.24 Create Trigger
The following information applies to a trigger, which is which is a stored PL/SQL
block associated with a table, a schema, or the database, or an anonymous PL/SQL
block or a call to a procedure implemented in PL/SQL or Java. The trigger is
automatically executed when the specified conditions occur.
Schema: Database schema in which to create the trigger.
Name: Name of the trigger. Must be unique within the database.
Add New Source in Lowercase: If this option is checked, new text is entered in
lowercase regardless of the case in which you type it. This option affects only the
appearance of the code, because PL/SQL is not case sensitive in its execution.
Trigger tab
Trigg e r Ty p e: The type of object on which to create the trigger: TABLE, VIEW,
SCHEMA, or DATABASE. (The remaining items depend on the type of trigger.)
Table Owner or View Owner: For a trigger on a table or a view, the name of the owner
of the table or the view.
Tab l e N a m e or View Name : For a trigger on a table or a view, the name of the table or
the view.
Before or After: For a trigger on a table, select Before to cause the database to fire the
trigger before executing the triggering event, or select After to cause the database to
fire the trigger after executing the triggering event.
Statement Level or Row Level: For a trigger on a table, Statement Level fires the
trigger once before or after the triggering statement that meets the optional trigger
constraint defined in the WHEN condition; Row Level fires the trigger once for each
row that is affected by the triggering statement and that meets the optional trigger
constraint defined in the WHEN condition.
Insert, Update, Delete: For a trigger on a table or a view, Insert fires the trigger
whenever an INSERT statement adds a row to a table or adds an element to a nested
table; Update fires fire the trigger whenever an UPDATE statement changes a value in
one of the columns specified in Selected Columns (or in any column if no columns are
specified); Delete fires the trigger whenever a DELETE statement removes a row from
the table or removes an element from a nested table.
Referencing - Old: For a trigger on a table, the correlation names in the PL/SQL block
and WHEN condition of a row trigger to refer specifically to old value of the current
row.
Referencing - New: For a trigger on a table, the correlation names in the PL/SQL
block and WHEN condition of a row trigger to refer specifically to new value of the
current row.
Available Columns: For a trigger on a table, lists the columns from which you can
select for use in an Update trigger definition.
Selected Columns: For a trigger on a table, lists the columns used in an Update trigger
definition.
When: For a trigger on a table, an optional trigger condition, which is a SQL condition
that must be satisfied for the database to fire the trigger. This condition must contain
correlation names and cannot contain a query.
Schema: For a trigger on a schema, the name of the schema on which to create the
trigger.

Create Type (User-Defined)
4-22 Oracle Database SQL Developer User’s Guide
Available Events: For a trigger on a schema or database, lists events from which you
can select for use in the trigger definition.
Selected Events: For a trigger on a schema or database, lists events used in the trigger
definition.
DDL tab
This tab contains a read-only display of a SQL statement that reflects the current
definition of the trigger.
4.25 Create Type (User-Defined)
This dialog box is displayed when you right-click Types in the Connections navigator
and select Create Type to create a user-defined type. After you complete the
information in this dialog box and click OK, a SQL Worksheet is displayed in which
you must specify the appropriate definition of the type.
Schema: Database schema in which to create the type.
Name: Name of the type. Must be unique within its schema.
Type: Select the type of data type to be created: array type, object type specification,
object type specification and type body, or table type.
For more information about creating a user-defined type, see the CREATE TYPE
statement in Oracle Database SQL Language Reference.
4.26 Create/Edit User
The user dialog box is used for creating a new database user or editing an existing
database user. The user properties are grouped under several tabs.
To create or edit a database user, the user associated with your database connection
must have the DBA role. You should also be familiar with the main concepts and
techniques documented in Oracle Database Administrator's Guide.
User tab
Specifies general properties for the database user.
User Name: The user name string. For an existing user, this field is read-only; to
change the name, you must drop the user and create a new user with the desired
name.
New Password: Password string for the new user, or new password for an existing
user. You must also type the same password string for Confirm Password.
Password Expired: If this option is checked, the password is marked as expired, and
the user must change the password before being permitted to connect to the database.
Account Locked: If this option is checked, the user will not be permitted to connect
connect to the database until a DBA user unlocks the account associated with this user.
Roles tab
Specifies roles to be granted to the user. For each role, you can check Granted to grant
the role, Admin to permit the user to grant the role to other users, and Default to use
the default settings for Granted and Admin.

Create/Edit User Defined Report
Dialog Boxes for Creating/Editing Objects 4-23
For convenience, you can click buttons to affect all settings (Grant All, Revoke All,
Admin All, Admin None, Default All, Default None); then, you can specify other
settings for individual roles.
System Privileges tab
Specifies privileges to be granted to the user. For each privilege, you can check
Granted to grant the privilege, and Admin Option to permit the user to grant the
privilege to other users.
For convenience, you can click buttons to affect all settings (Grant All, Revoke All,
Admin All, Admin None); then, you can specify other settings for individual
privileges.
Quotas tab
Specifies disk usage limits on specified tablespaces for the user. If you check
Unlimited, there is no disk usage limit on the tablespace.
SQL tab
Displays the SQL statements that SQL Developer will use to create (after executing a
CREATE USER statement) a new user or to edit an existing user. This display is
read-only; if you want to make any changes, go back to the relevant tabs and make the
changes there.
4.27 Create/Edit User Defined Report
The following information applies to a user-defined report. For information about how
to create a user-defined report, as well as examples of creating such reports, see
Section 1.11.11, "User Defined reports".
Details tab
Name: Name of the user-defined report.
Style: Report style: Tab l e (default), Code (formats the code in the output), Chart (bar or
pie chart; see Section 1.11.11.1, "User-Defined Report Example: Chart" for an example),
plsql-dbms_output (dynamic HTML; see Section 1.11.11.2, "User-Defined Report
Example: Dynamic HTML" for an example), or Script (executable script).
Description: Optional description of the report.
ToolTip: Optional tooltip text to be displayed when the mouse pointer stays briefly
over the report name in the Reports navigator display.
SQL Statement: The complete SQL statement for retrieving the information to be
displayed in the user-defined report. As a trivial example, the statement SELECT user
"Current User" FROM DUAL; displays Current User as the heading and the name of
the user associated with the current database connection.
Suggestion: Look at the SQL statements for various SQL Developer-supplied reports;
check the Messages - Log pane below the report results, or click the SQL icon under
the Report Results tab.
Add Child: Add a child report (subreport) of this report.
Test: Tests the report definition by running it in a separate window. This feature
enables you to test the report before creating it.

Create/Edit User Defined Report Folder
4-24 Oracle Database SQL Developer User’s Guide
Columns tab
Name: Name of the column.
Format: Format of the column.
hAlign: Horizontal alignment: Left or Right
vAlign: Vertical alignment: Bottom, Center, or Top
Add Column: Adds a new column.
Remove column: Removes the selected column.
Binds tab
Name: Name of the bind variable.
Prompt: String displayed when the user is prompted to enter a value. Example: Tab le
name
Default: Default value if the user does not enter a value at the prompt. To accept the
Oracle SQL value, specify NULL_VALUE.
ToolTip: Optional tooltip text to be displayed when the mouse pointer stays briefly
over the bind variable name.
Chart Details tab
Available if the report type is Chart.
Chart Type: Bar chart with horizontal or vertical bars, or pie chart.
3D Graph: Tru e for a three-dimensional appearance; False for a two-dimensional
appearance.
Gradient Effect: Tr u e for a gradient effect; False for no gradient effect.
Chart Style: Thematic name for the overall appearance of the chart.
Show Grid: True to show the grid lines; False to hide the grid lines.
Show Legend: True to show the chart legend; False to hide the chart legend.
4.28 Create/Edit User Defined Report Folder
The following information applies to a folder for organizing user-defined reports. Each
folder can contain reports and other folders (subfolders). For example, you can create a
folder named Sales, and then under that folder create folders named Sales by District
and Sales by Product.
For information about how to create user-defined reports and folders for these reports,
see Section 1.11.11, "User Defined reports".
Name: Name of the folder.
Description: Optional description of the folder.
ToolTip: Optional tooltip text to be displayed when the mouse pointer stays briefly
over the folder name in the Reports navigator display.
4.29 Create/Edit View
The view dialog box is used for creating or editing a view or materialized view. You
can use the SQL Query tab or a series of panes to specify the query part of the view

Create/Edit View
Dialog Boxes for Creating/Editing Objects 4-25
definition, and you can use one or more other panes (depending on the type of view)
for other parts of the definition.
If you click OK before you are finished creating or editing the view, right-click the
view name in the Connections navigator, select Edit, and continue creating or editing
the view.
Schema: Database schema in which to create the view.
Name: Name of the view. Must be unique within a schema.
Advanced: If this option is checked, the dialog box changes to include a pane that
provides an extended set of features for creating the view.
SQL Query tab or pane
As a tab (if you did not check the Advanced box), it contains the SQL code for the
query part of the view definition, using the SELECT and FROM keywords and usually
a WHERE clause with whatever syntax is needed to retrieve the desired information.
As a pane (if you checked the Advanced box), it presents options for building specific
parts of the query.
For example, the following query, from the Creating a View tutorial topic, selects
columns from the PATRONS and TRANSACTIONS tables, ordering them first by
values in the PATRON_ID column in the PATRONS table and then by values in the
TRANSACTION_TYPE column in the TRANSACTIONS table. The result is a listing
by patron ID of all patrons who had transactions, and for each listed patron the
transaction information listed by transaction type
CREATE VIEW patrons_trans_view AS
SELECT p.patron_id, p.last_name, p.first_name,
t.transaction_type, t.transaction_date
FROM patrons p, transactions t
WHERE p.patron_id = t.patron_id
ORDER BY p.patron_id, t.transaction_type;
SQL Parse Results: If you click Test Syntax, displays any SQL syntax errors, or
displays a message indicating no errors if there are no syntax errors.
Revert: Cancels any edits you have made in the Entire SQL Query box, and displays
the contents of the box before these edits.
Test Syntax: Checks the statement in the Entire SQL Query box for any SQL syntax
errors.
Quick-Pick Objects pane
Specifies objects that you can use in the SELECT, FROM, and WHERE clauses of the
view definition. Identify the tables and views on which this view is based, and the
columns in those tables and views that are used in the definition of this view. To see
the results of your quick-pick specification, either check Auto-Query or click Query.
Schema: Database schema containing the objects to be selected.
Type Filter - Filter Types: Enables you to limit the display of objects available for
selection to certain types of database objects (for example, to show only tables or
views).
Name Filter: Enables you to limit the display of objects available for selection
according to a character string in the name, with the percent sign (%) as a wildcard
character. For example, to limit the display of available tables and views to those
whose names start with the string EM, specify the following name filter: EM%

Create/Edit View
4-26 Oracle Database SQL Developer User’s Guide
Auto-Query: If this option is enabled, the display of available objects is automatically
refreshed when you specify or change the Type Filter or Name Filter value.
Query: Refreshes the display of available objects based on the Type Filter and Name
Filter values.
Available: Lists the objects (typically, tables and views in a hierarchical display) from
which you can select objects to use in the SELECT, FROM, and WHERE clauses of the
view definition.
Selected: Lists the objects (typically, columns) that you can use in the SELECT, FROM,
and WHERE clauses of the view definition.
To add an object as selected, select it in Available and click the Add (>) icon; to remove
an object as selected, select it in Selected and click the Remove (<) icon. To move all
objects from selected to available, use the Remove All (<<) icon. To move an object up
or down in the selected list, select it in Selected and use the arrow buttons.
For the example in DDL tab or pane, select the DEPTNO and SAL columns from the
EMP table.
FROM Clause pane
Specifies the tables and views that you can use in the FROM clause of the view
definition.
Available: Lists the tables and views that are available to be selected for use in the
FROM clause of the view definition.
Selected: Lists the tables and views that you can use in the FROM clause of the view
definition.
To add an object as selected, select it in Available and click the Add (>) icon; to remove
an object as selected, select it in Selected and click the Remove (<) icon. To move all
objects from available to selected, use the Add All (<<) icon; to move all objects from
selected to available, use the Remove All (<<) icon.
Alias: Alias for the table or view.
For the example in DDL tab or pane, select the EMP table.
SELECT Clause pane
Specifies objects that you can use in the SELECT clause of the view definition.
SELECT List: Lists the objects (typically, columns) that you can currently use in the
SELECT clause. To add an object, click the Add (+) icon; to delete an object, select it
and click the Delete (X) icon; to move an object up or down in the view definition,
select it and use the up-arrow and down-arrow buttons.
Expression: Column name or an expression. For expressions, you can type them, or
you can use the Expression Palette to add object names and function names.
Validate: Checks the validity of the Expression entry.
For the example in DDL tab or pane, select DEPTNO column and the MIN(emp.sal)
and MAX(emp.sal) functions.
Note: After you add an object, to add another object, click the Add
(+) icon.

Create/Edit View
Dialog Boxes for Creating/Editing Objects 4-27
WHERE Clause pane
Specifies the WHERE clause of the view definition.
WHERE: The text of the WHERE clause, without the WHERE keyword. You can type
the text completely; or you can type some of the text and use the Expression Palette to
add object names, function names, and operators.
Example (from the Creating a View tutorial exercise): p.patron_id = t.patron_
id
GROUP BY Clause pane
Specifies a clause to be used to group the selected rows based on the value of columns
for each row and return a single row of summary information for each group. The
GROUP BY clause groups rows but does not guarantee the order of the result set; to
order the groupings, use the ORDER BY clause.
Available: Lists the tables and views, and the columns in each, that are available to be
selected for use in the GROUP BY clause of the view definition.
Selected: Lists the tables and views, and the columns in each, that you can use in the
GROUP BY clause of the view definition.
To add an object as selected, select it in Available and click the Add (>) icon; to remove
an object as selected, select it in Selected and click the Remove (<) icon. To move all
objects from available to selected, use the Add All (<<) icon; to move all objects from
selected to available, use the Remove All (<<) icon.
HAVING Clause pane
Specifies an expression that must be satisfied for rows to be processed by the GROUP
BY clause. For example, HAVING MIN(salary) < 30000 causes the GROUP BY
clause to consider only rows where the minimum value of the relevant salary values is
less than 30000.
HAVING: You can type the complete expression text, or you can use the Expression
Palette to add object names, function names, and operators to the expression text.
ORDER BY Clause pane
Specifies one or more columns or column expressions whose values will be used to
sort the results returned by the view. Without an ORDER BY clause, no guarantee
exists that the same query executed more than once will retrieve rows in the same
order.
ORDER BY List: Lists the objects (typically, columns) that you can currently use in the
ORDER BY clause. To add an object, click the Add (+) icon; to delete an object, select it
and click the Delete (X) icon; to move an object up or down in the view definition,
select it and use the up-arrow and down-arrow buttons.
ORDER BY Expression Filter: For each column or column expression, you can type
the text completely into the Expression box; or you can type some of the text and use
the Expression Palette to add object names, function names, and operators.
Validate: Tests the validity of the syntax for the expression.
Note: After you add an object, to add another object, click the Add
(+) icon.

Create/Edit View
4-28 Oracle Database SQL Developer User’s Guide
Order: ASC for ascending (expression values sorted in ascending order); DESC for
descending (expression values sorted in descending order).
Nulls Ordering: NULLS FIRST to have null expression values appear before non-null
values; NULLS LAST to have null expression values appear after non-null values.
("Before" and "after" positions are determined by the Order value.)
View Information or Materialized View Properties pane
Options for a standard view:
Restrict Query: If this option is checked, you can enable one of the following options
■Read Only: Prevents the view from being used to add, delete, or change data in
the underlying table or tables.
■Check Option: If this option is checked, it prohibits any changes to the underlying
table or tables that would produce rows that are not included in this view.
Force on create: If this option is checked, the view is created even if it has errors in its
definition. This option is useful if you want to create the view regardless of any errors,
and go back and correct the errors later. If this option is not checked, the view is not
created is its definition contains any errors.
Options for a materialized view:
Refresh Options:
Method: The method of refresh operation to be performed:
■Complete Refresh: Executes the defining query of the materialized view, even if a
fast refresh is possible.
■Fast Refresh: Uses the incremental refresh method, which performs the refresh
according to the changes that have occurred to the master tables. The changes for
conventional DML changes are stored in the materialized view log associated with
the master table.The changes for direct-path INSERT operations are stored in the
direct loader log.
■Force Refresh: Performs a fast refresh if one is possible; otherwise, performs a
complete refresh.
■Never: Do not perform refresh operations.
When: The type of refresh operation to be performed:
■On Demand: Performs a refresh when one of the DBMS_MVIEW refresh
procedures is called.
■On Commit: Performs a fast refresh whenever the database commits a transaction
that operates on a master table of the materialized view. This may increase the
time taken to complete the commit, because the database performs the refresh
operation as part of the commit process.
■Specify: Performs refresh operations according to what you specify in the Start on
and Next fields.
■Never: Does not perform a refresh operation.
Type: Refresh type, which determines the type of materialized view:
■Primary Key: Creates a primary key materialized view, which allows materialized
view master tables to be reorganized without affecting the eligibility of the
materialized view for fast refresh.

Create/Edit View
Dialog Boxes for Creating/Editing Objects 4-29
■Row ID: Creates a rowid materialized view, which is useful if the materialized
view does not include all primary key columns of the master tables.
Start on: Starting date and time for the first automatic refresh operation. Must be in
the future.
Next: Time for the next automatic refresh operation. The interval between the Start on
and Next times establishes the interval for subsequent automatic refresh operations. If
you do not specify a value, the refresh operation is performed only once at the time
specified for Start on.
Constraints: If this option is checked, more rewrite alternatives can be used during the
refresh operation, resulting in more efficient refresh execution. The behavior of this
option is affected by whether you select Enforced or Trusted.
Enforced: Causes only enforced constraints to be used during the refresh operation.
Trus t e d : Enables the use of dimension and constraint information that has been
declared trustworthy by the database administrator but that has not been validated by
the database. If the dimension and constraint information is valid, performance may
improve. However, if this information is invalid, then the refresh procedure may
corrupt the materialized view even though it returns a success status.
Materialized View Options:
Parallel: If this option is checked, parallel operations will be supported for the
materialized view, and you can specify a number for the default degree of parallelism
for queries and DML on the materialized view after creation.
Enable Cache: If this option is checked, the blocks retrieved for this table are placed at
the most recently used end of the least recently used (LRU) list in the buffer cache
when a full table scan is performed. This setting is useful for small lookup tables. If
this option is not checked, the blocks are placed at the least recently used end of the
LRU list.
Build Type: Specifies when to populate the materialized view. Immediate indicates
that the materialized view is to be populated immediately. Deferred indicates that the
materialized view is to be populated by the next refresh operation. If you specify
Deferred, the first (deferred) refresh must always be a complete refresh; until then, the
materialized view has a staleness value of unusable, so it cannot be used for query
rewrite.
Enable Query Rewrite: If this option is checked, the materialized view is enabled for
query rewrite, an optimization technique that transforms a user request written in
terms of master tables into a semantically equivalent request that includes one or more
materialized views.
Prebuilt Option: If this option is checked, an existing table is registered as a
preinitialized materialized view. This option is particularly useful for registering large
materialized views in a data warehousing environment. The table must have the same
name and be in the same schema as the resulting materialized view, and the table
should reflect the materialization of a subquery. Reduced Precision authorizes the loss
of precision that will result if the precision of the table or materialized view columns
do not exactly match the precision returned by subquery. No Reduced Precision
requires that the precision of the table or materialized view columns match exactly the
precision returned by subquery, or the create operation will fail.
Index Storage Options:
Use Index: If this option is checked, a default index is created and used to speed up
incremental (fast) refresh of the materialized view. If this option is not checked, this

Create XML Schema
4-30 Oracle Database SQL Developer User’s Guide
default index is not created. (For example, you might choose to suppress the index
creation now and to create such an index explicitly later.)
Use Tablespace: If this option is checked, you can specify the tablespace in which the
materialized view is to be created. If this option is not checked, the materialized view
is created in the default tablespace of the schema containing the materialized view.
DDL tab or pane
If you are editing an existing view or if you have only partially created a view, this tab
contains a read-only display of a SQL statement that reflects the current definition of
the view.
To save the SQL statement to a script file, click Save and specify the location and file
name.
4.30 Create XML Schema
This dialog box enables you to specify the URL of an XML schema that can be
associated with XML document instances.
Schema: Name of the schema in which to create the XML schema object.
Name: URL of the XML schema.
4.31 Configure File Type Associations
This dialog box, which is displayed the first time you start SQL Developer, enables you
to associate certain file types with SQL Developer. If a file type is associated with SQL
Developer, files with that type’s extension will automatically be opened by SQL
Developer when you double-click the file name. Any previous association for that file
type is replaced.
If you do not associate a file type with SQL Developer, any existing association for that
file is unchanged.
After you close this box, you can change the associations for these file types and many
others by clicking Tools and then Preferences, and selecting File Types (see
Section 1.12.8, "File Types").
4.32 DDL Panel for Creating or Editing an Object
You can review and save the SQL statement that SQL Developer will use to create or
edit the object, to reflect any changes you have made to the object’s properties. If you
want to make any changes, go back to the relevant panels and make the changes there.
To save the SQL statement to a script file, click Save and specify the location and file
name.
4.33 Debugger - Attach to JPDA
This dialog box is displayed when you right-click a database connection name and
select Remote Debug. Use this dialog box if you are using the Sun Microsystem's Java
Platform Debugger Architecture (JPDA) and you would like the debugger to listen so
that a debuggee can attach to the debugger. For more information about remote
debugging, see Section 1.6.1, "Remote Debugging".
Host: Name or IP address of the remote host on which SQL Developer should listen
for the database to connect.

Export (Selected Objects or Types of Objects)
Dialog Boxes for Creating/Editing Objects 4-31
Port: Listening port number on the remote host. You can choose any valid port number
that is not in use by another process.
Timeout: The number of seconds that SQL Developer will wait for the remote
database to make a debugging connection.
Don’t Show Dialog Box Before Connecting: If this option is checked, this dialog box
will not be displayed before future connections for remote debugging.
4.34 Describe Object Window
This window is displayed when you select a database object name in the SQL
Worksheet, right-click, and select Describe. The information is read-only, and is
displayed using tabs that are appropriate for the type of object.
For example, if the display is for a table, the information displayed is similar to that in
the Create/Edit Table (with advanced options) dialog box.
4.35 Edit Value (Table Column Data)
This dialog box enables you to edit data in a cell in the table Data grid (that is, edit the
value of a single column within a row). You can change the data value and then click
OK.
The specific options available depend on the data type of the column associated with
that cell in the grid.
If you are not permitted to modify the data, the Value display is read-only.
4.36 Enter Bind Values
This dialog box enables you to enter values for each bind variable. If the NULL option
is checked, you cannot enter a value in this dialog box. (The NULL option is checked
by default.)
4.37 Export (Selected Objects or Types of Objects)
This dialog box is displayed when you click Tools and then Export. For a selected
database connection, you can export some or all objects of one or more types of
database objects to a file containing SQL data definition language (DDL) statements to
create these objects. To specify options for the export operation, use the Options tab. To
specify the objects or types of objects to export, use the Objects tab.
Options tab
File: Specify the name of the file to contain the DDL statements for creating the objects
to be exported (for example, my_tables.sql). You can click Browse to select a
directory for this file. (The default file path for export operations is specified in the
SQL Developer user preferences for Database.)
Show Schema: If this option is checked, the schema name is included in CREATE
statements. If this option is not checked, the schema name is not included in CREATE
statements, which is convenient if you want to re-create the exported objects under a
schema that has a different name.
Storage: If this option is checked, any STORAGE clauses in definitions of the database
objects are preserved in the exported DDL statements. If you do not want to use the

Export: Advanced Data Filter
4-32 Oracle Database SQL Developer User’s Guide
current storage definitions (for example, if you will re-create the objects in a different
system environment), uncheck this option.
Terminator: If this option is checked, a line terminator character is inserted at the end
of each line.
Pretty Print: If this option is checked, the statements are attractively formatted in the
output file, and the size of the file will be larger than it would otherwise be.
Include BYTE Keyword: If this option is checked, column length specifications refer to
bytes; if this option is not checked, column length specifications refer to characters.
Add Force to Views: If this option is checked, the FORCE option is added to any
CREATE VIEW statements, causing each view to be created even if it contains errors.
Constraints as Alters: If this option is checked, constraints for each table are defined in
separate ALTER TABLE statements instead of in the CREATE TABLE statement.
Export Data: If this option is checked, statements are included to insert the data for an
exported table or view. If this option is not checked, statements are not included to
insert the data for an exported table or view; that is, only the DDL statements are
included.
Include Drop Statements: If this option is checked, DROP statements are included
before the CREATE statements, to delete any existing objects with the same names.
However, you may want to uncheck this option, and create a separate drop script that
can be run to remove an older version of your objects before creation. This avoids the
chance of accidentally removing an object you did not intend to drop.
Objects tab
Connection: Select the database connection with the objects to be exported.
Objects: Expand the tree as needed to display the object types and objects that you
want to export, and check to select the desired object types and/or objects. You must
select at least one object or object type.
4.38 Export: Advanced Data Filter
This dialog box is displayed when you click Advanced in the Export (Selected Objects
or Types of Objects) dialog box.
Schema: Select the name of the schema to see the available objects on which you can
specify a filter.
Filter: A WHERE clause specifying the condition or conditions for filtering data from
the selected object.
Apply Filter: Click to apply the specified filter.
When you are finished applying any filters, click Apply.
4.39 Export Error
This dialog box is displayed when you tried to export some or all objects of one or
more types of database objects to a file containing SQL statements, but did not include
some essential information, which might include one or more of the following:
■The name of the output file. Look at the Options tab, and be sure that you
specified a file.

External Tools
Dialog Boxes for Creating/Editing Objects 4-33
■One or more objects or types of objects. Look at the Objects tab, and be sure that
you selected (checked) at least one object or type of object.
4.40 Export Table Data
This dialog box is displayed when you right-click a table name, a table data display, a
SQL Worksheet result set, or report output, and select Export and then an export
format. You can export some or all of the data to a file or to the system clipboard. To
restrict the output to specified columns, use the Columns tab. To restrict the output
based on a WHERE clause condition, use the Where tab.
Format tab
Format: Determines the format of entries written in the specified output file: Insert for
SQL INSERT statements, XML for XML tags and data, SQL LOADER for a
SQL*Loader control file, or CSV for comma-separated values including a header row
for column identifiers.
Output: File writes the output to a file that you specify; Clipboard places the output on
the system clipboard, so that you can paste it into a file, a command line, or other
location appropriate for the format.
File: If the output is to a file, click Browse to select the directory or folder and to
specify the file name and extension. The file path is then placed in the File box. (The
default file path for export operations is specified in the SQL Developer user
preferences for Database.) Standard file extensions are .sql for Insert format, .xml for
XML format, .ctl for SQL LOADER format, and .csv for CSV format.
Columns tab
You can specify whether the output should include data from all columns or just from
the checked columns.
Where tab
You can restrict the output by entering a valid WHERE clause for a query on the table,
without the WHERE keyword. For example, to restrict the exported data to rows
where a column named RATING contains a value greater than 5, specify: rating >
5
4.41 External Tools
This dialog box is displayed when you click Tools and then External Tools. It displays
information about user-defined external tools that are integrated with the SQL
Developer interface.
Find Tools: Checks for any tools that Oracle offers for your consideration, and adds
them to the list if they are not already included.
New: Starts a wizard for defining a new external tool (see Section 4.42, "Create/Edit
External Tool").
Edit: Displays a dialog box for editing the selected external tool (see Section 4.42,
"Create/Edit External Tool").

Create/Edit External Tool
4-34 Oracle Database SQL Developer User’s Guide
4.42 Create/Edit External Tool
This interface is displayed as a wizard if you are creating a new external tool, and as a
dialog box if you are editing an existing external tool (see Section 4.41, "External
Tools").
External Program Options
Program Executable: Path of the program executable for the tool.
Arguments: Arguments (parameters) to be passed to the program. You can click Insert
to insert a macro for the argument (see Section 4.44, "Insert Macro").
Run Directory: Directory in which to run the program. You can click Insert to insert a
macro for the directory (see Section 4.44, "Insert Macro").
Command Sample: A read-only sample display of the command to run the program.
Display Options
Specify how the external tool should appear when displayed in menu or toolbar items.
Caption for Menu Items: The text string that will appear for any menu item that calls
the external tool. To indicate the mnemonic character, use the ampersand before the
character. For example: &Mytool for the "M" to be underlined and used as the
mnemonic
ToolTip Text: Text for the tooltip to be displayed when the mouse pointer hovers over
the icon for the tool in a toolbar.
Icon Location: File path of the icon associated with the tool. Click Browse to specify a
graphics file, or Use Default to use the default icon (if you previously specified a
nondefault icon).
Preview: A read-only display of the menu item and its associated icon.
Integration Options
Specify how the external tool will be integrated with SQL Developer.
Add Items to Menus: Check any menus on which you want to include an item for this
tool.
Add Buttons to Toolbars: To add the icon for this tool to the SQL Developer main
toolbar, check Main Toolbar.
After Tool Exits: To have SQL Developer reload any open files after the tool exits,
check Reload Open Files.
Availability Options
Specify when the external tool is enabled. In contexts where the tool is not enabled, its
menu item and icon are grayed out.
Always: Makes the tool always available.
When a File is Selected or Open in the Editor: Makes the tool available only when a
file is selected or open, such as when the SQL Worksheet is open.
When Specific File Types are Selected: Makes the tool available only when files of the
specified type or types are selected. Use the arrow buttons to move desired types from
Available Types to Selected Types.

Filter Object Types
Dialog Boxes for Creating/Editing Objects 4-35
4.43 Filter
This dialog box is displayed when you right-click an object type node (such as Tables)
in the Connections navigator and select Apply Filter. Use this box to limit the number
of objects of that type that are displayed, according to one or more filter criteria that
you specify. For each criterion, specify the following:
■Criterion name (for example, OBJECT_NAME for a table)
■Operator (for example, LIKE)
■Value for comparison (for example EM%)
■Case Sensitive option for character data comparison
For example, to display only tables with names that start with EM, specify: OBJECT_
NAME LIKE EM% (with the percent sign as a wildcard character)
To add another filter criterion, click the Add (+) icon; to delete a criterion, select it and
click the Delete (X) icon; to move a criterion up or down in the list, select it and use the
arrow icons.
To apply the filter criteria to the Connections navigator display, click OK.
To remove the effects of applying a filter, right-click the object type node in the
Connections navigator display and select Clear Filter.
4.44 Insert Macro
This dialog box is displayed when you click Insert when specifying external program
options (see Section 4.42, "Create/Edit External Tool"). It enables you to insert a
sample text string into the relevant field for the external program option; you can then
edit that string to suit your needs. (This is somewhat analogous to using snippets to
insert text strings into the SQL Worksheet.)
Select the desired type of macro, read its description to ensure that it is what you want,
and click OK. For some macros, a sample expansion is included.
4.45 Externally Modified Files
This dialog box filters is displayed when an external application has modified a file
that you have open in SQL Developer. You are asked if you want to reload the
externally modified file.
If you click Yes, the externally modified file overwrites any changes that you might
have made in SQL Developer. If you click No, the externally modified file will be
overwritten by your version when you save the file in SQL Developer.
4.46 Filter Object Types
This dialog box filters (restricts) the types of objects to be displayed for the schema
associated with the selected user.
Available Object Types: Lists the types of objects that are available to be added to the
display.
Displayed Object Types: Lists the types of objects that are included in the display.
To add a type of object to the display, select it in Available Object Types and click the
Add (>) icon; to remove a type of object from the display, select it in Displayed Object

Filter Schemas
4-36 Oracle Database SQL Developer User’s Guide
Types and click the Remove (<) icon. To move all types of objects from available to
displayed (or the reverse), use the Add All (>>) or Remove All (<<) icon.
4.47 Filter Schemas
This dialog box enables you to restrict the schemas that are displayed under Other
Users in the Connections navigator.
Available Schemas: Lists the schemas that are not currently displayed under Other
Users in the Connections navigator, but that are available to be added to the list of
displayed users.
Displayed Schemas: Lists the schemas that are to be included in the display under
Other Users in the Connections navigator.
To add a schema to the display, select it in Available Schemas and click the Add (>)
icon; to remove a schema from the display, select it in Displayed Schemas and click the
Remove (<) icon. To move all schemas from available to displayed (or the reverse), use
the Add All (>>) or Remove All (<<) icon.
Only display schemas with visible objects: Limits the display to available schemas
that have any database objects that are visible to the database user associated with the
current connection.
4.48 Find/Replace Text
This dialog box specifies a text string to find, optionally a replacement text string, and
search options.
Text to Search For: Text string to search for.
Replace With: If you check this option, enter a text string to replace the text string that
is being searched for.
Options: Options to control the search behavior: Match Case makes the search case
sensitive; Search from Beginning starts the search at the beginning instead of at the
text cursor; Highlight All Occurrences highlights all occurrences of the search string
instead of just the first one; Wrap Around searches across line breaks; Whole Word
Only find the search string only if it is a complete word and not just part of a word;
Regular Expressions means that the search string is a regular expression; Selected
Text O n ly means to search only in the text block that you have selected.
Direction: Forward starts the search from the cursor in the direction of normal text
flow; Backward starts the search from the cursor in the opposite direction of normal
text flow.
4.49 Generate Oracle DDL
This dialog box is displayed when you click Migration, then Script Generation, then
Generate Oracle DDL It specifies the converted model for which to generate Oracle
DDL (data definition language) statements. The operation produces a SQL*Plus script
file that you use for offline generation: that is, you can run the script to create the
appropriate objects in the Oracle database.
When the operation is in progress, a box displays object types and the number of
objects of each type for which DDL statements are being generated.
After the operation finishes, a box displays the directory in which two files have been
created: a .sql file containing DDL statements (such as CREATE TABLE and CREATE

Modify Value
Dialog Boxes for Creating/Editing Objects 4-37
OR REPLACE VIEW) that create the migrated schema objects in the Oracle database,
and a .ctl file containing the SQL*Plus @ statement to invoke the .sql file.
Converted Objects: Converted model containing objects for which to generate Oracle
DDL statements.
4.50 Generate Offline Data Move Files
This dialog box is displayed when you click Migration, then Script Generation, then
Generate Data Move Scripts. It specifies the converted model and the destination
directory if you are performing offline data migration, which is explained in
Section 2.9.1.
Converted Model: Converted model containing tables whose data is to be moved to
the corresponding Oracle database tables.
Directory: Path in which to create files containing the data and the SQL*Loader
specifications.
4.51 Go to Line Number
Use this box to specify the line number to go to in the selected function or procedure.
After you enter the line number and click OK, that line is highlighted.
4.52 Go to Line Number: Error
This error box tells you that you entered an invalid line number in the Go to Line
Number box, probably because you entered a line number greater than that of the last
line in the function or procedure.
4.53 Load Preset Key Mappings
This dialog box is displayed when you click Load Preset when specifying accelerator
key preferences for SQL Developer. You can load a set of predefined key mappings for
certain systems and external editing applications. If you load any preset key mappings
that conflict with changes that you have made, your changes are overwritten.
4.54 Modify Value
This dialog box is displayed when you right-click a variable in the Data or Smart Data
pane during debugging and select Modify Value. You can modify the value for the
selected data item (primitive value, string, or reference pointer) during debugging.
Note: You cannot undo the action after you click OK, so be careful when making any
changes.
Current Value: The value of the data item.
New Value: The new value for the data item (enter or select from a drop-down list).
■For a primitive value, you can enter a new value.
■For a reference pointer, you can enter the memory address of an existing object or
array. To set a reference pointer to null, enter 0 as a memory address.
■For a string, you can enter either a new string value or the memory address of an
existing string.

Data Move Details
4-38 Oracle Database SQL Developer User’s Guide
Interpret New Value as Object Address: If this option is checked, the New Value
entry is interpreted as a memory address pointer to an object or array in the heap of
the program you are debugging. For a string, this box must be checked check if the
value you enter in the New Value field is the memory address of an existing string
4.55 Data Move Details
This dialog box is displayed when you click Migration, then Migrate Data. It specifies
the source and target information for online data migration, which is explained in
Section 2.9.
Source Connection: Database connection from which data is to be migrated.
Target Connection: Database connection to which data is to be migrated.
Converted Model: Converted model containing tables whose data is to be moved to
the corresponding Oracle database tables.
4.56 Open File
This is a standard box for selecting a file to open: use Location to navigate to
(double-clicking) the folder with the file to open, then click the file to select it.
4.57 Query Builder
The Query Builder box is displayed when you right-click in the SQL Worksheet and
select Query Builder. You can use this box to create a SELECT statement by dragging
and dropping table and view names and by graphically specifying columns and other
elements of the query. When you finish building the query, the resulting SELECT
statement is inserted into the SQL Worksheet.
The Query Builder capabilities are grouped under the following tabs.
Select Columns
Use the Select Columns tab to select tables and views, then columns within them, to be
used in the query. Use the connections tree on the left to find the desired tables and
views under the appropriate schema or schemas, and double-click each desired table
and view.
Within each selected table or view, click to select the desired columns (all or specific
ones) to include in the query.
Create Where Clause
Use the Create Where Clause tab to select, for each column in the WHERE clause, the
column name, operator, and value. For example, you might want to select only rows
where AUTHOR_LAST_NAME contains Melville or where RATING > 5.
Show SQL
Use the Show SQL tab to see a read-only display of the query reflecting what you have
specified so far.
View Results
Use the View tab to test the query in its current form. Click the Execute Statement icon
to execute the query.

Select Current Repository
Dialog Boxes for Creating/Editing Objects 4-39
Refresh: Specifies the refresh interval: the number of seconds between each time the
query is automatically re-executed and the results display is updated. A value of zero
(0) means that the query is not automatically re-executed after the initial execution.
4.58 Recent Files
This dialog box displays files recently opened in SQL Developer.
Files: A list of files opened in SQL Developer, with the most recent file first. The Show
All option determines whether the list includes only files opened implicitly or files
opened implicitly or explicitly.
Show All: If this option is checked, the list includes both explicitly and implicitly
opened files; if this option is not checked, the list includes only implicitly opened files.
Explicitly opened files are those that you opened directly; implicitly opened files are
those that SQL Developer opened to support your work (for example, while you were
debugging).
4.59 Create Repository
This dialog box is displayed if you click Migration, then Repository Management, then
Create Repository.
Create Repository: Name of the database connection to use to create a migration
repository. The objects associated with the migration repository are created in the
schema of the user associated with the selected connection.
4.60 Delete or Truncate Repository
The Delete Repository dialog box is displayed if you click Migration, then Repository
Management, then Delete Repository; the Truncate Repository dialog box is displayed
if you click Migration, then Repository Management, then Truncate Repository.
Deleting a repository removes all schema objects that are used for the migration
repository. Truncating a repository deletes all data from schema objects that are used
for the migration repository, but does not delete the schema objects themselves,
effectively leaving you with an empty repository.
Repository: Name of the database connection in which to delete or truncate the
migration repository.
4.61 Capture Microsoft Access Exporter XML
This dialog box is displayed if you click Migration, then Capture Exporter XML.
File Path: File path to the .xml file that was produced when you ran the appropriate
version of the exporter tool for Microsoft Access (when you clicked Migrations, then
Microsoft Access Exporter, then the appropriate version for your version of Microsoft
Access).
4.62 Select Current Repository
This dialog box is displayed if you click Migration, then Repository Management, then
Select Current Repository. You can use this dialog box to reconnect to a migration
repository after you have disconnected (using Migration, then Repository
Management, then Disconnect Migration Repository). In addition, if you have

Run/Debug PL/SQL
4-40 Oracle Database SQL Developer User’s Guide
multiple migration repositories, and you can use this dialog box to switch from one to
another.
Select Current Repository: Name of the database connection with the migration
repository to be used for all operations relating to migrating third-party databases to
Oracle.
4.63 Run/Debug PL/SQL
Use this box to specify parameter values for running or debugging a PL/SQL function
or procedure. (If you specify a package, select a function or procedure in the package.)
Targe t : Name of the function or procedure to run or to run in debug mode. (You have a
choice only if you specified a package that has more than one subprogram.)
Parameters: List of each parameter for the specified target. The mode of each
parameter can be IN (the value is passed in), OUT (the value is returned, or IN/OUT
(the value is passed in, and the result of the function or procedure’s action is stored in
the parameter).
PL/SQL Block: A block of PL/SQL code created by SQL Developer. You should
change the formal IN and IN/OUT parameter specifications in this block to actual
values that you want to use for running or debugging the function or procedure.
For example, to specify 10 as the value for an input parameter named in_rating,
change IN_RATING => IN_RATING to IN_RATING => 10.
When you click OK, SQL Developer runs the function or procedure.
If you are debugging a function or procedure, the debugging toolbar and one or more
windows for debug-related information are displayed, as explained in Section 1.6,
"Running and Debugging Functions and Procedures".
4.64 Create/Edit Breakpoint
Use this box to create or edit a breakpoint to use when debugging a PL/SQL function
or procedure.
Definition tab
Specify the definition of the breakpoint.
Breakpoint Type: Type of breakpoint, indicating when the breakpoint will occur.
Options include breaking when one of the following occurs: a specific line of code
(Source); exception class or other class; method, file, or watchpoint.
Breakpoint Details: Options depend on the breakpoint type.
Breakpoint Group Name: Breakpoint group in which to include this breakpoint.
Breakpoint groups can be edited, enabled, and disabled.
Conditions tab
Specify any conditions that apply to the breakpoint.
Condition: A SQL condition (WHERE clause without the WHERE keyword)
restricting when the breakpoint occurs. For example, to specify that the condition
should occur only when status_code is greater than 10, specify:
status_code > 10

Schema Differences
Dialog Boxes for Creating/Editing Objects 4-41
Thread Options: You can specify whether the breakpoint occurs for all threads, or
only when the breakpoint is hit by threads that either do or do not have a specified
name.
Pass Count: The number of times the debugger should allow execution to pass over
the breakpoint before the breakpoint occurs.
Actions tab
Specify the actions to be taken when the breakpoint occurs. The options you specify
override any default values on the Debugger: Breakpoints: Default Actions pane for
SQL Developer Preferences.
Halt Execution: Pauses execution when the breakpoint occurs.
Beep: Beeps when the breakpoint occurs.
Log Breakpoint Occurrence: Sends a message to the log window when the breakpoint
occurs. You can also specify the following to be included in each display: a tag, and a
condition to be evaluated.
Enable/Disable a Group of Breakpoints: Enables or disables the specified breakpoint
group when this breakpoint occurs.
4.65 Save/Save As
This is a standard box for saving information to a file: use Location to navigate to
(double-clicking) the folder in which to save the file, then specify the file name
(including any extension) and, if necessary, the file type.
4.66 Save Files
This box asks if you want to save the specified files before another action occurs (for
example, saving procedures you had been editing before disconnecting).
4.67 Unable to Save Files
This box informs you that SQL Developer is unable to save the specified file or files. To
cancel the attempt to save the files and to return to edit the relevant object, click
Cancel.
4.68 Save Style Settings
This dialog box is displayed when you click Save As in the Code Editor: Syntax Colors
pane when setting SQL Developer Preferences. You can save the specified color
settings as a named color scheme, which adds it to the drop-down list for Scheme in
that pane.
4.69 Schema Differences
This dialog box is displayed if you click Tools, then Schema Diff. Use this box to find
differences between objects of the same type and name (for example, tables named
CUSTOMERS) in two different schemas, and optionally to update the objects in one
schema (destination) to reflect differences in the other schema (source).
Use the Source tab to specify one database connection, and use the Destination tab to
identify the database containing the schema with objects to be compared with the

Schema Differences Source or Destination Error
4-42 Oracle Database SQL Developer User’s Guide
source schema. The database for the destination schema can be the same as, or
different from, the database for the source schema.
Source tab
Connection: Database connection for the source schema (the schema in which selected
objects are to be compared with objects in the destination schema).
Objects: Expand the hierarchy, and select one or more types or objects or specific
objects that will compared with objects of the same type and name in the destination
schema.
Destination tab
Connection: Database connection for the database that contains the destination
schema (the schema containing one or more objects of the same type and name as
those selected in the source schema). The selected connection can be the same as, or
different from, the connection for the source schema.
Schemas: Select a schema in the database associated with the specified connection.
SQL Developer will find differences in objects of the same type and name between this
schema and the schema for the source connection.
Results tab
When you click Apply, the Results tab displays SQL statements to modify the
destination objects to reflect source object features that are different-- for example, an
ALTER TABLE statement to add a column from the source table to the destination
table of the same name. However, the statements are not applied to the destination
schema objects until you execute them after clicking Save As or Open Editor.
Save As: Enables you to save the results to a .sql file, which you can later execute.
Open Editor: Opens a SQL Worksheet window in which you can edit the results and
perform other operations.
4.70 Schema Differences Source or Destination Error
This error box is displayed if you click Apply before specifying the source or the
destination, or both, for a schema differences operation.
Click OK to close the error box, then follow the instructions for performing the schema
differences operation, as explained in Section 4.69, "Schema Differences".
4.71 Set Data Mapping
This dialog box is displayed if you right-click a captured model and select Set Data
Mapping. You can use this dialog box to specify source data type mappings when
migrating the specified third-party database to Oracle. If you are editing an existing
mapping, you can change only the Oracle data type, precision, and scale information.
Show only data types used in the source model: If you check this option, only data
types used in the selected captured model are shown. If you do not check this option,
all valid data types for the source (third-party) database are shown.
Source Data Type: Data type name in the third-party database.
Oracle Data Type: Data type name in Oracle Database.
Type: System for a system-defined data type, or User for a user-defined data type.

Single Record View
Dialog Boxes for Creating/Editing Objects 4-43
Add New Rule: Displays the Add/Edit Rule dialog box, for specifying a mapping for
another data type.
Edit Rule: Displays the Add/Edit Rule dialog box, for editing the selected mapping.
Remove Rule: Deletes the selected mapping.
4.72 Add/Edit Rule
This dialog box is displayed if you click Add New Rule or Edit Rule in the Set Data
Mapping dialog box, which is used for specifying source data type mappings when
migrating a specified third-party database to Oracle.
Source Data Type: Data type name in the third-party database.
Oracle Data Type: Data type name in Oracle Database.
Precision and Scale: Precision and scale values to be used for the source data type and
Oracle data type during the conversion.
4.73 Set Pause Continue
This dialog box is displayed if you enter the SQL*Plus statement SET PAUSE ON in
the SQL Worksheet and then run the worksheet contents as a script. After the SET
PAUSE ON statement is processed, execution pauses (and this dialog box is displayed)
after each statement until the SET PAUSE OFF statement is processed.
To have execution continue at the next statement, click OK.
4.74 Sign In (checking for updates)
This dialog box is displayed if any of the updates that you selected during the check
for updates process are on a remote site that requires you to log in. Currently, all
updates are on the Oracle Technology Network (OTN), so you must enter your OTN
user name and password.
User Name: Your user name at the remote site.
Password: Your password at the remote site.
Sign Up: If you do not have an account at the remote site, click this link.
Find Password: If you have an account at the remote site but cannot remember your
password, click this link.
4.75 Single Record View
The main use for this box, which is displayed by right-clicking the display grid for an
object and selecting Single Record View, is to edit data for a table or view, one record at
a time. After you change data in any cells in a row, you can apply the changes by
clicking Apply or by navigating to another record. (For non-Data grids, the cells are
read-only.)
Navigation icons: First (<<) moves to the first record, Previous (<) moves to the
previous record, Next (>) moves to the next record, and Last (>) moves to the last
record.
Apply: Applies changes made to the current data record.
Cancel: Cancels changes made to the current data record, and closes the box.

Save Snippet (User-Defined)
4-44 Oracle Database SQL Developer User’s Guide
4.76 Save Snippet (User-Defined)
Use this box to create a user-defined snippet. For information about how to create
user-defined snippets, including options for snippet categories, see Section 1.9.1,
"User-Defined Snippets".
Category: Existing or new category in which to place the snippet. To create a new
(user-defined) category, type the category name instead of selecting a category name
from the list.
Name: Name of the snippet, as it will be displayed when users see the list of available
snippets in the specified category. If an existing Oracle-supplied snippet has the same
name in the same category, the user-defined snippet definition replaces the
Oracle-supplied definition.
ToolTip: Optional tooltip text to be displayed when the mouse pointer stays briefly
over the snippet name in the display of snippets in the specified category.
Snippet: Text that will be inserted for this snippet.
4.77 Edit Snippets (User-Defined)
This box displays any existing user-defined snippets, and enables you to add, edit, or
delete user-defined snippets.
To edit an existing user-defined snippet, select its row and click the Edit User Snippet
icon, which displays the Save Snippet (User-Defined) dialog box.
To create a new user-defined snippet, click the Add User Snippet icon, which displays
the Save Snippet (User-Defined) dialog box.
To delete a user-defined snippet, select its row and click the Delete User Snippet icon.
4.78 SQL History List
Use this box, which is displayed by clicking the SQL History button in the SQL
Worksheet toolbar, to view SQL statements that you have executed and optionally to
select (click) one to have it either replace the statements currently on the SQL
Worksheet or be added to the statements currently on the SQL Worksheet.
You can click on a column heading to sort the rows by the values in that column.
The SQL history list will not contain any statement that can include a password. Such
statements include (but are not necessarily limited to) CONNECT, ALTER USER, and
CREATE DATABASE LINK.
Filter: If you type a string in the text box and click Filter, only SQL statements
containing that string are displayed.
Clear: Removes all statements from the SQL history.
Replace: Replaces any statements currently on the SQL Worksheet with the selected
statement.
Append: Appends the selected statement to any statements currently on the SQL
Worksheet
4.79 SQL*Plus Location
Use this dialog box (displayed if you click Tools and then SQL*Plus and no SQL*Plus
executable location is currently defined in your SQL Developer Preferences for

Unable to Open File
Dialog Boxes for Creating/Editing Objects 4-45
Database) to specify the location of the SQL*Plus executable on the system on which
you are running SQL Developer. The SQL*Plus executable is under the Oracle home
directory or folder, and its specific location and file name depend on your operating
system and Oracle Database installation.
If there is no SQL*Plus executable on the system on which you are running SQL
Developer, you cannot invoke SQL*Plus from SQL Developer.
4.80 Unable to Open File
This box informs you that SQL Developer is unable to perform the export operation to
the location and file that you specified. The cause might be that you do not have
permission to write to that location.

Unable to Open File
4-46 Oracle Database SQL Developer User’s Guide

Index-1
Index
A
accelerator keys
for menus, 1-3
accelerators (keyboard shortcuts), 1-35
Access (Microsoft) connections, 4-3
Advanced Security for JDBC connection, 1-15
analyzing tables, 1-12
Apply Filter
to display of objects, 1-4, 4-35
associations
file types, 4-30
autocommit
preference for database connections, 1-38
autocomplete preferences, 1-7, 1-36
autotrace
Autotrace pane, 1-23
preferences for, 1-37
B
bind variables
for reports, 1-27
saving to disk on exit, 1-39
breakpoints
creating and editing, 4-40
C
character encoding
nonstandard (migrations on Windows), 2-11
charts
user-defined report example, 1-32
check constraints, 4-15
Check for Updates feature, 4-1
coalescing an index, 1-9
code fragments, 1-24
code insight, 1-36
column sequences, 4-16
columns
decrypting, 1-13
encrypting, 1-12
normalizing column data, 1-13
Compact option for shrinking a table, 1-12
compiling
function, 1-9
with debug, 1-9
procedure, 1-10
with debug, 1-10
view, 1-13
completion
SQL Developer preferences, 1-7, 1-36
completion insight, 1-36
configuring, 2-12
third-party databases, 2-12
configuring file type associations, 4-30
connections
creating, editing, or selecting, 4-2
explanation, 1-14
Microsoft Access, 4-3
Microsoft SQL Server, 4-4
MySQL, 4-3
Oracle Database, 4-3
constraints
check, 4-15
disabled, 1-28
unique, 4-14
converted model
correcting errors in, 2-17
creating and customizing, 2-16
custom export delimiter
preference for database connections, 1-39
customizing SQL Developer
setting preferences, 1-34
D
data
entering and modifying, 1-15
data types
creating, 4-22
database connections
creating, editing, or selecting, 4-2
explanation, 1-14
Microsoft Access, 4-3
Microsoft SQL Server, 4-4
MySQL, 4-3
Oracle Database, 4-3
database links, 1-8
creating or editing, 4-6
database objects, 1-8
exporting, 4-31

Index-2
searching for, 1-25
DB Object Search pane, 1-25
DBMS_OUTPUT
user-defined report example, 1-33
DBMS_OUTPUT pane, 1-23
debugging PL/SQL function or procedure, 1-16
dialog box, 4-40
remote debugging, 1-18
decryption
data in a table column, 1-13
deployment
after database migration, 2-25
destination schema
schema differences, 4-41
dialog boxes and tabs, 4-1
directories (directory objects), 1-8
disabled constraints, 1-28
drivers
third-party JDBC, 1-38
dynamic HTML
user-defined report example, 1-33
E
encryption
data in a table column, 1-12
entering data in tables, 1-15
errors
parse exceptions, 2-17
Excel
importing data, 4-5
execution plan, 1-23
EXPLAIN PLAN
execution plan, 1-23
exporting
applying filters, 4-32
database objects, 4-31
reports, 1-26
table data, 1-12, 4-32, 4-33
extensions, 4-34
SQL Developer, 1-40
user-defined, 1-38
external tables
properties, 4-20
external tools, 1-7, 4-33, 4-34
F
F10 key
for File menu, 1-3
file types
associating with SQL Developer, 4-30
file-oriented development
SQL Worksheet right-click operations, 1-20
filter
applying, 1-4, 4-35
clearing, 1-4, 4-35
folders
for user-defined reports, 1-31, 4-24
foreign keys, 4-14
Freeze View
pinning an object’s display, 1-5, 1-16, 1-26
FROM clause, 4-26
full pathname for java.exe, 1-2
functions
compiling, 1-9
compiling with debug, 1-9
creating, 4-9
debugging, 4-40
running, 4-40
G
Gather Schema Statistics menu command, 1-15
graphical user interface (GUI), 1-2, 2-27
GROUP BY clause, 4-27
H
HAVING clause, 4-27
help
PDF file containing online help, 1-45
using the online help, 1-44
HTML
dynamic (user-defined report), 1-33
I
identifier collection
PL/Scope, 1-15
importing
Excel data, 4-5
reports, 1-26
indexes, 4-15
coalescing, 1-9
creating or editing, 4-7
explanation, 1-9
making unusable, 1-9
rebuilding, 1-9
index-organized tables
properties, 4-19
introduction
SQL Developer, 1-1
J
java.exe
pathname for, 1-2
JDBC drivers, 1-38
K
keyboard shortcuts, 1-35
L
link
database, 4-6
LOB parameters, 4-17
locking a table, 1-11
lowercase characters in object names

Index-3
quotation marks required, 4-1
M
materialized view logs, 1-10
creating and editing, 4-7
materialized views, 1-9
options when creating or editing, 4-28
Microsoft Access
capturing using exporter tool, 2-15
configuring before migrating, 2-13
creating data files, 2-19
turning off security, 2-13
Microsoft Access connections, 4-3
Microsoft Excel
importing data, 4-5
Microsoft SQL Server, 2-12
creating data files, 2-19
third-party JDBC drivers, 1-38
Microsoft SQL Server connections, 4-4
migration
architecture, 2-4
before you start (general), 2-9
before you start (source-specific), 2-12
deployment after migrating, 2-25
introduction and main topics, 2-1
overview, 2-3
planning for, 2-5
quick start, 2-2
required roles and privileges, 2-10
migration plan
preparing, 2-5
migration repository
creating database user for, 2-9
MOD_PLSQL
OWA output, 1-24
modifying data in tables, 1-15
moving a table to another tablespace, 1-12
MySQL
configuring before migrating, 2-15
creating data files, 2-20
third-party JDBC drivers, 1-38
MySQL connections, 4-3
zero date handling, 4-4
N
nonstandard character encoding on Windows
migration considerations, 2-11
normalizing
column data, 1-13
O
object search
DB Object Search pane, 1-25
objects
database, 1-8
exporting, 4-31
offline data transfer, 2-18
offline generation of Oracle DDL, 4-36
online help
PDF file containing, 1-45
using, 1-44
open SQL Worksheet automatically
preference for database connections, 1-38
Oracle Database connections, 4-3
Oracle ODBC data source
setting, 2-12
Oracle Web Agent (OWA), 1-24
ORDER BY clause, 4-27
overview
SQL Developer, 1-1
OWA_OUTPUT pane, 1-24
P
packages
creating, 4-8
debugging, 4-40
running, 4-40
parameter insight, 1-36
parse exception errors, 2-17
partitioned tables
partition definitions, 4-19
partitioning options, 4-18
subpartitioning options (templates), 4-18
pathname
for java.exe, 1-2
PDF file containing online help, 1-45
pinning an object’s display, 1-5, 1-16, 1-26
PL/Scope
toggling identifier collection, 1-15
PL/SQL packages
creating, 4-8
PL/SQL subprograms
creating, 4-9
debugging, 4-40
breakpoints, 4-40
running, 4-40
plsql-dbms_output
user-defined report example, 1-33
preferences
customizing SQL Developer, 1-34
primary key, 4-13
private database links, 1-8
private synonyms, 1-11, 4-10
privileges
required for migration, 2-10
Probe debugger, 1-42
procedures
compiling, 1-10
compiling with debug, 1-10
creating, 4-9
projects
creating plan, 2-8
public database links, 1-8
public synonyms, 1-11, 4-10

Index-4
Q
query builder, 4-38
quotation marks
for name with lowercase characters, special
characters, or spaces, 4-1
R
Raptor
former code name for SQL Developer, 1-1
rebuilding an index, 1-9
recompiling
view, 1-13
Recycle bin, 1-11
remote debugging, 1-18
report navigator, 1-26
reports, 1-26
bind variables for, 1-27
exporting, 1-26
importing, 1-26
shared, 1-27
user-defined
chart example, 1-32
creating and editing, 4-23
dynamic HTML example, 1-33
explanation, 1-31
folders for, 1-31, 4-24
UserReports.xml, 1-31
roles
required for migration, 2-10
running PL/SQL function or procedure, 1-16
dialog box, 4-40
S
schema
XML, 1-14, 4-30
schema differences
differences between two schemas, 4-41
schema objects, 1-8
schema statistics
gathering, 1-15
scratch editor, 2-30
script runner, 1-22
scripts
running, 1-22
security
Advanced Security for JDBC connection, 1-15
SELECT clause, 4-26
sequences, 1-11
creating and editing, 4-9
for populating table columns, 4-16
shared reports, 1-27
shortcut keys
accelerator key mappings, 1-35
for menus, 1-3
shrinking a table, 1-12
single record view, 4-43
snippets, 1-24
user-defined, 1-25
source database
capturing, 2-16
source schema
schema differences, 4-41
spaces in object names
quotation marks required, 4-1
special characters in object names
quotation marks required, 4-1
split
data pane for a table or view, 1-16
SQL Developer archive files, 1-44
SQL Developer preferences, 1-34
SQL file
creating, 4-10
SQL scripts
running, 1-22
SQL Server
configuring, 2-12
creating data files, 2-19
third-party JDBC drivers, 1-38
SQL Server connections, 4-4
SQL Worksheet
opening automatically on database
connection, 1-38
using, 1-19
SQL*Plus
location of executable, 4-44
location of executable (SQL Developer
preference), 1-37, 1-42
using, 1-24
SQLDEVELOPER_USER_DIR location, 1-43
sqldevnnnnn.sql files (archive files), 1-44
statistics
computing table and column, 1-12
estimating table and column, 1-12
gathering schema, 1-15
storage options, 4-16
subpartitions
templates, 4-18
subprograms
creating, 4-9
debugging, 4-40
running, 4-40
substitution variables, 1-22
Sybase Adaptive Server
creating data files, 2-19
Synonyms, 1-11
synonyms, 1-11
creating and editing, 4-10
T
tables, 1-11
analyzing, 1-12
compacting, 1-12
computing statistics, 1-12
creating and editing, 4-12
creating quickly, 4-10
decrypting column data, 1-13
encrypting column data, 1-12

Index-5
entering and modifying data, 1-15
estimating statistics, 1-12
exporting data, 1-12, 4-32, 4-33
external
properties, 4-20
index-organized
properties, 4-19
locking, 1-11
moving to another tablespace, 1-12
normalizing column data, 1-13
partitioned
partition definitions, 4-19
partitioning options, 4-18
subpartitioning options (templates), 4-18
shrinking, 1-12
splitting the data pane, 1-16
temporary, 4-12
truncating, 1-11
validating structure, 1-12
tablespaces
considerations when migrating, 2-18
temporary tables, 4-12
third-party databases
configuring before migrating, 2-12
third-party JDBC drivers, 1-38
tnsnames.ora file, 1-14
Toggle PL/Scope Identifier Collection menu
command, 1-15
tools
external, 1-7, 4-33, 4-34
transferring
data offline, 2-18
translation scratch editor, 2-30
triggers, 1-13
creating and editing, 4-21
truncating a table, 1-11
tutorial
creating objects for a small database, 3-1
types
creating, 4-22
U
unique constraints, 4-14
unusable indexes, 1-9
updates
checking for SQL Developer updates, 4-1
user information directory (SQLDEVELOPER_USER_
DIR), 1-43
user interface (UI), 1-2, 2-27
user-defined extensions, 1-38
user-defined reports
chart example, 1-32
creating and editing, 4-23
dynamic HTML example, 1-33
explanation, 1-31
folders for, 1-31, 4-24
UserReports.xml, 1-31
user-defined snippets, 1-25
user-defined types
creating, 4-22
UserReports.xml, 1-31
users
creating and editing, 4-22
V
views, 1-13
compiling, 1-13
creating and editing, 4-24
FROM clause, 4-26
GROUP BY clause, 4-27
HAVING clause, 4-27
options when creating or editing, 4-28
ORDER BY clause, 4-27
recompiling, 1-13
SELECT clause, 4-26
splitting the data pane, 1-16
WHERE clause, 4-27
W
WHERE clause, 4-27
X
XML schema, 1-14
creating, 4-30
Z
zero date handling
MySQL connections, 4-4
Index-6
