Sandrah Saga Guide
User Manual: Pdf
Open the PDF directly: View PDF ![]() .
.
Page Count: 92

BG2EE
Sandrah Saga Guide
A mod for Baldur’s Gate EET
Paula Migrate
2/20/2018
Version 0.2
Mod walkthrough
Sandrah’s alternate portrait

Sandrah Saga Guide
1 ©PaulaMigrate
Sandrah Saga Guide
Table of Contents
Sandrah Saga Guide ................................................................................................................................. 1
Introduction ......................................................................................................................................... 8
Sources and References ...................................................................................................................... 9
Part 1 Sandrah Appears – Sandrah in BG1 ........................................................................................ 10
1. Candlekeep (BG2600) ............................................................................................................ 10
Hint – Imoen’s Class .................................................................................................................. 10
2. Lion’s Way (BG2700) ............................................................................................................. 10
Hint – Sandrah’s Items .............................................................................................................. 10
Hint – Haiass .............................................................................................................................. 11
3. Coast Way (BG2800) .............................................................................................................. 11
Quest - Sandrah’s Father ........................................................................................................... 11
Eldoth and Sandrah ................................................................................................................... 12
Hint – Sandrah and Dark Horizons ............................................................................................ 12
4. Friendly Arm Inn aka FAI (BG2300) ....................................................................................... 12
Hint – PIDs ................................................................................................................................. 12
Hint – Sandrah’s Parcel .............................................................................................................. 13
5. Friendly Arm Inn Inside (BG2301) ......................................................................................... 13
Jaheira/Khalid and Sandrah ....................................................................................................... 13
6. Friendly Arm Inn Inside 2 (BG2303) ...................................................................................... 14
Hint – Jen’lig .............................................................................................................................. 14
7. High Hedge (BG3201) ............................................................................................................ 14
Kivan and Sandrah ..................................................................................................................... 15
8. Beregost (BG3300) ................................................................................................................ 15
Branwen and Sandrah ............................................................................................................... 15
Neera and Sandrah .................................................................................................................... 15
Quest – A Demonic Scroll .......................................................................................................... 15
Hint – Revisits in later game parts ............................................................................................. 18
Garrick and Sandrah .................................................................................................................. 18

Sandrah Saga Guide
2 ©PaulaMigrate
Tiax and Sandrah ....................................................................................................................... 18
9. Temple of Morninglord (BG3400) ......................................................................................... 18
Hint – Sandrah and other mod NPCs ......................................................................................... 18
Hint – Sandrah Secret of Bone Hill I .......................................................................................... 19
10. Trade Way North (BG3800) ............................................................................................... 19
11. Trade Way South (BG4300) ............................................................................................... 19
Hint – Sandrah in Stone of Askavar ........................................................................................... 20
12. Red Canyons (BG3700) ...................................................................................................... 20
Hint – Sandrah and Cyric ........................................................................................................... 20
13. Wilderness Lake (BG4200) ................................................................................................. 21
14. Nashkel Carnival (BG4900) ................................................................................................ 21
15. Nashkel (BG4800) ............................................................................................................. 21
Edwin and Sandrah .................................................................................................................... 21
Quest – Imoen’s Quests ............................................................................................................ 22
16. Nashkel Mines Outside (BG5400) ...................................................................................... 24
17. Nashkel Mines Second Level (BG5402) ............................................................................. 24
18. Nashkel Mines Lowest Level (BG5404).............................................................................. 24
19. Nashkel Mines Final (BG5405) ........................................................................................... 24
Quest – Jen’lig’s Quest .............................................................................................................. 24
Xan and Sandrah ........................................................................................................................ 25
20. Valley of Tombs (BG5000) ................................................................................................. 25
21. Fire Leaf Forest (BG5300) .................................................................................................. 25
22. Dryad’s Falls (BG5200) ....................................................................................................... 26
23. Lonely Peaks (BG4400) ...................................................................................................... 26
24. Ulcaster School (BG3900) ................................................................................................. 26
Quest – Sandrah’s Quest I ......................................................................................................... 26
25. Sharp Teeth Plain (BG3500)............................................................................................... 27
Shar-Teel and Sandrah .............................................................................................................. 27
26. Old Waterdeep Road (CVROA1) ........................................................................................ 27
27. Waterdeep South West Ward (CVROA2) .......................................................................... 28
Hint – Map of Waterdeep ......................................................................................................... 29
28. Waterdeep Central Ward (CVELM1) ................................................................................. 30
Quest – Book hunters ................................................................................................................ 30
29. Mystra’s Temple (CVELM4) ............................................................................................... 33

Sandrah Saga Guide
3 ©PaulaMigrate
Hint – Sandrah and Mystra ........................................................................................................ 33
30. Waterdeep Fish Market (CVROA3) .................................................................................... 34
Hint – Black Pits access from main game .................................................................................. 34
Quest – Waterdeep fishermen problem ................................................................................... 34
31. Waterdeep Sewers (CVSew1) ............................................................................................ 35
32. Waterdeep Coq d’Or (CVWDRE) ........................................................................................ 35
33. Elminster’s House (CVDre2) .............................................................................................. 35
34. Elminster’s Garden (CVDre1) ............................................................................................. 36
Hint – Managing Larger Group .................................................................................................. 36
35. Sandrah’s Tower (CVSanT)................................................................................................ 36
Hint – Romancing Sandrah ........................................................................................................ 36
36. Elminster’s Study (CVstud) ............................................................................................... 37
37. Firewine Bridge (BG4500) .................................................................................................. 37
Quest– Kahrk and Valiant .......................................................................................................... 37
38. Gullykin (BG4000) .............................................................................................................. 38
39. Larswood (BG2900) ........................................................................................................... 38
Quest – Sandrah’s Quest II ........................................................................................................ 38
40. Peldvale (BG2400) ............................................................................................................. 39
Viconia and Sandrah .................................................................................................................. 39
41. Bandit Camp (BG1900) ..................................................................................................... 39
Quest – Gorion’s Dagger ........................................................................................................... 40
42. Cloakwood I (BG2200) ...................................................................................................... 41
Coran and Sandrah .................................................................................................................... 41
43. Cloakwood Falls (BG2100) ................................................................................................ 41
44. Cloakwood Grove (BG1600) .............................................................................................. 41
Quest – Alternate Poison Quest ................................................................................................ 41
45. Cloakwood Crossroads (BG1700) ...................................................................................... 42
46. Cloakwood Mines (BG1800) .............................................................................................. 42
Hint – Sanpoints ........................................................................................................................ 42
47. Cloakwood Mines Prison Level (BG1804) .......................................................................... 43
48. Cloakwood Mines Orc Prison I (CVORC1) .......................................................................... 43
49. Cloakwood Mines Orc Prison II (CVORC2) ......................................................................... 43
50. Cloakwood Mines Final Level (BG1803) ............................................................................ 44
Hint – Sandrah in DSotSC (Dark Side of the Sword Coast) ........................................................ 44

Sandrah Saga Guide
4 ©PaulaMigrate
51. Gibberling Mountains (BG5500) ........................................................................................ 47
52. Lower Chionthar (BG1400) ................................................................................................ 47
Ajantis and Sandrah ................................................................................................................... 47
53. Wyrm’s Crossing (BG0900) ............................................................................................... 47
54. East Baldur's Gate (BG0800) .............................................................................................. 48
Hint – Sandrah in NTotSC (Northern Tales of the Sword Coast) ............................................... 48
55. North East Baldur's Gate (BG0300) ................................................................................... 48
56. South East Baldur's Gate (BG1300) ................................................................................... 49
57. South Baldur's Gate (BG1200) ........................................................................................... 49
58. South West Baldur's Gate (BG1100) .................................................................................. 49
59. Undercellar (BG0112) ........................................................................................................ 49
60. Central Baldur's Gate (BG0700) ......................................................................................... 50
61. West Baldur's Gate (BG0600) ............................................................................................ 50
62. North Baldur's Gate (BG0200) ........................................................................................... 50
Hint – Sandrah in Grey Clan....................................................................................................... 50
63. Xvart Village (BG4700) ...................................................................................................... 51
64. Ancient Ruins (BG4100) .................................................................................................... 52
Hint – Sandrah and Brage .......................................................................................................... 52
65. Lighthouse (BG3600) ........................................................................................................ 52
Safana and Sandrah ................................................................................................................... 52
66. Rocky Coast (BG3100) ....................................................................................................... 52
67. Bear River (BG4600) .......................................................................................................... 53
68. Gnoll Stronghold (BG5100) ................................................................................................ 53
Dynaheir and Sandrah ............................................................................................................... 53
Quest – Sandrah’s Quest III ....................................................................................................... 53
69. Upper Chionthar (BG0400) ................................................................................................ 54
70. Ulgoth’s Beard (BG1000) ................................................................................................... 54
71. Field of the Dead (AR10PB) ............................................................................................... 54
72. Northern Citadel (AR30PB) ................................................................................................ 55
73. Salamander Island (AR90PB) ............................................................................................. 55
74. Wood of the Dead (AR01PB) ............................................................................................. 55
75. Spider Wood (BG3000) ...................................................................................................... 56
76. Candlekeep Chapter 6 (BG2626) ....................................................................................... 56
Quest – Imoen’s Origin .............................................................................................................. 56

Sandrah Saga Guide
5 ©PaulaMigrate
77. Candlekeep Library (BG2608) and up ................................................................................ 57
78. Candlekeep Catacombs (BG2615) ..................................................................................... 57
Hint – Sandrah Secret of Bone Hill II ......................................................................................... 57
79. Balduran’s Island North (BG1500) ..................................................................................... 57
80. Balduran’s Island South (BG2000) ..................................................................................... 58
81. Durlag’s Tower (BG0500)................................................................................................... 58
Drizzt and Sandrah .................................................................................................................... 58
82. Temple of the Black Hand (AR60PB) ................................................................................. 59
83. Nine Hells (F_6666) ........................................................................................................... 59
84. Brueno’s Cabin (F_7777) ................................................................................................... 60
85. Ducal Palace (BG0108) ...................................................................................................... 61
86. Thieves Maze (BG0146) ..................................................................................................... 61
87. Undercity (BG0123) ........................................................................................................... 61
88. Bhaal Temple (BG0120) ..................................................................................................... 61
Part 2 Sandrah in SoD ........................................................................................................................ 63
89. Korlasz Tomb, First Floor (BD0120) ................................................................................... 63
90. Korlasz Tomb, Second Floor (BD0130) .............................................................................. 63
91. Ducal Palace, Bedroom (BD0103) ...................................................................................... 63
92. Ducal Palace, Ground Floor (BD0102) ............................................................................... 63
Hint – Sandrah and SoD NPCs ................................................................................................... 63
93. Coast Way Crossing (BD1000) ........................................................................................... 64
94. Repository of Undeath (BD1200) ...................................................................................... 64
95. Coast Way Forest (BD7000) ............................................................................................... 64
96. Temple of Cyric (BD7230) ................................................................................................. 64
97. Boareskyr Bridge (BD2000) ............................................................................................... 64
98. Coalition Camp (BD3000) .................................................................................................. 65
99. Dead Man’s Pass (BD7300) ................................................................................................ 65
100. Kanaglym (BD5300) ........................................................................................................... 65
101. Dragonspear Castle Basement (BD4300) .......................................................................... 65
Hint – Sandrah and Skie’s murder ............................................................................................. 66
Part 3 Sandrah in BG2........................................................................................................................ 67
102. Irenicus’ Dungeon (AR0602) .............................................................................................. 67
103. Air Plane (AR0601) ............................................................................................................. 67
104. Irenicus’t Dungeon, Exit Level (AR0601) ........................................................................... 67

Sandrah Saga Guide
6 ©PaulaMigrate
Yoshimo and Sandrah ................................................................................................................ 67
Quest – Region of Terror ........................................................................................................... 68
105. Waukeen’s Promenade (AR0700) ..................................................................................... 68
106. Circus (AR0607) ................................................................................................................. 68
Aerie and Sandrah ..................................................................................................................... 68
107. Slums (AR0400).................................................................................................................. 69
108. Copper Coronet (AR0406) ................................................................................................. 69
109. Arena (RA4300) ................................................................................................................. 69
110. City Gates (AR0020) ........................................................................................................... 70
Hint – Sandrah The Darkest Day ................................................................................................ 70
Hint – Sandrah Fishing for Trouble ............................................................................................ 70
111. Docks (AR0300) ................................................................................................................. 70
Hint – Sandrah and Extended Thief Stronghold ........................................................................ 71
112. Bridge District (AR0500) .................................................................................................... 71
113. Government District (AR1000) .......................................................................................... 71
Quest – Viconia’s Prosecution ................................................................................................... 72
Amber and Sandrah ................................................................................................................... 72
114. Graveyardt District (AR0800) ............................................................................................ 73
115. Temple District (AR0900) .................................................................................................. 73
Quest – How to Restore a Tiefling ............................................................................................. 73
116. Sewers and Unseeing Eye (AR0202) .................................................................................. 74
117. Umar Hills (AR1100) .......................................................................................................... 74
118. Shade Lord Temple (AR1401) ............................................................................................ 75
119. D’Arnise Hold (AR1300) ..................................................................................................... 75
Quest – Waterdeep Vampires ................................................................................................... 75
120. Arlax (RR3100) ................................................................................................................... 76
121. Westchar (RR3300) ............................................................................................................ 77
122. Stormhorn Mountains (AR3520) ....................................................................................... 77
123. Swamp Caves (CVSHA1) .................................................................................................... 78
124. Swamp Caves Exit (CVSHA2) .............................................................................................. 78
Hint – Map of Stormhorn Lands ................................................................................................ 79
125. Orcland Way Sign (CVSHA3) .............................................................................................. 79
126. Orcland Ice Road (CVSH10)............................................................................................... 79
127. Hai 'Ulthak , Outskirts (CVSHA4) ....................................................................................... 80

Sandrah Saga Guide
7 ©PaulaMigrate
128. Hai 'Ulthak , Prison (CVSHA9) ............................................................................................ 80
129. Road to Sharkta Fai (CVSHA5) ........................................................................................... 81
130. Sharkta Fai Pool (CVSHA7) ................................................................................................. 81
Quest – Shauhana’s Quest - Interlude....................................................................................... 82
131. Nib’s Ship/Palace Entry (CVSH13) ..................................................................................... 82
Quest – Shauhana’s Quest – The Factory .................................................................................. 82
132. Orc Cemetary (CVSH11) ..................................................................................................... 83
133. Ice bear Clan Village (CVSH12) .......................................................................................... 83
134. Hai ‘Ulthak, Old Mill (CVSH14) .......................................................................................... 84
135. Hai ‘Ulthak, Main Village (CVSH15) ................................................................................... 84
136. Sharkta Fai Factory (CVSH20) ............................................................................................ 85
137. Trademeet (AR2000) ......................................................................................................... 86
Part 4 Sandrah in ToB ........................................................................................................................ 88
138. Pocket Plane (AR4500) ..................................................................................................... 88
Part 5 Return to Faerun ..................................................................................................................... 89
Part 6 Time of Troubles Revisited ..................................................................................................... 90
Annex EET/Sandrah Saga Chapter Guide .......................................................................................... 91

Sandrah Saga Guide
8 ©PaulaMigrate
Introduction
The idea to write a walkthrough for the Sandrah Saga has proven to be not feasible. The mod is far
too complex and entwined with the original plot of Baldur’s Gate for that. I call this a *guide* now to
indicate that I do not propose a certain play style or a specific route through the game but just noted
down the things as they occur in my playthrough.
This non-walkthrough is based on Version 2.05 of the mod. The Sandrah Saga is still maintained and
enhanced, so things may be added or changed. In case you find such discrepancies please notify the
author.
The Sandrah Saga covers all of the Baldur’s Gate Trilogy as made available through EET. Sandrah can
become a constant companion and party member from the moment Gorion dies until your final
decision at the Throne of Bhaal. The saga even continues after the official game if you so decide at
the finale.
As such, the mod is not prescribing a linear path through the game, but fits into many options and
variations. The way the walkthrough is structured does not necessarily imply that you follow it
sequentially but consider it more as a reference.
Most Sandrah quests are long – very long. Many cannot be just followed in one go but evolve with
the game progress. *Gorion’s Dagger* for example starts with finding the item on your foster
father’s body and run’s like a red thread until the end of Sandrah – Time of Troubles Revisited.
Sandrah has no restrictive requirements on the protagonist’s gender, race, class or even alignment.
She evaluates her relationship to the player during the progress of the game based on your conduct
(see Sanpoints hint later on).
I use some general paragraphs indicated as *hints* or *quests* at certain points in the guide. These
are intended to give an overview of an aspect of the mod. Especially the quests that run over a very
long time and several chapters of the game are summarized in this way. In most cases this is not
equal to an exact walkthrough since often not all parts of the quest are accessible from the
beginning.
Episodes that apply only when Jen’lig is in the party as well are marked (J) and written in italics.
This guide of course contains massive SPOILER.
I made best experience with an EET/Sandrah game with having SCS installed, setting game difficulty
to Core Rules and de-selecting “Max HP on level up” and “No difficulty increased damage”. This way
the new quests and encounters appear best balanced for a large modded game installation.
©PaulaMigrate 2017
Contact; PaulaMigrate@Mail.com

Sandrah Saga Guide
9 ©PaulaMigrate
Sources and References
Downloads
Sandrah Saga is hosted and continuously updated at Github
http://www.shsforums.net/topic/59012-mod-sandrah-saga-for-eet/
Alternative Portrait
https://www.dropbox.com/s/rhvmqdzhxeyg97f/SanPortAlt1.zip?dl=1
Support Forum
http://www.shsforums.net/topic/59011-sandrah-saga-for-eet-bug-and-support-forum/
Note that I included a lot of quotes and hints from that forum in my guide.
Same for the readme that comes with the download of the mod or can be found here:
http://www.shsforums.net/files/download/1154-sandrah-saga-for-eet/

Sandrah Saga Guide
10 ©PaulaMigrate
Part 1 Sandrah Appears – Sandrah in BG1
1. Candlekeep (BG2600)
You get the first indications of the Sandrah mod before you even meet her. Your game starts in
front of the Candlekeeo Inn. You can either move into the direction of Phlydia to be addressed by
one of the watchers or you go into the inn and talk to Winthrop – in both cases you receive the
*Gift of Mystra*, a useful sword at that time of the game. It has limited enchantments and is
usable by any class.
When you meet Imoen, her usual dialogue is expanded. She reports about having met a young
female cleric the night before and discovered some ability with magic by this. At the end of the
conversation there are some choices for you to make Imoen a mage, a thief/mage or leave her as
is. The mage or mage/thief options unlock a large quest series for Imoen/Sandrah if both stay in
your party. The dialogue options do not break the 4th wall but their meaning should be obvious,
e,g, “Someone to throw fireballs or conjure up pink berries could be of use.” denotes the mage
choice.
Hint – Imoen’s Class
You can change Imoen’s class by a number of mods and tweaks in EET. The Sandrah option
handles this as follows:
- Thief >> whatever you chose for Imoen before is retained, otherwise she will be vanilla thief
- Mage>>She will join you as a level2 mage
- Mage/Thief >> She will join you as a level2 dual class mage/thief
Even if in the first case you select a spell caster of any type, Imoen will not qualify for the
additional contents from the Sandrah mod.
When you approach Gorion, you observe him in a conversation with Sandrah. Gorion sends her
away after a heated discussion and she leaves. There is no way to talk to her or make her join at
this time.
2. Lion’s Way (BG2700)
Follow Imoen’s advice to look for the letter at Gordon’s body. You meet Sandrah and can decide
to let her join. This walkthrough assumes that you take her; otherwise you may stop reading
here. She will only wait for a short time if not joined and will leave the area and be gone for
good as soon as you either reach Friendly Arm or Beregost.
Hint – Sandrah’s Items
Sandrah is a fighter (level2) /Priestess of Mystra (level2) when you meet her. Her experience
level represents her education and the fact that she travelled all the way from Waterdeep alone
to meet you – she is no novice to travelling. She has a number of personal items she does not
part with. Some items are upgraded during the game at higher levels. Even when you give her

Sandrah Saga Guide
11 ©PaulaMigrate
other items, she will need to have her belongings in the inventory. Over all, her items are suited
for her throughout the game. She works best when letting her use her own stuff.
Among her equipment is a book *Encyclopedia of Faerun*. It is a conversable book and can be
used to identify items. The items to be identified must be in Sandrah’s inventory. The book can
only be used after some time intervals; you get a dialogue stating that. Once activated, you have
some 20 seconds time to identify the items in Sandrah’s inventory slots, thereafter the effect is
dispelled and a new waiting period starts – the period is not reset by resting but follows its own
timer.
Some minutes after Sandrah joined your wolf companion Haiass appears. He will follow you
throughout the game. Sandrah will heal him and keep him alive if possible.
Picking up Gorion’s Dagger starts a quest. There is nothing at the moment to do other than to
keep the dagger.
Hint – Haiass
Haiass comes with a whistle you can use to call him. He has limited dialogues to steer his
behavior. I highly recommend that you talk to him once and tell him to “I want you to attack all
our enemies, giving priority to spell casters.” He works best this way.
There are many interactions and little episodes related to Haiass. Besides he is a good
reinforcement in combat. Haiass gains levels and abilities at certain points in the game.
Some other events in this area occur in later chapters
- In case you have the AC Quest mod installed, the final episode of the Karlini quest takes place
on the stone circles. Sandrah adds an additional option to betray the demon and rescue the
gnomes. If you remember the formula, you can call them back even if the demon took them
both.
- When you revisit the area in the RtF sequel, you will find a memorial site at the place where
Gorion died.
- The eremite Kolssed will show his real face in RtF.
3. Coast Way (BG2800)
You meet Elminster at the big road sign in the west of the area. You get another hint with respect
to Sandrah’s father here. If Imoen is present, she will be involved as well.
Quest - Sandrah’s Father
This is not really a *quest* but rather a part of getting to know each other. A number of NPCs
you meet early in the game recognize Sandrah or know her father. After you found enough hints
about her origin, you automatically get an option to talk to her and reveal some facts. This is the
prerequisite for her other quests to start. (Global ("ElmHint","GLOBAL”) is incremented on each
occasion. When it is greater than 5, you solved the riddle.)

Sandrah Saga Guide
12 ©PaulaMigrate
Persons involved (in any sequence): Elminster at road sign, Khalid and Jaheira, Thalantyr, Priest in
Nashkel temple, Volo in Nashkel, Haebal in the tower in Larswood, Shandalar, Drizzt at
Fisherman’s Lake, Firebead in Nashkel.
Sandrah interacts with the ogre’s girdles found in the area.
Eldoth and Sandrah: Sandrah dislikes the bard right away. She joins in with Imoen to not take
the guy into the party. They quarrel over several issues if you keep them both. However, none of
Sandrah’s relations with any other NPC ever escalates to the point where they would start a
fight. Eldoth is one of the NPCs who have comparably little interaction with Sandrah.
In chapter 4 or later you will find members of a secret organization hunting you first at FAI and
afterwards here on the northern road. On the body of Davenport you find a letter and a key that
lead to a house in Beregost near the smithy. This starts the Dark Horizons quest.
Hint – Sandrah and Dark Horizons
In area (CM3376) there is a golem construction manual. After you identified it, Sandrah talks
about golems and their de-construction. This activates an ability she can use against all types of
golems; at certain intervals she seems to create small short circuits in their mechanics that cause
damage. Note that this book and the resulting effect can also be found in a number of other
places you visit sooner or later.
Later when you storm the organization’s headquarter in Baldur’s Gate, explore the cellar as well.
The mage has retreated to that area and gives Sandrah some insights of how those people were
related to the main quest.
If you did both parts of the quest in BG1, you will find a secret installation of these people later in
BG2 behind a locked door in the Government District.
4. Friendly Arm Inn aka FAI (BG2300)
The mod adds a couple of encounters to the outside of the FAI. They make the area outside of
the walls slightly more dangerous but also more rewarding. The quest for the flame dance ring
adds a challenge to equal it to the reward you receive for it.
On the west side of the area you run into two hostile duergar. They are a precursor for a later
quest, they were involved in stealing an item from Elminster in Waterdeep. Later in the game this
will be the point from which your journey to Waterdeep starts.
If Imoen is in the party and you chose a mage class for her (see Candlekeep) , then her mage
career is boosted once you pick up the scroll from Tarnesh. In addition you get the information
that Sandrah knows about Khalid and Jaheira already before you meet them.
Hint – PIDs
Player Initiated Dialogues (PID) aka Force Talks are an important feature in the Sandrah mod.
What you can ask her is updated all the time while you progress through the game. Your interest
in her and her opinions and advice has direct impact on your relationship (see also sanpoints).
Sandrah Saga Guide
13 ©PaulaMigrate
Aside from the getting-to-know banters, the PIDs often advance her story or a certain quest. It
can as well be used to start a delayed conversation with her. You can activate some helpful
dialogues through PIDs.
In later chapters you get an upgrade for Gorion’s dagger when you meet him after the bandit
camp is finished.
The end of the Elminster’s Shard quest opens two new options in the Sandrah mod:
Sandrah receives her magic parcel from Elminster.
You can start the quest that opens the road to Waterdeep-
Hint – Sandrah’s Parcel
Use a PID option to ask Sandrah about the parcel she received from Elminster. During BG1 the
parcel has the following options (in later parts there are enhancements):
1. Retrieve lost items – this option can restore plot/quest items you may have found but no
longer in your possession when you actually need them. Sandrah can only call back items the
party found while she was present.
2. Get some gold from Sandrah’s purse
3. Get some jewel from her possession – a random gem is produced
4. Enhance a healing potion
5. Get some magical items e.g. a stone to flesh scroll (only if party has none)
6. Get something to celebrate a party – sounds silly but is useful e.g., if you need a keg of beer
or a bottle of wine in some plot
The options become available through a dialogue that opens when you select the *use item*
button on the parcel in Sandrah’s inventory-
5. Friendly Arm Inn Inside (BG2301)
Old man Jopi greets you on entry. He will have an important plot item for Sandrah at a later stage
that is required to access Waterdeep.
Sandrah will be involved in the discussion with Khalid and Jaheira and you learn more about her
background.
Jaheira/Khalid and Sandrah: The couple has known her as a child and they know her parents.
Jaheira mistrusts the young priestess thoroughly, both for being in the protagonist’s party for
reasons Sandrah seems to hide and second for the *influence* she seems to have on her
husband. The second issue is resolved during the BG1 events. Jaheira only changes her attitude
towards Sandrah after Khalid’s loss and their common adventures in BG2,
Talking to Thorengrim will give you a hint to look for a strange veiled creature that went to the
upstairs rooms recently.

Sandrah Saga Guide
14 ©PaulaMigrate
6. Friendly Arm Inn Inside 2 (BG2303)
When you finished the Landrin quest, just talk to her once again. She will return to her house in
Beregost. When you visit her there later on, she will always offer you a cup of tea. Accept it and
your party will be healed.
In the last room on the right you will encounter a githyanki and a slain flaming fist sergeant. After
you inquire about what happened, you can fight the githyanki, let her go to follow her quest, or
invite her to join.
Hint – Jen’lig
Jen’lig is a thief, which is unique for her race. Due to her race abilities she is also a very useful
melee fighter in her own rights with her silver sword. Her abilities are counteracted that she is
very hard to control by the player. She is in fact a githyanki plane walker who has learned to
detect traps and open locks but there is no way for her to have learned a Primary plane's thief
behavior in combat. Yes, she swallows potions like mad if you give them to her, especially in her
fighting mood (githyanki fight Berserker style and never use ranged weapons - they want to look
their dying enemy straight in the eye.).
You will hear Jen'lig comment on this herself (...use psychic bonds to give orders in battle...) You
cannot, so she makes her own decisions. While you learned your battle skills by killing some rats
in a warehouse, she has fought mind-flayers, drow, beholders and worse. She has commanded a
githyanki ship on the Astral Plane; she is not your thrall on the battlefield.
Jen'lig is installed as part of the Sandrah package, but she is a separate NPC. You need Sandrah in
the party to recruit her and you need Sandrah in ToB if you want to meet Jen'lig again, otherwise
both are largely independent (although Jen'lig will sooner or later leave you for being an
incompetent leader if you kick Sandrah out). You do not need Jen'lig to complete Sandrah's
quests, her own quest in BG1 is completed there and independent of Sandrah's quests
In summary, you can play Sandrah without Jen'lig but not vice versa
If you kick her out you cannot recruit her back - she will reappear at the Sarevok showdown but
not rejoin you (in her eyes you have disqualified as *commander* - true githyanki logic.)
Jen'lig does not care at all about PC's reputation, why should a githyanki care about concepts of
the prime? She evaluates the PC according to the mayor battles (s)he wins and the progress (s)he
makes in the quest.
7. High Hedge (BG3201)
Thalantyr is one of those who recognize Sandrah. He plays a role in a number of later quests as
either point of information or being able to provide necessary spells or ingredients.
When you succeed in rescuing the talking chicken, you will discover that Sandrah and Melicamp
are old acquaintances. In the Return to Faerun sequel, Melicamp becomes a joinable NPC and
his relationship with Sandrah is renewed.

Sandrah Saga Guide
15 ©PaulaMigrate
(J) In one of the outdoor areas Jen’lig will ask you to find a silver amulet or ring. Once you found
one, she will forge an amulet of mind flayer protection from it. Only she can use it for whatever
reason.
Kivan and Sandrah: Sandrah, as a priestess, is first of all a healer. This is emphasized by the
mod on many occasions. The elf is hurt in body and soul and immediately gets her attention.
Their relationship is the bittersweet attempt of a young woman to heal Kivan with her skills and
love. Whether it is a romance or a therapy is left to the player’s imagination. But even Sandrah
can never replace Deheriana in Kivan’s heart, and she has to accept it in the end. Kivan is one of
the NPCs who have much interaction with Sandrah.
8. Beregost (BG3300)
With Imoen in party, so not miss to visit the large mansion in the north of town (BG3320). The
Travenhurst mansion plays a central role in the Sandrah/Imoen quests later on. It will also be the
place where you find Imoen in the RtF sequel.
Branwen and Sandrah: Sometime after you enter the town or the temple east of it (whatever
comes first), Sandrah will tell you about a petrified priestess in some playground area who awaits
her rescue. This obviously relates to Branwen. Branwen is not required directly by the Sandrah
mod, your rescuing her is just evaluated by Sandrah for your relationship with her (see
sanpoints). You can just do the rescue but there is no need to recruit Branwen. However, if you
take her, there will be a growing friendship between her and Sandrah. Branwen will re-appear in
RtF as a plot figure but will not be joinable in the sequel. Branwen is one of the NPCs who has
much interaction with Sandrah.
When you meet Neera and the red wizards of Thay make their appearance, Sandrah immediately
takes the side of the wild mage and expresses her disgust/hatred for the *red scum*. This theme
runs through the entire initial trilogy. It later comes to its climax during RtF and the journeys to
Thay itself.
Neera and Sandrah: Mystra is the goddess of all magic and Sandrah claims that the earliest
incarnation of her goddess, Mystril, was the first wild mage herself. Neera is the only of the new
EE NPCs who has extended contents with Sandrah. They share their dedication to the Weave as
much as their hate of Thayans.
When you do the Firebead book quest, the mage will address Sandrah and tell her about a scroll
to be found in an upstairs room in a chest. In case you skip the quest in the early part of the
game, you will later be send by Elminster anyway to retrieve the scroll. Whichever path you
follow, you will sooner or later need the scroll from area (BG3334) for the quest
Quest – A Demonic Scroll
This quest starts approximately a day after you discovered Sandrah’s heritage with the arrival of
the mage Landrel, an assistant of Elminster. You and Sandrah are invited to meet the archmage
at the Temple of Wisdom (BG2304). This is the only timed event in this plot since you need to
start the journey to Elminster within 2 hours real playing time (not game time) , otherwise there
will be a reminder and if you still hesitate, Sandrah will leave you to perform the quest alone.

Sandrah Saga Guide
16 ©PaulaMigrate
Once you talked to Elminster, there is no further hurry to perform the search at your
convenience.
Elminster will inform you that an artifact has been stolen from him - remember the duergar you
met west of FAI earlier?
As first step, you need to retrieve the scroll from Firebead. You either
a. Already have the scroll and know about its talking abilities, or
b. Need to travel to Beregost again and afterwards meet Elminster at the High Hedge
After Elminster has inspected the scroll, the search leads to some waterfall in the Cloudpeak
mountains.
In area BG5300 Fire Leaf Mountains follow the west bank of the river southwards. Near a
waterfall you will be attacked by a creature that looks like a demon knight. Since the knight only
attacks the protagonist, it is easy to defeat if your PC just moves around it in circles and your
companions slowly hack it down. Once the knight is defeated, Sandrah moves to the waterfall
and detects an entrance there. You are transported inside (CVNAR1).
You meet Naronguth (first of a number of meetings if you keep Sandrah in your party). You find
that he built the trap for Elminster but is just as happy to have Sandrah instead. You have several
options in the dialogue:
a. Fight the demon >>> it is possible to harm him enough to retreat to where he came from.
You are transported out of the cave again but you will have lost Sandrah. Nothing more to
tell here.
b. Make a deal with the demon to leave Sandrah with him for a ten-day. >>> You and your party
are free to go; you may find Sandrah later at the Morning Lord Temple. You missed the
adventure, some XPs, some items you might have found, and some of Sandrah’s sympathy
for you (sanpoints). You can let her join again.
c. Bluff the demon with some information you gained from Elminster and the talking scroll.
>>>The deal is to exchange Elminster’s artifact for the heart of Naronguth’s archenemy.
The following assumes that you chose option c) as otherwise the quest was finished already one
way or other. Your whole party is transported back to the surface near the waterfall and you
received a second scroll. You now need to find the second demon and another waterfall.
When you enter the area of Dryad’s Fall (BG5200), the scroll becomes active. You are in the right
area but not yet close enough. Inspect the waterfall (maybe find the dead cat). Sandrah tells you
that this time the waterfall is not the entry and suggests to ask the girl nearby (Drienne). The girl
gives you a hint to the cave at 3160/2670.
Enter the cave and when ready, talk to the scroll. The scroll opens the portal and moves you
inside (CVNAR2). The exit will be blocked until you gained Alzaligundrel’s real heart or a faked
replica – both of them work to solve the quest. The area you are in is a large cave system and
your target is more or less east of where you enter at the other side (3710/1310). You can use
stealth or force, go direct or explore the cave, just as you like. There is a number of quite

Sandrah Saga Guide
17 ©PaulaMigrate
challenging battles (assuming you are still a relatively low-level party) but also rewarding bounty.
You cannot come back to this area again later.
However you decide, finally you meet Alzaligundrel, who looks impressive in his blue dragon
impersonation. Again you can either
a. Fight him and gain his real heart plus some loot
b. Accept the heart of another demon instead (since Naronguth will not be able to tell one
from the other)
c. Do b. save the game and try your luck with c. for the extra XPs and the loot.
With any of the hearts in your possession, the way out is open now. When you leave the cave,
the talking scroll has become useless and you cannot go back there again.
Return to area BG5300 Fire Leaf Mountains where a servant of Naronguth awaits you to let you
inside again.
Give whatever heart you want to Naronguth, he will accept it and invites you to party with him.
a. If you give him an answer that upsets him or if you decide to attack him to get Elminster’s
shard, a fight will break out >>> it is possible to harm him enough to retreat to where he
came from. You are transported out of the cave again but you will have lost Sandrah. Nothing
more to tell here.
b. If you stay cool and finally let Sandrah deal with the guy, she will find his weak spot that
makes him hurry *home*, leaving the artifact, a good bow, and his silver slippers behind.
Take the shard and the slippers – the bow if you like.
Ask Sandrah to use the shard (if she does not do it herself already) and you are outside again.
It is time to bring the item back to Elminster; either at FAI or High Hedge - depending on how you
played earlier in the quest. But beware, there is an ambush waiting for you just when you are
about to reach your goal. The thin woman and the fat man who ask for your help turn out to be
after the artifact as well and they give you a hard battle over it.
When you finally deliver the shard back to Elminster, you receive a number of rewards that will
be discussed separately
- Sandrah’s parcel
- The option to travel to Waterdeep.
Upstairs in the house where you meet Mirianne (BG3314) you find a ConstrGolemuction
Manual.
At Thunderhammer’s (BG3301) Sandrah will have some interaction with Taerom at later visits in
the game (not on first occasion). You can only guess what your companion and the smith do in
the backroom…
Bjornin (BG3304) is another of Sandrah’s little flirts - on first meeting and after you finished his
ogres.

Sandrah Saga Guide
18 ©PaulaMigrate
Bring the three items from Landrin’s house (BG3315) back to her at FAI. She returns to here and
you get some free heeling every time you visit her later in game (see *Tea with Landrin*.
Hint – Revisits in later game parts
Magnus at location 2508/2970 sells high prized/very useful items. Among those is a werebane +1
dagger. Since you find those items in BG1 and BG2 anyway, I suggest not to purchase the item
now but leave it there to buy it in the ToT extension (provided you plan to play it). You cannot
take items into the extensions and you will need an adequate weapon later to fight Malar the
Beastlord and his company.
In the Red Sheaf (BG3357) Finch – you met her in Candlekeep – will help you against Karlat. In
case you installed the Finch NPC mod, she is joinable; otherwise she stays at the inn as a plot
person. She is involved in the Sandrah quest *Bookhunters* that starts later upon your visit to
Waterdeep. It is not required for her to join in order to get that quest.
Garrick and Sandrah: When it comes to bards, except for Eldoth, Sandrah loses her usual
intelligence and falls for their sweet words, even knowing that they are just sweet words. Or
maybe she feels she can have all the fun without caring about obligations. Their little affair is
triggered if you follow Garrick’s quest that starts at Nashkel Carnival. After the adventure, Garrick
leaves for the Elfsong for a performance and can be recruited there again later.
Tiax and Sandrah: They are followers Mystra and Cyric, or rather Midnight and Cyric, the
mortals who rose to godhood after Bhaal’s defeat. According to Tiax they will rule. The truth
often comes from the mouth of fools. There are a few interesting banters between those two
NPCs but not awful much since Sandrah claims that the gnome is too insane to be cured while
the company is travelling and adventuring.
Inside the Burning Wizard (BG3307) there are two separate mod NPCs to recruit, Vynd and
Drake. Sandrah has crossmod contents with both of them.
9. Temple of Morninglord (BG3400)
Outside the temple you meet Gavin, mod NPC, if installed. Sandrah knows his brother Jolumn
already and there is a nice episode in the Elfsong tavern later. Sandrah and Gavin get along well
and like to exchange their views on this and that. (In earlier versions of Sandrah a possible mini-
romance between those two NPCs could develop, this was deprecated from recent versions.)
Another NPC in the vicinity is the tiefling Sirene. Sandrah has but a few banters with her. The
crossmod content seems to be unfinished.
Hint – Sandrah and other mod NPCs
Sandrah interacts with all vanilla NPCs in the trilogy. She also may have smaller or extended
interactions with quite many mod added NPCs as well (crossmod contents). An up-to-date list
can be found in the mod’s own readme. Contents for some NPCs has been removed again since
the other mod’s author may not have liked it, others may not have qualified for crossmod
contents at all.

Sandrah Saga Guide
19 ©PaulaMigrate
Use Sandrah to heal party members whenever possible. Many interactions and banters are
triggered by her healing another NPC, even if the other one is a cleric as well.
In the cave (AR9305) added by Northern Tales of the Sword Coast (NTotSC) you should accept
Torkion’s quest. Sandrah interacts with that mod as well as *The Vault* that is connected to it.
Ask her via PID once you left the cave again. She will again provide some advice when you traded
the ancient armor and Kozah statue with Ulcaster’s ghost for the Vampire Revenge sword and
when you brought the sword and holy water to free Torkion’s soul.
The astronomer Galileus has some extended text that foreshadows some of the events in the
Sandrah Saga. This may only become apparent in hindsight.
Ashen has some extra banter with either Sandrah or Ajantis or both – depending on who is in
party – as both know the guy from Waterdeep.
The petrified woman in the south-east of the area is not the one Sandrah talked about earlier.
Kelddath Ormlyr In the temple (BG3402) is involved as a contact for a number of Sandrah’s
quests. He also appears in RtF as representative of Beregost.
If you visit the vestibule (BG3401) later than chapter 3 again, it will start a quest from the Vault
mod (if installed). Sandrah and (J) Jenlig will have interjects with that quest when you follow it.
In chapter 3 and if you have Secret of Bone Hill mod installed, you meet a mage called Pelltar
inside the temple. Sandrah will recognize him as a friend of her father. In case you accept his
quest, you will be transported to the island of Lendore for a quest.
Hint – Sandrah Secret of Bone Hill I
Throughout the mod’s plot, Sandrah will interact with a number of characters on the island. She
has been there before and this reflected in the dialogues. The mod adds the bard Fabio, who can
join the party but only stays during the plot on the island and leaves party again when you
finished the plot. Sandrah has a short romantic interlude with Fabio.
None of the added contents is needed for Sandrah’s main plot. All interactions are optional and
just making the game livelier.
10. Trade Way North (BG3800)
(J) Visit the cave (BG3802) for an extra encounter for Jen’lig. In the cave you find a wounded elf
who tries to infiltrate your thoughts to control them. Jen’lig steps in and attacks the creature. It is
the first encounter with a mind flayer you can have in the game. You only survive it with her help
because the creature is nearly dead already when you meet it. Note: The ogre for the Kessy and
Jumper quest from AC Quest Pack mod will be west of the cave mountain in this case.
11. Trade Way South (BG4300)
If Imoen is in the party, she and Sandrah pick up the *a boyfriend for Imoen* topic again. Talk to
Portalbendarwinden afterwards.

Sandrah Saga Guide
20 ©PaulaMigrate
In case you have the “Deep Gnomes on the Sword Coast” mod installed, there is a cave entry
around 3650/700 (AG4301). Finding an old shield in the cave triggers a conversation with
Sandrah.
Again, if Imoen is in the party, she and Sandrah have a foreshadowing conversation after you met
Lord Foreshadow.
In chapter 5 or later, you will find some Teldorn fighters that kill a harper scout. If you pick up his
letter, the Stone of Askavar mod is started.
Hint – Sandrah in Stone of Askavar
Finding Mecorima’s chainmail in the Bluebell Wood (ARS002) will trigger a sub-quest. Sandrah
will identify the armor as one stolen by Talos’ followers and sometime later, a bunch of Talonites
will appear to demand it back. This is another episode to fuel the hatred between Sandrah and
Talos.
When you have collected the amulets, Sandrah will initiate talks with Cearwin and Aranor to get
some harper’s information on Gorion and the bhaalspawns.
12. Red Canyons (BG3700)
When you meet the talking chicken Melicamp, you receive a hint that Sandrah knows the jinx
somehow. Accept the quest and solve it at High Hedge to see more.
When you defeated Basilius, Sandrah makes some remarks concerning Cyric. The relation of your
companion to the Prince of Lies is a major red thread that runs all through the original trilogy and
the sequels. This is just an early glimpse on the theme.
Hint – Sandrah and Cyric
Cyric is the (mad) god of strife and lies – and also of murder. He was a human thief from Zhentil
Keep who was raised to godhood at the end of the Time of Troubles and after he killed Bhaal –
the then god of murder – with his sword Godsbane at Boareskyr Bridge. With the same sword he
had already killed his companion Kelemvor Lyonsbane, who later became a god as well, the Lord
of the Dead. Another companion of Cyric and Kelemvor was a young priestess of Mystra named
Midnight. After Mystra was slain by Helm during the Time of Troubles, Midnight became her
successor and a goddess on the same day that Cyric was elevated. Since Midnight/Mystra
discovered that Cyric had murdered her former lover Kelemvor, she and Cyric became the worst
of enemies among the gods of Faerun.
Sandrah is a priestess of Mystra, however it is said that the human Cyric was her grandfather. At
least, both Sandrah and Cyric believe it. This does not make Sandrah a godchild but the
grandchild of a mortal who fought and defeated gods. Cyric is Sandrah’s Nemesis.
As Cyric is also the reigning God of Murder after he killed Bhaal, he is the protagonist’s natural
enemy as well.
Zargal and his hobgoblins get reinforcement if Sandrah is in your party to make the challenge
adequate to the loot and threat.

Sandrah Saga Guide
21 ©PaulaMigrate
13. Wilderness Lake (BG4200)
The Sandrah mod opens the hut north of the lake. Depending on the status of your romance,
some events will take place there. (BG4201)
After killing Bjornim’s ogres, there is a different reaction from Sandrah depending on whether
the protagonist is male or female.
After you helped Drizzt against the gnolls and you talk to him again, you will learn that Sandrah
and Drizzt know each other. In case Shar-Teel or Branwen are in party, this will trigger banter
with one of them by which more is revealed; otherwise, there will be a PID options to ask her
about it. The Drizzt/Sandrah/Mystra connection will be elaborated later when you meet Drizzt
again, either after Durlag’s tower (Drizzt Saga mod) or in BG2 part (Region of Terror, if installed).
Do not fight and kill Drizzt if Sandrah is with you.
14. Nashkel Carnival (BG4900)
Around 1400/1350 some shadow druids with their troops lurk for an assault on the festivities.
They only appear if the party level is higher than 4, for a good reason – they are tough.
Either in the north-east of this area or on the east side of the river in Nashkel town (whatever
comes first), you meet a gnomish herbalist. She recognizes Sandrah as a healer and gives her
some leaves. You can buy these leaves as well in some shops throughout the game. Once she
received her magic parcel, she can use a leave and a normal healing potion to produce a greater
potion of healing.
In case you play an evil aligned protagonist (or your reputation is low), there is an extra episode
with Oopah, the exploding ogre.
Sandrah will remind you of the search for Branwen if needed.
15. Nashkel (BG4800)
When you cross the northern Nashkel bridge, Haiass gains a level for his experience so far.
Near the southern bridge, Sandrah issues a *warning* and expresses her disgust of Edwin, since
she hates the red wizards in general for reasons revealed later on.
Edwin and Sandrah: When both are in the party, they immediately start to quarrel. Edwin
seems to suffer from a curse that causes some of his spells to work against him. He accuses
Sandrah, respectively Mystra, to cause it. After an outdoor rest, a visit to one of the temples and
the visit of a city, Edwin will be cured. Sandrah still pretends to be innocent, believe it or not.
Their relationship does not improve but it is just verbal battles. There is a complete change in
Edwin later in RtF when you meet him again in Thay. Edwin becomes a plot character of
importance during the RtF Thay episodes.

Sandrah Saga Guide
22 ©PaulaMigrate
There are some people in town who know about Sandrah: Volo, in the tavern near Edwin and
Nalin, the priest in Helm’s temple. Volo, in addition, gives you a copy of his bestseller *From
Midnight to Mystra* - the many parallels between Sandrah and her paragon become apparent
over time.
If Imoen is in the party, her main quest with Sandrah starts when entering the shop next to the
Nashkel Inn. (Note that this quest and all other Imoen quests are only available if you chose one
of the mage options at the start of the game.)
Quest – Imoen’s Quests
This is the beginning of a sequel of Imoen/Sandrah related quests.
1) Prior clearing Nashkel Mines
Henning, the Nashkel storekeeper, asks Sandrah to formally introduce him to Imoen. Soon after
leaving the shop Imoen expresses her interest in the man to Sandrah. Once you reach an out of
town area, Imoen asks you to hunt for winter wolf pelts. As soon as you have one, you should
revisit the shop to hand it in. After a day revisit the shop and Imoen receives a (very useful) gift
from Henning.
Sandrah and Imoen discuss the gift. Next time you are in a city they decide to buy a gift for
Henning as well. Return once more to the shop.
2) The story will continue after you cleared the Nashkel mines.
Report your success to Berrun. Visit the shop and find Henning missing. (Alternative – some
witness finds Imoen to tell her that the Nashkel shop has been attacked.) Talk to Berrun again
and find out more. You get the (false) hint to the Cloakwood forest. When you travel overland,
you will find a scared merchant who had escaped the kidnappers, a large orc gang. He tells you
that the orcs are actually on their way to Gullykin. After you defeated Tranzig in Beregost, the
bandit camp will still be hidden on your worldmap while Imoen’s quest is ongoing.
In the Halfling village talk to Gandolar to learn about a missing beekeeper. You find the injured
beekeeper south of the village and need to heal him to get his report. He gives you the clue to a
cave on the eastern part of the Gullykin map around 3940/3000. Clear out the cave (CVORCA)
and find the loot in a wagon in the north of the cave. One of the orc leaders gives you the hint to
Tazok.
Once you leave the orc cave, there is a conversation with Sandrah.
3) Bandit camp is now revealed on the worldmap.
Do not go there directly. Follow Sandrah’s advice to infiltrate the camp by making contact in
either Peldvale or Larswood. You trick your way into the camp and get rid of Tazok. You have
limited time to explore the camp before the bandits find out about your true nature. Talk to the
bandits in the tents but avoid the large tent for now. Get a hint to the cave north of the large
tent. Defeat the inhabitants and talk to the wounded orc left there.
By that time, either the camp gets hostile or you trigger the battle by visiting the large tent now.
After the job is done, talk to Endar and he will have more news for Imoen.

Sandrah Saga Guide
23 ©PaulaMigrate
4) The plot continues once you are inside the Cloakwood mines.
On the second level, you will notice the locked door to the prison cells. When you open it, some
orcs will flee to the far end of the tunnel and vanish to a new area. You follow them to a new
area (CVORC1) (Note that one of the watchers carries half of a keystone you need). Defeat all the
orcs and orc priests in the area and find another prisoner, Hynalt, who will give you a lot of useful
information about the kidnapping, the Iron Throne, Sarevok…and a man named Gerald
Travenhurst (the man in the large house in Beregost, remember?). You need to find both parts of
the keystone to move on.
The next level is dangerous, full of orc mages and traps (CVORC2). In the initial part of the battle,
Imoen will have a strange transformation. Once back to normal and with the initial onslaught
behind you, there will be a hint to what it might have been but the rest is for later. Continue tp
explore the side chambers of the cave until you find the leader and a badly injured Henning.
Sandrah will leave your party to care about the wounded man – no worry; she will be back pretty
soon to join you again for the remaining plot in the mines. Explore the area and the loot. There
will be a significant amount of gold hidden in that last room and do not forget to pick up
Travenhurst’s purse from the orc leader, you need the evidence later.
Return back up to the prison level of the mines to find Sandrah again with her report about
Henning.
5) The last episode starts if you revisit Beregost.
Sandrah reminds you of the Travenhurst mansion (you need the purse in your inventory). There
will be a discussion in your party whether to get Kelddath Ormlyr’s approval or not before
confronting Travenhurst. It is player’s choice, but going to the temple first is more entertaining
though. You need to battle your way through some orcs and Iron Throne mages before you
finally capture the main man. During the battle on the ground floor, Travenhurst will make his
escape to the upper floor, so follow him for more orcs upstairs. Travenhurst is no fighter; he
gives up when he sees his guards defeated. You learn a lot from him about the background of the
kidnapping, the iron crisis etc. In the end, Imoen decides to let the broken man escape. In return
she gains the ownership over the mansion.
Instead of making this your stronghold, little sister decides to turn the house into an orphanage
for all the lost children of the Sword Coast who had no Gorion or Winthrop to take care for them.
Visit the temple once again to organize everything with the temple and to finish the quest for
now. Return to the mansion some time later to see the orphanage in operation – and to meet
Izzy.
Izzy (real name Isobel) and the orphanage will play a role later in the RtF sequel.
You will meet the restored Henning in Elminster’s house in Waterdeep later (Sandrah will give
you a reminder). After the reunion scene with Imoen, he will open his shop in Bloomwhiffler’s in
Waterdeep.
There is also an optional connection to the bookhunters quest.

Sandrah Saga Guide
24 ©PaulaMigrate
16. Nashkel Mines Outside (BG5400)
Zargos, the assassin awaiting you near the hut, has some company with him. They are tough
dwarf mercenaries but worth it for the loot.
Prepare well for the Prism/Greywolf episode if you want to side with the artist against the
bounty hunter. Greywolf has some archers to support him. They are not that tough but
strategically positioned so they surprise your party with crossfire if you only consider Greywolf
against you,
After Greywolf’s defeat, the mod NPC Isra can join your party. She and Sandrah get along well,
Isra suggests that Sandrah would make a valid disciple of Sune herself.
17. Nashkel Mines Second Level (BG5402)
Sandrah helps you to rescue the miner Beldin near the entrance from the attacking kobolds.
Your counselor advises you to take a sample of the contaminated iron and the mysterious liquid
for later inspection by Taerom in Beregost.
The exit to the lower levels has some extra guards, kobold shaman and giant spiders.
18. Nashkel Mines Lowest Level (BG5404)
The mod adds some additional enemies both prior to and after Mulahey’s defeat to the cave.
In case you have The Vault mod installed, Sandrah meets an important quest character in this
cave after you retrieved the stolen book for Candlekeep. Once you defeated the drow high
priestess, follow Sandrah’s advice to come to this area again.
19. Nashkel Mines Final (BG5405)
(J) You will find the sheath of a sword on the dead Mulahey. Jen’lig will ask you for it.
Quest – Jen’lig’s Quest
Brief summary:
The githyanki is on the hunt for a stolen silver sword and the thieves who murdered her mentor
and teacher for it. Six men were involved in the murder and they can be found in your normal
progress of the game through BG1.
- If Jen'lig is in the party do not miss the cave south of Beregost (BG3802)
- Get a silver amulet for her if she asks you for it
- Have some Initial talk to learn about her race
- Have some PID dialogue with her.
- To get more, you need to prove your value to her (as a githyanki she values you for fighting
good). She will comment and react after specific battles you win or creatures you defeat.

Sandrah Saga Guide
25 ©PaulaMigrate
- Help Prism against Greywolf
- Get to the bottom of the Nashkel mine and find a clue about her quest.
- Convince Tazok to take you and propose to assist him with his troupe inspection. Once he is
dead (there is another revelation for Jen'lig if she is with you) make haste to inspect the bandit
camp huts and the cave in the north (but avoid the main tent for now) before Tazok's death is
noticed.
- There is more Jen'lig contents in Cloakwood as well as in DSOTC episodes, in Waterdeep (once
Sandrah has opened the way for you)
- There is also a (not-a-romance) episode for a male PC (or for Edwin if PC is female) - just mind
that *love* is *not a githyanki concept*
In Baldur's Gate
- accept the invitation to the shadow thieves, let Jen'lig not miss Hussam
- find Jardak and Sunin in Baldur’s Gate who were involved in the killing of her mentor based on
the hints you get from the shadow thieves
- Take Jen'lig to the final battle with Sarevok. Search Semaj’s body for the sword.
She will leave for her home at the end of SoD’s initial dungeon quest
Xan and Sandrah: Sandrah is immediately attracted by the melancholic elf. Her healer instinct
makes her want to cure him and her best trusted medicine is love. Unless the protagonist is
suited for it, a kind of romance will evolve between the two NPCs. This will be continuous for BG1
and BG2 parts. Xan is one of the NPCs who have much interaction with Sandrah.
20. Valley of Tombs (BG5000)
Sandrah will make an analysis of what you found and have not found in the mines and
recommend that you first return to Nashkel and then visit Feldepost inn.
Some assassins from NTotSC will wait for you in the area.
21. Fire Leaf Forest (BG5300)
In the northern part of the map is Ordolath who has forgotten his candle in Baldur’s Gate in a
house north of Ramazith’s tower. Sandrah adds extra contents if you accept this quest.
If you have started Elminster’s demonic scroll quest, you find your first hint on the left bank of
the river near a waterfall.
Help Albert find his dog. The strange *boy* will appear again later outside of the Cloakwood
mines, if you have Sandrah still with you.

Sandrah Saga Guide
26 ©PaulaMigrate
22. Dryad’s Falls (BG5200)
The demonic scroll will alert you as soon as you enter the area. (See).
23. Lonely Peaks (BG4400)
The mod opens the abandoned house in the area for a quest. When you come to the area,
Sandrah will mention the house to you – if your romance is active, she has something in mind,
obviously. Enter the house (CVWOHA) to find a little girl having lost her mother. She will follow
you outside and through the area while you search. It is a trap leading to a battle with some ogre
mages. After the battle you may or may not be in the mood to visit the house with Sandrah. Use
PID to trigger the event. Otherwise, simply explore the hut for some treasure.
24. Ulcaster School (BG3900)
On the first level of the school dungeon (BG3901) you will find a journal of a Rashemen Scout on
the dead body. Keep it and identify it. Sandrah will start a conversation about it once you are out
in the open again. The item is related to Sandrah’s main plot.
Quest – Sandrah’s Quest I
Sandrah’s main quest spans the whole trilogy and does not even end at ToB final; actually it is
continued with RtF afterwards. There are uncountable variations, side quests and optional
additions. It is the heart of the Saga and there is contents related to the story throughout the
game and even in mod added portions. Due to this, hints and tips for this particular part of the
mod will be distributed all through this guide at appropriate points.
The scout’s journal is one of the items to be found in BG1. The others are three pieces of a cloth
that belong together. The four items can be collected in any sequence and at various times.
Preferably you should have all of them prior to returning to Candlekeep – this way you get
maximum contents. (The scout journal may be optional; it just adds further explanation and
detail to the story.) The three cloth pieces are mandatory. Without them Sandrah’s BG1 part will
fail and probably she will not follow you into SoD. The three pieces are found
1. Viconia after you rescue her from the flaming fist (Depending on whether you let her join or
not, she will give Sandrah the piece right away or during the common travel. In the second
case you will receive some additional information, too). Sandrah is required in party when
you save Viconia.
2. Mellum, the insane fighter in the NE part of the Firewine Bridge map. Sandrah is required in
party when you talk to the man.
3. Dynaheir, after her rescue – two variations:
Sandrah is in party when you rescue her, in this case she will give Sandrah the piece after you
found Dynaheir’s journal.
Sandrah has temporarily left the party to make room for Dynaheir, the wichlarn gives the
piece to the PC once you left the Gnoll area.
After you found some of the items (scout journal and a cloth piece), Winski Perorate makes his
first appearance and issues some warnings. In the conversation that follows one of the mayor

Sandrah Saga Guide
27 ©PaulaMigrate
themes of the Sandrah Saga is introduced: the Time of Troubles is not over yet, but the seeds of
old now bear their fruits. Your story and hers both have their roots there. There is also a hint to
Alaundo’s prophesy to play a role for both of you.
Continued
(J) Defeating Icharyd will trigger a reaction from Jen’lig providing further insight into githyanki
existence.
25. Sharp Teeth Plain (BG3500)
In the NW of the area you meet Shar-Teel. In case you have a female party or your male fighter
has lost, Sandrah will still provoke Shar-Teel to a duel. Sandrah and Shar-Teel have much
interactions and having both in the party will cause both of them to further develop their
personalities in unexpected ways.
Shar-Teel and Sandrah: They establish a deep friendship in which they refer to each other as
*wildcat* and *pussycat*. Sandrah sees a large part of herself in Shar-Teel and vice versa, they
just grew up under very different circumstances. In case of a male protagonist, having them both
in the party through BG1 part will lead to extra quests and features. After the BG1 part, Shar-Teel
continues to play a major role in further parts of the game as a non-joinable plot character who
becomes an important figure in Waterdeep (and for a male player if you romance her). As
Sandrah’s influence brings out the *better* Shar-Teel over time, the romance with the fighter
woman becomes available to all alignments. Shar-Teel in her enhanced status at Waterdeep will
also play an important role in the RtF sequel. (Note: this makes eventual mods bringing Shar-Teel
into the BG2 part of the game incompatible with Sandrah.)
(J) Once Jen’lig learns about Shar-Teels origins she will inquire for her own quest, as the sergeant
she killed at FAI was a Flaming Fist.
26. Old Waterdeep Road (CVROA1)
This is the only map of Waterdeep that appears on your worldmap. All travels to and from
Waterdeep go through here. Within Waterdeep, you move between city areas in a realistic way,
i.e. from the end of a street or through a gate to the next area.
All travels from Waterdeep end at FAI, while Old Waterdeep Road is accessible from all other
areas once you have discovered its location with Sandrah’s quest:
- Ask Sandrah about travelling to her hometown via PID.
- Talk to Gellana in the temple in FAI and she will mention Jopi.
- Jopi is in the main tavern room of the FAI, he will give you an old map when you chose the
right dialogue options.

Sandrah Saga Guide
28 ©PaulaMigrate
- Leave the inn and Sandrah will offer you to use the map. You can do that right away or tell
her to wait. In the second case, you can pick up the topic later, provided you are at the FAI
outside area (BG2300).
- Telling her to lead on will start a cutscene that moves the party to a point west of the
compound (where you have met the duergar earlier on) and then moves you to the new
area.
There are some harmless encounters in the area until you move further north and become
witness of a bandit killing a man and kidnapping a child. Lady Hilath will approach you and ask for
your help against the bandit Khattark. You must solve the quest to gain access to Waterdeep and
also to keep Sandrah in your party (she will leave you to help her hometown if you refuse, not to
return.)
Khattark can be found in the nearby hut. There are various ways to solve the problem, the best
ways are to make a deal or bluff the bandit. This way you get the boy back alive and have the
quest in Waterdeep to catch the bad man.
Return the child to the mother and you get access to town now. You will see the Lady again later
with this outcome.
This is all in this area on your first visit, You will come through here many more times and the
area will be the scene for a number of events that are described later in their respective context.
Move north to finally enter Waterdeep.
27. Waterdeep South West Ward (CVROA2)
Talk to the guardian right at the gate where you enter.
Sandrah will give you a brief introduction about the area you are in and what else there is to see.
Just like in the area before, you will pass here a number of times and new things will be
happening as the story proceeds. Here the events on your first visit are described.
The area is dominated by a number of temples including the festhall and thermae of Sharess, the
goddess of hedonism and sensual fulfillment. As such her *establishments* include all types of
expensive services. Strangely enough, your priestess seems to be well known here, see the
Midnight references to her personality.
The drow matron in the thermae (CVROA4) provides you with insight into Sandrah’s life in town.
The festhall (CVROA7) provides rooms and drinks at typical Waterdeep rates (200GP for a bottle
of wine, includes exotic dancers though).
The barmaid informs you about a merchant in the backroom who buys artifacts at high prices –
state your interest to get a key. Be careful, the door is trapped. Inside you meet the *Collector*
who is interested in very special items only, e.g. Imoen’s pink fur coat if she has received it from
Henning. He will disappear after your meeting but he will return in BG2 part and later play a role
in the RtF sequel.

Sandrah Saga Guide
29 ©PaulaMigrate
The large unmarked house north of the festhall (CVROA5) seems to be empty when you enter it.
It is full of valuable loot, especially rare scrolls and potions. When you are about to leave, you will
be ambushed by some shadow thieves. They are a major challenge if you run into them
unprepared. Sandrah will explain that officially the shadow thieves have been driven out of
Waterdeep, their presence seem to indicate some flaws in the town’s security. That topic will be
extended later in the game; with a special variation for the case you have Shar-Teel in the party.
The Temple of Splendor (CVROA6) looks all but splendid when you first enter it. It has been
robbed by Khattark and his gang and the priest promises you a reward for fighting the bandit.
Once you succeeded, do not forget to pick up the reward. It takes some time for the temple to be
rebuild, but in later chapters it appears in all of Waukeen’s glory.
At the Temple of Siamorphe (CVROA9) you will meet Lady Ilvastarr, which turns out interesting if
both Ajantis and Sandrah are present. There is a portal that connects this temple with the
Waukeen temple, I have not found the story behind this, if any.
The harbor master (CVROA8) has no function at this point. Later in RtF you can buy sea transport
to far away harbor towns from him.
The entrance to the sewers is near the house of the Shadow Thieves. I recommend to go there
after you visited Mystra’s Temple and have learned a bit more.
A house at the eastern side of the map (CVMAG1) is not accessible yet, you are warned of watch
dogs. Go there when you found the fishermen/siren quest at the fish market.
Hint – Map of Waterdeep
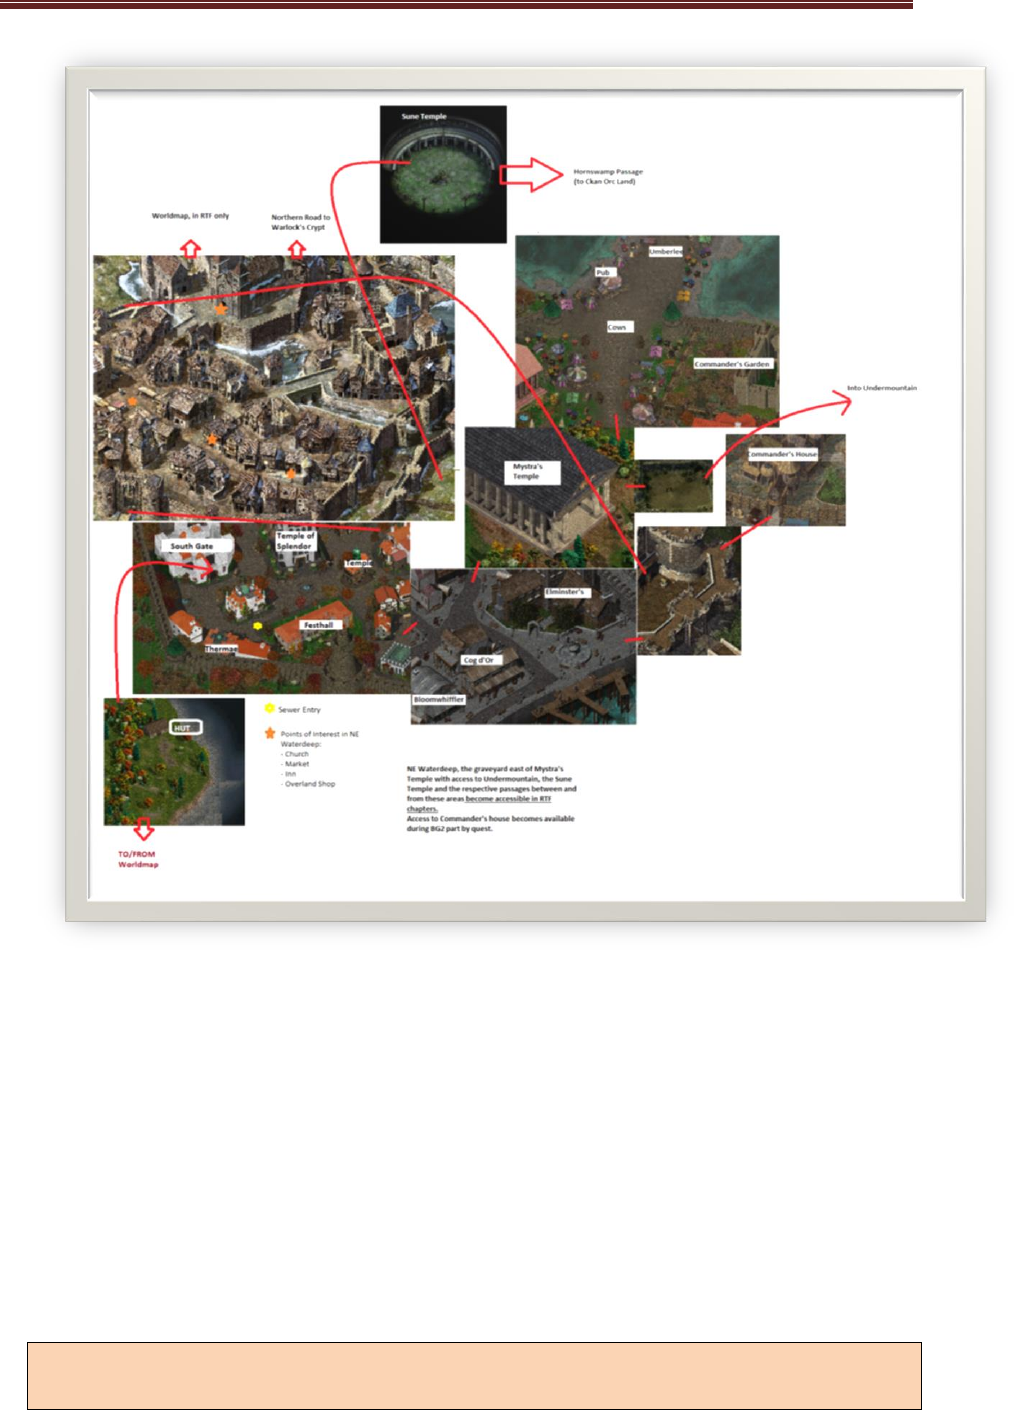
Sandrah Saga Guide
30 ©PaulaMigrate
28. Waterdeep Central Ward (CVELM1)
When you enter the area, you are greeted by a tame beast Araxias. Other than indicating that
you are near Sandrah’s home, there seems to be no further point in this meeting. Edwin, if in
party, will be apparently nervous since he does not trust Sandrah and Elminster and fear for his
safety when entering the mage’s house. Sandrah will assure Edwin’s safety however.
When you move south, you will be greeted by Clarissa Bloomwhiffler. This meeting will start a
larger quest, initially related to Finch. The quest works with or without Finch in party, only some
dialogues reflect her presence or absence, the core of the quest remains identical.
Quest – Book hunters
The quest is started by Clarissa, a relative of Finch, who will give you a small book. You are either
tasked to deliver the book to Finch in Beregost or it is given to her for her library.
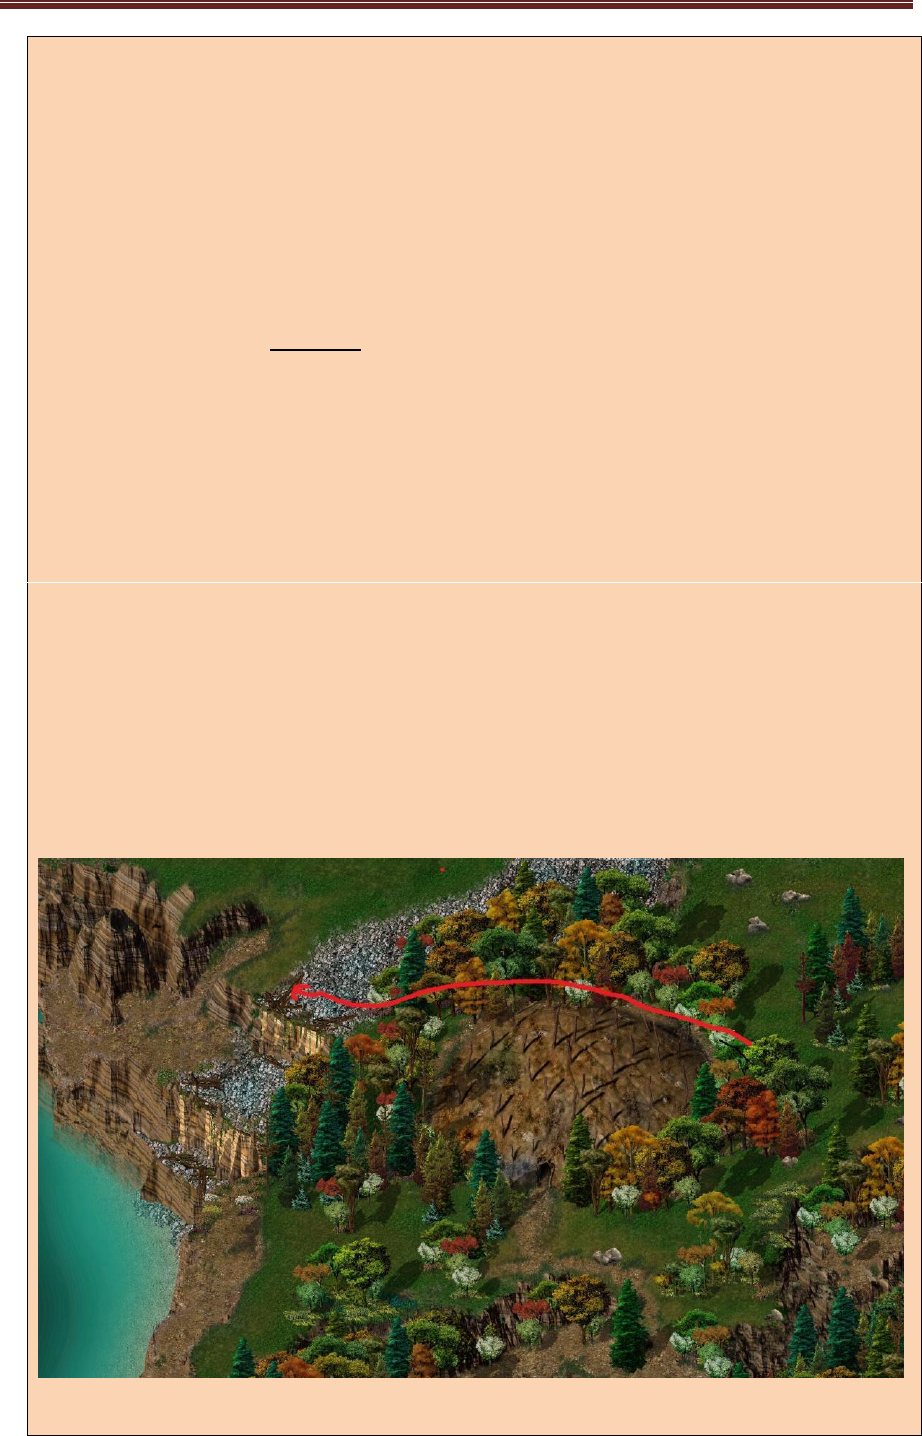
Sandrah Saga Guide
31 ©PaulaMigrate
Sometime after you leave Waterdeep, you will be visited by some mysterious *book hunters*
who try to get the philosophical treaty. Obviously there is some secret with the book and they
will finally try to get it by force. This is the first of a number of bloody encounters before you find
out more about the book’s significance.
After a second visit from the book hunters, some connection to pirates is revealed. Sometime
later at some indoor rest, Sandrah studies the book once more and finds indications of a hidden
map. The map shows some island and provides hints of how to progress when on the island.
Afterwards, further hints are found in the lighthouse at the Sword Coast and the mysterious men
there (you must have the Sirens Call mod installed); a dwarf at the Wyrm’s Crossing Bridge,
Delsvirftanyon in Ulgoth’s Beard. It becomes clear that the philosopher Monteelah had a darker
past as a pirate captain.
You cannot progress with the quest until you get access to the town of Baldurs Gate.
When in town, inquire with the harbor master (BG0702). You have enough hints now to find the
drunken captain in the Blushing Mermaid (BG0114). Once you talked with him, you can decide to
follow the quest right away or delay it. Anyway, you get all the necessary background
information on the plot. To pursue it, you need 20000gp. This is an investment, pay it.
Paying the money will transport you to a small area where you embark for the journey. Once you
arrive at the island, the captain will wait at the ship while you explore the landscape. You will
need to traverse the island by night, even though it is swarming with zombie pirates, the
murdered crew of Captain Monteelah.
On the main island (CVPIR3) your goal is to reach the point shown on the map. This will trigger a
dialogue during which the bees appear that show you the secret passage.
Inside, there is a battle with very nasty pirate zombies before you can claim the treasure:

Sandrah Saga Guide
32 ©PaulaMigrate
- Several heavy sacks full of stolen goods, take as much as you can carry to the Morning Lord
temple
- A stack of papers that according to Sandrah are the real treasure. Keep them.
- Some additional options for the case that you did Imoen’s Henning rescue and the
Orphanage quests before.
Return to the ship to witness your captain being murdered by a zombie leader. Defeat the
remaining enemies and find a book on the captain’s corpse. You need to search inside the ship
for a second book. By using both books and comparing ship design with sailing instructions, you
must figure out how to maneuver the ship without the captain.
Put both books on the table near the main mast. This will trigger a dialogue in which you have to
find the right answers that your *crew* executes to sail home. When you did it right, the ship
brings you back to land but it will be a crash landing. You strand at the ship wreck coast
(BG3100).
Sandrah has studied the papers meanwhile and gives you further explanations. Monteelah is still
alive and out there somewhere. He appears after a couple of days to demand the papers. Giving
them or keeping them only influences the difficulty of the resulting battle – since you and
Sandrah know the essential information from the papers, you are free to deal with the pirate as
you wish.
Note: The book hunt involves Brage of Nashkel at various points, regardless of whether you met
him already or not. Avoid killing Brage when Sandrah is present.
You will later meet Brage during the Dragonspear campaign. He will be on his way to Sharkta-Fai,
the place that was mentioned in those papers from the treasure. This is just an interlude.
The second part of the plot will happen in the BG2 part as an episode in the Shauhana Quest.
After giving you the quest, Clarissa moves into her shop nearby (CVEBS1). You can buy scrolls and
tomes there at steep prices. After the Imoen/Henning quest, Imoen’s friend will be there as well
and offer shop services.
Do not miss to visit the most expensive restaurant of Faerun (CVWDRE) in the next block of
buildings. The best time is after you solved the Khattark quest, because your bill will be taken
care of in this case.
Across the road is Elminster’s house.
You will revisit this area a couple of times during all parts of the game. The additional contents
will be discussed later in context with the respective plots.
The area south east of Elminster’s house (CVELM6) has nothing of interest on the first journey
but becomes relevant only later.
Leaving the area to the north leads to Mystra’s Temple.

Sandrah Saga Guide
33 ©PaulaMigrate
29. Mystra’s Temple (CVELM4)
Again, this is an area where later events take place. For the first visit, follow Sandrah’s wish to
visit her colleagues.
Inside the temple (CVELM2) talk to some priests, especially the Yuan-Ti Rhanthona. She provides
temple services and also asks Sandrah to meet her former teacher in the inner sanctum of the
temple (right side exit). Do not forget to look inside the chests and shelves. The trapped chest
south of Rhanthona contains a tome that sheds some light on Mystra’s origins – this is worth to
know for the remaining story since the topic plays a significant role in the mod.
In the inner sanctum (CVELM3) you meet Ringhontal. The priest was Sandrah’s main teacher and
acts as a quest giver all through the game for Sandrah. The temple and the inner sanctum are like
your NPC’s stronghold which demands her (and your) assistance from time to time.
During the first visit there are two tasks for you and Sandrah:
1. Find Khattark, the priest will provide you with an important hint, in case the quest is still
unresolved, and also with some reward.
2. Heal a very sick girl (you need to have accomplished 1. before you get 2.). You need the girl’s
body and a temple dagger which you both find around the central altar. The healing act
requires some of your blood as well (bhaalblood, but you do not know that yet). Failing the
quest will separate you from Sandrah permanently and Waterdeep stays closed for you as
well.
Doing the quest will gain Sandrah some useful abilities. In addition, you get the temple
dagger, a returning dagger +2 which is a pretty good weapon, e-g-for mage Imoen. The girl
you rescued will appear again on a later visit to Waterdeep. In the RtF sequel, Leyala will
become a joinable NPC (monk).
In case you did not know it before already, you will learn from the conversations in the
temple that Sandrah is the granddaughter of a woman named Midnight.
Hint – Sandrah and Mystra
Mystra is the goddess of all magic and has gone through a number of incarnations until the time
of our story. Her predecessor Mystryl sacrificed herself to protect the Weave from the archmage
Karsus of Netheril. In this battle, both Netheril and Mystril were destroyed; the Weave (the
source of all magical powers) was given to Mystra and Shar (the Shadowweave). After Mystra
was slain by Helm during the Time of Troubles, Midnight became her successor and a goddess on
the same day that Cyric was elevated. Midnight assumed the name Mystra from her
predecessors.
Sandrah is a priestess of Mystra; however this is not so much religious dedication but much more
following the footsteps and example of the human Midnight, who is her grandmother. This does
not make Sandrah a godchild but the grandchild of a mortal who fought and defeated gods.

Sandrah Saga Guide
34 ©PaulaMigrate
In this way and also by her relation to Cyric, Sandrah is deeply connected to the Time of Troubles
which is as well the source for the protagonist’s fate. Both stories are entwined in many aspects
and this is the basis for the main plot of the Sandrah Saga during the original trilogy’s chapters.
A portal on the north east side of the inner sanctum leads to an area with Khalindra’s grave
(CVUMO1). The further passage is still closed at this time but will play a significant role in
BG2/ToB chapters later.
Outside and north of the temple is the fish market area, to the east is an old graveyard with
access to Undermountain, however the latter area is not accessible until RtF.
30. Waterdeep Fish Market (CVROA3)
In a tent in the south (CVELT1), two doppelgangers guard some treasure.
(J) In the central area, a herd of cows trigger some reaction from Jen’lig providing you with some
insight in her culture and history.
The strange dwarven pub on the west side (CVELT3) contains the entry to the Black Pits. If you
trigger the right dialogue option (maybe talk to the guy several times), he will reveal a backdoor
that leads to the arena.
Hint – Black Pits access from main game
These are Baeloth’s Black Pits which are only accessible as a separated campaign otherwise.
The visit is not really related to the Sandrah mod, although she will comment at some points on
the events.
Black Pits is simply a series of arena fights of your party against other groups with increasing
difficulty. The mod allows you to play this extension with your current group and leave with that
group again afterwards. You do not get the experience point rewards of the original but some
limited gold and you can buy equipment from merchants in the pits.
Once you enter the pits you can only leave again by defeating Baeloth himself in the last battle.
To get there, you need to win all previous battles. There is not much story content in this
episode, just tactical fights.
The final challenges seem to have been slightly modified for a lower level party.
When you succeeded, you free Baeloth’s djinni slave who helps you to return to the pub.
In the utmost north at the fish market displays, a couple of fishermen identify Sandrah and asks
her for help with a problem.
Quest – Waterdeep fishermen problem
The first task is to find two items required to summon an Ambassador of the Sea, to find out
about the problem.

Sandrah Saga Guide
35 ©PaulaMigrate
Inquire at the temple of splendor. In order to progress, you need to have solved the Khattark
problem. You learn that the bowl is at the Siamorphe temple (just search the chests there). For
the scroll the options are Bloomwhiffler’s or the hut on Old Waterdeep Road. The hint to the
sewers is a dead end.
You find the scroll either at the hut or with Clarissa, whatever you check out first.
When you obtained both items, return to the fishermen. Talk to the man and Sandrah starts the
ritual. The Ambassador appears and tells you to search a captive sirene. Sandrah talks again with
the fishermen and you get the hint to a mage in the vicinity of the harbor master.
This refers to the locked house on the east side of the South West Ward, the one with the
howling watch dogs. Unlock the southern door with your thief or spell. Beware, the ground floor
is full of dangerous watch dogs aka hellhounds. Check the crystal in the middle of the room to get
a further clue.
Through a door on the left side you advance to the lower level where you find the sirene and her
*victim* who maybe is not a victim if you believe her story. You get various options and some of
your companions will issue their recommendations of how to solve the case. Depending on your
decision, you get different endings of the quest when you return to the fishermen.
31. Waterdeep Sewers (CVSew1)
The entry is near the Shadow Thieves House in the South West Ward. Khattark has a large gang
assembled and is not easily defeated. The labyrinth you find yourself in is populated by black
talon bandits including a general. Khattark’s mage has also summoned a minor army of undead
warriors.
You best progress slowly and make use of the cave system to attack only smaller groups at a
time. Khattark himself is protected by his mage and a circle of traps surrounding him.
Having defeated him gets you rewards from the temples of Waukeen and Mystra. In addition,
this victory is required to get Sandrah’s second temple quest and to advance with the fishermen
quest.
32. Waterdeep Coq d’Or (CVWDRE)
After the victory over Khattark why not spend a moment at the most exquisite restaurant of the
City of Splendor? Just go inside and let things evolve. Keep your hands off the mouse while your
party is seated and served. After the meal, talk to the servants and guests for entertainment.
33. Elminster’s House (CVDre2)
You meet Elminster and Landrel here to greet you when you first arrive. Up the stairs to the left
is the exit to the garden, the right exit leads to Elminster’s study, which we visit later, a
decorated door straight ahead leads to a tower with Sandrah’s quarters.

Sandrah Saga Guide
36 ©PaulaMigrate
Landrel will remind Sandrah to meet Pelligram in the garden.
Elminster will invite you to explore his house with his daughter and asks you to consult him in his
study later to discuss some interesting news.
Sandrah, of course, invites you to her rooms; however we visit the garden first.
34. Elminster’s Garden (CVDre1)
You may have seen this area in dreams already before. For those who already played ToB, the
area looks familiar and there is a background story to it. You will learn about the connection
when you visit the ToB area later with Sandrah. It is part of the main plot.
You meet Pelligram in the middle of the area and she will accompany Sandrah from that point
on. Many episodes are connected with the creature. Finding out about Pelligram’s true nature is
part of the saga. In RtF, Pelligram in a human avatar joins your group as a party member for a
while.
Hint – Managing Larger Group
Having Haiass and Pelligram (+ maybe a familiar) with you might get difficult in narrow dungeons.
It often helps to use the *select all* button on the lower right corner to manage your group more
easily and to move party members and other *green* companions out of the way.
Right behind the place where you find Pelligram there is a small altar for Mystra. This altar will
later play a role in a number of subsequent quests.
35. Sandrah’s Tower (CVSanT)
The tower overlooks Waterdeep and part of the Sword Coast. In a distance the light of
Candlekeep seems to be visible. There will be a romantic encounter between Sandrah and the
protagonist (slightly different depending on gender). It is up to the player how to pursue this
topic afterwards.
Hint – Romancing Sandrah
Sandrah sees more in the protagonist than just a friend or comrade. She openly advances a male
or female player. You have options to agree to her or reject her. Even in the latter case she will
not completely give up her hope that one day she may win you. Romancing Sandrah is not
exclusive, i.e. she will not kill any other romance you decide on, however she will notice it and
react in some way or other. Being with you does not hinder her to have some adventures with
other NPCs on the side from time to time, nor will she blame you for doing the same.
In RtF and on, some bond between you and her has been established, even if that is not
elaborated at greater depth. It is obvious from the story.

Sandrah Saga Guide
37 ©PaulaMigrate
Within this guide, the romance will not be further discussed. It is not essential for the plot and it
is always matter of taste to enjoy such contents or not. Romancing her makes some things easier
but not much (see sanpoints).
The tower will later be the location of some other scenes when your bhaalspawn heritage is
revealed.
36. Elminster’s Study (CVstud)
Before leaving Waterdeep at the end of the first visit, talk again to Elminster in his study. Look
into the shelves for some interesting but completely useless items.
Elminster will warn you about Naronguth, the shard thief, who is still after you for your betrayal.
He gives you a copied pair of the demon’s slipper. Do not put them on but keep them in your
inventory.
Naronguth awaits you outside of Waterdeep near Khattark’s hut. He demands the slippers back
that you found in his lair. You can either give them back, try to trick him with Elminster’s pair, or
try to fight him. Decide at your discretion – you have not seen him for the last time, though.
37. Firewine Bridge (BG4500)
In the empty riverbed you find some additional encounters. Among them are a couple of desert
trolls. Sandrah will advise you that you need acid arrows to kill them. The encounter adds the
ability for her to produce some acid arrows per PID. You need to be in a forest where the
necessary material can be found in order to use that function and there cannot be enemies
about.
Melium in the NE of the area has an artifact to give to Sandrah.
Carsa when fleeing from you will drop her jar in any case such that the ogre mage Kahrk will
appear whenever Sandrah is in your party. Picking up the sword from Kahrk will start a short
quest.
Quest– Kahrk and Valiant
Give the sword to Sandrah to identify. She will provide you with a background story.
After a time, you will be attacked by groups of ogre mages on several occasions. They give you a
hint about some ogre leader pursuing you. The attacks will cease after a time.
In case you have the Vault mod installed, the quest is connected to the Ogre attack on Gullykin.
The tower at the SE end of the bridge contains the entry to a secret area that you can access
after the Charlton Nibs quest. The contents is from the Northern Tales of the Sword Coast mod.
The same entry later plays a role in RtF – in fact the Firewine Bridge is revisited on several
occasions in the sequel due to its old history.
In the Firewine catacombs (BG5201) you can rescue the half-elf Indira (a mod NPC) who has a
short intermezzo with Sandrah. The NPC has little contents and consequently little interaction
with Sandrah.

Sandrah Saga Guide
38 ©PaulaMigrate
38. Gullykin (BG4000)
In case you came here on Imoen’s quest, talk to Gandolar at the village entry. Telben is among
the trees in the very south of the area. You must heal him with a spell to start his dialogue. The
cave entry is marked on the area map after you talked to him.
Clear out the cave (CVORCA) from all types of orcs and nasty orc priests and find the loot in a
wagon in the north of the cave. Rellruk, one of the orc leaders provides you with details about
the kidnapping but also tells you that you need to find Tazok to progress.
Once you leave the orc cave, there is a conversation with Sandrah about the Cloakwood and its
relation to the iron crisis. The bandit camp is now revealed on the map.
In case you have the ogre sword Valiant from the Firewine with you and you have the Vault mod
installed as well, you will find the ogre leader in the north of the hills in this area – but only if you
defeated his ogre battalions.
39. Larswood (BG2900)
The mage Haebal in the tower recognizes Sandrah and vice versa. The plot is connected with
Sandrah’s involvement with the NTotSC mod.
Quest – Sandrah’s Quest II
At some time after you discovered the identity of Sandrah’s father and after you had some
further talks with Sandrah about her dead mother, if you enter one of the inns in the game, you
observe the first of some dream cutscenes. During those scenes you learn that her mother’s
name was Khalindra who died giving birth to a younger sister or brother of Sandrah. The child
was most likely a bhaalspawn. Apparently it was the search for that child that initially brought
Sandrah to Gorion’s death site.
Without knowing about your heritage yet, she sees the protagonist as a key to her search but is
unaware which of the people involved is related to Bhaal: Imoen, Sarevok or the protagonist.
Depending on the evidence you find over time while travelling together, Sandrah (with your help)
will develop a number of theories and assumptions about the situation. Some of them are
correct; some of them errors or wishful thinking, but those errors are part of the plot and at
times complicate the protagonist’s situation further.
The discovery of Imoen’s origin is integrated in this storyline if you keep Imoen in the BG1 party.
Again, the search for Khalindra’s second child spans the whole original trilogy and will only be
resolved in the second half of ToB.
(J) Jen’lig shows some almost emotional reaction when you free the gnome slave in the east from
his goblin capturers (requires Deep Gnomes of the Sword Coast mod).
In the middle of the area and when you are ready to visit the bandit camp, you meet Teven. He
seems to know Sandrah from her Waterdeep days and provides you with an incognito access to
Tazok and the camp. (A similar access is provided by Raiken in the north of the Peldvale area.)

Sandrah Saga Guide
39 ©PaulaMigrate
The guy will make a second appearance during your journey through Cloakwood to take revenge
on Sandrah for her betrayal at the bandit camp.
Teven plays another role in the Grey Clan mod when your search for the manipulators in
Beregost.
40. Peldvale (BG2400)
In the north of the area and when you are ready to visit the bandit camp, you meet Raiken. He
seems to know Sandrah from her Waterdeep days and provides you with an incognito access to
Tazok and the camp. (A similar access is provided by Teven in the middle of the Larswood area.)
The guy will make a second appearance during your journey through Cloakwood to take revenge
on Sandrah for her betrayal at the bandit camp.
You meet and rescue Viconia in the NE. Viconia is owner of one of the items Sandrah needs for
her main quest, so killing or letting Viconia be killed, will stop Sandrah’s progress. You have two
choices to get the item from Viconia
Rescue her from the Flaming Fist without letting her join, both Viconia and Sandrah will
have unpleasant words for you but you get the item. You need to get the related details
and story from other sources.
Rescue her from the Flaming Fist and let her join. Viconia will hand the item to Sandrah
after some time of travelling together and provide details of how she came into its
possession.
Viconia and Sandrah: Sandrah in general seems to have a special sympathy for drow. While the
goddesses of the two priestesses – Shar and Mystra - are enemies, the disciples get along well in
your party. Viconia and Sandrah trust each other and develop a kind of friendship. A male
protagonist can even romance them both without penalty but needs to careful not to become
their common play thing. Viconia and Sandrah have excessive content through BG1 as well as
BG2/ToB. The Sandrah mod adds a large Viconia quest to the BG2 part. (To be described later).
Finally, Viconia is among those NPCs who are later joinable in the RtF sequel, provided you had
her in party in earlier parts. She will finally break with Shar when the conflict between Shar and
Mystra escalates.
41. Bandit Camp (BG1900)
Should you decide to make your initial journey to the bandit camp directly via the worldmap,
Sandrah will start a conversation and propose infiltration rather than a frontal attack. For that
purpose she advises to use either Teven at Larswood or Raiken at Peldvale to get you into the
camp incognito.
This guide assumes that you follow her advice and are transported to the camp by one of the
above contacts. You are confronted by Tazok and you persuade him to accept you as
reinforcement. When he leaves the camp to inspect his forces, Sandrah proposes to join him to

Sandrah Saga Guide
40 ©PaulaMigrate
prove your worth. Outside of the camp, Tazok gets suspicious about your intention and confronts
you.
(J) He will recognize Jen’lig if in party and you will learn that he was one of the murderers she is
hunting. You will also find out that the one who has the sword is some sorcerer.
Once Tazok is defeated, you have three hours of game time to explore the camp before his body
is found and the camp turns hostile – unless you decide to start the battle yourself.
In case you follow the Imoen/Henning quest, talk to the people inside the small tents. They will
give you hints to the cave in the north of the camp. After you defeated the gnolls in that cave
(BG1903) you find an injured orc who was left behind by the kidnappers. Sandrah heals him on
Imoen’s request and you can inquire him for further hints about Henning.
After you have won the battle in the camp and invaded the main tent, Ender Sai will have more
information for Imoen.
Sandrah will provide you with her interpretation about the progress you make and especially
about Sarevok’s role in it once you found the documents in the trapped chest that mention his
name.
(J) After you found the letters, Jen’lig concludes that the Iron Throne and the group to which the
murderous sorcerer belongs are one and the same.
When you have finished the bandit camp and start to travel to Cloakwood, you should make a
stop at the FAI. You meet Elminster there for further hints. At that occasion he will also upgrade
Gorion’s Dagger.
Quest – Gorion’s Dagger
You find the item on your foster father’s body at the start of the game.
During your journey, you will have some conversations with Sandrah about the item and discover
more details. You find the engraved latter *A* on the hilt, you will learn that it was a ritual device
rather than a weapon and that it was most likely used for bloody sacrifices by some cult.
Elminster will upgrade it after your visit to bandit camp.
During the NTotSC episode at the Temple of the Black Hand (AR60PB) you learn that the former
owner prior Gorion was a priestess of one of the Dead Three (Bane, Bhaal, Mirkul).
Another hint can be found during SoD if you decide to free the blind tortured Bhaal priestess
from the Cyricists.
In BG2 you lose the dagger when you get captured by Irenicus. When you solve the djinn’s quest
in Irenicus’ dungeon, he will tell you that the elven mage took your dagger. You will get the
confirmation from Irenicus himself when you and Sandrah confront him at Spellhold.
You regain the dagger (once again upgraded) from Sarevok during the challenge in Hell at the
end of BG2.

Sandrah Saga Guide
41 ©PaulaMigrate
The true nature of the dagger and its history and purpose are finally revealed during ToB when
you learn from the Solar about your origins.
42. Cloakwood I (BG2200)
A stone throw SW of where you enter the area, you will meet either Raiken or Teven, depending
on which of the two you used to access the bandit camp. He bears a grudge against Sandrah and
he was come with quite a number of dangerous bandits and murderers to take revenge.
Coran and Sandrah: Sandrah never misses an affair with a bard and she and Coran fit perfectly.
She does not believe a single word he says and she does not pretend that love has anything to do
with their relationship. But maybe both err in that. In the end it goes deeper than any of them
expected. In case of a female PC, Sandrah invites you for a friendly challenge of who will win the
playboy. She will or course step back when the female protagonist really has an interest in Coran.
43. Cloakwood Falls (BG2100)
After you met Centeol (BG2201), there will be a conversation between Imoen and Sandrah
concerning the Henning rescue, if you follow that quest.
Sandrah will make some remarks with respect to the Jon Irenicus mentioned by Centeol,
provided you chose the respective dialogue option with the spider woman.
(if you play the Saga until the ToT expansion, you will meet Centeol with Bodhi in Suldanessalar,
both in their former elfish incarnations. You will learn about the background of her fate there.)
44. Cloakwood Grove (BG1600)
The area plays a role in the Lothander/Marek poison plot in case you have chosen the alternate
solution from the Sandrah mod. You find the poisonous wyvern you need in the northern part of
the area.
Quest – Alternate Poison Quest
At the central Baldur’s Gate Area (Market BG0700), Lothander will approach the party and tell
them that the Iron Throne poisoned you and you will die within ten days. If you are tired to go
through the Lothander/Marek routine again, you can select a dialogue option and tell him to get
lost – you will trust your healer to cure you.
After one day, you will feel the sickness from the poison and Sandrah will investigate the cause.
She recommends to visit Thalantyr for further analysis. If you agree, you will race against the
time limit from the original quest but you can go back to Lothander any time again. Here, we
assume you follow Sandrah’s route:
Visit High Hedge and let Thalantyr inspect the poison. His discussion with Sandrah reveals that
you need three items for the antidote:

Sandrah Saga Guide
42 ©PaulaMigrate
- Aescalus herb – Sandrah may still have some from Nigati, otherwise you can buy it from
various traders you may already have encountered (High House of Wonders, Lucky Aello's
Discount Store, The Collector. Temple of Mystra)
- Holy water – you can get at some temples
- The sting of a great poisonous wyvern
You must have the first two items before you start to hunt the beast.
Once you killed and defeated the wyvern here in Cloakwood, Sandrah will extract the poison
from its sting and mix the other ingredients for the antidote. During the following conversation
you get the option to take the medicine and heal your group.
(J) Jen’lig will make a useful recommendation for the use of a wyvern that you kill in that area.
45. Cloakwood Crossroads (BG1700)
(J) Jen’lig senses the same dark shielding magic she felt in the Nashkel mines However, even if
Daevorn in the mines turns out to be the sorcerer she seeks, she will stay with you until you find
Sarevok. But you will find that Daevorn is not the final step in her quest.
46. Cloakwood Mines (BG1800)
Slightly south of the entrance to the palisades you will see Albert again, the *boy* from the
Cloudpeeks who lost his *dog*. He gives you a hint about what is going on in the mines. In a
small cutscene you observe a Thayan slaver and his men on their way to deliver new slaves for
the mine.
Move to the western part of the area outside the compound and defeat the red mage and his
men. Free the children. You can easily find the location on your local area map after the
cutscene.
Visit the barracks and the second room in the barracks (BG1806) to get some information about
the location where you find Henning for Imoen.
After you cleared the mines and finished the chapter, you return to the surface again. At that
moment, your protagonist’s compatibility and overall progress with Sandrah is evaluated. She
may decide to leave you if she thinks you have failed in her eyes.
See what Global("Sanpoints","GLOBAL") gives you (should be 47 or more)
Hint – Sanpoints
Sanpoints is a counter tracking your and her compatibility overall. There are many factors (quests
done, answers given, decisions taken in various quests, talking to her via PID that increment or
decrease the counter.
Normally doing Sandrah's quests and showing some overall interest in her views is sufficient (no
use to be overly sweet to her, 47 points is about 40% you could have at that chapter change).

Sandrah Saga Guide
43 ©PaulaMigrate
Charisma or reputation have no impact. So an *evil* character who nevertheless takes the right
decisions will qualify just the same as the *good* protagonist. There is no necessity to bend your
character to her liking. But if your protagonist follows a completely different mindset from what
would make sense for Sandrah, she decides to go. Otherwise you can have a very long road
together through the game.
Accepting her romance makes things easier but is not essential. You can gain her respect and
trust on other ways, too. Asking her for opinions via PIDs quite often gives you points.
Sandrah is a manipulator since she develops a certain plan while she travels with you and she
needs a certain kind of co-operation in the long term. If you are too far from what she thinks she
needs for her purpose, she will leave to look for alternatives.
Note that in some SHS forum posts the author of the mod herself has referred to the bhaalspawn
Balthazar in ToB as Sandrah’s alternative instead of the protagonist. It seems however, that this
was never implemented in the mod and she never appears again to resolve this, once she is
gone.
There are some other checkpoints later in the game near the end of BG1 and BG2 parts - those
are more related to having reached some plot/quest events at that time.
47. Cloakwood Mines Prison Level (BG1804)
In the initial room you find a locked door and an orc among the guards in front of it. Once they
are dead, Sandrah and Imoen will start a conversation, provided the Henning plot is active. Once
you unlocked the door, you will witness another orc trying to run away and sounding an alert.
Follow him down the cell corridor to find the stairs down to the orc prison. Make sure you search
guards you kill for one half of a keystone.
Later, when you rescued Henning, you will find Sandrah in this room again to rejoin the party.
48. Cloakwood Mines Orc Prison I (CVORC1)
The cave is swarming with all types of orc and orc priests. On some altar in the second room you
find the second half of a keystone.
Once the battle is won, you will find an orc prisoner, Hynalt, merchant from Ulgoth’s Beard. In a
longer dialogue with Sandrah and Imoen you will learn about the background of Henning’s
kidnapping and a lot of useful details about the Iron Throne and Sarevok. Send Hynalt to the
surface so he will not drown when you flood the mine.
To move further downstairs, you need the two keystone parts you found before.
49. Cloakwood Mines Orc Prison II (CVORC2)
You find yourself in a small ante-room. Search for traps, the floor and the door are trapped. The
whole area is heavily trapped as you move on, so beware. A large group of orcs and their priests

Sandrah Saga Guide
44 ©PaulaMigrate
are waiting for you in the next room. They are standing on some floor ornaments which are
trapped as well, so try to lure them away from that part of the floor.
As soon as Imoen sees the capturers, she loses control and transforms into a version of the slayer
(even you are not yet supposed to know what the slayer is at that point in the game). When the
battle is over and Imoen returns to normal, there will be a discussion with Sandrah and Imoen
about what you just witnessed. The scene will play some role later on when you all learn more
about imoen’s heritage.
Continue to explore the area, disarm the traps, and find the secret side chambers. Again some
orcs and priests to battle until you reach the badly wounded Henning and the orc leader
Knawlod. Regardless how you answer in the short dispute with him, you will fight him in the end.
Make sure to pick up the purse from his corpse. It is evidence against the man he was working
for – Travenhurst from the large mansion in Beregost.
At this point, Sandrah will leave your party to bring the badly injured Henning to Waterdeep with
the help of a splinter from Elminster’s shard. Explore the area for any treasure you like to keep
and move back to the regular mine levels.
Sandrah is waiting for you already upstairs. Elminster’s and Mystra’s magic have returned her.
She tells Imoen that her boyfriend will be healed and waiting in Waterdeep in a tenday. This ends
the first part of Imoen’s quest. For the remaining part of the quest see point 5 here.
50. Cloakwood Mines Final Level (BG1803)
(J) Daevorn is another of the murderers Jen’lig seeks. Search his body for a letter that will reveal
two more names, Jadak and Sunin and once again mention the sorcerer already known from
Tazok’s last words. All three seem to be in Baldur’s Gate. In a conversation involving Jen’lig and
Sandrah, your counselor recommends to ask the shadow thieves in the city about those two new
names.
Jem’lig will show no mercy with the apprentice Stephan even if the protagonist decides to spare
the man.
At some time after the Cloakwood event and if you had the first visit from Winski already, he
may ambush you again in some outdoor area. After further threats and his confirmation that
Sandrah’s assumptions about Sarevok are correct, he will summon a bunch of nasty fiends for
you to battle.
In addition, when you return the FAI after Cloakwood, the elven cleric Jet’Laya is waiting for you.
Take her into the party to start Dark Side of the Sword Coast (DSotSC).
Hint – Sandrah in DSotSC (Dark Side of the Sword Coast)
Both, Sandrah and Jen’lig will have additional content during the five main quests of DSotSC.
1. Jet Laya’s sister

Sandrah Saga Guide
45 ©PaulaMigrate
For this quest you need to have the elf in your party temporarily, you can dismiss her after you
found her sister. Sandrah and Jet’ Laya will have some friendly interactions during the common
travel.
In the initial Wood of Sharp Teeth (DSC001) you will have an additional meeting with the Dark
One who warns you to pursue him. He leaves some skeleton lords to scare you away. Naturally
that will not hinder you. The exit to the next area (DSC002) is guarded by a pair of additional fire
drakes.
In the next area (DSC002) take notice of the abandoned house and the phantom fighters. They
become relevant on your way back.
(J) When you enter (DSC004), Jen’lig will warn you about mind flayers being in the vicinity. To
find two of them, go to the cave on the northern ridge (DSC007). Jen’lig receives an ability after
defeating them.
After you solved the sisters’ quest (make sure you pick the amulet from the banshee), Sandrah
will remind you of the ghostly fighters who are another bunch of souls captured by the Dark One.
She also tells you that you may probably find the Lich’s phylactery in the abandoned house. Once
you have that essence, you can defeat the Lich. Afterwards report to Jet’Laya’s uncle in Beregost
and you can kick her from the party there.
Of the other DSotSC NPCs nobody is required in party for the following quests.
2. Dragon of Nashkel
(J) When you receive the quest in Beregost, Jen’lig will inform you about the holy pact between
the goddess of the dragons Tiamat and the githyanki. While the dragon at hand is not one of
Tiamat’s children, this pact will later play a role for Jen’lig’s quests.
In case it is Sandrah in person who defeats the dragon (i.e. hits the final blow to kill it), she gains
an ability per assimilation, a technique specific to Mystra’s priests.
3. Castle Daerthmac
A zombie lord able to summon other fiends awaits you in the northern part of the map. The
difficulty of this encounter very much depends on the tactical mods you have installed.
In the cellar (DSC015) you find the door to the catacombs locked and you must find a key in the
upper levels first.
You can get to the outside from the first floor (DSC012) and go to the upper platform to find
some loot. Picking up the ancient shield from the shaman triggers a conversation with Sandrah.
Inside again move to the top floor (DSC014) to find the first vampire. Sandrah will start a
conversation about vampires and the need for wooden stakes. Agree and she will produce some
from the wood in the fireplace nearby. Afterwards you will always have a PID option to ask her
for stakes in vampire infested areas, she will just hack some wood with her hammer to produce
them. The key for the cellar is in a locked and trapped chest in a side-room.

Sandrah Saga Guide
46 ©PaulaMigrate
(J) Facing the vampires will trigger Jen’lig to comment on the similarity with her race fighting the
mind flayers. It is one of the scenes of agreement with your githyanki that provides you with more
control over her actions in combat.
Once you defeated Claris and Daerthmac, Sandrah will remind you to find their coffins and put
wooded stakes through their hearts so that they cannot return.
4. Otho’s Nephew
The mod tries to tie the events in the underground labyrinth and its actors to the main plot and
also to later events. There are a number of dialogues and additional events concerning both
Sandrah and Jen’lig. It is best to follow Sandrah’s advise here to get the contents.
In area (DSC026) make sure you identify a drow item and kill the drow weapon master in a side-
room. You will first hear the name Jarlaxle who plays a role later in the game and also appears as
Drizzt’s arch enemy a couple of times.
(J) After you found the dwarf and received the hammer in (DSC027) go down the trap door first
before you follow the main route via the stairs. Inside the cellar (DSC028), Jen’lig will find a death
githyanki and start a small quest.
The presence of Black Talons in (DSC029) among duergar and drow raises Sandrah’s suspicion
about a connection between the Iron Throne and the Bregan D'aerthe. She urges you to move
forward.
In (DSC034) you reach the heart of the complot. Listen to Shar Nadal and Mortius until they
discover your presence. Once Shar Nadal is dead, Sandrah will analyze the situation with you. She
advises you to follow the tunnels onward instead of returning all the way.
(J) Among the loot on Shar Nadal’s corpse there is also a silver sword. Jen’lig states it is not the
one she seeks in her main quest but asks you to take it along. It belonged to the dead kinsman of
her you found earlier.
(J) If you follow Sandrah’s and exit the area onwards to (DSC035) you find a *horse*, actually the
steed of the dead githyanki. The Tiamat plot is expanded here. It will find its conclusion in ToB
much later, in case you pick Jen’lig again after her return.
The short exit route ends in the cave in bandit camp.
If you have NOT the Vault mod installed, you will meet a drow priestess of Eillestrae and some
other elves at the exit. She will assure you that she will seal the drow access to the labyrinth. This
meeting (resp the priestess) will later become very important in the Sandrah plot. This time
Sandrah will provide you with some information concerning Eillestrae. (Note – with the Vault
mod installed this meeting will instead take place when you recovered the stolen book needed
for Candlekeep in the Nashkel mines.)
Coming out of the cave, any drow items will be destroyed by the sunlight. Sandrah will remind
you of your duty to inform Otho about his nephew’s death.

Sandrah Saga Guide
47 ©PaulaMigrate
(J) A squadron of githyanki will appear and demand the sword you found in the caves. They will
recognize Jen’lig as a superior. The best way to solve this meeting is to trade the sword for a piece
of information from the young squadron leader. You can later inquire with Sandrah and Jen’lig via
PID about its possible meaning.
Bringing Otho the news will finish DSotSC.
51. Gibberling Mountains (BG5500)
Sandrah adds additional content to the Samuel quest in this area. If you agree to help the man, a
number of other Flaming Fist deserters and some murderers will appear and try to hinder you.
This is a hard battle. Samuel will wake up from the commotion and will give you some hints
about traitors in the Flaming Fist. If you have Shar-Teel in the party at that time, she will add her
view on Angelo Dorsan, her father, to that report.
If you take deviations on your way to the FAI with Samuel, there may be more encounters with
deserters trying to get Samuel from you before you reach safety.
In a cave on the northern rim you will find the forest dragon from the DSotSC quest.
52. Lower Chionthar (BG1400)
Sandrah steps into the conversation with the fishermen and gets the protagonist into deep
trouble. Although she apologizes for her behavior, the problem she created remains. The party
automatically receives the stolen bowl of Umberlee to be delivered to Tenya. But Sandrah’s
thoughtless reaction has alerted the followers of Talos, and from that point on the Stormlord is
among your opponents. You should delay your travels further to the north until your party is at
least level 6 at average. (Of course you can delay the confrontation by avoiding the fishermen’s
quest until you feel ready.)
Ajantis and Sandrah: They both have their very different ways to fight and work for what they
think is *good*. They both hail from Waterdeep’s upper class. They have known each other in
the past. However, after some initial opening banters to set the scene, they stop to talk to each
other and nothing is resolved. The much larger original interactions between those two NPCs
have been removed from the mod (according to the changelog). Obviously the original content
was not compatible with the mods that expand Ajantis for a PC romance and for BG2.
53. Wyrm’s Crossing (BG0900)
The dwarf Furlon near the bridge is a seller of information. Talk to him if you follow the book
hunters quest. It is worth talking to him a second time when you learned about the treasure map
already.
If you have the bowl for Tenya, be careful when pass by the bridge to the north and her hut.
Talos’ followers will ambush you and try to keep you off from finishing your mission.

Sandrah Saga Guide
48 ©PaulaMigrate
If you have the bowl, you can directly solve the Tenya quest. With the respective mod installed,
Tenya can join your party now. She and Sandrah have some minor interactions.
Haiass will gain an additional level for his experience gained with you when you cross the middle
of the bridge.
54. East Baldur's Gate (BG0800)
Elminster awaits you near the gate as you enter the town. He has a shield for Sandrah and a
reference to her famous grandmother, aside from his original talk with the protagonist.
In the Elfsong tavern (BG0705) there is a meeting between Sandrah and Gavin’s brother Jolun
(Gavin mod required). It is a bit foreshadowing events far in the future.
On the upper floor (BG0706) you can talk to Alyth. Provided you chose the dialogue option to
talk about the Elfsong ghost, Sandrah will reveal some interesting detail that connects to
Dragonspear Castle. It is continued later when you reach SoD.
If you decide to bring a corpse to Arkion (BG0805), Sandrah will start a conversation with respect
to Mystra and her position towards Necromancers.
On the upper floor of Sorcerous Sundries (BG0704) you will have a second meeting with
Shandalar but only if you did his Ice Island quest before while Sandrah was in your party.
(J) Inside the thieves guild talk to Husam. He will tell Jen’lig that one of the murderers, Jardak,
stays in a house in the north of town near Ramazinth’s tower.
In the outside area you can get two quests from NTotSC, from Magnad who approaches you near
the fountain and from Shaella, a priestess of Leira.
Hint – Sandrah in NTotSC (Northern Tales of the Sword Coast)
The NTotSC episodes play a key role in the Sandrah Saga, as the mod expands the story around
General Ghotal and the events with the orcs at the Fields of Dead significantly. The new areas
and the plot are the starting point for the Shauhana quest in BG2 and are further expanded in
the RtF Sequel.
Note that the Guide will discuss new areas added by the mod in the same way than other areas
since NTotSC is a prerequisite for Sandrah.
55. North East Baldur's Gate (BG0300)
When entering the area from the south (BG0800) Sandrah will identify a haystack near the city
wall as hiding a secret passage once used by Baldur. When you click on the haystack, it will
transport you to the other side of the wall, i.e. from the Counting House side to the Splurging
Sturgeon side.
In the northern room of the Blushing Mermaid (BG0114) there is Captain Holghorn, the man you
need to continue the book hunters’ quest. You need a bottle of wine or a keg of ale to make the

Sandrah Saga Guide
49 ©PaulaMigrate
captain talk, if you do not want to run around and search for one, you can use the *have a party*
option in Sandrah’s parcel dialogue.
56. South East Baldur's Gate (BG1300)
In the Blade and Stars inn (BG0105) get the sphere gem quest from Gaxir. When you bring him
the gem, Sandrah will reveal some details about the old temple below the town,
57. South Baldur's Gate (BG1200)
Talk to Kesheel near the Harbour Master’s house if you have the book hunters quest active.
You can also inquire with the harbor master inside (BG0702) and he will point you to the captain
in the Blusshing Mermaid.
In Jopalin’s Tavern (BG1215) meet a captain Resach who mistakes Sandrah for her mother, he
was the captain of the ship who once brought her to Waterdeep where she met Elminster. The
captain *re-appears* i n the ToT sequel where you get a glimpse of the events of that journey
(ToT actually takes place prior BG1).
When you approach the row of houses south of the Iron Throne, Sandrah will stop you and
indicate that she feels something strange nearby in one of the houses. Unlock and enter the
house on the right (BG1201). You observe a blind orc mage and his guide, an orc boy. They
search a child of celestial heritage but obviously it is neither you nor Sarevok. Sandrah identifies
them as Clan Orcs, a much stronger and independent type of Orcs in the Stormhorn Mountains.
You also get a journal entry (*Things to Come*). You find further hints to the Clan Orcs and the
godchild they seek during the NTotSC quests. All of it in BG1 is a preview of the Shauhana quest
in BG2 as well as one of the main plots in the RtF sequel.
I spare the Iron Throne building for now until the remaining city and quests are explored.
58. South West Baldur's Gate (BG1100)
(J) In a house on the west wall (BG1111) you find Sunin. He is one of the killers of Jen’lig’s mentor
and he mentions a name – Semaj, one of Sarevok’s lieutenants. So the githyanki and the
protagonist in deed have a common goal.
When you report the Seven Sun success to Scar (BG0607) and agree to his subsequent tasks,
Sandrah will start another of her intermezzos.
59. Undercellar (BG0112)
Draglon

Sandrah Saga Guide
50 ©PaulaMigrate
60. Central Baldur's Gate (BG0700)
Lothander will approach you near the fortune teller’s tent to reveal that the Iron Throne
poisoned you. With Sandrah in your party you get an option to try an alternate solution to that
well-known quest.
East and south of the wall is the entrance for Dark Horizon’s second quest on the backside of a
house (3715.2320).
61. West Baldur's Gate (BG0600)
Sandrah in a way supports the theft of the telescope from the Hall of Wonders. A practical use is
preferable to a museum where any copy can educate and inspire just as well. If you have it in
town at nighttime, she will show you again the constellation of Hope and Mystra that was
already mentioned by the astrologer at the Morning Lord temple.
62. North Baldur's Gate (BG0200)
(J) In a house in the north (BG0010) you find Drelik and if you move upstairs you find Jardak . He
is one of the killers of Jen’lig’s mentor. In some conversations between Jen’lig and Sandrah it
becomes clear, that mission success for the githyanki can be very dangerous. The lich queen of
her race survives by assimilating the essence of capable kinsmen. This may be your companion’s
fate if she returns with the sword she may find on Semaj.
Near Ramazinth’s tower, General Jedyan approaches you to start the *Grey Clan* mod. He
recognizes Sandrah and your companion afterwards counsels you to accept the general’s quest.
Hint – Sandrah in Grey Clan
The original mod was names *Grey Clan Episode 1* but no sequel has ever been provided to the
game. Sandrah extends the mod with two more episodes and also uses the big boss later in in
RtF.
During the original first part, there are a number of hints and interjections that show that
Sandrah knows some of the involved actors. The original mod is otherwise unchanged.
During the original quest, you have learned that Sandrah knows a bit about the Academy of
Legencase. You will gain a fibula when you defeat the two sorceresses in the Beregost final
battle. During the finishing talk after the battle, there will be an option to continue the quest.
For that purpose you keep the fibula and visit Elminster in Waterdeep. Once you agree to take
the task, he will activate the fibula that transports you to the Academy entry (CVAKA1). The
entrance to the building is guarded by a Myconid Watcher. As long as the creature is alive, it will
call groups of orcs and archers for help periodically. The Myconid itself can only be hit with
ranged weapons, so target it with your archers etc. Once it is dead, the attacks stop and the door
opens.
On the first floor (CVAKA2) you are attacked by various types of golems. Your chances are
improved if Sandrah has read one of the golem manuals already. In addition, there are some High

Sandrah Saga Guide
51 ©PaulaMigrate
Sorceresses who are more than pleased to see Sandrah again – and to kill her. Loot the chests in
each of their rooms to gather the facts about the Grey Clan’s plan.
Follow the long corridor (some more golems) to the last room where you find the head mistress
Monika. You can try in vain to persuade her to give up. She summons help and casts some nasty
spells but when you injure her enough, she retreats to the next level which is now accessible.
In the ante-room (CVAKA3) some other type golems await you. In the NW room are steps that
lead to a room with a platform (CVAKA4). The transport device is activated with Monika’s blood,
so you need to find and fight her first. She is in the last NE room after you finished all her allies.
The platform returns you to Waterdeep where Tergius and Elminster reward you for the job and
the Grey Clan document (if you found them in the chests). They will mention that the worst of
those enemies did not even show up this time, Xephistagoras, the mage you saw at the FAI. This
means there will be a sequel – he appears in BG2 and later in RtF.
If you have BGQE Quest pack installed, there is a paladin in trouble in the temple of Helm
(BG0002). Sandrah does not intervene with the mod but if you help the man here, he will leave
to pursue the demon on the way to Luskan. Sandrah adds a sequel to his adventure: you can
meet him again at the Northern Citadel (AR30PB) and help him defeat the demon.
In a house on the north side behind the tower you find Ordolath’s candle. You also find a red
wizard whom you fight and kill. When you leave the house with the candle, another red wizard
will approach you to inquire for Ordolath. His name is Narghal Rasz and he brings some re-
enforcements along. After this meeting, he will pursue Sandrah a number of times and especially
in the later RtF episodes involving Thay.
(J) In the Three Old Kegs (BG0119) Bellamy identifies Jen’lig as githyanki. He means no harm and
warns her of the paladin Phandalyn.
63. Xvart Village (BG4700)
Once you fought your way to the cave (BG4701), Sandrah will initiate dialogue to urge you to find
out the reason for the Xvart behavior. She asks you to inspect the cave a bit closer. On the
western side you will find some stairs leading down.
In the cave below (CVDRU0) there a pools with some strange vapor that let party members go
unconscious at random. You fight further xvarts and their priests until you discover some two
shadow druids that seem to rule the campaign in *protection of nature*.
After you eliminated the shadow druids, the remaining xvarts in the area will stay neutral and run
away if they see party members (this only applies for xvarts in the village though).

Sandrah Saga Guide
52 ©PaulaMigrate
64. Ancient Ruins (BG4100)
Brage plays a role throughout the Sandrah Saga and will cross your ways several times until his
tragic death in BG2 but even afterwards in RtF. For Sandrah at the first meeting he is a man in
need of medical care and help, not a criminal. If you kill him, Sandrah will treat you as a murderer
and go hostile, So answer *death* to his riddle and bring him to the Nashkel temple.
Hint – Sandrah and Brage
If you talk to him at the Nashkel temple after the rescue, he will mention Sharkta Fai and the
Stormhorn mountains. You may learn about that place during BG1 from the Sandrah book
hunters quest. In later episodes you gain the impression that Brage was the man who pursued
Monteelah and maybe the curse was a way of the pirate to get rid of Brage.
You will find Brage during SoD on Dead Man’s Pass (BD7300) where he is searching a way into
the Clan Orc’s land of the Stormhorns.
When you later meet Shauhana in the Stormhorns (BG2 quest), you will learn about Brage’s
further fate and his death.
The corpse of the dead Brage is found during RtF in the Hornswamp Passage (RTF004) and is a
plot item there.
When you agree to help Chaleston Nib, he will give you an extra scroll for a secret entrance at
the Firewine Bridge. The same entrance later plays a role in the RtF sequel. In addition, Sandrah
will point out the relation between this excavation and the cave near the Morninglord temple,
and counsel you to take the idol with you. This is another episode that brings trouble with Talos,
as Kozah was just an earlier incarnation of the Lord of Destruction.
65. Lighthouse (BG3600)
Inside the lighthouse itself (J#Lig2) you find papers that reveal the true nature of the pirates in
the house nearby. In case you follow the book hunters’ quest, they have information about
Montelaah. The siren encounter can be ended peacefully if the pirates are dead already when
you meet Sil.
Safana and Sandrah: Sandrah and Safana both love men and they love luxury, but their
approach to both cannot be more different. If you have both in party when you visit the town of
Baldur’s Gate, there is a mini-quest in which Safana is arrested as a pirate due to the stories she
tells about her past. Sandrah gets her free by proving that Safana’s tales were pure fantasy.
Safana is not very thankful for this.
66. Rocky Coast (BG3100)
(J) When Jen’lig sees the sea near to where Galan stands, she will tell you about her home plane
and its ships.
Both, Jenlig (J) and Sandrah have interjections with the Surgeon.
When you return from the zombie pirate island Glorham, you will land near the ship wreck.

Sandrah Saga Guide
53 ©PaulaMigrate
67. Bear River (BG4600)
Believe it or not, the mod adds nothing to this area.
68. Gnoll Stronghold (BG5100)
Sometime after you enter the area and you have not yet rescued Dynaheir and your party is full
already, Sandrah will initiate a dialogue in which she offers to make space for the witch you came
to rescue. Depending on your replies, she will leave to wait at the Nashkel temple or stay. You
need to rescue Dynaheir to get one of the crucial items for Sandrah’s quest.
Dynaheir and Sandrah: Sandrah and Dynaheir build a friendship right away when they discover
how much they have in common. Both came to the protagonist’s side due to their bhaalspawn
research, both assume that you play a role in Alaundo’s prophesy, both hate the red wizards and
both develop deep feelings for you. If Minsc is also in the party, Sandrah’s healer calling coincides
with Dynaheir’s care for the man. Dynaheir is one of the NPCs who have much interaction with
Sandrah. Dynaheir is special to the Sandrah mod as her knowledge about the Othlor Winski
merges with Sandrah’s quests involving the mage.
The Gnoll Stronghold area plays a big role in the Sandrah Saga later on:
- During RtF the origin of the castle is revealed and it is the scenery for a major quest episode
as (RTF123).
- It is also the starting area for Sandrah ToT, again in its former form before it became a ruin
and became home to the gnolls.
Quest – Sandrah’s Quest III
Once you have all three cloth pieces, Sandrah matches them to one and identifies the piece as a
bed cloth from her parents’ household. The story of Khalindra’s second child and that of the
protagonist are connected in a way and Bhaal is the common factor. Only Elminster can provide
further insight, so the next step is another visit to Waterdeep.
Elminster will not tell you much but send you to Mystra’s altar in the garden (CVDRE1). You need
to touch the altar (see area map for location). You will get a message and a symbol from Mystra.
With those hints, go to Sandrah’s tower in Elminster’s house (CVSant). You will observe another
scene from the past which includes Gorion, Winthrop and Elminster and some baby
bhaalspawns. The scene is open to interpretation at that stage still. Sandrah’s (and Imoen’s)
deductions from it may be true or errors, but they guide both girls’ actions/reactions for some
time in the game until more facts are revealed. It is not clear whether Sandrah actually thinks
that the protagonist may be the missing child or whether she tries to plant this idea for easier
manipulation. This ambiguity seems to be intentional judging from the later development of the
plot.
On your return to FAI you will be ambushed on Old Waterdeep Road by massive forces sent by
Winski.

Sandrah Saga Guide
54 ©PaulaMigrate
When you reach the Sword Coast again, do not forget to initiate PIDs with Sandrah to advance
the quest.
69. Upper Chionthar (BG0400)
North west of Wenric’s house is a zombie lord. The longer you wait until you face him after you
talked to Wenric, the more ghasts and other creatures he is able to summon in addition to the
zombies that infest the farm.
When you move south again after you finished the quest, you find some necromancing sisters
who claimed you destroyed their lovers, the zombies and they try to revenge them.
70. Ulgoth’s Beard (BG1000)
Delsvirftanyon has some information for Sandrah concerning Monteelah. It sheds some light of
how the mysterious book for the book hunters made it to Waterdeep.
Sandrah and Shandalar immediately clash; the priestess of Mystra does not accept this type of
magic user even if her goddess does. She nevertheless encourages the protagonist to accept the
quest, only to see what that mage is up to. She will later comment on the issue when you are on
ice island (BG1010). If you do the Shandalar quest with Sandrah, there will be a sequel on the
second floor (BG0704) of the Sorcerous Sundries.
In the tavern (BG1001), Sandrah has a fling with Galkin.
Taking Mendas’ quest adds a PID option for Sandrah.
Outside the inn will be Regis who later plays a role if you agree to meet Drizzt after you finished
Durlag’s Tower.
Also nearby is Yness from NTotSC to give you a quest to find her husband on the Field of Dead.
71. Field of the Dead (AR10PB)
This is an NTotSC area. The Sandrah mod makes this former battlefield the scene of an historic
event from the Time of Troubles and connects the events around General Ghotal with the main
story of the protagonist and Sandrah. The area plays a role in later quests and the RTF and ToT
sequel.
During the BG1 visit, there is another astrologer in the southern part of the area. This one
prophesies your death – right here and now. When he drops his disguise it is to reveal himself as
a deadly Tanari Prince.
Talk to Pandris after you defeated the orcs, to learn about Ghotal. In the conversation Sandrah
will add additional information that creates some background story from the past. In her version
of the events, the Clan Orcs led by Ghotal were no invaders but a folk protecting their homelands

Sandrah Saga Guide
55 ©PaulaMigrate
from the human and elf invaders instead. They were defeated at that time. History is written by
the winners.
The lost battle on the Field of Dead was partly due to the loss of protection from the god Myrkul,
who was slain at that time by no other than Midnight, the later Mystra. The events have
imbalanced the relationship between the major races of Faerun and endangered the orcs. During
BG1, some orcs try to resurrect Ghotal to continue the fight. This fails, but when the
protagonist’s party finally lays the General to rest (AR11PB), they receive the outlook that a
godchild is already born who will unite the Clan Orcs and bring back a balance between the races.
This is told in the BG2 Shauhana quest and continued in RtF.
72. Northern Citadel (AR30PB)
This is an NTotSC area. The Dauron paladin mod from Helm’ temple in Baldur’s Gate is continued
here. You meet the paladin near the lonely house west of the citadel. He has tracked down the
demon but cannot face it alone. The citadel lends no support due to their internal problems.
When you agree to help, Dauron will point you to the graveyard in the NE of the area. He will
follow you there. The demon will raise some dead creatures from the graves around when you
approach. Dauron will attack and you best assist him. There can be various results; the most
rewarding is if you defeat the demon without Dauron dying. Regardless of the outcome, visit the
Helm temple inside the citadel and help to restore the paladin’s reputation by reporting the
deed. (Note that the demon may play a role later if Amber is installed and in party together with
Sandrah.)
You need to solve the citadel riddle in order to learn about Helm’s locked altar. You need the key
from the Salamander Island to open the altar. The altar contains the symbol you need to open
Ghotal’s grave on the Field of the Dead which plays an important role for subsequent Sandrah
episodes.
73. Salamander Island (AR90PB)
This is an NTotSC area. After you leave Moander’s cave to receive the *cult quest*, some
surprise is waiting outside. And orc shaman named Vennegrat is waiting outside together with
your old friend Talos. You may have met the orc before or you still will in the Wood of the Dead.
The orc warns you to get involved in the affairs surrounding Ghotal, which is of course a
confirmation for you that you are on the right track. Prepare for a nasty battle during which
Vennegrat and Talos will disappear to pursue you at later stages of the game.
74. Wood of the Dead (AR01PB)
This is an NTotSC area. Heel the dwarf Keelor beset by the Gnolls at the SE bridge. You will meet
him again in Beregost afterwards where he has useful information for Sandrah.
Once you defeated the orc mages around the old temple, Sandrah will warn you not to touch
anything here without the required keys. She also provides you with hints to Ghotal and Haeball
in Larswood.

Sandrah Saga Guide
56 ©PaulaMigrate
In Beregost, Keelor will contact you and tell you - respectively Sandrah - to meet him in a house
west of town (BG3347). Keelor confirms that Ghotal was betrayed by some of his own kinsmen
rather than defeated by the enemy. It is also revealed that he was indeed a spawn of Myrkul and
that some celestials may be involved in the events in the north.
75. Spider Wood (BG3000)
In case the Vault mod is installed and you follow the vestibule quest, you will find the demon
Lestraubimat with the red wizards here. Their defeat will trigger comments from Sandrah and (J)
Jen’lig. Otherwise, there is nothing here to see for Sandrah.
76. Candlekeep Chapter 6 (BG2626)
In case you have the Vault mod installed, you will not be able to enter Candlekeep right away.
Instead, when delivering your findings about the Iron Throne to Duke Eltan, you find yourself
again at Wyrm’s Crossing where a man Zernan proposes you a deal for the book that allows you
to enter Candlekeep. You have two options to play this quest until you regain the book and can
finally go to the library. Sandrah and Jen’lig interact with this quest in multiple ways but without
changing contents, just adding details.
Entering the (revised) Candlekeep area you will be ambushed by some ogre mages. You find a
scroll from Sarevok on their leader. Sarevok now officially declares himself *God of Murder* in it.
Sandrah will start a discussion in the roles the two of you may play in that context.
In case you have solved Sandrah’s cloth pieces riddle by now and have visited Waterdeep for the
Winthrop-Elminster-Gorion revelation before, you have sufficient hints concerning Imoen. Of
course it requires her presence in the party.
Quest – Imoen’s Origin
The following conditions need to be fulfilled sometime prior returning to Candlekeep with
Imoen:
- You found all the cloth pieces for Sandrah
- You visited Waterdeep and observed the babies scene with Winthrop-Elminster-Gorion
- You had the PID dialogues concerning the issue with Sandrah
- You have rested outdoors afterwards
- You can check it with C:GetGlobal("Formedcloth","GLOBAL") it should be 14
You will get a plea from Imoen to visit Elminster in Waterdeep again.
In another talk between Sandrah, Imoen and the protagonist there is more information about
why Imoen’s bhaal heritage is far less visible or driving her. In case you had her slayer change
during the Henning rescue, this is as well explained this time.
This time you find Elminster in his study. He tells Imoen the story of her mother and how
Winthrop was related to it. In the ToT sequel, you can actually meet those two in a scene in
Elminster’s house.

Sandrah Saga Guide
57 ©PaulaMigrate
Provided that you followed above quest so far, Imoen will ask you to see Winthrop when you
enter Candlekeep. Apart from the reunion scene, you get additional background information
from the innkeeper.
77. Candlekeep Library (BG2608) and up
Inside the library, Sandrah will cite from the scrolls you find in the shelves that contain quotes
from the prophesy.
One story up (BG2609) you have your first meeting with Sarevok. He will identify Sandrah as his
opponent right away even when trying to convince you to take his ring.
(J) After you found Gorion’s letter (BG2612), Jen’lig will provide you with her own insight into
your heritage, the githyanki view.
78. Candlekeep Catacombs (BG2615)
In the most western part of the labyrinth you find some faded parchments in a locked and
trapped grave. Sandrah identifies them as Alaundo*s original manuscript but it is now
unreadable from age. Nobody will know what was originally written there, a first hint to the
theme that the original vision may have been altered in a way to serve somebody’s purpose
better. This theme re-appears in the Sandrah Saga and is finally confirmed in the ToT part.
In the SW chamber is a zombie lord spawning ghasts. These creatures create a new thrall at
intervals, so if you decide to deal with them, do it quickly before they create an army against you.
Upon dying, a zombie lord exhausts a poisonous cloud.
On the next level (BG2619) when you face Gorion, Elminster, and Tethtoril, Sandrah easily
identifies her father as a doppelganger with a dialogue option.
Once you are outside again, you can meet Fabio from Lendore again:
Hint – Sandrah Secret of Bone Hill II
In the second part of the mod Sandrah has little interactions with the detective story.
In the Lake Lizards area (BH2200) you can have another Talos encounter. Find the Talos symbol
inside the lizardmen temple in the snake altar (BH2202). Your old friend will wait for you when
you leave the caves.
79. Balduran’s Island North (BG1500)
After you accepted Kaishas’ quest and travel to the northern island part, Sandrah will comment
on the language the villager’s use. She also warns you that hers or other party member’s healing
skills will not be sufficient against lycanthropy.

Sandrah Saga Guide
58 ©PaulaMigrate
80. Balduran’s Island South (BG2000)
(J) Githyanki use silver weapons, helpful against the beasts of this island.
Provided you did the child rescue quest and the cloak and flower quests for Delainy/Durlyle,
Sandrah adds a peaceful solution at the final talk with Kaishas. You can convince the headwoman
that you will preserve her secrets and can leave without wiping out the whole population – there
will still be the showdown with Mendas however.
When you leave the island, there will be an intermediate stop at Paradise Island (AR0PBA). This is
an NTotSC area. Go to the southern part to talk to Archandra. She has an offer for male
protagonists, while Krestian does the same for females – if you are male, then Sandrah takes her
chance.
When you leave Archandra/Krestin again, old friends await you, the Talos priests. This time they
demand that you hand Sandrah over to them while the rest of the party is free to go if they pay
20000GP to the Stormlord’s coffers. You decide
a. Pay the money and deliver Sandrah to them. There will still be left some of them to occupy
your party with a battle while the rest take Sandrah away. She will be able to free herself
with Mystra’s help and await you in Ulgoth’s Beard when you finally arrive there. You will
have lost 20000GP, some XPs from the full battle and some of Sandrah’s sympathy (i.e.
sanpoints).
b. Stand to your companion, battle all the Talos followers and win Sandrah’s sympathy.
In case you opt for b, Talos will make another attempt soon. It becomes obvious that he is
interested in the protagonist to spread chaos and disorder, which are god’s domain, and he
claims that Sandrah is a hindrance to let you come to your full potential.
81. Durlag’s Tower (BG0500)
After you finished the complete Durlag quest and have found the soultaker dagger, Drizzt will
wait for you near the drawbridge and ask you for help. Agree to meet him later at the Ulgoth
Beard’s tavern. The meeting will trigger deep reactions from Sandrah.
Drizzt and Sandrah: Sandrah and Drizzt know each other as Drizzt is a friend of her father. If
you met Drizzt already at the fishermen’s lake, you may have discovered that Drizzt at times was
Sandrah’s teacher. As this was in her teenage years, the young girl of course fell deeply in love
with the drow. It is not known if the drow even noticed this. However, Drizzt had some
relationship with Sandrah’s grandmother Midnight long time ago (later subject in the ToT sequel)
and he sees many communalities between the two women. There is a mot-really-a-romance
relationship between Drizzt and Sandrah that evolves and finishes either during the Drizzt Saga
episodes or in Region of Terror (RoT), if installed. Note that Sandrah also allows you to solve the
RoT quest without recruiting Drizzt, provided you decide the help the drow in his quest after
Durlag’s Tower.
You can get to the outside from the first floor (BG0503) and go to the upper platform to find
some loot. Picking up the ancient shield from the shaman triggers a conversation with Sandrah.

Sandrah Saga Guide
59 ©PaulaMigrate
You can delegate the answering of the Durlag family story riddles to Sandrah in the dialogues in
the compass room (BG0515). She has the story in her book.
With the soultaker dagger you return to Ulgoth’s beard and destroy the cult. Afterwards you can
talk the Reedrig, the guy you saved in the Field of Dead, to continue the NTotSC quest and find
the Temple of the Black Hand. Second option is to let Drizzt join party for the Drizzt Saga quests.
Actually you can do both in any order you like.
82. Temple of the Black Hand (AR60PB)
This is an NTotSC area. You need the *Ring of the Grave* from the high priest in the temple as
one part of the key for the monument in Wood of the Dead (the other part is a rusty dagger from
Haebal).
In the BG1 part of the game, you find an important clue for the Gorion’s Dagger quest here. Meet
Brother Aschmaan outside the front door of the temple for the respective conversation. Give him
a chance to talk before you kill him.
Once you have ring and dagger, you can visit the Wood of the Dead and enter the temple. You
will find General Ghotal’s legendary sword. When you leave the temple with it, the orc priest
Vennegrat from the Salamander Island will appear. You can persuade him that the sword is save
with you and he will issue further threats and hints about the godchild girl mentioned before.
You can also now report back to the Salamander Meandar and receive the key for the altar in the
Northern Citadel. You find a symbol of Helm which opens the mausoleum on the Field of Dead.
Here you find Ghotal and lay him to rest after having listened to his true story. The sequel will
take place in BG2 when you visit the Stormhorn Mountains.
Note: The Temple of Black Hand later plays a role in both parts of the Sandrah sequel due to its
strategic location and dark history.
83. Nine Hells (F_6666)
As soon as Drizzt joins your party and you leave Ulgoth’s tavern, Regis will talk to you and start
the Drizzt Saga. You will find yourself in the outskirts of Nine Hells for the first quest.
The most significant tweak with Sandrah in the party is that you do not need to recruit all of
Drizzt’s companions for the quest. Just let Drizzt himself join and you will be able to send all
others you rescue during the quest home. In addition, Sandrah will have a number of interactions
with Drizzt during his stay with the party.
The first level is a straight line ahead full of monsters and loot. Take the Ice Slasher +2. Second
level (F_6661) is a single demon. Once it is dead talk to the head of a dragon sculpture to receive
a riddle. Answer *soul* to get out to Ulgoth’s Beard again.
Here Elminster awaits you to start the actual quest. Agree on it and you will be transported to
the Spine of the World.

Sandrah Saga Guide
60 ©PaulaMigrate
84. Brueno’s Cabin (F_7777)
(Drizzt Saga continued) Fight your way to the cabin to find Regis with some clues on the quest
ahead.
North of the hut is a wounded man with a second hint. The area is a kind of hub from which you
can:
- Southern exit = access to the worldmap, you can go back and forth to deal with the quests at
your convenience – it is also access to Bear Tribe Village for the quest given by the wounded
man.
- Northern Exit = Dragon Caves and main quest
The Bear Tribe Quest
Go to the village (F_0111), kill the Frost Giants outside, talk to the villagers inside the main
building and leave the area to the north (F_0112). Kill more Frost Giants and find Nib Jansen’s
skyship stranded nearby. This time, Jansen just offers shop services. You will meet him later in
BG2 when he has an operating skyship that plays a role in the Shauhana quest. He also appears in
the RtF sequel.
In the wolf spirit temple fight all the…yes, Frost Giants and the werewolf spirit and grab the baby
to return to the villagers.
You can also talk to Nibby Dipnose in the village and let him cast a scroll for an extra side-quest
that is optional and has no real connection to the story. You will find a rod of resurrection in the
final area (F_0223).
Lich Quest
In the Dragon Cave area (F_7779) you find large numbers of orcs and goblins. On the eastern side
of the map are two caves. The one in the NE has a skull that you need (F_9494). The one in the SE
is guarded by two baby dragons. After two caves of monsters, you reach the Lich’s tomb
(F_9393). Sandrah has a number of hints from her books about how to fight a lich. The Lich is
named Kangaxx and your reward is a ring BUT this is not the same ring or lich you find later in
Athkatla. The lich quest is optional after all.
Jarlaxle Quest
This is the main quest from the Drizzt Saga. You just leave the Dragon Cave area to the north and
meet another of Drizzt’s friends, Bruenor. Further to the north is the entry to the drow caves.
Several areas containing spiders and drow follow. Sandrah and Drizzt will come to the conclusion
that an old enemy, Artemis, has set up the trap for Drizzt. If you did the DSotSC quest #4 before,
you already know about the criminal drow Jarlaxle, his sometime partner. You meet him and
Errtu in the inner cave (F_9797). You also free the last of Drizzt’s companions there, Cattie-Brie.
After the battle make sure to take a scroll that can be used to upgrade the Ice Slasher you found
in Nine Hells.

Sandrah Saga Guide
61 ©PaulaMigrate
While you march back, you will be ambushed by another old friend, Naronguth. This time you
really have to fight him. Since he is focused on killing Sandrah, you can just let her run out of his
reach while the rest of the party wears him down.
Moutain of Dead
Coming out of the caves again, you meet the Hooded Man (aka Robed Figure) – yes, really! The
Drizzt Saga mod introduced him already more than a decade prior to SoD’s release. He will
kidnap you and drop you in the final quest of the Drizzt Saga (F_9898).
Before entering the mountain, look for a green dragon skull. Inside the mountain, there is the
dwarven smith Varlag who can use the Ice Slasher and the scroll to forge an upgraded weapon.
He can as well make an armor from the dragon skull. You will find the smith again later in the RtF
sequel in the Stormhorns in Shauhana’s residence.
You will fight a lot of vampires (greetings from Bohdi) and wailing deads. In the final cave you
defeat the hooded man. You will find a letter from someone with the initial *I* to his sister.
Guess the rest.
Drizzt will depart after you finished his last task; you may see him again in BG2 if you have Region
of Terror (RoT) mod installed.
85. Ducal Palace (BG0108)
Before you decide to finally face Sarevok, take another tour of the city to see what changed.
Make sure that Sandrah meets Tamoko near Sorcerous Sundries and at the entrance of Flaming
Fist Headquarter.
86. Thieves Maze (BG0146)
At the entry of the maze Sandrah will heal Voleta for some xp.
87. Undercity (BG0123)
(J) Jen’lig will point out that both her target – Semaj – and yours – Sarevok – are hiding in the
middle of the area. Again she assures you of her loyalty.
After you have met Tamoko for the last time, you will learn something about Sandrah’s
motivation again.
88. Bhaal Temple (BG0120)
(J) Jen’lig will initiate a dialogue and reveal Semaj . After the battle, do not forget to pick up the
silver sword from Semaj’s corpse.
When Sarevok is dead, Sandrah starts a key conversation about the end of the *Prelude*,
indicating that now the Realms will know about the protagonist’s heritage but the challenge for

Sandrah Saga Guide
62 ©PaulaMigrate
the Throne of Bhaal will only now begin. And there is no escape from it for the protagonist. (With
certain mods installed it may be necessary to move the party away from Sarevok’s corpse for the
transition to trigger.)
Note that the transition into SoD will be delayed until
- Sandrah has made her statement
- (J) Jen’lig has the silver sword
depending on their presence. If Sandrah is not there, her story has ended and she will not re-
appear in the game again. If Jen’lig is not present, she will not return to the game in ToB.

Sandrah Saga Guide
63 ©PaulaMigrate
Part 2 Sandrah in SoD
89. Korlasz Tomb, First Floor (BD0120)
Sandrah and Jen’lig will both be in your starting party here, provided they were in the final battle
against Sarevok before.
90. Korlasz Tomb, Second Floor (BD0130)
When you find one of the crusader’s pamphlets in the area, Sandrah will foresee that both of you
will be getting involved in the matter sooner or later.
(J) When Korlasz is defeated – dead or imprisoned - Jen’lig will announce that she needs to leave
now and return the silver sword to her plane. During the common travel it has become clear that
your githyanki companion may lose her life to her godqueen by doing so. She will return with her
story of how she survived when you establish your pocket plane in ToB. (She will not appear
during SoA.)
91. Ducal Palace, Bedroom (BD0103)
Sandrah has promised to stay with you and she holds her word. She will be with you when you
wake up in your rooms in the palace and the SoD campaign actually begins. Part of your
equipment is in the chest near to where you awake.
Haiass, your wolf, and Sandrah’s Pelligram will also be there with you.
When the assassins wound Imoen, Sandrah will converse with Liia Jannath about poison being
used and agree that Imoen needs rest and heeling in the palace that she cannot provide when
she follows your quest.
92. Ducal Palace, Ground Floor (BD0102)
During and after the conversation with the Dukes, Sandrah issues some hints that she suspects a
connection between the attack, the crusade and the protagonist’s origin, as well as Caelar’s own.
Hint – Sandrah and SoD NPCs
Sandrah has no interactions with the new SoD-only NPCs except for Corwin at the time of writing
this guide. She continues to talk with continuous NPCs and those dialogues are in standard
format, not the SoD overhead texts.

Sandrah Saga Guide
64 ©PaulaMigrate
93. Coast Way Crossing (BD1000)
When you leave the camp on the big road leading north, you will run into old friend Talos. He
claims that he had a hand in the recent events but Sandrah treats him as an imposter. He leaves
some priests and fighters to battle when he leaves angrily.
When you find the petrified group in the NW, remember that Sandrah’s parcel can produce
stone to flesh scrolls.
Keep the *Historical Treaties of Dragonspear* when you find it. Sandrah makes an interesting
find in it when you give her time to study it.
94. Repository of Undeath (BD1200)
Find the Tome of Ancient Knowledge in the bookshelf near the entrance. With its help, Sandrah
provides the clue for the pillar riddle (snowflake – cracked leaf – sun – first leaf or pillars 2 – 4 – 1
- 3).
During SoD, Sandrah also has additional PID options that are of interest.
95. Coast Way Forest (BD7000)
Sandrah’s reaction when you find Skie killing the marauders is strange. You get a PID option to
ask her about it. It is the first indication that Sandrah suspects Skie to be a bhaalspawn as well.
Sandrah will give you her interpretation about Caelar and her influences when you find the
crusader tract on a dead messenger.
96. Temple of Cyric (BD7230)
Talk to the imprisoned Bhaal priestess and try to learn as much as possible from her. Sandrah will
interject for information about Gorion’s dagger. Best free the priestess.
When leaving the temple after you solved the mystery, there will be a strange man, Emcyric
waiting for you. He thanks you for your deed in the temple and your killing of Sarevok. He very
much dislikes Sandrah’s presence in your company. He disappears as another figure who now
takes interest in your progress.
Sandrah also identifies the temple to be originally a Bhaal temple and pretty close to the place
where Bhaal was killed during the Time of Troubles.
The Cyric/Bhaal temple will play an important role in the sequel parts of the Sandrah Saga,
especially in ToT.
97. Boareskyr Bridge (BD2000)
The crossing of the bridge where Bhaal fell not only causes the protagonist to be confronted with
the heritage. Cyric’s granddaughter has a similar event triggered. In the first meeting Sandrah has

Sandrah Saga Guide
65 ©PaulaMigrate
with Mystra, it is implied that she is to aid the protagonist to prevent the return of Bhaal whom
Midnight and Cyric once hunted and defeated. This makes Sandrah either your forceful ally or
your future enemy, depending on how you plan to act towards your *father*. Sandrah receives
some reward from her goddess for having made it up to here with the party. The event clarifies
that Sandrah told the truth when she claimed she was not sent to the protagonist’s aid by Mystra
or the temple.
Boareskyr Bridge of course will later play a role in ToT.
98. Coalition Camp (BD3000)
Talk to the cleric Dosia and offer your help, you get an option to make use of Sandrah’s healing
skills. This will incorporate the original quest *Uncommon Cold*. In Bloodbark Grove (BD7400)
there is a tree which provides the needed ingredient,
You can ask Sandrah via PID about Torsin de Lancie after you received the barrel of explosives.
99. Dead Man’s Pass (BD7300)
Near the hidden cellar in the NE of the area you will meet Brage again. He refuses to join you or
the coalition camp but tell you he is on his way to the Stormhorns in search of Sharkta-Fai. There
is another hint that he may have been the mysterious pursuer of the pirate Montelaah.
In the conversation with Caelar, Sandrah advocates to agree with the Shining Lady. Nevertheless,
iIt makes her clash with de Lancie again. Regardless, the negotiation fails according to the original
game script. Afterwards Sandrah again points out the role that Hephernaan plays seemingly
against Caelar.
100. Kanaglym (BD5300)
Provided that you
- solved the riddle of this area and
- you agreed to help the lost souls in the cave (BD5110) and
- bring her bodies to rest in the Fugue Plane and
- you talked to Alyth in the Elfsong Tavern before
then you find the story of the elfsong ghost here.
101. Dragonspear Castle Basement (BD4300)
In a trapped locked chest near the altar find a tome on *magical entrapments`*. Take it and
Sandrah will comment on it. It will play a role later to get back Skie in SoA part.
Sandrah will inspect Skie’s body and discover the use of a soultaker weapon right away. She
never has any doubt in the protagonist’s innocence but also knows that the trap has snapped and
little can be done at this moment.

Sandrah Saga Guide
66 ©PaulaMigrate
Hint – Sandrah and Skie’s murder
Sandrah knows that the hooded man is the killer of Skie but there is currently no way to proof
that. She appears after the trial in the prison to accompany you in your escape. Her dialogues
with the protagonist and later with Imoen imply that your two best friends and companions have
worked witj the Dukes to get you free.
Later in BG2, the Sandrah mod provides you with a quest to get hold of the murder weapon and
to restore Skie.
Sandrah will be in your party when you are ambushed but escapes the shadow thieves before
you get caught. This is part of her story of how she makes it to Athkatla to join you in BG2.

Sandrah Saga Guide
67 ©PaulaMigrate
Part 3 Sandrah in BG2
102. Irenicus’ Dungeon (AR0602)
You have lost all your equipment including Gorion’s dagger. Sandrah will not be in the cells in the
initial area, you will find her once you make it to Irenicus’ living room in the middle of the area.
She will appear from the portal that leads to the upper level. According to her story (you can get
via PID), she followed the shadow thieves storming the dungeon.
Haiass, your wolf, will not be in the dungeon. He will appear again on the Promenade once you
are back in the open. He has gained another level by this time.
When you talked to the Dryads, Sandrah will quickly react to the name Irenicus and renew your
memory of earlier encounters (Centeol, the mysterious *I* in Drizzt Saga, the hooded man in
SoD).
Sandrah can restore a few of your and Imoen’s items from her parcel. Since she came from
outside into the dungeon, she has not lost her equipment and she has Pelligram with her. It still
appears that she cannot be misused to carry excessive extra equipment from prior game parts
into SoA.
103. Air Plane (AR0601)
At the entrance you meet Chloe, if you have her mod installed. Sandrah and Chloe can have a
very intense relationship. The Chloe mod has been largely enhanced and expanded for EET.
Accept the djinni’s quest (mind Gorion’s dagger). Even though it turns out that the weapon the
djinn was talking about was not the dagger but Sarevok’s sword, you will receive a further hint
after completion of the quest when you return the flask.
The air plane just like the rest of Irenicus’ dungeon will be revisited and play an important role
later in RtF.
104. Irenicus’t Dungeon, Exit Level (AR0601)
Sandrah confirms during the Yoshimo dialogue that you are in Athkatla in Amn.
Yoshimo and Sandrah: Aside from the interjection in the initial meeting, there seems to no
interaction with Yoshimo.
There are interactions from Sandrah when you find Khalid (and Jaheira is in party), when you
killed the Ellesime clone and when you find the vampire in a side room.
In the duergar area you can free Adrian, a mod NPC, if installed. He serves Azuth, an ally of
Mystra. The two NPCs have can have an interesting relationship.

Sandrah Saga Guide
68 ©PaulaMigrate
Quest – Region of Terror
Near the exit you will meet Drizzt in case you have the Region of Terror mod installed. If you had
Drizzt from the Drizzt Saga mod in your party during BG1, the Sandrah mod opens a new
possibility to play the RoT plot. While the mod normally requires you to take Drizzt and all his
friends into your party, Sandrah adds the option to follow most of the quest without Drizzt. He
will appear as an ally for the final battle. To make use of this option, select the dialogue options
in the first meeting that say ~ I propose that we operate separately to increase our chances to
succeed. I know Sandrah will take care that we do everything necessary to help you and your
friends in time.~
Due to the complexity of RoT and how it is merged into the BG2 plot, it is treated in this guide as
it emerges during play.
105. Waukeen’s Promenade (AR0700)
Haiass will join you soon after the opening cutscene.
When you come near the terrace where Lord and Lady Ophal are sitting, you get a message that
Pelligram has been blessed by Mystra. She has risen a level just like Haiass has done before he re-
joined.
When Pelligram comes into sight of the caged leopard in the middle of the market, a cutscene
starts. Sandrah’s mysterious panther uses her powers to free the leopard and lets it escape. In
the conversation with Sandrah following the event you get options to ask about *unsanctioned
use of magic* or Pelligram’s true nature.
RoT >>> Talk to the town crier at the SW entrance of the promenade. He will reveal *The Arena*
(RA4300) on your worldmap (and stop his advertisements afterwards). Since Sandrah is both a
fighter and a priestess of the goddess of magic, she can be used to fight in both competitions of
the Arena.
You can find Dace, mod NPC, near the entrance of Adventurer’s Mart. This might be interesting
for Sandrah and a male PC for the crossmod contents.
Sandrah will have many new PID options once you do your initial survey of the city.
106. Circus (AR0607)
Here you free and meet Aerie.
Aerie and Sandrah: Sandrah, the healer, and the elf suffering the loss of her wings clearly have
a lot of interaction. During the Sharkta-Fai episodes in the Shauhana quest, Sandrah gets a lot of
opportunity to help her friend. Aerie is one of the NPCs who have much interaction with
Sandrah.
Aerie will also appear in the RtF sequel, however not as a joinable NPC. You will meet her in the
air plane in Irenicus Dungeon and later on witness her wedding in Faenya Dale.

Sandrah Saga Guide
69 ©PaulaMigrate
107. Slums (AR0400)
Once you leave Gaelan’s house you meet Brus. He will tell you that his uncle did not tell you the
whole truth but that the shadow thieves actually need much more money and that you are
supposed to learn that bit by bit over time. He reveals that they plan to get 150.000gp from you
in the end. However, Bodhi and Gaelan will finally start to make offers when you achieved
130.000gp.
RoT >>> Ryon in front of the Copper Coronet will mark Westchar on your worldmap.
RoT >>> If you re-visit the slums 2 days after the first visit, you encounter the djinni working for
Jarlaxle and against Drizzt. He gives you a hint about the town of Arlax.
Near the Jansen home you encounter the blind orc mage Ghatlenk you once met in Baldur’s Gate
who was searching for a godchild. This time he addresses you directly and points you to the
Stormhorns. You are sure he is not talking of Imoen when he says godchild. This is the start of the
Shauhana quest. However, you gain more information around the city (City Gates, Promenade)
before you should actually follow the hints.
108. Copper Coronet (AR0406)
Sandrah has an episode with Salvanas (like a number of other female NPCs) if you select her to
talk to the elf. There is a sequel if you let Sandrah talk to him another time.
On the gallery of the pits is Arath, mod NPC. He and Sandrah go along well and have sufficient
crossmod contents. There is a mini quest with Arath: in some city area you find an injured
mountain cat. Sandrah heals it and Arath suggests taking it back into some wilderness. Next time
you are in a forest, the two companions will set the animal free. Of course some reactions from
Pelligram are included.
As soon as she sees the beastmaster and his Tabhita, there is another outburst from Pelligram,
who sides with the mistreated animals. Tabhita will turn against the slaver before she escapes
with Pelligram’s help.
When you free Hendak and Sandrah sees the captured children, she goes berserk and kills
Lehtinan without hesitation. Talk to her via PID about it. Sandrah’s crusade against slavery is a
constant thread through the mod ever since the Cloakwood episode.
When you follow the second slaver task in the ship (AR0406), pick up the scroll from Captain
Haegan. Sandrah will later remind you to search for a building in Temple district for more slavers.
109. Arena (RA4300)
Sandrah will tell you that she is willing to fight in the arena in order to gain gold/equipment for
Imoen’s rescue. Even though she hates such kind of *entertainment, e.g. the slave pits in the
Copper Coronet, she makes an exception here, as all fighters are volunteers and everybody is
healed and resurrected after the theatre.

Sandrah Saga Guide
70 ©PaulaMigrate
In order to participate in the mage competition, the candidate has to be higher than level 14. You
also need a 1000gp entry fee for any competition. Apart from Sandrah, you may have other
candidates as well in the party or the protagonist may qualify if mage and/or fighter. Note that
the list of possible NPCs to qualify is defined by the RoT mod and you may have mages or fighters
that are not recognized by the mod. (Korgan, Mazzy, Wulfgar, Bruenor, Sandrah = fighters or
Edwin, Aerie, Sandrah = spellcasters if above level 14).
110. City Gates (AR0020)
A pirate will approach you and tell you about Velvetfoot. An area in the Stormhorn Mountains is
revealed on your worldmap. You could travel there but I recommend (and describe here) the way
to travel there with Nib’s skyship instead of 250+ hours land travel. After the pirate visit, Sandrah
will mention the gnome and you can find him on the southern stairs of the promenade
thereafter. Continued here.
In the Crane (AR0021) there may be Tian to start the Tower of Deception mod, if installed.
Sandrah is compatible with it but does not add any further contents.
In this area and other locations you can get hints to quests from the Darkest Day mod (TDD).
Hint – Sandrah The Darkest Day
As soon as some TDD areas (e.g. Purskal, Eshpurta , Riatavin) are revealed on your worldmap,
you have PID choices to ask Sandrah about those towns.
Sandrah interacts with all quests you can do from TDD. She will especially react when Elminster,
Jarlaxle, Mystra, Cyric and other persons who play a role for her appear in the quests.
None of the added contents is needed for Sandrah’s main plot. All interactions are optional and
just making the game livelier. As such, I will not detail her involvement with the mod further.
For the case that Fishing for Trouble mod is installed, a mage will approach you with a letter to
provide to Elminster.
Hint – Sandrah Fishing for Trouble
You can ask Sandrah with PID about the mage and she will tell you that he knows him and that he
tells the truth and you can accept the quest.
Since the mod involves Elminster at several points and also Sandrah may have her own quests
with him in parallel, the dialogues have been aligned so that there is one integrated Elminster
serving both mods. Otherwise, Sandrah just adds occasional remarks to the mod contents which
are optional and just making the game livelier.
111. Docks (AR0300)
When you are near the temple of Oghma, Sandrah indicates that this would be a place for her to
go if she had spare time. This may be a hint where she goes when kicked out although most of

Sandrah Saga Guide
71 ©PaulaMigrate
the times she will be gone for good anyway if she decides to leave. (I never risked to thoroughly
testing this case.)
After you talked to the golden skull (AR0331), there will be a PID option to consult Sandrah on
the issue. She will have several hints and options for you as you follow the quest to find the
several parts of his body. When you give her a protection against magic scroll for the final battle,
her hammer is one of the weapons in game that can kill the lich.
Sandrah will interact with the pirate hideout (AR0310) below the Sea Bounty tavern.
In Mae Var’s guild upper level (AR0304) you meet again Emcyric, the guy from the Bhaal tmple in
SoA. This time it becomes clear that Cyric in his avatar seems to be interested in both of you, the
protagonist and Sandrah. Your working together irritates the Prince of Lies.
After you talked to Mae Var and accepted his quest, Sandrah will identify him as the man you
organized your kidnapping from Baldur’s Gate. She encourages you to play along with the
shadow thieves in hope to gain more information about your capturer Irenicus.
Meeting Edwin again provokes the expected reaction from Sandrah. On the other hand she is
happy that those tasks can be used to remove some scum from Athkatla.
Once you gathered the papers from Marcus, Sandrah will suggest inspecting them secretly to see
what Edwin is involved in. You gain some insight if you agree.
At the end of the Mae’Var quest, when Renal offers you the guild, Sandrah counsels you to
accept. She claims you would gain insight into the activities of a mighty player in town and you
can conduct your branch of the guild in a moderate way.
Hint – Sandrah and Extended Thief Stronghold
There are a couple of interactions between the mods. The Haer’Dalis quest can make use of Black
Lily from the mod. Sandrah will provide the possibility to come to a peaceful solution to the
thieves vs City Guard conflict in the docks that is worth as much xp as the battle but more
satisfying for good/neutral players.
112. Bridge District (AR0500)
When you find the tomb (AR0526) Sandrah continues her analysis of the possible Kangaxx
solutions with you.
Sandrah will spot the man in the red robe in case you try to solve the quest of the buried alive
man from the graveyard.
Sandrah will gain a special ability if she accompanies you during the Twisted Rune visit.
113. Government District (AR1000)
In case you did the Dark Horizons quest in BG1, you will find Madeline, one of your former
opponents on the SE edge of the park. You will learn that despite Sarevok’s death, the

Sandrah Saga Guide
72 ©PaulaMigrate
organization will still fulfill their contract, i.e. to eliminate you and Sandrah. Follow her into a
nearby building to meet what is left of Oversight – it still is a tough battle but worth the loot.
Note that the secret door revealed by Madeline will only stay open for a short while, so follow
her right away after she escapes.
Quest – Viconia’s Prosecution
Sandrah will inquire with Viconia about the true reason she ended at the stake. Viconia tells her
about an affair with a very influential citizen of Athlatla.
Sometimes later while in one of the outdoor city areas, your party will be stopped by the guards
and Viconia will be arrested for murder of Lorena Balthis, Acton Balthis' wife. You can try to give
her an alibi, but she will be put into jail anyway and you can try to solve her case with Corgeig
Axehand in the Council of Six building.
You and Sandrah can raise some doubt with Corgeig and he will allow you to do your own
investigation.
Visit the scene of the crime in the Bridge District, Balthis home (AR9506). Interview the secretary
Pip, a witness. You will learn that he saw a drow at the murder scene but does in fact not know
Viconia in person since his master met his drow mistress secretly. Also you learn that the weapon
used was a katana, not usable by a priestess of Shar.
Report back to Corgeig who gives you a tenday to find the true murderer before Viconia needs
to stand trial. Visit Viconia in jail and inform her about the findings. Viconia and Sandrah come to
the conclusion that the drow woman who did the murder may be one of Viconia’s surviving
sisters. Viconia thinks that a drow not used to the surface will seek out the underground areas of
Athkatla.
Go to the graveyard and enter the main tomb area (AR0801). When you come near the spider
dome construction in the middle of the area, Sandrah will point out a drow she just saw entering
the spider lair.
Prepare for a massive battle with Binamor DeVir and her entourage including a drow weapon
master and a drow battle mage. (Pai Na may take a side in this, depending on whether you met
her before and how you treated her.) Pick the murder weapon from Binamor when you
succeeded to defeat her.
Report your results to Corgeig and pick up Viconia from the prison.
You can free the mod NPC Amber from prison after a lot of paperwork in the Council of Six
building.
Amber and Sandrah: The two girls like each other from the first moment. It turns out they both
grew up in Waterdeep even if under the most different circumstances. Sandrah agrees to help
Amber to find out more about her origins. After they girls get more acquainted with each other,
they will one day have a conversation about some demons Sandrah met in the past. Apparently
they have a common enemy, the demon Paraagariel, the same you might have fought once near
the Northern Citadel while helping the paladin of Helm. As soon as his name gets mentioned, he

Sandrah Saga Guide
73 ©PaulaMigrate
appears, happy to find both enemies together and a battle breaks out. The victory brings your
two companions only closer.
114. Graveyardt District (AR0800)
Valen and soultaker
115. Temple District (AR0900)
When you come near the entrance of the *Guarded Compound*, Sandrah will bring up the issue
of the slaver hideout again, provided you defeated the slavers in the slum ship already.
The suspicion is confirmed in the dialogue with the two mages inside (AR0906).
When you accepted the Unseeing Eye quest, you can ask Sandrah with PID if her books have any
information about the case.
The theft of the Talos’ priestess’ necklace for the Mae’Var quest will result in another
confrontation between Sandrah and the Stormlord. This time the perspective of upcoming
bloodshed rather amuses Talos than anger him.
Mekrath's Hideout (AR0705) allows you to free and recruit Haer'Dalis. Sandrah curses Mekrath
when she learns that he enslaved the bard. You can use PID afterwards to learn more.
Haer'Dalis and Sandrah: Sandrah falls for every bard in the game she meets. She simply loves
their wreck less lies, exaggerations and compliments. Nothing is ever permanent with them and
that is the freedom she savours. Her affair with the tiefling includes a quest.
Quest – How to Restore a Tiefling
The quest starts when Sandrah and Haer'Dalis have been in your party long enough to start a
relationship but only if the protagonist is not following a romance with the tiefling already.
When you rest your party in an outdoor area out of town, your two companions will bring up the
topic of common acquaintances. They find they both know Naronguth and Alzaligundrel for
different reasons. Up jumps the devil, i.e. the two fiends appear when they hear their names and
are most happy to find their two enemies in one place. Battle breaks out in which the demons
escape when injured enough. Haer’Dalis falls, leaving behind his body.
Heal and resurrect everybody (Haer’ Dalis cannot be saved at this time) and pick up the body.
Mystra will appear and talk to Sandrah. She gives her priestess a map that indicates a drop of
blood from one of the injured demons and gives her advice about how the tiefling may be
restored. With the help of the map you need to pursue the demons who try to reach the Nine
Hells.
The first drop leads you to the shadow ruins at Umar Hills. When you enter the area, you observe
a cut scene with the two demons, who cannot use the entry they seek here and move on,
leaving some guardians behind to protect their escape. Near the old temple entrance you find a

Sandrah Saga Guide
74 ©PaulaMigrate
couple of demon knights. Defeat and loot them to find Mystra’s map updated with a second
drop.
This time it is Druid’s Grove area. Move to the bridge near the abandoned house and prepare for
another ambush of all kinds of fiends. After you have won and looted them, the third drop
appears on your map.
The drop is in the City of Baldur’s Gate at the Shadow Thieves Headquarter – or, as Sandrah
points out, rather the Undercity below it, where you defeated Sarevok and his essence escaped
to Hell. Question is how to get there? You may already have resolved Skie’s rescue, in whih case
you will be able to simply travel there. For the sake of this guide, we assume that you have not
yet access to the town by worldmap.
Return to Athkatla and Brus (Gaelan’s nephew) will seek you out and offer help. You learn that
Black Lily from BG is on the docks. In case you own the former Mae’Var guild and you have the
extended stronghold mod installed, she will be in your guild building, otherwise you need to find
her somewhere in the docks.
Sandrah and Lily will agree on travel arrangements and your party is transported into the Guild
Building of BG. You cannot leave into town this time but go down into the maze once more. You
will find you are in the right place, as there are all types of demons in the maze. Fight your way to
the temple of Bhaal.
In the temple you face Alzaligundrel alone, his friend has managed to use Sarevok’s passage. Kill
the demon and pick up his heart. Sandrah will instruct you that the way forward is the opening
left behind by Sarevok. So you go down to Hell.
Find Naronguth and kill him, make sure you pick up his heart. With the heart and Haer’Dalis body
you fight yourself through another assembly of fiends until you reach Demogorgon. Sandrah
makes a deal with him, you learn what Haer’Dalis did to anger the demons and you get your
companion back. Move further to the far end of the area to find the exit.
In the passage that leads back out again, you will meet – Sarevok. He will vanish after a
conversation with Sandrah. After you fought some guardians at the exit, you come back to the
surface in one of the crypts in the Athkatla Graveyard.
116. Sewers and Unseeing Eye (AR0202)
When you come near the tomb with some more Kangaxx parts, Sandrah has again some
counseling for you.
The Forgotten Believers city (AR0204) will later play a big role in Sandrah’s quest.
117. Umar Hills (AR1100)
Haiass will gain an additional level for his experience gained with you when you pass the major’s
house in the east of the map.

Sandrah Saga Guide
75 ©PaulaMigrate
ROT >>>> Near the entrance to the cave a messenger from Jarlaxle awaits you. Alora gives you
the hint to a house in Westchar and a key to it. After Alora disappears, Sandrah will bring up the
name of Brother Cadderly and the temple named Spirit Soaring as possible next station after
Bruenor is rescued at Westchar.
In the NE corner of the map is the ranger Sarah (mod NPC). Sandrah has a couple of banters with
her and may be seduced by the young lesbian.
Not far from that place, the mod NPC Tyris Flare makes an explosive appearance. She has
crossmod content with Sandrah. Your healer tries her best to make the exotic fighter feel at
home in Faerun after her home plane was destroyed.
Derrick, a friend of Valygar who can be met on the stairs leading to the cabin, knows Sandrah and
tells her about Valygar and his trouble with the cowled wizards.
Valygar and Sandrah: Their relationship focuses on the ranger’s family history with respect to
magic. It ends with a flirt but nothing serious.
After you solved the Umar quest, return to Marella’s cabin, regardless whether you get the
ranger stronghold or not. You old friends from Talos will await you and try to imply that the
Stormlord had his hands in helping the Shade Lord to set up his reign in the hills. As usual, a
battle breaks out.
118. Shade Lord Temple (AR1401)
You can ask Sandrah to answer the question from the Amaunator statue, a convenience for those
having solved it before.
When you enter the dragon’s lair (AR1402), Sandrah makes a remark about the *archive* that is
part of every Amaunator temple. This knowledge is crucial at a later stage of her main quest.
119. D’Arnise Hold (AR1300)
About 12 real time hours after you started SoA with Sandrah and when you leave the city, the
first of her Waterdeep quests may start. Sandrah receives a number of missions from her temple
during SoA. In a way the Waterdeep temple may be considered her stronghold. Landrel, the
messenger, will seek her out and for the first quest provide her with an ability to transport the
party to Elminster’s garden and back. There is some time interval between uses of the spell, but
you can as well reach Waterdeep by worldmap travelling.
Quest – Waterdeep Vampires
Landrel asks Sandrah to report to her old teacher Ringothal at the Waterdeep temple.
Before the quest starts, you may meet Leyala again, the girl you rescued at the temple by giving
her some of your blood. She is happy to live again but afraid of the influence of the bhaalblood.
Sandrah can convince her that your deeds are mostly heroic (provided they are) and she will later
appear in RtF as a joinable NPC.

Sandrah Saga Guide
76 ©PaulaMigrate
Talk to Ringothal at the temple’s inner sanctum. Talk to the harbor master in the Central Ward,
he will stand in the south on the peer. He will give you more details and also mention the
fisherman Reagan. You can go to the ship right away or prepare for the mission beforehand.
On the ship (CVELS1) you can click on the nose to row back to land, if necessary. The rats on the
ship can be quite nasty and infectious. Fight your way down inside the ship. On the lowest level
(CVELS3) and after you killed all rats, two plane vampires appear like out of the wall. Once
defeated, you inspect the wall and find a kind of portal between the planes. It seems that this is
how the vampires come and go and why nobody could trace them before. Again you have a
choice to go on or postpone the quest. (Use PID on Sandrah if you want to continue after you
received healing.)
Once through the portal (CVELS4) there is no visible way back. The area has more plane
vampires and vampiric mists swarming around. There is also a golem that can only be killed with
non-magical weapons.
In a library room you find Reagan lying on the ground. Talk to him. He will tell you about a
planned invasion and recall for you in a cutscene a speech of the Eldest Plane Vampire to his
disciples. You learn that you need to find a plane crystal to stop the invasion and to use it
yourself to open the portal back home. For this you need to find and defeat the Eldest. Sandrah
promises to take the fisherman back to the temple to restore him as soon as you solved the
quest.
In a NE room you find a richly ornamented sarcophagus. Once you found and defeated the Eldest
Vampire, you need to put a wooden stake through his heart to prevent his return and to get the
crystal. Remember that Sandrah can produce stakes with her hammer if you converse with her
parcel.
You find the Eldest in the rooms in the north surrounded by a swarm of plane vampires and
vampiric wolves. The exit is behind him. Kill the boss, put a stake through his heart at the
sarcophagus else he keeps returning and you receive the crystal. Return to Reagan and he will
start to follow you until you return to Waterdeep.
Take care on your way out that Reagan stays close to you and follows you through the
transitions until you are back in the harbor. As soon as Reagan sees the harbor master, he will
make a report and afterwards the two walk off for a drink. You go back to the temple to bring
Ringothal the crystal.
Return to the harbor and watch the spectacle of the priest cleansing the ship. Return to your
previous plot.
120. Arlax (RR3100)
ROT >>>> In the NW or NE ares the entrances to the sewers, they look like a well (RR3150). In
the SW corner of the sewers is a drow messenger Moradin. He will tell you about one of Drizzt’s
companions and the Mozuma’s Cave which now will be marked on your worldmap.
Arlax is full of other quests and story side-lines from RoT but none of them is related to Sandrah.

Sandrah Saga Guide
77 ©PaulaMigrate
Fight your way through the Caves (RR3220) until you meet Errtu again, you may know him
already from the Drizzt Saga in BG1. You can trick him in dialogue to reveal more details. After
you sent him back to hell, you will find Drizzt’s friend Regis. After you free him, you have a choice
to recruit him or send him to the Copper Coronet. In any case, you receive a hint to the Umar
Hills.
121. Westchar (RR3300)
ROT >>>>>Again there are a number of quests started in this area. Here only the episode of the
main quest involving Sandrah is detailed.
The house you seek and for which you received the key in Umar Hills is in the SW with a guard in
front of it. Even with the key in hand, your protagonist needs to have at least 1,25mio XP to enter
the hut.
You make your way through the riddles and battle against fire giants and vampires until you
finally find Bruenor. You send him to join the other Drizzt comrades in the Copper Coronet.
Return to the Gragha queen to be transferred back to Westchar.
This is about all from the ROT main quest you can do until you reach Brynnlaw.
122. Stormhorn Mountains (AR3520)
Nib Jansen will be on the Promenade around 1900/3200 and give you a map that can lead you to
his skyship. To use it, you cannot have more than 5 members in your party (to have a slot for
Shauhana to join you for her quest). You can as well reach the area via worldmap but you will
miss a bit of (non-crucial) content and waste a lot of time. Another reason to use the skyship may
be the ownership of a stronghold with timed events.
On your first journey with the ship, you will go down with navigational trouble. Regardless of
your chosen destination, you will crash land in the Stormhorns. After your party regains
consciousness you explore the area. You find mostly orcs.
In the SE you witness a female fighter with a box who fights against a larger group of orcs. In the
following cutscene, she defeats those orcs with her bow salves. Talk to Shauhana, the half-orc
afterwards and let her join.
Of course there are options to leave her alone or to send her away on her own. In this case you
can explore the area for a dragon cave and massive battle with Velvetfoot. You get xp and large
loot. Otherwise this is a dead end for the mod.
Shauhana is a fighter when she joins equipped with her personal bow that needs no ammunition.
From the moment on that she joins she will get further levels as a mage. The reason for it is part
of her story.
When she joins you, this blocks all exits from the area except the one she will tell you about in
her initial conversation. You are in Clan Orc land (you heard about the Clans already during BG1

Sandrah Saga Guide
78 ©PaulaMigrate
part in context with General Ghotal and the events in the Field of Deaths). To escape with your
new companion, a half-orc, you need to take the route through a haunted cave system.
You may meet the new Clan Hounds on your way to the cave entrance. They require a killing
technique similar to trolls. Ask Shauhana with PID about them and she will tell you why. You
should use PID with Shauhana a lot and also rest regularly during the Stormhorn quest to trigger
her story.
Before you enter the Swamp Caves, you have the option to visit the dragon cave. However you
can delay that since you will return to the mountains again later in the plot. Velvetfoot is not
connected to the Shauhana quest.
123. Swamp Caves (CVSHA1)
You cannot leave the caves again from the point you entered. The caves have clan orc ghosts,
clan hounds and spiders. At two places there is some slimy moss that hinders your party. When
you step into the first patch you find, this triggers an incident with Shauhana that reveals her
scar to you. You get further PID options afterwards. Take any chance to rest and to learn more
about your new companion.
In the NW you find the exit to Amn but it is currently sealed by a mighty orc rune. Shauhana
advises you that the rune can only be removed with the shaman’s staff that once sealed it. That
staff is guarded by the arch shaman of the Clan, so you need to get it somehow.
After you found the sealed exit, you will be able to find an exit to Clan’s land in the SW.
124. Swamp Caves Exit (CVSHA2)
The area has a couple of clan hounds, otherwise it is a good area for a rest. Before going to sleep,
Shauhana will provide you with more details of her past. During the conversations with her you
will also learn about the final part of the journey of Brage from Nashkel.

Sandrah Saga Guide
79 ©PaulaMigrate
Hint – Map of Stormhorn Lands
125. Orcland Way Sign (CVSHA3)
This area will play an important role in various parts of the Sandrah mod even though ion the
first visit you only find some orc priests and clan hounds here. The northern exit is not yet
accessible; it leads to Sharkta Fai, the legendary place you have probably heard about during the
book hunters’ quest in BG1 and from Brage’s meetings.
After a PID that tells you about her relationship to Brage, she will ask Sandrah to help her with
the book she inherited from the Nashkel captain. It turns out that this is probably the missing
piece from the Sharkta Fai papers found earlier on the pirate island. Later in another
conversation Shauhana will reveal that she knows where Sharkta Fai is located. You still need to
find the method how to enter it, though.
In another dialogue, Shauhana will ask about Minsc and Boo. Minsc plays a role for the second
part of the Shauhana quest that starts when you managed to leave the orc lands and return to
Amn.
126. Orcland Ice Road (CVSH10)
The area has exit to adjacent areas on all for sides following the roads, however on the first visit
only the northern exit to the village is accessible. The area contains Ice Golems, orc shamans and

Sandrah Saga Guide
80 ©PaulaMigrate
archers, Frost Giants, Hook Horrors and more. On subsequent visits there is more content, on the
first visit you just fight your way north.
127. Hai 'Ulthak , Outskirts (CVSHA4)
Shauhana provides you with information about what lies ahead. The shaman’s hut to find the
staff is in the north of the area. The jail cave is in the east of the area, this is where the orcs take
Shauhana when she gets caught.
During daytime, Shauhana will advise you to wait until night to face less opposition. It is up to
you to heed that advice or not. There are significantly more and harder opponents if the alert is
sounded during daytime.
When you finally reach the hut (CVSHA8) and cleared it of the undead minions, you find
Vennegrat, the shaman. It is the same orc you may have met twice already, once on the
Salamander Island and once near the temple where you found Ghotal’s sword. He addresses
Shauhana as *godchild* just like in all the foreshadowing events during BG1. He transports away
when injured enough telling you that you will not escape orc lands.
The orc staff is hidden in a wall crack. When you have it, it is time to make your way back to the
swamp caves and its exit. Check out if you still have PID options with Shauhana to get her full
story.
On the way to the cave, Vennegrat and reinforcements will stop you at the way sign. The only
way to escape is to give them Shauhana. During the negotiation Sandrah gives a potion of
invulnerability to the orc girl that will help her to endure the orc’s torture for a period of time,
hopefully long enough for you to arrange the rescue. Shauhana tells you that she will most likely
be taken to the prison in the east of the area where the shaman’s hut is located.
128. Hai 'Ulthak , Prison (CVSHA9)
Vennegrat, Shauhana, and most orcs teleport away – they also confiscate the staff you need for
escape. The remaining orcs are easily overwhelmed and you make your way to the prison.
After the hailer is defeated, Shauhana joins you again. She asks you to take the body of her
teacher with you who died in her defense. You need this body to enter Sharkta Fai, so follow her
advice.
In the floor container nearest to the entry you find Shauhana’s weapons and the staff.
Once you leave the prison, Vennegrat and some golems appear to stop you. This time you will be
able to finally defeat him. Take the Sharkta Fai jewel from his corpse and return to the way sign
area.

Sandrah Saga Guide
81 ©PaulaMigrate
129. Road to Sharkta Fai (CVSHA5)
Provided you did the Shauhana dialogues and you rested st least once in the Stormhorns and you
possess the jewel now, your half-orc companion will reveal the road to Sharkta Fai as soon as you
reach the way sign area. After her briefing and Sandrah’s explanation about what she found in
Brage’s book, the northern exit from the area is opened.
This is a long winding road through icy mountains with loads of different monsters to fight. You
will travel it again in the second part of the Dhauhana quest with a cast of new and different
opponents that time.
Near the NW exit, Shauhana will show you her gratitude for what you do for her. In a narrow
crack in the icy rocks in the NW is the entry to the temple (CVSHA6). You need to unlock the altar
and place the jewel inside. You also need the dead teacher’s body that Shauhana has asked you
to pick up from the prison.
130. Sharkta Fai Pool (CVSHA7)
Upon entering the area, Shauhana asks you to look for useful items around the room. You will
find an emblem of Myrkul among the loot. Keep it as another hint to her grandfather and her
heritage.
Let Shauhana step into the pool to face the central statue at the northern wall. The healing
process will start but also the guardian will appear. After another *godchild* talk, the guardian is
satisfied with the dead teacher you delivered and lets you go. You are transported out and find
yourself back at the start of the mountain road. Just move south to get back to the way sign.
Shauhana asks you for the Myrkul emblem and in the dialogue that follows you find out that she
is the granddaughter of General Ghotal, the orc leader from the Fields of Death.
Shauhana will also inquire about Minsc (if he is not yet in party). You can now leave the
Stormhorns and return to Anm to continue your main quest. The second part of the Shauhana
quest will evolve in parallel to other tasks you do until it is time to visit the Stormhorns again.
You will need Shauhana and Minsc for this episode to start. However, once the main second
quest starts, those two will leave the party and become plot characters. You then get a chance to
replace them with other NPCs. You can do a bit of planning your party composition at that point.
If you need a slot to make room for Minsc, consider those NPCs that will wait for you when you
kick them out. You need Minsc for just ten game days including 4 days required to reach the
Stormhorns next time.
Also upon leaving the mountains Sandrah will express her doubts about the guardian, the
afterlife and Sharkta Fai in general. It does not fit into her scientific views although she has no
explanation ready yet.
Leave the orc caves at the exit that is now available at the orc rune statue and find yourself back
at the City Gates.

Sandrah Saga Guide
82 ©PaulaMigrate
Quest – Shauhana’s Quest - Interlude
Keep Shauhana in your party while continuing with other quests you still need to resolve. The
following events will happen while you move around Athkatla and its surroundings.
Visit the blind orc in the slums who gave you the initial quest. Also, find Minsc and let him join, if
necessary.
Minsc and Shauhana will start a series of friendship talks with the outcome that the berserker
starts to protect the wizard apprentice – not that she needs much protection.
Upon a rest with Minsc and Shauhana in party, another piece of truth about Boo and Pelligram
will be revealed. Another interesting episode happens if you do the *Kidnapping of Boo*
episode while Minsc and Shauhana are in the party.
About an hour real time playing after you talked to Ghatlenk in the slums and when you are in a
city area at night, an orc boy will approach Shauhana. He will ask Shauhana to help the Clan orcs.
It turns out the little boy is just a magical disguise; it is actually Wallrick, the last loyal adjutant of
the late General Ghotal. To find out more about Shauhana’s godchild heritage and the possible
mission, agree to see again the blind orc in the slums.
You find Wallrick and Ghatlenk together, father and son. They and Sandrah provide you with
parts of the background story about Ghotal’s failed mission and Shauhana’s task for a second
attempt. To continue, you need to meet them after a tenday at the orcland way sign you visited
already. You need to bring Minsc along for this journey. (Consider that the journey itself will take
4 ½ days out of the 10.)
131. Nib’s Ship/Palace Entry (CVSH13)
This small area is a gateway for the second part of the Shauhana quest but will again become
important during RtF.
Quest – Shauhana’s Quest – The Factory
You travel to the Stormhorns by worldmap this time and have Shauhana and Minsc in your party.
You pass again through theswamp cave filled with new monsters.
At the waysign area Ghatlenk and Wallrick await you. They reveal the name of Shauhana’s father
and the reason for her heritage. Ghotal’s granddaughter is to re-unite the Clan orcs si that they
stand a chance to survive in an environment dominated by humans and elves. But the true
enemy is still an internal one. With the help of a mighty ally, Vennegrat has returned and
mobilizes an army of undead against those following Shauhana, Ghattlenk and Wallrick.
Shauhana needs your help to find the source of those undead; Sandrah already suspects that
Sharkta Fai may be involved here.
Move ahead to the crossing of the ice roads to talk again with the orc leaders and decide to split
forces. Just prior that second meeting you will witness Minsc as he proposes to Shauhana.
The enemy forces gather in the west in Icebear Clan village while the loyal forces are preparing in
the village in the north. While Shauhana and Minsc now leave the party to train and fortify the

Sandrah Saga Guide
83 ©PaulaMigrate
village in the north, the rest of your party is tasked to explore the west and find out details by
espionage.
As Minsc and Shauhana will permanently leave the party now, you should follow Wallrick’s
advice to first go east to meet Nib Jansen again. He has repaired the ship and now offers free
travel to Amn. Use his ship to fill the vacant party slots with new or old companions.
Nib Jansen awaits you for travels to Amn without cost of gold or travel time. North of his ship is
an ancient entry to a palace that is currently blocked. Later you will be able to visit Shauhana’s
residence there.
Ask Nib to take you to the city gates. Arriving there, you receive a travel scroll by which you can
return to the orc lands again. Do so after you picked up two new companions.
Now leave the sky ship area west and cross again the large road area to leave by the western exit
this time.
132. Orc Cemetary (CVSH11)
Two orcs await you when entering the area to report about strange events and the appearance
of many undead from a graveyard nearby. They also state that there are more undead orxs than
were ever buried there and even some who were brought to Sharkta Fai instead or being buried.
You can talk to the orc scouts in a camp in the north and send them home for xp.
Explore the graveyard in the eastern part of the area. You will be attacked by undead warriors;
one of them turns out to be Shauhana’s dead teacher, the one you delivered to Sharkta Fai
yourself. An open grave seems to expel those undead although the entry seems to be at another
location.
Near the western exit you find an injured shaman with more information. Continue to the next
area west.
133. Ice bear Clan Village (CVSH12)
The frozen lake in front of you cannot be crossed as the ice is too slippery so you must take a
southern route around it. The lake will play an important role in near future. You can see a lot of
corpses embedded in the ice, the history of the place will soon be revealed.
In the south are the remains of a former village, now filled with hostile ghosts. On the east side
of the lake you find an area with some bone golems.
North and south of the golems are two passages to the actual Ice Bear Clan village, or what is left
of it. Regard which passage you take, you will trigger an alert and an ambush of various
creatures. The mix of that group is very dangerous and you have little means to prepare
yourself.

Sandrah Saga Guide
84 ©PaulaMigrate
In the village itself there are two Thayan Liches and Vennegrat. Those liches give you a glimpse of
the dangers you will face to solve the riddle but they also are a first hint to the enemy in the
background. Vennegrat will teleport away after he dropped a hint about what is going on.
After the liches are defeated and you received the hint from Vennegrat, Sandrah will advise you
to return to the open grave in the previous area for further investigation.
(Note that there is a passage to the south of the area that is a dead-end at this time. It will open
for the RtF sequel later.)
When you come back to the open grave in the cemetery, Sandrah will draw a map of the areas
around. It shows that the graveyard and Sharkta Fai are most likely connected below the surface.
In between she assumes the location of the *factory* already mentioned by Vennegrat where
the dead heroes are turned into undead. According to your counselor, this is just a side effect of
what is really happening there and whatever is performed by the master in the background.
Before she can tell you who she thinks that is, a new wave of undead emerge from the grave.
134. Hai ‘Ulthak, Old Mill (CVSH14)
You now need to report to Shauhana and also ask her for Myrkul’s amulet which you found at
Sharkta Fai during your last visit. You need the symbol to enter the fountain once more and dig
deeper into its secrets.
Return to the village outskirts you visited before. Some orc mooseherd will point you the further
way and also explain that you may occasionally still meet hostile orc folowers of Vennegrat.
Depart the area to the NE to reach the mill area.
You will be greeted by Giran, the little errand boy from the sword coast. He has a tale to tell
about he came to the Stormhorns. His little story will evolve along the main plot and he will end
up in Shauhana’s and Minsc’s care at the end of the quest. (Note that Minsc will educate the boy
to become a ranger. When you return to the couple in RtF, the boy has grown to be a young man
and ready to join you.)
In the area, you find the traces of the recent battle and orcs and shamans rebuilding the mill. You
will hear different opinions about the new queen and her berserker if you talk to them. In the
middle of the area be careful otherwise you may cause a moose stampede.
The exit to the main village is to the east.
135. Hai ‘Ulthak, Main Village (CVSH15)
The orc at the village entrance can give you directions. Shauhana can be found ioutside the large
tent in the NE of the area. Minsc and his new besrserker elites are training in the center area.
West of their circle you can enter Minsc’s lodge building.
Talk to Minsc. Then talk to Shauhana to plan the next step. Sandrah finally tells you the name of
the necromancer and lich she suspects at the heart of the operation: Szass Tam, the Zulkir of
Thay. More detail is given in the dialogue. Take the Myrkul emblem from the tent behind

Sandrah Saga Guide
85 ©PaulaMigrate
Shauhana with you. Now return to the way sign area and take the road up to Sharkta Fai for a
second time.
On the road to Sharkta Fai you meet Ghatlenk again. He wants to bring fallen orcs to Sharkta Fai
but you can convince him not to bring new material to the factory. The winding road has new
monsters including one more Thayan lich.
When you arrive at the pool, Sandrah will explain a few things she has found out. The legend
seems to be a mixture of a natural phenomenon spiced with a lot of religion and superstition.
Sandrah made some use of it when healing Shauhana but Szass Tam uses the beliefs of the orcs
in large scale for his operations.
After a small wait, Sandrah will urge you to go forward. You can decide to go right away or rest
the party before you tell her to move on. She will use Myrkul’s emblem on the pool.
136. Sharkta Fai Factory (CVSH20)
You break through the ice of the frozen pool and end up at the bottom of a ravine in the NW
corner of the *factory*. You have no chance to climb up the frozen path again, so there is only
moving forward.
You are in a very large cave and the exit is in the SE, it will lead you back to the open grave in the
cemetery. At regular intervals you observe undead warriors coming out of exits from the
machinery and making their way towards the exit. The caves is filled with myconids of all sorts
and also shape shifting duergar. The duergar in enlarged forms drop large rocks on you – you will
need three of those rocks to block the factory’s machinery.
At a central platform you can find the Sharkta Fai watcher. He reveals his tale and tells you about
the new master of Sharkta Fai and his plans. He was left behind by Myrkul, the god killed during
the Time of Troubles by Midnight, Sandrah’s grandmother. He will ask Sandrah to release him
from his eternal service for the god who will never return. You mercifully kill him and receive his
wardstone.
The wardstone opens a temple building (CVSH21) in the NE of the cave that you reach by
following all along the northern edge of the cave from the point where you came in due east. In
the building you finally find Szass Tam who tells you more about the how and why of his
installation.
There are three energy inlets around the room that provide the kernel with what it needs. The
idea is to block these dark matter streams in some way. There is an area in front of every inlet
where you can position items out of your inventory. This is where the duergar rocks play their
role. Place at least 2 rocks in front of every inlet to stop its operation. (Here is a little trick: as
soon as you put 2 rocks in front of any inlet, it stops and you get a success message – just pick up
the rocks again and drop them at the next inlet, etc. This way you just need to carry 2 rocks from
the duergars to the temple.).

Sandrah Saga Guide
86 ©PaulaMigrate
When you stopped his energy supply, Szass Tam will jump out of his inner circle to confront you.
Use your wits instead of force in the upcoming conversation and he will retreat from the event –
you will face him again in RtF. He will leave his adjutants to take care of you.
Leave the temple and proceed towards the cave exit. The adjutants awaiting you are old
acquaintances, one is Winski Perorate, the other is Narghal Rasz, the Red Wizard you may have
met in Baldur’s Gate if you did Ordolath’s candle quest. Finish them and leave the cave.
You emerge from the open grave and find yourself on a battlefield. While you were underground,
Shauhana and Minsc and the clan orcs have defeated most of Vennegrat’s followers. The couple
asks you to accompany them to the frozen lake at the ice bear clan village where the remaining
enemies have gathered. Shauhana will provide you with the tactic used by her grandfather
Ghotal during the battle once fought at the lake (those are the dead bodies encased in the ice
that you saw during the first visit.) The orcs will move ahead to the final battle and you follow as
soon as you are ready, once again to the west and the frozen lake.
Shauhana will greet you and give you a briefing. Afterwards Sandrah will move to the lakeside
and start to use her magic hammer on the ice. Most of the attackers from the other side of the
lake will crack through the ice before they reach your side and your party can just kill the few
that make it through. When most enemies have fallen including Vennegrat, Shauhana will
declare the victory and you get some reward. She tells you to meet her at Nib’s skyship.
When you pass through the cemetery area once more on your way out, Mystra will await you –
respectively Sandrah – and they will have a conversation. You will learn about the whole story
but you also get the warning that Szass Tam is not defeated and has plenty of resources for
further actions. You will only see him again much later in RtF, for now the quest is done. You also
get a PID option to ask Sandrah for further details about the Weave and its Dark counterpart.
This may not be important right away but contains significant information for later in RtF when
you deal again with Szass and with Shar, the goddess of the Shadow Weave,
Talk to Minsc and Shauhana to end the Shauhana quest and use Nib to return to Amn.
The sequel to all of those events and a return to your friends await you after you finished ToB.
137. Trademeet (AR2000)
After you accept Logan’s quest and talked to Cernd, some Lord Khellon Menold will approach you
in the street to provide you with some *insight of what is really going on*. If you take the
dialogue options to hear him out, he will provide you with a poison for the druid grove to finish
the problem. This is in fact the option for the *evil* path that is put before the player if Sandrah
is in the party. Note that Sandrah does not encourage the evil solution; this is rather an extra test
where she evaluates your decisions.
The gypsy Kveroslava has fortune telling for Sandrah and Shauhana.
During the Tiris/Rejiek encounter, Sandrah will cast a detect evil spell that identifies who are the
evil creatures among those you face. She can apply one of her restorations spells on the girl
afterwards.

Sandrah Saga Guide
87 ©PaulaMigrate
After all quests are done for Logan, he may invite Sandrah for a private meeting.
138. DeArnise Hold (AR1300)
On the roof platform kill the Yuan-Ti mage at the SW end to trigger another of Sandrah’s *castle
talks*. The topic is responsibility and how you will handle it. Her expectations in the protagonist
start to shape.

Sandrah Saga Guide
88 ©PaulaMigrate
Part 4 Sandrah in ToB
139. Pocket Plane (AR4500)
(J) Jen’jig returns

Sandrah Saga Guide
89 ©PaulaMigrate
Part 5 Return to Faerun

Sandrah Saga Guide
90 ©PaulaMigrate
Part 6 Time of Troubles Revisited

Sandrah Saga Guide
91 ©PaulaMigrate
Annex EET/Sandrah Saga Chapter Guide
Sandrah uses and extends the EET continuous chapter system.
Chapter 1 Start ----> Entering Nashkel
Chapter 2 Entering Nashkel -----> Nashkel Mine Finish
Chapter 3 Picking up documents in Nashkel Mines, Mulahey dead -----> Looting Tazok's
chest in Bandit Camp
Chapter 4 Looting Tazok's chest in Bandit Camp -----> Killing Daevorn in Cloakwood Mine
Chapter 5 Killing Daevorn in Cloakwood Mine ------> Receiving Book from Duke Eltan
Chapter 6 Receiving Book from Duke Eltan -------> Coming out of Candlekeep Catacombs
Chapter 7a Coming out of Candlekeep Catacombs -------> Transition to SoD
Chapter 7b (SoD) Clearing Sarevok's remains + Start of SoD quest ------> Leaving Baldur's
Gate
Chapter 8 (SoD) Leaving Baldur's Gate ------> Reaching Boareskyr Bridge
Chapter 9 (SoD) Reaching Boareskyr Bridge ------> Reaching Coalition Camp
Chapter 10 (SoD) Reaching Coalition Camp ------> Reaching Dragonspear Castle
Chapter 11 (SoD) Reaching Dragonspear Castle ------> Entering the Portal to Avernus
Chapter 12 (SoD) Entering the Portal ------> Arrested for murdering Skie
Chapter 13a (SoD) Escaping from Baldur's Gate + Being captured by Irenicus
Chapter 13b Starting Irenicus Dungeon ------> Having talked to Gaelan
Chapter 14 Having talked to Gaelan ------> Deciding for either Bodhi or Gaelan offer
Chapter 15 Decision on path to Spellhold made (running jobs for your ally) ----> Starting the
Journey
Chapter 16 Journey to Spellhold -------> Entering Underdark
Chapter 17 Entering Underdark ------> Back to Surface, Elhan's Camp
Chapter 18 Back on Surface after Underdark -----> Entering Suldanessalar
Chapter 19 Entering Suldanessalar -----> Transition to ToB
Chapter 20 Begin of ToB ------> Reaching Amkethran
Chapter 21 Reaching Amkethran ------> Entering ToB Final
Chapter 22 Final Fight at Throne of Bhaal
Chapter 23 Start Return to Faerun (RtF) The Hornswamp Intrigue
Chapter 24 RtF Cerameon's Seal (starts when Wallrick notifies attack on Summer Camp)
Chapter 25 RtF Journey to Thay (starts when reaching Thay Cyric Temple)
Chapter 26 RtF Alliances (starts after defeating Talos at Black Hand)
Chapter 27 RtF The Spell Plague
Chapter 28 RtF The Citadel
Chapter 29 RtF A Revelation
Chapter 30 Time of Trouble Revisited (ToT) Companions
Chapter 31 ToT Liriel's quest (starts with Liriel's story about Windwalker)
Chapter 32 ToT Kelemvor Lyonsbane's quest (starts leaving Suldanessalar)
Chapter 33 ToT Myrkul's Defeat (starts Night after Kelemvor's Cure)
Chapter 34 ToT Adon's quest (starts End of Celestial Stairs, Transport to Athkatla)
Chapter 35 ToT Cyric's quest (Bhaal hunt) starts with Bane + Torm death in Tantras
Chapter 36 ToT Ascensions (starts leaving Bhaal temple in Thay, Bhaal alive)
