Scratch 2.0 Beginner S Guide, 2nd Edition
User Manual: Pdf
Open the PDF directly: View PDF ![]() .
.
Page Count: 296 [warning: Documents this large are best viewed by clicking the View PDF Link!]
- Cover
- Copyright
- Credits
- About the Author
- About the Reviewers
- www.PacktPub.com
- Table of Contents
- Preface
- Chapter 1: Welcome to Scratch 2.0
- Chapter 2: A Quick Start Guide to Scratch
- Joining the Scratch community
- Time for action – creating an account on the Scratch website
- Time for action – understanding the key features of your account
- Taking our first steps in Scratch
- Time for action – moving the cat across the stage
- Time for action – animating a walking motion with the cat
- Time for action – saving our work
- Introducing forever loops
- Time for action – setting the cat in motion, forever
- Time for action – flipping the cat right-side up
- Adding sprites to the project
- Time for action – adding a second sprite and script
- Reviewing a video-sensing project
- Time for action – reviewing pop the balloon - video starter
- Summary
- Chapter 3: Creating an Animated Birthday Card
- Introducing the paint editor
- Time for action – painting a happy birthday sprite
- Time for action – drawing a vector image
- Time for action – using the fill with color tool to paint the stage
- Adding gradients
- Time for action – applying a gradient
- Time for action – adding more sprites to address the card
- Initializing a sprite's starting values
- Time for action – hiding all sprites when the flag is clicked
- Time for action – displaying happy birthday
- Specifying memorable names and comments
- Time for action – renaming sprites
- Inserting comments into our code
- Time for action – adding comments to a script
- Transforming sprites with graphical effects
- Time for action – transforming sprites
- Time for action – turning m in a circle
- Time for action – making a sprite fade in with the ghost effect
- Summary
- Chapter 4: Creating a Scratch Story Book
- Designing the outline of a barnyard joke book
- Time for action – designing a clickable table of contents
- Time for action – adding pages to the book
- Time for action – adding a sprite to the Backpack
- Building a joke with say blocks and sounds
- Time for action – making a horse talk with the say block
- Time for action – synchronizing and animating the horse
- Time for action – importing a horse sound
- Positioning a sprite by its coordinates
- Time for action – moving the dog based on x and y coordinates
- Time for action – duplicating, flipping, and switching a sprite's costume
- Composing custom sound effects
- Time for action – creating drum sound effects
- Time for action – integrating the dog's joke sequence
- Navigating the story and coordinating scenes
- Time for action – hiding the table of contents
- Time for action – displaying the dog scene
- Time for action – navigating back to the table of contents
- Summary
- Chapter 5: Creating a Multimedia Slideshow
- Importing photos as backdrops
- Time for action – importing photos from files
- Working with images
- Adding slideshow controls to display images
- Time for action – flipping through the photos
- Playing and recording sounds
- Time for action – adding a sound from Scratch's library
- Time for action – recording sounds in the sound editor
- Editing sounds
- Time for action – editing a recorded sound
- Time for action – appending a sound
- Time for action – adding sound effects to recordings
- Using x and y coordinates to find the position of the mouse's pointer
- Time for action – using mouse location to hide arrows
- Time for action – providing user instructions
- Displaying a project in presentation mode
- Time for action – presenting a fullscreen slideshow
- Summary
- Chapter 6: Making an Arcade Game – Breakout (Part I)
- Learning about the Breakout game
- Time for action – importing and playing the Pong starter project
- Time for action – adding the left and right arrow controls
- Time for action – determining if the ball is below the paddle
- Time for action – adjusting the center of a sprite costume
- Cloning to create identical sprites
- Time for action – drawing bricks
- Time for action – cloning bricks
- Time for action – breaking bricks when I start as a clone
- Ricocheting with the point in direction block
- Time for action – changing a sprite's direction
- Time for action – setting the starting position and the direction
- Time for action – ricocheting off bricks
- Defining a variable to keep score
- Time for action – adding a score variable
- Summary
- Chapter 7: Programming a Challenging Gameplay – Breakout (Part II)
- Implementing lives
- Time for action – adding a variable to track lives
- Time for action – checking for game over
- Adding more bricks to the level with a custom block
- Time for action – creating a second brick
- Time for action – drawing rows of bricks with custom blocks
- Time for action – coordinating the ball play
- Increasing ball speed and difficulty
- Time for action – increasing ball speed
- Time for action – decreasing the paddle size based on the clones' costume
- Time for action – detecting when we clear the level
- Keeping the score using cloud variables
- Time for action – keeping a global scoreboard
- Summary
- Chapter 8: Chatting with a Fortune Teller
- Creating, importing, and exporting lists
- Time for action – creating lists to store multiple values
- Time for action – importing fortunes to a list
- Prompting the player for a question
- Time for action – asking a question
- Time for action – validating the seeker's question
- Time for action – selecting a random fortune
- Time for action – counting our fortunes with mod
- Time for action – creating a custom say fortune block
- Time for action – ensuring grammatically correct questions
- Creating a keyword scanner
- Time for action – scanning a text string to build a list of words
- Summary
- Chapter 9: Turning Geometric Patterns into Art Using the Pen Tool
- Drawing basic shapes
- Time for action – drawing our first square
- Time for action – building on the square
- Time for action – enabling the user to create custom shapes
- Time for action – turning triangles into pinwheels
- Time for action – creating a custom shapes procedure
- Time for action – plotting x,y coordinates to draw a square
- Understanding and using color
- Time for action – coloring our shapes
- Time for action – finding a color picker workaround
- Time for action – creating a color palette
- Time for action – limiting color values with a slider
- Creating asymmetrical patterns
- Time for action – creating an explosion
- Turning straight lines into string art
- Time for action – animating a radar screen
- Time for action – breaking out of the circle
- Summary
- Appendix A: Connecting a PicoBoard to Scratch 1.4
- Using Scratch 1.4, the PicoBoard, and Raspberry Pi
- Purchasing the PicoBoard
- Time for action – enabling and testing the PicoBoard support in Scratch 1.4
- Animating webcam images by detecting sound
- Time for action – creating a talking head
- Measuring resistance
- Time for action – recording the resistance of a thermistor over time
- Time for action – charting our measurements
- Time for action – revising the graph
- Summary
- Appendix B: Pop Quiz Answers
- Index

Scratch 2.0 Beginner's Guide
Second Edition
Copyright © 2014 Packt Publishing
All rights reserved. No part of this book may be reproduced, stored in a retrieval system,
or transmied in any form or by any means, without the prior wrien permission of the
publisher, except in the case of brief quotaons embedded in crical arcles or reviews.
Every eort has been made in the preparaon of this book to ensure the accuracy of the
informaon presented. However, the informaon contained in this book is sold without
warranty, either express or implied. Neither the author, nor Packt Publishing, and its dealers
and distributors will be held liable for any damages caused or alleged to be caused directly or
indirectly by this book.
Packt Publishing has endeavored to provide trademark informaon about all of the
companies and products menoned in this book by the appropriate use of capitals.
However, Packt Publishing cannot guarantee the accuracy of this informaon.
First Published: July 2009
Second Edion: April 2014
Producon Reference: 1080414
Published by Packt Publishing Ltd.
Livery Place
35 Livery Street
Birmingham B3 2PB, UK.
ISBN 978-1-78216-072-4
www.packtpub.com
Cover Image by Ross Manges (ross@rossmanges.net)
www.allitebooks.com

Credits
Author
Michael Badger
Reviewers
Samyak Bhuta
Manuel Menezes de Sequeira
Franklin Webber
Acquision Editor
Joanne Fitzpatrick
Content Development Editor
Dayan Hyames
Technical Editors
Shubhangi Dhamgaye
Shweta Pant
Mrunmayee Pal
Aman Preet Singh
Copy Editors
Sarang Chari
Brandt D'Mello
Mradula Hegde
Project Coordinator
Binny K. Babu
Proofreaders
Simran Bhogal
Maria Gould
Ameesha Green
Paul Hindle
Indexer
Mehreen Deshmukh
Producon Coordinator
Nitesh Thakur
Cover Work
Nitesh Thakur
www.allitebooks.com

About the Author
Michael Badger is a writer and technical communicator who has worked in a range of
technical roles, including support, automated soware tesng, and project management.
He has authored several books for Packt Publishing, including Scratch 1.4 Beginner's Guide.
He also authors a regular Scratch column for Raspberry Pi Geek Magazine, which focuses on
Scratch 1.4.
I'd like to thank the team at Packt Publishing for pung up with me and
helping me make this revision the best it could be. My loving wife Chrise
and son Cameron also deserve credit for allowing me the exibility to
complete this book.
www.allitebooks.com

About the Reviewers
Samyak Bhuta is fascinated by art and technology and is always excited when they
both meet. He is a soware architect by profession with over a decade of experience.
He started programming in his childhood with GWBasic and quickly moved over to QBasic.
Professionally, he has worked on Java, JavaScript, Python, and PHP. He enjoys coding user
interfaces as well as working on backend programming. Samyak believes in the open source
philosophy and has been acve in his local community. He loves to eat dal ba, an Indian
dish, and has dreams to become a aust.
I would like to thank Packt Publishing for keeping paence when I couldn't
submit my reviews on me.
Manuel Menezes de Sequeira has been teaching programming since 1995. He started
teaching programming using C, then moved to C++, and later to Java. Nowadays, in his
lectures, he usually starts programming with Scratch and Snap!, and then moves on to
text-based languages such as Java. Manuel teaches at the Universidade Europeia | Laureate
Internaonal Universies in Lisbon, Portugal, where he also champions in CoderDojo LX, the
Lisbon-based CoderDojo, where children can learn to program for free while having fun. He
lives in Lisbon, Portugal, and has been involved for a few years in the translaon of Scratch,
SNAP!, and other projects to Portuguese.
Franklin Webber is a soware professional whose professional experience comes from
a tesng background where he sought to automate himself out of a job. A college teaching
assistant once told Frank that he was a great soware developer and a terrible computer
scienst, and that the soware he wrote cared more for the user experience than the
size of its Big O Notaon. As a soware developer, he became the resident generalist who
was always willing to step up to learn new technologies. He now spends most of his me
teaching soware design to students, both young and old.
www.allitebooks.com

www.PacktPub.com
Support les, eBooks, discount offers, and more
You might want to visit www.PacktPub.com for support les and downloads related to
your book.
Did you know that Packt oers eBook versions of every book published, with PDF and ePub
les available? You can upgrade to the eBook version at www.PacktPub.com and as a print
book customer, you are entled to a discount on the eBook copy. Get in touch with us at
service@packtpub.com for more details.
At www.PacktPub.com, you can also read a collecon of free technical arcles, sign up
for a range of free newsleers and receive exclusive discounts and oers on Packt books
and eBooks.
TM
http://PacktLib.PacktPub.com
Do you need instant soluons to your IT quesons? PacktLib is Packt's online digital book
library. Here, you can access, read and search across Packt's enre library of books.
Why Subscribe?
Fully searchable across every book published by Packt
Copy and paste, print and bookmark content
On demand and accessible via web browser
Free Access for Packt account holders
If you have an account with Packt at www.PacktPub.com, you can use this to access
PacktLib today and view nine enrely free books. Simply use your login credenals for
immediate access.
www.allitebooks.com

Table of Contents
Preface 1
Chapter 1: Welcome to Scratch 2.0 7
About Scratch 8
Encouraging everyone to think programmacally 8
Sample Scratch uses 9
Computaonal thinking 9
Finding a project for you 10
Making animaons 10
Telling stories 11
Building games 12
Programming games of chance 12
Creang art projects 13
Sensing the real world 13
Programming concepts 13
Using Scratch 2.0 15
Looking inside a Scratch project 17
The stage area 18
The sprites pane 18
The scripts area 18
The built-in image editor 20
Using Scratch 2.0 oine 21
Encountering Scratch 1.4 22
Tinkering encouraged 22
Summary 23
www.allitebooks.com

Table of Contents
[ ii ]
Chapter 2: A Quick Start Guide to Scratch 25
Joining the Scratch community 25
Time for acon – creang an account on the Scratch website 26
Time for acon – understanding the key features of your account 28
Abiding by the terms of use 30
Creang projects under Creave Commons licenses 30
Finding free media online 30
Taking our rst steps in Scratch 31
Time for acon – moving the cat across the stage 31
Using events to trigger an acon 33
Time for acon – animang a walking moon with the cat 33
Understanding the basics of a Scratch Project 35
Saving early, oen, and automacally 36
Time for acon – saving our work 36
Undoing a deleon 37
Introducing forever loops 37
Time for acon – seng the cat in moon, forever 37
Controlling a sprite with loops 39
Time for acon – ipping the cat right-side up 39
Clicking on a block runs the command 41
Adding sprites to the project 41
Time for acon – adding a second sprite and script 42
Reviewing a video-sensing project 44
Time for acon – reviewing pop the balloon - video starter 44
Sensing video 46
Summary 47
Chapter 3: Creang an Animated Birthday Card 49
Introducing the paint editor 50
Time for acon – painng a happy birthday sprite 50
Changing the size of a bitmap image 52
Choosing bitmap or vector images 53
Time for acon – drawing a vector image 53
Changing the size of the vector image 54
Reviewing the image eding tools 55
Erasing in the vector mode 56
Filling the stage with color 57
Time for acon – using the ll with color tool to paint the stage 57
Adding gradients 59
Time for acon – applying a gradient 59
Time for acon – adding more sprites to address the card 61
Inializing a sprite's starng values 62
www.allitebooks.com

Table of Contents
[ iii ]
Time for acon – hiding all sprites when the ag is clicked 62
Time for acon – displaying happy birthday 64
Specifying memorable names and comments 66
Time for acon – renaming sprites 66
Inserng comments into our code 67
Time for acon – adding comments to a script 67
Transforming sprites with graphical eects 68
Time for acon – transforming sprites 68
Graphical transformaons 71
Comparing the repeat and forever blocks 72
Time for acon – turning m in a circle 73
Time for acon – making a sprite fade in with the ghost eect 74
Two ways to control ming 76
Summary 78
Chapter 4: Creang a Scratch Story Book 79
Designing the outline of a barnyard joke book 79
Time for acon – designing a clickable table of contents 80
Time for acon – adding pages to the book 81
Time for acon – adding a sprite to the Backpack 83
Using the Backpack to store sprites and scripts 84
Building a joke with say blocks and sounds 85
Time for acon – making a horse talk with the say block 85
Time for acon – synchronizing and animang the horse 86
Time for acon – imporng a horse sound 87
Playing supported sound formats 89
Posioning a sprite by its coordinates 89
Time for acon – moving the dog based on x and y coordinates 89
Locang sprites with x and y coordinates 91
Creang a new costume 93
Time for acon – duplicang, ipping, and switching a sprite's costume 93
Comparing costumes to sprites 94
Composing custom sound eects 95
Time for acon – creang drum sound eects 96
Creang sound eects and music 96
Time for acon – integrang the dog's joke sequence 98
Navigang the story and coordinang scenes 100
Time for acon – hiding the table of contents 100
Time for acon – displaying the dog scene 101
Coordinang scenes by backdrop name 102
Time for acon – navigang back to the table of contents 103
Summary 105
www.allitebooks.com

Table of Contents
[ iv ]
Chapter 5: Creang a Mulmedia Slideshow 107
Imporng photos as backdrops 107
Time for acon – imporng photos from les 108
Working with images 111
Resizing images 112
Using cauon while resizing images 112
Adding slideshow controls to display images 114
Time for acon – ipping through the photos 114
Related backdrop blocks 116
Playing and recording sounds 118
Time for acon – adding a sound from Scratch's library 118
Time for acon – recording sounds in the sound editor 119
Understanding sound related blocks 122
Eding sounds 123
Time for acon – eding a recorded sound 123
Time for acon – appending a sound 124
Time for acon – adding sound eects to recordings 125
Reviewing available sound eects 126
Using x and y coordinates to nd the posion of the mouse's pointer 126
Time for acon – using mouse locaon to hide arrows 127
Time for acon – providing user instrucons 130
Displaying a project in presentaon mode 131
Time for acon – presenng a fullscreen slideshow 132
Summary 134
Chapter 6: Making an Arcade Game – Breakout (Part I) 135
Learning about the Breakout game 135
Discovering Pong 136
Time for acon – imporng and playing the Pong starter project 136
Remixing a legacy Scratch project 138
Moving a sprite with the mouse or arrows 138
Using reporter blocks to set values 138
Customizing the gameplay of the Pong project 139
Time for acon – adding the le and right arrow controls 139
Evaluang the y posion of the ball to end the game 140
Time for acon – determining if the ball is below the paddle 140
Time for acon – adjusng the center of a sprite costume 142
Cloning to create idencal sprites 144
Time for acon – drawing bricks 144
Time for acon – cloning bricks 145
Dealing with the cloned sprite 147

Table of Contents
[ v ]
Time for acon – breaking bricks when I start as a clone 147
Cloning explained 149
Rapid re shoong with cloning 149
Cloning related blocks 150
Ricocheng with the point in direcon block 151
Time for acon – changing a sprite's direcon 151
Figuring out the direcon 153
Time for acon – seng the starng posion and the direcon 153
Time for acon – ricocheng o bricks 154
Condional statements 156
Condional statements in real life 157
Dening a variable to keep score 157
Time for acon – adding a score variable 158
Seng variables For all sprites 159
Seng variables For this sprite only 160
Summary 161
Chapter 7: Programming a Challenging Gameplay – Breakout (Part II) 163
Implemenng lives 164
Time for acon – adding a variable to track lives 164
Time for acon – checking for game over 165
Evaluang mulple programming soluons 167
Adding more bricks to the level with a custom block 169
Time for acon – creang a second brick 169
Time for acon – drawing rows of bricks with custom blocks 170
Introducing procedures by way of custom blocks 173
Seng custom block inputs 173
Time for acon – coordinang the ball play 176
Increasing ball speed and diculty 177
Time for acon – increasing ball speed 177
Using Boolean evaluaons 179
Keeping score based on a clone's costume 180
Time for acon – decreasing the paddle size based on the clones' costume 180
Considering alternave soluons 183
Time for acon – detecng when we clear the level 184
Keeping the score using cloud variables 186
Time for acon – keeping a global scoreboard 186
Understanding cloud variables in Scratch 2.0 188
Viewing the cloud data log 188
Summary 190

Table of Contents
[ vi ]
Chapter 8: Chang with a Fortune Teller 191
Creang, imporng, and exporng lists 192
Time for acon – creang lists to store mulple values 192
Working with an item in a list 194
Imporng a list 195
Time for acon – imporng fortunes to a list 195
Exporng a list from Scratch 197
Prompng the player for a queson 197
Time for acon – asking a queson 197
Using stored quesons 200
Time for acon – validang the seeker's queson 200
Deleng the list values 201
Selecng a random fortune 202
Time for acon – selecng a random fortune 202
Time for acon – counng our fortunes with mod 203
Using magic numbers 206
Creang a custom say fortune block 206
Time for acon – creang a custom say fortune block 207
Using the if () then else block 208
Manipulang the text 209
Time for acon – ensuring grammacally correct quesons 209
Tesng your project 210
Creang a keyword scanner 211
Time for acon – scanning a text string to build a list of words 211
Summary 215
Chapter 9: Turning Geometric Paerns into Art Using the Pen Tool 217
Drawing basic shapes 218
Time for acon – drawing our rst square 218
Time for acon – building on the square 220
Drawing user-dened shapes 221
Time for acon – enabling the user to create custom shapes 222
Time for acon – turning triangles into pinwheels 224
Dening procedures for home and shapes 226
Time for acon – creang a custom shapes procedure 226
Plong the coordinates of shapes 228
Time for acon – plong x,y coordinates to draw a square 229
Understanding and using color 230
Time for acon – coloring our shapes 230
Understanding color shades 232
Working with the set pen color to () block 232

Table of Contents
[ vii ]
Time for acon – nding a color picker workaround 232
Finding a color to use by its number 233
Time for acon – creang a color palee 234
Adding color slider inputs to the shapes project 237
Time for acon – liming color values with a slider 237
Creang asymmetrical paerns 239
Time for acon – creang an explosion 240
Turning straight lines into string art 242
Time for acon – animang a radar screen 242
Time for acon – breaking out of the circle 244
Summary 246
Appendix A: Connecng a PicoBoard to Scratch 1.4 247
Using Scratch 1.4, the PicoBoard, and Raspberry Pi 248
Finding Scratch 1.4 248
Purchasing the PicoBoard 248
Time for acon – enabling and tesng the PicoBoard support in Scratch 1.4 249
Adding the PicoBoard support to Scratch 2.0 250
Animang webcam images by detecng sound 251
Time for acon – creang a talking head 251
Sharing Scratch 1.4 projects online 254
Sensing the environment with the PicoBoard 254
Measuring resistance 254
Time for acon – recording the resistance of a thermistor over me 255
Compleng a circuit 257
Time for acon – charng our measurements 258
Interpreng the graph 261
Time for acon – revising the graph 262
Summary 264
Appendix B: Pop Quiz Answers 265
Index 269
Preface
This book demyses Scratch programming through a variety of projects. The book assumes
that you have no programming experience when you begin reading, but by the me you
reach the last page, you will be ready to explore your own projects and help other people
with Scratch.
The projects start with simpler concepts and get progressively more complicated in terms of
programming concepts and design. You will learn how to make mulple-scene stories, think
through the logic of a fast-paced arcade game called Breakout, interact with a snarky fortune
teller, and more. The book's projects tend to demonstrate a programming concept rst and
then discuss the concept in more detail.
You will receive a balanced introducon to Scratch and universal programming concepts as
you create digital stores, animaons, and games. With a rm grasp on the fundamentals,
you'll be ready to take on more advanced topics and projects.
What this book covers
Chapter 1, Welcome to Scratch 2.0, introduces Scratch and the various types of projects
covered in the book.
Chapter 2, A Quick Start Guide to Scratch, takes us on a tour of the online Scratch
community. In this chapter, we will create our rst Scratch animaon while learning basic
programming concepts such as loops.
Chapter 3, Creang an Animated Birthday Card, will guide us through how to use Scratch's
built-in paint editor to draw bitmap and vector images. To create the card, we will learn
important programming concepts such as project inializaon, object naming, and event
coordinaon.
Chapter 4, Creang a Scratch Story Book, will guide us through how to build a joke book and
coordinate scene changes as a way to navigate through the book. The chapter introduces
sound and coordinates as a way to move sprites.

Preface
[ 2 ]
Chapter 5, Creang a Mulmedia Slideshow, will guide us through how to create a
personalized slideshow by uploading les from our computer. We will also work on
resizing images and recording slide narraons that can be played on demand.
Chapter 6, Making an Arcade Game – Breakout (Part I), remixes the classic Pong game into
our own brick-busng version called Breakout. We'll clone sprites, esmate direcon, and
create custom variables to develop the framework of the game.
Chapter 7, Programming a Challenging Gameplay – Breakout (Part II), builds on our
Breakout game from the previous chapter. Here, we make the gameplay more challenging by
programming the ball speed and reducing the paddle size based on the gameplay. Important
concepts include custom procedures, Boolean values, and cloud data.
Chapter 8, Chang with a Fortune Teller, deals with our game of fortune, where a fortune
teller will provide a random fortune in response to the user's typed queson. We will work
with lists, track intervals with mod, and split words apart to idenfy individual words.
Chapter 9, Turning Geometric Paerns into Art Using the Pen Tool, combines all the
programming concepts we've learned so far to draw art using simple math equaons,
polygons, and string art. The projects will show you how to take user-dened values and turn
them into shapes. This chapter also explains how to apply color and shades to Scratch projects.
Appendix A, Connecng a PicoBoard to Scratch 1.4, emphasizes on projects that use a
computer's webcam and the PicoBoard, which is an add-on device capable of running on
Scratch 1.4 on the Raspberry Pi. The PicoBoard project incorporates an experiment that
measures the resistance of warming water using a thermistor and generates graphs for it.
What you need for this book
To create projects using the Scratch 2 project editor, you need a relavely recent web
browser (Chrome 7 or later, Firefox 4 or later, or Internet Explorer 7 or later) with Adobe
Flash Player Version 10.2 or later installed. Scratch 2 is designed to support a screen
resoluon of 1024 x 768 or larger. If your computer doesn't meet these requirements,
you can try downloading and installing Scratch 1.4, which you can sll use to share
projects to the Scratch 2 website.
An oine Scratch 2 editor is also available. You can also sll use Scratch 1.4. Note that you
can have both Scratch 1.4 and 2 on your computer.
The soware to download are as follows:
The Scratch 2 oine editor can be downloaded from the following link:
http://scratch.mit.edu/scratch2download
The Scratch 1.4 editor can be downloaded from the following link:
http://scratch.mit.edu/scratch_1.4

Preface
[ 3 ]
Who this book is for
The author approaches the content in this book with the belief that we are all teachers and
that you are reading this book not only because you want to learn, but also because you
want to share your knowledge with others. Movated students can pick up this book and
teach themselves how to program because the book takes a simple, strategic, and structured
approach to learning Scratch.
Parents can grasp the fundamentals so that they can guide their children through
introductory Scratch programming exercises. It's therefore perfect for homeschool
families. Teachers of all disciplines from Computer Science to English can also quickly
get up to speed with Scratch and adapt the projects for use in the classroom.
Conventions
In this book, you will nd several headings that appear frequently.
To give clear instrucons of how to complete a procedure or task, we use:
Time for action – heading
1. Acon 1
2. Acon 2
3. Acon 3
Instrucons oen need some extra explanaon so that they make sense, so they are
followed with:
What just happened?
This heading explains the working of tasks or instrucons that you have just completed.
You will also nd some other learning aids in the book, including:
Pop quiz – heading
These are short mulple-choice quesons intended to help you test your own understanding.
Preface
[ 4 ]
Have a go hero – heading
These praccal challenges give you ideas for experimenng with what you have learned.
You will also nd a number of styles of text that disnguish between dierent kinds of
informaon. Here are some examples of these styles, and an explanaon of their meaning.
Code words in text, database table names, folder names, lenames, le extensions,
pathnames, dummy URLs, user input, and Twier handles are shown as follows: "Condional
statements are used to check whether a statement is true or false. For example, if 4 >
0 is a condional statement."
New terms and important words are shown in bold. Words that you see on the screen, in
menus or dialog boxes for example, appear in the text like this: "The top of the page contains
the Create, Explore, and Discuss links."
Warnings or important notes appear in a box like this.
Tips and tricks appear like this.
Reader feedback
Feedback from our readers is always welcome. Let us know what you think about this
book—what you liked or may have disliked. Reader feedback is important for us to
develop tles that you really get the most out of.
To send us general feedback, simply send an e-mail to feedback@packtpub.com,
and menon the book tle through the subject of your message.
If there is a topic that you have experse in and you are interested in either wring or
contribung to a book, see our author guide on www.packtpub.com/authors.
Customer support
Now that you are the proud owner of a Packt book, we have a number of things to help you
to get the most from your purchase.

Preface
[ 5 ]
Downloading the example code
You can download the example code les for all Packt books you have purchased from
your account at http://www.packtpub.com. If you purchased this book elsewhere,
you can visit http://www.packtpub.com/support and register to have the les
e-mailed directly to you.
Downloading the color images of this book
We also provide you a PDF le that has color images of the screenshots/diagrams used in
this book. The color images will help you beer understand the changes in the output.
You can download this le from: https://www.packtpub.com/sites/default/files/
downloads/0724OT_coloredimages.pdf.
Errata
Although we have taken every care to ensure the accuracy of our content, mistakes do happen.
If you nd a mistake in one of our books—maybe a mistake in the text or the code—we
would be grateful if you would report this to us. By doing so, you can save other readers from
frustraon and help us improve subsequent versions of this book. If you nd any errata, please
report them by vising http://www.packtpub.com/submit-errata, selecng your book,
clicking on the errata submission form link, and entering the details of your errata. Once your
errata are veried, your submission will be accepted and the errata will be uploaded to our
website, or added to any list of exisng errata, under the Errata secon of that tle.
Piracy
Piracy of copyright material on the Internet is an ongoing problem across all media. At Packt,
we take the protecon of our copyright and licenses very seriously. If you come across any
illegal copies of our works, in any form, on the Internet, please provide us with the locaon
address or website name immediately so that we can pursue a remedy.
Please contact us at copyright@packtpub.com with a link to the suspected
pirated material.
We appreciate your help in protecng our authors, and our ability to bring you
valuable content.
Questions
You can contact us at questions@packtpub.com if you are having a problem with any
aspect of the book, and we will do our best to address it.
www.allitebooks.com
1
Welcome to Scratch 2.0
I assume you're reading this book because you want to learn how to create
interactive stories, animations, and games using Scratch, or you want to learn
Scratch so that you can teach someone else how to program. It matters not
whether your classroom is in a middle school, a home school environment, an
after-school workshop, or a weekend coding project with your son or daughter.
We are all teachers. That's the perspective of this book. You'll learn how to
create projects using Scratch so that you can teach someone else, but no
programming knowledge is expected.
In this chapter, we will:
Review what Scratch is and how we can use it
Learn more about the types of projects we will create in this book
Explore an example project from the Scratch website and review the project editor
Whether you're 8 or 80, the Scratch programming language provides a beginner-friendly
computer programming environment that enables you to create digital projects. Success
with Scratch comes quickly. You won't nd any quirky syntax to learn, and you won't make
any typing mistakes that prevent your program from running.
Creang a project in Scratch is as easy as snapping the color-coded blocks together.
This environment allows us to see the posive results quickly. In addion to this,
Scratch helps turn passive users into creators.
You'll nd comfort in Scratch's building-block approach to create animaons, games,
and stories. Aer using Scratch, programming will make sense. It will seem easy. It will
bring a smile to your face, and you'll be able to cope with technical concepts in the future.

Welcome to Scratch 2.0
[ 8 ]
About Scratch
Mitch Resnick and the Lifelong Kindergarten Group at the Massachuses Instute of
Technology (MIT) in the Media Laboratory developed Scratch as a teaching language
primarily for 8 – 16 year olds, but there's nothing stopping the rest of us from enjoying
the Scratch experience and sharpening our creave minds.
Encouraging everyone to think programmatically
The natural reacon of people is to see Scratch as a means of teaching computer science
and integrang it into classrooms of all levels. There are teachers who use Scratch across a
variety of subjects as seen on the ScratchEd site. The ScratchEd site caters to the educaonal
community and aggregates a lot of Scratch resources, including lesson plans and ps.
However, the approach and thoroughness of the included material varies greatly.
You can check out ScratchEd at http://scratched.media.mit.edu/.
While wring this book, I did not set out to write a computer science textbook. It's
quite simply a tutorial for people who want to learn how to use Scratch to create stories,
animaons, games, or art. It primarily addresses the parents, home school families, and
teachers who may not be programmers themselves but want a fun way to help their children
become more digitally literate. Everyone, however, can use this tutorial to learn Scratch, and
many young students have worked through the Version 1.4 of Scratch of this book. I expect
young scratchers will be more than capable of working through the projects in this edion.
My underlying belief is that knowing how to program can benet everyone, but not
everyone needs to be a programmer. The mental work required to create a program
inherently develops an understanding of how computers work, sharpens our crical
thinking skills, and gives us lots of pracce at solving problems.
There's also an increasingly popular idea that somemes we want to create applicaons for
personal use. Of course, system administrators have always created custom scripts to help
automate repeve tasks. However, modern applicaons such as Scratch or the MIT App
Inventor (originally developed by Google) make it incredibly easy to create programs for
personal use or with the intenon of sharing it with a small group of friends, which counters
the perspecve that learning to program is synonymous with wanng to be a professional
programmer or an applicaon developer.
When you have a lile bit of programming knowledge, you'll approach non-programming
problems in a dierent way. For example, I've used programming as a marketer to manage
search engine opmizaon and keyword research on business websites. I've also used my
programming knowledge to write automated soware tests.

Chapter 1
[ 9 ]
Boom line, programming becomes a tool in your problem-solving toolbox. This is the key to
understanding how I approach this Scratch tutorial. I want the computer sciensts to come
along for the ride, but I'm catering to a broader audience.
Sample Scratch uses
I couldn't begin to suggest every possible way for you to use Scratch; that's why we have an
imaginaon. However, here are a few ideas to get you started:
Use Scratch to teach yourself or your students how to program. That's the
obvious one.
Use Scratch to demonstrate Math concepts. Scratch can also demonstrate the
x and y coordinate system in an interacve way.
Use Scratch to inspire your kids to read and write. Find a story and animate
each scene or encourage them to animate the story. Turn their haiku into a
Scratch project.
Have a child who only wants to play video games? Make a deal. Your child can
only play the games he creates or remixes with Scratch.
As you work through the examples in this book, write down your project ideas no maer
how hard, easy, obvious, or silly they seem. The next one might be your best idea yet.
Computational thinking
Learning: we do it for life. We should help our children develop skills that will help them
keep learning and solving problems in an increasingly digital environment. Using Scratch,
we will learn how to design, think, collaborate, communicate, analyze, and program in a
computer language.
You may frame the Scratch approach as computaonal thinking. According to Wikipedia:
Computaonal thinking is a problem solving method that uses computer science
techniques. The term computaonal thinking was rst used by Seymour Papert
in 1996.
By the me we make our cat dance for the rst me, we'll forget all about the academic
research and theories behind Scratch. Instead, we'll focus on having fun and creang the
next project.
Welcome to Scratch 2.0
[ 10 ]
Finding a project for you
This book will give you a well-rounded introducon to Scratch. It's true that creang games
are incredibly popular, and young boys tend to want to create games. However, there are
other uses of Scratch, and plenty of people who want to do something other than just create
games. Generally speaking, we'll make an animaon, tell a story, build a game, create art,
and sense the real world.
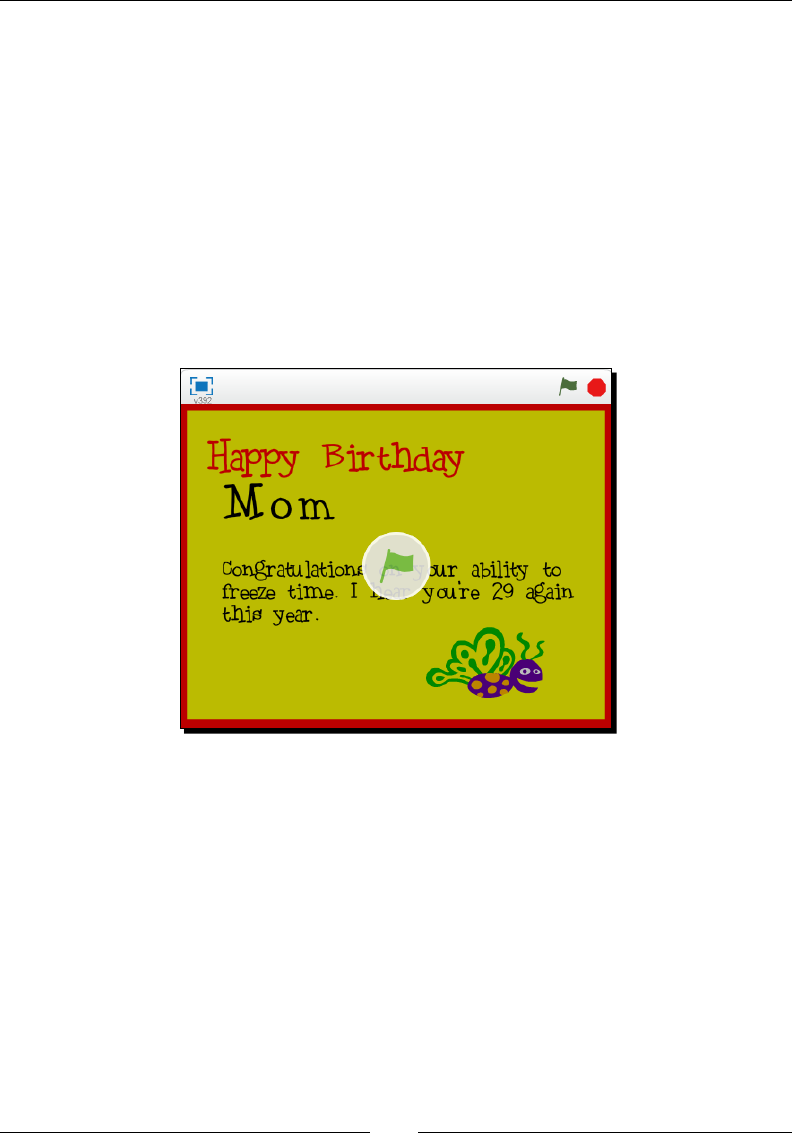
Making animations
An animaon lets the sprites interact with each other. We'll use the common example
of a birthday card to demonstrate animaons. The following screenshot shows a birthday
card example from Chapter 3, Creaing an Animated Birthday Card:
However, some folks have created more complicated projects using stop-moon
animaons. You can nd some stop-moon animaons on the Scratch website at
http://scratch.mit.edu/studios/254628/.
Chapter 1
[ 11 ]
Telling stories
The rst story project we do will create a slideshow that's designed to be narrated with
Scratch's built-in audio capabilies. The following screenshot is a preview of our slideshow:
Our second story project takes a more classical approach to tell a story by creang a book with
a table of contents and then animang the individual scenes as a way of narrang the story.

Welcome to Scratch 2.0
[ 12 ]
Building games
Games are by the far the most popular Scratch project, and people tend to create all the
normal types of games: plaormer games, scrolling backgrounds, role-playing games,
mazes, and classic arcade games. We'll remix the classic Pong game into a challenging game
of Breakout, and in the process, we'll set the stage for many common game-programming
concepts. The following screenshot shows the Breakout game:
Programming games of chance
We will encounter randomness throughout the book, but we'll develop a project that applies
random outcomes to an interacve story. The following screenshot shows a Trip to the
fortune teller:
Chapter 1
[ 13 ]
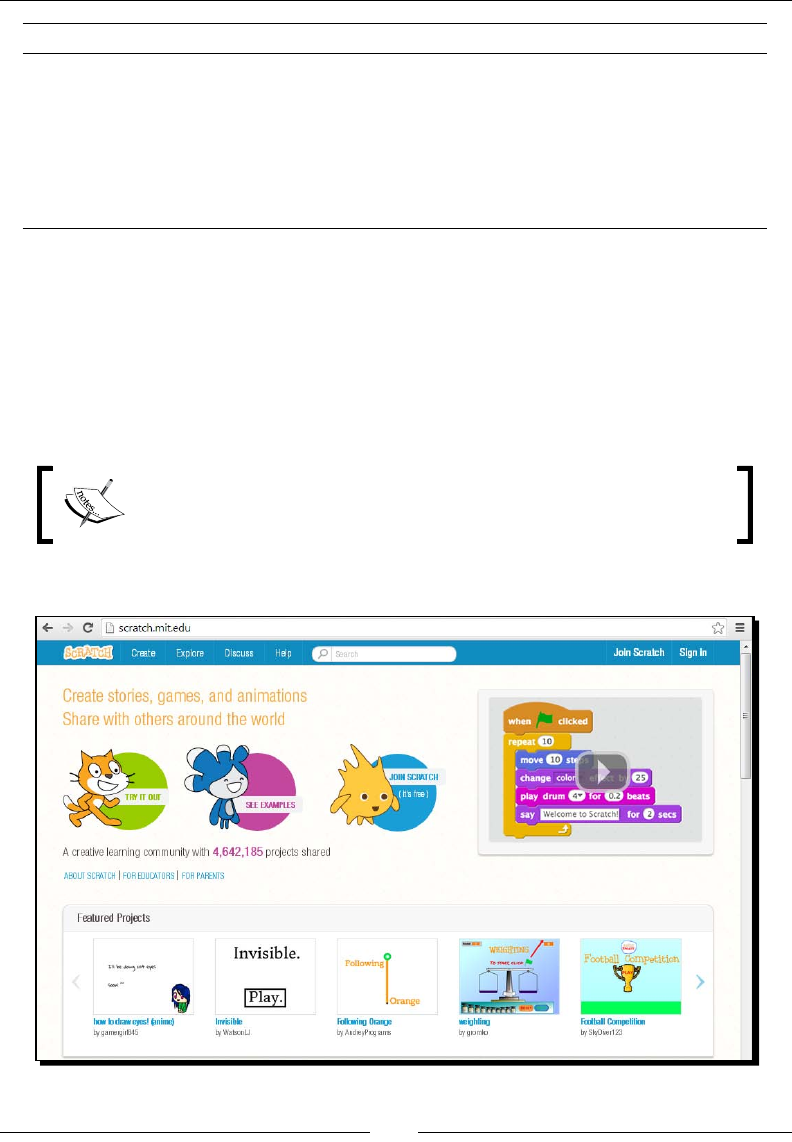
Creating art projects
The Scratch site is loaded with talented illustrators, and Scratch provides all the tools needed
to draw characters and scenes, namely a paint editor and an easy way to animate them.
The other kind of art you'll nd on the Scratch site is computer-generated art, and we'll
spend me drawing geometric shapes, as seen in the following screenshot:
Sensing the real world
Scratch has historically included support for add-on hardware, such as PicoBoard and LEGO
WeDo. Scratch also includes built-in support to use the computer's webcam and senses
external sounds using the computer's microphone. We'll explore the webcam, microphone,
and PicoBoard in our project.
Programming concepts
The following table summarizes several programming concepts that can be learned with
Scratch. It's included here primarily to reinforce Scratch as a programming language and
foreshadow the concepts we'll use throughout the book. We'll introduce concepts in
greater detail as we work through the book.
Concept Description
Interface design When we design a program, we turn our imagination into a creation
that can be shared with others. We create the flow of the program,
how the user interacts with the project, and the actions each sprite
takes to tell our story.

Welcome to Scratch 2.0
[ 14 ]
Concept Description
Loops (iteration) A loop repeats (iterates) through a list of programming commands
(also known as blocks in Scratch). Often, we'll use conditional
statements to control when and how often a loop runs.
Boolean logic A Boolean command evaluates a given statement as true or false. In
Scratch, a Boolean command can check whether a specified condition
is true (for example, is the color blue?), or we can compare values with
and, or, and not operators. For example, if 4 > 0 and 4 < 2.
Variables Variables store text or numbers for reuse in the program. For example,
if x > 0 creates a conditional statement that evaluates whether
the number assigned to x is greater than 0.
Arrays (Lists) Arrays are similar to variables in that they store information that may
or may not change. However, a list stores multiple values in the same
way a grocery list stores a group of items.
Events Scratch provides an entire group of event blocks that allows us to
tell our program what to do when that event happens. For example,
events include when flag is clicked or when a space key is pressed.
Synchronization and
coordination
Programming a sprite to receive a broadcast message from another
sprite coordinates a cause and effect. Broadcasting a message and
waiting for all the other sprites to act on the broadcast synchronizes
the action. Throughout the book, broadcasts are a technique we will
use often, and they provide the fundamental communication between
the sprites in the project.
Concurrency Creating two scripts to run on the same control enables parallel
execution. For example, programming four different sprites to pixelate
when the green flag is clicked creates four concurrent actions.
Random numbers This concept picks a random number from a specified range.
Cloud data Scratch 2.0 introduces cloud variables that enable projects to store
data on the Scratch web servers so that the data is available to other
Scratch users. For example, the use of cloud data might include
keeping a high score or tracking the survey results.
Procedures Procedures can also be called as functions or methods in other
programming languages. Scratch 2.0 adds the ability to create custom
blocks that allows you to create a stack of blocks under a single name.
When you use a custom block, you can pass an argument, such as a
sprite number, into the procedure.
Vector and Bitmap
graphics
Scratch includes a built-in image editor that enables you to create
graphics and sprites for your projects. Vector graphics is a new feature
of Scratch 2.0.
Chapter 1
[ 15 ]
Concept Description
Cloning New to Scratch 2.0, cloning allows a sprite to duplicate itself while the
program is running. Clones inherit the parent sprite's costumes and
scripts. For example, many people create games that need to shoot
something, such as asteroids. Cloning in Scratch 2.0 allows us to shoot
multiple times.
Video By using the computer's built-in webcam, Scratch 2.0 can enable the
project to sense the video(s).
Using Scratch 2.0
With the release of Scratch 2.0, project creaon has primarily moved online. For users who
do not have access to the Internet, the Scratch team has launched a complementary oine
editor. I'll introduce you to both the environments.
To get started, in your Flash-enabled web browser, go to http://scratch.mit.edu.
For more informaon about installing Adobe Flash, go to
http://get.adobe.com/flashplayer/ in your web browser.
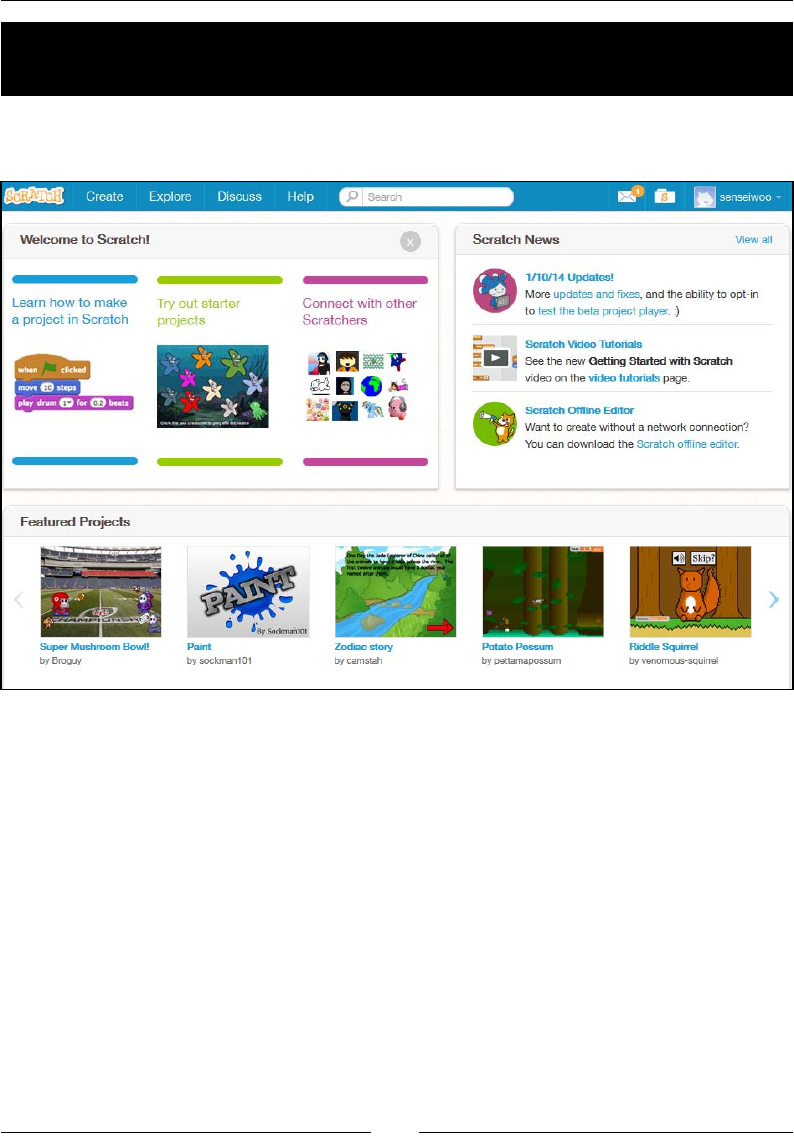
You'll get a page that resembles the following screenshot:
www.allitebooks.com
Welcome to Scratch 2.0
[ 16 ]
The top of the page contains the Create, Explore, and Discuss links. As we work through our
projects, we'll spend our me creang projects, and I'll leave the forum discussions for later.
For now, let's just look at a project.
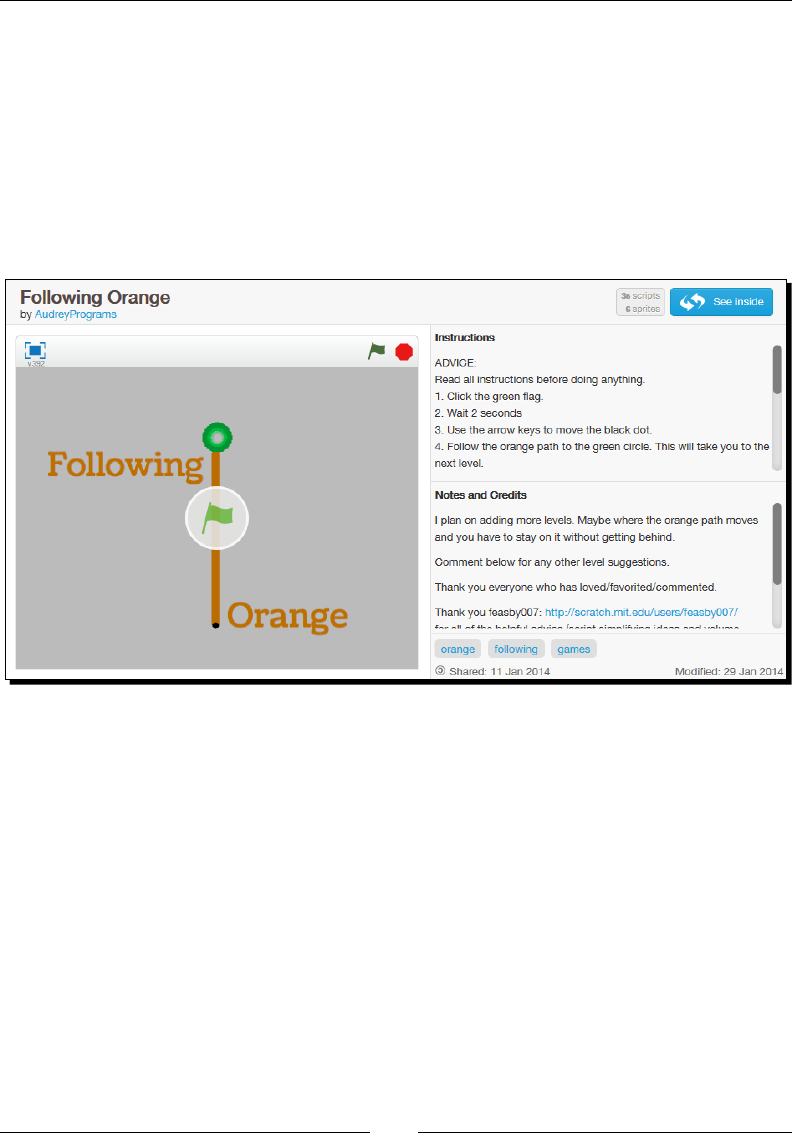
At the me I wrote this chapter, the Following Orange project was displayed as a featured
project. It's available at http://scratch.mit.edu/projects/14852464/. If for some
reason this project is not available in the future, just click on any project on the Scratch
home page and play it. Just experience a Scratch project as a user.
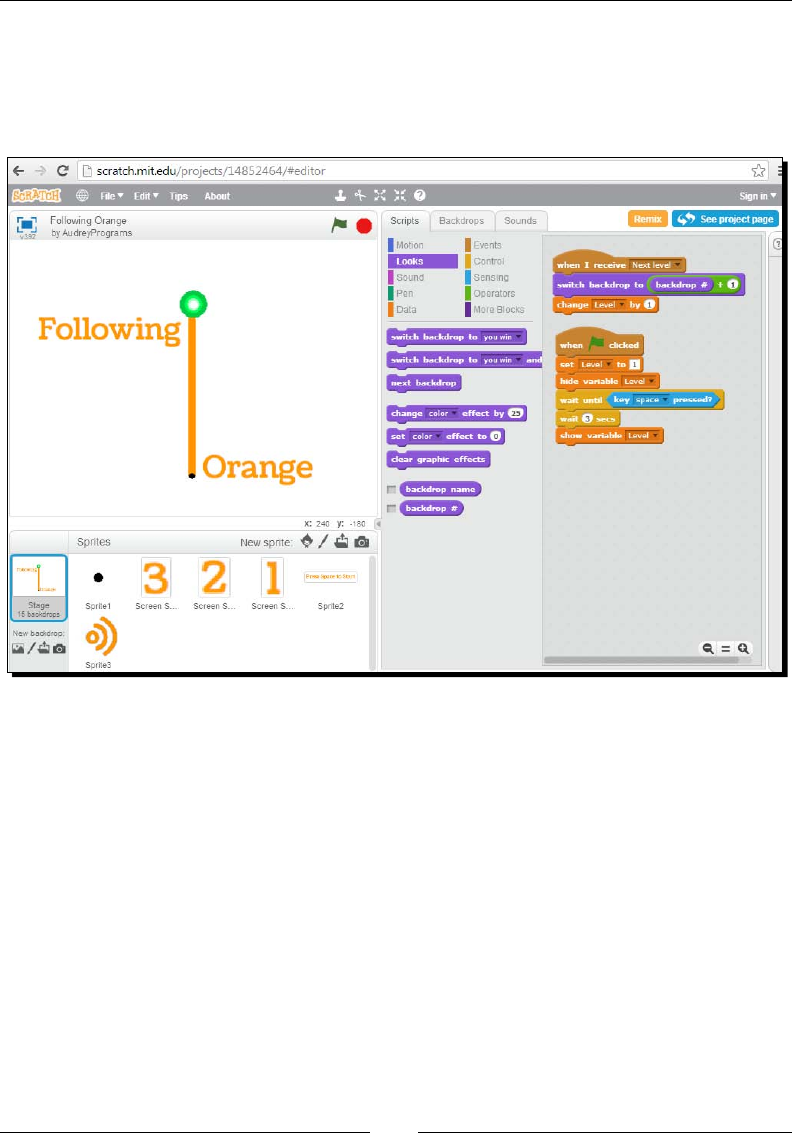
The following screenshot shows the Following Orange project:
When you share your projects with the Scratch community, this is the primary view. It's a
relavely intuive design. The users provide some instrucons and credits about the project
as seen in the right-half of the previous screenshot. The project displays a green ag in a
circle, and clicking on the green ag starts (inializes) the project.
Above the stage, we see the project name with the name of the author (I have no idea who
this user is as I just selected it out of convenience). To the right of the project name is a blue
See inside buon. When you click on See inside, you'll see the project editor.
Chapter 1
[ 17 ]
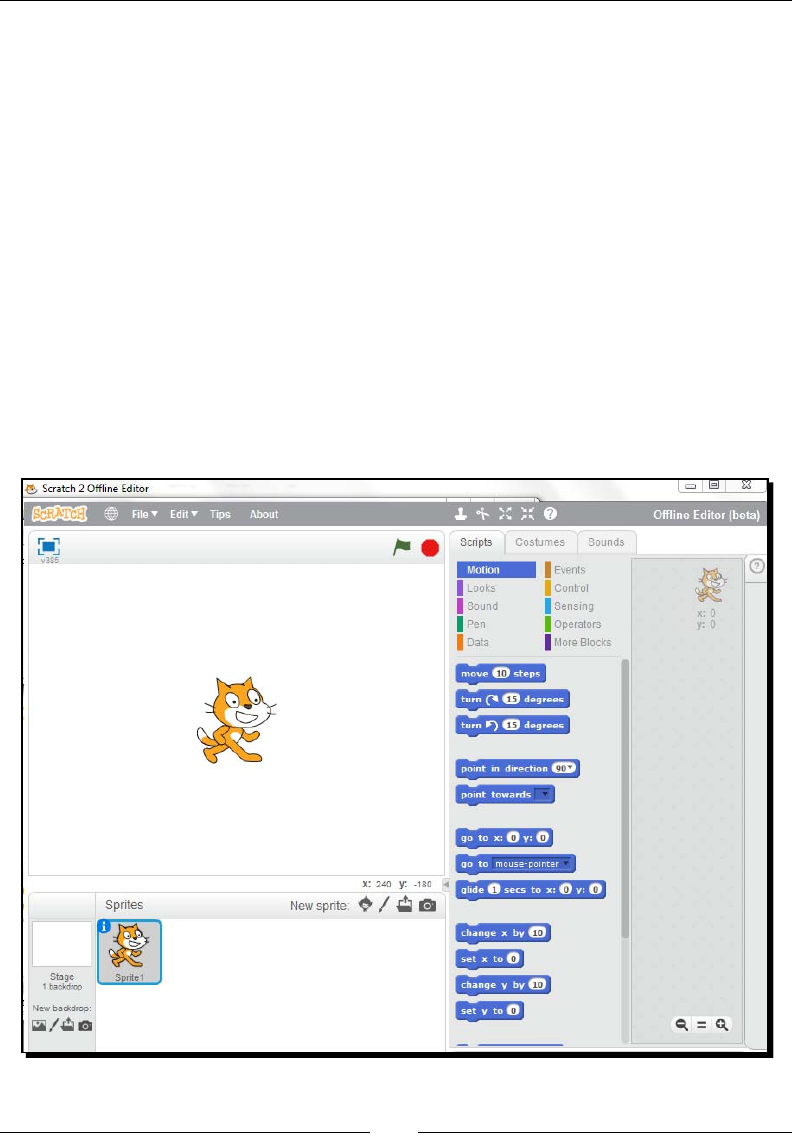
Looking inside a Scratch project
Clicking on the See inside buon for a project will display the details of the project in the
project editor, as seen in the following screenshot. If you click on the Create buon from
the Scratch website, you will open a new project in the same view.
The display gets a lile more complicated because there are more things available on the
screen, but it's important to note that everything we need to create, test, and run our
projects is accessible from the single view of the project editor.
To borrow a phrase from the Scratch Wiki, the project editor is divided into palees and
panes. At this point, I'll draw your aenon to three key areas: the stage, the sprites pane,
and the script area. Using the Following Orange project as a guide, we'll discuss each one
of the three key areas in the following secons.
Welcome to Scratch 2.0
[ 18 ]
The stage area
The large space beneath the green ag and the stop sign icons is the stage. This is where
our sprites act out their scripts. It's here that we get to see the result of our programming.
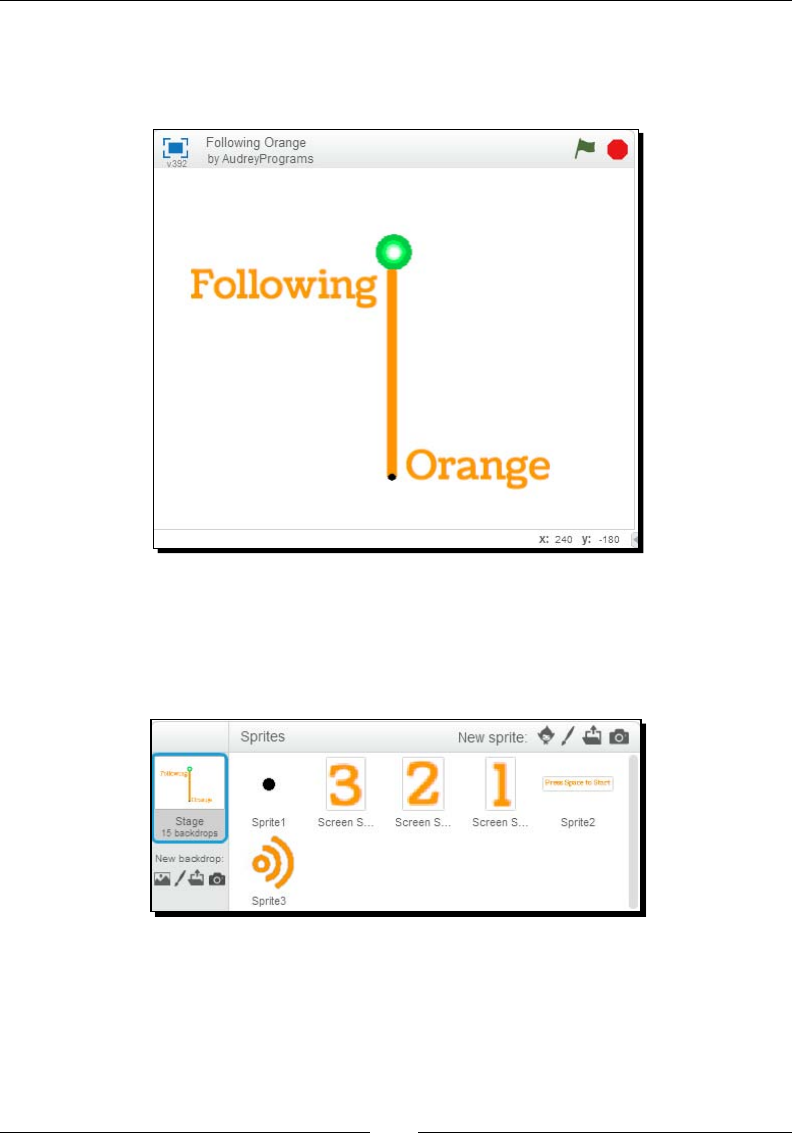
The sprites pane
Sprites are the characters and objects in our Scratch projects. The list of sprites can
be found below the stage. The following screenshot shows the list of sprites available
to the Following Orange project:
The scripts area
In order to get our sprites to animate, move, or interact with one another on the stage,
we need to create one or more scripts for each sprite. If you click on a sprite from the list,
the project editor will show the exisng stacks of blocks in the scripts area.
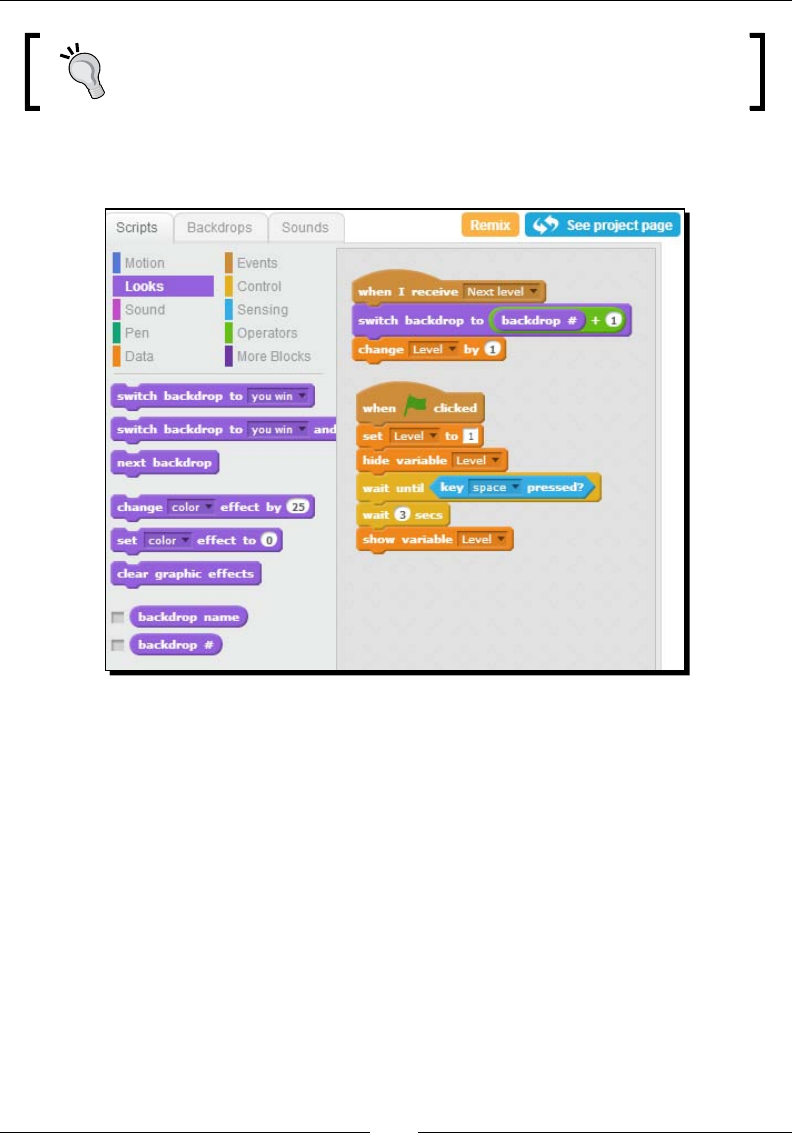
Chapter 1
[ 19 ]
A stack of blocks is a script, and a sprite can have mulple scripts assigned to
it. In this book, I'll use either script or stack to refer to a collecon of blocks.
The following screenshot shows a script for one of the sprites in the Following
Orange project:
To create a game, story, or animaon in Scratch, we stack blocks together to form a script
that gives instrucons to the project sprites. In the middle of the project editor screen, we
have categories of blocks that are grouped by the kinds of tasks they represent. They are
Moon, Looks, Sound, Pen, Data, Events, Control, Sensing, Operators, and More Blocks.
Throughout the book, I'll refer to these categories of blocks as palees; they can be seen
in the previous screenshot.
The palees of blocks are analogous to the palee of colors an arst mixes while creang
a painng. We mix the blocks together to form our art work. Each type of block is color
coded so that we can easily idenfy them by their type in our scripts.
The commands wrien on the blocks are in plain English, and they don't require a lot
of eort to understand the basic idea behind any block. Take the script visible in the
previous screenshot as an example. You might not know exactly what these two scripts do,
but by reading the blocks, you will generally understand that these blocks are inializing the
game and changing to the next level.
Welcome to Scratch 2.0
[ 20 ]
The built-in image editor
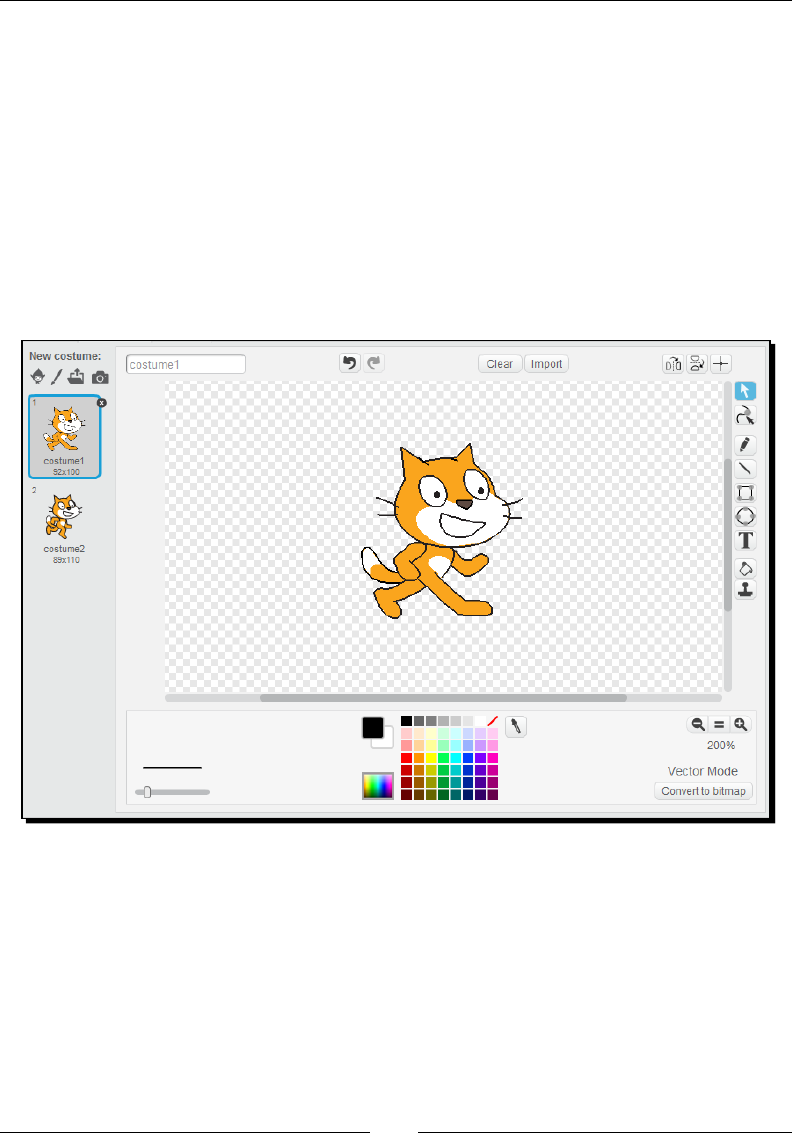
One of the core features of Scratch is its built-in image editor, which allows us to draw our
own backgrounds and sprites. This makes it incredibly easy for users to create sprites and
project backgrounds, and it's readily available from the project editor.
Previous versions of Scratch used a bitmap image editor, but as of Version 2.0, Scratch can
also draw in vector graphics, which allows us to create images that are smooth and scalable
to any size.
The following screenshot shows the default Scratch cat in the paint editor. If you've used any
image editor in the past, including GIMP or Photoshop, then the drawing tools should have a
familiar feel to them.
Scratch's built-in paint editor is relavely basic in terms of the number of features,
but is funconal for most of our uses. In general, the paint editor will allow you to
perform the following tasks:
Create shapes and text
Import and edit images in popular formats
Apply color
Resize and change the orientaon of the image
Chapter 1
[ 21 ]
The image editor is available from mulple points within the Scratch interface, as we'll see
throughout the book. We'll cover the paint editor in greater detail in Chapter 3, Creang an
Animated Birthday Card.
Using Scratch 2.0 ofine
It's not possible to be connected to the Internet all the me, which may be an increasingly
dicult idea to accept for some people. Nevertheless, consider that your Internet
connecon may go down, that the Scratch website may be oine for updates, or perhaps
your Internet connecon is slow.
If you can't get to the Scratch website, then you can't create a project using the online
project editor. Thankfully, the Scratch team has released an oine editor. You can download
it from http://scratch.mit.edu/scratch2download/.
The download page includes an online installer that will install the prerequisite
soware, namely Adobe Air, on your computer. The following screenshot shows
the Scratch 2 Oine Editor:

Welcome to Scratch 2.0
[ 22 ]
As we see, the oine editor looks like the online editor. Using the oine editor, you can
create projects and then share them to the Scratch website. We'll review sharing projects
in Chapter 2, A Quick Start Guide to Scratch. The oine version of Scratch 2.0 has been in
development for several months following the ocial release of Scratch 2.0.
The previous screenshot indicates that the editor shown is beta. Be sure to double-check
the download page for informaon pertaining to the funconality and release stability of
the oine editor. I would highly recommend downloading the oine version as a backup to
the online version. While the Scratch team does make a great eort to protect user privacy,
creang and saving projects oine does not require an account on the Scratch website,
ensuring user privacy.
Encountering Scratch 1.4
One of the biggest liming factors of Scratch 2.0 is its reliance on Flash and Adobe Air
(for the oine version). Not all computer systems are capable of running Flash
environments; some Linux users and users of the low-cost, credit card-sized Raspberry Pi
come to mind. The Pi is a Linux-based computer that's capable of plugging into an exisng
television set and keyboard. The Pi and Linux versions in general run Scratch 1.4. My XO
laptop also runs Scratch 1.4.
All of these Flash challenges increase the likelihood of encountering Scratch 1.4. I do not
insist on the use of Scratch 1.4 unl we come across the PicoBoard projects in Appendix A,
Connecng a PicoBoard to Scratch 1.4; however, if you're a Scratch 1.4 user, most of these
projects can be adapted with lile eort. I've taken the eort to specically idenfy features
that are exclusive to Scratch 2.0 so that users of the older versions can adapt appropriately.
Tinkering encouraged
The structure of the Scratch interface makes it easy for us to nker and explore ideas.
As we create projects, we evaluate our work and determine whether the results meet
our expectaons. It's very easy because everything happens in one interface.
To check whether our project works, we don't have to compile the code, switch windows,
upload les to a server, or work around any number of other obstacles to run our project.
Scratch enables us to modify the program as it runs and see the results in real me.

Chapter 1
[ 23 ]
Summary
In this chapter, we reviewed Scratch both in terms of its possibilies and how it's used in
the book to create stories, animaons, games, and art. Whether you're a mom, a dad, a
workshop facilitator, or a young scratcher, this chapter lays the foundaon for the work
we'll do in the rest of the book. We've even explored a project and the project editor.
In the next chapter, we'll create an online Scratch account, explore the community, and then
move right into our rst Scratch project. It'll give us an easy way to nker with the Scratch
interface and take our rst steps. We'll focus on some project management fundamentals
including naming objects, sharing projects, and lots of things in between.
2
A Quick Start Guide to Scratch
The anticipation of learning a new programming language can sometimes
leave us frozen on the starting line, not knowing what to expect or where to
start. Together, we'll take our first steps into programming with Scratch, and
block-by-block, we'll create our first animation. Our work in this chapter will
focus on getting ourselves comfortable with some fundamental concepts before
we create projects in the rest of the book.
In this chapter, we will be introduced to Scratch programming. We will:
Join and tour the online Scratch community
Create a project to take our rst steps in Scratch
Introduce loops using forever and repeat blocks
Add and animate mulple sprites in a project
Remix a video-sensing project
Joining the Scratch community
If you're planning to work with the online project editor on the Scratch website, I highly
recommend you set up an account on scratch.mit.edu so that you can save your
projects. If you're going to be working with the oine editor, then there is no need to create
an account on the Scratch website to save your work; however, you will be required to create
an account to share a project or parcipate in the community forums.
Let's take a moment to set up an account and point out some features of the main account.
That way, you can decide if creang an online account is right for you or your children at
this me.
www.allitebooks.com
A Quick Start Guide to Scratch
[ 26 ]
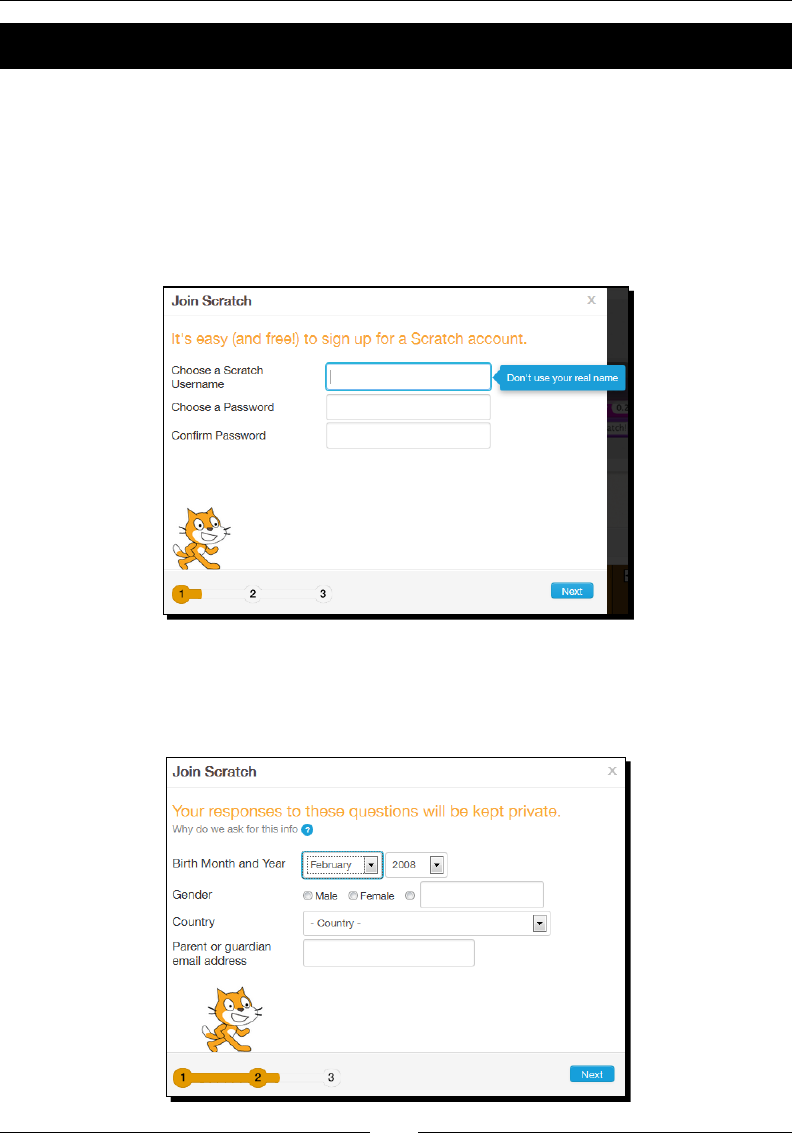
Time for action – creating an account on the Scratch website
Let's walk through the account creaon process, so we can see what informaon is generally
required to create a Scratch account. Open a web browser and go to http://scratch.
mit.edu, and click on the link tled Join Scratch.
1. At the me of wring this book, you will be prompted to pick a username and a
password, as shown in the following screenshot. Select a username and password.
If the name is taken, you'll be prompted to enter a new username. Make sure you
don't use your real name. This is shown in the following screenshot:
2. Aer you enter a username and password, click on Next. Then, you'll be prompted
for some general demographic informaon, including the date of birth, gender,
country, and e-mail address, as shown in the following screenshot. All elds need
to be lled in.
Chapter 2
[ 27 ]
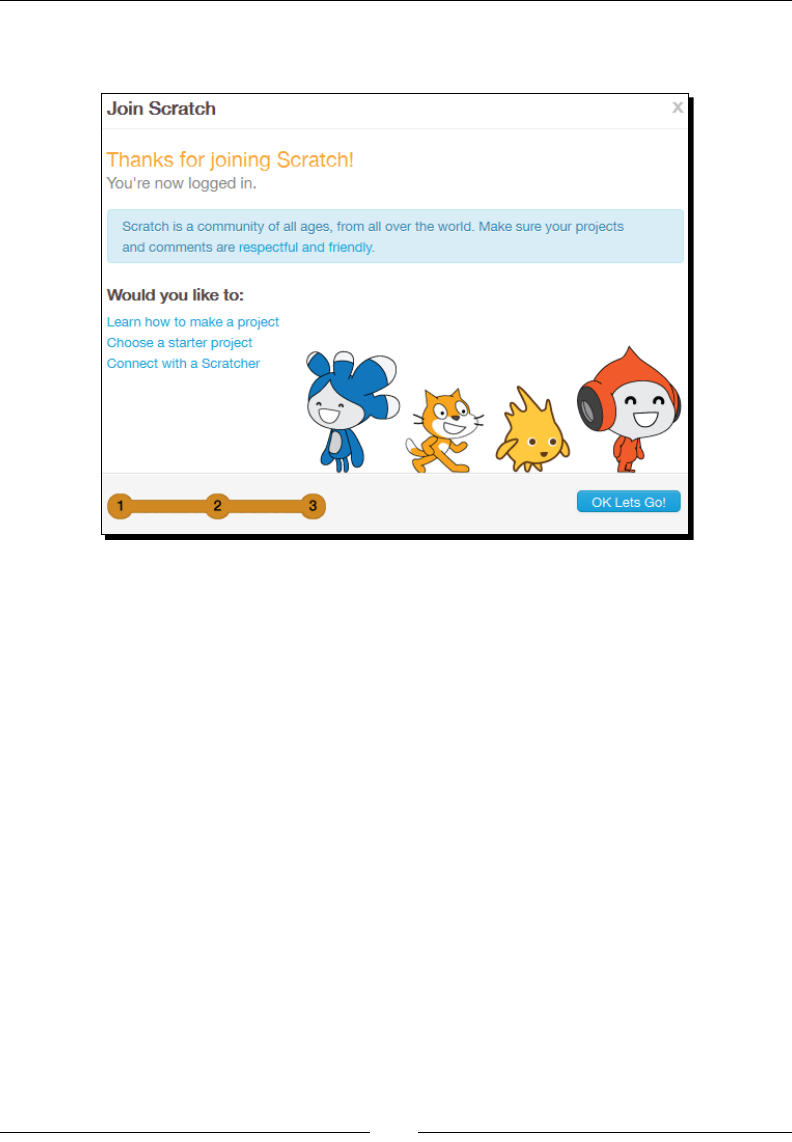
3. Aer entering all the informaon, click on Next. The account is now created, and
you receive a conrmaon screen as shown in the following screenshot:
4. Click on the OK Let's Go! buon to log in to Scratch and go to your home page.
What just happened?
Creang an account on the Scratch website generally does not require a lot of
detailed informaon. The Scratch team has made an eort to maximize privacy.
They strongly discourage the use of real names in user names, and for children, this is
probably a wise decision.
The birthday informaon is not publicized and is used as an account vericaon step while
reseng passwords. The e-mail address is also not publicized and is used to reset passwords.
The country and gender informaon is also not publically displayed and is generally just used
by Scratch to idenfy the users of Scratch. For more informaon on Scratch and privacy, visit:
http://scratch.mit.edu/help/faq/#privacy.
A Quick Start Guide to Scratch
[ 28 ]
Time for action – understanding the key features of your
account
When we log in to the Scratch website, we see our home page, as shown in the
following screenshot:
We reviewed the Create and Explore interfaces briey in Chapter 1, Welcome to Scratch 2.0;
so, we'll take a brief click-through tour of some of the primary features, starng from the
right-hand side of the navigaon and working towards the le.
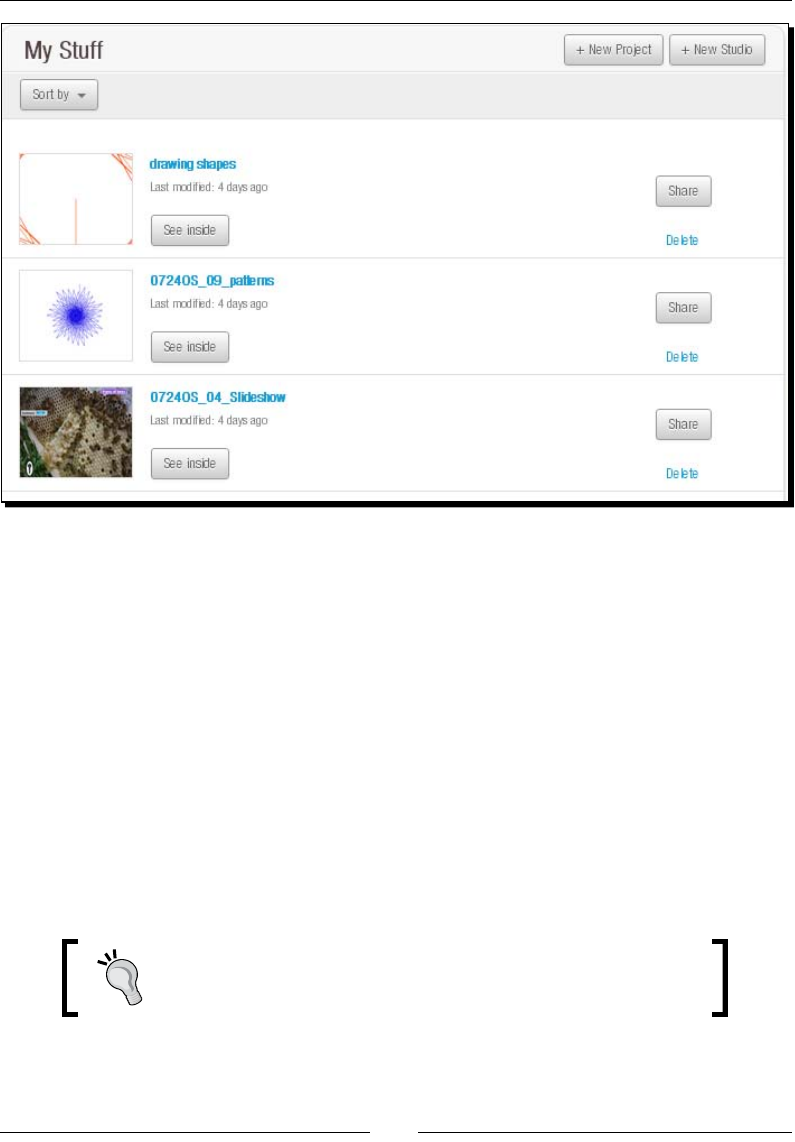
1. All the projects we create online will be saved to My Stu. You can go to this
locaon by clicking on the folder icon with the S on it, next to the account avatar,
at the top of the page. The following screenshot shows my projects:
Chapter 2
[ 29 ]
2. Next to the My Stu icon in the navigaon pane is Messages, which is represented
by a leer icon. This is where you'll nd nocaons of comments and acvity on
your shared projects. Clicking on this icon displays a list of messages.
3. The next primary community feature available to the subscribed users is the Discuss
page. The Discuss page shows a list of forums and topics that can be viewed by
anyone; however, an account is required to be able to post on the forums or topics.
What just happened?
A Scratch account provides users with four primary features when they view the
website: saving projects, sharing projects, receiving nocaons, and parcipang in
community discussions.
When we view our saved projects in the My Stu page, as we can see in the previous
screenshot, we have the ability to See inside the project to edit it, share it, or delete it.
All newly created projects are unshared by default. Users will need
to explicitly share the project for others to view it.

A Quick Start Guide to Scratch
[ 30 ]
Abiding by the terms of use
It's important that we take a few moments to read the terms of use policy so that we know
what the community expects from us. Taken directly from Scratch's terms of use, the major
points are:
Be respecul
Oer construcve comments
Share and give credit
Keep your personal informaon private
Help keep the site friendly
Creating projects under Creative Commons licenses
Every work published on the Scratch website is shared under the Aribuon-ShareAlike
license. That doesn't mean you can surf the web and use copyrighted images in your work.
Rather, the Creave Commons licensing ensures the collaboraon objecve of Scratch by
making it easy for anyone to build upon what you do.
When you look inside an exisng project and begin to change it, the project keeps a remix
tree, creding the original sources of the work. A shout out to the original author in your
projects would also be a nice way to give credit.
For more informaon about the Creave Commons Aribuon-ShareAlike license, visit
http://creativecommons.org/licenses/by-sa/3.0/.
Closely related to the licensing of Scratch projects is the understanding that you as a web
user can not inherently browse the web, nd media les, incorporate them into your project,
and then share the project for everyone.
Respect the copyrights of other people. To this end, the Scratch team enforces the Digital
Millennium Copyright Act (DMCA), which protects the intellectual rights and copyrights of
others. More informaon on this is available at http://scratch.mit.edu/DMCA.
Finding free media online
As we'll see throughout the book, Scratch provides libraries of media, including sounds
and images that are freely available for use in our Scratch projects. However, we may nd
instances where we want to incorporate a broader range of media into our projects.
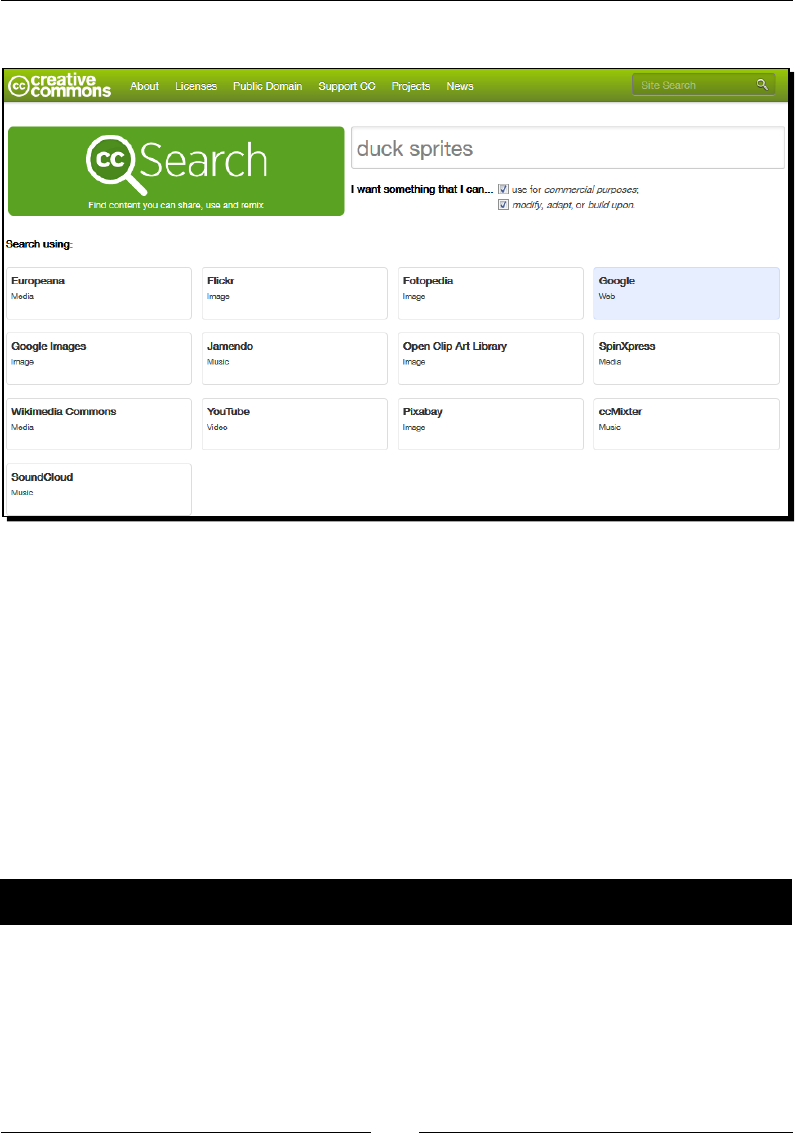
Chapter 2
[ 31 ]
A great search page to nd free media les is http://search.creativecommons.org.
Taking our rst steps in Scratch
From this point forward, we're going to be project editor agnosc, meaning you may choose
to use the online project editor or the oine editor to work through the projects.
When we encounter soware that's unfamiliar to us, it's common to wonder, "Where do I
begin?". The Scratch interface looks friendly enough, but the blank page can be a daunng
thing to overcome. The rest of this chapter will be spent on building some introductory
projects to get us comfortable with the project editor.
If you're not already on the Scratch site, go to http://scratch.mit.edu and let's
get started.
Time for action – moving the cat across the stage
As a warm up, we're going to make the default Scratch cat move across the stage.
1. Click on the Create buon to open a new project in the editor. The project contains
a single sprite—the Scratch cat.
2. In the blocks palee, click on the Events buon.
3. Drag the when ag clicked block to the scripts.
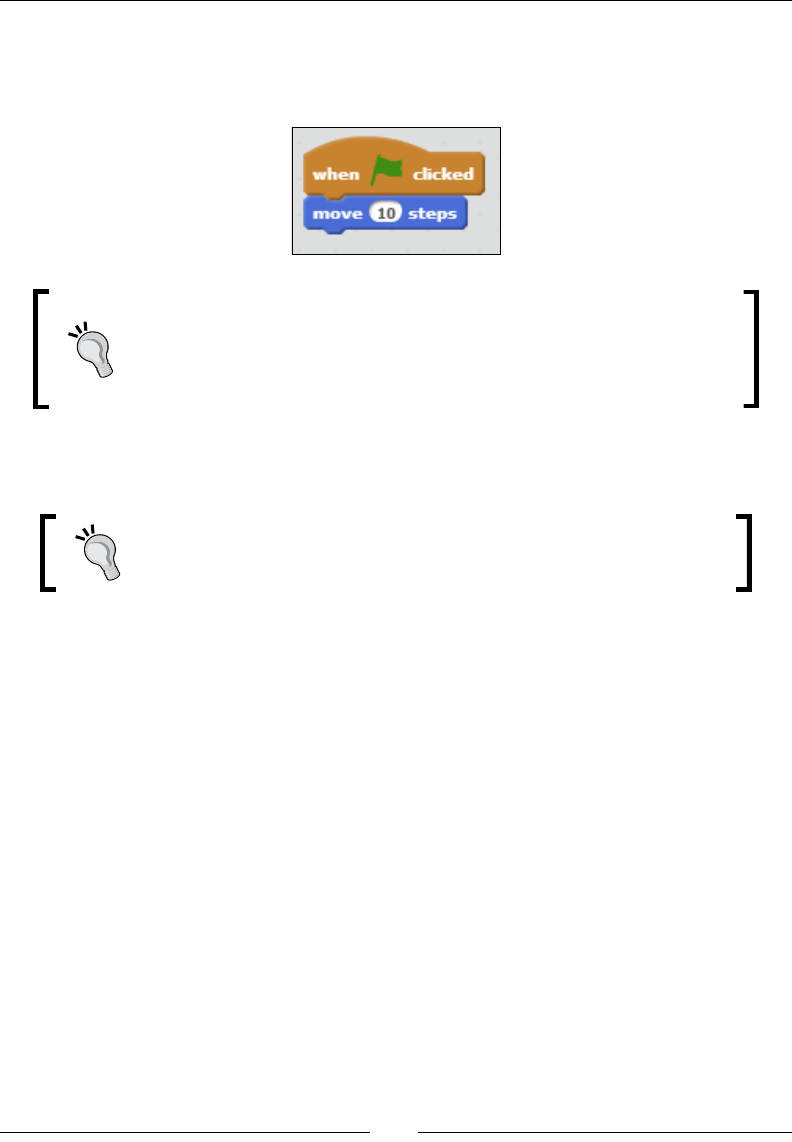
A Quick Start Guide to Scratch
[ 32 ]
4. In the blocks palee, click on the Moon buon.
5. Drag the move (10) steps block to the scripts area and snap it to the boom of the
when ag clicked block, as shown in the following screenshot:
How to snap two blocks together
As you drag a block onto another block, a white line is displayed to indicate
that the block you are dragging can be added to the script. When you see
the white line, release your mouse to snap the block in place.
6. Click on the green ag above the stage repeatedly to set our rst Scratch program
in moon.
If the cat reaches the end of the stage, you need to manually move the
sprite to the left side of the stage by clicking-and-dragging the cat.
What just happened?
Our rst Scratch project combined two blocks to make the cat move across the screen. The
rst block we used was the when ag clicked block from the Events block, and, very simply,
when the ag was clicked, we used the move () steps block to give the cat some moon.
As we clicked through the blocks palee, we saw that the available blocks changed
depending on whether we chose Moon, Looks, or Events. Each set of blocks is color
coded to help us easily idenfy them in our scripts.
Did you look closely at the blocks as you snapped them together? As children, most of us
probably had a game where we needed to put the round peg into the round hole. Building a
Scratch program is just that simple. We see instantly how one block may or may not t into
another block. One of the friendly design aspects of Scratch is that it's incredibly obvious
when two blocks t together, just like when you put puzzle pieces together or build with
LEGO. Scratch's building block design is heavily inuenced by LEGO. The Events block, for
example, always sit on top of a stack of other blocks. You can never put the move () steps
block on top of the when ag clicked block.
Chapter 2
[ 33 ]
The move (10) steps block accepts a numeric value that can be changed.
Throughout the book, we'll encounter many blocks that accept values,
and oen, the blocks have a default value, such as the move block. In the
exercises, you will noce block values are kept in parenthesis, and somemes
you might see the block referenced with the value, as in move (10) steps.
When we need to change the default value, you might see the block wrien in
the format move () steps, which omits the default value.
Using events to trigger an action
One of the most important groups of blocks in Scratch is the Events block. We used the
when ag clicked block as a trigger to make the cat move. There are other event blocks that
we'll encounter in future projects, but a majority of the Scratch projects developed by the
community will use the when ag clicked block to start the project.
As we develop more sophiscated projects, we'll see how the when ag clicked block can be
used to inialize the starng values, posions, and views of the project.
Have a go hero – testing the move block
Take a minute to explore our two block scripts by changing the value in the move () steps block.
Check what happens when you use a larger value such as 50 or a negave value such as -23.
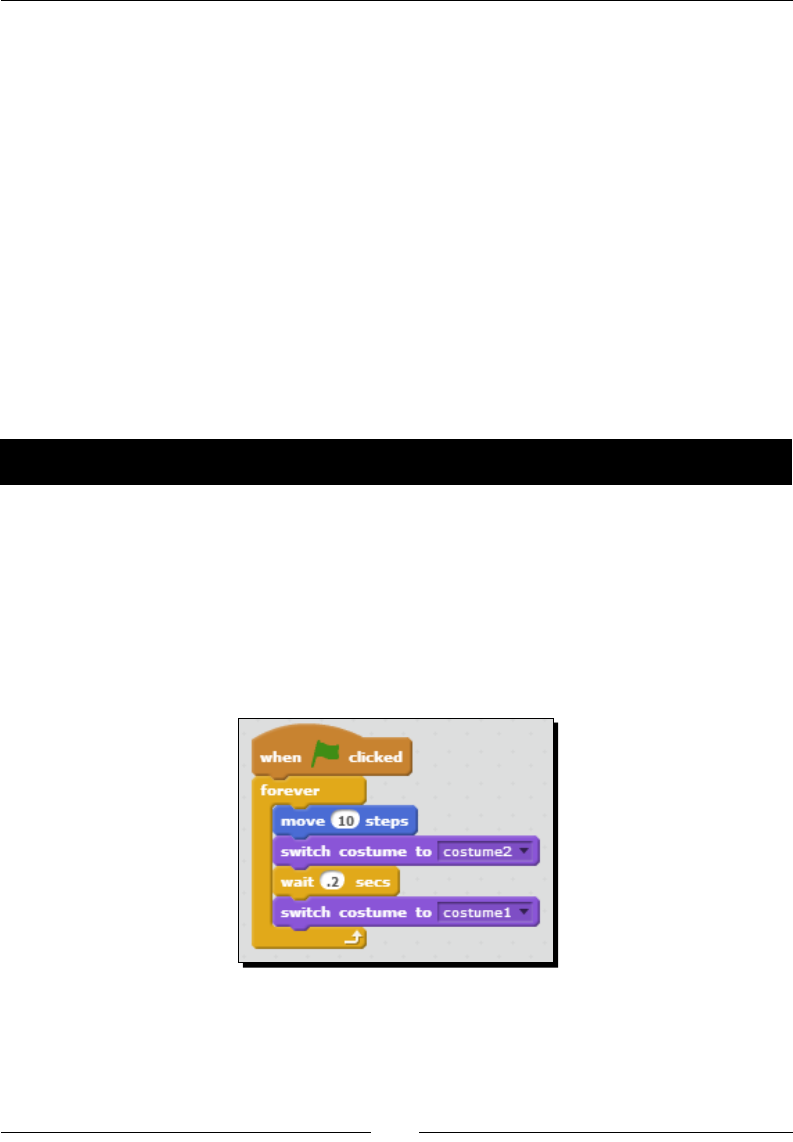
Time for action – animating a walking motion with the cat
We're going to build on our script by creang an appearance of movement:
1. From the Looks palee, aach the switch to costume () block to the move () block
in our script. The default costume will be costume2.
2. Click on the green ag to move the cat. Note that the rst me we clicked on
the ag, the appearance of the cat changed, but it remained the same on
subsequent movements.
A Quick Start Guide to Scratch
[ 34 ]
3. We'll make the animaon more realisc in a minute, but let's examine the costumes
by clicking on the Costumes tab. The following screenshot shows the contents of the
Costumes tab:
4. This view opens the sprite in the paint editor, but our primary interest is the
costume thumbnails. If you've run the script as we've created, then costume2 is
highlighted. Alternavely, click on the thumbnails and observe how selecng the
costume displays on the stage.
5. Depending on the speed of your clicks, the cat has the appearance of walking or
running in place. There's no horizontal movement associated with toggling the
costumes back and forth.
6. Now, let's adjust the script to replicate this walking moon. Add another switch to
costume () to our script. Select costume1.
7. Now, repeatedly click the green ag. You will discover that our script doesn't appear
to switch the costumes like we expected.
8. Scratch is actually running our blocks faster than we can see with our naked eye.
We need to adjust the ming so that we can see the animaon. From the Control
palee, snap a wait () secs block between the switch to costume (costume1) and
switch to costume (costume2) blocks.
9. The default value in the wait () secs block is 1. Change it to a smaller number, such
as .2, to speed up the me it takes to switch the costumes.
Chapter 2
[ 35 ]
10. Our revised script can be seen in the following screenshot:
What just happened?
By adding the switch costume to () blocks, our script now gives the appearance of walking.
The wait () secs block added some ming so that the transion between the costumes could
be detected.
Costumes are a fundamental part of Scratch and can be used to change the appearance of
our sprite, as we've seen in our example. There's a liming factor in our script so in that the
cat only takes a step when the green ag is clicked.
We'll connue to rene the movement and acon of our script, but let's pause for a moment
to put our simple project into a wider Scratch context.
Understanding the basics of a Scratch Project
Inside every Scratch project, we will nd the following ingredients: sprites, costumes, blocks,
scripts, and a stage. It's how we mix the ingredients with our imaginaon that creates
capvang stories, animaons, and games. Think of each sprite in a Scratch program (also
known as a project) as an actor. Each actor walks onto the stage and recites a script, which
consists of individual lines. How each actor interacts with another actor depends on the
words the director chooses, and we are in the director's seat of our Scratch programs.
Throughout the book, we'll learn how to add and customize sprites. A sprite wears a costume
like an actress dresses up for her role in the play. Change the costume, and you change
the way the sprite looks. Blocks are commands that are grouped by their type and include
Moon, Looks, Sound, Pen, Data, Events, Control, Sensing, Operators, and More Blocks.
We snap blocks together to create scripts, as our current exercises demonstrate.
Scripts are a set of blocks that tell a sprite exactly what to do. Each block represents an
instrucon or a piece of informaon that contributes to the sprite or to the project in
general. We'll explore those relaonships in our projects.
www.allitebooks.com
A Quick Start Guide to Scratch
[ 36 ]
Saving early, often, and automatically
It's good pracce to get in the habit of saving our work.
Time for action – saving our work
The online project editor will autosave our work, but it's good pracce to manually save
our projects, especially before you close your web browser or navigate away from the
Scratch website.
1. To manually save your new project, click on Save now from the File menu at the
top of the project editor. This works whether we're working with the online or
oine editor.
2. As you review the project, you'll noce that each project has a name. Our current
project is called untled. To change the name of your project from untled, nd
the white textbox above the stage and change the project name to something
meaningful by clicking in the box and typing. The following screenshot shows the
project name in relaon to the screen. My project is named run, kiy, run.
What just happened?
Autosave is nice and will generally limit our loss should we encounter an unexpected error or
loss of Internet connecvity. The general rule whenever you're creang something is to save
early and save oen. This is especially true for users of the oine editor, where there is no
autosave feature.
Chapter 2
[ 37 ]
A variaon of saving the current project is to use Save as a copy to create a copy of the
current project. This is useful if we want to save our work at a parcular point. There is no
versioning within Scratch, so somemes saving a copy of a project before making a lot of
addional changes is the only reliable way to get back to a known starng point.
Undoing a deletion
If you deleted something you shouldn't have, there is an Undelete opon under the Edit menu
at the top of the Scratch editor. You can only undelete the most recent item that you deleted.
Introducing forever loops
Let's get back to our walking cat animaon and set it in perpetual moon. When we do
something forever, we constantly repeat it. In Scratch's context, forever means we're going
to constantly loop through a series of blocks for as long as the project is running.
Time for action – setting the cat in motion, forever
So far, the cat has moved incrementally across the screen each me we clicked the green
ag. Now, we're going to introduce the idea that the cat can stay in moon forever.
1. We want to wrap the stack of blocks in a forever block. To do this, click on the move
(10) steps block in the script and detach it from the when ag clicked.
2. Now, from the Control palee, snap the forever block onto the when ag clicked
block. Grab the stack of blocks you detached and drag it to the center of the forever
block. Your script should look like the following screenshot:
3. Run the script and watch the cat disappear from the stage.
4. Let's get the runaway cat back. From the Moon palee, add the if on edge, bounce
block to the boom of the forever block. Now, watch the cat reappear upside down
and bounce around the boom-right corner of the stage.
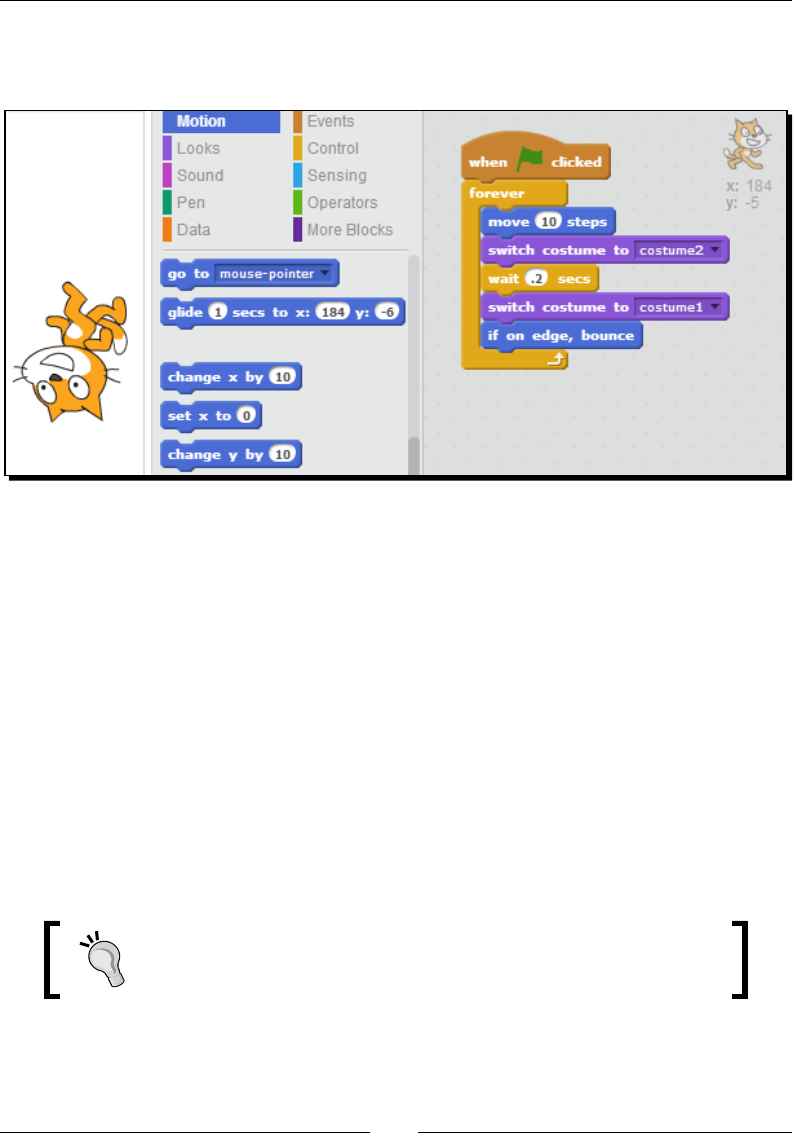
A Quick Start Guide to Scratch
[ 38 ]
5. To stop the cat, click once on the script or click on the stop sign above the stage.
The following screenshot shows the current state of our project:
Our script has a couple of issues to work through, such as a choppy walking moon and an
upside down cat. We'll come back and x this up some more, but rst let's consider what
we accomplished.
What just happened?
We wrapped our enre script in a forever block, which is synonymous with a loop. In
programming, a loop runs a group of commands over and over again. Aer we repeatedly
instructed the sprite to move across the stage, it didn't take long before it went o the stage.
The if on edge, bounce block did as the name implies—it turned the cat around when it hit
the edge of the stage. As the if on edge, bounce block was the last block in the forever loop,
the script checked for the edge of the stage with each step.
If you carried out the steps in the exercise as described, you will see that as soon as you
placed the if on edge, bounce block into your script, the sprite reappeared.
You can add blocks to the loop and change the block aributes as the
script runs, and the sprite automacally adjusts to the new values.
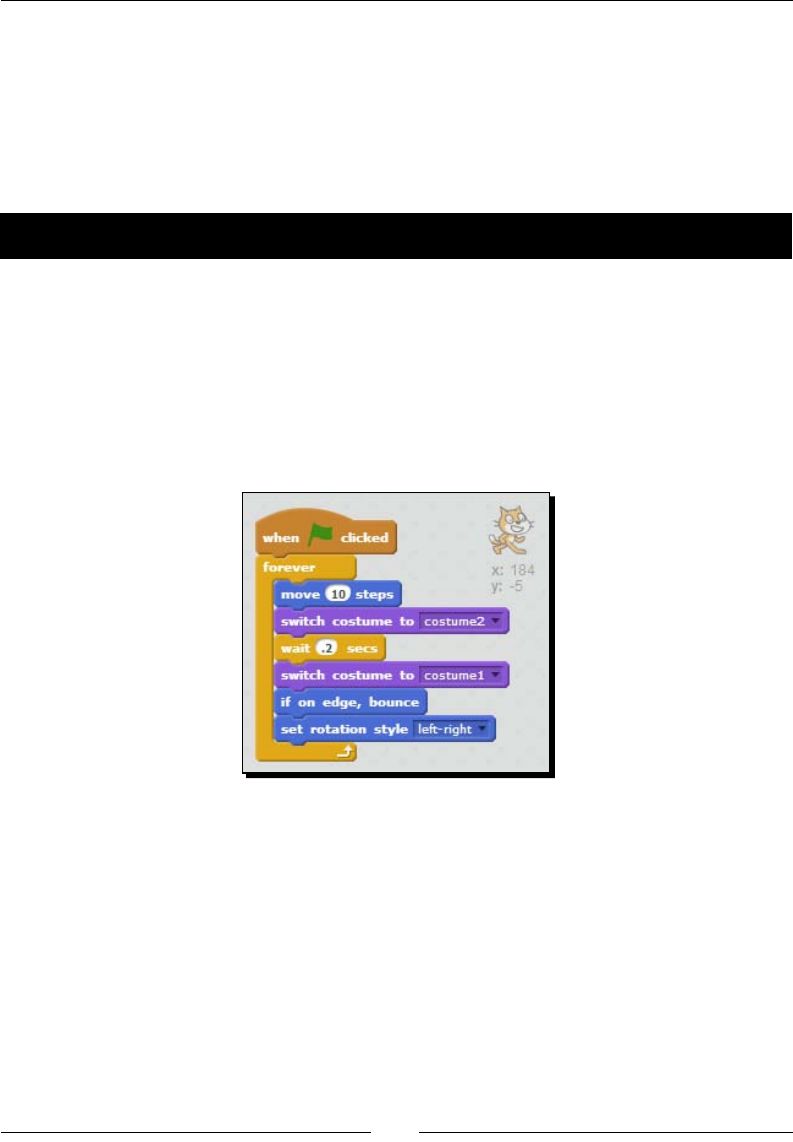
Chapter 2
[ 39 ]
Controlling a sprite with loops
Any me we need to repeat an acon within a project, we use a loop. The forever block
represents an innite loop because there is nothing in the script that tells the block to
stop running. The blocks inside the loop will run as long as the Scratch program is running.
We'll use loops throughout the book to control how a sprite behaves and to connually
evaluate the changing condions of our games, stories, and animaons.
Time for action – ipping the cat right-side up
Let's tweak our script so the cat rotates right-side up and see if we can speed up our steps:
1. Scratch 2.0 introduced the set rotaon style block in the Moon palee that will
set our cat right-side up. From the Moon palee, nd the set rotaon style () block
and add it to your script aer the set rotaon style () block. The default aribute for
the set rotaon block is le-right, which xes our problem.
2. Click on the stack of blocks to run the script. Your script should look like the
following screenshot:
3. Now, let's address the choppy movement of the sprite. From the Looks palee, drag
the next costume block into the scripts area. Don't aach it to the script yet because
we want to expose another one of Scratch's features. If the cat is sll moving, you
can stop it by clicking the stop sign.
4. Click the next costume block directly. And then, repeatedly click on the block so
that you see the cat switching between its costumes with each click of the block.
This block is mimicking the funconality we've already built into the script, but we'll
explain the full ramicaons aer we wrap up the exercise.

A Quick Start Guide to Scratch
[ 40 ]
5. Remove the following blocks from the script by clicking on them and dragging them
to an empty spot in the scripts area: switch costume to (costume2), wait (.2) secs,
and switch costume to (costume1).
Removing blocks from the middle of the script is not always a clean process.
Often, Scratch will remove more blocks than you want it to. As long as you
drag the blocks to the Scripts area, you can easily add the relevant blocks
back to the script.
6. Add the next costume block aer the move (10) steps block, replacing the three
blocks we just removed. Verify your script against the following screenshot:
What just happened?
Of primary interest to us was geng the cat's rotaon correct as it bounced o the edge
of the stage. The set rotaon style (le-right) block told the cat to rotate horizontally.
Before we set the rotaon, the cat was ipping vercally as it reversed direcon.
The next thing we did was consolidate the changing of the costumes down to a single
next costume block. This made the running moon smoother but much faster. We can
slow the cat back down by adding a wait () secs block at the end of the forever loop and
experimenng with values.
You might be wondering why we were able to replace the mulple switch costume to ()
blocks with next costume and sll see the running moon of the cat. The reason lies in
the loop. Before we added the forever loop, the script used two blocks to explicitly switch
between the costumes. These two switch costume to () blocks equaled one step. The wait
(.2) secs block put a slight hesitaon in the step. In order to get the appearance of running
or walking, we needed to manually switch between the two costumes within that one step.

Chapter 2
[ 41 ]
When we replaced the switch costume to () blocks with a single next costume block,
each step was now a costume switch. The animaon was much smoother even without the
wait () secs block. All the blocks in the loop became one step that was repeated forever.
The connual looping of the script provided the same end result that we had when we
added the mulple switch costume to () blocks.
With the next costume block, we don't need to know the name of the costume or even care
how many costumes the sprite has. If the current costume is number one, then the next me
through the loop, the costume will change to number two, and so on. When we use next
costume, we do have to be concerned that the costumes t the project we're working on.
On the other hand, if we need to explicitly display a sprite's costume, the switch costume to
() block is a beer choice. For example, if we need to make sure a sprite looks a certain way
at the start of a game, we'd use the switch costume to () block in a script that started with
when ag clicked.
Clicking on a block runs the command
Before we added the next costume block to the script, we placed it in the scripts area and
clicked on the block. This allowed us to run the block before we added it to the script and is
a feature of Scratch. Unl this point, we've been clicking on the green ag to run the script,
but we could just as easily be clicking on the stack of blocks to start to run the script.
The ability to run an individual block against a sprite gives us a chance to observe the
behavior of the block before we add the block to our script. It's a great way to test and learn.
Have a go hero – exploring sprite rotation
The set rotaon style () block we used in our script has three rotaon values available:
le-right, all around, and don't rotate. Explore the behavior of the cat by using each
rotaon style.
Adding sprites to the project
So far, we have learned that if we want something done in Scratch, we must tell a sprite to
act by creang one or more scripts. Scratch always starts a new project with a single cat.
However, we don't always want to use the cat, and our games and stories will most likely
include mulple sprites.
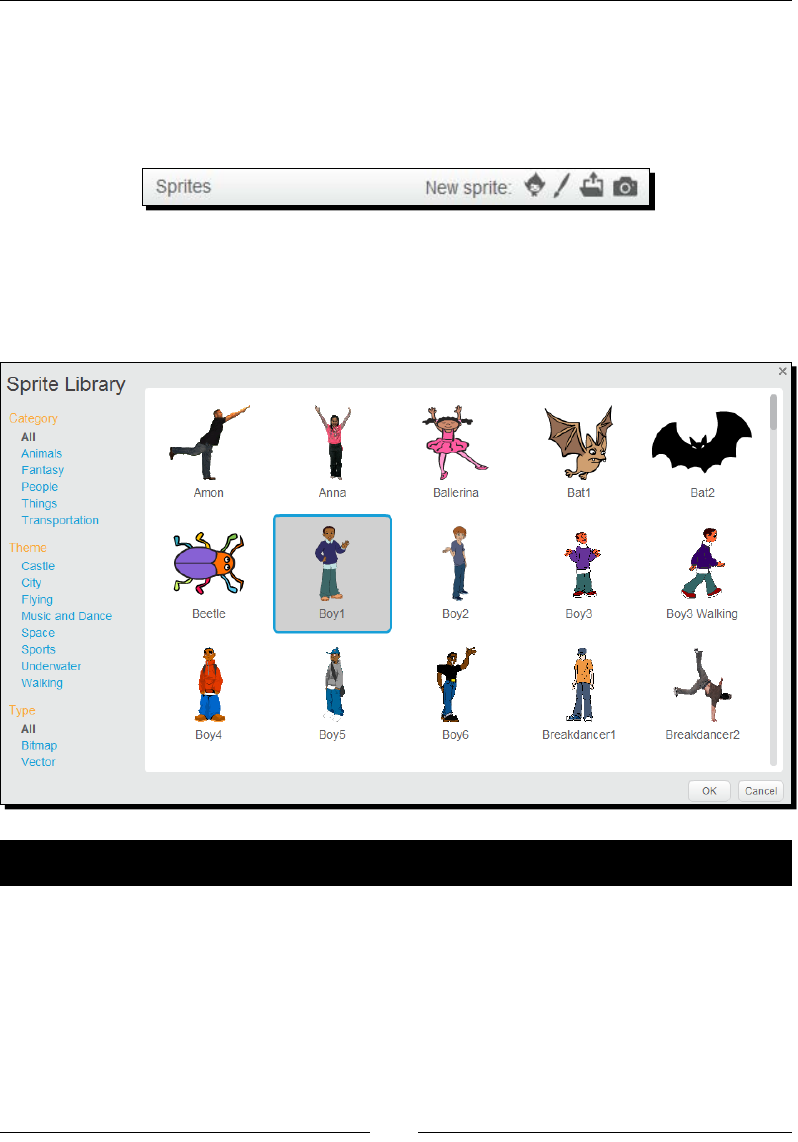
A Quick Start Guide to Scratch
[ 42 ]
We can add sprites to the stage in one of the four ways: paint a new sprite, choose a sprite
from the library, upload a sprite from le, or a new sprite from the camera. The icons to
insert a sprite using one of these four methods are located in the New sprite pane, between
the stage and the sprites list. The following screenshot shows the New sprite icons. Move
the mouse over each icon to see a toolp that idenes the new sprite method.
As we build future projects, we'll explore the various ways to add sprites. For now, we'll focus
on Scratch's built-in sprite library. It's a great benet to have a library of available sprites
at the click of a mouse. The following screenshot shows what you see when you select the
choose sprite from library opon:
Time for action – adding a second sprite and script
We've menoned that we can have mulple sprites acng out their scripts, but now we're
going to add a second sprite to the project to illustrate the concept and explore some
addional moon blocks and loops.
1. Add a new sprite by clicking on the Choose new sprite from library opon.
Then, browse to the Animals category and select Dog1. Click on OK to add the
dog to the project.
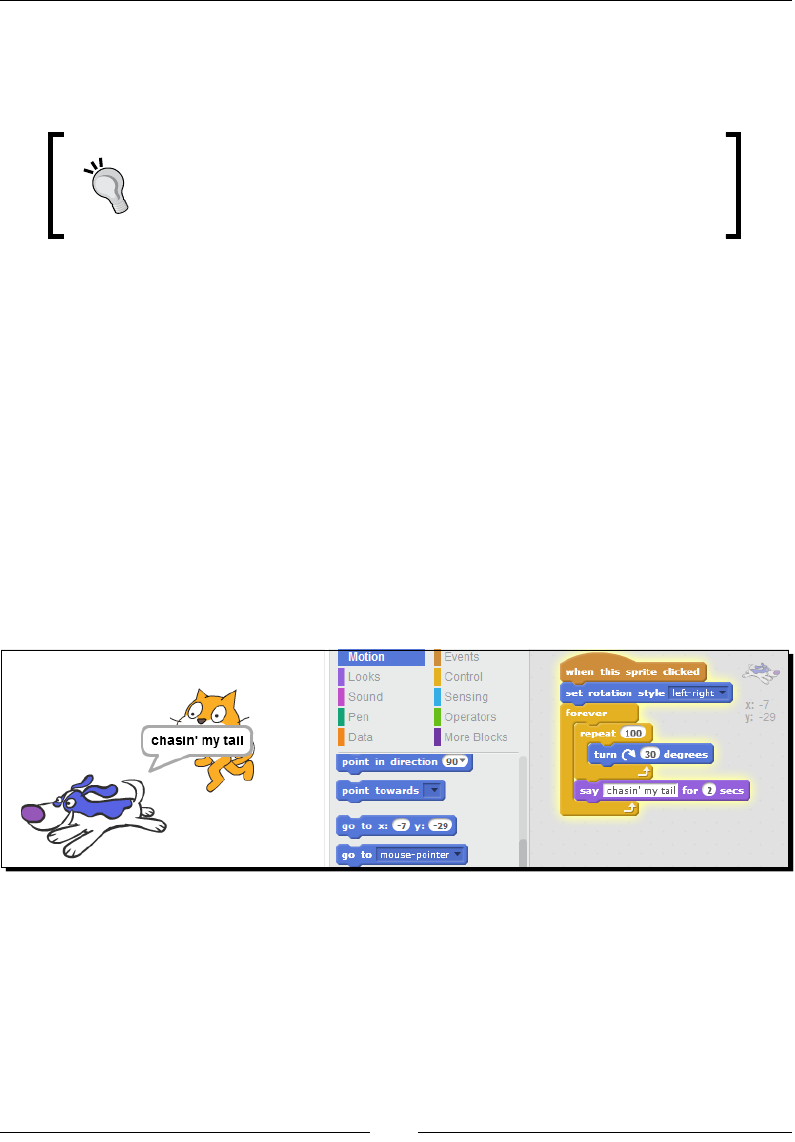
Chapter 2
[ 43 ]
2. Ensure Dog1 is selected in the sprite list to ensure we have the scripts area for
the dog.
3. From the Moon palee, drag one of the turn blocks into the scripts area.
Two turn blocks
If you look in the Motion palette, you'll notice that there are two turn
blocks. One has a circle arrow that points clockwise and the other turn
block points counter-clockwise.
4. Find the repeat block from the Control palee and snap it around the turn block.
5. Wrap the script in the forever block.
6. From the Events palee, add the when this sprite clicked block on top of the enre
stack of blocks.
7. From the Looks palee, snap the say () for () secs block onto the boom of the
repeat () block and above the forever block.
8. Next, we'll ne-tune the values of the blocks we just added. Change the value on the
repeat block to 100. Change the value on the turn block to 30. Change the value on
the say block to chasin' my tail.
9. Click on the dog on the stage and watch the sprite spin in a circle as if it's chasing its
tail. Click on the green ag and set the cat on its trip back and forth across the stage.
The following screenshot shows the dog and its script:
What just happened?
We have two sprites on the screen that act independently of each other. This seems simple
enough, but let's step through our script.
We added the dog sprite to the project and created a script that made the dog appear as if
it was chasing its tail. Changing the value of the turn block will make the dog spin slower
or faster.

A Quick Start Guide to Scratch
[ 44 ]
By increasing or decreasing the value of the repeat block, we can control how many mes
the dog spins before it says chasin' my tail. The repeat () blocks contained in the repeat loop
run for the number of mes specied.
The repeat loop diers from the forever loop in that a repeat loop has a specied end,
while the forever loop runs innitely. As our exercise demonstrates, we can combine
the loops, thereby providing mulple control points in our script.
Our exercise also introduced the idea of using mulple events in the same project to control
when a sprite acts. The cat acts when the ag is clicked, while the dog acts only when you
click on the dog sprite.
Reviewing a video-sensing project
We're going to leave our rst Scratch project behind, and go out to the Scratch website to
nd a project that uses some of the blocks we've used throughout this chapter. Our main
purpose is to view a complementary project in terms of blocks that can give us some ideas
to extend our introductory project and introduce a Scratch 2.0 feature.
Time for action – reviewing pop the balloon - video starter
We'll be viewing a project from the Scratch website, so open a browser and go to
http://scratch.mit.edu/projects/10126867/. Alternavely, you can download
the book's supporng code les and open Pop the balloon - video starter.sb2.
The project is from chrisg, a Scratch team member.
1. When you have the Pop the balloon - video starter.sb2 project open,
click on the See Inside buon to see the sprites and scripts of the project. If you're
using the oine editor, you'll automacally open the project in the code view.
2. This program uses a webcam, so let's see what it does. Click on the green ag to
start it.
3. You will be prompted with a message that indicates that Scratch wants access to
your microphone and webcam. Click on Allow.
4. The view of your webcam is now on the Scratch stage with oang balloons.
Touch the balloons to pop them.
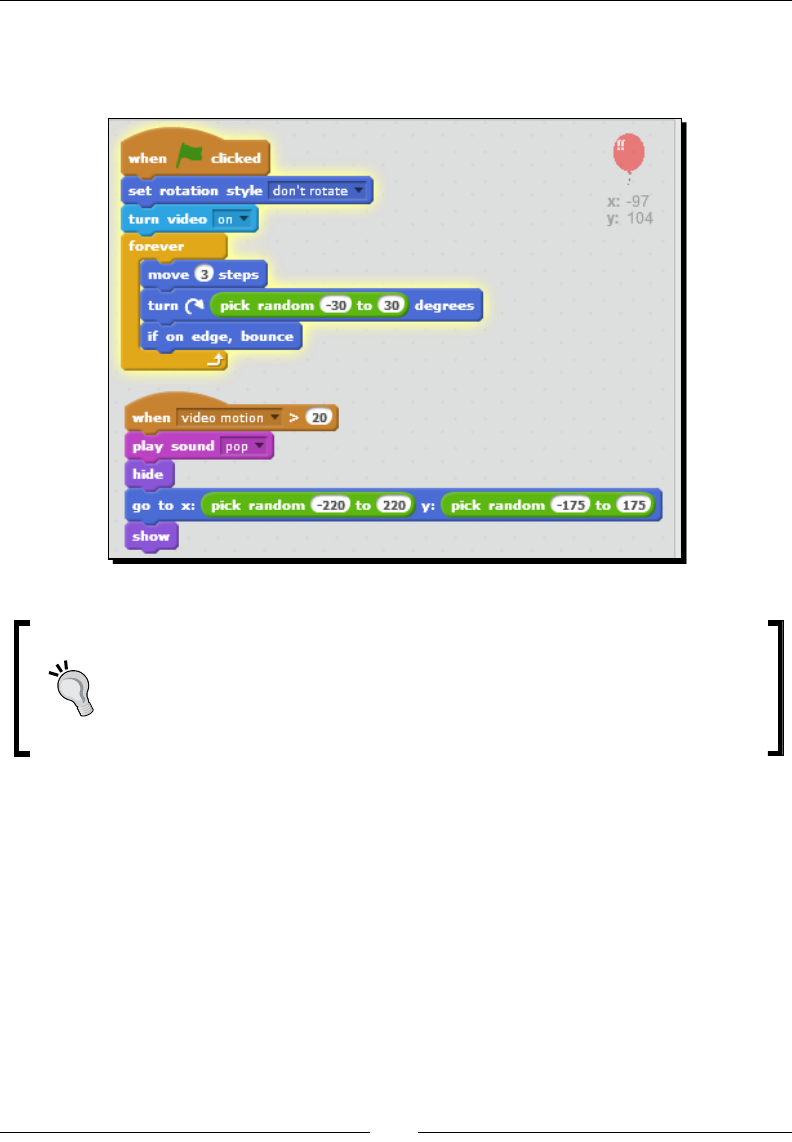
Chapter 2
[ 45 ]
5. This project has one sprite with two scripts. If you take a look at the script that
begins when the ag is clicked on the block, most of these blocks look familiar, and
that's why we're looking at this script at this point in me.
Downloading the example code
You can download the example code les for all Packt books you have purchased
from your account at http://www.packtpub.com. If you purchased this
book elsewhere, you can visit http://www.packtpub.com/support and
register to have the les e-mailed directly to you.
What just happened?
In our earlier chapter exercises, we've used the set rotaon style (), forever, move () steps,
turn () degrees, and if on edge, bounce blocks to animate the cat and dog. In the balloon
project, these same blocks are moving a balloon around the stage and creang a dierent
eect, essenally by changing the values assigned to the blocks.
The biggest dierence we see is the pick random () to () block, which resides in the
Operators palee. This block takes two values, which correspond to a range, meaning the
turn block is randomly picking a number between -30 and 30. That gives the balloon the
variaon in the movement and gets it traveling up, down, right, and le. We'll encounter
the pick random () to () block again.
www.allitebooks.com

A Quick Start Guide to Scratch
[ 46 ]
Sensing video
One of the other reasons for opening this project is that it demonstrates one of Scratch
2.0's features—video sensing. This feature has a lot of eye candy because it incorporates
live video from the web cam into the project. However, we can't actually record videos for
playback. It's limited to sensing moon and direcon.
We're not going to work with video sensing in any of our future projects. Now that you know
this feature, I recommend you explore video sensing aer you learn some more of the basics
behind Scratch programming.
Have a go hero – remixing ideas with our starter project
The one thing about learning to program with Scratch (or any language) is that somemes
you can use scripts, snippets, and ideas from another project to accomplish a task in your
project. Can you take the moon of the balloon project and apply it to the cat in the starter
project? Likewise, now that you have the video-sensing project open, you can take a stab
at customizing in some way. We haven't covered much to this point, but there's nothing
stopping you from a bit of exploraon.
Pop quiz – getting started with Scratch
Q1. What are the advantages of registering an account with the Scratch website?
1. Ability to save and share projects from the online project editor.
2. Ability to post to the site forums.
3. Ability to save unshared projects in My Stu.
4. All of the above.
Q2. Which one of the following blocks represents an event?
1. move (15) steps.
2. when ag clicked.
3. repeat.
4. forever.
Q3. Why would you use a forever block?
1. To run a series of commands for a set number of mes.
2. To run a group of blocks only when a condion is true.
3. To run a group of blocks for as long as the project runs.
4. There is no good reason to use a forever block.

Chapter 2
[ 47 ]
Q4. The repeat () block does what?
1. Runs a group of blocks for the specied number of mes.
2. Runs a group of block forever.
3. Runs a stack of blocks each me the green ag is clicked on.
4. Runs a stack of blocks each me the script is clicked on.
Q5. The repeat and forever blocks represent what programming concept?
1. Variables.
2. Loops.
3. Events.
4. Synchronizaon.
Summary
In this chapter, we covered a lot of ground and got a quick introducon to creang our
rst project in Scratch. We focused on moving the sprite around the stage. We made the
cat travel across the stage connuously using a forever loop while the dog chased its tail.
We learned that sprites can have mulple costumes, and when we create a script to access
those costumes, we can animate the sprite's behavior.
In the next chapter, we will animate a birthday card, and in the process, we will learn to
use Scratch's built-in paint editor. We'll also apply graphical eects and connue to work
with events to ensure we get the me of our animaons just right.

3
Creating an Animated Birthday Card
Now that we've taken a tour of Scratch and created some sample scripts,
let's actually create a complete project, right from concept to completion.
In this chapter, we will create an animated birthday card for a friend or
family member using both sprites that we design and sprites that we import
from Scratch's library. Animating a card is an excellent introductory Scratch
programming exercise because it can be accomplished using relatively basic
concepts. We'll also be introducing Scratch's paint editor in this chapter,
which gives really young children who might not be able to read very well
a low-tech way to interact with Scratch by drawing and editing sprites.
In addion to doing something fun, praccal, and thoughul, we will also learn how to:
Design bitmap and vector images using the built-in paint editor
Inialize a sprite's starng values
Name sprites in easy-to-remember ways
Transform sprites using graphical eects, loops, and broadcasts
We'll ll in these general ideas with details as we move through the exercises in this chapter.
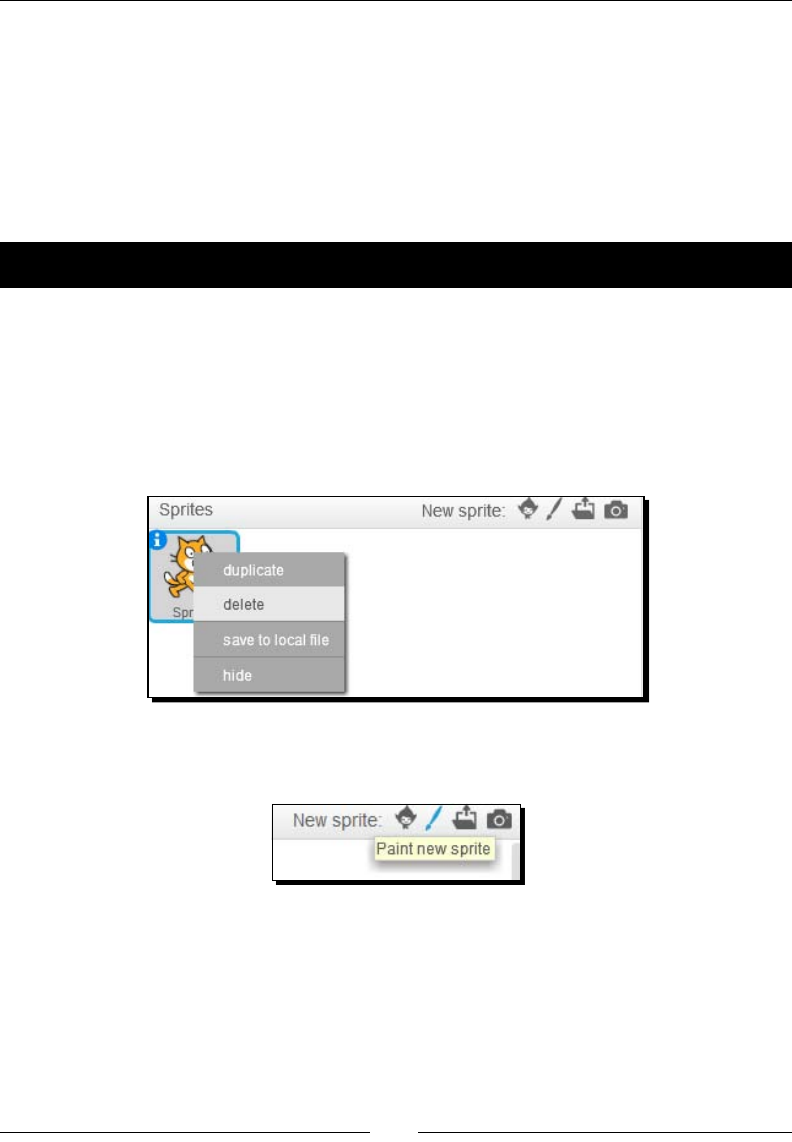
Creang an Animated Birthday Card
[ 50 ]
Introducing the paint editor
Tradional birthday cards that you buy ve minutes before a party are an impersonal way
to show someone you care. So, when you care enough to send a card, make it a homemade
card that you have designed yourself. Instead of cung, gluing, and stenciling paper, we're
going to make a homemade animated birthday card using Scratch.
Can't think of anyone to send a card to? Send it to yourself—I won't tell anyone.
Time for action – painting a happy birthday sprite
When we create a new project, our rst task is to add our cast of characters and props;
otherwise, we won't have any sprites to animate. Let's start by adding the most obvious
part of a birthday card—the Happy Birthday text:
1. To start a new project, click on the Create buon on the Scratch website.
2. We won't be using the cat, so you can delete that sprite by right-clicking on the
cat icon, labeled as Sprite1 in the sprites list, and choosing delete.
3. For our rst sprite, we want to draw a new one; so, click on the Paint new sprite
icon, as shown in the following screenshot:
4. Clicking on the Paint new sprite icon creates a new sprite named Sprite1 and
opens the paint editor to an empty canvas, as shown in the following screenshot.
To start, click on the Text tool, as shown in the following screenshot, so that we are
able to type:
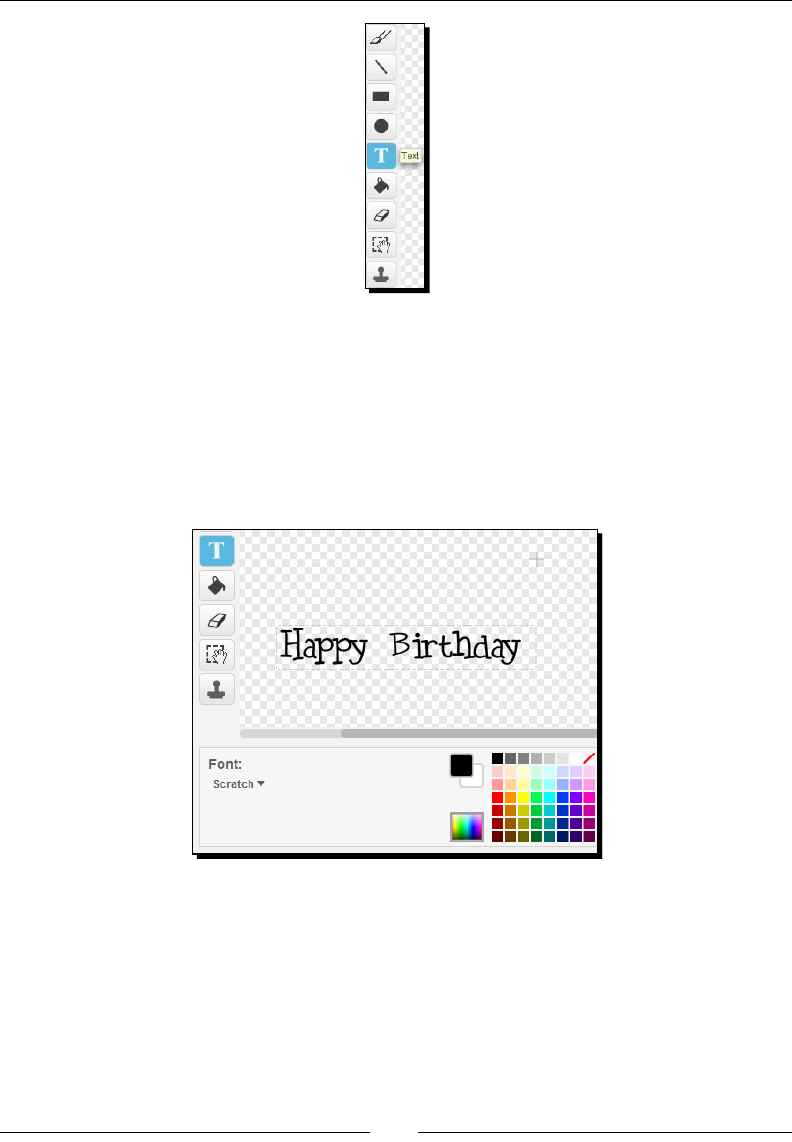
Chapter 3
[ 51 ]
5. Click on the canvas with your mouse where you want to type, and you'll see a
vercal bar appear, which indicates that you are able to type. Go ahead and type
Happy Birthday. If the text scrolls o the screen, use the horizontal and vercal
scroll bars on the editor window to posion the text in the editor window.
6. Don't like the default font? We can change it. Highlight the text you just typed and
look at the boom of the paint editor to nd the Font menu. You can select from a
limited number of fonts. In the following screenshot, I have selected the Scratch font:
7. As you can see, there is also a color palee available, so let's change the text
color. Highlight the text and click on the color you want from the color palee.
Happy Birthday is now displayed in the color you select.
8. If you're happy with the words, font, and color, you can save your sprite by clicking
anywhere on the stage or the paint editor. The sprite is now visible on the stage.
But be careful; aer you click out of the Text tool, you will not be able to change
your text.
Creang an Animated Birthday Card
[ 52 ]
Erasing mistakes
The toolbar contains an erase tool with an adjustable eraser width that
allows you to remove parts of your image. If you want to change the words,
font, or color of the text we just created, you'll need to erase the sprite and
start over.
What just happened?
We used the default bitmap editor to create a simple Happy Birthday sprite in the font and
color of our choice. Note that aer we saved our text by clicking anywhere in the image
editor or the stage, we created a sprite. Even though our sprite inially comprised of 13
leers, it's now treated as a single bitmap image instead of individual leers. If we need to
change the details of the Happy Birthday sprite, we'll need to erase what we have created
and start over again.
Changing the size of a bitmap image
Aer we save the size of our sprite, Scratch 2.0 does not provide a size seng in the bitmap
version of the editor where we just created this image. Bitmap is the type of image we
created in the previous exercise, and we'll talk a bit more about it in the following secon.
To change the size of the sprite we just created, we can manually resize the image using
the Grow and Shrink buons, which are located directly above the ag and stop sign in the
project editor. To manually make a sprite bigger, click on the Grow buon and then on the
sprite. The following screenshot shows the locaon of the Grow and Shrink buons. Scratch
will remember these sizes unless we change the size of the sprite with a block.
We can also change the size of the sprite by adding the set size to () block from the Looks
palee. The next exercise will use the set size to () block.
Our exercise is focused on drawing a sprite using words; however, you can draw shapes or
characters if you're so inclined.
Chapter 3
[ 53 ]
Choosing bitmap or vector images
Not only does Scratch have a built-in image editor, but it also allows you to choose from
bitmap or vector graphics. Bitmap images tend to be easier to work with, but as you make
the image bigger in size, it becomes less clear and more blurry, and the quality deteriorates.
The image appears to have rough edges. That's because a bitmap image is represented on a
computer by pixels or single dots of color that are arranged in a paern to create the image
we see.
If we were to zoom in on a bitmap image, we would eventually see the individual dots.
When we resize an image to the point where we start to see the individual pixels, this
eect is commonly referred to as pixilaon. The image is no longer smooth and crisp.
Vector graphics, on the other hand, will appear to be smooth no maer how big you make
the images. However, they tend to be a bit harder to work with. When a vector graphic is
displayed on a computer screen, a program (Scratch in this case) renders the image based
on a mathemacal calculaon to draw the curves and lines instead of individual pixels of
color. This makes the image scalable to any size while avoiding pixilaon.
Let's try a side-by-side comparison using the Happy Birthday sprite.
Time for action – drawing a vector image
Let's draw the Happy Birthday sprite in the vector mode. Then, we'll increase the size of both
our images to compare the appearance:
1. Create a new sprite by clicking on the Paint new sprite icon.
2. Convert the image to vector graphics by clicking on the convert to vector buon at
the boom-right of the editor. When the mode changes, the toolbar moves to the
right side of the editor.
3. From the toolbar, use the text tool to create a second Happy Birthday sprite.
4. Now, let's make the sprites bigger. From the Looks palee, drag the set size to ()
block into the Scripts area. Change the size aribute to 300 and then click on the
block to apply the size.
5. Repeat step 4 for the other Happy Birthday sprite we created.
6. View the project in fullscreen mode by clicking on the blue square located at the
top of the stage, to the le of the project name. The output looks similar to the
following screenshot:
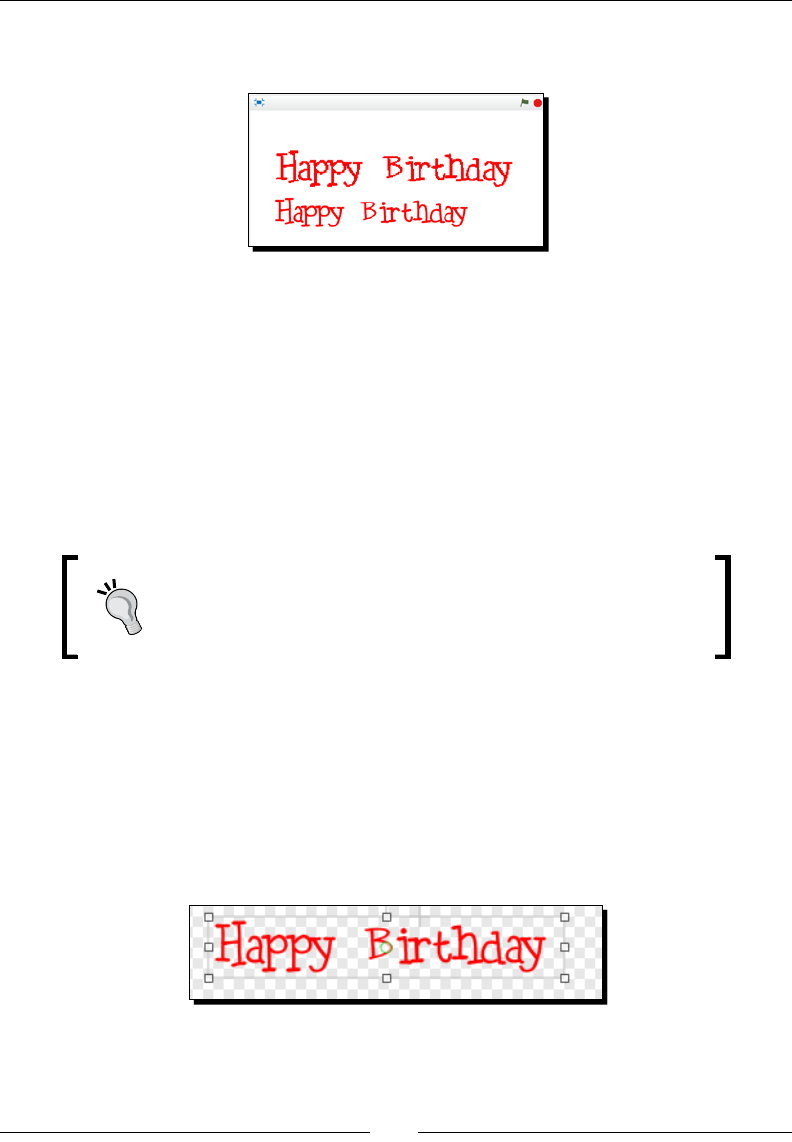
Creang an Animated Birthday Card
[ 54 ]
When the project opens in fullscreen mode, the output on your screen should resemble the
following screenshot:
As you can see in the previous screenshot, the image at the top is starng to pixelate and is
not as crisp as the boom sprite. This top image is the bitmap image.
What just happened?
In the preceding screenshot, the rst Happy Birthday sprite is the bitmap image. As we
made the sprites bigger by viewing the project in fullscreen mode, the bitmap starts to show
ragged edges that didn't show up when we viewed the sprite in the editor at its original size.
If you compare this bitmap image with the vector graphic, by comparison, the vector graphic
looks smooth. Visually, that's the key dierence between vector and bitmap graphics.
In addion to creang your own vector images, the Scratch sprite
library contains many vector-based images. The editor cannot
convert bitmaps to vector images, and all imported images are
imported as bitmaps.
You can choose to use vector or bitmap images depending on your ability and needs.
The best way to nd some Scratch drawing inspiraon is to explore the community.
Changing the size of the vector image
When we create a vector image, Scratch allows us to resize the image by clicking on one of the
control points on the boundary of the image. The following screenshot shows eight square
control points around the Happy Birthday sprite that allow us to resize or reshape the image:
Of course, we can also change the size of the vector-based sprite by using the Grow or Shrink
buons and the set size to () block, as discussed with the bitmap images.

Chapter 3
[ 55 ]
Reviewing the image editing tools
Each image mode contains a toolbar. The following table denes the tools for both bitmap
and vector modes. The tool name column corresponds to the toolp you get when you hover
your mouse over the tool.
The bitmap eding tools along with their descripons are listed as follows:
Bitmap editing tools Description
Brush This tool is used to draw freehand. You can select a color and a
line width.
Line This tool is used to draw straight lines only by clicking-and-dragging
the mouse on the canvas. You can select a color and line width.
Rectangle This tool is used to draw a rectangle. In addition to selecting a line
width and color, you can draw a solid rectangle or transparent
rectangle.
Ellipse This tool is used to draw an oval. In addition, you can hold down
the Shift key to draw a circle with your mouse. You can draw an
image with a solid or transparent center. You can also select a
color and line width.
Text This tool creates a text box with a cursor when you click on the
canvas. You can select the font and color. However, the text can't
be changed after you save it.
Fill with color This tool fills a region with a solid color or gradient.
Erase This tool enables an eraser with a selectable size.
As you move the eraser over the canvas, it removes the image.
Select This tool, as the name suggests, selects an area of the image that
you can move, stretch, or shrink.
Select and duplicate This tool selects an area of an image and then copies the selected
area so that it can be dragged to a new place on the canvas.
The vector eding tools along with their descripons are as follows:
Vector editing tools Description
Select This tool selects a sprite by clicking on it so that you can
reposition or rotate it. It allows you to resize, shrink, or stretch
the image.
Reshape This tool changes the shape by clicking on and dragging one of
the control points.
Pencil This tool is used to draw a freehand design using a selectable
line width and color.
www.allitebooks.com
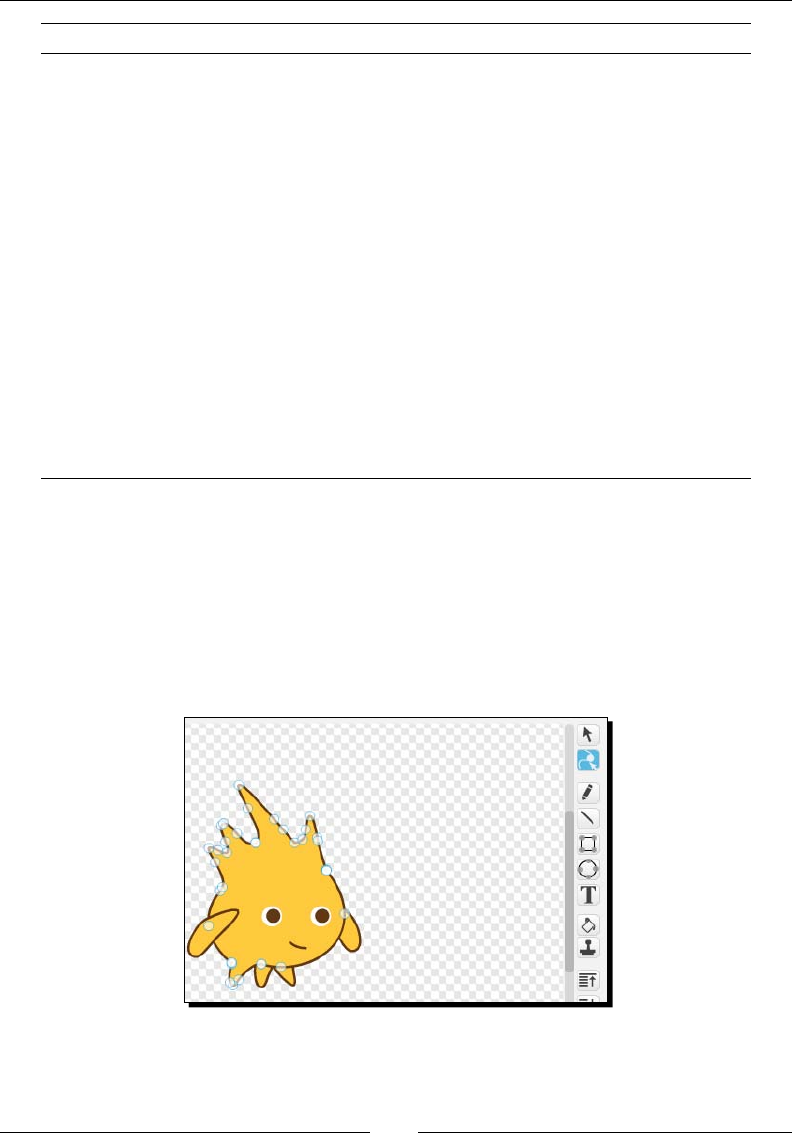
Creang an Animated Birthday Card
[ 56 ]
Vector editing tools Description
Line This tool is used to draw a straight line on the canvas by
clicking-and-dragging from one point to another. You can
select the line width and color. To make a curvy line, you will
first start with a straight line and then use the reshape tool to
create the shape you need.
Rectangle This tool is used to draw a rectangle. In addition to selecting
a line width and color, you can draw a solid rectangle or
transparent rectangle.
Ellipse This tool is used to draw an oval, or hold down the Shift
key to draw a circle with your mouse. You can draw an
image with a solid or transparent center. Select a color
and line width.
Color a shape This tool is used to fill a vector object. Unlike the fill tool in the
bitmap editor, it cannot fill a blank background or object.
Duplicate This tool is used to select and copy an object with the mouse
pointer. The copied object can then be moved and changed as
needed.
Erasing in the vector mode
You may noce that there is no erase tool in the vector mode. In the vector mode, you can
remove the secons of a line or curve by pressing the Shi key and clicking on a circle control
point, or you can do this by dragging a control point to reshape the line. This funconality
is available under the reshape tool. The following screenshot shows Gobo, one of Scratch's
default sprites in the paint editor, with the reshape tool selected. Note the circular control
points around the perimeter of the selected shape.
If you click around the Happy Birthday vector sprite we created, you'll also noce that it's
possible to change the individual leers of the text we created as well as the color.
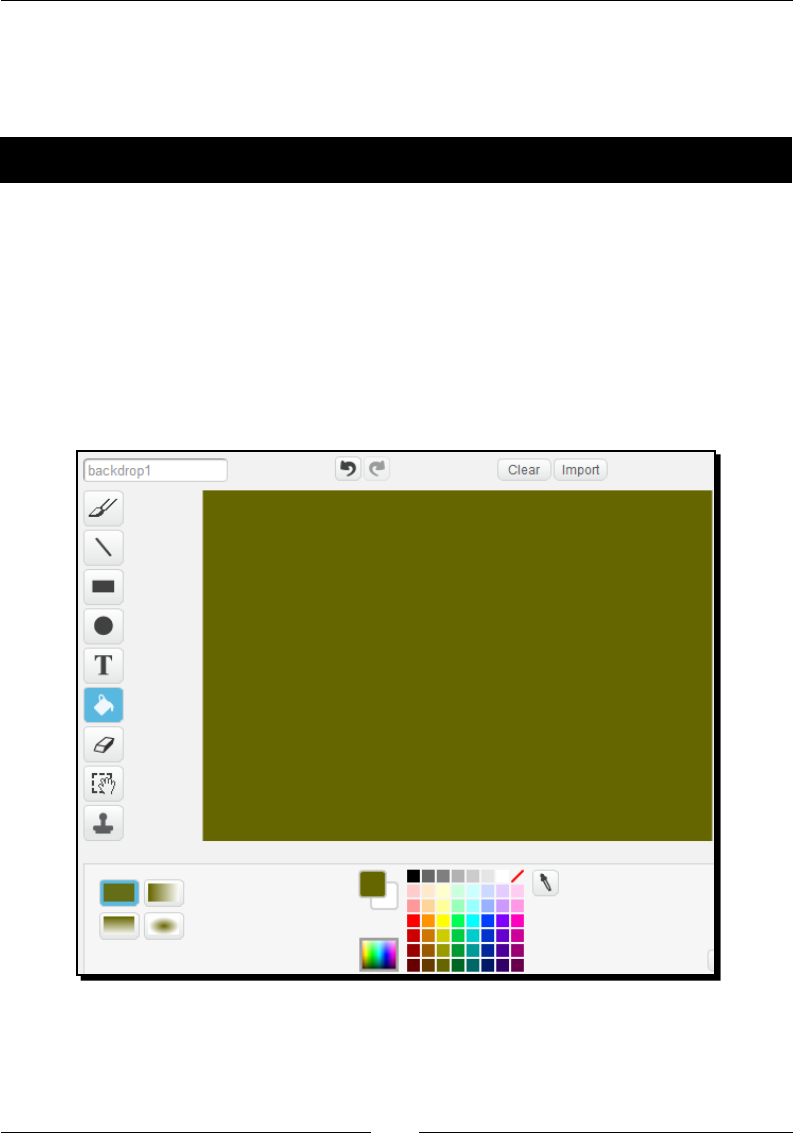
Chapter 3
[ 57 ]
Filling the stage with color
A white background seems boring, and we're not about to tolerate boring, are we? Let's see
how easy it is to design our stage with colors and gradients.
Time for action – using the ll with color tool to paint the stage
In this exercise, we're going to create a solid background for our card and add a border to the
design using a second color. Before you paint the background, let's delete the bitmap version
of the Happy Birthday sprite. Let's paint by performing the following steps:
1. Select Stage in the sprite list.
2. Select the Backdrops tab. Our project is new, so we see the default white
background in the paint editor.
3. Apply a color by selecng the Color the shape tool and then choosing a color from
the color palee. Click on the stage to ll it with the selected color.
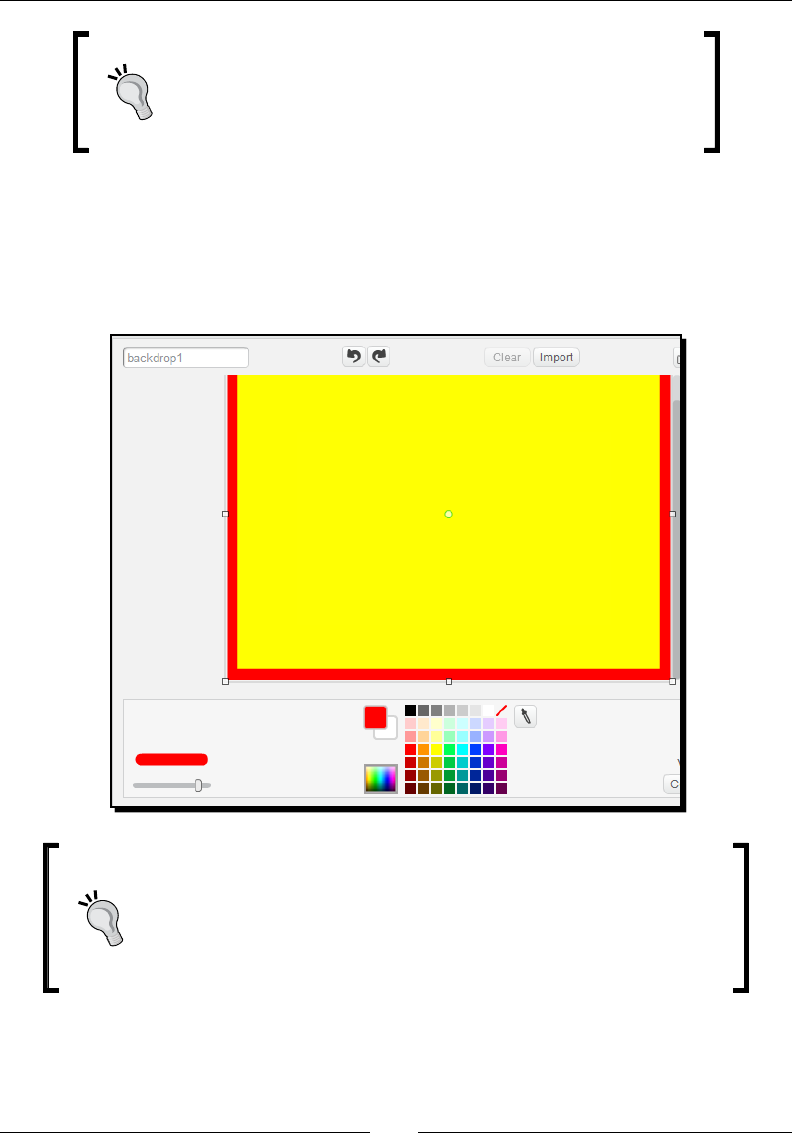
Creang an Animated Birthday Card
[ 58 ]
Undo
If you don't like the color you put in place, you can remove it by
pressing the Clear button located above the editor. Likewise, you
can use the Undo button, which is the counter-clockwise arrow.
4. Let's create a frame around the edge of the stage so that we can add a second color.
Convert the stage backdrop to the vector mode so we can use the Rectangle tool.
5. Select the Rectangle tool and pick a contrasng color. Click on the image editor to
draw a rectangle. The following screenshot shows a sample backdrop border on
the stage:
Changing the width of the line
At the bottom-left of the paint editor, there is a slider to control the
width of the rectangle line. Several other tools also include a way to set
the width of the line, including the pencil, line, ellipsis, rectangle, and
reshape tools.
We've now given our stage some color and a touch of personality. Feel free to
experiment here.

Chapter 3
[ 59 ]
What just happened?
A basic tool of any image eding soware is the ll tool, which allows you to ll an area
with color. When we were working in the vector mode, our ll tool was called Color a shape.
In the bitmap mode, it's called Fill with color. When we add the simple rectangle shape, we
are able to create a border or a frame.
This exercise, beyond adding some color, should get you thinking about design. Even the
simplest of projects will be designed. Our design is relavely simple right now. We have
mulple colors and shapes in addion to the text.
One of the beauful things about design (much like any other creave process) is that it's an
iterave process, which means you expect to change it as the project evolves.
Adding gradients
Gradients gradually blend two colors together and are available in both the color a shape
and Fill with color tools. Let's take a quick look at using the gradient tool.
Time for action – applying a gradient
In our previous exercise, we used the Color a shape tool to apply a solid color to the stage.
Let's see what happens when we choose a gradient instead:
1. Open the stage in the paint editor if it's not already open. Then, select the color a
shape tool.
2. Next to the color palee at the boom of the editor are two color squares, one
overlaid on top of the other. You can bring the boom square to the front by clicking
on it. Clicking on a color square from the palee will assign that color to the top
square. Select two colors; we'll use them to draw a gradient.
3. Now select a gradient, which are the four squares available at the boom-le of the
editor. The rst opon is the solid ll and working clockwise, we have horizontal,
circular, and vercal. Choose one of the other gradient opons and click on the
image editor. Now, try reversing your two colors and see how the gradient changes.
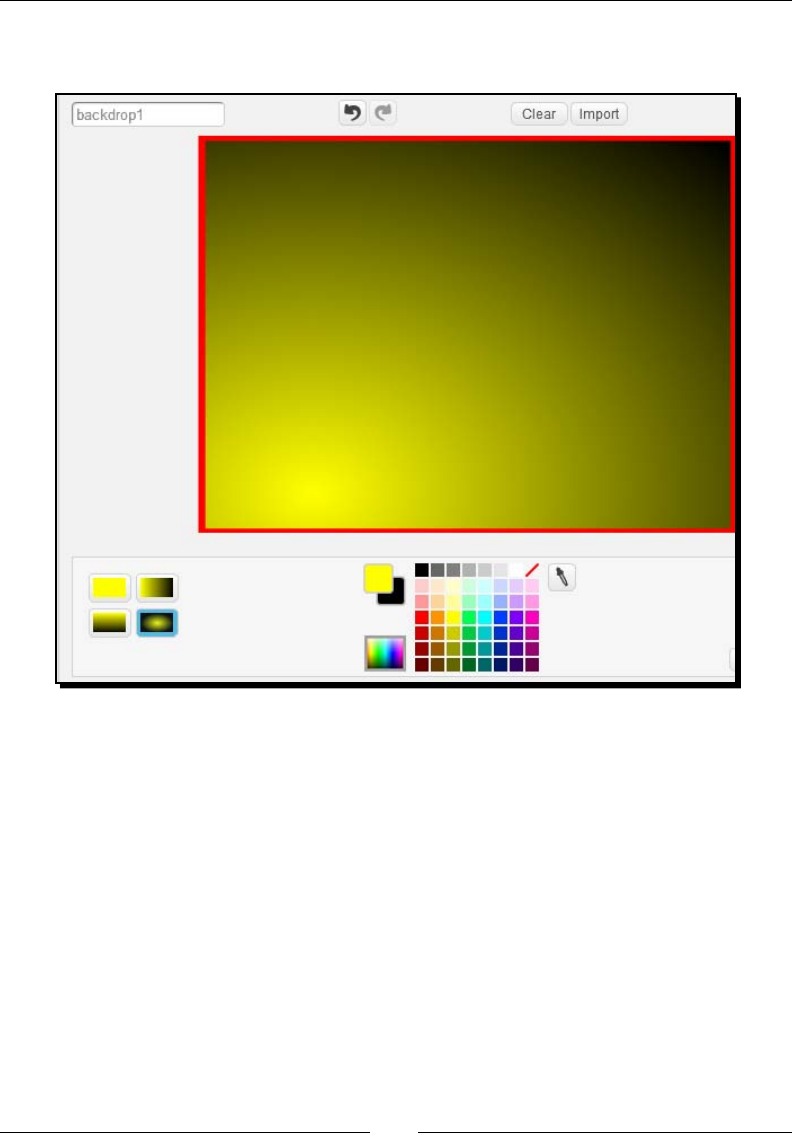
Creang an Animated Birthday Card
[ 60 ]
4. The following screenshot shows a gradient along with the color opons at the
boom of the editor:
5. Now that you have a gradient opon, you may choose to connue designing your
card with it. For my card, I'm scking to a solid background.
What just happened?
If you click around the stage and apply dierent gradients, one of the things you will noce
is that color one is darkest at the point where you click onto the stage and then it gradually
fades into the second color.
There are three gradient opons. A vercal gradient will start with color one at the top of the
stage and gradually fade into the second color. A horizontal gradient starts with the rst color
to the le of the stage and transions to the second color as it lls to the right of the stage.
Use the ip le-right and ip up-down opons in the paint editor to change that orientaon.
The circular gradient starts wherever you click on the stage with color one and transions to
the second color as the circle reaches the edge of the stage.
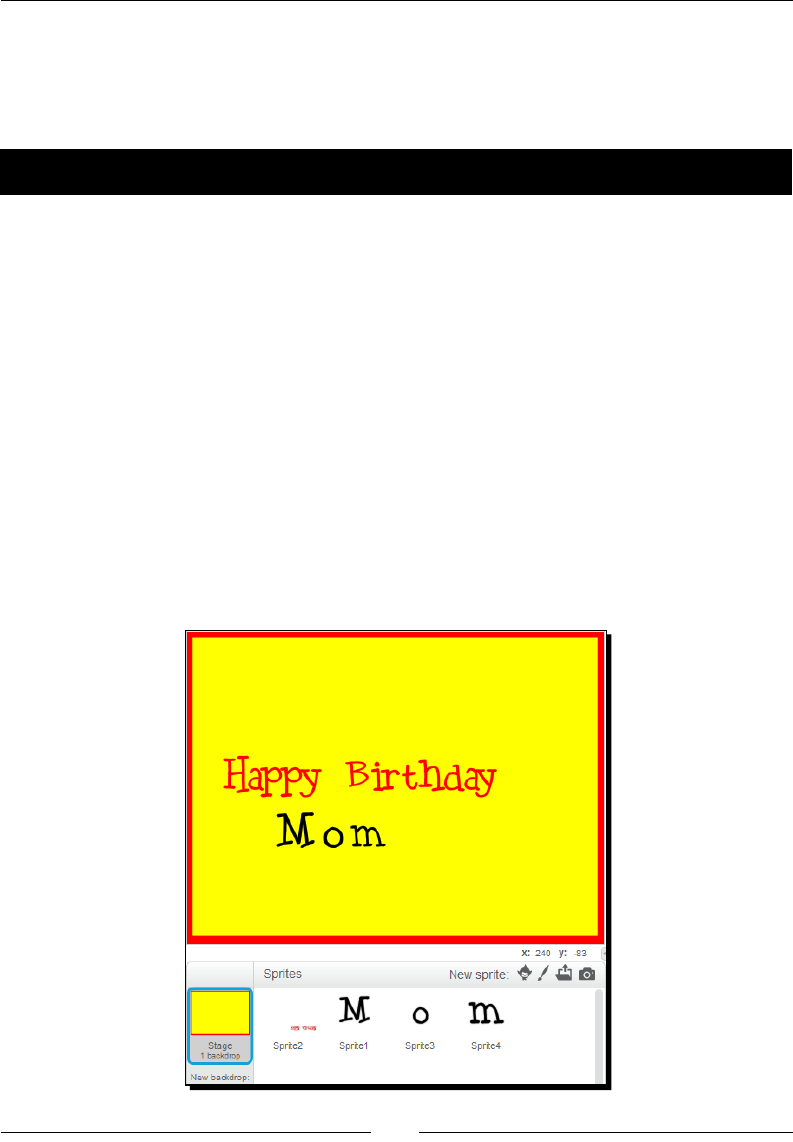
Chapter 3
[ 61 ]
While working with gradients, the gradient will ll to a boundary created by another line or
shape. If the stage is empty, then the gradient will ll the enre space. If you draw a square
in the middle of the stage and ll the square with a gradient, the gradient connes itself to
the boundary of the square.
Time for action – adding more sprites to address the card
So far, we have not placed one block of code in our birthday card. This will change soon
enough, but we have some addional sprites to add.
For this exercise, use the paint editor to spell out the name of the person receiving the card,
but do it such that each leer is an individual sprite. This will give us more control over the
animaon of the name:
1. Use the Paint new sprite opon one by one to create a sprite for each leer of the
person who you are sending the card to. I'm sending my card to my mom, so I'm
going to spell Mom. You may choose anyone you want, but I'd recommend you keep
the name short for this exercise.
2. Aer you add the sprites, reposion the name on the stage by clicking and dragging
each leer around the stage so that they form a word. If the leers are too small,
you can resize them as needed.
3. The following screenshot shows my updated project. Note that I have three new
sprites: M, o, and m.
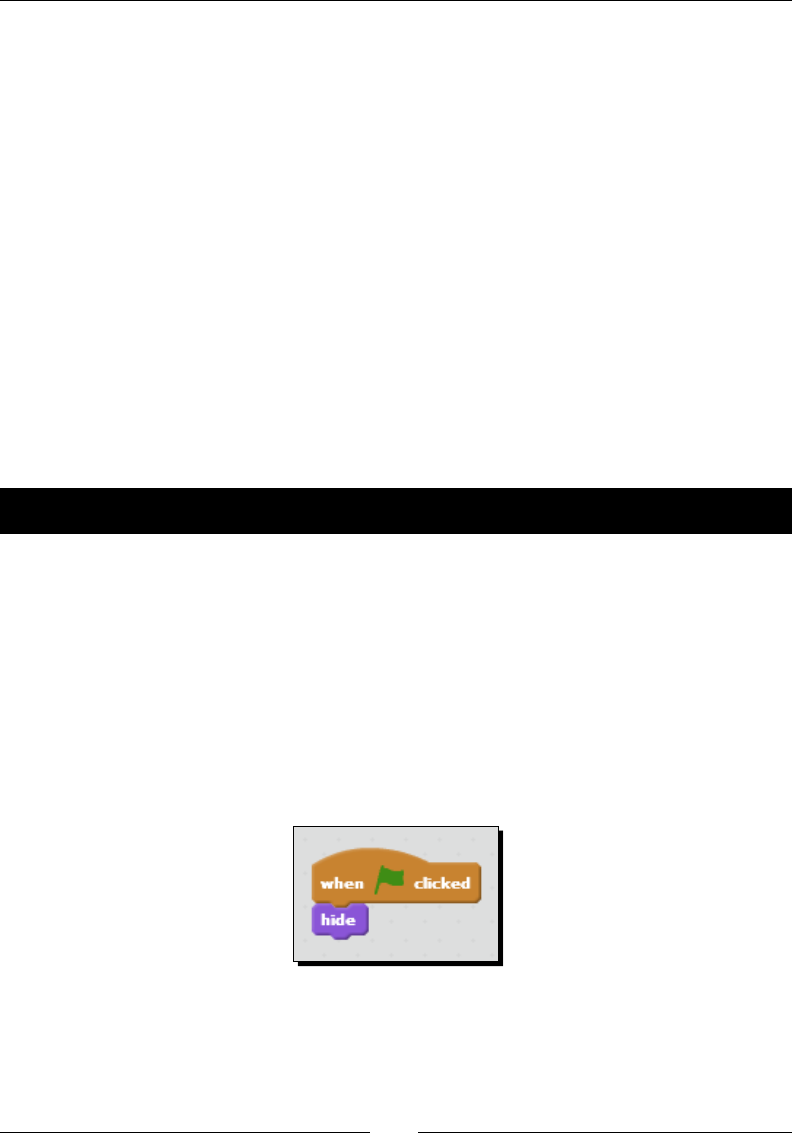
Creang an Animated Birthday Card
[ 62 ]
What just happened?
Happy Birthday, Mom. Now it's starng to look like a card. For the grammarians among us,
feel free to insert a comma aer Birthday.
Did you make an observaon as you dragged each leer around the stage to correctly spell
mom? You dragged the M, the o, and the m independently of one another. We can't drag
each leer in the Happy Birthday sprite around the stage. Go ahead, give it a try. You can
move the enre phrase, but you cannot separate Happy from Birthday.
This subtle but important dierence is what allows us to control the animaon of each leer in
the word mom, whereas in the Happy Birthday sprite, we can only control the enre phrase.
Initializing a sprite's starting values
As we animate the card, we need to start thinking about how the card looks when we give
it to somebody. In other words, we need to know what happens when that person clicks on
the green ag to view the card.
Time for action – hiding all sprites when the ag is clicked
We're going to animate our card, which means we're going to be changing the default
appearances of the sprites in our card. Therefore, we need to think about the starng values
of our sprites. As the rst step in our animaon, we'll hide all sprites so that we start with
a blank screen. Then, we can introduce and animate each sprite in turn as shown in the
following steps:
1. Select the Happy Birthday sprite to display its script area.
2. We'll use the click on the green ag as an event to trigger our script. From the
Events palee, drag the when ag clicked block to the scripts area.
3. From the Looks palee, snap the hide block to when ag clicked.
4. Hide each of the leers that spell mom using the same script. Try the
following shortcut:
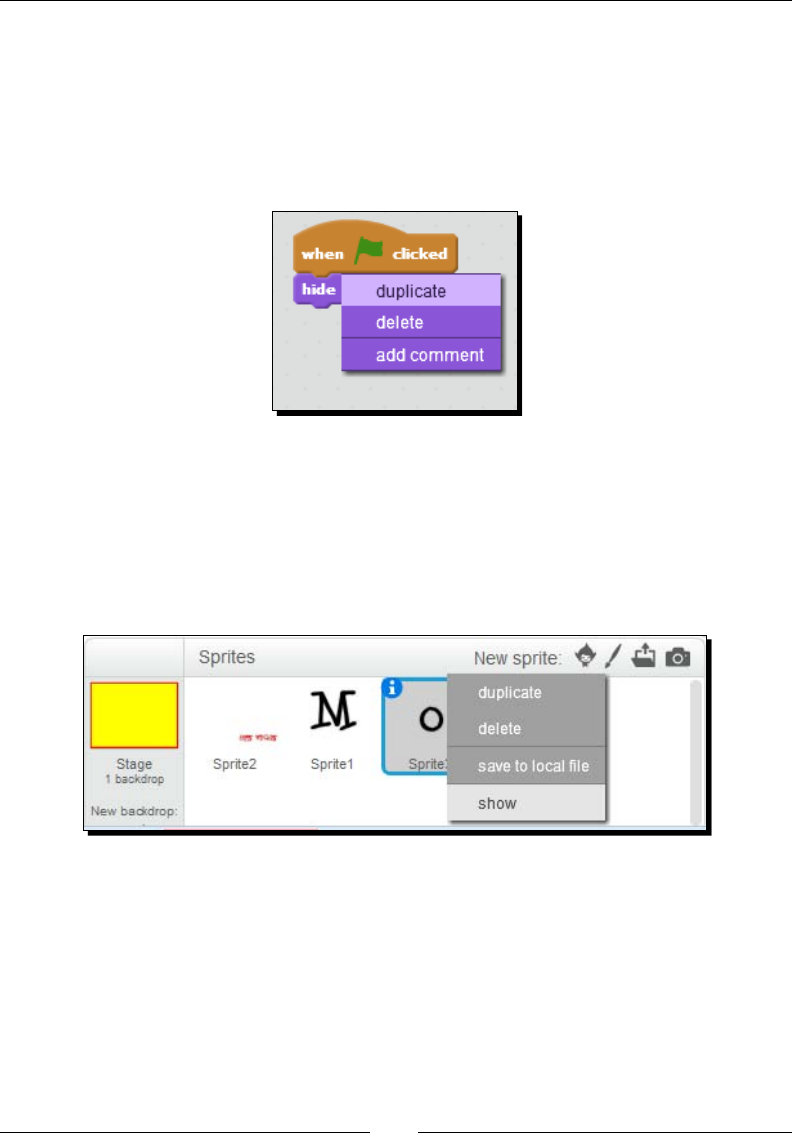
Chapter 3
[ 63 ]
1. Right-click on the Happy Birthday script and select duplicate. The script
attaches to your mouse cursor.
2. Drag the script to one of the other sprites in the sprite list and click on it.
The script copies to the sprite.
3. Duplicate the script for the remaining sprites, with the exception of
the stage.
5. Check your work. Click on each sprite and verify whether it has the script that hides
the sprite when the green ag is clicked.
6. Click on the green ag and watch our greeng, Happy Birthday, Mom, disappear
from the screen.
7. In the current state, you can make the sprites reappear by right-clicking on each
sprite in the sprite list and choosing show.
What just happened?
As creave directors, we want control over when and how our sprites enter the stage.
For this project, we don't want Happy Birthday, Mom passively sing there, so we send
them backstage.

Creang an Animated Birthday Card
[ 64 ]
The when ag clicked block, when added to the script area for each sprite, tells each sprite
to do something when the green ag is clicked. In our example, we tell them to hide, which
clears each sprite from the stage. In the programming context, we're inializing our project.
In other words, we're explicitly seng the starng view of our card. This will be common in
most of the projects we create. In other examples of inializaon, we will somemes want
to hide or show a sprite, posion a sprite, or give a variable a specic value when the user
starts the project. Clicking on the green ag is one such event that we can use, but any of
the other Event blocks can be also used to inialize a sprite's starng values.
Time for action – displaying happy birthday
Can you imagine mom's confusion? She clicks on the green ag, and the screen goes blank.
That's like going to a play where all the actors are sing on the stage in front of the curtain
unl show me. Then, when the curtain goes up, all the actors disappear. However, we
don't go to the theater to watch an empty stage. We want actors. Without further fuss,
let's introduce our sprites:
1. Let's bring out the Happy Birthday sprite rst. Select the Happy Birthday sprite from
the sprite list.
2. From the Control palee, add the wait (1) secs block to the exisng script to create
a bit of delay and to allow the Happy Birthday sprite to display.
3. Before we show the sprite, let's set the default size, adding the set size to () block.
I set the size to 300, but your design may require a dierent value. The value inside
the set to () block is a percentage.
4. Show the sprite by adding the show block from the Looks palee.
5. Run the script by clicking on the green ag. Happy Birthday disappears and
reappears one second later. Now, let's make it pulse.
6. From the Control palee, snap the forever block in place below the show block.
7. From the Looks palee, drag the change size by () block into the forever block.
Change the value on the change size by () block to -20.
8. Add a second change size by () block to the forever loop and change the size to 20.
9. From the Looks palee, add the wait () secs block between the two change by size
() blocks and enter a value of .5 seconds.
10. From the Events palee, add a broadcast block between the show and forever blocks.
11. On the broadcast block, add a new message: hi mom.
12. Click on the green ag to make Happy Birthday pulsate on the screen.
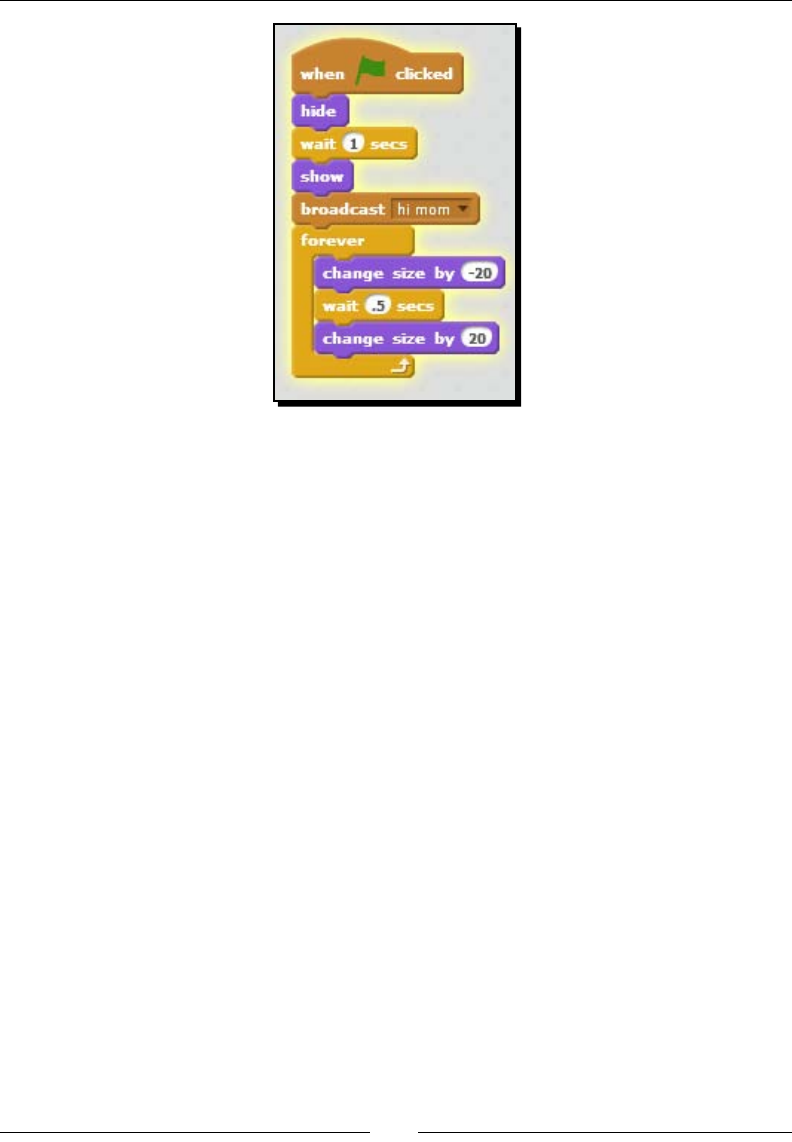
Chapter 3
[ 65 ]
If you haven't already done so, you can stop your pulsang sprite by clicking on the
stop buon.
What just happened?
Like a beang heart, the "Happy Birthday" text contracts and expands on the stage as long as
the script runs. We get the pulsang eect from the blocks of code in the forever loop. We
increase the size by 20 pixels, and then half a second later, we decrease the size by 20 pixels.
The set size to (300) block does something very important. It resets the size of the sprite
each me it runs. Otherwise, the size of the sprite will get increasingly smaller as you run
and stop the script mulple mes because you will stop and start the script while it's in the
process of geng bigger or smaller. Let's say you stop the script during the wait () block and
aer the size was changed by -20 units. Then, when you start the script again, everything
starts from the beginning. Now, the change size by -20 block just ran a second me, but was
only negated one me. Scratch remembers state, which makes it necessary to set the size
when the green ag is clicked on. That's why we explicitly inialize the sprite's size at 300
percent each me the user runs the project by clicking on the ag. This ensures the sprite
always has a correct starng value and helps ensure the user has the correct experience.
Before our sprite enters into its innite loop, it broadcasts the message hi mom. Nothing
happened in our script as a result of the broadcast because we have not yet programmed
any other sprites to act on the hi mom message.
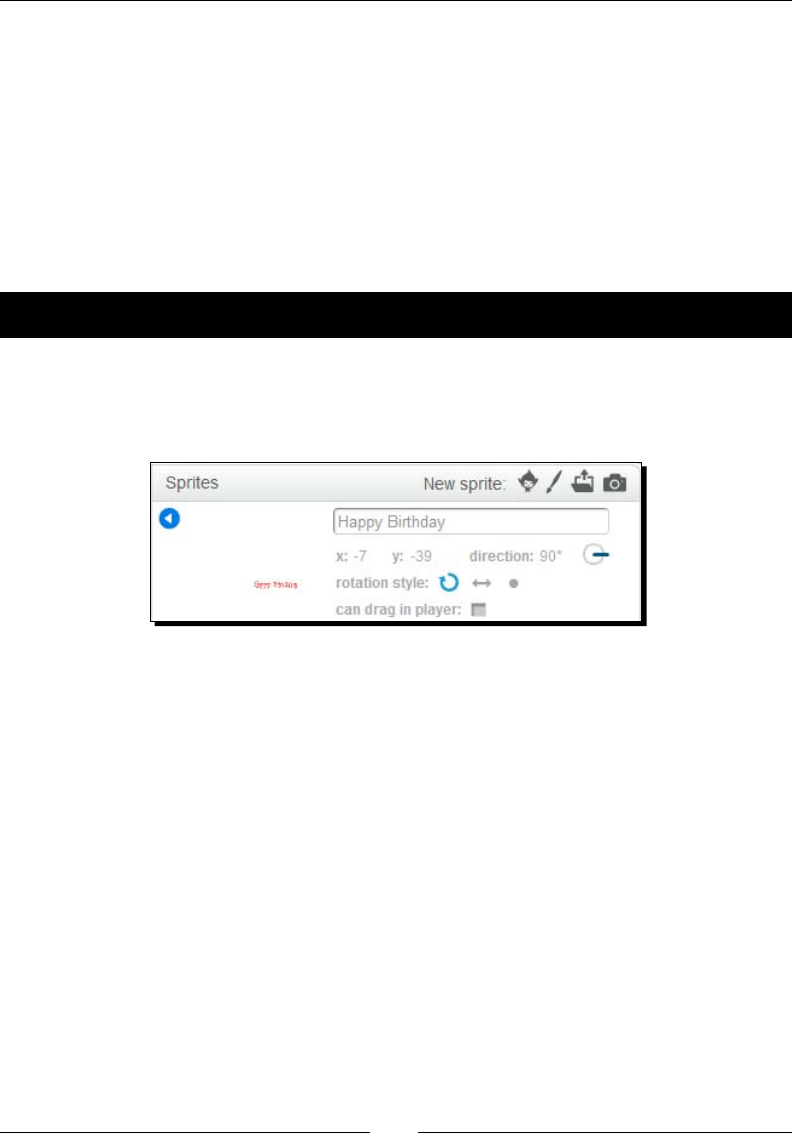
Creang an Animated Birthday Card
[ 66 ]
Specifying memorable names and comments
We haven't focused on naming convenons yet, but we just created a new broadcast
message with a unique name. So, I'm going to use this opportunity to introduce the
importance of naming things in our projects.
If we look closely at our list of sprites, we see the following names: Sprite1, Sprite2, Sprite3,
and Sprite4. The broadcast messages would follow an equally bland naming convenon.
If we allow this default naming convenon to connue, we'll easily lose track of our
objects in Scratch.
Time for action – renaming sprites
Let's rename our sprites by performing the following steps:
1. Select Sprite1 from the sprite list and click on the blue i icon to display the sprite
properes. Change Sprite1 to Happy Birthday.
2. Rename the remaining sprites with a memorable name, such as First M, Second M,
and O.
Each sprite in the list can now be idened by a unique name.
What just happened?
To the computer, Sprite3 is just as good as First M, but humans benet from associang
sprites, costumes, backdrops, lists, variables, and messages to a descripve name. In our
example project, we spell mom from individual sprites. How do we know if Sprite2 is the
First M or the last M? But if we rename Sprite2 to First M, we have no doubt.
In addion to providing context, names provide a way for us to easily idenfy our objects
later. For example, if we broadcast one message as message 1 and another as message 2,
we may not know which message does what when it's me to make a sprite perform an
acon based on that message. If the message becomes hi mom, then we know that the
message signals the beginning of the mom animaon.
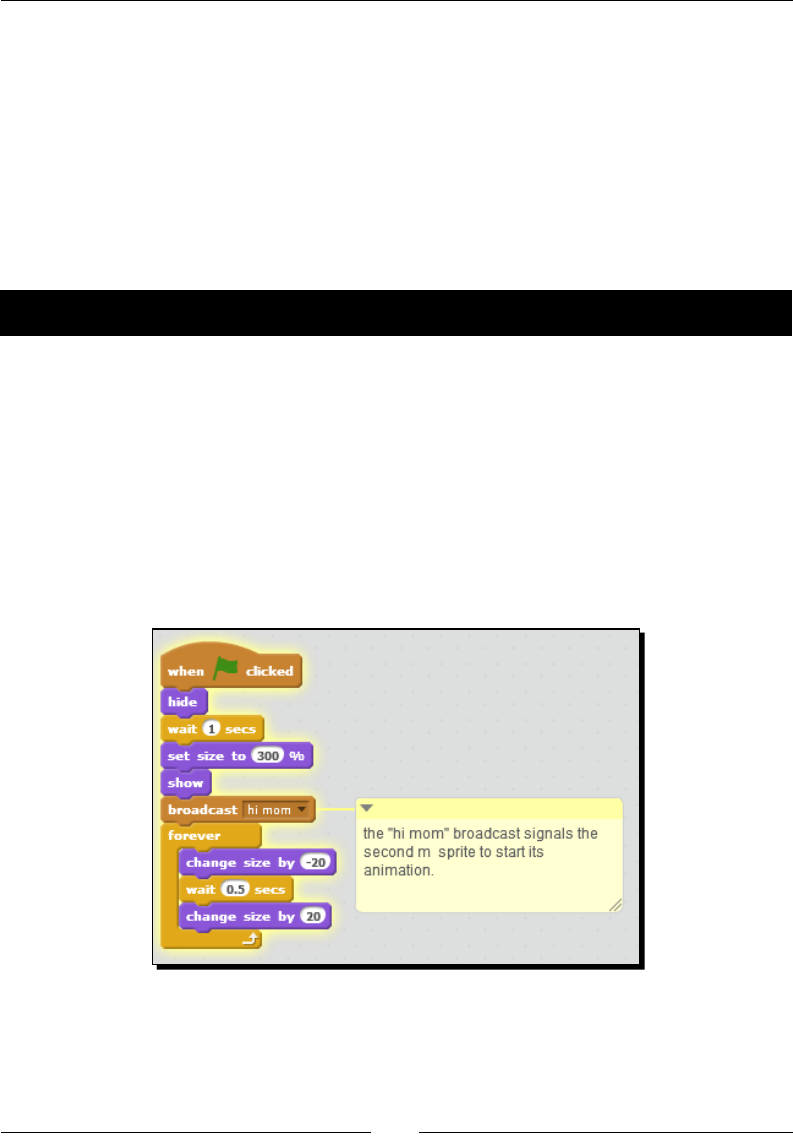
Chapter 3
[ 67 ]
As meaningful names give us a context and understanding about the object, it helps us and
other programmers understand our code later. As you create your projects, don't rely on
Scratch's default naming. Change it as necessary.
Inserting comments into our code
A topic closely related to naming our objects is adding comments to our scripts. Adding
comments to scripts provides a way for us to explain complicated scripts. Commenng
allows us and other programmers to easily understand our code.
Time for action – adding comments to a script
Let's add a quick comment that annotates the broadcast block in the Happy Birthday
sprite's script:
1. Select the Happy Birthday script. Right-click somewhere in the scripts area and
select add comment.
2. In the yellow box that appears, type the following: the "hi mom" broadcast
signals the second m sprite to start its animation.
3. Now click on the yellow comment box and drag it to the broadcast (hi mom) block.
Then, release the block. This can be tricky, but the goal is to aach the comment to
the block. See the following screenshot:
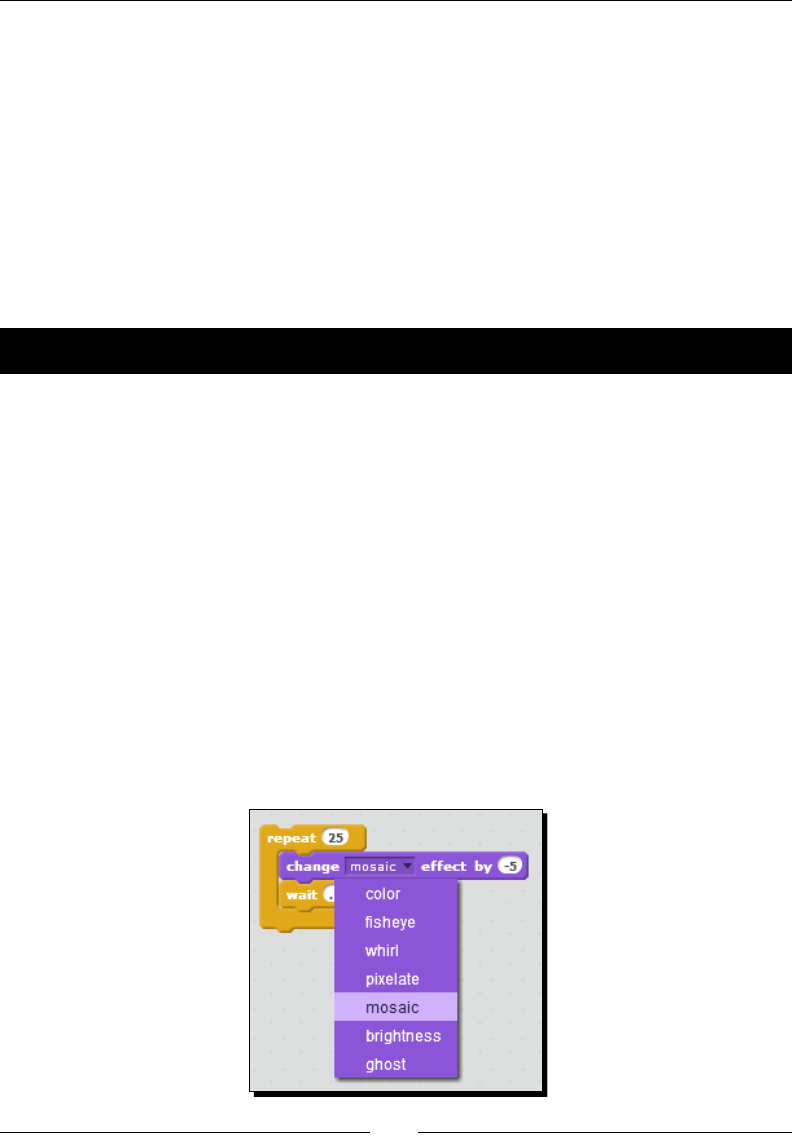
Creang an Animated Birthday Card
[ 68 ]
What just happened?
Commenng our code is one of those things that we should always do more oen because it
helps other people understand our code. And in reality, this can help us understand what we
did when we open a project we haven't worked on in months.
Transforming sprites with graphical effects
Scratch provides two blocks in the Looks palee to allow us to apply a variety of graphical
transformaons to our sprites. The eects are color, sheye, pixelate, mosaic, brightness,
ghost, and whirl.
Time for action – transforming sprites
Next, we want to introduce the sprites that spell mom, and as we show the leers, we'll use
the graphical eects to transform the leers:
1. We're going to start by adding the when I receive () block to the scripts area for
Second M.
2. To unhide the leer M, we need to add the show () block.
3. Click on the green ag to see the script run so far. As Happy Birthday ashes on the
screen, the second leer M appears on the screen. Click on the stop buon when
you're ready to connue.
4. We're going to transform the m by using the mosaic eect and a repeat loop. From
the Control palee, snap the repeat () block to the boom of the show block and
change the value to 25.
5. From the Looks palee, add the change () eect by () block to the repeat loop.
Change the eect from color to mosaic by selecng mosaic from the drop-down
list as seen in the following screenshot:
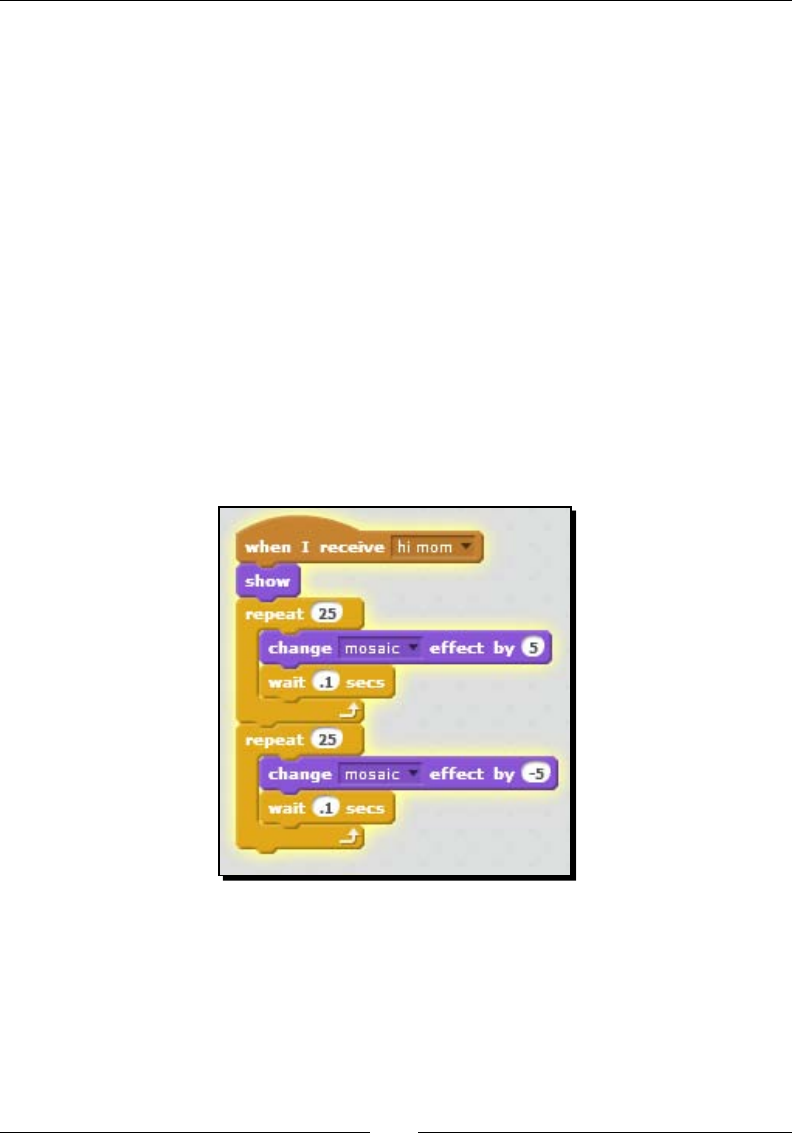
Chapter 3
[ 69 ]
6. Click on the green ag and watch the eect of our acon. Our m is a mosaic, but it's
no longer readable. Click on stop when you're ready to connue.
7. From the Looks palee, double-click on the clear graphic eects block to redisplay
the leer m. A shortcut to run the block is to click on the block name, which in this
case clears any eects.
8. Snap another repeat () block to the boom of the rst repeat () block and set the
value to 25.
9. Insert a second change () eect by () block into the new repeat 10 block. Change the
eect to mosaic and set the value to -25.
10. If you run this script now, the mosaic happens quickly. You can slow down the eect
so that it's visible by adding a wait () secs block aer each of the change () eect by ()
blocks. Try a small value, such as .1.
11. Next, we need the script to announce when it's nished so we can signal the next
leer in the animaon. Add a broadcast () block and create a new message named
next m.
The following screenshot shows the script we've just created:
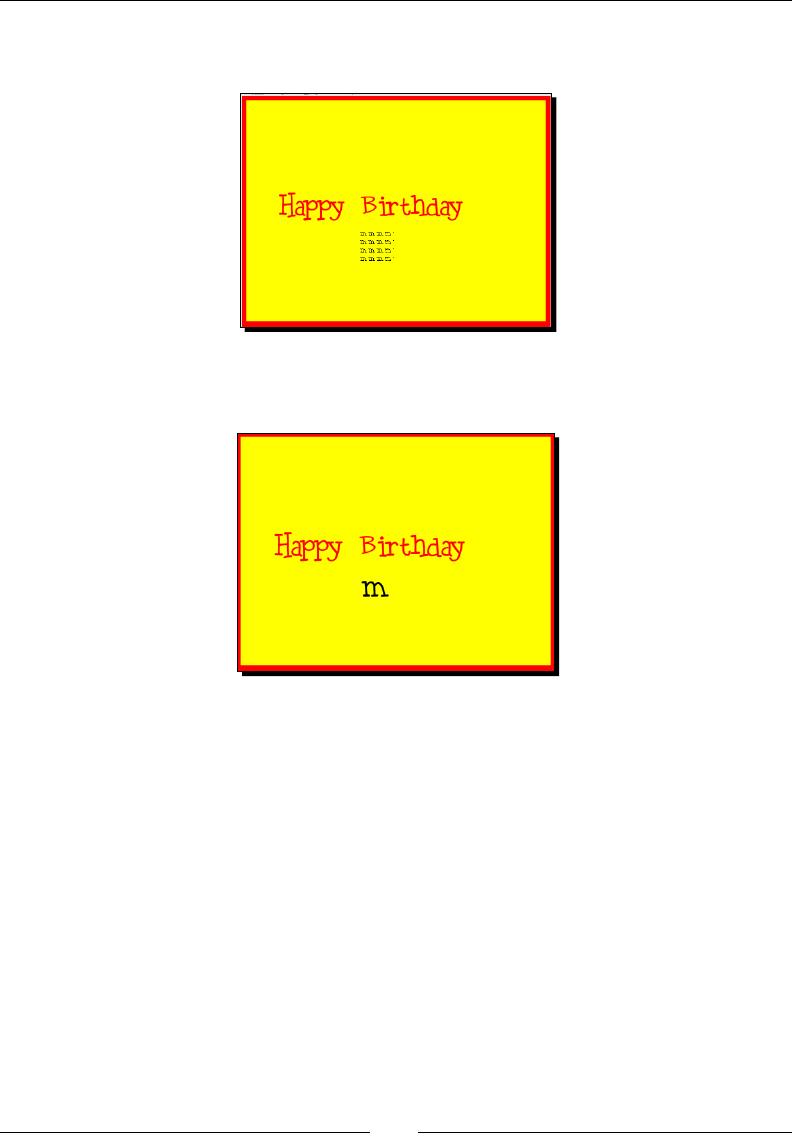
Creang an Animated Birthday Card
[ 70 ]
To see what that script does, click on the green ag. The following screenshot shows the
change in the leer m as we apply the change (mosaic) eect by (25) command:
The following screenshot shows the nished product aer we apply the change (mosaic)
eect by (-25) command:
What just happened?
Finally, we acknowledged the Happy Birthday sprite's hi mom broadcast message. Hi mom
was the cue that told Second M to enter the stage with dramac eect.
Once the leer "m" displayed, it split apart to form a paern of its own before it reconstuted
itself into a whole leer. The code that created our paern was straight forward. First, we split
the "m" into a mosaic 25 mes via the repeat () block, which turned the single leer into 25
smaller copies of itself.
The second repeat () block also ran 25 mes, but it changed the mosaic eect by -5 units
each me. The second repeat block undid the eects of the rst repeat () block through
negaon. This has the praccal eect of running the clear graphical eects block with a big
dierence. The clear graphical eects block will abruptly turn the sprite back to its original
state. By using a second repeat () block to undo each step of the rst repeat () block, the
animaon connues unl the sprite returns to normal.
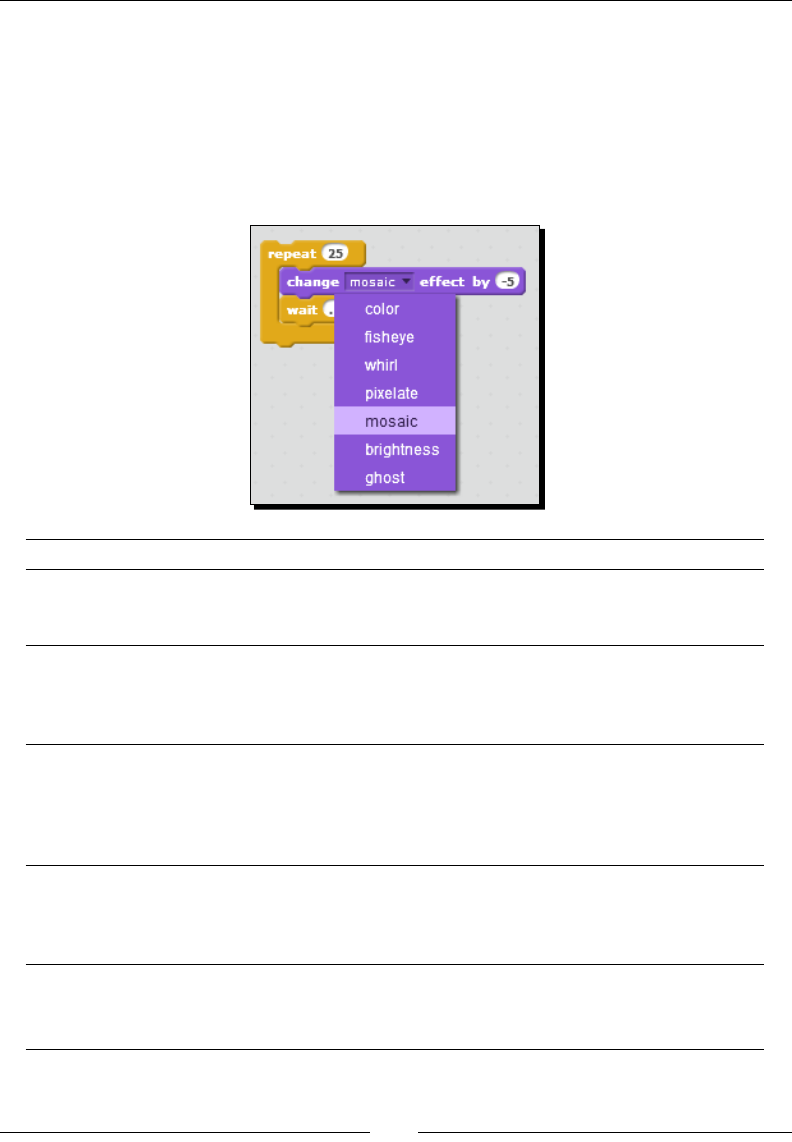
Chapter 3
[ 71 ]
Graphical transformations
We can change the appearance of a sprite very easily, as we have seen with the Happy
Birthday card, and Scratch includes several special eects that we can apply directly to the
sprite or its costume.
The eects in the following table can be found in the change () eect by () and set () eect
to () blocks in the Looks palee.
Effect What it does Sample usage
color This effect changes the color of the
sprite. A sprite or costume can have
up to 200 color effects.
While creang art
To visually signify a different state
fisheye This effect distorts the sprite by
rounding the edge as if you're
looking at it through a glass or peep
hole.
To distort the sprite
For use as a transition effect
whirl This effect twists the sprite around
a center point and produces an
effect similar to throwing a pebble
in the water. The greater the whirl
effect, the more difficult it is to see.
To distort the sprite
For use as a transion eect
To give a spin
pixelate This effect increases the size of the
pixels in the image so that you can
see them. However, it creates a
blurry image.
To blur an image
For use as a transion eect
To cover up another sprite
mosaic This effect splits the sprite into a
pattern of smaller images of itself.
For use as a transion eect
To split a single sprite into
multiple
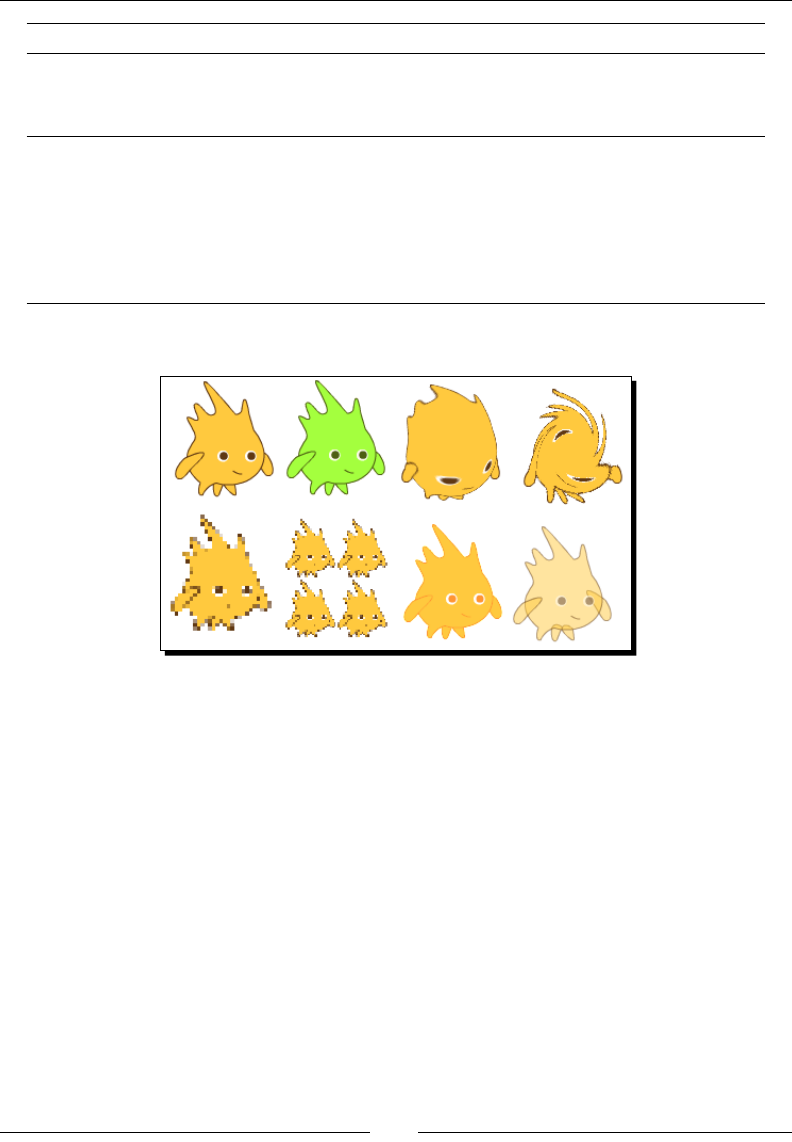
Creang an Animated Birthday Card
[ 72 ]
Effect What it does Sample usage
brightness This effect increases the luminance
of the sprite to make it appear
brighter.
To make a sprite glow
To make a sprite dimmer
ghost This effect makes the sprite
transparent so that you can see
other sprites and backgrounds
through the sprite. A value of
100 hides the sprite by making it
completely transparent; -100 shows
the sprite.
To hide a sprite
To create a fade in/out eect
To create transparency
(like a ghost)
The following screenshot shows all the graphical eects as applied to Gobo:
In the preceding screenshot, the eects on the rst row are normal, color, sheye, and whirl.
The eects on the second row are pixelate, mosaic, brightness, and ghost. All the graphical
eects can be undone by clicking on the clear graphic eect block. You can also undo the
eect by negang the original eect. For example, if you set a sheye eect of 100, you can
return to normal by applying a sheye eect of -100.
Comparing the repeat and forever blocks
Like the forever block, the repeat () block creates a loop that runs the blocks inside the loop.
The repeat () block diers from the forever block in that we specify the count for which the
loop will run.
In addion to typing a number in the repeat block, we can insert variables values via reporter
blocks. We will introduce variables in Chapter 6, Making an Arcade Game – Breakout (Part I).
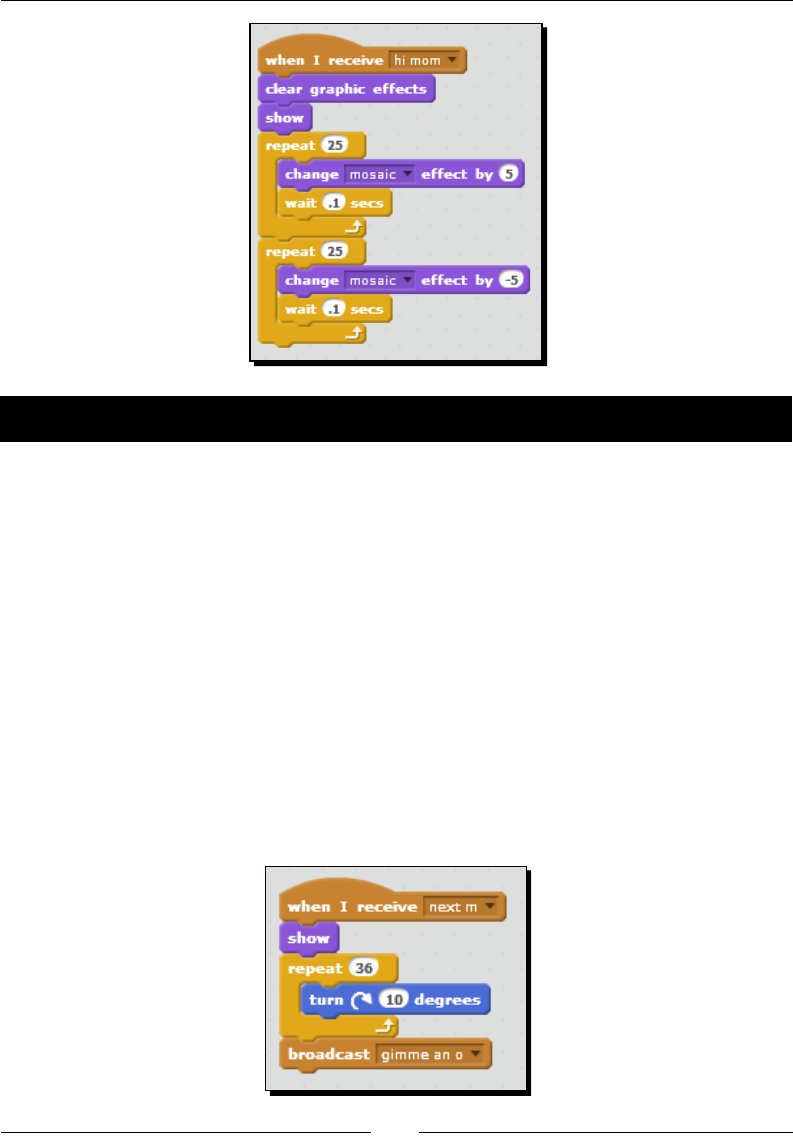
Chapter 3
[ 73 ]
Time for action – turning m in a circle
When we last le our animaon, we had the second M displayed on the screen. Now, let's
create the script that receives and acts on the next m broadcast message by spinning the
First M sprite around in a circle:
1. Add the blocks to show the First M sprite when it receives the next m broadcast
message. If you get stuck, you can take a peek at the screenshot in this exercise.
2. Instead of a graphical eect, we can animate this script with moon by rotang
the First M sprite. From the Moon palee, add the turn () degrees block to the
show block.
3. Wrap the turn () degrees block in a repeat () block. Change the value on the repeat
block to 36 and set the value on the turn () block to 10.
4. Check your animaon by clicking on the green ag. Note the moon on the First M
sprite as it spins 360 degrees in a circle.
5. Now that the First M sprite is nished with its animaon, we need to add a broadcast
() block and create a new message named gimme an O to signal the leer O.

Creang an Animated Birthday Card
[ 74 ]
What just happened?
When signaled by the Second M's broadcast message, First M tumbled onto the stage.
The repeat () block instructed the M to turn 10 degrees clockwise for a total of 36 mes.
If we mulply 10 degrees by 36, we get 360 degrees, which is otherwise known as a circle.
Have a go hero – cleaning up the animations
Earlier in the chapter, we spoke about inializing our sprites so they always display properly
at the start of the project. Go through the sprites we've transformed and ensure they have
scripts that reset the sprite to a default starng point. The First M sprite is using moon. Can
you add a block to ensure it's always poinng in a posion that looks like an M?
Test your work by stopping the project mid-animaon and then clicking on the green ag to
start it again.
Finally, complete the "mom" animaon by showing and animang the leer "o" sprite.
Time for action – making a sprite fade in with the ghost effect
Let's put some nishing touches on our card by adding a buery and a personal message
to mom:
1. To add a new sprite, click on the Choose sprite from library buon to open the list
of sprites. Browse to Animals. Find and select Buery1. Click on OK to add it to
the stage.
2. Scratch places the buery at the middle of the stage, so we need to drag the
buery to a place on the stage where it ts into the design.
3. We should add a personal note for mom on her birthday. Use the paint editor and
create a new sprite that contains your message. I like to joke with my mom, so for
my message, I have typed Congratulaons on your ability to freeze me. I hear
you are only 29 again this year.
4. Resize and reposion the sprites on the stage so that they t nicely. Take a look at
the following screenshot for an example.
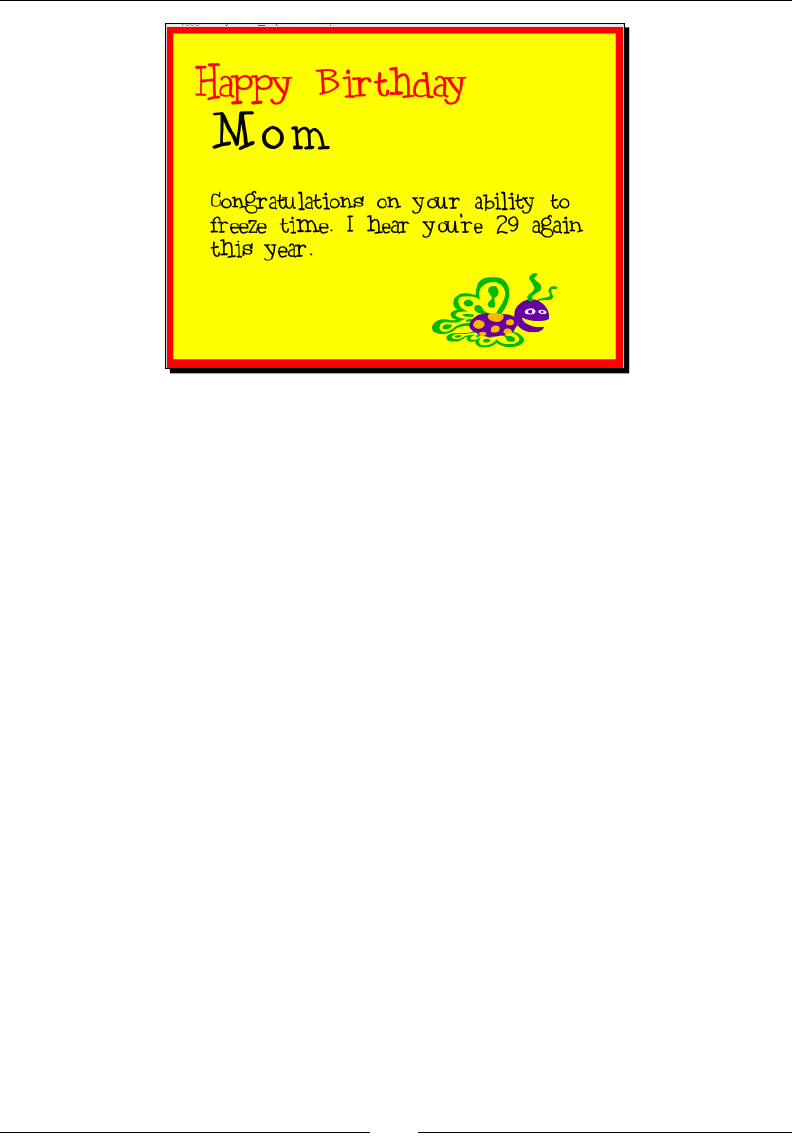
Chapter 3
[ 75 ]
5. Right now, the note and the buery are not animated, and they remain on the
screen for the enre me. We'll change that now by experimenng with a new
graphic eect called ghost.
6. Add the when ag clicked block to the scripts area for the note and add the change
() eect by () block. Change the eect to ghost. Set the value to 100. This eecvely
hides the sprite.
7. We don't want the note to show up right away, so add a wait () secs block with a
value of 9 seconds, and make sure you place it aer the change (ghost) eect by
(100) block.
8. Add a repeat () block and change the value to 20.
9. Inside the repeat () block, add a change () eect by () block. Change the eect to
mosaic and set the value to -5.
10. As the script is wrien, the note will fade in very fast. Go ahead and try it by clicking
on the green ag.
11. To slow the fade, we can add a wait () secs block to the repeat (20) block and set a
value of 0.2.
12. Click on the green ag to run the script. Now, our note fades in three seconds aer
we click on the green ag and aer the word mom displays.
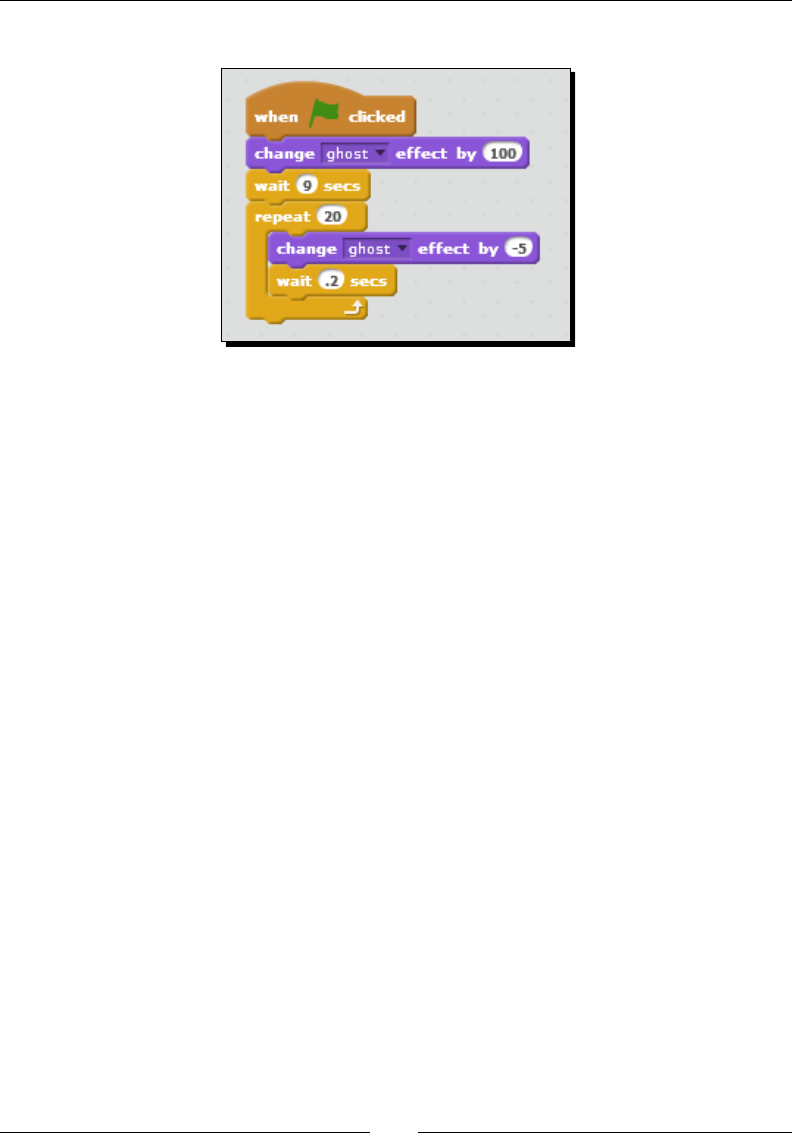
Creang an Animated Birthday Card
[ 76 ]
13. The script for the note should look like the following screenshot:
What just happened?
There is oen more than one way to accomplish a task, as this exercise illustrates. Seng
the ghost eect to 100 is the same as making the sprite invisible or hiding it. So, if you were
creang a game where you wanted a sprite to disappear when shot, you could hide it or use
the ghost eect to slowly fade out.
In our birthday card example, we repeat the ghost eect by -5 for 20 mes. Guess what our
ghost value becomes? If we mulply 20 by -5, we get -100, which negates the ghost 100
eect we started with, eecvely showing the sprite.
To control the ming of the animaon, the .2 second wait at the end of the repeat loop
slows down the fade so that we have a gradual transion.
Two ways to control timing
In this chapter, we've used both broadcasts and the wait () block to control the ming of our
animaons. Let's take a moment to discuss the ramicaons of our decisions.
As we have seen in the examples in this chapter, the broadcast () block gives us a way to
synchronize events across sprites. For example, when we animated the word mom in our
card, we actually brought the second "m" in rst, and at the end of the eect, it signaled
the rst "m" to display. A broadcast can be sent to any sprite within Scratch.
The wait () secs block pauses the script for the amount of me specied. However,
the wait () secs block does not stop other scripts and only interacts with the sprite it's
assigned to. It eecvely creates a mer or a delay for the script.

Chapter 3
[ 77 ]
Trying to use the wait () secs block to synchronize the acons of all our sprites could be a
considerable challenge. Could you imagine the revisions we would have to make if we used
the wait () secs block throughout our animaons in this chapter? Every me we alter the
animaon, we would potenally have to go back through every script to manually set the
ming. That's a tedious prospect.
Have a go hero – animating the buttery
Our birthday card is relavely complete. At the moment, all sprites are animated except the
buery. Take this opportunity to revise your card or add an animaon to the buery. Need
some ideas? The buery has two costumes. Make it y.
Pop quiz – reviewing the chapter
Q1. Which of the following statements is true about vector and bitmap graphics?
1. Vector graphics are represented by pixels on the screen.
2. Bitmaps use calculaons to draw lines.
3. Bitmap images are smooth at any size.
4. Vector graphics are smooth at any size.
Q2. When naming sprites, you should always:
1. Allow Scratch to dene the name.
2. Forget about names because they're not important.
3. Pick memorable, meaningful names.
4. Use names based on Greek gods.
Q3. Which of the following best describes a gradient?
1. Gradients ll an area with a solid color.
2. Gradients are only available to vector graphics and transion one color into
another color.
3. Gradients are an opon in the change () eect by () block that fade two
colors together.
4. Gradients gradually blend two colors together and are available in both the vector
and bitmap image editor.

Creang an Animated Birthday Card
[ 78 ]
Q4. If you want to loop through a set of blocks for an innite number of mes, which block
do you use?
1. forever
2. repeat
3. broadcast ()
4. set () eect by ()
Q5. Which of the following graphical eects splits a sprite into a paern of smaller images
of itself?
1. whirl
2. pixelate
3. mosaic
4. brightness
Q6. How do you copy a script from one sprite to another?
1. Right-click on the script, select duplicate, and drag the script to the second sprite.
2. Highlight the script, press Ctrl + C to copy it, and press Ctrl + V to paste it on the
second sprite.
3. Both 1 and 2.
4. You can't copy scripts from one sprite to another.
Summary
We just completed our rst Scratch project from concept to compleon. In the process,
our animated birthday card introduced us to several Scratch programming concepts.
We started by using the built-in paint editor to create sprites and explore the dierences
between bitmap and vector graphics. We then animated these sprites by using graphical
transformaons. Throughout the chapter we relied on the following blocks to make the
animaons work: forever, repeat (), and broadcast () and wait () secs.
In the next chapter, we will create a storybook with mulple scenes. We'll also build
navigaon that lets the user click through the chapters.
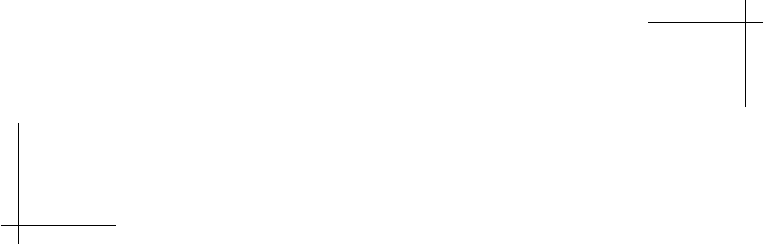
4
Creating a Scratch Story Book
Building on the design and graphic elements we've learned in the previous
chapters, we will create a book of barnyard jokes. The project unfolds in a fairly
non-linear way, and the scripts are built and tested several blocks at a time, but
as we near the end of the chapter, we come to create a seamless transition from
the table of contents to a joke and back again. In this chapter, we'll provide a
framework that empowers the user to pick their flow through the project.
In addion to praccing our storytelling skills, we will:
Design the book's outline
Use the say () block to deliver the chapter jokes
Play sounds and create sound eects
Move sprites based on x and y coordinates
Coordinate scene changes to navigate the book
Designing the outline of a barnyard joke book
Got a good joke or two? Feel free to substute them for my examples in the following
exercise. Our rst step is to create a table of contents that users can use to navigate the
jokes in our book.
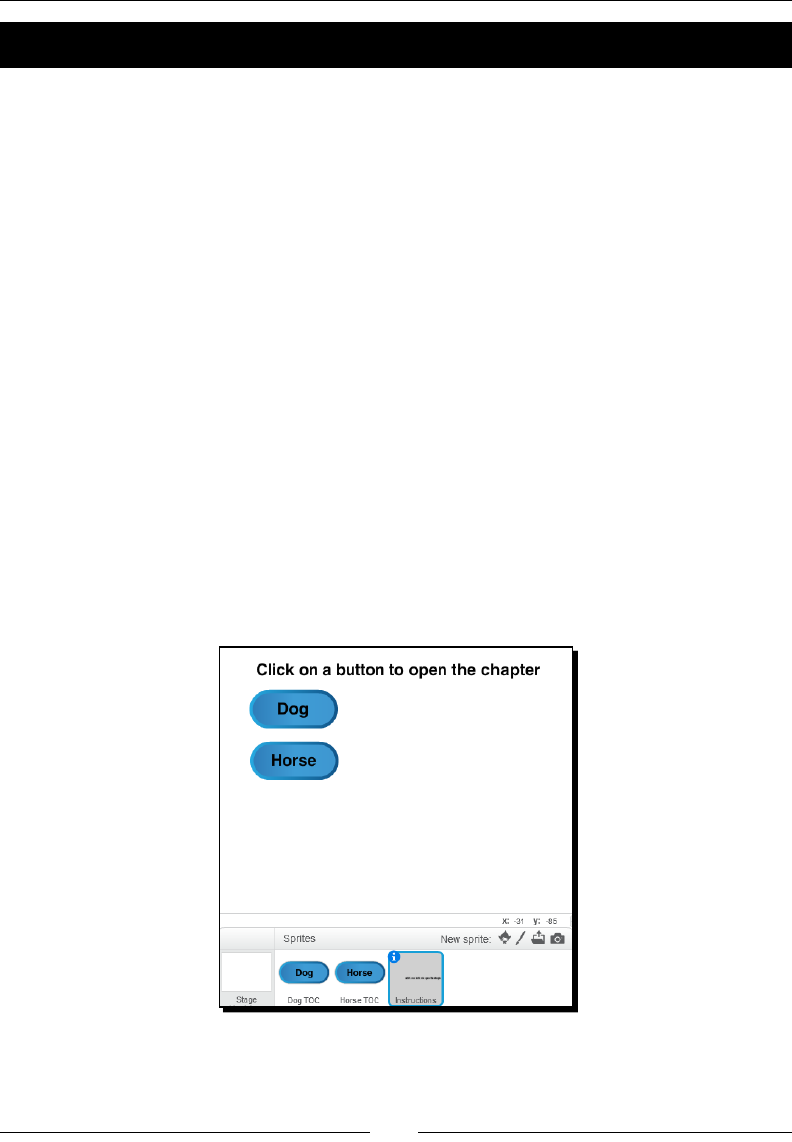
Creang a Scratch Story Book
[ 80 ]
Time for action – designing a clickable table of contents
For our storytelling project, we will create buons with labels that the user can click to open
each joke sequence, which we'll make analogous to a chapter in our Scratch book. We'll refer
to these buons as our table of contents. The steps to design a clickable table of contents
are as follows:
1. Open a new project and delete the default Scratch cat sprite.
2. Let's import a buon sprite into Scratch. For this project, I'm choosing the Buon2
sprite from the Things category because it's a vector image and it has two costumes.
Change the sprite name to Dog TOC so that we can idenfy this buon as something
that appears on our table of contents page.
3. Aer you import the buon into the project, click on the Costumes tab to open up
the paint editor. We need to add a label.
4. Use the text tool to type Dog in any font you want.
5. Resize the text and posion the word Dog so that it ts inside the buon. Because
this is a vector image, we can make the buon as big or small as we want.
6. Create a new sprite using the text tool that says Click on a button to open
the chapter. Then, name the sprite Instructions.
7. Duplicate the Dog TOC sprite and edit the text of the duplicated buon to say
Horse and name the new buon Horse TOC. The following screenshot shows
our new sprites:
Posion the sprites anywhere you like on the screen.

Chapter 4
[ 81 ]
What just happened?
Our book now has a table of contents. You will be able to add to this at a later date, but
creang two chapters will be enough to get us started. By using a combinaon of the sprite
library and the image editor, we were able to create a buon with a label. As we connue
to build the book, we'll make the buons clickable.
Time for action – adding pages to the book
Next, we are going to add two background images from the Scratch Backdrop Library to our
project to represent pages in our book.
We'll adapt our backdrops by combining them with a sprite to create something unique for
our project. Our objecve is to create a single image from a backdrop and a sprite. I'll explain
the nuances of this task aer we complete the exercise rather than try to explain the reasons
as we go.
With the stage selected, let's get started:
1. Use the Choose backdrop from library buon on the Backdrops tab to import
bedroom1 from the Indoors category and hay eld from the Outdoors category.
2. From the Backdrops tab, select hay eld to open it in the paint editor. Convert the
image to vector format, or you'll have unsasfactory results when we import the
microphone in the following steps.
3. Next, we're going to import a microphone into the project that we'll use as a visual
aid for our scenes. Choose the Microphone Stand from the Things category in the
Sprite Library. Aer you import the microphone as a sprite, open the Backdrops tab
for the stage and select hay eld.
4. From the list of sprites (beneath the stage), click and drag the Microphone sprite
into the hay eld backdrop in the paint editor. This places the sprite into the
backdrop as seen in the next screenshot.
Creang a Scratch Story Book
[ 82 ]
5. We can posion and resize the microphone object in the paint editor by clicking on
it with the select tool and dragging it around the image. For our purposes, posion
it in the boom-right of the stage. The following screenshot shows the status of our
project so far. Noce that our stage displays two microphone stands. One is a sprite
and the other is part of the backdrop. We'll x this in due me, but let's pause to
review our exercise rst.
What just happened?
The backdrops we added begin to provide some graphical context to our story. For example,
many pet dogs like to spend their days inside on a bed, and while we may not nd horses
roaming the hay elds, they do eat hay. It's up to us to use design eecvely in our stories.
We're also able to suspend our disbelief as we create our story. It does not maer if you put
your horse on the moon or your dog in an aquarium.
The microphone adds a layer to the story. This is a joke book, and the microphone is a
perfect way for our characters to deliver the joke.
In addion to the design, we also discovered a technical feature of Scratch. Scratch 2.0
convolutes the process of combining sprites into a single image, but as the example
demonstrated, it's possible to combine them. Combining sprites with backdrops allows
us to further customize the sprites and backdrops included with Scratch.
If you didn't follow the instrucons closely and le the hay eld backdrop as a bitmap
image, you will have noced a white box around your microphone when you added it to
the backdrop. Undoing the change and converng the backdrop to vector format before
you add the microphone will get a seamless image.

Chapter 4
[ 83 ]
Now our hay eld backdrop consists of two objects: the original backdrop and the microphone
stand. We'll be able to edit those objects independently if we edit the backdrop, but when the
backdrop image displays on the Scratch stage, it will appear as one image.
For this project, I made a design decision to integrate the two images because it will create
one less sprite in my list and will be one less sprite that we have to manipulate as we
transion our chapters. This decision has a tradeo. We will not be able to independently
add scripts to the microphone in our project because we made it part of the backdrop.
Time for action – adding a sprite to the Backpack
Right now, our project sll displays the extra microphone sprite we imported. That was
a necessary step so that we could combine the sprite with the backdrop; however, it's
cluering our project. And because we will want to use this same microphone throughout
our chapters, we don't want to have to re-import the microphone each me. We'll decluer
our project by using Scratch's Backpack. The Backpack is a feature in the online project
editor for users who are signed in. If you're not signed in to the online project editor, the
Backpack will not be available.
Let's work through the steps, and then we'll explain:
1. The Backpack is collapsed (that is, closed) at the boom-right of the Scratch
interface. You can open it by clicking on the up triangle next to the word Backpack.
2. Drag the Microphone Stand sprite into the open Backpack to create a copy.
3. Now, you can delete the Microphone Stand sprite from the sprites list by
right-clicking on the sprite thumbnail in the sprites list and choosing Delete.
4. Now let's see how we can add the microphone to the bedroom backdrop.
Open the bedroom1 backdrop in the Backdrops tab so that it displays in the
paint editor.
5. From the Backpack, drag the microphone onto the bedroom1 backdrop in the
paint editor.
6. Resize and posion the microphone object as needed.
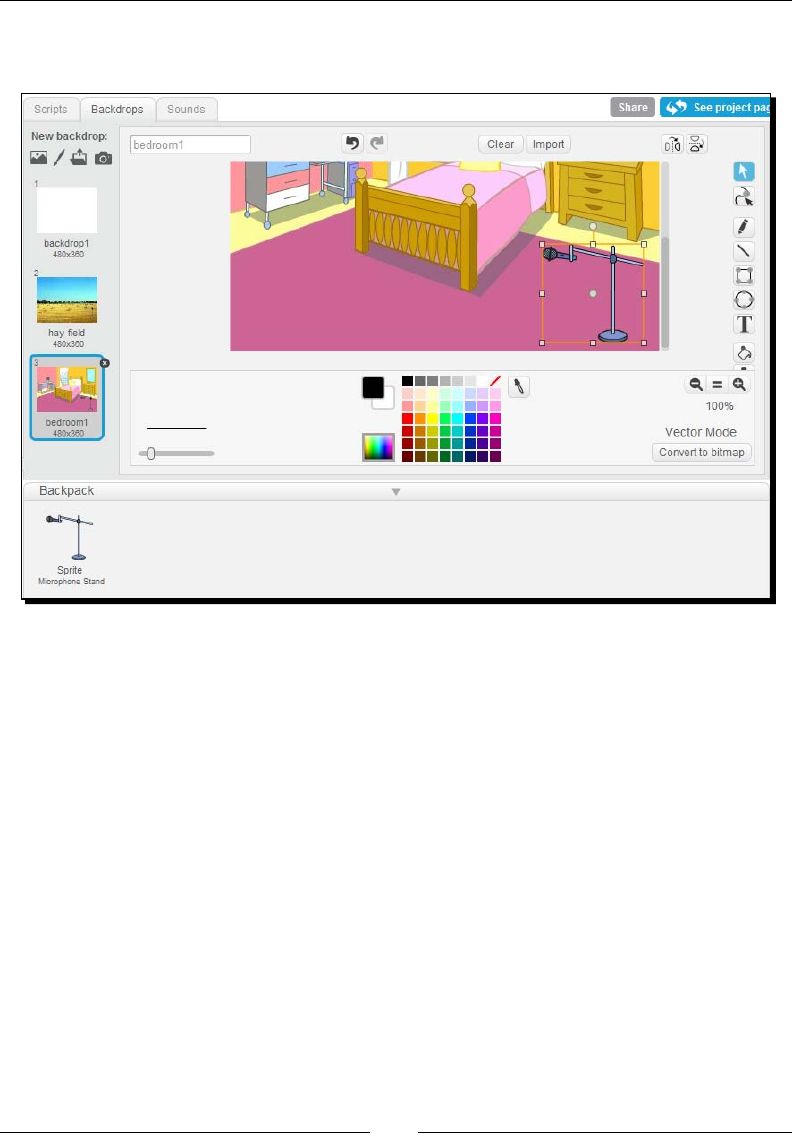
Creang a Scratch Story Book
[ 84 ]
7. The following screenshot shows the microphone in the Backpack and the sprite
added to the backdrop:
What just happened?
Welcome to the Backpack—a new feature in Scratch 2.0. We're making a creave but
modest use of the feature in the context of this project as a way to combine the microphone
with any backdrop that we add in the future.
The benet we get from removing the unused sprite is that our sprite list stays cleaner and
we don't have to worry about inadvertently showing the Microphone Stand sprite when it
shouldn't be shown. In other words, we limit our ability to make future mistakes.
Using the Backpack to store sprites and scripts
As our project example demonstrates, the Backpack can hold things, but it's capable of
holding more than just a sprite.
When you drag a sprite to the Backpack, it will copy the sprite, its costumes, and all of
the scripts associated with the sprite. In addion, you could drag an individual script to
the Backpack.
Chapter 4
[ 85 ]
The Backpack is only available online and to users who sign-in to Scratch.
And like a backpack on a second-grader, the contents of the Scratch Backpack follow the user
from one project to the next. So, the sprites and scripts we add to the Backpack will now
will be available to all of the projects we create, edit, or remix, making the Backpack our
portable collecon of our favorite things.
If we create a script that you think may be useful in the future, feel free to add it to
your Backpack.
Building a joke with say blocks and sounds
Now that we have the basic page designs dened via our backdrops, let's add in a horse as
our character for the hay eld scene and write some lines for its comedy roune.
Time for action – making a horse talk with the say block
Right now, we have the Dog TOC and Horse TOC sprites displayed on the screen. Go ahead and
hide them from the stage by right-clicking on the sprites and selecng hide. Then, make sure
the hay eld displays on the stage by clicking on the hay eld backdrop from your list of stage
backgrounds:
1. Import the horse1 sprite from the Animals category of Scratch's Sprite Library.
2. Posion the horse next to the microphone by dragging the sprite on the stage with
your mouse. If the horse and microphone seem out of proporon, resize the horse
sprite using the shrink or grow tools.
3. Next, we'll try our hand at joke wring. Click on the Scripts tab to get started.
4. From the Looks palee, drag the say () for () block into the script area. Change the
message from Hello! to How do you make it rain?. Change the me value to 4.
5. If the sprite is close to the edge of the stage, the speech bubble that displays from
the say block may appear at the backend of the sprite. If this happens, move the
sprite away from the edge.
6. Add a say () for () block. Change the message to Mow a hay field, and change
the me from 2 seconds to 3. I didn't say we were going to write good jokes; check
with your local farmer to understand the relaonship of hay making to rain. In all
sincerity, you can write any joke you want.
7. Add a wait () secs block. Change the me from 1 to 3 seconds.
Creang a Scratch Story Book
[ 86 ]
8. Add the say () for () block to the script. Change the message to Hello, is this
thing on?.
9. Double-click on the script to watch our horse tell its rst joke.
What just happened?
We wrote a short script to deliver the joke using the say () for () blocks to display speech
bubbles, and aer three seconds of silence, our horse tossed out a comedic cliché, "Is this
thing on?"
We used two variaons of the say block. For the joke and punchline, the horse speaks for a
specied number of seconds. However, at the end of the script, the say block we added did
not specify a me value. And if you look at the stage, you'll see that the speech bubble sll
displays Hello, is this thing on?. We're going to use that say block to our advantage in the
next exercise.
Time for action – synchronizing and animating the horse
The rst part of this exercise will be familiar to you. We want to animate the horse using
its costumes. However, we'll combine that animaon with another say block to create a
uid scene:
1. Connue building the script by adding a next costume block.
2. Add a wait () secs block.
3. Add a next costume block. Note that since we are not actually going to call the
name of the costume for the horse1 sprite, we're not going to take the me to
rename them from their defaults.
4. Add a say () block with an empty input value.
5. Double-click on the script to run the code.
Chapter 4
[ 87 ]
What just happened?
It was a tough crowd, and the joke fell at, causing the horse to nervously rear up on its hind
legs and say Hello, Is this thing on?. Even though our script technically runs the say (Hello,
Is this thing on?) block before switching to the costume of the horse on its hind legs via the
next costume block, any delay between the two acons is going to be dicult to noce,
which is the intenonal eect; we want those two acons to happen in a uid way.
By adding a say () block at the end of the script with an empty value, we clear the speech
bubble. The dierence in the two say blocks warrants some discussion.
When we use a say () for () secs block, the speech bubble displays on the stage for the
amount of me specied, and more importantly, the script stops when the specied me
elapses. If we use the say () block with no me value, the speech bubble displays and the
script connues, meaning we can animate the sprite while the speech bubble displays as
we demonstrated in our script.
Speech bubbles enable us to convey a conversaon; however, the text can only be displayed
on the screen. While it would be cool to have a computer-generated voice read the value
of the say block, that's not yet possible in Scratch. Maybe we can ask the Scratch Team for a
feature enhancement.
For our next exercise, we're going to add some prerecorded sounds from Scratch's library.
Time for action – importing a horse sound
Let's add some further context to our story by incorporang some actual sounds. As we'll
see in the exercise, Scratch includes a horse sound, making it relavely easy to create some
themac stories based on the included media:
1. With the horse sprite selected, click on the Sounds tab.
2. Click on the Choose sound from library buon to display Scratch's sound library.
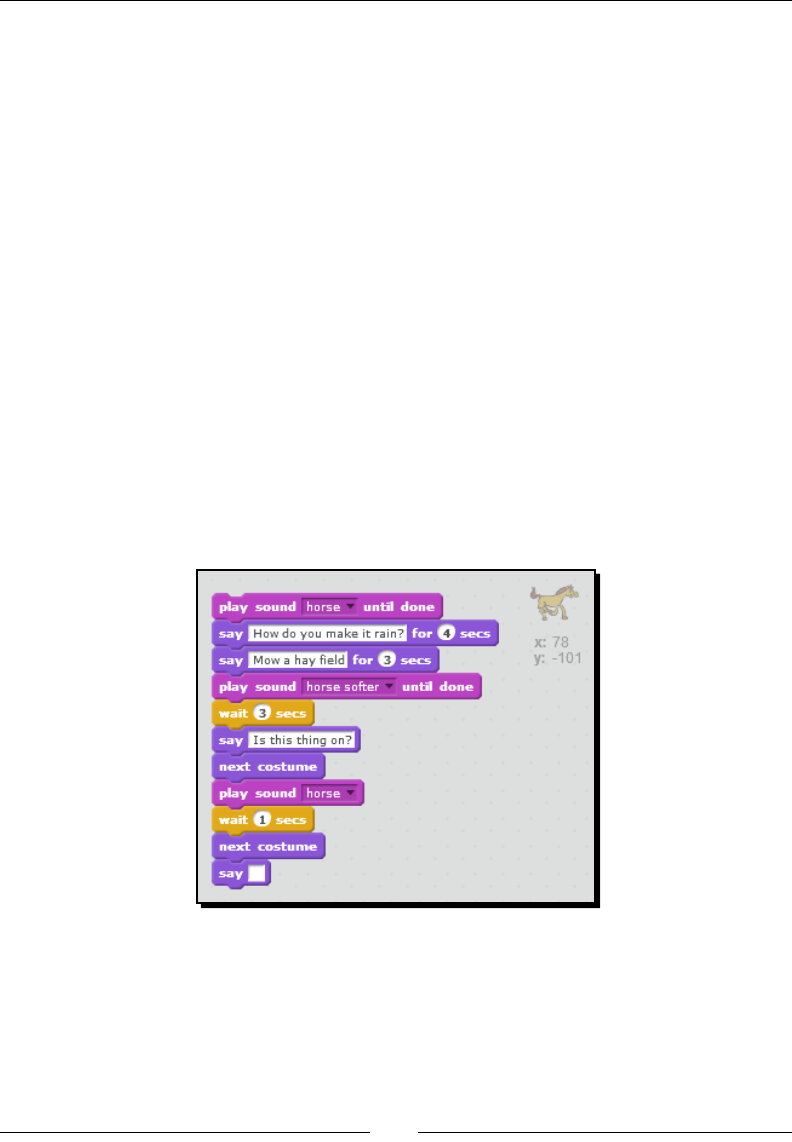
Creang a Scratch Story Book
[ 88 ]
3. Browse to the Animal category and select Horse.
4. To demo a sound before you import it, click on the play buon next to each sound.
5. Click on OK to add the sound to the list of sounds for the horse sprite. To listen to
the horse whinnying, click on the play buon in the sound editor.
6. Duplicate the horse sound by right-clicking on the sound and selecng Duplicate.
7. Select all of horse2 in the sound editor and apply the soer eect. To select the
sound wave, click on the le-hand side of the sound editor and drag your mouse to
the le. This is the same selecon technique we used to highlight text in a document.
8. Let's give horse2 a beer name. Change the name to horse soer to correspond
to the eect we used. You can change the name of the selected sound above the
sound editor.
9. Now let's add the sound to several places in our script. From the Sound palee, add
the play sound unl done block to the top of the script and select the horse sound.
10. Insert a second play sound () unl done block aer the say (Mow a hay eld) for (1)
secs block. Select horse soer as the sound to play.
11. Insert the play sound () block aer the next costume and before the wait (1) secs
block. Select horse as the sound to play.
12. The following screenshot shows our script so far:
What just happened?
We used Scratch's sound library to add a horse sound to the scene as we connued to build
our story. We introduced the horse with a whinny, and then we reiterated the sound aer
the joke's punchline.

Chapter 4
[ 89 ]
By duplicang the whinny and applying the soer eect, we created a mid horse. Right
about then, the horse is realizing that if he has to explain the joke, it's not a good joke.
At the end of the script, we used the plain play () sound block to play the horse sound
while the script connues to run. This allowed the horse to do several things at one me:
say Hello, Is this thing on?, rear up, and whinny. This combinaon at the end enabled us to
reinforce the nervous horse idea.
Playing supported sound formats
Scratch includes a library of sounds that you can use in any of your projects, and you can
also easily import your own sounds. The Upload sound from le buon on the Sound tab
provides a dialog box that lets you select sounds on your own computer.
In addion to the MP3 format, Scratch can play uncompressed WAV, AU, and AIF sound les.
Positioning a sprite by its coordinates
With our horse scene complete, we'll move on to the dog. Our dog is also a comedian, but
in this scene, we're going to be moving the dog across the stage. Therefore, we'll have to
posion the sprite to be exactly where we need it to be in order for the scene to play out.
Time for action – moving the dog based on x and y coordinates
In this exercise, we're going to use the x and y coordinates to move our dog:
1. Let's prepare the stage by hiding the horse1 sprite by right-clicking on the
thumbnail in the sprites list and choosing Hide. Then, display the bedroom1
backdrop on the stage.
2. Next, add the dog2 sprite from the Animals category of Scratch's sprite library.
3. Posion the dog so that it's talking into the microphone. Resize the sprite as necessary.
4. With the dog in posion, let's nd the x and y coordinates of the sprite so we
can ensure the dog always returns to this posion. Select the dog2 sprite in the
sprite list and then click on the i icon on the sprite thumbnail to display the sprite
properes pane as seen in the following screenshot:
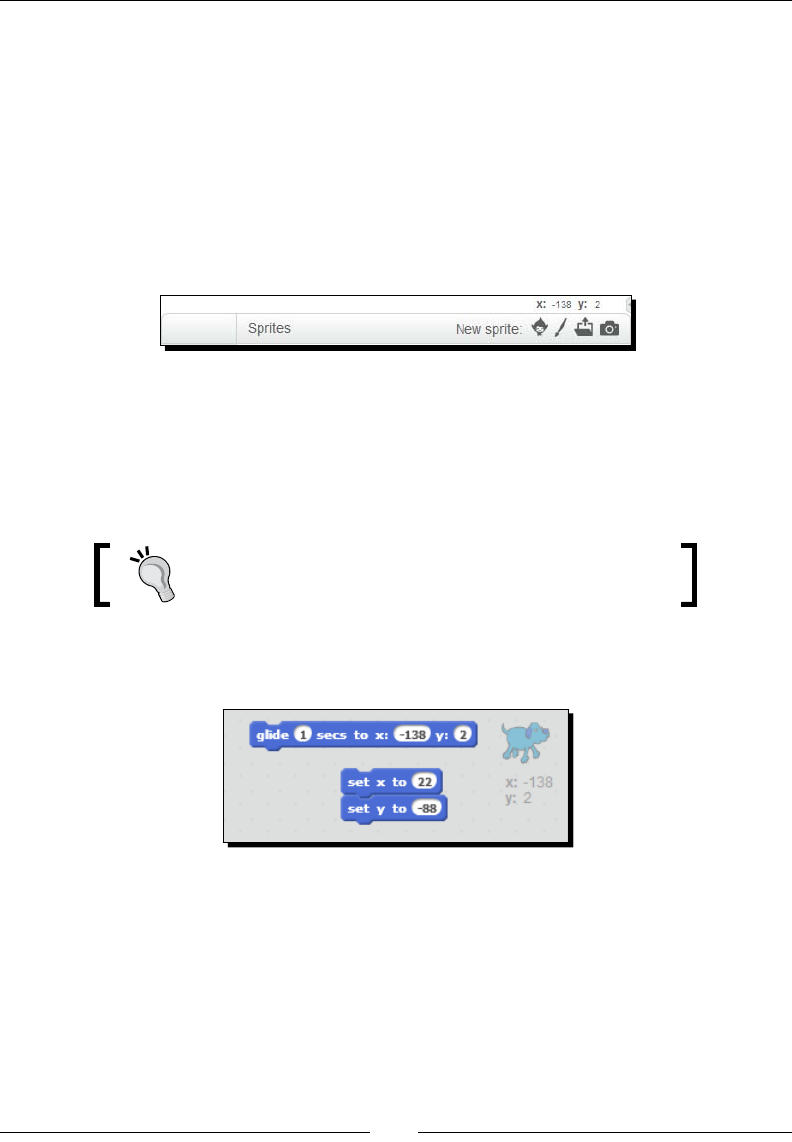
Creang a Scratch Story Book
[ 90 ]
5. Now, we'll create the script that always returns the dog to the spot in front of the
microphone. From the Moon palee, drag the set x to () block to the scripts area.
Change the value to the dog's x value. My example uses 22.
6. Add the set y to () block. Change the value to the dog's y value. My example uses -88.
7. Let's idenfy some coordinates on the le-hand side of the stage by the desk
because we will want our dog to move there aer it's done telling the joke. As
you move your mouse around the stage, Scratch tracks the x and y posion of the
mouse. The informaon displays the x: and y: values in the space between the stage
and the New sprite icons as seen in the following screenshot:
8. From the Moon palee, add the glide () secs to x: () y: () block to the scripts area,
but do not aach it to the set x: (22) and set y: (-88) blocks.
9. The glide () secs to x: () y: () block is populated with the current x and y coordinates
of the selected sprite. Let's change the coordinates to where we want the dog to go.
Change the x value to -138 and the y value to -2. Change the secs value to 2.
The more seconds you add to the glide block, the longer it
takes the dog to reach its coordinates.
10. Run each script by clicking on each stack and observe how the dog changes
posions. The following screenshots show the scripts so far:
11. The following screenshot shows the result of the glide block by posioning the dog
next to the bed and in front of the desk:
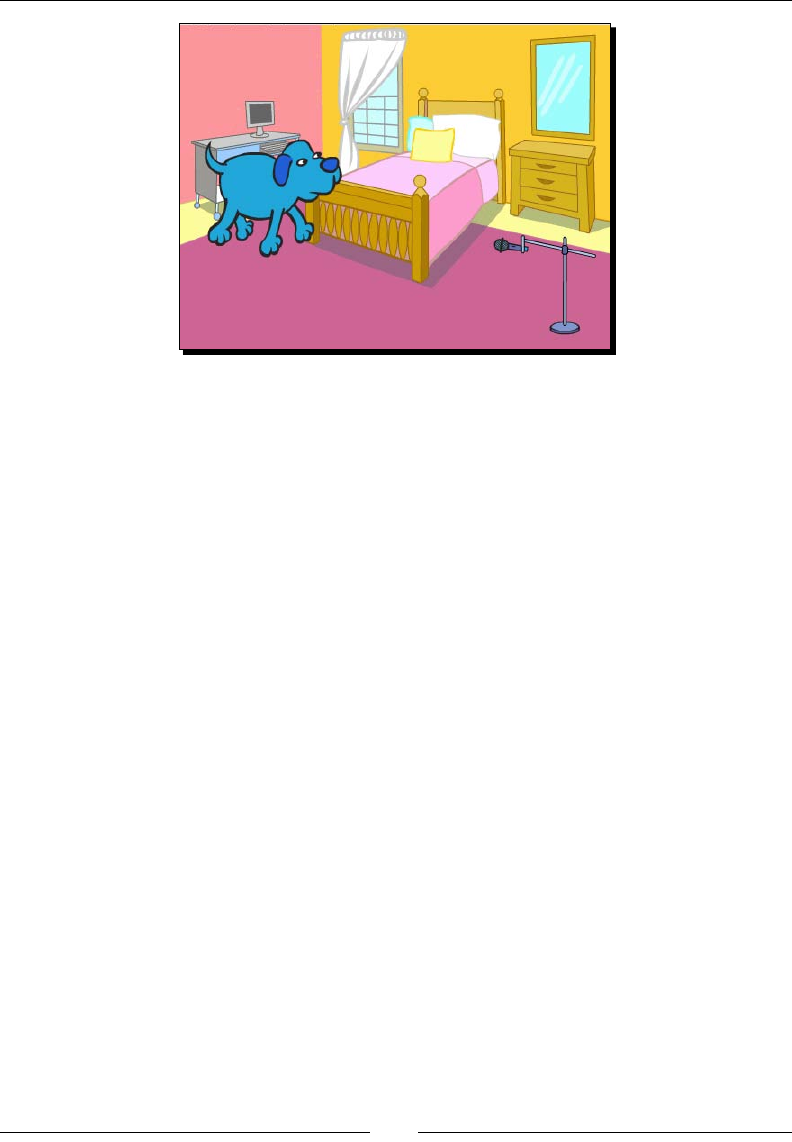
Chapter 4
[ 91 ]
What just happened?
We issued a series of commands and our dog responded with precision. The rst script sets
the dog's X and Y coordinates next to the microphone. The second script moves the dog to
the new X and Y coordinates in front of the desk by gliding to the point over the course of
two seconds. If we wanted the dog to amble along, we could set the value to a higher value,
such as 10 seconds.
When we built the horse scene, we didn't need to know the posion of the horse because it
didn't move. Each me we displayed the horse, it was in the same locaon.
However, the dog will change posion as the scene plays out, and since Scratch remembers
the sprite's previous posion, we need to ensure that the dog always starts in front of the
microphone when the scene starts.
Did you noce that the dog walked backwards when you ran the glide block? Of course you
did. We'll x that up in due me.
Locating sprites with x and y coordinates
Scratch uses the Cartesian coordinate system to dene the posions on the stage. If you're
not familiar with the Cartesian coordinate system, it's basically a set of two points (numbers)
that describe a locaon. There are a lot of everyday items that are located by describing them
in terms of two points. For example, a street address is generally described in terms of a street
name and a number, as in 352 Main Street. In another example, spreadsheets are comprised of
cells that are located by a leered column and a numbered row. Here, B2 represents the cell in
the second column, second row of the spreadsheet. Cartesian coordinates are represented in
terms of x and y posions, as our previous example demonstrated.
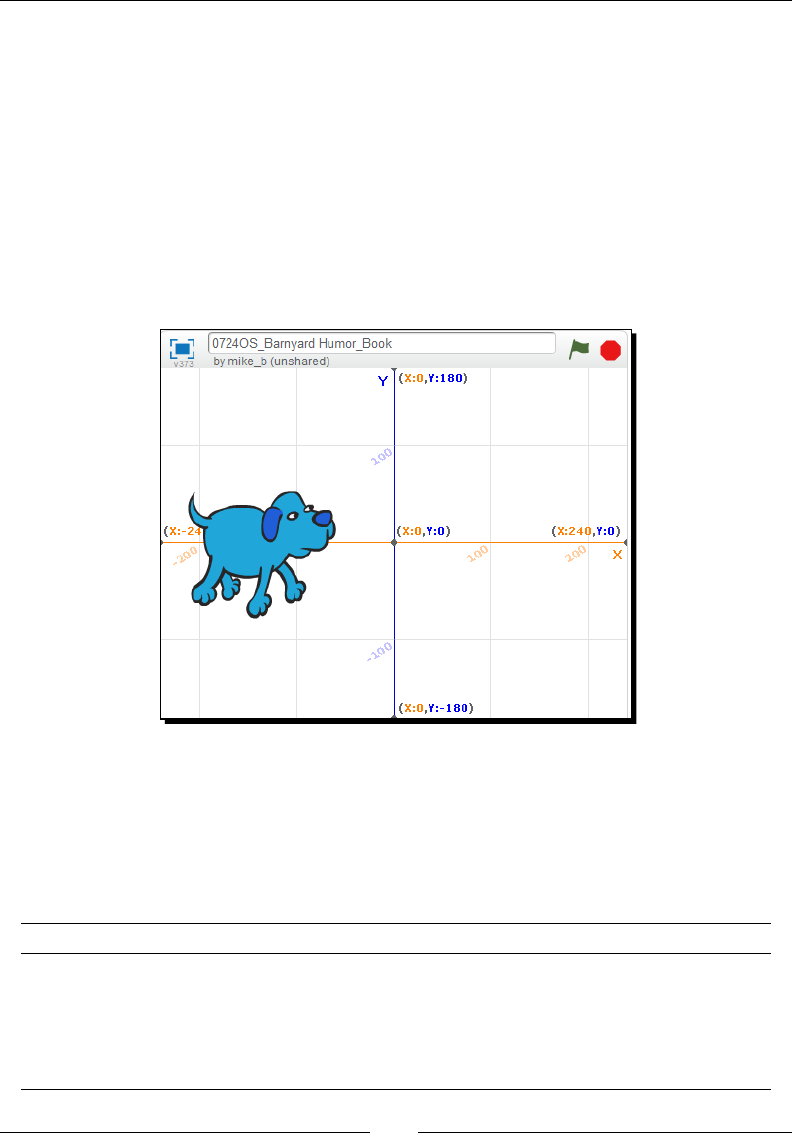
Creang a Scratch Story Book
[ 92 ]
The x axis divides the stage into equal halves horizontally, and the y axis divides the
stage into equal halves vercally. The two axes intersect in the middle of the screen
or at coordinates 0,0 to form four equal quadrants, or blocks.
If a sprite has a posive x value, it's posioned in the right half of the stage. If a sprite has a
posive y value, it's posioned in the top half of the stage. A negave x value can be found in
the le half of the stage, and a negave y value can be found in the boom half of the stage.
The following screenshot shows the Scratch stage with an x and y grid as a background.
The background displays the four equal quadrants with key points labeled. This grid is
one of Scratch's included backdrops and provides a very nice graphical representaon
of the coordinate system.
When we locate a sprite on the stage by the coordinates, Scratch uses the center point of
the sprite to determine exactly where the sprite is placed. We'll explore the sprite's center in
more detail in Chapter 6, Making an Arcade Game – Breakout (Part I).
The following table denes several key coordinates on the stage. The coordinates are listed
in the format (x, y).
Coordinates (x, y) Location
(0,0) This marks the center point of the stage.
(240, 0) The x=240 identifies the right edge of the stage. The y=0 represents
the vertical midpoint on the right edge of the stage.
(-240, 0) The x=-240 identifies the right edge of the stage. The y=0 represents
the vertical midpoint on the right edge of the stage.
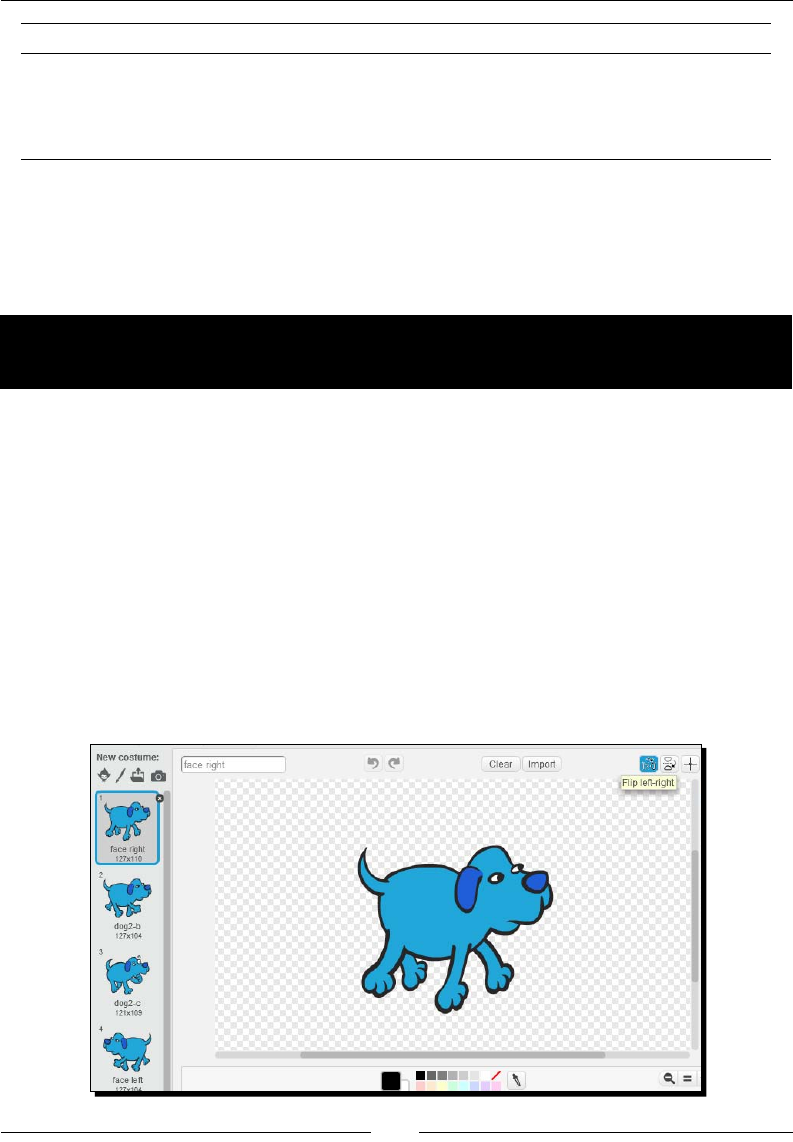
Chapter 4
[ 93 ]
Coordinates (x, y) Location
(0, 180) The y=180 identifies the top edge of the stage. The x=0 represents
the horizontal midpoint on the top edge of the stage.
(0, -180) The y=-180 identifies the bottom edge of the stage. The x=0
represents the horizontal midpoint on the bottom edge of the stage.
Creating a new costume
Most dogs don't walk across the room backwards like ours does. Let's get our dog walking
forward by creang a new costume that points in the direcon we want to go.
Time for action – duplicating, ipping, and switching a sprite's
costume
We've established throughout our exercises in this book that sprites have costumes, and we've
chosen sprites that have more than one costume because it's been convenient to our projects.
We can, however, add costumes to a sprite. In this exercise, we'll add a costume by duplicang
an exisng costume as follows:
1. With the dog sprite selected, click on the Costumes tab.
2. Right-click on the dog2-b costume and select duplicate to create a fourth costume
called dog2-b2.
3. Select the dog2-b2 costume and then click on the ip le-right buon at the top of
the image editor. The costume dog2-b2 now faces to the le.
4. Name the costume face le. Also, change the name of dog2-a to face right. See the
following screenshot:
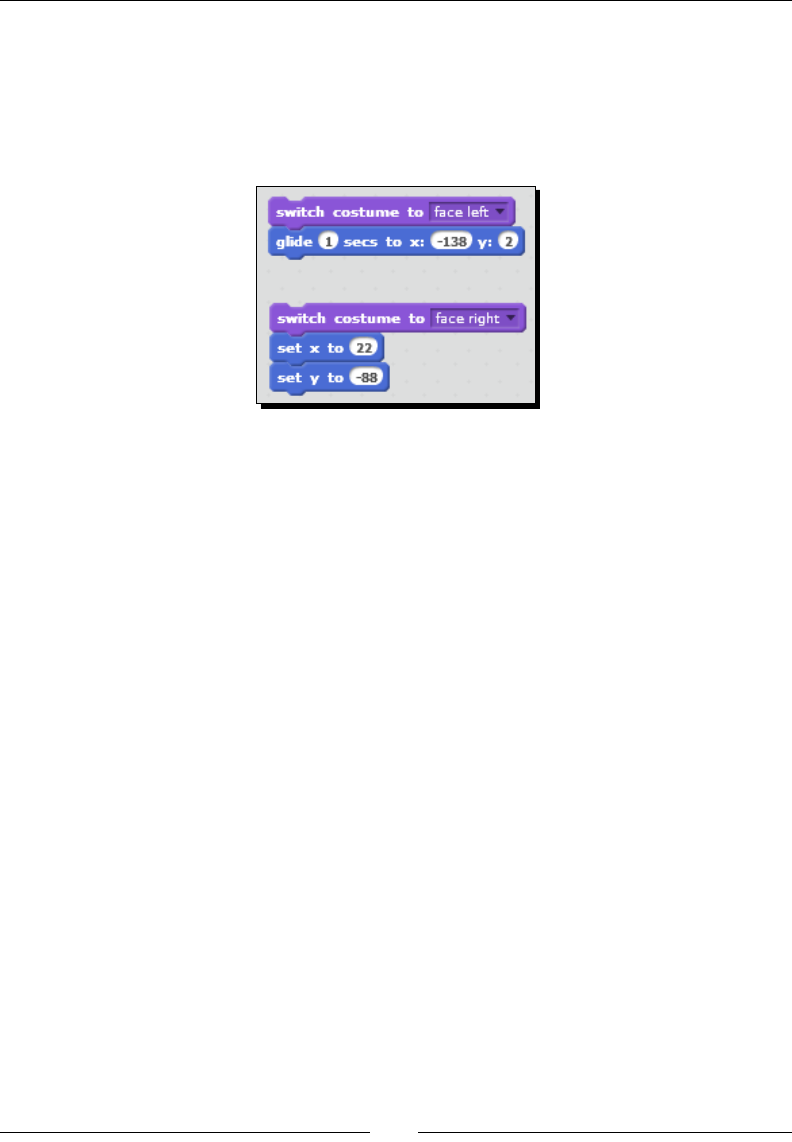
Creang a Scratch Story Book
[ 94 ]
5. To use the new sprite, add the switch costume to () block to the top of the glide
block. Select the face le costume.
6. Add another switch costume to () block to the top of the script that starts with the
set x to (22) block. Select face right as the costume.
7. Click on each script to run the blocks of code.
What just happened?
Costumes change the appearance of the sprite, and in this case, duplicang a costume
and ipping it horizontally points the dog in the opposite direcon. We used the switch
costume to (face-le) block to display the le-facing costume before we glide. When we
posion the dog in front of the microphone, we use another switch costume to block to
posion the dog correctly.
Comparing costumes to sprites
We'll use the following denion from the Scratch Wiki to describe a sprite. Sprites are the
objects that perform acons in a project. While the stage can also be programmed in a project,
most projects have at least one sprite as well because only sprites can move. We can think of
the "acons" as a reference to the scripts, costumes, and other properes that we assign to
a sprite. I generally will not refer to sprites as objects because sprites is a more specic word;
however, it's worth menoning sprites as objects because other people, parcularly people
from a computer science background may tend to think in terms of objects.
We use a costume to manipulate the appearance of the sprite by switching between the
costumes. Another way to think about costumes would be as frames, as in the frames of an
animaon. By using costumes, we can easily make a sprite run, walk, dance, or explode into
pixels. In our previous exercise, we switched to a costume to point our dog in the direcon
we wanted to make it walk. There could be other ways to script this behavior, but the
switching costume approach accomplishes the goal simply.
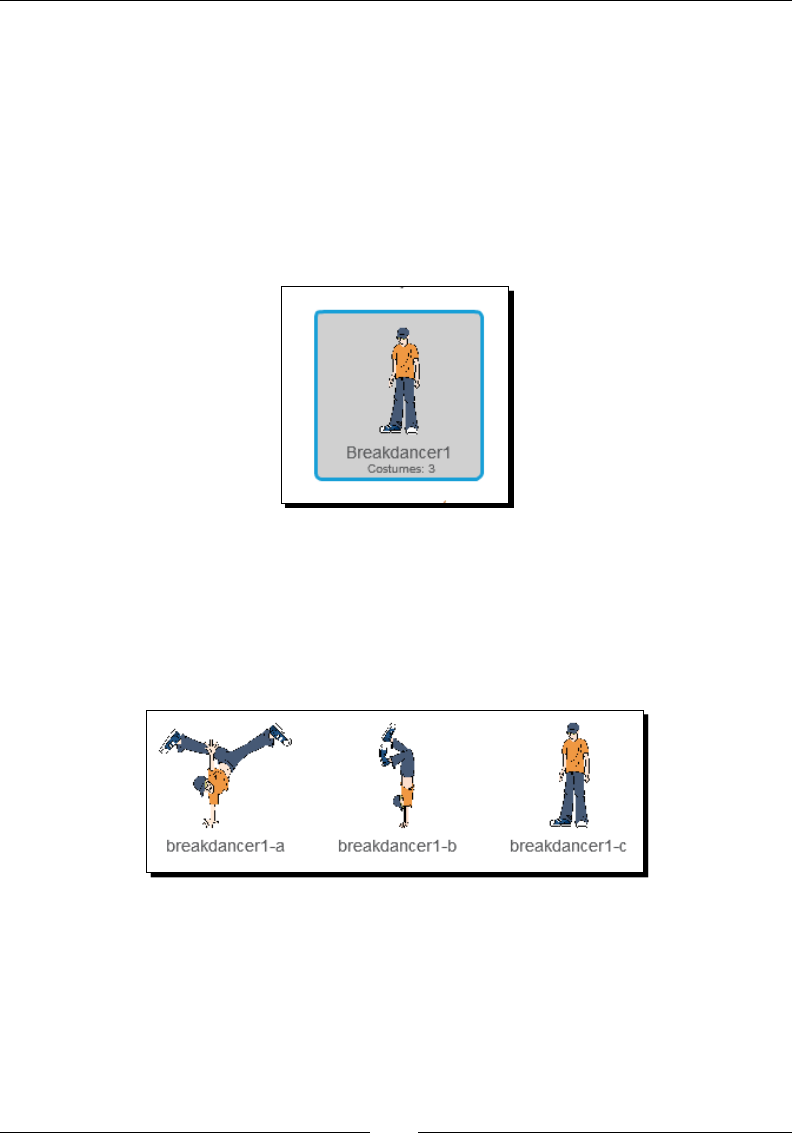
Chapter 4
[ 95 ]
In our exercise, we duplicated an exisng sprite's costume, but you can also add a costume
by drawing it or by imporng a costume from Scratch's library (at the top of the Costumes
tab). When working in a Scratch project, it's possible to import a sprite with costumes or just
one costume.
The Scratch Library has the benet of including many sprites that are packaged with mulple
costumes that provide a great way to jump-start our animaons. When you choose a sprite
from the library, you can tell if the sprite has costumes by clicking on its thumbnail. The
number of costumes will display below the sprite costume. The Breakdancer1 sprite, as seen
in the following screenshot, includes three costumes that will be imported with the sprite:
If you're working from the Costumes pane and want to import a single costume into the
sprite you're eding, then you Choose costume from library from the New costume icons.
The dierence between choosing the costume versus choosing the sprite is that choosing a
costume shows all the individual costumes of sprite for selecon. The following screenshot
shows the three costumes that are available to the Breakdancer1 sprite when you use the
Choose costume from library opon in the Costumes tab:
Composing custom sound effects
Earlier in the chapter, we used the play sound () block. Scratch includes several
sound-related blocks, such as the play (drum) block, that allow us to create music
and sound eects for use in our projects.
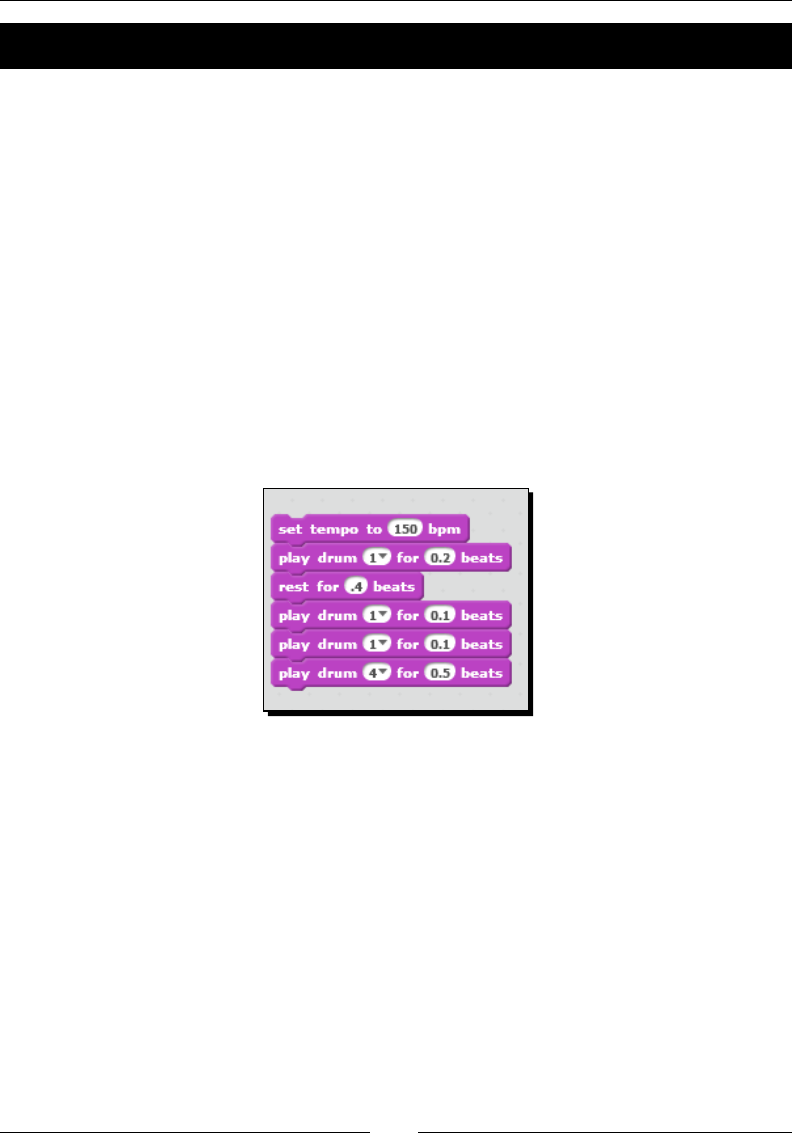
Creang a Scratch Story Book
[ 96 ]
Time for action – creating drum sound effects
Let's try our hand at creang a drum eect that plays on the punchline of the dog's joke.
We'll create the dog's joke in the next Have a go hero exercise:
1. From the Sound palee, drag the set tempo to () bpm block to the script area,
but do not aach it to an exisng stack of blocks. Change the bpm value to 150.
2. From the Sound palee, add a play drum () for () beats block. Use the block's
default value (a snare drum for .25 beats).
3. Snap the rest for () beats block from the Sound palee to the script and change
the value to .4.
4. Add two more play drum () for () beats blocks, leaving the drum value set to one.
Change the beats value to .1 for both.
5. Add another play drum () for () beats block to the end of the script and change
the drum value to 4 (Crash Cymbals). Set the beats value to .5.
6. Click on the stack of blocks to listen to the eect.
Feel free to tweak the values and experiment with the sound.
What just happened?
By arranging three blocks to aect the drum eects, tempo, and rest, we created a familiar
da dat dat chsh drum roll. If we wanted a faster pace, we could set a higher beats per
minute (bpm) value in the set tempo to () bpm block. We're going to use this sound eect
to punctuate the punchline of the dog's joke, which we haven't wrien yet.
Creating sound effects and music
In the Sounds palee, Scratch provides several blocks that can be used to create sound
eects (as we did) or to create your own musical scores. The following table lists the sound
blocks that will help you create your own music and sound eects:

Chapter 4
[ 97 ]
Block Description
play drum() for () beats Select from a variety of percussion instruments,
including drums, cymbals, triangles, cowbells, and
hand claps. You can also set the number of beats
the drum plays for.
play note () for () beats Specify both the note to play and the beat. Notes
are annotated with numbers in a range of 0 to 127,
and the pitch gets higher as the number increases.
A list of predefined numbers and notes are
available in the note drop-down list, including the
following key notes:
48 – low C
60 – middle C
72 – high C
set instrument to () Use in conjunction with the play note block to set
the instrument for the note. The current instrument
values are between 1 and 21 and include a variety
of options including drums, organs, and flutes.
rest for () beats The block plays silence for the specified number of
beats. The default value is .25.
set tempo to () bpm Specify the beats per minute (bpm) that the note
or drum plays. The higher the bpm, the faster the
tempo.
change tempo by () Increase or decrease the tempo by the specified
amount. Use a negative number to decrease the
tempo.
set volume to () The default volume is 100 percent, but you can limit
the volume with this block. The change volume by
block can also be used to increase or decrease the
volume.
Have a go hero – writing a joke sequence for the dog
You should be able to build the joke sequence for the dog without much help from me. Feel
free to incorporate your own joke, but I'm going to use a top three list, as in "What are the
top three reasons dogs don't use computers?" The responses will be:
It's hard to read the monitor with your head cocked to one side.
They can't stop hunng the mouse.
CarPAW Tunnel Syndrome!
In the next exercise, we'll refer to this block of code as the joke sequence.
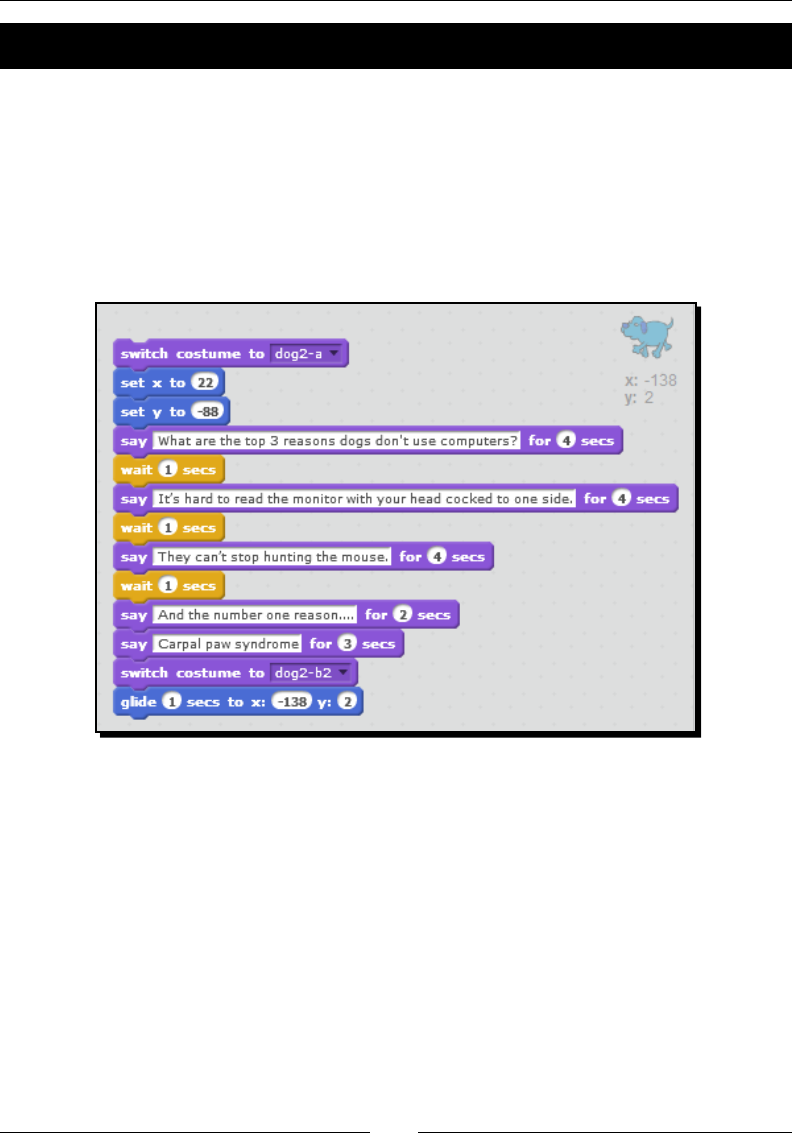
Creang a Scratch Story Book
[ 98 ]
Time for action – integrating the dog's joke sequence
With jokes in hand, let's integrate them into our scene:
1. Snap the joke sequence to the script that ends with the set y to () block. In the next
screenshot, my joke sequence is everything between the say (What are the top
three reasons dogs don't use computers?) for (4) secs and say (CarPAW Tunnel
Syndrome!) for (3) secs blocks.
2. Add the stack that ends with the glide (1) secs to x: (-138) y: (2) block to the end of
the joke sequence. Check your work against the following screenshot:
3. Now let's add our drum eect to the script. We have three jokes; therefore, we will
use a broadcast () and wait block to play the drum eect aer each line. Aer each
joke, insert a broadcast and wait block. Create a new broadcast message named
play drums and select the play drums message in each broadcast () and wait block.
4. Add a when I receive () block to the top of the drum eects stack and select the play
drums message.
5. Double-click on the stack that contains the joke sequence to watch the scene unfold.
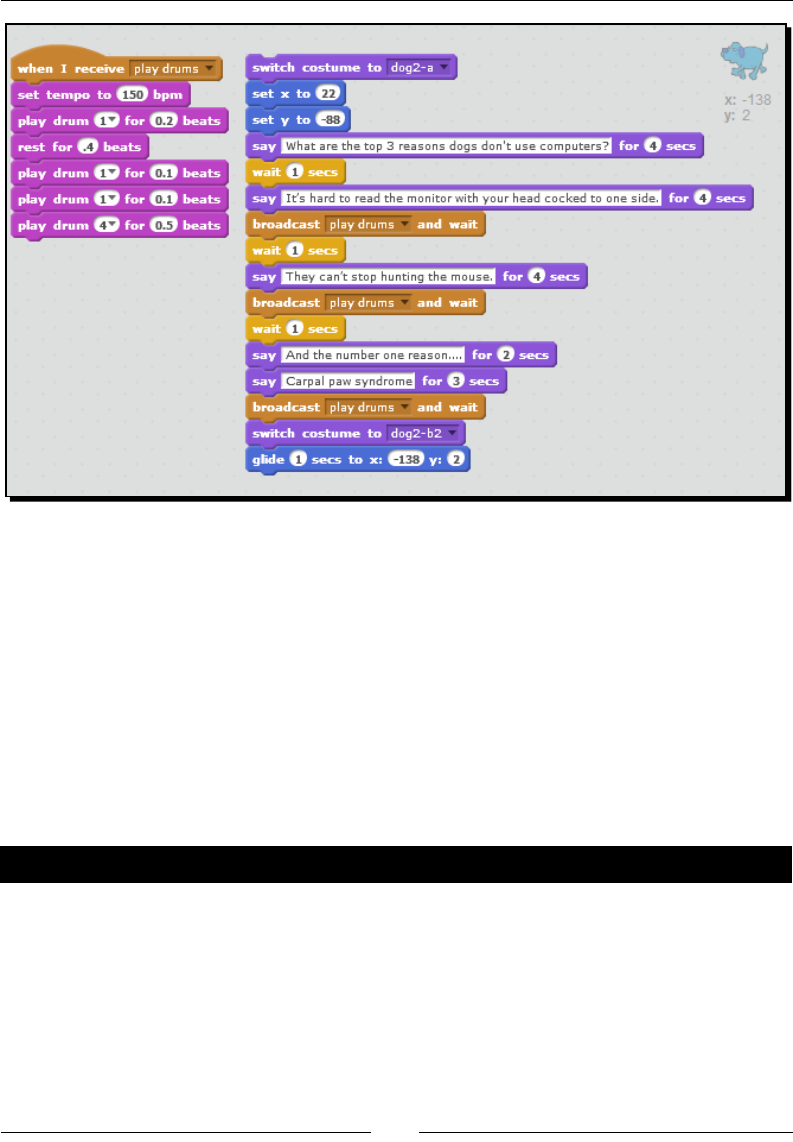
Chapter 4
[ 99 ]
What just happened?
We took our disparate stacks of code and combined them into two stacks that execute
our scene. The broadcast () and wait block is signicant to the ming of our scene. The
broadcast (play drums) and wait block pauses the script unl all the code in all of the
when I receive (play drums) blocks run. The broadcast () block by comparison will send the
broadcast message and connue running the blocks in the remainder of the stack regardless
of whether or not the code aached to the when I receive () block completes or not.
Aer we complete our work in Chapter 7, Programming a Challenging Gameplay – Breakout
(Part II), you'll recognize that we could also use custom blocks, which is a new Scratch 2.0
feature to create procedures. In our script, one way would be as good as the other.
Have a go hero – adding context to the dog's scene
We have an opportunity to customize the dog's behavior extensively. Here are a couple of
suggesons. Can you make the dog lie on its back on the bed? As another example, one of the
dog's costumes has a raised eyebrow, which might be a good expression to show aer each line
of the joke. I'm sure you can come up with some ways to add meaning to the scene.
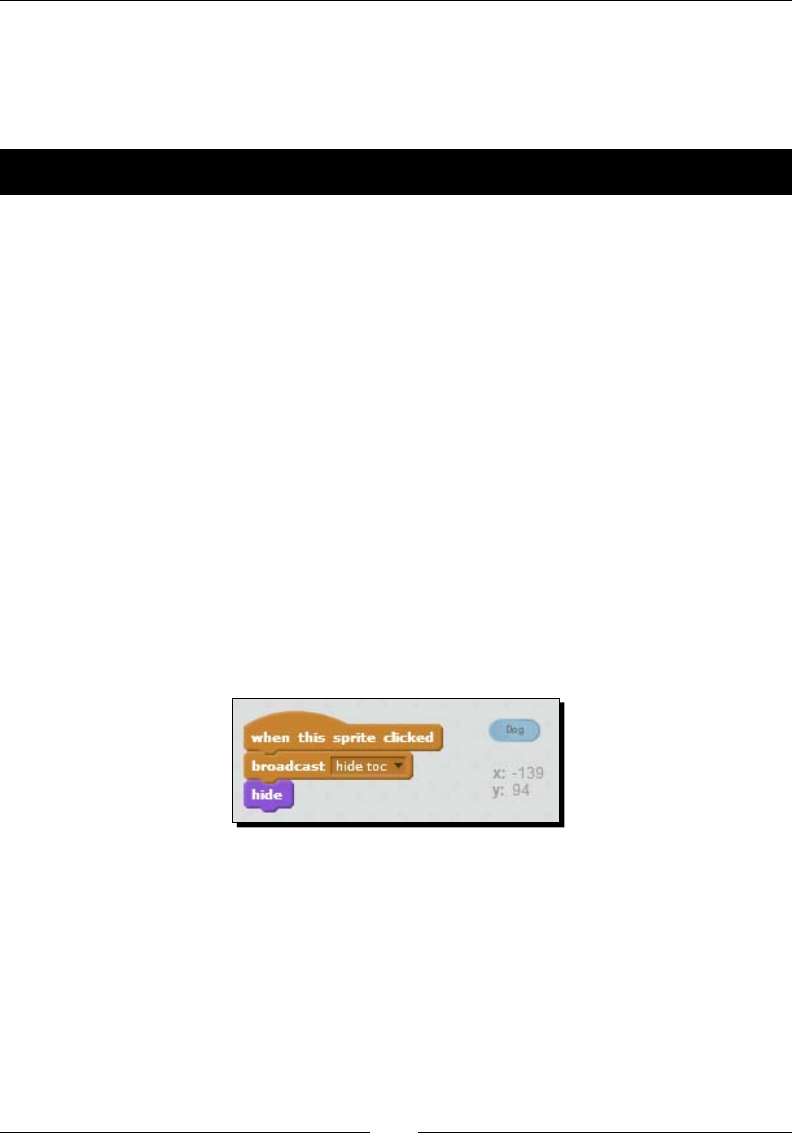
Creang a Scratch Story Book
[ 100 ]
Navigating the story and coordinating scenes
With the majority of the project complete, the only steps le are to add some controls to the
project so our readers can click from one scene to the next.
Time for action – hiding the table of contents
For navigaon, we want to give users the ability to click on an item from the table of
contents to play the scene. The user can then click back to the table of contents by clicking
on a home link.
1. Let's get back to the plain white background that represents our table of contents.
Hide the Dog2 sprite. With the stage selected, click on the Backdrops tab. Select the
blank white backdrop.
2. Display the Dog TOC, Horse TOC, and Instrucons sprites by right-clicking on each
one from the sprites list and selecng show.
3. We're going to make the Dog TOC sprite clickable, so select the Dog TOC from the
sprites list.
4. From the Events palee, drag the when this sprite clicked block into the scripts
area. Add a broadcast () block to the script and create a new broadcast message,
hide toc, because clicking on the Dog TOC buon will cause the dog scene to load
and all visible sprites on the table of content page to hide.
5. Next, add a hide block to the script.
6. The script can be seen in the following screenshot:
7. In addion to hiding the clicked buon, we want to use the hide toc broadcast
message as a signal to hide all the visible sprites. Let's start with the Horse TOC
buon. Add the when I receive () block to the Horse TOC sprite's script area.
Select the hide toc message.
8. Add the hide block to the when I receive (hide toc) block. The following screenshot
shows the two block stack:
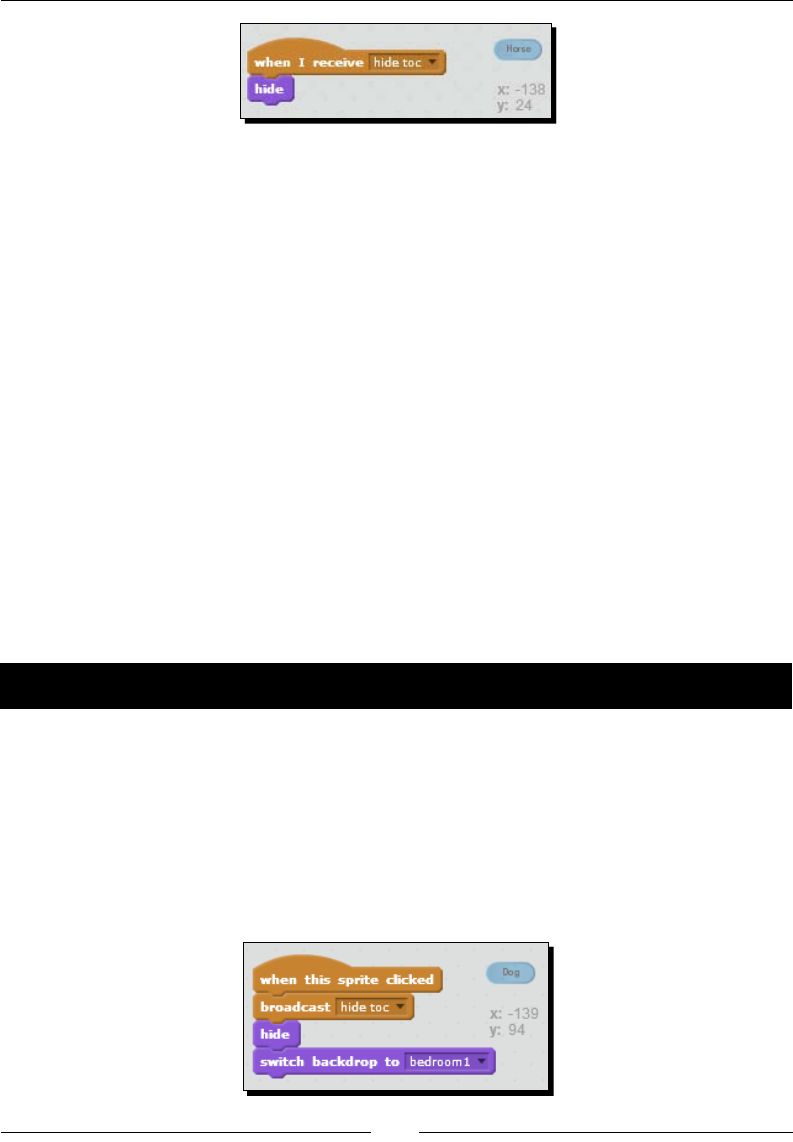
Chapter 4
[ 101 ]
9. Now we can copy the when I receive (hide toc) script to the Instrucons sprite.
What just happened?
Before we can play our scene, we need to clear the stage in preparaon for the dog scene.
We use the broadcast () and when I receive () blocks to coordinate what happens when we
click on the Dog TOC buon. Now when we click on the Dog buon, all the sprites should hide.
Let's reect on the sprite names in our project so far. There can ulmately be no wrong
answers when it comes to naming convenons and vernaculars, and I'm not intent on enforcing
any one on you. I think it's a good idea to choose names that provide meaning to you.
Let's break down our current Dog TOC example. We can tell by looking at the sprite that it's
a buon and the Dog label gives us a clue as to what scene will load. TOC represents the
table of contents, which is where the buon displays. When we click on the Dog TOC sprite,
we need to hide the table of contents, which we do with the hide toc broadcast. You might
noce that the name of our dog character is sll the Scratch default Dog2. This will drive
some of you nuts, but from a praccal standpoint, Dog2 already adequately describes the
sprite. Changing the name to Dog, for example, will not add clarity to anything, especially
because we're not adding more than one dog sprite to the project.
Time for action – displaying the dog scene
We connue to build around the broadcast message enter dog to display the sprites and
background of the dog chapter:
1. Now that we have cleared the table of contents, we need to load the dog scene.
We'll bring in the backdrop rst and the dog second. Select the Dog TOC sprite.
2. From the Looks palee, add the switch to backdrop to () block to the end of the
when this sprite clicked stack and choose bedroom1. The revised script can be
seen in the following screenshot:
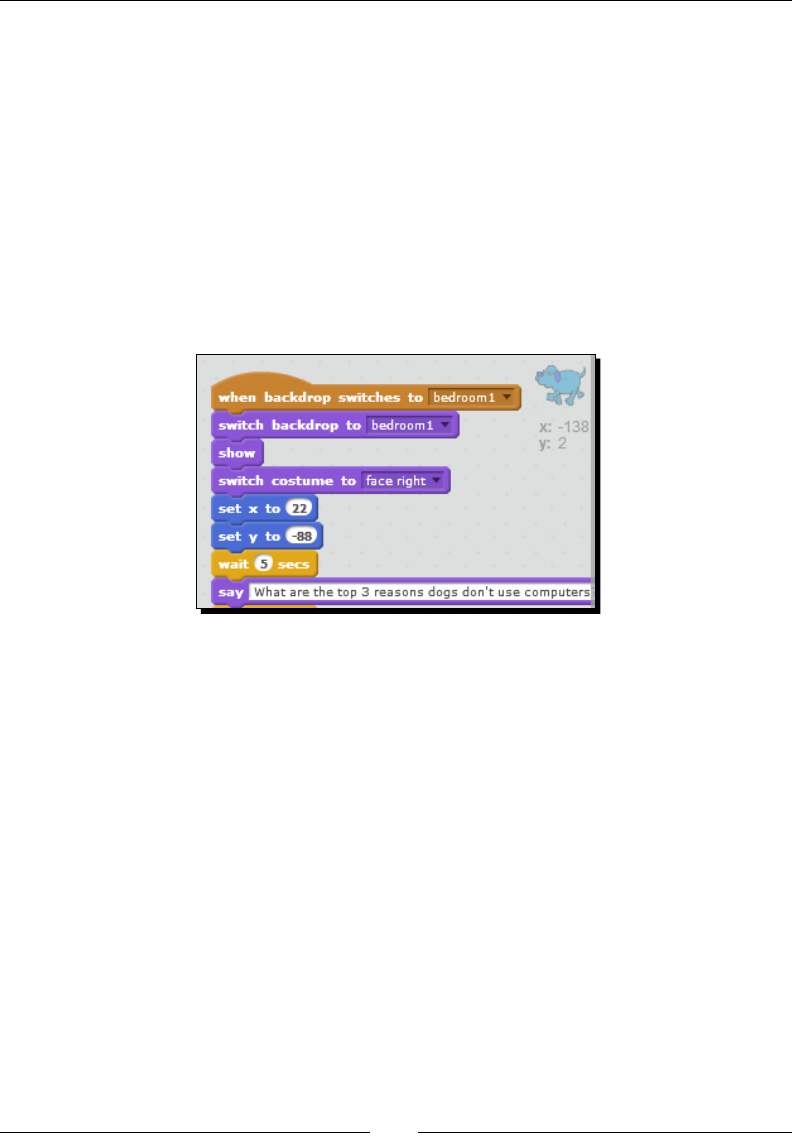
Creang a Scratch Story Book
[ 102 ]
3. Now let's display the dog. Select the Dog2 sprite.
4. From the Events palee, add the when backdrop switches to () block to the
scripts area. Select the bedroom1 backdrop.
5. From the Looks palee, snap the show block to the script.
6. Now aach the when backdrop switches to (bedroom1) stack to the top of the
script that begins with the switch costume to (facing-right) stack that iniates the
dog's joke sequence.
7. Aer the scene changes, we want to delay the start of the acon for a few seconds
so our users have a chance to acclimaze to the switch. Add a wait () secs block in
place aer the set y to () block and change the value to 5. The revised script can be
seen in the following screenshot:
8. Click on the dog buon from the table of contents and watch the dog chapter
load and play.
What just happened?
With one mouse click, we loaded our wise-cracking dog and learned why dogs don't use
computers. Did you noce the sequence? First, we switched the backdrop. Then, we used
the backdrop as the cue to display the dog.
We needed to add some ming to control the scene by delaying the start of the joke by
ve seconds. Without the delay, everything happened at once: the background displayed,
the dog displayed, and the joke started. It would have been too abrupt.
Coordinating scenes by backdrop name
In our chapter exercises, we've seen two ways to coordinate the ow of our program.
The broadcast (play drums) and wait block iniates the drum eects, and the broadcast
(hide toc) block hides everything on the table of contents. But then we added a new wrinkle
by using the when backdrop switches to () block, which is a new Scratch 2.0 block.
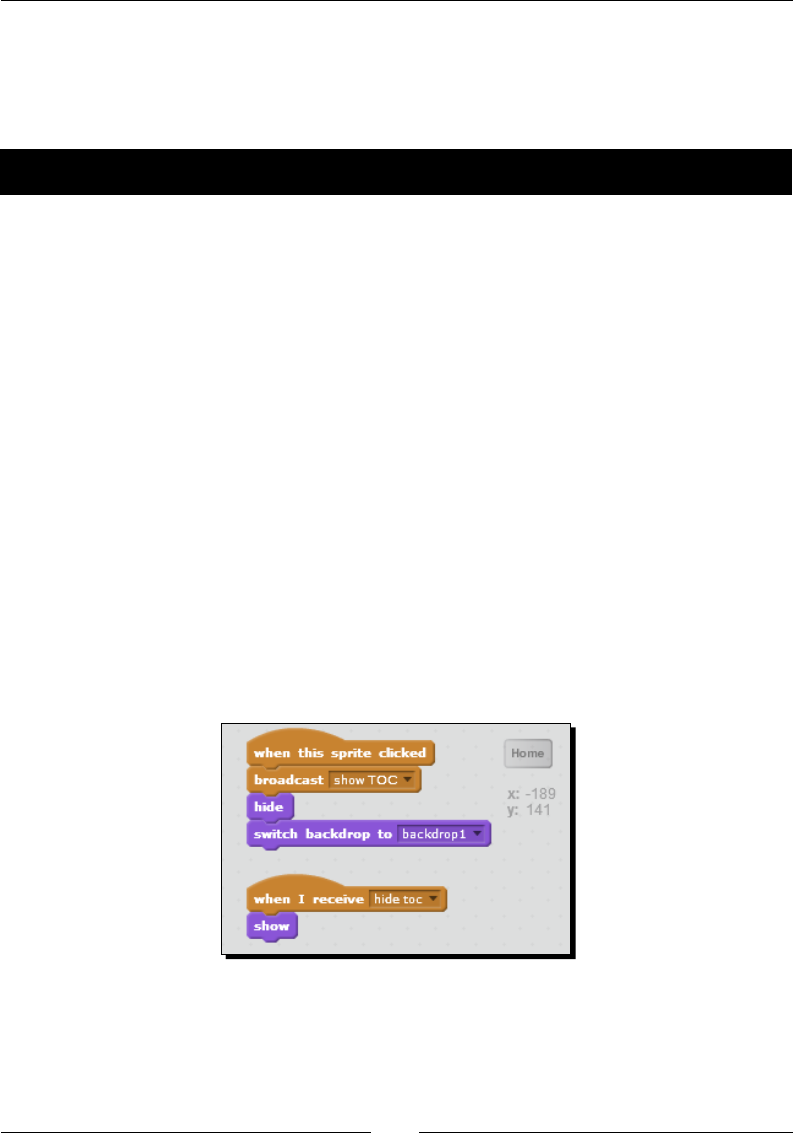
Chapter 4
[ 103 ]
The Dog2 sprite is checking to see if the current backdrop is bedroom1, and if the backdrop
is bedroom1, then the dog's joke sequence plays out. Otherwise, the dog stays hidden and is
silent. The when backdrop switches to () block only checks stage backdrops as the name of
the block implies.
Time for action – navigating back to the table of contents
Aer a scene plays out, we need to give our users a way to play the next scene. We'll do that
by adding a home buon on the scene. We're going to return to the table of contents and
allow the user to select the next item. Let's add the controls:
1. The Scratch sprite library includes several buons we can use. For this exercise, I'm
going to import Buon3. You can use or create any buon you like. Just add a text
label that says Home via the paint editor and give the sprite a name, such as home
buon. Posion the Home buon on the top-le of the stage.
2. From the Events palee, drag the when this sprite clicked block into the scripts area.
3. Add a broadcast () block to the script and create a new message: Show TOC.
4. Add the hide block.
5. Aer we send the message to show the table of contents via the show TOC
broadcast and hide the Home buon, we need to switch the backdrop to the rst
stage backdrop. Add the switch backdrop to (backdrop1) block.
6. Now we need to create the script that shows the Home buon. Add the when
I receive (hide toc) block to the home sprite to take advantage of a broadcast
message we created earlier to hide the table of contents.
7. Add a show block. Our two scripts can be seen in the following screenshot:
Creang a Scratch Story Book
[ 104 ]
What just happened?
Now we have a way to navigate back to the table of contents for our joke book, and a key
part of that navigaon are the show TOC and hide toc broadcast messages. Our script
establishes the table of contents page as home; therefore, when we broadcast the show
TOC message, we're displaying the table of contents (or home). When the user is viewing
the home screen, the user doesn't need a way to navigate to home, so we hide the sprite.
Then, when we broadcast the hide toc message, it means we're loading a scene, and
therefore need to show the Home buon.
Whether we guide the user through the project or make it interacve, we need to think
about "what happens when". The answer to the "what happens when" queson becomes
the basis of how we move our users through the project.
Have a go hero – nishing the sequence and initializing the project
Right now, we're able to switch back and forth from the table of contents to the dog's scene.
Take a moment to make the horse scene load when you click on the Horse TOC buon.
Then, take the necessary steps to inialize the start of the project with the when ag clicked
block from the Events palee to ensure that the project always starts with the table of
contents showing.
Pop quiz – checking chapter concepts
Q1. Which of the following best describes the Backpack?
1. It stores revisions of your scripts that can be restored later.
2. It stores scripts and sprites that can be copied among projects.
3. It lists all your created Scratch projects.
4. It contains help les.
Q2. How can we use the when backdrop switches to () block?
1. As an event that runs the script if the selected backdrop displays.
2. To halt all running scripts.
3. To inialize the project's starng values.
4. To coordinate events via a broadcast message.

Chapter 4
[ 105 ]
Q3. If you want to posion a sprite in your script, how can you do that?
1. Measure the distance from the edge of the stage.
2. Drag the sprite around to the point on the stage where you want it.
3. Add the glide block to the script.
4. Determine the X and Y coordinates for use in moon blocks, such as the
glide () secs to x: () y: () block.
Q4. Which of the following best describes the play sound () unl done block?
1. The selected sound plays while the scripts connue to run.
2. The selected sound sends a broadcast message.
3. The selected sound plays, and the script does not run the next block in
the stack unl the sound nishes.
4. The block allows you to select from several drums.
Summary
Somemes, programming in Scratch can seem like the easy part of creang a project,
especially when we have to simultaneously create the storyline and coordinate all the
elements to make the story unfold. Fortunately for us, everything gets easier with pracce.
We started our work at the beginning of the chapter with the idea to create a book of
jokes—and I'll forgive you if you think my jokes are bad—and by the me we nished our
exercises, we had a project that could seamlessly navigate through the stories based on the
users' selected path. In the process of telling a story via our Scratch book, we got our rst
good look at using coordinates to precisely locate sprites, explored sound, and coordinated
acon based on a background.
In the next chapter, we're going to connue our work with backgrounds by creang a
slideshow from some of our personal images. We'll explore some of the advanced features
of some of the concepts we introduced in this chapter, including hiding the slideshow
navigaon based on the mouse locaon and playing back our recorded slide navigaon.
5
Creating a Multimedia Slideshow
If you're like me, you have thousands of photos on your computer hard drive.
It's time to dust off a few of these photos for our next project as we will be
creating a slideshow with images we import from our computers. To help
us personalize our slideshow, we'll incorporate generic sounds and custom
recordings into our project.
In this chapter, we will do the following:
Import personal photos as backdrops
Work with and resize images for use in our projects
Add slideshow controls to display images
Play and record sounds
Locate the x and y coordinates to locate the mouse and hide the navigaon controls
Display a project in presentaon mode
We will start simple with this project and add advanced features as we near the end
of the chapter, but the basic slideshow framework should be well within reach of the
youngest Scratchers.
Importing photos as backdrops
Before we begin, you might want to look through your photo library. As a backyard
beekeeper, I'll be using some of my bee photos. As you look for your own photos, you might
want to consider selecng a group of images from a party, a trip, or some other event to help
create a theme for the slideshow. A minimum of three photos would be a good place to start
as we work through the chapter.
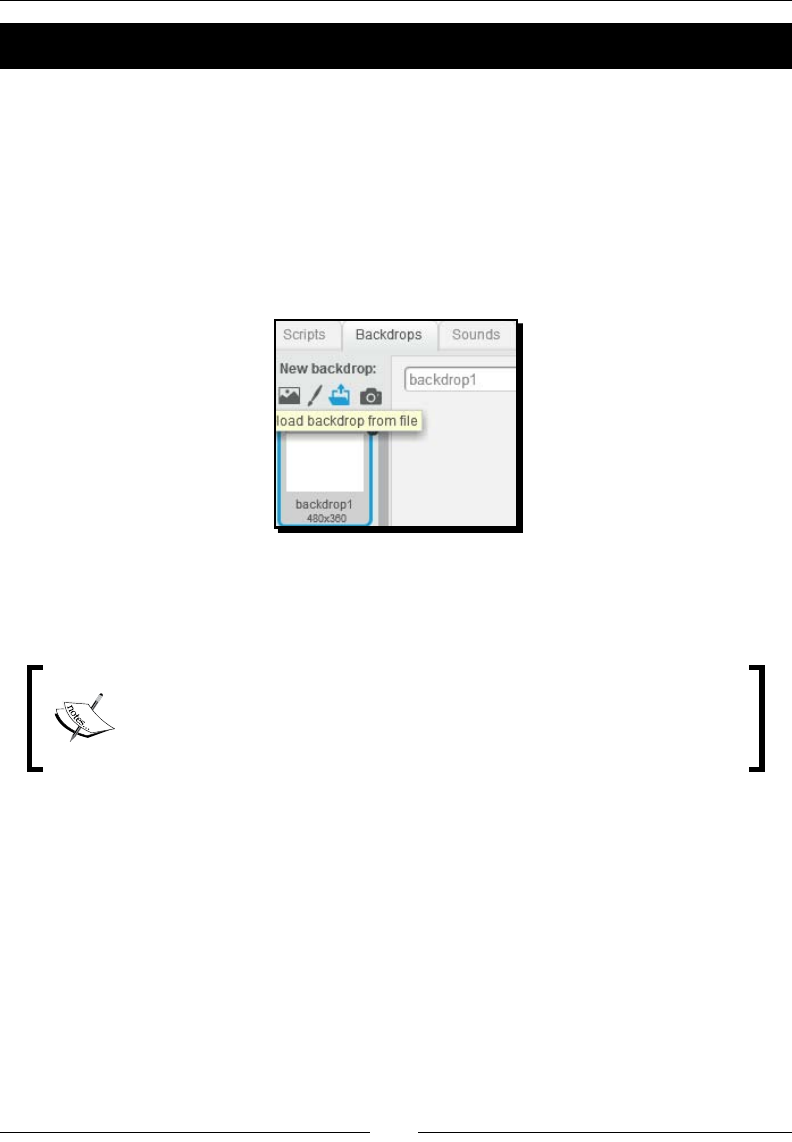
Creang a Mulmedia Slideshow
[ 108 ]
Time for action – importing photos from les
Let's import a batch of photos from our computers so that the slideshow has something
to display:
1. From the Sprites pane, select the stage thumbnail and then click on the Backdrops
tab to show the current white project backdrop. Click on the upload backdrop from
le icon. The following screenshot shows the available New backdrop opons.
The opon upload backdrop from le is the third icon from the le and looks like
a folder with an arrow. You'll also noce these same New backdrop opons under
the stage thumbnail in the Sprites pane.
2. Browse your computer's folders unl you nd your photos and add them to
the project. To select mulple les, hold down the Shi key while selecng your
image les.
Scratch will autosize the images to fit the stage size of 480 x 360 pixels. If you
want to make sure that your image will fit the Scratch stage perfectly, you
can use an external graphics editing tool (GIMP, PhotoShop, and others) to
crop the image to 480 x 360 pixels prior to importing the image in Scratch.
3. Aer all the images are imported into Scratch from your computer, you will see a
list of backdrop thumbnails in the Backdrops pane. To preview each imported image
on the stage, click on the thumbnail. This step will conrm that all the images were
imported and will be displayed properly.
4. Now, let's work with the names of our images. We're going to display the name
of the photo on the stage. On the Looks palee, nd the backdrop name block
and click on it to make the name of the image appear on the stage. The following
screenshot shows the Looks palee and a check mark next to the backdrop name
block. In my example, this adds the words bee hive to the stage.
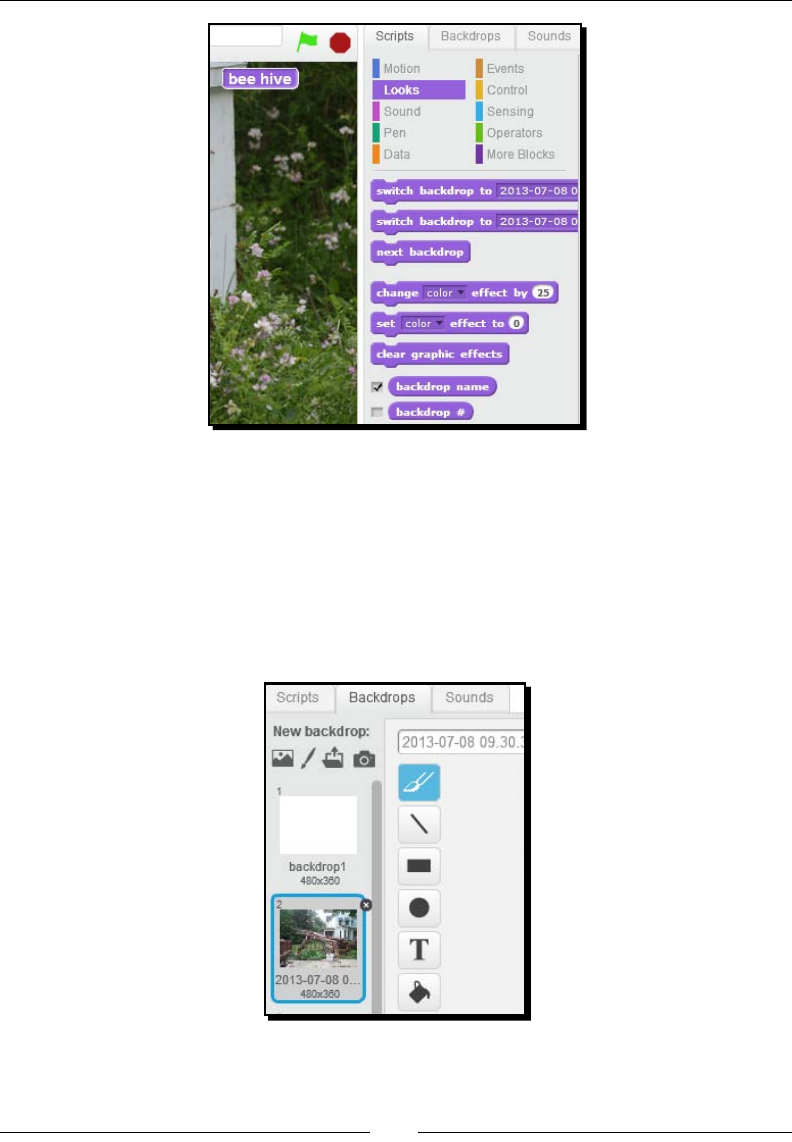
Chapter 5
[ 109 ]
5. When Scratch imports an image, the backdrop name is derived from the le name of
the photo on your computer. In many cases, those le names will be combinaons
of numbers and dates because that's how your digital camera or phone names
them. Fortunately, we can rename the backdrops in Scratch to be something
meaningful. As you click on the backdrop thumbnail on the Backdrops pane, you will
see that the text area in the top-right corner of the image editor contains a name.
The following screenshot shows an example of an imported image. Note that the
name of the backdrop is 2013-07-08 09.30.3.
6. Go through your list of imported backdrops and give them meaningful, human-
friendly names.
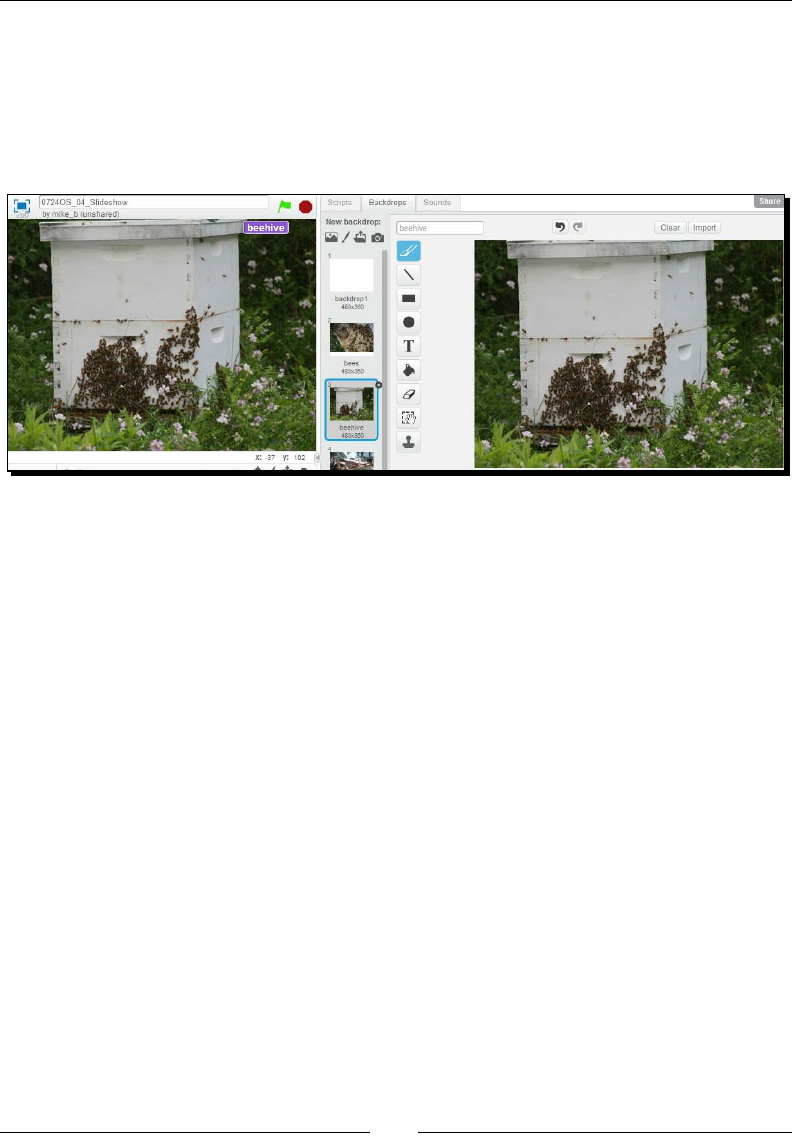
Creang a Mulmedia Slideshow
[ 110 ]
As the following screenshot shows, my project has several photos added, and the default
white stage remains as the rst backdrop. Like a sprite and its costumes, the stage's
backdrops can be edited via the built-in paint editor. The following screenshots show a
backdrop on the stage and in the image editor. Should you choose to, you could use one
of the image eding tools to manipulate the image in some way. We're not going to modify
our imported images, but the opon is there should you need to use it.
The list of backdrops is arranged in the order in which they were added, but backdrops can
be sorted by dragging and dropping the thumbnail around the Backdrops tab. You may want
to manually sort your photos because our slideshow will sequenally move through the
backdrops and the order in which you display them could become part of the story you tell
with your photos.
What just happened?
By imporng photos from our individual computers, we create an extremely personal and
unique project. Scratch also provides a list of backdrops via the Choose backdrop from
library icon, which is the rst icon under the New Backdrop heading.
The backdrop name block is a reporter block in Scratch and is designed to be used as the
value for other blocks. We'll use the backdrop name block in a script later in this chapter.
The previous exercise gives us a quick and easy capon on the stage as long as we give
our backdrops meaningful names. The reporter block can be reposioned on the stage
by dragging it around.

Chapter 5
[ 111 ]
An alternave way to accomplish capons and tles is to edit each backdrop to create the
capons with the text tool. We've chosen the easier route in our project because we're going
to use sound to provide a more detailed explanaon of the images, so a descripon of a
word or two will be sucient.
Adding text directly to the image may appear more polished, but it can be more dicult to
maintain. The changing color of the images, for example, may mean you need to reposion
the text dierently per image or choose a dierent color for the text. And as we've seen in
Chapter 3, Creang an Animated Birthday Card, working with the text tool in our images may
pose problems to actually changing the text aer you save your text.
On the surface, these are not large obstacles and can be overcome. Working in vector mode,
for example, will let us edit the text at any me. Therefore, even though we're relying on the
backdrop's name and the backdrop name block to create a simple capon, it doesn't prevent
you from doing something more elaborate.
Let's briey talk about working with images in Scratch.
Working with images
Working with digital images is a topic worthy of its own book, but Scratch has some built-in
image eding capabilies that we can use, and we've seen some of those limited capabilies
as we created sprites throughout Chapter 3, Creang an Animated Birthday Card. Basically,
we can change colors, draw rectangles and circles, insert lines, type text, duplicate areas, and
resize, reshape, rotate, and ip images. I'll editorialize for a moment and just say that I think
that's an awesome feature set for Scratch to include by default. However, if we want more
advanced eding capabilies, we need a more advanced editor. Examples of third-party
graphics editors include the following:
GIMP: This is an open source, cross-plaorm editor available at
http://www.gimp.org
Adobe Photoshop: This is a sophiscated editor oered by Adobe at
http://www.adobe.com/products/photoshop.html
MS Paint: This comes installed with Microso Windows
Pixelmator: This is a full-featured app for Macs available at
http://www.pixelmator.com
Scratch imports the popular image formats: PNG, BMP, JPG, GIF, and SVG. If you import
an animated GIF, Scratch will import each frame as a backdrop or as a costume if you're
imporng the animaon as a sprite. Animated GIF creates animaons by combining and
cycling through many individual images.

Creang a Mulmedia Slideshow
[ 112 ]
When imporng an SVG (vector) graphic, Scratch imports the le as a vector graphic,
which means its resoluon can be maintained. We introduced vector graphics in
Chapter 3, Creang an Animated Birthday Card.
Resizing images
The stage in Scratch measures 480 pixels wide by 360 pixels high. In graphic design, we list
width rst, so an 800 x 600 image is 800 pixels wide. As we learned in Chapter 3, Creang
an Animated Birthday Card, if we were to look at an image under extreme magnicaon,
we would eventually see individual dots. These dots are pixels and contain all the
informaon the computer needs to display the image on the screen.
Counng pixels becomes important so we can select images that will meet our needs.
If we want an image to take up the enre backdrop, we need an image that is at least
480 x 360 pixels to ensure we have an image of acceptable quality.
The problem with using an image that is less than 480 x 360 pixels is that we need to stretch
or upsize the image in order for it to ll the screen. As we resize an image to a larger size, the
pixels are made bigger, and we will begin to see the individual pixels. This eect creates a
grainy and unclear image, which is oen referred to as a pixelated image.
We don't have to worry about image pixelaon when we resize the image to a smaller size
from a larger size. Whenever possible, start with a larger image and downsize if needed.
I'll state the excepon even at the expense of being obvious. We're working with backdrops
in this case, but we can import images as sprites, too. In either case, we may want the
imported le to be smaller than the stage, and in those cases, you wouldn't necessarily
want to start with a large image.
Using caution while resizing images
The good news is that if we start with an image that is larger than 480 x 360, then we
don't need to resize the image at all. Scratch will resize the image to t within the correct
dimensions automacally. Be aware that anyme you allow a computer program such as
Scratch to resize your images, you run a great risk of being dissased with the results.
Here's an example. One of the backdrops I started with in the previous exercise was 3504
x 2336 pixels. When I inially uploaded the image via Scratch's paint editor, the imported
image was not tall enough, as seen in the following screenshot:
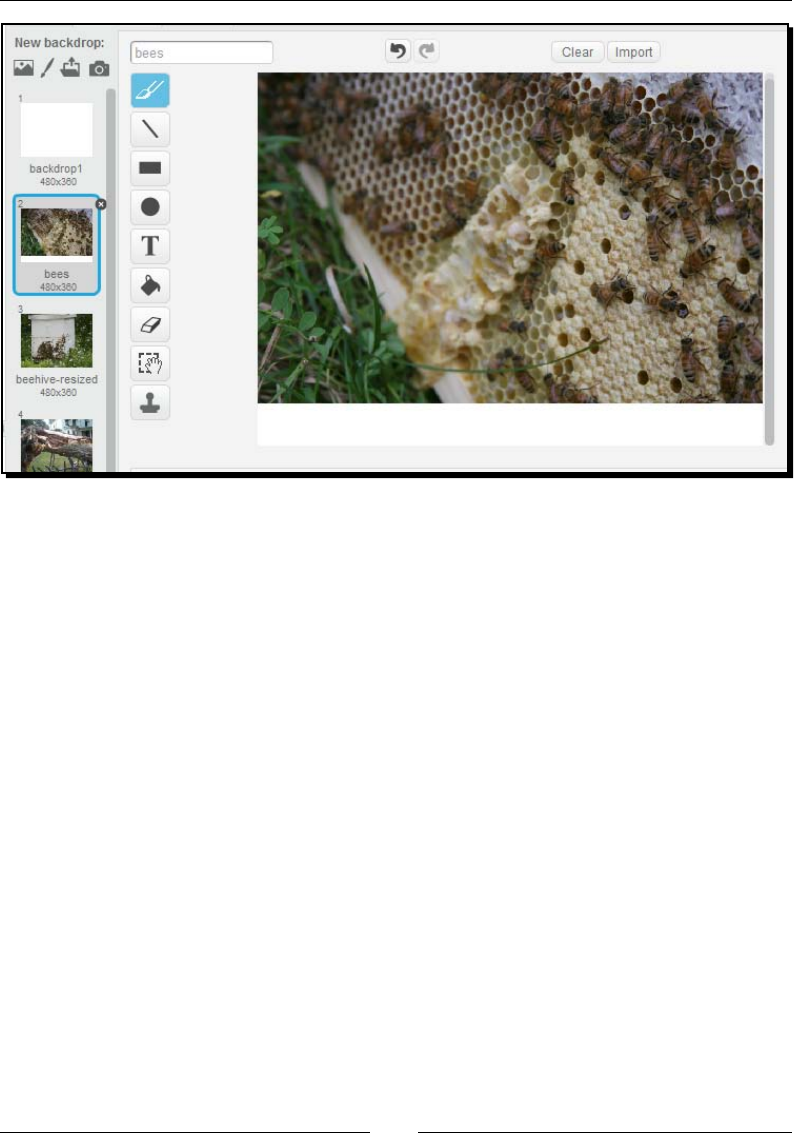
Chapter 5
[ 113 ]
Noce the white space below the image? If you look at the backdrop's thumbnail
(highlighted in the screenshot), you will see that the image dimensions are the
expected 480 x 360. However, my inial image did not have white space at the boom.
Here's what's happening. When Scratch receives a big image, it resizes the width to 480
pixels and scales the height appropriately. If the resized height is less than or equal to 360
pixels, no further processing happens; however, the image editor will create an image that is
360 pixels high by lling in the dierence with white space. If the resized height is too much,
Scratch will crop the boom of the image to make it t.
The technical concept at play here is called aspect rao. We'll cite Wikipedia's denion of
aspect rao as "the proporonal relaonship between its width and its height." The 480 x 360
stage size has a 4:3 aspect rao. We won't go too far down the aspect rao path, but if you
were to scale an image that is 480 x 360 pixels by seng the width to 4 pixels, the height would
proporonally scale to 3. Other common aspect raos are 3:2 and 16:9, but when Scratch
doesn't scale your images as you'd like, the aspect rao of the image may be the reason.
The boom line is that if you want to have absolute control over what your image looks like
when you import it into Scratch, then use a full-featured image eding soware package to
crop the image to the correct size before you import it into Scratch.

Creang a Mulmedia Slideshow
[ 114 ]
Have a go hero – importing an animated GIF or vector graphic
In the Working with images secon of this chapter, I have menoned that animated GIF
and SVG les can be imported into Scratch. These le formats have interesng properes,
as we've discussed. Now it's me to see these properes yourself.
The code les in this book include two publically available images that you can use for this
exercise. One is animated gif example.gif and the other is yellow bird.svg.
Import each of these les as both a backdrop and a costume. I recommend that you open
a new project as this exercise is a bit tangenal to our slideshow project but will prove
informave. Make some observaons about how Scratch is resizing this image based on how
you're trying to use the image in Scratch. The original le size of both sample images is much
smaller than the Scratch stage.
The example animaon in the book is courtesy of the Animated Gifs: Fleischer's Bubbles
(1922) series by The Public Domain Review website at http://publicdomainreview.
org/2013/09/24/animated-gifs-fleischers-bubbles-1922.
The example yellow bird.svg le was obtained courtesy of the openclipart website at
http://www.openclipart.org/detail/190937/yellow-googley-eye-bird-by-
ruthirsty-190937.
Adding slideshow controls to display images
Let's get back to our slideshow. Now that we have our photos imported into Scratch,
we need to add a way to click forward and backward through the photos. We'll accomplish
this by using one of the arrow sprites included in Scratch's sprite library.
Time for action – ipping through the photos
The Scratch sprite library contains a couple of sample arrows that we can use. However, you
may decide to paint your own arrows or import other images. Just keep in mind that we
need a le and right arrow.
1. Let's add the arrow2 sprite from the Things folder in Scratch's sprite library. You can
nd the sprite by clicking on the Choose sprite from library in the Sprites pane. This
sprite points to the right by default, but there's a costume that points to the le,
which we'll use in the next step.
2. Let's get an arrow that points to the le into the project. Repeat step 1 and add
a second copy of arrow2. Click on the Costumes tab and select the costume that
points to the le. This will give us le and right arrows on the Scratch stage.
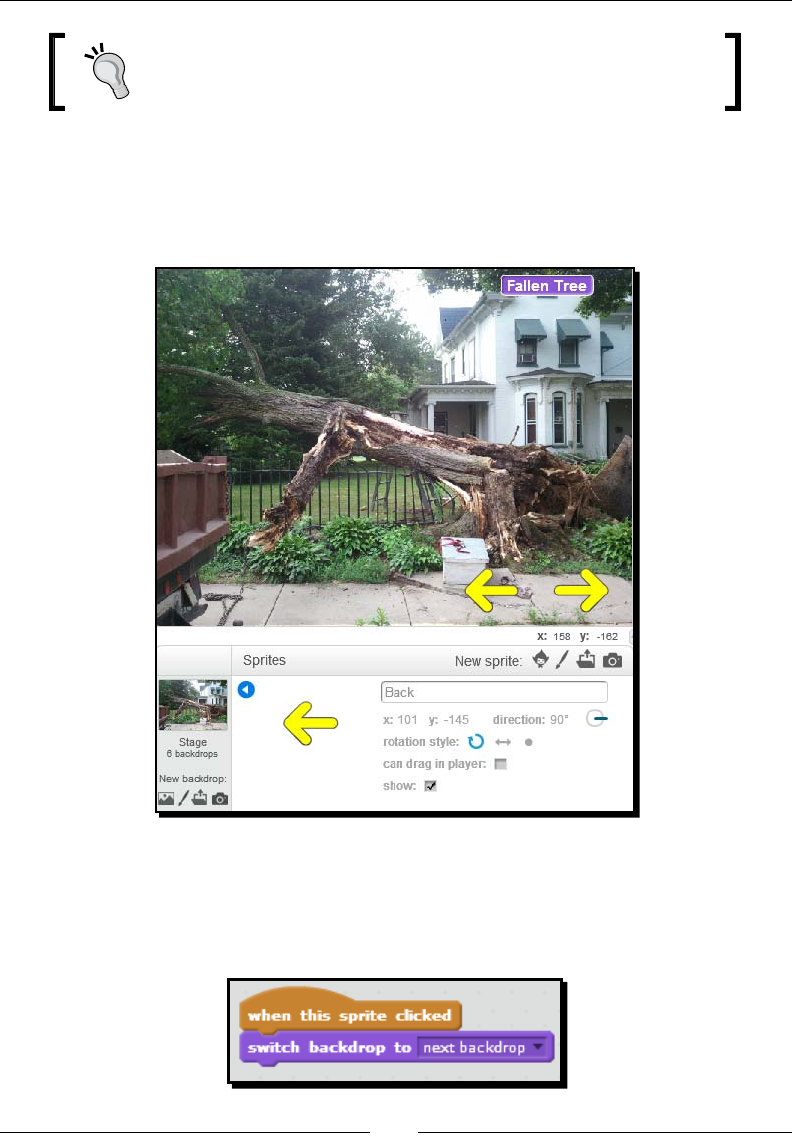
Chapter 5
[ 115 ]
If the default color of the arrows blends in with your images, you may
want to use the image editor and use the color a shape tool to change
the color of the arrow.
3. Posion the arrows in the boom-right corner of the screen.
4. To help keep the arrows straight, rename the le-facing arrow to Back and the
right-facing arrow to Next. Rename the sprite by clicking on the i icon on the
sprite to display the sprite info pane, as seen in the following screenshot:
5. Let's build the script for the Next arrow rst. From the Events palee, add the
when this sprite clicked block.
6. From the Looks palee, add the switch backdrop to () block and select next
backdrop from the drop-down list of values.

Creang a Mulmedia Slideshow
[ 116 ]
7. Now, create the same script for the Back arrow, but select previous backdrop for
the value of the switch backdrop to () block.
What just happened?
The scripts we just created for the arrows use the switch backdrop to () block, which is a new
Scratch 2.0 block. This simple block has some big ramicaons for working with backdrops.
In our script, we used the next backdrop and previous backdrop values to sequenally move
through the backdrops. All backdrops have a number, so if we're currently viewing backdrop
number 3, then clicking on the Next arrow will display backdrop number 4. And if we're
viewing number 4, clicking back will display backdrop number 3.
The switch backdrop to () block also contains a list of all the backdrops in the project,
allowing us to select a specic backdrop.
Related backdrop blocks
We've used a couple of the backdrop blocks in our script so far. However, there are several
backdrop blocks available to us, as listed in the following table. Some backdrop blocks are
only available to the stage.
Block name Location palette Description Example uses
switch backdrop
to ()
Looks This changes the
backdrop on the stage
to the one specified.
Available attributes are
the next background, the
previous backdrop, and
the name of each stage
backdrop.
Can be used to switch
the backdrop in a variety
of contexts, including
creating levels in a game
or setting a starting
screen.
switch backdrop
to () and wait
Looks (stage only) Selects the specified
backdrop. This block
works in conjunction
with the when backdrop
switches to () block by
waiting for any scripts
that start with the when
backdrop switches to
() block to finish before
continuing. Only available
to the stage.
Can be used in the same
situations as the switch
backdrop to () block.

Chapter 5
[ 117 ]
Block name Location palette Description Example uses
backdrop name Looks Each backdrop has a
name. This block allows
you to use the name as
a value for other blocks
and passes the current
backdrop's name into the
blocks. It's also a reporter
block, which means you
can show the current
backdrop name on the
stage by clicking on the
checkbox next to the
block.
Used when you need
to create a script based
on a specific backdrop,
such as playing a sound
or checking for a game
level.
backdrop
number
Looks A backdrop also has a
number to indicate its
relative position within
the list of backdrops for
the stage. The backdrop
number block can be
used to display the
number of the current
background on the stage
or as the value for other
blocks. It is only available
to the stage.
Similar to the backdrop
name block.
next backdrop Looks Go to the next backdrop
in the list.
Can be used to create
photo slideshows or
animations including
stop animations.
when backdrop
switches to ()
Events Runs the script when
the specified backdrop is
displayed. The attributes
are a list of all backdrops.
Allows a sprite to
run a script based on
switching to the specified
backdrop.
Plays a sound based
on the backdrop. Runs
a script based on a
backdrop.
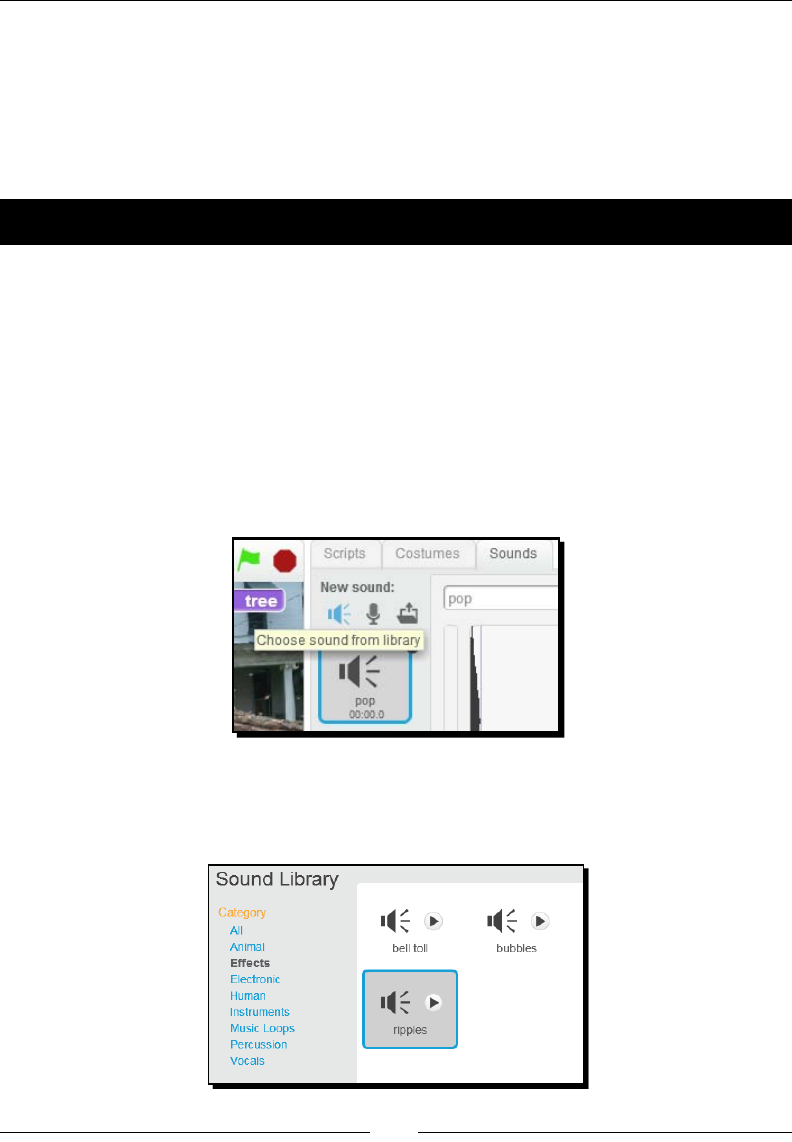
Creang a Mulmedia Slideshow
[ 118 ]
Playing and recording sounds
Scratch provides both a library of sounds that we can incorporate into our project and
a way to record our own sounds. We'll start o with a quick exercise to play a sound
when we click on the Next arrow. Then, we'll explore Scratch's built-in sound recorder
to narrate our images.
Time for action – adding a sound from Scratch's library
At the moment, we have a script that shows the next background when the user clicks on
the Next arrow. Let's create a sound eect to signal the next slide:
1. Select the Next sprite and add a play sound () block from the Sound palee to the
script that starts with when this sprite clicked.
2. You'll noce that the play sound () block uses a default pop sound. If you click on the
Next arrow, you'll hear the sound play as the next image loads.
3. Let's choose a new sound from Scratch's library. Click on the Sounds tab in the
project editor to display a list of sounds associated with the sprite. Then, click on
the Choose sound from library icon. Look at the following screenshot for reference:
4. The Sound Library window will open and display a list of sound categories on the
le-hand side. Select Eects and then select the ripples sound. Click on OK to add it
to the Sounds tab.
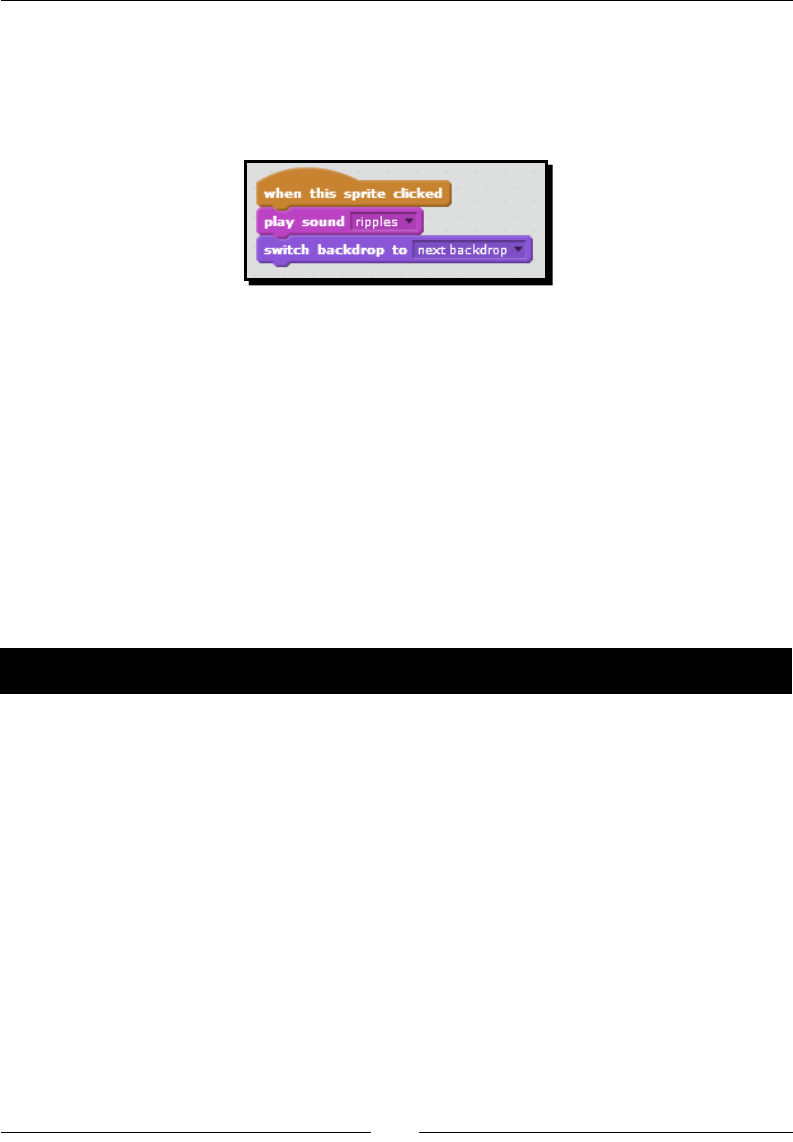
Chapter 5
[ 119 ]
5. Click on the Scripts tab.
6. Select ripples from the play sound (pop) block.
7. Test the script by clicking on the Next arrow. Your revised script should look as
shown in the following script screenshot:
What just happened?
When our user clicks on the Next arrow to change the image, the ripples will signal the
image change. Note that when you click on the Back arrow, there is no sound. Of course,
we can add other sounds to the script, but the crical step is to add them to the sound tab
rst. Just as sprites and backgrounds, Scratch includes a library of sounds that are freely
available for use in our projects.
The sounds are assigned to the sprites. So, if you look under the play sound () block for the
Back arrow, for example, you'll noce the ripples sound is not available.
Next, we'll use the more advanced sound features in Scratch and record our own sound for
use in the project.
Time for action – recording sounds in the sound editor
We're going to complete our slideshow by recording some audio to describe each backdrop.
This gives our users a richer experience and might be comparable to what you'd experience
if you were ever to take a self-guided walking tour.
For the purposes of this exercise, think about a two- or three-sentence descripon for one of
your images. Our basic task will be to add a sprite that will play the correct audio when we
click on it. Let's walk through the steps:
1. Sounds are associated with a sprite or the stage, so let's add a sprite that can be
used to play the audio we will record. Import Microphone from the Things category
in the Sprite Library.
2. Now select the microphone sprite so that we can record our audio. To record
new audio, click on the microphone icon in the Sounds tab. A new sound called
recording1 is added and selected.
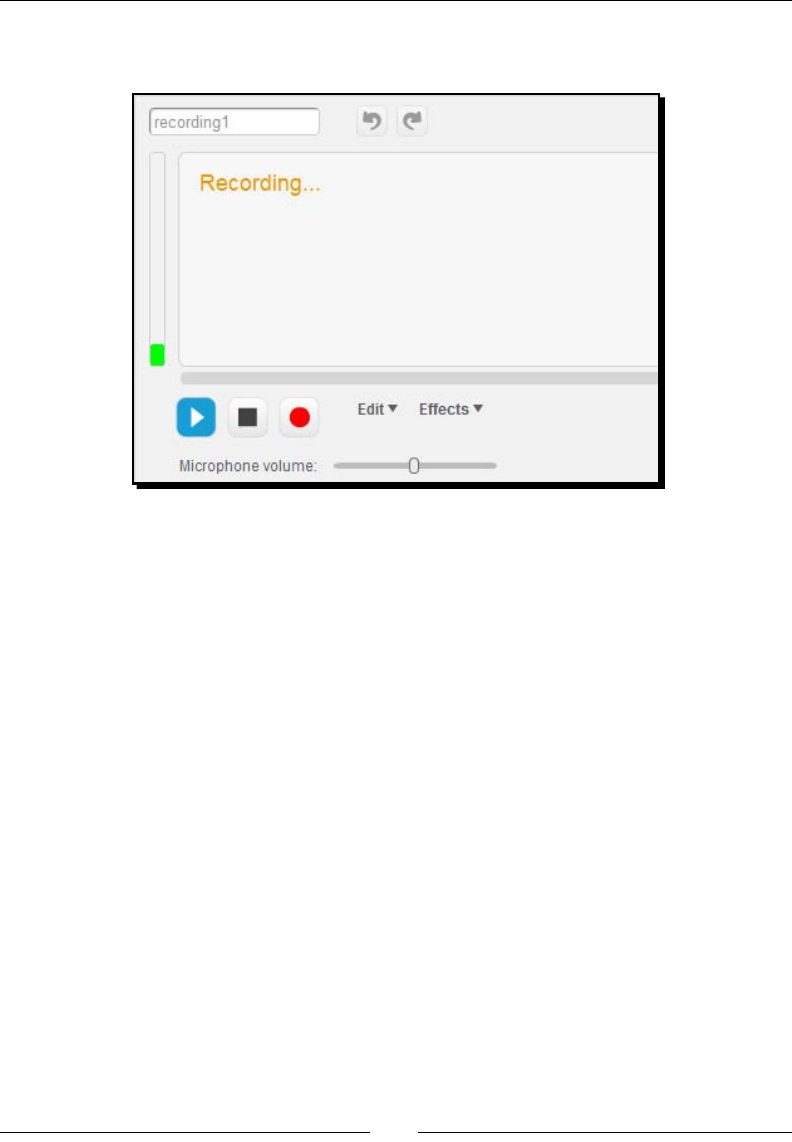
Creang a Mulmedia Slideshow
[ 120 ]
3. Click on the circle icon in the sound recorder to start recording. It is the icon to the
le of the Edit menu and is shown in the following screenshot:
4. When you are nished, click on the square buon to stop recording. In the previous
screenshot, that's the icon to the le of the record (circle) buon.
5. To hear the sound, click on the play buon.
6. In order to make our scripng easier and relevant to this project, rename recording1
to be the name of the image. For example, I made a recording for an image named
Inside bee tree, so that will be the name for my recording.
7. Now let's write a script that plays our recording when the microphone is clicked.
With the microphone sprite selected, click on the Scripts tab.
8. From the Events palee, add a when this sprite clicked block. Then, aach a
broadcast block.
9. From the Looks palee, drag the backdrop name reporter block into the value of
the broadcast block.
10. Now we need to act on the broadcast. Sll working with the microphone sprite,
add the when I receive block to the Scripts area. Create a new message that
corresponds to the name of the backdrop name. In my example, that name is Inside
bee tree. Your names will likely be dierent, but recognize the relaonship we're
creang here. The name of the backdrop matches the name of the recording.
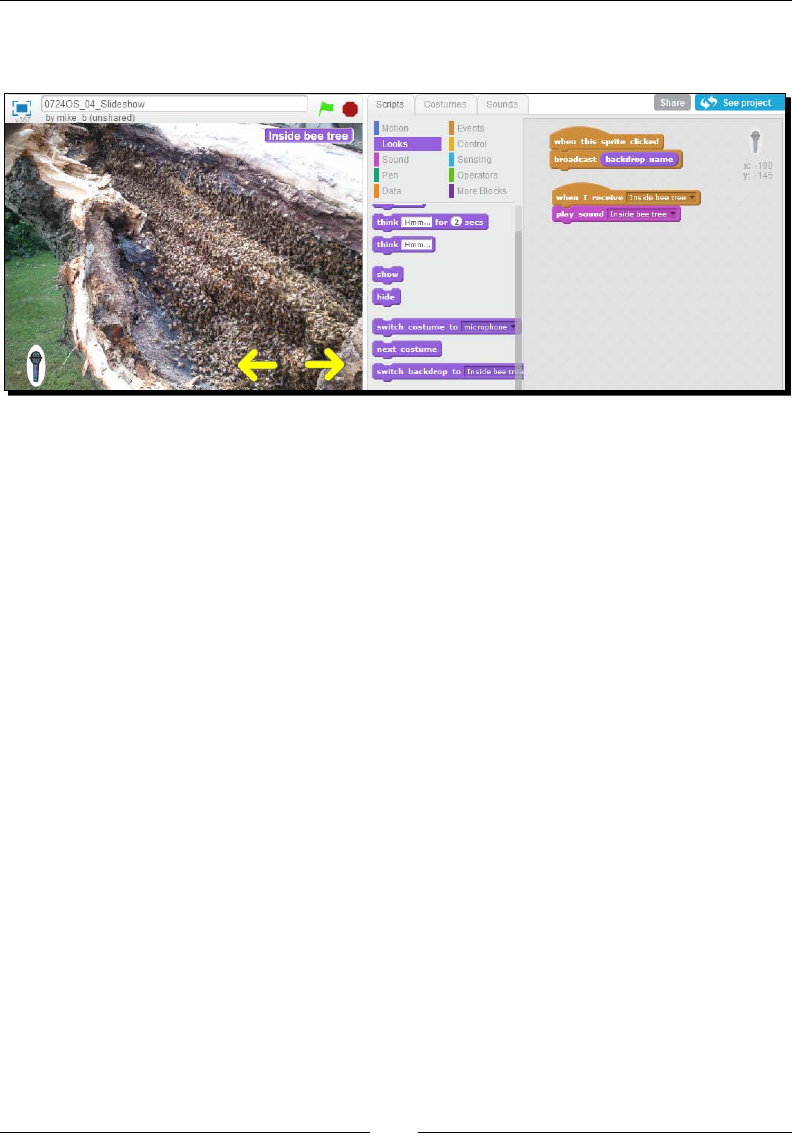
Chapter 5
[ 121 ]
11. Finish the script by adding the play sound block from the Sounds palee. Select the
recording you just made from the drop-down list of values.
Give it a try. Click through each image in the slideshow and try clicking on the microphone.
If you've succeeded, the recording should only play for one image because that's all we've
programmed so far.
If you're encountering problems, double check the spelling of the image name, recording
name, and broadcast name. Typos will cause this script to fail.
Want to add a second recording? All you need to is to make a new recording, duplicate the
when I receive script block, and then change the broadcast and sound values accordingly.
What just happened?
We have a lot to cover here, but let's start with the basics. By using Scratch's built-in sound
recorder, we were able to narrate an image name. The key to this script is the use of the
backdrop name reporter block as a value in the broadcast block.
Earlier in the chapter, we introduced the backdrop name block as a reporter block that
always knew the name of the current backdrop. By adding the backdrop name reporter
block as the value of the broadcast () block, we have created an easier way to broadcast
Inside bee tree based on my example in the exercise. This two-block script will work
regardless of the backdrop that is currently displayed.
We do have to create a separate when I receive () script for each backdrop we want to narrate.
The new broadcast message should match the name of the backdrop you want to play a sound
for. Of course, you'll need to record the addional recordings for use in the script.
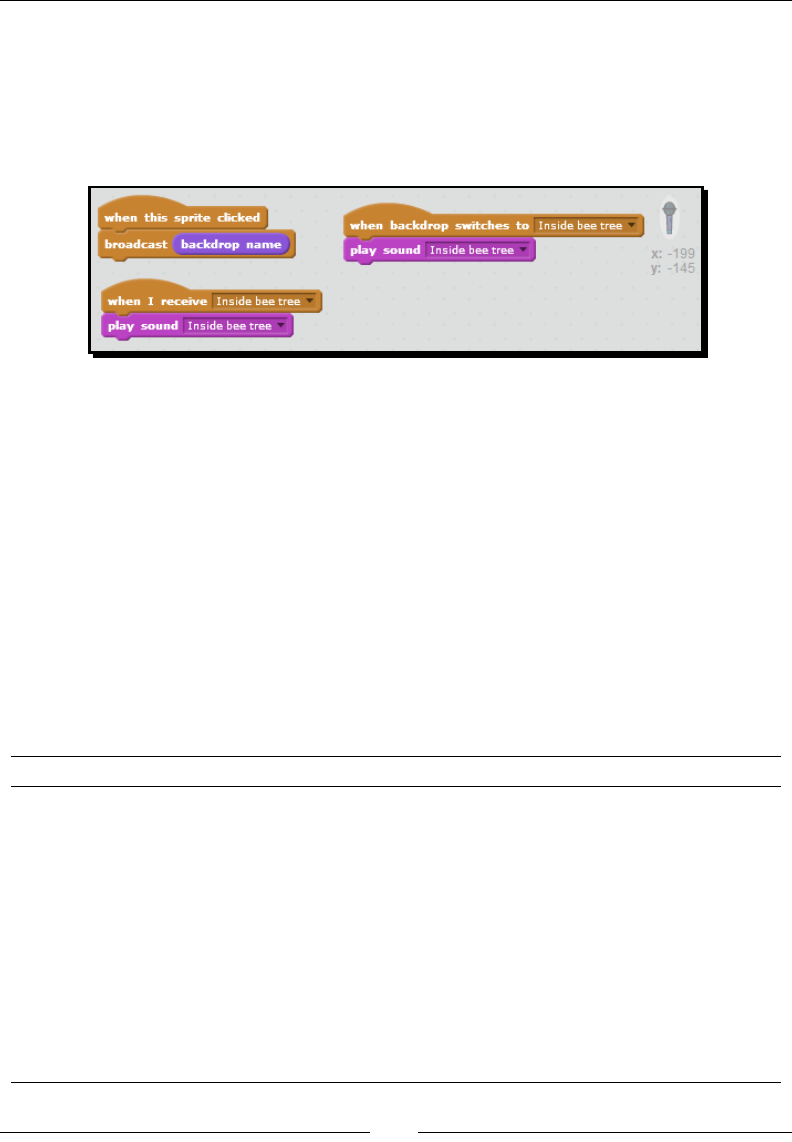
Creang a Mulmedia Slideshow
[ 122 ]
By using thoughul naming convenons instead of computer generated defaults, we have
a way to keep the backdrop name, recording name, and broadcast name in sync. This will
reduce confusion when it's me to manage and troubleshoot our scripts.
Let's take a moment to reect on a possible variaon. Consider the scripts shown in the
following screenshot:
The two stacks of blocks on the le are the scripts we built in the previous exercise.
The two block script on the right also plays a sound based on the backdrop. We didn't
build that one, but it's listed here for discussion purposes.
The crical dierence in the scripts shown in the screenshot is when the sound plays.
Our script enables the user to play the sound on demand. The simpler script will play
automacally when the backdrop loads. The user has no say in the decision. However,
the script on the right can be used to play an introductory sound when the backdrop loads.
We chose to play a generic sound to transion the image, but this discussion introduces an
alternave approach.
Understanding sound related blocks
Scratch provides the following blocks for playing sounds:
Block Palette location Description Uses
play sound Sounds Plays the specified sound. The
available attributes are the
sounds associated with the sprite
or background.
Sound is a generic
term that may mean
a sound effect, a
recording sound, or an
imported music file.
play sound
until done
Sounds Similar to the play sound
block, except the script doesn't
continue until the sound is
finished.
Similar to the play
sound block.
stop all
sounds
Sounds Stops any sound that is currently
playing.
Stops playing sound
when a level or
background changes.
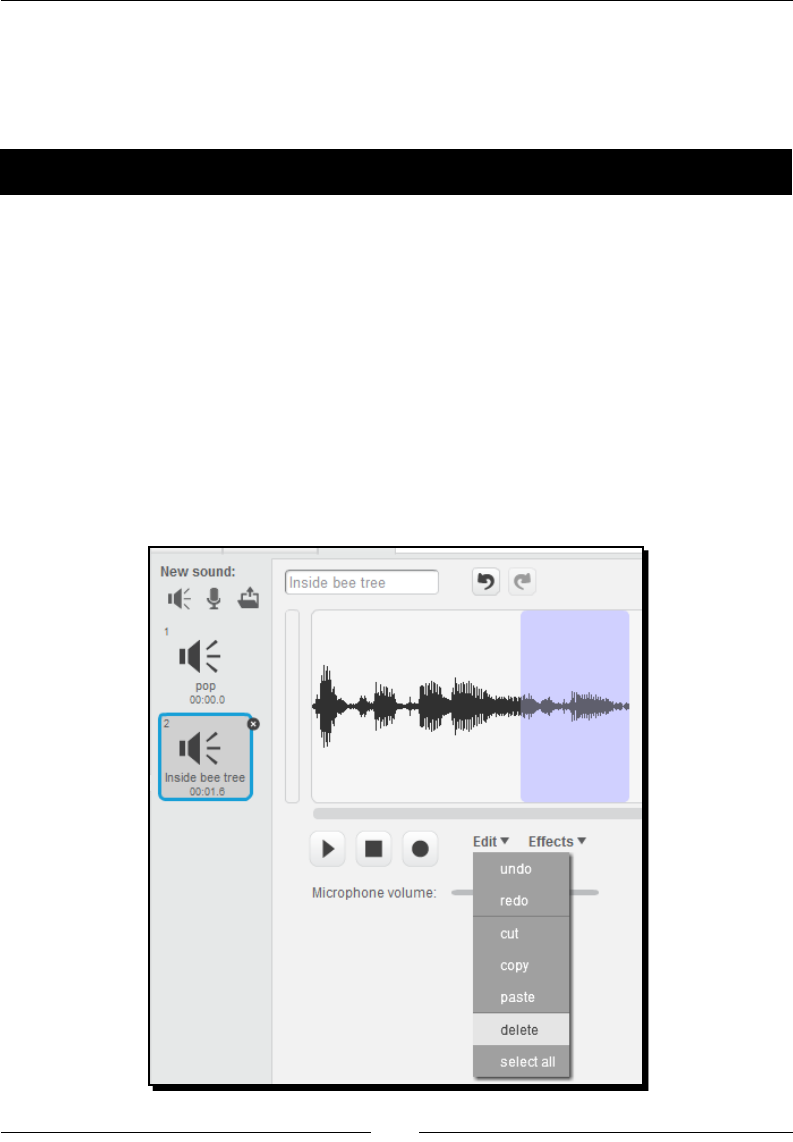
Chapter 5
[ 123 ]
Editing sounds
The sound editor includes several advanced but easy-to-use opons for working with sounds,
including copy, paste, and delete.
Time for action – editing a recorded sound
We're going to delete a secon of the sound we recorded in the previous exercise. For
example, if you recorded a bunch of dead air at the beginning or end, you can use the
following exercise to delete it:
1. In the Sounds tab, click on your recorded sound to open the sound in the editor.
2. In the sound editor, highlight the area in the sound recorder that you want to delete
by clicking and holding the mouse and then dragging the mouse to select the sound
you want to remove.
3. Before you delete the selecon you can listen to it by clicking on the play buon in
the editor.
4. From the Edit menu, select Delete. The following screenshot illustrates the process
of deleng a secon of a sound:
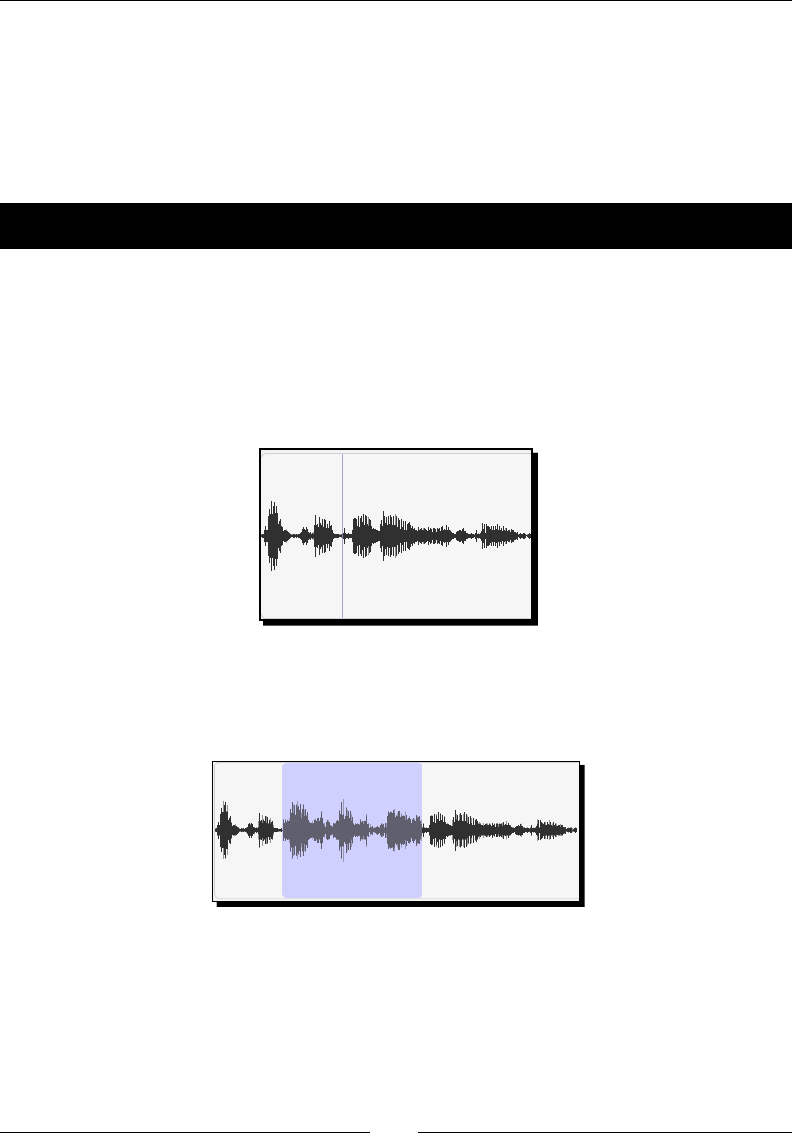
Creang a Mulmedia Slideshow
[ 124 ]
What just happened?
Deleng a secon of your recording may be useful, say to trim dead space at the beginning
or end of a recording. You can also delete those pesky ums and uhs.
As you can see in the Edit menu, there are several other basic eding opons available to us:
cut, copy, paste, delete, and select all.
Time for action – appending a sound
Aer you listen to a recording, you may realize that you have more to say about it. Let's
connue working with our recorded sound:
1. Click on the recording at the point where you want to insert a new sound.
The vercal line in the following screenshot shows where the new sound will
be added. Note that the screenshot shows that it's possible to add a new
recording in the middle of an exisng sound.
2. Then, click on the record buon and speak.
3. When you're nished, click on the stop buon. The newly recorded secon will be
highlighted when you click on the stop buon, as seen in the following screenshot:
4. To preview the new recording, click on the play buon. You can keep deleng and
recording unl you're sased with the results.
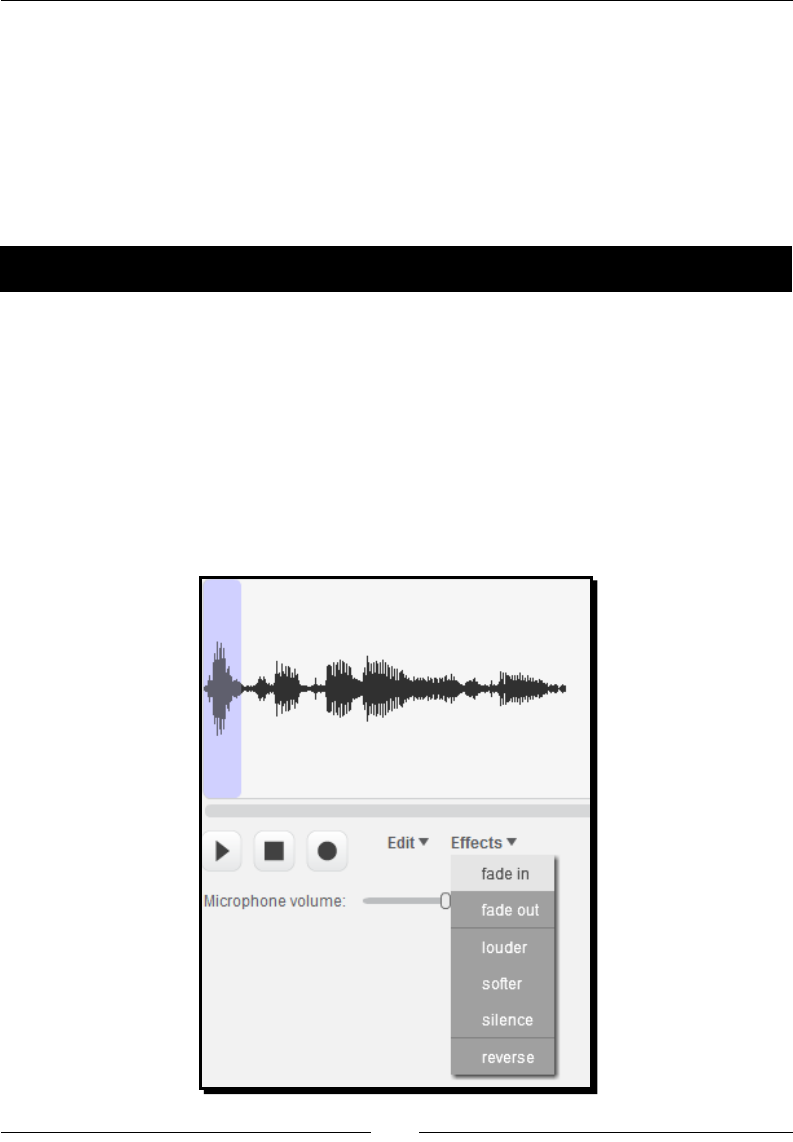
Chapter 5
[ 125 ]
What just happened?
I nd that the hardest thing about recording is actually geng all the words out in a way that
makes sense. We've seen how easy it is to record, delete, and edit a sound. As the examples
demonstrate, we can edit at the beginning or end or at any point in between.
In our slideshow project, we've been narrang a descripon of each slide, but we could just
as easily record our own sound eects or music.
Time for action – adding sound effects to recordings
Aer we record our sound, and it's just the way we want it, we can use the sound editor to
add eects.
1. Highlight the secon of the recording to which you want to apply an eect.
2. Then select an eect from the Eects menu to apply it. For example, we could select
the fade in eect to make the sound start out quietly and gradually get louder.
3. You can expand or reduce the selecon by clicking and dragging the edge of the
selected sound.
The following screenshot shows the list of eects:

Creang a Mulmedia Slideshow
[ 126 ]
What just happened?
The sound editor includes a list of eects that can be applied to any sound, such as fade in,
fade out, louder, soer, silence, and reverse.
Reviewing available sound effects
The following table provides an example usage for each eect:
Effect Use
fade in This effect starts the audio quietly and gradually
increases the volume.
fade out This effect starts the audio at a normal volume
and gradually decreases the volume until it's
quiet.
louder This effect increases the volume.
softer This effect decreases the volume of the selection.
silence This effect silences the audio selection.
reverse This effect takes the selection and reverses the
order with which it is played, which is a good way
to create gibberish.
Have a go hero – narrating additional images
Take a moment to record a narraon for at least one of the other images in your slideshow
and update your scripts to play the narraon at the appropriate me. You can also
experiment by adding addional sounds based on the backdrop.
Using x and y coordinates to nd the position of the
mouse's pointer
At this point, our slideshow is full of engaging images and has a rich user experience.
We could stop here, but we're going to add one more wrinkle to our show by making the
arrows hide and show based on the posion of the mouse cursor. We'll build these scripts
block by block, so even if the x and y coordinate system is a new concept for you, you'll sll
have a ready-made example to explore the concept some more.
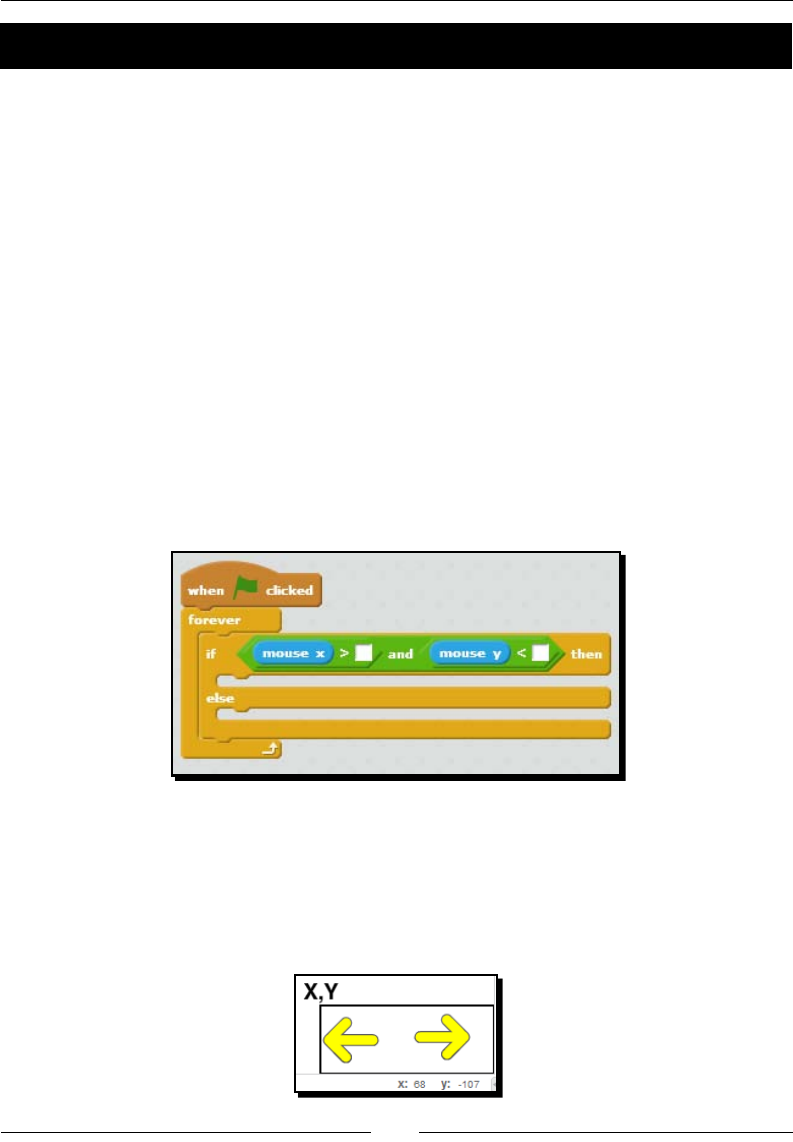
Chapter 5
[ 127 ]
Time for action – using mouse location to hide arrows
This exercise will add a lile bit of glitz to our project, but there's also a funconal reason
behind our wanng to build this interface. The arrows obstruct a part of our backdrop.
Hiding the arrows shows more of the backdrop.
1. To determine when we show or hide the arrows, we need to connually check the
posion of the mouse. Let's start building the script to do this on the Next arrow
sprite. Start the script with the when ag clicked block. Aach a forever block.
2. Inside the forever block, add the if () then, else block from the Control palee.
3. The if () then, else block checks to see if a condion is true. To determine when to
show the arrows, we're going to check the x and y posion of the mouse. We'll start
by adding the () and () block from the Operators palee to the value of if () then,
else to accommodate a check for both x and y posions.
4. In the le value of the () and () block, add the is greater than (>) block, and then add
the is less than (<) block to the value on the right hand side of the () and () block.
5. From the Sensing palee, drag the mouse x block to the is greater than (>) block
and the mouse y block the is less than (<) block. The following screenshot shows
our script so far:
6. Next, we need to replace the empty values of the is greater than (>) and is less
than (<) blocks. To do that, we need to determine the x and y coordinates that will
appropriately show the sprites. Consider the following screenshot that shows my
Next and Back arrows with a rectangle around them. If the mouse moves into the
rectangle area (the hot zone), as shown in the following screenshot, we will want
to display the arrows:
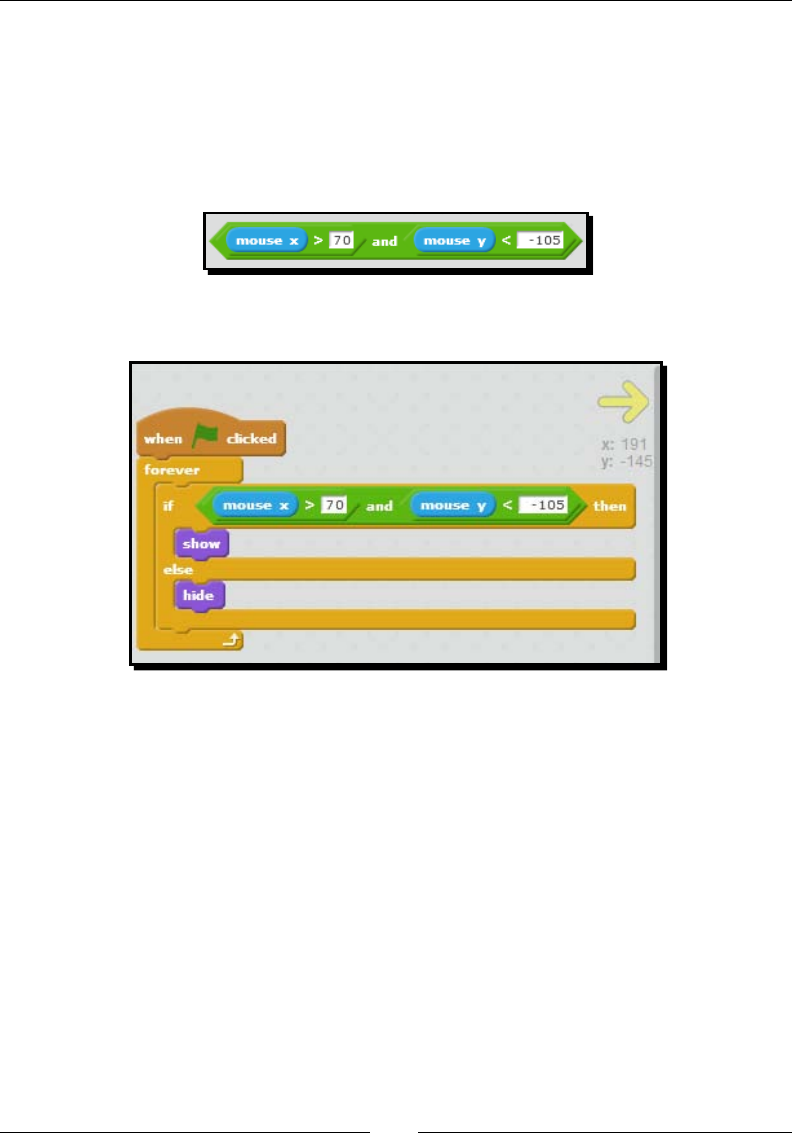
Creang a Mulmedia Slideshow
[ 128 ]
7. As you move your mouse cursor to the right, the x value gets bigger. As you move
the mouse towards the boom of the stage, the y value gets smaller. The x and y
coordinates of the mouse can be seen in the following screenshot. These values
represent the mouse locaon, which is approximately where the x and y annotaon
occurs in the previous screenshot. I'm going to round my values o a bit, and enter
70 in the mouse x > () block script and -105 in the mouse y < () block script. The
following screenshot shows the evaluaon:
8. Let's nish our script by adding the show block to the if part of our block and the
hide block to the else part. Our enre script is shown in the following screenshot:
9. Give the script a try by clicking on the green ag and moving your mouse cursor
around the screen. If the script behaves as you expect, you can duplicate it and
move it to the Back arrow sprite.
What just happened?
We created a script to show the Next and Back arrows depending on the mouse locaon.
We oen see this eect on the web, such as while playing or pausing YouTube videos where
the video controls are hidden unl you mouse over the boom of the video. The controls are
visible when you posion your mouse cursor along the boom of the video. You may wonder
how other users will know they need to move their mouse into the corner to display the
arrow. We'll address that problem in our next exercise. By using the () and () block, our script
was able to check both the x and y posions of the mouse cursor. Only when both condions
were true did we show the arrows. While we purposely chose to use the coordinates, our
values were somewhat subjecve in that we can make a larger or smaller hot zone on the
stage by altering the coordinates.
Chapter 5
[ 129 ]
If x and y coordinates are a new math concept for you, you just need to know that each
locaon on the Scratch stage is represented by two numbers. The x coordinate idenes
the horizontal (le/right) posion on the stage while the y coordinate idenes the vercal
(up/down) posion on the stage.
If you're following my example closely, you'll realize that if you move your mouse below and
to the right of the stage, the arrows are sll visible. That's because the script we created only
dened the top and le edges of the hot zone, leaving it an open-ended hot zone.
The stage, however, does have denite boundaries and coordinates. If you move the
mouse cursor beyond the boundary of the stage to the boom-right corner of the project
editor, the reported values never show higher than 240 (value of x) and -180 (value of y).
When a user views the project page, this might happen if the user lets the mouse wander
below the stage.
Have a go hero – redening the hot zone
As we've discussed, if the user moves the mouse outside our hot zone, the arrows hide as
long as the mouse cursor stays above and to the le of the Next and Back arrows. If the user
moves the mouse below the arrows or to the right of the arrows and outside the stage, then
the arrows will sll be displayed.
Can you constrain the arrows' hot zone to ensure the arrows are only displayed if the mouse
is within the boundary of the stage? You can, and to do this, you'll need to update the arrow
scripts to evaluate a second set of x and y values by modifying this block: if ((mouse x) > (70)
and (mouse y) < (-105)).
Hints
Add more () and () blocks to the value in the if () then else block to
check whether the mouse is within the stage boundary. The following
expressions check whether the mouse is within the stage boundary:
mouse x posion < 240
mouse y posion is > -180
The project les included with the book include a working example of this soluon for the
Next sprite.
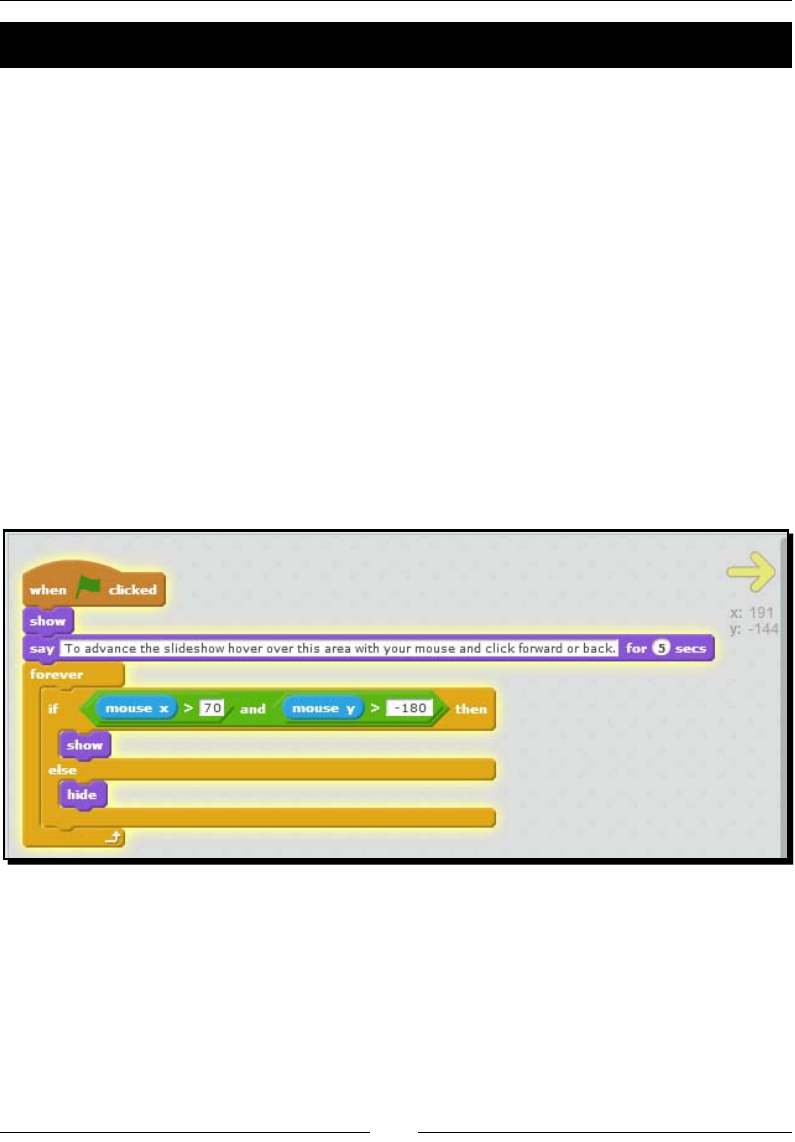
Creang a Mulmedia Slideshow
[ 130 ]
Time for action – providing user instructions
Based on our current scripts, it's possible for our slideshow to start with no Back or Next
arrows on the screen because their display is determined by the locaon of the mouse
cursor. That could be confusing to a user. Let's revise our script to provide some user
instrucon at the start of the project. Select one of the arrows and add a show block
to the when ag clicked block.
1. From the Looks palee, add a say for () secs block aer the show block.
2. For the text value of the say block, type an instrucon to the user
(for example, To advance the slideshow hover over this area.).
3. Increase the me value in the say for (2) secs to 5.
4. Now select the other arrow sprite and add a show block aer the when ag
clicked block.
5. This me, add a wait (2) secs block aer the show block. Change the value to 5.
6. Give the script a go by clicking on the green ag.
The following screenshots shows our revised arrow script:
What just happened?
We updated the script for each arrow so that the next and back controls are always visible
for at least ve seconds when a user starts the project. Both the arrow sprites used the show
block to always display the arrows. Then we created some user instrucons using the say ()
for () secs block.
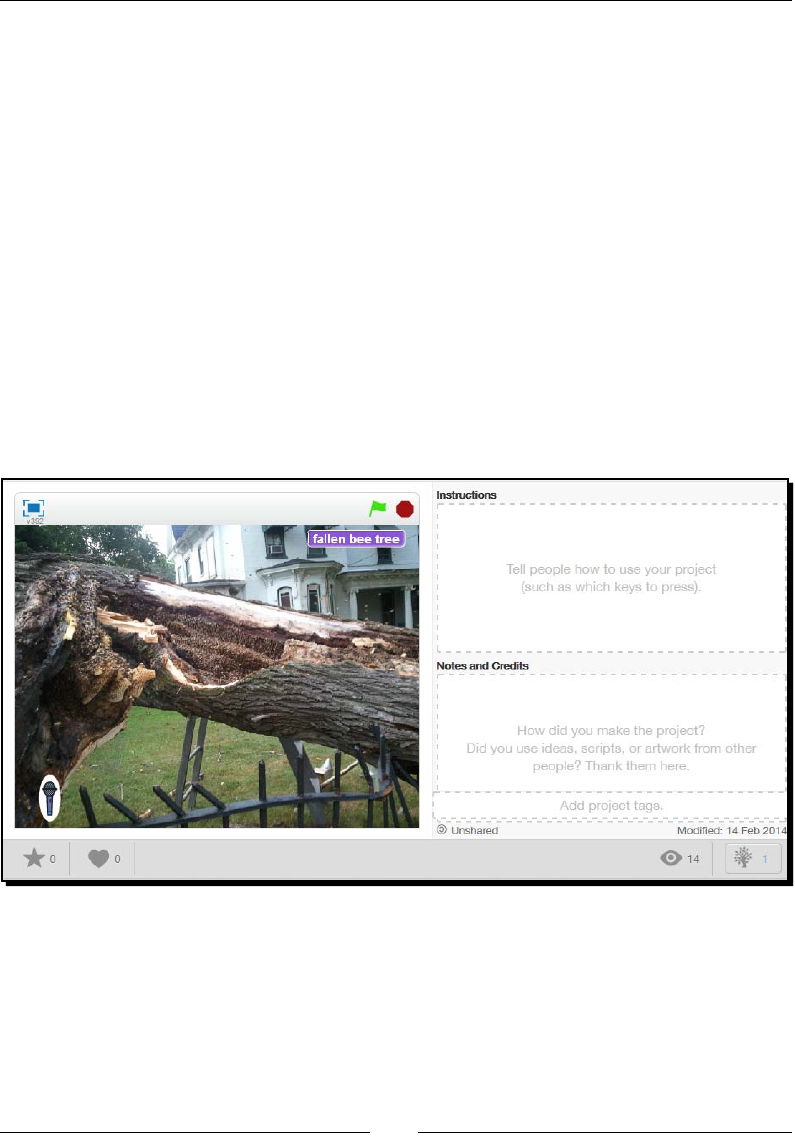
Chapter 5
[ 131 ]
Aer the say () for () secs block, we go straight to the part of the script that shows/hides
the arrows based on where the mouse cursor is posioned. We want the instrucon to be
displayed for a reasonable amount of me so that our user can read it. The say () for () secs
block gave us a way to control the ming of our script. Because the block has a seconds
value, the message will stay on the screen for the specied me. No other blocks in the
script will run as long as the message is displayed on the screen. We solved two problems
with one block—user instrucon and ming.
When we updated the other arrow sprite, we used the wait () secs block in place of the
say () for () secs block. That's because we don't need both arrows to give instrucons,
but we do want both arrows to stay on the screen for ve seconds.
Displaying a project in presentation mode
Up to this point, we've been viewing our projects in the project editor with the block palee
and script areas visible. When our users view the slideshow, they sll have a small viewing
area, as seen in the following screenshot:
However, Scratch has a way for us to view projects in fullscreen mode.
Creang a Mulmedia Slideshow
[ 132 ]
Time for action – presenting a fullscreen slideshow
Let's check out Scratch's fullscreen presentaon mode:
1. The buon to enter presentaon mode is located in the top-le corner of the
project editor. It's the blue square to the le of the project name and below the
menus and is shown in the following screenshot:
2. Check out your slideshow by clicking on the blue square.
3. When you've nished viewing the project in fullscreen mode, press the Esc
key on your keyboard to return to the Scratch interface. You can also click on
the blue square to exit fullscreen mode.
What just happened?
Presentaon mode allows us to run our projects using a larger viewing area with less screen
cluer. And some projects, such as the slideshow we're creang, would look really good
displayed in fullscreen mode on our television or large monitor.
Have a go hero – personalizing the slideshow with graphic effects
Right now, we have a funconing slideshow complete with narraon. Before you set the
family down for a private screening, consider enhancing the transions between slides with
some graphical eects. We covered graphical eects in Chapter 3, Creang an Animated
Birthday Card.

Chapter 5
[ 133 ]
Pop quiz – reviewing the chapter's concepts
Q1. How big is Scratch's stage?
1. 360 x 480.
2. 480 x 360.
3. 420 x 320.
Q2. Aer a sound is added to the project, it is available to all sprites via blocks,
such as play sound ().
1. True.
2. False.
Q3. What block gives us the name of the current backdrop?
1. next backdrop.
2. backdrop name.
3. previous backdrop.
4. backdrop #.
Q4. How would you know where the mouse is located on the screen?
1. The mouse has an x coordinate accessible via the mouse y block.
2. The mouse has an y coordinate accessible via the mouse x block.
3. The mouse has x and y coordinates accessible via the mouse x and mouse y blocks.
4. You can see the mouse pointer on the screen.
Q5. Which of the following image formats does Scratch support?
1. PNG.
2. GIF.
3. JPG.
4. All of the above.

Creang a Mulmedia Slideshow
[ 134 ]
Summary
How great is Scratch! Not only does it give us an engaging programming environment, it also
gives us a whole suite of tools to personalize our projects. In this chapter, the slideshow we
created used our personal images. With the click of a buon, we brought the images to life
with our own recorded voices and with sounds from Scratch's included sound library. And
with a lile creave programming using the broadcast block, we were able to synchronize
the backdrops with a specic sound. We ended the chapter with the slightly more advanced
concept of using the x and y coordinate system to locate the mouse and used this as a way to
show or hide navigaon controls.
Our project used personal photos. However, what we really created was a project that can be
remixed into a presentaon on any topic: science, favorite Scratch authors, birds found in the
backyard, and the list goes on.
In the next chapter, we're going to remix the classic Pong game with the game of Breakout
so we can smash some bricks. We'll introduce variables, condional statements, and cloning.
Cloning is a new Scratch 2.0 feature that allows us to duplicate a sprite and all its associated
scripts, costumes, and properes.
6
Making an Arcade Game – Breakout
(Part I)
If you spend any time with Scratch, you will encounter a Pong project. In
this chapter, we're going to remix that classic arcade game to create our
own version of the game Breakout. In Breakout, the player breaks through
multiple layers of bricks by hitting a bouncing ball. In this chapter, we'll lay the
foundation of the game while in the next chapter we'll make the game more
challenging.
In this chapter, we will:
Upload a Pong starter project that we will customize
Use cloning to create exact duplicates of the sprites that can be individually
controlled
Find and calculate the sprite direcon to program the ball's direcon
Create and use custom variables to keep score
To help you understand the idea of the game, let's get a brief introducon to Breakout.
Learning about the Breakout game
Breakout is a 1976 Atari game that expanded the arcade game Pong. In the gameplay, the
player hits a ball with a paddle in order to break the rows of bricks. There are eight layers of
bricks; every two rows use a dierent color. From top to boom, the colors are red, orange,
green, and yellow. The player bounces the ball o the paddle or the wall to break the bricks
and score points.

Making an Arcade Game – Breakout (Part I)
[ 136 ]
Breaking bricks earns points, and the player will have three chances to break all the bricks.
The ball speed will increase at dened intervals.
You can read about the history of Breakout on its Wikipedia page. We'll mimic the evoluon
of Pong into our own variaon of a Breakout-style game. By the me we nish this chapter
and the next one, we'll have a clear understanding of just how powerful remixing can be.
Let's get started so that we can create our own version of this game.
Discovering Pong
The 1.4 Version of Scratch included a Pong starter project. Now that Scratch 2.0 has moved
online, nding those starter projects is more challenging. Therefore, I've included the
game in the code bundle of the book. If you haven't already done so, download the book's
accompanying code.
Time for action – importing and playing the Pong starter project
Any me we open another person's Scratch project with the intenon of remixing it, we
need to spend some me understanding the project. This exercise will walk us through the
process of uploading a legacy game from our computer and help us discover some of the
details. Our rst step will be to import, play, and learn about how the exisng Pong game
works. Let's follow these steps to import and play the game:
1. The starter project has the le name Pong.sb. To import it into Scratch, create a
new project from the Scratch project editor. Then click on the File menu and select
upload from your computer. Browse and select the Pong.sb starter project to
create a new project using the uploaded project.
2. Play the game by clicking on the green ag. Move the mouse le or right to control
the paddle and hit the ball. Move the mouse up and down the stage, and note that
the paddle doesn't move.
3. When you've had enough, stop the game.
4. Let's get some more informaon about what the ball is doing. With the ball sprite
selected, enable the direcon reporter block by clicking on the checkbox next to
the block's name in the Moon palee. The value of the direcon variable displays
on the stage.
5. Play the game again, and note how the value of the ball's direcon changes as the
ball travels across the stage. When you're done, let the ball hit the red stripe to end
the game.
6. Next, we'll examine the paddle's script by clicking on the paddle sprite.
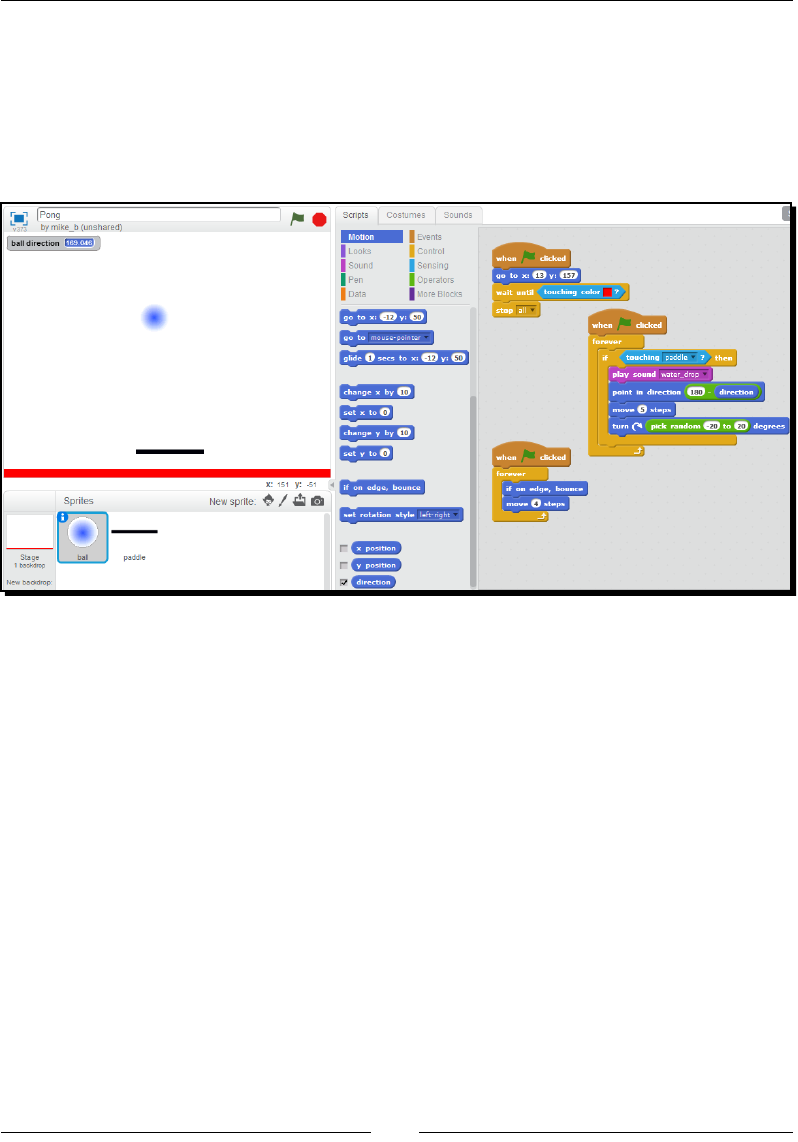
Chapter 6
[ 137 ]
7. Enable the x posion block from the Sensing palee by clicking on the checkbox
next to the block's name. The x posion block is also a block and you should now
have two stage monitors displayed (one for the ball's direcon and one for the
paddle's x posion).
8. Play another game. Watch as the monitor blocks report the direcon of the ball and
the locaon of the paddle in real me.
What just happened?
The mission is simple—keep the ball from landing on the red stripe to keep the game alive.
The paddle moves based on the movement of the mouse. When you hit the ball, it ricochets
o the top and sides of the stage. As we move the mouse to the le, so does the paddle;
however, the paddle doesn't respond to up and down mouse movements because the
scripts in the game do not specify any acon based on the vercal posion of the mouse.
We tracked the ball's direcon and the paddle's x coordinate by enabling the direcon and
x posion reporter blocks, respecvely. These two values highlight the primary variables in
Pong. These blocks represent the built-in variables (reporter blocks) in Scratch.
The direcon change of the ball is accomplished with the point in direcon block that
executed when the ball touched the paddle. The script calculated the new direcon by
subtracng the ball's direcon from the constant value of 180.
As the ball bounced o the paddle, the script put a twist on the direcon change by turning
the ball a random number of degrees between -20 and 20. We'll cover the sprite direcon in
detail later in this chapter.
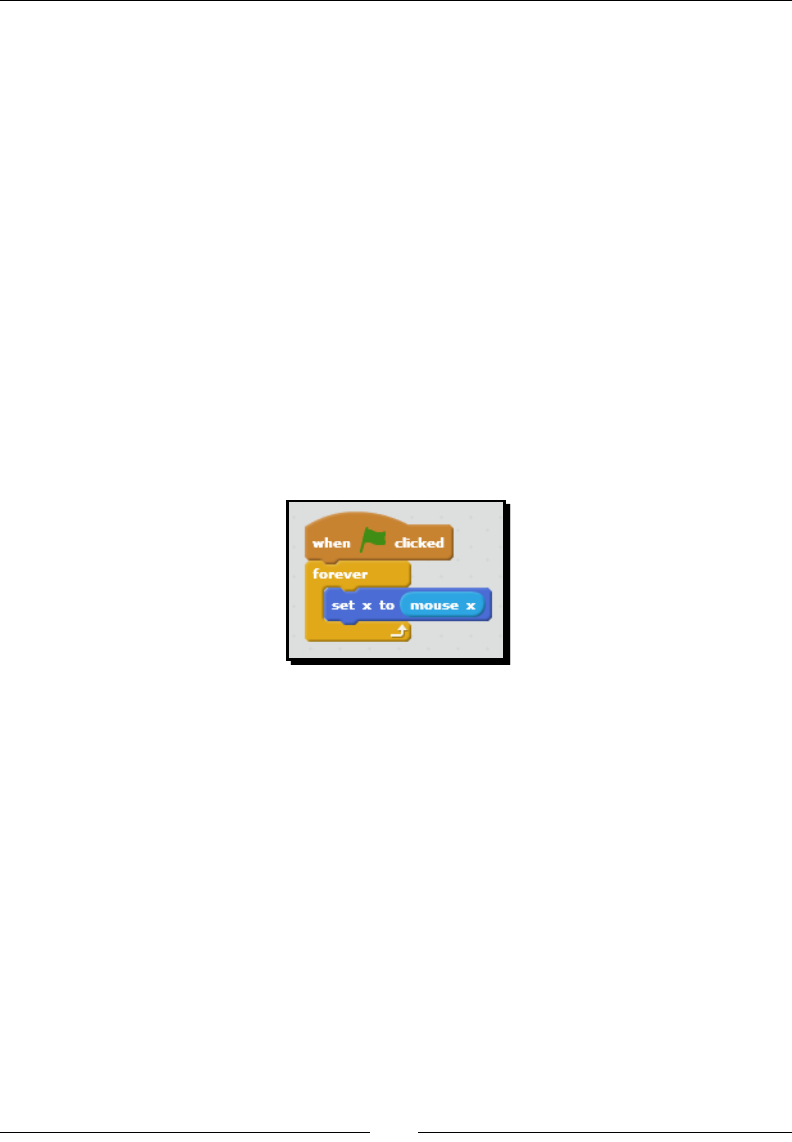
Making an Arcade Game – Breakout (Part I)
[ 138 ]
Remixing a legacy Scratch project
In the previous exercise, we uploaded a Scratch 1.4 project, which can be idened by the
.sb le extension. Scratch 2.0 will read this le just ne and actually save it as a Scratch
2.0 le, which uses the .sb2 le extension. In case you're wondering, the choice to start
with the legacy version of Pong is a choice made for a few reasons. It's the version I used in
the rst edion of this book, and it ensures that readers of the book always have the same
starng point available to them.
There are Pong starter projects available at scratch.mit.edu, but nding appropriate les
to use in one, two, or more years is not guaranteed. Also, the exercise gives a nice lesson
using old Scratch le formats—namely, it's possible.
Moving a sprite with the mouse or arrows
The script for the paddle moves the sprite le or right based on the x coordinate of the
mouse by using the set x to () block. The script reads the x coordinate of the mouse via
the mouse x block and uses that value to set the x posion of the paddle. The following
screenshot shows the script:
Using reporter blocks to set values
The mouse x block enables us to use the current x coordinate of the mouse as a value for
any block that accepts a numeric value, such as the set x to () block. The mouse x block is a
reporter block in Scratch. Reporter blocks are the built-in variables that capture the current
value of something in Scratch. Other examples include the direcon, mouse y, loudness,
x posion, and y posion blocks. These blocks watch a single value for the sprite they are
enabled for. For example, in Pong, the direcon block always knows what direcon the ball
is traveling in, and that's the value it reports.
Reporter blocks are the oval-shaped blocks found throughout the palee of blocks in
Scratch. And as we'll nd out later in this chapter, when we create our own custom
variables, Scratch will create a corresponding reporter block.
Variables, whether built-in or custom, provide a way for us to use the value in the reporter
block as a value in any of the other Scratch blocks that has an oval shape for a value,
as illustrated in the previous screenshot showing the set x to (mouse x) block.
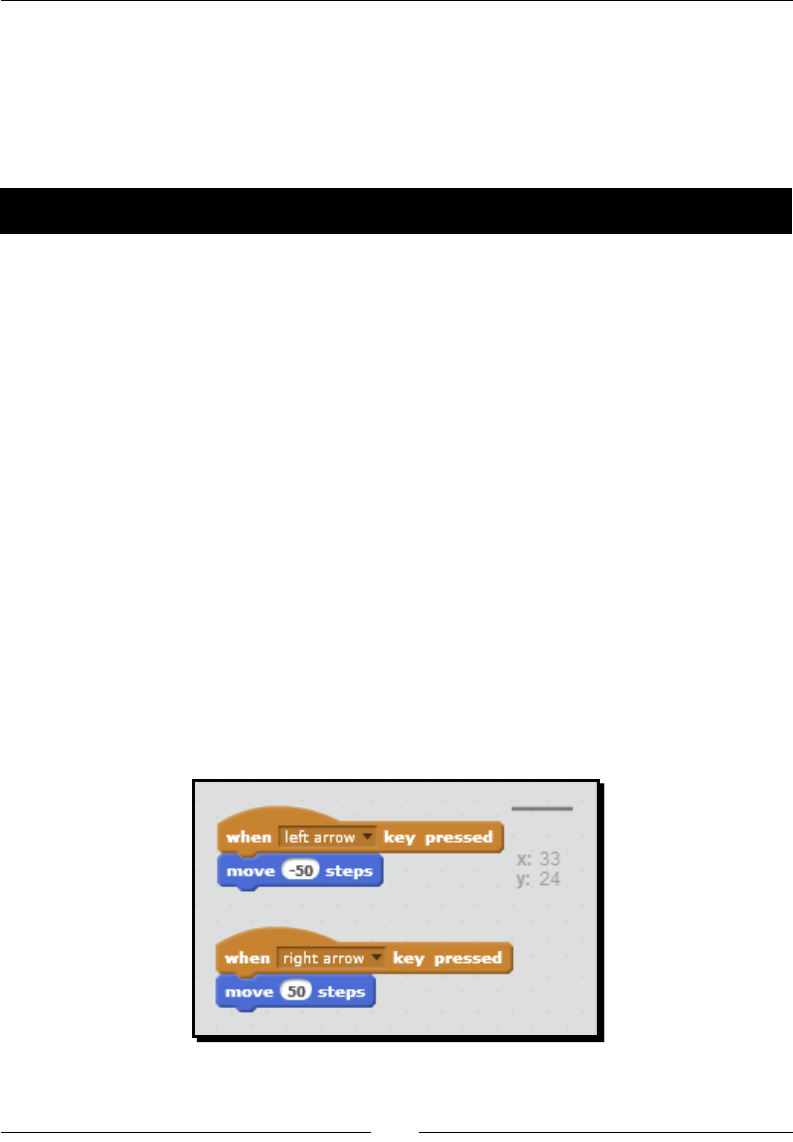
Chapter 6
[ 139 ]
Customizing the gameplay of the Pong project
There are a few inial customizaons that we will do to make the game easier to use and to
avoid potenal conicts with our Breakout game. You might like using the mouse to control
the paddle, and that's ne. We're going to walk through the process of changing the paddle
control to the le and right arrow keys.
Time for action – adding the left and right arrow controls
Moving the paddle with the mouse works, but users on a laptop may nd their built-in
mouse dicult to use. Let's revise the paddle script to use the le and right arrows to control
movement by following the given steps:
1. Select the paddle sprite from the sprite list.
2. From the Control palee, add the when key pressed block to the scripts area.
3. Change the value to le arrow.
4. From the Moon palee, aach the move () steps block to the when le arrow key
pressed block.
5. Change the value to -10 (negave 10).
6. Repeat steps 4 and 5, but use the right arrow key to move 10 steps.
7. Play the game, and use the arrow keys to move the paddle. The paddle appears to
move slowly across the screen.
8. Let's try to take bigger steps. Change the number of steps to a larger number,
such as 50.
9. Clean up the script by removing the original when ag clicked block that used the
mouse x value to control the movement. From the Moon palee, uncheck the x
posion block.

Making an Arcade Game – Breakout (Part I)
[ 140 ]
What just happened?
Now we have an alternate way to control the paddle that actually runs the move () steps
block based on an arrow key event. The when () key pressed block connually monitors for
a key to be pressed. In our example, we chose to use the le and right arrow keys, but you
could have chosen to use any key you wanted.
When the le arrow key is pressed, the paddle moves a value of -50 steps, which moves the
sprite to the le. The right arrow key gets a value of 50, which moves the paddle right.
The values in the move () steps block, as you might have surmised, match what we expect
when we use the coordinate system to locate a sprite. Negave values move le along the
x-axis; posive values move right.
Evaluating the y position of the ball to end the game
If we look closely at the ball scripts, we see that all scripts will stop when the sprite touches
the color red. This signals that the game is over and that the player lost. Red conicts with
one of the primary colors of the bricks we could use later.
Instead, let's evaluate the y posion of the ball and the paddle to determine if we should
end the game.
Time for action – determining if the ball is below the paddle
In the starter project, the game is over when the ball touches the color red, which matches
the color of the strip at the boom of the stage. Red is going to be one of our brick colors,
so we'll want to adjust our game over condion to be a neutral color.
Basically, we need to determine if the ball falls below the paddle, but in doing so, we're going
to encounter some problems that we'll need to solve. Let's follow the given steps:
1. The game over condion is set by the ball sprite. So select the ball, and remove the
touching color ()? block from the value of the wait unl () block.
2. Replace touching color ()? with the less than block (<) from the Operators palee.
3. From the Moon palee, nd the y posion block, and add it to the le-hand side
of the less than (<) block.
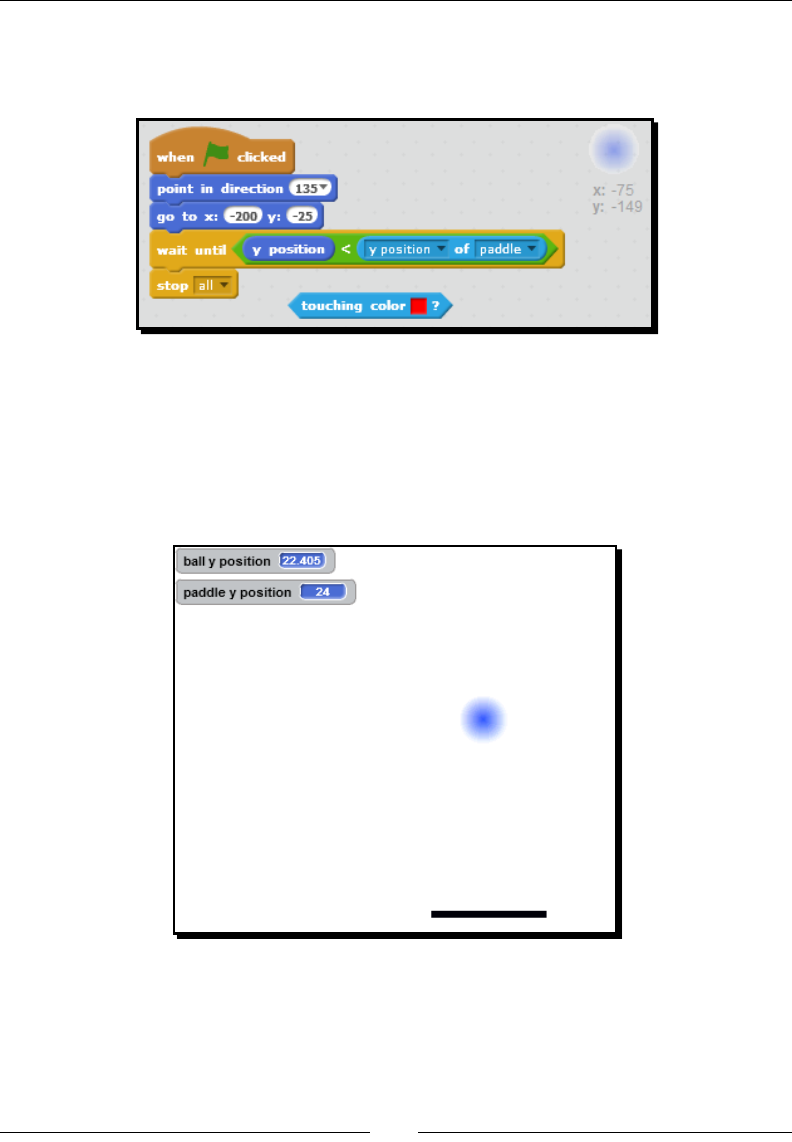
Chapter 6
[ 141 ]
4. From the Sensing palee, add the block that reads (x posion) of paddle to
the right-hand side of the less than (<) block. Change x posion to y posion.
The revised script can be seen in the following screenshot:
5. Now play the game. Does it behave as you expect? In my game, the game ends
when the ball is in the middle part of the stage.
6. To help us debug, turn on the y posion block for the ball and the paddle so
that we can verify that Scratch is correctly following our instrucons. See the
following screenshot, which is showing a game over condion based on our
latest programming changes.
Let's pause and reect on what we're trying to do compared to what we've done.
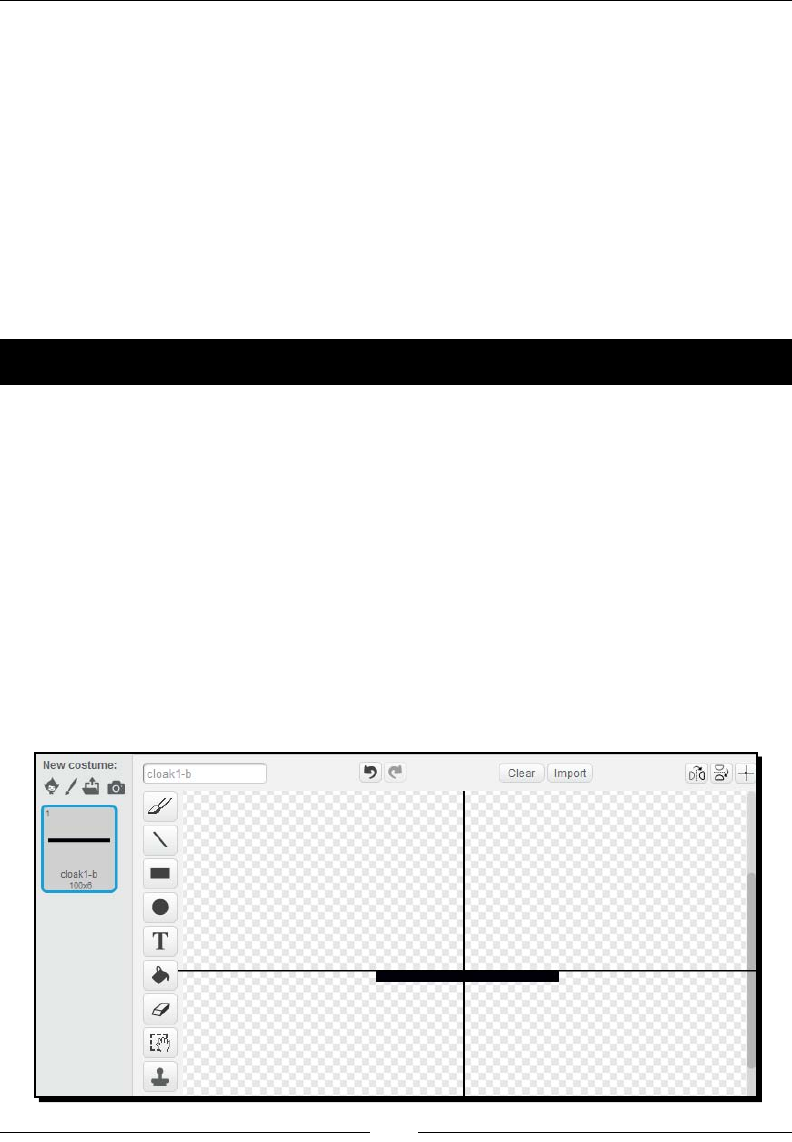
Making an Arcade Game – Breakout (Part I)
[ 142 ]
What just happened?
We took a working script, made changes, and as a result, no longer have a working game.
But our mistakes are not to be punished; they are to be learned from.
We expect the paddle, which is posioned near the boom of the stage, to have a y posion
of approximately -175. In reality, the y posion of the paddle is closer to 24. Your posion
may vary a bit, but it's clearly nowhere close to what we expect.
So, what's wrong with the paddle?
To answer that queson, we need to know that Scratch determines the x or y posion of the
sprite based on the center of the sprite.
Time for action – adjusting the center of a sprite costume
Let's edit the paddle in the image editor to see where the center of the paddle is by
following the given steps:
1. Look closely at the costume in the paint editor. You likely see a vercal scroll bar in
the editor, and the paddle is not visible unless you scroll down. In the middle of the
screen is a cross mark.
2. The problem is looking straight at us. The center for this costume is not actually on
the black paddle. It's above the actual paddle. Let's redene the center by clicking
on the set costume center icon, located at the top-right of the paint editor.
3. When you click the set costume center icon, two intersecng lines appear on the
image canvas. The current center is at the intersecon of those two lines.
4. To reset the center, click on the intersecon of the lines with your mouse, and drag
the point down to your paddle, as illustrated in the following screenshot:
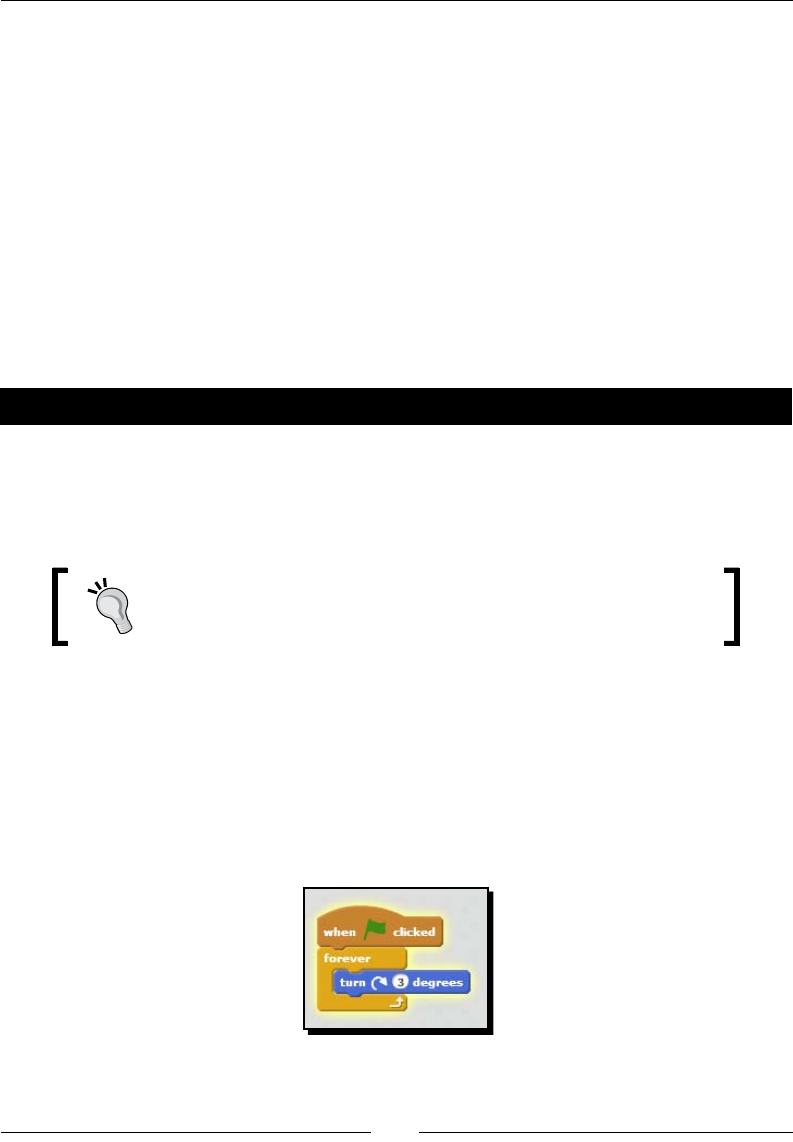
Chapter 6
[ 143 ]
5. To save the change, just click anywhere on the paint editor canvas.
6. On the stage, the paddle will reposion itself to the middle of the stage.
Drag the paddle back to the boom of the stage to put it in its place.
7. Now, play the game again. This me the game over check works as expected.
What just happened?
For some reason, the center of the paddle costume was disconnected from the visible part
of the sprite. Because neither you nor I created the original project, we can only speculate
why the original game's author made that choice, and speculaon is not going to help us.
By adjusng the center of the sprite to be on the sprite, our new game over evaluaon
works as expected. When the y posion of the ball is less than the y posion of the paddle,
all scripts stop—our current game over condion.
Have a go hero – using the costume center in projects
As Pong demonstrates, the center of the costume determines the locaon of the sprite
in terms of the x and y coordinates. Sprites also rotate around the costume's center.
And in another use, when you tell a sprite to go to the posion of another sprite,
the rst sprite goes to the center of the second sprite.
In Scratch 2.0, you must set the centers of your costumes manually
when you create a sprite or costume.
In theory, seng the center of a costume is a straighorward idea. However, in pracce,
adjusng the center of your sprite's costume could have dramac, interesng, or
confounding consequences. Here's a quick script courtesy of the Scratch Wiki to
clearly demonstrate costume centers:
Draw a square, and ll it with a color. Set the center to the middle of the square.
Animate the sprite using the following script. Then adjust the center of the sprite
to be on a corner of the sprite. Compare the rotaon dierences.
Making an Arcade Game – Breakout (Part I)
[ 144 ]
Cloning to create identical sprites
We're going to use a Scratch 2.0 feature called cloning to easily create rows of bricks that the
player breaks during gameplay.
Time for action – drawing bricks
To clone a brick, we need to rst make a brick. We'll use the paint editor to do that. We'll use
this single brick to build a connuous row of bricks across the width of the stage in a later
exercise. Let's follow the given steps to create a brick:
1. Create a new sprite with the paint new sprite icon, and then convert the sprite to
the vector mode.
2. Use the rectangle tool to create a solid yellow shape.
3. Draw the rectangle to be 48 pixels wide and 25 pixels tall. To see the current size
of the rectangle, look at the thumbnail of the costume to see the current size. The
width of 48 pixels will allow us to create 10 blocks to span the width of the stage.
We have more exibility in the actual height.
4. The following screenshot shows the costume thumbnail with the image dimensions:
5. You can resize the height and width of the shape by dragging the borders of the
rectangle. This step takes some nesse to get the right size.
6. Don't forget to set the costume center.

Chapter 6
[ 145 ]
What just happened?
This step actually takes some planning as the exercise suggests. We want the row of bricks to
span the enre width of the stage, which is 480 pixels. So a 48 pixel wide block will take 10
blocks to span the stage.
We drew the brick using Scratch's built-in image editor, and even though it's a bit awkward,
it is possible to resize the sprite to a target size if the image is in vector format. An alternave
way to create a block to a specic size would be to use a third-party image editor to create
the image and then import that image into Scratch.
Time for action – cloning bricks
Our task is to take the single brick and connuously duplicate it unl we create two solid
rows of yellow bricks that span the width of the stage. As we work through the exercise,
we'll make a couple of calculaons to accomplish the task, and we'll e it all together aer
we create the script. Let's follow the given steps for cloning bricks:
1. Start the script with a when ag clicked block, and add the show block.
2. We need to specify the starng point of the blocks, so add the go to x: y: () block
from the Moon palee. We're going to assume a starng point on the le-hand
side of the stage. Set the x: value to -216 and the y: value to 25.
3. Add a repeat () block, and change the value to 10.
4. From the Control palee, add the create clone of () block, and choose myself from
the drop-down list.
5. Add a go to x: () y: () block to the create clone of () block.
6. From the Operators palee, drag the addion block (+) block into the x: value.
From the Moon palee, add the x posion block to the rst value of the addion
block. Then change the second value of the addion block to 48. Our calculaon
reads x posion + 48, where 48 is the brick size.
7. To the y: value, add the y posion block from the Moon palee.
8. Copy the go to x: () y: () block in step 2 and place it aer the repeat () block.
Change the y: value to be the sum of the y posion + 25. Duplicate the repeat ()
block, and add it to the boom of our stack.
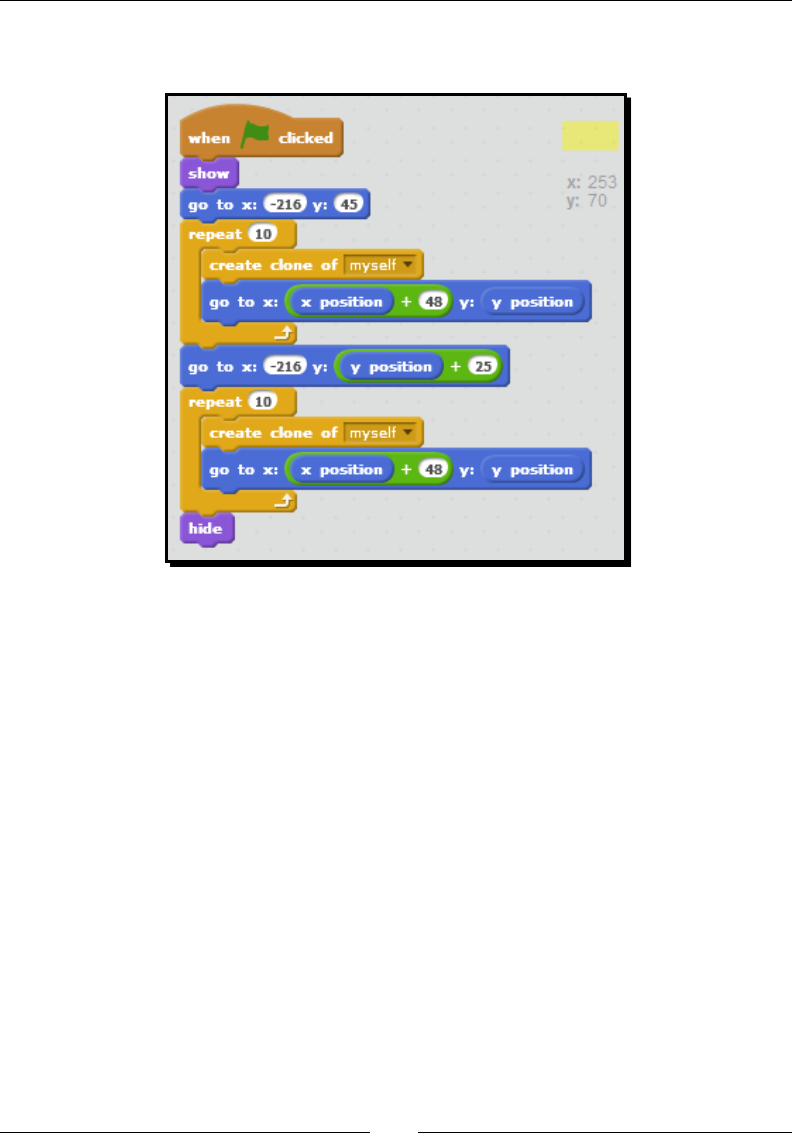
Making an Arcade Game – Breakout (Part I)
[ 146 ]
9. Add a hide block to the end of the stack. The following screenshot shows the script
we just built:
What just happened?
We have a lot to sort out in this stack of blocks. Let's start with the posioning of the rst
brick. We know that the le edge of the stage is represented by an x coordinate of -240.
When Scratch displays the coordinates of a sprite, it uses the center of the sprite, which
means we can divide the length of our sprite in half to get its center point (24 pixels).
The calculaon to nd the starng x posion becomes -240 + 24 = -216.
The starng y coordinate is somewhat arbitrary in the current script. Depending on how
many rows of bricks you add to the level and how tall you make each brick, you may need
to revise the starng height.
Inside the repeat (10) block, the create clone of (myself) block duplicates the brick ten
mes. The go to x: ((x posion) +(48)) y: (y posion) block advances across the stage by a
value of 48. The number 48 represents the width of the block we created.
With each loop through the repeat (10) block, the script creates a new clone that is 48
pixels to the right of the previous clone. We use the x posion + 48 calculaon because the
x posion block always knows the current posion of the sprite, and we place block two
relave to the posion of block one, and block three relave to block two, and so on unl
the stage width is lled.

Chapter 6
[ 147 ]
The script uses another go to x: () y: () block to posion the second row of bricks. This me, we
change the y value by 25, or the height of one brick, but we use the sprite's current y posion
+ 25 to get the starng height. This way if we do change the starng height of the yellow brick,
we only have to change the y: value in the rst go to x: () y: () block. That's the reason we built
the script using the y posion block in all of the go to x: () y: () blocks even though the height
only changes once. It will make future maintenance and improvements a bit easier.
The second repeat (10) block builds the second row of bricks across the stage and works in
the same way as the rst repeat () block we built.
The end result of our programming is two yellow horizontal rows of bricks. Because
our bricks rely on the most rudimentary designs, the row appears as a connuous strip
of yellow, but rest assured, they are individual bricks. The more eort and design you apply
to the brick, the more realisc it can look. We're not going to get bogged down in design.
You can handle those revisions later.
Dealing with the cloned sprite
In our script, each repeat () block clones itself 10 mes to ll the width of the stage, and
at the very end of the stage, we hide the original yellow brick sprite. If we did not hide this
sprite, we would have an eleventh brick on the second row. Because the clones inherit all
the properes of the original and become separate instances, we no longer have a use of
the original sprite we cloned.
You may be asking, "Why don't we repeat the cloning steps nine mes and leave the original
block showing?"
We could have done that and my early version of the game did that. However, that approach
will convolute our future scripts because we'd have to write one script to break the clones
and one script to break the sprite.
Time for action – breaking bricks when I start as a clone
Cloning works in Scratch in two major steps. First, we need to duplicate the sprite. Second,
we write the scripts that tell the clone what to do.
We created the clones in the previous exercise. Now, let's break the bricks by following the
given steps:
1. From the Control palee, add the when I start as a clone block from the Events
palee to the scripts area of the yellow brick sprite to handle the cloned sprites.
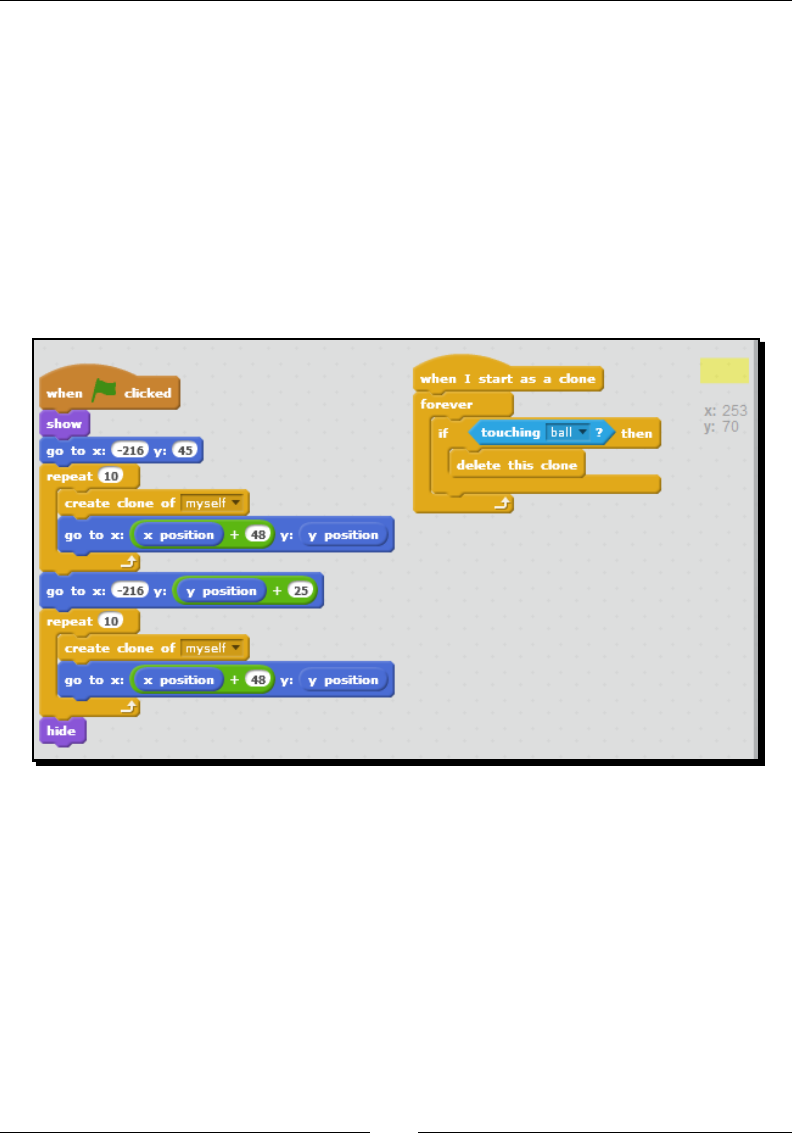
Making an Arcade Game – Breakout (Part I)
[ 148 ]
2. We'll need to connuously check if the ball and the clone touch so that we know
when the brick is supposed to break.
3. Start with a forever block, and then add the if () then block from the Control palee.
4. Inside the if () then block, add the delete clone block from the Control palee,
which will represent the breaking brick.
5. From the Sensing palee, add the touching ()? block to the value of the if () then
block, and select ball as the touching value.
The following screenshot shows the new script (on the right-hand side) and the script we
built in the previous exercise because the script on the le-hand side creates the clone,
while the other script denes what happens to the clone aer it is created.
What just happened?
If you haven't already done so, play this game so that you can see what happened.
Don't worry about what the ball is doing yet.
The script we created for when I start as a clone connually checks each clone to see if it
is touching the ball sprite. If the ball and the clone touch, we delete the clone. And in the
context of our game, deleng the clone is the same as breaking the brick.
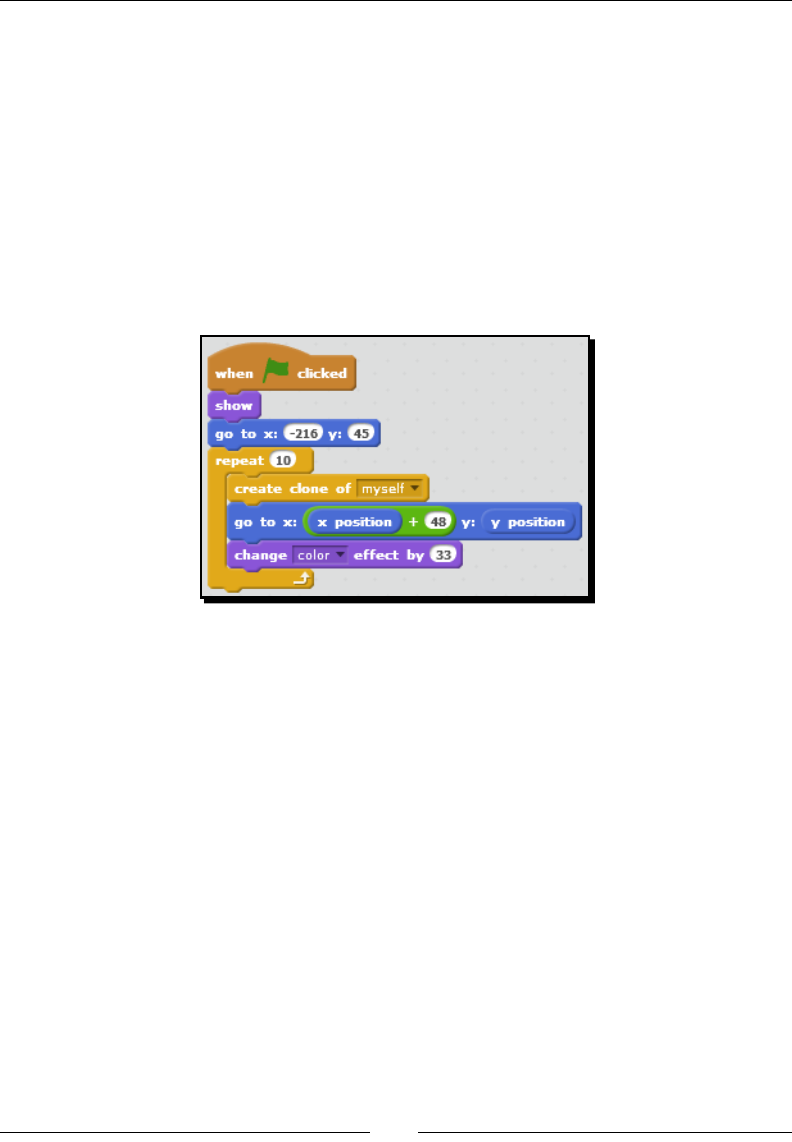
Chapter 6
[ 149 ]
What happens when the ball breaks the bricks, in terms of our game, is going to be the
subject of many exercises and also provides endless customizaons.
Cloning explained
As our two previous exercises demonstrated, a clone in Scratch 2.0 is a duplicate of the
sprite being cloned. A clone inherits the costumes, variables, and scripts of the parent sprite;
however, the clone can be modied aer it's created. This makes cloning a very powerful
resource for Scratch programming.
Here's a simple example that shows a clone being modied aer it was created. I used this in
my early versions of the cloning bricks exercise to ensure that I was really geng 10 bricks.
In the previous screenshot, the change (color) eect by (33) block changes the color of the
sprite, and we end up with a paern of dierently colored bricks.
Rapid re shooting with cloning
We're using clones to replicate rows of bricks, and each clone can be acted upon
independently, but consider the challenge of an Asteroid-like game where you shoot falling
objects. Prior to Scratch 2.0, we could only re one shot at a me. The shot would have to
miss or hit the target before reloading.
Cloning allows you to shoot a connuous stream of bullets at the target. We can illustrate
the concept using our exisng game of Breakout. The following two scripts show how we
could make our paddle rapid-re balls at the bricks.
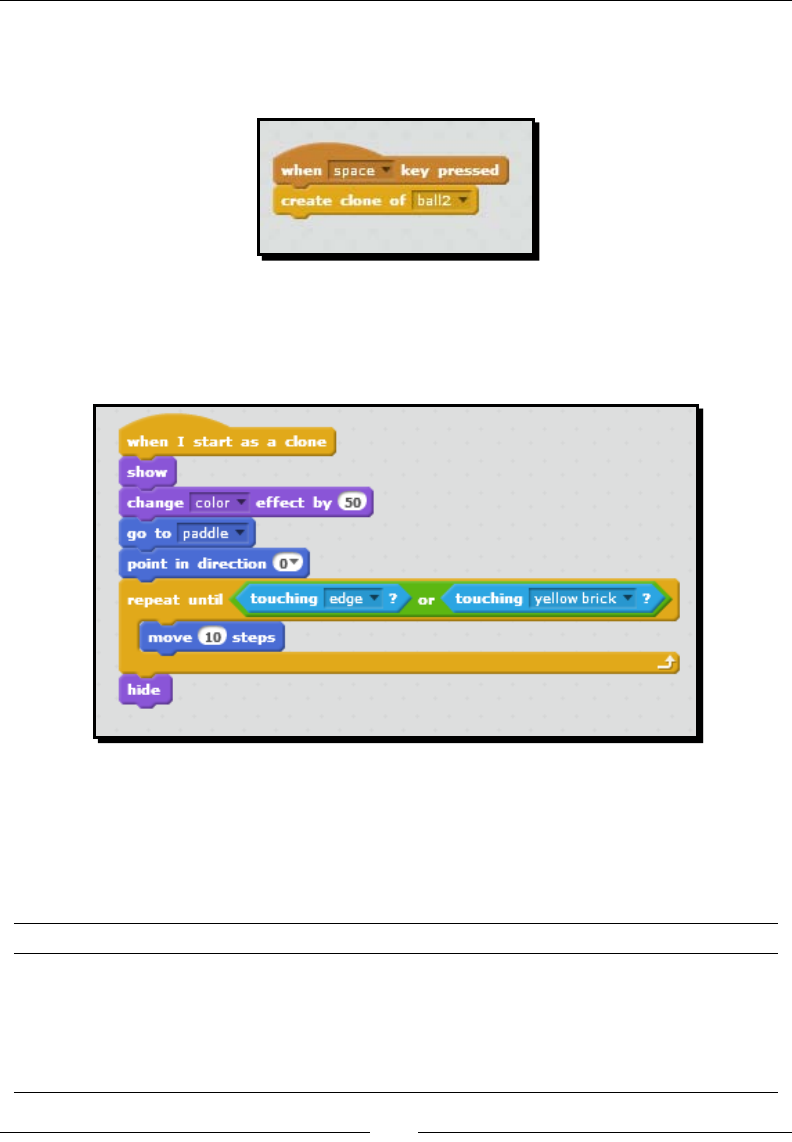
Making an Arcade Game – Breakout (Part I)
[ 150 ]
To make the paddle clone the ball (that is, a bullet), use the script in the following
screenshot. The create clone of () block is using a sprite named ball2 because I duplicated
the ball sprite, so I didn't modify the sprite in my game and make inadvertent mistakes.
The following screenshot shows the when I start as a clone block that would be aached to
the ball. The crical control point of the script is the repeat unl () block that will move the
clone (the ball in this example) ten steps unl it touches the stage edge or a yellow brick.
These two scripts could be duplicated and modied for any shoong game you might create.
Cloning related blocks
The following table shows the available cloning blocks in Scratch:
Block Description Example usage
when I start as a clone This block allows the clone
to act independently of the
parent sprite. It waits until
the clone is created to run.
Detects when a clone collides
with sprite
Moves the clone
Changes the clone's
appearance
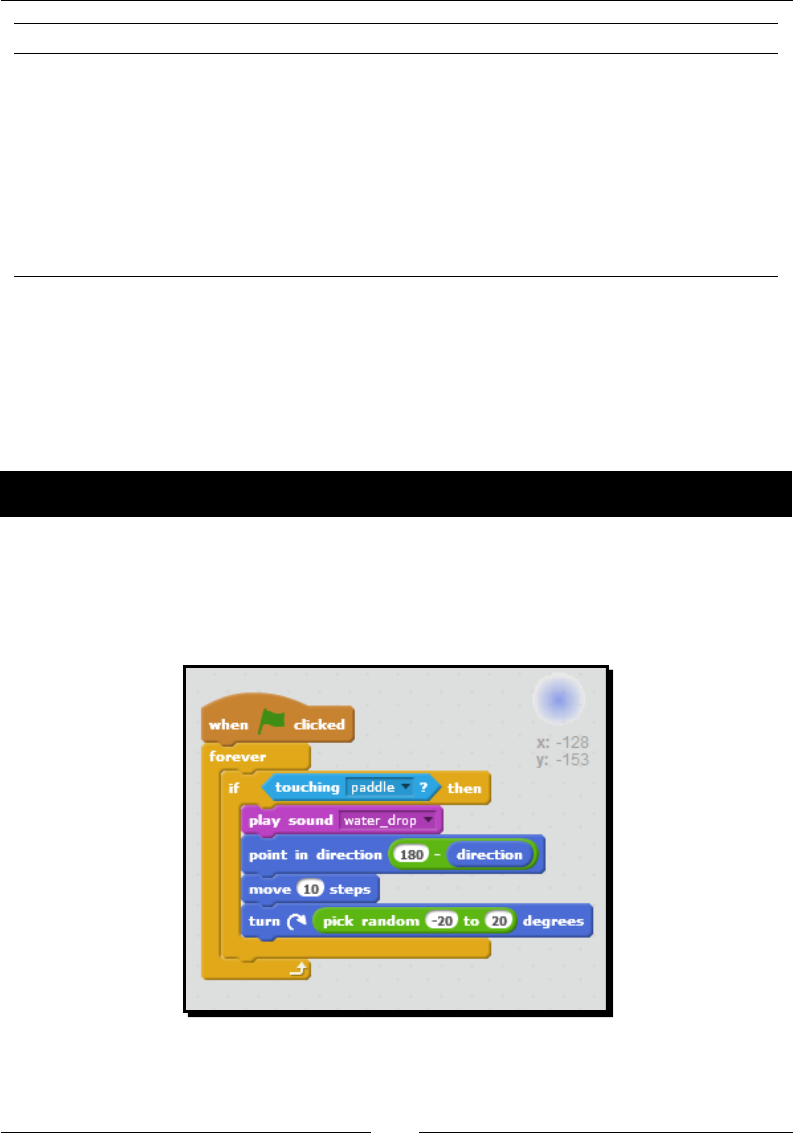
Chapter 6
[ 151 ]
Block Description Example usage
create clone of () This block clones the
sprite running the block or
another sprite. It specifies
the sprite to be cloned in the
drop-down list.
Rapid-re a never-ending
supply of bullets
Create reworks
Create multiple copies of a
sprite
delete this clone This block gives you a way to
programmatically delete the
clones.
Aer the clone and sprite
collide
After the game is over
Ricocheting with the point in direction block
In a game of Pong or Breakout, controlling the ball's movement is crical, and as a game
designer, you can make the ball move in a predictable way or choose not to. Let's run several
exercises that explore the current ball movement and then revise the script.
Time for action – changing a sprite's direction
Why does the point in direcon () block use the calculaon 180 - direcon? Let's answer
that queson by experimenng with some new direcons as given in the following steps:
1. Select the ball sprite from the sprites list, and nd the script that contains the
point in direcon () block. See the following screenshot:
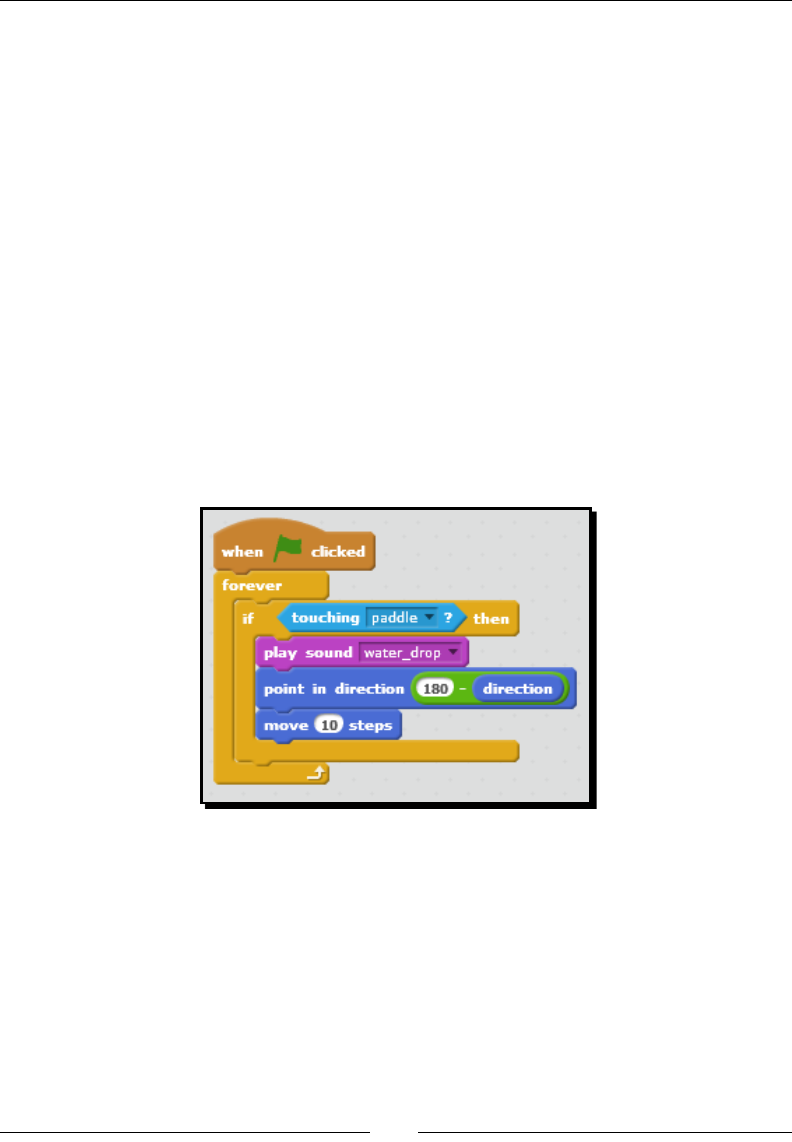
Making an Arcade Game – Breakout (Part I)
[ 152 ]
Find the calculaon used to redirect the ball and change 180 to 90:
1. Play the game and observe the results.
2. Let's simplify the direcon change. Drag the green number block that currently
contains the calculaon 90 - direcon out of the value of the point in direcon()
block. You can drag it down to a blank spot in the scripts area.
3. Change the value of the point in direcon block to 180. Click the green ag to
play. Observe the results. The ball should always fall through the paddle and to
the boom of the screen.
4. Change the value of the point in direcon () block to 0. Click the green ag to play.
This me the ball bounces back up when it hits the paddle.
5. Drag the turn clockwise block to a blank spot in the scripts area so that it doesn't
run when we play the game.
6. Click the green ag. Each me the ball hits the paddle, it bounces straight up.
7. Restore the 180 - direcon block to the point in direcon () block. The script should
look like the following screenshot:
What just happened?
In the original point in direcon ((180) – (direcon)) block calculaon, the script calculated
a new direcon by subtracng the ball's current posion from 180. For example, if the ball's
direcon is 121, the calculaon subtracts 121 from 180 to get 59. Therefore, the value of the
point in direcon () block becomes 59, and that's the new direcon of the ball. The script
also added a random turn.
The original calculaon always seems to bounce the ball o the paddle and put it in play.
When we changed our calculaon to use 90 - direcon, the ball behavior became much
more errac and may have failed to bounce o the paddle.

Chapter 6
[ 153 ]
When we simplied our direcon with a value of 180, the ball never appeared to bounce o
the paddle. In reality, however, the ball did bounce o the paddle; it just bounced down.
When we set the direcon to 0, the ball bounced o the paddle as expected; however,
it bounced straight up with a bit of an angle. The turn () degrees block ensures the ball
doesn't bounce straight up because it's turning a random number of degrees.
You may note that I didn't put the turn () degrees block back into the script. I'm choosing to
leave it out for now, so that I can have a more predictable bounce as we connue to build
scripts. Aer we get things working, this would be a good eect to add back.
Figuring out the direction
The point in direcon () block has several prepopulated values available. Understanding
what those values mean to Scratch will help us move the ball in the right direcon. The
block does not use a 360 degree circle. Instead, the values are 180 to -180, and that can be
confusing. As a reference point, -90 as a block value would be equivalent to 270 if we were
talking about a 360 degree circle.
The following table outlines how the predened values move the sprite:
Direction value Movement
0 Up
90 Right
-90 Left
180 Down
The point in direcon () block accepts custom values as well. Use the four default values
as a guide to determine which way the sprite will move.
Time for action – setting the starting position and the direction
Let's take what we learned about the point in direcon () block and apply it to the starng
posion of the ball. We'll also set the starng coordinates because the ball currently starts
above the row of bricks. Let's follow the given steps for seng the starng posion and
the direcon:
1. Change the starng x and y coordinates in the go to x: y: block to be -200 and -25.
The value -25 will keep us below the bricks, and -200 posions the sprite on the
le-hand side of the stage.
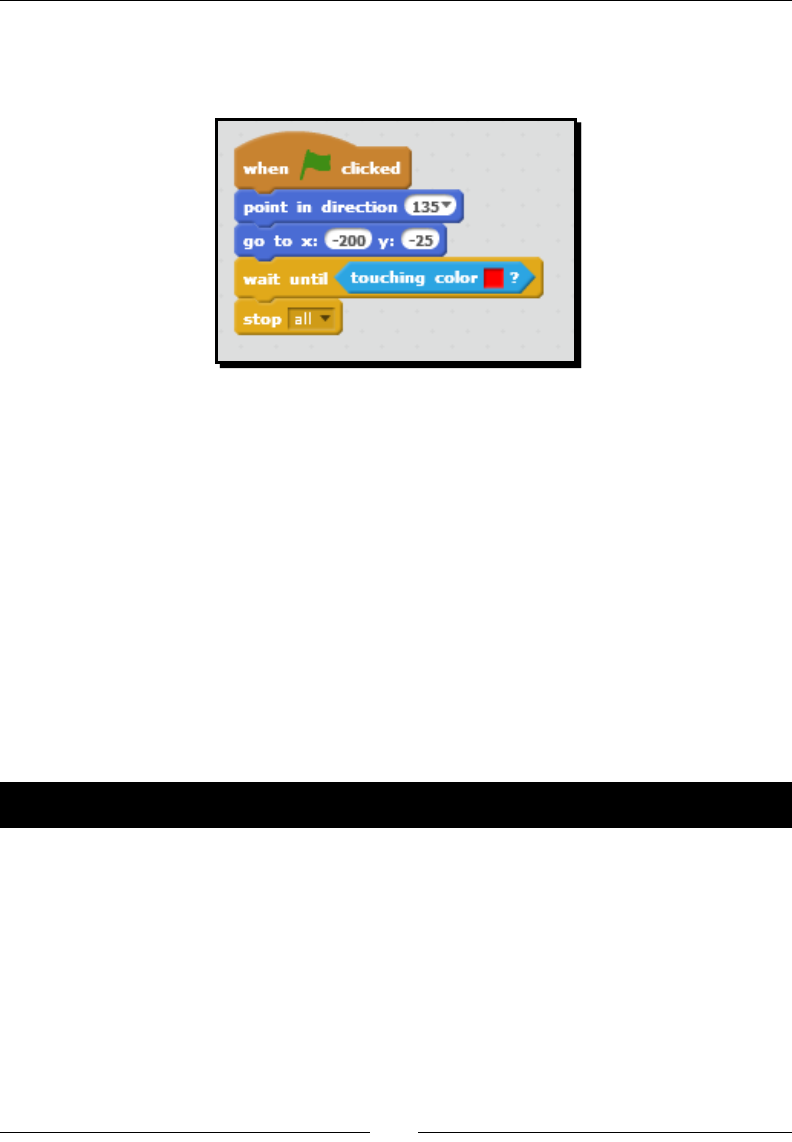
Making an Arcade Game – Breakout (Part I)
[ 154 ]
2. We want to make sure the ball moves down at the start of the game. Add a point
in direcon () block. Change the value to 135. The revised script can be seen in the
following screenshot:
3. As you play the game, note the direcon being reported in the direcon stage monitor.
What just happened?
The inial starng posion of the ball was above the yellow bricks, so our rst tweak starts
the ball below the bricks on the le-hand side of the stage. By adding the point in direcon
() block, we can control the starng trajectory with a direcon of 135.
Did you noce the ball's direcon? The ball always approaches the paddle at either 135 or
-135 and leaves the paddle at 45 or -45. When the ball bounces on the edge of the stage,
it leaves in the opposite direcon, so it will bounce at -45 or 45.
Without the turn block adding a random rotaon to the block, the movement of the ball is
predictable, and you eliminate the possibility of geng awkward angles as the ball bounces
o the paddle. We can also clearly see our calculaons in acon.
Time for action – ricocheting off bricks
Right now, the ball bounces o the edge and ricochets o the paddle, but it connues
passing through the bricks. We're going to change that behavior by making the ball bounce
o the bricks. Let's follow the given steps:
1. Select the yellow brick sprite. Add a broadcast () block to the script that checks
if the brick touches the ball, and create a new message called bounce. See the
following screenshot:
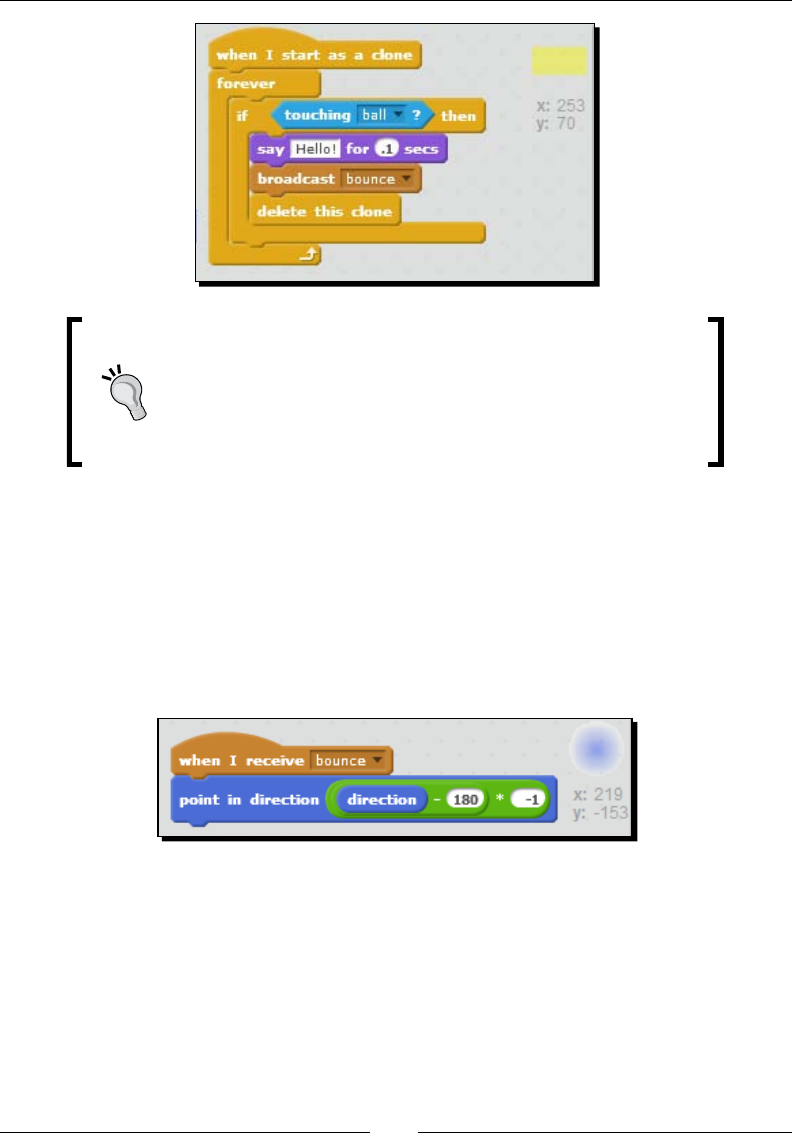
Chapter 6
[ 155 ]
Troubleshoot with the say block
If you're having problems with a script or you want to be sure a
certain part of the script is working, you can add a say () block,
as seen in the previous screenshot. When the condition is met,
a quick Hello! appears on the screen.
2. Select the ball sprite, and add the when I receive block to the scripts area.
3. Aach a point in direcon () block.
4. We're going to do a calculaon inside the point in direcon () block to redirect the
ball back to the paddle. Add a mulplicaon (*) block from the Operators palee.
Then add a subtracon (-) block to the le-hand side of the mulplicaon block.
5. Add a direcon block to the le-hand side of the subtracon block, and enter 180
to the rst box. Mulply that by -1. See the following screenshot:
What just happened?
This piece of our game creates a realisc response when the ball breaks a brick. Our rst step
was to send a broadcast message when the brick touches the ball. This coordinates the ball's
change in direcon.

Making an Arcade Game – Breakout (Part I)
[ 156 ]
We then told the ball to act on the broadcast with a new trajectory that we calculated
in the point in direcon ((direcon) - (180) * (-1)) block. Now, here is where our exercise
gets interesng. This calculaon is a bit more complicated than changing the direcon when
the ball bounces o the paddle.
Let's run through a simple calculaon. Remember, the ball is traveling at +/- 45 as it leaves
the paddle and +/-135 as it approaches the paddle. This means that the ball approaches the
bricks at +/-45. So, if the ball is traveling in a direcon of 45 and hits a brick, then the new
direcon is calculated as ((45-180)*-1) or 135. If you run the calculaon for a ball direcon
of -45, the new direcon becomes -135.
This creates the same bounce paern as the ball hing the paddle; however, we achieve
it with a variaon of our direcon calculaon for bouncing o the paddle. The end result is
that the ball is reected away from the bricks and towards the paddle.
Conditional statements
If we go back to the when I start as a clone script in use by the brick, we see an if () then
block that checks to see if the brick is touching the ball, and it's wrapped in a forever block.
We rst reviewed forever blocks in Chapter 2, A Quick Start Guide to Scratch. While the
forever block always runs, the code in the if () then block only runs when the condion is
true. Scratch provides several other condional blocks for use in our scripts, as seen in the
following table:
Block Description Example usage
if () This block is deprecated in
Scratch 2.0 and is replaced by
the if () then block. You may
encounter this block if you're
editing a Scratch 1.4 project.
See the if () then block
if () then This block evaluates an
argument, and if the argument
is true, then the code runs.
Compare values
Control a sprite
Check input
if () then else This block evaluates an
argument, and if true, the
code in the if block runs. If
false, the code in the else
block runs.
Run code based on the
checked value such as
checking a player's
"lives" in a game
Evaluating the player's
score

Chapter 6
[ 157 ]
Block Description Example usage
repeat until () This block evaluates an
argument, and if it's false,
the code runs.
Posion a sprite on the
screen
Repeat a script for a
specified time or interval
wait until () When the specified condition is
true, run the blocks following
the wait until block.
Check for game over
Wait for a specific
variable value before
running a script
The condional blocks control when and if something happens, so we nd them in the
Control palee.
Conditional statements in real life
Condional statements are an integrated part of our everyday, non-programming thought
process in that we evaluate our environmental inputs and take acon based on the results.
Here's an example. You want to cross the street. If there are no oncoming cars, you cross the
street. If there are oncoming cars, you wait and check again.
If we reframe our example of crossing the street into a programming statement using one of
Scratch's condional statements, we might say:
If there are no cars coming, then cross the street
If there are cars coming, do not cross the street; else, cross the street
You'll wait unl there are no cars coming before crossing the street
When you receive a walk signal, cross the street
Dening a variable to keep score
How do we know how good we are if our game doesn't keep score? The next step in our
project is to add points each me we break a brick and display the value on the stage.
Before we begin, turn o any remaining monitors from the stage because we no longer
need to see them.
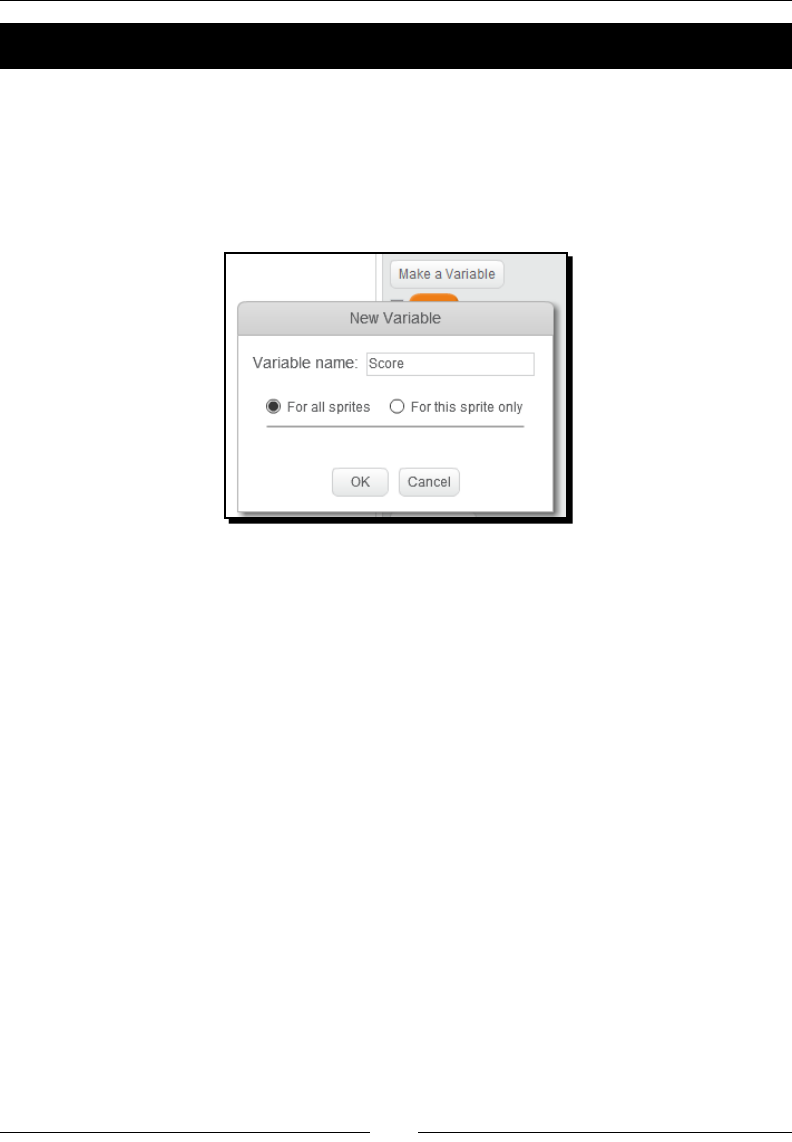
Making an Arcade Game – Breakout (Part I)
[ 158 ]
Time for action – adding a score variable
To keep score, we need to set up a variable and add a condional statement to increment
the score when the ball touches a brick. Let's follow the given steps to add a score variable:
1. From the Data palee, click on the Make a Variable buon to display the New
Variable dialog box.
2. Type the word Score, and select the For all sprites opon.
3. Click on OK to add the variable. The Data palee displays several new blocks,
and the Score reporter block automacally displays a monitor on the stage.
4. Posion the score monitor somewhere on the stage where it won't interfere with
the gameplay, such as in a boom corner.
5. We will increase the score when a brick breaks, so let's work with the yellow brick
sprite. Add the change () by () block from the Data palee aer the broadcast
(bounce) block in the when I start as a clone script. The default block values of
score and 1 are correct.
6. Click on the green ag and play the game. Each me the ball breaks a brick, the score
increments. Play the game several mes and note that we have a running score.
7. We need to reset the score to 0 at the beginning of the game. From the Data
palee, add the set () to () block between the when green ag clicked and show
blocks. The default block values of score and 0 are correct.
8. Play the game a few mes. The score resets to zero each me you click on the
green ag.
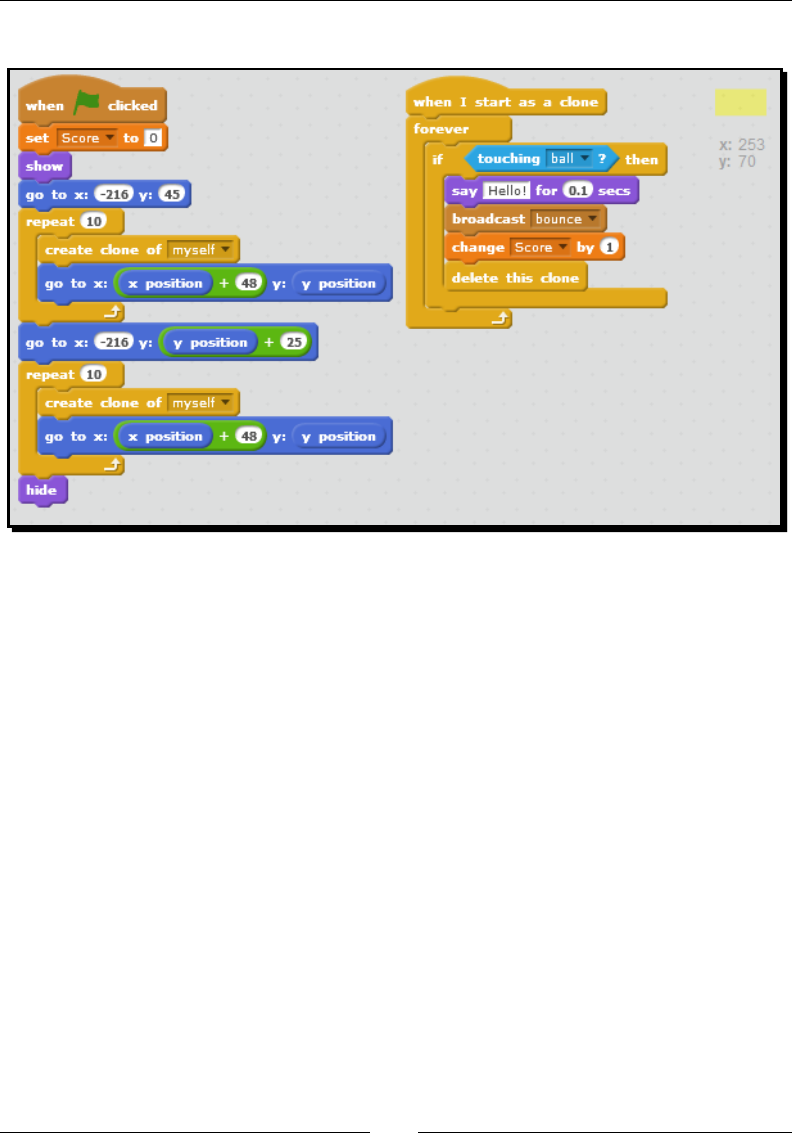
Chapter 6
[ 159 ]
9. The following screenshot shows the two revised scripts for the yellow brick sprite:
What just happened?
Each me the ball touches the brick, we increase the score by 1 and display the value on the
stage. At the start of each game, we reset the score to 0, so that the player doesn't add to
the score from the previous game.
When we created the score variable, we set it for all sprites because as we build upon this
game, we will add dierent colored bricks, and this will allow all brick sprites to adjust the
score. Let's review the two dierent variable opons: For this sprite only and For all sprites.
Setting variables For all sprites
When we make a variable for a sprite, we can select the For all sprites opon. This makes a
global variable, which means that all our sprites can access the value stored in the variable.
This has a couple of implicaons.
All sprites can change the value of a global variable; therefore, it can be dicult to track
problems when they occur because we have to invesgate each script in each sprite to nd
all the places that may be aecng our project. The bigger our project gets, the harder it can
be to keep track of global variables.

Making an Arcade Game – Breakout (Part I)
[ 160 ]
We may also end up programming in some unintended consequences, such as adding points
to our score each me we press the right arrow key. Sure, we can track those mistakes down,
but if we can avoid creang those problems, we should.
Working with too many global variables will quickly complicate your scripts because each
sprite has access to the variables, and the Data palee will ll up with variable opons.
Setting variables For this sprite only
In contrast to the global variable, Scratch allows us to create a variable, For this sprite only.
Programmers oen call this a local variable because it can only be accessed by the sprite you
assigned it to.
It's a good programming habit to use a local variable whenever you can because it will keep
your Data palee and variables organized. It also reduces the risk of inadvertently seng
your variable's values by an unrelated sprite.
Have a go hero – creating a graphical effect for the bricks
What happens when the ball breaks the brick? Our game currently hides the brick, but
that's not too excing. Take this opportunity to make the brick do something when it's hit
by the ball. Here are some suggesons to get you started: change color, show a cracked
brick, explode the brick, and so on.
Pop quiz – reviewing the chapter
Q1. When cloning in Scratch, the clone inherits the original sprite's:
1. Costumes.
2. Scripts.
3. Variables.
4. All of the above.
Q2. The center of a costume is always at the center of the visible sprite.
1. True.
2. False.

Chapter 6
[ 161 ]
Q3. What is another way to state Scratch's direcon of -90?
1. 270 degrees.
2. 340 degrees.
3. 135 degrees.
4. 45 degrees.
Q4. Why would you want to use a local (For this sprite only) variable compared to a variable
for all sprites?
1. Local variables are accessible to all sprites.
2. Local variables minimize cluer and future mistakes.
3. There is no reason to use local variables.
4. Local variables are easier to dene.
Q5. Which of the following block commands represents a condional statement?
1. move (10) steps.
2. forever.
3. if () then.
4. repeat 10.
Summary
Right now we have a playable version of our Breakout game with a solid foundaon. The ball
breaks bricks, we keep score, and there's a game over condion. However, there are several
very important concepts introduced in this chapter that will make you Scratch programming
ninjas, including cloning, condional statements, and variables. The game, however, is not
very challenging yet.
In the next chapter, we'll connue building our Breakout game to create a more challenging
gameplay by increasing the ball speed and adding more bricks. We'll learn how to condense
our scripts by turning duplicate blocks of code into a reusable custom block. We'll also take a
look at cloud variables to keep score, which is another one of Scratch 2.0's featured addions.
7
Programming a Challenging
Gameplay – Breakout (Part II)
We ended Chapter 6, Making an Arcade Game – Breakout (Part I) with a
framework for the Breakout game. Basically, we're breaking bricks and keeping
scores in the framework. The game ends if we miss the ball. In this chapter,
we're going to develop the game by adding challenging elements such as
increased ball speed and a shrinking paddle. By the time we finish the chapter,
we'll have a strong foundation that you can continue developing.
Our objecves include:
Making incremental changes to the game, including mulple lives and ball speed
Implemenng custom blocks as a way to consolidate duplicate scripts
Understanding how to use Boolean blocks to control program ow
Creang variables that use cloud data
Debugging and considering alternave soluons
If you've already made a bunch of changes to your game, which will make it dicult for
you to follow this chapter, you can open the project from Chapter 6, Making an Arcade
Game – Breakout (Part I), from the book's source les, and connue working through
this chapter.

Programming a Challenging Gameplay – Breakout (Part II)
[ 164 ]
Implementing lives
Up unl now we have seen that the Breakout game ends when the ball falls below the
paddle, which occurs when the player misses the ball. In the original gameplay, the player
has three turns to clear as many bricks as possible across the two levels.
Time for action – adding a variable to track lives
As we make the game more dicult, it will be appropriate to provide the player with more
than one opportunity to clear the game. We'll do this by tracking the player's lives, as shown
in the following steps:
1. Create a variable named lives. You can create it For all sprites.
2. Let's set the starng value of the new variable at the start of the game. Select the
ball sprite. Then, add a set () to () block to the when ag clicked stack, which sets
the ball's inial posion and direcon.
3. Select the lives variable and enter the value 3.
4. Next, we need to change the logic that ends the game to check for life. To do
this, detach the stop (all) block from the wait unl (y posion) < (y posion)
of (paddle) block.
5. Instead of stopping everything, let's decrease the value of the lives variable. Add a
change () by () block to the boom of the stack. Select the lives variable and enter a
value of -1 in the by value.
6. Add a wait unl () block from the Control palee to the boom of the change (lives)
by (-1) block.
7. Using the () = () block from the Operators palee, make the wait unl () block
evaluate if lives = 0.
8. Then, add the stop (all) block to the end of the stack.
Play this game and miss the ball on purpose. Does your game ever end? How about the lives
value—does it ever reach zero? No. We have a bug.
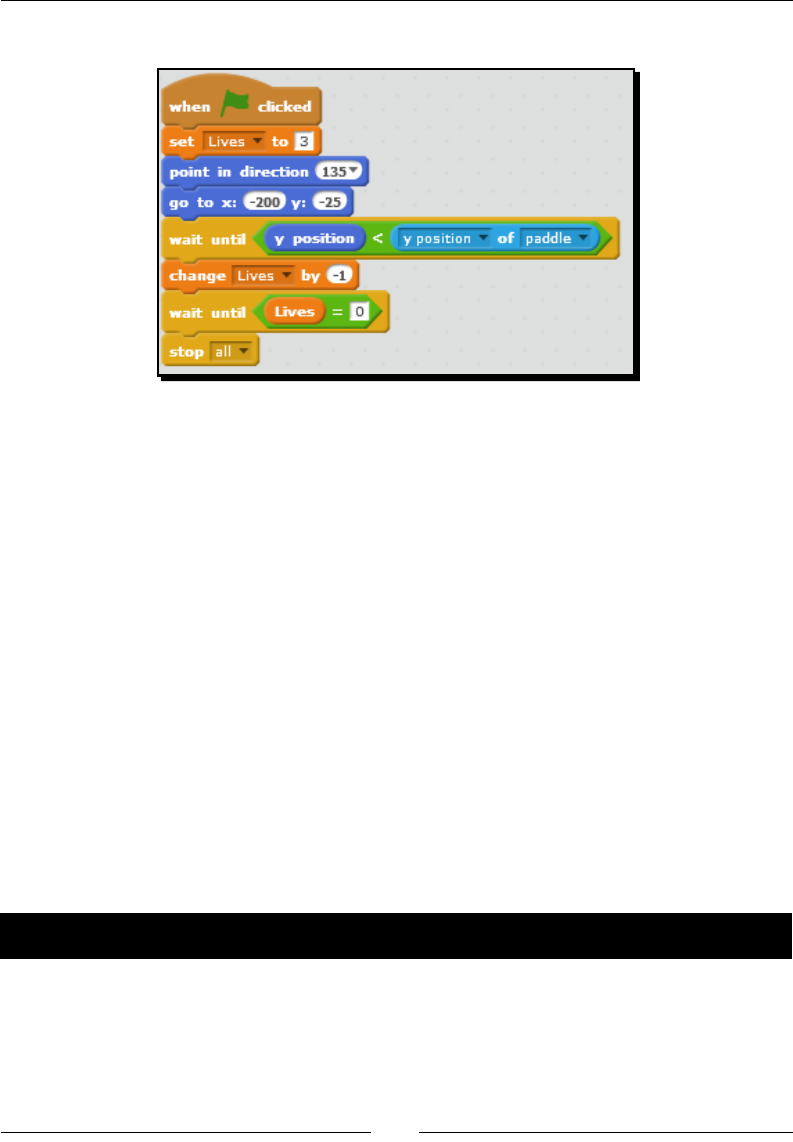
Chapter 7
[ 165 ]
The following screenshot shows our current script:
Let's pause a bit to examine this script and idenfy the bug.
What just happened?
Adding the lives variable was straighorward. We dened the variable by assigning it a
starng value 3. Each me the player misses the ball, change (lives) by (-1) will run and
reduce the number of lives available to the player. When there are no more lives le, the
game ends. At least, that's how we want our project to work. To understand why it's not
working as expected, we have to gure out how a wait unl () block works.
By this point, we know that the code aer the wait unl () block does not run unl the value
evaluates to true. What's happening in our script is that if we miss the ball once, the lives
variable is properly reduced. The script also evaluates the wait unl (lives = 0) block, which
amounts to false; therefore, our game connues correctly.
When the player misses the ball the second me, we see our bug. The problem is that the
wait unl () block will run only once; therefore, the code to reduce the variable by -1 never
runs more than once, ensuring that the lives variable remains at a value of 2.
We need to rewrite the script to get beer control over the wait unl () blocks.
Time for action – checking for game over
There's going to be more than one way to address our "game over" bug, and that shouldn't
surprise you by now. We're going to approach this problem with the forever block.
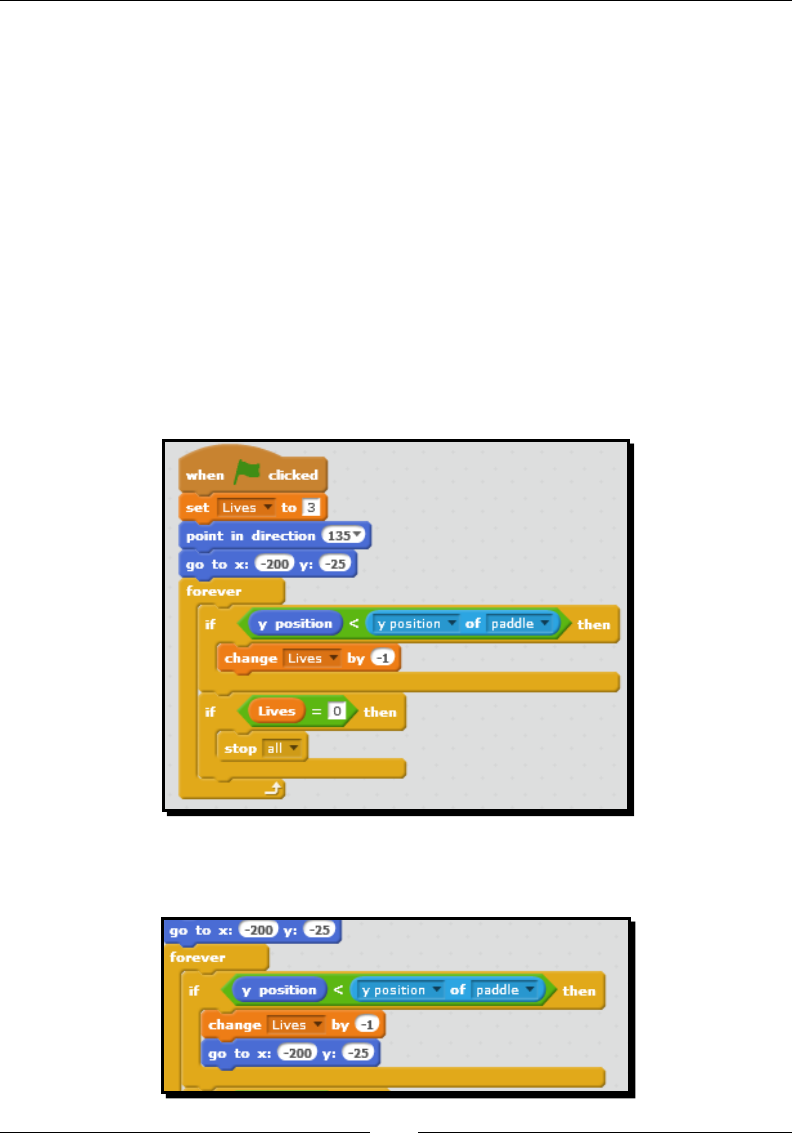
Programming a Challenging Gameplay – Breakout (Part II)
[ 166 ]
Let's see what we can do by performing the following steps:
1. First, detach the rst wait unl () block from the script and add the forever
block in its place.
2. Add two if () then blocks to the forever block because we will evaluate two
unique values.
3. The rst if () then block should evaluate the y posion < y posion of
(paddle) statement.
4. Add the change (Lives) by (-1) block to the rst if () then block we just added.
5. Make the second if () then block evaluate lives = 0.
6. Add the stop (all) block to the second if () then block we just added.
7. Play the game and allow the ball to miss the paddle, and then watch your lives
quickly drop to zero. Now, we've found another bug. The following is a screenshot
of our current script:
8. This bug can be overcome by adding a copy of the go to x: () y: () block to the
change (lives) by (-1) block. The following screenshot shows the revision:
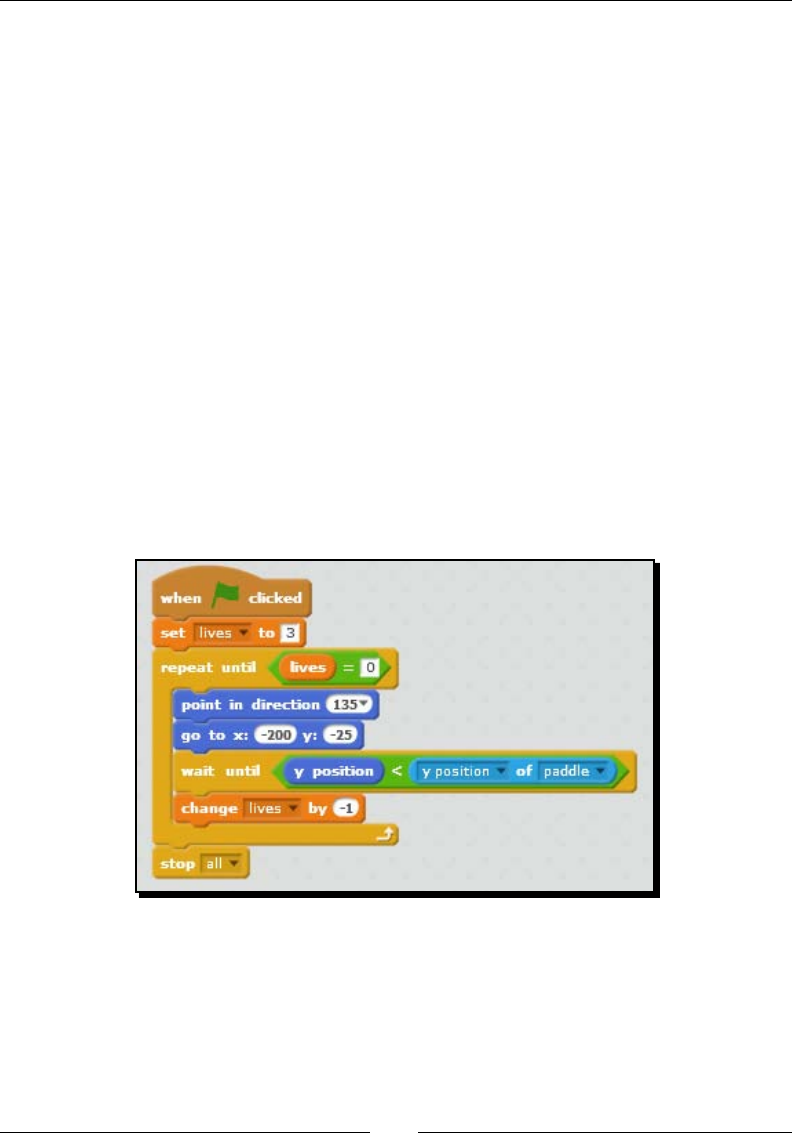
Chapter 7
[ 167 ]
What just happened?
Scratch, like any other programming language or computer applicaon, is designed to do
exactly what you tell it to instead of what you think it should do. In addion, we don't know
how far that gap is unl we snap some blocks together and run the code.
We started this exercise knowing that we had to x our wait unl () blocks because they
didn't suciently control the ow of our script. The x was to use a combinaon of a
forever block and two if () then blocks.
The second big problem we encountered was that once the ball fell below the paddle, the
ball remained below the paddle and depleted the player's lives. The ball never went back
into play. The go to x: (-200) y: (-25) block, which we added aer we reduced the player's
life, put the ball back into play like it was at the beginning of the game. Even though we are
going back to the original starng posion, you can choose to randomize the new starng
posion to add some unpredictability.
Evaluating multiple programming solutions
Let's pause for a brief discussion on revising our script. I was provided with an alternave
script to x the bug of reducing the player's life. As the soluons go, the script that was
provided to me is concise and is visible in the following screenshot:

Programming a Challenging Gameplay – Breakout (Part II)
[ 168 ]
It has some benets in which it doesn't duplicate some blocks and uses one of the original
wait unl () blocks. The queson about whether this is a beer soluon or not is a subjecve
debate, as it doesn't inherently work any beer than the original revision that we did in the
exercise. That's the point of our diversion. When you're faced with construcve cricism, you
get to choose how you're going to accept the crique in most cases. Naturally, parents and
teachers get to impose their will on the people they teach, but independent readers always
have a choice about how these scripts come together.
Somemes a funconal script trumps someone else's beauful soluon. Unless I'm xing a
bug or my original soluon was just absolutely hideous, I don't make changes to my script
just because someone else has a "beer" soluon. There are some dierences that make
me consider revising the script in the previous exercise, and it has to do with the starng
locaon and direcon of the ball.
We programmed our ball to start at point (-200,-25) and aer the player misses, we send the
ball back to the same place. The ball, however, will restart in its previous direcon, which
may actually be -135. If it's -135, it will bounce o the side of the stage aer being put back
into play (that is, aer the player misses the ball). Now, the queson is—does that maer?
If it does, then you need to consider revising the script. However, what if we wanted the ball
to start at a specic locaon, but go to a random starng posion aer the player misses the
ball? In that case, the proposed soluon in the previous screenshot will make our change
a bit harder, though not impossible.
Hopefully, you will see that the decision to revise a script is not always a simple right or a
wrong opon. Rather, these changes have complicaons and ramicaons. The decision
about which soluon to implement is yours.
Have a go hero – programming a character's health
Our Breakout game uses lives to track the number of chances a player gets to win the game.
When the player misses the ball, the game takes away a chance. A closely related idea to
lives is health. With health, a character may take several hits unl it is beaten or weakened.
Imagine that you want to insert a super strong brick into the game. You wouldn't want
the player to break the super strong brick with one hit of the ball, right? That wouldn't
be super strong.
With a bit of programming, you can track the number of hits a parcular brick takes. Thus,
you can now break the brick only when the number of hits crosses a threshold; or, you can
weaken the brick by making it smaller with each subsequent hit.
Take a shot at building a super strong brick in the game that takes repeated hits to break.
In the current design, you can place the brick above or below the current rows.
Chapter 7
[ 169 ]
Adding more bricks to the level with a custom block
Currently, we have two rows of yellow bricks. Our next task will be to create a new brick
color and add two more rows to the game using this new brick color. However, this will
require us to revise our exisng code that redraws the bricks, and through this revision,
we will turn the current script into a custom block, which is a new feature in Scratch 2.0.
Time for action – creating a second brick
There are a couple of dierent ways to create a new brick color in the game. We can create
a new sprite with the color or we can add a costume color to the exisng brick sprite.
This exercise will take the costume approach so that we can use a single custom block
to draw all the rows and colors. The steps are as follows:
1. Let's ensure the brick has a valid name that will represent our changes.
I recommend that you use the name brick instead of yellow brick.
2. From the Costumes tab of brick, add a new costume by using the paint new
costume icon.
3. When the blank canvas of the paint editor opens, convert the image to vector
and draw a solid red rectangle that is 45 pixels long and 25 pixels tall because that's
how big the yellow bricks were. We did this exercise in Chapter 6, Making an Arcade
Game – Breakout (Part I).
To give you more control and make it easier to draw the image to a
specific size, zoom in on the image using the zoom icon, as shown in
the following screenshot:
4. Aer you draw the second costume, rename the costumes according to their color;
for example, yellow and red.
Creang these bricks is the kind of process that could very well drive you mad. If you have
problems, go get the book's code bundle and grab the same from the chapter code le.
Also, note that the paint editor has a Clear buon. You can use it to start over.
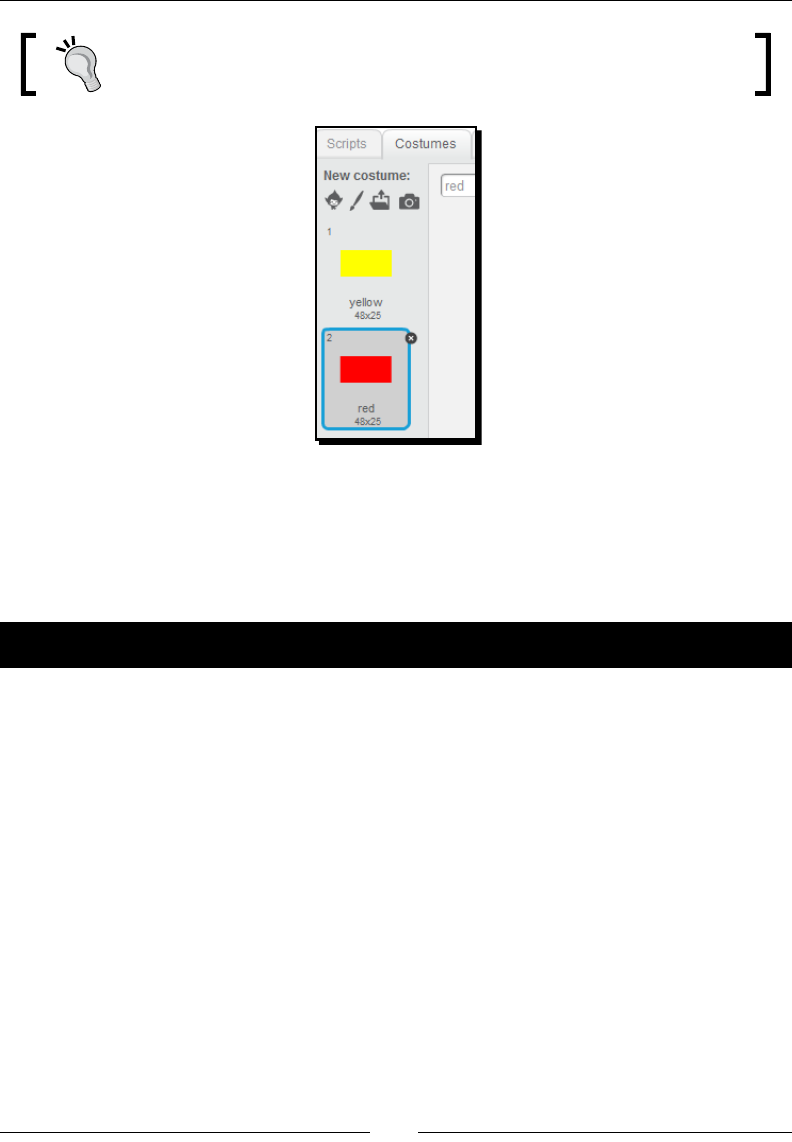
Programming a Challenging Gameplay – Breakout (Part II)
[ 170 ]
While resizing the sprites, try drawing the sprite smaller than you need it to
be intenonally. Then, drag the edges of the sprite unl it is the right size.
What just happened?
This exercise mirrors our eorts in Chapter 6, Making an Arcade Game – Breakout (Part I).
However, we now have a single brick sprite that has mulple colors, which we'll use in
the game.
Time for action – drawing rows of bricks with custom blocks
The script to create the two rows of yellow bricks is working well; however, we're about to
duplicate a lot of code and potenally have a really large and a dicult-to-manage script.
Let's break the duplicate code into a procedure, also known as a custom block in Scratch 2.0,
as described in the following steps:
1. From the Scripts tab of the brick, click on the More Blocks palee and click on the
Make a Block buon.
2. In the New Block dialog that opens, type in lay bricks in the text eld of the
purple block and then click on OK to create the block.
3. Aer you create the block, Scratch places a block with the name lay bricks in the
More Blocks palee, and in the scripts area, you now have a block tled dene
lay bricks.
4. If you look closely at the code to create the bricks, you'll note that everything in
the repeat blocks is an exact duplicate. Break the script apart and aach one of the
repeat blocks to dene lay bricks.
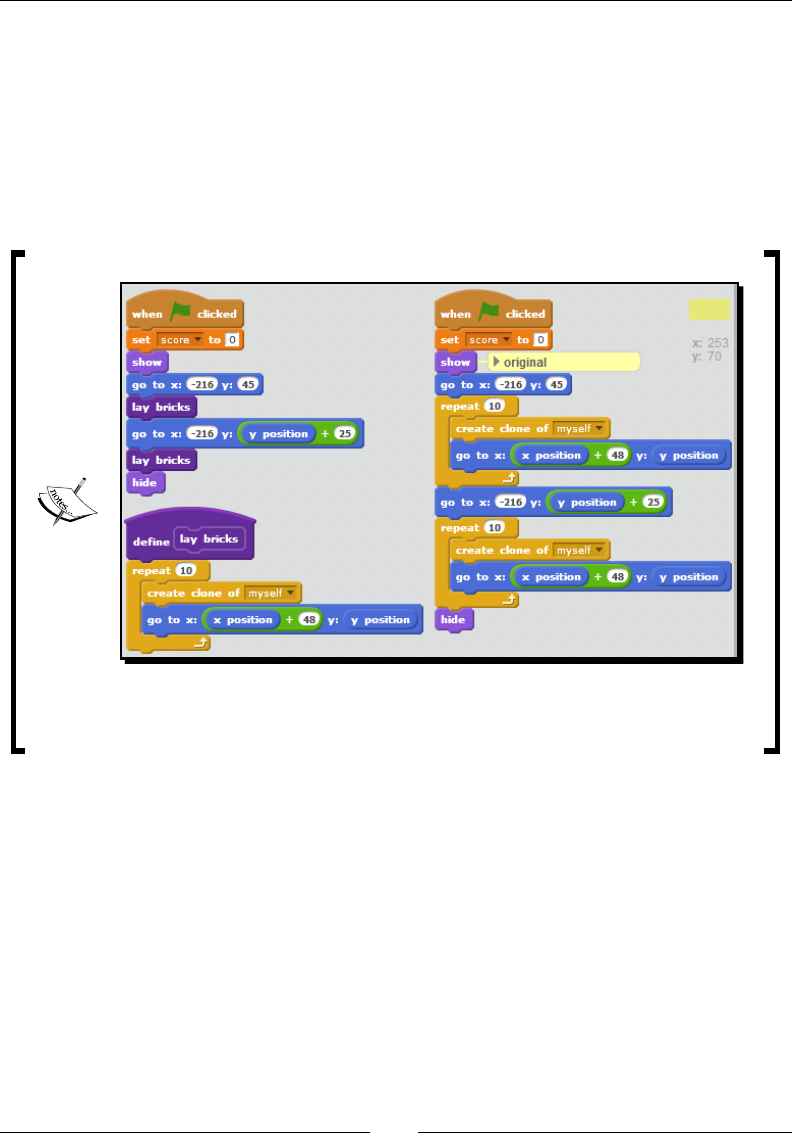
Chapter 7
[ 171 ]
5. Discard the other repeat block. We don't need it any more.
6. To ensure we're on the right track, let's get our script back to the state where
it makes two rows of yellow bricks. Aach a lay bricks block to the rst
go to x: () y: () block.
7. Then, add the second go to x: () y: () block followed by another lay bricks block.
Finish the stack by reaaching the hide block. The following screenshot shows
our revised script alongside our old script:
The preceding screenshot is only for illustration purposes. Running both of these
scripts at the same time will produce wrong results.
8. If you haven't already tested the code, click on the green ag to ensure it sll works.
9. Now, let's add the red brick. Detach the hide block for a few steps. Add a switch
costume to () block to the stack and select red.
10. Aach a duplicate of the go to x: (-216) y: ((y posion) + (25)) block, followed by a
lay bricks block.
11. Repeat the previous step and reaach the hide block. Refer to the following
screenshot for our new script.
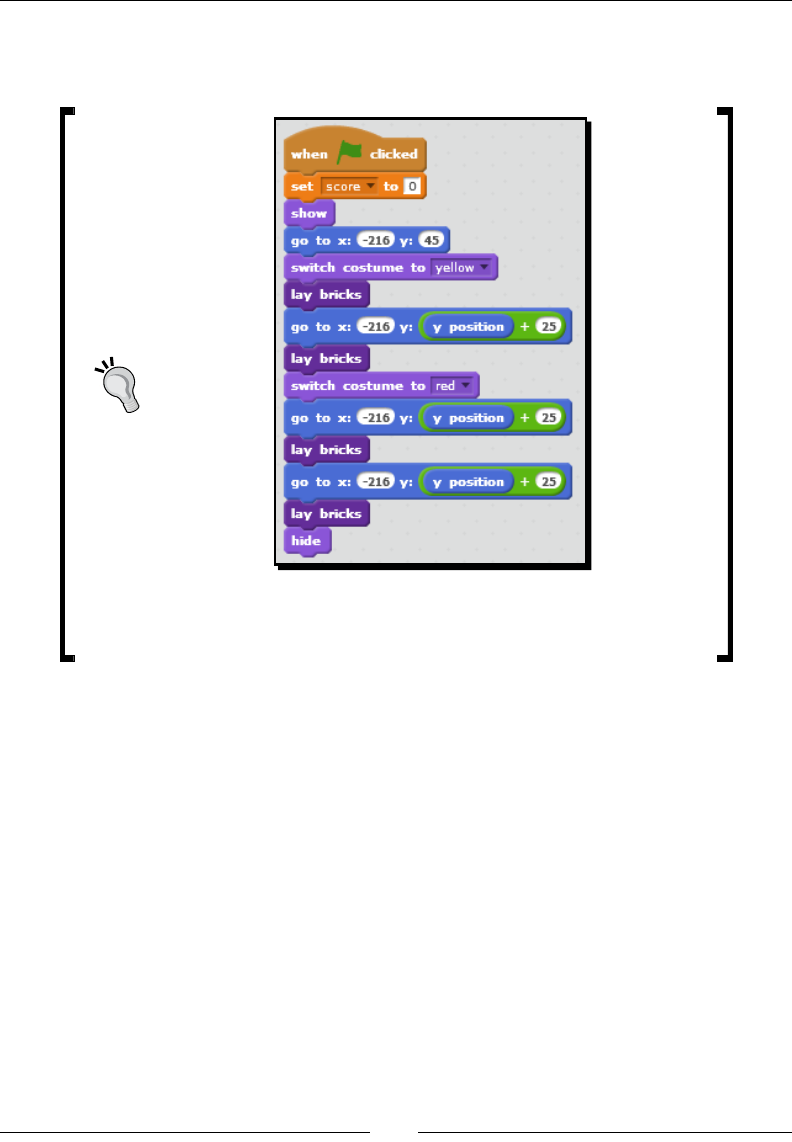
Programming a Challenging Gameplay – Breakout (Part II)
[ 172 ]
12. Add a switch costume to () block aer the show block at the top of this script and
choose yellow.
To delete a custom block, you must first remove all instances of the
custom block from the scripts area. Then, you can drag the define
block to the blocks palette to remove the custom block.
What just happened?
Have you ever built a fort in the backyard, a snow castle, or a LEGO house? If so, this process
should look familiar. First, build a layer of a wall. Then, go to the top of the layer and add a
new one. It's a repeve process where you repeat steps unl you're nished or red.
As Scratch programmers, the repeon of code is a real pain. Note that in the rst version
of the script, we were required to duplicate all the code in the repeat block, two mes for
each brick color we add to the game. By refactoring our code to use a custom block, we've
made the script easier to build, read, and maintain. Note that I'm not saying all duplicaon
is bad or can be avoided, as we've clearly duplicated small snippets of blocks in previous
exercises. However, duplicang two blocks, for example, is much more manageable than
duplicang ten.
Now, for example, if we decide to change the width of the bricks, we have one place where
we can make the change—in the dene lay bricks stack.
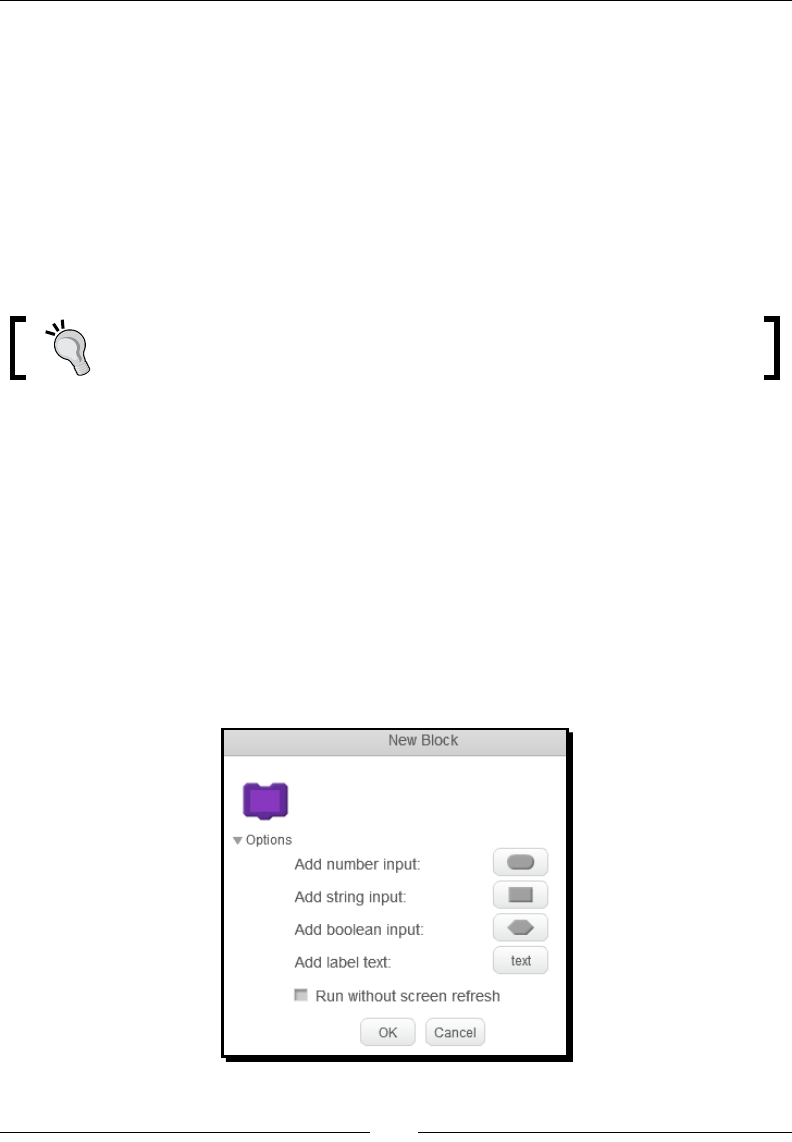
Chapter 7
[ 173 ]
I can hear you poinng out the obvious. "But Mike," you're saying, "what's with all the
duplicate go to blocks?". Good point. We'll come back to that.
Introducing procedures by way of custom blocks
Procedures allow us to give a stack of blocks a name that can then be reused in other scripts,
which avoids duplicaon. If you check out other languages, you may come across the term
method or funcon.
The power custom blocks can be seen in the previous exercise. It's a consolidaon of code in
a single line or block.
In Scratch 2.0, a custom block is only available to the sprite that you create it for,
which is the sprite with the dene block.
Prior to Scratch 2.0, Scratch programmers could use broadcasts as a way to provide some
script deduplicaon. There are some obvious dierences as you use custom blocks and
broadcasts. For example, custom blocks accept inputs, whereas broadcasts do not support
inputs (arguments). One of the less obvious dierences is that the custom blocks can support
recursion, which means the dene stack can use the custom block as part of the procedure.
Setting custom block inputs
When we created the custom block in our exercise, you may have observed the New Block
dialog had an Opons menu. The opons include Add number input, Add string input,
Add boolean input, Add label text, and Run without screen refresh, as shown in the
following screenshot:
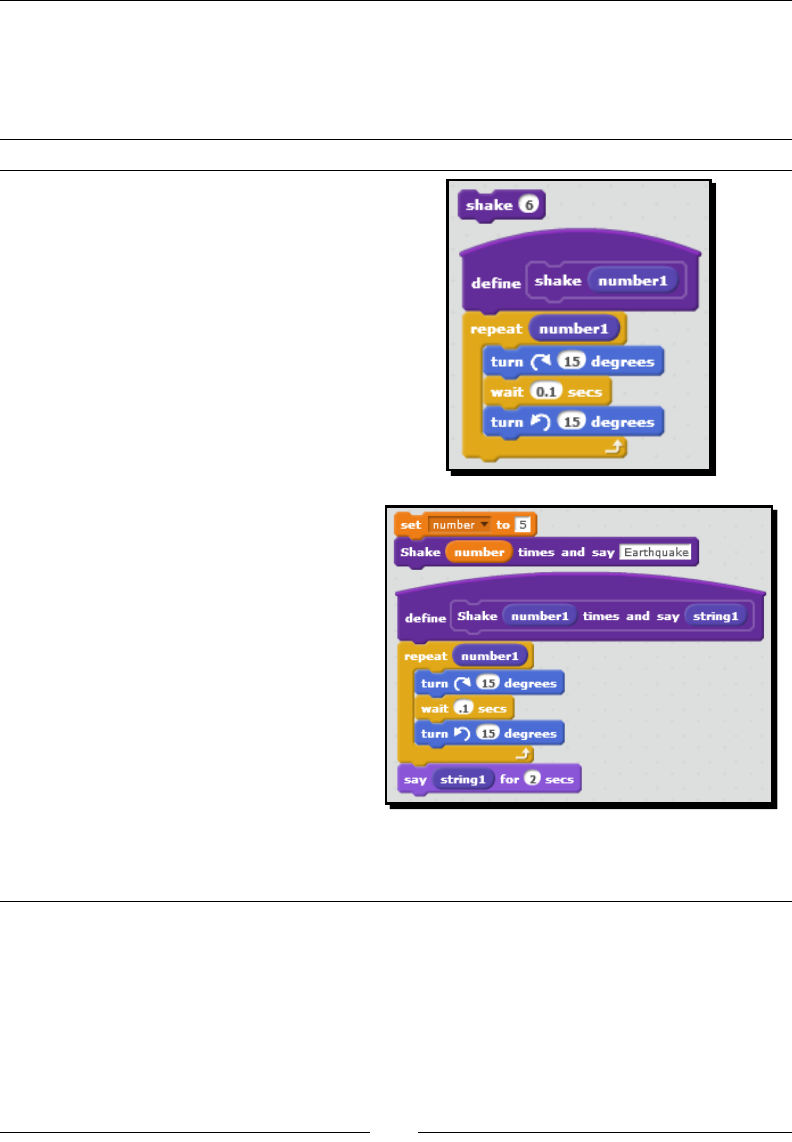
Programming a Challenging Gameplay – Breakout (Part II)
[ 174 ]
In the Have a go hero – creang a custom block with opons exercise that follows, you'll
have a chance to explore the custom block inputs. We'll also use custom block inputs in
Chapter 9, Turning Geometric Paerns into Art Using the Pen Tool. The following table
provides an overview and a sample of each custom block opon:
Option Description Sample usage
Add number
input
This option passes a
number to the custom
block definition.
The code blocks in the
sample usage column
will shake the sprite six
times.
Add string input With this option, the
text that gets passed
to the custom block
definition can be
printed via the block.
In the sample usage
code shown in the
screenshot (on the
right hand-side of
this table), the block
is passing a variable
with a value 5 and the
text Earthquake.
When the block runs,
the sprite will shake
five times and then say
Earthquake.
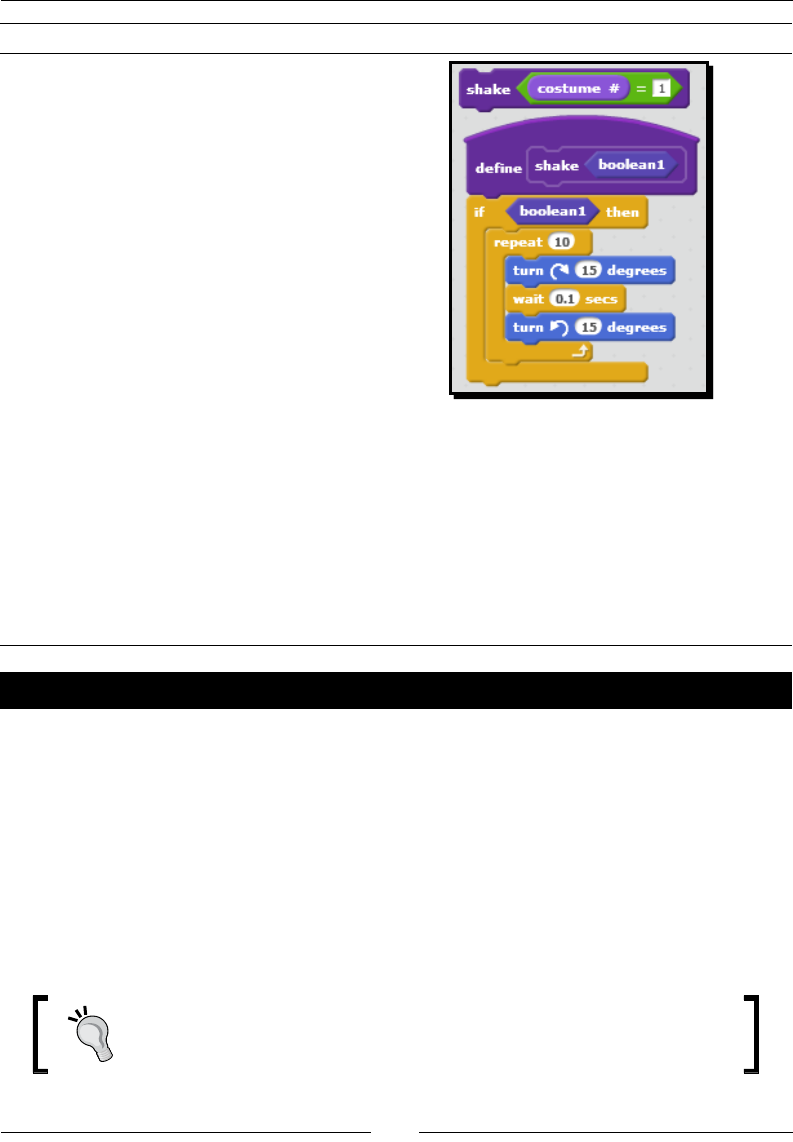
Chapter 7
[ 175 ]
Option Description Sample usage
Add boolean
input
With this option, the
statement is evaluated
and runs the custom
block if true.
The sample usage
screenshot (on the
right-hand side of this
table) shows a block
that evaluates whether
or not the current
costume equals 1. If the
costume is 1, the sprite
will shake 10 times.
Add label text This option will provide
a block label that can
give some context to
the type of value that
should be passed to the
custom block.
In the string input example, times and say is the
label on the block.
Run without
screen refresh
If this option is checked,
the block runs all
at once rather than
waiting between blocks.
This block can be used for very large calculations
or scripts.
Have a go hero – creating a custom block with options
We demonstrated the power of procedures by way of custom blocks as a way to consolidate
the code, but the current script to create the rows of bricks sll has a lot of duplicaon.
Here's a two-part challenge. Pass the height of the brick costumes to the custom block,
and incorporate the go to x: -216 y: ((y posion )+ (25)) calculaon as part of the lay bricks
procedure. You'll only need to pass the height of the brick because the procedure we created
already accounts for the width of the brick in the go to block in the procedure. Even though
the height value can always be 25 to match the actual height of our brick, we can change
the height to be bigger than our current brick size, which would create white space between
each row.
You can edit the procedure and add opons by right-clicking on the dene
block or the block name in the More Blocks palee.
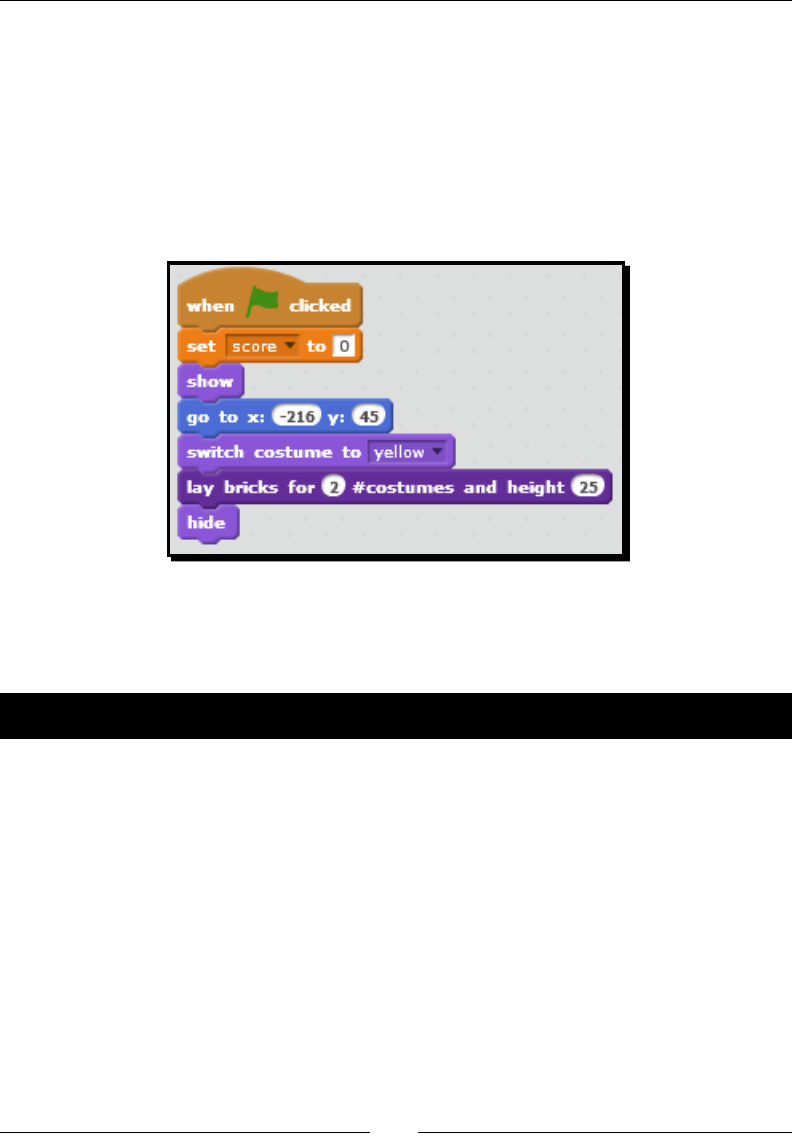
Programming a Challenging Gameplay – Breakout (Part II)
[ 176 ]
Part two is to consolidate the script even further by passing the number of brick costumes
you want to use as an input opon to the procedure. By adding this input to the procedure,
you have the necessary variables to make the procedure perform the enre work of building
two rows of bricks for each costume.
The following screenshot shows a modied lay bricks block that passes the number of
brick costumes and the height of the brick or height of row into the procedure. This stack
successfully builds two yellow bricks and two rows of red bricks, just as we le o in our
previous exercise. However, it uses considerably less blocks.
Need a hint? You need to have a control for three values: total costumes, row width, and two
rows per costume. We have already built the procedure to handle two rows for one costume,
so don't throw out what we've done.
Time for action – coordinating the ball play
Now that we have the rows of bricks built and we know all about custom blocks, it's me
for an easier problem. In our script, the ball starts before the bricks are built. We can use
broadcasts to coordinate the two events. The steps are as follows:
1. With the brick sprite selected, add a broadcast block to the end of the stack that
builds the rows of bricks. Give it a clear name, such as play.
2. On the ball sprite, nd the forever block with the move (10) steps and if on edge,
bounce blocks.
3. Replace the when ag clicked block with the when I receive block. Select the
play message.
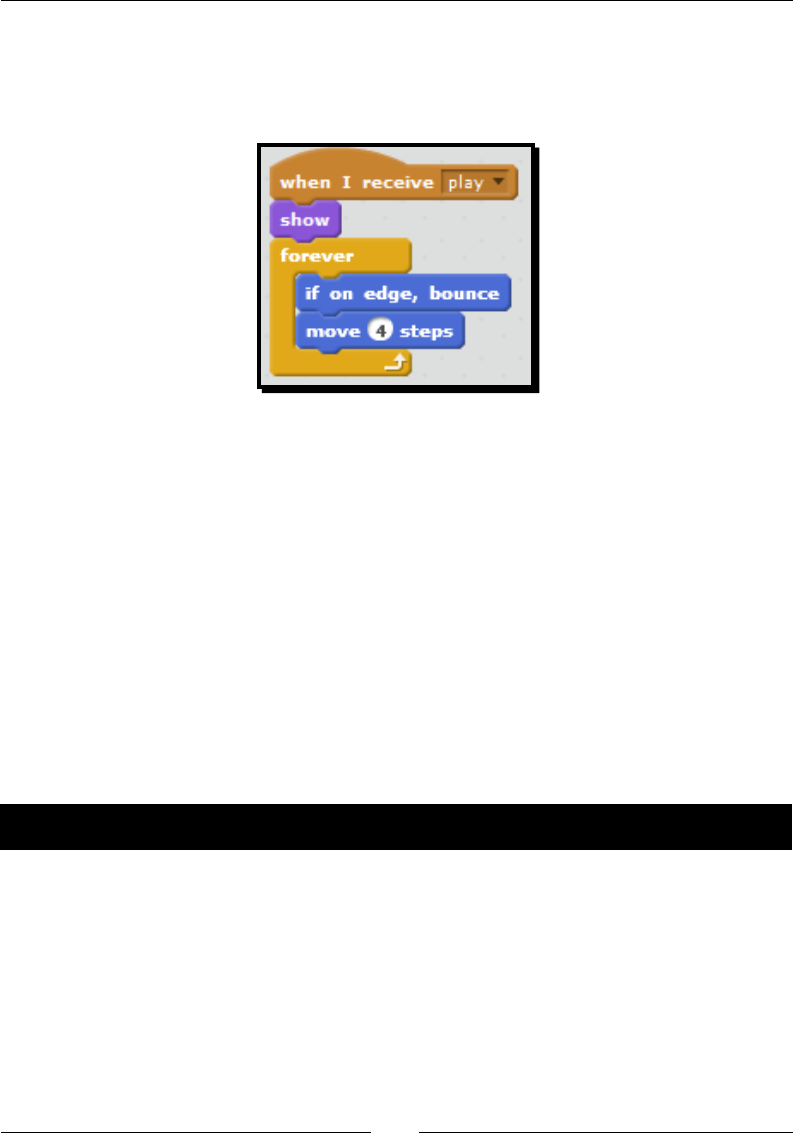
Chapter 7
[ 177 ]
4. Now, when you start the game, the ball should not start unl aer the bricks are all
created. However, the ball remains visible on the screen. We must hide it by adding
a hide block to the script that inializes the lives variable and sets the starng
posion and direcon. Then, add a show block to the when I receive (play) block.
What just happened?
We don't want the game to start before the screen is fully set up. So, this exercise was all
about geng our ming right by using the broadcast block to ensure the ball doesn't go
into play while the game setup is sll placing the bricks on the screen.
Have you noced a trend yet? One change introduces another problem, which requires
another incremental change. This iterave revision process occurs with any creave
endeavor. Enjoy it.
Increasing ball speed and difculty
At the moment, the ball is moving at a leisurely pace. We know by now that the higher the
value we assign to the move block, the faster the ball goes.
Time for action – increasing ball speed
There are several criteria that we could use to increase the ball speed, such as score or
number of hits. However, we're going to increase the ball speed based on the duraon
of the game. The steps are as follows:
1. To manipulate the ball speed as the script runs, we'll need a variable. So, create a
variable named speed for the ball.
2. Find the ball script that begins with when I receive (play) and add a set () to () block
from the Data palee at the top of the stack. Select the speed variable and give it a
starng value of 5.
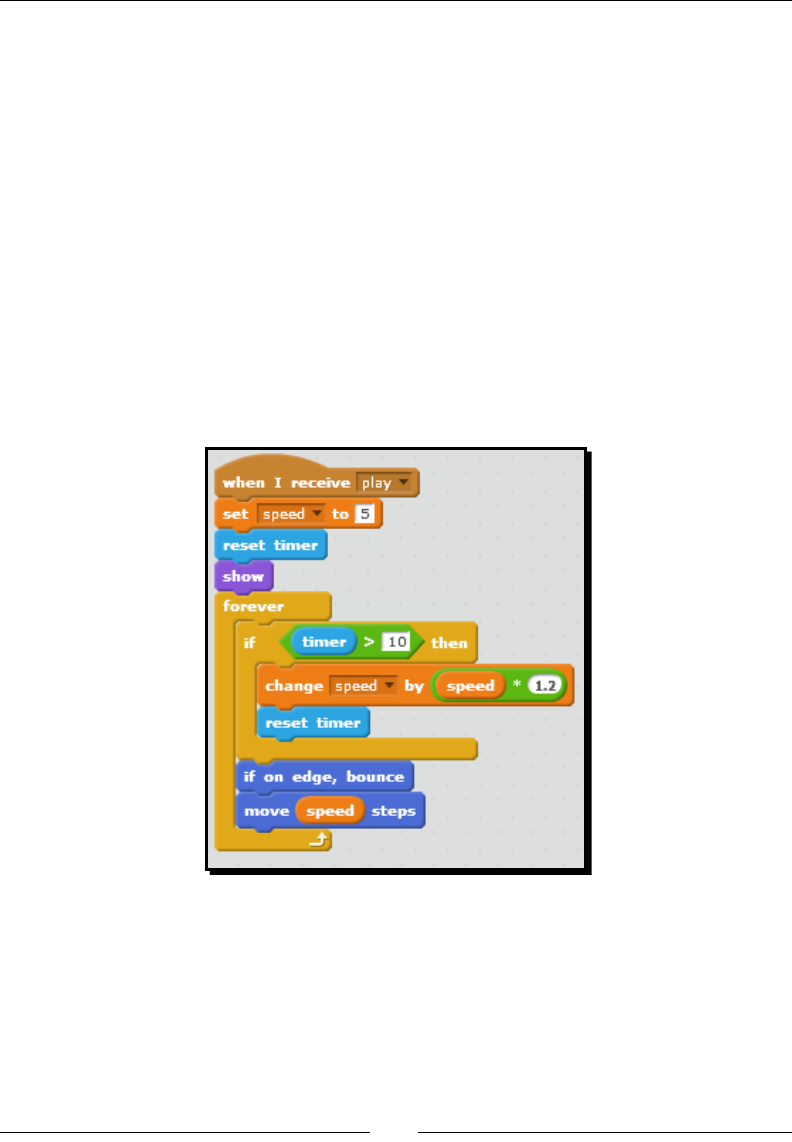
Programming a Challenging Gameplay – Breakout (Part II)
[ 178 ]
3. From the Sensing palee, add a reset mer block. We'll use this block with the
understanding that we won't use reset mer anywhere else in the project.
4. Inside the forever block, add an if () then block.
5. We're going to evaluate whether or not the mer block is greater than 10
by snapping the () > () block from the Operators palee into the if () block.
Then, we will add the mer block from the Sensing palee into the rst value.
Type in 10 into the second value.
6. Inside the if (mer > 10) then block, add a change () by block. Select the speed
variable and add a mulplicaon block from the Operators palee to the value.
Mulply the speed variable by 1.2.
7. Add a reset mer block to the if block.
8. Finally, add the speed reporter block from the Data palee to the value of the
move block.
9. Your script should look like the following screenshot. Play the game.
What just happened?
For every 10 seconds the player stays alive, the ball speed will increase by a factor of 1.2,
which ensures we steadily increase the speed and progressively make the game harder.
This project introduced the mer block, and if you enable the mer reporter block, you'll
noce that the built-in me connually runs. By reseng it in our script, we have an easy
way to count me intervals. Using more than one reset mer block in a project will have
unintended consequences and create bugs.

Chapter 7
[ 179 ]
There are three key adjustments in the script we just created: the starng value of the speed
variable, the mer duraon that we evaluate, and the mulplier value in the change () by ()
block. This won't be the only diculty that we will add to our game, but you can adjust these
sengs to get just the right ball speed.
Using Boolean evaluations
In Scratch, the Boolean blocks are hexagonal in shape and t into the hexagonal values
of other blocks. When a Boolean block is evaluated, it reports either true or false. Our
previous exercise demonstrated a common way to control a script using the Control block
and a Boolean evaluaon. The Boolean evaluaon, that is, speed > 10 will either be true or
false. If it's true, then the script increases the speed and the reset the mer block will run.
The following table shows the Boolean blocks included with Scratch:
Block Location Description
() < () Operators This block returns true if the first value is less than
the second value. It also compares the text (for
example, a < b).
() = () Operators This block returns true if the two values are equal.
It also compares the text (for example, f = f).
() > () Operators This block returns true if the first value is greater
than the second value. It also compares the text (for
example, z > a).
() and () Operators This block combines two Boolean blocks where
both have to be true to report true.
() or () Operators This block combines two Boolean blocks but only
one of them has to be true in order to report true.
not () Operators This block evaluates the Boolean to see whether
it is false and reports true if the condition is
false; likewise, it reports false if the condition
is true.
touching ()? Sensing This block reports true if the current sprite is
touching the specified sprite.
touching color ()? Sensing This block reports true if the current sprite is
touching the specified color.
color () is touching ()? Sensing This block reports true if the specified sprite color
is touching the specified color of the stage or any
other sprite.
mouse down ()? Sensing This block reports true if the left mouse button is
clicked.

Programming a Challenging Gameplay – Breakout (Part II)
[ 180 ]
Block Location Description
key () pressed? Sensing This block reports true if the specified key is
pressed.
sensor ()? Sensing This block is only available for use with a PicoBoard.
It reports true if the specified button is pressed or
the specified port is connected.
() contains () Data This block reports true if the specified list contains
the specified text. This block only shows up when a
list is created.
All programming languages will use Boolean expressions, comparisons, and condional
statements as fundamental ways to control what happens in the program.
Keeping score based on a clone's costume
Our Breakout game deserves another challenge. This me, we're going to keep track of the
costume number of the cloned bricks so that we can decrease the paddle size when some
of the yellow bricks are broken.
Time for action – decreasing the paddle size based on the
clones' costume
We have three main tasks. We need to create a smaller costume for the paddle, create the
script to keep track of how many mes the ball touches the brick's yellow costume, and then
build the script that changes the paddle's costume.
To detect the yellow costume of the brick, we have mulple soluons available to us.
However, we're going to pick a slightly more complicated soluon because it oers us more
exibility for future enhancements. We'll revisit some alternaves aer we work through
the exercise. The steps are as follows:
1. Let's start with the paddle rst. Duplicate the exisng paddle costume and then use
the eraser tool to make the costume smaller. Let's name the costumes something
meaningful, such as big and small.
2. While we're thinking about it, let's ensure our game always starts with the big
paddle costume visible. Create a when ag clicked stack for the paddle and add
the switch costume to (big) block.
3. Now, we need to keep track of how many mes the ball hits the yellow sprite's
costumes. To do this, we're going to assign a unique ID number to each clone.
For the ball, create a variable named clone id and set it to For this sprite only.
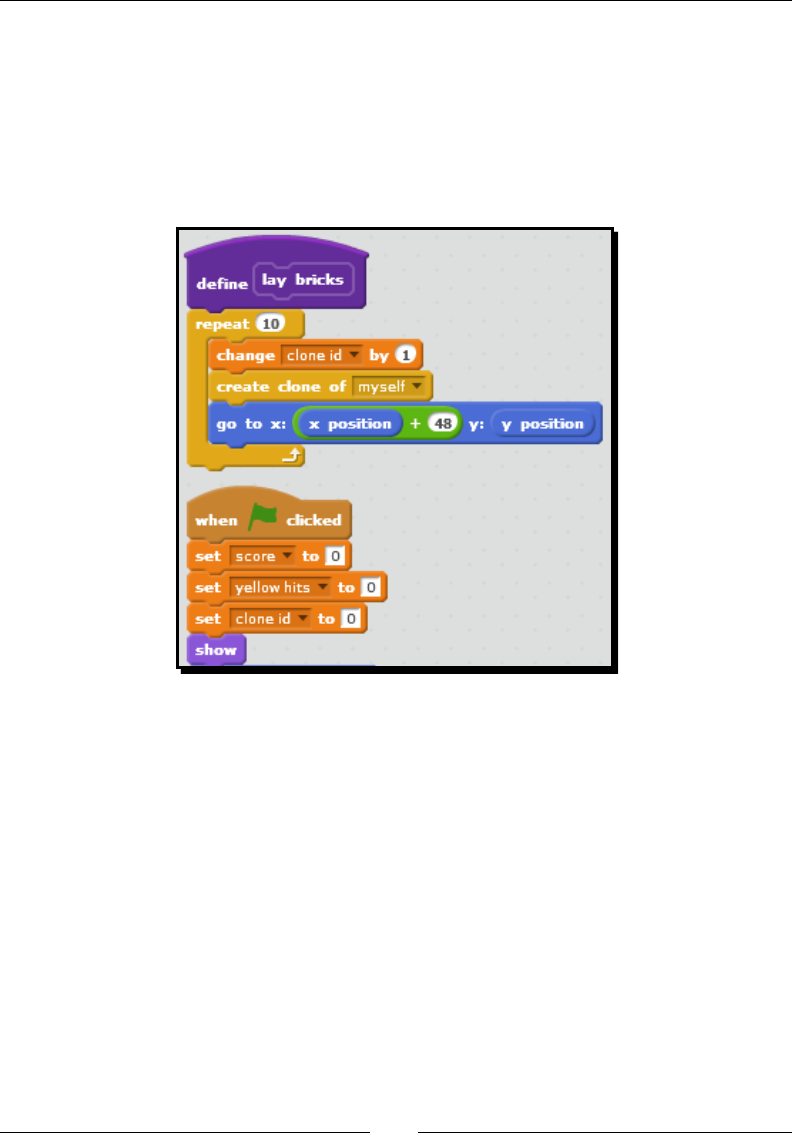
Chapter 7
[ 181 ]
4. In the dene lay bricks stack, add a change (clone id) by (1) block before the create
clone of (myself) block.
5. Remember, any me we manipulate a variable or seng, we need to reset the
value at the start of the game. Add a set (clone id) to (0) block to the when ag
clicked stack that builds the rows of bricks. The following screenshot shows the
modicaons to the brick sprite's scripts. Your stacks may be slightly dierent if
you did the hero exercise earlier in this chapter.
6. Now that each clone has an ID, we need to evaluate that ID when the ball touches
the clone to determine if we count the hit. To track the hits to the yellow bricks,
create a variable named yellow hits and set it to For all sprites.
7. When Scratch creates a clone of the sprite, the clone inherits the variables assigned
to the sprite. If the variable is local to the sprite, it becomes local to the instance of
the clone and will only be accessible to the clone. However, a global variable will
be available to all clones. Add an if () then block to the if (touching ((ball)?) then
condional statement in the when I start as a clone stack and evaluate the ((clone
id) < (21)) statement.
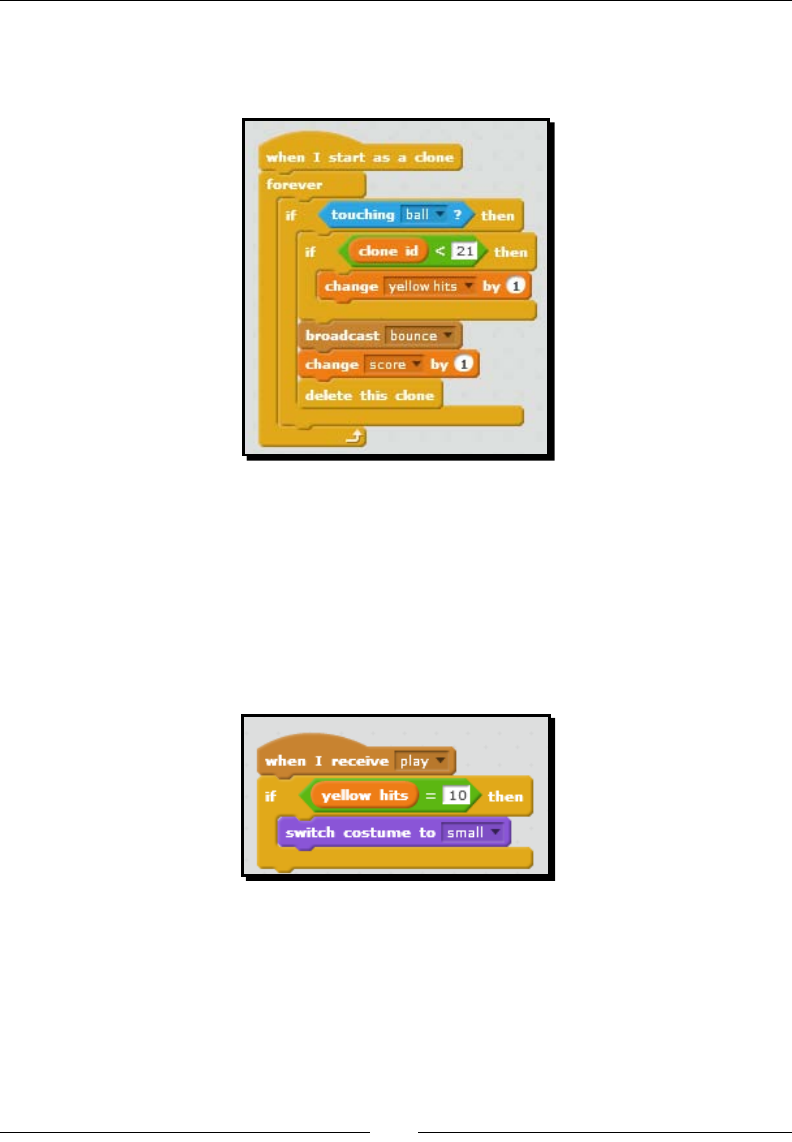
Programming a Challenging Gameplay – Breakout (Part II)
[ 182 ]
8. Add a change () by () block to the if (clone id) < 21) then statement. Select the
yellow hits variable and enter 1 for the change by value. The following screenshot
shows the script:
9. Now, we need to tell the paddle to shrink, so select the paddle sprite. Start a new
stack with the when I receive (play) block. Add an if () then block.
10. In the if block, evaluate if yellow hits = 0.
11. Inside the if ((yellow hits) = (10)) then block, add the switch costume to () block
and select small.
12. Aer the change (yellow hits) by () block and evaluate the ((yellow hits) = (10))
statement.
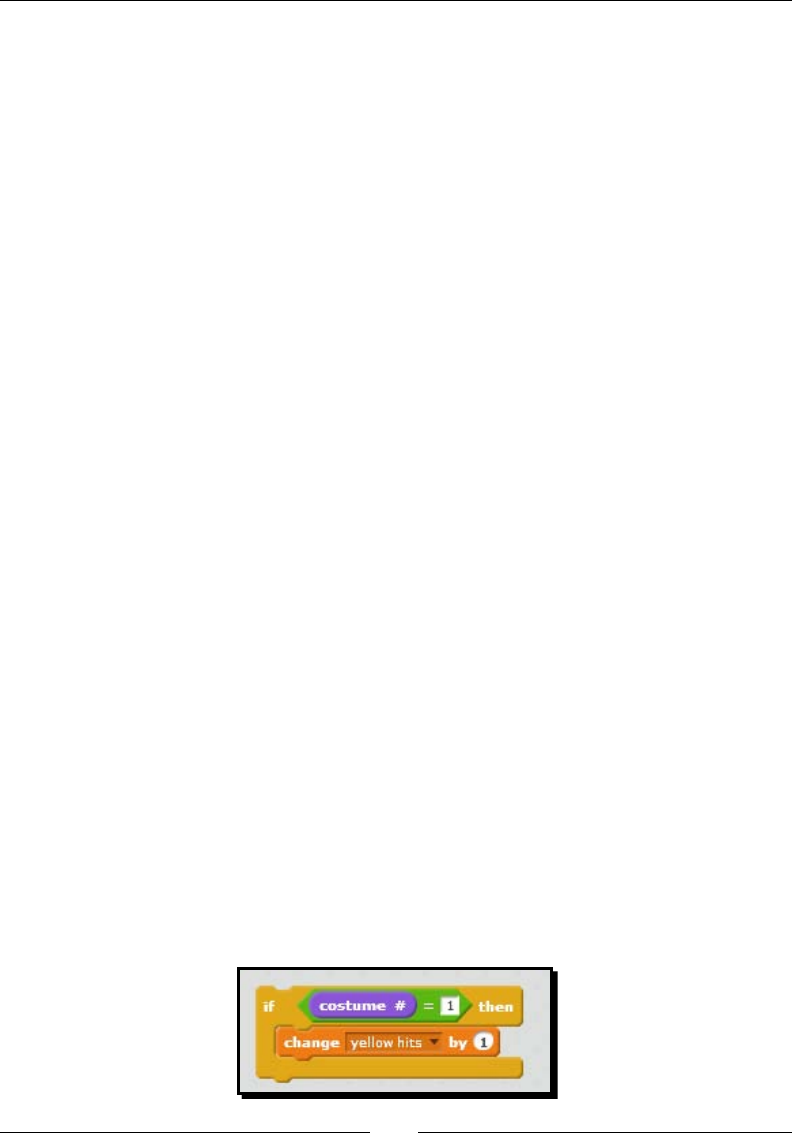
Chapter 7
[ 183 ]
What just happened?
The challenge of this exercise is detecng the costume of another sprite, or in this case,
a clone. Scratch does not provide us with a touching (costume #) of (sprite) block.
This block would have alleviated a lot of code. Instead, we had to get creave.
By assigning the clone a unique ID number at the me the clone is created, we can track
that clone no maer where it is on the stage. This is just like the GPS signal from your smart
phone that can be used to locate your posion anywhere in the world among millions of
similar devices. Cloning the costumes of the bricks is a systemac process, and we've already
dened the math behind that process. Each costume gets cloned 10 mes per row for two
rows. That's a total of 20 cloned bricks per costume.
This means the yellow bricks are represented by clone IDs 1 through 20. The red bricks can
be idened by clone IDs 21 through 40. This gives us the rst Boolean evaluaon, that is,
if ((clone id) < 21)).
If the clone ID is less than 21, we instruct the script to add 1 to the yellow hits variable.
Then, the paddle connually checks to see whether yellow hits equals 10. When it does,
the paddle switches to the small costume, thereby creang a more challenging game.
If you followed my step-by-step instrucons, then your game should work. However, if you
doubted the reason to make the yellow hits variable global and instead opted to choose
For this sprite only, then you have a broken script at the moment. If you make yellow hits
a local (For this sprite only) variable, then the change (yellow hits) by (1) variable will not
increment. This is because all clones can access a global variable; however, the For this sprite
only variables are assigned to individual clones, which means the brick clones would not be
able to access the yellow hits variable of the parent sprite unless it is created for all sprites.
In the game, shrinking the paddle aer ten yellow bricks are broken does not mean that
no red bricks were broken. You can opt to shrink the paddle aer 10 bricks of any color.
As a game designer, determining how hard you make the game and at what point you add
a challenge is your privilege.
Considering alternative solutions
Here's another way to solve the problem of tracking the hits to the yellow bricks.
In the following screenshot, the script checks the costume number to determine when to
increment the yellow hits variable. All the yellow bricks have a costume equal to 1 and all
the red bricks have a costume equal to 2.
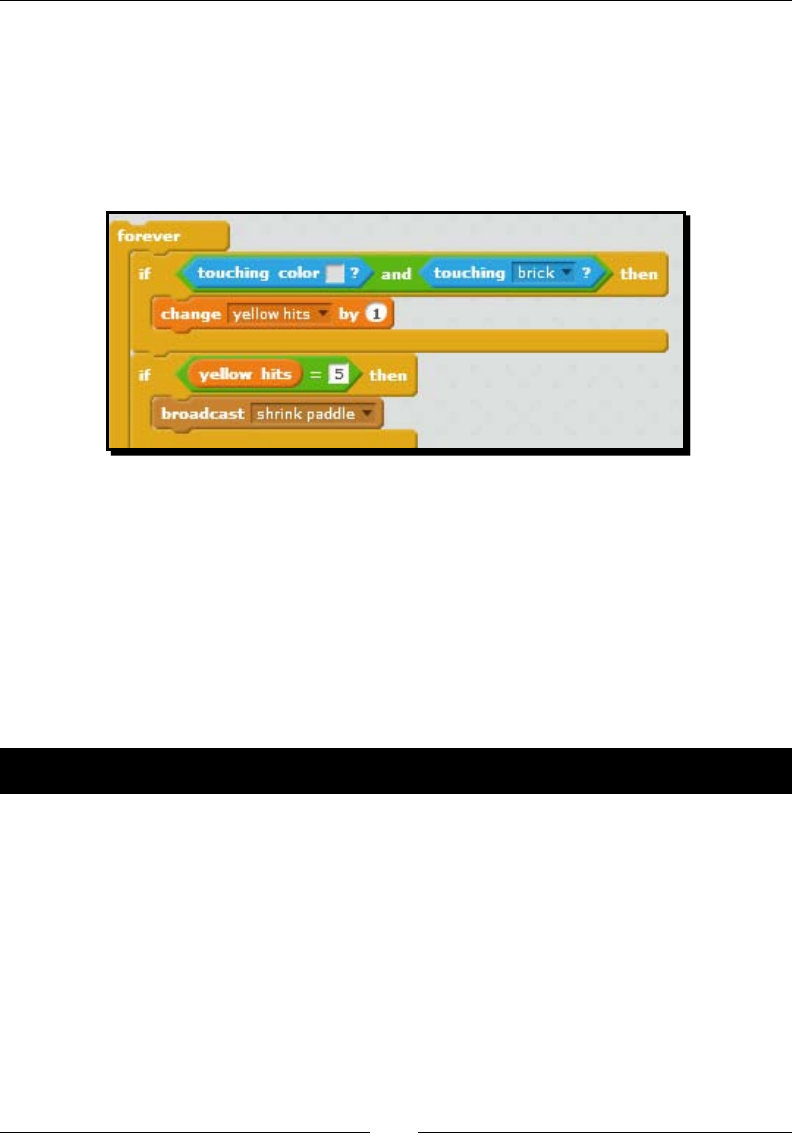
Programming a Challenging Gameplay – Breakout (Part II)
[ 184 ]
This would be a really good simple soluon. However, it's liming in that we have 20
instances of costume 1 displaying on the stage. What if we wanted to single out the tenth
yellow brick? Looking for costume 1 is not going to help us.
Next, consider the following screenshot, which shows that we can use the () and () block to
ensure that the hit only counts the updated yellow hits variable if the ball is touching the
brick and the color of the brick is yellow:
The code in the previous screenshots would eliminate a variable and the step of assigning a
unique clone ID.
The clone IDs give us more exibility for future features precisely because we can idenfy
each clone individually. By using the clone ID, we can assign weighted points to each brick,
which aects the game score, or we can count the number of total bricks broken as a way
to detect when the level is clear.
The point is that no perfect soluon exists, so we roll with the best one that meets our needs
and abilies at the me.
Time for action – detecting when we clear the level
How do we know when the level is over? The answer is simple, that is, when all the bricks
are broken; so, let's build the simple answer. We know that at the start of the game, there
are 40 bricks on the screen. Let's follow the given steps to detect when we clear the level:
1. The cloud id variable has a record of the total number of bricks we built. Let's assign
that value to a new variable named level hits. Then, we'll actually count down the
level hits variable with each broken brick.
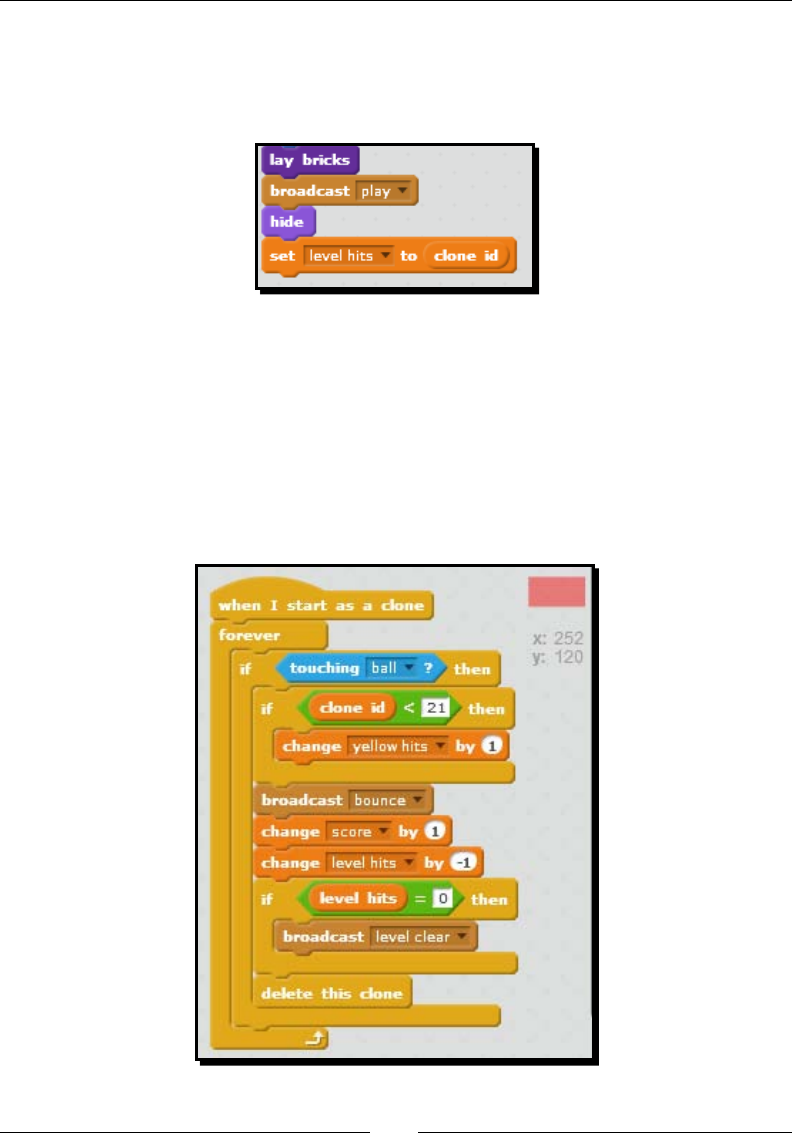
Chapter 7
[ 185 ]
2. Select the brick sprite. Add the set () to () block to the end of the stack that uses
the lay brick custom block. Select level hits as the variable and drag the cloud id
reporter block from the Data palee to the to value. Check your blocks against the
following screenshot:
3. Each me the ball breaks a brick, we will reduce the value in the level hits variable.
Add a change (level hits) by (-1) block aer the change (score) by (1) block in the
when I start as a clone stack.
4. Finally, we need to stop the ball when the level hits variable is equal to zero. Add an
if () then block aer the change (level hits) by (-1) block. Then, add the condion
(level hits) = (0) block.
5. Add a broadcast block to the if ((level hits) = (0)) then block. Create a new message
named level clear. The following screenshot shows the revised script:
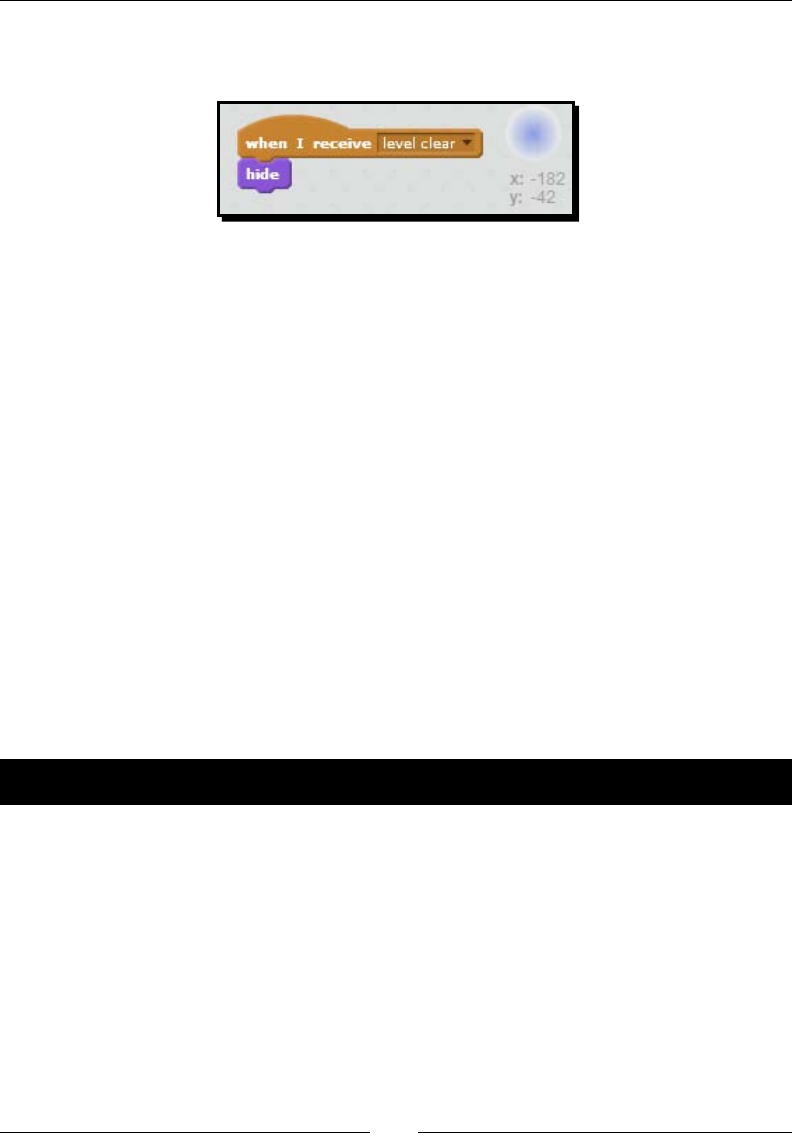
Programming a Challenging Gameplay – Breakout (Part II)
[ 186 ]
6. To the ball, add a new script that starts with a when I receive (level clear) block.
7. Then, add a hide block.
What just happened?
We now have a way to stop our game aer the player successfully clears the level. Stopping
the game at this point really means we stop the ball by hiding it. We didn't use the stop (all)
block because you may want to add a second level and the stop (all) block will not allow to
connue with the project.
No maer how many bricks we place on the screen, our script will always know when all the
bricks have been broken by using the clone ID value to provide the total number of bricks on
the stage.
Keeping the score using cloud variables
We'll wrap this chapter up with a small script to assign the player's score to a high score
variable that we will store in the cloud. Consider this a value-added feature because you
could stop right now and have a fully funconal game. Depending on your privacy concerns,
you may not wish to record informaon to the cloud, which will include the user name,
score, and access me. The cloud refers to storing informaon on an internet-based server,
which is hosted by the Scratch Team in this case.
Time for action – keeping a global scoreboard
Currently, there are two condions in our script that signify the end of the game. The rst is
when the player clears the level. The second is when the player's lives become zero. Because
we have some duplicaon, we'll use a custom block to set the score. The steps are as follows:
1. With the ball sprite selected, select the More Blocks palee and click on the Make a
block buon to create a block named update scoreboard.
2. Add the scoreboard block to the when I receive (level clear) block.
3. Add the scoreboard block before the stop (all) script in the if ((lives) = (0))
then block.
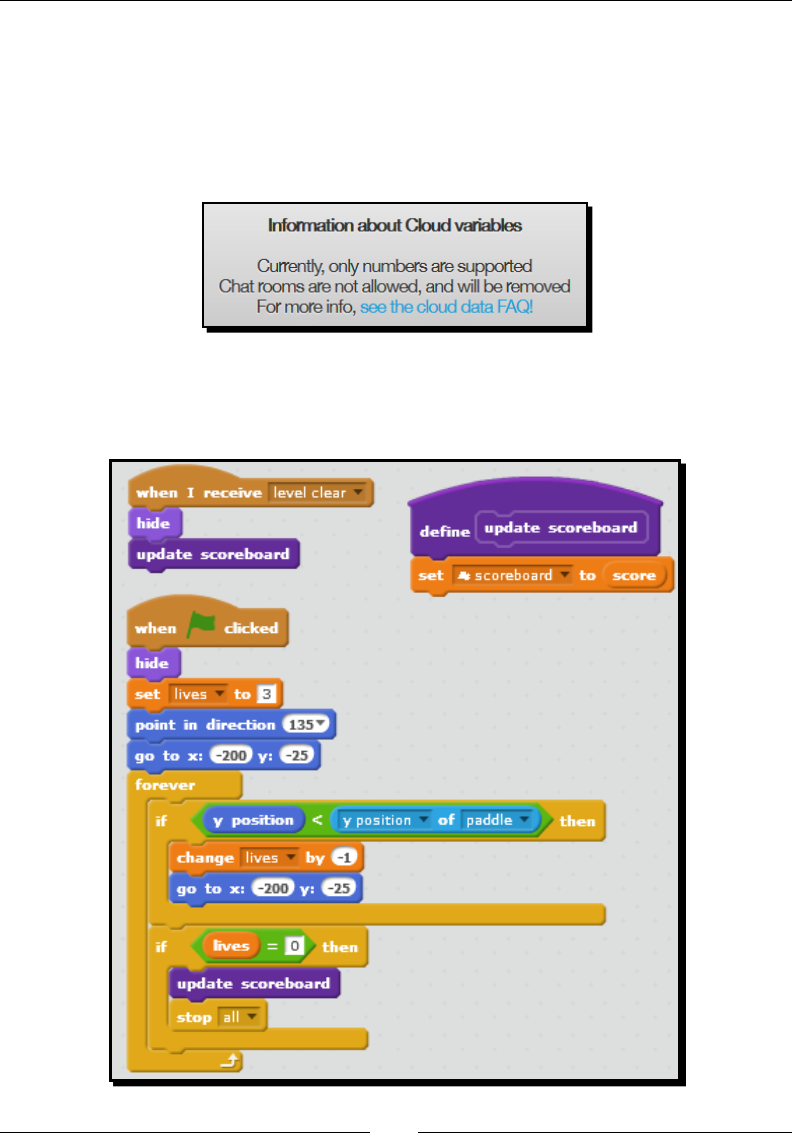
Chapter 7
[ 187 ]
4. We need to add a new cloud variable to use in the dene update scoreboard block.
From the Data palee, click on the Make a variable buon. Name the variable
scoreboard and select the cloud variable (stored on the server) checkbox.
5. When you click on OK to create the project's rst cloud variable, you will get an
informaon box that tells you the cloud variables can only be numbers. You can
click on this message to clear it.
6. Add a set () to () block to the dene update scoreboard block. Select scoreboard
as the variable and add the score reporter block to the to value. The following
screenshot shows the changes we just made to the scripts for the ball:

Programming a Challenging Gameplay – Breakout (Part II)
[ 188 ]
What just happened?
By using a Scratch 2.0 feature called cloud variables, we created a scoreboard that gets
stored on the Scratch website. It can only be accessed by our game, but everybody who
plays the game can potenally record their score in the cloud.
If you decide to add a second level to this game, then you will need to remove the custom
scoreboard block from the when I receive (level clear) block and add it to the new last level.
Understanding cloud variables in Scratch 2.0
Being able to store data in the cloud that all users of a Scratch project can access alludes
to great programming possibilies. In the current implementaon of Scratch 2.0, cloud
variables' main benet is the ability to track high scores in games and to conduct surveys
because of the limitaons the Scratch Team has placed on their use. As the exercise pointed
out, cloud variables are limited to numbers.
Cloud variables are only available to users who are signed into their Scratch account;
however, not all Scratch users can access cloud data. New users will most certainly not
be able to access cloud data. According to the cloud data FAQ by the Scratch Team, users
must achieve a Scratcher status before being able to access the cloud. How one aains the
Scratcher status is ambiguously described by the Scratch Team as follows:
You can become a Scratcher through acvely parcipang on the website.
The FAQ secon has more informaon at http://scratch.mit.edu/help/
faq/#clouddata.
These limitaons are in place as of early 2014. As Scratch 2.0 matures, I would expect the
cloud data features to evolve and become more exible.
Viewing the cloud data log
Aer you share a project with the world and the users start interacng with it, the cloud data
is wrien to the Scratch website (that is, the server). When another user remixes a project,
the new project has its own cloud data. The signed-in users can see it by viewing the project
page on the website and clicking on Cloud Data Log.

Chapter 7
[ 189 ]
The following screenshot shows the kind of informaon displayed when a user is logged on
to the server:
As you can see, the user, the informaon about the data, and the access me are all
recorded and are publicly available.
Pop quiz – reviewing the chapter's concepts
Q1. A custom block can be used by:
1. All sprites in the project.
2. All sprites with a global variable.
3. Only scripts that use a Boolean value.
4. Only the sprite it was created for.
Q2. A Boolean reports:
1. The value of the variable.
2. Either true or false the high score of the game.
3. A comparison of two numbers using the and operator.
4. None of these.
Q3. When using variables with clones, you should make the variable:
1. For all sprites.
2. For this sprite only.
3. A cloud variable.
4. Clones can't access variables.

Programming a Challenging Gameplay – Breakout (Part II)
[ 190 ]
Q4. A cloud variable enables a project to:
1. Pass data from one sprite to another sprite.
2. Consolidate duplicate code into a single script.
3. Simulate a sky theme.
4. Store variable data on the Scratch server.
Have a go hero – extending Breakout
There are a many ways you could improve and extend this project based on the foundaon
we've built in the last two chapters. Here are several things to do: add a second level, add
more levels of bricks, design a welcome screen, and calculate a score bonus.
Summary
We nished this chapter with a technically sound framework for a Breakout game that
introduces a couple of Scratch 2.0's highly touted features—custom blocks and cloud
variables. Of course, the concepts we've used in this chapter can be combined with
everything we've learned so far to create an enrely dierent game of your own design.
In the next chapter, we'll create a snarky fortune teller to help answer all our quesons. The
project will prompt the player for a queson and the all-knowing psychic will provide an
answer. In the process, we'll introduce lists to store groups of data and work on scanning
text strings.
8
Chatting with a Fortune Teller
In the Breakout game we created in the previous chapters, we learned how
easy it is to create projects that keep track of the changing values by using
variables. However, variables have a limitation in they store only one value at
a time. In this chapter, we're going to create a random fortune-spewing teller,
which will require the sprites to have access to a list of multiple values at
one time.
Welcome to lists. In Scratch, a list feature allows us to associate one list with
multiple items or values in almost the same way we create a list before going
to the grocery store. We can think of the items in the list as variables. Each list
item can be changed, removed, or added to.
In this chapter, we will take a trip to the fortune teller to demonstrate lists, and I am sure
you'll learn how to:
Store and retrieve informaon in lists
Prompt the player for project inputs, check for errors, and idenfy paerns with
the mod block
Use the if () then else block to control the program
Develop a project test plan
Create a keyword scanner to split and idenfy words and leers

Chang with a Fortune Teller
[ 192 ]
Creating, importing, and exporting lists
Most of us enjoy a good circus, carnival, or county fair. There's fun, food, and fortunes.
What would a fair be without the fortune teller tent? By the end of the chapter, you'll know
everything you need to spin your own fortunes and amaze your friends with your wisdom.
Time for action – creating lists to store multiple values
Before we start the rst exercise, create a new project with exactly two sprites. The rst
sprite will be the seeker. The second sprite will be the teller. Choose any sprites you want and
edit them in any way you wish. My seeker will be Pico and my teller will be a Wizard, both
from Scratch's image library. The seeker will ask the quesons and the teller will provide the
fortune or the answers to the seeker's quesons. As you import your sprites, name them
seeker and teller because that is how I'll refer to them throughout the rest of the chapter.
In order to have a successful fortune telling session, we need two things: a queson and an
answer. Let's start by dening some quesons and answers as given in the following steps:
1. Select the seeker from the list of sprites.
2. From the Data palee, click on the Make a List buon.
3. In the list name dialog box, type in questions and select For all sprites.
4. Click on OK to create the list. Several new blocks will be displayed in the Variables
palee, and a stage monitor tled quesons displays on the stage.
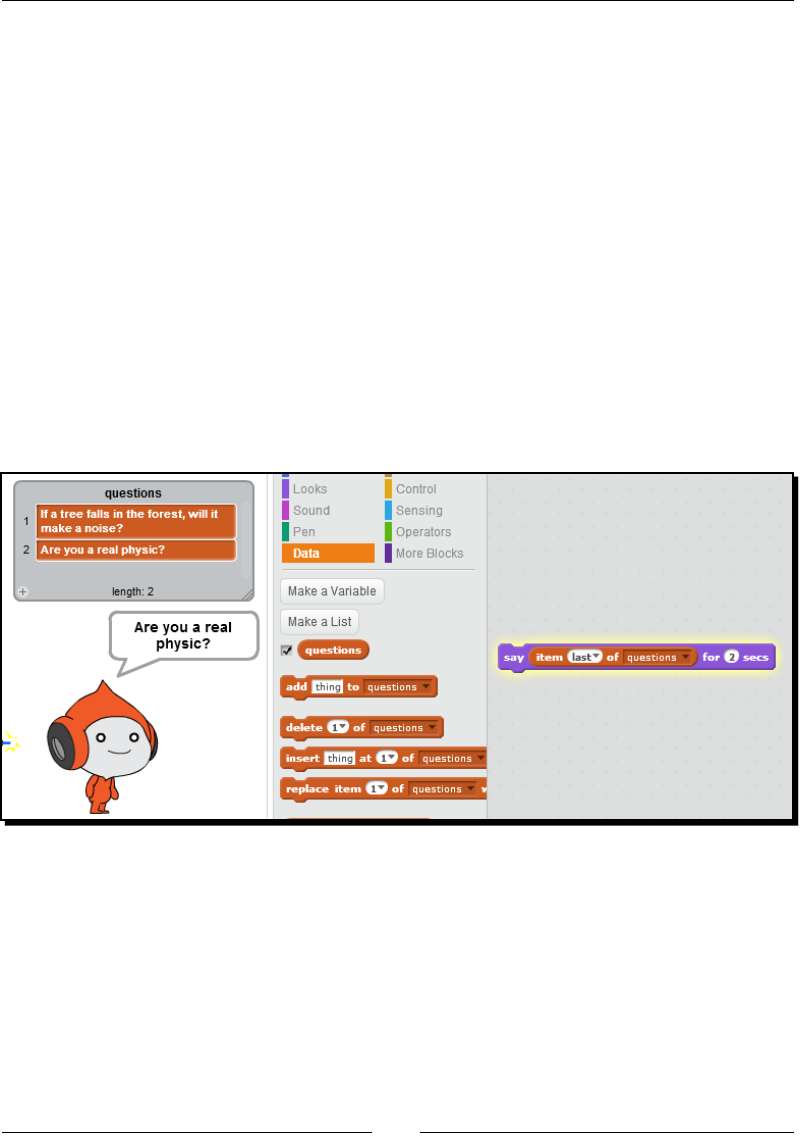
Chapter 8
[ 193 ]
5. Think about a couple of quesons you may be tempted to ask; for example,
"Are you a real physic?" or "If a tree falls in the woods, will it make a sound?".
6. Let's add our proposed quesons to the quesons list. Click on the plus sign (+)
located at the boom-le corner of the quesons stage monitor (on the stage) to
add an item to list; a text input eld will be displayed. If Scratch populates your text
box with ***, remove them and then type in your rst queson.
7. Click on the plus sign (+) again and enter the second queson. We now have two
quesons in our list.
8. Let's add a say () for () secs block to the scripts area of the seeker sprite so we can
start the dialog.
9. From the Data palee, drag the item (1) of (quesons) block to the text value of the
say() for () secs block.
10. Click on the block for the seeker to ask the rst queson in the list.
11. Change the posion value on the item block to last and click on the block again.
This me the seeker asks the second queson, which is also the last queson.
Chang with a Fortune Teller
[ 194 ]
What just happened?
I'm certain you could come up with a hundred dierent quesons to ask a fortune teller.
Don't worry; you'll get your chance to ask more quesons later.
Our exercise introduced another group of Data blocks that allow us to work with lists.
Like variables, making a new list makes several new Data blocks available. The new list
contains zero items, and as we saw in the exercise, we can add items directly to the list.
Another similarity with the variables is that the scope of the list can be limited to this sprite
only or extended to all sprites. We chose to make the quesons list for all sprites because
we will want the teller to access the list of seeker quesons later.
If you work with other programming languages, then you will likely refer
to the lists as arrays.
A quick way to access the items in the list was with the item () of () block. In our example,
we accessed two items in the list: 1 and last. This value was passed to the say block so we
saw it being displayed on the screen.
The most notable dierence between lists and variables is that lists can contain mulple
items, and therefore, mulple values which are accessible via a numbered index. It's a lot
like creang a to-do list.
Working with an item in a list
We can use lists to group related items, but accessing the items in the list requires an extra
level of specicity.
To access an item in a list, we need to know the list name and the
posion of the item in the list. In Scratch, the rst item of the list is made
available by using the number one. In other programming languages,
however, the rst item may be accessed via the number zero.

Chapter 8
[ 195 ]
The following table shows the available ways to interact with the items in a list and the
associated blocks:
Position Description Use and blocks
1 This position identifies the first
item in the list
It is found in the following blocks:
delete () of ()
insert () of ()
replace item () of ()
random This position selects a random
item from the list
It is found in the following blocks:
insert () of ()
replace item () of ()
last This position selects the last
item in the list
It is found in the following blocks:
delete () of ()
insert () of ()
replace item () of ()
all This position selects all items in
the list for deletion
It is found in the following blocks:
delete () of ()
reporter This option reports all the items
in the list as a string
The most common use is to show the list
monitor on the stage by clicking on the
checkbox next to the block's name in the
Data palette
Specify an item
number
This option enters a specific
item number
Type in a number, such as 3, to access the
third item in the list
Importing a list
Entering one item at a me via the Scratch interface is funconal, but the small size of
the list monitor can be dicult to use when you need to add a large number of items.
Fortunately, there's an easier way. You can create a text le outside of Scratch and then
import it to your list.
Time for action – importing fortunes to a list
Now, we'll see how easy it is to import an exisng text le to a Scratch list called answers.
You can use any answers you want, but I'm going to use a list of the common Magic 8-Ball
responses available via Wikipedia at http://en.wikipedia.org/wiki/Magic_8_ball.
My list will contain 20 answers to start.
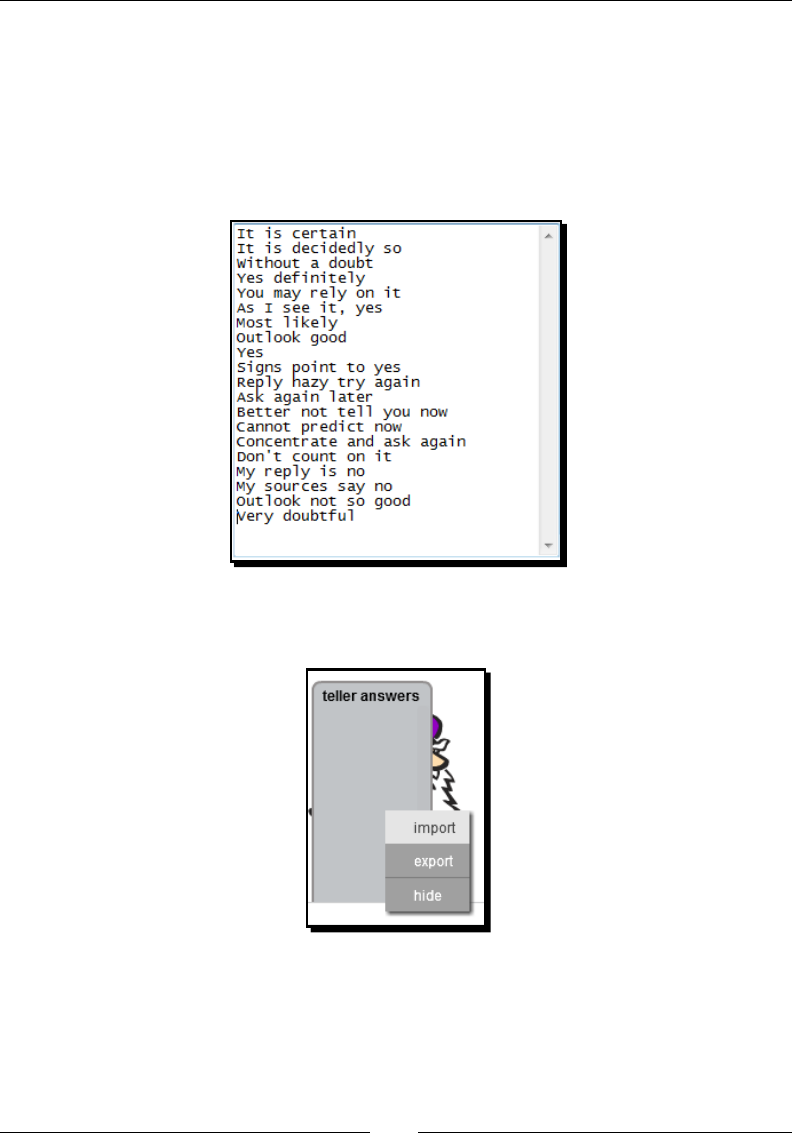
Chang with a Fortune Teller
[ 196 ]
Let's follow the given steps for imporng fortunes to a list:
1. Create a new list for the teller called answers.
2. Build a plain text le with the answers you want to use in response to the
seeker's quesons. Enter one answer per line in a plain text editor. The following
screenshot shows my list of answers. The book's source les will include a sample
answers.txt le.
3. To import the list, right-click on the answers list monitor and choose import.
This will erase any items you previously added to the answers list.
4. In the Import List dialog box, browse to the answers text le you saved on your
computer prior to starng this exercise and select it. The answers list in Scratch
now contains the contents of the text le.

Chapter 8
[ 197 ]
What just happened?
I don't know about you, but I had a much easier me typing in a text editor than I did typing
in the list monitor that gets created on the Scratch stage. Actually, if you took my lead, you
copied the Magic 8-Ball responses from Wikipedia and pasted them into a text le. That way,
the only typing you had to do was to clean up some formang.
If you completed the cloud variable exercise in Chapter 7, Programming a Challenging
Gameplay – Breakout (Part II), you might be thinking that creang a cloud list would be
a good feature. As of early January 2014, Scratch does not include the cloud funconality
for lists. The early alpha versions of Scratch 2.0 did include references to cloud lists, so it's
reasonable to expect that a future release will put lists in the cloud.
Exporting a list from Scratch
As you create your projects, the contents of a list may change. In that case, you may want
to export the new list, or as a game designer, you may want to export a backup of the list
so that you could revert to a saved copy, because aer an item is removed from the list,
it cannot be recovered.
To export a list, right-click on the list monitor and click on export.
Exporng and imporng a list has one big limitaon. There are no Scratch blocks to either
import or export a list.
Prompting the player for a question
If we wanted to have the seeker and teller interact independently of the player, then the two
lists we have would accomplish that. We could randomly pull a queson from the seeker's
list and then match it up to a response from the teller's list. Our game, however, is going to
be more interacve than that.
By using Scratch's ask () and wait block, the teller can prompt the player for a queson on
behalf of the seeker. In other words, the seeker sprite will represent the human player.
Let's take a look at an example.
Time for action – asking a question
Our task is to make the seeker have a conversaon with the teller and ulmately, ask
a queson. Select the seeker sprite, and let's begin:
1. First, clean the cluer from the stage. Right-click on each of the list monitors and
select hide.
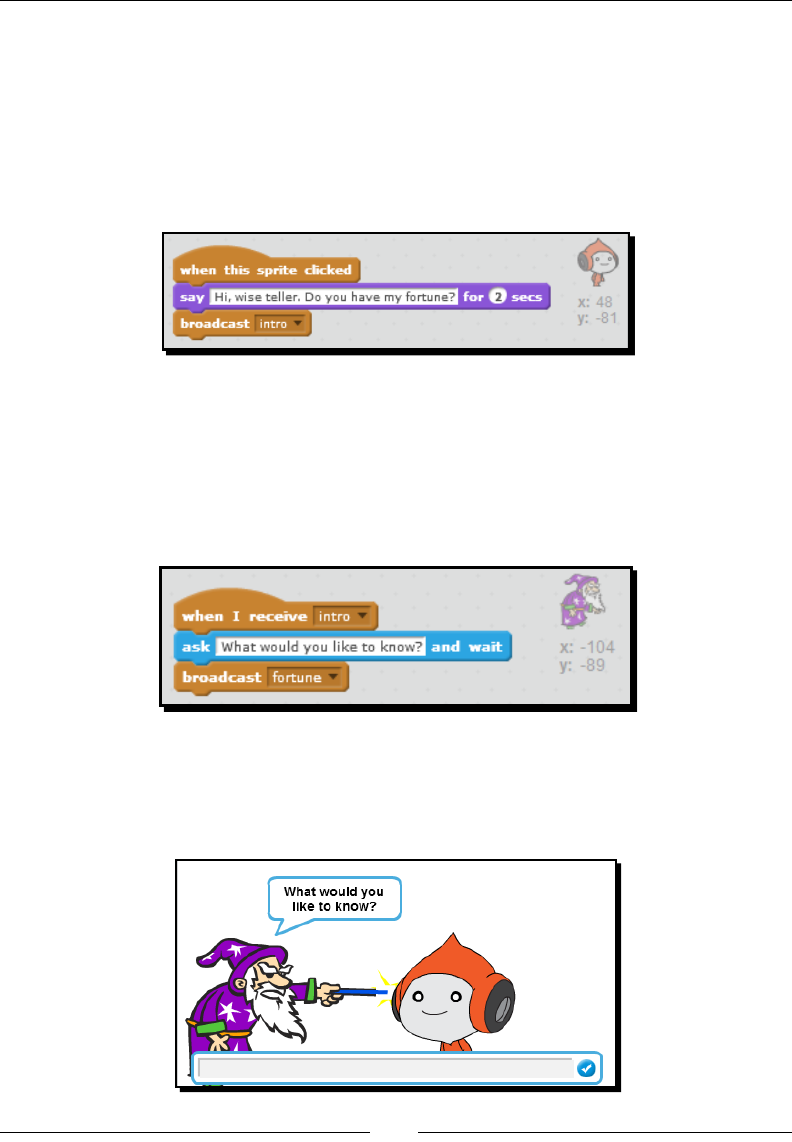
Chang with a Fortune Teller
[ 198 ]
2. Let's stch together some dialog between the two sprites. From the Events palee,
add the when this sprite clicked block to the scripts area.
3. Aach a say () for () secs block and change the text value to a pleasant introductory
sentence such as Hi, wise teller. Do you have my fortune?.
4. Add a broadcast () block, and create a new message named intro (short for
introducon) as a way to signal the teller that the seeker is ready, as shown
in the following screenshot:
5. For the teller, add a when I receive (intro) block to the scripts area, and aach an
ask () and wait block from the Sensing palee. Replace the text value of the ask
block with something that prompts the player to ask a queson on behalf of the
seeker, such as What would you like to know?.
6. Aer the teller receives the queson, add a broadcast () block and create a new
messaged named fortune. Refer to the following screenshot for the teller's script:
7. At this point, if you click on the seeker, you should be prompted for the queson. You
can type in a queson in the text box provided and then press Enter. Pressing Enter
saves the text you typed to the answer block, which is located in the Sensing palee.
The following screenshot shows the teller prompng the seeker for the queson:

Chapter 8
[ 199 ]
8. Let's add the queson to the queson list when the seeker receives the fortune
broadcast. Select the seeker sprite and add the add () to () block from the Data
palee to a when I receive (fortune) block from the Events palee. From the
Sensing palee, drag the answer block to the rst value. Select quesons for the
second value.
9. As a debug step to verify whether the queson was properly stored, add the
following block to the seeker's when I receive (fortune) stack: say (item (last)
of (quesons)) for (1) secs. The following screenshot shows both the scripts we
created for the seeker. You can remove the say block aer you do the vericaons.
What just happened?
Coordinang the back and forth conversaon between the seeker and the teller by using the
broadcast () blocks should be second nature to you by now. In our fortune teller game, the
player is the seeker, so the ask () and wait block prompts you, the seeker, for a queson.
The ask () and wait block forces the script to wait for the keyboard input, which means our
script stopped unl we provided input.
We'll make the teller answer the queson in an upcoming exercise, but for now, we've
prompted the player for a queson and saved that queson to the quesons lists via the
answer block. By saving each queson, the seeker has a growing list of quesons.
Because the queson list is for all sprites, we could have the teller add the item to the list.
However, I've made a self-imposed decision that only the seeker will modify the quesons list
even though I want the teller to be able to see it—we are creang a fortune teller, aer all.
Also, by sending a broadcast, we provide a cue back to the seeker that a fortune is coming.
This is an opportunity for future game enhancement by changing the seeker's reacon.
We can use the stored quesons in a variety of ways. For example, we could script an
automated demo of the game, or we could check for duplicate answers as a way to prevent
sneaky seekers from repeang quesons and uncovering the teller's decepon.

Chang with a Fortune Teller
[ 200 ]
Using stored questions
If we wanted to make the seeker repeat the queson, the say (answer) for (2) secs block
that we used as a vericaon step provides the way to access the last queson in the list.
In our game, we will use the list of stored quesons as a way to check for duplicate quesons
from the player, which will allow us to add error checking into the game.
Time for action – validating the seeker's question
Now that we're prompng the player for a queson via the seeker and adding it to the
quesons list, it is a good idea to check for some common errors that may come our way.
First, we're going to make sure the seeker types something into the textbox when prompted.
Secondly, we're going to check for the duplicate quesons because receiving dierent
answers for the same queson may expose the teller's randomness.
Select the Scripts tab of the teller sprite and let's begin:
1. In the when I receive (intro) stack, add a repeat () unl block right before the
broadcast (fortune) block.
2. As we have two condions to check, insert the () and () block from the Operators
palee to the value in the repeat () unl block.
3. In the rst value of the and block, add a greater than (>) block.
4. To the rst value of the greater than block, add the length of () block from the
Operators palee. Then, add the answer block as the length value.
5. In the second value of the greater than block, type in a relavely small number,
such as 5.
6. Now, let's build the second condion in the and block. From the Operators palee,
add the not () block. Then, add the () contains () block from the Data palee. Select
quesons from the available lists. Add the answer block to the contains value.
7. The command that we want to repeat unl both condions evaluate as true is
the ask () and wait block. Add the block and change the ask value to something
appropriate, such as Please ask your question.
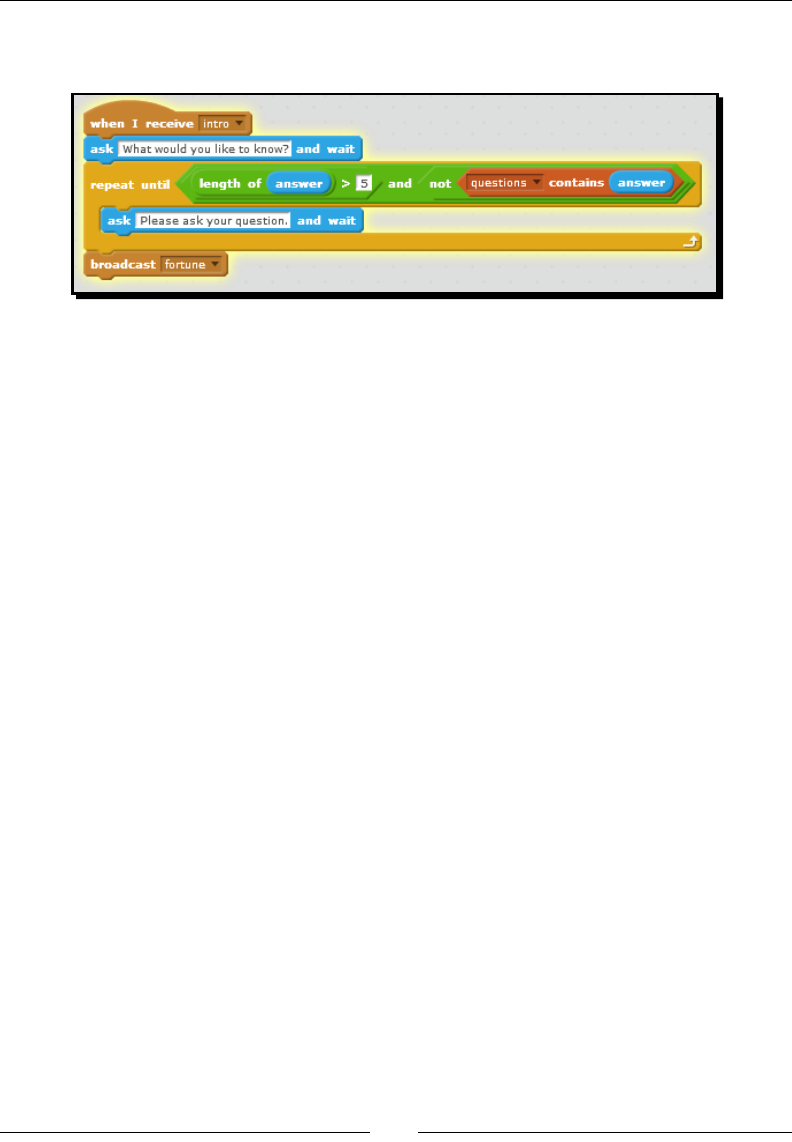
Chapter 8
[ 201 ]
8. Test the script by running the program and don't forget to provide invalid answers.
The following screenshot shows the revised script:
What just happened?
We just added a bit of error handling to our script by way of the repeat () unl block. We rst
evaluated the answer to ensure that the length of the answer is more than ve characters.
This essenally creates a minimum length requirement for quesons. In reality, I don't know
of any queson that can be asked in ve characters, but having this condion provides a
starng point for us. Feel free to make the minimum length more dicult by increasing the 5
value in the length of (answer) > 5 block. A false value will cause the teller to prompt the
seeker for a new queson.
In the second condion, we check to see whether the seeker has asked the queson before.
The () contains () block checks the value stored in the answer variable with each item in
the quesons lists. If it nds a match, it reports true. A true value will cause the teller to
prompt the seeker for a new queson because the not operator inverts true to false.
Only when both condions are true do we allow the teller to respond with the fortune,
which is signaled with the broadcast (fortune) block.
One of the limitaons of this approach is that we can only detect exact matches between
the answer value and the contents of the quesons list. An extra space or a typo creates a
dierent value.
Deleting the list values
As you spend me creang and tesng the scripts, you may want to clear your quesons list
so that you can start with an empty list. Scratch has a block for that.
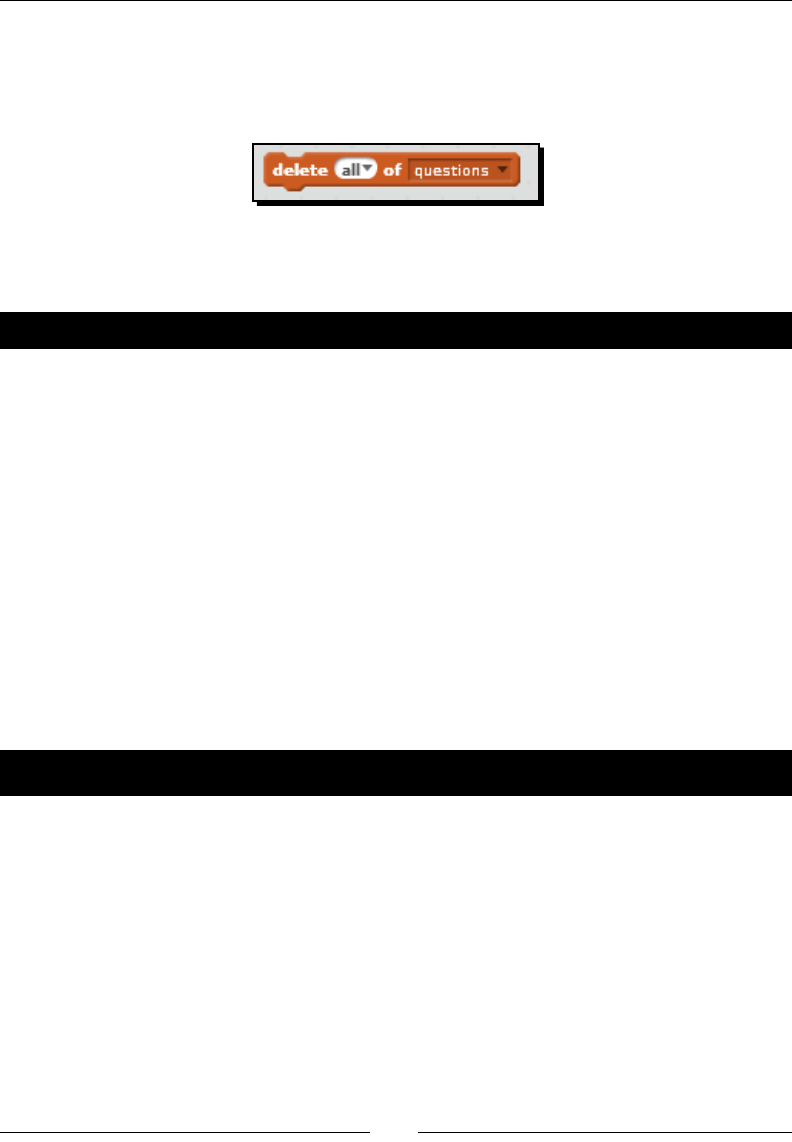
Chang with a Fortune Teller
[ 202 ]
The delete () of () block can be found in the Data palee. The rst value of the block accepts
a posion in the list and the second value selects the list. You can specify a number, 1 or
all. The following screenshot shows the full command to remove all the items from the
quesons list:
You could run the block manually to remove the list items or add it as part of the start up
script when the green ag is clicked.
Have a go hero – nding and using the player's username
You want a smart and cordial fortune teller, right?
Scratch 2.0 introduced a new block in the Sensing palee called username, which reports
the username of the player who is viewing the project. Modify the teller's inial response to
address the player (also known as the seeker) by his or her username.
Remember that not all users will be signed into their Scratch account, or they may be using
an oine version of Scratch, which means the username will not be available. Your script
should check for the value of the username. How do you know if the player's username
block has a value? Think about how we evaluated the length of the seeker's queson.
Selecting a random fortune
The reason we visit the fortune teller is to hear a fortune. It's me to make the teller pull
a random fortune just like real life.
Time for action – selecting a random fortune
We're going to use a separate stack of blocks to handle the script to issue a fortune. The
steps are as follows:
1. With the teller sprite selected, add a when I receive (fortune) block to the scripts
area. Aach a say () for () secs block.
2. From the Data palee, drag the item () of () block into the rst value of the say
block. Select random for the posion value and answers from the available lists.
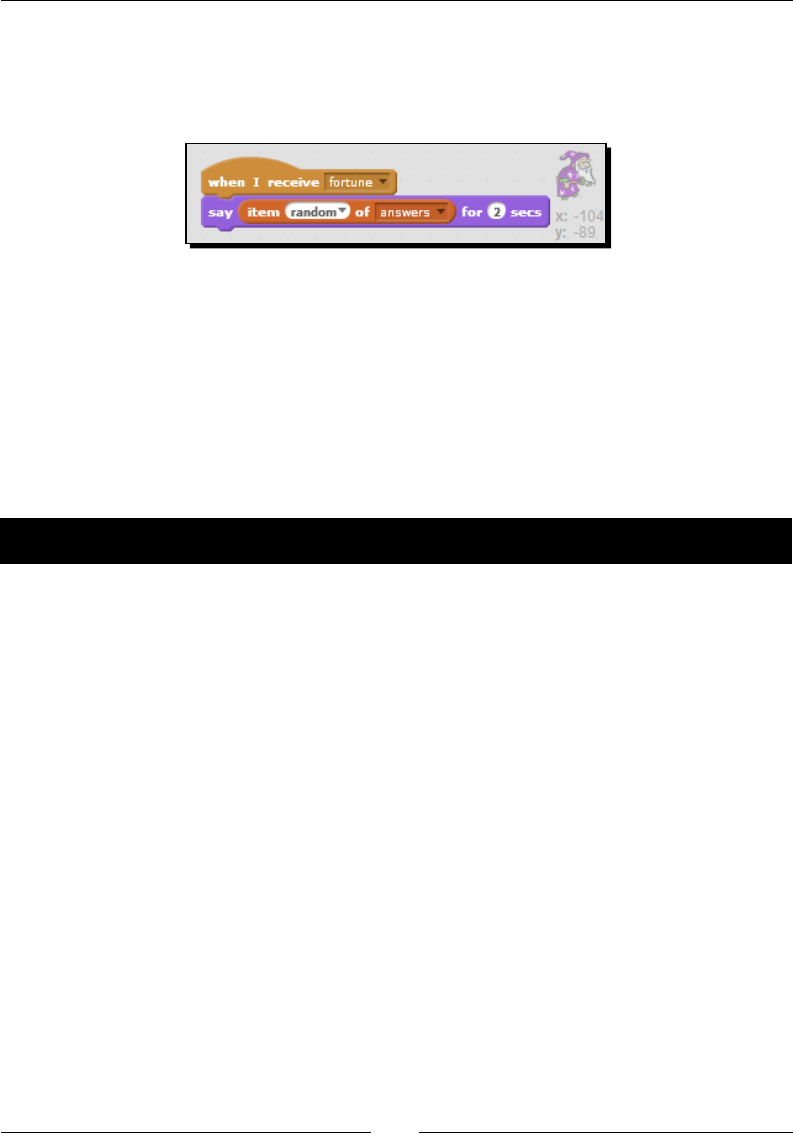
Chapter 8
[ 203 ]
3. Test the program by clicking on the seeker sprite. If all goes well, you will receive an
answer (that is, a fortune) in response to your queson. If your seeker repeats the
queson, you can remove the say block we used as a debug step in the previous
exercise. The following screenshot shows our sample script so far.
What just happened?
We'll pause here for a brief moment, so you can reect on your future life as a physic in
the carnival. Our game framework is complete in that we have everything we need to ask
a queson and receive a fortune.
In this exercise, we reiterated our use of the item () of () and say blocks. Based on our use of
the item () of () and say blocks, we can answer any queson that can come our way, and our
response will seem profound. At least, that's what we'll choose to believe.
Time for action – counting our fortunes with mod
Now, we will rene how the teller determines what fortune to give by counng the quesons
and issuing a negave response for every h queson. If you copied the list of Magic 8-Ball
responses, as I did, then your negave responses are items 15 through 20 in the answers list.
If you added your own answers to the list, move the negave responses to the end of the
list. You can do this in a text editor and reimport the answers list. The steps are as follows:
1. Our rst task is to set up a variable to count how many quesons the seeker asks
so that we can calculate whether or not it's me to answer in negaves. Select the
teller from the sprites list and create a new variable named question number
and make it For this sprite only.
2. Add the when ag clicked block to the scripts area.
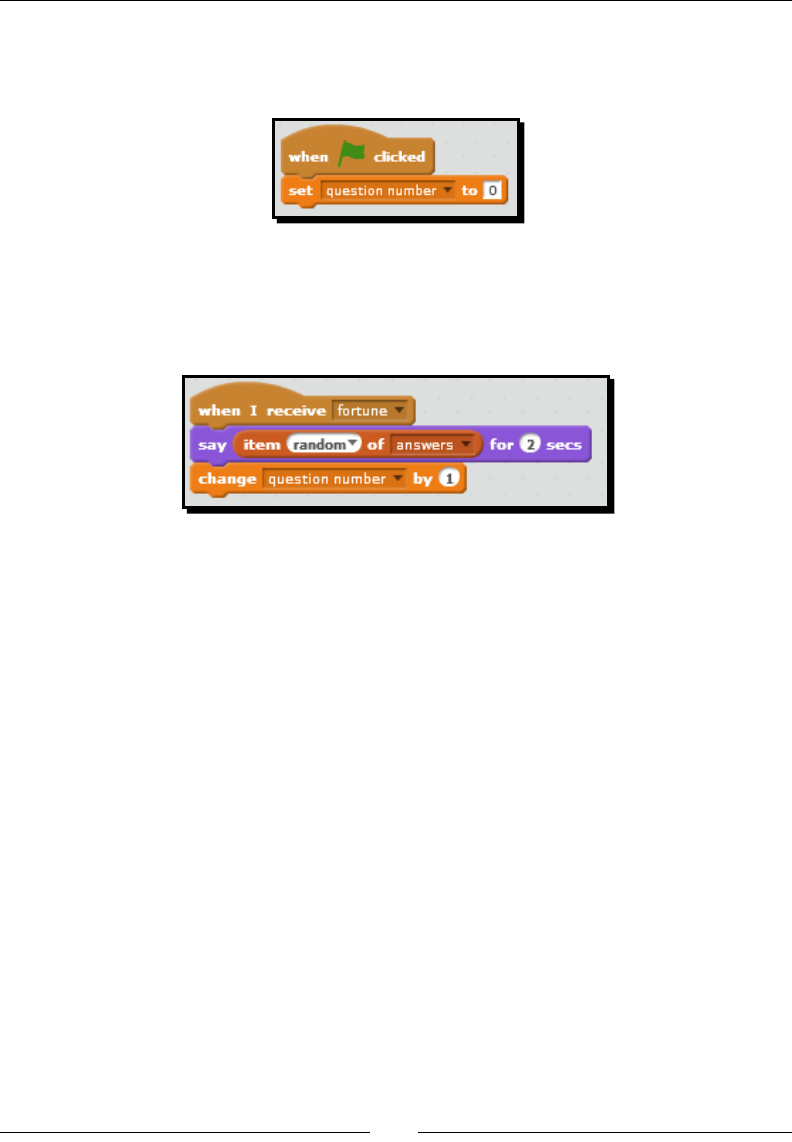
Chang with a Fortune Teller
[ 204 ]
3. From the Variables palee, add the set queson number to (0) block to the when
ag clicked block. Now, we have a way to reset our counter at the start of the game.
Refer to the following screenshot:
4. Next, we need to assign a value to the queson number variable when the teller
answers the seeker. We can do this by adding a change (queson number) by
(1) block to the end of the when I receive (fortune) script. Refer to the following
screenshot:
5. Our goal is to make the teller sprite give a range of answers based on the queson
number. From the Control palee, add the if () then else block to the change
(queson number) by (1) block.
6. Drag the say ((item (random) of (answers)) for (2) secs block to the "c" part of the
if () then else block.
7. Add a pick random () to () block to the posion value of the item () of () block, which
replaces the block's random selecon. Does it seem strange that we're replacing
the block's built-in random value with a pick random block? If it does, the reason
why we're doing this will be revealed soon.
8. Type in the number 15 to the rst value of the pick random block. For the second
value, add the length of () block from the Data palee. Insert the answers block
as the value.
9. Now, we need to supply a condion to the if block to test whether or not we should
force a negave response. Add the equals to (=) block to the if block.
10. Drag the () mod () block from the Operators palee to the rst value.
11. We're going to use the () mod () block to divide the queson number variable by 5
so that we can calculate the remainder. Add the queson number block to the rst
value of the () mod () block.
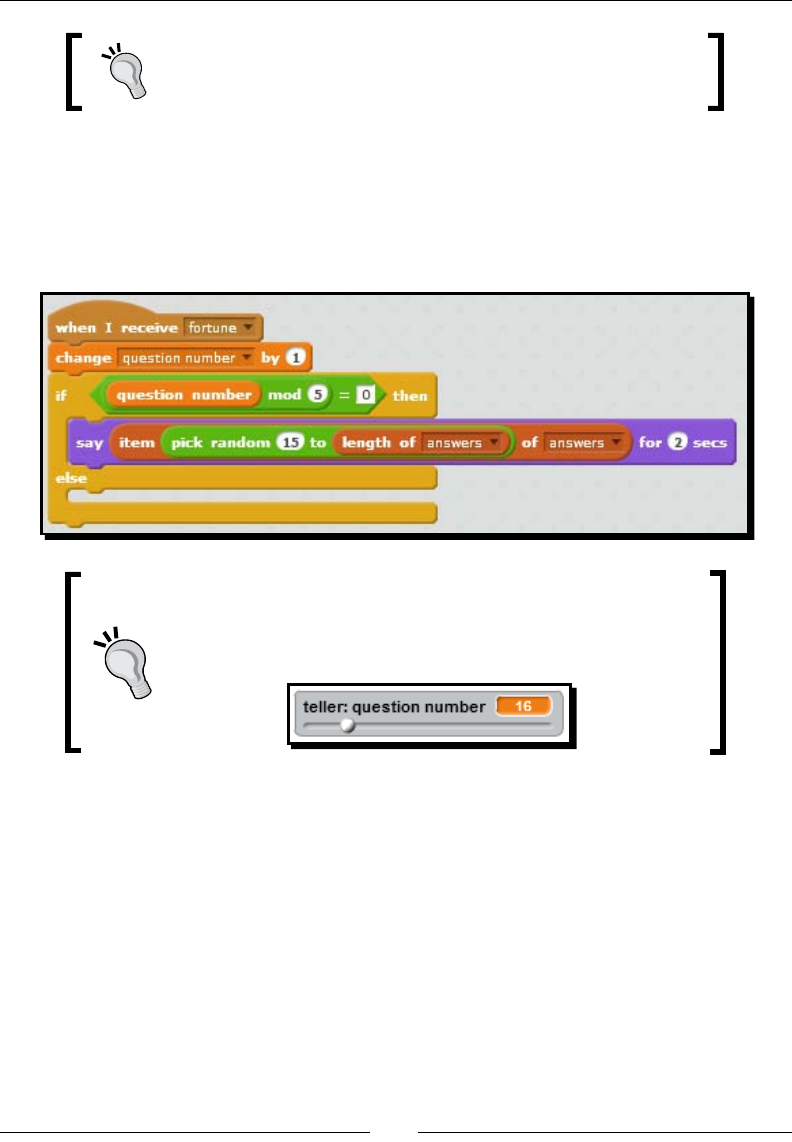
Chapter 8
[ 205 ]
The () mod O () block reports the remainder of a division problem,
which makes it useful to identify intervals with numbers.
12. Change the second value of the () mod () block to 5 so the block reads
(queson number) mod (5).
13. Test the script by seeking a fortune. With our current setup, the teller only
responds on the h queson, and it's always a negave response. Refer to the
following screenshot:
If you display the question number stage monitor, you can display
a slider by right-clicking on the stage monitor. The slider lets you
assign a value to the variable, which can help you test your scripts,
as shown in the following screenshot:
What just happened?
We asked our teller to only issue a negave response every h queson, but we needed
a way to let our teller sprite determine when the h queson was asked. We created the
queson number variable as a counter to track the quesons the seeker asked.
In our script, there are a couple of dierent ways to think about the queson number.
The variable is counng the number of fortunes received, which could be further qualied
as the number of quesons accepted by the teller. By incremenng the counter in the when
I receive (fortune) stack of blocks, we ensure the seeker's queson has passed the error
checks we created.

Chang with a Fortune Teller
[ 206 ]
The () mod () block gave us the logic we needed to let the teller calculate whether or not
to issue a negave response. The () mod () block returns the remainder, which means our
script is looking for a remainder of zero—in other words, if we divide a number by ve and
receive a remainder of zero, we know that the queson being asked is an increment of 5
(for example, 5, 10, 15, 20, and so on). And when the remainder is zero, we pick a negave
answer from the list. If we wanted to change the paern to every fourth queson, then the
check would become queson number mod 4 = 0.
Prior to this exercise, we used the default posion value of random in the item () of () block
to select a random item from the list for the fortune. However, in our exercise, we wanted
to restrict the range of possible fortunes, so we used the pick random (15) to (length of
(answers)) blocks. The length of () block reports the current length of the list in terms of
items. In my answers list, the length is 20; therefore, the calculaon picks a random number
between 15 and 20.
The else part of the if () then else block is empty, which is why the teller only issued a
response on every h queson. We'll build the rest of our script as we work through
the remaining exercises.
Using magic numbers
In programming, one of the denions of magic numbers is using constant values in your
code when those values don't really have a clear meaning, and if you work on somebody
else's code, you'll encounter this frequently. Someone's else hack is your pain.
Our expression that picks the negave answer ts the denion of a magic number because
we're dening the range between 15 and the last item posion in the list. When someone
else edits this project, they're going to wonder why we chose this range. Addionally, it will
be worse if someone else adds items to the answers list; that person won't know that the
specied range has a purpose.
Do we have to x this? At the very least, that secon of code should be commented so that
people have some understanding about what it accomplishes. One soluon would be to
move the negave responses to a new list. Then, we run the risk of maintaining duplicate
answers across mulple lists, among some other potenal problems. Another soluon
would be to use variables to set the start and end posions of our negave responses.
In the next exercise, we will x our magic number and make our code clearer.
Creating a custom say fortune block
At this point, we have our teller that issues a negave fortune every h queson, but we
don't have any blocks in place to provide an answer to the rest of the quesons. So, we'll
x that.
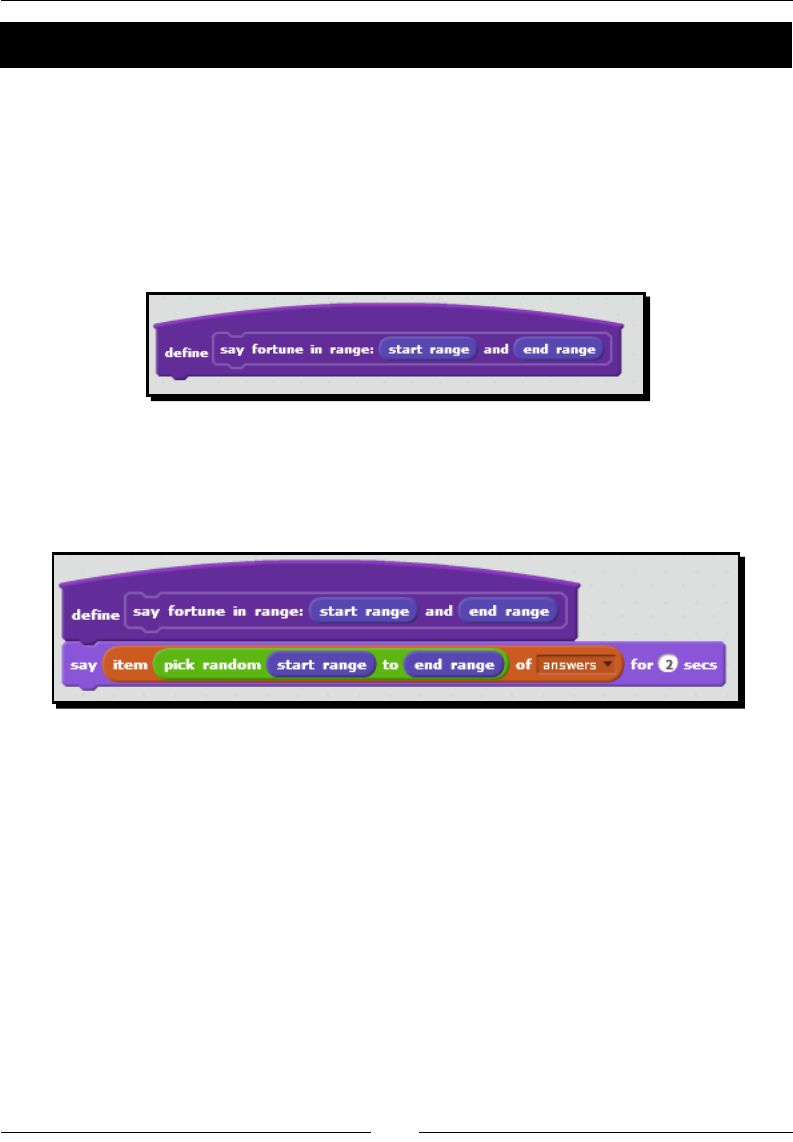
Chapter 8
[ 207 ]
Time for action – creating a custom say fortune block
We're about to duplicate a script, so we're going to take this opportunity to create a custom
block to select an item from the answers list based on a specied range of items.
1. With the teller sprite selected, click on the Make a Block buon from the More
Blocks palee. Name the block say fortune in range:. Then, add a number
input and change the input name to start range. Next, add a label with the text
and; nish the block by adding another number with the name end range.
The following screenshot shows the resulng dene block:
2. We want to use a similar set of blocks that we've already added to the if () then
else block as we previously added to the when I receive (fortune) stack. The new
expression will be say (item (pick random start range) to (end range) of (possible
answers)) for (2) secs, as shown in the following screenshot:
3. Let's put the custom block to use in the when I receive (fortune) script. Find the
say () for () block that runs when the condion in the if () then block evaluates
to true and replace it with a say fortune in range: () and () block from the
More Blocks palee.
4. Now, let's x our magic number. Create two variables named start neg resp and
end neg resp. They can be for this sprite (teller) only. Note that I'm abbreviang
my names due to space constraints. Feel free to be verbose.
5. Add the start neg resp reporter block to the rst value in the say fortune block and
the range () and () block. The end neg resp reporter block goes in the second value.
6. We can inialize the values of the new variables as part of the exisng when
ag clicked stack by seng the start neg resp variable to 15 and the end neg
resp variable to 19, or we can use the numbers that represent your range of
negave answers.

Chang with a Fortune Teller
[ 208 ]
7. Next, we need to have the teller predict a fortune when the queson does not t
the paern of every h queson. The expression in the else part of the block is say
fortune in range: (1) and (length of (answers)).
8. The following screenshot shows our revised scripts, including the inializaon script:
What just happened?
Blocks are cheap. Don't be afraid to throw your chosen blocks out in favor of something beer.
In this exercise, we opted to create a custom block so that we can have more control over
the range of answers the teller selects from. The scripts funconally achieve what we've
already done; however, we avoided some duplicaon in the script as well as created a
procedure that could be easily adapted and expanded upon.
Using the if () then else block
In earlier chapters, we've become familiar with the if () then block as a way to run a script
when a condion is true. The false condion doesn't trigger any code.
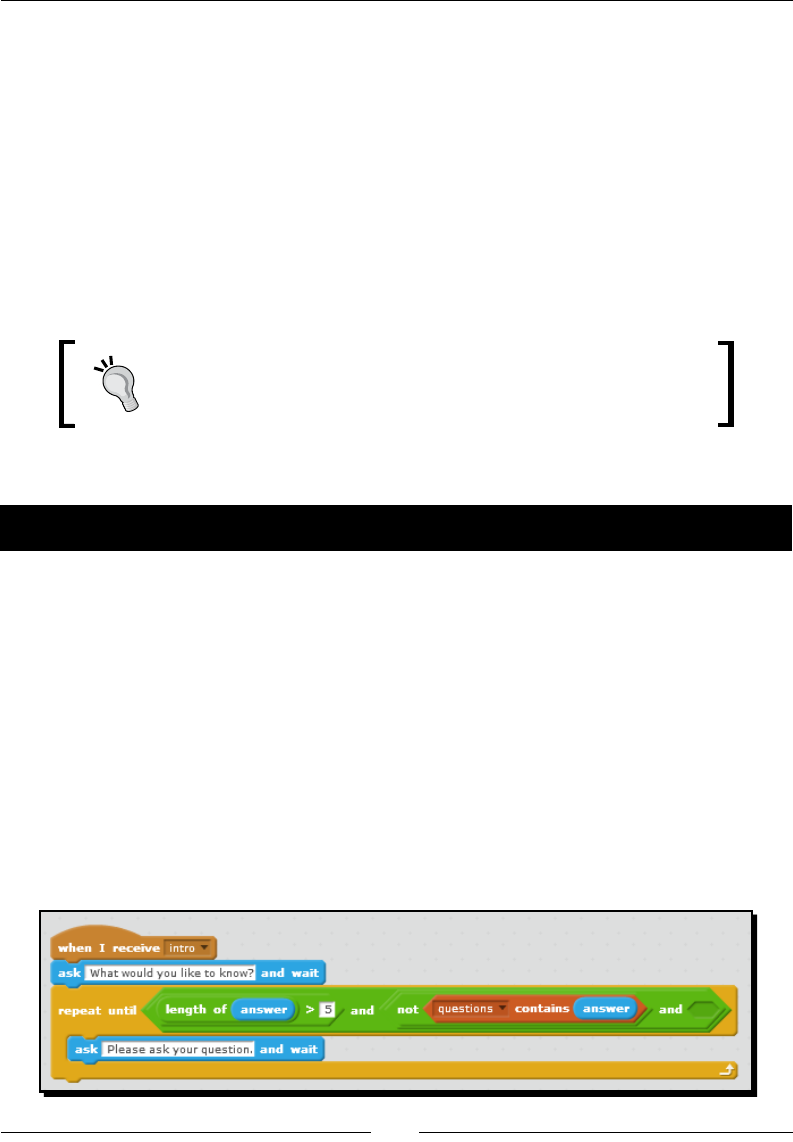
Chapter 8
[ 209 ]
In contrast, the if () then else control block evaluates a condion, and if the evaluaon is
true, the code in the if part of the block executes. If the condion evaluates to false, then
the code in the else part of the block executes. This can be helpful in scripts where you want a
default acon to happen, regardless of the condional evaluaon. For example, in our project,
we always want a fortune, which is what we get in the else poron. If the fortune answers the
h queson, we want to be more selecve in the response.
Manipulating the text
In this chapter, we've been capturing and storing text as a way to create a dialogue between
the sprites. We use the text in a variety of ways: we type directly in a block, we access a list
item, and we retrieve the text from a variable.
In programming, a piece of text is generally referred to as a string,
and working with strings is a fundamental task.
Let's go beyond whole strings and look at the individual characters of a string.
Time for action – ensuring grammatically correct questions
We have a good grasp on accessing groups of words as a single item, but this exercise is
going to look at the individual characters of those strings. Right now, the teller has a script
that starts with the when I receive (intro) block. It ulmately prompts the player for a
queson and validates the queson before issuing the answer. We're going to revise this
script. The steps are as follows:
1. Detach the broadcast (fortune) block from the boom of the stack and move it
out of the way for now.
2. The exisng repeat unl () block already provides a check for a minimum
length and a duplicate queson. We can perform a third check by adding a
second () and () block to the exisng evaluaon. You'll need to reconstruct the
expression by replacing the not ((quesons) contains (answer)) expression with
an () and () block. The following screenshot shows the revision:
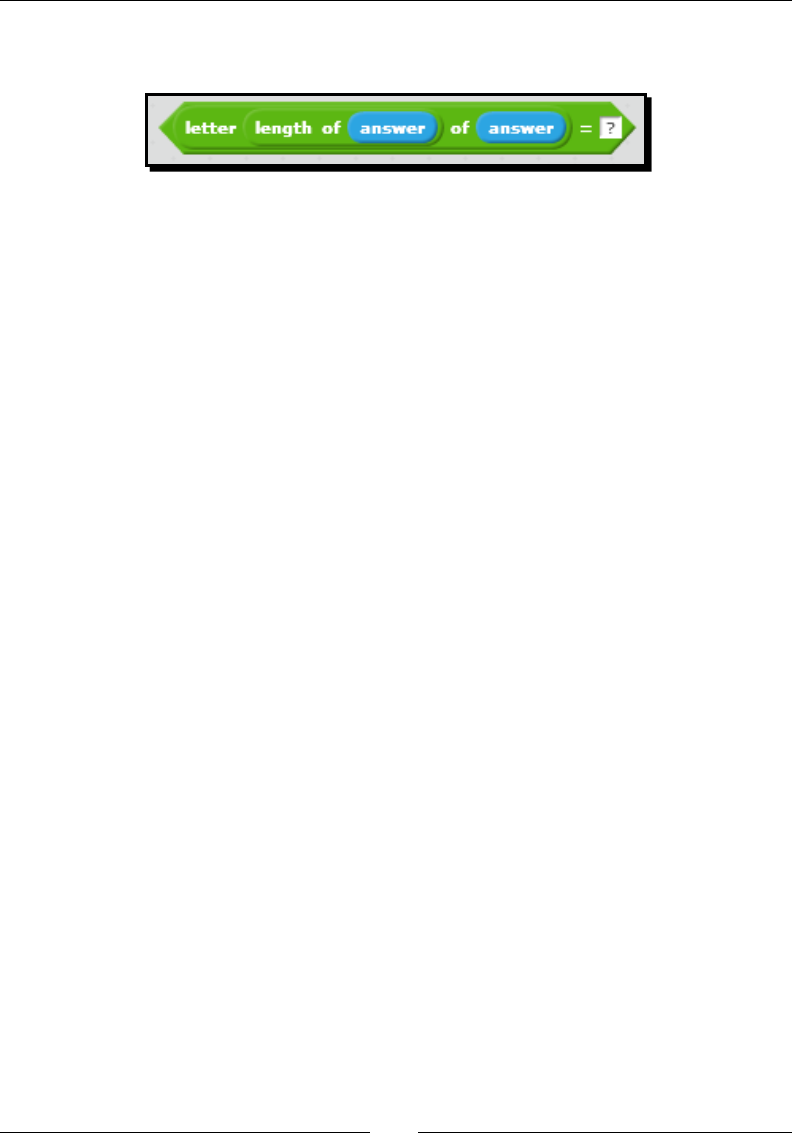
Chang with a Fortune Teller
[ 210 ]
3. To the open value, we want to add the following evaluaon: ((leer (length of
(answer)) of (answer) = (?)). Refer to the following screenshot for details:
4. Aach the broadcast (fortune) block to the end of the script.
5. If you want to revise the text in the second ask () and wait block, feel free to make
it provide some context for the repeated queson; for example, something like,
"Please ask a properly punctuated and unique question".
6. We now have a compact script that validates the queson in three dierent ways.
What just happened?
With some creave block assembly, we're able to idenfy the last leer in our string.
When we nest blocks, Scratch evaluates the innermost block rst. So, the rst value
evaluated in the check for the queson mark is the length of (answer) block. This results in
a number, which tells us how long the string is. That number is used as the rst value of the
leer () of () block. The second value of the leer () of () block is the answer block. Now, it's
a simple equality check to see if the last leer in the answer block equals a queson mark.
We structured our script such that three condions must be true in order for the teller to
provide an answer to the player. The player's queson must be more than ve characters
long, the queson must be original, and it must contain a queson mark. If all three
condions are true, the teller provides an answer to the player. If any of the three
condions are false, the teller prompts the player for a new queson.
Testing your project
One of my greatest joys is soware tesng. It's the reason I know anything about
programming. The layers of queson validaon we're adding to the teller's script is
geng more intricate as we go, which means we have lots of opportunies to create bugs.
Tesng our project requires deliberate steps, and it's a good idea to do some structured
before you turn it loose to the greater Scratch community.
Whether you use a sheet of paper, rely on your memory, or use a spreadsheet, it helps to
create a matrix of tests with the expected results. That way you can verify whether your
script works as you expect it to.

Chapter 8
[ 211 ]
The following table shows a quick matrix to help us test the queson validaon part of the
fortune teller project:
Test Expected result
Enter a question with three letters or characters The teller prompts for a new question
Enter a question that's greater than five letters, is not a
duplicate, and contains a question mark at the end
The teller provides a fortune to the
seeker
Enter a question with more than five characters that is
also a duplicate
The teller prompts for a new question
Enter an original question that is greater than five
letters and does not end with a question mark
The teller reports the error and prompts
for a new question
Enter a question that's greater than five letters, has a
question mark, but is an exact duplicate
The teller prompts for a new question
Creating a keyword scanner
The next logical step in our project is to scan the seeker's queson for individual keywords,
but that will require us to write a script that analyzes the text in the answer block. We know
that words are separated by spaces, so that will become the character we scan for.
Time for action – scanning a text string to build a list of words
The main task in this project is to look for spaces and create new entries in a list when we
nd one. Let's step through the blocks:
1. For the teller, create a new list named scanned words and a new variable
named leer#.
2. Since we will recreate the scanned words list each me we get a new queson from
the seeker, we need to delete all the items before we analyze the new answer block
value. Drag a delete (all) from (scanned keywords) list from the Data palee to the
Scripts area.
3. Next, set the leer# variable to 1, which will track our progress through the
answer value.
4. To iterate through the characters in the answer value, aach a repeat (length of
(answer)) block to the stack.
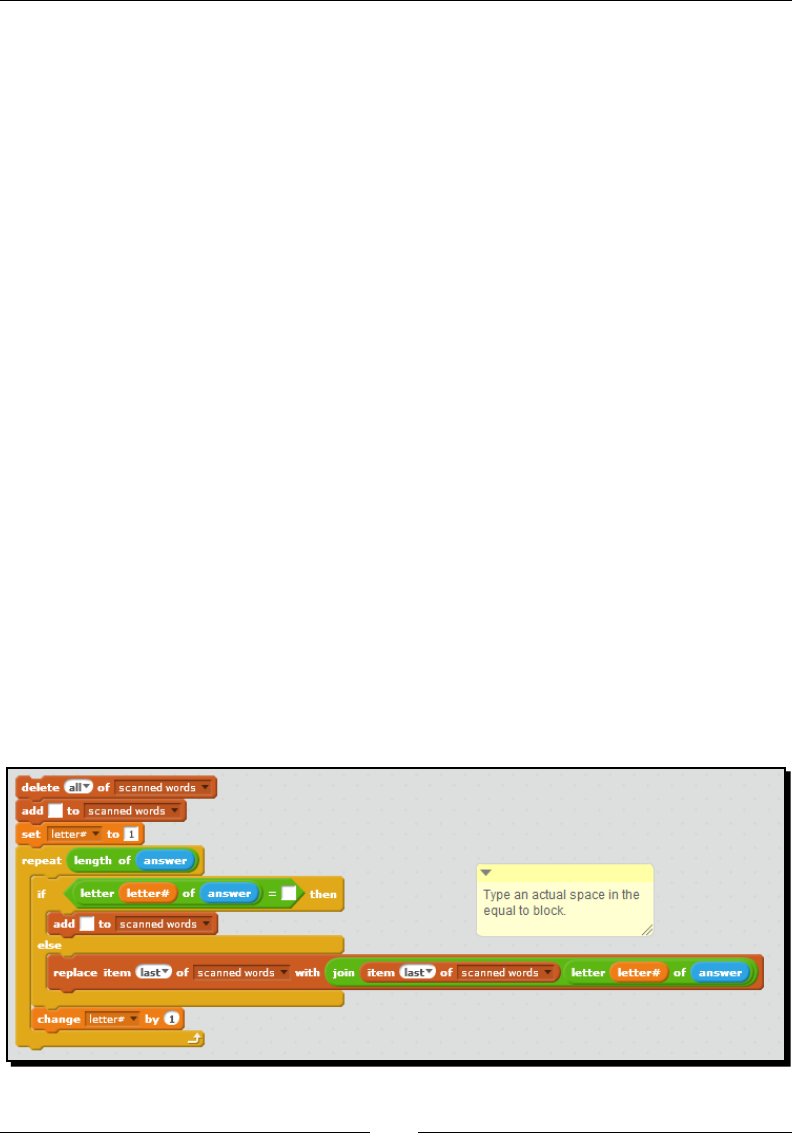
Chang with a Fortune Teller
[ 212 ]
5. Then, add an if () then else block. We will evaluate the current character of the
answer value to determine if it is equal to a space. The Boolean expression will be as
follows: ((leer (leer#) of (answer)) = ( )). You need to actually type a space in the
second value of the equal to block.
6. If the condion evaluates to true, add an entry to the scanned words list with this
Data block: add () to (scanned words).
7. Add the replace item (last) of (scanned words) with () block to the else branch of
the block condion.
8. In the with value of the replace item block, add a join block. In value one of the join
block, insert item (last) of (scanned keywords). For value two, insert leer (leer#)
of (answer).
9. Finally, increment the leer# counter by inserng a change (leer#) by (1) block
aer the if () then else block.
10. Your project should already have a mulword value stored in the answers from your
previous tesng. Click on the stack of blocks to run the scanner. If the scanned words
list monitor is not showing on the stage, then you need to show it so that you can
inspect the results.
11. The good news is that the script runs and adds an entry to the scanned words list.
The bad news is that the script is only adding the last word in the answer block to
the list. We've got a bug.
12. The error in our script occurs in the inializaon of the lists. Insert an add () item to
(scanned words) block aer the delete (all) of (scanned words) block. Let the value
of add be empty. This inializes the list before we start looping through the repeat
block. Now when you run the script, it should split the string into individual words
and store all those words in the list.
13. The following screenshot shows the nished script:

Chapter 8
[ 213 ]
I rst encountered this script on the Scratch Wiki:
http://wiki.scratch.mit.edu/wiki/Separating_a_
String_Into_Wordhttp://wiki.scratch.mit.edu/wiki/
Separating_a_String_Into_Word
What just happened?
We've seen most of these blocks throughout our work in this chapter. One of the keys to
making the word scanner work is the iteraon through each character of the answer value
and tracking that progress with the leer# variable. I've been using leer and character
interchangeably, but the script is ulmately looking for leers (for example, a, b, c), but
we need to examine all the non-leer characters too. As the script examines each leer,
it checks for a space. A space signals the beginning of a new word, so the add () to () block
adds a new empty word to the list. If you remember our previous encounter with this block,
you know that the new item is added to the last posion of the list.
If the player enters a queson with consecuve spaces, our script will create a new
item with an empty word. Depending on how you use this scanner, that may or may not
be a problem.
As the script encounters a non-space leer, it joins the leer to the current item in the
last posion of the scanned words list, which is the paral word. This is the second key to
understanding this script. For a simple example, let's assume the rst word in the answer is
dog. The last item in the scanned words will be "d", the rst me through the loop. On pass
two, the last item becomes "do". The third pass yields "dog". During the fourth pass, the script
encounters a space and therefore, creates an empty word in the list. You can verify this by
inserng a say ((item (last) of (scanned words)) for (1) secs) block aer the replace item block.
Have a go hero – creating a more intelligent chat bot
The addion of the word scanner script opens up the possibility of scanning the answer value
for a word or words that can be used to trigger a more intelligent or at least a contextual
response. For example, if you scan for "chicken", you could program the teller to respond
with a fortune related to chicken, such as, "Pasture raised chicken has great avor. You will
eat some in the near future".
Currently, our scanner is not integrated into any of our scripts. Your challenge is to scan the
player's answer and respond based on a keyword or keywords. The teller's answer can be
manually issued for each keyword, or you may create a separate list of keywords that trigger
one or more alternate responses.
Oh! And don't forget to update the word scanner to ignore punctuaon when scanning the
answer value.

Chang with a Fortune Teller
[ 214 ]
Pop quiz – understanding how to work with text
Q1. If you wanted to group ten related items together, you would create a:
1. Variable.
2. Numbers block.
3. List.
4. Forever loop.
Q2. If you want to add many items to a list at one me, how would you do it?
1. Type in each item one at a me into the add block.
2. Type in each item into the list monitor that displays on the stage.
3. Export the list from Scratch.
4. Create a list in a text le and import it via Scratch.
Q3. The mod block:
1. Modies a number in the list.
2. Creates a variable that tracks an interval.
3. Transforms the sprite into a leprechaun.
4. Divides two numbers and reports the remainder.
Q4. We use a "counter" variable to:
1. Track how many mes an event occurs.
2. Idenfy how many sprites we have in the project.
3. Select a random item from a list.
4. Add a new item to a specic posion in the list.
Q5. Which of the following blocks gives us the exact length of a piece of text?
1. (leer#) > (length of (answer))
2. Length of () from Data palee
3. length of () from Operators palee
4. item () of ()

Chapter 8
[ 215 ]
Summary
We're well on our way to creang an intelligent conversaon with our fortune teller. I hear
you. Can a conversaon with a fortune teller really be intelligent? An implicit lesson in all of
this is that somemes you need a suspension of disbelief in order to enjoy a good book, a
movie, or a Scratch project.
We have seen the power that the lists and variables give us to create dynamic, exible, and
fun projects. As you worked through this chapter, you probably realized that we could have
used lists in some of our previous projects. For example, our scripts in Chapter 05, Creang
a Mulmedia Slideshow, would have been much smaller had we used lists. However, by
avoiding lists in the earlier chapters, I ensure the projects are suitable for the youngest of
Scratchers, and it sets up a nice illustraon of the pragmac usefulness of lists and variables.
By the me we nished this chapter, we have the foundaon to work with a piece of text
that you may encounter from list items all the way down to individual words and characters.
Whether we're looping through a list, a string, or providing data validaon, manipulang all
that text requires a rm grasp on the use of condional statements and control blocks.
Our programming knowledge has been accumulang nicely to this point even though you
may not know it. In the next chapter, we're going to draw on everything we know as we learn
to draw geometric art in Scratch. We'll turn shapes into owers, pinwheels, and interesng
paerns in addion to creang string art. We'll also explore how to use the nd and use the
color opon in Scratch.
9
Turning Geometric Patterns into Art
Using the Pen Tool
Feeling artistic? Don't worry if you're not. This is art that anyone can do.
We'll make the sprite do all the hard work.
As we work our way through the chapter, we'll be programmatically creating
designs in Scratch by giving the sprite a precise pattern of movements to follow.
At the end of this chapter, we'll have created a shapes drawing project, a color
finder application, and some string art.
These projects will have a place on their own and can be quite addictive to
experiment with. However, they are highly applicable to the work we've done
through the first eight chapters. These art projects, or animations, can be used
in a variety of places including when the player loses in Breakout, to draw stars
on a card, or as level and scene transitions.
In this chapter, we will draw on many of the concepts we've learned so far in addion to
the following:
Exploring the pen blocks to draw basic and user-dened polygons
Capturing user input to create paerns via a custom procedure
Understanding and using color and shade
Drawing asymmetrical paerns and string art
Turning Geometric Paerns into Art Using the Pen Tool
[ 218 ]
Drawing basic shapes
What can you do with a triangle, square, pentagon, hexagon, octagon, and other polygons?
Let's nd out.
Time for action – drawing our rst square
Let's start a new project and call it shapes. We'll work with the default cat sprite using the
following steps:
1. Add the when () key pressed block from Events, and choose the leer d for draw.
We'll use this key to draw the shape.
2. From the Pen palee, add the pen down block.
3. Aach a move () steps block, and set a value of 50.
4. Aer the move (50) steps block, add a turn () degrees block, and change the
value to 90.
5. Duplicate the move (50) steps and turn (90) degrees blocks three mes.
Your script should look like the following screenshot:
6. Press the d key, and observe that the cat quickly draws a square as shown in
the following screenshot. Press the d key repeatedly, and note that the shape
doesn't change.
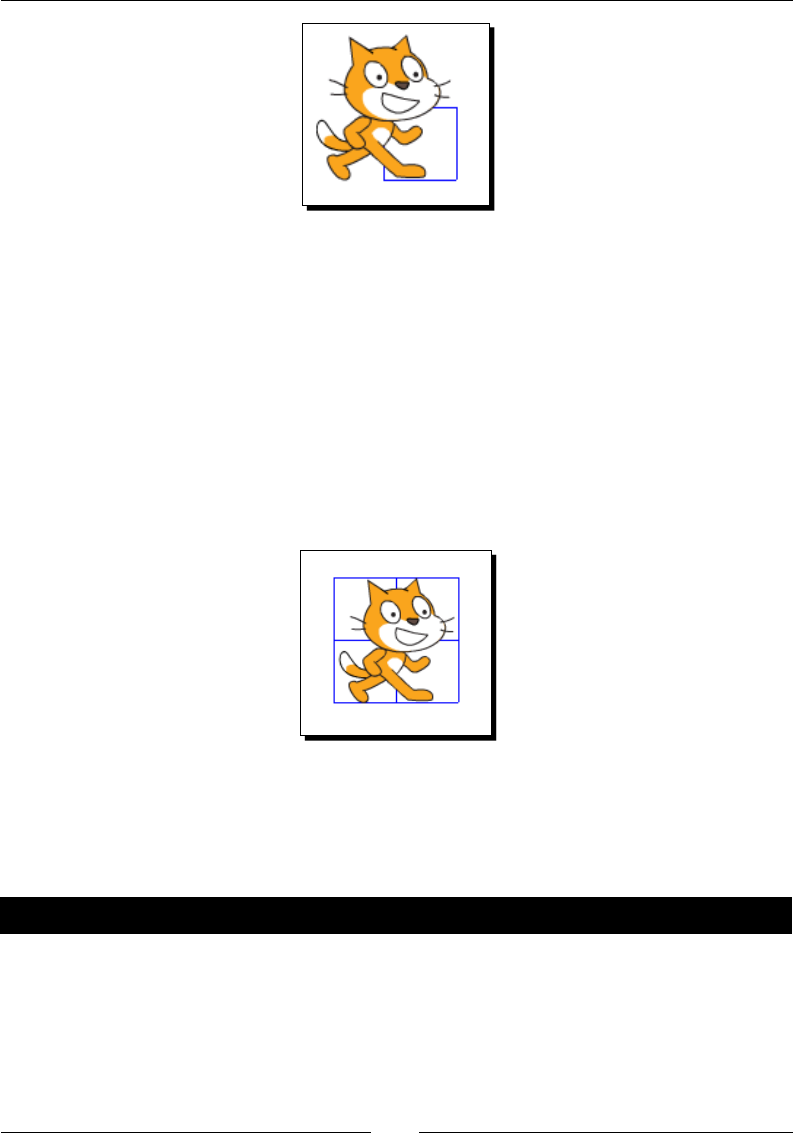
Chapter 9
[ 219 ]
What just happened?
We drew a square even though it happened too quickly to see, and the cat is parally
obstrucng the line. We'll make our script more concise soon enough, but this simple script
introduces us to the Pen blocks in scratch. By using pen down, we instruct the sprite to draw
using a color. Right now, we're using the default color, but we'll work on changing colors as
we work through future exercises.
If you keep pressing the d key to redraw the square, the cat will connually retrace its path;
however, its moon will be undetectable. Noce that as we move the cat, it's facing in the
same direcon that we started with. If we leave o the last turn (90) degrees block, and press
the d key four mes, the cat will draw the paern as shown in the following screenshot:
Noce that as you draw this shape, the cat draws the smaller squares in a counterclockwise
paern. This is because aer drawing the rst square, the cat is facing up so that when you
draw the second square, the cat rst moves up before making the rst 90-degree turn. And
the paern repeats unl you draw one big square.
Have a go hero – exploring squares
Really quickly, explore this simple script a bit more by removing or adding the move and turn
blocks in the script. For example, what paern do you get if you remove the boom three
blocks of the script we built in the exercise?
Turning Geometric Paerns into Art Using the Pen Tool
[ 220 ]
Time for action – building on the square
Let's clean up our code, get back to a common starng posion, and explore some
addional shapes by performing the following steps:
1. Aer the when (d) key pressed block, add a hide block and a clear block from
the Looks and Pen palees, respecvely. This will hide the sprite and remove
the previous drawing if any.
2. Aer the clear block, add the go to x: (0) y: (0) and point in direcon (90) blocks.
3. Now, aach a repeat () block to pen down. Then drag the move (50) steps and
turn (90) degrees blocks inside the repeat () block. Delete the remaining move
and turn blocks.
4. Change the value in the repeat () block to 4.
5. At the end of the stack, add the pen up block.
6. Double-check your work by pressing the d key. You should get a square, and the
cat should be hidden. The nal script should look like the following screenshot:
7. Now, change the value in the repeat (4) block to 3 and in the turn (90) degrees
block to 120 to get a triangle.

Chapter 9
[ 221 ]
8. Next, try repeang a 72-degree turn ve mes to get a pentagon.
9. Now if you repeat a 36 degree turn 10 mes, you'll get a decagon.
Can you nd the point at which you get a circle? As you experiment and the shape becomes
too large for the stage, experiment with the length of the sides in the move (50) steps block.
What just happened?
Did you noce that the product of the repeat () block and the turn () degrees block always
equaled 360? By controlling the number of sides via the repeat () block and the number of
degrees each line moved, we were able to change shapes.
The following are the outside angles of some common shapes:
A square consists of four 90 degree angles (4 * 90 = 360)
An equilateral triangle has three 120 degree angles (3 * 120 = 360)
A regular pentagon has ve 72 degree angles (5 * 72 = 360)
A regular octagon has eight 45 degree angles (8 * 45 = 360)
When we're drawing our shapes, we're calculang the exterior angles, which will total
up to 360 degrees. The interior angles of various polygons will change with the shapes.
For example, an equilateral triangle has three interior angles of 60 degrees each for a
total of 180 degrees. The interior angles of a regular octagon are 135 degrees each.
Drawing user-dened shapes
Manually changing the values each me we want to create a dierent shape is a real pain,
even for us, project developers. By using variables and stage sliders, we can very easily
create a user interface that allows anyone to draw custom shapes based on the number
of sides, side length, and pen size.
A user interface provides a way for people to interact with the computer program. Enre
disciplines are devoted to designing user interfaces. If you think back to our joke book in
Chapter 4, Creang a Scratch Story Book, the table of contents is an example of a user
interface—it allowed us to select a story. The Breakout game we created in Chapters 6,
Making an Arcade Game – Breakout (Part 1) uses the arrow keys as a way for the user
to control the project.
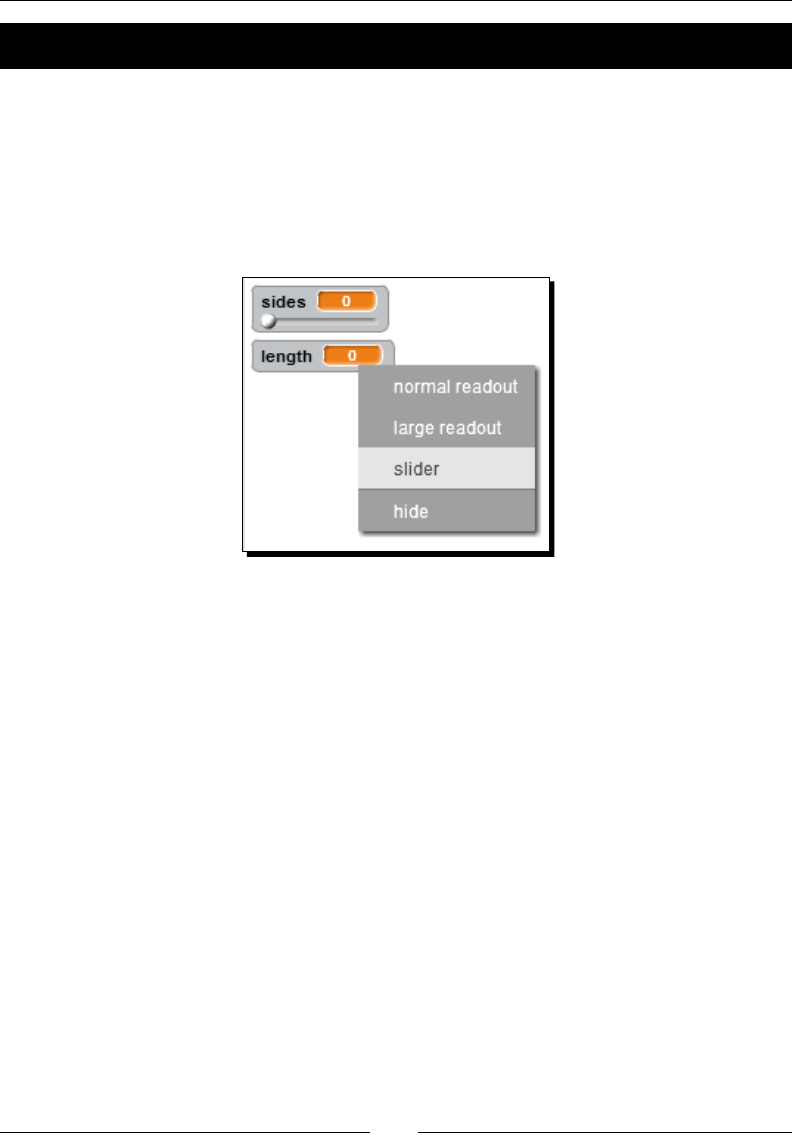
Turning Geometric Paerns into Art Using the Pen Tool
[ 222 ]
Time for action – enabling the user to create custom shapes
In this exercise, we're going to create variables and enable user-entered values via sliders:
1. Create four variables named sides, length, angle, and pen size. This
automacally adds a stage monitor for each variable.
2. Hide the angle stage monitor. We're going to turn the other monitors into
slider controls. Right-click on each monitor and select slider, as shown in the
following screenshot:
3. Next, add a set () to block from the Data palee as the rst block aer the when (d)
key pressed block. We want to calculate the angle of the shape by dividing 360 by
sides. The set () to block becomes set (angle) to (360/sides).
4. Add the sides reporter block to the repeat block.
5. Add the length reporter block to the move () steps block.
6. Add the angle reporter block to the turn () degrees block.
7. Insert the set pen size to () block above pen down. Add the pen size block as the
size value in set pen size to ().
8. The script looks like the following screenshot:
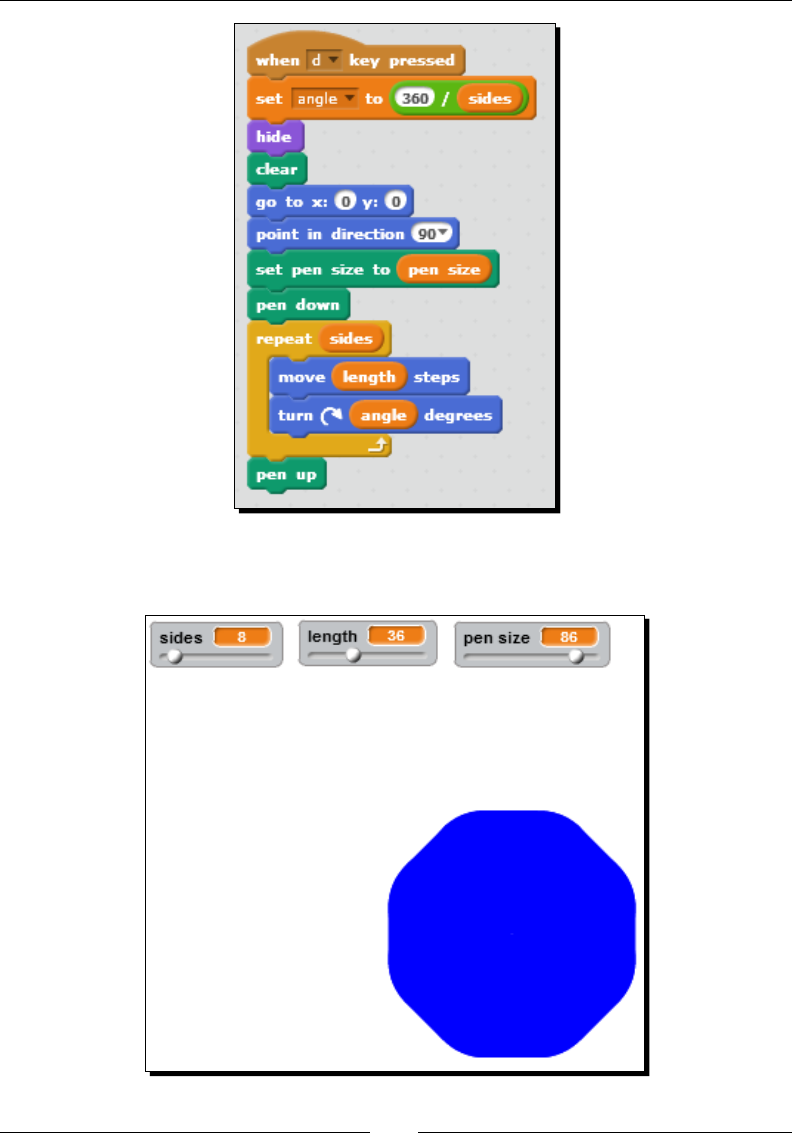
Chapter 9
[ 223 ]
9. Now use the slider to set dierent values and draw. The following screenshot shows
a solid octagon:
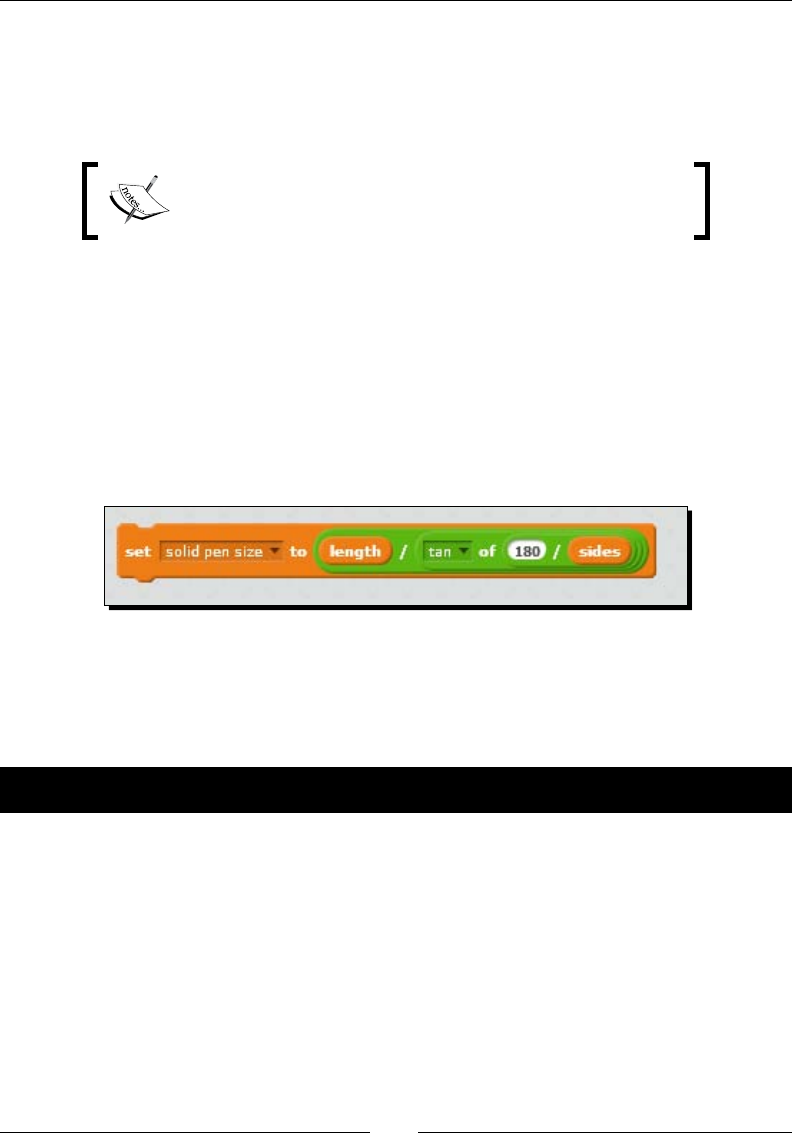
Turning Geometric Paerns into Art Using the Pen Tool
[ 224 ]
What just happened?
We've just made it incredibly easy to doodle with basic shapes. By using variables for the
key values, we eliminate tedious eding of the script every me we want to create a shape.
The slider control makes entering values a snap.
Changing the stage monitor to a slider is a very popular way
for Scratchers to collect user input for use in interacve games
and art.
We introduced the set pen size to () block, which changes the width of the line we draw.
As my previous screenshot depicts, it's possible to use set pen size to () to create a shape
with solid colors. To create a solid square, you can set the pen size variable to the same
value as the length variable. To create other shapes in a solid color, you can experiment
with pen size and/or use a calculaon of length/tan(180/sides) as seen in the following
screenshot. The following code expressions assign the calculaon to a variable named
solid pen size, which would be used in the set () to () block.
It's shown as follows for illustraon purposes and won't be integrated into our project:
In the script we're building, we chose to ask the user for a number of sides, and then we
used that number to calculate the angle of our shape. We could just as easily do the reverse;
ask the user for the angle. Then calculate the number of sides as 360/angle. It's more likely
that the user will know the number of sides.
Time for action – turning triangles into pinwheels
We're just a few blocks short of turning our basic shapes into art and paerns. Let's perform
the following steps to do so:
1. Create another variable called revs (short for revoluons). We'll use this as
the number of mes to repeat our shape. Turn the stage monitor into a slider.
2. Enclose the repeat (sides) block with a new repeat () block. Add the revs
variable as the value in this new block.
3. Add a turn () degrees block aer the inner repeat (sides) block. Use the
calculaon 360 divided by revs for the turn value. The nal script looks
like the following screenshot:
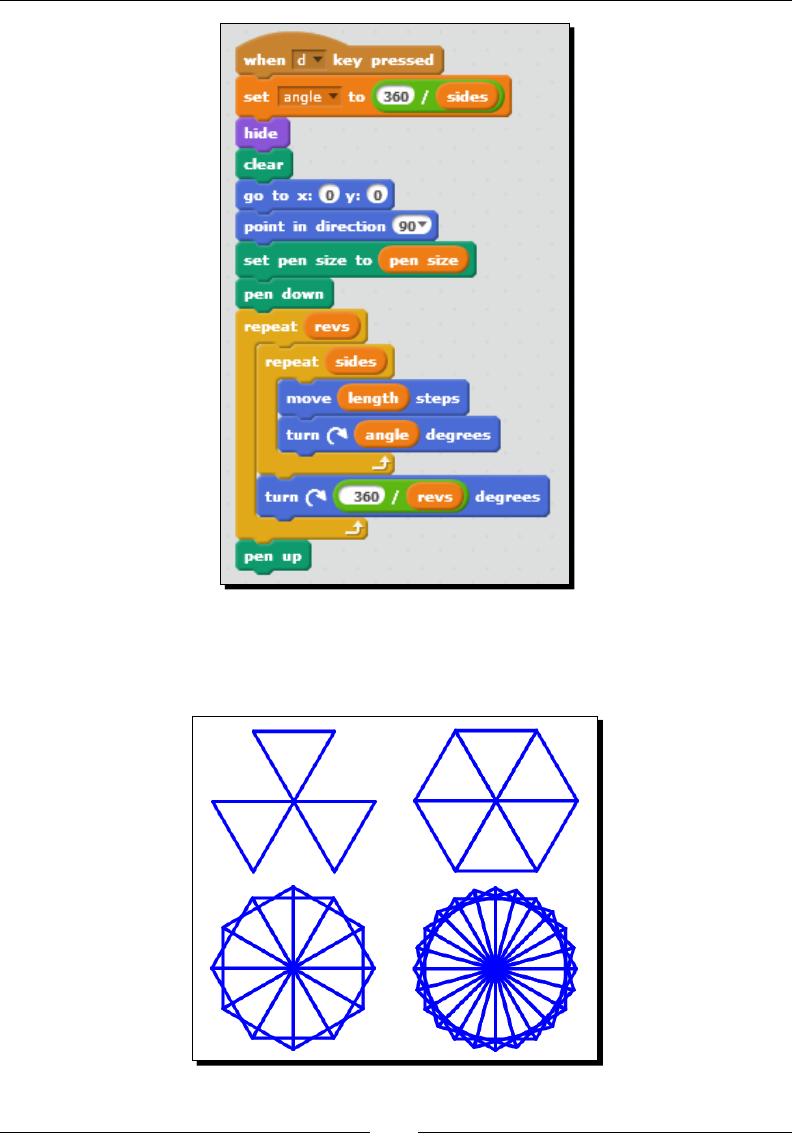
Chapter 9
[ 225 ]
4. Now things are geng interesng. Set the values for the sides, length, revs
variables as 3, 100, and 3, respecvely. Then redraw the shape by changing revs
to 6, 12, and 24, respecvely. The following screenshot shows the paern:

Turning Geometric Paerns into Art Using the Pen Tool
[ 226 ]
What just happened?
The revs variable allows the users to determine how many mes to repeat the paern,
but the most important block to drawing this paern is the turn () degrees block that runs
aer the primary shape is drawn. Without this turn block, the paern would simply retrace
its original path, and we'd only see one shape on the screen.
We calculate the number of degrees to turn by dividing 360 by the user-specied number
of revoluons so that a value of 3 for revs will rotate 120 degrees between each paern.
This calculaon ensures the paern turns a full 360 degrees. This gets us back to the original
starng point and creates symmetry. If you were to show the cat sprite, you'd see that it's
sll facing right at the end of this script in the middle of the stage—exactly where it started.
Have a go hero – adding a stem to the ower
Using the pen tools, draw a stem on the ower. How do you control if the stem appears in
front of or behind the shape? Can you create a square ower?
Dening procedures for home and shapes
Let's take a minute to clean up our scripts and create some custom blocks for the parts of
our code that we're likely to repeat from this point forward. The custom blocks will also
make great addions to our Scratch Backpack.
Time for action – creating a custom shapes procedure
We're going to make procedures (custom blocks) for home and shapes. Home will inialize
our drawing environment, and shapes will handle the drawing:
1. We'll start with dening a home block that sets our inial sprite posion and
values. From the More Blocks palee, click Make a Block, and name it home
as a representaon of an inial starng posion. It will inialize the our
drawing project.
2. Drag these four blocks from the exisng stack, and add them to the dened
home block: hide, clear, go to x: (0) y: (0), and point in direcon (90).
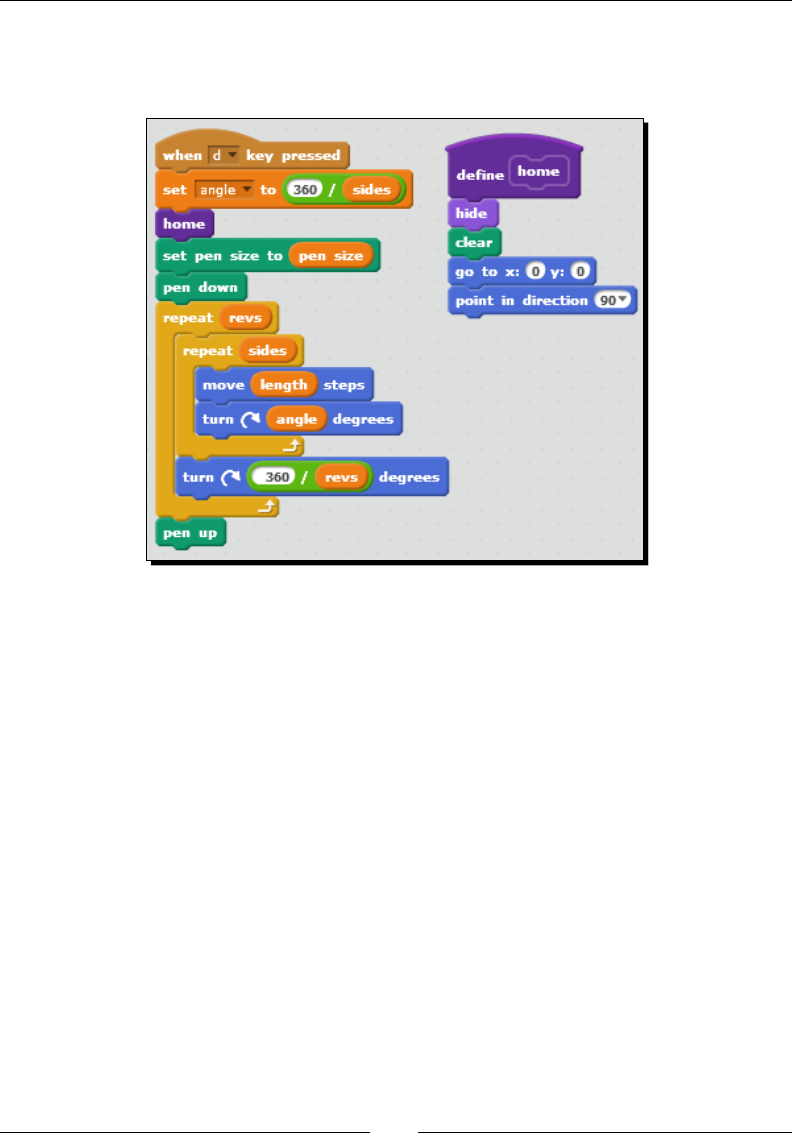
Chapter 9
[ 227 ]
3. Then use the home block from the More Blocks palee to replace the four
blocks you just removed from the when (d) key pressed script. Check the
following screenshot:
4. Next, we'll make a custom block out of the repeat (sides) block. Create a new
custom block named shapes that takes three numbers as inputs: sides, length,
and angle. For clarity, you should add a text label to each number input and
give each input a descripve name. You can see how I chose to do it in the next
screenshot. I tried to nd a balance between name length and comprehension.
5. Drag the repeat (sides) loop out of the exisng script and aach them to the
dened shapes block.
6. Add the shapes block to the script in place of the repeat (sides) loop we just
moved. Then add the reporter blocks for sides, length, and angle into the
respecve values of the shapes block.
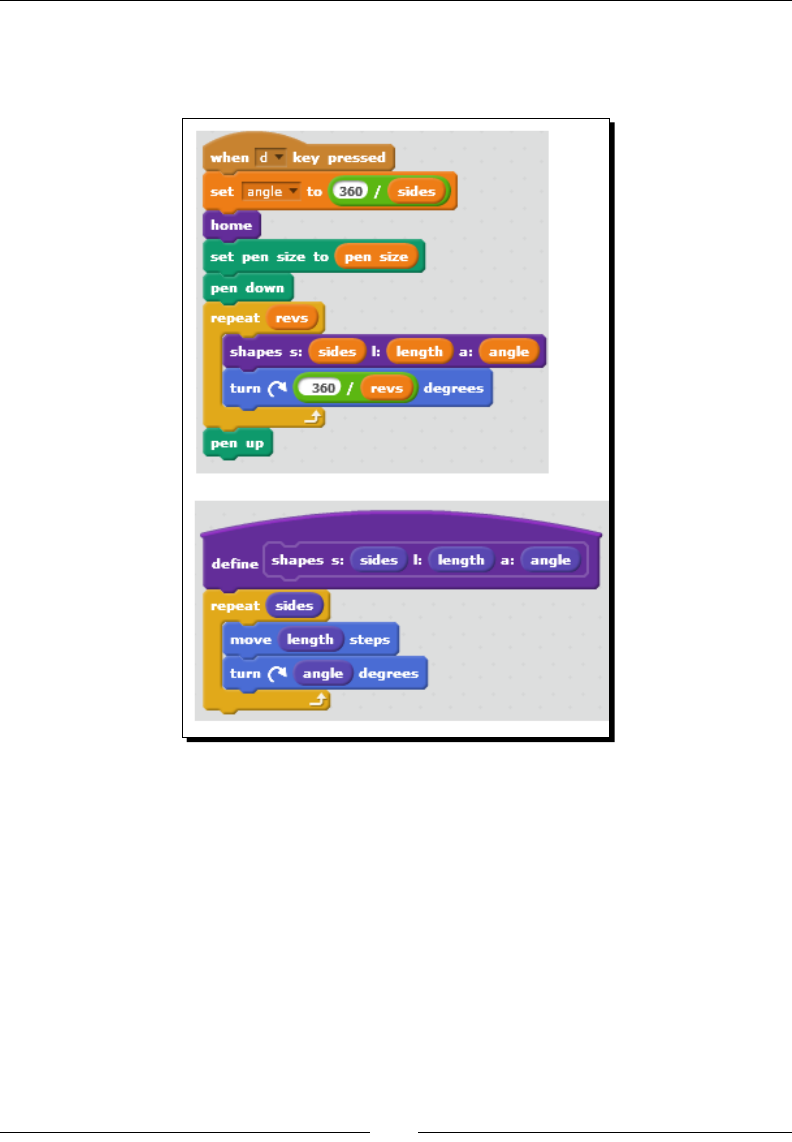
Turning Geometric Paerns into Art Using the Pen Tool
[ 228 ]
7. Go back to the dene shapes block to do some clean up. Replace the values
in the script with the custom block values. The following screenshot shows the
new block and scripts:
8. Take a moment to verify that your script sll works.
What just happened?
Aer some inial experimentaon, we ended up with code that will be benecial to our
other drawing projects by creang our own custom procedures. The shapes block now
properly turns the user-specied values into the correct paern.
Plotting the coordinates of shapes
In the examples so far, the length value controlled how long each line segment was.
Even though we started at the center of the stage, we didn't need to worry about the
actual coordinates of our lines. It's incredibly easy to create the paerns that we did.
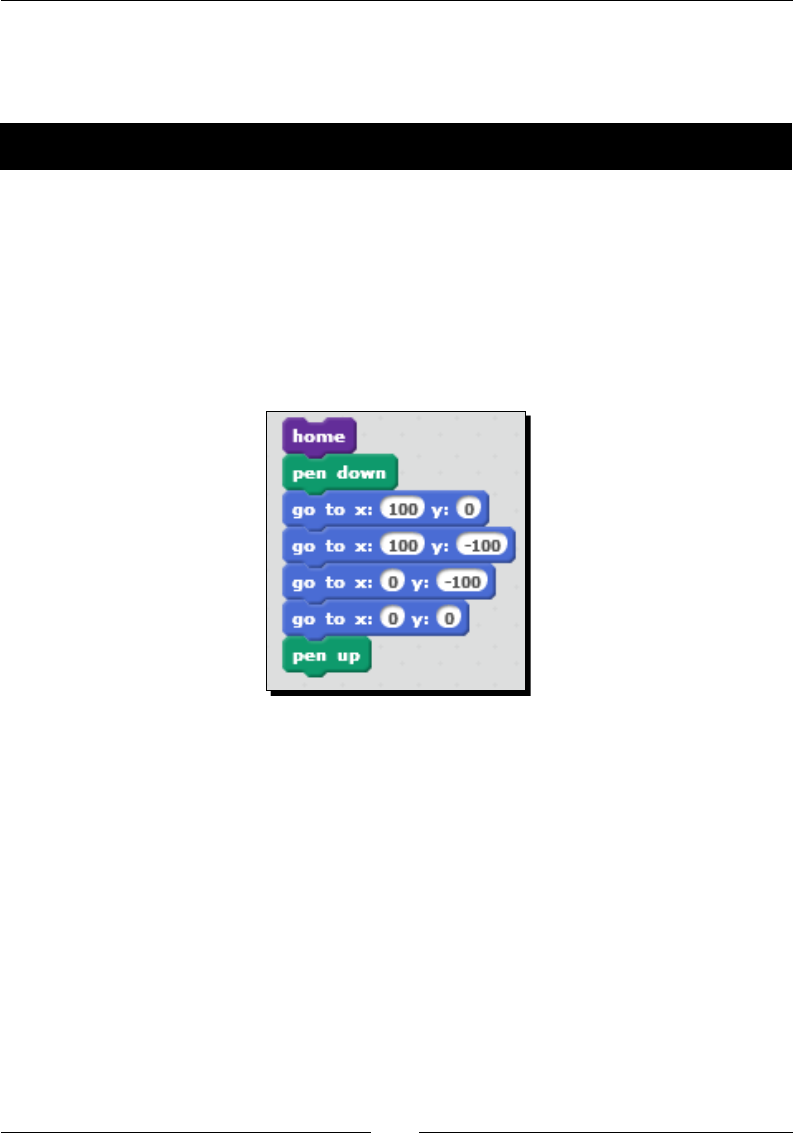
Chapter 9
[ 229 ]
Throughout the book, we've used the Cartesian coordinate system as a way to move and
posion sprites. The center of the stage is represented as (0,0). Let's take a quick look at
what it would take to draw our simple square using x and y coordinates.
Time for action – plotting x,y coordinates to draw a square
To complete this exercise, just create a new script in the exisng project. That way, we can
make use of our custom home block. Let's perform the following steps to do so:
1. Start the script with the custom home block, and add a pen down block.
2. Next, we need to add four go to x: () y: () blocks. The coordinates for each block
are (100, 0), (100, -100), (0,-100), and (0,0) respecvely.
3. Finish the stack with a pen up block. The following screenshot shows this quick script.
As you run this stack of blocks, you'll conrm that you do, in fact, get a square.
What just happened?
I picked an easy example. We're drawing the square by plong absolute points, meaning we
need to know exactly where to posion the sprite in terms of its x and y posions in order to
get the shape we want. Drawing a pentagon would have been much more dicult. But let's
get back to the square.
In previous exercises, we rotated our shape around a center point to make a paern. If
we try to make similar paerns by plong coordinates, we make the programming more
dicult because now we'll need to know more than the number of degrees to turn. We'd
need to calculate the new coordinates of the square for each revoluon in the paern,
and that would simply make our life unnecessarily hard for this project.
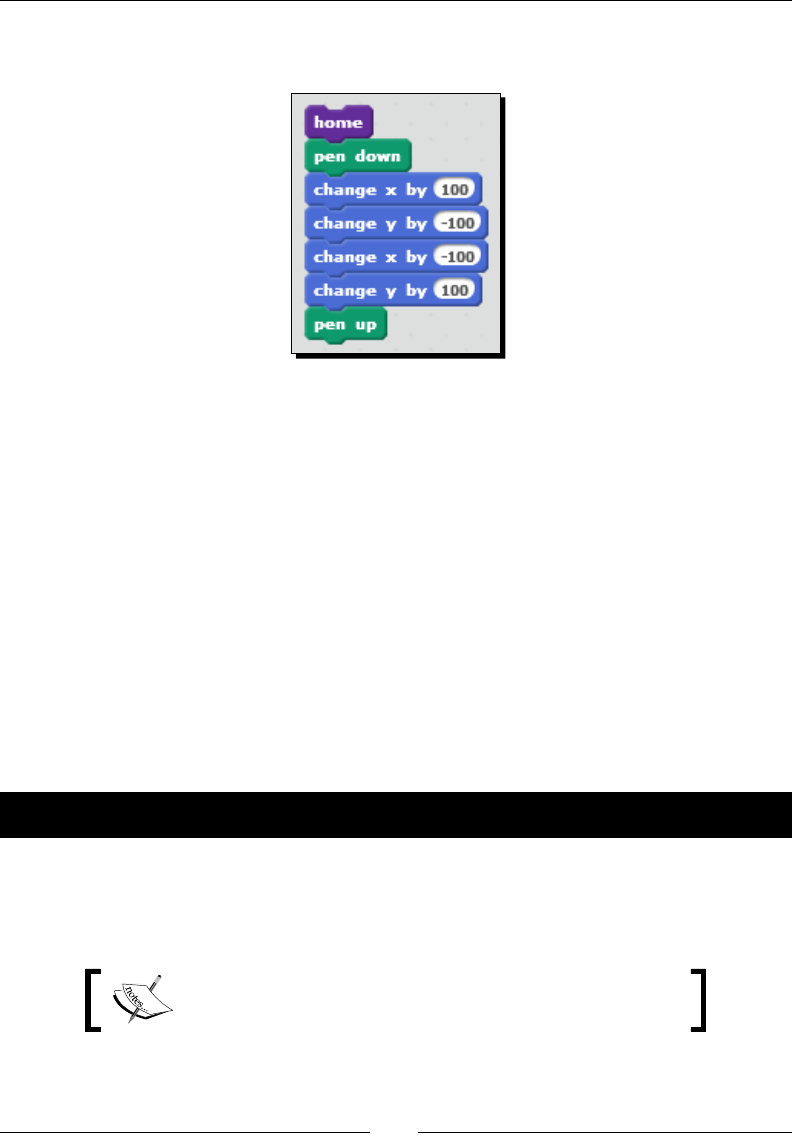
Turning Geometric Paerns into Art Using the Pen Tool
[ 230 ]
The following screenshot represents an alternate stack of blocks that will also draw a square
that is a hybrid between the move and the go to approaches:
In the previous screenshot, we no longer have to worry about the coordinates of the shape.
We're moving by coordinates, but it's relave to the sprite's current posion. However, as
the shapes get more complicated, this method will also become more dicult to use.
Can you spot the dierence between the examples using the go to x: () y: () and the change
by () blocks compared to the move () steps block that we built inially?
In our shapes procedure, we're controlling two points of movement: direcon via the turn ()
degrees block and distance via the move () steps bock. The signicance of this is demonstrated
by the alternate soluons in this exercise.
Understanding and using color
Adding a splash of color can transform a cool shape into a beauful drawing. Next, we'll look
at the set pen color to () and change pen shade by () blocks.
Time for action – coloring our shapes
Let's take a moment to add some color to our drawing by performing the following steps:
1. In the stack that begins with when (d) key pressed, add a set pen color to () block
from the Pen palee below the set pen size to (pen size) block. Enter a value of 15.
There are two set pen color to () blocks. One is a color picker,
and the other block takes a number input.
2. Now draw a shape, and you'll see that the shape is in orange color.
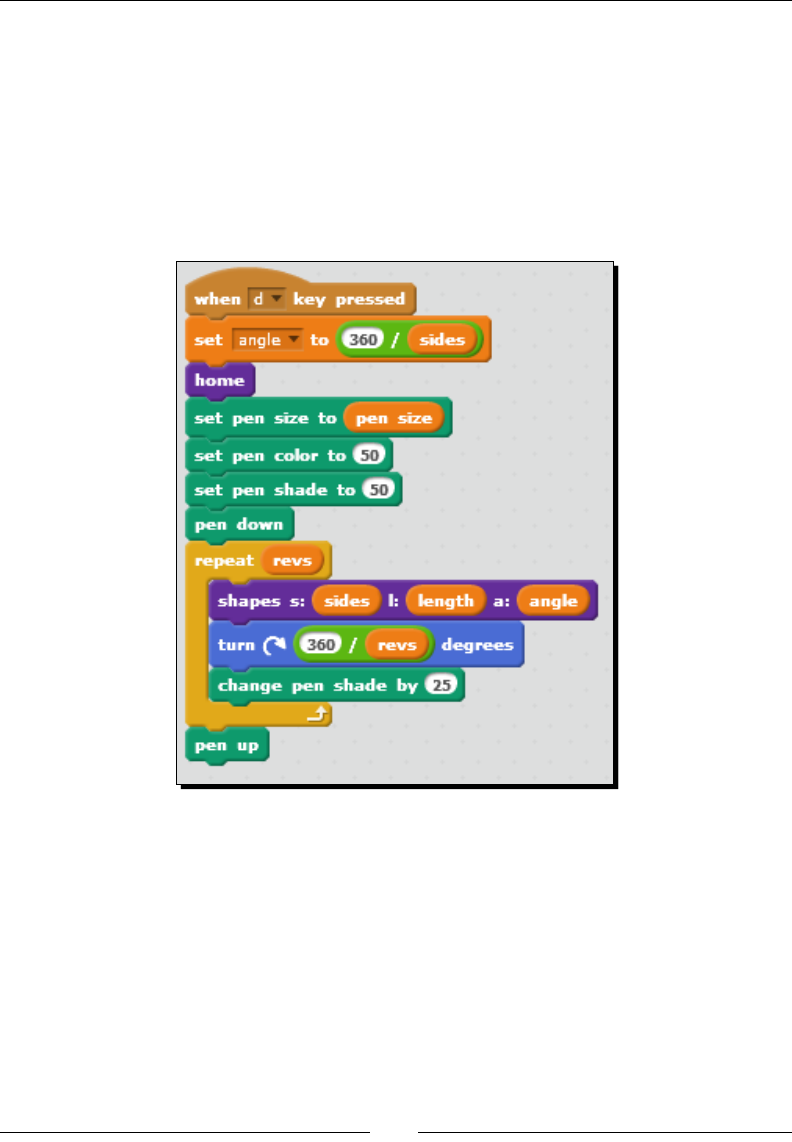
Chapter 9
[ 231 ]
3. Find the set pen shade to () block, and add it aer the set pen color to () block.
Change the shade value to 25.
4. Draw the shape again while leaving the color value set to 15. The color of the
shape has now changed based on the shade.
5. Let's iterate through several colors by adding a change pen shade by () block
inside the end of the repeat (revs) block. Set its value to 25.
6. Now draw the shape again, and observe the color change as each paern gets
drawn. Our script looks like the following screenshot:
What just happened?
When we work with color, it may help us to think of color as having hue, shade, and
saturaon. Saturaon involves the intensity of the color, but we're not going to worry
about it for this discussion. Instead, we'll look at hue and shade as our previous exercise
has already demonstrated. When we work with the set pen color to () and pen shade by ()
blocks, we specify a numeric value that represents the color hue.
The set pen shade to () and change pen shade by () blocks adjust the shade of the color, so
we combine the shade and color hue as in our exercise to get dierent colors, such as red,
orange, light blue, and dark green.
Turning Geometric Paerns into Art Using the Pen Tool
[ 232 ]
The set pen color to () block takes a range from 1 to 200
before the color hues start repeang.
Our sample script shows us a very important feature of the values in Scratch's color blocks.
The default shade is set to 50, which makes a color value of 15 draw in orange. Changing the
shade to 25 drew a dierent orange.
Understanding color shades
The set color shade to () block accepts a base range of 0 through 100. Shade values close
to zero turn darker (for example, black) while values close to 100 turn the color lighter.
However, if you enter shade values greater than 100, the dark/light color alternates. Shade
values 0, 200, 400, and so on will draw dark shades. The values 100, 300, 500, and so on
will draw in light shades depending on the pen color. There are sll only 100 shades, but the
range alternates every 100 so that 1 to 100 goes black to light, 101 to 200 goes light to black,
201 to 300 goes black to light, and so on.
Working with the set pen color to () block
The second set pen color to () block is a color picker. Like the touching color ()? block in the
Sensing palee, the set pen color to () block with the color picker only allows you to select
colors that are visible in the project editor. To use it, click on the color swatch of the block,
and then click on the color you want by selecng it from anywhere in the project editor.
While this method of seng the pen color works if you want to coordinate colors with your
background or sprites, or if the color you want happens to be visible in the project editor,
its limited use in an art project should be self-evident. Sll, picking a color like this is a lot
easier than entering a random number and hoping you get a color you want.
We can create a color sprite to make picking colors easier.
Time for action – nding a color picker workaround
Let's import a color picker sprite from the book's source les so that we can have a full
range of hues to select from in our art projects by performing the following steps:
1. For those of you who do not wish to or are unable to download the source les for
the book, one opon would be to use an image of the color picker in Scratch's paint
editor. You could take a screenshot and crop the image so that only the color palee
is included. Then import the new image into Scratch as a sprite.
2. The easier opon is to look in the code folder for this chapter and nd the image le
named Color_picker.png.
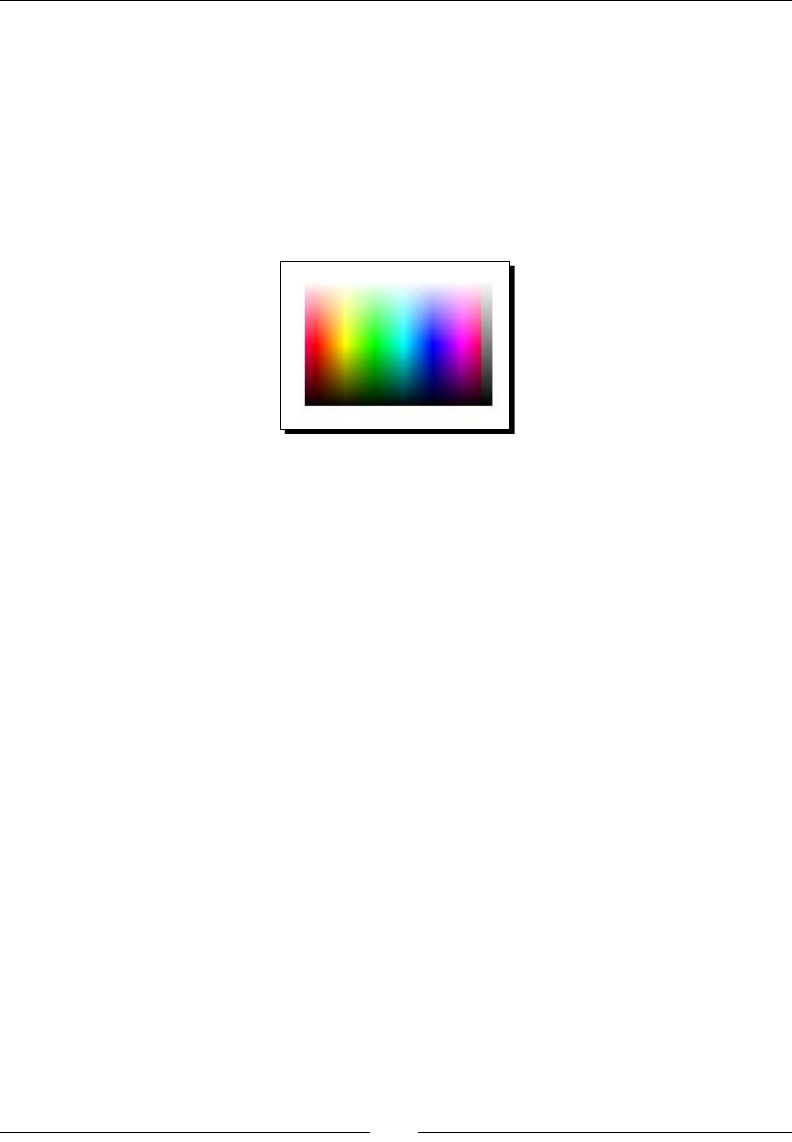
Chapter 9
[ 233 ]
3. From Scratch, click on the Upload sprite from the le icon. Browse for and select the
Color_picker.png le to import it. The image le we're imporng is from the
Scratch Wiki; however, this is the same color picker image that can be found in the
set pen color to () block in Scratch 1.4.
4. Now you can select a color for use in the set pen color to () block by clicking on the
color swatch in the block and then clicking on the new color picker sprite.
5. The following screenshot shows the new sprite. Aer you pick a color, you can hide
or delete the sprite to keep it out of the way of your art project.
What just happened?
With a bit of creave thinking, we now have our own picker that shows the various color
shades. I'd recommend adding this sprite to your backpack so that it becomes available
in all your projects when you need to pick a color.
There's a change from Scratch 1.4 to 2.0 that needs to be acknowledged parally because
I called it out in the exercise. In Scratch 1.4, the set pen color to () and touching () blocks
(from Sensing) actually displayed a color picker similar to what we imported in the exercise,
making color selecon a snap. Scratch 2.0 no longer uses the color picker in conjuncon
with the blocks, and that was the point of the exercise.
In the Sensing palee, the Scratch 2.0 method makes a lot of sense as you generally only
want to sense the colors of the exisng costumes and backdrops. However, when you're
drawing, it's safe to assume that the needed color is not visible in the project and therefore
can't be selected. This exercise gave us a workaround.
Finding a color to use by its number
In the previous exercise, we imported a color picker image into Scratch that contains a wide
range of hues. That's a great color selecon workaround if the project creator is selecng
colors and drawing. However, what if you were to create a drawing that let the user select a
color value? The pickers won't work, but we could allow the users to enter number values.
It would be nice to have a reference that showed the associaon between numbers and colors,
but there doesn't appear to be one available in the Scratch resources. So we'll create our own.

Turning Geometric Paerns into Art Using the Pen Tool
[ 234 ]
Time for action – creating a color palette
How do we know that a color value of 15 will get us orange? Let's create a simple app for
that. We know that we have 200 color values, so let's script a program to draw each color
value for a specied shade.
For this exercise, I'd recommend that you build the script for the color picker sprite we
added in the previous exercise, and then you could add the sprite to your backpack and
have both the picker and the script in one place. Let's run through this exercise, and then
we'll discuss some variaons. If you completed the Breakout game, then the logic for
creang the color swatches in the following exercise will look familiar:
1. Since we will be repeang a paern a set number of mes, create a new variable
called count.
2. Create a custom block named draw colors.
3. Let's set the starng values for our script by aaching the following blocks to the
dene draw colors block:
clear
go to x: (-240) y: (180)
set (count) to (0)
set pen size to (18)
set pen shade to (50)
set pen color to (0)
4. Repeat the following commands unl the count variable is equal to 200:
pen down
move (35) steps
pen up
move (13) steps
change (count) by (1)
set pen color to ((count) + (1))
5. Inside the repeat unl() block, add an if () then block, and evaluate the statement
(count) mod (10) = 0.
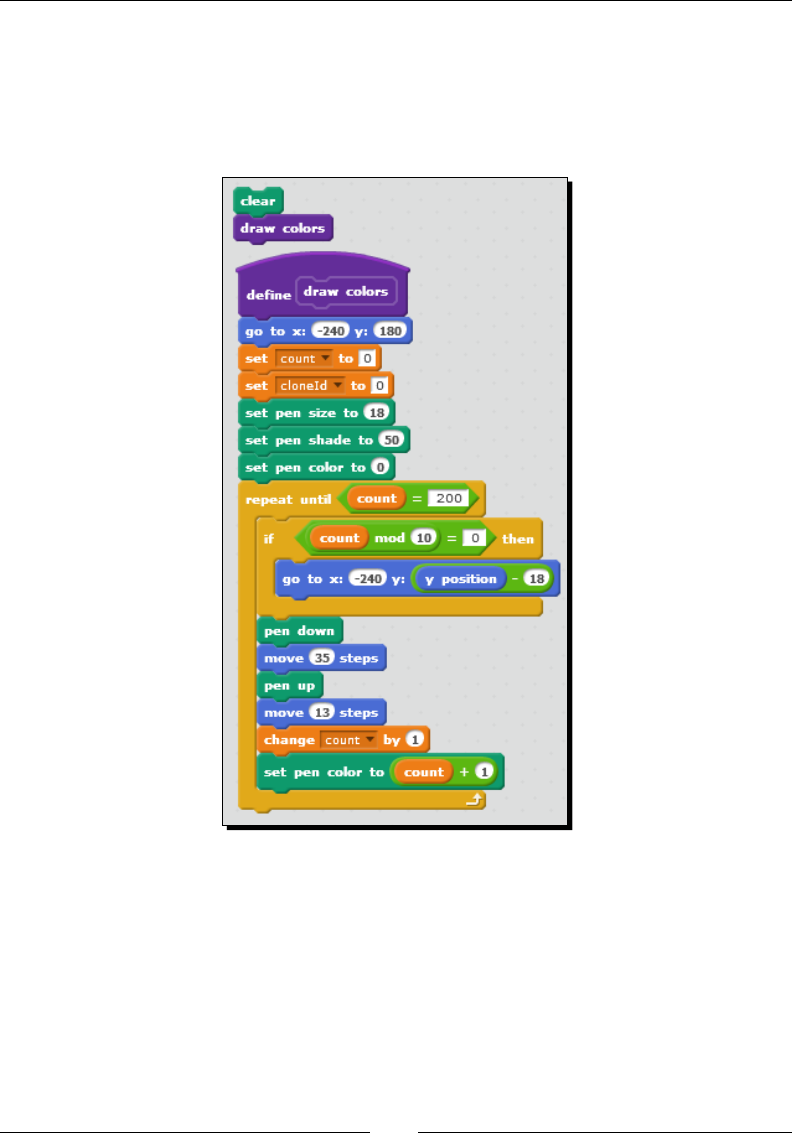
Chapter 9
[ 235 ]
6. If the previous statement evaluates to true, then add go to x: (-240) y: ((y posion)
– 18) inside the if () then block.
7. Check your script against the following screenshot, and then run it. The following
screenshot shows a two block script that can be used to clear any pen eects and
then run the new draw colors block:
8. Adjust values in the set pen shade to () block, and compare the colors you get.
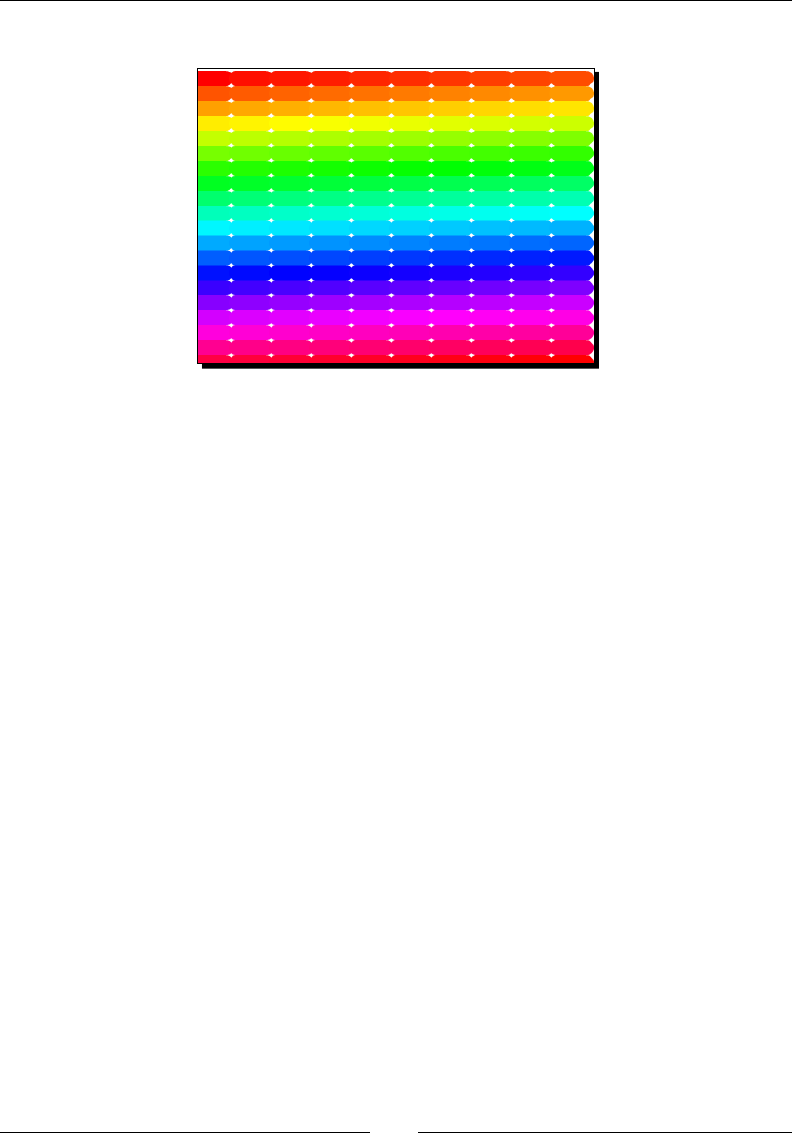
Turning Geometric Paerns into Art Using the Pen Tool
[ 236 ]
The following screenshot shows the paern of color our app creates for a shade of 50:
What just happened?
We just applied all of our Scratch learning to solve a problem that we encountered while
trying to create another Scratch project. If you've been through all the chapters in the book
so far, you'd recognize the concepts we used, including mod to track the paern in order to
dynamically build the rows.
We have 20 rows of 10 swatches, and numbering starts at zero in the top-le hand side
corner and ends at 199 in the boom-right hand side corner. That should allow you to nd
color value 15. We drew the grid of colors in such a way that you could easily pick a color
and idenfy the corresponding number by counng. You'll have a chance to automacally
report the number of each color in the next secon, but before we talk about the next
steps, we need to reect on some of the math in the current exercise.
The paern shown in the previous screenshot will take up the enre stage, which is why we
started at (-240, 180). We're drawing 10 colors per row for a total of 20 rows. That gives us
200 colors. In order to make each row span the width of the stage, we need to make each
color take up 48 pixels. Our script actually uses two move () steps blocks to get this done.
We rst set the move (35) steps block, put the pen up block, and then set the move (13)
steps block. This creates the visual whitespace you'll see in the paern of colors. If you
use a single move (48) steps block, there would be no visual separaon. We use 48 in our
calculaons because the stage is 480 pixels wide, and when we divide 480 by 10, we get 48.
To move the paern down the stage horizontally, we need to know that the stage is 360
pixels tall, so when we divide 360 by 20 we get 18. We make 18 the pen size, and we move
the rows down the stage by 18 pixels.
I'd suggest adding this script to your backpack as well.
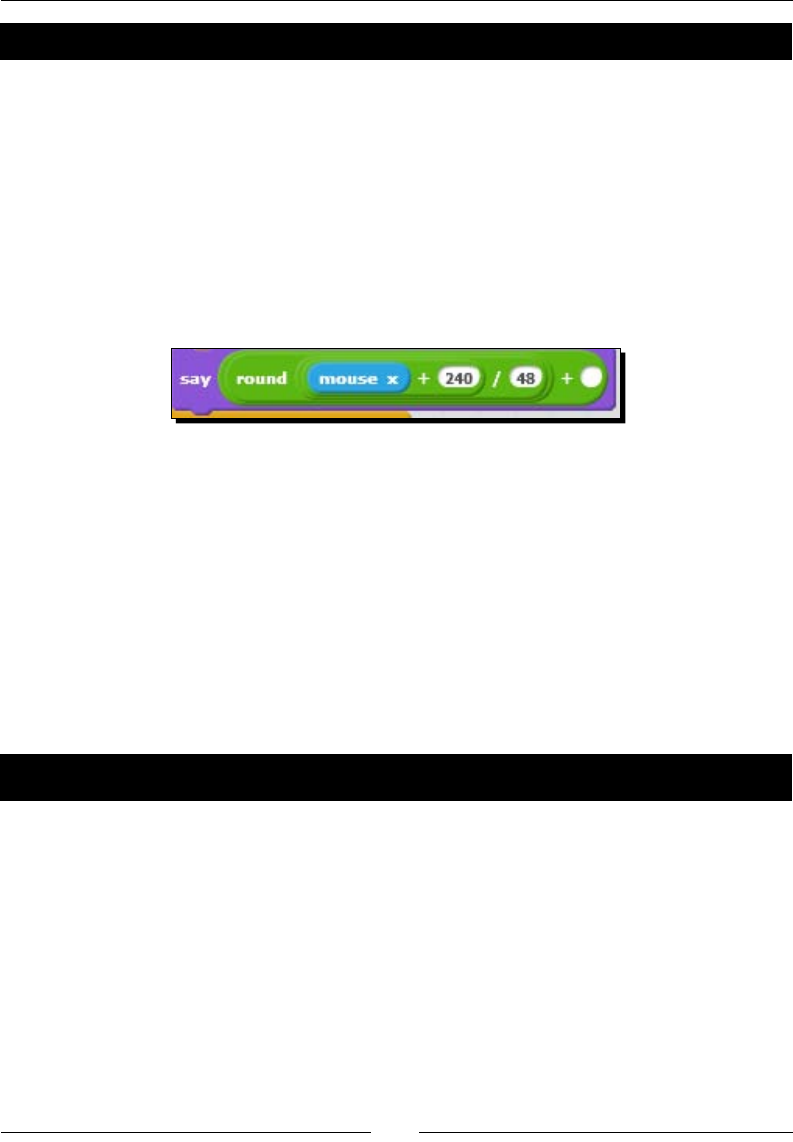
Chapter 9
[ 237 ]
Have a go hero – nding all shades for a color
There are mulple ways to build upon the color app we just created. We have a quick way to
see all the color hues for a specied shade. The following are a few potenal modicaons:
The script can be duplicated and modied to draw the shades of a specied color.
You can also create a script that reports the color number when you click on a point
on the stage. The code sample includes a possible soluon by rst determining the
x posion and then the y posion. If you think carefully about the numbers that we
used and talked about, you'll have a good starng point. I'll give you a hint by giving
you the coordinate to idenfy the posion on the x axis. The missing part of the
script in the following screenshot is calculang the row based on the y coordinate.
You can develop an applicaon that draws all 100 shades for each of the 200 color
hues. If you want inspiraon for that, check out the project at http://scratch.
mit.edu/projects/18089786/. Actually, this project will give you some hints
about how to use the mouse cursor to idenfy a point on the color picker that
we built. However, it won't translate directly to the version that we created in our
exercise, but it does get you in the right direcon.
Adding color slider inputs to the shapes project
As one of the last pieces of customizaon to this project, let's give the user a way to add
color via a stage slider just as we do for sides, length, pen size, and revs.
Time for action – limiting color values with a slider
Let's perform the following steps to limit color values via the slider:
1. We have two color values to manipulate, so create two more variables with the names
color and shade. Turn each new variable into a slider control on the stage.
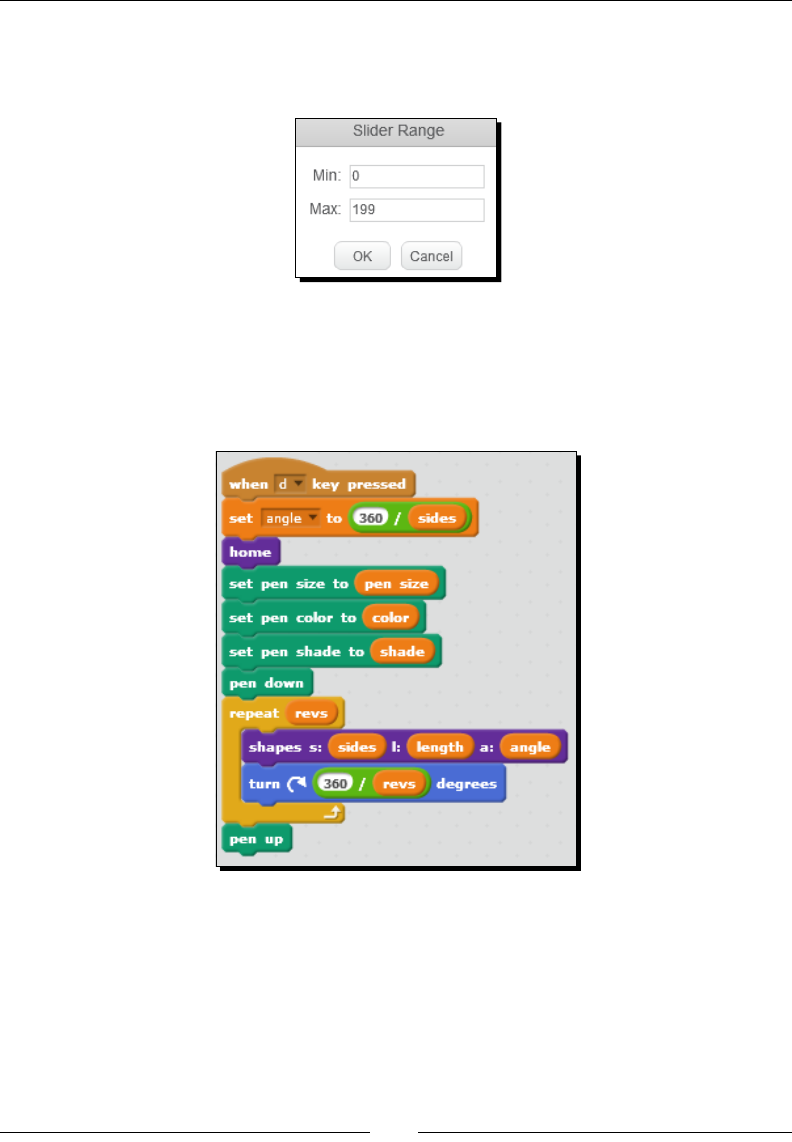
Turning Geometric Paerns into Art Using the Pen Tool
[ 238 ]
2. Let's limit the input that the user can enter. Right-click on the color slider, and select
the opon set slider min and max. This will open a Slider Range dialog box as
shown in the following screenshot:
3. In the Min and Max elds, enter 0 and 199 respecvely. Click on OK to save the range.
4. Test the slider control out, and verify that you cannot select a value higher than 199.
5. Now incorporate the color and shade variables into the appropriate blocks in the
script as shown in the following screenshot:

Chapter 9
[ 239 ]
What just happened?
Now, every value in our shapes project can be set by the user via slider controls that are
displayed on the stage. This exercise showed us that we can force the user to enter a range
of values via the set slider min and max opon, which is obviously very useful when we
want to restrict values that a user can enter via the slider controls. In a Scratch project, a
non-programming user will have access to edit the project, but we assume that most of our
users will interact with the project via the user interface we designed. And you'll noce that
if you try to move the slider all the way to the edges, it never passes the dened range.
Even with the sliders, as programmers, we can sll use the set () to () block to assign any
value we want to the variable. The slider controls only limits the the values through the
user interface.
Have a go hero – expanding the shapes application
The shapes applicaon we created has a lot of potenal, and it seems to be well suited to
exploring symmetrical paerns of dierent shapes. The interface could use some renements
before being published to the Scratch community. One recommendaon would be to hide the
sliders when the user draws the shape. That way you can use the enre screen to draw. That
would require an extra step to reset the sliders on the stage perhaps when the green ag is
clicked. You also need to provide some instrucons to the user.
Technically, what else can you do with this basic shape drawing applicaon? Can you move
the paern to a dierent spot on the stage and draw mulple copies? Maybe you can ask
the user for the number of mes to repeat the enre paern and then write the script to
arrange that paern on the stage using all the user-dened informaon. Sll, another idea
would be to instruct the user to click on a point on the stage and then draw the paern
around that point.
Creating asymmetrical patterns
While our work in this chapter has been interesng and insighul, everything has been
symmetrical. In the next exercise, we're going to create a new explosion paern with ever
increasing line lengths and odd angles.

Turning Geometric Paerns into Art Using the Pen Tool
[ 240 ]
Time for action – creating an explosion
Let's draw a paern, and then we'll completely change the paern by changing a couple of
key values. You don't have to, but I'm going to start with a new project.
1. Create a variable named counter. Let's inialize our script with the following set
of blocks:
clear
go to x: (0) y: (0)
set (counter) to (1)
pen down
2. Add a repeat () block and change the value to 125.
3. Repeat the following set of blocks:
move ((counter) * (2)) steps
turn (204) degrees
change (counter) by (1)
4. Next, nish the script by adding the pen up block outside the loop.
5. Check your script against the following screenshot, and then draw the shape:
6. First, remove the (counter) * (2) block from the move () steps block. Then change
the value in the move () steps block to 100, and draw the shape.
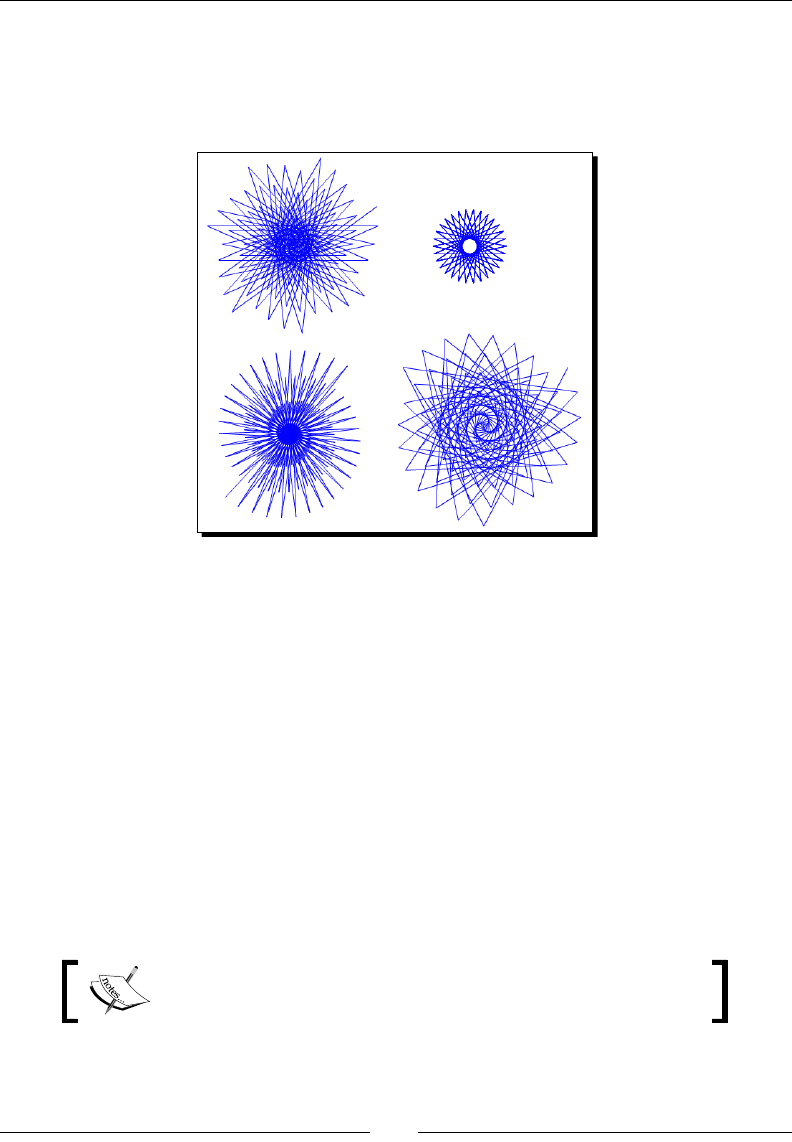
Chapter 9
[ 241 ]
7. Now put the (counter) * (2) block back into in the move () steps block. Then change
the value in the turn () block to 185, and draw the shape.
8. The following screenshot shows the three paerns we just drew. Can you gure out
how to draw the fourth paern?
9. You might noce that some of the paerns have a tag end visible where the paern
stops. You can clean that up by adding a move (60) steps block aer the repeat ()
loop. That will not work with the symmetrical paern that we drew using the move
(100) steps version. Experimentaon is the name of the game.
What just happened?
We created a simple but cool project. Our rst twist is the use of the counter variable.
In the past, we've used this type of variable to control the number of mes to loop through
the repeat() block. Even though counter tracks the number of mes the paern has run,
it's used as a mulplier in the move () steps block.
We demonstrated the impact the (counter) * (2) calculaon had on the move () steps block
by removing it and using a constant number, such as 100. The paern became very even
compared with the explosive appearance of the original calculaon.
If you want an easy way to slow down and see the paern develop,
add a wait (.3) secs block at the end of the repeat () loop.
Turning Geometric Paerns into Art Using the Pen Tool
[ 242 ]
Turning straight lines into string art
So far, we've used the pen tools to draw paerns using angles and forward movements
to trace a connuous path. For our next art project, let's straighten our movements out
and create something using nothing but straight lines, which is a technique oen called
string art. The lines will not be connuous.
Time for action – animating a radar screen
To pull o a radar paern, we'll rotate straight lines around a circle, but we'll need to draw
upon our earlier work with colors to make the animated eect. Let's create a new stack of
blocks by performing the following steps:
1. Let's inialize our starng point with the following blocks:
clear
go to x: () y: ()
set pen shade to (50)
pen down
2. Then add a forever block. We want to repeat the following set of blocks:
set pen size to (1)
turn (90) degrees
set pen color to (15)
move (60) steps
move (60) steps
set pen size to (1)
set pen color to (101)
move (-120) steps
turn (1) degrees
3. When you run the script, you should get a paern similar to the following
screenshot. As the paern repeats, the thin, dark lines create a movement
around the center point while the background color remains solid. It's a
relavely noisy paern.
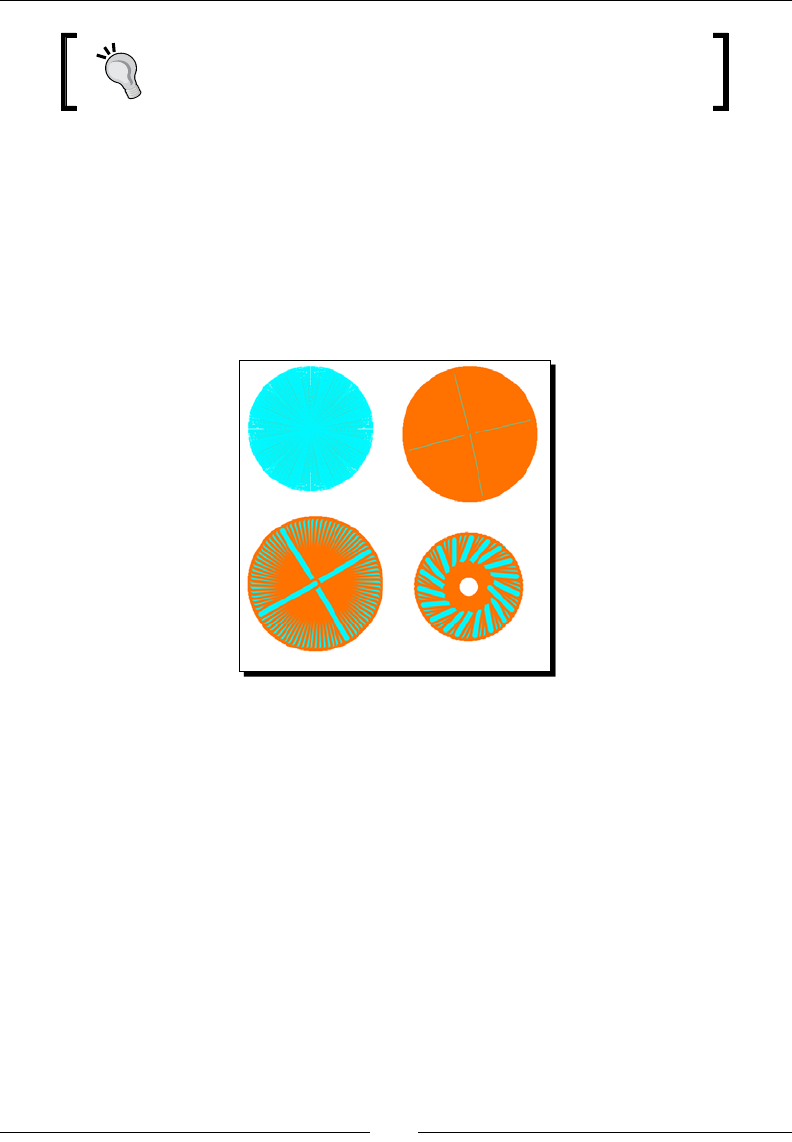
Chapter 9
[ 243 ]
To speed up the pattern, use the turbo mode by shift-clicking the
green flag.
4. Now let's experiment a bit. To see the eect properly, rerun the script so that the
previous paern clears. Set the rst set pen size to () block value to 20, and note
the change in the animaon.
5. Now change the value in the second set pen size to () block to 10.
6. For the next animaon, change the value in the third move () steps block to -60,
and update the last turn () degrees block to 5 degrees.
7. The following screenshot shows a snapshot each of the animaons we just created:
What just happened?
To create these animaons, we're not only drawing on our recently discovered color
knowledge, but we're moving forward and then retracing the line to create some curious
eects. It's the combinaon of color and movement that creates the visible animaon in
the paern.
Remember what we said about color? The smaller numbers such as 15 will be darker, while
the larger number such as 101 will be lighter. The rst two move () steps blocks move forward
60 steps each in the orange color. The third move () steps block advances -120 steps, retracing
the original forward movement; however, this me the color is a light blue, which becomes the
dominant color.

Turning Geometric Paerns into Art Using the Pen Tool
[ 244 ]
There's a lot happening in the animaon. There is a turn (90) degrees block at the beginning
of the loop, and at the end we have a turn (1) degrees block. This second turn will ensure
that the paern eventually overlaps itself. If we run this animaon at normal speed and
not in turbo mode, we noce that it takes many revoluons before we see the noisy
paern of the darker line shows up. Running in turbo mode enhances the visual eect.
The combinaon of the speed of the animaon combined with the slight hesitaon caused
by the two consecuve move (60) steps blocks appears to be the primary reason we see the
paern, because if we consolidate the two move (60) steps blocks with a single move (120)
steps block, the paern disappears.
In our fourth paern, we shortened the backward movement to half of what the forward
movement was; the thick orange circle in the middle of the paern is a direct result of that
uneven movement. The bigger angle at the end of the paern creates a thicker blue line.
Time for action – breaking out of the circle
Not all of our art needs to create a circle, and just to prove it, the following is a quick example:
1. For this paern, we'll use a variable called counter as both a way to control the
number of mes to repeat the paern and a mulplier for the ever-changing x and
y coordinates. Create the variable, if you don't have one in your current project.
2. Set the inial values for the paern as shown in the following set of blocks:
set (counter) to (0)
clear
hide
set pen size to (1)
3. Add a repeat () unl block and use the condion (counter) > (25) as the value.
Repeat the following set of blocks:
pen up
go to x: ((counter) * (10) y: (0)
pen down
go to x: (0) y: (250) – ((counter) * (10))
change (counter) by (1)
4. The resulng paern should match the following screenshot:
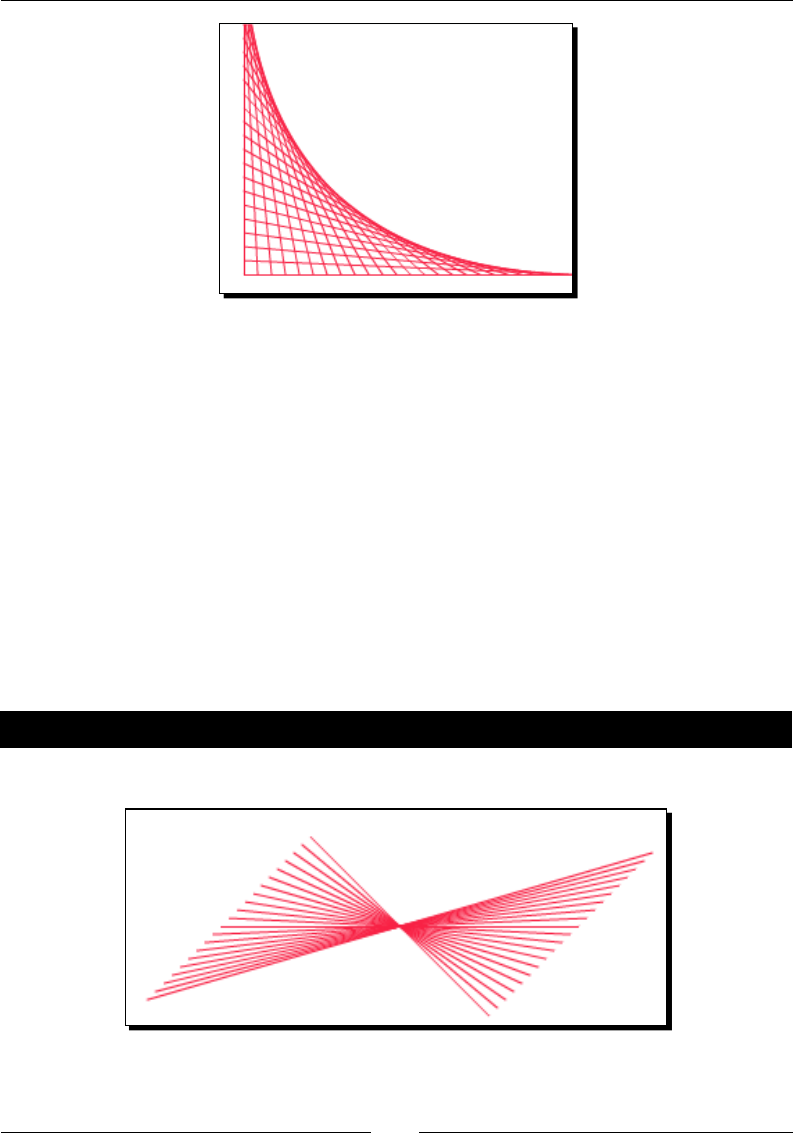
Chapter 9
[ 245 ]
What just happened?
The key to this paern is the use of the counter variable as a mulplier. The paern starts
at (0, 0) and moves right along the x axis in increments of 10 with each iteraon, which is
controlled by the calculated value of counter * 10.
The second go to x: () y: () block calculates the desnaon point of the line, which is constantly
dropping vercally. If we were to slow this paern down with a wait () block, we'd be able
to see that at about the sixth pass, the line crosses the top of the paern for the rst me,
creang the curved perspecve—all without a turn () degrees block, you'll note.
There's another signicant value in this script. The loop is repeang 25 mes and we're
using a calculaon of 250 – (counter) * (10) to draw. Repeang 20 mes would not give us
the same complete paern, while 30 would be too much. If we repeat the paern 30 mes,
we would need to calculate the y coordinate as 300 – (counter) * (10). See a paern?
Have a go hero – twisting your perspective
Can you twist your perspecve to gure out how to draw the following paern?

Turning Geometric Paerns into Art Using the Pen Tool
[ 246 ]
Pop quiz – getting into shape
Q1. If you want to draw a square and an octagon, what is the sum of the all the exterior
angles in the shape?
1. You can't do that.
2. 90 degrees.
3. 45 degrees.
4. 360 degrees.
Q2. If you want to select a light shade, which of the following shade values would you use in
the set pen shade to () block?
1. 0.
2. 10.
3. 100.
4. 200.
Q3. How can you restrict the user input to a variable with a slider stage monitor?
1. Users should never be able to control a variable.
2. The slider control cannot be restricted.
3. Right-click on slider, and use the set slider min and max opon.
4. Write a script to validate the user entry.
Summary
Whether it's the simple elegance of a square rotang 18 mes in 20 degree increments or
animated string art, there is a lot to be fascinated by in this chapter. What's more, you could
spend hours exploring these paerns one angle at a me. While not every project has a need
for drawings, adding a strategic drawing to help with level transions or as an indicator that
something happened can add a nice design touch.
The color sprite and app we created in this chapter should go into your backpack so that
they are available for use in all your Scratch projects. You never know when you need to
nd a specic color. Likewise, the custom blocks we created for our home and shapes
projects would be nice addions to your backpack.
In the next chapter, we'll explore our physical world by adding the PicoBoard, our
webcam, and our computers' built-in microphone to our Scratch projects. We'll capture
environmental eects that we can use to control our projects or that we can display via
a Scratch-generated graph.
A
Connecting a PicoBoard to
Scratch 1.4
There are various ways to connect Scratch to the physical world, including
Makey Makey, LEGO® WeDo, Raspberry Pi, and PicoBoard. Even though all
of these devices require add-on hardware to interact with Scratch, they
extend the Scratch experience and enable Scratch projects to connect to the
physical world.
We're going to use the PicoBoard as the basis for our examples, because it
tends to be one of the most popular devices used with Scratch and has a long
history with the Scratch team. With slight modifications, each project can be
adapted to work without a PicoBoard, and therefore, to work with Scratch 2.0.
In this appendix, I will introduce the PicoBoard and show you how to:
Animate webcam images based on detected sound
Monitor and collect environmental data and then graph the results
Explore electrical resistance
As of the publicaon of this book update, Scratch 2.0 does not have full support for add-on
hardware such as the PicoBoard; however, the Scratch team foresees full support at some
point in 2014. Unl Scratch 2.0 fully supports the PicoBoard, you may use Scratch 1.4 to
complete these projects.
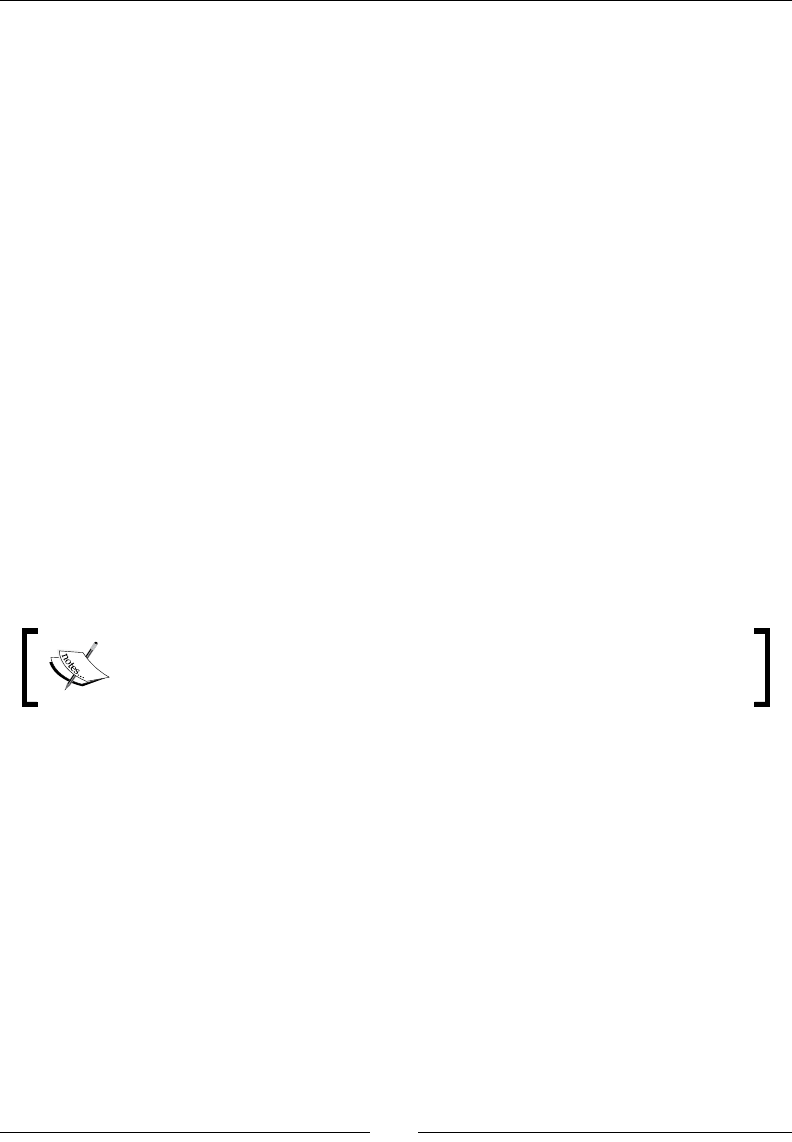
Connecng a PicoBoard to Scratch 1.4
[ 248 ]
I've selected projects that have components that will apply to Scratch 2.0 right now,
including the webcam, detecng sound, recording data at set intervals, and graphing.
The fact that I choose to use the PicoBoard to develop these projects acknowledges the
wealth of opportunity to extend Scratch. It's also a nod to Raspberry Pi users for whom
Scratch 2.0 is not currently an opon, but the PicoBoard works on the Pi.
Using Scratch 1.4, the PicoBoard, and Raspberry Pi
Unl Scratch 2.0 fully supports the PicoBoard, you'll need to use Scratch 1.4 to interact with
the PicoBoard. It just so happens that the Raspberry Pi only supports Scratch 1.4 at this
me, and the PicoBoard will work just ne on the Pi. Pi users are a custom-built audience
for Scratch and hardware such as the PicoBoard.
If you run a Linux-based system, then your choice of Scratch versions gets more complicated.
Adobe, the developer of Flash, has announced that it's no longer supporng AIR or Flash on
Linux aer Version 11.2 of its player unless you're running the Chrome browser. Adobe and
Google have a deal to provide a Chrome-only plugin. If you work in an open source operang
system world, then you know the intricacies and frustraons of managing mainstream
soware from companies such as Adobe.
We won't get sidetracked here. Just know that if you're on an open source operang system
and you have problems with Scratch 2.0, then seek out the 1.4 Version. You'll sll have a
great experience.
The boom line is that it appears as if Scratch 1.4 will coexist with Scratch 2.0
for the foreseeable future. Your chances of encountering 1.4 are great.
Finding Scratch 1.4
Scratch 1.4 is available from the following resources:
Installable version: http://scratch.mit.edu/scratch_1.4/
Source code: http://info.scratch.mit.edu/Source_Code
Purchasing the PicoBoard
The PicoBoard is an add-on piece of hardware that has sensors to detect the amount of light,
sound, and resistance. There is also a slider controller and a buon. Today, the PicoBoard is
manufactured and sold by SparkFun (https://www.sparkfun.com/products/10311),
but previous versions of the board were sold by PicoCricket. Consult the manufacturer for
installaon instrucons.
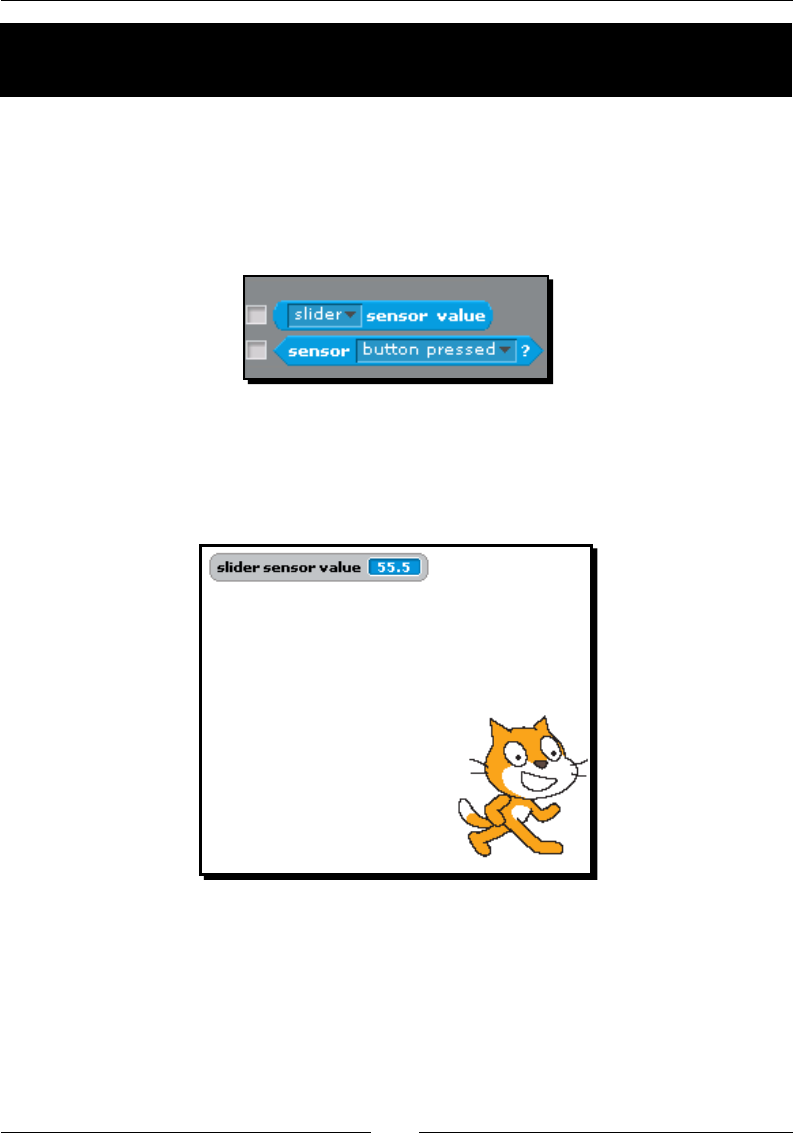
Appendix A
[ 249 ]
Time for action – enabling and testing the PicoBoard support in
Scratch 1.4
The blocks we need to interact with the PicoBoard are hidden by default. Let's enable them
by proceeding with the following steps:
1. Plug your PicoBoard in to your computer and start Scratch. In the Sensing palee,
there are two blocks related to the PicoBoard: the () sensor value reporter block
and the sensor () Boolean block as shown in the following screenshot:
2. Let's ensure we have a signal. Click on the checkbox for the (slider) sensor value
block to show the stage monitor.
3. Then move the slider back and forth and ensure that a value is being reported as
you move the slider. The following screenshot shows the stage monitor:
4. If the block is not detecng a value, double-check your connecons, and ensure you
have the drivers from the manufacturer installed correctly. You should also close
Scratch and reopen it.
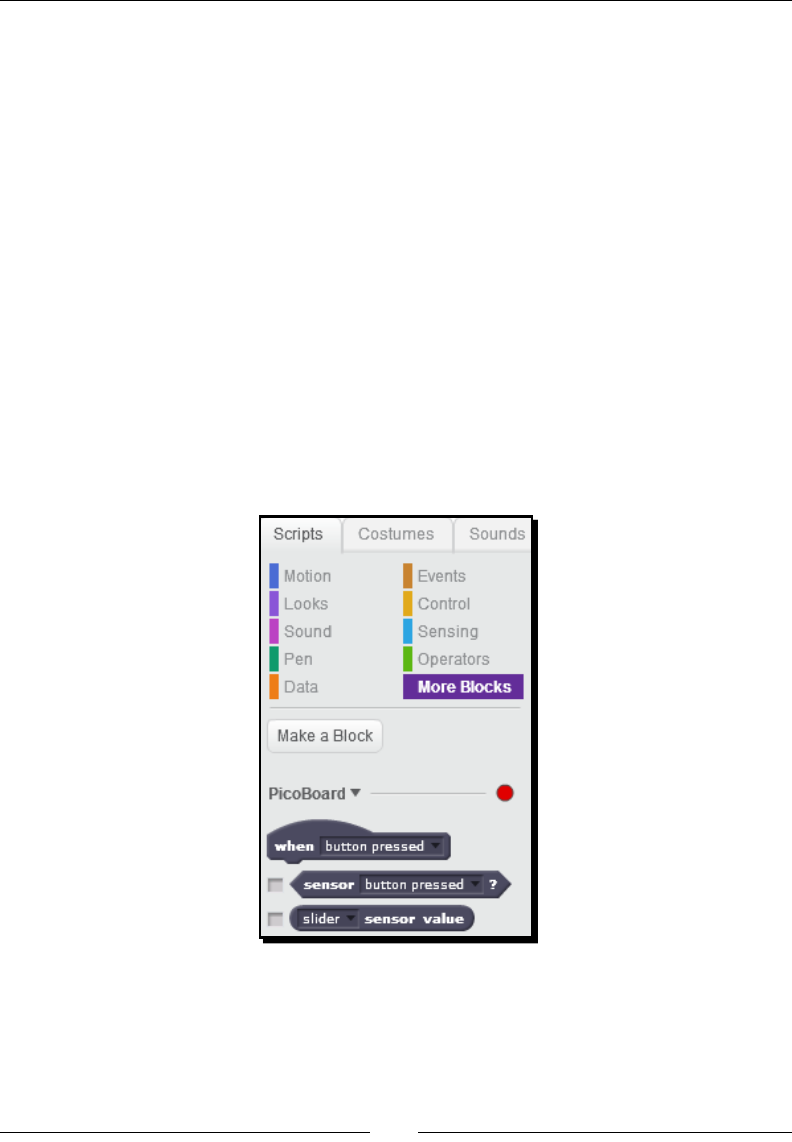
Connecng a PicoBoard to Scratch 1.4
[ 250 ]
What just happened?
The PicoBoard is connected, and Scratch is reading values from the board. The () sensor
value and sensor () blocks will be used as values and condional evaluaons for many
other blocks in Scratch.
Adding the PicoBoard support to Scratch 2.0
I know what you're thinking. At the beginning of this appendix, I said Scratch 2.0 doesn't
support the PicoBoard—at publicaon, that's true. You can check if PicoBoard is supported
in 2.0 by shi-clicking on the More Blocks palee. That will display an Add an Extension
buon, which will give you access to Extension Library.
If PicoBoard is available, it will be an opon in Extension Library. You can select it, and then
test the PicoBoard just as we did in the previous exercise. At various mes, the PicoBoard
opon has appeared and reappeared in Extension Library, but it's only a guess as to when
the support might ocially show up in Scratch 2.0.
The following screenshot shows the proposed PicoBoard blocks in 2.0 (from a me when the
extension was available):

Appendix A
[ 251 ]
You can keep yourself updated on Scratch 2.0 and the PicoBoard support via the
following resources:
Scratch News: http://scratch.mit.edu/news
How to connect to Physical World: http://wiki.scratch.mit.
edu/wiki/How_to_Connect_to_the_Physical_World and
http://scratch.mit.edu/newshttp://wiki.scratch.
mit.edu/wiki/How_to_Connect_to_the_Physical_World
Connecting to the Physical World forum: http://scratch.mit.
edu/discuss/32/
Animating webcam images by detecting sound
One of the coolest features of Scratch is its ability to work with your computer's webcam.
The ability to incorporate backdrops (in Scratch 2.0), backgrounds in Scratch 1.4, and sprites
by taking pictures with the webcam has been a long-me feature of Scratch, including the
current version. In this project, we'll incorporate webcam photos with a sound sensor on
the PicoBoard.
Don't have a PicoBoard? Then I'll show you how to use the computer's built-in microphone.
Time for action – creating a talking head
In previous examples, we've seen how easy it is to import images from Scratch's built-
in libraries or from les on our computer. Now, it's me to circle back and check out the
webcam. This exercise will also use the PicoBoard's sound sensor to detect our voice.
To start, create a new project, and delete or hide the Scratch cat and then complete
the following steps:
1. With the stage selected, click on the Backgrounds (Backdrops in 2.0) tab,
and then click on the camera icon. A new window is displayed and shows
what the webcam sees.
On Scratch 2.0, an Adobe Flash Player settings' dialog box will prompt
you to allow or deny access to the computer's camera and microphone.
You must allow access in order to use the webcam.
Connecng a PicoBoard to Scratch 1.4
[ 252 ]
2. Look at the camera with your mouth closed, and click on the camera icon to import
the image. Then open your mouth, and take another snapshot. Click on Done to
close the dialog box. We now have two background images.
3. Name the rst imported image silent and the second one talking.
4. Now let's script our snapshots. Click back to the Scripts tab, and start with
a when ag clicked block.
5. Add a switch to background () block, and select the silent background.
This block is called switch backdrop to ().
6. Now we'll need to connually evaluate whether or not the detected sound
sensor value is greater than 15.
7. Add a forever block followed by an if (), else block from the Controls palee.
Add the greater-than block to the condion value. From the Sensing palee,
add the () sensor value block, and select the sound sensor. Enter 15 for the
block's second value.
If you are completing this exercise without the PicoBoard,
substitute the loudness block for () sensor value to use the
computer's built-in microphone.
8. If the sound is greater than 15, we want to alternate between the two backgrounds.
Add a switch background to (talking) block, followed by a wait (.1) secs block,
which is then followed by a switch background to (silent) block.
9. As the else condion, add a switch backdrop to (silent) block.
10. Click on the green ag and talk. Feel free to experiment with the detected loudness
value and the wait value of the script to see what eects you end up with.
11. Let's make one more enhancement to this script to give our animaon the feel of a
1980s television staon that went o air. Add the following block to the if condion:
set (ghost) eect to ((100) – ((sound) sensor value). Then to the else condion,
add this block: set (ghost) eect to (100). Depending on how loudly you talk, you
might want to experiment with mulplying the (sound) sensor value by some
number, such as ve. Now the image will fade in and out based on the loudness.
The following screenshot shows our script:
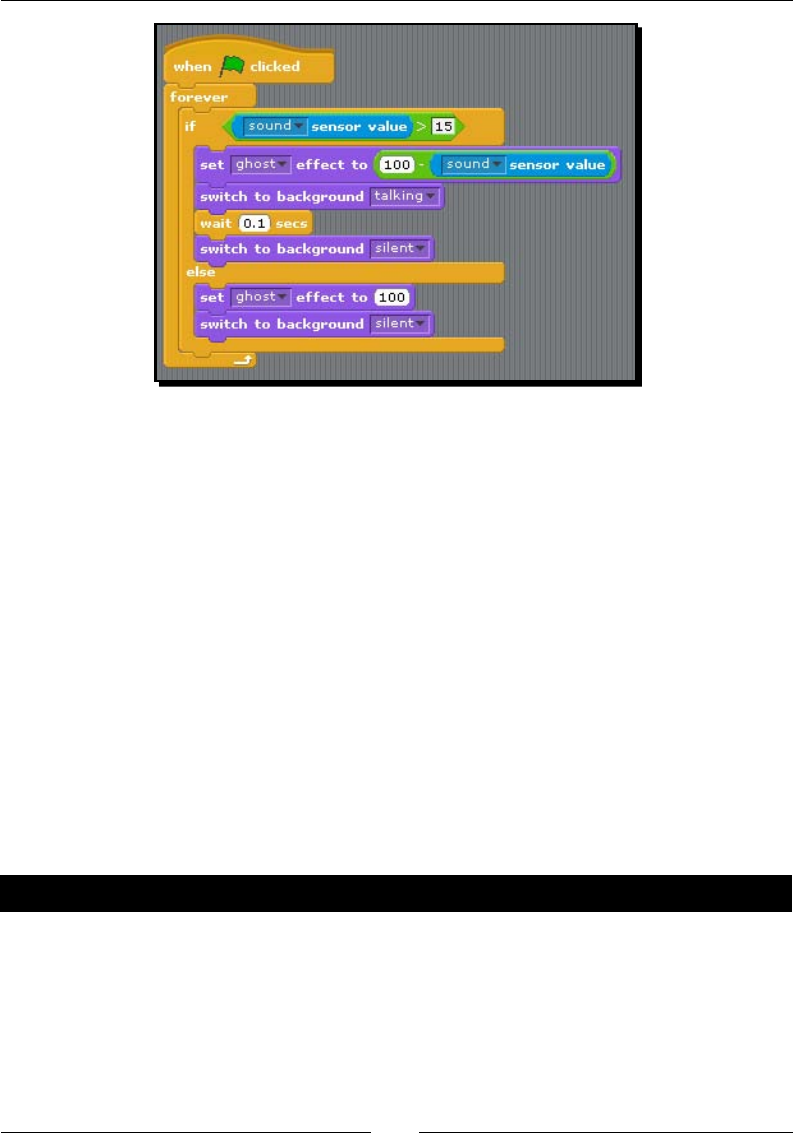
Appendix A
[ 253 ]
What just happened?
By combining the backgrounds that we saved from the computer's webcam and the detected
sound levels, we very quickly and easily integrated external data into our Scratch project. The
fact that our talking head looks a lile goofy makes it fun. It reminds me of translated movies
where the English translaon is dubbed in over the original movie. The sound never quite
matches the mouth movements, but it is oen close enough to get the point across.
By adjusng the ghosng eect, we took some of the emphasis o the ming of the script.
The visual strength of the image depends on the strength (loudness) of the detected sound.
With the sound sensor on the PicoBoard, a higher sound value corresponds to a louder
noise. The sensor will report values from 0 to 100 like the loudness block.
When we apply the ghosng aect while speaking, we calculate the new ghost value by
subtracng the sound value from 100. You'll need to experiment with your sounds, but if
the sensor measures a sound value of 20, then the ghost value becomes 80. This ensures
our image is visible but not in full strength. Remember that with ghost, 0 is fully visible and
100 is transparent.
Have a go hero – using sound to move a sprite forward and backward
The talking head makes a great way to introduce Scratch programming in the physical world
because it's quirky and generally makes people chuckle. It's really well suited for an audience
such as workshops or presentaons. I've seen this project done with animated lips, and I've
used it in the past to strobe two colors based on the sound.
Connecng a PicoBoard to Scratch 1.4
[ 254 ]
You could also use the sound value in other projects to change a sprite's costume, to move a
sprite, or to apply a graphical eect. Explore the sound values some more by wring a script
that moves a sprite forward and backward based on the detected loudness of the sound.
Sharing Scratch 1.4 projects online
If you create a project in Scratch 1.4, you can sll share that project to the new Scratch 2.0
website. Other people will be able to view your project on the website. The Scratch 2.0
website will not export a 1.4 le, and as soon as you edit the older le online, it will be
saved as a new Scratch 2.0 format.
You can tell a Scratch 1.4 le by its le extension; they end in .sb while
Scratch 2.0 projects have a .sb2 extension.
Sensing the environment with the PicoBoard
Each of the PicoBoard's sensors is described in the following table:
Sensor Values Description
sound 0 to 100 Captures the sound from via the board's built-in microphone. A
quiet noise will register a lower value than a louder noise.
light 0 to 100 A higher value means that the sensor is detecting more light. As
you block light from reaching the sensor, it reports lower values.
button true or false Clicking on the button causes the sensor to register a true value,
and it will continue to register a true value for as long as the
button is pressed.
slider 0 to 100 Move the slider to select a value. Could be used to provide
numeric input, such as setting the size of a sprite to the selected
value.
resistance 0 to 100 The board includes four analog ports (A, B, C, D) with alligator
clips to measure the resistance in a circuit.
Measuring resistance
The PicoBoard comes with four analog ports labelled A through D. Each port has its own set
of alligator clips to form circuits. We'll be connecng a thermistor to the alligator clips in
order to record the resistance of the thermistor over me. We'll complete this project in
two exercises: one to record values and the other to chart the values.

Appendix A
[ 255 ]
Thermistors are commonly used as temperature sensors, and the next exercise will show
us how to collect values from our thermistor that can be used in conjuncon with
temperature-based experiments. Wikipedia states that:
A thermistor is a type of resistor whose resistance varies signicantly with
temperature, more so than in standard resistors.
Thermistors are inexpensive and available from electric supply outlets that can be found
online and in stores near you.
Time for action – recording the resistance of a thermistor
over time
The following exercise walks us through creang a script that records resistance values based
on an interval. If you don't have a PicoBoard or a thermistor, you could alter the script to
record loudness. We're going to be seng up this project as a way to conduct experiments
with resistance, and because we're using the thermistor, we can draw some conclusions
about temperature.
We'll create the framework to do the monitoring, and at the end of this exercise, you'll have
a thermistor measuring the resistance at room temperature. (Non-PicoBoard users can set
this framework up with the loudness block to capture sound.)
We'll discuss ways to apply our environmental monitor in other interesng ways aer we get
the framework nished up. We create the framework as follows:
1. Let's set up our project. Create a new project, and replace the Scratch cat with a
small circle sprite that you create in the paint editor. You may name it circle sprite.
2. Add a new list called measurements as a place to store the collected results.
3. Make sure the PicoBoard is connected to the computer and has one of the alligator
clips plugged into one of the ports.
4. Connect one lead of the alligator clip to one lead of the thermistor. Aach the
second clip to the other lead of the thermistor.
5. Next, add the when ag clicked block to the Scripts area. Aach the following blocks
to inialize the project:
hide
delete (all) of (measurements)
add (resistance-B) sensor value to (measurements)

Connecng a PicoBoard to Scratch 1.4
[ 256 ]
6. Add a forever block to the script so we can connually run the following blocks:
wait (60 secs)
add (resistance-B) sensor value to (measurements)
7. The following screenshot shows the script. Note that this script will run forever.
We'll review why I chose this script in the upcoming discussion.
What just happened?
If we examine the values that we recorded in the measurements list, they likely do not vary
signicantly at room temperature. The key control point of this script is the interval at which
we collect informaon. Basically, we collect a sample every 60 seconds. We actually record a
measurement before we start the forever loop, which gives us a reading at minute zero that
which would correspond to the start of the experiment, assuming we use this script as the
basis for the experiment.
The script, as wrien, is an innite loop. I'm okay with that. The real queson is, are you?
The reason I chose not to provide an exit for the data collecon is that it may be dicult to
know how long the script should run, and depending on what you choose to measure, you
will be present to manually stop the script and the collecon. If you measure the resistance
of boiling water, you'd be present. If you measure the warming of water from solid ice to
room temperature, you're not sure how long that would take. So, you could set the script
and come back several hours later to check on it.
In other words, you pressing the stop buon in the project is the condion that stops the
data collecon. For example, if you wanted to ensure that you had an exact number of
measurements, you could replace the forever block with a repeat () block. Your choice!
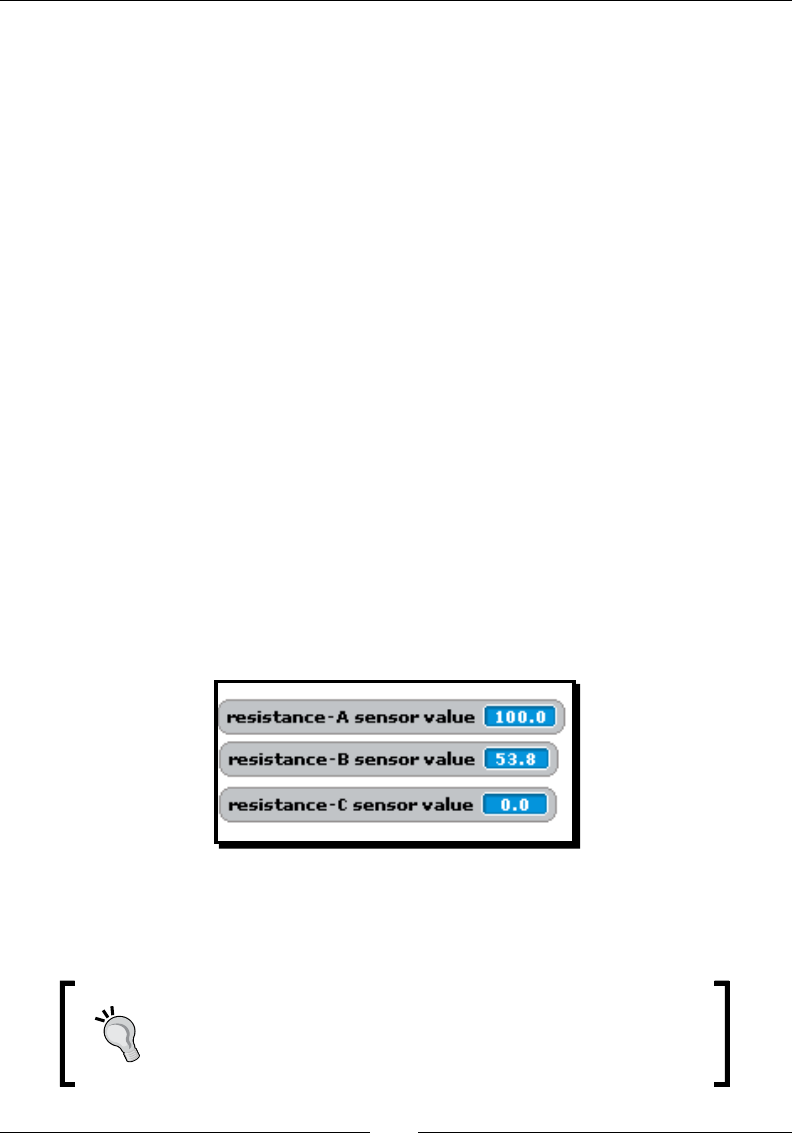
Appendix A
[ 257 ]
The data we collect is dependent on using the alligator clips to form a circuit using
the thermistor. As I alluded, thermistors can be used to calculate a temperature based
on the measured resistance. A widely used formula called the Steinhart-Hart equaon
(http://en.wikipedia.org/wiki/Steinhart%E2%80%93Hart_equation) can be
used to calculate a temperature in Kelvin based on resistance values that could then be
converted to Fahrenheit or Celcius.
Scratch interprets resistance on a scale from 0 to 100, which limits our ability to perform the
actual temperature calculaon based on the measured resistance. For now, the recorded
resistance values could be used to make observaons about temperature; the actual
temperature calculaon is not a goal of our exercises.
Completing a circuit
When we connect the alligator clips together, we basically replicate a switch, like the one
that turns the light in the room on and o. Connect the clips to complete the circuit (that is,
turn it on). Remove one clip to break the circuit (that is, turn it o). In Scratch, a resistance
value of 100 is equivalent to o; no current passes through the circuit. A resistance value of
0 means that current is owing freeing through the circuit without any resistance. Values
between 0 and 100 measure the amount in the circuit.
The following screenshot illustrates the resistance values. The value in resistance-A is
100.0 because the alligator clips are not connected. The 53.8 value for resistance-B is the
resistance value recorded by a thermistor at room temperature (approximately 70 degrees
Fahrenheit), and the resistance-C value of 0.0 is a circuit with no resistance from two
alligator clips connected together.
The loudness reporter block is working in a similar way. A loudness value of 0 means there
is no detected sound, while a value of 100 indicates maximum loudness (as measured
by Scratch).
You can only create a circuit using the alligator clips aached to a
single sensor. In other words, connecng the clips on sensor A to
sensor B will not create a circuit and the values for sensors A and B
will remain 100.
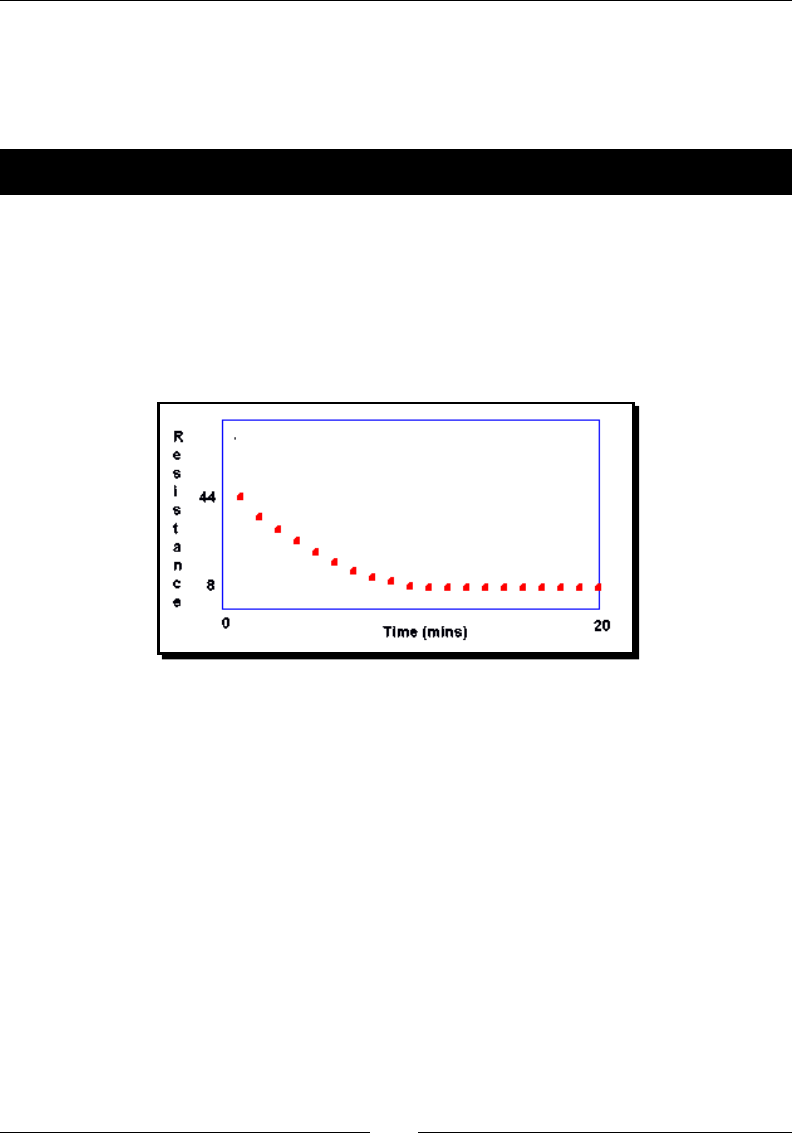
Connecng a PicoBoard to Scratch 1.4
[ 258 ]
When we measure electrical resistance, we want to know by how much the material
impedes an electrical current. In the case of our PicoBoard sensor, the higher the value,
the more the material impedes the current. How we use that value is le to our imaginaon
and the needs of our project.
Time for action – charting our measurements
Now that we have some data in our measurements list, we can create a graph to display the
results. If you did not collect a list of measurements through the previous exercise, you can
import 0724OS_measurements.txt from the book's code les into your measurements
list. If you remember our work with lists in Chapter 8, Chang with a Fortune Teller, you
recall that you can import a list by showing the list monitor, right-clicking on the monitor,
and choosing import. Then you'll have everything you need in order to create a graph.
The following screenshot shows what our nished graph will look like:
I haven't told you much about a thermistor's relaonship with temperature and resistance
yet, which makes drawing any conclusions about the graph dicult. We'll get there, but rst,
let's chart the data as follows:
1. Create a new variable named count that we can use as a way to track our script's
posion in the measurements list.
2. We'll use the when (g) key pressed block as the event to draw the graph. Our rst
group of blocks will inialize our drawing condions as follows:
point in direction (90)
clear
set size to (5) % (You may need to adjust this percentage based on the
original size of your circle sprite.)

Appendix A
[ 259 ]
set (count) to (1)
pen up
go to x: (-150) y: (0)
pen down
3. We should recognize the border around the graph as a rectangle. To draw the
rectangle, repeat the following blocks two mes:
move 300 steps
turn clockwise 90 degrees
move 150 steps
turn 90 degrees
pen up
4. Stop drawing by adding the pen up block aer the repeat (2) block.
5. Now we plot the points. To ensure we see the circle sprite, add a show block. Add a
repeat () block with the following value, which will represent the number of mes to
repeat the blocks: (length of (measurements). Then repeat the following blocks:
go to x: () y: ()
stamp
change (count) by (1)
6. Let's ll in the x: value of the go to block with a simple calculaon (x posion) +
(15). Based on our recorded data, this makes one minute equal to 15 pixels, which
runs along the x axis.
7. For the y: value, we'll use (item (count) of (measurements)) * (2). This means
that we scale each resistance value to two pixels so that a resistance value of 44
will be ploed at 88 on the y axis. This spreads our data out to present a more
readable format.
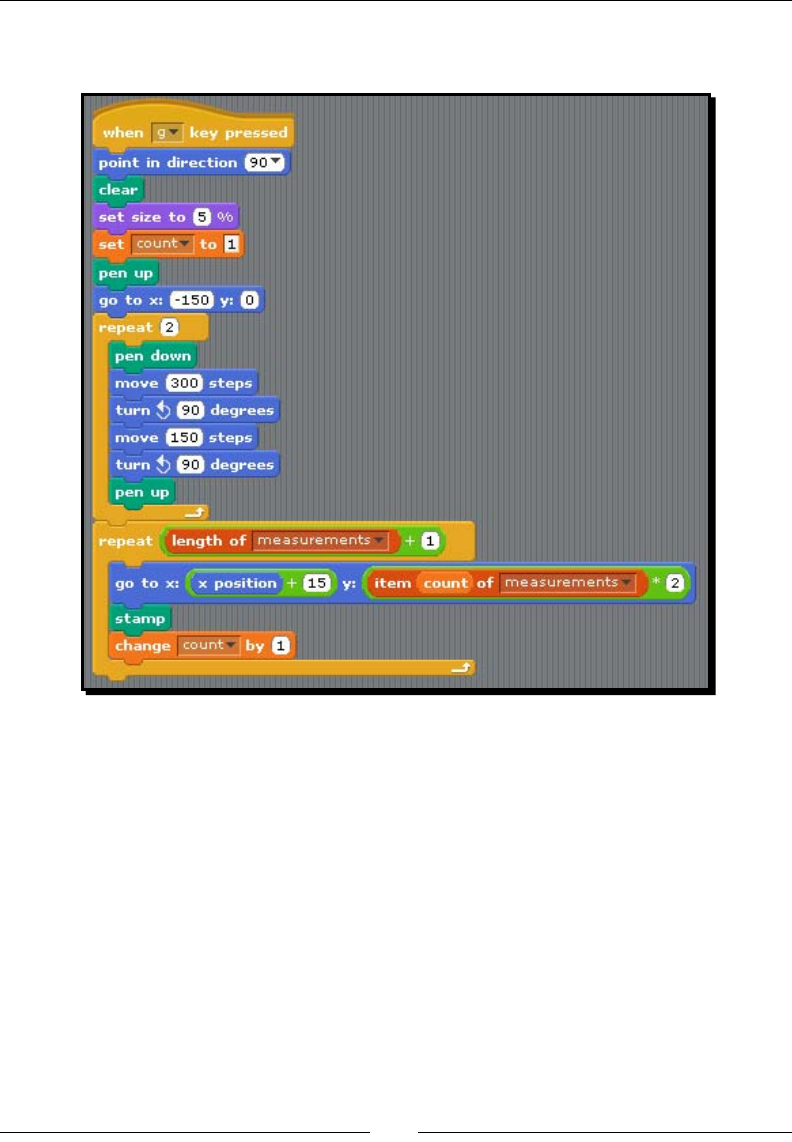
Connecng a PicoBoard to Scratch 1.4
[ 260 ]
8. Aer the repeat (length of (measurements) block, add a hide block so that the circle
sprite is no longer visible. Our nished script looks like the following screenshot:
9. You can nish up the graph by adding some labels as seen in the screenshot at the
top of the exercise. Using the paint editor to create labels that you posion on the
stage to represent key points would be sucient.
What just happened?
We've used all of the previous concepts throughout the book. The key to making our graph
display is determining how to scale our graph to t onto the Scratch stage. I made a decision
to run the x axis in the center of the screen at y=0.
Our test data was a small sample size, so we actually scaled up to make the graph legible;
if you end up with a lot of data that exceeds your screen size, you would have to scale the
graph down. Making each minute correspond to ve pixels instead of 15 pixels could be
an example.
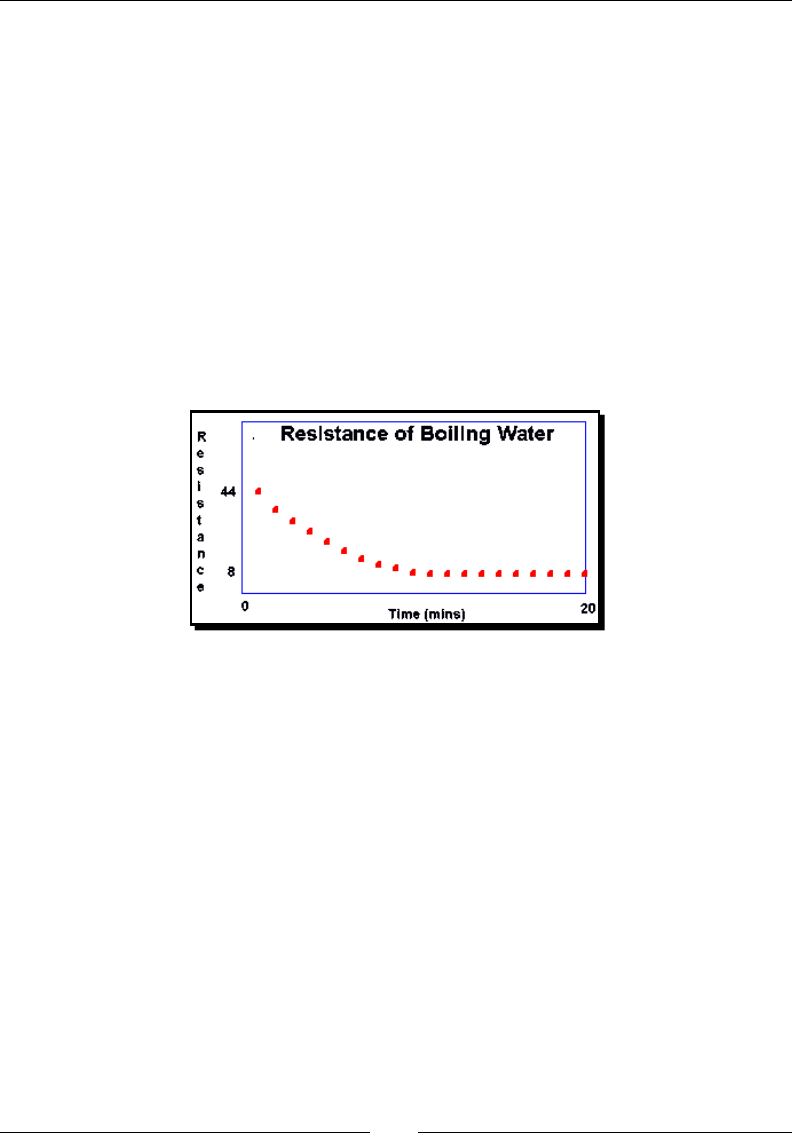
Appendix A
[ 261 ]
To scale the resistance value on the y axis, we scaled those values up. Knowing some basic
informaon about what we're graphing certainly helps make these decisions. For example,
examining the measurements, I knew the largest value was 44, and we drew the chart
boundary to be 150 pixels tall. Scaling the resistance values by two means that my rst
point is ploed 88 pixels high on the graph's y axis, and everything looks just ne.
We also use the stamp tool from the Pen palee to place individual dots, but a bigger
dataset might be beer served by drawing the curve with a connuous line.
Interpreting the graph
I've been holding back some informaon about a thermistor, but that informaon is
important to understanding what we're graphing. As the temperature rises, the resistance
of the thermistor decreases. So, that means our graph (in the 0724OS_measurements.txt
list) is charng a rising temperature. That graph is shown as follows:
As you see from the graph's now-visible tle, the graph is charng the change in temperature
by way of the resistance as the water rises to boil. Because this is the type of experiment
where you would be monitoring things very closely, you'd know through observaon that
the water started to boil at approximately 12 minutes, which is represented by the levelling
out of the points on the graph. Looking at the actual values in the measurements list, we see
that the resistance levels out at 8.2, making 8.2 the resistance of boiling water as observed
with this thermistor.
This project is more about showing you the possibilies of using a PicoBoard to conduct
experiments and less about teaching you that the temperature of water does not rise the
longer it boils.
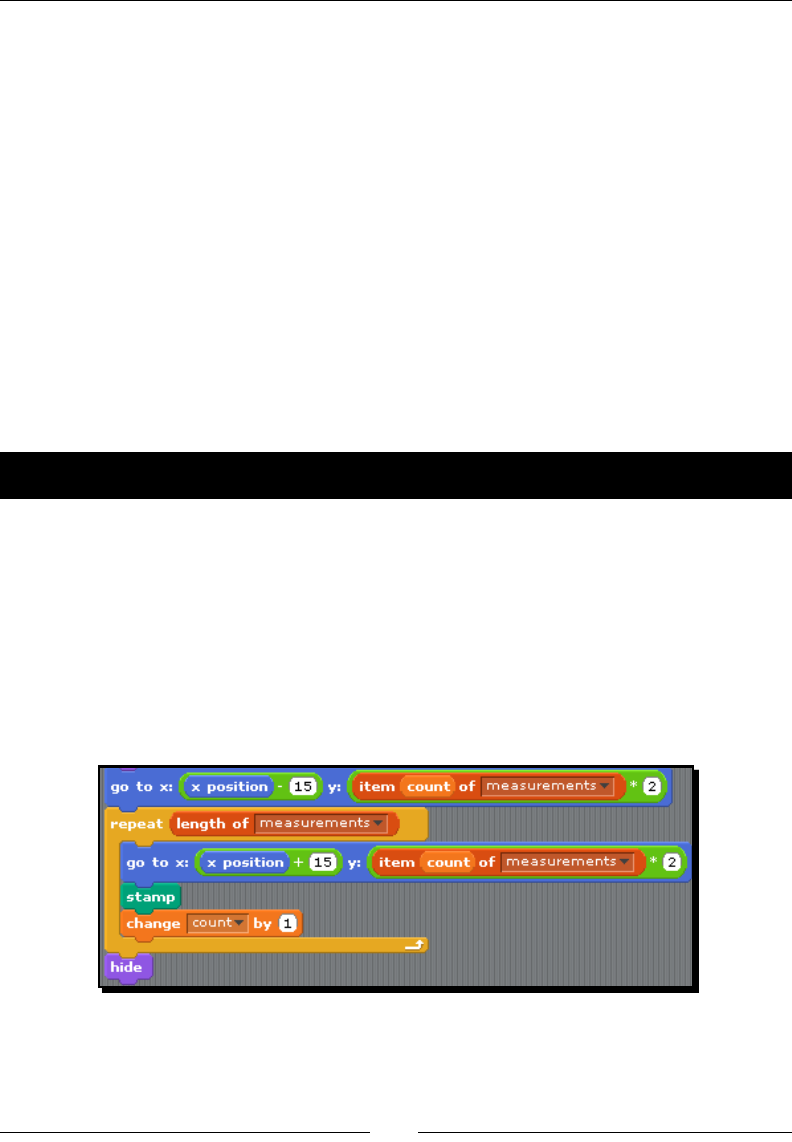
Connecng a PicoBoard to Scratch 1.4
[ 262 ]
The graph labels are highlighng key values. The 44 on the resistance (y axis) is marking the
rst recorded value. On the x axis, we measure me, starng at 0 and ending at 20 minutes.
The rst point on the graph is represenng our rst resistance value of 44 (44.1 actually). As
the water warmed, the resistance dropped unl the twelh minute. At minute 12, the water
was in a rolling boil, which is 212 degrees Fahrenheit. From that point on, the resistance was
at, meaning the water doesn't get hoer the longer it boils.
If this was a temperature graph, we would expect to see the graph rise as the temperature
approached boiling. However, with a thermistor, as the temperature rises, the resistance
falls. The graph is accurately describing what happens with the resistance as the water heats.
And here's a general disclaimer. I collected my measurements by suspending the thermistor
into the top one-fourth inch of water and protecng my PicoBoard from the heat source.
I'm not responsible for your acons. Only do experiments if you think through your safety
and consequences. Suspending a thermistor in ice water and measuring values as the water
warms to room temperature would be a less risky alternave.
Time for action – revising the graph
As you see in the previous screenshot, the rst point on the graph is moved to the right by
15 pixels. Our rst measurement in the data that we graphed occurred at zero minutes is not
accurately reected in our graph. Let's make the graph match the numbers more closely by
moving the circle sprite to the le for the rst point as follows:
1. Add a go to x: () y: () block before the repeat () block.
2. Add the expression ((x posion) – (15)) to the x value.
3. Add the expression ((item (count) of (measurements) * (2)) to the y value. The
following screenshot shows the revised script:

Appendix A
[ 263 ]
What just happened?
Our inial graph didn't properly mark the rst point at zero minutes. In our revised script,
we moved the circle sprite to the le by 15 pixels so that when we graph the rst point in
the repeat (length of (measurements)) block, the point was placed properly on the graph.
Have a go hero – brainstorming data collection topics
Unless you're monitoring a doorway that frequently opens and closes, recording the room
temperature probably doesn't provide much excitement. Other items to measure might
include a pot of boiling water or measuring how long it takes for a glass of ice water to
reach room temperature.
You could also run a series of resistance tests with common materials. For example, aach
the alligator clips to a potato, a paper clip, and so on. Record the values and then graph the
results. You may need to modify the collecon framework to record a value based on the
occurrence of an event such as the buon click on the PicoBoard or a key press on
the keyboard.
Let's see what you can come up with!
Pop quiz – connecting to the real world
Q1. What Scratch block can provide an alternave to the PicoBoard's sound sensor?
1. There is no alternave block.
2. The play sound block.
3. The loudness block.
4. The microphone block.
Q2. Why would you choose to use Scratch 1.4?
1. You want to use Scratch on the Raspberry Pi.
2. You want to use the source code.
3. Your current web browser does not support Flash.
4. All of the above.
Q3. What do the analog ports on the PicoBoard measure?
1. Sound.
2. Resistance.
3. Temperature.
4. Weather.

Connecng a PicoBoard to Scratch 1.4
[ 264 ]
Summary
The PicoBoard makes Scratch programming tangible. We can hear the sounds we collect
or feel the temperature we record through the analog ports. Scratch allows us to interpret
those environmental smuli through our projects whether we create a goofy talking head or
more seriously chart measured data as part of an experiment.
The strength of the PicoBoard is that it gives us a new context to apply to our Scratch
projects. We sll use the same programming concepts, but the perspecve of the
informaon we have changes to things we can touch.
That's it! You have all the tools you need to turn your imaginaon and the imaginaon of
your children into your very own mad sciensts' laboratory.
Happy Scratching!
Pop Quiz Answers
Chapter 2, A Quick Start Guide to Scratch
Pop quiz – getting started with scratch
Q1 4
Q2 2
Q3 3
Q4 1
Q5 2
Chapter 3, Creating an Animated Birthday Card
Pop quiz – reviewing the chapter
Q1 4
Q2 3
Q3 4
Q4 1
Q5 3
Q6 1
B
Pop Quiz Answers
[ 266 ]
Chapter 4, Creating a Scratch Story Book
Pop quiz – reviewing the chapter
Q1 2
Q2 1
Q3 4
Q4 3
Chapter 5, Creating a Multimedia Slideshow
Pop quiz – reviewing the chapter
Q1 2
Q2 2
Q3 2
Q4 3
Q5 4
Chapter 6, Making an Arcade Game – Breakout (Part I)
Pop quiz – reviewing the chapter
Q1 4
Q2 2
Q3 1
Q4 2
Q5 3
Appendix B
[ 267 ]
Chapter 9, Turning Geometric Patterns into Art Using the
Pen Tool
Pop quiz – getting into shape
Q1 4
Q2 3
Q3 3
Appendix A, Connecting a PicoBoard to Scratch 1.4
Pop quiz – connecting to the real world
Q1 3
Q2 4
Q3 2
Index
A
Add boolean input opon 175
Add label text opon 175
Add number input opon 174
Add string input opon 174
animaons
making 10
stop-moon animaons 10
arrows
hiding, mouse locaon used 127-129
arrow sprites
used, for ipping through images 114-116
art projects
creang 13
aspect rao 113
asymmetrical paerns
creang 239
explosion paern, creang 240, 241
Atari game 135
B
backdrop blocks
backdrop name 117
backdrop number 117
next backdrop 117
switch backdrop to () 116
switch backdrop to () and wait 116
when backdrop switches to () 117
Backdrop Library
background images, adding from 81-83
backdrop name block 108, 110, 117
backdrop number block 117
backdrops
photos, imporng as 107-114
photos, imporng from les 108-111
Backpack feature
sprite, adding to 83, 84
used, for storing scripts 84
used, for storing sprites 84
ball play
coordinang, broadcast block used 176, 177
ball, Pong project
posion, evaluang to end game 140-142
ball speed
increasing 177, 178
barnyard joke book
clickable table of contents, designing 80, 81
outline, designing 79
pages, adding 81-83
sprite, adding to Backpack 83, 84
basic shapes
color, adding 230, 231
coordinates, plong 228, 229
procedures, dening 226-228
square, building on 220, 221
square, drawing 218, 219
user-dened shapes, drawing 221-226

[ 270 ]
bitmap eding tools
Brush 55
Ellipse 55
Erase 55
Fill with color 55
Line 55
Rectangle 55
Select 55
Select and duplicate 55
Text 55
bitmap images
or vector images, choosing 53
bitmap image size
changing 52
Boolean blocks
() < () 179
() = () 179
() > () 179
() and () 179
color () is touching ()? 179
() contains () 180
key () pressed? 180
mouse down ()? 179
not () 179
() or () 179
sensor ()? 180
touching ()? 179
touching color ()? 179
Boolean evaluaons
using 179, 180
Breakout game
history 135, 136
brick rows
drawing, with custom blocks 170-172
bricks
cloning 145-147
drawing 144, 145
brightness eect 72
broadcast () and wait block 98, 99
broadcast () block
adding 100
used, for coordinang ball play 176, 177
buon sensor 254
C
Cartesian coordinate system
used, for dening posion 91
change tempo by () block 97
circle
breaking out of 244, 245
clear graphical eects block 70
clickable table of contents
designing, in scratch book 80, 81
hiding 100, 101
navigang back to 103, 104
clone costume, detecng
paddle size, decreasing 180-183
clone costume, detecng(alternave soluons)
paddle size, decreasing 183, 184
cloned sprite
working with 147, 148
cloning blocks, Scratch
create clone of () 151
delete this clone 151
when I start as a clone 150
cloning feature
rapid re shoong 149, 150
used, for creang idencal sprites 144-149
cloud data log
viewing 188, 189
cloud variables
in, Scratch 2.0 188
used, for keeping global scoreboard 186-188
color
adding, to shapes 230-232
color eect 71
color palee
creang 234-237
color picker workaround
nding 232, 233
color shades
applying, set color shade to () block used 232
color values
liming, slider used 237-239

[ 271 ]
comments
adding, to script 67, 68
computaonal thinking 9
condional blocks, Scratch
if () 156
if () then 156
if () then else 156
repeat unl () 157
wait unl () 157
condional statements 157
coordinates
plong, to draw square 229
sprite, posioning by 89-93
sprites, locang with 91-93
used, for moving dog 89-91
costume, sprite
comparing 94, 95
creang 93
duplicang 93, 94
ipping 93, 94
switching 93, 94
create clone of () block 151
Creave Commons Aribuon-Share
Alike license
URL 30
custom block
ball play, coordinang 176, 177
inputs, seng 173-175
procedures, introducing 173
used, for adding more bricks 169, 170
used, for drawing rows of bricks 170-172
custom block opons
Add boolean input 175
Add label text 175
Add number input 174
Add string input 174
Run without screen refresh 175
custom say fortune block
creang 207, 208
custom sound eects
composing 95-99
drum sound eects, creang 96
D
delete this clone block 151
Digital Millennium Copyright Act (DMCA) 30
dog
moving, with x and y coordinates 89-91
dog scene
displaying 101, 102
Dog TOC buon 101
drum sound eects
creang 96
E
events
used, for triggering acon 33
events, used for triggering acon
walking moon of cat, animang 33-35
F
fade in eect
using 126
fade out eect
using 126
ll with color tool
used, for painng stage 57-59
sheye eect 71
Following Orange project
details, displaying 17-20
For all sprites opon 159
forever blocks
comparing, with repeat blocks 72
forever loops
about 37
block, clicking to run command 41
cat, rotang right-side up 39, 40
used, for controlling sprite 39
used, for keeping cat in moon
indenitely 37, 38
fortunes
counng, mod block used 203-206
imporng, to lists 195-197
fullscreen presentaon mode
project, displaying in 132

[ 272 ]
G
game over
checking for 166, 167
games
building 12
ghost eect
about 72
used, for making sprite fade in 74-76
uses 72
global scoreboard
keeping, cloud variables used 186-188
gradient
applying 59- 61
graphical eects
used, for transforming sprites 68-70
graphical transformaons
brightness eect 72
color eect 71
sheye eect 71
ghost eect 72
mosaic eect 71
pixelate eect 71
whirl eect 71
graph, resistance
interpreng 261, 262
revising 262, 263
H
Happy Birthday card
more sprites, adding 61, 62
Happy Birthday sprite
displaying 64, 65
gradient, applying 59, 60
painng, Paint editor used 50-52
horse
animang, say() block used 86, 87
synchronizing, say() block used 86, 87
horse sound
imporng 87
playing, play sound () block used 88, 89
Horse TOC buon 100
I
idencal sprites
creang, cloning feature used 144, 145
if () block 156
if () then block 156
if () then else block
about 156
using 208
image eding tools
bitmap eding tools 55
reviewing 55
vector eding tools 55, 56
vector mode, erasing 56
images
ipping, arrow sprites used 114-116
resizing 112, 113
working with 111
Import List dialog box 196
J
joke
building, say blocks used 85-89
building, sounds used 85-89
joke sequence, dog
integrang 98, 99
K
keyword scanner
creang 211
text scanning, to build word list 211-213
L
le arrow control, Pong project
adding 139, 140
LEGO WeDo 13
level clearance
detecng 184-186
light sensor 254

[ 273 ]
lists
creang, to store mulple values 192-194
exporng, from Scratch 197
fortunes, imporng to 195-197
imporng 195
item, interacng with 194, 195
list values
deleng 201
lives
implemenng 164
tracking, with lives variable 164, 165
lives, implemenng
game over, checking 165-167
lives variable, adding to track lives 164, 165
mulple programming soluons,
evaluang 167, 168
lives variable
adding, to track lives 164, 165
louder eect
using 126
loudness reporter block 257
M
M
spinning, in circle 73, 74
magic numbers
using 206
Make a Block buon 207
Make a List buon 192
Make a Variable buon 158
media, free
nding online 30
MIT App Inventor 8
mod block
used, for counng fortunes 203-206
mosaic eect 71
mouse locaon
used, for hiding arrows 127-129
mulple programming soluons
evaluang 167, 168
mulple values
storing, lists used 192-194
N
New backdrop opons 108
New sprite icons 90
next backdrop block 117
P
paddle size
decreasing, based on clone’s costume 180-183
pages
adding, to book 81-83
Paint editor
about 50
bitmap image size, changing 52
bitmap or vector images, choosing 53
ll with color tool, using to paint stage 57-59
image eding tools, reviewing 55, 56
used, for painng Happy Birthday sprite 50-52
vector image, drawing 53, 54
vector image size, changing 54
photos
imporng, as backdrops 107-114
PicoBoard
about 13
purchasing 248
sound sensor, used for creang talking
head 251-253
using 248
PicoBoard sensors
buon 254
light 254
resistance 254
slider 254
sound 254
PicoBoard support
adding, in Scratch 2.0 250, 251
enabling, in Scratch 1.4 249, 250
pinwheels
triangles, turning into 224-226
pixelate eect 71
pixilaon 53
play drum () for () beats block 96, 97

[ 274 ]
play note () for () beats block 97
play sound () block
about 122
used, for playing horse sound 88, 89
play sound unl done block 122
point in direcon () block
ball, ricocheng o bricks 154-156
sprite direcon, seng 153, 154
sprite starng posion, seng 153, 154
used, for changing sprite direcon 151-153
Pong, legacy version
remixing 138
Pong starter project
game play, customizing 139-143
imporng 136, 137
playing 136, 137
reporter blocks, using to set values 138
sprite, moving with mouse/arrows 138
presentaon mode
project, displaying in 131
procedures (custom blocks)
about 173
creang, for home 226-228
creang, for shapes 226-228
programming concepts
arrays (lists) 14
boolean logic 14
cloning 15
cloud data 14
concurrency 14
events 14
interface design 13
loops (iteraon) 14
procedures 14
random numbers 14
synchronizaon and coordinaon 14
variables 14
vector graphics 14
video 15
Q
queson
asking, to seeker sprite 197-199
validang, for grammacal errors 209, 210
queson number variable 205
queson, seeker
validang 200, 201
R
radar screen
animang 242-244
random fortune
selecng 202, 203
rapid re shoong
cloning, used 149, 150
Raspberry Pi
using 248
repeat blocks
comparing, with forever blocks 72
repeat unl () block 157
reporter blocks
about 110, 138
used, for seng values 138
resistance sensor 254
resistance, thermistor
circuit, compleng 257, 258
graph, interpreng 261, 262
graph, revising 262, 263
measurements, charng 258-260
recording, over me 255-257
rest for () beats block 96, 97
reverse eect
using 126
right arrow control, Pong project
adding 139, 140
Run without screen refresh opon 175
S
say (answer) for (2) secs block
used, for repeang queson 200
say() block
used, for animang horse 86, 87
used, for synchronizing horse 86, 87
say () for () block
used, for making horse talk 85, 86
scenes(chapters)
coordinang, by backdrop name 102

[ 275 ]
scoreboard block 186
score variable
adding 158, 159
Scratch
about 8, 9
computaonal thinking 9
URL 26
uses 9
Scratch 1.4
PicoBoard support, enabling in 249, 250
projects, sharing online 254
URLs 248
using 22, 248
Scratch 2.0
cloud variables 188
PicoBoard support, adding in 250, 251
project details, displaying 17-21
using 15, 16
using, oine 21, 22
Scratch 2.0 project details
built-in image editor 20, 21
scripts area 18, 19
sprites pane 18
stage area 18
Scratch account
creang 26, 27
Creave Commons licensing 30
free media, nding online 30
key features 28, 29
terms of use policy 30
ScratchEd
URL 8
Scratch project
animaons, making 10
art projects, creang 13
basics 35
cat, moving across stage 31, 32
creang 31
deleon, undoing 37
displaying, in fullscreen presentaon mode 132
displaying, in presentaon mode 131
events, using to trigger acons 33
games, building 12
Pong, legacy version 138
programming concepts 13-15
second sprite with script, adding 42-44
Sensing 13
sprites, adding to 42
stories, telling 11
tesng 210
walking moon, animang with cat 33-35
work, auto saving 36, 37
scripts
storing, Backpack used 85
script, sprite
adding, to project 42-44
comments, adding 67, 68
second brick
creang, with custom block 169, 170
seeker sprite
queson, asking 197-199
seeker’s queson
validang 200, 201
set color shade to () block
used, for applying color shades 232
set instrument to () block 97
set pen color to () block
working with 232, 233
set size to () block 52
set tempo to () bpm block 96, 97
set volume to () block 97
silence eect
using 126
slider
used, for liming color values 237-239
used, for drawing user-dened shapes 221-224
slider sensor 254
slideshow controls
adding, to display images 114-117
soer eect
using 126
sound blocks, for creang sound eects
and music
change tempo by () 97
play drum() for () beats 97
play note () for () beats 97
rest for () beats 97

[ 276 ]
set instrument to () 97
set tempo to () bpm 97
set volume to () 97
sound editor
sounds, recording in 119-122
sound eects
adding, to recordings 125, 126
fade in 126
fade out 126
louder 126
reverse 126
silence 126
soer 126
Sound Library window 118
sound, recorded
appending 124, 125
eding 123, 124
sound related blocks
play sound 122
play sound unl done 122
stop all sounds 122
sounds
adding, from Scratch’s library 118, 119
recording, in sound editor 119-122
sound sensor 254
sprite costume center, Pong project
adjusng 142, 143
sprite direcon
changing, point in direcon () block
used 151, 152
guring 153
seng 153, 154
sprites
about 94
adding, to address Happy Birthday card 61, 62
adding, to Backpack feature 83, 84
adding, to project 41-44
controlling, forever loops used 39
hiding, when ag clicked block used 62-64
locang, with x and y coordinates 91-93
posioning, by its coordinates 89-92
renaming 66
storing, Backpack used 84
transforming, graphical eects used 68-70
variables, seng for 159, 160
sprite starng posion
seng 153, 154
sprites starng values
inializing 62-64
square
building on 220, 221
drawing 218, 219
drawing, coordinates ploed 229, 230
stage
painng, ll with color tool used 57-59
stop all sounds block 122
stop-moon animaons
URL 10
stored quesons
using 200
stories
telling 11
string art
about 242
paerns, creang 244, 245
radar screen, animang 242-244
supported sound formats
playing 89
switch backdrop to () and wait block 116
switch backdrop to () block 115, 116
switch costume to (face-le) block 94
switch to () block 94
T
talking head
creang, PicoBoard sound sensor used 251-253
thermistor
about 254
resistance, recording over me 255-257
third-party graphics editors
Adobe Photoshop 111
GIMP 111
MS Paint 111
Pixelmator 111
ming, animaons
controlling, broadcast () block used 76
controlling, wait () secs block used 76
triangles
turning, into pinwheels 224-226
turn () degrees block 224, 226

[ 277 ]
W
wait () secs block 69
wait unl () block
about 157
webcam images
animang, by sound detecon 251-253
when backdrop switches to () block 117
when ag clicked block
used, for hiding all sprites 62-64
when I receive (fortune) block 202
when I start as a clone block
about 150
used, for breaking bricks 148
whirl eect 71
word list
building, text scanned for 211-213
X
x posion block 137
U
Undelete opon
used, for undoing deleon 37
user-dened shapes
drawing, sliders used 221-224
user instrucons
providing 130, 131
V
vector eding tools
Color a shape 56
Duplicate 56
Ellipse 56
Line 56
Pencil 55
Rectangle 56
Reshape 55
Select 55
vector images
drawing 53, 54
or bitmap images, choosing 53
size, changing 54
video sensing feature
about 46
video-sensing project
reviewing 44, 45

Thank you for buying
Scratch 2.0 Beginner's Guide Second Edion
About Packt Publishing
Packt, pronounced 'packed', published its rst book "Mastering phpMyAdmin for Eecve MySQL
Management" in April 2004 and subsequently connued to specialize in publishing highly focused
books on specic technologies and soluons.
Our books and publicaons share the experiences of your fellow IT professionals in adapng and
customizing today's systems, applicaons, and frameworks. Our soluon-based books give you the
knowledge and power to customize the soware and technologies you're using to get the job done.
Packt books are more specic and less general than the IT books you have seen in the past. Our unique
business model allows us to bring you more focused informaon, giving you more of what you need to
know, and less of what you don't.
Packt is a modern, yet unique publishing company, which focuses on producing quality, cung-edge
books for communies of developers, administrators, and newbies alike. For more informaon, please
visit our website: www.PacktPub.com.
Wring for Packt
We welcome all inquiries from people who are interested in authoring. Book proposals should be sent
to author@packtpub.com. If your book idea is sll at an early stage and you would like to discuss
it rst before wring a formal book proposal, contact us; one of our commissioning editors will get in
touch with you.
We're not just looking for published authors; if you have strong technical skills but no wring
experience, our experienced editors can help you develop a wring career, or simply get some
addional reward for your experse.
Scratch Cookbook
ISBN: 978-1-84951-842-0 Paperback:262 pages
A quick and easy guide for building Scratch programs
intended for further learning through projects,
such as interacve animaons and games
1. Get started using Scratch, or take your programs
to a new level using simple, easy-to-read recipes.
2. Learn techniques for animang stories.
3. Create fun and engaging games.
Scratch 2.0 Game Development Hotshot
ISBN: 978-1-84969-756-9 Paperback: 330 pages
10 engaging projects that will teach you how
to build excing games with the easy-to-use
Scratch 2.0 environment
1. Discover how to make the most of the
new Scratch 2.0 interface.
2. Understand how video games work
under the hood.
3. Make your projects come to life, using
praccal programming principles.
4. Learn how to plan and build your own
interacve projects.
Please check www.PacktPub.com for information on our titles
GameSalad Beginner's Guide
ISBN: 978-1-84969-220-5 Paperback:308 pages
A fun, quick, step-by-step guide to creang games
with levels, physics, sound, and numerous enemies
using GameSalad
1. Learn to build three games; Ball Drop, Space
Defender, and Metal Mech with GameSalad.
2. Complete these games with sound eects,
use of physics, gravity, and collisions.
3. Learn ps and tricks to make a game popular
straight from the author's own experience.
Unity Android Game Development by
Example Beginner's Guide
ISBN: 978-1-84969-201-4 Paperback: 320 pages
Learn how to create excing games using Unity 3D for
Android with the help of hands-on examples
1. Enter the increasingly popular mobile market
and create games using Unity 3D and Android.
2. Learn opmizaon techniques for ecient
mobile games.
3. Clear, step-by-step instrucons for creang
a complete mobile game experience.
Please check www.PacktPub.com for information on our titles
