Solar Capture User Guide (2014) SF 111817 DH 9 (SF 108469 CD 9) Issue
User Manual: Pdf
Open the PDF directly: View PDF ![]() .
.
Page Count: 118 [warning: Documents this large are best viewed by clicking the View PDF Link!]
- Chapter 1: What’s New
- Chapter 2: Feature Availability Matrix
- Chapter 3: Introduction
- Chapter 4: Overview
- Chapter 5: Installation
- Chapter 6: SolarCapture Functionality
- Chapter 7: Command Line Interface
- 7.1 Introduction
- 7.2 Run Command Line Interface and Getting Help
- 7.3 Capturing packets with solar_capture
- 7.4 Command line options
- 7.5 Selecting Streams to Capture
- 7.6 Join Multicast Groups
- 7.7 Setting thread affinity
- 7.8 Command Configuration File
- 7.9 Port Aggregation/Merging
- 7.10 Multiple Ports/Multiple Files
- 7.11 Software Based Filtering
- 7.12 Capture using VLAN Identifier
- 7.13 Command Line Examples
- 7.14 User Privileges
- Chapter 8: Application Clustering
- Chapter 9: Libpcap Support
- Chapter 10: Data Acquisition Module
- Chapter 11: AOE SolarCapture
- Chapter 12: SolarReplay
- Chapter 13: SolarCapture Monitor
- Chapter 14: Additional Features
- Chapter 15: Embedding SolarCapture
- Chapter 16: Extending SolarCapture
- Chapter 17: Known Issues and Limitations
- Chapter 18: Tuning Guide
- 18.1 Introduction
- 18.2 File System Tuning
- 18.3 RAID Controller Tuning
- 18.4 Virtual Memory Tuning
- 18.5 Capture Thread Tuning
- 18.6 Allocating Huge Pages
- 18.7 NUMA Binding
- 18.8 C-States
- 18.9 Isolate CPU Cores
- 18.10 Memory Usage
- 18.11 Packet Pool Limitations
- 18.12 RXQ size on Packed Stream Firmware
- 18.13 Kernel Services
- 18.14 Interrupt Moderation
- 18.15 SolarCapture Configuration
- 18.16 RSS
- Appendix A: Configuration File Structure
- Appendix B: SolarCapture Attributes

Issue 9 © Solarflare Communications 2014 i
SolarCapture
User Guide
SolarCapture™ User Guide
Copyright © 2014 SOLARFLARE® Communications, Inc. All rights reserved.
The software and hardware as applicable (the "Product") described in this document, and this document, are protected
by copyright laws, patents and other intellectual property laws and international treaties. The Product described in this
document is provided pursuant to a license agreement, evaluation agreement and/or non-disclosure agreement. The
Product may be used only in accordance with the terms of such agreement. The software as applicable may be copied only
in accordance with the terms of such agreement.
The furnishing of this document to you does not give you any rights or licenses, express or implied, by estoppel or
otherwise, with respect to any such Product, or any copyrights, patents or other intellectual property rights covering such
Product, and this document does not contain or represent any commitment of any kind on the part of SOLARFLARE
Communications, Inc. or its affiliates.
The only warranties granted by SOLARFLARE Communications, Inc. or its affiliates in connection with the Product described
in this document are those expressly set forth in the license agreement, evaluation agreement and/or non-disclosure
agreement pursuant to which the Product is provided. EXCEPT AS EXPRESSLY SET FORTH IN SUCH AGREEMENT, NEITHER
SOLARFLARE COMMUNICATIONS, INC. NOR ITS AFFILIATES MAKE ANY REPRESENTATIONS OR WARRANTIES OF ANY KIND
(EXPRESS OR IMPLIED) REGARDING THE PRODUCT OR THIS DOCUMENTATION AND HEREBY DISCLAIM ALL IMPLIED
WARRANTIES OF MERCHANTABILITY, FITNESS FOR A PARTICULAR PURPOSE AND NON-INFRINGEMENT, AND ANY
WARRANTIES THAT MAY ARISE FROM COURSE OF DEALING, COURSE OF PERFORMANCE OR USAGE OF TRADE.
Unless otherwise expressly set forth in such agreement, to the extent allowed by applicable law (a) in no event shall
SOLARFLARE Communications, Inc. or its affiliates have any liability under any legal theory for any loss of revenues or
profits, loss of use or data, or business interruptions, or for any indirect, special, incidental or consequential damages, even
if advised of the possibility of such damages; and (b) the total liability of SOLARFLARE Communications, Inc. or its affiliates
arising from or relating to such agreement or the use of this document shall not exceed the amount received by
SOLARFLARE Communications, Inc. or its affiliates for that copy of the Product or this document which is the subject of
such liability.
The Product is not intended for use in medical, life saving, life sustaining, critical control or safety systems, or in nuclear
facility applications.
SF-108469-CD
Issue 9

Issue 9 © Solarflare Communications 2014 ii
SolarCapture
User Guide
Table of Contents
Chapter 1: What’s New . . . . . . . . . . . . . . . . . . . . . . . . . . . . . . . . . . . . . . . . . . . . . . . . . . . . . 1
1.1 SolarCapture SDK. . . . . . . . . . . . . . . . . . . . . . . . . . . . . . . . . . . . . . . . . . . . . . . . . . . . . . 1
1.2 SolarCapture Live. . . . . . . . . . . . . . . . . . . . . . . . . . . . . . . . . . . . . . . . . . . . . . . . . . . . . . 2
1.3 SolarCapture Pro . . . . . . . . . . . . . . . . . . . . . . . . . . . . . . . . . . . . . . . . . . . . . . . . . . . . . . 3
1.4 SolarCapture AOE . . . . . . . . . . . . . . . . . . . . . . . . . . . . . . . . . . . . . . . . . . . . . . . . . . . . . 3
1.5 New Features in SolarCapture v1.3 . . . . . . . . . . . . . . . . . . . . . . . . . . . . . . . . . . . . . . . 4
Chapter 2: Feature Availability Matrix . . . . . . . . . . . . . . . . . . . . . . . . . . . . . . . . . . . . . . . . . 6
2.1 SolarCapture Features by Distribution . . . . . . . . . . . . . . . . . . . . . . . . . . . . . . . . . . . . 6
2.2 SolarCapture Features by Adapter. . . . . . . . . . . . . . . . . . . . . . . . . . . . . . . . . . . . . . . . 7
Chapter 3: Introduction . . . . . . . . . . . . . . . . . . . . . . . . . . . . . . . . . . . . . . . . . . . . . . . . . . . . . 8
3.1 Purpose . . . . . . . . . . . . . . . . . . . . . . . . . . . . . . . . . . . . . . . . . . . . . . . . . . . . . . . . . . . . . 8
3.2 Definitions, Acronyms and Abbreviations . . . . . . . . . . . . . . . . . . . . . . . . . . . . . . . . . 8
3.3 Software Support. . . . . . . . . . . . . . . . . . . . . . . . . . . . . . . . . . . . . . . . . . . . . . . . . . . . . 10
3.4 Firmware Variants . . . . . . . . . . . . . . . . . . . . . . . . . . . . . . . . . . . . . . . . . . . . . . . . . . . . 10
3.5 Hardware Support . . . . . . . . . . . . . . . . . . . . . . . . . . . . . . . . . . . . . . . . . . . . . . . . . . . . 10
3.6 AppFlex™ Technology Licensing. . . . . . . . . . . . . . . . . . . . . . . . . . . . . . . . . . . . . . . . . 11
Chapter 4: Overview . . . . . . . . . . . . . . . . . . . . . . . . . . . . . . . . . . . . . . . . . . . . . . . . . . . . . . 12
4.1 How it Works . . . . . . . . . . . . . . . . . . . . . . . . . . . . . . . . . . . . . . . . . . . . . . . . . . . . . . . . 12
4.2 Threading Model . . . . . . . . . . . . . . . . . . . . . . . . . . . . . . . . . . . . . . . . . . . . . . . . . . . . . 12
4.3 SolarCapture Components . . . . . . . . . . . . . . . . . . . . . . . . . . . . . . . . . . . . . . . . . . . . . 13
4.4 Use Cases . . . . . . . . . . . . . . . . . . . . . . . . . . . . . . . . . . . . . . . . . . . . . . . . . . . . . . . . . . . 14
Chapter 5: Installation . . . . . . . . . . . . . . . . . . . . . . . . . . . . . . . . . . . . . . . . . . . . . . . . . . . . . 16
5.1 Download Access. . . . . . . . . . . . . . . . . . . . . . . . . . . . . . . . . . . . . . . . . . . . . . . . . . . . . 16
5.2 Install Dependencies . . . . . . . . . . . . . . . . . . . . . . . . . . . . . . . . . . . . . . . . . . . . . . . . . . 16
5.3 Remove Existing SolarCapture Installs. . . . . . . . . . . . . . . . . . . . . . . . . . . . . . . . . . . . 16
5.4 The SolarCapture v1.3 Distributions . . . . . . . . . . . . . . . . . . . . . . . . . . . . . . . . . . . . 17
5.5 Install Onload. . . . . . . . . . . . . . . . . . . . . . . . . . . . . . . . . . . . . . . . . . . . . . . . . . . . . . . . 17
5.6 SolarCapture - What to Install . . . . . . . . . . . . . . . . . . . . . . . . . . . . . . . . . . . . . . . . . . 17
5.7 Install SolarCapture AOE. . . . . . . . . . . . . . . . . . . . . . . . . . . . . . . . . . . . . . . . . . . . . . . 19
5.8 Install PTP. . . . . . . . . . . . . . . . . . . . . . . . . . . . . . . . . . . . . . . . . . . . . . . . . . . . . . . . . . . 22
Chapter 6: SolarCapture Functionality . . . . . . . . . . . . . . . . . . . . . . . . . . . . . . . . . . . . . . . . 23
6.1 Line Rate Packet Capture . . . . . . . . . . . . . . . . . . . . . . . . . . . . . . . . . . . . . . . . . . . . . . 23
6.2 Operating Modes. . . . . . . . . . . . . . . . . . . . . . . . . . . . . . . . . . . . . . . . . . . . . . . . . . . . . 24
6.3 Capture Frame Check Sequence . . . . . . . . . . . . . . . . . . . . . . . . . . . . . . . . . . . . . . . . 24
6.4 Capture file timestamp format. . . . . . . . . . . . . . . . . . . . . . . . . . . . . . . . . . . . . . . . . . 25
6.5 Hardware Timestamps . . . . . . . . . . . . . . . . . . . . . . . . . . . . . . . . . . . . . . . . . . . . . . . . 25
6.6 Ingress Packet Capture . . . . . . . . . . . . . . . . . . . . . . . . . . . . . . . . . . . . . . . . . . . . . . . . 26

Issue 9 © Solarflare Communications 2014 iii
SolarCapture
User Guide
6.7 Egress Packet Capture. . . . . . . . . . . . . . . . . . . . . . . . . . . . . . . . . . . . . . . . . . . . . . . . . 26
Chapter 7: Command Line Interface. . . . . . . . . . . . . . . . . . . . . . . . . . . . . . . . . . . . . . . . . . 27
7.1 Introduction . . . . . . . . . . . . . . . . . . . . . . . . . . . . . . . . . . . . . . . . . . . . . . . . . . . . . . . . . 27
7.2 Run Command Line Interface and Getting Help . . . . . . . . . . . . . . . . . . . . . . . . . . . . 27
7.3 Capturing packets with solar_capture. . . . . . . . . . . . . . . . . . . . . . . . . . . . . . . . . . . . 30
7.4 Command line options . . . . . . . . . . . . . . . . . . . . . . . . . . . . . . . . . . . . . . . . . . . . . . . . 30
7.5 Selecting Streams to Capture . . . . . . . . . . . . . . . . . . . . . . . . . . . . . . . . . . . . . . . . . . . 31
7.6 Join Multicast Groups . . . . . . . . . . . . . . . . . . . . . . . . . . . . . . . . . . . . . . . . . . . . . . . . . 31
7.7 Setting thread affinity . . . . . . . . . . . . . . . . . . . . . . . . . . . . . . . . . . . . . . . . . . . . . . . . . 33
7.8 Command Configuration File . . . . . . . . . . . . . . . . . . . . . . . . . . . . . . . . . . . . . . . . . . . 34
7.9 Port Aggregation/Merging . . . . . . . . . . . . . . . . . . . . . . . . . . . . . . . . . . . . . . . . . . . . . 36
7.10 Multiple Ports/Multiple Files . . . . . . . . . . . . . . . . . . . . . . . . . . . . . . . . . . . . . . . . . . 36
7.11 Software Based Filtering . . . . . . . . . . . . . . . . . . . . . . . . . . . . . . . . . . . . . . . . . . . . . . 36
7.12 Capture using VLAN Identifier . . . . . . . . . . . . . . . . . . . . . . . . . . . . . . . . . . . . . . . . . 37
7.13 Command Line Examples . . . . . . . . . . . . . . . . . . . . . . . . . . . . . . . . . . . . . . . . . . . . . 37
7.14 User Privileges . . . . . . . . . . . . . . . . . . . . . . . . . . . . . . . . . . . . . . . . . . . . . . . . . . . . . . 38
Chapter 8: Application Clustering . . . . . . . . . . . . . . . . . . . . . . . . . . . . . . . . . . . . . . . . . . . . 39
8.1 Application Clusters. . . . . . . . . . . . . . . . . . . . . . . . . . . . . . . . . . . . . . . . . . . . . . . . . . . 39
8.2 Configuration Sequence . . . . . . . . . . . . . . . . . . . . . . . . . . . . . . . . . . . . . . . . . . . . . . . 40
8.3 Snort Example . . . . . . . . . . . . . . . . . . . . . . . . . . . . . . . . . . . . . . . . . . . . . . . . . . . . . . . 42
8.4 Configuration Sequence - Snort . . . . . . . . . . . . . . . . . . . . . . . . . . . . . . . . . . . . . . . . . 42
8.5 solar_clusterd Configuration File . . . . . . . . . . . . . . . . . . . . . . . . . . . . . . . . . . . . . . . . 44
8.6 Running solar_clusterd as a Linux service . . . . . . . . . . . . . . . . . . . . . . . . . . . . . . . . . 45
Chapter 9: Libpcap Support. . . . . . . . . . . . . . . . . . . . . . . . . . . . . . . . . . . . . . . . . . . . . . . . . 46
9.1 Introduction . . . . . . . . . . . . . . . . . . . . . . . . . . . . . . . . . . . . . . . . . . . . . . . . . . . . . . . . . 46
9.2 Usage . . . . . . . . . . . . . . . . . . . . . . . . . . . . . . . . . . . . . . . . . . . . . . . . . . . . . . . . . . . . . . 46
9.3 Configuration . . . . . . . . . . . . . . . . . . . . . . . . . . . . . . . . . . . . . . . . . . . . . . . . . . . . . . . . 47
Chapter 10: Data Acquisition Module . . . . . . . . . . . . . . . . . . . . . . . . . . . . . . . . . . . . . . . . 49
10.1 Introduction . . . . . . . . . . . . . . . . . . . . . . . . . . . . . . . . . . . . . . . . . . . . . . . . . . . . . . . . 49
10.2 Usage . . . . . . . . . . . . . . . . . . . . . . . . . . . . . . . . . . . . . . . . . . . . . . . . . . . . . . . . . . . . . 49
10.3 Read File Mode . . . . . . . . . . . . . . . . . . . . . . . . . . . . . . . . . . . . . . . . . . . . . . . . . . . . . 49
10.4 Passive Mode. . . . . . . . . . . . . . . . . . . . . . . . . . . . . . . . . . . . . . . . . . . . . . . . . . . . . . . 50
10.5 Inline Mode . . . . . . . . . . . . . . . . . . . . . . . . . . . . . . . . . . . . . . . . . . . . . . . . . . . . . . . . 50
10.6 Configuration . . . . . . . . . . . . . . . . . . . . . . . . . . . . . . . . . . . . . . . . . . . . . . . . . . . . . . . 50
Chapter 11: AOE SolarCapture . . . . . . . . . . . . . . . . . . . . . . . . . . . . . . . . . . . . . . . . . . . . . . 53
11.1 Introduction . . . . . . . . . . . . . . . . . . . . . . . . . . . . . . . . . . . . . . . . . . . . . . . . . . . . . . . . 54
11.2 Running AOE SolarCapture daemon . . . . . . . . . . . . . . . . . . . . . . . . . . . . . . . . . . . . 57
11.3 Running AOE SolarCapture . . . . . . . . . . . . . . . . . . . . . . . . . . . . . . . . . . . . . . . . . . . . 59
11.4 Configuration Files. . . . . . . . . . . . . . . . . . . . . . . . . . . . . . . . . . . . . . . . . . . . . . . . . . . 61

Issue 9 © Solarflare Communications 2014 iv
SolarCapture
User Guide
11.5 Command Line Examples . . . . . . . . . . . . . . . . . . . . . . . . . . . . . . . . . . . . . . . . . . . . . 65
11.6 Configuration Files Examples . . . . . . . . . . . . . . . . . . . . . . . . . . . . . . . . . . . . . . . . . . 67
11.7 Changing Default Options. . . . . . . . . . . . . . . . . . . . . . . . . . . . . . . . . . . . . . . . . . . . . 74
11.8 AOE SolarCapture Statistics . . . . . . . . . . . . . . . . . . . . . . . . . . . . . . . . . . . . . . . . . . . 75
Chapter 12: SolarReplay . . . . . . . . . . . . . . . . . . . . . . . . . . . . . . . . . . . . . . . . . . . . . . . . . . . 77
12.1 Introduction . . . . . . . . . . . . . . . . . . . . . . . . . . . . . . . . . . . . . . . . . . . . . . . . . . . . . . . . 77
12.2 How it Works . . . . . . . . . . . . . . . . . . . . . . . . . . . . . . . . . . . . . . . . . . . . . . . . . . . . . . . 77
12.3 Command Line. . . . . . . . . . . . . . . . . . . . . . . . . . . . . . . . . . . . . . . . . . . . . . . . . . . . . . 78
12.4 Replay Command Line . . . . . . . . . . . . . . . . . . . . . . . . . . . . . . . . . . . . . . . . . . . . . . . 80
12.5 Replay Script File . . . . . . . . . . . . . . . . . . . . . . . . . . . . . . . . . . . . . . . . . . . . . . . . . . . . 81
Chapter 13: SolarCapture Monitor . . . . . . . . . . . . . . . . . . . . . . . . . . . . . . . . . . . . . . . . . . . 82
13.1 Introduction . . . . . . . . . . . . . . . . . . . . . . . . . . . . . . . . . . . . . . . . . . . . . . . . . . . . . . . . 82
13.2 Getting Help. . . . . . . . . . . . . . . . . . . . . . . . . . . . . . . . . . . . . . . . . . . . . . . . . . . . . . . . 82
13.3 Using solar_capture_monitor. . . . . . . . . . . . . . . . . . . . . . . . . . . . . . . . . . . . . . . . . . 82
13.4 Debug Level . . . . . . . . . . . . . . . . . . . . . . . . . . . . . . . . . . . . . . . . . . . . . . . . . . . . . . . . 84
13.5 Notes On Monitor Output . . . . . . . . . . . . . . . . . . . . . . . . . . . . . . . . . . . . . . . . . . . . 85
Chapter 14: Additional Features . . . . . . . . . . . . . . . . . . . . . . . . . . . . . . . . . . . . . . . . . . . . . 86
14.1 SolarCapture - Arista Timestamps . . . . . . . . . . . . . . . . . . . . . . . . . . . . . . . . . . . . . . 86
Chapter 15: Embedding SolarCapture . . . . . . . . . . . . . . . . . . . . . . . . . . . . . . . . . . . . . . . . 90
15.1 Sessions — struct sc_session . . . . . . . . . . . . . . . . . . . . . . . . . . . . . . . . . . . . . . . . . . 90
15.2 Attributes — struct sc_attr. . . . . . . . . . . . . . . . . . . . . . . . . . . . . . . . . . . . . . . . . . . . 90
15.3 Threads — struct sc_thread . . . . . . . . . . . . . . . . . . . . . . . . . . . . . . . . . . . . . . . . . . . 90
15.4 Virtual Interfaces — struct sc_vi . . . . . . . . . . . . . . . . . . . . . . . . . . . . . . . . . . . . . . . 91
15.5 Nodes — struct sc_node. . . . . . . . . . . . . . . . . . . . . . . . . . . . . . . . . . . . . . . . . . . . . . 91
15.6 Mailboxes — struct sc_mailbox . . . . . . . . . . . . . . . . . . . . . . . . . . . . . . . . . . . . . . . . 92
15.7 BuiltIn Nodes . . . . . . . . . . . . . . . . . . . . . . . . . . . . . . . . . . . . . . . . . . . . . . . . . . . . . . . 92
15.8 Additional Nodes . . . . . . . . . . . . . . . . . . . . . . . . . . . . . . . . . . . . . . . . . . . . . . . . . . . . 94
Chapter 16: Extending SolarCapture. . . . . . . . . . . . . . . . . . . . . . . . . . . . . . . . . . . . . . . . . . 95
16.1 Node factories — struct sc_node_factory. . . . . . . . . . . . . . . . . . . . . . . . . . . . . . . . 95
16.2 Node types — struct sc_node_type. . . . . . . . . . . . . . . . . . . . . . . . . . . . . . . . . . . . . 95
16.3 Node libraries . . . . . . . . . . . . . . . . . . . . . . . . . . . . . . . . . . . . . . . . . . . . . . . . . . . . . . 96
16.4 Insert a user-defined node between capture and sc_writer . . . . . . . . . . . . . . . . . 96
Chapter 17: Known Issues and Limitations . . . . . . . . . . . . . . . . . . . . . . . . . . . . . . . . . . . . 97
17.1 Captured packets. . . . . . . . . . . . . . . . . . . . . . . . . . . . . . . . . . . . . . . . . . . . . . . . . . . . 97
17.2 Software Timestamp accuracy . . . . . . . . . . . . . . . . . . . . . . . . . . . . . . . . . . . . . . . . . 97
17.3 Capture performance . . . . . . . . . . . . . . . . . . . . . . . . . . . . . . . . . . . . . . . . . . . . . . . . 97
17.4 Stopping SolarCapture . . . . . . . . . . . . . . . . . . . . . . . . . . . . . . . . . . . . . . . . . . . . . . . 97
17.5 Allocation of Packet Buffers . . . . . . . . . . . . . . . . . . . . . . . . . . . . . . . . . . . . . . . . . . . 98

Issue 9 © Solarflare Communications 2014 v
SolarCapture
User Guide
17.6 Solarflare DAQ for Snort . . . . . . . . . . . . . . . . . . . . . . . . . . . . . . . . . . . . . . . . . . . . . . 98
17.7 Filtering on VLAN. . . . . . . . . . . . . . . . . . . . . . . . . . . . . . . . . . . . . . . . . . . . . . . . . . . . 98
17.8 PTP - Hybrid Mode . . . . . . . . . . . . . . . . . . . . . . . . . . . . . . . . . . . . . . . . . . . . . . . . . . 98
17.9 Onload and Line Rate Packet Capture . . . . . . . . . . . . . . . . . . . . . . . . . . . . . . . . . . . 98
17.10 Sniff Mode in Packed Stream Firmware . . . . . . . . . . . . . . . . . . . . . . . . . . . . . . . . 99
Chapter 18: Tuning Guide . . . . . . . . . . . . . . . . . . . . . . . . . . . . . . . . . . . . . . . . . . . . . . . . . 100
18.1 Introduction . . . . . . . . . . . . . . . . . . . . . . . . . . . . . . . . . . . . . . . . . . . . . . . . . . . . . . . 100
18.2 File System Tuning. . . . . . . . . . . . . . . . . . . . . . . . . . . . . . . . . . . . . . . . . . . . . . . . . . 101
18.3 RAID Controller Tuning . . . . . . . . . . . . . . . . . . . . . . . . . . . . . . . . . . . . . . . . . . . . . . 103
18.4 Virtual Memory Tuning. . . . . . . . . . . . . . . . . . . . . . . . . . . . . . . . . . . . . . . . . . . . . . 103
18.5 Capture Thread Tuning . . . . . . . . . . . . . . . . . . . . . . . . . . . . . . . . . . . . . . . . . . . . . . 104
18.6 Allocating Huge Pages. . . . . . . . . . . . . . . . . . . . . . . . . . . . . . . . . . . . . . . . . . . . . . . 105
18.7 NUMA Binding . . . . . . . . . . . . . . . . . . . . . . . . . . . . . . . . . . . . . . . . . . . . . . . . . . . . . 106
18.8 C-States . . . . . . . . . . . . . . . . . . . . . . . . . . . . . . . . . . . . . . . . . . . . . . . . . . . . . . . . . . 107
18.9 Isolate CPU Cores . . . . . . . . . . . . . . . . . . . . . . . . . . . . . . . . . . . . . . . . . . . . . . . . . . 107
18.10 Memory Usage . . . . . . . . . . . . . . . . . . . . . . . . . . . . . . . . . . . . . . . . . . . . . . . . . . . 108
18.11 Packet Pool Limitations. . . . . . . . . . . . . . . . . . . . . . . . . . . . . . . . . . . . . . . . . . . . . 108
18.12 RXQ size on Packed Stream Firmware. . . . . . . . . . . . . . . . . . . . . . . . . . . . . . . . . 109
18.13 Kernel Services . . . . . . . . . . . . . . . . . . . . . . . . . . . . . . . . . . . . . . . . . . . . . . . . . . . 109
18.14 Interrupt Moderation . . . . . . . . . . . . . . . . . . . . . . . . . . . . . . . . . . . . . . . . . . . . . . 109
18.15 SolarCapture Configuration . . . . . . . . . . . . . . . . . . . . . . . . . . . . . . . . . . . . . . . . . 110
18.16 RSS . . . . . . . . . . . . . . . . . . . . . . . . . . . . . . . . . . . . . . . . . . . . . . . . . . . . . . . . . . . . . 110
Appendix A: Configuration File Structure. . . . . . . . . . . . . . . . . . . . . . . . . . . . . . . . . . . . . 111
Appendix B: SolarCapture Attributes . . . . . . . . . . . . . . . . . . . . . . . . . . . . . . . . . . . . . . . . 113
Issue 9 © Solarflare Communications 2014 1
SolarCapture
User Guide
Chapter 1: What’s New
This document is the user guide for the SolarCapture™ family of Linux based network packet capture
applications.
SolarCapture is supported on Solarflare (Onload) SFN5000, SFN6000 and SFN7000 series adapters
and the Solarflare ApplicationOnload™ Engine (AOE).
Starting from distribution version 1.3, SolarCapture development follows a multi-tier license and
distribution model outlined below. The features available depend on the SolarCapture license
installed and the adapter on which SolarCapture is to run.
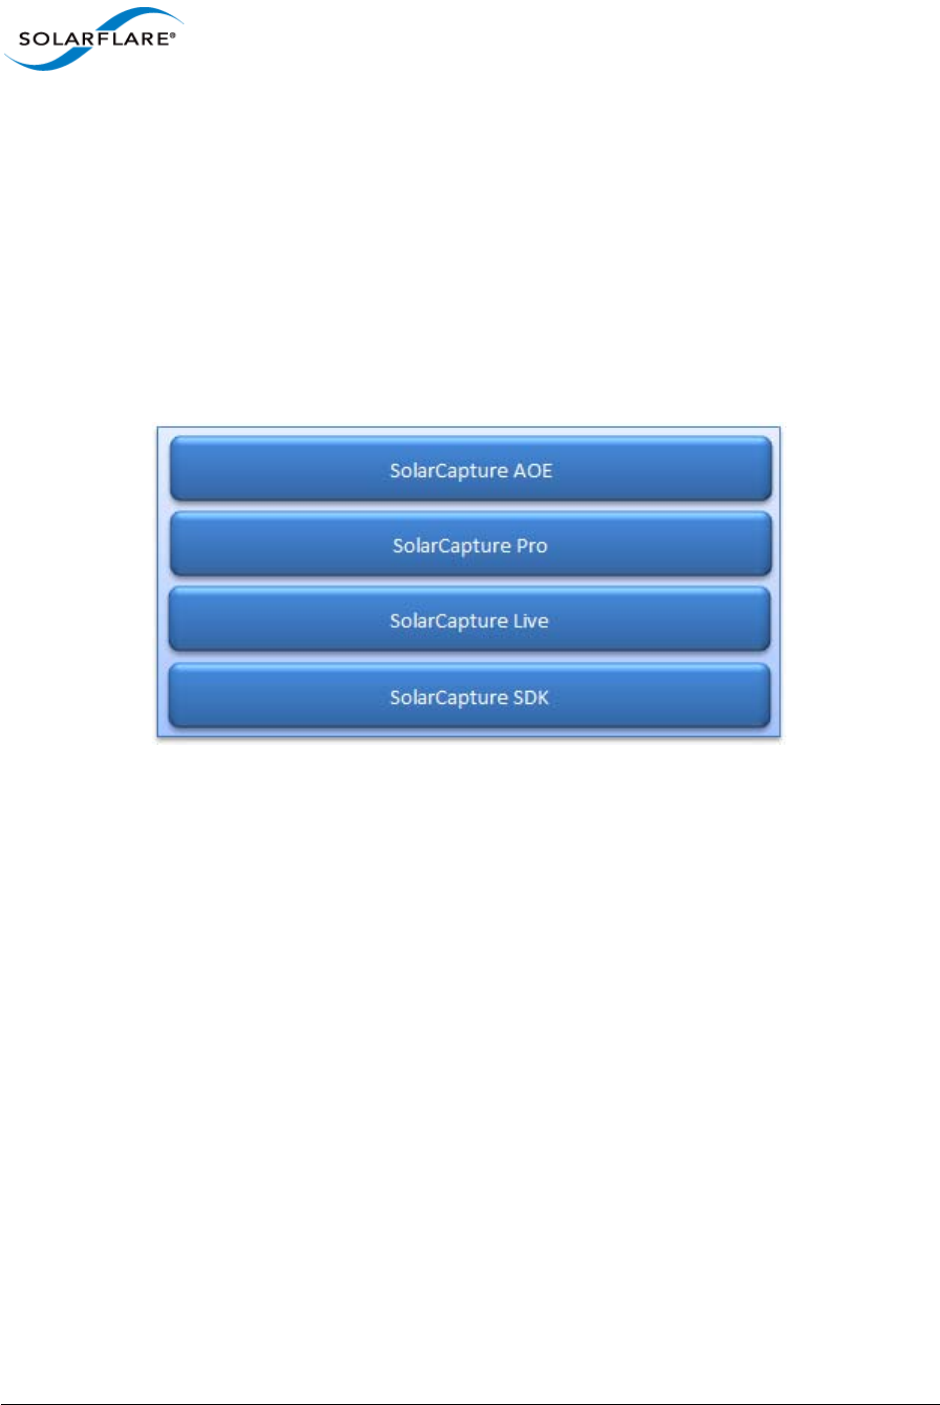
Figure 1: SolarCapture License Model
To identify feature availability, refer to SolarCapture Features by Distribution on page 6.
To identify features supported per Solarflare adapter, refer to SolarCapture Features by Adapter on
page 7.
For details of AppFlex™ Technology licensing requirements, refer to AppFlex™ Technology Licensing
on page 11.
1.1 SolarCapture SDK
Description
The SolarCapture Software Development Kit is a free library for developers who want to implement
efficient fast packet processing of network traffic, at high packet rates, in a Linux user mode
application. SolarCapture SDK can be used to receive and send packets with the minimum number
of CPU cycles for packet capture, network security, NFV or other packet processing (C, C++, python)
applications.
The SDK can be used on any of the supported adapters without a license.

Issue 9 © Solarflare Communications 2014 2
SolarCapture
User Guide
Version 1.3 Features and Changes
SolarCapture v1.3 includes the initial release of the SolarCapture SDK.
• C and python bindings, examples and documentation
• Ability to receive and transmit network packets direct from user-mode
• Software timestamps
• Polled and interrupt modes
• Line-rate packet capture (AOE/SFN7000 series adapters)
• Capture packets with intact FCS
• solar_capture_monitor
• solar_capture_doc
• solar_debug
1.2 SolarCapture Live
Description
In addition to the features from the SDK, SolarCapture Live provides libpcap support, providing
access to the SolarCapture feature set and SolarCapture performance for applications coded to the
standard libpcap API.
User applications or third party applications, for example the Snort network intrusion detection and
prevention system, can be dynamically linked to the alternative solar_libpcap library to take
advantage of SolarCapture performance and scalability features. Recompilation is not required.
SolarCapture Live can be run on all Solarflare Onload adapters and requires a SolarCapture Live
license or SolarCapture Pro license.
Version 1.3 Features and Changes
• SolarCapture Live includes all features from the SDK
• libpcap bindings (solar_libpcap)
• sniff mode (AOE/SFN7000 series adapters)
• Line-rate packet capture (AOE/SFN7000 series adapters)
• Capture packets with intact FCS
• Software filtering (BPF)
• Application Clustering - applications can scale over multiple cores and process significantly
higher aggregate packet rates
• Data Acquisition Module

Issue 9 © Solarflare Communications 2014 3
SolarCapture
User Guide
1.3 SolarCapture Pro
Description
SolarCapture Pro provides line-rate high performance packet capture on Solarflare SFN7000 series
adapters and includes all SolarCapture features including hardware timestamping of packets.
SolarCapture Pro also provides the solar_capture command line interface and solar_replay
interface.
SolarCapture Pro can be run on Solarflare Flareon™ SFN7000 series adapters and requires a
SolarCapture Pro license.
Version 1.3 Features and Changes
• SolarCapture Pro includes all features from the SDK and Live
• Command line interface (solar_capture)
• Packet replay interface (solar_replay)
• Hardware timestamps (AOE/SFN7000 series adapters)
• Capture packets with intact FCS
• Line-rate packet capture (AOE/SFN7000 series adapters)
• Third party timestamps (Arista)
• Data Acquisition Module
1.4 SolarCapture AOE
Description
The AOE combines a low latency server adapter with a powerful FPGA acceleration engine delivering
“on-the-fly” processing of network data. By processing data in hardware, before it is presented to
the server CPU, the AOE reduces application processing times and server CPU workloads.
Solarflare’s AOE SolarCapture is a network packet capture application that runs directly on the AOE
adapter, with the SolarCapture AOE license, allowing the SolarCapture Pro feature set to take
advantage of the AOE platform.
Version 1.3 Features and Changes
• SolarCapture AOE includes all features from SolarCapture Pro
• Guaranteed lossless packet capture at 10Gbps line rate
• On board DDR3 memory buffers - no packet drops ever
• Reduced CPU utilization and reduced I/O transaction rate

Issue 9 © Solarflare Communications 2014 4
SolarCapture
User Guide
1.5 New Features in SolarCapture v1.3
For feature availability, refer to SolarCapture Features by Distribution on page 6.
Line Rate Packet Capture
SolarCapture delivers 10Gbps line-rate packet capture on Solarflare Flareon™ SFN7000 series
adapters using the new capture-packed-stream firmware variant. For further details and
configuration requirements, refer to Line Rate Packet Capture on page 23.
SolarReplay
The SolarReplay feature provides a packet replay facility allowing packets captured in libpcap format
to be transmitted through a Solarflare adapter interface.
Command line options provide flexible control over replay speed and bandwidth whilst preserving
inter-packet pacing. For more details refer to SolarReplay on page 77.
Command Configuration File
The command configuration file is an alternative mechanism to configure SolarCapture. Instead of
specifying capture instances and options directly on the command line, these can be placed in one
or more command configuration files.
For further information and examples see Command Configuration File on page 34.
Operation Modes
New command line options, capture_busy_wait and writeout_busy_wait allow
SolarCapture to be run in a polling mode or in interrupt driven mode.
In polling mode SolarCapture will busy-wait on capture threads and writeout threads. In interrupt
mode a capture thread or writeout thread will block when there are no more packets to capture/
process.
Polling mode is recommended for applications receiving packets at high traffic rates, applications
that may be subject to sustained bursts of traffic and latency sensitive applications.
Interrupt driven mode, is ideal for applications receiving lower traffic rates and those that are not
subjected to bursts of traffic.
For further information see Operating Modes on page 24 for details.
Egress packet Capture
SolarCapture can now capture incoming and outgoing packets on Solarflare SFN7000 series adapters
- a feature previously available only on the AOE adapter. For each capture instance, the user can
elect to capture from the ingress capture point or egress capture point.
Refer to Ingress Packet Capture on page 26 and Egress Packet Capture on page 26 for details.

Issue 9 © Solarflare Communications 2014 5
SolarCapture
User Guide
Packet FCS
Running on the Solarflare SFN7000 series adapter, SolarCapture can be configured to capture
packets with the Frame Check Sequence (FCS) intact. See Capture Frame Check Sequence on
page 24 for configuration details.
Libpcap bindings - Nanosecond Timestamps
For applications linking to the Solarflare enhanced libpcap library, a new environment variable,
SC_PCAP_NANOSEC will deliver nanosecond timestamps. When set to 0 (default) timestamp
resolution is in microseconds.
Refer Libpcap Support on page 46 to for further information.
Snort Data Acquisition Module (DAQ)
The Solarflare DAQ is a library module developed to work with the Snort Data Acquisition Module
framework.
Supported features and configuration options are detailed in Data Acquisition Module on page 49.
Arista Timestamps - Replace-FCS
In SolarCapture Pro v1.3 the sc_arista_ts builtin node has been enhanced to support all modes of
the Arista 7150 ’FCS-type’ parameter so now includes the replace-fcs mode.
For further details refer to SolarCapture - Arista Timestamps on page 86.
Improved Documentation
SolarCapture includes the solar_capture_doc command to list all attributes which can be set in
the SolarCapture environment using the SC_ATTR environment variable.
For more information about the solar_capture_doc command refer to Appendix B: SolarCapture
Attributes on page 113.
Performance Tuning Guide
For performance tuning guidelines and procedures, refer to Tuning Guide on page 100.

Issue 9 © Solarflare Communications 2014 6
SolarCapture
User Guide
Chapter 2: Feature Availability Matrix
2.1 SolarCapture Features by Distribution
The following table identifies the SolarCapture features available in the SolarCapture distribution
packages.
Feature SDK Live Pro AOE
C and python bindings
example applications
solar_capture_monitor
solar_capture_doc
solar_debug
solar_replay
solar_capture (cmd line)
libpcap support
DAQ
Mode: steal
Mode: sniff
polling mode
interrupt mode
Line rate packet capture
SW timestamp RX
HW timestamp RX
HW timestamp TX
Software Filters (BPF)
Application Clustering

Issue 9 © Solarflare Communications 2014 7
SolarCapture
User Guide
2.2 SolarCapture Features by Adapter
The following table identifies the SolarCapture features supported per Solarflare adapter series.
All SolarCapture Live features are supported when Live is run on SFN7000 series adapters or the AOE
adapter. When run on other adapters certain features e.g. Line-rate packet capture, sniff mode are
not supported as identified from the table above.
Feature SFN5000 SFN6000 SFN7000 AOE
C and python bindings
example applications
solar_capture_monitor
solar_capture_doc
solar_debug
solar_replay
solar_capture (cmd line)
libpcap support
DAQ
Mode: steal
Mode: sniff
Line rate packet capture
SW timestamp RX
HW timestamp RX
HW timestamp TX
Software Filters (BPF)
Application Clustering

Issue 9 © Solarflare Communications 2014 8
SolarCapture
User Guide
Chapter 3: Introduction
3.1 Purpose
This document describes the SolarCapture family of packet capture applications for Solarflare
network adapters. SolarCapture captures received packets from the wire, and either writes these to
a capture file, or forwards the packets to user-supplied logic for processing. SolarCapture assigns
accurate timestamps to received packets, and is able to capture at line rate.
SolarCapture can be run as a command line tool which captures packets received from network
interfaces and writes them to a file. A monitoring tool is included that provides visibility of
configuration and statistical data.
SolarCapture includes a library with C and Python bindings which can be embedded in the user’s
own applications. Users can also extend SolarCapture by providing processing nodes which can be
integrated into SolarCapture’s packet processing pipeline.
Alternatively, the libpcap bindings can be used to interface with any existing application that is
written to the pcap API.
3.2 Definitions, Acronyms and Abbreviations
AOE Solarflare’s ApplicationOnload™ Engine SFA6902F adapter.
Data striping A technique used in RAID systems where logically sequential data is
segmented such that consecutive segments are stored on different
physical storage devices. By spreading segments across multiple
devices which can be accessed concurrently, total data throughput is
increased. Data striping is also a useful method for balancing I/O load
across an array of disks.
Deadline Deadline scheduler. An I/O scheduler which guarantees a service start
time for a request.
DMA Direct Memory Access. Allows the adapter to write data directly to a
portion of the system memory without having to use the system CPU.
ext3 Third extended file system. A type of journaling file system commonly
used by the linux kernel.
ext4 Fourth extended file system. A type of journaling file system commonly
used by the linux kernel which extends the capabilities of ext3.
Journaling file
system
A file system which keeps track of changes which have been made in a
journal. A journal could, for example, be a circular log.

Issue 9 © Solarflare Communications 2014 9
SolarCapture
User Guide
NUMA Non-Uniform Memory Access. A computer memory design found in
recent server designs. Memory access time is dependent on where, in
relation to the processor, the memory is located on the server (some
memory is “local” to a processor, some is “remote”).
Onload Solarflare open source OpenOnload and EnterpriseOnload accelerated
network middleware.
PCAP The file format for storing captured packets.
PTP IEEE 1588-2008 Precision Time Protocol.
RAID Redundant Array of Independent Disks. A storage technology allowing
multiple physical disks to be presented to the system as a single logical
unit.
read_expire One of the tuning options available for the deadline scheduler. When a
read request first enters the I/O scheduler, it is assigned a deadline
that is the current time + the read_expire value (in units of
milliseconds).
RHD Reliable Host Delivery. A mechanism on an AOE NIC which guarantees
that any network packet which arrives at the interface will be delivered
to the host system (i.e. lossless delivery of captured traffic).
RSS Receive Side Scaling distributes data processing across the available
CPU cores.
SSD Solid state drive or solid state disk.
Strip or stripe The unit into which data is segmented in data striping.
Stripe size This is the amount of data a segment used in data striping can store.
VI The virtual interface is a receive channel between the adapter and the
software application to provide the receive queue and event queue
from which captured packets are delivered to a consumer application.
VM Virtual Memory. A memory management technique that is
implemented using both hardware and software.
write_expire One of the tuning options available for the deadline scheduler. When a
write request first enters the I/O scheduler, it is assigned a deadline
that is the current time + the write_expire value (in units of
milliseconds).
xfs A type of journaling file system optimised for parallel I/O.
Issue 9 © Solarflare Communications 2014 10
SolarCapture
User Guide
3.3 Software Support
• SolarCapture has been developed and verified on the following OS distributions - other OS
distributions may also work:
- RHEL 5, RHEL 6, RHEL 7, SLES 10, SLES 11
• To run SolarCapture (earlier than v1.3) the following Onload package must be installed:
- OpenOnload 201310-u1 (or later release). EnterpriseOnload from version 3.0.
• To run SolarCapture v1.3 the following Onload package must be installed:
- OpenOnload 201405-u1 (or later release). Not currently supported by EnterpriseOnload.
• SolarCapture capture files conform to libpcap 1.3.0 format. Refer to http://www.tcpdump.org/
for details.
3.4 Firmware Variants
The Solarflare SFN7000 series adapter supports three firmware variants:
• full-featured - recommended when capturing a subset of traffic, but also using Onload features
• ultra-low-latency - low latency throughput without support for hardware-multicast-loopback,
sniffing of transmit traffic and filtering on VLAN-Id.
• capture-packed-stream - delivers line-rate packet capture on the SFN7000 series adapters.
3.5 Hardware Support
• SolarCapture is supported on the following Onload enabled Solarflare adapters.
NOTE: Onload must be installed to use SolarCapture. Refer to the Onload User Guide
(SF-104474-CD) download from https://support.solarflare.com/ for installation instructions.
NOTE: SolarCapture v1.3 requires firmware version 4.1.1.1023 on SFN7000 series adapters or
3.3.0.6298 on earlier Solarflare adapters. These firmware versions are available from the Solarflare
Linux Utilities package (SF-107601-LS) issue 24.
SFN5000 SFN6000 SFN7000 AOE
SDK
Live
Pro
AOE

Issue 9 © Solarflare Communications 2014 11
SolarCapture
User Guide
• SolarCapture is supported on all Intel x86 and AMD 64bit processors.
3.6 AppFlex™ Technology Licensing
The following table identifies SolarCapture license requirements.
SolarCapture Pro, SolarCapture Live and AOE SolarCapture are subject to a license that must be
installed on the adapter to enable advanced features.
Live, Pro and AOE customers should contact their Solarflare sales channel for SolarCapture
download site access and to obtain the appropriate AppFlex license.
SolarCapture Pro licenses purchased for v1.2 will continue to grant access to SolarCapture Pro
features in v1.3.
The license will be installed on the adapter using the sfkey utility from the Solarflare Linux Utilities
package (SF-107601-LS) issue 24 or later.
For detailed instructions for installing the license, refer to the Solarflare Sever Adapter User Guide
(SF-103837-LS).
Table 1: License Requirements
Product License Requirement
SDK No license required.
Live SolarCapture Live or SolarCapture Pro license.
Pro SolarCapture Pro license.
AOE SolarCapture AOE license. The license enables SDK, Live
and Pro features on the AOE.

Issue 9 © Solarflare Communications 2014 12
SolarCapture
User Guide
Chapter 4: Overview
This section describes the SolarCapture operation, identifies the various constituent parts of the
SolarCapture product and presents a number of use-cases.
4.1 How it Works
SolarCapture performs a similar task to the tcpdump utility, but achieves a much higher level of
performance by employing the kernel-bypass features on Solarflare adapters.
Whereas packets captured by tcpdump are processed by the network stack in the OS kernel,
SolarCapture receives packets directly from the network adapter via a dedicated channel. Packets
are delivered directly into the address space of the user-level application, bypassing the network
stack.
The advantage of this architecture is that SolarCapture is able to capture packets at much higher
rates, and can assign very accurate timestamps. Hardware timestamps are used on AOE adapters
and SFN7000 series adapters with a PTP/hardware timestamping license.
SolarCapture’s default capture mode is ’steal’. In this mode, packets are consumed by the capture
process and are no longer delivered to host applications. It is common to use SolarCapture in
conjunction with a mirror port or span port on a switch in order to capture unicast traffic flowing
between other hosts in the network. SolarCapture can also capture multicast traffic.
SolarCapture Live and Pro also supports a ’sniff’ capture mode. In this mode, packets continue to be
delivered to host applications. The adapter delivers each packet a second time directly to the
SolarCapture Pro application.
On a fast server, SolarCapture can process millions of packets per second on just two CPU cores, and
can also be configured to spread the load over a larger number of cores using receive-side scaling
(RSS).
4.2 Threading Model
SolarCapture applications usually include at least two threads:
• One or more capture threads, which manage the network interface and assign accurate
timestamps.
• One or more write-out threads, which write captured packets to disk or perform application
processing.
In custom configurations there can also be other threads as needed to provide processing functions.
Although it is possible to perform capture and write-out in the same thread, this is not
recommended as delays in write-out can cause packet loss and inaccuracy in software timestamps.

Issue 9 © Solarflare Communications 2014 13
SolarCapture
User Guide
4.3 SolarCapture Components
• Command Line Interface
The command line interface is a complete application for capturing received packets and
writing these to files. The command line interface includes options for installing filters to
select packets, joining multicast groups and managing buffering etc. Refer to Command Line
Interface on page 27 for details.
• SolarReplay
The SolarReplay feature provides a playback facility allowing packets captured in libpcap
format to be transmitted through a Solarflare adapter interface.
Command line options provide flexible control over replay speed and bandwidth whilst
preserving inter-packet pacing. For more details refer to SolarReplay on page 77.
• SolarCapture Monitor
The solar_capture_monitor utility provides visibility of configuration and runtime state. Refer
to SolarCapture Monitor on page 82 for details.
• SolarCapture Extensions Interface
SolarCapture includes a plug-in interface that allows developers to define custom processing
for packets handled by SolarCapture. Custom processors are known as nodes. Refer to
Extending SolarCapture on page 95 for details.
• SolarCapture C Library
SolarCapture can be embedded in applications by linking to the SolarCapture C library. Refer to
Embedding SolarCapture on page 90 for details.
• SolarCapture Python Module
SolarCapture includes Python bindings for the C library. This provides a convenient interface
for constructing custom configurations of SolarCapture and to make use of features not
available via the command line interface.
• libpcap Library
A SolarCapture enabled libpcap library (binary) allowing existing applications, written to the
pcap API, to access SolarCapture functionality. Refer Libpcap Support on page 46 to for further
information.
• Snort Data Acquisition Module
The Solarflare DAQ is a library module developed to work with the Snort Data Acquisition
Module framework. Supported features and configuration options are detailed in Data
Acquisition Module on page 49.
Issue 9 © Solarflare Communications 2014 14
SolarCapture
User Guide
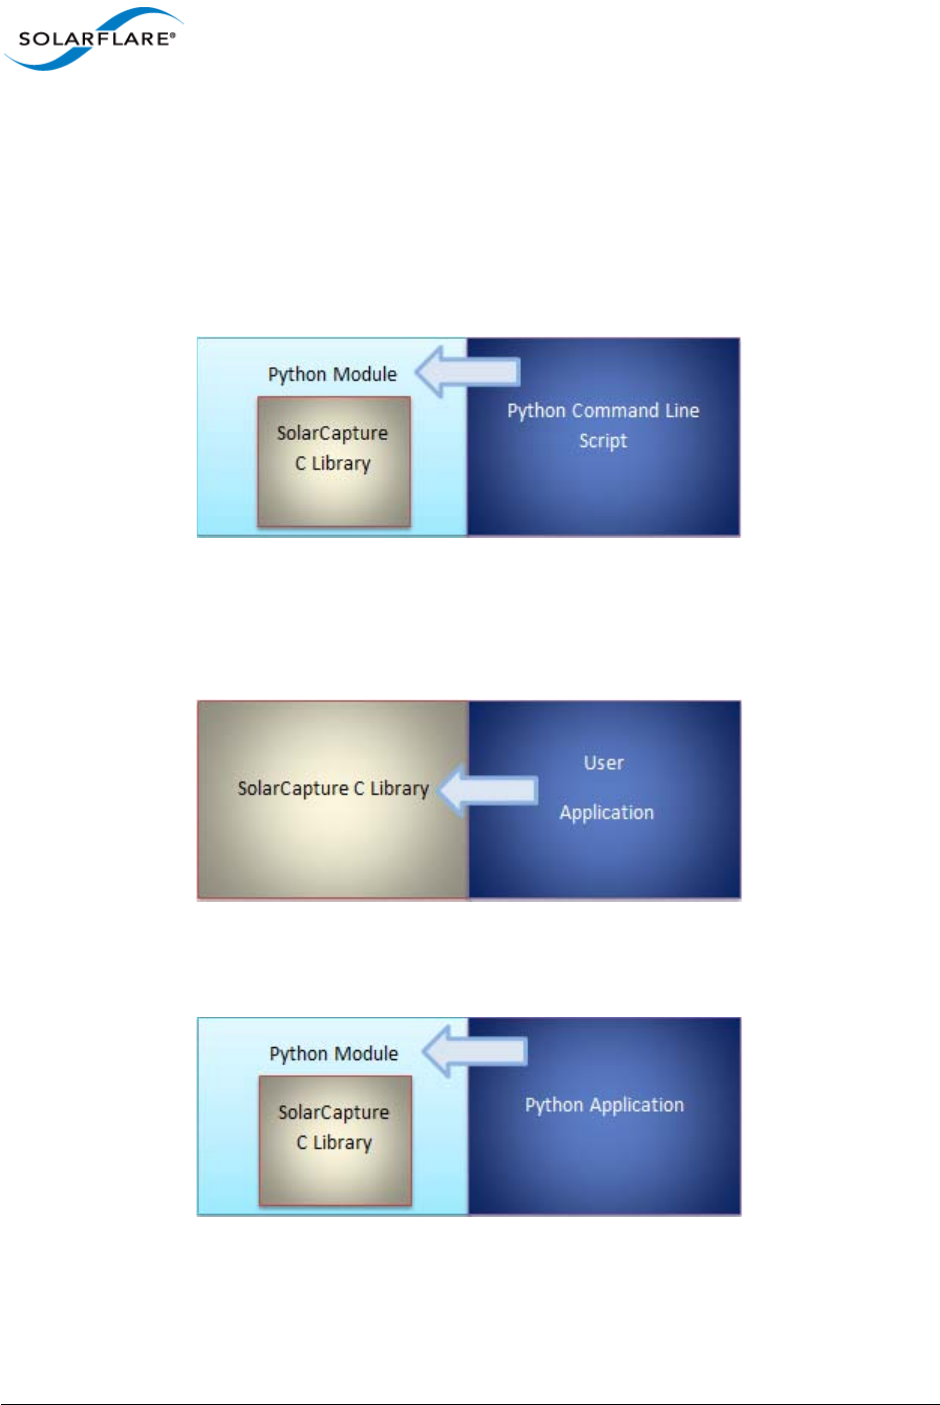
4.4 Use Cases
SolarCapture can be used in a number of different ways:
• Command Line Interface
The command line interface is sufficient for most packet capture needs. Received packets are
captured, timestamped and written to file. The command line interface is written in Python,
and so interacts with SolarCapture via the Python module.
Figure 2: Python Command Line application
• Embedding SolarCapture
SolarCapture can be embedded in user applications via the C bindings:
Figure 3: SolarCapture embedded in a C application
...or the Python bindings:
Figure 4: SolarCapture embedded in a Python application
Issue 9 © Solarflare Communications 2014 15
SolarCapture
User Guide
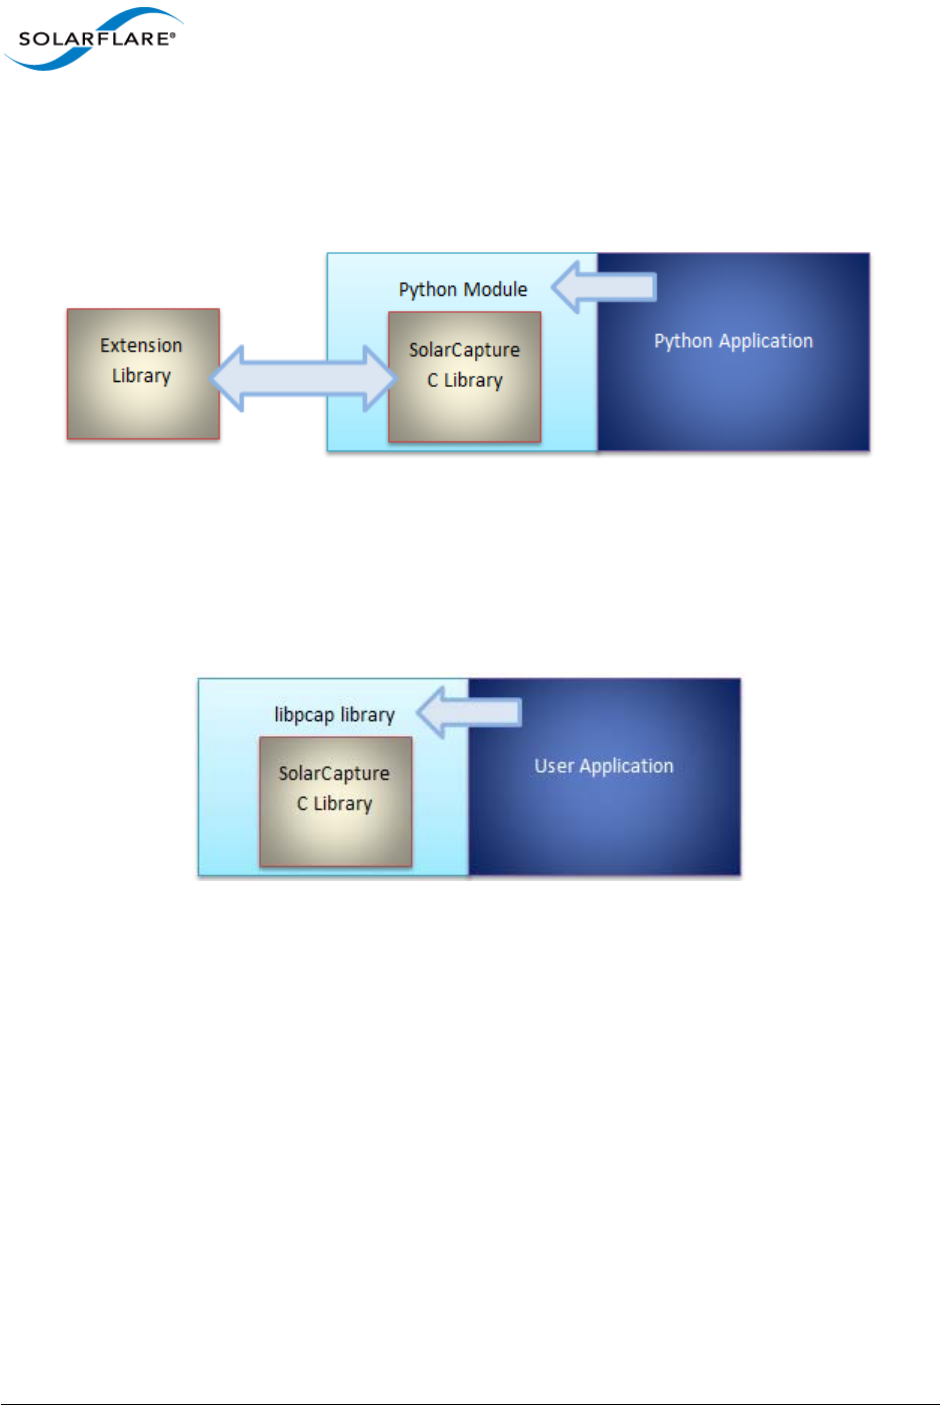
• Extending SolarCapture
SolarCapture can be extended by providing a shared library which conforms to the
SolarCapture node interface. Nodes can be inserted into the packet processing pipeline via the
C or Python bindings.
Figure 5: Extending SolarCapture
• libpcap Library
The SolarCapture enabled libpcap library exposes pcap API function calls and allows existing
applications written to the pcap API to use SolarCapture functionality. See Libpcap Support on
page 46 for the methods of using the libpcap library.
Figure 6: Using the Modified libpcap library
• Application Clustering
Application clustering allows the captured traffic load, from one or more physical interfaces to
be spread among multiple receiving applications.
For more details including configuration procedures refer to Application Clusters on page 39.

Issue 9 © Solarflare Communications 2014 16
SolarCapture
User Guide
Chapter 5: Installation
5.1 Download Access
Solarflare drivers, utilities packages, application software packages and user documentation can be
downloaded from: https://support.solarflare.com.
Onload distributions can be downloaded from: http://www.openonload.org/.
SolarCapture Live, Pro and AOE customers should contact their Solarflare sales channel to obtain
download site access and the required AppFlex license.
5.2 Install Dependencies
The install process will build and install Onload, the Solarflare adapter net driver and SolarCapture
software on the host. Firmware on an AOE adapter will also be updated during the install process.
Before software and firmware can be built and installed the host server:
• Must support a general build environment i.e. has gcc, make, libc and libc-devel, python-devel.
• Must be capable of compiling kernel modules i.e. have the correct kernel-devel package for the
installed kernel version.
• libpcap and libpcap-devel must be installed.
• libaio must be installed.
5.3 Remove Existing SolarCapture Installs
It is important that any previous SolarCapture versions are un-installed before installing
SolarCapture v1.3.
1To identify a previous installation e.g.
# rpm -qa | grep solar_capture
solar_capture-core-1.2.0-0.x86_64
solar_capture-1.2.0-0.x86_64
# rpm -qa | grep solar_clusterd
solar_clusterd-oo_40041-0.x86_64
2Remove installed packages (Note the order of removal):
# rpm -e solar_clusterd-oo_40041-0.x86_64
# rpm -e solar_capture-1.2.0-0.x86_64
# rpm -e solar_capture-core-1.2.0-0.x86_64

Issue 9 © Solarflare Communications 2014 17
SolarCapture
User Guide
5.4 The SolarCapture v1.3 Distributions
5.5 Install Onload
Onload should be installed before installing SolarCapture. Refer to the Onload User Guide (SF-
104474-CD) for install instructions. OpenOnload will be installed by the INSTALL.sh script when
installing AOE SolarCapture.
5.6 SolarCapture - What to Install
Copy the appropriate distribution zipfiles to the target server, unzip to reveal the RPMs, license file
and release notes.
• SolarCapture Live: install packages SDK and Live.
• SolarCapture Pro: install packages, SDK and Live and Pro.
• SolarCapture AOE: install packages SDK and Live and Pro and AOE.
Table 2: SolarCapture Packages
SF-112972-LS SolarCapture SDK
SF-112974-LS SolarCapture Live and Pro
SF-110991-LS SolarCapture AOE
SF-107601-LS Linux utilities - including (firmware) sfupdate
sfkey and sfboot
Table 3: SolarCapture Installation RPMs
solar_capture-core-<version>.x86_64.rpm C library and core functionality
solar_capture-live-<version>.x86_64.rpm SolarCapture Live
solar_capture-pro-<version>.x86_64.rpm SolarCapture Pro
solar_capture-python-<version>.src.rpm python bindings and utilities
Table 4: SolarCapture AOE Installation RPMs
aoe_solarcapture-<version>.x86_64.rpm AOE SolarCapture RPMs
aoe_utils-<version>.x86_64.rpm AOE utilities RPMs

Issue 9 © Solarflare Communications 2014 18
SolarCapture
User Guide
Install AOE
To install SolarCapture AOE - follow Install SolarCapture AOE on page 19.
Install SDK
1Unzip package SF-112972-LS.zip
# unzip SF-112972-LS.zip
Archive: SF-112972-LS.zip
inflating: solar_capture-<version>-ChangeLog.txt
inflating: solar_capture-<version>-LICENSE.txt
inflating: solar_capture-<version>-README.txt
inflating: solar_capture-<version>-ReleaseNotes.txt
inflating: solar_capture-core-<version>.x86_64.rpm
inflating: solar_capture-python-<version>.src.rpm
2Follow install Binary and Source RPM procedures below.
Install Live or Pro
1Unzip package SF-112974-LS.zip
# unzip SF-112974-LS.zip
Archive: SF-112974-LS.zip
inflating: solar_capture-live-<version>.x86_64.rpm
inflating: solar_capture-pro-<version>.x86_64.rpm
2Follow install Binary RPM procedures below.
Install a binary RPM:
1Install a binary RPM (example).
# rpm -ivh solar_capture-core-<version>.x86_64.rpm
2To view all installed components and files:
# rpm -qlp solar_capture-core-<version>.x86_64.rpm
Build and install a source RPM:
1Build a binary from the source RPM (example).
# rpmbuild --rebuild solar_capture-python-<version>.src.rpm
This will produce some output including a "Wrote......" line.
2Install the binary file:
# rpm -ivh <copy the location from the wrote line in the previous step>.rpm

Issue 9 © Solarflare Communications 2014 19
SolarCapture
User Guide
5.7 Install SolarCapture AOE
1Copy ALL of the following packages to the same directory on the AOE server.
• SF-109585-LS OpenOnload Release Package
• SF-107601-LS Solarflare Linux Utilities
• SF-112972-LS Solarcapture SDK
• SF-112974-LS Solarcapture Live and SolarCapture Pro
• SF-110991-LS AOE Solarcapture RPMs
2Unzip all packages
# unzip ‘*.zip’
3Run the INSTALL.sh script:
# ./INSTALL.sh
INSTALL.sh should be run in a directory writable by the root user. Running INSTALL.sh as above will
install AOE SolarCapture software components and FPGA image files on all adapters in the server. To
install only software components, use the no-update option:
# ./INSTALL.sh --no-update
The sfaoeupdate utility can be used independently to install the image files (listed in Table 5) on
selected adapters. For details of sfaoeupdate refer to Install FPGA Image files on page 21.
The INSTALL.sh has the following options:
--dry-run Just print the install actions
--no-install Skip the install step, just build the sources
--no-update Just install, don't update firmware on the AOE card
--uninstall Uninstall AOE-SolarCapture RPMs
•The complete installation can take upwards of 5 minutes - depending on the server.
Issue 9 © Solarflare Communications 2014 20
SolarCapture
User Guide
4Check for successful installation:
Confirm that the solar_aoed service has been installed.
# service solar_aoed status
AOE SolarCapture files
Following installation the following files will be present on the host system:
NOTE: If the AOE SolarCapture Pro license is NOT already installed on the AOE adapter, the
installation will succeed, but will not start the solar_aoed service and will report a FAILED
status e.g.
# service solar_aoed start
Starting solar_aoed: Registered AOE at interface eth3
Internal error: Failed to initialise capture blocks for capture point 0:
Capture component(s) not found or not licensed
Failed to initialise capture point 0: Invalid component type passed.
Hardware initialisation failed
2015-01-20 14:14:35.293784.Abnormal exit - not resetting hardware
[FAILED]
Install the AOE SolarCapture Pro license using the sfkey utility, then the solar_aoed service can be
started manually:
# service solar_aoed start
Table 5: Image Files
File Description
/usr/share/aoe/solarcapture/aoe-
solarcapture-<version>.dat
An FPGA image file.
/usr/share/aoe/solarcapture/cpld-
<version>.dat
Complex Programmable Logic Device
image file.
/usr/share/aoe/solarcapture/fcfw-
<version>.dat
FPGA controller firmware image file.
/usr/share/aoe/solarcapture/mcfw-
<version>.dat
MAC controller firmware image file.
/etc/aoe/solarcapture.lst Used by the sfaoeupdate utility to write
all above listed firmware image files to
the AOE adapter.
/etc/aoe/solar_aoed.conf Example configuration file used by the
solar_aoed daemon service.
/usr/bin/solar_aoed The AOE SolarCapture process.

Issue 9 © Solarflare Communications 2014 21
SolarCapture
User Guide
Install FPGA Image files
All FPGA image files listed in Table 5 above are installed during the full installation process described
in Install SolarCapture AOE on page 19 unless the INSTALL.sh script is run with the --no-update
option.
The sfaoeupdate utility can be used to independently write FPGA images to the AOE adapter. The
sfaoeupdate utility is part of the aoe_utils package installed during Install SolarCapture AOE on
page 19.
To write FPGA images to all AOE adapters in the server use the following command:
# sfaoeupdate -w /etc/aoe/solarcapture.lst
Image files can be installed on selected adapters using the --adapter option. For a full list of
sfaoeupdate options use the following command:
# sfaoeupdate --help
Un-install AOE SolarCapture
To un-install the AOE Solarcapture components, ensure all solar_aoed processes are terminated
and then run the INSTALL script with the --uninstall option as demonstrated in the following
example:
# ./INSTALL.sh --uninstall
openonload-201210_u2_aoe_3_3_3_6329-1.el6.x86_64
solar_capture-core-1.0.1-0.x86_64
solar_capture-1.0.1-0.x86_64
sfutils-3.3.3.6330-1.i586
aoe_utils-1.3.0.1069-1.x86_64
aoe_solarcapture-1.0.0.1069-1.x86_64
openonload-kmod-2.6.32-279.el6-201210_u2_aoe_3_3_3_6329-1.el6.x86_64
rpm --erase openonload solar_capture-core solar_capture sfutils aoe_utils
aoe_solarcapture openonload-kmod-2.6.32-279.el6-
201210_u2_aoe_3_3_3_6329-1.el6.x86_64
/etc/rc.d/init.d/solar_aoed The AOE SolarCapture service.
Table 5: Image Files
File Description

Issue 9 © Solarflare Communications 2014 22
SolarCapture
User Guide
5.8 Install PTP
SolarCapture, running on any Solarflare adapter, uses software to generate the timestamp of packets
in the capture file.
SolarCapture Pro on SFN7000 series adapters and the AOE adapter, which have the AppFlex PTP/
hardware timestamping license, will use the hardware timestamp generated as packets are received
by the adapter. Using the Solarflare Enhanced PTP daemon, the adapter time can be synchronized
to an external PTP clock source.
Install Solarflare PTP
1Download the Solarflare Enhanced PTP distribution package SF-108910-LS to the target server.
2Unzip the package to create the sfptpd-<version> subdirectory containing the sfptpd binary
and all supporting files.
# tar -zxvf SF-108910-LS
3For instructions on configuration and operation of sfptpd refer to the Solarflare Enhanced PTP
User Guide (SF-109110-CD).

Issue 9 © Solarflare Communications 2014 23
SolarCapture
User Guide
Chapter 6: SolarCapture Functionality
6.1 Line Rate Packet Capture
The Solarflare AOE can, by default, capture at 10Gbps line-rate (~14.8Mpps) on both ports. Line-rate
is also possible on the SFN7000 series adapter using the capture-packed-stream firmware
variant. In this mode the SFN7142Q can capture packets at line-rate on two 10G ports
simultaneously. In this mode SFN7x22 adapters can capture packets at line-rate on a single port
when there are no packets received on the second adapter port. On a SFN7x22 adapter line-rate
capture is still possible even if the second adapter port is used only to send packets.
Using the capture-packed-stream firmware variant. The number of pages required to sustain
line-rate packet capture will depend on the ability of the application to keep up with the packet
arrival rate and write packets to the storage device. Enabling a greater number of huge pages and
packet buffers can help sustain line-rate capture during traffic burst periods.
To enable huge pages on Red Hat Enterprise Linux, the kernel must be compiled with the
CONFIG_HUGETLB_PAGE flag set.
• The size of huge pages allocated by the OS can be identified:
# cat /proc/meminfo | grep Hugepagesize
• The number of huge pages available can be identified:
# cat /proc/sys/vm/nr_hugepages
• To allocate 100 huge pages:
# echo 100 > /proc/sys/vm/nr_hugepages
• To ensure this setting is persistent across restarts add the following line to the sysctl.conf file:
vm.nr_hugepages = 100
Users of other Linux OS variants should refer to the appropriate operating system documentation for
huge pages configuration instructions.
The SFN7000 series firmware variant can be selected using the sfboot utility included in the
Solarflare Linux Utilities package (SF-107601-LS) issue 24 or later.
# sfboot --adapter=eth<N> firmware-variant=capture-packed-stream
To display the current boot configuration for an adapter:
# sfboot
Following a firmware variant change it is necessary to reload the adapter drivers before the
change becomes effective:

Issue 9 © Solarflare Communications 2014 24
SolarCapture
User Guide
# onload_tool reload
6.2 Operating Modes
Polling vs Interrupt Mode
The command line option capture_busy_wait is used to configure SolarCapture to either ’spin’
(busy_wait) on a capture thread or to block on that thread when no traffic is being received. A
blocked capture thread will be ’unblocked’ by an interrupt to signal that there is further incoming
traffic to process. A polling (busy_wait) thread will never block.
Polling is recommended for applications receiving high traffic rates, that are latency sensitive or can
be subject to prolonged bursts of traffic. This is the default SolarCapture behaviour.
# solar_capture eth2=eth2.pcap capture_busy_wait=1....
Interrupt driven mode can be used by applications receiving lower traffic rates, that are not latency
sensitive and not expected to be receive large or sustained bursts of traffic.
# solar_capture eth2=eth2.pcap capture_busy_wait=0....
When using interrupt mode, the number of interrupts can be controlled by configuring interrupt
coalescing and interrupt moderation options rx_usecs and adaptive-rx via ethtool. For more
information refer to the Solarflare Server Adapter User Guide (SF-103873-CD).
A companion option ’writeout_busy_wait’ controls the same behaviour for writeout threads.
6.3 Capture Frame Check Sequence
The Solarflare SFN7000 series adapter can be configured to deliver received packets with the FCS
intact. This is a global setting, when set, all packets will be delivered to all receiving applications with
the FCS intact.
To enable the driver to deliver packets and packet FCS, write a ’1’ to the following file:
echo 1 > /sys/class/net/eth<N>/device/forward_fcs
To configure SolarCapture to retain the packet FCS use the strip_fcs option:
# solar_capture strip_fcs=0 eth4=eth4.pcap
NOTE: It is not possible at this time to run applications with Onload when the
adapter is using the capture-packed-stream firmware version.

Issue 9 © Solarflare Communications 2014 25
SolarCapture
User Guide
6.4 Capture file timestamp format
By default packets are written to files in PCAP format, which supports microsecond resolution
timestamps. There is a well-known variant of PCAP that uses nanosecond resolution for the
timestamps. Use the ’format’ solar_capture command line option to select one of the following
values:
format=pcap
format=pcap-ns
For details of the nanosecond pcap timestamp format refer to http://anonsvn.wireshark.org/
viewvc/trunk/wiretap/libpcap.h?revision=3754.
6.5 Hardware Timestamps
SolarCapture will use hardware generated timestamps if the following conditions are met:
• Running on SFN7000 series adapter or AOE adapter.
• PTP/HW timestamping license is installed or Performance Monitor license is installed.
If hardware timestamps are not available, SolarCapture will silently fallback to use software
timestamps, taking time from the host system clock. Specific attributes are available to control
timestamp options:
force_sw_timestamps - When non-zero this will always use software timestamps even when
hardware timestamps are available.
require_hw_timestamps - When non-zero, this will cause VI allocation to fail if hardware
timestamps are not available.
Use solar_capture_monitor to check that hardware timestamping is enabled on the adapter
(0=not enabled, 1=enabled):
$ solar_capture_monitor dump | grep hw_timestamps
hw_timestamps 1
For more information about setting SolarCapture attributes see Appendix B: SolarCapture Attributes
on page 113.
Solarflare recommend running PTP (sfptpd) to synchronize the adapter clock with an external PTP/
NTP time source, however, even if synchronized time is not a requirement, it may be necessary to
run sfptpd briefly in ’freerun_mode nic’ to set the initial adapter clock time to the system clock.
Refer to the Solarflare Enhanced PTP User Guide (SF-109110-CD) for instructions.

Issue 9 © Solarflare Communications 2014 26
SolarCapture
User Guide
6.6 Ingress Packet Capture
SolarCapture, by default, will capture incoming packets from the specified interface. To explicitly
capture received traffic identify the capture_point using the following syntax:
solar_capture eth4=eth4.pcap mode=sniff capture_point=ingress
All captured packets are hardware timestamped - if hardware timestamps are available. See
Hardware Timestamps on page 25.
6.7 Egress Packet Capture
SolarCapture, by default, will capture incoming packets from the specified interface. To capture
outgoing packets identify the egress capture point using the following syntax:
solar_capture eth4=eth4.pcap mode=sniff capture_point=egress
All captured packets are hardware timestamped - if hardware timestamps are available. See
Hardware Timestamps on page 25.

Issue 9 © Solarflare Communications 2014 27
SolarCapture
User Guide
Chapter 7: Command Line Interface
7.1 Introduction
The solar_capture command line application captures and timestamps packets received at one
or more network interfaces, and writes these to files. The interface includes a number of
configuration options:
• Set the capture file format
• Join multicast groups
• Control resources used by SolarCapture
• Install filters to select streams to be captured
• Affinitize threads to specific CPU cores
• Control the types of packets captured
• Capture file rotation
The Command Configuration File is an alternative to the standard command line configuration
method. Refer to Command Configuration File on page 34 for details.
7.2 Run Command Line Interface and Getting Help
To run the command line interface:
$ solar_capture <options>
To get help:
$ solar_capture --help
$ solar_capture help <option>
$ solar_capture help all
Table 6 lists all SolarCapture command line options. .
NOTE: The command line interface enables the most commonly used features of SolarCapture. For
more complex deployments the user can use either the SolarCapture C library or Python module.
Table 6: Command Line Options
Option Description
join_streams ; separated list of streams to join and capture.

Issue 9 © Solarflare Communications 2014 28
SolarCapture
User Guide
streams ; separated list of stream to capture.
join_mcasts ; separated list of multicast groups to join.
capture_cores List of cores to capture on. The number of capture
cores cannot exceed the number of RSS queues
configured by the net driver module option rss_cpus
and the number of cores must be a power of 2 value.
writeout_core The core to use for capture file write-out.
format Packet capture file format.
rotate_seconds Capture file rotation (like tcpdump -G). Files are not
created before packets are received.
When using AOE SolarCapture a 24 byte file is always
created before any packet is received.
The file name specified on the command line is the
name of all files created1.
rotate_file_size Capture file rotation (like tcpdump -C). Files are not
created before packets are received.
When using AOE SolarCapture a 24 byte file is always
created before any packet is received.
A incrementing index starting at 0 is appended to each
file created.
filter Specify a filter in the Berkeley Packet Filter (BPF)
specification. Packets not matching the filter are
discarded.
arista_ts Forces SolarCapture to use Use Arista 7150 hardware
timestamps. For detailed information run the following
command:
solar_capture help arista_ts
snap Max bytes from each packet to store to capture file.
append Set to 1 to append to capture file (otherwise truncate).
on_write_error Set to exit (default), abort, message or silent.
Table 6: Command Line Options
Option Description

Issue 9 © Solarflare Communications 2014 29
SolarCapture
User Guide
* AOE SolarCapture only.
mode steal (default)|sniff
In steal mode, packets are captured by SolarCapture,
but do not continue to their destination.
In sniff mode, packets are captured by SolarCapture
and continue to their destination.
On a SFN7000 series adapter ’sniff’ mode captures all
traffic at the specified interface. On the
ApplicationOnload Engine ’sniff’ mode can capture
individual streams.
capture_point Default = ingress. Set to ingress or egress.
delivery_interface* Interface on which captured packets are delivered to
the AOE host.
cluster Name of application cluster to join.
discard List of packet errors that should be discarded.
rx_ring_max Maximum fill level for RX descriptor rings.
buffers Number of packet buffers per capture interface.
promiscuous Enable/disable promiscuous mode when using ’sniff’
mode.
1 - all packets received at the capture port are
captured.
0 - only packets that would arrive at the host are
captured.
user Drop privileges to lower user name (like tcpdump -Z).
ptp Set to 1 to not capture IGMP because PTP is in use.
capture_busy_wait Set to 1 to busy-wait in capture thread(s), 0 to block.
writeout_busy_wait Set to 1 to busy-wait in writeout thread, 0 to block.
strip_fcs Set to 1 to remove FCS from captured packets, set to 0
to capture packets with FCS intact.
config_file Identify a command configuration file to configure
solar_capture. Command Configuration File on page 34
<extension> add optional processing step into pipeline.
Table 6: Command Line Options
Option Description

Issue 9 © Solarflare Communications 2014 30
SolarCapture
User Guide
1. One method of ensuring that unique filenames are created each time the capture file is rotated is
to use the Linux date formatting escapes when naming the file:
solar_capture rotate_seconds=10 eth2=eth2%Y%m%d-%H:%M:%S.pcap
7.3 Capturing packets with solar_capture
Identify the physical network interface receiving the packets to be captured; for example eth2. The
following command captures all packets arriving at eth2, and writes them to eth2.pcap.
solar_capture eth2=eth2.pcap
To get the highest level of performance from SolarCapture, and to achieve consistently accurate
software timestamps, it is best to assign SolarCapture threads to individual CPU cores as follows:
solar_capture eth2=eth2.pcap capture_cores=1 writeout_core=2
The example above assigns the capture thread to core 1 and the write-out thread to core 2. For best
performance it is best to select two cores on the same processor. Refer to Tuning Guide on page 100
for further tuning options.
7.4 Command line options
The command line consists of options and capture instances. For example eth2=eth2.pcap is a
capture instance.
solar_capture [global-options] eth2=eth2.pcap [instance-options]
Options appearing before a capture instance apply as defaults for all instances. Options appearing
after a capture instance apply only to that instance, and override defaults.
solar_capture snap=0 eth2=eth2.pcap eth3=eth3.pcap snap=60
In the above example, the snap=60 option overrides the snap=0 option for interface eth3.
Therefore complete packets are written to eth2.pcap, but only the first 60 bytes of each packet are
written to eth3.pcap.

Issue 9 © Solarflare Communications 2014 31
SolarCapture
User Guide
7.5 Selecting Streams to Capture
By default solar_capture captures all packets on the specified interface. The streams option can
be used to capture a subset of packets, with other packets being delivered to the network stack as
normal. Streams of TCP and UDP packets can be specified by IP address and port number, and
streams can also be specified by destination Ethernet MAC address with optional VLAN. Here are
some examples:
Capture TCP packets with destination IP 123.1.2.3 and port 1111:
streams=tcp:123.1.2.3:1111
Capture UDP packets with destination IP 123.1.2.3 and port 1111 and destination IP 123.4.5.6 and
port 2222 (note the semi-colon separators and escape sequence):
streams="udp:123.1.2.3:1111;udp:123.4.5.6:2222"
Capture TCP packet on a single connection specifying both source and destination parameters:
streams="tcp:123.1.2.3:1111,120.3.2.1:222"
Capture all packets to a specific destination MAC address and all broadcasts:
streams="eth:00:0F:53:16:04:74;eth:ff:ff:ff:ff:ff:ff"
Capture all broadcast packets on VLAN 3:
streams="eth:vid=3,ff:ff:ff:ff:ff:ff"
7.6 Join Multicast Groups
Most networks perform multicast filtering in the switches so that multicast packets are only
delivered to hosts subscribed to the corresponding groups. In such environments it may be
necessary to join multicast groups to be captured. The join_mcast option instructs SolarCapture
to join the given groups via the IGMP protocol. For example:
join_mcasts="224.1.1.1;239.2.2.2"
To join a multicast group on a particular VLAN - add the VLAN ID:
join_mcasts="239.0.0.1;239.0.0.2;vid=77,239.1.2.3"
It is common to want to capture a multicast stream and join the corresponding group, so a shortcut
is provided to make this easy: The join_streams option combines the functions of the streams= and
join_mcasts= options. These two examples are equivalent:
solar_capture eth2=eth2.pcap\
streams=udp:224.1.2.3:21002 join_mcasts=224.1.2.3
solar_capture eth2=eth2.pcap \
join_streams=udp:224.1.2.3:21002

Issue 9 © Solarflare Communications 2014 32
SolarCapture
User Guide
7.7 Setting thread affinity
As noted above, assigning SolarCapture threads to individual CPU cores delivers the best level of
performance and software timestamp accuracy.
The writeout_core option sets the CPU core to use for a write-out thread.
The capture_cores option sets the CPU core or cores used for packet capture and timestamping.
If a single core is given, then a single thread is used to capture packets. If a list of cores is given, then
packet capture is distributed over multiple threads using receive-side scaling (RSS). This algorithm
distributes received packets over the cores according to a hash on addresses in the packet headers.
This ensures that packets within any given stream will be consistently delivered to the same capture
thread, and so will be processed in order.
Below are some examples:
• Create a single capture thread, assigned to CPU core 2:
capture_cores=2
• Create 2 capture threads, assigned to CPU cores 4 and 8:
capture_cores=4,8
• Create 2 capture threads, not affinitized to any particular CPU core:
capture_cores=-1,-1
• Create a single thread with 2 receive queues:
capture_cores=1,1
• To capture data from multiple streams, using multiple capture-cores and multiple writeout
cores, run a command similar to the following:
solar_capture \
format=pcap buffers=24000 snap=0 \
rx_ring_low=40 rx_ring_high=60 rx_refill_batch_low=64 rx_ring_max=4095 \
eth1=file1 join_streams="<list 1 of streams>" capture_cores=1,2
writeout_core=3 \
eth2=file2 join_streams="<list 2 of streams>" capture_cores=4,5
writeout_core=6 \
eth3=file3 join_streams="<list 3 of streams>" capture_cores=7,8
writeout_core=9 \
In the above example streams are grouped with each group of streams using a different writeout
core. By default SolarCapture creates a single capture thread, and a single writeout thread and does
not set the core affinity.
NOTE: It only makes sense to use RSS if the capture instance is configured to capture multiple
independent streams of packets. There is no guarantee that the load will be spread evenly over the
available capture cores.

Issue 9 © Solarflare Communications 2014 33
SolarCapture
User Guide
7.8 Command Configuration File
The command configuration file is an alternative mechanism to configure SolarCapture. Instead of
specifying capture instances and options directly on the command line, these can be placed in one
or more command configuration files.
A separate command configuration file can be created for each capture instance, or a single file can
configure all options requested for a solar_capture instance.
Specifying arguments in a command configuration file is exactly the same as the standard command
line with each argument appearing on a separate line.
Per Capture Instance # 1
solar_capture snap=60 eth2=/tmp/eth2.pcap streams=tcp:192.168.1.1:5001
This command line can be placed in a configuration file e.g ’sc_eth2.cfg’
snap=60
eth2=/tmp/eth2.pcap
streams=tcp:192.168.1.1:5001
Note: that each command line argument appears on a separate line and the capture instance
eth2=/tmp/eth2.pcap is specified in the configuration file.
The command configuration file can then be identified when starting solar_capture e.g
solar_capture config_file=sc_eth2.cfg
A separate command configuration file can be created for each capture instance.
Per Capture Instance # 2
solar_capture snap=60 eth2=/tmp/eth2.pcap streams=tcp:192.168.1.1:5001 \
streams=udp:127.0.0.100:8080
This command line could be placed in a configuration file e.g ’sc_eth2.cfg’
snap=60
streams=tcp:192.168.1.1:5001
streams=udp:127.0.0.100:8080
Note that each command line argument appears on a separate line and the capture instance
eth2=/tmp/eth2.pcap is identified on the command line.
The command configuration file can then be identified when starting solar_capture e.g
solar_capture config_file=sc_eth2.cfg eth2=/tmp/eth2.pcap
A separate command configuration file can be created for each capture instance.

Issue 9 © Solarflare Communications 2014 34
SolarCapture
User Guide
Per Capture Instance # 3
solar_capture eth2=/tmp/eth2.pcap streams=tcp:192.168.1.1:5001 snap=60 \
capture_cores=3 writeout_core=5 eth3=/tmp/eth3.pcap
streams=udp:127.0.0.100:8080 snap=120 capture_cores=7 writeout_core=9
This command line could be placed in TWO configuration files e.g ’sc_eth2.cfg’ and
’sc_eth3.cfg’
streams=tcp:192.168.1.1:5001
snap=60
capture_cores=3
writeout_core=5
streams=udp:127.0.0.100:8080
snap=120
capture_cores=7
writeout_core=9
Note that each command line argument appears on a separate line and the capture instances
eth2=/tmp/eth2.pcap and eth3=/tmp/eth3.pcap are identified on the command line.
The command configuration files can then be identified when starting solar_capture e.g
solar_capture config_file=sc_eth2.cfg eth2=/tmp/eth2.pcap \
config_file=sc_eth3.cfg eth3=/tmp/eth3.pcap
A separate command configuration file can be created for each capture instance.
Single File
solar_capture snap=0 eth2=/tmp/eth2.pcap streams=tcp:192.168.1.1:5001 \
capture_cores=1 writeout_core=3 eth3=/tmp/eth3.pcap \
streams=udp:127.0.0.1:8080 snap=60 capture_cores=5,7 writeout_core=9 \
eth4=/tmp/eth4.pcap join_mcasts="224.1.1.100;239.2.2.200" \
capture_cores=2,4 writeout_core=6 snap=160
This command line can be placed in a single file:
snap=0
eth2=/tmp/eth2.pcap
streams=tcp:192.168.1.1:5001
capture_cores=1
writeout_core=3
eth3=/tmp/eth3.pcap
streams=udp:127.0.0.1:8080
snap=60
capture_cores=5,7
writeout_core=9
eth4=/tmp/eth4.pcap
join_mcasts="224.1.1.100;239.2.2.200"
capture_cores=2,4

Issue 9 © Solarflare Communications 2014 35
SolarCapture
User Guide
writeout_core=6
snap=160
Note: that each command line argument appears on a separate line. The command configuration
file can then be identified when starting solar_capture e.g.
solar_capture config_file=serverX.cfg
Note: as for the standard command line, options appearing before any capture instance are global
options. Options appearing after a capture instance affect only that instance.
7.9 Port Aggregation/Merging
Using SolarCapture, the captured traffic from one or more interfaces - from the same or from
different adapters can be aggregated into a single receive stream. Packets captured will be written
to the same pcap file.
The following example demonstrates the correct method to capture from two interfaces to the same
capture file:
solar_capture eth1=/tmp/capturefile.pcap join_streams=udp:224.1.2.3:319" \
eth2=/tmp/capturefile.pcap join_streams=udp:225.1.2.3:8100
7.10 Multiple Ports/Multiple Files
The captured traffic from one or more interfaces - from the same or from different adapters can be
captured to different capture files as follows:
solar_capture eth1=/tmp/cap1.pcap join_streams=udp:224.1.2.3:319" \
eth2=/tmp/cap2.pcap join_streams=udp:225.1.2.3:8100
or like this:
solar_capture eth1=/tmp/cap1.pcap join_streams=udp:224.1.2.3:319"
solar_capture eth2=/tmp/cap2.pcap join_streams=udp:225.1.2.3:8100"
7.11 Software Based Filtering
Software Filtering allows the user to create user-level filters using the Berkeley Packet Filter (BPF)
format. Software filters can be created when using the SolarCapture Pro API or can be specified from
the solar_capture command line.
To create software filters using the SolarCapture Pro API use the SC_FILTER environment variable.
To create software filters on the command line, use the command line filter option e.g.
$ solar_capture eth2=<capture_file> filter="port 80"
Users interested in software based filtering should refer to http://www.tcpdump.org/papers/bpf-
usenix93.pdf for details of the BPF format.

Issue 9 © Solarflare Communications 2014 36
SolarCapture
User Guide
7.12 Capture using VLAN Identifier
SolarCapture can only capture from a physical interface. The following syntax is wrong and will not
capture any packets from the VLAN interface:
solar_capture snap=0 eth2.117=<capture_file>
To capture from VLAN eth2.117 use the following syntax (examples):
solar_capture snap=0 eth2=<capture_file> streams="eth:vid=117,
00:0F:53:16:04:78"
OR
solar_capture eth2=<capture_file> join_streams=udp:224.1.2.3:8001;vid=117
7.13 Command Line Examples
• Capture all traffic from a single interface. Packet capture will be handled on CPU core 8 and
written to file using CPU core 12:
solar_capture eth2=capfile capture_cores=8 writeout_core=12
• Capture all traffic from multiple interfaces:
solar_capture eth2=eth2file.pcap eth3=eth3file.pcap
• Capture a single UDP stream:
Capture interface eth2
Capture file capfile
capture_cores 8
writeout_core 12
Capture interface eth2 and eth3
Capture file eth2file.pcap and eth3file.pcap
Protocol udp
Capture interface eth2
Destination address 123.0.1.129
Destination port 319

Issue 9 © Solarflare Communications 2014 37
SolarCapture
User Guide
solar_capture streams="udp:123.0.1.129:319,172.16.128.28:319"
eth2=capfile
• Capture all traffic arriving at specific MAC address:
solar_capture streams=eth:00:0F:53:16:04:74 eth2=capfile
For a complete listing and description of command line options, type:
solar_capture help all
or refer to Table 6 on page 27.
7.14 User Privileges
SolarCapture supports the ’user’ command line option - which functions like the tcpdump -Z
argument. If SolarCapture is started by root, following startup, the user ID is changed allowing the
lower privileged user to access to the capture files and to terminate the SolarCapture application.
# solar_capture user=1234
Source address 172.16.128.28
Source port 319
Capture file capfile
local MAC address 00:0F:53:16:04:74
Capture interface eth2 - the interface corresponding to
the MAC address
Capture file capfile
Issue 9 © Solarflare Communications 2014 39
SolarCapture
User Guide
Chapter 8: Application Clustering
8.1 Application Clusters
The application clustering feature allows the captured traffic load, from one or more physical
interfaces to be spread amongst multiple receiving applications.
Using a configuration file, the user defines one or more ’clusters’. Each cluster identifies a capture
interface, a set of hardware filters to define a subset of traffic to capture and includes a number of
Virtual Interfaces (VI) over which to spread this traffic. The virtual interface is a receive channel
between the adapter hardware and the software application.
Application clustering uses hardware filters to describe the traffic to be captured within each cluster.
It then uses RSS to spread this traffic over the configured number of VIs within the cluster.
Multiple instances of solar_capture are run with each instance receiving traffic from one or
more VIs. Each solar_capture instance captures packets to a separate capture (.pcap) file. Multiple
instances of solar_capture can use the same cluster ID to receive a portion of the total received
traffic from the CaptureInterface identified in the cluster definition. No two applications will
receive replicated or duplicated traffic.
Figure 7: Application Clustering with SolarCapture
Figure 7 above shows an example configuration of application clustering. Hardware filters are used
to capture a subset of the traffic received on eth1 into two clusters.

Issue 9 © Solarflare Communications 2014 40
SolarCapture
User Guide
The first cluster uses RSS to spread this traffic over two VIs. In contrast, ALL traffic received on eth2
is captured into a single cluster which is then spread over three VIs.
The number of receive channels created per cluster is configured with the NumChannels option in
the configuration file. The number of channels can be any value. However, if there are less receiving
applications than there are NumChannels, then some of the received traffic will be lost.
8.2 Configuration Sequence
The following steps provide the configuration file and solar_capture command lines required for
the example scenario shown in Figure 7 above.
1 Configuration File
The configuration file can be placed anywhere on the host server and have any name/any extension
- .cfg is recommended. The following is an example configuration file and associated command lines.
Capture streams can use 4-tuple dhost,dport,shost,sport or 2-tuple dhost,dport descriptions.
[Cluster cluster1]
CaptureInterface = eth1
CaptureMode = steal
NumChannels = 2
CaptureStream =
udp,dhost=224.1.2.3,dport=8001,shost=172.16.131.156,sport=3010
CaptureStream =
udp,dhost=225.1.2.3,dport=8002,shost=171.10.111.150,sport=3144
[Cluster cluster2]
CaptureInterface = eth1
CaptureMode = steal
NumChannels = 1
CaptureStream = udp,dhost=226.1.2.3,dport=8003
[Cluster cluster3]
CaptureInterface = eth2
CaptureMode = sniff
NumChannels = 3
CaptureStream = all
2 Run solar_cluster daemon
$ solar_clusterd -f <path to config file>
This starts the solar_clusterd daemon and establishes the solar_capture environment. The
-f option ensure that the solar_clusterd daemon will run in the foreground.
The solar_clusterd daemon is not required when running AOE SolarCapture which uses the
solar_aoed daemon.

Issue 9 © Solarflare Communications 2014 41
SolarCapture
User Guide
3 Run solar_capture
For each channel defined in the config file, start an instance of solar_capture to capture a portion
of the traffic.
For each cluster the number of solar_capture instances running must be equal to the
NumChannels otherwise a portion of the total received traffic will be lost.
$ solar_capture eth1=/tmp/cap11.pcap capture_cores=1 writeout_core=3
cluster=cluster1
$ solar_capture eth1=/tmp/cap12.pcap capture_cores=5 writeout_core=7
cluster=cluster1
$ solar_capture eth1=/tmp/cap13.pcap capture_cores=9 writeout_core=11
cluster=cluster2
$ solar_capture eth2=/tmp/cap21.pcap capture_cores=2 writeout_core=4
cluster=cluster3
$ solar_capture eth2=/tmp/cap22.pcap capture_cores=6 writeout_core=8
cluster=cluster3
$ solar_capture eth2=/tmp/cap23.pcap capture_cores=10 writeout_core=12
cluster=cluster3
Issue 9 © Solarflare Communications 2014 42
SolarCapture
User Guide
8.3 Snort Example
The following example uses the Snort network intrusion prevention and intrusion detection
application with libpcap and SolarCapture Pro application clustering. For more information about
Snort see the following link http://www.snort.org/
Figure 8: Application Clustering with libcap application
The configuration sequence for the scenario shown in Figure 8 uses the same configuration file and
captures the same traffic as demonstrated in the previous example(Figure 7). Each instance of the
Snort application uses the SolarCapture enabled libpcap library to gain SolarCapture functionality.
8.4 Configuration Sequence - Snort
The following steps provide the configuration file and command lines required for the scenario
shown in Figure 8 above.
1 Configuration File
The configuration file can be placed anywhere on the host server and have any name/any extension
- .cfg is recommended. The following is an example configuration file and associated command lines.
Capture streams can use 4-tuple dhost,dport,shost,sport or 2-tuple dhost,dport descriptions.

Issue 9 © Solarflare Communications 2014 43
SolarCapture
User Guide
[Cluster cluster1]
CaptureInterface = eth1
CaptureMode = steal
NumChannels = 2
CaptureStream =
udp,dhost=224.1.2.3,dport=8001,,shost=172.16.131.156,sport=3010
CaptureStream =
udp,dhost=225.1.2.3,dport=8002,shost=171.10.111.150,sport=3144
[Cluster cluster2]
CaptureInterface = eth1
CaptureMode = steal
NumChannels = 1
CaptureStream = udp,dhost=226.1.2.3,dport=8003
[Cluster cluster3]
CaptureInterface = eth2
CaptureMode = sniff
NumChannels = 3
CaptureStream = all
2 Run solar_clusterd daemon
$ solar_clusterd -f <path to config file>
The solar_clusterd daemon is not required when running AOE SolarCapture which uses the
solar_aoed daemon.
3 Run Snort Applications
$ SC_PCAP_THREAD="eth1=1" SC_ATTR="cluster=cluster1" solar_libpcap snort \
<snort command line>
solar_libpcap is used to cause Snort to link to the SolarCapture enabled libpcap library to gain
SolarCapture functionality.
The SC_PCAP_THREAD environment variable instructs the SolarCapture libpcap library to create an
additional thread for packet processing outside of the main Snort application threads. In the above
command line, this thread is affinitized to CPU core 1.
If SC_PCAP_THREAD is not defined, all capture processing is instead performed in the context of the
Snort libpcap API calls.
The cluster used by this instance of Snort is identified using the SC_ATTR environment variable.
This process is repeated for each instance of snort as follows:
$ SC_PCAP_THREAD="eth1=3" SC_ATTR="cluster=cluster1" solar_libpcap snort \
<snort command line>
Issue 9 © Solarflare Communications 2014 44
SolarCapture
User Guide
$ SC_PCAP_THREAD="eth1=5" SC_ATTR="cluster=cluster2" solar_libpcap snort \
<snort command line>
$ SC_PCAP_THREAD="eth2=2" SC_ATTR="cluster=cluster3" solar_libpcap snort \
<snort command line>
$ SC_PCAP_THREAD="eth2=4" SC_ATTR="cluster=cluster3" solar_libpcap snort \
<snort command line>
$ SC_PCAP_THREAD="eth2=6" SC_ATTR="cluster=cluster3" solar_libpcap snort \
<snort command line>
8.5 solar_clusterd Configuration File
The solar_clusterd configuration file used by clustering applications is a text file conforming to
the File Structure Conventions on page 111.
The configuration file contains one or more [Cluster] sections and a number of per-cluster
properties identified in the following table.
NOTE: Specifying an affinity value of -1 with SC_PCAP_THREAD, i.e. eth3=-1, creates a thread but
does not affinitize this thread to any core.
Table 7: [Cluster]
Property Description
CaptureInterface The interface to capture traffic from. This should be specified
only once for each cluster.
NumChannels The number of receive channels to create. If there are less
receiving applications than receive channels, a portion of the
captured traffic will be lost.
Default value is 1.
CaptureStream Identify the streams to capture traffic from. Each stream should
be prefixed with the CaptureStream property. And each stream
should appear on a separate line.
CaptureMode sniff|steal
The default capture mode is steal.

Issue 9 © Solarflare Communications 2014 45
SolarCapture
User Guide
8.6 Running solar_clusterd as a Linux service
The solar_clusterd daemon can also be run as a Linux service using the standard Linux service
commands, start, stop, restart.
ProtectionMode If not specified the default value is FE_PD_DEFAULT. For other
values see the file:
onload/src/include/etherfabric/pd.h
Table 7: [Cluster]
Property Description

Issue 9 © Solarflare Communications 2014 46
SolarCapture
User Guide
Chapter 9: Libpcap Support
9.1 Introduction
The Solarflare enabled libpcap library solar_libpcap allows existing applications that are
dynamically linked with the standard libpcap to be accelerated and gain SolarCapture functionality.
Recompilation is not required.
The solar_libpcap library is supported in SolarCapture Live, Pro and SolarCapture AOE. After
installing the SolarCapture Live RPM, the library is located in the following directory:
/usr/lib64/solar_capture/libpcap
9.2 Usage
By default, applications will continue to dynamically link to the standard libpcap library. The
following command example will cause runtime linking to the solar_libpcap library.
solar_libpcap tcpdump -i eth2
Thereafter, pcap API calls made by the application are processed by the SolarCapture libpcap library.
To check that the application is dynamically linked with solar_libpcap, use the Linux ldd
command:
# solar_libpcap ldd /usr/sbin/tcpdump
linux-vdso.so.1 => (0x00007fff49dff000)
libcrypto.so.10 => /usr/lib64/libcrypto.so.10 (0x0000003c74600000)
libpcap.so.1 => /usr/lib64/solar_capture/libpcap/
libpcap.so.1 (0x00007fafd8f27000)
libc.so.6 => /lib64/libc.so.6 (0x0000003c66600000)
libdl.so.2 => /lib64/libdl.so.2 (0x0000003c66200000)
libz.so.1 => /lib64/libz.so.1 (0x0000003c67200000)
librt.so.1 => /lib64/librt.so.1 (0x0000003c67600000)
libm.so.6 => /lib64/libm.so.6 (0x0000003c66e00000)
libaio.so.1 => /lib64/libaio.so.1 (0x00007fafd8d24000)
/lib64/ld-linux-x86-64.so.2 (0x0000003c65e00000)
libpthread.so.0 => /lib64/libpthread.so.0 (0x0000003c66a00000)
Refer to Snort Example on page 42 for an example of using Snort with solar_libpcap.

Issue 9 © Solarflare Communications 2014 47
SolarCapture
User Guide
9.3 Configuration
The following tunable environment variables are available when using SolarCapture libpcap
bindings. Use the export command to set variables in the application environment, for example,
export SC_PCAP_LOG_FILE=/tmp/filename
SC_ variables can also be set using the SC_ATTR environment variable - refer to Appendix B:
SolarCapture Attributes on page 113 for details.
SC_PCAP_THREAD
Range: CPU core Default: none
By default, SolarCapture creates no additional processing threads. All capture processing is
performed in the context of the libpcap API calls. Alternatively, solar_libpcap can use a
dedicated thread for processing received packets delivered by the adapter.
The SC_PCAP_THREAD environment variable instructs solar_libpcap to create an additional
thread for packet processing outside of the linked application threads.
The value specified can be a single integer to identify the core to which the thread is affinitized:
export SC_PCAP_THREAD=2
A value of -1 means the thread is created, but not affinitized to any particular CPU core:
export SC_PCAP_THREAD=-1
A comma separated list identifies each capture interface and a CPU core on which to process packets
captured from the interface.
export SC_PCAP_THREAD="eth1=3,eth2=5"
If SC_PCAP_THREAD is not defined, all capture processing is instead performed in the context of the
application->libpcap API calls.
SC_PCAP_RECV_BATCH
Range: 1 - 32 Default: 4
Controls how often SolarCapture polls the adapter for new packets when the packet arrival rate
exceeds the processing rate.
Set to 1 means to poll the adapter for each received packet. Set to the default value 4, means poll
the adapter every 4 packets received.
A lower value means more CPU time is given to the capture thread, reducing the risk of loss under
bursty traffic conditions.

Issue 9 © Solarflare Communications 2014 48
SolarCapture
User Guide
A higher value means more CPU time is given to the application processing, so processing efficiency
is higher.
SC_PCAP_LOG_LEVEL
Range: 0 - 3 Default: 0
Specify the logging level of output produced by SolarCapture.
SC_PCAP_LOG_FILE
Range: filename Default: none
Identify the file for logging output.
SC_PCAP_NANOSEC
Range: 0 - 1 Default: 0
Specify SolarCapture timestamp resolution. 0 is microseconds, 1 is nanoseconds.
The environment variable is an alternative to the pcap_set_tstamp_precision() function call.
An application linked to solar_libpcap must be separately configured to expect nanosecond
precision.
NOTE: SC_PCAP_RECV_BATCH has no effect if a dedicated capture thread has been created using
the SC_PCAP_THREAD option.

Issue 9 © Solarflare Communications 2014 49
SolarCapture
User Guide
Chapter 10: Data Acquisition Module
10.1 Introduction
Solarflare daq_sfsc is a library module developed for the Snort Data Acquisition Module (DAQ)
framework.
The Solarflare DAQ is included with the SolarCapture v1.3 Live distribution package. Once installed
it is located in:
/usr/lib64/solar_capture/daq/daq_sfsc.so
The snort DAQ supports the read-file, passive and inline modes.
Using read-file mode, packets are read from a pcap file and passed to Snort. In passive mode the DAQ
will send all captured packets to Snort before silently discarding them. In inline mode the DAQ will
send all captured packets to Snort, but can forward any packets not rejected by Snort rules to a
Solarflare interface.
For more information about Snort and the DAQ see https://www.snort.org/
10.2 Usage
The DAQ can be identified from the command line:
snort --daq-dir /usr/lib64/solar_capture/daq --daq sfsc
Alternatively the DAQ can be identified by adding the following lines to the Snort configuration file:
config daq_dir: /usr/lib64/solar_capture/daq
config daq: sfsc
10.3 Read File Mode
In read file mode packets read from a pcap file are passed to Snort via the DAQ. Packets are not
available to be forwarded again to a Solarflare interface.
Configure read-file mode on the Snort command line:
snort -r <pcap_file>
or in the Snort configuration file:
config daq_mode: read-file
config interface: <pcap-file>

Issue 9 © Solarflare Communications 2014 50
SolarCapture
User Guide
10.4 Passive Mode
In passive mode, the DAQ passes all captured packets to Snort before silently discarding them.
Configure passive mode on the Snort command line:
snort -i <capture-interface>
or in the Snort configuration file:
config daq_mode: passive
config interface: <capture-interface>
10.5 Inline Mode
In Inline mode, the DAQ passes all captured packets to Snort, but will also forward packets not
rejected by Snort rules to a Solarflare interface. The forwarding interface may be the capture
interface or it may be a different Solarflare interface.
Configure inline mode on the Snort command line:
snort -Q -i <capture-interface>:<forward-interface>
or in the Snort configuration file:
config daq_mode: inline
config interface: <capture-interface>:<forward-interface>
10.6 Configuration
Solarflare DAQ configuration parameters are specified on the command line using the following
syntax:
--daq-var key=value
Parameters can also be placed in the Snort configuration file:
config daq_var: key=value
ns_timestamps
Range: 0 - 1 Default: 0
Specify the timestamp resolution of packets passed to Snort. Set to 0 for microseconds. Set to 1 for
nanosecond resolution.
To ensure timestamps are reported correctly, the output plugin must be configured to expect
nanoseconds values in the ts.tv_usec field of the DAQ_PktHdr_t structure.

Issue 9 © Solarflare Communications 2014 51
SolarCapture
User Guide
buffer_size
Range: none Default: 65536 (bytes)
Identify the maximum buffer size (bytes) to receive packets into the DAQ in a single read operation.
capture_core
Range: CPU core Default: none
By default packet capture is performed in the context of the DAQ/snort libpcap API calls.
Alternatively, a dedicated thread can be selected for processing received packets.
The following example will creates a thread and affinitize this to the specified core:
capture_core=2
A value of -1 means the thread is created, but not affinitized to any particular CPU core:
capture_core=-1
If capture_core is not defined, all capture processing is instead performed in the context of the
application->libpcap API calls.
recv_batch
Range: 0 - 32 Default: 4
Controls how often SolarCapture polls the adapter for new packets when the packet arrival rate
exceeds the processing rate.
Set to 1 means to poll the adapter for each received packet. Set to the default value 4, means poll
the adapter every 4 packets received.
A lower value means more CPU time is given to the capture thread, reducing the risk of loss under
bursty traffic conditions.
A higher value means more CPU time is given to the packet processing, so processing efficiency is
higher.
NOTE: The recv_batch value has no effect if a dedicated capture_core has been specified using the
capture_core option.

Issue 9 © Solarflare Communications 2014 52
SolarCapture
User Guide
streams
Range: none Default: all
Identify a subset of received packets to be captured. If no streams are specified, all received packets
are captured.
Refer to Selecting Streams to Capture on page 31 for streams examples and also use the following
command for further streams syntax:
solar_capture help streams
When adapters are not able to filter TCP and UDP streams by VLAN-ID, the VLAN specification is
ignored for capture, but is used for the purposes of joining multicast groups (join_streams).
See Filtering on VLAN on page 98 for limitations detail.
Limitations
Refer to Known Issues and Limitations on page 97.

Issue 9 © Solarflare Communications 2014 53
SolarCapture
User Guide
Chapter 11: AOE SolarCapture
This chapter covers the following subjects:
AOE SolarCapture...Page 54
Capture Paths...Page 55
Running AOE SolarCapture daemon...Page 57
Running AOE SolarCapture...Page 59
Configuration Files...Page 61
Command Line Examples...Page 65
Configuration Files Examples...Page 67
Changing Default Options...Page 74
AOE SolarCapture Statistics...Page 75
AOE SolarCapture should be read in conjunction with the Solarflare ApplicationOnload™ Engine User
Guide, SF-108389-CD available from support.solarflare.com.
Issue 9 © Solarflare Communications 2014 54
SolarCapture
User Guide
11.1 Introduction
AOE SolarCapture
The Solarflare® SFA6902F ApplicationOnload™ Engine (AOE) moves application processing into the
network adapter to accelerate real-time network data application processing performance. The AOE
combines a low latency server adapter with a powerful FPGA acceleration engine delivering “on-the-
fly” processing of network data. By processing data in hardware, before it is presented to the server
CPU, the AOE reduces application processing times and server CPU workloads.
Solarflare’s AOE SolarCapture is a network packet capture application that runs directly on the AOE
adapter allowing sent and received packets to be captured at line rate from each network port.
AOE SolarCapture provides extensive capture flexibility using multiple filters, multiple capture paths
and capture modes which enable packets to be delivered to a capture file in pcap format and to a
destination host application.
Packets are captured from selected ingress or egress capture points on the adapter - see Figure 9
below. Every captured packet, sent or received, is hardware timestamped. From the capture point,
packets are transferred to the host using a Reliable Host Delivery (RHD) protocol. The RHD protocol
regulates the flow of packets between host and adapter to ensure (a) the host does not drop packets
when it cannot keep up with the capture rate and (b) packets are delivered to the host in the same
order as they are received from the wire. Each capture point has a dedicated 2Gbyte DDR3 memory
buffer on the adapter in which to queue packets.
A combination of configurable options identify the physical adapter port to capture from, the
capture point associated with the port (ingress|egress) and the interface used to deliver captured
packets to the host.
AOE SolarCapture supports two capture modes; steal and sniff. Packets captured with the steal
mode are not delivered to the adapter destination port. Packets captured with the sniff mode will
also be delivered to the adapter destination port.
NOTE: DDR3 SODIMM memory modules must be installed in memory top slots 0 and 1 positions on
the SFA6902F adapter to use AOE SolarCapture. Memory modules can be obtained direct from
Solarflare Communications. Refer to the AOE User Guide (SF-108389-CD) for details of the SFA6902F
adapter memory and send an email to support@solarflare.com.
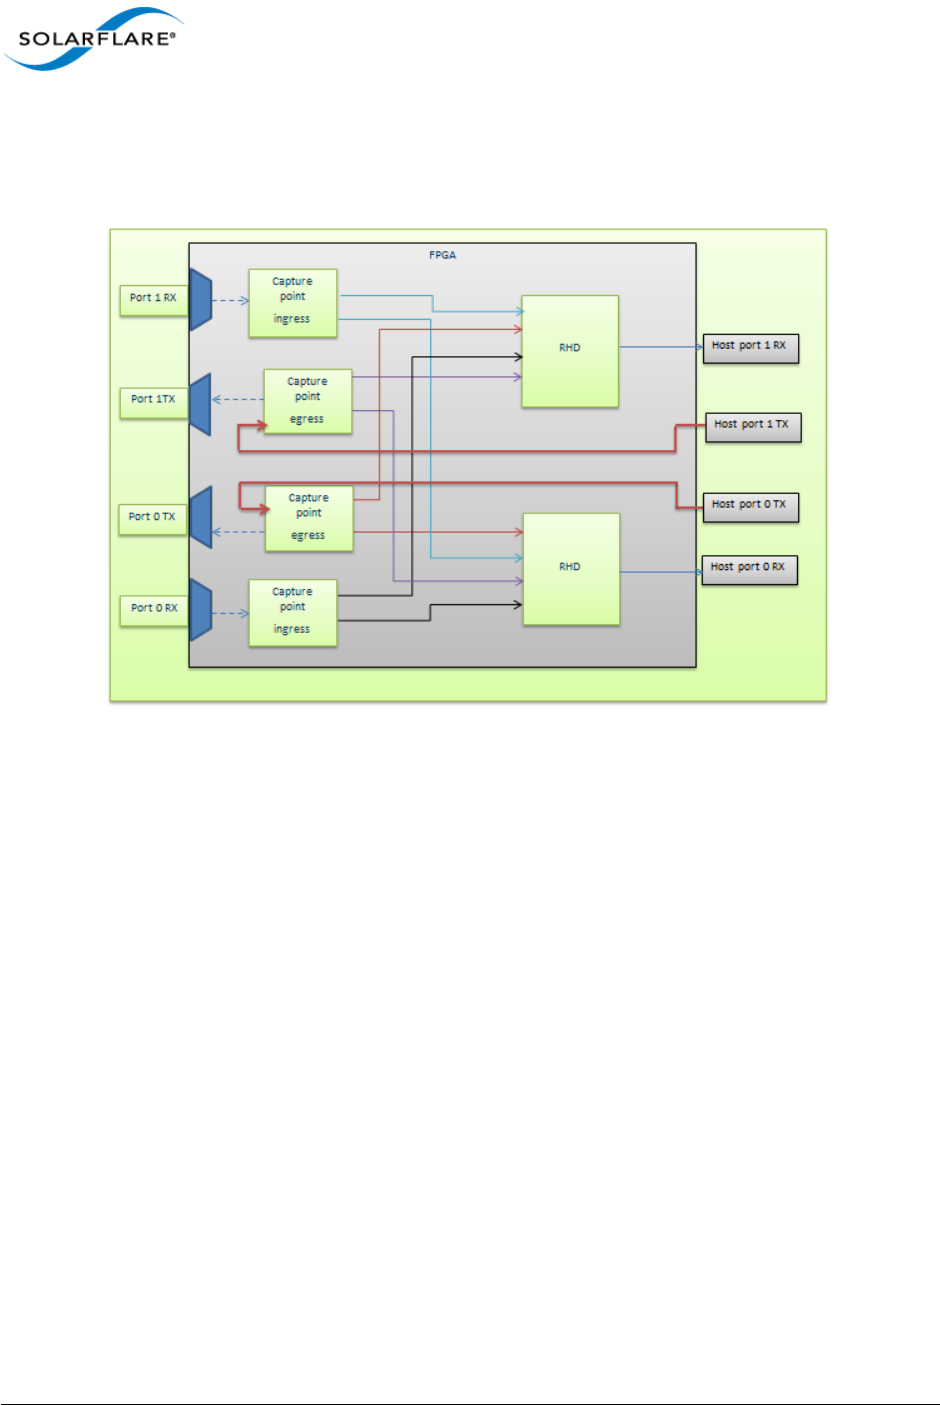
Issue 9 © Solarflare Communications 2014 55
SolarCapture
User Guide
Capture Paths
Each physical network port has independent TX and RX paths, as illustrated in Figure 9, which can be
independently configured to enable packet capture.
Figure 9: Capture Paths
Figure 9 identifies that there are 8 capture paths on the dual port adapter:
Port0_RX ingress -> RHD -> Host_port_0
Port0_RX ingress -> RHD -> Host_port_1
Port1_RX ingress -> RHD -> Host_port_1
Port1_RX ingress -> RHD -> Host_port_0
Port0_TX egress -> RHD -> Host_port_0
Port0_TX egress -> RHD -> Host_port_1
Port1_TX egress -> RHD -> Host_port_0
Port1_TX egress -> RHD -> Host_port_1
Packets not subject to AOE SolarCapture filters will continue to be delivered to the host as normal
or can be subject to the CaptureDefaults section in the configuration file. These paths are not shown
in the above diagram.
• Each capture path maintains an independent set of packet match filters.
• A RX capture point will support up to 127 filters shared between its two capture paths.

Issue 9 © Solarflare Communications 2014 56
SolarCapture
User Guide
• A TX capture point will support up to 32 filters shared between its two capture paths.
• A capture point can support a maximum of two wildcard filters.
• Packets captured from one physical interface can be delivered to the host on any host port, e.g.
capture at port0_ingress capture_point and deliver via RHD to host port 1.
• A capture point is allocated 2Gbyte of DDR3 memory where captured packets can be buffered
whilst being transferred to the host using the Reliable Host Delivery protocol.

Issue 9 © Solarflare Communications 2014 57
SolarCapture
User Guide
11.2 Running AOE SolarCapture daemon
AOE configuration daemon, solar_aoed, can be run as a normal Linux process or as a Linux service.
The solar_aoed daemon must be started before using the solar_capture command line.
Run the daemon as a Linux process
• To run as a foreground process:
# ./solar_aoed --foreground --config /etc/aoe/solar_aoed.conf
• To specify the AOE interface on the command line:
# ./solar_aoed eth3
• To change the name/directory location of the configuration file use the following option - each
instance must use a different configuration file:
# ./solar_aoed --config <path/filename>
• To view all options.
# ./solar_aoed --help
Run the daemon as a service
• To run solar_aoed as a Linux service using the /etc/aoe/solar_aoed.conf file, use the
following command:
# service solar_aoed start
Stop the service before making changes to the .conf file:
# service solar_aoed stop
• When solar_aoed is running as a service the ps command can be used to identify the process
identifier, log file and configuration file being used e.g:
# ps -aux | grep solar_aoed
solar_aoed --log /var/log/solar_aoed.log --config /etc/aoe/solar_aoed.conf
NOTE: A single configuration file is used by all AOE SolarCapture host clients.

Issue 9 © Solarflare Communications 2014 58
SolarCapture
User Guide
The AOEInterface
The AOEInterface option identifies one or more AOE adapters which will be configured by the
configuration file.
One or more AOE adapter interfaces can be specified on the solar_aoed command line or in the
configuration file - but not both. Any interface value on the command line will override all
AOEInterface values in the configuration file. The AOEInterface value identifies the adapter(s)
where the configuration file is applied.
Log File
The log file describes the configuration and records all events, warnings and errors while AOE
SolarCapture is running. The following is an example solar_aoed.log output:
Starting solar_aoed [v1.3.0.1115_rc3
(a829a1861828d379b0e7aa526847a9f4efee76eb)]
Date: Thu Nov 14 14:22:12 2013
Reading configuration from /etc/aoe/solar_aoed.conf
INI: AOE interface from config is eth0
Created listening socket 6
Initialising AOE at interface eth0
Hardware initialised
INI: Setting RHD MTU to 9100 for DeliveryInterface eth0
INI: Setting RHD MTU to 9100 for DeliveryInterface eth1
INI: Creating Cluster cluster1 with 1 channels on delivery interface eth0
Client 0: CreateCluster entry
Client 0: CreateCluster > name="cluster1"
Client 0: CreateCluster > delivery_interface="eth0"
Client 0: CreateCluster < info.cluster_handle=0x53414c4d414e
Client 0: CreateCluster < return_code=0 Successful operation.
Client 0: CreateCluster exit
Process ID 13565
2013-11-14 14:22:13.840039.Starting polling loop...
NOTE: The log file should not be deleted while solar_aoed is running.
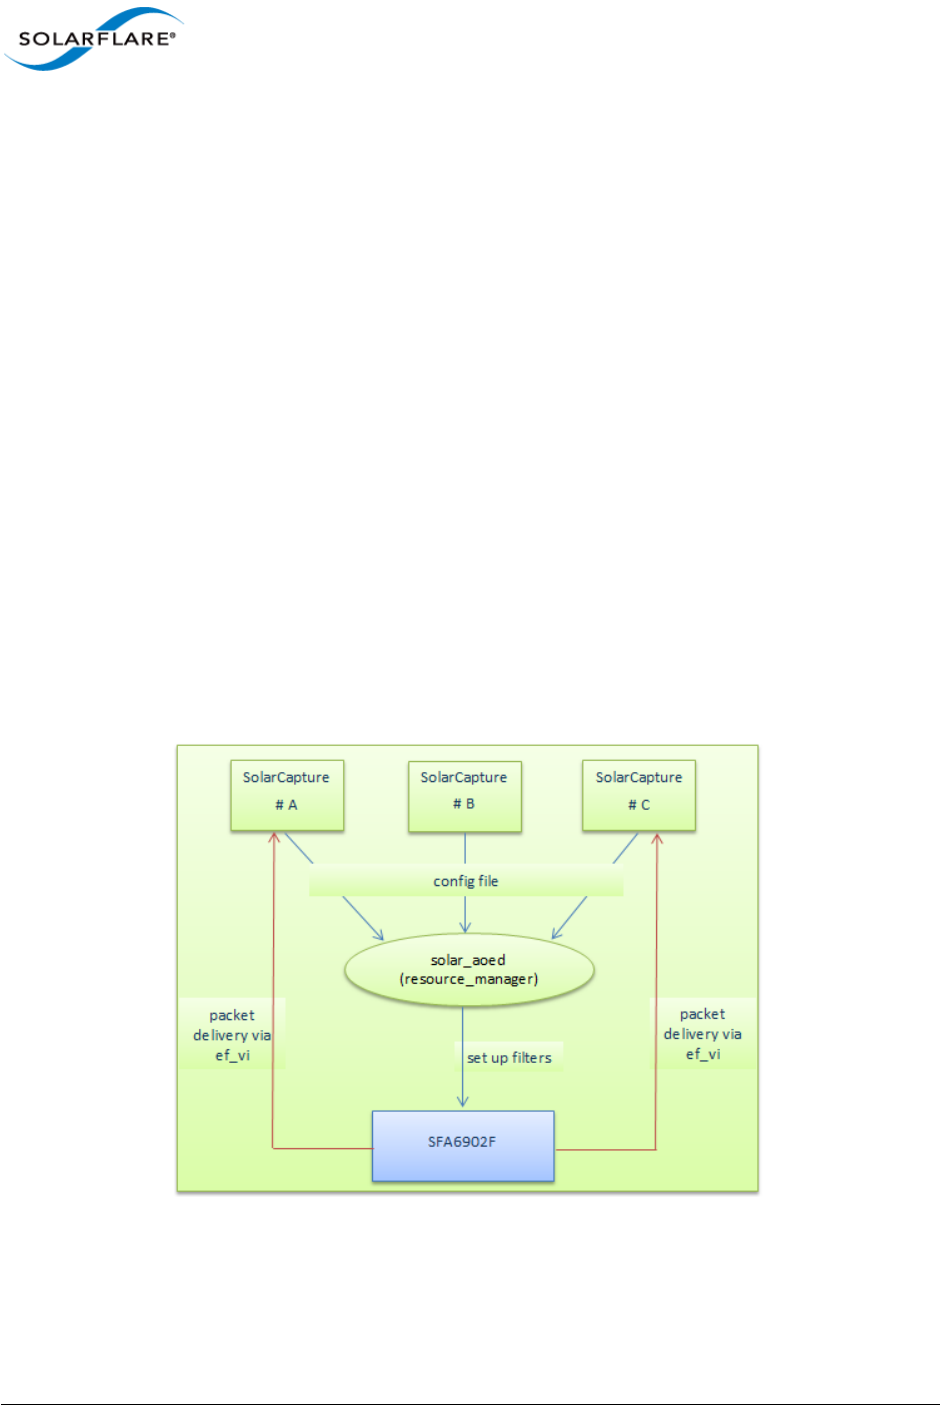
Issue 9 © Solarflare Communications 2014 59
SolarCapture
User Guide
11.3 Running AOE SolarCapture
AOE Solarcapture allows a single SolarCapture instance or multiple instances to run simultaneously
on the same server. Per instance configuration options and filter definitions can be configured from
the solar_capture command line or from the configuration file - but not both. The configuration
file must be applied to one or more AOE adapters.
• When running solar_aoed as a service the AOEInterface property is used to identify the
AOE adapters the configuration is applied to.
• When running solar_aoed as a normal process the AOE adapters can be identified on the
command line or in the configuration file - but not both. A value on the command line overrides
all AOEInterface values in the configuration file.
1Edit the .conf file to identify the AOE adapters.
[Global]
AOEInterface = eth<N>
2When solar_aoed is running, use the solar_capture command line to specify capture
streams, join multicast groups etc. OR put all capture definitions into the .conf file.
Multiple SolarCapture Host Clients
Multiple AOE SolarCapture host clients can run simultaneously on a single server - as illustrated by
Figure 10 below.
Figure 10: AOE SolarCapture - resource manager
The common resource_manager daemon (solar_aoed) will use the configuration file to configure
the AOE adapter. It is the task of the resource_manager to share and manage all available capture
resources between multiple SolarCapture clients. When filters are established on the AOE adapter,

Issue 9 © Solarflare Communications 2014 60
SolarCapture
User Guide
captured traffic is delivered directly to the appropriate SolarCapture client using the Onload ef_vi
(Layer 2) API.
Shared Resources
The resources to be shared by all AOE SolarCapture clients are:
• RHD Channels
There are two RHD ’blocks’ on the AOE adapter - see Figure 9. Each RHD supports 8 channels used
to deliver captured packets to the application. When a channel has been selected by one
SolarCapture client it is unavailable to other clients.
• Filters
- Hardware filters are established on the adapter when the configuration file or command line
filter specifications are parsed by the resource manager daemon.
- Each receive capture path will support up to 127 filters whilst each transmit capture path will
support up to 32 filters.
- If a SolarCapture client creates 127 receive path filters on a single capture path, then further
receive filters cannot be established on the same capture path by another SolarCapture
client.
- Duplicate filters on the same capture path are not permitted. A SolarCapture client
attempting to install a filter already installed by another client will not receive packets
captured from that filter.
Cluster Groups
A cluster group defines the set of RHD channels used to deliver captured packets to a SolarCapture
client. Each RHD supports up to 8 channels. If a SolarCapture client selects 2 of the 8 available RHD
channels, these channels are then allocated to that client and are not available to other clients of
SolarCapture. The remaining 6 channels from the RHD are available to another client(s).
Clustering allows the captured traffic load to be spread evenly between multiple capture instances
- refer to Configuration examples below.
It is not possible to select and then steer individual RHD channels to specific CPU cores.
A SolarCapture instance can select channels from any RHD block - where an RHD is identified by the
command line delivery_interface parameter or config file DeliveryInterface.

Issue 9 © Solarflare Communications 2014 61
SolarCapture
User Guide
11.4 Configuration Files
A default configuration file, solar_aoed.conf, is located in the /etc/aoe directory during the
install process.
The solar_aoed.conf file follows standard INI file format and conventions. To learn more about
INI files refer to Appendix A: Configuration Files on page 35.
All sections and properties of the configuration file are optional and can be enabled/disabled as
required followed by a restart of solar_aoed.
Configuration File Sections/Properties
The full list of supported sections [section] and properties e.g. CaptureInterface= are described in
the following tables.
Table 8: [Global]
Property Description
AOEInterface The AOE adapters to load the configuration onto. Each interface
can be specified as an interface name e.g eth3 or by MAC
address.
Multiple AOE adapter interfaces can be specified e.g.
AOEInterface = eth3 eth4 eth5
This is a mandatory configuration file parameter when
solar_aoed is run as a service. This can be specified on
solar_aoed command line or in the configuration file when run
as a normal process.
If an AOEInterface is not specified on either command line or
the configuration file, the configuration file will be applied to all
AOE adapters.
Table 9: [DeliveryInterface]
Property Description
RhdMTU Max size of data (bytes) that will be transferred to the delivery
interface via RHD.

Issue 9 © Solarflare Communications 2014 62
SolarCapture
User Guide
RhdChanMaxRate The packets per second rate at which RhdMTU size of data will
be delivered to the delivery interface.
Can be a numeric (bytes) value or AUTO.
The default and recommended setting is AUTO which means
the rate is calculated based on the RhdMTU and packet receive
rate divided by the number of RHD channels being used such
that the full available channel capacity is divided between all
running AOE SolarCapture clients.
RhdChanMaxBurst The maximum number of packets to be coalesced before data is
transferred to the delivery interface.
Default value is 1.
When capturing data on an interface which is being used for ’real’ traffic (other traffic not
being captured), the RHD MTU, max rate and max burst properties can be used to ’tune’ the
captured packets delivery rate to ensure that the real traffic is not delayed while captured
traffic is being transferred to the host. A large RhdMTU can delay delivery and thereby
increase the latency of other traffic.
Table 10: [Cluster Group]
Property Description
DeliveryInterface The interface through which captured traffic is delivered to the
host. This can be different to the capture interface.
NumChannels The number of RHD channels from the delivery interface RHD
block to use when delivering traffic to the host. Each RHD block
has 8 channels.
This must be specified as a power of 2 value.
RhdChanMaxRate Will override the value set in any previously defined
[DeliveryInterface] section identified by this cluster group
DeliveryInterface property.
When used in a Cluster group section this should not be set to
AUTO.
RhdChanMaxBurst Will override the value set in any previously specified
[DeliveryInterface] section identified by this cluster group
DeliveryInterface property.
Table 9: [DeliveryInterface]
Property Description

Issue 9 © Solarflare Communications 2014 63
SolarCapture
User Guide
Frame Size and MTU
AOE SolarCapture can capture ethernet frames up to a total size of 9100 bytes.
CaptureInterface 0 = The first interface to capture from. This can be the interface
name or MAC address e.g
CaptureInterface 0 = eth1
CapturePoint 0 = ingress | egress
CaptureStream 0 = The stream to capture at this CaptureInterface e.g.
udp,dhost=192.168.1.1,dport=20019
CaptureSnap 0 = The max number of bytes to capture from each packet. Bytes
beyond the snap rate are discarded.
CaptureMode 0 = steal | sniff
CaptureInterface 1 = A second interface to capture traffic from. This can be the
interface name or MAC address e.g
CaptureInterface 1 = eth4
CapturePoint 1 = refer to previous definition above.
CaptureStream 1 = refer to previous definition above.
CaptureSnap 1 = refer to previous definition above.
CaptureMode 1 = refer to previous definition above.
Table 11: [CaptureDefaults]
Property Description
DefaultMode The CaptureDefaults section can be used to specify the
behaviour applied to all packets that do not match any filter.
DefaultMode = Pass|Drop.
Pass - packets not captured will be delivered to their
destination.
Drop - packets not captured will be dropped.
Table 10: [Cluster Group]
Property Description

Issue 9 © Solarflare Communications 2014 64
SolarCapture
User Guide
Capture Buffers
A capture path can have one or more capture buffers where captured packets are held before being
transferred to the host. Capture buffers are maintained on the adapter on-board DDR3 memory
associated with each capture point.
Packet Types
The following table lists different packet types and the actions taken by AOE SolarCapture.
Packet Timestamps
All transmitted and received packets captured by AOE SolarCapture will be hardware timestamped
at the point they enter the FPGA. Timestamps have a resolution of 10 nanoseconds.
Timestamps are represented in 8bytes where the lower 32bits is the nanosecond portion, the higher
32bits is the second portion. Timestamps are held in the created pcap meta data for each captured
packet.
Table 12: Packet Types
Packet Action
Pause Transmitted or received control frames are not captured.
CRC error Packets received with CRC error will be captured subject to these
being filter matched or as the mode configuration allows.
PCAP files have no mechanism for indicating packets with CRC
errors - so these will be visible as normal packets. CRC erroroed
packets can be excluded from the capture using the discard=crc
option.
Checksum error Packets received with IP checksum error are captured subject to
these being filter matched or as the mode configuration allows.
Length error Undersized or oversized packets will be captured subject to these
being filter matched or as the mode configuration allows.
Oversized packets are truncated to the SolarCapture MTU size.
SolarCapture retains the original size in meta data passed to the
host application.
Errored packets Other errored packets are captured subject to these being
accepted by the MAC/PCS and subject to these being filter
matched or as the mode configuration allows.
Link state change Packets dropped due to a network side link changing between up/
down states will not be captured.

Issue 9 © Solarflare Communications 2014 65
SolarCapture
User Guide
11.5 Command Line Examples
Refer to Command Line Interface on page 27 for details of the solar_capture command line,
command line options and examples of command line syntax.
AOE SolarCapture supports additional command line options; capture_point, mode and
delivery_interface, not supported by the software SolarCapture application. The following
examples are specific to AOE SolarCapture.
Supported Filters
When creating filters to capture a subset of received traffic, AOE supports any combination of the
following header fields.
• Source and destination TCP/UDP address
• Source and destination TCP/UDP port
• IP protocol (only TCP/UDP)
• Ethernet type (only IP)
• VLAN Id (outer tag only)
The AOE does NOT support filtering on source/destination MAC address.
Command Line Example #1
• Use ’sniff’ mode to capture all traffic from an interface on the adapter and deliver all received
packets to the host. Packets captured will be handled on CPU cores 8 and written to file using
CPU core 16:
solar_capture eth2=capfile mode=sniff capture_cores=8 writeout_core=16
Command Line Example #2
• Use ’steal’ mode to capture all traffic from the ingress capture_point on eth2, deliver to the host
via eth2. Packet capture will be handled on CPU core 8 and written to file using CPU core 12:
solar_capture eth2=capfile mode=steal capture_point=ingress \
delivery_interface=eth2 capture_cores=8 writeout_core=12
Command Line Example #3
To capture data on a single interface from multiple streams, using multiple capture-cores and
multiple writeout cores, run a command similar to the following:
solar_capture format=pcap buffers=24000 snap=0 rx_ring_low=40
rx_ring_high=60 rx_refill_batch_low=64 rx_ring_max=4095 \
eth1=file1 join_streams="<list 1 of streams>" capture_cores=1
writeout_core=2 \

Issue 9 © Solarflare Communications 2014 66
SolarCapture
User Guide
eth1=file2 join_streams="<list 2 of streams>" capture_cores=3
writeout_core=4 \
eth1=file3 join_streams="<list 3 of streams>" capture_cores=5
writeout_core=6 \
eth1=file4 join_streams="<list 4 of streams>" capture_cores=7
writeout_core=8
In the example3 streams are grouped with each group using a different capture core and a different
writeout core.

Issue 9 © Solarflare Communications 2014 67
SolarCapture
User Guide
11.6 Configuration Files Examples
The configuration file is used by all AOE Solarcapture instances. When run as a service solar_aoed
will use the configuration file in /etc/aoe - unless the default settings are changed. When run as a
process the configuration file is identified using the --config option to solar_aoed.
Configuration File Example #1
The following example uses two instances of SolarCapture:
Configuration File
[Global]
Version = 1
#
AOEInterface = eth0
[Cluster cluster1]
DeliveryInterface = eth0
NumChannels = 2
[Cluster cluster2]
DeliveryInterface = eth0
NumChannels = 1
CaptureInterface 1 = eth0
CapturePoint 1 = ingress
CaptureStream 1 = udp,dhost=225.1.100.3,dport=81,shost=172.28.136.28
CaptureSnap 1 = 128
CaptureMode 1 = Steal
Filter definitions for cluster 1 are defined on the command line - not in the configuration file.
Filter definitions for cluster 2 defined in the configuration file - not on the command line.
Command Lines
1Capture multicast traffic using addresses 225.0.0.1, 225.0.0.2 received at eth0 and deliver to
host port eth1 using 2 RHD channels. Packets are captured into two files: pcap1.pcap and
pcap2.pcap.
See cluster1 definition.
solar_capture eth0=/tmp/pcap1.pcap cluster=cluster1 \
join_streams=udp:225.0.0.1:1234 mode=steal eth0=/tmp/pcap2.pcap \
join_streams=udp:225.0.0.2:9876 mode=steal cluster=cluster1
2Capture multicast traffic from 225.1.100.3 received at eth0 and deliver to host port eth0 using
1 RHD channel. Packets are captured into pcap3.pcap file.
See cluster2 definition.
solar_capture eth0=/tmp/pcap3.pcap cluster=cluster2

Issue 9 © Solarflare Communications 2014 68
SolarCapture
User Guide
Log File (/var/log/solar_aoed.log)
Starting solar_aoed [v1.3.0.1127_rc7 (3ccef5d918e02765c1c4995aff09c28257b774c6)]
Date: Tue Nov 19 10:07:53 2013
Reading configuration from /etc/aoe/solar_aoed.conf
INI: AOE interface from config is eth0
Creating server socket at /var/run/aoe/solar_capture_rm
Created listening socket 6
Initialising AOE at interface eth0
Hardware initialised
INI: Setting RHD MTU to 1800 for DeliveryInterface eth0
INI: Creating Cluster cluster1 with 2 channels on delivery interface eth0
Client 0: CreateCluster entry
Client 0: CreateCluster > name="cluster1"
Client 0: CreateCluster > delivery_interface="eth0"
Client 0: CreateCluster < info.cluster_handle=0x53414c4d414e
Client 0: CreateCluster < return_code=0 Successful operation.
Client 0: CreateCluster exit
INI: Creating Cluster cluster2 with 1 channels on delivery interface eth0
Client 0: CreateCluster entry
Client 0: CreateCluster > name="cluster2"
Client 0: CreateCluster > delivery_interface="eth0"
Client 0: CreateCluster < info.cluster_handle=0x53414c4d414f
Client 0: CreateCluster < return_code=0 Successful operation.
Client 0: CreateCluster exit
INI: Creating Capture 1 for cluster cluster2
Client 0: AddCapture entry
Client 0: AddCapture > capture.cluster_handle=0x53414c4d414f
Client 0: AddCapture > capture.capture_interface="eth0"
Client 0: AddCapture > capture.capture_point="ingress"
Client 0: AddCapture > capture.action=0
Client 0: AddCapture > capture.snap_length=0
Client 0: AddCapture > capture.filter : Prot=0x11 Dest=225.1.100.3
Source=172.16.136.28 ETYPE=0x800
Client 0: AddCapture < info.capture_handle=0x53414c4d4150
Client 0: AddCapture < return_code=0 Successful operation.
Client 0: AddCapture exit
NIC clock within 0:23725048 seconds, not stepping
Process ID 2797
2013-11-19 10:07:54.949669.Starting polling loop...
2013-11-19 10:14:35.363973.New client_fd 8
2013-11-19 10:14:35.366186.Client 1, request 0x306
Client 1: GetClusterByName entry
Client 1: GetClusterByName > name="cluster1"
Client 1: GetClusterByName < info.cluster_handle=0x53414c4d414e
Client 1: GetClusterByName < return_code=0 Successful operation.
Client 1: GetClusterByName exit
2013-11-19 10:14:35.367595.Client 1, request 0x308
Client 1: JoinCluster entry
Client 1: JoinCluster > cluster_handle=0x53414c4d414e
Enabling RHD channel 0
Client 1: JoinCluster < channel.delivery_interface=eth0
Client 1: JoinCluster < channel.channel_index=0
Client 1: JoinCluster < return_code=0 Successful operation.
Client 1: JoinCluster exit

Issue 9 © Solarflare Communications 2014 69
SolarCapture
User Guide
2013-11-19 10:14:35.390216.Client 1, request 0x302
Client 1: AddCapture entry
Client 1: AddCapture > capture.cluster_handle=0x53414c4d414e
Client 1: AddCapture > capture.capture_interface="eth0"
Client 1: AddCapture > capture.capture_point="default"
Client 1: AddCapture > capture.action=0
Client 1: AddCapture > capture.snap_length=0
Client 1: AddCapture > capture.filter : Prot=0x11 Dest=225.0.0.1 DPort=1234
ETYPE=0x800
Client 1: AddCapture < info.capture_handle=0x53414c4d4151
Client 1: AddCapture < return_code=0 Successful operation.
Client 1: AddCapture exit
2013-11-19 10:14:35.395017.Client 1, request 0x304
Client 1: StartCapture entry
Client 1: StartCapture > capture_handle=0x53414c4d4151
Client 1: StartCapture < return_code=0 Successful operation.
Client 1: StartCapture exit
2013-11-19 10:14:35.397992.Client 1, request 0x306
Client 1: GetClusterByName entry
Client 1: GetClusterByName > name="cluster1"
Client 1: GetClusterByName < info.cluster_handle=0x53414c4d414e
Client 1: GetClusterByName < return_code=0 Successful operation.
Client 1: GetClusterByName exit
2013-11-19 10:14:35.399425.Client 1, request 0x308
Client 1: JoinCluster entry
Client 1: JoinCluster > cluster_handle=0x53414c4d414e
Enabling RHD channel 1
Client 1: JoinCluster < channel.delivery_interface=eth0
Client 1: JoinCluster < channel.channel_index=1
Client 1: JoinCluster < return_code=0 Successful operation.
Client 1: JoinCluster exit
2013-11-19 10:14:35.421156.Client 1, request 0x302
Client 1: AddCapture entry
Client 1: AddCapture > capture.cluster_handle=0x53414c4d414e
Client 1: AddCapture > capture.capture_interface="eth0"
Client 1: AddCapture > capture.capture_point="default"
Client 1: AddCapture > capture.action=0
Client 1: AddCapture > capture.snap_length=0
Client 1: AddCapture > capture.filter : Prot=0x11 Dest=225.0.0.2 DPort=9876
ETYPE=0x800
Client 1: AddCapture < info.capture_handle=0x53414c4d4152
Client 1: AddCapture < return_code=0 Successful operation.
Client 1: AddCapture exit
2013-11-19 10:14:35.425427.Client 1, request 0x304
Client 1: StartCapture entry
Client 1: StartCapture > capture_handle=0x53414c4d4152
Client 1: StartCapture < return_code=0 Successful operation.
Client 1: StartCapture exit
2013-11-19 10:15:09.795514.New client_fd 9
2013-11-19 10:15:09.796925.Client 2, request 0x306
Client 2: GetClusterByName entry
Client 2: GetClusterByName > name="cluster2"
Client 2: GetClusterByName < info.cluster_handle=0x53414c4d414f
Client 2: GetClusterByName < return_code=0 Successful operation.
Client 2: GetClusterByName exit
2013-11-19 10:15:09.798149.Client 2, request 0x308
Client 2: JoinCluster entry

Issue 9 © Solarflare Communications 2014 70
SolarCapture
User Guide
Client 2: JoinCluster > cluster_handle=0x53414c4d414f
Enabling RHD channel 2
Starting pre-defined capture 0x53414c4d4150 for cluster 0x53414c4d414f
Client 2: StartCapture entry
Client 2: StartCapture > capture_handle=0x53414c4d4150
Client 2: StartCapture < return_code=0 Successful operation.
Client 2: StartCapture exit
Client 2: JoinCluster < channel.delivery_interface=eth0
Client 2: JoinCluster < channel.channel_index=0
Client 2: JoinCluster < return_code=0 Successful operation.
Client 2: JoinCluster exit
2013-11-19 10:15:09.818201.Client 2, request 0x302
Client 2: AddCapture entry
Client 2: AddCapture > capture.cluster_handle=0x53414c4d414f
Client 2: AddCapture > capture.capture_interface="eth0"
Client 2: AddCapture > capture.capture_point="default"
Client 2: AddCapture > capture.action=0
Client 2: AddCapture > capture.snap_length=0
Client 2: AddCapture > capture.filter : VLANID=0 Prot=0x0 Dest=0.0.0.0
Source=0.0.0.0 DPort=0 SPort=0 ETYPE=0x0
Client 2: AddCapture Warning: A capture is already added to this cluster by client 0
Client 2: AddCapture < return_code=25 A capture definition already exists
Client 2: AddCapture exit
In the above logfile, client 0 identifies the configuration file. Client 1 and client 2 identify the
solar_capture instances as these are started using the solar_capture command line
The filter definitions for client 1 are defined on the solar_capture command line. The filter
definitions for client 2 are defined when the configuration file (client 0) is parsed.
The Warning message appearing as client 2 capture filters are added means that the capture filter
definitions for client 2 were already installed by the configuration file (and not on the command
line). This causes the return_code=25 to be returned to the solar_capture instance which displays
the corresponding warning message when the command line is invoked:
sc_vi_add_stream__rhd: Warning: Streams are already defined on the cluster. Not changing them.

Issue 9 © Solarflare Communications 2014 71
SolarCapture
User Guide
Configuration File Example #2
The following configuration uses clustering to spread the load received on one interface between
capture files. UDP multicast traffic is sent from host 172.16.136.28. The example includes the
solar_capture command line, the configuration file and the generated logfile.
Configuration File
[Global]
Version = 1
#
AOEInterface = eth0
#
[DeliveryInterface eth0]
RhdMtu = 1800
#
[cluster cluster1]
DeliveryInterface = eth0
NumChannels = 2
CaptureInterface 0 = eth0
CaptureStream 0 = udp,dhost=225.0.0.1,dport=1234,shost=172.16.136.28
CaptureStream 1 = udp,dhost=225.0.0.2,dport=9876,shost=172.16.136.28
CapturePoint 0 = ingress
CaptureSnap 0 = 0
CaptureMode 0 = steal
Command Line
solar_capture eth0=/tmp/pcap0.pcap cluster=cluster1 eth0=/tmp/pcap1.pcap \
cluster=cluster1
When the command line is started, the following warning is displayed to identify that the filter
definitions for cluster1 are already defined in the configuration file:
sc_vi_add_stream__rhd: Warning: Streams are already defined on the cluster. Not changing them.
Logfile (/var/log/solar_aoed.log)
Starting solar_aoed [v1.3.0.1127_rc7 (3ccef5d918e02765c1c4995aff09c28257b774c6)]
Date: Tue Nov 19 11:00:40 2013
Reading configuration from /etc/aoe/solar_aoed.conf
INI: AOE interface from config is eth0
Creating server socket at /var/run/aoe/solar_capture_rm
Created listening socket 6
Initialising AOE at interface eth0
Hardware initialised
INI: Setting RHD MTU to 1800 for DeliveryInterface eth0
INI: Creating Cluster cluster1 with 2 channels on delivery interface eth0
Client 0: CreateCluster entry
Client 0: CreateCluster > name="cluster1"
Client 0: CreateCluster > delivery_interface="eth0"

Issue 9 © Solarflare Communications 2014 72
SolarCapture
User Guide
Client 0: CreateCluster < info.cluster_handle=0x53414c4d414e
Client 0: CreateCluster < return_code=0 Successful operation.
Client 0: CreateCluster exit
INI: Creating Capture 0 for cluster cluster1
Client 0: AddCapture entry
Client 0: AddCapture > capture.cluster_handle=0x53414c4d414e
Client 0: AddCapture > capture.capture_interface="eth0"
Client 0: AddCapture > capture.capture_point="ingress"
Client 0: AddCapture > capture.action=0
Client 0: AddCapture > capture.snap_length=0
Client 0: AddCapture > capture.filter : Prot=0x11 Dest=225.0.0.1
Source=172.16.136.28 DPort=1234 ETYPE=0x800
Client 0: AddCapture < info.capture_handle=0x53414c4d414f
Client 0: AddCapture < return_code=0 Successful operation.
Client 0: AddCapture exit
INI: Creating Capture 1 for cluster cluster1
Client 0: AddCapture entry
Client 0: AddCapture > capture.cluster_handle=0x53414c4d414e
Client 0: AddCapture > capture.capture_interface="eth0"
Client 0: AddCapture > capture.capture_point="default"
Client 0: AddCapture > capture.action=0
Client 0: AddCapture > capture.snap_length=0
Client 0: AddCapture > capture.filter : Prot=0x11 Dest=225.0.0.2
Source=172.16.136.28 DPort=9876 ETYPE=0x800
Client 0: AddCapture < info.capture_handle=0x53414c4d4150
Client 0: AddCapture < return_code=0 Successful operation.
Client 0: AddCapture exit
NIC clock within 0:23369668 seconds, not stepping
Process ID 3842
2013-11-19 11:00:41.592982.Starting polling loop...
2013-11-19 11:00:49.598035.New client_fd 8
2013-11-19 11:00:49.600461.Client 1, request 0x306
Client 1: GetClusterByName entry
Client 1: GetClusterByName > name="cluster1"
Client 1: GetClusterByName < info.cluster_handle=0x53414c4d414e
Client 1: GetClusterByName < return_code=0 Successful operation.
Client 1: GetClusterByName exit
2013-11-19 11:00:49.601832.Client 1, request 0x308
Client 1: JoinCluster entry
Client 1: JoinCluster > cluster_handle=0x53414c4d414e
Enabling RHD channel 0
Starting pre-defined capture 0x53414c4d414f for cluster 0x53414c4d414e
Client 1: StartCapture entry
Client 1: StartCapture > capture_handle=0x53414c4d414f
Client 1: StartCapture < return_code=0 Successful operation.
Client 1: StartCapture exit
Starting pre-defined capture 0x53414c4d4150 for cluster 0x53414c4d414e
Client 1: StartCapture entry
Client 1: StartCapture > capture_handle=0x53414c4d4150
Client 1: StartCapture < return_code=0 Successful operation.
Client 1: StartCapture exit
Client 1: JoinCluster < channel.delivery_interface=eth0
Client 1: JoinCluster < channel.channel_index=0
Client 1: JoinCluster < return_code=0 Successful operation.
Client 1: JoinCluster exit
2013-11-19 11:00:49.626504.Client 1, request 0x302
Client 1: AddCapture entry

Issue 9 © Solarflare Communications 2014 73
SolarCapture
User Guide
Client 1: AddCapture > capture.cluster_handle=0x53414c4d414e
Client 1: AddCapture > capture.capture_interface="eth0"
Client 1: AddCapture > capture.capture_point="default"
Client 1: AddCapture > capture.action=0
Client 1: AddCapture > capture.snap_length=0
Client 1: AddCapture > capture.filter : VLANID=0 Prot=0x0 Dest=0.0.0.0
Source=0.0.0.0 DPort=0 SPort=0 ETYPE=0x0
Client 1: AddCapture Warning: A capture is already added to this cluster by client 0
Client 1: AddCapture < return_code=25 A capture definition already exists
Client 1: AddCapture exit
2013-11-19 11:00:49.628764.Client 1, request 0x306
Client 1: GetClusterByName entry
Client 1: GetClusterByName > name="cluster1"
Client 1: GetClusterByName < info.cluster_handle=0x53414c4d414e
Client 1: GetClusterByName < return_code=0 Successful operation.
Client 1: GetClusterByName exit
2013-11-19 11:00:49.630186.Client 1, request 0x308
Client 1: JoinCluster entry
Client 1: JoinCluster > cluster_handle=0x53414c4d414e
Enabling RHD channel 1
Client 1: JoinCluster < channel.delivery_interface=eth0
Client 1: JoinCluster < channel.channel_index=1
Client 1: JoinCluster < return_code=0 Successful operation.
Client 1: JoinCluster exit
2013-11-19 11:00:49.649296.Client 1, request 0x302
Client 1: AddCapture entry
Client 1: AddCapture > capture.cluster_handle=0x53414c4d414e
Client 1: AddCapture > capture.capture_interface="eth0"
Client 1: AddCapture > capture.capture_point="default"
Client 1: AddCapture > capture.action=0
Client 1: AddCapture > capture.snap_length=0
Client 1: AddCapture > capture.filter : VLANID=0 Prot=0x0 Dest=0.0.0.0
Source=0.0.0.0 DPort=0 SPort=0 ETYPE=0x0
Client 1: AddCapture Warning: A capture is already added to this cluster by client 0
Client 1: AddCapture < return_code=25 A capture definition already exists
Client 1: AddCapture exit
In the above logfile, client 0 identifies the configuration file. Client 1 identifies the solar_capture
instance when this is started using the solar_capture command line
The filter definitions for client 1 are defined when the configuration file (client 0) is parsed.
The Warning messages appearing as client 1 capture filters are added means that the capture filter
definitions for client 1 were already installed by the configuration file (and not on the command
line). This causes the return_code=25 to be returned to the solar_capture instance which displays
the corresponding warning message when the command line is invoked:
sc_vi_add_stream__rhd: Warning: Streams are already defined on the cluster. Not changing them.

Issue 9 © Solarflare Communications 2014 74
SolarCapture
User Guide
11.7 Changing Default Options
To change the default settings for the logging or configuration files being used by solar_aoed
when running as a service, edit the following file to un-comment and change the default values:
/etc/sysconfig/solar_aoed
# The location of the config file for sfaoeconfigd
#CONFIGFILE=/etc/aoe/solar_aoed.conf
# Where to log errors, warnings and info.
# NOTE: If you change this you need to change /etc/logrotate.d/aoe too
#LOGFILE=/var/log/solar_aoed.log
# Enable extended logging
#VERBOSE=1
# Optional extra options.
#EXTRA_OPTIONS=

Issue 9 © Solarflare Communications 2014 75
SolarCapture
User Guide
11.8 AOE SolarCapture Statistics
The sfaoestats utility provides access to AOE per-stream statistics. This tool will generate
extensive statistical data for all stats blocks in the AOE FPGA. The simplest way to run sfaoestats
is to specify the interface option:
$ sfaoestats --interface=<ethX>
Where ethX is an interface on the AOE adapter. By default, this command will read the contents of
all the stats blocks in the FPGA every half second, for a total duration of one second. The frequency
and duration of the stats collection can be controlled with the interval and duration options, both of
which are specified in milliseconds. For example, the following command will display stats every
second for one hour:
$ sfaoestats --interface=<ethX> --interval=1000 --time=3600000
Generating stats to a Graphite server (http://graphite.wikidot.com/) is also supported when the
hostname and port options are specified:
$ sfaoestats --interface=<ethX> --hostname=<graphite server address> --
port=<graphite server port> --interval=1000 --time=3600000
This will plot a graph of the statistics counters in the FPGA, taking measurements every second over
the course of one hour.
sfaoestats includes dropped packet counters. To view these use the following command -
identifying an ethernet interface on the AOE adapter:
# sfaoestats --Interface=eth<N> --direct | grep -A2 \
EXT_MEM_CTRL_DROP_STATS
Statistics block sf_capture_3 (instance=0, location=0:0, EXT_MEM_CTRL_DROP_STATS):
Generated at 1384441337.36867000
drop_packets_count: 0
Statistics block sf_capture_2 (instance=0, location=0:0, EXT_MEM_CTRL_DROP_STATS):
Generated at 1384441337.105994000
drop_packets_count: 0
Statistics block sf_capture_1 (instance=0, location=0:0, EXT_MEM_CTRL_DROP_STATS):
Generated at 1384441337.295449000
drop_packets_count: 0
Statistics block sf_capture_0 (instance=0, location=0:0, EXT_MEM_CTRL_DROP_STATS):
Generated at 1384441337.484406000
drop_packets_count: 0

Issue 9 © Solarflare Communications 2014 76
SolarCapture
User Guide
where:
sf_capture_0 is the port 0 rx capture point
sf_capture_1 is the port 1 rx capture point
sf_capture_2 is the port 0 tx capture point
sf_capture_3 is the port 1 tx capture point
For additional information on sfaoestats options:
$ sfaoestats --help
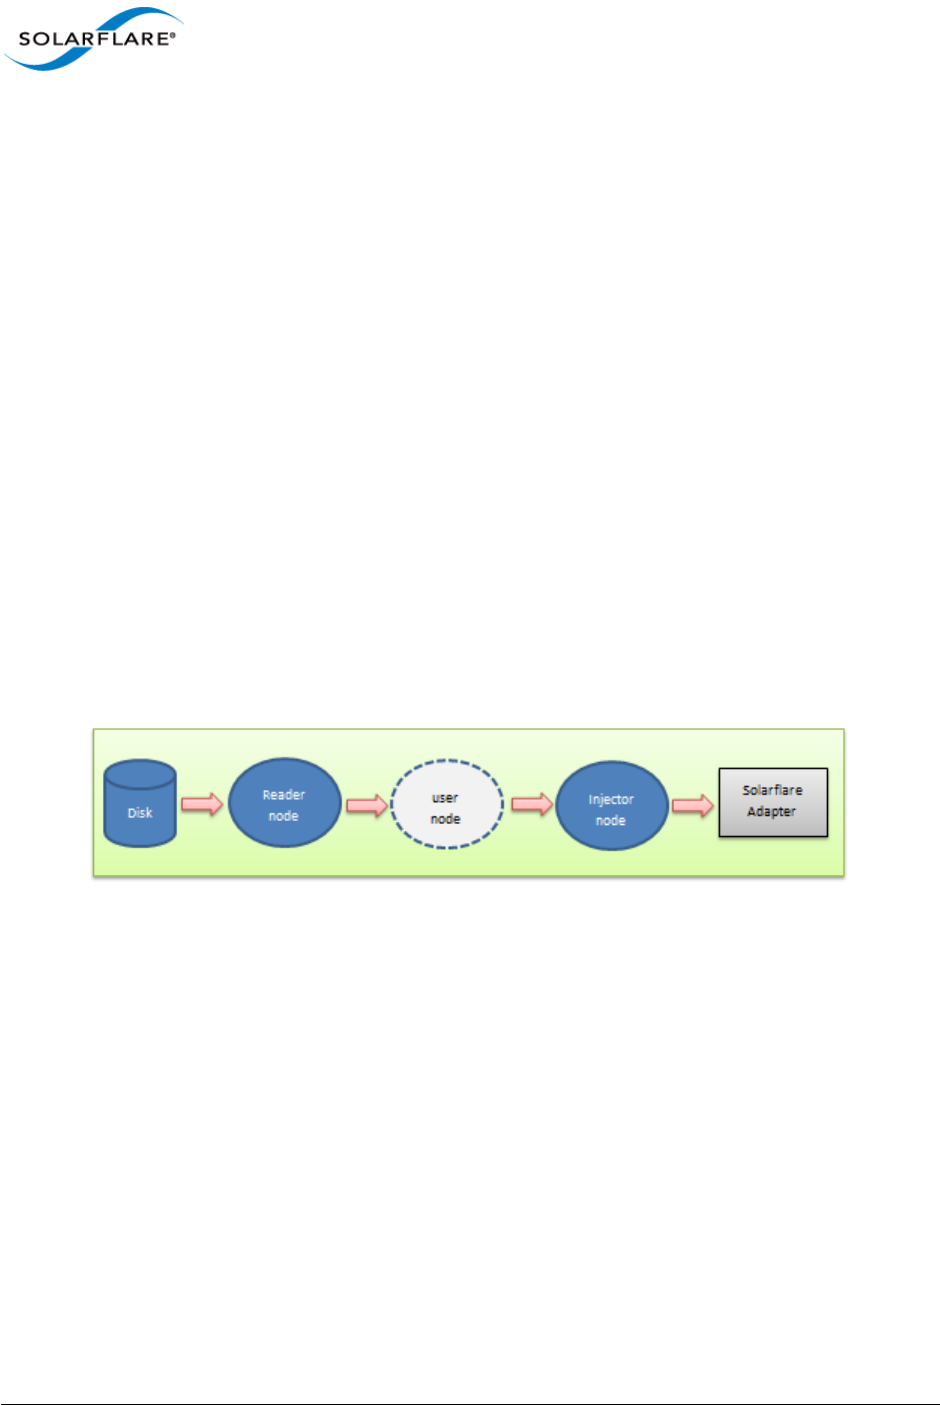
Issue 9 © Solarflare Communications 2014 77
SolarCapture
User Guide
Chapter 12: SolarReplay
12.1 Introduction
SolarReplay allows packets captured to file in libpcap format to be replayed through a Solarflare
adapter interface.
The packets could be first captured using SolarCapture, or from any other source e.g. tcpdump or
wireshark.
Command line options provide flexible control over replay speed and bandwidth whilst preserving
inter-packet pacing.
Packets can be replayed between two ports of the same adapter, between two adapters in the same
host or replayed from a source server to a remote destination server where the network path may
include network switches.
12.2 How it Works
Packets from the capture file are read from the capture file through a reader node and then to the
injector node before passing directly to the Solarflare adapter to be replayed through the specified
interface.
Figure 11: SolarReplay Sequence
The (optional) node command line option provides extra flexibility allowing the user to insert
customized nodes into the replay path and perform pre-processing of packets, for example, filters
could be applied, source and destination addresses, port number could be altered to match network
requirements.
If the prebuffer option is specified on the command line, packets from the capture file will first be
buffered by SolarReplay before insertion into the replay path. This is useful and may be necessary to
facilitate reading the capture file from slower storage devices.

Issue 9 © Solarflare Communications 2014 78
SolarCapture
User Guide
12.3 Command Line
To display all SolarReplay command line options:
# solar_replay
For a detailed description of a specific option:
# solar_replay help <option>
Table 13: SolarReplay Options
Option Description
bpf Replay only packets from the capture file matching the specified
Berkeley Packet Filter (BPF).
bpf="port 80"
bw Specify maximum bandwidth bits-per-second rate when
replaying the pcap file.
bw=1000
ctl_script Specify a script of SolarReplay options in a single script file. This
allows the user to simulate different traffic patterns and traffic
burst periods by varying options such as the speedup,
bandwidth, pause, packet-per-second and repeat options.
ctl_script=<path to script file>
injector_core Identify the CPU core processing packets through the injector
node.
injector_core=5
CPU cores can be assigned per stream when more than a single
stream is identified on the command line.
interactive Connects stdin to the playback process allowing the user to
control replay by executing command line options such as
pause, speedup and bandwidth.
Use the following command for more details:
solar_replay help interactive
node Customized node(s) to be inserted into the replay path allow
pre-processing of captured packets before replay.
example:
node:[node_args]
./solar_replay node_name:range=1-100, bw=1000

Issue 9 © Solarflare Communications 2014 79
SolarCapture
User Guide
packet_range Select a subset of packets (index) from the capture file to be
replayed.
1-100 all packets 1-100
1-10, 200-250 packets 1-10 then 200-250
1,3,5 packets 1, 3 and 5 only
100- from packet 100 onwards
pause Pause packet replay for N seconds. Default 1 second.
The pause option can be used in interactive mode or within a
control script to simulate traffic patterns during replay.
pause=10
pps Replay packet-per-second rate.
example:
pps=1.5e6
pps=1000
prebuffer Buffer packets from the capture file before sending.
This is particularly useful when the capture file has to be read
from a slow storage device, but must be replayed at high speed.
Each packet is read into a single buffer from the default
allocation of 512 buffers. Additional buffers can be allocated
using the SC_ATTR environment variable:
SC_ATTR="n_bufs_tx=1024" solar_capture...
or
export SC_ATTR="n_bufs_tx=2048"
Note: Reading the capture file from slow storage devices may
cause the replay to slow down when packets cannot be read
into buffers quick enough to keep pace with the replay speed,
bw or pps parameters.
reader_core Identify the CPU core processing packets through the reader
node.
reader_core=3
Table 13: SolarReplay Options
Option Description

Issue 9 © Solarflare Communications 2014 80
SolarCapture
User Guide
12.4 Replay Command Line
Syntax:
solar_replay [global-opts] <interface>=<pcap> [stream-opts]
Global options apply to all streams and may be overridden by stream options which apply only to
the interface immediately preceding them.
Examples:
solar_replay pps=1000 eth2=example.pcap
solar_replay eth2=play1.pcap speedup=10 eth3=play2.pcap
repeat Repeat the playback. Default value 0.
repeat=1
This will loop back round to the first packet once all packets
have been replayed and continue until killed.
This option requires at least as many buffers as exist in the pcap
file. See ’prebuffer’ notes above.
speedup Allows the capture file to be replayed at different speeds while
preserving packet pacing dictated by the packet timestamps.
This can be useful to simulate differing traffic patterns and burst
conditions.
speedup=10 replay is ten times faster
speedup=0.1 replay is 10 times slower
The speedup option is incompatible with either the pps or bw
options.
time_range Select a subset of packets from the capture file using the packet
timestamps.
Use the following command for details of timestamp formats:
solar_replay help time_range
Table 13: SolarReplay Options
Option Description

Issue 9 © Solarflare Communications 2014 81
SolarCapture
User Guide
12.5 Replay Script File
A control script can be used to simulate traffic patterns using SolarReplay options to control packet
send rates.
The control script is a text file having any name and any extension. To view an example script with
detailed syntax information and list commands which can be included, use the following command:
solar_replay help ctl_script
The following is an example control script file:
pps 100
for 1s
pps 200
for 1s
pps 400
for 1s
pps 800
for 1s
pps 1600
for 1s
stop
The final line in the control script should always be the ’stop’ label which will cause the playback to
terminate.
Identify the control_script on the SolarReplay command line:
solar_replay eth4=eth4.pcap ctl_script=playctl.txt

Issue 9 © Solarflare Communications 2014 82
SolarCapture
User Guide
Chapter 13: SolarCapture Monitor
13.1 Introduction
The solar_capture_monitor utility reports configuration and runtime data for instances of
SolarCapture.
SolarCapture exports runtime data via shared memory-mapped files, and
solar_capture_monitor maps and reads those files to provide visibility of SolarCapture
operation. This mechanism ensures that solar_capture_monitor has very little impact on
SolarCapture performance.
13.2 Getting Help
$ solar_capture_monitor --help
13.3 Using solar_capture_monitor
• To list running processes using solar_capture:
$ solar_capture_monitor
#pid user-id log-directory
22175 root /var/tmp/solar_capture_22175
22177 root /var/tmp/solar_capture_22177
• To display full output from all running instances of solar_capture:
$ solar_capture_monitor dump
• To display full output from a specific instance of solar_capture:
$ solar_capture_monitor <pid> dump
See Table 14 for details of the output from the dump command.
• To display counts of packets captured:
$ solar_capture_monitor line_total
time eth4-cap-pkts eth4-cap-bytes eth4-0-write-pkts
20140702-09:34:55.033 1398427 83905620 1398362
20140702-09:34:56.033 1413417 84805020 1413415
20140702-09:34:57.033 1428394 85703640 1428393
20140702-09:34:58.033 1443372 86602320 1443369
20140702-09:34:59.033 1458349 87500940 1458348

Issue 9 © Solarflare Communications 2014 83
SolarCapture
User Guide
• To display capture rate and bandwidth:
$ solar_capture_monitor line_rate
time eth4-cap-rate eth4-cap-mbps eth4-0-write-rate
20140702-09:36:38.459 0 0 0
20140702-09:36:39.459 14976 6.85574 15055
20140702-09:36:40.459 14977 6.85607 14976
20140702-09:36:41.459 14977 6.85637 14976
20140702-09:36:42.459 14977 6.85595 14978
• cap-rate is the packets per second capture rate.
• cap-mbps is the mega bits per second capture rate.
• write-rate is the per second rate at which packets are passed to the writeout-core.
Table 14: SolarCapture Monitor Dump - Example Output
Field Description
name sc_vi(0,eth<N>)
id Identifier of this VI.
thread_id Identifier of the thread using this Vi.
vi_group_id RSS group identifier
pool_id Packet pool identifier.
interface_id The interface this VI is capturing packets from.
recv_node_id 1
n_rxq_low Estimation of number of times the capture thread fell
behind.
free_pool_empty Estimation of number of times the writeout thread fell
behind.
rx_csum_bad Number of packets that failed with bad TCP, UDP or IP
checksum reported by the network adapter
rx_crc_bad Number of packets with bad Ethernet CRC reported by
the network adapter
rx_trunc Number of packets truncated due to network adapter
fifo overflow
rx_mcast_mismatch Number of unsolicited multicast packets received
rx_ucast_mismatch Number of unsolicited unicast packets received

Issue 9 © Solarflare Communications 2014 84
SolarCapture
User Guide
13.4 Debug Level
When using the SolarCapture API the debug logging level can be set as follows:
export SC_ATTR="log_level=6"
or
SC_ATTR="log_level=6" solar_capture eth1=eth1.pcap
rx_no_desc_trunc Number of large packets discarded part way through
due to the descriptor ring going empty
thread_id The thread where this VI exists
rx_refill_batch_low Batch size of packets buffers re-assigned to the rx_ring
on each refill after the rx_ring_low_level
threshold is reached
rx_refill_batch_high Batch size of packets buffers re-assigned to the rx_ring
on each refill after the rx_ring_high_level
threshold is reached
poll_batch Number of packets recovered from the receive queue
on each poll
n_bufs_rx Number of packet buffers available to this VI
n_bufs_rx_min Minimum number of packet buffers that will be
reserved for this VI
evq_size Size of the event queue in this VI
tx_ring_max Max number of packet buffers that can be held in the
tx_ring
rx_ring_max Max number of packet buffers that can be held in the
rx_ring
rx_ring_size Size of the receive queue in this VI (buffers)
rx_ring_low_level rx_ring low watermark (number of buffers available)
rx_ring_high_level rx_ring high watermark (number of available buffers is
considered to be sufficient if above this value)
discard_mask=TRUNCATED Mask of error packets to discard
Table 14: SolarCapture Monitor Dump - Example Output
Field Description

Issue 9 © Solarflare Communications 2014 85
SolarCapture
User Guide
When using the SolarCapture command line the debug logging level can be set as follows:
solar_debug[-l 6] solar_capture ...
Debug levels are in the range 3 (default) - 6 (verbose).
13.5 Notes On Monitor Output
n_rxq_low
Observing n_rxq_low events does not necessarily mean that packets are being dropped. This is a
fairly conservative warning which is raised when the RX ring drops below 60% fill level. The
n_rxq_low counter is not relevant when using the capture-packed-stream firmware
variant.
Identify Asynchronous Writer Mode
Using the following command, SolarCapture is using the asynchronous writer mode is the
async_mode is set to 1. Set to 0 the writer mode is synchronous.
solar_capture_monitor dump | grep async_mode
async_mode 1
Running low on buffers
The pcap packer node sc_pcap_packer has an explicit counter, buffer_low, which will
increment when the pool of pcap buffers runs low.
Use the following command to identify if SolarCapture is running low on buffers:
solar_capture_monitor dump | grep buffer_low
buffer_low 0
A value of 0 means SolarCapture has sufficient buffers, otherwise the value indicates the number of
times SolarCapture has run low on buffers.

Issue 9 © Solarflare Communications 2014 86
SolarCapture
User Guide
Chapter 14: Additional Features
14.1 SolarCapture - Arista Timestamps
The SolarCapture sc_arista_ts builtin node has been specially developed to take advantage of the
Arista 7150 switch hardware timestamping features.
Using data from the Arista switch keyframe, the sc_arista_ts node will convert a received packet
software timestamp (arrival at the host) to a hardware timestamp (arrival at the switch) to deliver
greater accuracy in received packet timestamps. Timestamps are UTC time at the switch.
Refer to https://eos.arista.com/timestamping-on-the-7150-series/ for guidance on configuring the
Arista 7150 switch for packet timestamping. SolarCapture supports the Arista switch ’FCS type’ 0
(timestamping disabled), 1 (timestamp appended to payload) and 2 (timestamp overwrites the FCS).
This feature can be used with the solar_capture command line tool as follows:
solar_capture eth2=./eth2
"sc_arista_ts:kf_ip_dest=255.255.255.255;kf_eth_dhost=ff:ff:ff:ff:ff:ff"
The corresponding configuration for the connected egress port on the Arista switch is:
switch(config)# platform fm6000 keyframe kf1 int et1 255.255.255.255
ff:ff:ff:ff:ff:ff
switch(config)# int et1
switch(config-if-Et1)# mac timestamp before-fcs
The sc_arista_ts node supports the following egress links:
Keyframes and LLDP packets are treated specially because they are not timestamped by the switch,
and so it is not possible to give them timestamps with the same clock as other packets.
(*) no_sync packets go to the same place as lost_sync packets by default. If no_sync_drop=1, then
they are freed by default.
Table 15: sc_arista_ts egress links
Link name Default Description
(default -- empty string) free Packets with corrected timestamps
lost_sync default Packets with corrected timestamps when
no keyframes have been seen for a while
no_sync lost_sync or free* Used when no recent keyframes have
been seen
keyframes no_sync Used for keyframes
lldp no_sync Used for LLDP packets

Issue 9 © Solarflare Communications 2014 87
SolarCapture
User Guide
The sc_arista_ts node supports the following arguments:
Using the sc_arista_ts node
With the Arista 7150 switch configured as per section 8.1 above, running SolarCapture will produce
output similar to the following to show that keyframes are being received from the switch:
[root@server]# solar_capture snap=0 eth4=./eth4.pcap
"sc_arista_ts:kf_ip_dest=255.255.255.255;kf_eth_dhost=ff:ff:ff:ff:ff:ff"
SolarCapture 1.0.1. Copyright 2013 Solarflare Communications, Inc.
arista_ts: kf_eth_dhost=ff:ff:ff:ff:ff:ff
arista_ts: kf_ip_proto=253
arista_ts: kf_ip_dest=255.255.255.255
arista_ts: strip_ticks=1
arista_ts: tick_freq=0.000000
arista_ts: lost_sync_gap=10000
arista_ts: no_sync_gap=60000
arista_ts: max_freq_error=20000
arista_ts: KF: state=no_sync utc=1376928723.298764705 host=1376928723.510198000 ticks=15487b6950a drops=0
arista_ts: no_sync => sync1
arista_ts: KF: state=sync1 utc=1376928724.300648689 host=1376928724.510208000 ticks=1549c9d432c drops=0
arista_ts: KF: delta=1.001883983 tick_freq=350002779
arista_ts: sync1 => sync2
arista_ts: KF: state=sync2 utc=1376928725.302667379 host=1376928725.510214000 ticks=154b184a24e drops=0
arista_ts: KF: delta=1.002018690 tick_freq=350000947
Once in sync (state=sync2), the received Arista keyframes continue to update and are displayed on
the console every second.
Table 16: sc_arista_ts arguments
Name Type Default Description
log_level str sync silent, errors, setup, sync or verbose
kf_ip_proto int 253 IP protocol for keyframes
kf_eth_dhost str REQUIRED Dest mac address for keyframes
kf_ip_dest str REQUIRED Dest IP address for keyframes
kf_device int Filter keyframes by device field
lost_sync_ms int 10000 Time after last keyframe to enter lost_sync
state
no_sync_ms int 60000 Time after last keyframe to enter no_sync state
strip_fcs int 1 Set to zero to retain the FCS when using the
Arista switch replace-fcs mode.
strip_ticks int 1 Set to zero to disable stripping of switch
timestamp
tick_freq int 350000000 Expected frequency of switch tick
max_freq_error
_ppm
int 20000 If measured tick frequency differs from
tick_freq by more than this value, a warning is
issued
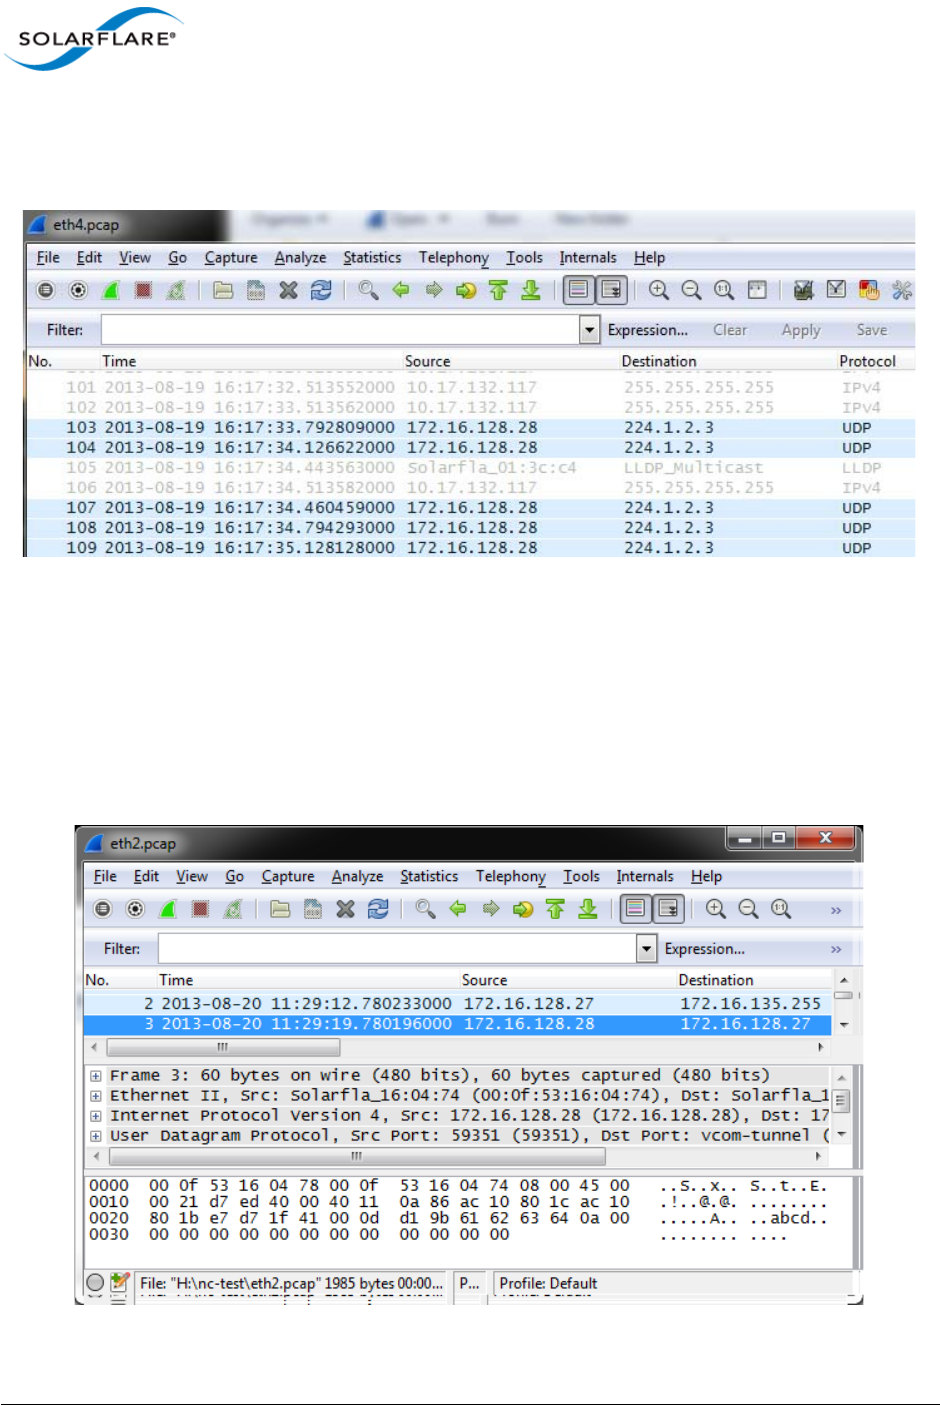
Issue 9 © Solarflare Communications 2014 88
SolarCapture
User Guide
When the SolarCapture pcap file is viewed in Wireshark, the hardware timestamps are visible in the
Time field as shown below.
Figure 12: Hardware timestamps viewed in Wireshark
Demonstration
The following two screen shots show the same packet received by SolarCapture on a single server
from an Arista 7150 switch.
Figure 13 shows packet 3 received by SolarCapture which is not configured to convert the Arista
hardware timestamps. Time displayed is the software timestamp packet arrival at the host.
Figure 13: SolarCapture - Timestamp arrival at the host
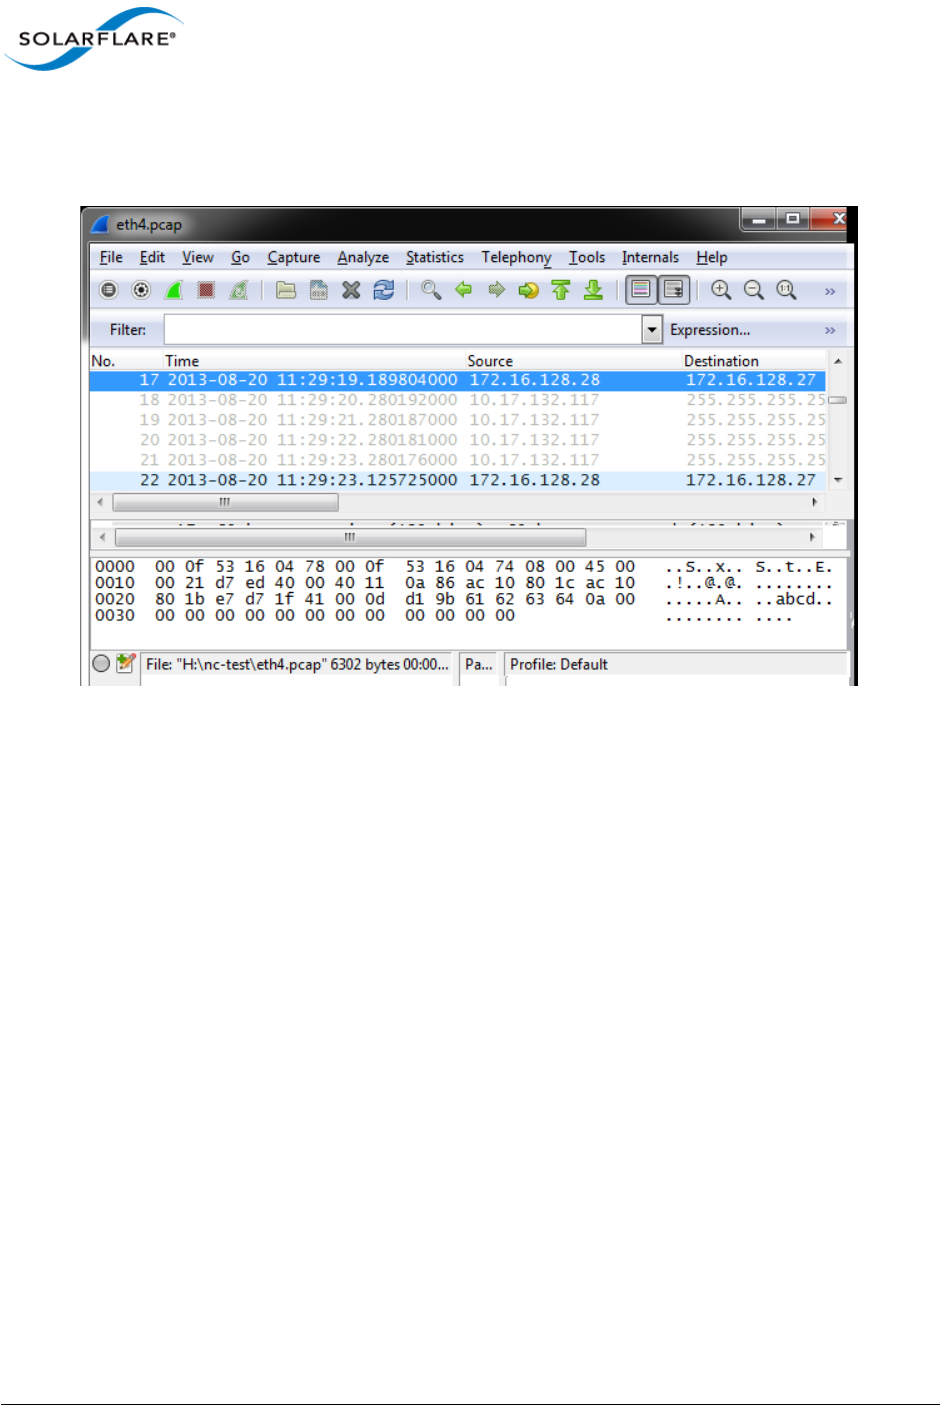
Issue 9 © Solarflare Communications 2014 89
SolarCapture
User Guide
Figure 14 shows packet 17 (which is the same as packet 3 above) received by SolarCapture
configured to receive Arista keyframes and to use the hardware timestamp packet arrival at the
switch.
Figure 14: SolarCapture - Timestamp arrival at the switch

Issue 9 © Solarflare Communications 2014 90
SolarCapture
User Guide
Chapter 15: Embedding SolarCapture
The SolarCapture distribution includes C bindings, allowing SolarCapture to be embedded in
applications. Example code can be found at:
/usr/share/doc/solar_capture-<version>/examples
Applications that embed SolarCapture should include the <solar_capture.h> header, and
should link to the solarcapture1 library, as shown in the sample code.
The following sections describe the main objects and concepts used in SolarCapture. For more
information please refer to the example code and documentation in the header files, which can be
found at:
/usr/include/solar_capture/
15.1 Sessions — struct sc_session
All applications embedding SolarCapture must first instantiate a session object. A session provides
an association between SolarCapture components.
All objects in a SolarCapture session must all be allocated up front, and capture is then initiated by
calling sc_session_go(). Once capture has started it is not possible add new objects to the
session.
15.2 Attributes — struct sc_attr
Attributes provide a convenient way to specify options, such as the size of buffers. For detailed
information concerning SolarCapture attributed, refer to Appendix B: SolarCapture Attributes on
page 113.
15.3 Threads — struct sc_thread
A session includes one or more threads that work together. Threads can be used for packet capture,
packet processing or a combination of the two. All threads in a particular session are started and
stopped as a group.
Most objects live in a particular thread and are only accessed by that thread. This allows
SolarCapture to operate without locks or expensive atomic operations.
A thread can be bound to a particular CPU core by setting the affinity_core attribute.
NOTE: This version of SolarCapture uses busy-waiting. Each thread will consume 100% of a CPU core.
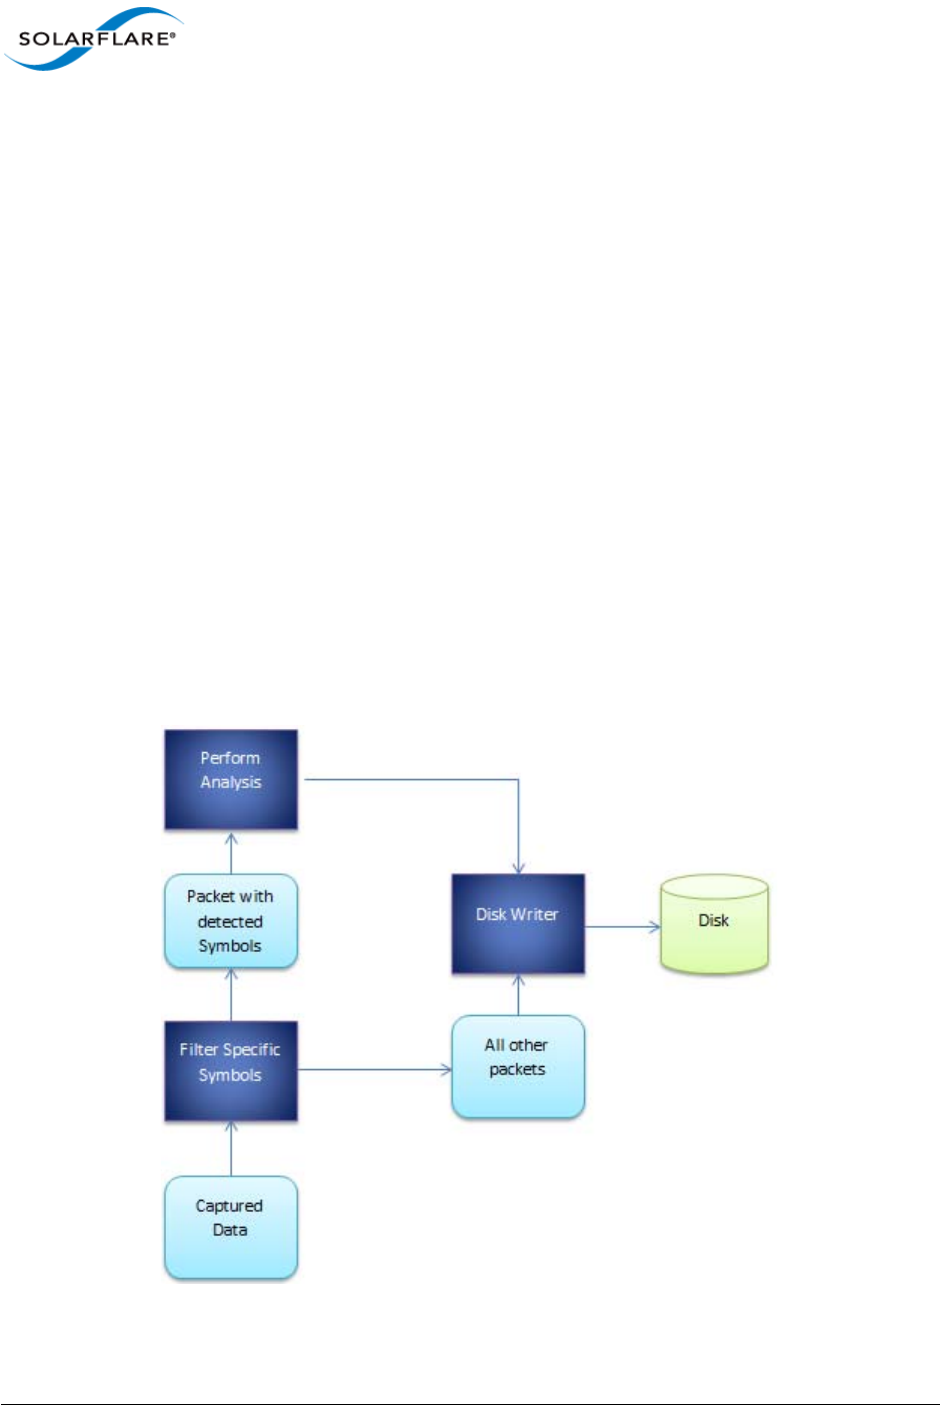
Issue 9 © Solarflare Communications 2014 91
SolarCapture
User Guide
15.4 Virtual Interfaces — struct sc_vi
A virtual interface (VI) receives raw Ethernet packets from a particular network interface. The
sc_stream interface is used to indicate which packets should be delivered to a particular VI.
It is recommended that VIs be placed in a thread that is dedicated to packet capture. This gives the
best level of performance, and maximizes accuracy of timestamps.
15.5 Nodes — struct sc_node
Nodes perform processing on packets. VIs and nodes are connected in a directed acyclic graph, with
links passing packets from one node to another. Nodes can be used to inspect or modify packet
contents, perform custom processing or to write packets to a file.
Nodes can only be directly connected to other nodes in the same thread. To pass packets from one
thread to another a mailbox is needed.
Special links are used to free packets at any point in the processing pipeline. Packets may be freed in
any thread, not just the thread in which they originate. SolarCapture will ensure that freed packets
are returned to the appropriate buffer pool.
See “Extending SolarCapture” on page 95. for details on the implementation of new node types.
A user application can consist of one or more nodes which may co-operate in order to progressively
process the received network packets.
Figure 15: Example Application Nodes
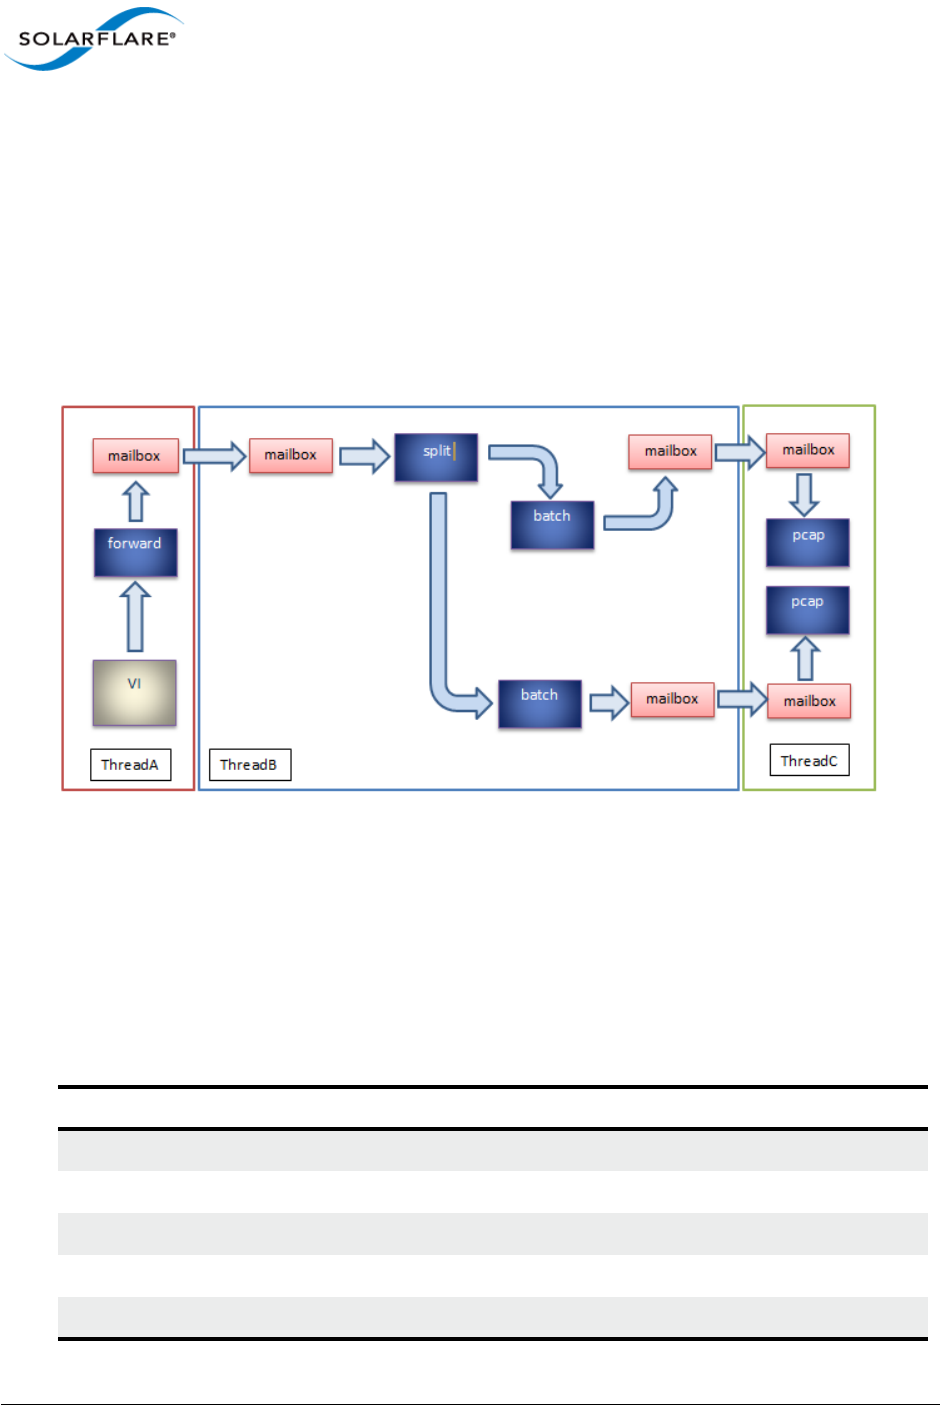
Issue 9 © Solarflare Communications 2014 92
SolarCapture
User Guide
Figure 15 is an example of co-operating nodes in a stock trading environment. Captured packets are
fed to a filtering node which selects packets of interest to be forwarded to a second node for further
analysis. All other packets a fed to the disk writer node. The analysis node will conduct further
analysis on the packets such as statistics collection before passing packets to the disk writer node.
15.6 Mailboxes — struct sc_mailbox
Mailboxes provide a mechanism to pass packets between nodes in different threads. Mailboxes
operate using an efficient lock-free shared memory channel. Each mailbox is paired with another in
a different thread, and packets can be passed through a pair of mailboxes in both directions.
Figure 16: Mailboxes
15.7 BuiltIn Nodes
sc_writer
This node writes packets to a file in libpcap format. Table 17 lists sc_writer arguments.
Table 17: sc_writer
Name Type Default Description
filename str REQUIRED Name of the output file
format str pcap pcap | pcap-ns
on_error str exit exit | abort | message | silent
snap int 0 Number of packet bytes to capture. 0=whole packet
append int 0 0 | 1

Issue 9 © Solarflare Communications 2014 93
SolarCapture
User Guide
Capture files conform to libpcap 1.3.0 format. Refer to http://www.tcpdump.org/ for details.
sc_rate_monitor
description
sc_snap
description
sc_sim_work
description
rotate_seconds int 0 Create new capture file after the number of
seconds
rotate_file_size int 0 Create new capture file when file exceeds (bytes)
size
Table 18: sc_rate_monitor
Name Type Default Description
pkt_rate int n/a Packet capture rate
cap_bytes int n/a Number of bytes captured
link_bytes int n/a Number of bytes received
cap_bw int n/a % bandwidth of captured bytes
link_bw int n/a % of total link bandwidth used
Table 19: sc_snap
Name Type Default Description
snap int REQUIRED Number of packet bytes to capture. 0=whole packet
Table 20: sc_sim_work
Name Type Default Description
pkt_work_ns int REQUIRED
batch_work_ns int REQUIRED
Table 17: sc_writer
Name Type Default Description

Issue 9 © Solarflare Communications 2014 94
SolarCapture
User Guide
sc_arista_ts
Refer to SolarCapture - Arista Timestamps on page 86 for details.
15.8 Additional Nodes
Interface details for the following additional nodes will be exposed in the next release of
SolarCapture via the solar_capture_doc command. In the meantime, users who require node
interface details should contact support@solarflare.com
sc_reader
sc_injector
sc_filter
sc_tap
sf_fd_reader
sc_ts_adjust
sc_pacer
sc_repeater
sc_line_reader
sc_tracer
sc_header_editor
sc_exit
sc_merge_sorter
sc_rate_monitor
sc_arista_ts
sc_vss

Issue 9 © Solarflare Communications 2014 95
SolarCapture
User Guide
Chapter 16: Extending SolarCapture
SolarCapture defines a coherent API allowing applications to be constructed from reusable
components known as nodes. The core SolarCapture functionality can be extended by implementing
new types of nodes in C. An example of how to define a new node type can be found at:
/usr/share/doc/solar_capture-<version>/examples/extensions_api
Implementations of new node types should include the <solar_capture_ext.h> header, and
should link to the solarcapture1 library, as shown in the sample code. More advanced node
types may also need to include <solar_capture.h>.
This chapter describes the objects and concepts needed to create new nodes. There is also some
documentation in the headers, which can be found at:
/usr/include/solar_capture/ext_*.h
16.1 Node factories — struct sc_node_factory
A node factory provides an interface for instantiating new nodes. When a node is allocated with
sc_node_alloc(), the nf_init_fn() is invoked which should initialise the implementation and
set the node type. Private state for the node implementation can be stored in the nd_private field.
The nf_init_fn() can retrieve arguments passed to sc_node_alloc() by invoking the
following functions:
sc_node_init_get_arg_int()
sc_node_init_get_arg_str()
16.2 Node types — struct sc_node_type
This object defines the behaviour of a node. Implementations must only instantiate objects of this
type by calling sc_node_type_alloc().
The nt_prep_fn() callback is invoked once per node just before the threads in a session are
started. The outgoing links configured by the application are passed to this function. For nodes
where the names of links can be chosen by the application, the links array should be inspected
directly. Nodes that support links with fixed names should use the following functions to find their
links:
sc_node_prep_get_link()
sc_node_prep_get_link_or_free()
The nt_pkts_fn() callback is invoked when packets arrive at a node. This callback provides the
core functionality of the node. Packets provided to this callback should be forwarded via one of the
node’s outgoing links with sc_forward() or sc_forward_list(). Packets do not have to be
forwarded immediately.
Issue 9 © Solarflare Communications 2014 96
SolarCapture
User Guide
16.3 Node libraries
A node library is a shared object file that contains one or more sc_node_factory instances. Each
factory instance must be named <something>_sc_node_factory so that it can be found by
sc_node.
If a node library contains a single factory, it is conventional to give the factory and the file matching
names so that it is not necessary to name the library in the call to sc_node_factory_lookup().
For example, in the "reflect" example, the factory instance is reflect_sc_node_factory, and
the library is reflect.so. If this library is placed /usr/lib/solar_capture/nodes/ or in a
directory referenced by the environment variable SC_NODE_PATH, then it will be found by either of
the following calls:
/* In a C application: */
sc_node_factory_lookup(&p_factory, session, "reflect", NULL);
sc_node_alloc(&p_node, attr, thread, p_factory, args, n_args);
# In a python application:
node = thread.new_node("reflect")
16.4 Insert a user-defined node between capture and sc_writer
User-defined nodes can be inserted between the capture node and sc_writer node. See the
extensions_api sample code for examples included in the solar_capture-python RPM.
The following example demonstrates how to insert a user-defined node called ’header_strip’ into
the solar_capture pipeline:
# SC_NODE_PATH must include directory containing header_strip.so
export SC_NODE_PATH=/path/to/nodes
solar_capture eth4=/captures/eth4.pcap header_strip:
The following example demonstrates how to pass arguments to the ’header_strip’ node:
solar_capture eth4=/captures/eth4.pcap "header_strip:arg1=foo;arg2=bar"
NOTE: Node factories do not have to be placed in node libraries. They can simply be instantiated
within an application that embeds SolarCapture and be passed directly to sc_node_alloc().
However, this makes reuse of the node more difficult.

Issue 9 © Solarflare Communications 2014 97
SolarCapture
User Guide
Chapter 17: Known Issues and Limitations
17.1 Captured packets
Packets captured by SolarCapture are not available to the kernel stack, OpenOnload or any other
process. Therefore if the SolarCapture version does not support ’sniff’ mode, it is not possible to use
SolarCapture to monitor streams that are consumed by applications on the same server. For unicast
streams, Solarflare recommends using SolarCapture with mirror/span switch ports.
Unexpected behaviour might be observed when Onload and SolarCapture run on the same server.
This is due to the priorities of different filters created by the two applications which direct packets
to one application but not both.
These limitations do not apply to SolarCapture Live, Pro or to AOE SolarCapture which support steal
and sniff modes.
17.2 Software Timestamp accuracy
Software timestamps are assigned by SolarCapture, and as such are subject to system jitter caused
by the OS kernel, BIOS and other processes. To get timestamps that are as accurate as possible,
SolarCapture should be run on isolated cores which are configured to minimise interruptions from
system interrupts and processes.
On a well tuned system a vast majority of timestamps will be highly accurate. Solarflare’s sysjitter
tool can be used to measure the amount of system jitter on the cores of a server. Sysjitter can be
downloaded from http://www.openonload.org/download.html.
SolarCapture Pro running on the SFN7000 series adapters or an AOE adapter will generate a
hardware timestamp for each captured packet as it is received by the adapter. These hardware
timestamps are not subject to jitter.
17.3 Capture performance
The capture performance depends on many factors. In most deployments the sustained capture rate
is likely to be limited by storage performance. Other factors that affect capture rate include:
• The I/O performance of the server.
• The size of the internal packet buffer pool.
• Spreading of load using receive-side scaling.
17.4 Stopping SolarCapture
Currently the only way to stop SolarCapture is to kill it with a signal. A programmatic interface will
be added in a future release.

Issue 9 © Solarflare Communications 2014 98
SolarCapture
User Guide
17.5 Allocation of Packet Buffers
An error similar to the following indicates insufficient packet buffers available for each capture
interface.
ERROR: Unable to allocate sufficient buffers for VI (wanted=20480 min=8192 got=0)
To overcome this the user can reduce the number of packet buffers per interface using the command
line buffers parameter, use SR-IOV or use Physical addressing mode. Further information can be
found in the README file from the SolarCapture distribution. For details of SR-IOV and physical
addressing mode refer to the Onload User Guide (SF-104474-CD).
17.6 Solarflare DAQ for Snort
The Solarflare Data Acquisition Module (DAQ) for use with Snort does not support packets larger
than 1778 bytes which cannot be passed to Snort as a contiguous buffer.
17.7 Filtering on VLAN
The Solarflare adapters identified below are not able to filter TCP and UDP streams by VLAN-ID.
• Solarflare SFN5000 or SFN6000 series
• Solarflare SFN7000 series with low-latency or capture-packed-stream firmware variants
On these adapters the VLAN specification is ignored for capture, but is used for the purposes of
joining multicast groups (join_streams). The SFN7000 series adapter using full-featured firmware
variant and Solarflare AOE can filter by VLAN-ID.
17.8 PTP - Hybrid Mode
When capturing from an interface also being used to send/receive PTP messages, PTP hybrid mode
will not function correctly as SolarCapture consumes the ARP response messages. This prevents the
unicast Delay_Request messages being sent from a PTP slave. PTP in multicast mode is not affected
and users are advised to select multicast mode in the ptp_slave.cfg file:
ptp-network-mode multicast
Solarflare aim to address this issue in a future release of SolarCapture.
17.9 Onload and Line Rate Packet Capture
It is not possible at this time to accelerate applications with OpenOnload or EnterpriseOnload when
the adapter is using the capture-packed-stream firmware version. This functionality will be
available in a future release. Users who need Onload should first change the firmware variant on the
SFN7000 series adapter.

Issue 9 © Solarflare Communications 2014 99
SolarCapture
User Guide
17.10 Sniff Mode in Packed Stream Firmware
Sniff mode is not supported when using the capture-packed-stream firmware variant and will
result in the following type or errors:
# solar_capture mode=sniff eth2=/dev/null
SolarCapture 0.3.0.31. Copyright (c) 2012-2014 Solarflare Communications,
Inc.
SolarCapture session=19901/0 log=/var/tmp/solar_capture_root_19901/0
ERROR: errno=22 from core/sc_stream.c:615 in sc_stream_add():
ERROR: Bad stream: specified stream is not supported on this NIC
ERROR: Bad stream: specified stream is not supported on this NIC

Issue 9 © Solarflare Communications 2014 100
SolarCapture
User Guide
Chapter 18: Tuning Guide
18.1 Introduction
The following sub-sections identify tuning options and recommendations that can improve
SolarCapture Pro performance.
Firmware Variants
Solarflare SFN7000 series adapters support different firmware variants. Refer to Firmware Variants
on page 10 for details.
Packet Buffers
Incoming packets are captured by a capture thread before being handed over to a write-out thread
and written to disk. Packets are captured into packet buffers.
Using the capture-packed-stream firmware variant, the size of a packet buffer is a 1MB.
Using other firmware variants, the size of a packet buffer is a 2MB and each buffer can store up to
1792 bytes + 256 bytes of internal meta data. Larger packets are split over several buffers.
Before writing to disk, packet buffers are copied into a pcap buffers in the writer thread. A pcap
buffer is, by default, 32k in size – but can be set to different sizes. Individual packets are bundled
together in a pcap buffer to increase disk write efficiency. When a pcap buffer is filled, the contents
are written to disk.
PCAP Buffers
PCAP buffers are the “blocks” of data written to the storage medium. Buffers can be configured using
SolarCapture attributes using the SC_ATTR command - refer to Appendix B: SolarCapture Attributes
on page 113 for details.
The attribute buf_size_pcap specifies the size (in bytes) of the pcap buffers available to a
SolarCapture instance. CRITICAL: This must be a multiple of 4k.
The attributes n_bufs_pcap specifies the number of pcap buffers available to a SolarCapture
instance.
By default, buf_size_pcap is set to 32k. Selecting an optimum value for this will depend on both
the disk and the RAID setup (i.e tuning will be required). On some systems, the optimal value can be
determined by inspection of the value in the following file:
/sys/block/<disk>/queue/optimal_io_size
Another option is to set buf_size_pcap to the stripe size of the RAID.

Issue 9 © Solarflare Communications 2014 101
SolarCapture
User Guide
18.2 File System Tuning
Solarflare recommend the ext4 file system and it has been observed that other file systems can
incur performance penalties. For example, the async writer in combination with xfs and some types
of RAID controllers causes xfs to block on I/O whereas ext4 delivers better performance with less
blocking on I/O. Additionally, if the RAID system consists of SSDs the file system should be trimmed
periodically to maintain optimal performance. Trimming wipes blocks on an SSD which are no longer
in use.
Mount Options
File I/O performance is influenced by the underlying disk partition alignment and file-system mount
options. Users are advised to consult the system RAID documentation and the OS mount options for
recommended settings for optimal write performance.
The following example identifies some fstab tuning parameters that can be adjusted to improve
I/O performance on a standard Linux system.
rw,data=writeback,nobarrier,commit=3000,journal_ioprio=6
rw read/write access.
data=writeback set the journaling mode for file data to writeback, for maximum
throughput.
nobarrier disable the use of write barriers. A write barrier is a mechanism for
enforcing a particular ordering in a sequence of writes to the
filesystem.
commit=3000 sync all data and metadata every 3000 seconds. Writeout
performance is improved when syncs are delayed.
journal_ioprio=6 Set the I/O priority for kjournald2 during a commit operation. This
option can take values from 0 (highest priority) to 7 (lowest priority).

Issue 9 © Solarflare Communications 2014 102
SolarCapture
User Guide
Scheduling Options
These options are for block device scheduling and only apply to a device dedicated to packet
capture.
Operating systems have different scheduling options, for example, on Redhat Enterprise 6.4 (64 bit),
the default policy is CFQ (Completely Fair Queuing). It has been observed that CFQ is suboptimal for
the SolarCapture use case and the recommendation is to use the deadline scheduler instead:
echo “deadline” > /sys/block/<device>/queue/scheduler
A further recommendation is to set the write expire option to a large value:
echo “50000” > /sys/block/sdb/queue/iosched/write_expire
If concurrent reading from capture files is required, the user should also experiment by increasing
the value for the read_expire option.
Synchronous vs. Asynchronous writer
Standard write/writev calls are synchronous such that data to be written is copied into the page
cache and buffers can be reused.
Asynchronous writes greatly improve performance in most cases, but require that sufficient file
space be pre-allocated before submitting writes.
The asynchronous writer only works on file systems which support fallocate. This can be verified
if the following command succeeds or fails - and if it fails the writer will fall back to a synchronous
mode:
fallocate -l <length> <destination file on relevant partition>
The solar_capture_monitor utility will also identify when the asynchronous writer is being
used. In the output from solar_capture_monitor, if async_mode in the node with
node_type_name set to sc_disk_writer is set to 1, then the writer is using the asynchronous
method. Otherwise it will use the synchronous writer.
Using the asynchronous writer, storage space for the pcap file is pre-allocated in 64MB chunks.
Therefore, during normal operation of SolarCapture, the pcap file size is not an accurate indicator of
the number or size of packets captured. On shutdown, SolarCapture will close the file and set the
end point of the file correctly.
With async writes, performance is sensitive to the I/O scheduling policy used. The default policy
on Redhat Linux is CFQ (Completely Fair Queuing). However, it has been found that performance
can be improved by changing the scheduling policy to deadline. Refer to Scheduling Options above
for details.
With sync writes tuning the pcap buffer size is less critical than when using the asynchronous writer.
The sync writer may require a larger buffer pool as packet buffers are consumed while the writer is
blocked during a sync write.

Issue 9 © Solarflare Communications 2014 103
SolarCapture
User Guide
If the sync writer is to be used, then a key performance bottleneck will be the virtual memory
manager. Refer to Virtual Memory Tuning for more details.
18.3 RAID Controller Tuning
• Interrupts
Interrupts serving the RAID controller should be pinned away from cores being used for the capture
threads.
• Partitions and File System
Disk partitions should be aligned to the stripe size of the RAID array. On Red Hat Enterprise Linux,
the alignment parameters for a RAID system can be determined by inspection of the following file:
cat /sys/block/<disk>/queue/optimal_io_size
• File System
When configuring the server file system, ensure that the file system is correctly configured for the
specified stripe size. The RAID vendor documentation should also be consulted for system-specific
recommendations.
18.4 Virtual Memory Tuning
When the synchronous writer is being used, performance gains can be achieved by tuning the
virtual memory manager. This section can be ignored when not using the synchronous writer.
Kernel tunable parameters in /proc/sys/vm can be adjusted to optimize the virtual memory
manager for high performance disk write workloads:
•Set
dirty_background_ratios (dirty_background_bytes) to a small value, no more
than 5.
• Set the dirty_ratio (dirty_bytes) values between 80 and 90. It has been observed that
values larger than 90 do not necessarily offer improved performance.
•Set
dirty_writeback_centisecs value to a large number. This setting is advised only on
machines dedicated to packet capture and setting this parameter increases the risk of data loss
in the case of an unclean shutdown. User who wish to experiment with this value should set it to
a value significantly larger than the default value of 500.
NOTE: When the synchronous writer is being used, increasing the number of pcap buffers may not
be sufficient to prevent a slow write from causing drops.
This occurs because the writer thread is responsible for filling the pcap buffers and for writing the
data to disk and will block the filling of pcap buffers until a write has completed. Under these
conditions the number of packet buffers available to SolarCapture should be increased.

Issue 9 © Solarflare Communications 2014 104
SolarCapture
User Guide
18.5 Capture Thread Tuning
A capture thread operates in one of three different modes and SolarCapture will select the best
performing option available:
• Reliable Host Delivery (RHD): This mode offers the best performance, and is only available for
SolarFlare AOE (ApplicationOnload Engine) adapters.
• Packed Stream: This mode provides best capture performance for non-AOE adapters i.e.
SFN7000 series. This mode is only available when the adapter is using the capture-packed-
stream firmware variant.
• Normal: This mode is used when neither of the previous two modes apply.
RHD Mode
This option is available for Solarflare AOE adapters only. In this mode, Solarflare recommends that
the most relevant tuning is to size the channel buffers depending on the number of channels
available.
Setting Channel Buffers
There are two RHD ’blocks’ on the AOE adapter. Each block is associated with one of the physical
interfaces on the adapter. Each RHD block supports 8 channels used to deliver captured packets to
the application. When a channel has been selected by one SolarCapture client it is unavailable to
other clients. A SolarCapture instance can select channels from any RHD block - where an RHD is
identified by the command line delivery_interface parameter or, within a configuration file
using the DeliveryInterface option.
The size of the buffer available for a channel is configured with the MaxChannels option. This is a
per delivery interface setting and ports on the same adapter can be configured with different values.
Buffer size per Channel
There is an on-board buffer on the AOE FPGA for putting together RHD packets. The total size of this
buffer is 512k, and the buffer is shared evenly between channels. Setting MaxChannels in the
DeliveryInterface section of the configuration file therefore changes the size of the buffer available
per channel. The value of MaxChannels must be a power of two.
There is no benefit to setting MaxChannels to 1, as there is an internal limit of 256k per channel.
The recommended value for MaxChannels is between 2 and 8. For high rate traffic which isn't
being spread, the recommended value for MaxChannels is 2.
Packed Stream Mode:
Using the capture-packed-stream firmware variant, buffers used by the adapter to push packets
to the host are 1MB in size and can contain multiple packets.
By default, the number of buffers is 256. Increasing this can provide greater resilience to bursty
traffic. Having more than 2000 buffers provides limited additional benefit, and can impact
performance.
The 1MB buffers need to be kept in contiguous memory, so it is important to allocate sufficient huge
pages ((1/2)*(number of buffers) + 1) for these buffers. If insufficient huge pages have
been allocated, SolarCapture will fail on startup.

Issue 9 © Solarflare Communications 2014 105
SolarCapture
User Guide
Normal Mode:
On SFN7000 series adapters, the number of available packet buffers depends on a number of
factors:
• The amount of physical memory in the system.
• The amount of free memory in the system, and whether the system is heavily loaded or not.
• The kernel version being used (2.6.32 and later, or older versions).
The theoretical maximum for the number of buffers available is between 120 thousand (requiring
240MB of system memory) and 30 million (requiring 60GB of system memory), depending on the
level of fragmentation of system memory.
The reason for this variability is as follows: The adapter has a hard limit for the amount of memory
locations it can index (around 60 thousand).
On modern kernels (newer than 2.6.32), the adapter tries to allocate memory in 2MB contiguous
chunks (ie groups of 512 4k pages) using transparent huge pages. If all memory is allocated in this
way, then the maximum of 30 million packets can be allocated. If, however, if the system memory is
badly fragmented (due to heavy use), then only the minimum of 120 thousand packets will be
attained. On older kernels, transparent huge pages are not available and explicit huge pages should
be enabled to allow the adapter to allocate memory in 2MB contiguous chunks.
Memory fragmentation can be avoided by using huge pages. SolarCapture supports two attributes
which can be set to use huge pages:
The attribute request_huge_pages, if set, will cause the packet pool to use explicitly allocated
huge pages, if available. Note that, even if this attribute is not set, transparent huge pages may be
used, if they are supported on the system.
The attribute require_huge_pages, if set, will cause the packet pool to only use explicitly
allocated huge pages. If enough huge pages are not available, then the buffer allocation mechanism
will fail.
If the system supports transparent huge pages, the recommendations are:
1Packet allocation should be increased to ~500k packet buffers, using the buffers option in
SolarCapture - see example in below.
2Experiment with adjusting the size and number of buffers available for the pcap buffer pool
(pcap buffers) using the SC_ATTR settings buf_size_pcap and n_bufs_pcap – see the
example in below.
18.6 Allocating Huge Pages
The current hugepage allocation can be checked by inspection of /proc/meminfo
cat/proc/meminfo | grep Huge
This should return something similar to

Issue 9 © Solarflare Communications 2014 106
SolarCapture
User Guide
AnonHugePages: 2048 kB
HugePages_Total: 2050
HugePages_Free: 2050
HugePages_Rsvd: 0
HugePages_Surp: 0
Hugepagesize: 2048 kB
The total number of hugepages available on the system is the value HugePages_Total
The following command can be used to dynamically set and/or change the number of huge pages
allocated on a system to (<N> is a non-negative integer):
echo <N> > /proc/sys/vm/nr_hugepages
On a NUMA platform, the kernel will attempt to distribute the huge page pool over the set of all
allowed nodes specified by the NUMA memory policy of the task that modifies nr_hugepages. The
following command can be used to check the per node distribution of huge pages in a NUMA system:
cat /sys/devices/system/node/node*/meminfo | grep Huge
Huge pages can also be allocated on a per-NUMA node basis (rather than have the hugepages
allocated across multiple NUMA nodes). The following command can be used to allocate <N>
hugepages on NUMA node <M>:
echo <N> > /sys/devices/system/node/node<M>/hugepages/hugepages-2048kB/ \
nr_hugepages
18.7 NUMA Binding
NUMA binding should follow from core allocations. Ensure that the cores being used are those which
are local to the adapter. The adapter NUMA node can be determined by inspection of the value in
the following file:
/sys/class/net/eth<N>/device/numa_node
The NUMA ID for each core can be determined by inspection of the output from the command:
numactl –hardware
The following example shows the output from a system with 2 NUMA nodes:
# numactl --hardware
available: 2 nodes (0-1)
node 0 cpus: 0 2 4 6 8 10 12 14
node 0 size: 3059 MB
node 0 free: 1492 MB
node 1 cpus: 1 3 5 7 9 11 13 15
node 1 size: 3071 MB
node 1 free: 1798 MB
node distances:

Issue 9 © Solarflare Communications 2014 107
SolarCapture
User Guide
node 0 1
0: 10 20
1: 20 10
In this system, there are 2 NUMA nodes, each with 8 cores. The system has a total of 6GB of memory,
split evenly between the two nodes (3GB each). The node distances indicates the relative distance
between the nodes.
18.8 C-States
When SolarCapture is spinning (which is the default mode), these tuning options will have limited
impact, but are most relevant if SolarCapture is running in interrupt driven mode (when the
attribute capture_busy_wait is set). See Polling vs Interrupt Mode on page 24 for further details.
There are a number of tuning parameters which can be added to the kernel command line in /
boot/grub/grub.conf file:
Disable the intel driver. Setting this to 0 disables intel_idle driver and falls back to the
acpi_idle driver:
intel_idle.max_cstate=0
Set processor max_state. note that even if this is set, the kernel actually silently sets it to 1 (see file
processor_idle.c in the kernel source code):
processor.max_cstate=0
Set the idle parameter to poll. Setting this to poll forces a polling idle loop, which can improve
performance, but at the expense of power:
idle=poll
Thus, a full, aggressive squeeze out as much latency as possible approach would be to set all of the
following:
intel_idle.max_cstate=0 processor.max_cstate=0 idle=poll
18.9 Isolate CPU Cores
There are a number of ways to isolate CPU cores on a system to ensure that only specified tasks run
on them. One of these is the grub configuration option isolcpus (another method is to use
csets).
The command isolcpus will cause the specified CPUSs (defined by the cpu_number value) to be
removed from kernel SMP balancing and scheduler algorithms. Once isolated, the only way to move
a userland process on or off an isolated CPU is to manually specify the process affinity, for example
via taskset.
The isolcpus can be used by adding the following command to the /boot/grub/grub.conf
kernel command line options:

Issue 9 © Solarflare Communications 2014 108
SolarCapture
User Guide
isolcpus=<CPU ID 1>,<CPU ID 2>,...,<CPU ID k>
Note:
CPU numbers start at 0. For example, the directive
isolcpus=1,2
will isolate the 2nd and 3rd CPUs on a system.
It is recommended not to use the first CPU core on each CPU socket. The kernel typically uses these
cores for routine housekeeping tasks (see Limitations below).
18.10 Memory Usage
The amount of memory used by SolarCapture is dependent on:
• The number of packet buffers (set via the command line option buffers) being used.
• The number of writer threads being called.
• The size (buf_size_pcap) and number (n_bufs_pcap) of pcap buffers being used.
Using the capture-packed-stream firmware variant, packet buffers are 1MB in size, so the
calculation becomes:
buf_size_pcap * n_bufs_pcap + 1048576 * buffers + <overhead ~16MB>
When not using capture-packed-stream firmware variant the calculation is:
buf_size_pcap * n_bufs_pcap + 2048 * buffers + <overhead ~16MB>
In the following example (not using capture-packed-stream firmware) the total memory
required is 1GB.
SC_ATTR = "buf_size_pcap=4194304 ; n_bufs_pcap=16" \
solar_capture eth4=/dev/null buffers=500000 \
capture_cores=3 writeout_core=5 rx_ring_max=4095
18.11 Packet Pool Limitations
SolarCapture Pro V1.3 supports at most 64 packet pools. If this limit is exceeded, the mechanism by
which these pools are refilled can fail, resulting in some pools running dry. To avoid this issue, the
user should create no more than 60 writeout files per instance of SolarCapture.
SolarCapture has two types of packet:
• packet buffers, where incoming packets are stored;
• pcap buffers, where packets are copied to prior to being written to disk by the disk writer.
When a VI or a disk writer node is created, it is assigned a packet pool, which provides a store of
buffers (packet or pcap) for use by the node.

Issue 9 © Solarflare Communications 2014 109
SolarCapture
User Guide
• When not using capture-packed-stream firmware, each capture core has a pool.
• Using capture-packed-stream, each capture core has 2 pools.
• Each file being written out has a pool.
• Additionally, SolarCapture has a private pool, which is used for internal housekeeping tasks.
Example:
solar_capture capture_cores=1 writeout_core=3 \
eth2=/tmp/file1.pcap stream="udp:239.100.10.1" \
eth2=/tmp/file2.pcap stream="udp:239.100.10.2" \
eth2=/tmp/file3.pcap stream="udp:239.100.10.3"
This will require a total
5 (1 capture, 3 writers, 1 private) pools in (not capture-packed-stream) mode.
6 (2 capture, 3 writers, 1 private) pools in (capture-packed-stream) mode.
The number of packet pools can be identified from the output from solar_capture_monitor
dump:
solar_capture_monitor dump | grep sc_pool | wc -l
18.12 RXQ size on Packed Stream Firmware
The capture-packed-stream firmware variant imposes a limitation of 2048 descriptors in the
receive queue. Setting this to a larger value will cause SolarCapture to fail to start. By default, this
value is set to 512 which maintains a smaller working set.
18.13 Kernel Services
• Terminate the following OS services:
service cpuspeed stop
service iptables stop
18.14 Interrupt Moderation
• Disable interrupt moderation:
ethtool -C eth<N> rx-usecs 0 rx-frames 0 adaptive-rx off
• When using interrupt-driven mode, it may be beneficial to experiment with the interrupt
moderation interval to establish the optimum setting.
Increasing the interrupt moderation interval:
- increase latency
- reduce CPU utilization

Issue 9 © Solarflare Communications 2014 110
SolarCapture
User Guide
- improve peak throughput
Decreasing the interrupt moderation interval:
- decrease latency
- increase CPU utilization
- reduce throughput
18.15 SolarCapture Configuration
• Set the following options on the SolarCapture command line:
buffers=110000
rx_ring_low=40
rx_ring_high=60
rx_refill_batch_low=64
rx_ring_max=4095
If physical addressing mode is being used, a greater number of packet buffers may be allocated.
18.16 RSS
When multiple capture-cores are identified for a capture instance, Receive Side Scaling (RSS) is used
to spread the received traffic load over these cores.
The sfc driver module option can be enabled to restrict RSS to only use cores on the NUMA node
local to the Solarflare adapter. Driver module options can be set in a file e.g. sfc.conf, in the
/etc/modprobe.d directory
options sfc rss_numa_local=1
This option is relevant only when using SolarCapture in the interrupt-driven mode
(capture_busy_wait=0). When SolarCapture is being used in the default ’polling’ mode
(capture_busy_wait=1) few interrupts, if any, will be generated therefore it is not necessary to
set this option.

Issue 9 © Solarflare Communications 2014 111
SolarCapture
User Guide
Appendix A: Configuration File Structure
This section identifies the required INI file format of configuration files used by SolarCapture
applications.
A configuration file can have any name and any extension e.g <name>.ini, <name>.cfg, <name>.txt.
$ solar_capture --config /<path to config file>/filename.ini
File Structure Conventions
Configuration files follow standard INI file formats and conventions.
Properties
The basic construct in an INI file is a property. Each property is a name and value pair delimited by
an equals character(=), e.g.
name=value
Property names are case-insensitive and any leading or trailing white space around the
property name and property value will be ignored making all the following equivalent:
name=value Name=value name = value naMe =value name= value
Property declarations with duplicate names, or names that only differ in case, will override
earlier occurrences.
Multi-Value Properties
White space within multi-value properties will be treated as a delimiter. Quoting with either double
quotes (") or single quotes (’) should be used for values where white space is significant:
name = value1 value2 value3
name = "value1" "value2" "value3"
name = ’value1 ’ ’value2 ’ ’value3 ’
name = ’multi-word value’ ’ leading white space’ ’trailing white space ’
name = ’a value containing "quotes"’
A backslash (\) immediately followed by an end-of-line causes the end-of-line to be ignored allowing
multiple lines to be concatenated together - useful for properties with many values.
Sections
INI files support properties grouped into sections. The section name should be enclosed in square
brackets ([]) and appear on a line by itself. All properties defined after the section declaration are
associated with that section.
A section ends when another section is started or the end-of-file is reached. Section names are case-
insensitive and may contain white space:

Issue 9 © Solarflare Communications 2014 112
SolarCapture
User Guide
[section]
name=value
[another section]
name=value
name2=value
Comments
Comments start with semi-colon (;) or hash (#) symbols. The comment symbol can occur at any point
on a line and any characters following a comment symbol up to the end of the line are considered a
comment.
Full line comments should appear on a line by themselves. A comment which includes a backslash
character (\) immediately before the end of the line causes the end-of-line to be ignored allowing
multiple lines to be concatenated.
Blank Lines
The INI file can contain blank lines which are ignored.
Character set and encoding
The INI file should only use 7-bit ASCII characters. Spaces and horizontal tabs (HT) are considered
white space. Lines are terminated by either a carriage return (CR) or linefeed (LF) character. When
CR and LF appear together they are treated as a single line terminator.

Issue 9 © Solarflare Communications 2014 113
SolarCapture
User Guide
Appendix B: SolarCapture Attributes
SolarCapture includes the solar_capture_doc command providing detailed information for all
attributes which can be set on the command line or exported to the solar_capture environment.
To view all solar_capture_doc options
# solar_capture_doc
Usage:
solar_capture_doc [options] <topic>
solar_capture_doc list_attr - List names of attributes
solar_capture_doc list_attr <obj> - List attributes that apply to obj
solar_capture_doc attr <name> - Document named attribute
solar_capture_doc attr - Document all attributes
solar_capture_doc attr <obj> - Document attributes that apply to obj
options:
--all - Document all features, including unstable, beta and
deprecated features
Options:
-h, --help show this help message and exit
--all Do not hide deprecated and unstable features
To list all attributes
# solar_capture_doc list_attr
Detailed attribute information
# solar_capture_doc attr
To set attributes
export SC_ATTR="log_level=6"
or
# SC_ATTR="log_level=6;force_sync_writer=1" solar_capture eth1=eth1.pcap
Multiple attributes should be separated by a semi-colon.

Issue 9 © Solarflare Communications 2014 114
SolarCapture
User Guide
To list attributes specific to an object
# solar_capture_doc list_attr mailbox
group_name
mailbox_max_nanos
mailbox_min_pkts
mailbox_recv_max_pkts
managed
name
