Sugar_Open_Source_User_Admin_Guide_v40 Sugar Open Source User Admin Guide V40
User Manual: Pdf
Open the PDF directly: View PDF ![]() .
.
Page Count: 99

Sugar Open Source
User and Administrator Guide
Version 4.0
December 2005

Copyright © 2004-2005 SugarCRM Inc.
www.sugarcrm.com
Original version authored by the Long Reach Corporation
This document is subject to change without notice.
License
The contents of this document are subject to the SugarCRM Public License Version 1.1.3 ("License").
You may not use this document except in compliance with the License. You may obtain a copy of the
License at
www.sugarcrm.com/SPL
.
Disclaimer
Software and documents distributed under the License are distributed on an "AS IS" basis, WITHOUT
WARRANTY OF ANY KIND, either express or implied. See the License for the specific language
governing rights and limitations under the License.
Trademarks
All SugarCRM logos in this document are trademarks of SugarCRM Inc. See the SugarCRM
trademark policies at
www.sugarcrm.com/trademark
for more information on how SugarCRM trademarks
can be used.

Table of Contents
Table of Contents
List of Figures..........................................................................................vi
Welcome to Sugar Suite .........................................................................ix
About this Guide.....................................................................................................ix
Who Should Read this Guide?...............................................................................ix
About Sugar Suite ....................................................................................1
Core Features .........................................................................................................1
What’s New to 4.0...................................................................................................2
Getting Started..........................................................................................3
Technical Requirements .........................................................................................3
Web Browser and Window Controls .......................................................................4
Accessing Sugar Suite............................................................................................4
Logging In ...............................................................................................................5
Security Timeout .....................................................................................................5
Managing Your Password.......................................................................................5
User Interface............................................................................................7
Module Tabs ...........................................................................................................8
Module Description ...........................................................................................8
Selecting a Module .........................................................................................10
Navigating the Module Screens......................................................................10
List View Screen .............................................................................................11
Detail View Screen..........................................................................................11
Printing and Help ............................................................................................12
System Links.........................................................................................................12
My Account .....................................................................................................12
Employees ............................................................................................................14
Logout ...................................................................................................................14
About.....................................................................................................................15
Using Sugar Suite...................................................................................16
My Portal Module ..................................................................................................16
Navigation Shortcuts.......................................................................................17
Calendar Module...................................................................................................18
Navigation Shortcuts.......................................................................................19
Activities Module ...................................................................................................22
Navigation Shortcuts.......................................................................................23
Contacts Module ...................................................................................................28
Navigation Shortcuts.......................................................................................29
Accounts Module...................................................................................................31
Accounts List View..........................................................................................31
Accounts Detail View ......................................................................................32
Navigation Shortcuts.......................................................................................32

Table of Contents
Leads Module........................................................................................................34
Navigation Shortcuts.......................................................................................35
Opportunities Module............................................................................................37
Navigation Shortcuts.......................................................................................38
Cases Module .......................................................................................................40
Navigation Shortcuts.......................................................................................40
Bug Tracker Module..............................................................................................42
Navigation Shortcuts.......................................................................................42
Documents Module ...............................................................................................44
Creating a Document......................................................................................44
Viewing a Document.......................................................................................44
Identifying MS Word Mail Merge Templates...................................................45
Navigation Shortcuts.......................................................................................45
Emails Module.......................................................................................................46
My Inbox .........................................................................................................47
Group Inbox ....................................................................................................47
Inbound Email.................................................................................................48
Navigation Shortcuts.......................................................................................48
Campaigns Module ...............................................................................................51
Creating an Email Campaign..........................................................................52
Navigation Shortcuts.......................................................................................56
Projects Module ....................................................................................................58
Project Lists ....................................................................................................58
Navigation Shortcuts.......................................................................................59
RSS Module..........................................................................................................61
Dashboard Module................................................................................................62
Customizing Dashboard Charts......................................................................63
Import and Export...................................................................................65
Importing Accounts and Contacts.........................................................................65
Exporting Contacts from Your Current Contact Manager...............................65
Importing Accounts .........................................................................................66
Importing Contacts..........................................................................................67
Importing Leads and Opportunities.................................................................68
Exporting Information............................................................................................68
System Administration ..........................................................................70
System ..................................................................................................................70
Configure Settings ..........................................................................................71
User Management ..........................................................................................71
Role Management...........................................................................................71
Upgrade Wizard..............................................................................................76
Sugar Updates................................................................................................76
Repair .............................................................................................................77
Currencies.......................................................................................................78
Backups ..........................................................................................................78

Table of Contents
Module Loader................................................................................................78
Scheduler........................................................................................................ 78
Studio....................................................................................................................79
Field Layout ....................................................................................................79
Edit Custom Fields..........................................................................................80
Portal...............................................................................................................80
Migrate Custom Fields....................................................................................81
Dropdown Editor .............................................................................................81
Configure Tabs ...............................................................................................82
Rename Tabs .................................................................................................82
Bug Tracker Releases ..........................................................................................82
Email-Campaign Management .............................................................................82
Mass Email Manager ......................................................................................82
Email-Campaign Settings ...............................................................................83
Setting Up EmailMan ......................................................................................83
Inbound Email .......................................................................................................84
Manage Mailboxes..........................................................................................85
Inbound Email Setup ......................................................................................85
Sharing Calendar Information...............................................................................86
Index ........................................................................................................87

List of Figures
List of Figures
Figure 1: Sugar Open Source Log In Screen ........................................................................................ 4
Figure 2: My Account Screen................................................................................................................. 6
Figure 3: Home Screen.......................................................................................................................... 7
Figure 4: Sub-Panel Data Popup......................................................................................................... 12
Figure 5: My Account Screen............................................................................................................... 13
Figure 6: My Portal Module.................................................................................................................. 16
Figure 7: My Portal Module (Add Site Edit View)................................................................................ 17
Figure 8: Calendar Module (Week Format) ......................................................................................... 18
Figure 9: Calendar Module (Day Format) ............................................................................................ 18
Figure 10: Calendar Module (Schedule Meeting)................................................................................ 19
Figure 11: Calendar Module (Schedule Call Edit View)....................................................................... 19
Figure 12: Calendar Module (Calls List View) ..................................................................................... 20
Figure 13: Calendar Module (Meetings List View)............................................................................... 21
Figure 14: Activities Module (Task List View) ...................................................................................... 22
Figure 15: Activities Module (Calls List View)...................................................................................... 23
Figure 16: Activities Module (Schedule Call Edit View)....................................................................... 23
Figure 17: Activities Module (Meetings List View) ............................................................................... 24
Figure 18: Activities Module (Tasks List View) .................................................................................... 24
Figure 19: Activities Module (Create Task Edit View).......................................................................... 25
Figure 20: Activities Module (Notes List View) ................................................................................... 26
Figure 21: Activities Module (Create Note or Attachment Edit View) .................................................. 26
Figure 22: Activities Module (Import Notes Edit View)......................................................................... 27
Figure 23: Contacts Module................................................................................................................. 28
Figure 24: Contacts Module (Create Contact Edit View)..................................................................... 29
Figure 25: Contacts Module (Enter Business Card Edit View) ............................................................ 30
Figure 26: Contacts Module (Create from vCard Edit View)................................................................ 30
Figure 27: Contacts Module (Import Edit View) ................................................................................... 30
Figure 28: Accounts Module ................................................................................................................ 31
Figure 29: Accounts Module (Create Account Edit View).................................................................... 33
Figure 30: Accounts Module (Import Edit View) .................................................................................. 33
Figure 31: Leads Module ..................................................................................................................... 34
Figure 32: Leads Module (Create Lead Edit View).............................................................................. 35
Figure 33: Leads Module (Create From vCard Edit View)................................................................... 35
Figure 34: Leads Module (Import Edit View) ....................................................................................... 36

List of Figures
Figure 35: Opportunities Module.......................................................................................................... 37
Figure 36: Opportunities Module (Create Opportunity Edit View) ....................................................... 38
Figure 37: Opportunities Module (Import Opportunity Edit View) ........................................................ 39
Figure 38: Cases Module..................................................................................................................... 40
Figure 39: Cases Module (Create Case Edit View)............................................................................. 41
Figure 40: Bug Tracker Module ........................................................................................................... 42
Figure 41: Bug Tracker Module (Report Bug Edit View)...................................................................... 43
Figure 42: Documents Module............................................................................................................. 44
Figure 43: Documents Module (Create Document Edit View)............................................................. 45
Figure 44: Emails Module .................................................................................................................... 46
Figure 45: My Inbox ............................................................................................................................. 47
Figure 46: Group Inbox ........................................................................................................................ 48
Figure 47: Emails Module (Compose Email Edit View) ....................................................................... 49
Figure 48: Emails Module (Create Archived Email Edit View)............................................................. 50
Figure 49: Emails Module (Create Email Template Edit View)............................................................ 50
Figure 50: Campaigns Module............................................................................................................. 51
Figure 51: Creating a Campaign.......................................................................................................... 53
Figure 52: Creating a Target................................................................................................................ 54
Figure 53: Creating a Target List ......................................................................................................... 54
Figure 54: Creating an Email Marketing Record.................................................................................. 55
Figure 55: Campaign Detail View Example ......................................................................................... 55
Figure 56: Campaign View Status Example ........................................................................................ 56
Figure 57: Projects Module .................................................................................................................. 58
Figure 58: Projects Module (Project List View).................................................................................... 59
Figure 59: Projects Module (Create Project Edit View) ....................................................................... 59
Figure 60: Projects Module (Create Project Task Edit View)............................................................... 60
Figure 61: RSS Module........................................................................................................................ 61
Figure 62: Dashboard Module ............................................................................................................. 62
Figure 63: Sales Pipeline by Sales Stage Chart.................................................................................. 64
Figure 64: Confirm Fields and Import Screen...................................................................................... 67
Figure 65: CSV File in Excel ................................................................................................................ 69
Figure 66: System Administration Module ........................................................................................... 70
Figure 67: System Administration........................................................................................................ 71
Figure 68: Role Management Menu .................................................................................................... 72
Figure 69: Junior Staff Member Example Role.................................................................................... 74
Figure 70: Sales Representative Example Role.................................................................................. 75
Figure 71: Junior Sales Representative Example Role ....................................................................... 76

List of Figures
Figure 72: Studio Administration.......................................................................................................... 79
Figure 73: Bug Tracker Administration ................................................................................................ 82
Figure 74: Email-Campaign Management ........................................................................................... 82
Figure 75: Mass Email Queue Management ....................................................................................... 83
Figure 76: Email-Campaign Settings ................................................................................................... 83
Figure 77: Inbound Email Administration............................................................................................. 84
Figure 78: Monitored Email Inboxes .................................................................................................... 85
Figure 79: Inbound Email Setup .......................................................................................................... 85

Welcome to Sugar Suite
Welcome to Sugar Suite
Thank you for using Sugar Suite, created by SugarCRM Inc. The Sugar Suite edition is designed to
help you enable your organization to efficiently organize and maintain information which is crucial to
many aspects of your business.
• Sugar Suite provides integrated management of corporate information on customer accounts
and contacts, sales leads and opportunities, plus activities such as calls, meetings, and
assigned tasks.
• The system also offers a graphical Dashboard to track your sales pipeline, the most
successful lead sources, and the month-by-month outcomes for opportunities in the pipeline.
Most importantly, the system seamlessly blends all of these capabilities into an intuitive and friendly
tabbed interface.The instructions in this Guide will introduce you to some basic Customer
Relationship Management (CRM) concepts and help you get familiar with the fundamentals of using
your Sugar Suite system.
Sugar is an open source project, and as such, advances quickly through the development and
contribution of new features by its entire supporting community, of which SugarCRM Inc. and many
other organizations and individuals are proud to be a part. Welcome to the community!
About this Guide
This Guide is current with the details of operation for Sugar Suite 4.0. It is designed for users who are
new to Sugar Suite, or the areas of customer relationship management and web-based applications.
The information in this Guide describes how to use a personal computer and a web browser to
access Sugar Suite to perform a broad range of corporate information management tasks.
Readers are not required to have any programming or software development knowledge, but should
be generally familiar with the use of a personal computer and Internet browser software, such as
Microsoft Internet Explorer or Mozilla Firefox.
Who Should Read this Guide?
This Sugar Open Source User and Administrator’s Guide provides information primarily for users who
want to record and track company activities and outcomes. In addition, this Guide provides
information for system administrators who manage user access and system configuration.

About Sugar Suite
About Sugar Suite
Sugar Suite enables organizations to efficiently organize, populate, and maintain information on all
aspects of their customer relationships. The system seamlessly blends all of the functionality required
to manage information on many aspects of your business into an intuitive and friendly tabbed user
interface.
Core Features
Customer Relationship Management
• Account creation and management, with any number of Contacts associated with each
Account.
• Activity history (Meetings, Calls, Tasks, Notes with optional file attachments, and Emails) is
tracked for Contacts, Accounts, Leads, Opportunities and Cases.
• Tasks may be assigned to users, and automatic email notifications may optionally be sent to
advise users of new tasks.
Sales Force Automation
• Summary view of upcoming Appointments, top Opportunities, open Cases, Leads, open
Tasks, assigned Bugs, sales pipeline graph, monthly calendar, and a quick contact entry
facility.
• Sales Lead creation and tracking, and conversion of sales Leads into Opportunities.
• Graphical Dashboard display of Opportunities Pipeline, Lead Sources & Outcomes.
Customer Service Tracking
• A case management system that allows users to track customer problems and resolutions.
Allows each problem to have a lifecycle of information to improve customer satisfaction.
• Each case links to the related Account, Contacts, Notes, associated files, plus Call and
Meeting activity history.
• A bug tracking system for managing bugs reported against different revisions of software.
News Service
• The RSS news feeds module lets you select and manage your favorite news feeds and
display them on your My RSS News Feeds screen.
Corporate Calendar
• Calendar view (by Day, Week, Month, or Year) of all corporate Activities, with an associated
Task list.
• Shared calendar for viewing other user’s calendars for avoiding scheduling conflicts.

About Sugar Suite
Interface Consolidation
• The Portal module allows administrators and users to link external web sites and web
applications into the Sugar Suite user interface, enabling Sugar Suite to become a unified
information interface for its users.
Sugar Suite is built on established open-source technologies and widely supported industry
standards, including the PHP development environment, the MySQL relational database, the Apache
or IIS web servers, and the Linux or Windows Server operating systems. The system supports both
the LAMP (Linux, Apache, MySQL, PHP) and WIMP (Windows, IIS, MySQL, PHP) platforms.
What’s New to 4.0
With each revision of the Sugar Suite software, significant advances are made in both the feature set
and usability of the software. Here are some of the highlights of version 4.0 of the software, as
compared to the previous version.
User Interface Enhancements
Significant user interface enhancements such as a user My Inbox, default values for Probability in
Opportunities: Sales Stage dropdown, an Accounts “Copy to Contacts” action, Quick Search feature,
number field search, sub-panel Select button popups, and clickable URLs in the description field.
Campaign Management Improvements
Campaign enhancements include a new Schedule button, list management, Email templates at the
Target List level, Email template creation directly from the Email Marketing screen, and a new Activity
View screen for a tracking view of the Campaign.
Access Control List (ACL)
The access control list governs the actions (read, write, update, import, and export) than can be
performed on data within modules. ACL allows a set of privileges identified as a Role to be assigned
to a user.
Mail Merge Enhancements
Enhancements include allowing identification of MS Word mail merge templates within the
Documents Module, performing a mail merge from with Sugar Suite, and performing a Word merge
from within MS Word.
Inbound Email Processing
The Inbound Email feature provides the capability to monitor, route, assign, and reply to emails.
Multiple mailboxes can be monitored, such as support@company.com or sales@company.com.

Getting Started
Getting Started
This Guide assumes that the resources you need to access the system are available and that you are
familiar with how to use them. If you are not sure whether your system meets the requirements or
how to use required third-party tools, such as a web browser, talk to your manager or system
administrator.
Technical Requirements
Before you begin using the system, ensure that you have the required software installed and
configured on your system. You will require the following:
• A current web browser running on your computer.
Sugar Suite has been tested with and supports a variety of browsers. The following browsers are
known to work with Sugar Suite:
• Mozilla version 1.7 and higher - www.mozilla.org/mozilla1.x
• Firefox version 1.0 and higher - www.mozilla.org/firefox
• Microsoft Internet Explorer version 5 and higher - www.microsoft.com/ie
You may encounter problems if you try to access Sugar Suite using older web browsers such as
Internet Explorer 4 or Netscape 4.x. If you are unsure about which web browser version you are
using, click Help > About or similar options on the menu bar in your browser. The version number
displays.
• JavaScript and cookies support enabled in your web browser.
Both JavaScript and cookies support must be enabled in the security settings of your browser and
is usually turned on by default.
If you encounter problems accessing the system, check your browser configuration to ensure
both JavaScript support and cookies support are enabled. Click Tools > Internet Options >
Privacy and Security tabs in Internet Explorer, or Tools > Options > Privacy and Web Features
tabs in Firefox.
• Network access to a server that is running the Sugar Suite software.
Your system or network administrator can provide you with an Internet address (URL) from which
the system can be accessed.
Getting Started
Web Browser and Window Controls
Sugar Suite dynamically creates the HTML screens displayed by
the web browser when you click certain buttons in the web pages.
Using the web browser’s Back and Forward buttons can cause
problems displaying these dynamically generated pages. For this
reason, it is not recommended to use these controls on your
browser when using Sugar Suite.
Sugar Suite is designed for a minimum 1024x768-pixel screen
display resolution.
Accessing Sugar Suite
To access Sugar Suite, type the URL into your web browser’s address bar. A screen displays which
is similar to the one shown in following figure:
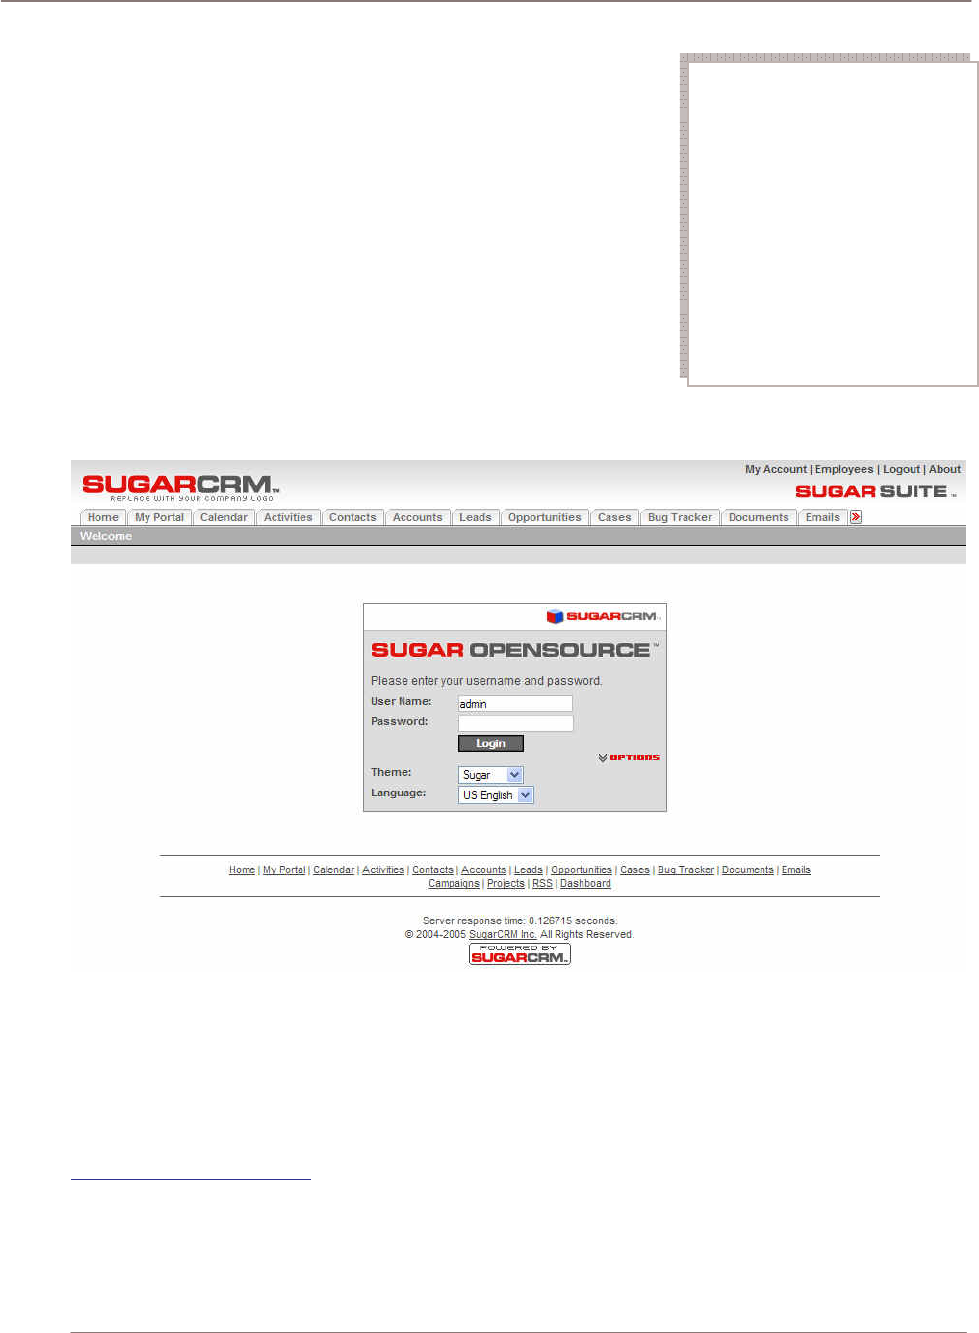
Figure 1: Sugar Open Source Log In Screen
This is the Sugar Suite log in screen. If you do not see a log in screen, verify that you have typed the
URL correctly, or contact your system administrator to verify that you have the correct URL.
To proceed, you must log in to the system by providing a valid user name and password.
You may also choose the language that you want to use when working in the system and the theme
or visual appearance you want the system to have. Languages and themes can be found at
http://www.sugarforge.org/.
Tip
Hold down the CTRL key in
Mozilla Firefox or the Shift
key in Windows Internet
Explorer while clicking on a
link to open a new browser
window when navigating
throughout the application.
This is a useful navigation
technique when viewing
many records in a list view or
in a report.

Getting Started
Logging In
Your system administrator assigns log in information – a user name and password – to every system
user. If you have not received your user name and password combination, contact your system
administrator.
If you do not provide the correct user name and password, Sugar Suite does not allow you access to
the system.
To log in to the system:
1. In the Sugar Suite log in screen, type your user name in the User
Name box.
2. Type your password in the Password box.
3. Select the language and theme that you want to use (if applicable).
4. Click the Log In button.
If you cannot log in, check the following:
• Verify that your user name and password were typed correctly,
including any capital letters.
• Contact your system administrator to verify that you have the
correct user name and password combination.
• Your account may have been disabled. Contact your system administrator.
Security Timeout
For security reasons, the system automatically logs you out of the system if you do not perform any
tasks for a period of time. By default, the system does not log you out until 30 minutes have elapsed
without any activity. (This feature can be turned off, or the time period changed, via PHP configuration
parameters.)
When you are ready to resume working with the system, click any button on the screen. The system
automatically loads the log in page for you. You can also close the web browser windows and re-load
the log in page manually in a new browser window.
Managing Your Password
When you are first given access to the system, your administrator will provide you with a password.
For security reasons, you should change this password to another one that only you know. Ensure
that you choose a password that is easy for you to remember, but difficult for another person to
guess.
You can change your password at any time. It is a good idea to change your password occasionally.
To change your password:
1. Click the My Account link that appears at the top right of your screen whenever you are logged in
to the system.
2. On the My Account screen, click on the Change Password button.
3. In the Change Password dialog box which appears, type your new password in the New
Password box, and again in the Confirm Password box.
4. Click the Save button.
Tip: System passwords
are case sensitive.
“John differs from
“john”.
Tip: System passwords
must be at least 6
characters long and
contain at least 1
numeric character.
Getting Started
If you forget your password, you must contact your system administrator, who will reset it to a value
which you can use temporarily. You should then log in to the system, and change the password to
another value of your own choosing, according to the procedure described above.
Figure 2: My Account Screen
User Interface
User Interface
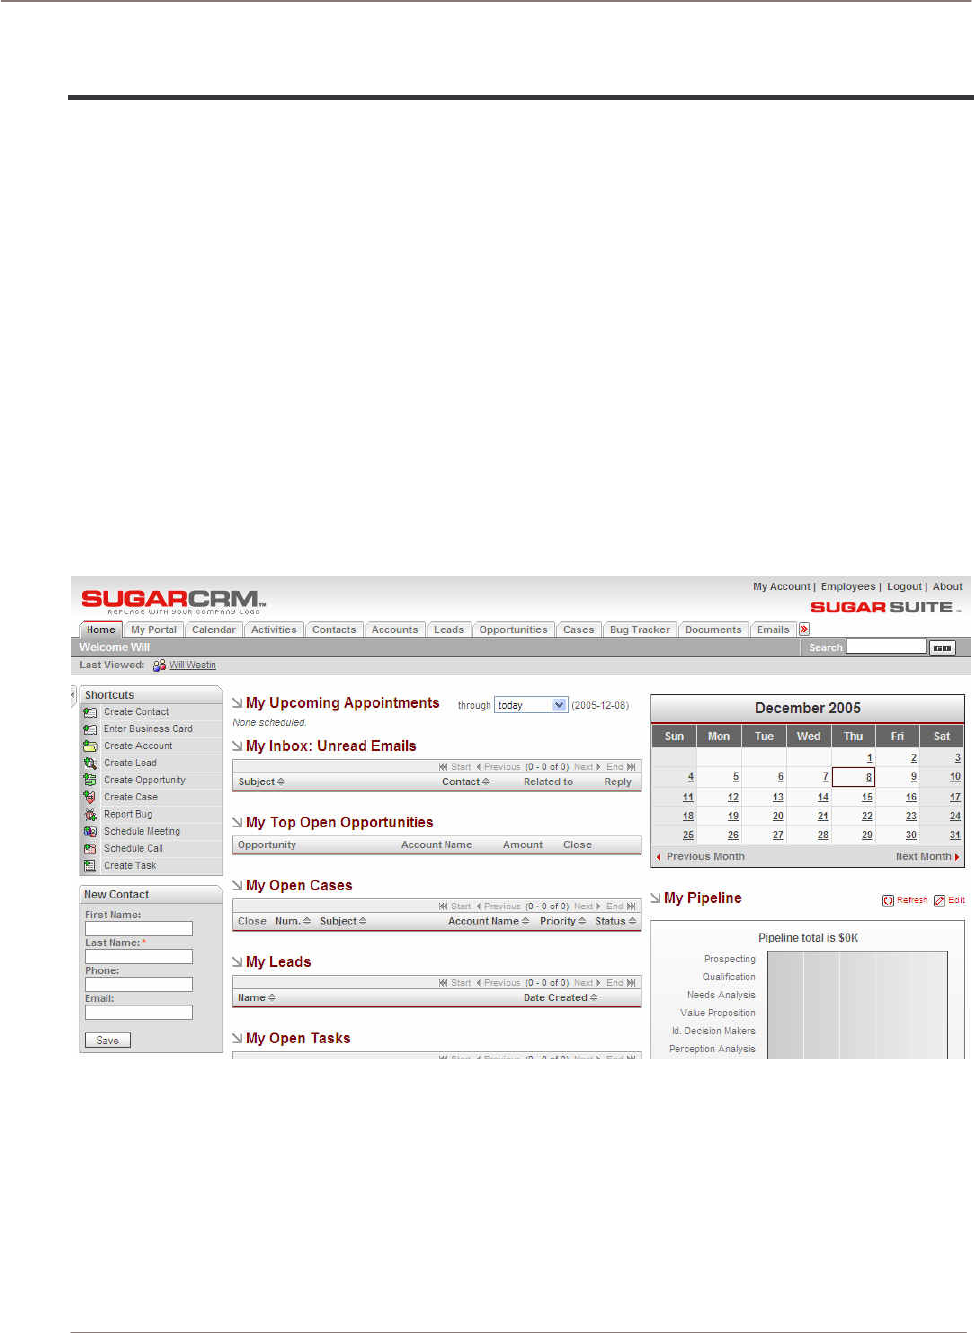
When you log into the system, the Home screen displays. Various key elements of the screen layout
are highlighted on the following figure:
• System Links: My Account, Employees, Logout, and About. The Admin link is only available to
users defined as administrators.
• Module Tabs: Click to choose a module (such as Cases, Opportunities, etc.) to view the list view.
A dropdown menu lets you select other modules if you have more than 12 tabs.
• Search Box: Search for a text string within key data held by Sugar Suite.
• Last Viewed: A useful trail of recent records you have viewed.
• Shortcuts Box: Specific shortcuts useful within each module.
• Quick New Item Box: Quick data entry box to create a new item for the current module.
• My Inbox: The My Inbox is populated by items from the Inbound Email feature. See the System
Administration, Inbound Email section for more information.
• Monthly Calendar and a Pipeline graph.
Figure 3: Home Screen
The Home screen layout uses the same layout as all of the other tabs. The screen layout features
and capabilities include the following:
• As you move between the tabs, the shortcuts change according to the specific tab, and the main
screen body displays the information indicated by the tab name.
• The Quick New Item box changes to offer quick access for creating new items based on the tab,
for example, New Contact, New Account, New Opportunities, and so on.

User Interface
Module Tabs
From the Home tab, you can access any module by clicking on the tab
related to its name. Modules help you work more efficiently by grouping
the tools and functions you need to perform specific tasks. Some
themes display the modules as links on the left side of the user
interface instead of tabs. This document refers to the tabbed interface.
Module Description
Sugar Suite consists of the following modules:
• Home
The Home tab contains a general overview of Cases, Opportunities, Appointments, Leads, Tasks,
Calendar and Pipeline. It also includes shortcuts to enter most sorts of data, and a quick form for
new contacts. The Home tab provides a quick overview of what customer tasks and activities you
need to focus on today.
• My Portal
My Portal contains a series of shortcuts which can link to any web site you choose. This is
commonly used to include email, forums, or any other web-based application, allowing Sugar
Suite to become a single user interface for multiple applications.
• Calendar
View scheduled activities (by day, week, month or year), such as meetings, tasks, and calls.
Being able to share your calendar with your coworkers is a powerful tool for coordinating your
daily activities.
• Activities
The Activities tab allows you to create or update scheduled activities, or to search for existing
activities. Sugar Suite allows you to manage the myriad of calls, meetings, notes, emails and
tasks that you need to track in order to get your job done.
• Tasks are for tracking any action that needs to be managed to completion by a due
date.
• Notes allow you to capture note information as well as upload file attachments.
• Calls allow you to track all of your phone calls with leads and customers.
• Meetings are like calls, but also allow you to track the location of the meeting.
• Emails allow you to archive sent or received email messages. If you use Microsoft
Outlook, you can quickly archive email messages with the Sugar Plug-in for Outlook.
• Contacts
View a paginated contact list, or search for a contact. You can click on a specific contact to zoom
in on the detailed contact record. From a specific contact record, you may link to the related
account, or leads, opportunities, cases, or direct reports (related contacts).
Contacts are the people with whom your organization does business. As with accounts, Sugar
Suite allows you to track a variety of contact information such as title, email address, and other
data. Contacts are usually linked to an Account, although this is not required.
• Accounts
Tip
Not every module
has a screen tab. For
instance, the Notes,
Emails, Tasks, Calls,
and Meetings
modules are all
grouped together in
the Activities tab.

User Interface
View a paginated account list, or search for an account. You can click on a specific account to
zoom in on the detailed account record. From a specific account record, you may link to related
contacts, activities, leads, opportunities, cases, or member organizations.
Accounts are the companies with which your organization does business. Sugar Suite allows you
to track a variety of information about an account including website, main address, number of
employees and other data. Business subsidiaries can be linked to parent businesses in order to
show relationships between accounts.
• Leads
View a paginated list of leads, or search for a specific lead. You can click on an individual lead to
zoom in on the lead information record. From that detailed lead record, you can link to all related
activities, and see the activity history for the lead.
Leads are the people or companies with whom your organization might do business in the future.
Designed to track that first point of interaction with a potential customer, leads are usually the
hand off between the marketing department and the sales department. Not to be confused with a
contact or account, leads can often contain incomplete or inaccurate information whereas
contacts and accounts stored in Sugar Suite are core to many business processes that require
accurate data. Leads are typically fed into the Sugar Suite system automatically from your
website, trade show lists or other methods. However, you can also directly enter leads into Sugar
Suite manually.
• Opportunities
View a paginated list of opportunities, or search for a specific opportunity. You can click on an
individual opportunity to zoom in on the Opportunities information record. From that detailed
Opportunities record, you can link to all related activities, see the activity history for the
opportunity, and link to related leads and contacts.
Opportunities track the process of selling a good or service to a potential customer. Once a
selling process has commenced with a lead, a lead should be converted into a contact and
possibly also an account. Opportunities help you manage your selling process by tracking
attributes such as sales stages, probability of close, deal amount and other information.
• Cases
View a paginated list of cases, or search for a specific case. You can click on an individual case
to zoom in on the case information record. From that detailed case record, you can link to all
related activities, see the activity history for the case, and link to related contacts.
Cases are the handoff between the sales department and the customer support department.
Cases help customer support representatives manage support problems or inquiries to
completion by tracking information for each case such as its status and priority, the user
assigned, as well as a full trail of all related open and completed activities.
• Bug Tracker
View a paginated list of reported software bugs. You can click on an individual bug to zoom in on
the detailed bug report. From that detailed bug report, you can link to all related activities, see the
activity history for the bug, and link to related Contacts, Accounts, and Cases.
Tracking software bugs is an important function of a customer support department. The Bug
Tracker module helps customer support representatives manage software-related support
problems or inquiries to completion by tracking information for each bug such as its status and
priority, its resolution, the user assigned, the release of software involved, its type (defect or
feature) as well as a full trail of all related open and completed activities.
• Documents

User Interface
!
The Documents tab shows you a list of documents that you can download. You can also upload
your own documents, assign publish and expiration dates, and specify which users can access
them.
• Emails
The Emails tab allows you to write and send emails and to create Email Templates that can be
used with email-based marketing campaigns. You can also save drafts and archived emails.
• Campaigns
The Campaigns tab helps you implement and track marketing campaigns. Campaigns may be
telemarketing, mail or email based. For each Campaign, you can create the Target List from your
Contacts or Leads or outside file sources.
• Projects
The Projects tabs helps you manage tasks related to specific projects. You can track and manage
tasks for a project. Tasks can be assigned to different users and assigned estimated hours of
effort. As tasks are in progress and completed, users can update the information for each task.
• RSS
View the latest headlines provided by your favorite RDF Site Summary (RSS) feeds. These feeds
provide news or other web content that is distributed or syndicated by web sites which publish
their content in this manner. The system has hundreds of RSS feeds available as supplied, and
others may easily be added.
Yahoo, ZDNet, Wired, Slashdot, Washington Post, The Telegraph, The Seattle Post, Reuters,
New York Times, InfoWorld, Boston Globe, CBS MarketWatch, ABC News, BBC News – you can
make them available to create your own custom news-gathering experience.
• Dashboard
The Dashboard tab displays a graphical dashboard of your Opportunities Pipeline by Sales
Stage, Opportunities by Lead Source by Outcome, Pipeline by Month by Outcome, and
Opportunities by Lead Source.
Selecting a Module
To select a module when the Home tab displays:
• Click on the tab which shows the name of the module you want to
use.
Navigating the Module Screens
All of the Task module screens use the same basic layout – making it easy for you to move from one
area of the application to the next.
Tip
The Module tab is
always available at
the top of the
browser.

User Interface
List View Screen
Most module screens (Home, Calendar and Dashboard are exceptions) have two key elements to
them – a search filter capability at the top, and a list view of items below. Generally, the search filter
has basic search fields, and a link to use the advanced search with more fields on which to filter the
list of items below.
List view searches
When working with the list view, you can work with the complete list, or use the search filter to reduce
it to a more manageable size. To use the search filter, type in one or more boxes and then click on
the Search button. Text entered in search fields needs to match from the beginning of the value
stored in each record – for example “fred” will match Frederick, but not Alfred, in a first name field. If
text is entered in more than one search field, then a record must match on all those fields to be
included in the filtered list. Wild card search characters are not needed and not supported. In other
words, searching for “fred*” would only match first names like “Fred*erick” or other “Fred” names
containing the asterisk (*) character.
System-level searches
Using the system level search box is much the same, only it searches Contacts, Accounts, Leads,
Opportunities and Cases, and looks for search text to match from the beginning of key fields for each,
as below. Note: numeric search strings will match anywhere in a field. Then all matching records are
displayed in a series of paginated lists.
Contacts: First Name, Last Name, Email, Other Email, Home (phone), Mobile (phone), Office Phone,
Other Phone, Fax, Assistant, Assistant Phone
Accounts: Account Name, Phone, Other Phone, Fax
Leads: First Name, Last Name, Account Name, Email, Other Email, Home (phone), Mobile (phone),
Office Phone, Other Phone, Fax
Opportunities: Opportunity Name
Cases: Search by one case number, a list of numbers (delimited by commas, e.g., 2630, 2489,
2690), and by Subject.
Bug Tracker: Search the number field with a list of numbers delimited by commas (e.g., 2630, 2489,
2690).
Quick searches
Quick Search feature: performs immediate data lookups based on keystroke entries. Matching values
are presented in dropdowns adjacent to the field for selection. Typing any character in the field
presents a list. Typing additional characters restricts the resulting list. The Quick Search feature is
available on any edit field that has a Select button next it in edit view, for example, Assign To fields.
Detail View Screen
From a module’s list view, clicking on any entry in the list displays the detail view for that item – for
example the full details of a contact, or an account. This detail view shows more information than the
list view for the specific item selected. It also shows all associated items of information, and lets you
click on links to them. For example, the Accounts detail view screen lists all associated Account Open
Activities, History (Notes, Emails, Tasks, Meetings, and Calls), Contacts, Opportunities, Leads,
Cases, Member Organizations and Bugs. These lists of related information are called sub-panels
which associates and represents information in much the same way that your brain thinks, and lets
you navigate or explore the information that way.
User Interface
Select popups
Sub-panel popups are accessed via sub-panel Select buttons and are multi-select popups. This
feature promotes rapid association of multiple records, for example, multiple Contacts under an
Account.
Data popups
Data popups automatically show detail information when you pass over an item as illustrated below:
Figure 4: Sub-Panel Data Popup
Note that URLs in description fields are clickable for navigation purposes. A separate popup is
generated.
Printing and Help
Each module provides Print and Help icons on the title bar at the top of the main screen body.
Click the Print icon to print the current screen view. Clicking the Help button displays a link to the
latest user documentation.
System Links
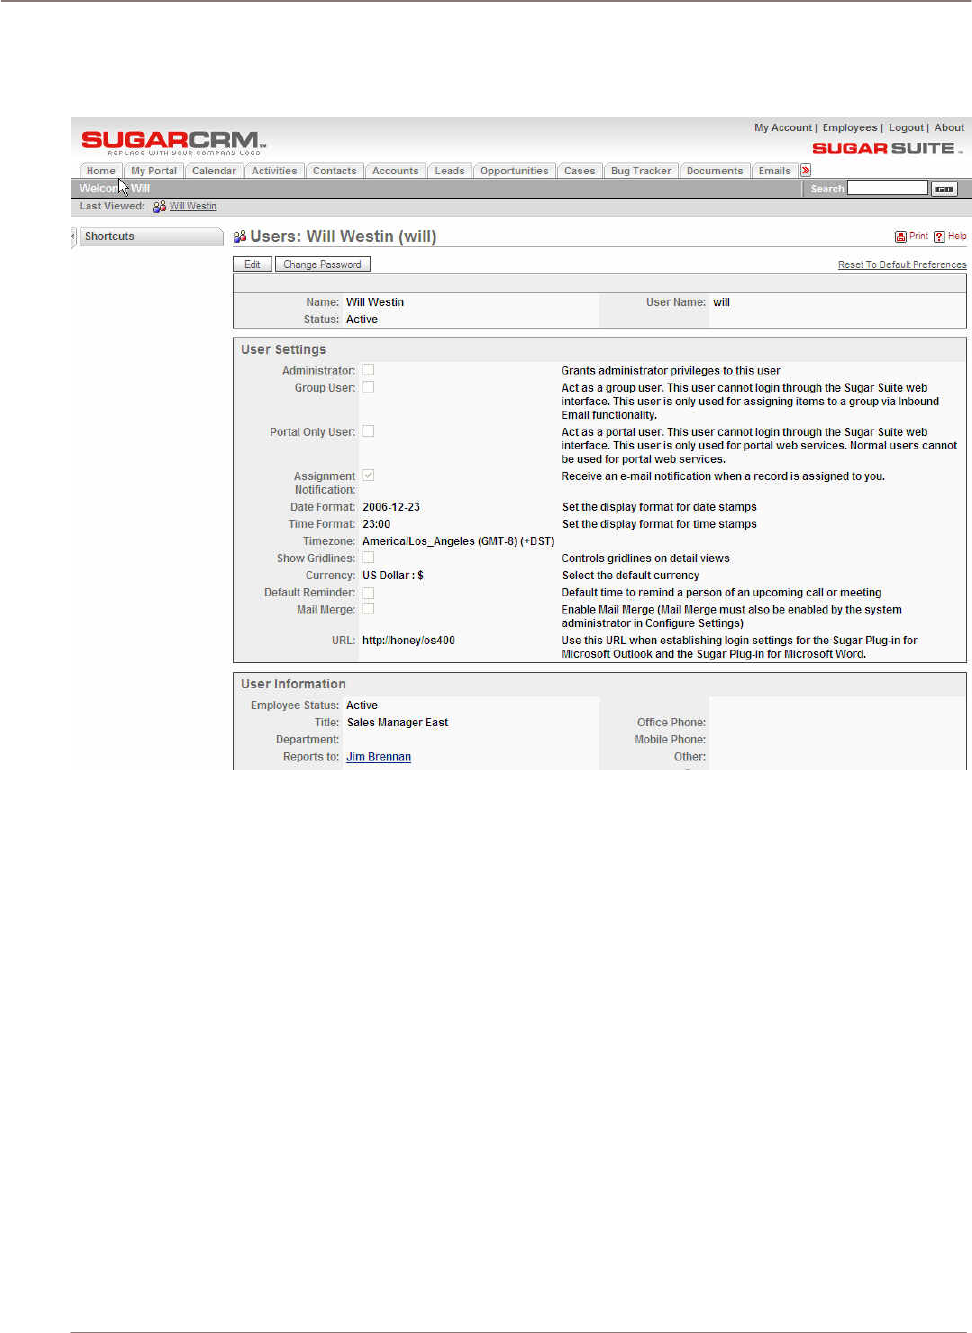
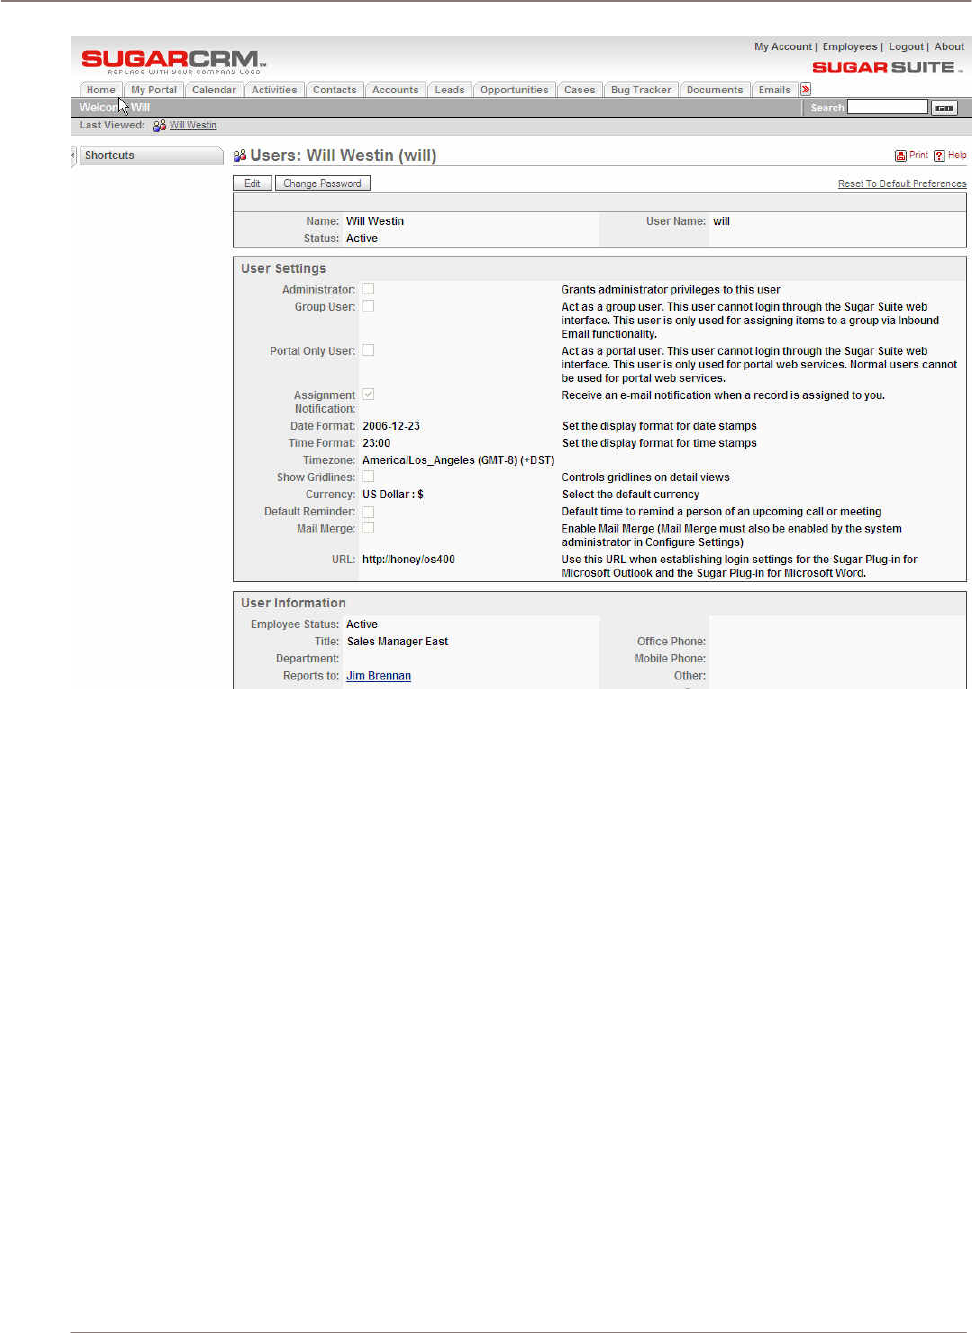
My Account
To access your own user profile screen, click the My Account link appears at the top right of your
screen whenever you are logged in to the system. Note that an Admin link next to it is only displayed
for users with Administrator capability. The figure below shows the user profile screen. When
Administrators view information on a user, a Duplicate button displays, which allows an administrator
to duplicate an account record, and then edit it briefly, as a quick way of creating a new user.
As discussed in the section on Managing Your Password, the Change Password button should be
used periodically to change your user password.
User Interface
Figure 5: My Account Screen
To edit the user profile, and change user preferences, click on the Edit button. The edit view displays
a screen which lets you define header information (such as First and Last Name, and User Name),
User Settings, User Information (email address, title, department, and phone numbers), Address
Information, Calendar Options, Email Options, and Edit Tabs. These groups of information are known
collectively as the user profile.
User Settings
User settings include such items as a check box for Administrator capability (only users with
Administrator capability are able to check this off), Assignment notifications (do you receive an email
when you are assigned a responsibility), time format (AM/PM or 24-hour clock), a check box for
gridlines on screen displays and a selector for the default preferred Currency.
User Information
User information includes more details about the user and contact information.
Email options contain information about your email server and must be specified correctly for you to
send emails from the Emails module. This information is provided by an Administrator.
The Calendar options include settings to share your free vs. busy time between your calendars in
Microsoft Outlook and Sugar Suite. This information is provided by an Administrator.
Users can also modify what module tabs they see when logged in. Administrators define the master
list of available tabs in the administration screens, but users can then modify their own tab list by
removing any unneeded tabs. When Administrators edit users account, they can disallow tabs for
individual users so that they are not available.

User Interface
E-mail Options
This option allows you to set your “From” name and address.
In addition, you can view and change the mail transfer agent, change the server set up, and specify
SMTP authentications. Check with your system administrator before editing these setting.
Calendar Options
This option allows you to determine whether your calendar is published or not.
Roles
Roles are created to determine the module a users has access to and what actions (via the Access
Control Lists) the user can perform on that module. Roles are created and assigned to users by the
System Administrator. An example use for a Role is to create different module sets for Roles named
Sales, Marketing, and Support. While the users assigned to the Support Role need access to the Bug
Tracker module, the users in the Sales Roles do not. The Access Control Lists (ACLs) allow very
granular definitions of Roles based on modules and actions that can be performed on that module.
The ACL mechanism governs the actions (read, write, delete, update, import, export) that can be
performed on data within modules. Roles are abstract definitions of privileges. See the Role
Management section of System Administration for more detailed information about Roles and ACLs.
Employees
The Employees link displays a list of employees maintained by the administrator. The list displays the
following values for each employee record: Name, Department, Reports To, Email, Phone and User
Name.
The Employees module provides a list of all or selected Employees from a recent search. The
Employees list may be sorted by clicking on any column title which has the icon beside it. Clicking
on a column title when it is already the highlighted sort column reverses the sort order.
The Employees list is paginated if it contains more items than are displayed on the screen. Controls
are provided to go to the start or end of the list, or step to the next or previous page. Clicking on any
Employee in the list displays the detail information for that Employee.
The navigation shortcuts provided help you create a new employee or switch back to the Employees
list view. When creating a new employee, you can add other contact information such as mailing
address and employment status.
Every User in the system has an attached Employee record. However, every Employee does not
necessarily have a User record. Users that are not Administrators can view, search, and select
employees from the list. They cannot edit or add employees.
Logout
When you are finished working with the system, you should always log out of the system rather than
just closing your web browser.
When you log out, the system performs several ‘clean-up’ procedures, and then automatically returns
the web browser window to the Login screen.
To log out:
• Click the Logout link in the User Management area (top right hand area of the screen).
• Close the browser window.

User Interface
About
This link provides information about SugarCRM Inc. as well as credits and valuable source code
references.
Using Sugar Suite
Using Sugar Suite
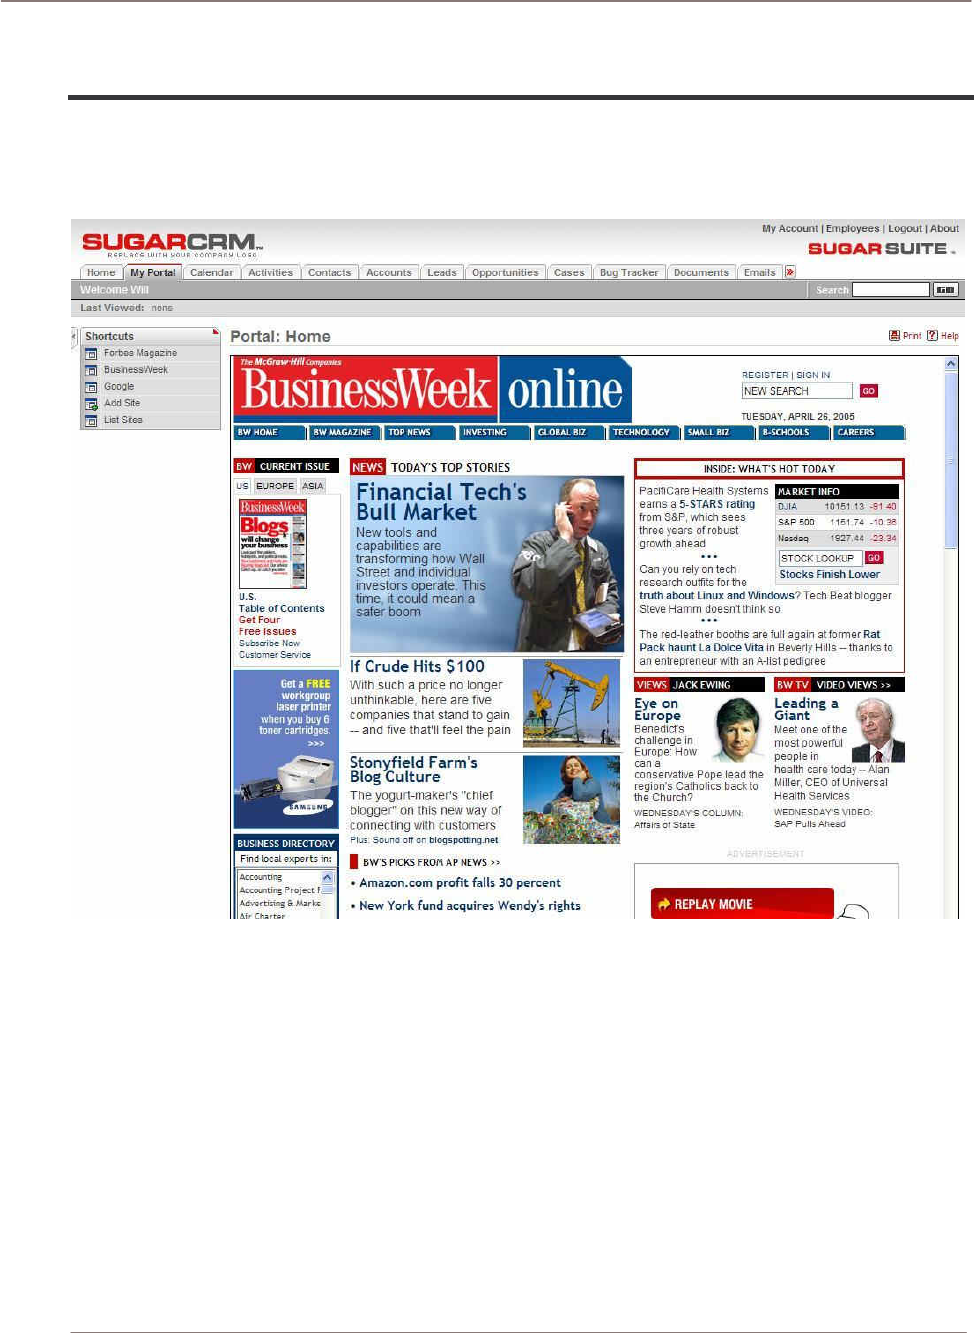
My Portal Module
The Portal Module list view is selected using the My Portal navigation tab:
Figure 6: My Portal Module
The My Portals screen provides shortcuts to web sites or applications. You can create shortcuts to
web sites so that they appear as a set of shortcuts on the My Portal screen. Administrators can also
add shortcuts to the list in the My Portal tab and they can create additional Portal tabs. New tabs are
often used for email, forums, or other web-based applications, which allows Sugar Suite to provide a
single interface for multiple application purposes. The initial web site displayed when you click the My
Portals tab is the Portal home site, which is configured by the Administrator.
A set of shortcuts allows you to Add Site, List Sites, or to navigate to sites with shortcuts already
created. The shortcuts include shortcuts you created to view Personal sites and shortcuts to Global
sites created by the Administrator.
• To display the Portal screen list, click the List Sites shortcut.
• To delete a Portal site from the Portal List screen, click the checkbox next to the site and then
click the Delete button below the list of Portal sites.
• To edit a Portal site, click on its name.
Using Sugar Suite
• To view its target web site, click the link to the URL.
• To create a new Portal site, click the Add Site shortcut. When creating a new Portal site, you
can type the name and web site, click to select if you want it to be currently visible or not.
You might want to hide shortcuts without deleting them from the list. You can select whether the
shortcut displays in the shortcut list, on the tab menu or both. Administrators can select whether the
site is Personal or Global. Global means that the shortcut is added for all users.
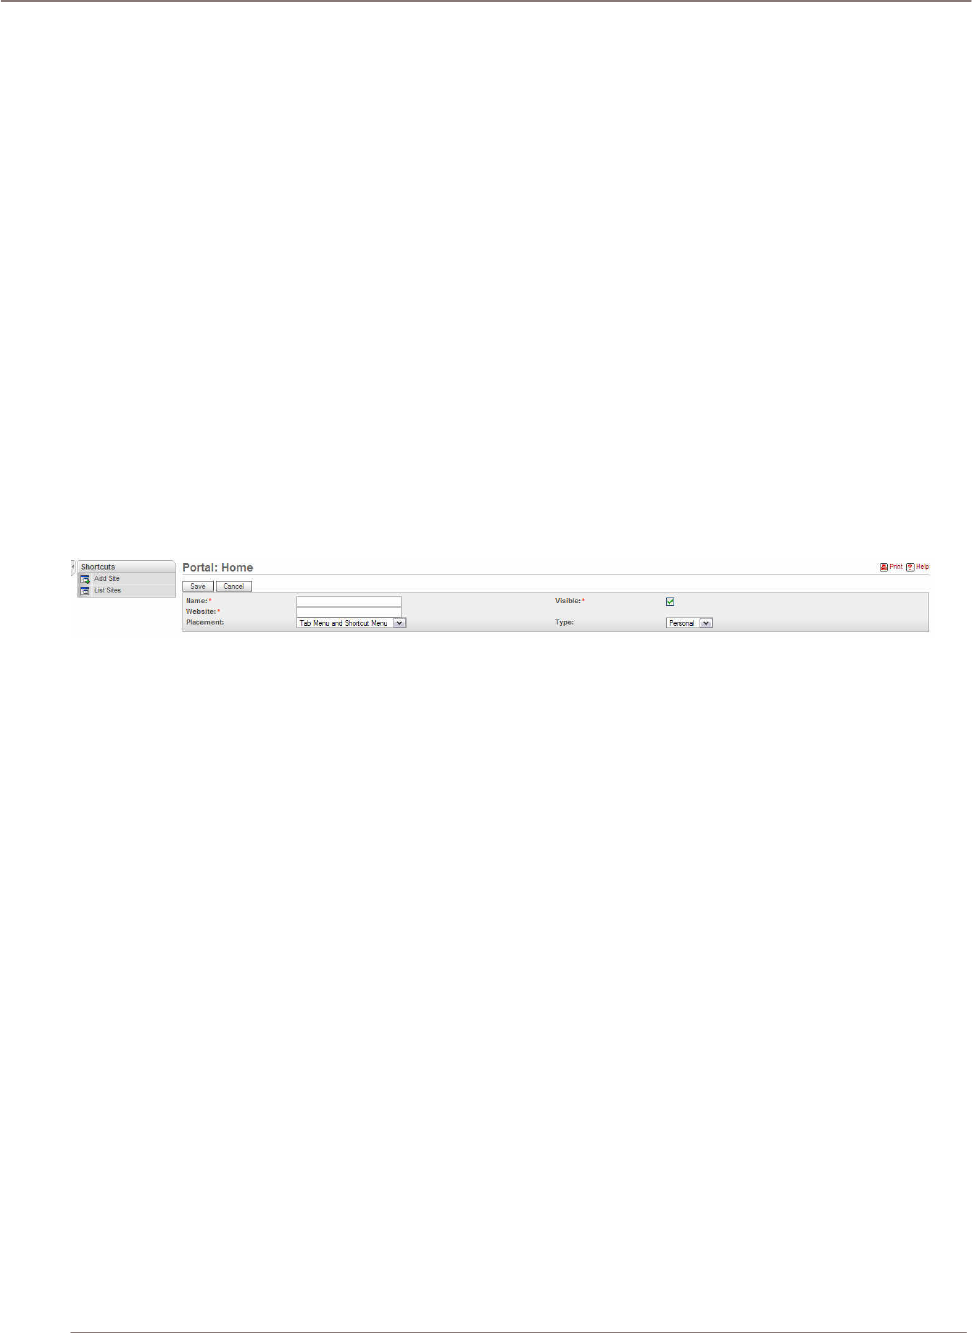
Navigation Shortcuts
Navigation Shortcut – Add Site: Users can add their favorite website or work related website
directly into the SugarCRM application. Name is what you want to call your website. The website text
box is the area where you enter the URL of the website.
The placement drop down menu gives the user the following options:
• Tab and shortcut means the website link shows up on the shortcut and tab on the top.
• Tab menu shows up on the tab only.
• Shortcut menu shows up on the shortcut bar only. If the visible checkbox is checked, it
indicates that the link shows up at the places according to placement option.
• Type dropdown menu determines who gets the link to the websites on the application.
Figure 7: My Portal Module (Add Site Edit View)
Using Sugar Suite
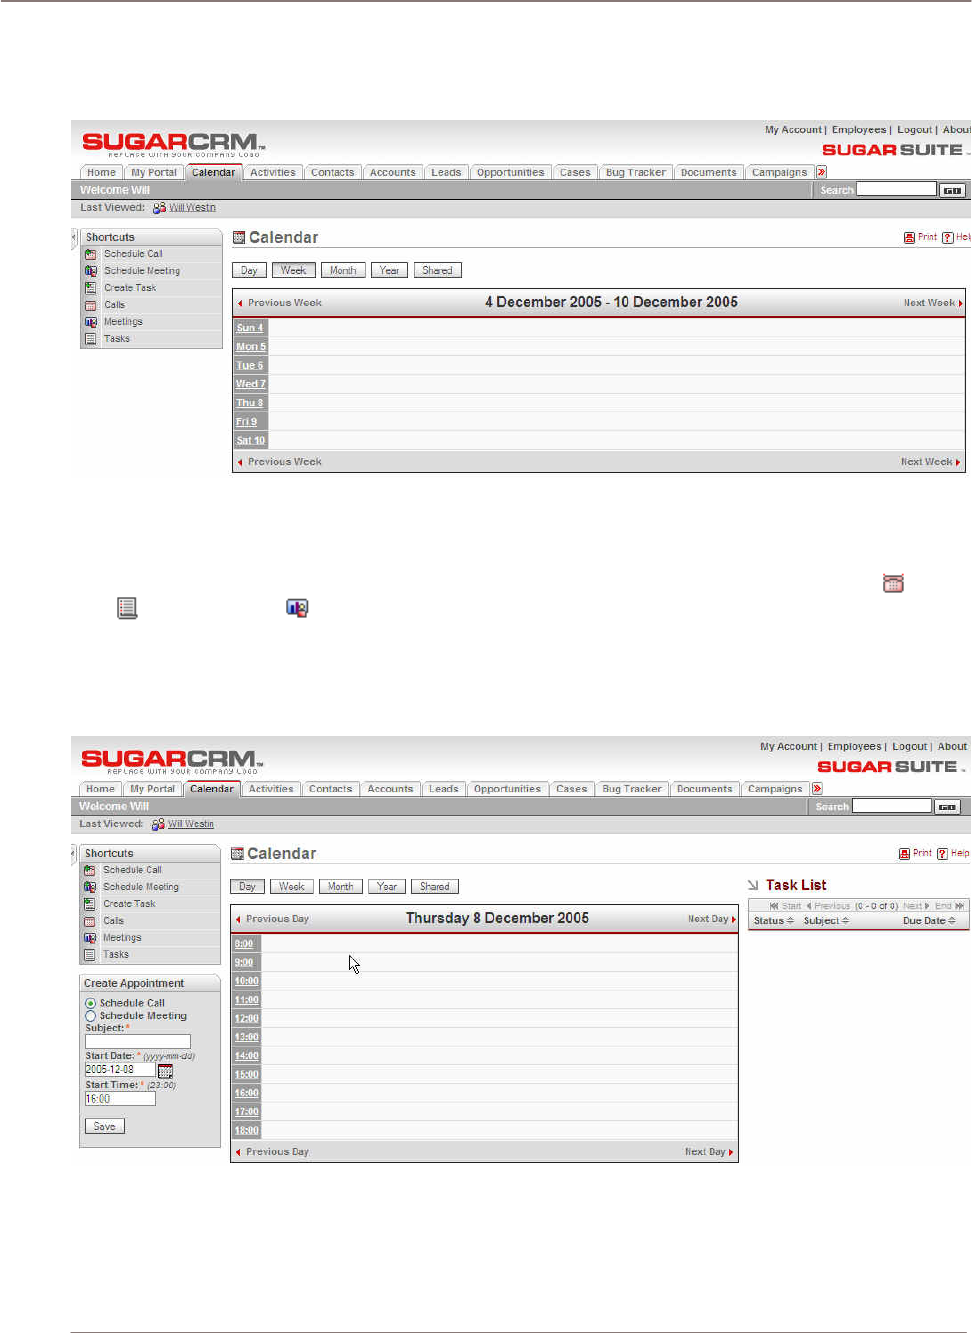
Calendar Module
The Calendar Module list view is selected using the Calendar navigation tab:
Figure 8: Calendar Module (Week Format)
You can display your calendar by Day, Week, Month or Year by clicking on the buttons at the top left
of the main screen. In each format, any planned activities with associated dates are displayed – such
as Calls, Meetings, Tasks, Notes and Emails. Icons are used to indicate the type of activity: for a
Call, for a Task, and for a Meeting. You may click on any activity in your calendar to edit that
activity.
Each different display format allows you to nudge backwards and forwards in time - by one day,
week, month or year. In the Week, Month or Year display formats, clicking on a particular date within
the display shifts the display to Day format for that date.
Figure 9: Calendar Module (Day Format)
The Day display format has the hours of the day listed vertically. Clicking on a specific time displays a
quick method of scheduling a Call or Meeting.
The Day display format also includes a task list on the right side of the main screen body. Click the
subject of a task in the list to view the details of that task.
Using Sugar Suite
The shortcuts allow you to view Calls, Meetings and Today. You can also click a shortcut to schedule
a meeting or call. When you click the Schedule Meeting shortcut, you can view the meeting time slot
in graphical view of the day. If other calls or meetings are scheduled, the busy time displays as
blocked out. You can invite other users to the meeting by searching by their names and adding them.
Figure 10: Calendar Module (Schedule Meeting)
Navigation Shortcuts
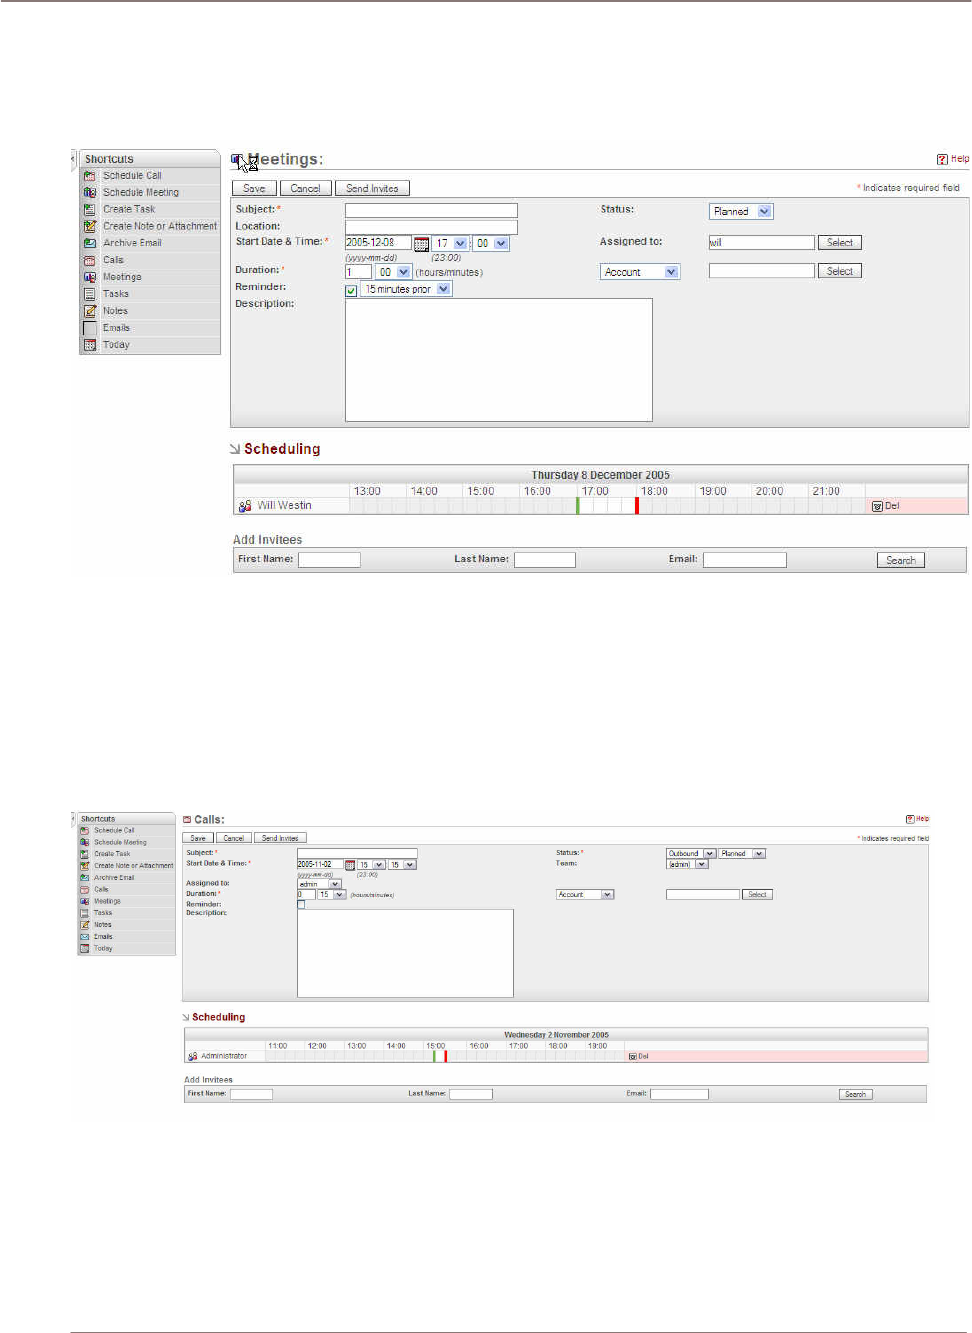
Navigation Shortcut – Schedule Call: The Schedule Call edit view takes you to the Calls’ edit page.
You can schedule a call by entering the information in this page. The required fields are: Subject,
Start Date & Time, Duration and Status. After the required field information are entered you can save
the call, cancel the call, or send invites to other team members by using the buttons at the top left of
the panel.
Figure 11: Calendar Module (Schedule Call Edit View)
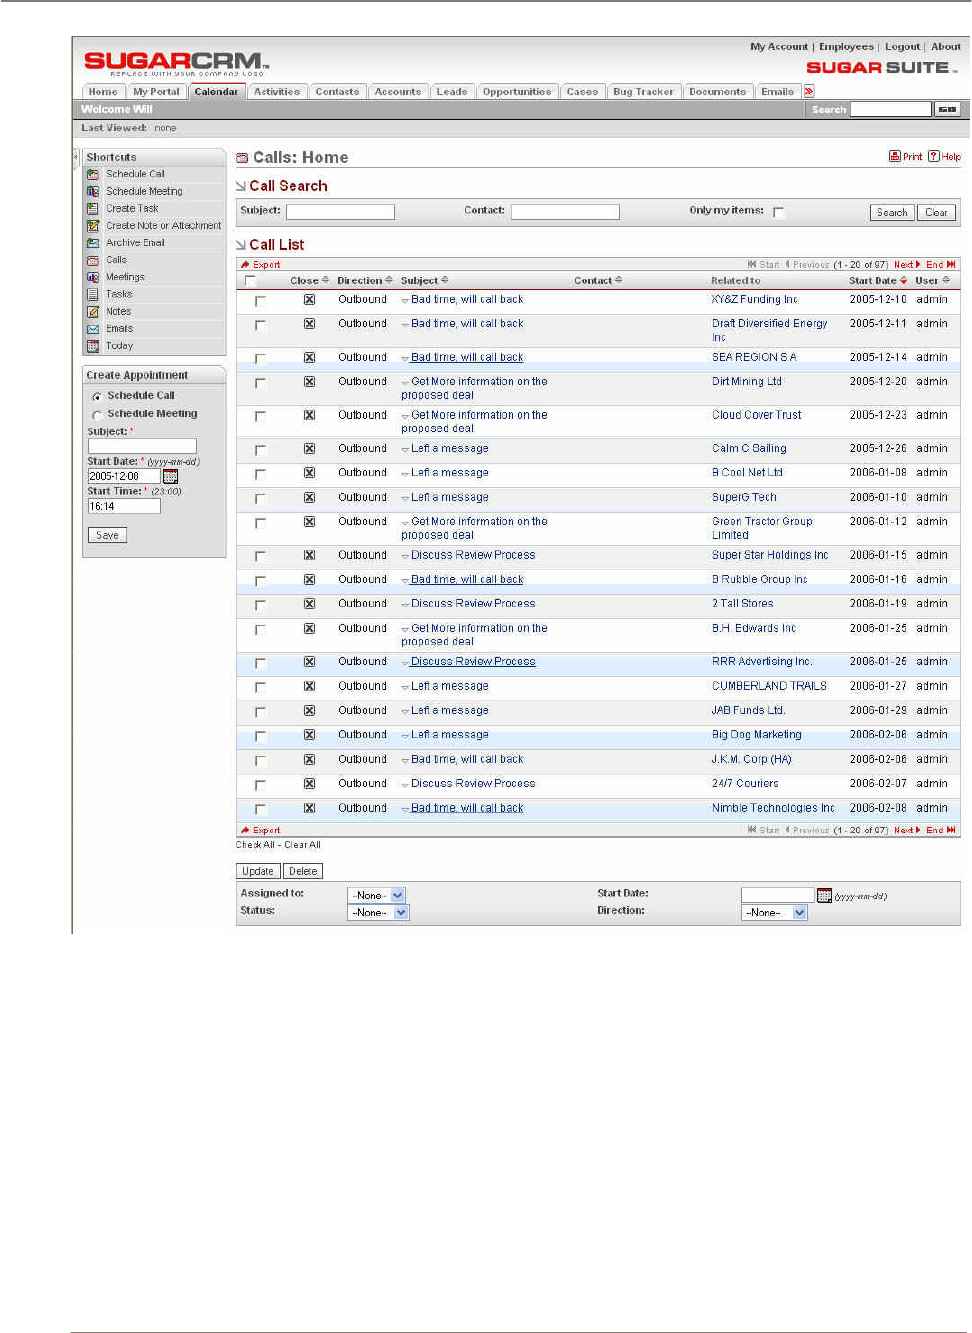
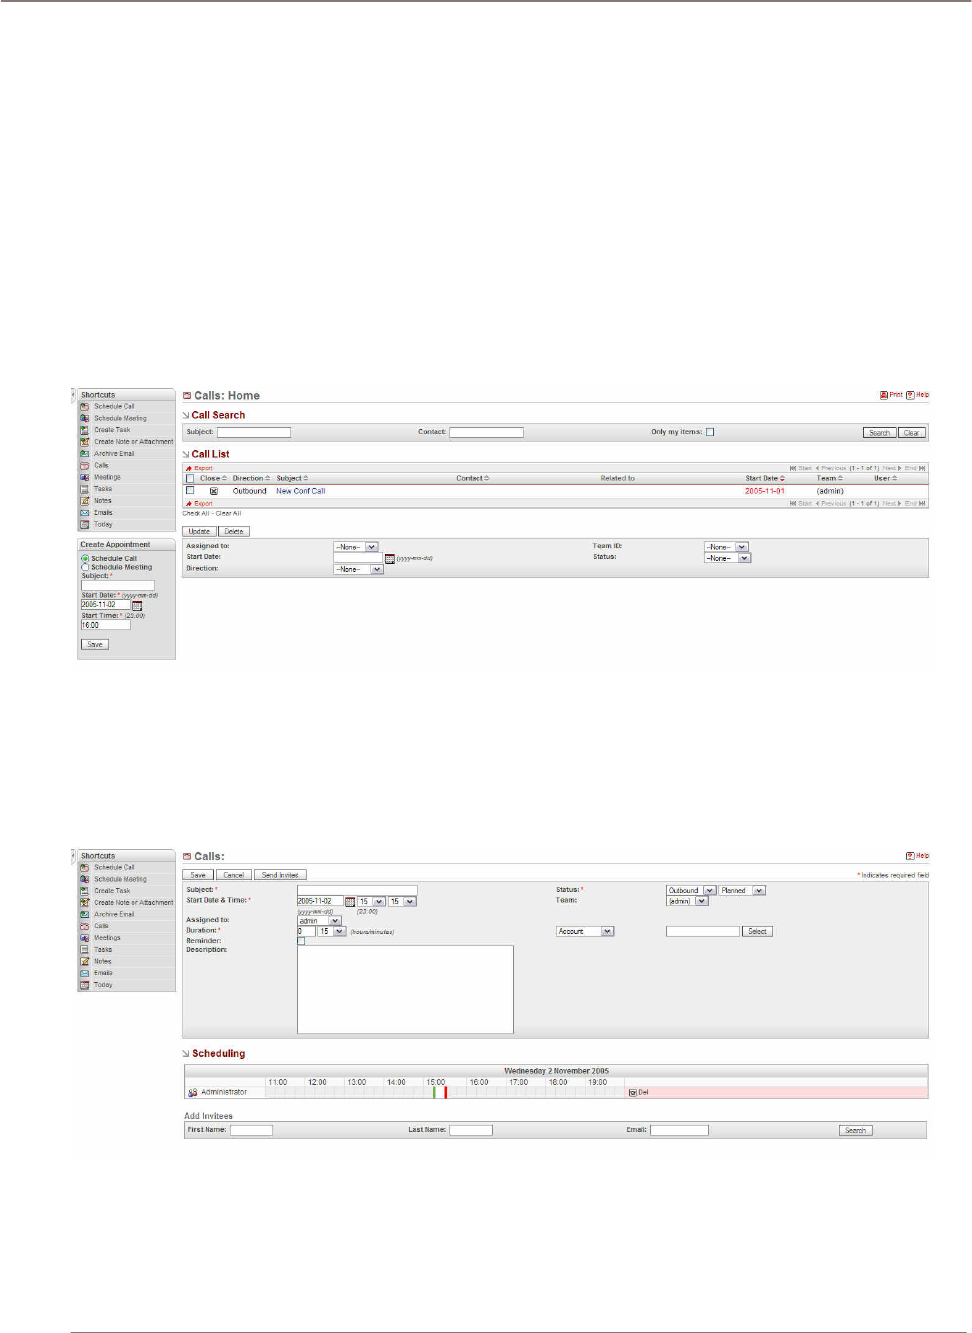
Navigation Shortcut – Calls: The Calls shortcut takes you to the Call detail view page. You can
search for a scheduled call in the search box on the upper left hand corner of the panel. The Call List
displays calls that you have permission to see. By clicking on the subject link, it takes you to the call’s
detail page.
Using Sugar Suite
!
Figure 12: Calendar Module (Calls List View)
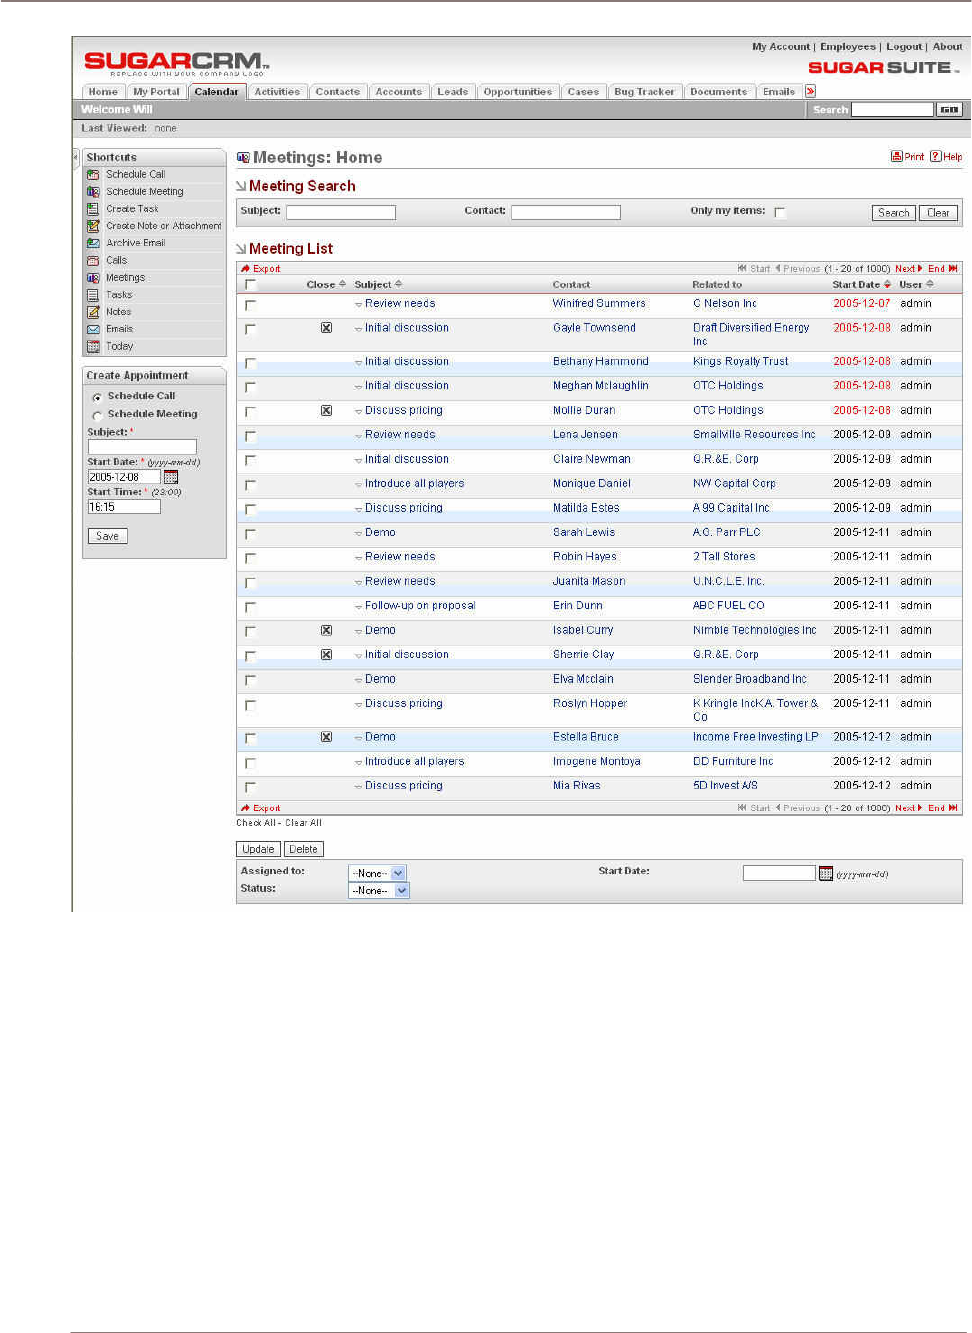
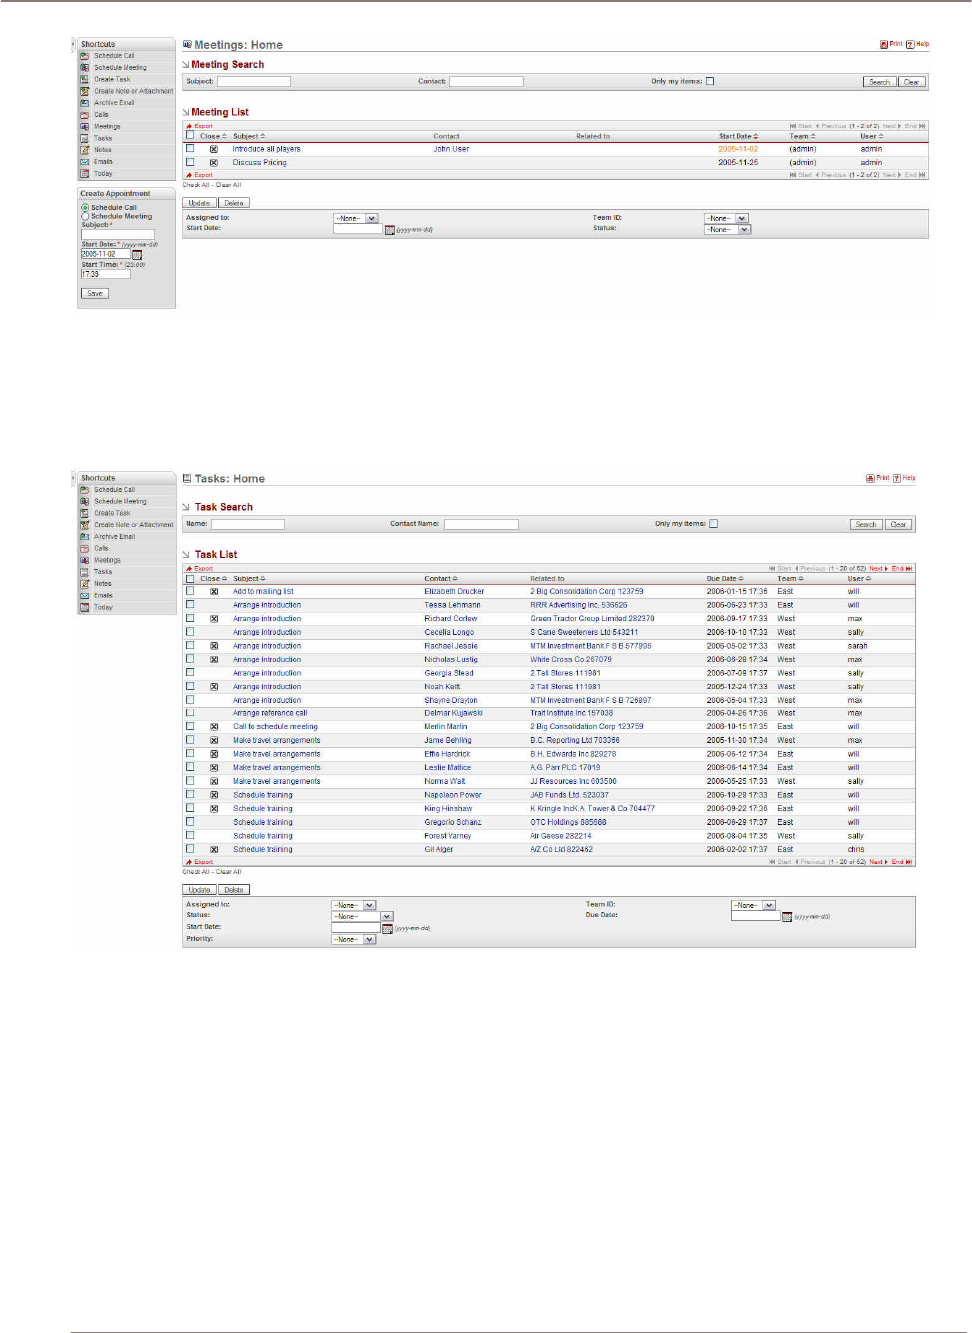
Navigation Shortcut - Meetings: The Meetings detail view is similar to Calls detail view page. You
can search for a meeting with subject or contact name. This window also shows the list of meetings
that you have permission to see.
Using Sugar Suite
Figure 13: Calendar Module (Meetings List View)
Using Sugar Suite
Activities Module
The Activities Module list view is selected using the Activities navigation tab:
Figure 14: Activities Module (Task List View)
The Activities module allows you to create a new Call, Meeting, Task, Note or Email, by using
shortcuts in the navigation shortcuts box. As well, you may select different list views for Calls,
Meetings, Tasks, Notes or Emails, using the navigation shortcuts box. Each of the list views typically
provides a list of all or selected items from a recent search. Each item in the list has a check box at
the left, and at the bottom of the screen is a facility to update one or more field values for all checked
items.
Each list may be sorted by clicking on any column title which has the icon beside it. Clicking on a
column title when it is already the highlighted sort column reverses the sort order. Each list is
Using Sugar Suite
paginated if it contains more items than may be listed on the display, and controls are provided to go
to the start or end of the list, or step to the next or previous page.
Each of these list views provides powerful linking capabilities to related information. The Task list
view, for example, lists Subject, Contact, Related To, Due Date, and the user assigned to the task.
Clicking on a task’s subject takes you to a detailed view of the specific task. Clicking on the Contact
zooms to a detailed view of that contact, and so on. You can also click Import Notes to import notes
from an outside file such as a .csv or .tsv file or from Salesforce.com.
Navigation Shortcuts
Navigation Shortcut – Calls: The Calls shortcut takes you to the call detail view page. You can
search for a scheduled call in the search box on the upper left hand corner of the panel. The Call List
display calls that you have permission to see. By clicking on the subject link, it takes you to the call’s
detail page.
Figure 15: Activities Module (Calls List View)
Navigation Shortcut – Schedule Call: The Schedule Call edit view takes you to the Calls’ edit page.
You can schedule a call by entering the information in this page. The required fields are: Subject,
Start Date & Time, Duration and Status. After the required field information are entered, you can save
the call, cancel the call, or send invites to other team members by using the buttons at the top left of
the panel.
Figure 16: Activities Module (Schedule Call Edit View)
Navigation Shortcut - Meetings: The Meetings detail view is similar to Calls detail view page. You
can search for a meeting with subject or contact name. This window also shows the list of meeting
that you have permission to see.
Using Sugar Suite
Figure 17: Activities Module (Meetings List View)
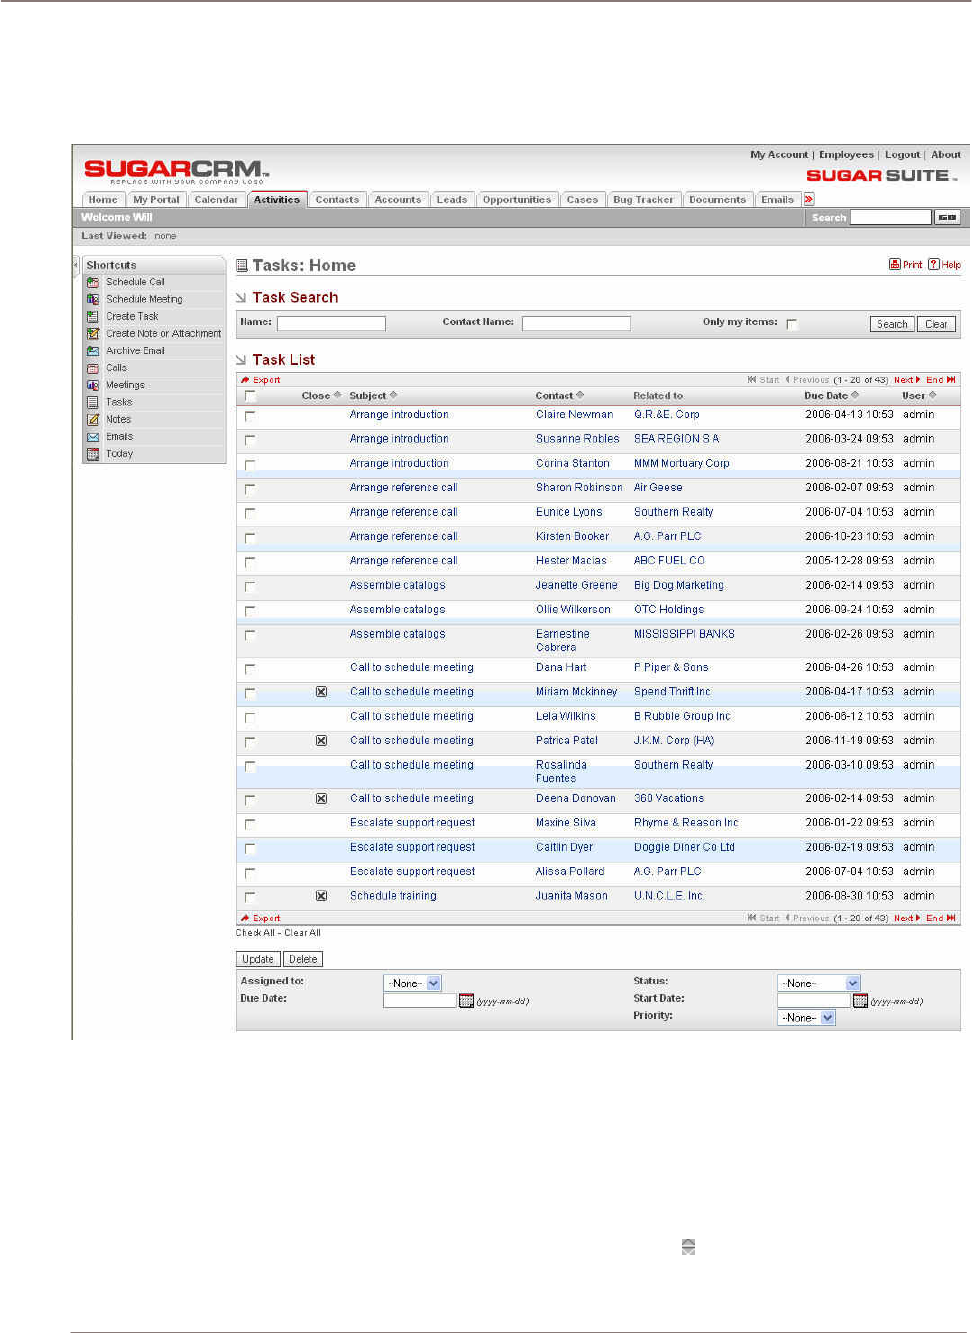
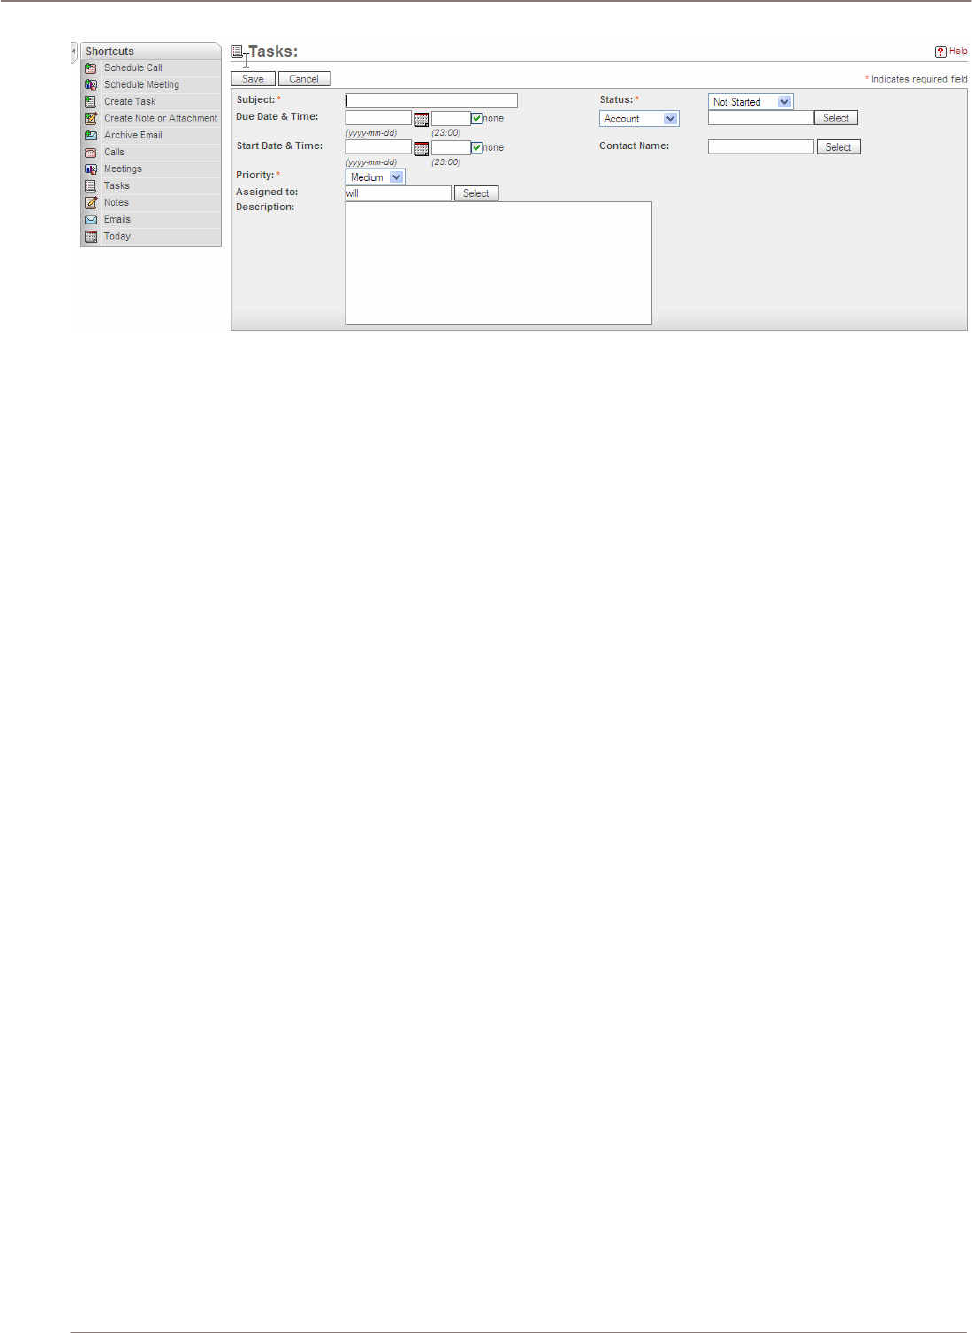
Navigation Shortcut – Tasks: The Tasks home view gives a list of tasks that are associated with
your view permission. You can see the detail of each task by clicking on the subject item. The search
bar on the top panel provides a quick search through the tasks list either by task name or contact
name.
Figure 18: Activities Module (Tasks List View)
Navigation Shortcut - Create Task: The Create Task edit view provides a window where you can
add new tasks to the current tasks list. Subject, Status, and Priority are required fields and must be
filled in order to save the new task to the system.
If you want the task to show up on the calendar as a reminder, the Due Date & Time information
should be entered.
Using Sugar Suite
Figure 19: Activities Module (Create Task Edit View)
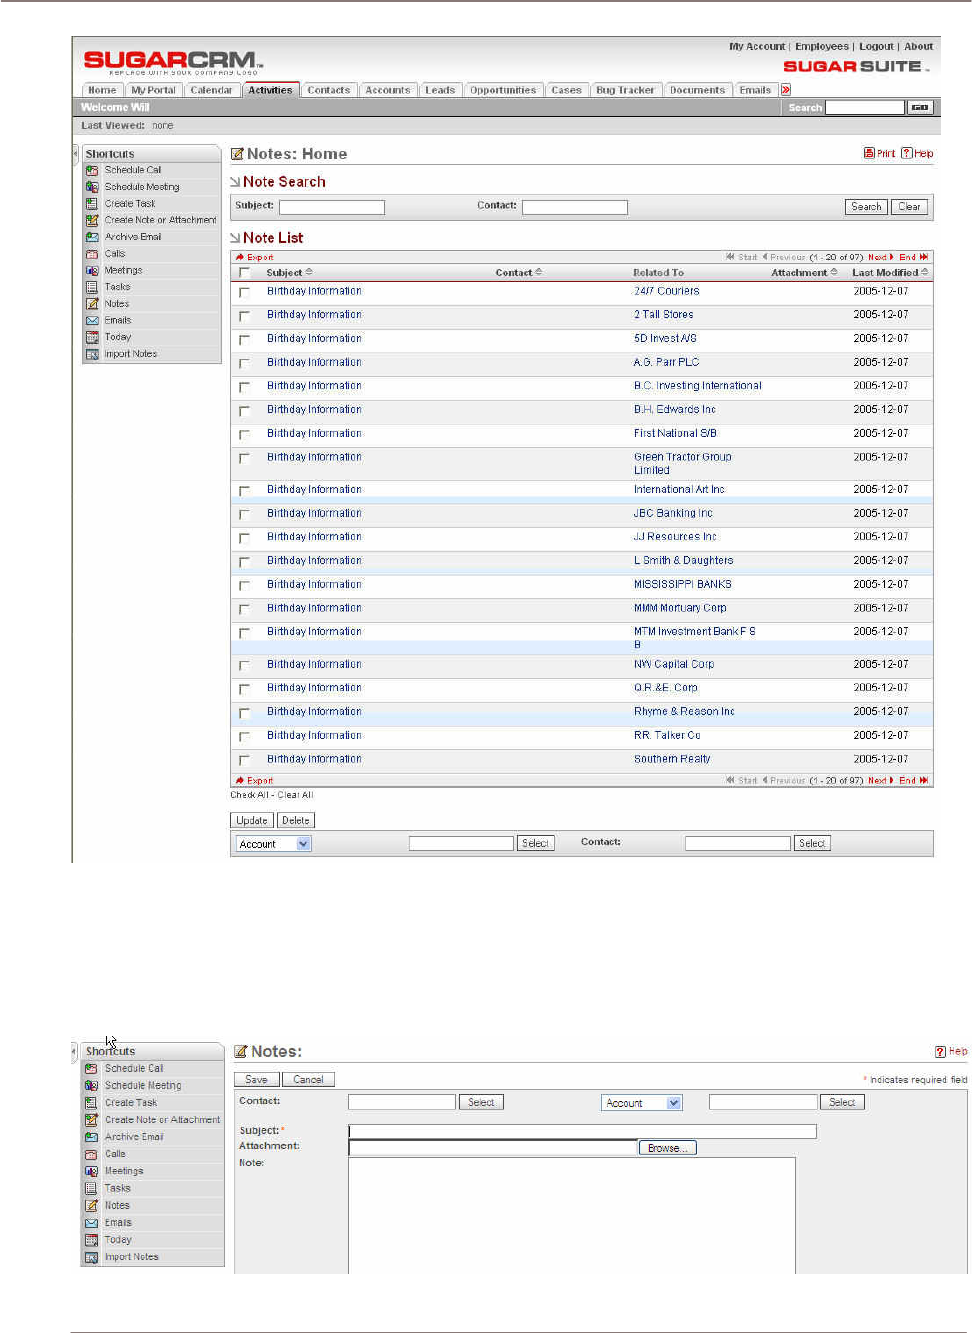
Navigation Shortcut – Notes: The Notes home view page displays the list of notes that is in the
system. You can search for a particular note by using the note search sub-panel. The search criteria
are based on either the subject or the contact that is related to the note. Another feature on this page
is the mass update function panel on the bottom of the page. You can mass update the target notes
by first selecting the notes through the checkbox. By using the update panel, you can mass update
the notes’ team ID, the contact, or the selection from the drop down menu.
Using Sugar Suite
Figure 20: Activities Module (Notes List View)
Navigation Shortcut – Create note or attachment: You can add notes and attachment by using this
panel. Subject field is the required field and must be completed before the application is able to save
a note. You can add attachment to the note by using the browse button right next to the Attachment
field. The drop down menu on the right side of the panel allows you a quicker way to populate the
related information according to which option is picked.
Figure 21: Activities Module (Create Note or Attachment Edit View)
Using Sugar Suite
Navigation Shortcut – Import Notes: A standard feature in the Activities module is importing notes
from another source. Import Notes view provides a step-by-step page for user to import his/her own
notes.
Figure 22: Activities Module (Import Notes Edit View)
Using Sugar Suite
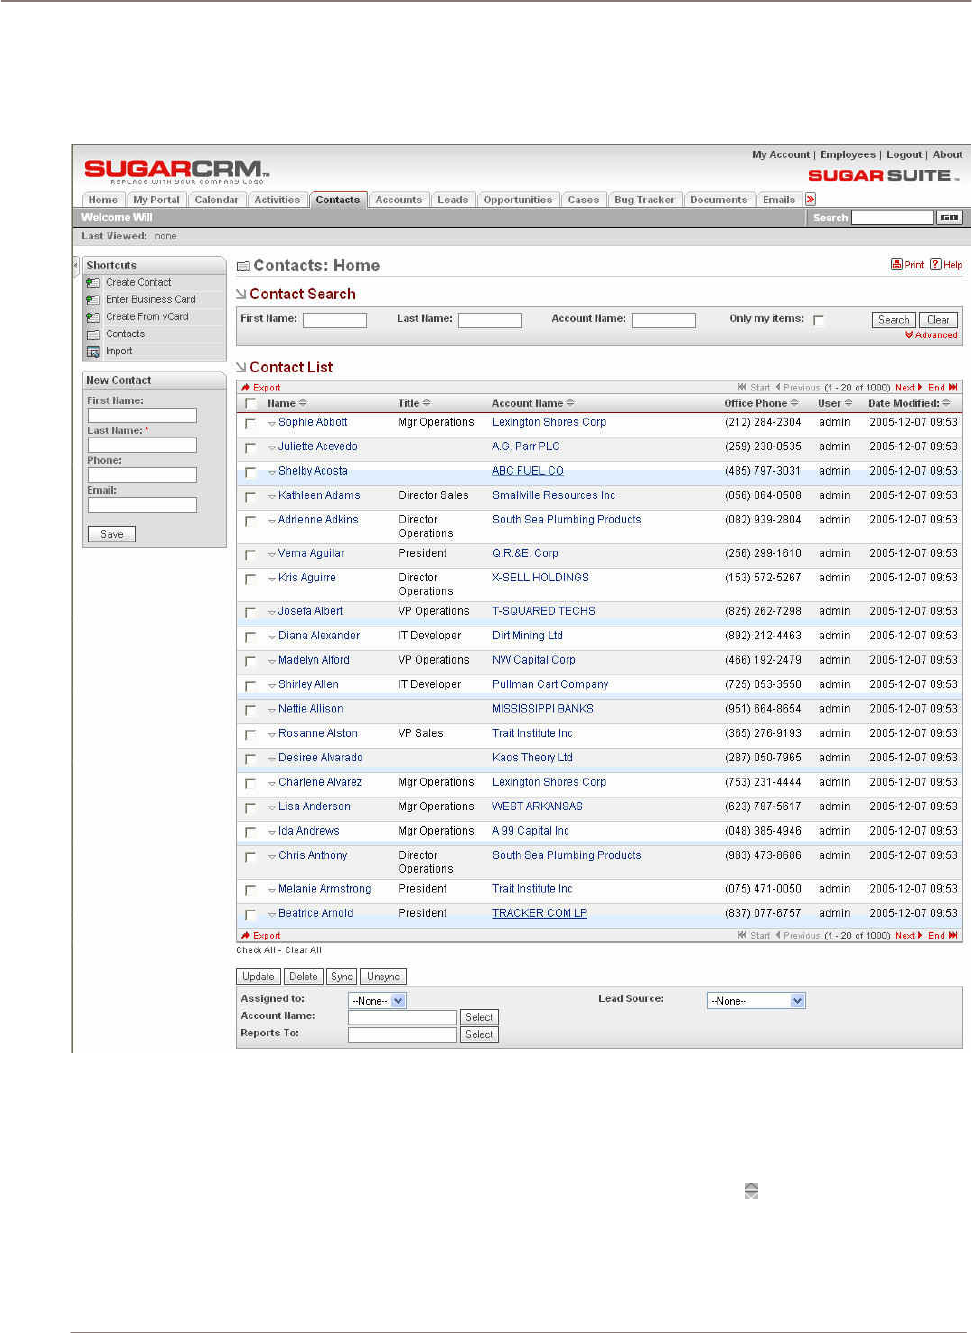
Contacts Module
The following Contacts Module list view is selected using the Contacts navigation tab:
Figure 23: Contacts Module
Contacts are people related to sales accounts. The Contacts module provides a list of all or selected
Contacts from a recent search. Each Contact in the list has a check box at the left, and at the bottom
of the screen is a facility to update one or more field values for all selected Contacts.
The Contact list may be sorted by clicking on any column title which has the icon beside it. Clicking
on a column title when it is already the highlighted sort column reverses the sort order.
The Contact list is paginated if it contains more items than may be listed on the display, and controls
are provided to go to the start or end of the list, or step to the next or previous page. Clicking on any
Contact in the list displays the detail information for that Contact. You can edit or view information
Using Sugar Suite
about the Contact. Click the View Change Log link to view the old and new values for fields that track
changes. The tracked fields include Assigned User, Do Not Call flag, Office Phone, and Email. In the
History sub-panel, click the Summary button to view history information at a glance instead of
selecting each item to view.
The Contact list view provides powerful linking capabilities to related information. Clicking on the
Contact name displays a detailed view of that Contact. Clicking on the Account name displays a
detailed view of that Account.
Navigation Shortcuts
The navigation shortcuts provided help you create a new contact by typing it in, by importing the
information from a vCard, or by switching back to the Contact list view. An Import facility is also
provided to import bulk contact data from Salesforce.com, Outlook, ACT!, or other applications.
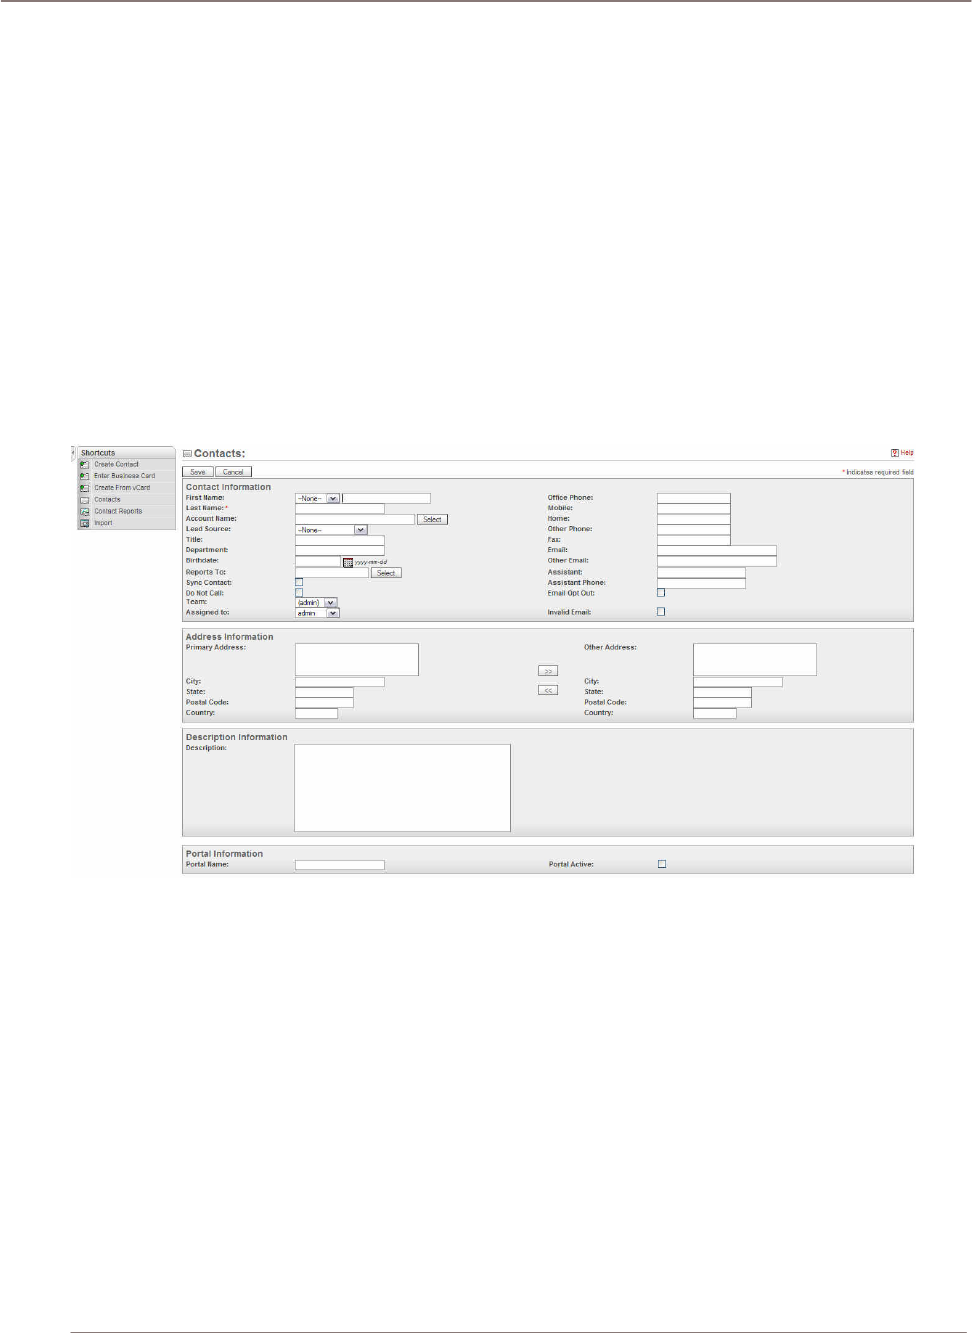
Navigation Shortcut – Create Contact: This view allows you to enter the detail information on a
new contact. The contact’s last name needs to be entered in order for the system to save the new
contact.
Figure 24: Contacts Module (Create Contact Edit View)
Navigation Shortcut – Enter Business Card: Another way to add a new contact is through entering
a business card. The basic information is the same as creating the contact from the edit view. A
feature on this view is that you can easily create a new contact, account, opportunity, and
appointment by using the sub-panel at the bottom of the page.

Using Sugar Suite
!
Figure 25: Contacts Module (Enter Business Card Edit View)
Navigation Shortcut – Create From vCard: Using this interface, you can create a new contact by
importing a vCard file from their local system.
Figure 26: Contacts Module (Create from vCard Edit View)
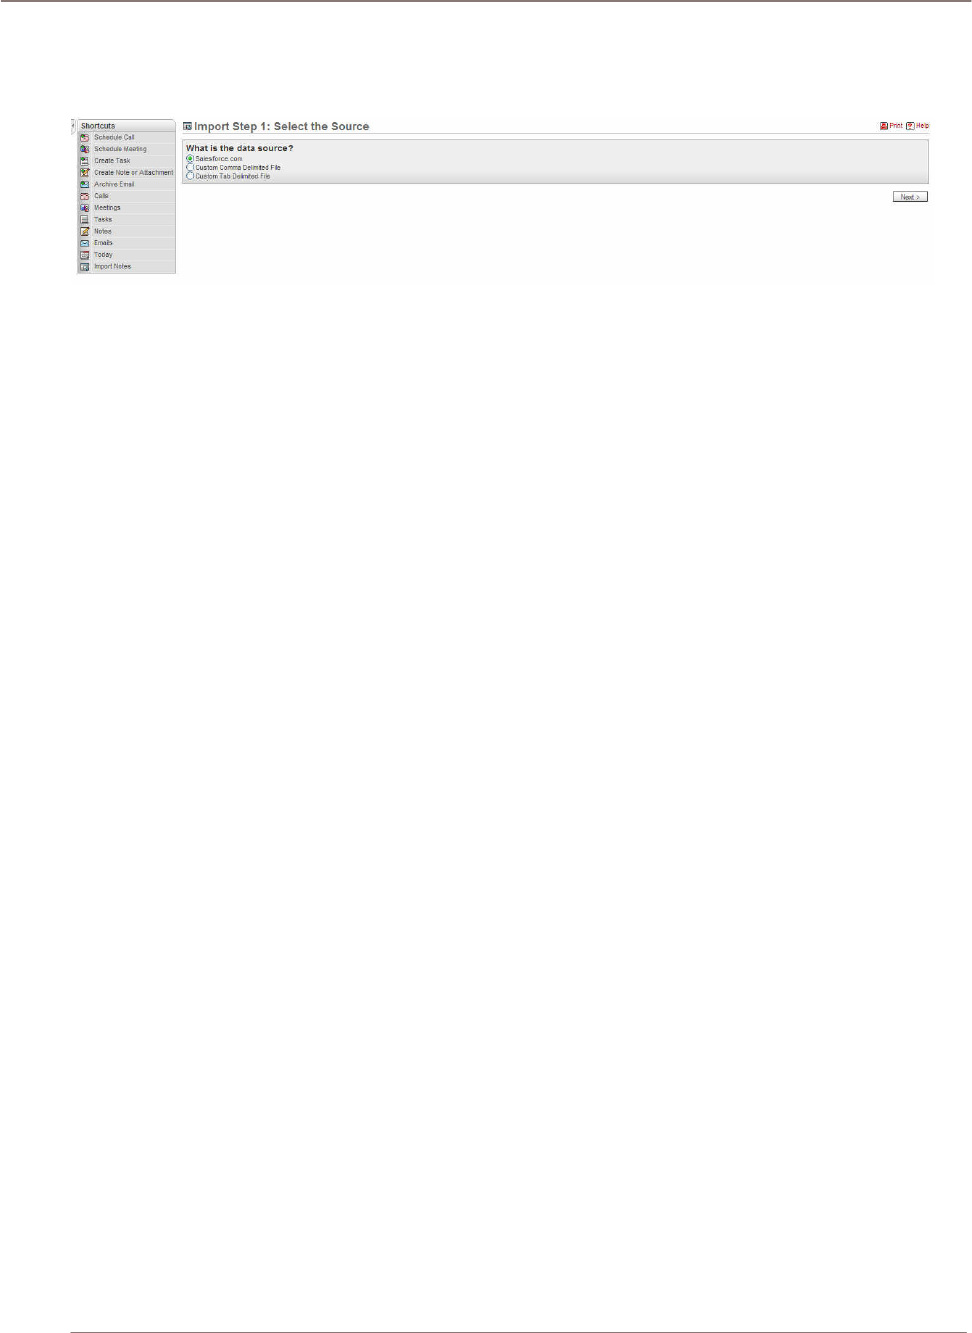
Navigation Shortcut – Import Contacts: You can use the import tool to transfer a bulk account
data. From the menu you have an option of importing from Salesforce.com, Microsoft Outlook, Act!
2005, Custom Comma Delimited File (CSV), or Custom Tab Delimited File. After selecting the data
source, the application guides you through the import process by clicking on the next button.
Figure 27: Contacts Module (Import Edit View)
Using Sugar Suite
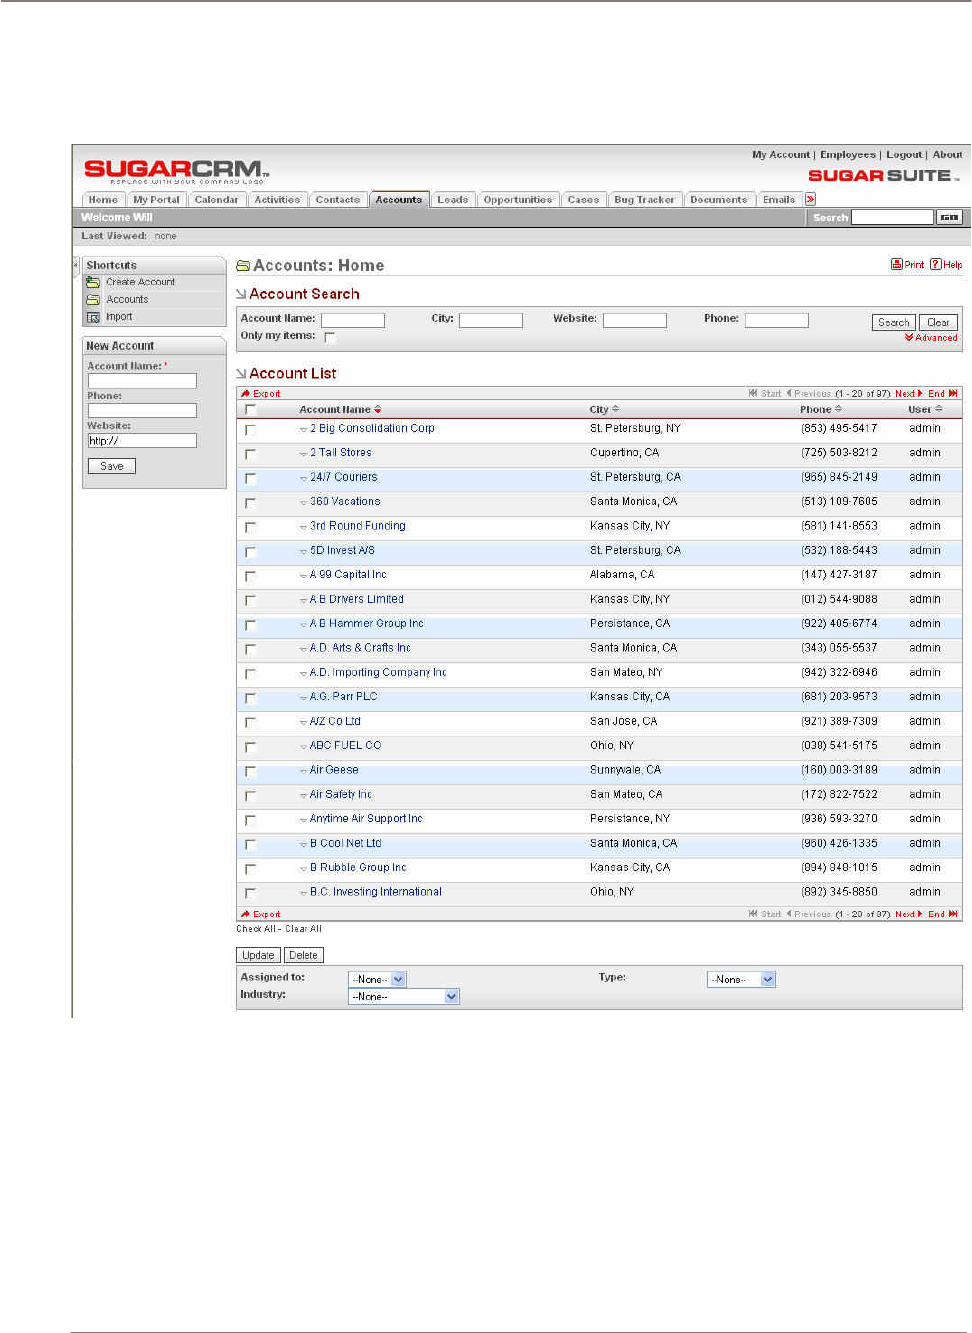
Accounts Module
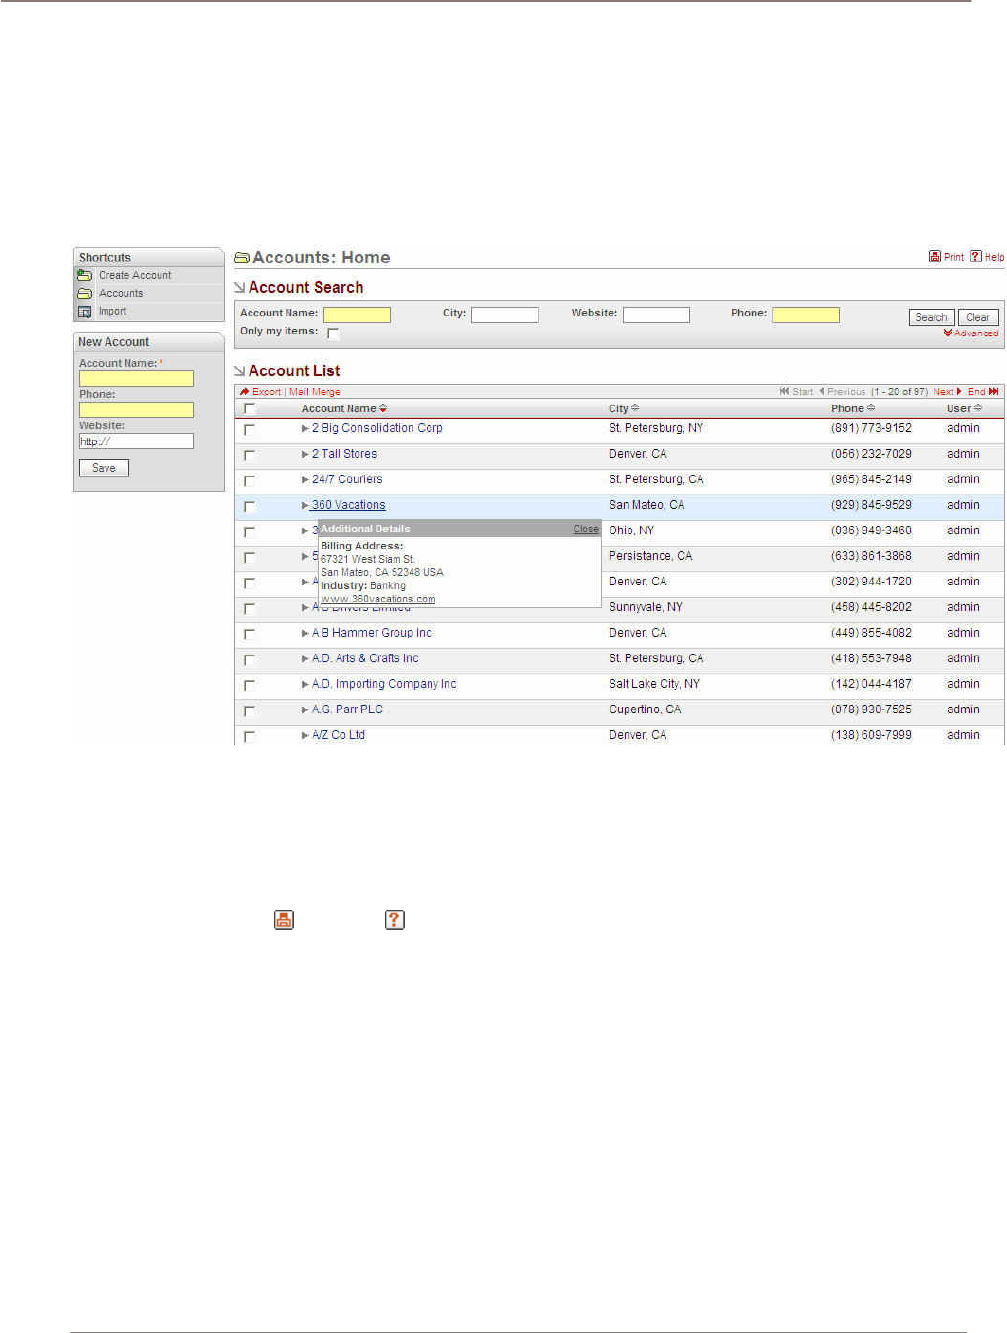
The Accounts Module list view is selected using the Accounts navigation tab:
Figure 28: Accounts Module
The Accounts module provides a list of all or selected Accounts from a recent search. Each account
in the list has a check box at the left, and at the bottom of the screen is a facility to update one or
more field values for all selected accounts.
Accounts List View
The Account list is paginated if it contains more items than may be listed on the display. Controls are
provided to go to the start or end of the list, or step to the next or previous page.

Using Sugar Suite
Viewing Account Information
To view account information:
• Click on any account in the list displays the detail information for that account.
• Click the View Change Log link to view the old and new values for fields that track changes. The
tracked fields include Assigned User, Member Organization assignment, Fax, and Email Address.
• In the History sub-panel, click the Summary button to view history information at a glance instead
of selecting each item to view.
• Click on any column title which has the icon beside it to sort the account list.
• Click on a column title when it is already the highlighted sort column reverses the sort order.
The navigation shortcuts provided help you create a new account, or switch back to the Account list
view.
Importing Bulk Account Information
An Import facility is provided, to import bulk account data from Salesforce.com, ACT!, or other
applications. See the Import and Export section for more information.
Assigning Accounts to Users
You can assign accounts to other users and describe accounts by Type and Industry.
Accounts Detail View
The Accounts detail view has a “Copy to Contacts” action which allows you to propagate the Account
Bill-to or Ship-to address for selected Contacts.
1. Click the link.
2. In the popup, identify the contacts associated with the account.
3. The address field is propagated.
Navigation Shortcuts
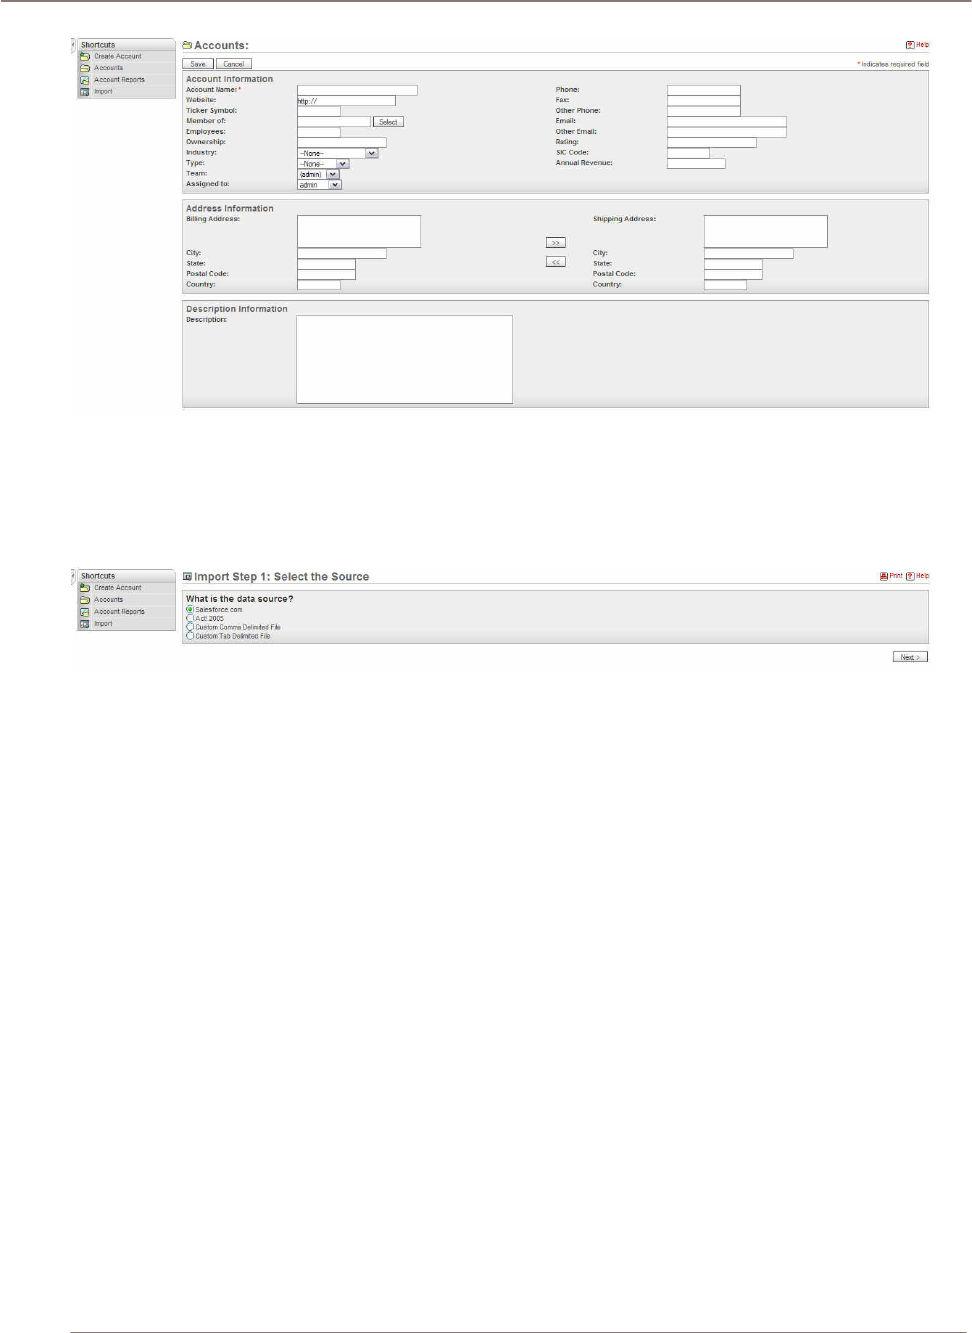
Navigation Shortcut – Create Account: The edit view allows you to create an account. The Account
Name field is the required field in the system. You need to enter the Account Name information at the
minimal in order for the system to save the record.
Using Sugar Suite
Figure 29: Accounts Module (Create Account Edit View)
Navigation Shortcut – Import Accounts: You can import a bulk of account information by using this
option. The panel offers the option of importing from Salesforce.com, Act! 2005, Custom Comma
Delimited File, or Custom Tab Delimited File. After selecting the data source, the panel guides you
through the import process by clicking on the next button.
Figure 30: Accounts Module (Import Edit View)
Using Sugar Suite
Leads Module
The Leads Module list view is selected using the Leads navigation tab:
Figure 31: Leads Module
Leads are early contacts in the sales process. Once they have been properly evaluated and
assessed, they may be converted into Contacts, with associated Opportunities and Accounts.
They may be managed and tracked through their life-cycle using the Leads module. Leads may be
assigned a Lead Source of Cold Call, Existing Customer, Self Generated, Employee, Partner, Public
Relations, Direct Mail, Conference, Trade Show, Web Site, Word of Mouth, or Other. They have a
status of New, Assigned, In Process, Converted, Recycled, or Dead.
• Leads may be duplicated by clicking on the Duplicate button as a handy way of creating a
number of similar leads.
• Leads may also be converted by clicking on the Convert Lead button to Contacts, and optionally
their related Account, Opportunities, and even Appointment.
The Leads module provides a list of all or selected Leads from a recent search.
• The Leads list may be sorted by clicking on any column title which has the icon beside it.
• Click on a column title when it is already the highlighted sort column to reverse the sort order.
• Each lead in the list has a check box at the left, and at the bottom of the screen is a facility to
update one or more field values for all selected leads.
• The Leads list is paginated if it contains more items than may be listed on the display, and
controls are provided to go to the start or end of the list, or step to the next or previous page.
• Click on any lead in the list to display the detail information for that lead.
• Click the View Change Log link to view the old and new values for fields that track changes. The
tracked fields include Assigned User, Source, Status, Do Not Call flag, Office Phone, Email, and
Email Opt Out. In the History sub-panel.
• Click the Summary button to view history information at a glance instead of selecting each item to
view.
Using Sugar Suite
Navigation Shortcuts
The navigation shortcuts provided help you create a new lead (from a vCard, or by simply typing it in),
or you can switch back to the Leads list view. An Import facility is provided also to bring in bulk lead
data from applications such as Salesforce.com.
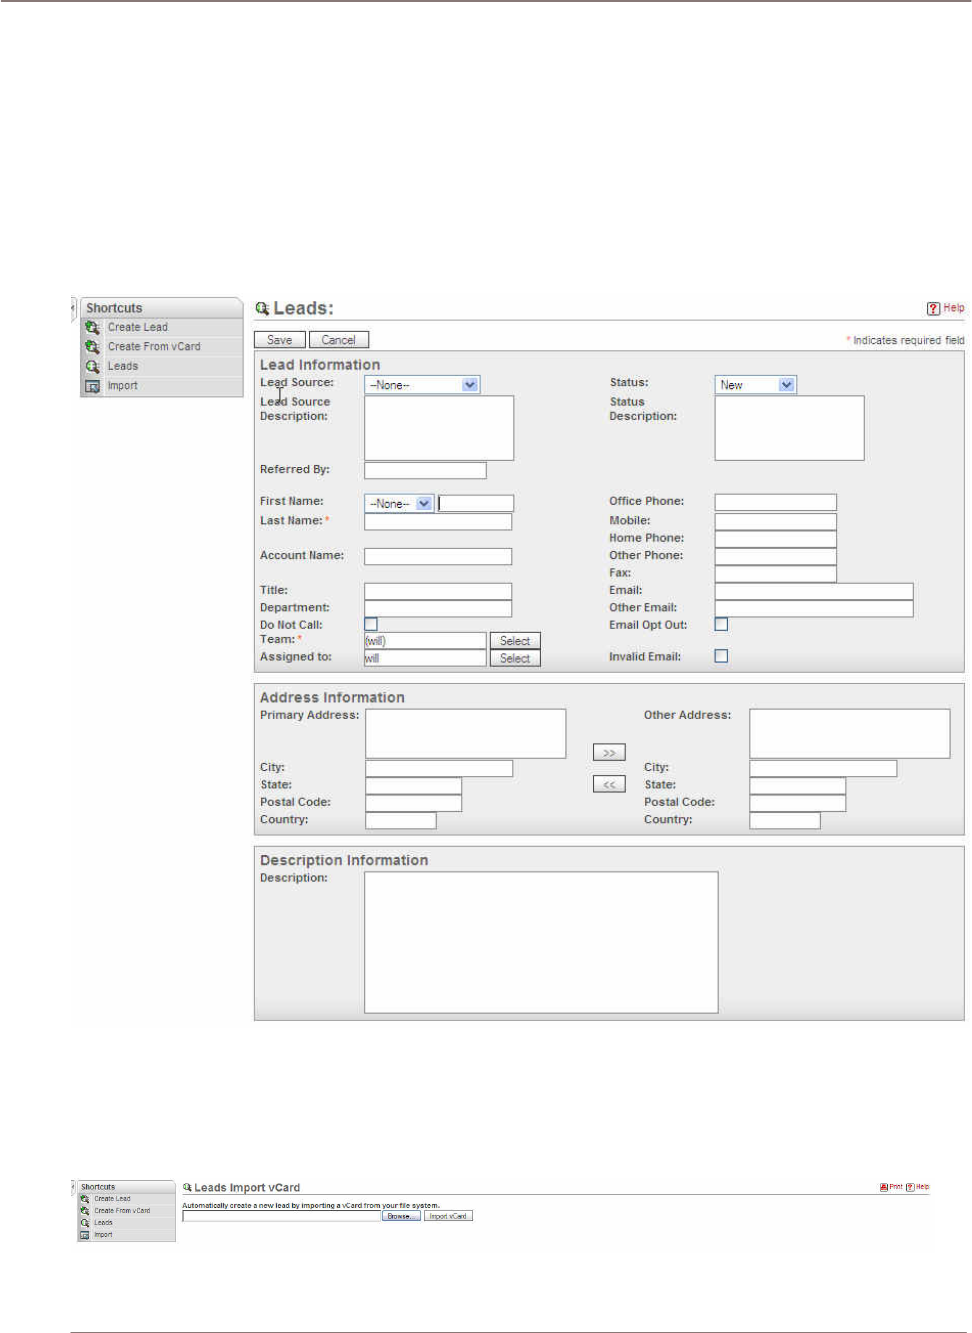
Navigation Shortcut – Create Lead: Create Lead edit view provides the form for creating a new
lead. The Last Name text field is the required field on this page. You need to enter the lead’s last
name in order to save the new record. The default assigned team and assigned to is admin. Make
sure those two fields are correctly assigned in order to have the right privilege for the assigned
member.
Figure 32: Leads Module (Create Lead Edit View)
Navigation Shortcut – Create From vCard: Using Create from vCard shortcut allows you to
automatically create a new lead by importing a vCard from the file system. Click on the browse button
to locate the vCard file that you wanted to import from the local system. After the file has been
selected, click Import vCard to create a new lead from vCard file.
Figure 33: Leads Module (Create From vCard Edit View)
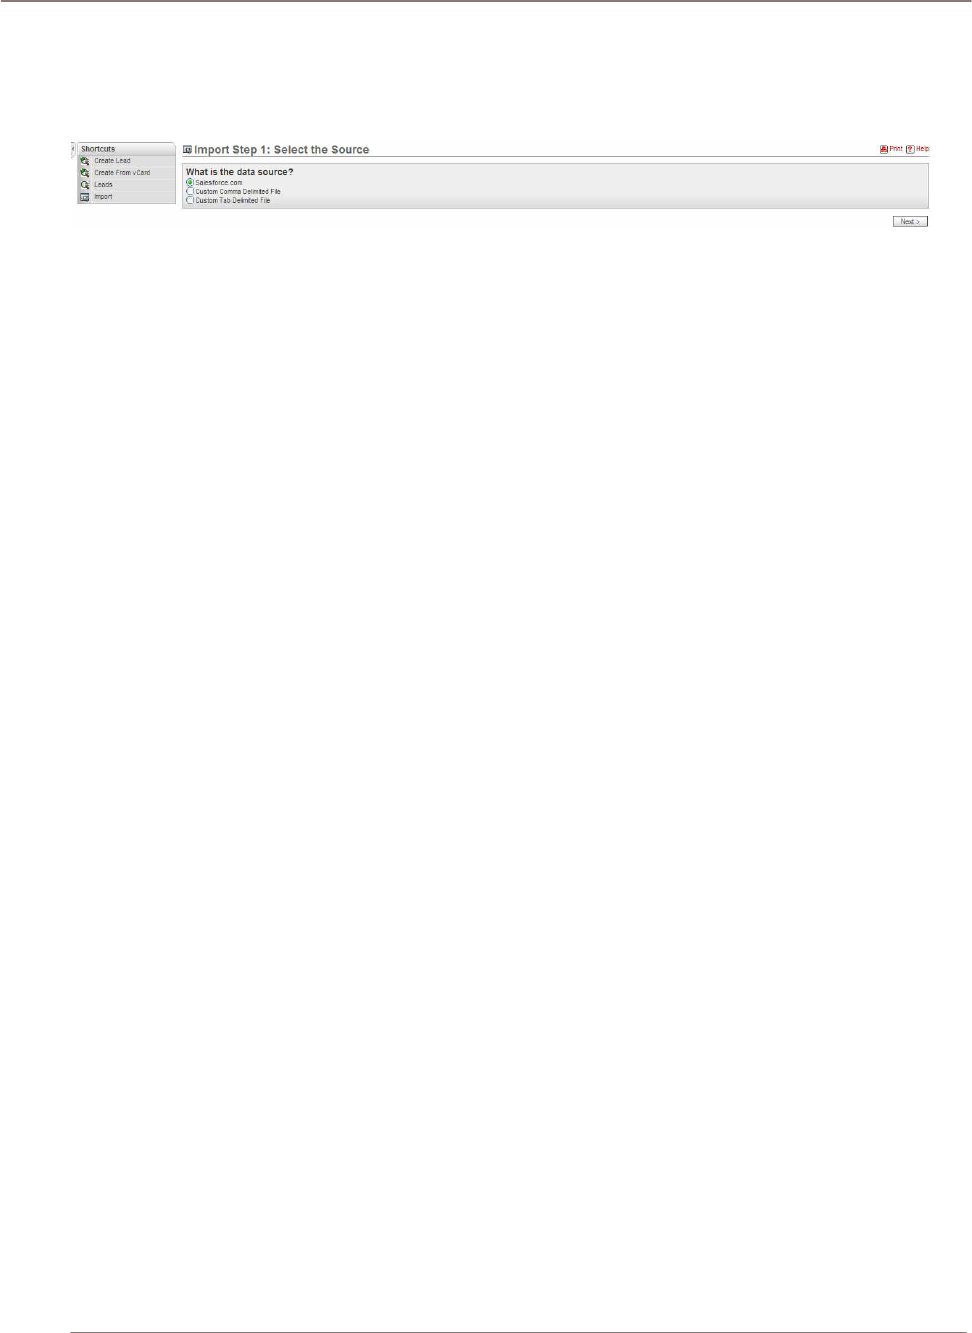
Using Sugar Suite
Navigation Shortcut – Import Leads: Another way to create leads is by importing the lead
information from another lead file. This feature here allows the user to import and create new leads by
importing from another system such as Salesforce.com, Custom Comma Delimited File, and Custom
Tab Delimited File.
Figure 34: Leads Module (Import Edit View)
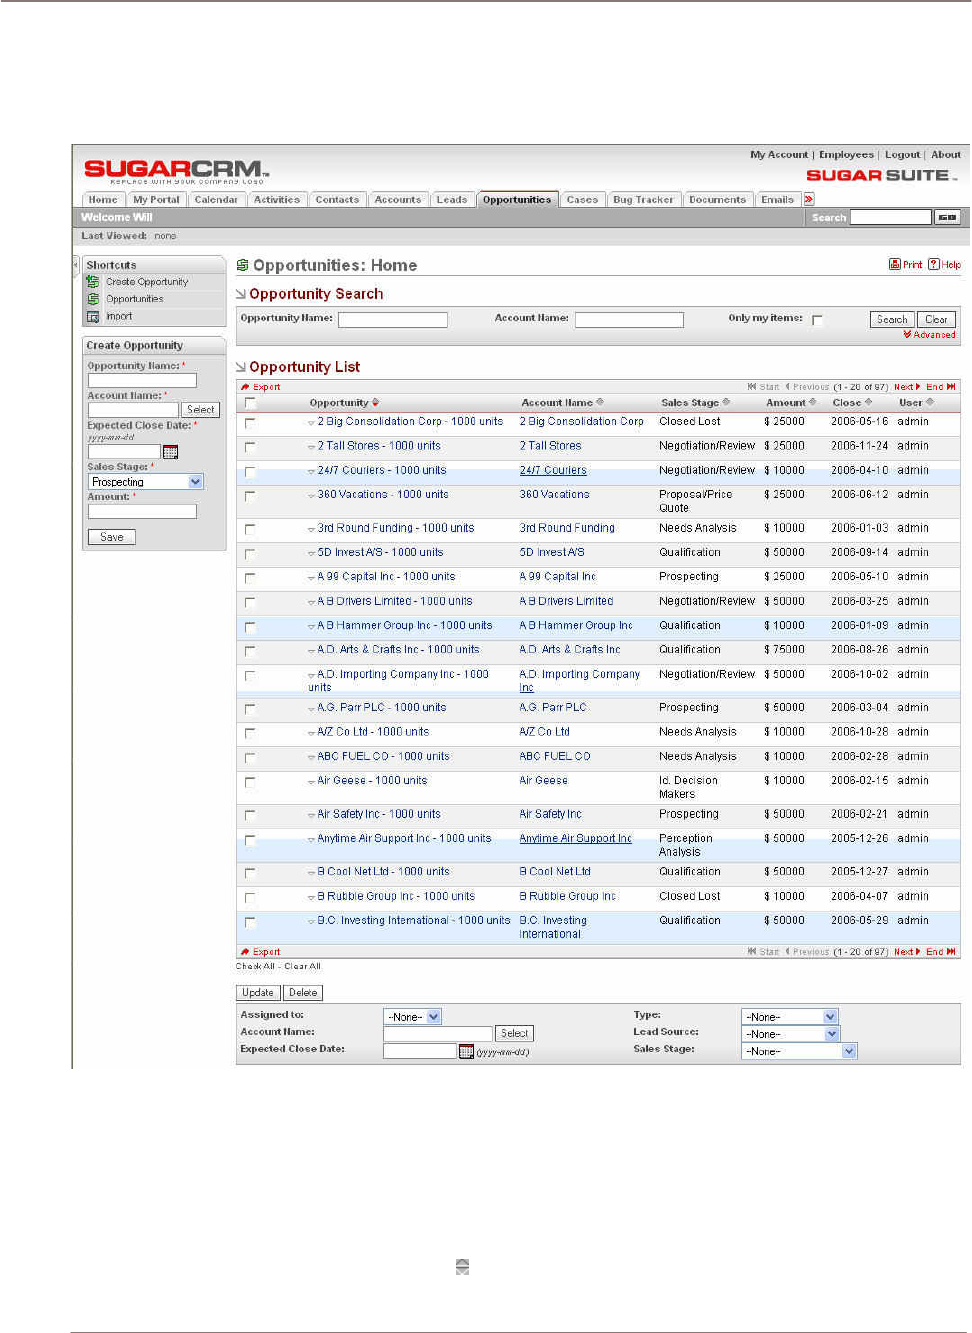
Using Sugar Suite
Opportunities Module
The Opportunities Module list view is selected using the Opportunities navigation tab:
Figure 35: Opportunities Module
Opportunities represent potential sales opportunities that you want to manage into becoming sales.
You can change the values for the amount, the current sales stage and probability of closing. You can
assign opportunities to other users.
The Opportunities module provides a list of all or selected Opportunities from a recent search. The
Opportunities list may be sorted by:
• Click on any column title which has the icon beside it.
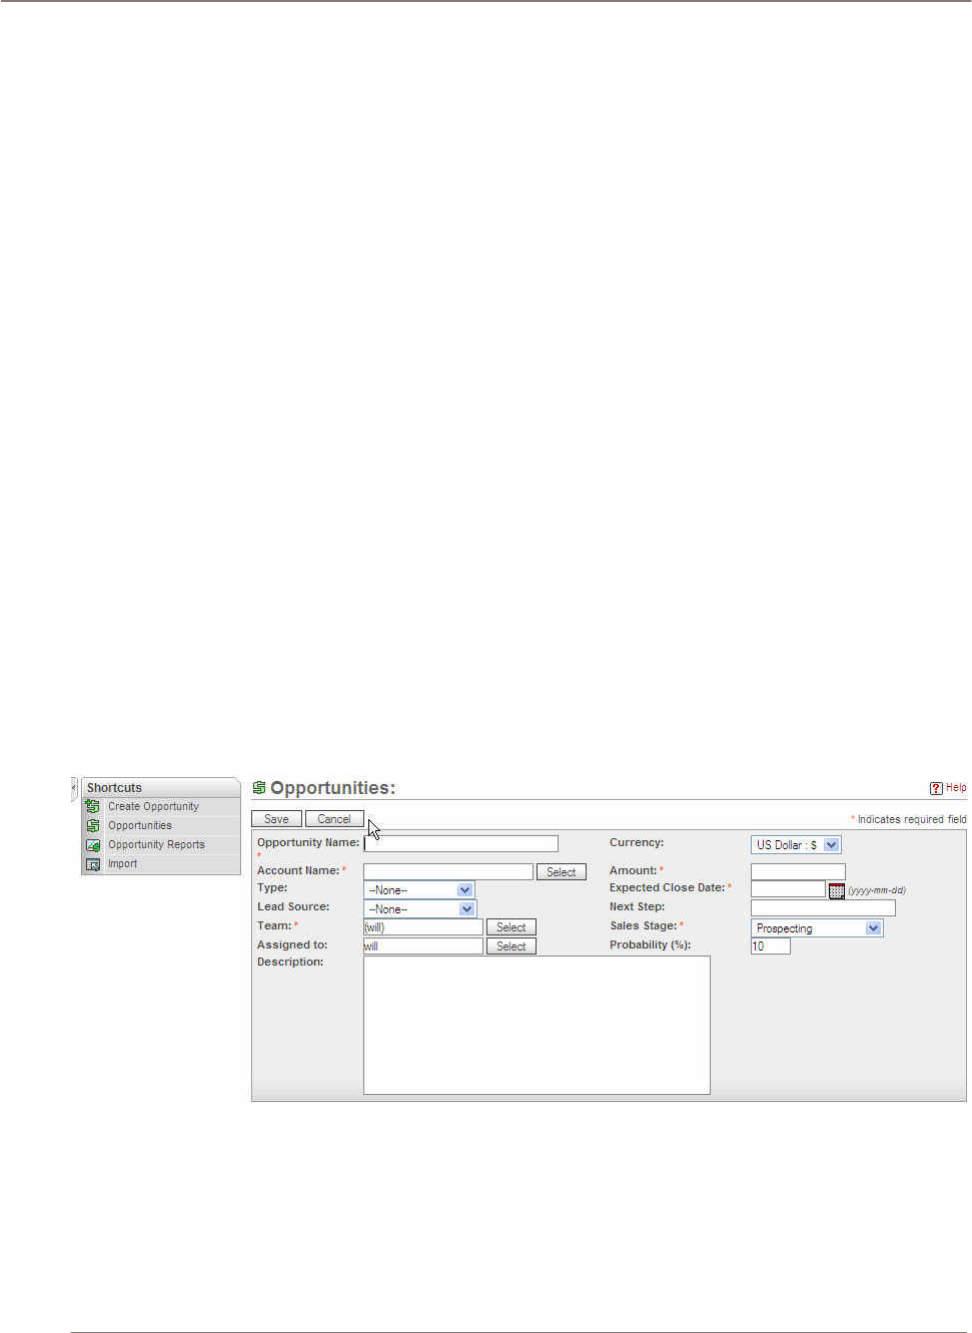
Using Sugar Suite
• Click on a column title when it is already the highlighted sort column to reverse the sort order.
Each opportunity in the list has a check box at the left, and at the bottom of the screen is a facility
to update one or more field values for all selected opportunities.
The Opportunities list is paginated if it contains more items than may be listed on the display, and
controls are provided to go to the start or end of the list, or step to the next or previous page.
• Click on any opportunity in the list to display the detail information for that opportunity.
• Click on the account name for an opportunity link to the detailed information for that account.
• Click the View Change Log link to view the old and new values for fields that track changes. The
tracked fields include Assigned User, Type, Amount, Date Closed, Sales Stage, and Probability.
• In the History sub-panel, click the Summary button to view history information at a glance instead
of selecting each item to view. The navigation shortcuts can help create a new opportunity or
switch back to the Opportunities list view. As well, an Import facility is provided, to bring in bulk
opportunity data from Salesforce.com, or other applications.
• Opportunities: Sales Stage dropdown values determine the default value for Probability.
Navigation Shortcuts
Navigation Shortcut – Create Opportunity: This page provides the necessary fields for you to enter
the information for creating a new opportunity. The required fields in this screen are:
• Opportunity Name - The given name for this particular opportunity.
• Account Name - The account that is associated with this opportunity. The account must be
present in order to select and link the account to the opportunity.
• Amount - The amount of the opportunity.
• Expected Close Date – The expected or estimated close date for this particular opportunity.
• Sales Stage - The current stage of this opportunity.
Figure 36: Opportunities Module (Create Opportunity Edit View)
Navigation Shortcut – Import Opportunities: Import edit view allows you to create a list of
opportunities from another data source such as Salesforce.com, Custom Comma Delimited File, or
Custom Tab Delimited File. After selecting the data source, you can click on the next button in order
to move on to the next step of the importing process.
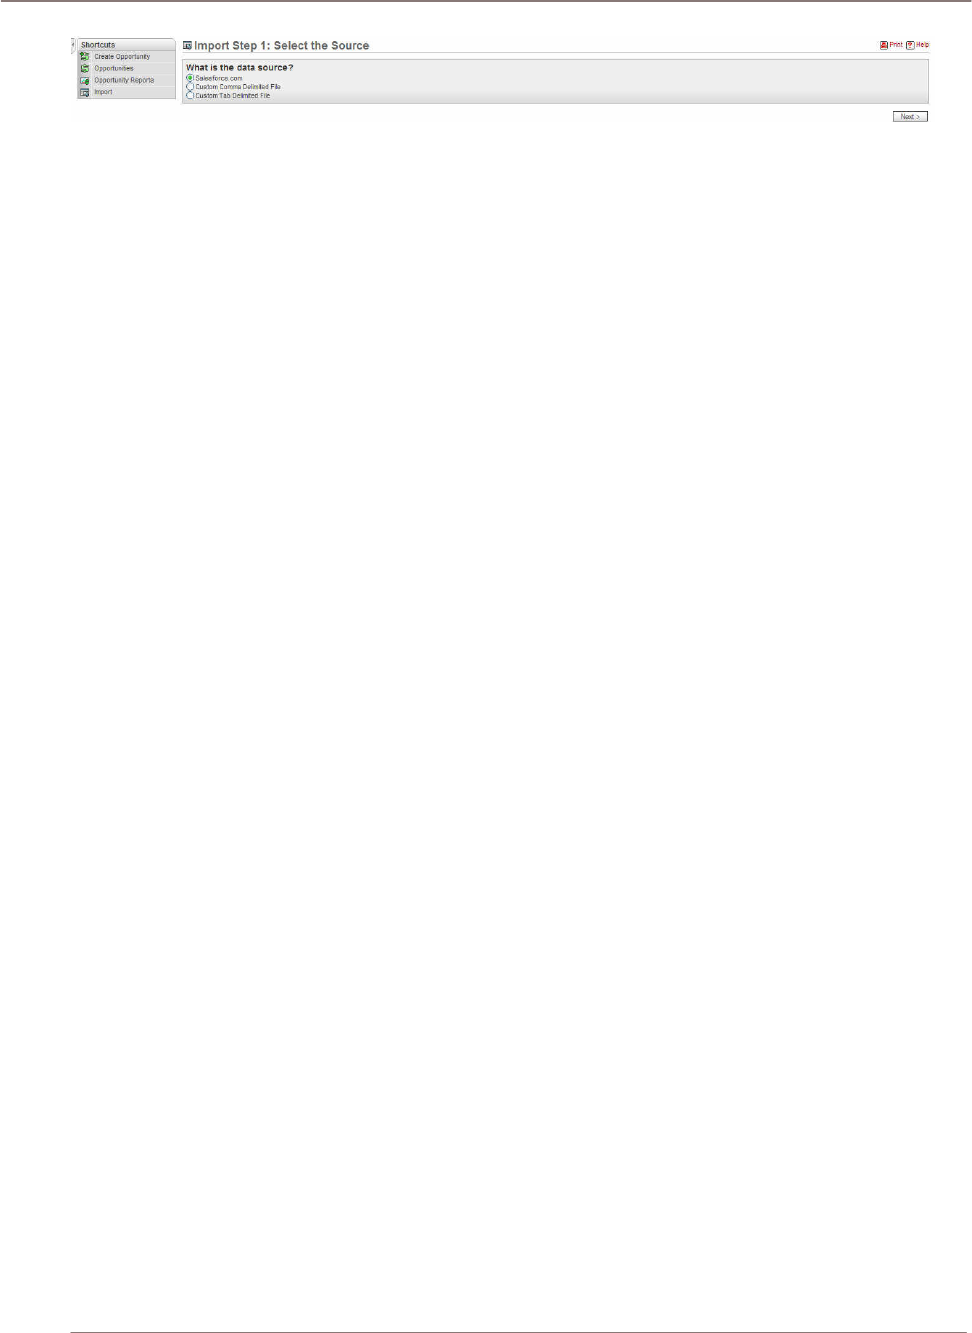
Using Sugar Suite
Figure 37: Opportunities Module (Import Opportunity Edit View)
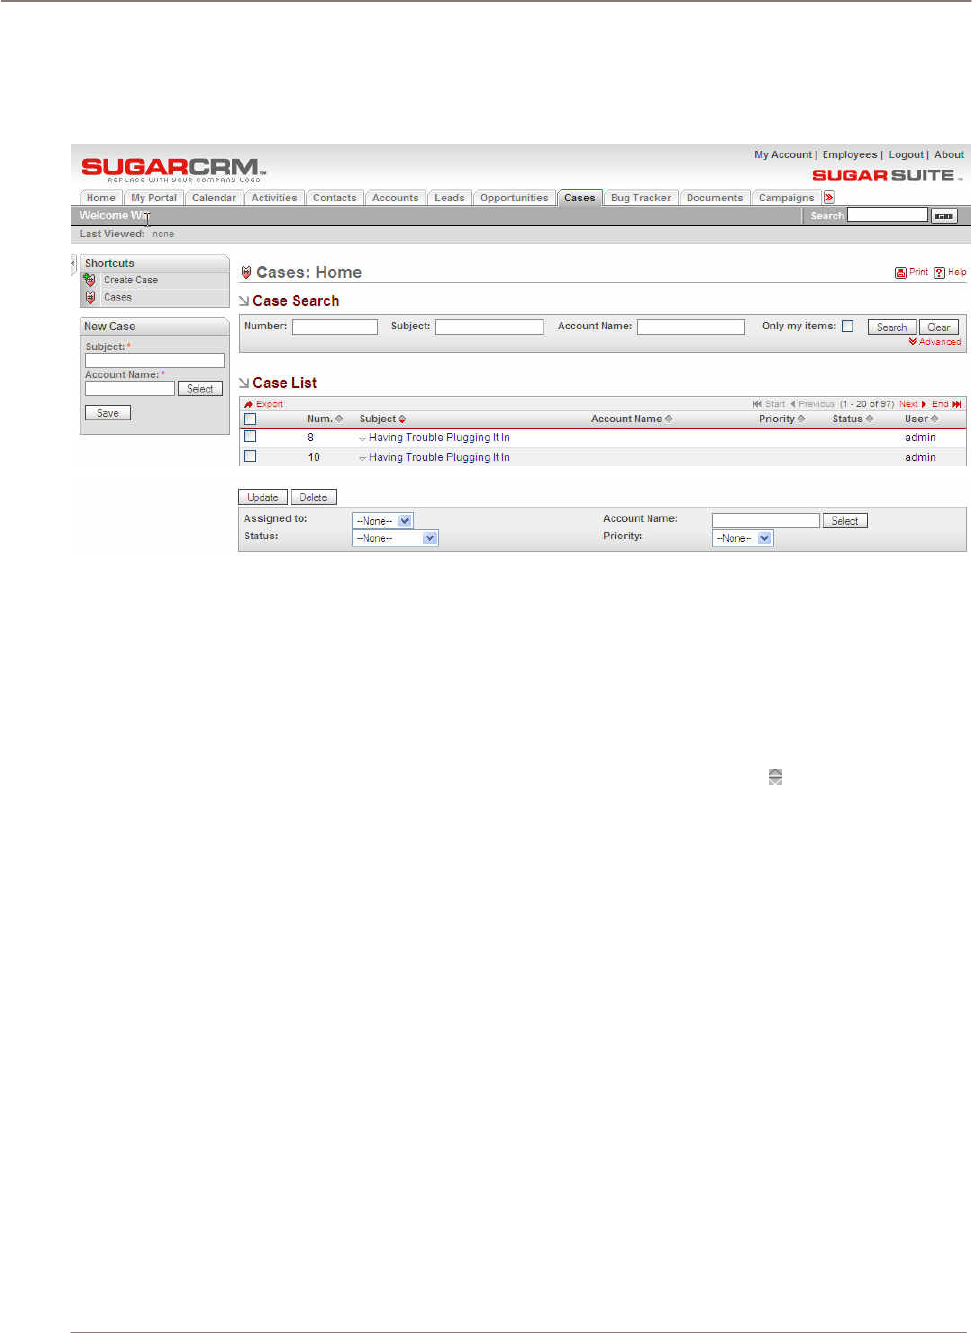
Using Sugar Suite
!
Cases Module
The Cases Module list view is selected using the Cases navigation tab:
Figure 38: Cases Module
Cases are inquiries or problems associated with an account. They may be managed and tracked
through their life-cycle using the Cases module. Cases may be assigned High, Medium or Low
priority. They have a status of New, Pending Input, Assigned, Rejected, or Closed.
The Cases module provides a list of all or selected Cases from a recent search. Each Case in the list
has a check box at the left, and at the bottom of the screen is a facility to update one or more field
values for all selected Cases.
• The Cases list may be sorted by clicking on any column title which has the icon beside it.
• Click on a column title when it is already the highlighted sort column to reverse the sort order.
The Cases list is paginated if it contains more items than may be listed on the display, and
controls are provided to go to the start or end of the list, or step to the next or previous page.
• Click on the subject for any case in the list to display the detail information for that case.
• Click on the account name for case links to the detailed information for that account.
• Click the View Change Log link to view the old and new values for fields that track changes. The
tracked fields include Assigned User, Account, Status, and Priority. In the History sub-panel.
• Click the Summary button to view history information at a glance instead of selecting each item to
view.
Navigation Shortcuts
The navigation shortcuts provided help you create a new case, or switch back to the Case list view.
Navigation Shortcut – Create Case: The Create Case screen provides the necessary space for you
to enter all the information regarding the case. Subject field and Account name are the required fields.
Both items need to be filled out in order to save the new case in the system.
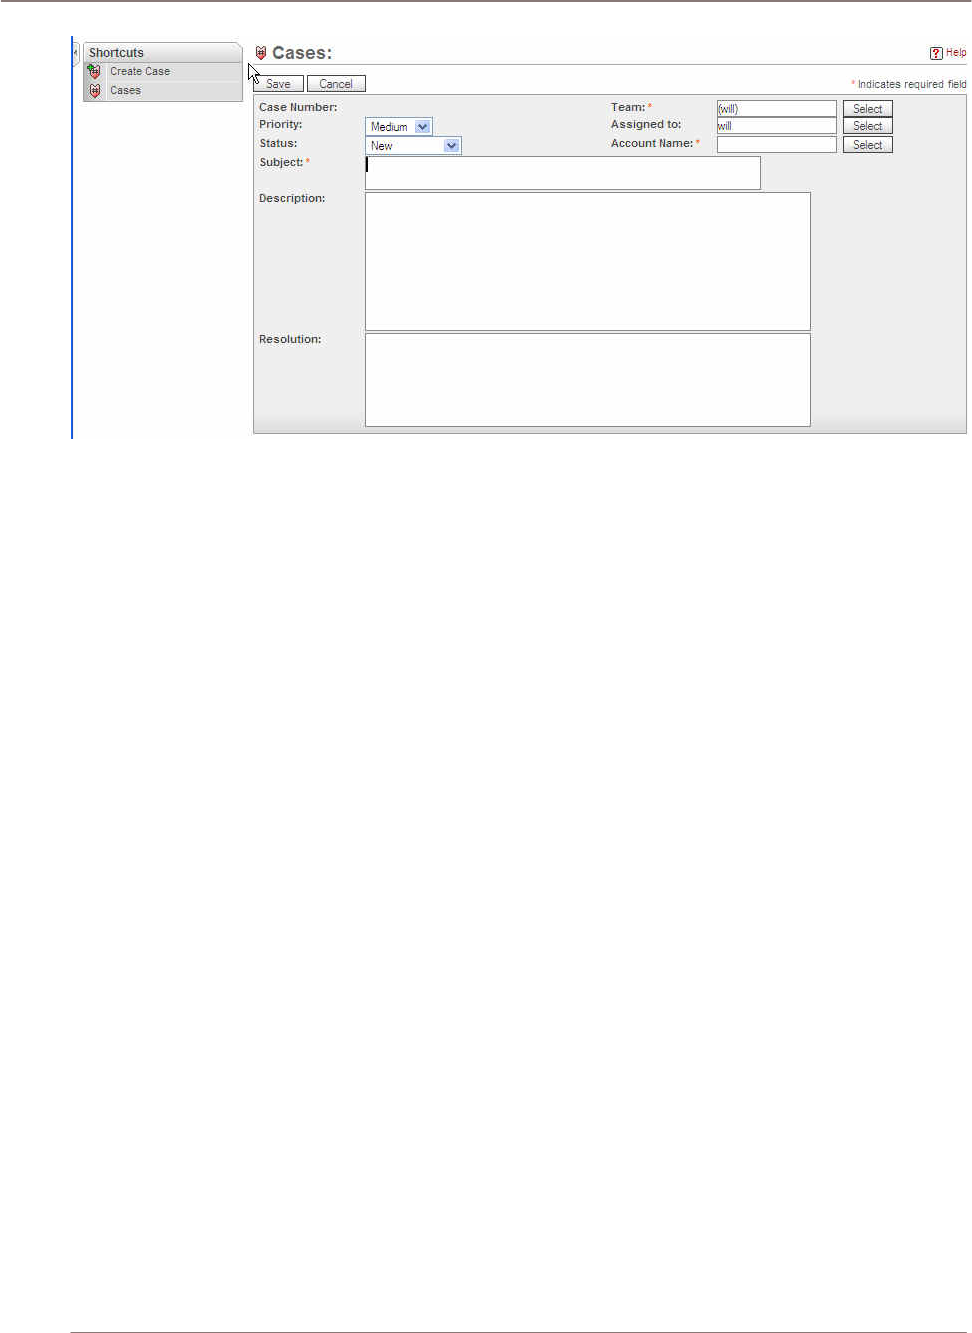
Using Sugar Suite
Figure 39: Cases Module (Create Case Edit View)
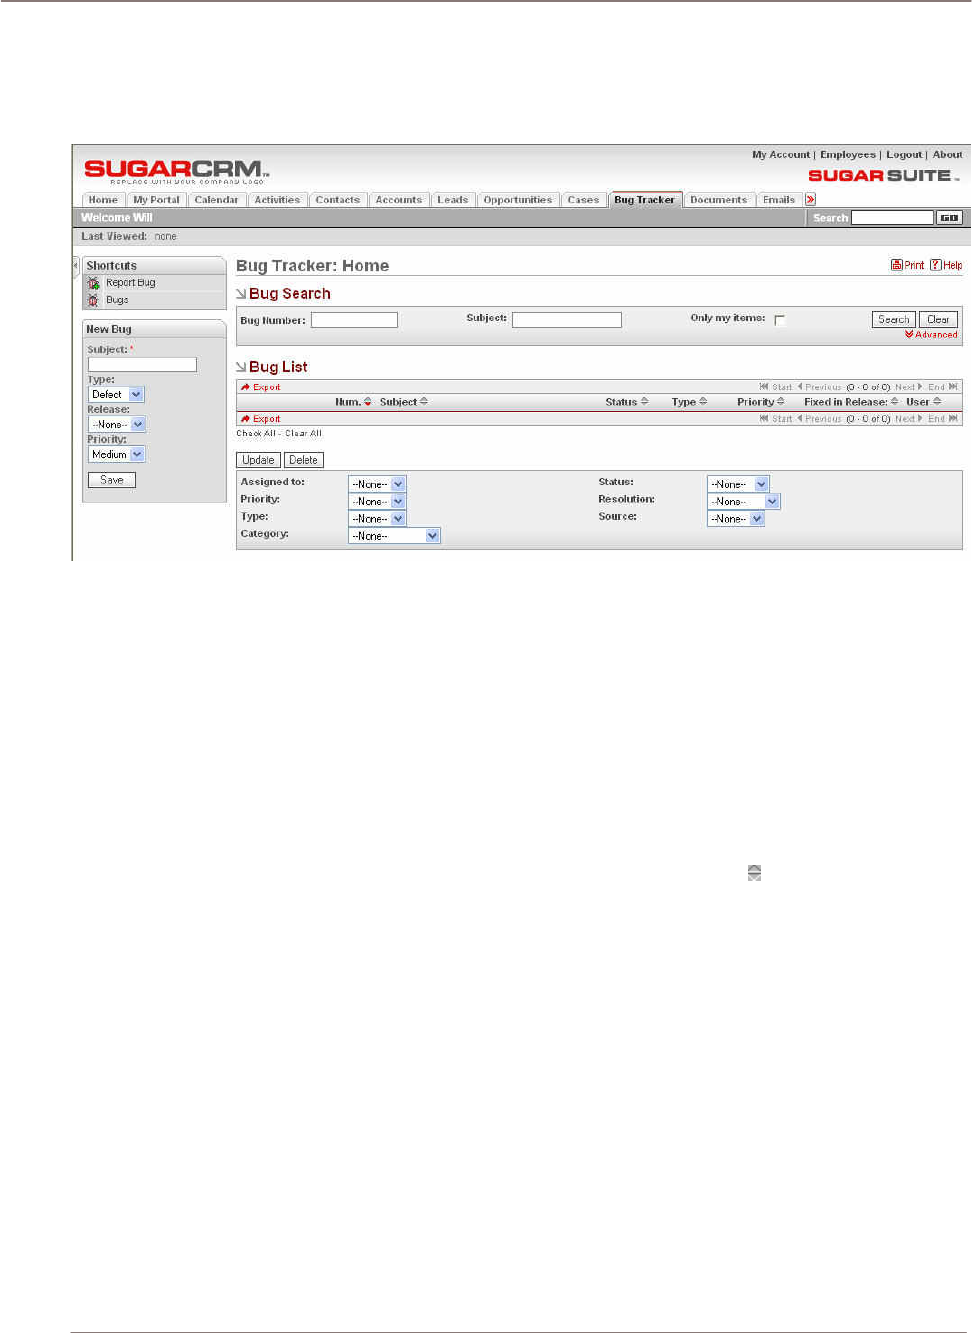
Using Sugar Suite
Bug Tracker Module
The Bug Tracker Module list view is selected using the Bug Tracker navigation tab:
Figure 40: Bug Tracker Module
Bugs are defects or features associated with a particular revision of a product. They may be managed
and tracked through their life-cycle using the Bug Tracker module. Bugs may be assigned a priority of
Urgent, High, Medium and Low. They have a status of New, Assigned, Closed, Pending Input, or
Rejected. Each Bug also specifies a release. The drop-down list of choices for release is populated
by the System Administrator using the Issue Tracker Administration option within the administration
screens. Each Bug may also be assigned a resolution status of Accepted, Duplicate, Fixed, Out of
Date, Invalid, or Later.
The Bug Tracker module provides a list of all or selected Bugs from a recent search. Each Bug in the
list has a check box at the left, and at the bottom of the screen is a facility to update one or more field
values for all selected Bugs.
• The Bug list may be sorted by clicking on any column title which has the icon beside it.
• Click on a column title when it is already the highlighted sort column to reverse the sort order.
The Bug list is paginated if it contains more items than may be listed on the display and controls
are provided to go to the start or end of the list, or step to the next or previous page.
• Click on the subject for any Bug in the list to display the detail information for that Bug.
• Click the View Change Log link to view the old and new values for fields that track changes. The
tracked fields include Assigned User, Status, Priority, and Resolution.
• In the History sub-panel, click the Summary button to view history information at a glance instead
of selecting each item to view.
Navigation Shortcuts
The navigation shortcuts provided help you create a new Bug report or you can switch back to the
Bug list view. There is also a New Bug data entry box for quickly entering a new Bug as it is reported.
Navigation Shortcut – Report Bug: Report Bug edit view allows you to submit new bugs to the
system. The drop down menus provide the standardize information field that is related to the bug.

Using Sugar Suite
Subject field box is the required field and it needs to be filled with subject name in order for the
system to save the new record.
Figure 41: Bug Tracker Module (Report Bug Edit View)
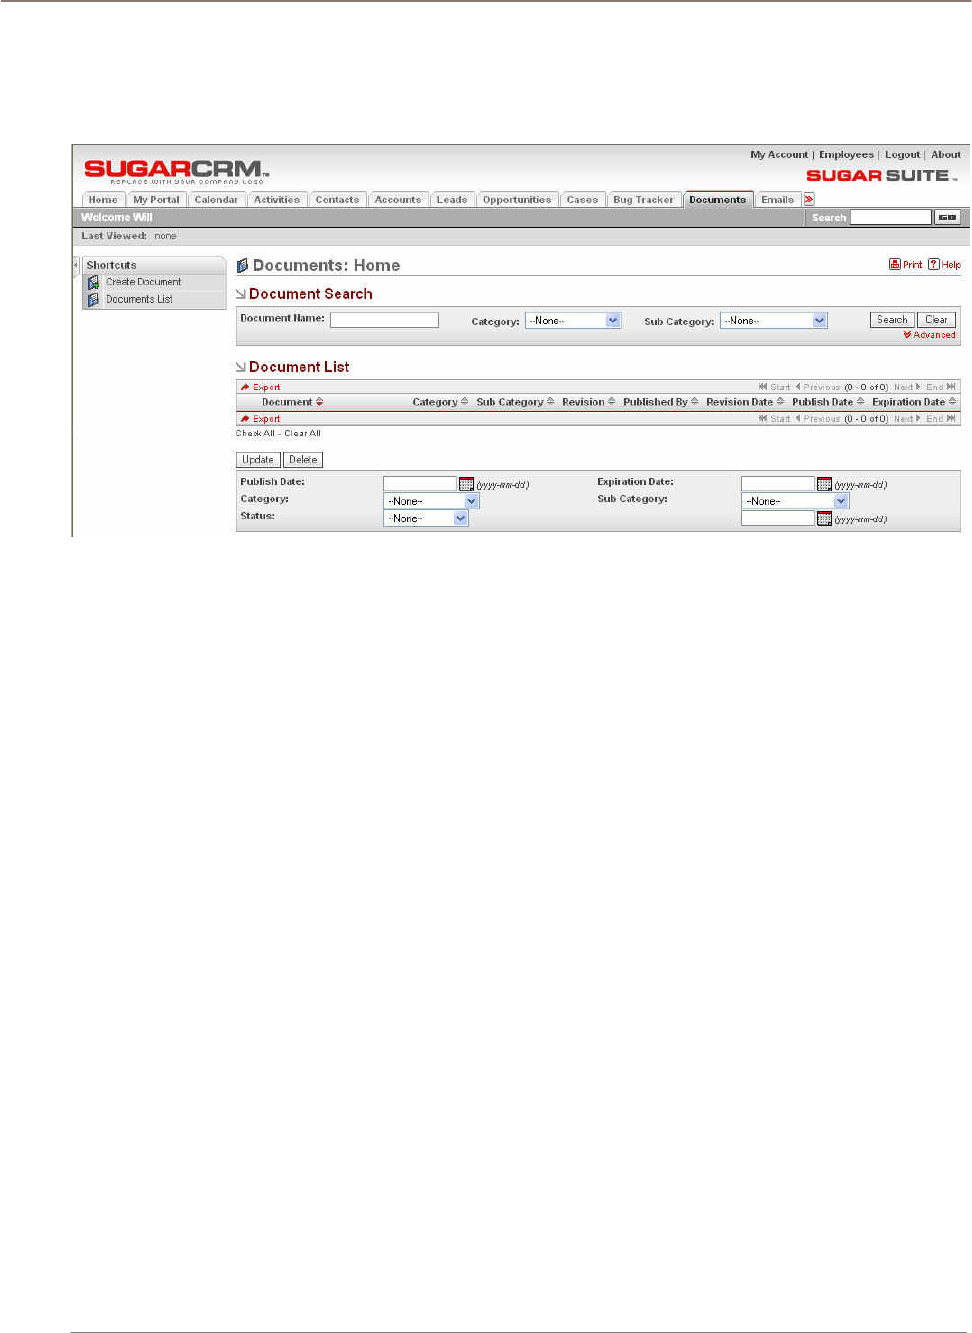
Using Sugar Suite
Documents Module
The Documents Module list view is selected using the Documents tab:
Figure 42: Documents Module
The Documents module allows you to attach files to create a document list for sharing with other
users. The Documents module provides a list of all or selected documents from a recent search.
Each document in the list has a check box at the left, and at the bottom of the screen is a facility to
update one or more field values for all selected documents. For example, you might want to change
the expiration date for several documents at one time.
Creating a Document
To create a document:
1. Click the Create Document shortcut.
2. Browse to the file you want to attach. You can type a different name for the document or use the
file name provided. Select a Category, Sub-category, Status, Publish Date, and Expiration Date.
3. Define a revision number or version and a description for the document, if desired.
After a document is published, other users can download it and view it.
Viewing a Document
To view a document in the Documents List:
1. Click the document name and then select the file name next to Download File.
2. Save or open the downloaded file.
3. When documents change, you can attach a new revision of the file by the editing the document.
To edit the document:
1. Select the document from the Document List and click
2. Create in the Document Revisions section.
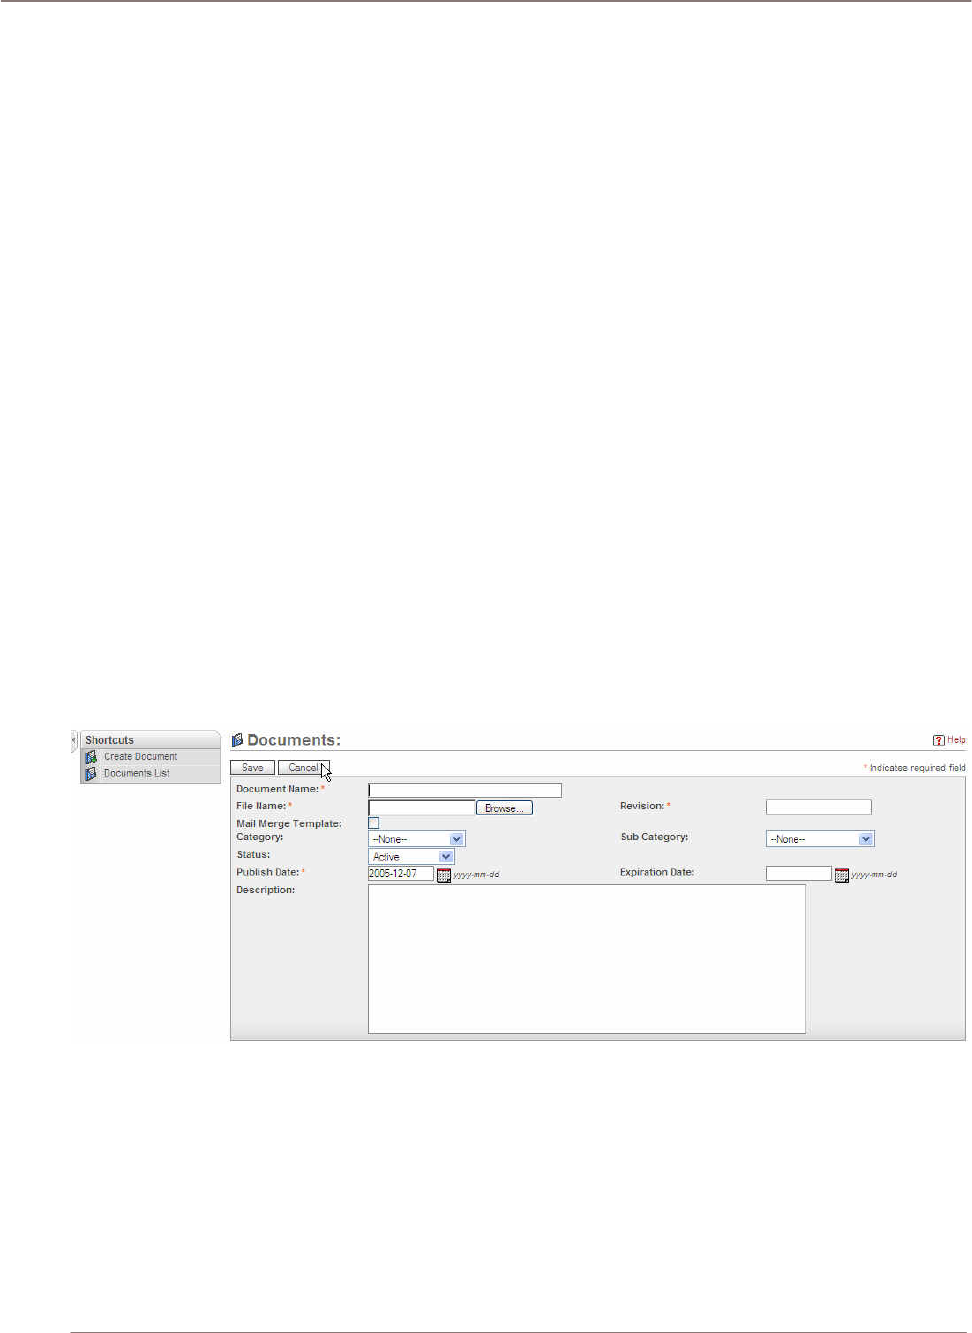
Using Sugar Suite
3. Select the changed file using the same name or a new file to replace the original file.
4. Specify a revision number and click Save. You cannot change the Document name displayed in
the Document List when you are adding a revision. The revised file is displayed in the Document
List with the new revision number.
Identifying MS Word Mail Merge Templates
This module allows for the identification of Microsoft Word mail merge templates. It is these templates
that are used when a mail merge is performed directly from within Sugar Suite. The templates
themselves can be created from the Sugar Add-in for Microsoft Word and uploaded to Sugar
Documents.
• In Documents, a checkbox identifies a Document as a mail merge template.
• In the navigation bar (Mail Merge), a link allows direct access to the Sugar Suite mail merge
wizard without having to go through a list view.
Navigation Shortcuts
Navigation Shortcut – Create Document: This edit screen provides the text box and the drop down
menu for adding detailed information to the document that is uploaded into the system. The required
fields are:
• Document Name – This is a brief descriptive name of the document.
• File Name – This field is used to locate the document from the local storage via the browse
button.
• Publish Date – This is the date the document is uploaded.
• Revision – This is the version of the document.
Figure 43: Documents Module (Create Document Edit View)
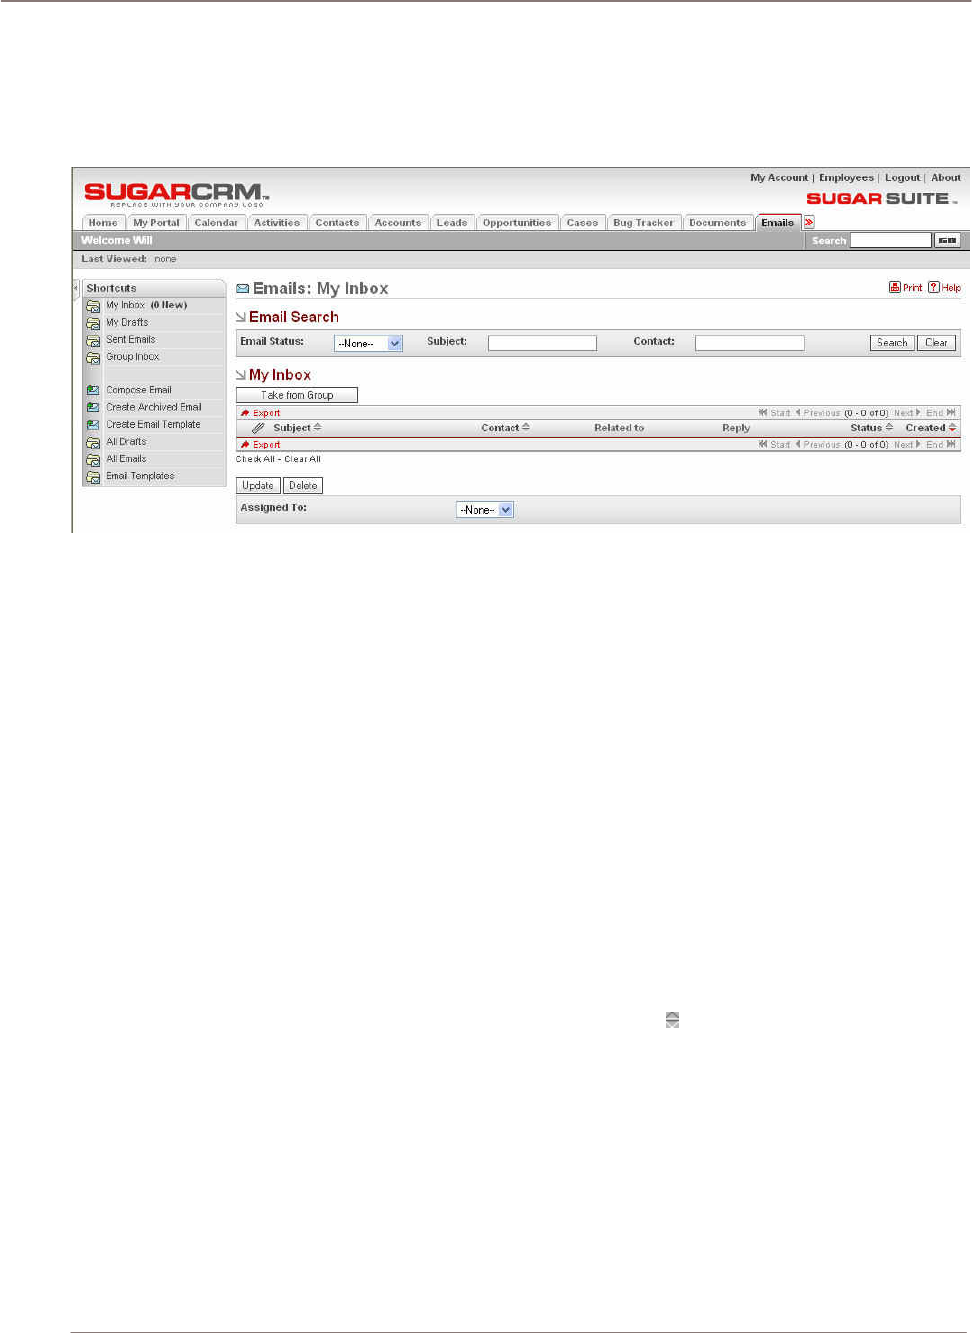
Using Sugar Suite
Emails Module
The Emails Module list view is selected using the Emails tab and provides a list of all or selected
Emails from a recent search.
Figure 44: Emails Module
Items contained in email boxes can be parsed and associations made to applicable existing Sugar
records, such as an email for a given Case ID. Emails that do not reference existing Sugar records
can be placed in a Group Inbox and subsequently assigned and worked.
• Emails retrieved from monitored mailboxes are put in the Group Inbox.
• Items in the Group Inbox can be assigned and/or distributed to users and once distributed, the
items appear in the user’s My Inbox.
• Email items residing in the Group Inbox can be assigned to specific individuals or to individuals
within teams. With either option, you can distribute the assignment based on two available
assignment options: round-robin or least-busy. You can choose to assign single email items or in
bulk by using the “Only Checked” and “All Search Results” options.
• From My Inbox, a user can create a lead, case, or contact.
Listing and Sorting Emails
Each Email in the list has a check box at the left, and at the bottom of the screen is a facility to update
one or more values for all selected Emails.
• Sort the Email list by clicking on any column title which has the icon beside it.
• Click on a column title when it is already the highlighted sort column to reverse the sort order. The
Emails list is paginated if it contains more items than are displayed on the screen. Controls are
provided to go to the start or end of the list, or step to the next or previous page.
• Click on the subject for any Email in the list to display the detail information for that Email.
• Use the navigation shortcuts to create a new Email.
• Use the Email list view to create or view Email Templates or view Archived Emails.
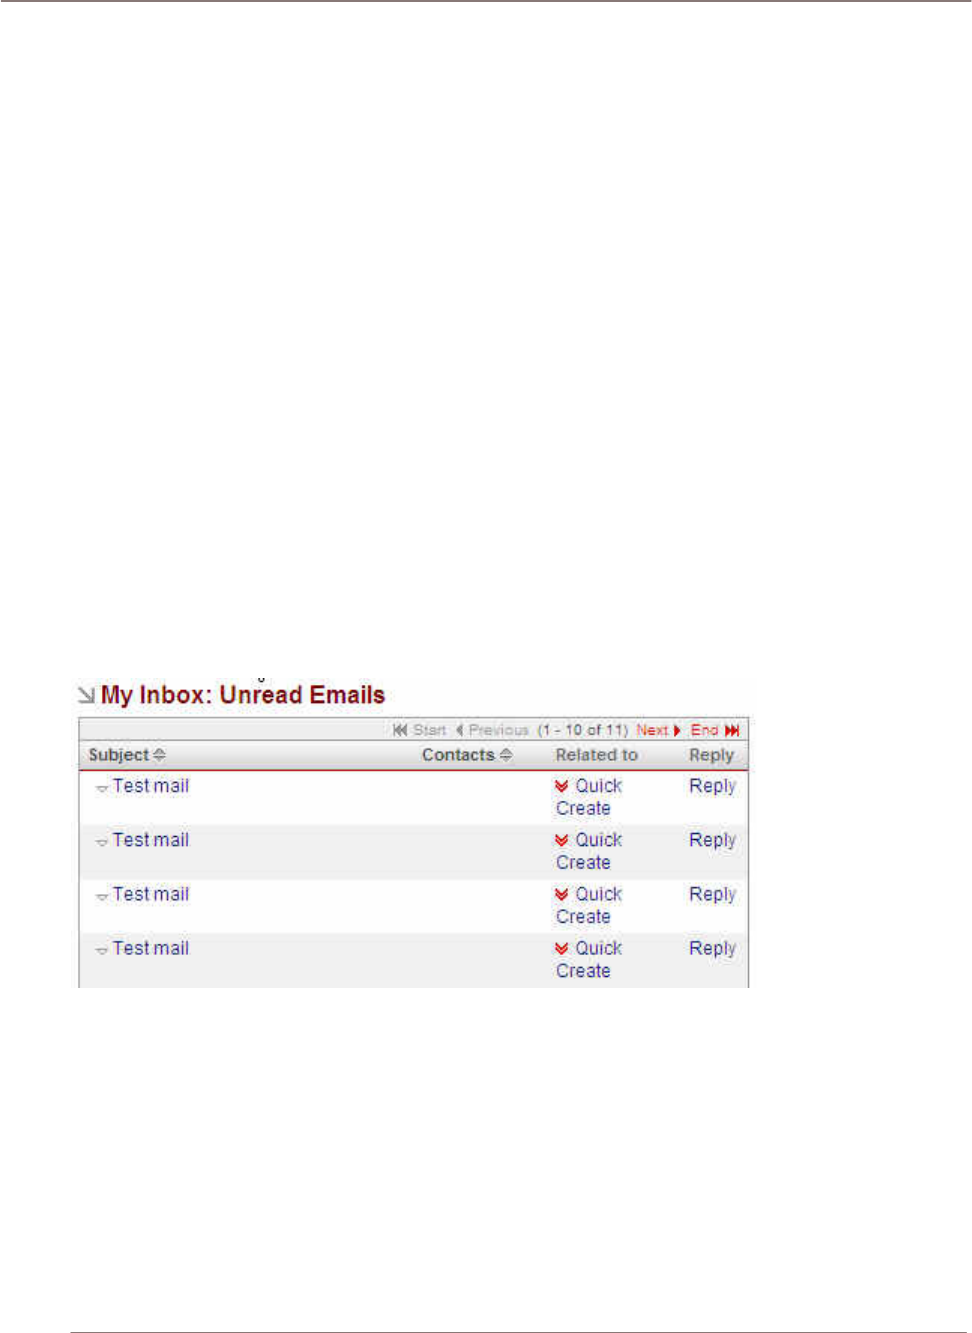
Using Sugar Suite
Creating Emails
You can create Emails and send them if the Email Options in My Account are set correctly. An
administrator must provide this information for your particular environment. When you send emails,
you can attach a file to the email. This file becomes saved as a Note related to your email.
• Start emails and then click the Save As Draft button to send it later.
• Click the Drafts shortcut to display your draft emails.
• When you create an Email Template, you can insert variables for information such as First Name,
Last Name, address or email.
• Apply a saved template when creating an email for individuals or in an emailing Campaign. The
variables can be filled by data from the Target records when the email is sent. Refer to the
Campaigns Module for more information on creating an emailing Campaign for large groups of
leads or contacts.
• Format the body text in emails and email templates using the text formatting toolbar. Highlight the
text and click buttons on the toolbar to apply standard formatting options such as font face, size,
bold, italics, indentation and color. Additional buttons insert rules, hyperlinks, pictures, table and
display the HTML source code.
• Click Edit Alt Text to specify the text that displays when an email client cannot render HTML
code.
My Inbox
Your Inbox contains emails that assigned to you. This Inbox can also be accessed from your Home
screen. This illustration shows a user’s My Inbox list:
Figure 45: My Inbox
Group Inbox
The Group Inbox is designated for the Group user. This Inbox contains emails that are NOT assigned
to specific users. These emails can be assigned to individuals using algorithms such as round robin,
least busy, and direct assignment with the Using Rules drop down menu.
This illustration shows a Group Inbox containing items from monitored mailboxes:
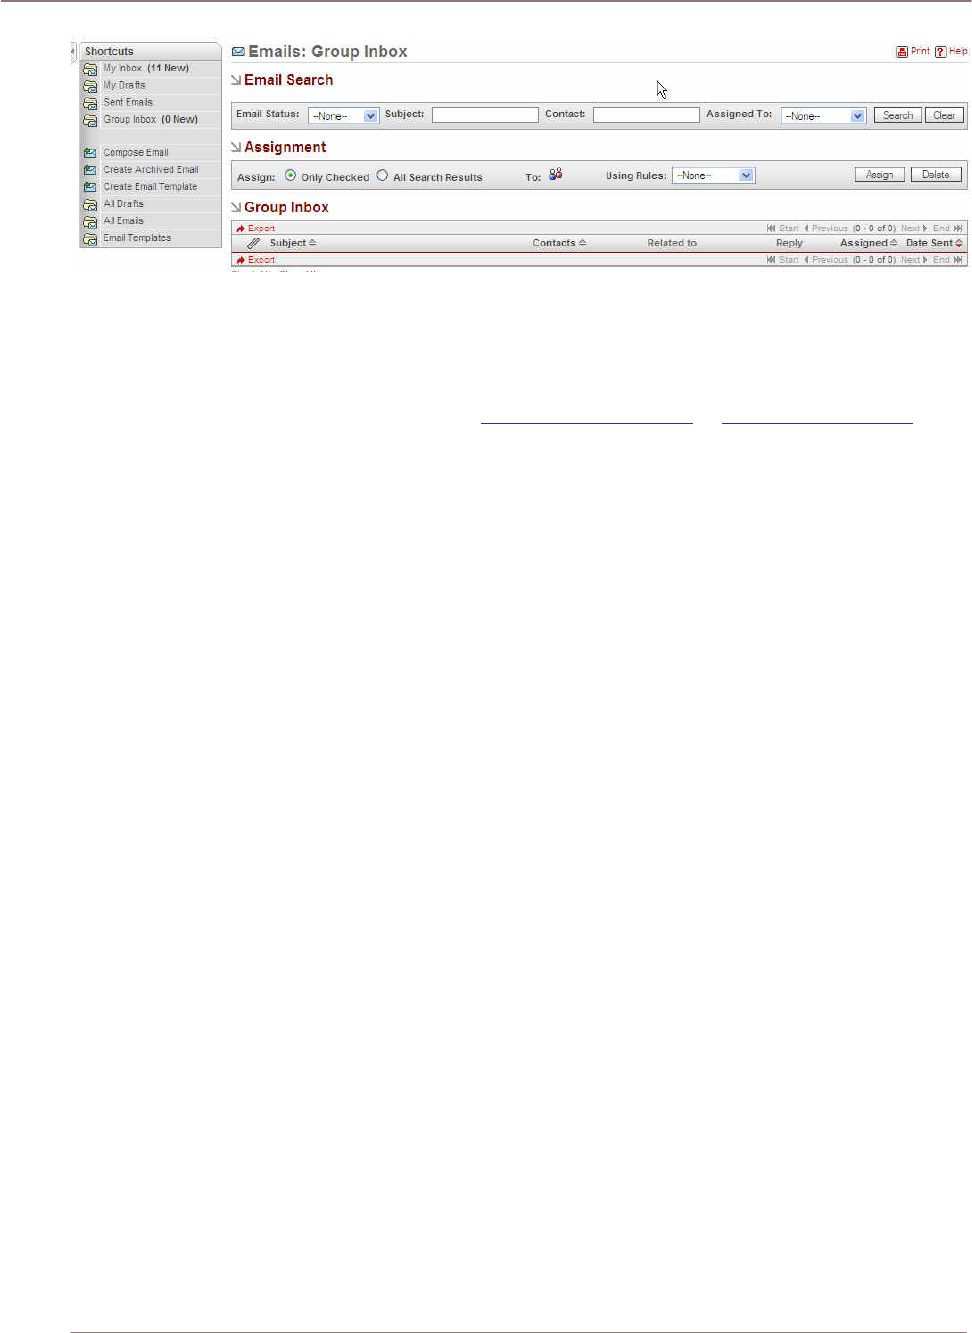
Using Sugar Suite
Figure 46: Group Inbox
Inbound Email
The Inbound Email feature provides the capability to monitor, route, assign, and reply to emails.
Multiple mailboxes can be monitored, such as support@company.com or sales@company.com.
Items contained in these email boxes can be parsed and associations made to applicable existing
Sugar records, such as an email for a given Case ID. Emails that do not reference existing Sugar
records can be placed in a Group Inbox and subsequently assigned and worked.
Inbound Email processing functionality has been exposed in other areas of the application, like the
Home Screen with the new My Inbox area.
• Emails retrieved from monitored mailboxes are put in the Group Inbox (which is accessible via the
Emails module).
• Items in the Group Inbox can be assigned and/or distributed to users.
• Once distributed, the items appear in the user’s My Inbox.
• Email items residing in the Group Inbox can be assigned to specific individuals or to individuals
within teams. With either option, you can distribute the assignment based on two available
assignment options: round-robin or least-busy. You can choose to assign single email items or in
bulk by using the “Only Checked” and “All Search Results” options.
• From My Inbox, a user can create a lead, case, or contact.
Navigation Shortcuts
Navigation Shortcut – Compose Email: This is the edit screen for composing an email message.
Standard text fields such as To, Cc, Bcc and subject field are near the top of the panel. If you want to
add an attachment to the message, you can do so by clicking the add file button at the bottom of the
page.
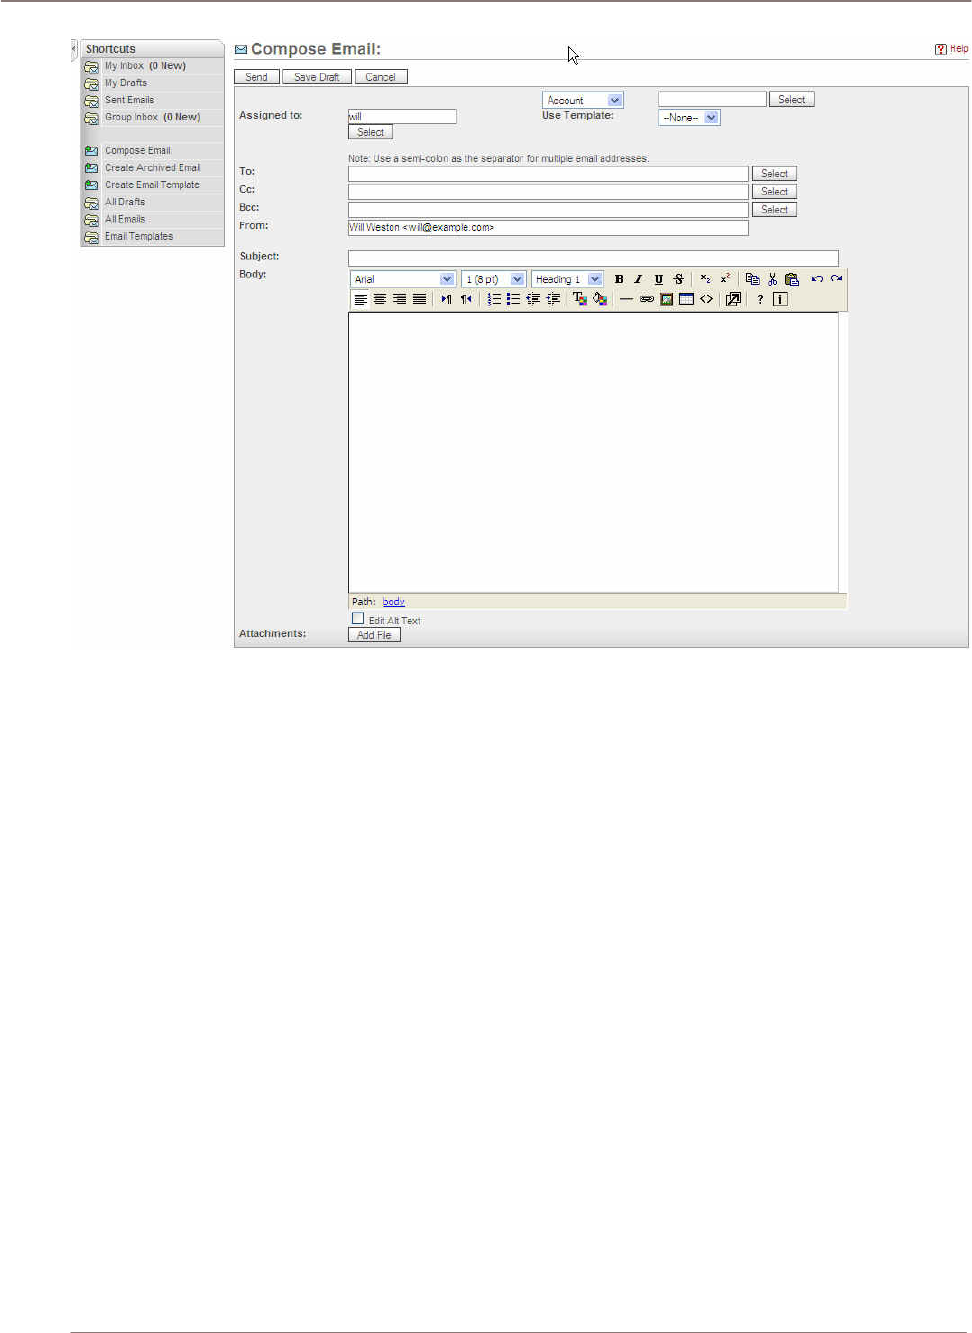
Using Sugar Suite
Figure 47: Emails Module (Compose Email Edit View)
Navigation Shortcut – Create Archived Email: You can create archived email using this screen. It
is similar to compose email in functionality and also includes the option of linking account information
from the account list. The difference between compose email and archived email is that archived
email will not be able to send an email.
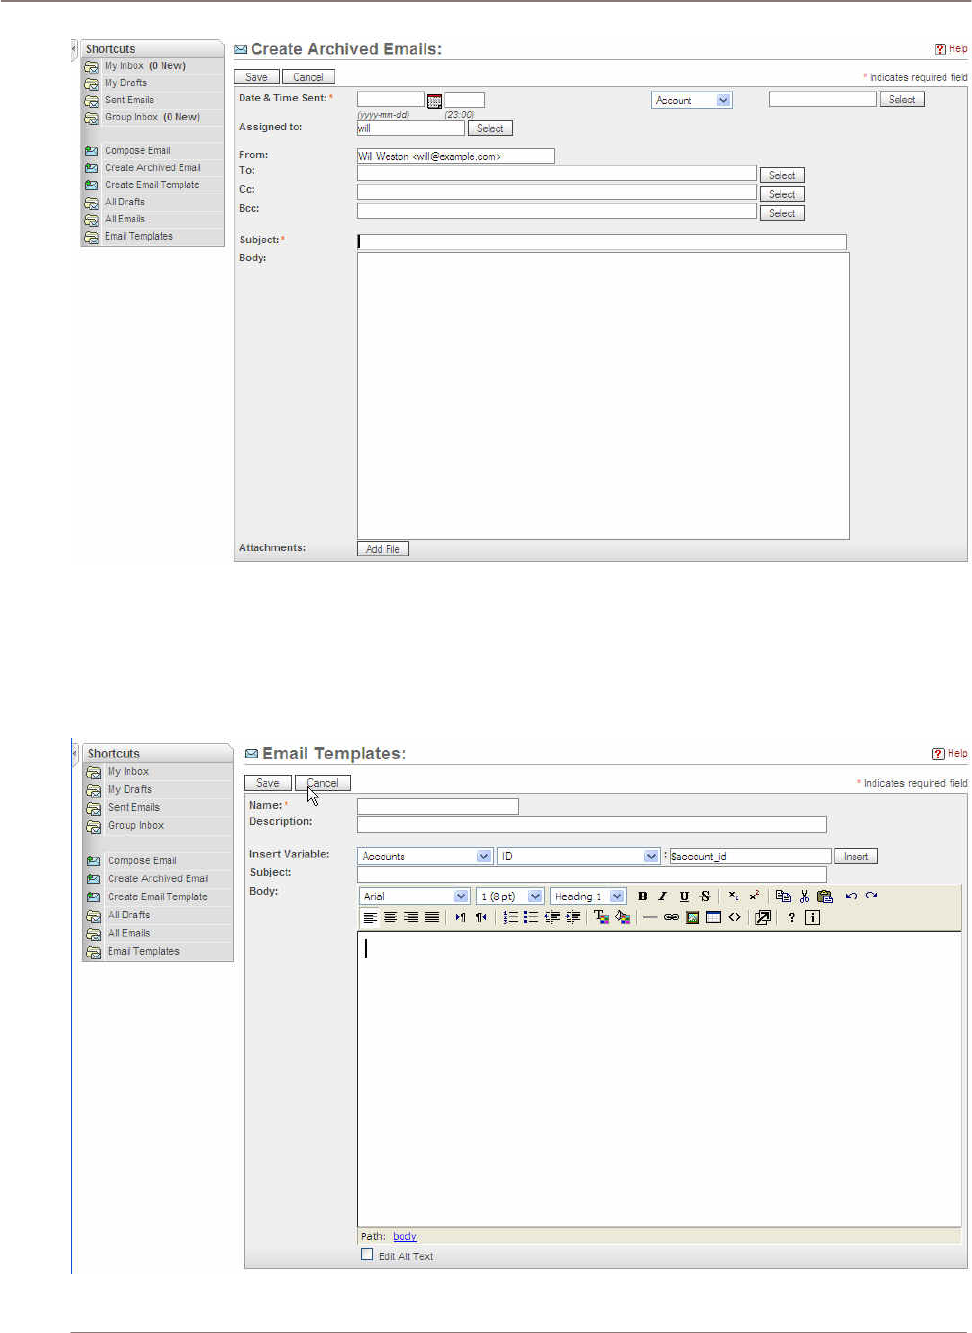
Using Sugar Suite
!
Figure 48: Emails Module (Create Archived Email Edit View)
Navigation Shortcut – Create Email Template: You can create an email template by using the
template feature. Be sure to create a name for the template. The name is used as the search criteria
in the email template list view and it will also show up on the template list. This template also has the
option of inserting variables from accounts or contacts to save the time of searching for them when
needed.
Figure 49: Emails Module (Create Email Template Edit View)
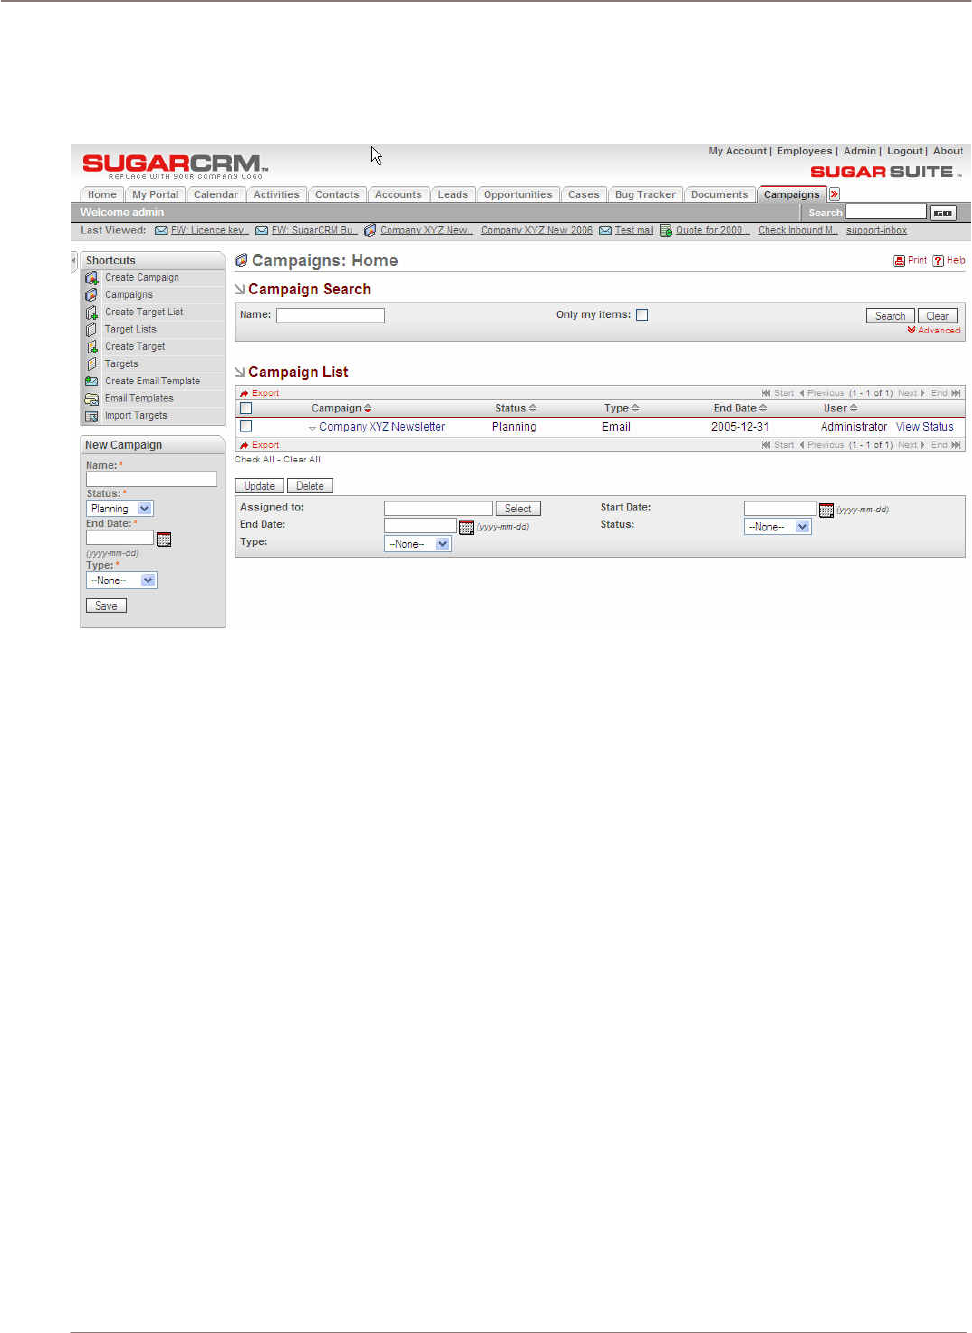
Using Sugar Suite
Campaigns Module
The Campaigns Module list view is selected using the Campaigns navigation tab:
Figure 50: Campaigns Module
You can create campaigns to track and manage marketing campaigns and targets. You can create a
campaign and then create a target list. Then you can add targets to the list by importing them from file
(either CSV or TSV) or by selecting them from Contacts or Leads. Targets contain all the contact
information for each target.
The Campaigns module has the following capabilities and features:
• A Schedule button on the Campaign setup screen that allows campaign managers to designate
exactly when an email campaign should begin queuing outbound emails.
• List management is available which can create multiple types of list such as seed, test, and
suppression (do not send to this person) lists.
• Email templates can be designated at the Target List level within a campaign rather than applying
to the entire campaign. This allows finer control over the emails you deliver within a single
campaign.
• Email templates can be created directly from within the Email Marketing screen.
• An Activity View screen provides a tracking view of the Campaign. In the Campaign Activity View,
various aspects of the campaign can be monitored including:
Messages Sent/Attempted
Messages resulting in an error when sending
Invalid emails
Click-thru Link
Message opened
Opted out
• If you create an Email Campaign, an additional Email Campaign section displays at the bottom of
the screen. You can specify the From Name and From Email Address and the date you want the
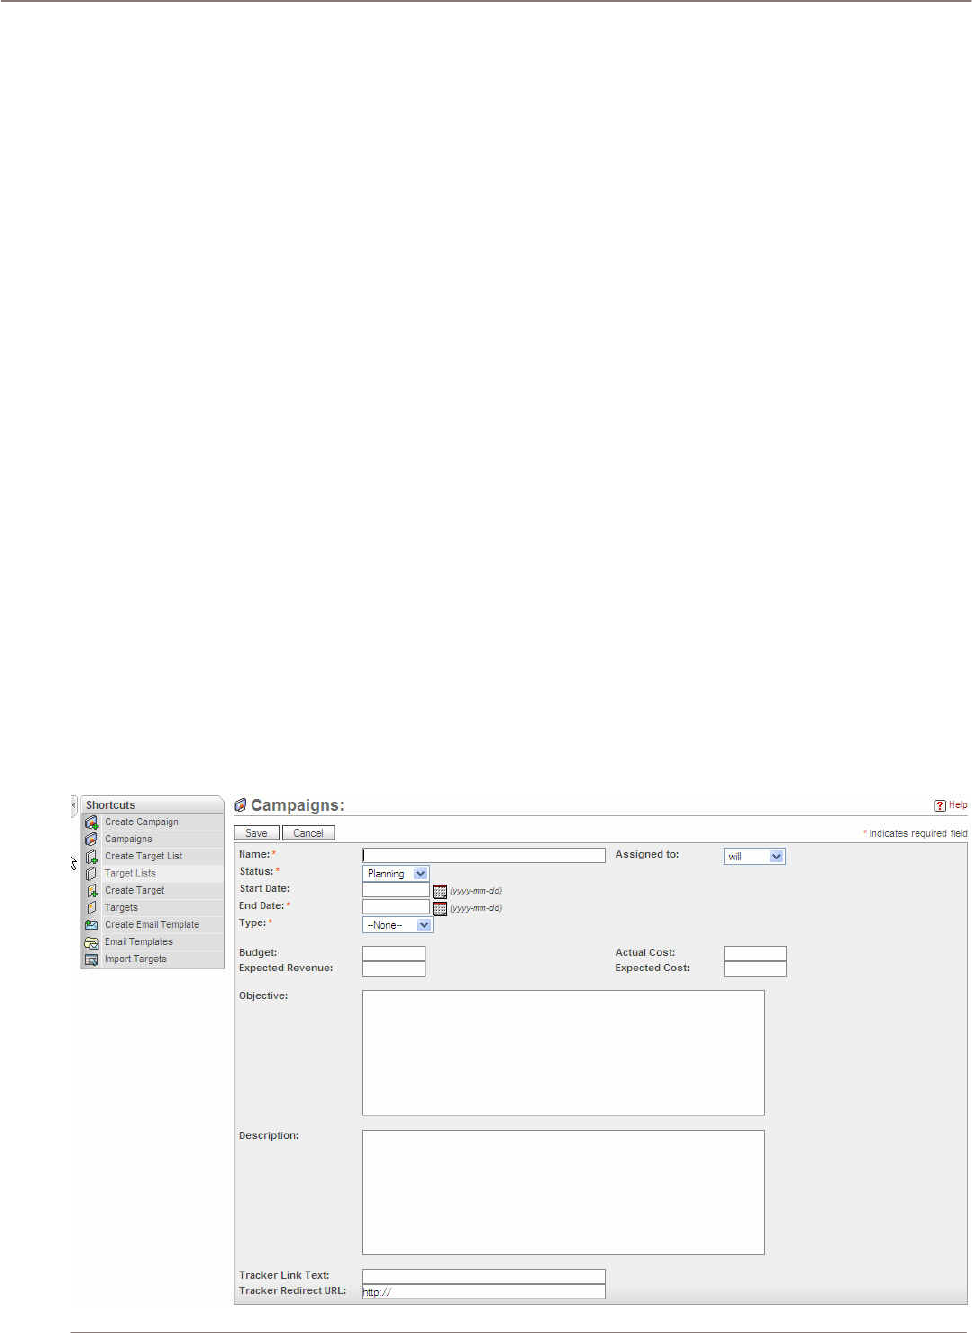
Using Sugar Suite
email to be sent to the targets. You must also select an Email Template created in the Email
module. When viewing the campaign, an additional list displays the status of scheduled email
campaigns and allows you to edit or remove email campaigns that are waiting to be sent. When
you remove an email campaign from the Email Marketing list, it deletes all of the emails related to
the campaign but does not delete the campaign. Status for email campaigns in the Email
Marketing list can be In Queue, In Progress, or Sent.
• For email campaigns, you can also specify settings for a Tracker Redirect URL which contains a
hyperlink in the email that goes to a Web page and Tracker Link Text which is the displayed text
for the hyperlink. After the emails have been sent, the Tracker Count displays how many times
the Redirect URL has been clicked by readers of the emails.
• The Campaigns module provides a list of all or selected campaigns from a recent search. Each
campaign in the list has a check box at the left, and at the bottom of the screen is a facility to
update one or more field values for all selected campaigns. For example, you might want to
change the end date for several campaigns at one time. Clicking on a campaign displays details
about the campaign.
• The View Change Log link shows views of the old and new values for fields that track changes.
The tracked fields include Assigned User, Start Date, End Date, Status and Type.
Creating an Email Campaign
Confirm with your system administrator that the outbound email process is configured to send email
from your system as described in Configure System section and Mass Emailing section.
• Create a campaign.
• Create or select an associated target list.
• Create an email marketing record associated with the campaign.
If the target list has no associated targets, create or add targets to the target list.
Creating a Campaign

Using Sugar Suite
Figure 51: Creating a Campaign
Use the start date and end date to indicate when a campaign takes place. Note that these values do
not impact the execution of an email marketing campaign. Use the Campaign status to track the
current planning stage of the campaign. Like the start/end dates, the status value does not impact
the execution of an email marketing campaign.
In an email marketing campaign, the Tracker URL is appended to the end of every outbound email
message inside of Tracker Link Text. When a recipient receives the email and clicks on the Tracker
URL Link logs the visit in the campaign tracking system.
Example: Campaign Management via Email
The following instructions demonstrate campaign management by executing an email campaign. The
Campaign Manager has capabilities to manage many campaign types such as web, direct mail,
email, etc.
1. Create Campaign.
2. Import Lists and optionally:
• create Target List – specify the type of list (standard, test, seed, etc.)
• merge with existing Target List
3. Select targets, leads, contacts, etc. for the campaign.
4. Select or create email.
• add custom variables and messages
• associate email by list or to entire campaign
• assign launch date for the email
5. Select Launch Test button.
6. Send Test email.
7. Clear statistics from Test.
8. Launch Campaign.
9. Optionally, convert Targets into Leads.
Notes:
• Test lists are lists of people used to test your campaign before launch.
• Seed lists are lists of people that need to be considered in the campaign but should not be
tracked as a potential lead.
• Test and seed lists are ignored in email tracking statistics.
• The start date selected in the email marketing screen determines when the email is sent.
Creating a Target
Targets created in this screen are stand-alone records that are not attached to Contacts or Leads.
These records are stored in their own table and completely separate from Contact and Lead records.
If you plan to send emails to existing Contacts or Leads, you can skip this step.
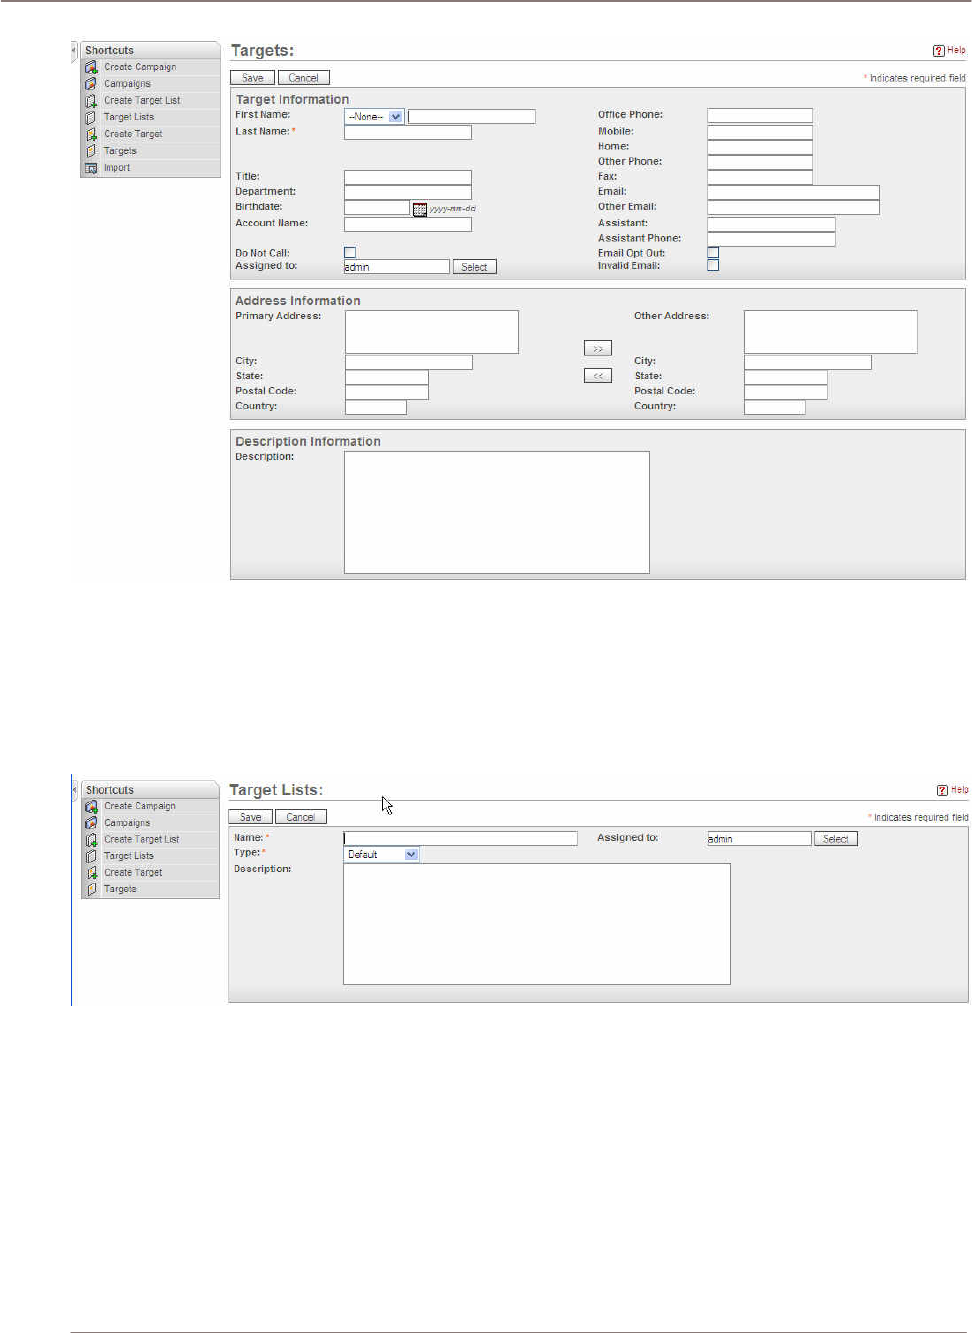
Using Sugar Suite
Figure 52: Creating a Target
Creating a Target List
Target Lists are groupings of Contact, Lead, Target, or User records. You can add Contacts or Leads
to a Target List using a saved Contact or Lead report.
Figure 53: Creating a Target List
Creating an Email Marketing Record
An email marketing record can be created for each campaign. As soon as a target list is attached to
the parent campaign record and the email marketing start date and time is in the past, outbound
emails is queued for delivery. It is very important to note that every time the email marketing record is
saved and the start date is in the past, the email is queued for delivery. Be careful of this condition as
you could inadvertently send duplicate emails.
Create or choose an email template to be used for sending out campaigns. Note that email marketing
campaigns will only start executing if the start time is in the past. Any email bounce backs are sent to
the From address defined in this record.
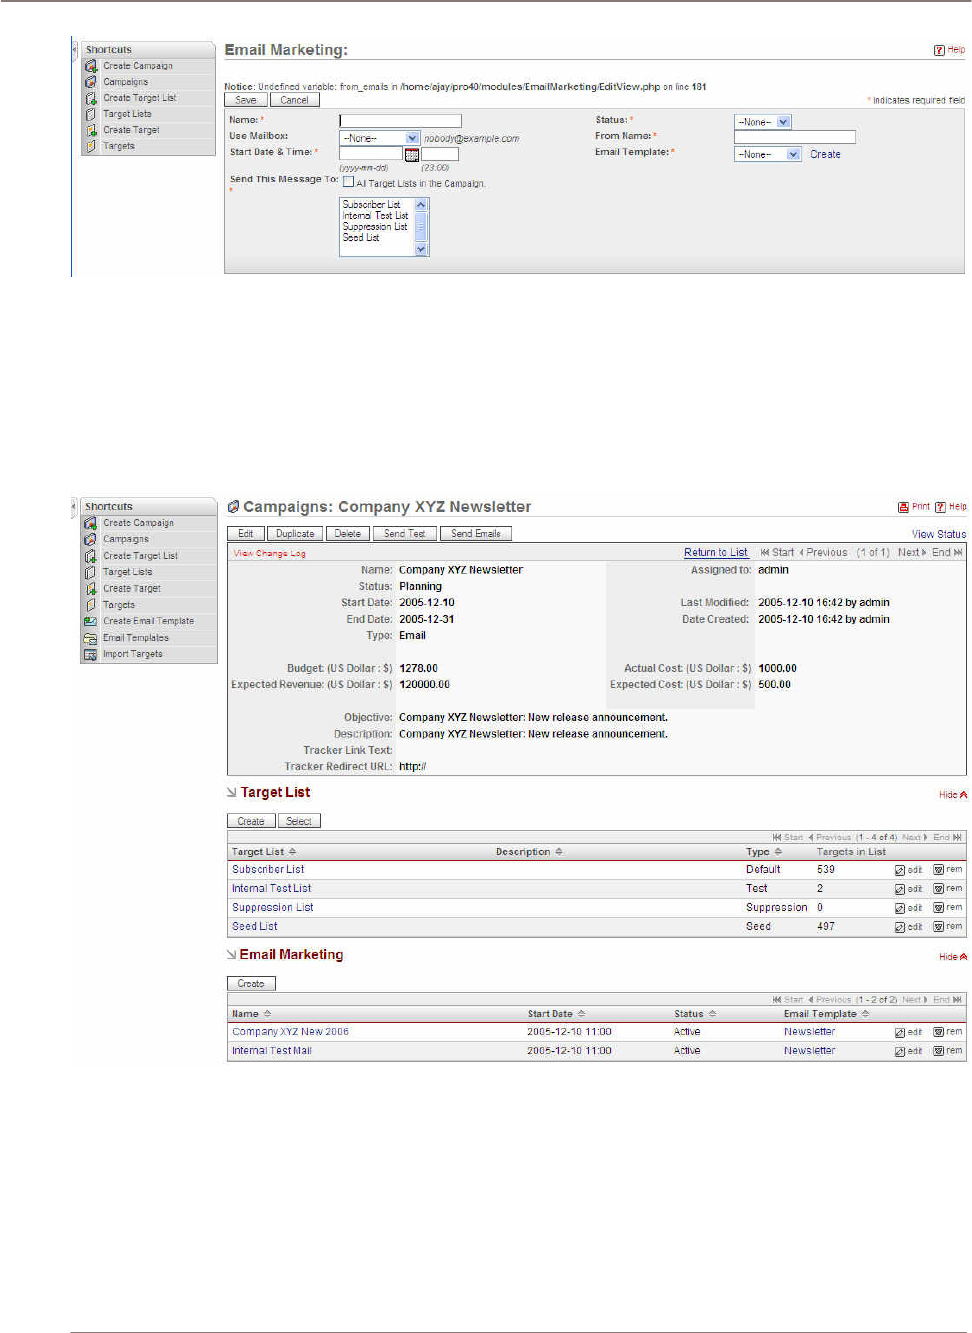
Using Sugar Suite
Figure 54: Creating an Email Marketing Record
You can wrap the Tracker URL link defined in the campaign around any text in the outbound email by
simply putting the keywords TRACKER_URL_START and TRACKER_URL_END around the text you
wish to be turned into a hyperlink.
Example: Campaign Detail View
The following illustrates a detail view of a campaign management example:
Figure 55: Campaign Detail View Example
Example: Campaign View Status
The View Status link provides information about the campaign including a campaign summary,
message queue, message attempts, contacts created, and bounced emails among other statistics.
The following illustrates some View Status information of a campaign management example. This
illustration is an incomplete view of Campaign status information.
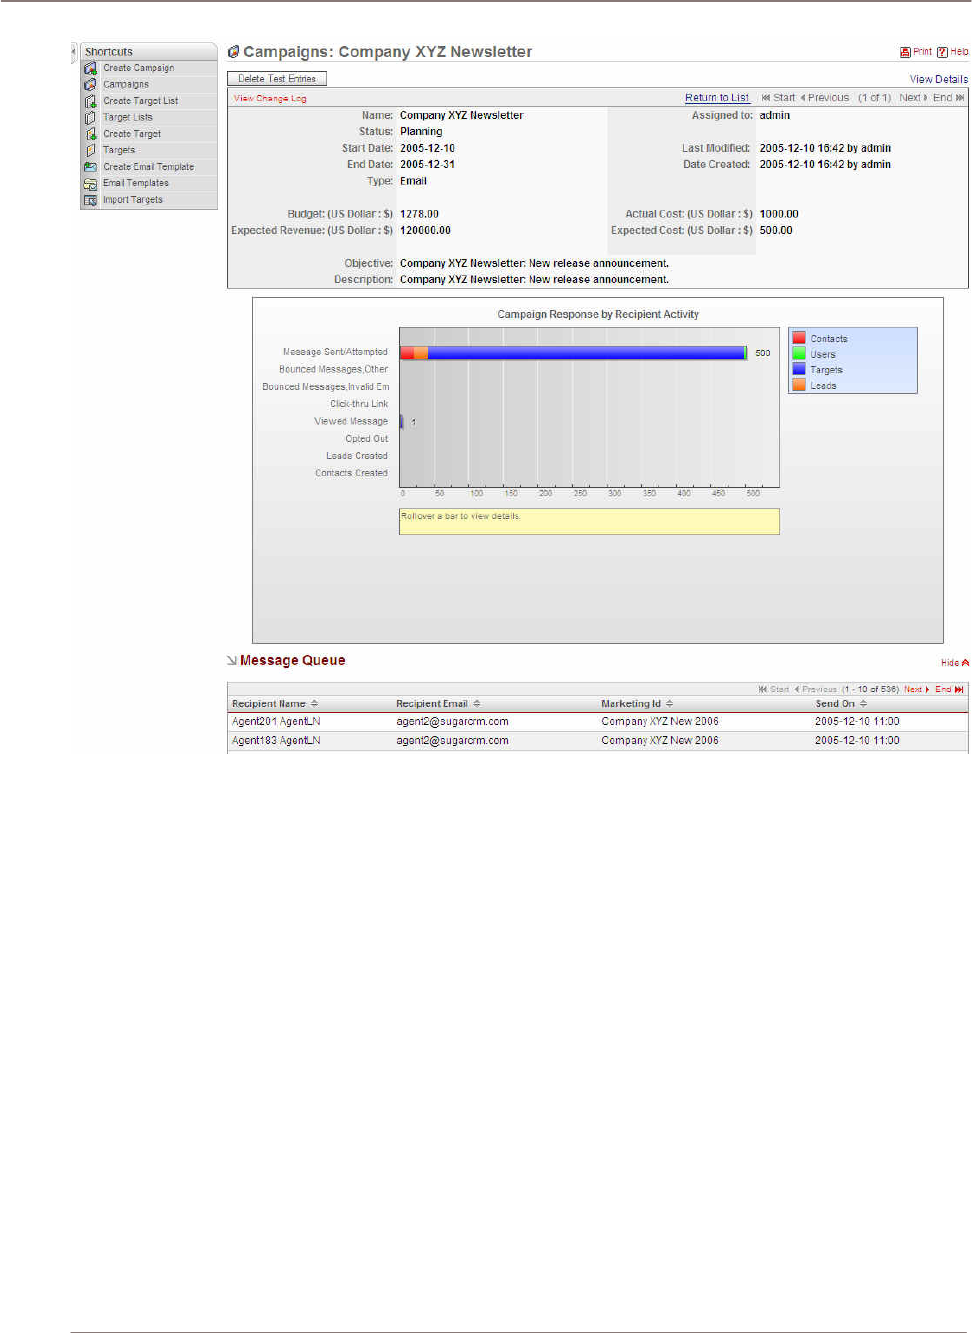
Using Sugar Suite
Figure 56: Campaign View Status Example
Navigation Shortcuts
Navigation Shortcut – Create Campaign: The edit view of the campaign module provides the form
for creating a new campaign. The required fields are:
• Name – This is the short descriptive name for the campaign.
• Status – This indicates the stage where the campaign is at such as planning, active, inactive,
or complete.
• End Date – This is end date of the campaign.
• Type – This indicates what type of campaign it is? (mail, telephone, email etc.)
The tracker redirect URL text box is on the bottom of this panel.
Navigation Shortcut – Create Target: This edit form allows you to create a new target. This screen
is divided into the following sub-panels:
• Target Information - Last Name is the required field so it needs to be filled in order for the
application to save the new target detail.
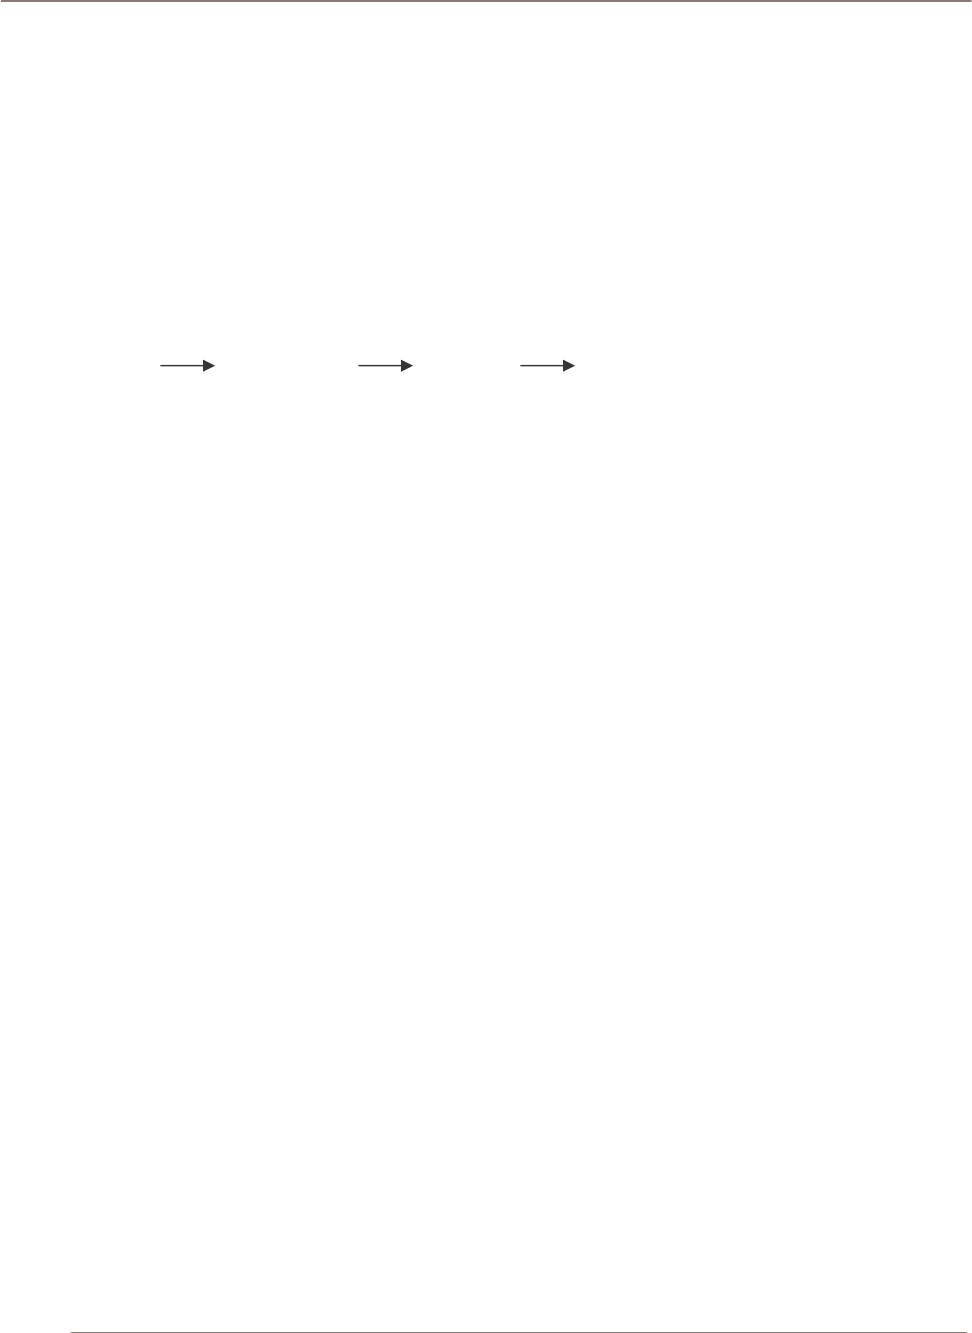
Using Sugar Suite
• Address Information - This section has the space for primary address and other address. You can
enter the address information on either one of the sections and duplicate the information by using
the arrow buttons.
• Description Information – This is space for adding extra notes to this target.
A target is someone who you have some information on but who doesn’t qualify as a lead or contact.
The components and process of using the Campaigns module begins with a target. After you have
more than one target, you can group the targets into a target list according to a set of predetermine
criteria such as age group or spending habit. When a new marketing campaign is created, the user
can go back to the campaign and add the target list from the Campaigns List.
The general process flow is as follows:
Targets Target List Campaign Campaigns List
Using Sugar Suite
Projects Module
The Projects Module list view is selected using the Projects navigation tab:
Figure 57: Projects Module
You can create Projects that contain Tasks. To create a Project, click the Create Project shortcut and
type a Project name and assign the Project to a person. Then you can create tasks belonging to the
Project. Tasks include details such as status, starting date, due date and measures of effort to
complete the task.
The Projects module provides a list of all or selected Projects from a recent search. Each Project in
the list has a check box at the left, and at the bottom of the screen is a facility to update the Assigned
To value for all selected Projects. The Total Estimated Effort column in the Project list view is the sum
of all Project Tasks' estimated effort. The Total Actual Effort column in the Project list view is the sum
of all Project Tasks' actual effort. Projects can be searched from the global search box in the top-right
corner of the application.
Project Lists
The Projects list may be sorted by clicking on any column title which has the icon beside it. Clicking
on a column title when it is already the highlighted sort column reverses the sort order.
The Projects list is paginated if it contains more items than are displayed on the screen. Controls are
provided to go to the start or end of the list, or step to the next or previous page.
• Clicking on the subject for any Project in the list displays the detail information for that Project.
• In the History sub-panel, click the Summary button to view history information at a glance
instead of selecting each item to view.
• For Project Tasks, click the View Change Log link to view the old and new values for fields
that track changes. The tracked fields include Assigned User, Status, Due Date, Start Date,
and Percent Complete.
You can indicate a Project Task dependency by choosing a Project Task in the Depends On field.
• The Utilization field indicates how much time a user is supposed to dedicate their work hours
towards the assigned task. Only one person can be assigned to a given Project Task.
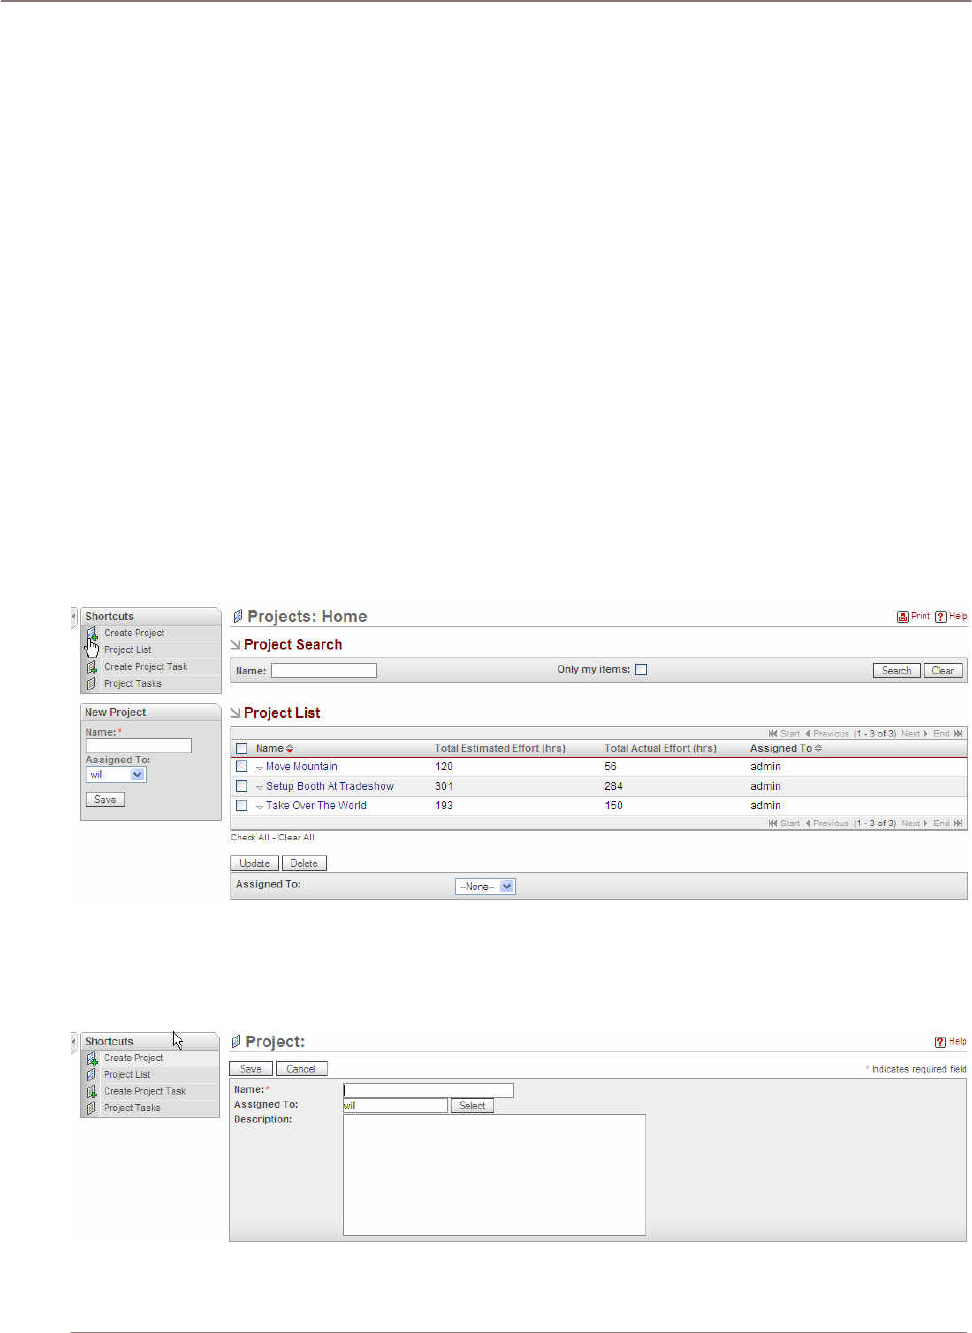
Using Sugar Suite
• The Progress field is available for the user to update to indicate how far along a Project Task
is.
• The Task Number can be used to uniquely identify a task by number and can be used instead
of referring to a task by Name.
• The Order field can be used to indicate what sequence a list of project Tasks should be
performed in which is useful for Project Tasks that do not have tasks with dependencies
assigned to them. All Project Tasks must be assigned to a Project. However, a Project may be
associated to one or more Contact, Account, or Opportunities.
• Project Tasks under the Project tab are separate from Tasks under the Activities tab.
• The Milestone flag can be used to signify that a Project Task is significant as some sort of
milestone along the Project lifetime.
Navigation Shortcuts
The navigation shortcuts help you to create a new Project or you can switch back to the Project list
view to create a new Task or view all Project Tasks. You can link Projects to Contacts, Accounts, and
Opportunities.
Navigation Shortcut – Project List: The list view displays a list of projects in the system. You can
search for a particular project by using the search panel at the top of the screen. Remember to use
the clear button to clear out the search value in the search box after the search is complete. This
allows you to see a complete list of projects.
Figure 58: Projects Module (Project List View)
Navigation Shortcut – Create Project: In this edit view, you can create a new project by filling out
the information in the text box provided. The Name text field is a required field. You must enter the
name so the new entry can be saved in the project list.
Figure 59: Projects Module (Create Project Edit View)
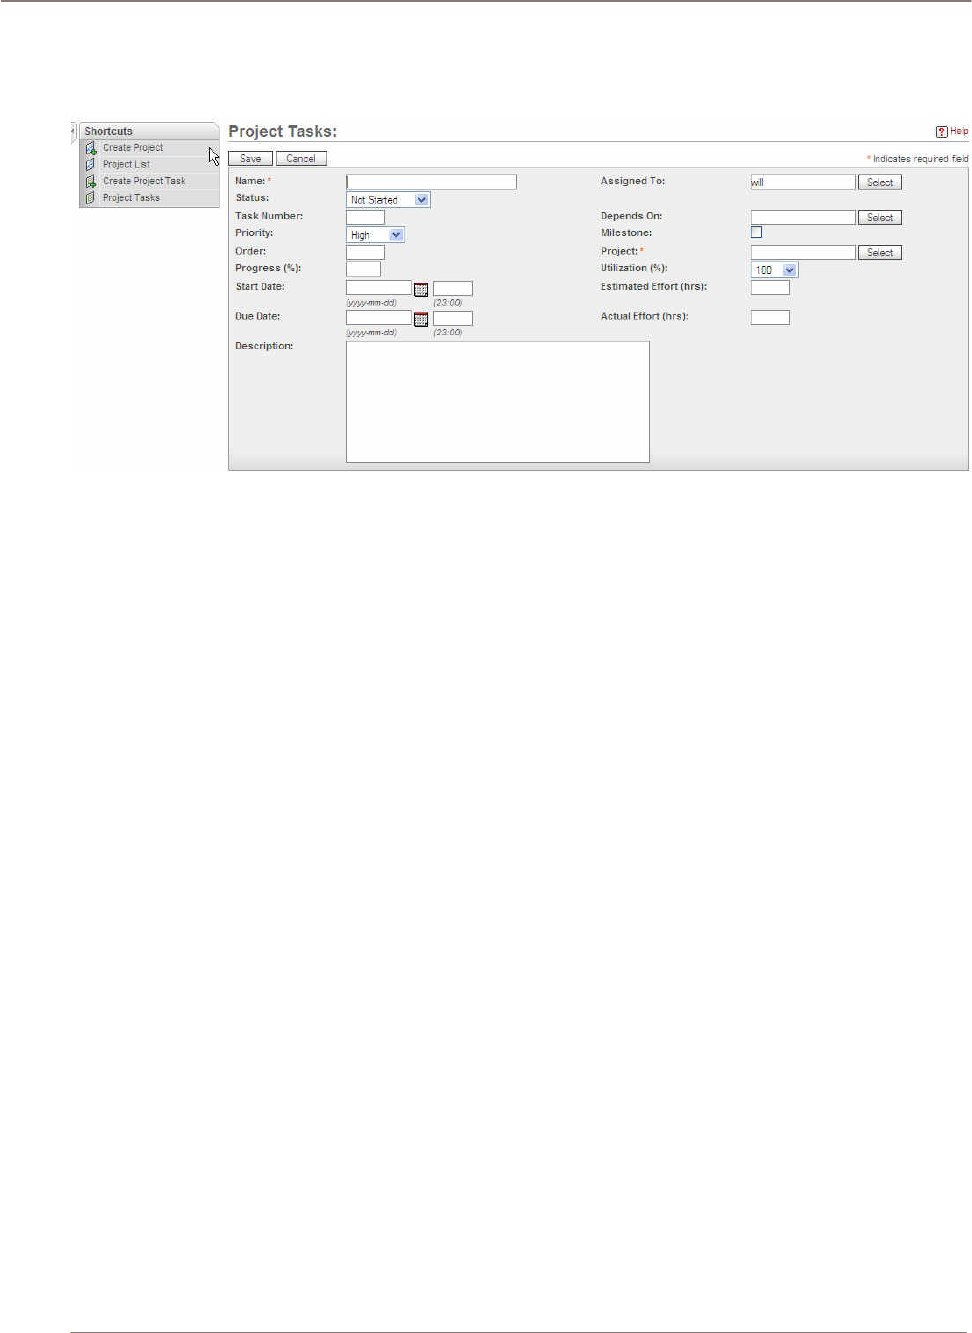
Using Sugar Suite
!
Navigation Shortcut – Create Project Task: This edit view is for creating tasks related to the
project. The required fields are the task’s name and project. Enter a descriptive name for the name of
the task and select the project from the list that is in the system.
Figure 60: Projects Module (Create Project Task Edit View)
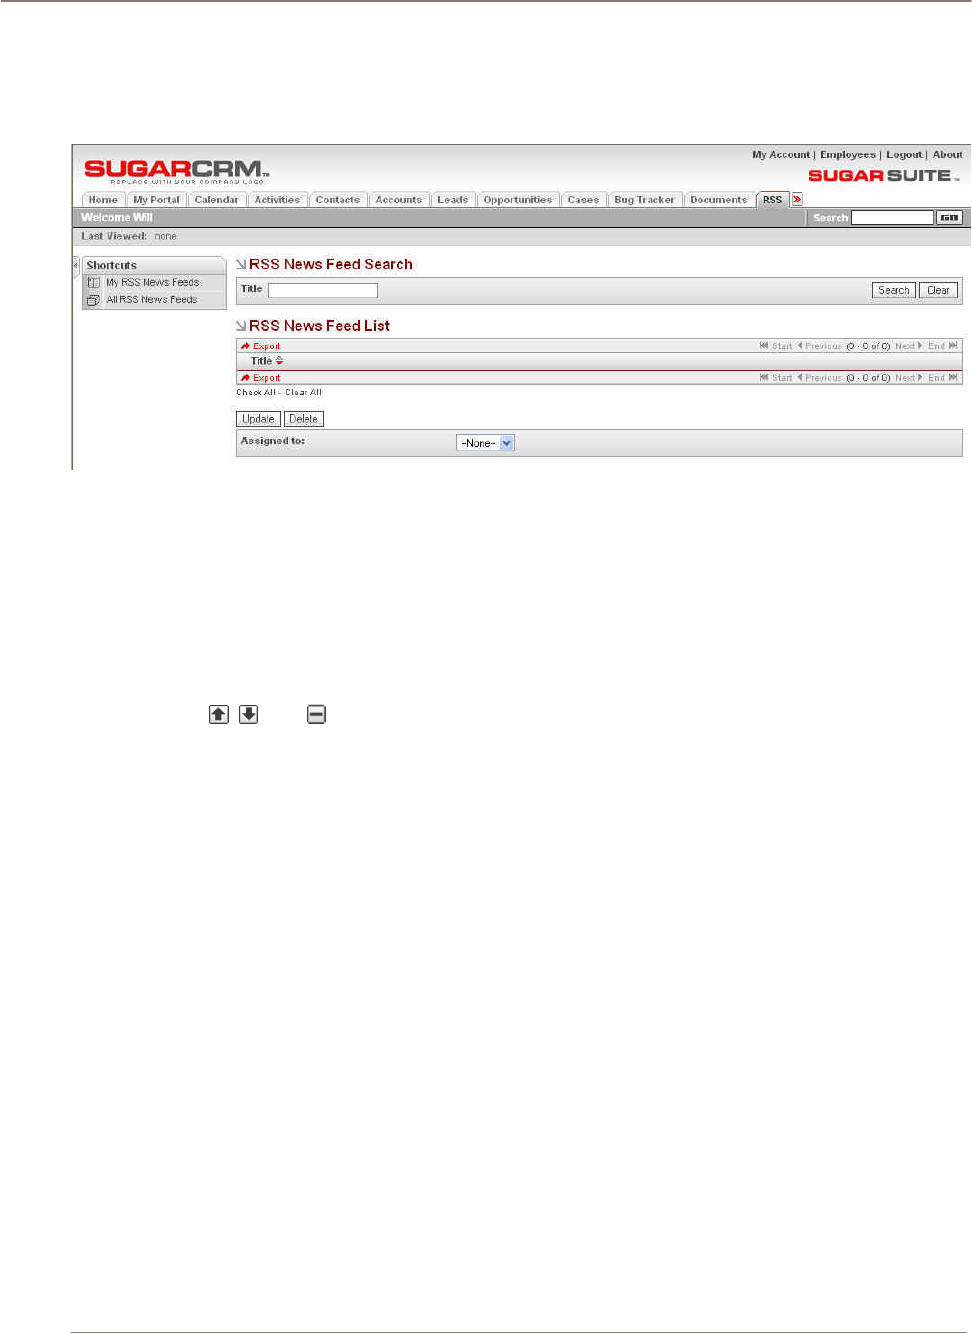
Using Sugar Suite
RSS Module
The RSS Module list view is selected using the RSS navigation tab:
Figure 61: RSS Module
The RSS module manages RDF Site Summary (RSS) feeds. These feeds provide news or other web
content that is syndicated by web sites which publish their content in this manner. Sugar Suite has
hundreds of RSS feeds available as it is supplied, and others may easily be added via the New RSS
Feed data entry box to create your own custom news-gathering experience.
•
Click on the RSS Tab to open the My RSS News Feeds screen. This screen is assembled
from all the feeds you have marked as your favorites, and shows the latest information being
provided by those feeds.
• Use the , , and controls to the right side of their header bar to promote, demote, or
remove a feed from the My RRS News Feeds screen.
• Click on the name of the feed to see information items available from that feed. Each item
listed has a brief title (which is linked to the full story or content) and the timestamp of when
the item was added to the feed.
• Click on an item to see the full content in a new browser window.
• Click on Website to go to the website associated with that feed.
On the All RSS News Feeds screen, a list of all or selected RSS News Feeds from a recent search is
displayed. The RSS News Feeds list is paginated if it contains more items than are displayed on the
screen. Controls are provided to go to the start or end of the list, or step to the next or previous page.
• Click on the Title for any RSS News Feed to display the information items currently available
from that feed.
• Use the controls, to add or remove a RSS News Feed from your list of favorites.
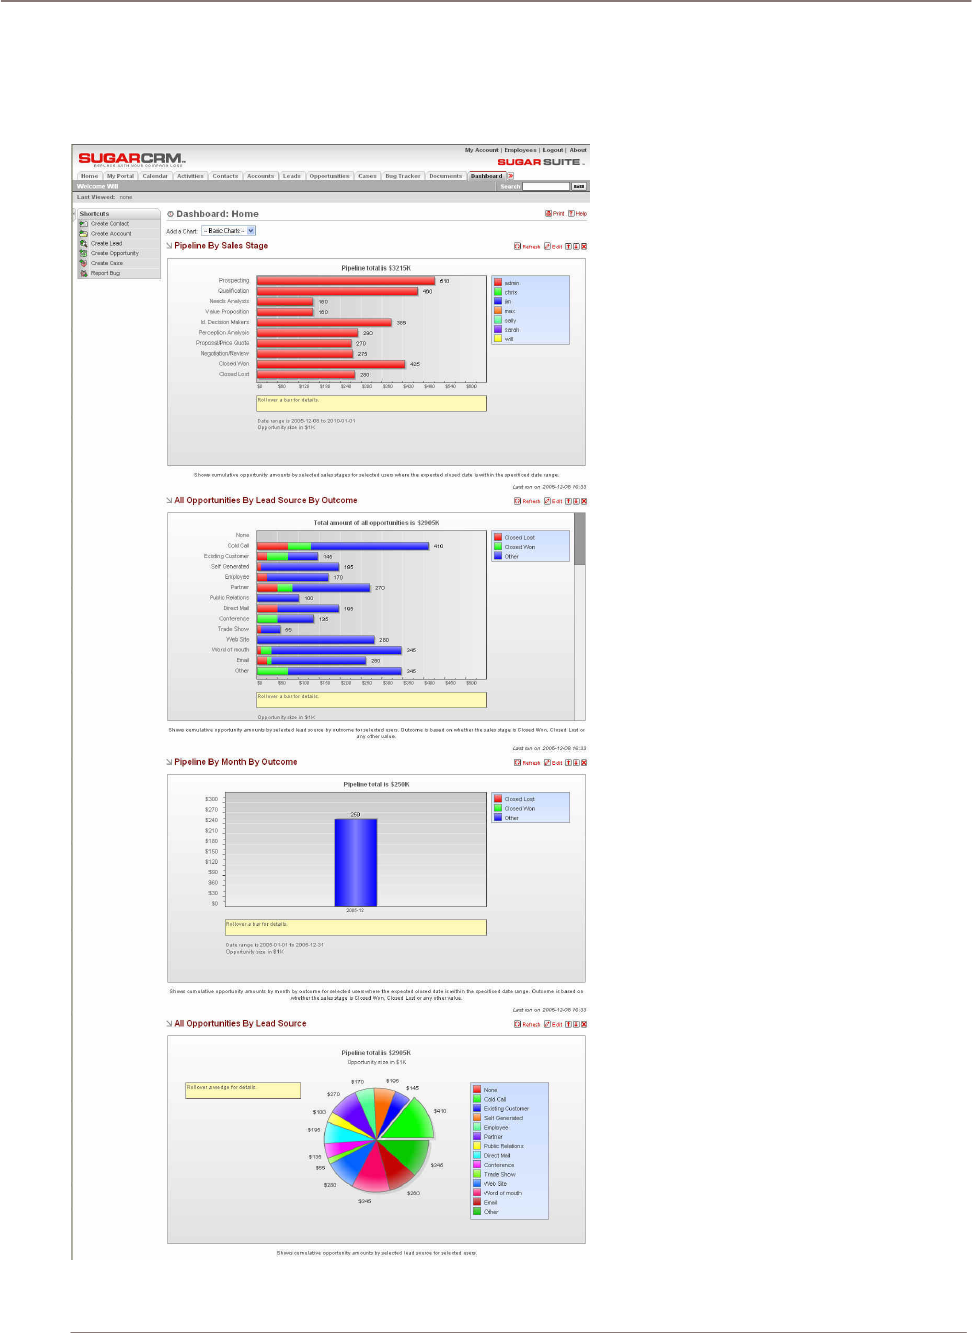
Using Sugar Suite
Dashboard Module
The Dashboard Module list view is selected using the Dashboard navigation tab:
Figure 62: Dashboard Module
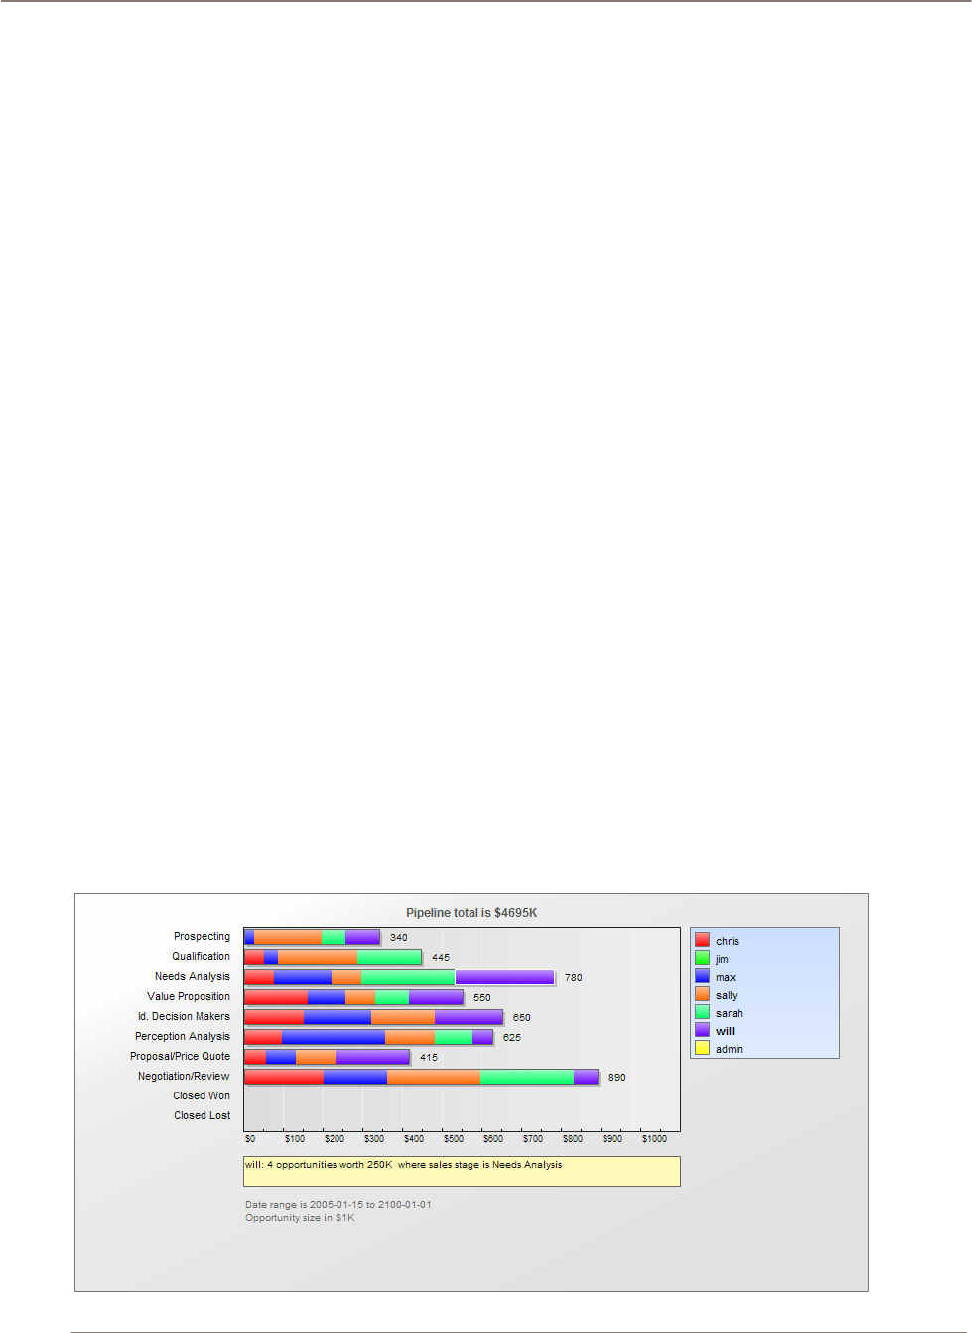
Using Sugar Suite
The predefined charts on the Dashboard display are
• A horizontal stacked bar chart of Pipeline by Sales Stage. Each bar shows the value of
potential sales at each stage of the sales pipeline.
• A horizontal stacked bar chart of Opportunities by Lead Source by Outcome. It shows a
stacked bar of the total opportunities for each lead source. Each bar is made up of multi-
colored segments which represent the outcome proportions for that lead source.
• A stacked bar chart of Pipeline by Month by Outcome. Each bar shows the total sales pipeline
for each month. Each bar is made up of multi-colored segments which represent the outcome
proportions for the pipeline in that month.
• A pie chart of Opportunities by Lead Source. This shows a simple pie visualization of the
proportion of total sales opportunities for each lead source.
Customizing Dashboard Charts
Each chart may be customized by clicking on the Edit button by the top right corner of the chart. This
displays a small dialog area which permits you to specify parameters of the report, including (as
appropriate):
• Date range or year for data to be charted
• User(s) for whom data should be charted
• Sales Stages to be charted
• Lead Sources to be charted
The following describes some common manipulations:
• To close the dialog box for each chart, Click on the Edit button again
• To produce a chart from different data, alter the parameters and click on the Select button.
• To set its display quality, to zoom the image, or to print it (charts are produced using Flash
technology), right click on each chart.
• To copy a chart for inclusion in a document (as in the below), take a screen copy (such as by
using Alt-Print Screen in Windows) and then crop the captured image in an image editor such
as Photoshop.

Using Sugar Suite
Figure 63: Sales Pipeline by Sales Stage Chart
A remarkably powerful feature of the Dashboard is that the charts allow for drilling down into the
actual underlying data. This means that each distinctively colored area on every chart is actively
linked to the set of opportunities it represents – simply click on an area to see those opportunities. For
performance, their data sources are not automatically recalculated each time the Dashboard is
displayed. To recalculate the data source for a given chart, simply click on the Refresh button
associated with it (beside the Edit button).

Import and Export
Import and Export
One of the most important aspects of any CRM software is getting the data from your last CRM
system moved across into the new one, and getting the data out of your new CRM system for use in
other applications. Note that this should only be done by a system administrator.
Sugar Suite supports the importation of various kinds of data from several different popular contact
managers and full CRM systems:
• Accounts may be imported from Salesforce.com, from ACT!, or from most other systems via a
custom mapping.
• Contacts may be imported from Salesforce.com, from ACT!, from Outlook, or from most other
systems via a custom mapping.
• Leads may be imported from Salesforce.com, or from most other systems via a custom
mapping.
• Opportunities may be imported from Salesforce.com, or from most other systems via a custom
mapping.
Importing Accounts and Contacts
Importing Contacts into Sugar Suite is fairly straightforward. First you use your old CRM application or
contact manager to export the data into a Comma Separated Values (.CSV) file format. Then you use
the import function within the Contacts module (accessible via the Navigation Shortcuts Box) to
import the data. If a Contact record is imported which refers to an unknown Account, then a new
record is automatically created for an Account of that name.
One thing to watch, however, is that when Account records are created automatically in this fashion,
they are essentially empty – they have associated contacts, but no address or telephone information
is recorded. Because of this, you should typically import your Account data first, creating the records
complete with address and telephone information (plus perhaps Account Type and lots of other
information, depending on your old CRM system). This avoids creating rather empty Account records,
and having to manually add the rest of their information later.
See the sections below for exact steps on exporting and importing Contacts and Accounts.
Exporting Contacts from Your Current Contact Manager
This example uses Outlook 2003 for exporting contact manager data. Other systems tend to work in
similar ways.
1. Under the File menu, select Import and Export. The Import and Export Wizard dialog box is then
displayed.
2. Select the action Export to a file, and click the Next button.
3. Choose to create a file of the type Comma Separated Values (Windows), and click on the Next
button.
4. Select an Outlook folder from which to export – typically your contacts folder - and click the Next
button.
5. Enter the filename and directory location for the exported file to be created, and click the Next
button.

Import and Export
6. Confirm your intention to export this file by clicking on the Finish button.
The CSV file is then created by Outlook 2003. You can view the file easily, using Microsoft Excel or a
simple text editor, to confirm that the data you intended has been exported.
Importing Accounts
If your Account data is coming in from another CRM system, then typically that system understands
the distinction between a Contact and an Account – that one Account can have multiple Contacts –
and has separate data for each. If, however, your data is being imported from a simpler contact
manager – such as Microsoft Outlook, then the only data available is Contact data, and you will have
to be a bit creative to avoid a lot of manual data entry as described above.
If you are importing Account data from a full CRM, proceed now to step 5. If you only have exported
contact data, and need to massage it to act as Account data to be imported, perform steps 1-4 below:
1. Copy your exported Contacts.csv file, and call the copy Accounts.csv.
2. Edit the Accounts.csv file using Excel. First, sort the file on the column which contains the
Company name.
3. Now the more complex part: As you scroll through your data, sorted by Company name, you will
see successive records which have the same company name, because there is more than one
Contact from that Account (in Sugar Suite terminology). To avoid multiple copies of the same
Account within Sugar Suite, you need to delete these duplicates. And to make sure that the best
information is attached to the Account record, you should retain only the contact whose address
and telephone information best represents the Account as a whole.
Also look out for Company names which are similar but not identical due to inconsistencies in the
way the Company name was entered – you should delete all duplicate records except the one
with the Company name spelt exactly how you want to see it in Sugar Suite.
4. Now that you have a nice clean set of Account data, save the Excel file as a .CSV file type, and
let’s proceed to import this Account data.
5. Click on the import Accounts function within the Navigation Shortcuts Box of the Accounts
module.
6. Specify the Data Source: Select Salesforce.com, ACT!, or Custom – then click on the Next button
to continue. For ‘massaged’ Outlook files where the field names no longer match exactly what is
exported from Outlook, use the Custom data source.
7. Upload the Export File: Use the Browse button to locate the Accounts CSV data file, and then
click on the Next button to continue.
8. Confirm Fields and Import: This screen (see below) shows four columns of data. Column 2
(Header Row) is the key – this contains the names of the fields being exported from your old
CRM or contact manager. Columns 3 and 4 show example data from the first two records you are
about to import. Column 1 (Database Field) is where you come in – you need to use all of the
drop-down box controls in this column to select the fields within Sugar Suite into which each
incoming Account field is imported.
Spend some time with this, exploring the names of the incoming fields, and the names of the
corresponding Sugar Suite fields, until you are sure you have defined the optimum mapping
between them. If you are importing from Outlook, a particularly important field mapping to get
right is to map the incoming Company field to the Account Name field within Sugar Suite.
9. When you are satisfied you have the field mapping right, click on the Import Now button, at the
bottom right of the screen. Before you do this you may choose to click on the Save As Custom
Mapping checkbox, and provide a name for this mapping so that it may be used again in future.
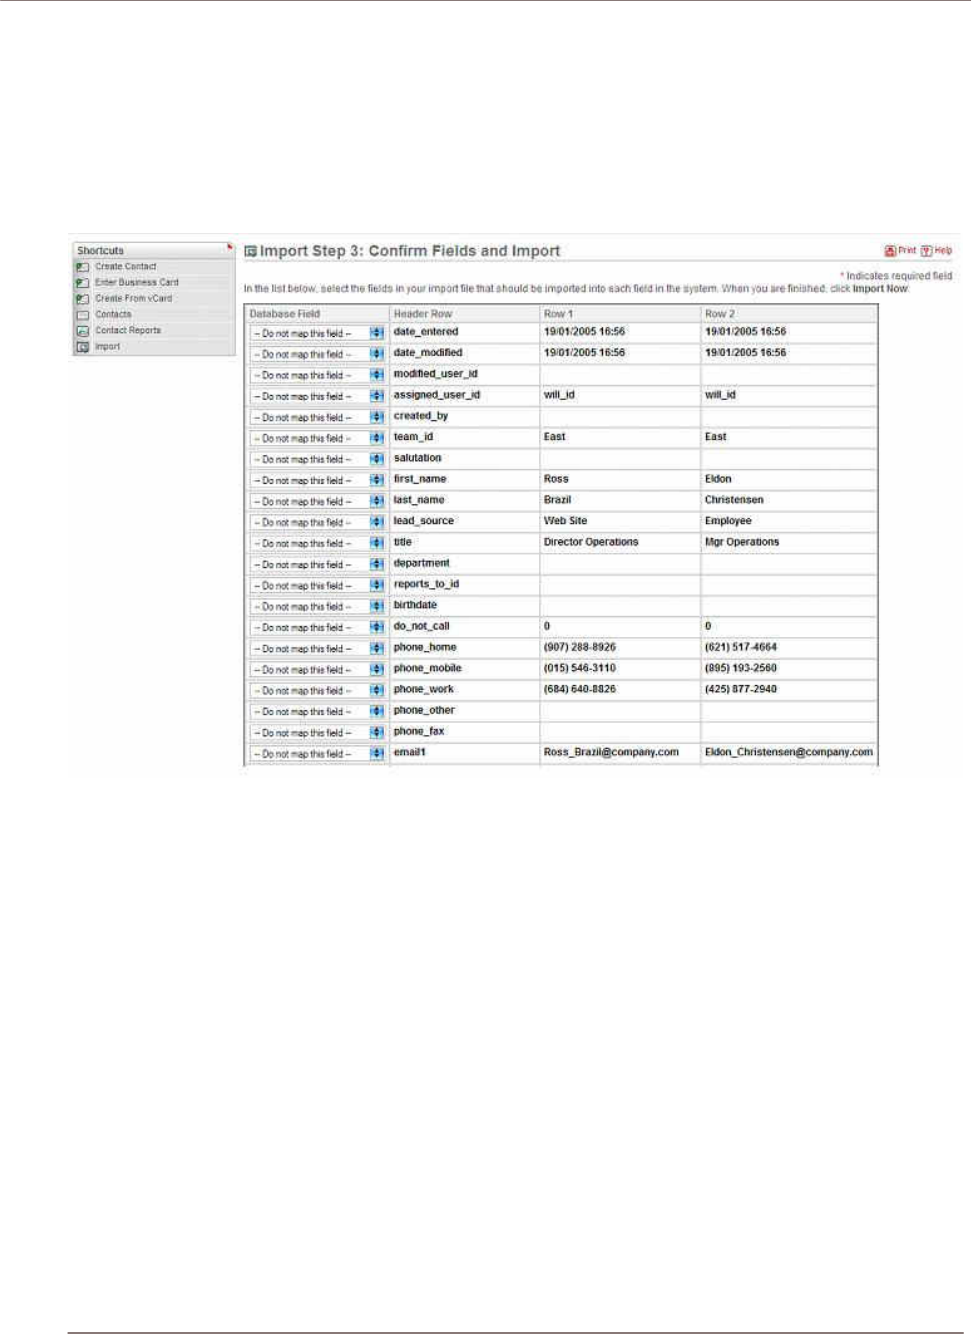
Import and Export
10. The Import Results screen is displayed. It summarizes how many records were successfully
imported, how many were skipped over, and the reasons they were skipped over. Below the
summary are complete lists of all the data imported.
11. You can now choose to click on the Undo Last Import, Import More, or Finished buttons. Click on
the Finished button if you are satisfied with the results of the data import, or Undo Last Import if
you want to go back and try again – usually to improve the field mapping.
Figure 64: Confirm Fields and Import Screen
Importing Contacts
Now that you have a set of Account records with fully descriptive data, let’s import your Contact data:
1. Click on the import Contacts function within the Navigation Shortcuts Box of the Contacts module.
2. Specify the Data Source: Select Salesforce.com, Microsoft Outlook, ACT!, or Custom – then click
on the Next button to continue.
3. Upload the Export File: Use the Browse button to locate the data file exported by your contacts
manager, and then click on the Next button to continue.
4. Confirm Fields and Import: This screen shows four columns of data. Column 2 (Header Row) is
the key – this contains the names of the fields being exported from your old CRM or contact
manager. Columns 3 and 4 show example data from the first two records you are about to import.
Column 1 (Database Field) is where you come in – you need to use all of the drop-down box
controls in this column to select the fields within Sugar Suite into which each incoming Contact
field is imported.
Spend some time with this, exploring the names of the incoming fields, and the names of the
corresponding Sugar Suite fields, until you are sure you have defined the optimum mapping
between them. If you are importing from Outlook, a particularly important field mapping to get

Import and Export
right is to map the incoming Company field to the Account Name field within Sugar Suite, so that
Contacts are associated with the correct Accounts.
5. When you are satisfied you have the field mapping right, click on the Import Now button, at the
bottom right of the screen. Before you do you may choose to click on the Save As Custom
Mapping checkbox, and provide a name for this mapping so that it may be used again in future.
6. The Import Results screen is displayed. It summarizes how many records were successfully
imported, how many were skipped over, and the reasons they were skipped over. Below the
summary are complete lists of all the data imported – both Contacts, and any Accounts which
were automatically created.
7. You can now choose to click on the Undo Last Import, Import More, or Finished buttons. Click on
the Finished button if you are satisfied with the results of the data import, or Undo Last Import if
you want to go back and try again – usually to improve the field mapping.
Importing Leads and Opportunities
Leads and Opportunities are typically only tracked by a full CRM system, not a simple contact
manager. If your old system is Microsoft Outlook or a similar contact manager, then you will have no
data to import. If you are migrating from a full CRM system such as Salesforce.com, then the Lead
and Opportunities data may be exported from that system and imported into Sugar Suite in a very
similar fashion to importing Contact data, as described above.
Exporting Information
Sugar Suite has quite flexible data exporting capabilities. Essentially all of the Sugar Suite modules
have an export function, accessed by clicking on the Export link in the top left corner of the list portion
of each list view screen, including all five types of Activities, Accounts, Contacts, Leads, Opportunities
and Cases.
In each case, a Comma Separated Values (.CSV) file is produced, which contains all the currently
selected records from the module in use (not just those records currently displayed on the screen).
CSV files can be opened by Microsoft Excel for viewing or by Notepad, WordPad, and other text
editors – and can easily be parsed as input files by most software.
A sample portion of a CSV file, exported from the Accounts module and viewed in Excel, is shown in
below. You can see that essentially the entire database table of information is exported in the CSV
file with column titles, including the Record ID (a long and largely incomprehensible string of letters
and numbers used as a unique reference to each Account record) and other fields which Sugar Suite
uses internally.
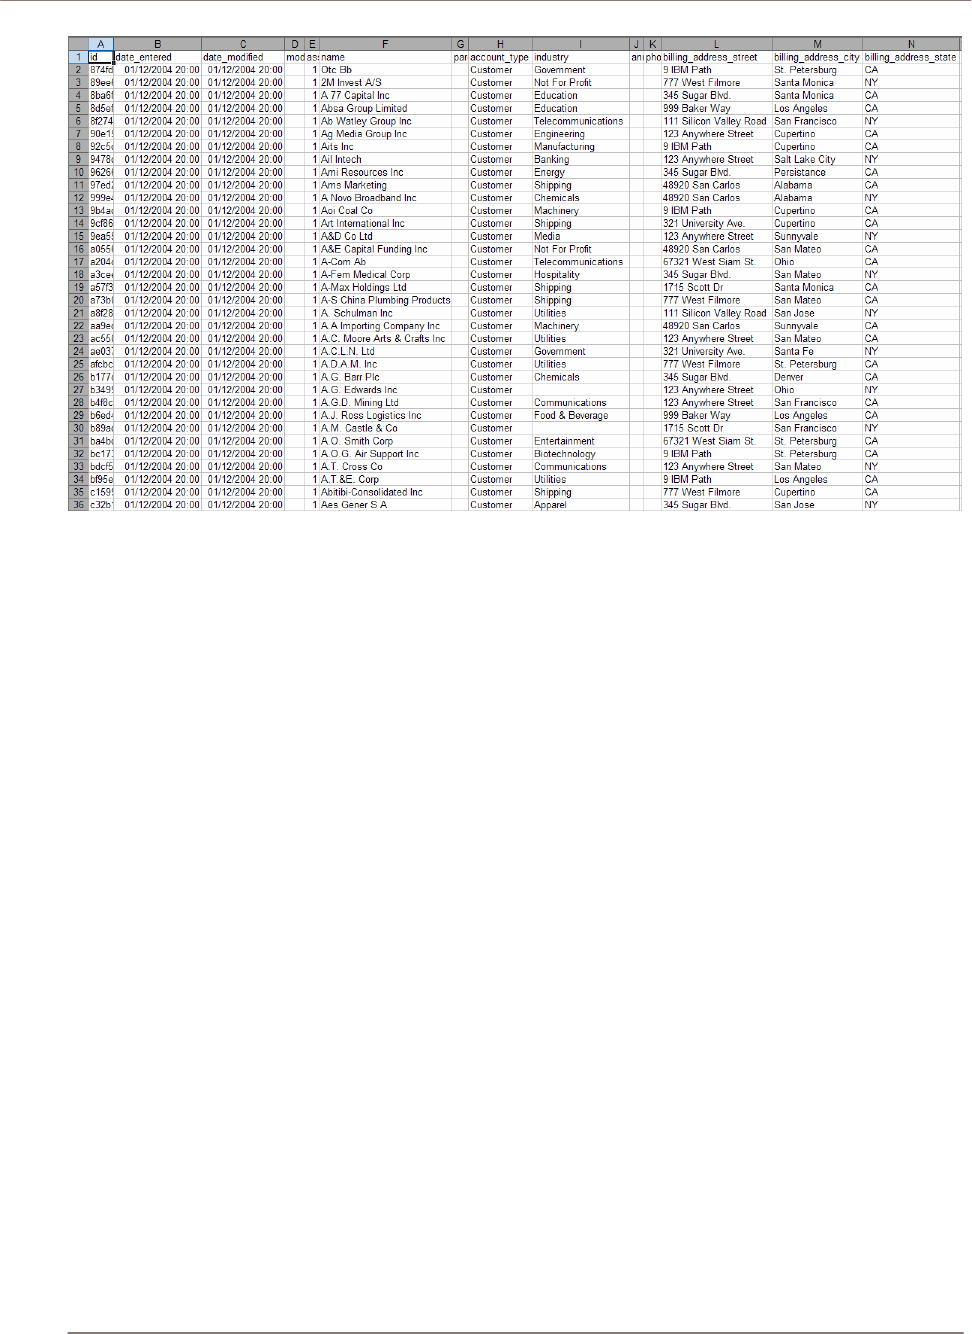
Import and Export
Figure 65: CSV File in Excel
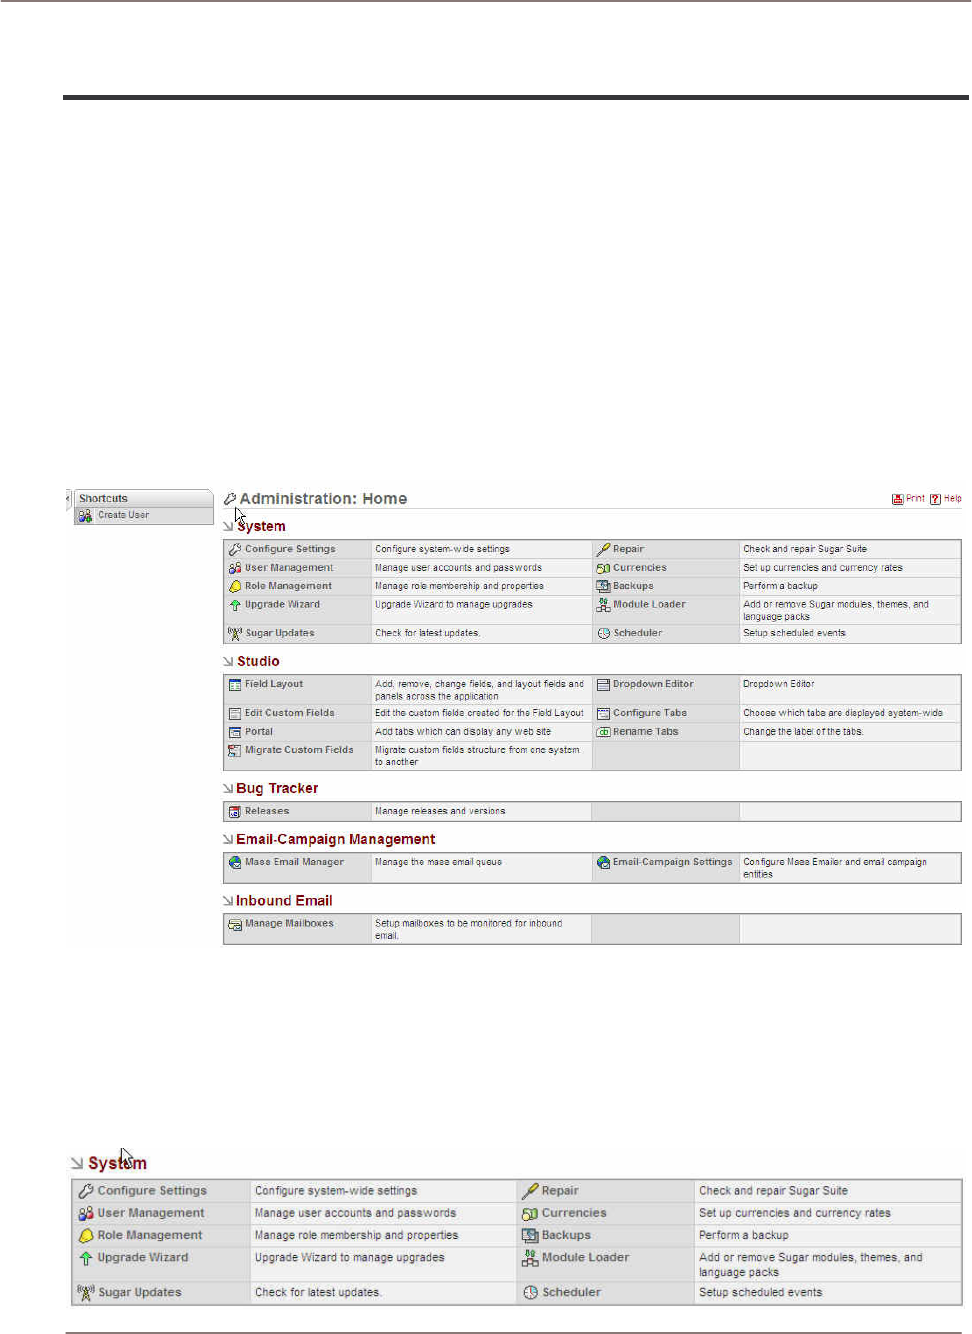
System Administration
!
System Administration
This section is intended for Administrators of Sugar Suite. Administrators access an additional
System Administration screen by clicking on the Admin link). Note that the Admin link is only
displayed for Administrator users. This section describes the main areas, their settings in System
Administration screen, and other administrative tasks including:
• System
• Studio
• Bug Tracker
• Mass Email Manager
• Inbound Email
• Sharing Calendar Information
Figure 66: System Administration Module
System
This section describes the various setting associated with system-level administration including
configure settings, user management, role management, upgrade wizard, sugar updates, repair,
currencies, backups, module loader, and scheduler.

System Administration
Figure 67: System Administration
Configure Settings
Sugar Suite can send users an email notification when they are assigned new responsibilities. Within
the system administration functions, Configure Settings is used to enable, disable or configure the
email notification system.
Email notification settings include the subject line of the email to be sent, the user name and email
address from which the email is sent, as well as the Mail Transfer Agent (MTA) to be used. Note that
the SMTP (Simple Mail Transfer Protocol) MTA should be selected if your system is running
Windows. If your system is running Linux, either the SMTP or sendmail MTA may be selected,
depending upon how your server is configured.
If the SMTP MTA is selected, you must also specify the SMTP server name, and port number (default
is 25) used to communicate with SMTP. If SMTP Authentication is selected via the checkbox
provided, the SMTP User Name and Password to be used must also be provided.
Configure Settings can also enable and disable the email notification system, and establishes the
default notification setting for new users.
You can also choose to enable self-service portal integration by selecting the check box. This allows
Cases, Notes and other data to be accessed by an external customer self-service portal system.
User Management
User Management is used to create, remove, edit, and activate/deactivate users of the Sugar Suite
system.
On this screen, an Administrator can do the following:
• Search for a user
• Edit a user’s profile including change their password
• Duplicate a user profile (see the My Account section for more information)
• View a user’s role
• Assign a role to a user
Note that users must have a valid email address to receive email notifications.
The user list also includes Roles that are created through Role Management as well as the Roles
assigned to each user.
Role Management
You can define Roles for groups of users to specify which modules the users have access to through
the Access Control Lists (ACLs). An example use for a Role is to create different module sets for
Roles named Sales, Marketing, and Support. While the users assigned to the Support Role need
access to the Bug Tracker module, the users in the Sales Roles do not. The ACLs allow very granular
definitions of Roles based on modules and actions that can be performed on that module.
When modules are not included, the sub-panels related to the module that display on other module
pages are also removed.
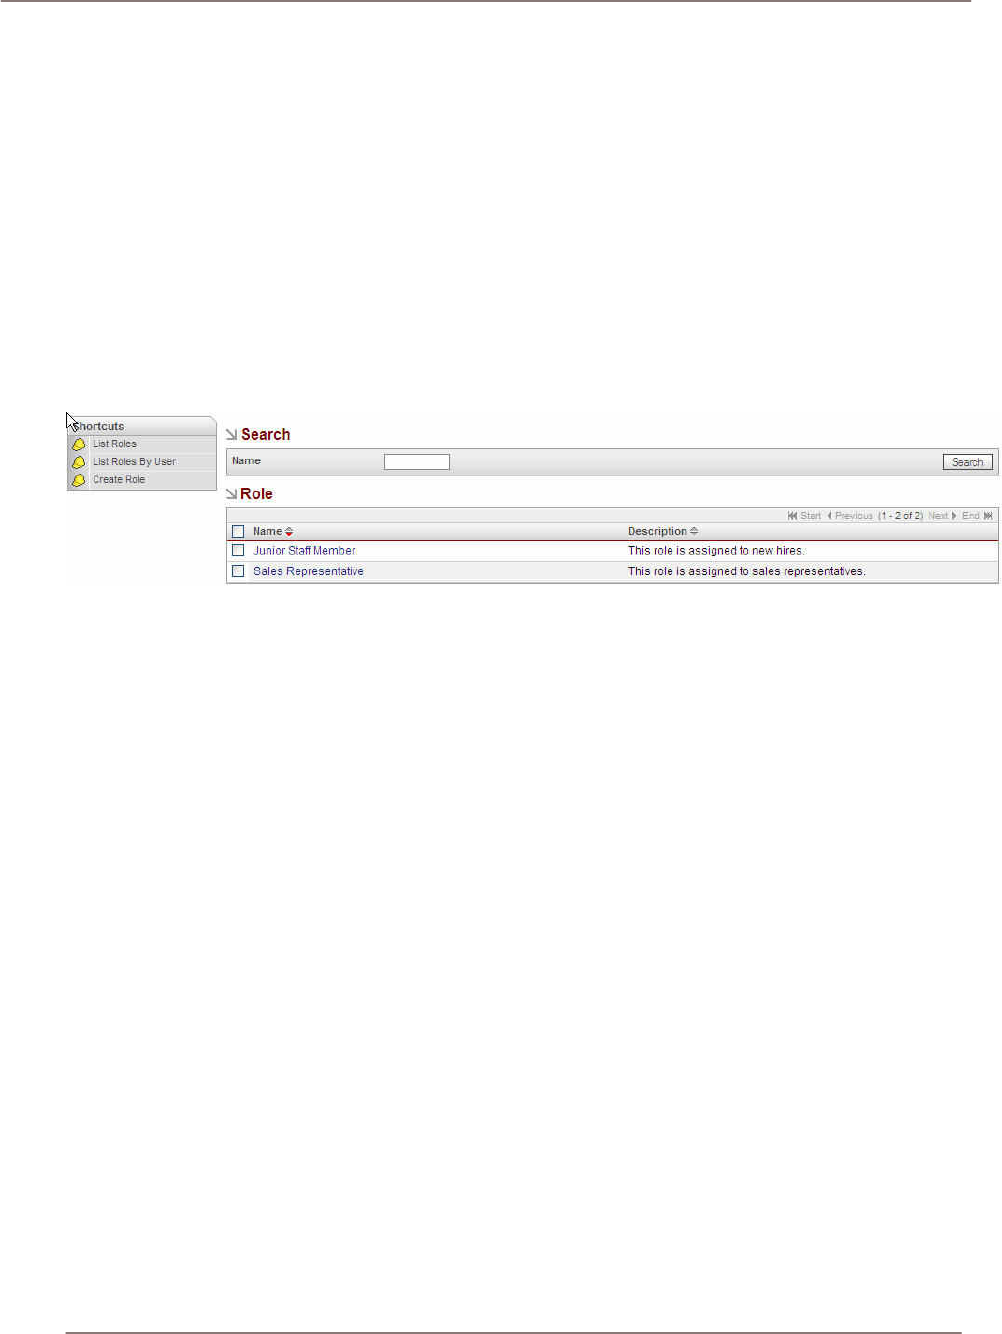
System Administration
Access Control Lists (ACLs)
The ACL mechanism governs the actions (read, write, delete, update, import, export) that can be
performed on data within modules. Roles are abstract definitions of privileges and have the following
characteristics:
• A particular set of privileges can be identified as a Role and assigned to a user.
• Roles take effect when the Role is assigned to a user.
• Users are optionally associated with one or more roles. When multiple roles are associated
with a given Sugar user, the more restrictive privilege prevails.
• The SOAP layer is aware of ACL privileges.
Role Management Menu
The following illustrates the Role Management menu with sample Roles:
Figure 68: Role Management Menu
Creating and Managing Roles
Roles consist of a set of privileges which are determined by assigning an action to a module (for
example, disabling Access to the Bugs module). All changes to Role based access control (changing
role definitions and granting or revoking roles to and from users) takes effect upon new login
sessions. In other words, user privileges are calculated upon login until the next new login session.
To create a Role, click the Create Role shortcut, type and name and select the modules to include for
the Role and then save the Role. The following describes how to create and assign a Role:
1. Login as the administrator.
2. Select Admin > Role Management
.
3. Select Create Role from Shortcuts
.
4. Add a new role (for example, a Support Representative) and provide a description.
5. Change the privilege. For example, change the Delete privilege to None for the Accounts module.
(Change other privileges as desired.)
6. Save.
7. Assign a user to the Role through the User sub-panel.
8. Alternatively, assign Roles to users via the User Management section.
Assigning Users to Roles
To assign users to a Role, you can view a Role from the Roles list and click the Role to see the
modules included in the Role. Under the Users section, click the Select button to display a list of
users. You can check the user names that you want to assign to this Role.

System Administration
Role Definitions
The following actions are available for each module:
• Access
• User Type
• Delete
• Edit
• Export
• Import
• List
• View
Generally speaking, the All, Owner, and None options indicate the following:
• All option indicates that the action is allowed.
• Owner is the owner of a record. In other words, the record is assigned to that user and
only that owner can perform that particular action.
• None indicates that the action is not allowed.
Access: Enable/Disable options. Determines access to a module. Enabled is the default. Disabled
means that the module does not appear in the Sugar tab bar or shortcut options (located at the
bottom of every Sugar page). The module does not appear as sub-panels or as sidebar navigation
options. If disabled is select for a particular module, then the Role cannot perform any actions
associated with that module regardless of any other settings.
Delete: All/Owner/None options. Privileges to delete a record. Owner in this context is the Assigned
To user associated with the record. If None is selected, the Delete button that appears on detail views
is disabled when this condition is met.
Edit: All/Owner/None options. Privileges to edit a record. If None is selected, the effect is that the Edit
button is disabled on a detail view. Additionally, the Mass Update function (located at the bottom of
list views) will not update records that meet this condition.
Export: All/Owner/None options. Ability to export a record. The red Export link (located at the top of
list views) is removed when this privilege is not available to the user.
Import: All /None options. Ability to import a record. The Import link in the navigation bar does not
appear when this privilege is not available.
List: All/Owner/None options. Determines whether data appears in a list view. The user is unable to
access the module’s list view when this privilege is not available.
View: All/Owner/None options. Controls access to data that is available in a detail view. Links from
list views and sub-panels are disabled when this privilege is not available. Specifically, hyperlink
access to the detail view is disabled from the list views, sub-panel link access to the detail view is
disabled, and other accesses receive an error message indicating that the user does not have
authorization to edit the record.
Example Role: Junior Staff Member
This example Role for a Junior Staff Member restricts delete, export, and import functions are for all
modules.

System Administration
Figure 69: Junior Staff Member Example Role
Example Role: Sales Representative
This example Role for a Sales Representative establishes a base set of privileges.
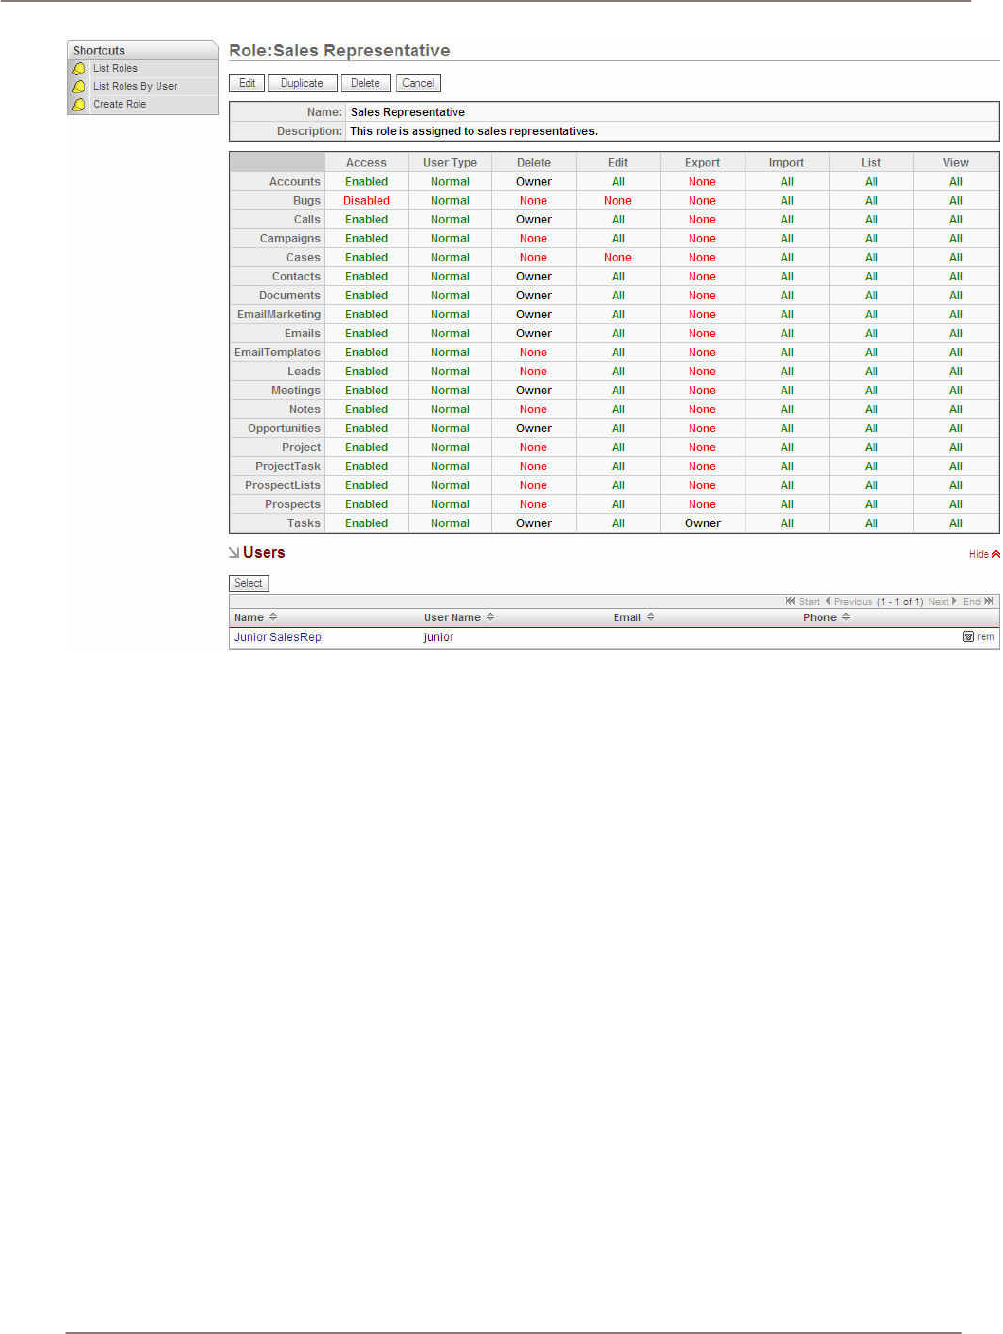
System Administration
Figure 70: Sales Representative Example Role
Example Role: Junior Sales Representative
This example demonstrates the privileges granted to a Junior Sales Representative who has multiple
roles. By combining the Junior Staff Member example Role with the Sales Representative example
Role, a Junior Sales Representative privilege definition is effectively achieved for this user.
This information is viewable via Admin > User Management (Administrator privileges are required).
Note that more restrictive privileges supersede less restrictive privileges.
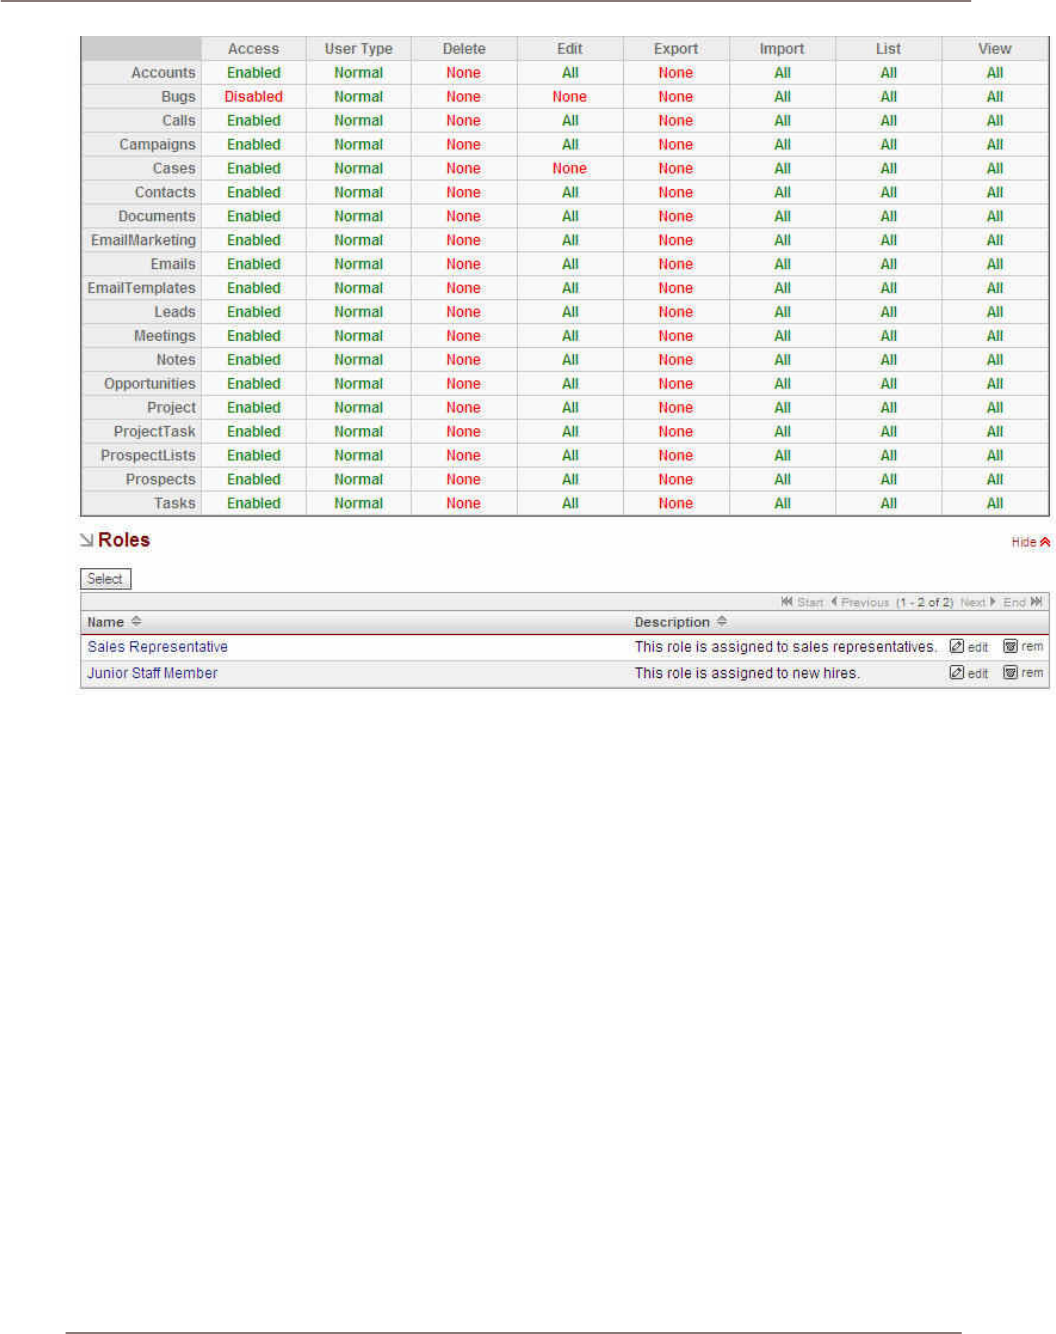
System Administration
Figure 71: Junior Sales Representative Example Role
Upgrade Wizard
The Upgrade Wizard provides a quick way to upload and install upgrades to new versions as well as
patches to existing versions. These files are provided as .zip files. Before using the Upgrade Wizard,
the config.php file for your installation must be writable.
As administrator, you browse to select the .zip file for the upgrade and click Upload. Uploading the file
queues the upgrade files for installation although no installation has yet occurred. Then, click Install to
install the upgrade files. A list of files displays with checkboxes that you can deselect if you do not
want specific files. Click Commit to complete the installation. The Upgrade Wizard automatically
unzips and installs the files.
A history of all upgrades that have been queued and installed displays in the list. Select the item to
uninstall and click Uninstall. You cannot uninstall upgrades to new versions and patches.
Sugar Updates
When Sugar Updates is enabled, your system will periodically send SugarCRM, Inc. anonymous
statistics about your installation. This information is used by SugarCRM, Inc. to track usage patterns
and improve the product. In addition, administrators receive update notices when new versions or
updates are available. You can check for updates automatically or manually by selecting the radio
buttons and clicking the Check Now button.

System Administration
Repair
The Repair page includes options to upgrade and rebuild data from a previous version of Sugar Suite
into the right form for the current version of the program. The upgrade options include:
• Opportunities: Controls how currency fields within Opportunities are upgraded. This is needed to
support an internationalized currency capability, which stores the currency type separately from
the amount. Opportunities contains the following:
Verify Amounts: Clicking on this button verifies that the values in the currency fields are valid
(numeric only), and do not have any currency characters such as US, CDN, in the value
portion of the field. Checking Include Closed Records will also verify the currency fields of all
closed records.
Fix Amounts: Attempts to fix any invalid amounts as detected above by creating a valid
decimal value from the current amount. This procedure will backup any amounts it modifies
into a database field called amount_backup. Warning: If you perform this function and notice
errors, do not perform it again without first restoring from the backup (via Restore Amounts,
below) as it will most likely overwrite the backup with new invalid data. Checking Include
Closed Records will also fix the currency fields of all closed records.
Merge Currencies: Merges multiple currencies into a single currency. If you notice that there
are multiple currency records for the same currency, you may choose to merge them
together. This will also merge the currencies for all other modules. For example, “US” and
“U.S.” would be merged to a single currency.
Update US Dollar Amounts: Updates the U.S. Dollar amounts for Opportunities based on the
current currency rates. This value is used to calculate Graphs and list view currency
amounts. This will apply the exchange rates stored in the Sugar Suite system and modify all
the US currency field values based upon the current rates. Checking Include Closed Records
will also update the US dollar amounts of all closed records.
Restore Amounts: This will undo the Fix Amounts processing, by restoring the original value
from the backup field.
• Rebuild Audit: Checks and rebuilds your audit tables.
• Rebuild Extensions: Rebuilds extensions including extended vardefs, language packs, menus,
and administration.
• Repair Database: Repairs your Sugar database based on values defined in vardefs. This applies
to MYSQL databases only.
• Rebuild Config File: Rebuilds the config.php by updating the version and adding defaults when
not explicitly declared.
• Rebuild Relationships: Rebuilds relationship meta data and drops the cache file.
• Upgrade Custom Labels: Upgrades the format of the custom field labels in every language file.
• Clear Chart Data Cache: Removes cached data files used by charts.
• Rebuild .htaccess file: Rebuilds .htaccess to limit access to certain files directly.
• Apply Daylight Savings Time Fix: Updates the time handling functionality (MySQL only). This step
is mandatory.

System Administration
Currencies
The Currencies screen is used to define currencies other than the US dollar. For each new currency
defined, the name, symbol (e.g. $), exchange rate to the US$, and code (such as CDN for the
Canadian dollar) must be entered. Note that each user can select his default currency in the User
Management screen.
Backups
You can create a backup of your Sugar application files as a .zip file. Specify a directory that is
writable by the same user as the Apache process. Type a file name for the .zip file including the .zip
extension. Click Confirm Settings to confirm that backup can be performed. Then click Run Backup to
create the .zip file of your Sugar application files. To backup your database information, refer to your
database vendor’s documentation.
Module Loader
The Module Loader lets you upload custom modules, new language packs, and custom themes so
that they are included in the current installation. Custom modules are provided as .zip files. As
administrator, you browse to select the .zip file for the module and click Upload. Uploading the file
queues the module on the local server for installation. Then, click Install to install the module. The
Module Loader automatically unzips and installs the custom module. A history of all modules that
have been queued and installed displays in the list. You can also uninstall modules using the Module
Loader. Select the module to uninstall and click Uninstall.
Scheduler
You can schedule regular emails and emailed reports through the Scheduler.
Reports are emailed to a user depending on what schedule the user has specified for a given report.
The reports are sent to the user via email from a PHP script that needs to be run on a regular interval
to send out the emails at the appropriate time. The user can choose which reports to receive and how
often to send the reports in the Reports tab of the Sugar Suite application.
1. You must correctly configure the email settings outlined in the Configure Settings section. The
Scheduled Reports utility uses the same email server connection settings. Notifications do not
necessarily have to be turned on, but the settings must be properly configured for users to
receive reports via email.
2. The Scheduled Reports utility requires a scheduling program to run the PHP script. For Microsoft
Windows, you can use the Task Scheduler. For UNIX, you can use cron. Examples for both are
below.
Setting Up the Scheduled Reports Cron Job on UNIX
As a root user, type the following command at the shell prompt, replacing the 'path-to-sugarcrm' with
your own path to the Sugar Suite installation directory and replacing the 'apache' with the proper
username that the web server runs as (usually defaults to 'apache'):
echo "0,10,20,30,40,50 * * * * cd /path-to-sugarcrm;
./process_queue.php" | crontab -u apache
The above command sets up a cron job to check every 10 minutes for whether any reports are due to
be emailed out. If any reports need to be sent out, the Scheduled Reports utility will send the
scheduled reports immediately to the email address of the user specified under the user's 'My
Account' settings of SugarCRM.
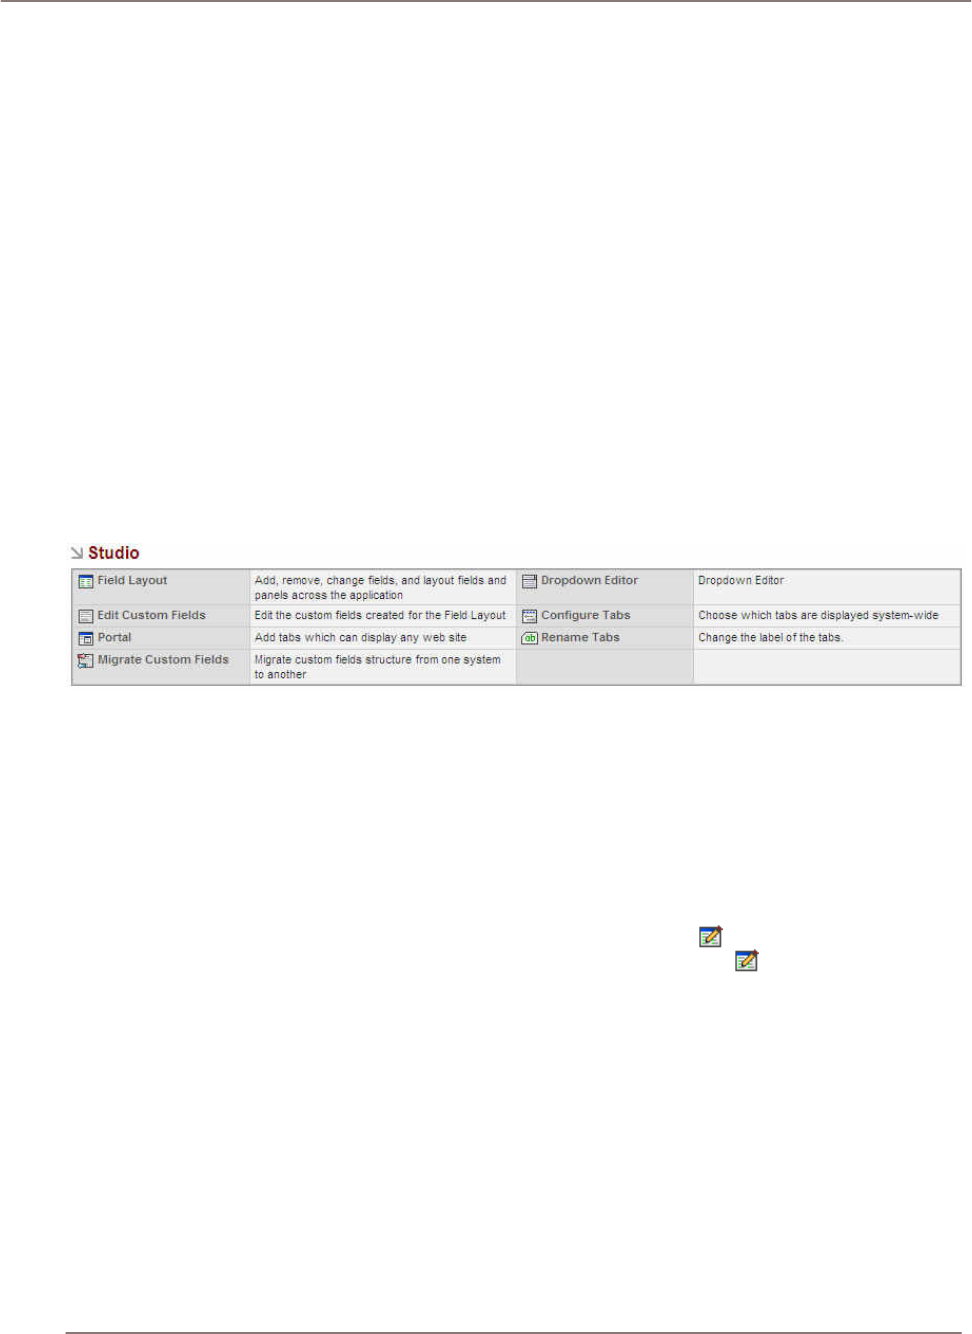
System Administration
For more information about how to specify different times for running the cron job, see the man page
of cron:
man 5 crontab
Setting Up the Scheduler on Microsoft Windows
As a user with Administrator privileges, go to Start > Settings > Control Panel > Scheduled Tasks.
Double-click on 'Add Scheduled Task'. When the Scheduled Task Wizard asks you for the program
you want Windows to run, browse for the 'process_queue.php' file under your 'path-to-sugarcrm'
directory. Continue with the rest of the Wizard, making sure you click on the 'Daily' option when asked
when to perform this task.
Before you click on the Finish button for the Scheduled Task Wizard, check the box that says, 'Open
advanced properties for this task when I click Finish.' A new dialog box displays after you click Finish.
Click on the Schedule tab and then on the Advanced button. Check the box for 'Repeat task' and
specify every 10 minutes with a duration of 24 hours.
Studio
This section describes the various settings associated with the user interface such as field layout,
editing, tab configuration and renaming.
Figure 72: Studio Administration
Field Layout
The Field Layout editor lets you rearrange the fields and panels on the screens available within Sugar
Suite, to customize them to fit your needs.
Begin by selecting the name of the file to customize. This can be a specific view from one of the
system’s modules, such as the list view, detail view, list view, or a sub-panel-. Choose the file name
from the drop-down box provided, and then click on the Select File button. If you are not sure what file
to edit you can select the Edit in Place checkbox; this adds an edit icon to all the editable screens
throughout Sugar Suite. Now go to the screen you want to edit, click on the icon, and enter the
screen layout editor to customize that screen layout.
Within the field layout function, special shortcuts display in the Shortcuts Box:
Select File: Sends you to the screen first seen when entering the field layout function, to select a file
to edit. If you select this shortcut when you are in the middle of editing a screen, edits on that screen
are lost if not already saved.
Edit Fields: Within the Layout Editor, Edit Fields is a mode that let’s you drag and rearrange
individual fields or their labels within the details panel. Select the item handle (the little square grey
box) next to the field or label you want to move, and then click on the item handle where you want the
field or label located. This moves the item from its previous location to its new location. If there was
already a field or label at the destination the two items swap positions. Edit Fields also lets you move
sub-panels. Moving sub-panels is the same as moving fields; select the source sub-panel handle and
then click on the destination sub-panel handle, and the two switch locations.
System Administration
!
Edit Rows: Within the Layout Editor, Edit Rows is a mode that allows the addition and removal of
rows in the details panel. Pressing the button adds a row below the one currently selected, and
pressing the removes the row currently selected. This feature is named Edit Columns in list views.
Edit Labels: Clicking Edit Labels displays all the fields used on the page and their labels in the
Toolbox in the shortcuts area. The labels are displayed in edit boxes so that you can edit one or more
labels at once and then click Save. You can also click on a specific label in the page to view and edit
a single label in the Toolbox and then click Save.
The Toolbox provides a workspace to add new fields and labels to a screen, to temporarily hold items
that have been removed from a screen, and to discard items which are not needed. Its functions
include:
Display HTML Code: To test this feature, select this checkbox and then move your cursor around the
screen being edited. As the cursor passes over each field or label in the screen you can see the html
that comprises it displayed as ‘Alt’ text in a floating box below the cursor. Note: While this function
can be informative it is very CPU intensive, and should only be used when absolutely necessary.
Add Field: Opens a dialog box which lets you specify the type of field you want to add and its name
label. Click on the Add button to put your new field and its label in the Toolbox workspace, and close
the dialog box. Next, to move your new field from the Toolbox to the screen, select its item handle
and then click on the item handle where you want the field located.
Edit Fields: Displays the Edit Custom Fields functionality for creating new fields. Click Save Layout to
save your changes before clicking this item. Changes are not saved when you click this item because
you are leaving the page.
Staging Area: Drag items to the Staging Area while you are working with them.
Sugar Fields: Lists the fields that are not used in the page. Selecting a field adds it to the Staging
Area. You may only drag items out of this area.
Sugar Bin: You can add items from the Sugar Bin to the Staging Area. Items that you left in the
Staging Area when you click Save Layout appear in the Sugar Bin the next time you edit this page.
You may only drag items out of this area.
To remove a field, select its handle and drag it to the Staging Area. After you remove a field it is listed
in the Sugar Bin so that it is easy to locate for later use.
Use the Save Layout button to save changes while in the Layout Editor. To discard changes simply
choose the Select File shortcut to work on another file, or exit the Layout Editor entirely. Remember
to un-check the Edit in Place checkbox before you leave the field layout function, or all your screens
will still have the icon on them.
Edit Custom Fields
You can add custom fields to any module in Sugar Suite. First, select the module in which you want
to add or edit custom fields. Then you can define the field using Field Name, Field Label (the label
displayed on the module), Data Type, Max Size, Required Field (indicated by asterisks for users), and
Default Value.
After saving a new field, you can view and edit information about the field in the Custom Fields list for
the module. In Field Layout, you can place the custom field on the module page by dragging it to the
new location, just like any other field.
Portal
The Portal Administrative function is used to add new Tabs and Shortcuts to Sugar Suite, which can
link to any website you choose. This is commonly used to include email, forums, or any other web-
based application, allowing Sugar Suite to become a single interface focus for its users.

System Administration
Using this administrative option performs a similar function to clicking on the Portal tab to select the
Portal module, and indeed takes you to the Portal module. However note that an Administrator will
initially see the Portal List screen, but other users will see the Portal home site (a configuration
option).
All users have a set of shortcuts allowing them to Add Site, List Sites, or navigate to any site visible to
them. Each user has shortcuts to all sites marked as Global sites, plus any Personal sites they have
created.
The Portal List screen may be reached by clicking on the List Sites shortcut. For an Administrator,
this screen lists all sites - Global sites available to all users, as well all the Personal sites created by
individual users for their own specific purposes. If you are not an Administrator, you will not see the
Global sites listed on this screen, as you do not have the ability to change any of them.
From the Portal List screen, you can delete one or more Portal sites by selecting the checkbox beside
them, and clicking on the Delete button below the list of Portal sites. You can also edit a Portal site by
clicking on its name, or preview its target website by clicking on the link to its URL.
You can create a new Portal site by clicking on the Add Site shortcut.
• When creating a new Portal site, you may enter the name and website for the new Portal site,
click to select if it is currently visible or not, and choose if it is Personal (viewable only by you), or
Global (viewable by everyone). Note that only Administrators have the option to create Global
Portal sites.
• You may also choose to have the new Portal site placed on a new Tab, on a new Shortcut, or
both. Note that only Administrators have the option to place a site on a Tab – other users may
only create shortcuts.
• On any new Tab created by the Portal function, the Shortcuts Box contains all the same shortcuts
as are provided on the Portal Tab.
Migrate Custom Fields
You can migrate custom fields by exporting the custom field structure from one server and importing it
on another server. Before importing a new custom field structure, it is recommended that you export
the current custom field structure as a backup. When you import a custom field structure, details
display to describe what changes is made to the database. If you agree with the changes, click the
Execute non-simulation mode link. Importing removes any previously defined custom field structures
that are not defined in the imported .sugar file as well as any data stored in those custom fields. If you
want to revert the import process, import the backup version of the structure you exported.
Dropdown Editor
The Dropdown Editor is a very valuable tool for the Administrator. It permits the values in all of the
drop-down boxes in the system to be edited. The options presented to the user may be edited,
existing options may be eliminated, and new options may be added. For example, when defining a
new Account, in the Account Type field, the user must normally choose from a set of drop-down
options, including Analyst, Competitor, Customer, Integrator, Investor, Partner, Press, Target,
Reseller, and Other. By using the Dropdown Editor, this option set may be altered, with more or less
options, and different option values.
To use the Dropdown Editor:
• Select a name of a drop-down list, from the drop-down list of their names (if that is not too
confusing a statement). For example, account_type_dom is the second option on this list.
• If you select that option, and then choose the language US English (only those language packs
which have been installed on your system is available as choices).
System Administration
• Click on the Select button, you will see a list of the Account Type options as given above.
On each line of the list, you will see a number of controls on the right hand side. The up and down
arrows controls allow you to promote or demote an option, to a higher or lower position on the list.
The Edit and Del controls allow you to edit or delete the drop-down options, respectively. The Ins
control adds a new drop-down option into the list above the item on the line you click on.
Configure Tabs
Both system administrators and users can easily configure which tabs appear at the top of the
application. In the Configure Tabs administration option, administrators can define which menu tabs
will appear for all users.
Users can then modify their own personal tab settings in the My Account screen. Any tabs that an
administrator removes cannot be added back by a user. You can unselect the Allow users to
configure tabs check box if you do not want them to make any changes.
Rename Tabs
You can rename and rearrange the tabs that display for all users. In the list of tabs, you can click on
the edit controls on the right side of list to move the tab up or down in the order of display. You can
also edit the name, delete the tab, or add a new tab to the list. Tabs are identified by a key and a
value.
Bug Tracker Releases
The Releases Administration function is used to maintain the options available in the Release drop-
down box displayed when reporting a new bug in the Bug Tracker module.
Figure 73: Bug Tracker Administration
Each Release entry consists of a release version, a status (Active or Inactive, where Inactive will
remove it from drop down lists) and the order in which it is listed in the Release drop down list.
Email-Campaign Management
You can manage mass email campaigns that have been created in the Campaigns module. Other
users may create email campaigns containing a template email to large numbers of targets.
Depending on the send date the user assigns to the emails, the emails then wait in the email queue
to be sent on the particular date.
Figure 74: Email-Campaign Management
Mass Email Manager
The Mass Email Manager menu shows mass email queue management option such as queue search
and other information associated with the queued email. Emails created through email campaigns are
displayed and exclude emails created using the Email module.
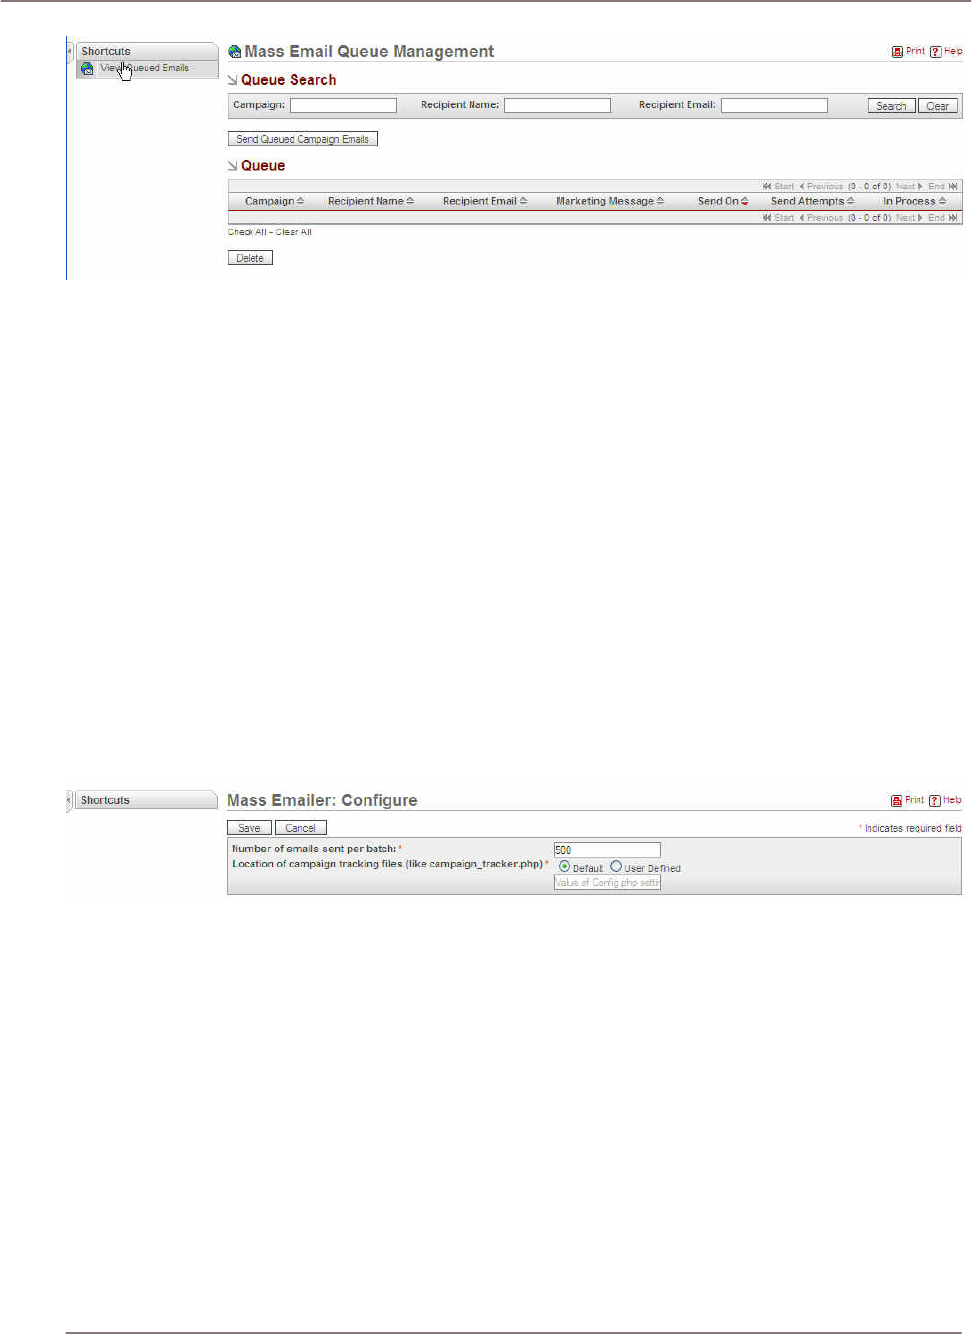
System Administration
Figure 75: Mass Email Queue Management
As administrator, you can monitor these emails as they are sent. You can also delete emails that are
waiting to be sent. You can view information on each email such as Campaign, Recipient Name,
Recipient Email, From Name, and so on.
To delete an email that is waiting to be sent:
1. Click the check box next to the email.
2. Click the Delete button.
3. Alternatively, Click Check All to select all the emails in the list.
Once a campaign email has been processed, they are viewable from the View Processed Emails
shortcut. Statistics such as the send date and number of times an email delivery was attempted are
tracked.
Email-Campaign Settings
The Email-Campaign Settings menu allows you to configure mass email. Specify the number of
emails sent per batch and the location of the campaign tracking files.
Figure 76: Email-Campaign Settings
Setting Up EmailMan
EmailMan processes emails that are scheduled to be sent from within Campaigns. The template
emails are sent to the recipients from a PHP script that must be run on regular intervals to send out
the emails at the appropriate time. The user can choose the email template from the Campaigns
module as well as the sender name, sender email address (recommended to be no-reply@<your
company.com>.or something similar), and the time and date to send the email.
When an email is processed, a link is appended to the end of the email for recipients to opt out of
receiving emails. This will link back to a page on the same machine as your Sugar instance.
To use EmailMan, you must first correctly configure the email settings as described in Configure
Settings section. EmailMan uses the same email server connection settings. Notifications do not
necessarily have to be turned on, but the settings must be properly configured for recipients to
properly receive emails.
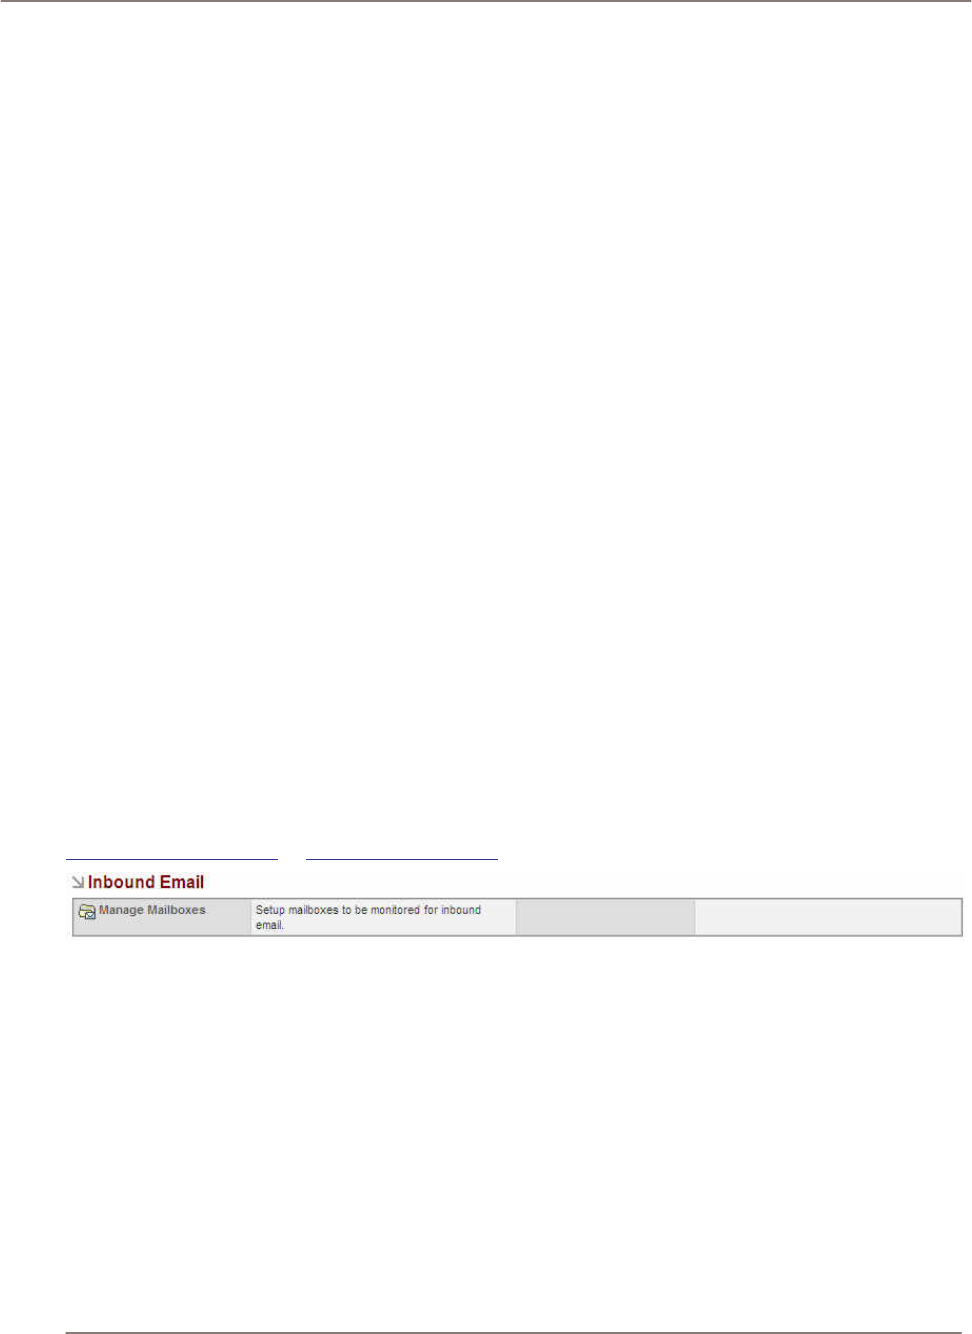
System Administration
Second, EmailMan requires a scheduling program to run the PHP script. For Microsoft Windows, you
can use the Task Scheduler. For UNIX, you can use cron. Examples for both are below.
Setting Up the Mass Emailing Cron Job on UNIX
As a root user, type the following command at the shell prompt, replacing the 'path-to-sugarcrm' with
your own path to the Sugar Suite installation directory and replacing the 'apache' with the proper
username that the web server runs as (usually defaults to 'apache'):
/echo "0,10,20,30,40,50 * * * * cd /<path-to-sugarcrm>;
<path-to-php> ./emailmandelivery.php" | crontab -u apache/
This sets up a cron job to check every 10 minutes for whether any emails need to be sent out. If any
do, EmailMan will process the template and send an email out immediately to the recipient.
For more information about how to specify different times for running the cron job, see the man page
of cron:
/man 5 crontab/
Setting Up the Task Scheduler on Microsoft Windows
As a user with Administrator privileges, go to Start > Settings > Control Panel > Scheduled Tasks.
Double-click on Add Scheduled Task. When the Scheduled Task Wizard asks you for the program
you want Windows to run, browse for the '/emailmandelivery.php/' file under your 'path-to-sugarcrm'
directory. Continue with the rest of the Wizard, making sure you click on the Daily option when asked
when to perform this task.
Before you click on the Finish button for the Scheduled Task Wizard, check the box that says, Open
advanced properties for this task when I click Finish. A new dialog box displays after you click Finish.
Click on the Schedule tab and then on the Advanced button. Check the box for Repeat Task and
specify every 10 minutes with a duration of 24 hours.
Inbound Email
This section describes Inbound Email processing. Inbound Email provides the capability to monitor,
route, assign, and reply to emails. Multiple mailboxes can be monitored, such as
support@company.com or sales@company.com.
Figure 77: Inbound Email Administration
Items contained in these email boxes can be parsed and associations made to applicable existing
Sugar records, such as an email for a given Case ID. Emails that do not reference existing Sugar
records can be placed in a Group Inbox and subsequently assigned and worked. Inbound Email can:
• Emails retrieved from monitored mailboxes are put in the Group Inbox (which is accessible via the
Emails module).
• Items in the Group Inbox can be assigned and/or distributed to users and once distributed; the
items appear in the user’s My Inbox.
• Email items residing in the Group Inbox can be assigned to specific individuals or to individuals
within teams. With either option, you can distribute the assignment based on two available
assignment options: round-robin or least-busy. You can choose to assign single email items or in
bulk by using the “Only Checked” and “All Search Results” options.
• From My Inbox, a user can create a lead, case, or contact.
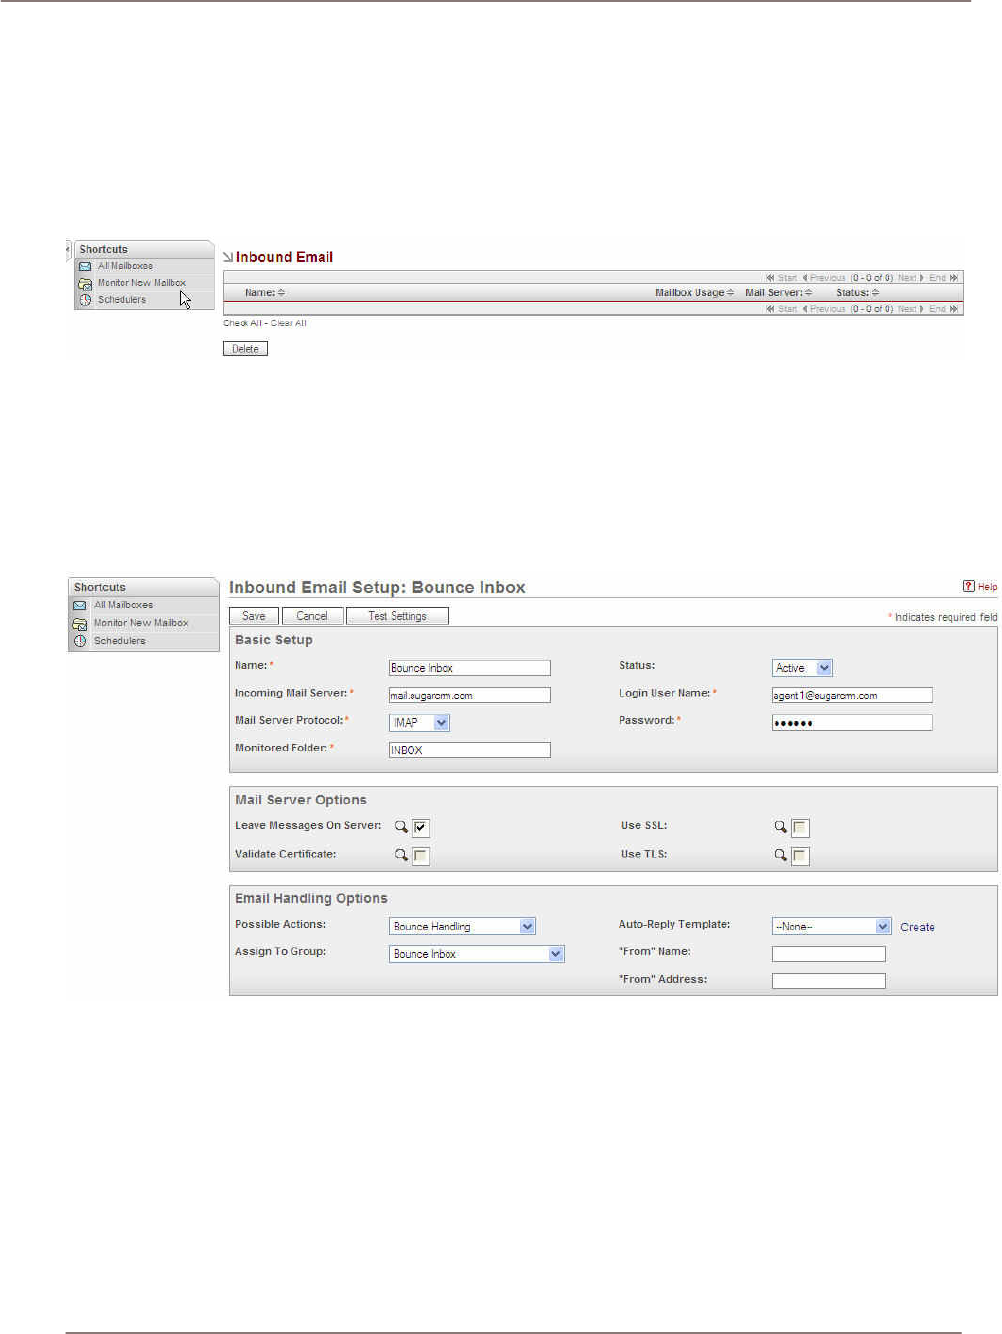
System Administration
Inbound Email processing functionality has been exposed in areas such as the Home Screen with the
My Inbox area and are set up for monitoring through Admin > Inbound Email > Manage Mailboxes >
Monitor New Mailbox.
Manage Mailboxes
The following illustration shows three monitored email inboxes in Admin > Inbound Email > Manage
Mailboxes.
Figure 78: Monitored Email Inboxes
Inbound Email Setup
The following illustration shows the basic Email setup, mail server options, and Email handling
options for the Bounce Inbox. Such an inbox is useful for capturing and reporting on bounced emails
arising from an email marketing campaign. See Campaign Management for more information
regarding this capability.
Figure 79: Inbound Email Setup
Setting up Mailbox Management
To set up Mailbox Management, you need Admin privileges:
1. Login as the administrator.
2. Access Admin > Inbound Email.
3. From Shortcuts, select Monitor New Mailbox.
4. Complete the Basic Setup, Mail Server Options, and Auto-Reply Options configuration.

System Administration
5. Associate this monitored mailbox with a Group. A Group is a special form of User initially
assigned ownership of incoming email items. An example, Group is support-user or sales-user.
(The Admin > User Management menu contains a checkbox for designating a Group.)
Creating a Case from Email
To create a case from an email that appears in My Inbox (this process also applies to creating a lead
or contact):
1. Access My Inbox.
2. Click Create Case. This generates a case with pre-filled data and original email content and then
assigns the item to you.
3. Save. When you save, the email item is automatically associated with the case.
From the My Inbox, you can reply to emails and create Sugar record such as cases, leads, and
contacts. From the Group Inbox, you can assign emails, reply to emails, and create Sugar records
based on email items.
View Queued Outbound Marketing Campaign Emails
All emails queued for delivery by the EmailMan process are displayed in this screen accessed by
clicking on Admin and then on Mass Email Manager. The EmailMan process only attempts to send an
email up to five times. You can remove emails from the delivery queue by selecting the check box to
the left of the email and then clicking Delete.
View Processed Outbound Marketing Campaign Emails
All processed emails are viewed from the View Processed Emails shortcut. Statistics such as the
send date and number of times an email was attempted to be sent are tracked.
Sharing Calendar Information
You can specify settings in Outlook so that the free/busy information from the Outlook calendar for a
user is shared with the user’s Calendar in Sugar Suite. The settings must be configured on each
user’s computer.
In Microsoft Outlook, do:
1. Select Tools > Options. Then click the Calendar Options button.
2. Click Free/Busy. Select the Publish at my location checkbox and enter the path for the Sugar
email account information following the syntax:
http://servername/sugarcrm/vcal_server.php/type=vfb&source=outlook&email=
myemail@servername.com
where ‘myemail@servername’ is the email address specified for Email Options in the user’s My
Account page in Sugar Suite. On the My Accounts page in the Calendar Options, the URL for
publishing free/busy information is displayed in Your Publish URL.
3. For Search location enter the path for the Outlook account information, such as:
http://servername/sugarcrm/vcal_server.php/type=vfb&source=outlook&email=%NAME%@%SE
RVER%
where %NAME% and %SERVER% are Outlook replacement variables to construct the email
address.

Index
Index
About............................................................ 15
About Sugar Suite.......................................... 1
Access Control Lists..................................... 72
Accessing
Sugar Suite................................................. 4
Accounts
importing............................................. 65, 66
module...................................................... 31
Activities
module...................................................... 22
Adding
custom fields............................................. 80
Backups ....................................................... 78
Browser .......................................................... 4
Bug tracker................................................... 82
module...................................................... 42
Calendar
module...................................................... 18
options...................................................... 14
Outlook ..................................................... 86
Campaigns
creating..................................................... 52
module...................................................... 51
Case
creating from email................................... 86
Cases
module...................................................... 40
Charts
customizing............................................... 63
Configure settings ........................................ 71
Configuring
tabs........................................................... 82
Contacts
importing............................................. 65, 67
module...................................................... 28
Cookies .......................................................... 3
Creating
email template .......................................... 52
target lists ................................................. 54
targets....................................................... 53
Cron.............................................................. 84
Currencies.................................................... 78
Custom fields
adding....................................................... 80
editing....................................................... 80
migrating................................................... 81
Dashboard
customizing charts.................................... 63
module...................................................... 62
Detail view.................................................... 11
Documents
module...................................................... 44
Dropdown editor........................................... 81
Editing
custom fields............................................. 80
dropdown.................................................. 81
Email-Campaign management .................... 82
EmailMan ..................................................... 83
Emails
creating a case ......................................... 86
creating campaigns .................................. 52
inbound..................................................... 84
module...................................................... 46
notification settings................................... 71
options...................................................... 14
Employee Directory...................................... 14
Exporting...................................................... 65
contacts .................................................... 65
information................................................ 68
Features......................................................... 1
Field layout................................................... 79
Fields
custom...................................................... 80
Firefox ............................................................ 3
Getting started................................................ 3
Help.............................................................. 12
Importing ...................................................... 65
accounts ............................................. 65, 66
contacts .............................................. 65, 67
leads......................................................... 68
opportunities............................................. 68
Inbound email............................................... 84

Index
Information
exporting................................................... 68
Interface
user............................................................. 7
Internet Explorer............................................. 3
JavaScript ...................................................... 3
Konqueror ...................................................... 3
Leads
importing................................................... 68
module...................................................... 34
List view ....................................................... 11
Logging in....................................................... 5
Logout .......................................................... 14
Mailbox
management............................................. 85
Managing
password .................................................... 5
Mass Email................................................... 84
EmailMan.................................................. 83
Migrating
custom fields............................................. 81
Module
accounts ................................................... 31
activities.................................................... 22
bug tracker................................................ 42
calendar.................................................... 18
campaigns ................................................ 51
cases ........................................................ 40
contacts .................................................... 28
dashboard................................................. 62
description .................................................. 8
documents................................................ 44
emails ....................................................... 46
leads......................................................... 34
my portal................................................... 16
navigating ................................................. 10
opportunities............................................. 37
projects..................................................... 58
RSS .......................................................... 61
selecting ................................................... 10
tabs............................................................. 8
Module Loader ............................................. 78
Mozilla ............................................................ 3
MS Windows
controls....................................................... 4
Scheduler ................................................. 84
My Account .................................................. 12
My Portal
module...................................................... 16
Opportunities
importing................................................... 68
module...................................................... 37
Outlook
calendar.................................................... 86
Password
changing..................................................... 5
managing.................................................... 5
Portal administration .................................... 80
Print.............................................................. 12
Projects
module...................................................... 58
Release administration ................................ 82
Renaming
tabs........................................................... 82
Repair........................................................... 77
Reports
scheduling ................................................ 78
Requirements................................................. 3
Role management........................................ 71
Roles ............................................................ 14
RSS
module...................................................... 61
Scheduled reports........................................ 78
Scheduler..................................................... 78
MS Windows............................................. 84
Security
timeout........................................................ 5
Settings
configure................................................... 71
Studio........................................................... 79
Sugar Suite
about........................................................... 1
accessing.................................................... 4
user interface.............................................. 7
Sugar Updates ............................................. 76
System administration.................................. 70
System links................................................. 12
Tab

Index
modules...................................................... 8
Tabs
configuring................................................ 82
renaming................................................... 82
Target list
creating..................................................... 54
Targets
creating..................................................... 53
Technical Requirements ................................ 3
Timeout .......................................................... 5
Updates........................................................ 76
Upgrade wizard............................................ 76
User
information................................................ 13
interface...................................................... 7
settings ..................................................... 13
User management........................................ 71
Web browser.................................................. 4
What's new..................................................... 2
Wizard.......................................................... 76
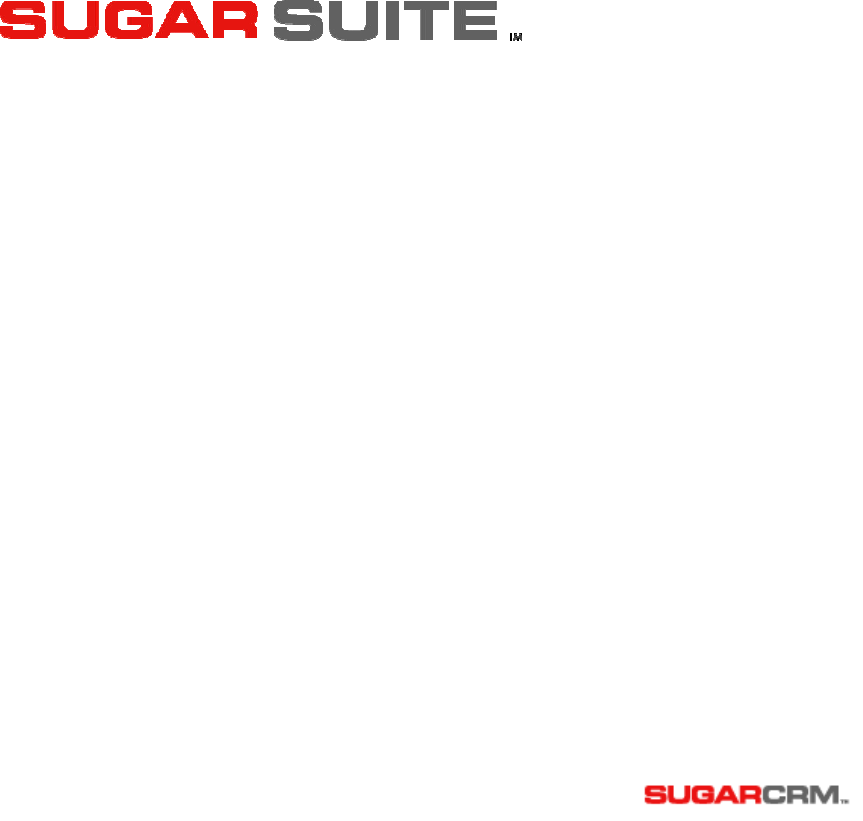
!
Sugar Open Source
User and Administrator Guide
Please send suggestions or corrections to:
support@sugarcrm.com
SugarCRM Inc.
10050 North Wolfe Road, Suite SW2-130
Cupertino, CA 95014
www.sugarcrm.com
