ALM Rangers TFS Upgrade Guide
User Manual: Pdf
Open the PDF directly: View PDF ![]() .
.
Page Count: 63
Team Foundation Server Upgrade Guide – Foreword
Page 2 of 63
The information contained in this document represents the current view of Microsoft Corporation on the issues discussed as of the date
of publication. Because Microsoft must respond to changing market conditions, it should not be interpreted to be a commitment on the
part of Microsoft, and Microsoft cannot guarantee the accuracy of any information presented after the date of publication.
This document is for informational purposes only. MICROSOFT MAKES NO WARRANTIES, EXPRESS, IMPLIED OR STATUTORY, AS TO THE
INFORMATION IN THIS DOCUMENT.
Microsoft grants you a license to this document under the terms of the Creative Commons Attribution 3.0 License. All other rights are
reserved.
2013 Microsoft Corporation.
Microsoft, Active Directory, Excel, Internet Explorer, SQL Server, Visual Studio, and Windows are trademarks of the Microsoft group of
companies.
All other trademarks are property of their respective owners.

Team Foundation Server Upgrade Guide – Foreword
Page 3 of 63
Table of Contents
Foreword .................................................................................................................................................................................................................................................................. 4
Introduction ............................................................................................................................................................................................................................................................ 5
Chapter 1: What’s New?..................................................................................................................................................................................................................................... 6
System Requirements .................................................................................................................................................................................................................................. 6
Chapter 2: Supported Upgrade Paths .......................................................................................................................................................................................................... 9
Recommended Upgrade Paths ................................................................................................................................................................................................................ 9
Chapter 3: Pre-Upgrade Checklist .............................................................................................................................................................................................................. 10
Long lead preparations ............................................................................................................................................................................................................................. 10
Checklists ......................................................................................................................................................................................................................................................... 12
References....................................................................................................................................................................................................................................................... 14
Chapter 4: Upgrade Walkthroughs ............................................................................................................................................................................................................ 15
In-place Upgrade ......................................................................................................................................................................................................................................... 15
Roll Back In-place Upgrade ..................................................................................................................................................................................................................... 21
Migration Based Upgrade ........................................................................................................................................................................................................................ 23
Clone TFS 2012 for Test Upgrades ....................................................................................................................................................................................................... 30
Move TFS Collection to TFS 2013 using TFSConfig /Attach ...................................................................................................................................................... 45
Upgrade SharePoint ................................................................................................................................................................................................................................... 48
Chapter 5: Post-Upgrade Checklist ............................................................................................................................................................................................................ 52
Verifications .................................................................................................................................................................................................................................................... 52
Checklists ......................................................................................................................................................................................................................................................... 52
Chapter 6: FAQs ................................................................................................................................................................................................................................................. 58
Appendix ............................................................................................................................................................................................................................................................... 60
Upgrading Process Template using PowerShell ............................................................................................................................................................................. 60
In Conclusion ....................................................................................................................................................................................................................................................... 63

Team Foundation Server Upgrade Guide – Foreword
Page 4 of 63
Foreword
When I first began working in the Team Foundation Server group last year, one of my first tasks was to install and upgrade
my personal TFS deployment in order to experience the area of ownership I had just inherited from a customer’s
perspective. Even with a relatively simple deployment, I found the number of considerations I needed to manage to
successfully complete this task, were much higher than I anticipated. I quickly gained an appreciation for both the setup
and configuration space I was working in and for the TFS 2012 Rangers Upgrade Guide, which helped me through the
process.
Since then, I have assisted many other groups with their upgrades, and have encountered innumerable environment
permutations and customizations – I still see new ones every month. Configuring TFS is highly complex given that it can be
deployed in a wide range of environments, from a small virtual machine to a distributed 10+ server topology. While our
MSDN documentation does a good job of covering traditional, “happy path” scenarios, customer needs can diverge
greatly from the norm. One of the main purposes of this guide is to comprehensively detail many of these special upgrade
and migration considerations, even if you do not see your environment perfectly represented by one of our walkthroughs
or checklists, you should be able to extract a solid framework for your upgrade, from preliminary preparation all the way
through verification.
I am more convinced than ever of the utility of this undertaking. Upgrading is a process that every TFS user must execute
at some point, and at the same time, it can be quite daunting. This document not only outlines workflows for TFS
upgrades and migrations, but also provides peace of mind to administrators concerned with minimizing downtime and
ensuring their business’s important data is serviced correctly. With companies – including Microsoft – switching to a model
of releasing features to their users more frequently, upgrades will only become a more common occurrence.
I am thrilled that the Rangers Upgrade Guide has been updated for TFS 2013, and am pleased to have been able to
contribute to a project that I believe is extremely valuable, with a group of experts that are just as passionate about TFS as
I am. I hope you find this resource as indispensable as I did when I started here at Microsoft.
Andrea Scripa – Program Manager, Team Foundation Server
Team Foundation Server Upgrade Guide – Introduction
Page 5 of 63
Introduction
Welcome to the Team Foundation Server Upgrade Guide where we, the ALM Rangers, will take you on a guided journey
through practical and scenario-based guidance for upgrading your existing Team Foundation Server (TFS) infrastructure to
TFS 2013, walking through some of the common scenarios encountered during the upgrade process.
NOTE
The guidance is based on Visual Studio TFS 2013 and should be used in conjunction with documentation that accompanies the
product and is available on the Microsoft Developer Network (MSDN) at http://msdn.microsoft.com.
Intended audience
We expect the majority of our audience personas to be Dave – TFS Server Administrator, Jane – Infrastructure specialist,
Garry – Development Lead and Paul – Database Administrator. See ALM Rangers Personas and Customer Types
1
for more
information on these and other personas.
The guide assumes a good knowledge of the TFS and an operational administration mindset – in other words,
intermediate to advanced TFS Administrators.
What you’ll need
The following prerequisites are needed and referenced in this guide as ‘supported editions’:
TFS 2010 and 2012 as existing environment
TFS 2013 as target environment
Visual Studio ALM Rangers
The Visual Studio ALM Rangers are a special group with members from the Visual Studio Product group, Microsoft
Services, Microsoft Most Valuable Professionals (MVP) and Visual Studio Community Leads. Their mission is to provide
out-of-band solutions to missing features and guidance. A growing Rangers Index is available online
2
.
Contributors
Andre Scripa, Bijan Javidi, Christian Nielsen, Ewald Hofman, Francisco Fagas, Gordon Beeming, Hosam Kamel, Michael Fourie, Osmar
Landin, Patricia Wagner, Pierre Donyegro, Pramod Vasanth, Stefan Mieth, Thomas Isler, Vlatko Ivanovski, William H. Salazar, Willy-Peter
Schaub
Acknowledgements
ALM Rangers never work alone, standing on the shoulders of giants. We would like to thank our families for their patience,
the countless engineers who advised us and shared their knowledge, and content owners from MSDN and TechReady.
Special thanks to Dawid Ciarach.
Additional ALM Rangers Resources
Understanding the ALM Rangers – http://aka.ms/vsarunderstand
Visual Studio ALM Ranger Solutions – http://aka.ms/vsarsolutions
1
http://aka.ms/treasure4
2
http://aka.ms/vsarindex

Team Foundation Server Upgrade Guide – Chapter 1: What’s New?
Page 6 of 63
Chapter 1: What’s New?
This section covers the various hardware and software requirements for TFS 2013, giving you the information you need to
determine if your existing hardware and software configuration is sufficient.
System Requirements
Supported No longer supported
This section covers the various software and hardware requirements for TFS 2013.
Environment Upgrade Blockers
TFS 2013 no longer supports these previously supported platforms:
SharePoint 3.0
Microsoft Office SharePoint Server 2007
Project Server 2007
SQL Server 2008 R2
SQL Server 2012 with no Service Pack
Windows Server 2008
Windows Server 2008 R2 with no Service Pack
Windows Server 2012 with no service pack
Software Requirements
NOTE
Refer to System Requirements for Team Foundation Server for information on TFS 2010 3, not covered in the tables below.
Server Operating System Requirements
Operating System
TFS 2012
TFS 2013
Windows Server 2008 4 w/SP2 (Standard, Enterprise, Datacenter)
Windows Server 2008 5 R2 w/SP1 (Standard, Enterprise, Datacenter)
Windows Server 2012 (Essentials, Standard, Datacenter)
Windows Small Business Server 2011 (Essentials, Standard, Premium Add-On)
Windows Home Server 2011
Windows Server 2012 R2 (Essentials, Standard, Datacenter)
Table 1 – Server Operating System Requirements
NOTE
All server operating systems need to be x64.
3
http://msdn.microsoft.com/en-us/library/dd578592(v=vs.100).aspx
4
Windows Server 2008 Server Core not supported
5
Windows Server 2008 R2 Server Core are not supported
Team Foundation Server Upgrade Guide – Chapter 1: What’s New?
Page 7 of 63
Client Operating System Requirements for installing
Operating System
TFS 2012
TFS 2013
Windows 7 32-/64-bit (Home Premium, Professional, Enterprise, Ultimate)
Windows 7 32-/64-bit (Home Premium, Professional, Enterprise, Ultimate) + SP1
Windows 8 32-/64-bit (Basic, Pro, Enterprise)
Windows 8.1 (Basic, Pro, Enterprise)
Table 2 – Client Operating System Requirements for installing TFS
SQL Server Requirements for
SQL Server Version
TFS 2012
TFS 2013
SQL Server 2008 R2 (Express, Standard Edition, Enterprise Edition)
SQL Server 2012 (Express6, Standard Edition, Enterprise Edition)
SQL Server 2012 SP1
Table 3 – SQL Server Requirements
NOTE
We strongly recommend you install CU2 or KB 2793634 on top of SQL Server 2012 SP1. See SQL Server requirements for Team
Foundation Server 7 for more information.
SharePoint Requirements TFS
SharePoint Version
TFS 2012
TFS 2013
Windows SharePoint Services 3.0 (Foundation, Standard, Enterprise)
Microsoft Office SharePoint Server 2007 (Foundation, Standard, Enterprise)
Microsoft SharePoint Server 2010 (Foundation, Standard, Enterprise)
Microsoft Office SharePoint Server 2010 (Foundation, Standard, Enterprise)
Microsoft SharePoint 2013 8 (Foundation, Standard, Enterprise)
Microsoft Office SharePoint Server 2013 (Foundation, Standard, Enterprise)
Table 4 – SharePoint Requirements
Project Server Integration Support for TFS
Project Server Version
TFS 2012
TFS 2013
Project Server 2007
Project Server 2010
Project Server 2013
Table 5 – Project Server Requirements
Build OS Support for TFS
Operating System
TFS 2012
TFS 2013
Windows Server 2008 9 w/SP2 (Standard, Enterprise, Datacenter)
Windows Server 2008 10 R2 w/SP1 (Standard, Enterprise, Datacenter)
Windows Small Business Server 2011, with latest SP
6
Team Foundation Server 2013 released with SQL Server 2012 Express SP1
7
http://msdn.microsoft.com/en-us/library/Dd631889(v=vs.120).aspx
8
Team Foundation Server 2013 released with SharePoint Foundation 2013
9
Windows Server 2008 Server Core not supported
10
Windows Server 2008 R2 Server Core are not supported
Team Foundation Server Upgrade Guide – Chapter 1: What’s New?
Page 8 of 63
Operating System
TFS 2012
TFS 2013
Windows Server 2012 (Essentials, Standard, Datacenter)
Windows Server 2012 R2 (Essentials, Standard, Datacenter)
Windows 7 32-/64-bit (Home Premium, Professional, Enterprise, Ultimate), with latest SP
Windows 8 32-/64-bit (Basic, Pro, Enterprise)
Windows 8.1 (Basic, Pro, Enterprise)
Table 6 – Build OS Requirements
Lab Management Support for TFS
SCVMM Version
TFS 201
TFS 2013
SCVMM 2008 R2
SCVMM 2012 (RTM + SP1)
SCVMM 2012 R2
Table 7 – Lab Management Requirements
Hardware Requirements
The following table lists the minimum hardware requirements for TFS 2013 (without SharePoint Products).
If you need to determine your hardware requirements based on capacity, please refer to the System Requirements for TFS
11
or TFS Planning Guide
12
, both of which were referenced to build these compatibility tables.
The hardware requirements of TFS 2013 are not very different from the requirements of TFS 2012.
The following table summarizes the hardware requirements of TFS 2013:
Number of
users
Configuration
CPU
Memory
Hard disk
< 250
Single-server 13
1 single core processor at 2.13 GHz
2 GB
1 disk at 7.2k rpm 125 GB
250 to 500
Single-server
1 dual core processor at 2.13 GHz
4 GB
1 disk at 10k rpm 300 GB
500 to 2,200
Dual-server 14
Team Foundation Server
Database Engine Server
1 dual core Intel Xeon proc. at 2.13 GHz
1 quad core Intel Xeon proc. at 2.33 GHz
4 GB
8 GB
1 disk at 7.2k rpm 500 GB
SAS disk array at 10k rpm 2 TB
2,200 to 3,600
Dual-server
Team Foundation Server
Database Engine Server
1 quad core Intel Xeon proc. at 2.13 GHz
2 quad core Intel Xeon proc. at 2.33 GHz
8 GB
16 GB
1 disk at 7.2k rpm 500 GB
SAS disk array at 10k rpm 3 TB
Table 8 - Hardware Requirements
11
http://msdn.microsoft.com/en-us/library/vstudio/dd578592(v=vs.120).aspx
12
http://aka.ms/treasure5
13
TFS and the Database Engine on the same server
14
TFS and the Database Engine on different servers
Team Foundation Server Upgrade Guide – Chapter 2: Supported Upgrade Paths
Page 9 of 63
Chapter 2: Supported Upgrade Paths
Context
This section provides guidance on choosing an upgrade path when you upgrade your current TFS environment.
Personas
Dave, the TFS Administrator, performs the TFS upgrade, Garry, the Dev Lead, is one of the core users of the
environment and Jane, the Infrastructure Specialist, owns access to the environment impacted by upgrade.
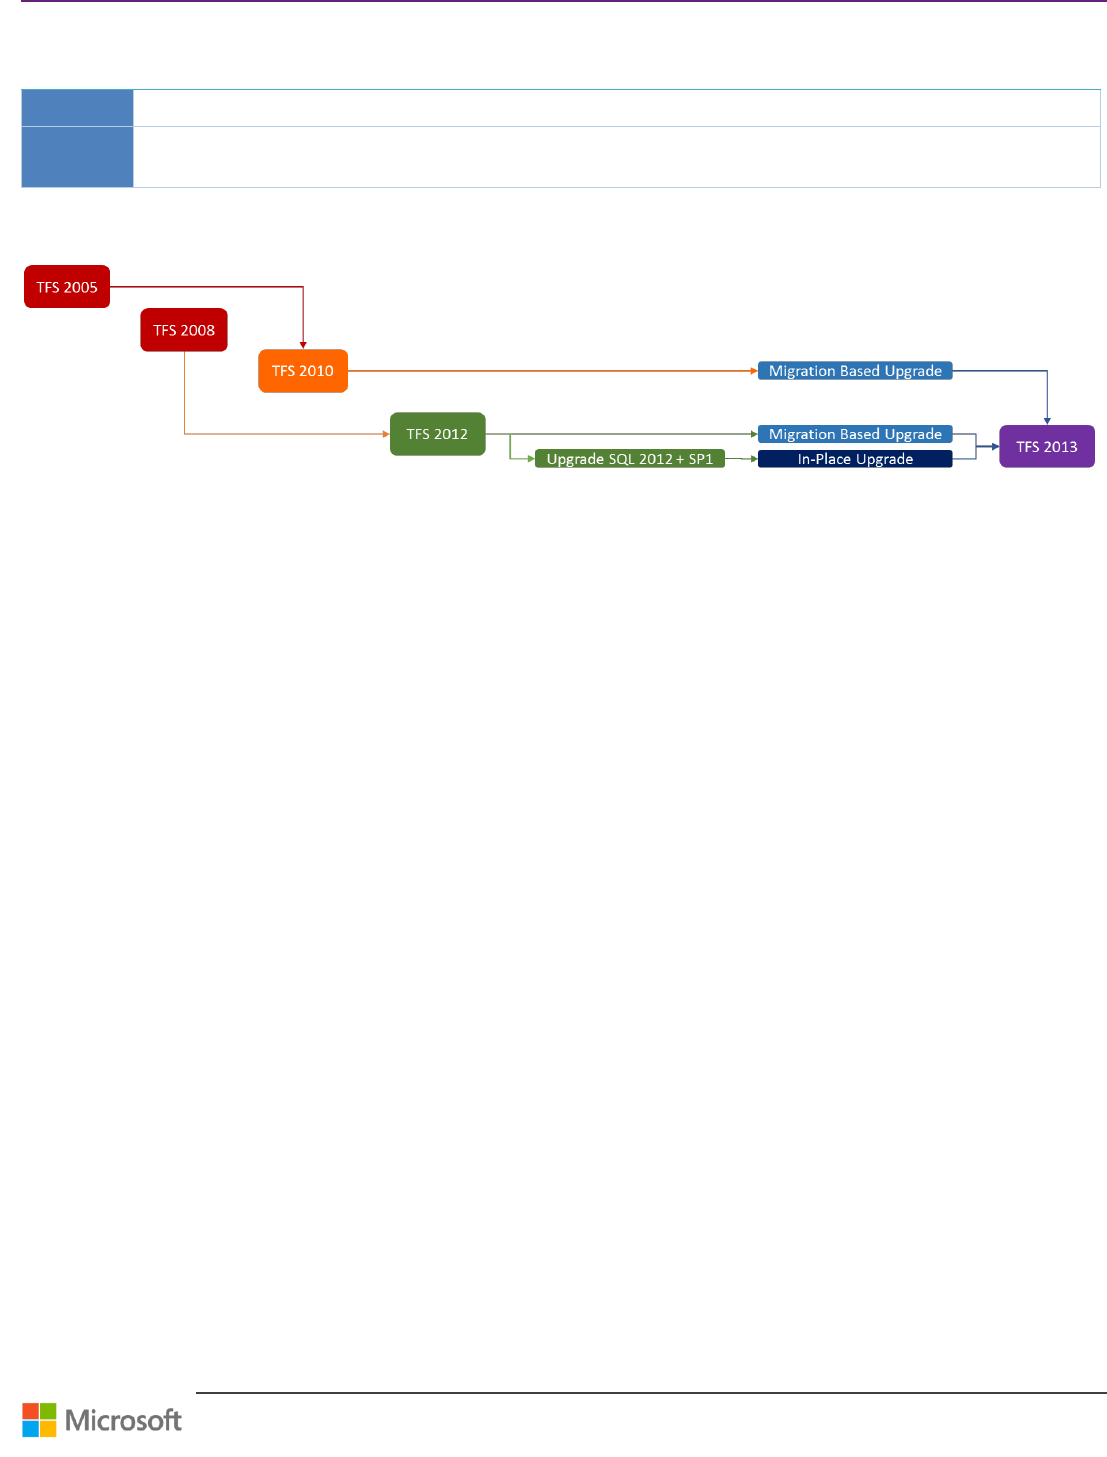
Recommended Upgrade Paths
Figure 1 – Recommended Upgrade Paths
In-Place Upgrade Path
You can perform an in-place upgrade by doing an upgrade on the same hardware that was running the earlier version of
TFS. You may need to uninstall the previous version of TFS first. If upgrading from TFS 2012 RTM or higher, the process of
uninstalling is part of the TFS 2013 install. If upgrading from TFS 2010, the process of uninstalling is a manual step, then
install TFS 2013 and then run the upgrade wizard. If you use an in-place upgrade, you will have a single TFS 2013
environment after the upgrade.
Migration-Based Upgrade Path
You can also perform a migration based upgrade by migrating your data to different hardware. When you use this path,
you must copy your data to different hardware, install TFS 2013, and then run the upgrade wizard.
Use this upgrade path if you if you want your deployment to run on better hardware, new software (like the OS), or if you
want to change the topology of your deployment. If you just want to test the upgrade then you should create a cloned
environment and test on that. After moving and restoring your existing data to the new hardware, the data is
autonomous allowing users to continue using the other environment.
Unlike previous versions of TFS, TFS 2013 only supports SQL 2012 + SP1. As with TFS 2012, TFS 2013 only supports 64-bit
server operating systems. 32-bit client operating systems are still supported. The Figure 1 shows the recommended
upgrade paths for a given TFS environment.
Team Foundation Server Upgrade Guide – Chapter 3: Pre-Upgrade Checklist
Page 10 of 63
Chapter 3: Pre-Upgrade Checklist
NOTE
Peruse What does a well-maintained Team Foundation Server look like? 15 for an excellent article by Grant Holliday, which
provides very helpful information for your operational TFS environment.
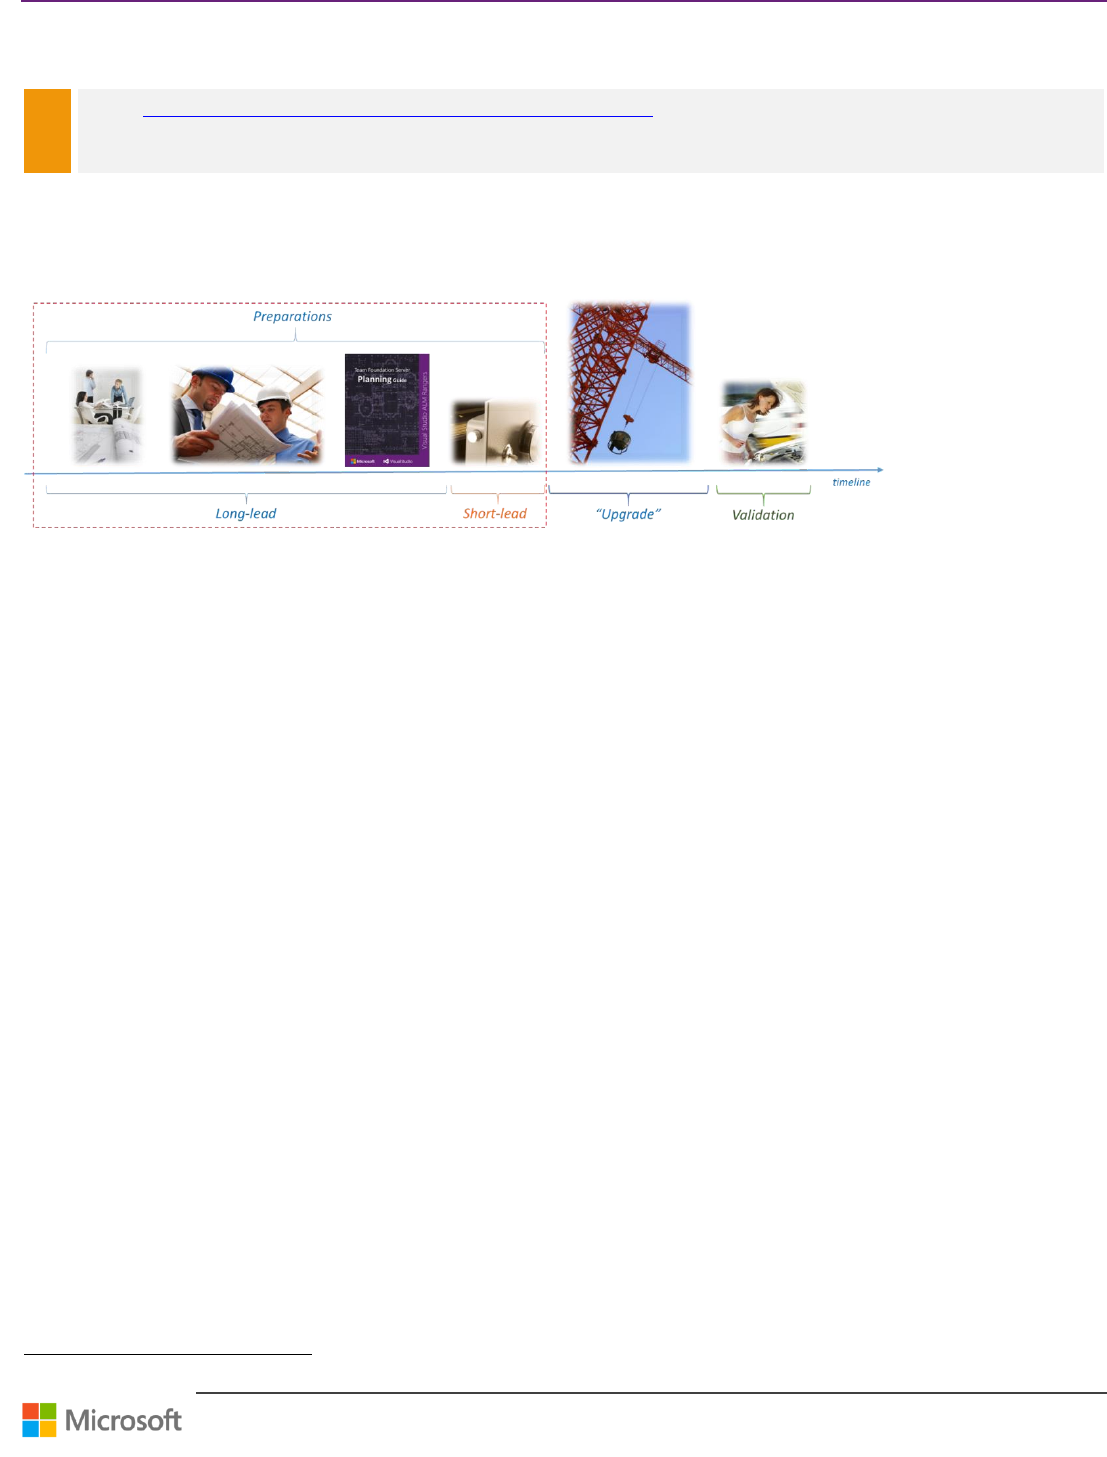
Two periods make up your pre-upgrade preparations.
The first is a long-lead set of preparations where you plan, research and gather information so you are fully prepared
to upgrade.
The second is that short-lead timeframe right before actually kicking off the next version installation media.
Long lead preparations
Migration planning meetings
If you are upgrading from a previous version of TFS, chances are there are probably a number of users across your
company who now rely on TFS as a critical tool in their daily work. Meetings with the infrastructure team that monitors
and maintains TFS, the lead developers who store and build their source code in TFS, the lead testers who manage their
testing cycles and test cases in TFS and the project managers, business analysts and stakeholders that monitor project
progress in TFS will be important. All these groups of users will need to be aware of the upgrade and can help you reduce
risk in conducting the upgrade.
Here are some things that each these groups can provide that will assist in the upgrade of their TFS:
Developers
o Clean up old workspaces that are no longer used. As developers come and go on a project, orphan
workspaces inevitably occur. Cleaning these up can speed up the upgrade process.
o Identify build dependencies. One of the trickier or work intensive elements of a TFS migration is ensuring that
all the builds work after the migration.
Infrastructure \ DBA team
o Previous databases have grown over time - the question is how much. Long before the actual migration, a test
backup and restore should be done if you are moving to new hardware. The backups tend to be larger than
users think they will be, and if you are moving to a different part of the LAN, backing up, moving and
restoring can take a significant chunk of time. This is a good time to test the movement of data so you know
how long this step will take during the actual migration.
o Are the target servers up-to-date and running the minimum operating versions of OS, SQL Server and
SharePoint?
15
http://blogs.msdn.com/b/granth/archive/2013/10/08/what-does-a-well-maintained-team-foundation-server-look-like.aspx
Team Foundation Server Upgrade Guide – Chapter 3: Pre-Upgrade Checklist
Page 11 of 63
Planning your new instance
If you are moving to new hardware, it’s important to revisit and plan the topology for your new instance. This is a good
time to consider load balancing the front-end application tiers. On the other hand, if the current instance is on real metal,
now is a good time to consider whether it makes sense to virtualize all or parts of your new instance. You could consider
referring to the TFS Planning and DR Avoidance Guide
16
at this time to plan your TFS infrastructure.
Team Project Collection Planning
First, managing the size of an individual collection can make migration faster and easier. As a collection grows past the
100GB or 200GB size range, backup and movement of the database can be a significant problem. Now is a good time to
consider breaking up the set of Team Projects into non-related collections. For more information please read the Split a
Team Project Collection
17
MSDN article. Going to multiple collections in a large enterprise allows for scaling the database
across multiple SQL server instances. This could be important if your SQL Server performance is starting to show signs of
stress.
AlwaysOn Availability Groups
18
requires a small amount of TFS-specific configuration, which can help you provide high
availability (HA) to TFS relational databases like Tfs_Configuration and Tfs_Collection by configuring the
MultiSubnetFailover option. TFS support for AlwaysOn Availability Groups is an on or off proposition: if you use it, you
must include your Tfs_Configuration database as well as all your Tfs_Collection databases in an availability group. If you
add a team project collection in the future, the database for that collection must be added to an availability group in SQL
Server. For more information please read the Use SQL Server 2012 Always On Availability Groups with Team Foundation
Server
19
MSDN article.
SharePoint Migration Planning
If you are currently running Windows SharePoint Services, a migration of TFS is a good time to consider an upgrade to
your SharePoint infrastructure, especially if you have had plans to upgrade from Windows SharePoint Services to a full
SharePoint Server installation. SharePoint Services (WSS3.0) are not supported by TFS 2013.
TFS Best Practice Analyzer
Run the TFS Best Practice Analyzer tool on the old and the new topologies. This will help to:
Verify that the deployment for TFS is configured according to recommended best practices
Identify the source of problems in an unhealthy deployment
Take a snapshot of the configuration of a deployment
You need to run the appropriate TFS Best Practices analyzer on the source and target system.
TFS 2010 Power Tools
20
TFS 2012 Power Tools
21
TFS 2013 Power Tools
22
16
http://aka.ms/treasure5
17
http://msdn.microsoft.com/en-us/library/vstudio/dd936158(v=vs.110).aspx
18
http://technet.microsoft.com/en-us/library/ff877884.aspx
19
http://msdn.microsoft.com/en-us/library/vstudio/jj662725.aspx
20
http://visualstudiogallery.msdn.microsoft.com/c255a1e4-04ba-4f68-8f4e-cd473d6b971f
21
http://visualstudiogallery.msdn.microsoft.com/b1ef7eb2-e084-4cb8-9bc7-06c3bad9148f
22
http://visualstudiogallery.msdn.microsoft.com/f017b10c-02b4-4d6d-9845-58a06545627f
Team Foundation Server Upgrade Guide – Chapter 3: Pre-Upgrade Checklist
Page 12 of 63
SQL Best Practice Analyzer
Run the latest version of the Best Practice Analyzer tool on the old and the new topologies. As of this writing, the latest
version of the Microsoft® SQL Server® 2012 Best Practices Analyzer can be found here
23
.
SQL Server Version Planning
If you have been running SQL Server Standard version, now is a good time to consider upgrading to the Enterprise
version. The longer a company uses TFS, the more they tend to leverage its reporting features. Many features are only
available in the Enterprise version of SQL Server that TFS can leverage.
Ensure your peruse the general comparison of SQL Editions
24
, whereby we recommend that the Enterprise version of SQL
Server 2012 SP1 be deployed.
SQL Server 2012 offers a new high availability (HA) feature that requires a Team Foundation Server-specific configuration,
which can highly improve availability of database used by Team Foundation Server. Currently these High Availability
features are available and supported for TFS 2013:
Always On Failover Cluster Instances
25
Always On Availability Groups
26
SQL Mirroring
27
Some of other features of Enterprise edition of SQL Server 2012 that can considerably improve overall functioning
(performance and scalability) of Team Foundation Server are:
Data Compression
28
Online indexing
29
Fast recovery
Mirrored backups
30
Hot Add Memory and CPU
No limitation in Compute capacity Used by Single instance and Memory Utilization
Checklists
Long lead pre-upgrade tasks
Step
Instructions
1
New install
guide
꙱ - Done
Download the current installation and administration guides 31.
2
Schedule
meetings
꙱ - Done
Schedule the migration planning meetings: Timing, Roles and Preparations.
You must plan these meetings between the stakeholders well in advance in order to encourage collaboration
and stay on schedule.
23
http://www.microsoft.com/en-us/download/details.aspx?id=29302
24
http://www.microsoft.com/en-us/sqlserver/editions.aspx
25
http://technet.microsoft.com/en-us/library/ms189134.aspx
26
http://msdn.microsoft.com/en-us/library/vstudio/jj662725.aspx
27
http://technet.microsoft.com/en-us/library/ms189852.aspx
28
http://technet.microsoft.com/en-us/library/cc280449.aspx
29
http://technet.microsoft.com/en-us/library/cc280449.aspx
30
http://technet.microsoft.com/en-us/library/cc280449.aspx
31
http://www.microsoft.com/en-us/download/details.aspx?id=29035
Team Foundation Server Upgrade Guide – Chapter 3: Pre-Upgrade Checklist
Page 13 of 63
Step
Instructions
3
Plan server
topology
꙱ - Done
Plan the server topology in terms of availability, scalability and geographies.
Draw up a detailed design of new infrastructure if you are planning a migration as well as an upgrade. Even
though TFS can have a simple topology, when you factor in Reporting Services, SharePoint and build servers, a
design is worth the investment in time.
4
Update
environments
꙱ - Done
Update the environment versions, service packs and appropriate hotfixes for Windows OS, SQL Server, TFS,
SharePoint and Client software.
If you are doing a migration based upgrade, you need to update both the source and the target environments.
Verify that all environments, including legacy and third party components, are compatible with the new
version of TFS you wish to upgrade to.
WARNING
WSS 3.0: When you are running a WSS3.0 server with your existing environment and you want to upgrade
to SharePoint Server 2013 you have to upgrade to SharePoint Server 2010 first. See page 48 for further
information about SharePoint upgrade.
5
Research and
plan TPC
꙱ - Done
Each TFS instance can have one or more Team Project Collections, which are the basic unit of recovery and
isolation for TFS. See TFS Planning and DR Avoidance Guide 32 for more information.
Even though Team Project Collections were designed for internet-scale hosting facilities, if your databases are
getting very large — to the point where backup and movement of data is getting risky — it might be a good
time to break up the database into multiple collections.
6
Research and
plan security
꙱ - Done
Existing TFS servers may not adhere to recommended AD security group guidelines. For example, TFS servers
may have leveraged local server groups on the TFS servers, which is an issue when the new environment is to
be load balanced
7
Validate
accounts
꙱ - Done
For installing TFS 2013, TF Build or TFS Proxy, use service accounts.
As a best practice, TFS service accounts should not be members of the Windows Local Administrators group
on the server where TFS is installed.
NOTE
By default, every component uses a built-in account (such as Network Service) as its service account. You
can change this account to a user account when you install the component, but you must ensure that any
user accounts that you use have the Log on as a service permission.
If you use domain accounts for your service accounts, you should use a different identity for the report reader
account.
If you are installing a component in a workgroup, you must use local accounts for service accounts.
These are service accounts identities for TFS and its components:
o Reporting TFSREPORTS
o TFS TFSSERVICE
o Team Foundation Build TFSBUILD
o TFS Proxy TFSPROXY
o SharePoint Products WSSSERVICE
o SQL Server SQLSERVICE
For more info, read the Accounts required for installation of Team Foundation Server 33 MSDN article.
32
http://aka.ms/treasure5
33
Accounts required for installation of Team Foundation Server
Team Foundation Server Upgrade Guide – Chapter 3: Pre-Upgrade Checklist
Page 14 of 63
Step
Instructions
8
Test builds
꙱ - Done
Your test plan should include everything that’s needed for a smooth migration to a new version of TFS. The
upgrade tools can port existing build definitions, but you should consider other factors as well. Do you want to
install additional components on build machines? Would you ever re-configure using batch or PS scripts for
post-build events? What about security permissions for pre- or post-build execution, such as folder/cache
cleanup, IIS deployment, IIS reset, SQL DB access, and so forth?New build servers might be moving from 32-bit
to 64-bit. If there are Java builds involved, there might be new TF build extension targets that have new
versions. References to them might require new references.
9
Review ports
꙱ - Done
Review required ports and make sure the network team acknowledges that all are open in the target
environment. You can find more information here 34.
Table 9 – Long lead pre-upgrade task checklist
Short lead pre-upgrade tasks
Step
Instructions
1
Backup
꙱ - Done
Backup current TFS data using Backup/Restore PowerTool or using Scheduled Backups (available as part of
TFS 2012 Update 2)
NOTE
The Backup/Restore PowerTool isn’t supported on releases where Scheduled Backups is available (TFS
2012.2 or later). You can use Scheduled Backups in the same way you would have previously used the
Backup/Restore PowerTool. When upgrading to TFS 2013 from a release that uses the PowerTool, your
PowerTool settings will be automatically configured into Scheduled Backups as part of your upgrade, and
the PowerTool will be uninstalled.
2
Backup
encryption
key
꙱ - Done
NOTE
Reporting Services uses an encryption key to secure sensitive data that is stored in the report server
database. To ensure that you have continued access to encrypted data, it’s important that you create a
backup of the encryption key in case you need to restore it later due to changes in the service account or
as part of a planned migration.
Single-server deployment
o Backup the encryption key for SQL Server Reporting Services using the Reporting Services
Configuration tool or the RSKEYMGMT command-line tool, provided by SQL Server.
Multi-server deployment
o You must backup the encryption key using the RSKEYMGMT command-line tool.
Refer to rskeymgmt Utility (SSRS) 35 for more information.
3
Uninstall TFS
꙱ - Done
This step might not be necessary, depending on the Upgrade method selected, and which version of TFS you
are upgrading from.
Uninstalling TFS does not alter the databases.
Table 10 – Short lead pre-upgrade task checklist
References
System Requirements for TFS
36
REVIEW
Any upgrade of TFS, regardless of how basic or complex, whether in-place or including hardware migration, needs to be
planned. That planning should start long before the migration happens and should include all parties of the TFS ecosystem,
meaning all the user roles as well as infrastructure roles.
34
http://msdn.microsoft.com/en-us/library/dd578664(v=vs.120).aspx
35
http://msdn.microsoft.com/en-us/library/ms162822(v=sql.110).aspx/css
36
http://msdn.microsoft.com/en-us/library/dd578592(v=vs.120).aspx
Team Foundation Server Upgrade Guide – Chapter 4: Upgrade Walkthroughs
Page 15 of 63
Chapter 4: Upgrade Walkthroughs
WARNING
Ensure that you perform a full backup and verify the restore before considering an upgrade. An upgrade failure could leave the
environment in a corrupt, non-reversible state.
In-place Upgrade
Context
Scenario for an in-place upgrade from TFS 2010 or TFS 2012 to TFS 2013, without doing any infrastructural changes to
the environment. This is the recommended upgrade path.
It’s neither harder nor riskier than the migration based upgrade if practiced on a cloned environment. The in-place
upgrade is the tested much more frequently by the product team than migration or attach upgrades. You are not
changing any other variables in the underlying infrastructure TFS relies on prior to upgrade; this isn’t necessarily true
for migrations and can cause unforeseen issues.
Version
TFS 2010 TFS 2013
TFS 2012 TFS 2013
Persona
Dave, the TFS Administrator, performs the TFS upgrade.
Jane, the Infrastructure Specialist, owns and fine-tunes the environment impacted by the upgrade.
Table 11 – Overview: In-place upgrade from TFS 2010 or TFS 2012 to 2013
Walkthrough
Step
Instructions
1
Prepare
꙱ - Done
Complete the pre-upgrade checklist. See page 10 for details.
Quiesce every application tier in the farm
Note: Post the installation of .Net 4.5.1, the system may restart. Post restart, TFS services that were halted by
Quiesce may start again and TFS may be available for a brief amount of time.
2
Uninstall TFS
꙱ - Done
TFS 2010 only:
TFS databases will not be impacted.
TFS configuration settings will not be persisted and must be documented.
3
Upgrade
OS/SQL/WSS
꙱ - Done
You may need to update your operating system or other dependencies in your environment such as SQL Server
and SharePoint Server to meet the pre-requisite requirements.
4
Install TFS
꙱ - Done
Run the tfs_server.exe from the TFS 2013 installation media or use the web installer.
Team Foundation Server Upgrade Guide – Chapter 4: Upgrade Walkthroughs
Page 16 of 63
Step
Instructions
5
Upgrade TFS
꙱ - Done
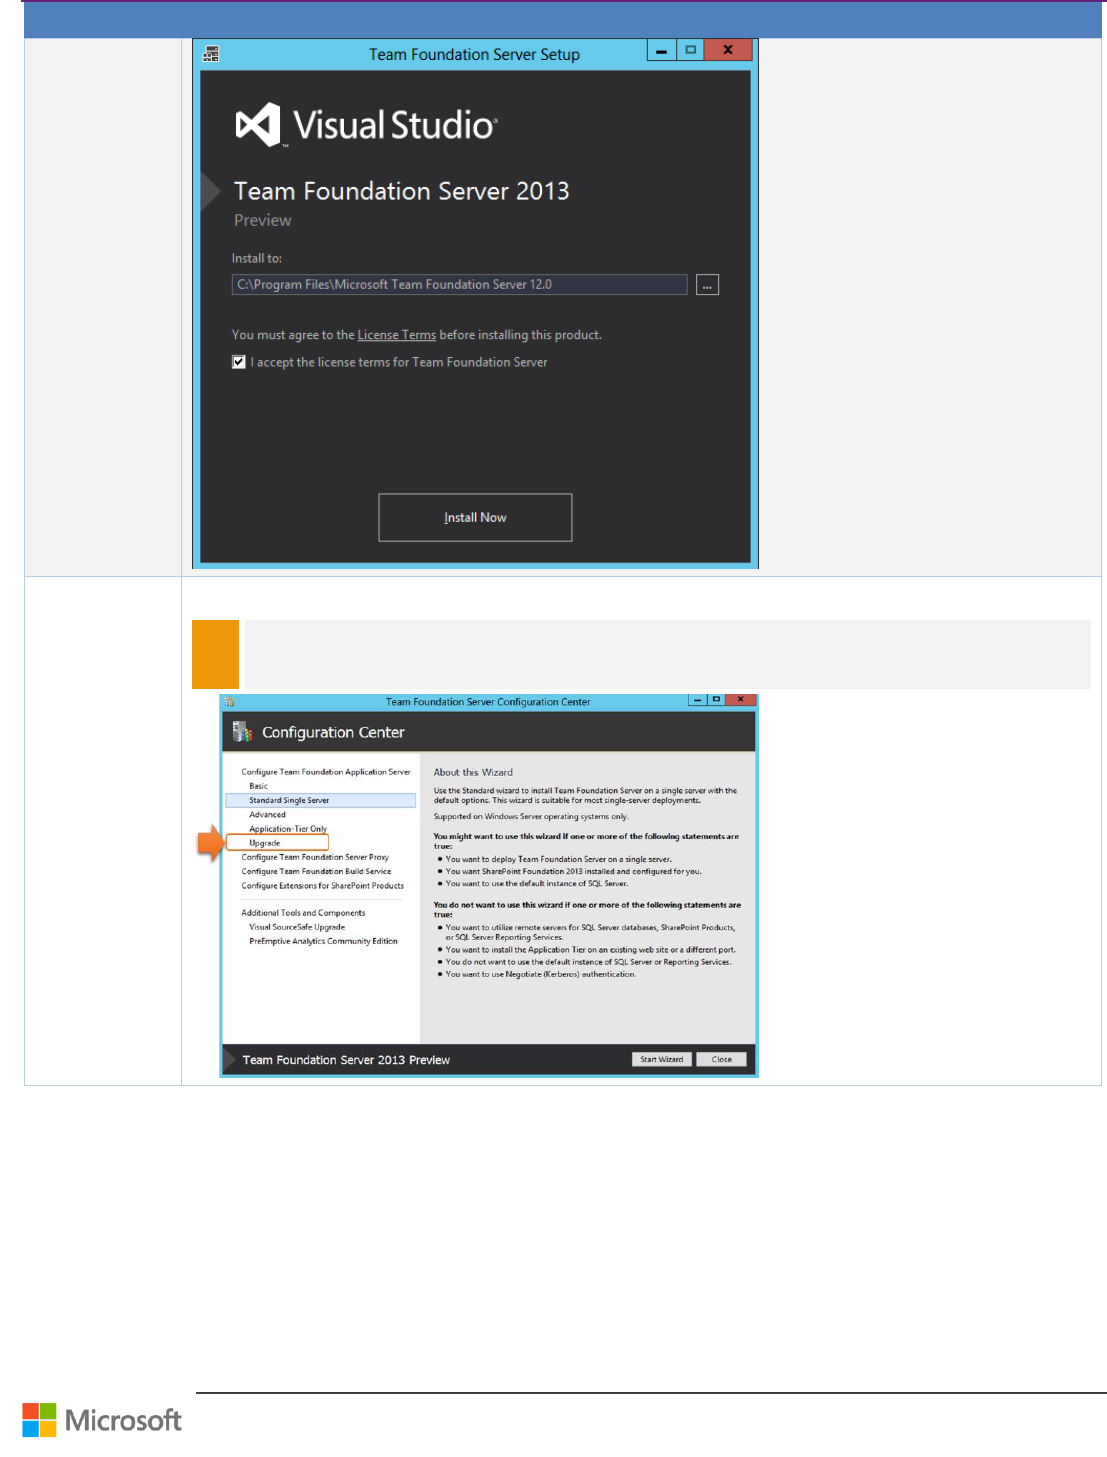
Select the Team Foundation Server Configuration Center, select Upgrade and start the wizard.
NOTE
The setup may automatically detect that the environment should be upgraded, in which case you can
skip this step.
Team Foundation Server Upgrade Guide – Chapter 4: Upgrade Walkthroughs
Page 17 of 63
Step
Instructions
6
SQL Server
Instance
꙱ - Done
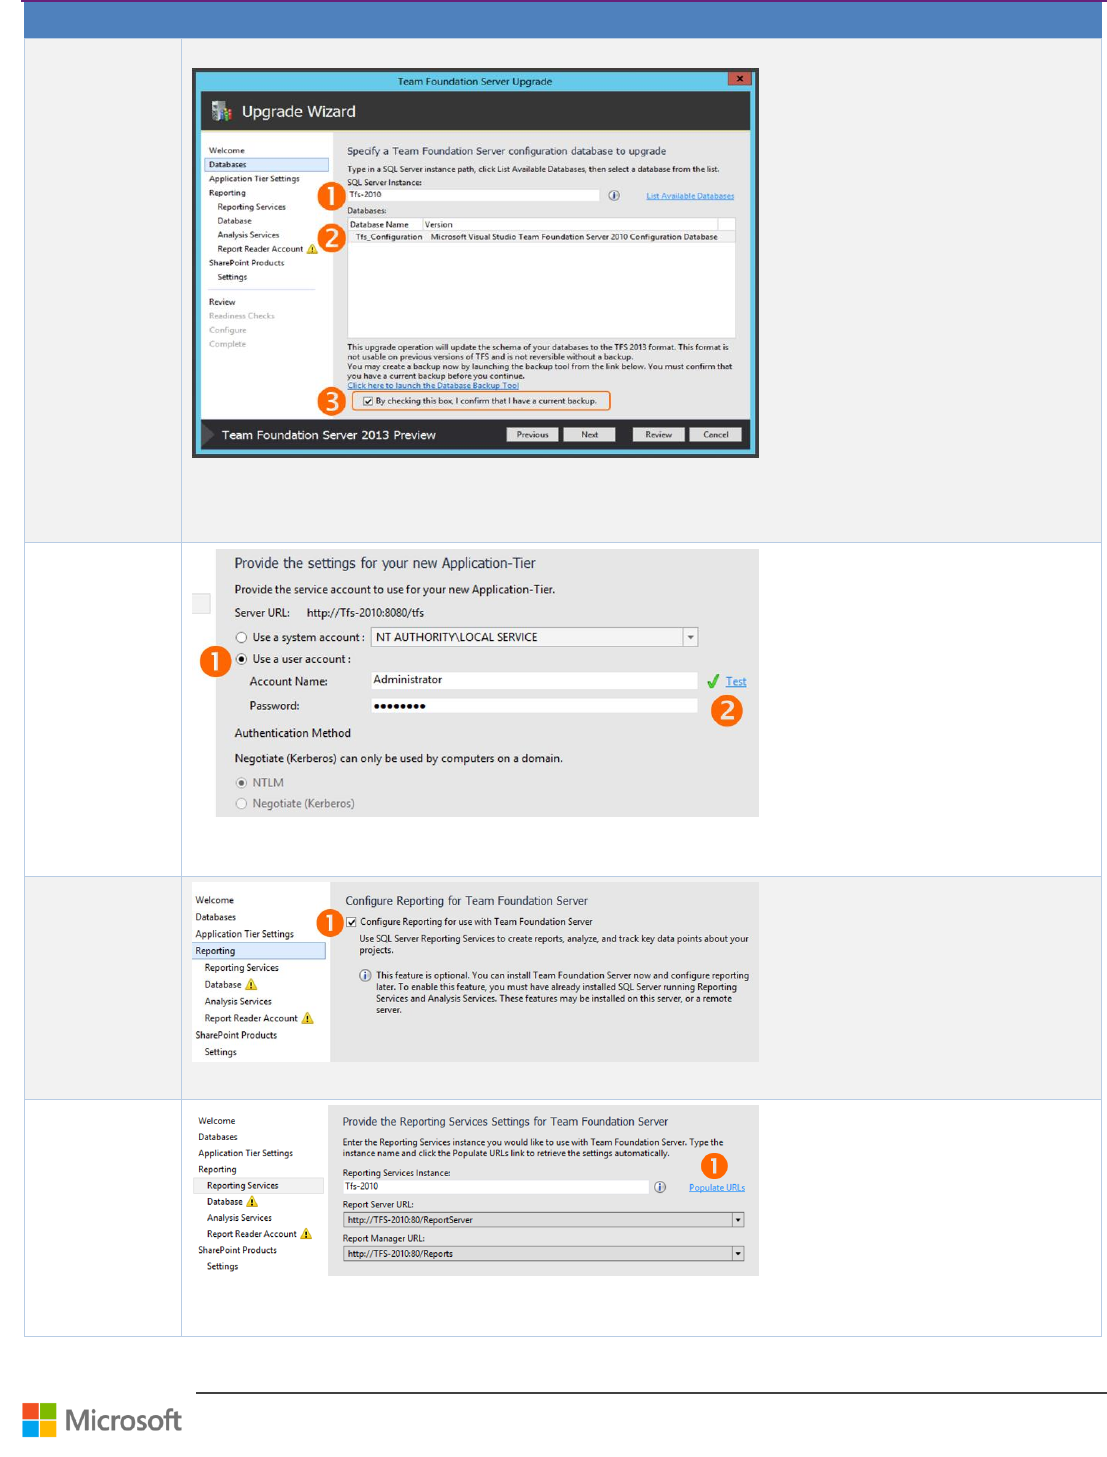
Select the SQL instance that contains the configuration database from TFS.
Type the SQL Server Instance name where the TFS configuration database is.
Select List Available Databases and click on the configuration database in the list
Check By checking this box, I confirm that I have a current backup.
7
Account
information
꙱ - Done
Enter the account information for TFS 2013 to use.
Test the credentials.
8
Reporting
꙱ - Done
Optionally select the check box to Configure Reporting.
8.1
Report Server
꙱ - Done
Click Populate URLs to verify the Report Server Instance and automatically retrieve the URLs.
Continue only if validation passes.
Team Foundation Server Upgrade Guide – Chapter 4: Upgrade Walkthroughs
Page 18 of 63
Step
Instructions
8.2
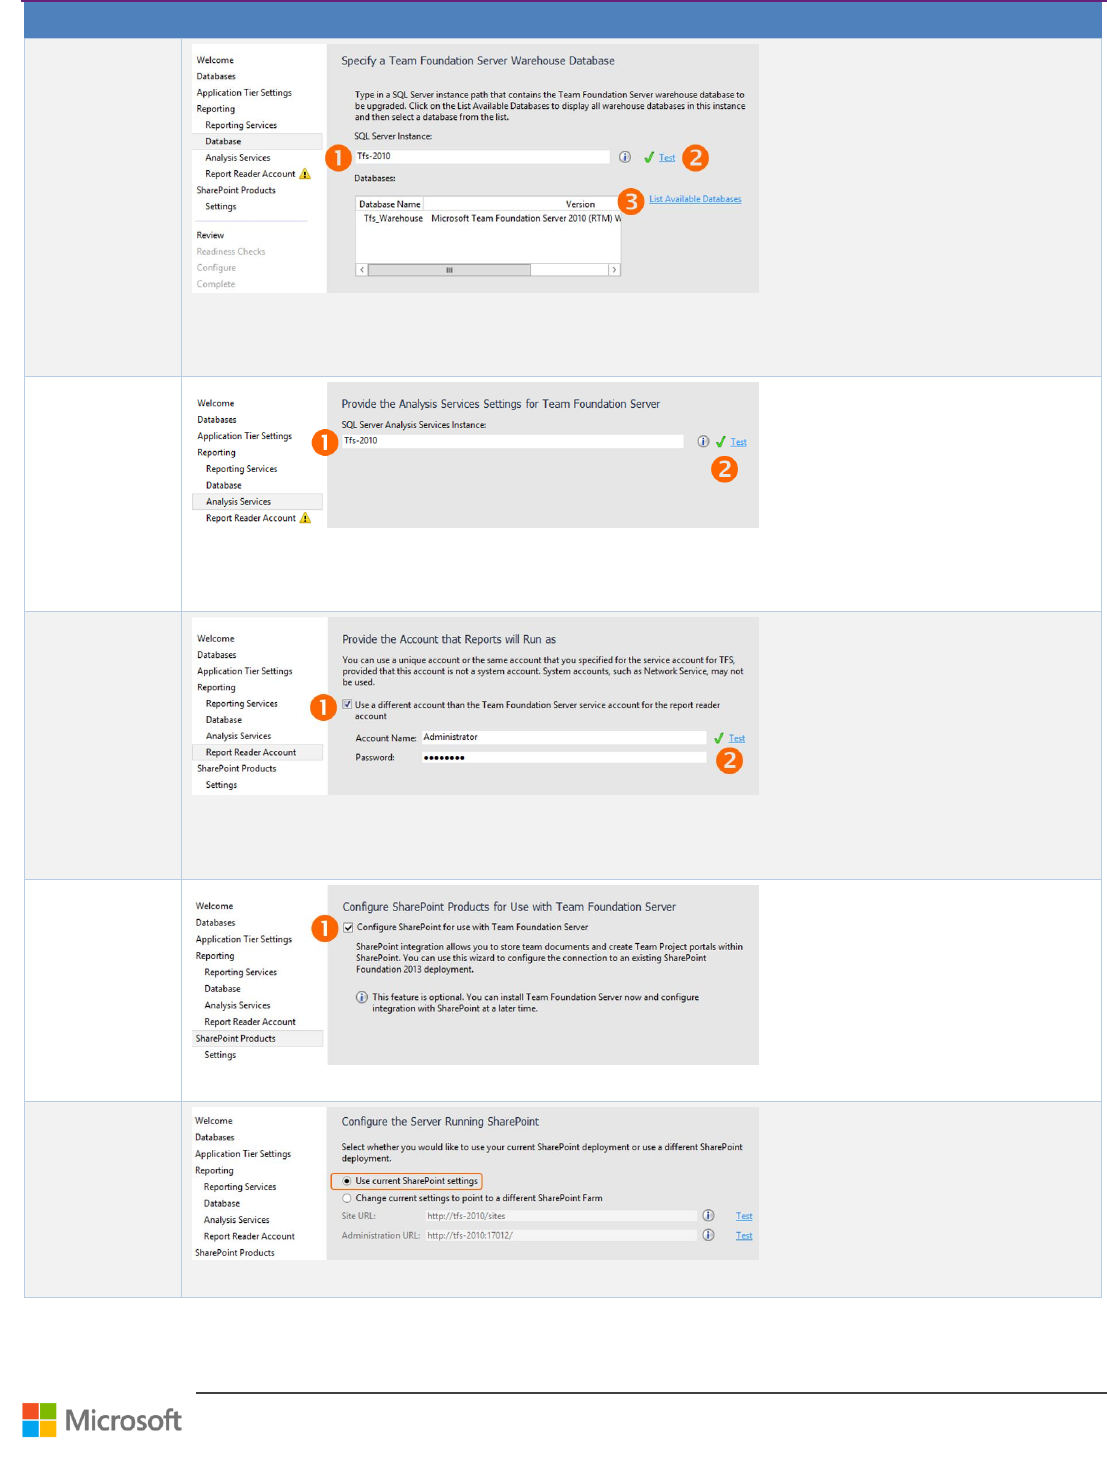
Warehouse
Database
꙱ - Done
Specify the SQL Server Instance that contains you warehouse database.
Select Test to verify the SQL Server Instance.
Select List Available Databases, and then select the correct warehouse database.
8.3
Analysis Services
꙱ - Done
Specify the SQL Server Analysis Services Instance.
Select Test to verify the SQL Server Analysis Service instance.
Continue only if validation passes.
8.4
Reporting
Account
꙱ - Done
Specify the report reader account.
Select Test to verify the SQL Server Analysis Service instance.
Continue only if validation passes.
9
SharePoint
꙱ - Done
Optionally select the check box to Configure SharePoint Products.
9.1
Configure
SharePoint
Server
꙱ - Done
Select Use current SharePoint settings to use the same SharePoint server as before the in-place upgrade.
Team Foundation Server Upgrade Guide – Chapter 4: Upgrade Walkthroughs
Page 19 of 63
Step
Instructions
10
Confirm
Configuration
꙱ - Done
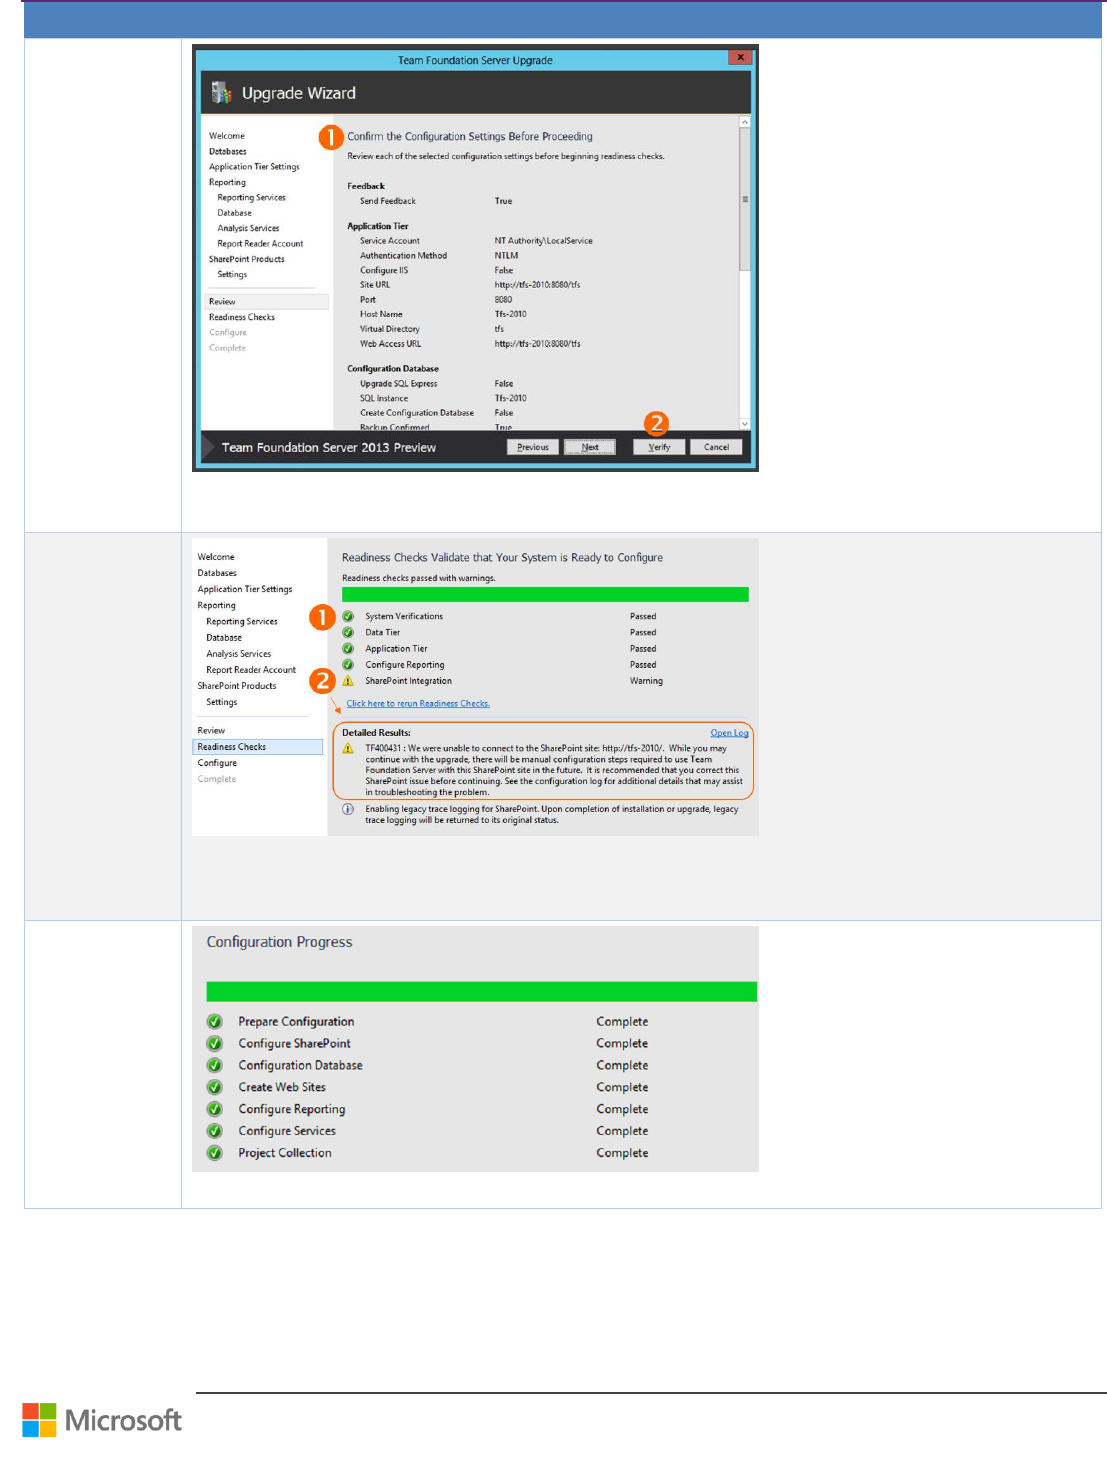
Confirm all of the Configuration Settings.
Verify the configuration settings.
11
Verify
꙱ - Done
Verify that all readiness have passed without warnings.
In case of a warning, as shown, peruse the detailed results and resolve the issue.
When all readiness have passed without warnings, click Configure.
12
Project
Collection
Configuration
꙱ - Done
Click Next and monitor the Project Collection configuration progress.
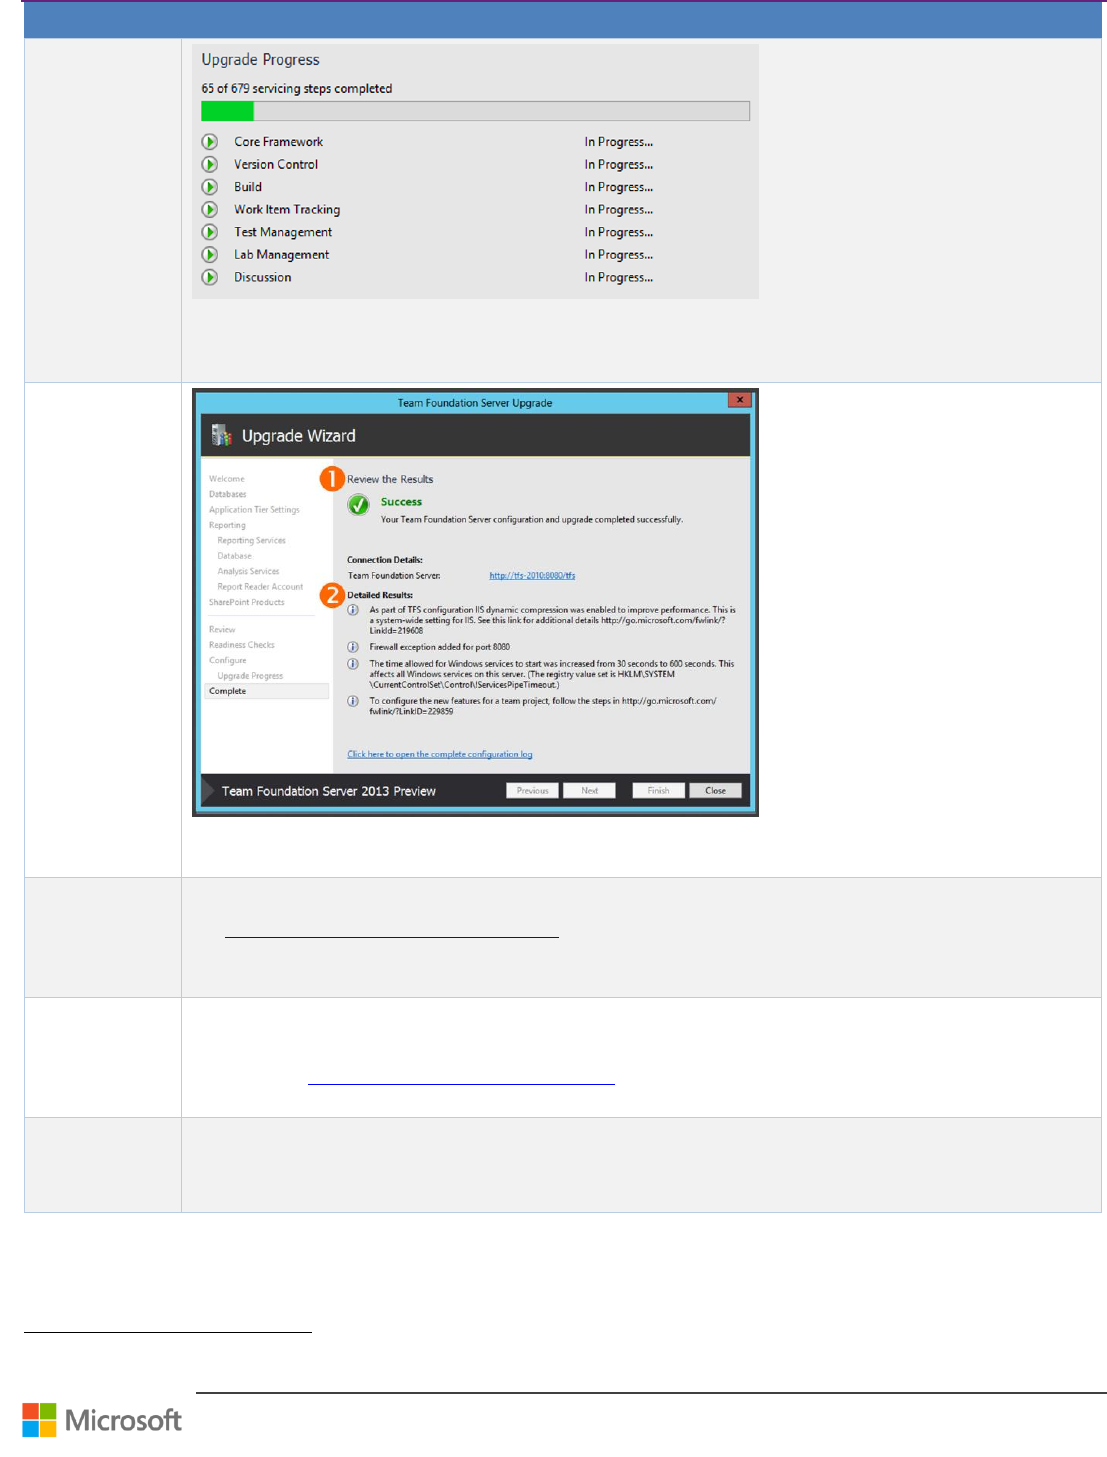
Team Foundation Server Upgrade Guide – Chapter 4: Upgrade Walkthroughs
Page 20 of 63
Step
Instructions
13
Upgrade Process
꙱ - Done
Monitor the upgrade process.
The process can take a substantial amount of time, depending on the amount of TFS history, which is why a pre-
upgrade dry-run is recommended.
14
Validate
Upgrade
꙱ - Done
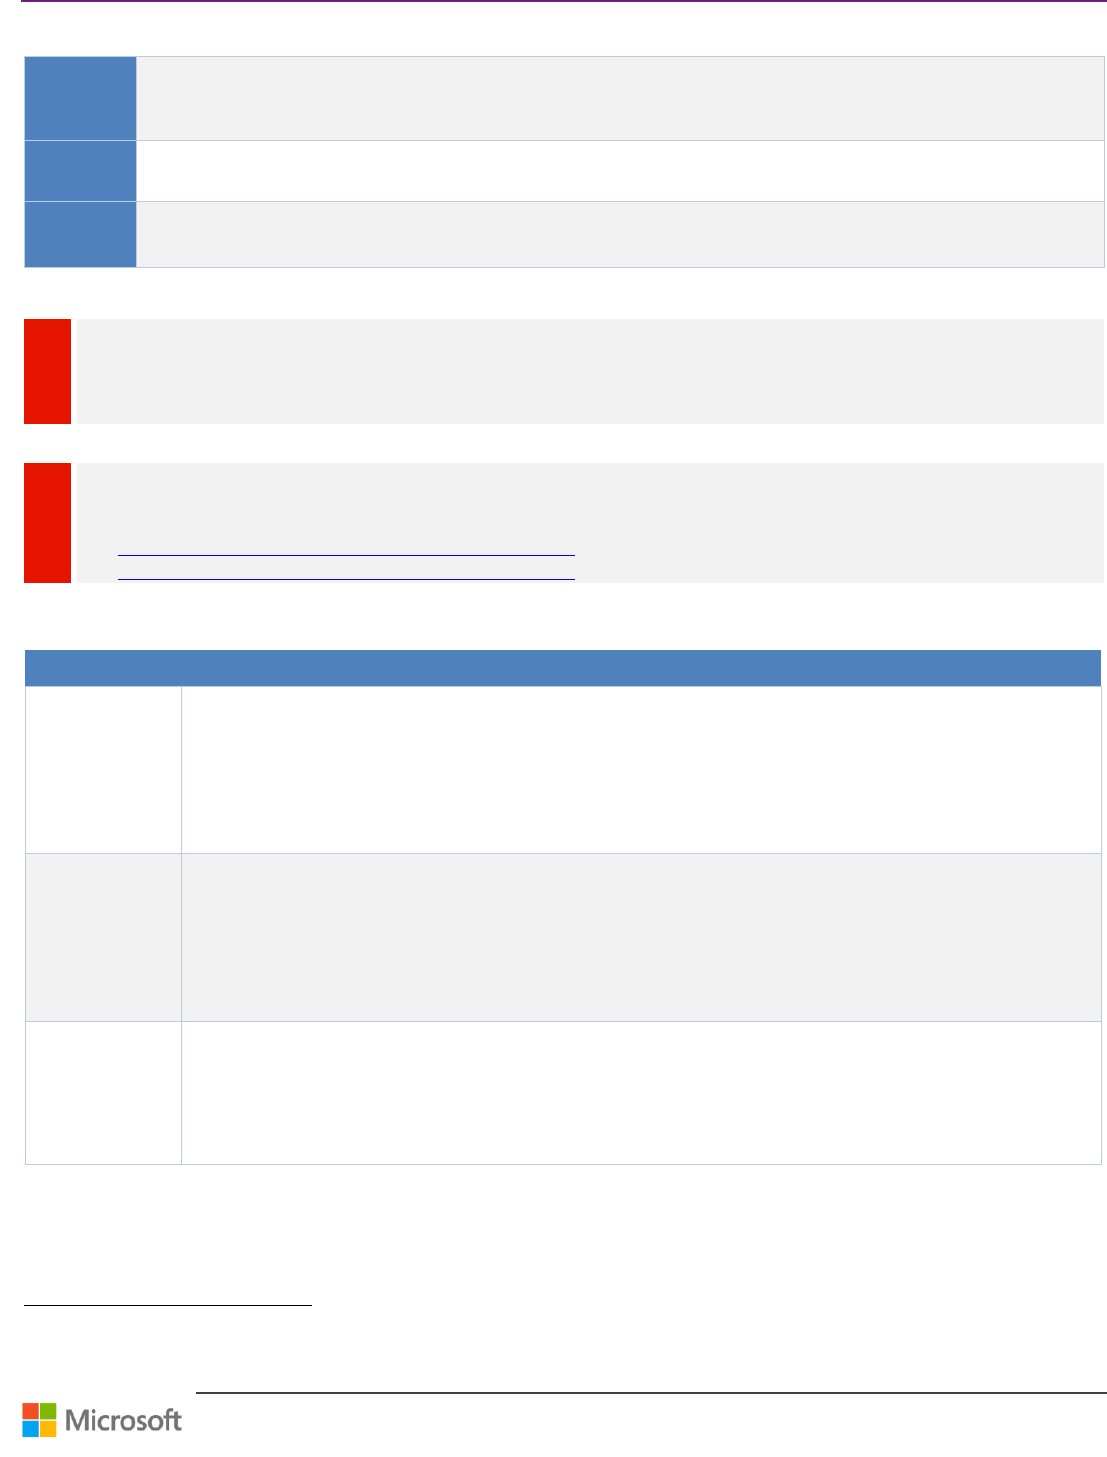
Review the upgrade process results.
Review the detailed result and take corrective actions if needed.
15
Upgrade Build
Infrastructure
꙱ - Done
Upgrade Build Server(s).
See Set up Team Foundation Build Service 37for further information.
16
Upgrade process
template
꙱ - Done
Upgrade your team project templates to the latest. You can accomplish this by following one of the links below.
Later in this guide: Upgrading Process Template using PowerShell, page 60.
MSDN Article: Configure features after a TFS upgrade 38
17
Verify
꙱ - Done
Complete the post-upgrade checklist. See page 52 for details.
Table 12 – Walkthrough: In-place upgrade from TFS 2010 or TFS 2012 to TFS 2013
37
http://msdn.microsoft.com/en-us/library/ee259687(v=vs.120).aspx
38
http://msdn.microsoft.com/en-us/library/vstudio/ff432837.aspx
Team Foundation Server Upgrade Guide – Chapter 4: Upgrade Walkthroughs
Page 21 of 63
Roll Back In-place Upgrade
Context
In this scenario, we would like to roll back and return to a previous version of TFS where we have installed or
attempted to install TFS 2013. A rollback is required if the in-place upgrade to TFS 2013 failed or puts your
environment in an undesired state.
Version
TFS 2013 TFS 2012
TFS 2013 TFS 2010
Persona
Dave, the TFS Administrator, performs the TFS rollback in-place upgrade.
Jane, the Infrastructure Specialist, owns and fine-tunes the environment impacted by the upgrade.
Table 13 – Overview: Roll Back In-place Upgrade
WARNING
TFS stores all of its state information in the database and it’s therefore critical that a full backup be created. There is no
“downgrade script” that will allow you to roll back your deployment in the event that an upgrade fails; the only way to put your
server back into a healthy state will be to restore your backups.
WARNING
If rolling back to TFS 2010 make sure you check what the supported versions of dependencies are, even if your TFS rollback
works on later technology than originally used, it may not be supported. For help on what versions of dependencies are
supported for older versions of TFS you can use the below links or contact Microsoft.
See Installing Prerequisites for Team Foundation Components 39 for more information on TFS 2010.
See Installing Prerequisites for Team Foundation Components 40 for more information on TFS 2012.
Walkthrough
Step
Instructions
1
Rollback the In-
Place TFS 2013
installation
꙱ - Done
Because rolling back to the previous version of TFS requires a reinstall of the previous version TFS bits, you will
first need to uninstall the binaries from the Servers where the TFS 2013 Upgrade was attempted. This includes all
the application tiers, build servers and proxies. You can Uninstall the TFS Binaries from the "Programs and
Features" option in the Control Panel.
2
Stop all
dependent
services and
installations
꙱ - Done
There are many services and applications that depend on the restored databases as part of the rollback,
including TFS Proxies, Build Controllers and Agents, SharePoint and Reporting Services. Stop all of these
dependencies before continuing.
3
Ensure the
environment is
fully supported
꙱ - Done
Ensure that all the dependencies in your TFS environment are supported by the version of TFS that you are
rolling back to as outlined in section System Requirements, page 6.
39
http://msdn.microsoft.com/en-us/library/dd631921(v=vs.100).aspx
40
http://msdn.microsoft.com/en-us/library/hh561426.aspx
Team Foundation Server Upgrade Guide – Chapter 4: Upgrade Walkthroughs
Page 22 of 63
Step
Instructions
4
Restore the
backups of your
early TFS
databases
꙱ - Done
Restore the old databases that were in place prior to our upgrade attempt. If backups were taken manually by
taking services offline and using your DBA team’s standard backup procedures, restoring them won’t require any
special operations. This will just be standard SQL Server database restoration.
If you used the TFS Backup Tool, please follow the steps on MSDN for restoring using the Back up and Restore
Data for TFS 41.
5
Install previous
TFS version
꙱ - Done
If you are not going to attempt another upgrade and you need to restore the previous version, you are back to a
standard configuration stage for that version of TFS. Install the old version of TFS.
6
Reconfigure
previous TFS
version
꙱ - Done
Reconfigure the previous version of TFS. For this, you will have to Configure Team Foundation Server Using the
Application-Tier Only Configuration Wizard 42.
7
Reporting
Services and
SharePoint
꙱ - Done
Because the TFS installation and upgrade does not install SharePoint or Reporting Services, rolling back those
installations is an independent part of the rollback procedure. If you did not upgrade those installations, you will
only need to attach the restored databases.
WARNING
There is no official documentation for “downgrading” of SSRS and downgrading after major version
upgrade is not supported. The only way to downgrade SSRS would be backing up old deployment and
recovering from the backup in case of downgrade. Please consider following documentation for
migration procedure which might be used instead of upgrade: http://technet.microsoft.com/en-
us/library/a6fc56c1-c504-438d-a2b0-5ed29c24e7d6#bkmk_nativemode_migration_overview
Table 14 – Walkthrough: Roll Back In-place Upgrade
REVIEW
Rolling back a failed or undesired TFS upgrade is really an easy process. First, you need to stop any dependent services and
applications. Then you remove any installation bits from the failed upgrade, rollback dependencies (WSS, OS and SQL) to
supported versions, drop any databases that were present during the upgrade, and restore the databases from the previous
installation. Finally, configure and reattach the collections from the previous version of TFS and restore dependent applications.
41
http://msdn.microsoft.com/en-us/library/jj620932.aspx
42
http://msdn.microsoft.com/en-us/library/vstudio/ee259684.aspx

Team Foundation Server Upgrade Guide – Chapter 4: Upgrade Walkthroughs
Page 23 of 63
Migration Based Upgrade
Context
Scenario for an upgrade from TFS 2010 to TFS 2013, with infrastructural changes to the environment. We recommend
you consider in the in-place upgrade as the recommended upgrade option.
Version
TFS 2010 TFS 2013
TFS 2012 TFS 2013
Persona
Dave, the TFS Administrator, performs the TFS migration based upgrade.
Jane, the Infrastructure Specialist, owns and fine-tunes the environment impacted by the upgrade.
Table 15 – Overview: Roll Back In-place Upgrade
WARNING
WSS 3.0: When you are running a WSS3.0 server with your existing environment and you want to upgrade to SharePoint
Server 2013 you have to upgrade to SharePoint Server 2010 first. See page 48 for further information about SharePoint
upgrade.
Preparations
Peruse the TFS Planning and DR Avoidance Guide
43
to review your infrastructure requirements. You should, as a bare
minimum, as yourself the following questions:
Should I change to a virtual environment?
Should I change from / to single / dual server environment?
What are the needs in performance?
Are there other Migrations outstanding (see WSS 3.0 Issues below)
Walkthrough
Step
Instructions
1
Prepare
꙱ - Done
Complete the pre-upgrade checklist. See page 10 for details.
2
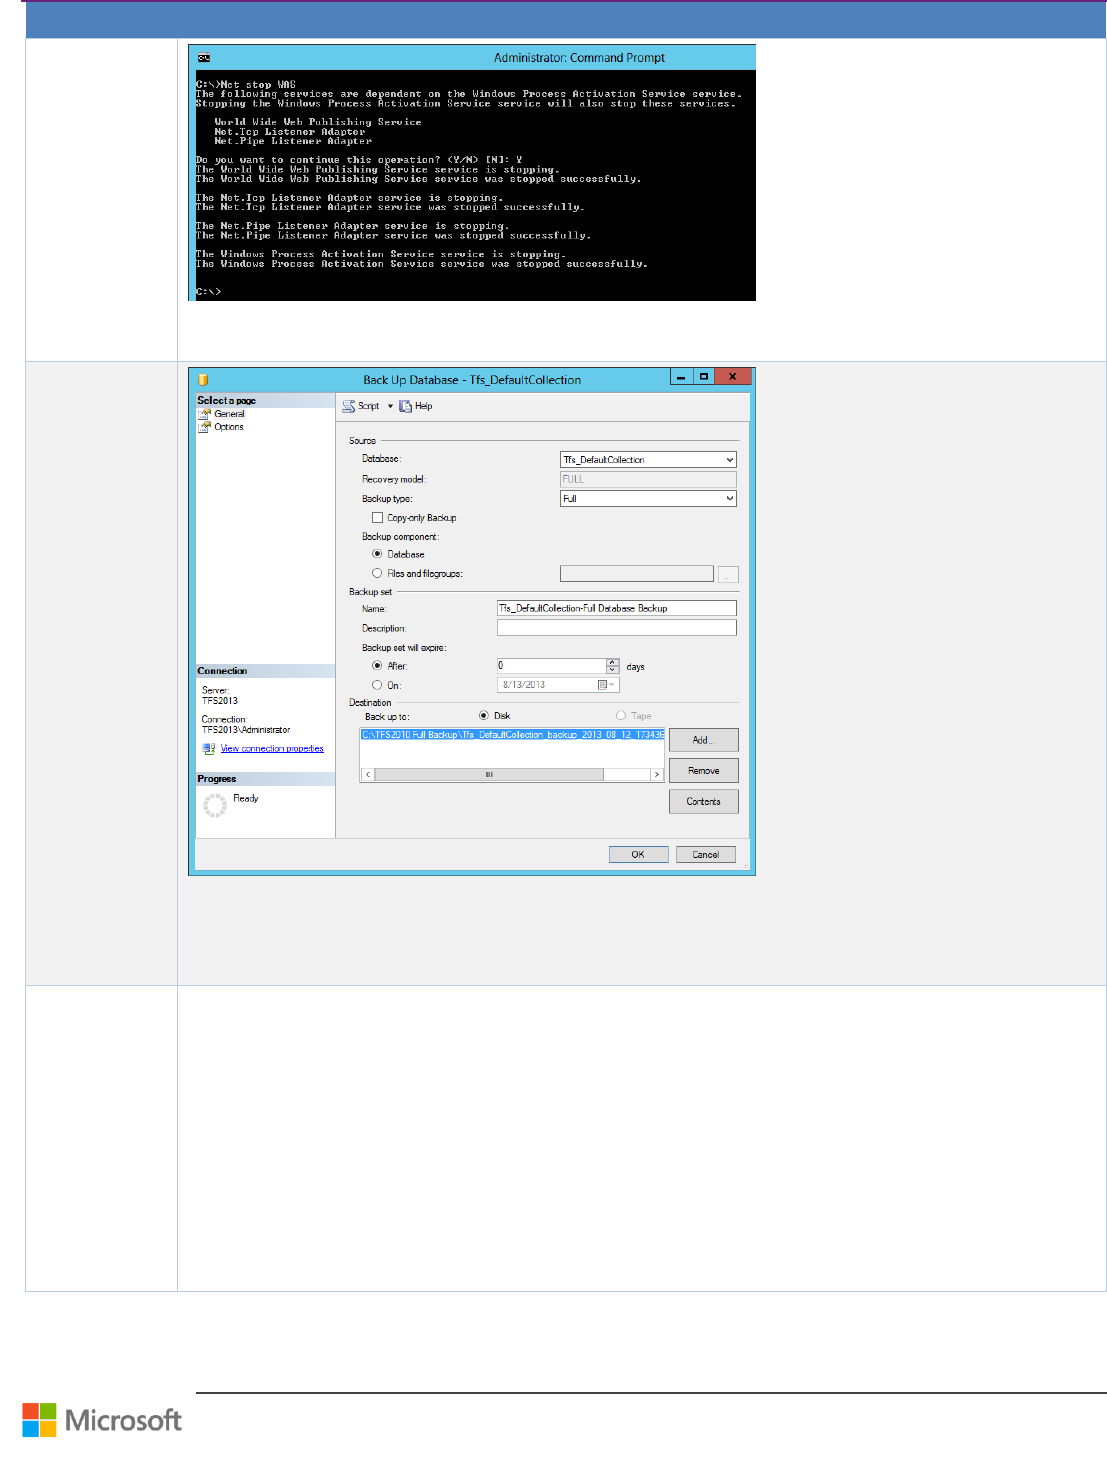
Stop TFS
Services
꙱ - Done
You can skip the following steps 2 and 3 if you are using Scheduled Backups or the TFS Power Tools to perform
the database backup.
Open CMD
cd %programfiles%\Microsoft Team Foundation Server 2010\Tools
TFSServiceControl quiesce
43
http://aka.ms/treasure5
Team Foundation Server Upgrade Guide – Chapter 4: Upgrade Walkthroughs
Page 24 of 63
Step
Instructions
2.1
Stop the
Webserver
꙱ - Done
Type net Stop WAS
Enter Y when prompted and then press enter
3
Backup
Databases
꙱ - Done
Start SQL Server Management Studio
Choose Database Engine
Select Task -> Back Up from database context menu
Configure full backup
3.1
Backup
Databases
꙱ - Done
Create database backups for the following databases using the same method.
TFS Databases
o Tfs_Configuration
o All collection databases (e.g. Tfs_DefaultCollection)
Reporting Databases
o ReportServer
o ReportServerTempDB
o Tfs_Warehouse
SharePoint Databases
o WSS_AdminContnet
o WSS_Config
o WSS_Content
Team Foundation Server Upgrade Guide – Chapter 4: Upgrade Walkthroughs
Page 25 of 63
Step
Instructions
4
Backup
reporting
encryption key
꙱ - Done
Open Reporting Services Configuration Management, select reporting server instance and backup reporting
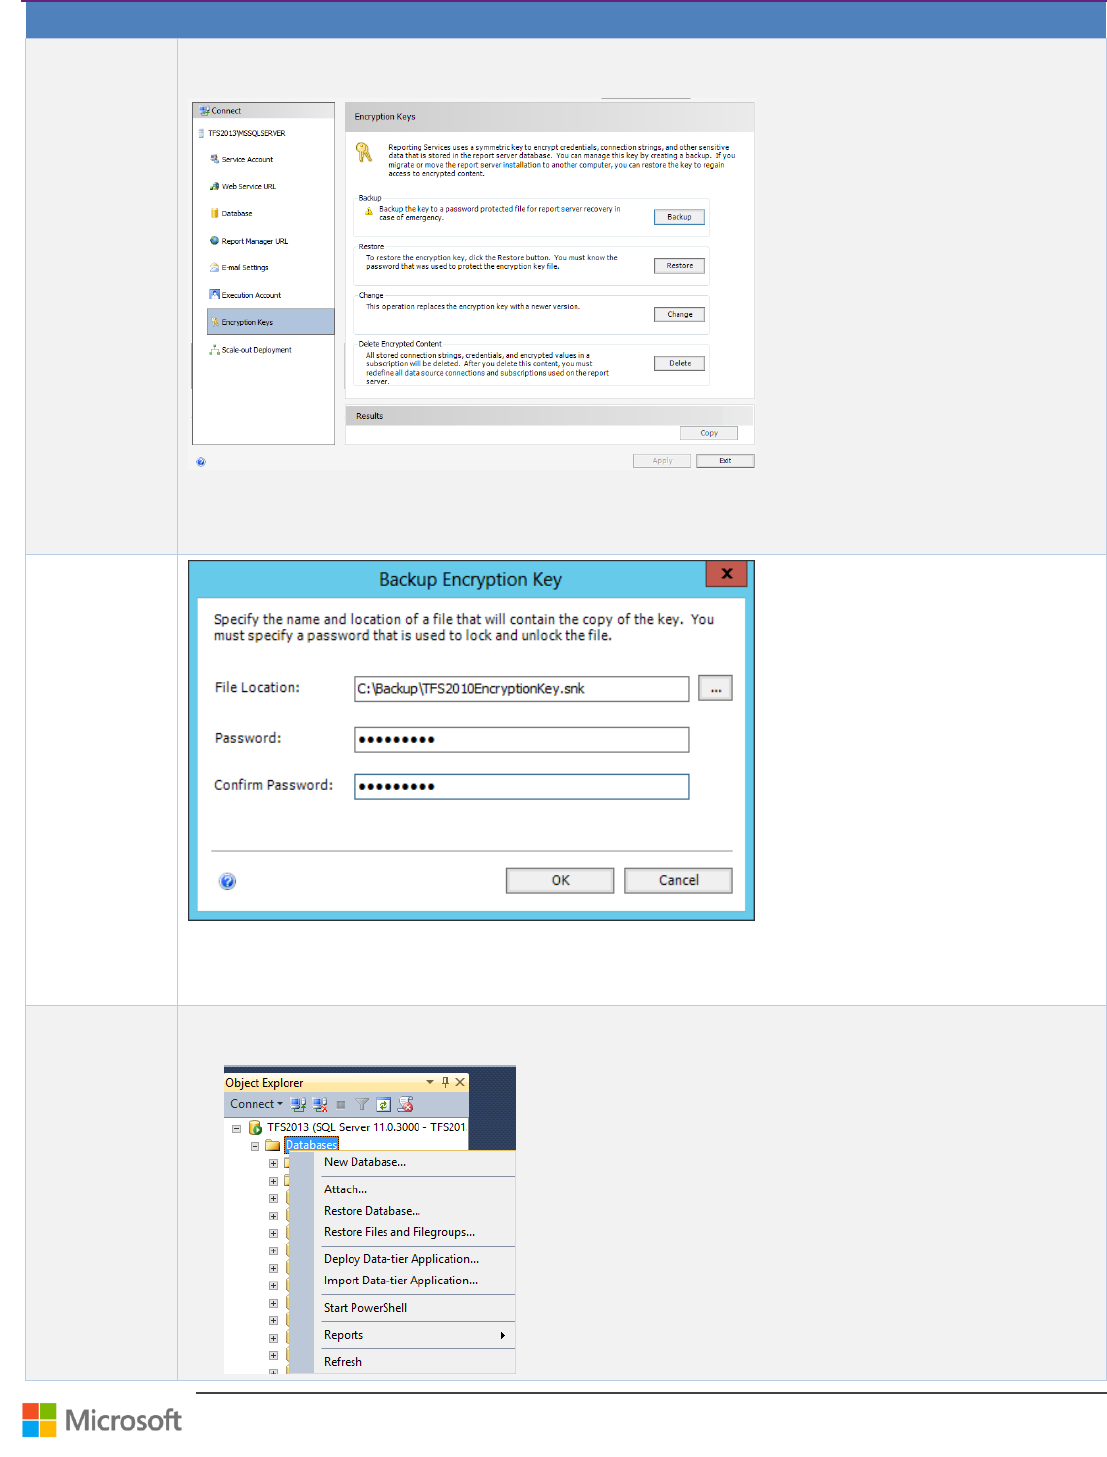
encryption key.
Open Reporting Services Configuration Management
Select Encryption Keys
Choose Backup
4.1
Backup
reporting
encryption key
꙱ - Done
Define file save location
Enter Password to secure the encryption key
Copy Encryption Key file to new Server
5
Restore
Databases
꙱ - Done
Start SQL Server Management Studio, connect to Database Engine and restore all databases to new database
server
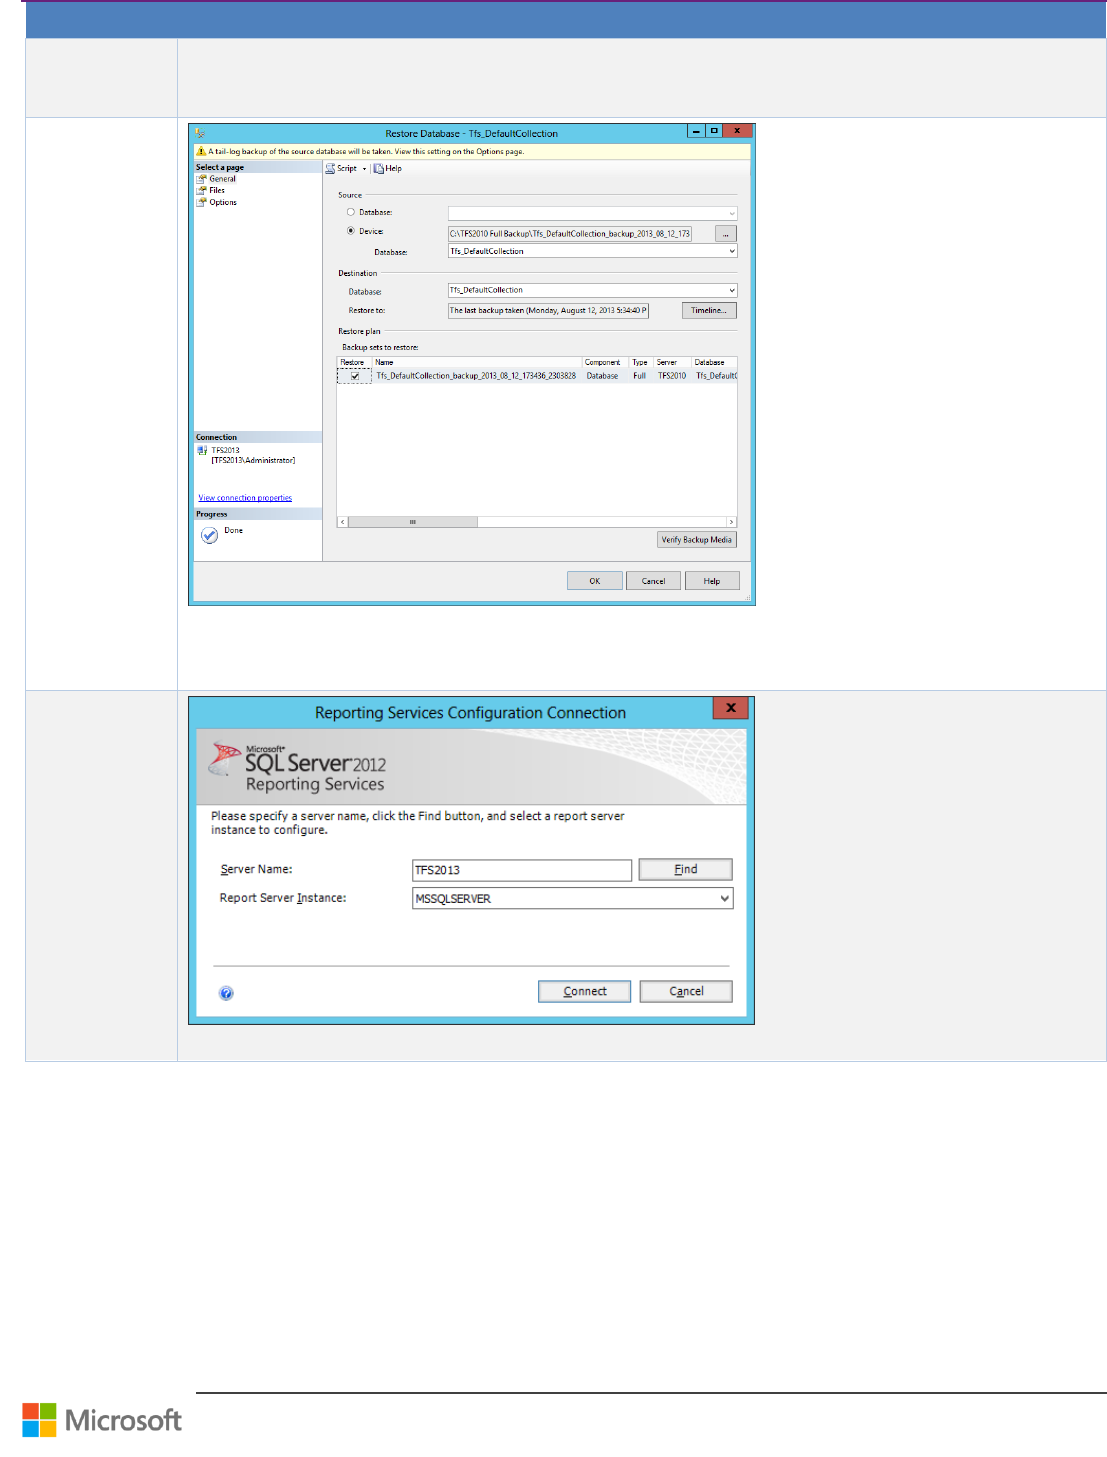
Team Foundation Server Upgrade Guide – Chapter 4: Upgrade Walkthroughs
Page 26 of 63
Step
Instructions
Open Microsoft SQL Server Management Studio
Connect to Database Engine
Select Databases -> Restore Database
5.1
Configure
database
restore
꙱ - Done
Select Device
Choose database backup file and select OK.
Perform for each Database
6
Restore
Reporting
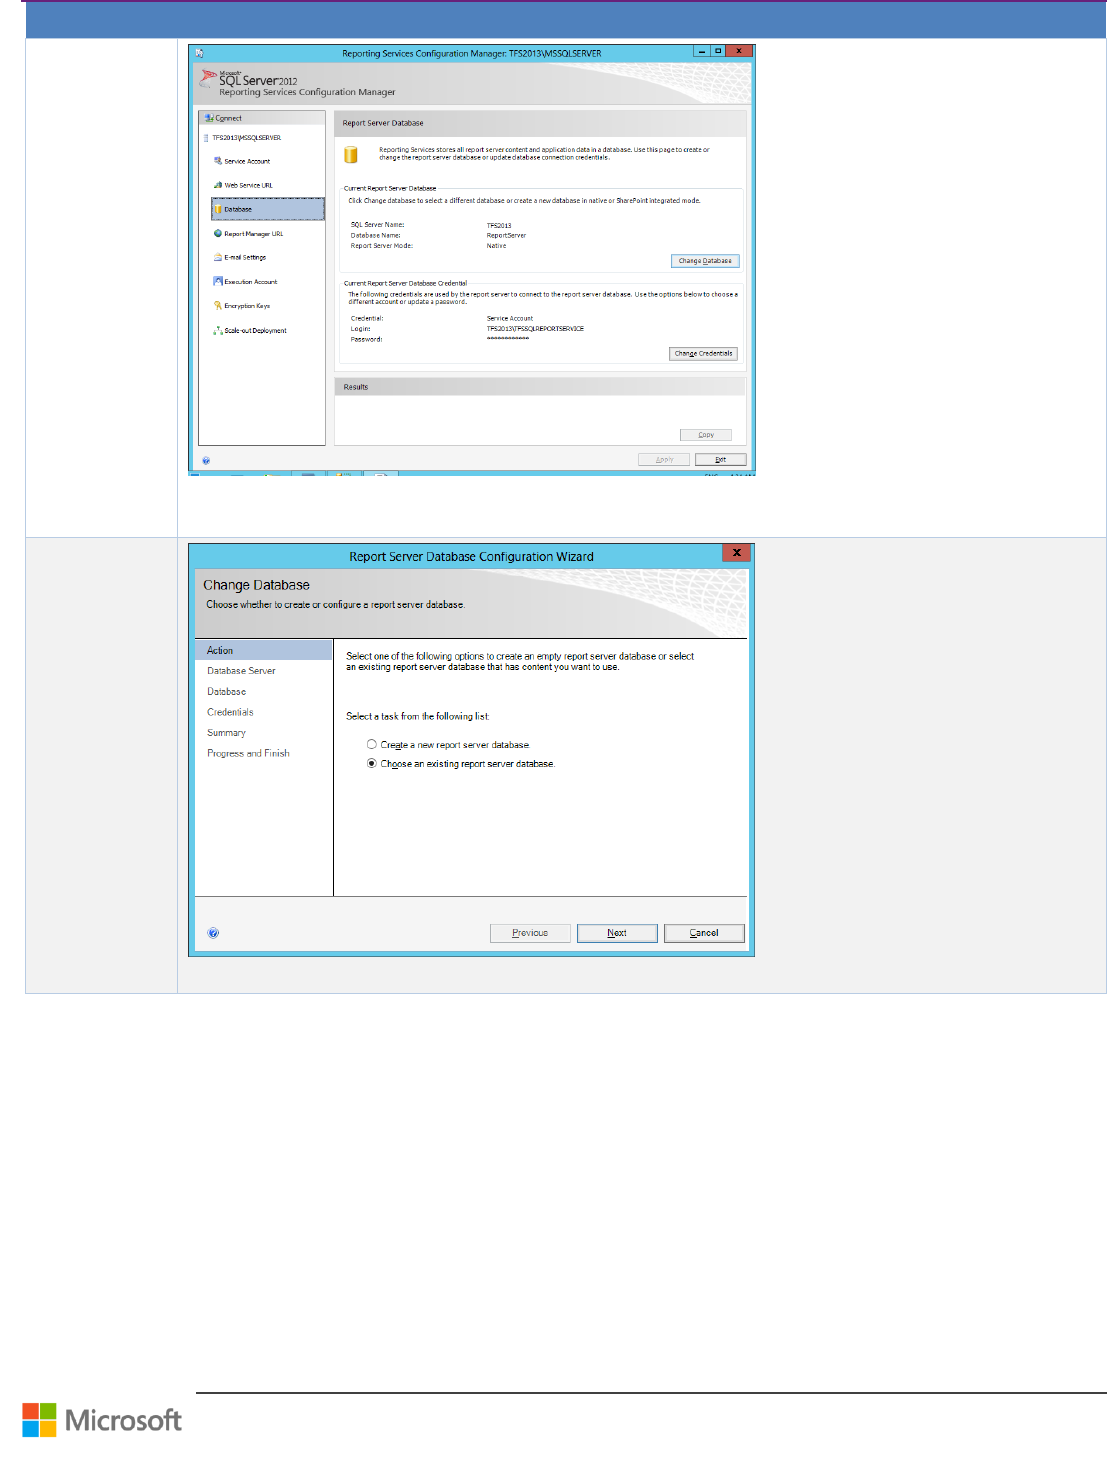
꙱ - Done
Start Reporting Service Configuration
Team Foundation Server Upgrade Guide – Chapter 4: Upgrade Walkthroughs
Page 27 of 63
Step
Instructions
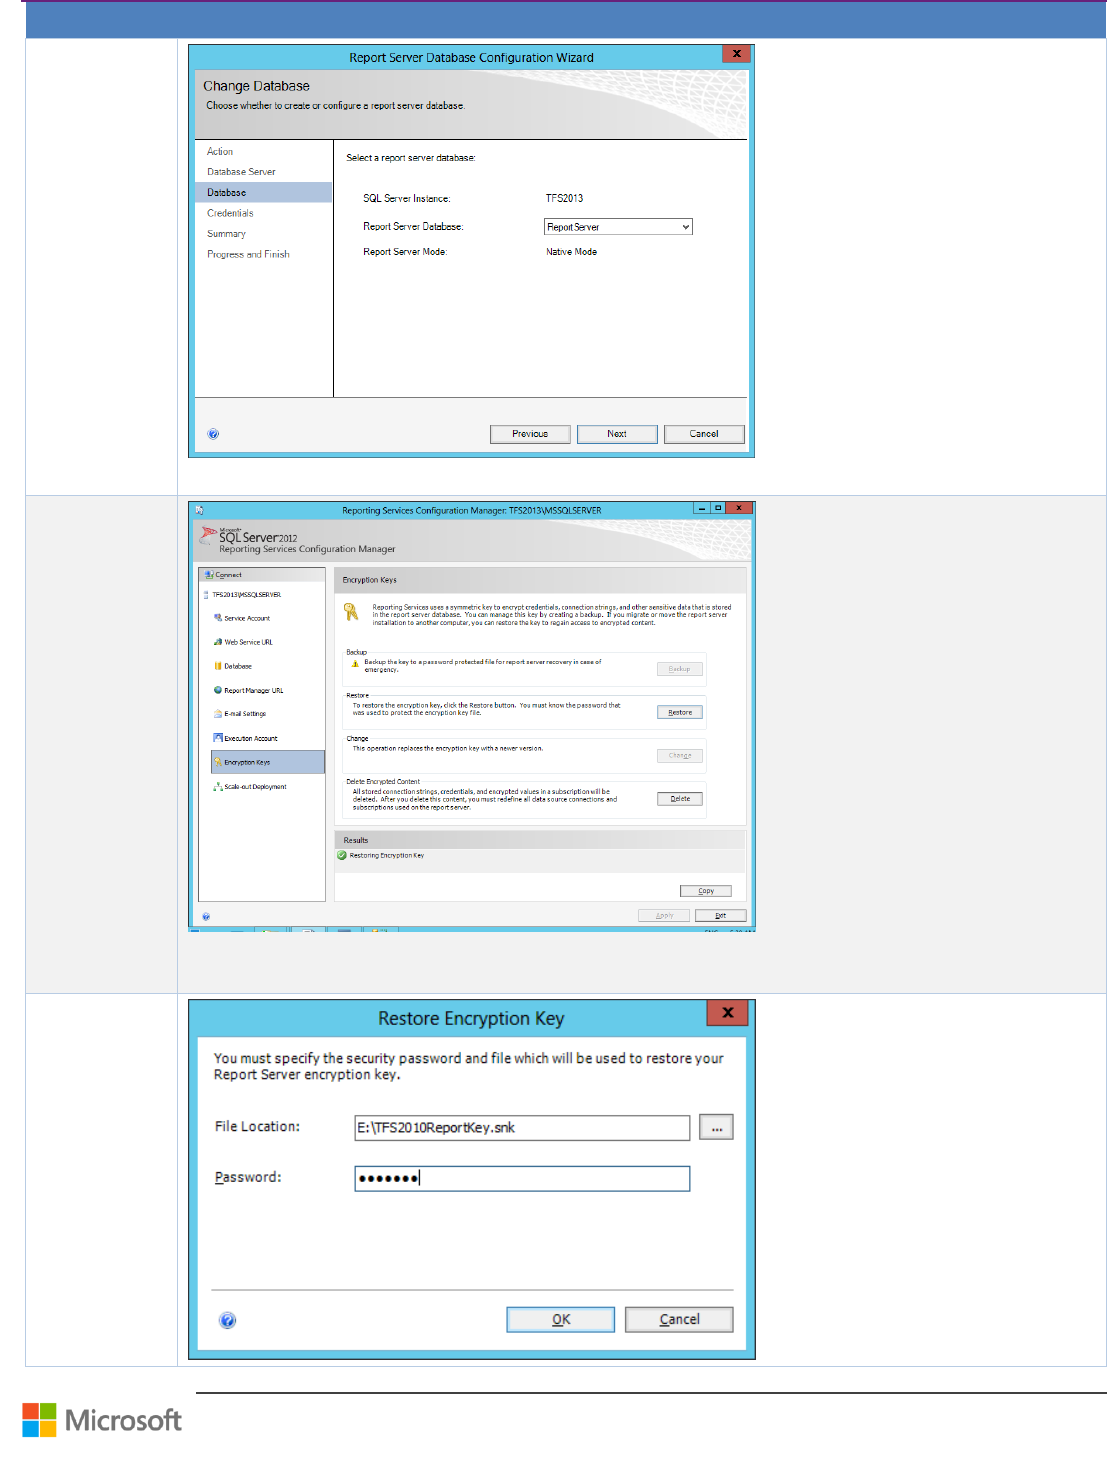
6.1
Change Report
Database
꙱ - Done
Choose Database form left side
Choose change Database
6.2
Restore type
꙱ - Done
Select Choose an existing report server database
Team Foundation Server Upgrade Guide – Chapter 4: Upgrade Walkthroughs
Page 28 of 63
Step
Instructions
6.3
Select Database
꙱ - Done
Select previous restored database (per default ReportServer)
7
Restore
Encryption Key
꙱ - Done
Select Encryption Keys from left side
Choose the Restore button
7.1
Restore
Encryption Key
꙱ - Done
Team Foundation Server Upgrade Guide – Chapter 4: Upgrade Walkthroughs
Page 29 of 63
Step
Instructions
Select Reporting encryption key file backup from old server
Enter password you set when backing up
Click OK
8
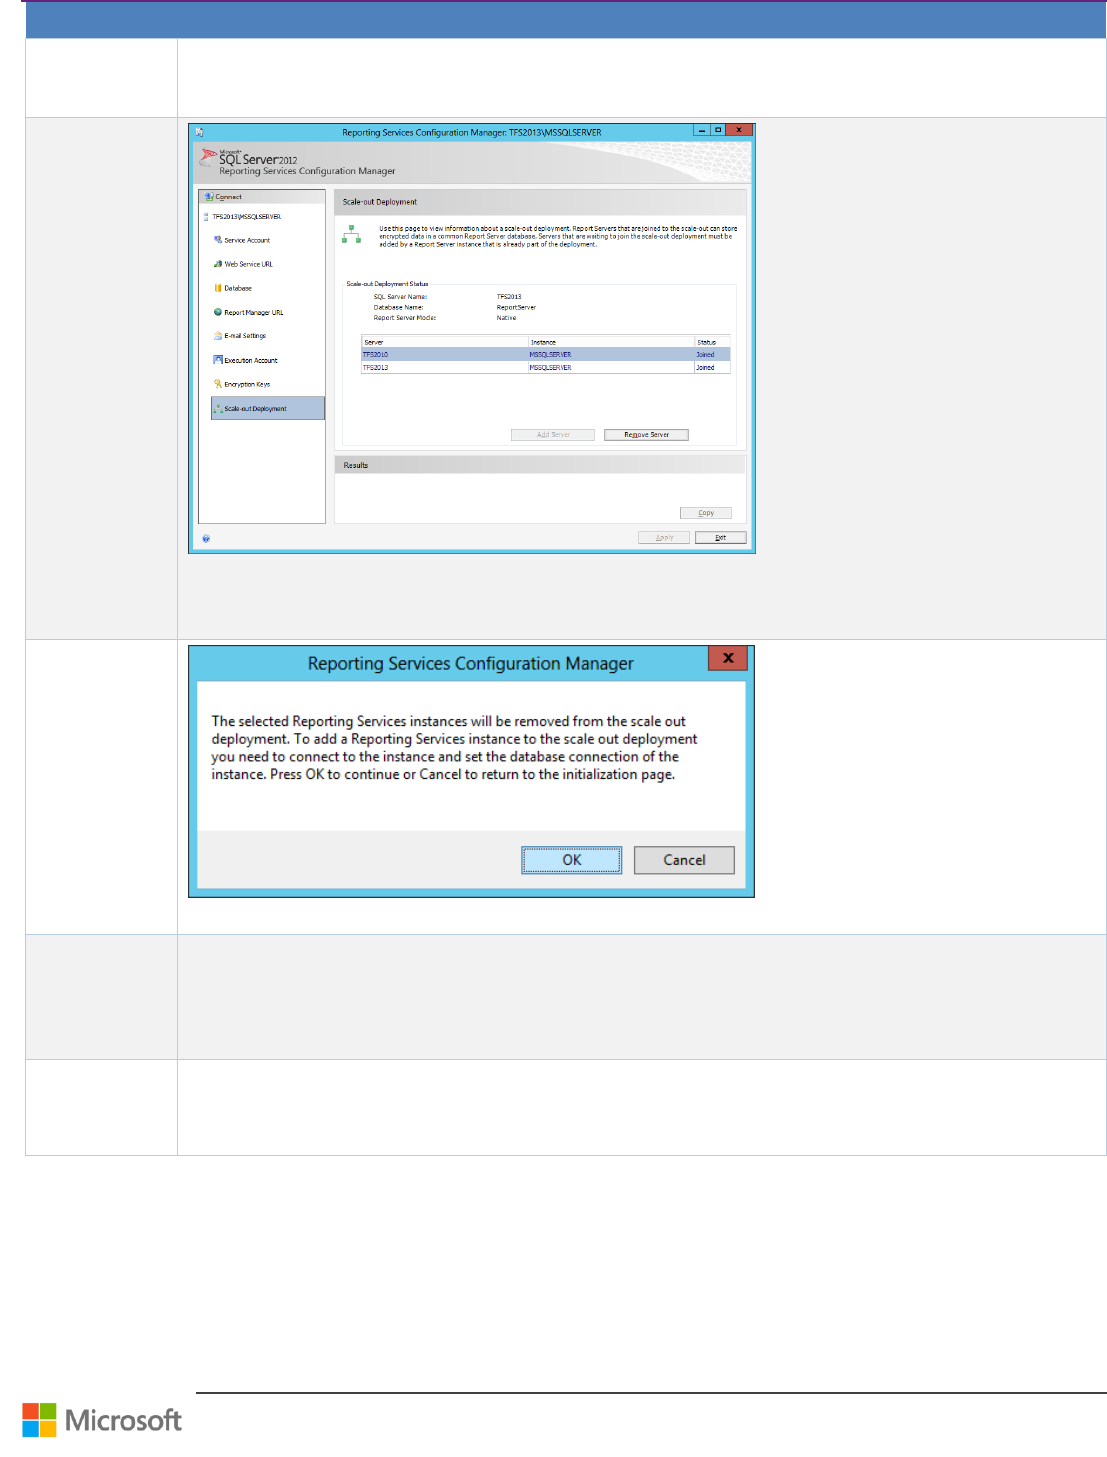
Remove Report
Server Scale-out
Deployment
꙱ - Done
Select scale-out Deployment from left side
Choose old report server entry from table
Click Remove Server button
8.1
Remove Report
Server Scale-out
Deployment
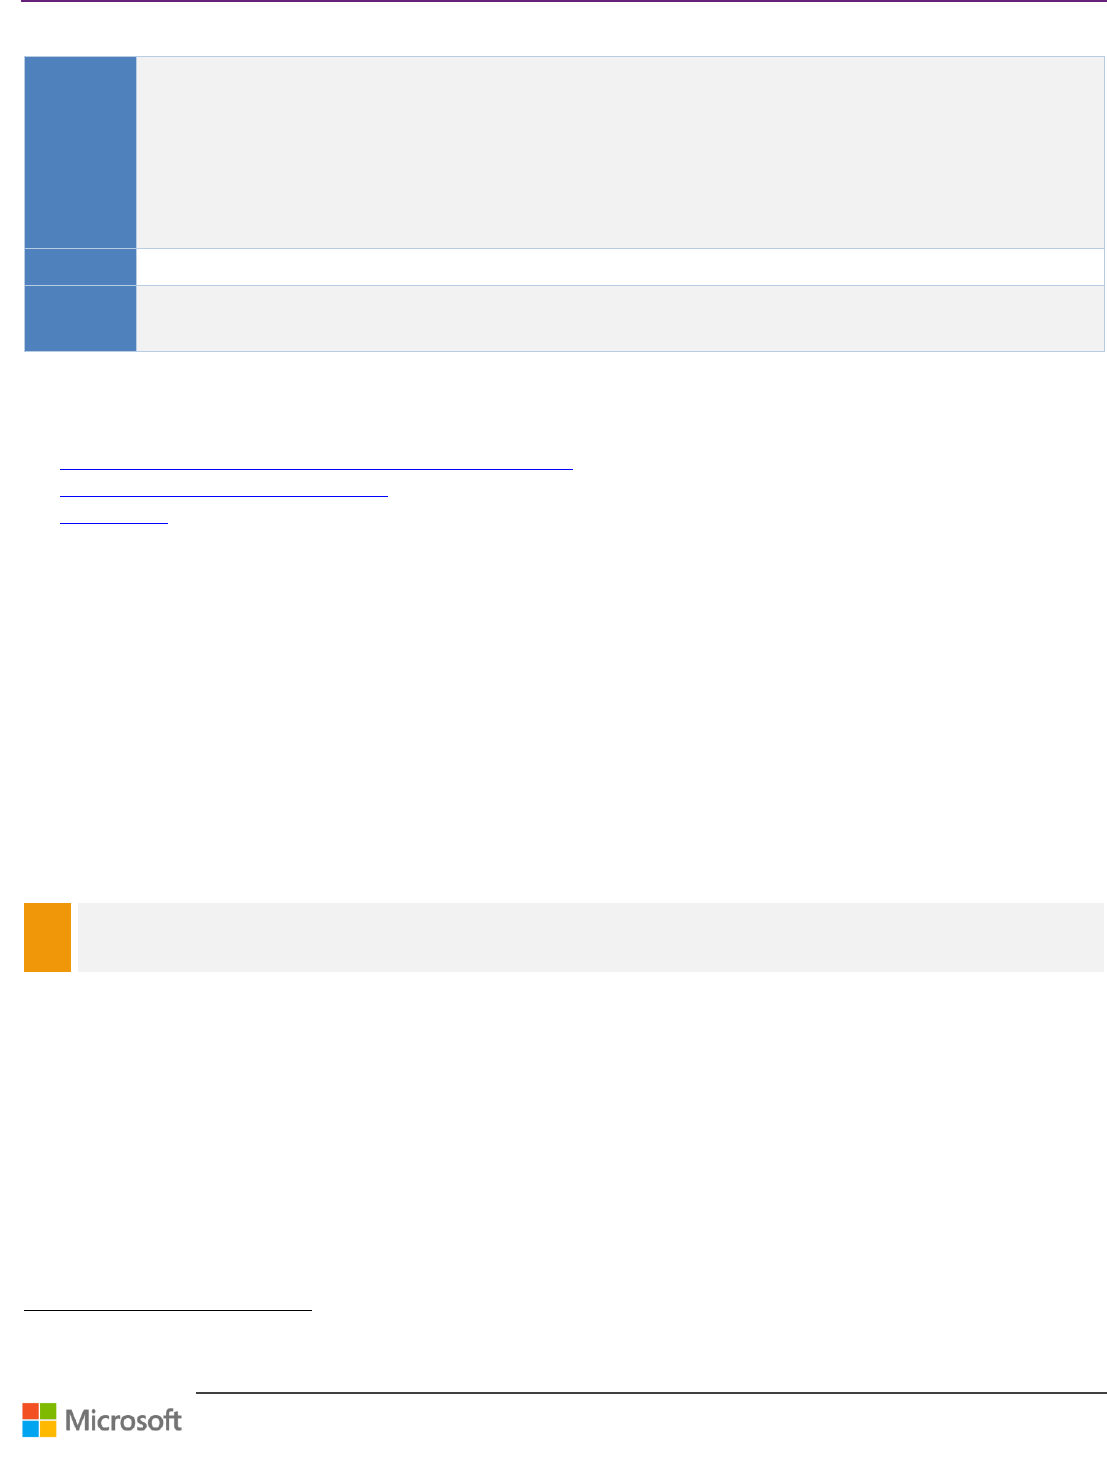
꙱ - Done
Click OK to continue
9
Install
SharePoint
꙱ - Done
Install and upgrade SharePoint Server. See page 48 for further information.
10
Install TFS
꙱ - Done
Go to “In-place Upgrade”, page 15 and start at step 4 – Install TFS and complete the in-place upgrade
walkthrough.
Table 16 – Walkthrough: In-place upgrade from TFS 2010 or TFS 2012 to TFS 2013
Team Foundation Server Upgrade Guide – Chapter 4: Upgrade Walkthroughs
Page 30 of 63
Clone TFS 2012 for Test Upgrades
Context
To help reduce the chance of failure and to keep the length of the maintenance window to a minimum during the
upgrade process, it’s always a good practice to test the upgrade process on a cloned environment that matches the
production environment as good closely as possible.
One of the most useful benefits you get from this kind of testing is the estimate of the upgrade process duration. This
will help you to properly plan the maintenance window and prepare adequate resources for the production upgrade.
The main goal of this chapter is to describe the steps to prepare the test environment so that you achieve this in the
shortest possible time and with minimum impact on the production environment.
Version
TFS 2012
Persona
Dave, the TFS Administrator, performs the TFS clone.
Jane, the Infrastructure Specialist, owns and fine-tunes the environment impacted by the clone.
Table 17 – Clone TFS 2012 to test in-place upgrade
Useful Reference Information
Team Foundation Installation Guide for Visual Studio 2012
44
TfsConfig ChangeServerID Command
45
Back Up TFS
46
Understanding the clone process
The primary focus of this chapter is on cloning TFS 2012.
Cloning the TFS environment is in many aspects similar to moving the environment to new hardware but leaving the
original one active.
The main differences between cloning and moving the environment to a new hardware are the following:
When moving the environment, you need to stop the Team Foundation services on the original server so that no more
changes can be done to the data that is being moved. When you are cloning, you do not need to stop the production
environment so you are actually cloning a snapshot given by the time of the backup used.
When you are moving the environment, you can just move the TFS bits and continue using external systems
(SharePoint, Reporting Services) in their original locations. When cloning, you must not reference any of the
production external system – you must clone them as well and update the references.
NOTE
Cloning means both environments will stay running and you must change the internal IDs of the cloned TFS so that client tools
do not get confused.
Two main things you want to avoid when cloning your environment:
Impacting your production in any way – unplanned outage or reducing the performance.
Leaving any references from the cloned environment to an external component in production – SharePoint, Reporting
Services, Project Server, Team Build Drop Locations and Symbol Servers. All components need to be cloned and
references between them updated! Otherwise, you will get data corruption!
Some steps can be simplified by using cloning software or, in case of Virtual environment, by imaging techniques. In such
cases, you need to ensure you create new names and IDs for the servers or use network isolation for the cloned system
from the production domain.
44
http://www.microsoft.com/en-us/download/details.aspx?id=29035
45
http://msdn.microsoft.com/en-us/library/ee349259.aspx
46
http://msdn.microsoft.com/en-us/library/ms253070.aspx

Team Foundation Server Upgrade Guide – Chapter 4: Upgrade Walkthroughs
Page 31 of 63
Another option for fast and consistent testing would be physical-to-virtual cloning that would let you reuse your virtual
environment instead of acquiring new hardware. However, it might be hard to match the performance capabilities of your
physical environment by the virtual one.
A more lightweight option to the complete clone can be as well a clean installation of TFS and migration of the main Team
Project Collections using detach/attach operation from team Foundation Administration console. This will probably result
in a configuration that isn’t exactly the same as the production environment but still can provide some estimates
regarding the duration of the upgrade process. Even so, you need to be careful about a few aspects, which are described
in this walkthrough.
External Systems
In TFS 2012, the external systems like SharePoint, Project Server and SQL Server Reporting Services are loosely coupled
and they will follow their own specific upgrade path. Often, they can stay on the same version when TFS is upgraded.
When you clone the system, you need to clone these environments as well and you need to make sure that the new TFS
environment does not point to any production system.
Usually, you want to test the upgrade of all parts of the environment to see that everything —reports, portals, etc.— is
correctly working. However, if your main concern is the core TFS services like Version Control, Work Items, and Builds, you
may greatly simplify the cloning of your environment by excluding some of the external systems. After you clone TFS, you
should only remove the external relations from your TFS Instance and Project Collections.
Team Foundation Alert SOAP Handlers
One particularly dangerous area for cloning is related to Team Foundation Alert SOAP handlers, which are usually web or
WCF services that are registered to receive specific events from TFS (check-in, build finished, wok item changed) and
based on that, these Team Foundation Alert SOAP handlers perform some action – often, again, on the Team Foundation
data. You need to ensure that the subscriptions in cloned environments are updated, otherwise you may find yourself in a
situation where events from the wrong environment. A related concern is regarding email subscriptions – do you want the
users to receive emails from the cloned environment?
Team Build Definitions – drop locations, symbol servers, deployment
Another area that can be forgotten when cloning the environment is Team Build definitions. They specify things like drop
locations, symbol server and other custom deployment targets, which are not updated automatically by the database
cloning and need to be manually updated so that they do not point to production.
Scenario
Although this walkthrough is quite general regarding the Team Foundation environment complexity, it has been tested
and tuned mostly on a standard dual tier installation:
Application Tier
Windows Server 2008 R2, SP1
SQL Server 2012, SP1 - Reporting Services only
SharePoint Foundation 2010
TFS 2012 Update 2
Data Tier server
o Windows Server 2008 R2, SP1
o SQL Server 2012, SP1 – Database Engine and Analysis Services
Team Build server
o Windows Server 2008 R2, SP1
o TFS 2012 Update 2 – Team Foundation Build Service feature
Team Foundation Proxy
o Windows Server 2008 R2, SP1
o TFS 2012 Update 2 – Team Foundation Proxy feature
Team Foundation Server Upgrade Guide – Chapter 4: Upgrade Walkthroughs
Page 32 of 63
The installation and configuration was run using mostly the default values.
Even if you have a more complex, customized or distributed environment, you should still be able to follow the procedure
because it was written in general way. Consider the special customizations you made to your environment. If any of these
had to be manually set after configuration, you will likely need to perform these steps in your cloned environment. If they
point to other resources in production, you will need to update these pointers. If the software versions you are using
differ from the ones in this walkthrough, you may want to look for documentation online on how to perform the steps
below, as the workflows may differ.
The expected result of this walkthrough should be a completely mirrored environment running on the same domain with
servers having different NetBIOS names but otherwise equally configured as the original servers.
If you need to clone to a different domain you will need to handle additional steps, especially security related tasks, in case
there is no full trust configured between the domains.
Walkthrough
Step
Instructions
1
Prepare the
hardware
꙱ - Done
Choose as exact the same hardware to create your clone for meaningful runtime results. For only testing the
feasibility a less powerful or even virtual environment is also sufficient. However, we recommend an exact copy
for medium to large environments because of migration time.
The duration of the upgrade process might not be an issue in small or medium environments but if your TFS
databases have tens or hundreds of GB of data, it might take significantly longer. In these cases, you probably
want to know approximately how long the maintenance window will be. Therefore, the hardware on which
your cloned testing environment runs should be similar to the production environment so that you can plan
for the upgrade process to take the same amount of time. This relates to memory, processor power, disks,
network interfaces etc.
Special care needs to be taken around the storage configuration. Regarding the physical configuration, you
again want to get identical set of disks like in production. Putting all data on a single disk or using logical
partitions instead of physical drives will lead to inaccurate results. Regarding the size, you should mirror the
sizes of production storage or at least reflect the used space but you may need additional space for the
database backups to be restored as well.
2 Installing
Operating
system on the
new servers
꙱ - Done
You should install the same version OS for all software components in your environment—including service
packs and hotfixes. Even if you plan to upgrade some components when upgrading TFS (SQL2008 to SQL 2008
R2 for example) this should be part of upgrade testing, but the clone itself should be created with identical
software versions, just like the original environment.
First, you need to install the same version and edition of the operating system and apply the same Service
Pack and hotfixes that were installed on the corresponding original servers. You can find out the version and
service level of the operating system using the following tools:
Run winver from command line on the original server
Windows Update or WSUS
Microsoft Baseline Security Analyzer 47
Add or Remove Programs – Show Updates or Programs And Features – View Installed Updates
3
Prepare User
and Service
Accounts
꙱ - Done
Verify that the account that you will use to install TFS is a member of the Administrators security group on the
servers where you will install TFS and other components like Reporting Services, SharePoint, SQL Server etc.
The account used to install other server components must be System Administrator (sysadmin) on all SQL
Server Instances where TFS databases are hosted and if you plan to configure SharePoint Products, you must
be a member of the Farm Administrators group on the SharePoint Central Administration site. This can be
easily achieved by using this account for installation of all components on all the servers.
For installing and configuring other software components, you need to have ready the service accounts and
passwords that will be used to run system services and access the products resources.
See your Disaster Recovery Plan documentation or the exact setting on the production servers:
On the Data Tier servers, run SQL Server Configuration Manager – SQL Server services, and check your
service identities.
47
http://www.microsoft.com/download/en/details.aspx?id=7558
Team Foundation Server Upgrade Guide – Chapter 4: Upgrade Walkthroughs
Page 33 of 63
Step
Instructions
On the SharePoint server check the SharePoint 2010 Timer service (SPTimerv4) Windows service
identity
On the Application Tier server, run the Team Foundation Administration Console and in the
Application Tier section look up the Service Account (TFSSERVICE) under Application Tier Summary
and the Reader Account (TFSREPORTS) under Reporting Services Summary
On the Team Build server, run the Team Foundation Administration Console and in the Build
Configuration section, click Build service Properties and see Credentials for configure with the same
credentials on the cloned environment.
On the TFS Proxy server, run the Team Foundation Administration Console and in the Proxy Server
section, check the Service Account.
4
Installing
required
software on
the new Data
Tier server
꙱ - Done
The collation settings of your database must be compatible with TFS, and you have to be careful when moving
between Enterprise and other editions due to data compression, but the edition does not have to be the same.
If you restore a TPC to a later version of SQL, the database will generally be upgraded to that version
automatically, that means changes the databases to function with the current version of TFS, see more about
Supported Version and Edition Upgrades of SQL Server 2012.
You could also upgrade your instance before the move rather than after the move, if you want to split up the
downtime. But be careful if you are upgrading from 2010. You must to upgrade everything at the same time
because TFS 2010 and TFS 2013 do not have any supported SQL versions in common.
To verify this on your original SQL Server you can:
Run SQL Server Configuration Manager – SQL Server services to see which components and SQL
Instances are running on the server and under which service accounts.
In SQL Server Management Studio you can right-click Database Engine or Analysis Services connection,
select Properties and click View connection properties to see product version, edition, language and
collation.
Alternatively, run SELECT @@VERSION on your SQL Server instance to find out the version, service pack
and edition of the SQL Server and SELECT SERVERPROPERTY('Collation') - to find out the server
collation.
In addition, you need a proper storage configuration that is equivalent to your production environment–
installation directory, system databases data and transaction logs directories (tempdb specifically), user
databases data and transaction logs directories and Analysis Services data directory. You can find this
information in SQL Server Management Studio connected to your production server:
Right-click the Database Engine connection and select Properties. In General tab see Root Directory
property for installation directory and in Database Settings tab see the default database locations.
Right-click each SQL Server database (system/user) and select Properties, see Files for the actual location
of the database files. Alternatively run select * from sys.database_files on each database.
Right-click Analysis Services connection, select Properties and in General tab see DataDir property for
the default data location. Note as well LogDir, BackupDir and TempDir (Show Advanced) properties for
other files locations.
Right-click Analysis Services database (Tfs_Analysis), select Properties and see Storage Location – if
empty, it follows the server default configuration see previous check. If not empty and different from the
server’s default configuration then you need to provide this one when restoring Analysis Services
database in Cloning the databases (backup / restore), on page 34.
You need to install SQL Server with all necessary components (equivalent to production). If your production
data tier hosts Reporting Services as well you should install it within this step and skip the installation of this
component Install required software on the new Application Tier server, on page 34, but make sure that
you select Install, but do not configure the report server.
Follow the steps in the TFS Installation Guide 48 – provide components, instance name, collations, service
accounts and file locations (Data Directories) .
Follow the steps in the TFS Installation Guide 49 – provide components, instance name, collations, service
accounts and file locations (Data Directories) according to the findings from the checks above:
Scenario: Installing TFS on a Single-Server
o Installing Prerequisites for Team Foundation Components
48
http://www.microsoft.com/en-us/download/details.aspx?id=29035
49
http://www.microsoft.com/en-us/download/details.aspx?id=29035
Team Foundation Server Upgrade Guide – Chapter 4: Upgrade Walkthroughs
Page 34 of 63
Step
Instructions
SQL Server
NOTE
If your environment is more distributed than in this walkthrough, for example you have Analysis Services
on a dedicated server or you have Project Collection databases across multiple servers or you use Failover
Cluster, you need to make sure that you install the corresponding versions and components on the new
servers that mirror your production environment with the same principles described here.
5
Install required
software on
the new
Application
Tier server
꙱ - Done
On the Application Tier you need to configure and install the following components:
If you will install SharePoint Foundation 2013 or SharePoint Server 2013, we recommends read first
SharePoint 2013: Install Prerequisites Offline or Manually on Windows Server 2012 50.
SQL Server Reporting Services (if your Reporting Services is on a data tier server you have probably
installed them already in Installing required software on the new Data Tier server, on page 33.
If neither Reporting Services nor any other SQL Server Component is installed on the Application Tier
server, you must install at least the SQL Server Client Tools Connectivity to enable warehouse processing if
you will use reporting features.
IIS can be configured for you by the SharePoint and/or TFS installation see Install the Application Tier on the
new hardware on page 38, but still you need to make sure the IIS configuration on the new server is the same
as the original one.
You won’t be able to install SharePoint Products and Reporting Services as part of the installation of the
application tier when you move it to a new server even though you might have done it this way when
installing the original environment.
SharePoint Foundation is free and can be downloaded from the download center, or included with TFS.
You need to assure the same version, edition, configuration, service pack and hotfixes as on the original
server. You can verify this:
IIS6 (WS2003): Add or Remove Programs - Add/Remove Windows Components
IIS7 (Win7, WS2008, WS2008R2): Programs and Features - Turn Windows features on or off
(client OS), Server Manager – Roles – Web Server (server OS)
SQL Server Reporting Services – go to Reporting Services Configuration Manager to find the
version and edition. See How to determine the version and edition of SQL Server and its components
51 for more details about SQL versions.
SharePoint - You can go to SharePoint Central Administration and find the version and configuration
database name and location in Operations - Servers in Farm.
See http://technet.microsoft.com/en-us/sharepoint/ff800847.aspx (note the link on right for
SharePoint 2010) for more details on SharePoint versions and updates.
You can install these components as described in Team Foundation Installation Guide:
Scenario: Installing TFS on a Single-Server
o Installing Prerequisites for Team Foundation Components
Internet Information Services
SharePoint products
Manually Install SharePoint products for Team Foundation Server 52.
NOTE
Make sure you use the same settings regarding the web site and application pool configuration like in
production but use different name for the content database because we will be importing the production
one in Step 6: Cloning the databases (backup/restore) and you would get name collision.
6
Cloning the
databases
(backup /
restore)
The TFS environment backup and restore is based on SQL databases. For creating the cloned environment, the
main task is getting the copy of the production databases. Both ways – “detach, copy, attach” and “backup,
restore”— are possible but the first one requires an outage of the system.
You must restore all databases to the same point in time, or the databases will be out of synchronization. For
more information, see as well Back Up TFS 53.
50
http://social.technet.microsoft.com/wiki/contents/articles/14582.sharepoint-2013-install-prerequisites-offline-or-manually-on-windows-server-2012-a-comprehensive-guide.aspx
51
http://support.microsoft.com/kb/321185
52
http://msdn.microsoft.com/en-us/library/vstudio/dd578615.aspx
53
http://msdn.microsoft.com/en-us/library/ms253070.aspx
Team Foundation Server Upgrade Guide – Chapter 4: Upgrade Walkthroughs
Page 35 of 63
Step
Instructions
꙱ - Done
In larger environments, cloning the databases can be a difficult and lengthy task given the size of the
databases. Caution should be taken not to impact the performance of the production environment.
The recommended way for the cloning scenario is to use the standard regular backups created for your
environment. For testing purposes, the data need not to be completely up-to-date so you can take only the
latest full database backups without applying the differential or all the transactional log backups (if marked
transactions are used you still need to apply the transaction log backup immediately following the full
database backup!).
There are certain practices that you should be aware of:
Do not perform full database backup during the business hours (if you are concerned about the
additional IO traffic created)
Do not back up to the same storage where the production database files are located. Use a dedicated disk
or a network share.
Consider improving the backup speed by using compression (SQL Server 2012 Enterprise, Standard and
Business Intelligence editions).
See Backup Compression (SQL Server) 54
On the new data tier server(s), you need to restore the Team Foundation Server Databases 55.
NOTE
You may get name collision for this database in case you used the same name for the content database
when creating the new web application in Step 5: Installing required software on the new Application Tier
server. You can solve it either by using different name for restored one but get difference from the
production or removing the content database before restoring the production one as described in Step 7:
Redirect SharePoint Products to the New Location of the Content Database (step 1-7).
On the server that is running SQL Server Analysis Services, if you have one configured for your deployment:
Tfs_Analysis – note that this isn’t a SQL Server Relational database but SQL Server Analysis Services
database. Although in Step 17
Configure Reporting and SQL Server Analysis Services we will rebuild this database we still need to
restore it on the new Analysis Services server otherwise steps Step 11
Change the Ownership of the Moved Databases and Step 12
Update All Service Accounts will fail!
Various techniques can be used to restore the databases. You can do it manually, using T-SQL scripts, third
party tools, or TFS backup tools. The preferred way for your environment should be documented in your
Disaster Recovery Plan.
To restore a database manually from SQL Server Management Studio follow these steps:
Under Database Engine connection right-click Databases and point to Restore Database. The Restore
Database dialog box opens.
In To Database specify the database name you want to restore.
Under Source for restore, click From Device, and then click the ellipsis button (…).
In the Specify Backup dialog box, specify the location of the backup file, and then click OK.
The first backup that you restore must be a full backup, followed by the differential backup, and then the
transaction log backups, in the order in which they were created.
Under Select the backup sets to restore, specify the backup sets to restore. Make sure that you restore
the full, differential, and transaction log databases if you created marked transaction backup sets.
In the Select a page pane, click Options, and then select the Overwrite the existing database check
box.
In the Restore the database files as list, verify that the paths match your required database paths.
Under Recovery state, perform one of the following steps:
If you are using marked transactions or just applying additional transaction logs, click Leave the
database non-operational, and do not roll back uncommitted transactions. Additional
transaction logs can be restored. (RESTORE WITH RECOVERY).
If you are not using marked transactions and you are not applying additional transaction logs, click
Leave the database ready to use.
Click OK. A progress icon appears.
54
http://technet.microsoft.com/en-us/library/bb964719.aspx
55
http://msdn.microsoft.com/en-us/library/ms400720.aspx
Team Foundation Server Upgrade Guide – Chapter 4: Upgrade Walkthroughs
Page 36 of 63
Step
Instructions
When the SQL Server Management Studio dialog box appears and confirms successful restoration, click
OK to return to Object Explorer.
If you are using marked transactions or applying additional transaction logs, right-click the database that
you just restored, point to Tasks, point to Restore, and then click Transaction Log. The Restore
Transaction Log window opens.
On the General page, make sure that the appropriate database is selected in the Database list.
Under Restore source, click From file or tape, and then click the ellipsis button (…).
In the Specify Backup dialog box, specify the location of the transaction log backup file, and then click
OK.
Under Select the transaction log to restore, select the check box next to the log that you want to
restore.
If you are using marked transactions under Restore to, click Marked transaction. The Select Marked
Transaction window opens.
In the Select the marked transaction to stop the restore at list, select the check box next to the
transaction mark that you want to use for the restoration, and then click OK.
Important: you must use the same transaction mark that has the same date and time for all databases to
successfully restore the data.
In the Restore Transaction Log window, click OK. A progress icon appears.
When the SQL Server Management Studio dialog box appears and confirms successful restoration, click
OK.
For more information, see the following page on the Microsoft Web site: Applying Transaction Log
Backups 56.
To backup and restore Analysis Service database manually in SQL Server Management Studio follow these
steps:
Under production Analysis Services connection right-click Tfs_Analysis database and point to Backup
Database. The Backup Database dialog box opens.
In Backup File provide the backup file name and location.
Let Apply compression checked and if needed Encrypt backup file as well – you need to provide a
password then.
Click OK and wait until backup finishes.
Under cloned Analysis Services connection right-click Databases and point to Restore Database. The
Restore Database dialog box opens.
In Backup File provide the path to the backup file created in the previous steps.
In Restore Database provide the database name (Tfs_Analysis)
If you need specific storage location (other than the server default) set Storage location
If the backup file was encrypted provide the password in Password.
Click OK and wait until restore finishes. See How to back up your databases using TFS backup tool 57 for
more information.
7
Redirect
SharePoint
Products to
the New
Location of
the Content
Database
꙱ - Done
After you have cloned the content database for SharePoint Products (WSS_Content) to the new server, you
must redirect the server that is running SharePoint Products to the new location of that database. This
database must be operational before you can reconfigure TFS with the new locations of its databases.
Following is the procedure for SharePoint Foundation 2010. To perform the procedure, you must be a member
of the Administrators group on the server that hosts SharePoint Products:
Log on to the server that is running SharePoint Foundation 2010 open Computer Manager, and make sure
that the following components are started:
IIS Admin Service (IISADMIN)
HTTP SSL (HTTPFilter)
SharePoint 2010 Timer service (SPTimerv4)
World Wide Web Publishing Service (W3SVC)
SharePoint Central Administration (application pool)
SharePoint Central Administration (Web site)
56
http://go.microsoft.com/fwlink/?LinkId=115460
57
http://msdn.microsoft.com/en-us/library/vstudio/jj620932.aspx
Team Foundation Server Upgrade Guide – Chapter 4: Upgrade Walkthroughs
Page 37 of 63
Step
Instructions
Click Start, point to Administrative Tools, and then click SharePoint Central Administration. The
Central Administration window opens.
Click the Application Management tab and then click Content Databases. The Manage Content
Database page opens.
Click WSS_Content. The Manage Content Database Settings page opens.
NOTE
WSS_Content is the default name. Your installation might use a custom name for this database
Select the Remove content database check box, and then click OK.
NOTE
This step detaches the database but does not delete any content. You should delete the database
manually.
In the warning dialog box that appears, click OK.
In Manage Content Database Settings, click OK to confirm your changes.
Open the Command Prompt window (use Run as administrator if UAC enabled), and change directories
to the SharePoint Foundation 2010 bin directory. By default, you can find this directory in
%programfiles%\Common Files\microsoft shared\web server extensions\14\BIN.
Type the following command to add a content database:
stsadm -o addcontentdb -url http://SharePointServerName -databaseserver newDataTierServerName -
databasename WSS_Content
NOTE
WSS_Content is the default name. Make sure that the name that you type matches the name of the
content database that you have restored in Step 6: Cloning the databases (backup/restore).
Type the following command to change the permission policy so that TFS can access the content
database (DomainName\UserName is TFSService account):
stsadm.exe -o addpermissionpolicy -url http://SharePointServerName -userlogin
DomainName\UserName –permissionlevel "full control"
Type the following command to restart Internet Information Services:
iisreset
(Optional) If you backed up any custom site definitions, custom site templates, or custom Web parts for
SharePoint Products that you want to keep, restore these components now. For more information, see this
page on the Microsoft Web site: Recommendations for data protection and recovery (SharePoint
Foundation 2010) 58.
Click Start, point to Administrative Tools, and click Services.
If not started already, right-click SharePoint 2010 Timer service (SPTimerv4), and click Start.
8
Configure
Reporting
Services
꙱ - Done
In Step Install required software on the new Application Tier server we have installed but not configured
SQL Server Reporting Services and in Step Cloning the databases (backup / restore) we restored the
Reporting Services databases from the original environment. Now we will configure Reporting Services on the
new server so that they will use the restored databases:
Start the Reporting Services Configuration Manager and open a connection to the report server.
On the Service Account page, provide the same credentials that are used in production. Click Apply.
On the Web Service URL page, provide the same url(s) that are used in production. Click Advanced for
additional URLs. Click Apply.
On the Database page, click Change Database.
Click Choose an existing report server database. Click Next.
Select the SQL Server that now hosts the report server database and click Test Connection. Click Next.
In Database Name, select the report server database that you want to use. Click Next.
In Credentials, specify the credentials that the report server will use to connect to the report server
database. Click Next.
Click Next and then Finish
58
http://go.microsoft.com/fwlink/?LinkId=115274
Team Foundation Server Upgrade Guide – Chapter 4: Upgrade Walkthroughs
Page 38 of 63
Step
Instructions
On the Report Manager URL page, provide the same url(s) that are used in production. Click Advanced
for additional URLs. Click Apply.
Click Exit.
On the server open a Command Prompt (Run as administrator if UAC enabled).
Go to SQL Server tools directory. For x86-based systems, the default directory is
%ProgramFiles%\Microsoft SQL Server\100\Tools\binn. For x64-based systems, the default directory is
Program Files(x86)\Microsoft SQL Server\100\Tools\binn.
Type the following command to list installation IDs of Reporting Services:
RSKeyMgmt -l
In the list, find the installation ID (GUID) that corresponds to the old data-tier server.
Type the following command to remove that installation ID, where DTInstanceID corresponds to the old
data-tier server GUID:
RSKeyMgmt –r DTInstanceID
NOTE
Do not remove the installation ID that corresponds to the new data-tier server
Start again the Reporting Services Configuration Manager and open a connection to the report server.
On the Encryption Keys page click Restore
Select the file that contains backup of the production encryption key – you have either this backup
already or you can get it from production Reporting Services.
Click OK and click Apply.
NOTE
If your production Reporting Services have Email, Execution Account or Scale Out deployment configured
you need to provide the same configuration in the cloned environment as well.
9
Install the
Application
Tier on the
new hardware
꙱ - Done
In order to gain access to the command-line tools for TFS, you must install them by installing Team
Foundation Server on the computer that will be the application-tier server. You may want to use several of
these tools before you can configure the server as the application-tier server.
Install if your production Reporting Services have Email, Execution Account or Scale Out deployment
configured you need to provide the same configuration in the cloned environment as well. On the new server
according to the Team Foundation Installation Guide but make sure that you cancel the configuration wizard.
You can complete the configuration wizard for the new application-tier server after the preparation steps are
complete.
You need to apply any Service Packs and hotfixes needed to match the production Team Foundation version
otherwise you won’t be able to connect to the TFS configuration database in Step Configure the Application
Tier on the New Hardware. You can find this version when you launch the Team Foundation Administration
Console on a production Application Tier server and look up the details in the Application Tier Summary tab.
NOTE
In a Network Load Balancing (NLB) setup you may have multiple Application Tier servers. It may not be
necessary to install the same number of nodes as in production but more than one is recommended if you
use NLB.
10
Redirect TFS
to its
databases
꙱ - Done
You must redirect TFS to its moved databases. You must run the RemapDBs command if any of the following
conditions is true:
The Tfs_Analysis or the Tfs_Warehouse database is hosted on a different server from Tfs_Configuration.
You are using a named instance to host your databases.
You have one or more collection databases hosted on a different server from the configuration database.
To redirect TFS to its databases:
Log on to the new application-tier server for Team Foundation, open a Command Prompt window (Run as
administrator if UAC enabled), and change directories to Drive:\%programfiles%\Microsoft Team
Foundation Server 2010\Tools.
Type the following command, where ServerName is the name of the instance of SQL Server that hosts the
configuration database for TFS, Tfs_Configuration is the name of the restored configuration database for
TFS, and ServerName2 is the name of the server that hosts the remote collection. You can have as many
ServerName parameters as you have servers configured in your deployment. You can specify ServerName
in either ServerName or ServerName\InstanceName format. You must specify the instance name if you are
Team Foundation Server Upgrade Guide – Chapter 4: Upgrade Walkthroughs
Page 39 of 63
Step
Instructions
not using the default instance:
TFSConfig RemapDBs /DatabaseName:ServerName;TFS_Configuration
/SQLInstances:ServerName,ServerName2 /AnalysisInstance:ServerName2
/AnalysisDatabaseName:DatabaseName
NOTE
In /SQLInstances, you must specify all of the instances, separated by commas, of SQL Server that host
databases for TFS. For more information, see the RemapDBs Command.
If you have multiple application-tier servers you need to run this command only on one of them.
11
Change the
Ownership of
the Moved
Databases
꙱ - Done
You must use the TFSConfig Accounts ResetOwner command to change the database owner login for the
moved databases to the current user only if the users are different from production. Before you perform the
next sequence of steps, make sure that the user account with which you are logged on is an appropriate
account. For example, you can use the same account with which TFS was installed, referred to in the
installation guide as TFSSETUP. At a minimum, you must use an account that is a member of the Team
Foundation Administrators group in TFS and a member of the sysadmin group in SQL Server.
To change the ownership of the restored databases to the current user:
On the new application-tier server open a Command Prompt window, and change directories to
Drive:\%programfiles%\Microsoft Team Foundation Server 2010\Tools.
Type the following command, where ServerName (in either ServerName or ServerName\InstanceName
format) is the name of the instance of SQL Server that hosts the databases for TFS and DatabaseName is
the name of the configuration database (by default, Tfs_Configuration):
TFSConfig Accounts /ResetOwner /SQLInstance:ServerName /DatabaseName:DatabaseName
If you specify the configuration database, this command will change the ownership for all of the
databases of TFS.
NOTE
If you have multiple application-tier servers you need to run this command only on one of them.
12
Update All
Service
Accounts
꙱ - Done
You must update the service account for TFS (TFSService) and the data sources account (TFSReports). Even if
these accounts have not changed, you must update the information to help ensure that the identity and the
format of the accounts are appropriate for the new server.
To update service accounts:
Log on to the new application-tier server for Team Foundation, open a Command Prompt window (Run as
administrator if UAC enabled), and change directories to Drive:\%programfiles%\Microsoft Team
Foundation Server 2010\Tools.
At the command prompt, type the following command to add the service account for Team Foundation,
where DatabaseName is the name of the configuration database (by default, Tfs_Configuration) and
AccountName is TFSService account:
TfsConfig Accounts /add /AccountType:ApplicationTier /account:AccountName
/SQLInstance:ServerName /DatabaseName:DatabaseName
At the command prompt, type the following command to add the data sources account, where
DatabaseName is the name of the configuration database (by default, Tfs_Configuration) and
AccountName is TFSReports account:
TfsConfig Accounts /add /AccountType:ReportingDataSource /account:AccountName
/SQLInstance:ServerName /DatabaseName:DatabaseName
For more information, see Accounts Command 59.
13
Change Server
IDs
꙱ - Done
This is very important step for the cloning scenario. Since the both production and cloned environment will
be running concurrently and may be accessed by the same clients, you need to change the internal IDs of the
cloned TFS so that they do not duplicate the original environment.
To do this, run TfsConfig ChangeServerID command as described in ChangeServerID Command 60
59
http://msdn.microsoft.com/en-us/library/ms253107.aspx
60
http://msdn.microsoft.com/en-us/library/ee349259.aspx
Team Foundation Server Upgrade Guide – Chapter 4: Upgrade Walkthroughs
Page 40 of 63
Step
Instructions
Log on to the new application-tier server for Team Foundation, open a Command Prompt window (Run as
administrator if UAC enabled), and change directories to Drive:\%programfiles%\Microsoft Team
Foundation Server 2010\Tools.
Run the following command where ServerName is SQL Server Instance name and DatabaseName is the
name of the configuration database (by default, Tfs_Configuration):
TFSConfig ChangeServerID /SQLInstance:ServerName /DatabaseName:Tfs_Configuration
14
Configure the
Application
Tier on the
New Hardware
꙱ - Done
After you prepare the servers for your TFS application and data tiers, you must configure the application tier
on the new server using the Application-Tier Only Wizard.
To configure a server as the Application Tier server open the administration console, and restart the
application-tier only wizard. For more information and step-by-step procedures follow the Team Foundation
Installation Guide: How to: Configure Team Foundation Server Using the Application-Tier Only
Configuration.
15
Update the
URL for the
Application
Tier Server
꙱ - Done
You need to update the URL for the new application tier server in the administration console:
On the new application tier server open the administration console for Team Foundation.
For more information, see Open the Team Foundation Administration Console 61
In the navigation bar, click Application Tier, and then click Change URLs. The Change URLs window
opens.
In Notification URL, type the URL for the new application-tier server, and then click OK.
NOTE
If for any reason Server URL (should be localhost) is pointing to the production server or production NLB
URL, change it to the corresponding value, too.
Under Application Tiers you may still see production application tier without any option to remove it but
this isn’t an issue because it will never connect to the cloned database.
16
Configure
SharePoint
Products
꙱ - Done
As part of cloning to a new server, you must install and configure the extensions for SharePoint Products on
your new SharePoint server. You must also reconfigure the settings for the SharePoint Web applications that
the deployment uses so that it does not point anymore to the production environment but to its cloned
equivalent.
To install extensions and configure the settings for SharePoint Web applications:
Open the Team Foundation Installation Guide, and follow the instructions to install and configure the TFS
Extensions for SharePoint Products on the server. For more information, see Extensions for SharePoint
Products 62:
Scenario: Installing TFS Using Existing Infrastructure or More than One Server
o Using an Existing Infrastructure for Prerequisites
Extending Existing Deployments
How to: Install TFS Extensions for SharePoint Products – unless you installed it
already in Configure the Application Tier on the New Hardware, on page 40.
How to: Configure TFS Extensions for SharePoint Products
You need to apply as well any Service Packs and hotfixes needed to match the production Team Foundation
version on the server where TFS Extensions for SharePoint are installed.
On the new application tier server open the administration console for Team Foundation.
In the navigation bar, click SharePoint Web Applications.
In the SharePoint Web Applications list, click the Web application on the production server that has been
cloned, and then click Change.
In Friendly Name, Web Application URL and Central Administration URL, change the values to reflect the
URLs on the new server. If necessary, change the value of Default location for team project collection sites
to the new default location for this Web application.
Click OK.
Check the SharePoint Team Portals in a web browser and if not working properly, run Repair Connection
from SharePoint Web Applications section in Team Foundation Administration Console.
61
http://msdn.microsoft.com/en-us/library/dd273718.aspx
62
http://msdn.microsoft.com/en-us/library/dd631915.aspx
Team Foundation Server Upgrade Guide – Chapter 4: Upgrade Walkthroughs
Page 41 of 63
Step
Instructions
If TFS is on a different server than SharePoint Products, you must also configure access to TFS by opening the
administration console that is on the server that is running SharePoint Products and expanding the Extensions
node.
For more information about how to configure SharePoint Web applications as part of your deployment, see
Add a SharePoint Web Application to Your Deployment 63 and Interactions Between SharePoint Products and
TFS 64.
If your deployment topology and security requirements allow it, add the service account for Team Foundation
(TFSService) to the Farm Administrators group.
For more information, see Interactions Between SharePoint Products and TFS 65 and Service Accounts and
Dependencies in TFS 66.
17
Configure
Reporting and
SQL Server
Analysis
Services
꙱ - Done
Make sure that the new TFS installation does not point back to the production Reporting Services or Analysis
Services instances.
You can skip this procedure if you are not using a server that is running SQL Server Reporting Services as part
of your deployment. If your deployment uses a report server, you must redirect TFS to its location, restart the
warehouse, and manually rebuild the database for Analysis Services.
To configure the settings for Reporting:
Open the administration console for Team Foundation.
In the navigation bar, click Reporting.
On the Reporting page, click Edit.
In the Take Offline dialog box, click OK. The Reporting dialog box opens.
Select the Use Report Server check box.
Click the Warehouse tab, and, in Server, type or click the new name of the report server.
In Database, type the name of the warehouse database for TFS. By default, this database is named
Tfs_Warehouse.
(Optional) Click Test Connection to make sure that the database that you specified is valid.
Click the Analysis Services tab.
In the Server list, type or click the name of the new server that is running SQL Server Analysis Services.
In Database, type the name of the Analysis Services database for TFS. By default, the name of this
database is Tfs_Analysis.
If you are not using the default instance for the database, select the Specify nondefault instance check
box, and then type or click the name of the instance.
(Optional) Click Test Connection to make sure that the database that you specified is valid.
In Username and Password, type the account name and password (if any) for the data sources account
(TFSReports).
On the Reports tab, in the Server list, type or click the name of the new report server, and then click
Populate URLs.
In Username and Password, type the account name and password (if any) for the data sources account
(TFSReports).
In Default Path, type the relative path for storing reports, and then click OK.
In the Team Foundation Administration console, click Start Jobs to restart reporting.
Open a Command Prompt window, and change directories to %ProgramFiles%\Microsoft Team
Foundation Server 2010\Tools.
Type the following command to rebuild the database for Analysis Services:
TFSConfig RebuildWarehouse /AnalysisServices /ReportingDataSourcePassword:Password
Password is the password for the data sources account for Reporting Services (TFSReports).
Wait until the command is successfully completed.
The warehouse will start processing within a few minutes. Analysis Services processing is by default scheduled
to run every 2 hours. If you need to accelerate this you can:
On application tier open warehouse control web service in a web browser:
http://localhost:8080/tfs/TeamFoundation/Administration/v3.0/WarehouseControlService.asmx
63
http://msdn.microsoft.com/en-us/library/dd236907.aspx
64
http://msdn.microsoft.com/en-us/library/ms253177.aspx
65
http://msdn.microsoft.com/en-us/library/ms253177.aspx
66
http://msdn.microsoft.com/en-us/library/ms253149.aspx
Team Foundation Server Upgrade Guide – Chapter 4: Upgrade Walkthroughs
Page 42 of 63
Step
Instructions
Run ProcessWarehouse with empty parameters.
Run GetProcessingStatus with empty parameters periodically until all Warehouse Sync jobs finished
with status Succeeded.
Run ProcessAnalysisDatabase with parameter Full.
Run GetProcessingStatus with empty parameters periodically until Full Analysis Database Sync job
finished with status Succeeded.
18
Configure
Project Server
Integration
꙱ - Done
Another external system you may integrate with TFS is Project Server. In such case for isolating cloned
installation of the Project Server or at least dedicated Web Application may be required. This isn’t covered
here.
You can skip this procedure if the deployment that you are moving isn’t integrated with Microsoft Project
Server. For more information, see Microsoft TFS 2010 and Microsoft Project Server Integration Feature Pack 67.
If you intend to continue the integration between the projects and collections and cloned Project Server, you
must register the instance of Project Web Access or Project Web App (PWA) with the application-tier server for
your moved deployment.
To integrate the moved deployment with Project Server:
Register an instance of cloned Project Web Access or Project Web App with the moved deployment of
TFS by using the TFSAdmin ProjectServer /RegisterPWA command with the /tfs, /force, and /pwa
options.
After you have registered the instance, you must wait for the data to synchronize. This process happens
automatically on a predetermined schedule. For more information, see Overview of the Synchronization
Process for TFS and Project Server Integration 68, Changing the Configuration of Your Deployment 69,
Registering an Instance of PWA to TFS 70, and Removing a Component from Participating in Data
Synchronization 71.
19
Clone Build
servers
꙱ - Done
The production build server farm can be as simple as a single server or as complex as having hundreds of
them. Unless having a particular performance or configuration concern, you probably do not need to clone all
of them for Team Foundation Upgrade testing. It may be enough to pick up one or more servers with the
most typical configuration.
Before you start running the builds in the cloned environment – and this can be as soon as a build server is
available for scheduled builds - you need to update all build definitions to avoid accessing production
environment especially regarding:
Drop location – build numbers won’t be unique which may result in conflicts and overwritten outputs.
Symbol Servers – access to the symbol server won’t be synchronized and can result in conflicts.
Custom deployment actions – different types of conflicts possible, broken testing environments etc.
Depending on the number of build definitions this can be achieved either manually or by using the Team
Foundation API.
Follow the steps in Team System Installation Guide to install and configure your build service:
Scenario: Installing Team Foundation Build Service – when configuring the original production
server will be found – select option Replace an existing build machine
You need to apply as well any Service Packs and hotfixes needed to match the production Team Build service
version.
NOTE
Additional software may be required depending on your application build process specific requirements.
Typically, you install Visual Studio, custom or third party MSBuild extensions and other products
supporting building and deploying various aspects of the software solutions.
20
Clone Team
Foundation
Proxy servers
꙱ - Done
In your production environment, one or more TFS Proxy servers can be used. Unless you have a particular
performance or configuration concern, you probably do not need to clone all of them for Team Foundation
Upgrade testing. It may be enough to only pick up one or more of them.
Follow the steps in Team System Installation Guide to install and configure your build service:
Scenario: Installing TFS Proxy
67
http://msdn.microsoft.com/en-us/library/gg455680.aspx
68
http://msdn.microsoft.com/en-us/library/gg412649.aspx
69
http://msdn.microsoft.com/en-us/library/gg636820.aspx
70
http://msdn.microsoft.com/en-us/library/gg412639.aspx
71
http://msdn.microsoft.com/en-us/library/gg412644.aspx
Team Foundation Server Upgrade Guide – Chapter 4: Upgrade Walkthroughs
Page 43 of 63
Step
Instructions
You also need to apply any Service Packs and hotfixes needed to match the production Team Foundation
Proxy version.
NOTE
If you configured your production proxy for a specific Version Control cache location you may need to do
that in the cloned system as well during the configuration.
21
Configure
Team Explorer
꙱ - Done
If you registered your proxies for automatic configuration based on user domain site you may need to
configure it for your cloned environment as well using tf.exe proxy command
22
Verify
Permissions
for Users,
Groups, and
Service
Accounts
꙱ - Done
After you clone your environment, make sure that all users, groups, and service accounts for your deployment
are configured with the permissions that they require to function correctly on each server.
Depending on the purpose of the cloning you do not necessarily need complete permission setup equal to
production. Usually only service accounts and users who will be accessing the cloned environment (testing the
upgrade for example) which often is only a small subset of the production users will need the permissions. In
some cases, it may even be desirable for the other users to not be able to connect to the cloned environment
so that they cannot interfere with the testing. Nevertheless, if your goal is to have an environment as equal as
possible to production, or if you want to involve a larger part of your production users in testing, you need to
take care of this task completely.
Because most permission settings are saved in the product’s databases, they are automatically cloned but
some permissions cannot be automatically migrated. For example, Team Foundation administrators must be
members of the local Administrators group on the application-tier server to open the administration console,
so you must add them manually to that group. SharePoint farm level and SQL Server or Analysis Services
server level permissions are not migrated by database migration.
To verify permissions:
Log on to all new servers and make sure local Administrators group contains the same users and groups
like the corresponding servers in production.
On the new Application Tier, server run the Team Foundation Administration Console and in the
Application Tier section under Administration Console Users for each listed user run Reapply
With SQL Server Management Studio connect to all the new SQL server instances, go to Security –
Logins and Server Roles and make sure they contain same users like on the corresponding production
SQL Servers
With SQL Server Management Studio connect to the new Analysis Services instance
o Go to the Instance Properties - Security and make sure Server Administrators contain same
users like on the corresponding production Analysis services
o For the Tfs_Analysis database go to Roles under this database and make sure they contain the
same users like production Analysis database
Run SharePoint Central Administration on the new SharePoint server and check the same users that are
in production are also configured in:
o Operations - Security Configuration - Update farm administrator's group
o Application Management - Application Security - Policy for Web application
o Application Management - SharePoint Site Management - Collection Administrators
For more information, see Add Users to Team Projects 72, Set Administrator Permissions for Team Project
Collections 73, Set Administrator Permissions for TFS 74, and Service Accounts and Dependencies in TFS 75.
23
Client
Configuration
꙱ - Done
Thanks to Change Server IDs the production and cloned TFSs will appear to the clients as two independent
environments. They can just add the cloned environment as an additional TFS.
The only issue is that the production and cloned environments will overlap with their Version Control
workspace mappings and the key users can accessing both these environment for validate the cloned
environment, the clients will have to update the mappings for one of them – most probably the cloned one.
This can be done manually on the client machine:
72
http://msdn.microsoft.com/en-us/library/bb558971.aspx
73
http://msdn.microsoft.com/en-us/library/dd547204.aspx
74
http://msdn.microsoft.com/en-us/library/bb552341.aspx
75
http://msdn.microsoft.com/en-us/library/ms253149.aspx
Team Foundation Server Upgrade Guide – Chapter 4: Upgrade Walkthroughs
Page 44 of 63
Step
Instructions
Open Visual Studio and connect to TFS – menu Team – Connect To Team Foundation Server
Open Manage Workspaces dialog from menu File – Source Control – Workspaces
For each workspace in the list click Edit and:
o For each Working folder change the Local Folder to a new location that does not overlap with
any other Team Foundation environment.
Click OK, then Close
The other option, which is more suitable for larger number of users, would be to prepare this for all the
possible users using Team Foundation API but this would require that there are some conventions in client
folder structures that would allow you to specify the correct local folder locations for all the users.
Another option would be to completely delete all workspaces using tf.exe, the Team Foundation API, or third
party tools (Attrice 76 for example) and let the users accessing the cloned environment recreate them at new
locations. This may have a drawback that it can significantly reduce the size of the TFS databases and provide
incorrect results when testing the upgrade especially regarding the length of the operation.
24
Additional
Steps
꙱ - Done
Depending on how you configured and customized your production environment and which of these features
you want to clone, some additional steps may be required. These are some examples:
Clone SCVMM server and Lab Management environments
Close Test Controllers and Agents used by your environment
Configuring backups of the cloned databases – this may or may not be necessary depending on the
importance of the cloned environment
TFS Power Tools installation and possible Backup configuration
Custom TFS controls for handling events in the environment (placed in Drive:\%ProgramFiles%\Microsoft
Team Foundation Server 2010\Application Tier\Web Services\bin\Plugins)
Custom Team Foundation Alerts SOAP Handlers
o If you want to use them you need to clone them as well – usually these are Web or WCF services.
WARNING
1. In any case you must reconfigure (or remove) the subscriptions otherwise cloned TFS may call these
handlers in production!
2. You must reconfigure (or remove) the subscriptions otherwise cloned TFS may call these handlers in
production!
Team Foundation Alerts Email Subscriptions – if you do not want that the production users receive
notification emails from the cloned system you need to remove the subscriptions or disable Email Alerts
in Team Foundation administration Console
Cloning custom or third party application and tools that use TFS if you want to test how they work with an
upgraded environment – TFS Integration Tools, etc.
You may need to install additional client tools for testing the upgrade in the cloned environment to see
how they work after upgrade like custom check-in policies, custom work item fields
May want to practice upgrading process templates. We have special docs now that outline the upgrade paths
that will require an update: Learn more about new features 77, Configure features after a TFS upgrade 78
Table 18 – Walkthrough: Clone TFS 2012 to test in-place upgrade
76
http://www.attrice.info/cm/tfs/index.htm
77
http://msdn.microsoft.com/en-us/library/vstudio/jj635155.aspx
78
http://msdn.microsoft.com/en-us/library/vstudio/ff432837.aspx

Team Foundation Server Upgrade Guide – Chapter 4: Upgrade Walkthroughs
Page 45 of 63
Move TFS Collection to TFS 2013 using TFSConfig /Attach
Context
This is a typical scenario for moving and upgrading a TFS 201x Team project Collection to an existing TFS 2013 farm.
This scenario is useful when only some project collections of an existing farm are ready to upgrade to TFS 2013 and
others wish to continue on the existing farm. This method is NOT encouraged for users who are ready to upgrade
all TPCs of the existing farm, since the Detach / Attach operations have to do lots of additional work beyond
upgrade and have proved less reliable. When issues occur in the Detach / Attach operations they are typically related
to users and group memberships or to permissions.
Version
TFS 2010 TFS 2013
TFS 2012 TFS 2013
Persona
Dave, the TFS Administrator, performs the TFS upgrade, and Jane, the Infrastructure Specialist, who owns access to
environment impacted by upgrade.
Table 19 – Move TFS Collection to TFS 2013 using TFSConfig /Attach
Preparation
TFS 2013 environment needs to be up and running.
Walkthrough
Step
Instructions
1
Prepare
꙱ - Done
Detach the TFS TPC
The TPC can be detached either from TFS Administration Console or by using the TFSConfig Collection /detach 79
command.
Backup the TPC database using SQL. Refer Backing and Restoring SQL Database 80 for more information. See
Migration Based Upgrade on page 23 for more details on the backup and restore.
Restore TPC database to TFS 2013 data tier
NOTE
As an alternative you can as well detach, copy and reattach the database.
See Move a Team Project Collection 81 for more information. You would want this alternative if you still want to
use this collection in your old deployment (for example, you want to keep it around for servicing purposes, or
you’re forking a project and keeping one team on the old version).
@
2
Attach
collection
꙱ - Done
To upgrade and attach the restored collection, execute the following steps:
o Open Command prompt and navigate to the location of TFSConfig.exe (default location
%programfiles%\Microsoft Team Foundation Server 12.0\Tools)
o Run the following command to attach the TPC
o tfsconfig collection attach /collectionDB:<sqlInstance>;<databaseName>
See the TFSConfig Collection Commands 82for more information.
79
http://msdn.microsoft.com/en-us/library/ee349263%28v=vs.120%29.aspx
80
http://msdn.microsoft.com/en-us/library/ms187048(v=sql.105).aspx
81
http://msdn.microsoft.com/en-us/library/vstudio/dd936138.aspx
82
http://msdn.microsoft.com/en-us/library/ee349263%28v=vs.120%29.aspx
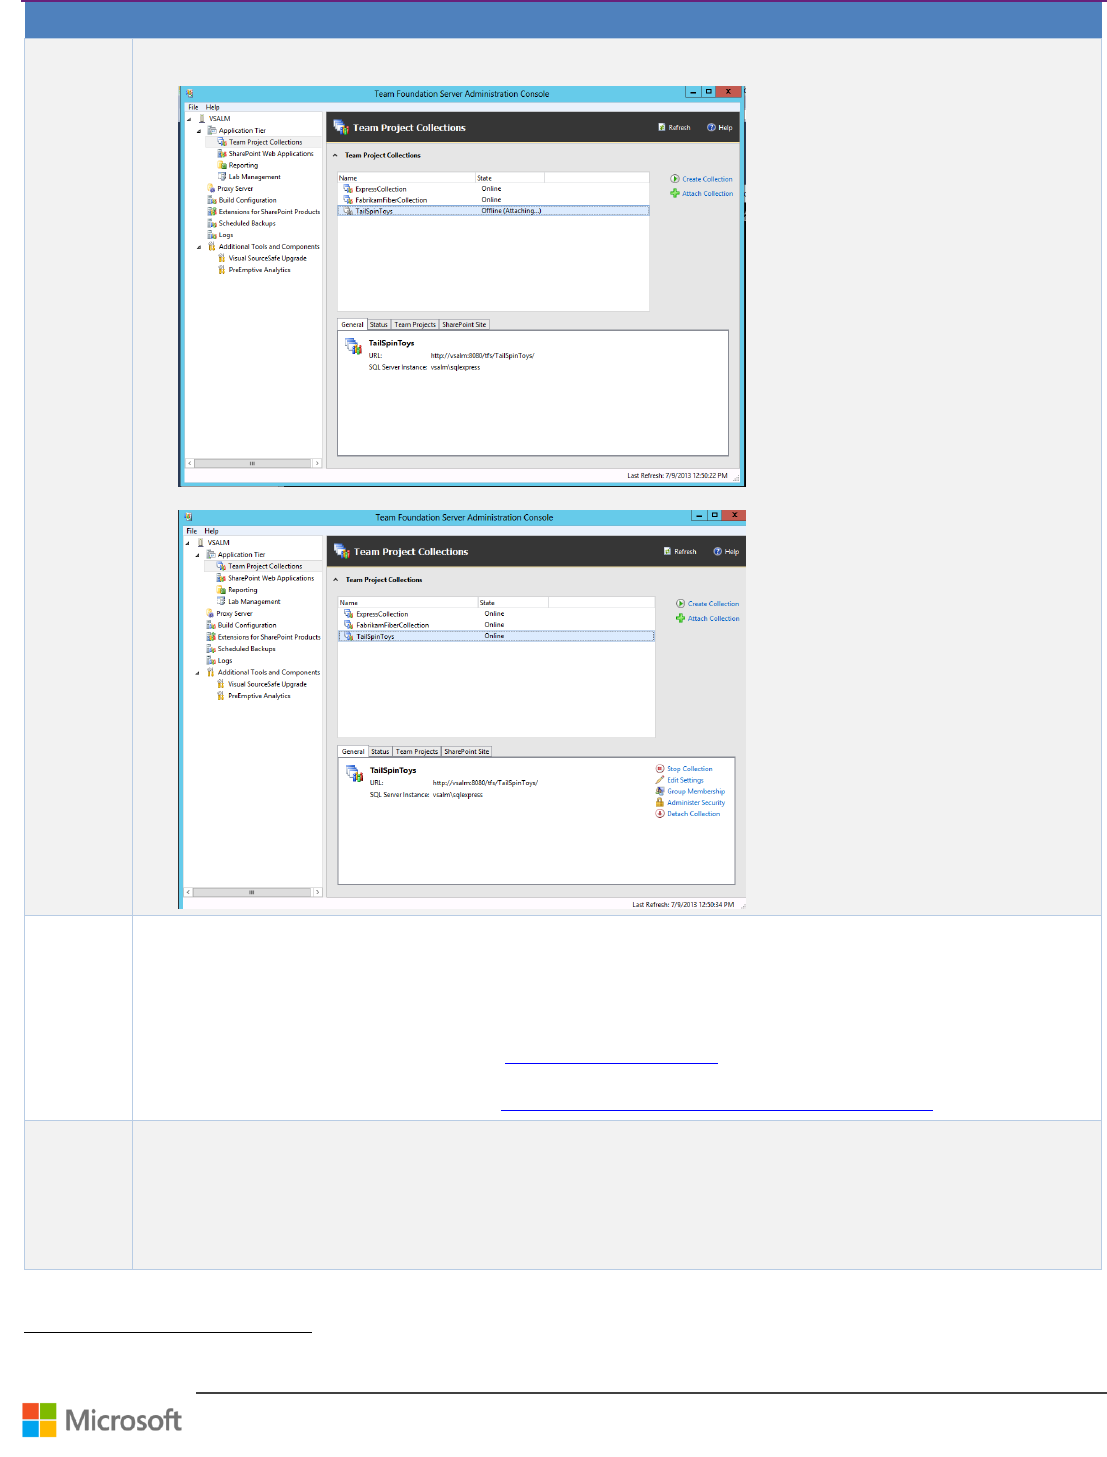
Team Foundation Server Upgrade Guide – Chapter 4: Upgrade Walkthroughs
Page 46 of 63
Step
Instructions
While the command line is attaching and upgrading the collection, the TFS Administration Console will also
indicate that the collection is being serviced.
Once the Upgrade has completed, the upgraded TPC will be available for use.
3
Adjust
Report
settings
꙱ - Done
Post upgrade, the TFS reports are not moved to the new farm.
The reports have to be manually moved to the new report server and the connection string have to be updated to
point to the new TFS Data Source.
To move reports:
o Upload each report that you want to move to the appropriate folder in Report Manager .The following
link provides more information: Uploading Files to a Folder 83.
o In Report Manager, edit each report to change the data source to the new report server. The following
link provides more information How to: Configure Data Source Properties for a Report 84.
4
Adjust
SharePoint
settings
꙱ - Done
To integrate SharePoint with the new TPC, first follow the steps mentioned in the section Upgrade SharePoint,
page 48, to upgrade the existing SharePoint farm to work with TFS 2013.
If the original SharePoint Farm isn’t supported by TFS 2013, you will have to move the content of the SharePoint
collection to a new farm, which TFS 2013 supports.
83
http://go.microsoft.com/fwlink/?LinkID=177729
84
http://go.microsoft.com/fwlink/?LinkID=177730
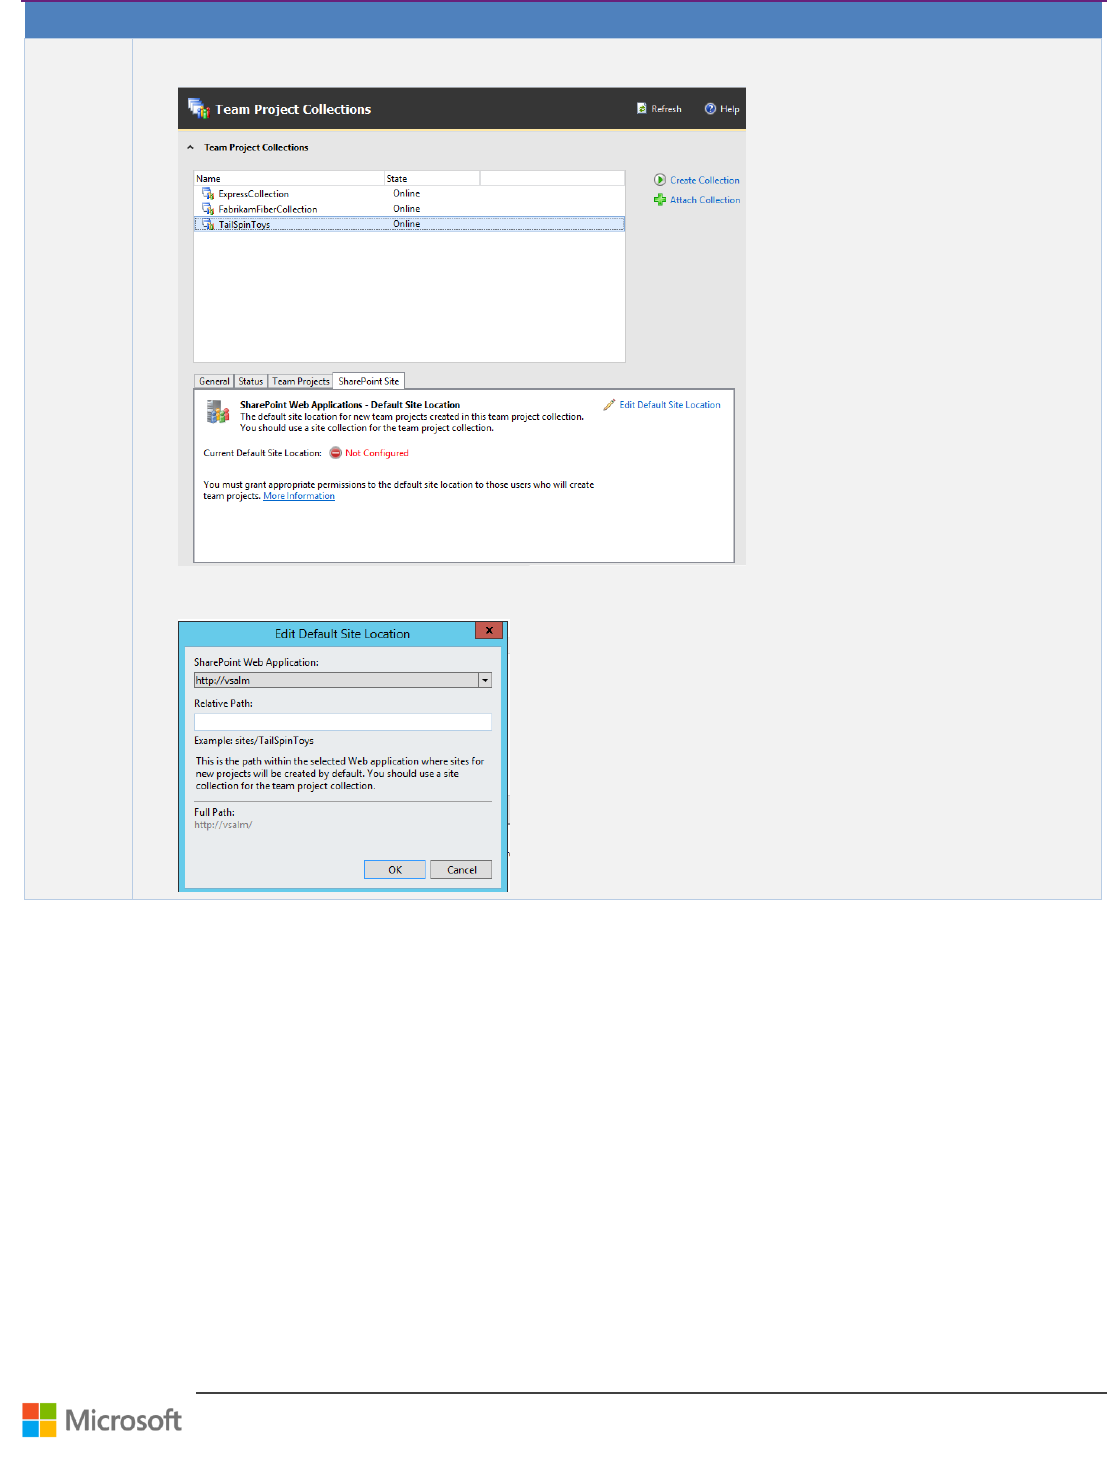
Team Foundation Server Upgrade Guide – Chapter 4: Upgrade Walkthroughs
Page 47 of 63
Step
Instructions
Once the SharePoint farm has been upgraded and the contents of the site collections are available, navigate to the
TFS Administration Console and select the newly Upgrade TPC and click on the SharePoint Site Tab.
On the SharePoint Site tab, select Edit Default Site Location. In the resulting dialog box, select the SharePoint
Web Application Name from the drop-down list. Enter the Relative Path of the site collection and click OK.
Table 20 – Walkthrough: Move TFS Collection to TFS 2013 using TFSConfig /Attach
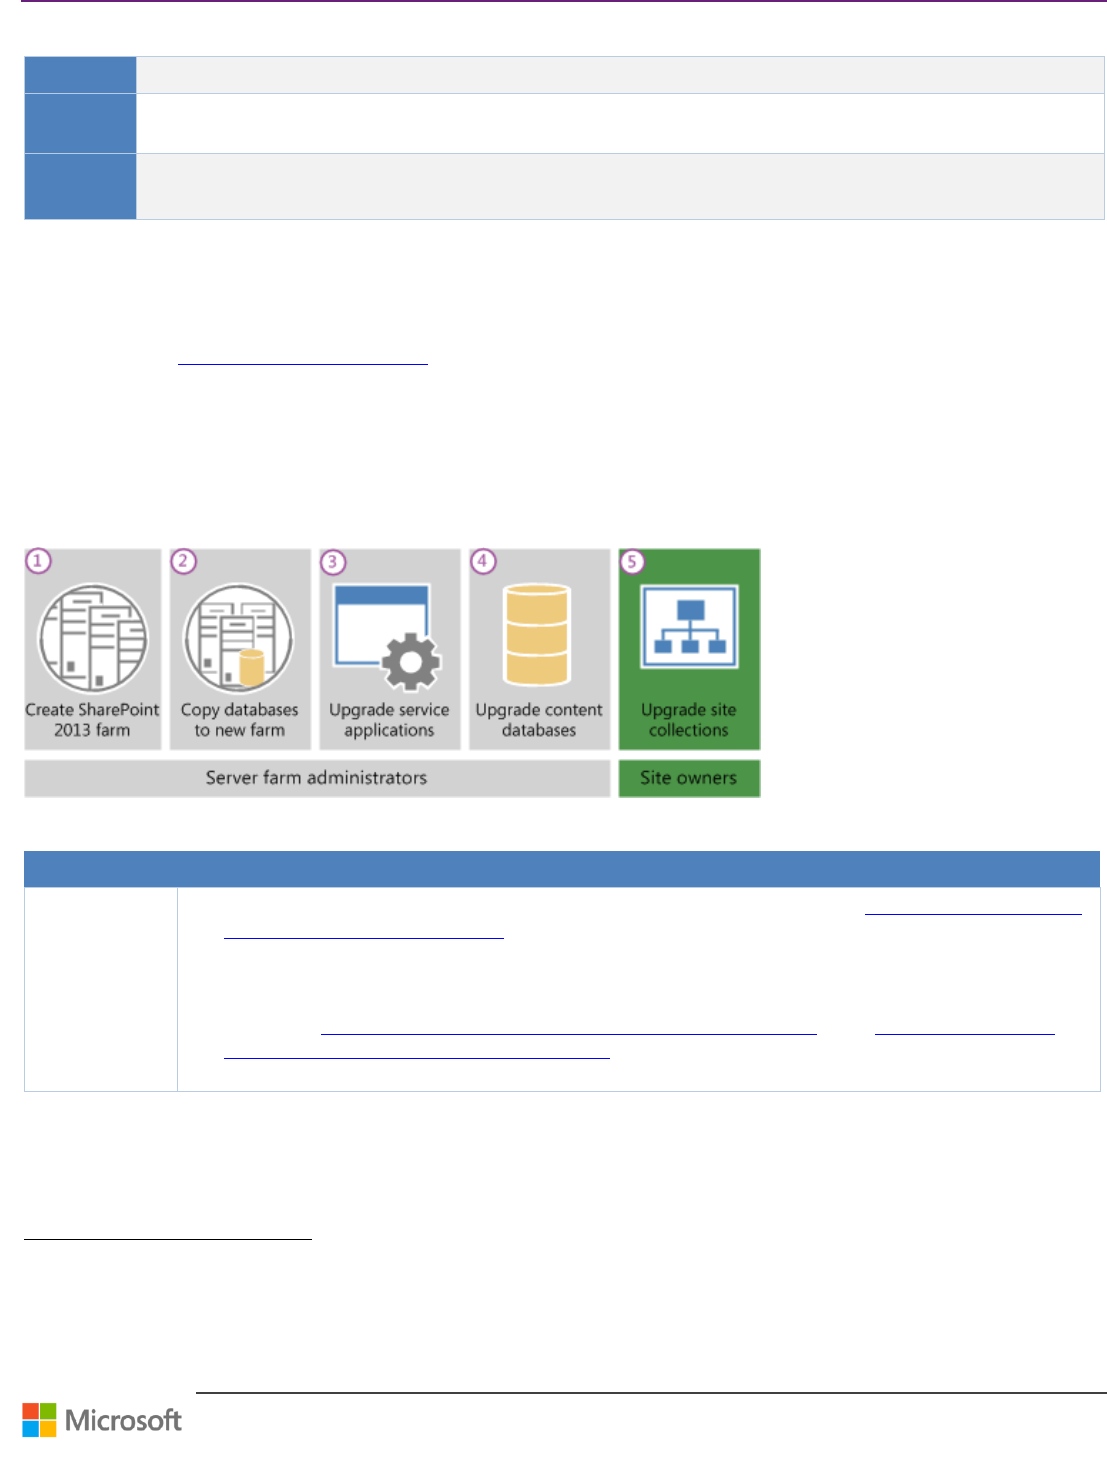
Team Foundation Server Upgrade Guide – Chapter 4: Upgrade Walkthroughs
Page 48 of 63
Upgrade SharePoint
Context
This is a typical scenario for upgrading SharePoint Foundation 2010 to SharePoint Foundation 2013 with TFS 2013.
Version
TFS 2010 TFS 2013
TFS 2012 TFS 2013
Persona
Dave, the TFS Administrator, performs the TFS upgrade.
Jane, the Infrastructure Specialist, owns and fine-tunes the environment impacted by the upgrade.
Table 21 – Upgrade SharePoint
Preparation
TFS 2013 environment needs to be up and running. SharePoint Foundation 2013 environment needs to be up and
running. Refer to Upgrade to SharePoint 2013
85
for information on upgrading your existing SharePoint 2010 environment.
Walkthrough
To upgrade from SharePoint 2010 Products to SharePoint 2013, you use the database-attach method. In the database-
attach method, you first create and configure a SharePoint 2013 farm. Then you copy the content and service application
databases from the TFS 201x SharePoint 2010 farm. Next, attach and upgrade the databases. This upgrades the data to
the new version. Finally, upgrade the required TFS 201x site collections.
Figure 2 - The sequence of upgrade stages
86
Step
Instructions
1
Prepare
꙱ - Done
SharePoint server farm administrator installs SharePoint 2013 to a new farm. See Create the SharePoint 2013
farm for a database attach upgrade 87 for detailed information on this step. The administrator configures
farm settings and tests the environment.
Recommended: You can use Team Foundation Server extensions for SharePoint Products configuration
wizard to install SharePoint Foundation 2013 on a different server from the one running Team Foundation
Server. See SharePoint Products requirements for Team Foundation Server 88 and How to: Set up remote
SharePoint Products for Team Foundation Server 89 for information on configuring SharePoint 2013 for TFS
using the Team Foundation Server extensions for SharePoint Products.
85
http://technet.microsoft.com/en-us/library/cc303420
86
http://technet.microsoft.com/en-us/library/cc262483(v=office.15)
87
http://technet.microsoft.com/en-us/library/cc263026.aspx
88
http://msdn.microsoft.com/en-us/library/vstudio/hh667648.aspx
89
http://msdn.microsoft.com/en-us/library/vstudio/hh548140.aspx
Team Foundation Server Upgrade Guide – Chapter 4: Upgrade Walkthroughs
Page 49 of 63
Step
Instructions
2
Backup, Copy,
Restore
SharePoint 2010
databases
꙱ - Done
SharePoint server farm administrator backs up the content and service application databases from the SQL
Server instance on the SharePoint 2010 farm. See Copy databases to the new farm for upgrade to SharePoint
2013 90 for detailed information on performing this step.
SharePoint server farm administrator restores a copy of the databases to the SQL Server instance on the
SharePoint 2013 farm and sets the databases to read-write on the new farm. See Copy databases to the new
farm for upgrade to SharePoint 2013 91 for detailed information on performing this step.
3
Upgrade
SharePoint 2010
databases and
service apps
꙱ - Done
When you upgrade from SharePoint 2010 Products to SharePoint 2013, you must use a database attach upgrade,
which means that you upgrade only the content for your environment and not the configuration settings. After
you have configured the SharePoint 2013 environment, and copied the content and service application
databases, you can upgrade the service applications to SharePoint 2013.
SharePoint farm administrator configures the service applications for the new 2103 farm. The following
service applications have databases that you can upgrade during this process:
o SharePoint Server 2010 and SharePoint Foundation 2010
◾ Business Data Connectivity service application
o SharePoint Server 2010 only
Managed Metadata service application
PerformancePoint Services service application
Search service application
Secure Store Service application
See Upgrade service applications to SharePoint 2013 92 for detailed information on performing this step.
SharePoint farm administrator creates a web application on the SharePoint 2013 farm for each TFS web
application on the SharePoint 2010 farm. Use the same URLs and port numbers.
4
Upgrade
content
databases to
SharePoint 2013
꙱ - Done
After you have configured the SharePoint 2013 environment, copied the content and service application
databases, and upgraded the service applications, you can attach and upgrade the content databases to
SharePoint 2013.
Before you attach and upgrade the content databases, review the following information and take any
recommended actions.
Make sure that the account that you use to attach the databases is a member of the db_owner fixed
database role for the content databases that you want to upgrade.
Make sure that the account that you use to create web applications is a member of the Farm administrators
group in Central Administration.
Create a web application for each web application that existed in the SharePoint 2010 Products
environment. For each web application, do the following:
Use the same URL (including name, port, and host header) and configure alternate-access mapping settings.
If you use a different URL, Microsoft Office applications might not be redirected correctly to the new URLs and
all bookmarks to the old URLs will not work.
Use the same authentication method.
Recreate included paths.
Recreate quota templates.
Configure email settings for the web application. For more information, see Configure email integration for a
SharePoint 2013 farm 93
Enable self-service site creation for any web application that used it in the previous environment. Recreate
any self-service site creation settings.
Recreate any web application policies or other web application settings that you had configured in the
previous environment.
90
http://technet.microsoft.com/en-us/library/jj839720.aspx
91
http://technet.microsoft.com/en-us/library/jj839720.aspx
92
http://technet.microsoft.com/en-us/library/jj839719.aspx
93
http://technet.microsoft.com/en-us/library/ee956941.aspx
Team Foundation Server Upgrade Guide – Chapter 4: Upgrade Walkthroughs
Page 50 of 63
Step
Instructions
Optional: Create the managed path for the My Sites (/personal) on the web application that hosts My Sites.
My Sites are available in SharePoint Server only.
Reapply Customizations:
One frequent cause of failures during upgrade is that the new environment does not have customized
features, solutions, or other elements. Make sure that all custom elements from the SharePoint 2010
Products environment are installed on your front-end web servers before you upgrade any content
databases. For more information about how to update customizations for use in SharePoint 2013, see
Redeploying Customizations and Solutions in SharePoint Foundation 2010 and SharePoint Server 2010 94.
For more information about how to deploy customizations to your environment, see Install and manage
solutions for SharePoint 2013 95.
Verify Custom Components:
To make sure that you have identified all custom components for your environment, use the Stsadm -o
enumallwebs operation in the SharePoint 2010 Products environment and use the includefeatures and
includewebparts parameters. For more information, see Enumallwebs: Stsadm operation (Office SharePoint
Server) 96 and Clean up an environment before an upgrade to SharePoint 2013 97.
Attach a content database to a web application and upgrade the database:
When you attach a content database, you upgrade the database and add the site collections in that database
to the web application that you specify. However, for SharePoint 2013, the process does not upgrade the site
collections.
By default, when you created the web applications in the new SharePoint 2013 environment, a content
database was created for each web application. You can ignore these default databases until after you have
attached your SharePoint 2010 Products databases, and then you can delete the default databases.
You must use the Mount-SPContentDatabase cmdlet to attach a content database to a web application.
Using the SharePoint Central Administration pages to attach a content database is not supported for
upgrading. Ensure that the account that you use to attach the databases is a member of the db_owner fixed
database role for the content databases that you want to upgrade.
Verify upgrade for upgraded databases:
After you attach a database, you can use the Upgrade Status page in Central Administration to check the
status of upgrade on your databases. After the upgrade process is complete, you can review the upgrade log
file to see whether upgrade produced issues. See Verify database upgrades in SharePoint 2013 98 for more
information 99.
Attach remaining databases and verify uprade:
After you restore the first content database and verify success, you can continue to restore and upgrade
other databases. You can then verify the upgrade for those databases as well. See Verify database upgrades
in SharePoint 2013 100 for more information 101.
Connect new SharePoint 2013 farm to Team Foundation Server 2013 environment:
If you used the Team Foundation Server SharePoint Extensions Configuration wizard to install the new
SharePoint 2013 farm, it should have configured the SharePoint 2013 web application that is used by TFS
2013. If using SharePoint 2013 Enterprise server, you can also configure the Enterprise Application Definition
during this step. See Configure the enterprise application definition for Team Foundation Server 102 for more
information.
94
http://msdn.microsoft.com/library/ee662217.aspx
95
http://technet.microsoft.com/en-us/library/cc263299.aspx
96
http://technet.microsoft.com/library/dd789634(v=office.12).aspx
97
http://technet.microsoft.com/en-us/library/cc263299.aspx
98
http://technet.microsoft.com/en-us/library/cc424972.aspx
99
http://technet.microsoft.com/en-us/library/cc263299.aspx
100
http://technet.microsoft.com/en-us/library/cc424972.aspx
101
http://technet.microsoft.com/en-us/library/cc263299.aspx
102
http://msdn.microsoft.com/en-us/library/vstudio/ee126232.aspx
Team Foundation Server Upgrade Guide – Chapter 4: Upgrade Walkthroughs
Page 51 of 63
Step
Instructions
You can refer to SharePoint Products requirements for Team Foundation Server 103 and How to: Set up
remote SharePoint Products for Team Foundation Server 104 for information on configuring SharePoint 2013
for TFS using the Team Foundation Server extensions for SharePoint Products.
Add SharePoint Web application as a default root for project administrators to create Team Portals:
Open the administration console for Team Foundation.
For more information, see Open the Team Foundation Administration Console 105.
Expand the name of the server, expand Application Tier, and then choose Team Project Collections.
In the Team Project Collections list, choose the collection from the list for which you want to add a web
application and a default location where team project portals will be created.
On the SharePoint Site tab, choose Edit Default Site Location.
The Edit Default Site Location window appears.
In the SharePoint Web Application list, choose an application.
In Relative Path, specify the relative path of the location where sites and sub-sites will be created on the web
application for this collection.
If the site does not exist, a SharePoint Site dialog will appear asking you to confirm creation of a site. Choose
Yes.
In Full Path, review the information, and then choose OK if it is correct.
Table 22 – Upgrade SharePoint checklist
103
http://msdn.microsoft.com/en-us/library/vstudio/hh667648.aspx
104
http://msdn.microsoft.com/en-us/library/vstudio/hh548140.aspx
105
http://msdn.microsoft.com/en-us/library/dd273718(v=vs.110).aspx
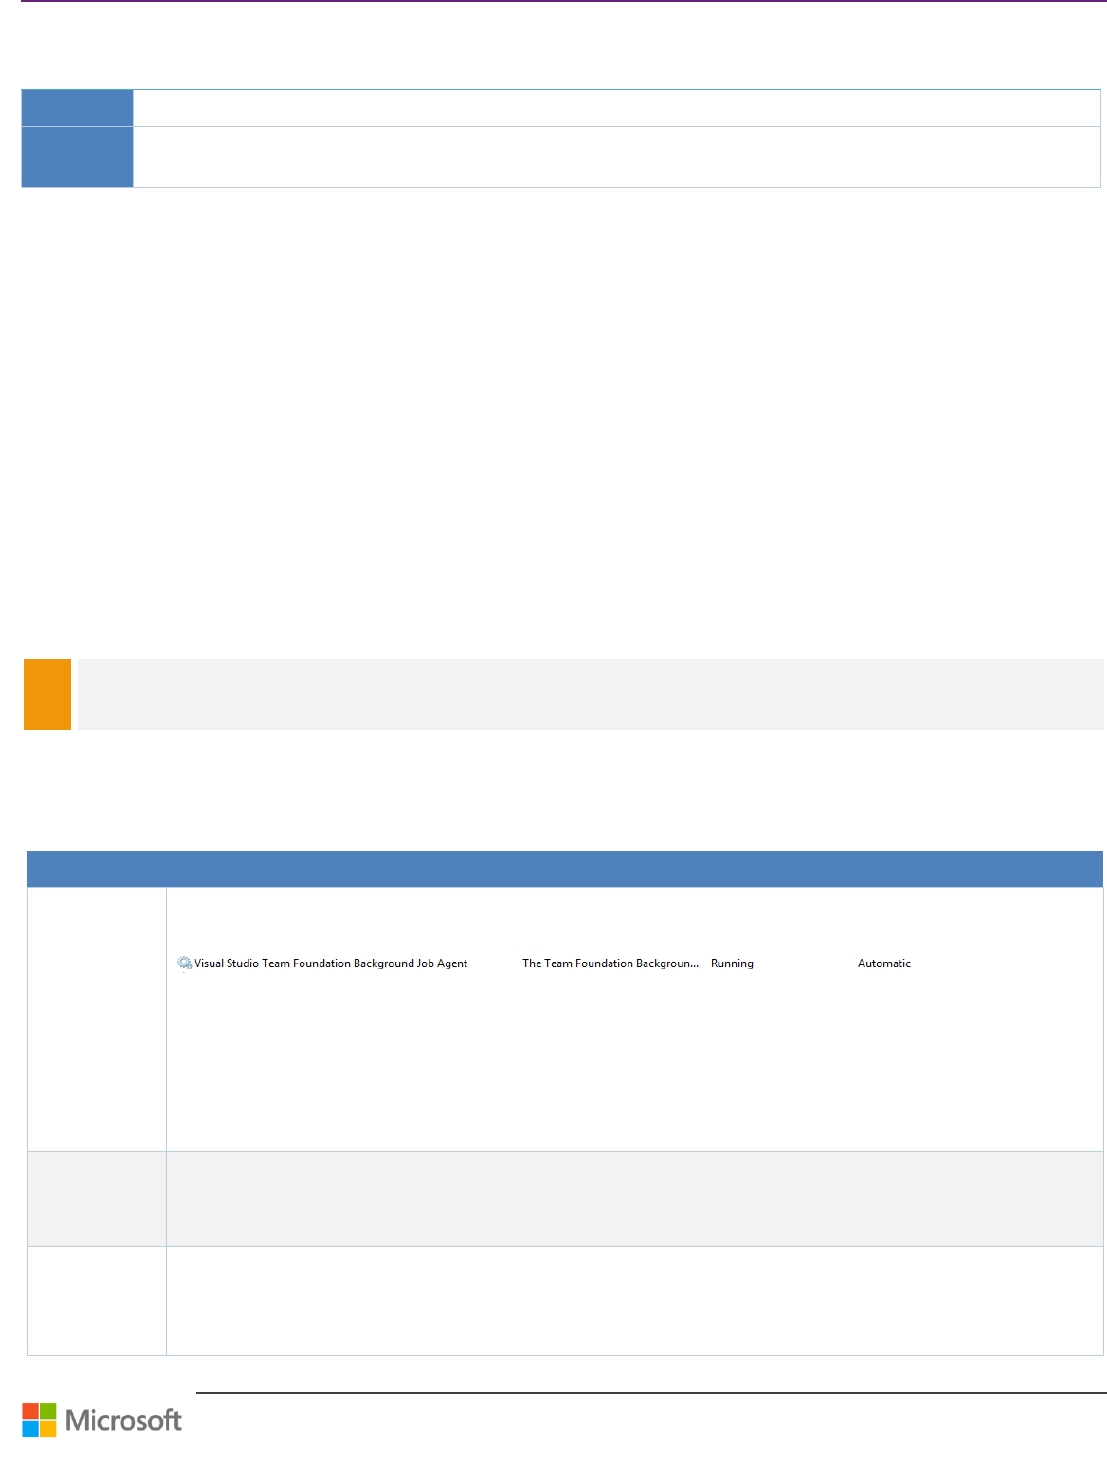
Team Foundation Server Upgrade Guide – Chapter 5: Post-Upgrade Checklist
Page 52 of 63
Chapter 5: Post-Upgrade Checklist
Context
When the upgrade is finished, you have to check everything works as expected/wanted.
Personas
Dave, the TFS Administrator, performed the TFS upgrade, Garry, the Dev Lead, is one of the core users of the
environment and Jane, the Infrastructure Specialist, owns access to environment impacted by the upgrade.
Verifications
Environment Verification
After the upgrade is completed, the first step is to check the environment to make sure that these services are up and
running: Services from The Data Tier as well as from the Application Tier, Test and Build Controller and Lab Management.
Operations Verification
You may notice that the Operations verification may overlap with some of the environment verification processes.
Therefore, if you can connect from a supported client (Team Explorer, Visual Studio, Web access, Excel, SharePoint, etc.,) to
your upgraded TFS Instance, that is an indication that most of your services are up and running. For other validations,
such as SharePoint or Reporting Services, you would need to ensure that they do not point to the old environments. In
addition, the old environment should be in quiesced or offline at this point.
Checklists
NOTE
In case the warehouse rebuild was part of the upgrade, you may not have the reports and TFS Cube working correctly for a
while.
You can skip the related validations and return to them later when TFS is operational.
Server side validations
Application Tier
Step
Instructions
1
Windows
Services
꙱ - Done
At the Run prompt, open Services.msc to open the Services MMC and verify that the following services are in
Running state as shown in figure below.
Verify the following TFS services are running:
Visual Studio Lab Agent Service
Visual Studio Lab Network Agent Service
Visual Studio Team Foundation Background Job Agent
Visual Studio Team Foundation Build Host 2012
Visual Studio Test Controller
2
Event Logs
꙱ - Done
Run eventvwr from the Run Command and review Application and System Event Logs for any possible errors.
3
IIS
Management
Console
Verify that the following TFS Web sites are started:
Team Foundation Server
Team Foundation Server Upgrade Guide – Chapter 5: Post-Upgrade Checklist
Page 53 of 63
Step
Instructions
꙱ - Done
4
TFS BPA
꙱ - Done
You can download the Microsoft Visual Studio TFS 2013 Power Tools from here 106.
Run the TFS Best Practice Analyzer (tfsbpa.exe) and verify and mitigate any errors and warnings. Be aware that
some warnings will appear if you do not have certain components installed such as Test Controller might be false
positive or might not apply to your environment.
Verify that the deployment for Team Foundation Server is configured according to recommended best
practices
Identify the source of problems in an unhealthy deployment
Take a snapshot of the configuration of a deployment and compare it to the old snapshot of the pre-upgrade
Obtain usage data about the volume of data stored or accessed in the past 14 days. Includes specific
information about database tables that have a tendency to grow and that may need to be reduced in size.
5
TFS Admin
Console
꙱ - Done
Verify that the TFS admin console can be opened. Opening the admin console successfully provides some basic
assurance that the installation or upgrade ran smoothly.
Run TFS admin console and verify the following:
Verify all URLs, connection strings and settings for all components are accurate
Verify all project collections that they are attached, enabled and pointing to the right SharePoint and
Reporting Services locations
Analyze TFS logs and look for any errors coming from the upgrade process.
6
Team Web
Access
꙱ - Done
You can run Team Web Access from Visual Studio or from the following URL: and browse thru each team projects,
backlogs, code and work items.
http:// <ServerName>:::8080/tfs/DemoCollection/CmmiTeamProjectDemo
7
TFS Web
Services
꙱ - Done
You can run TFS Web Services from a browser to verify some of the TFS components:
To check the warehouse status, access the URL:
http://<ServerName>::8080/tfs/TeamFoundation/Administration/v3.0/WarehouseControlService.asmx
?op=GetProcessingStatus.
8
TFS Admin
Interface
꙱ - Done
Access additional monitoring tools via Web Access to view Activity Log and Job Monitoring. Launch the link
http://your-server:8080/tfs/_oi and navigate to “Job Monitoring”.
Verify that all the jobs are running correctly.
Review the “Job History” tab and verify if any Jobs have failed.
Table 23 - Server side application tier validation
Data Tier
Step
Instructions
1
SQL Config
Manager
꙱ - Done
Verify the following TFS services are running:
o SQL Server
o SQL Server Analysis Service
o Agent and Browser Service
Verify that the required protocols are enabled.
For more info please see Ports Required for Installation of Team Foundation Server 107
2
Event Logs
꙱ - Done
Review Application and System Event Logs for any possible errors.
106
http://visualstudiogallery.msdn.microsoft.com/f017b10c-02b4-4d6d-9845-58a06545627f
107
http://msdn.microsoft.com/en-us/library/dd578664.aspx
Team Foundation Server Upgrade Guide – Chapter 5: Post-Upgrade Checklist
Page 54 of 63
Step
Instructions
3
SQL Server
Management
Studio
꙱ - Done
Connect to your SQL Instance and verify that all necessary databases are attached and running in multiuser
mode.
Connect to Analysis services and verify TFs_Analysis database is present and that you can browse Team
System cube.
Table 24 - Server side data validation
Report Server
Step
Instructions
1
Windows
Services
꙱ - Done
Verify Reporting Services are running by navigating to Windows Services and ensuring that SQL Server Reporting
Services is running.
2
Event Logs
꙱ - Done
Review Application and System Event Logs for any possible errors.
3
Reporting
Services
Configuration
Manager
꙱ - Done
Run the Reporting Service Configuration tool (RSConfigTool) from the Run Command and verify the settings:
Service Account
Web Service and Report manager URL
Database
Table 25 – Report server validation
SharePoint Server
Step
Instructions
1
Windows
Services
꙱ - Done
Run services.msc from the Run Command window and verify that SharePoint services are running:
SharePoint Administration
SharePoint Tracing
SharePoint Timer
SharePoint Foundation
2
Event Logs
꙱ - Done
Review Application and System Event Logs for any possible errors.
3
IIS
Management
Console
꙱ - Done
Verify (where?) that the SharePoint Web sites are started:
SharePoint Central Administration
SharePoint – 80 (or other web application used by TFS)
4
SharePoint
Central
Administration
꙱ - Done
Run the SharePoint admin console and verify the following system settings:
System Settings: Manage servers in this farm
System Settings: Manage services on server
Monitoring: Review problems and solutions
Monitoring: Check Job Status
Table 26 – SharePoint server validation
Team Foundation Server Upgrade Guide – Chapter 5: Post-Upgrade Checklist
Page 55 of 63
Client side validations
Visual Studio
Step
Instructions
1
Connect to TFS
꙱ - Done
Connect to your TFS using Visual Studio Team Explorer.
Verify that you can see all the Team project Collections and Team projects under each Collection.
Choose a project collection on which to perform the client side validations.
2
Version Control
꙱ - Done
Run Source Control Explorer and verify that you can run various operations:
Browse and see your files
See history
Manage workspaces
Get latest version
3
Work Items
꙱ - Done
Verify that you can see and run work items queries, open the work items, etc.
4
Builds
꙱ - Done
Verify that you can:
See Build definitions and open them, see the builds history, etc.
Manage Build Controllers and you see them online.
5
Reports
꙱ - Done
Verify that you can see the Reports folder and open the reports.
6
Project Portals
꙱ - Done
Verify the Project Portal setting. Try to open the portal for a Team Project.
Table 27 - Client side Visual Studio validation
Team System Web Access
Perform similar validations as you did using Visual Studio Team Explorer, but using the Web Access.
SharePoint Portal
Step
Instructions
1
URL
꙱ - Done
Verify that the correct portal address (URL) opens when selected.
2
Layout and
components
꙱ - Done
Verify that the portal shows correctly dashboards, reports and TFS Web Parts (work items, builds, etc.)
3
TF Web Access
Link
꙱ - Done
Verify that you can open Team Foundation Web Access.
Table 28 – SharePoint portal validation
Team Foundation Server Upgrade Guide – Chapter 5: Post-Upgrade Checklist
Page 56 of 63
Additional Steps
Step
Instructions
1
Disaster
Recovery
꙱ - Done
Make sure your backup strategy is in place for the new environment and the Disaster Recovery Plan is updated.
See TFS Planning and DR Avoidance Guide 108 for more information.
2
External
Applications
꙱ - Done
Update connection strings of any applications accessing TFS if necessary, for example after performing a
migration-based upgrade.
3
Process
Template
꙱ - Done
You may want to update your current process templates or existing Team Projects to use new features, especially
when upgrading from TFS 2008.
You should pay special attention that custom process templates still work as expected. You may need to create a
New Team Project using your custom process templates.
4
Server Ready!
꙱ - Done
Communicate to the users that the system is available and provide a new connection string if necessary, for
example, after performing a migration-based upgrade.
5
Post release
monitoring
꙱ - Done
You should closely monitor the system at the first weeks of usage - Event logs, performance, etc.
See TFS Planning and DR Avoidance Guide and TFS Reporting Guide 109 for more information on reports that may
help you.
Table 29 – Additional steps
Other post configuration steps to consider
Step
Instructions
1
MSF for Agile
꙱ - Done
If you have updated a team project based on v5.0 of MSF for Agile, perform manual updates described in Update
the Workflow for Agile Team Projects. For more information, please see Configure Features after a TFS Upgrade
110
2
Team Web
Access
꙱ - Done
If you have team members that will use one or more of the following TWA features, you will need to provide them
Full access to TWA.
Portfolio Backlogs
Feedback
Team Rooms
Test case management
To change access level, please see Change access levels 111.
3
SMTP
꙱ - Done
If your team will use the feedback request and code review features, make sure that you have configured an SMTP
server for TFS.
4
Admin Only
If you are the server administrator for TFS and do not actually contribute to a team, then you may want to remove
yourself as a member, and add a project lead as the team administrator.
108
http://aka.ms/treasure5
109
http://aka.ms/treasure55
110
http://msdn.microsoft.com/en-us/library/vstudio/ff432837(v=vs.120).aspx
111
http://msdn.microsoft.com/library/jj159364(v=vs.120).aspx
Team Foundation Server Upgrade Guide – Chapter 5: Post-Upgrade Checklist
Page 57 of 63
Step
Instructions
꙱ - Done
Your user account was added automatically as a team administrator for the team project when you ran the
Configure Features wizard.
Table 30 – Post configuration steps
NOTE
If the farm has multiple Application tiers, you will need to uninstall the existing TFS installation and install TFS 2013. Once
installed, use the “Application Tier only” wizard to add the new Application Tiers to the farm.
For more information refer the link http://msdn.microsoft.com/en-us/library/ee259684.aspx
Team Foundation Server Upgrade Guide – Chapter 6: FAQs
Page 58 of 63
Chapter 6: FAQs
Q) Has the upgrade process changed since TFS 2012?
The upgrade process has not changed significantly since TFS 2012. One improvement to be aware of is that just like in the
later updates for TFS 2012, the 2013 configuration wizards will persist your Application Tier and Build settings
112
during
in-place upgrades. As of 2012.2, we also support upgrading databases involved in SQL AlwaysOn or SQL Mirroring
113
.
Q) Do I have to use the Visual Studio 2013 client to connect to the TFS 2013?
No, you do not. You can continue to use Visual Studio 2012 clients with the TFS 2013. The Visual Studio 2010 SP1 client is
also compatible if you install the 2012 compatibility GDR
114
. We no longer support integration with VS 2008 clients,
except for very limited functionality through the MSSCCI provider. The only feature that will require Visual Studio 2013 is
Team Project creation.
Q) If I upgrade my server to TFS 2013, can I decide to go back to TFS 2012 later?
The short answer is no. Every release of TFS fully replaces the previous installation of TFS on your server, so they cannot be
removed like patches. There is also no "downgrade" path from a later version of TFS to an earlier one. You can roll back,
see page 21, to your previous version of TFS using the backup you took of your data prior to upgrading, which is useful if
you experience any issues configuring the TFS 2013. However, it’s not possible to revert any upgraded databases back to
their original servicing level, so any work you do after upgrading your server will be lost if you roll back.
Q) Can I install the TFS 2013 side-by-side with TFS 2012?
No, you cannot. The installation process will automatically uninstall TFS 2012 from your box. Note that this behavior is
different from the Visual Studio client, where the 2013 Visual Studio client CAN be installed side-by-side with the 2012
one. If you want to try out the TFS 2013 without getting rid of your TFS 2012 instance, you need to install it on a different
server.
Q) Can I upgrade my TFS 2005 or TFS 2008 to TFS 2013?
No, direct upgrade from TFS 2005 to TFS 2013 isn’t supported. TFS 2005 and TFS 2008 do not have the same
dependencies as TFS 2013. For TFS 2005, it’s recommended to upgrade to TFS 2010 and then to TFS 2013. For TFS 2008,
it’s recommended to upgrade to TFS 2012.Latest and then to TFS 2013.
Q) I have TFS 2008+SP1 and TFS 2010 in my environment and I wish to upgrade them both
to 2013. How do I do it?
The easiest way is to first upgrade the TFS 2010 instance using Detach/Attach Team Project Collection process and then
import the additional instances using TFSconfig/Import. After the upgrade is complete for all instances, you will have
multiple collections (one for each instance Imported) and a single default collection.
Q) Can I install TFS 2013 on a 32-bit Operating system?
Yes, TFS 2013 can be installed on 32 bit Windows 7 SP1, Windows 8 and Windows 8.1. No SharePoint or Reporting is
available in this case.
112
http://blogs.msdn.com/b/visualstudioalm/archive/2013/03/05/tfs-update-2-offers-settings-preservation-for-in-place-upgrades.aspx
113
http://blogs.msdn.com/b/tfsao/archive/2013/03/05/upgrading-alwayson-and-mirrored-environments.aspx
114
http://www.microsoft.com/en-us/download/details.aspx?id=29082
Team Foundation Server Upgrade Guide – Chapter 6: FAQs
Page 59 of 63
Q) I have a farm that has multiple ATs and one single DT. How do I upgrade this farm?
To upgrade the farm, first pick one of the ATs and run the TFS Upgrade wizard. This will upgrade both the App tier and
Data tier. After the upgrade, run only the Application Tier Only wizard on the remaining App tiers.
Q) What happens to the TFS reports post upgrade?
Post upgrade, the TFS reports are not moved to the new farm. You will have to manually move the reports and update the
connection string of the data source to get the reports working.
Q) What can I do pre-migration to improve the upgrade process?
Make sure that TFS database maintenance has been performed. Defragmenting indexes can improve the upgrade process.
Remove old unused workspaces to save processing time. Follow SQL Server best practices for TempDB data files. The
upgrade process uses TempDB heavily so make sure there is one TempDB per processor. Communicate with teams in
advance of the final upgrade to address questions and discuss timelines. Have them be part of your testing process. Run
the Best Practice Analyzer in the environment to verify that there aren’t going to be issues with the environment you are
upgrading to.
Q) Where is the upgrade log written?
The upgrade log by default can be found in C:\ProgramData\Microsoft\Team Foundation\Server Configuration\Logs. It
can be viewed as the import process runs. Just be careful not to lock it up.
Q) Which version of SQL Server is supported?
TFS 2013 supports SQL Server 2012 SP1.
Q) What TF Build controllers and agents are supported with TFS 2013?
TFS 2013 supports TFS 2010, TFS 2012 and TFS 2013 build controllers and agents.
See Team Foundation Server 2012 Update 2 supports 2010 Build Agents and Controllers
115
for more information.
Q) Will TFS 2013 work with older version test controllers
Yes, TFS 2013 will work with older version of test controllers 2012 and test agents 2012. It won’t work with test controllers
2010 and test agents 2010. When you upgrade your TFS server, you are not forced to upgrade the rest of your
infrastructure (TC, lab environments, SCVMM, etc.) on the same day. You can continue with your current infrastructure, and
upgrade those components independently. When you upgrade your test controller, all of the lab environments will
indicate that they need to be upgraded as well. You will be able to do this from Microsoft Test Manager (MTM).
Q) What version of System Center Virtual Machine Manager can I use with TFS 2013?
TFS 2013 will work with SCVMM 2008 R2, SCVMM 2012 RTM + SP1 and SCVMM 2012 R2.
Q) What is required to upgrade my environment that uses SQL Mirroring or SQL AlwaysOn?
If you are using AlwaysOn or Database Mirroring with TFS, you should only have one database group and your
configuration database should always be part that group. When you run the upgrade wizard and point it to your
configuration database, the wizard will detect its involvement in AlwaysOn or mirroring and display some additional text
that you would have to acknowledge by checking a tick box. For more information on this topic, look at the blog post
Upgrading AlwaysOn and Mirrored Environments.
115
http://blogs.msdn.com/b/buckh/archive/2013/03/30/team-foundation-server-2012-update-2-supports-2010-build-agents-and-controllers.aspx
Team Foundation Server Upgrade Guide – Appendix
Page 60 of 63
Appendix
Upgrading Process Template using PowerShell
Context
This walkthrough and companion sample script will guide through using a sample PowerShell script that with some
configuration will upgrade TFS Team Projects to the latest process templates.
Version
TFS 2012 TFS 2013
Persona
As Dave, the TFS admin, I would like guidance on how to upgrade existing Team Projects to the latest process
templates in a scalable fashion (for example, automated / PowerShell).
Table 31 – Overview: Upgrading Process Template using PowerShell
WARNING
Ensure that you perform a complete backup of all the Project Collections where you will be upgrading the process templates;
the backups will be required in case there are customizations that are unknown and lead to lose of data.
What will this script do?
This script will take the configured values and for each team project name in the team project collection. It will upload the
work item type definitions of the latest version of the process template.
WARNING
The script is intended to be used with out-of-the-box process templates and has not been tested with customized process
templates. If you are working with customized process templates, you will have to analyze the impact and update the sample
script accordingly.
To just do bulk Feature Enablement see How to Configure Features for dozens of team projects.
What will this script upgrade?
This script is designed to upgrade the work item tracking part of the process template.
Work Item Tracking
What will this script not upgrade?
The following items are not upgraded by the script because they are upgraded during the regular upgrade process or they
are linked to permissions that are able to be changed outside of the process template. This could possibly lead to an
unwanted state of your team projects.
Build
Classification
Groups and Permissions
Lab
Reports (Please manually replace the Backlog/Stories Overview report, as older versions of this report are not
compatible with TFS 2013 portfolios)
Test Management
Version Control
Windows SharePoint Services
Team Foundation Server Upgrade Guide – Appendix
Page 61 of 63
How does this script work?
All interaction with TFS in this script is done using the witadmin tool
116
and is executed against each of the TFS Team
Projects configured. The script performs the following operations:
Imports each of the link types
117
.
Imports each of the work item type definitions
118
.
Imports the categories configurationhttp://msdn.microsoft.com/en-us/library/vstudio/ms194980.aspx
119
.
Imports the process configuration
120
.
Prerequisites
1. Visual Studio Team Explorer 2013
2. PowerShell
Walkthrough
Step
Instructions
1 Backup
꙱ - Done
Back up all collections that you will be running this script against.
2 Get the Latest
Version
꙱ - Done
Download the latest version of the process template from TFS. http://msdn.microsoft.com/en-
us/library/vstudio/ff452587(v=vs.120).aspx
7 Set
Configuration
꙱ - Done
Set the configuration for the script; replace the values for these variables in the script under the config section.
$server
Name of the server where TFS is.
$CollectionName
Collection name that contains team projects that are going to be upgraded
$TeamProjectNames
Array of team projects that are going to be upgraded
$ProcessTemplateRoot
The path that you saved the process template to in step 2; this is the path down to the directory that
contains the ProcessTemplate.xml.
3 Run the script
꙱ - Done
Run the script. If there are any errors, you will see them in the running panel, in red.
Table 32 - Walkthrough: Upgrading process template using PowerShell
116
http://msdn.microsoft.com/en-us/library/vstudio/dd236914.aspx
117
http://msdn.microsoft.com/en-us/library/vstudio/dd286513.aspx
118
http://msdn.microsoft.com/en-us/library/vstudio/ms194980.aspx
119
http://msdn.microsoft.com/en-us/library/vstudio/dd273721.aspx
120
http://msdn.microsoft.com/en-us/library/hh500413.aspx

Team Foundation Server Upgrade Guide – Appendix
Page 62 of 63
Sample Script
# Copyright © Microsoft Corporation. All Rights Reserved.
# This code released under the terms of the
# Microsoft Public License (MS-PL, http://opensource.org/licenses/ms-pl.html.)
#
#config
$server = "Localhost"
$port = 8080
$virtualDirectory = "tfs"
$CollectionName = "DefaultCollection"
$TeamProjectNames = @("Scrum Team 1", "Scrum Team 2", "Scrum Team 3", "Scrum Team 4", "Scrum Team 5")
$ProcessTemplateRoot = "C:\Downloaded Process Templates\Microsoft Visual Studio Scrum 3.0"
$CollectionUrl = "http://$($server)$(if ($port -ne 80) { ":$port" })$(if
(![string]::IsNullOrEmpty($virtualDirectory)) { "/$virtualDirectory" })/$($CollectionName)"
$API_Version = "12.0"
#----------------------------
# don't edit below this line
#----------------------------
#get a reference to the witadmin executable path for the current api version
$WitAdmin = "${env:ProgramFiles(x86)}\Microsoft Visual Studio $API_Version\Common7\IDE\witadmin.exe"
#if there is a file with the name GlobalLists-ForImport.xml import it as Global List info for the current
collection
if (Test-Path "$ProcessTemplateRoot\GlobalLists-ForImport.xml")
{
Write-Host "Importing GlobalLists-ForImport.xml"
& $WitAdmin importgloballist /collection:$CollectionUrl /f:"$ProcessTemplateRoot\GlobalLists-ForImport.xml"
}
#get a reference to all work item type definitions
$wit_TypeDefinitions = Get-ChildItem "$ProcessTemplateRoot\WorkItem Tracking\TypeDefinitions\*.*" -include
"*.xml"
#get a reference to all work item link types
$witd_LinkTypes = Get-ChildItem "$ProcessTemplateRoot\WorkItem Tracking\LinkTypes\*.*" -include "*.xml"
#import each Link Type for the $CollectionName
foreach($witd_LinkType in $witd_LinkTypes)
{
Write-Host "Importing $($witd_LinkType.Name)"
& $WitAdmin importlinktype /collection:$CollectionUrl /f:$($witd_LinkType.FullName)
}
foreach ($TeamProjectName in $TeamProjectNames)
{
Write-Host "Upgrading $TeamProjectName."
#import each Type Definition for the $TeamProjectName
foreach($wit_TypeDefinition in $wit_TypeDefinitions)
{
Write-Host "Importing $($wit_TypeDefinition.Name)"
& $WitAdmin importwitd /collection:$CollectionUrl /p:$TeamProjectName /f:$($wit_TypeDefinition.FullName)
}
#import work item categories for the $TeamProjectName
& $WitAdmin importcategories /collection:$CollectionUrl /p:$TeamProjectName
/f:"$ProcessTemplateRoot\WorkItem Tracking\Categories.xml"
#import work item process configuration for the $TeamProjectName
& $WitAdmin importprocessconfig /collection:$CollectionUrl /p:$TeamProjectName
/f:"$ProcessTemplateRoot\WorkItem Tracking\Process\ProcessConfiguration.xml"
}
Write-Host "Done upgrading team projects"
Team Foundation Server Upgrade Guide – In Conclusion
Page 63 of 63
In Conclusion
This concludes our adventure into the TFS Upgrade. We have touched on theory and introduced you to the upgrade
scenarios and the associated walkthroughs.
We hope you find it a valuable technology to invest in and that you have found this guide useful.
Sincerely
The Microsoft Visual Studio ALM Rangers
